An Aztec cityscape gaming table would be incomplete without the use of proper pavements. Tenochtitlan was not built to look hardscrabble. These pavements would need to go under the massive buildings I had to represent the city of Tenochtitlan, the capital of the Aztec Empire. This post will cover the pavements I made for the cityscape. As I shared in my previous post, Building an Aztec Cityscape – Part 1: Causeways, Lifting Piers, and Removable Bridge Sections, I will similarly share my WIP photos as well as my lessons learned.
Many contemporary images of Tenochtitlan show a brilliantly white city. I am not convinced that this was its actual appearance. Much of the rock used would have been basaltic or limestone-like in quality. Both are subject to oxidation, and turn brownish-grey over time. That would be particularly true for pavements that were exposed daily to the intense rays of the sun. The painting below reinforced my decision not to go with a white/bleached appearance of stone structures for this project. I went more brownish/grayish.
A painting of Cortes at the Battle of Tenochtitlan (from Britannica). Note the brownish appearance of the masonry.
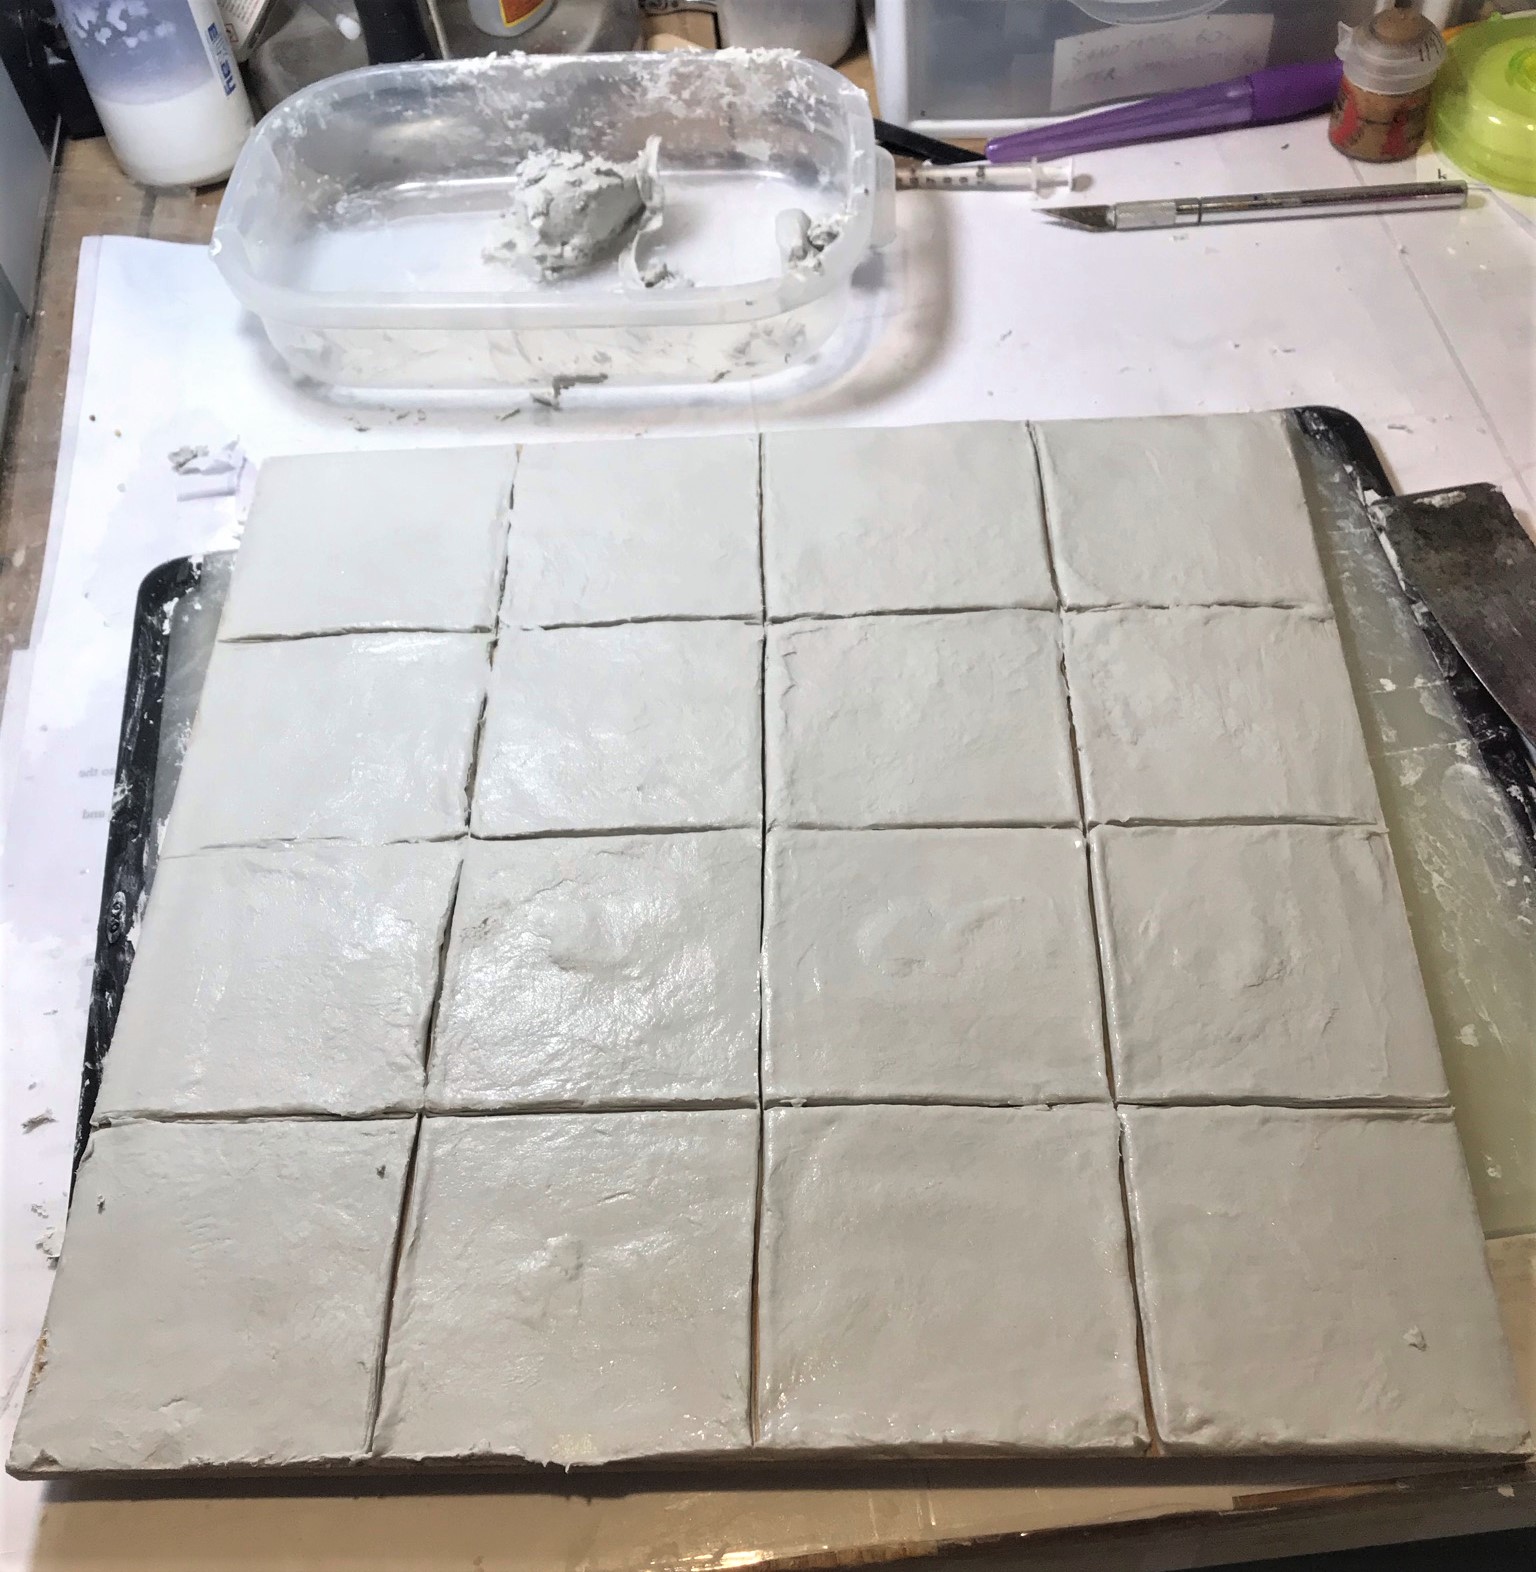
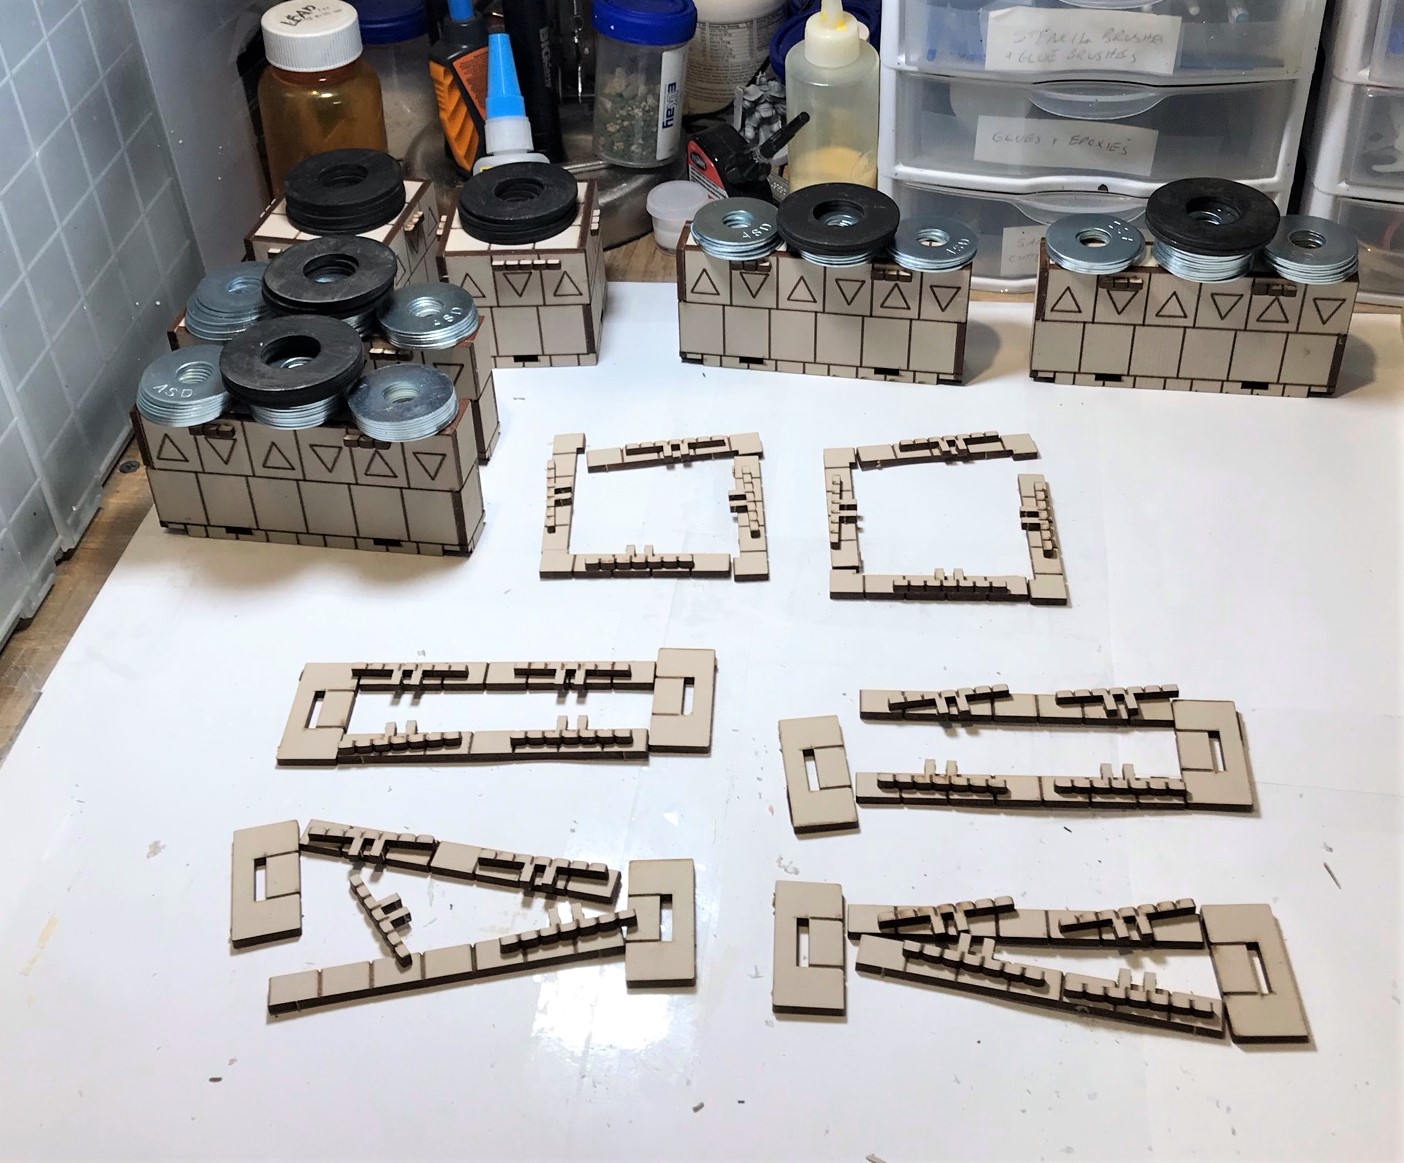
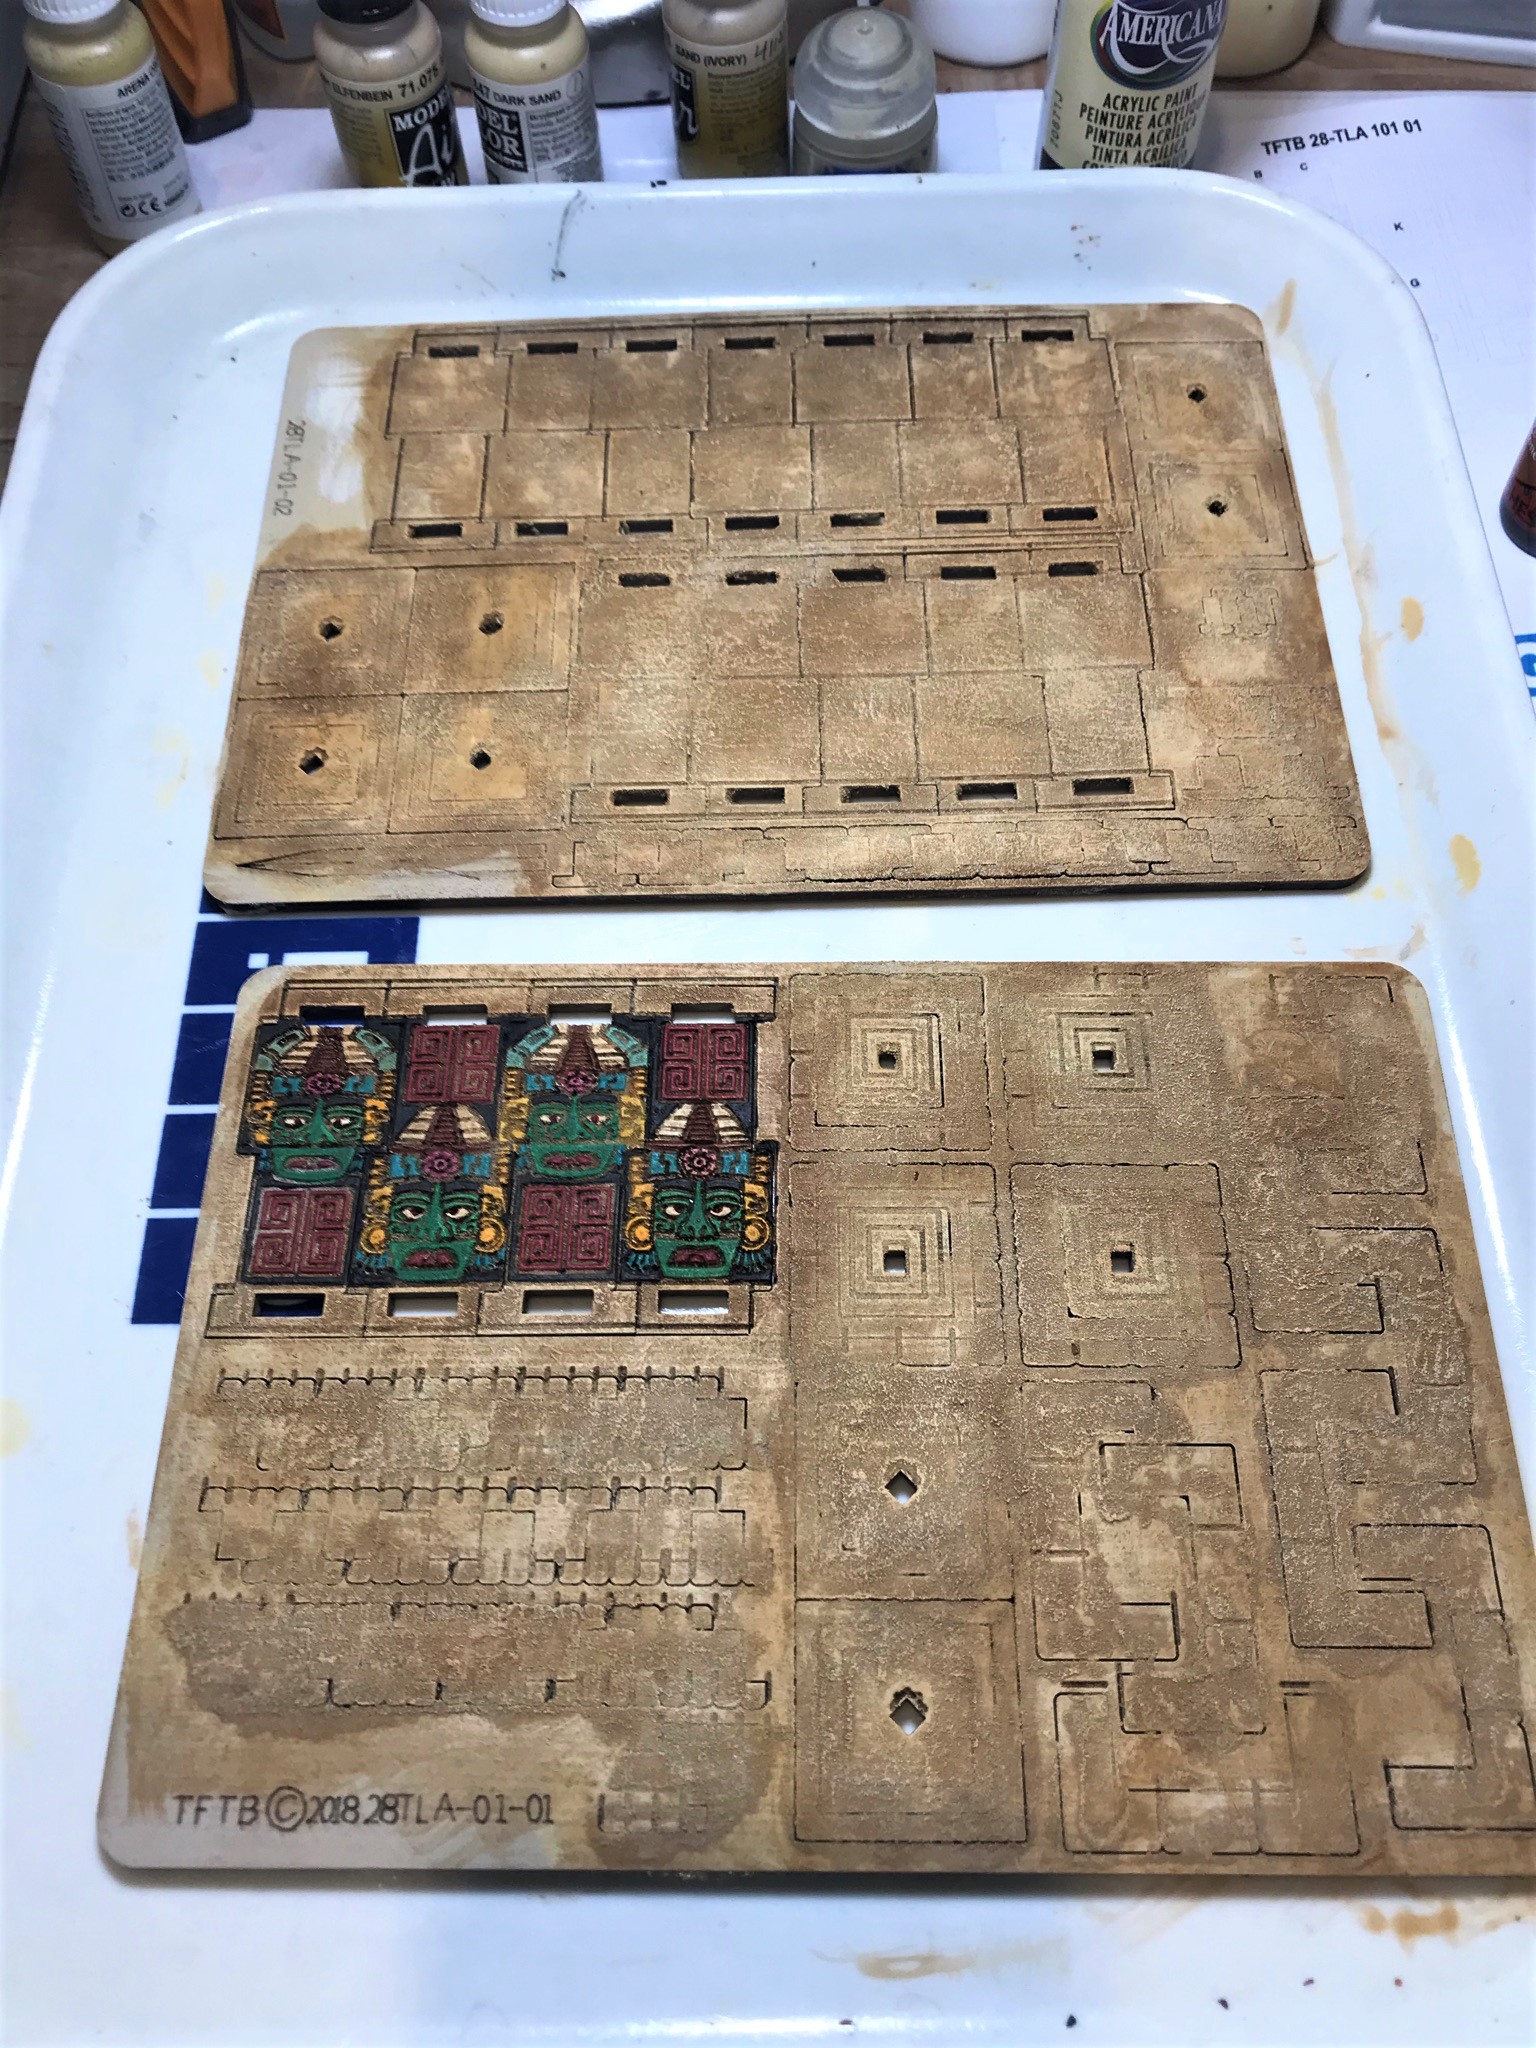
As with the causeways that I built, I used the MDF sheets I bought from Home Depot. They were 1/4″ thick sheets of 2′ by 4′ that Jeff Smith helped me to cut into ten 1’x 1′ and ten 6″ x 6″ sections. Then I laid them out to see if my initial layout concept would work. It did. But, unlike the causeways, I had an idea that the pavements should look weathered, and have some patterns sculpted onto them – Aztec patterns.
The initial plan
Jeff cutting the MDF
Dry-fitting the MDF on a swamp mat
A few months prior I had learned from a friend in Maryland (Greg Priebe) that he had a surplus Aztec Roller from Green Stuff World (see it here). I was deep into painting the figures that I had at that point – but I traded some Ral Partha Vikings to him for it – with some idea that I would use it when I got to the point of building a cityscape – somehow. (THANKS GREG!!)
I was not going to like just having the MDF just be painted, I wanted a more tactile, almost 3D effect on them.
However, we are talking about 15 square feet of surface! I considered using green stuff and Apoxie Sculpt (both too expensive and potentially difficult for a huge build like this). I considered using modeling clay and then baking it and passed as that would end up potentially with either MDF on fire or a cause for my wife to terminate my existence for using her stove or both. After perusing YouTube for some ideas on sculpting on the MDF, I found this video from a guy named Luke in the UK where he used DAS clay mixed with PVA glue to use with Green Stuff Rollers. I decided that I would give that approach a go. I bought this DAS in white at Michaels.
Before I started, I needed to test and practice with the roller itself. It has a rectangular pattern, but it is a roller. Therefore, I would need to know where to start and where to stop. The solution came in borrowing some of my granddaughter Tabitha’s Play-Doh and marking a start and stop point on the roller with a Sharpie (and then returning the Play-Doh of course). This also let me figure out how large the imprint would be.
The roller pattern on Play-Doh as a test pattern.
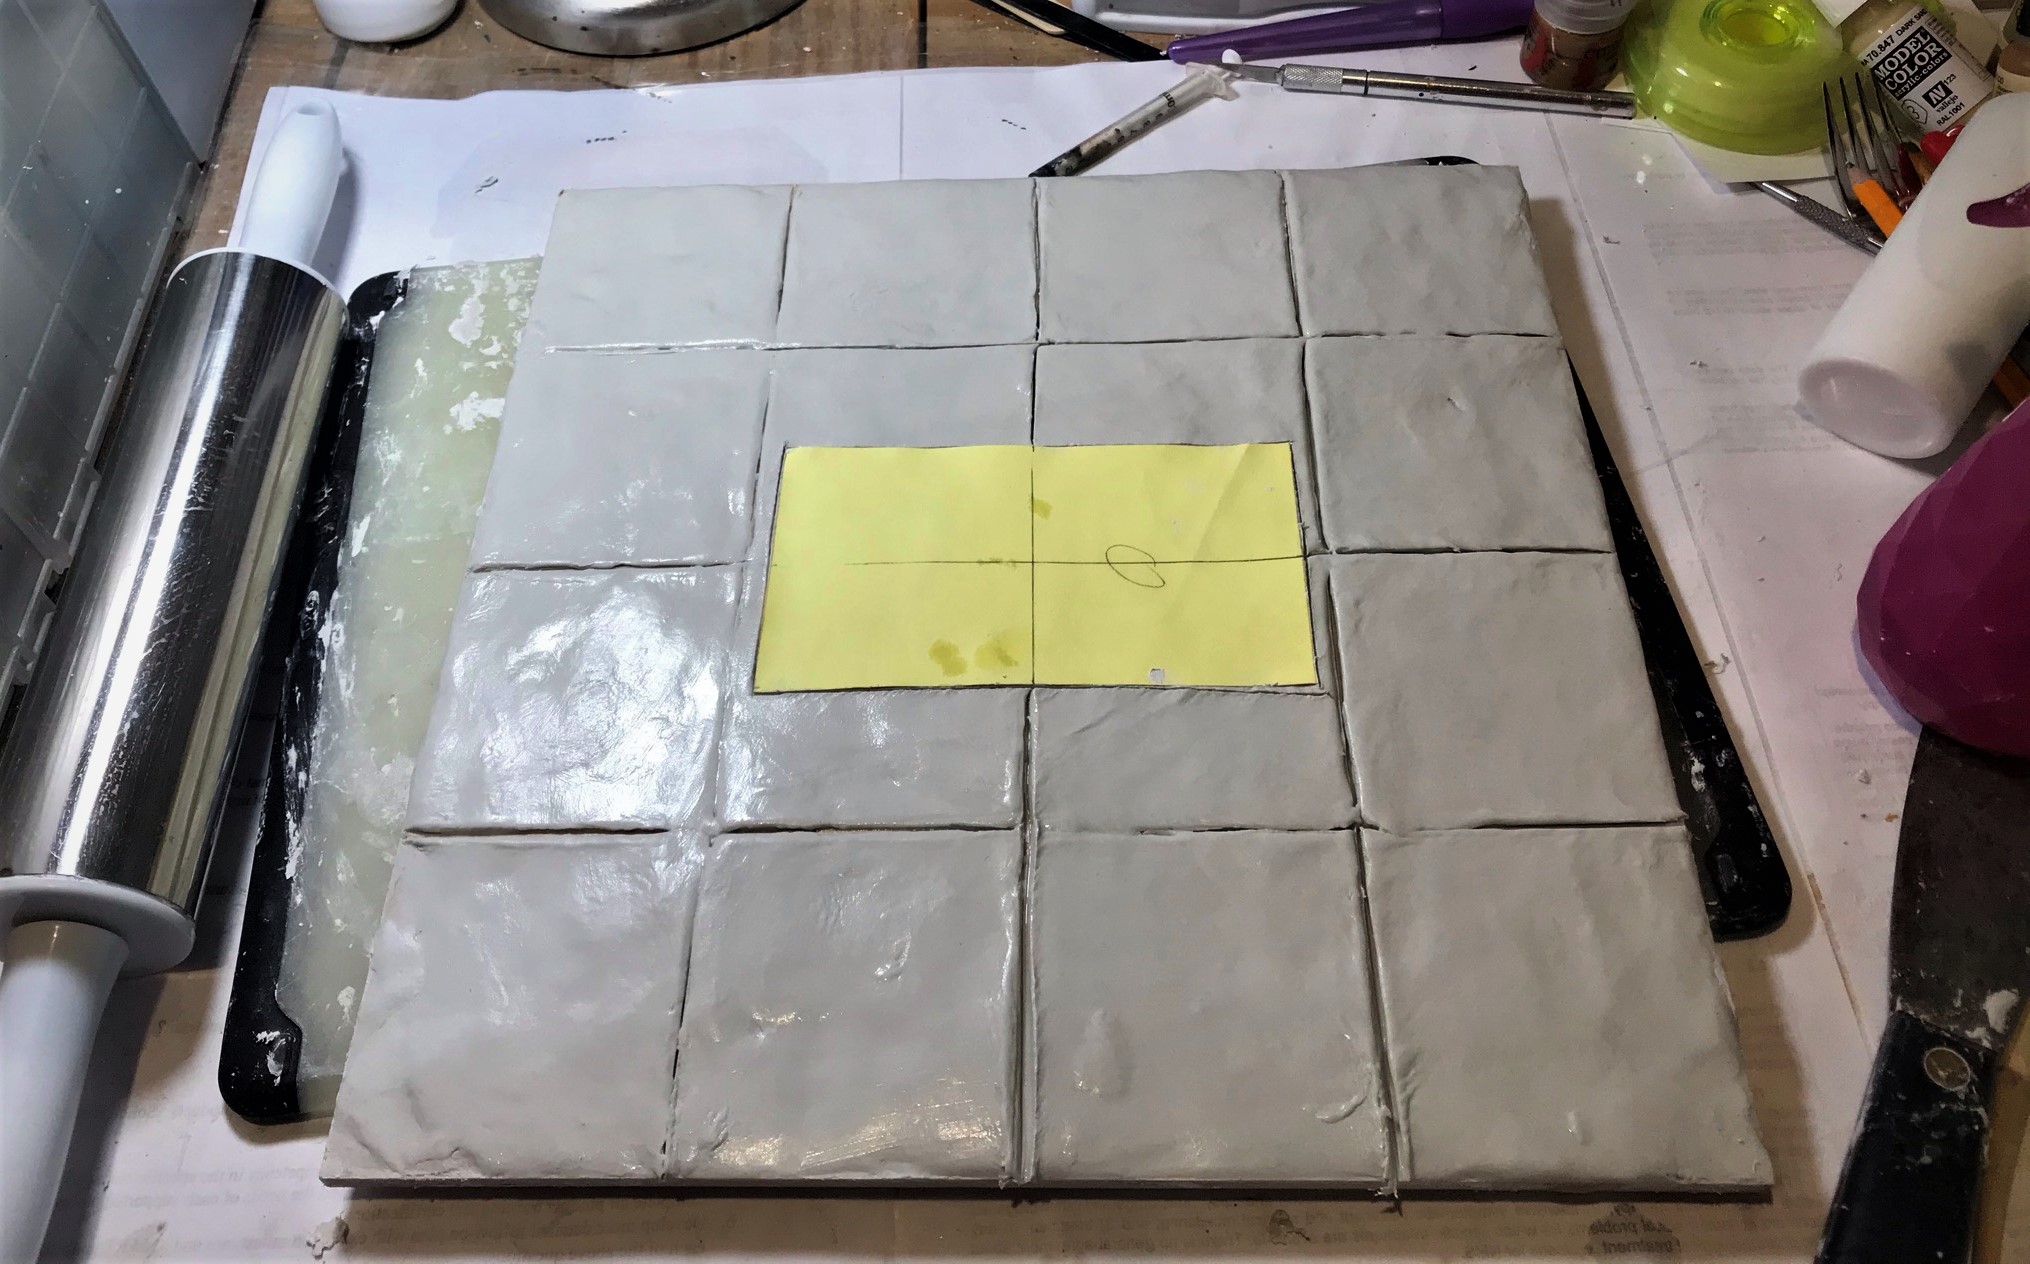
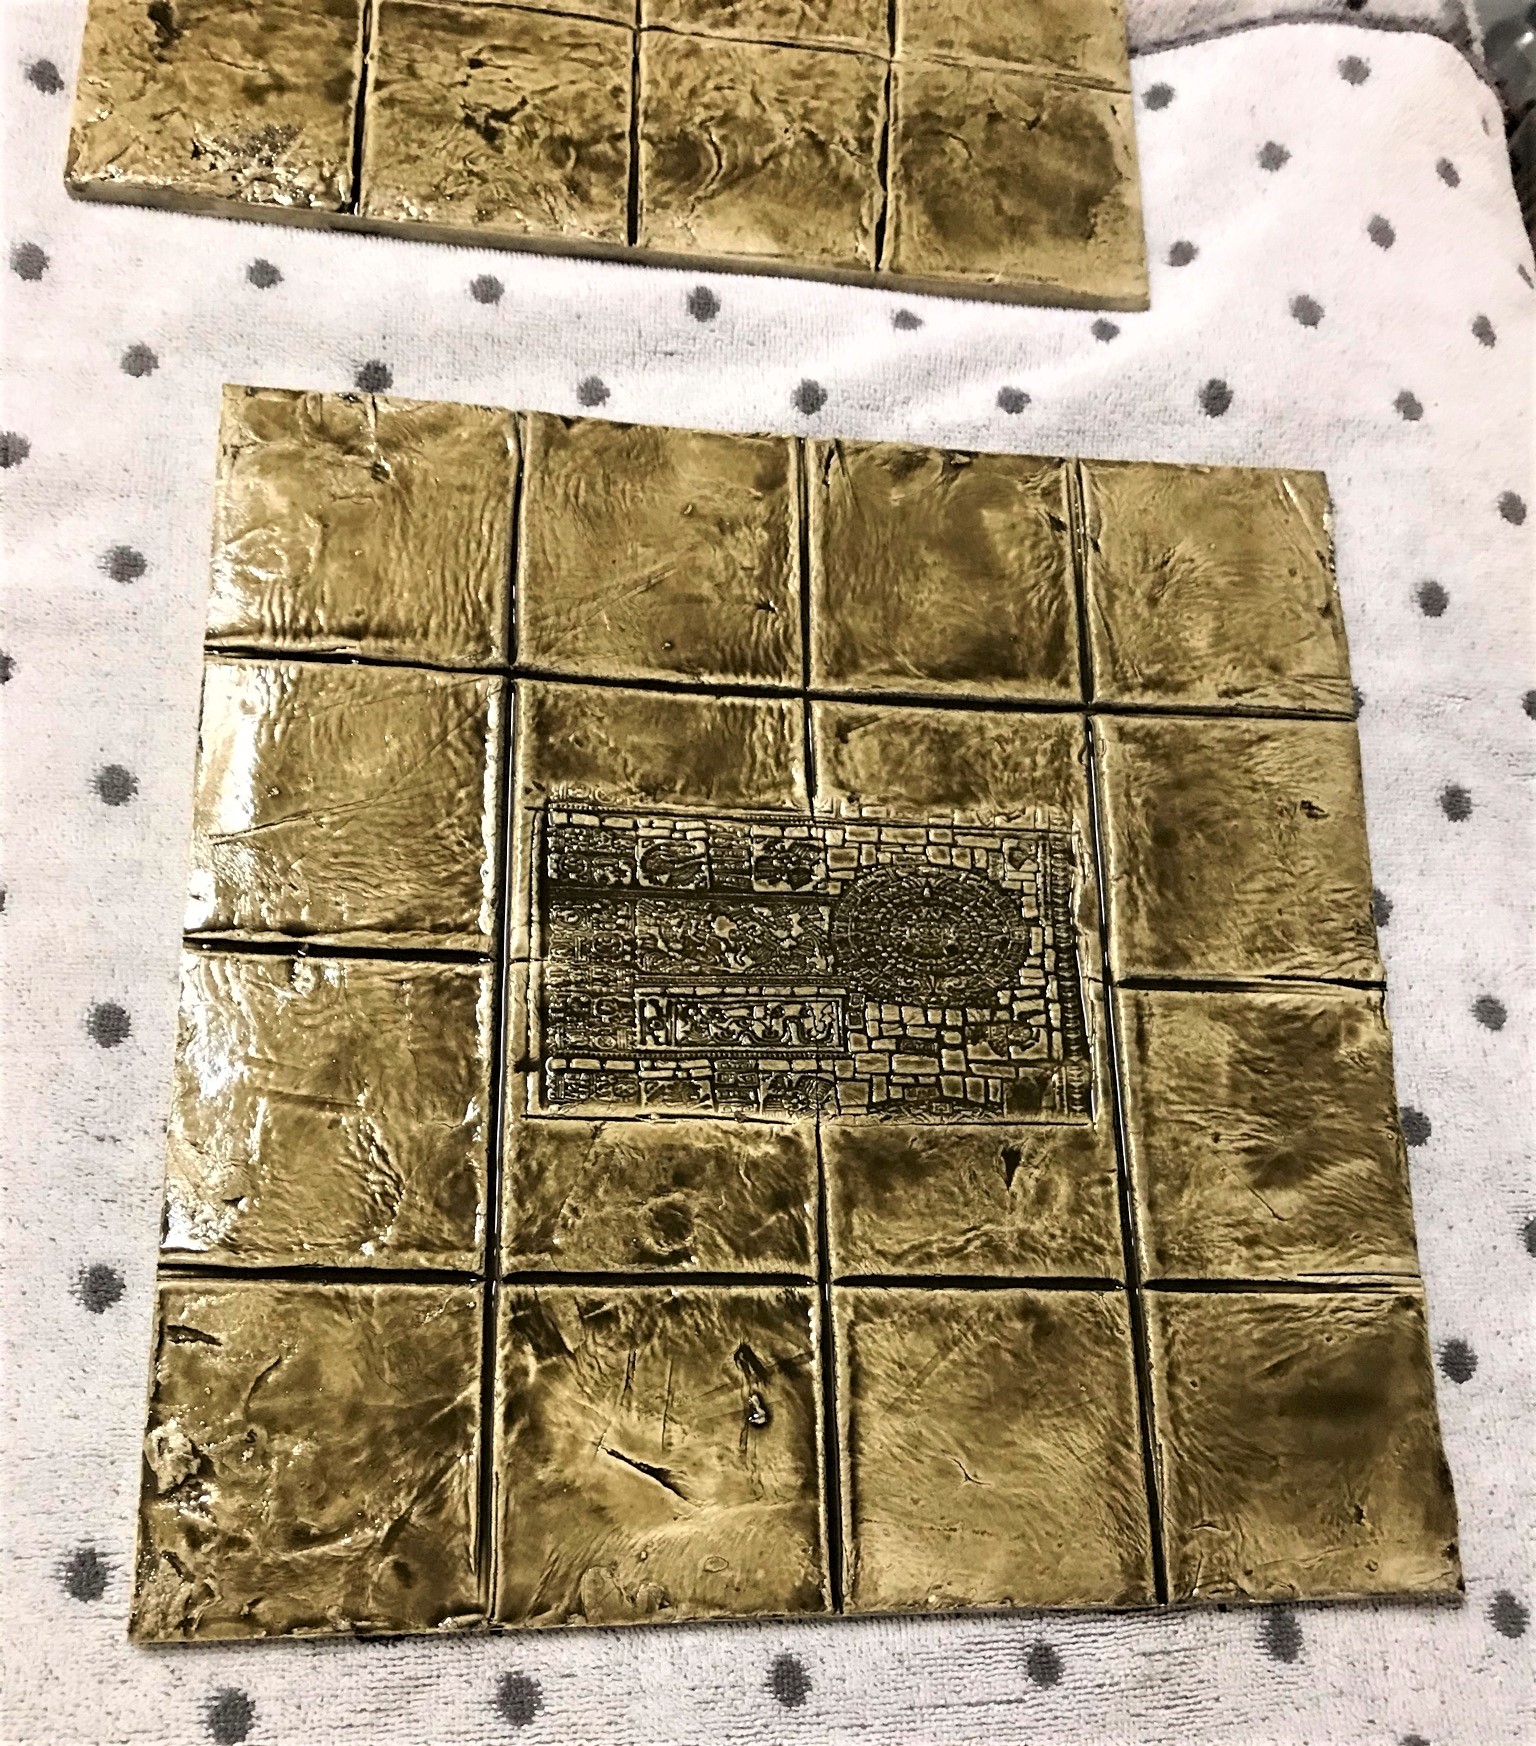
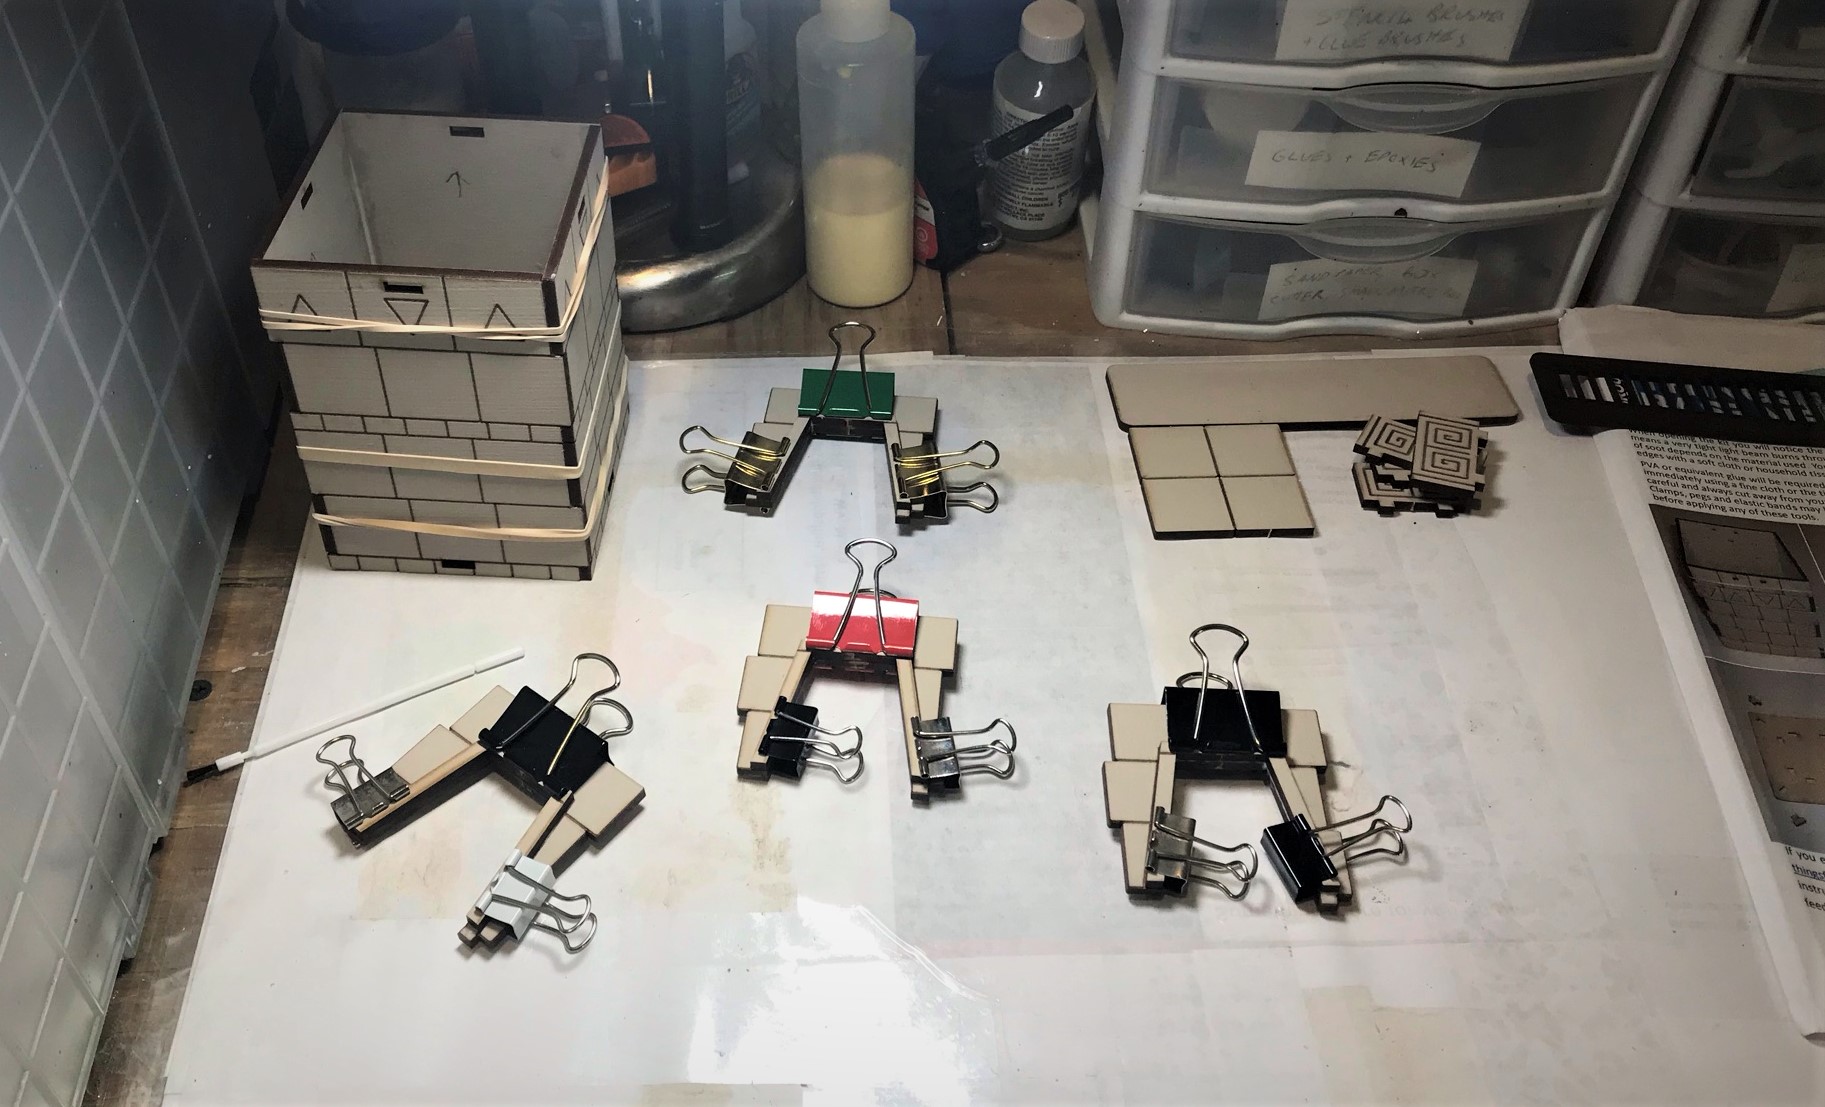
The next step was to figure out the marking/sculpting plan for each pavement. I decided that having 3″ x 3″ squares would work well with both the larger and smaller MDF tiles. I needed to have a properly-sized template for the Aztec roller such that I could center it on the sculpted tiles. I planned to do 6 large tiles with the roller imprint, 4 without, and 9 small tiles without the roller imprint, and one with it. The roller imprint would be approximately 3″ x 5.5″.
Designing the larger (1′ x 1′) tile with the roller imprint centered.
It was now time to, well, get all messy and sticky with DAS and PVA. I used a smooth pastry roller (my own thank you not my wife’s), and a carpenter’s square (also mine!) to smooth out the DAS/PVA as well as to score lines in the mix at 3″ intervals. I used separate plastic tubs to mix the DAS/PVA and to clean my tools.
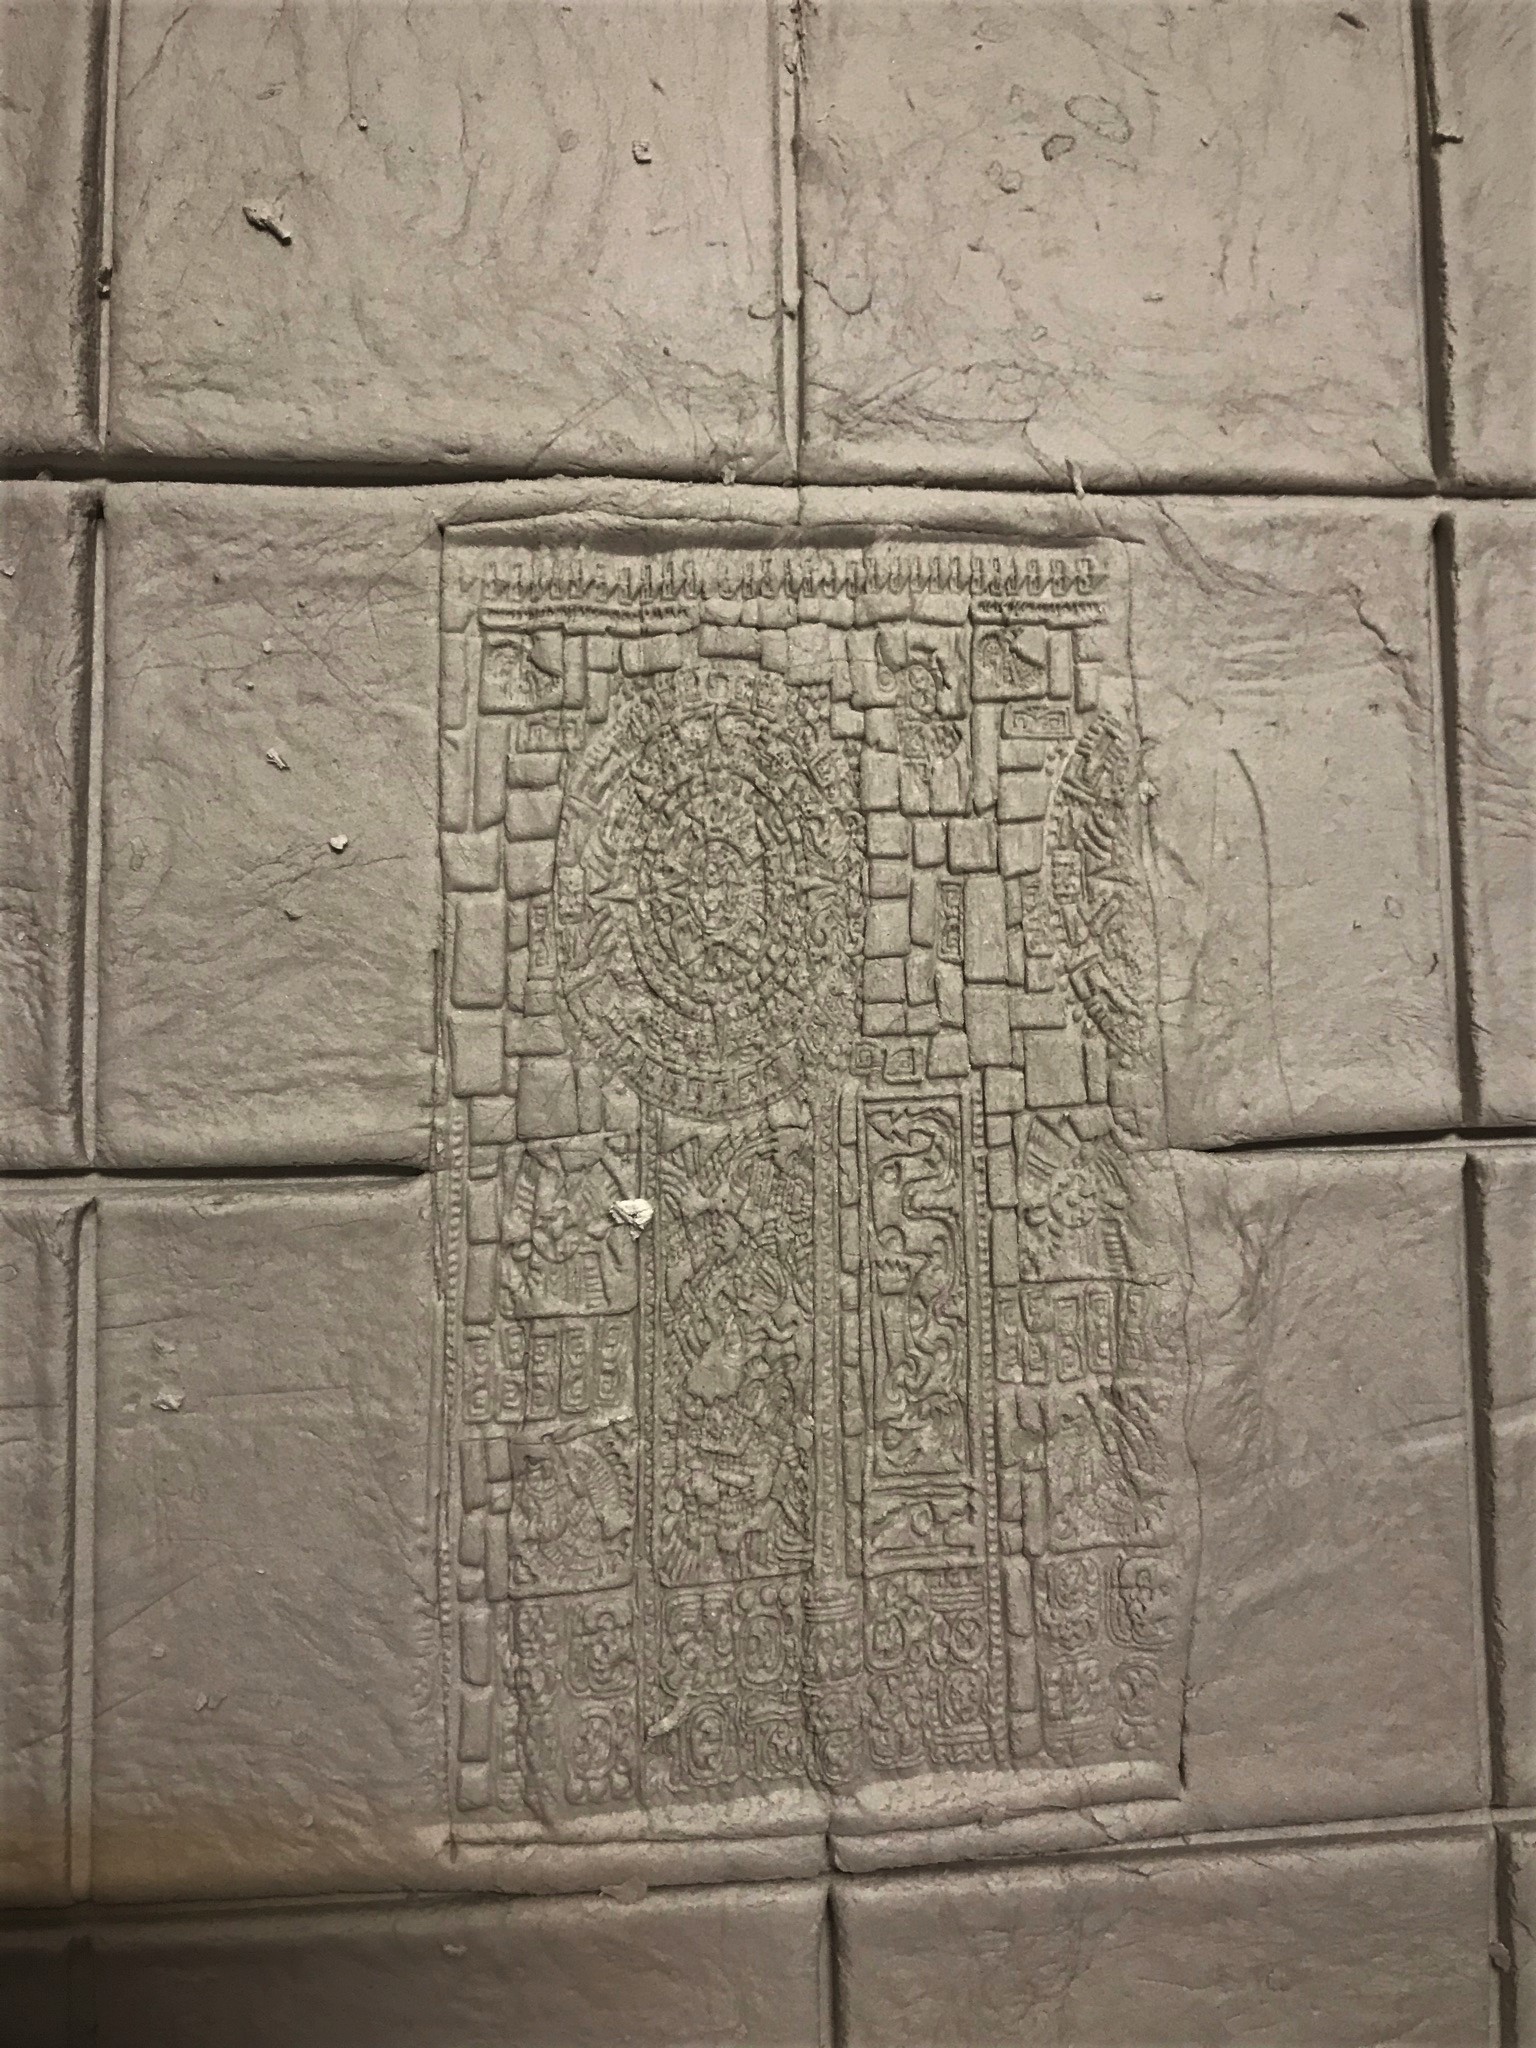
A tile without an imprint.This shows how I sculpted the tile surfaces for the roller. The DAS/PVA mix is on top – and I used a roller and wet fingers to smooth the top. Then I marked off 3″ squares and drew the edge of the carpenter’s square across as a tool. If there was to be an imprint, I placed and traced the template as you see here. Then, I would use the Aztec roller to make the imprint.An example of the rolled imprint. It was not always perfect, but I was able to smooth out the edges as best as I could. I expected to be able to make them work – and in the end they did. This was the worst example – I got better over time. In any case, when I was dry brushing I was able to make all look pretty good (though you can be the final judge).
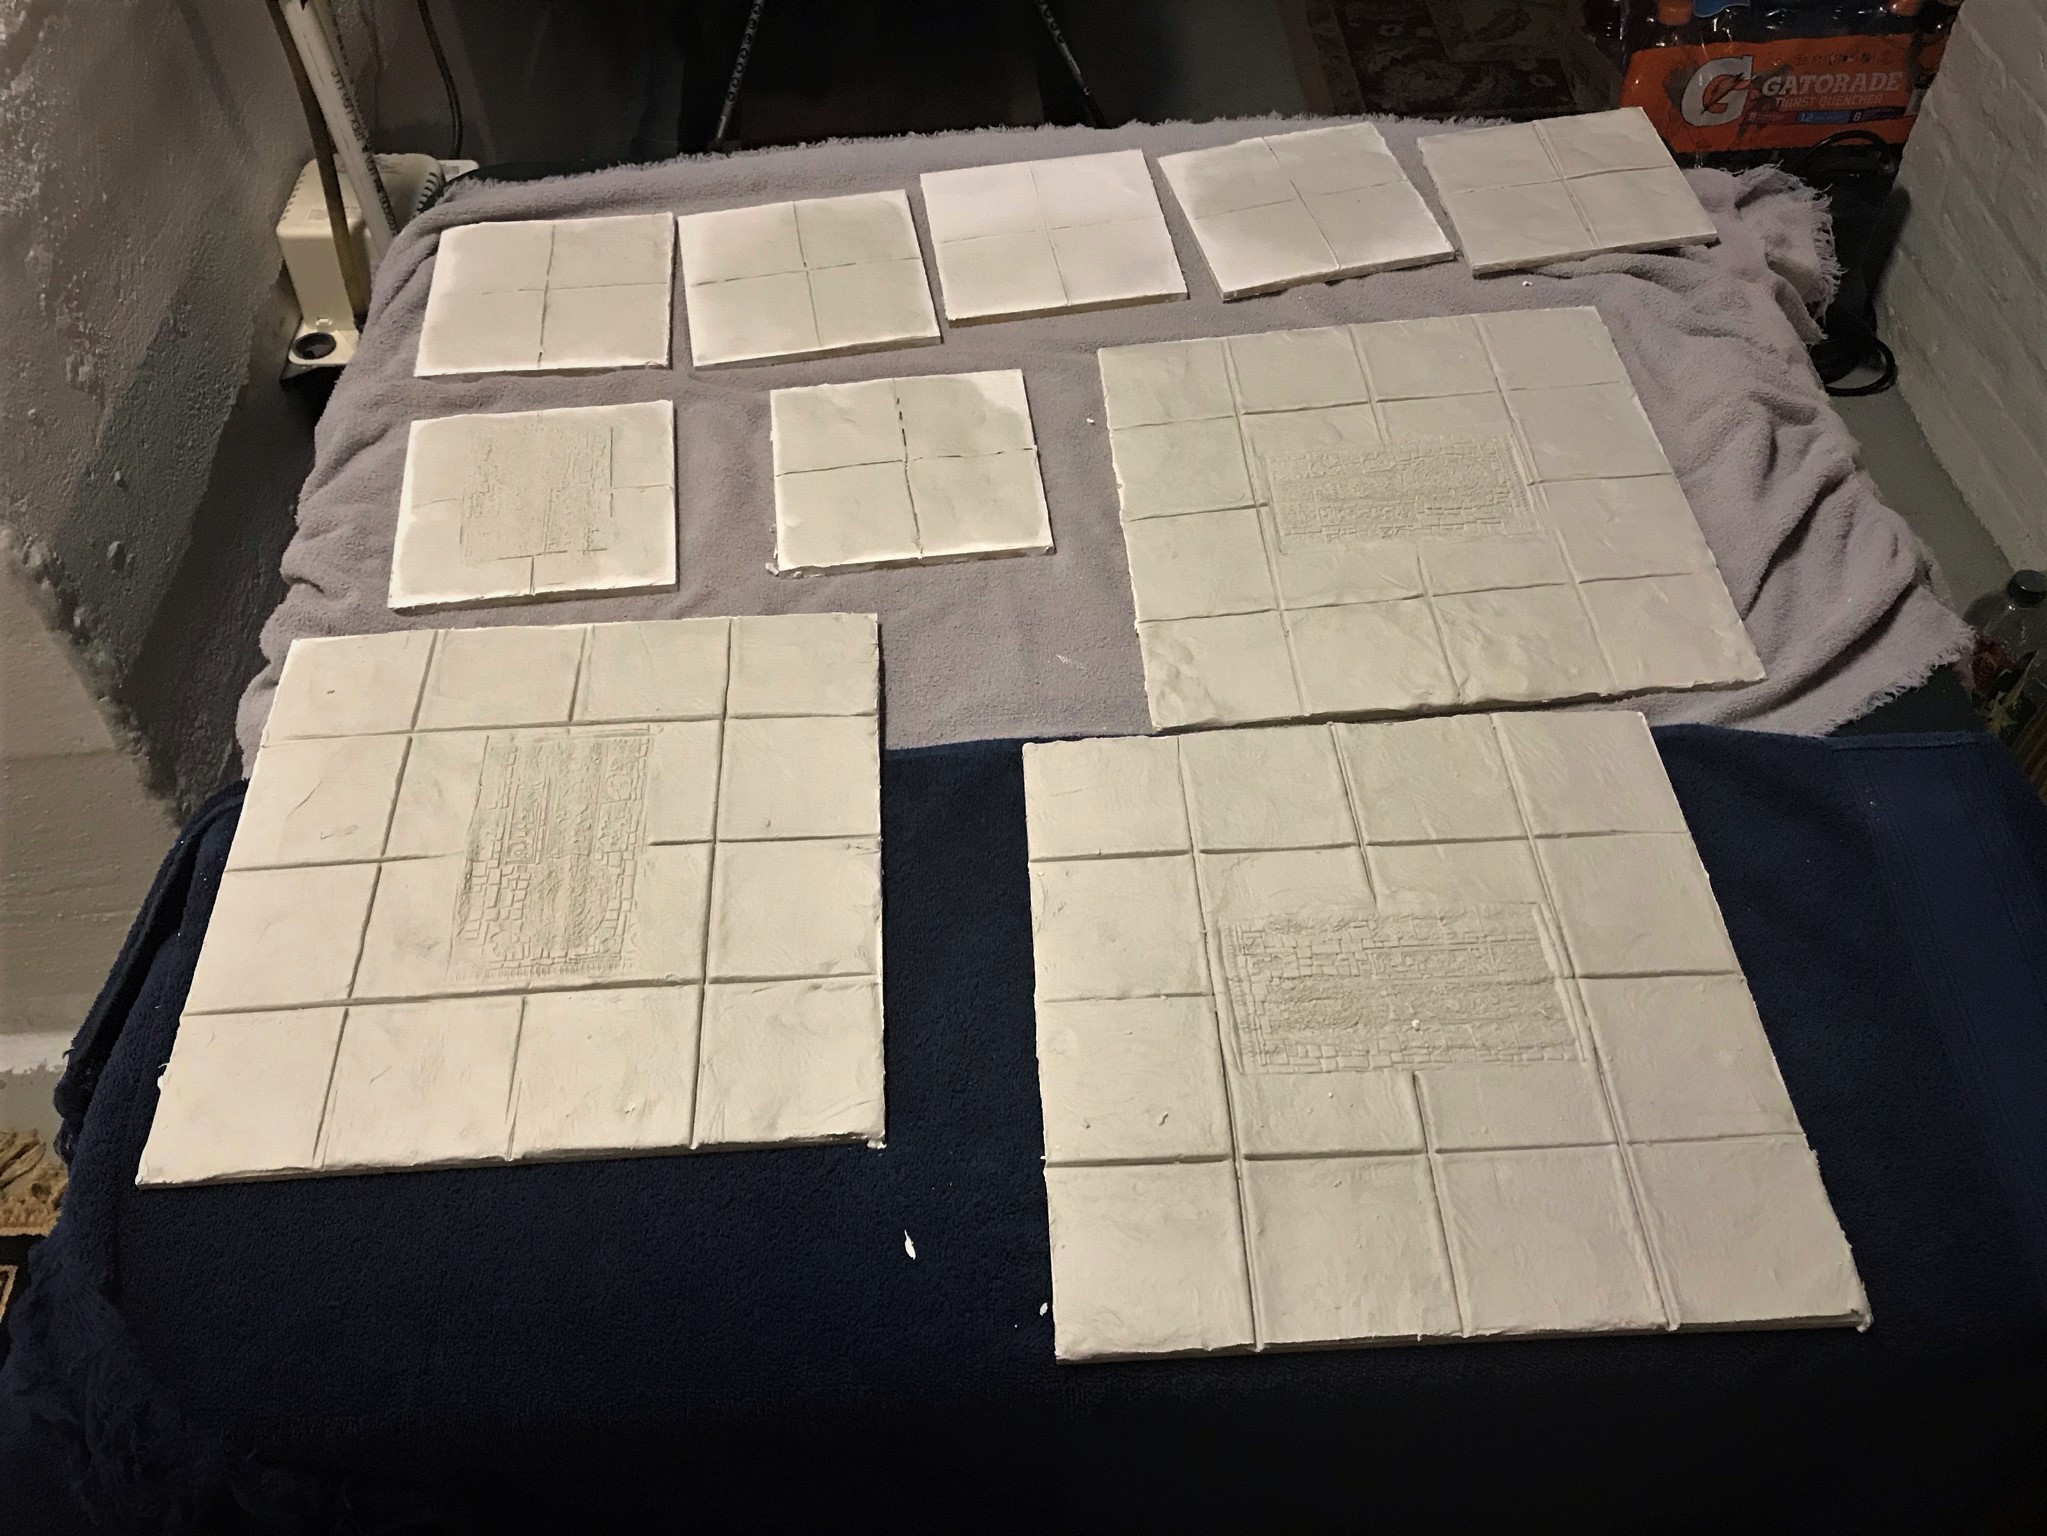
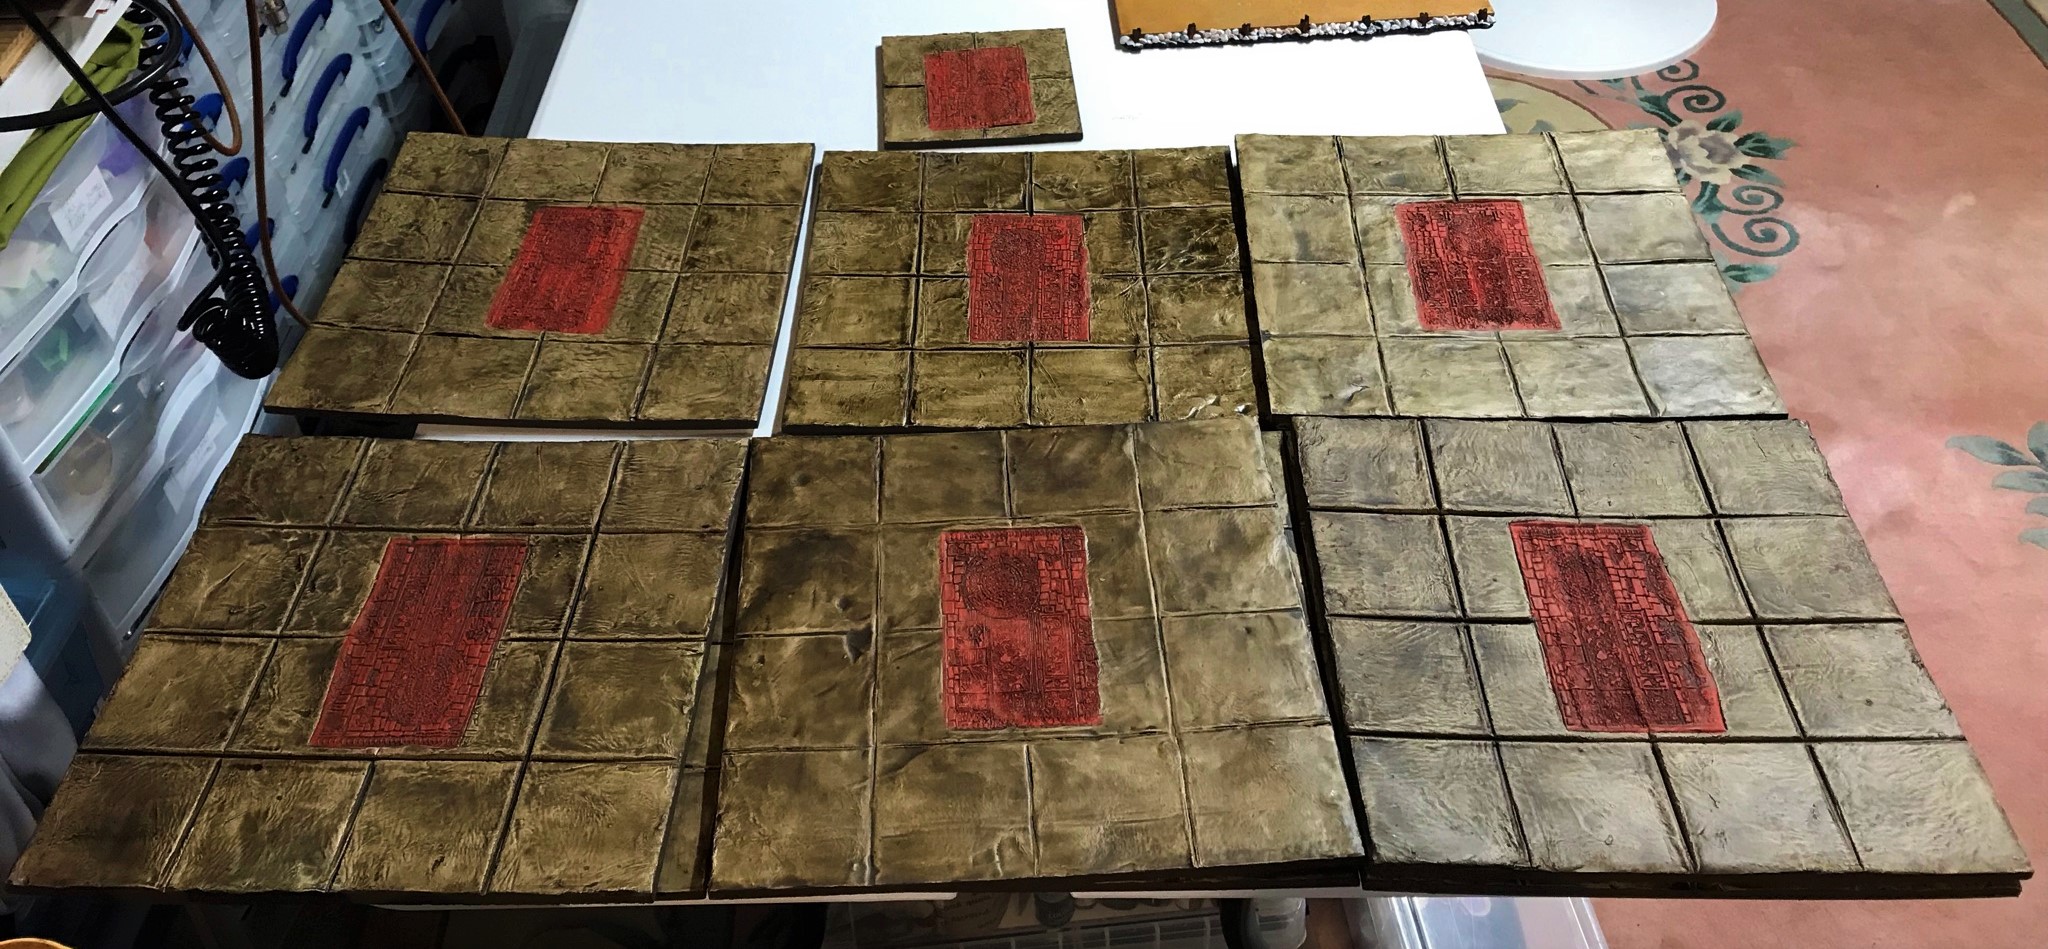
The roller worked fairly well, though there was a learning curve to be sure. I definitely needed to have a tub of water, a brush, and microfiber towels to clean it (and my tools) constantly. The DAS/PVA on the MDF was left to dry over 24 hours. On a few of the larger tiles, I was surprised to see some of the MDF had a bit of warp from the drying clay/glue combo. The smaller pieces had none. Lesson learned. Certainly, finding enough flat surface for all 15 square feet to dry was not easy. I ended up using multiple card tables in the cellar. Yes, the wife was annoyed again. This whole process used up three packs of DAS – that’s 3 kilograms/6.6 pounds – of the stuff.
Drying tiles.
Once they had dried, the next question was how to paint them? I decided to use up my cans of Army Painter Strong Tone and Soft Tone (the dip), as they would be otherwise gathering dust in my paint shed. They theoretically would provide a bit of protection as well. Again, I also needed 24 hours of drying after application – yet again.
The Army Painter “dip” drying.After the dip dried. I was happy with the way the pavements looked, except for the glossy effect.
Normally, I do not use spray varnishes, but these large pieces were good candidates for a spray of Krylon matte varnish. It was warm outside, so I gave them a coat. All went well – until some of the pieces – mainly one – started bubbling up like a cheese pizza. AHHHHH!
From what I could figure out, that was caused by the aerosolized solvent in the can vaporizing in the DAS and trying to release through the varnish and the dip surface. Luckily it was only on one large tile, but that tile took a rework and made this last at least a week or two longer as I tried to find the right combination to recreate a similar color. This took me into mid-July.
More drying time needed! Hell, drying SPACE. 15 square feet to go on a 24 square foot mat is a lot!
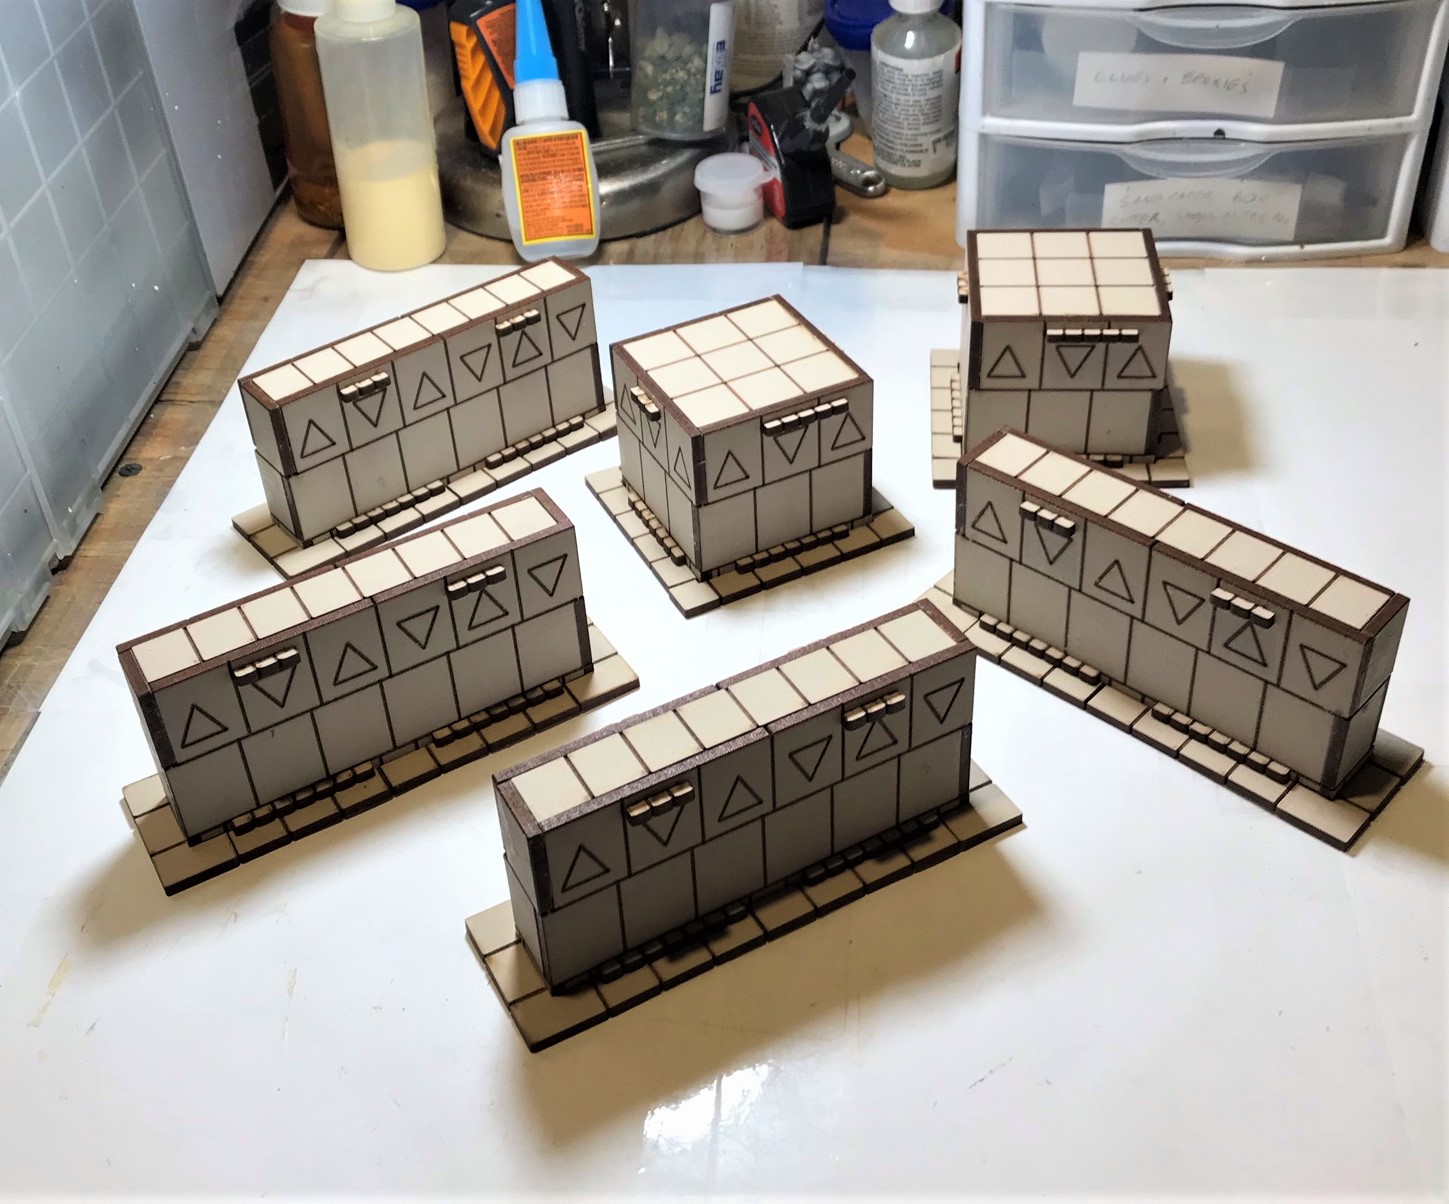
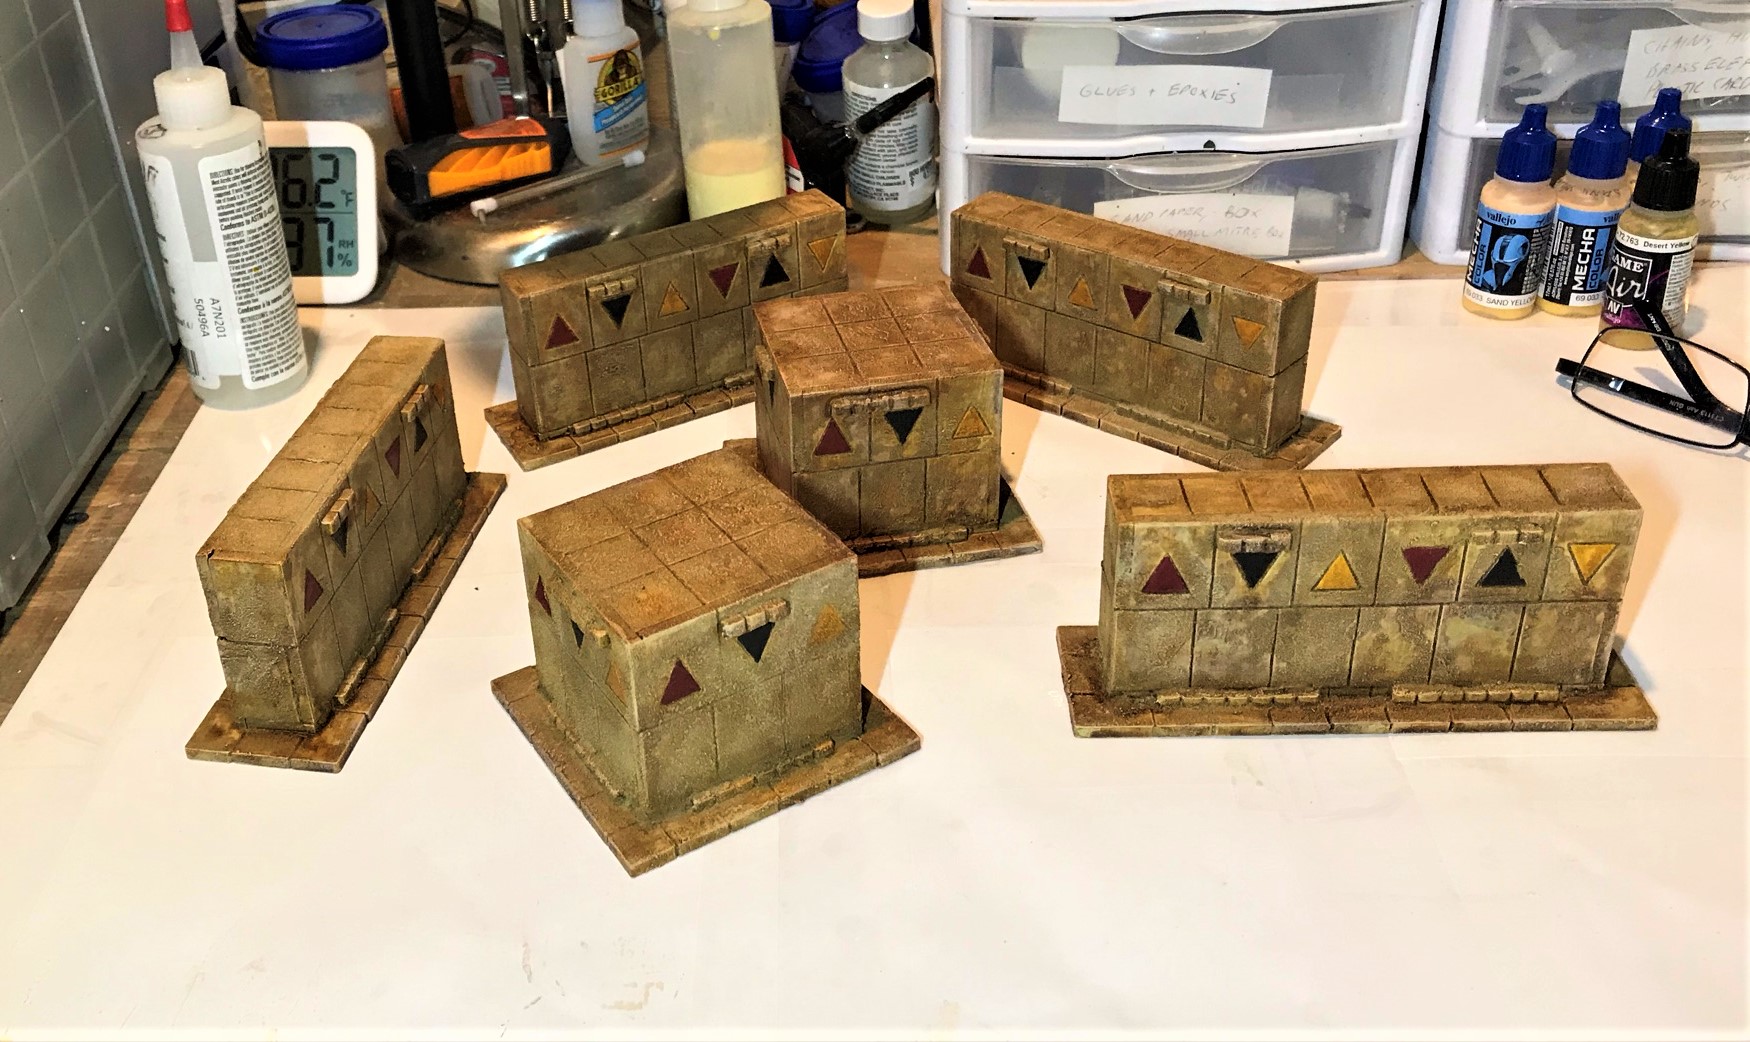
I then brush varnished and shaded all of the tiles. At this time I moved on to dry brushing the imprints with Citadel “Astorath Red”. I also darkened the edges with DecoArt “Raw Umber”. The tiles line up together on the lines nicely. Though some warp is visible, it is not horrible. I also went over all of the tiles and shaded them as needed so that the colors were similar and no untouched DAS/PVA was visible.
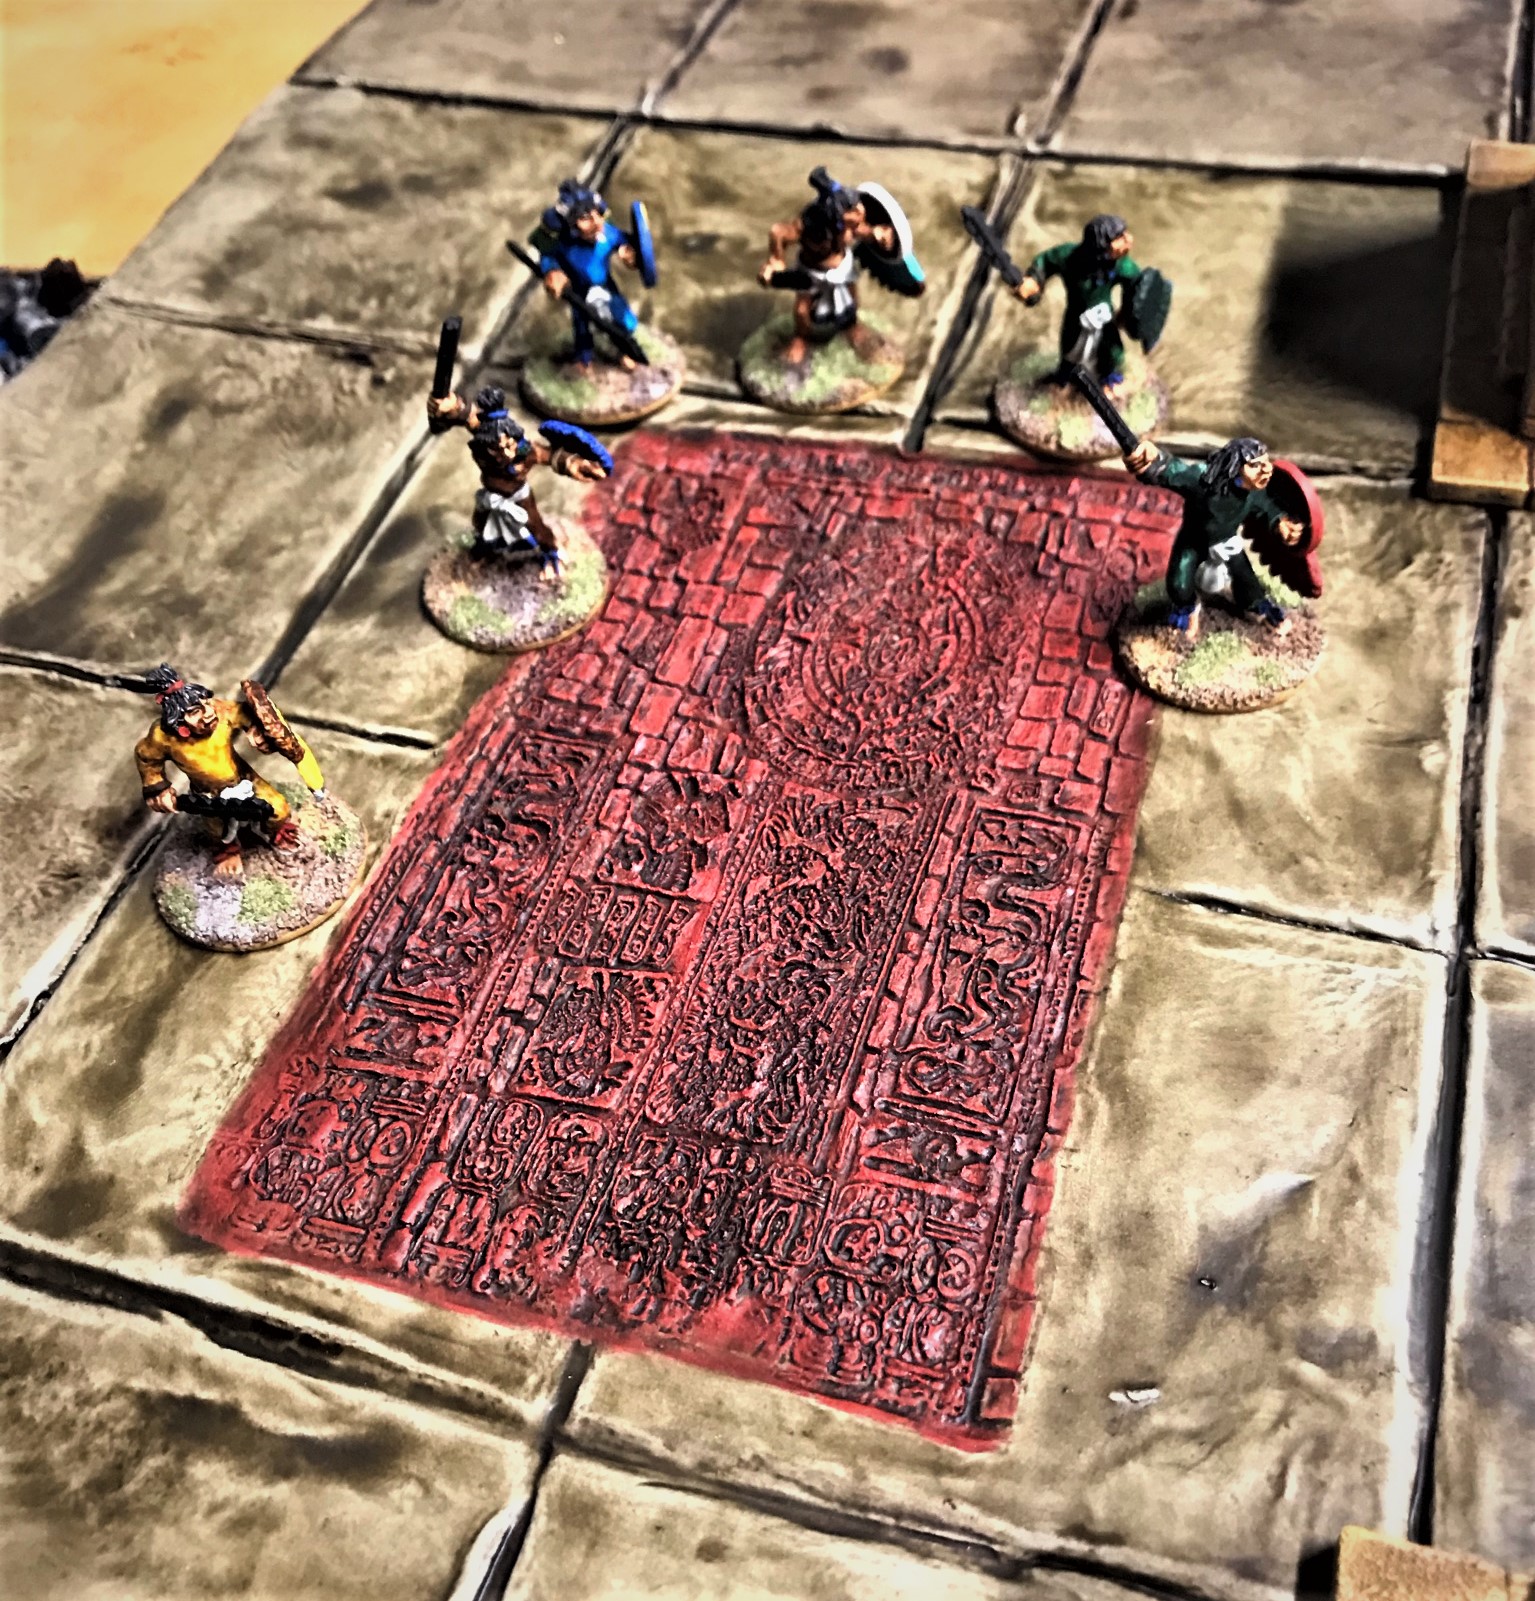
A comparison of the imprints before and after on the pavement tiles.All six tiles with imprints.Close up shot of a completed tile.An imprinted tile with some Aztec warriors for comparison.
Of course, when you see the completed cityscape, you will be able to better judge how all of these came out. As they are modular, I should be able to use them in many ways. They certainly meet the Aztec criteria of symmetry. Also, these all can be part of Dave’s Season of Scenery Challenge!
At this point in the project, I noticed how the edges of the tiles were a distraction and needed some attention. I thought that seeing bare 90 degree edges and MDF sides coming out of a lake (or swamp) was a less than aesthetically correct situation for my cityscape. People would have built the city up from the lake – and that would have involved reclaiming the lake as dry ground. How? Well, I am sure that the Aztecs would have used slave labor to haul and deposit tons upon tons of rocks on the water’s edge.
My fix was to build some revetments around the cityscape’s edge plus some lily pads, and cattails – which will be the next installment in this series!
I hope that you enjoyed this part 2 and that you stay tuned for the rest – let me know your thoughts in the comments section and I appreciate your giving this a read!
For all of my previous posts on games, units, and other projects for my 16th Century Spanish Conquest supplement for Feudal Patrol™ – “Civilizations Collide” – please see this page.
PAINTS, INKS, GLAZES, SHADES, WASHES, PIGMENTS, FLOCKING, GLUES AND MORE THAT I USED ON THESE TERRAIN PIECES/MODELS:
I have been working through July to build a representative 6′ x 4′ cityscape gaming table that would evoke the flavor of the city of Tenochtitlan, which was the capital of the Aztec Empire. On the arrival of Hernan Cortes in 1519, Tenochtitlan was populated by an estimated 200,000 to 400,000 people – making it even larger than contemporary London. It was built on an island in Lake Texcoco, and was linked to the mainland by multiple causeways. These causeways also had removable or liftable bridge sections. In effect, Lake Texcoco formed a “moat” around the city, making it impregnable to enemies for hundreds of years (until the Spanish Conquest occurred anyways). The causeways would be of major importance during all phases of the Spanish Conquest. Cortes met Montezuma II on a causeway for the first time. The Spanish and their Tlaxcalan allies would fight desperately at different times to both escape Tenochtitlan (La Noche Triste) and to return to conquer it afterwards. The nature and importance of the causeways were major aspects of these battles, so any representation of the city of Tenochtitlan needed to have causeways.
A 1524 map of Tenochtitlan showing the causeways (from History Today).Detail of a Tenochtitlan causeway (from Learnodo Newtonic).Cortes meets Montezuma on a causeway for the first time (from Pinterest).A painting of Cortes at the Battle of Tenochtitlan (from Britannica).
To build a city of such size would be massive – and certainly beyond the scope of a reasonably-sized gaming table. My goals were to make something special – while ensuring that it was something that could be used in games of Buck Surdu’s Feudal Patrol™ in Mesoamerica (using my Civilizations Collide supplement). I wanted a diorama that could be played on. To that end, I have built many buildings and figures that have been previously shared in this blog. What I needed to add was the underlying structure of the city – “the cityscape”.
The work that I did to build and paint this cityscape was extensive and would overwhelm a single blog post. Hell, it almost overwhelmed me just building it! Therefore, I have decided to break my work on it into 5 posts that I will share over the next few days. There will be a lot of WIP shots on each category, leading up to a final reveal. I am also continuing with my weekly garage+ build posts (like here and here), and I have some golf stuff to add as well. This is “Life, Golf, Miniatures, & Other Distractions” after all! My blogging drought is coming to an end! As for the cityscape posts, here is the listing of what is on deck:
Building an Aztec Cityscape – Part 1: Causeways, Lifting Piers, and Removable Bridge Sections (this post)
Building an Aztec Cityscape – Part 2: Pavements
Building an Aztec Cityscape – Part 3: Revetments, Lily Pads, and Cattails
Building an Aztec Cityscape – Part 4: Cortes’ War Wagons
Building an Aztec Cityscape – Part 5: Tenochtitlan – THE FINAL REVEAL
To build the cityscape, I started off with building the causeways, but work on all of these components overlapped. Please enjoy them and hopefully this is useful for my fellow gamers, modelers, and hobbyists. Luckily, these all can be part of Dave’s Season of Scenery Challenge – which is fun as well.
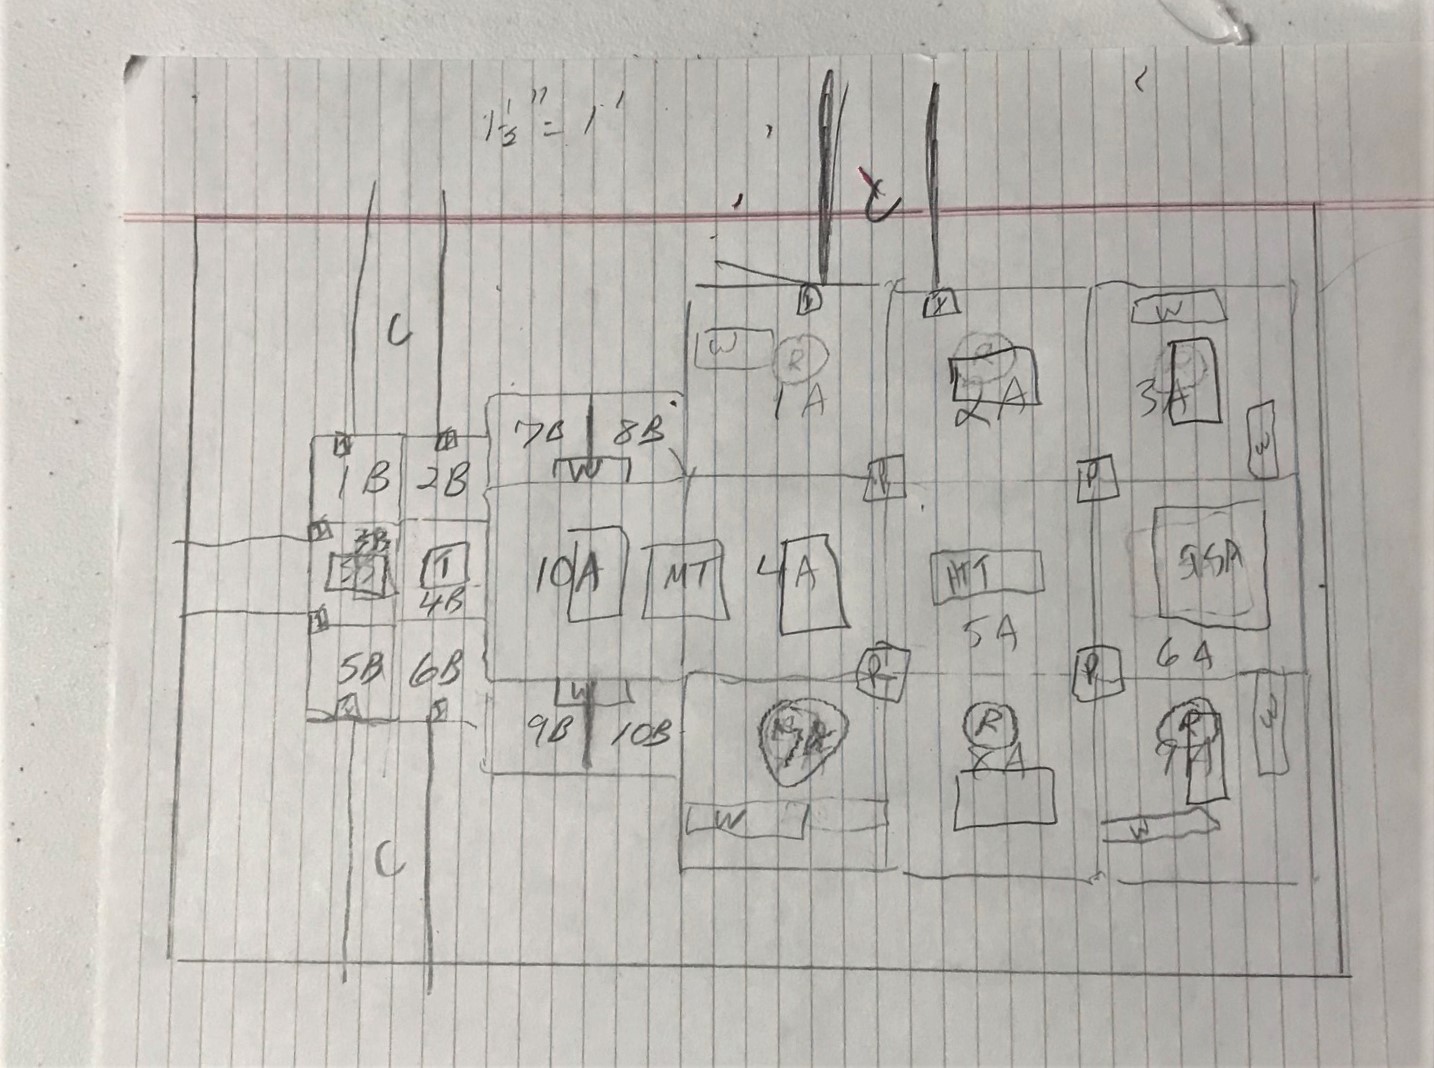
Initially, I wanted to plan the cityscape layout for a 6′ x4′ mat. I drew a rough sketch, and decided that I would get two 2′ x 4′ sheets of 1/4″ MDF from Home Depot. My friend Jeff Smith (a fantastic woodworker) has a lot of tools – to include a nice table saw, which I do not have. As I needed more precise cuts than I could achieve with my Black and Decker skilsaw, I enlisted his help. He was able to cut all the pieces in no time at all (and again, thanks Jeff!!!).
My initial rough concept of how to use the MDF sheets. They would be the basis of all of the cityscape construction. The pavements and causeways are both planned here, as well as where I wanted it all to go.Jeff cutting some causeways.
After the MDF was all cut, I laid out the pieces that I had on my FLG swamp mat, and arranged my buildings. Later, I would get a water mat from them, as I thought the swamp would not work as well. After the MDF concept layout, I was on to the building of the six causeways. I usually went through the process of doing one phase of work on one piece (like a prototype), and if that worked, moving on to the rest in similar phases.
My initial concept laid out on a swamp mat.
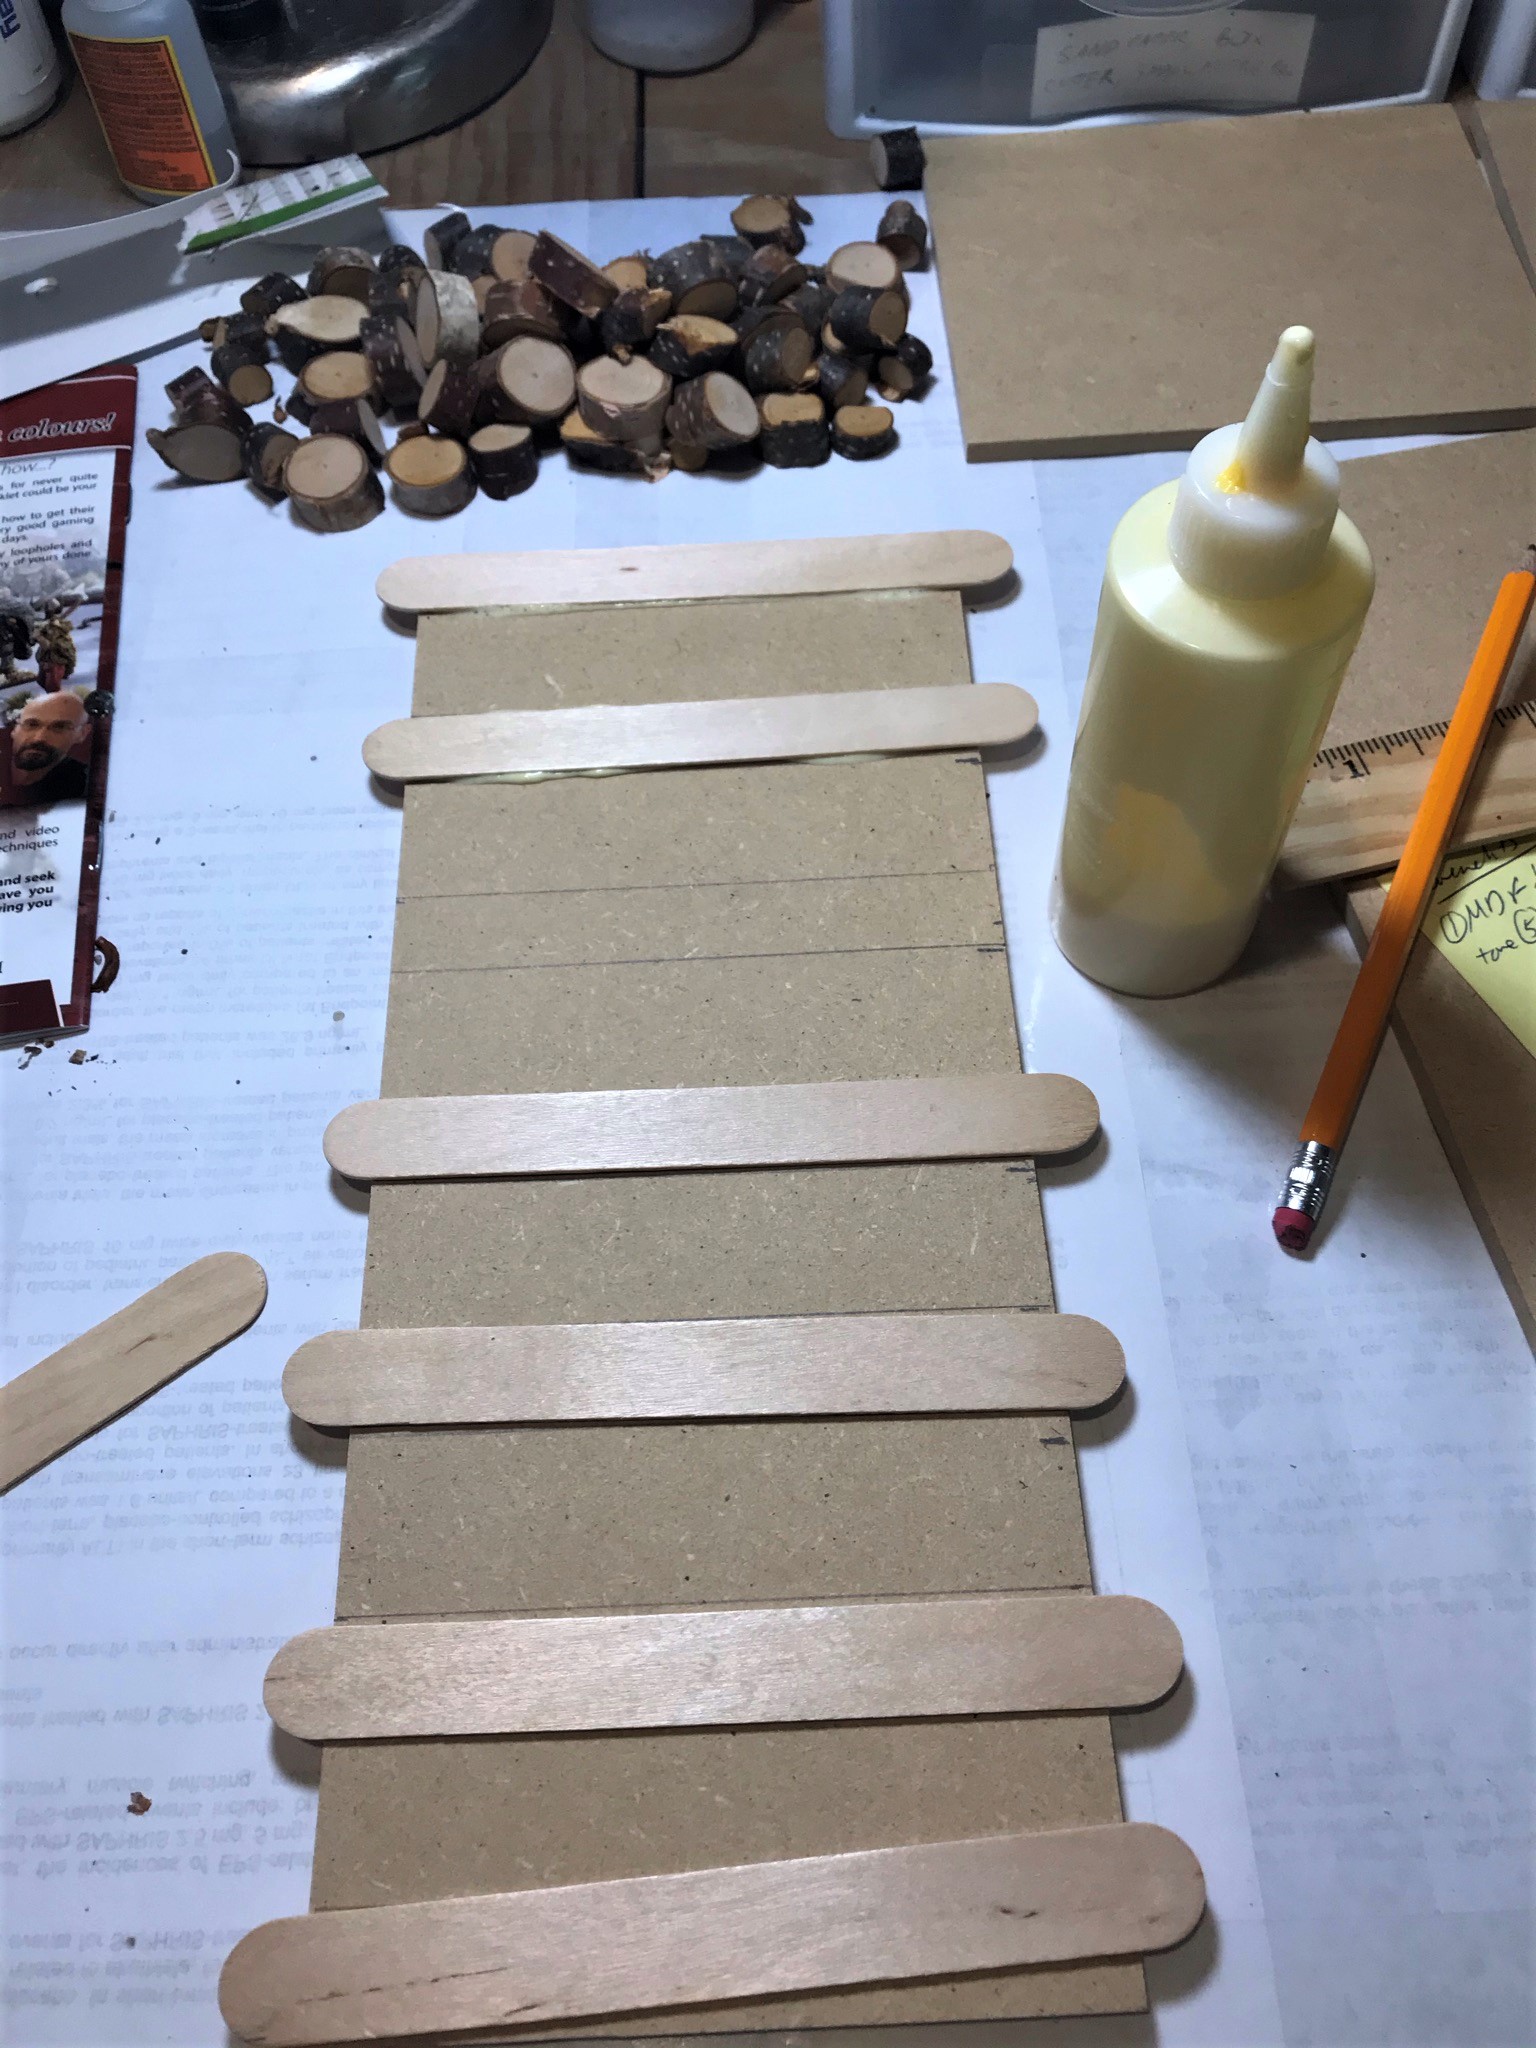
My causeway section prototype would be 5″ wide and a foot long. I spaced out some 6″ craft sticks evenly across the bottom and used wood glue to affix them. These would be to support the wooden piers and stones around them on the sides of the top surface. This worked ok, so I did all six with the cross-glued craft sticks.
Lining up the craft sticks on the bottom of the first causeway. At the top you can see some wood I was planning to use as piers – more on those shortly.After I glued all the craft sticks across the bottoms, I weighted them down and let the glue set overnight.
While the glue was setting on phase I of the causeway undersides, I built the two removable bridge sections. These are 6″ long and the same width as the causeways. These would be analogous to a medieval drawbridge. I broke up craft sticks irregularly and dry-fitted them to the top of the bridge sections. Then, I weathered the wood by beating a small chain on and into them with a ball peen hammer. After this, I glued them on with wood glue and let dry overnight. I did not press these with weight as I wanted a less uniform surface of the bridge to represent wear and aging.
My chain and ball peen hammer weathering of the craft stick wood surface.The weathered wood ready for gluing.
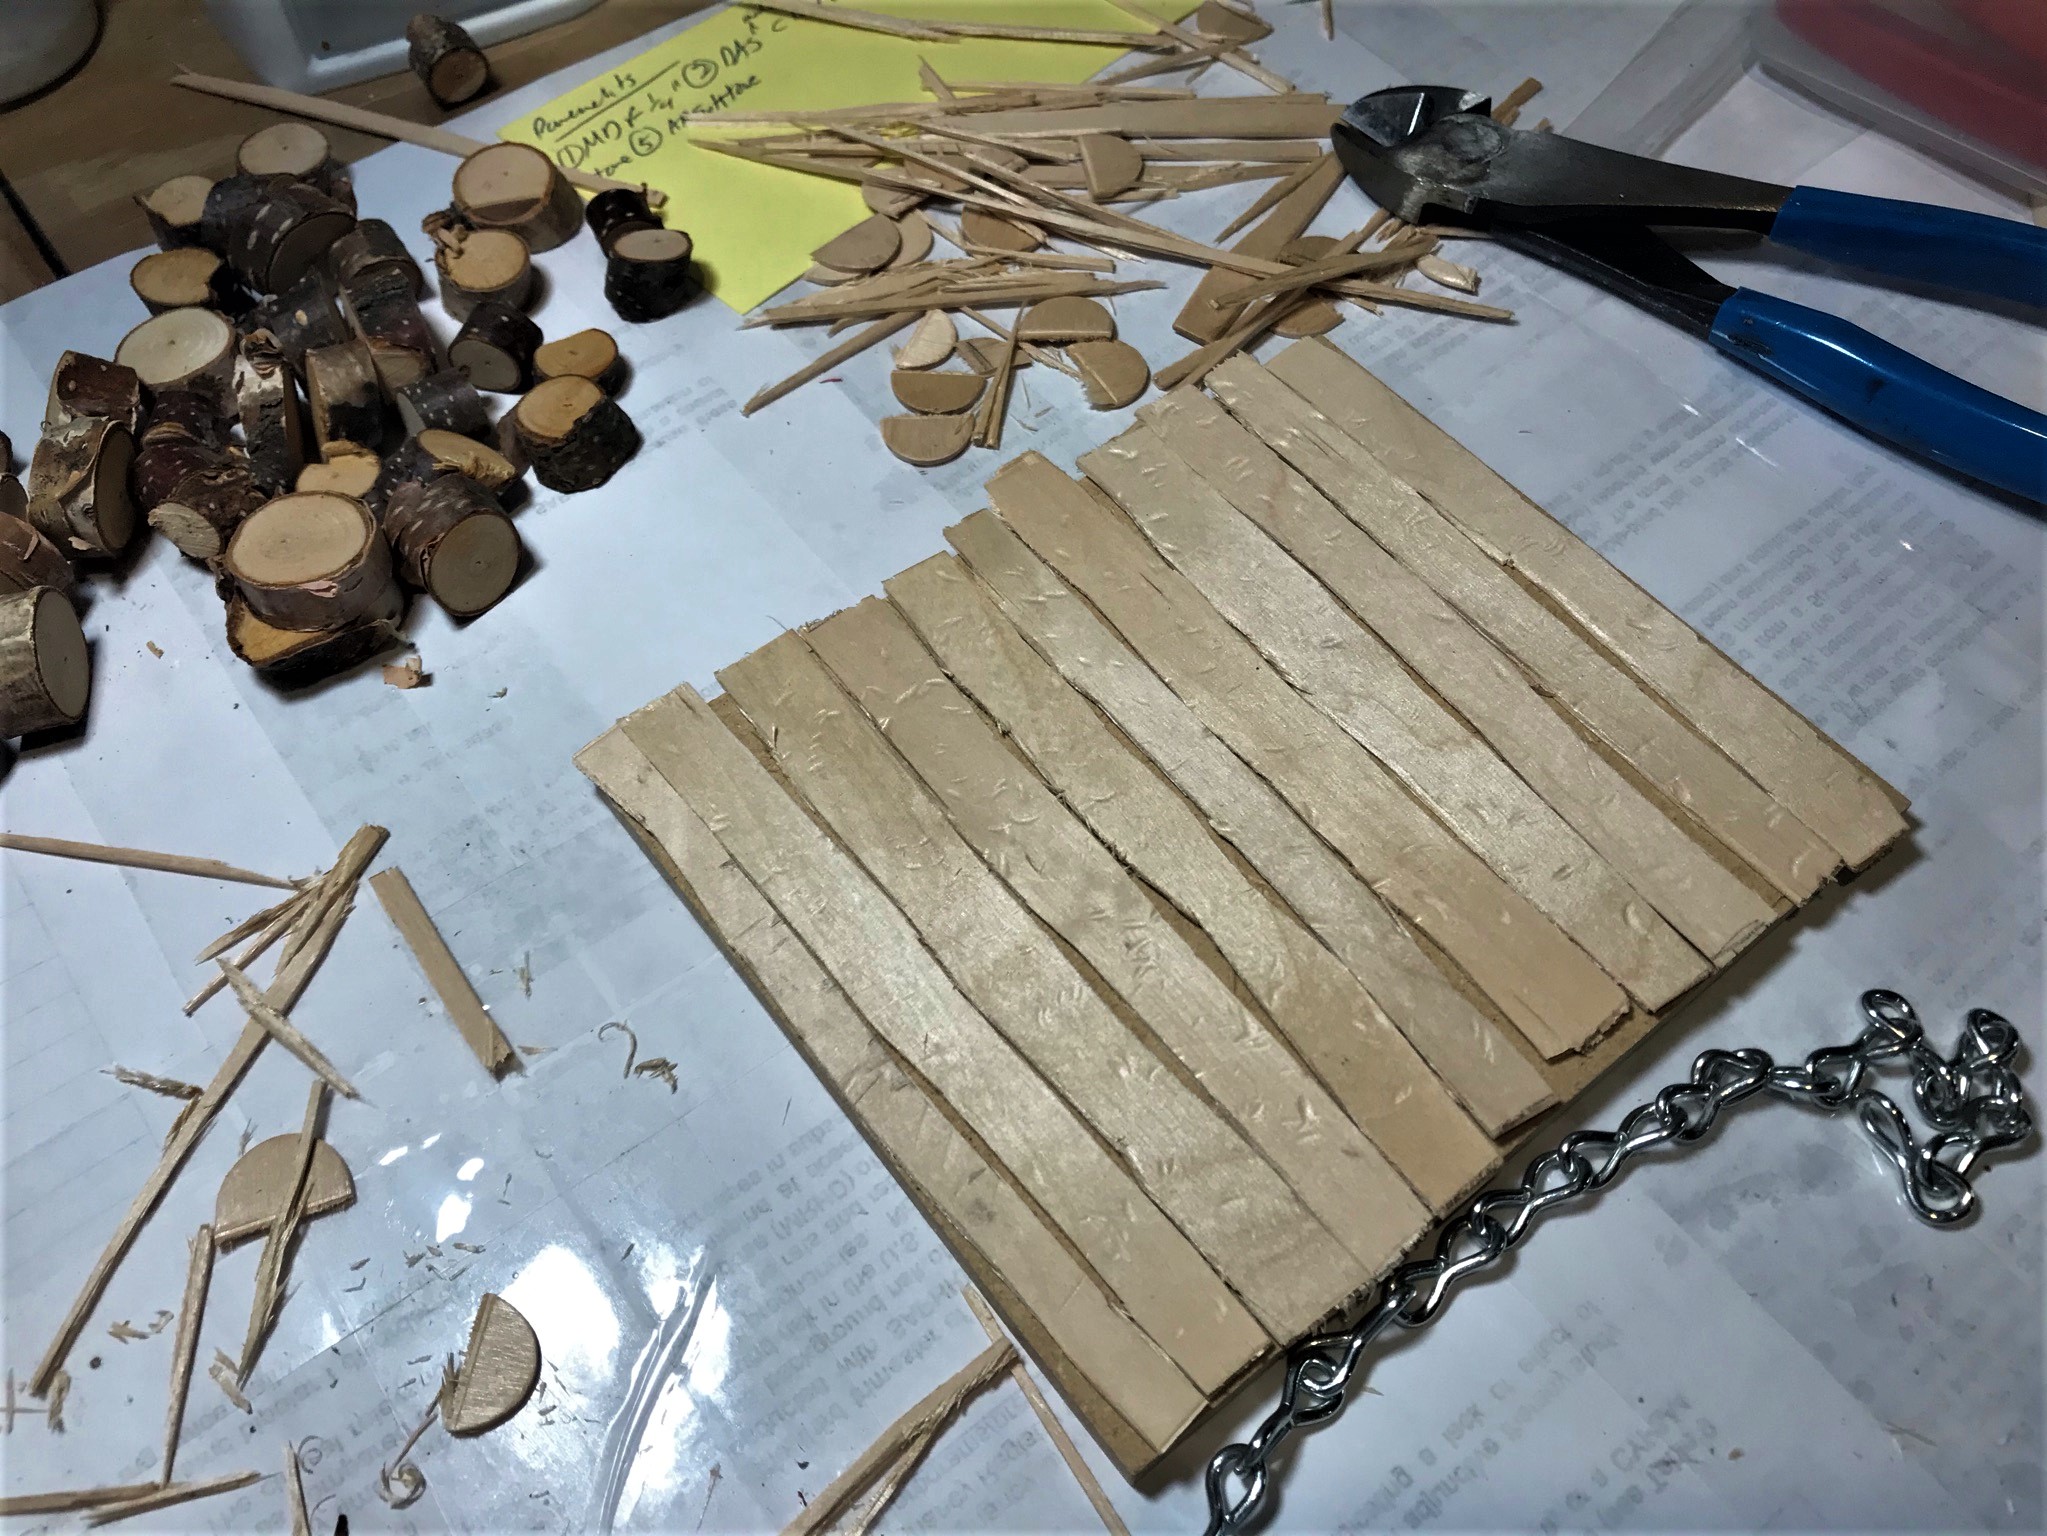
Then, I went back to the causeways. The cross-sections were ok, but I needed to have a way to add the revetments along the sides – so I added more craft sticks longitudinally on each side. They would jut out about 1/2″ on the side of the causeways.
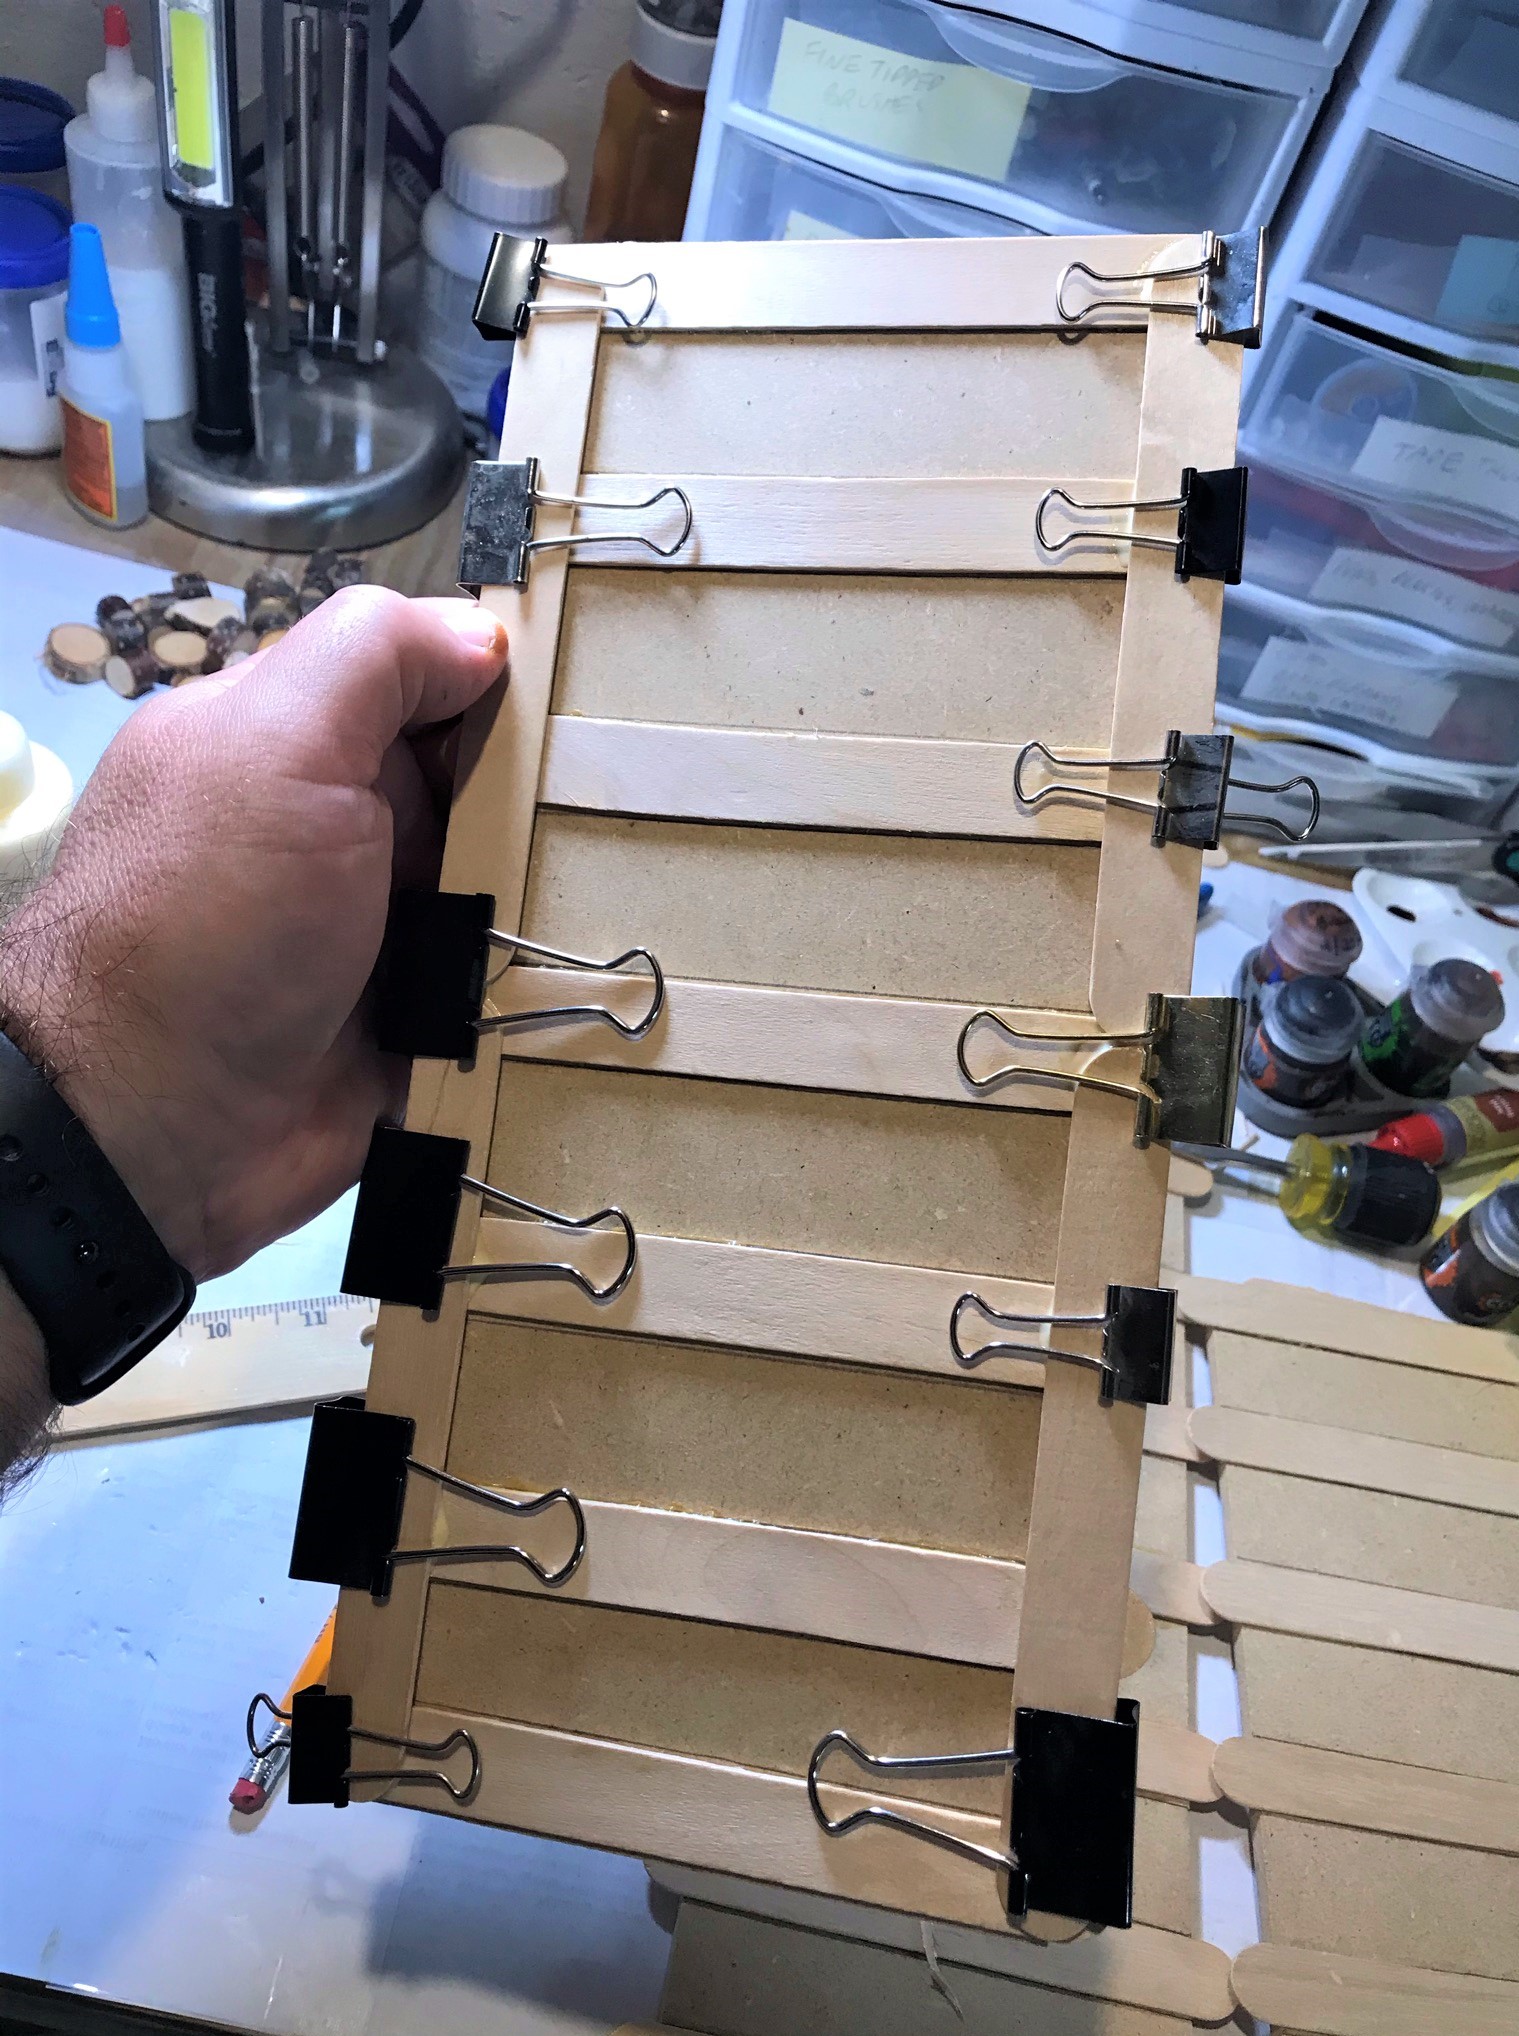
Here you see four of the six causeways after the first gluing – and before adding more on the sides for the rocky revetments.Here are the longitudinally-added craft sticks set with binder clips for overnight drying.
Once dry, I covered the surfaces with glue and then chinchilla dust.
After adding the chinchilla dust and allowing for drying. Next up would be the painting and shading of the causeways’ surfaces, then onto adding the piers and rocks.
I finished painting the removable bridge sections and build and painted 4 lifting piers out of square dowels and 1/8″ plywood.
The masked causeways ready for painting, along with the 4 lifting piers and the 2 removable bridge sections. I masked the sides as I wanted to have a clean gluing surface for the piers and rocks. Having an airbrush sped this process – especially relative to all of the gluing!I base coated the causeways, lifting piers, and removable bridge sections (ignore the WIP pavements behind – that’s a sneak peek at the next post!)All painted and shaded – except I wanted to add a bit more to the bridge sections……which you see here – I added some contrast to the planks.
Next, I moved on to the side piers and causeway revetments. The following day I grabbed a dry oak branch from the woods behind the house and cut it up. As each causeway section would need 14 wooden piers (seven per side), I figured I’d need 84 piers. So, I initially planned on using some birch wood discs I had plus the oak sections. I cut up the wood in sizes I thought would work well. However, as I laid it out (dry fit), I was not happy with the appearance. At all. Clearly, compared to a 28mm figure, the wood size was far in excess of what would have been used as piers along the causeways.
The oak and birch wood pier candidates
Laid out, I saw that these were not the right size or appearance. The finished surfaces of the causeways that you see here were ok though.
It was time to regroup. For piers, I then decided to use 1/8″ wooden dowels instead. I cut them up roughly to represent timber and glued them together in threes – and if you are doing the math, yes, that is cutting up and gluing together 252 pieces for the 84 piers. This project had a LOT of gluing and drying stages! I also found a nice source of rocks at Michaels – those little filler stones that some people use in glass vases. These were much cheaper than any hobby talus would have been. The time downside was that for effective placement I needed to glue one course of rocks at at a time – one rock at a time – with PVA – more gluing and waiting for drying…
Detail of the pier and rocks gluing. I cut the pier wood pieces irregularly as possible to add realism.The first side of a causeway glued up with piers and rocks and a 28mm Conquistador for comparison. The PVA would dry and “suck” up nicely into the crevices.
I then painted the piers and added some shade to them.
Painted piers
For the rocks, I painted them with Vallejo “Grey Surface Primer, followed by a layer of Reaper “MSP Black Primer” on the bottom (where the rocks would have been by the lake), and added some slime to them there as well. After that, I added an aggressive layer of shading with Citadel “Nuln Oil”. The effect on the rocks was excellent. You can see a list of all the paints and other materials that I used at the end of this post.
Adding black primer to the bottom of the rocks over the grey primer in an irregular pattern to represent the water line.After adding grey and black primers to the rocks.Finished causeway with the Conquistador. Note the effect of the shading on the rocks.Top viewA finished causeway, lifting piers, and removable bridge section on my new FLG water mat.Tlaxcalans assault the city from the causeway (another sneak peek!)
With the causeways, removable bridge sections, and lifting piers, I now have terrain components that I can use for the cityscape. I also could use them for a causeway battle, and add war canoes in the lake with Aztecs shooting bows, slings, and atlatl at the Conquistadors and Tlaxcalans from the water.
I think you can see why I am breaking up this into multiple posts! This started in June and ended in July. My next post will focus on the design and building of the cityscape pavements. I hope you found this useful and will keep following this series – and please let me know your thoughts in the comments section.
Thanks so much for looking!
For all of my previous posts on games, units, and other projects for my 16th Century Spanish Conquest supplement for Feudal Patrol™ – “Civilizations Collide” – please see this page.
PAINTS, INKS, GLAZES, SHADES, WASHES, PIGMENTS, FLOCKING, GLUES AND MORE THAT I USED ON THESE TERRAIN PIECES/MODELS:
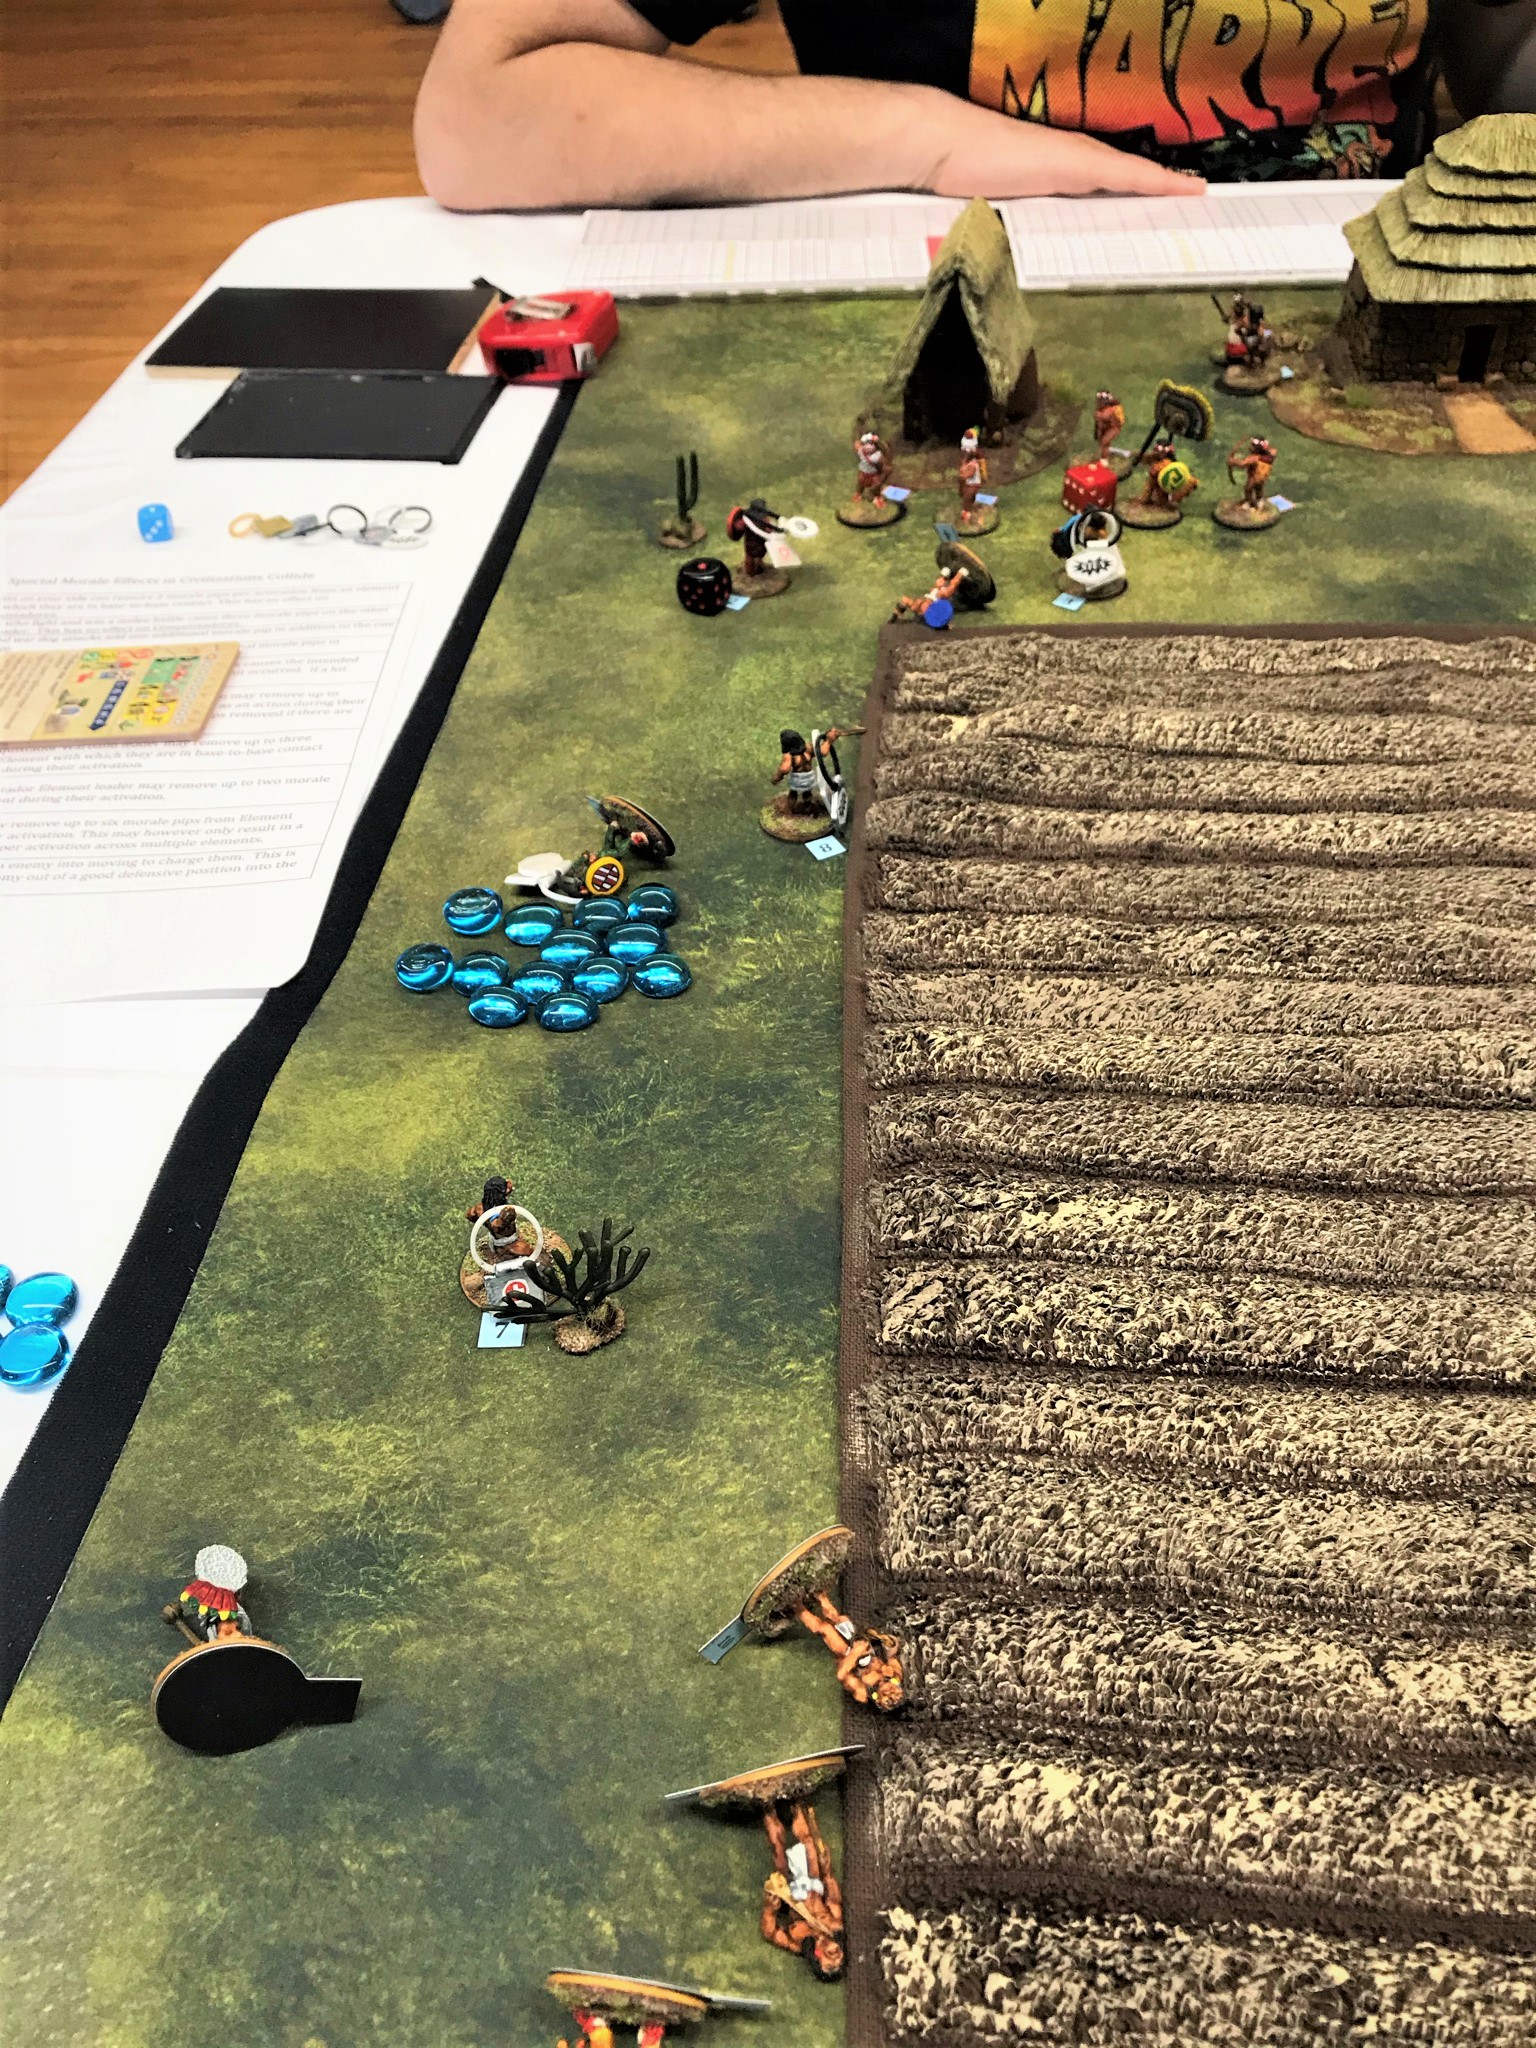
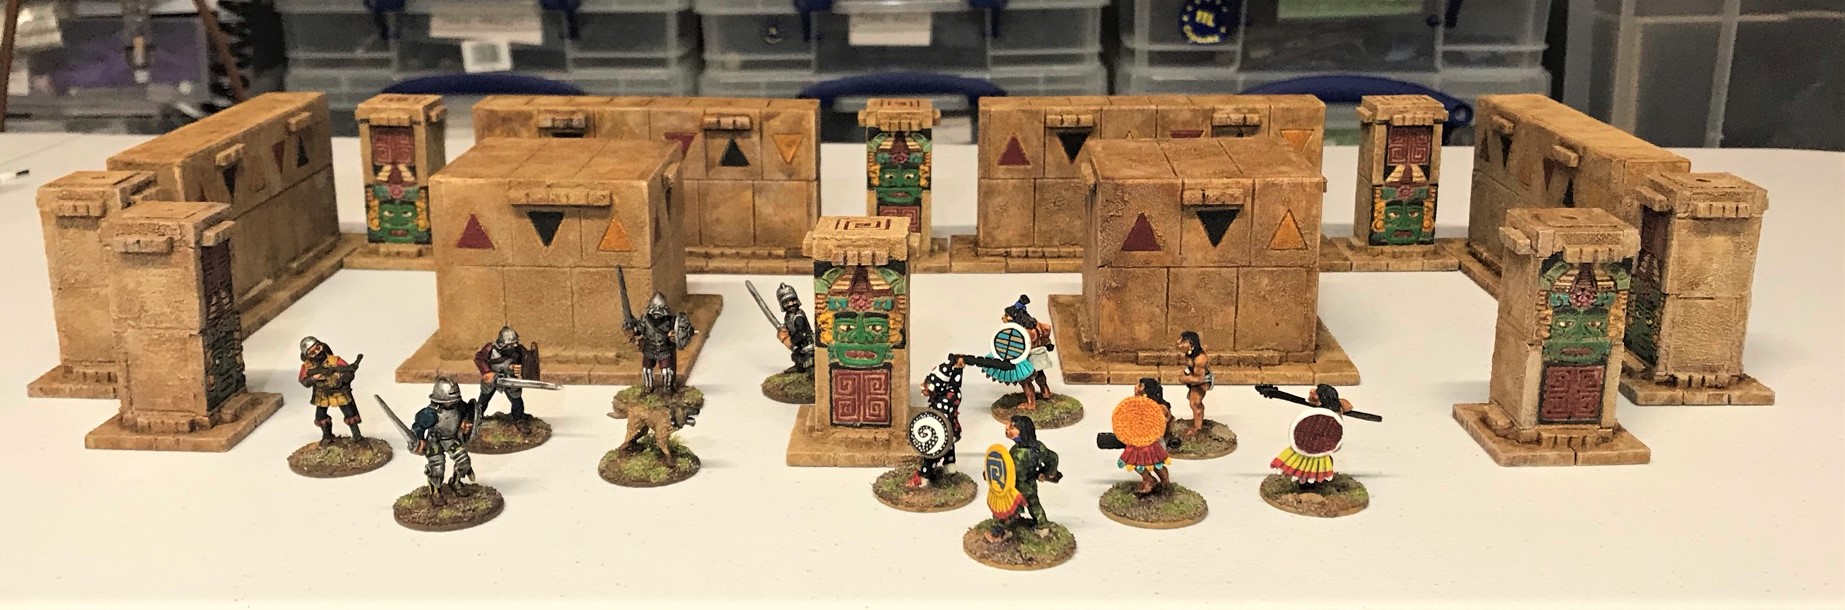
The Mass Pikemen returned to tabletop wargaming with live face-to-face interactions on June 5th! We played a game of Feudal Patrol™ in Mesoamerica (using my Civilizations Collide supplement. The game scenario was as follows:
Surprise Raid on Outpost
A Tlaxcalan village is being raided by the Aztecs, seeking to take wealth, food, and prisoners. The Aztecs know the majority of the Tlaxcalan troops are with the Conquistadores elsewhere, and expect an easy task. Unbeknownst to the Aztecs, there are some Spanish troops at this town who will help to defend it.
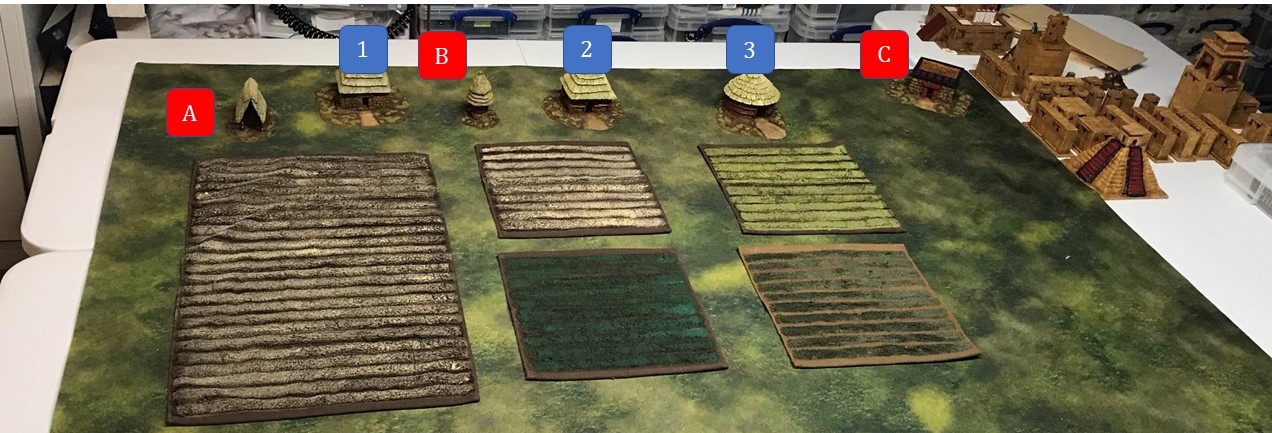
The battlefield.
Objectives:
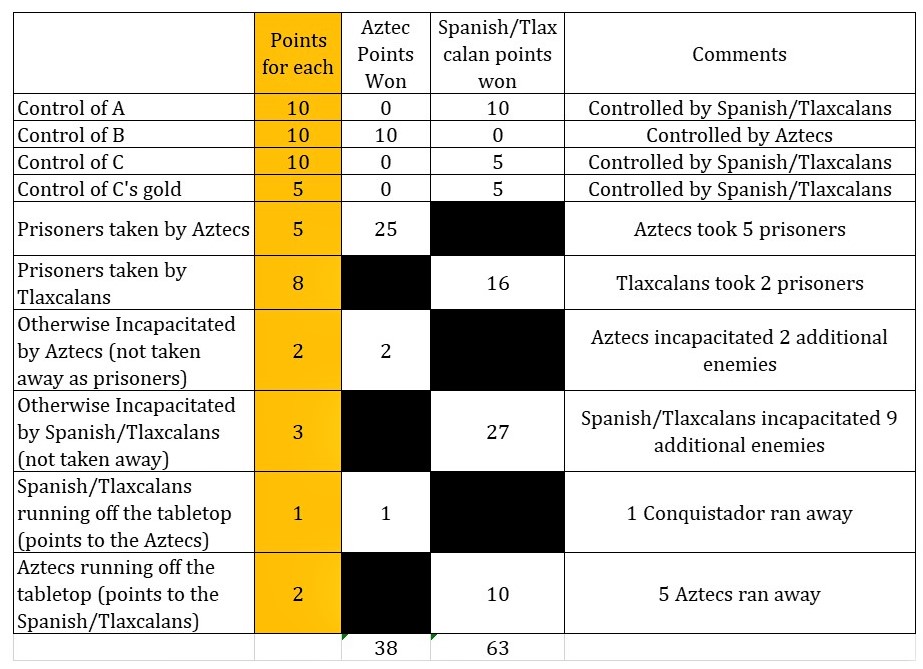
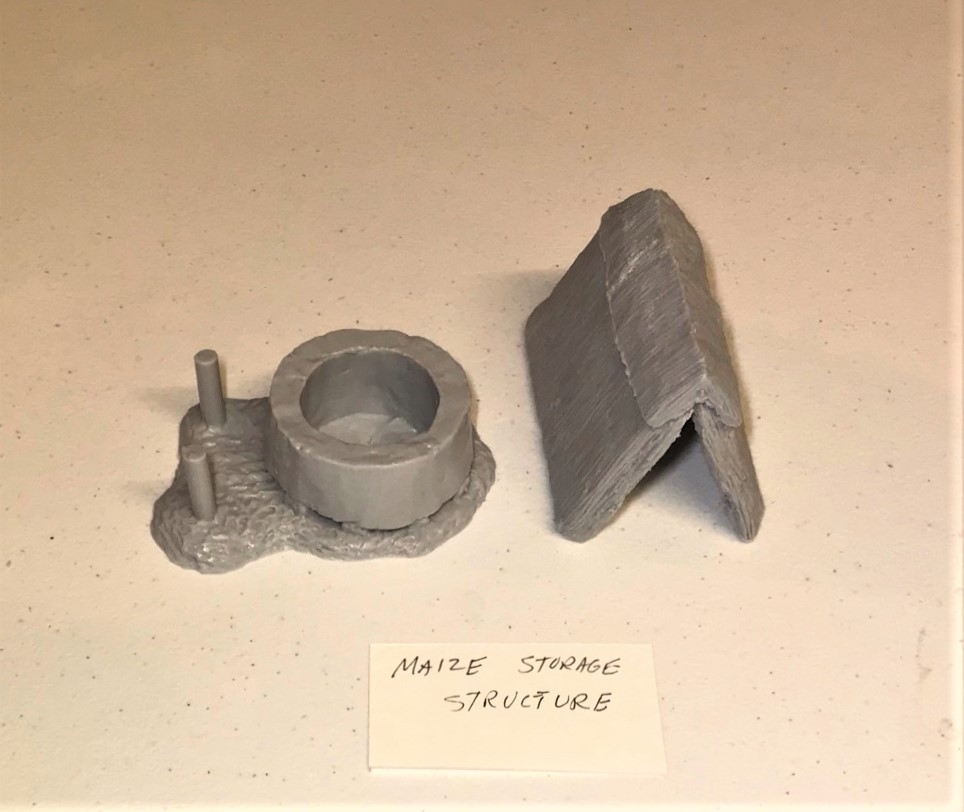
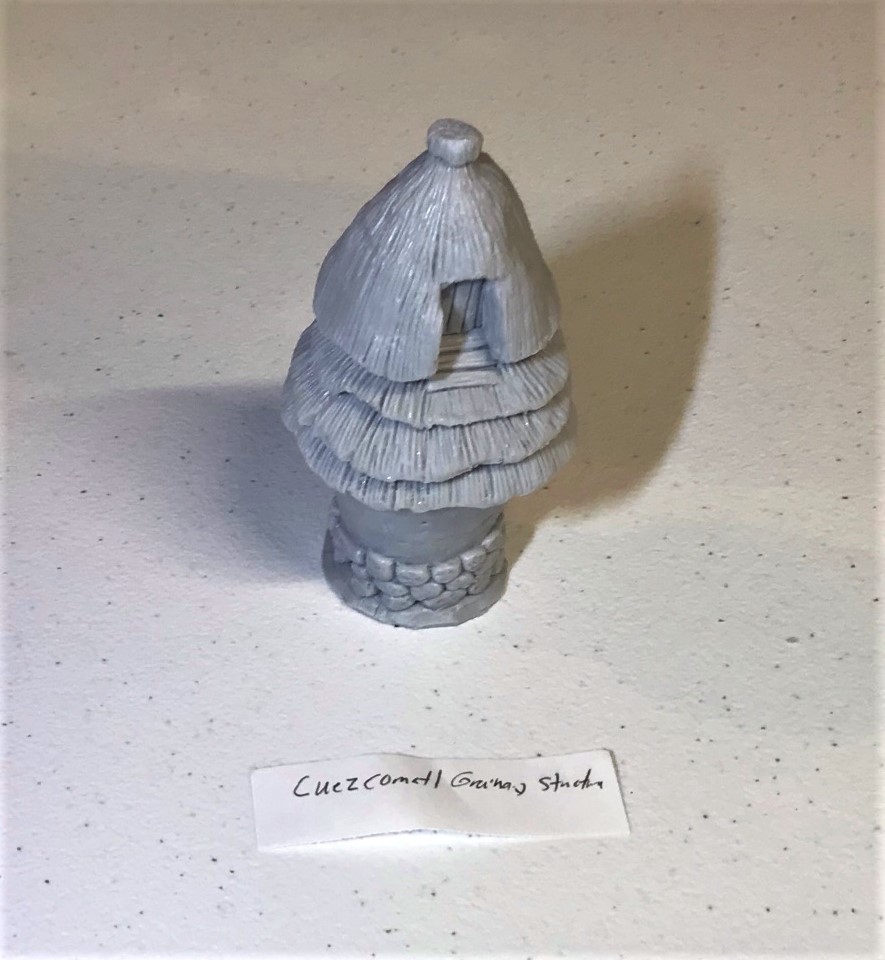
A: a maize storage structure – 10 points to either side for control
B: Cuezcomatl Granary Structure – 10 points to either side for control
C: Tlaxcalan Noble’s House – 10 points to either side for control, 5 more for securing the gold inside and having possession of it.
Additionally, the attacking Aztecs gain 5 points for each prisoner taken, 2 points for each enemy otherwise incapacitated, and 1 point for any enemy that runs off the tabletop. The defenders gain 8 points for each prisoner taken by Tlaxcalans, and 3 points for each enemy otherwise incapacitated, and 2 points for any enemy that run off the tabletop.
Deployment and special rules:
Aztecs:
All Aztecs troops deploy anywhere on the south side of the tabletop 6” from the long end of the mat.
The Aztec Warband Leader controls two Warrior Priests
Conquistadores and Tlaxcalans:
The Conquistador leader (a Warband Leader) deploys from C.
Each of the three Spanish/Tlaxcalan elements deploy in 1,2, and 3 and are hidden from the Aztecs but predetermined before the game start. This means that some will be out of command and cannot swap dice at the beginning of the game (24” command radius). At start, they can be outside of their huts.
Tlaxcalan element cannot swap dice, and cannot be considered out of command radius.
The map:
The fields are muddy and movement rate through them is at half-speed.
In this game, an element is 4-11 figures depending on type, and warbands are made up of 2-5 elements.
The Aztecs had an overall commander with his conch blower as a signaler. Under him was one warband leader commanding two “twinned” 11-figure veteran/novice elements, an elite 6 figure cuahchic (“Shorn Ones”) element, an elite 5-figure Eagle Warrior element, and two warrior priests.
The Spanish had an overall warband leader commanding an elite element of 5 figures and an elite element of 5 figures plus a war dog. The Tlaxcalans – who were separate but allied – had an elite warrior leader with 4 veteran bowmen.
The overall troop points were 54.75 for the Aztecs and 36.5 for the defending Spanish/Tlaxcalans. The fields were slightly moved for the actual game. Of note, the command radius for a warband leader is 24″ – so the Conquistadores have two command and control challenges. First, they start with one of their elements starting the game over 24″ away from the leader making them “pinned” – meaning they only get to activate half as much as normal until they can be made “unpinned” (not an easy task). Second, the Tlaxcalans are independent actors – meaning that the Spanish have limited command and control of them – but they are not limited by command radius restrictions either.
The Tlaxcalans ended up starting at 1, with the other two Conquistador elements at 2 and 3. The Conquistador leader was at C. The Aztecs deployed their elements (from the Aztec left to right) as follows: veteran/novice twinned element, cuahchic elite element, elite Eagle Warrior Element, and the other veteran/novice twinned element.
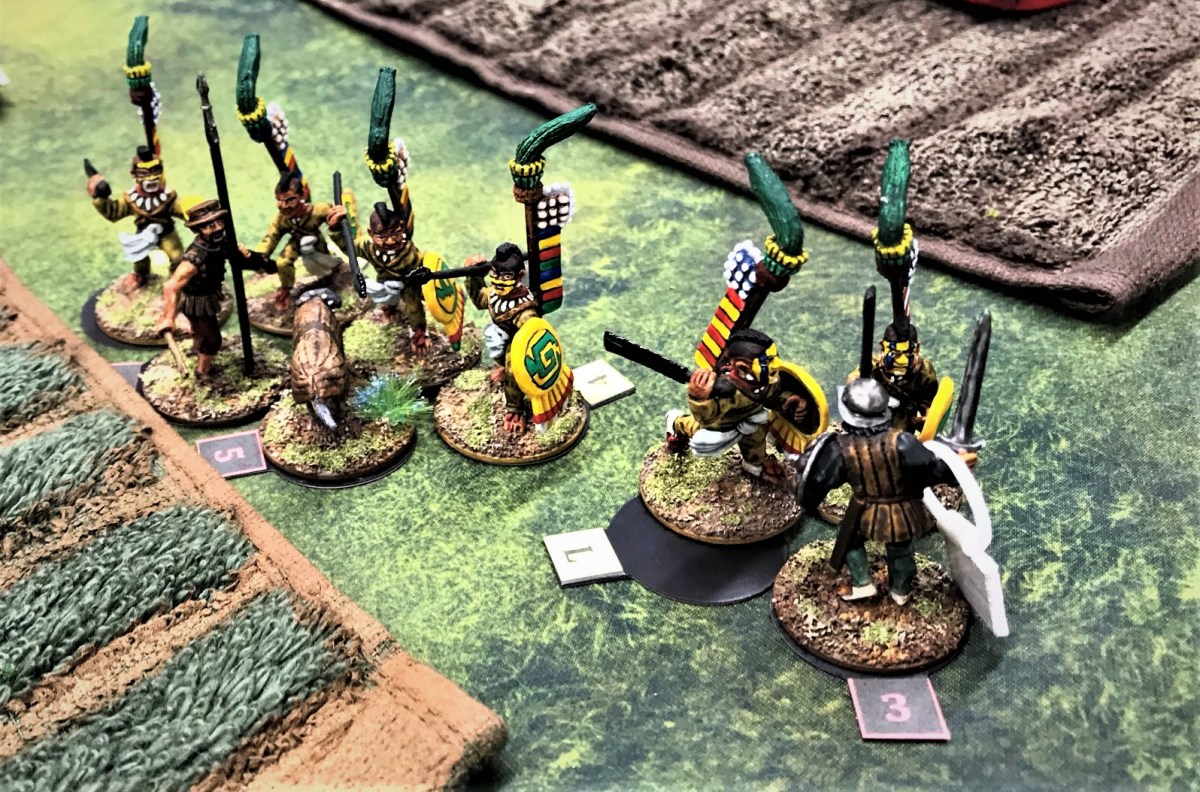
Scott looks over the tabletop. He would command the Tlaxcalans.Glenn moves up his twinned veteran/novice element while his ally Chris watches……and promptly takes fire from a Spanish arquebus and
a crossbow! The blue glass beads indicate morale checks that the Aztecs had to take and did pass here.
On the Aztec left, Chris moved up his veteran/novice twinned element to take on Scott’s Tlaxcalan bowmen. Historically, the Tlaxcalans were superior bowmen. Chris had to cross a lot of open ground, and the Tlaxcalans dispatched two novices from long range (novices typically are without armor). He then tried on a subsequent activation to charge into melee with the Tlaxcalans – a good move – but the Tlaxcalans were able to react and loose even more deadly arrows into the Aztecs.
Scott grins after sending an initial hail of lucky arrows into Chris’ approaching Aztecs. The incapacitated Aztecs are lying off their bases. The blue beads each indicate a morale check that the Aztec element would need to pass – and more would come…Only 4 out of 11 figures made it to the Tlaxcalan bowmen, and they had little effect as the Tlaxcalans repelled their assault.
In the middle of the tabletop, the two elite Aztec elements were making good progress forward. The Conquistadores were lucky enough to unpin their handicapped element, making their defense much stronger. That element had a wardog, and they challenged the advance of the cuahchic and the Eagle Warrior elements. That scrum left the Conquistadores with several dead – including the war dog. The cuahchicqueh (plural of cuahchic) advanced, but the Eagle Warriors lost heart and failed morale – running away from the fight.
Then Chris had even more morale checks to make. Luckily for him he endured them, but his unit was pretty decimated. Chris’ Aztecs had 14 morale checks to make. They passed, but were a spent force.
The Shorn Ones (cuahchicqueh) do a number on the Spanish and their war dog.The Shorn Ones advance to the cuezcomatl granary storage structure (objective B), while their Eagle Warrior comrades run away.Here you see Chris’ Aztecs – or what’s left of them – and their pile of morale check pips.
Glenn’s advance on the right of the elite elements was making good progress. They had a bowman, an atlatl user, and several slingers in their veteran/novice element. His non-missile weapon-armed Aztecs charged into Leif’s Conquistador element, hoping to take them down (especially as they had the arquebus and the crossbow). Glenn and Leif both did damage to each other in the ensuing melee.
Leif defends against Glenn’s Aztec assault. At this point, the Aztecs were threatening also to take out the Conquistador officer.Scott and Leif appear confident in their defense.Leif – commanding the Conquistador officer – takes out an Aztec – but quickly three more of Glenn’s Aztecs gang up on the leader, who kills another, and wounds one more but……the Conquistador officer is overwhelmed by the Aztecs, and is incapacitated and dragged off for sacrifice. This left both of the remaining Conquistador elements in a “pinned” status – meaning that they would only activate half as much as an unpinned element – a significant disadvantage.And finally, an Aztec Warrior Priest showed up to make sure the granary remained in Aztec hands.
The Conquistadores were able to sprint one remaining unwounded trooper over to objective C (Noble’s House), gaining control of it, and its gold, for important end of the game points. The Tlaxcalans were also able to secure the maize storage structure (A). Meanwhile, the Aztecs gained control of the granary (B). The overall scoring led to a Spanish/Tlaxcalan victory with a score of 63-38. If the Spanish had not secured the Noble’s House and it’s gold, it would have been 48-38.
The players all had a good time and really enjoyed the game. Some are already on the way to buying their own copy of Feudal Patrol™ !
I do like the scenario -and I thank Buck Surdu and David Wood for an earlier week Zoom playtest. When I update my supplement (which is coming by year’s end or sooner), it will be one of the scenarios I add. I do need to finish off my cityscape and THAT is in progress.
I do thank Saturday’s players as well. It was soooo nice to finally have a face-to-face game for the Mass Pikemen’s Gaming Club. On the next go-around, I will adjust the forces slightly – probably giving another element to the Aztecs and maybe a falconet or another element to the Spanish – depending on the number of players. I will also add points for incapacitating or even capturing warband or higher leaders.
So, when will that be? June 26th at 1 PM at the Great Stories Comics and Gaming Store in Uxbridge, MA! The Mass Pikemen are taking this (and other future games) to a great hobby store, Great Stories in Uxbridge, MA. We will be gaming there and at our home in East Brookfield going forward – hopefully alternating between sites for gaming.
I hope that you enjoyed this battler report – let me know your thoughts in the comments section!
For all of my previous posts on games, units, and other projects for my 16th Century Spanish Conquest supplement for Feudal Patrol™ – “Civilizations Collide” – please see this page.
Sounds like a good concept for a reality show doesn’t it? Circa 1520 or so…
Actually, it’s my latest attempt at adding another structure to my Aztec terrain/buildings for games of Feudal Patrol™ in Mesoamerica (using my Civilizations Collide supplement). There have been a good number of buildings from me lately (which is why I did my contest). There is also a link at the end of this post on all of my project terrain and miniature builds for it.
And this particular post is dedicated to Ryan MacRae and Chris Rett. Why?
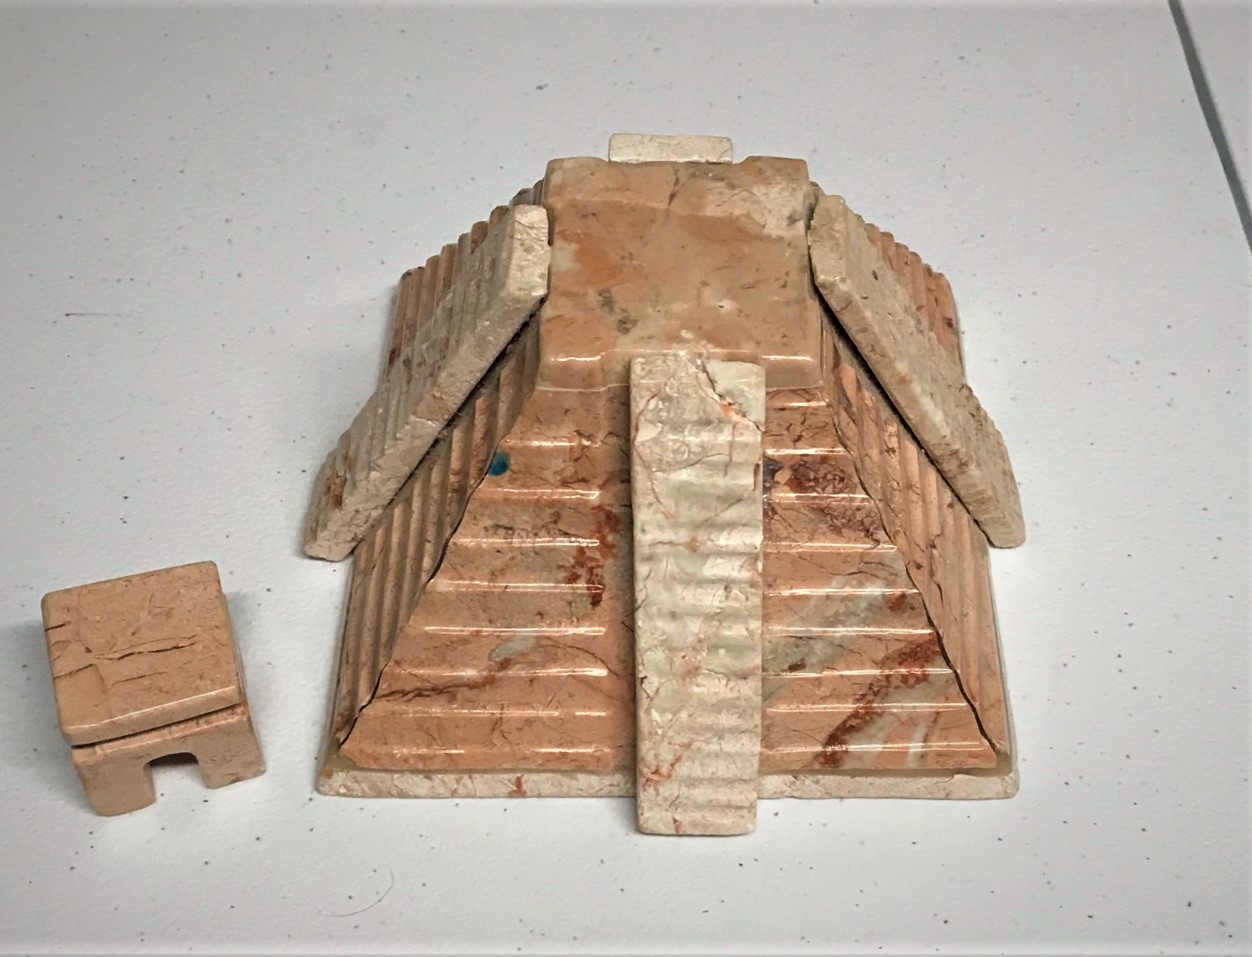
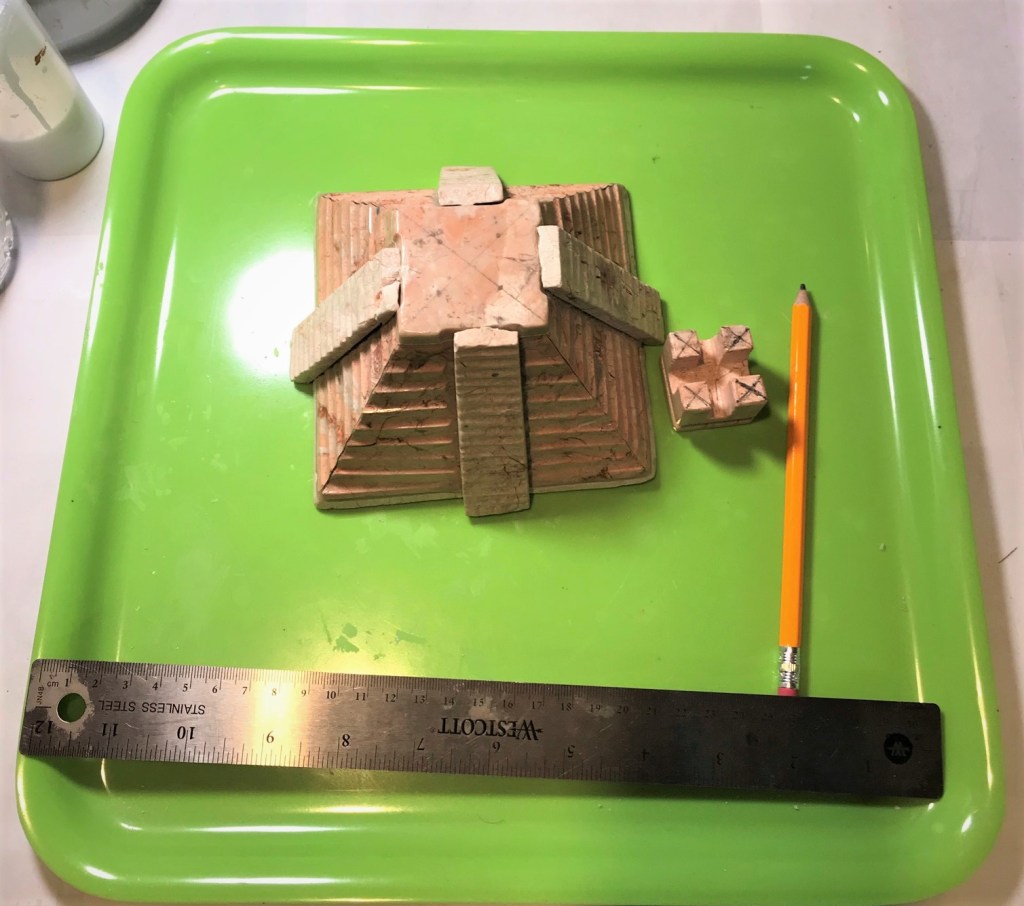
Well, this temple piece has a somewhat unclear past. It was given to me by Ryan MacRae and Christopher Rett. It was left over from their back room cleanout at the Great Stories store in Uxbridge, MA. Ryan said it was maybe originally found in his dad’s garage? Was it a souvenir? A kit project? A piece for a terrarium or even an aquarium? Who knows. All I saw in it was potential as a reasonable secondary temple-type building for Tenochtitlan. It was in two unconnected pieces, had a few cracks, and seemed to be somewhat ceramic. Obviously, I needed to have it match my other pieces. I was not thrilled with the stairs and their alignment, and it was mostly (but not totally) symmetrical. Though I believe something is either symmetrical or its not right? The top would not stay on the top if bumped. Anyways, I thought I could try to make something more useful out of it gaming-wise.
The piece as it was when I got it.
The first thing I did was to drill and install 1/8″ neodymium magnets to secure the top.
The next step was to pry off the old stairs, which I did with a screwdriver and nearly hitting myself in the eye with broken ceramic shards – I should have been more careful.
First steps
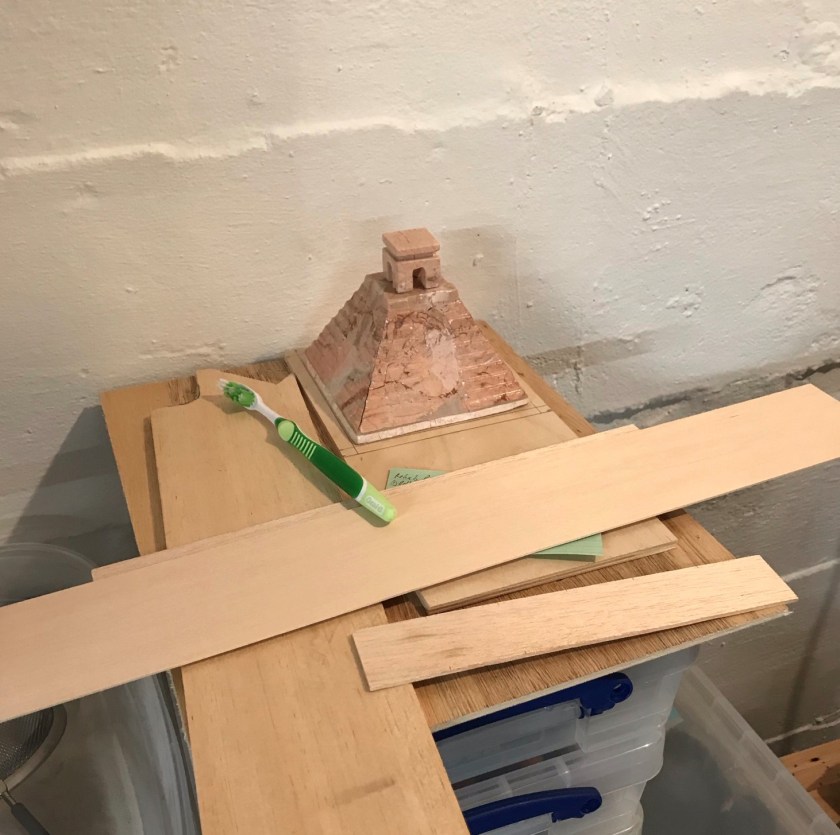
I thought it needed a base, and I did have an spare piece of Revell plywood that I cut to size up to the piece – as symmetrically as possible.
I debated about whether to use balsa or plywood, and went with the latter
Good quality hobby stuff
This mess shows my outdoor wood cutting setup – a Black and Decker cordless circular saw and my Craftsman workbench I bought in 1988.
Cutting the base.
I then sanded the edges of the plywood and the bottom of the piece, and attached the two with wood glue. As you can see, I found a way to compress the two while the glue set!
Lots of wood glue
As symmetrical as I could get it to be on the base.
Add an MBA reference book and a hematology textbook as weights and let dry overnight.
Mounting the piece.
I then decided to use black Milliput to construct the stairs. Why black? It was what was available! I don’t have a lot of experience with it, and I chose it due to being cheaper than green stuff. I did not expect to get great sculpted details on the stairs – I just wanted something that would be aesthetically ok on the tabletop. I did consider using square wood dowels, but the work involved in sizing them seemed disproportionate to the needs of this project. I also would make the steps wider and more visible – but still they would not useable by a figure on a base.
I traced out the stairs – note I made them wider as the original piece’s slots for stairs was both irregular and not quite centered.
I drilled two 1/8″ holes per stair for paper clip wires. These were at the bottom of the stairs to help with mounting. Note the asymmetry on this side.
Prepping for making the stairs.
As for the sculpting – it was a bit more difficult than I had imagined beforehand. I tried to use the existing lines on the piece as guidelines, and was successful for the most part. It’s not Michelangelo, that’s for sure. I actually was a little disappointed at this point, but I pressed on thinking the rest of the rehab may go better, and let the Milliput cure.
The sculpted stairs in black milliput.
Getting ready to dust the piece with chinchilla dust.
Sculpted stairs.
The dusting process was similar to my previous efforts with MDF – that being painting the model with a PVA/water slurry and dusting with a salt shaker containing the dust. I did add (temporarily) extra neodymium magnets so as to prevent the dust from blocking the installed ones.
All dusted up – note the extra magnets as masking.
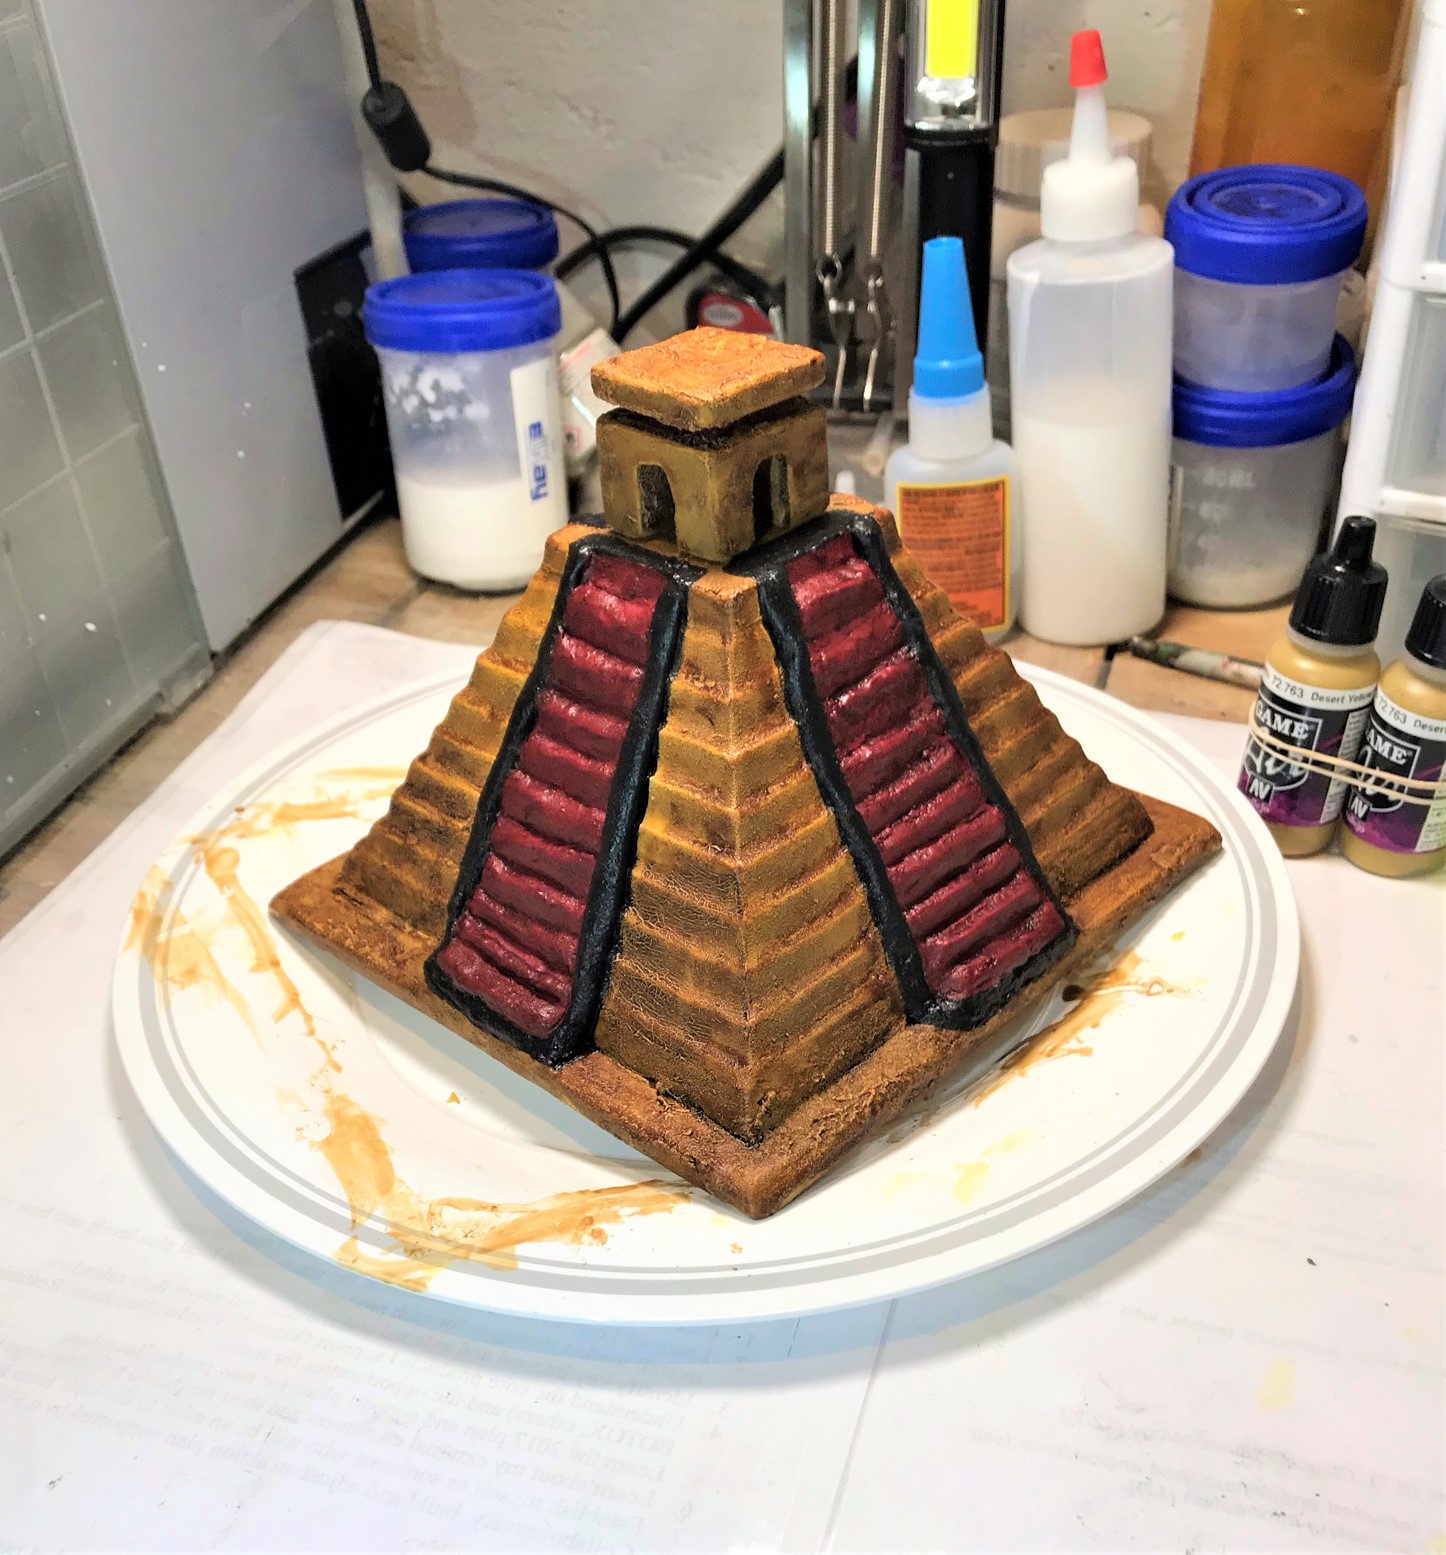
I then moved on to painting it. I dry brushed it and then painted it in the same color schemes as my MDF.
The piece after first dry brushing and base coating.
I then used Army Painter “Light Tone” on it and let it dry. Once dry, I added more highlights.
After adding the tone but before the final highlighting.Completed!
To get a feel for the model, here are some eye candy shots.
One sideOpposite sideTop side viewSome Eagle and Jaguar Warriors and a Warrior Priest by the piece.
I learned a bit during the processes of this project. I’m on the fence on Milliput as an architectural sculpting agent – it was not easy to sculpt into the stairs and I did face a challenge with regards to the Milliput’s “slump” (a term used to describe how wet concrete settles and does not hold a shape). Though, the extreme slope of the stairs (as is found with the actual ones) made gravity NOT my friend in this aspect. Maybe green stuff or Apoxie Sculpt would have been easier but more expensive. I am unsure. I think my approach in the end worked out ok, and the painting helped I think – and you, dear reader, can let me know your assessments.
My biggest goal was for this piece to be a good add to my little mini Tenochtitlan tabletop. The next two pics are good comparisons. I think it succeeded. Not my finest work, but it is acceptable.
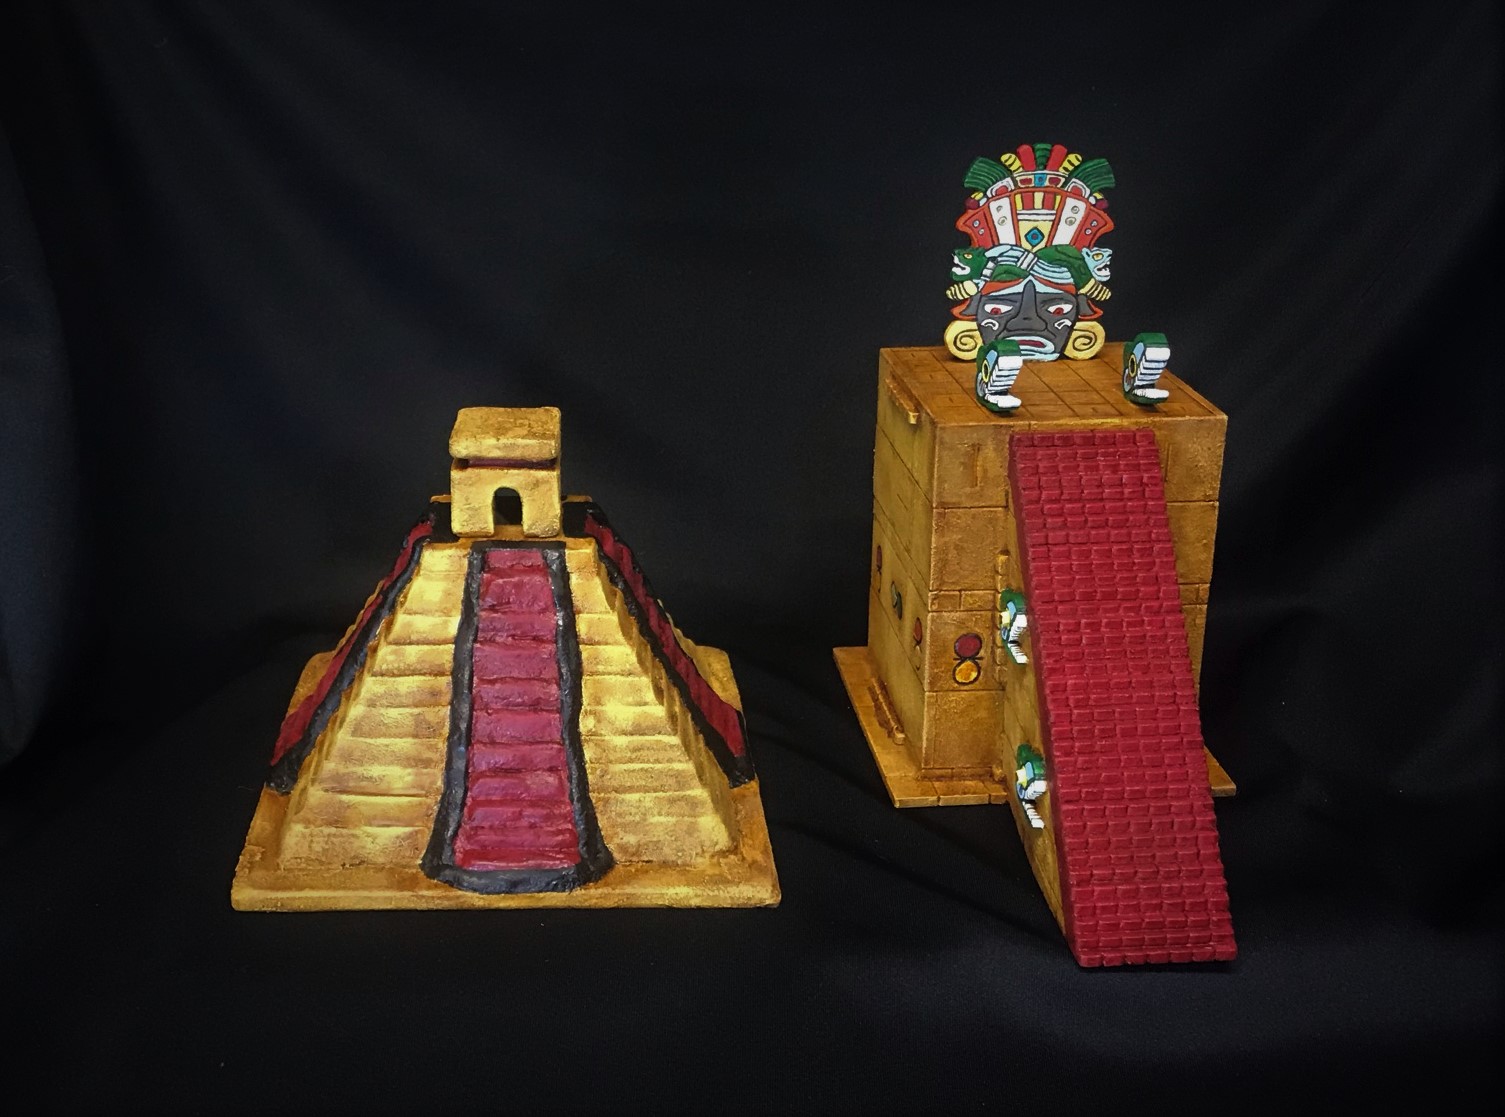
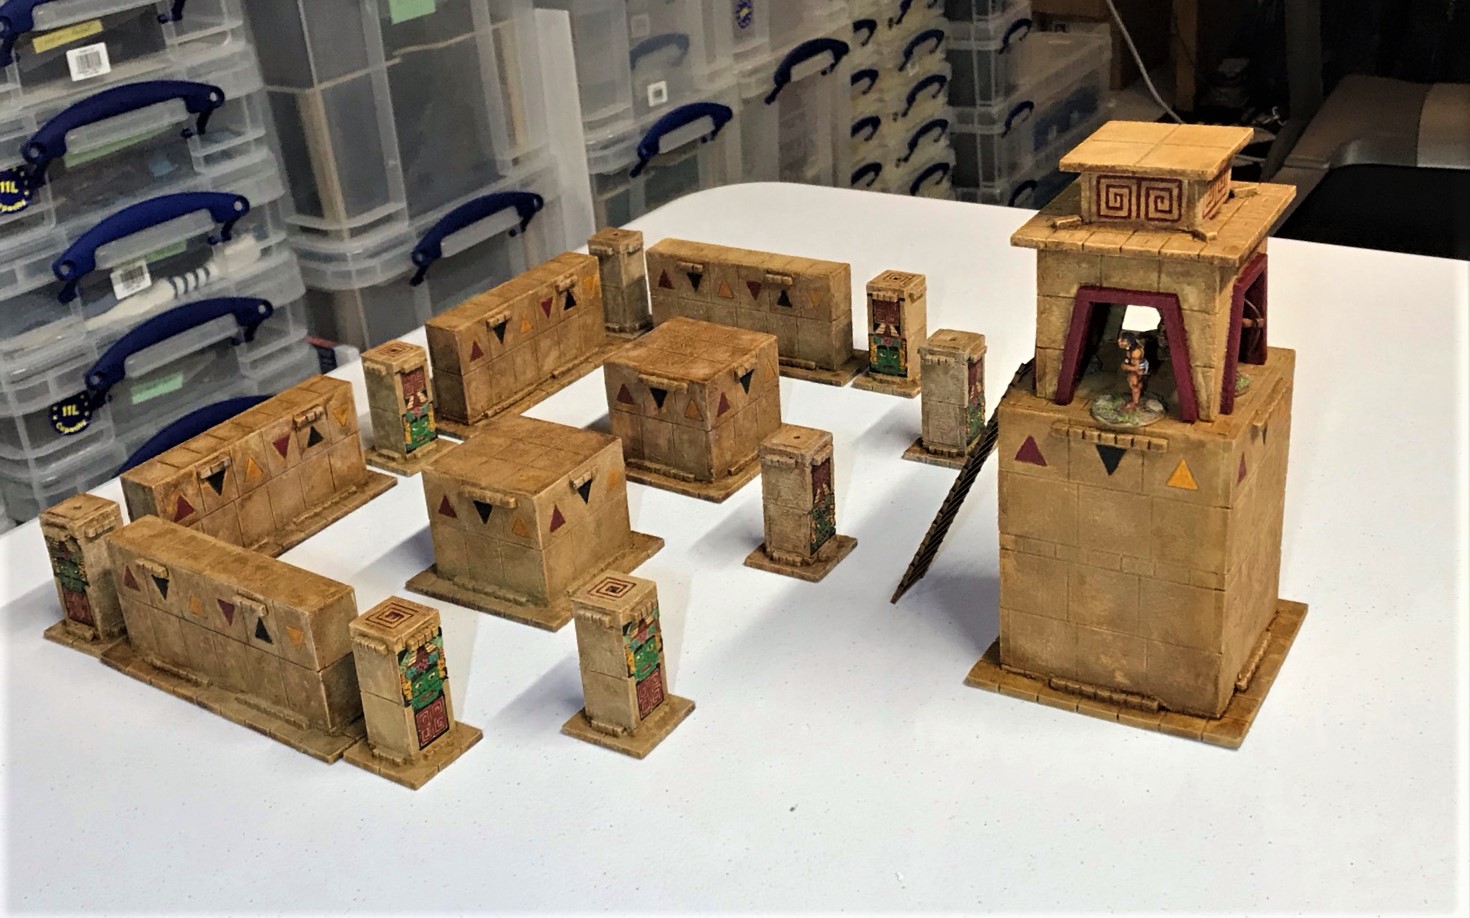
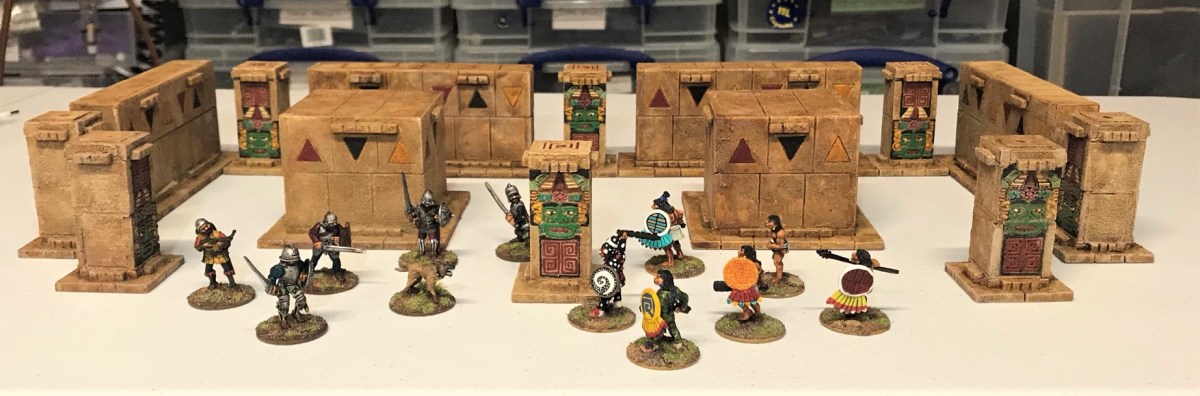
Next to the Temple High ThroneThe piece seen next to all of my Aztec terrain (with some WIP Conquistador War Wagons in the back – more on them in a future post).
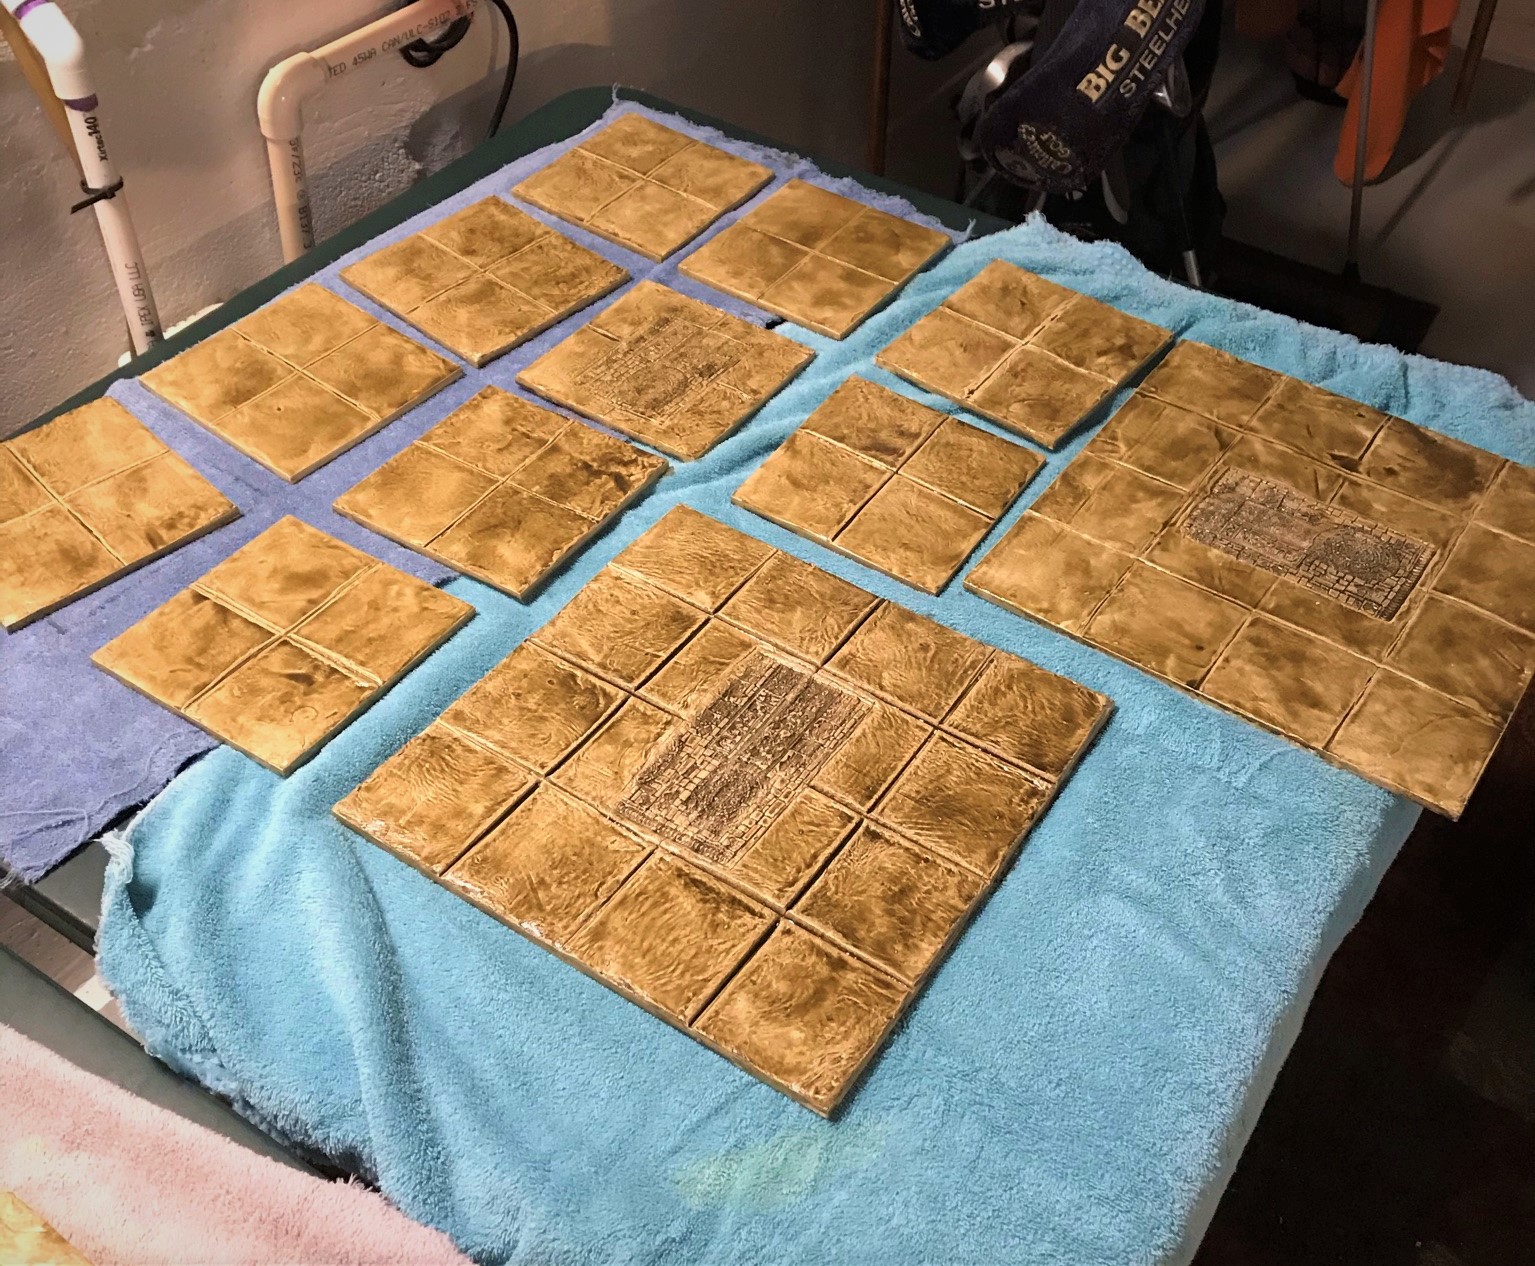
I think now my terrain just needs pavement and some causeways – I already have a working concept (below) and I will be making the surrounding lake swampy with some neat floating flora. More on this when I’m done with that!
My tabletop urban Aztec battlefield concept. There will be textured pavement and causeways on this MDF – and this will also be a future post! For rural areas, I have the other buildings.
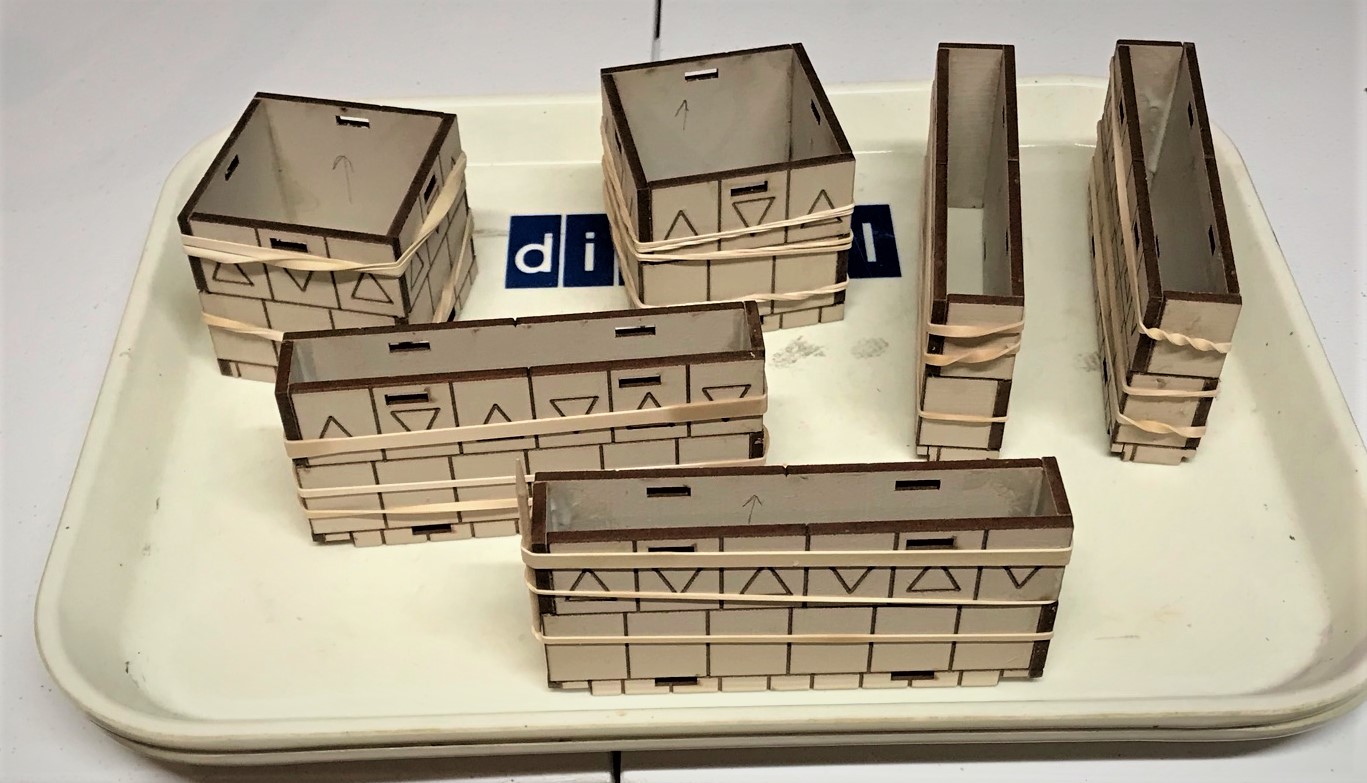
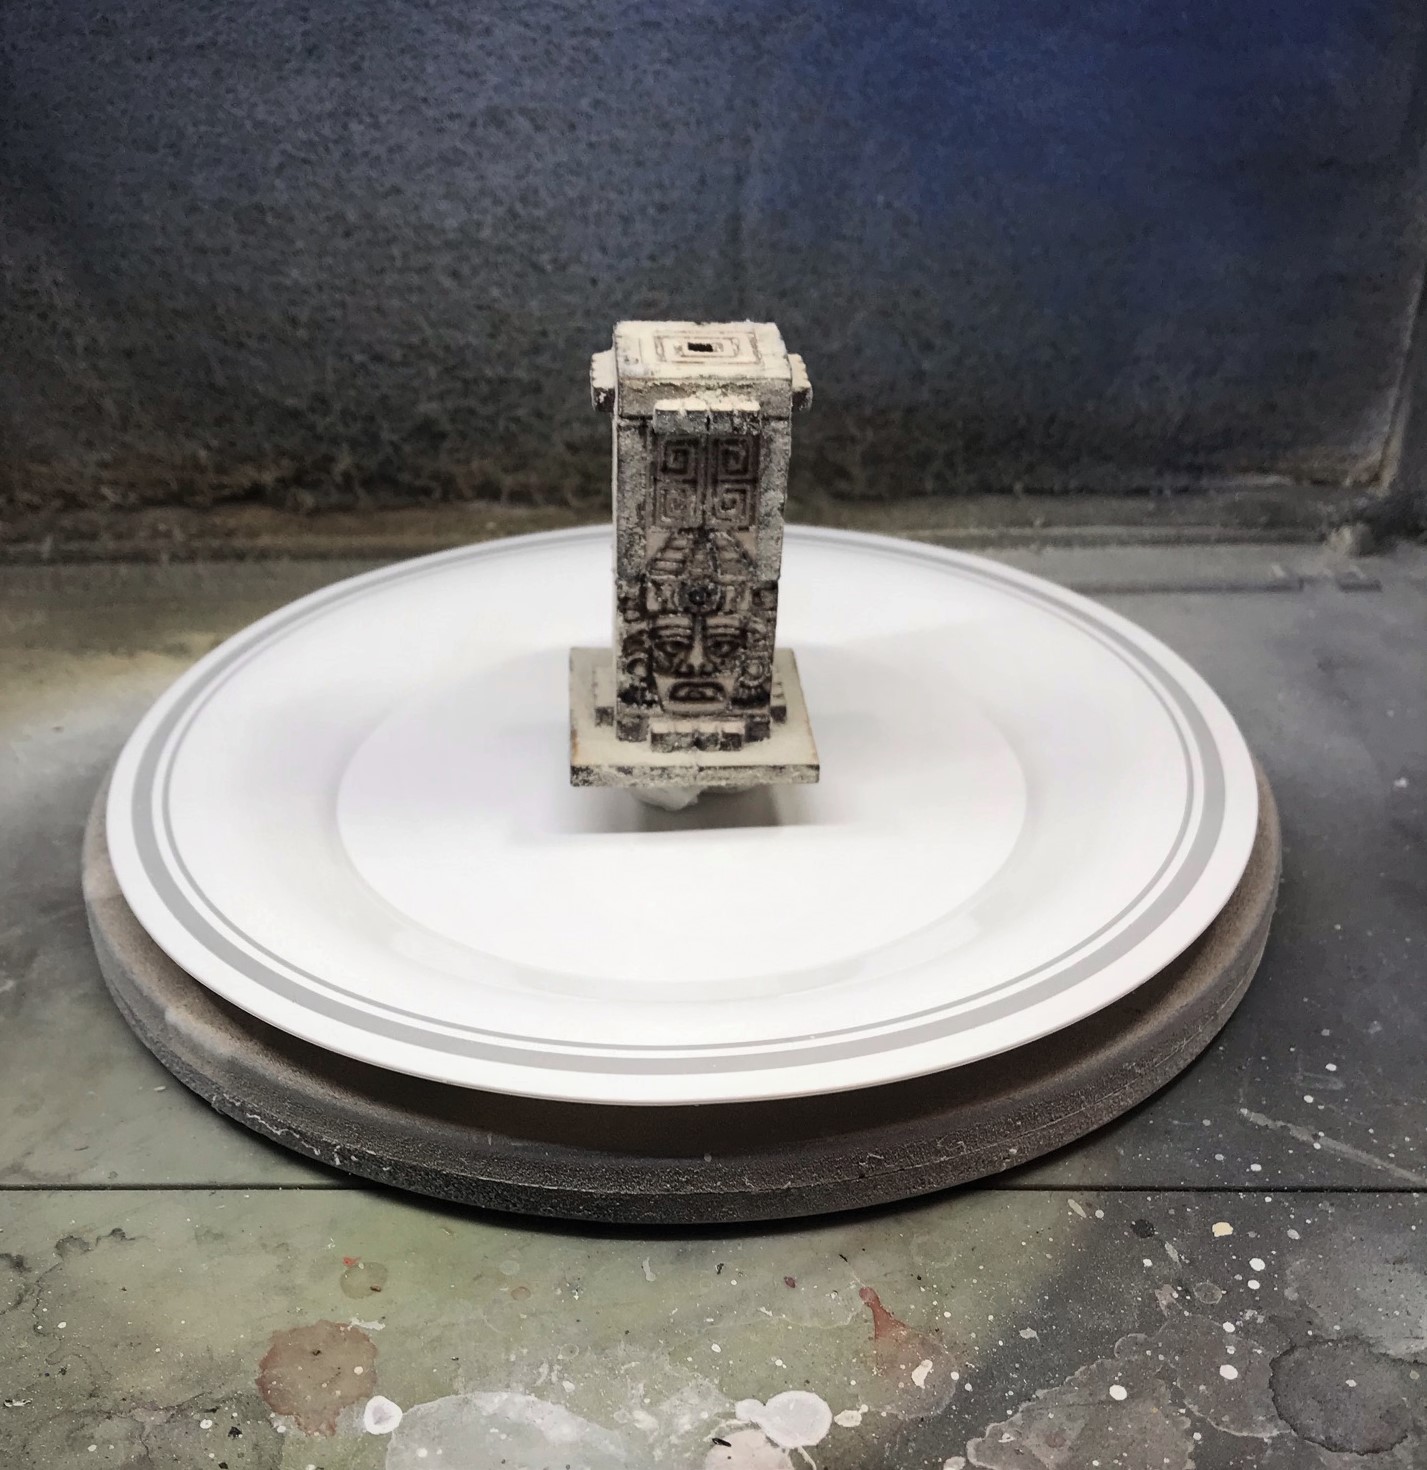
The pavement is in WIP. I used MDF with sculpted DAS clay (including a Green stuff Aztec roller in judicious spots). It needs to set and get matte varnished, but I’m excited on the potential. I also need to build the causeways.
Pavement WIP
So that’s it for now – hope you enjoyed this post – let me know your thoughts – good, bad, or otherwise – in the comments section. Thanks for looking!
For all of my previous posts on games, units, and other projects for my 16th Century Spanish Conquest supplement for Feudal Patrol™ – “Civilizations Collide” – please see this page.
PAINTS, INKS, GLAZES, SHADES, WASHES, PIGMENTS, FLOCKING, GLUES AND MORE THAT I USED ON THIS MODEL
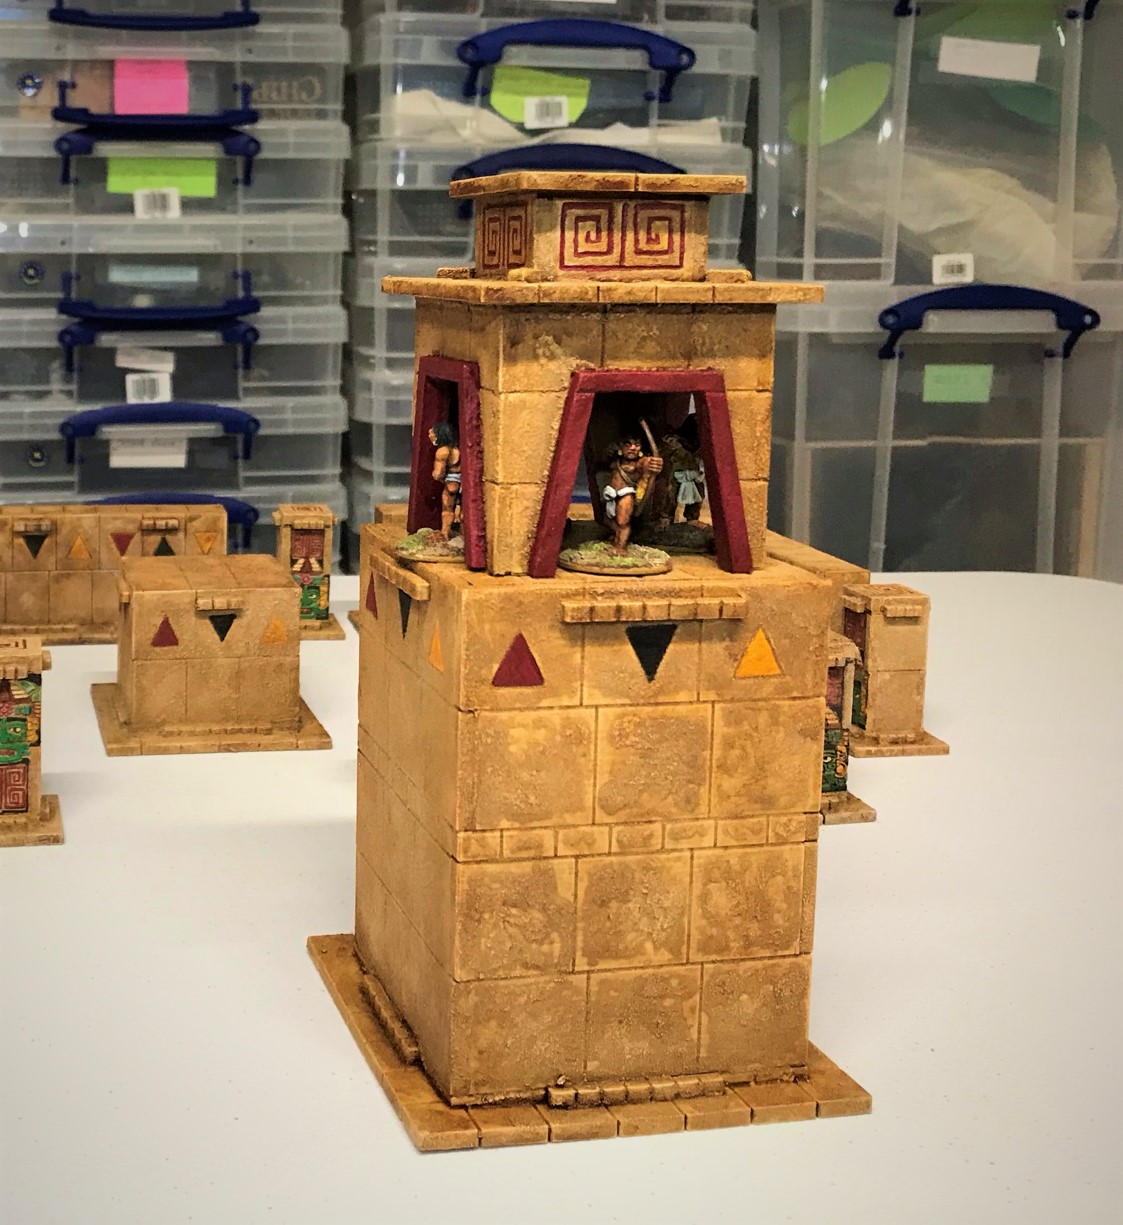
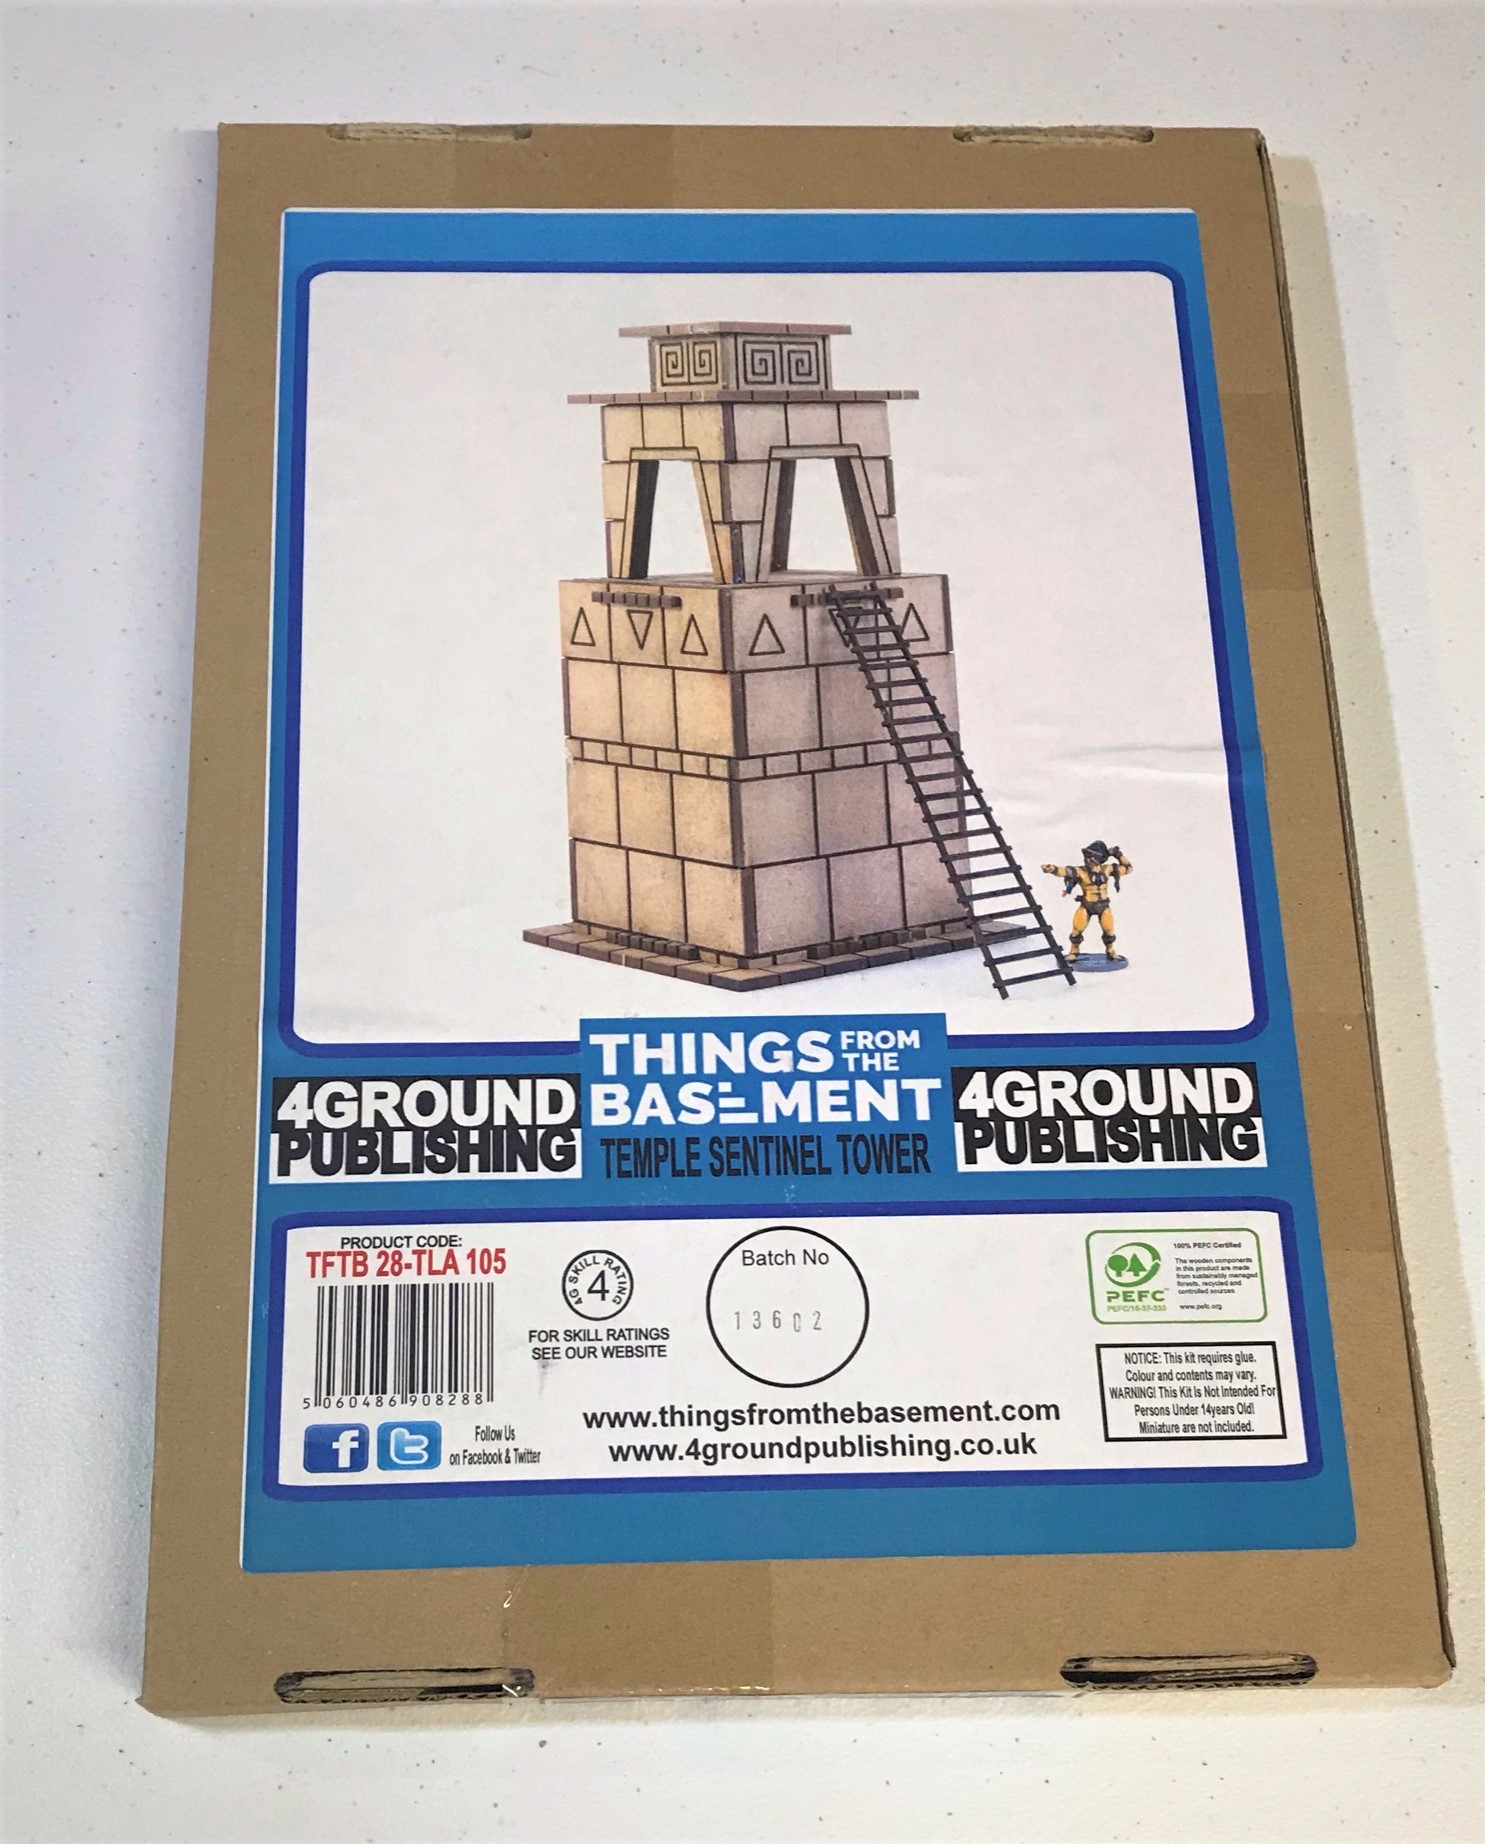
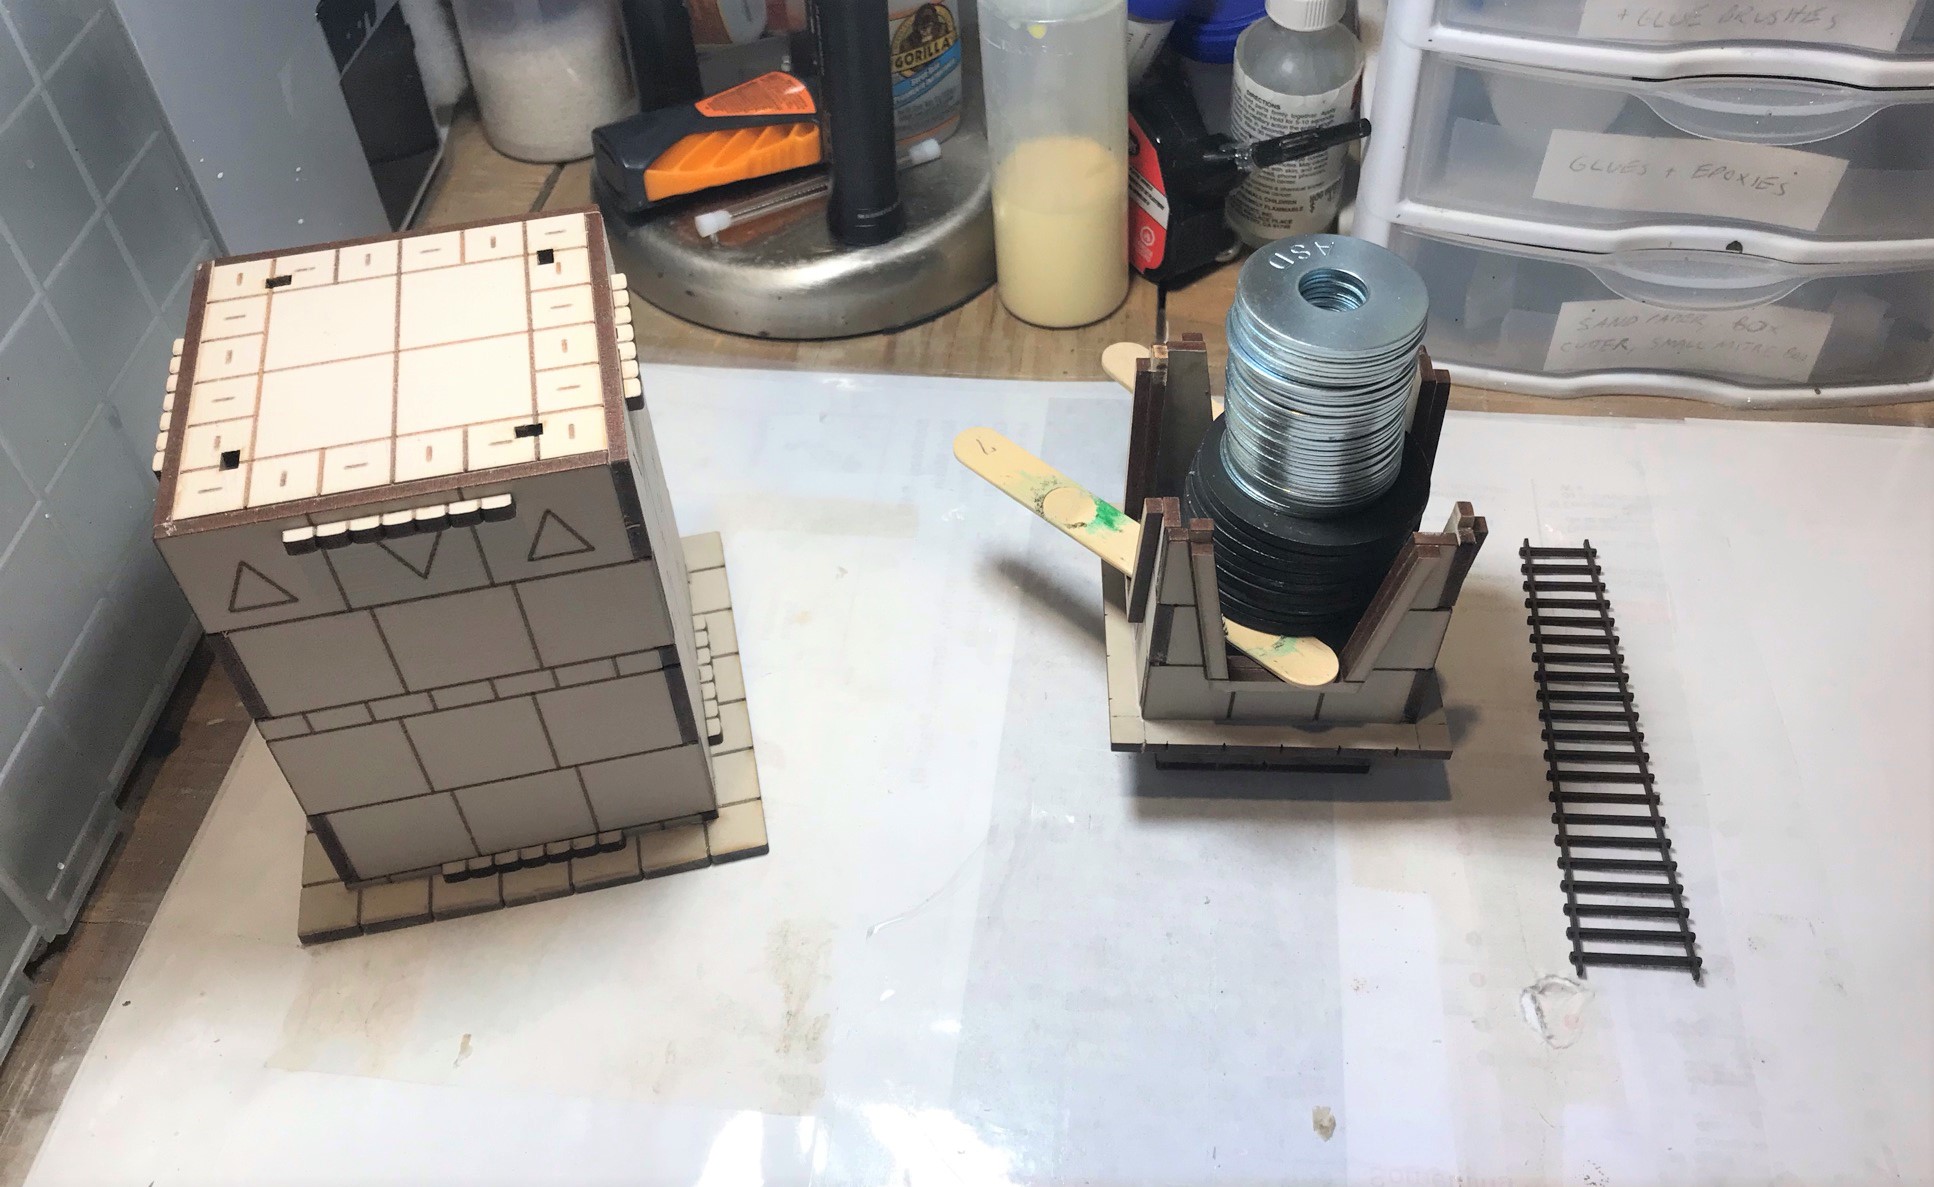
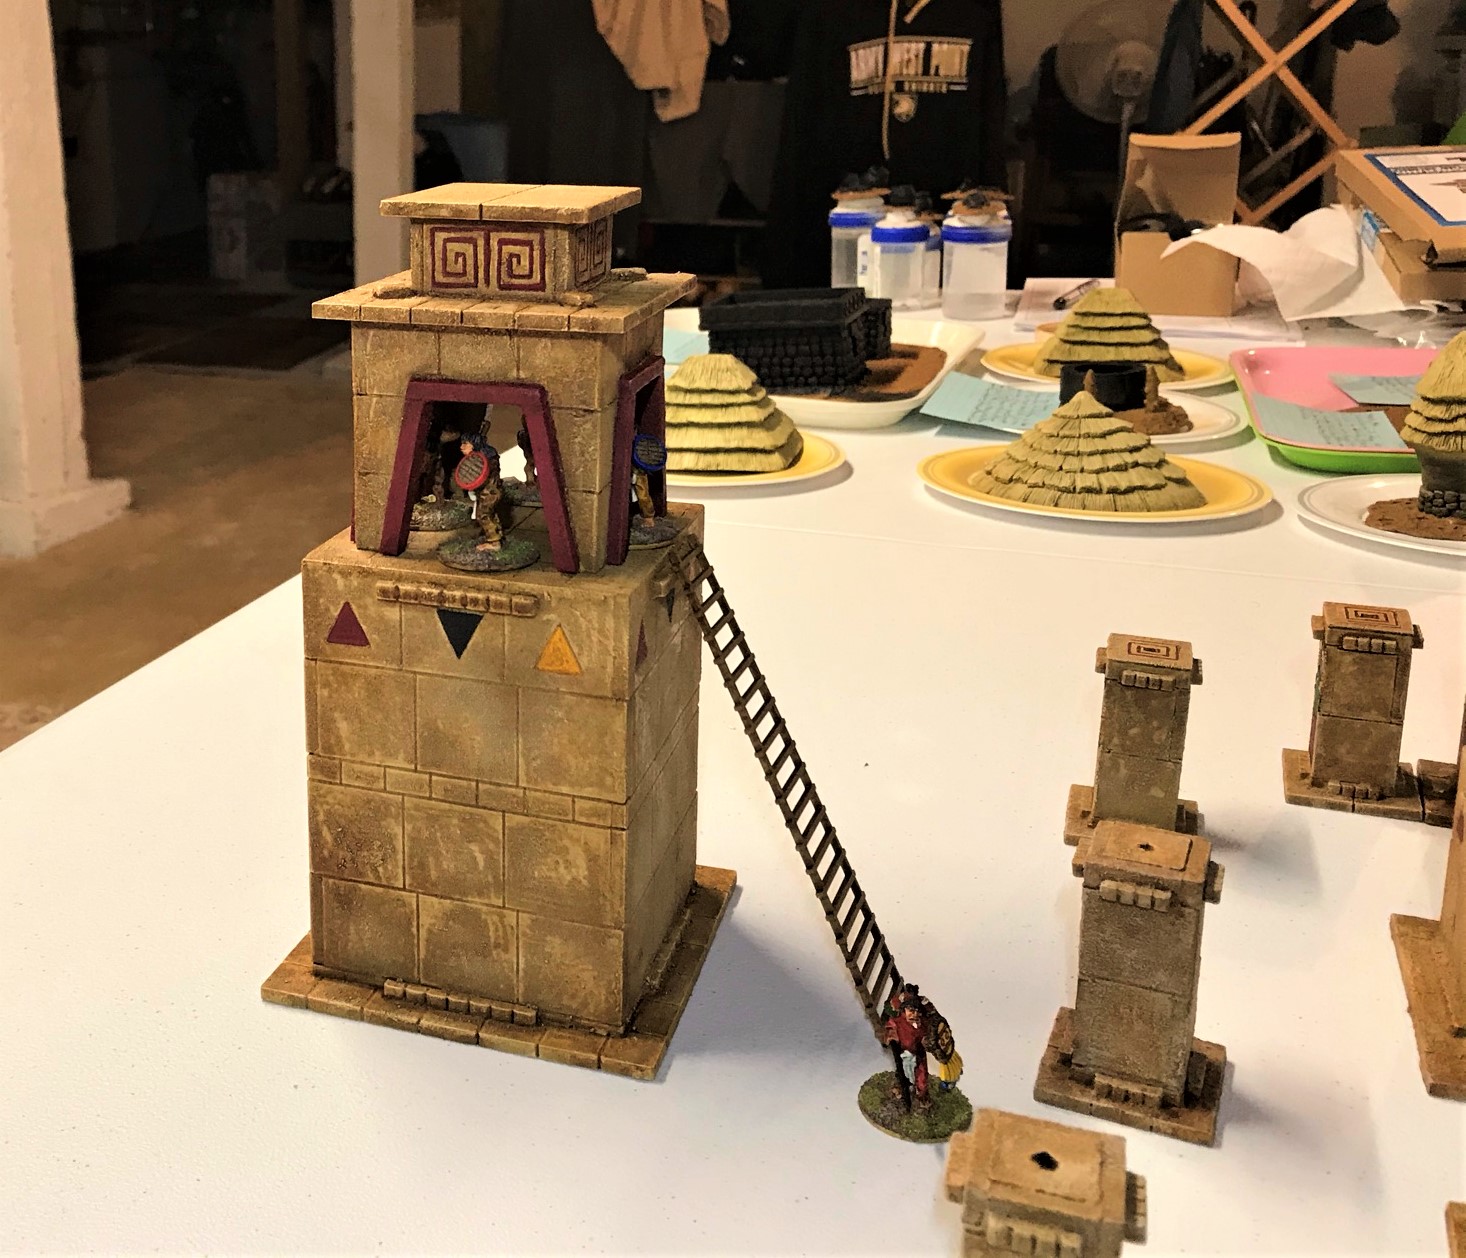
In this post I will share my latest MDF kit build for Feudal Patrol™ games in Mesoamerica (using my Civilizations Collide supplement). I was able to finish off another Aztec-inspired MDF kit. This one also came from from Things From the Basement via 4Ground via Badger Games (see it here). It is called Temple Sentinel Tower and is scaled for 28mm figures – and is just what it is described as being – a Temple Sentinel Tower which would be a nice piece of high ground for some missile troops.
It was an enjoyable kit to build. This one had a few challenges for the build as I needed to make sure that I could paint the inside of the tower as well as dust it up with chinchilla dust as I have been doing. I want all these cityscape Temple structures to match in character – and in color and texture. Basically, as you will see, I broke the kit into two parts until final assembly.
The kit after wiping down with a moist microfiber cloth. The instructions were good.First day of assembly and setting up with PVA, rubber bands, and clamps.The lower tower section is on the left – and the top here has been left to work on separately with paint and chinchilla dust as I have previously described (see this page). Having steel washers around held as weights with PVA gluing.The tower sections awaiting base coating after dusting up with the chinchilla dust and watered down PVA slurry.The sections after the base coat was applied and the dry brushing of the textures. The red, black, and yellow colors were painted after the dry brushing.
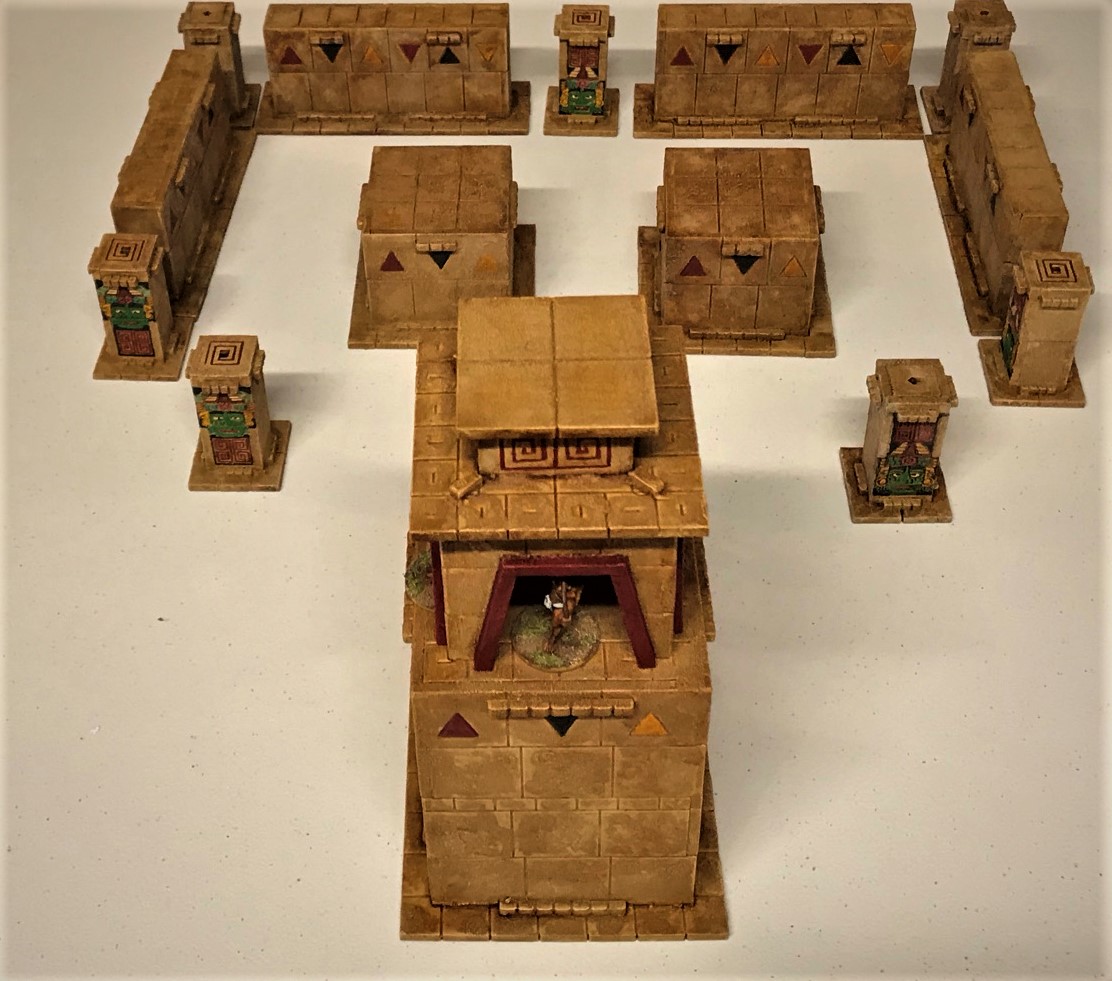
The finished Temple Sentinel Tower next to my previous MDF builds. I put a few missile troops up in the tower as examples.Different angle view.An Aztec veteran with an atlatl peers out while a macuahuitl-armed comrade guards the ladder access. A sling-armed novice is at the top of the ladder.A close up of a bowman (front) and another slinger (left) in the tower.
I think this came out well – what do you think?
For the other pieces in the building contest, I was also able to airbrush a decent base coat on my remaining resin structures, as well as to start on the ground cover on their styrene bases.
The remaining resin structures – I have a good start on them.
This now leaves me with two more MDF builds – the Temple High Throne and the Sacrificial Altar – in addition to the resin. These are going to take a back seat to finishing the resin pieces. This is because as I have more paint on order to properly finish them similarly to my previous MDF kits. I have found that I’m going though a good amount of paints and washes (chinchilla dust and MDF can be thirsty).
My remaining MDF kits!
I have also tried to show you, dear readers, the progress in my challenge in a non-award-winning video on IGTV and Instagram (well it hasn’t won yet, so there’s hope…).
My main communications channel is THIS BLOG! But, I’m just trying to keep up with the young ‘uns like IRO. It’s a bit of an unscripted thing – so enjoy! Without any further ado – here is the video link live from my cellar (that I cannot put on WordPress without paying more $$).
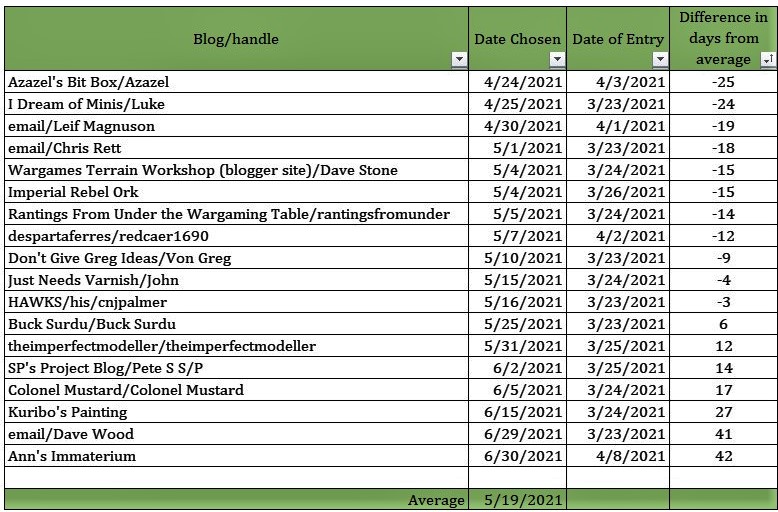
So as for the contest – I have a shot below that shows the range of guesses:
We’ve got American, Aussie, and Brit entries (what’s up with the rest of the world?). Thanks to all for entering and best of luck – and follow my progress (and your chances) here! The average is May 19th, with Azazel the earliest on 4/24/2021 and Ann the latest on 6/30/2021. Hell, your guesses are as good as mine at this point for sure.
A couple of small side notes. I was quite surprised and happy to see that 4Ground featured my work on their Facebook page – here is that Facebook link – and much thanks to our pal Kuribo who let me know on the blog that he saw it. Also, this marks my 30th post on this subject – and while I’m happy about the progress I’ve made – the listing of all the posts is getting to be a bit much (never mind approving all the WordPress pingbacks that this generates).
So, I’ve added a new selection on my main menu (“Gaming & Hobby Areas of Interest”), and under that will be individual genre selections. I’ve started with a page with a list of and links to all of my Mesoamerican posts called “Aztec, Conquistador, and Mesoamerican Hobby Projects Posts” – and I will (over time) be augmenting it with other stuff, such as retro sci-fi, France 1940, Normandy, etc. But I won’t get to that for a while – I’ll be focusing here on the Aztec stuff! I’ll still add the paints and materials section as before, mostly for my own references.
Thanks for looking and I hope that you can check out the video link and no matter what – let me know what you think of the tower – or my accent – or my graying hair – or whatever.
For all of my previous posts on games, units, and other projects for my 16th Century Spanish Conquest supplement for Feudal Patrol™ – “Civilizations Collide” – please see this page.
PAINTS, INKS, GLAZES, SHADES, WASHES, PIGMENTS, FLOCKING, GLUES AND MORE THAT I USED ON THESE PIECES:
This blog is titled “Life, Golf, Miniatures, and Other Distractions” – and it’s not often that it’s about anything but miniatures. This post will definitely concern miniatures – but as the title suggests, a few other things are going to get added in after the miniature stuff.
Why you ask? Well, the long and short of my current predicament is that a member of my household is near the end, and I need to deal with the ramifications of that. It’s sad, but it’s time.
Oh, sorry, not a person, it’s my PC that is on its last legs – and it is already quite legless.
My PC has had multiple thermal shutdowns over the last few weeks – while in sleep mode! Argh! I decided that I would need to get a new desktop before I lose all my hobby work (plus everything else that is on the thing). I prefer a PC over a laptop, though I still look at WordPress on my iPhone and my iPad. I just compose on a PC. Anyways, I will be without a computer shortly – so I needed to get a post in. Therefore this post will cover some miniature stuff first and some fun (I think) extras – I hope that they will be somewhat interesting for you.
Plus, this is my largest list of hashtags ever (I think so anyways).
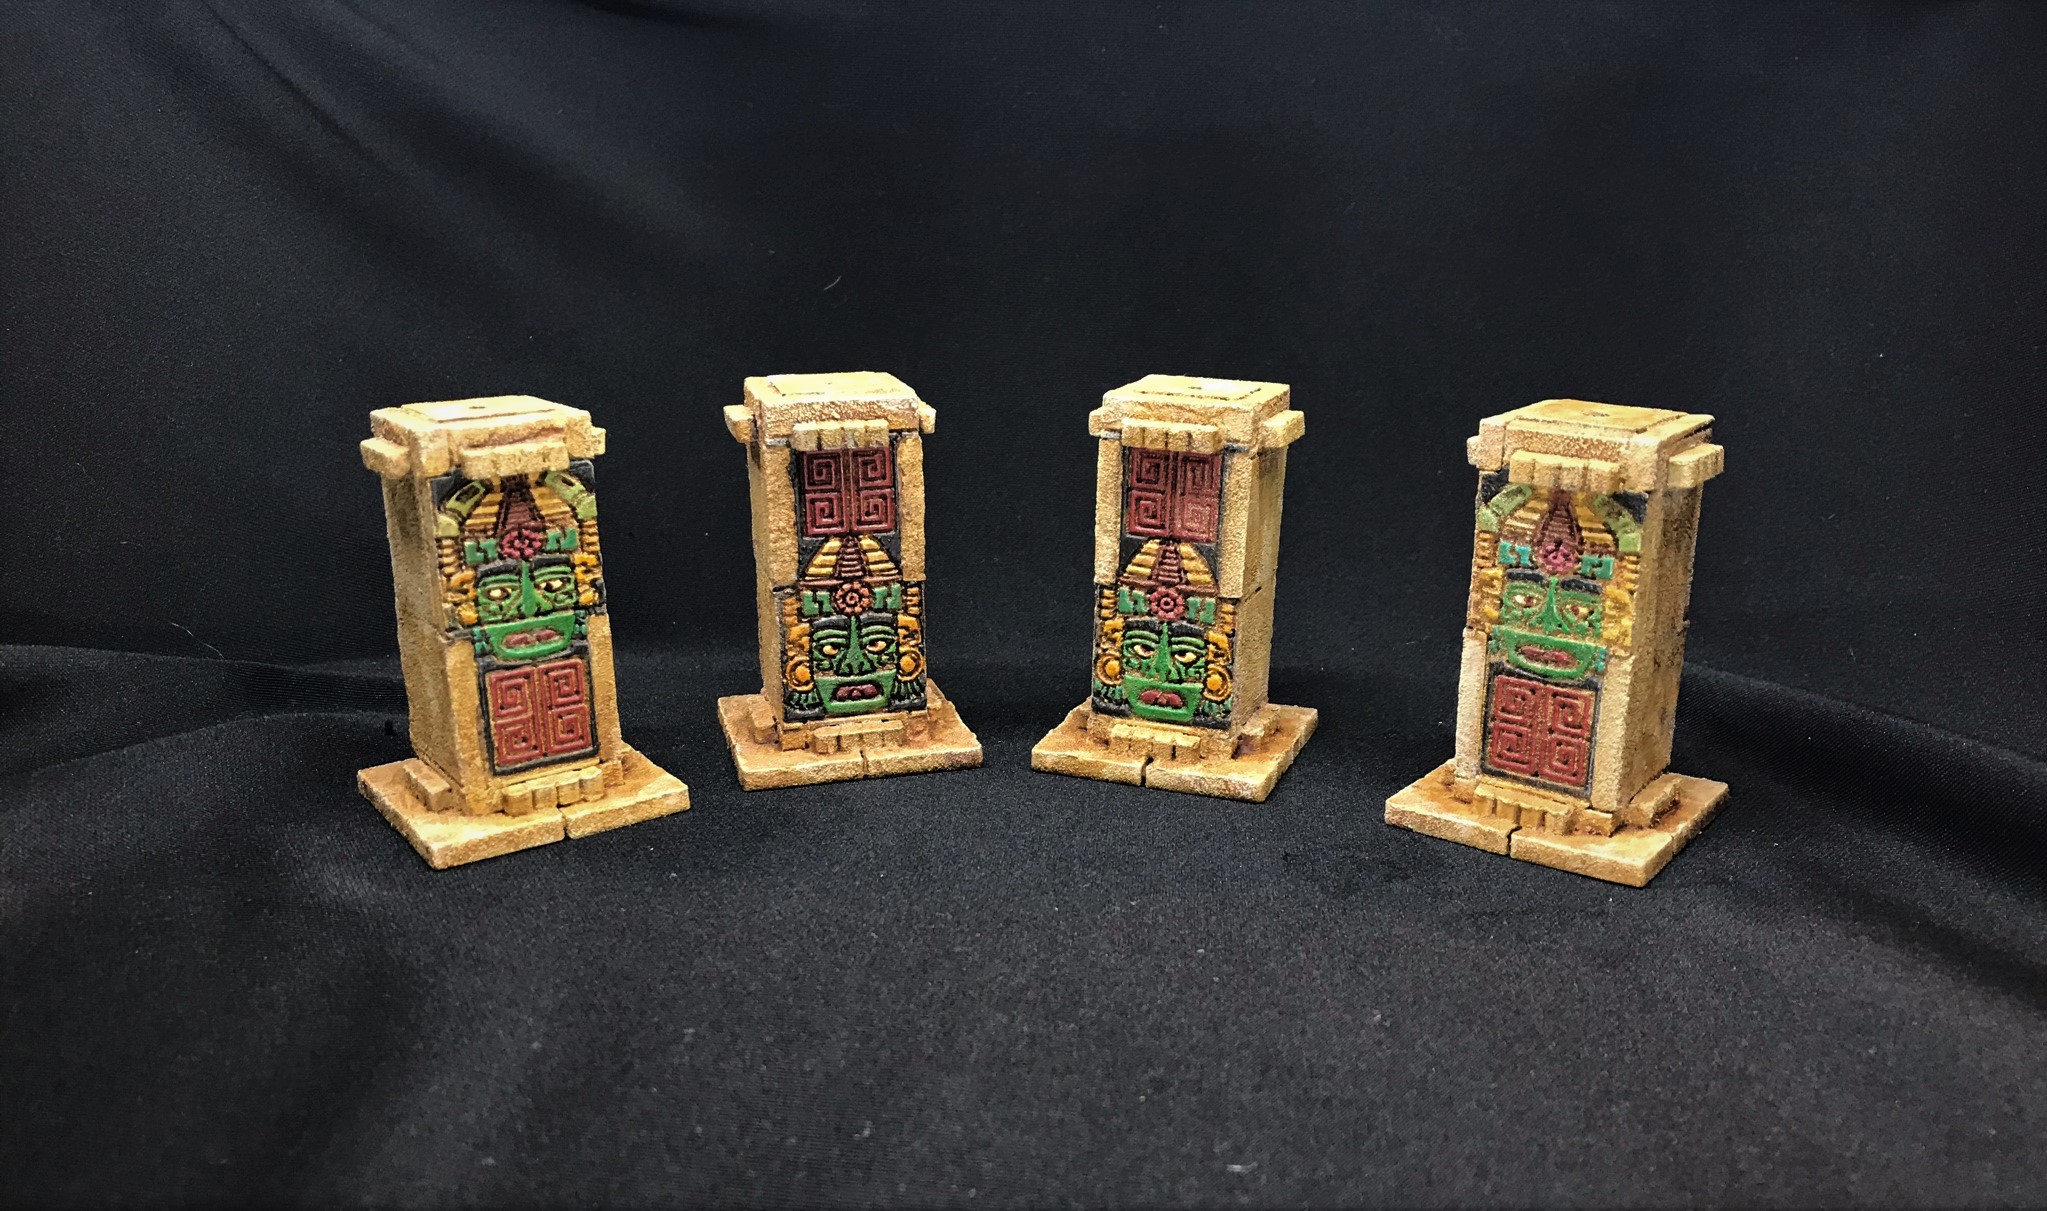
In my last post, as part of “Mark’s Aztec Building Challenge Contest” (which you should enter soon by the way!) I discussed how I assembled and painted 8 Temple Columns for my Aztec games of Feudal Patrol™ using my Civilizations Collide supplement. I had moved onto the MDF kits over my resin stuff as temperatures had been too cold here in Massachusetts to use rattlecans to prime outside. I truly enjoyed building and painting the MDF of my last post, and I certainly still have a love for using chinchilla dust.
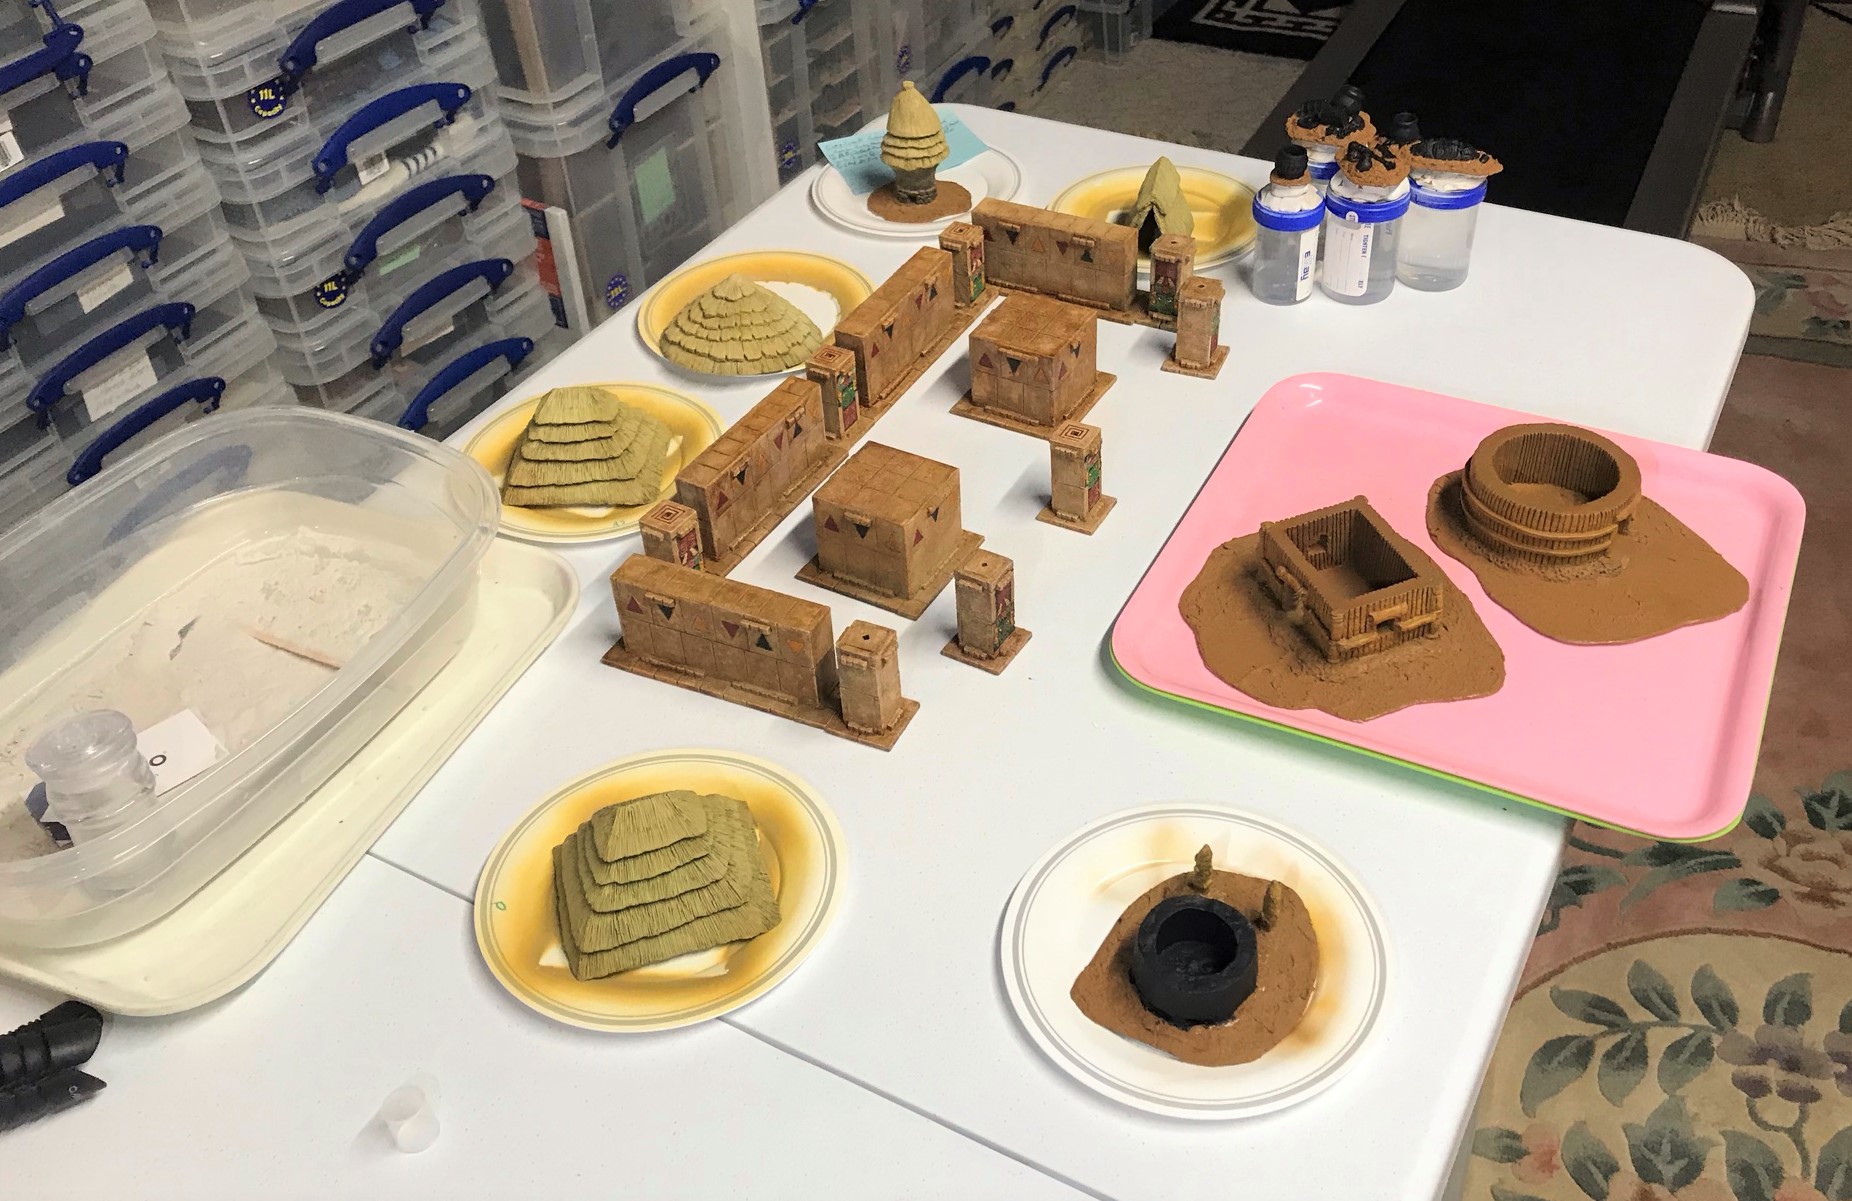
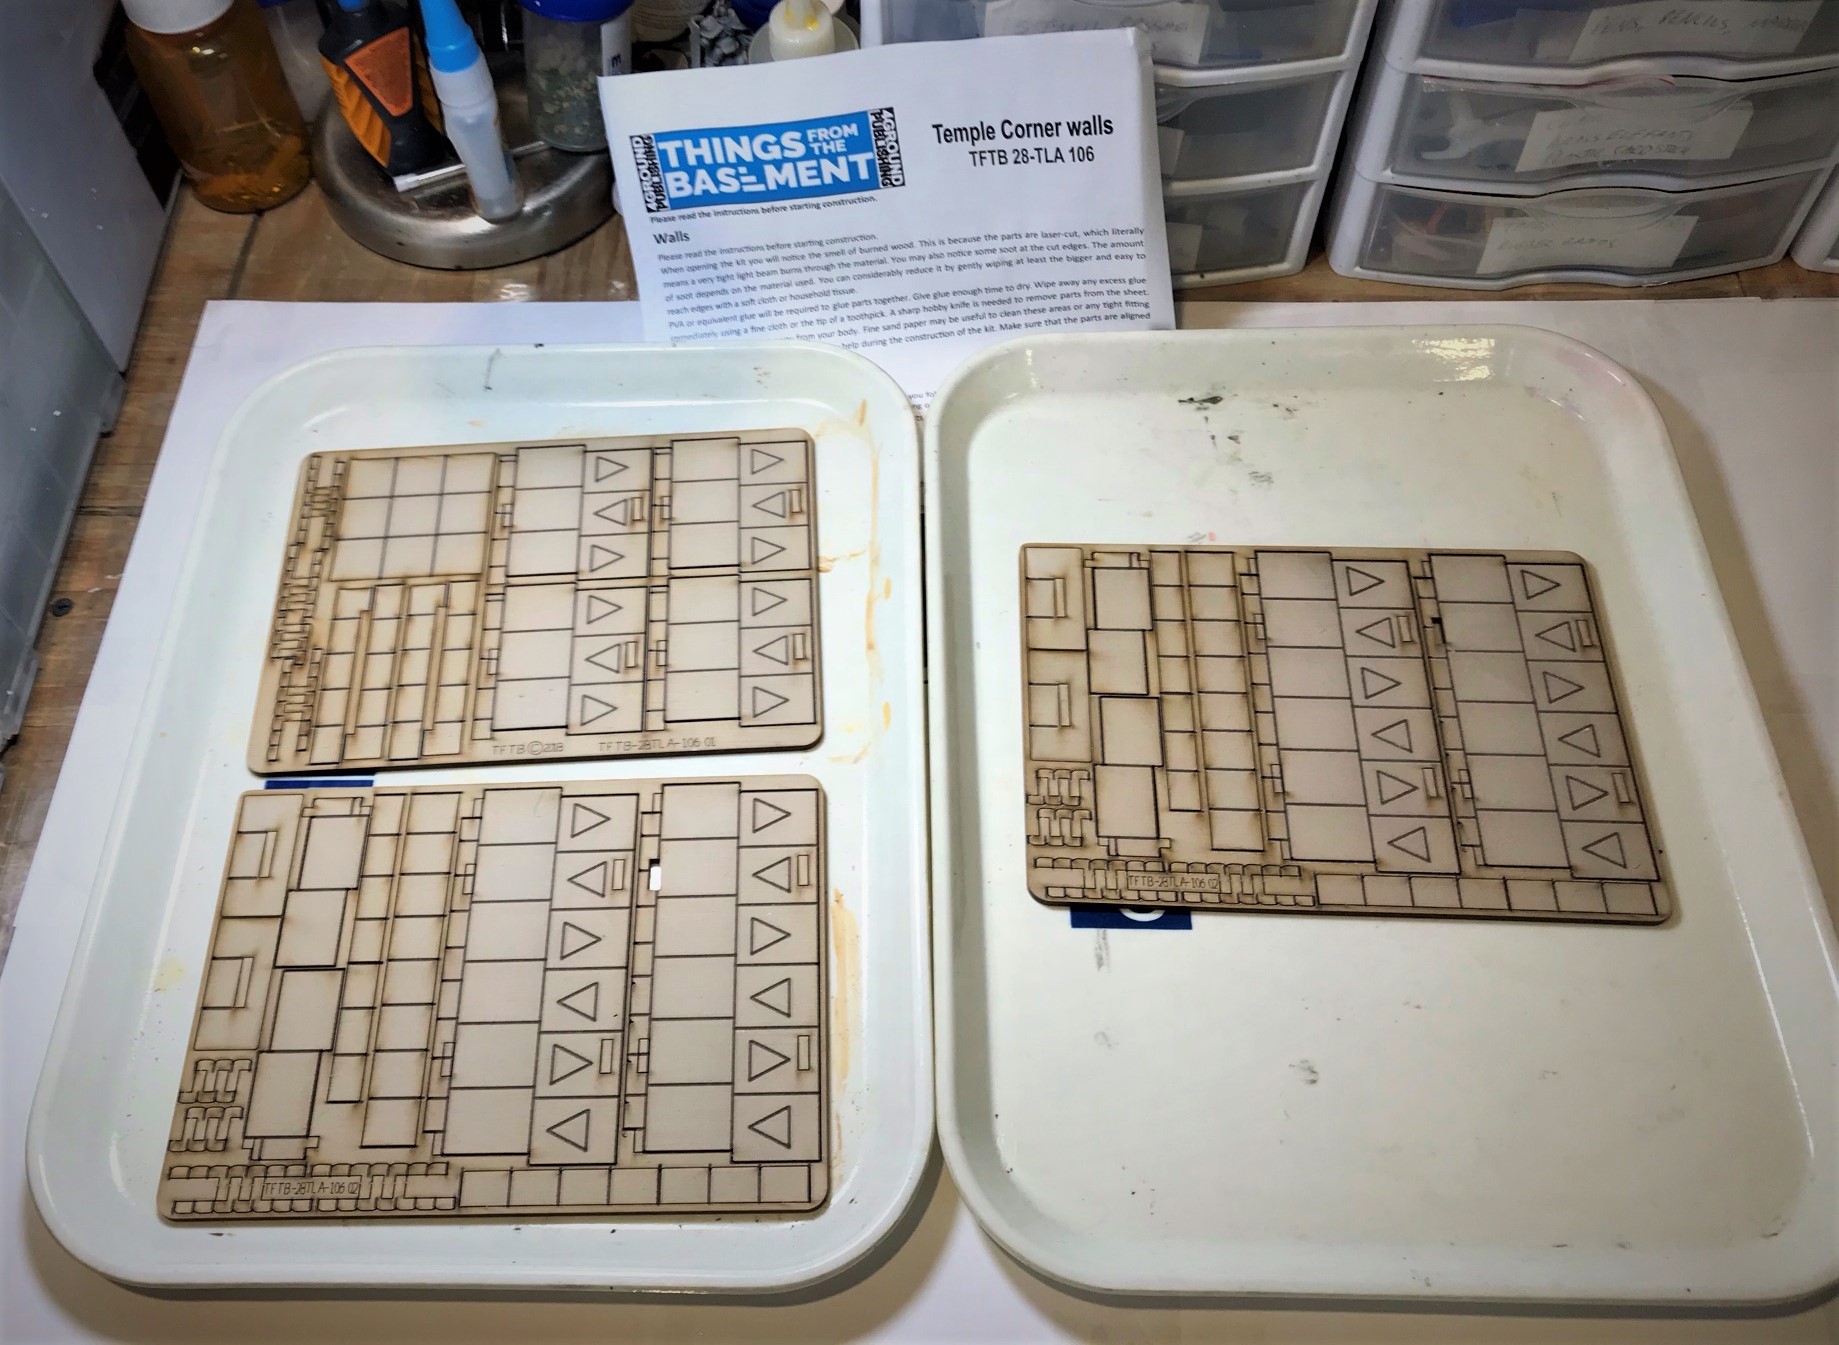
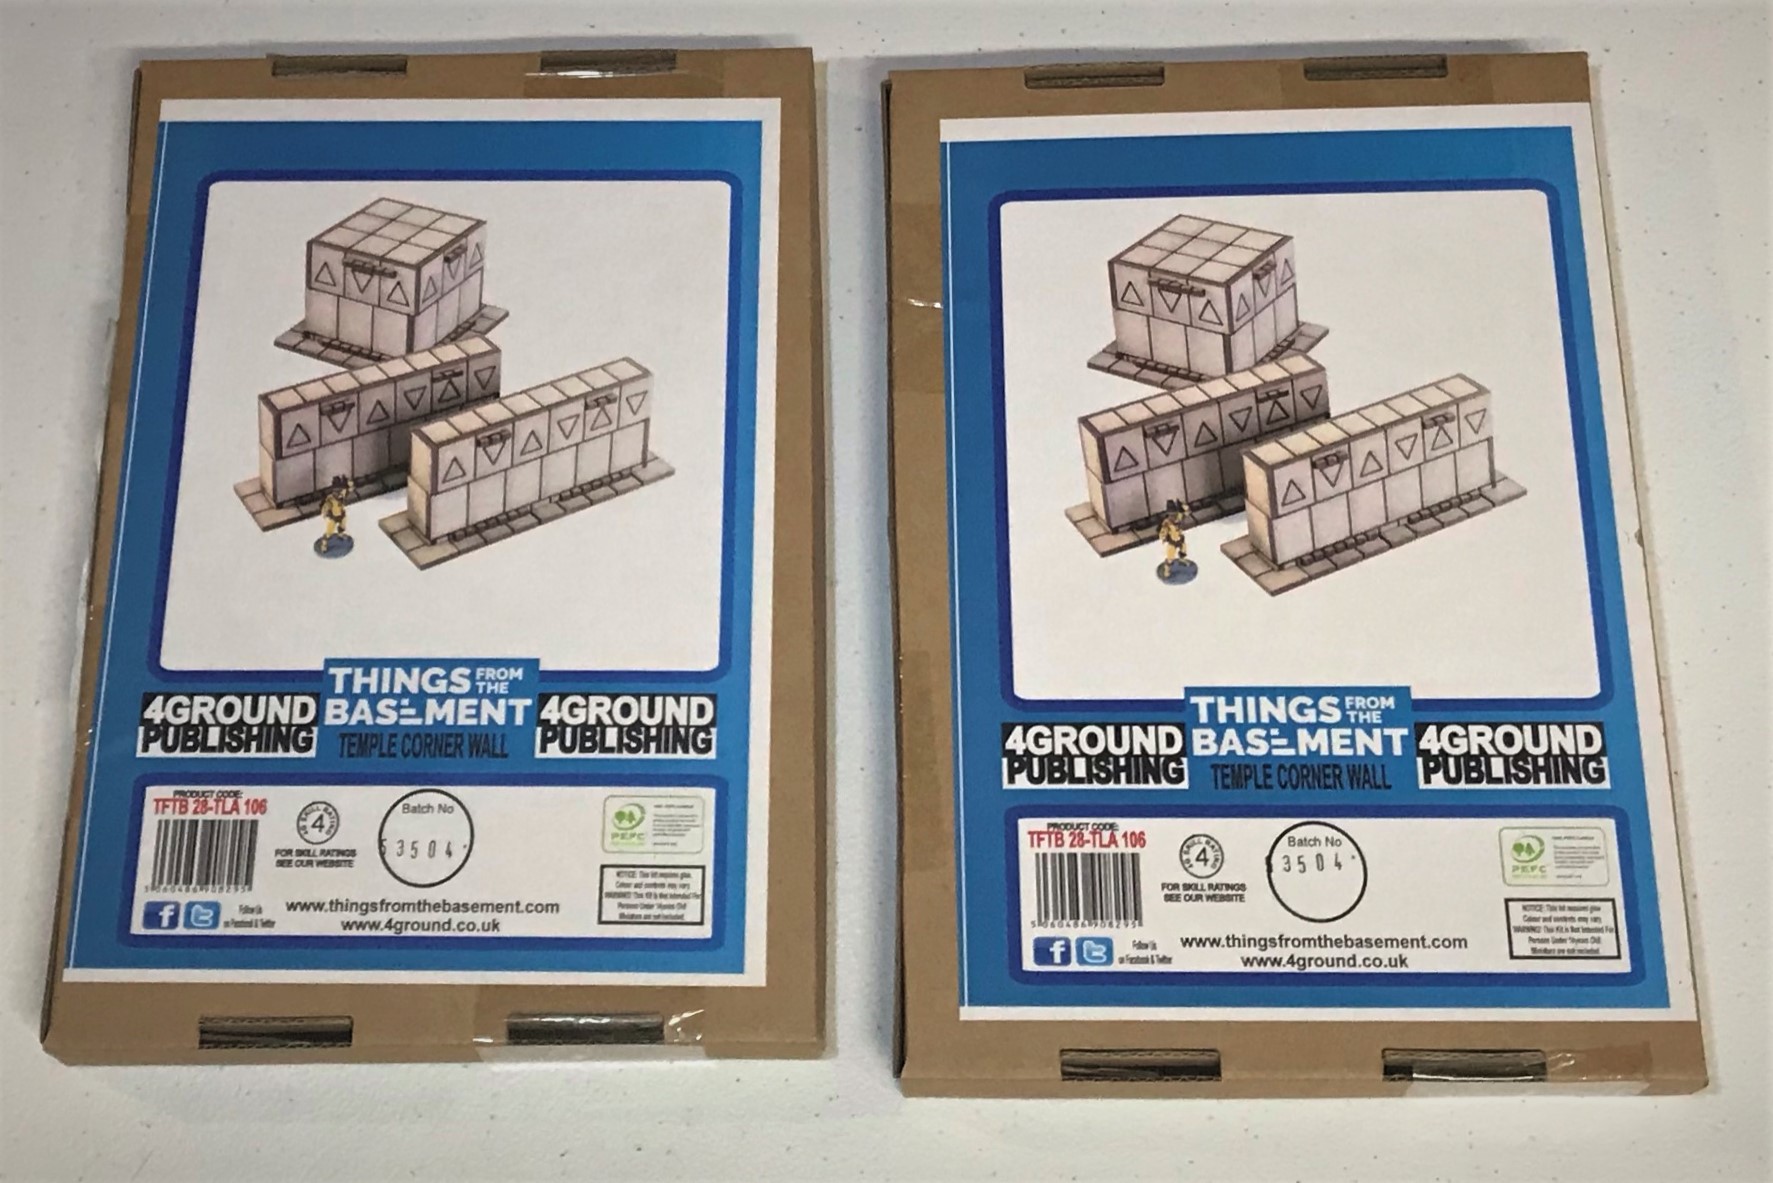
My next MDF effort would be two kits of the “Temple Corner Walls” – from Things From the Basement via 4Ground via Badger Games (see it here). Each kit had one square pillar-like structure and two walls – six in total. The kits are very nice and pretty easy to work with in my opinion. I basically used the second approach from last time – assemble first, then dust up with the chinchilla dust and paint them.
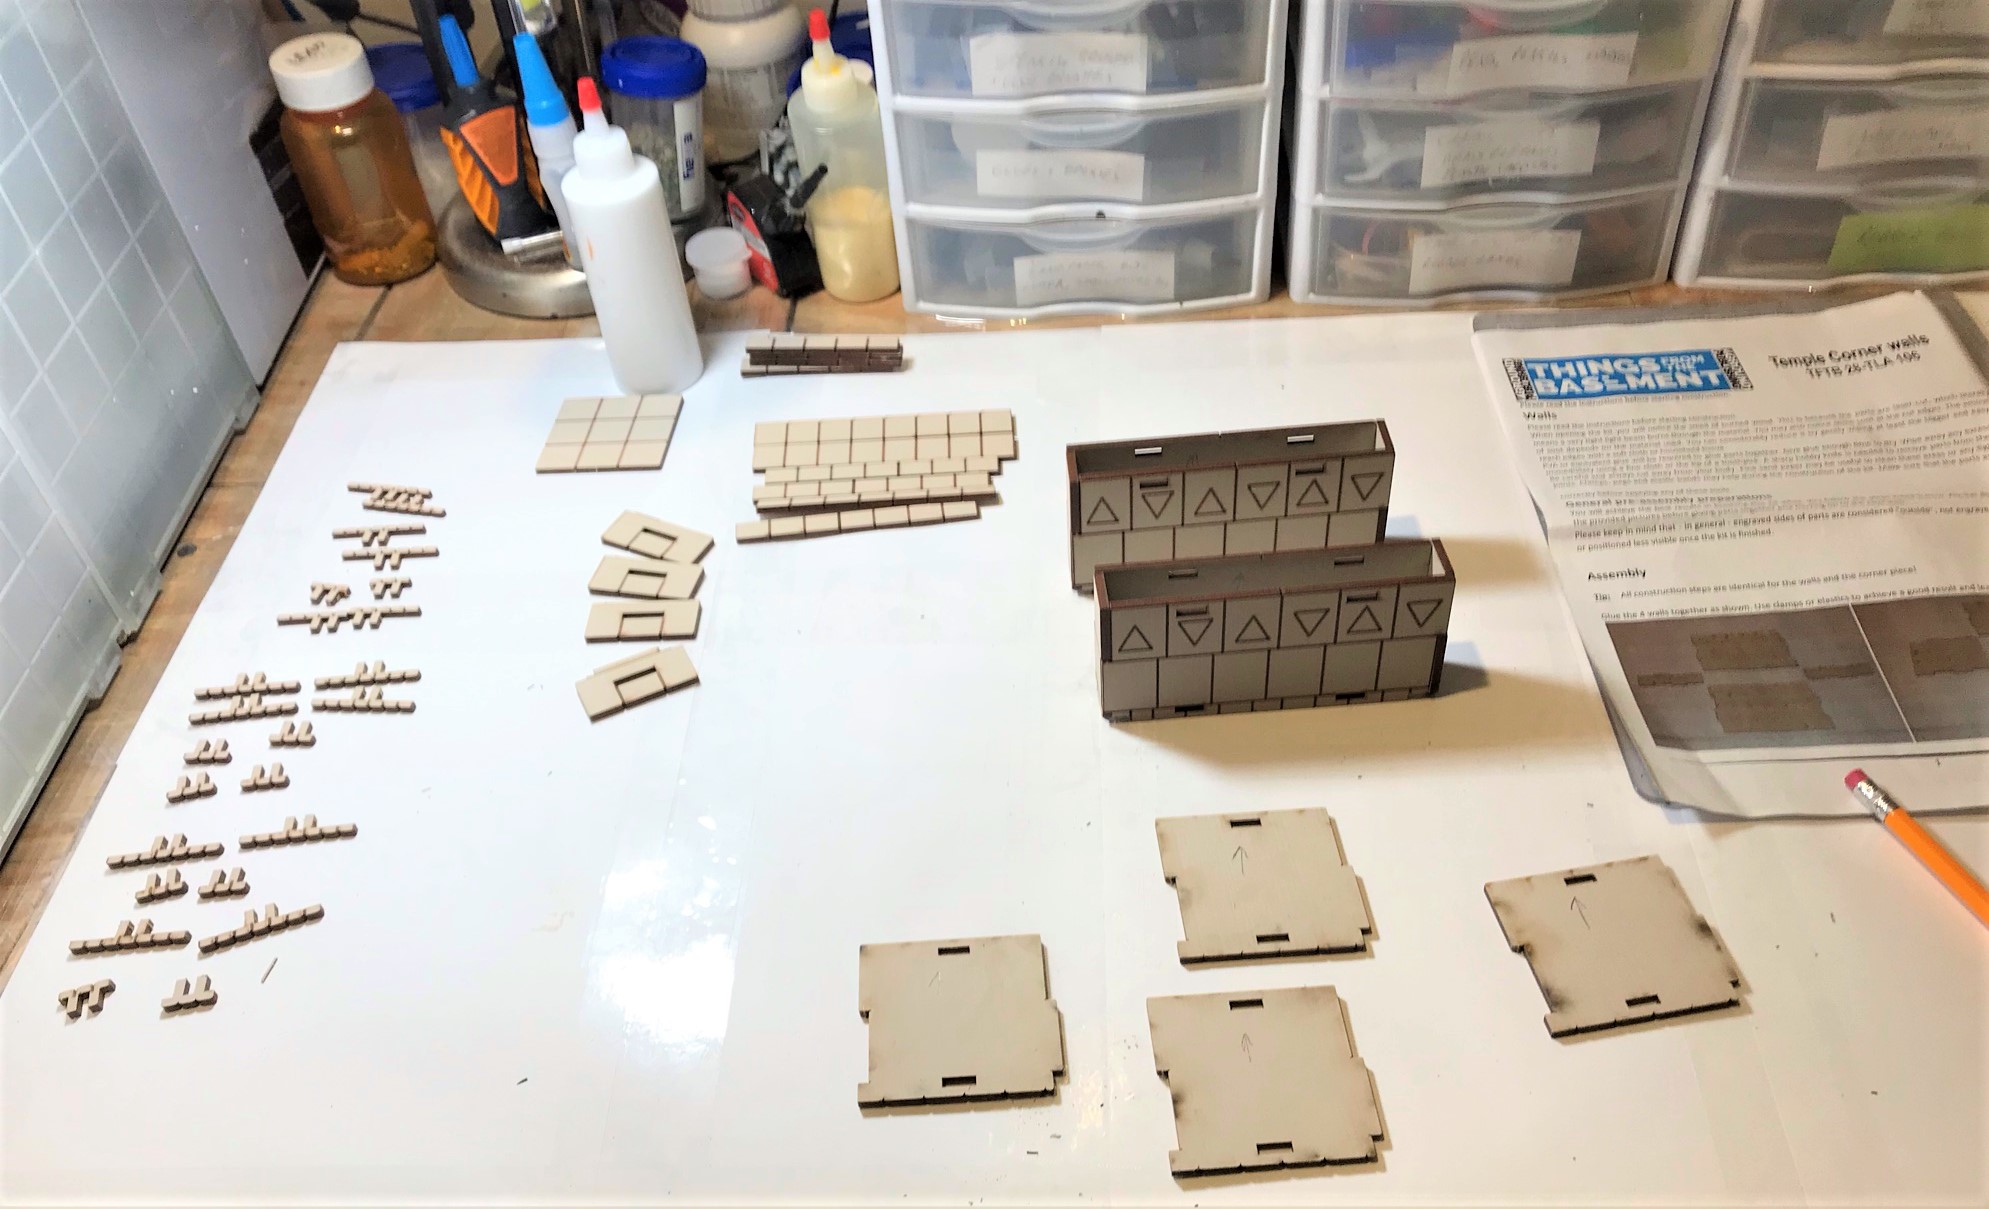
An example of one kit out of the bag after cleaning it off with a moist microfiber cloth.I have found with these MDF kits that it helps to dry fit first and organize the parts. Here you also see that I put an “up” arrow on the inside of the walls to help make sure that I did not assemble anything upside down.I assembled the wall sections first and let the PVA dry overnight.The next day, I added steel washers as weight to get the wall tops to glue flush to the previous step’s work. Then I glued to the bases (with the weights again).All of the “Temple Corner Walls” assembled and ready to get dusted up and painted.Here you see my early dry brushing after dusting – I use three colors to dry brush. I decided to paint the triangles in a red, black, and yellow pattern. You can see the paints that I used at the very end of this post.After I dry brushed the structures, I toned down the dry brushing with Army Painter “Light Tone”. Between the “thirst” of both the MDF and the chinchilla dust, I ended up using the better part of two bottles of the AP tone. Here, these are all complete.
I tried to use my spray booth again for some shots here but I did get some weird shadows and alternatively unwanted shine that I did not like. So I went with what you see below. I’ll need to investigate a light box (maybe).
Here you see a fight among the “Temple Column Walls” (this post) and the “Temple Columns” (from my last post) between a squad of Conquistadores (and a wardog) against an Aztec squad and a supporting warrior priest. I think that I was successful at getting all to blend in well.
So, the Temple Corner Wall structures of this post are part of two “challenges”. The first is mine as mentioned earlier – “Mark’s Aztec Building Challenge Contest” – in which I will give away free prizes to blog followers for being the closest to guess how long it will take me to finish all these buildings. The second is from Ann’s Immaterium, and is called Ann’s “Paint the Crap You Already Own” challenge. These definitely count there – and I hope there will be more for this April challenge.
I have ordered some more “Light Tone” – and with my remaining MDF I’ll need it. In the meantime, as an update – it warmed up here this week so I was also able to get my outside priming done – see below!
I was able to prime this week! I can now vary what I decide to complete.
I also am planning an update to my Civilizations Collide supplement, which will have rules for the falconet and some new scenarios (in addition to an overall update). So that might slow up my progress, as also golf might (haven’t played yet this year though). I also have been – wait for it – GAMING!
Well, remotely anyways. I was lucky enough to play in a Combat PatrolTM game last Saturday via Zoom with Sally4th’s Chris Abbey. Chris (in the UK) set up a James Bond game based on the 1977 film The Spy Who Loved Me that he called “Nobody Does it Better” (Carly Simon song of the movie). It featured the scene in the bad guy’s (Stromberg) supertanker interior hold (that held a captured US sub). The action focused on the scene where escaping British, Russian, and American crews fight the Stromberg goons to stop a nuclear launch. We had US and UK players – and I had James Bond. Our objective was to advance up the gantry and throw a satchel charge at the control room doors and blow it open. We had a lot of twists and turns in the game – James Bond’s satchel charge misfired, and so did a Stromberg flamethrower that would have fried him. A last second satchel charge throw from the Americans missed, but the explosive charge slid up to the door and blew it! Success! Notably, I had invited our blogger buddy TIM who got to watch the game – and it was fun to share the experience with him.
Take a look at the tabletop below – amazing!
The tabletop before the game.Chris Abbey GM’s the game exceptionally well. We were moving up the gantry on the left – the control room was in the center of the far end.
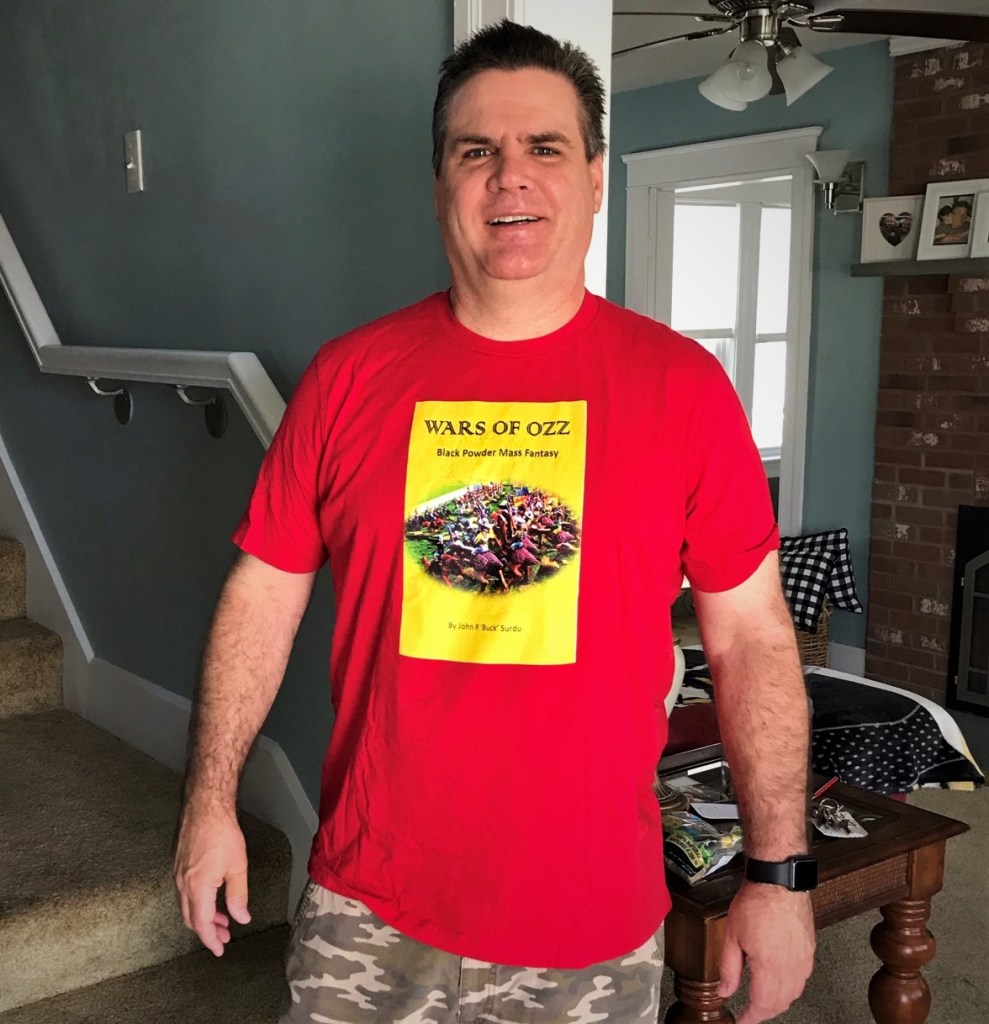
I also had two other nice surprises. The first was in the mail from Buck Surdu – who sent me a couple of Wars of Ozz shirts. I did get in the Kickstarter for it (and the figures are available from Sally 4th and Old Glory in the US) -and the next project I plan to do is paint these figures.
Love these shirts and I will be happy to be wearing them at future gaming events! I won’t be bringing Caesar (our nearly 27 year old cockatiel) – he hates dice.
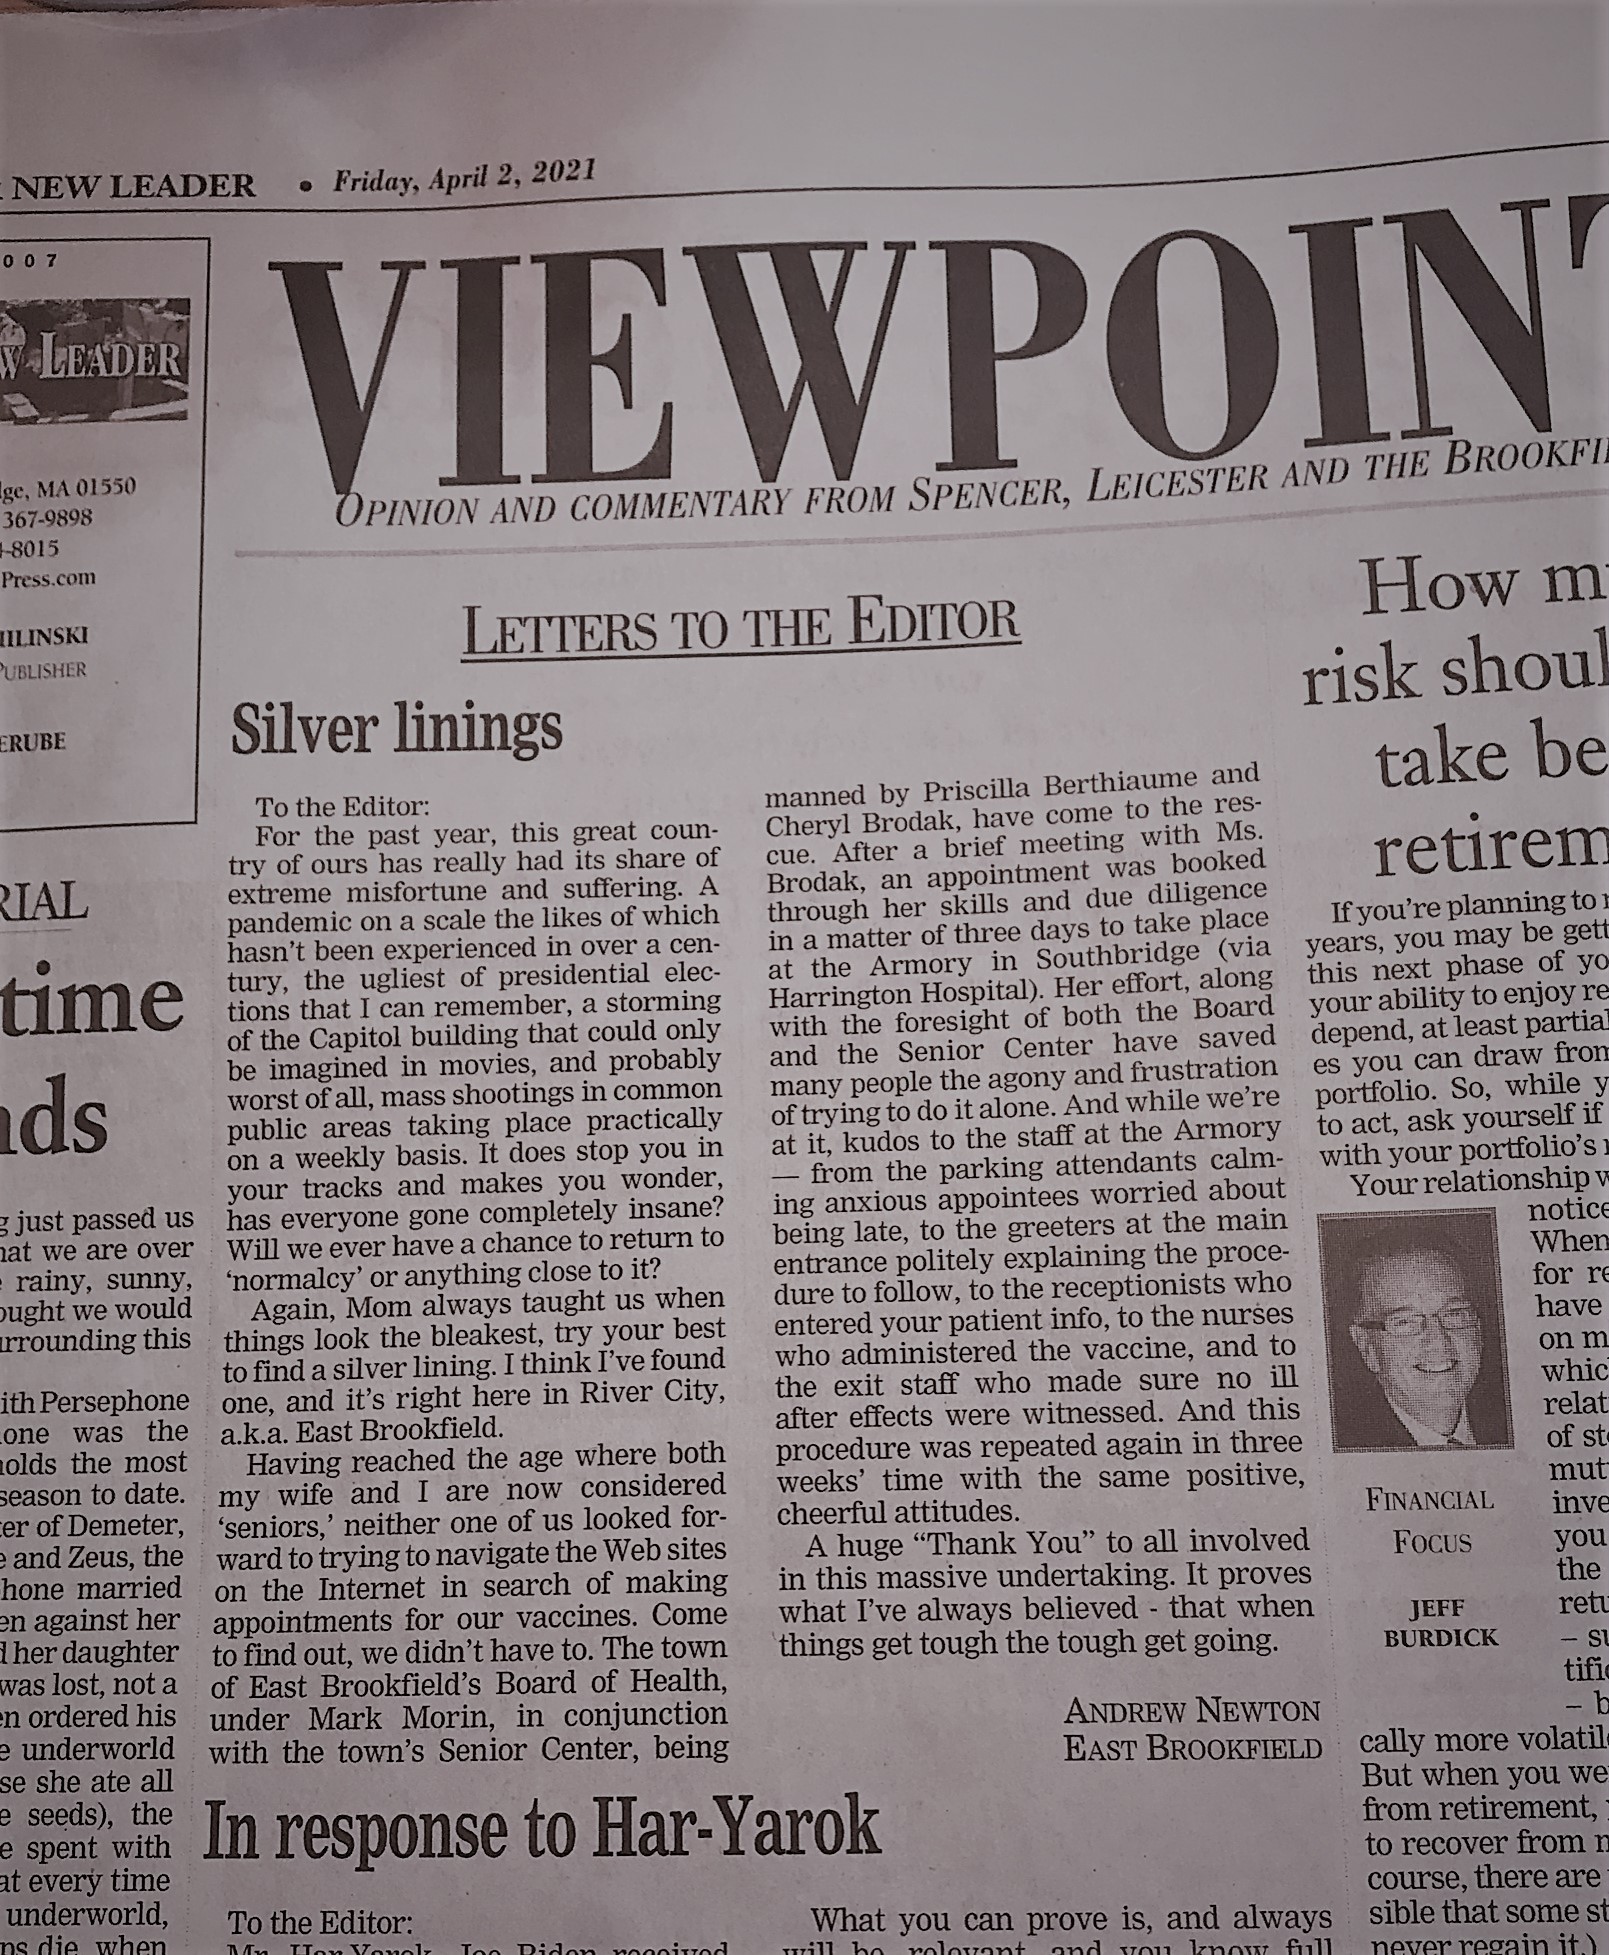
The second surprise came in our local weekly newspaper (see below). I’ll let Andy Newton’s words speak for themselves, but given the last few months, this was a heartwarming bonus for us.
From The Spencer New Leader
And though my computer is a problem, I did get the email from the Commonwealth of Massachusetts that has allowed me and my wife to get our first “jabs” this weekend! Take that COVID-19!
So, until my computer situation is better – I’ll be painting and following up on my iPad. Maybe I’ll be back this weekend – in any case, let’s discuss this post! So feel free to let me know your thoughts and comment – and to enter the contest. Take care all and thanks for looking!
Miscellaneous details and references for those interested in that sort of thing:
Previous posts on games, units, and other projects for my 16th Century Spanish Conquest supplement for Feudal Patrol™ – “Civilizations Collide”
Aztec Temple Corner Walls (Plus Some Life & Other Distractions Stuff Added In) (this post)
Perro de Guerra (Conquistador War Dogs). 13 figures total: Outpost Wargames Services #CONS6 “War Dogs” (8 war dogs); Eureka #100CON13 “Dog Handler and Dogs” (1 dog handler/pikeman and 4 war dogs)
Conquistador Foot Command, Crossbowmen, and a Couple of Officers. 11 figures total: Outpost Wargames Services #CONC1 “Conquistador Foot Command” (a leader, a banner bearer, a drummer, and a bugler); Eureka #100CON04 “Crossbowmen” (5 crossbowmen); and Eureka CONC1 “Conquistador Officer” and an unknown SKU officer (2 officers)
When one considers the Aztecs and their empire, what does the historical record say about which visual images struck the Conquistadores in 1519 with awe? Colorfully costumed and tremendously fierce warriors? Eagle Warriors? Jaguar Warriors? Montezuma II and his palace? Untold amounts of gold and silver? Perhaps their quite bloody reputation for human sacrifice, slavery, and occasional cannibalism? The magnificence of the city of Tenochtitlan and its amazing architecture? Probably all that and more, at least in what I have read.
As I shared in my last post – I am working on terrain/buildings for the period as part of “Mark’s Aztec Building Challenge Contest”. These buildings are either resin or MDF. I originally thought that I would start with the resin buildings and then move onto the MDF ones. To do that, I wanted a good primer on the resin – and the manufacturer (Acheson Creations) recommended a Rustoleum primer. This meant spray painting with the rattlecan outside safely – or doing it unsafely inside the house and provoking my lovely bride to commit several felonies upon my person due to the fumes. Well, I can’t visit her in jail during a pandemic – or from the grave – so I decided on the outside option.
However, despite one beautiful Massachusetts day in March where we saw the 70’s (that’s the low 20’s for you metric folks), it has been in the 40’s (4-9 for you metric folks) and rainy. Neither are good for outside. So, flip the order, and onto the MDF.
My experience with MDF is very limited – all I have done before is some MDF barriers that I did back in 2017. And they were not my best work IMO. All of my MDF in the challenge is supposed to be made of stone. MDF does not look like stone of course. It’s manufactured from wood dust and glue. So, what to do? First, I watched a smattering of YouTube videos on MDF kits. The best one said to wipe down MDF with a damp microfiber to clean prior to painting which was very important for paint to adhere!
I also reached out to a couple of friends – Buck Surdu (of Buck’s Blog) and The Imperfect Modeler (TIM) to seek their unbridled wisdom. Both were great – and TIM opened my eyes to a new (to me) and amazing hobby tool that I wanted to share with you all as I am in love with it.
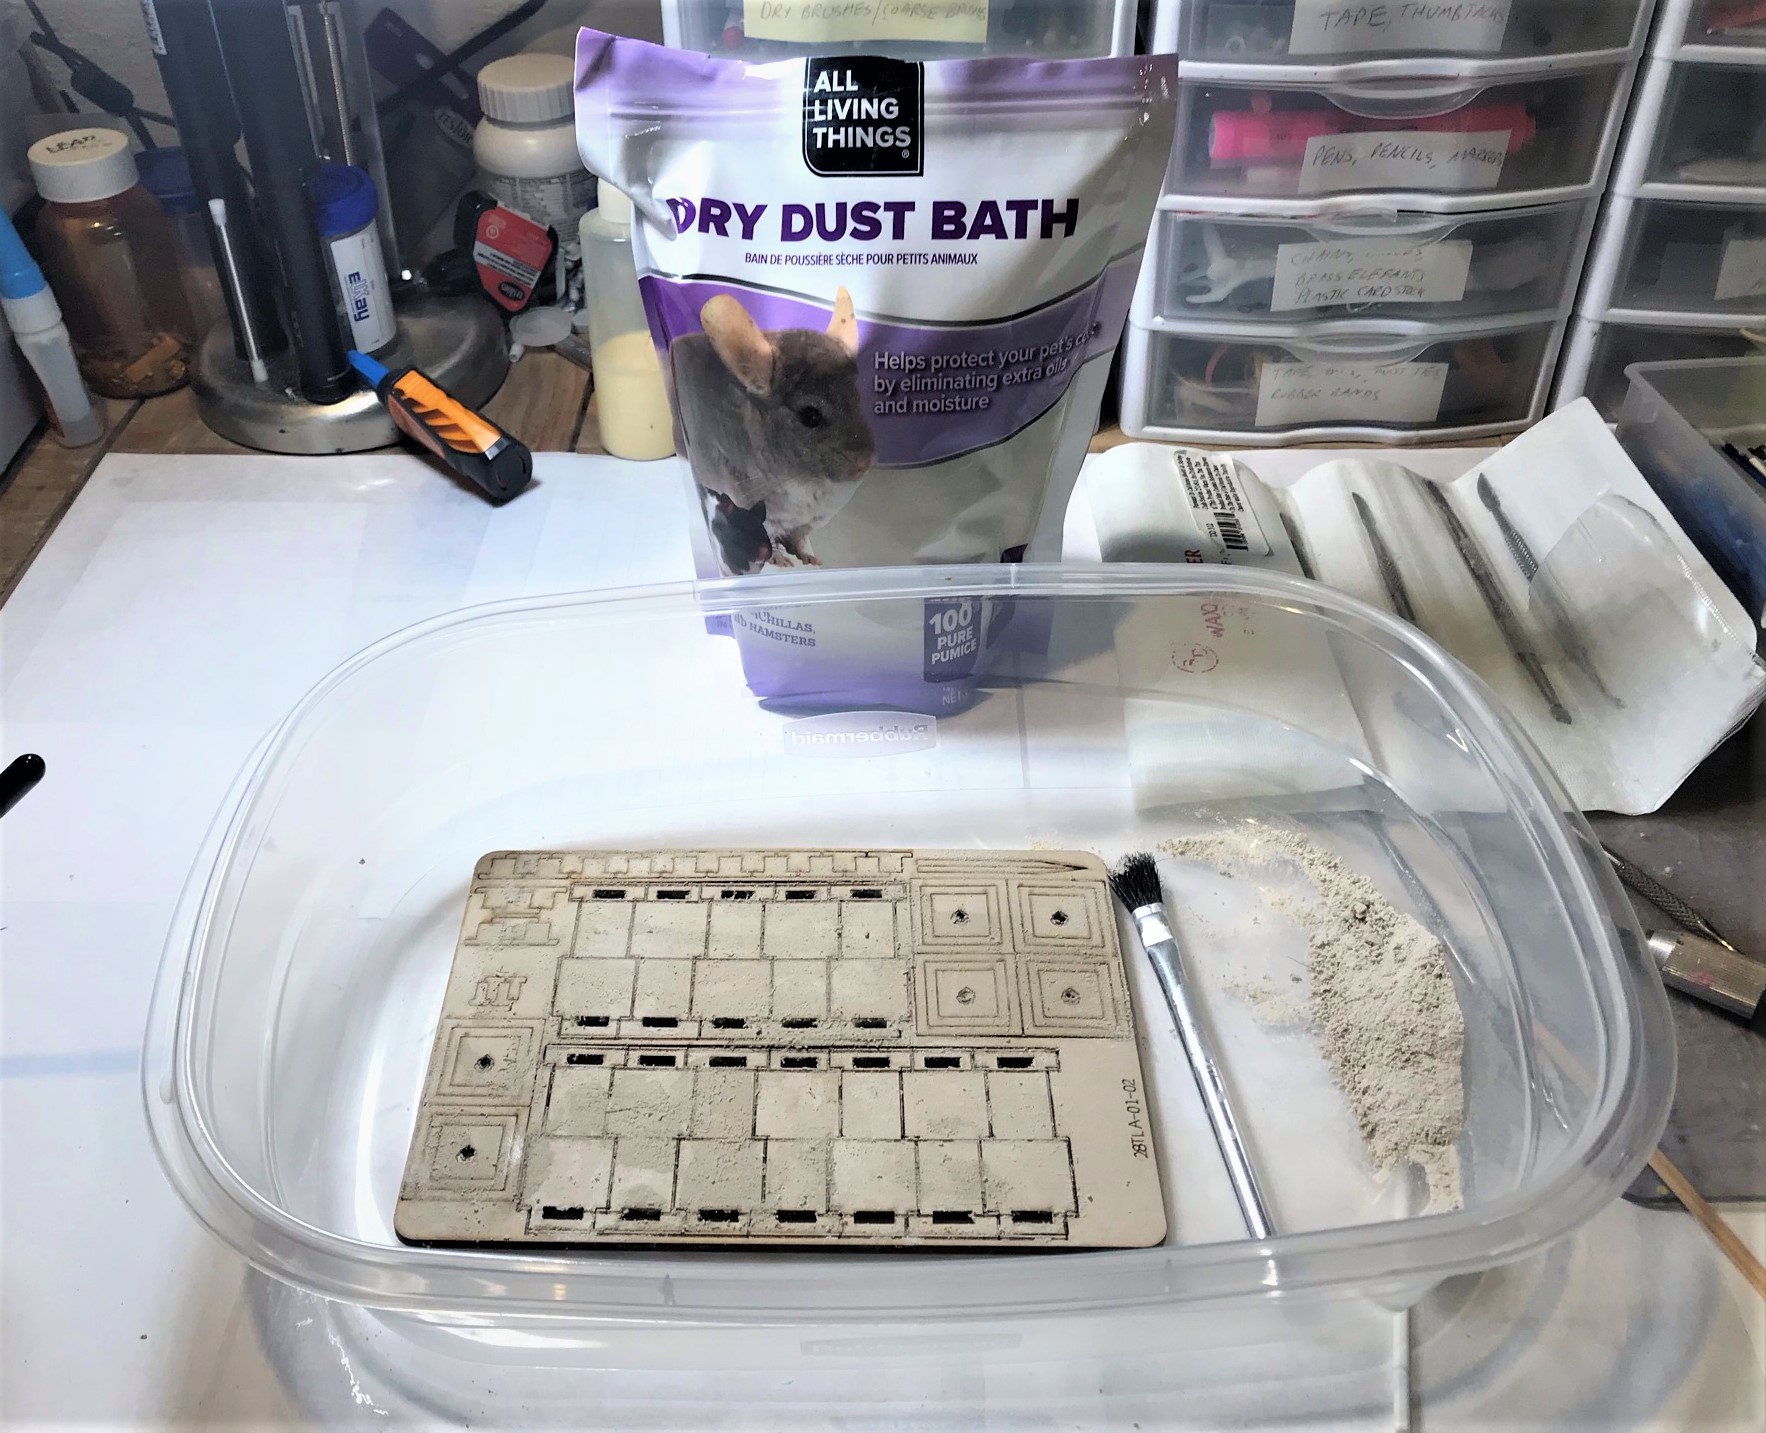
Chinchilla dust.
Yes, I had never heard of it before either. I have a 26 year old cockatiel, no gerbils or similar. You find it in the pet store – apparently gerbils and chinchillas and similar beasties bathe in dust, not water. This stuff is very, very finely ground pumice. A bag cost me $22 , and I think its a lifetime supply! Based on TIM’s recommendations and advice, I planned to try to use it to create a stone-like look. I hoped to accomplish this by using it over a watery PVA application.
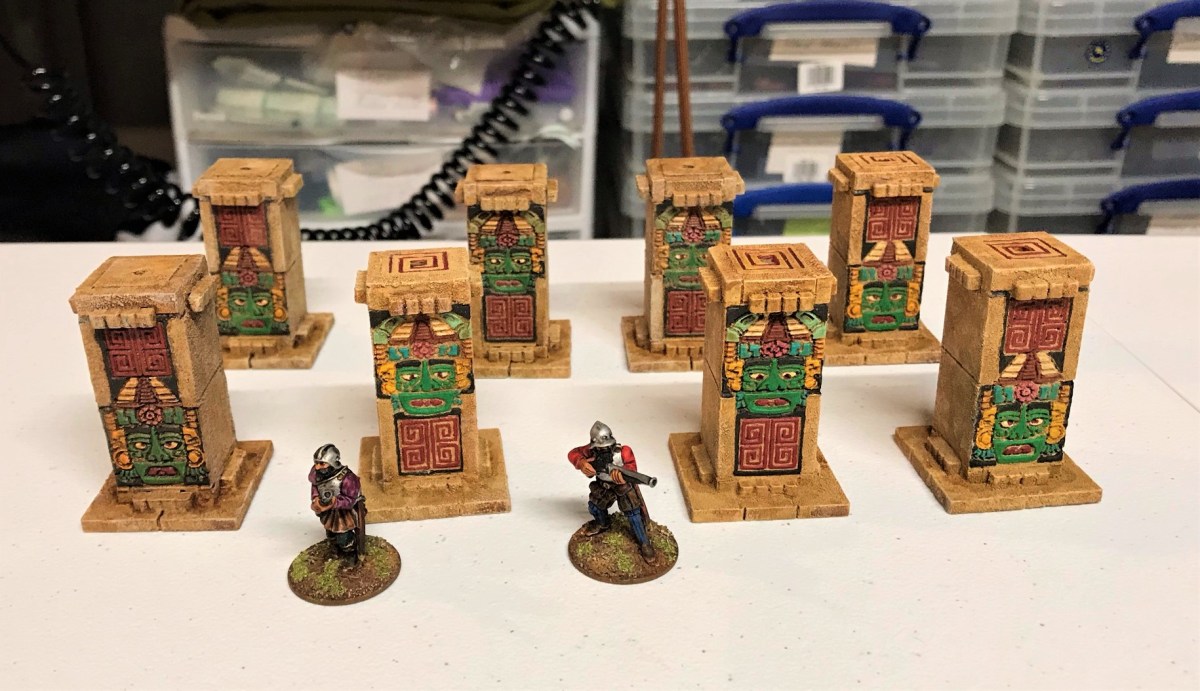
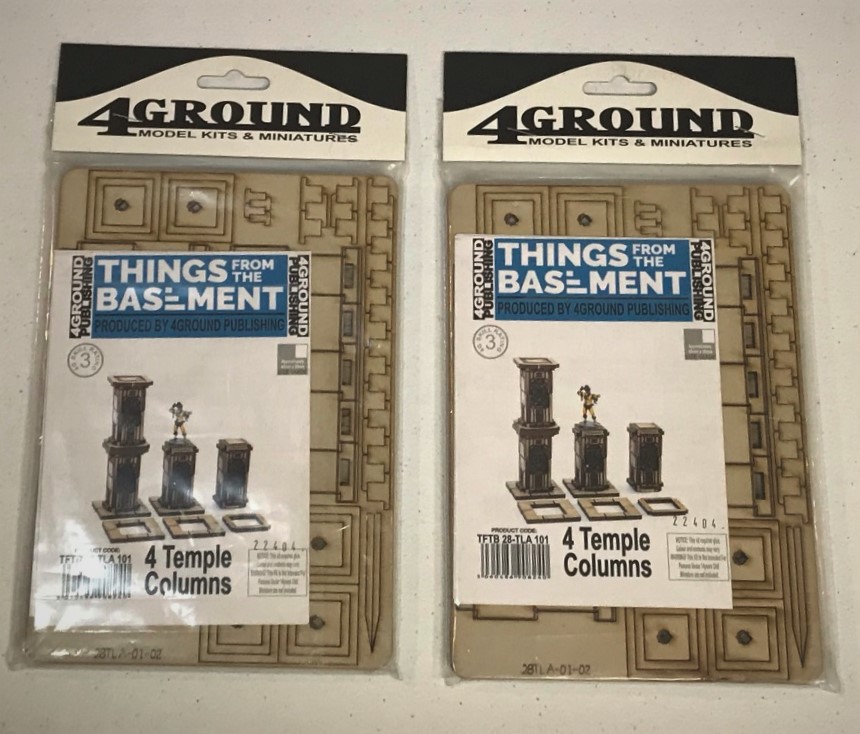
As I had two kits of the ones called “4 Temple Columns“, I thought I’d start there as it would enable me to experiment and learn for the rest of the MDF. I broke the kits into two attempts – with the first being painting and dusting the MDF on its sheet and then assembling the kit. The second attempt would be to assemble the kit first, and then dust up and paint.
The two unopened MDF kits. I decided that I would not need the columns stacked up as the single columns were sufficiently tall enough for my needs.After wiping the kit off with a wet microfiber cloth, I had this.
As stated, my first kit attempt was to paint and flock in situ as it were. I applied a watery PVA coat to the MDF, and then lightly spooned on or pinch-applied the chinchilla dust. I tried removing excess with a reusable Testors plastic cheap brush. I did this in a plastic tub so as to minimize the mess (and avoid unnecessarily ticking off the wife with the unannounced arrival of a new beach in the cellar). This was a bit time-consuming and not very efficient I found.
Here you see the MDF sheet with the chinchilla dust bag in the back. The watery PVA glue was applied with a cheap brush, and the chinchilla dust was applied with a tiny sculpting spoon or my pinched fingers. I tapped off or brushed off any excess.
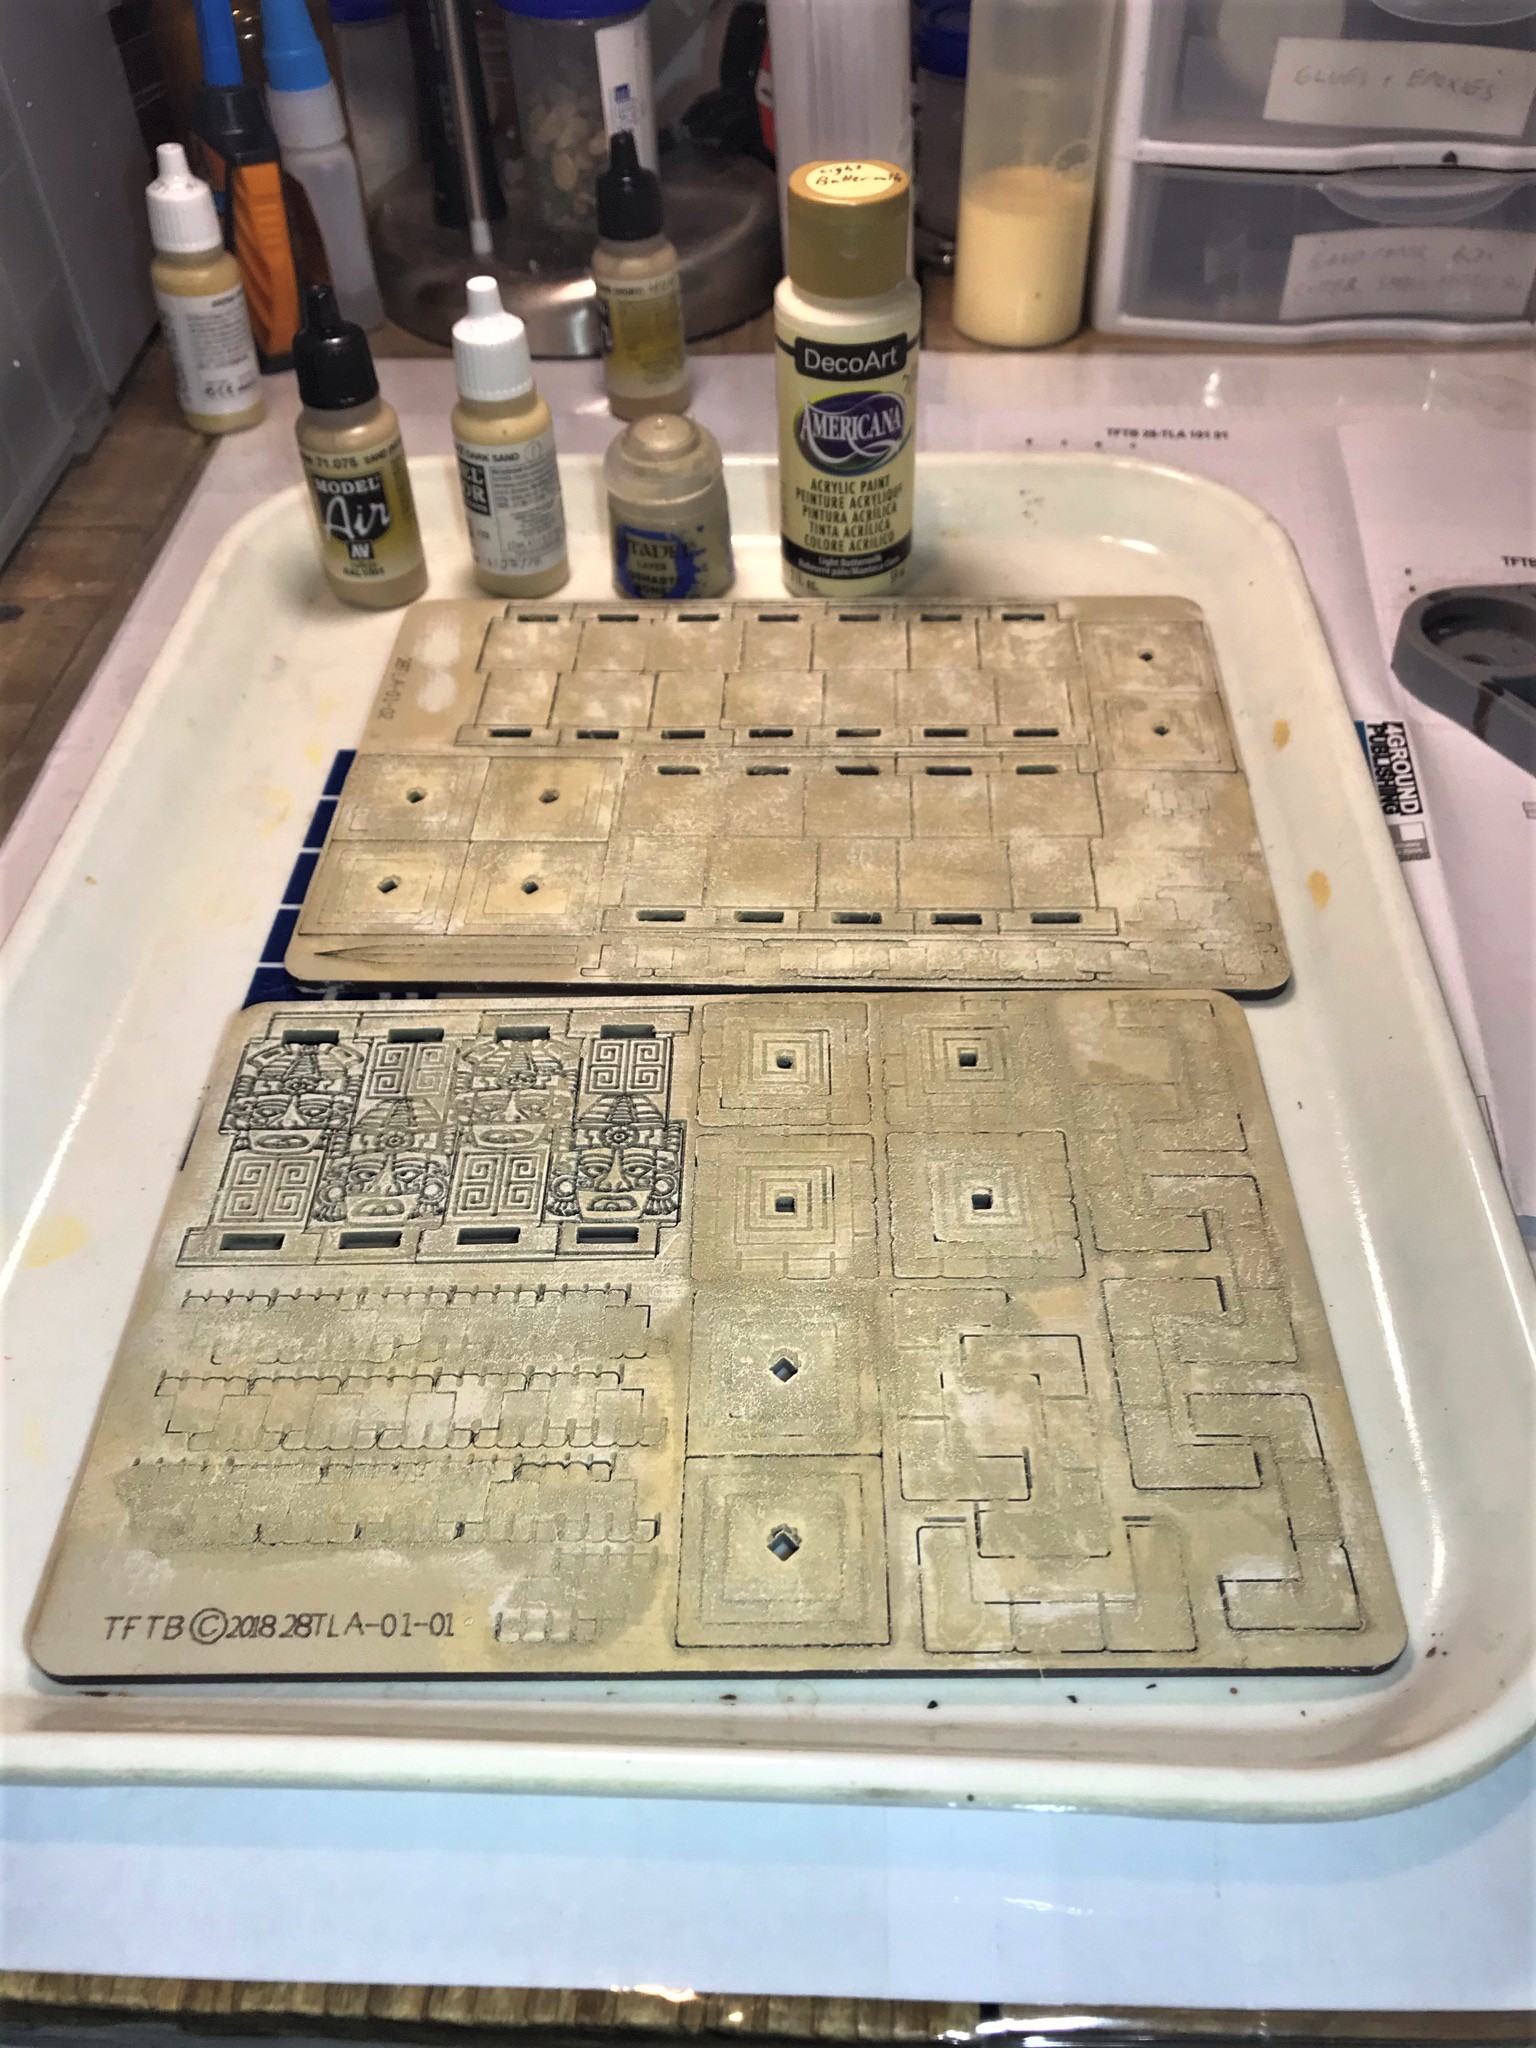
After the glue had dried, I used my cheapest airbrush (my Iwata Neo) to paint the sheet with Vallejo Model Air “Sand (Ivory)”. When that was dry and basically cured, I dry brushed the sheet serially with three colors: Vallejo Model Color “Dark Sand’, then Citadel “Ushabti Bone”, then DecoArt “Buttermilk”. I wanted to get some depth of color this way. Then I painted the idols’ faces (all paints are listed at the end of this post as references too). The main challenge I had was not to let my paints be too thin, as they could easily run via capillary action to unwanted parts of the models. Happily, the chinchilla dust is so porous that it grabs paint easily.
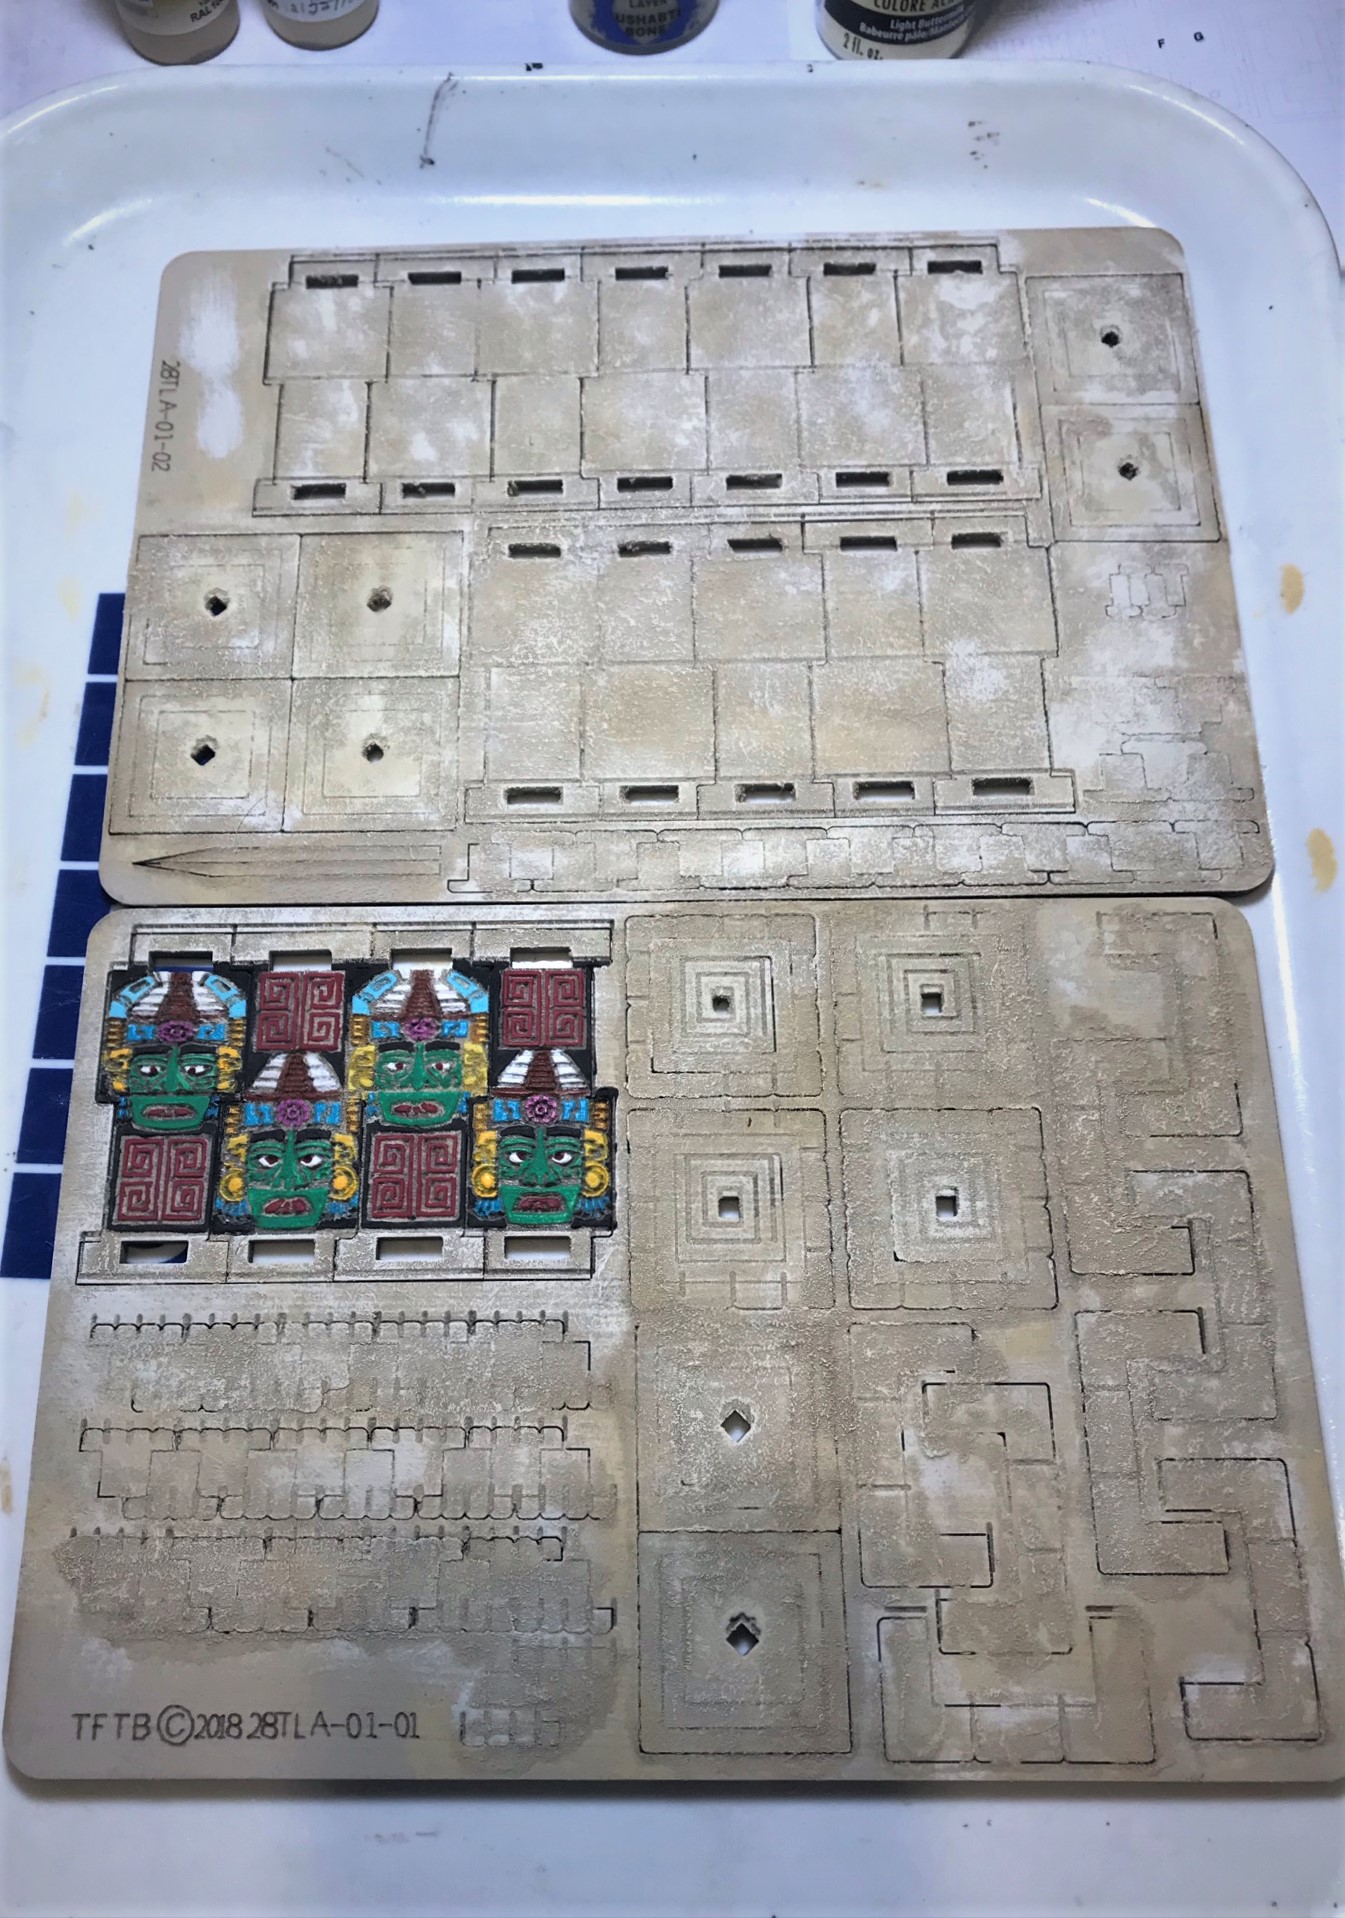
The MDF sheet after dry brushing the three colors over the base coat.Here you see the idols’ images painted. I wanted them to look well-carved but painted with primitive paints.
After painting all of it, I used Army Painter “Light Tone” over the whole of both sheets.
After the wash application.
Now, it was time to assemble. the directions were easy enough – but I discovered three issues. One was that I wasted a lot of paint and effort on parts I would not need. Second, that assembly would be complicated (just slightly) by the added thickness of the painted/dusted MDF. That was easily dealt with by an Exacto blade. Thirdly, the brown (laser-burned) surfaces of the MDF would not be the same texture and color of the rest – hardly a way to look like stone. These were the surfaces I did not get to paint by leaving the pieces of MDF on the sheets. I needed to touch all of those areas up after assembly and leaving to let the glue to dry overnight.
Assembled and left to let the PVA used in assembly dry overnight.All the brown areas needed touch up to match the rest of the pieces!I added more chinchilla dust and repeated the previous process with paint and wash. I needed an easier way!First group completed.Close up of example from the first group. I would later tone them down a bit more.
Going forward, I saw opportunities to address the shortcomings from the first go -around.
First, I would assemble first, and then apply the chinchilla dust, paint and wash. This would limit the need for so much touch up. Second, I got a small spray bottle and a cheap salt shaker from Wal-Mart to respectively apply the watery PVA glue and the chinchilla dust more easily. Both were huge improvements for round two.
Round two – let’s assemble FIRST.An example after the chinchilla dust application put on a plastic plate with poster tack in my spray booth.
I used the exact same order of paints and washes as before – and then went back afterwards with “Light Tone” to get better blending on all of them. A few bonuses here around chinchilla dust – it is so porous that it traps a lot of the paint and the wash – and it dry brushes great. You will use more paint too. Varnishing was unnecessary – a big plus!
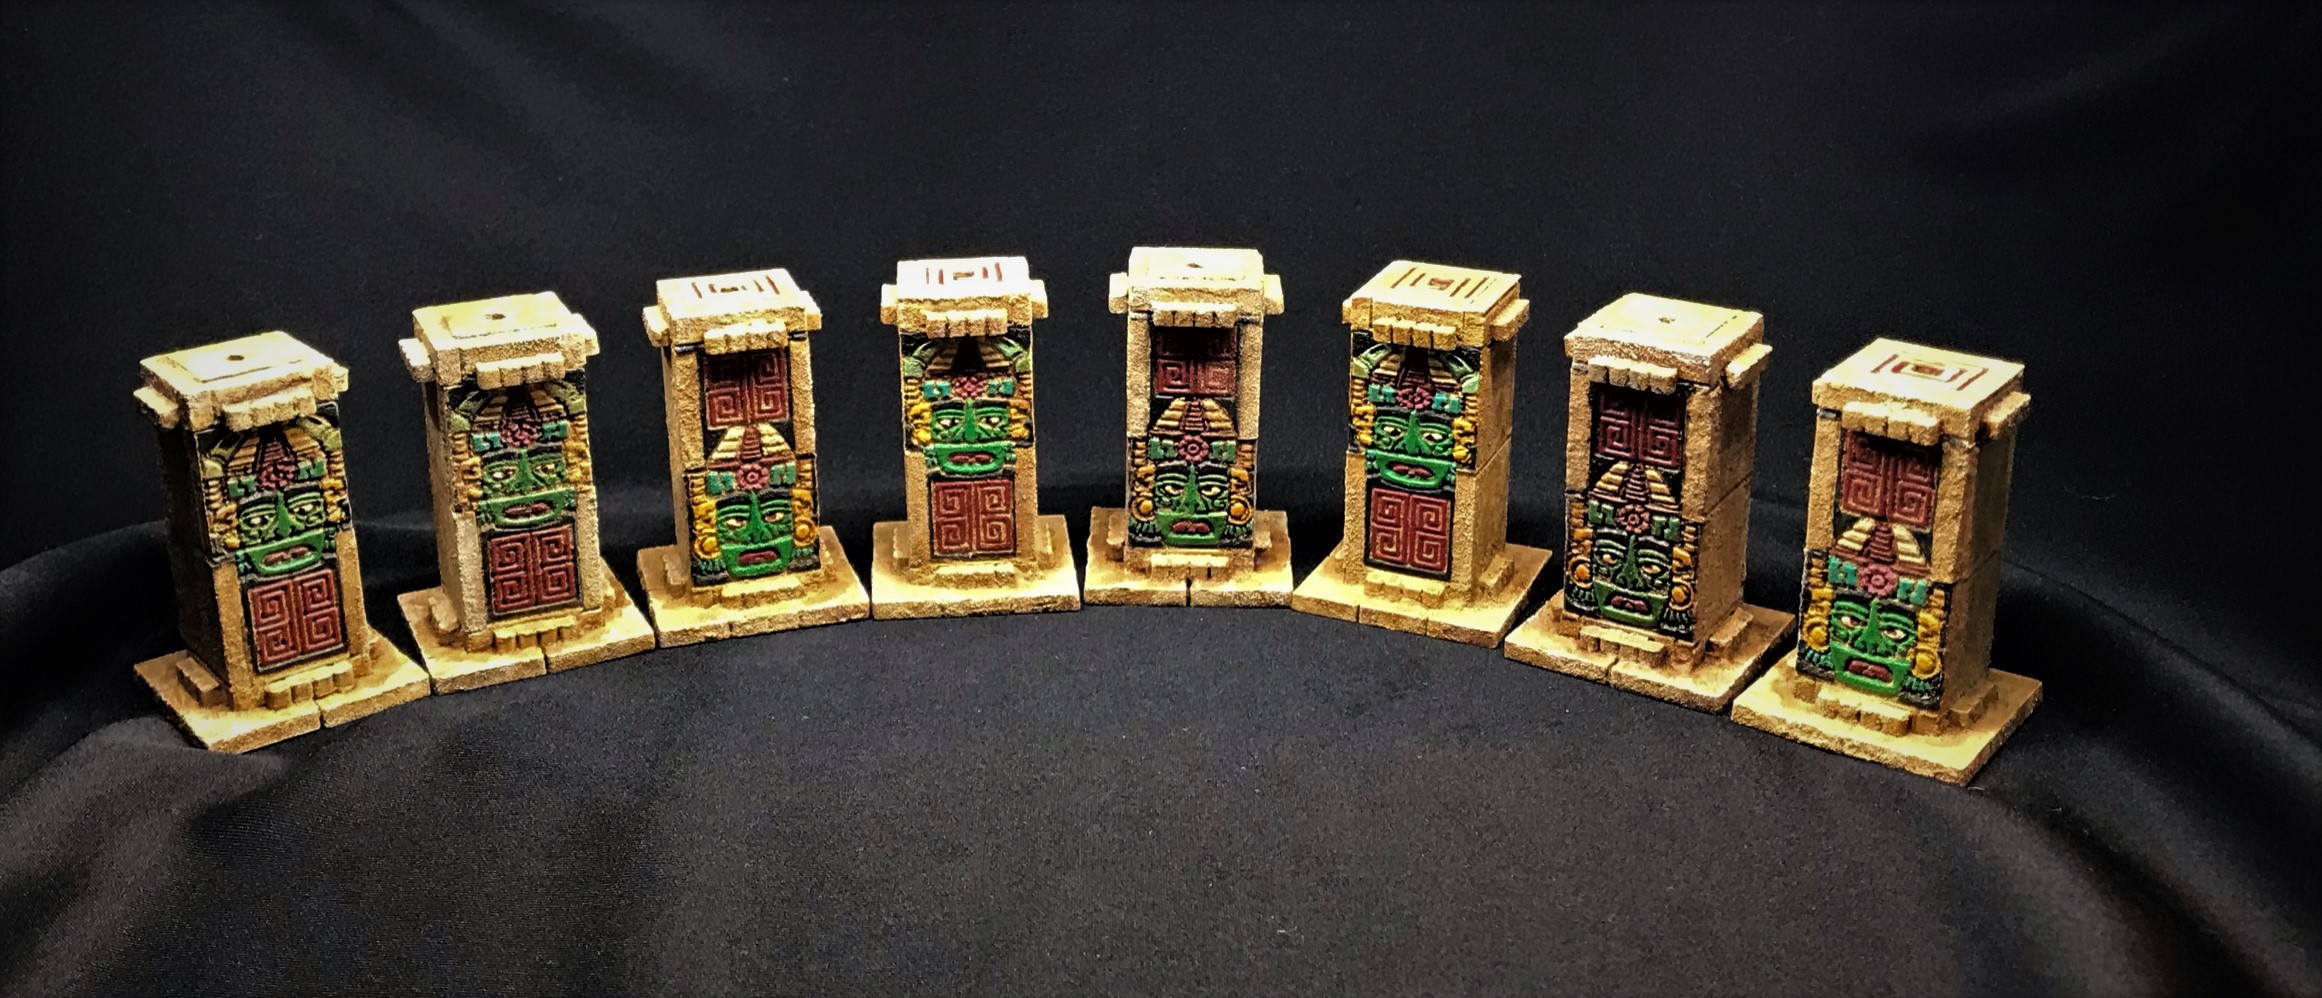
So here are the final results:
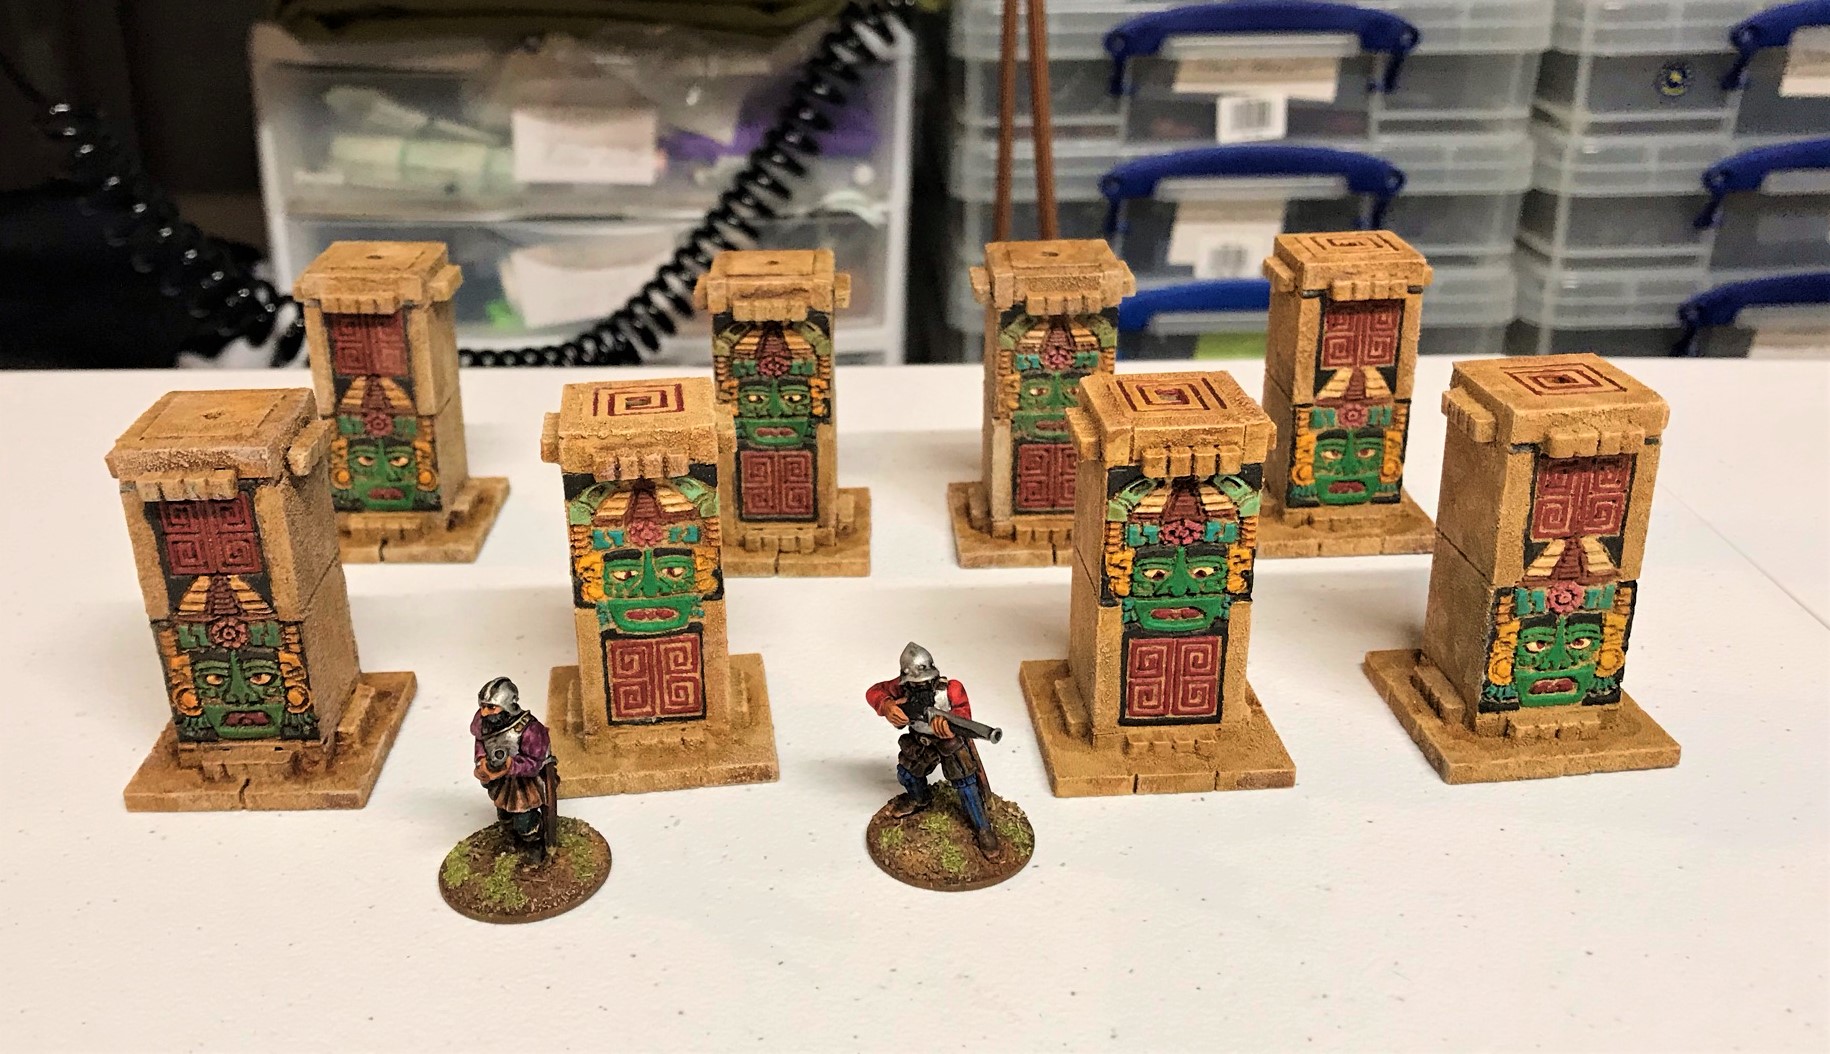
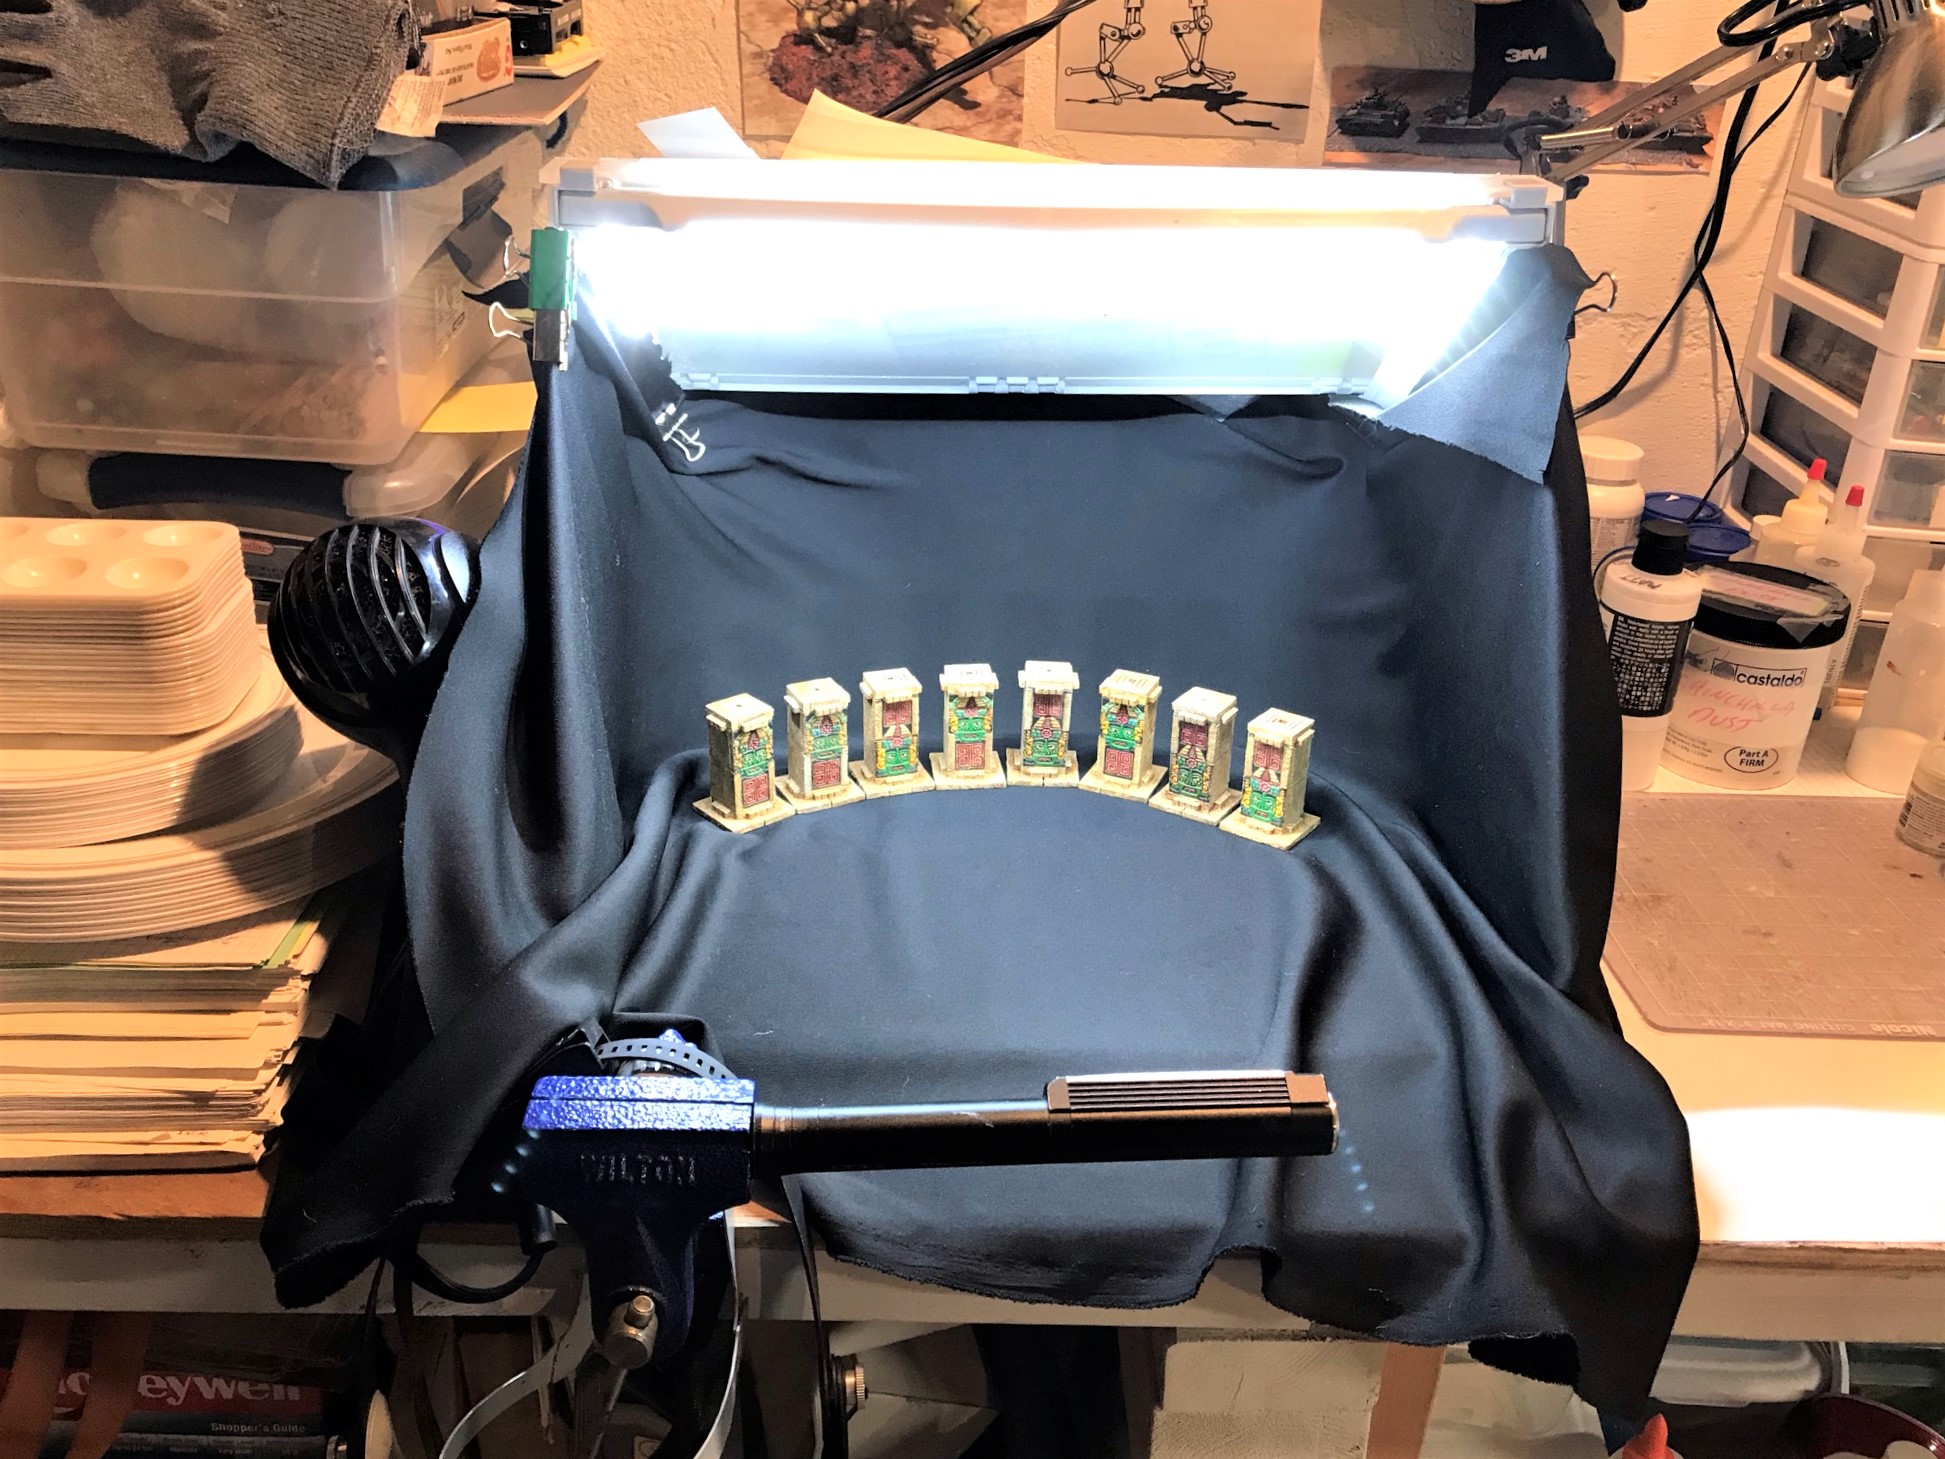
This is a shot of the first four Temple Columns that I completed.Here are all of the 8 Temple Columns. I used a different design top for the second set. The lighting here is making the tops look too shiny – see next shot – they are fine.Here is a top view. The first set tops ironically looked less “seamless” than the second set.Here you see the columns with a couple of 28mm Conquistador arquebusiers for scale comparison out of the booth.
I did use a new setup for photos here – got some black fabric to put in my spray booth, binder-clipped it, and add a flashlight – et viola. My previous Sonoran Desert background would not have worked well. I probably need to put a filter over the spray booth light next time as the light was too bright – even with editing.
Perro de Guerra (Conquistador War Dogs). 13 figures total: Outpost Wargames Services #CONS6 “War Dogs” (8 war dogs); Eureka #100CON13 “Dog Handler and Dogs” (1 dog handler/pikeman and 4 war dogs)
Conquistador Foot Command, Crossbowmen, and a Couple of Officers. 11 figures total: Outpost Wargames Services #CONC1 “Conquistador Foot Command” (a leader, a banner bearer, a drummer, and a bugler); Eureka #100CON04 “Crossbowmen” (5 crossbowmen); and Eureka CONC1 “Conquistador Officer” and an unknown SKU officer (2 officers)
Welcome to Mark’s Building Challenge Contest – a FREE chance for you (with no work at all except to follow my blog and guess correctly) to join me on the next leg of my Spanish Conquest journey for my 16th Century game supplement forFeudal Patrol™ – “Civilizations Collide” . Actually, as my supplement covers pre-Spanish contact, it really is a focus on Mesoamerica and South America.
The upside for you? Well, besides getting to be a follower of my blog – which I (somewhat humbly) hope is a bonus in and of itself – you will have a chance to win – yes WIN – some free stuff (miniatures or a game – see below)! This is my second giveaway contest – the first was well-received and you can see the winners here. As before, followers of this blog (either email OR WordPress) are eligible).
The upside for me is that I will get a bit more motivation to get these buildings done – and hopefully done well for the tabletop and to pass your scrutiny. Plus it will be fun. I’m hoping that I will (and many others) be able to soon get what the Brits are calling “the jab” and return to more gaming. Having these buildings done would be the icing on the cake. I also would be able to find new homes for the prizes, which are indeed nice (ask last contests’ winners Pete, Mike, and Leif).
As for this contest – read on!
Just like before, I thought this would be another way to get you involved on this project other than just reading this blog. You get to compete and guess the date that I’ll actually finish the buildings!
I am writing this on March 23rd, 2021. I have not done ANYTHING with this stuff except to take the photos of them. I’ll need to wash and assemble and paint and base and anything else I feel is needed for this stuff. My experience working with resin is ok – see here, here, and here. My experience with MDF is much less – see here. I expect to start work TODAY, March 23rd, 2021 .
How long will this take – YOU get to guess.
My goal is to have some fun, and reward my followers and share some stuff that I enjoy. Secondly, it’s to get more followers and to grow the community. Thirdly, it’s to have fun (yes that’s fun twice). I do not currently monetize my blog, and I’m not looking to anytime soon by the way. Here are the rules – please note the underlined parts:
Rules of Mark’s Aztec Building Challenge Contest:
HOW TO ENTER AND TO WIN:
You must be an email or WordPress follower of my blog.
You must pick a date (day, month, and year) that I will finish all of the Aztec Buildings shown here in this post. Finishing means, to me, that I am ready for the figures to be shown on my blog and used in a game. That is my call!
You must let me know that you want in on the contest by midnight EDT (US East Coast time) on April 10th, 2021. You do this by posting a comment that “you are in” here on this blog post in the comments section with the date information requested above in (2).
Only one entry allowed per follower except as described in (5) below.
If you get another person to follow my blog, you can earn another entry! For each new follower that credits you as a referrer, you can get another entry. All that person needs to do is comment on this post as in (3) above stating that he or she is “in” and who the referrer is. The referrer can then reply to that comment with an additional entry date.
Winners will be whoever is closest to the date I announce as the “completion date”. That can be earlier or later – for example picking a date that is one day before is as good as if it’s one day after. As there are multiple prizes, 1st place gets first choice, then 2nd, then third – and this time there is a 4th place! (Yes, I’m generous, eh?) If two people pick the same date, which is possible and allowed, ties will be broken by who submitted the date first. I reserve the right to add more prizes!
I also reserve the right to be the final judge on the contest – somebody’s gotta do that. When I finish, I will announce the winners.
So as for prizes, they will include metal miniatures, plus a brand-new shrink-wrapped unopened game is available that I will never get my wife to play – so it needs a new home. The minis are all vintage lead – and in original packaging. Great stuff I love but may not be able to paint soon – and they also deserve a home. First place gets first choice, and so on. And I will pay to ship them to the winners (including the US, UK, Australia – as long as I don’t need to hit the lottery for shipping)! So here are the current four prizes (and I may add more):
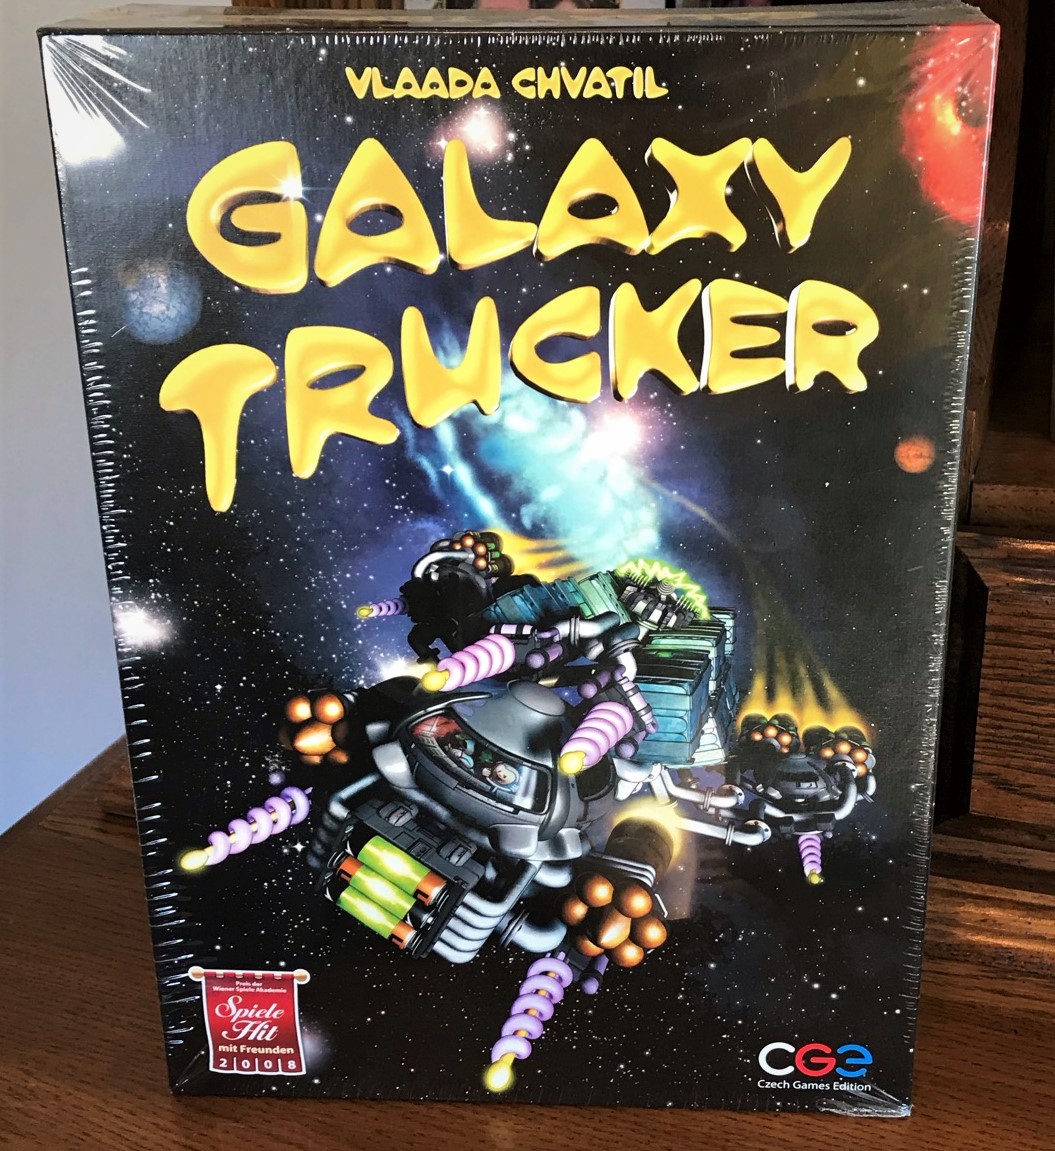
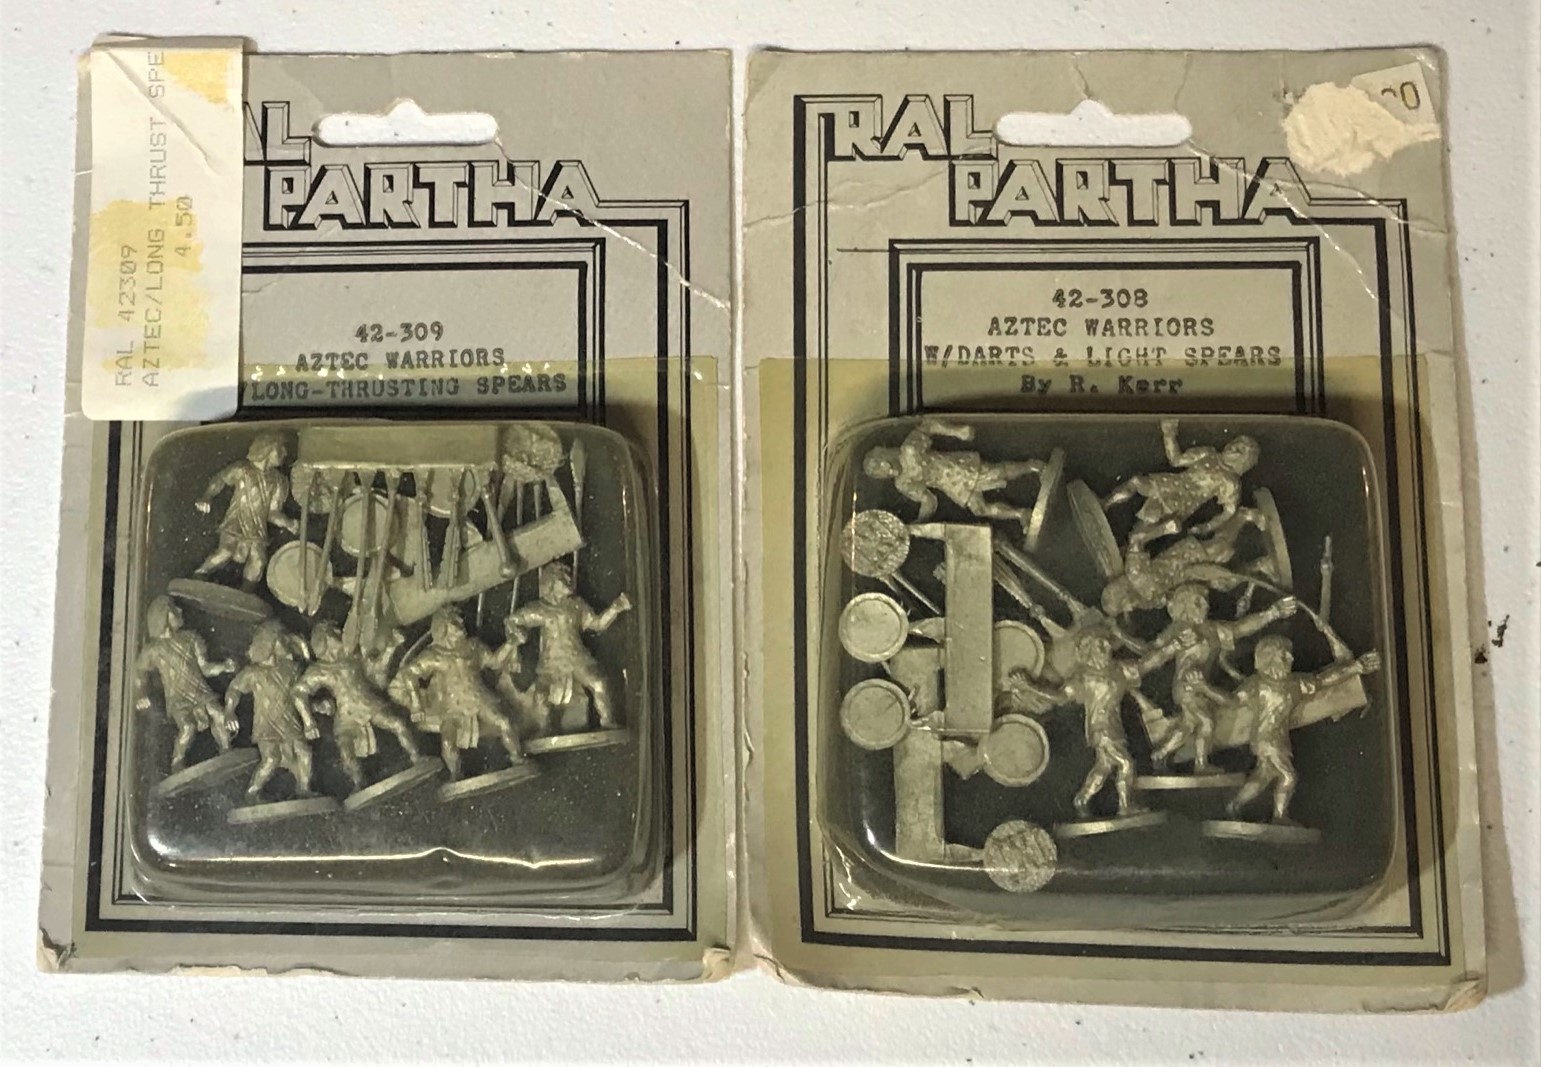
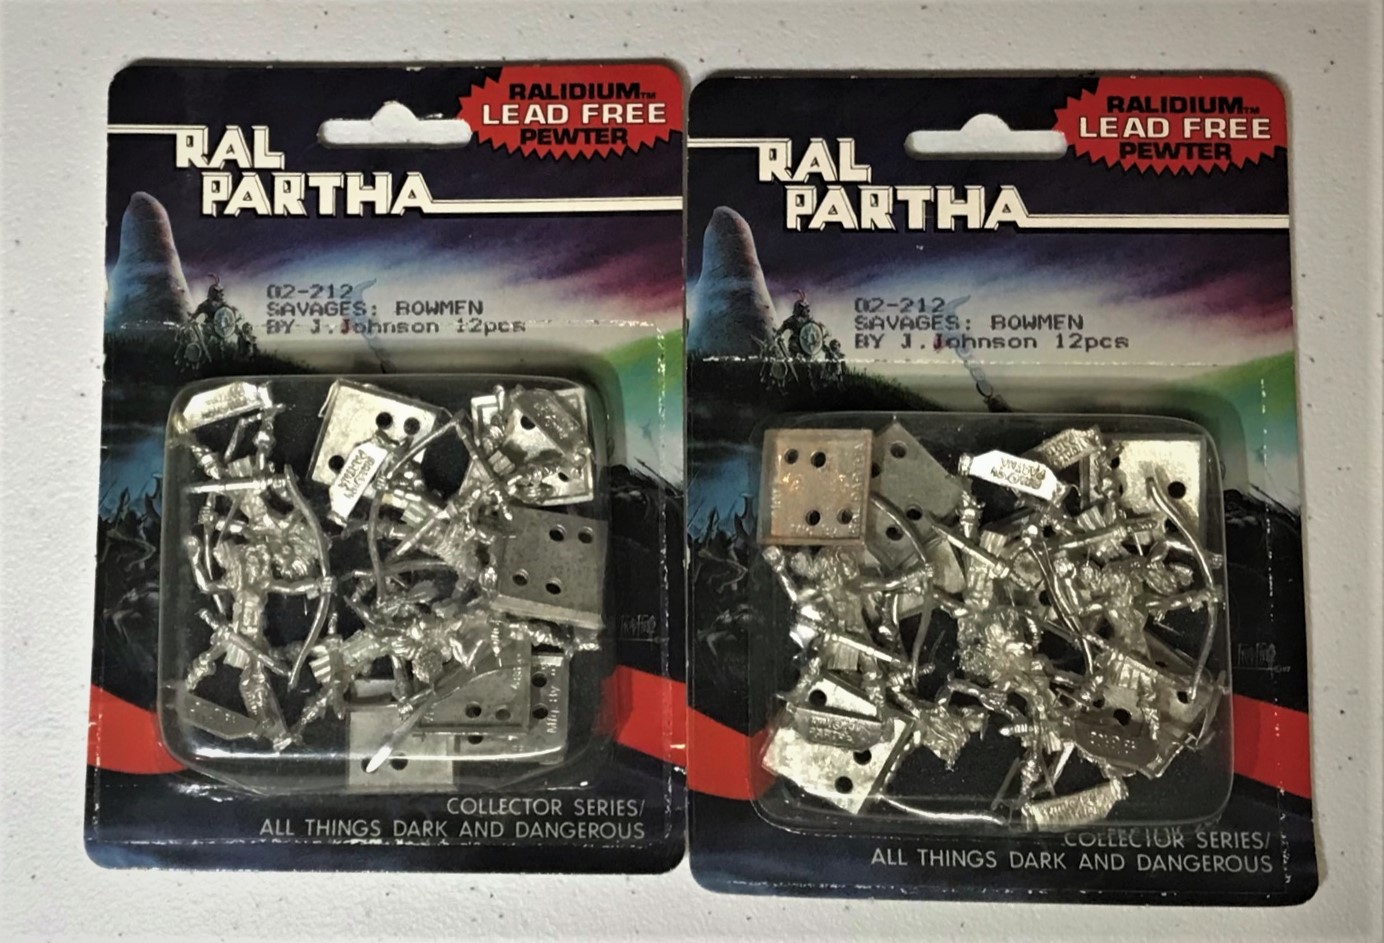
I won this Galaxy Trucker game at TotalCon last year – the wife won’t play! So maybe you would if you win? Never been opened and still in the shrink wrap. A three blister prize! Ral Partha 42-301 Aztec Generals, 42-305 Aztec Arrow Knights, and 42-309 Aztec Warriors w/Long Thrusting Spears (really tepoztopilli). 18 figures in total. All are unopened from the 1980’s. Works for 25mm or 28mm scale games. A two blister prize! Ral Partha 42-309 Aztec Warriors w/Long Thrusting Spears (really tepoztopilli) and 42-308 Aztec Warriors w/Darts & Light Spears (really atlatl) . 12 figures total. Both are unopened from the 1980’s. Works for 25mm or 28mm scale games. A two blister prize! Ral Partha 02-212 Savages: Bowmen (2 blisters – 12 figures total). Both are unopened from the 1990’s or early 2000’s. Works for 25mm or 28mm scale games.
Again, depending on participation and interest – I may add more. Hell, even if you win and don’t have a plan for them, these could be used as trade, or you could just tell me that “victory is enough” for you and to reward the next player or whatever you desire.
Your next questions should be – “what exactly is Mark trying to build and paint here?” and “how fast is he?”. For the second question, just check out my pages that show my previous projects. For example, 2021 is here, 2020 is here, and 2019 is here, but I list all my projects from 2016 onward under the “Miniatures and Projects” dropdown. This menu lets me track all I have done – and how, and can give you an idea.
Back to the contest. Here are the Aztec buildings (with links in the captions) of this next quest and this contest below. They are all scaled for 28mm. The resin buildings are from Acheson Creations, and there are 6 of them plus a group of scatter terrain that Acheson nicely threw in with my order. The MDF structures are creations from Things from the Basement creations via 4Ground via Badger Games. There are 7 kits of MDF.
So, for now that’s the contest. I hope that you will enter and wish you the best of luck! Referrers are always welcome – just need to follow the rules and importantly be one of my blog followers – like the rules said!
For full disclosure, I have conferred with TIM on the resin and the MDF – and he gave me a few helpful pointers. He also pointed me in the direction of a nice Sarissa book on MDF that is very helpful. I’m sure he will join in the contest but that might change the dates you pick – or not -it’s up to you!
Stay tuned for updates as I finish pieces of this project – and I really hope that you find this fun. As I have been doing, I’ll leave a synopsis as usual like below. Stay safe and enter in the comments section!!
Miscellaneous details and references for those interested in that sort of thing:
Previous posts on games, units, and other projects for my 16th Century Spanish Conquest supplement for Feudal Patrol™ – “Civilizations Collide”
Mark’s Aztec Building Challenge Contest (this post)
Perro de Guerra (Conquistador War Dogs). 13 figures total: Outpost Wargames Services #CONS6 “War Dogs” (8 war dogs); Eureka #100CON13 “Dog Handler and Dogs” (1 dog handler/pikeman and 4 war dogs)
Conquistador Foot Command, Crossbowmen, and a Couple of Officers. 11 figures total: Outpost Wargames Services #CONC1 “Conquistador Foot Command” (a leader, a banner bearer, a drummer, and a bugler); Eureka #100CON04 “Crossbowmen” (5 crossbowmen); and Eureka CONC1 “Conquistador Officer” and an unknown SKU officer (2 officers)
And for my blog buddy IRO, as it’s still March, here’s another t-shirt shot – well it’s still cold, so he gets a sweatshirt shot. It’s a Massachusetts outline with a Boston Bruins logo in different colors. Normally the Bruins (my favorite hockey team) colors are Black and Gold, but my lovely wife wanted me to have something other than those colors – so Red White and Blue are ok too!!
It’s my blogaversary! I started this blog 6 years ago today on March 19th, 2015!! It all started with this post – The Story of the Nightmare Legion. It’s been a fun journey.
I started this blog to share my minis and to share stuff that I learned after an extended absence from the hobby. I wanted to help with lessons learned and the like. Since then it’s been a blast, and I really appreciate all of you who read and follow this little blog of mine! I certainly have been inspired by yours.
This current post was one with which I struggled as far as deciding on whether or not to do write it as it involves making stuff to make my games easier for the players and for me as a GM. In the end, I was encouraged to give it a go (thanks IRO and TIM!). So, this post will be more of a how to (and a throwback to some of my earlier projects) in terms of stuff I have conceived of, designed, and built for my Feudal Patrol™ games using my supplement Civilizations Collide. After reading this, you might have some new ideas, you might know about some new materials, or you might just think that I am nuts. After all, the stuff I will show took 3+weeks to make.
Now, before I go any further, I want to emphasize that I did not need to do any of these projects to play Feudal Patrol™. Period. I did because they suited my personal needs and – well – I get thoughts of stuff in my head that need realization.
Buck’s Feudal Patrol rules have more than adequate tools and game aids. They are fantastic. My goals here were for myself so that I can make my games easier for me mainly. Also, with 216 available figures for a game of Civilizations Collide, I needed some tools if I am going to provide CHOICE and AGENCY to my players.
To accomplish this, I have broken down my efforts into “challenges” with some supporting pics and links for the materials and tools. I hope that you find them interesting as they are really how I built “stuff” for my games.
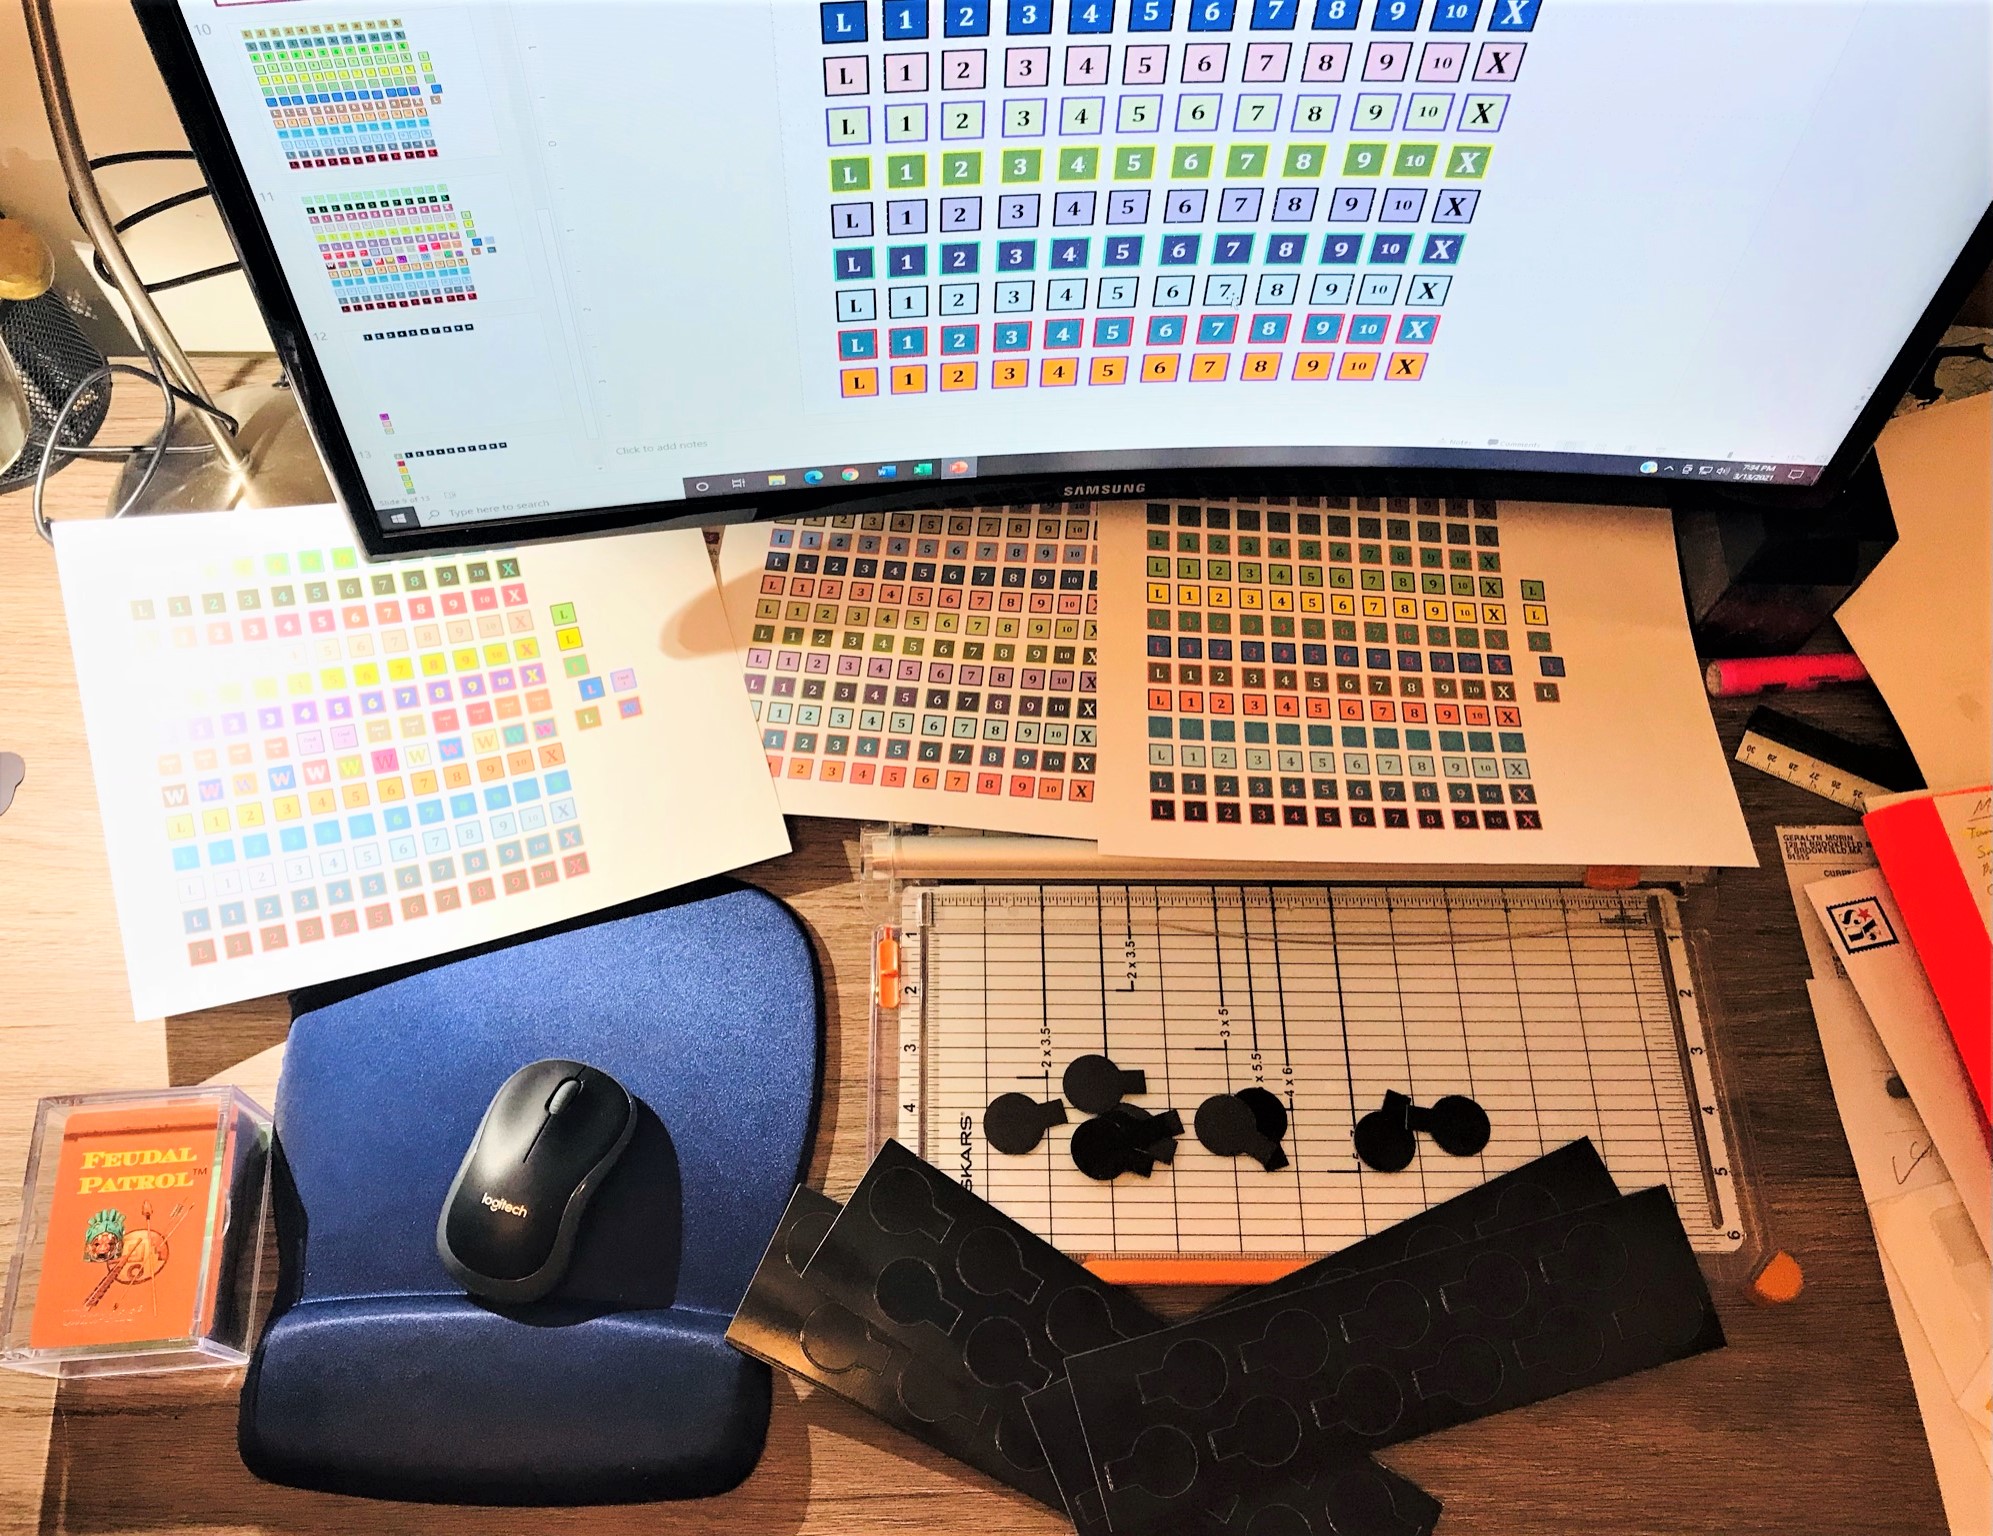
The Under-Base Label Challenge
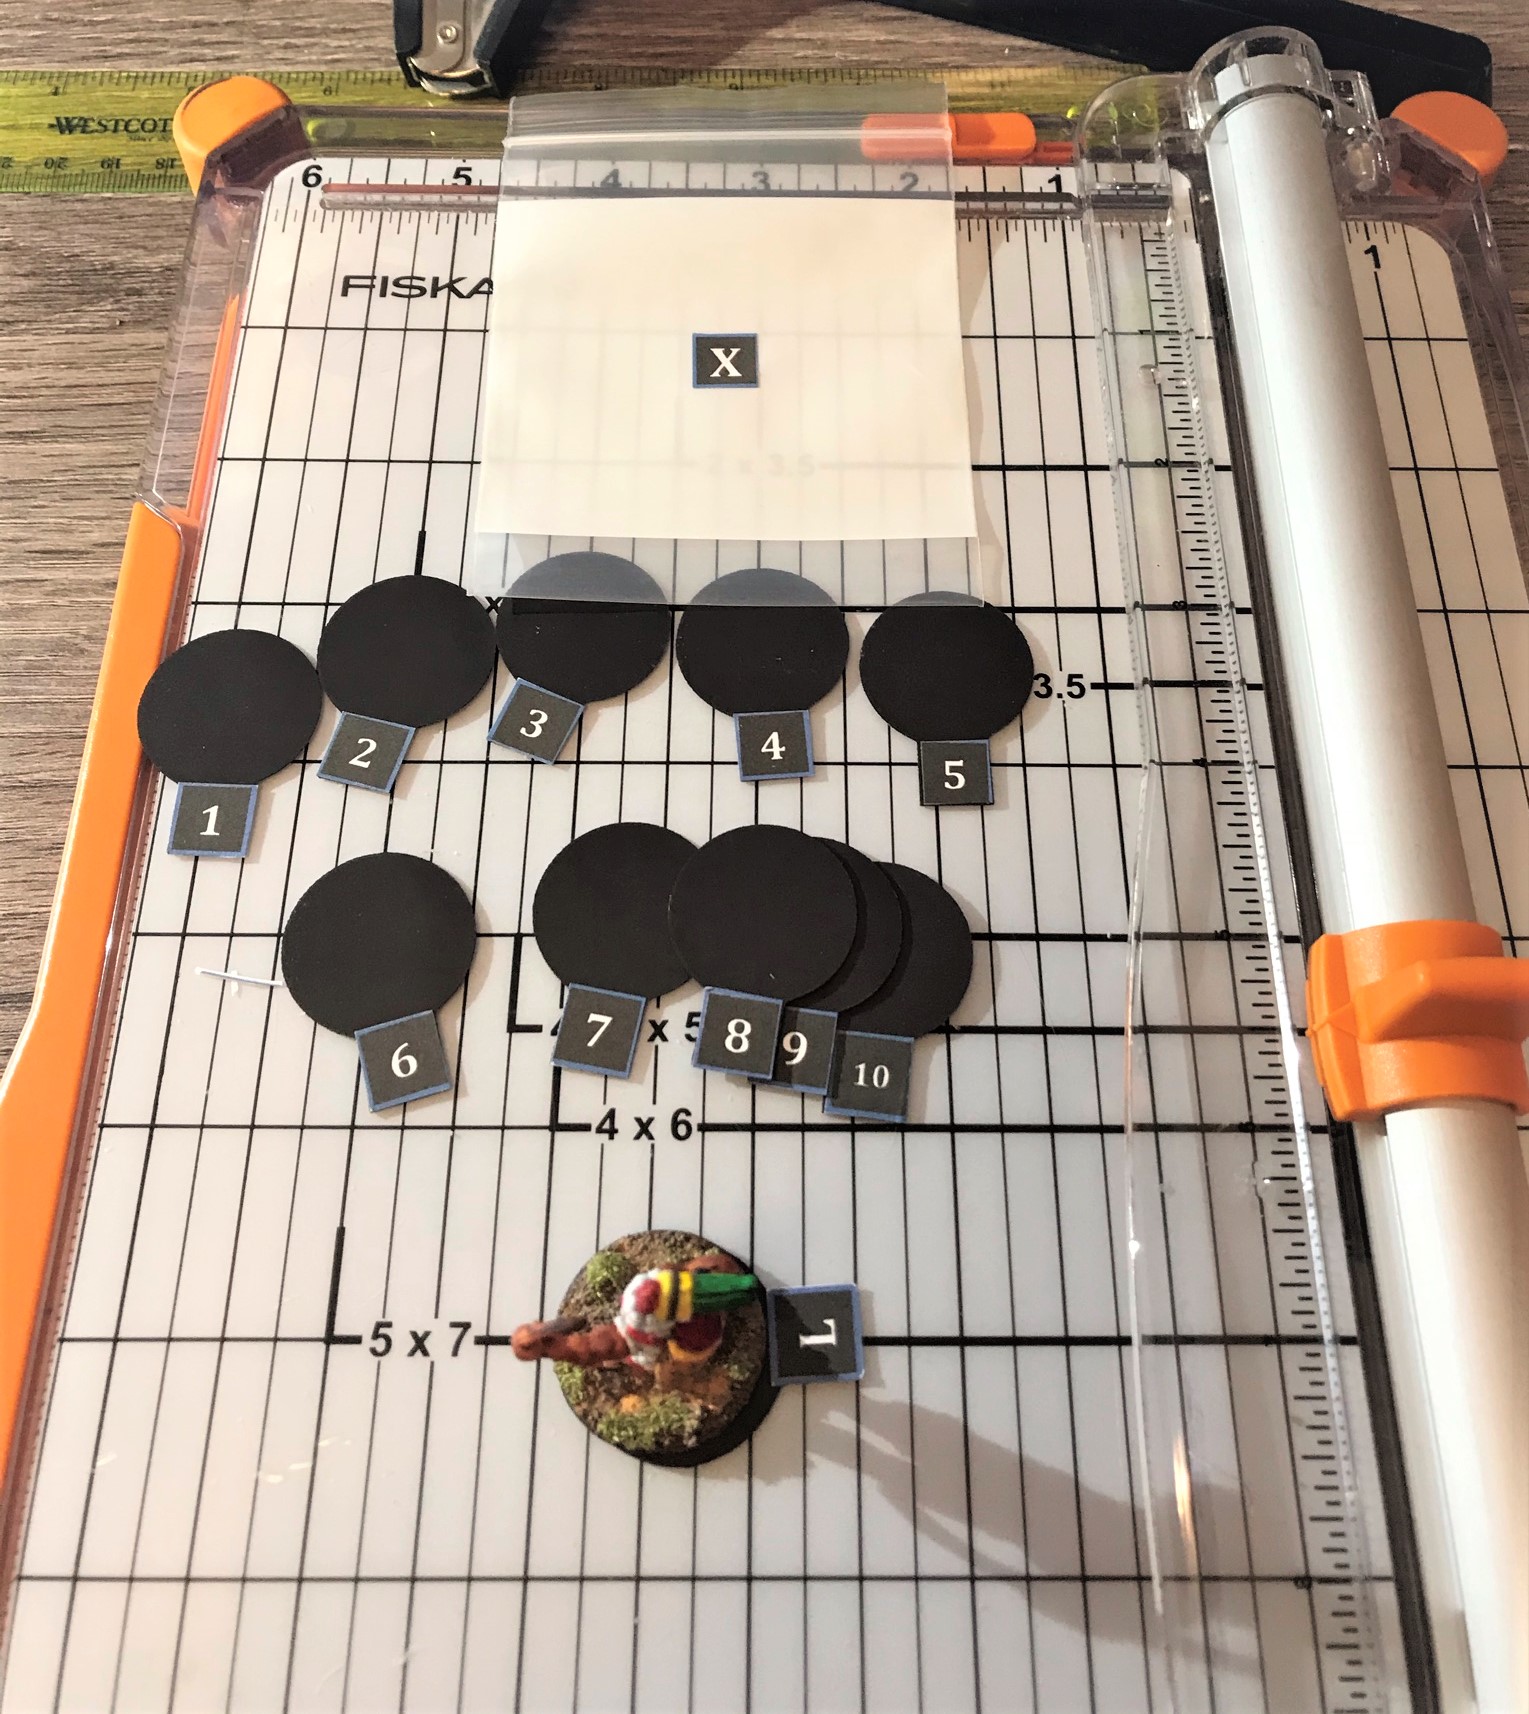
Challenge: The Conquistadores arrived in Mesoamerica in the early 16th Century and there had been many different Mesoamerican civilizations for centuries prior to that. “Uniforms” in this era were anything but uniform. In the game, Warbands and Elements within Warbands are composed of figures that are attired, armored, and armed differently. In terms of both figure identification and using the points system to build Elements and Warbands, this poses a challenge, especially with my 216 available figures. Having thought of this from the beginning of this project, I had kept an identification Excel spreadsheet for all 216 figures throughout the project – which helped immeasurably with having identification data for each figure. I did take many pictures and also wrote (somewhat illegibly as is my curse) on the bottoms of the figures’ bases with a Sharpie. However, I needed a clear and legible solution for the tabletop.
Goal: Make all figures easily and individually identifiable. Ideally, have a system that identifies each figure and the points cost for each under the 1” and 1.25″ steel washer bases.
Solution: Create custom labels for use under the 1” and 1.25″ steel washer bases.
Process: Using PowerPoint, I designed a ¾” round label that has both the figure identification number and the figure point value on it. I cut and pasted additional circles and aligned them on the sheet for future removal. Alignment of the circles and editing them was easy with PowerPoint – and was very helpful in later steps with the paper trimmer. I filled one sheet or slide in PowerPoint full of the circles. At that point all I needed to do was to copy that entire sheet and make a second sheet, and so on. This enabled me to edit each circle on the subsequent sheets for all 216 figures. I inputted the figure numbers and the point values from my master spreadsheet onto the circles. I used a color code for the round labels by type – grey for the Conquistadores, gold for the Aztecs, and red for the Tlaxcalans. I also used a thick point circle on the border of the circles – I used 1.5 but I could have gone thicker. The thicker borders help with aligning them for punching out later. I then printed off the sheets of labels on Avery™ #8165 8.5” x 11” Trueblock® shipping labels that I bought at Staples. I took each sheet and used my Fiskars® SureCut™ Deluxe Paper Trimmer (from Michaels) to cut thin strips holding multiple labels. This made punching out the labels easier. I used my 5/8” punch from Michaels (Lever Punch, Circle by Recollections™), punch out the labels. Even though the punch was 5/8” versus the 3/4” circle – they aligned better – as the thick point border helped me to position the strip. The punch has a clear underside so you can see if you are aligned or not. I affixed the labels to the underside of each base of each of the 216 figures. I store and transport my figures in 11-liter Really Useful Boxes (which I bought from Staples but this UK company has their own website too in the US) lined with Aleene’s® Magnetic Tacky Sheets™ (which Michaels sometimes carries too). The labels did not impede the magnetic attraction that I needed because they were smaller in diameter than the 1” bases – and were centered on the washers – leaving enough steel available to get a “bite”.
End result: Every figure now has a printed label with its ID number and point value printed on it underneath as you see below.
Printed off labels shown here in front of my PowerPoint design. Note the hole punch – trimming these with the Fiskars trimmer made punching them a breeze. (As if punching 216 labels could ever be considered a breeze!)Example of the under-label of a Conquistador Sword & Buckler Man figure.
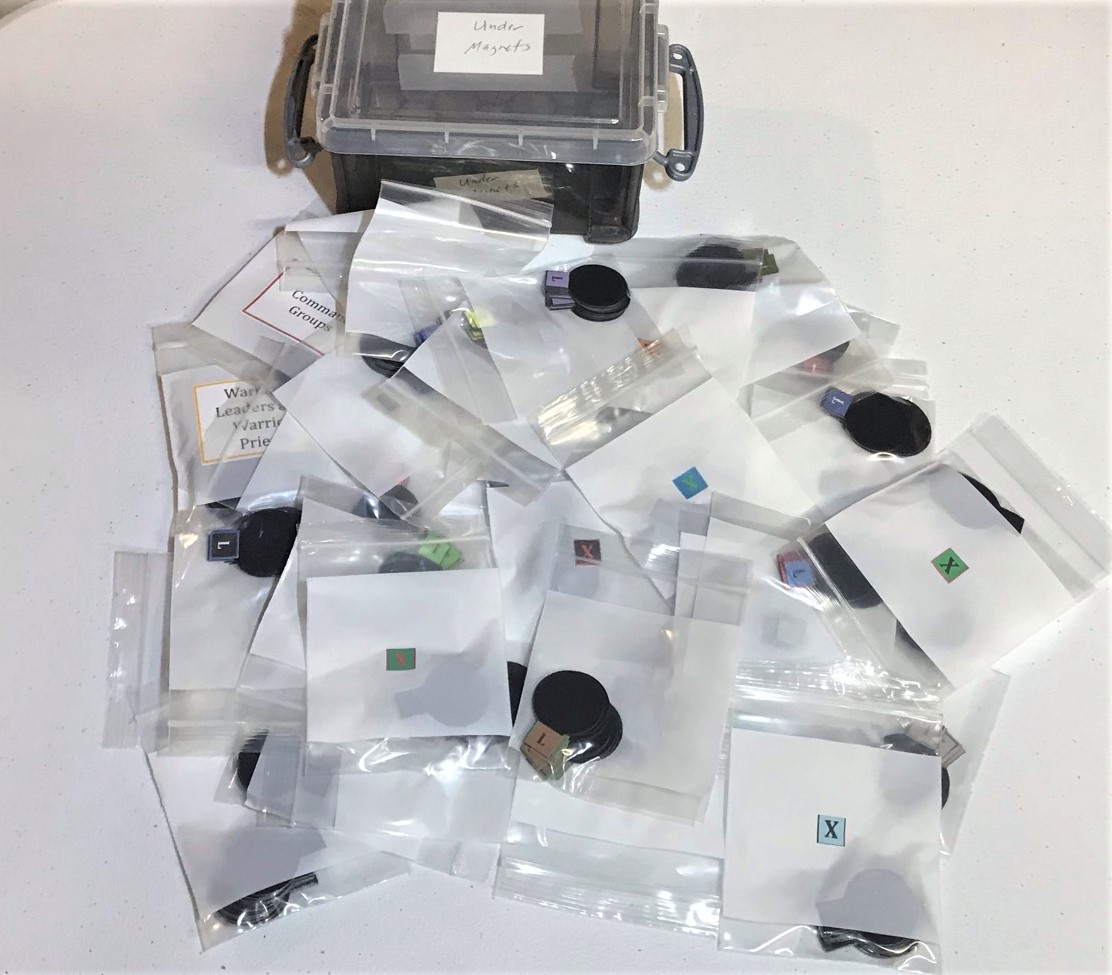
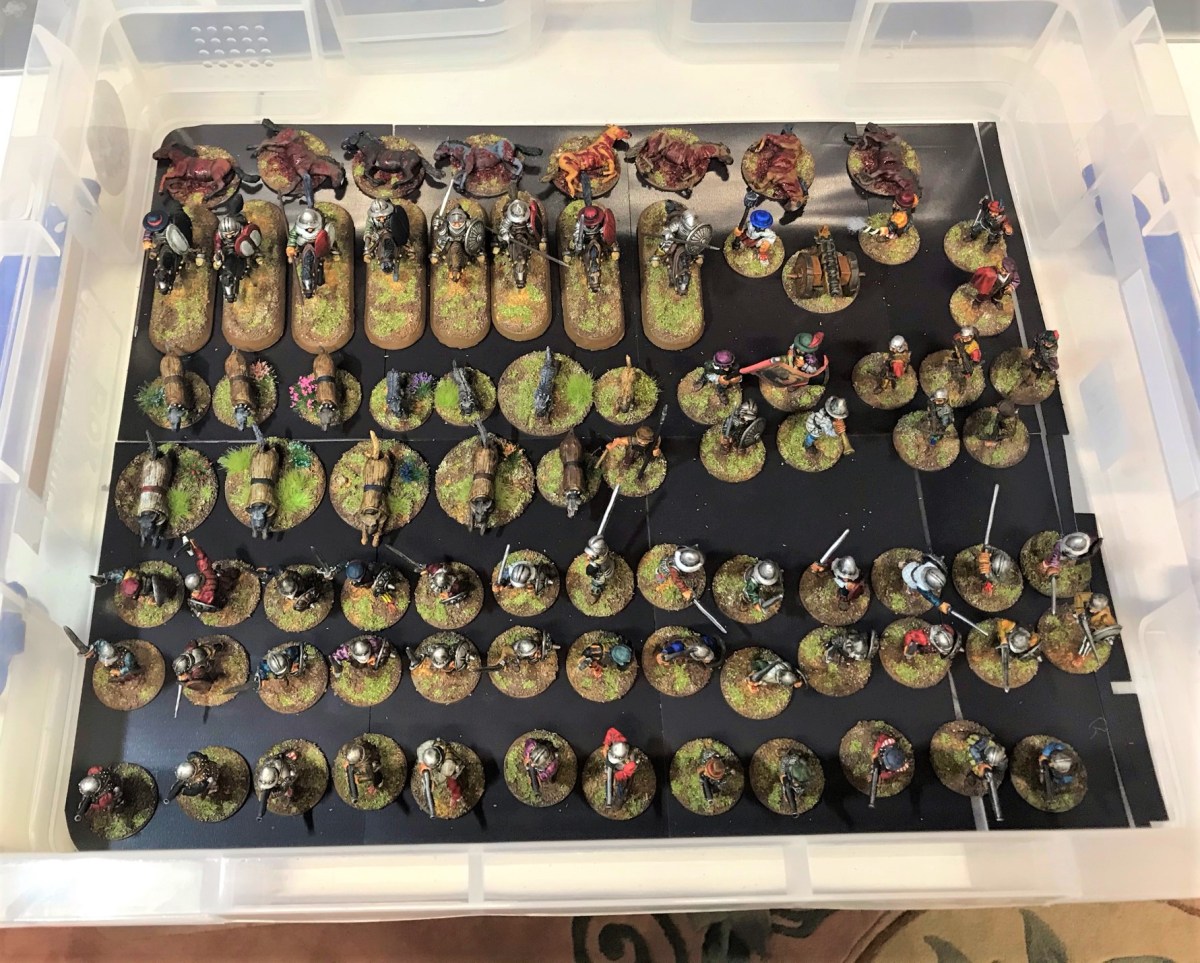
The Really Useful Box Organization Challenge
Challenge: I can store and transport each of the figures in my Really Useful Boxes, but setting up a game and gathering figures from 216 figures for a warband can be too time-consuming if one has to look at each figure’s undersides! I needed to make my Really Useful Boxes even more useful.
Goal: Make my Really Useful Boxes more organized and more functional such that each figure has an easily identifiable slot for selection and also to speed pick up after a game.
Solution: Design and build a system within each Really Useful Box that facilitates easy figure identification for both gathering figures for a game and picking them up after a game while preserving any benefits for storage and transport.
Process: Each 11-liter Really Useful Box is about 12” x 14.5”. I could have gone through endless iterations of how to organize the figures so that they would fit, and never be 100% sure my set up would work in reality. I came up with an idea that I think worked. Here again I went to PowerPoint. Most of my figures are on 1” bases, but a few are on 1.25” bases. I decided that I would make 3/8” labeling strips in layers upon which I could affix the figure identification numbers. I wanted each figure to have 1/8” clearance on both sides, so each row would be 1.5”. To verify how this would work, I made shapes in PowerPoint at 50% scale such that they fit on the screen. The shapes included how much space I would need for each type of figure. This really worked – and is a process that I will use again. You can see below my rough plan. Once I had my rough design, employing my Fiskars® SureCut™ Deluxe Paper Trimmer I cut strips of card stock and affixed them to the magnetically-lines Really Useful Boxes with small balls of poster tack. Then I made a second set of card stock strips to go on top of the first sets, affixing them with poster tack. Lastly, I just printed off my Excel spreadsheet pages onto card stock with the figure identification numbers on them, trimmed them up, and affixing them to the now-raised card stock “line” with poster tack. For the Conquistador cavalry, I made little corrals as they were in need of a bit more support. I then put all of the figures into the boxes as you see below – I ended up needing 4 boxes.
End result: Every figure has a labeled slot as you see below.
Really Useful Boxes before modifying them.Using PowerPoint as a CAD program, I designed the reorganization. Before any cutting!Aztec Box 1 finishedAztec Box 2 finishedConquistador Box 1 finished – note the cavalry corral.Conquistador/Tlaxcalan Box 2 finished
The Movement Tray Challenge
Challenge: I needed a safer way to transport figures to and from the tabletop.
Goal: Design and make a couple of magnetically-lined movement trays.
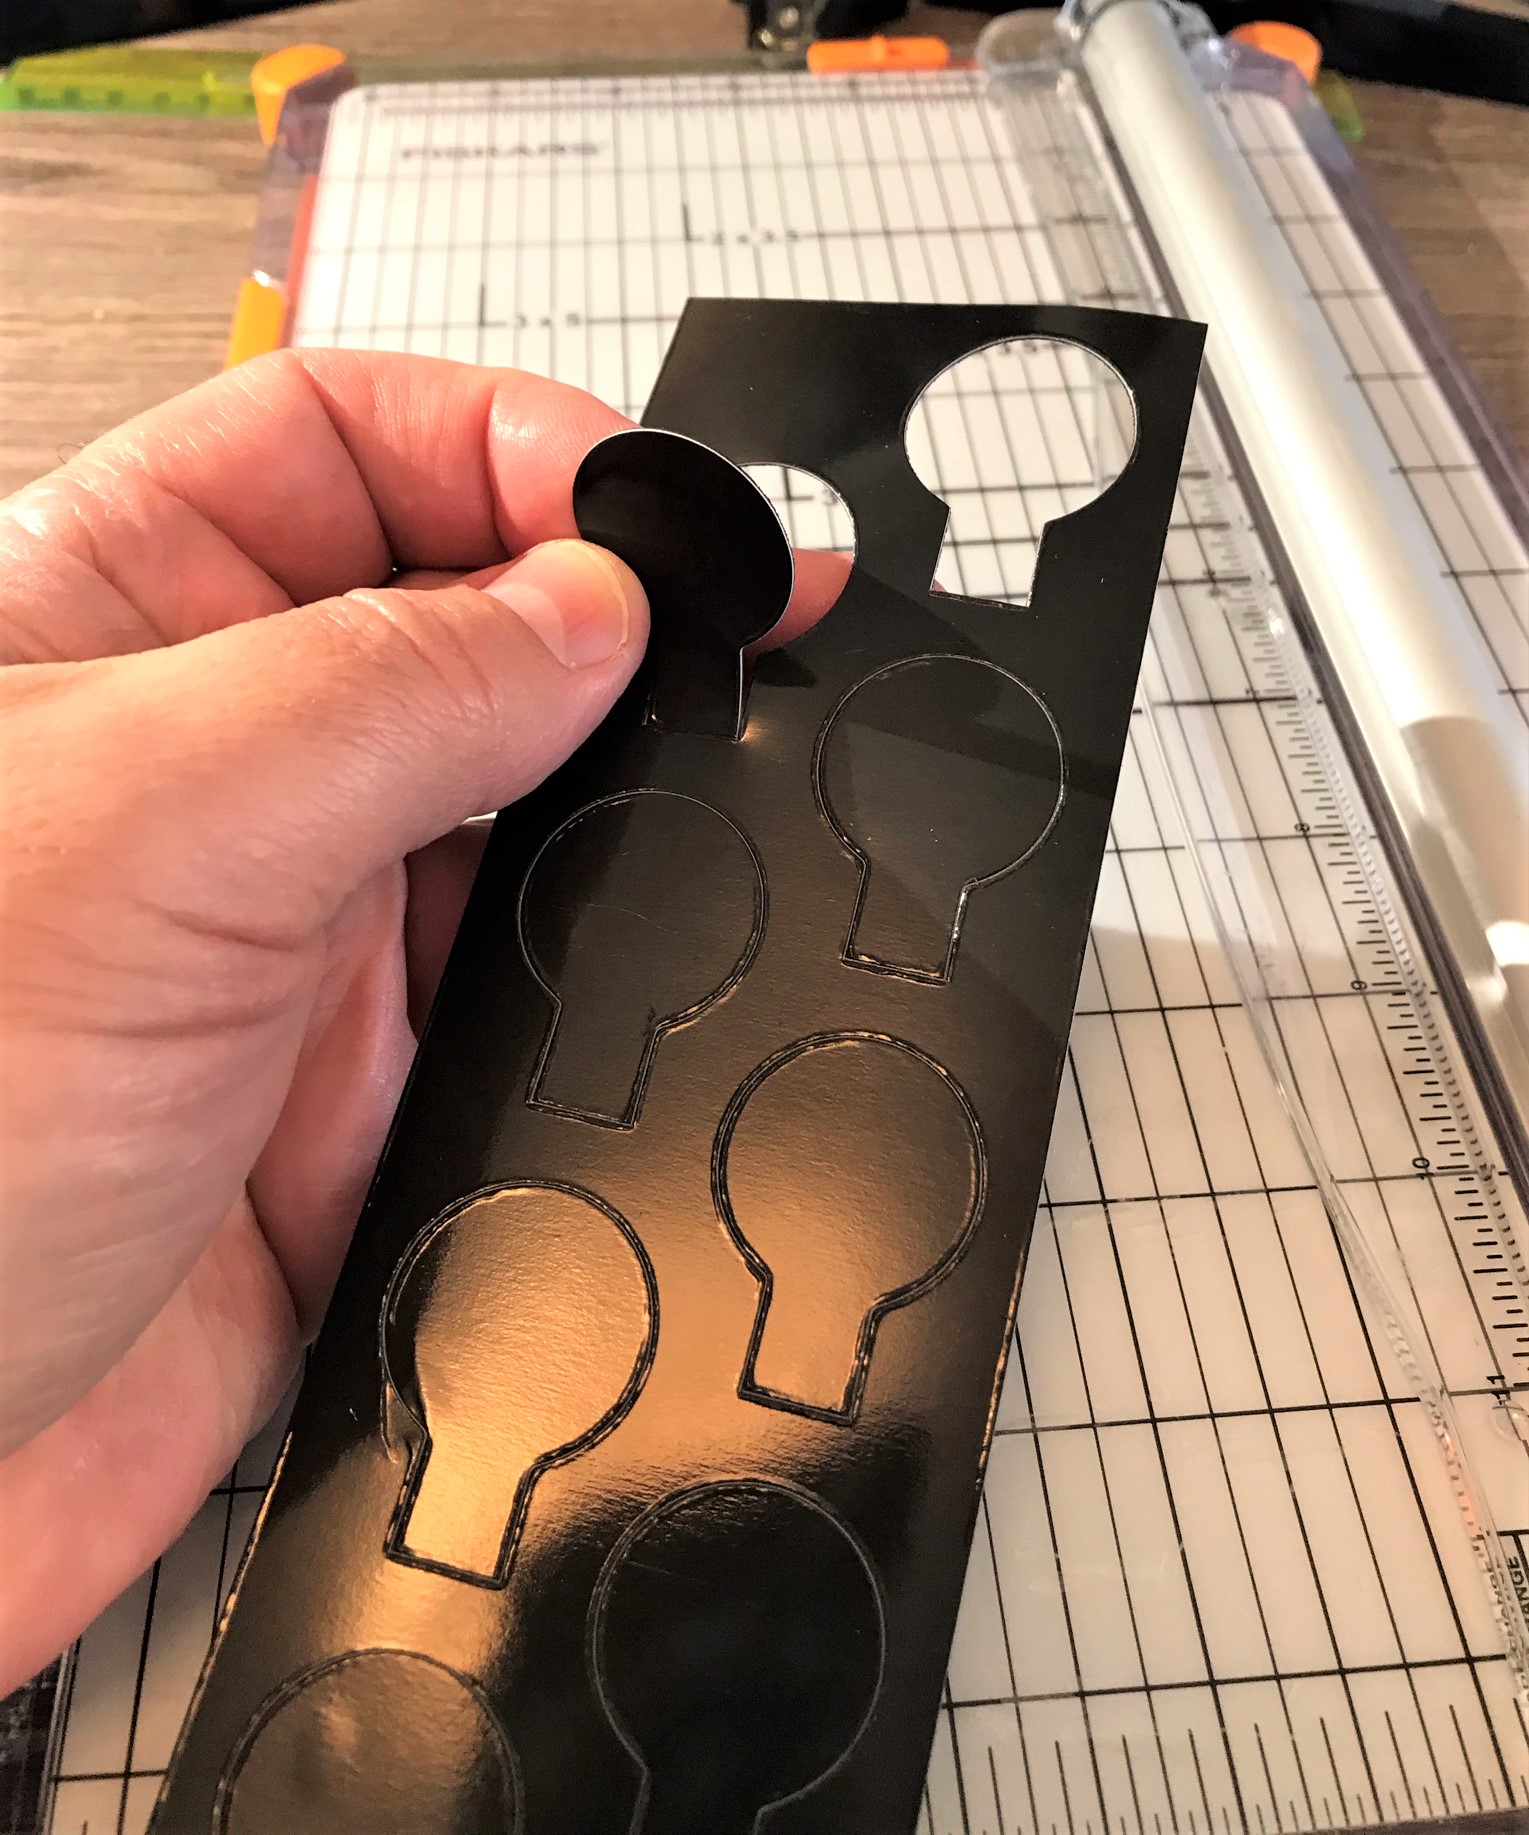
Process: This was pretty simple. I just used some old 1/8” thick balsa wood under two Aleene’s® Magnetic Tacky Sheets™ and reinforced the glue with wood glue. After being weighted down, the sheets were firmly attached.
End result: Success – I have two movement boards!
Magnetic Movement tray with some Conquistador Sword & Buckler MenMagnetic Movement Tray with some Aztec Cuachicqueh
The “Menu” Challenge
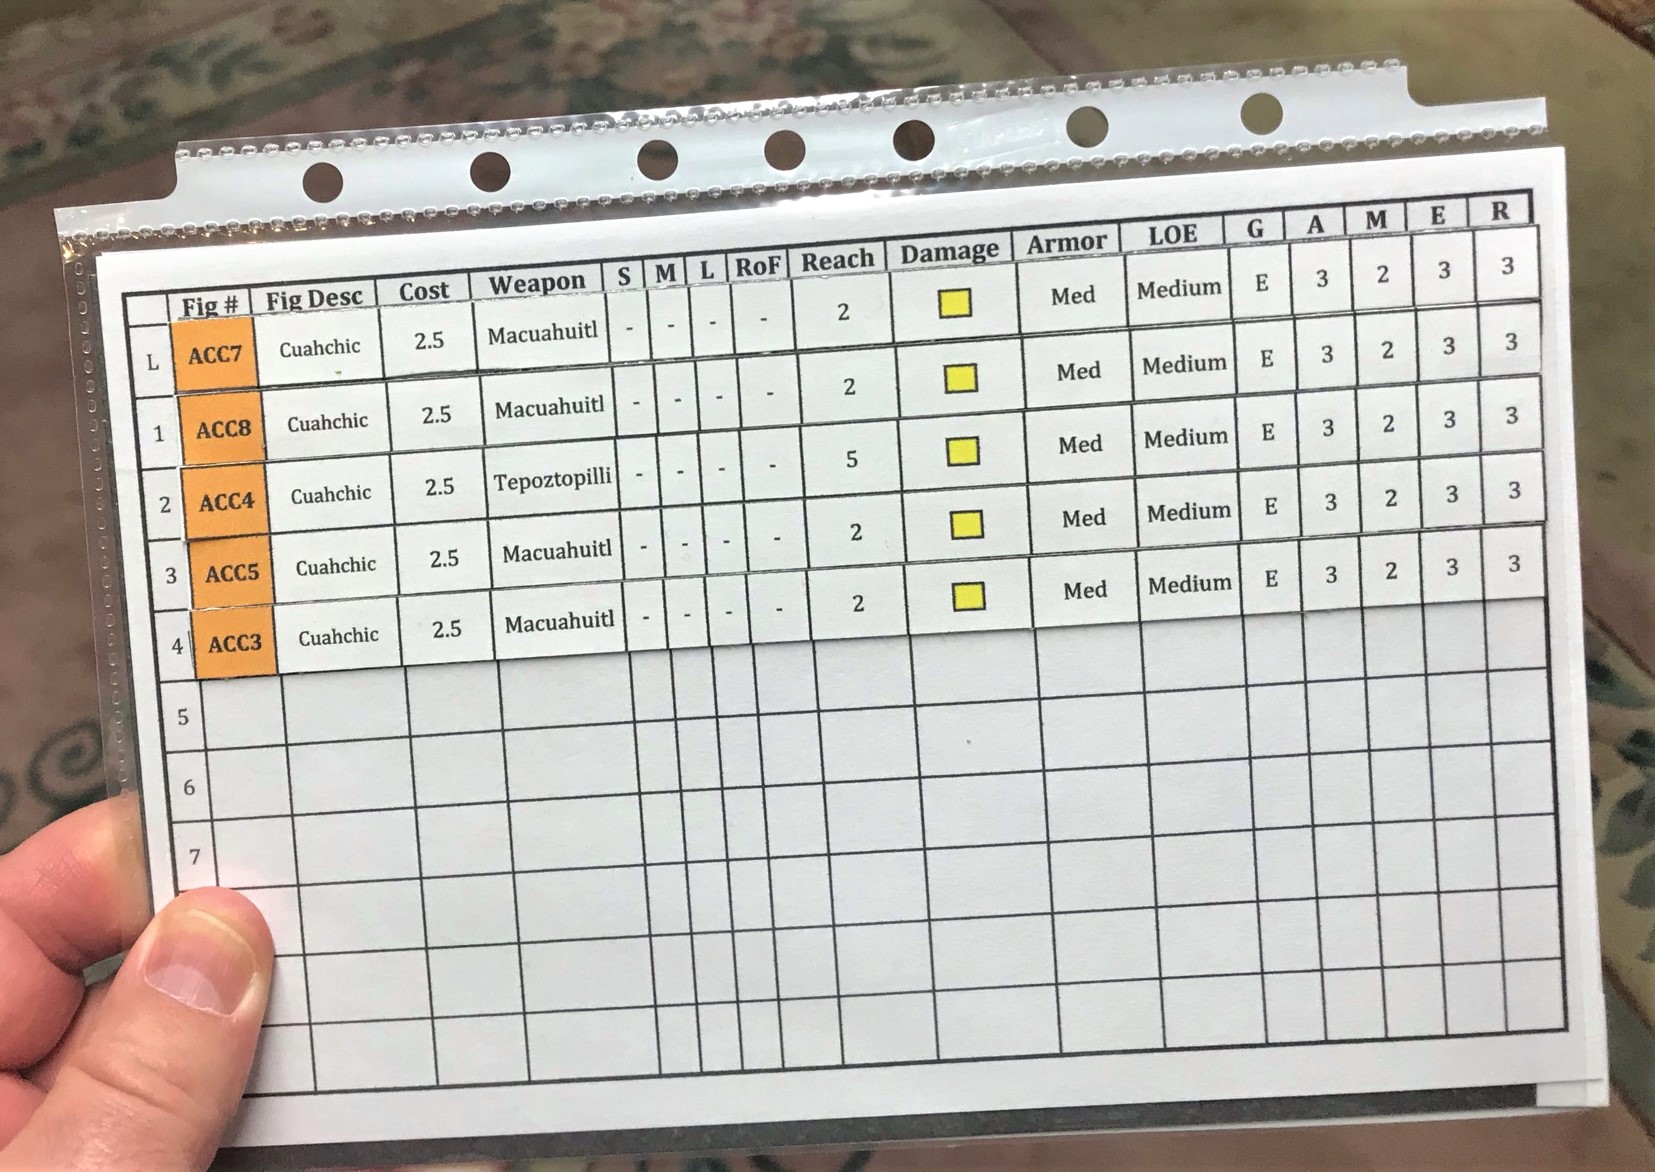
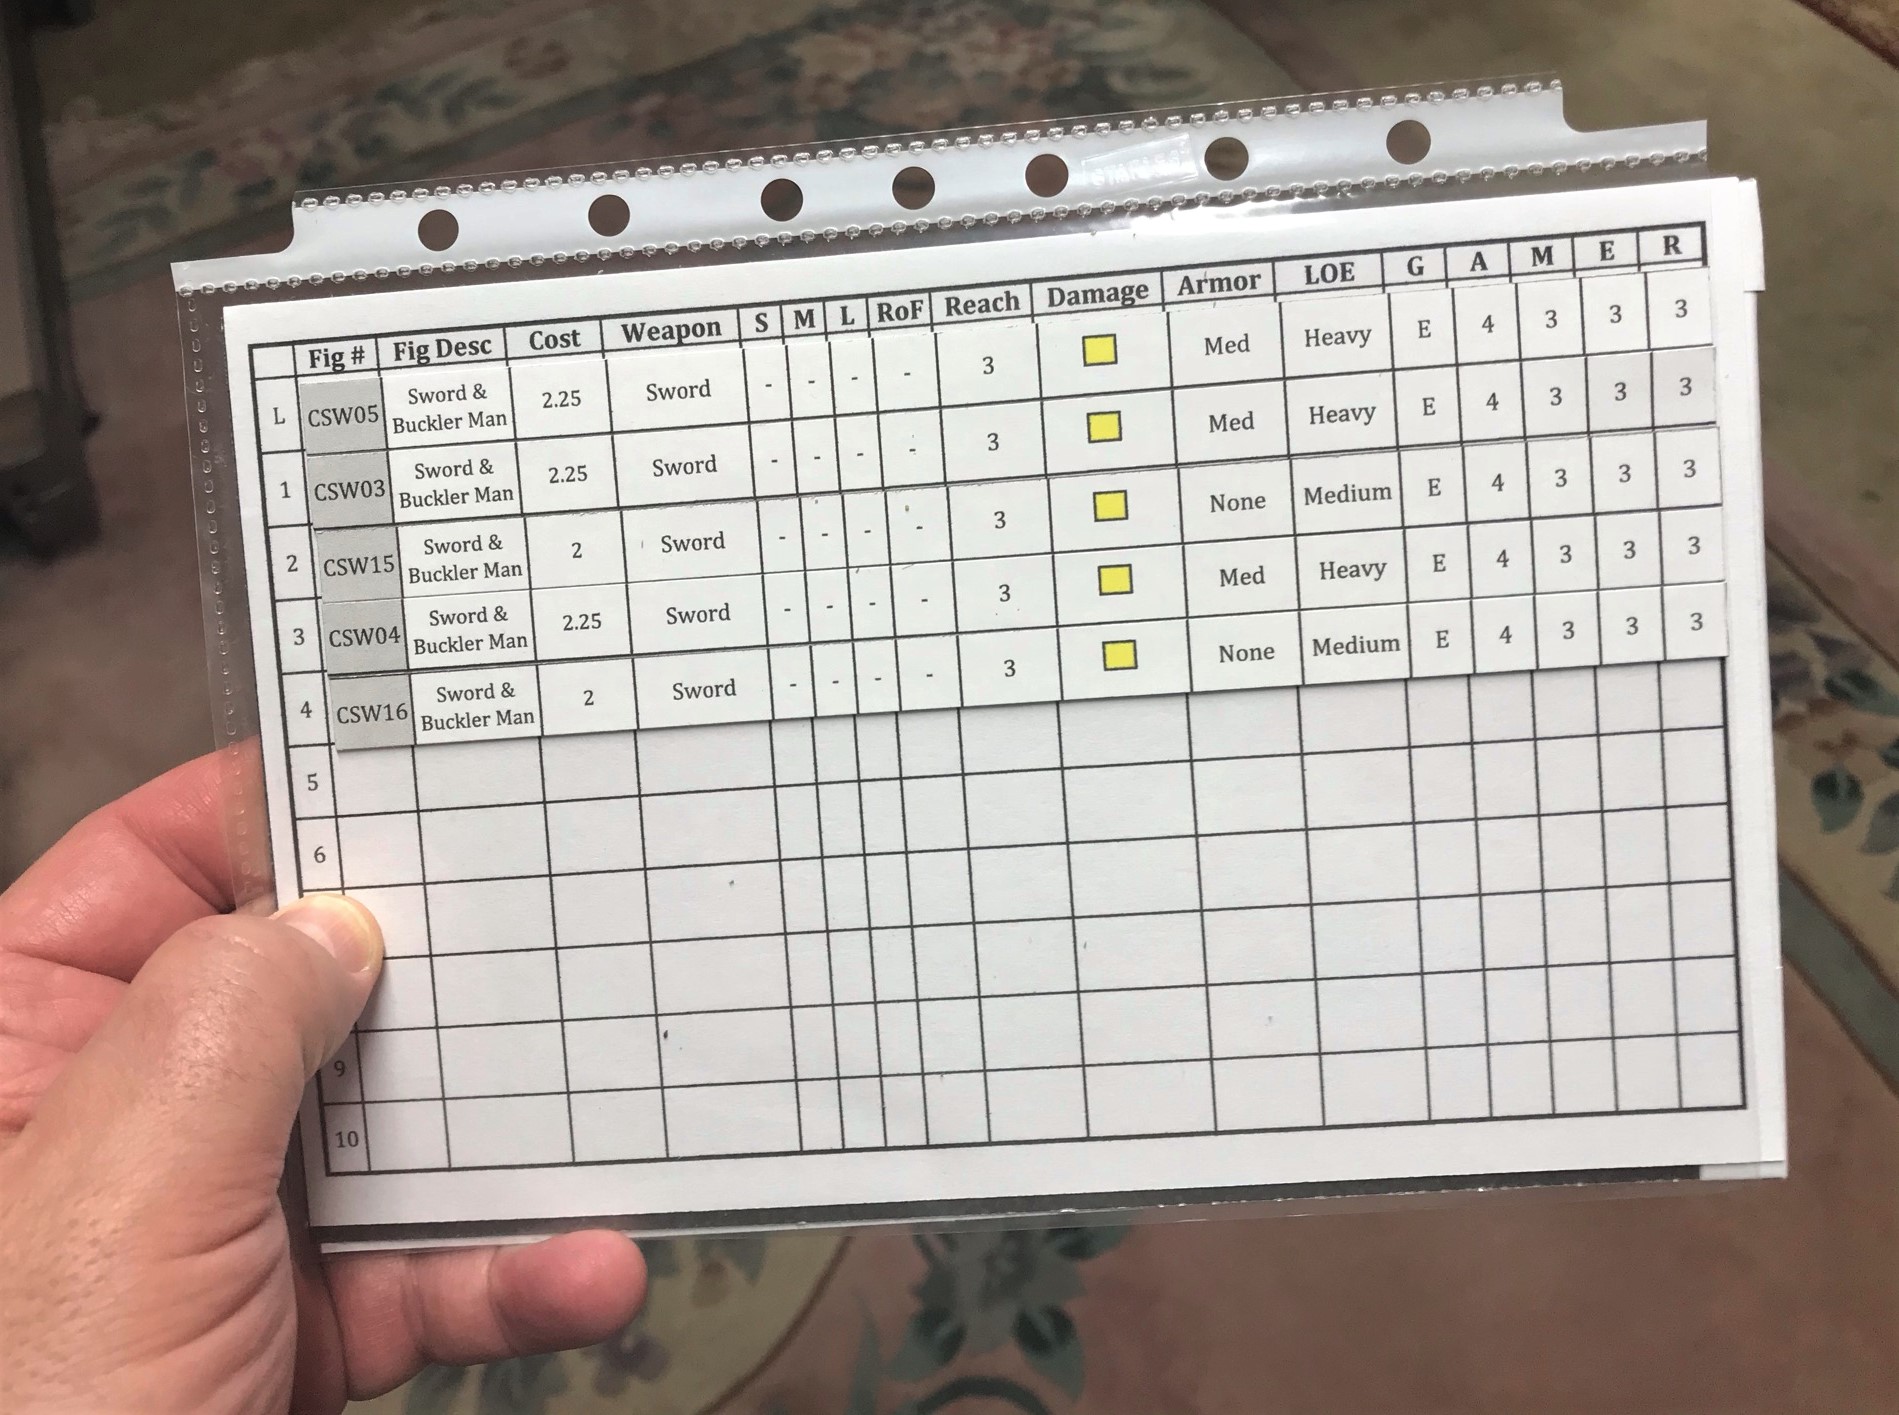
Challenge: Many of my games will be virtual, and some will be at convention games. I needed a simple way to convey two key concepts. First, I needed to present to the players the options that they had available with regards to figures’ stats and cost. Secondly, I needed to help them organize their troops – especially as Aztecs and Tlaxcalans have special organizations. In my games they are bigger and can have novice warriors attached. Normally, an Element in Feudal Patrol™ is 4-5 figures plus a leader figure. A Warband consists of 2-4 Elements plus a Warband Leader. To reflect how the Aztecs waged war, their Elements are bigger – adding up to 5 novice warriors to each Element (if they pay the point costs of course). This is useful as the novices can be assigned to drag away any incapacitated enemy for either sacrifice or slavery – which is historically in line with what they actually did do. Killing an enemy was regarded as “clumsy”. Additionally, each Mesoamerican Warband can have a Warrior Priest, who can both fight and help with Aztec or Tlaxcalan Morale results during a battle. At this point, my players could look at the figures in the boxes, but not have any information save the figure number, what he’s carrying and wearing, and the point value (if you pick one up to see the label). Certainly, this would not be efficient.
Goal: Design and make a simple way (a “menu” system) for players to make informed choices for both virtual and in-person games.
Process: What I did here was to go back to my Excel spreadsheet and size up the data to fit on a dashboard (more on that in a bit). Then I adapted Buck Surdu’s excellent data cards to fit on a single strip in Excel that would fit approximately 8” wide and 3/8” high. These I would make for each of my 216 figures – plus 4 additional to represent having the Army leader (Cortes or Pizarro) as a mounted versus dismounted choice for the Conquistadores. Each section of the Word document (basically a “menu” of figure choices) was organized as you see below. I then cut and pasted the strips from Excel into Word as pictures (paste special). I then added some brief information about the figures, as well as a picture of each of the 216 to help further identify the players’ options. Lastly, I created worksheets at the end of each “menu” to help the players build their forces. To do this, I went back to PowerPoint, and created the shapes that I wanted for the worksheets. I saved each individual slide as a JPEG (make sure you choose “Just This One” when it asks, and then edited the JPEG size. If it did not work, I just went back to the PowerPoint, resized, resaved as a JPEG, and repasted in Word. You can see the results below.
End result: I have three good menus that I can email or hand out to players at the beginning of a game and they will speed up the time for players to make their troop choices. As a side note, I prefer that players get to make choices in games!
Screen shot from Aztec MenuScreen shot from Conquistador Menu Screen shot from Tlaxcalan Menu Screen shot from Aztec Menu showing worksheets
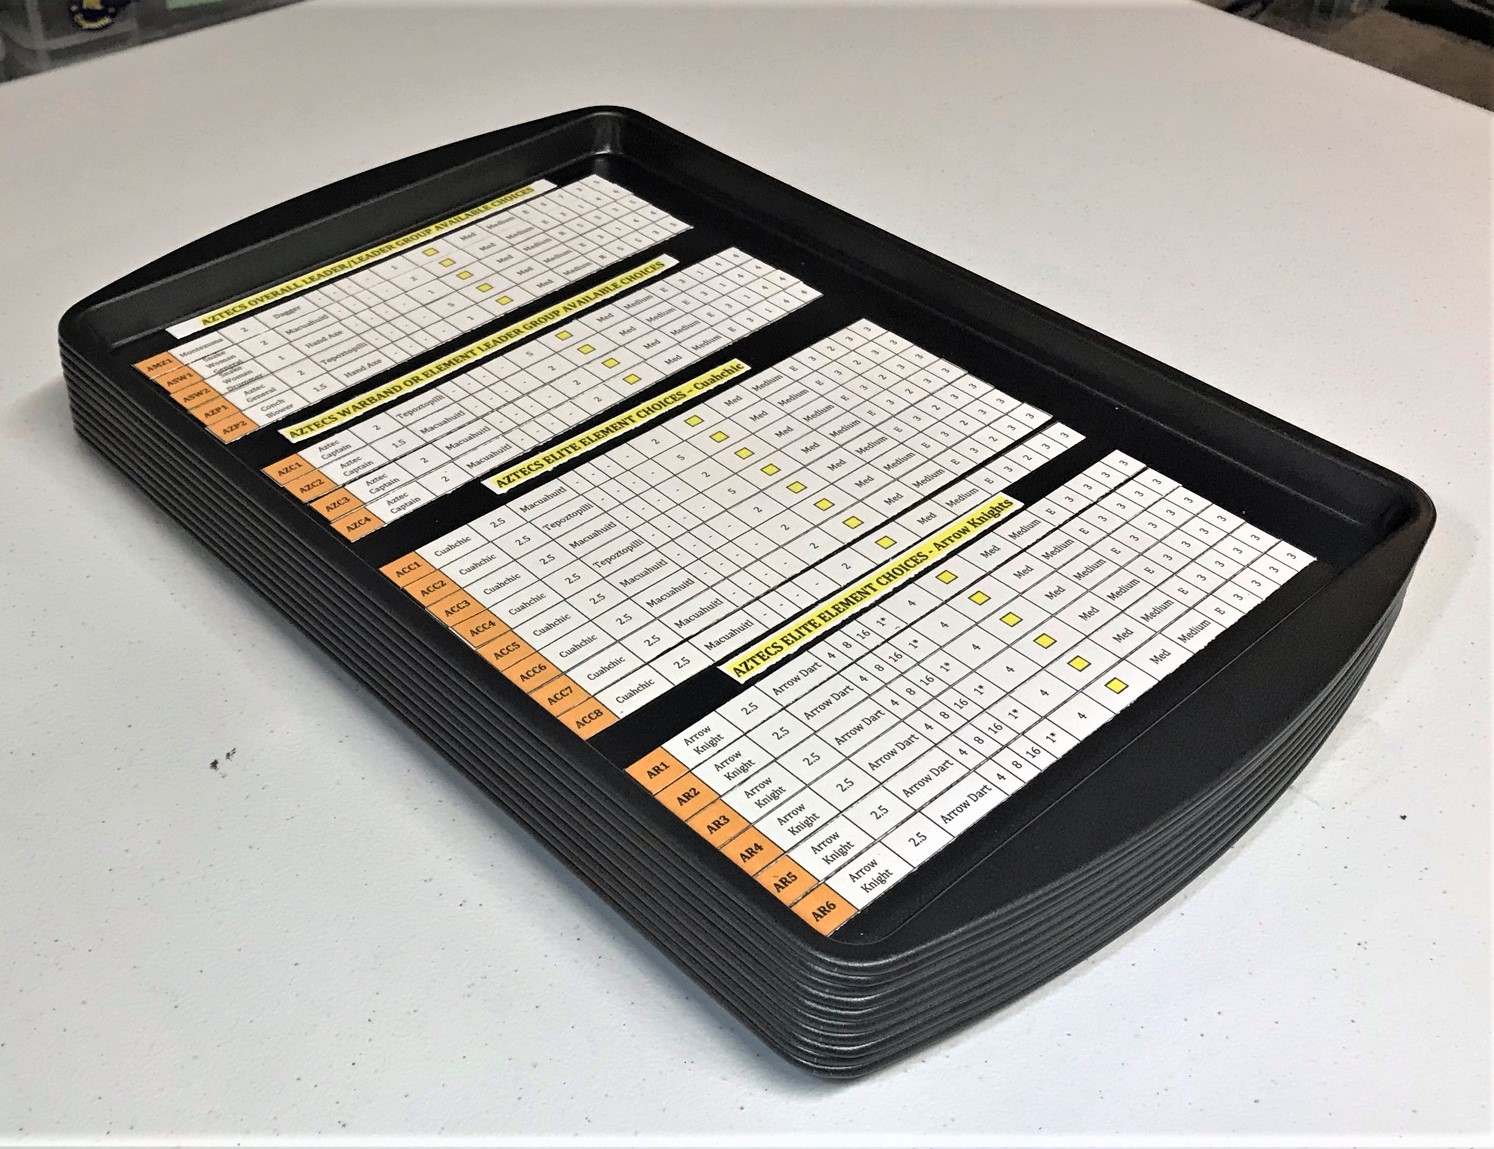
The Dashboard and Stat Strip Challenge
Challenge: The players need a quick and easy reference system that designates their troops’ stats, and one that does not take up a lot of space.
Goal: Design and build a system of sufficient dashboards and supporting elements of appropriate ease and flexibility such that the players can play easier and faster and have more fun.
Process: I do like gaming systems and setups that are flexible – that is giving players adequate AGENCY. As you have read, the menus allow the players to make their choices, but to have them write down all data at the game’s beginning could be a bit of a pain. Plus, there can be a variety of differnt types of figures in some Elements. My solution was to build on what I already had been developing. I designed a dashboard in Excel that would accommodate being printed off on card stock and placed in a 5.5” x 8.5” sheet protector such as this one from Staples. And remember the stat lines from the menus? I used them to fit on the dashboards. How you say? Well first, I special-ordered steel base material in sizes of 5.5” x 8.5” from Wargames Accessories. The steel sheets do have some rough edges – which I covered with scrap pieces from the Avery shipping labels with no problems. These steel sheets fit inside the sheet protectors and under the dashboards – and I made 31 of these. Then I cut and pasted each individual stat lines into Word as pictures. Then I printed off each of these 216 + 4 stat lines (220 in total) onto strips of card stock and trimmed them with the paper trimmer to fit on the dashboards. To affix them to the dashboards, I needed magnetic strips – 220 of them. I found a really nice source on Amazon of 8.5” x 11” sheets made by Craftopia called Adhesive Magnetic Sheets that are the best that I have found. Again, my paper trimmer helped here to trim the magnetic strips to ¼” size width (fitting nicely under the 3/8” wide stat strips). I did need to replace my Fiskars blade once and augment that effort with scissors. Each of the 220 strips could be now be added to the dashboards, but how to organize and store these! My answer would come from Wal-Mart. Cookie sheets! I found inexpensive cookie sheets (see photo below) for $1.50 each that stack together. I organized the strips as you see below and added troop categories – basically mirroring the menus.
End result: I have a pretty decent system now for organizing a game. I have every figure’s stat line on a removable magnetically-backed card on 10 stackable cookie sheets. These stat lines fit perfectly on sheet protector-encased steel dashboards.
Cutting magnets and stat stripsA dashboard with a stat strip flipped over to show the magnet underneathExample of an Elite Cuahchic Dashboard – as Elites they would not have novices attached but if this was a Veteran Dashboard there would be sufficient room for the novices’ stat stripsAn example of a Conquistador DashboardMy solution for organizing my stat strips!My 10 cookie sheets with stat strips, as well as the dashboards and other aids discussed here.Closer shot of the cookie sheets with the labels on them mirroring the menusThe cookie sheets stack nicely for transport
The Tabletop ID Challenge
Challenge: Using the dashboards is useful, but telling which figure is which on the tabletop can be a challenge, especially virtually. As with the previous challenges, the figure’s lack of uniformity poses a gaming identification challenge.
Goal: Design and create a system that would allow for easy identification of the figures but would not overly detract from the aesthetic of the game.
Process: I thought that as I used steel washers under my figures, my best option was to try something else in the realm of magnets. But what? I used some refrigerator magnets as prototypes of “under-magnets”, developed the concept, and then used PowerPoint to refine it. However, the concept of cutting out a few hundred magnets by hand was not appealing to me – plus I saw that they would look rough on the edges. I contacted Fridgedoor in Quincy, MA and worked with them to make me the magnets. There did not need to be any fancy printing on the bottom (non-magnetic) side as I knew that would be too tough and expensive. I had them make 20 mil thick sheets with each sheet having 11 of the under-magnets that could be easily popped out. One side (facing the figure) would be magnetic and the other printed black. The square jutting out on the magnetic side would be where I would affix labels for the figures. I used PowerPoint to make sets of differently colored and designed labels for the figures’ little jutting square. For the Elements, I made L, 1-10, and X (L for the Leader, 1-10 for the figure in the Element, and X for the baggie I would store them in). Then I printed them off, trimmed them, and affixed them. I ended up with 34 sets bags of under-magnets in individual little zip lock with ID numbers. This was made up of 33 sets of 11 and 1 set of 24 (different for Warband Leaders, Army Leaders, and Warrior Priests) for a grand total of 387 total under-magnets. I stored these in a small Really Useful Box, which in turn goes into another Really Useful Box for the game (see below).
End result: I have now a soup-to-nuts system for setting up and running my game more efficiently for both virtual and in-person games that is useful and easily transported.
My under-magnet design. Not rocket science!Popping out manufactured under-magnetsWorking on the under-magnets labelsHow the under-magnets will be used. Here, a Tlaxcalan figure has a Leader under-magnet. The rest of the set is above him, including the “X” marked baggie. Multiple color schemes were used.Lots of sets of under-magnetsHere you can see a group of Conquistadores and some Aztec Cuachicqueh engaging in battle – the under-magnets show who is who easily.
I hope that you enjoyed this blog (and all the other ones for the last 6 years!). Just for kicks, please take a look at my very first post, The Story of the Nightmare Legion. Here’s hoping I keep doing more and reading and more of yours as well – and let me know if any of my somewhat insane stuff inspires you or if I need to be medicated – just asking!
And here’s a pic for IRO who asked for a T-shirt shot in March. Not ready for selfies I guess.
GO ARMY! BEAT NAVY!
I’ll be announcing my next free giveaway contest soon – this time I’ve got some terrain to do and if you guess closest you can win stuff FREE from me. Just like in the last contest!
Don’t forget to let share your thoughts in the comments section!
Miscellaneous details and references for those interested in that sort of thing:
Previous posts on games, units, and other projects for my 16th Century Spanish Conquest supplement for Feudal Patrol™ – “Civilizations Collide”
Game Aids and Tools for Feudal Patrol games using the Civilizations Collide Supplement (this post)
Perro de Guerra (Conquistador War Dogs). 13 figures total: Outpost Wargames Services #CONS6 “War Dogs” (8 war dogs); Eureka #100CON13 “Dog Handler and Dogs” (1 dog handler/pikeman and 4 war dogs)
Conquistador Foot Command, Crossbowmen, and a Couple of Officers. 11 figures total: Outpost Wargames Services #CONC1 “Conquistador Foot Command” (a leader, a banner bearer, a drummer, and a bugler); Eureka #100CON04 “Crossbowmen” (5 crossbowmen); and Eureka CONC1 “Conquistador Officer” and an unknown SKU officer (2 officers)
Don’t you love suspense? Well, I have just a tiny bit here for you all!
I started “Mark’s Conquistador Contest” – for my loyal blog followers back on December 15, 2020. It’s purpose was threefold: one, to give myself a challenge to finish off my last 89 figures (all Conquistadores) for my for Civilizations Collide scenarios for games of Feudal PatrolTM ; two, to offer a prize of miniatures to worthy homes that could use them; and three, to have a fun journey along the way with my followers.
The entire project began nearly a year ago in April of 2020. I had spent the month of March 2020 and part of April 2020 doing my research, for the supplement and looking at sources for appropriate miniatures for the Aztecs, the Tlaxcalans, and the Conquistadores. I finished off 230 miniatures in total for the project.
I need more boxes!
I managed, with YOUR inspiration, to finish everything on Valentine’s Day, February 14th, 2021. This meant that I got the 89 done in 61 days – including all those holidays! That’s an average of 1.459 per day (according to my spreadsheet that all of you are completely unsurprised that I used).
At the beginning on 12/15/2020Now finished – all of the Conquistadores together.
As for the contest – the three prizes were as follows (in no particular order):
You must be an email or WordPress follower of my blog.
You must pick a date (day, month, and year) that I will finish the Conquistador miniatures shown here in this post. Finishing means, to me, that I am ready for the figures to be shown on my blog and used in a game. That is my call!
You must let me know that you want in on the contest by midnight EST (US East Coast time) on January 2nd, 2021. You do this by posting a comment that “you are in” here on this blog post in the comments section with the date information requested above in (2).
Only one entry allowed per follower except as described in (5) below.
If you get another person to follow my blog, you can earn another entry! For each new follower that credits you as a referrer, you can get another entry. All that person needs to do is comment on this post as in (3) above stating that he or she is “in” and who the referrer is. The referrer can then reply to that comment with an additional entry date.
Winners will be whoever is closest to the date I announce as the “completion date”. That can be earlier or later – for example picking a date that is one day before is as good as if it’s one day after. As there are multiple prizes, 1st place gets first choice, then 2nd, then third. If two people pick the same date, ties will be broken by who submitted the date first. I reserve the right to add more prizes!
I also reserve the right to be the final judge on the contest – somebody’s gotta do that. When I finish, I will announce the winners.
It’s been fun along the way – as people (Buck and Roger mostly) were telling me to SLOW DOWN. But, I kept on, hoping to get them done as well and as quickly as I could (sorry Buck and Roger!).
So here are the results – please join me in congratulating:
1st Place: Pete from SP’s Project Blog – nailed the date on the nose!
2nd Place: Mike from despartaferres/redcaer1690 – got second by the tiebreaker rule as he picked 6 days early but picked earlier than the third place winner who is.
3rd place: Leif (an email follower and fellow member of the my club The Mass Pikemen) who also picked 6 days away from 2/14 (but picked 9 days later than Mike did.
Overall and final standings
Congrats to the winners! Pete gets first choice, then Mike, and Leif gets what’s left. Just confirm in the comments section which one you want, and then email me your shipping information to MarkAMorin@aol.com (I’m sure that will work fine).
I will, as I intimated earlier, be doing this again (if there is interest) for all the terrain I have to do for the project. I’m hoping to have more prizes to give away (and maybe even better ones) but I need to get some game-specific stuff done in terms of game aids and the like first. I will NOT begin painting terrain before the next contest – which will begin, as this one did, with a blog post.
Thanks to ALL of you (even Roger😆) for playing and to ALL of you, more importantly, thank you for your encouragement and support!!! It really helped me and inspired me.
Miscellaneous details and references for those interested in that sort of thing:
Previous posts on games, units, and other projects for my 16th Century Spanish Conquest supplement for Feudal Patrol™ – “Civilizations Collide”
And the Winners of “Mark’s Conquistador Contest” are…(this post).
Conquistador Cavalry. 24 figures total: Outpost Wargame Services #CON5 “Conquistador Cavalry in light armour 1” (4 horses & 4 riders); Outpost Wargame Services #CON6 “Conquistador Cavalry in full armour” (4 horses & 4 riders); Eureka Miniatures “Moving Horses” #100ANM05 (8 horses used as casualty markers).
Perro de Guerra (Conquistador War Dogs). 13 figures total: Outpost Wargames Services #CONS6 “War Dogs” (8 war dogs); Eureka #100CON13 “Dog Handler and Dogs” (1 dog handler/pikeman and 4 war dogs)
Conquistador Foot Command, Crossbowmen, and a Couple of Officers. 11 figures total: Outpost Wargames Services #CONC1 “Conquistador Foot Command” (a leader, a banner bearer, a drummer, and a bugler); Eureka #100CON04 “Crossbowmen” (5 crossbowmen); and Eureka CONC1 “Conquistador Officer” and an unknown SKU officer (2 officers)
Total figures completed to date for this project: 230 figures: 109 Aztecs, 32 Tlaxcalans, 89 Spanish Conquistadores (ZERO more to go in Mark’s Conquistador Contest!)