On Easter Sunday after dinner, Chris Smedile and I were able to crank out 6 Archive (1981) Star Ducks (#2200 from the “Star Rovers” line) and 22 Roomans (both types from Ral Partha “Rooman War Party”). I made two molds earlier in the day and we had fun trying to get the casting process correct.
First mold half for the Second Rooman ModelStar Duck Ready for MoldingMaster Star Duck for Casting
Thanks to Chris there was a good number produced. Two of the Star Ducks did not have their ray guns fully formed, but ended up looking like they had submachine guns, so I kept them. The other four were good, and had flash that looked like the guns were firing – an unexpected bonus.
The Roomans mostly came out, but some were remelted for recasts. Some were missing an ear, which my daughter Ellen Morin described as “battle damage”!
Still have more to do but having fun making them – and even more fun doing them with Chris!
The 2016 Golf Season started (for Bay Path) on Saturday, March 23rd with a round of 18 with Bob Tilton and Jerry Dufresne. Not my best pic, but selfies are not my thing!
The course is in good shape for March Thanks to the hard work of Jeffrey and Justyne Smith.
Temperatures were cold. It ranged from 38° F to 43° F, and we were all rusty. We had a quota match. Bob and I tied on the front, and Bob won the back and the total on the 18th hole. Anytime you can walk 18 with an 83 year old, and lose to him, well that’s pretty cool! We at least got to be the first to play, and I got my first birdie of 2016 on the 10th hole! I did not play on Sunday as it was Easter, but I did work on miniatures – see my next blog entry!
Mark Morin, Bob Tilton, Jerry Dufresne at Bay Path Golf Course Opening Day
Back when I was at West Point, I was introduced to “Roomans” by Buck Surdu. He had a unit of them armed with pikes. He had painted them green and called them “Beaks”. He even had altered one to be armed with a sword and gave it a scratch-made airborne beret – I think that Buck still has them!
Over the years, I looked for them in hobby stores and only managed to find one package of three at Eric Fuch’s hobbies (I think in the mall at Burlington, MA – the shop long ago went out of business I believe). Ral Partha first cast these figures in 1977 as part of their “Personalities and Things That Go Bump in the Night” series as “Rooman War Party”. Originally, they were ES-44, and later 01-044. In fact, they were kangaroos (think beastmen) and did not have “beaks”, and were armed with piano wire pikes. Two of the three figures in the pack were the same with a smooth shield on the side, while the third had a riveted shield that was held in front. With the advent of eBay, occasionally I see some, but very infrequently. Sometimes I’m lucky – and have even found one ES-44 in its original packaging. Other times I find one or two in a lot mislabeled as goblins or just loose in an estate collection that I’d have to strip down. My goal was to get to 36 Roomans , and then paint them up at once.
As part of my search, I contacted Iron Winds Metals and they told me that unfortunately the old molds for the Rooman either no longer exist or cannot be found. I was able to get some of the piano wire pikes from them however which was appreciated!
So, as I cannot get them from the folks who made them, I made the decision to see if I could cast some and make my goal (these are for personal use and I have no plans to sell them although that seems to happen a lot on eBay – I wish that I could buy the originals!).
I have cast figures before with some Prince August molds back in the 1980’s. However, I was not using the right safety equipment back then to say the least (no respirator, no gloves, and heating on the gas stove in the kitchen). I did not have any way of checking the temperature of my metal, which was a mish-mash of old figures, modeling metal, fishing weights, and any lead or tin I could cobble together. My results were less than great, but acceptable – and any bad figures just got recycled into new ones.
I looked at some ways of making a mold and casting again, and some required a spin casting set up (not happening don’t have the space), vulcanizing rubber molds in my kitchen oven (I know enough to not even think to try to get my wife to go for that option), or liquid RTV (room temperature vulcanizing) rubber. The last option was a good possibility, as it came in a can and you added a catalyst. It did seem messy, and there was some discussion I saw about degassing with bubbles and that seemed problematic.
Luckily, I came upon a product called “Quick Sil” by Castaldo at a distributor known as Castings – http://miniaturemolds.com/main.sc. You mix equal amounts of two different putties and in 15 minutes it forms a hard silicone rubber. They sold me a mold-making kit (RTV Quick-Sil Starter Kit) that had the putty, a mold press, and all the items I’d need to make a mold. http://miniaturemolds.com/MAKE-YOUR-OWN-MOLD_c80.htm . They did warn of a learning curve with the product, which was true as you will see – but I do like the product.
RTV Quick-Sil Starter Kit from Castings website
The mold press is necessary to drive out bubbles from the rubber as it cures. It has a series of wooden blocks to create the mold shape and size that you want, with wing nuts and a cover to make a press. You can use it to make one or two-piece molds. For this Rooman project, I did need a two piece mold.
My Mold Press
My first attempt involved trying to make one mold for three Rooman figures.
The procedure is as follows (more or less). First, you put down a blue sulfur-free clay upon which the figures and mold keys are placed. Then you mix the two parts of the Quick-Sil – which you need to get in the mold within two minutes. The Quick-Sil will be placed over the figure and the blue clay. You compress the mold in the wooden press, and let the Quick-Sil cure. Then you remove the combination from the press. The blue clay is then removed from the new mold half. You apply a releasing cream to the mold half, avoiding the figure. You then prepare a second batch of Quick-Sil, and repeat the process, ending up with a two-piece mold – theoretically.
My first try to make a mold was overly ambitious and failed, wasting a lot of Quick-Sil, but provided key learnings. This failure occurred for a few reasons. I was too concerned with overworking the Quick-Sil putties which have a two-minute working time. I ended up underworking it. Also, my first try was too thick to cure in 15 minutes in a cold mold press. I needed to make a much thinner mold, and work the two putties longer before putting into the mold press. I also needed to warm the press and the figure with a blow dryer before adding the Quick-Sil and warm the mold while it was curing. I also needed to wait 26-28 minutes for the mold to fully cure.
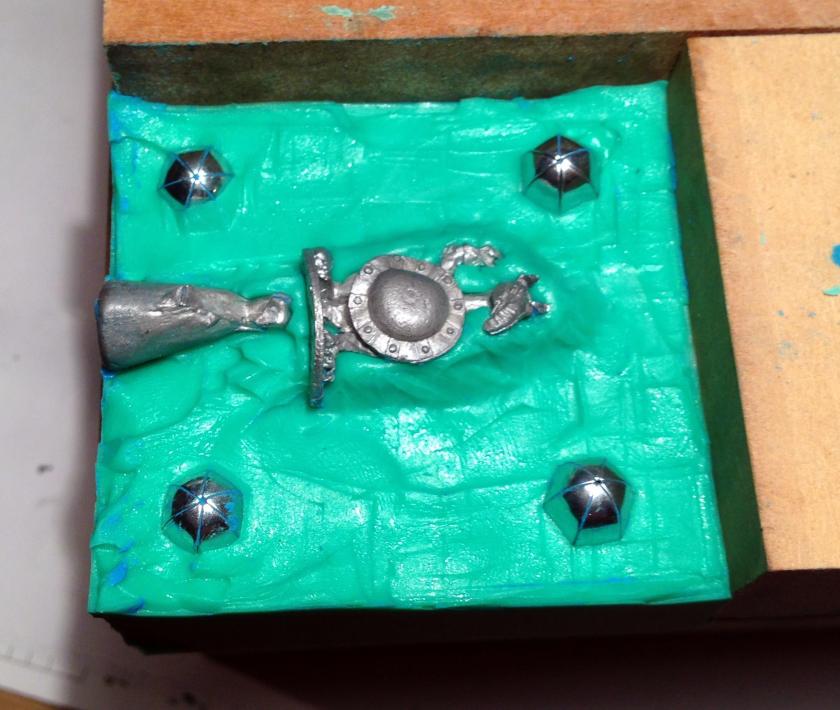
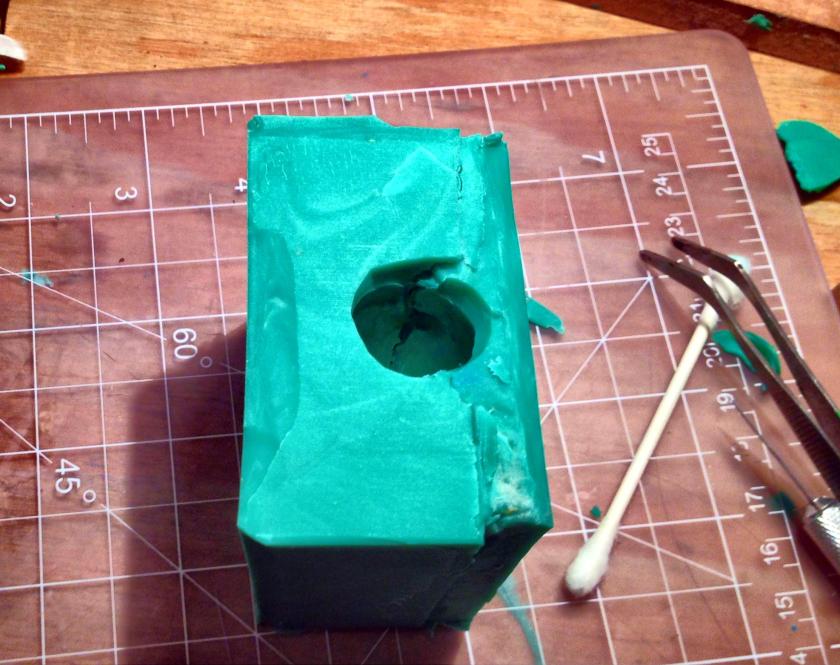
My first attempt at the mold half. The figures have been placed into the blue modelling clay next to pouring plugs. I also added toothpicks as venting gates. The metal nuts are for keys, and I had them upside down!
My second try was much better. I used just one figure, and made the mold smaller and thinner. I warmed the mold and the figure with a hand-held blow dryer before and after putting in the Quick-Sil. I also put in the keys correctly this time. These actually act as nice ways to align and shut the mold.
Attempt #2. Note the well I made for the figure in the modelling clay.
I flipped the mold half, and removed the blue modelling clay.
After curing, the first mold half looked like this
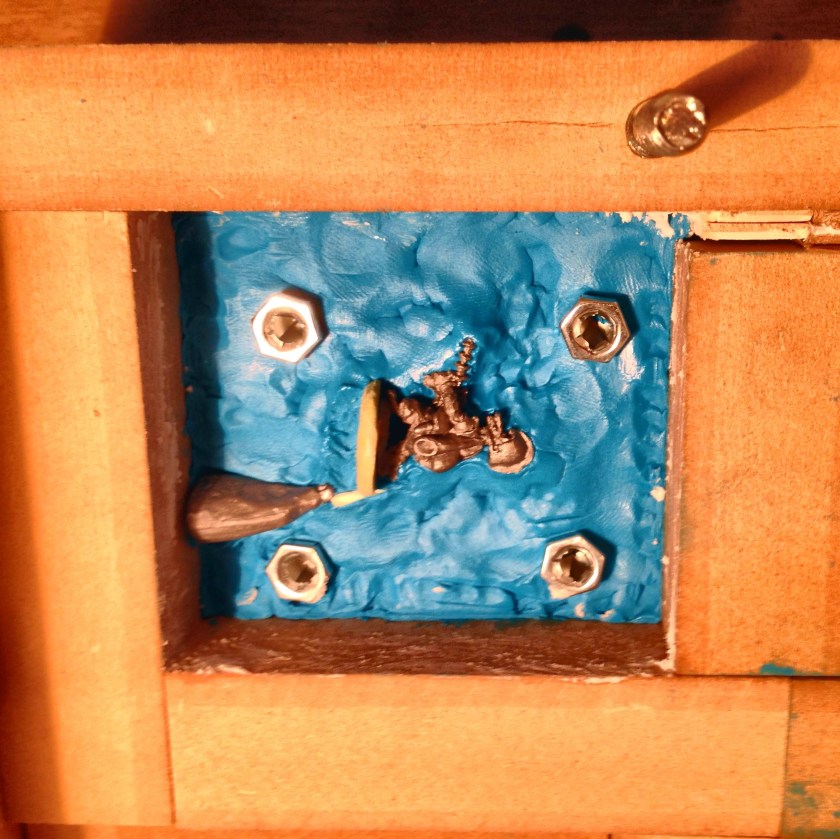
I then applied the Castaldo mold release cream on the mold avoiding the figure (Quick-Sil sticks to itself so this lets the two halves not stick together). I then repeated the process with the press. I did need to add cardboard shims to get the second mold half to the correct depth. Later on I made a third two-piece mold of the same figure. Using an Exacto knife is critical to getting the pieces out of the press.
The two mold halves. The keys really helped align the mold and allow it to close. I used an Exacto knife to clean off excess rubble and open the pouring hole.
The two pieces together of the first functional mold
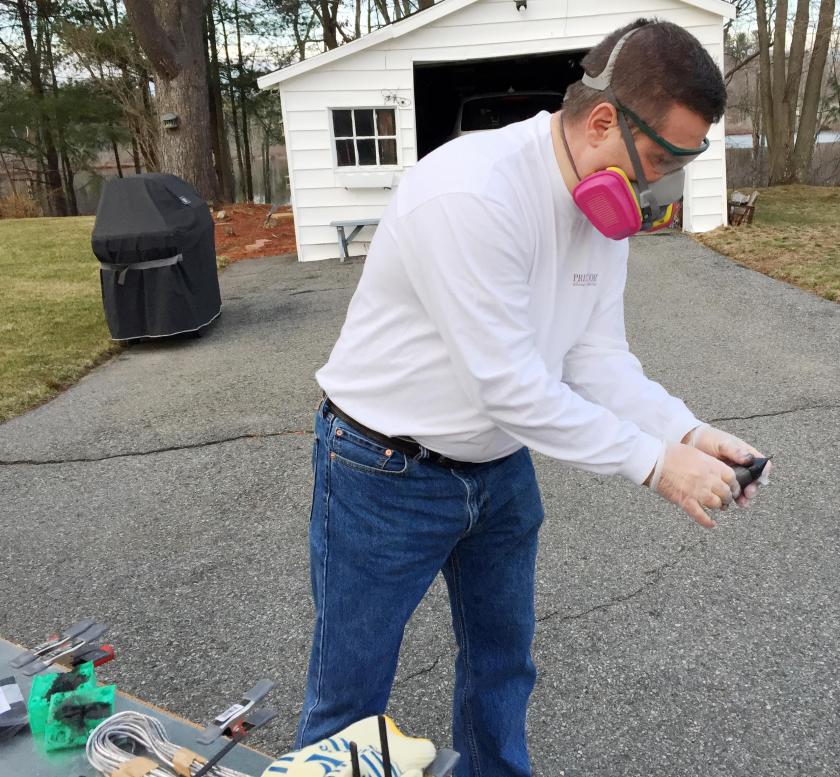
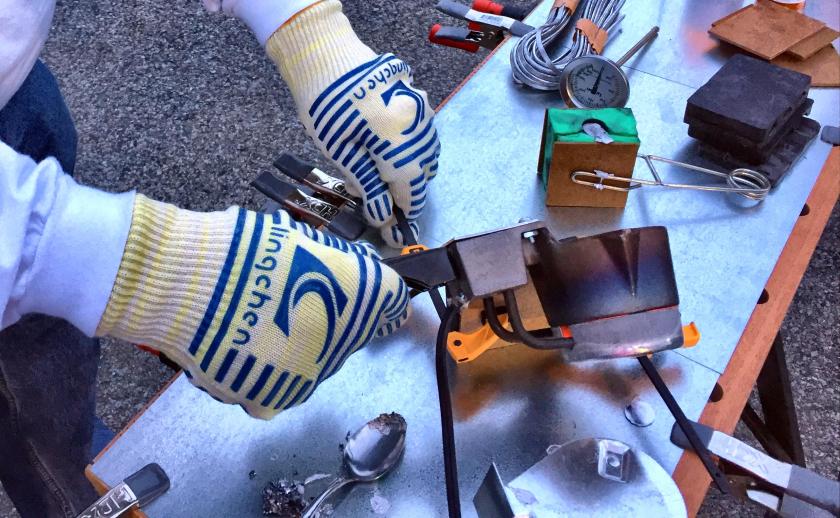
I needed to apply graphite powder to the mold interior so that the hot metal would flow properly. I got this from a locksmith in Worcester. Later on in the casting process, I would learn that its good to tap the mold with the hot metal in it to get all the mold filled. I am glad I had great heat-protective gloves, eye-protection, a respirator, long-sleeves, and pants on when I did that as hot metal flew around! My wife is glad I am outside!
Please note that I had steel sheets from Home Depot clamped to my work bench as well as a working surface. This was a big help when I casted – and a pretty inexpensive way to make a safe place to work with hot metal. I also had a Lyman thermometer to check the molten metal in my crucible as it had no temperature control except being on or off. I’d recommend this and I found that it cast well between 500° and 600° F. My metal was a combination of old broken figures plus any saved lead and tin alloyed metal I had kept since the second Reagan Administration.
Figuring out the graphite powder dispenser.
Applying the graphite powder to the mold
My crucible (Hot-Pot2) with broken figures awaiting rebirth as Roomans!
Pouring the metal – with heat resistant gloves
Trying an old Price August Mold. Note my workspace – steel sheets clamped to my Craftsman adjustable workbench
I ended up needing to cut some venting gates in the molds as well for better casting. This is easy in the Quick-Sil with an Exacto knife, as the rubber cuts fairly easily. I am fairly certain that I was responsible that day for all the world’s Rooman production!
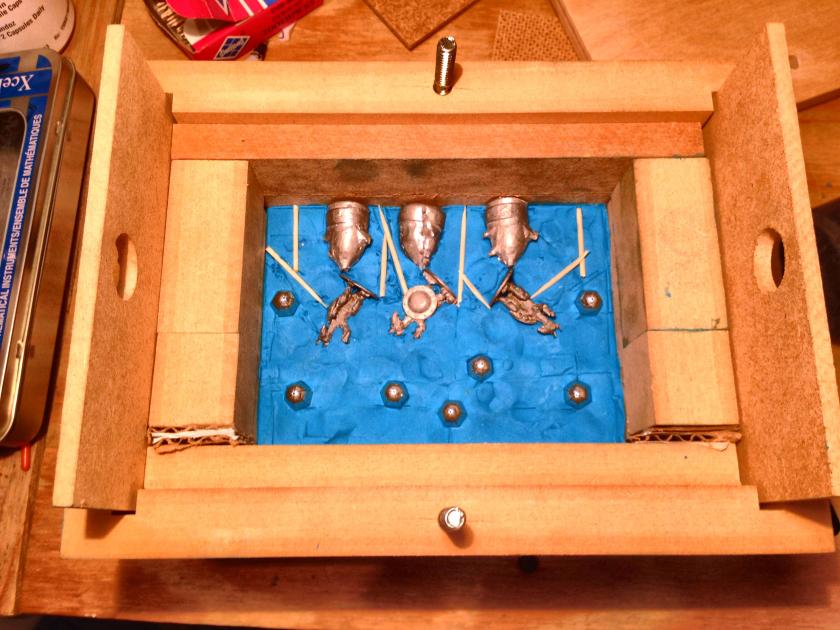
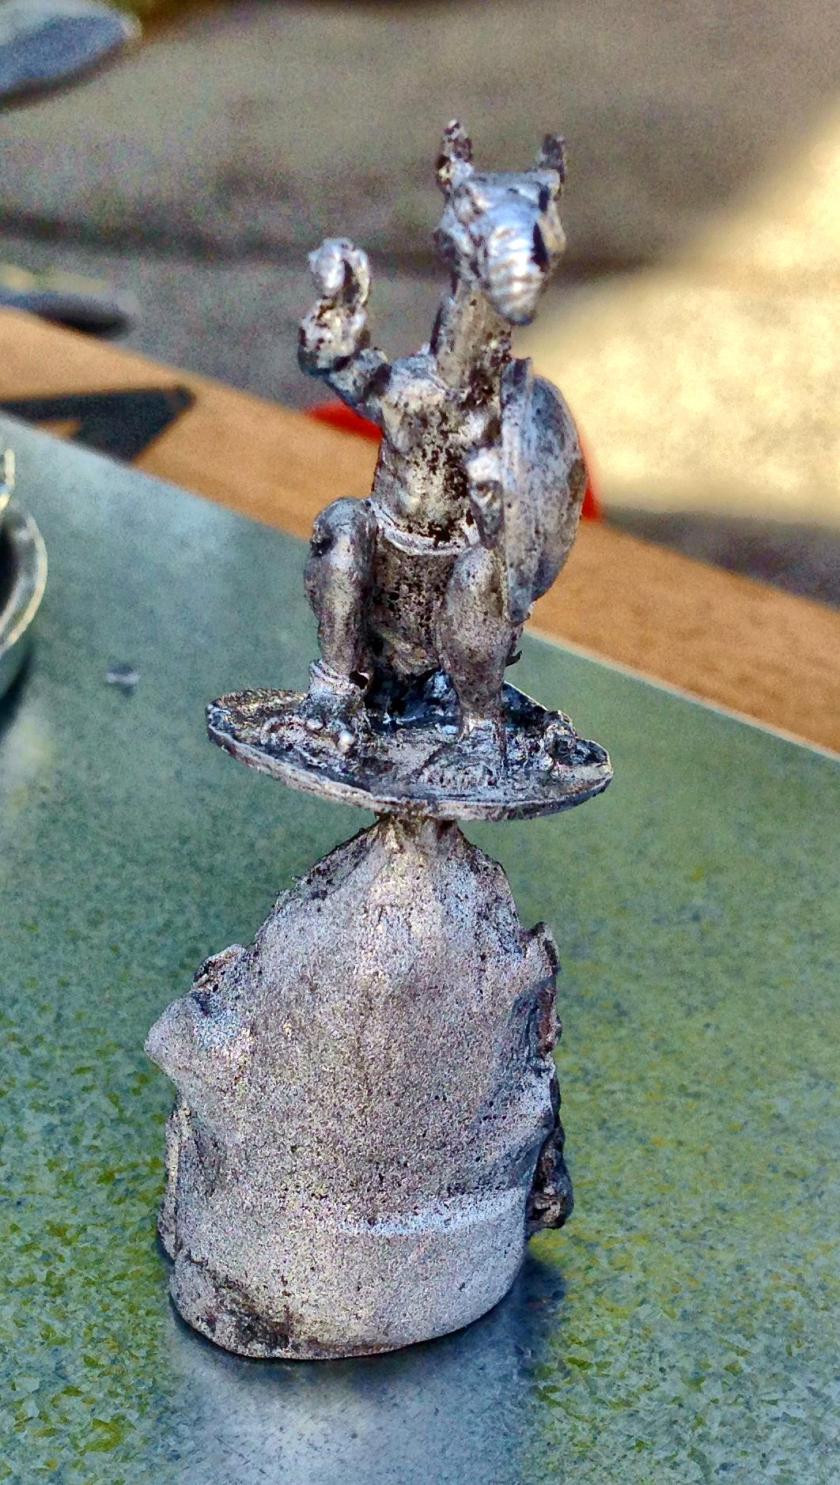
The first Rooman produced by the mold.
I ended up with 12 this weekend – 9 from the first mold and 3 from the second. after a while, the castings got better and easier.
The first 12 on my back bumper still on the flow hole plug
I removed the plugs with a pair of cutting pliers, and now I have 12 more Roomans. I need a few more though to complete the total.
The first 12 Roomans
My next attempt will be with the other Rooman model, and with some Archive Miniatures Space Ducks that I found on line as well. Stay tuned. I am happy to now have a way of getting out of production miniatures when I need them. I would recommend the RTV Quick-Sil starter kit for anyone wanting to do the same.
Winter is always a tough time to complete miniature projects in New England. I like to prime my figures, which involves spray paint, and I like to save and protect my paint jobs, which involves spray varnishes. Unfortunately, both of these are sensitive to cold and humidity – if only I had a heated garage! I did get lucky his month with the help of Jeff Smith who let me use his workshop to prime, but more on that in a bit. Work travel impacted production as well for me.
I needed a few “large creatures” for Wizards to control for my fantasy war game rules. I have a few that I got on eBay that are in progress, but I did not want a month to go by without any production at all.
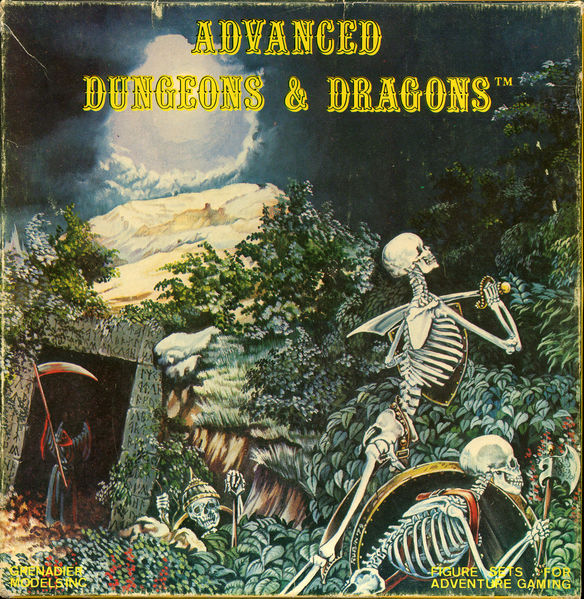
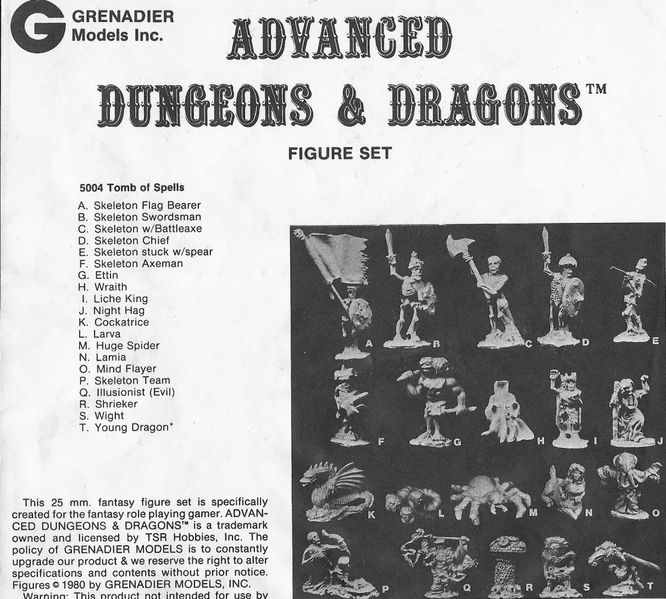
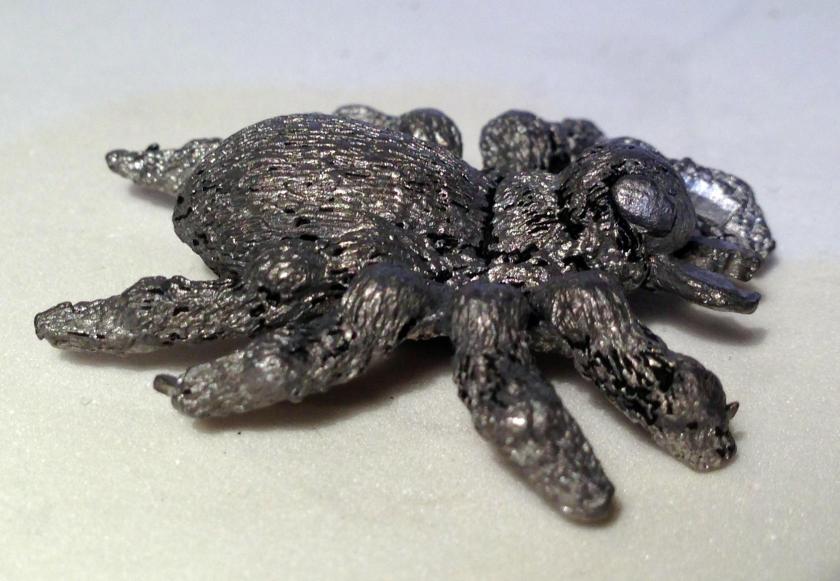
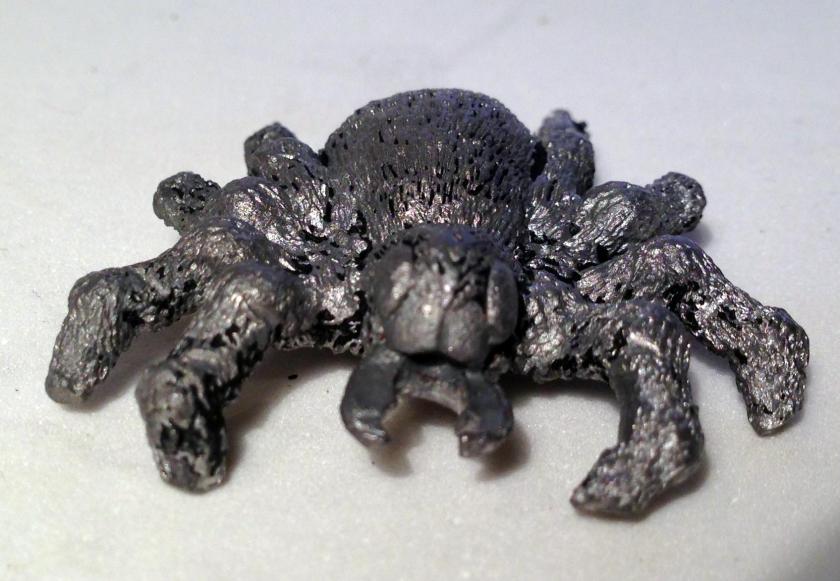
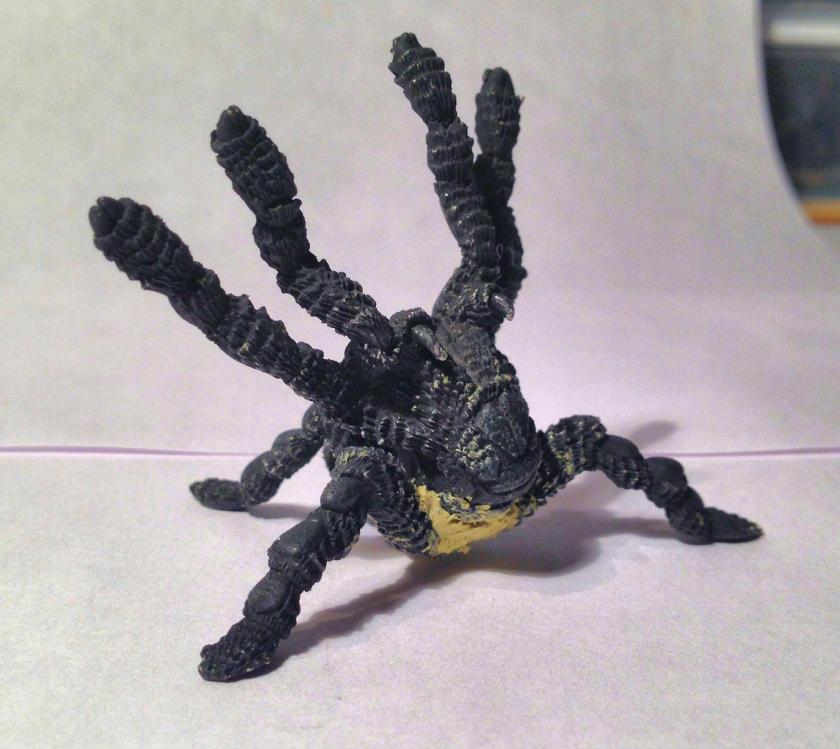
Maybe because of the passing of David Bowie last month, I had “Ziggy Stardust and the Spiders from Mars” echoing through my head. I really was a big fan of Bowie, and was lucky enough to see him one time back in the 90’s. It was a great concert. So, with a nod to the Spiders from Mars, I focused on two spiders I got on eBay. The first one was the smaller and older of the pair, called “Huge Spider”. It was made by Grenadier in 1980 as part of 5004 “Tomb of Spells” boxed set for AD&D. The second was a larger Ral Partha figure that came in 3 pieces and looks like a tarantula. It was made in 1995 for TSR’s AD&D 2nd edition Monsters series. It is 11-515, and according to Lost Mini’s wiki it was called “Spider/Steeder”. I will deal with each in turn.
The Tomb of Spells set had 20 miniatures in it (pictures of box and insert below from Lost Mini’s Wiki). Originally, the Huge Spider had only 6 legs, but subsequent versions were given 8 legs. The eyes were not those of a spider and more akin to the compound eyes of an insect.
Original Box Cover for the Grenadier Tomb of Spells Set
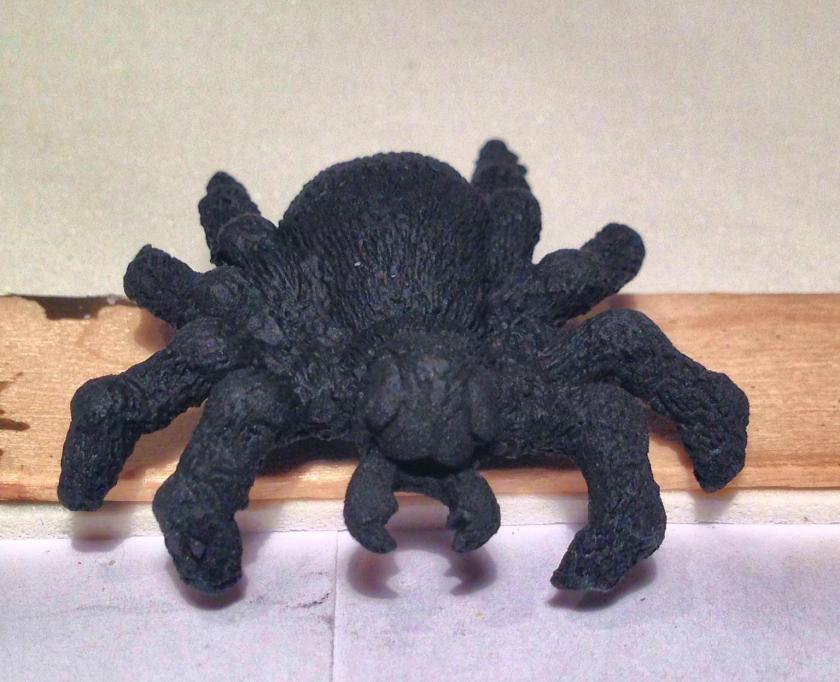
Tomb of Spells Insert (Huge Spider is “M”)The figure itself was painted black, and thickly so. A few days of soaking in Simple Green and scrubbing with a stiff plastic brush and a push pin got the vast majority of the old paint removed, but not all as seen below.
Side View after Cleaning (as much as possible!) Front View after Cleaning
I wanted to prime them, but the weather was around -5° Fahrenheit that Saturday. Thankfully, Jeff Smith was working in his wood shop up at Bay Path Golf Course. I took advantage of his kind offer to work there and prime several miniatures. He had a nice turntable for me to use which helped a lot. I primed the figures with Krylon Ultra-Flat Black at a safe distance from his roaring wood stove with the door ajar. Most of the vapors got sucked right into the stove which was a great solution!
I then mounted the figure on a #8 stainless steel washer and then used the washer to mount to a popsicle stick for painting. I used my scroll saw to cut a hexagonal 2½” base out of 1/8″ plywood for a permanent base. I learned from previous projects that a beveled base would hold flocking better, so I set my saw up to have about a 85° (instead of 90°) slope. I glued several zinc coated steel #8 washers to the bottom of the final base to provide a way for the model to attach to magnetic sheets in my storage drawers. My plan was to have the spiders be dark in a field of grass. To help make flocking easier I used some Deka Lack satin green (from 1987 and still good) to paint the final base. I then went back to painting the Huge Spider itself.
Grenadier Huge Spider Primed
I gave it a nice light coat of Americana “Lamp Black”. When that had dried, I used Special Weapons Washes “Heavy Body Black” on the figure. I then applied a dry brush of Citadel “XV-88” all over the figure.
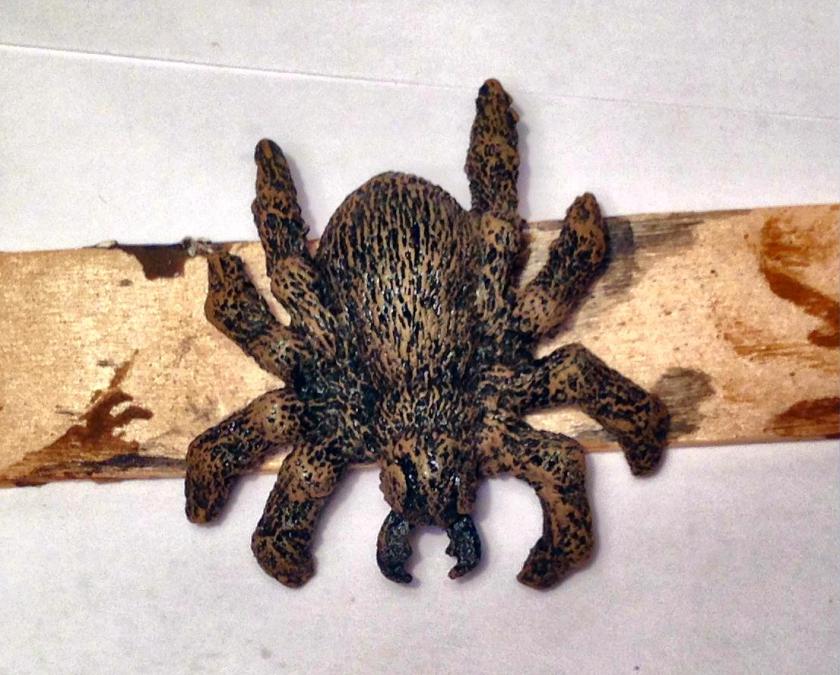
Grenadier Huge Spider after Dry Brushing
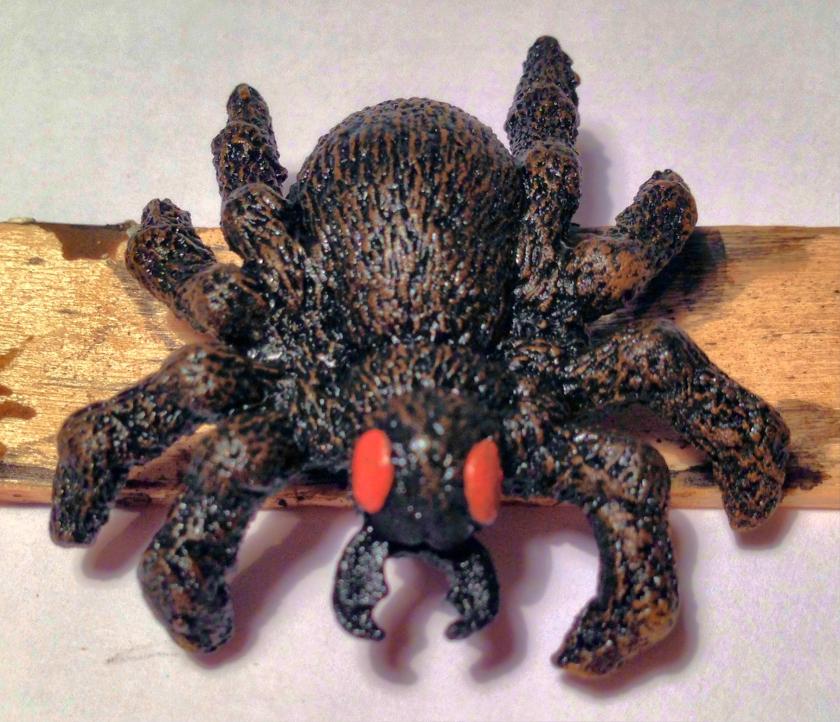
I then washed the figure again, this time with Special Weapons Washes “Red Black”. For the mandibles, Armory’s “Gloss Black” gave a menacing glint. Lastly, the eyes deserved menace, so Citadel’s “Wild Rider Red” was my choice.
Ready for Mounting on Final Base
As for mounting and finishing, I used wood glue to mount the figure to the hex base. Being careful to avoid the legs, I used toothpicks and small brushes to apply white glue for the flocking around and under the figure. The flocking base material was Army Painter Battlefields “Moss Green” which worked well with the underpainted green base. I sprinkled some 4Ground TSM-122 “Loose Foliage – Green” around to alter the color a bit and create depth. I sealed the entire base flocking with a slurry of diluted white glue which I let dry.
Grenadier Huge Spider Awaiting Varnishing and Final Touches
Back to weather and conditions challenges for varnishing – still too cold! And my wife really does not want varnish propellant in the house – I’ve pushed that before and will not again. Besides, it really is a health hazard. Traveling with the figure to Jeff’s workshop seemed too burdensome as I did need the usual two coats (Krylon Clear Glossy followed six hours later by Krylon Clear Matte). I also did not want dust or bumping the miniature to affect the varnish.
I came up with a nice solution using my cellar bulkhead. I opened the inner door to heat the stairway of the bulkhead from the cellar. Once warm, I affixed a couple of magnetic battery-powered LED lights for illumination on the interior of the outer bulkhead door. I put on my respirator, and shut the interior door, and used the spray varnish under the LED lights to coat the figure in a clean cardboard box with cutaways that was set on the stairs. I then opened the outer bulkhead door to vent the fumes, and quickly went back into the house from the back door with the figure before it got cold – and it worked!
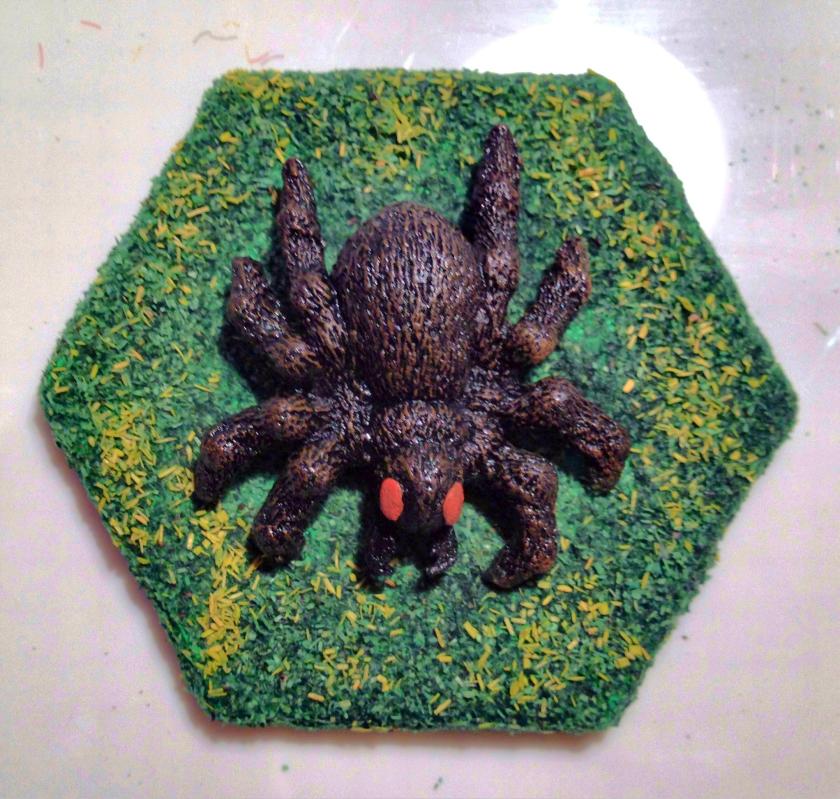
After the second coat (Matte) of varnish, I used a combination of Army Painter Battlefields “Wilderness Tuft” with a few “Wasteland Tuft” and some “Battlefield Rocks” to create a more 3D effect.
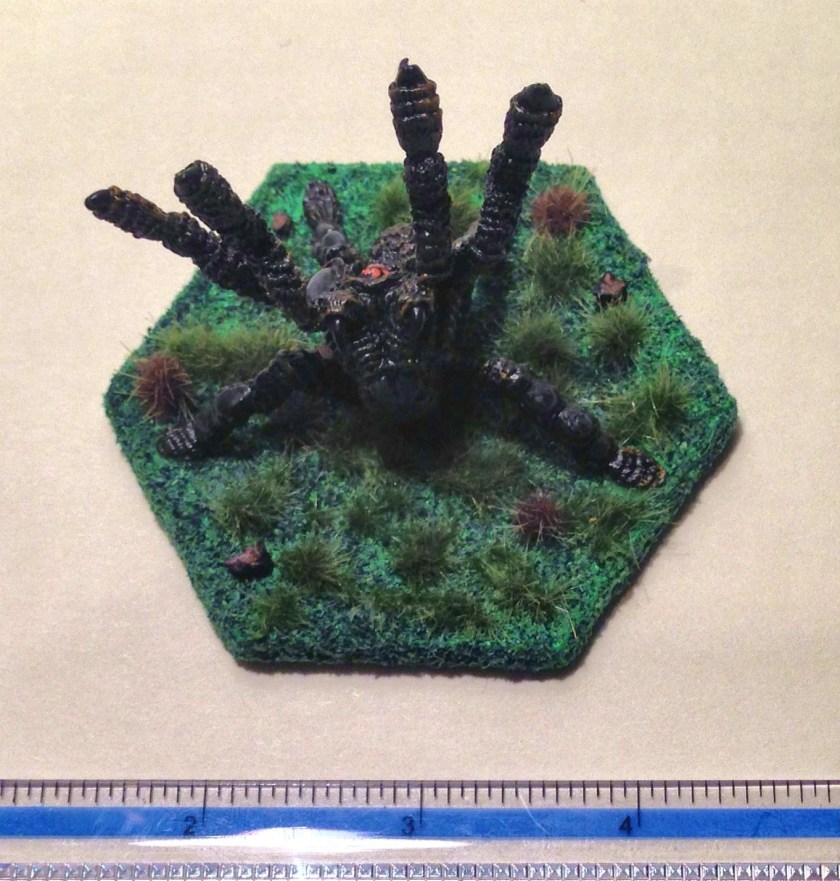
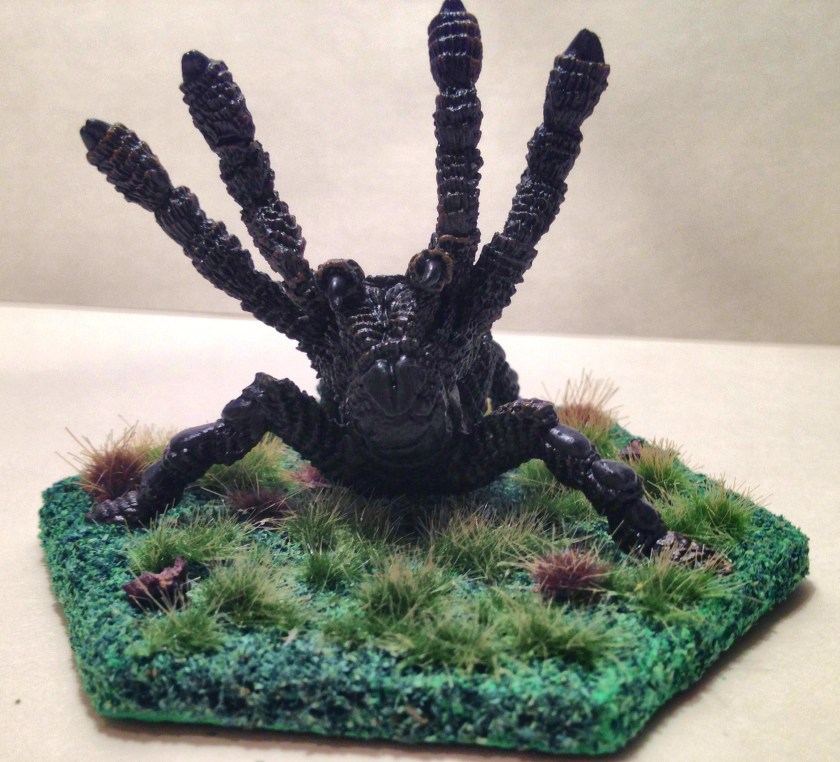
Grenadier Huge Spider, Top View with Ruler for ScaleGrenadier Huge Spider, Front ViewGrenadier Huge Spider, Side View
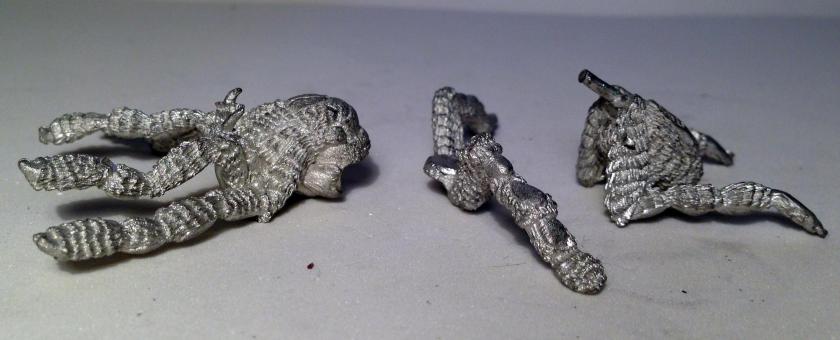
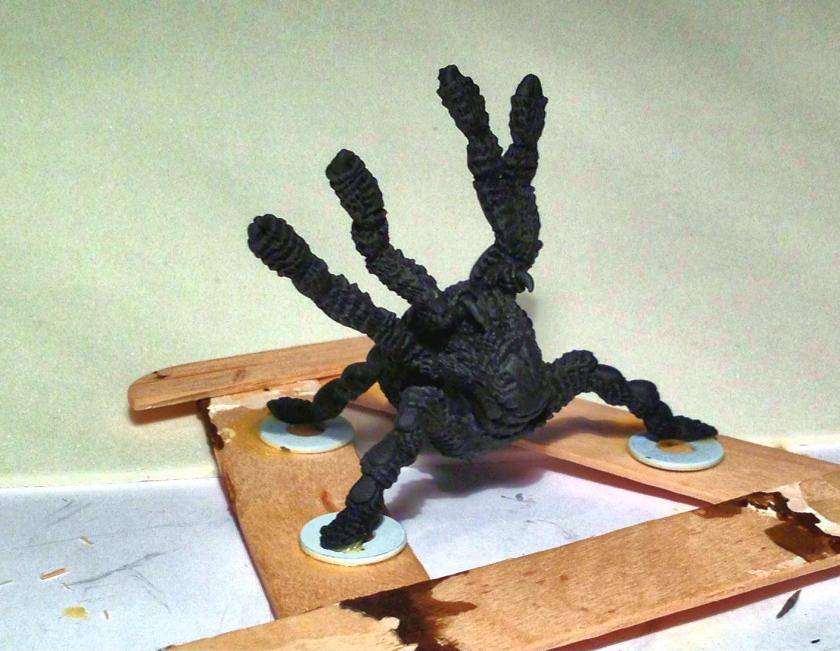
Now I shall discuss the Ral Partha Spider/Steeder. It was made for TSR’s AD&D Monsters line in 1995. It posed some new challenges, as well as some of the same as the Grenadier model. The first was assembly. It was not immediately clear as to how to put the creature together – especially the middle. Additionally, the rod at the back was supposed to go into all three pieces, but it was not anywhere near long enough to do that. I tried E600 epoxy, and it became clear to me quickly that I needed a structural solution. Hearkening back to my Engineer days, I went to rebar and concrete – well, sort of anyways!
Ral Partha Spider before Assembly
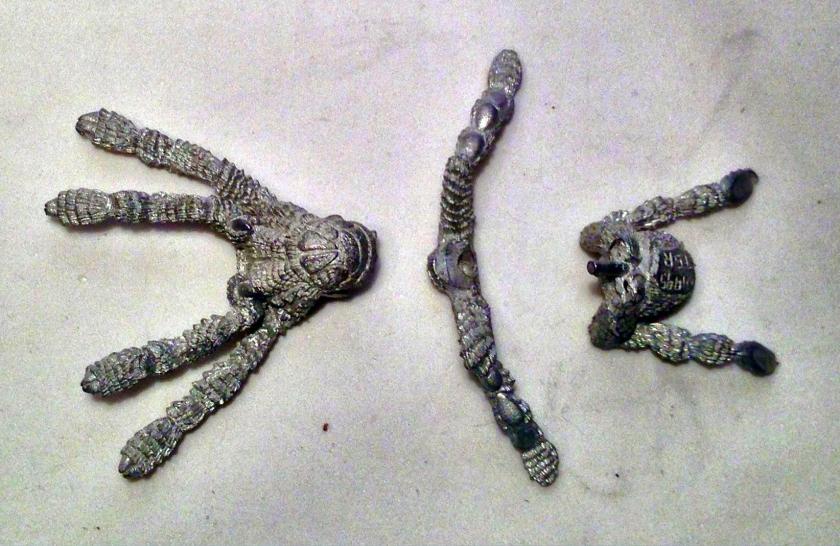
Using my pin vise and my smallest bit, I drilled 2 holes, one in each major end. I then cut off small pieces from a large paperclip and shaped them to go through the holed in each. I had some Milliput that I had never used before. It comes in two cylinders, and when you mix them in equal proportion, it goes from clay-like to rock overnight.
I combined the two types (and used more than I needed as it turns out). I then worked it into the cavities and around the paperclips, and braced it overnight. It held up great! The model was structurally sound. I sanded and filed the excess off and went on to prime the model and prepare its final base. The only differences here from the previous spider’s was that the base was larger (3″) – everything else was the same (paint, washers, bevel). I also had previously primed this model at the same time at Jeff’s workshop before assembling with Milliput and paperclips!
Ral Partha Spider after Priming and Assembly with MilliputRal Partha Spider After Base Coat
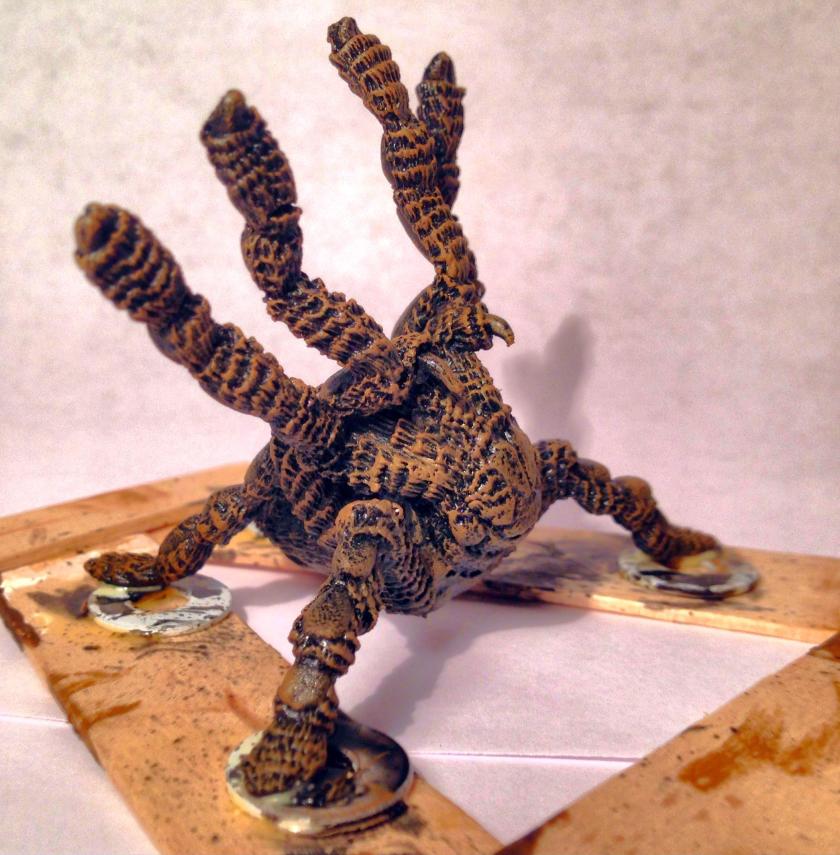
This figure had not been previously painted. I mounted it on washers and then mounted to a popsicle stick. As with the other model, I gave it a base coat of Americana “Lamp Black” followed by Special Weapons Washes “Heavy Body Black”, and a dry brush of Citadel “XV-88” all over the figure. The Milliput was not visible.
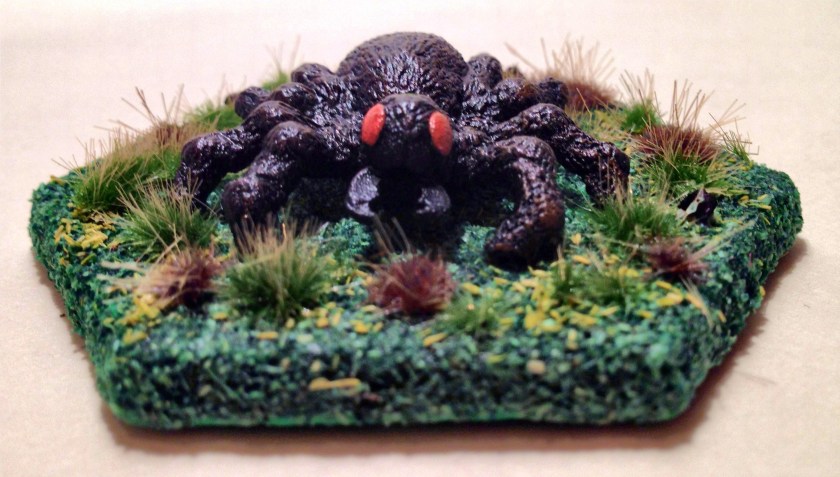
This figure was more akin to a tarantula. I used Citadel “Mechanicus Standard Gray” on the pads on the legs.
Ral Partha Spider After Dry BrushingI used Armory “Gloss Black” on the eye cluster, the fangs, the mandibles, and the leg tips. The eyes themselves were dots of Citadel’s “Wild Rider Red”. Another wash with Special Weapons Washes “Heavy Body Black” rounded out the painting as you see below.
Ral Partha Spider After Painting
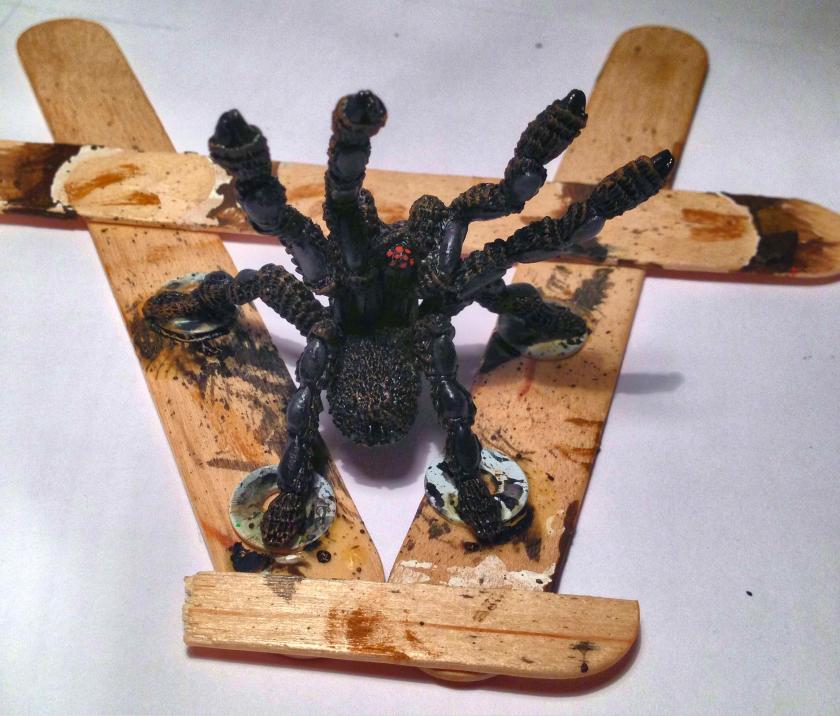
I then mounted the figure on the hex base, and followed the exact same procedure as the Grenadier model as to basing, flocking, varnishing, and finishing with grasses and rocks.
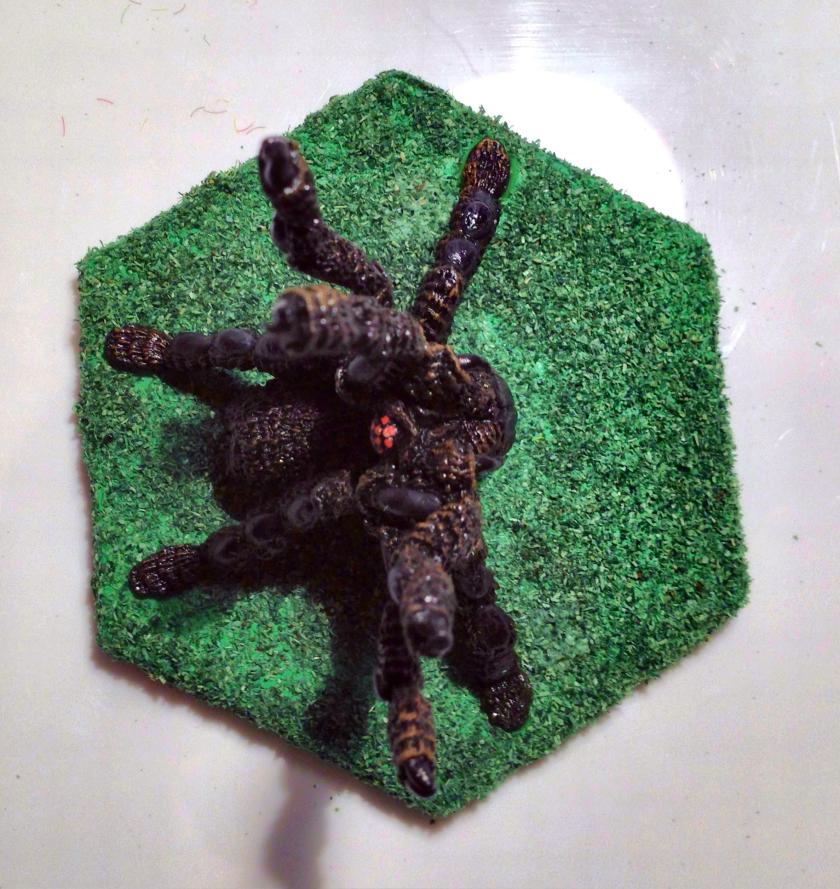
Ral Partha Spider Before Varnishing (front)
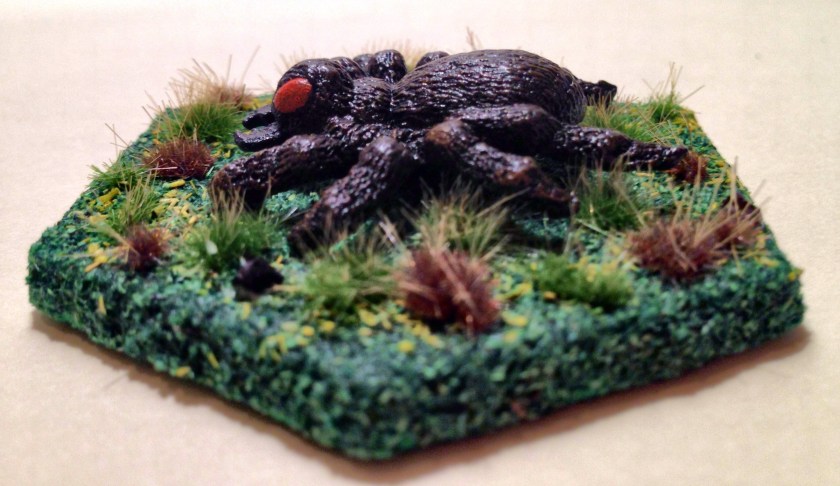
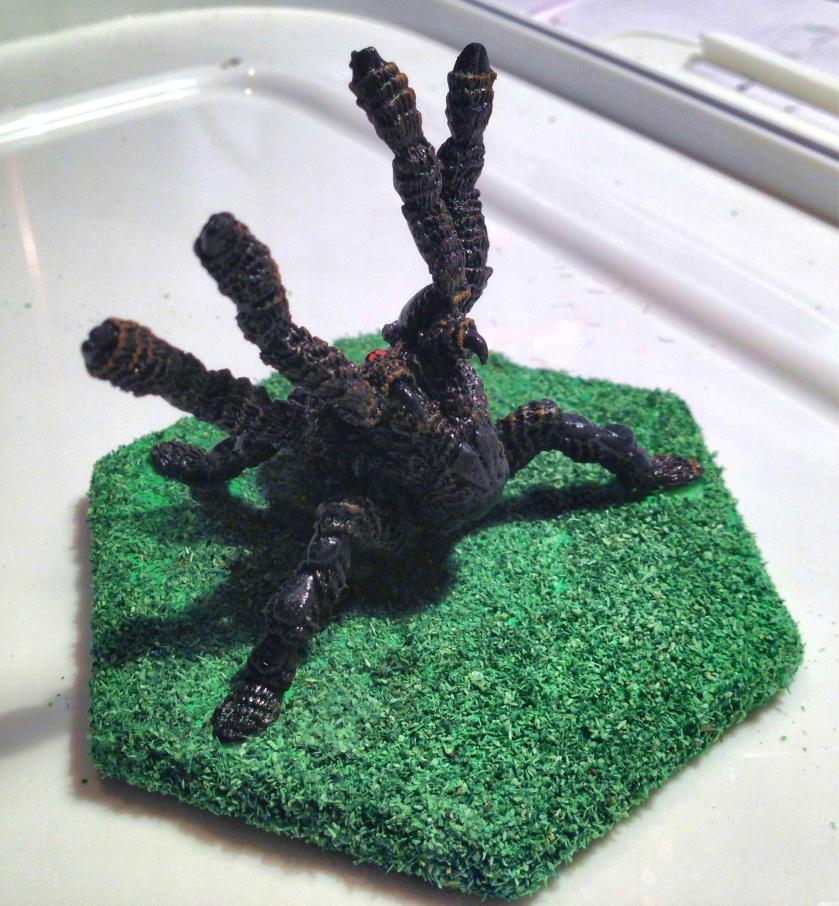
Top View before Varnishing Ral Partha 11-515 Finished! (top view)
Ral Partha 11-515 Finished (front view)
Overall, I am very happy. The figures look menacing and will be great for the Wizards to control, or as autonomous monsters…Scary Monsters…another David Bowie reference if you are paying attention!