Way back in July of 2023, I built and painted a “Munchkin Aerostat” for my Wars of Ozz games. It is a special unit that only the Munchkins have. I know that when I have had it on my tabletop it has always grabbed the attention of any passerby. You can see my post on that blue beauty here.
Since golf season ended, I have been preparing for many convention wargames. I will be running WWII (modified What a Tanker games), retro sci-fi skirmish games (using modified Combat Patrol TM WWII rules), and of course games of Wars of Ozz.
For Ozz, this year, I am focusing on the ruined “Robotic Sanctum – a.k.a. The Industrial City” of Professor Nitpik for my scenarios. There Nitpik toils away making armed automatons of tin – (Tin Men) to defend his city from outside raiders. Supposedly he is over 300 years old and the last survivor of “The Last Great War” that brought the post-apocalyptic world of Ozz to be. He guards his secrets jealously from all those who would raid his technological secrets.
With this in mind, my two scenarios involve the Munchkins and some allied troops perpetrating such a raid. One game will have the Munchkins attacking the city. The other will have the Munchkins trying to escape the wrath of Nitpik and escape to home. Oh yeah, the robots are in hot pursuit in game number 2.
These two games will necessitate my building and painting more units and more terrain. I will be sharing those efforts here in the next weeks.
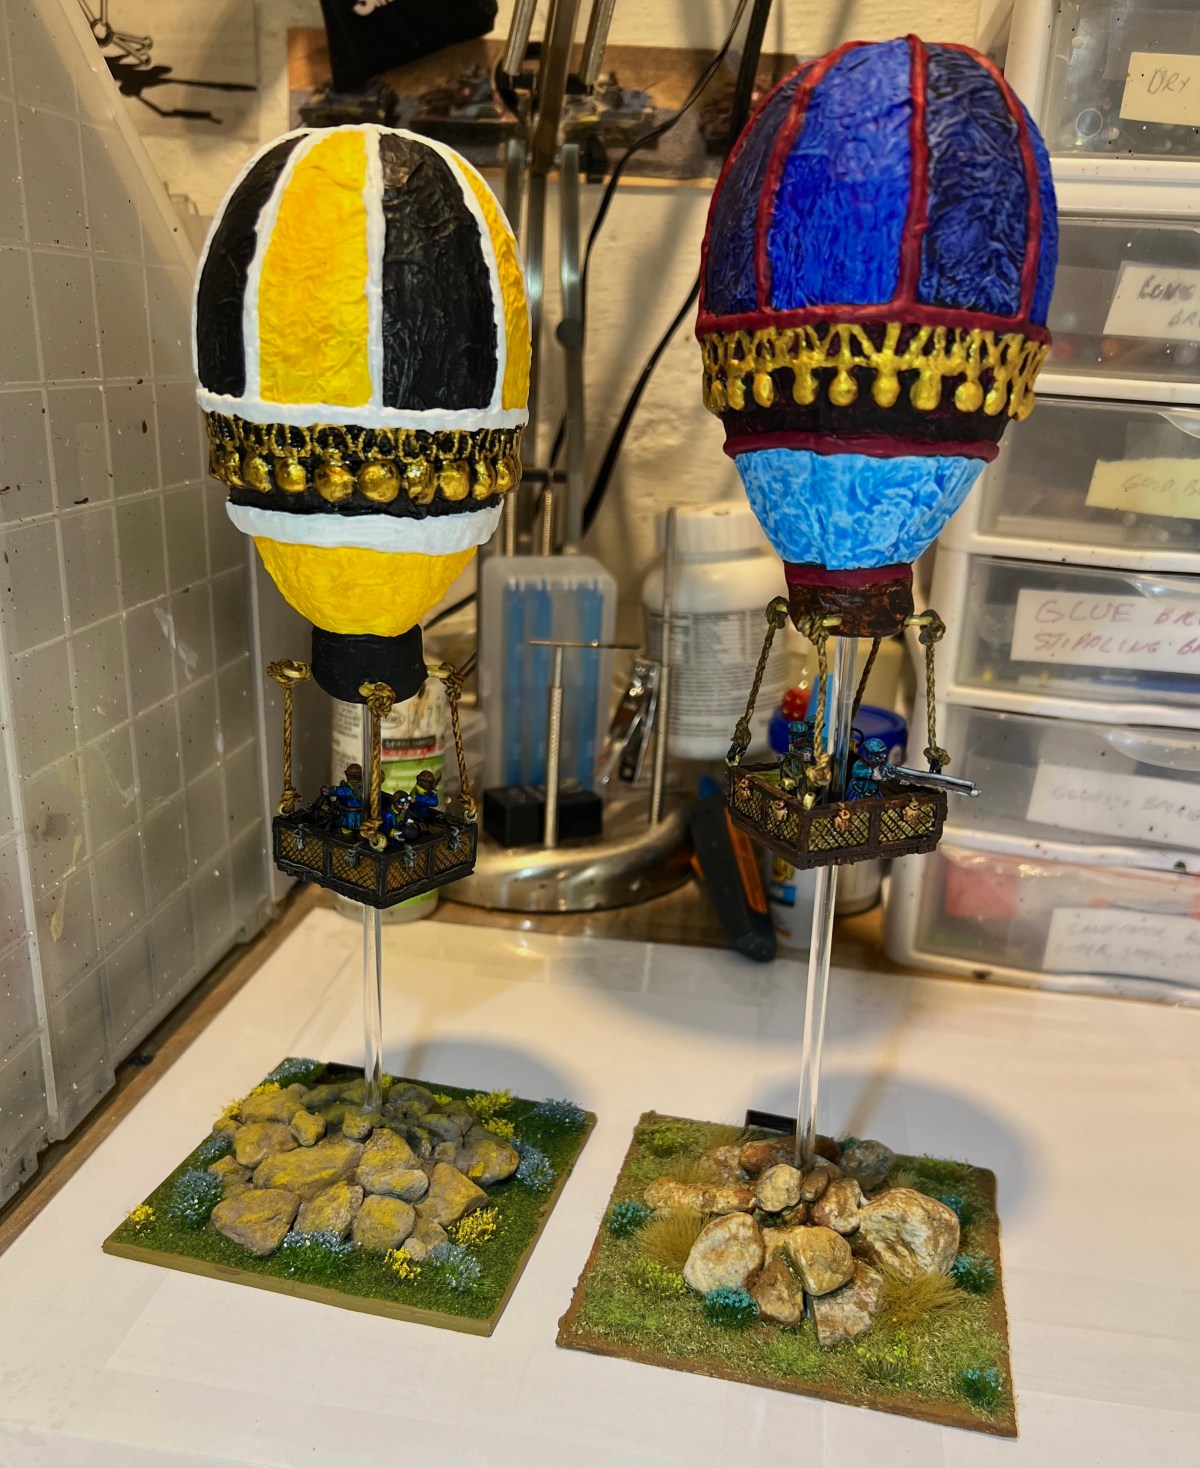
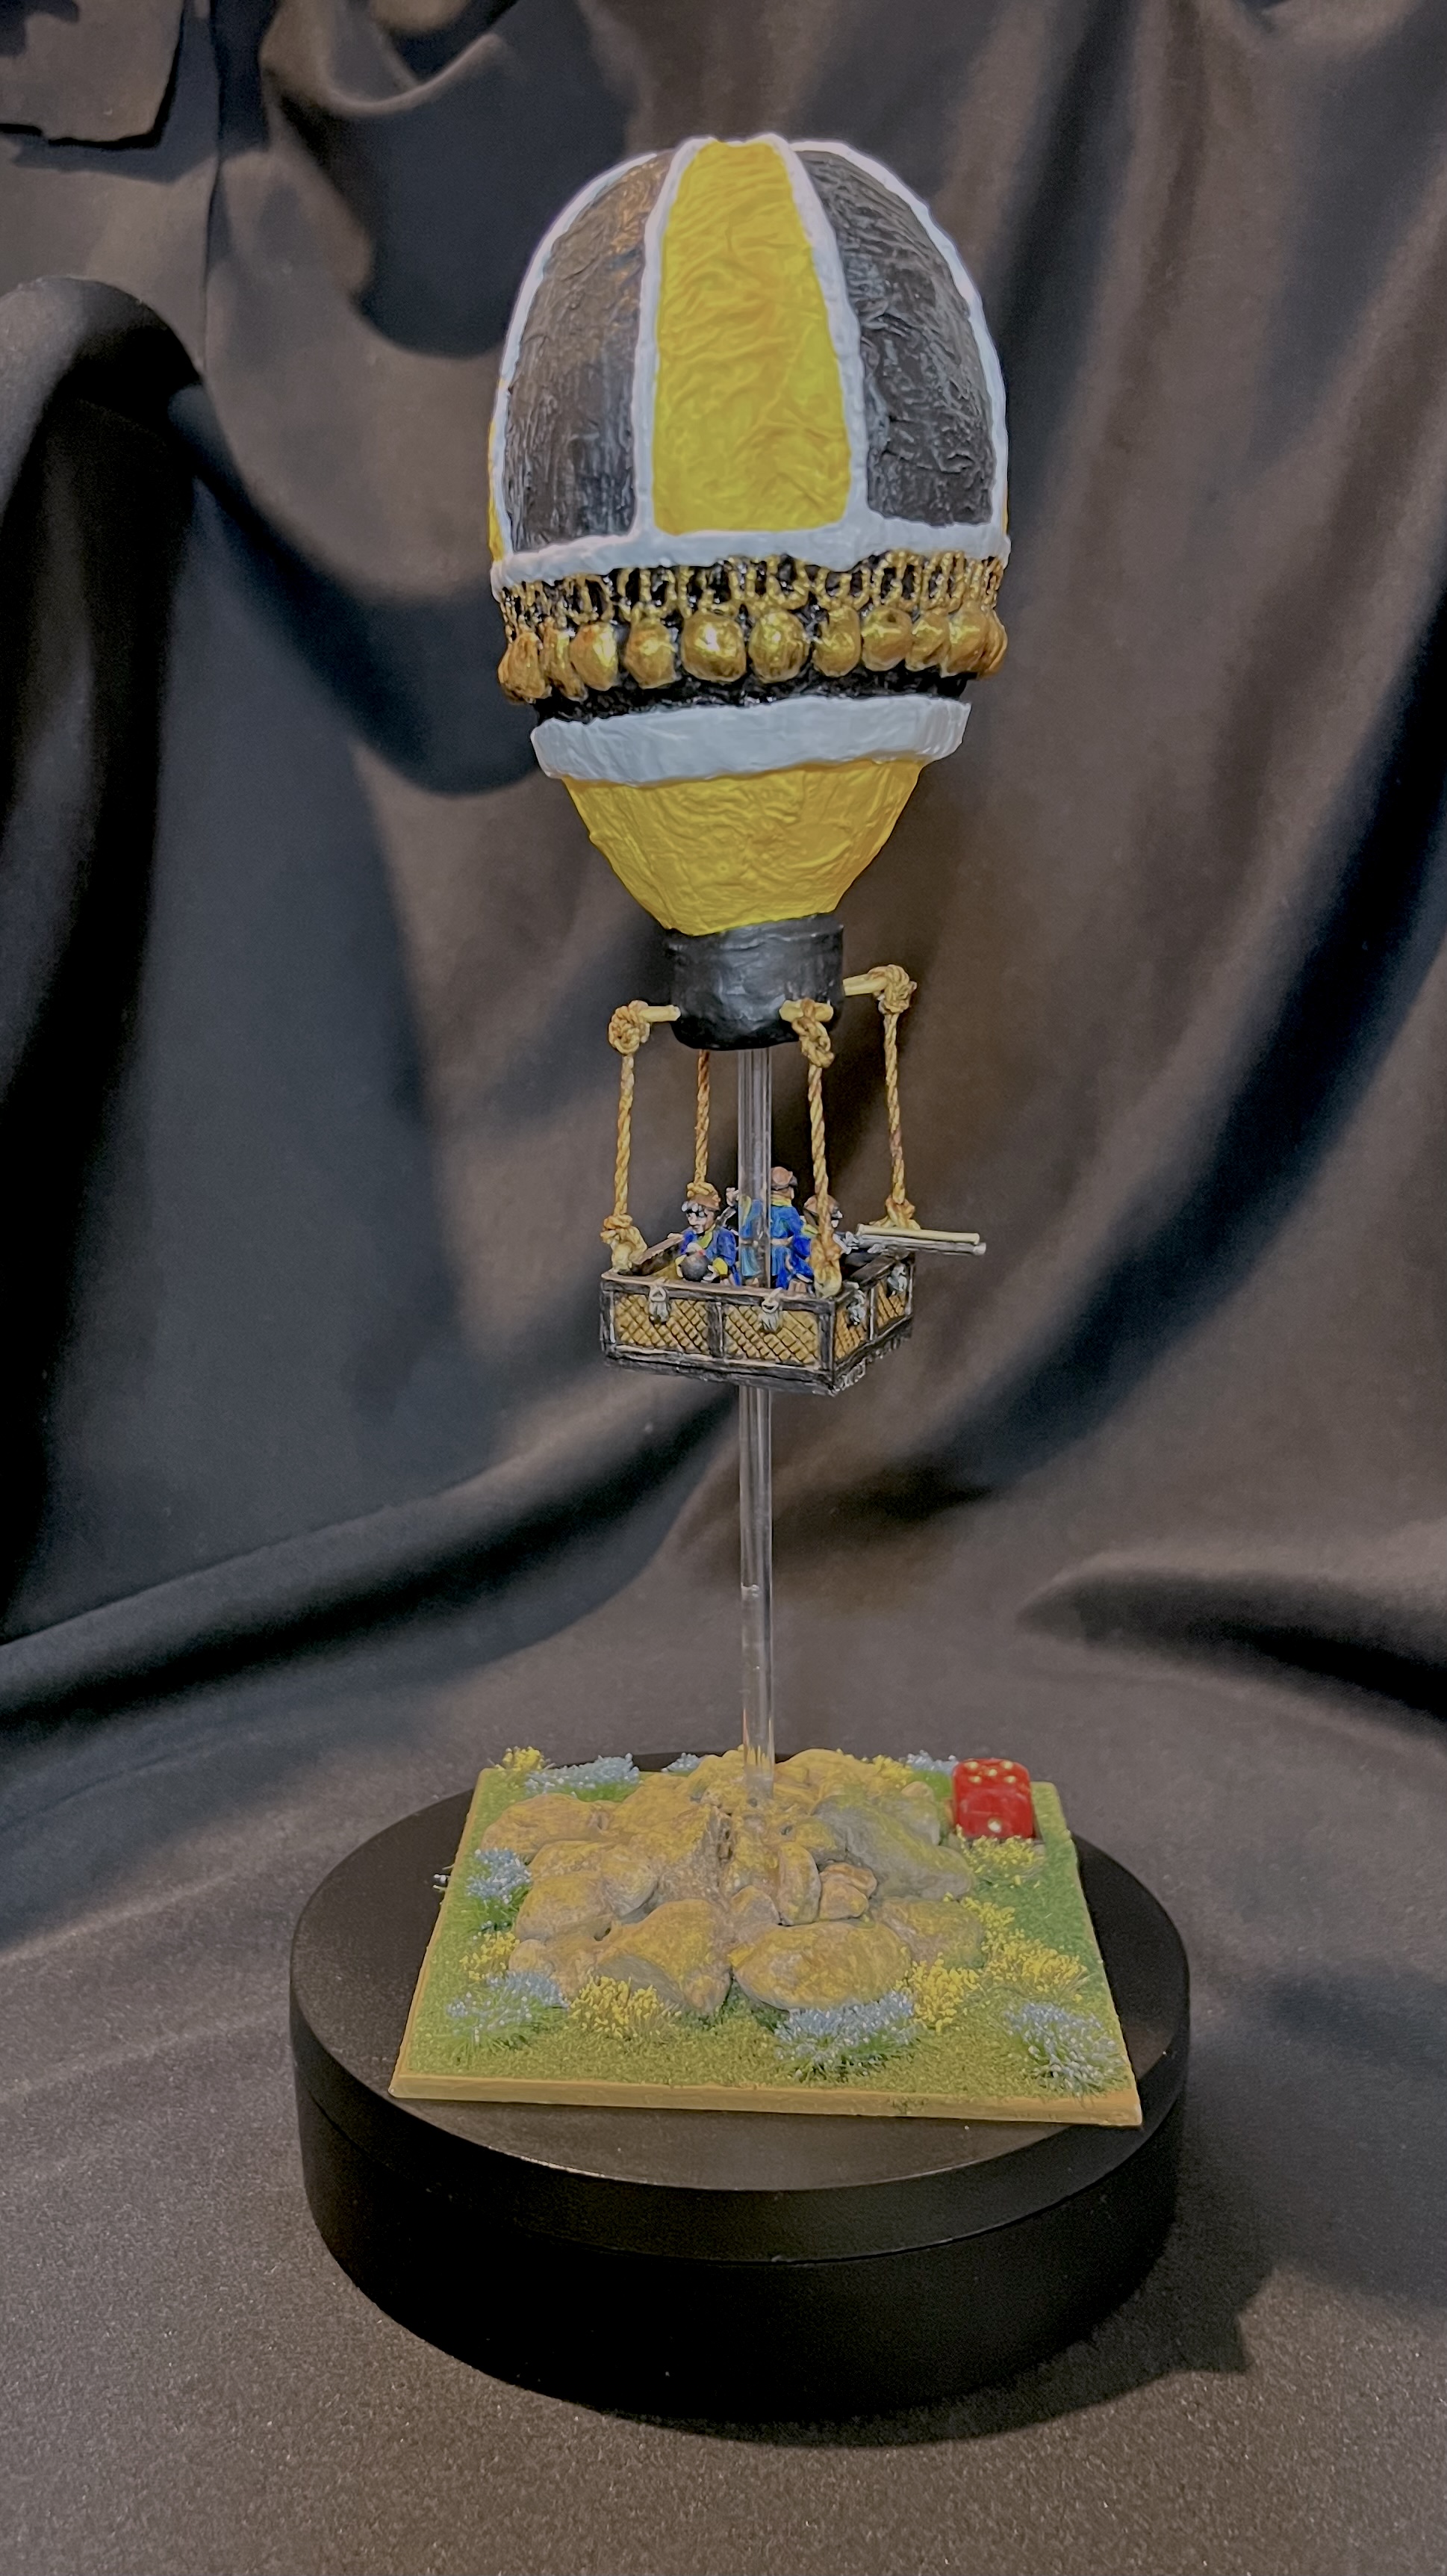
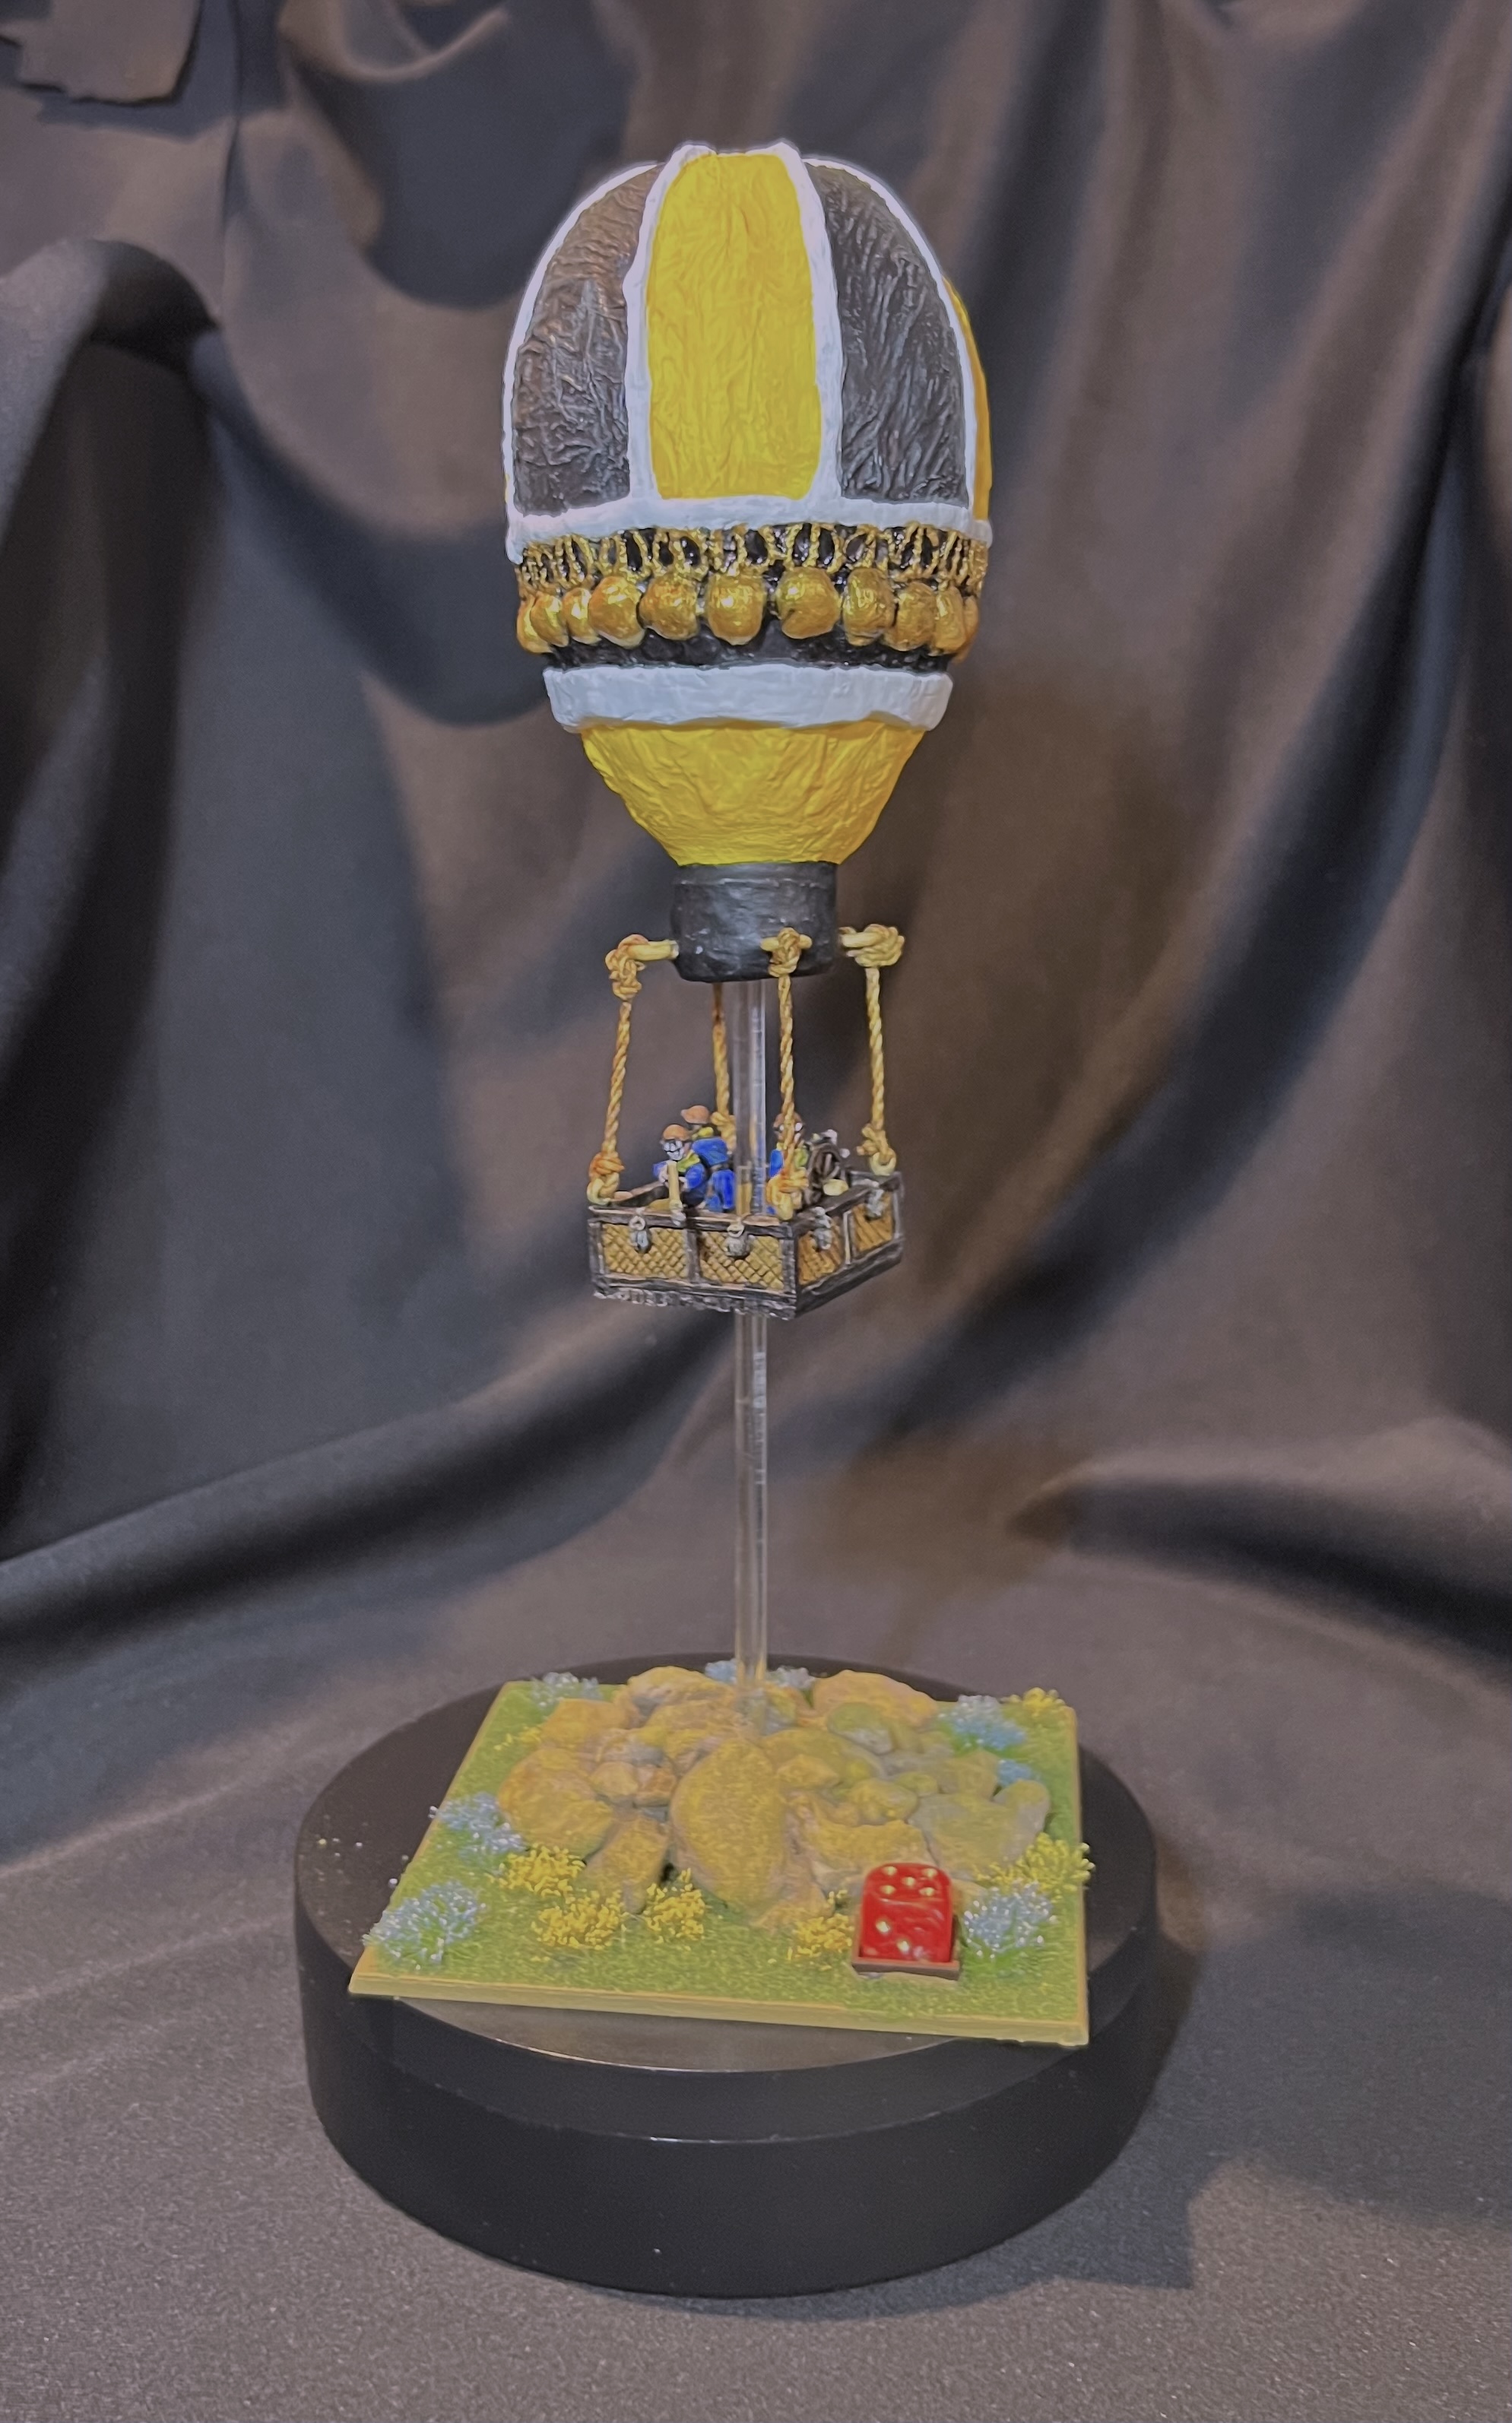
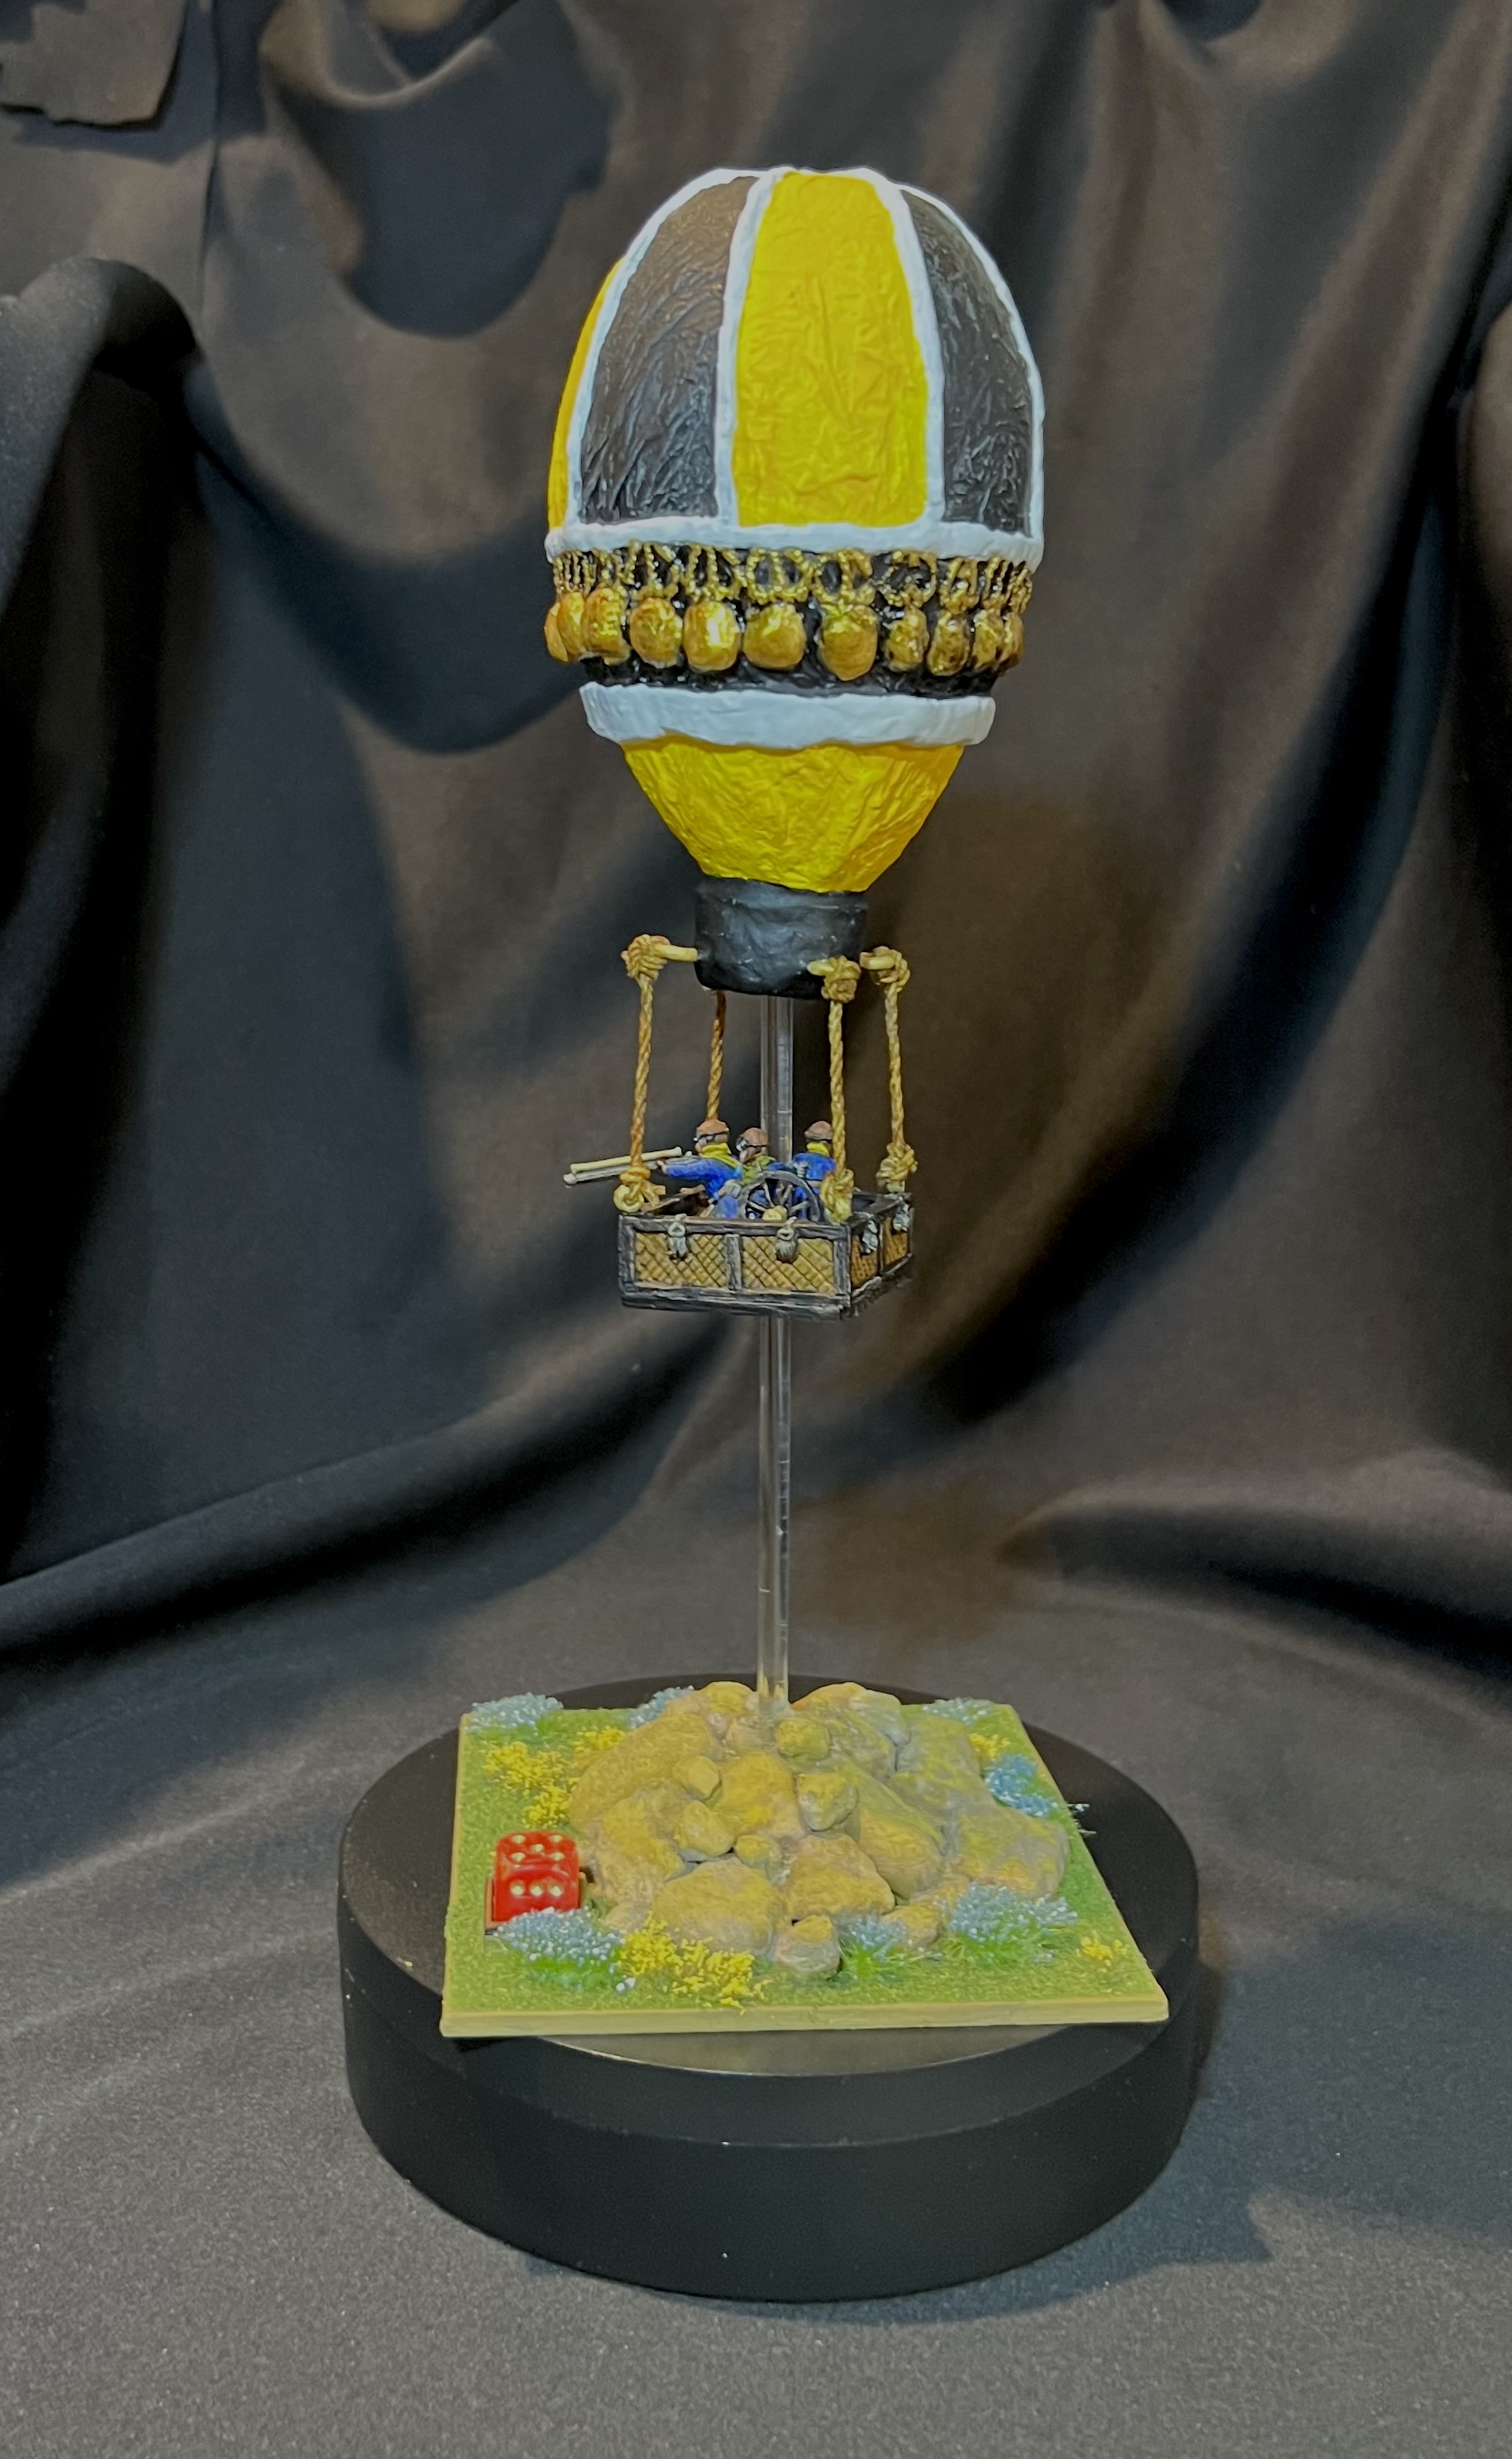
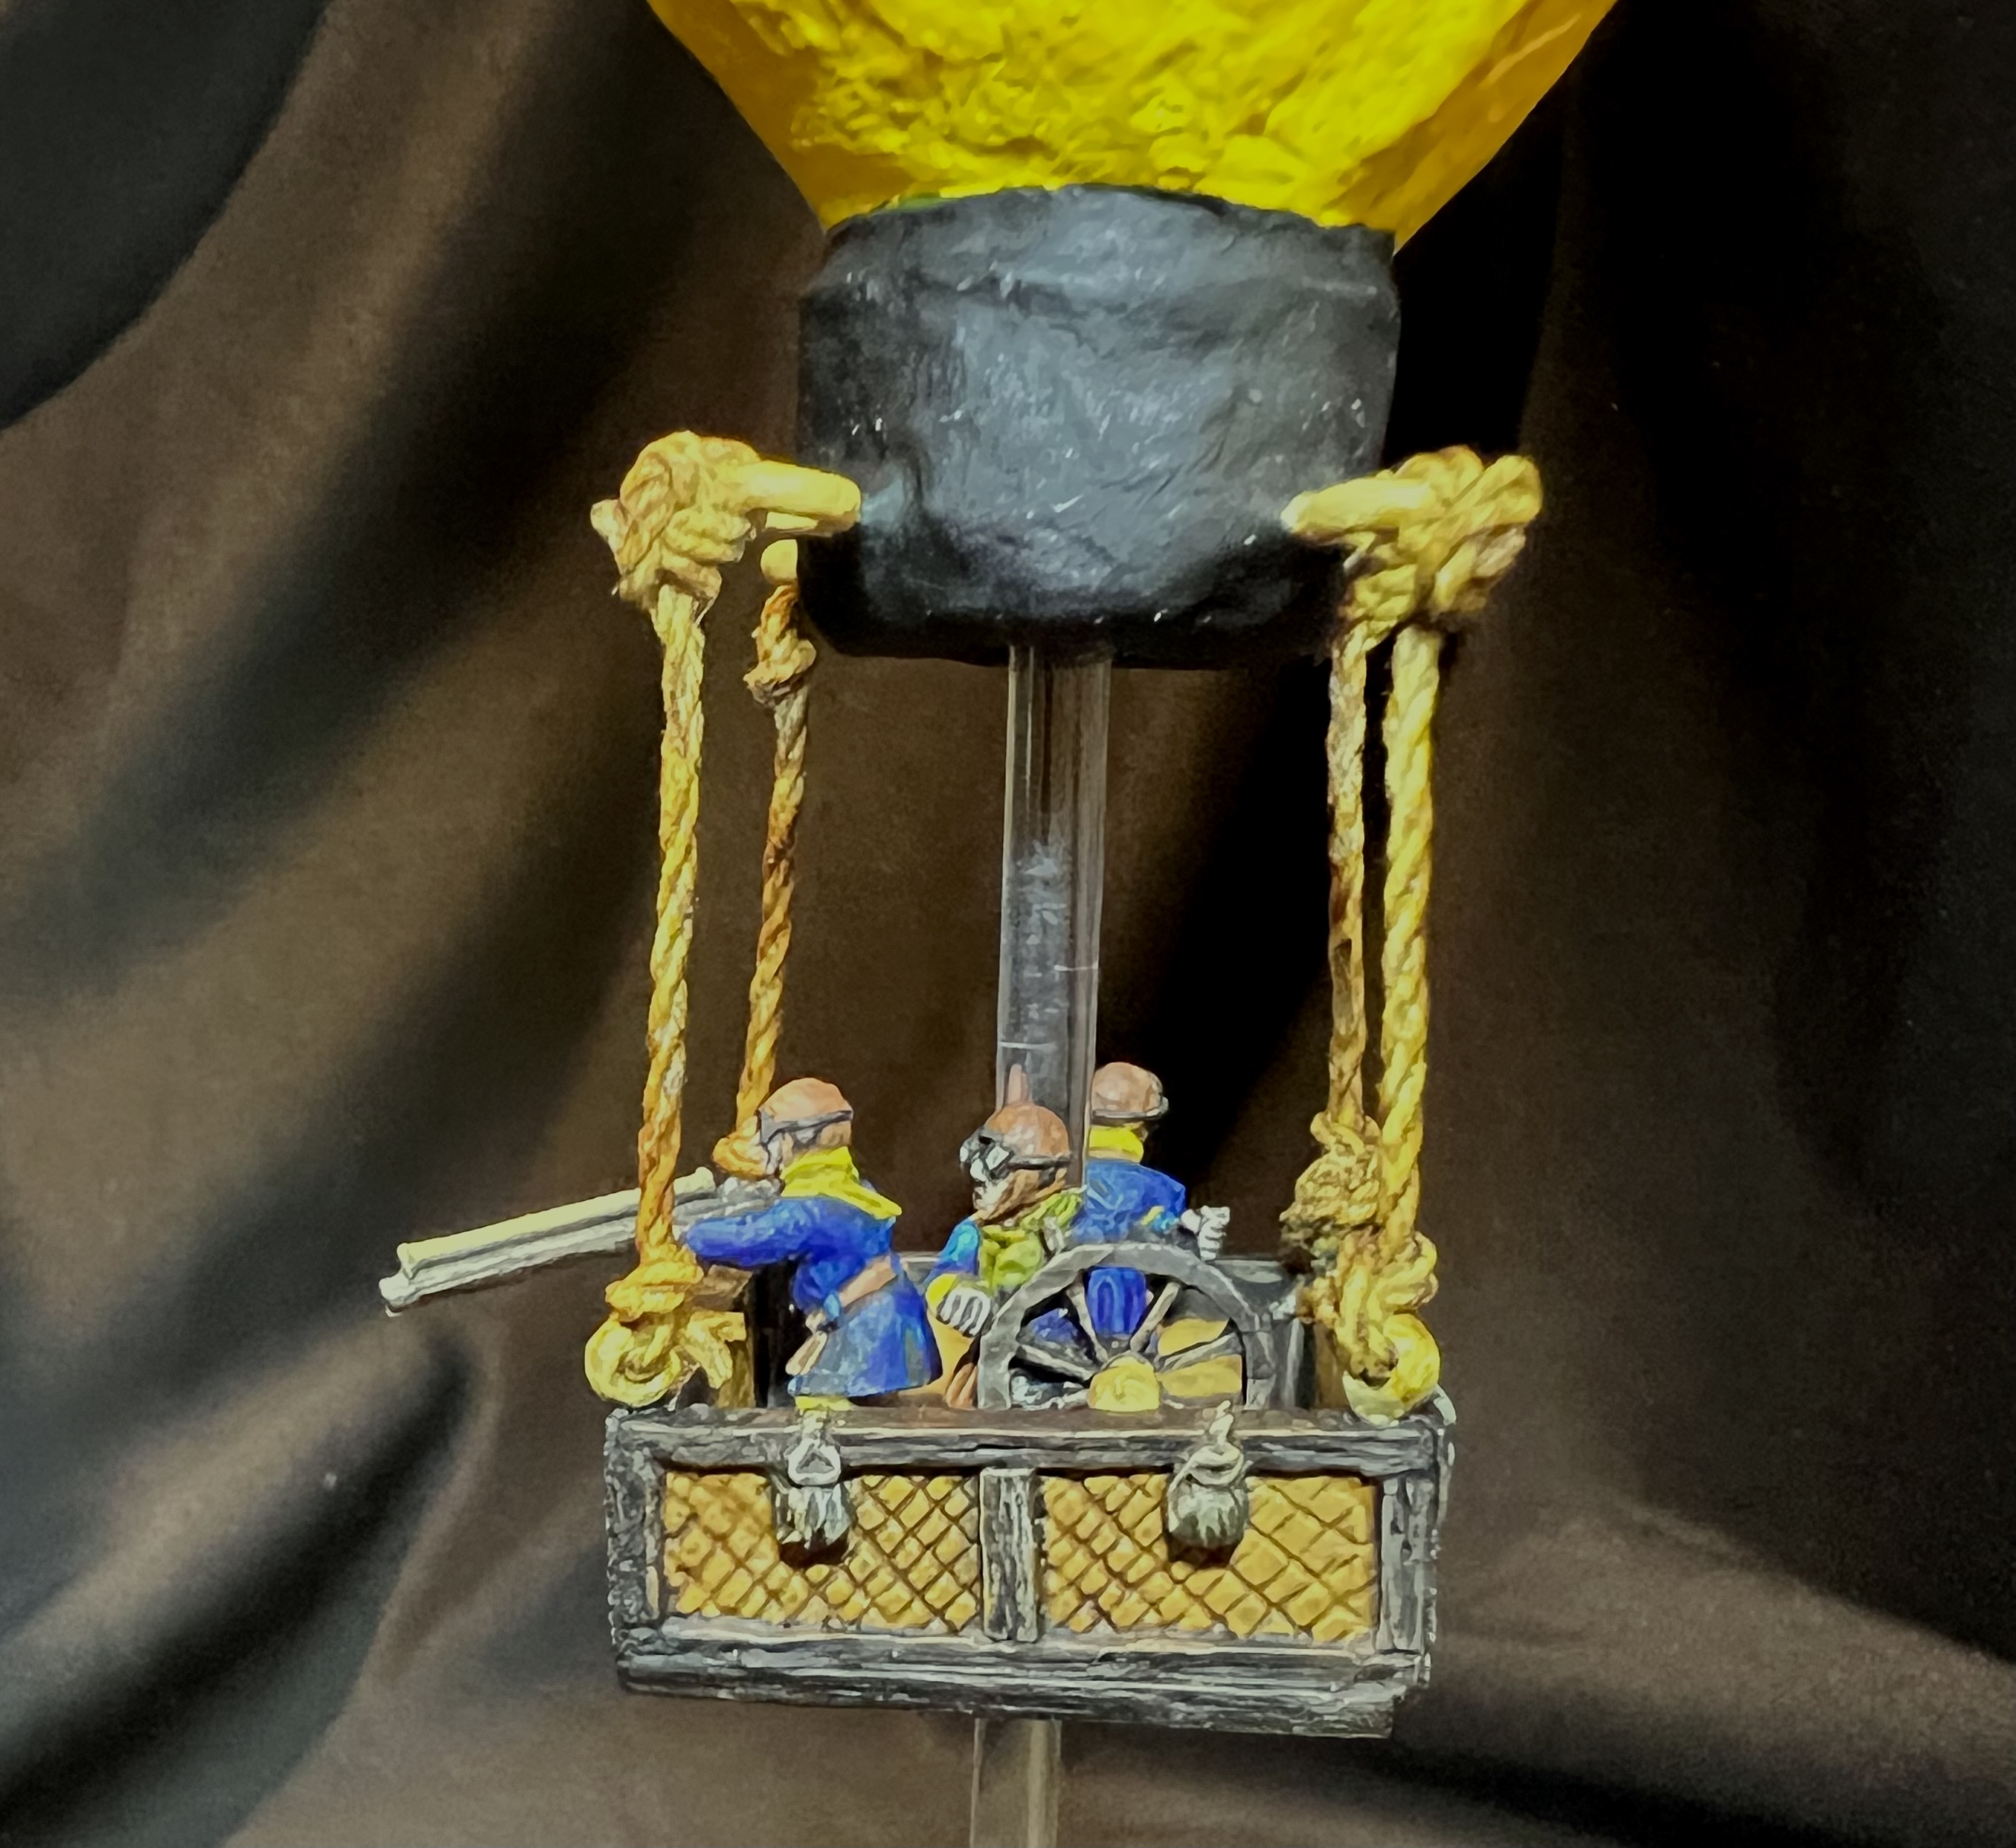
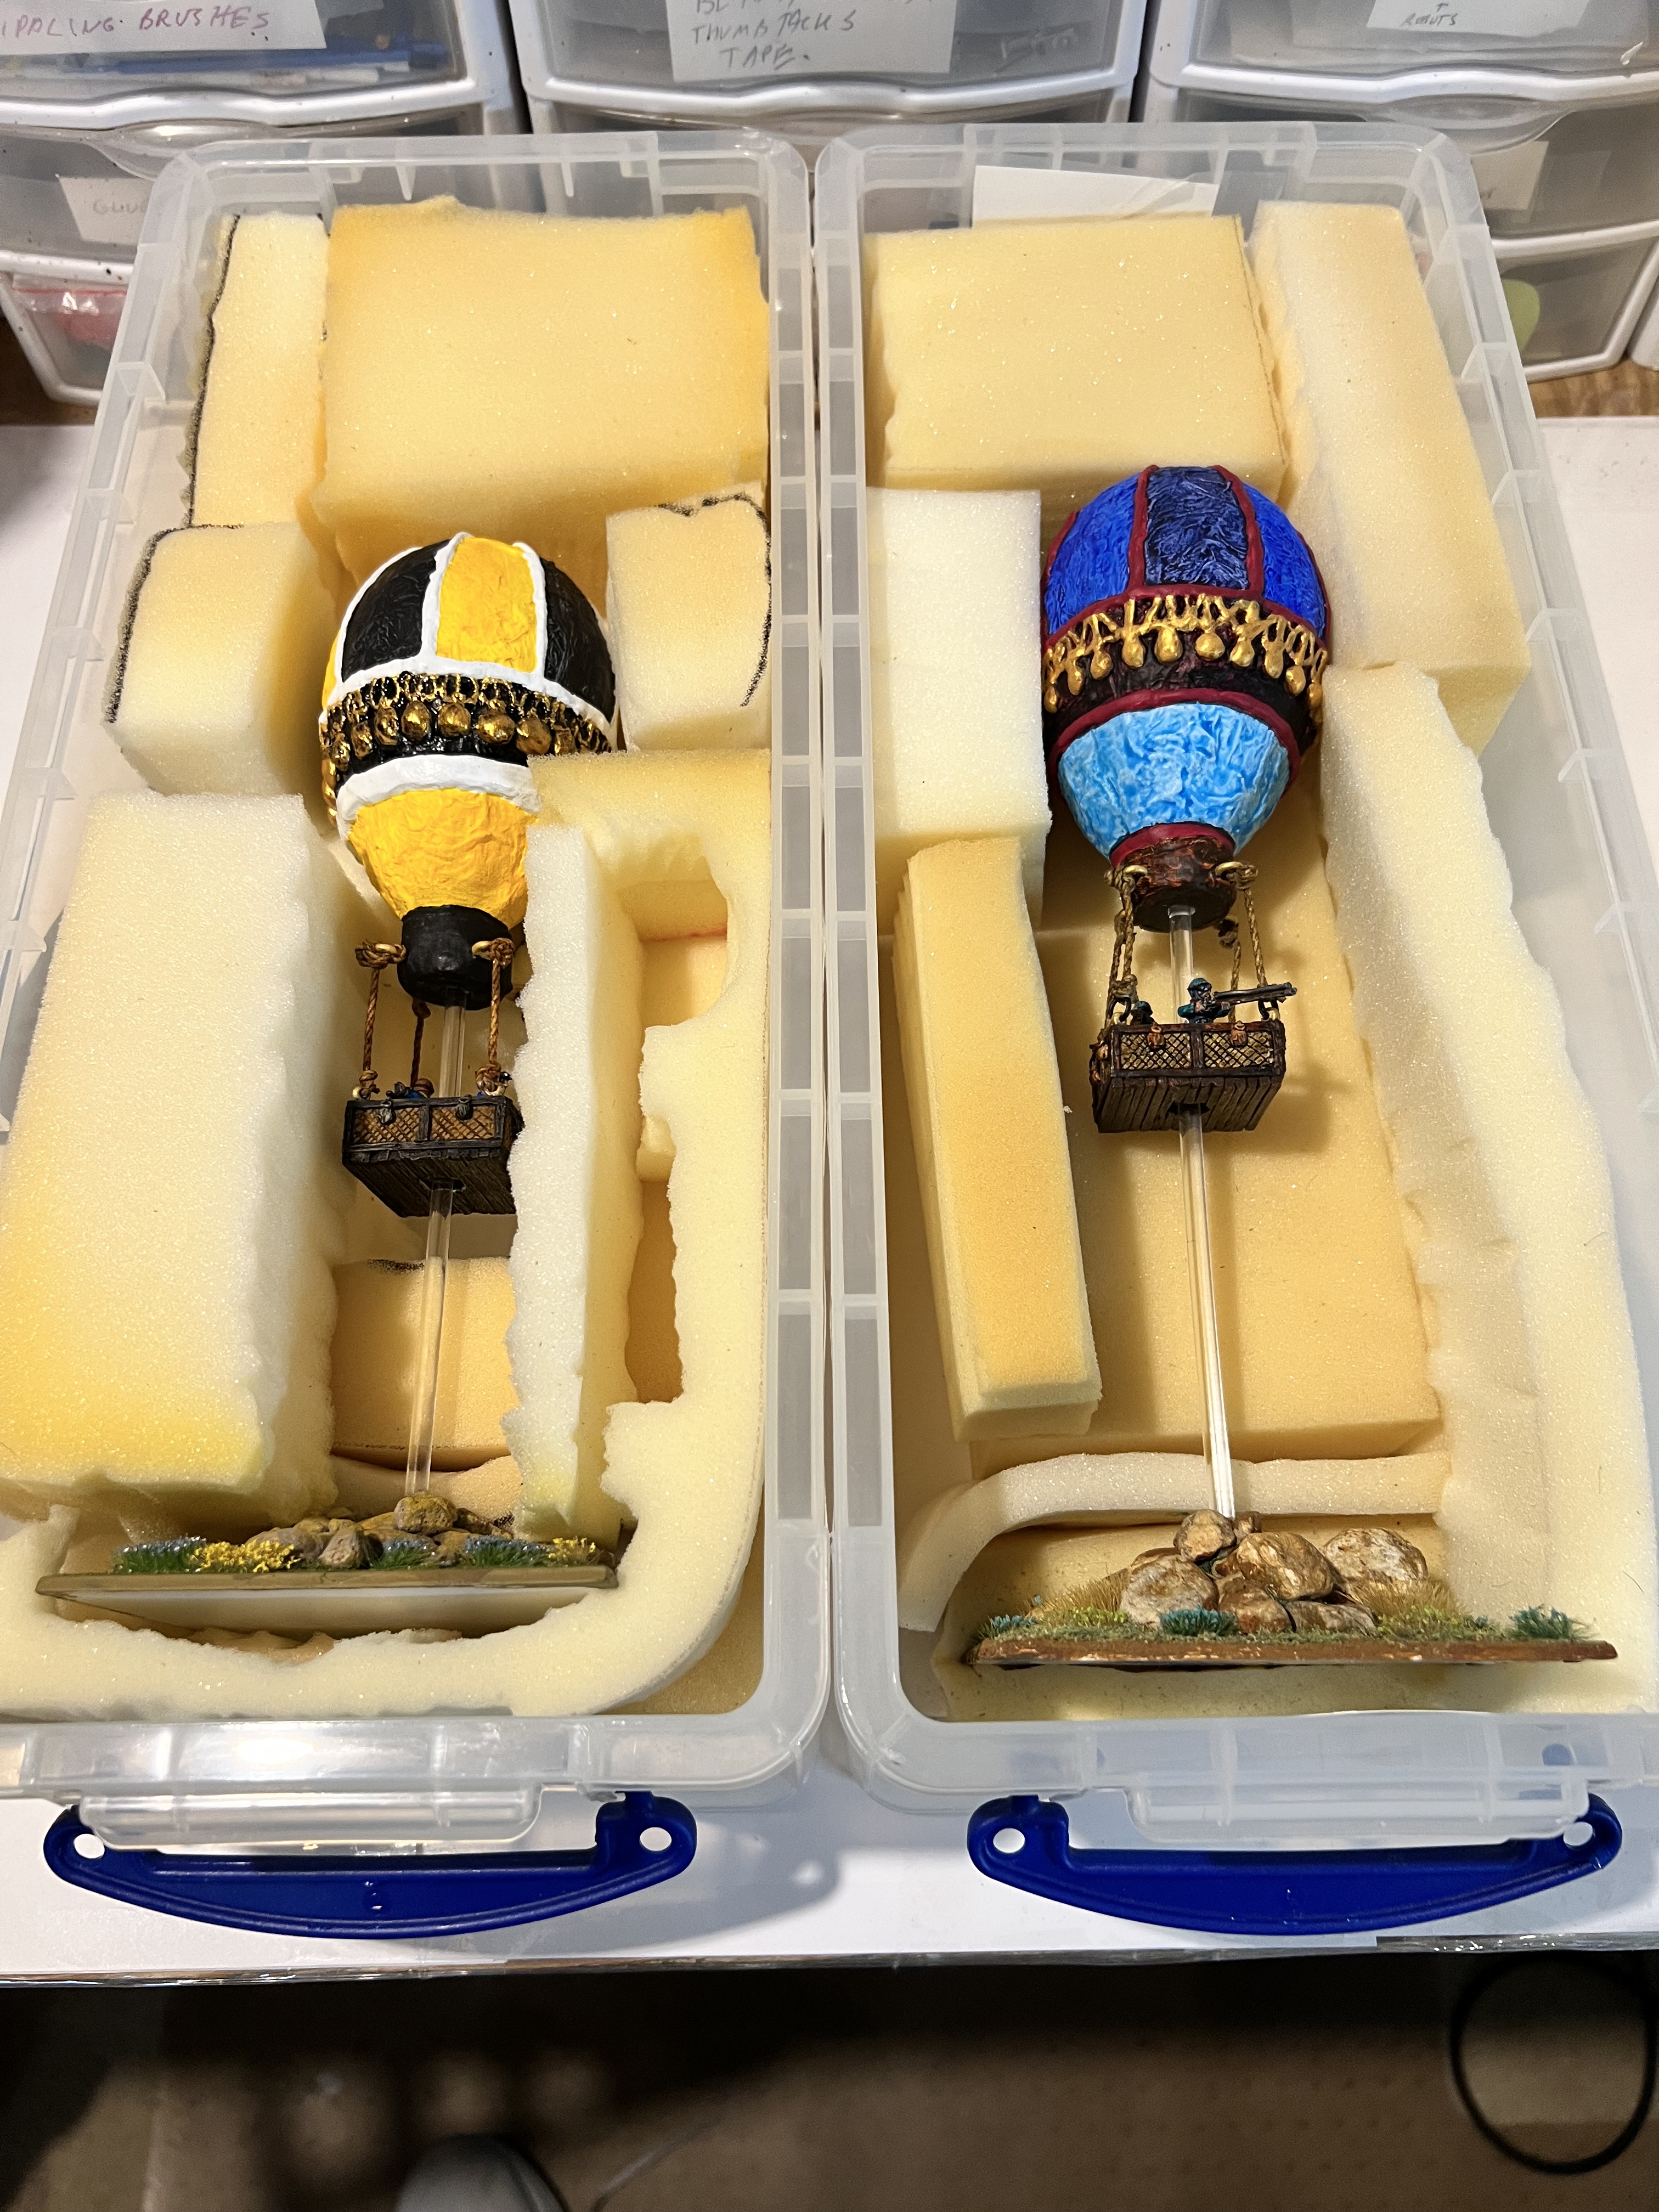
To augment the Munchkins’ forces, I decided to add a second Aerostat – and form a true Munchkin Air Force. As I wanted some color differentiation from my previous model – I went with Boston Bruins colors of Black, Gold, and White for the balloon, whole keeping the Munchkin crew in traditional blues. The model is 28mm in scale.
Go Bruins!
Assembly and Painting the Aerostat
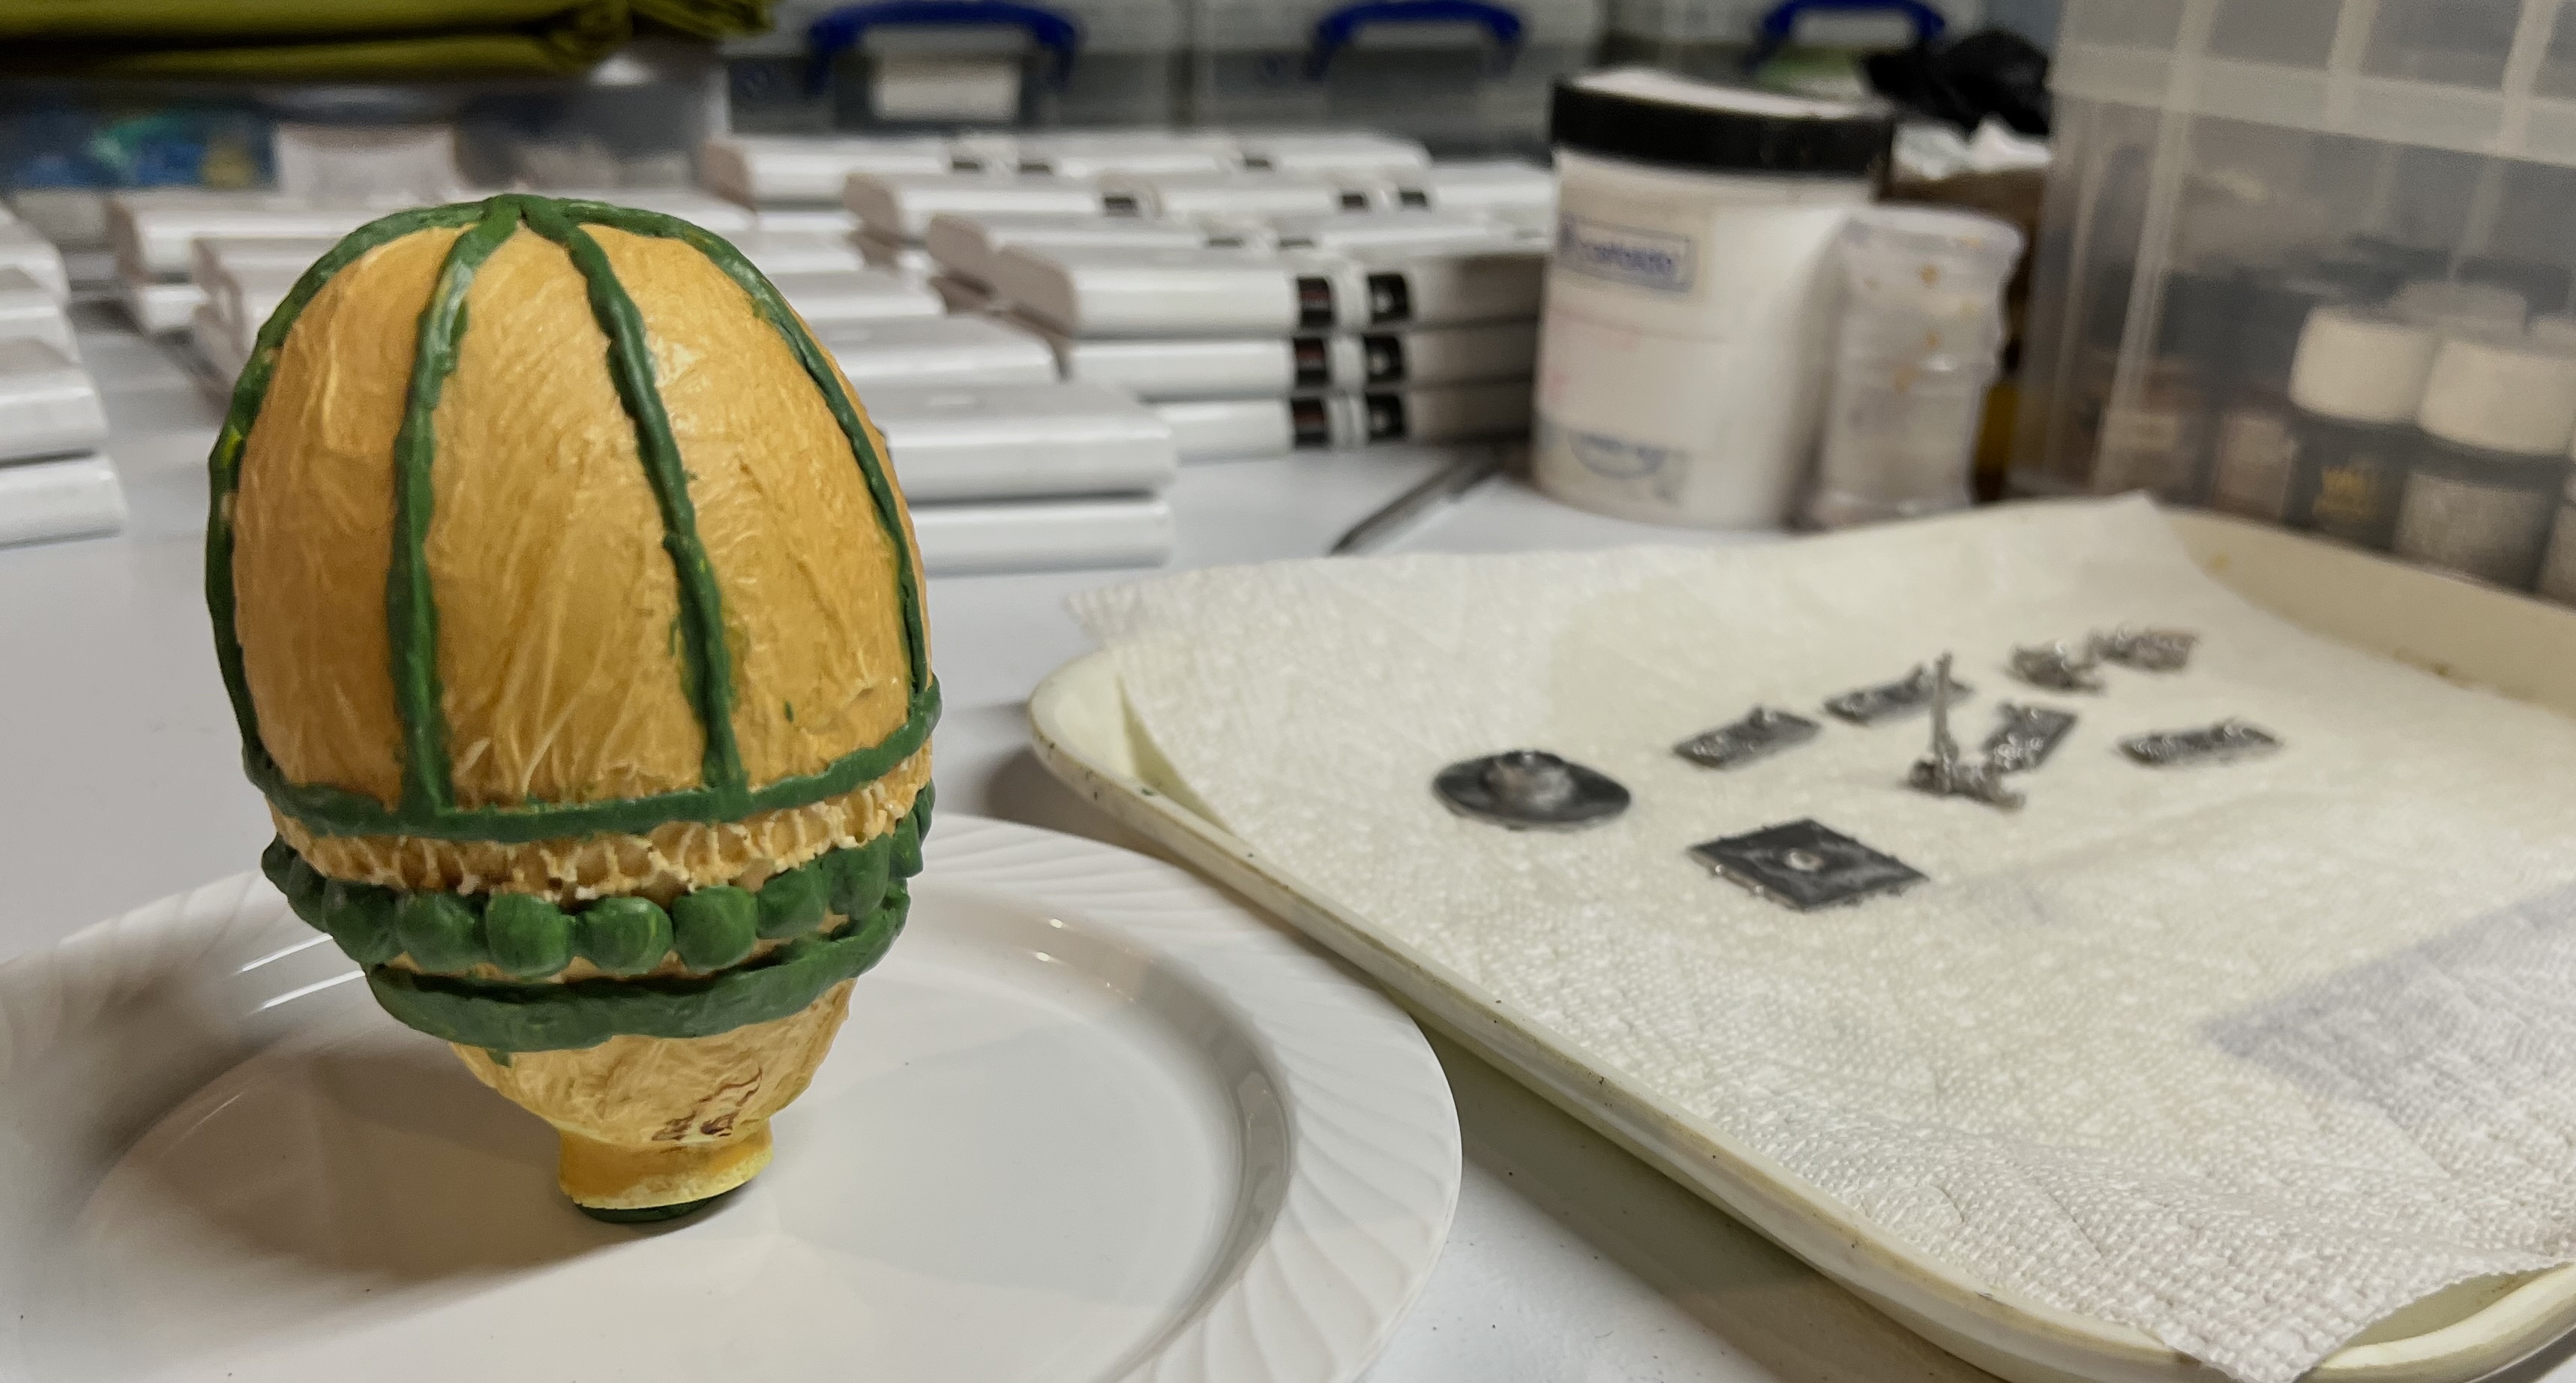
I basically followed the same process as I used on the last model. Having a blog post to review certainly proved useful in that endeavor! First step was not short as the balloon is made of foam. There were some (more than I’d like but fixable) cavitations similar to what you see in resin. I covered all the balloon lines and cavitations with green stuff – and reinforced the structure as you see below.
Lots of sculpting with green stuff. The metal parts of the model are in the background.
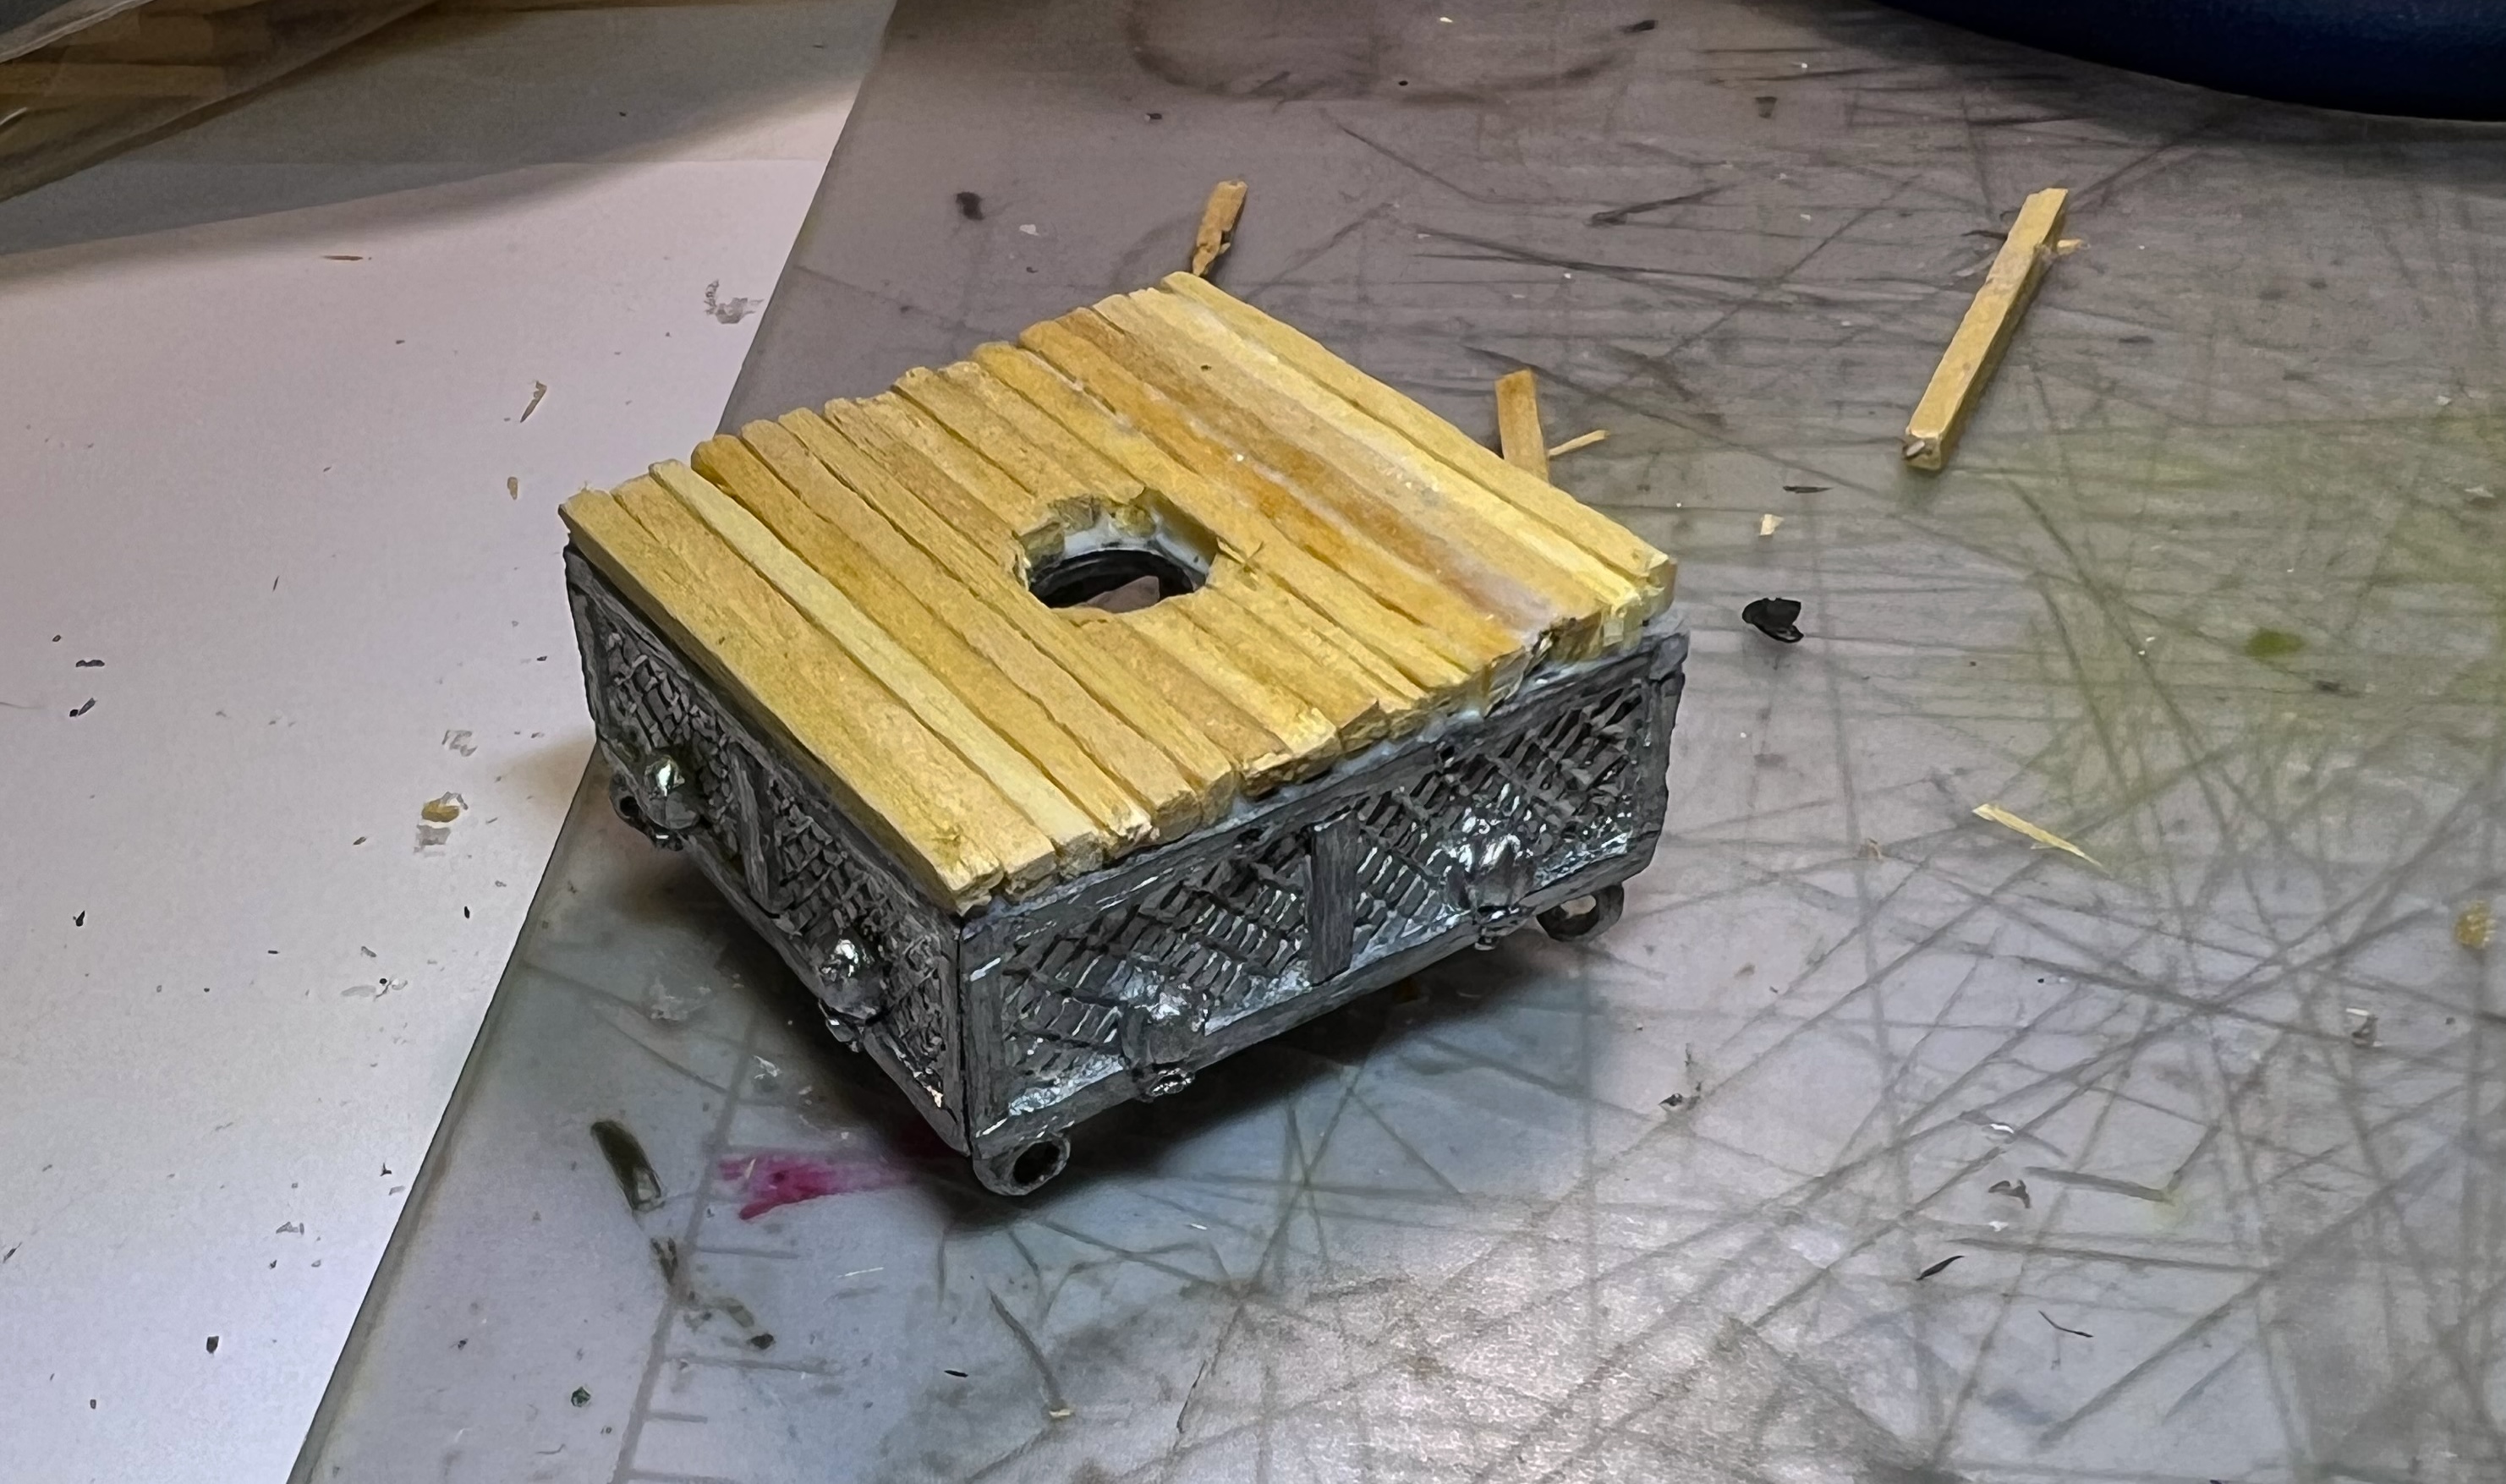
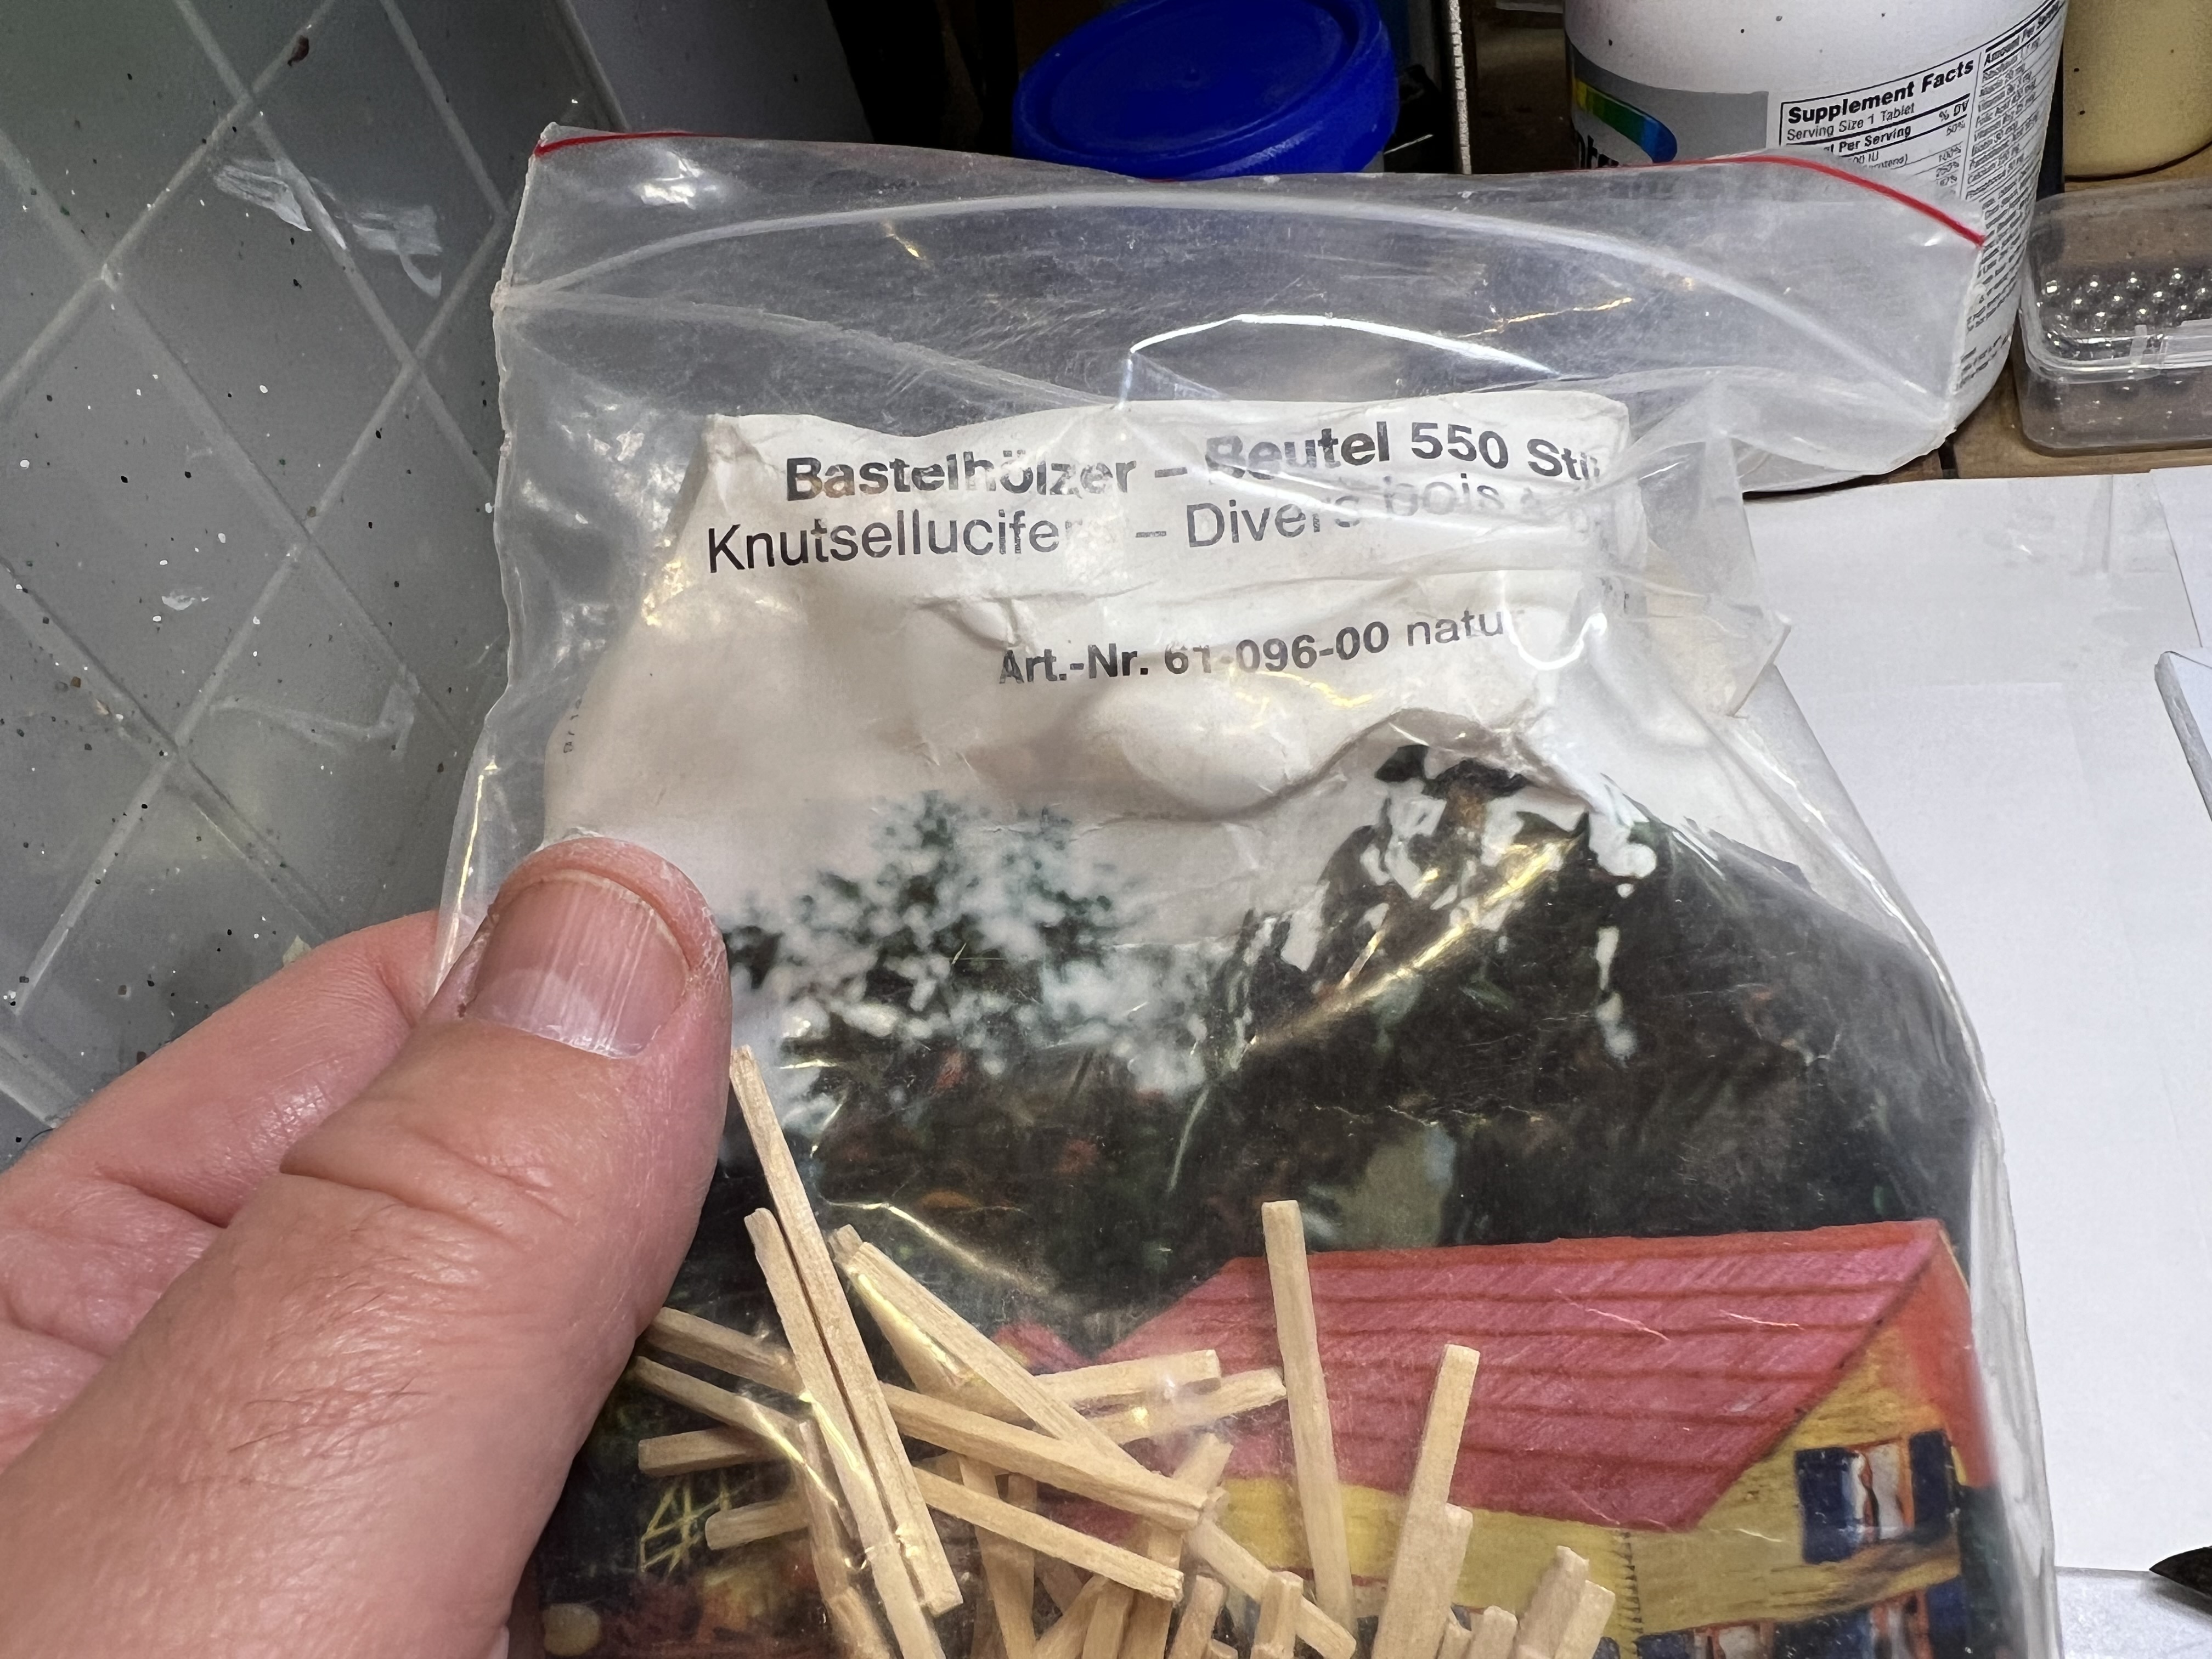
The basket is metal, and easily glued together. Once again, I used my 1987 matchsticks (that I purchased while stationed in West Germany) to give a more realistic look to the bare metal basket’s underside.
The basket’s underside with added matchsticks.Still in my hobby supplies – now for nearly 40 years!
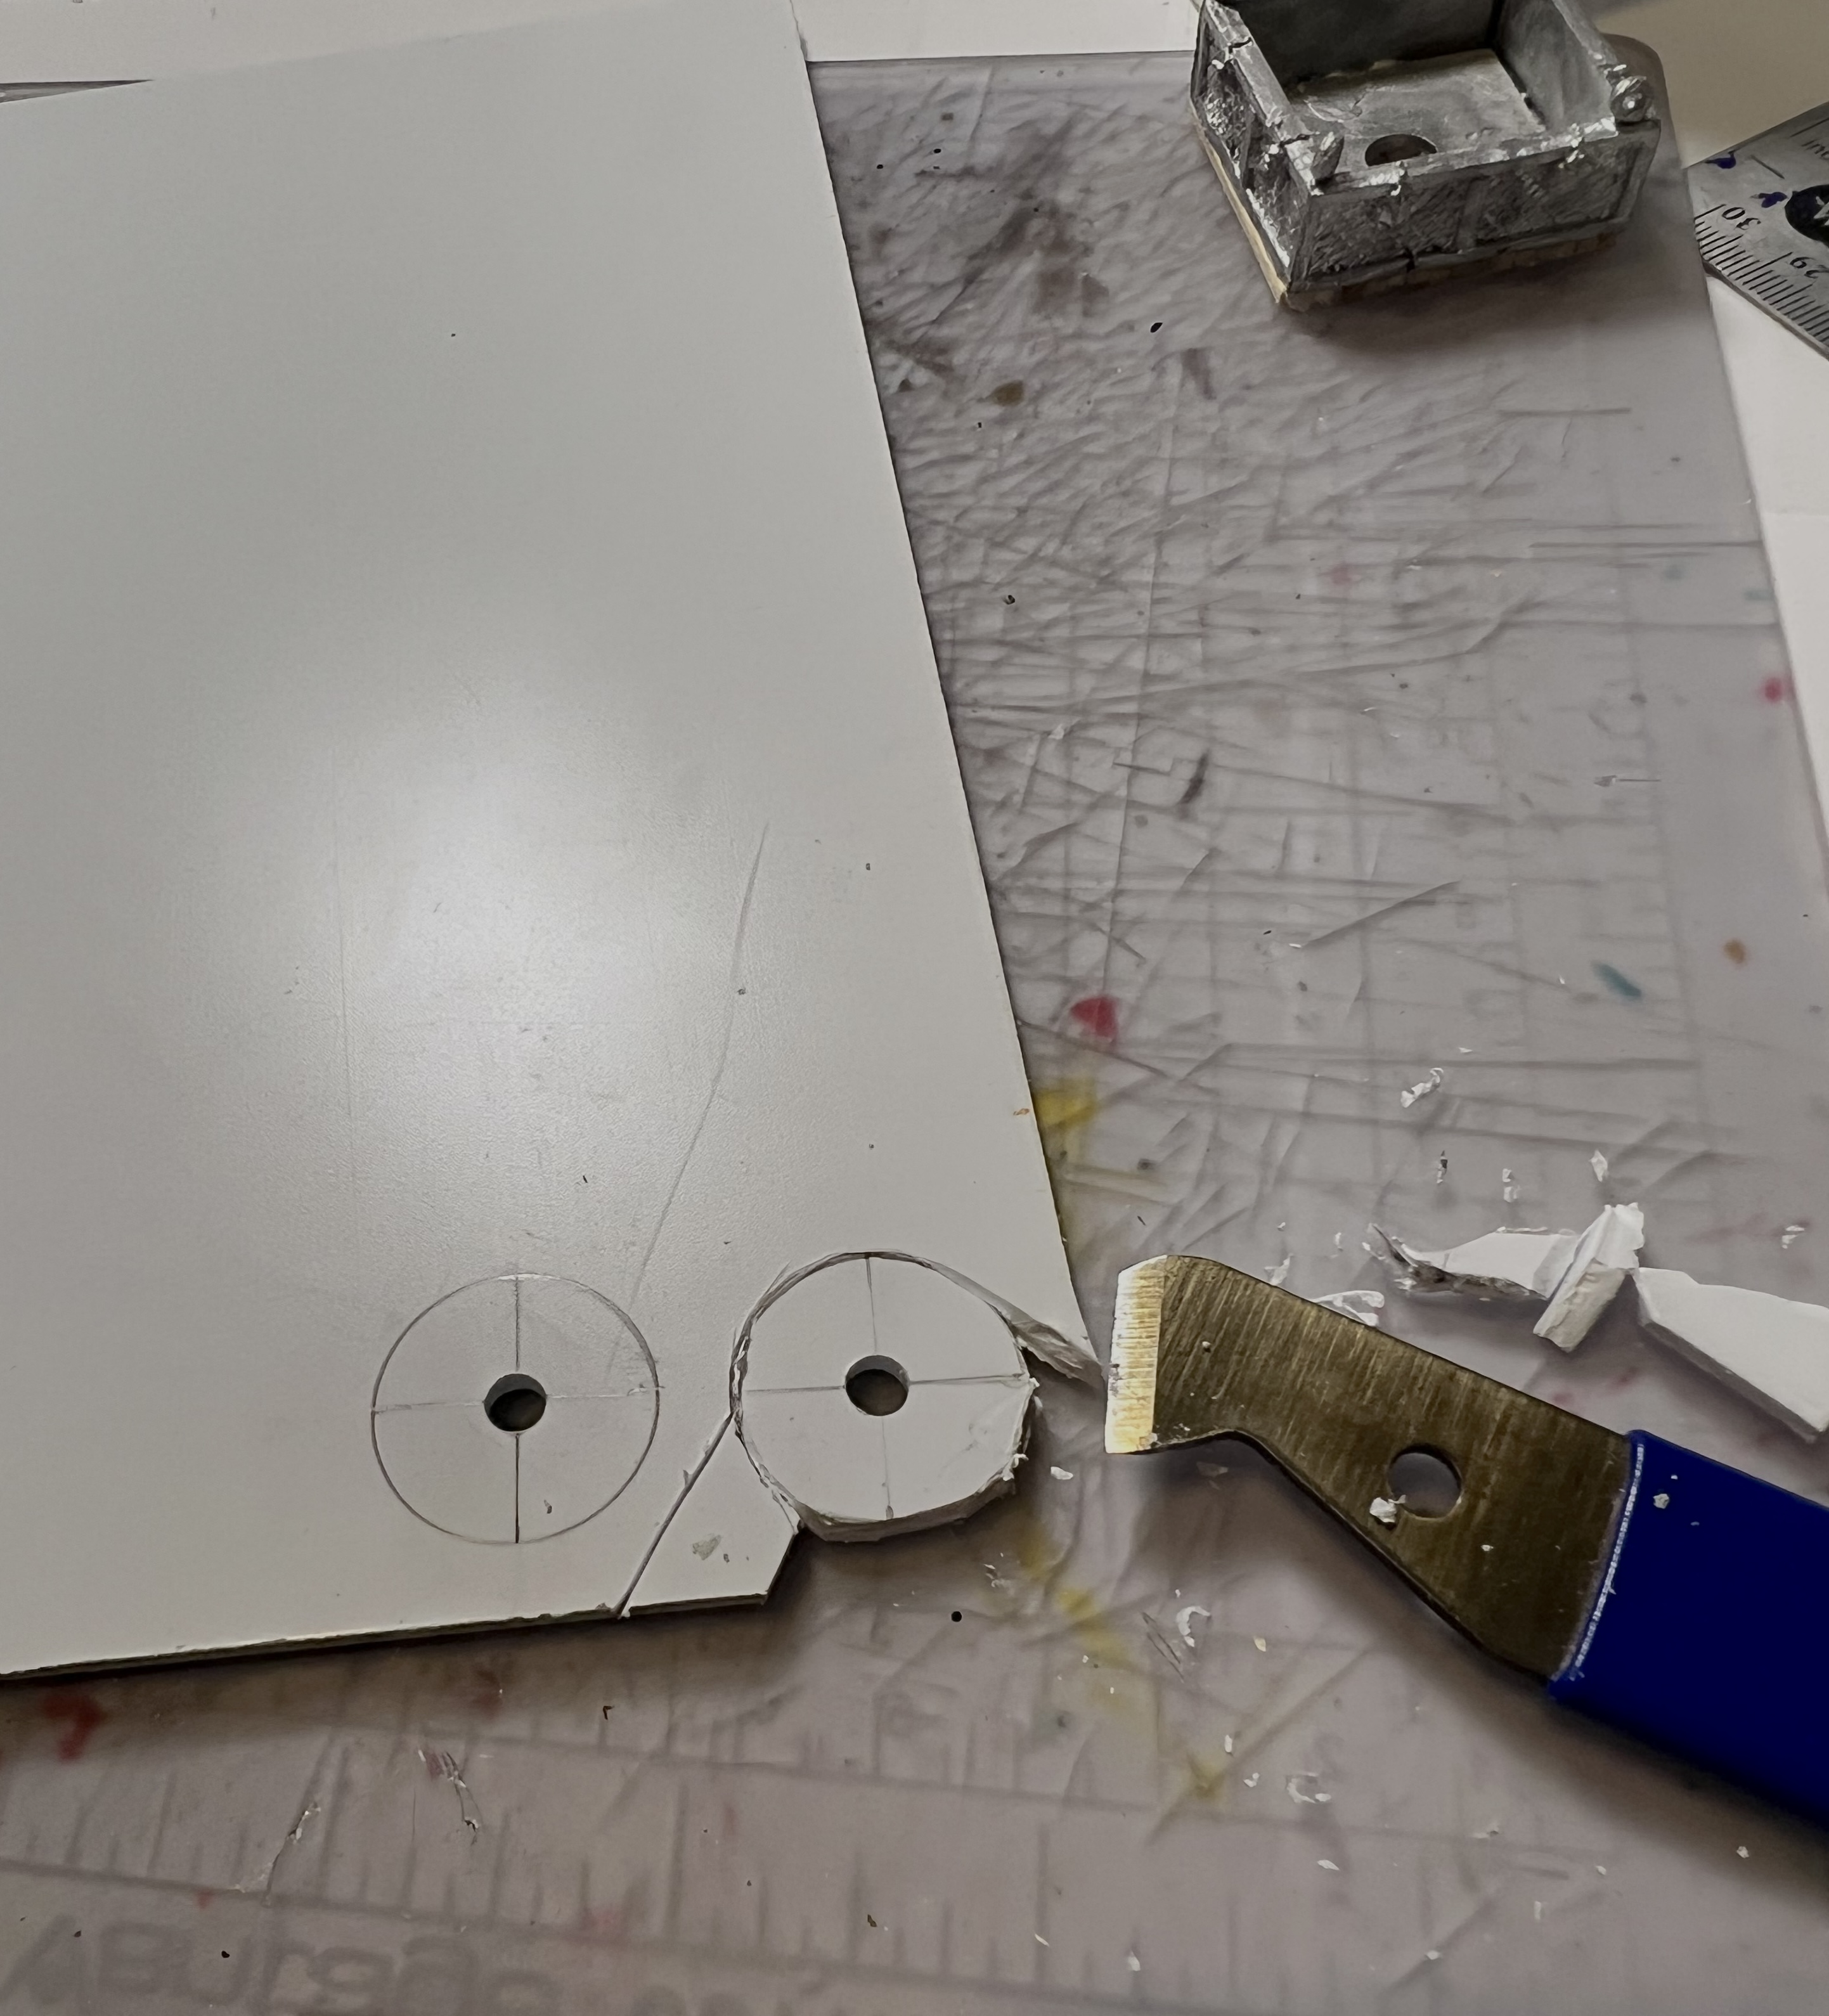
The model comes with wire to attach the basket to the balloon. Once again, I decided to employ a better mounting. A polystyrene and green stuff sandwich with inserted screw eyes worked well before – so I used that again.
Cutting out the disks from the drilled-out polystyrene. I sanded off any rough edges, then added the green stuff and the screw eyes to make the “sandwich”.
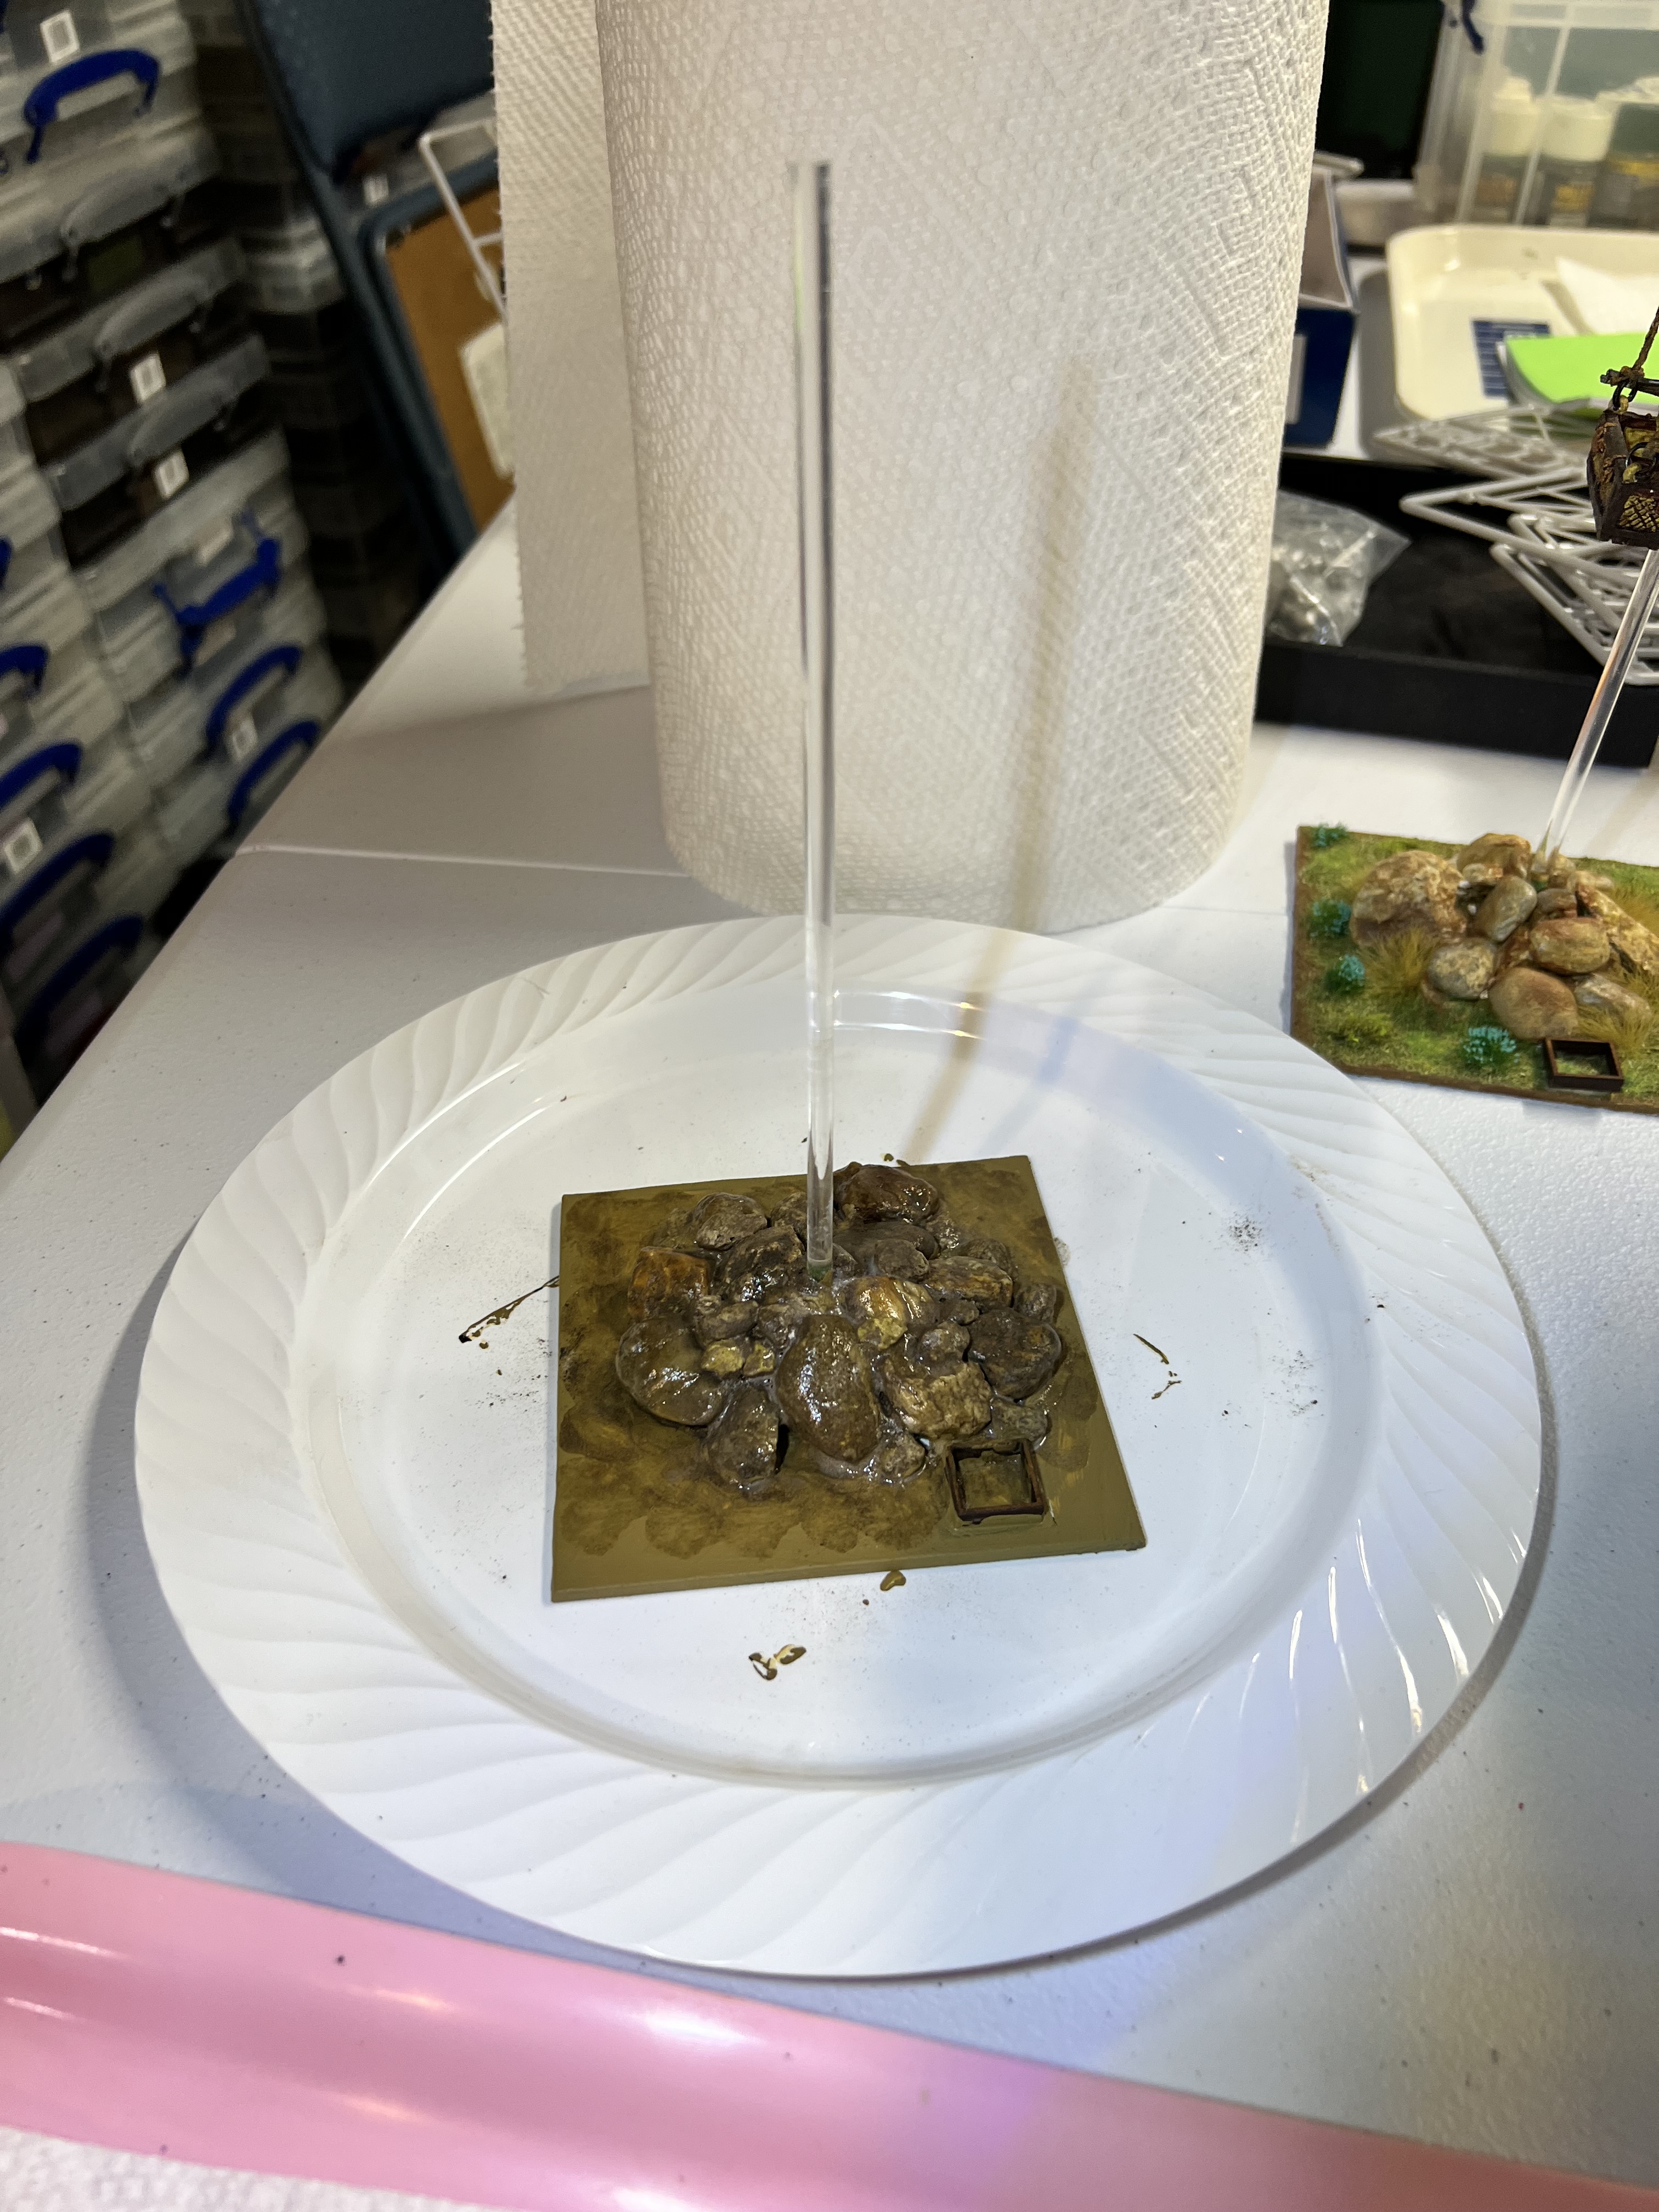
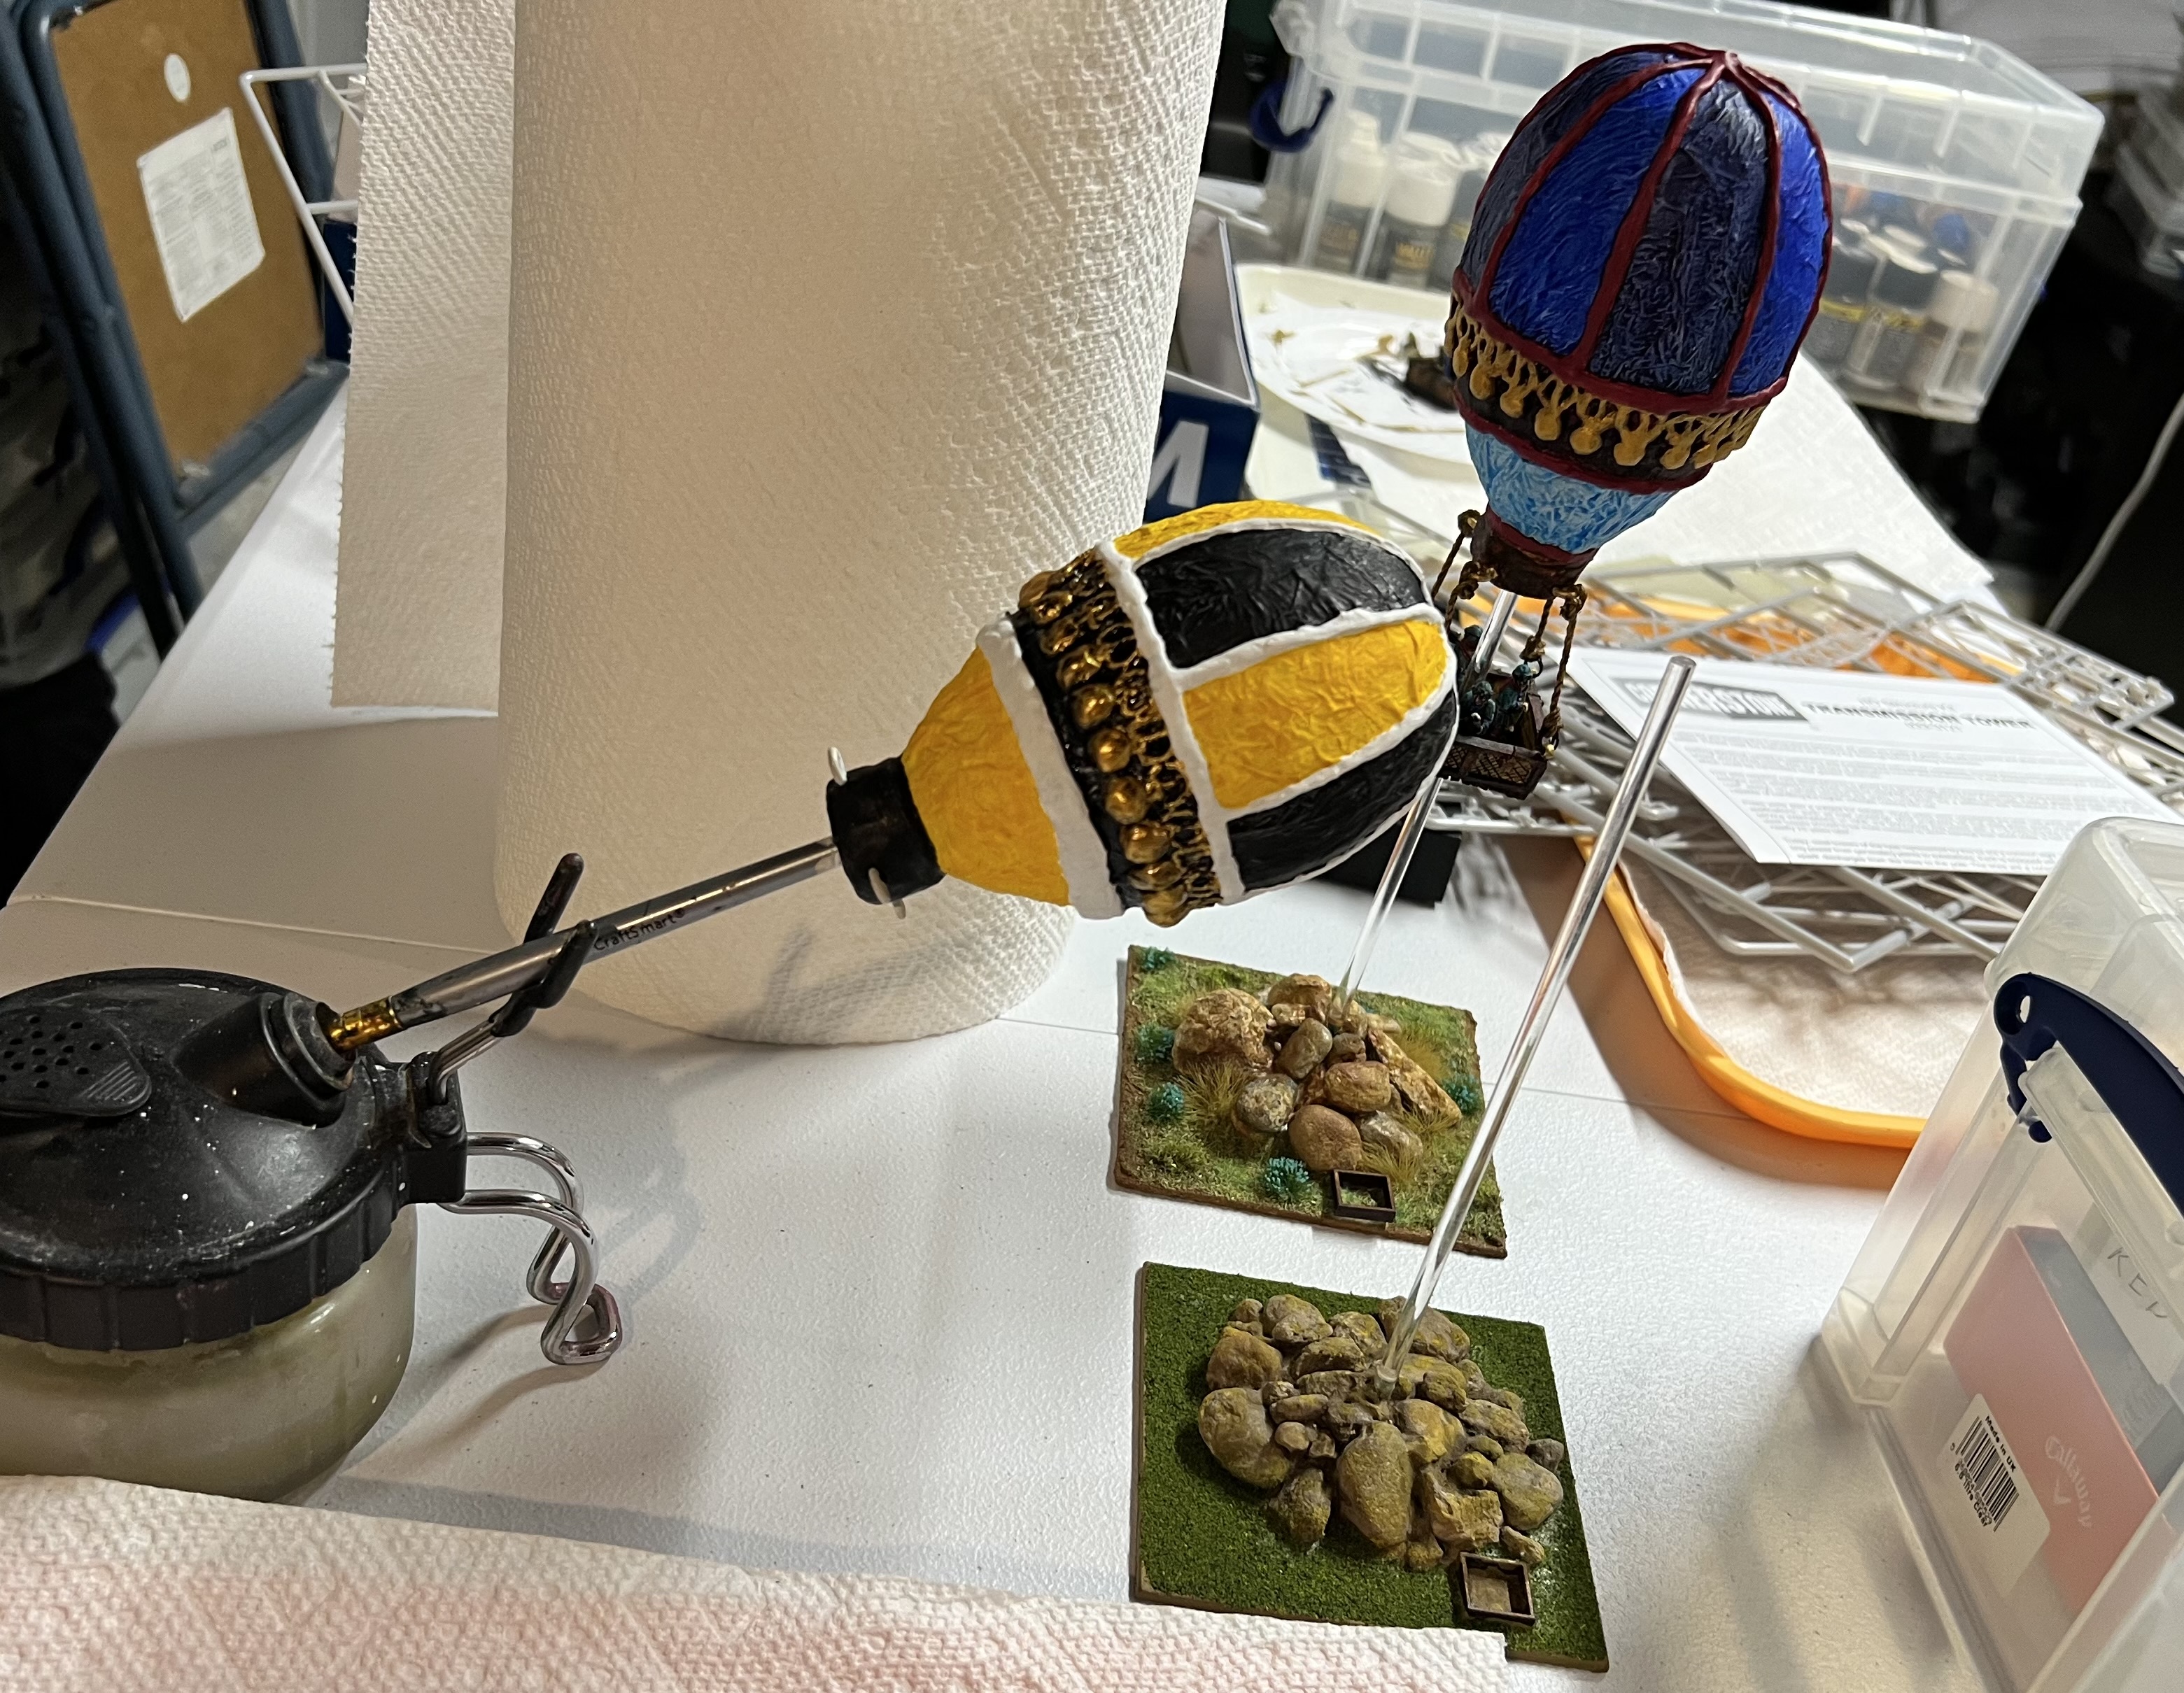
I affixed the sandwich to the balloon’s bottom with PVA – letting that dry overnight. I then drilled out though the sandwich (as perpendicularly as possible!) to make a path for the acrylic rod base support. This allowed me to prime and paint easily by using an old paint brush inserted into the balloon on one end and my airbrush cleaning bottle on the other.
Set up for painting – here primed.
As for the base, I used metal support braces, small rocks, and green stuff to secure the acrylic support rod as vertically as possible to a piece of 4″ square polystyrene. Once the green stuff cured, I added pigments and pigment binder to the base.
Early base work
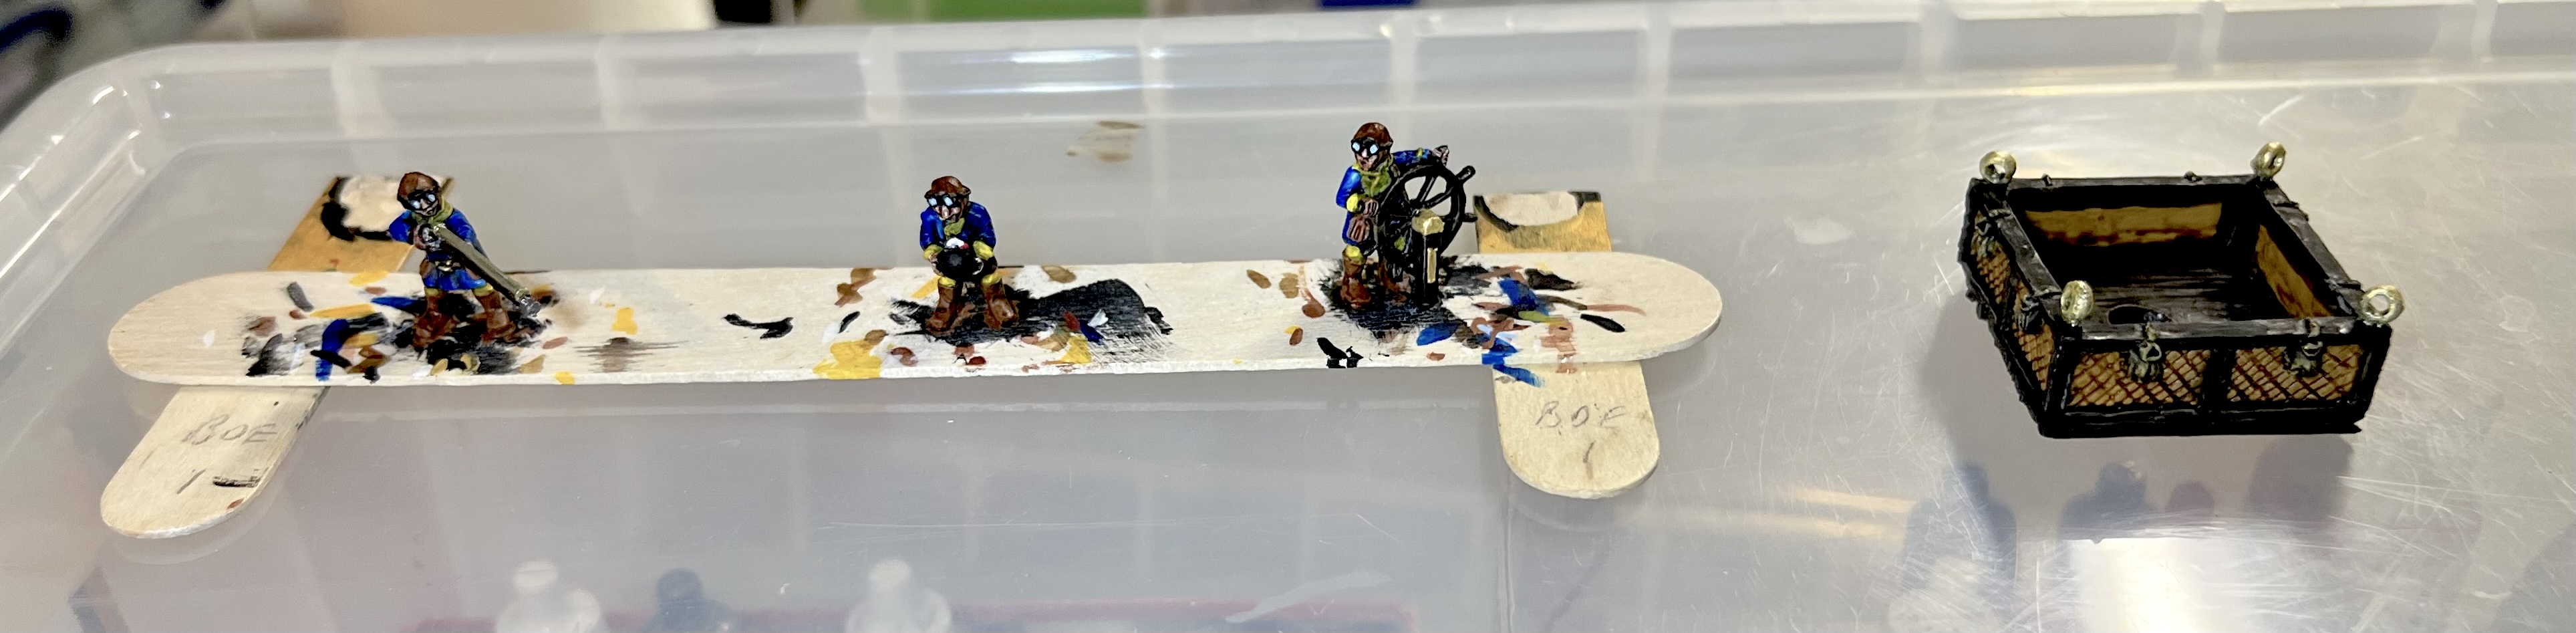
Then I painted the crew and the basket.
Painted crew and basket
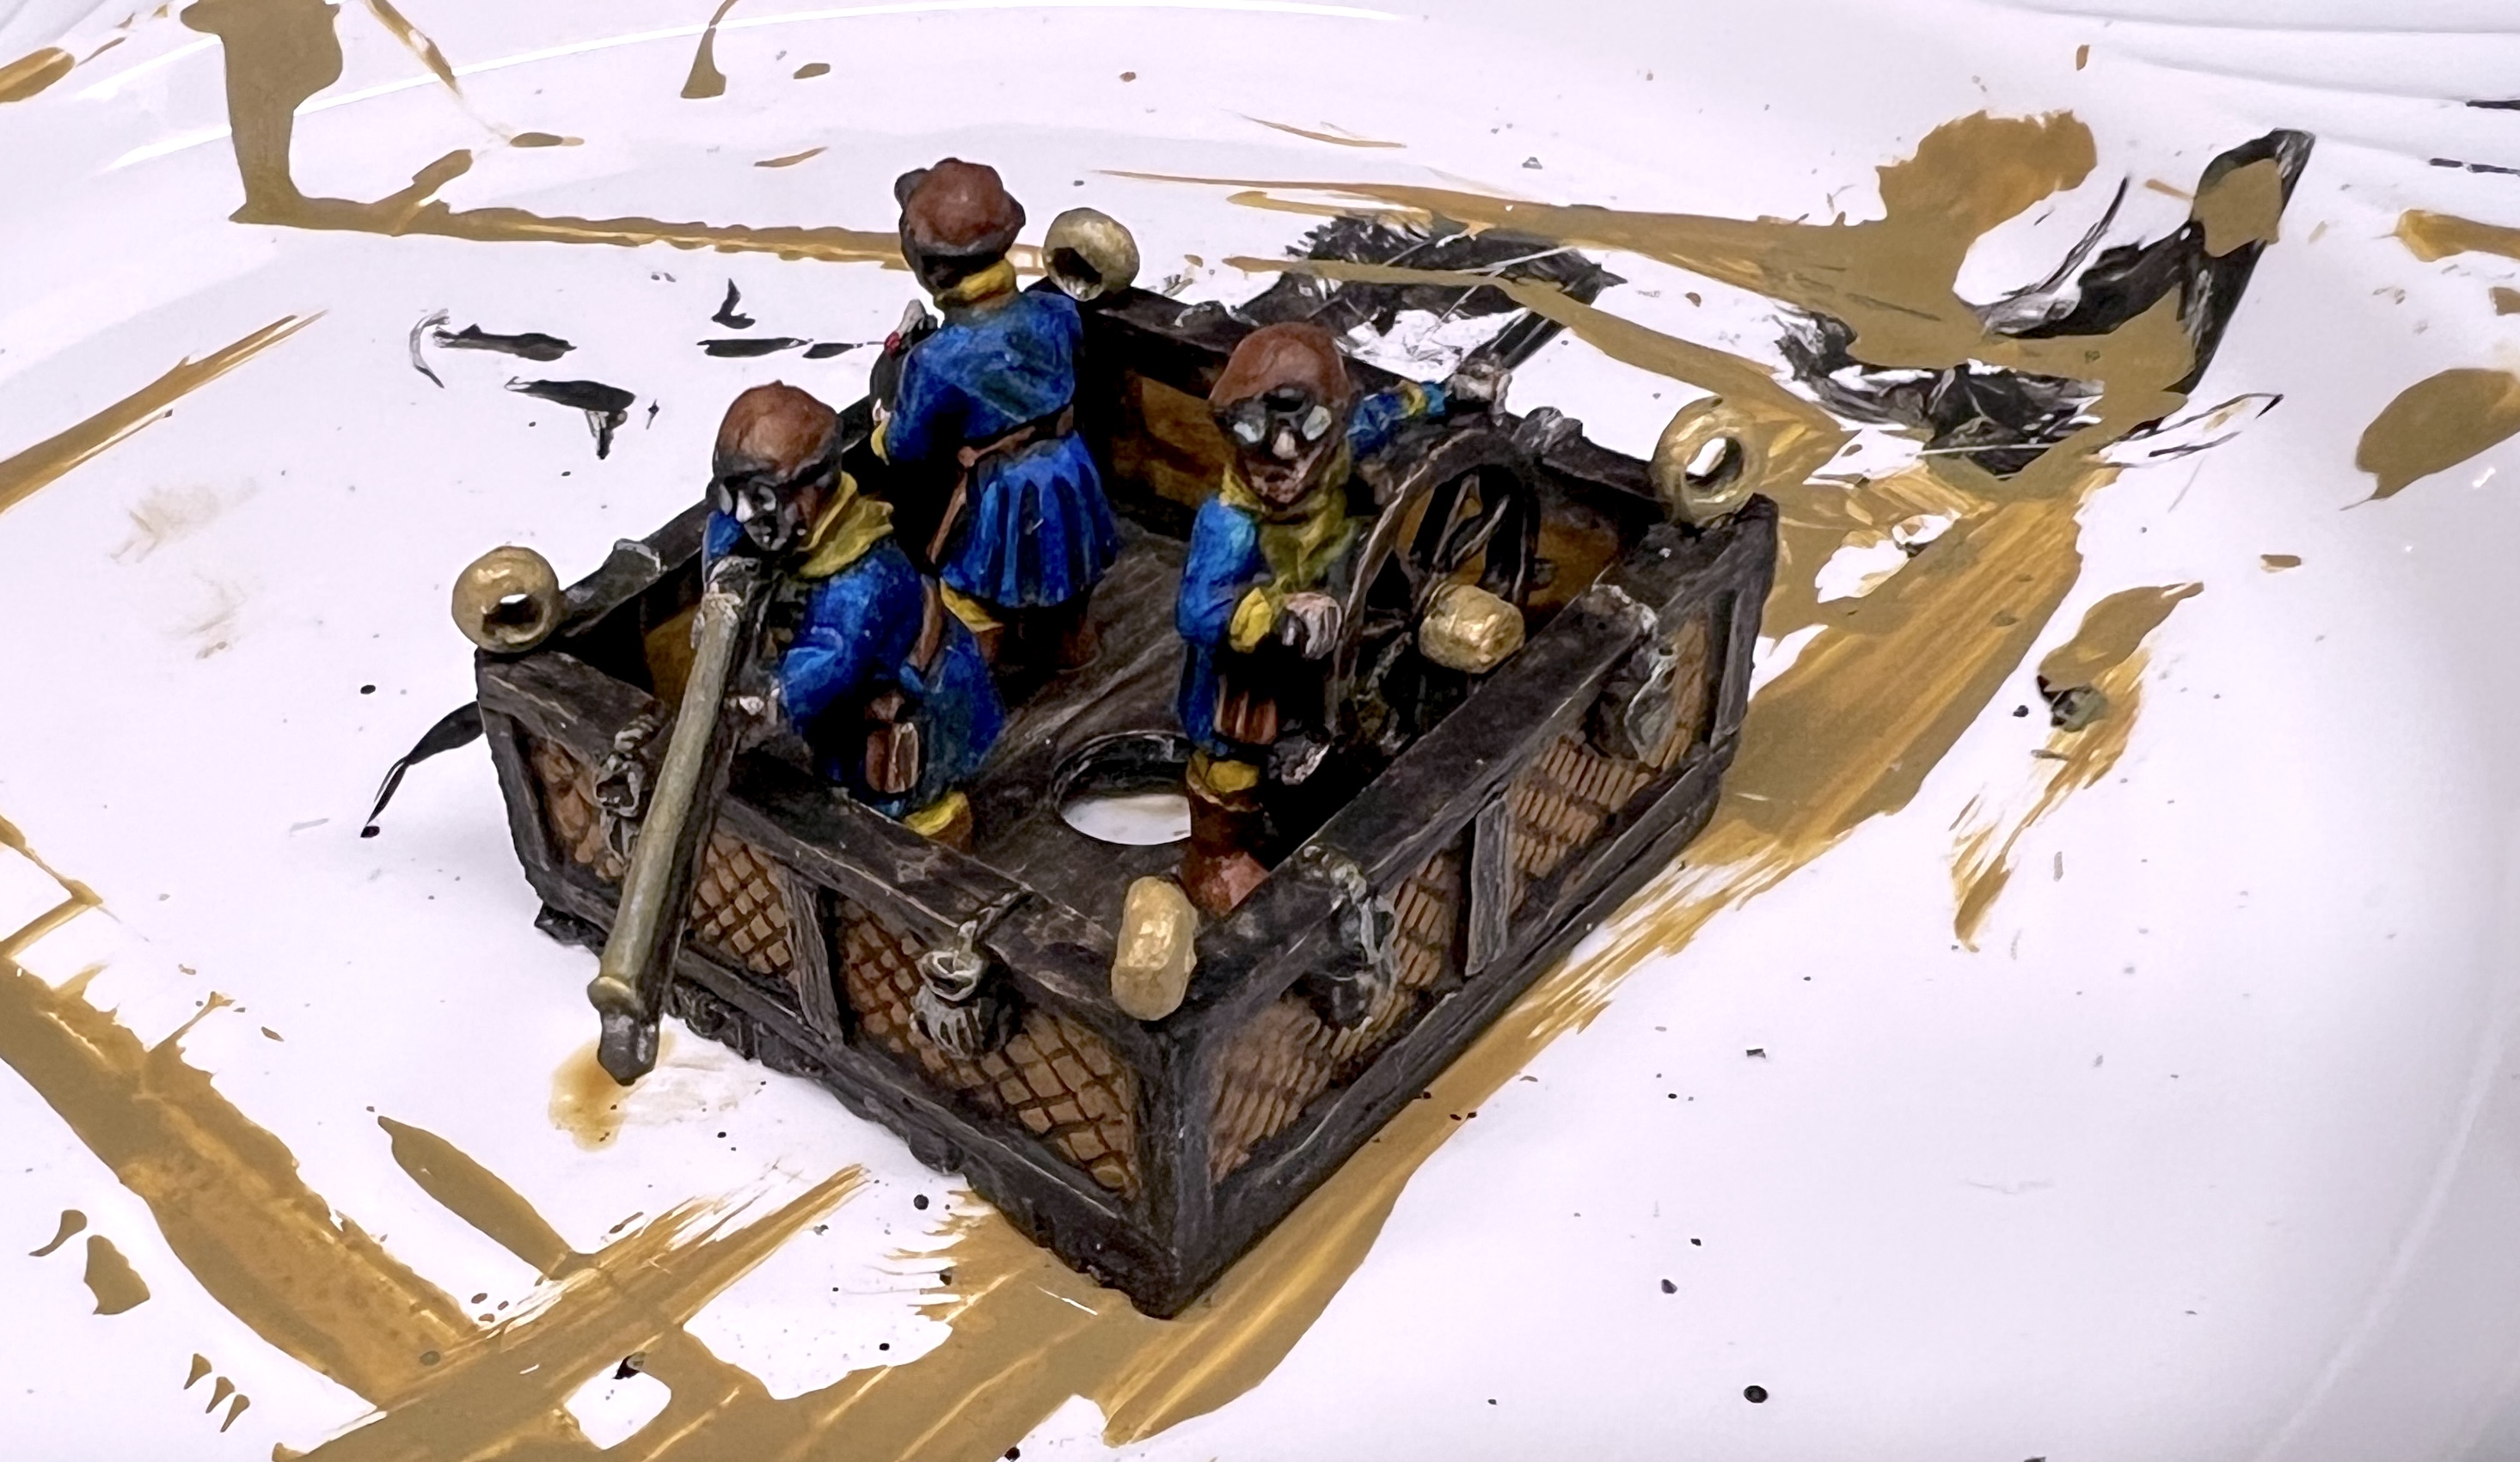
The crew have small tabs under their feet that correspond to little pre-drilled holes in the basket floor. Unfortunately, some of those did not make it off the popsicle sticks – but I was still able to use Gorilla Glue to securely mount them in the basket.
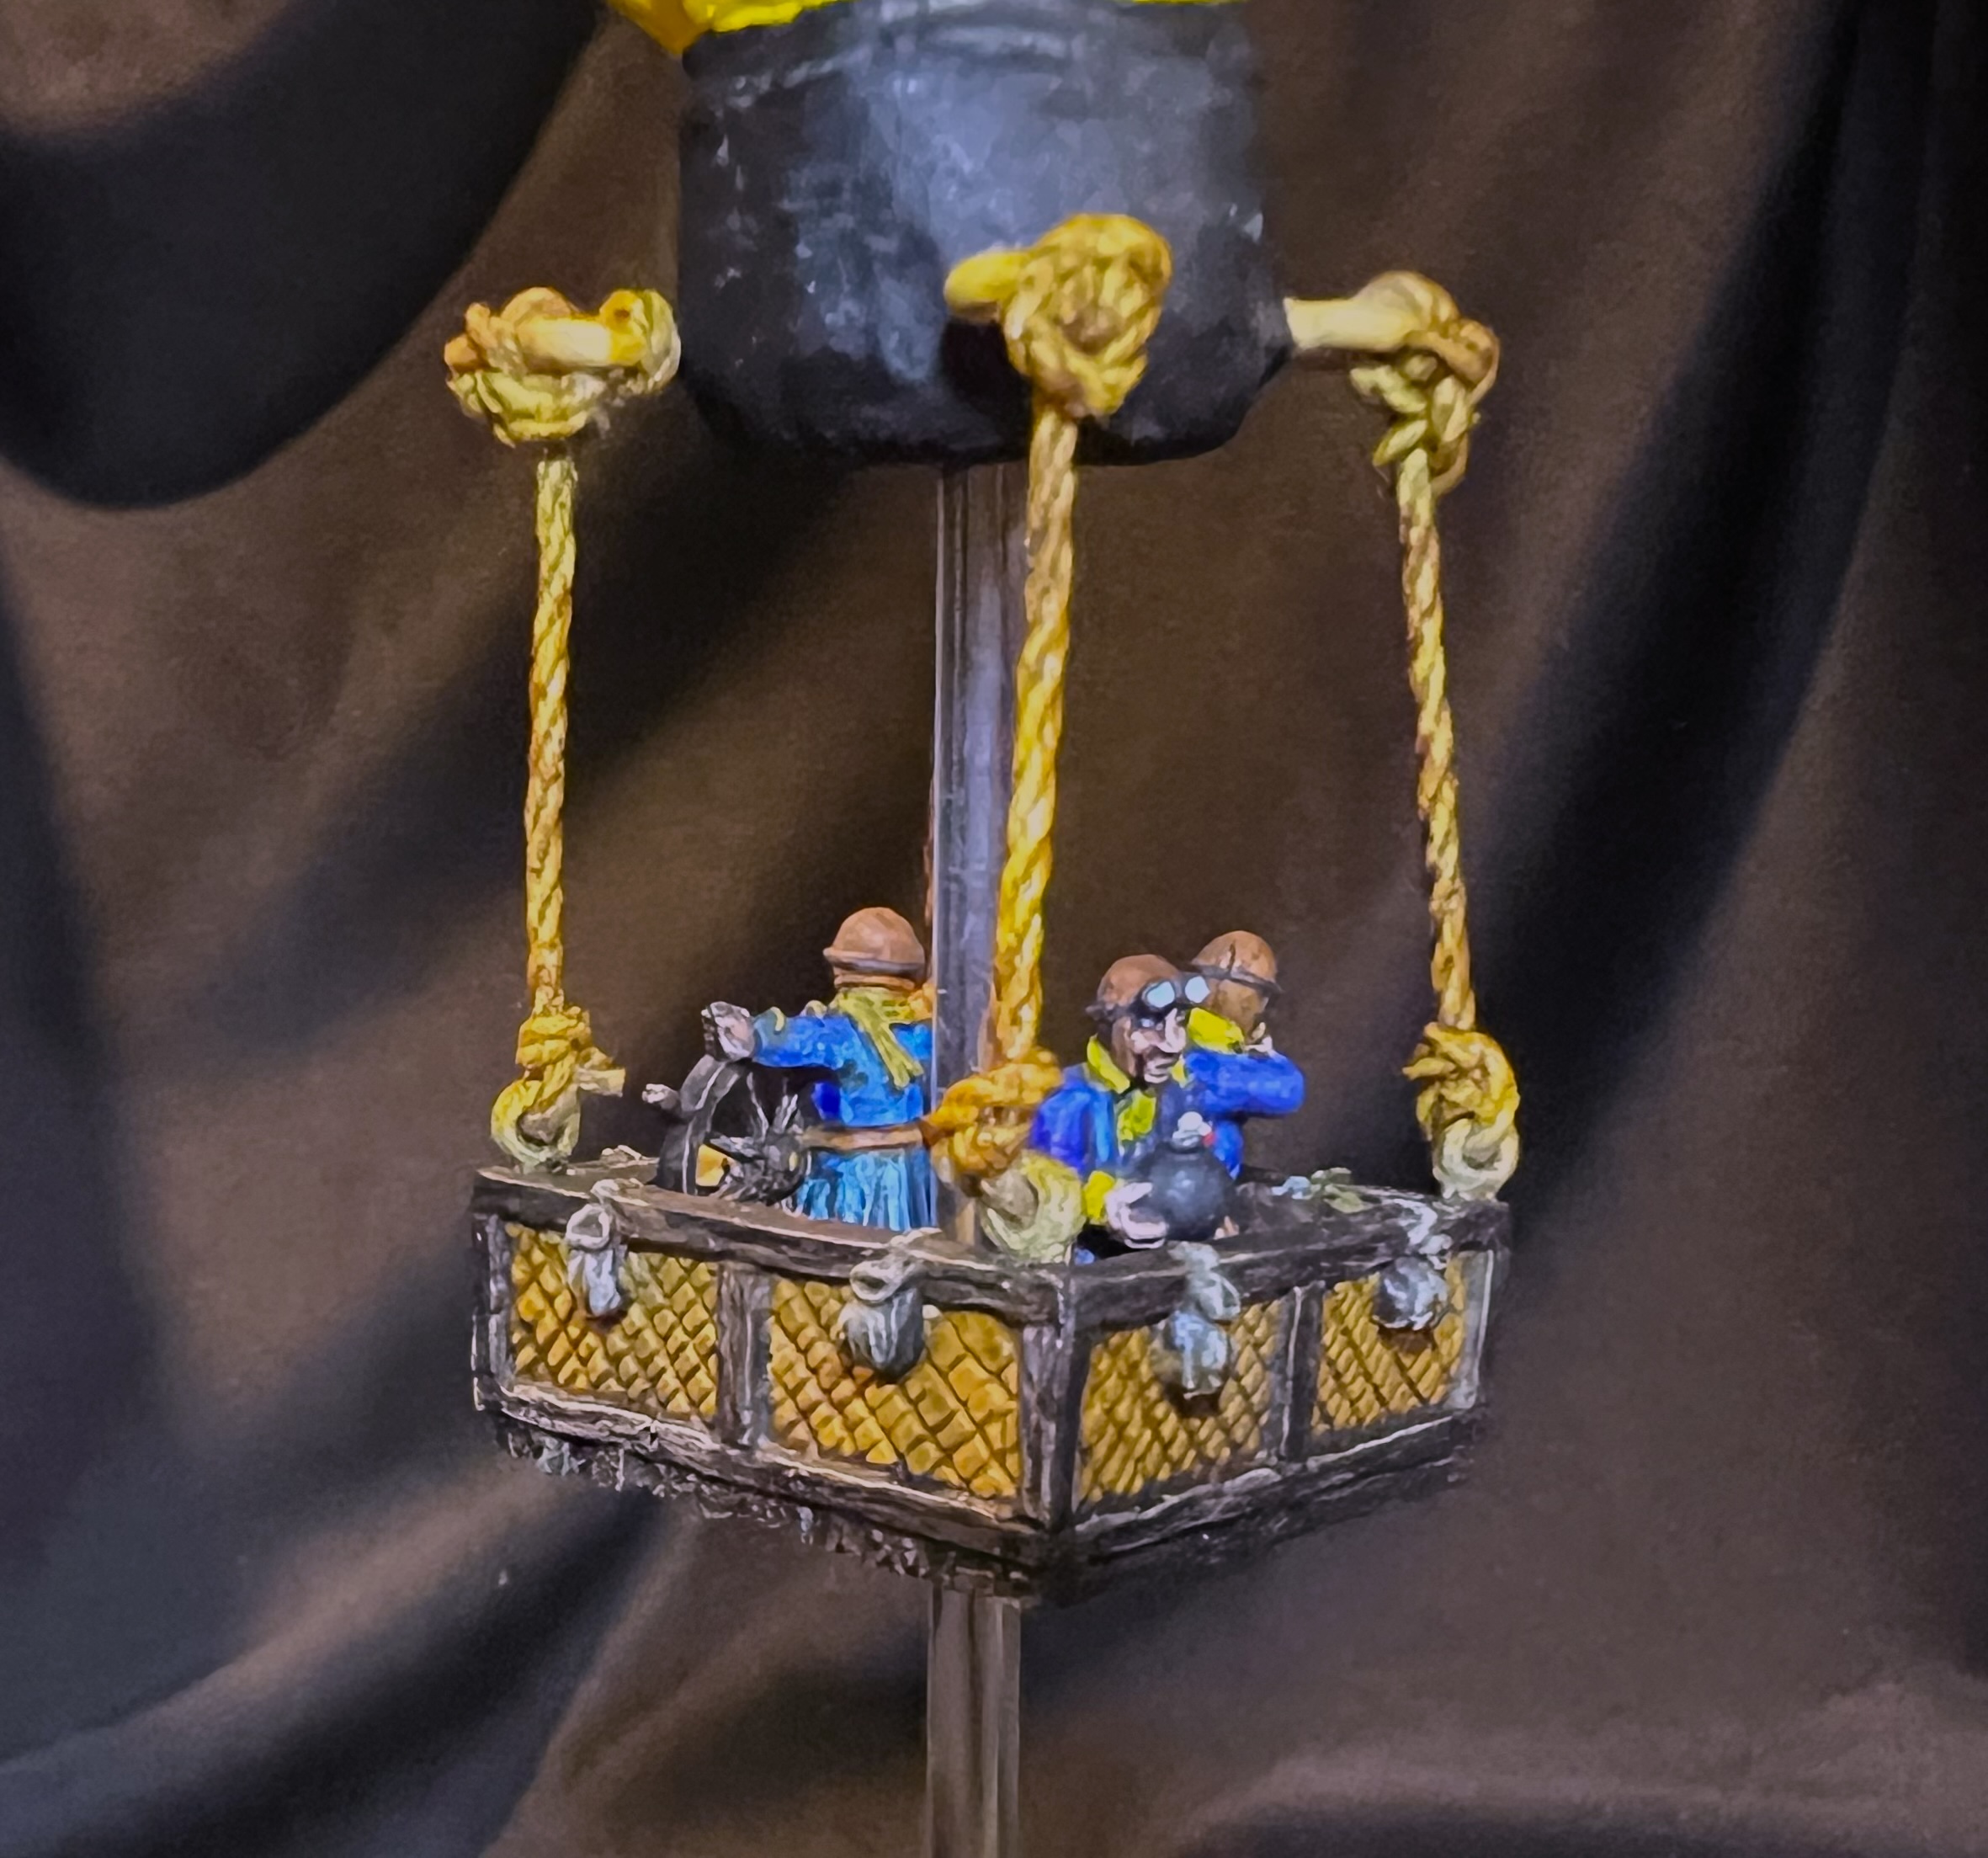
Crew in the balloon basket. Note the hole in the center for the support rod.
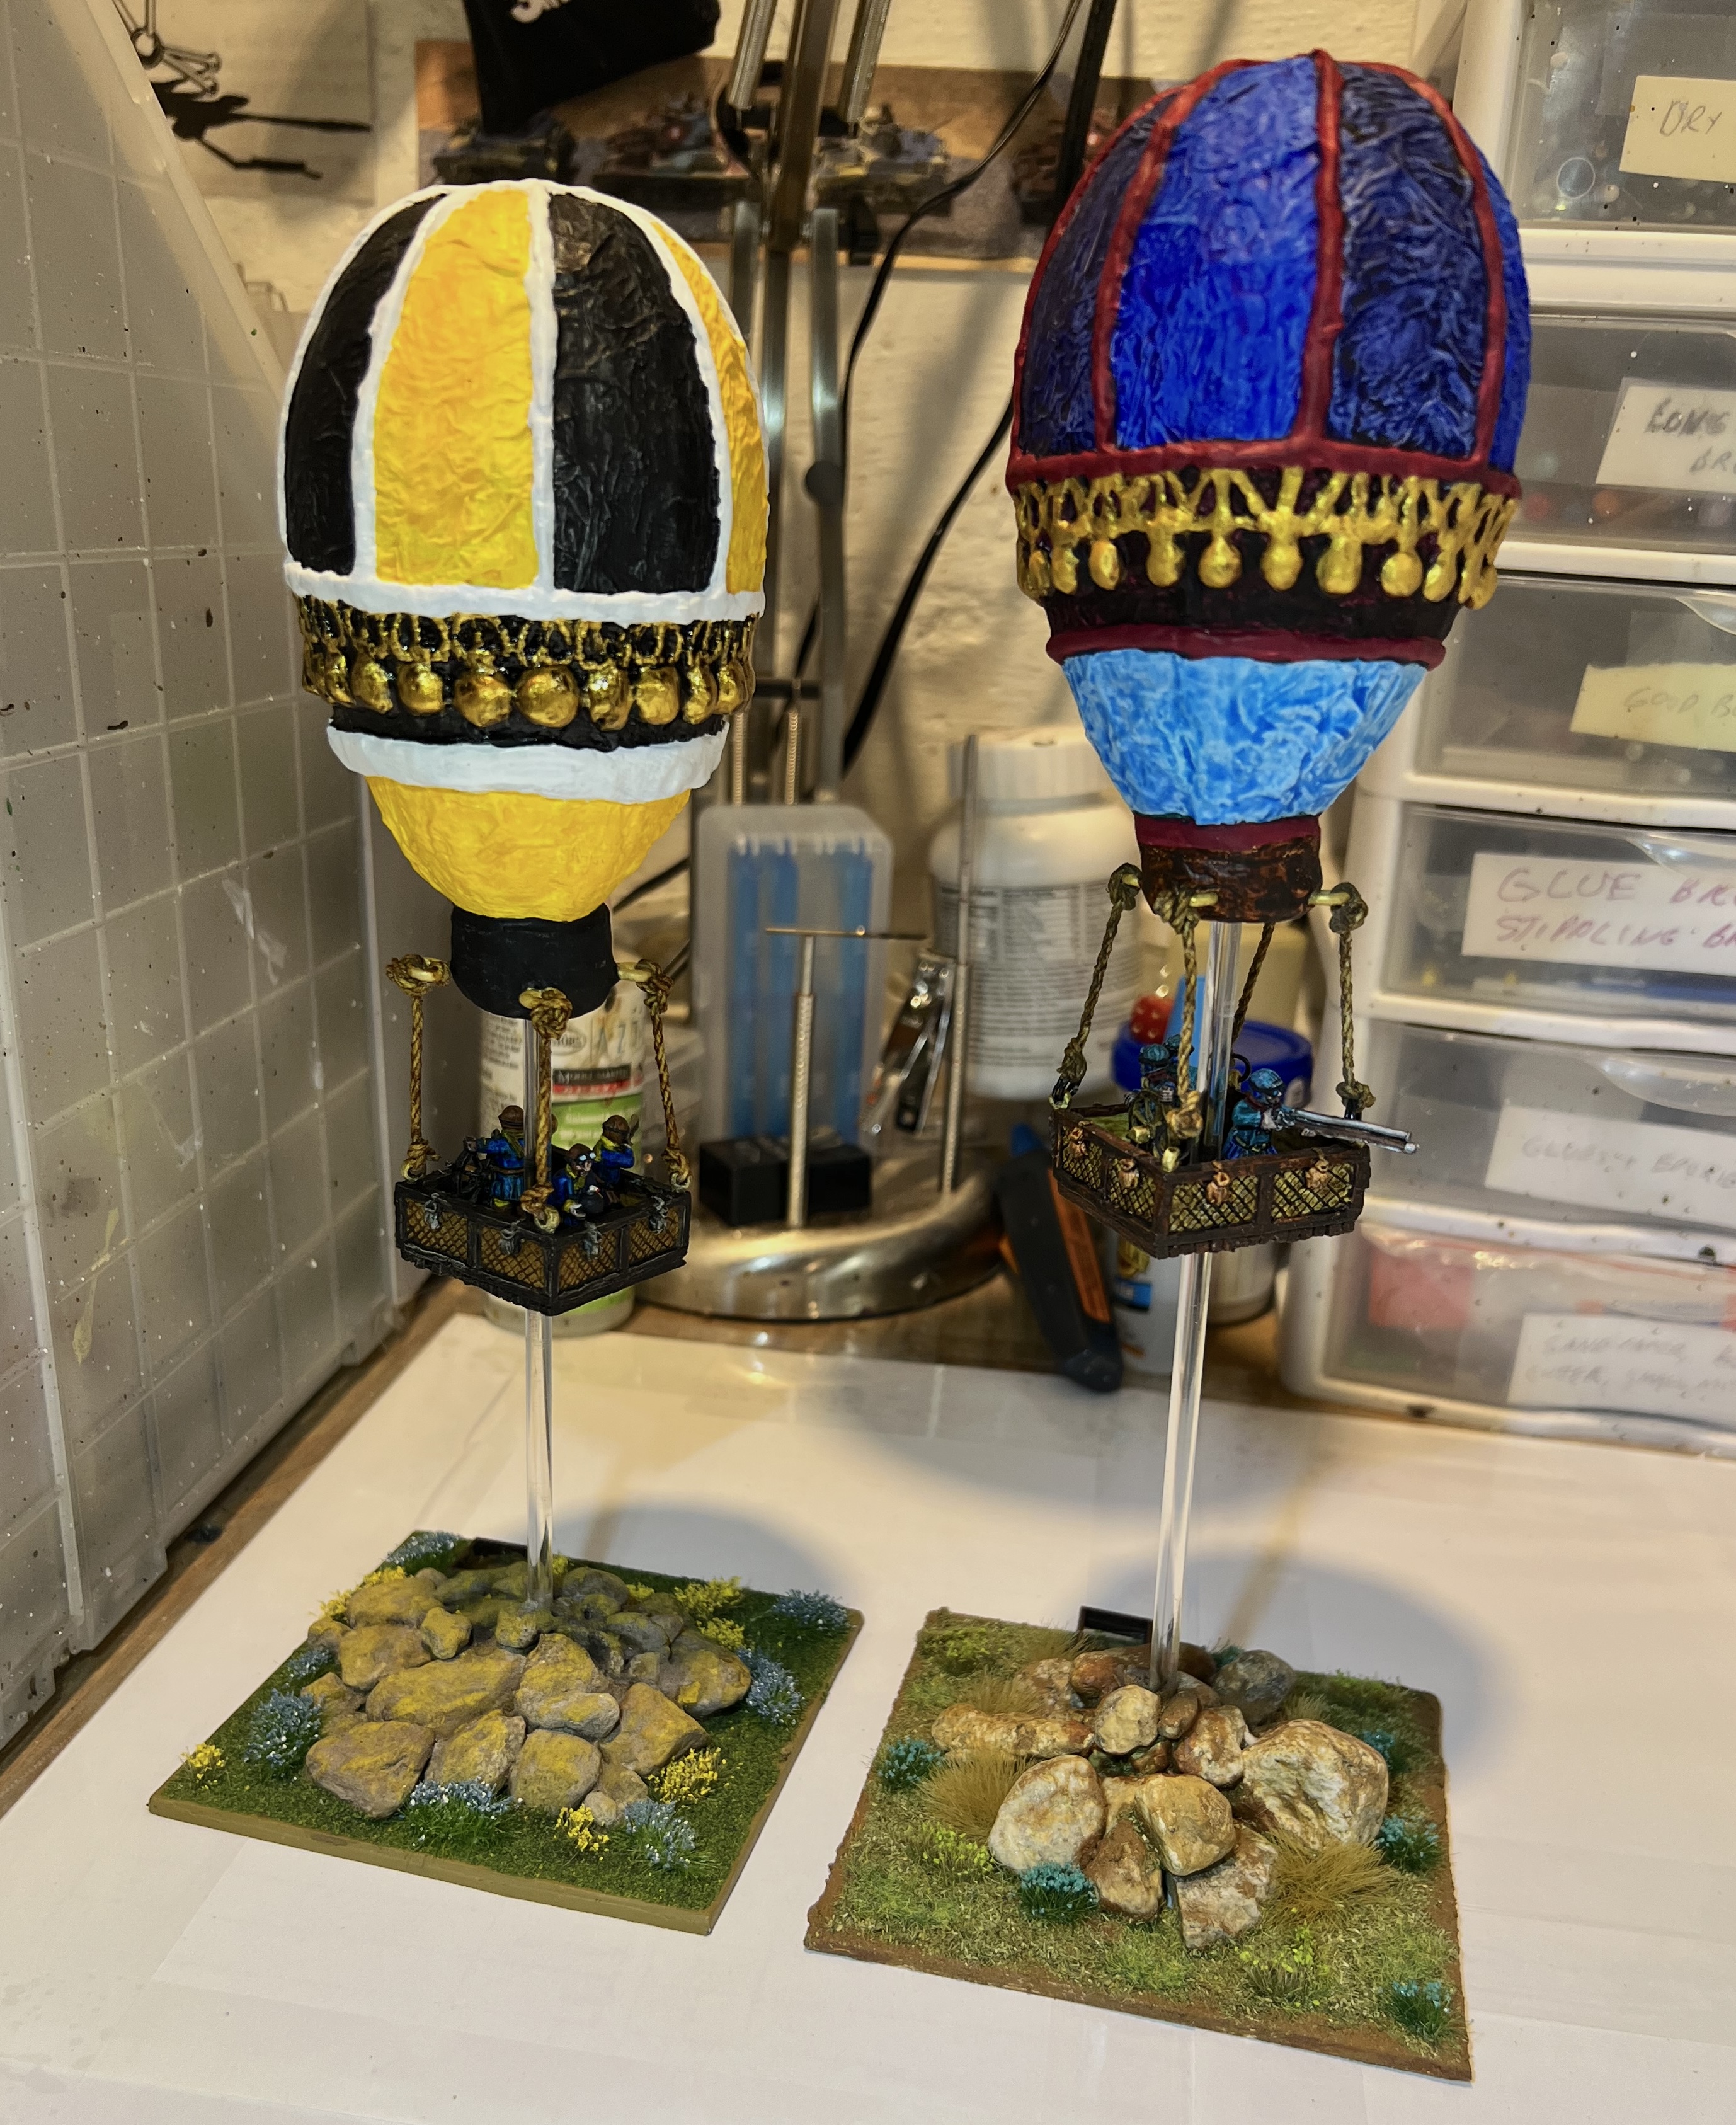
Painting of the balloon itself went fairly easily. I also flocked the base as you see below so that it would be completed before my rigging.
New balloon and base next to previous model for comparison.
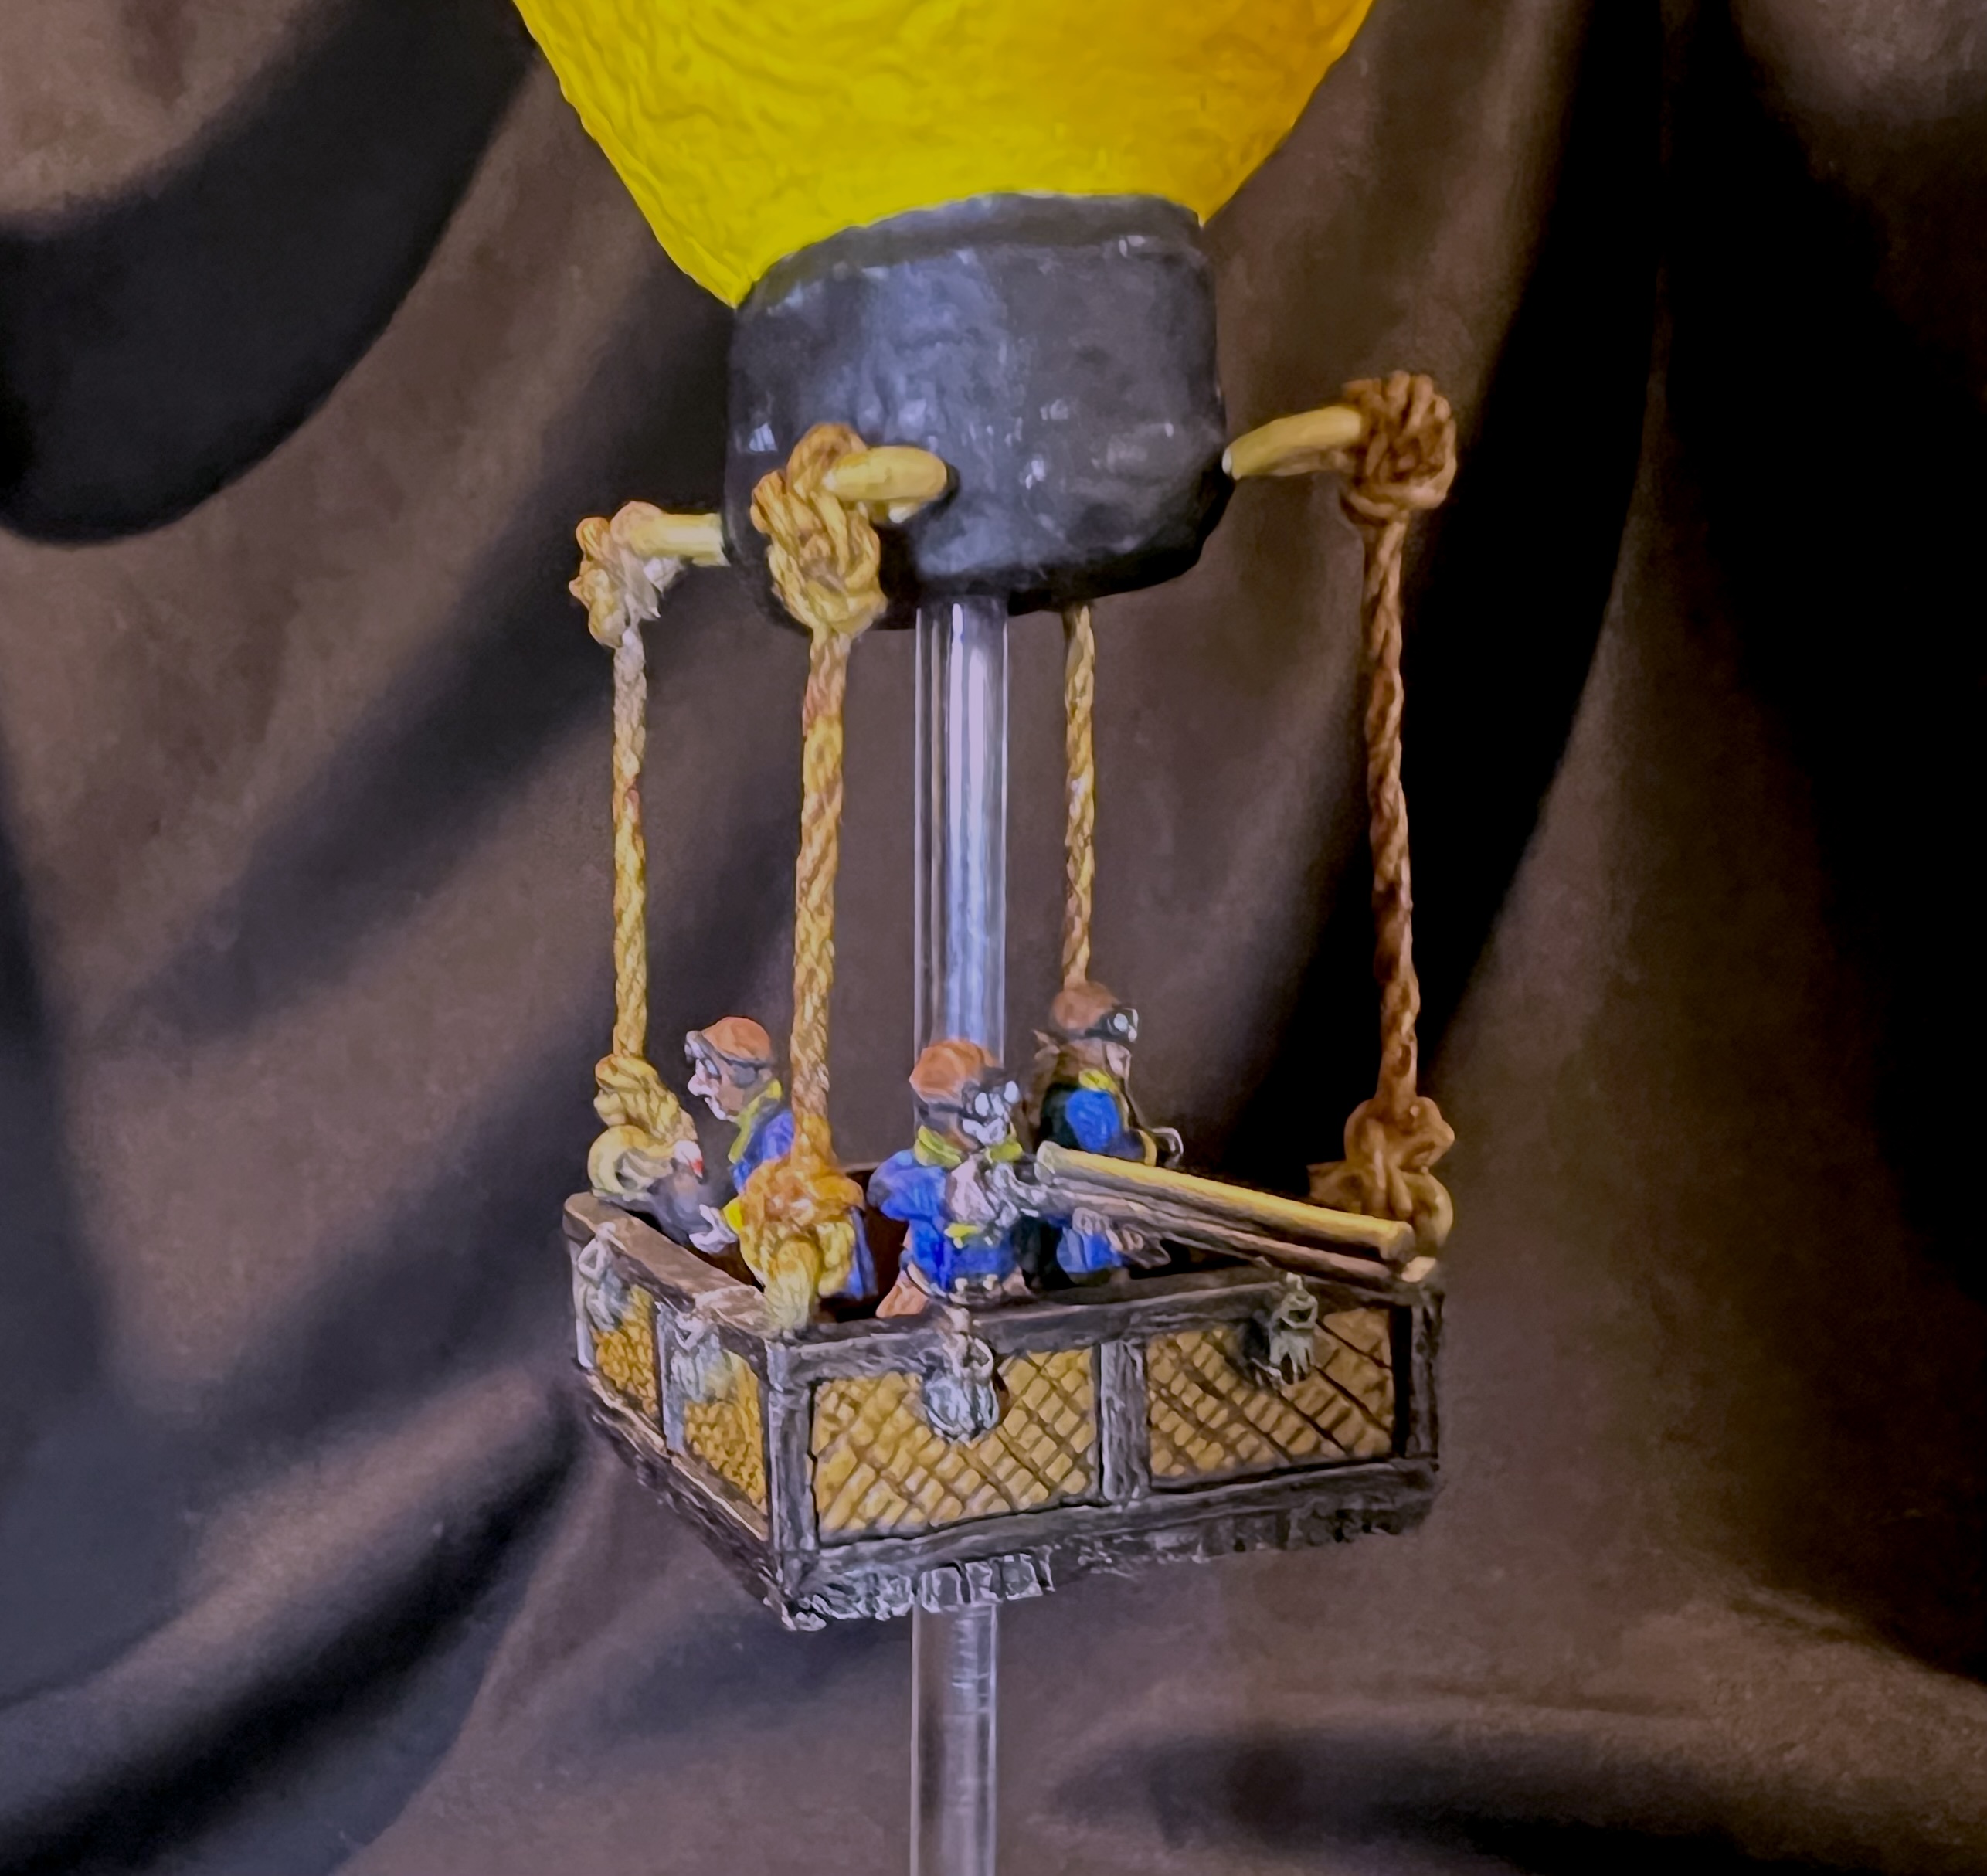
It was then on to rigging with twine – which is my least favorite thing to do with models. I made it work such that the basket was more or less level. Then I coated the twine with PVA, let that dry, then painted over that to make the twine look like rope.
I was done!
Here are some eye candy shots – as it is a model with no front or back – you’ll see a few shots of the total model as well as some crew shots. I did post a video on Instagram as well (a bit bright on the lighting):
Here now – the Munchkin Air Force assembled and ready to go after Professor Nitpik’s secrets!
And as they will need to travel -to these conventions- matching Really Useful Boxes…
I finished this model right before Christmas. This is my first Wars of Ozz modeling post since April! Wow! More will be coming. I also will have Nitpik forces AND terrain for his apocalyptic world. Come see this and join the fun at COLD WARS, TotalCon 2026, Cold Barrage 2026, HAVOC XL 2026, and Huzzah 2026 “The Revolution”.
I hope you found this interesting – if so (or if not), let me know in the comments section! And join me at a convention or two!
Final Notes and Links
Want to learn more about Ozz and its world? If you want to check out the excellent Wars of Ozz figures’ range, there are two places to get them. You can also get the rules there. (I make no money from this.) The game rules and the figures are available from the next two places:
Below you’ll see the list of paints and the like that I used on this Aerostat project. As I mentioned, I often use my old blog posts to help me remember what I did – and sometimes even what I should NOT do. Anyways, they are not likely as useful for you as they are for me, but that’s why I post the lists.
Miscellaneous details and references for those interested in that sort of thing:
For my earlier posts on Wars of Ozz games, view this page. It includes figures, units, and other related projects.
PAINTS, INKS, GLAZES, SHADES, WASHES, PIGMENTS, FLOCKING, GLUES AND MORE THAT I USED ON THE BOSTON BRUINS-COLOR THEMED MUNCHKIN AEROSTAT:
In short, (if you don’t want to click above) he has a list of folks who blog that he follows (most of them are the same ones that I also follow).
To quote Roger:
Well, What I’m asking you to do is, if you look below you’ll see a list of blogs that I follow (or should follow!), some are great painters (actually all of them are) 3D printers, game writers, DM’s, Sculptors, Convertors etc.. The one thing they all have in common is they are all entertaining writers! So if you can I’d like you to follow each of the links and take a look around, now some of these have not had new posts added for a while, but don’t let that put you off, have a look around check out some older posts, you never know there might be something you like or find useful, if so make a comment, follow (or if you have too “like”), let’s give these people some love and hopefully get them posting again!
So, take a look. I know some might not be up your alley, but if you’re into hobbying or modeling etc, most will. Of course my blog does also have some golf in there, but that’s just another addiction you know…
In WWII, the Royal Italian Army was heavily engaged in the North African Campaign starting in June 1940. They fought first alone against the British and then in concert with Nazi Germany’s Afrika Korps after February 1941. The tide of battle ebbed and flowed across North Africa. The Italians and the Germans formed the Panzerarmee Afrika. They battled the British 8th Army in Egypt, Libya, and eventually Tunisia. There, along with US and UK troops from Operation Torch, Axis forces were driven from North Africa in May 1943. Shortly afterwards, in early July of 1943, Operation Husky – the invasion of Sicily – occurred. By the end of that month, Mussolini was ousted. Italy then requested a separate armistice and was out of the war. German forces seized any available Italian war materiel and continued to fight in Italy. Italy then was really in a state of civil war. Some Italian forces fought with the Allies. Others sided with the Germans. Partisan attacks were common – and continued even after the German surrender in April 1945.
I have found the Royal Italian Army and its equipment interesting. At HAVOC I had run a big North Africa What a Tanker game back in 2019. At this year’s HISTORICON, discussions with one of the players intrigued me. We talked about a “what if” scenario for a “What a Tanker” game where I could have the French defending against the Italians. Mulling that over the summer, I decided to do it! I call it “Il Duce’s Desert Gamble“.
It’s 1942 or 1943. Here, the Allies do not launch Operation Torch. Instead, with the USSR on the verge of collapse, they make the disastrous decision to launch Operation Sledgehammer . It fails miserably. The USSR seeks a separate peace with Germany. The British 8th Army is routed and German forces advance towards the Middle East and its oil fields. The US and UK are in no position militarily or logistically to try any invasion anywhere in Europe for years. The US refocuses on Japan and the Pacific.
Meanwhile, Mussolini sees an opportunity to further his vision of a new Roman Empire that would dominate the Mediterranean. He sees France’s colonies as ripe for the taking, and gains Hitler’s assent to take them. This sets up my desert battle scenario between Vichy French armor and the Italians.
In preparation for the game – I have enough French from my Operation Torch game. I did however need to augment the Italians.
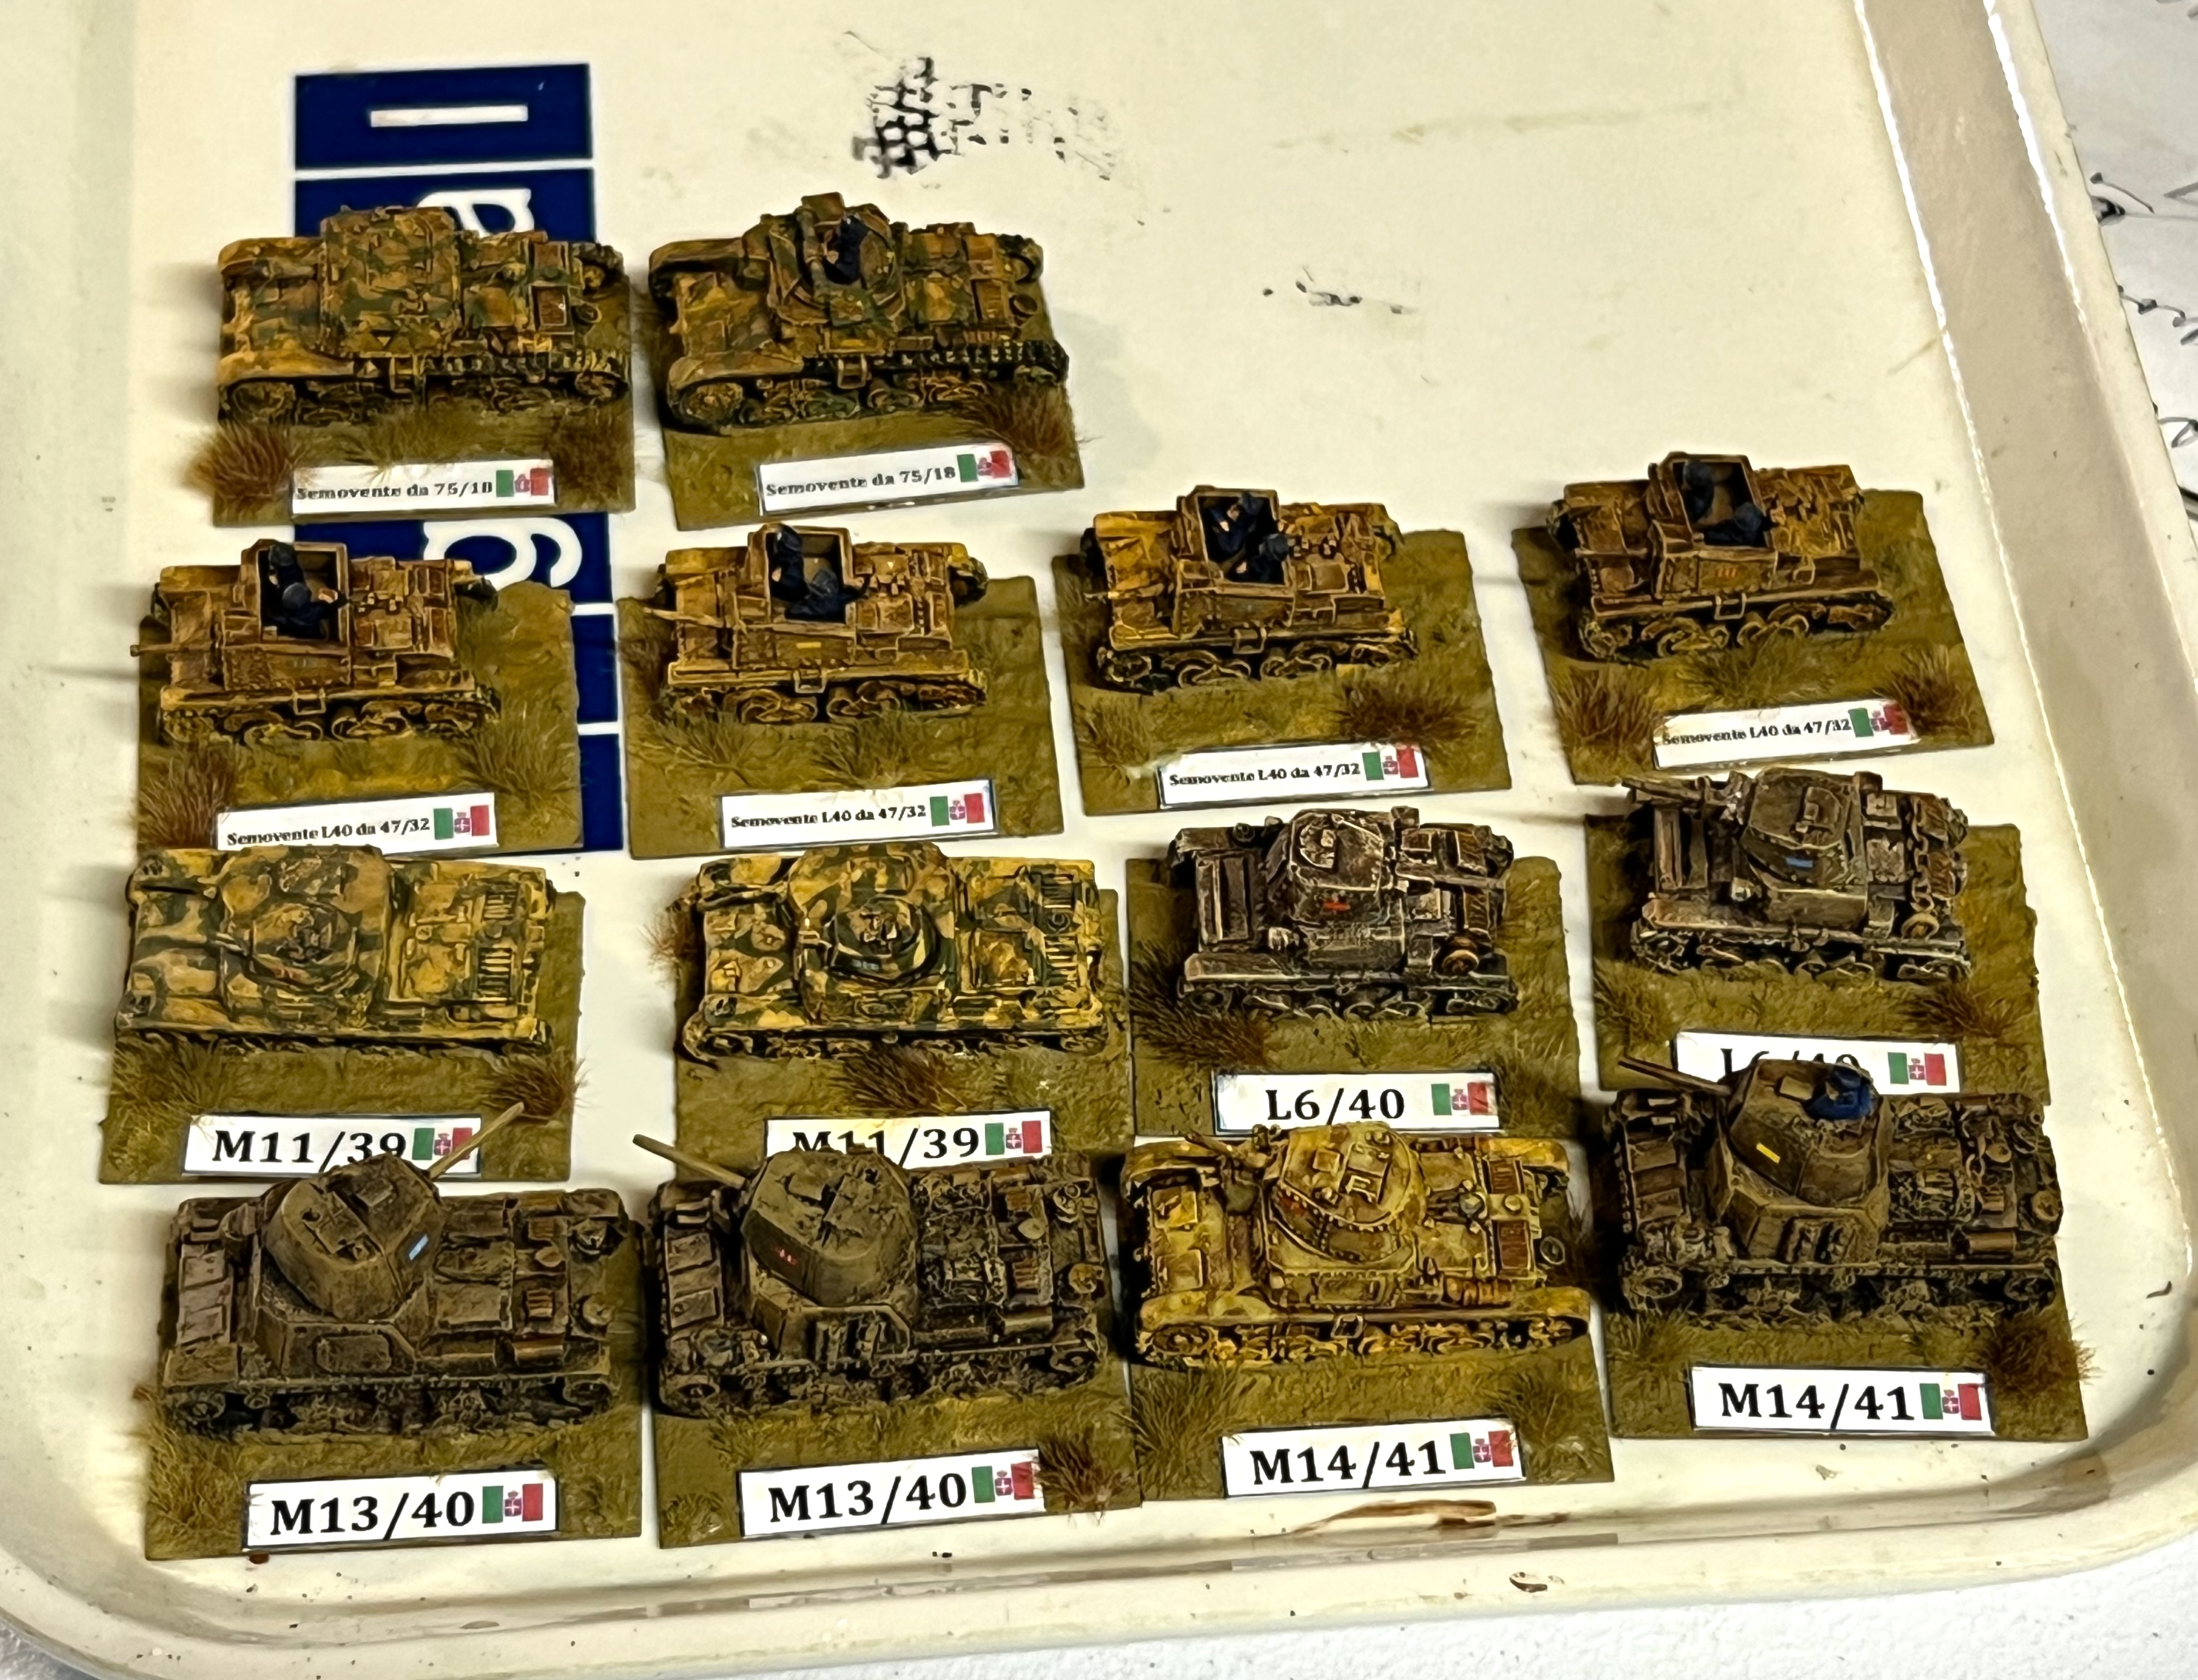
My Italian armor before this project.
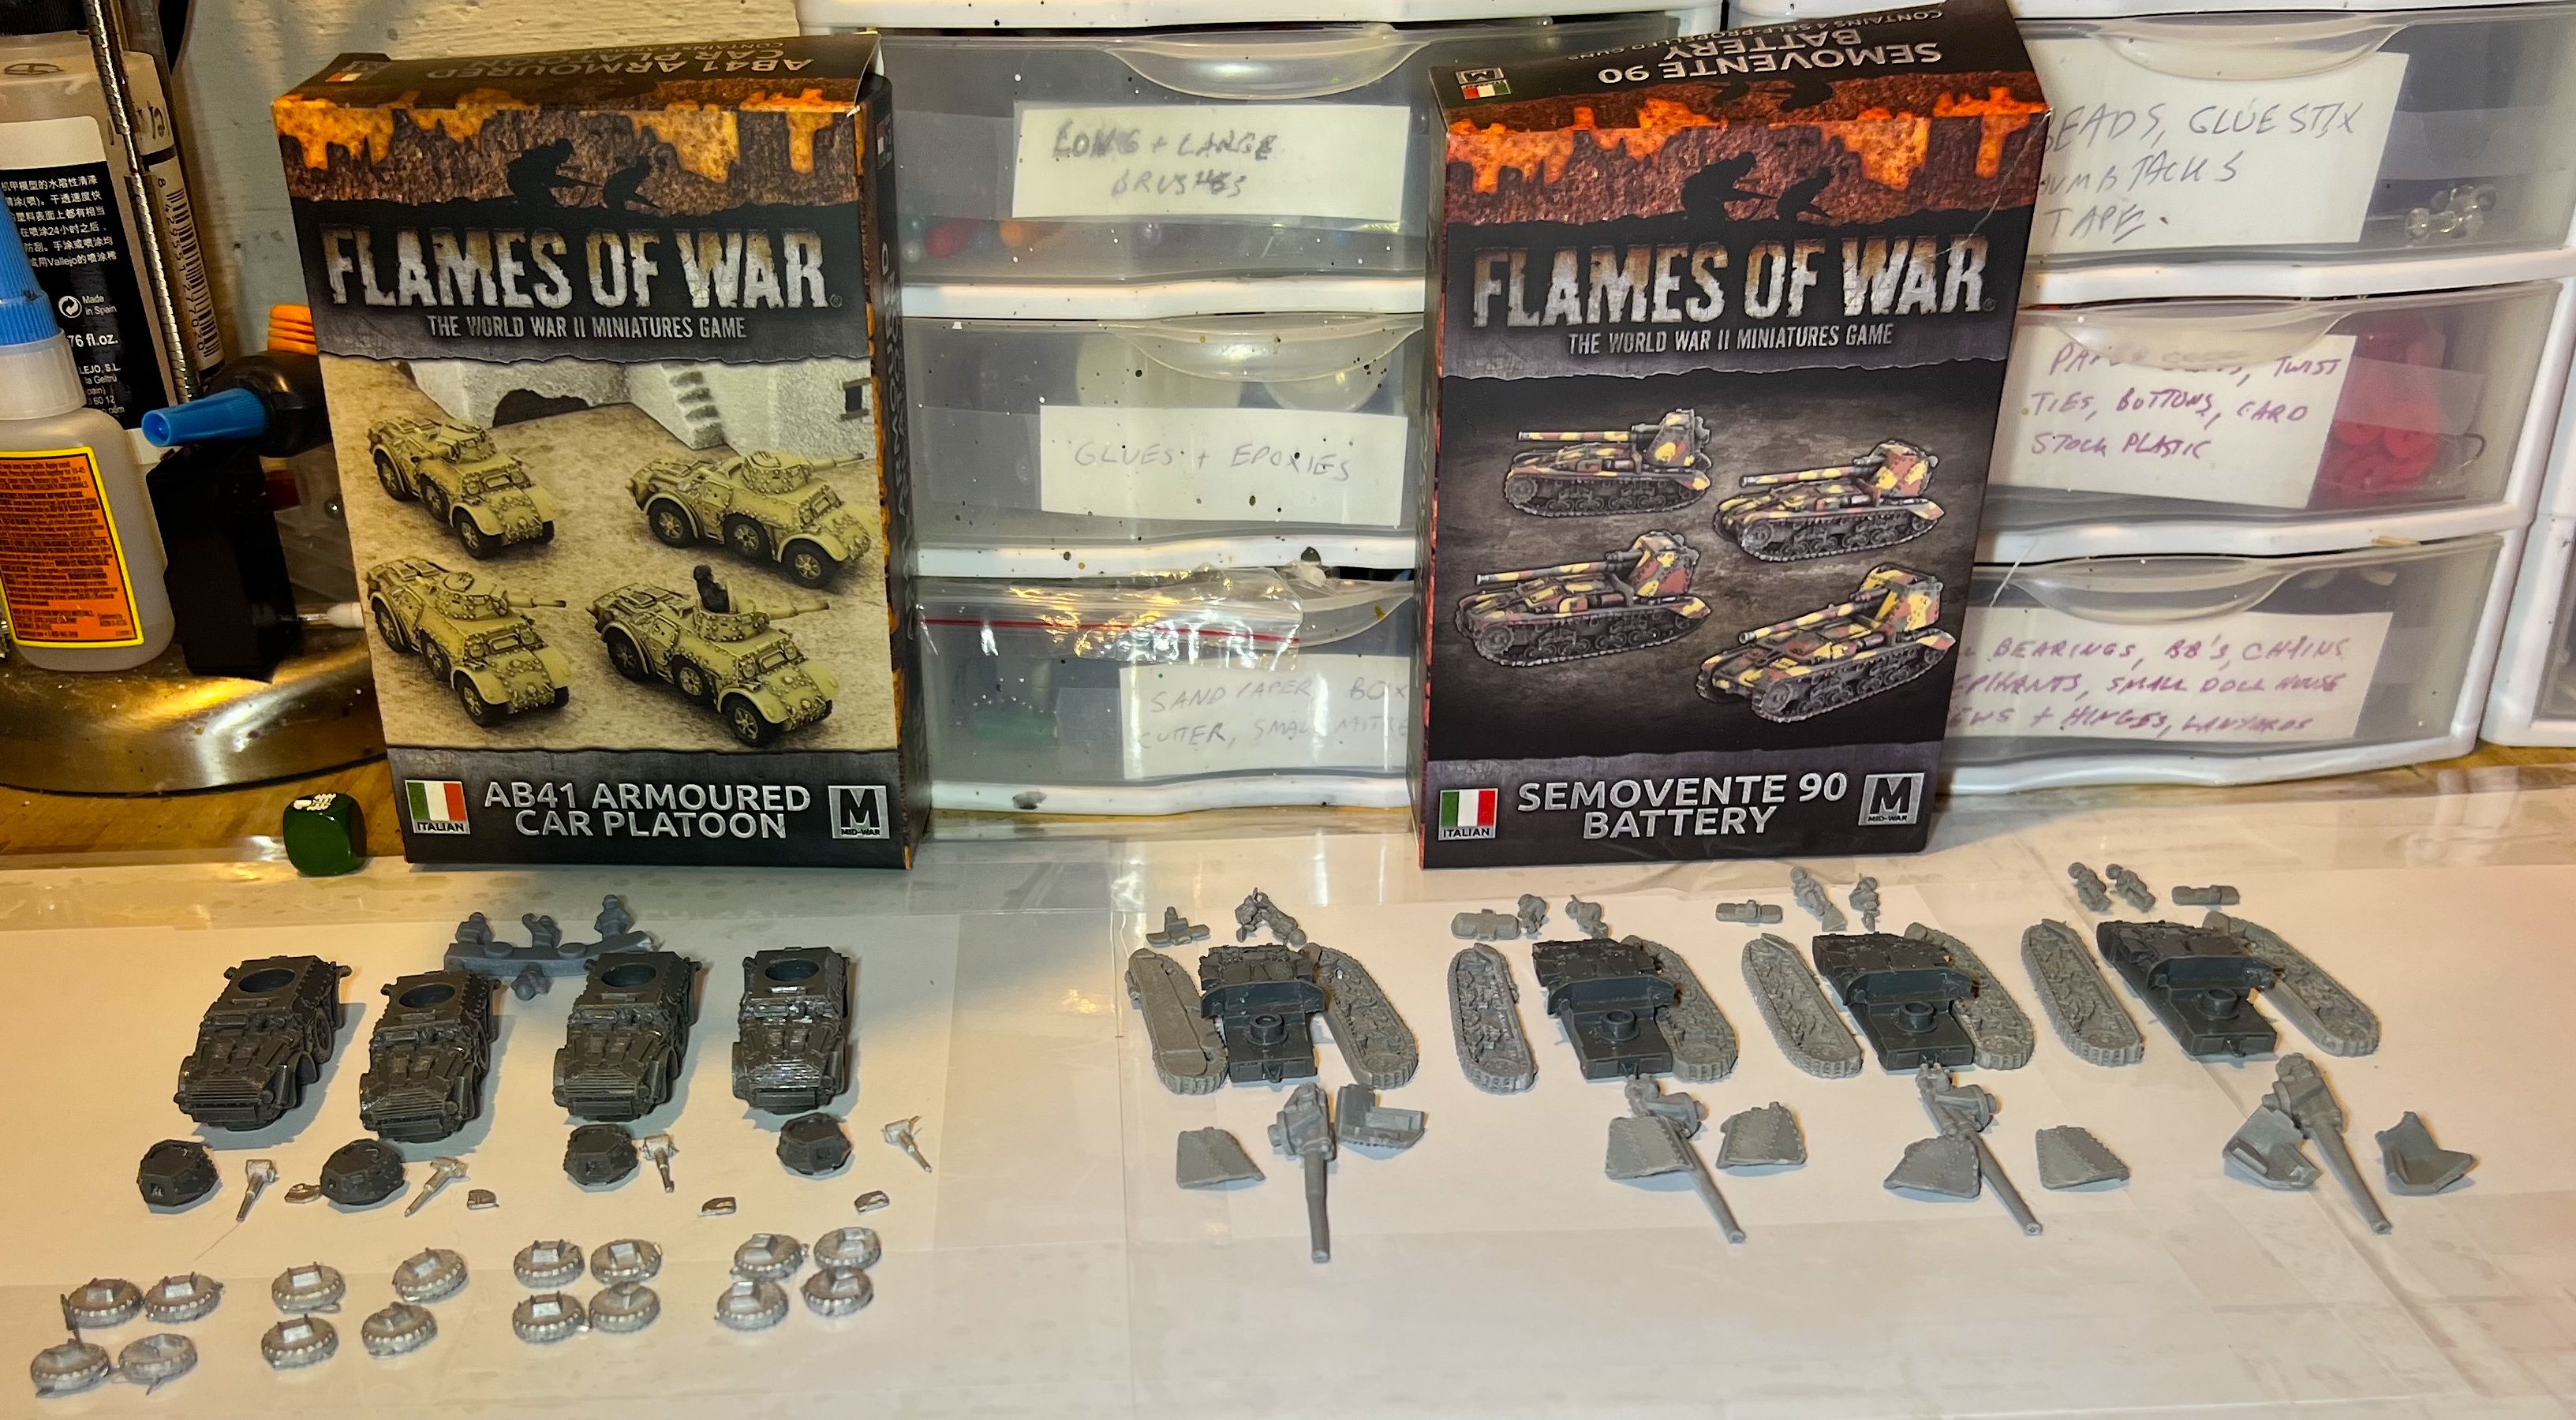
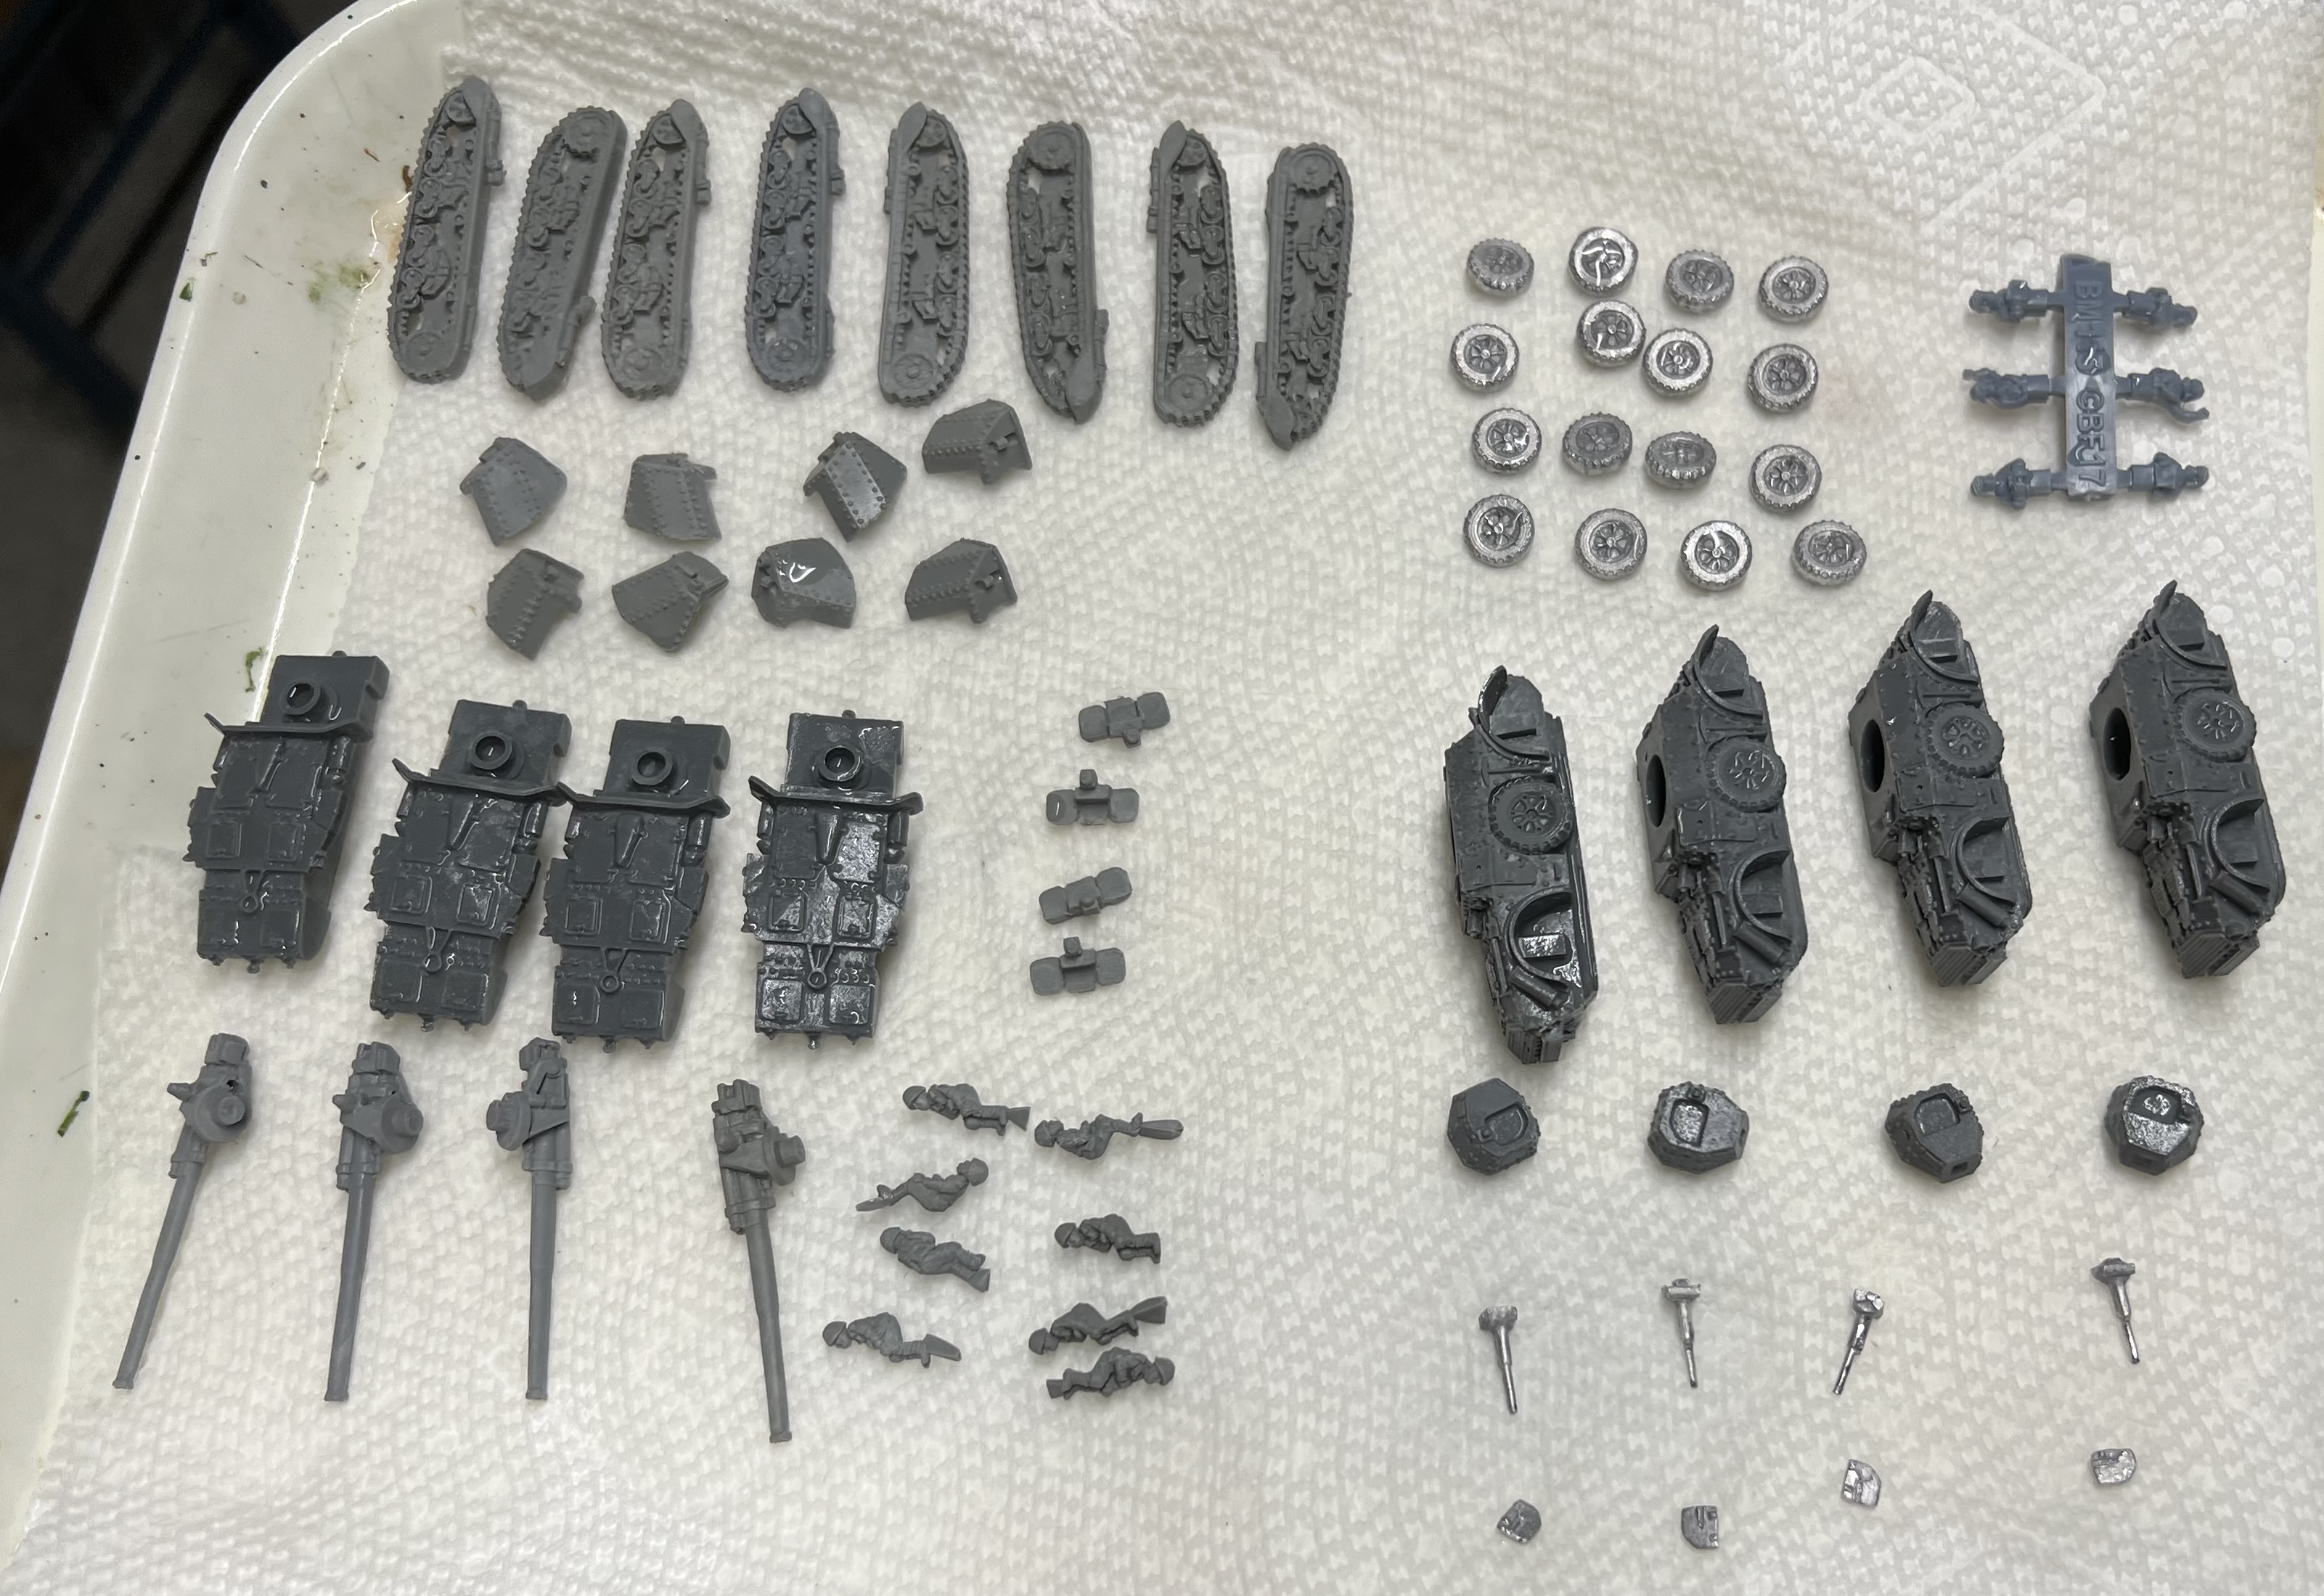
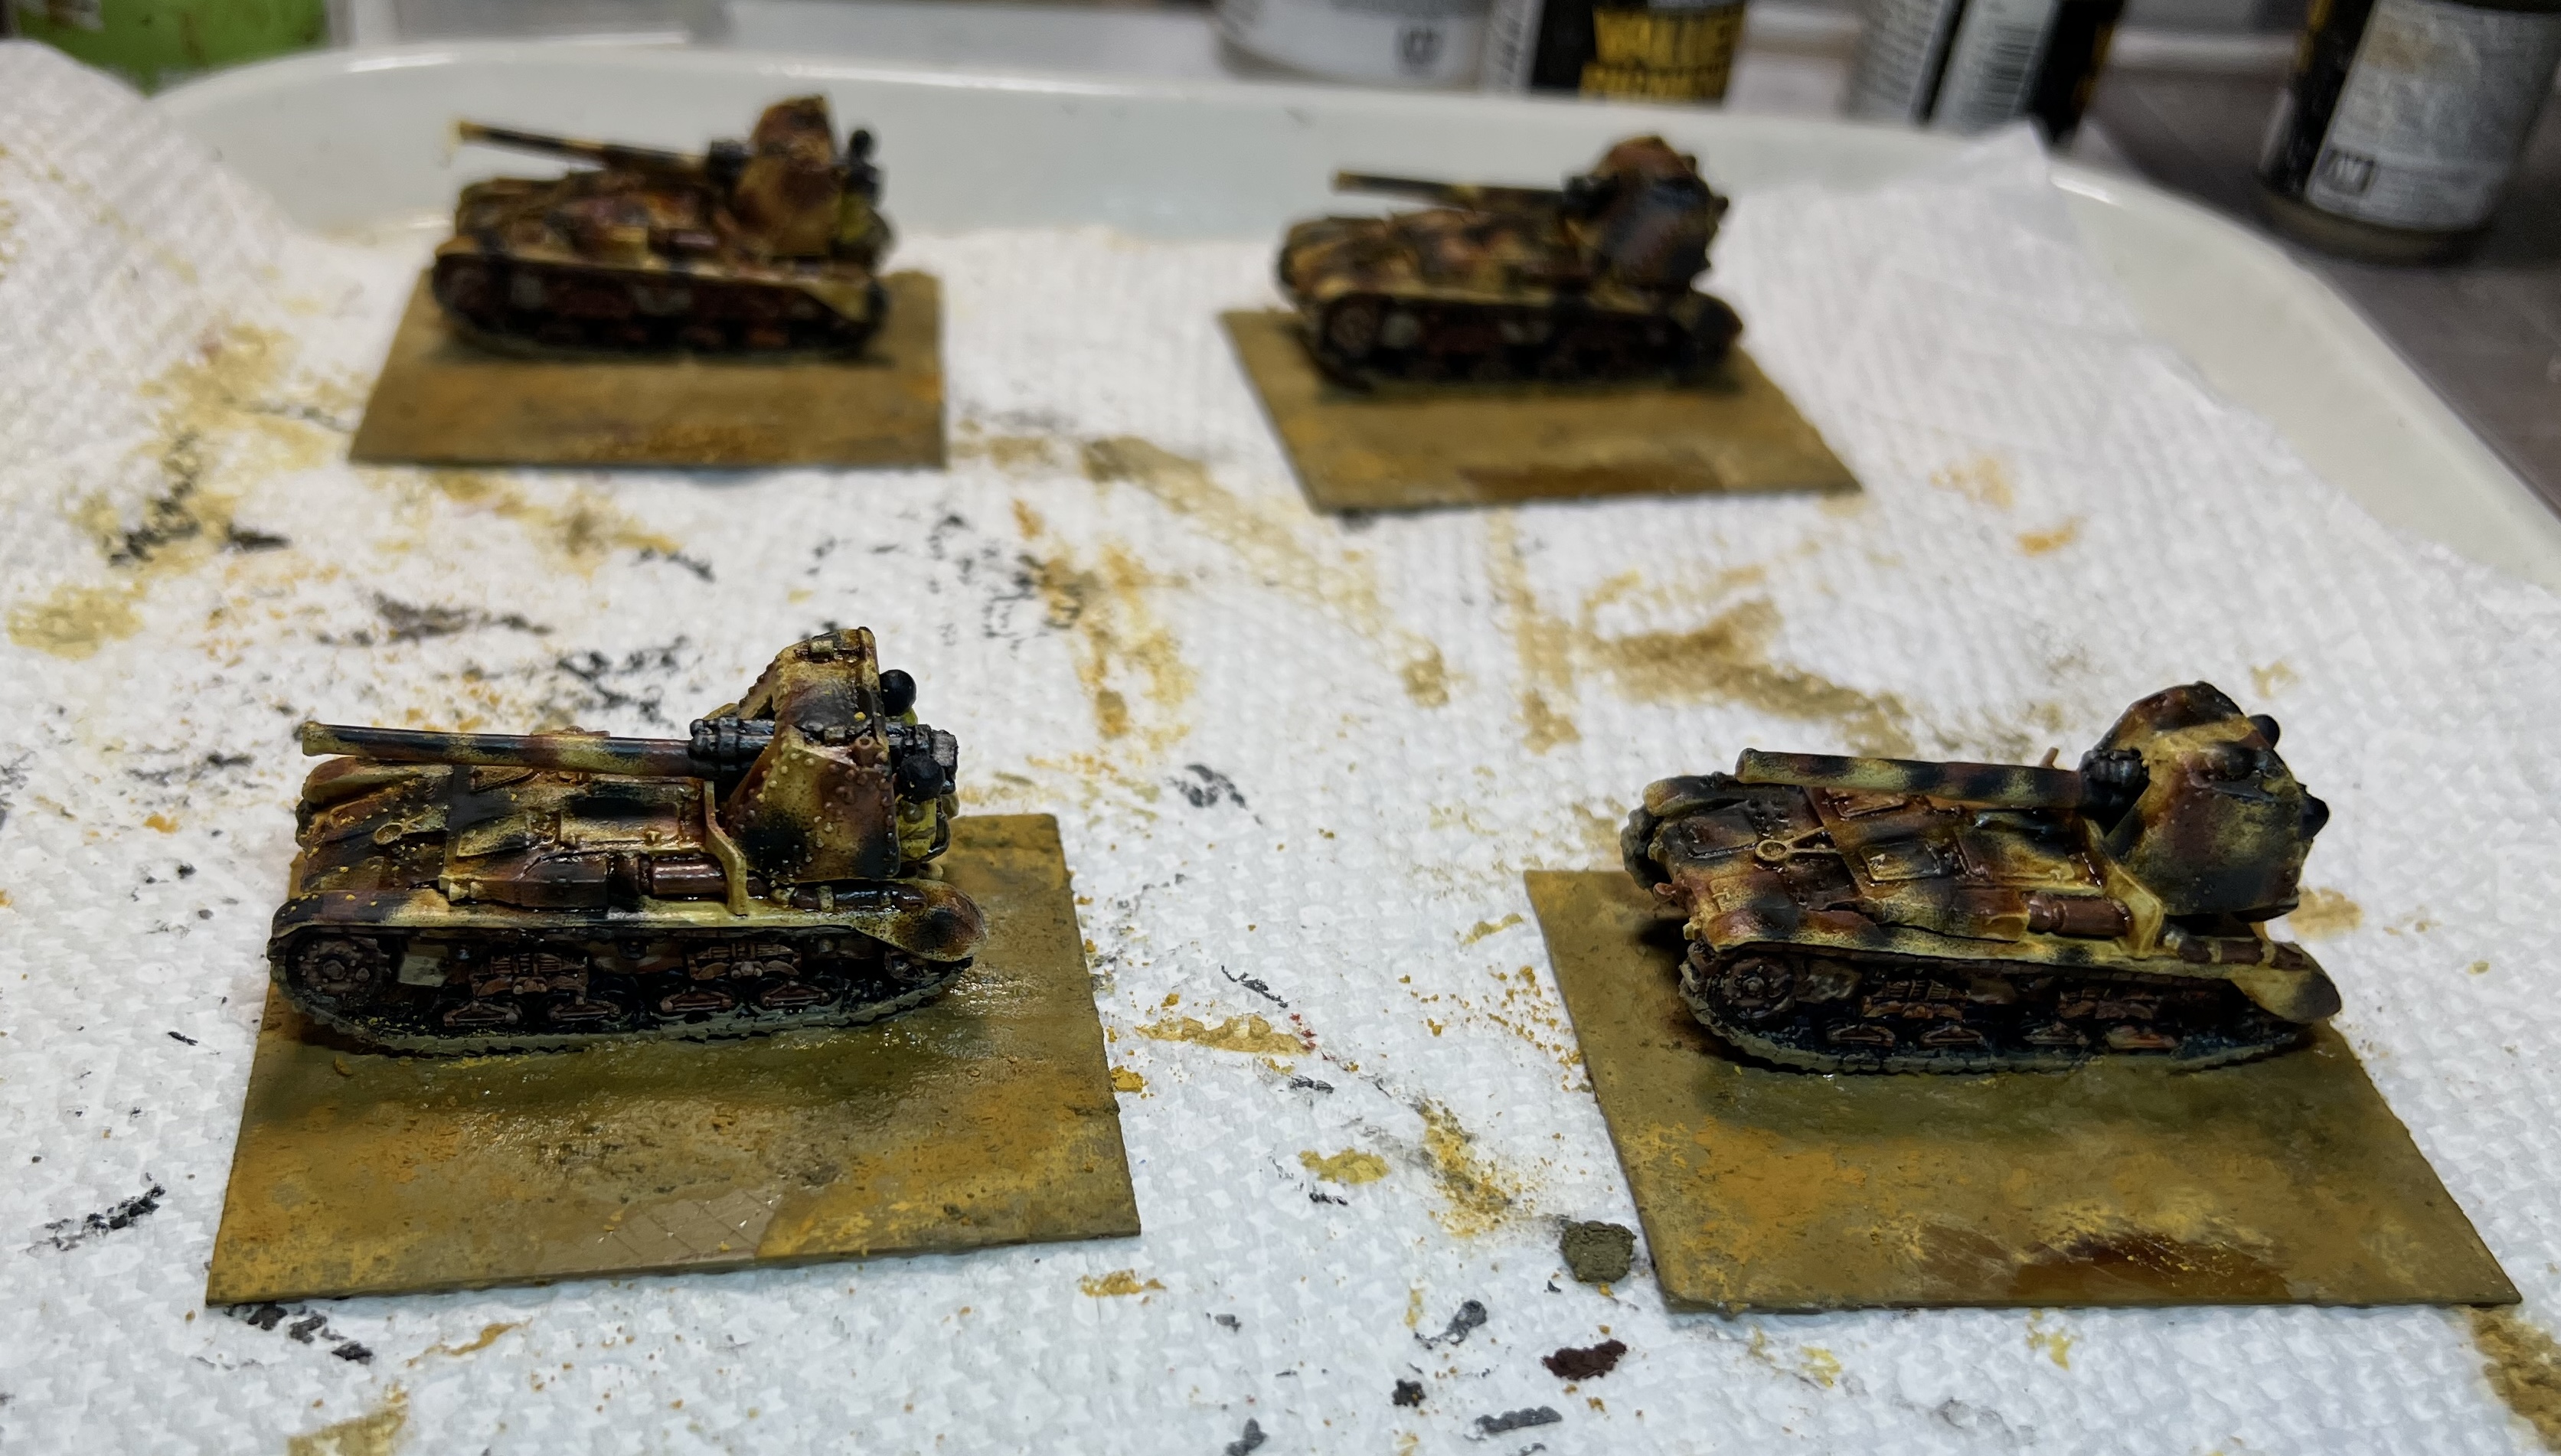
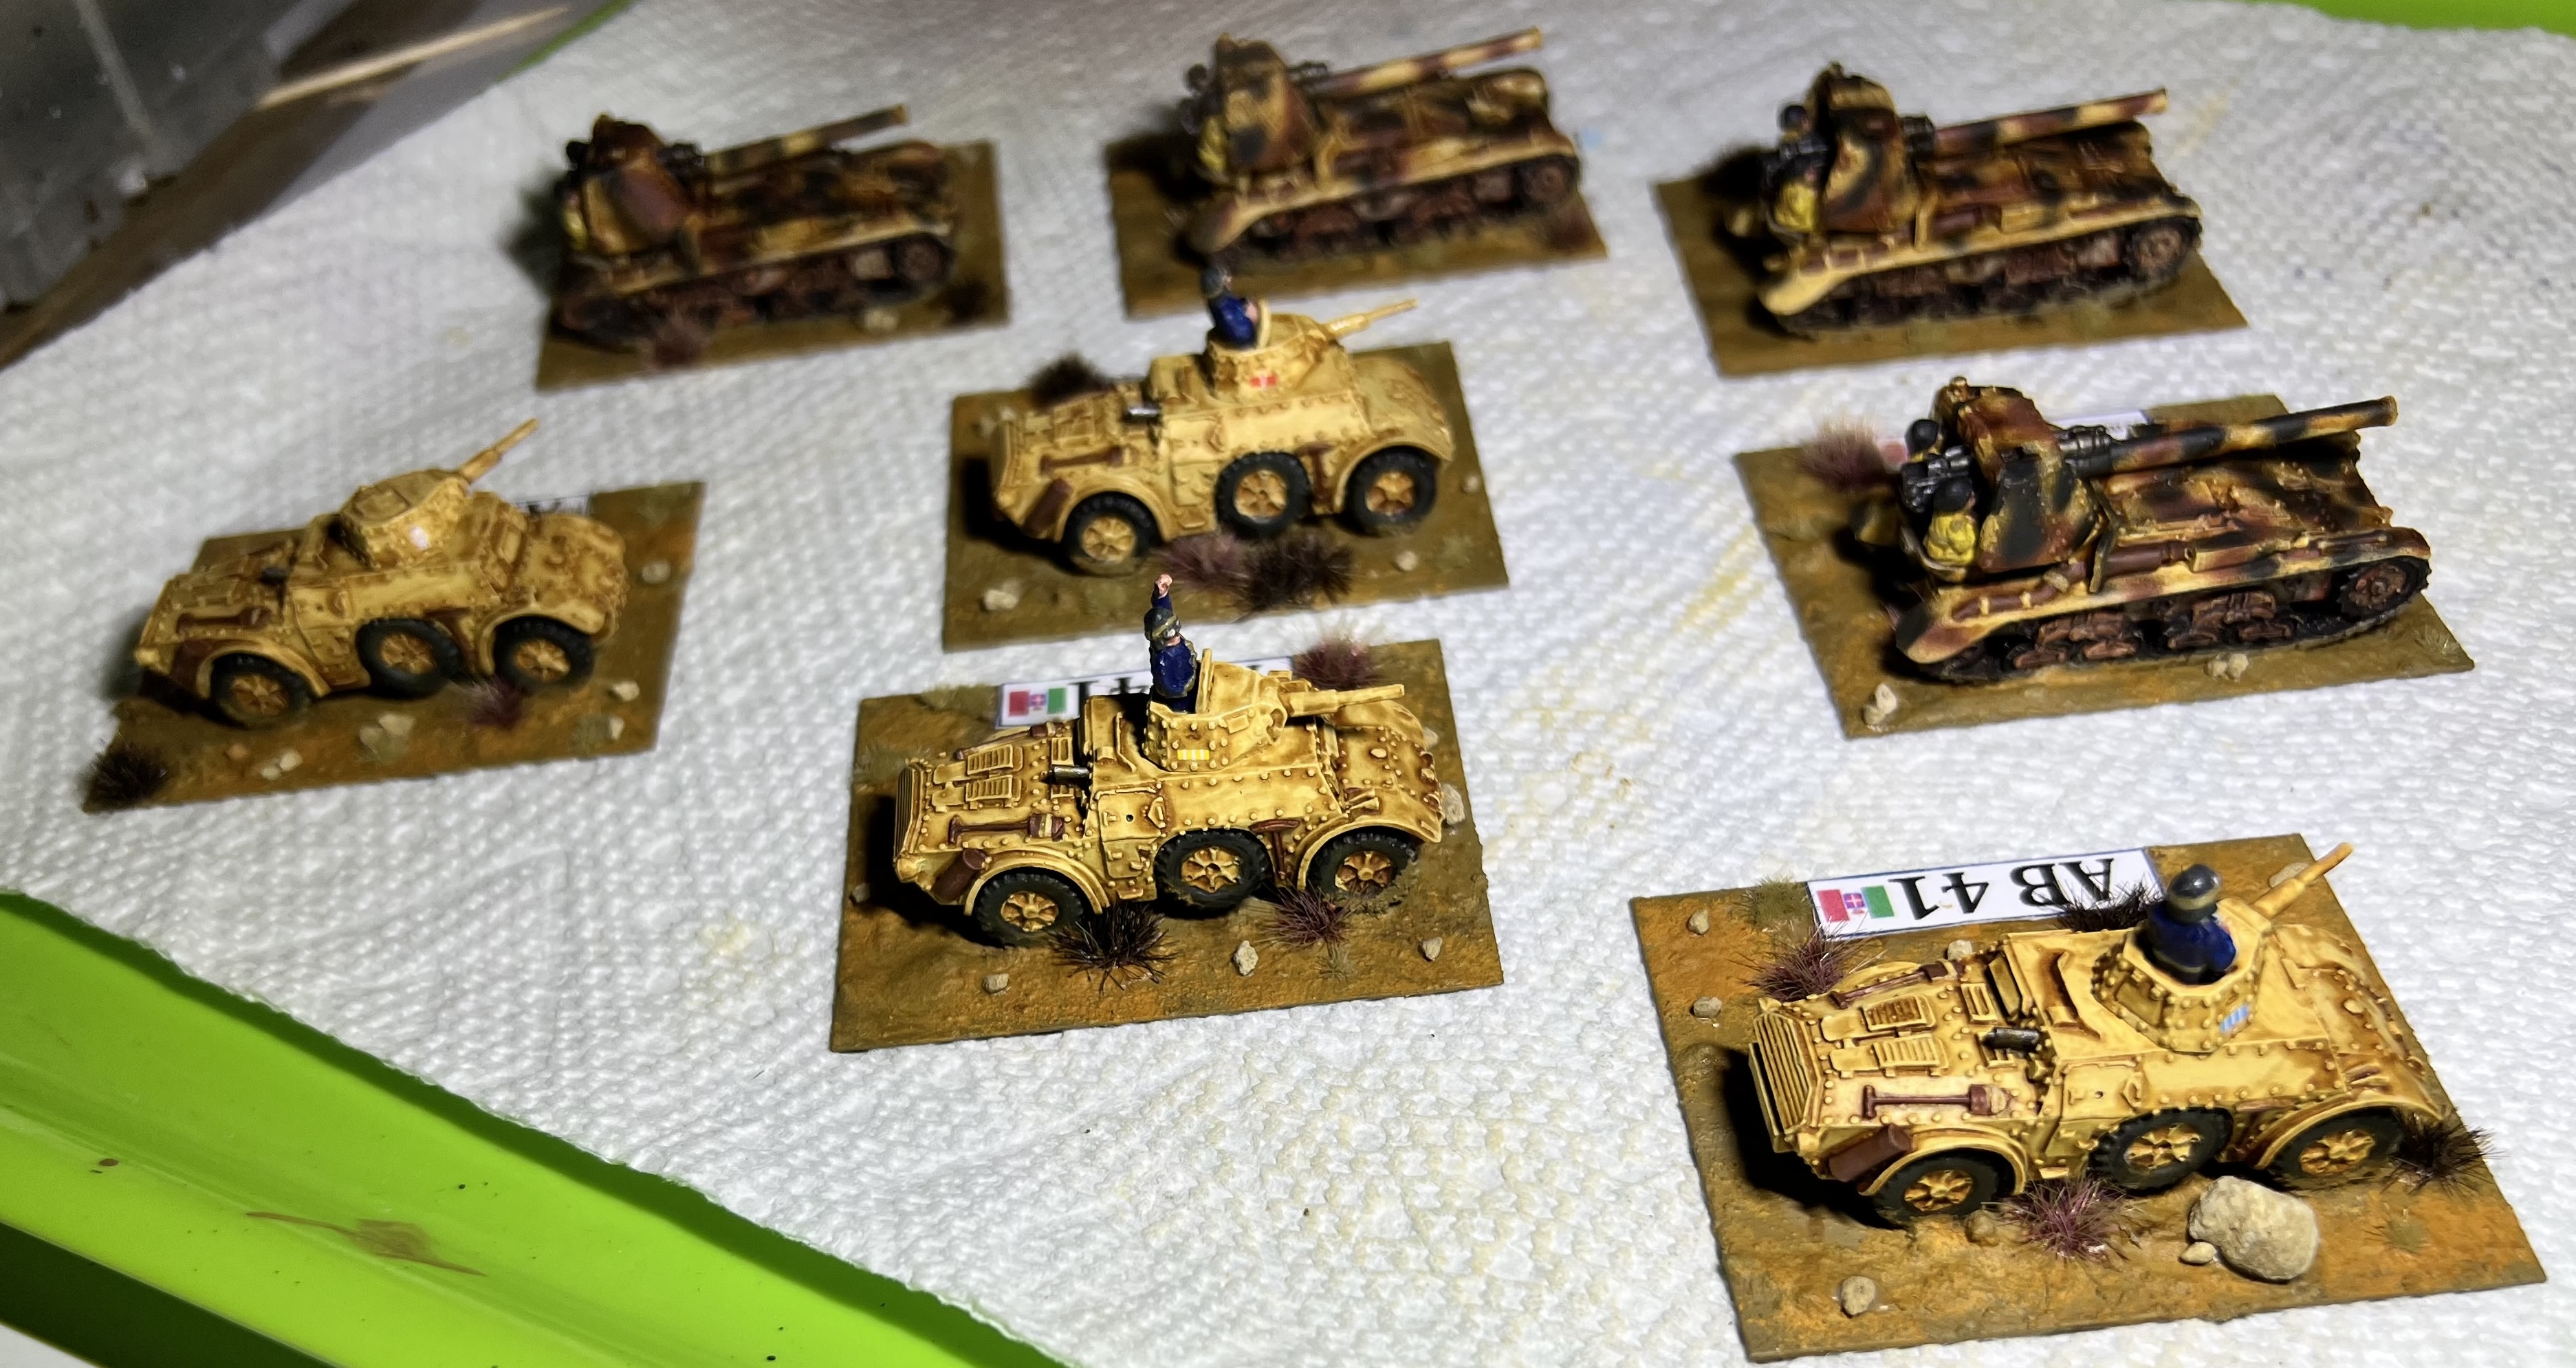
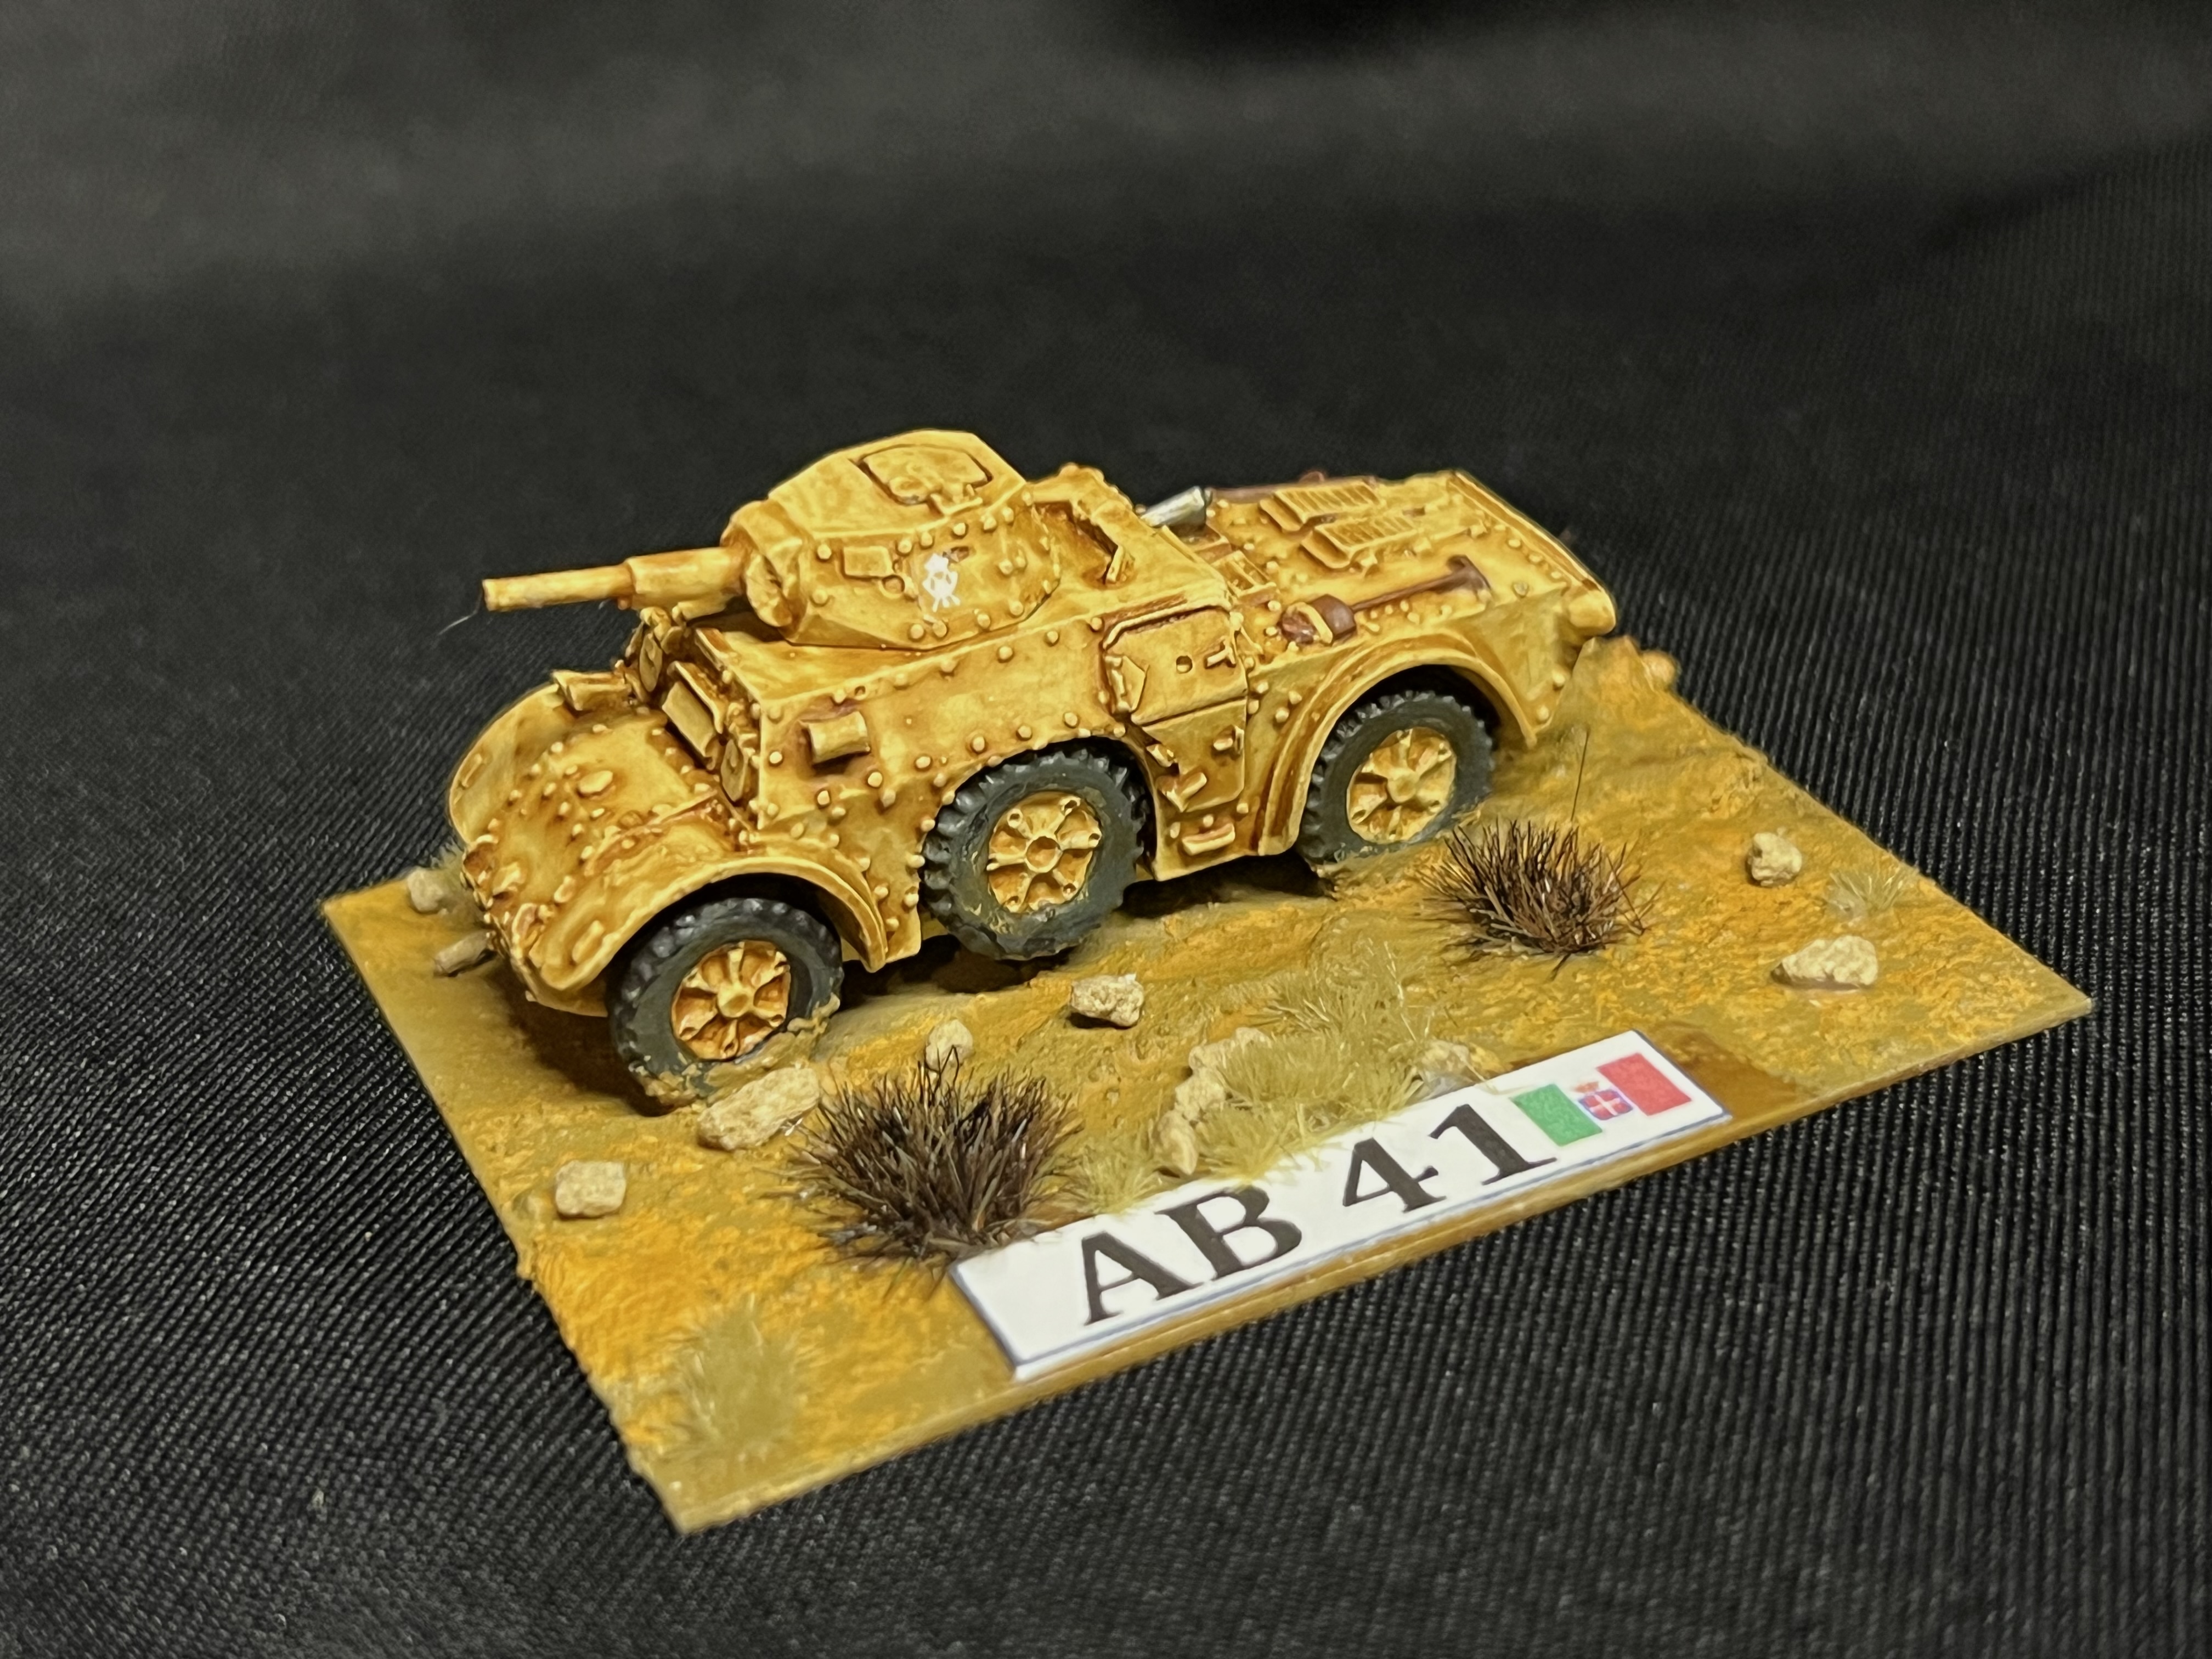
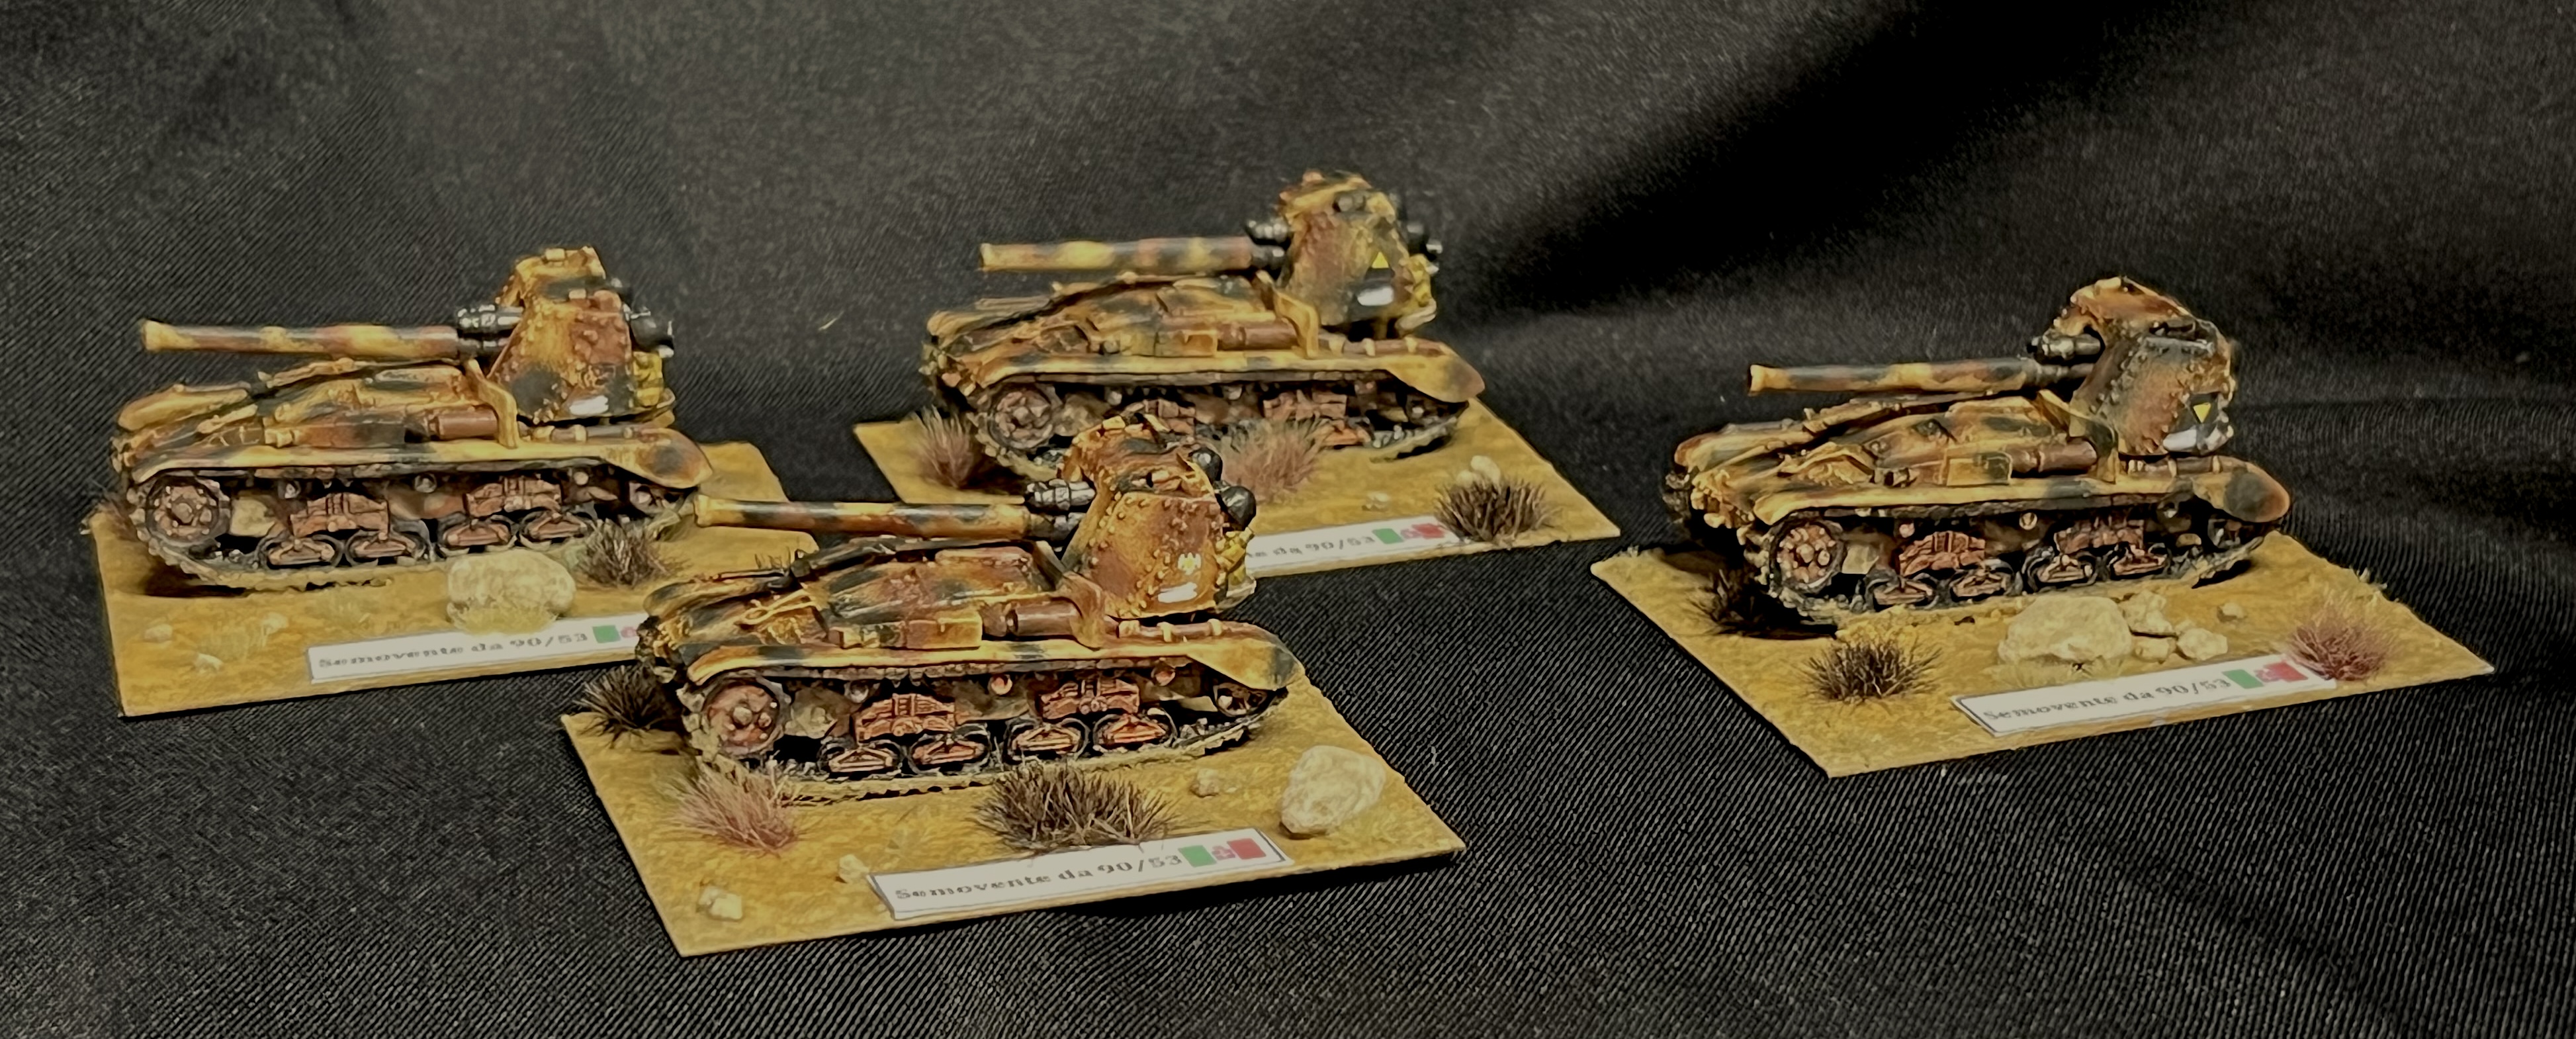
Specifically, I wanted to give them some armored cars. These include the Autoblinda Fiat-Ansaldo 41, also known as AB 41. I also wanted to provide another newer and more powerful tank destroyer, the Semovente 90/53. I use 15mm/1:100 scale models for these games. I acquired a 4-vehicle platoon of the AB 41’s. Simultaneously, I bought a 4-vehicle battery of the Semovente 90/53’s. Both kits are from Battlefront (Flames of War).
The AB 41 had a 20mm Breda autocannon – similar to the Panzer II- with decent anti-armor penetration capabilities. Its armor was effective against infantry small arms. 667 were built, and served everywhere the Royal Italian Army fought. It served also post-war until the mid-1950’s.
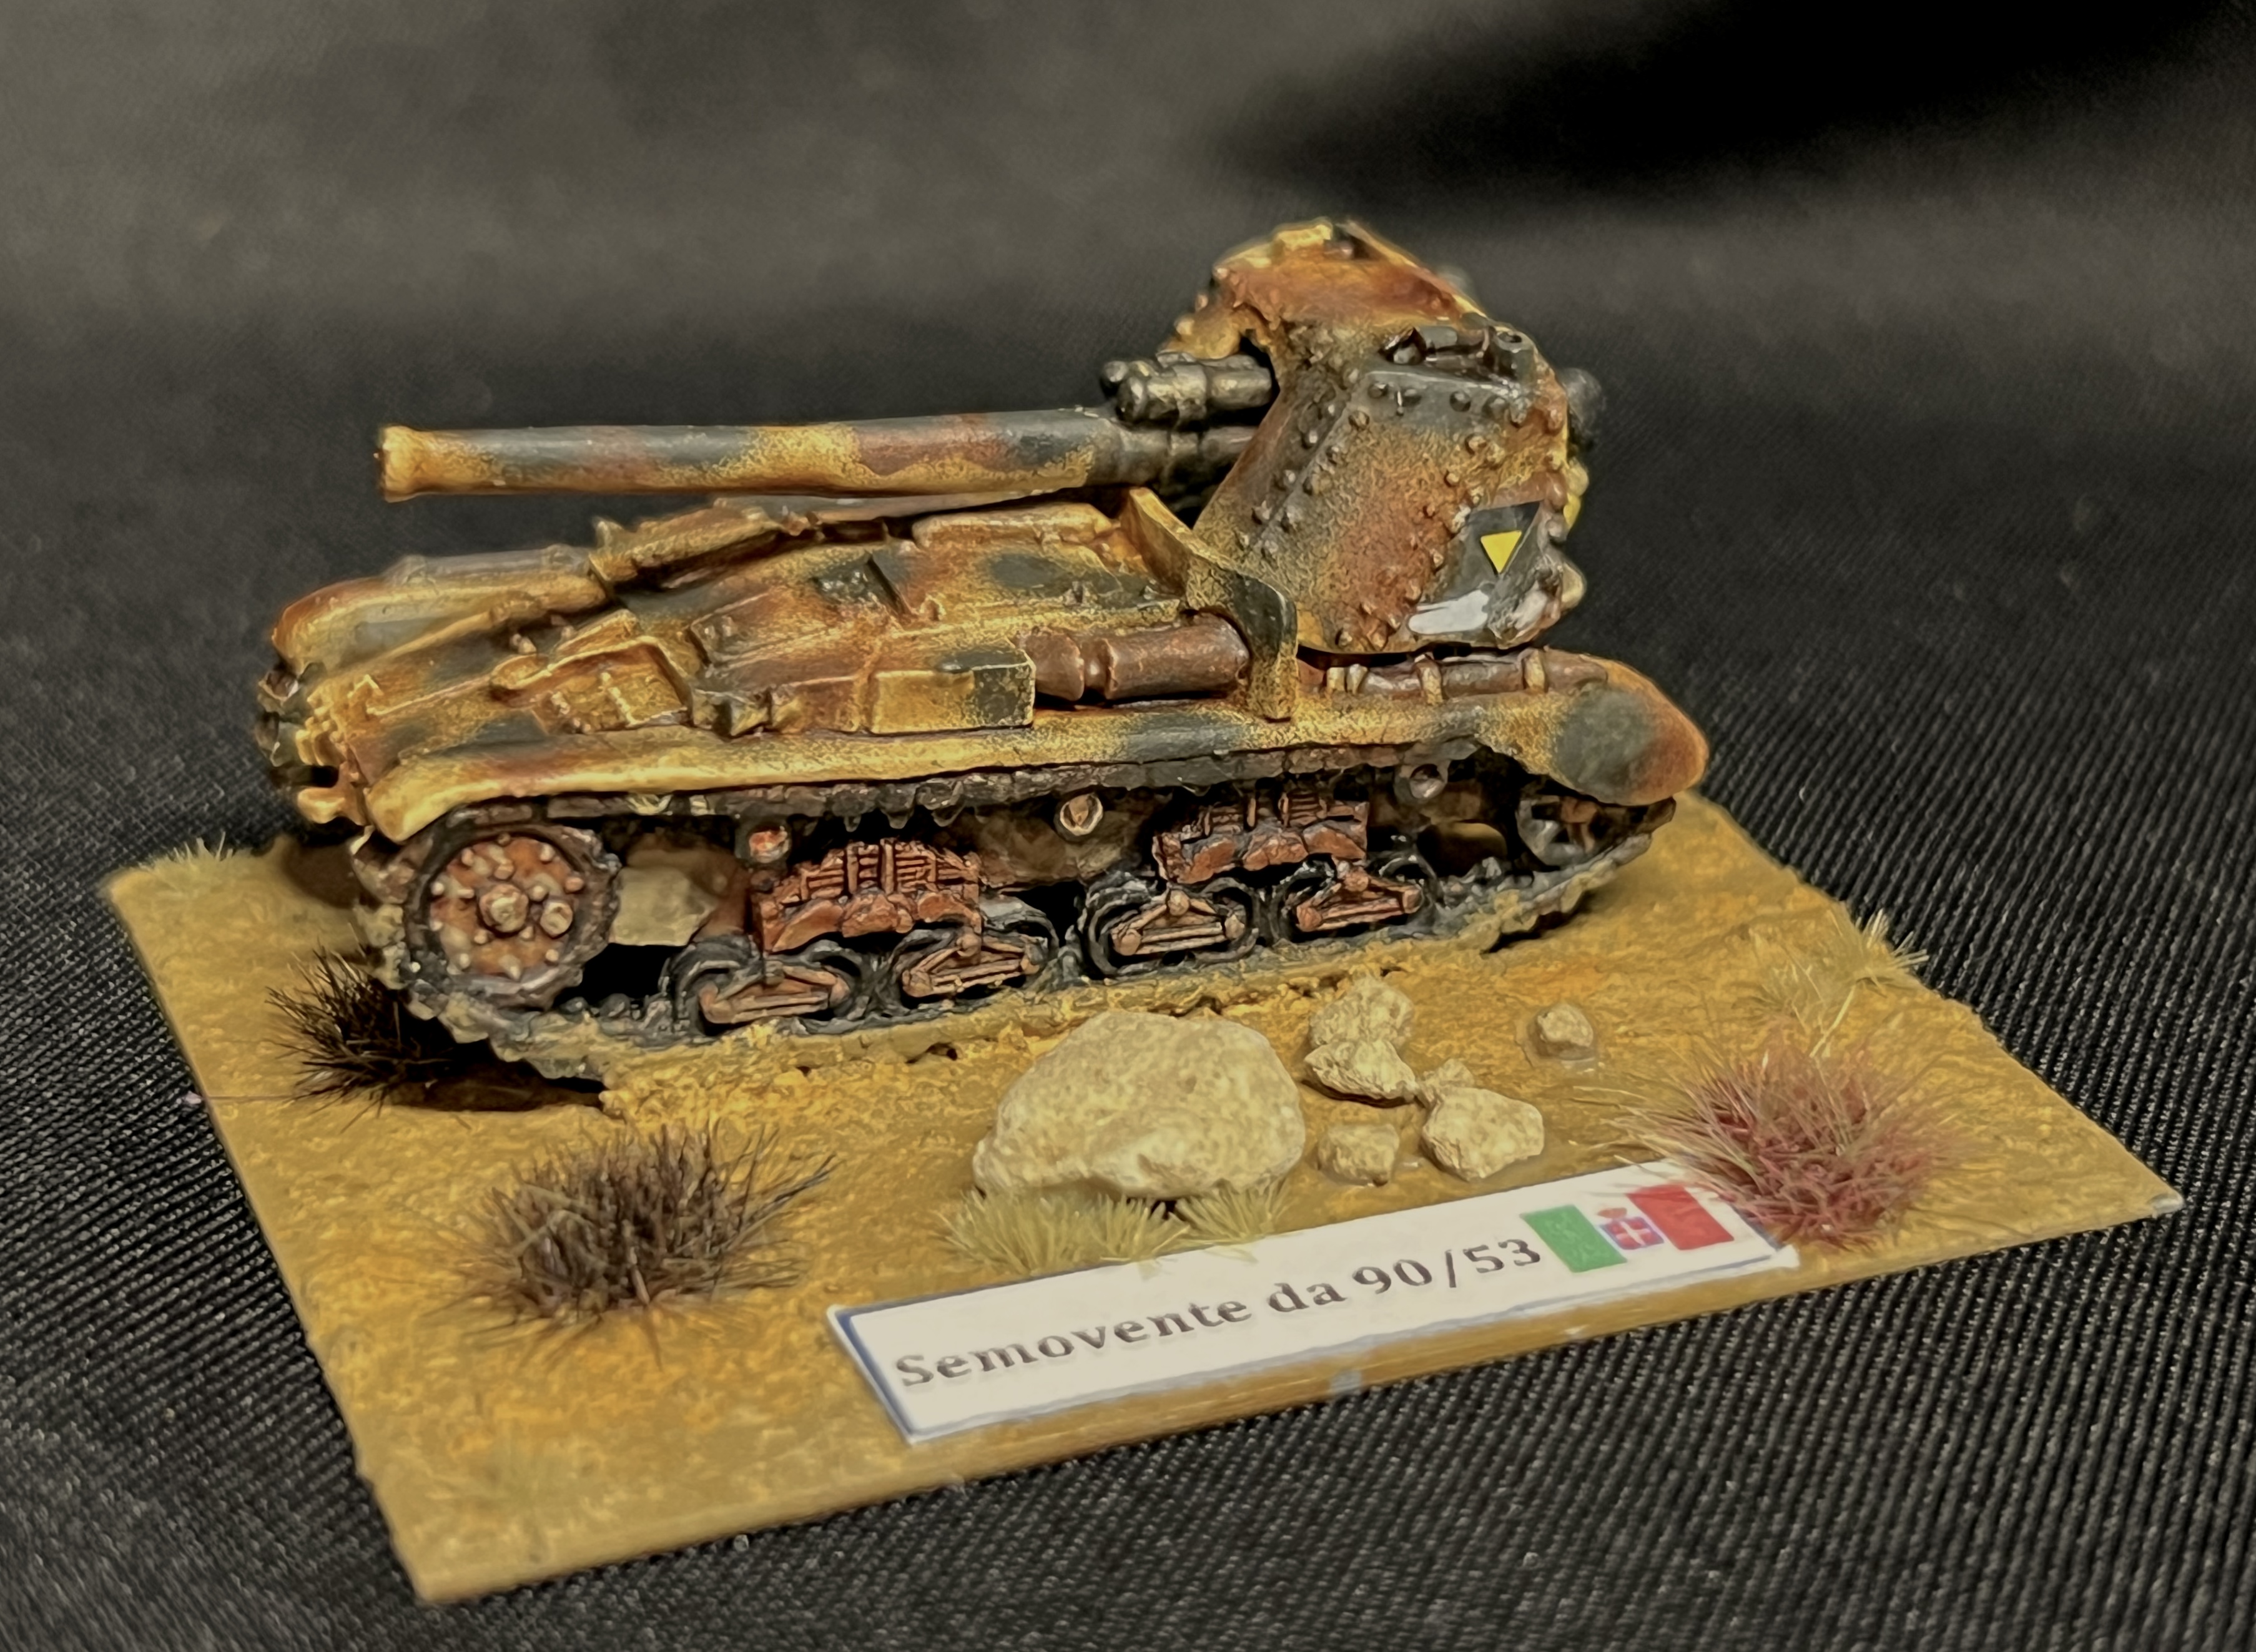
The Semovente 90/53 was built too late and in too few a quantity (only 30 were ever built) to see much WWII action. It had some (not much) experience in North Africa and Sicily under Italian control. The Germans also used seized examples. It’s design was inspired by the Italian experience on the Eastern front. The Italians there found that they had no way of stopping T-34’s or other more modern armor. It took a 90mm cannonne da 90/53 anti-aircraft gun and put it on an M14/41 tank chassis. The gunners would be exposed as they were behind a mantlet. It also needed an L6 tank modified to carry its ammunition. It’s armor penetration was impressive and any Allied tank it faced was vulnerable even at long range. I have decided to forego using any L6 tanks as ammo carriers for the game. I’ll just assume they are there. I’m also assuming that these would have been available in sufficient numbers for my game scenario in the absence of the Italian Armistice. Just one survives to this day at Fort Sill here.
An interesting aside note – 12 of the same type of anti-aircraft gun were taken from the Italian battleship Vittorio Veneto. These guns were awarded to Yugoslavia as war reparations. I remember playing with that ship’s token in Avalon Hill’s War at Sea game as a kid. That they ended up firing in 1991 is somewhat odd!
According to Wikipedia:
After the war, the twelve 90/53 guns from the Italian battleship Vittorio Veneto were assigned to Yugoslavia as a part of war reparations. They were mounted on a coastal artillery battery on island Žirje off Šibenik as a part of the Cold War defense strategy. These guns saw action in September 1991 during the Croatian War of Independence, deterring the Yugoslav People’s Army assault on Šibenik and blocking 34 Yugoslav Navy’s patrol boats and minesweepers which were later captured by Croatian forces in the inner harbor.
Reminiscing ended – back to the vehicles!
WIP Shots
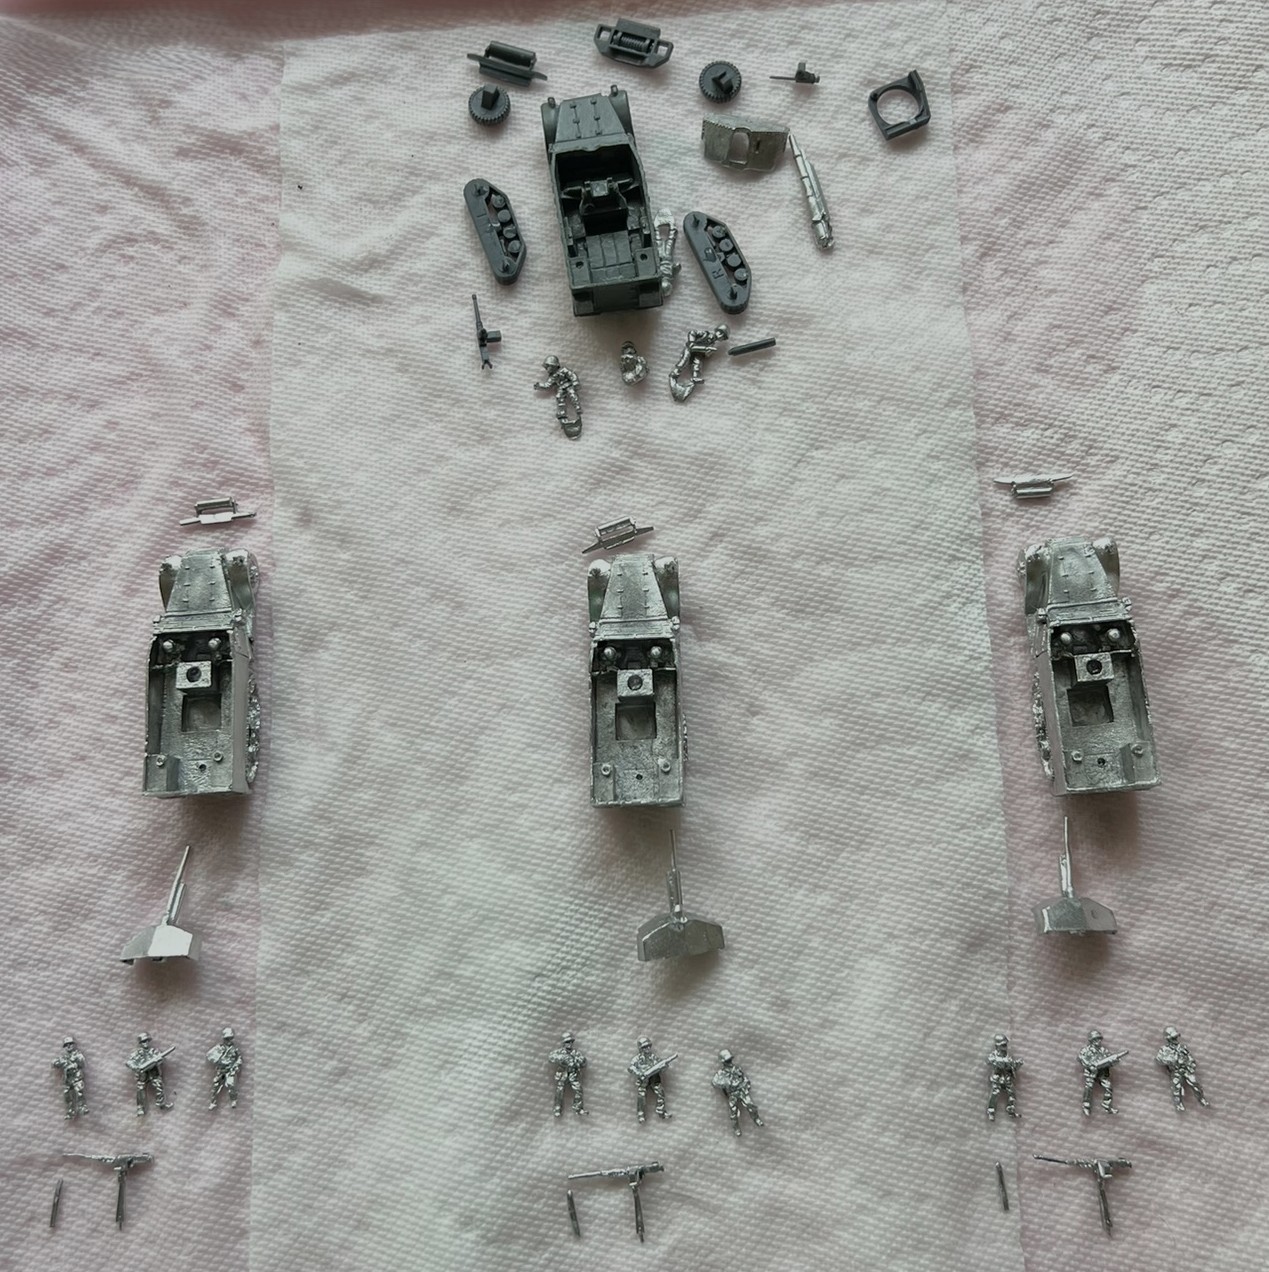
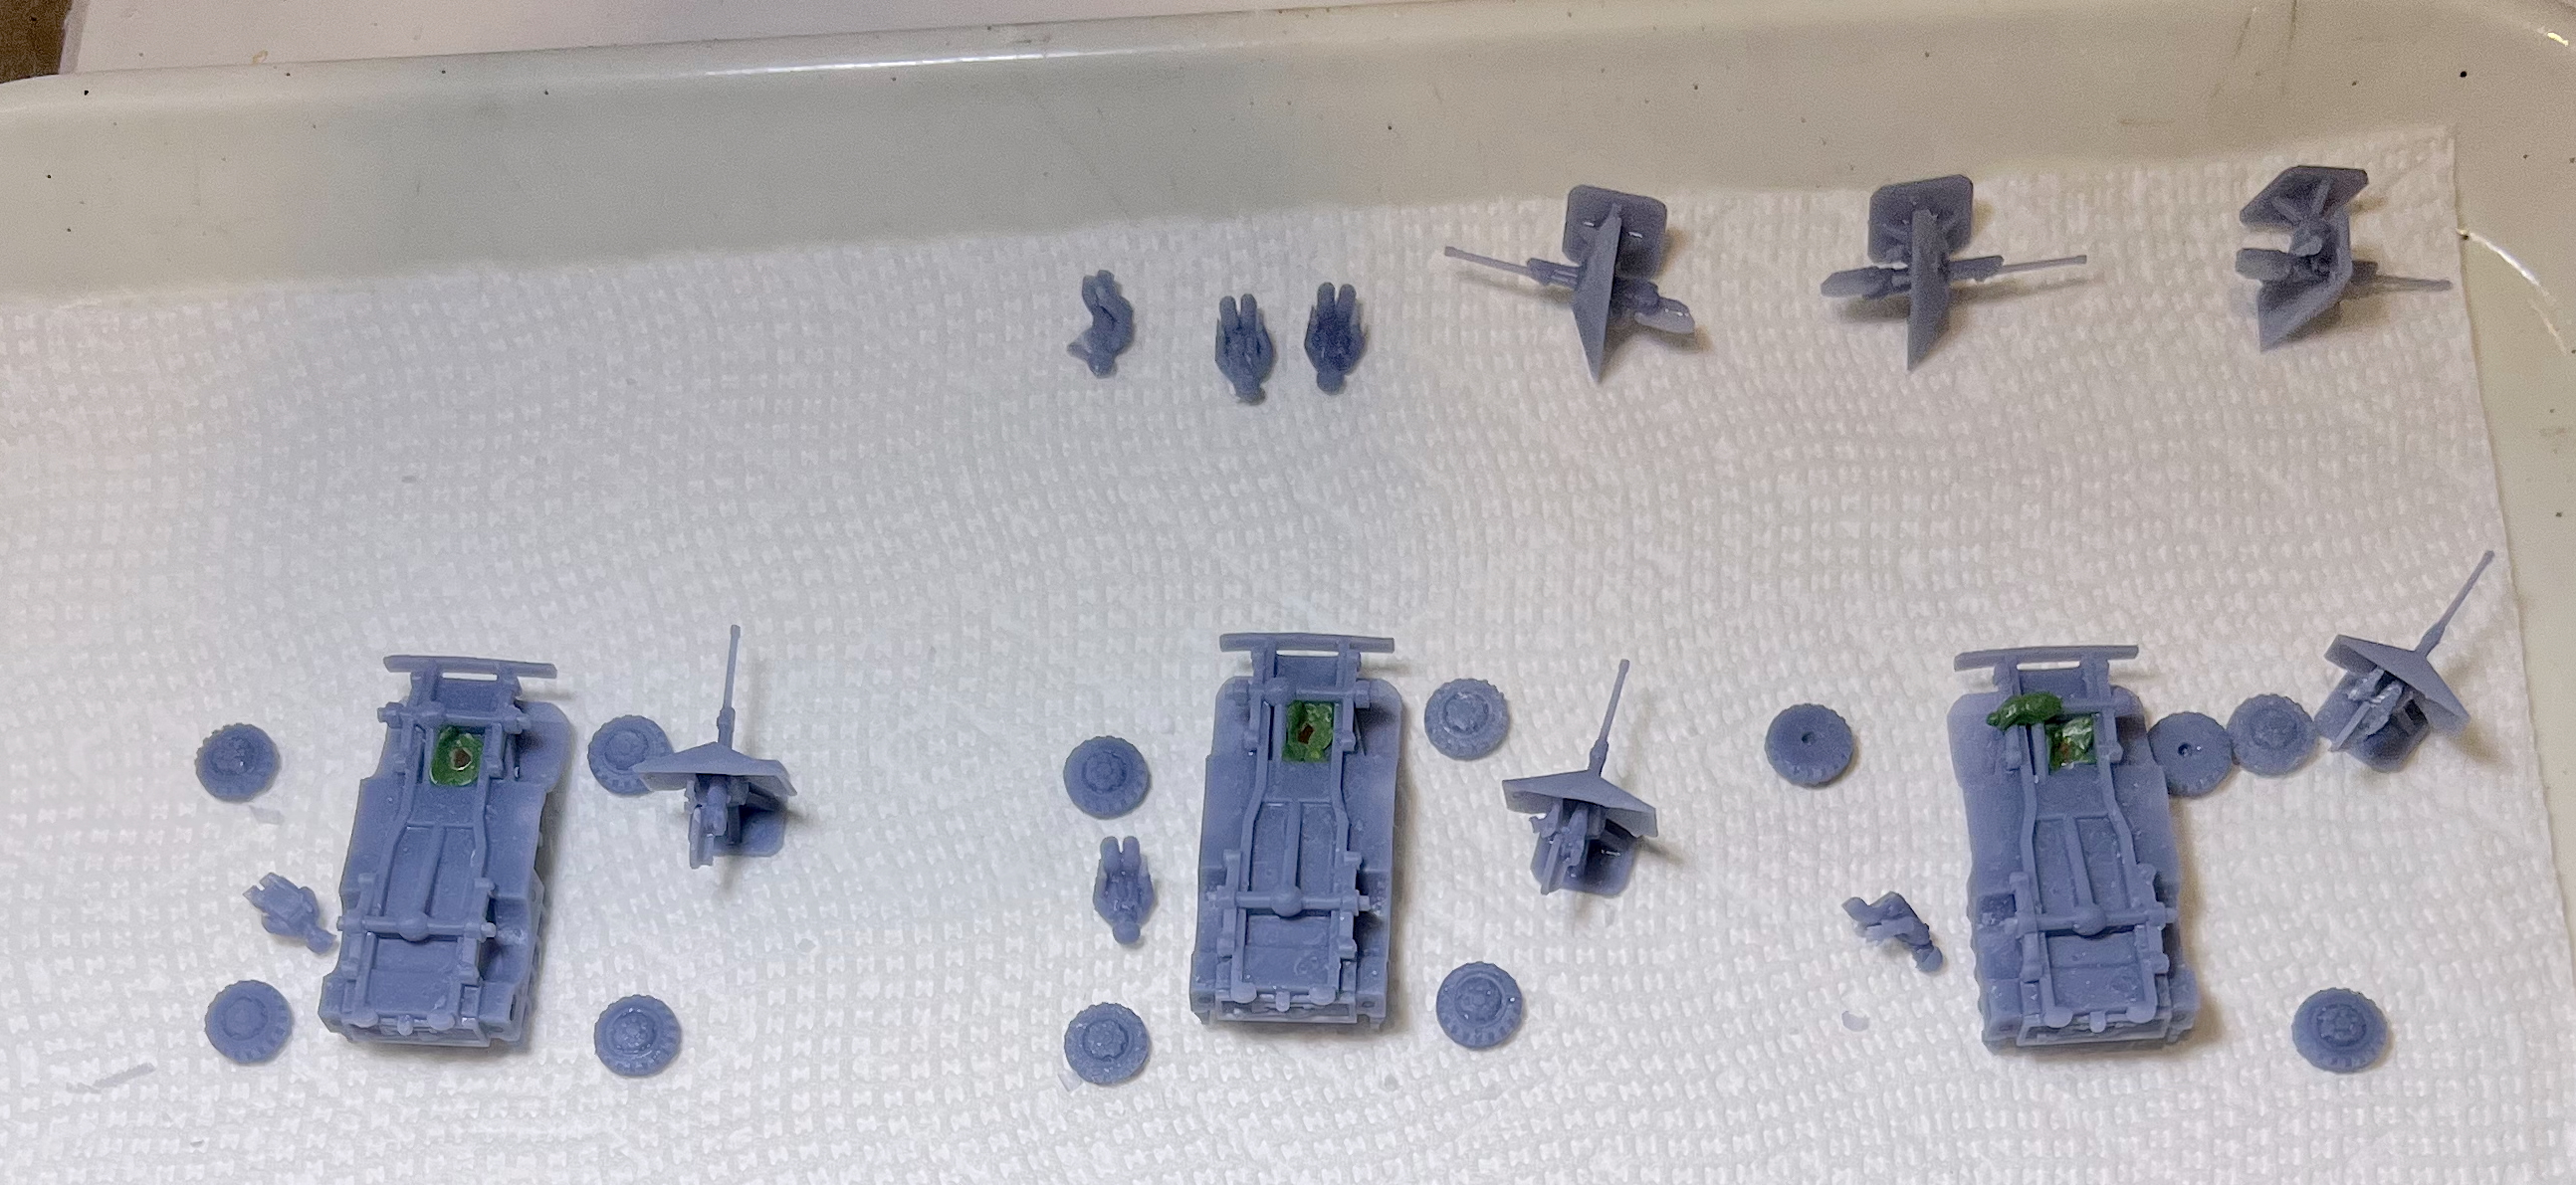
The two kits as received.
As is my usual practice, I washed and scrubbed the components.
That model was not so easy to work on – mainly the crew and weapon mounting. I ended up using green stuff on the fiddly mantlets. I did paint the crew of the Semovente’s – though no one will ever see their faces! As for the commanders of the AB 41’s – I used three different poses plus one with the hatch shut.
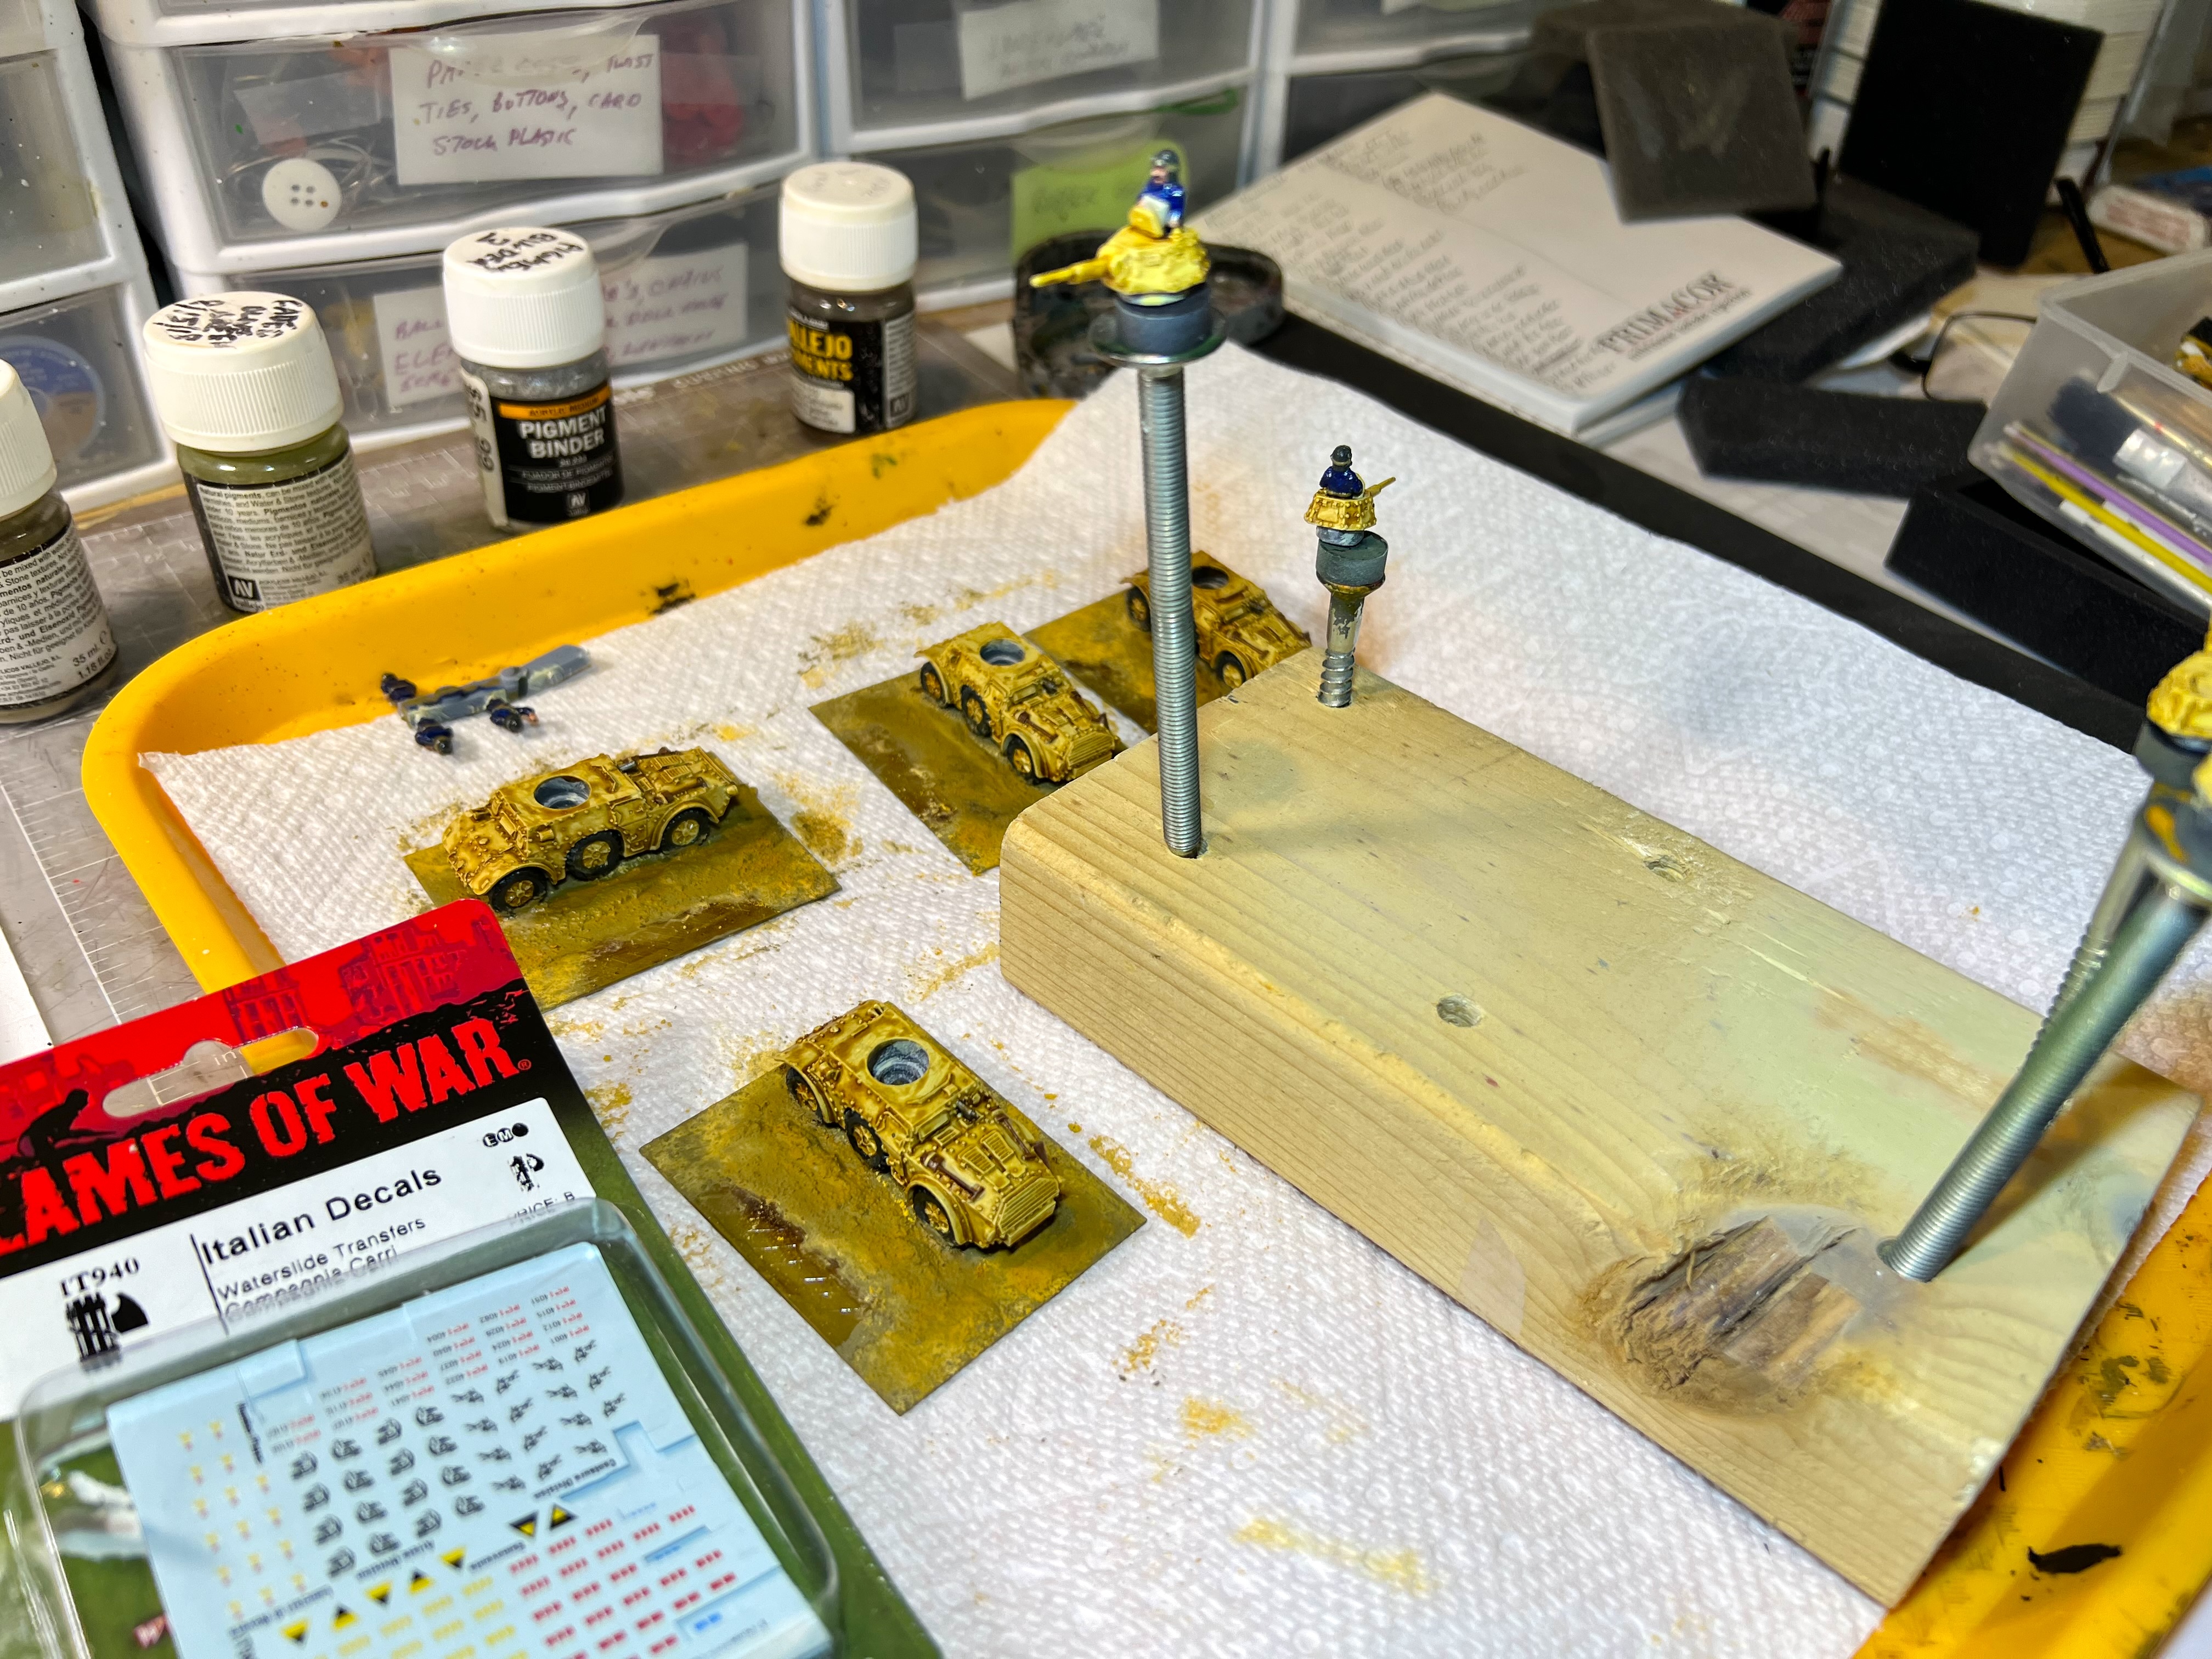
I mounted the vehicles on their bases as shown below. Once painted, I applied decals for better tabletop recognition (for the players).
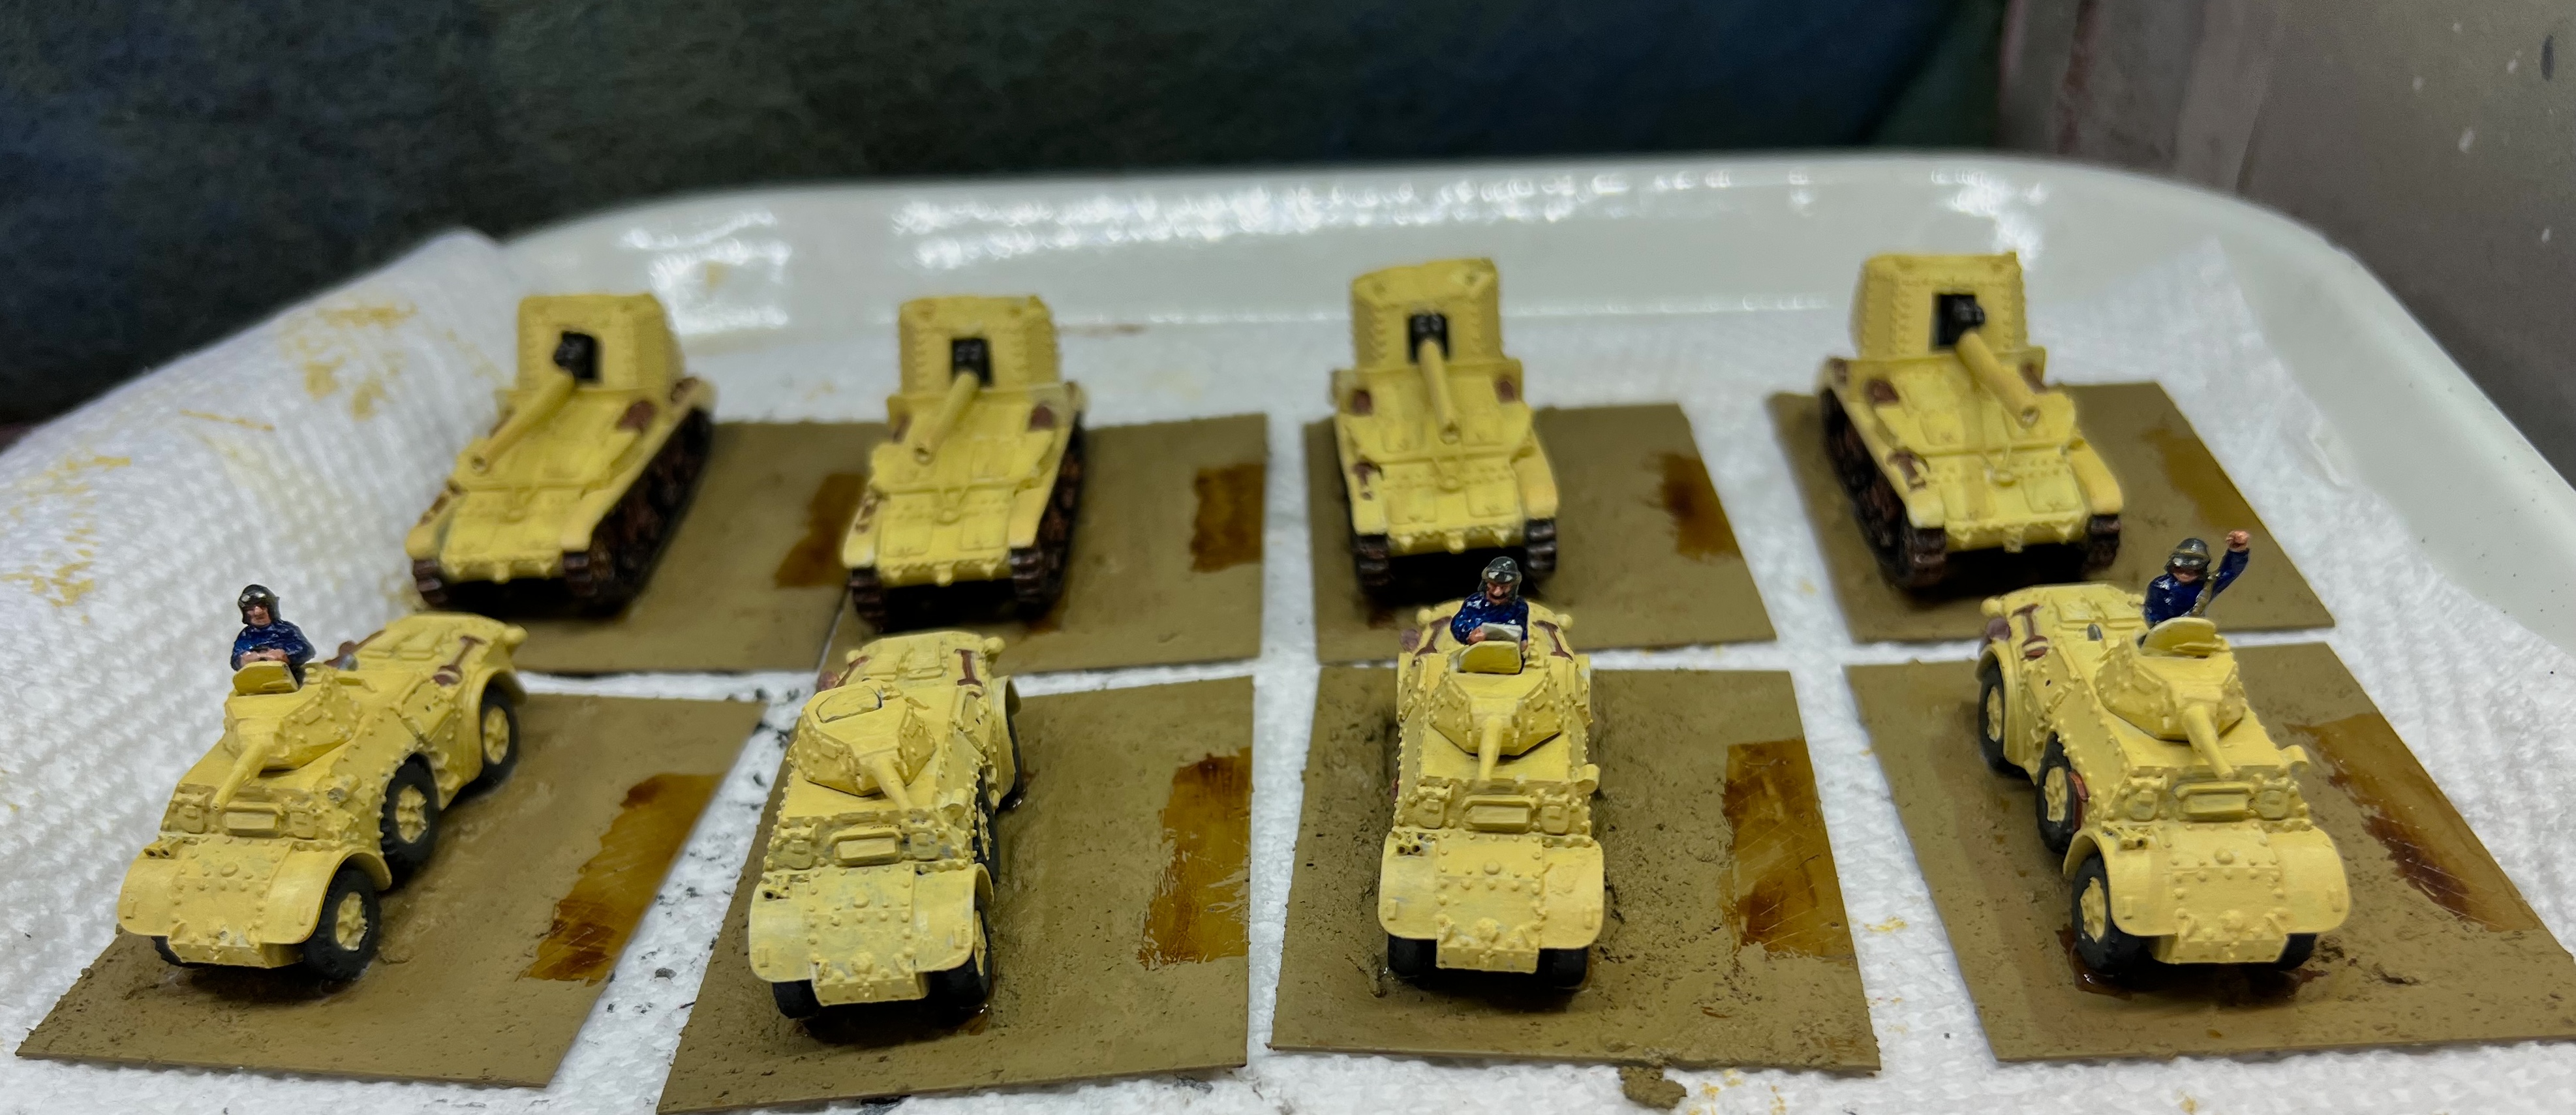
Side view on basesFront view on basesRear of Semovente 90/53 showing the crew.
I shaded the AB 41’s. I applied decals on the vehicles and pigments to some texture paints on the bases. All paints and more that I used are listed at the end of this post.
I airbrushed the camouflage pattern on the Semovente’s.
At this point, the models were finished!
Left sideRear viewRight side
Let’s now see some eye candy of the models.
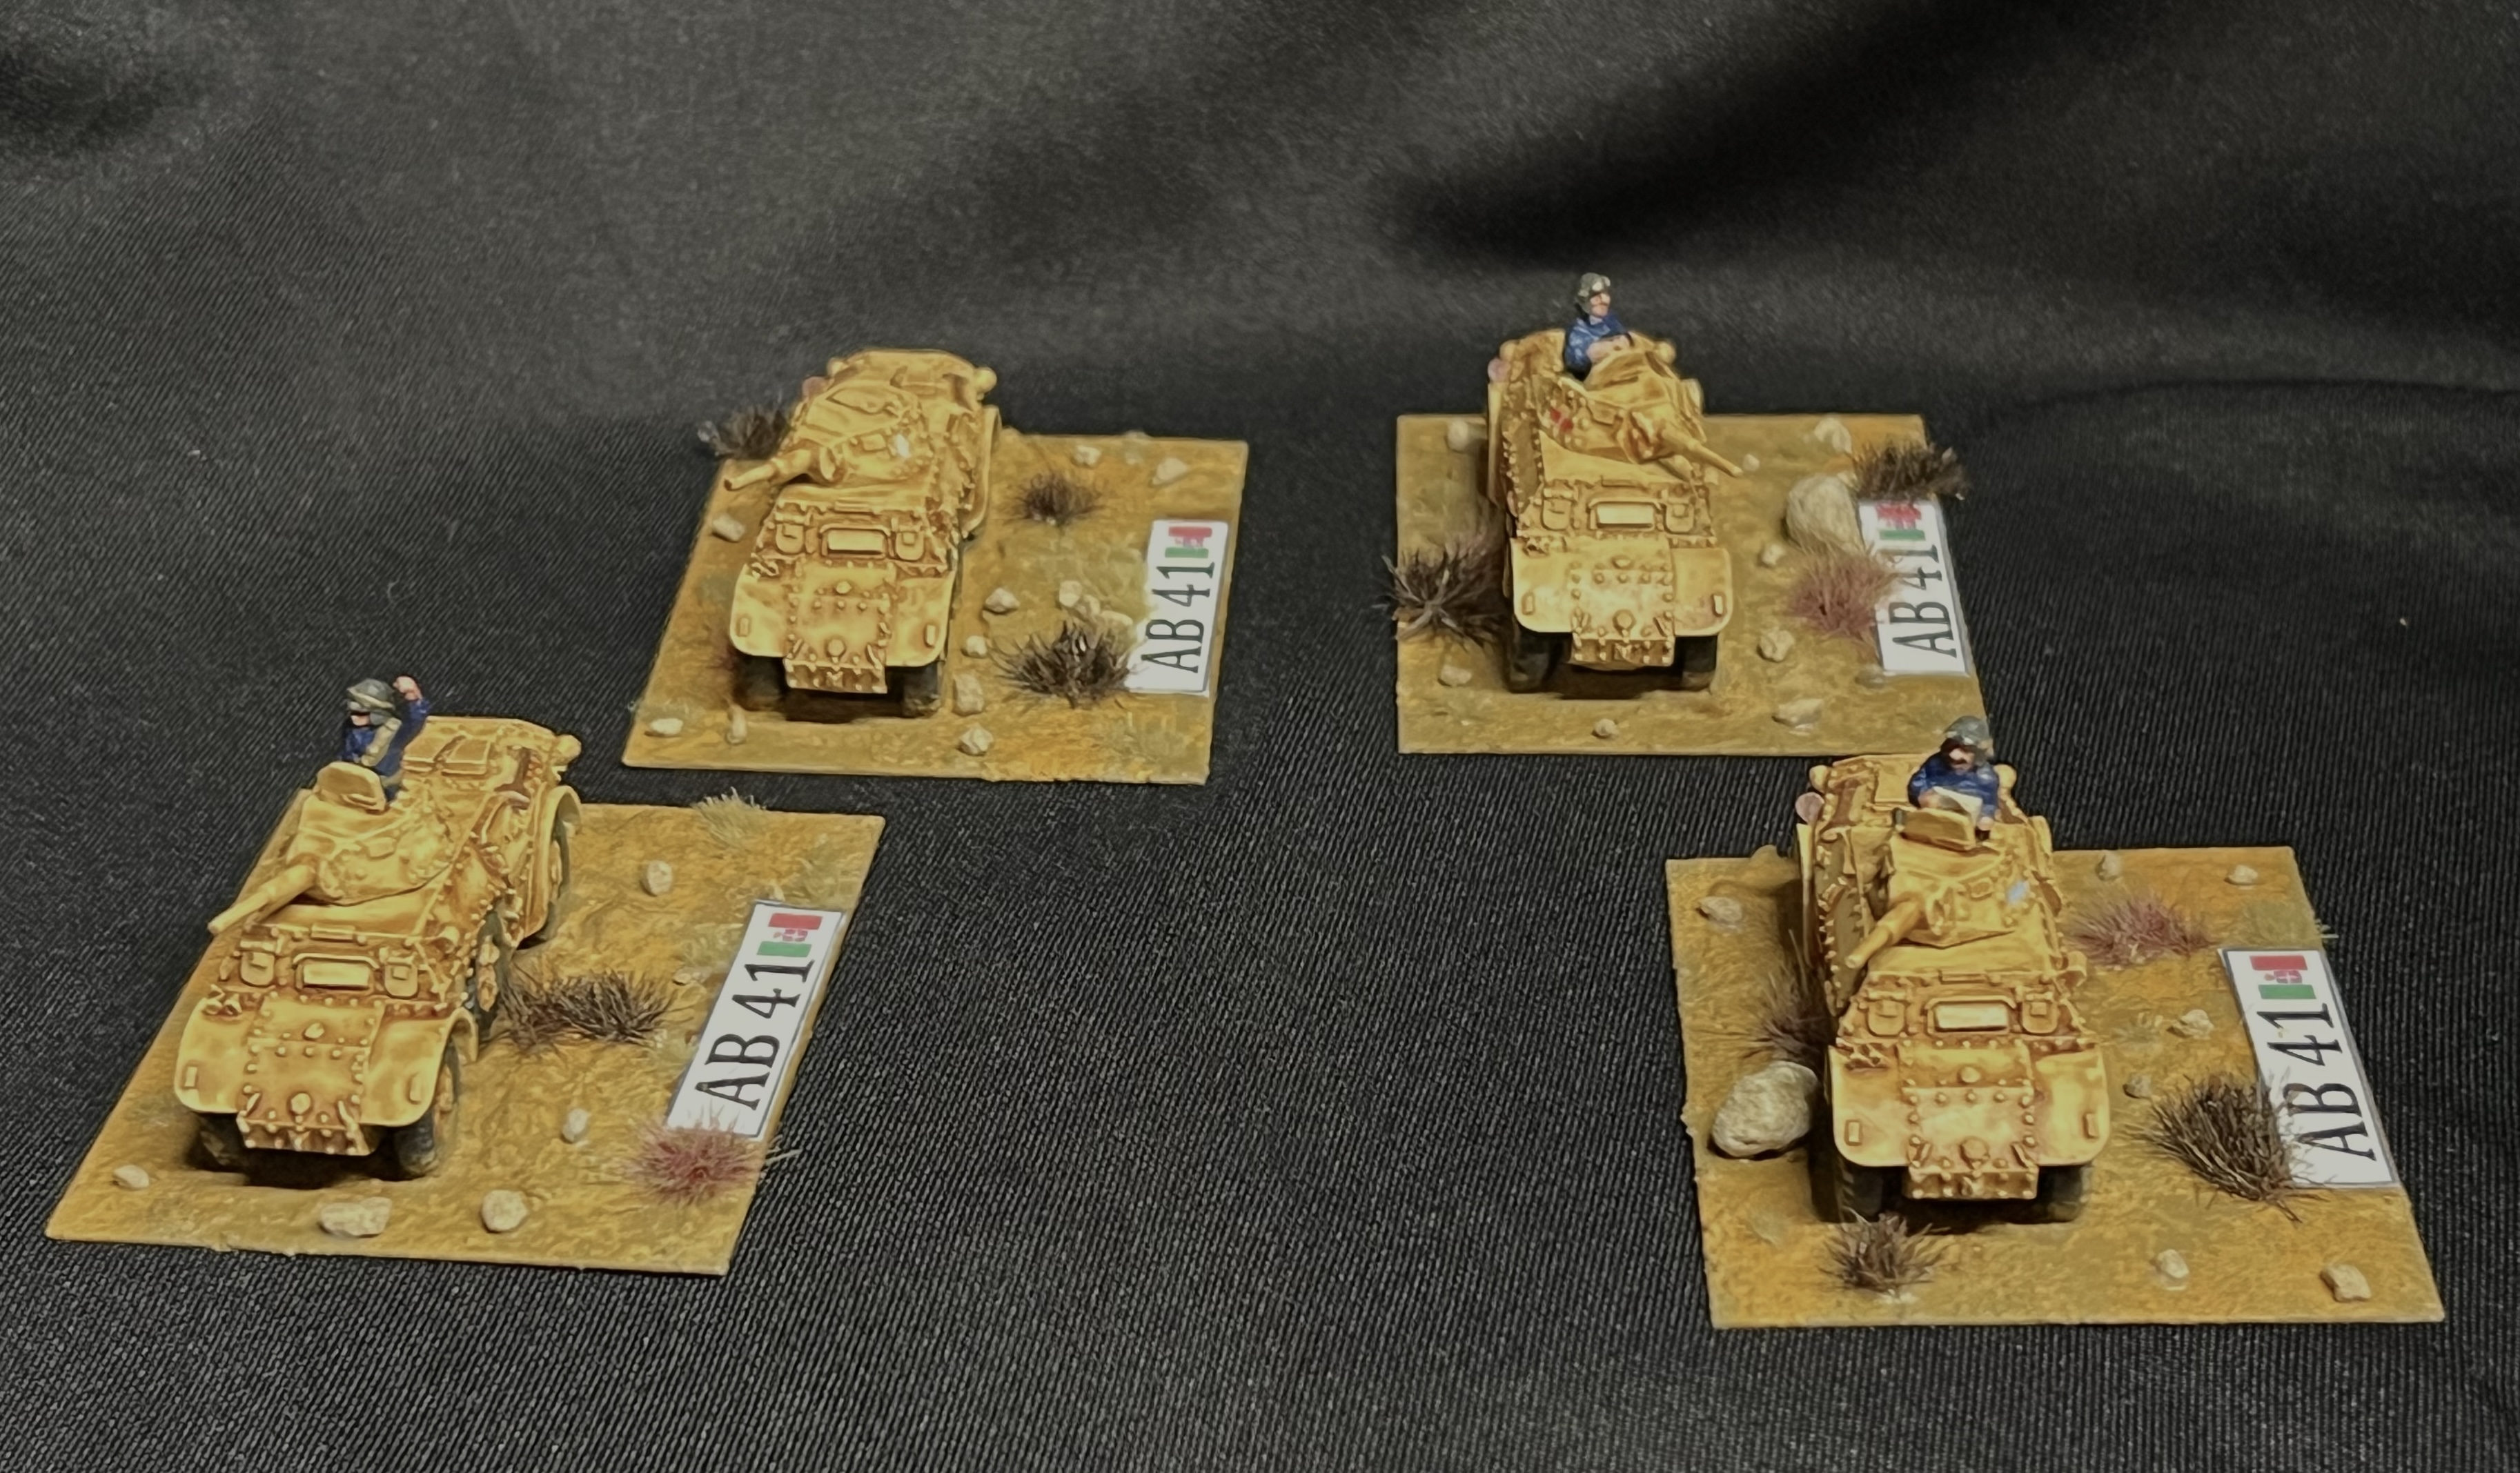
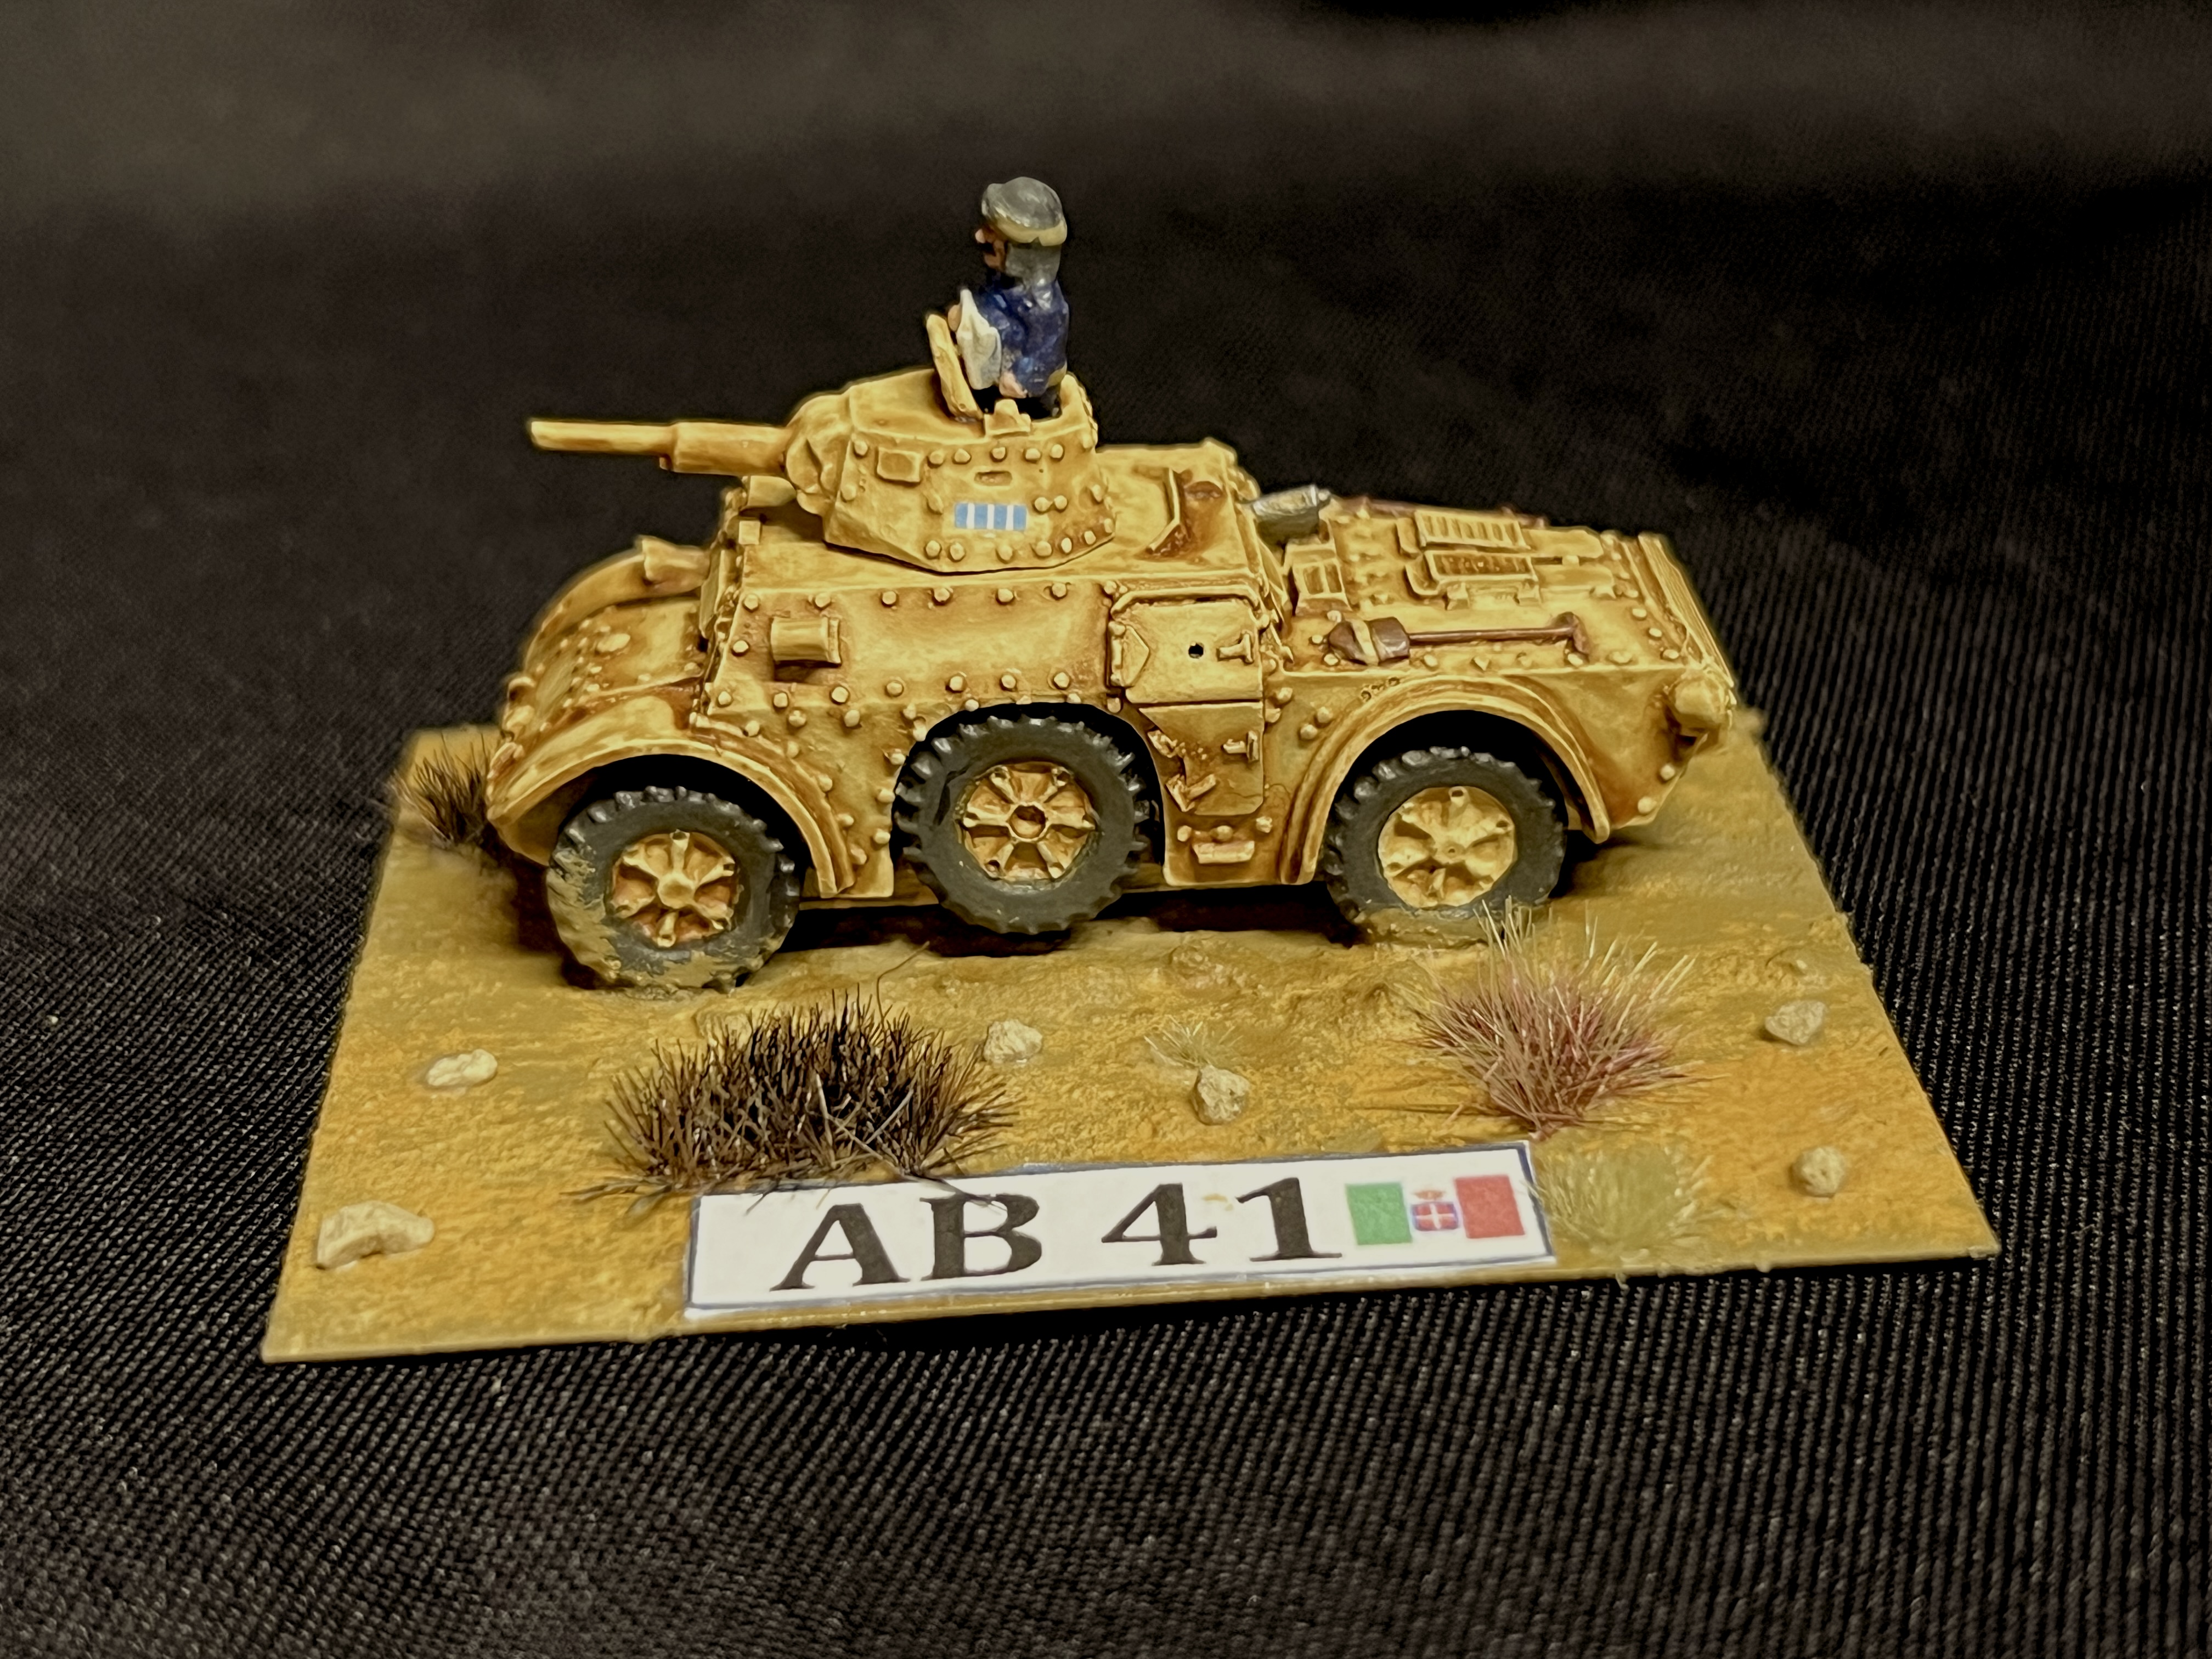
AB 41
AB 41 frontal viewAB 41 right sideAB 41 rear view
Lastly, close up shots of the 4. Note that they all have different decals on their turrets.
Commander with binocularsCommander with raised fistCommander with mapAB 41 with closed hatch
Semovente da 90/53
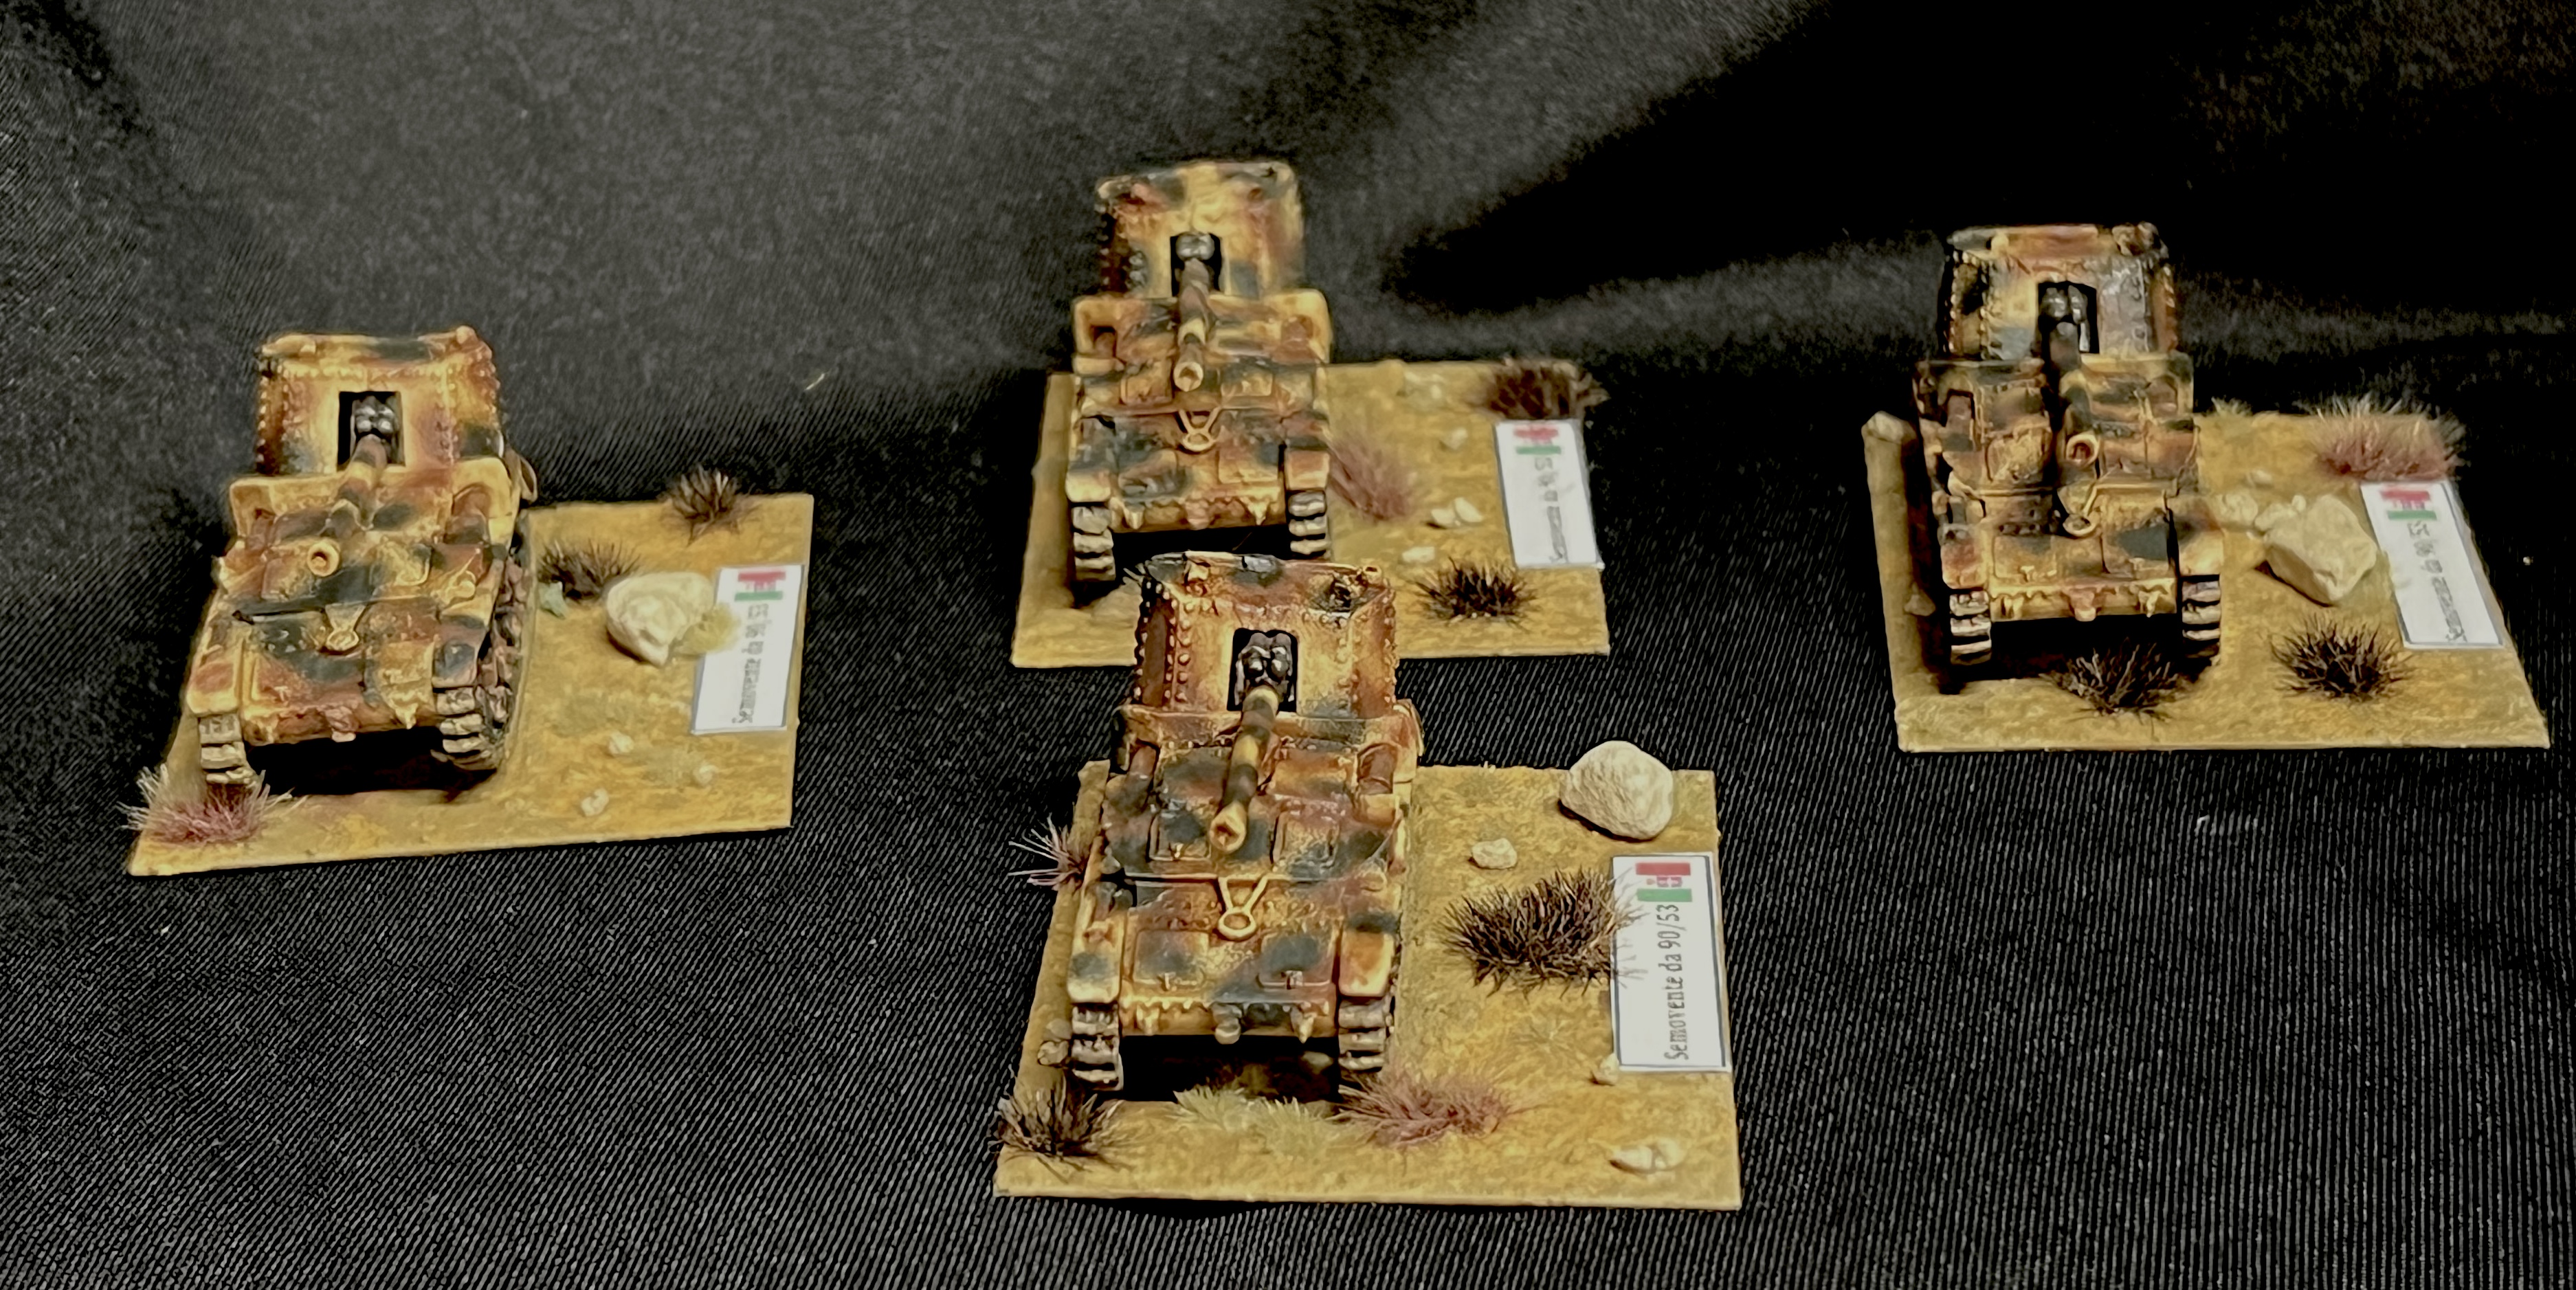
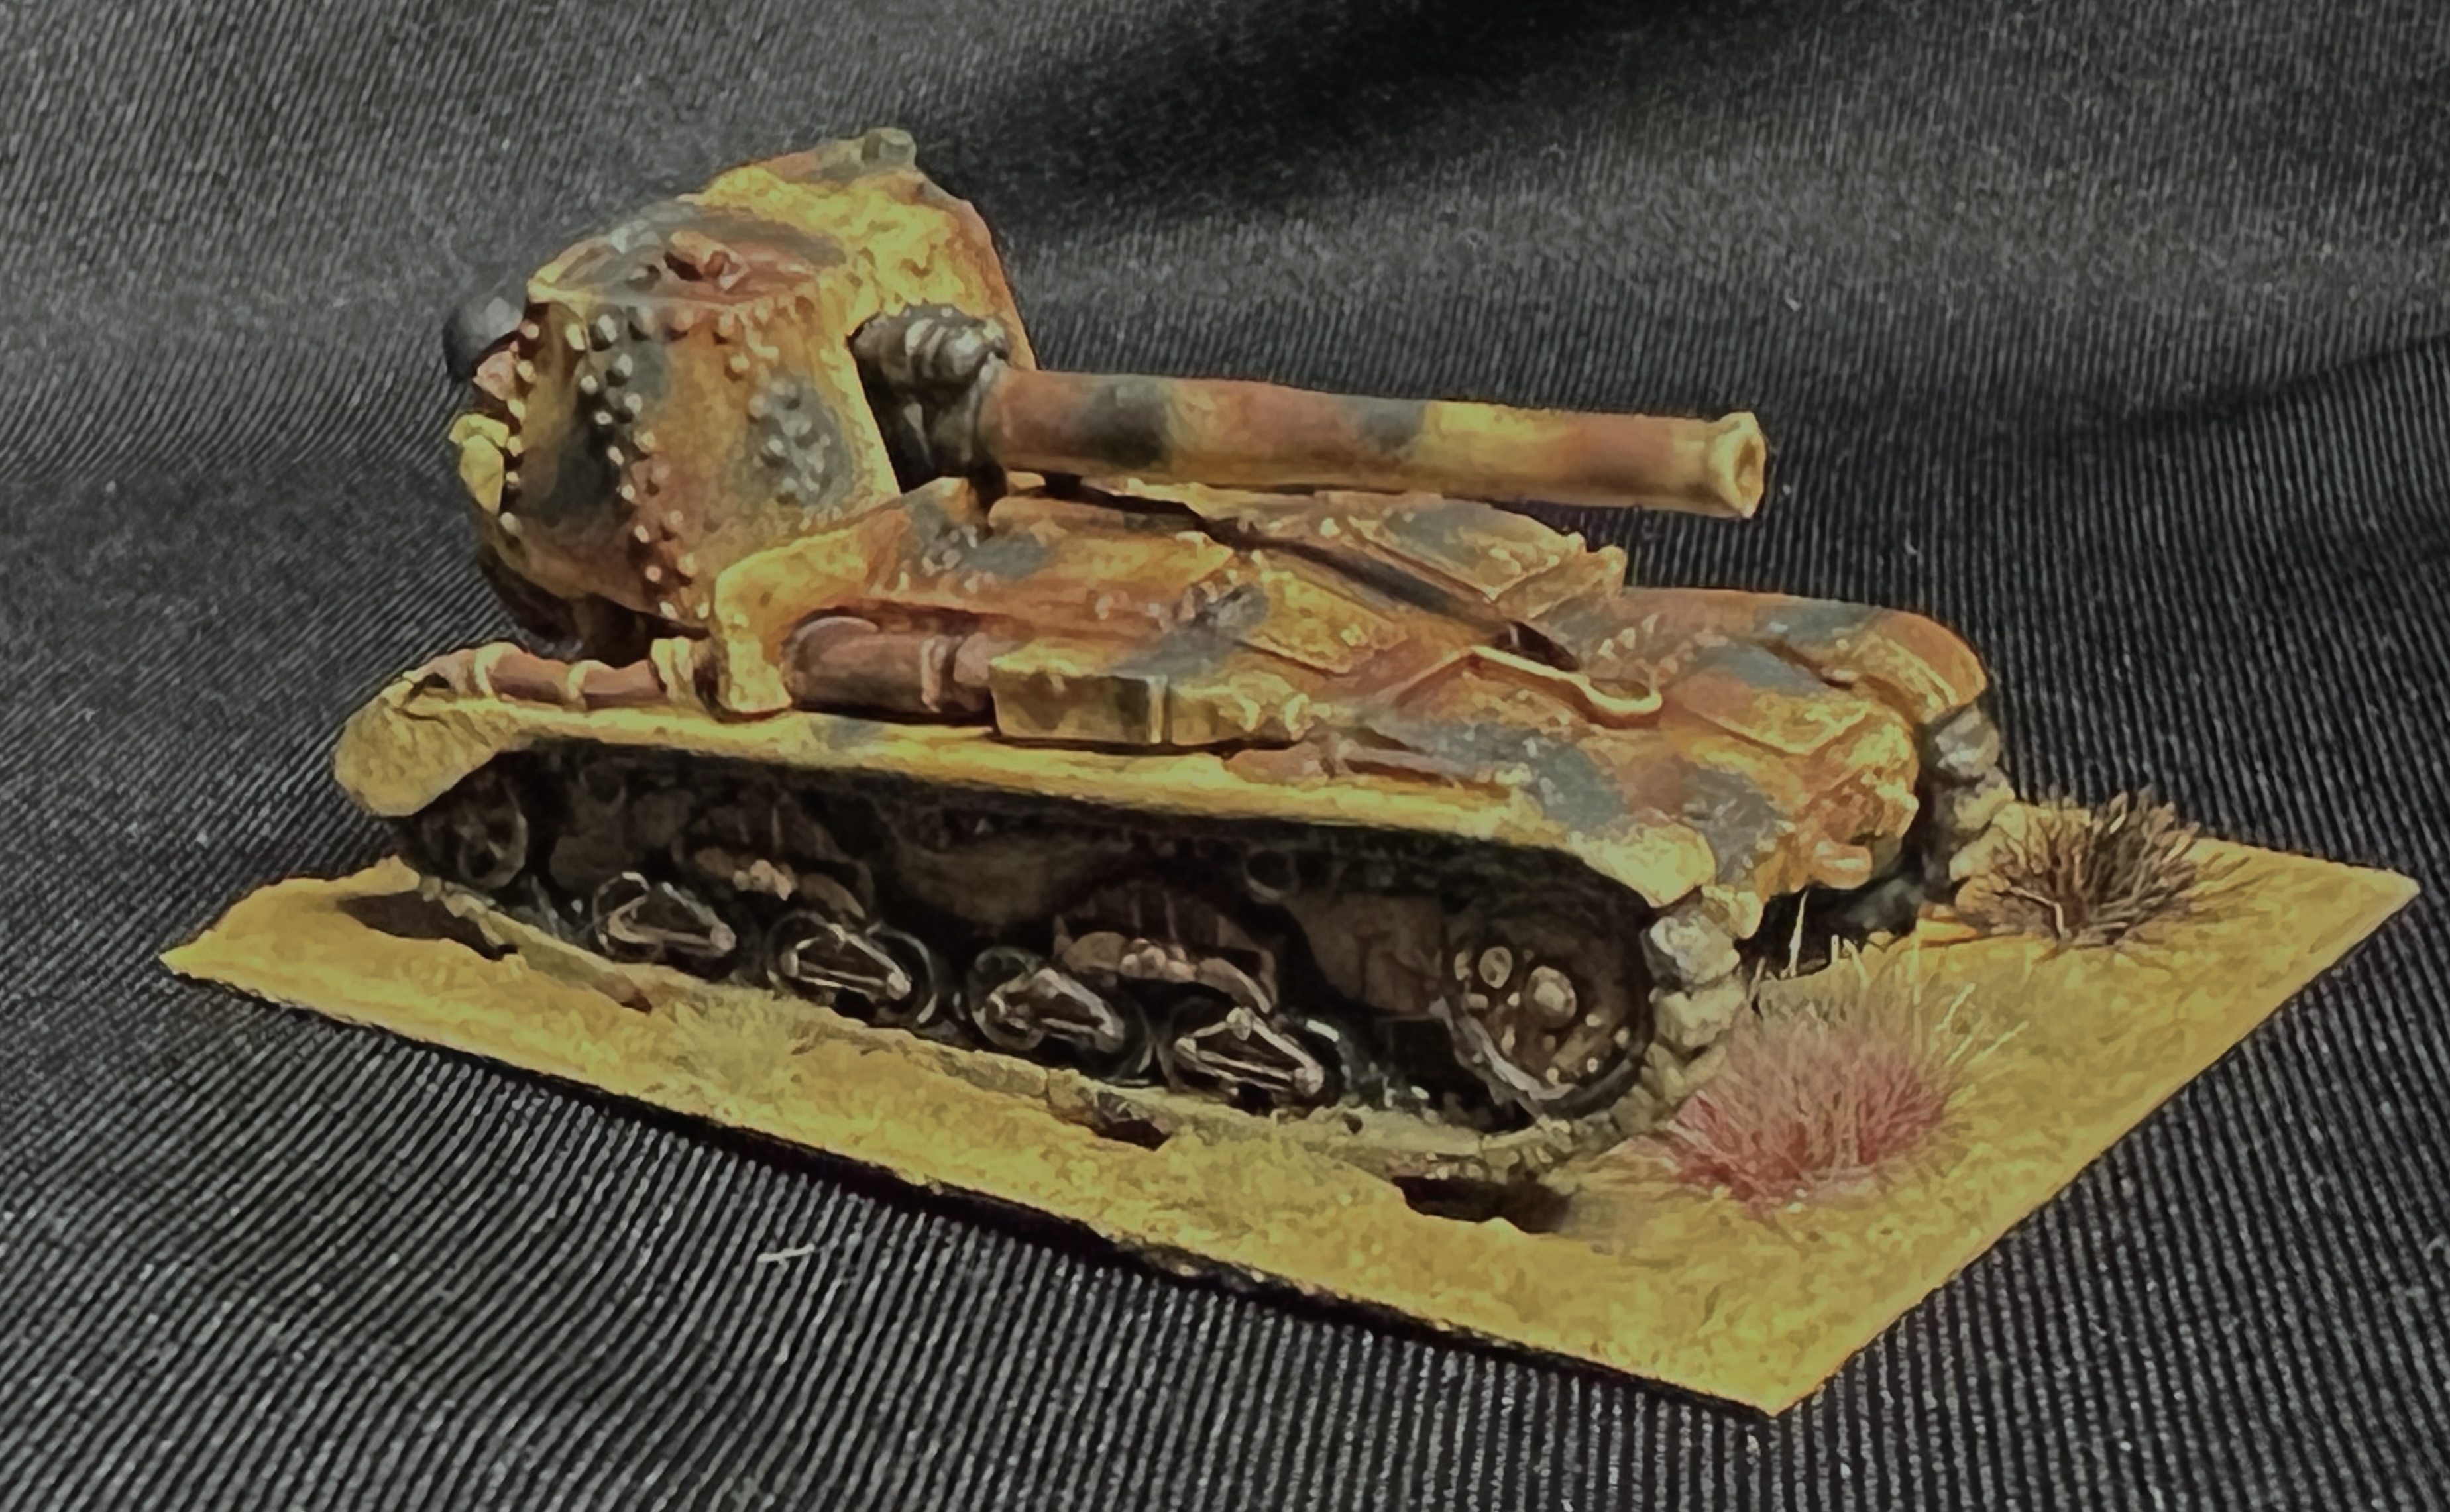
Semovente da 90/53 left viewSemovente da 90/53 frontal viewSemovente da 90/53 right side viewSemovente da 90/53 rear view showing gunners
Lastly, close up shots of the 4. Note that they all have different decals on their mantlets.
These will be on the tabletop at Cold Wars, TotalCon, and other upcoming conventions. Please let me know your thoughts and feedback in the comments section. Thanks in advance for your input. As always, thanks for reading.
For all of my posts on WWII games and projects, there is a consolidated list. You can find the posts and their links located here.
MATERIALS USED
PAINTS, INKS, GLAZES, SHADES, WASHES, PIGMENTS AND FLOCKING USED ON THE FOUR BATTLEFRONT/FLAMES OF WAR AB 41 ARMORED CAR MODELS
Green Stuff
Gorilla Glue
War Games Accessories Steel Bases Number FOW 3 (2″ x 2½”)
My recent efforts on the hobby front have been focused on multiple projects. Some of these are figures and vehicles, others are terrain-oriented. These are all in support of the games I will run at multiple 2026 gaming conventions.
This year, I will be running Wars of Ozz and What a Tanker games. I am also getting back into retro sci-fi skirmish games with Combat Patrol:WWII. I have not run these games in a while and they were always a lot of fun. To that end, I decided to add more terrain to the mix.
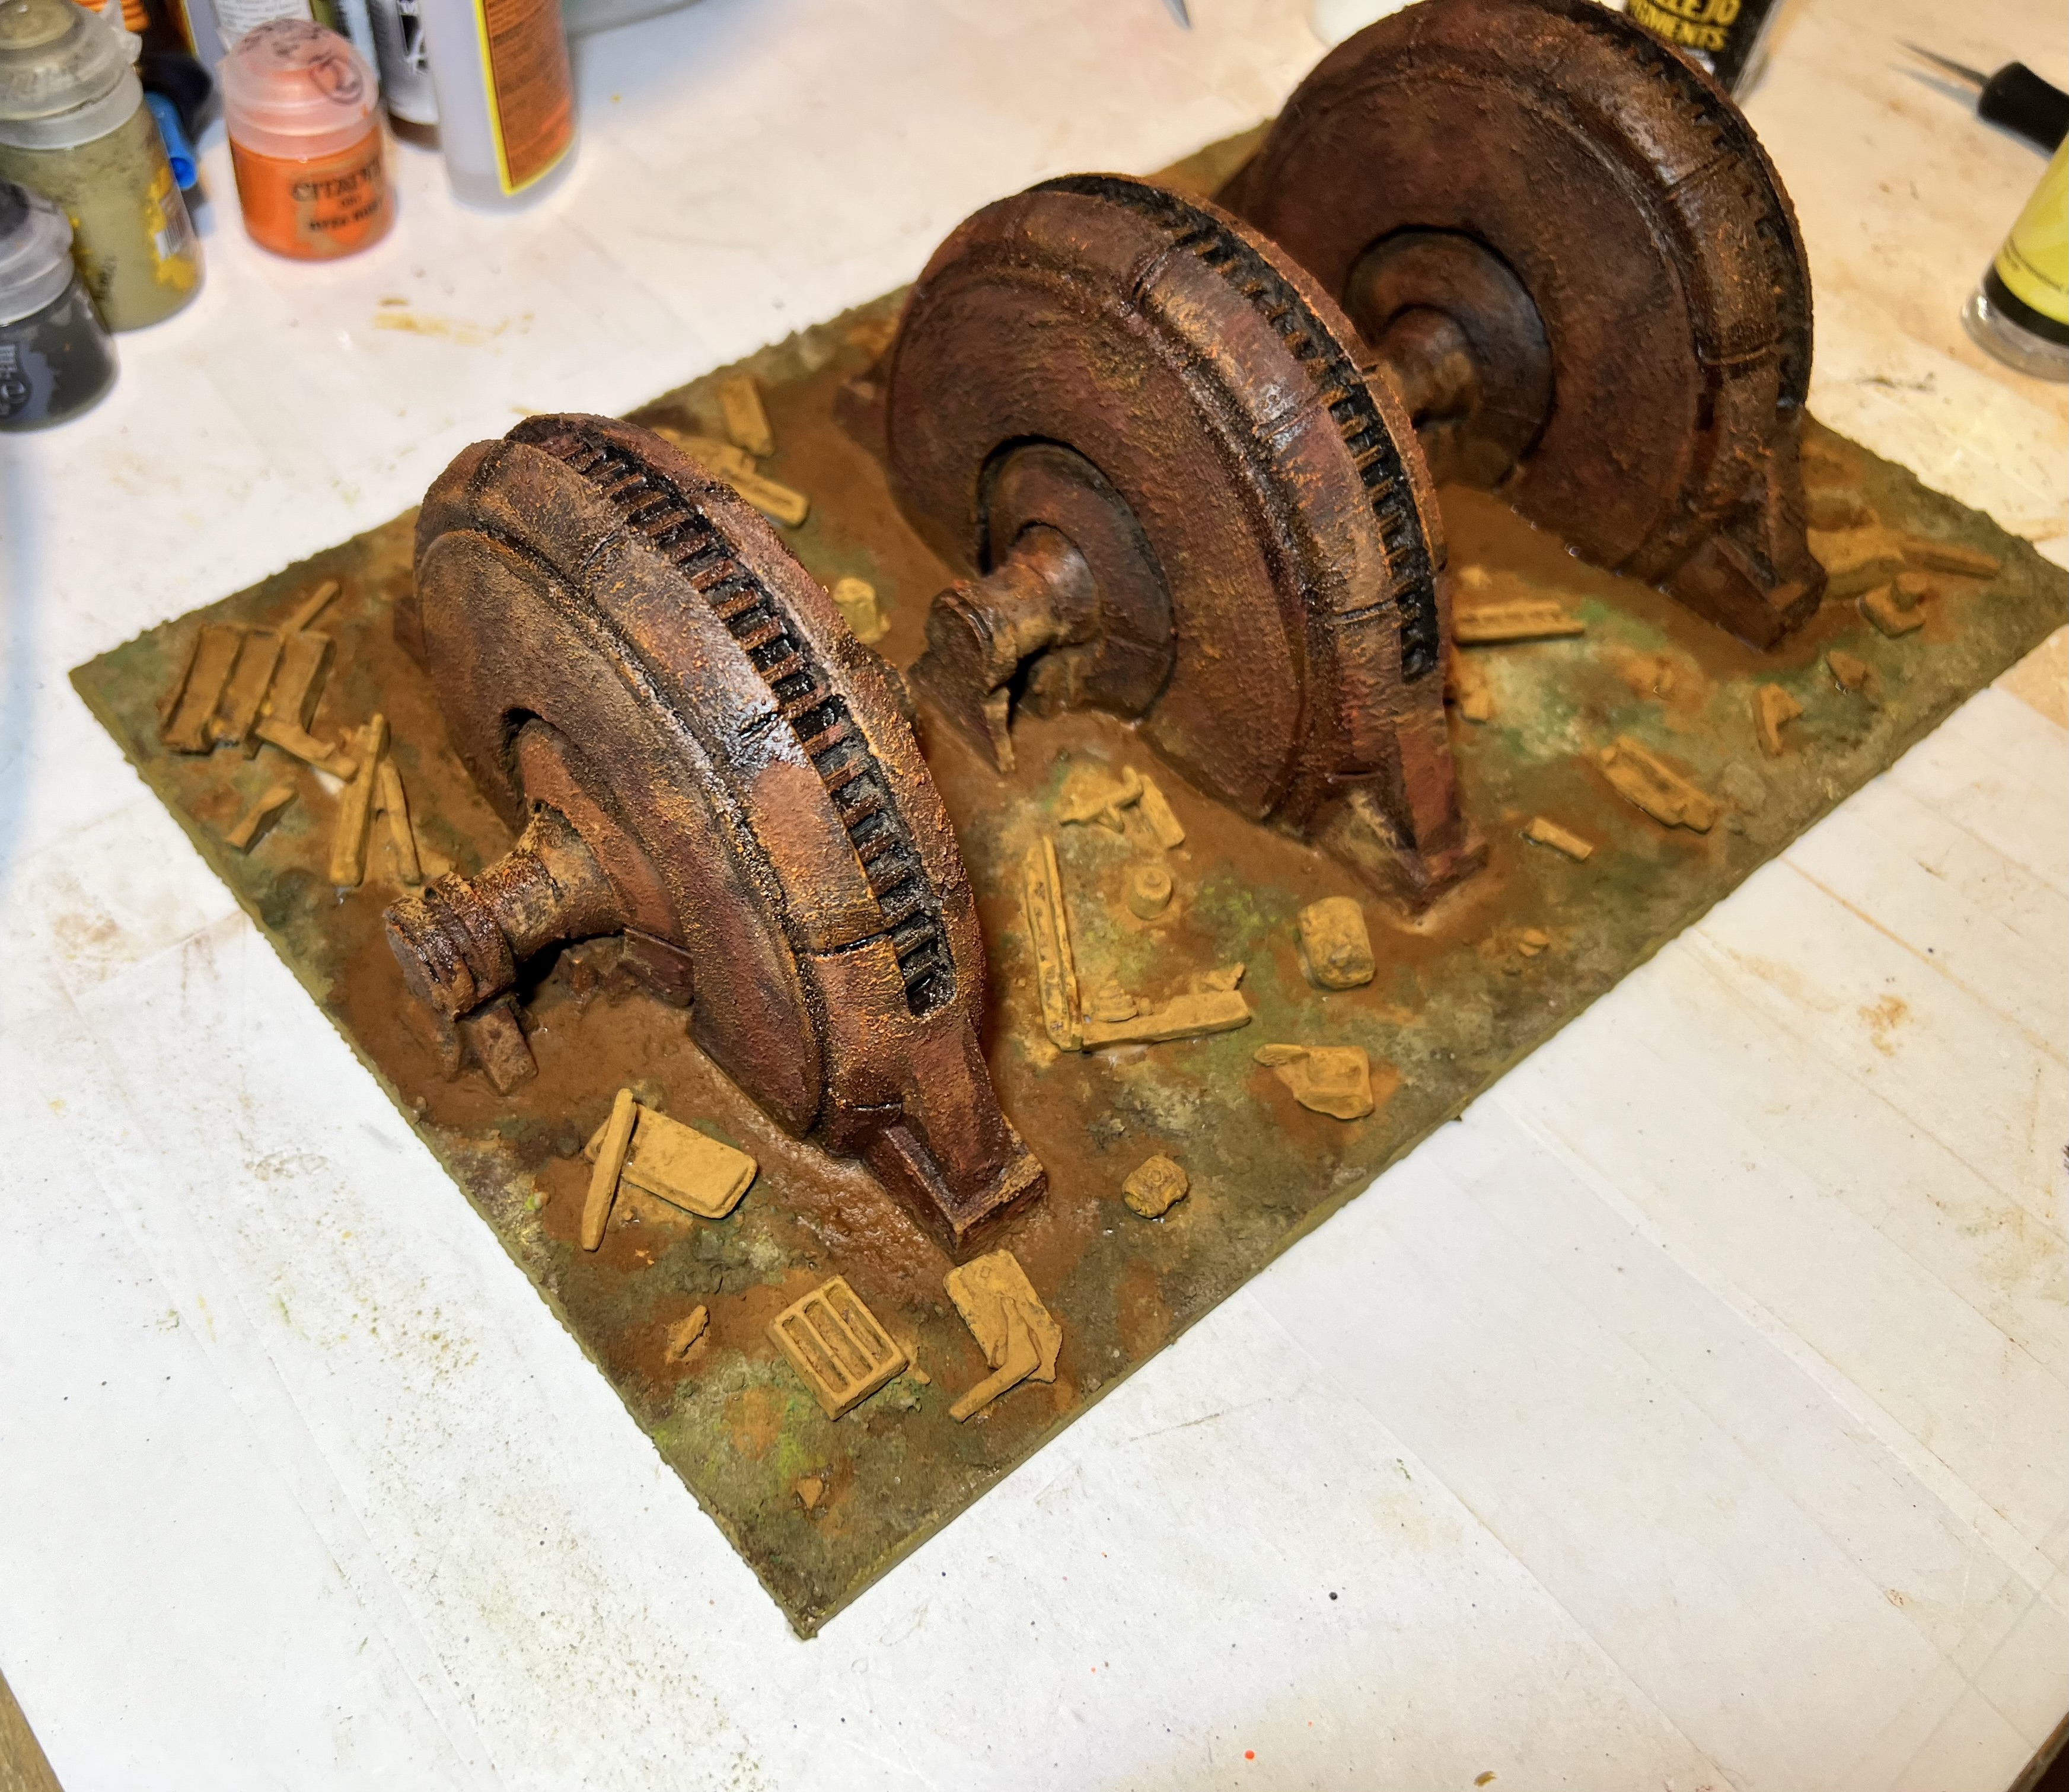
As background, a friend, Chris Rett, 3D-printed three excellent generators for me way back in 2018 (I think). These were great terrain pieces. At that point I was still immersed in retro sci-fi skirmish gaming with Combat Patrol:WWII as my preferred system. However, I was on the cusp of jumping my focus to WWII What a Tanker games. Thus, the generators took a back seat. My gaming then went in sequence to What a Tanker, then Feudal Patrol for the Spanish Conquest in Mesoamerica. Finally, I moved on to Wars of Ozz. Recently, I felt a need for a bit more variety as I mentioned – so terrain is what I hit first.
The three generators would be useful for retro sci-fi apocalyptic planet scenarios. They would also be useful for some Wars of Ozz scenarios. This includes any involving Professor Nitpik and the Industrial City. That city was wrecked over 300 years ago in the “Last Great War”. Plus I could use it as part of a “Space Cowboys” apocalyptic scenario.
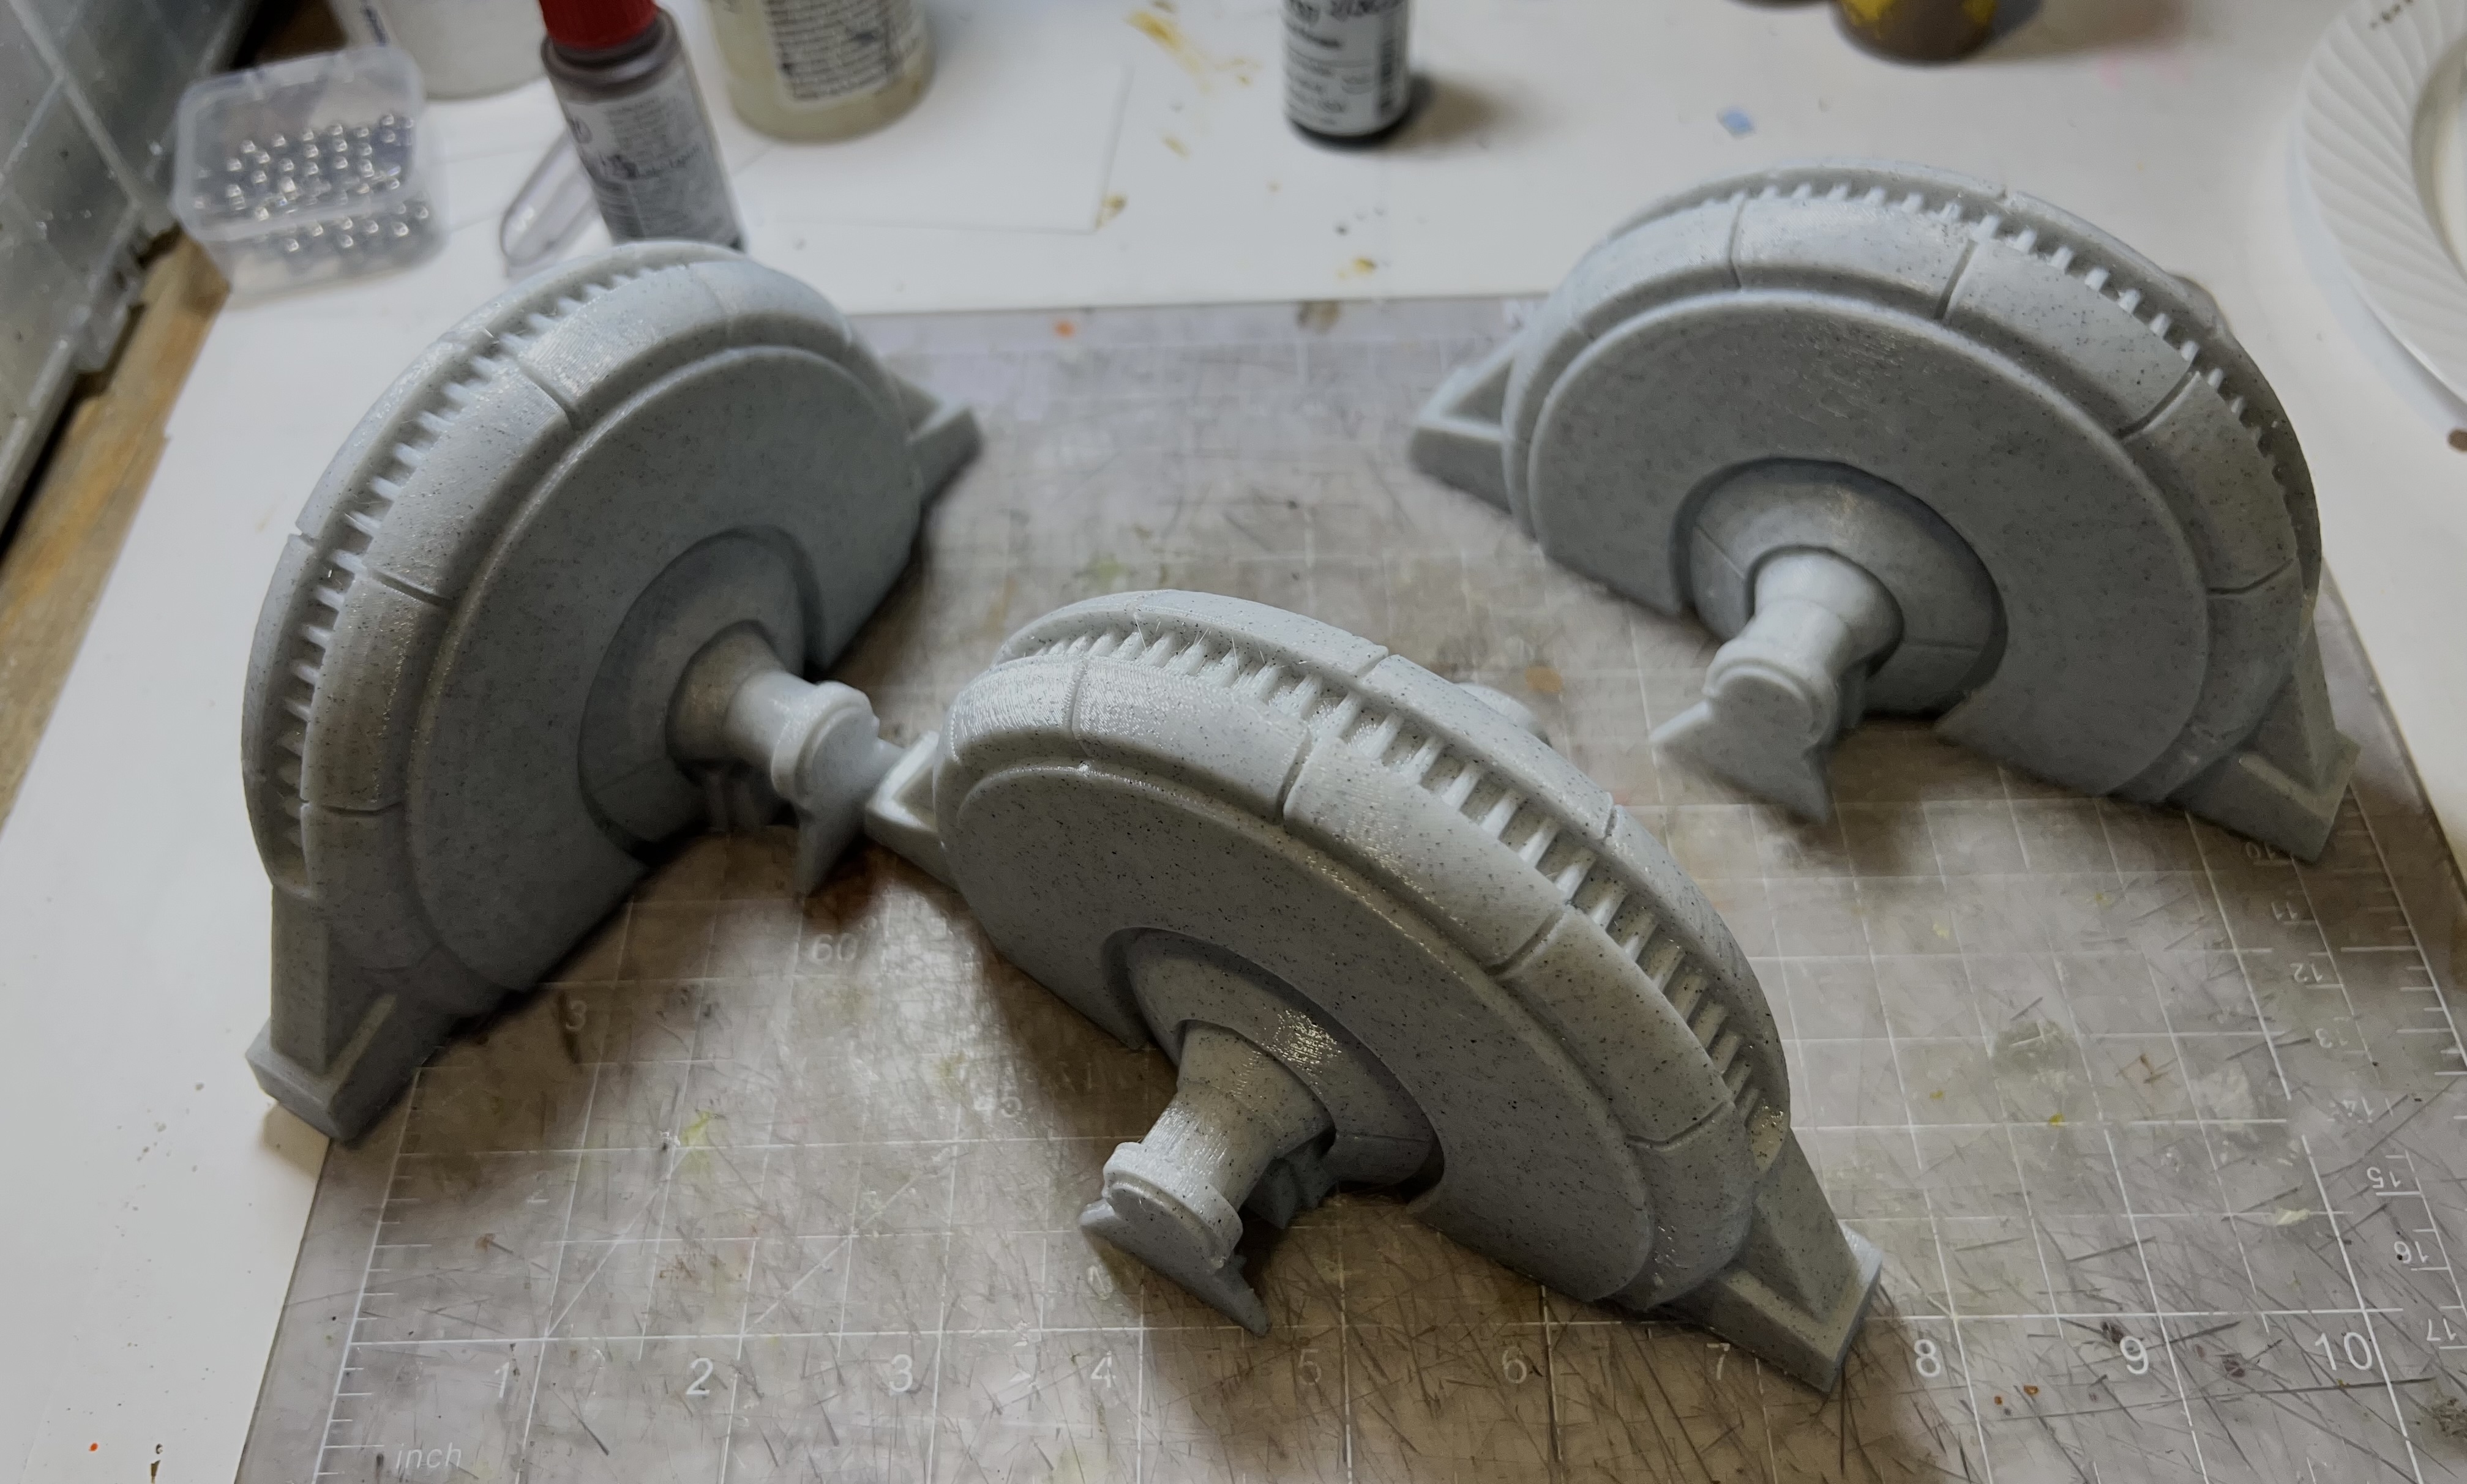
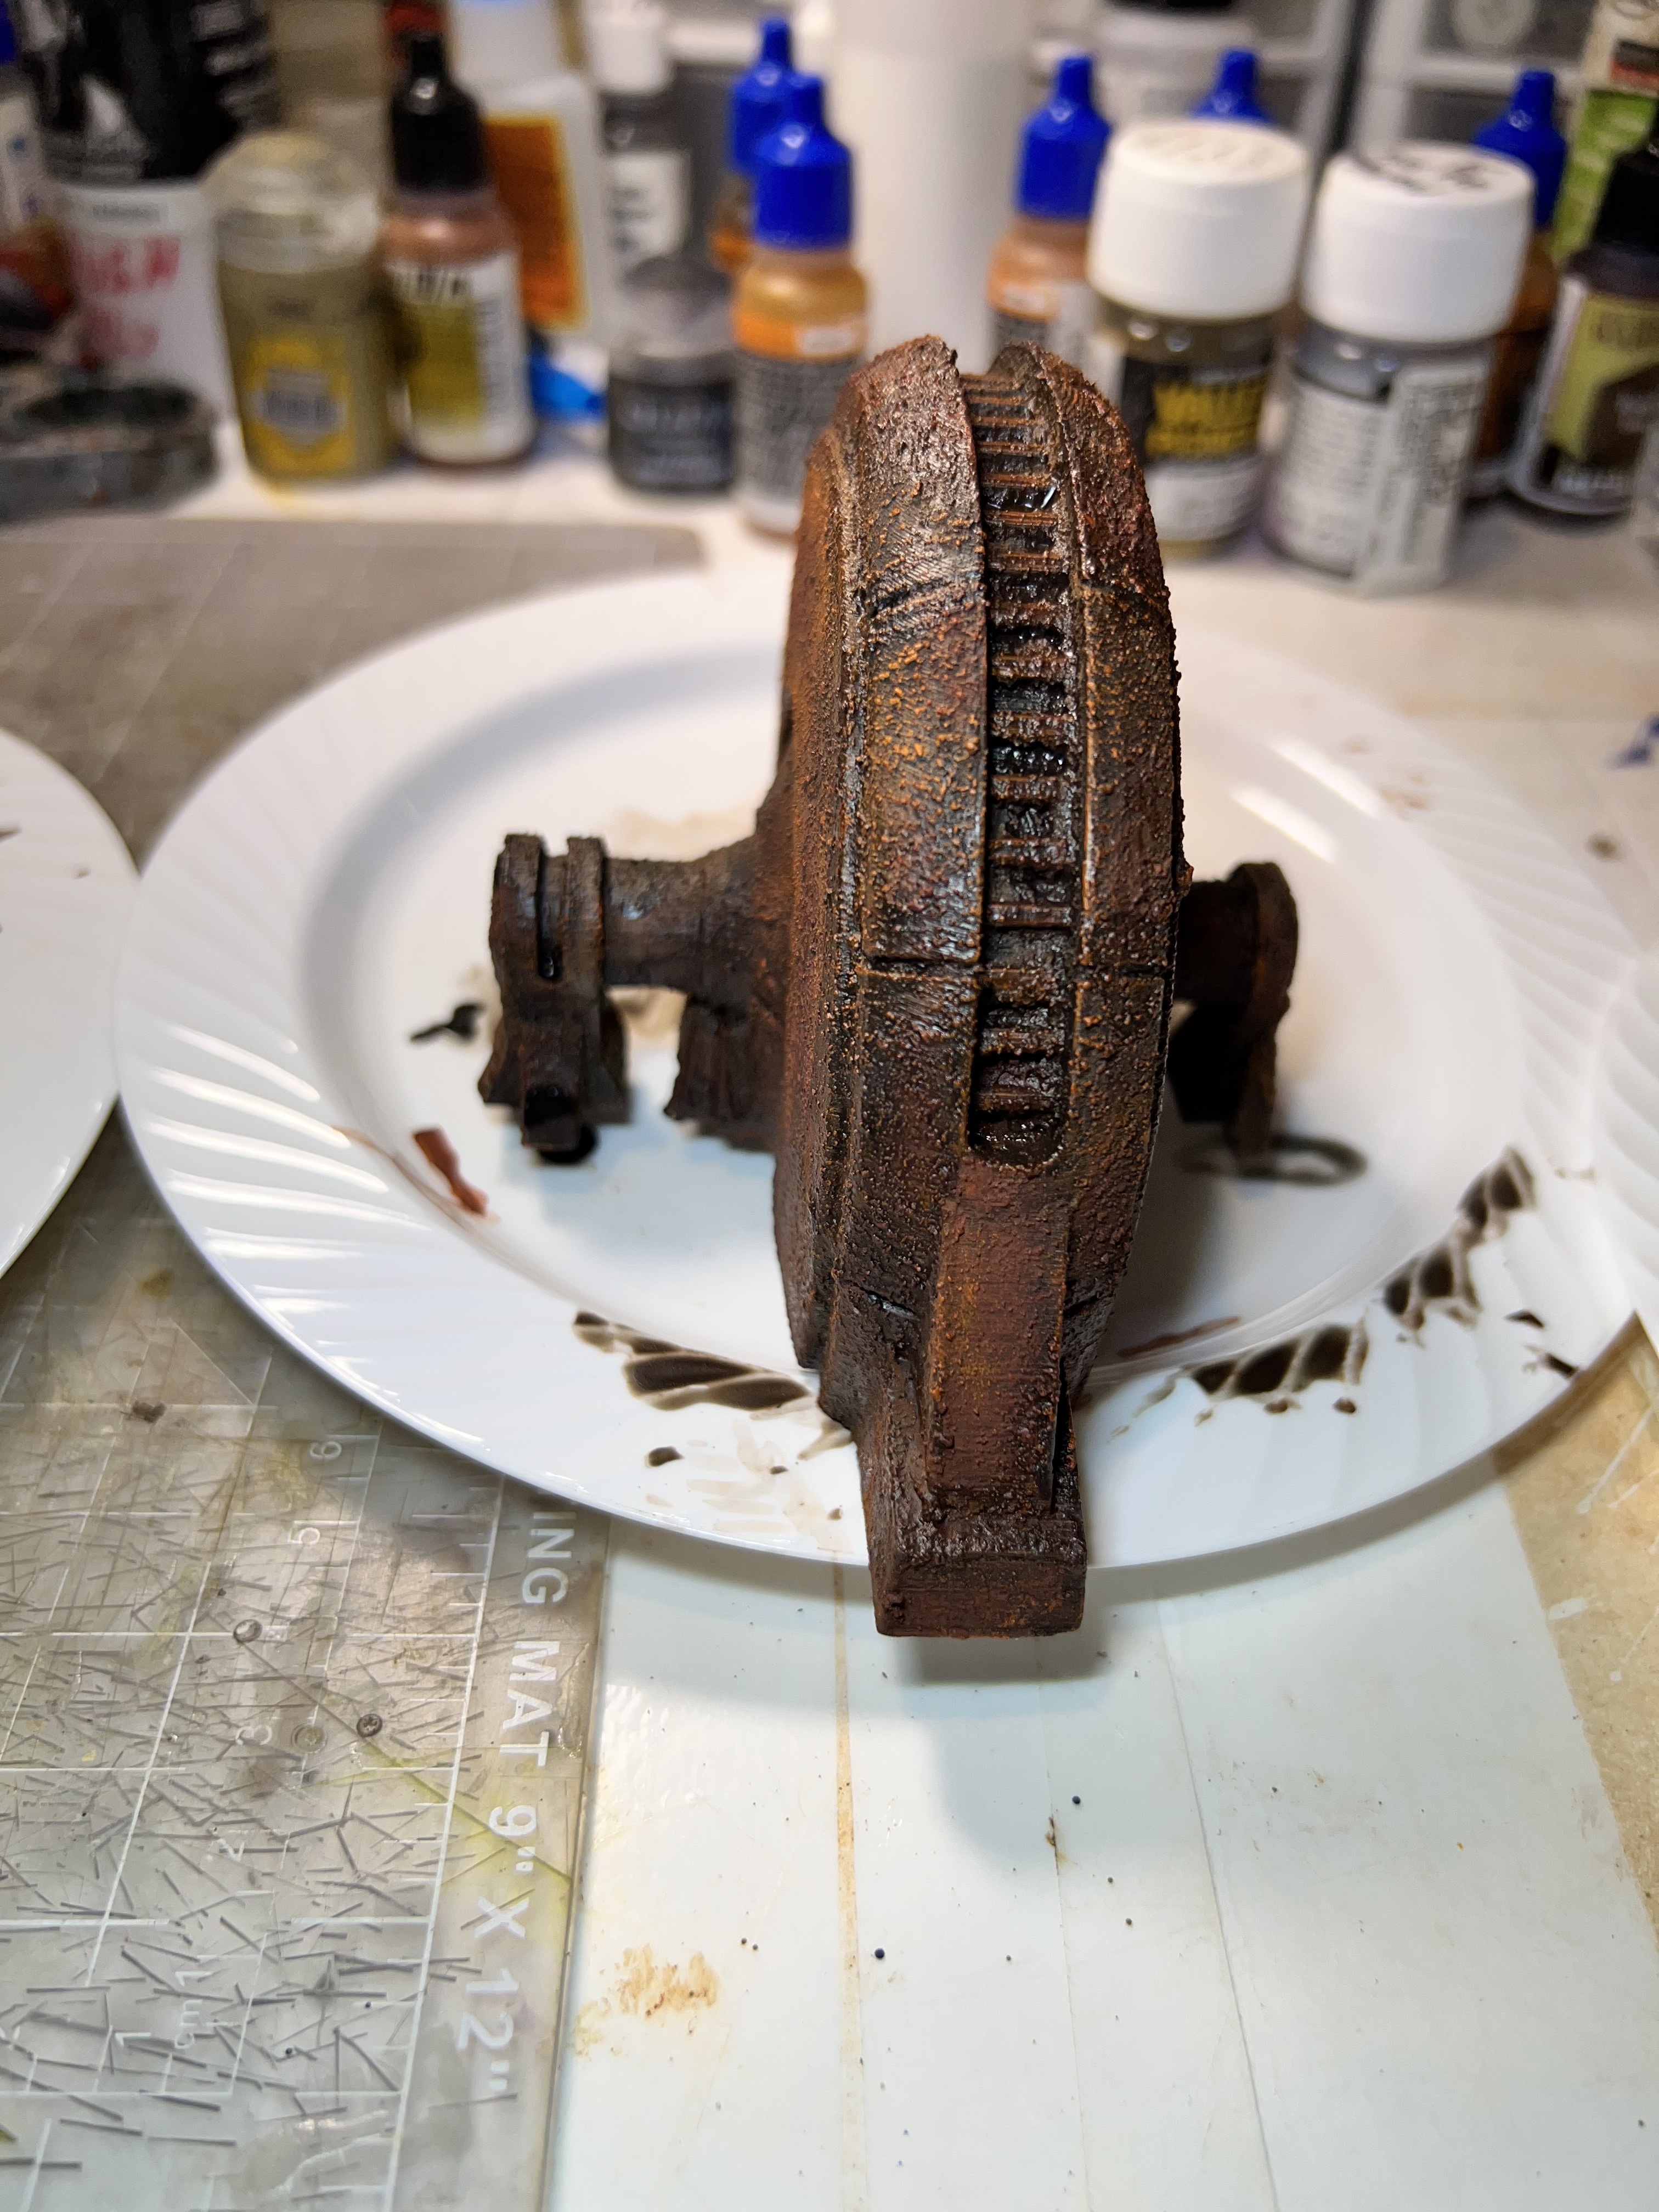
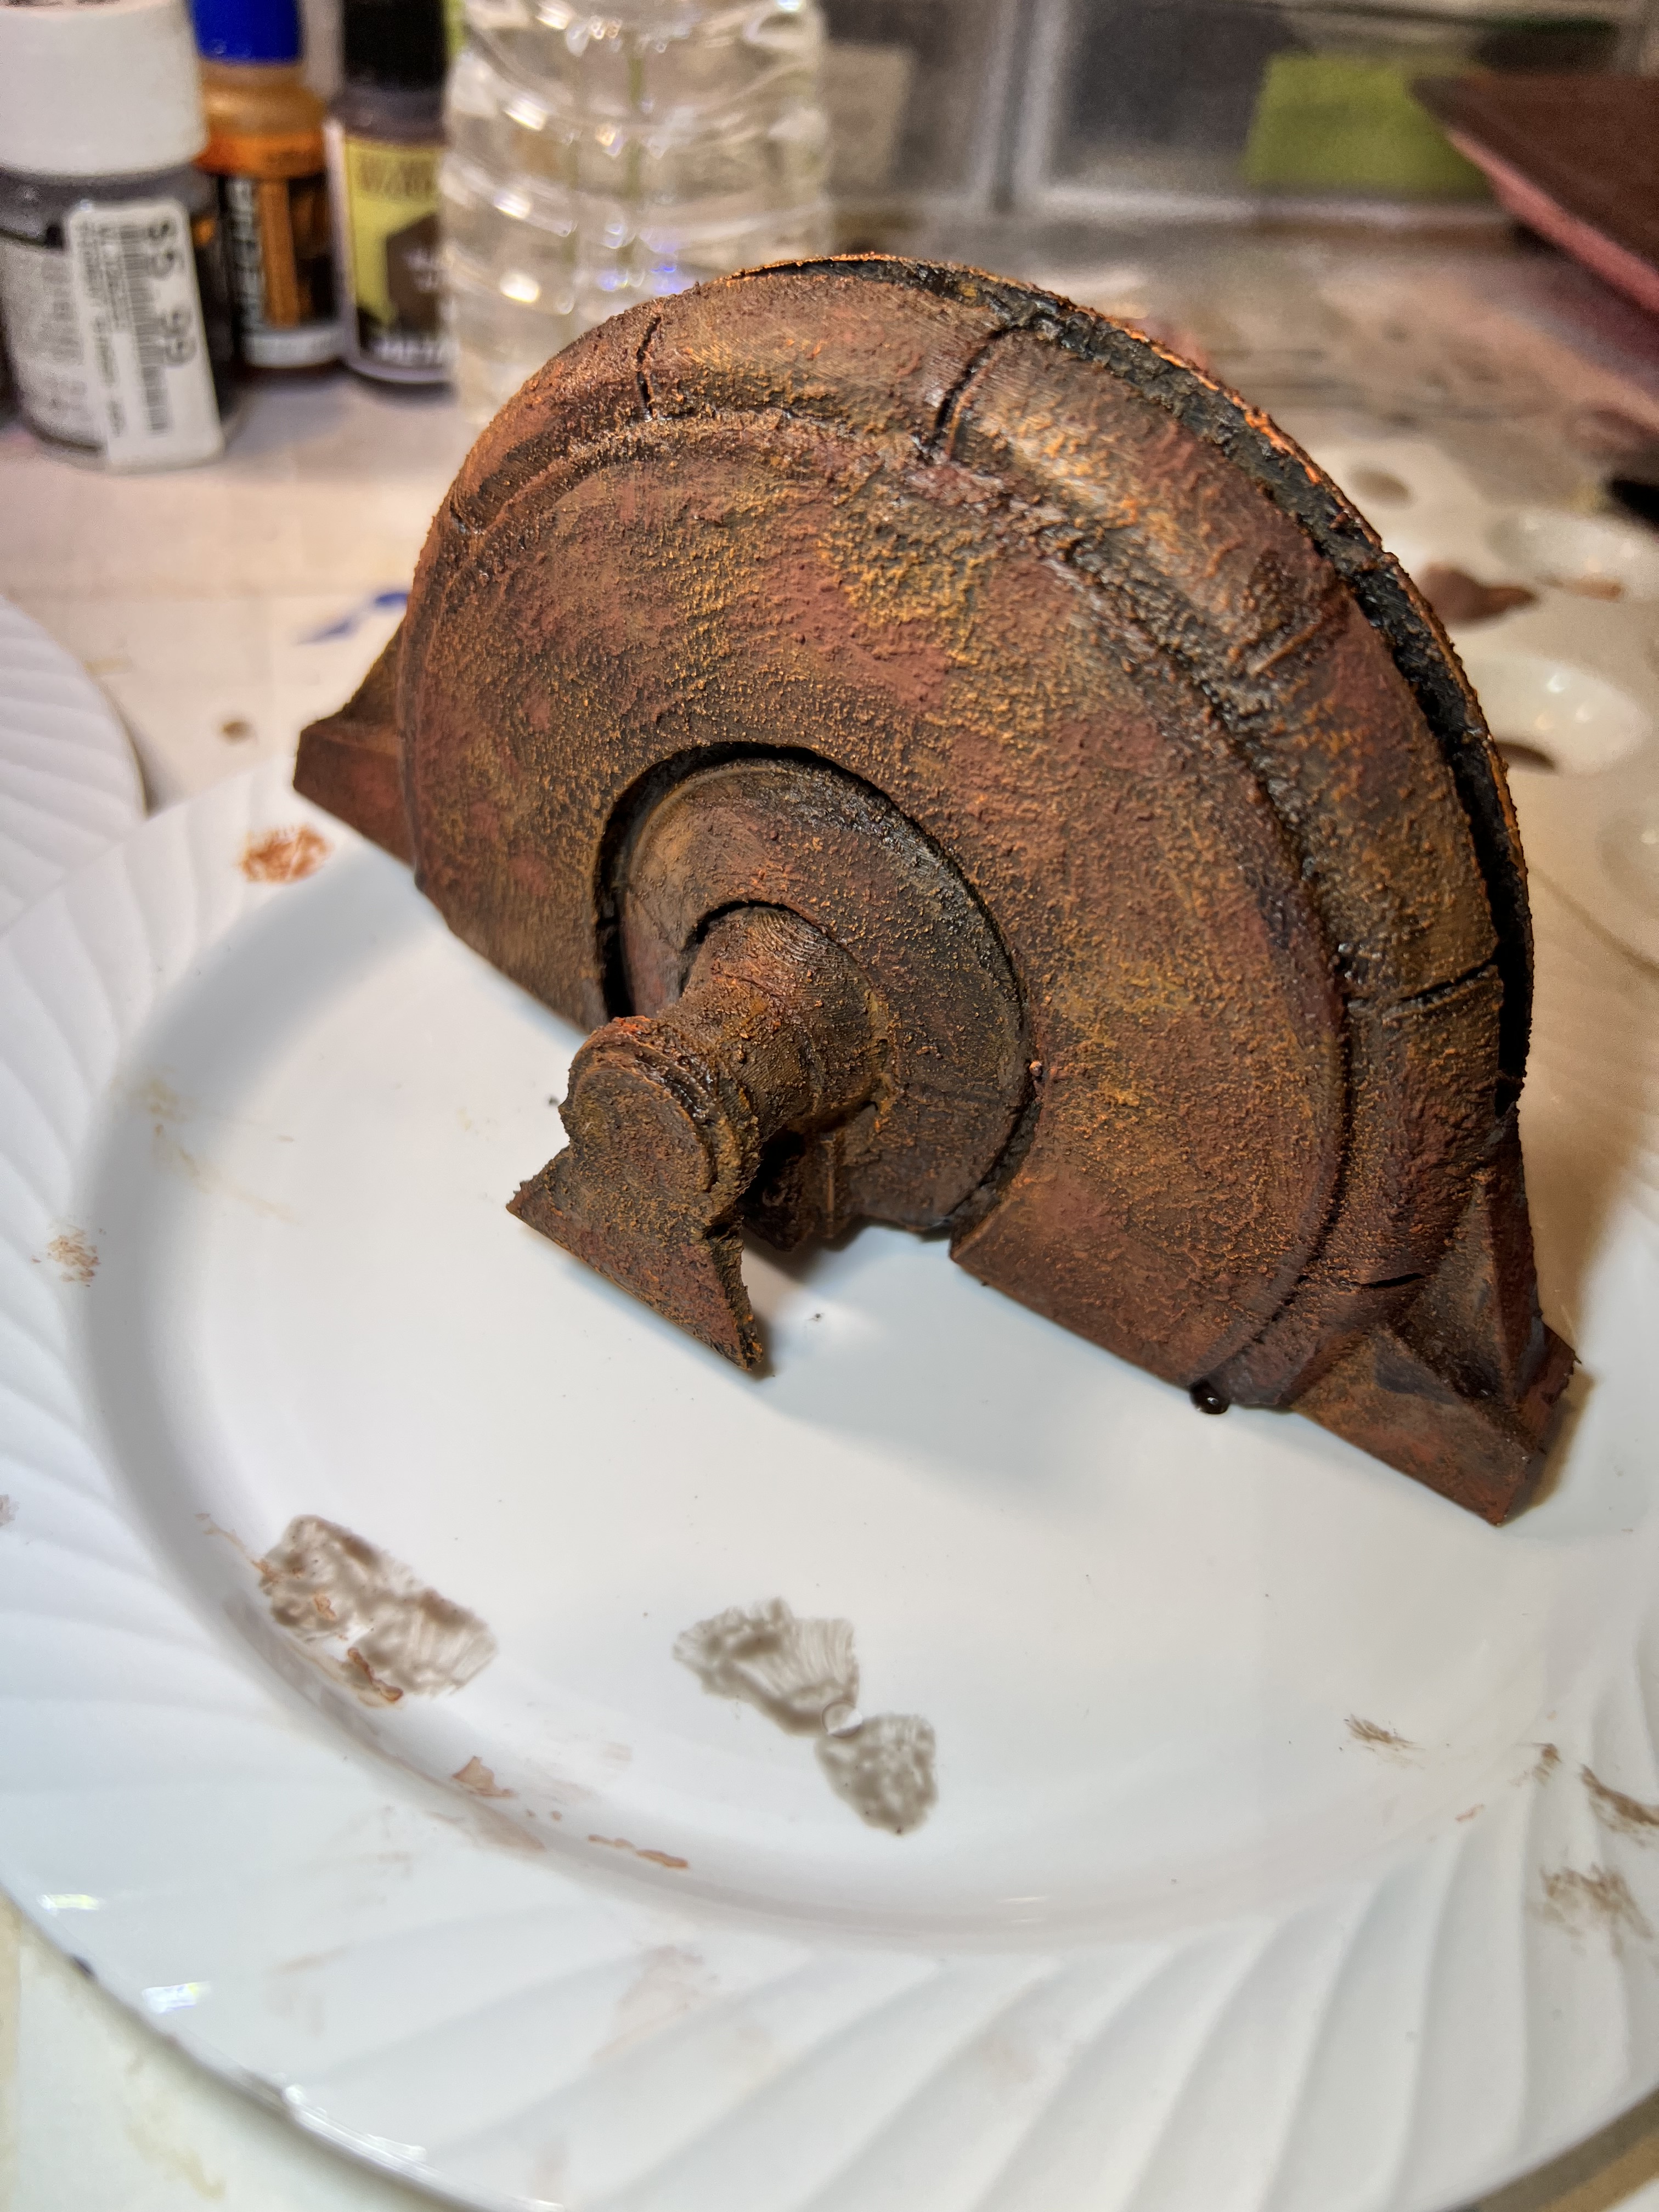
The generators at the start of the project.
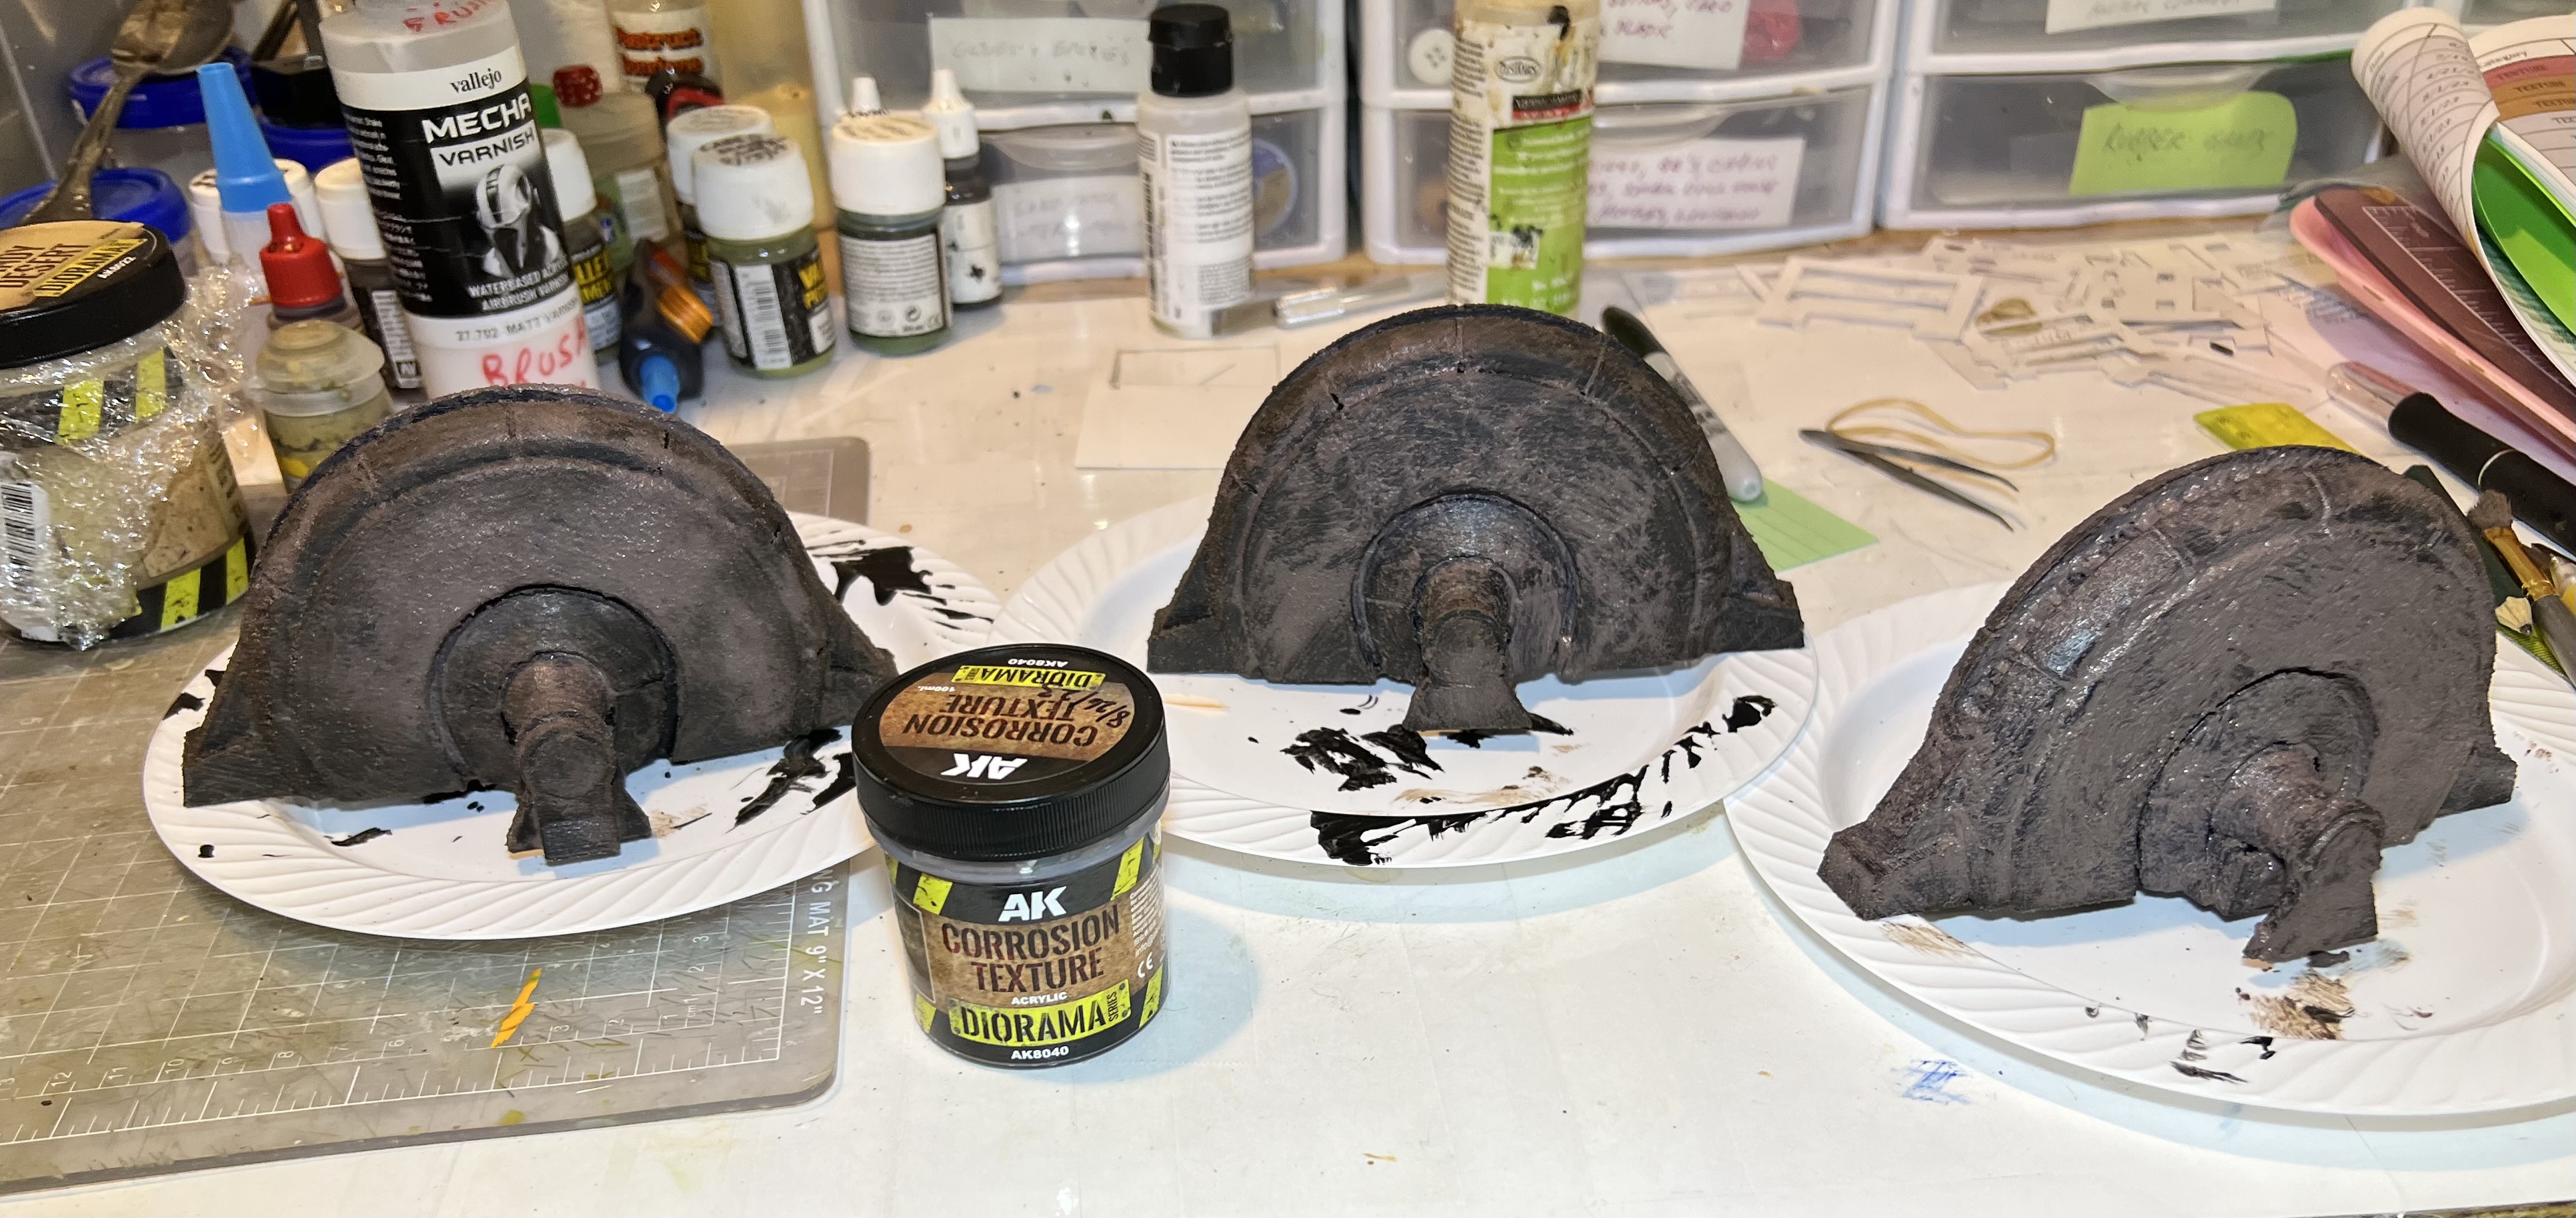
I primed the pieces. Then I used AK “Corrosion Texture” on it. This allowed me to use different rust pigments and paints on it.
Primed with corrosion texture added and drying here.
After the corrosion texture dried, I used the paints and pigments to “rust them up”.
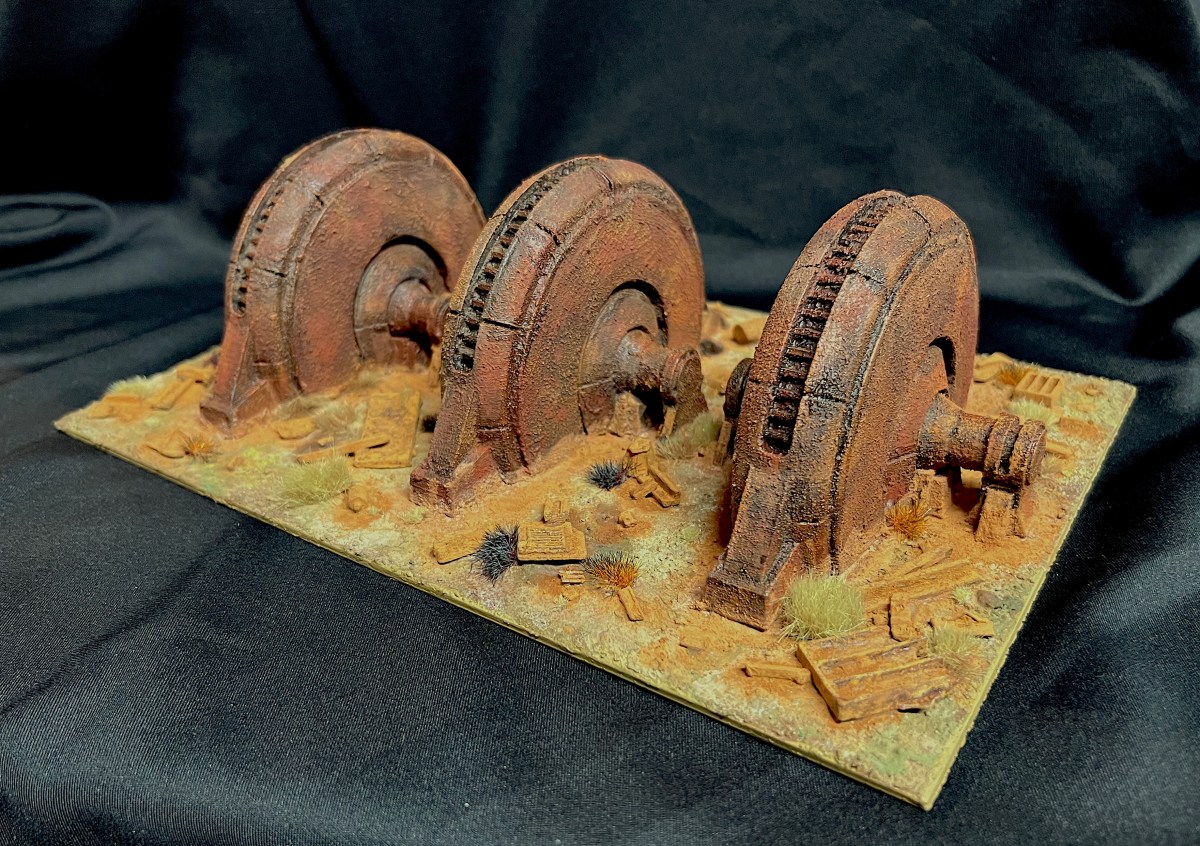
All rusted up!
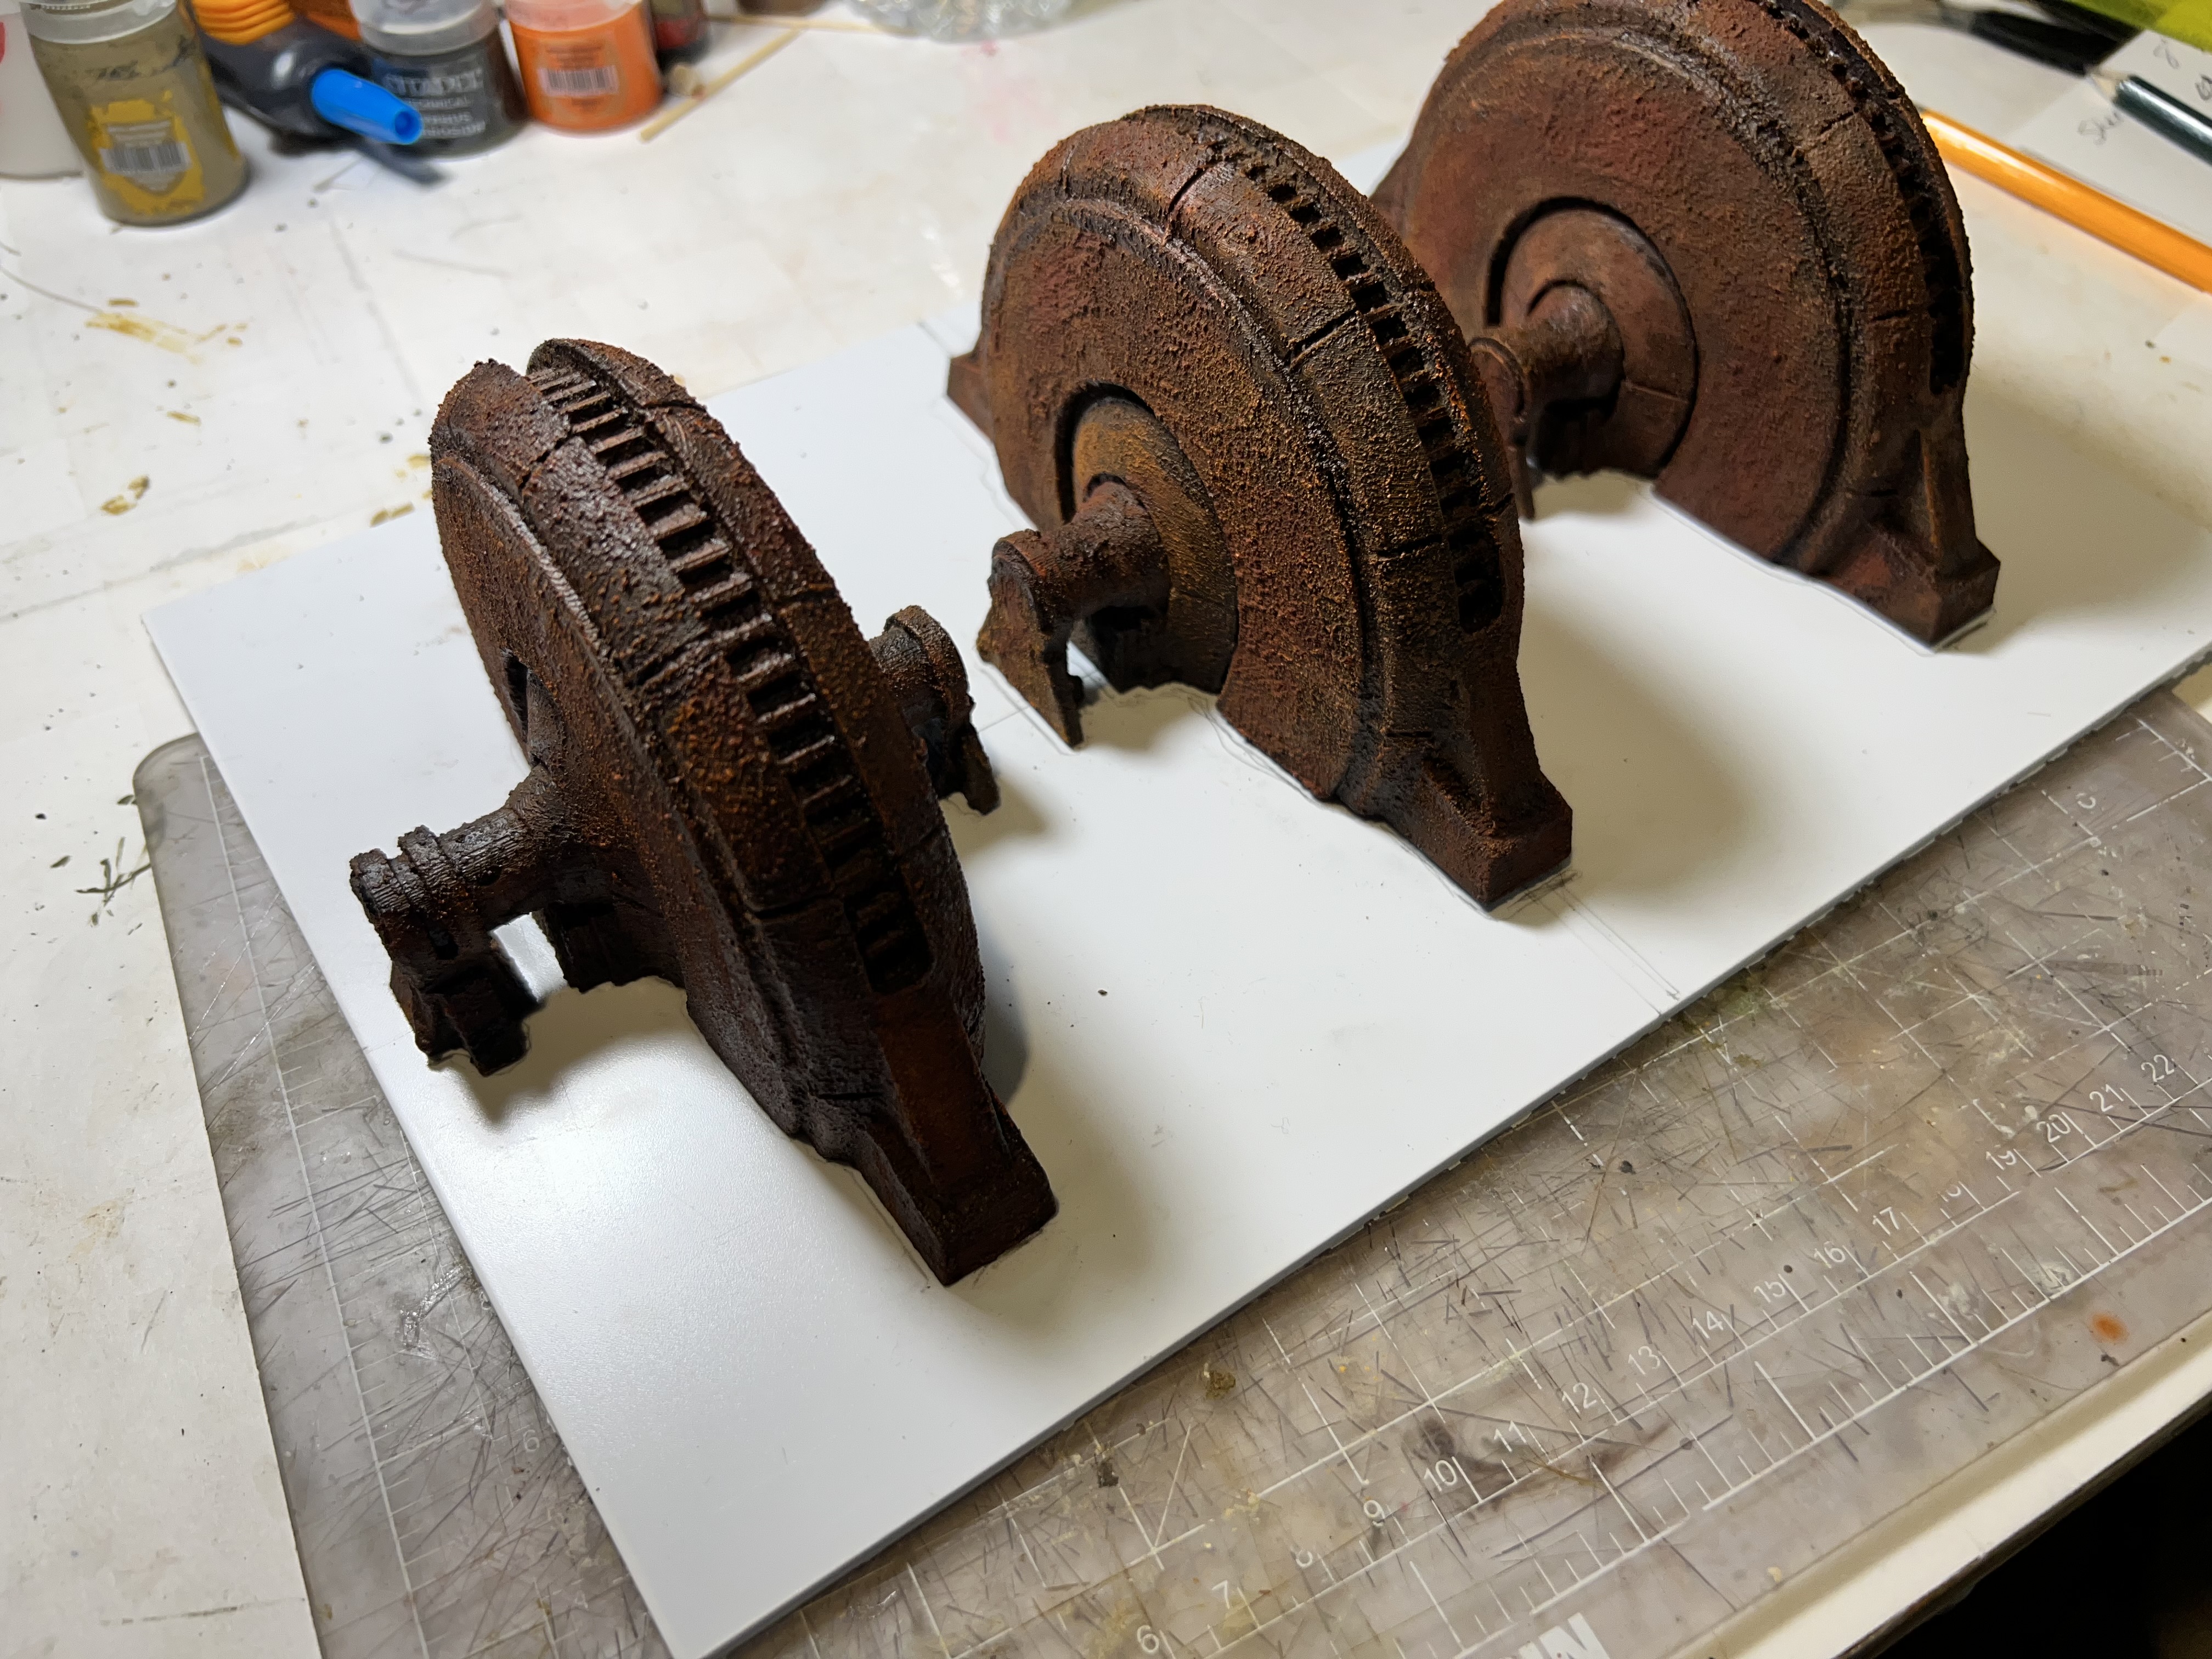
Two of the models were identical – so I planned on using them symmetrically on a polystyrene base. Using sand and PVA, I had a substrate for the rust pigments.
Here I measured carefully to align the three equidistantly on the base. Then, I traced out on the base where they would be glued. The one odd generator is in the center.Here you see the sand applied over the PVA. Note that where the generators would go is not covered with any glue/sand mixture.
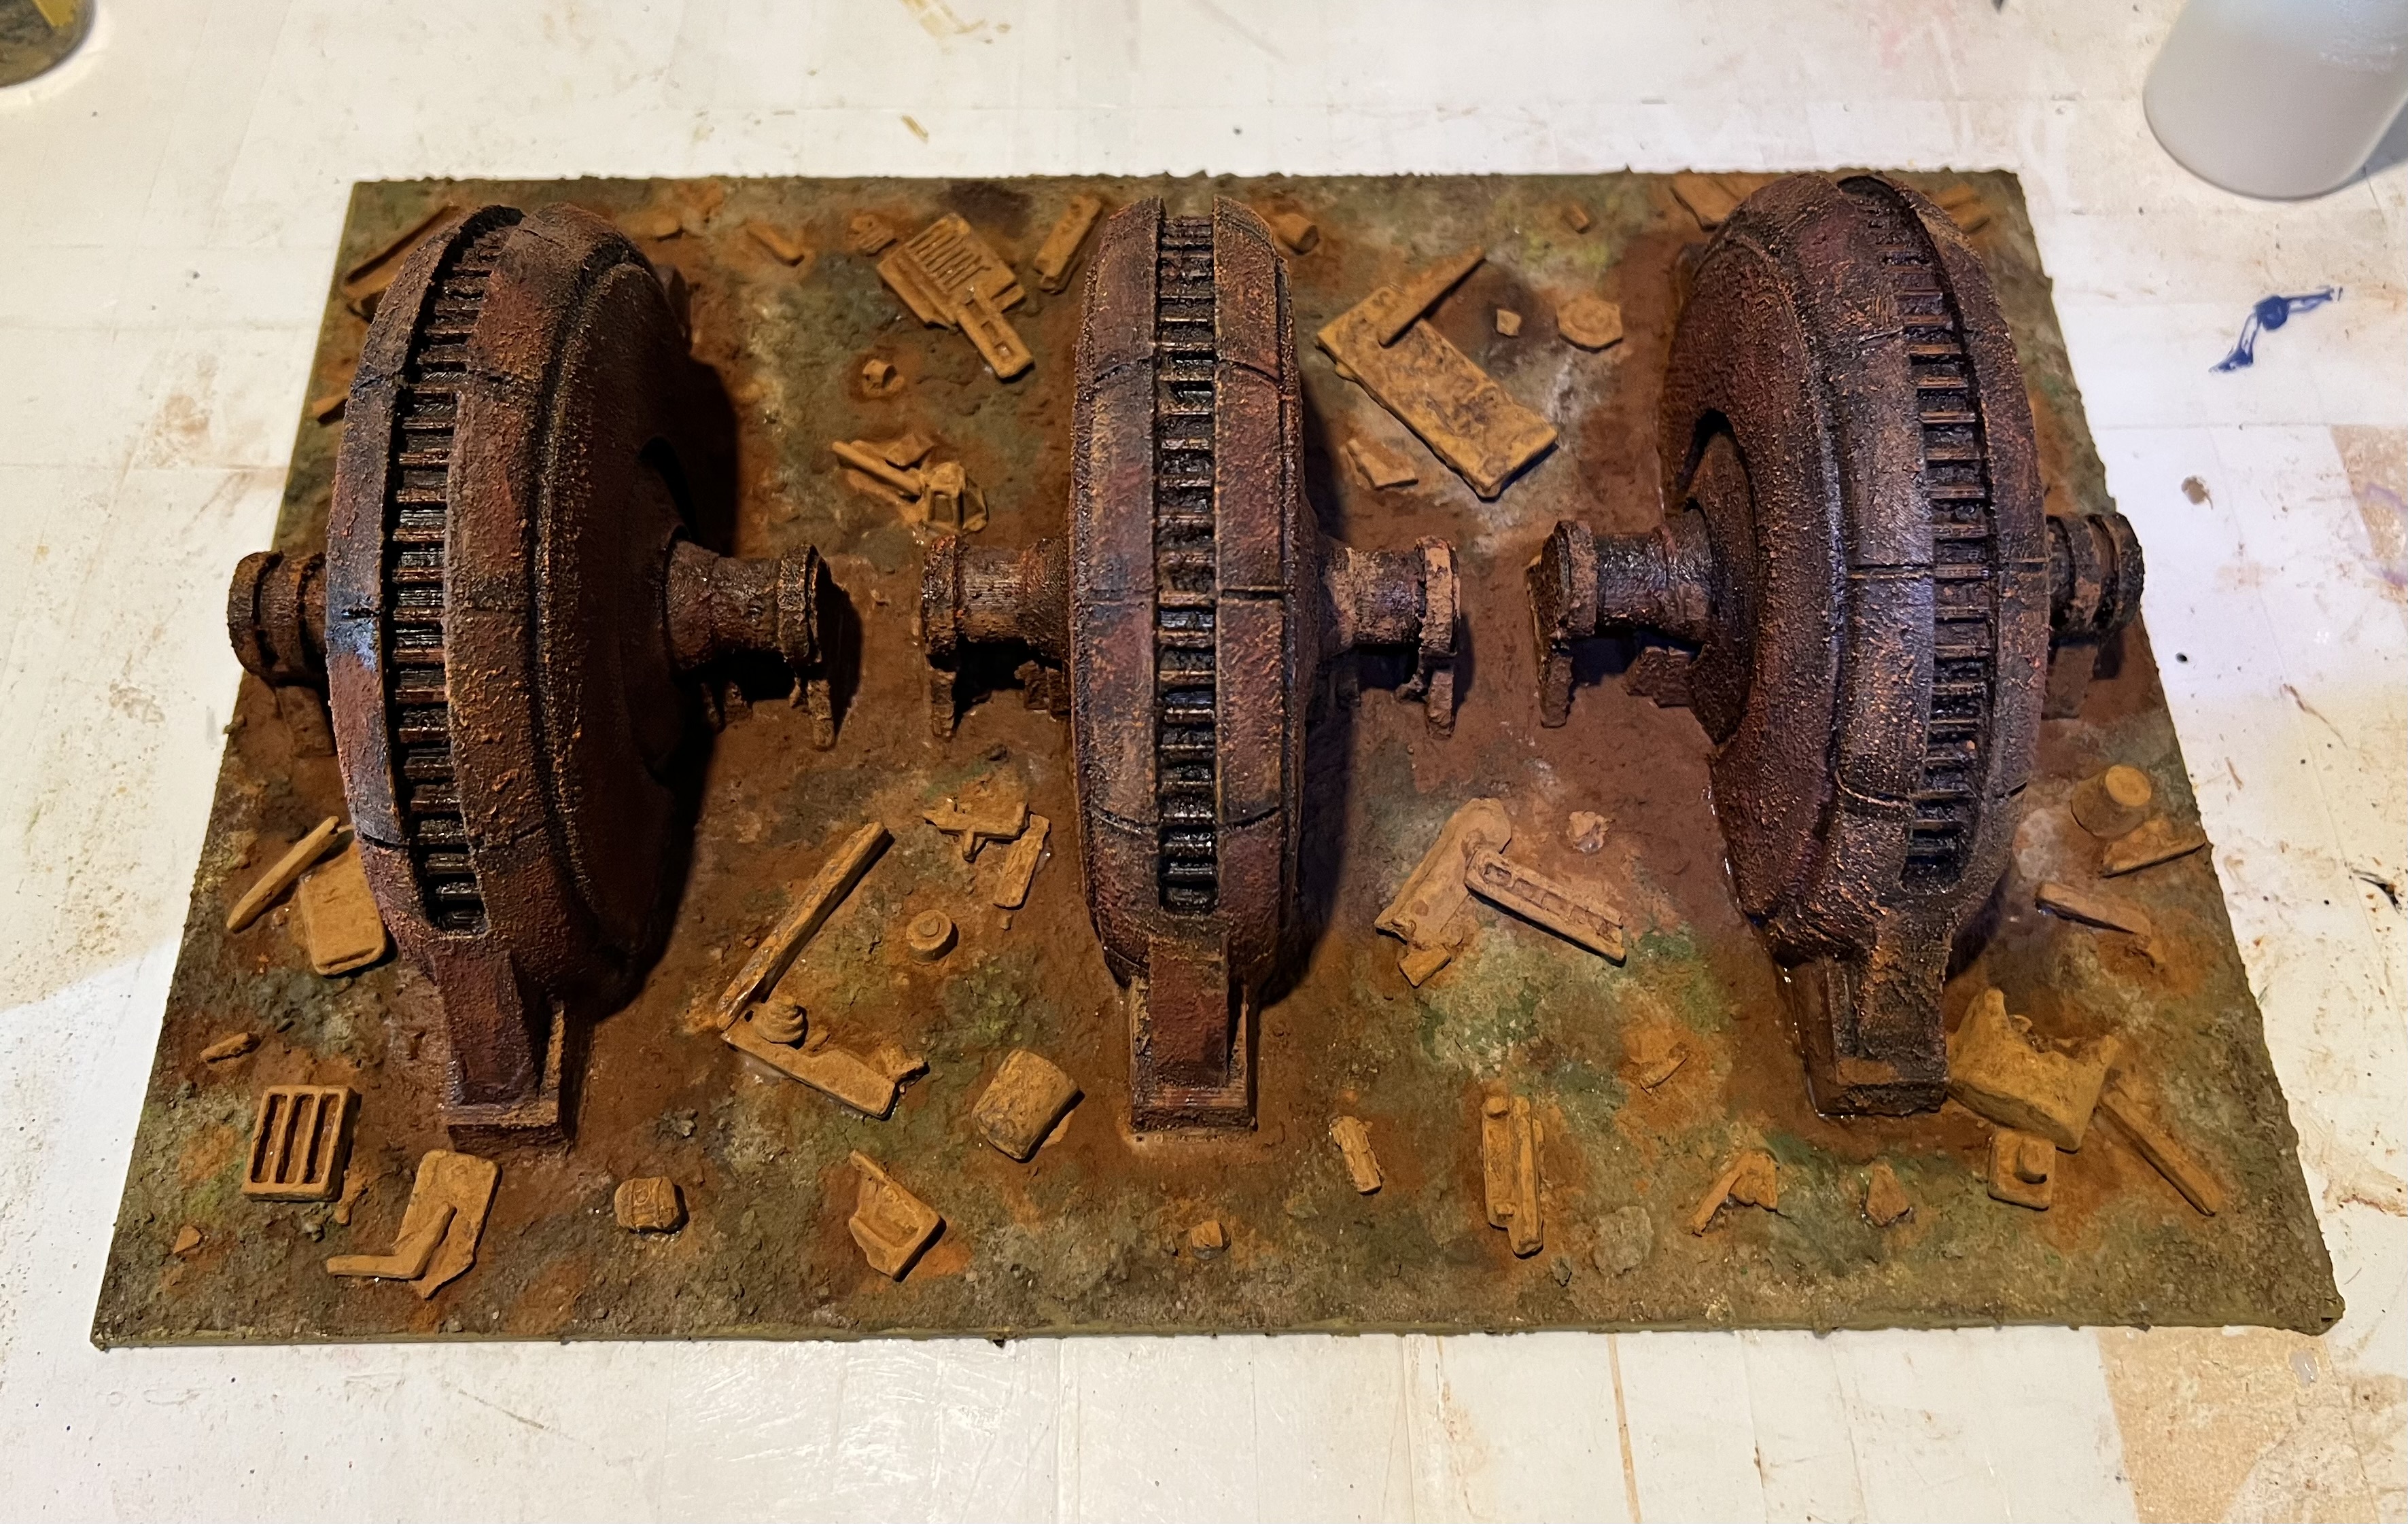
Once the sand mix had hardened, I assembled the pigments as you see below. I fixed all the pigments with pigment binder, as I have found that other liquids can dissolve the PVA/sand bonds.
Ready for gluing down the generators. Then, adding pigments to the base. As is my habit, I list all the materials that I used at the end of this post. This practice served me well here as older posts I did on rusty walls had some pearls that I forgot.
The generators were secured to the base by Gorilla Glue. Once that dried, I added the pigments to the base and fixed them with the binder. I then decided that there should be more detritus and wreckage here. I added some of my rusty Juweela scrap pieces. Then, I applied more rust pigments to them. These actions are shown in the gallery below.
Finally, in an effort to add some wasteland life to the piece, I added multiple different flocking tufts. Here are some finished shots.
Thanks again to Chris Rett for this gift, and sorry it took me so long to finally complete it!
I’m looking forward to having this on the tabletop. It will be a companion piece to my rusty walls and ruined buildings. It will also complement my ruined chemical plant. I will be making other pieces soon. Stay tuned! I hope that you found this interesting or useful. Let me know in the comments section.
Until next time.
For all of my previous posts on terrain projects, please see this page.For all of my previous posts on sci-fi projects, please see this page..
PAINTS, INKS, GLAZES, SHADES, WASHES, PIGMENTS, FLOCKING, GLUES AND MORE THAT I USED ON THIS MODEL
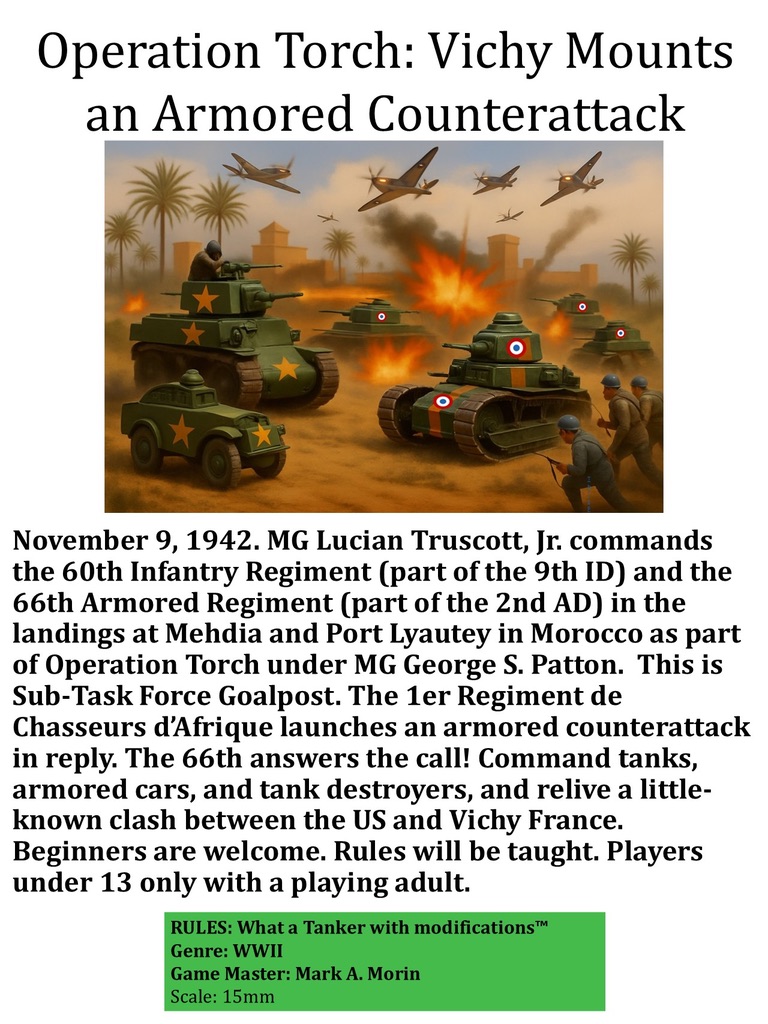
Over the summer, happily, golf dominated my free time for the most part. I didn’t really have much time for hobby work or wargames. Blogging about what little I did complete or participate in fell to the wayside. The “little” that I refer to is work on my 15mm/1:100 scale WWII scenario, Operation Torch: Vichy Mounts a Counterattack. This scenario is part of a What a Tanker game. It is set in Morocco in November 1942. The Vichy French responded to the American landings during this time with an armored counterattack.
It is a little-known clash. France the June 1940 post-armistice was titurlarly neutral, and had the responsibility to defend its colonies against any allied invasions. At this time in 1942, the Soviets were under massive German pressure on the Eastern Front. They were begging the Allies to get in the fight against the Germans – anywhere at all. However, at this point in the war, the US/UK were not in a position logistically to assault Fortress Europe. They also lacked the necessary forces to execute such a mission successfully.
The invasion of North Africa – and the colonies of Vichy France – became the compromised option. Operation Torch thus came to be. In addition, this assault would open up a line of attack on Rommel’s rear. This would reduce pressure on the British 8th Army in Egypt. However, no one knew how much the Vichy French would resist.
My flyer for the game scenario.
As I write this, the 2025 golf season is over now. At least it is here in balmy Massachusetts in November. It’s time for me to capture my summer and fall efforts that led to my running this games at conventions. This post will cover some of my preparations, upgrades, and the actual games themselves. I will discuss the initial games at HMGS HISTORICON, then my upgrades, then the games at HMGS FALL IN! and EllisCon.
By the time I attended HISTORICON in July of 2025, I had the scenario pretty much where I wanted it. I had play-tested it with friends, and was ready to roll it out. This year, in total I have run the game twice at three different conventions. These are HMGS HISTORICON in July, and both HMGS FALL IN! and EllisCon in November. This makes six iterations so far since the spring.
For vehicles for the game, I have finished many AFV’s for that I have discussed in previous posts. Here below are those posts in reverse chronological order in case you missed them:
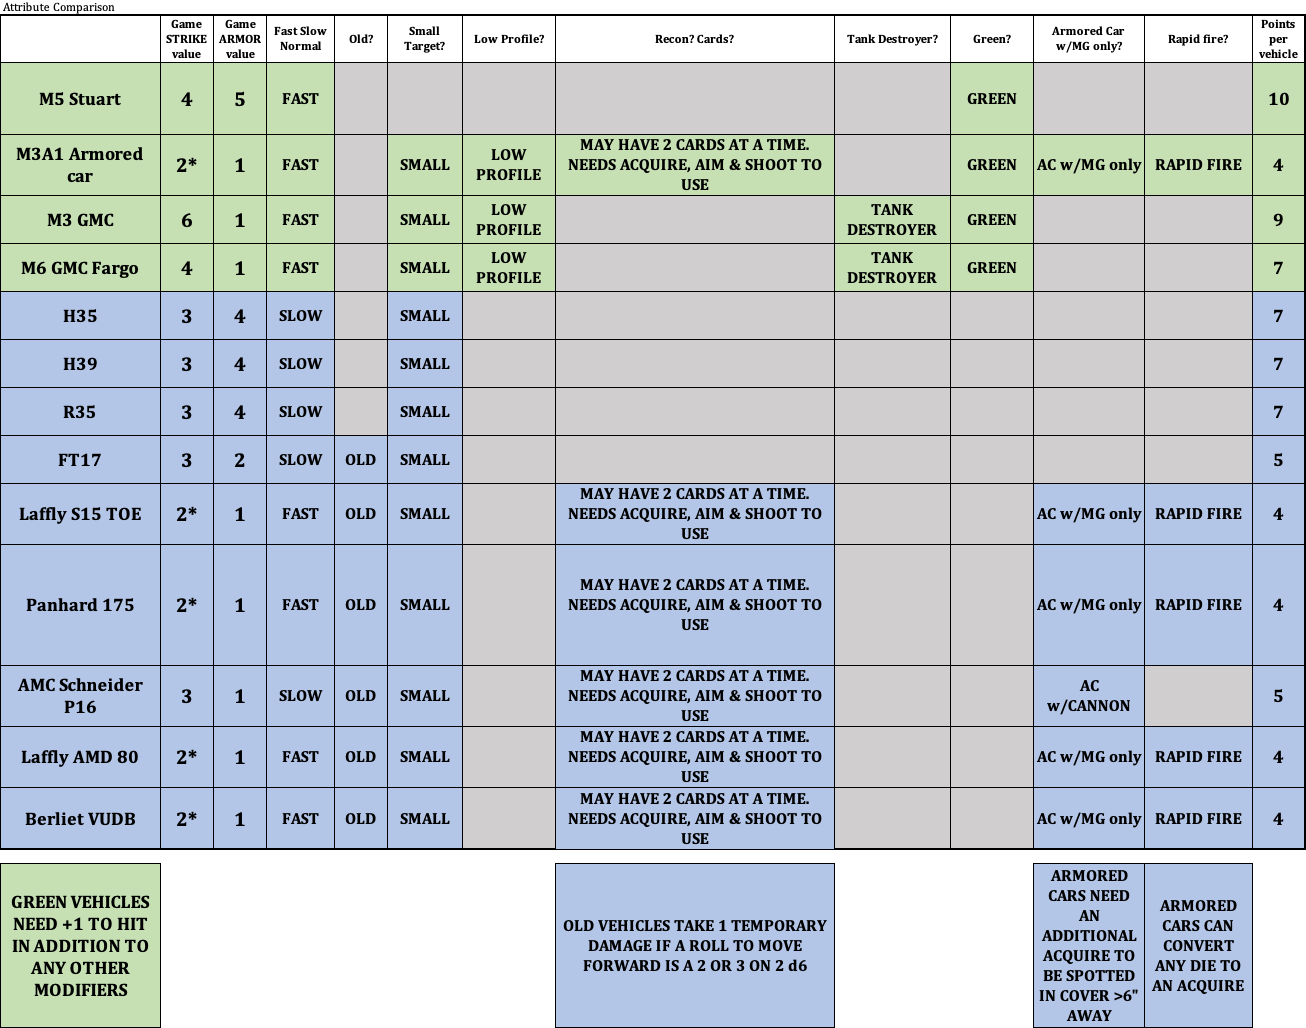
The vehicles for the gameAFV attributes for the game
In addition to the vehicles, many game aids also were on my to do list. Before HISTORICON, I made road sections and town bases out of poster board and painted them. I also built dice boxes and dice frames for ease of play. Plus, I needed more blast markers for destroyed vehicles.
I was making these dice aids to make play better. What a Tanker is a great game. However, for a multiplayer game at a convention, the activation sequence is not the greatest. It does not keep the players engaged. I decided to borrow Buck services Double Random ActivationTM activation methodology, and that seemed to serve the game well. I also added Bonus Attack Cards and other changes as discussed in the next section.
Overview of My Scenario Rules Modifications
The game uses modified What a Tanker rules. The major modifications that I use are:
The game starts with each player receiving $75 in Tanker Bucks.
Before there are any play or purchases of extra resources, there is a VICHY FREE ATTACK PHASE. All US vehicles on the table will receive both 1 French infantry attack and 1 French AT attack. This phase represents the Vichy infantry attacks that were repulsed in November 1942 prior to the armor engagement. This happens only once at the beginning of the game.
There is an ACQUISITION PHASE after the free attacks conclude. More vehicles and Bonus Attack Cards may be purchased. This phase happens once at the beginning of each turn.
Uses of Bonus Attack Cards in the game simulate infantry, anti-tank, artillery, naval gunfire, and air actions. These are deployed by scout cars according to each sides’ historical capabilities. These cards can be shared across the team. Bonus Attack Cards are purchased with “Tanker Bucks”, which also play into Victory Conditions. Having more Tanker Bucks at the games end is better, as high amount remaining wins the game. I allow teams to share their Tanker Bucks as well. However, you need to use resources to defeat the enemy. You earn $25 for each AFV or plane destroyed. See the card below to see the costs for acquisitions and for rewards. So, a balancing act exists for the players. Do they hoard their Tanker Bucks, or use them effectively against their opponent?
Costs and Rewards as shown on the requisition form.Vichy Bonus Attack CardsUS Bonus Attack Cards
To represent the French vehicles’ advanced age and mechanical unreliability. “OLD” French vehicles that try to move and roll a 3 or less will lose 1 die to temporary damage. Mathematically, there is an 8.33% chance of that happening. So a good number of the Vichy Forces are indeed OLD (mainly the armored cars and the FT-17’s). In addition, all of the French tanks and some armored cars are SLOW – which limits their advances. But, in the game, there are more of them, and not all of the French tanks are OLD.
Any vehicle touching a road can convert any die to a DRIVE dice.
Armored and scout cars may engage other armored cars and tanks with heavy machine guns or deploy Bonus Attack Cards. Also I have rules that show how devastating any cannon fire would have been against thin-skinned vehicles. Cannon fire causes double hits on thinly armored vehicles that are not tanks.
The US Army was inexperienced before these landings. To represent that, their status is GREEN at this point in the war. GREEN means their base roll needed to hit increases. It goes from needing a 6 on 2d6 added together to a 7 as a base number. Most of the French vehicles are SMALL. This necessitates an additional +1 to hit at short range. There is also another +1 at long range. Oh yeah, the Stuarts have just a 37mm gun. This means that the US has a tough time making damaging hits at long range against French tanks.
The US use of Bonus Attack Cards is limited to just the US Scout and French Armored Cars. The M5 Stuart’s radios got wet during the landings and were not working. Many French tanks in North Africa did not have radios. The one-man-turrets in all of these Vichy tanks made coordinating activities very difficult.
To represent the fight for air superiority, I added Bonus Attack Cards that allow the deployment of French Dewoitine D.520’s and American carrier-bases F4F Wildcats. These vie for air superiority and can also convert to ground attack missions with other Bonus Attack Cards as well.
Having air superiority enables the US player to deploy the Avenger TBM’s as spotter planes. These can improve US artillery accuracy significantly. They also can also bomb the French vehicles with depth charges (yes that happened). Lastly, Avenger deployment also opens up the chance for devastating naval gunfire from the light cruiser USS Savannah.
Modifying the activation sequencing methodology by using Buck Surdu’s “DOUBLE RANDOMTM ACTIVATION” method.
Because of the different activation sequence from What a Tanker, I now use three types of dice. Larger white d6 are used for COMMAND DICE (these let your AFV take actions). Larger colored d6 are used for ACTION DICE (for rolling for movement and firing). Smaller colored d6 are used for ACTIVATION DICE (to, well, activate an AFV in the game).
Scoring is done with TANKER BUCKS. Most wins at game end. See the rules file below (downloadable) for all the details.
I was asked to share my rules on the Facebook What a Tanker page. As I am a wicked nice guy (as we say here in Massachusetts), I am happy to do so. Below is the Word document that outlines all of the rules changes in detail. Feel free to download. If you use them, please do share your thoughts and experiences with me, I’d love to hear them.
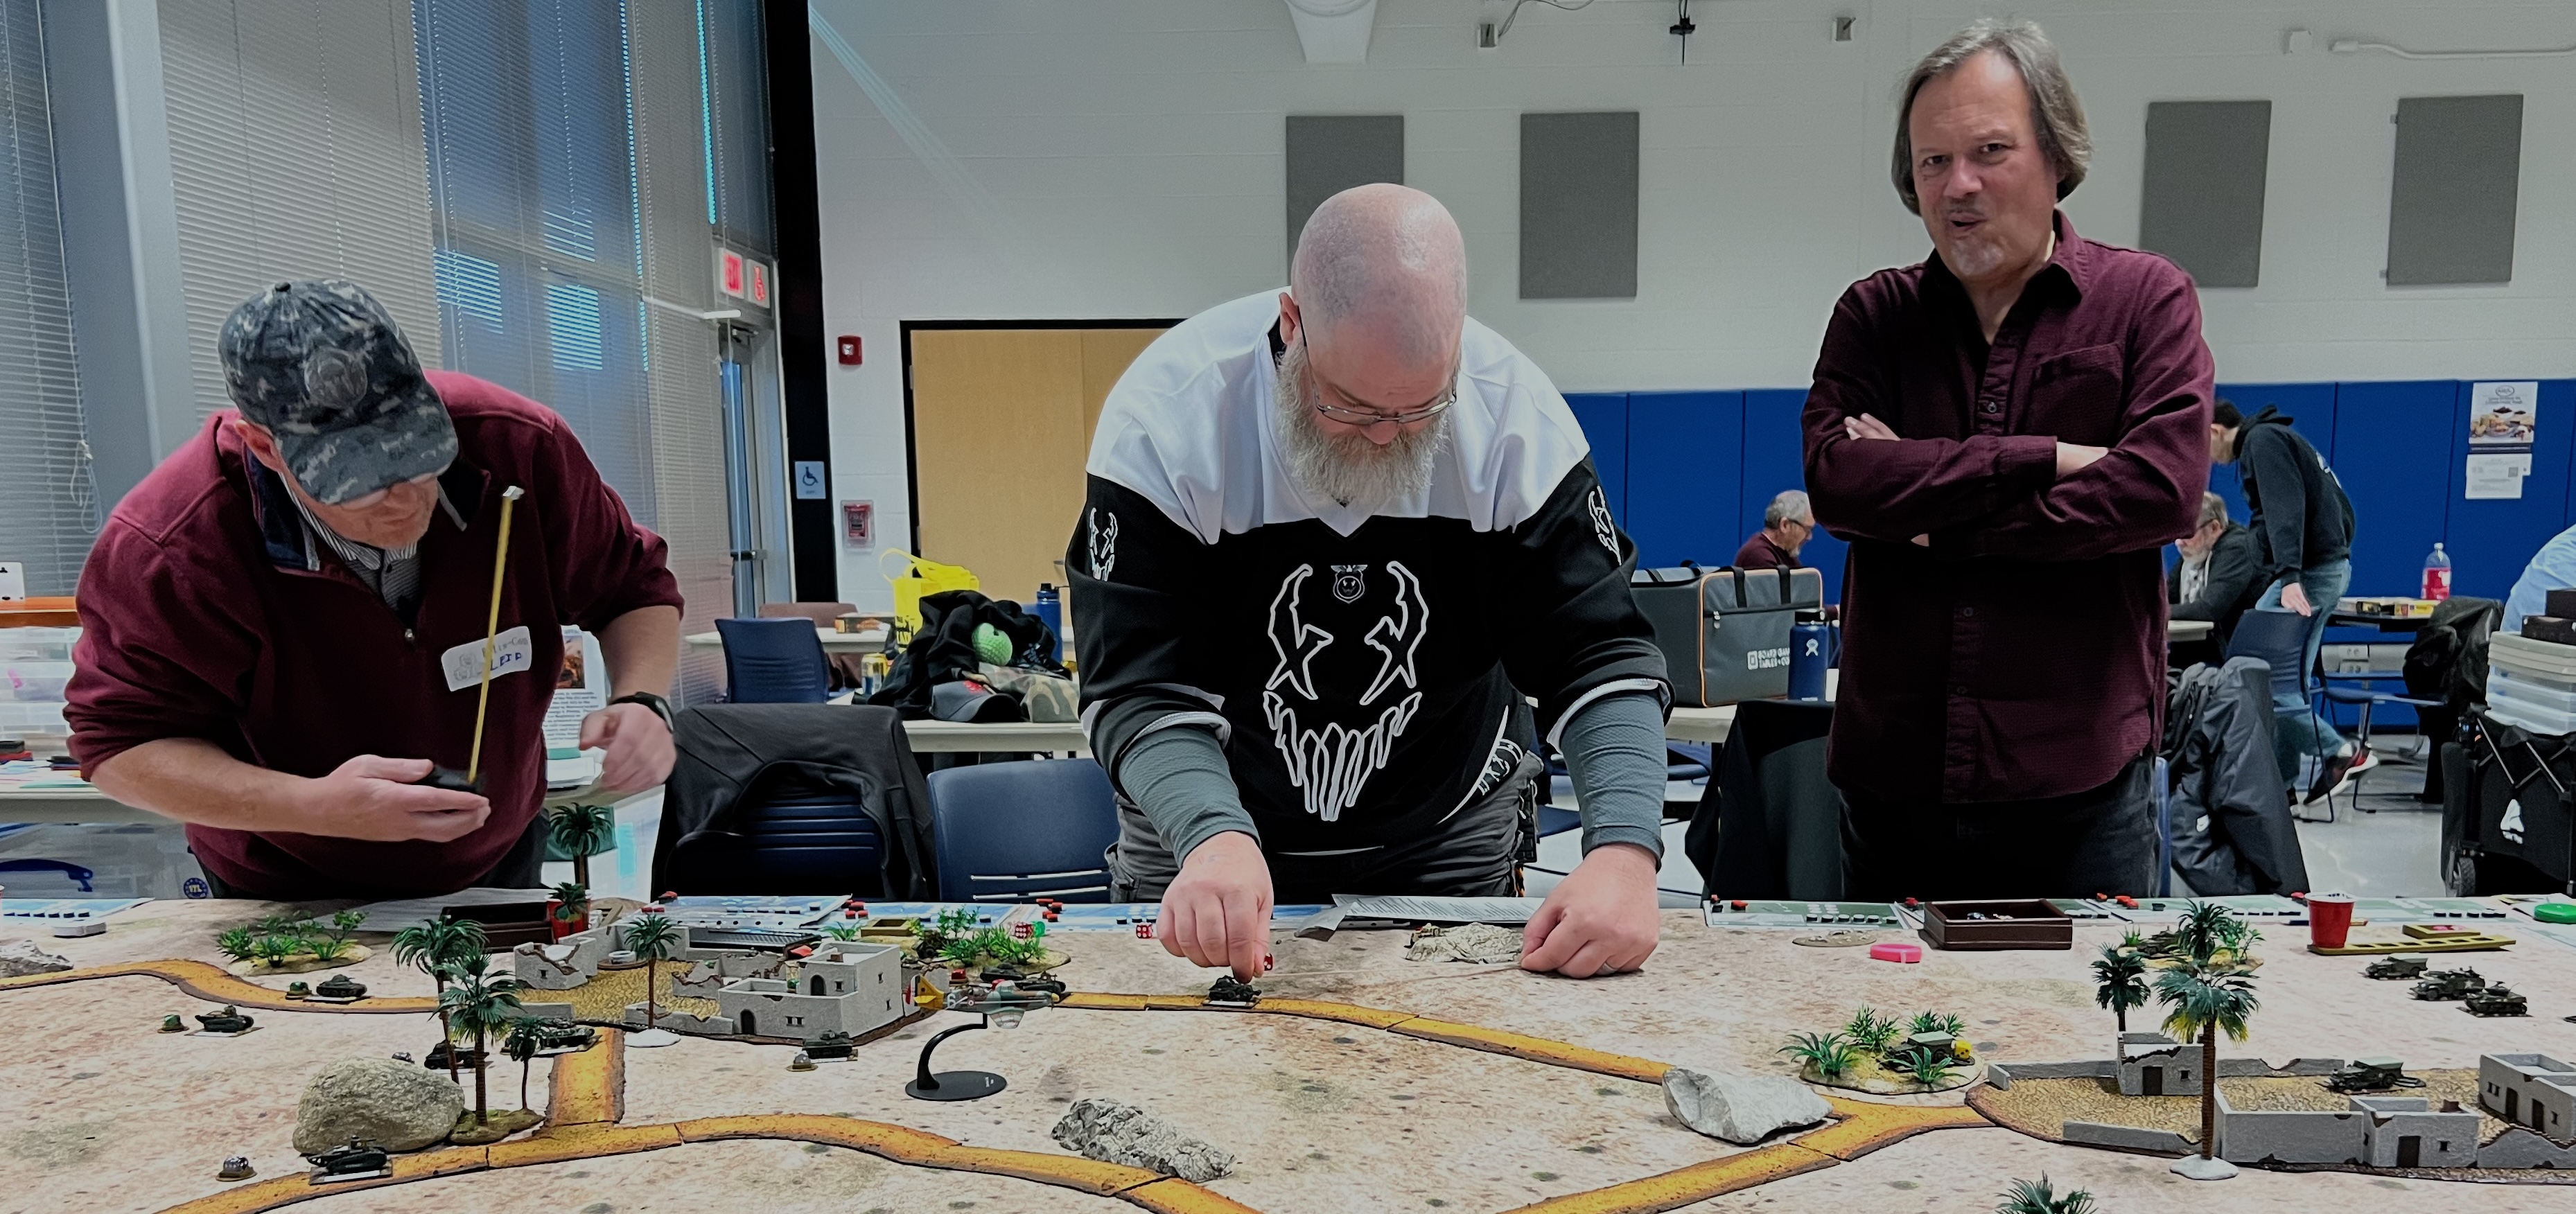
Let’s look at some photos from the HMGS HISTORICON convention games next.
HMGS HISTORICON 2025 PHOTOS OF THE GAME
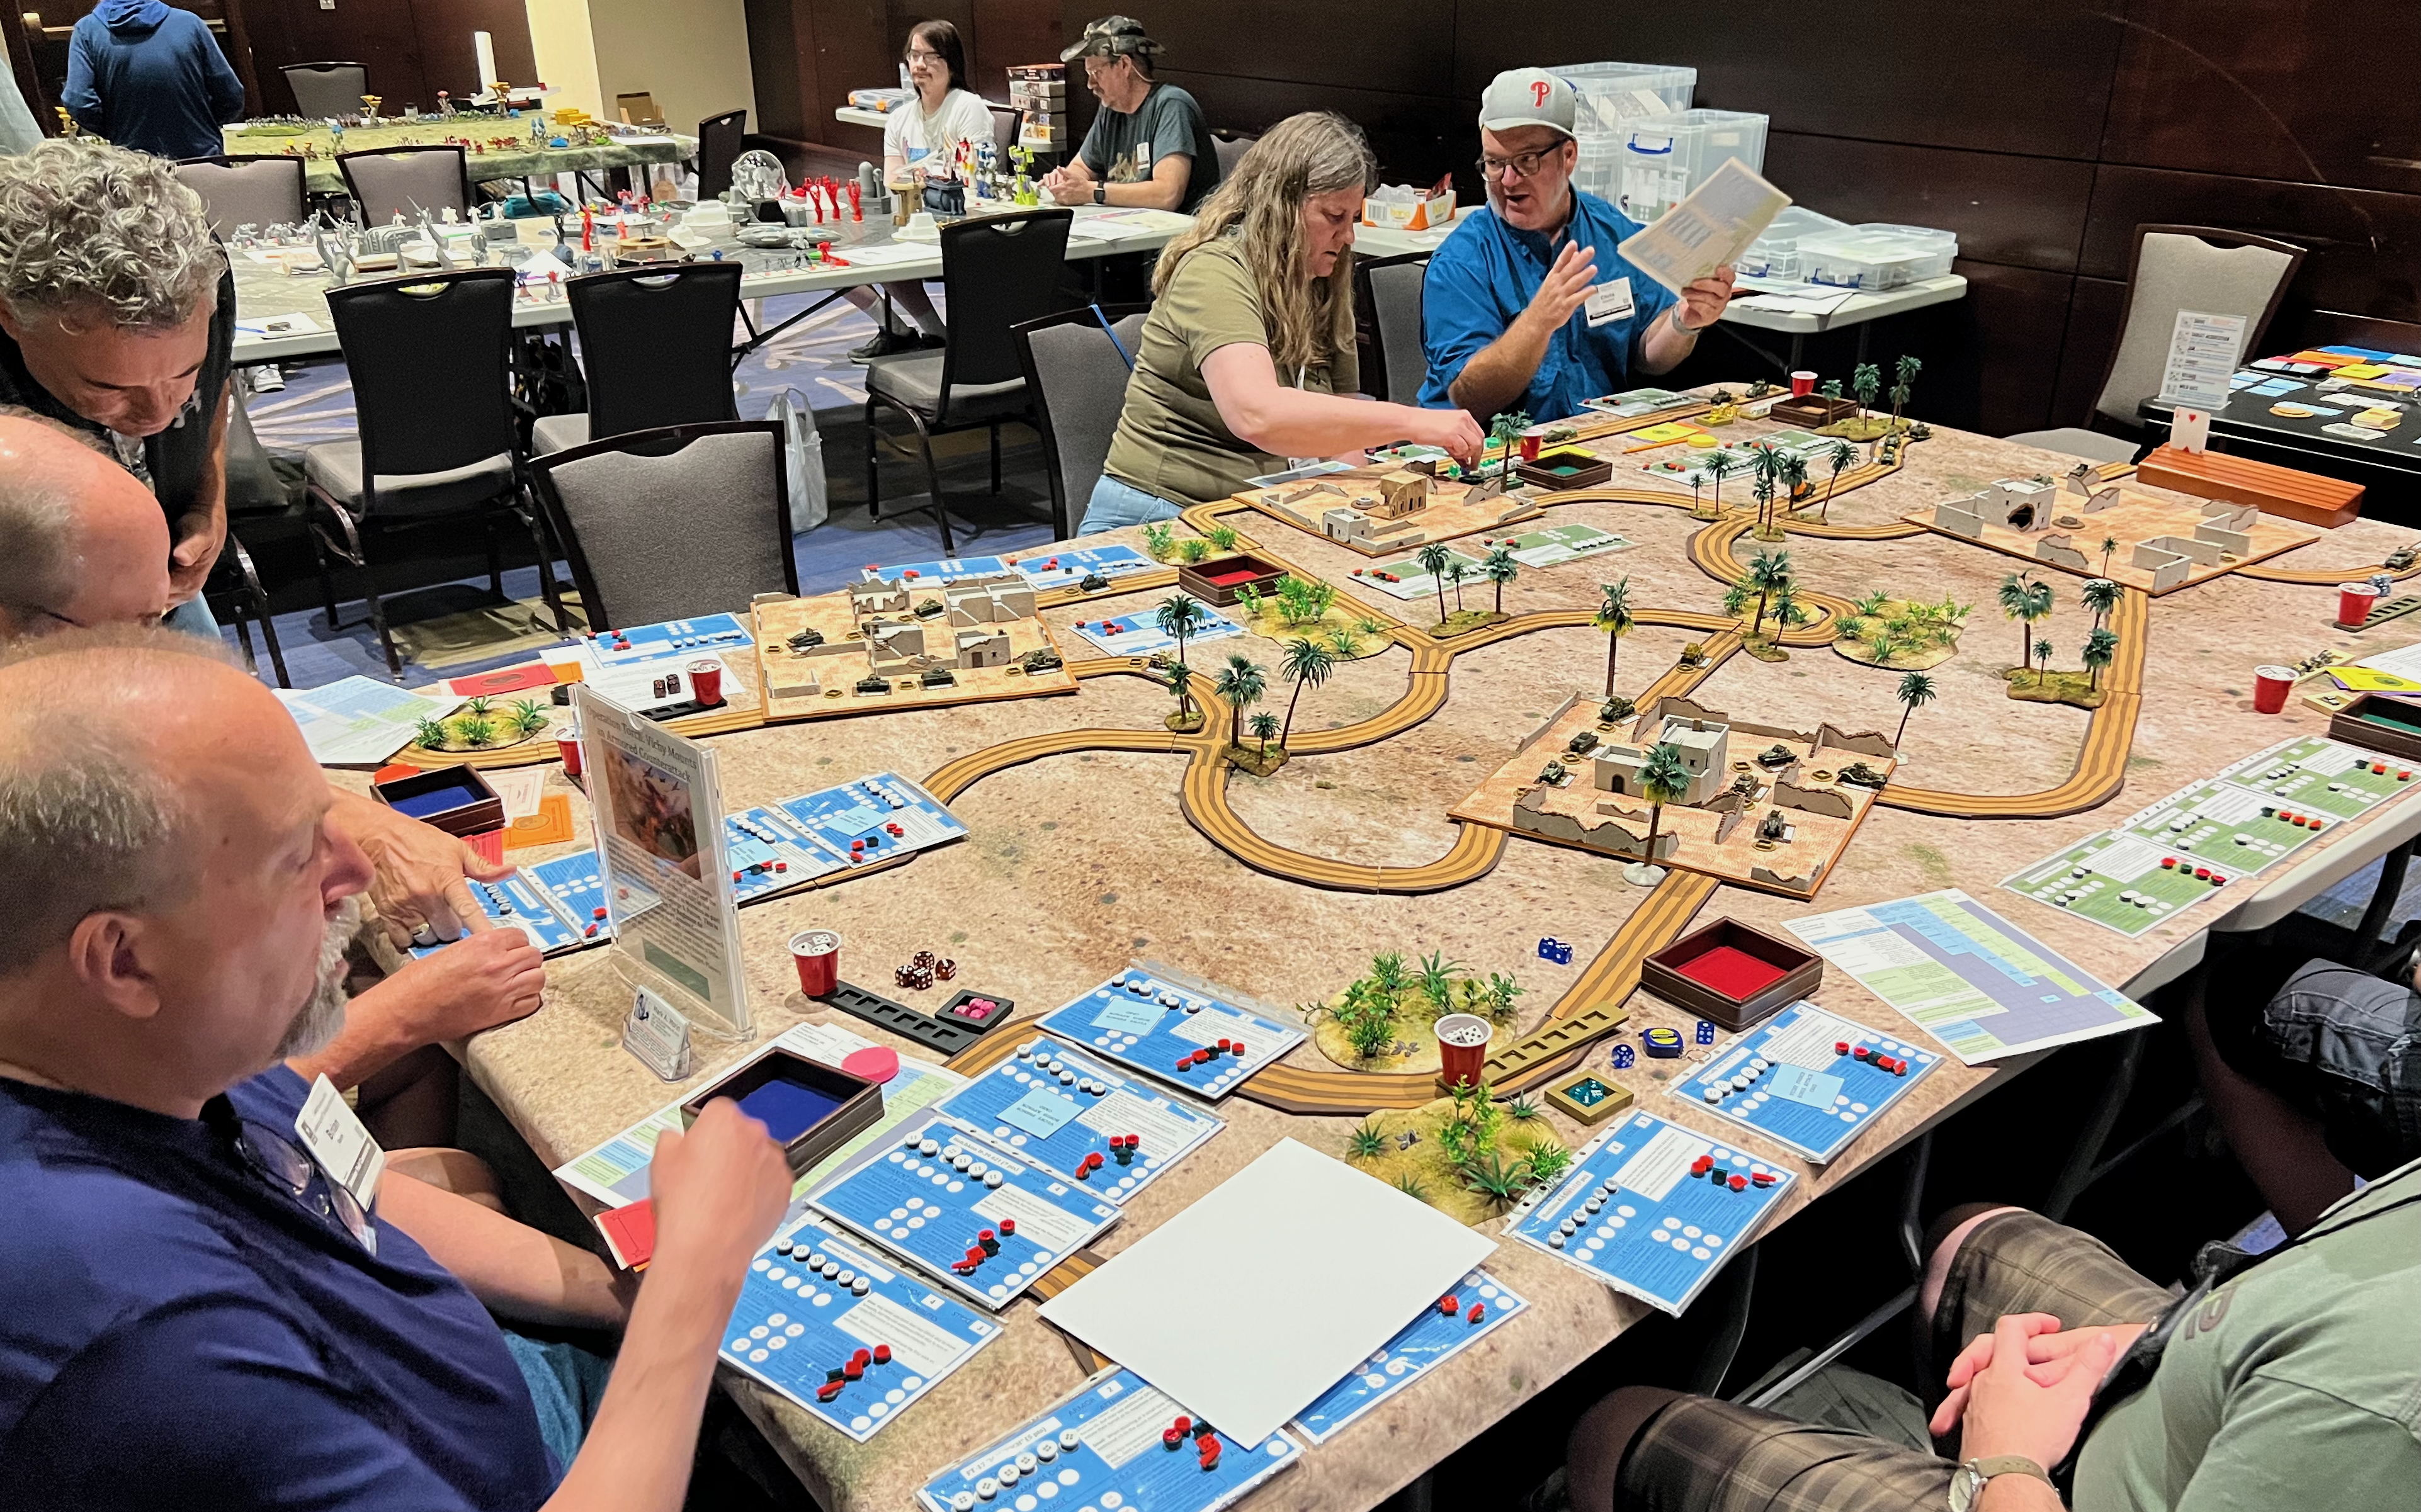
I ran the scenario twice at HISTORICON in July 2025. The games went well. Each side won once.
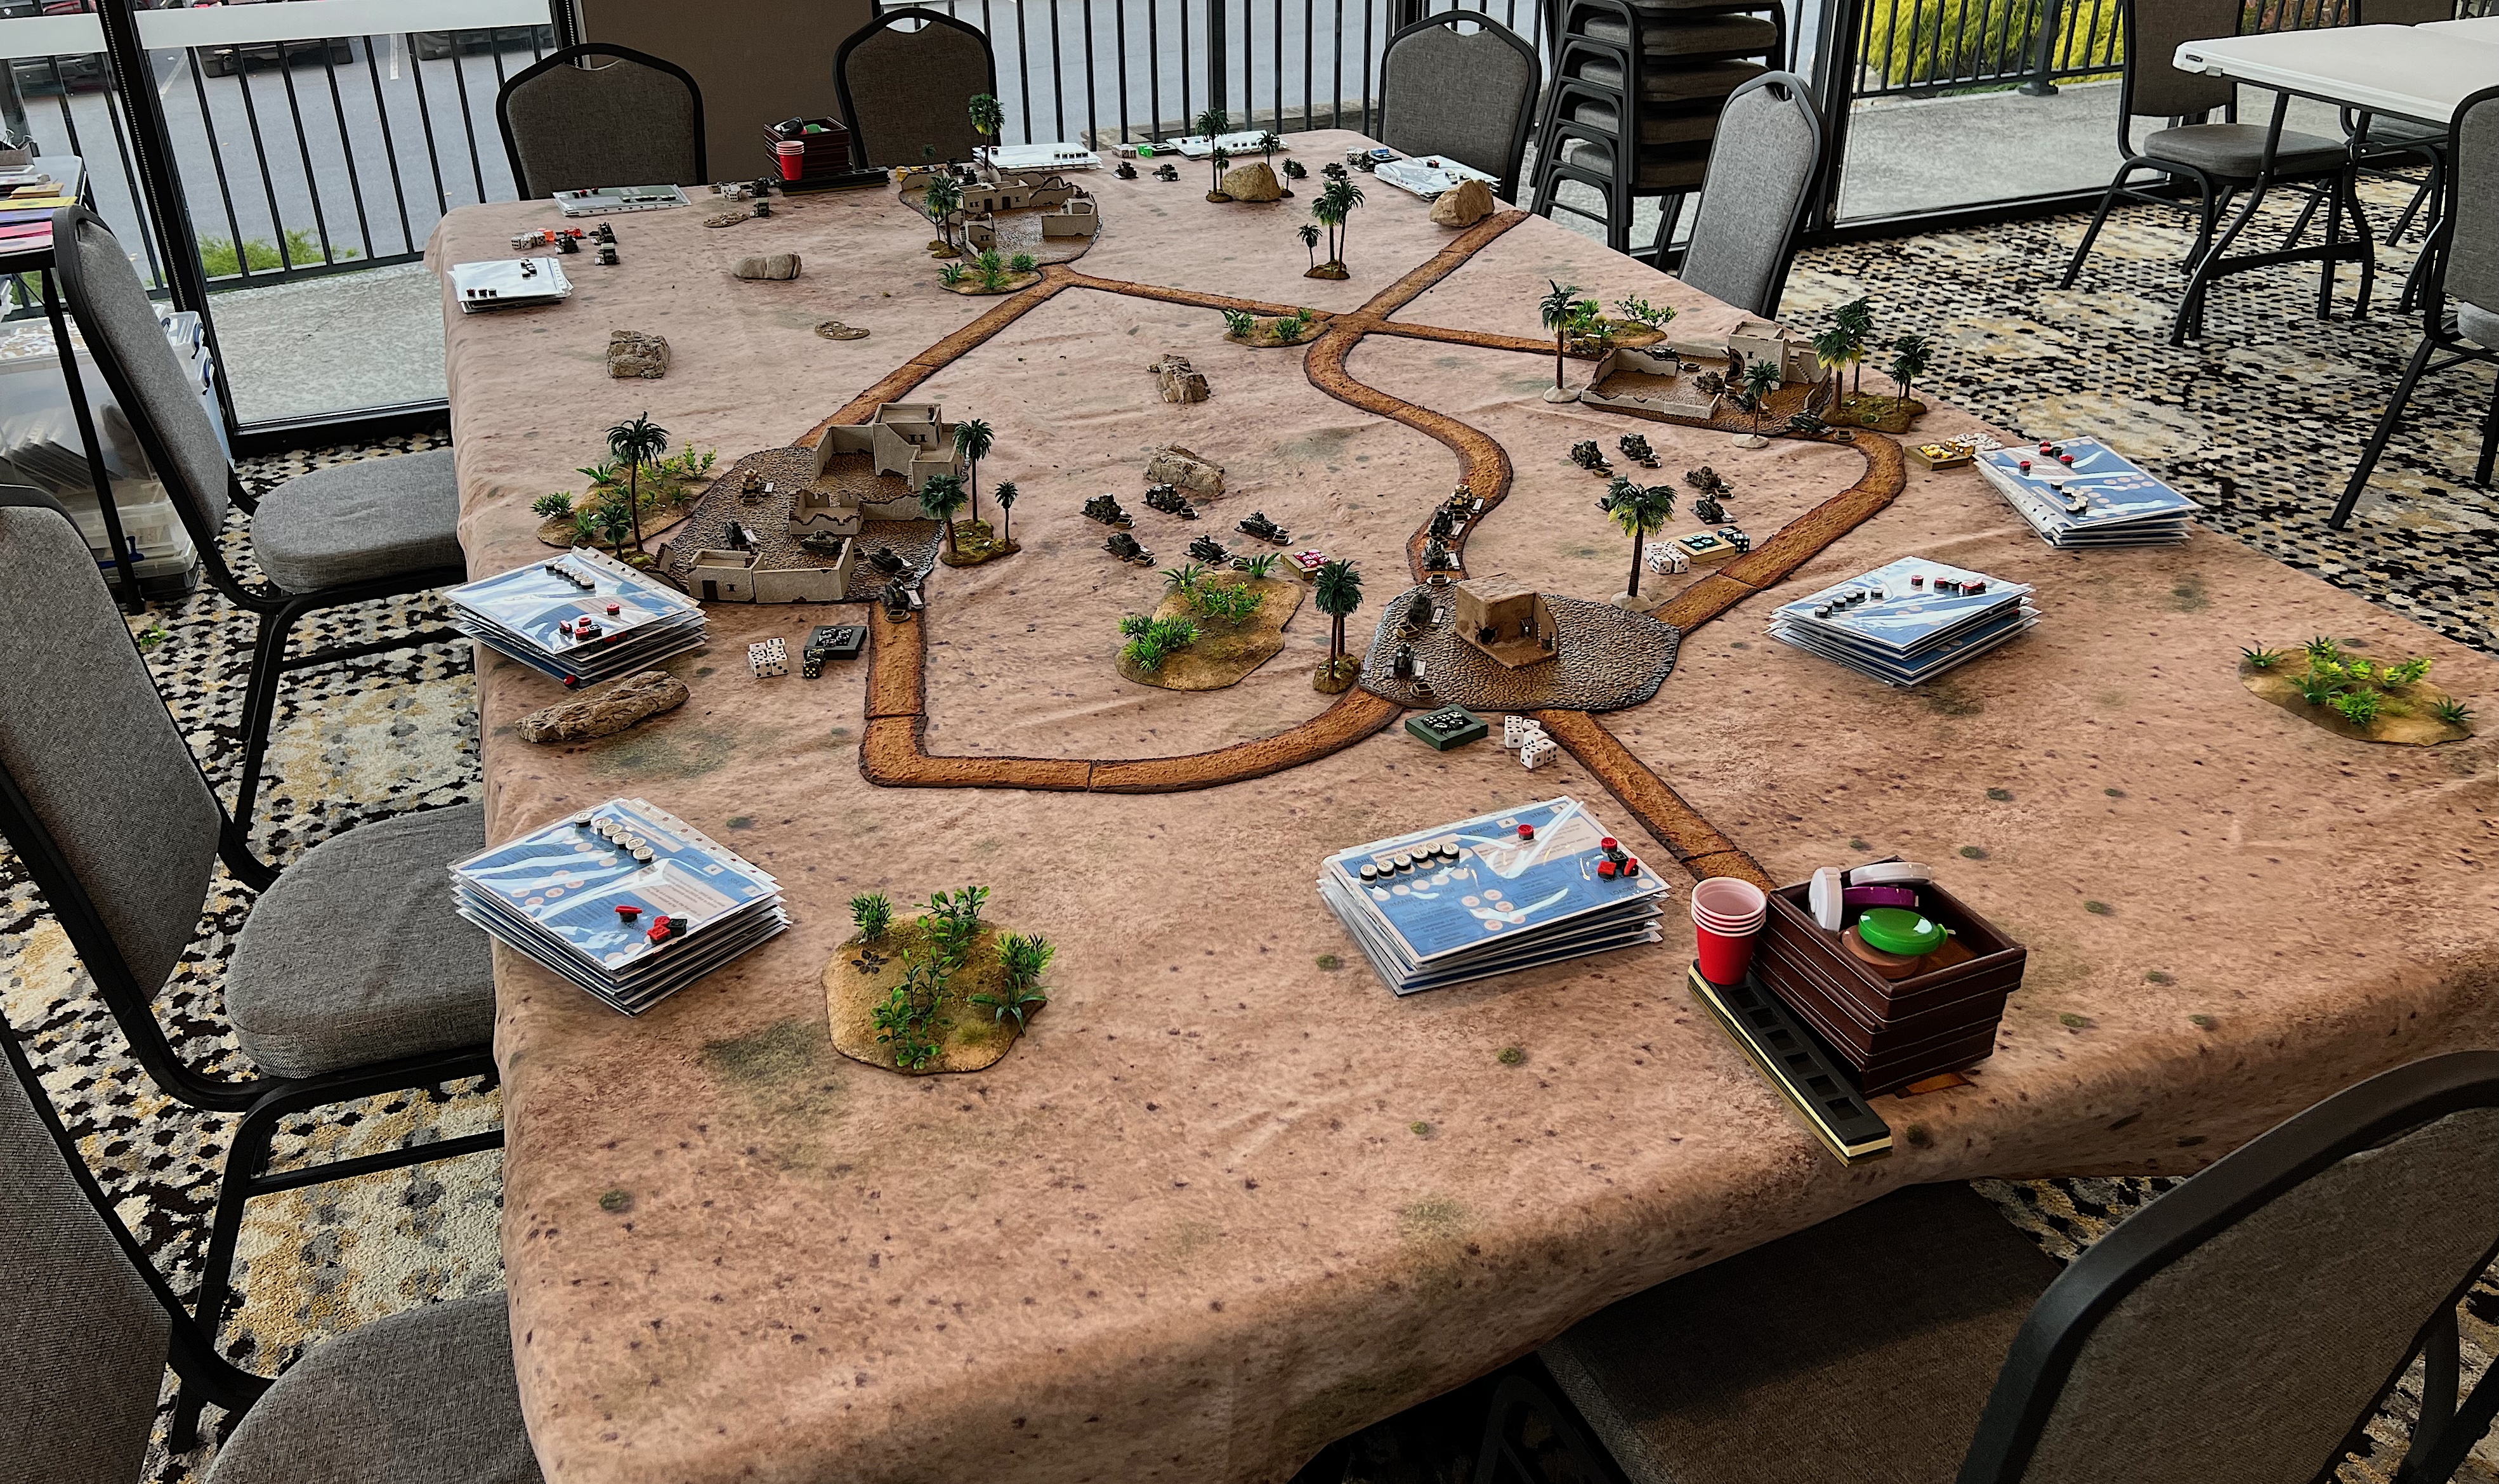
The tabletop set up from the French side. Note the painted poster board roads and town pavements.Each French player started with 5 vehicles. The number of American vehicles varied by player, usually 2-3 including one M5 Stuart tank.Set up with Tanker Bucks. I did eventually decide on $75 per player on each side with the differentials being the cost of resources.The players from the first game – the French won here.In the second game, the US won. This victory was mainly because Dan Eustace successfully used his Bonus Attack Cards. He successively achieved air superiority with Wildcats, then got the Avenger deployed. This led to calling in naval gunfire from the USS Savannah – unleashing a volley from its 15 6″ guns. The results on the French armor was devastating.
After the game, I pondered what improvements I could make. The tweaks in the rules are reflected in the file I shared previously. However, I need to add:
More game aids like dice holders
More blast markers
Better roads – I wanted rubber ones that laid flat and took up less space in a box.
Better town bases that also were rubber and laid flat on the tabletop.
Actual plane models to represent the aircraft. I was using photos on flight stands at HISTORICON for the planes, and I wanted better.
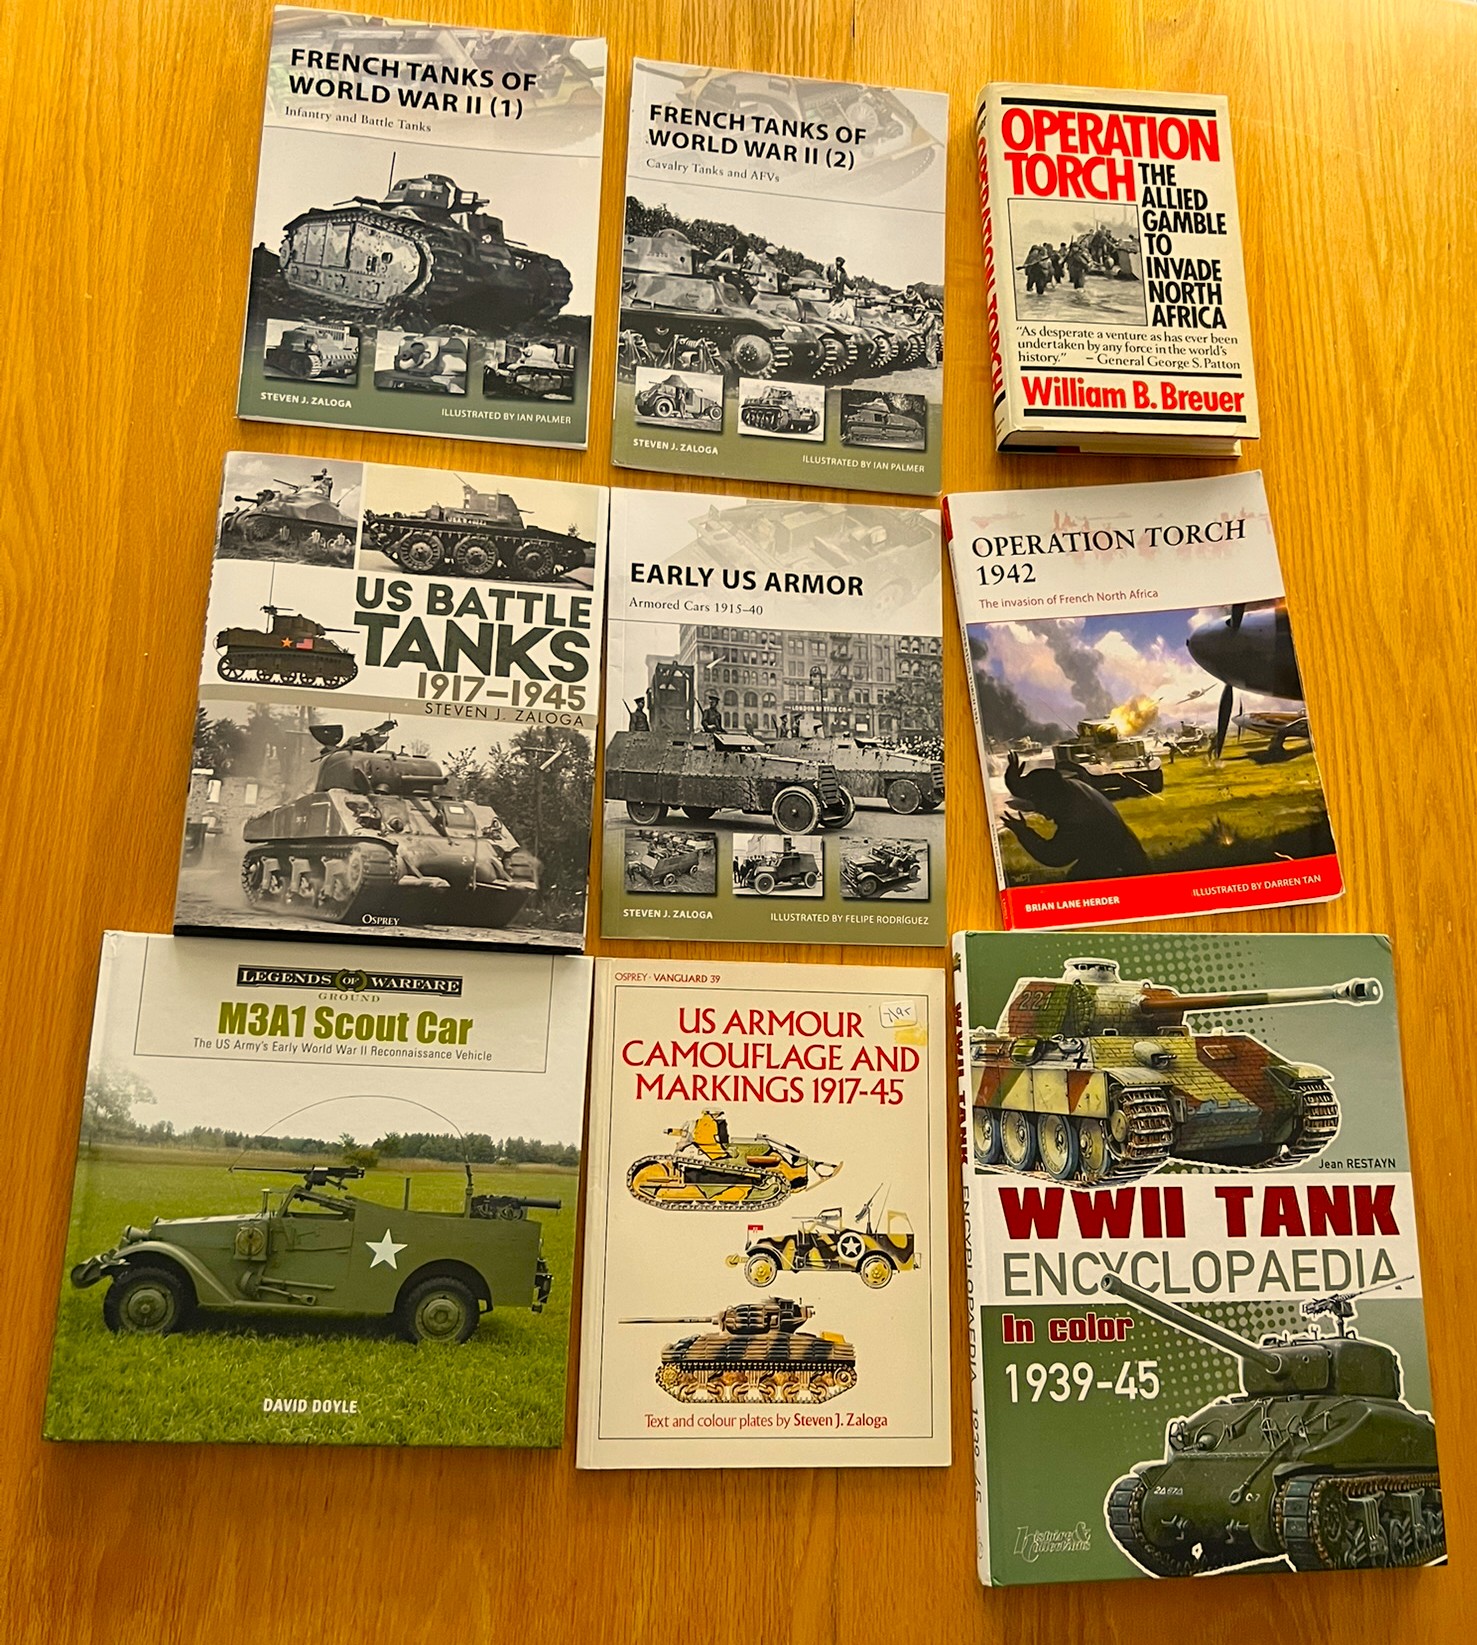
I wanted to read a book on the campaign that I learned about. It was recommended to me in a comment to one of my blog post links on TMP. It focused on this phase of WWII, and I planned to do this before I did any more hobby work. Rick Atkinsons’s An Army at Dawn is a true gem of a historical book, and a must read. This was my August effort.
Previous research booksAugust’s great read!
After reading these, it was time to get going on the additional “stuff” listed above. I knocked out the dice frames and similar tasks quickly. I had enough for 8 players, and now I was set for 10.
Building Dirt Roads and City Bases WIP Shots
Now it was time to make the roads and city bases. I stumbled on this excellent video on how to make rubber wargaming roads. It became the blueprint I used and I highly recommend his process.
Here is a link to the excellent video.
Below are progress WIP shots of how I built 54 sections of road and 4 bases.
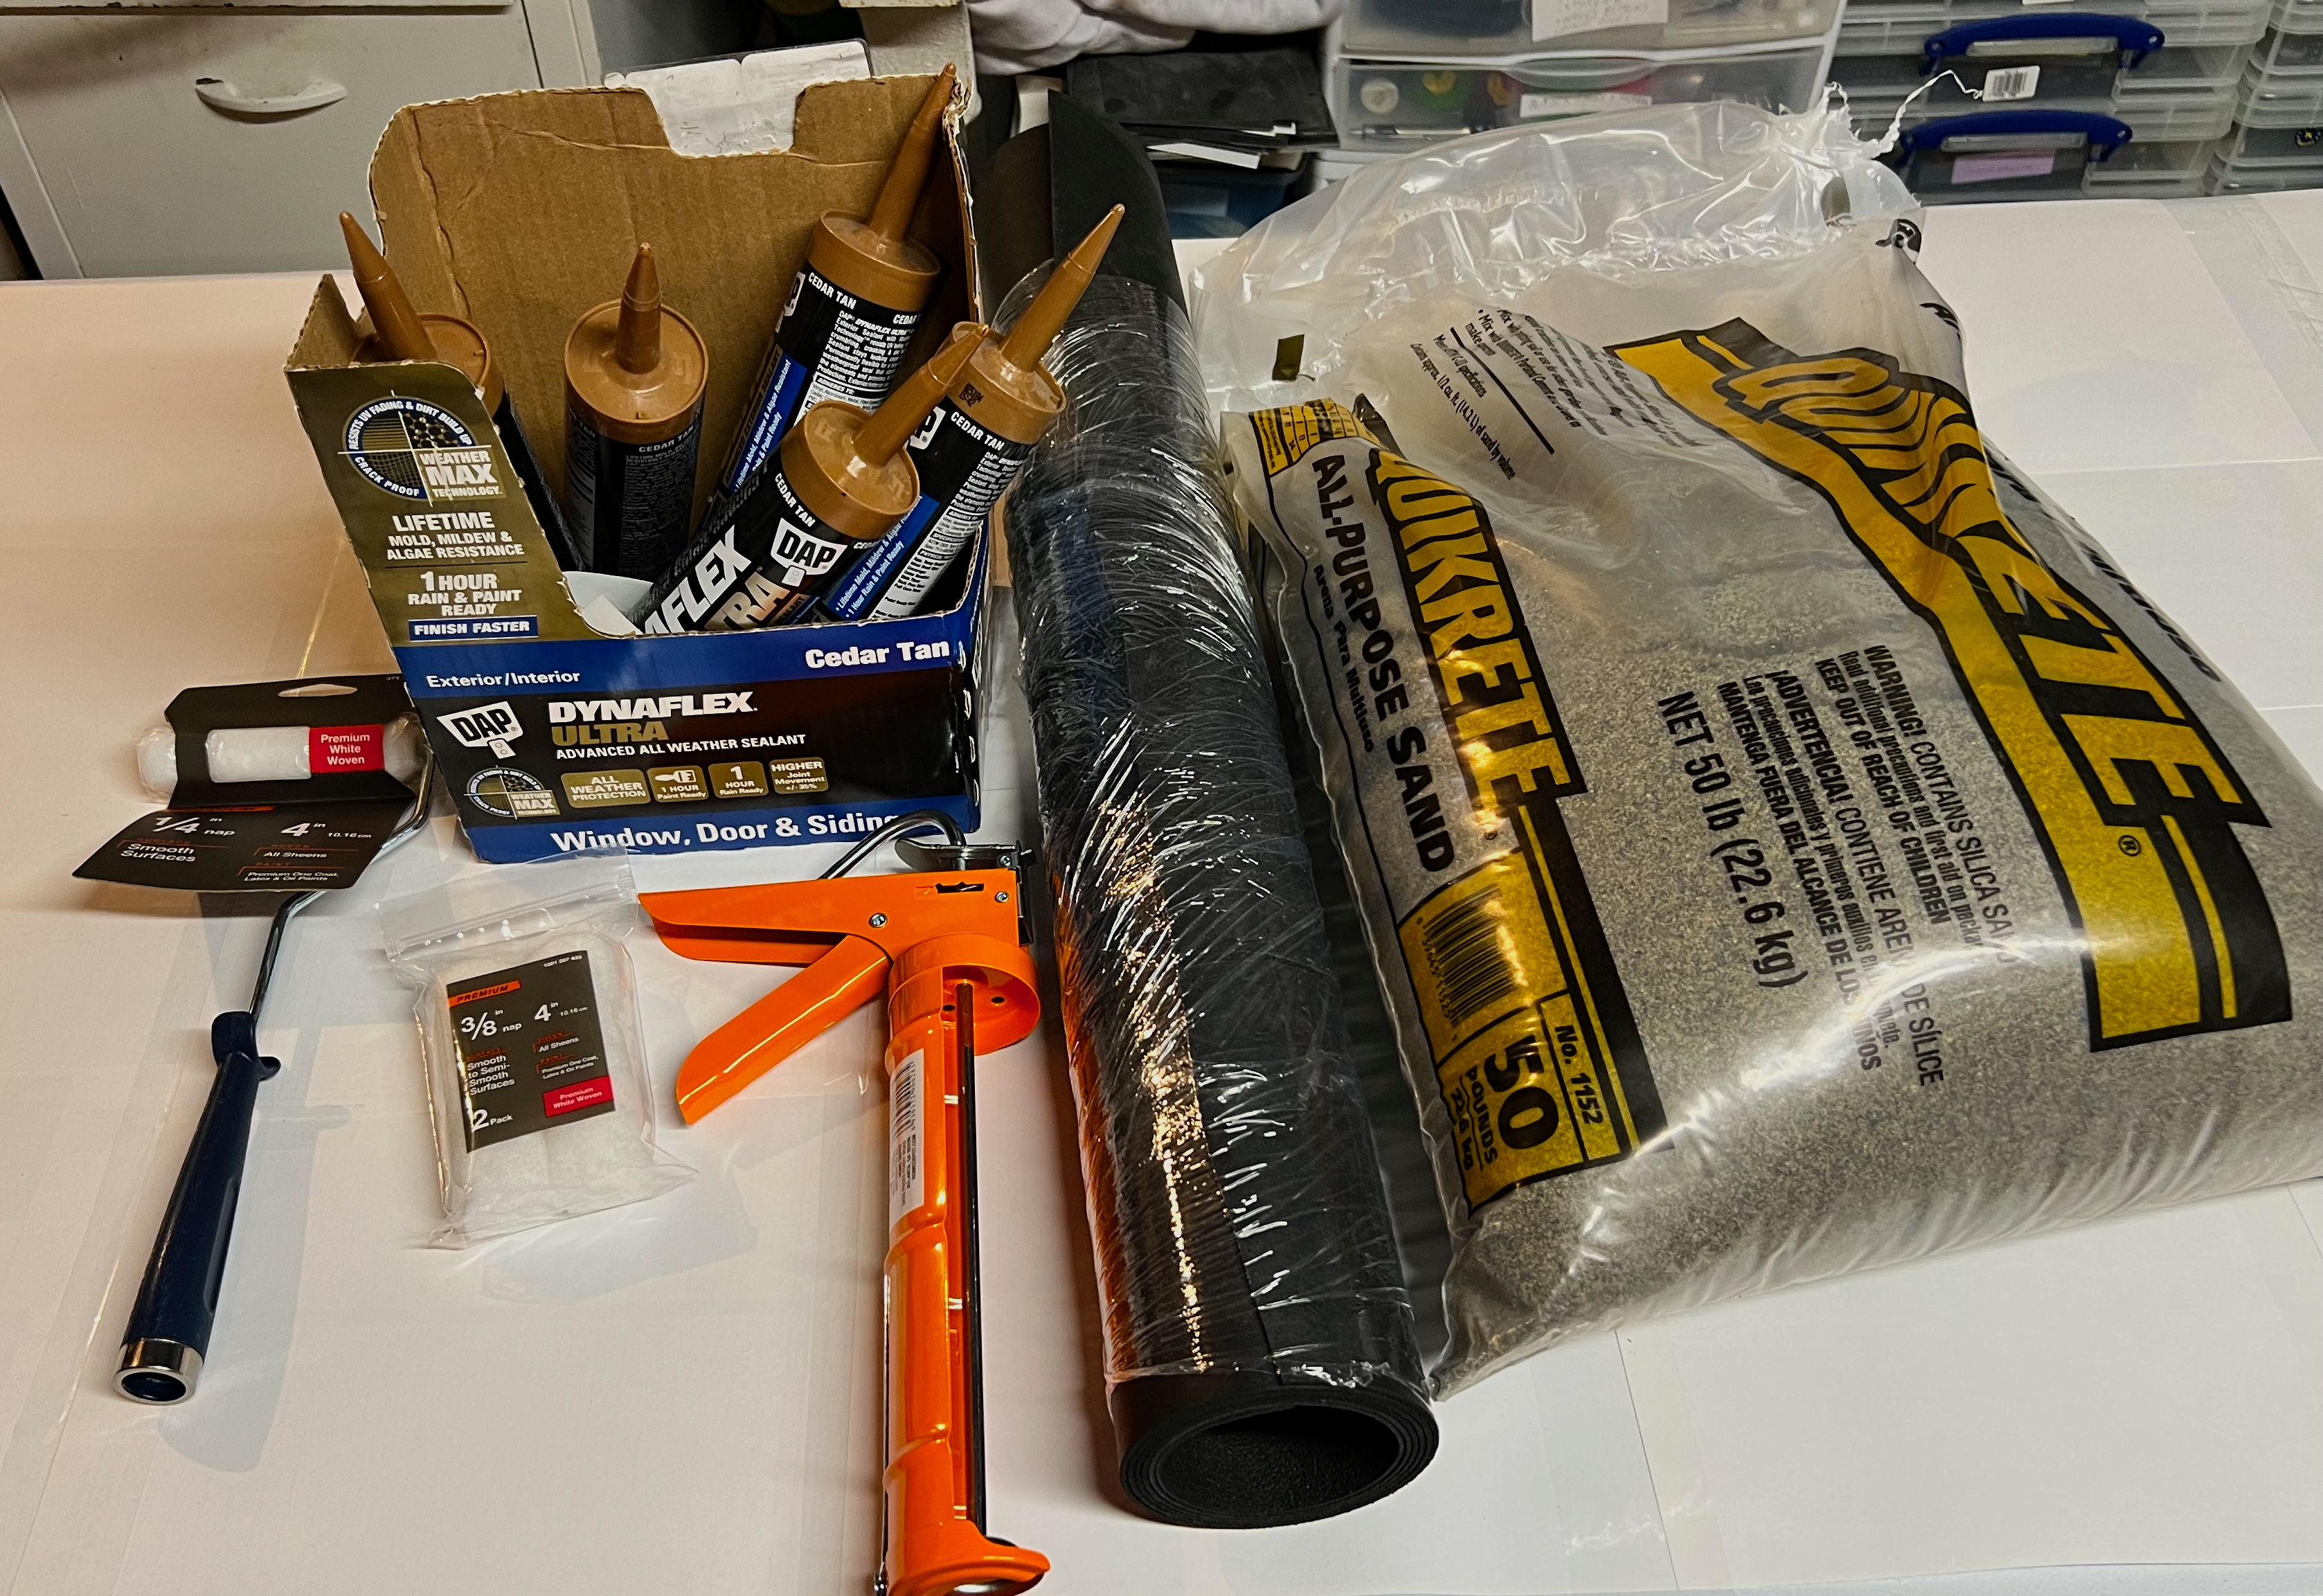
What I needed included a small paint roller, a caulking gun, and paintable caulk sealant. It also involved cutting up rubber floor runner material. Additionally, play sand and chinchilla dust were used on the roads for texture.I cut the floor runner rubber with a box cutter on a wooden cutting board. I made the same number and types of dirt roads I had previously made with the poster board (54).
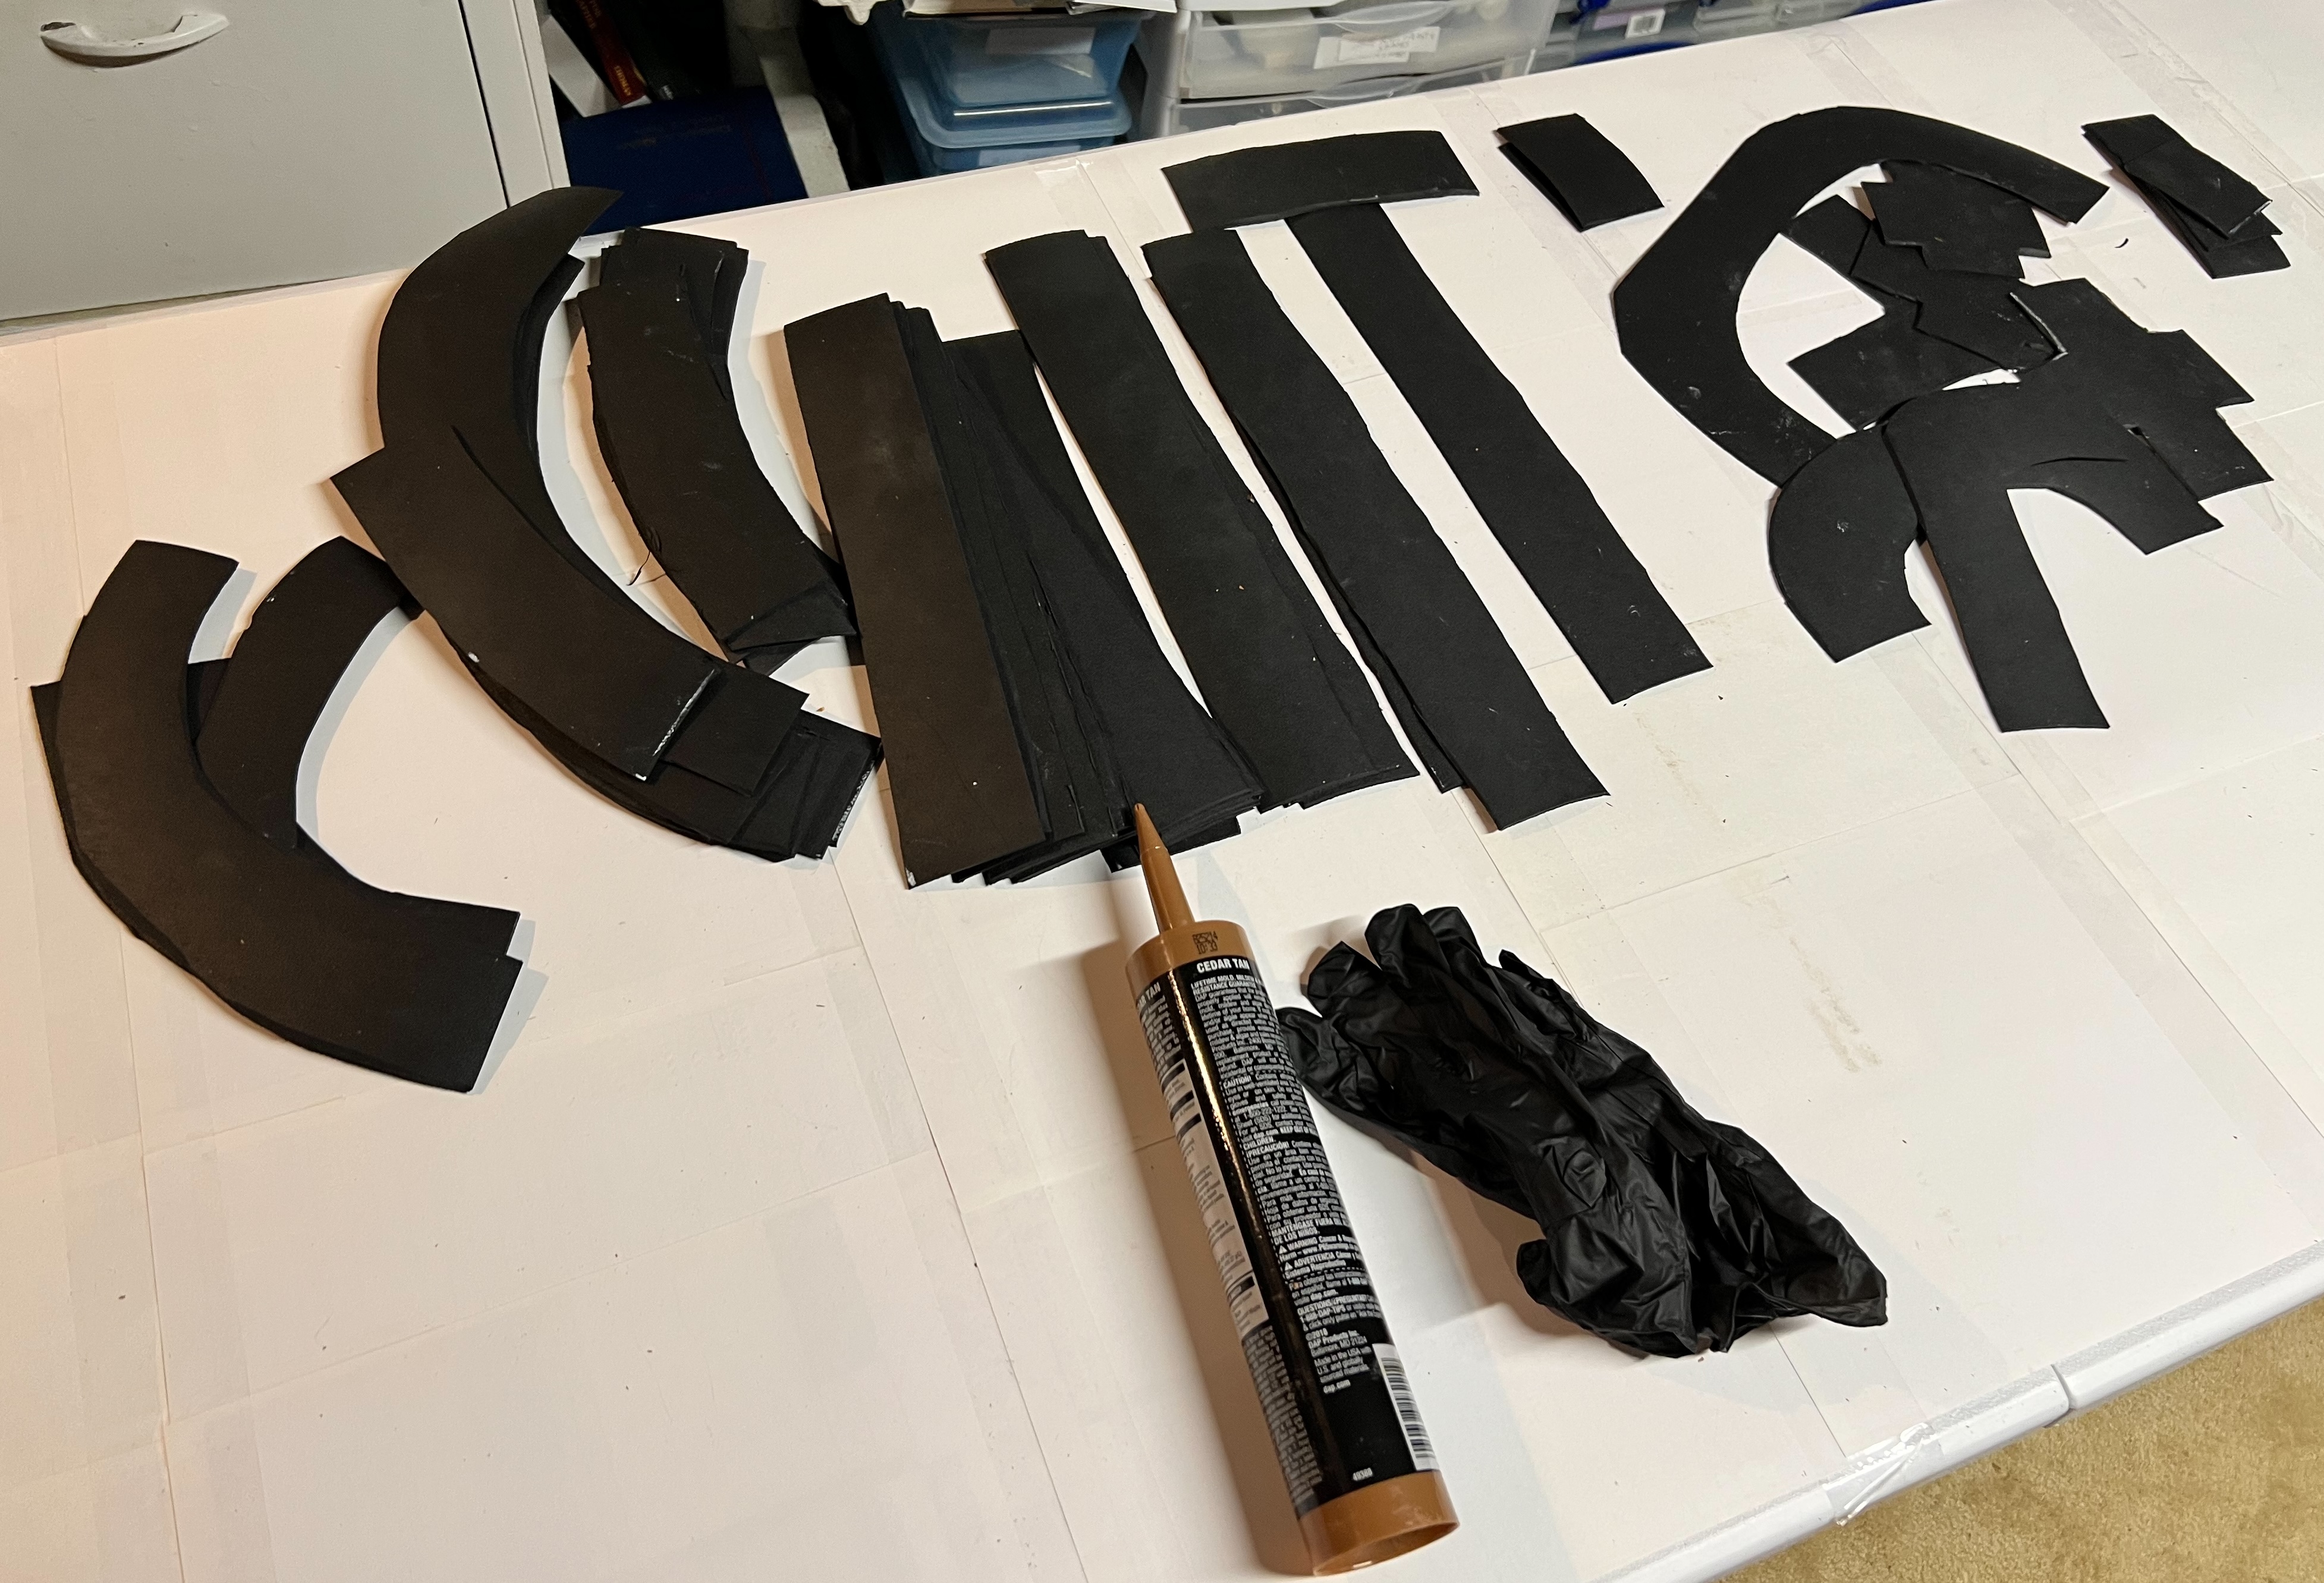
For a working space to work on the roads, I covered one of my gaming tables with paper. The sheets were secured with packing tape and this was sufficient to protect the table.
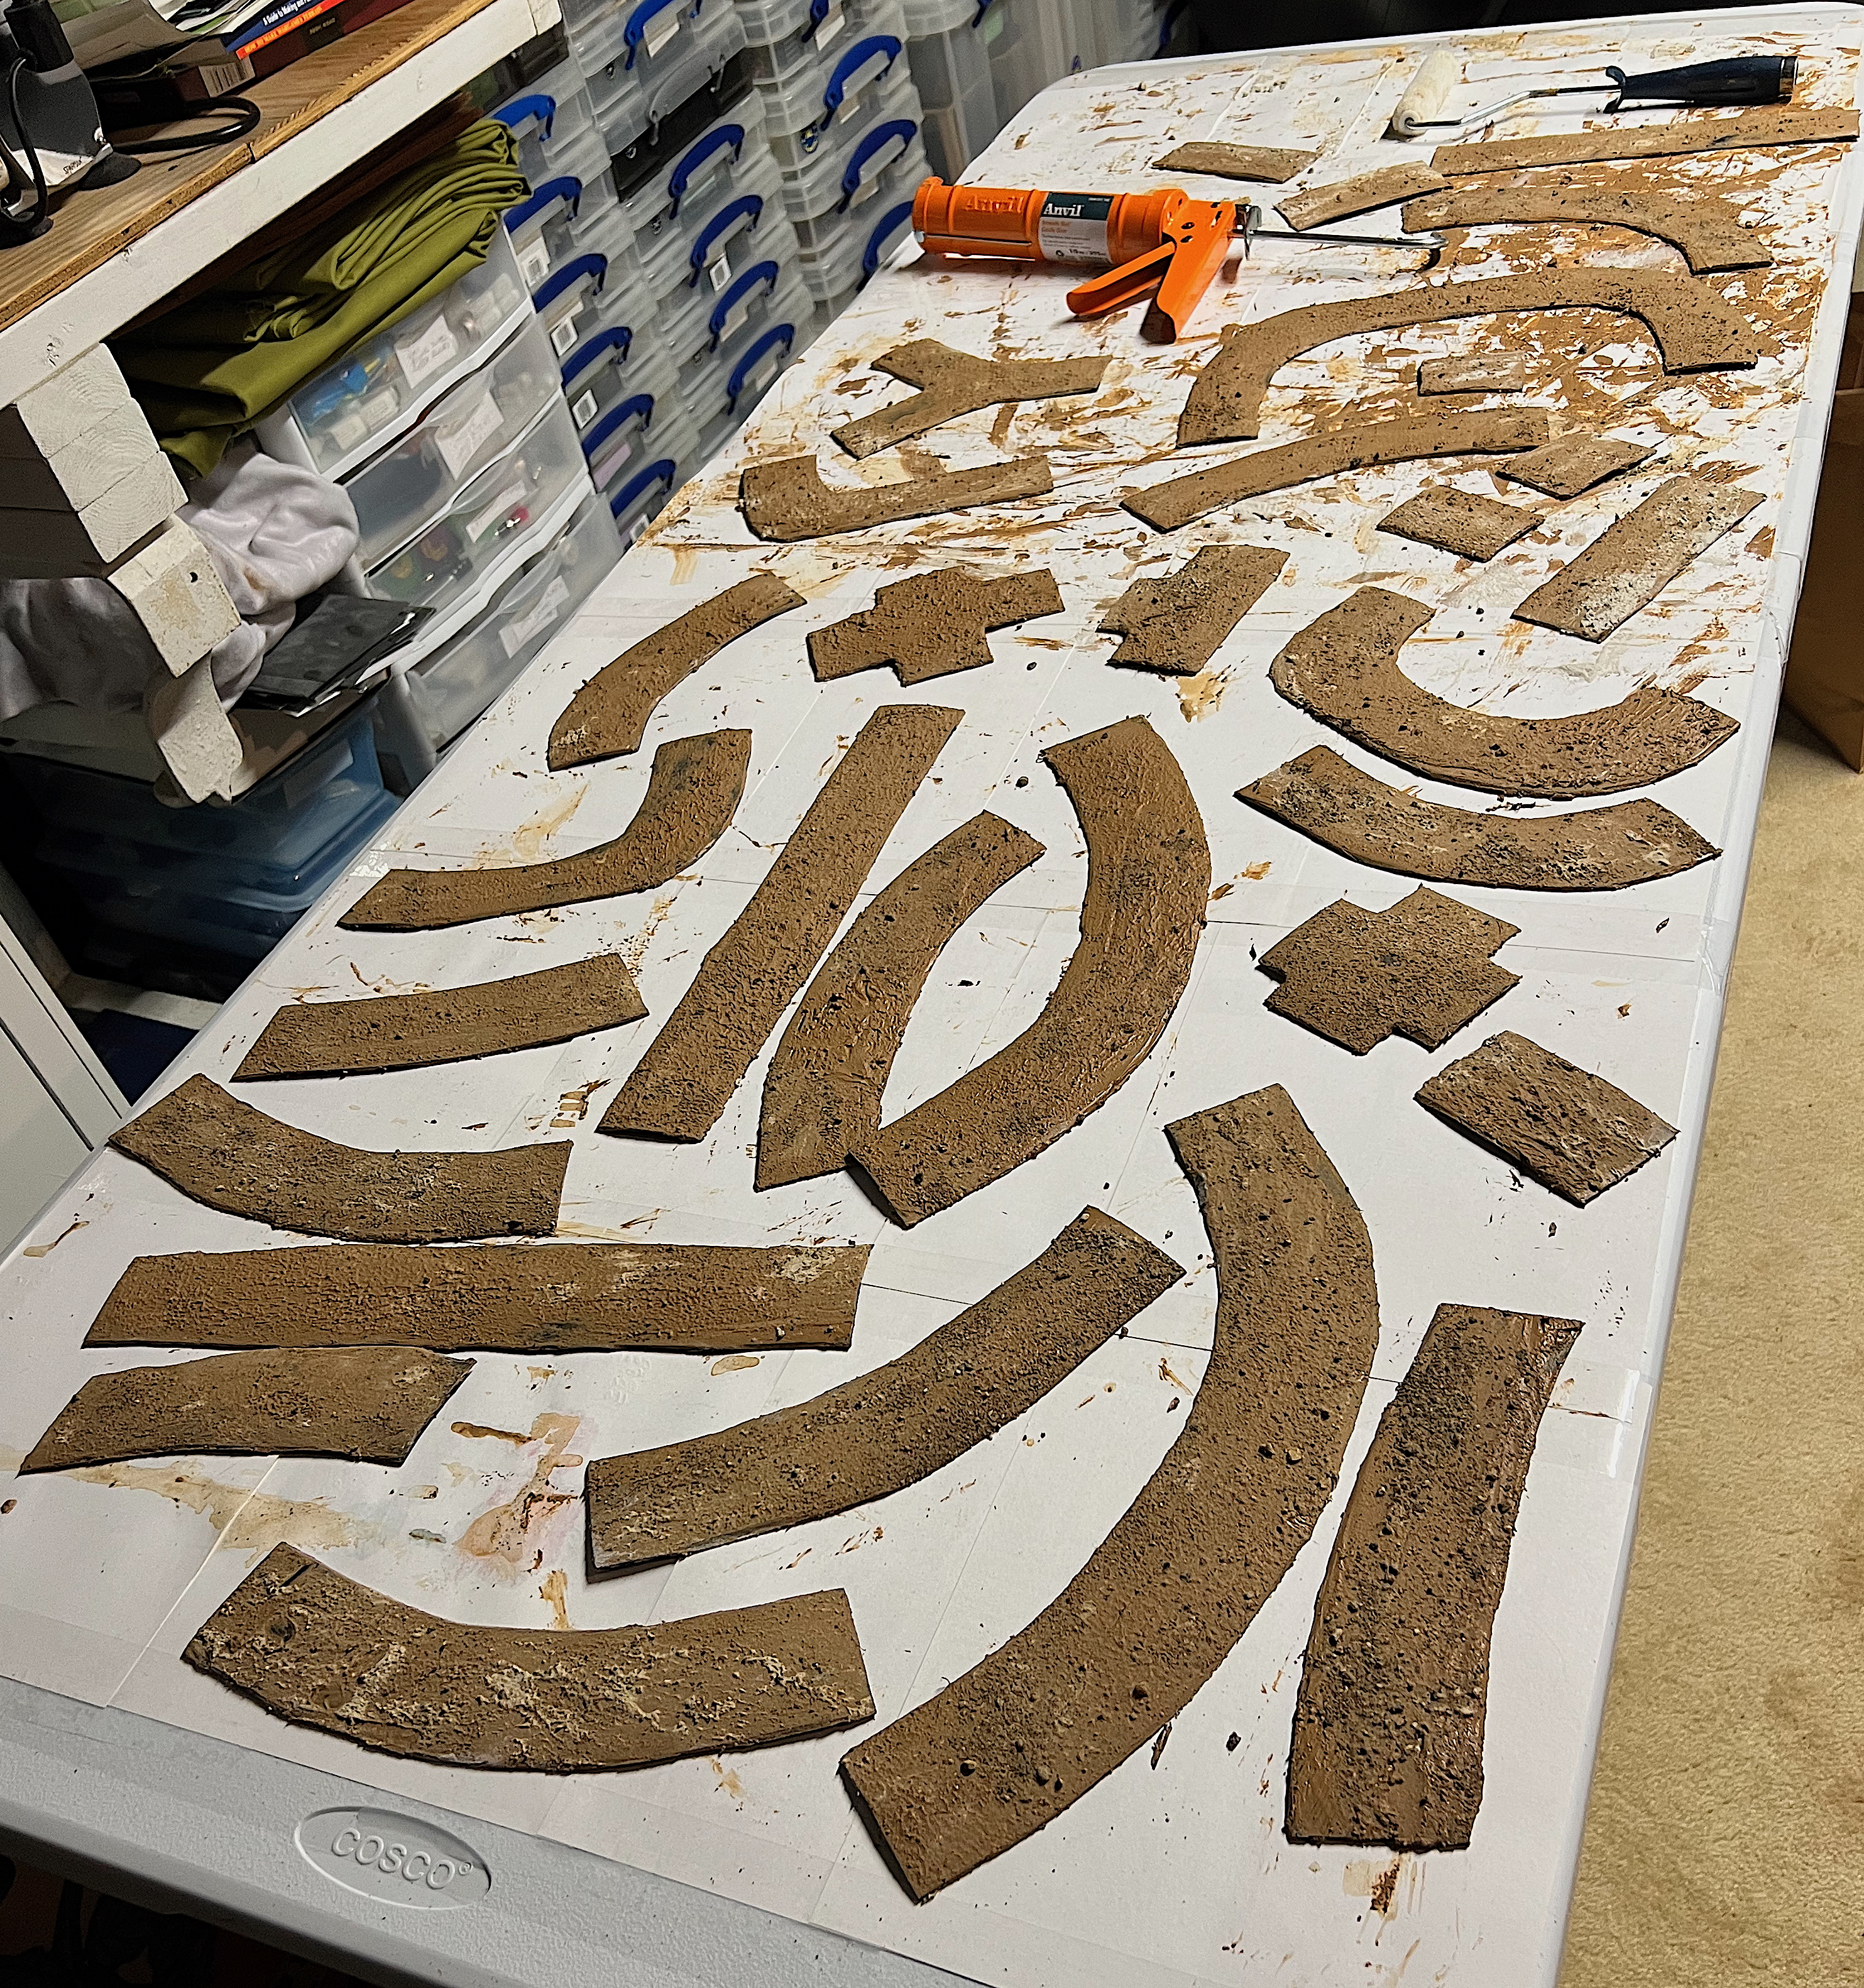
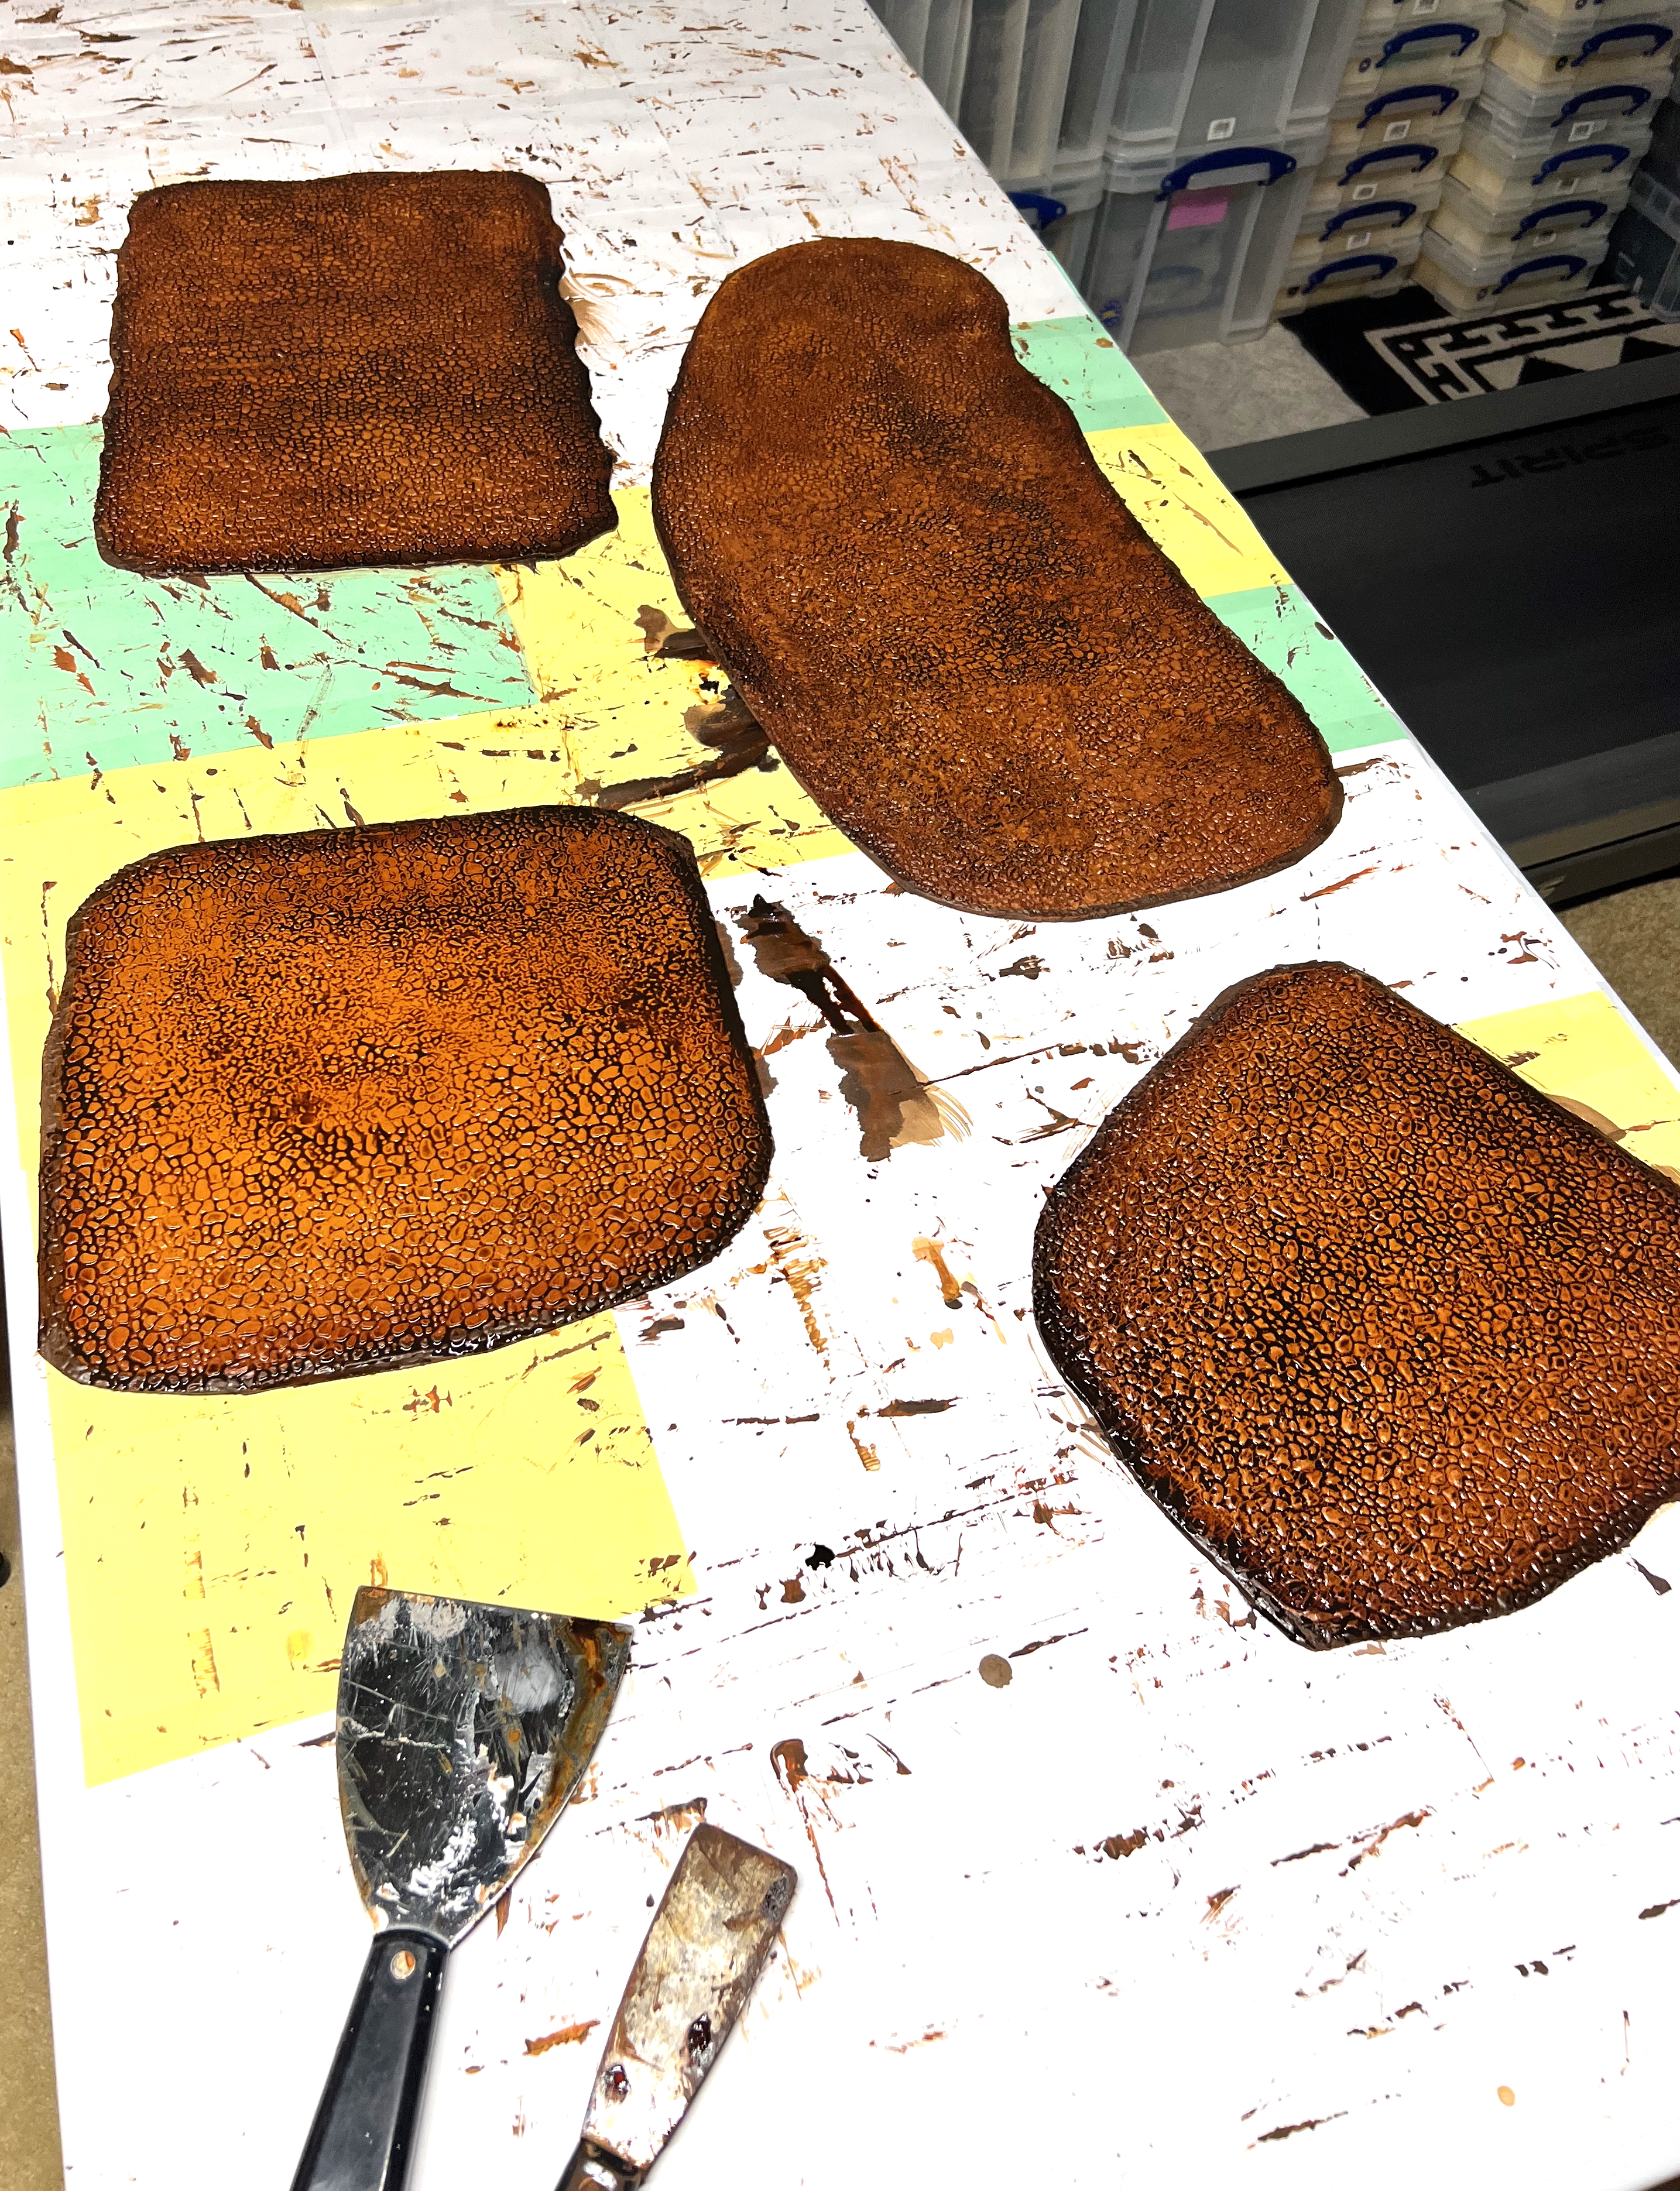
Here you see some of the road sections in progress. Sand and chinchilla dust were both rolled onto the caulk with a wet paint roller.The first tranche of roads drying……and here painted minus some final dry brushing.Then it was on to the city bases. I limited the width of the city bases to accommodate using a Green Stuff World Mega roller. The roller made a cobblestone imprint.Greg Priebe was kind enough to gift me the roller. Here I cut the first piece of rubber floor runner. As I did with the roads, I beveled the edges slightly. The edge angle was around 45 degrees.A caulking gun spread out the sealant. Then I smoothed it as you see with two different putty knives, before rolling the cobblestone patterns. This was the approach for all four bases – I just sized and shaped them differently.The painting scheme was basically the same for all four. Here you can see the imprinted cobblestones. To accentuate them, I used a Liquitex “Burnt Umber” ink cut with thinner. Then I let them dry before adding a quick dry brush.The final bases completed. I would place 15mm buildings on them.
This was far more economical than buying similar roads. Now that the dirt roads and town bases were completed, it was time to add my 3 aircraft.
Aircraft Model WIP Shots
My search initially was for the right three 1:100 scale planes, but that effort proved fruitless. No one really makes aircraft in that scale, at least not the ones that I was looking for. Most models were 1:72. I did find some die cast models that would work just fine. They are more like game status makers. Those diecast models were the carrier-based Grumman F4F Wildcat and the Dewoitine D.520. Both had flight stands – an important feature as I wanted their landing gear to be retracted in flight.
A bit of assembly for these two diecast models was required, but not much. That left the Grumman Avenger TBM to source. And lucky me, I found one on eBay – obviously left unassembled since at least 1979 – if not much earlier. It was an Airfix plastic model, and it was complete. The papers inside were amazingly yellowed with age as you will see. I had not built a plastic model like this since I was a kid. It was probably for sale back then!
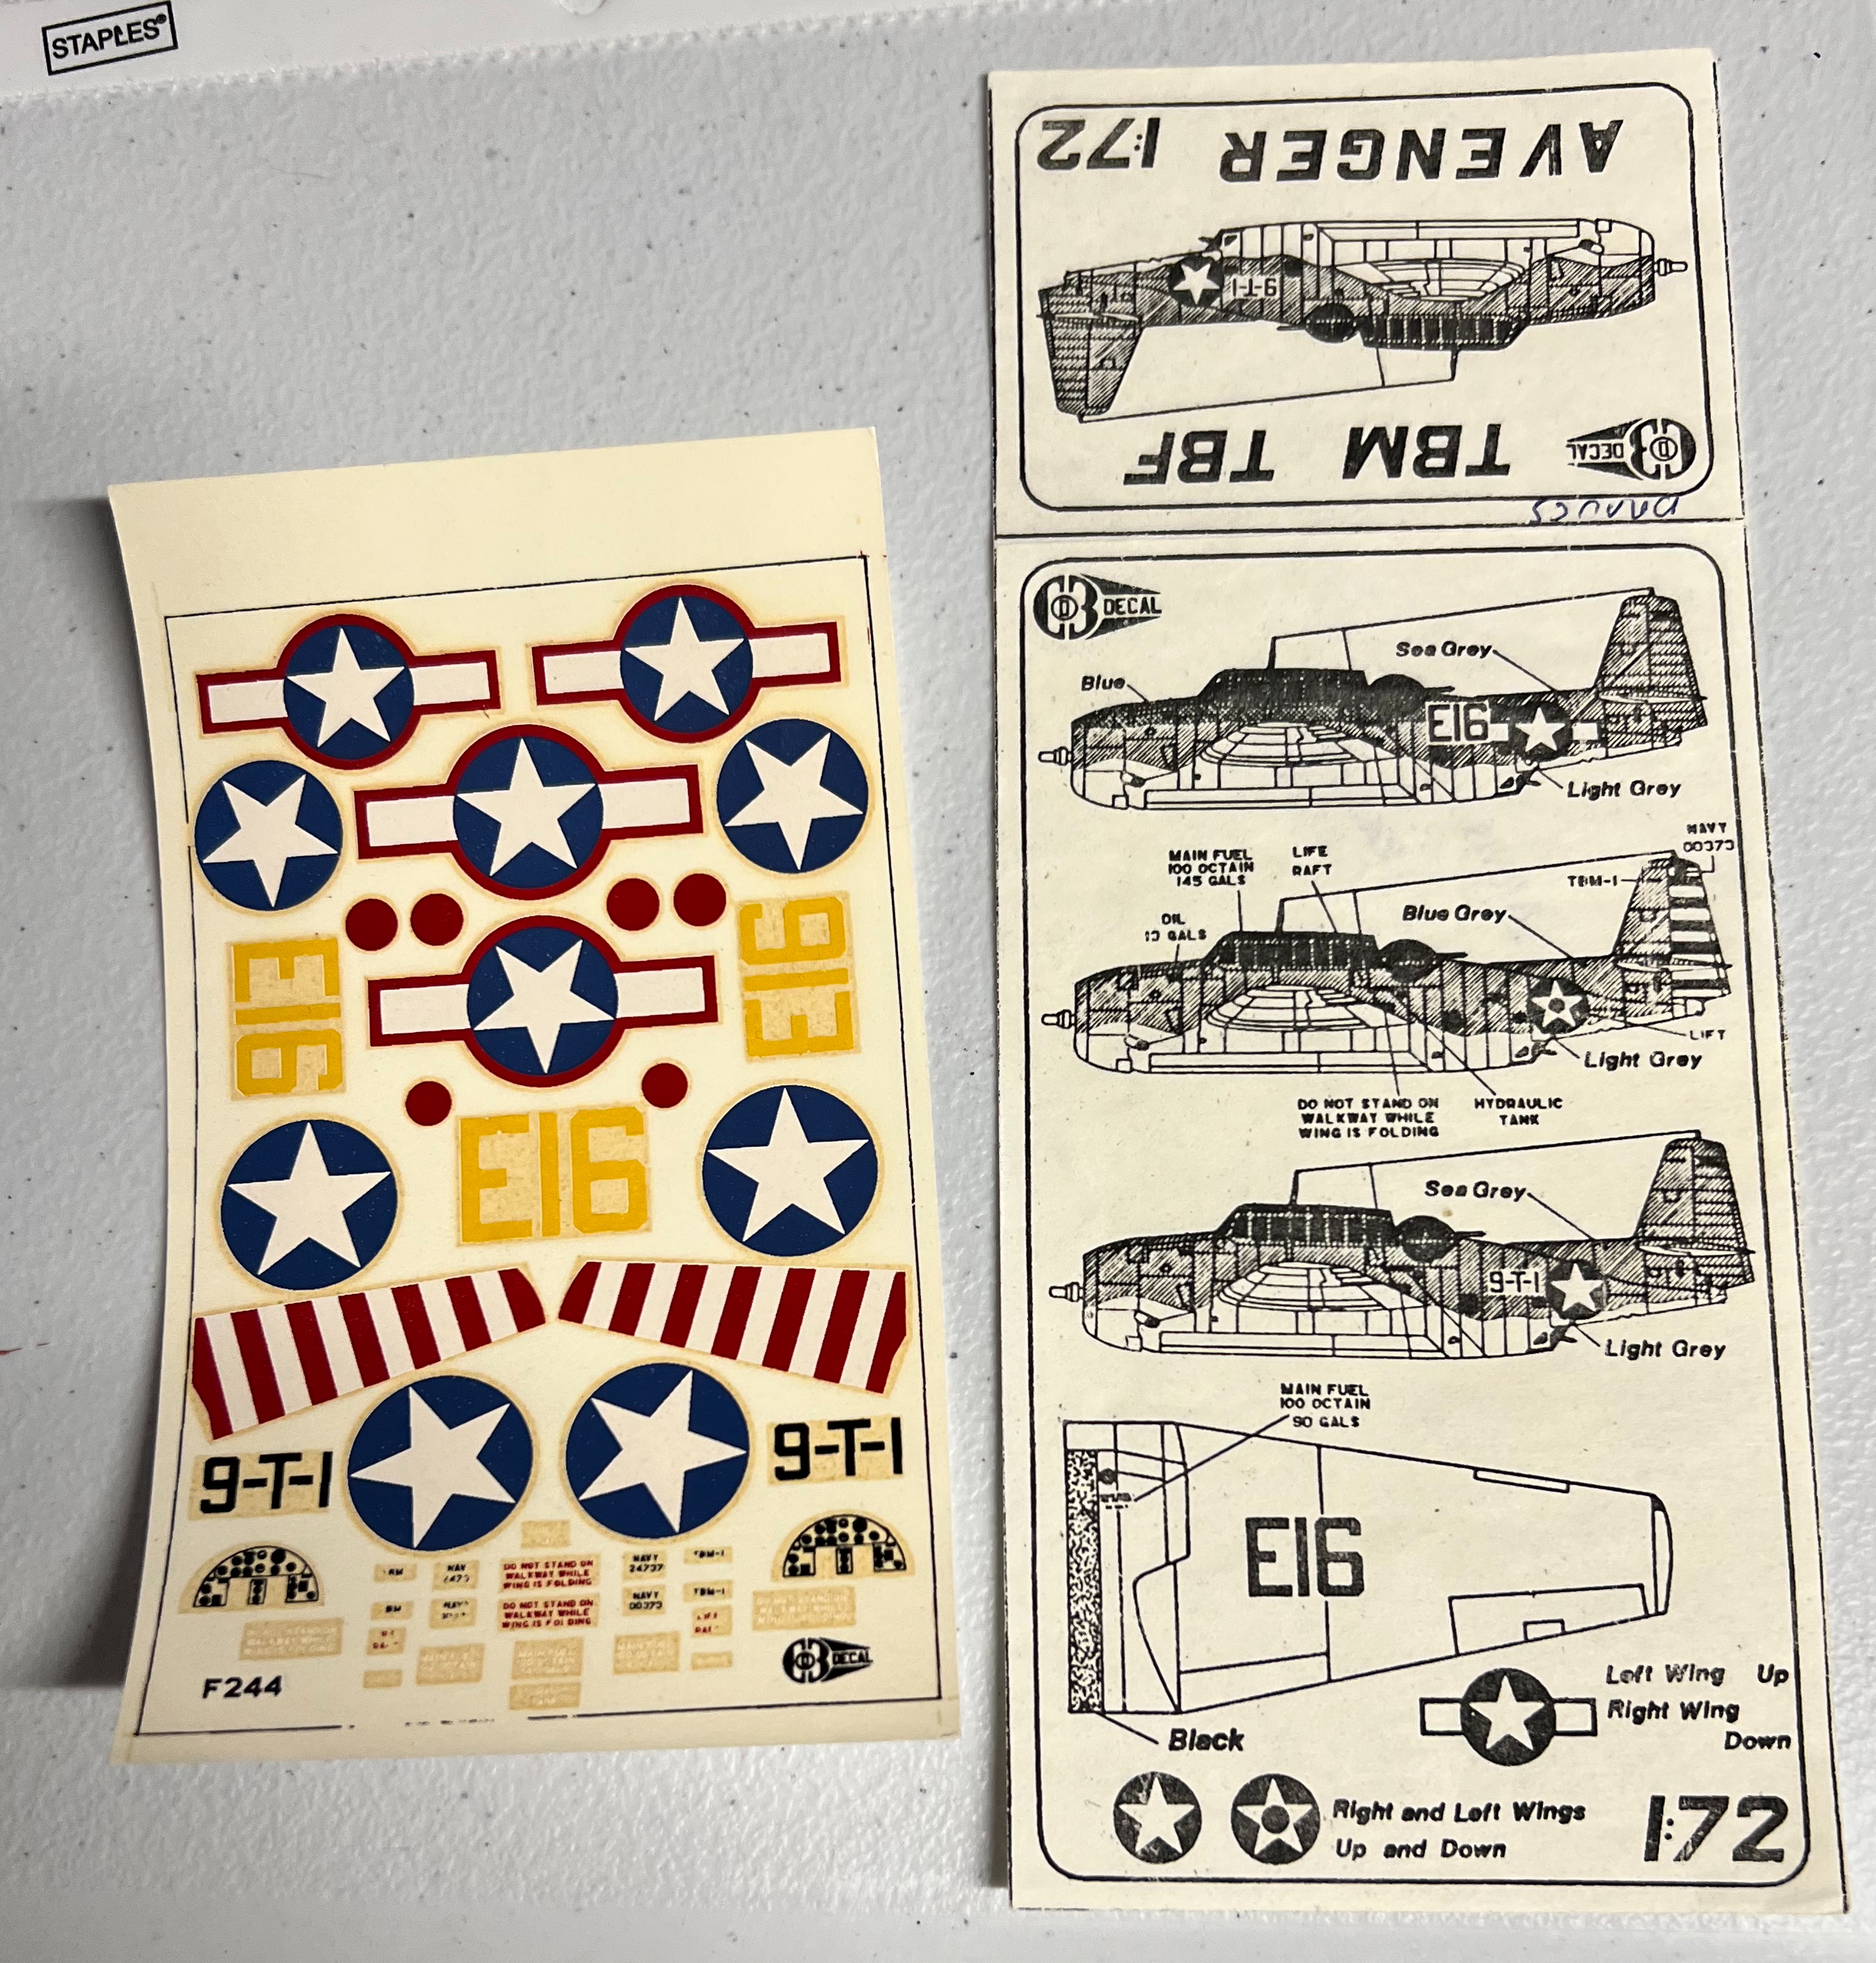
The F4F Wildcat, the Dewoitine D.520, and the Avenger kit. It says “new”, but…I guess it was at some point in the 1970’s? 1960’s?The kit contents.The components laid out so as to figure it all out. The directions were fine. The decals were, well, as you can see, trash. I did order some replacements from eBay as you will see.
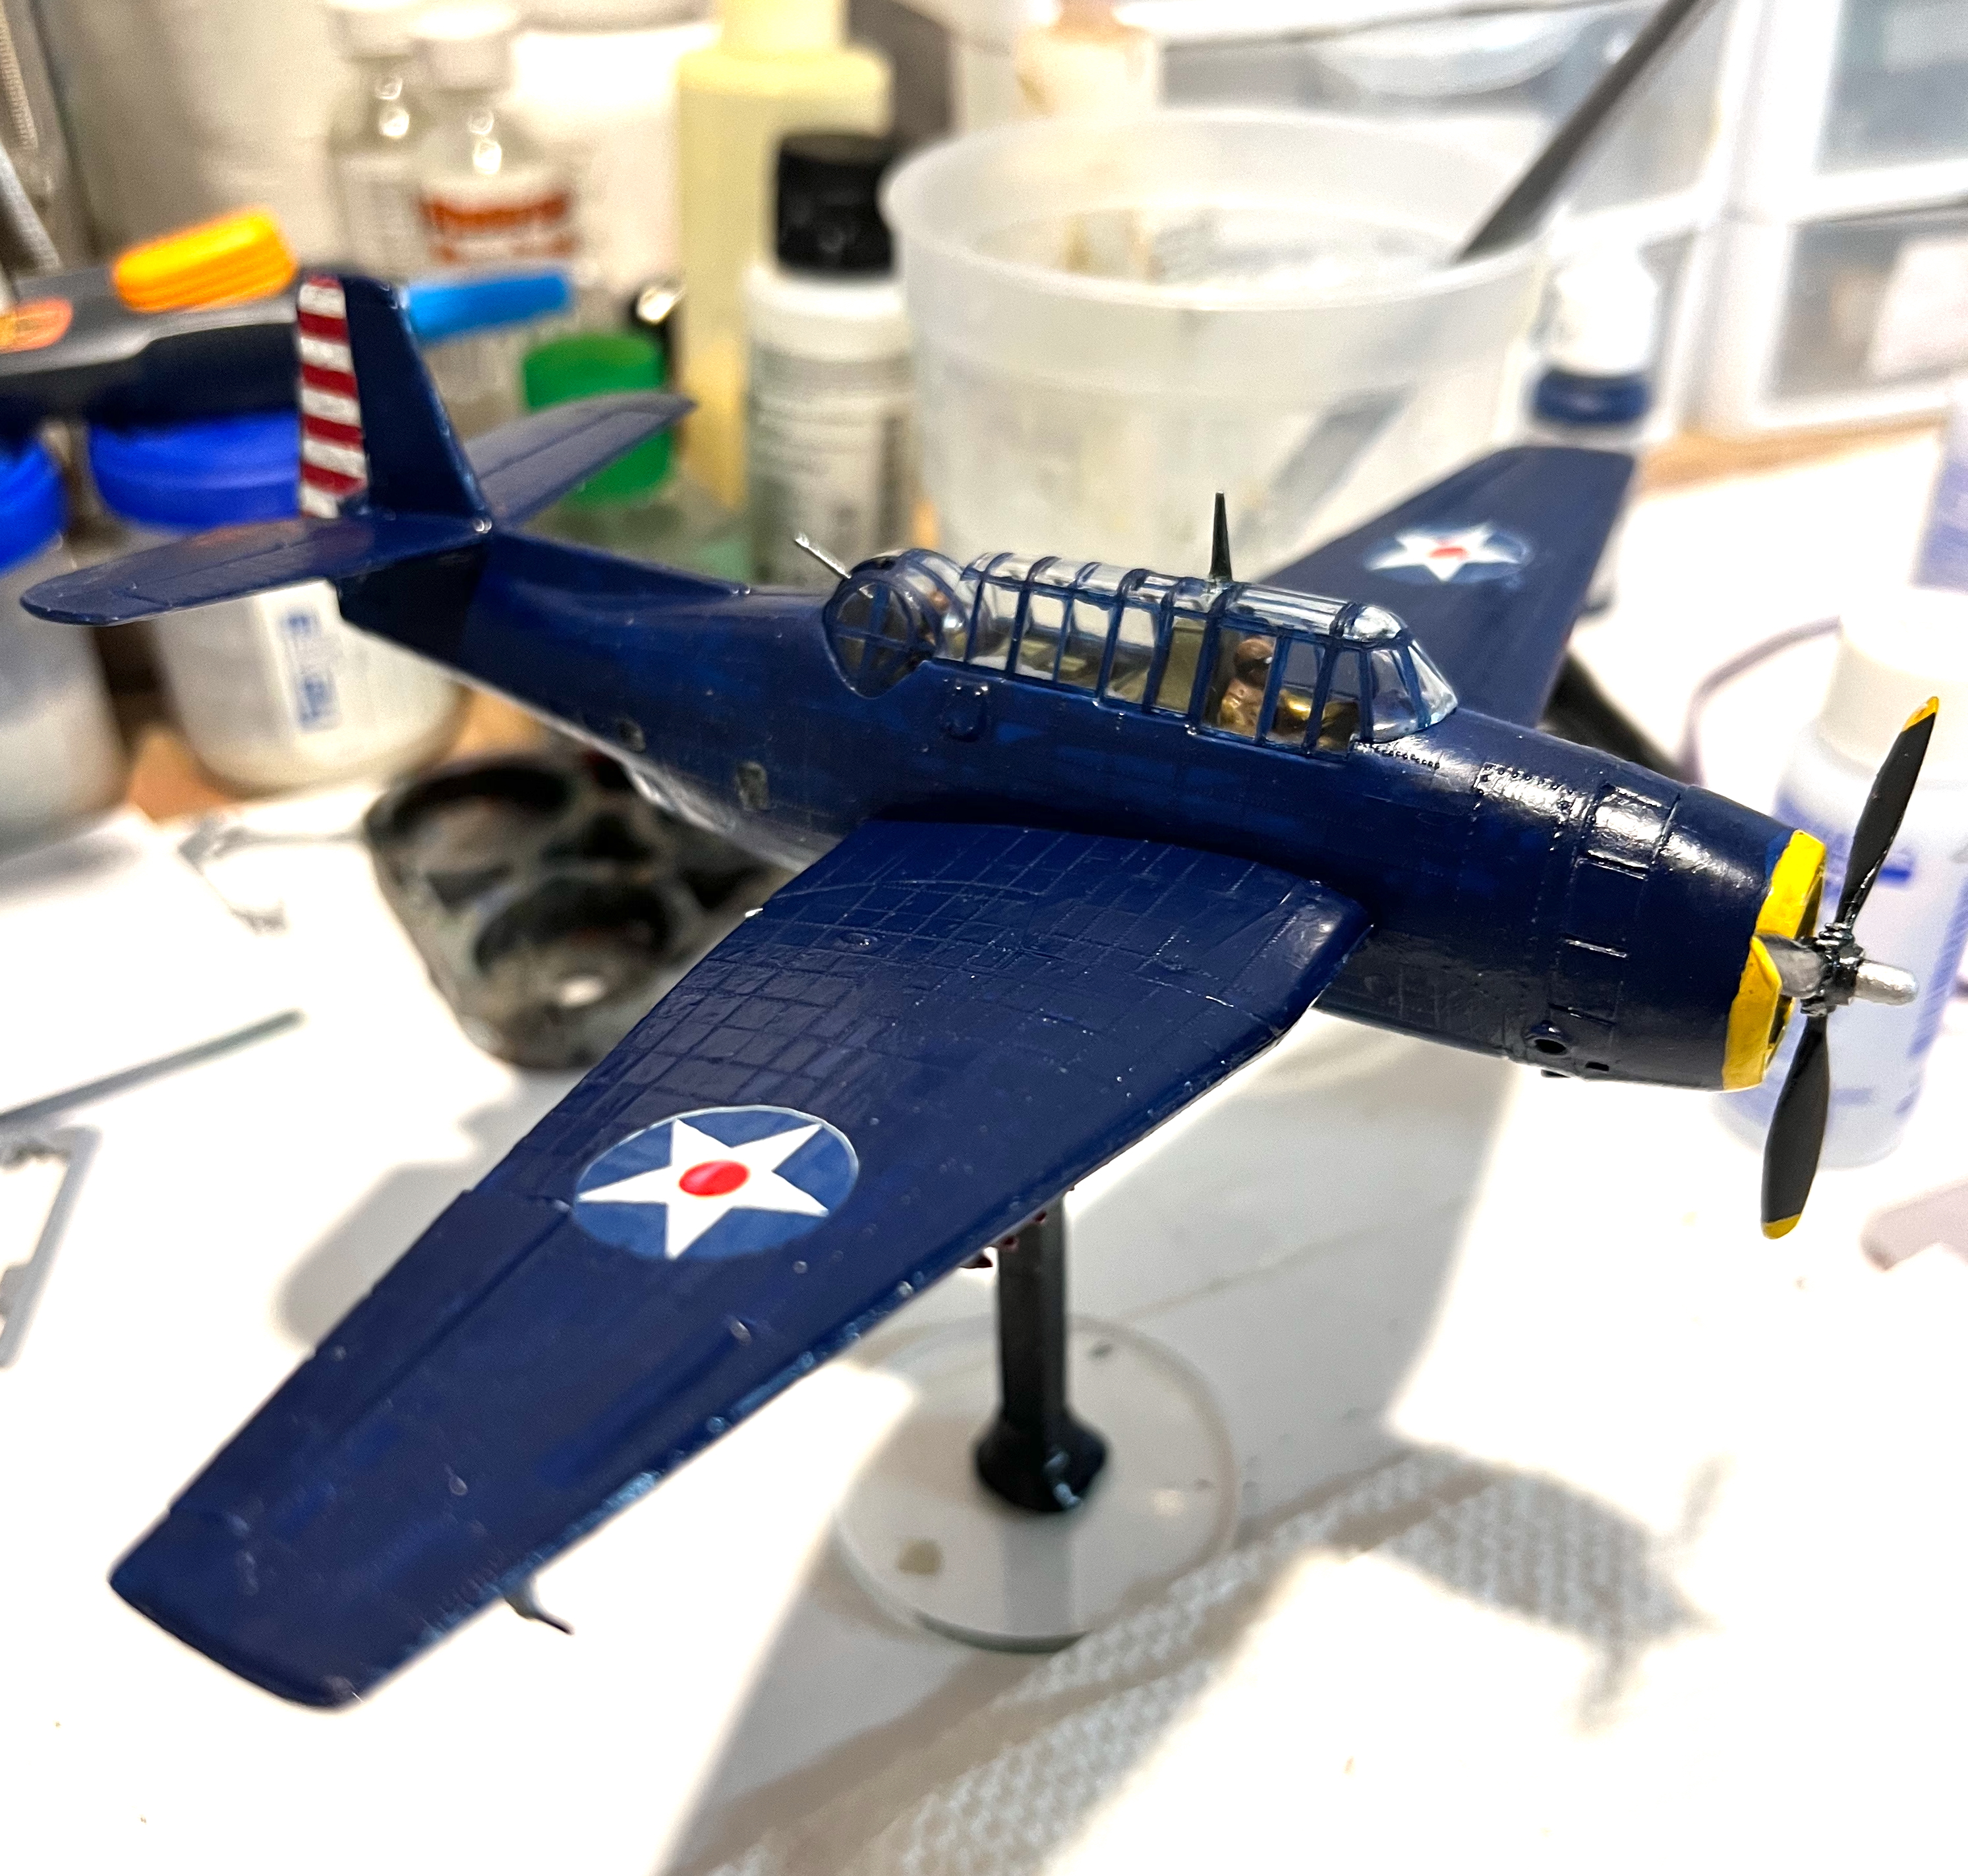
As for assembly, it went fine. I painted the three crewmen. The tail gunner will never be seen because the acrylic window was not too clear. As for the outside, I went with a Vallejo “Deep Prussian Blue” – it seemed closest to the box color. In my research, I saw several different color schemes for the undercarriage. Some were blue, some were two-toned. The model would be on a flight stand. This stand would not afford visibility to the bottom, so I decided that blue was sufficient.
Inside the wing – how old was this?The three crewmen and the rear landing gear and tailhook. The tailhook would not survive the build.Avenger TBM assembled and painted (and below in the gallery).
The last assembly from the kit for the Avenger was the rockets underneath. I assume that any depth charges would have been in the bomb bay – as unseen as the gunner underneath. So that works!
The rockets are mounted. Next, we moved on to applying appropriate decals. That proved to be the most difficult part.
The decals I bought were from the US and came via a modeling shop in Latvia of all places. I have no idea of the age – except likely post-Cold War I imagine. I used multiple coats of Microscale “Liquid Decal File” to restore them as best I could. Even with that, several of them disintegrated into multiple jigsaw pieces in the progress of placing them on the model. This led to my having to reconstruct the decals while wet. Ugh. I made it work.
The “newer” decal set.Latvia?
But wait – before all the decal work – I needed a flight stand! I made one with a 1/4″ wooden dowel, green stuff, and a 2″ acrylic base. I carefully carved out a hole on the model to accommodate the stand.
Then it was on to applying decals as best as I could.
Mid-stage with the decals. The tail and rudder ones were really finicky.
Finally the planes were done. I also built a special travel box for the Avenger. For the other two, the original package blisters served that purpose.
All three planes for the game, frontal view……and a side view.
Upon completion, I could mock up the tabletop in the cellar in preparation for HMGS FALL IN! in Lancaster PA and EllisCon in Danielson, CT.
Mock up of the Tabletop
I used photos of this mock up in my cellar to guide its recreation at both upcoming gaming conventions.
First up, HMGS FALL IN!
HMGS FALL IN! 2025 PHOTOS OF THE GAME
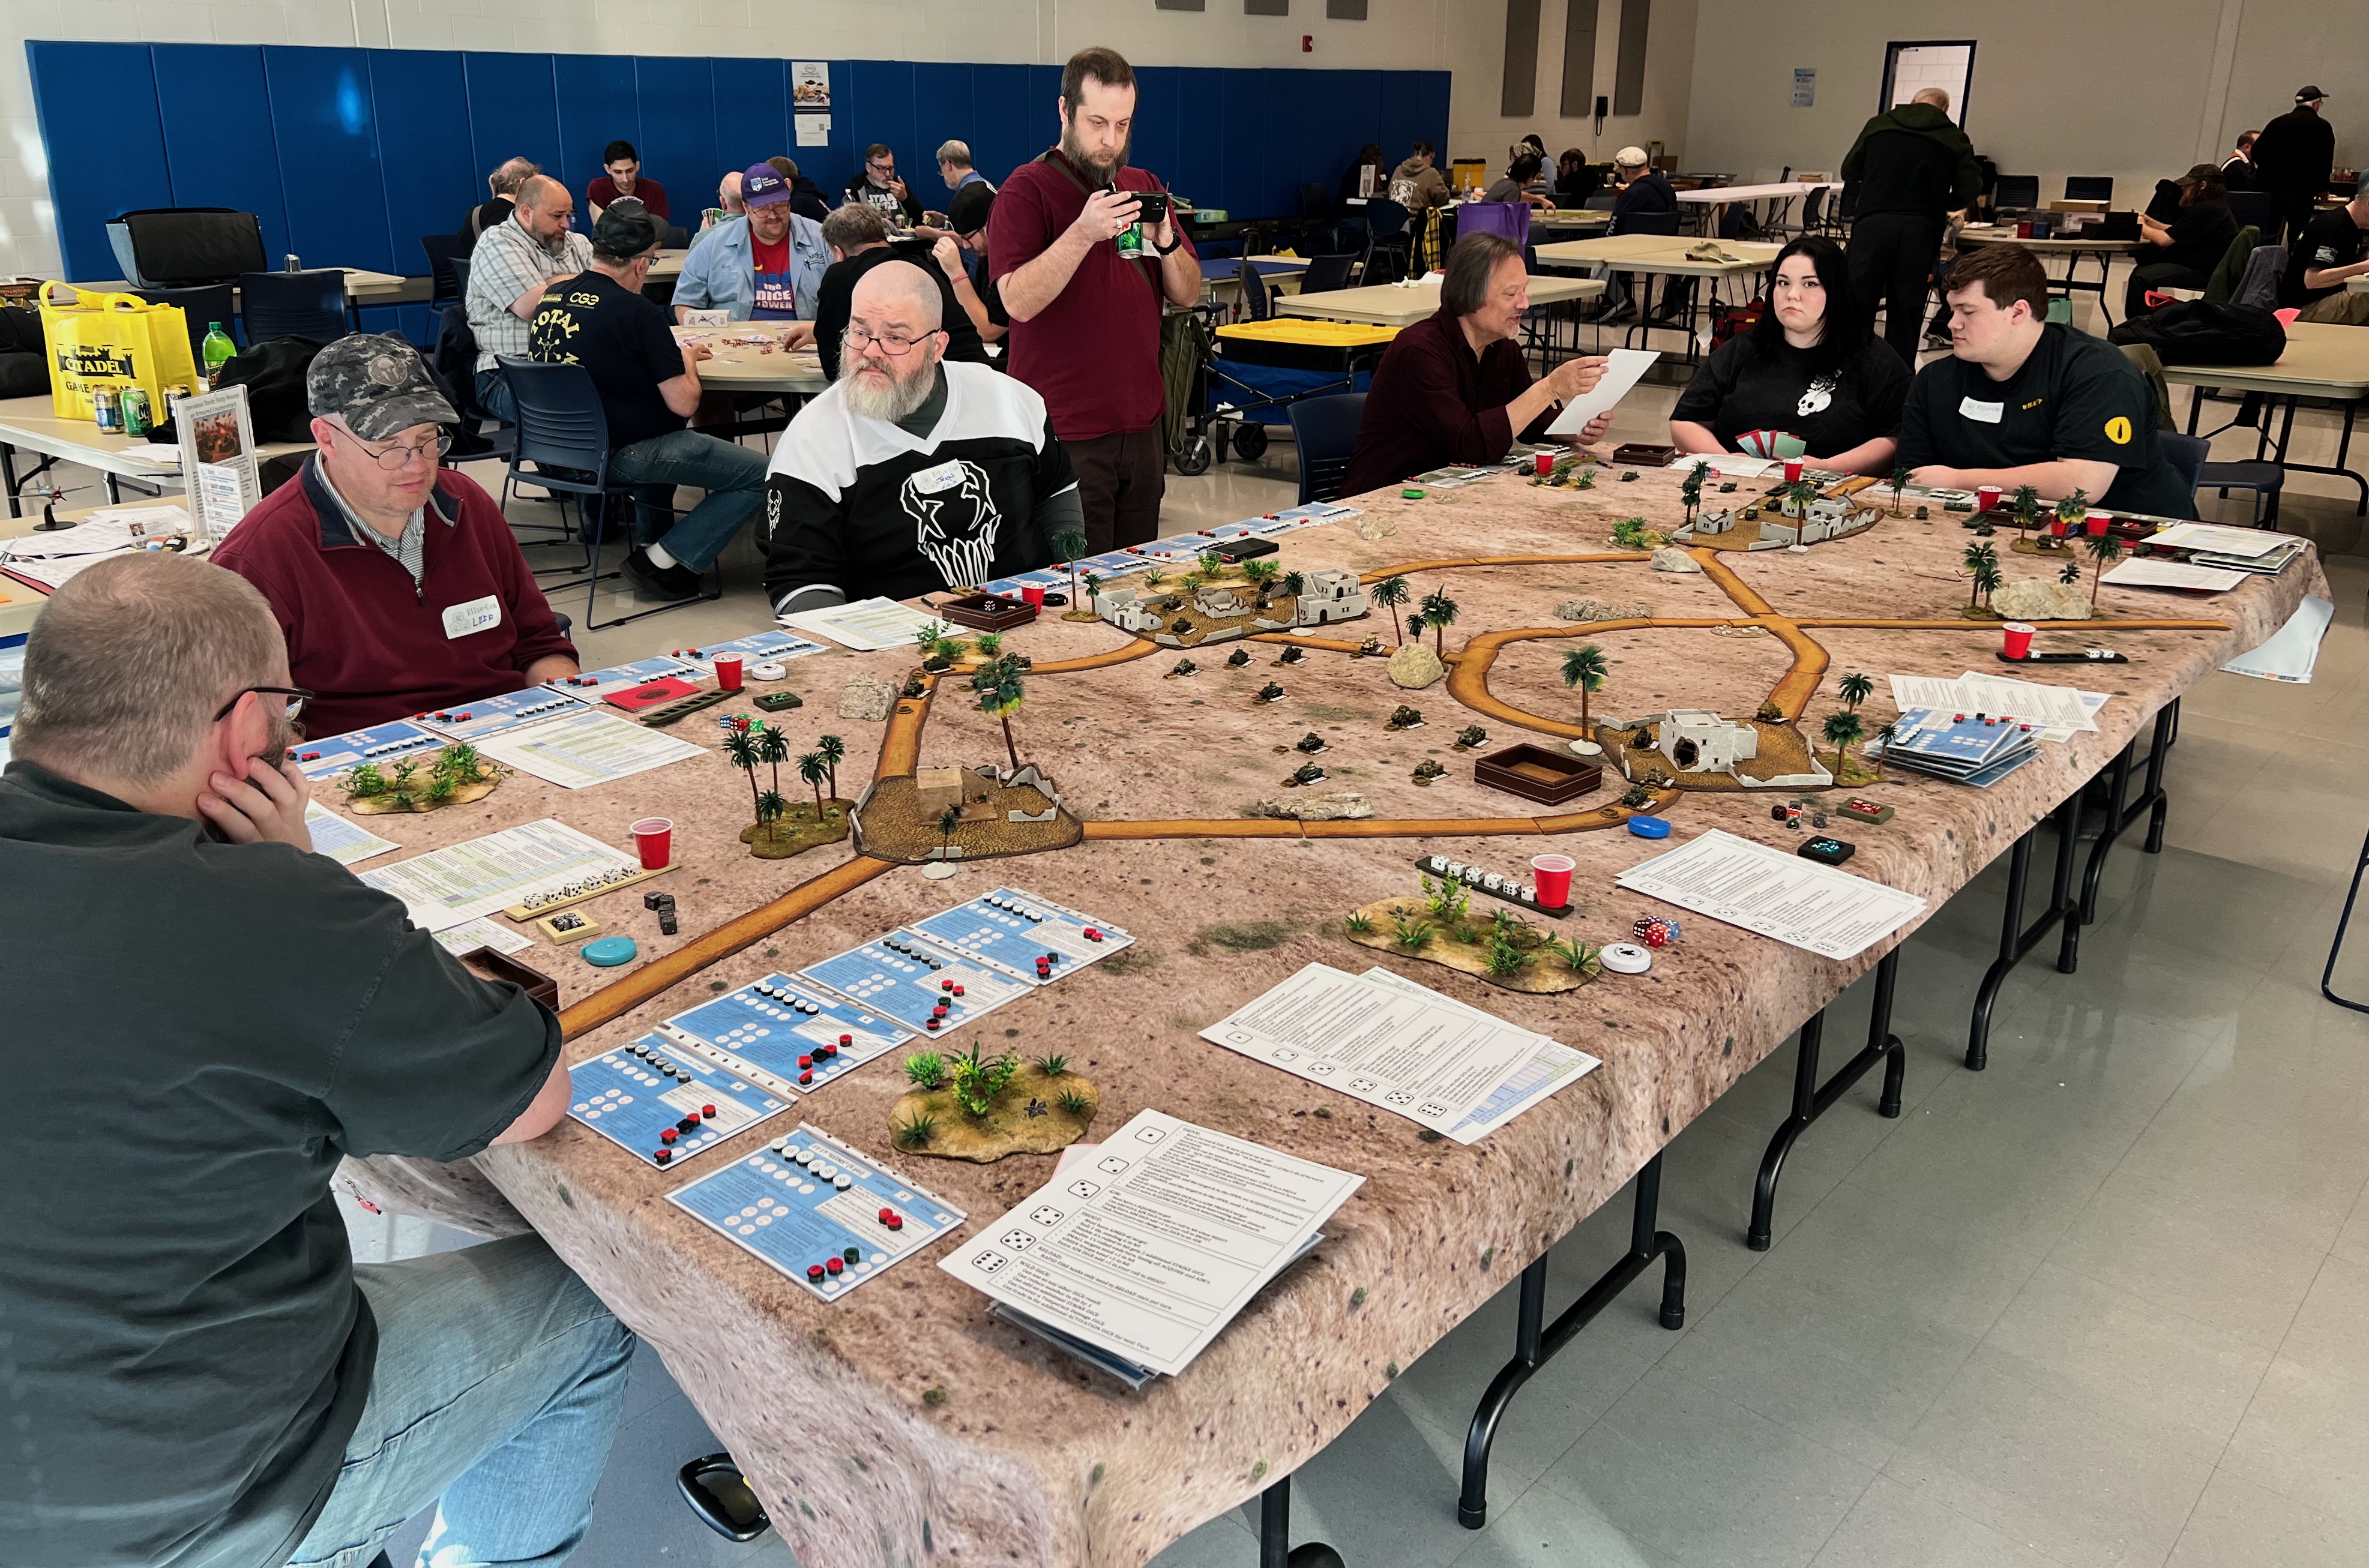
The game as set up in the H.A.W.K.’s room.The players in my first game. It was nice to have my Wargame Wingman Leif Magnuson in the game. Several Maine Historical Wargame Association members joined as well! As I am also a member of MHWA, that was VERY cool.The French tanks and armored cars were cautious about leaving a town here. The Mainers plot their strategy.
The US then deployed air, achieved superiority, and brought on the Avenger.
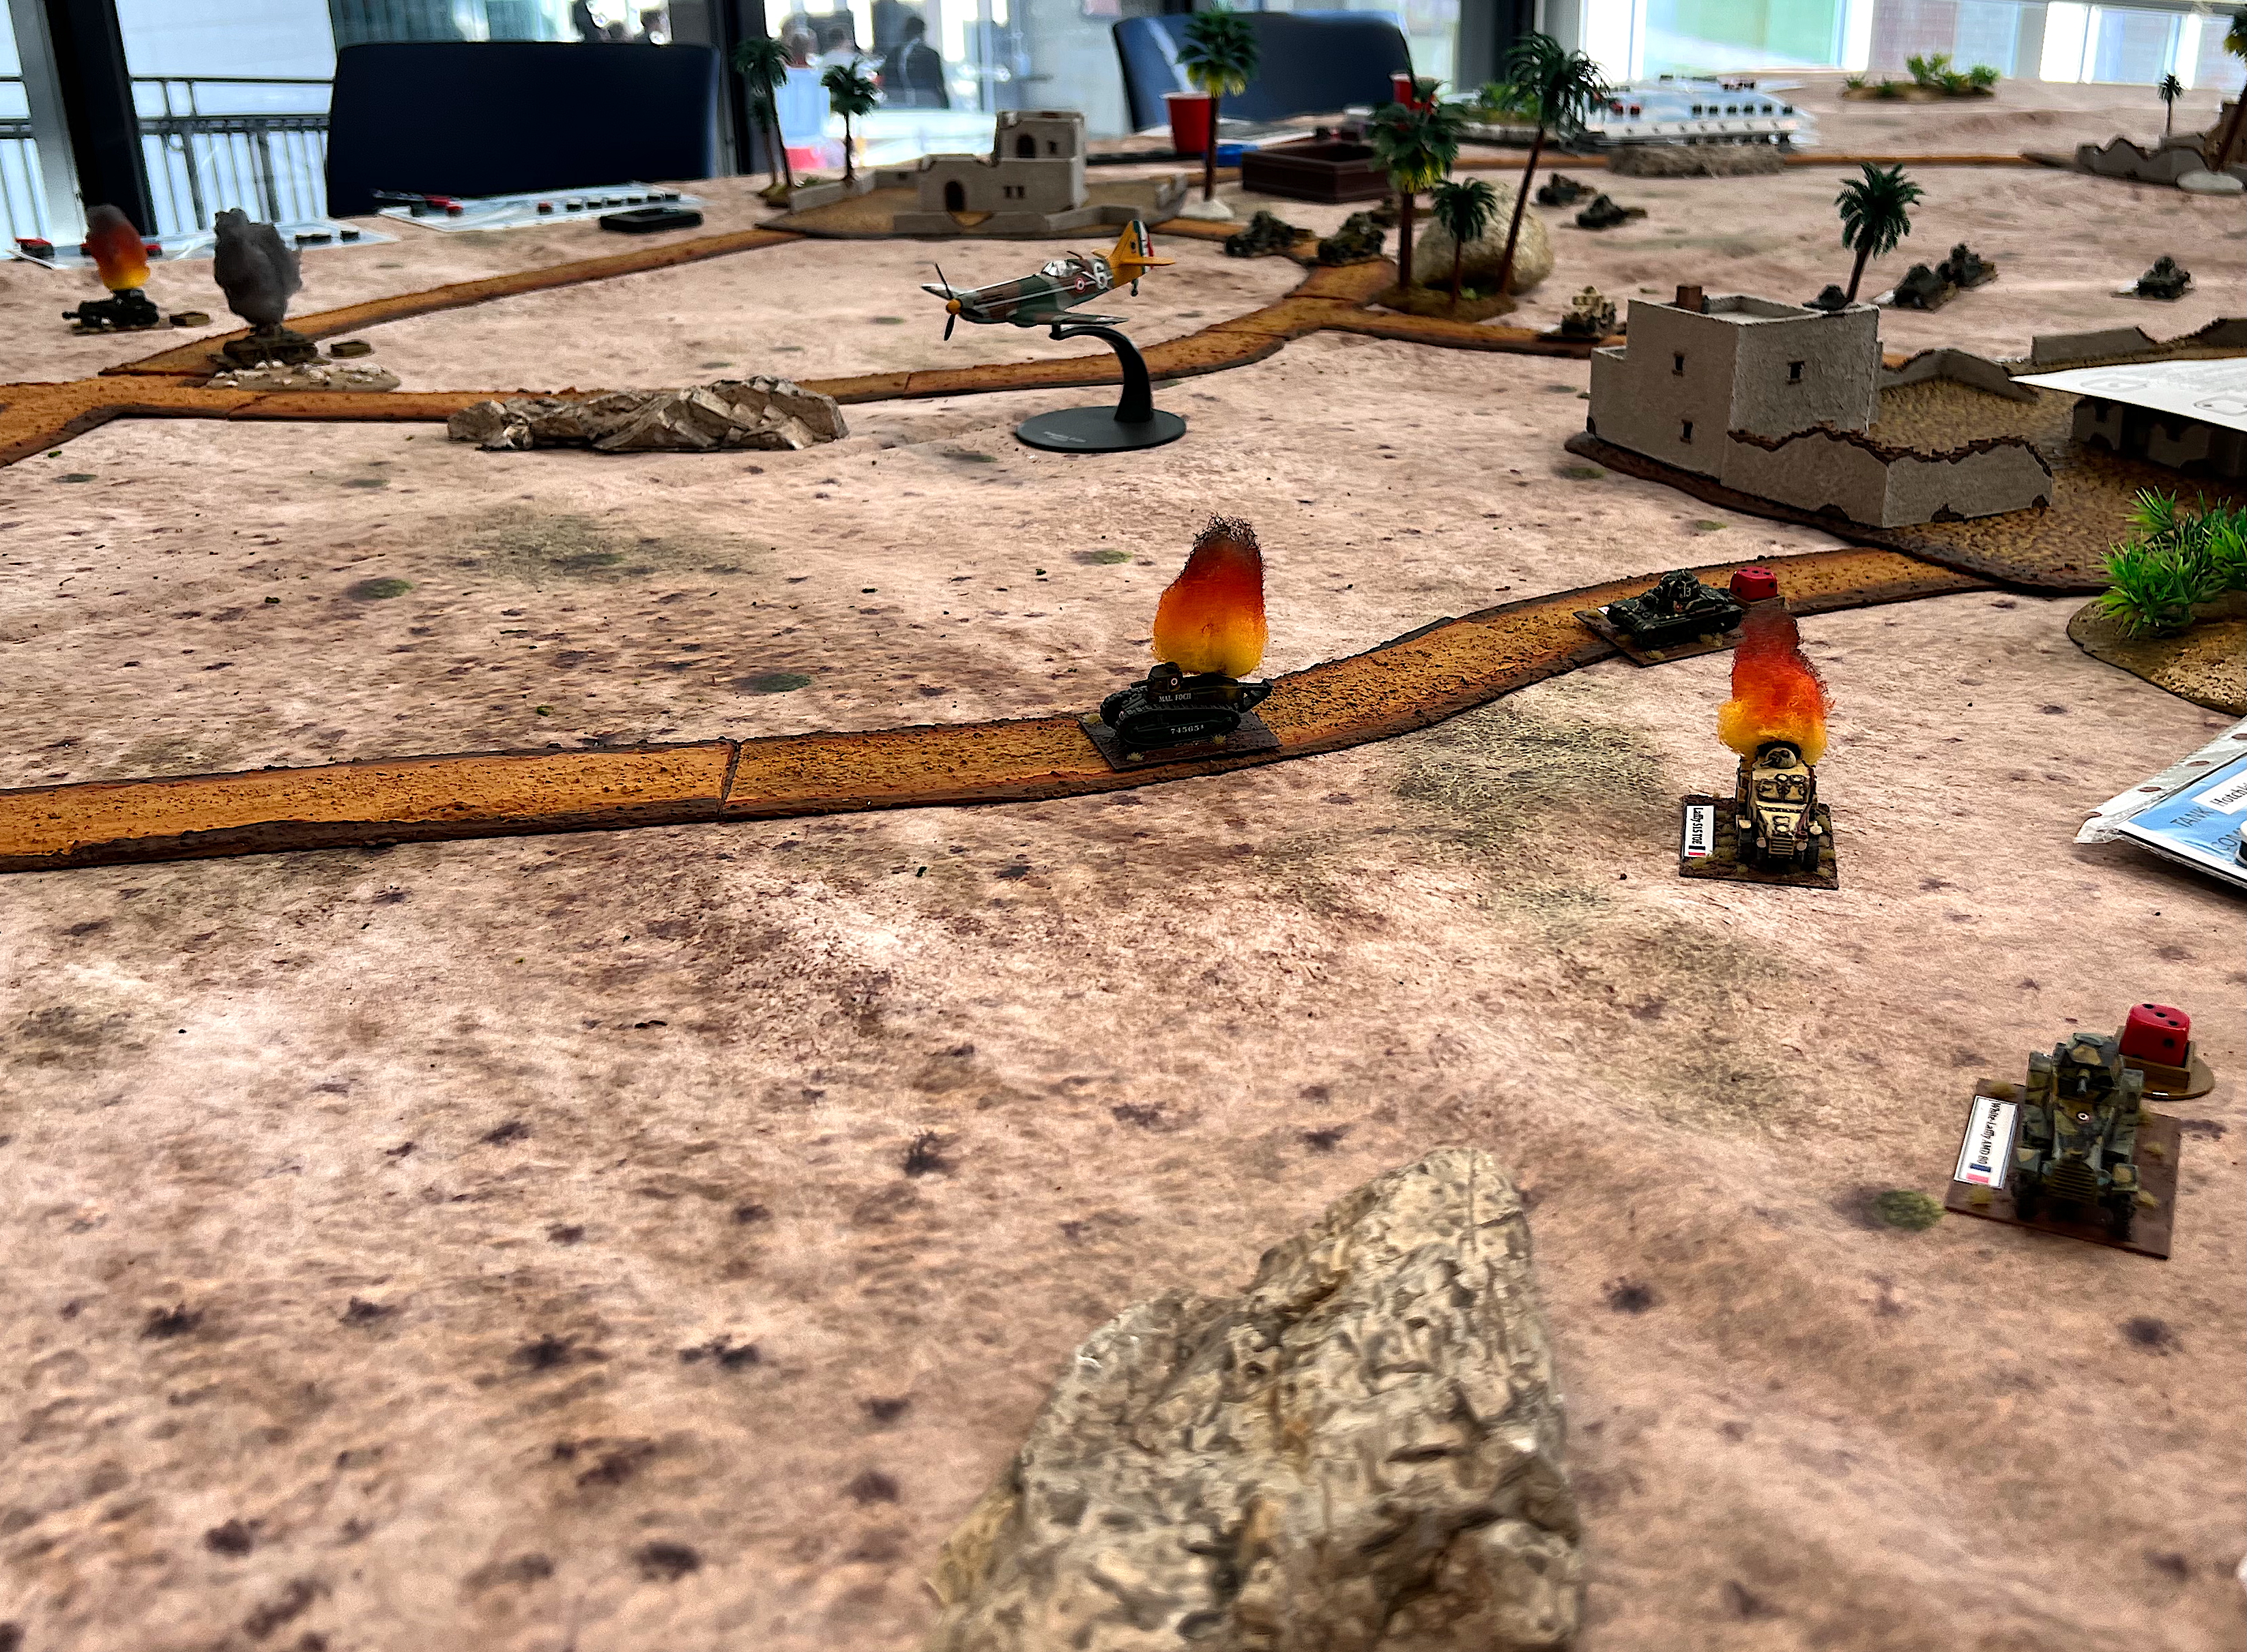
The F4F Wildcat about to dispatch the Dewoitine D.520.While US vehicles burn in the background, the Avenger deploys, and calls in naval gunfire……blasting the Vichy armor.
With that, the US won the first game I ran.
In the second game, the tables turned. The US never got going very well. Or, perhaps, the French were very lucky. Take your pick. I don’t have any photos of that game (apologies) – but it was a complete French victory.
Next up, one week later, was EllisCon.
EllisCon 2025 Photos
Here I also ran the game twice.
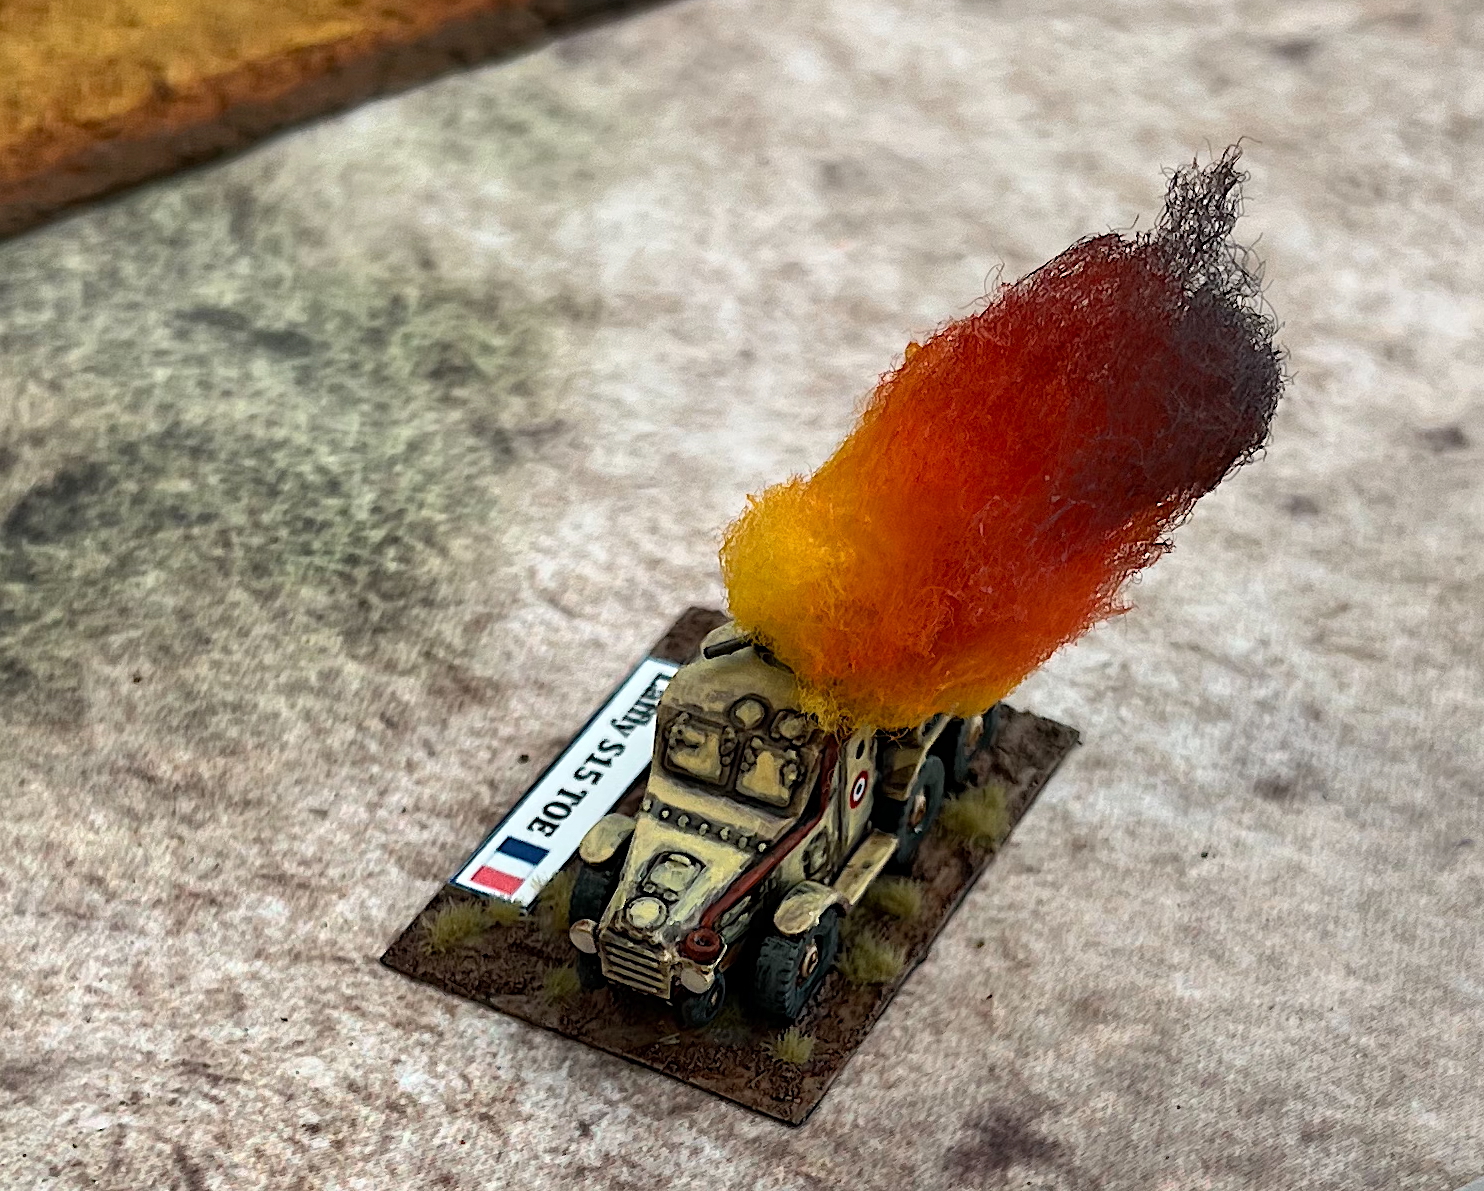
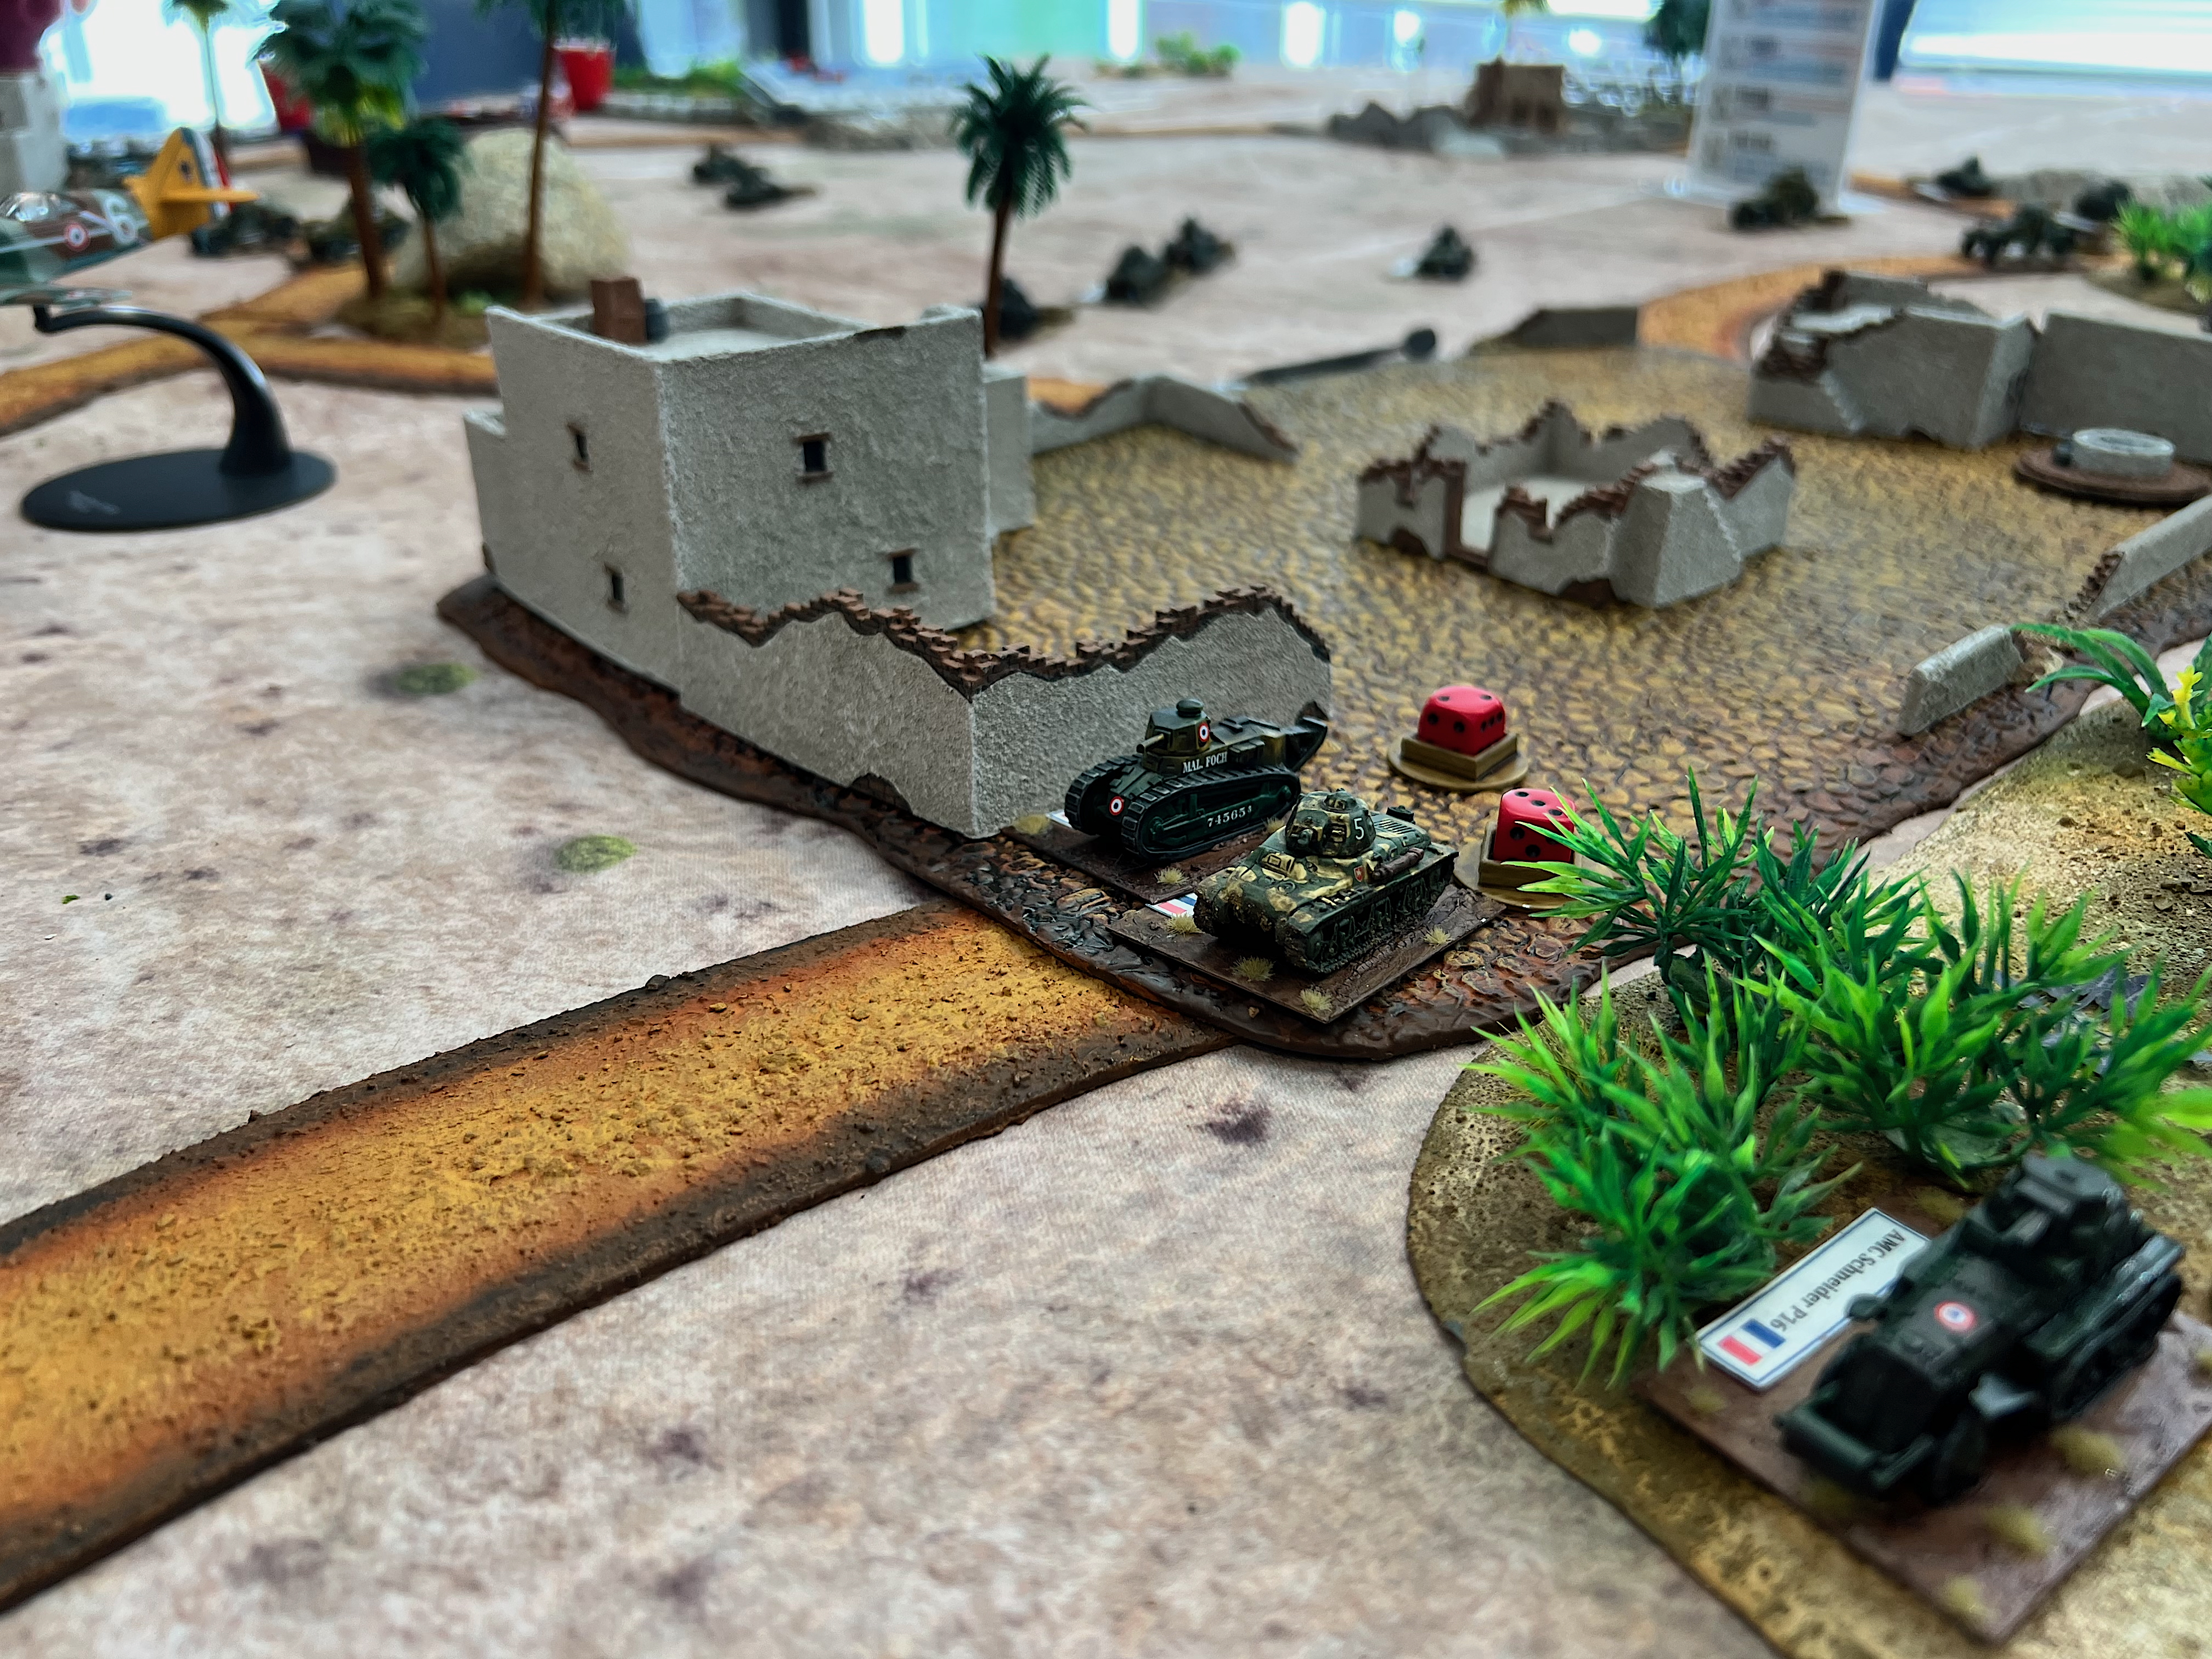
The first game at EllisCon had 4 players. Leif joined us again for both games. Here he strategizes for the French with his teammate Brian.A Laffly S15 TOE armored car is hit and burns early in the game.The US players are then hit hard, as the M5 Stuart “Beast”, and M3A1 Scout Car “Annie” are destroyed. The M3 GMC “Hurricane” takes cover in a brush firing position.Once again, though at a different convention, the Vichy armor looks to leave the town safely in the face of “Hurricane”.The French gain air superiority.An AMC Schneider P16 (the old armored car on right) uses its 37mm gun to destroy the M5 Stuart “Beast”.The FT-17 ” Marechal Foch” is taken out near r=the end of the game.
At the end, the Vichy claimed a victory, as their Tanker Bucks were more than the Americans total.
In game two, the fortunes reversed yet again. Leif played again and was joined on the other side by Gregg Belevick. Both were involved in my initial play testing of this scenario.
The players discuss their game strategies.The French players move up – and Gregg has a twinkle in his eye – does he have a plan?Yours truly GM’s the game. Photo courtesy of David DeVeauI guess Gregg did have a plan – naval gunfire! Convention history repeats itself as 5 Vichy vehicles burn on the Moroccan sand.
The US won this game with the last barrage destroying 1/3 of the Vichy force deployed at the time. A massive US victory!
I really like this scenario. So far, the victories have been 3 for each side. It seems pretty fairly balanced. It’s fun and highlights a little-known part of WWII. It’s likely coming again to a convention in 2026.
I list the paints that I used for the roads at the end of this blog post. For my records, I am sharing these materials I use for these projects with you, dear reader. You’ll see the list below detailing the process and materials for both the roads/bases and the Avenger torpedo bomber.
I hope that you found this tale of my journey interesting. If you do use my rules modifications, again please let me know how they worked out. If you have any questions, certainly throw them at me. I’d also enjoy any feedback on the work or this post in the comments section. Thanks in advance for that.
Lastly, I have compiled all of my posts on WWII games and projects. There is a consolidated list of posts and their links located here.
MATERIALS USED
PAINTS, INKS, GLAZES, SHADES, WASHES, PIGMENTS AND FLOCKING USED ON THE DIRT ROADS:
TrafficMaster Rubber Floor Runner from Home Depot, SKU 1003092882
DynaFlex Ultra Advanced All Weather Sealant “Cedar Tan”, (paintable caulking)
Quikrete “All Purpose Sand”
Chinchilla Dust
DecoArt Americana “Cinnamon Stick”
DecoArt Americana “Deep Ochre”
DecoArt Americana “Raw Sienna”
DecoArt Americana “Raw Umber”
Apple Barrel “Burnt Umber”
Vallejo Thinner
PAINTS, INKS, GLAZES, SHADES, WASHES, PIGMENTS AND FLOCKING USED ON THE TOWN BASES:
TrafficMaster Rubber Floor Runner from Home Depot, SKU 1003092882
DynaFlex Ultra Advanced All Weather Sealant “Cedar Tan”, (paintable caulking)
Quikrete “All Purpose Sand”
Chinchilla Dust
DecoArt Americana “Cinnamon Stick”
DecoArt Americana “Deep Ochre”
DecoArt Americana “Raw Sienna”
DecoArt Americana “Raw Umber”
Apple Barrel “Burnt Umber”
Vallejo Thinner
Liquitex “Burnt Umber” (ink)
PAINTS, INKS, GLAZES, SHADES, WASHES, PIGMENTS AND FLOCKING USED ON THE AIRFIX AVENGER TBM-3 MODEL:
Airfix Grumman Avenger TBM-3 1:72 plastic model kit
2025 was a great year for the TOB. The Committee is very happy with how we were able to get our events in – despite losing 1 tournament entirely and one curtailed due to rain. Many of you are new players and many have been playing for years – and we have a great group.
While my golf season is over, and my “wargame season” is now happening, I needed to give you all this TOB update. To my hobby and wargame followers – most of whom do not golf – I’ll be posting hobby and wargaming stuff here very shortly too, so keep looking here!
So what’s up for next year for the TOB? Well, we will have a few changes, and with my saying that, please understand that the changes I am announcing here are in themselves subject to change if the committee wants to do so. But, I am pretty sure these are settled issues, so I am sharing them with that caveat.
First, the dates – we may have some changes with our sponsors for specific tournaments, so I’ll leave that off for now. I don’t expect many issues with those.
Also, ALL OF THE 2026 EVENTS will be on SATURDAYS. No Sunday events are scheduled at this time.
2026 Dates for The Tour of the Brookfields
April 25th, registration opens at 8 AM, arrive by 8:30 AM, shotgun start at 9 AM
May 23rd, registration opens at 7 AM, arrive by 7:30 AM, shotgun start at 8 AM
June 13th, registration opens at 7 AM, arrive by 7:30 AM, shotgun start at 8 AM
July 11th, registration opens at 7 AM, arrive by 7:30 AM, shotgun start at 8 AM
August 1st, registration opens at 7 AM, arrive by 7:30 AM, shotgun start at 8 AM
August 29th, registration opens at 7 AM, arrive by 7:30 AM, shotgun start at 8 AM
September 24th – Draft Night for FINALS. STARTS at 7 PM at Quail Hollow. All are welcome and encouraged to attend.
September TBD – Sign up closes for FINALS
September 26th – FINALS, registration opens at 8 AM arrive by 8:30 AM, shotgun start at 9 AM
Please put on your calendars! To qualify for the FINALS, you must play in 3 events – though more is better.
Entry Fees
Years ago, the TOB was generally held at both Bay Path Golf Course in East Brookfield and at Quail Hollow, alternating between the two. When held at Bay Path, members got a discount to play in the TOB. Carl Fitz has now renewed that tradition of a discount for full Quail Hollow members in 2026 (not those who are just weekday members) !
The entry fees will be as follows:
Monthly Events:
Non-Members: $85
Full Quail Members: $65
FINALS:
Non-Members: $200
Full Quail Members: $180
Entry fee covers cart, golf, skins, and the player pools. Skins will continue to be run by flight.
Want to join Quail Hollow as a full member?
This fee change makes full Quail Hollow membership an even better deal, so if interested call the course at 508-882-5516 and join the club! The club can let you know what full memberships cost.
What if I know an interested new player?
If you know a new player who is interested in playing in the TOB, great! We’d love to have them, but we need to have some control to both protect the field and to make sure we don’t have any no-show issues that hurt an entire team. Here are our guidelines:
Any NEW players themselves must sign up on one of the sign up sheets (at Quail Hollow or Still Harts Cafe) or on the TOB Facebook page. Others cannot sign someone else who is new up. Telling a Committee member is great – but NOT foolproof. Get them to sign up! Then, there is more to do (see below).
We need to vet any potential new players. We need to know their name (obviously!), age, and golf handicap (if any). If a new player has no handicap, we need to know where they play, what scores in general they have, and any other play info that would help. Typically, that needs to be shared live with a member of the Committee – and those are George Fiske, Brad Earle, Mike Kularski, Ed McLeod, Matt Desimone, and myself (Mark Morin). Connect via phone or the Facebook page.
For now, that is all – the Committee will be considering any rules changes before April’s event. Expect the sign ups for that event to show up in late March.
To all of you, from the entire Committee, please have a great Thanksgiving and a wonderful Christmas season! As always, I invite you to follow this blog (see at the end of the post to follow) – and to give me any feedback here in the comments section.
I promised back in August that I would post about my US M5 Stuart tanks. These would be the linchpin of my US forces in my “Operation Torch: Vichy Mounts an Armored Counterattack” games.
M5 Stuart in Casablanca.
Yes, the US and UK did briefly engage French forces of Vichy in North Africa in WWII. After the US Operation Torch landings, Vichy did put up a resistance. Technically they were supposed to be neutral after the 1940 Armistice. However, the Soviets were dealing with massive battles on the Eastern Front, and the US/UK allies were not yet ready to successfully invade Fortress Europe. As the Dieppe raid showed, it would have been a catastrophic failure in 1942.
The idea was to take off some of the pressure on the Soviets by getting in the war somewhere and tie down the Germans. French North Africa became the chosen option, with the hope that the Vichy French would welcome the US/UK invaders as liberators and not invaders. For a brief period in November 1942, both of these two options played out in Morocco, Tunisia, and Algeria – until the French there decided to cease resisting the Allies. Subsequently, back in Europe, Hitler was enraged at the Vichy capitulation and ordered his forces to invade the remaining southern part of France that was not yet occupied.
Back in North Africa in November 1942, one of the more obscure incidents of the conflict was in Morocco – where the French 1er Regiment de Chasseurs d’Afrique launched an armored counterattack towards the landing beaches. At that critical juncture, the 66th Armored Regiment of the 2nd Armored Division (and Sub-Task Force Goalpost) had just 7 M5 Stuart tanks that it could cobble together to intercept the French. Their M4 Sherman tanks needed a port to unload, and that had not happened yet.
I found this article/post by Patrick Chaisson to be an excellent description of the combat that happened in November 1942.
As far as a concept for a wargame, I liked the idea of a game that would recreate this clash of armor – especially as one side was green as hell, and the other fielded such a hodgepodge of elderly and obsolescent armor.
I ran this game twice at HISTORICON 2025, along with two Wars of Ozz games. All went well. I hope to post some convention shots in my next post (albeit very late). Unfortunately golf season was very busy this summer (well, fortunately for my golf game and not my hobby projects). Still, I keep my word. I thought I’d add a bit about the game as well, while saving specific game/convention photos for the next post. However, the game is coming back!
I will be running the game again twice at HMGS Fall In this November. Here are the inks – one is on Friday afternoon and one is on Friday night. I can handle up to 10 players per game – and I can scale it for fewer as well. as of this writing, there are still slots available.
My game poster. It marks my first foray using AI (Freepik) to generate an image. I wasn’t completely thrilled with the result, but it’s OK for a flyer.
The game uses modified What a Tanker rules. The major modifications that I use are:
Using Bonus Attack Cards to simulate infantry, anti-tank, artillery, naval gunfire, and air actions. These are deployed by scout cars according to each sides’ historical capabilities. Bonus Attack Cards are purchased with “Tanker Bucks”, which also play into Victory Conditions. Having more Tanker Bucks at the games end is better. Yet, you need to use resources to take out the enemy. So, a balancing act exists for the players. Do they hoard their Tanker Bucks, or use them effectively against their opponent?
Representing the French vehicles’ advanced age and mechanical unreliability. “OLD” French vehicles that try to move and roll a 5 or less will lose 1 die to temporary damage. Mathematically, there is an 11% chance of that happening. So the Vichy Forces are indeed slow. But there are more of them, and not all of the French tanks are OLD.
Creating a way for armored cars to engage other armored cars – and tanks, with heavy machine guns or Bonus Attack Cards. Also I have rules that show how devastating any cannon fire would have been against thin-skinned vehicles.
Representing the US Army as being totally GREEN at this point in the war. Their base roll needed to hit goes from needing a 6 on 2d6 added together to a 7. Add to that the concept that most of the French vehicles are SMALL, necessitating an addition +1 to hit at short range, and another +1 at long range. Oh yeah, the Stuarts have just a 37mm gun. This means that the US has a tough time making damaging hits at long range against French tanks.
The US use of Bonus Attack Cards is limited to just the US and French Armored Cars. The M5 Stuart’s radios got wet during the landings and were not working. Many French tanks in North Africa did not have radios.
Use of Bonus Attack Cards also represented that the US had both carrier-based air support as well as naval gunfire from the USS Savannah. I added F4F Wildcat’s and Avenger TBF’s for US air support. The F4F’s can provide air superiority, which allows them to also do limited close air support missions. Having air superiority enables the US player to deploy the Avengers, which can act as spotter planes for both artillery and naval gunfire. The Avengers can also bomb the French vehicles with depth charges (yes that happened). The French can contest the US air superiority by deploying Dewoitine D.520’s.
Modifying the activation sequencing methodology by using Buck Surdu’s “Double Random Activation” method. It’s the same one used with Wars of Ozz, Feudal Patrol, and Combat Patrol games.
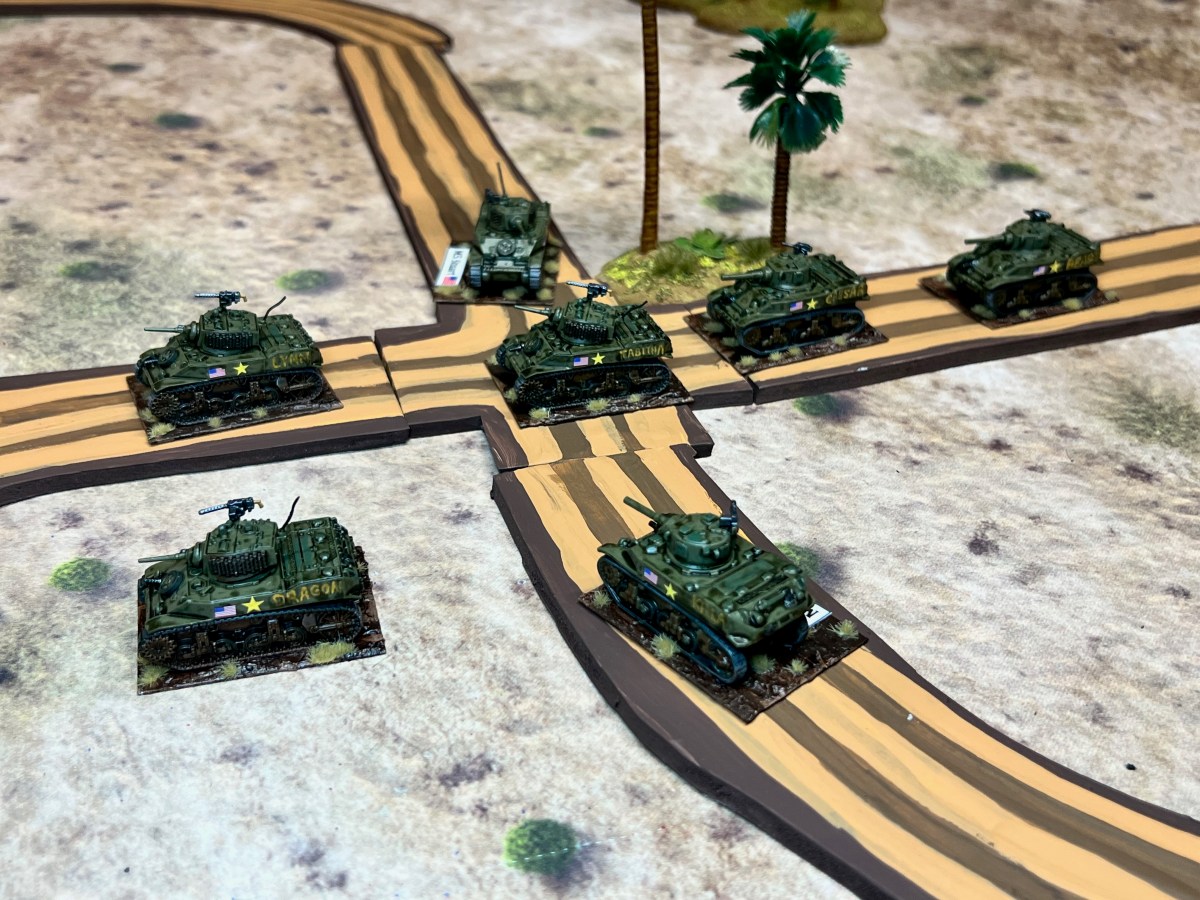
Back to the Stuarts. The M5 vehicles are 15mm/1:100 scale. I sourced them from two places. I got an OOP Flames of War 5-tank platoon (plastic) from Noble Knight Games. I also bought five 3D-printed resin models on eBay from HobbyHouse&Miniatures LLC. The plastic models were fun to work on, and I was glad to have the additional resin ones. Historically, 7 M5 Stuarts were sent to counter the Vichy counterattack. When I drilled out the resin models for magnet installation, two broke in half (not the fault of the model, just me. In the end, I had 3 of those, making 8 models in total, which was fine given that seven were originally sent along with some M3 and M6 tank destroyers.
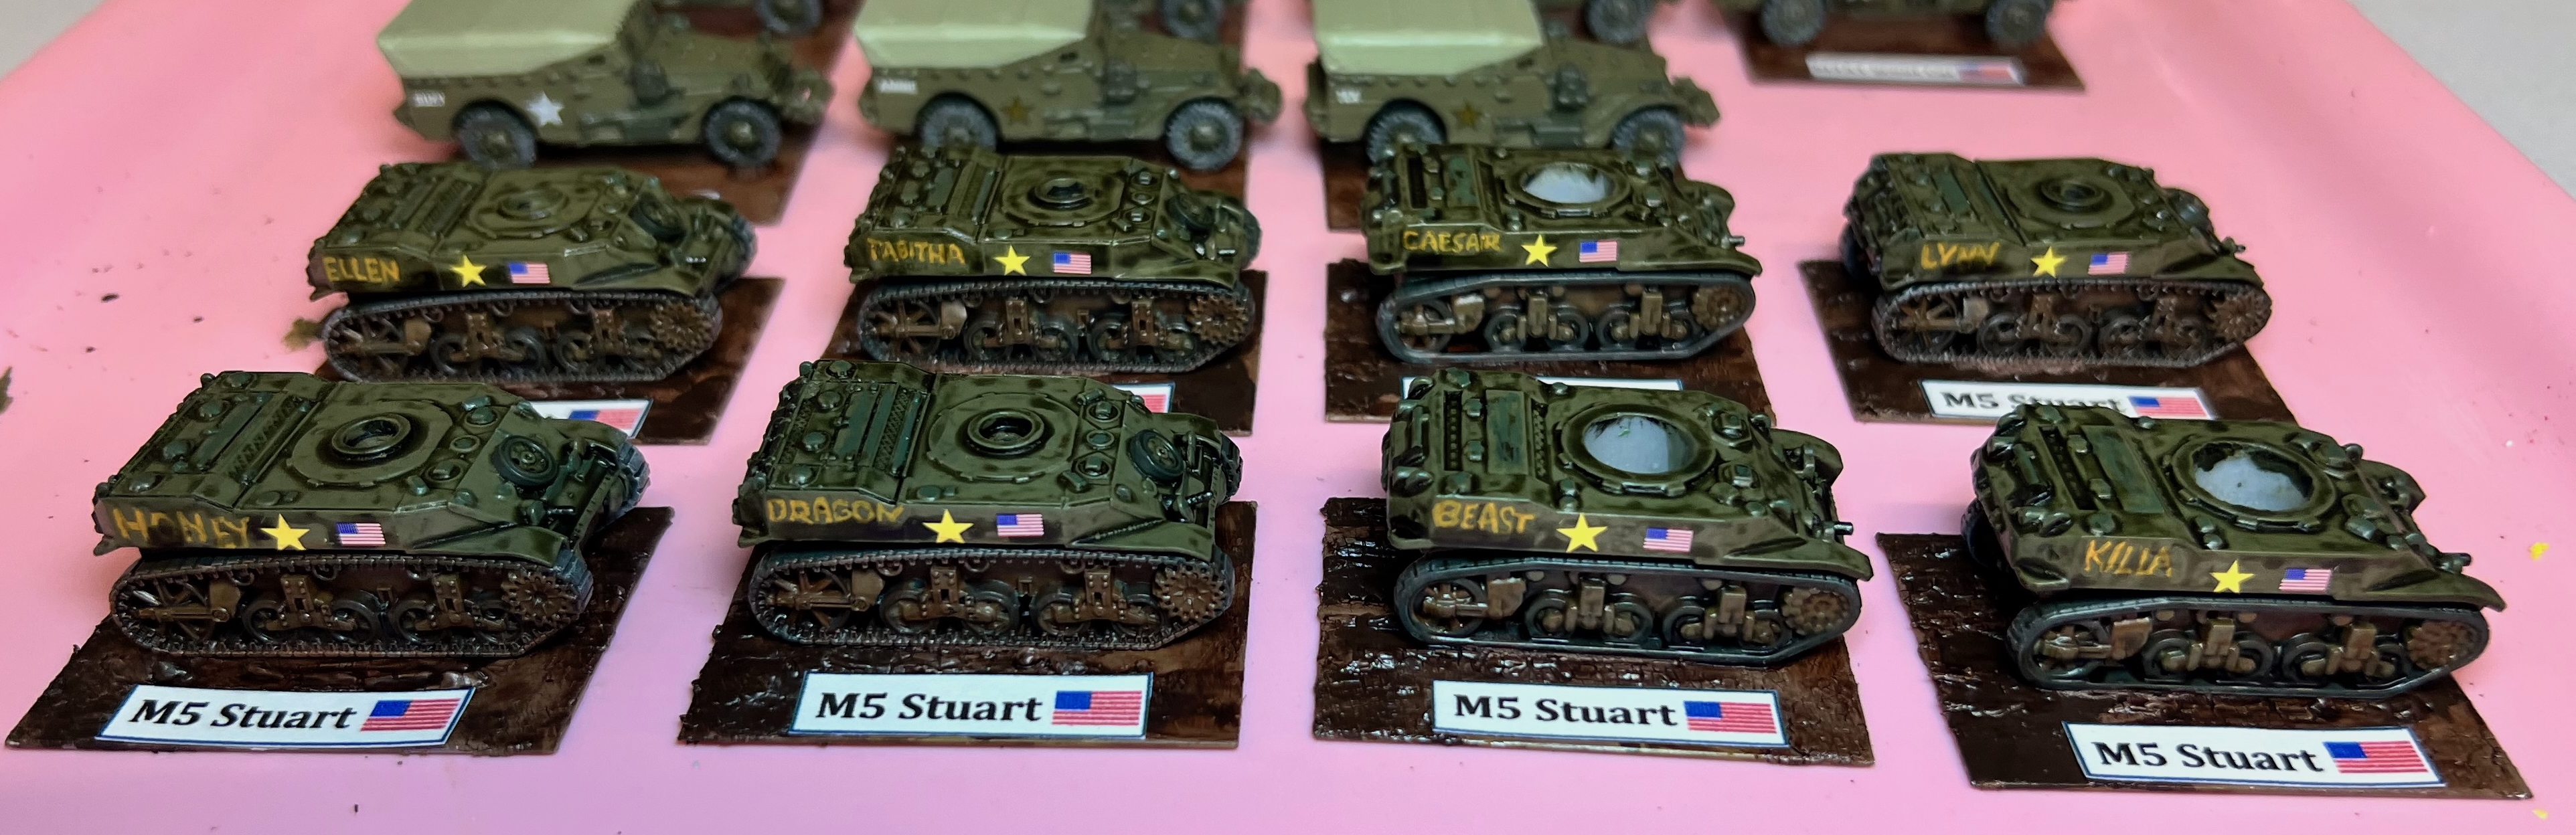
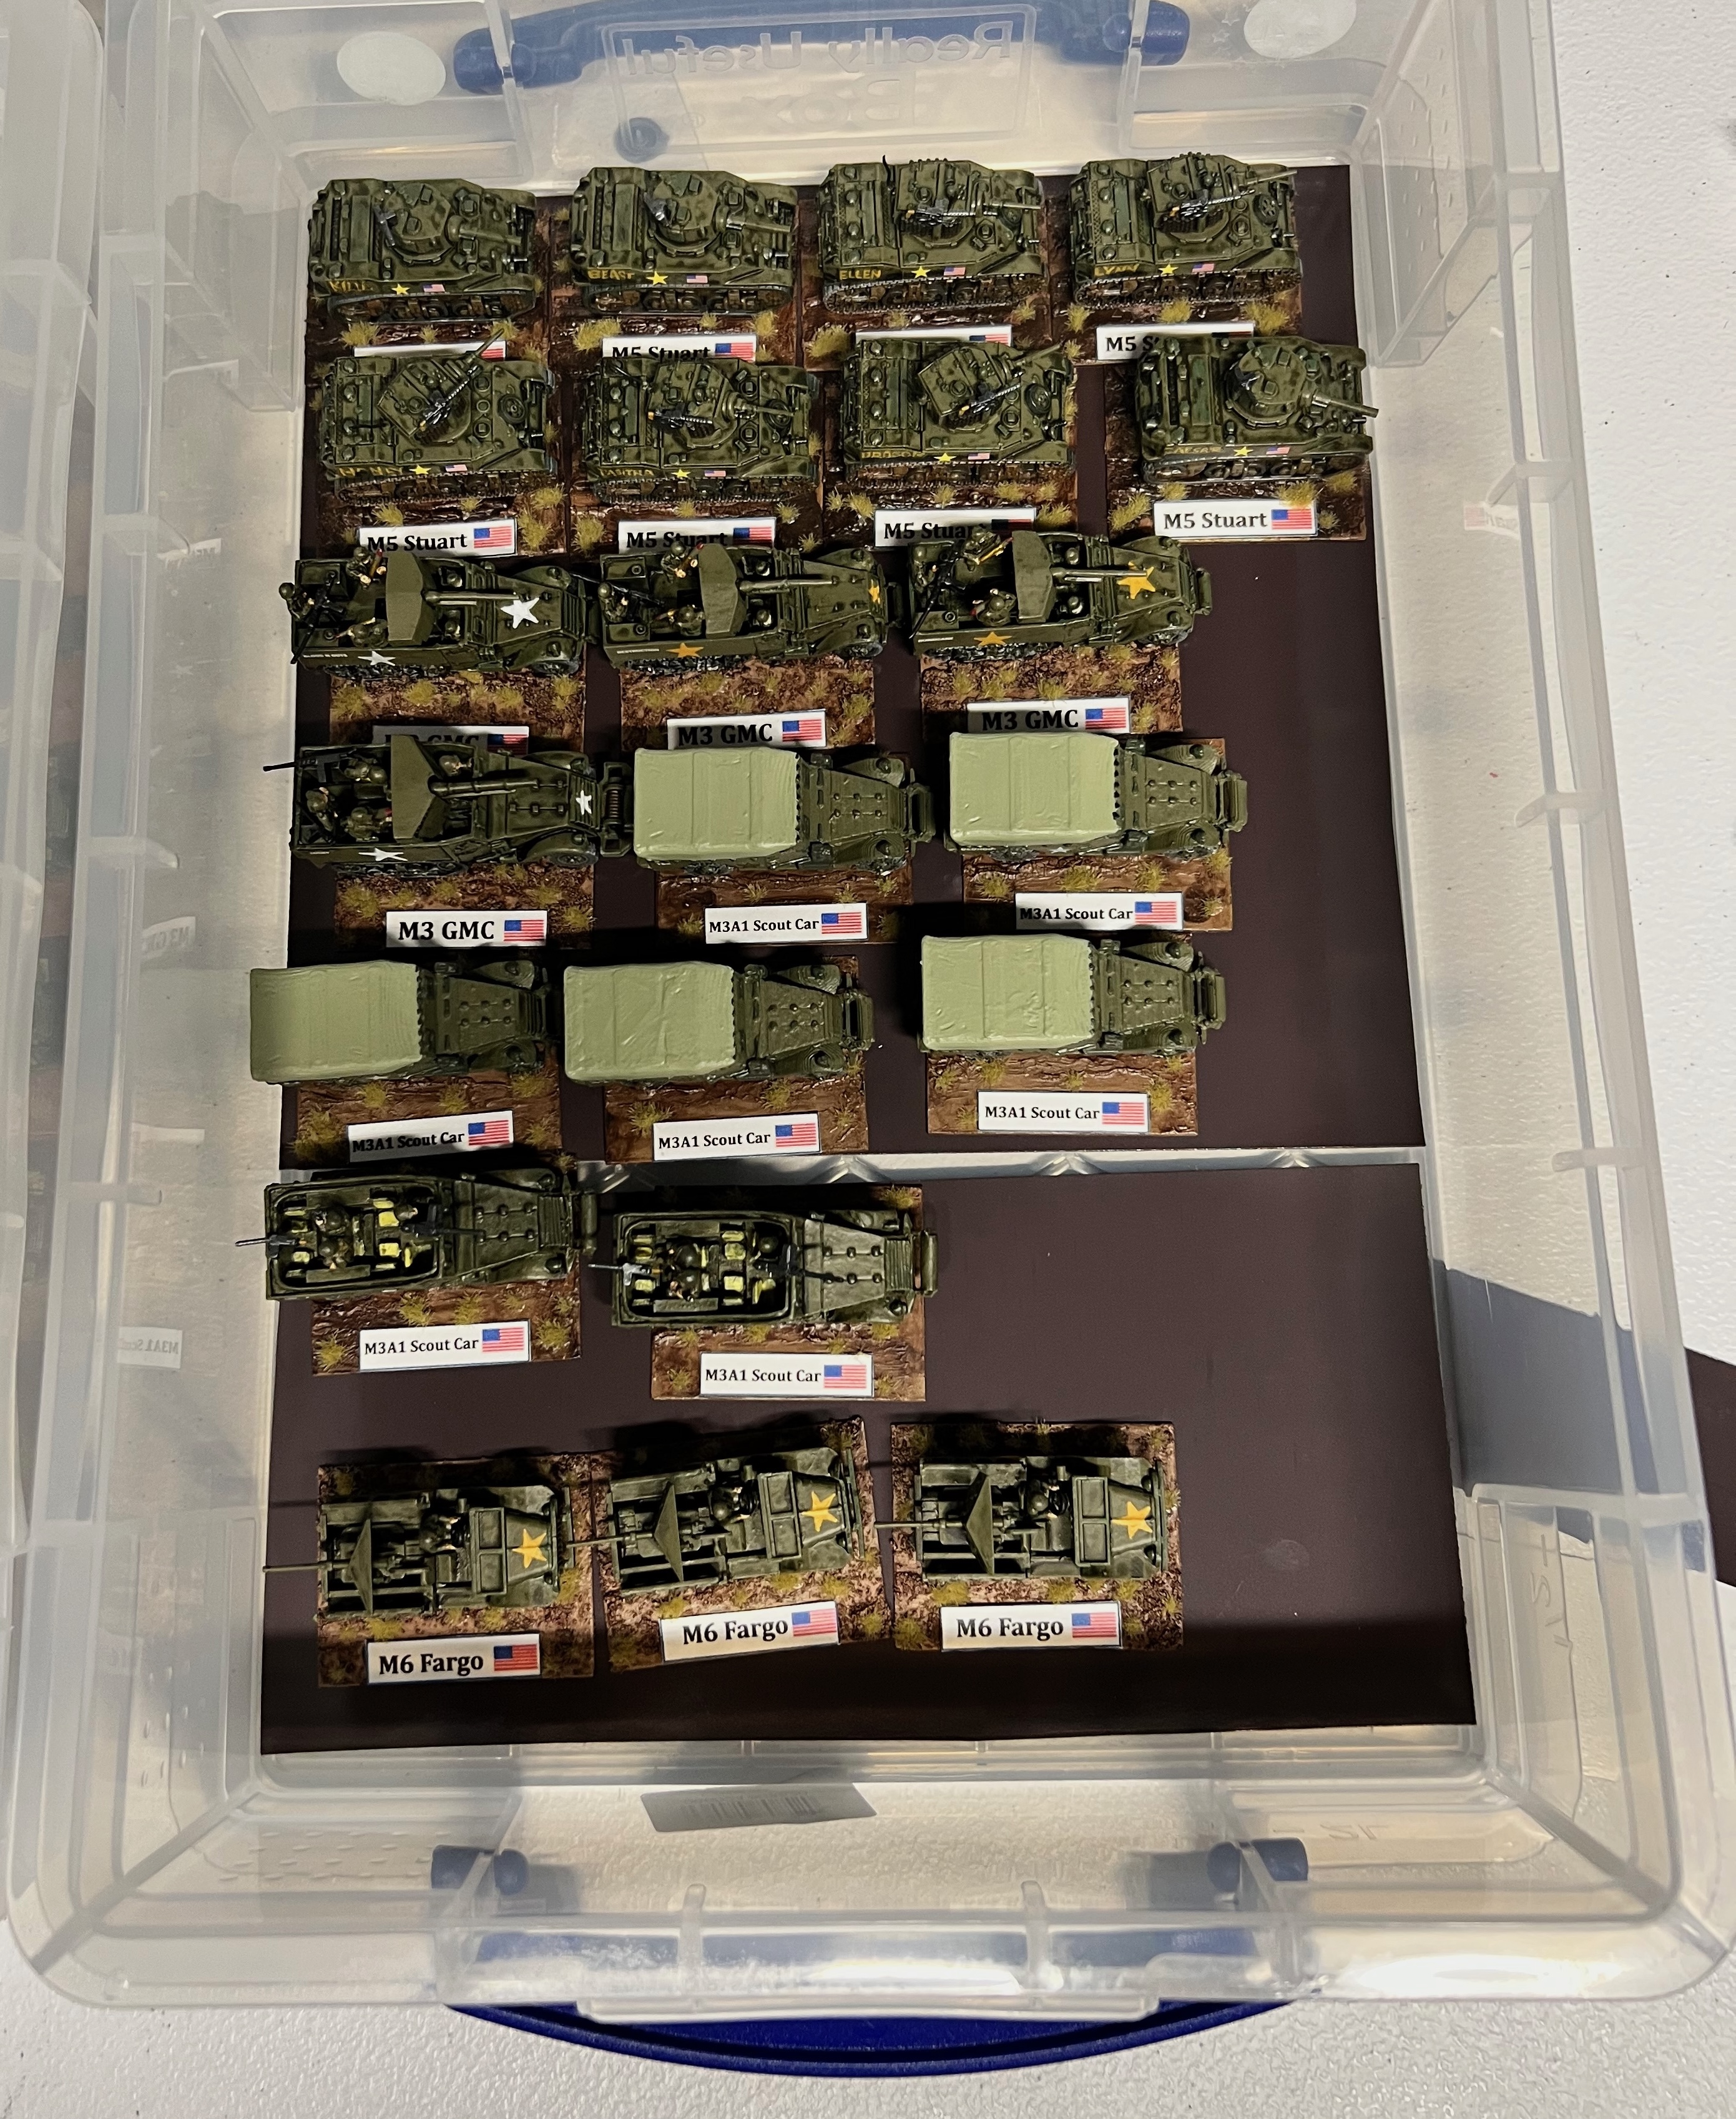
I worked on the M5 tanks in parallel with the M3A1 Scout Cars and the M3 and M6 Tank Destroyers that I have discussed previously. I tried to incorporate the gold stars and US flags that were unique to that period of the war. I also decided to give the vehicles hand-painted names:
Honey (my Mom’s nickname)
Dragon
Beast
Killah
Ellen (my daughter’s name)
Tabitha (my granddaughter’s name)
Caesar (my late cockatiel’s name)
Lynn (for my ever-so-tolerant wife)
The M5’s without their turrets, showing the basing and details. I list the paints and other materials used at the end of this post.The eight M5’s completed.The 22 US Army vehicles for my game in a Really Useful Box.The 8 M5’s on my tabletop.
This wraps up this post on my 8 M5’s. If you have any feedback – please let me know in the comments section!
Lastly, for all of my posts on WWII games and projects – there is a consolidated list of posts and their links located here.
MATERIALS USED
PAINTS, INKS, GLAZES, SHADES, WASHES, PIGMENTS AND FLOCKING USED ON THE FIVE BATTLEFRONT/FLAMES OF WAR PLASTIC M5 TANK MODELS AND THE THREE HOBBYHOUSE&MINIATURES LLC 3D-PRINTED RESIN M5 TANK MODELS:
Green Stuff
Paper Clip wire
War Games Accessories Steel Bases Number 16 (½” x ½”)
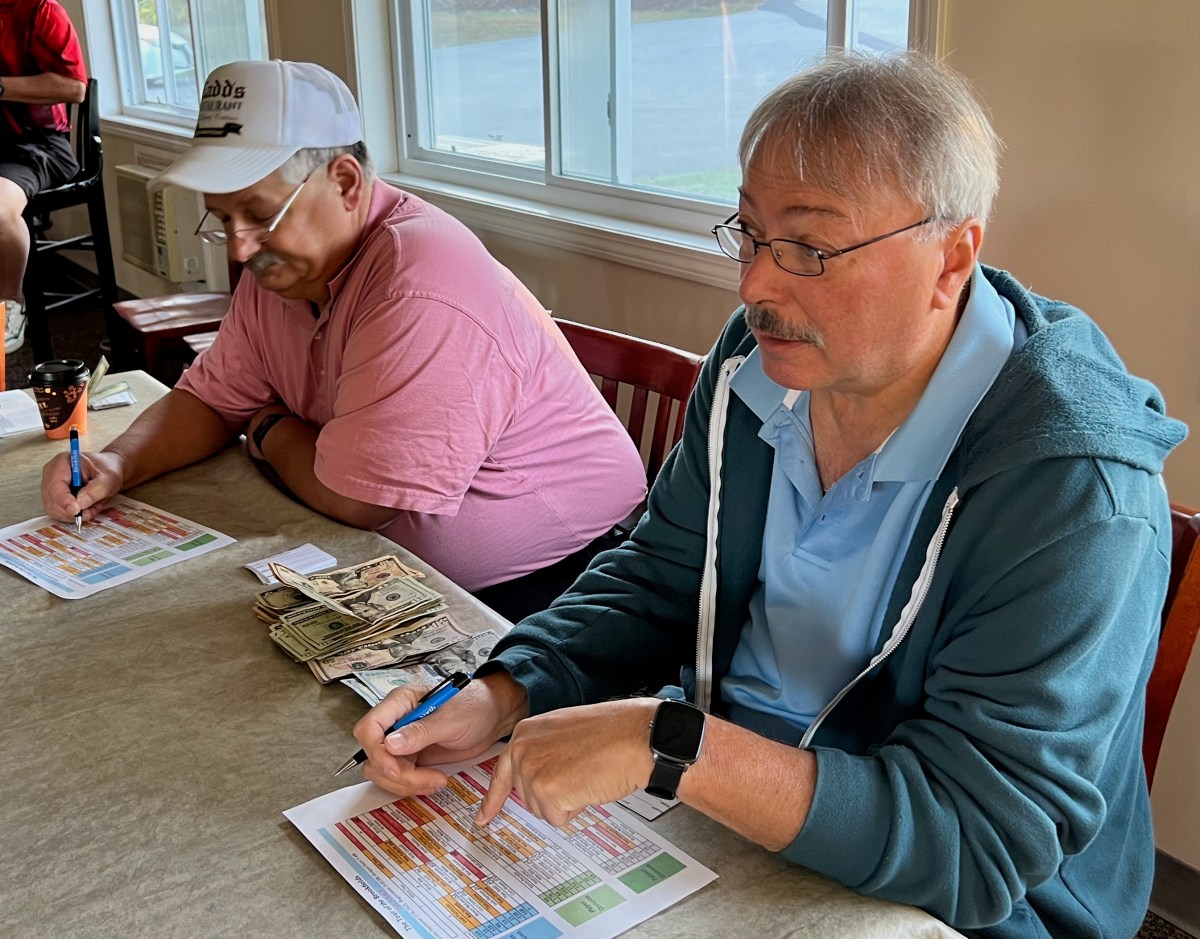
What an amazing final we had for the 2025 Tour of the Brookfields! It was held on Saturday, September 27th at Quail Hollow Golf and Country Club in Oakham, MA. We had 107 golfers. on 27 teams in 3 different flights. Let’s get into the results!
In the top flight, the Nicklaus flight, the team of Tom Gareau, Nelson Malin, Jared Danitis, and Lisa Persson won. They secured the victory by two strokes by coming in at a super 12-under par. Well done!
In the middle flight, there was a tie between two teams at -12. Team members were: Todd Allen, Paul Boulette, George Fiske, Doug Brown. The members of the opposing tied team were Adam Kettles, Ron McCann, Jarred Dandurrant, Ed Sanborn. A playoff of one hole would ensue with Adam Kettles dropping a 15-footer to win first place. Congrats to both teams!
Lastly, in the Palmer Flight, the team of Amanda Pierce, Jason Malin, Mark Bruso, and Jim Parker absolutely dominated. They achieved a score of 13-under par! This was the best score of the FINALS tournament. It also tied the best score by any team for the entire season, and won by 4 strokes. An absolutely stunning performance – wow!
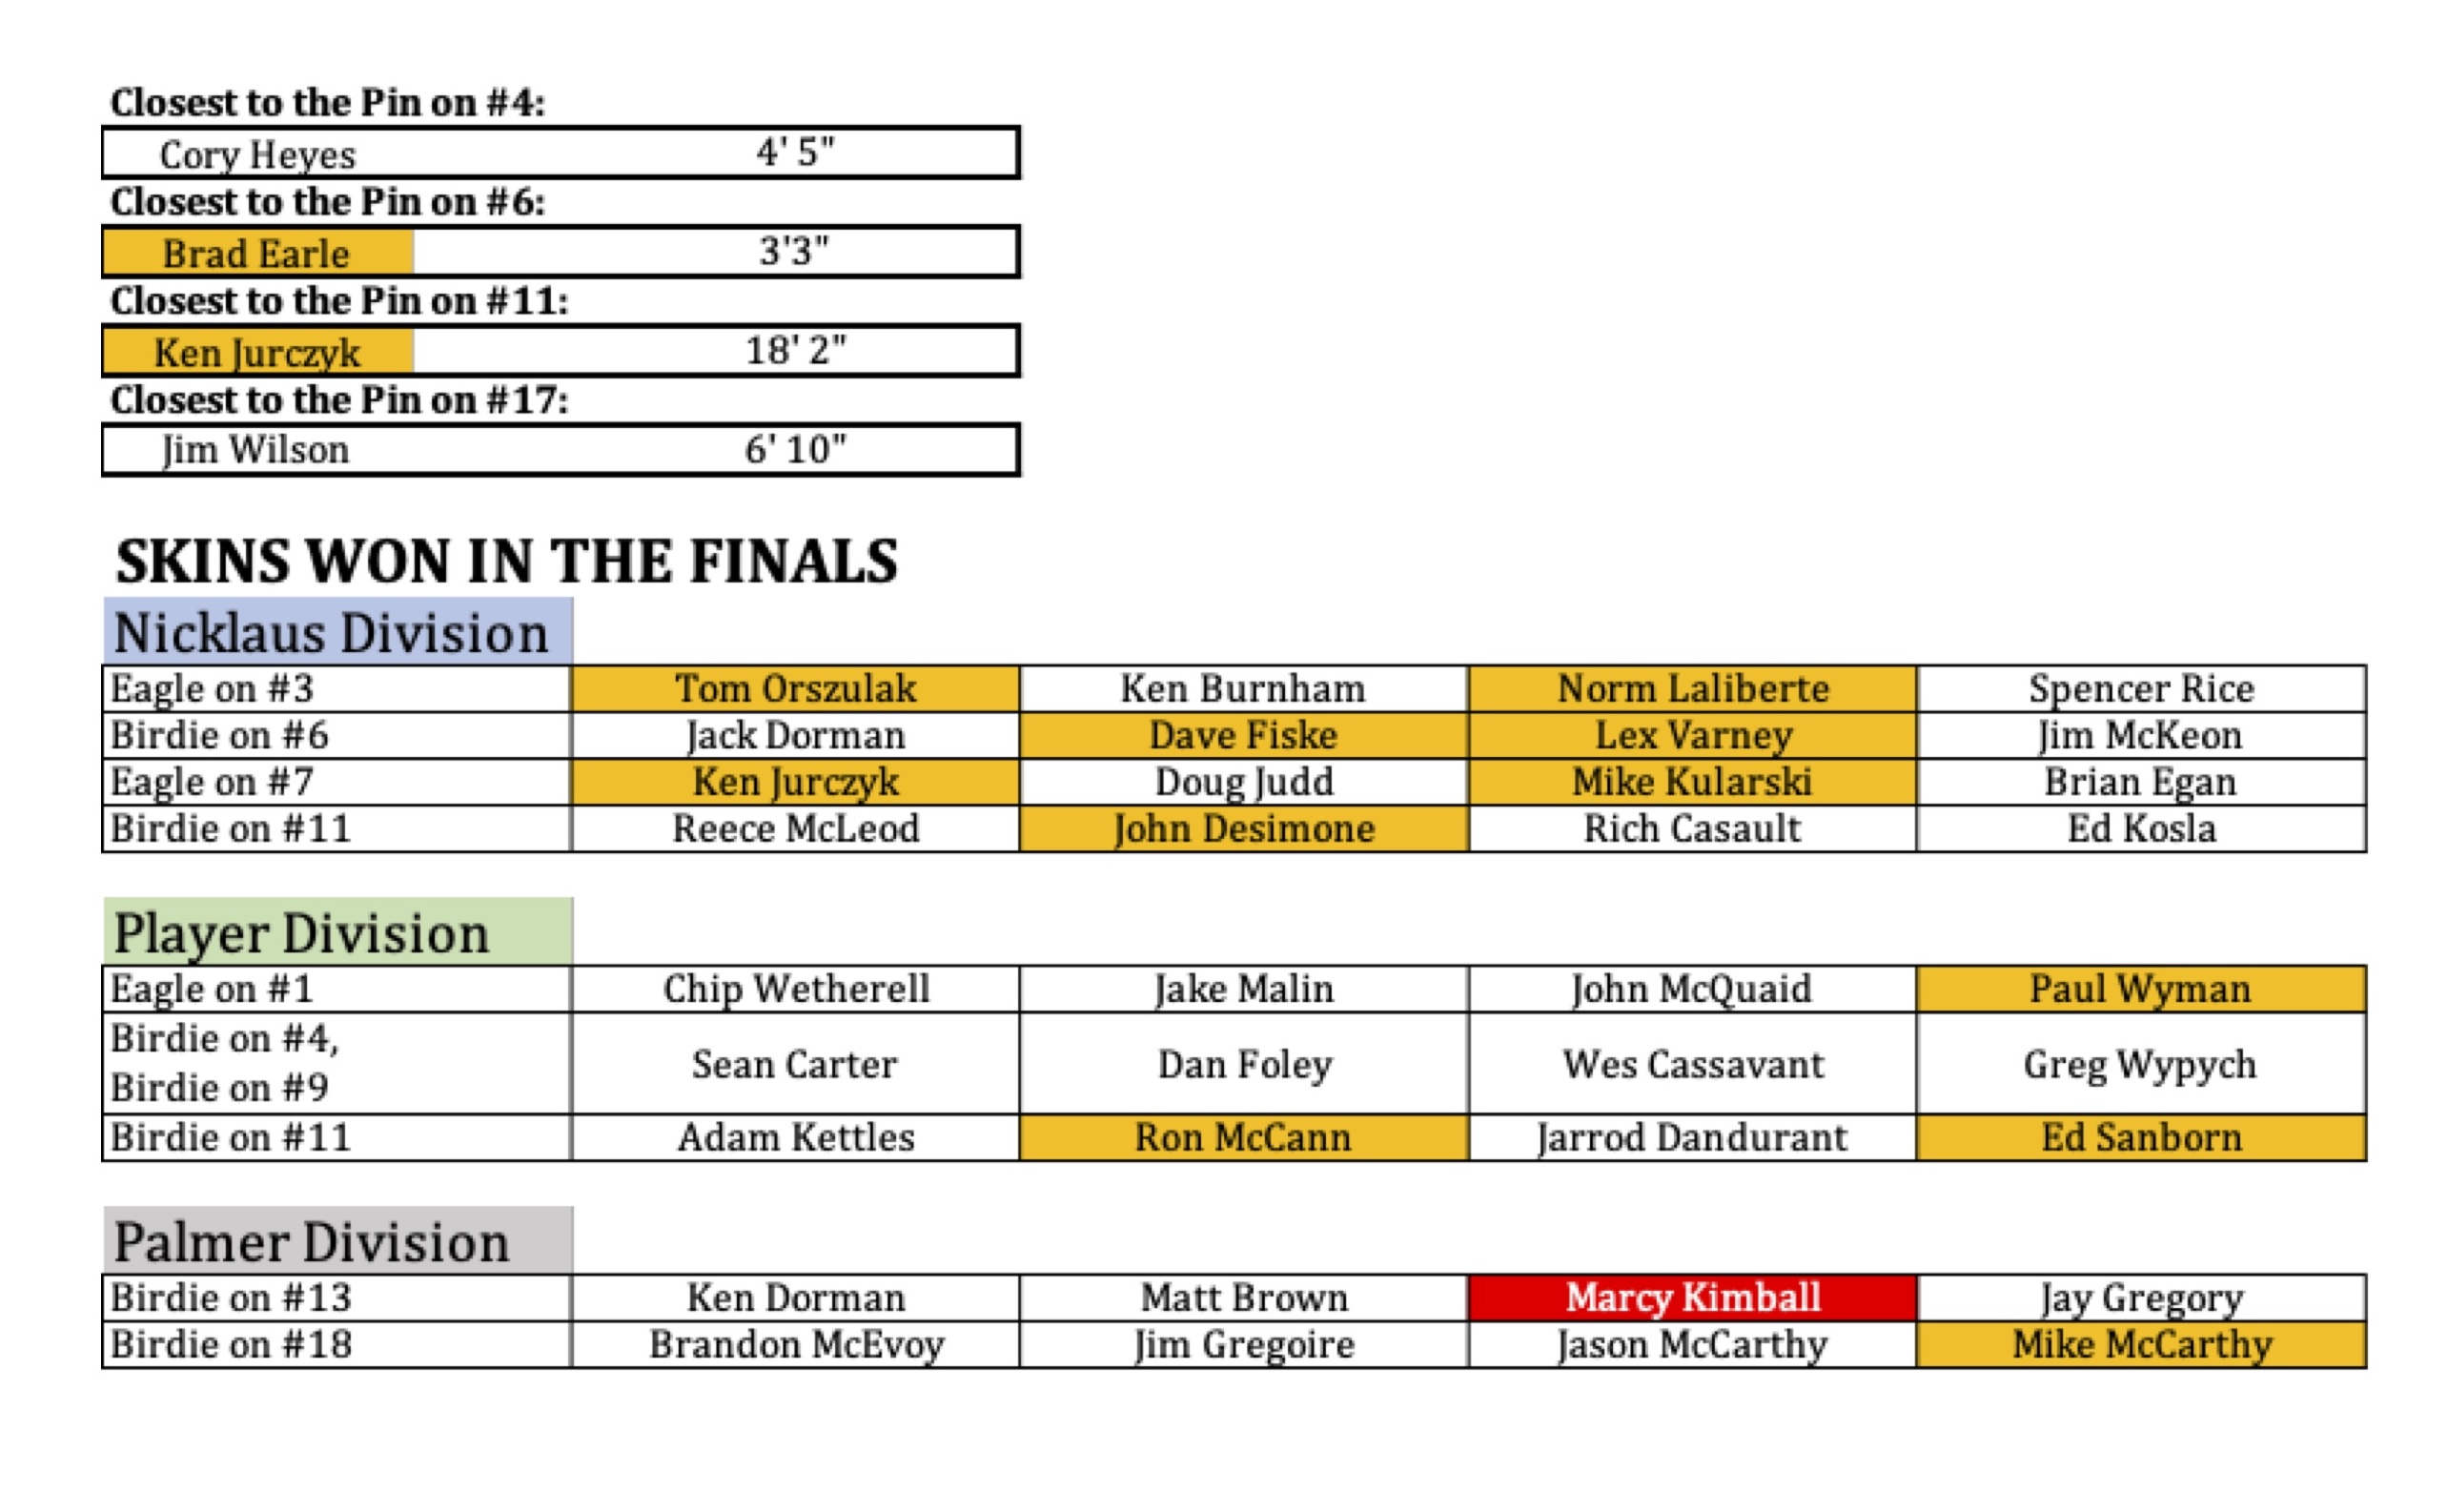
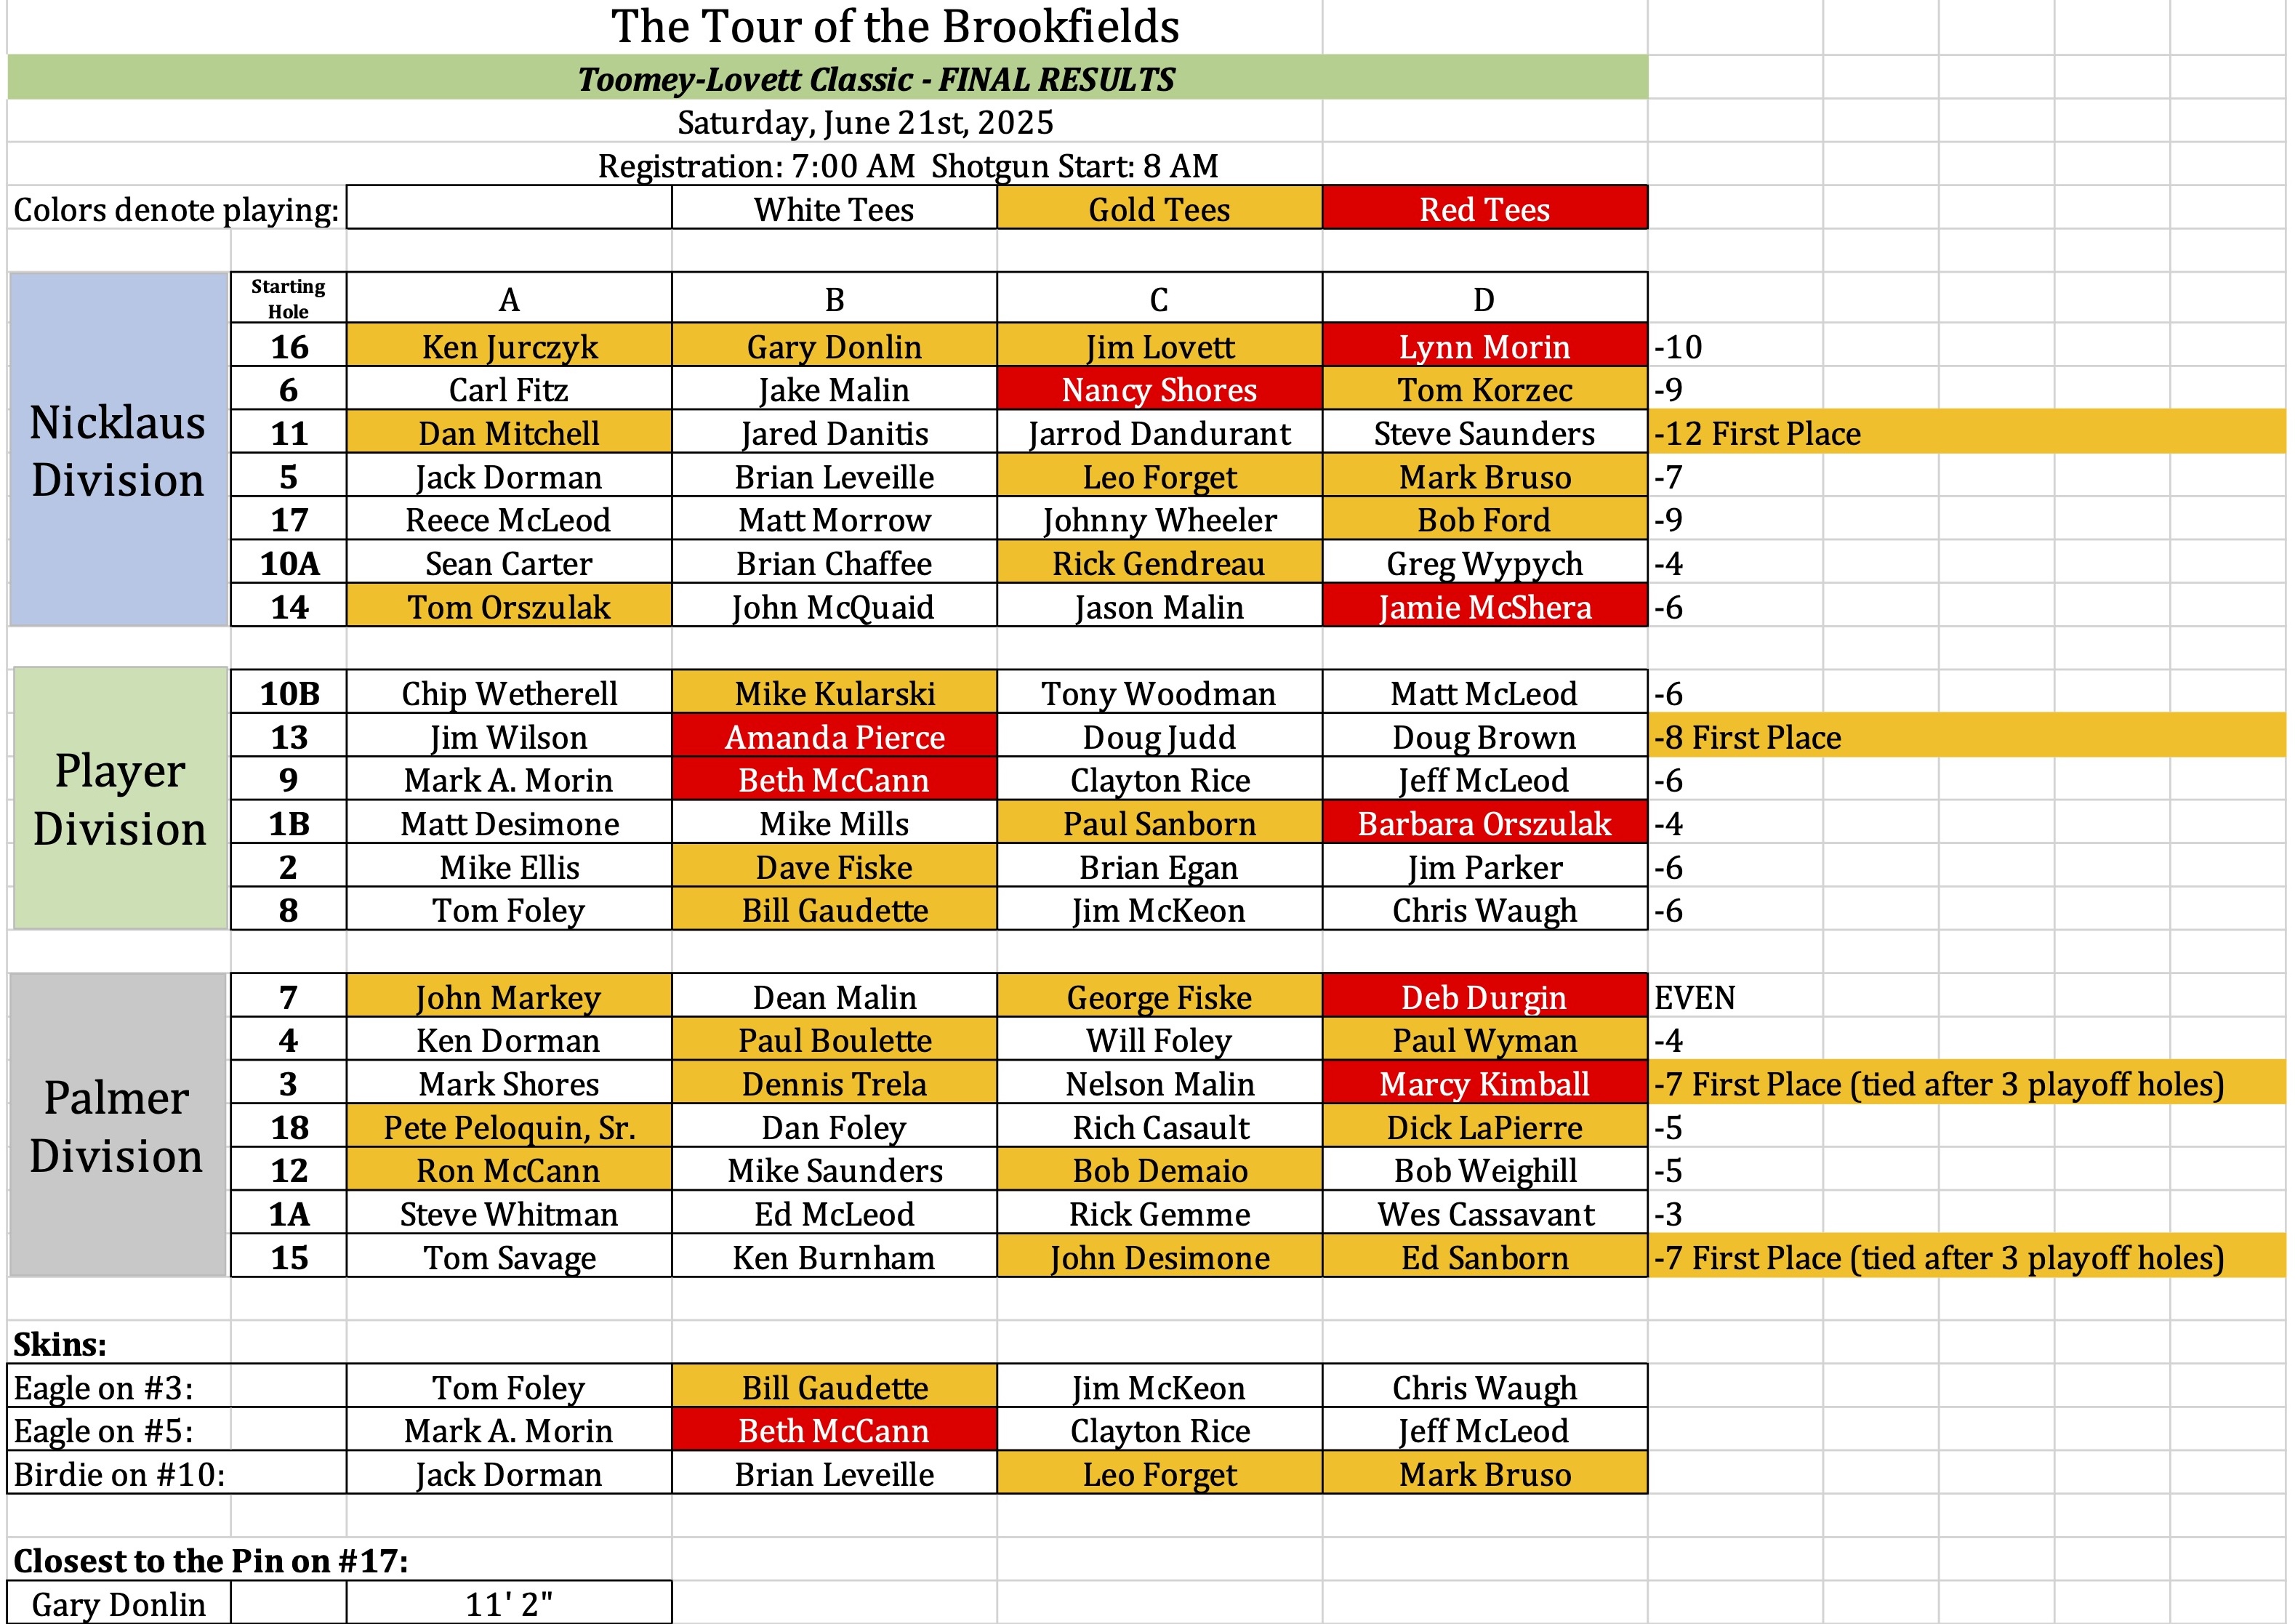
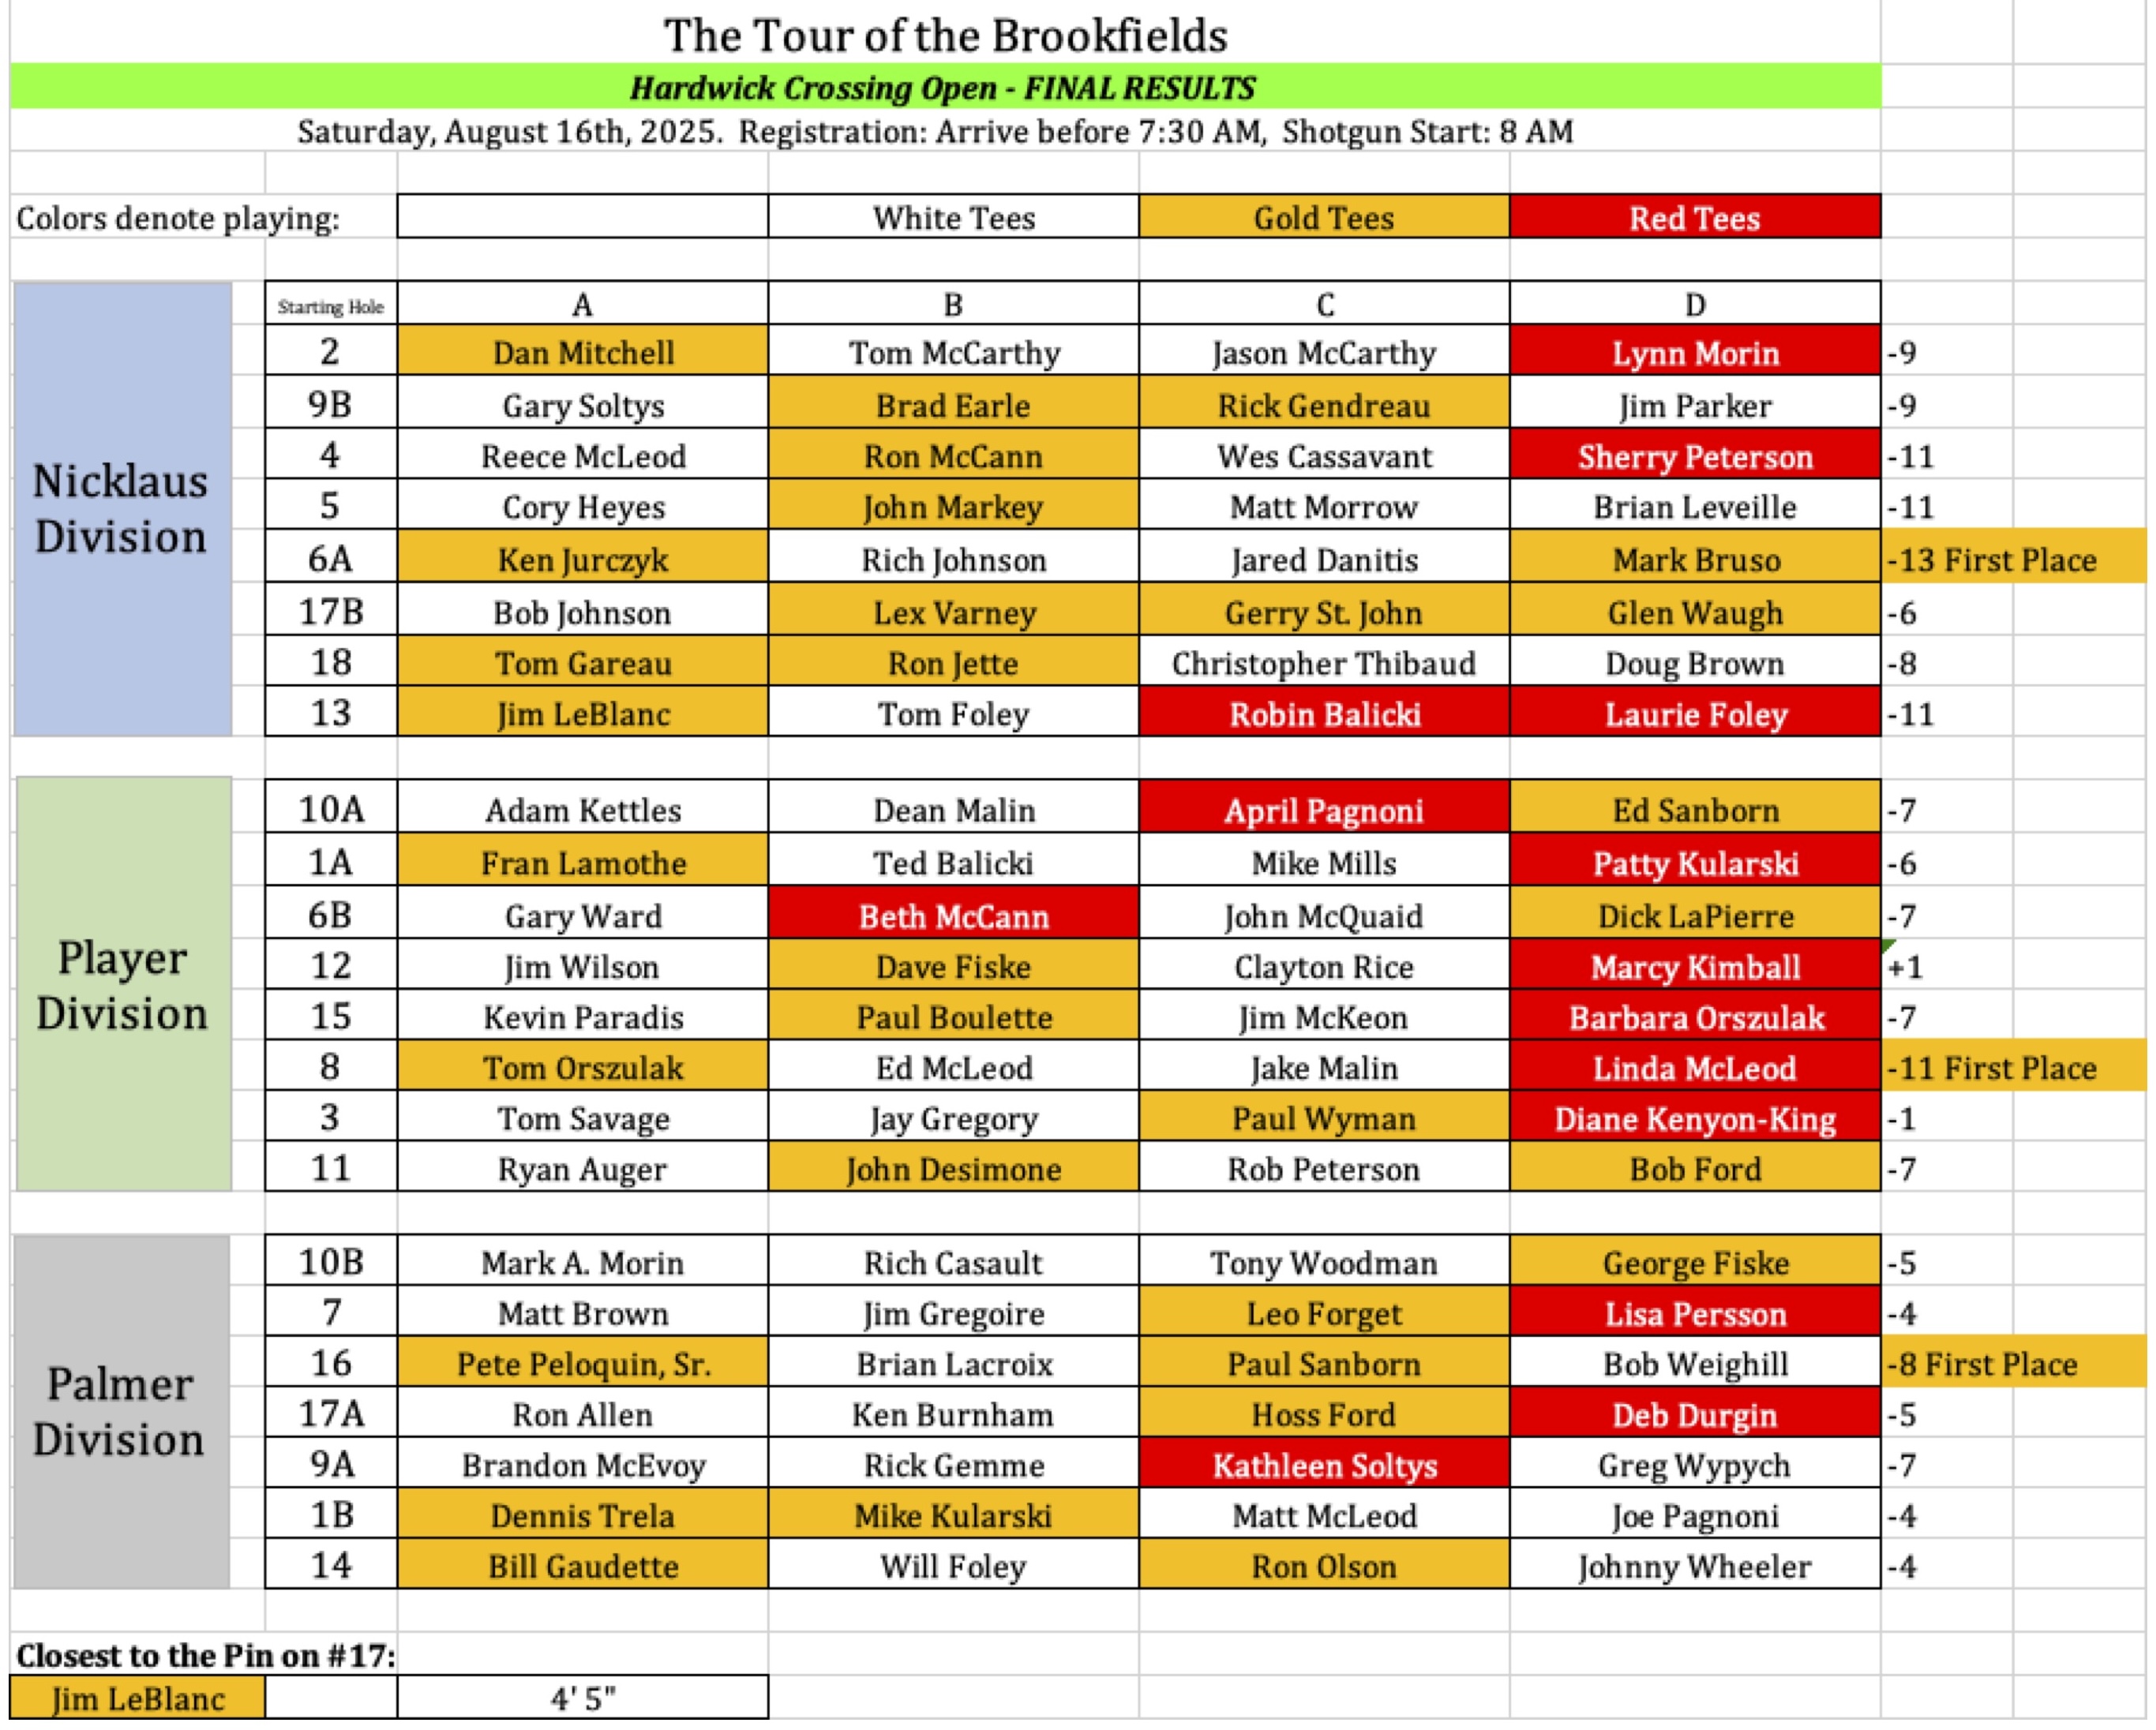
Below you can see the results of all three flights. You can also see the closest to the pin results. Additionally, the Skins won by flight are displayed. Click on the images to get a better view.
Special thanks again to all of our sponsors this year:
Extra special thanks to Carl Fitz, Jim LeBlanc, Tara, Ed, Art, Kenny, Ron and all the staff at Quail Hollow. They work so hard to make the Tour of the Brookfields possible!!!!
Next Year and Some Photos
We hope to have all of our players return next year plus some more. Recruit a few yourselves! When we know some details, we will share it with you on the Facebook page and in this blog. The Committee hopes to meet before the snow flies to capture any lessons learned and make next year even better!
By the way, next year marks the 47th year of the TOB!!
Personally, I want to credit and thank the Committee for being a great team. George Fiske, Brad Earle, Ed McLeod, Mike Kularski, and Matt Desimone, you guys are AWESOME. It is wonderful to work with all of you on the TOB Committee!!!
By the way, PLEASE subscribe to this blog. You’ll get updates on the TOB. You will also get a good view of my many hobby projects. You can read or ignore them! You can also add comments here at the end of this post.
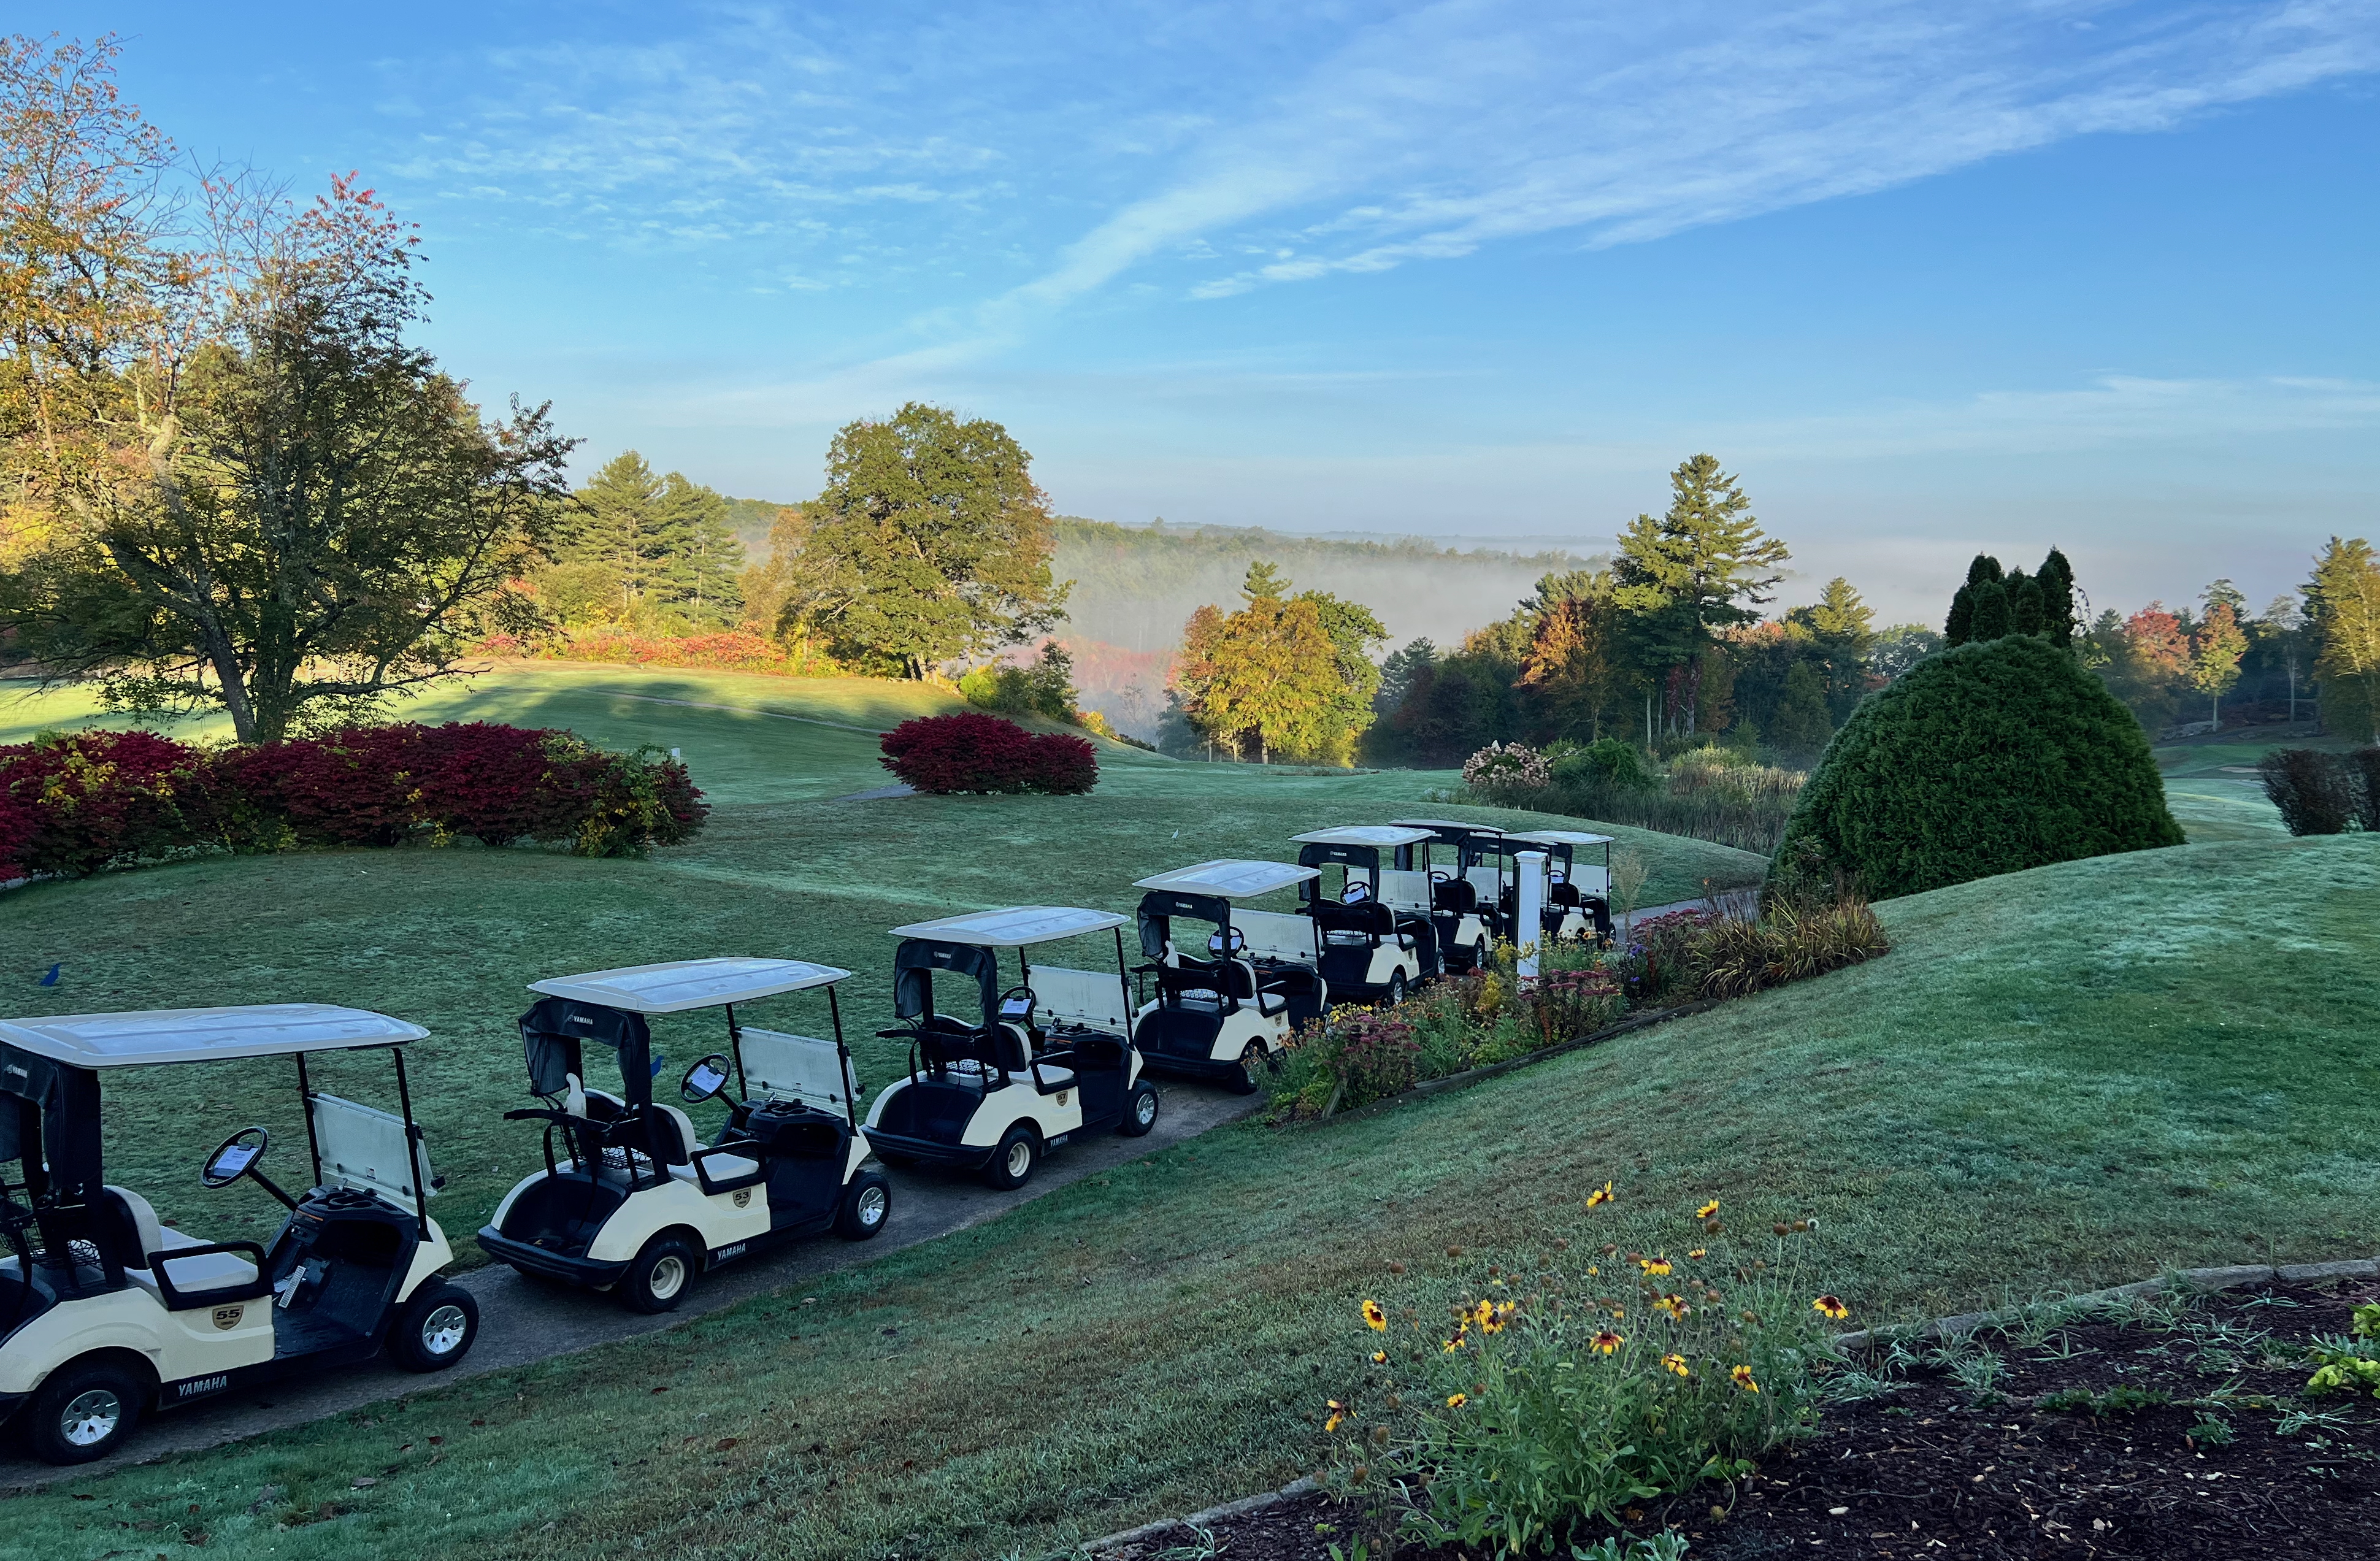
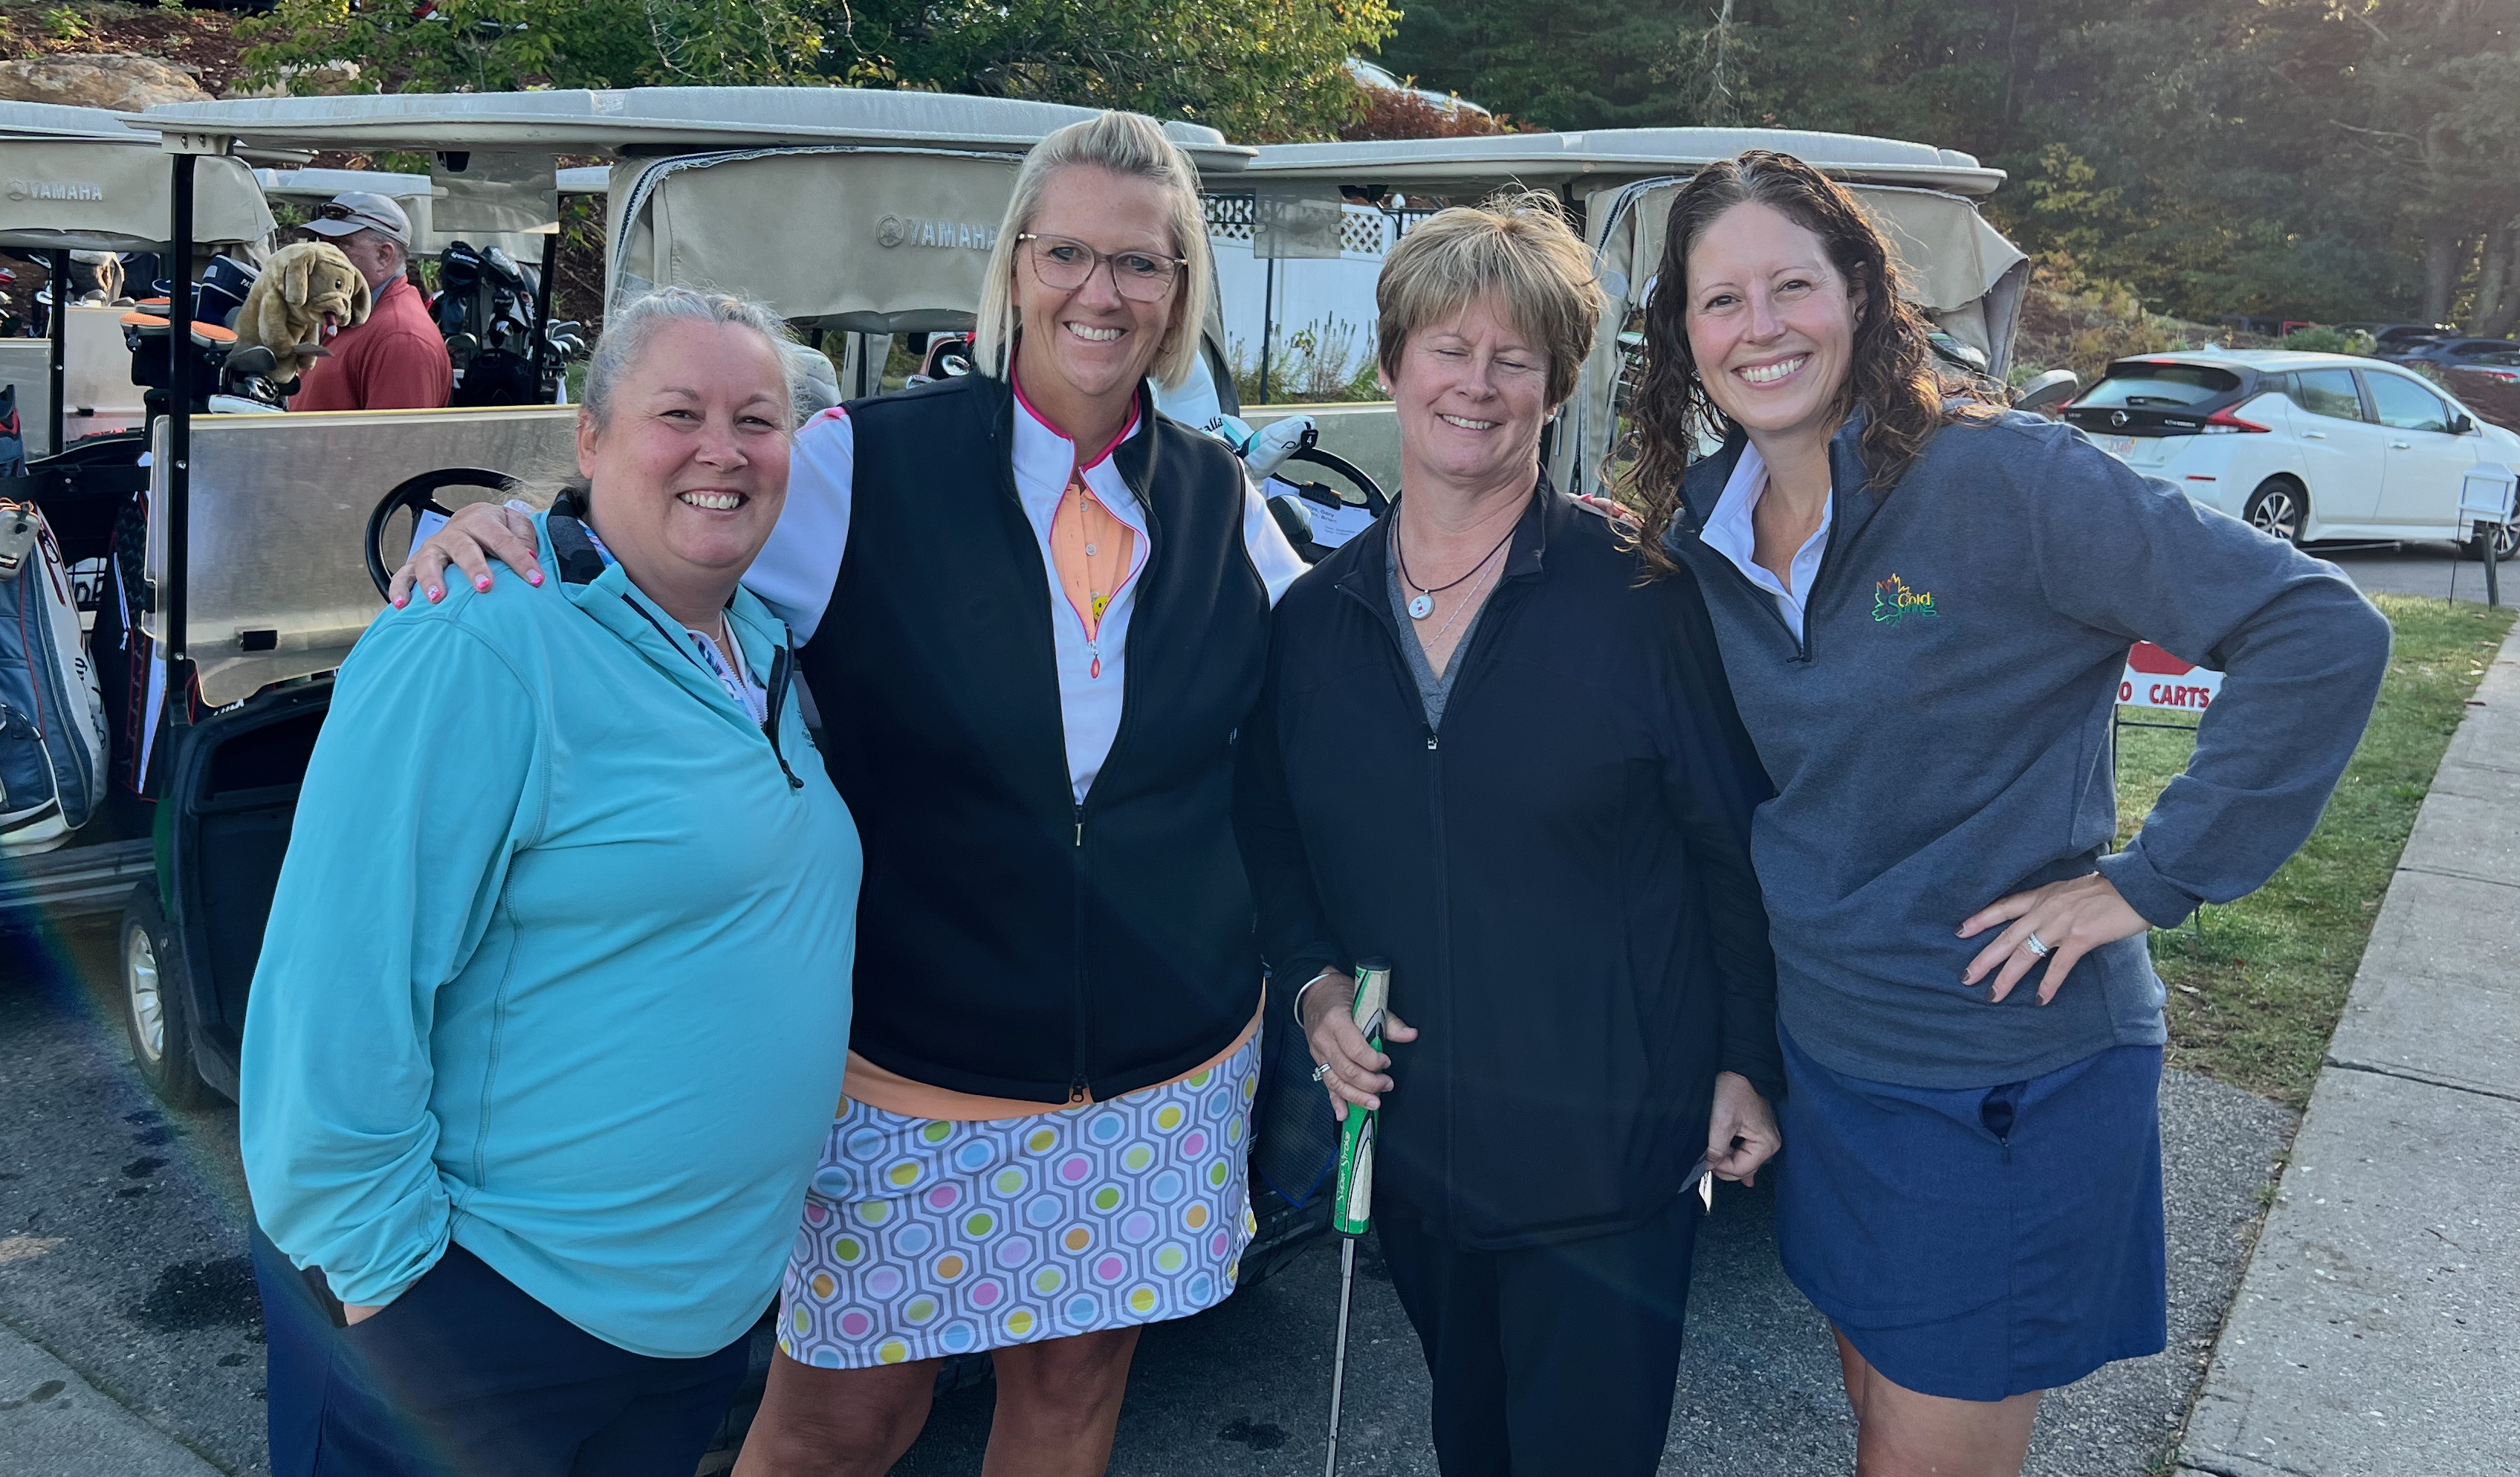
Now some photos from Saturday’s FINALS!! See you next year!!
The Draft night starts at 7 PM SHARP on Thursday, September 25th! All players are welcome, but A players need to come to pick their teams. The prizes and more will be covered there and then. If you need to make picking arrangements, speak directly with a committee member.
If an A player is late, we will still continue at 7 PM. Hence, please plan accordingly.
Arrive early.
Again, all are welcome and encouraged to attend the draft as it is a fun and exciting night!
As the FINALS for the 2025 Tour of the Brookfields season is Saturday, September 27th, I need to share information!! This blog post will have all of the pertinent data for all players. It will highlight the information for the A players. This information will give all players access to the exact same data to use for the Draft Night.
I will share the files here (which are downloadable) and screenshots of the files, with some explanations.
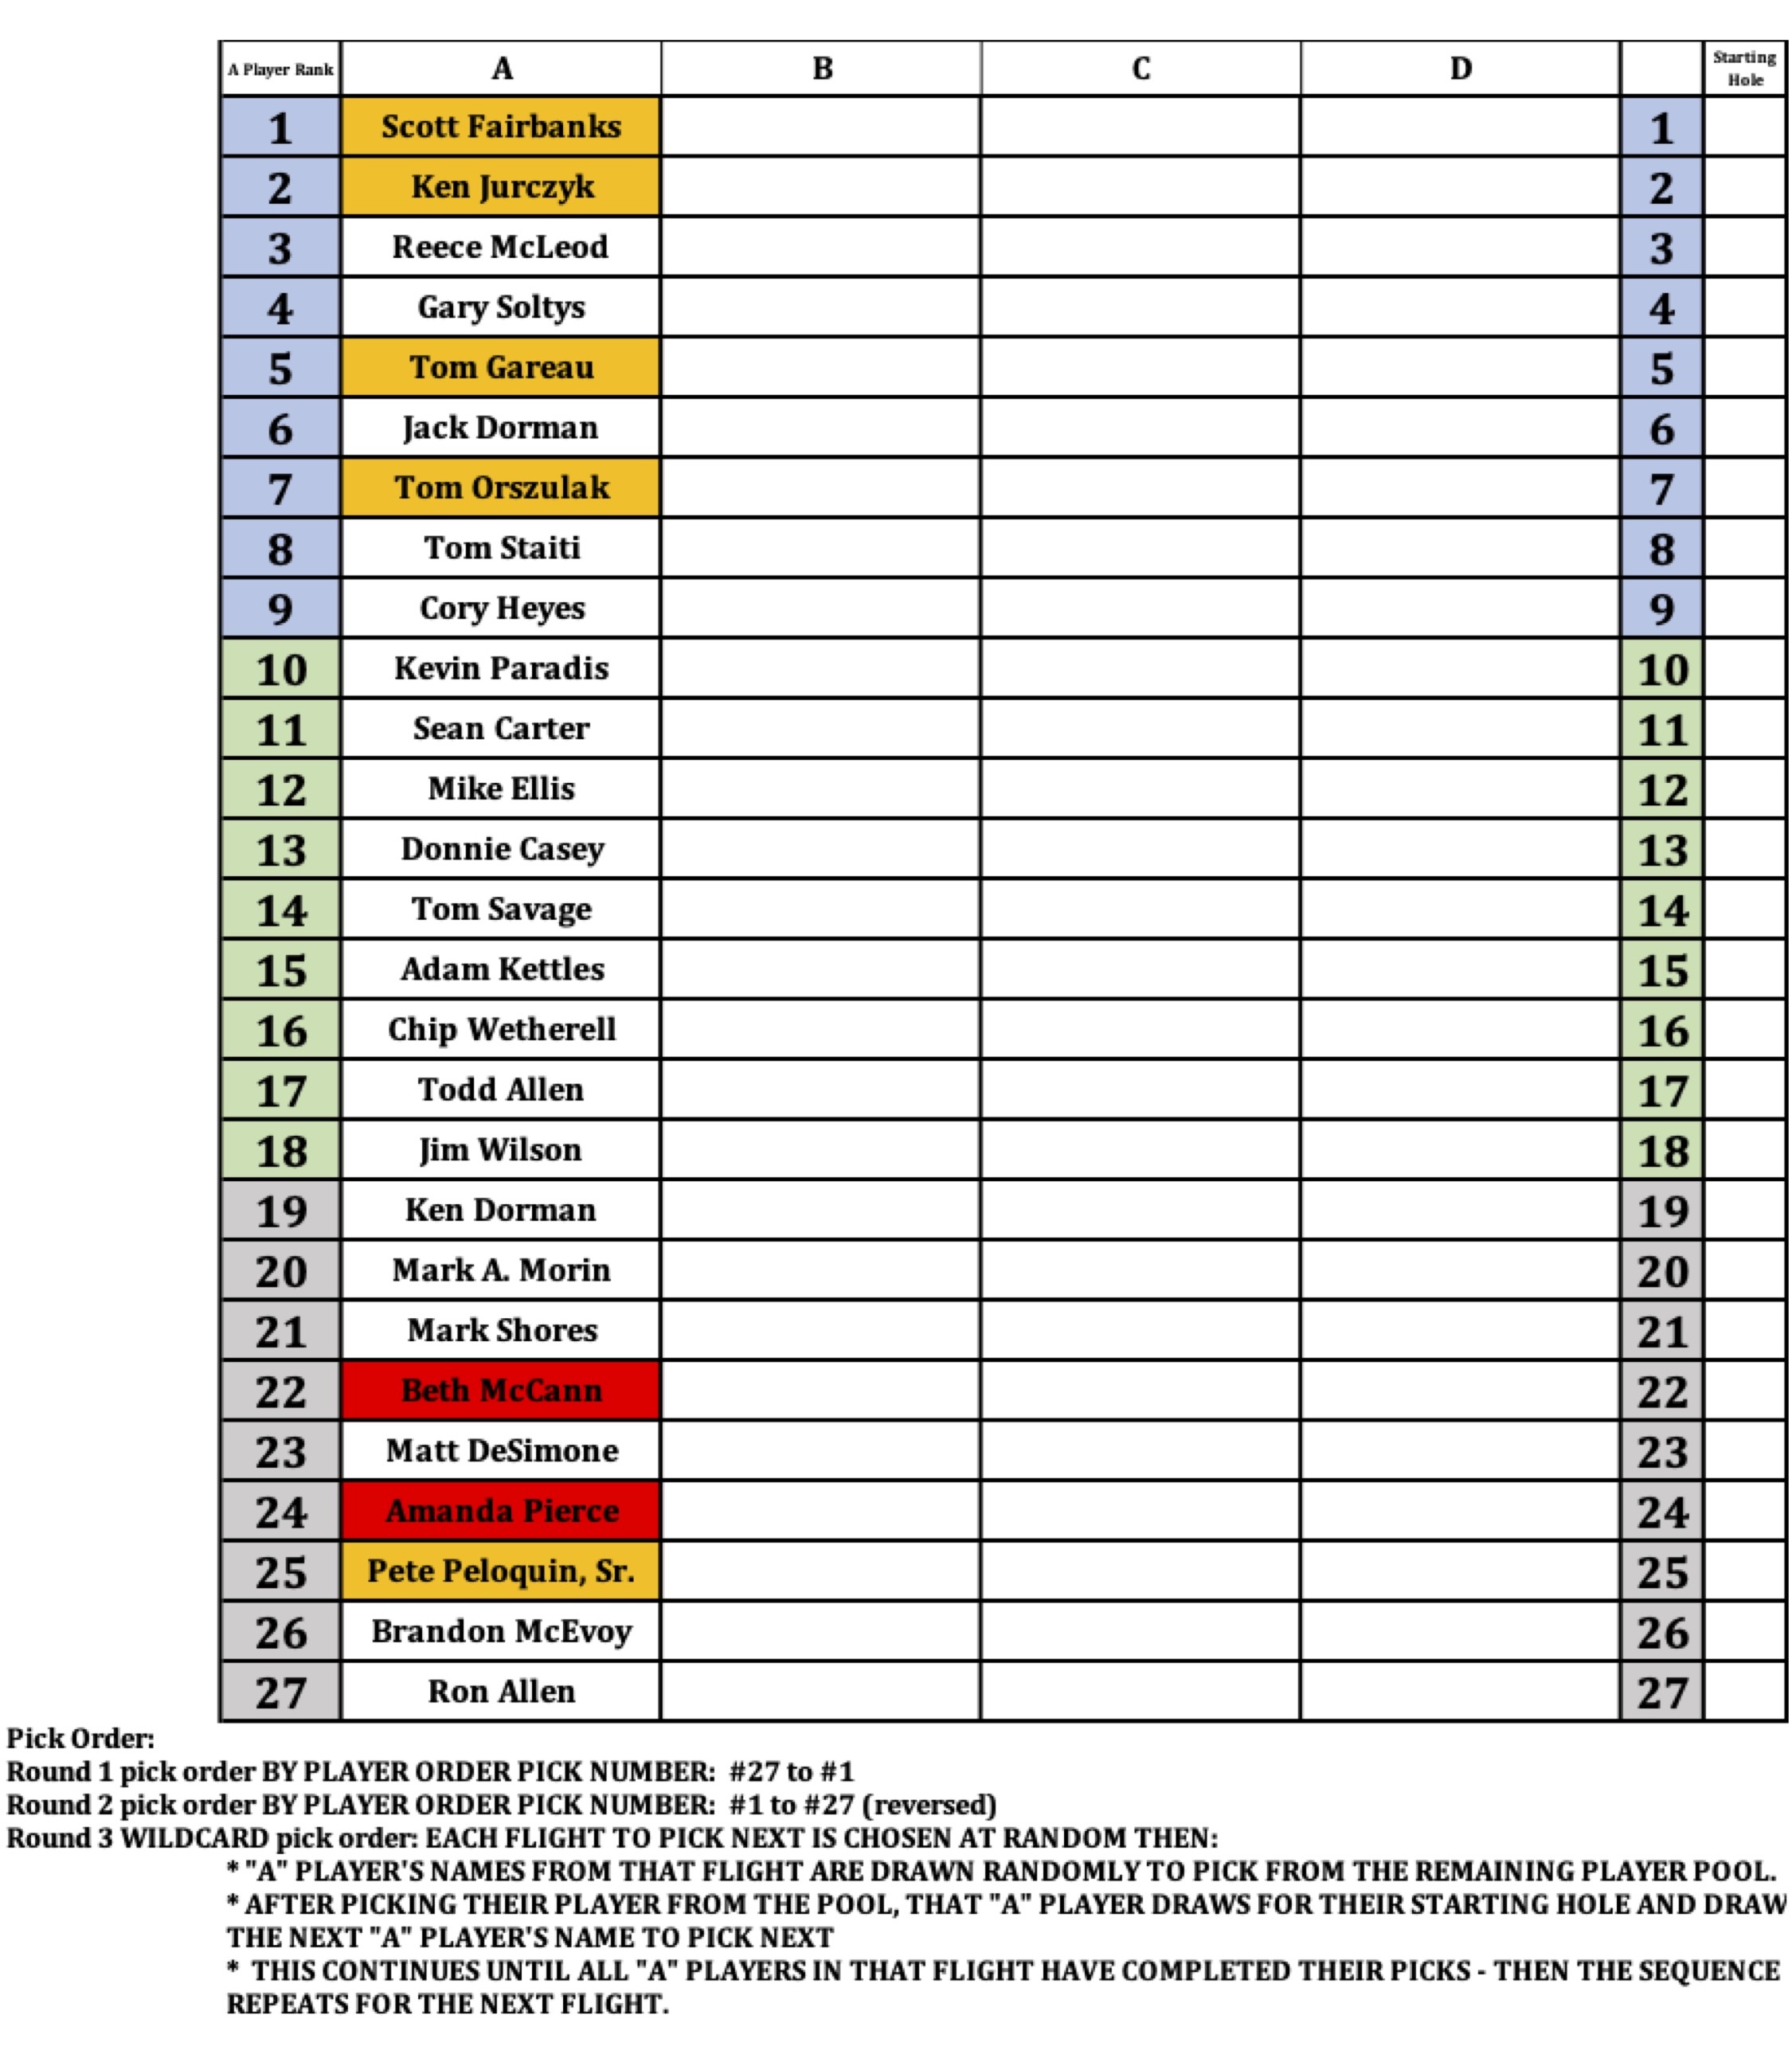
The “A” Players Ranking and Order of Pick Sheet
The screenshot below shows the pick/fill in sheet for the Draft Night, to include the 3 divisions/flights.
NOTE: ALL FILES AND SCREENSHOTS HAVE BEEN UPDATED WITH CHANGES AS OF 9/24/2025
In Round 1, the “A” players will pick in order starting with number 27. Ron Allen is number 27. Scott Fairbanks is number 1, and he picks last in the first round. Players can choose any remaining player (B, C, or D) from the player pool when their turn comes.
In Round 2, the “A” players will pick in order starting with number 1 (Scott Fairbanks). The second round ends with number 27 (Ron Allen). Again, players can choose any remaining player from the player pool when their turn comes.
Round 3 is the “WILDCARD” Round. Each flight will be randomly selected to go first, then second and then third. When a flight is chosen, all of the “A” players in that flight will then be also chosen in a random order. They will pick their final player from any of the remaining players from the player pool. At this point, they will also choose their starting holes at random as well.
The player field is shown below – in order alphabetically by first names.
Below, you can download an Excel file. It has both the the A Player rankings/fill in pick sheets and the 2025 field.
Consolidated Results for ALL 2025 Regular TOB Events
We only had a partial result for the Techo Bloc Open as we had to cobble something together with the monsoon that hit us. Notably, the Lamoureux Ford Open was rained out completely. The screenshots for each event is below, followed by a consolidated Excel file with the same information.
Lastly, here is the downloadable Excel called “2025 TOB Consolidated Event Results”:
I hope that you are looking forward to the Draft Night. I always suggest that everyone comes. You may help your A player with a pick. You may have knowledge that he or she does not. If you are not there – well you cannot help! Plus there are some extra activities that you won’t want to miss!!
The US Army had a lot of catching up to do at the start of World War II. This was true both in terms of vehicles and doctrine in the way of armored warfare. This included anti-tank units.
Initially, the US Army experienced internal squabbles about anti-tank troops and control. These were among the infantry, cavalry, and artillery branches. They disputed over which would control what were then-called “anti-tank battalions”. Interestingly, the Armor Branch (created in 1940) had little interest in that fight. It desired to stay focused on offensive operations.
The September 1941 Louisiana Maneuvers demonstrated the efficacy of anti- tank battalions. In June 1942, the Army created a new branch for this force. They also developed a doctrine to support their use (Field Manual 18–5, Tactical Employment, Tank Destroyer Unit). Tank destroyer battalions were then created and began to be fielded.
Developing doctrine is one thing – fielding self-propelled anti-tank equipment is another. When Operation Torch was launched, there were not any of the tank destroyers that you saw in later battles. No M10 Wolverines, M18 Hellcats, or M36 Jacksons – or even towed M1 57mm or M5 guns – took part in Torch.
Nope, at the start of the war, the US Army fielded just two models of tank destroyer. One was on an M3 half-track, which mounted the venerable 75mm Canon_de_75_modèle_1897. This combination was called the M3 Gun Motor Carriage (GMC). The other was the M6 Gun Motor Carriage (GMC). This was a Dodge Fargo truck with a rear-mounted M3 37mm gun. Defensively, needless to say, both of these types were not well-armored at all.
Offensively, while the 75mm gun could still pack an anti-armor punch, the 37mm was well on its way to complete obsolescence. Add to that the M6 GMC was rearward-facing. It would have to be turned around to fire, That would have been quite a challenge in combat. I imagine that it was inspired by the British use of portee anti-tank weapons. However, the main reason was probably the urgency of fielding something to fight in the anti-tank role. Add to that – US industrial might had not yet reached full production capacity seen later in the war.
M3 GMCM6 GMC
But you go to war with the Army you have. Tank Destroyer battalions were formed, consisting of a headquarters company, a reconnaissance company (including a pioneer platoon – Engineers!), and 3 twelve-vehicle tank destroyer companies. Each company fielded each one platoon of M6 Fargo GMC’s and two platoons of M3 GMC’s. Each M6 platoon had 4 vehicles, and each of both of the M3 platoons had 4. These would see combat starting in November 1942 during Operation Torch.
At that point, doctrinally, tank destroyers were by nature defensive forces. They were supposed to blunt any enemy armored attack or counterattack – obviously by destroying tanks. This would allow for counterattack by US tanks and infantry. Operation Torch would be the first test.
For my What a Tanker games for Operation Torch at HISTORICON 2025, I needed both types of tank destroyers. For the M3 GMC’s, I bought 6 from Old Glory (SKU CD-223A) and assembled and painted up just 3. I also found one Battlefront/FOW model (SKU US101) at HAVOC that joined the mix. Now I had 4 M3 GMC’s for gaming. M6 GMC were not easy to source – and I also had never heard of them. So my friend Greg Priebe agreed to 3D-print some for me. You may remember that Greg printed the French vehicles for me I previously wrote about here. He made Panhard 175 TOE’s and Berliet VUDB’s for me.
Thanks again Greg!
I was able to put together 3 M6 GMC’s with what Greg sent me. I worked on these in June as well.
June was a crazy month – and I was able to get these together before HISTORICON 2025. As for photos – well you’ll see what I have.
M3 GMC
The three Old Glory models are metal, while the FOW model is metal and resin. all are 15mm/1:100 scale. Painting the crews was challenging (and fun)!
Three Old Glory M3 GMC models are on the bottom, with the FOW model at the top of the photo.
I painted them up with both gold and white stars. The gold stars were unique to the North African campaign. I thought they gave a more authentic Operation Torch look. Apparently in November of 1942, standardization to white stars was not yet part of the US Army’s official painting scheme. Unlike my M3A1 Scout Cars, I freehand painted the stars. I found they looked better than my decals. For more variation, I either painted the stars on the hood or the grills. Also, each got a name – I used the decals that I had available. The names of these were:
BLOOD N GUTS
DESTRUCTION
HURRICANE
LUCKY
My 4 M3 GMC’s. From left to right, BLOOD N GUTS, HURRICANE, DESTRUCTION and LUCKY (the only FOW model).Close ups of DESTRUCTION and HURRICANE.
M6 GMC (FARGO)
These were all 3D-printed resin in 15mm/1:100 scale. I wish that I had been able to add crew to these. They were already so fiddly and small, that I satisfied myself with just having a driver. Even at that I had to do a good amount of surgery to get him to fit in his seat!
The M6 GMC’s washed after putting in magnets and ready for assembly and painting. I added magnets to each M3 and M6 to allow brewed-up markers to stick to the vehicles on the tabletop. The M6 GMC’s shown here painted staring at the back end of my Berliet VUDB’s. The M6’s are awaiting basing work and varnishing.
Like with the M3 GMC’s, I gave names to these as well. These names were the only differentiator for these models. The names were:
BUCK (for Buck Surdu)
DUKE
TEX
A close up of two completed models. Here, BUCK is maneuvering into a hide firing position. It would of course have to turn around to fire. Behind is DUKE moving up the road.A closer view of BUCK.
While the M3 GMC was partially effective in North Africa, the M6 was not. Clearly, both were very vulnerable to direct and indirect fire. As time progressed, they were both replaced by self-propelled vehicles with turrets and better protection. The M3 GMC’s were converted back into half-tracks. The M6 GMC’s were stripped of their guns, and were later used as just trucks.
In conclusion, I had some tank destroyers for Operation Torch games of What a Tanker! I also hope that you enjoyed this post on my early war tank destroyers. All that I have left to share on this project are my 8 American M5 Stuart tanks. I will also share a bit about my games at HISTORICON.
What did you think of these tank destroyers? Did anything surprise you? Motivate you to get some for yourself? Please let me know your thoughts in the comments section!
Lastly, you can find all of my posts on WWII games and projects in one place. There is a consolidated list of posts and their links located here.
The next lists are what I used on these vehicles. I review these lists for my own uses on future projects. For some of you, they may also be helpful.
MATERIALS USED
PAINTS, INKS, GLAZES, SHADES, WASHES, PIGMENTS AND FLOCKING USED ON THE ONE BATTLEFRONT/FLAMES OF WAR RESIN M3 GMC MODEL AND THE THREE OLD GLORY M3GMC MODELS:
Green Stuff
Vallejo Surface Primer “Black”
Vallejo Surface Primer “USA Olive Drab”
Gorilla Glue
Battlefront “European Skin”
Vallejo Thinner Medium
War Games Accessories Steel Bases Number 23 (1½” x 2″)
War Games Accessories Steel Bases Number 16 (½” x ½”)