Duck Vader and the Star Duck Platoon!

This was a very large project that ended up with producing a 45-figure platoon.  I hope that you find this story interesting, if only to see the determination I had to have to see this through!  I am going to give some background, and then show the photos for the finished unit.  After that, I will give a detailed description for my fellow hobbyists as to how I completed the various aspects of this unit – this will allow you to see the final product earlier in the blog – and those who want more details can go past the completed photos to see more detail.


0 Star Ducks originally
The beginning -my original 4 Star Ducks from an eBay estate sale.  Note the broken ray guns.  The broken ones made good candidates for conversions.


0 Duck Vader box
My Duck Vader box from eBay – this was a reproduction by Dark Ages miniatures, which like Archive, is no more.  Note Nevile Stocken’s name is misspelled.


Background

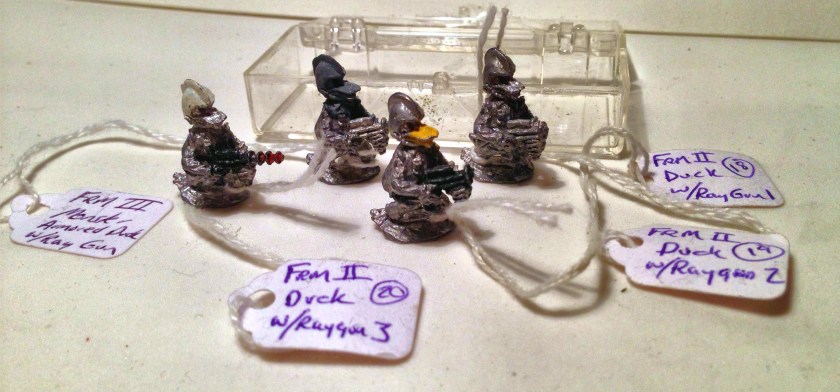
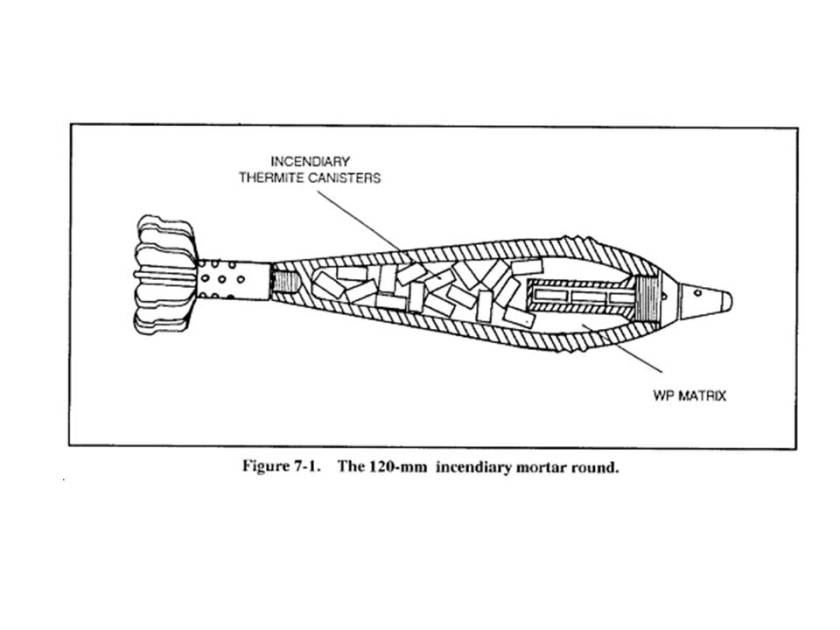
I first saw the Archive Star Ducks (#2002) and Duck Vader (#2326) on the Lost Minis Wiki as I was researching some other Archive Star Rovers figures.  These were made by Archive between 1977 and 1981 or so.  They are made of lead and tin alloy.  These were sculpted by Nevile Stocken.  He sent me the drawing below via Facebook Messenger.

00 Nevile Stocken drawing

The rights to some of Archive’s figures have been sold off a few times.  Several have been reproduced, but they are not currently in production.  I searched through eBay, and these are very hard to find.  I did manage to find only 4 Star Ducks and one Duck Vader, but that paltry number does not make a unit.  My stretch goal was to create a platoon for use with Buck Surdu’s Combat Patrol™ system for tabletop skirmish gaming.  I thought that I would need about 40 or more figures to make the unit, and I ended up with 45, which is a good size for a traditional platoon.  In this process, I ended up making a mold and casting 40 for myself and some for Buck as previously described in this blog and Buck’s.  I converted 4 Squad Leaders with War Games Supply Dump retro sci-fi weapons – which I was lucky to get as WSD closed on March 31st, 2017.  I converted 6 figures to make up the mortar crew, to include making the mortars, ammo boxes, and mortar rounds.  I also converted three figures to make up an Anti-Tank section (now known as the Bazookaducks) by arming them with Reaper Chronoscope bazookas.

 Platoon Organization

The platoon is composed of 45 figures as described below.  Five of the figures, including the platoon sergeant and the platoon leader are original castings.  The remaining 40 are all Star Ducks that I cast over the last year.

Star Duck Platoon

  • Platoon leader – Duck Vader (1)
    • Platoon Sergeant (1)
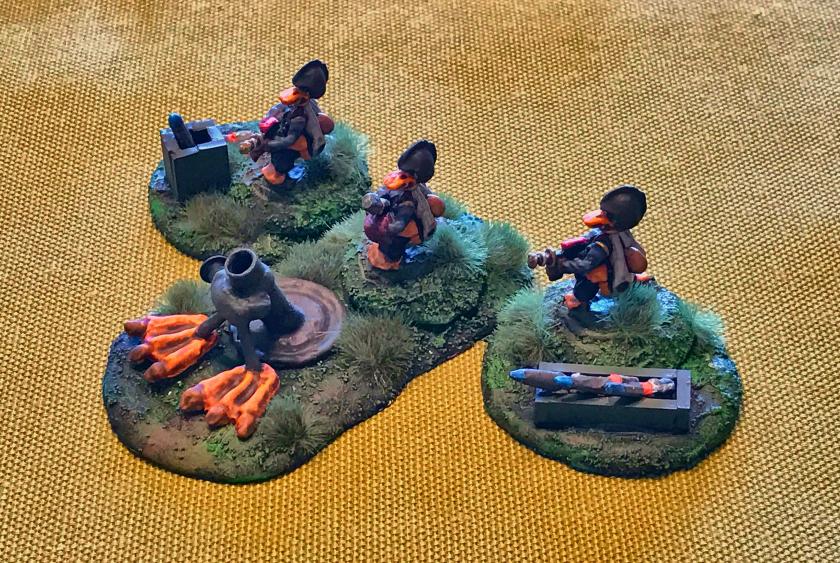
      • Duckfoot Mortar Section (6 figures)
        • Mortar Crew 1 (3 converted Star Duck figures as crewducks)
          • 1 loader
          • 2 crewducks
        • Mortar Crew 2 (3 converted Star Duck figures as crewducks)
          • 1 loader
          • 2 crewducks
    • First Squad (11 figures with tan gloves)
      • Squad Leader (1 converted figure with WSD weapon)
        • Team A (5 figures)
          • Team Leader (1) and 4 Star Ducks
        • Team B (5 figures)
          • Team Leader (1) and 4 Star Ducks
    • Second Squad (11 figures with light blue gloves)
      • Squad Leader (1 converted figure with WSD weapon)
        • Team A (5 figures)
          • Team Leader (1) and 4 Star Ducks
        • Team B (5 figures)
          • Team Leader (1) and 4 Star Ducks
    • Third Squad (11 figures with light green gloves)
      • Squad Leader (1 converted figure with WSD weapon)
        • Team A (5 figures)
          • Team Leader (1) and 4 Star Ducks
        • Team B (5 figures)
          • Team Leader (1) and 4 Star Ducks
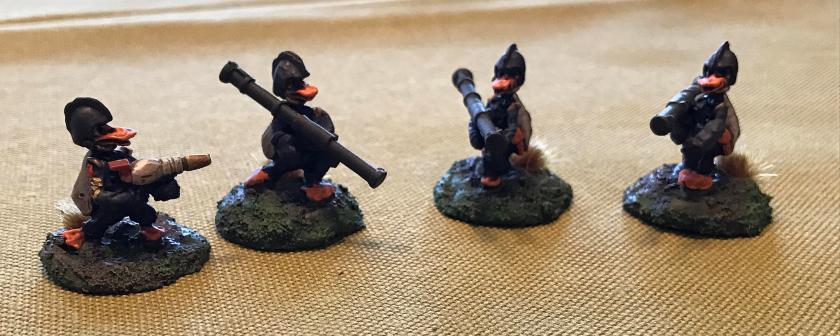
    • Bazookaduck Section (4 figures with dark red gloves)
      • Squad Leader (1 converted figure with WSD weapon)
      • Bazookaducks (3 Star Ducks with Reaper Anti-Tank weapons)

The Completed Duck Platoon


37 PL and PSG complete
Platoon Sergeant and Duck Vader, Platoon Leader, frontal view.  The Platoon Sergeant is an E-7 (Sergeant First Class).  Duck Vader is a First Lieutenant.


38 PL and PSG complete back side
Platoon Sergeant and Duck Vader, Platoon Leader, reverse view.  Both are original.


44 Squad Leaders
The 4 Squad Leaders, converted with WSD weapons.  Each is an E-6 (Staff Sergeant).  From right to left, 1st, 2nd, 3rd Squad and AT Section leader.  I used different colors on the gloves, lapels, and helmet buttons to differentiate them for tabletop play.


45 TeamLeaders
The team leaders for each line infantry squad, with the same coloration of the Squad Leaders but with original Star Duck weapons.  The B teams for each squad have a unique tuft.  These are E-5’s (Sergeants).


39 1st squad moves out
First Squad moves out.


40 2nd squad in the rocks
Second Squad defends the lava mounds.


41 3rd squad in the rocks
Third Squad assembles.


42 AT section attacked
The Bazooka Ducks face off against Frinx Sphere tanks.  For scale, the sphere tanks are golf ball sized.


43 AT section
The Bazookaduck Section Leader (an E-5), and the three Bazookaducks with Reaper Chronoscope bazookas.


33 Mortar Section 1 complete
Mortarduck crew A with Duckfoot mortar.  The two outer crewmen have ammo boxes and rounds to prepare for the loader.  The loader is converted and holds a scratch-built round.  The mortar is scratch-built from a washer, a bolt extender, paper clips, servo parts, and green stuff.  Brown tufts designate this as crew A.


34 Mortar Section 1 complete view from left
Reverse view of crew A.


35 Mortar Section 2 complete view from front
Mortarduck crew B.  Made similarly to crew A, except this crew has green tufts.


36 Mortar Section 2 complete view from left
Reverse view of crew B.


31 Complete long view from right
The Star Duck Platoon in formation, view from the right.


32 Complete long view from left
Star Duck Platoon, reverse view.


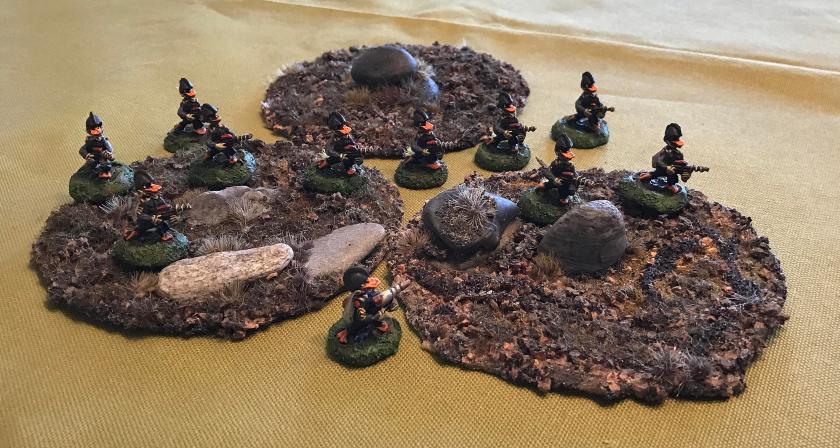
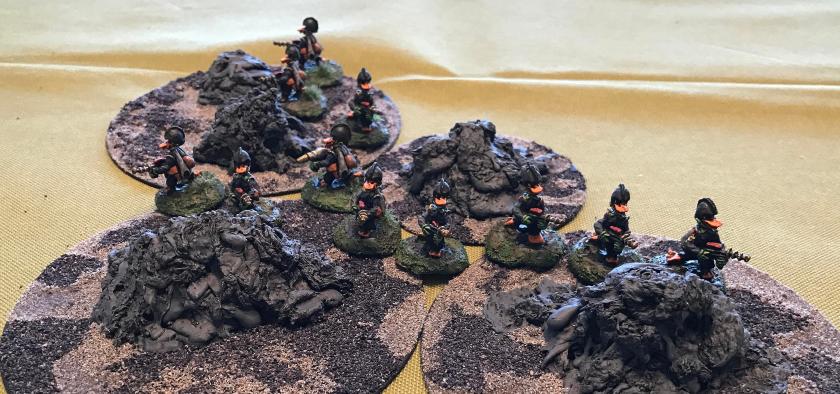
Overall, I am very happy with the unit.  I did use Army Painter Quickshade  (Soft Tone) which darkened them much more than I expected.  The effect was acceptable, but some of my identifying colors were muted.

I will now go into the how-to’s of the making of the unit.

How to Section

  1. Conversions

All of the figures that I converted were missing the ray gun ends.  These were either original casts or my own.  I used a jewelry saw, wood carving knives, files, an awl, and an Exacto knife to remove the ray guns and make room for the weapons.  Some of the figures lost limbs in this process, but I was able to use green stuff to recreate arms and hands for these figures.  I drilled any “amputees” with a pin vise, and used 24 gauge wire as an armature for these.

a. Mortars and Mortarducks

The mortars and mortarducks were the first conversions I attempted for this unit.  I envisioned two teams of three – made up of a loader, and two crewducks with ammunition boxes.  I made the ammo boxes from Plastruct styrene plastic and special styrene adhesive.  I had acquired some Army Painter green stuff, and decided to give it a go for the mortars and rounds.  I ended up using my steel sculpting tools, but quickly learned that I needed something different for green stuff, so I got some silicone- tipped tools that worked much better (less stickiness problems).  I used paperclip wire with the green stuff for the mortar legs and the rounds.  I tried to make a form for the mortar round bases out of 1/8″ plywood, with mixed success.  Eventually, I found that correction with an Exacto knife was a good way to go.  I made the bases with Apoxie Sculpt and steel washers.  In the case of the mortar base, this made sense as I was able to make a strong base with room for the loader using two slightly different washers.  The mortars themselves were made with screw extenders, washers, and servo parts for a model airplane.  Testors super glue was the means by which I glued the rounds to the loaders and the ammo boxes.  Additionally, I found that having some small hobby mirrors from Michaels made the sculpting and assembly process much easier.  I decided to leave the two crewducks with their original weapons as the loader conversion had proved to be a lot of work and I did not think it made a difference as I already had the ammo boxes.


3 Mortar design notes
My mortar plan and notes


1 Mortar round example
Idea for mortar round sculpts


4 mortars start
Initial work on the mortar and the rounds


5 mortars start front
Early stage in sculpt


6 mortars start side
Early stage in sculpt, side view


7 mortars fixed feet initial front
Middle stage of sculpt, before Duckfoot alteration


8 mortars duck feet front
Duckfoot mortars!


13 Rounds
Mortar Rounds completed and painted


18 Mortarduck, 1st try
Mortarduck loader conversion in progress


 b. Bazookaducks

I wanted the unit to have an anti-tank capability beyond the mortars.  I had previously converted some Frinx for this purpose, and decided to do the same for the Star Ducks.  The bazookas are from Reaper and came with several other weapons.  I basically carved away the ray gun and made the bazookas “fit”.  There were amputees in this group, but I think the conversions worked well.

c. Squad Leaders

The squad leaders were simply converted with the same tools.  I gave them the War Games Supply Dump blasters from the Dirk Garrison line.

3. Painting and Basing

The biggest challenge with painting was the color orange – I had not used it much before – and it took several iterations of trying different combinations until I found what I liked.
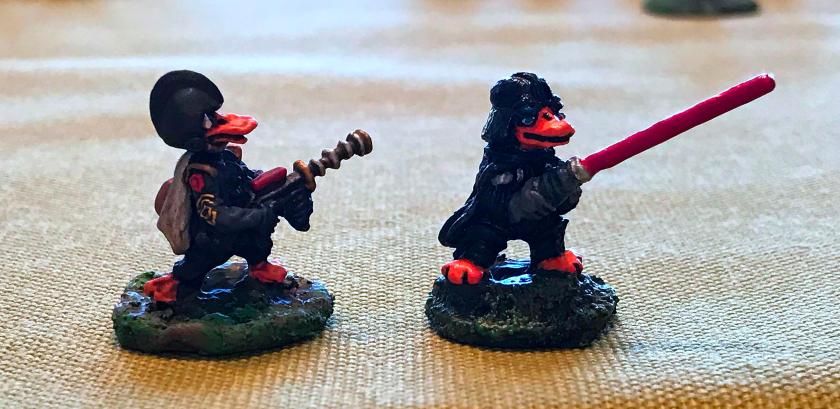
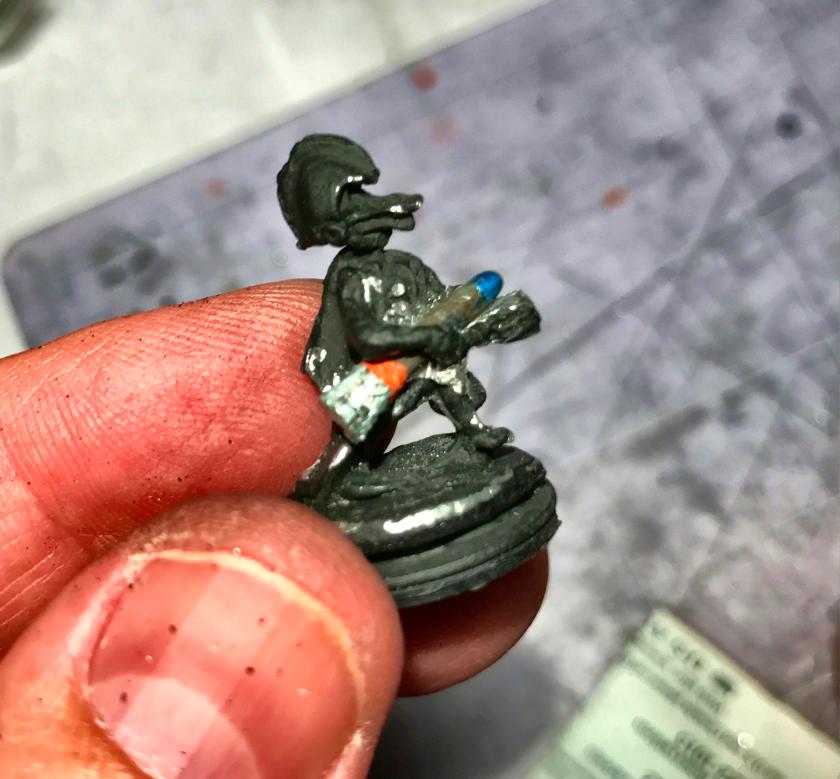
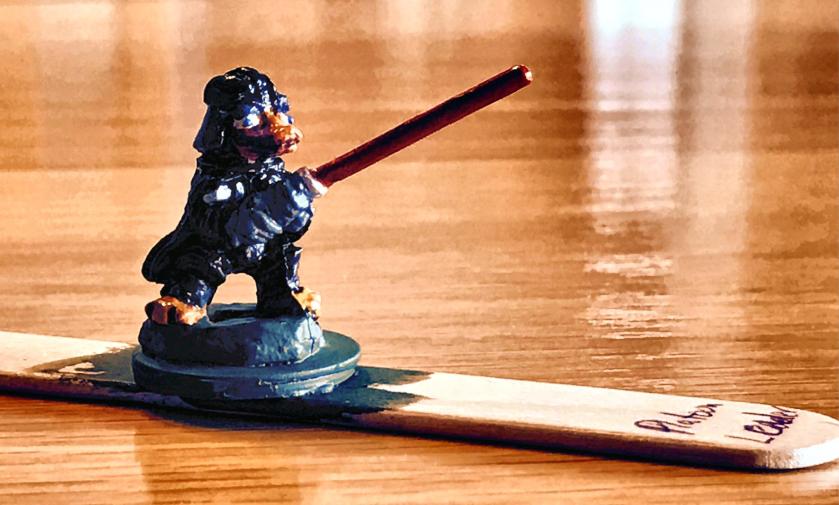
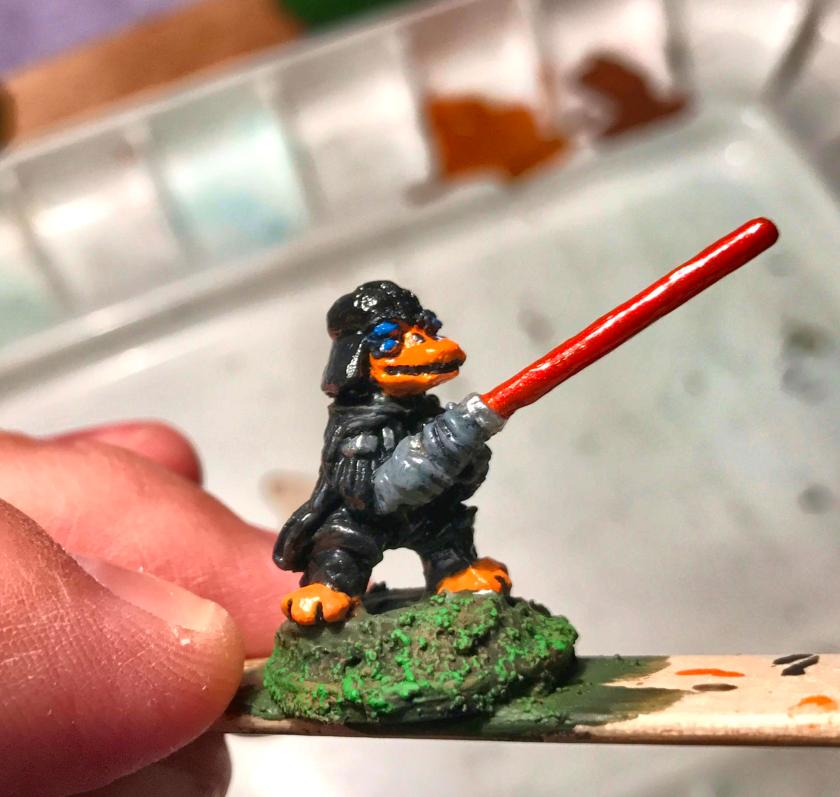
a. Duck Vader

The sequence was as follows:

  1. Citadel “Imperium Primer” as a brush primer
  2. Armory “Gloss Black” on helmet
  3. Craftsmart “Orange” on feet and bill
  4. Tamiya “Orange” on feet
  5. Citadel “Ceramite White” on face and tail
  6. Reaper MSP “Blue Liner” around eyes and pupils
  7. Vallejo “Aluminum” on light saber beam
  8. Vallejo “Chrome” on light saber handle
  9. Vallejo “Steel” on chest details
  10. Vallejo “Medium Gunship Gray” on gloves
  11. P3 “Cygnar Blue Highlight” on eyes
  12. Citadel “The Fang” on eyebrows
  13. Citadel “Castellan Green” on base
  14. Citadel “Nuln Oil Gloss” on cape and fingers
  15. Citadel “Spiritstone Red” on light saber
  16. P3 “Flesh Wash” on tail
  17. Highlight cape with Vallejo “Black Grey”
  18. Vallejo “Black” and “Glazing Medium” on cape and mouth slit
  19. Deka Lack “Weiss” highlight on tail and face
  20. Vallejo “Gloss Varnish” on helm
  21. Army Painter “Anti-shine Varnish” on figure


11 Duck Vader base coated
Base coated


17 Duck Vader completed
Finished Duck Vader

b. Mortar and mortar rounds


  1. The sequence was as follows:

    1. Citadel “Imperium Primer” as a brush primer
    2. Armory “Gloss Black” on mortar base
    3. Vallejo “US Dark Green” on mortar rounds
    4. Tamiya “Titanium Silver” on mortar round tips and base
    5. Craftsmart “Orange” on Duckfoot mortar feet
    6. Tamiya “Orange” on feet
    7. Citadel “Athonian Camoshade” wash on mortars
    8. P3 “Sulfuric Yellow” on toes of mortar feet
    9. Highlight with Tamiya “Orange” on feet
    10. Citadel “Soulstone Blue” on mortar tip/fuse
    11. Vallejo “Olive Drab” on mortar and rounds
    12. Vallejo “Steel” and “Black Metallic” on mortar fins
    13. Citadel “Fire Dragon Bright” on mortar rounds
    14. Mounted the mortars and boxes and rounds on bases
    15. Bases painted with Citadel “Lustrian Undergrowth”
    16. Bases shaded with Citadel “Seraphim Sepia”
    17. Bases highlighted with Armory “Musket Brown”
    18. Bases highlighted with Citadel “Niblet Green”
    19. Mortar dipped in Army Painter “Quickshade (Soft Tone)”
    20. Mounted mortar and rounds got coat of Testors “Dullcoat”
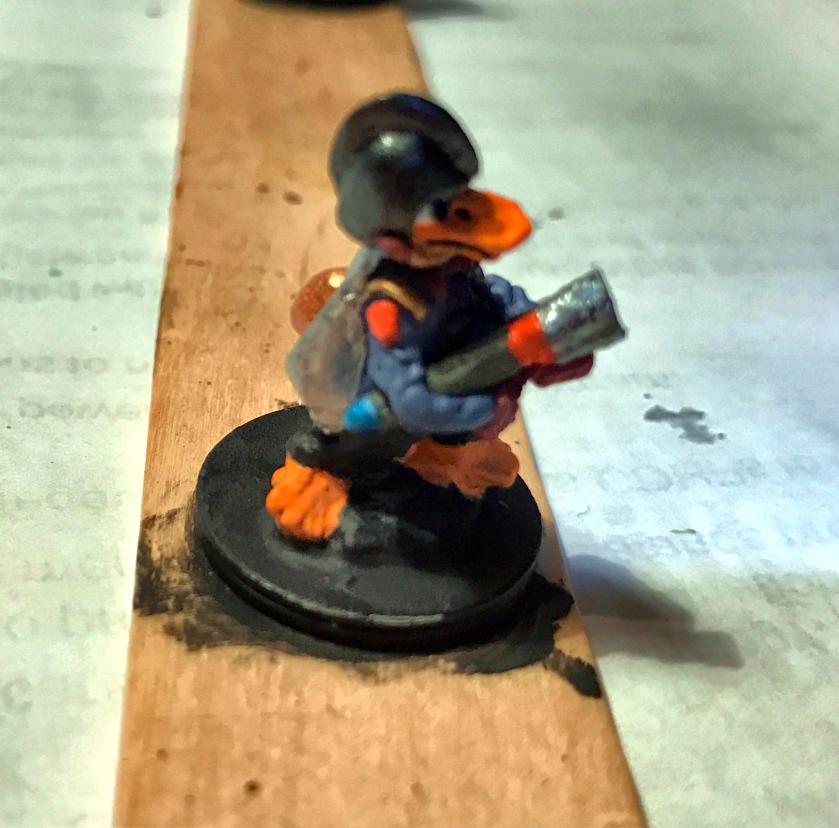
c. Star Ducks

  1. Citadel “Imperium Primer” as a brush primer
  2. Citadel “Nuln Oil” on figures
  3. Citadel “Ceramite White” on face and tail
  4. Citadel “Fire Dragon Bright” on feet and bills
  5. Reaper MSP “Blue Liner” around eyes and pupils
  6. Citadel “Soulstone Blue” on eyes
  7. Citadel “The Fang” on the jacket
  8. Vallejo “Metallic Black” on helmets and infantry ray guns
  9. Vallejo “Copper” on fuel tanks
  10. Americana “Ebony” on trousers
  11. Vallejo “Black” on mouth slit
  12. Vallejo “Aluminum” on jet venturi on back
  13. Vallejo “Gold” and “Chrome” on ray guns
  14. Polly-S “Goblin Flesh” and Vallejo “Glaze Medium” on holsters
  15. Vallejo “German Grey” on ammo pouches
  16. Vallejo “Signal Red” on ray gun scopes
  17. Vallejo “Gold”, “Chrome”, “Copper”, and “Signal Red” on WSD blasters
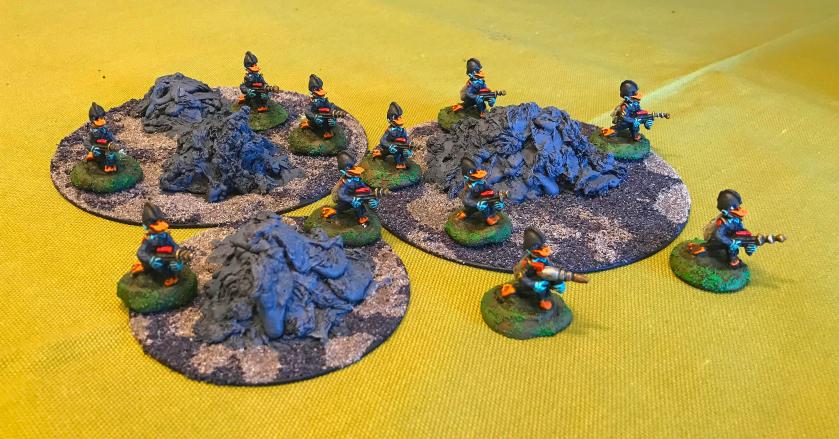
  18. Different glove colors on lapels, helmet buttons, and gloves: Platoon Sergeant – Vallejo Metallic “Arctic Blue”; 1st Squad – Citadel “Ushabti Bone”; 2nd Squad – Americana “Bahama Blue”; 3rd Squad – Americana “Apple Green”; Bazookaducks – Polly-S “Demon Deep Red”; Mortarducks – Americana “Dioxazine Purple”
  19. Armory “Musket Brown” and Vallejo “Neutral Grey” on cigars
  20. Vallejo “Black” on bill vents
  21. Vallejo “Light Orange” and “Glaze Medium” as glaze on bills and feet
  22. Vallejo “US Dark Green” on bazookas
  23. Citadel “Athonian Camoshade” wash on bazookas
  24. Milliput (yellow) on bases
  25. Bases painted with Citadel “Lustrian Undergrowth”
  26. Bases shaded with Citadel “Seraphim Sepia”
  27. Bases highlighted with Armory “Musket Brown”
  28. Bases highlighted with Citadel “Niblet Green”
  29. Figures dipped in Army Painter “Quickshade (Soft Tone)”
  30. Figures coated with an application of Testors “Dullcoat”
  31. Used various Army Painter tufts and meadow flowers on bases to designate teams


21 Completed base coat
Base coated and ready for varnish
22 Completed base coat closeup bazooka
Close-up of unit pre-varnish
23 Completed base coat closeup mortarduck loader
Mortarduck loader, pre-varnish
28 Completed platoon sgt
Platoon Sergeant, post-dip
30 After milliput basing
Platoon post dip, with Milliput added to bases


To wrap up, I am very happy that the unit is done.  I am on the fence as to the use of the Army Painter “Quickshade” – the figures are darker and well-shaded, and should be well protected, but some details are obscured.  I enjoyed my new Vallejo products and found that they really worked well.  I also learned that orange as a color requires multiple applications and glazing to work well.

I learned much that I can use for future projects, and I hope that you enjoyed this blog entry.

Please leave comments and feedback!  Thanks!

“Bonnie”, Reaper Chronoscope fighter

This blog is about the second figure that I painted for Chris Smedile’s birthday.  It is a 28mm Reaper Chronoscope figure, “Bonnie” (#80025) sculpted by Julie Guthrie in 2015 or 2016.  This was a challenging project mainly as I have so little experience in this type of fashion (if it can be called that).  This is also my first “Reaper Bones” figure (resin) as all my others have mainly been metal.  You can see the website link for it here.

0 Bonnie jpeg
From the Reaper website

I noticed that the figure had visible mold lines, which I tried to remove with an Exacto knife and some light sanding.  Then, I decided to apply a wash with Citadel “Agrax Earthshade” over the figure so as to see the details better.

2 Bonnie front
After wash, front
1 Bonnie Back
After wash, rear view

I initially had a struggle trying to have a vision for this figure.  Basically, she is a well-armed (probably overly-armed) post-apocalyptic warrior or perhaps a zombie hunter.  After looking at her attire, I decided that she needed to have a bright comic book look – after all, who wears this in the apocalypse?  Also, early on I was not so enamored of the details (or lack of details) that were molded on her face.  I ended up thinking about it a bit – and eventually going with a patent leather and purple/pink/violet and glossy black theme.

First, I base-coated the figure.  I began with her flesh, using P3 “Midland Flesh”.  I used Citadel “Ceramite White” for the whites of her eyes, and Americana “Ebony” for the pupils.

For her midriff vest/leather armor,  I used Americana “Slate Gray”.  Regarding her socks, halter top, and wrist wraps (I’m sure there is a name for them but hey, my fashion sense is limited!), I broke open my Americana “Bubblegum Pink”.  I did not like the solid pink look on the  top and the wrist wraps, so I mixed that with a little Americana “Vivid Violet” and “Dioxazine Purple” and that seemed to work better.  For her hot pants (or shorty-shorts if you’re Larry the Cable Guy), I went with a very distinctive purple – Americana “Dioxazine Purple”.  I gave her boots and straps a patent leather appearance with Armory “Gloss Black”.  I decided that her hair should be black, so I went with Americana “Ebony” and a Citadel “Nuln Oil” wash.  I gave her some hair highlights in with the three colors – “Vivid Violet”, “Dioxazine Purple”, and “Bubblegum Pink”.

For her two submachine guns, I applied Vallejo “Gun Metal”, which I also used for the triggers on her two sawed-off shotguns in holsters on her back.  I painted the handles of the shotguns with Armory “Musket Brown”, followed by Vallejo “Wood”.  For the base, I used Americana “Zinc”.

I moved on to some finer details and shading.  I drybrushed her boot laces with “Bubblegum Pink”.  I used Secret Weapons Washes “Armor Wash” to shade the submachine guns and her midriff armor.  I highlighted the guns with “Gun Metal”. I washed her flesh with a light use of Citadel “Reikland Fleshshade” .  Also I highlighted her ribbed sock tops with “Dioxazine Purple”.  For her bottom lips and the inside of her mouth, I chose Polly-S “Demon Deep Red”.

3 Bonnie initial basecoat
Initial base coating, highlights, and shading, front of Bonnie 
3 Bonnie initial basecoat, back
Initial base coating, highlights, and shading, back of Bonnie 

As you can see above, Bonnie looks pretty tan, and I felt as if she needed to look a little less of a tanning booth patron.  So, I lightened up her skin by mixing in P3 “Ryn Flesh” with some “Midland Flesh”.  I also tried to clean her up overall in a number of small fixes.  I used Americana “Slate” to highlight the base, gave it a wash of Secret Weapons Washes “Heavy Body Black”, and painted the washer on the bottom “Ebony”.

4 Bonnie base coated, prevarnish, front
Before varnish, front
5 Bonnie base coated, prevarnish, back
Before varnish, back

I then gave the figure two coats of Testors “Dullcoat”, allowing for adequate drying between steps.

6 Bonnie finished (blurry)
Bonnie completed, frontal view
7 Bonnie finished back
Bonnie completed, rear view


8 Bonnie finished side
Bonnie, aiming at you!

Overall, I thought the figure came out ok.  I was disappointed at the lack of facial details, especially as this was a Julie Guthrie figure, but perhaps that is a function of the resin.  The mold lines were harder to cut and sand than I would have thought.  I would use Bones figures again, but I am still preferential to metal.

The good news is that Chris like it, and I hope that he has a lot of great gameplay with it!


RAFM Bard from 1992

I apologize to my readers as its been a while since I have blogged, and as you will see I will be somewhat more active this week as I have completed some projects and now have a few things to actually write about!  I expect that I will write three blog entries this week about projects that I have completed.

This is my first entry and concerns a RAFM Bard sculpted by Steven Koo in 1992 as part of the Women of the Ninth Meridian line.  Here is a link to the 1994 catalog from DnD Lead website that shows that there were three in each set.  The circled figure is the subject of this blog.  The figure had pointed ears, so obviously she is an elf.

0 Bard
From the 1994 RAFM Catalog

Chris Smedile’s birthday was coming up, so I offered him the chance to go through my assorted unpainted miniatures and pick a couple of figures that he would like me to paint for him.  He picked two – this Bard, and a Reaper Chronoscope Bones figure (which you can read about here).  It is 25mm in scale, cast in white metal (possibly lead-free), and had great detail.


1 Bard unpainted, front
Bard front view before painting


2 Bard unpainted, back
Rear view of Bard before painting


3 Bard unpainted, bottom
“RAFM 92”


I looked at the weather forecast as I wanted to finish this project in time to properly use spray varnish outside – and I need close to 70° F and low humidity for best effect.  I wanted her to have a slight “Little Red Riding Hood” look.

Beginning the base coat process, I started with the flesh, and used P3 “Ryn Flesh”.  I painted her flute with Tamiya “Chrome Silver”.  Using a pine tipped brush, I painted her eyes with Citadel “Ceramite White” and Reaper MSP “Blue Liner”.  Moving on to her hair, I decided to go with blond.  For that, P3 “Sulphuric Yellow”  was my choice.  For her tunic and her earrings, I went with a paint I purchased in West Germany in 1987, Deka Lack “Dunkelblau” (dark blue).  She had a thin sword, and the scabbard I painted with Vallejo “Gun Metal”.

Moving on to her cape, I got another oldie but goodie paint from 1984.  This was Polly-S “Demon Deep Red”, which ironically is older than Chris is!!  I also used that color to base her hair ribbon.  For her breeches, I based with Armory “Prussian Blue”.  For the trim and cuffs on her tunic, I used another Deka Lack paint, “Weiss” (white).  She had a canteen and a pouch on her belt.  These I painted respectively with Vallejo “US Dark Green” and Armory “Brick Red”.  For her leatherwork and straps, I decided on P3 “Bootstrap Leather”.  I needed to finish her metallics, and so I painted her brooch and sword pommel with Vallejo “Silver”, and her belt buckle and scabbard tip with Vallejo “Bright Brass”.   She has a jewel in her brooch, which I painted with Citadel “Soulstone Blue”.  For her base, I used Americana “Hauser Light Green” so as to make later base applications better.


4 Bard base coated, front
Bard, front, after base coat


5 Bard base coated, back
Bard, back, after base coat


I then moved on to highlighting and shading the figure.  For her hair, I used successive washes, first with P3 “Sunshine Yellow” and then with Citadel “Reikland Fleshshade”.  I then used a wash on the tunic with Citadel “Agrax Earthshade”.  I then lightly washed her hands with “Reikland Fleshshade”.  To highlight her facial features, I mixed Polly-S “Elf Flesh” with P3 “Ryn Flesh” and applied it to her cheeks, nose, hand and fingers.

For her breeches, I shaded with “Agrax Earthshade”, followed by highlighting with a mix of “Weiss” and “Prussian Blue”.  Lastly, I moved on to her cape and hair ribbon.   Here, I darkened the cape with “Agrax Earthshade”, then highlighted it with Americana “Santa Red”.  I also painted her hair ribbon with “Santa Red”.

To finish the base, I applied Army Painter “Moss Green” flocking with white glue.  Then the figure got two coats of Testors spray “Dullcoat”, allowing for sufficient drying time between coats.  To finish her, I added a yellow flower tuft from Army Painter “Meadow Flowers”.


8 Bard finished, front
Finished Bard, frontal view


9 Bard finished, back
Finished Bard, rear view


10 Bard finished, side
Finished Bard, side view

Overall, I was pleased with the work I did on the figure.  It was a nice break from my very large Star Duck project.

Chris got it on his birthday, and he loved it!  I am looking forward to hearing of her exploits!


Frank Tank Rants

musings of a fat old bloke on tanks and wargames

Dragons of Lancasm

Games, miniatures, painting, books and more games

Tiny Painted Heroes

The Adventures of a lifelong Tabletop Gamer, Game Design hobbyist, and full-time Software Engineer

Home of the Grumpy Gnome

Tinkering with Artwork and Ideas

Steve's Paint Brush

Grimdark model making and mini painting

Wargamesculptors Blog

Life, Golf, Miniatures, & Other Distractions

Dead Dick's Tavern and Temporary Lodging

Life, Golf, Miniatures, & Other Distractions

Guru PIGS Blog

Guru's thoughts on wargaming, life, and the universe!

Wisely lead... without a head!

History, Miniatures and Wargaming

Kuribo's Painting

Fallout, MESBG, and Hellboy Painting, Terrain, Dioramas, and Battle Reports

Don't Give Greg Ideas

Seriously, just don't

War Across the Ages, and other dark horrors

A discussion of miniatures collecting, painting and gaming.

Classic Warhammer 40K

Painting diary focused on Warhammer 40K 2nd ed., 5th ed. WHFB, related GW games, and miscellaneous whimsy

Colonel Mustard

WW2 Modelling in 1/72 Scale

Bogenwald

Random painting and terrain making.

Pat's 1:72 Military Diorama's

Scale diorama tips and ideas

Arcade Dreams

Building the Arcade Dream

P.B.Eye-Candy

Phil's 20th century wargame pages

SP's Projects Blog

A futile fight against entropy or 'Every man should have a hobby'? Either way it is a blog on tabletop wargames, board games and megagames

30mmdave

Wargaming Plausible reality?

Faith&Steel

dave's gaming adventures: faithandsteel.wordpress.com

The Imperfect Modeller

Miniature Figure Painting and Diorama Modelling

Double Down Dice

Painting miniatures and rolling dice!

Just Needs Varnish!

My ongoing wargames projects!

miniaturepopcorns

Sculpting some worlds

Despertaferres

Wargaming with the ability of a dull nine year old

Dawn of the Lead

Miniature wargaming and the occasional zombie

Rantings from under the Wargames table

Wargames, Figures, Sculpting and Converting Miniatures

Simple as War

Miniatures & Terrains

Buck's Blog

Life, Golf, Miniatures, & Other Distractions

IRO aka Imperial Rebel Ork

- I model - therefore I am -

Azazel's Bitz Box.

Painting, Modelling, Miniatures, 1:6, Games... Whatever else I find interesting.

diggingforvictoryblog

Smallholding and Wargaming.......not always at the same time!

Shamutantis

Nørdblog numero uno

Harry Heckel

Writer/Game Designer