Armorcast 3-Crater Set (ACCR001)

For August, I decided that my efforts needed to be directed towards a few new areas that would be challenging for me.  I wanted to get more terrain for my games, specifically some that would be useful in making my Combat Patrol™ games more visually appealing to the players.  I also wanted to try to use some new techniques and incorporate new materials into my hobby kit bag.

This would involve working on things and using multiple materials with which I am less than fully experienced.  My goal was to stretch my horizons as it were, and this goal also dovetailed nicely with the monthly painting challenge run by our Australian friend Azazel.  The theme for August was “Technical August”, which was a wide-open challenge to try or improve upon techniques that we had little to no experience in doing previously.  With that said, I decided that assembling, building, and painting some Armorcast terrain would be a good way to do that.  Mainly my goal was to focus on using the five 4-pigment bottle sets of Vallejo Pigments that I have not really used (Dust & Dirt, Mud & Sand, Rust & Corrosion, Soot & Ashes, and Stone & Cement).  I did use the Soot & Ashes set on some cheap 3D printed buildings, but otherwise not much.

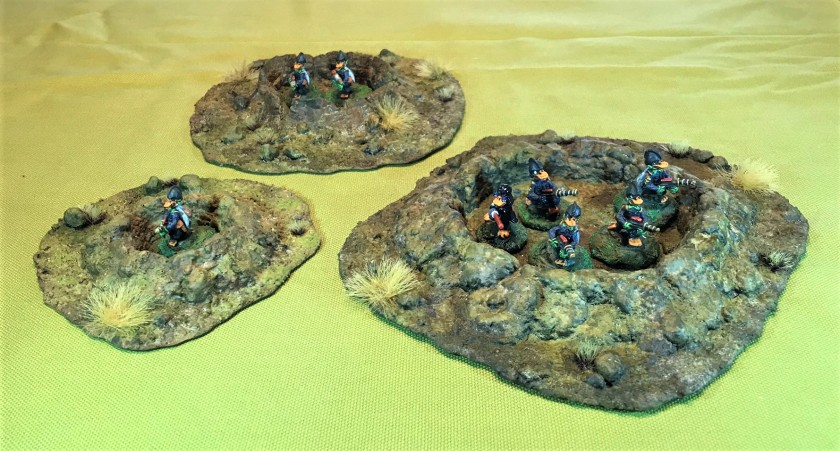
I acquired three types of Armorcast resin terrain (all suitable for 28mm scale) for the August challenge – craters, ruined buildings, and sci-fi ruined walls:

As for my technical goals, my list of “challenge” skills, materials, and techniques include:

  • Assembling, building, and basing terrain
  • Use of materials to create weathering and rusting effects, to include:
    • Vallejo Pigments, to include application and fixing (covered in this blog post)
    • Vallejo Mecha Color weathering products
    • Weathering and rusting/oxidizing effect products, to incude:
      • Citadel Technical paints:
        • Typhus Corrosion
        • Ryza Rust
        • Nihilakh Oxide
      • Vallejo and Vallejo Mecha Color rusting and weathering products
        • Vallejo Pigments (various)
        • Vallejo Game Air rusts (71.069 and 71.080)
        • Vallejo Mecha Color Weathering products
          • Oil Stains (gloss)
          • Rust Wash
          • Rust Texture (Matt)
  • Create a new storage system for my terrain pieces

The ones above in bold font are ones I worked on for the 3-crater project.  Others will be used for the remaining projects, even if that lasts into September (which is likely).

I had previously worked on some Armorcast sci-fi pieces and grenade blasts.  I like their products, but wanted to get better at getting them on the tabletop.

0 Lots of terrain
My collection of resin awaiting work

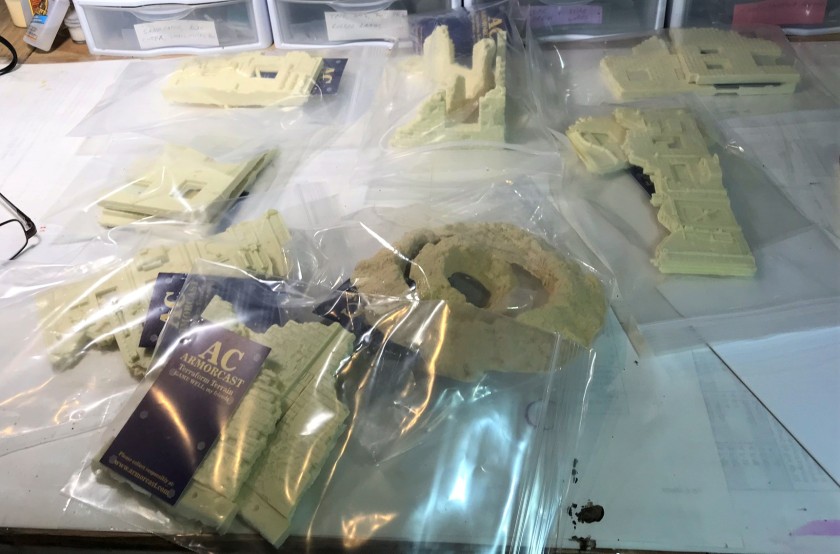
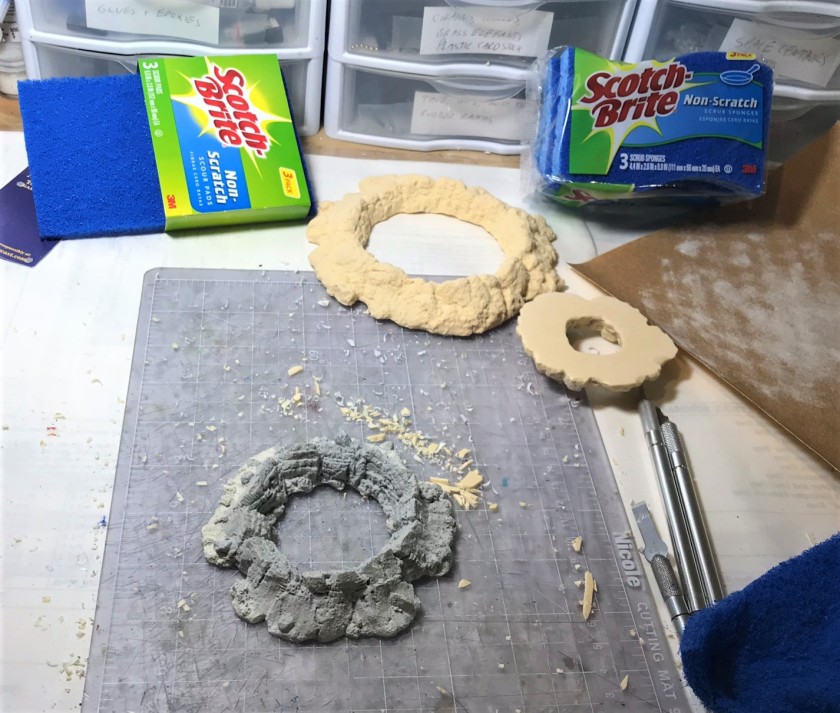
I got good advice from Armorcast (Gin Fritter) and Buck Surdu about preparing the resin for painting.  I ended up using a few Exacto knives to remove flash, and then used Scotch-Brite pads to lightly (imperceptibly in fact) give the pieces a rubdown to achieve a “bite” for airbrush priming.  Additionally, I used a 180 grit sandpaper sheet to scuff up the craters’ bottoms so that they would glue better to their planned bases.  I then washed the pieces thoroughly with dish washing soap in the sink and let them dry.

1 clean up of armorcast craters
Cleaning the resin craters – one was gray, the other two were not.  You can see the sandpaper, pads, and removed resin.

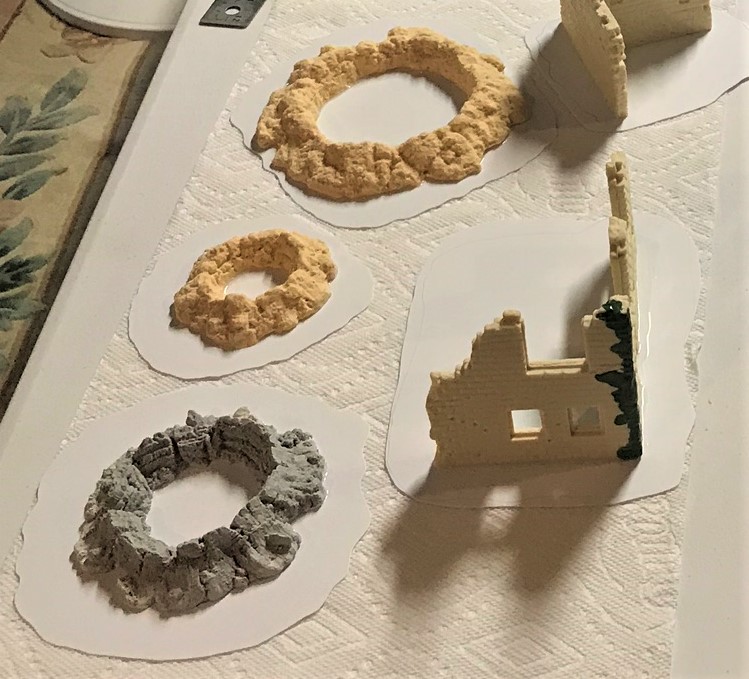
For basing, I chose to incorporate a few different materials.  First, I cut irregular shapes from Evergreen Scale Models #9020 polystyrene sheets – which is quite thin (.020″/0.5 mm).  I mounted the crater pieces to the cut shapes with Gorilla Glue.  Then, I also used a number of differently sized thin steel bases from Wargames Accessories to mount under the shapes for both strength and to be able to later store and transport securely in magnetically lined storage boxes (which is another project in and of itself that I have planned).  Here, I also used Gorilla Glue.

2 mounting materials
The polystyrene sheets that I used for bases
3 after mounting
My craters and a ruined building on my polystyrene sheet bases

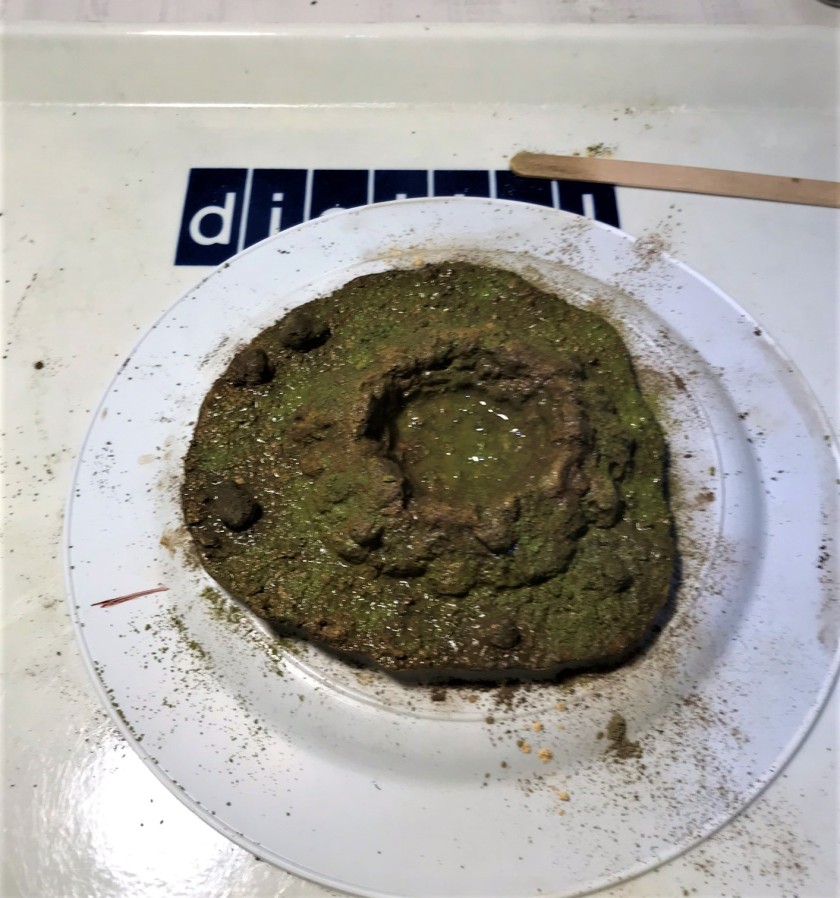
From my minimal experience with using pigments, I knew they had the potential for a huge mess.  I learned that using a cafeteria-type tray would make using them easier.  I hit my local Salvation Army and found four trays for this use.  Interestingly, three of them were from a former Digital (DEC) facility (there were a lot of them in Massachusetts before Compaq and later Hewlett Packard consumed them in 1998).  I removed what appeared to be ancient chili from them, and put them into use.  I also got a small palette from Michael’s craft store to use just for pigments.  I put that palette into a deep plastic Rubbermaid salad container, and I thereby effectively limited the migration of pigments from my work space.  You definitely do not want to have a fan or strong air circulation going while using pigments!

4 magic trays
Trays for using pigments.  Oh DEC, your cafeteria trays soldier on…

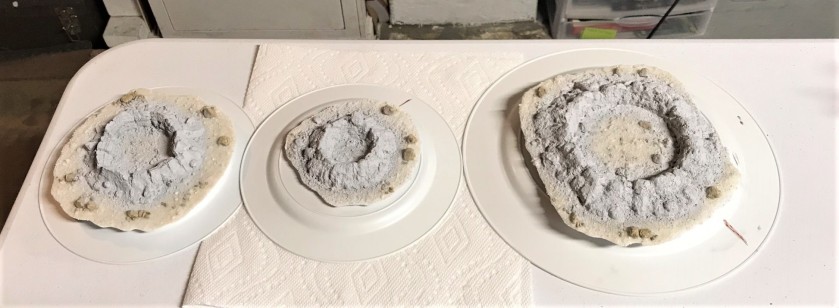
I then used PVA glue (good old Elmer’s) to affix some play sand and some Woodland Scenics stones to the bases, and let them harden.

6 sand and rocks
My sand and rocks for the bases

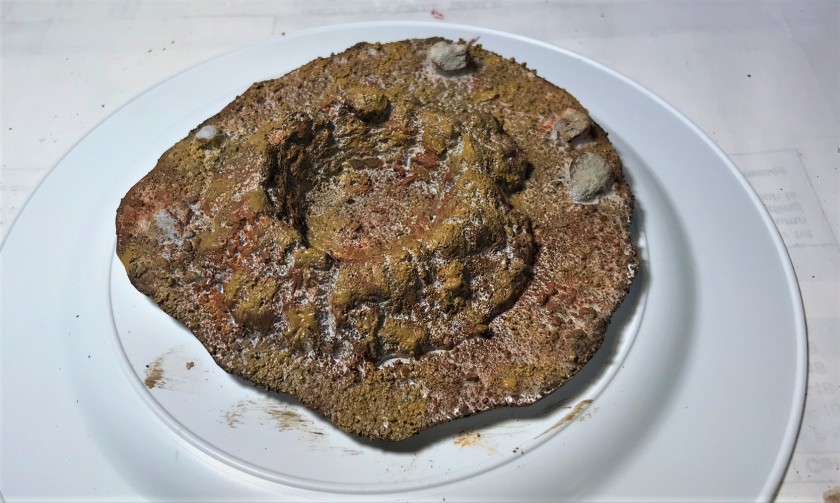
Next, in order that I could handle and work with the craters, I affixed their bases with poster tack to upside-down plastic plates before priming.  I marked each plate with a brown ink line for reference, and proceeded to airbrush prime the set with Vallejo “Surface Primer – Gray”.

7 after flocking
Primed craters

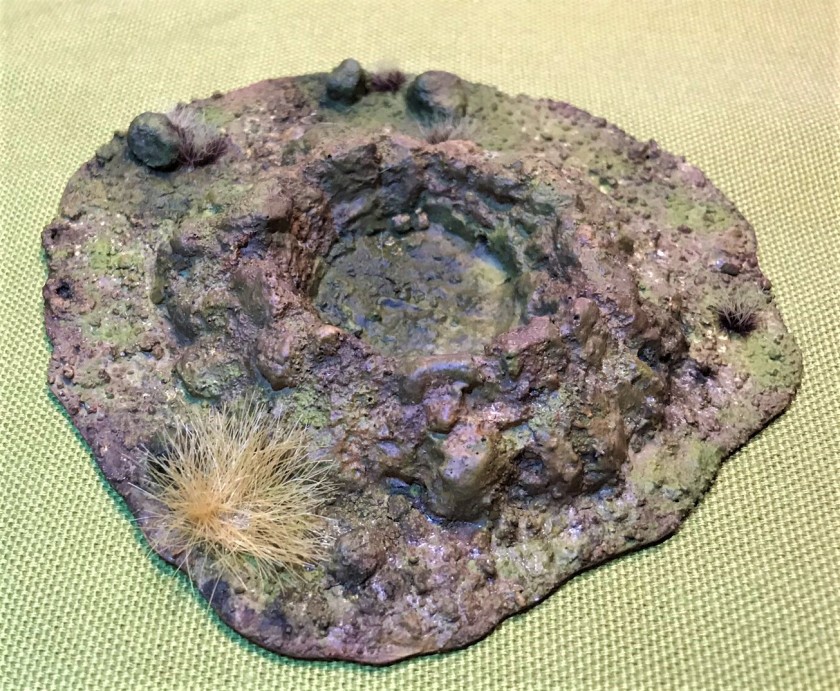
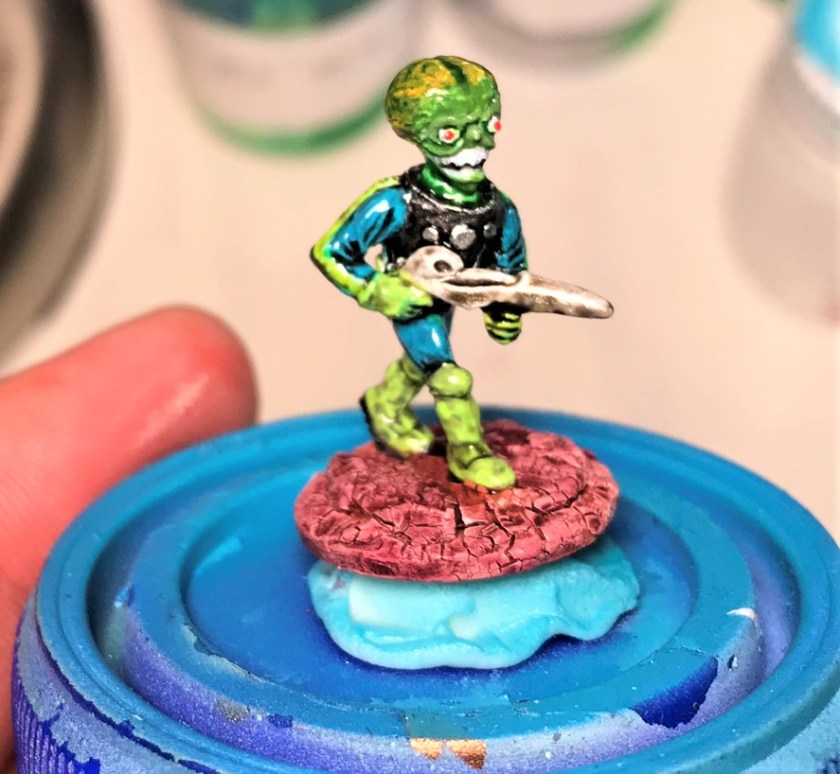
I then worked on the three craters sequentially, going from smallest to largest.  For the smallest one, I dry brushed with multiple shades of brown (there is a list of materials that I used at the end of this blog).  I was not sure that I needed to or if the pigments would be enough.  Primarily, I used the four pigments from the Vallejo “Mud and Sand” set (“Light Yellow Ochre”, “Natural Umber”, “Light Sienna”, and “Light Slate Grey”) plus the Vallejo “Faded Olive Green”.  I looked at the Vallejo YouTube video on pigments, and used some of the different techniques to apply and fix the pigments.

8 large one dry brushed
The smallest crater after heavy dry brushing.
9 middle one with pigments and capillary
The first crater after applying multiple pigments in a dry fashion.  I then fixed them with Vallejo “Airbrush Thinner” with a capillary action technique, leading to this mucky wet look.

After this, I moved on to the next larger crater, and also dry brushed it and used the same method of fixing the pigments.  One downside that I discovered was that the airbrush thinner tended to dissolve the PVA holding the rocks in place (but not the sand).  I replaced the displaced rocks on the bases after the airbrush thinner dried.

10 middle one just dry umber
The middle-sized crater before fixing the pigments – I also added more colors before fixing them here – this is a lot of “Natural Umber”.

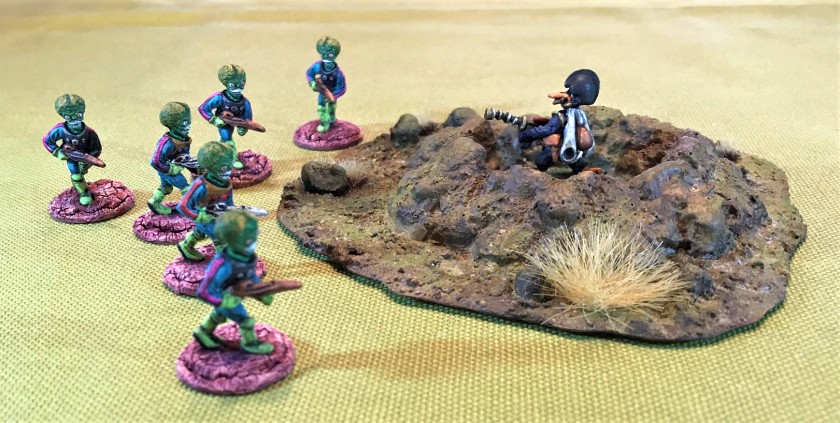
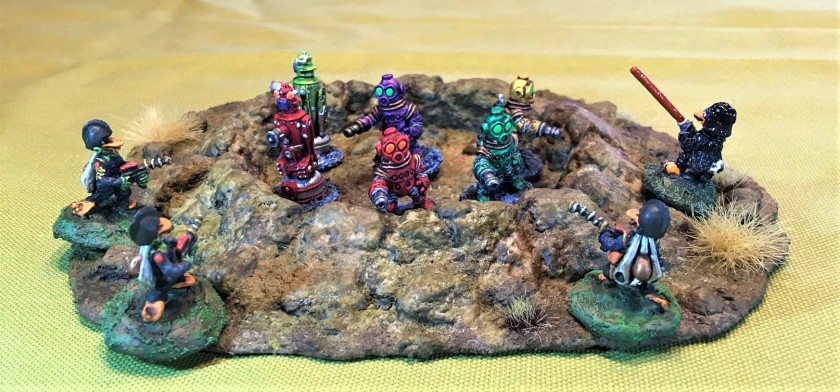
Lastly, I worked on the largest crater.  Here, I passed on doing any dry brushing.  For this one, I employed Vallejo “Pigment Binder” instead of the airbrush thinner to fix the pigments –  and to prevent the dissolving issue under the added rocks.  I also needed to use Secret Weapons Washes “Sewer Water” to give better shading.  While the pigment binder worked, it did lead to a thicker application of pigment as you see below.  I thought it blended too much – and I believe that one should use that product selectively.  I subsequently added more pigments to make the crater less of a solid olive green, fixing them with airbrush thinner.  It worked.

11 large one before varnish and tufts
The largest painted crater before varnish

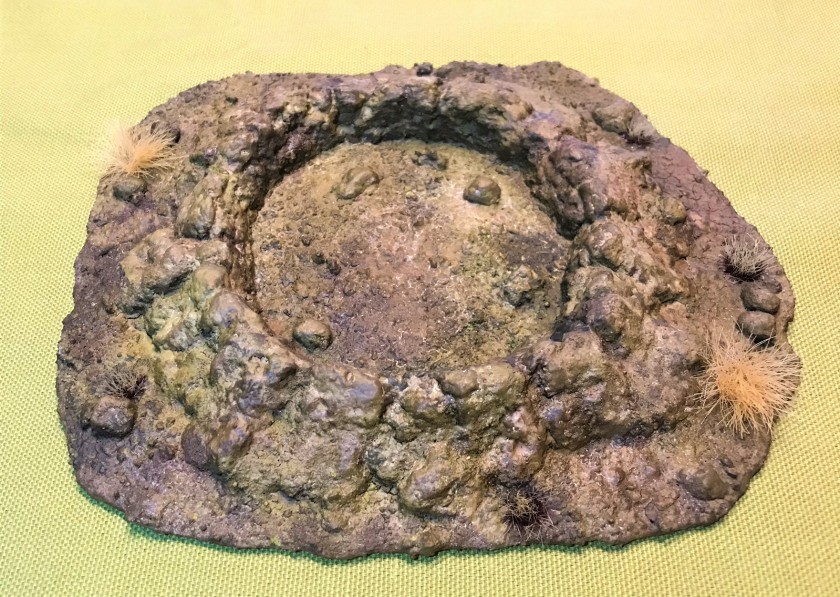
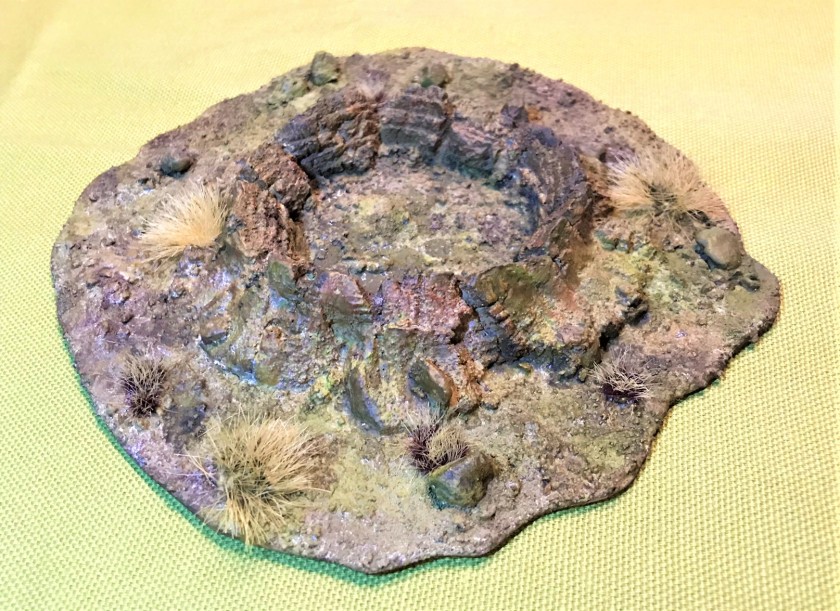
Lastly, I decided to airbrush varnish the craters.  Did I need to?  I wanted to protect the paint work, so I did.  I do think I needed to thin the varnish more, as I had some crazing to deal with, something I had not seen previously with its use on miniatures.  To help with color variety,  I applied Citadel “Agrax Earthshade” and “Athonian Camoshade” washes, mixed with a little varnish and applied with a brush to the affected areas.  I then applied Army Painter “Wasteland Tufts” and some 12 mm grasses from Shadow’s Edge Miniatures.

As an aside – I can say without a doubt that the Shadow’s Edge Miniatures products are far superior to Army Painter’s – they need no additional gluing, and they are visually stunning.  I plan on using their products, especially the flowers, on future unit bases to help with tabletop differentiation.

12 on the table
The three craters on the tabletop.  The thin bases made them quite flush with the tabletop.
12a underside showing steel
The bottom of the craters showing the use of the Wargames Accessories steel bases.
13a large done
Close up of the large crater as finished. 
13b middle done
Close up of the middle-sized crater.  I liked this sculpt the best of the three.
13c small done
The smallest crater.  I like the way the pigments made the bottom look realistically muddy.
14 Star Ducks in all 3
Some Star Ducks defend the craters.  I decided that the craters would be more useful looking as if they were from an older battle.  I was thinking of those I have seen at Verdun, though there are no historical records of ray gun armed ducks at Verdun…
15 Martians vs SFC Mallard
…or Martians…SFC Mallard defends the small crater against a Martian assault.
16 Martians vs SFC Mallard & Duck Wader
The Martians assault the middle-sized crater defended by Duck Wader and SFC Mallard.
17 Star Ducks vs the Space Dwarves
The Space Dwarves’ large crater is assaulted by the Star Ducks.

My lessons and thoughts from the project:

  1. The cleaning and scrubbing of the resin helped with the priming.  The Scotch-Brite pads work well for this use.
  2. For terrain pieces that will be totally covered in pigments, dry brushing with paint is not needed.  When I get to doing vehicles, such as tanks, it will be interesting to see how that works.
  3. Fixing pigments with airbrush thinner is easier than with pigment binder.  However, add any additional large features, such as extra rocks later, or use pigment binder on the rocks.
  4. Having trays and palette wells (such as the one I put my palette in) while working with pigments cuts down on the mess considerably.  Be ready to use multiple brushes, both wet and dry.  The mess vacuumed up or washed off easily from my palettes and trays.
  5. Always ensure your pigment bottles are shut tight.  I see how they could spill over easily (and I was lucky enough not to have this problem).
  6. PVA glue and play sand are an inexpensive winner.
  7. The combination of thin steel and thin polystyrene yields a model base with little to any “rise” from the tabletop at its edge, and is strong.
  8. Thin your varnish to prevent the crazing!  (Speaking with Buck today, he uses varnish to fix his pigments, so that needs to be considered).  I also want to see how well airbrushing the thinner fixes pigments in future projects, like my ruined buildings.
  9. Washes help in the end for touch ups.
  10. Shadow’s Edge Miniatures tufts are fantastic – need no extra glue and dry clearly.

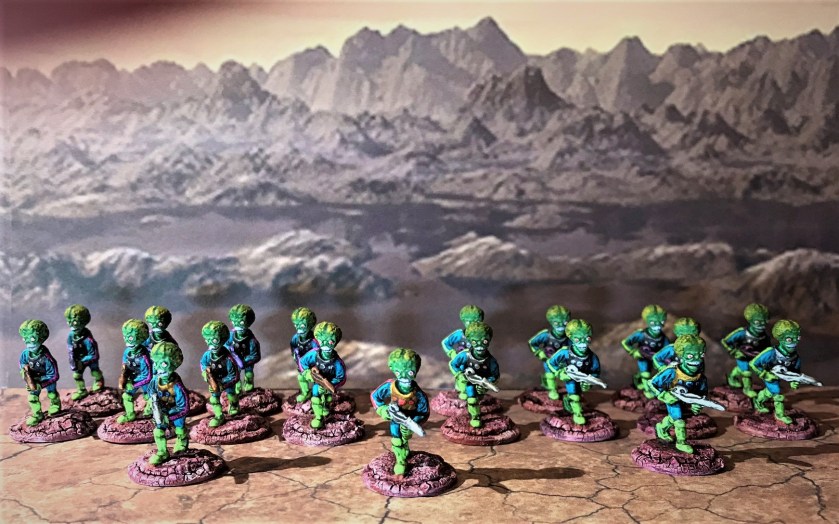
Now the three craters are now ready to join my other terrain.  Hopefully I can get more done this month.

Thanks for reading and if you have feedback, especially on my results or suggestions from your experiences, please, share them in the comments section.  I do so much appreciate them!

PAINTS, PIGMENTS, INKS, GLUES, GLAZES, WASHES, AND FLOCKING USED:

  1. Vallejo “Surface Primer – Gray”
  2. Generic play sand
  3. Elmer’s “Glue-All”
  4. SceneARama “Rocks”
  5. Evergreen Scale Models #9020 0.5 mm plain polystyrene sheets
  6. Gorilla Glue
  7. Wargames Accessories steel bases (various)
  8. Americana “Raw Umber”
  9. Citadel “XV-88”
  10. American “Burnt Sienna”
  11. Citadel “Skrag Brown”
  12. Citadel “Balor Brown”
  13. Vallejo “Natural Umber” (pigment)
  14. Vallejo “Light Yellow Ochre” (pigment)
  15. Vallejo “Light Slate Grey” (pigment)
  16. Vallejo “Light Sienna” (pigment)
  17. Vallejo “Faded Olive Green” (pigment)
  18. Vallejo “Airbrush Thinner”
  19. Vallejo “Pigment Binder”
  20. Vallejo “Airbrush Flow Improver”
  21. Secret Weapons Washes “Sewer Water” (wash/shade)
  22. Citadel “Agrax Earthshade”
  23. Citadel “Athonian Camoshade”
  24. Testors “Universal Acrylic Thinner”
  25. Vallejo Mecha Varnish “Matt Varnish”
  26. Army Painter “Wasteland Tufts”
  27. Shadow’s Edge Miniatures “12 mm tufts”

Thanks again – I hope this helps you or please feel free to add your own suggestions in the comments section.  After all, I am no expert in these – and I am just sharing my lessons learned – and I KNOW there are many other ways to accomplish what I did (I just don’t know them all!!).


“Mars Aliens” from Mega Miniatures, circa 2001, for Combat Patrol (TM)

I am always searching for cool old school figures that are out of production that I could use in my Combat Patrol™ retro sci-fi games.  This is firstly because I like to find neat stuff that time has passed by – and expose the figures to a brand new audience.  Secondly, it allows me to run really fun games – as the rules are so easy to play and learn even for true newbies – while older gamers are simultaneously having a good time.

Fortunately, I came across Michael Thomas’ site, classicminiatures.net.   There I found many Archive Star Rovers figures that he could cast (as he has a spin caster and now owns many original molds).  I acquired my Space Dwarves (Archive’s Long Gone Jones) from him, and he suggested two others that I might like.

One was also previously described in this blog – that being Mega Miniatures Robot Peacekeepers.  These were my first figures from that now-defunct company.  Michael piqued my interest with a second figure, which was Mega Miniatures “Mars Alien”  (#71501 seen here in the Lost Minis wiki) from their Sci Fi Future range Aliens subset.  It looks like the figure is the only one in that group, and was OOP in 2003.  It was sculpted by Hermann Grassnick, and the rights were sold by Mega Miniatures in 2011 (I am assuming to Michael Thomas).   I got 19 of the figures for a two-squad Martian platoon.

So when looking at these, one immediately sees their resemblance to the Martians in Tim Burton’s 1996 film, Mars Attacks.  You remember, the Martians speak “ack-ack” (which was the sound of a duck quacking played backwards).

Interestingly, I wonder if there was a copyright issue that caused a cessation of production?  I was also completely unaware that a UK company called Mantic Games put out a Mars Attacks game complete with figures and terrain.  I looked through the Mantic website, but it looks like the game is not really available or at least not supported much, or that Mantic is just selling whatever inventory it has of its components.  (Side note – I did also see the Kings of War game there which I have seen referred to often in the blogosphere. If I ever get back to fantasy armies, perhaps this will be a resource!).

Back to my Martians…

I did see that the figures from Mantic were colored like the movie, so I adopted that scheme for my Mega Miniature figures, which is a turquoise and lime green combination.  Of course, I thought I could finish these in time for a painting challenge by Azazel called “Jewel of July”  – after all turquoise is a jewel right?  But it was not to be, so these Martians got completed in early August.  There were no helmet bubbles or air tanks, but otherwise the figures were comparable.

I cleaned off any unwanted sprue residue, filed, and washed the figures.  They cleaned up easily, and the casting quality was good.  They are probably 25mm in scale (Star Duck size).  I mounted the figures to ¾” steel washers with Gorilla Glue, and then used poster tack to affix them to my painting jars.

0 Mega Mini DEAL 71501 Mars Attacks
The Martians as received

I wanted there to be an easy way for the platoon to be used on the tabletop.  I decided that I needed a painting plan.  So I made one, using different colors for the weapons, armored vests, belts, and accouterments – it was 11 PowerPoint pages – and you can see one such example below.  This helped me to keep it all straight.  I list all the paints that I used at the end of this blog post for those interested – there were a number used!

Mars attacks ppt painting plan
I usually use some details to denote who is who.  Usually red for officers, blue for higher NCO’s, and green for lower NCO’s.  I used two different colors on the trim to denote each squad.

As for the figures’ details, I did have an issue with the teeth and the brain folds (who doesn’t), as they tended to fill up quickly even with light airbrushing.  Eventually, I figured out how to present them in a game-worthy way.

1 Base coated
After priming and base coating with turquoise
1a Base coated
The B squad after priming

I ended up using multiple very thinned applications of Citadel “Ceramite White” on the Vallejo Mecha Color “Turquoise” so that I could get the other colors to be more vivid.

2 after white on heads
White heads – trim and belts next!

I tried to match the colors from the movie on the skulls and brains.  It was tough, but I found that using multiple inks, dry brushing, and washing here was a winning approach.  My initial tries were too dark or too light as shown below.

3 working on the brains
Need a middle ground!
4 brain solution and belts
Eventually, using patience, dry brushing, inks, and washes, I got my Martians’ brains to be close to the desired result.
5 close up mid point
I worked on the heads first, then inside to out on the torsos and legs.

After the painting was at a stage that I was happy with and what I wanted, I gave the torsos downward a good wash with Citadel “Nuln Oil Gloss”.  I like the results it gives with metallics. Still, the damn teeth were bedeviling me,  Washes were not working, and dry brushing them was not either.  They were fairly snaggle-toothed dudes.

6 after painting and wash
The platoon leader after an application of wash on his torso.  But the teeth were unacceptable!

My dental solution was to use a very thin and slightly jagged line of Vallejo Game Air “Black” just under the upper teeth – and I settled on that.

7 wash and no wash comparisons
A member of A squad (fluorescent magenta highlights) on the left and a B squad member (fluorescent yellow highlights) on the right.  The B Martian has not yet gotten a wash with the Nuln Oil Gloss.  Here, the teeth are improved.
8 b team after wash
B squad after the Nuln Oil Gloss wash on their torsos and legs.

I then used Vallejo “Gloss Varnish” for my first varnishing application.  I planned on adding a matte coat after I finished the bases.

9 B team after gloss varnish
Shiny happy people…err Martians…after the gloss varnish (apologies to REM)

I then worked on the bases.  I decided to use Citadel “Martian Ironearth” on them.  I really like to get the crackling effect from that paint when you use a hand-held hair dryer on it as it dries.  So yes, I used a blow dryer on dudes that not only had no hair, but no scalps…in any case the bases came out fine.  Instead of using a wash on them, I dry brushed the bases sequentially with Armory “Brick Red” (from 1996) and P3 “Ryn Flesh”.  I liked the effect better than my previous uses.

10 after base prep
B squad figure after base completion but before the matte varnish
11 matte applied group shot
The platoon all done and waiting for the matte varnish to dry
12 closeup of PL complete on jar
Closeup of the platoon leader
13 closeup of trooper complete on jar
An A squad trooper from Team 1 (denoted by the copper colored weapon)

Overall, I am happy to have some more “bad guys” to add to my retro sci-fi forces.  I do not think that they are my best work, but they are good enough, and should be fine for gaming.  And now, some action shots!

14 group shot in formation
The Martian platoon
15 leadership
Martian Platoon leadership – platoon leader is in the center, with the A squad leader and his two team leaders on the left of the photo, and the B squad leader and his two team leaders on the right.
15a belts and leadership
An example of how I painted the belts differentially.  From left to right, the platoon leader (red), the A squad leader (blue), a B squad team leader (green), an A squad trooper (magenta), and a B squad trooper (yellow)
16 A Squad moves out
The A squad moves out around some Armorcast terrain.
17 B Squad moves out
The B squad checks out the cooling units and power generator
18 A1 team with ball tank
The A squad’s Team 1 moves up alongside a Mark 1 Sphere tank
19 A2 team surrounds Texicans
The A squad’s Team 2 surrounds some Texican Space Rangers
20 PL and B1 take on Hurraku
Size does not matter as the platoon leader and the B squad’s Team 1 move in to kill the Hurraku Space Phraints…or at least try to do so!
21 B2 charging into Space Dwarves
The Space Dwarves throw grenades at the advancing Martians – the Team 2 from B squad
22 second group shot
ACK ACK ACK!

I hope you enjoyed this post – please let me know your thoughts and suggestions in the comments section.  And no, I will not have a Slim Whitman weapon that will kill these guys!

PAINTS, INKS, GLAZES, WASHES, AND FLOCKING USED:

  1. Vallejo “Surface Primer – White”
  2. Vallejo Mecha Color “Turquoise”
  3. Vallejo Game Air “Dead White”
  4. Tamiya “Gold Leaf X-12”
  5. Vallejo Model Air “Gold”
  6. Citadel “Retributor Armour”
  7. Citadel “Ceramite White”
  8. Tamiya “Gun Metal X-10”
  9. Tamiya “Chrome Silver X-11”
  10. Tamiya “Copper XF-6”
  11. Vallejo Mecha Color “Purple”
  12. Vallejo “Metal Medium”
  13. Vallejo “Gloss White”
  14. Tamiya “X-20A Thinner”
  15. Vallejo “Thinner Medium”
  16. DecoArt “Dazzling Metallic – Berry”
  17. Vallejo Game Air “Black”
  18. Secret Weapons Washes “Parchment” (ink)
  19. Citadel “Biel-Tan Green” (wash/shade)
  20. Craftsmart “Ultra Bright Metallic – Amethyst”
  21. DecoArt “Dazzling Metallic – White Pearl”
  22. Vallejo “Light Orange”
  23. Vallejo Mecha Color “Light Green”
  24. Vallejo “Vermilion”
  25. Citadel “Lamenters Yellow” (glaze)
  26. Citadel “Drakenhof Nightshade” (wash/shade)
  27. Vallejo Game Color “Livery Green”
  28. Vallejo Game Air “Sick Green”
  29. Polly S “Venetian Dull Red”
  30. Secret Weapons Washes “Just Red” (ink)
  31. Citadel “Nuln Oil Gloss” (wash)
  32. Vallejo Mecha Color “Green”
  33. Secret Weapons Washes “Blue” (ink)
  34. Vallejo Mecha Color “Green Fluorescent”
  35. Vallejo Mecha Color “Magenta Fluorescent”
  36. Vallejo Mecha Color “Yellow Fluorescent”
  37. Citadel “Martian Ironearth”
  38. Vallejo “Flow Improver”
  39. Vallejo “”Airbrush Thinner”
  40. Testors “Universal Acrylic Thinner”
  41. Vallejo “Gloss Varnish”
  42. Armory “Brick Red”
  43. P3 “Ryn Flesh”
  44. Citadel “Carroburg Crimson” (wash)
  45. Vallejo Mecha Varnish “Matt Varnish”

Thanks again – hope this was fun to see!!

Frank Tank Rants

musings of a fat old bloke on tanks and wargames

Dragons of Lancasm

Games, miniatures, painting, books and more games

Tiny Painted Heroes

The Adventures of a lifelong Tabletop Gamer, Game Design hobbyist, and full-time Software Engineer

Home of the Grumpy Gnome

Tinkering with Artwork and Ideas

Steve's Paint Brush

Grimdark model making and mini painting

Wargamesculptors Blog

Life, Golf, Miniatures, & Other Distractions

Dead Dick's Tavern and Temporary Lodging

Life, Golf, Miniatures, & Other Distractions

Guru PIGS Blog

Guru's thoughts on wargaming, life, and the universe!

Wisely lead... without a head!

History, Miniatures and Wargaming

Kuribo's Painting

Fallout, MESBG, and Hellboy Painting, Terrain, Dioramas, and Battle Reports

Don't Give Greg Ideas

Seriously, just don't

War Across the Ages, and other dark horrors

A discussion of miniatures collecting, painting and gaming.

Classic Warhammer 40K

Painting diary focused on Warhammer 40K 2nd ed., 5th ed. WHFB, related GW games, and miscellaneous whimsy

Colonel Mustard

WW2 Modelling in 1/72 Scale

Bogenwald

Random painting and terrain making.

Pat's 1:72 Military Diorama's

Scale diorama tips and ideas

Arcade Dreams

Building the Arcade Dream

P.B.Eye-Candy

Phil's 20th century wargame pages

SP's Projects Blog

A futile fight against entropy or 'Every man should have a hobby'? Either way it is a blog on tabletop wargames, board games and megagames

30mmdave

Wargaming Plausible reality?

Faith&Steel

dave's gaming adventures: faithandsteel.wordpress.com

The Imperfect Modeller

Miniature Figure Painting and Diorama Modelling

Double Down Dice

Painting miniatures and rolling dice!

Just Needs Varnish!

My ongoing wargames projects!

miniaturepopcorns

Sculpting some worlds

Despertaferres

Wargaming with the ability of a dull nine year old

Dawn of the Lead

Miniature wargaming and the occasional zombie

Rantings from under the Wargames table

Wargames, Figures, Sculpting and Converting Miniatures

Simple as War

Miniatures & Terrains

Buck's Blog

Life, Golf, Miniatures, & Other Distractions

IRO aka Imperial Rebel Ork

- I model - therefore I am -

Azazel's Bitz Box.

Painting, Modelling, Miniatures, 1:6, Games... Whatever else I find interesting.

diggingforvictoryblog

Smallholding and Wargaming.......not always at the same time!

Shamutantis

Nørdblog numero uno

Harry Heckel

Writer/Game Designer