Aztec Arrow Knights, Ral Partha circa 1988

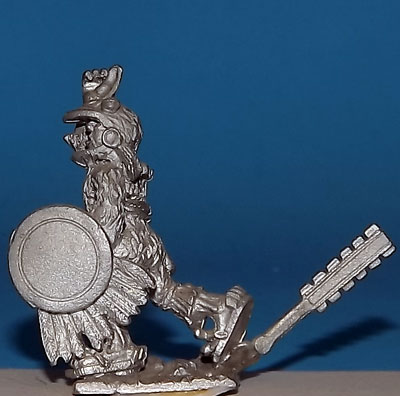
In building a set of troops for the Spanish Conquest, I came across a couple of blisters of 25mm Ral Partha figures called “Aztec Arrow Knights”.  These were in my lot of unpainted lead for the period, sculpted by R. Kerr, and dated from 1988.  The blisters held 6 figures armed with huge feathered arrows – think javelins with fletching.  As I thought that they were interesting potential elite troops with unique weapons, I decided to add one of the two blisters to my Aztec forces, keeping the other in reserve for future painting.

1 Ral Partha Arrow Knights 42-305 in blister
The blister pack – waited 32 years to be opened.

As I discussed previously, I had been doing research on the Aztecs.  I looked for suitable color plates or guides to paint up this unit.  To my surprise, there is a bit of mystery and possibly even controversy about Arrow Knights.  History provides little evidence in the codices as to their existence – though there are clues here and there.

I suppose it’s not out of the question that an elite unit of Aztec warriors specializing in launching massively huge javelin-like arrows could have existed.  Perhaps there was some confusion with the atlatl (ot-la-t) a spear-throwing device?  Just because old Ral Partha made these does not mean that they did exist – but for the purposes of my games and my Aztec Army – they do now.

atlatl
Atlatl use.

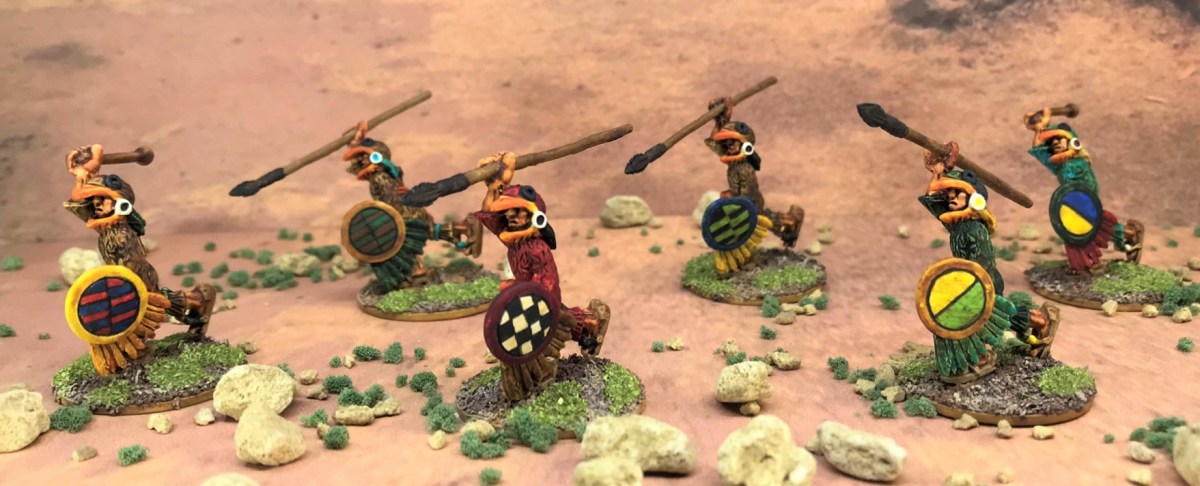
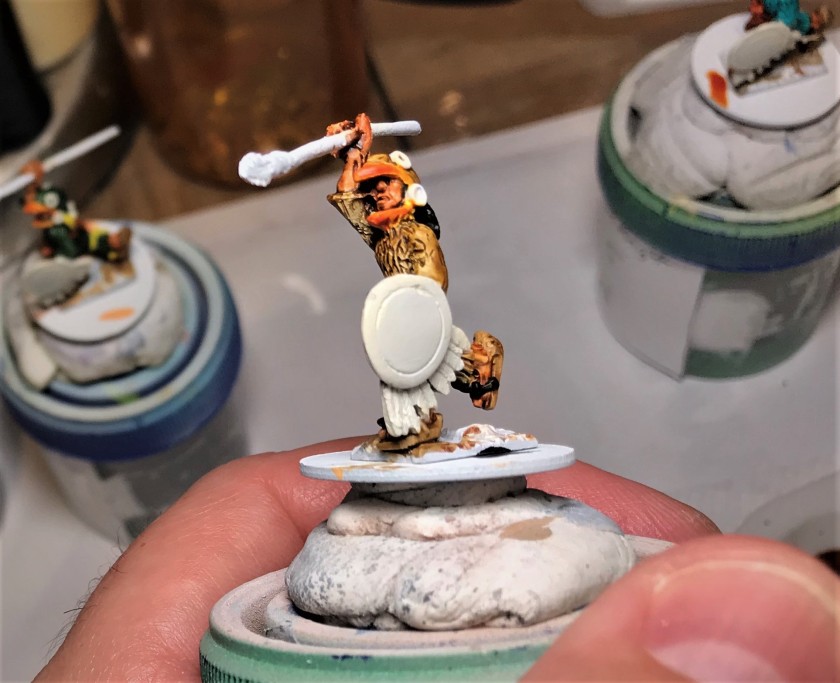
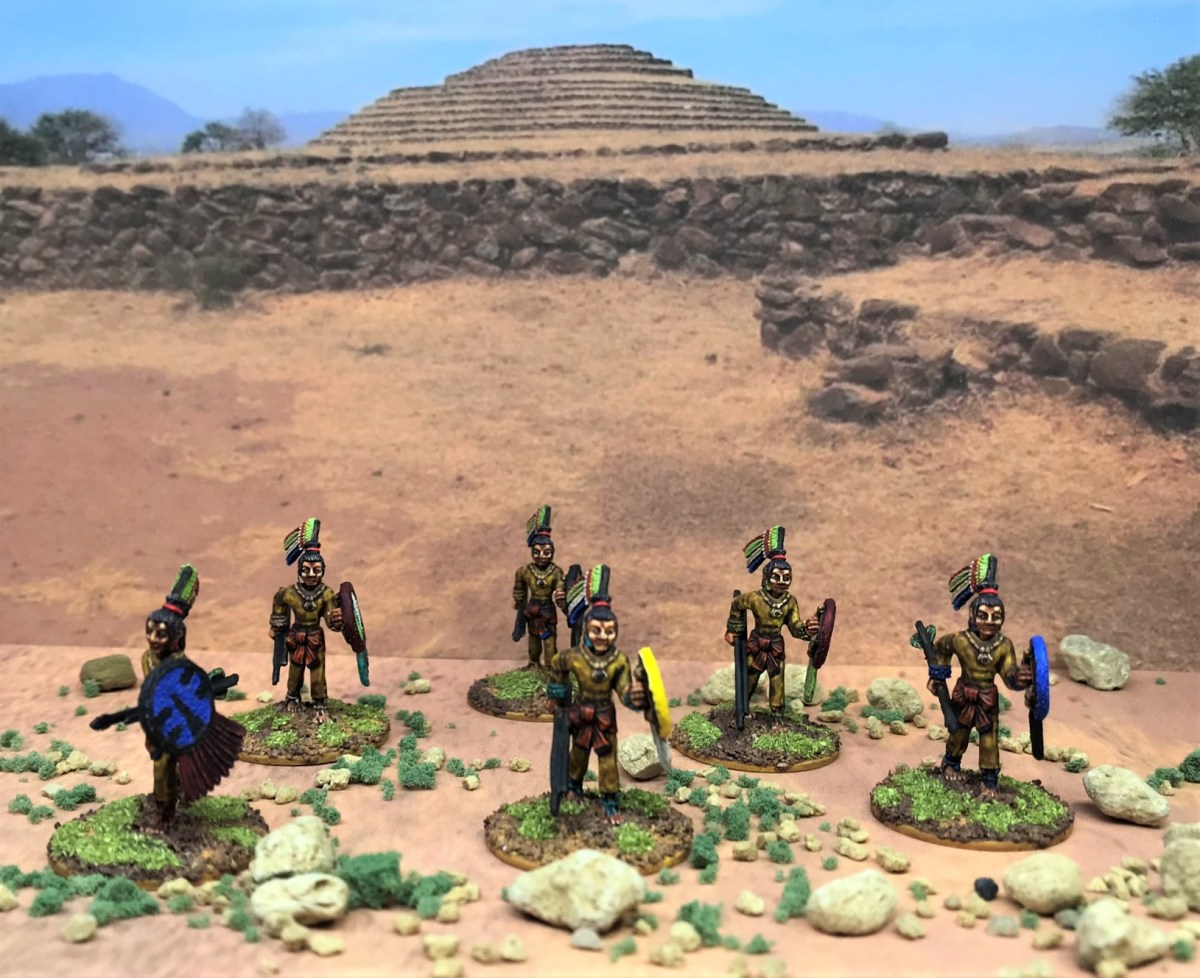
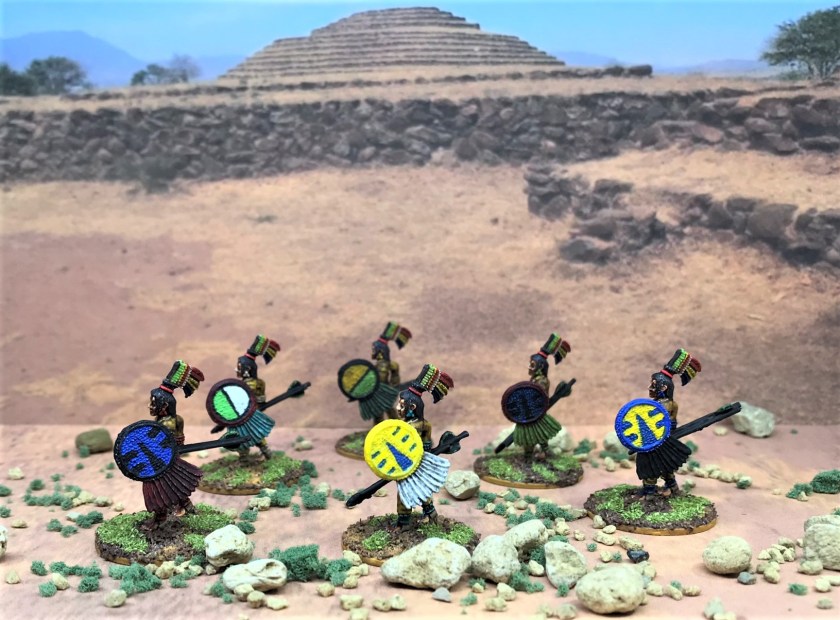
Of course, painting them would be up to me for choosing the colors.  The only picture that I found was from a computer gaming site – and it did not match any of the plates.  I did like the markings known as “hawk scratches”.  I decided that I would give the unit a coloration similar to the cuahchic elites – that being a yellowish suit of tanned hide that would have been worn over their quilted-cotton armor ichcahuipilli (each-ca-we-pee-lee).

Aztec_Arrow_Warriors_old.JPG
From the internet – not likely historically correct but a start.

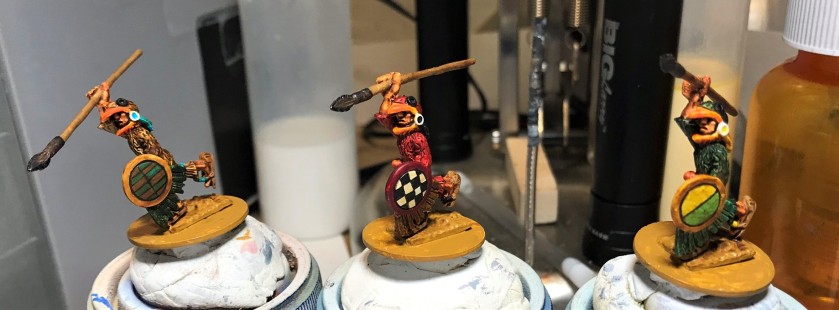
It was fun to break into this old blister from Ral Partha’s 1200 A.D.” line.  The figures were all in the same pose, but I figured that I could orient their arrows in slightly different positions, use slightly different colors on each , and give different shields to each for aesthetics and ease of tabletop identification and playability.  A familiar challenge was that the arrows were all lead – and vulnerable to bending and breaking.  I also wanted them to have two big arrows – one to throw and one to use in melee.

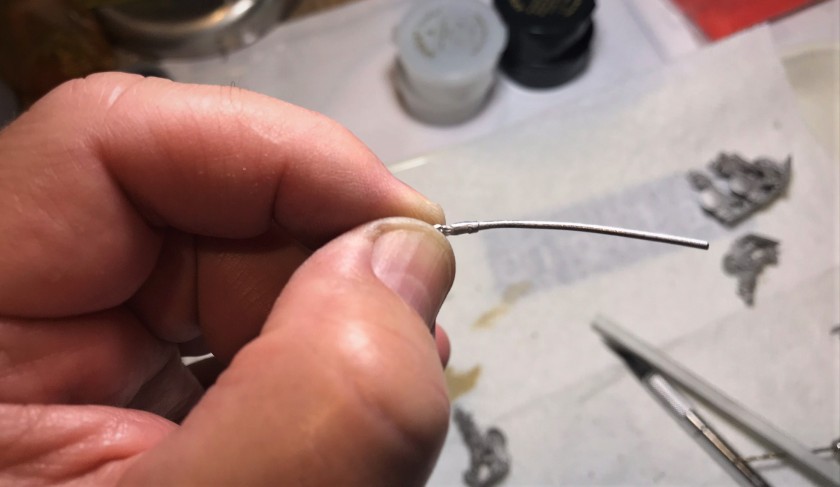
The problem with doing this were twofold.  First, I did not want to sculpt 6 little extra arrows – and second the little 25mm hands were too small to accommodate even the arrows provided.  My solution was to use some steel wire pikes I had gotten from Iron Winds Metals during my Rooman War Party project.  I cut the pikes to size and used super glue to affix them to the arrows.  They would be the “second” arrow, albeit without fletching or another obsidian head.  I think it worked – and you can be the judge.

4 Ral Partha Arrow Knights 42-305 shields and arrow sprues
One of the shield and weapon sprues with the “RAL PARTHA 1988” on it.
5 Ral Partha Arrow Knights 42-305 arrow fix
The arrows shown here reinforced by the steel wire.
6 Ral Partha Arrow Knights 42-305 mounted on washers
The Arrow Knights after affixing their “double arrows” to their hands and the figures themselves to the 1″ steel washers.  I would paint the shields separately.
7 Ral Partha Arrow Knights 42-305 mounted on washer, close up
Close up shot before painting.
10 Ral Partha Arrow Knights 42-305 tunic and hawk scratches May 4th
I used a series of yellow and tan inks, washes, and glazes over the hard-lined “hawk scratches” to get a good color that would darken appropriately but still show the markings.
11 Ral Partha Arrow Knights 42-305 tunic and hawk scratches May 4th close up
Close up shot mid-stage before darkening.
12 Ral Partha Arrow Knights 42-305 after shields added May 5th
After shields affixed and washes applied.
13 Ral Partha Arrow Knights 42-305 after shields added May 5th close up
Close up of  Arrow Knight prior to flocking.  I did like how the faces came out, and the uniforms as well.
14 Ral Partha Arrow Knights 42-305 after adding pigments to flocking May 6th close up
I flock the bases with Army Painter “Brown Battlefields”, then add pigments before varnishing.  After varnishing, I add static grass.  Here you see the pigments wet with Vallejo “Airbrush Thinner” which hardens up nicely.  Sometimes I drybrush the bases as well, but I opted this time not to and to instead use more pigments.
15 Ral Partha Arrow Knights 42-305 after adding pigments to flocking May 6th group
Dried and ready for varnishing in the spray booth.

Next, I’ll share some close up eye candy shots of each, a scale comparison, and some group shots.

Arrow Knight #1

Arrow Knight #2

Arrow Knight #3

Arrow Knight

Arrow Knight #5

Arrow Knight #6

Scale Comparison

17 scale comparison
Just for scale comparison – the Arrow Knight is on the left, a 28mm Wargames Foundry Novice Warrior is in the center, and a 25mm Tin Soldier UK Eagle Knight is on the right. I think they will work fine on the tabletop together.

Group Shots

18 group shot shield side
Good view of the six different shields together.

19 group shot shield front

I am also adding a new feature here.  I want to be able to share related posts on the larger Aztec project with folks who have not seen all of the previous posts.  Additionally, I need a way to help me keep track of my progress!  Therefore, the list of links below will accomplish both for me.

Posts on Units for my 16th Century Spanish Conquest Supplement for  Feudal Patrol™“Civilizations Collide”

  1. Aztec Arrow Knights, Ral Partha circa 1988 (this post) – 6 Aztec Arrow Knights
  2. Aztec Eagle Warriors from Tin Soldier UK – 6 Aztec Eagle Knights
  3. Aztec Novice Warriors and a few Frinx – 12 Novice Warriors

Total figures to date for this project:  24 Aztecs

20 army progress
Progress so far!

Thanks for looking and let me know what you think – I love the chance to learn your thoughts and to have a discussion!

Lastly, here are the paints and supplies I used on this project.

PAINTS, INKS, GLAZES, SHADES, WASHES, PIGMENTS, FLOCKING, GLUES AND MORE USED ON THESE AZTEC ARROW KNIGHTS:

  1. Gorilla Glue
  2. 1/8″ x 1″ Everbilt Fender Washers
  3. Steel wire lances from Iron Winds Metals
  4. Poster tack and plastic plates
  5. Vallejo “Surface Primer – White Primer”
  6. Vallejo “Flow Improver”
  7. Vallejo “Airbrush Thinner”
  8. Testors “Universal Acrylic Thinner”
  9. Vallejo Model Air “Weiss” (off-white)
  10. Vallejo Game Air “Black”
  11. Vallejo Model Color “Sunny Skin Tone”
  12. Vallejo Model Color “Light Flesh”
  13. Citadel “Contrast Paint – Fyreslayer Flesh”
  14. Vallejo Model Air “Moon Yellow”
  15. Vallejo Game Air “Escorpena Green”
  16. Citadel Air “Evil Sunz Scarlet”
  17. Vallejo Model Color “Dark Blue”
  18. Vallejo Mecha Color “Turquoise”
  19. Vallejo Game Air “Dead White”
  20. Citadel “Contrast Paint – Wyldwood”
  21. Army Painter “Flesh Wash” (wash)
  22. Citadel “Contrast Paint – Gryph-Hound Orange”
  23. Citadel “Contrast Paint – Basilicanum Grey”
  24. Battlefront “Wool Brown”
  25. Secret Weapons Washes “Parchment” (wash)
  26. Secret Weapons Washes “Sunshine” (wash)
  27. Citadel “Contrast Paint – Creed Camo”
  28. Citadel “Balor Brown”
  29. Citadel “Agrax Earthshade” (shade)
  30. Citadel “Lamenters Yellow” (glaze)
  31. Army Painter “Soft Tone” (shade)
  32. Vallejo Model Air “Armour Brown”
  33. Citadel “Praxeti White” (dry)
  34. Citadel “Contrast Paint – Aethermatic Blue”
  35. Citadel “Contrast Paint – Flesh Tearers Red”
  36. Citadel “Contrast Paint – Apothecary White”
  37. Vallejo Model Color “White”
  38. Vallejo Model Color “Glossy Black”
  39. Elmer’s PVA Glue
  40. Army Painter “Brown Battlefields” (flocking)
  41. Vallejo “Dark Yellow Ochre” (pigment)
  42. Vallejo “Burnt Umber” (pigment)
  43. Vallejo Mecha Varnish “Matt Varnish”
  44. Army Painter “Grass Green” (flocking)

Thanks for looking – please let me know your thoughts and feedback!


Aztec Eagle Warriors from Tin Soldier UK

As shown in my last post, I have started building forces of appropriate figures for tabletop wargames using the soon-to-be published Feudal Patrol™.  These are Aztecs and other troops from the era of the Spanish Conquest in the 16th Century.  This is a major project for which I eventually hope to have over 150 painted figures.  I have a ways to go, as this project brings that total to a mere 18.  Still, the journey of 1,000 miles begins with a single step…

I acquired a large lot of Aztec figures on eBay probably 4 or 5 years ago.  Most of them 25mm scale, and from Ral Partha dating from around 1988.  In the lot were also two baggies of 3 Aztec Eagle Warriors (#25 AZ4) – ostensibly 25mm as shown on the Tin Soldier UK website.    I was not familiar with Tin Soldier UK, but they have a pretty nice range of figures worth checking out.  Of course, 28mm is the scale that I am going for – and sometimes 25mm can work for 28mm.  While I was waiting for my order of new 28mm stuff to arrive (which I received this week), I decided to paint up some of the older figures and see if they could work with my 28mm figures visually.  To my eyes, the Tin Soldier UK Eagle Warriors looked close enough to 28mm to work.

1 Tin Soldier 25AZ in bags
The Tin Soldier UK baggies of Eagle Warriors.  Note the noodle-like tepoztopilli (obsidian-bladed thrusting spears) – more on that in a bit.

The Aztecs had two main elite unit types – the Jaguar Warriors,  and the Eagle Warriors (sometimes referred to as the Eagle Knights).  There were also the lesser-known Arrow Knights, which I will post about next time.  To be an Eagle Warrior, one had to have captured up to 20 enemy for sacrifice or equivalent deeds of valor (well, in the eyes of Aztec society anyways).  They were full-time professional warriors and along with the other elites were equivalent to nobility among the Aztecs.

Normally, Aztec Eagle Warriors would be armed with melee weapons, in particular the macuahuitl obsidian-edged club/sword.  All of these 6 had the same pose and were armed with tepoztopilli (obsidian-bladed thrusting spears).  They also had the weapons in a throwing versus a thrusting pose.  Therefore, I decided to go through the 25mm Ral Partha Aztecs that I had and see if I could get any macuahuitl or cuauhololli (round-headed club) as extra weapons.  The extra Ral Partha macuahuitl were way too small and bendable, but there were some cuauhololli that would work.  I ended up using two of the cuauhololli and four of the tepoztopilli as weapons for the six.  My plan was to orient each of  their weapons slightly differently and also to have different shield patterns and different colors for authenticity and ease of tabletop play.

Now, as for the spaghetti-like tepoztopilli, they needed a solution as they were made from lead and were as floppy and vulnerable to bending as most leaden miniature spears are unfortunately, especially those from the 1980’s and earlier.  The odd thing is that the model shown on the website indeed does have a macuahuitl instead of a tepoztopilli!  My guess is that they redid the mold at some point as these model thrusting spears were too weak for use in gaming.  In any case, I decided to try using a thin layer of Apoxie Sculpt on the shafts.  Apoxie sculpt is easy to use and can be made more workable when used with wet fingers – and it gets hard as a rock when it cures in 24 hours.  This process gave me much improved tepoztopilli, but still the underlying lead made them somewhat (though less) vulnerable to bend.

2 Tin Soldier 25AZ limp tepoztopilli
This bendy tepoztopilli will not do!
5 AZ4
From the Tin Soldier UK website – I definitely would have preferred this macuahuitl as a weapon for the models – but it is available now.
3 Tin Soldier 25AZ limp tepoztopilli Apoxie Sculpt
My set up for firming the tepoztopilli shafts – first I straightened them with a pair of needle-nosed pliers then rolled on wet Apoxie Sculpt.  Insert crass joke here…
5 Tin Soldier 25AZ Apoxie Sculpt limp tepoztopilli fix
New shafts reinforced with the Apoxie Sculpt after a 24 hour cure.

The models themselves were not too difficult to assemble.  I did need to clean up the mold lines and the hands needed to be drilled out carefully to hold the weapons.  I did pull out some of the molding rubber out of one model’s eyes, but overall I was happy with the quality of the castings.  I definitely liked that the shields were not separate.

I made a unit plan as there were many ways to do the unit – and I wanted to have something to refer to along the way.  In particular, one of my goals for this project was to give each Eagle Warrior a different shield design – and for that design to be historically correct.  Over at Steve’s Balagan, I found his blog to be a wonderful resource for Aztec and other shields.

6 Tin Soldier 25AZ the plan
Eagle Warriors primed and the painting plan – I did end up deviating a bit as I observed the colors of the models.

Most pictures that I have found on Eagle Warriors showed them in golden brown outfits – but some mention that there were possibly red, green, and blue ones as well.  I decided to make three in golden brown, and then make the others in red, green, and blue.  The accouterments and shields would also add to the differentiation on the tabletop.  Unlike the novices, the pics that I saw of Eagle Warriors all had orange loincloths, so that feature was common here.

7 Tin Soldier 25AZ April 29 progress
By April 29th, I had the basic colors down.  Citadel contrast paints were useful with these models, as their details for the most part were not really suited for dry brushing as opposed to shading.
8 Tin Soldier 25AZ April 30 progress
Progress by April 30 – still needed to paint the shields and weapons.
9 Tin Soldier 25AZ April 30 progress close up
Close up of April 30 progress.

My next big challenge was painting designs on the shields.  My handwriting is awful, and hand-drawing designs on shields has not been a strength for me – and these are tiny.  I decided to let the engineer in me break out.  I used an art template to trace a 9/32″ circle on a piece of paper, and then I cut that out.  It proved useful in helping me to lightly sketch the designs on the shields in pencil – as guides for painting.  I tried several designs that I saw on Steve’s Balagan blog.

10 Tin Soldier 25AZ May 1st shield template
Putting the template on the shield for marking up designs.

I wanted to get these done for the weekend, and my wife helped fuel my push with a home-made pizza (that tasted even better than it looked!).

11 Fuel to finish
Fuel for the finish!

Below are a couple of WIP shots after I finished painting the shields – for me, this was a result that I was surprised to see.

12 Tin Soldier 25AZ May 1st shields painted 1 to 3
Close up of Eagle Warriors 1, 2, and 3 showing shield details.
13 Tin Soldier 25AZ May 1st shields painted 4 to 6
Close up of Eagle Warriors 4, 5, and 6 showing shield details.

On May 1, I finished them with flocking and varnishing, ending with some static grass (all the materials I used are listed at the end for those interested).  This counts hopefully as my second entry into Ann’s Immaterium Painting Challenge “Paint the Crap you Already Own”.

14 Tin Soldier 25AZ May 2nd ready to go
The Aztec Eagle Warriors ready to come off their painting posts.

Here are some close up and group shots of the project:

Eagle Warrior 1, with tepoztopilli:

Eagle Warrior 2, with tepoztopilli:

Eagle Warrior 3, with tepoztopilli:

Eagle Warrior 4, with tepoztopilli:

Eagle Warrior 5, with cuauhololli:

Eagle Warrior 6, with cuauhololli:

Lastly, a couple of group shots:

22 group shot 1
Eagle Warriors attacking!
23 group shot 2
Close up shot – do you have a fave?

As for scale – here is a comparison between a 25mm Eagle Warrior and a 28mm novice warrior  – I think they will be OK.  Do you?

24 scale shot

What do you think?  Always wondering that – so let me know below in the comments section.  Now it’s back to painting more figures during the lockdown and beyond…

PAINTS, INKS, GLAZES, SHADES, WASHES, PIGMENTS, FLOCKING, GLUES AND MORE USED ON THESE AZTEC EAGLE WARRIORS:

  1. Apoxie Sculpt (White)
  2. Gorilla Glue
  3. 1/8″ x 1″ Everbilt Fender Washers
  4. E6000 Epoxy
  5. Poster tack and plastic plates
  6. Vallejo “Surface Primer – White Primer”
  7. Vallejo “Flow Improver”
  8. Vallejo “Airbrush Thinner”
  9. Testors “Universal Acrylic Thinner”
  10. Vallejo Model Air “Weiss” (off-white)
  11. Battlefront “Wool Brown”
  12. Battlefront “Dark Leather”
  13. Citadel “Contrast Paint – Gryph-Hound Orange”
  14. Vallejo Model Color “Sunny Skin Tone”
  15. Citadel “Contrast Paint – Skeleton Horde”
  16. Citadel “Contrast Paint – Blood Angels Red”
  17. Citadel “Contrast Paint – Creed Camo”
  18. Citadel “Contrast Paint – Aethermatic Blue”
  19. Vallejo Model Color “Basic Skin Tone”
  20. Citadel “Contrast Paint – Fyreslayer Flesh”
  21. Citadel “Contrast Paint – Iyanden Yellow”
  22. Army Painter “Light Tone” (shade)
  23. Vallejo Mecha Color “Turquoise”
  24. Vallejo Game Air “Black”
  25. Vallejo Model Air “Moon Yellow”
  26. Vallejo Model Air “Armour Brown”
  27. P3 “Sunshine Yellow” (ink)
  28. Vallejo Model Color “Red”
  29. Vallejo Model Color “Black Grey”
  30. Vallejo Model Color “Sunny Skin Tone”
  31. Battlefront “Chocolate Brown”
  32. Vallejo Mecha Color “Brown”
  33. Citadel “Contrast Paint – Flesh Tearers Red”
  34. Vallejo Game Air “Escorpena Green”
  35. Vallejo Model Color “Dark Blue”
  36. Citadel Air “Evil Sunz Scarlet”
  37. Citadel “Contrast Paint – Wyldwood”
  38. Citadel “Balor Brown”
  39. Vallejo Model Color “Glossy Black”
  40. Citadel “Seraphim Sepia” (shade)
  41. Elmer’s PVA Glue
  42. Army Painter “Brown Battlefields” (flocking)
  43. Vallejo “Dark Yellow Ochre” (pigment)
  44. Vallejo “Burnt Umber” (pigment)
  45. Americana “Desert Sand”
  46. Vallejo Mecha Varnish “Matt Varnish”
  47. Army Painter “Grass Green” (flocking)

Thanks for looking – please let me know your thoughts and feedback!

Frank Tank Rants

musings of a fat old bloke on tanks and wargames

Dragons of Lancasm

Games, miniatures, painting, books and more games

Tiny Painted Heroes

The Adventures of a lifelong Tabletop Gamer, Game Design hobbyist, and full-time Software Engineer

Home of the Grumpy Gnome

Tinkering with Artwork and Ideas

Steve's Paint Brush

Grimdark model making and mini painting

Wargamesculptors Blog

Life, Golf, Miniatures, & Other Distractions

Dead Dick's Tavern and Temporary Lodging

Life, Golf, Miniatures, & Other Distractions

Guru PIGS Blog

Guru's thoughts on wargaming, life, and the universe!

Wisely lead... without a head!

History, Miniatures and Wargaming

Kuribo's Painting

Fallout, MESBG, and Hellboy Painting, Terrain, Dioramas, and Battle Reports

Don't Give Greg Ideas

Seriously, just don't

War Across the Ages, and other dark horrors

A discussion of miniatures collecting, painting and gaming.

Classic Warhammer 40K

Painting diary focused on Warhammer 40K 2nd ed., 5th ed. WHFB, related GW games, and miscellaneous whimsy

Colonel Mustard

WW2 Modelling in 1/72 Scale

Bogenwald

Random painting and terrain making.

Pat's 1:72 Military Diorama's

Scale diorama tips and ideas

Arcade Dreams

Building the Arcade Dream

P.B.Eye-Candy

Phil's 20th century wargame pages

SP's Projects Blog

A futile fight against entropy or 'Every man should have a hobby'? Either way it is a blog on tabletop wargames, board games and megagames

30mmdave

Wargaming Plausible reality?

Faith&Steel

dave's gaming adventures: faithandsteel.wordpress.com

The Imperfect Modeller

Miniature Figure Painting and Diorama Modelling

Double Down Dice

Painting miniatures and rolling dice!

Just Needs Varnish!

My ongoing wargames projects!

miniaturepopcorns

Sculpting some worlds

Despertaferres

Wargaming with the ability of a dull nine year old

Dawn of the Lead

Miniature wargaming and the occasional zombie

Rantings from under the Wargames table

Wargames, Figures, Sculpting and Converting Miniatures

Simple as War

Miniatures & Terrains

Buck's Blog

Life, Golf, Miniatures, & Other Distractions

IRO aka Imperial Rebel Ork

- I model - therefore I am -

Azazel's Bitz Box.

Painting, Modelling, Miniatures, 1:6, Games... Whatever else I find interesting.

diggingforvictoryblog

Smallholding and Wargaming.......not always at the same time!

Shamutantis

Nørdblog numero uno

Harry Heckel

Writer/Game Designer