Terrain for What a Tanker: Making a Panzer IVD Wreck and Blast Markers

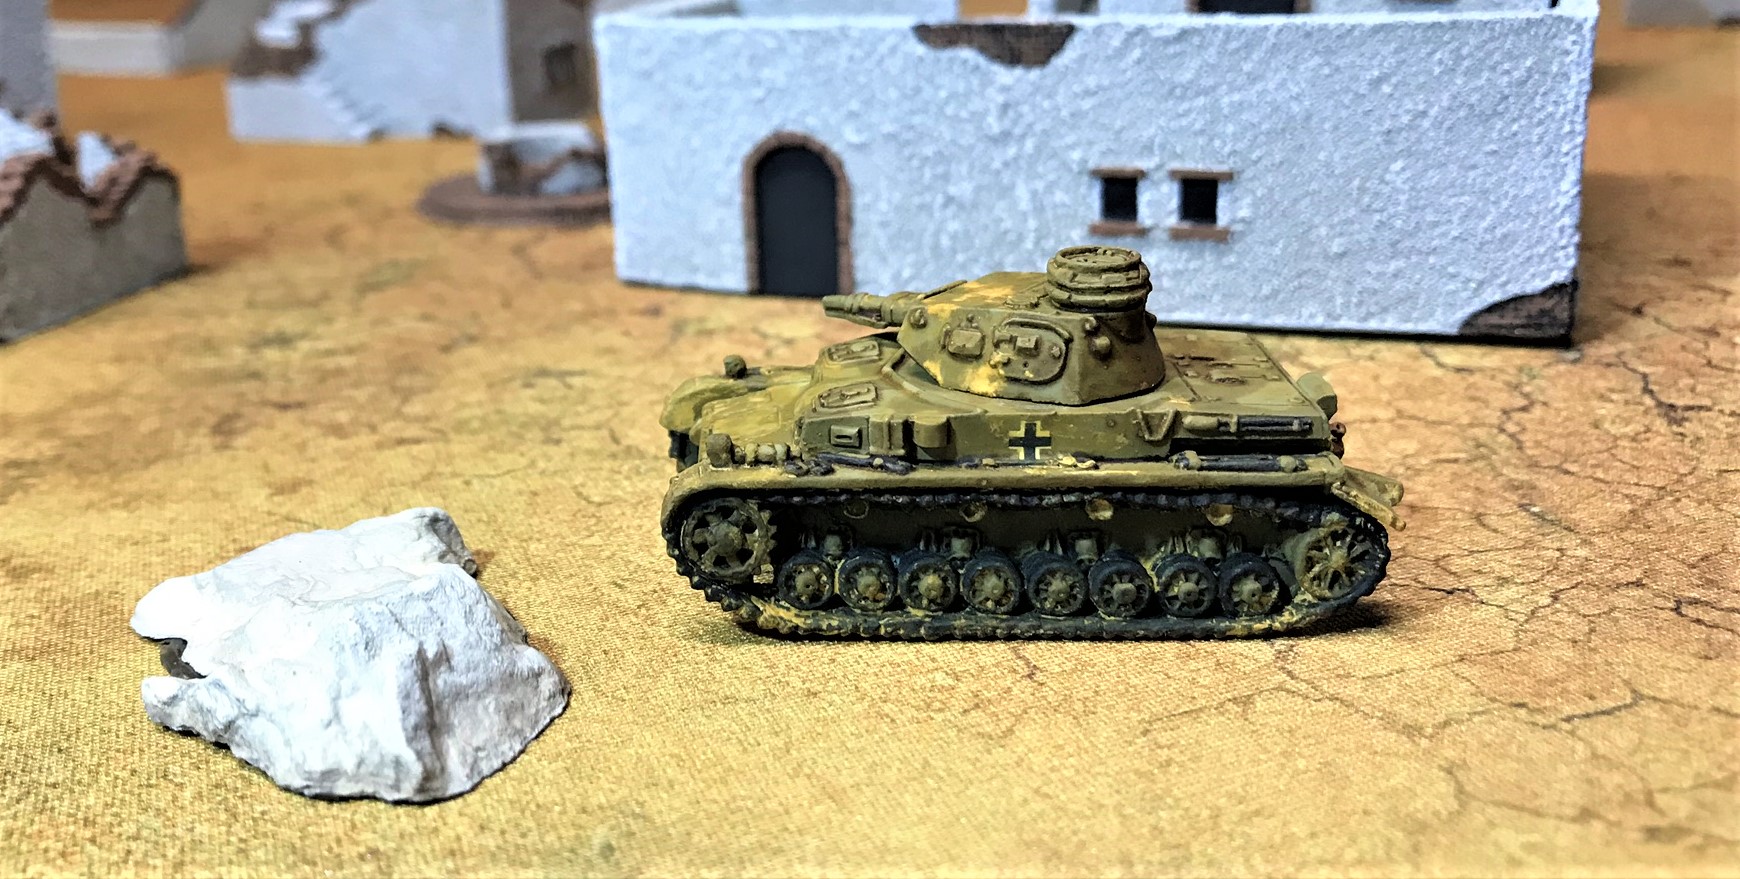
I have been trying to amass and put together more desert terrain and terrain markers for running What a Tanker© games set in North Africa in WWII.  A few months back I received a defective Panzer IVD model from Battlefront Miniatures –  in that it came with two left tracks.  Battlefront did a nice job in rectifying that situation and sent me a brand new model.  I finished that as a DAK Panzer IVD and wrote about it here.  But, I still had most of a Panzer IVD model that I could use for something.  I decided to make it into a wreck  – that would also be a nice addition as a terrain feature.  As I will be running a WaT game at HAVOC in April, so I decided to knock out four more smoke/blast markers to support that as well.  Both of these projects will be covered in this post.

These projects are my February submissions for Azazel’s February Community Painting Challenge, which he supplemented to include terrain.  This week I also started a new job!  So, I wanted to wrap up these projects this weekend.

Panzer IVD Wreck

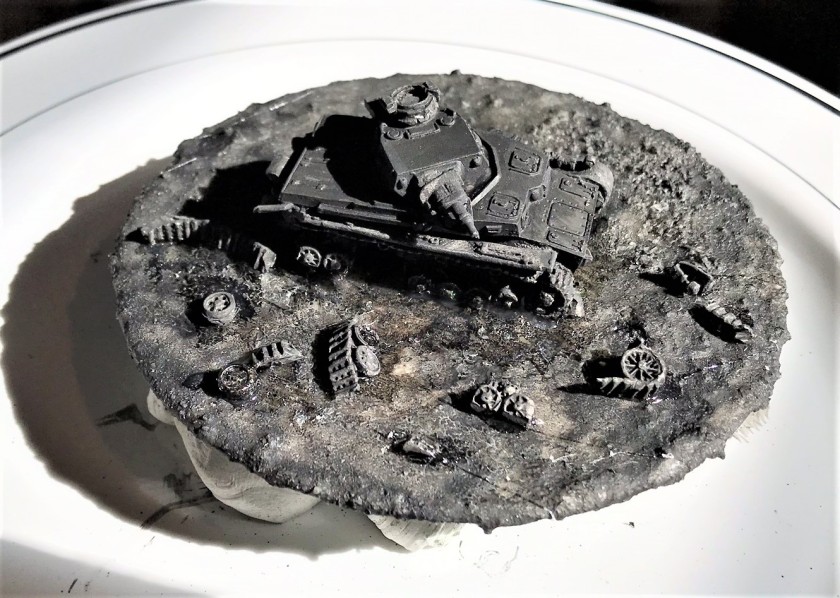
I decided to base the wreck on an old CD that was surfaced with play sand and Elmer’s (PVA) glue.  To cover the hole, I affixed some leftover polystyrene bits.  Then, I used sandpaper to lightly scratch the CD, then applied the glue, then the sand, and let it harden overnight.  I removed the front and rear sprockets from one of the tracks and cut away some road wheels, so as to be able to flip them on the CD and make them available for the right side of the wreck in the correct locations as debris.  I carefully cut away the road wheels and part of the track and some fender, and washed everything to prep for painting.

After all the pieces had dried, I then I assembled the model to look “messed up”.  I put the gun and mantlet on slightly crooked.  The turret and bustle rack were put on a bit akimbo as well.

I took a 1/8″ drill bit and drilled a hole into the hull between the missing road wheels to simulate the impact of a hard shot into the weaker flank of the tank.  In my portrayal, that shot hit ammunition, causing an explosion.  I scattered the resultant debris on one side of the tank to simulate that, affixing everything with E6000 epoxy.  I then mounted the CD onto a disposable plastic plate using poster tack for ease of painting.  I applied a coat of Citadel “Imperium Primer” as the E6000 was a bit rubbery and smooth – and I was worried that it would not hold paint well.  To double up on priming, I then airbrushed on another primer coat – Vallejo “Surface Primer – Black”.

4 Wrecked primed
My initial basing and priming 

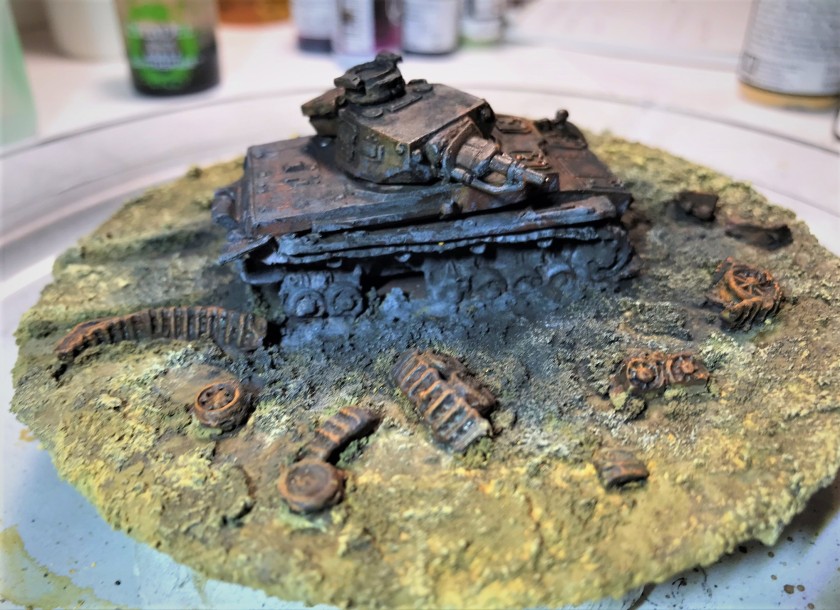
My next thought was to do a bit of the original Panzer IVD paint on the wreck before I changed it into a wreck, as perhaps some of it would survive (I don’t think much eventually did, but I thought, better safe than sorry).  This consisted of the same basic pattern I followed on my previous German tanks.

5 base coat (first)
First some grey…
6 base coat (second)
…and then some more DAK colors.

My concept at this point was to portray the Panzer IVD as having been hit, having caught fire, then after being abandoned, rusting away.  The fire would have destroyed all or most of the original paint on the hull.  Any metal debris would have rusted afterwards in my opinion, so I decided that decals would be a waste here.

7 early rust
Here, I worked on rusting things up with several different rusting products (all listed at the end of the post).

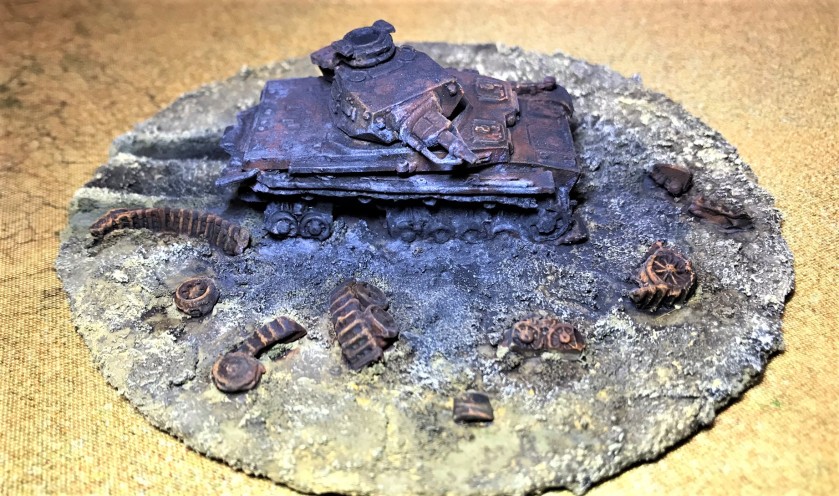
The sand and PVA glue texture was insufficiently granular for the base, so I used Citadel “Armageddon Dunes” to roughen up the landscape.  It also allowed me to make the doomed German tank’s last tracks in the desert at the rear of the vehicle.  I darkened them up with Citadel “Agrax Earthshade”.

8 after Armageddon Dunes on base
After using the Armageddon Dunes texture paint to gain a better surface on the base.

Then I went into using various Vallejo weathering pigments to create soot, smoke, and dust on and around the model.  I especially like the soot!

9 pigments and weathering and rust, impact side
Impact side, after weathering but before varnishing.
10 pigments and weathering and rust, left side
Opposite side of the tank before varnishing.
10 pigments and weathering and rust, top side
Top of the tank before varnishing.

For varnishing, I used two coats.  First, I applied a Vallejo “Satin” varnish with my airbrush.  After that had dried, I applied a light coat of Vallejo Mecha Color “Matt Varnish”.   I did not want to overly dull the tank, but I definitely did not want it too glossy.

12 after varnish, front
After first coat of varnish.

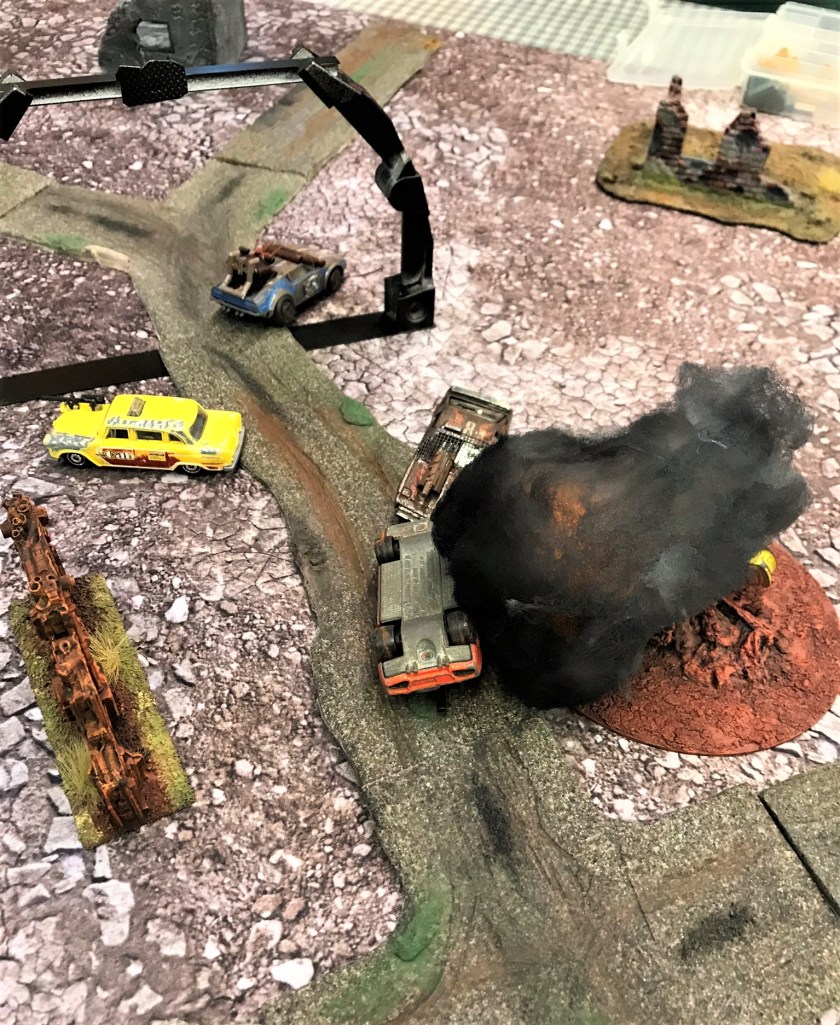
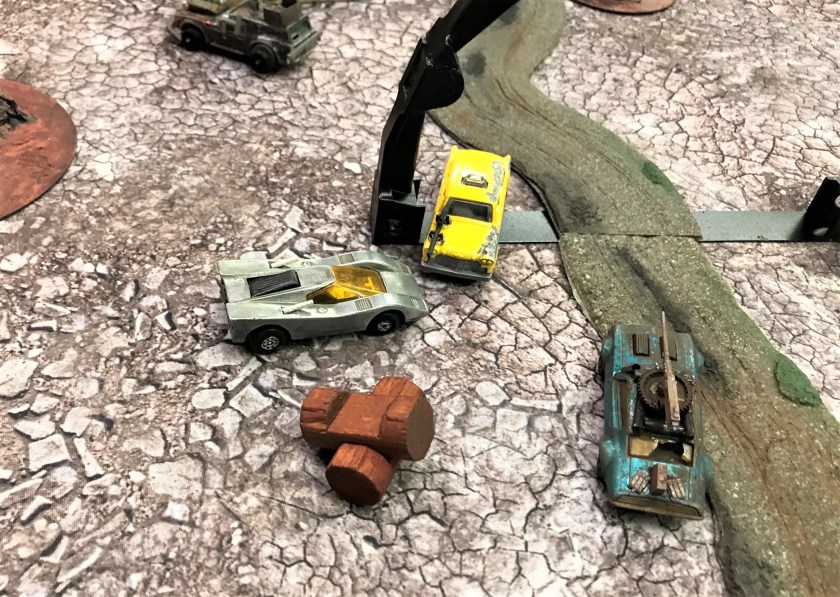
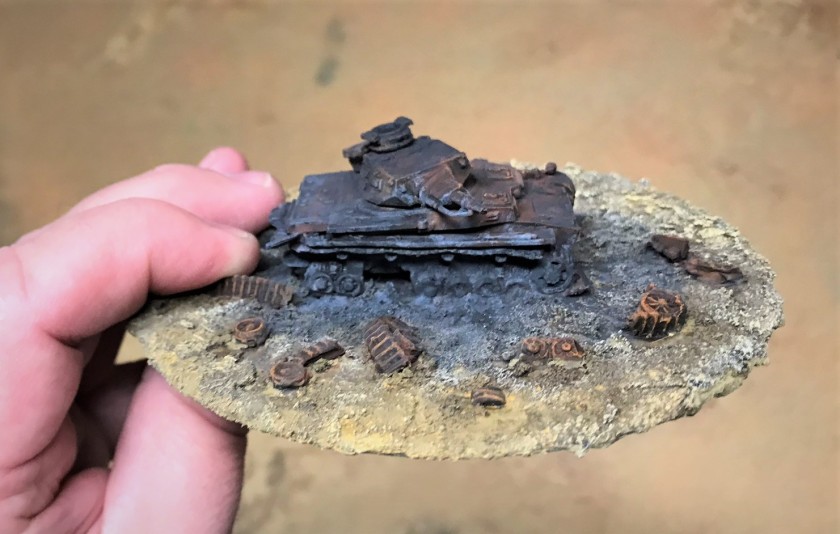
I am reasonably happy with the final results.  Here are some eye-candy shots on my desert game mat – you be the judge!

13 on mat complete, impact side
Completed Panzer IVD wreck model, impact side.
14 on mat complete, rear side
Completed Panzer IVD wreck model, rear side, showing the track marks in the sand before its final moments.
15 on mat complete, left side
Completed Panzer IVD wreck model, left side.
16 on mat complete, impact side
One of my favorite views.
17 that could have been us
An intact Panzer IVD crew drives by the wreck, thinking it could have been them!
18 that could have been us
Let’s be careful Heinz!  We don’t want to end up crispy like that one!
19 holding it
A little different angle – plus my hands for scale.
20 holding it top
Nice view of the top – some of the original paint can be seen here I think.

Smoke/Blast Markers

The next project was making some more (and better) to put on the tabletop when tanks meet their demise – or for any explosions in general.   I took tea lights, and hot glued thin strips of pillow batting to them in a “closed lily” type of shape.

1 unpainted smoke markers
After building the markers, but before painting them.
2 unpainted smoke markers lit up in dark
Lit up with the lights down.

I then painted them black and grey, trying to make them less dark thank my previous attempts.

3 painted smoke markers
Completed and lit in the light.
4 painted smoke markers lit up in dark
Look much better in less light!

Thanks for looking at these – and I hope that perhaps these give you some ideas.  In any case, I hope you enjoyed seeing them and my processes.  Please share any feedback you have in the comments section!

PAINTS, INKS, GLAZES, SHADES, WASHES, PIGMENTS AND FLOCKING USED ON THE PANZER IVD WRECK:

  1. Play sand
  2. Used CD
  3. Elmer’s Glue
  4. Battlefront model #GE040
  5. E6000 epoxy
  6. Gorilla Glue
  7. Testors “Universal Acrylic Thinner”
  8. Citadel “Imperium Primer”
  9. Polystyrene bits
  10. Vallejo “Flow Improver”
  11. Vallejo “Airbrush Thinner”
  12. Vallejo “Surface Primer – Black”
  13. Vallejo Model Air “Base Grey”
  14. Vallejo Model Air “German Green Brown”
  15. Vallejo Model Air “Light”
  16. Vallejo Model Air “German Green Brown”
  17. Vallejo Model Air “Hull Red”
  18. Vallejo Model Air “First Light”
  19. Vallejo Model Air “Brown”
  20. Citadel “Armageddon Dunes” (Texture)
  21. Battlefront “Monty Shade” (shade)
  22. Vallejo Mecha Color “Light Rust Wash” (wash)
  23. Vallejo Mecha Color “Dark Rust Wash” (wash)
  24. Citadel “Agrax Earthshade” (wash)
  25. Vallejo “Dark Sand”
  26. Battlefront “Dry Dust”
  27. Vallejo “Titanium White” (pigment)
  28. Vallejo “Carbon Black” (pigment)
  29. Vallejo “Pigment Binder”
  30. Citadel “Typhus Corrosion”
  31. Citadel “Ryza Rust”
  32. Vallejo “Desert Dust” (pigment)
  33. Vallejo “Dark Yellow Ochre” (pigment)
  34. Vallejo “Light Yellow Ochre” (pigment)
  35. Vallejo Model Air “Satin Varnish”
  36. Vallejo Mecha Varnish “Matt Varnish”
  37. Citadel “Nuln Oil” (wash)

PAINTS, INKS, GLAZES, SHADES, WASHES, PIGMENTS AND FLOCKING USED ON THE SMOKE/BLAST MARKERS:

  1. Tea lights (battery operated)
  2. Pillow batting material
  3. Hot glue from glue gun
  4. Vallejo “Flow Improver”
  5. Vallejo “Airbrush Thinner”
  6. Vallejo “Surface Primer – Black”
  7. Vallejo Model Air “Base Grey”

GASLANDS Game at Mass Pikemen

Last Saturday Jared Burns ran a very fun game of GASLANDS at the February meeting of the Mass Pikemen gaming club. For those of you not familiar with the game, it involves an apocalyptic race/gladiatorial battle using Matchbox cars. The cars are armed with different weapons such as rams, machine guns, and armor, and in the scenario they were racing through three gates with the first car to finish all three as the winning car.

Each of us had two cars. Jared brought his car collection which he had very effectively weathered. Also, Scott Howland brought his cool GASLANDS cars, so we had a nice selection. Jared had also made some very nice dashboards which made play much easier.

1 gaslands feb
The game set up – it was nice as several of us were able to contribute terrain to make a fun tabletop.
2 gaslands feb
Scott Howland made a couple of very cool billboards that were very fun – including this Johnny Cab one from “Total Recall” and…
3 gaslands feb
…this one showing spaceship service to Mars.
4 gaslands feb
These are the two cars that I had in the game. The cab (from Scott) had a ram and a machine gun. The rusty car (from Jared) had a machine gun and a limited ammo mortar.

We all started at gate one, with no firing weapons to be active until we crossed the first gate. Several cars, including my cab, never made it through that first gate. My rusty car did, and turned back to attack Jared’s similarly-armed orange car. I rolled well, and Jared did not, with the result being I destroyed his car. Unfortunately, his ammo sympathetically detonated and both of my cars took damage from that blast.

5 gaslands feb

The first kill – but the ensuing explosion damaged both of my cars.

At the same time, Mike Morgan had been sidelined due to a starting box collision that left one of his cars just getting going. His other car was speeding dangerously towards the stadium wall (the edge of the tabletop), so he was not being engaged. Scott and Jared were both heading to the second gate and taking shots at each other along the way. Scott’s other car was in front of my rusty one, so I shot at it, and the dice were with me again. Boom.

At the top of this shot you see Scott’s (silver car) and Jared’s (blue car) doing a NASCAR run while heading towards the second gate. Mike’s cars are on the far right and far left trying to get back into the fight.
7 gaslands feb
Jared, Mike and Scott ponder their next moves.

Unfortunately, the act of shooting Scott’s car also caused an explosion that wrecked my rusty car, leaving me with only the cab.

8 gaslands feb
My rusty car, a victim of its own murderous aggressiveness!

This left Mike with two cars, and Jared, Scott and I with one, and mine could only ram. I saw them headed for gate two, so I headed there.

9 gaslands feb
My cab goes at the two survivors.

I did damage to Scott’s silver car, causing it to flip and hit the post, and explode. Both my cab and Jared’s blue car were caught in the explosion. This action took all three out of the game, leaving Mike with the only remaining cars and victory!

10 gaslands feb
The mashup that took out three cars.

The game ended and I think we all had a blast (pun unintentional) even though I inadvertently succeeded in destroying my own cars. Thanks to Jared for running a great game.

Our next session is on March 2nd at 2 PM during which we will be playing What a Tanker in North Africa!

Italian Armor for North Africa

I have been really enjoying building armored forces for the tabletop war game What a Tanker©.  This, my latest group, rounds out my Panzer Army Africa forces with Royal Italian Army armor from 1940-1943.  This post will show these tanks and tank destroyers, as well as a German Panzer IVD that was left off from my last group that I previously detailed here.  These are all 15mm (1:100) tanks, which are very small (1-3″). 

My ultimate goal is to have an excellent game that I can run at conventions or club meetings.  I now have that, but will probably add some Marder III’s, M3 Grants/Lees, and M4 Shermans to be complete.  

I will share here both the Italian vehicles and the Panzer IVD – and some of their in progress photos.  Then, you will get a chance to view some eye candy shots!  Because I have been very busy seeking new employment (and it looks good on that front!), I was able to finish the tanks and run a couple of play tests before I could finish this post.  So there will be a few shots of the play tests I have been running with these tanks.  I also share the materials and research used at the end for those interested.  

Royal Italian Army Armor

The vehicles I assembled for the Italians make up about 2/3 of the list of the models in the What a Tanker© rule book.  I already had 5 Italian tanks from Wargame Models in Ohio that are very affordable (but not as nice as those from Battlefront Miniatures).  My current Italian Army consists of 12 vehicles:

M14/41 Tank

This tank is basically the M13/40 with a better engine and slightly better armor.

I used a painting scheme that attempted to match the one example in the Bovington museum.

7 M14-41 after decal
After applying decal and varnish, but before adding weathering powders.
8 M14-41 with photo of actual tank
The completed M14/41 tank model next to one in the book.

Semovente 47/32

In the WaT rules, this vehicle is interesting.  It is small (tougher to hit), low profile (tougher to acquire), fast (can move every turn), and a tank destroyer (can aim easier).  It also is, like the Panzerjager I, open-topped, so never buttoned (and more vulnerable).  Each blister had two vehicles, and I bought two at the 50% off sale!

3 Semovente 47-32 primed and base coated
The tiny tank destroyers primed and base coated.

Semovente 75-18

I had two of these, with one being a command model (carro comando), that had a range finder (called a goniometer).  I used a slightly different camouflage scheme with these and love the triangle vehicle marking decals that these got.  

6 Semovente 75-18 rear view after camo and decals
Hey, matching licence plates!
7 Semovente 75-18 with image
I used this color scheme, and went with the decals anyways.

Panzer IVD

My previous Panzer IVD did not make the last project group as it came with two left tracks.  Battlefront sent me a replacement, and I plan to use the defective one soon as a wreck project.

Italian Repainting

For my Wargame Model in Ohio tanks, I decided to give them a makeover with paint and decals so that they were less different than the newer Italian vehicles.  They are still not perfect, but I decided to stick with what I have done with them now.

2 Wargames Models of Ohio repainted
My repaint of the other Italians

I hope you liked the in progress stuff above – and now…it’s Eye Candy time!

Eye Candy

1 M14-41 front shot
Front view of M14/41.
2 M14-41 rear shot
Left rear view of M14/41
3 M14-41 side shot
Right side view of M14/41 on the road
4 Semovente 47-32 convoy
Little Semovente 47/32’s in a convoy
5 Semovente 47-32 front shot
Front left view of Semovente 47/32
6 Semovente 47-32 rear shot
Rear right view of Semovente 47/32
7 Semovente 75-18 side shot
Semovente 75/18 right side view.
8 Semovente 75-18 right side shot
Left front view of Semovente 75/85
9 Semovente 75-18 rear shot
Rear view of the Semovente 75/18 tank destroyer
10 Semovente 75-18 Carro commando rear shot
In comparison, here is the Semovente 75/18 Carro Comando version from the back
11 Semovente 75-18 Carro commando right side shot
Semovente 75/18 right side
12 Semovente 75-18 Carro commando left side shot
Semovente Carro Comando  75/18 right side.  Note the goniometer on the top in front of the crewman.
14 Semovente 75-18s
The two versions of the Semovente 75/18’s together
15 Pz IVD right side
Panzer IVD left side
16 Pz IVD left side
Panzer IVD left side
17 Pz IVD rear side
Rear view of the Panzer IVD
19 All Italian AFV's
Italian Group shot!

Lastly, I am thankful to Chris Rett, Ryan MacRae, Frank Ramsay, and Mike Morgan for helping me to start to play test the scenario and rules tweaks that I will use to make this work at HAVOC in April for up to 10-12 players.  Here’s a few shots!

1 Great Stories
At Great Stories in Uxbridge, MA – Chris, Ryan, and Frank have fun.  The Brits made a comeback and won here under Chris’ command.
3 Mike Morgan
Mike Morgan maneuvers his Brits to a narrow victory at my house.
3 Kill Rings
One of my innovations – Kill Ring Cards!

Thanks for looking – and I hope that you found this post interesting and fun.  As I add more tanks/tank destroyers, I will share them.  I also hope to add better pics from future games.

Please let me know your thoughts and feedback – as always – in the comments section!

PAINTS, INKS, GLAZES, SHADES, WASHES, PIGMENTS AND FLOCKING USED ON THIS TANK GROUP:

  1. Vallejo “Flow Improver”
  2. Vallejo “Airbrush Thinner”
  3. Vallejo “Surface Primer – Black”
  4. Citadel “Imperium Primer”
  5. Battlefront “German Camo Orange Ochre”
  6. Testors “Universal Acrylic Thinner”
  7. Vallejo Model Air “Base Grey”
  8. Army Painter Quickshade “Mid Brown” (wash)
  9. Battlefront “Dry Dust”
  10. Vallejo Model Air “German Green Brown”
  11. Battlefront “Monty Shade” (shade)
  12. Army Painter Quickshade “Strong Tone” (wash)
  13. Battlefront “Army Green”
  14. Battlefront “Dark Gunmetal”
  15. Battlefront “Panzer Gray”
  16. Vallejo “Neutral Grey”
  17. Vallejo Model Air “Green Brown”
  18. Vallejo Model Air “Light”
  19. Vallejo Model Air “Cam. Grey Green”
  20. Battlefront “Black”
  21. Battlefront “Battledress Brown”
  22. Vallejo Mecha Color “Light Rust Wash” (wash)
  23. DecoArt “White Pearl”
  24. Army Painter Quickshade “Light Tone” (wash)
  25. Battlefront “European Skin”
  26. Battlefront “Skin Shade” (shade)
  27. Vallejo “Dark Flesh”
  28. Vallejo “Dark Prussian Blue”
  29. Vallejo “Dark Yellow Ochre” (pigment)
  30. Vallejo “Light Slate Grey” (pigment)
  31. Vallejo “Light Sienna” (pigment)
  32. Vallejo “Desert Dust” (pigment)
  33. Citadel “Nuln Oil” (wash)
  34. Gorilla Glue
  35. Vallejo Mecha Varnish “Gloss Varnish”
  36. Microscale Micro-Set
  37. Microscale Micro-Sol
  38. Microscale Liquid Decal Film
  39. 1/8″ rare earth neodymium magnets
  40. Appropriate decals from Battlefront
  41. Vallejo Mecha Varnish “Matt Varnish”
  42. Aleene’s poster tack
  43. Sponges

Thanks for looking and for sharing your feedback!

ONCE MORE – ON MY RESEARCH MATERIALS

As for research materials, I used the same ones as I cited before – but for completeness here they are in case you are interested (you can find them on Amazon):

  • One by Jean Restayn:WWII Tank Encyclopaedia, 1939-45
  • One by the Smithsonian/DK: Tank: The Definitive Visual History of Armored Vehicles
  • One by Michael Green:Axis Armoured Fighting Vehicles of the Second World War (Images of War)
  • One by Robert Jackson:Tanks and Armored Fighting Vehicles Visual Encyclopedia

I would again easily recommend all of these books as really good resources for gamers and modelers.

Home of the Grumpy Gnome

Tinkering with Artwork and Ideas

Steve's Paint Brush

Grimdark model making and mini painting

Wargamesculptors Blog

Life, Golf, Miniatures, & Other Distractions

Dead Dick's Tavern and Temporary Lodging

Life, Golf, Miniatures, & Other Distractions

Guru PIGS Blog

Guru's thoughts on wargaming, life, and the universe!

Wisely lead... without a head!

History, Miniatures and Wargaming

Kuribo's Painting

Fallout, MESBG, and Hellboy Painting, Terrain, Dioramas, and Battle Reports

Don't Give Greg Ideas

Seriously, just don't

War Across the Ages, and other dark horrors

A discussion of miniatures collecting, painting and gaming.

Classic Warhammer 40K

Painting diary focused on Warhammer 40K 2nd ed., 5th ed. WHFB, related GW games, and miscellaneous whimsy

Colonel Mustard

WW2 Modelling in 1/72 Scale

Bogenwald

Random painting and terrain making.

Pat's 1:72 Military Diorama's

Scale diorama tips and ideas

Arcade Dreams

Building the Arcade Dream

P.B.Eye-Candy

Phil's 20th century wargame pages

SP's Projects Blog

A futile fight against entropy or 'Every man should have a hobby'? Either way it is a blog on tabletop wargames, board games and megagames

30mmdave

Wargaming Plausible reality?

Faith&Steel

dave's gaming adventures: faithandsteel.wordpress.com

The Imperfect Modeller

Miniature Figure Painting and Diorama Modelling

Double Down Dice

Painting miniatures and rolling dice!

Just Needs Varnish!

My ongoing wargames projects!

miniaturepopcorns

Sculpting some worlds

despertaferres

Wargaming with the ability of a dull nine year old

Dawn of the Lead

Miniature wargaming and the occasional zombie

Rantings from under the Wargames table

Wargames, Figures, Sculpting and Converting Miniatures

Simple as WaR

Miniatures & Terrains

Buck's Blog

Life, Golf, Miniatures, & Other Distractions

IRO aka Imperial Rebel Ork

- I model - therefore I am -

Azazel's Bitz Box.

Painting, Modelling, Miniatures, 1:6, Games... Whatever else I find interesting.

diggingforvictoryblog

Smallholding and Wargaming.......not always at the same time!

Shamutantis

Nørdblog numero uno

Harry Heckel

Writer/Game Designer

The Lost and the Damned

Fantasy, sci-fi and historical miniature gaming

sho3box

Toy soldier wargaming stuff.

L'ANSPESSADE

L"histoire militaire à lire, à voir, à jouer et à réinventer