Aztec Raid – Mass Pikemen Gaming Session June 5, 2021

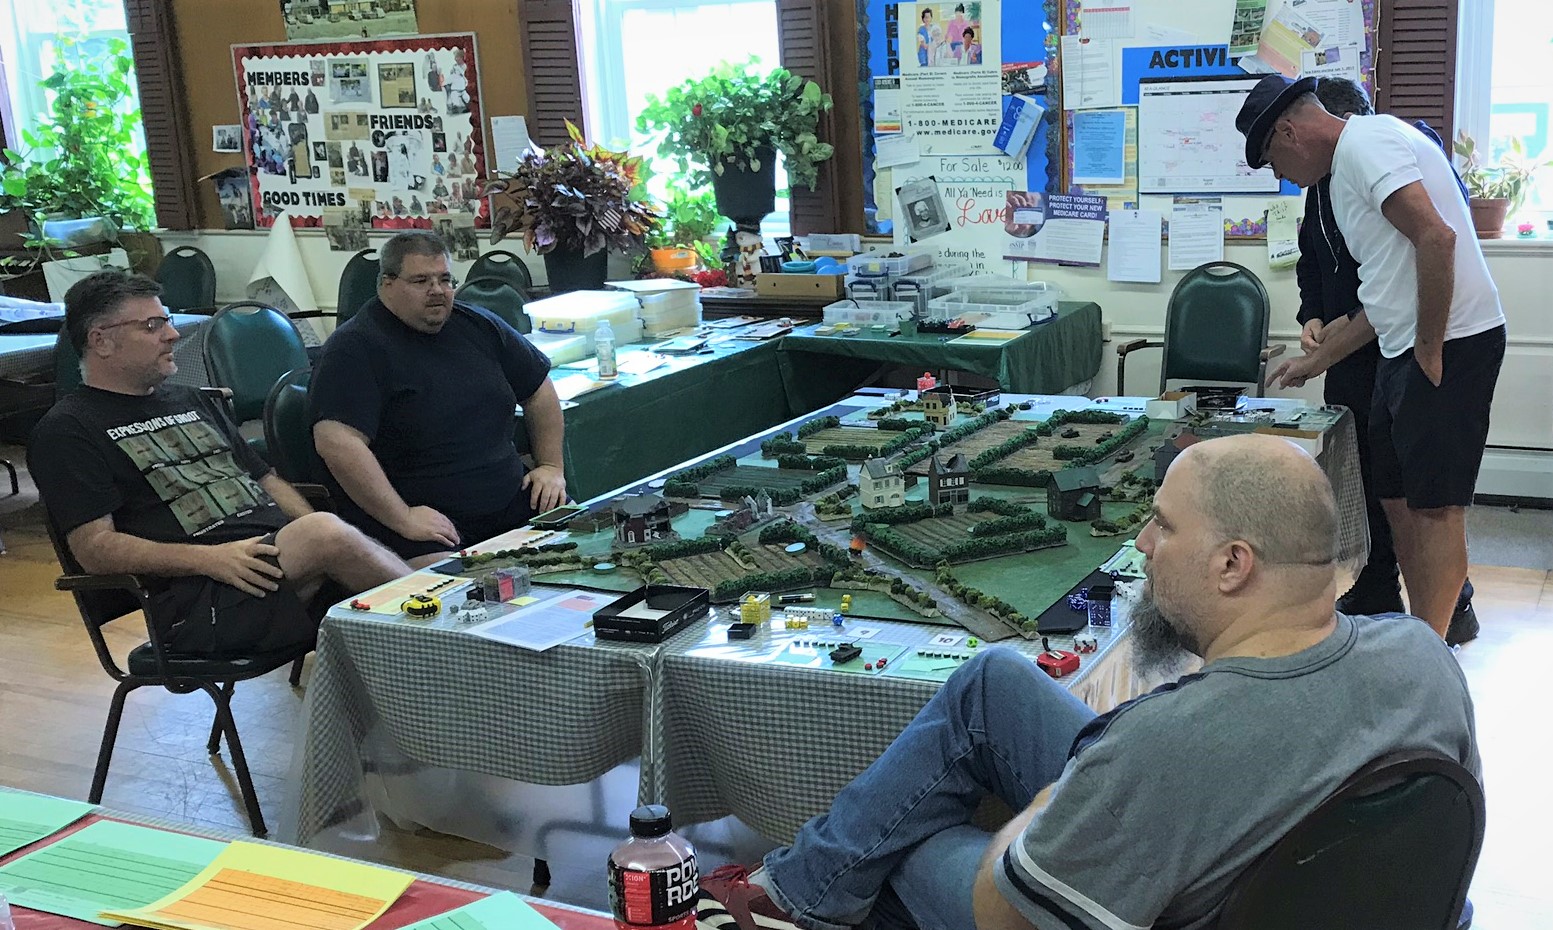
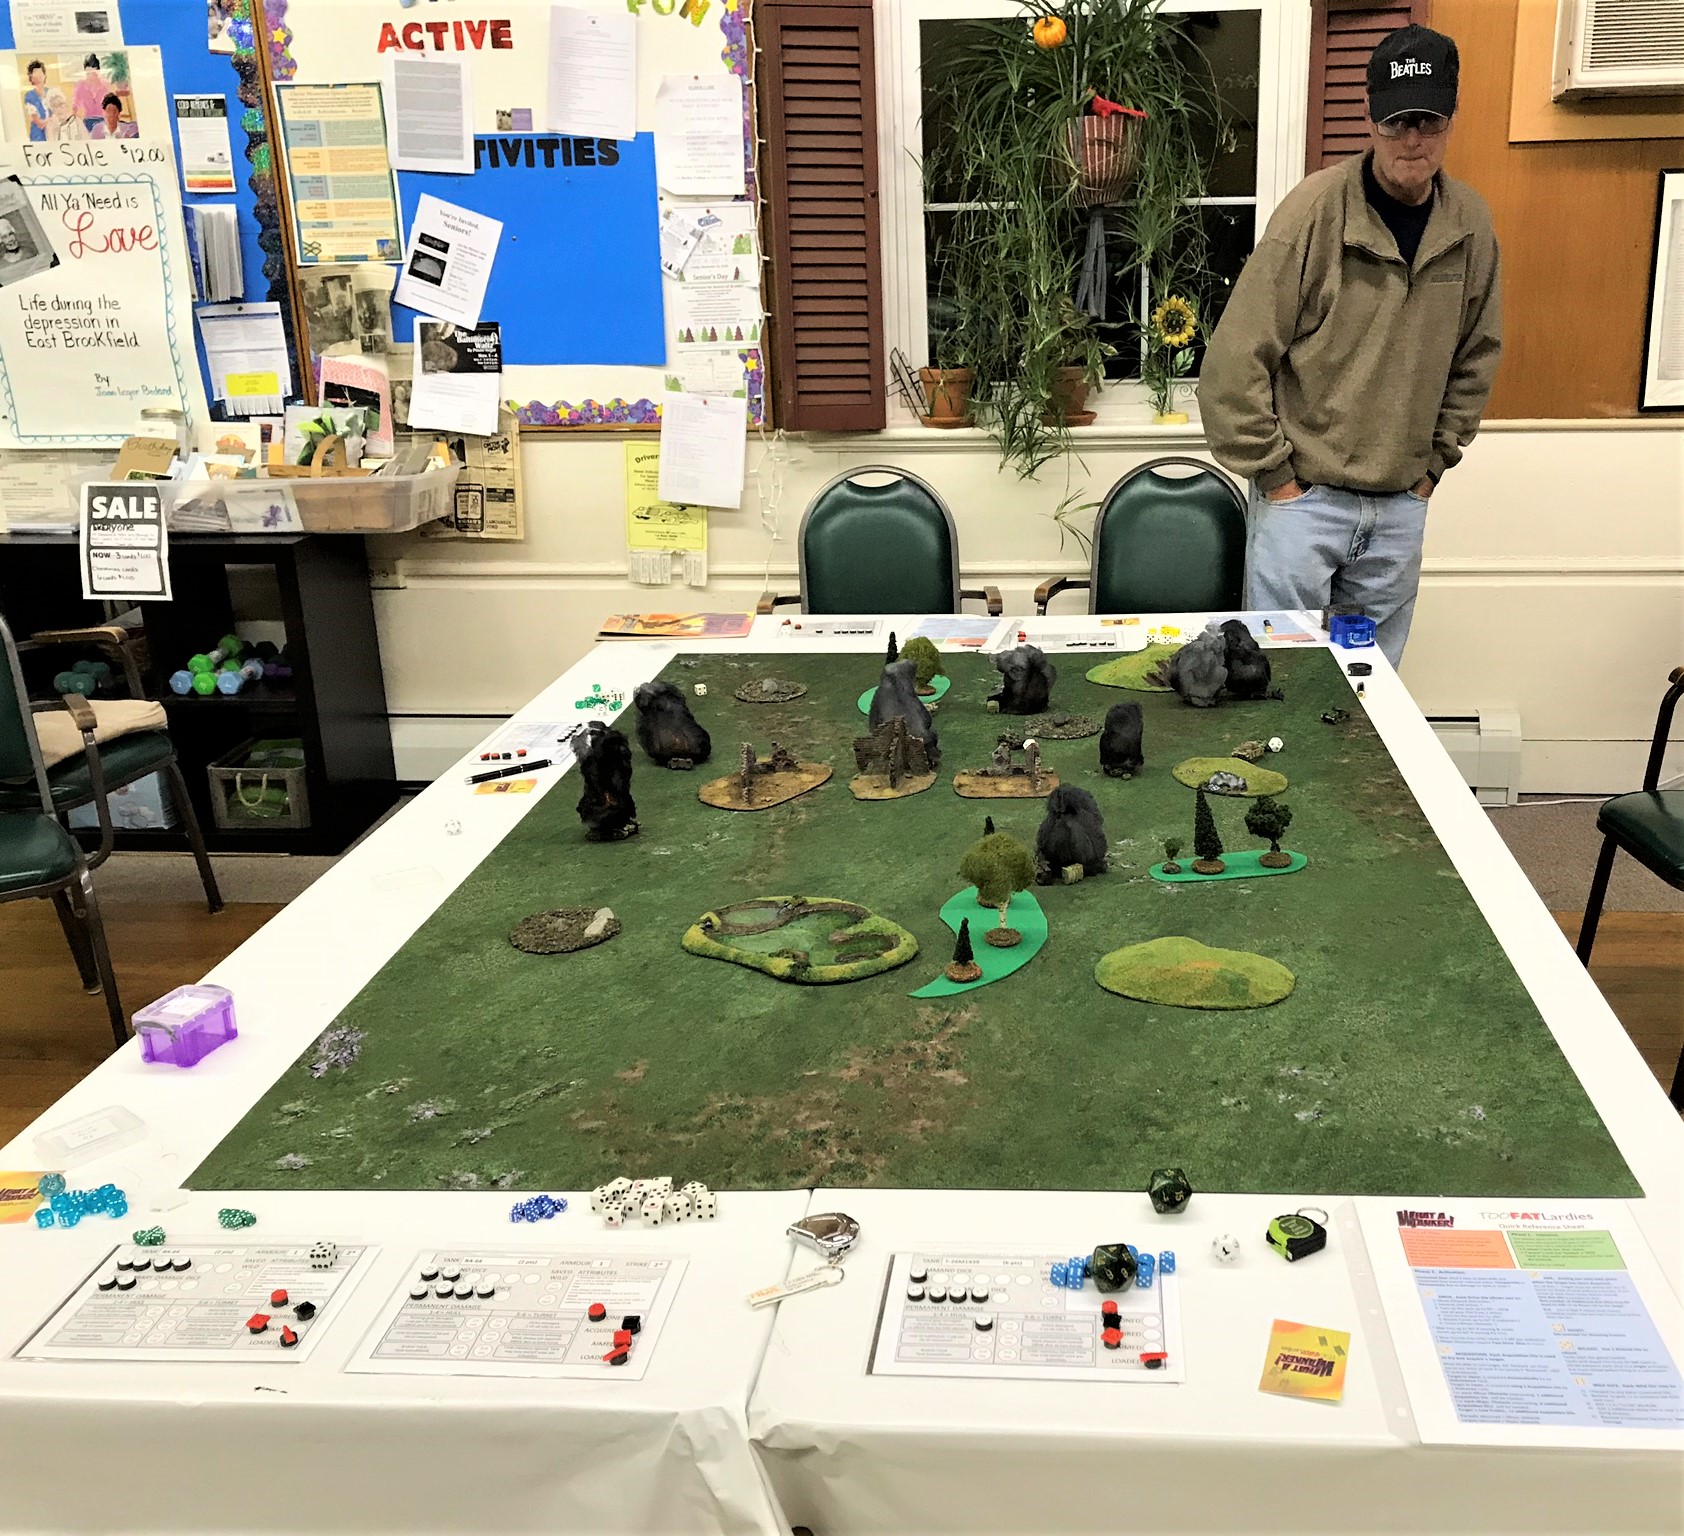
The Mass Pikemen returned to tabletop wargaming with live face-to-face interactions on June 5th! We played a game of Feudal Patrol in Mesoamerica (using my Civilizations Collide supplement. The game scenario was as follows:

Surprise Raid on Outpost

A Tlaxcalan village is being raided by the Aztecs, seeking to take wealth, food, and prisoners.  The Aztecs know the majority of the Tlaxcalan troops are with the Conquistadores elsewhere, and expect an easy task.  Unbeknownst to the Aztecs, there are some Spanish troops at this town who will help to defend it.
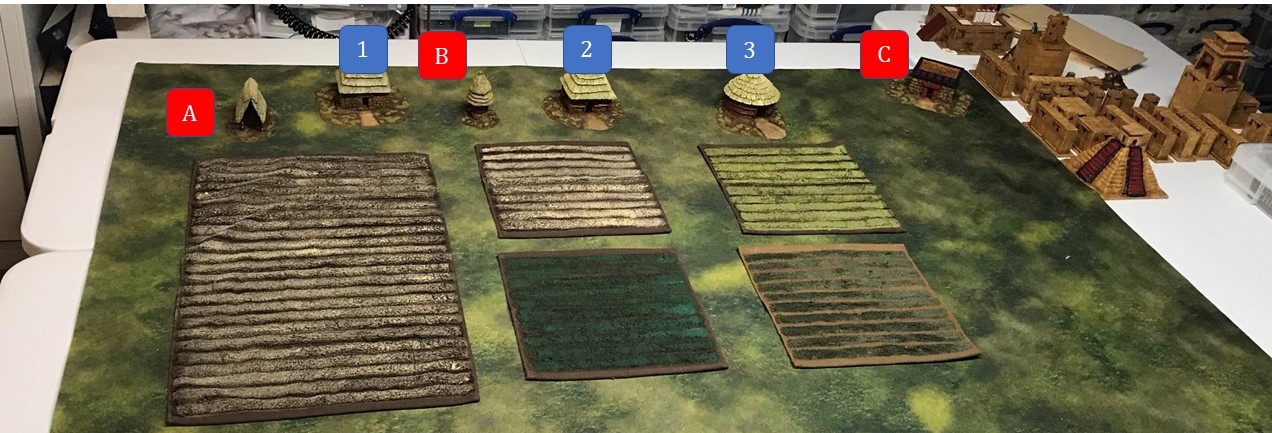
The battlefield.

Objectives:

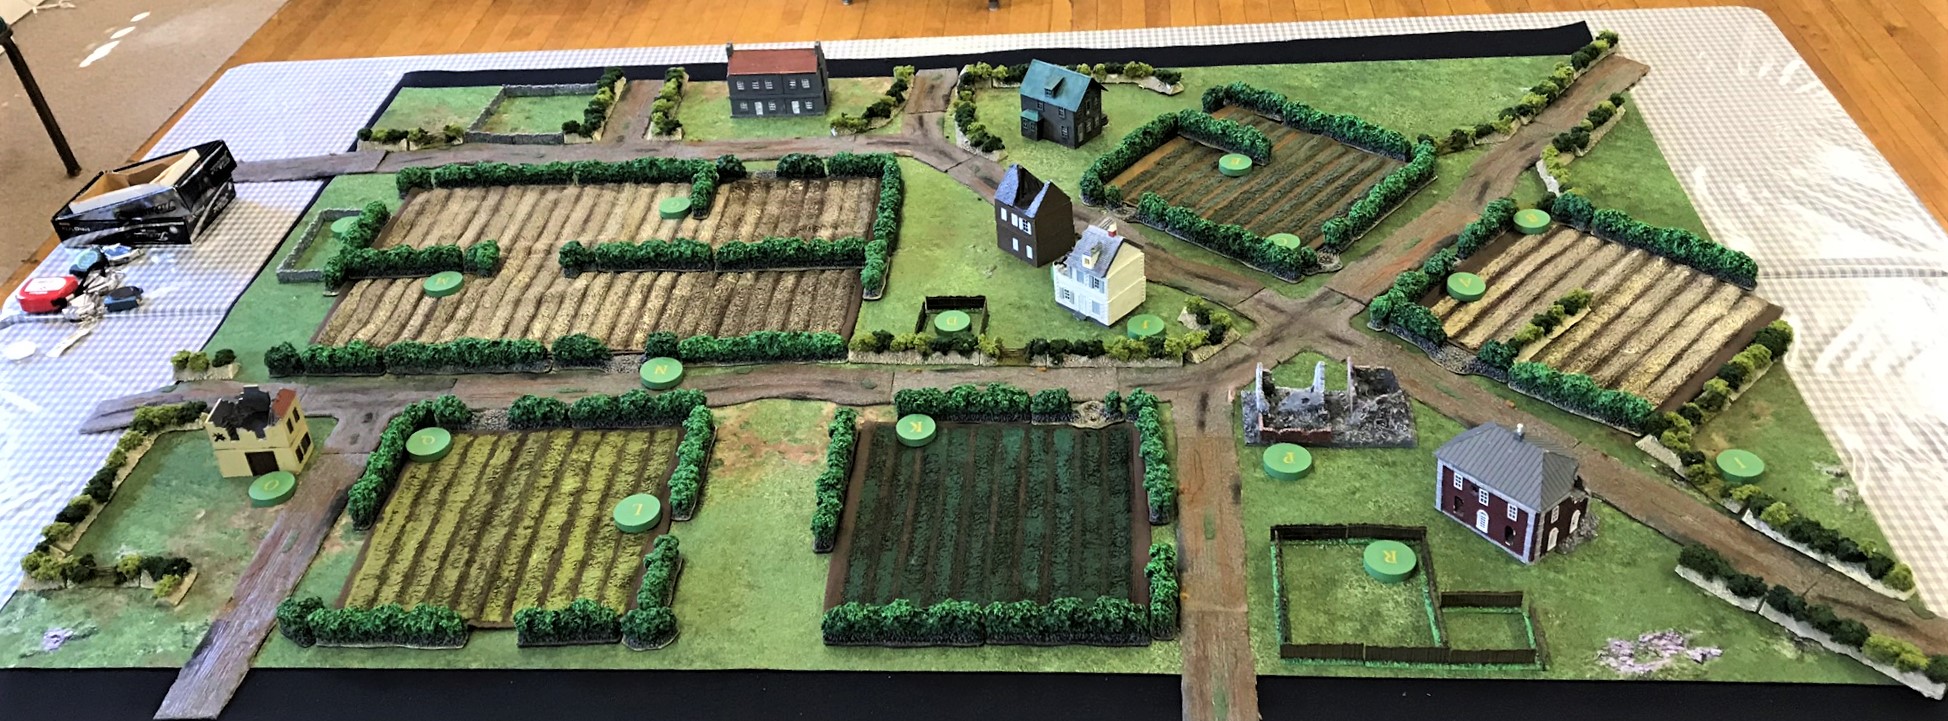
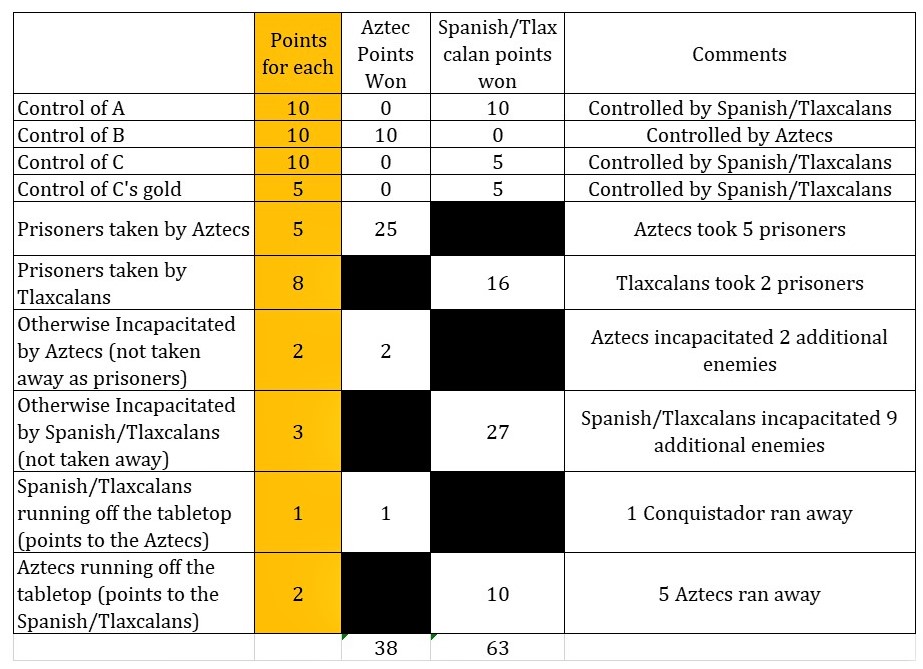
  • A: a maize storage structure – 10 points to either side for control
  • B: Cuezcomatl Granary Structure – 10 points to either side for control
  • C: Tlaxcalan Noble’s House – 10 points to either side for control, 5 more for securing the gold inside and having possession of it.
  • Additionally, the attacking Aztecs gain 5 points for each prisoner taken, 2 points for each enemy otherwise incapacitated, and 1 point for any enemy that runs off the tabletop.  The defenders gain 8 points for each prisoner taken by Tlaxcalans, and 3 points for each enemy otherwise incapacitated, and 2 points for any enemy that run off the tabletop.

Deployment and special rules:

Aztecs: 

  • All Aztecs troops deploy anywhere on the south side of the tabletop 6” from the long end of the mat.
  • The Aztec Warband Leader controls two Warrior Priests

Conquistadores and Tlaxcalans: 

  • The Conquistador leader (a Warband Leader) deploys from C.
  • Each of the three Spanish/Tlaxcalan elements deploy in 1,2, and 3 and are hidden from the Aztecs but predetermined before the game start.  This means that some will be out of command and cannot swap dice at the beginning of the game (24” command radius). At start, they can be outside of their huts.
  • Tlaxcalan element cannot swap dice, and cannot be considered out of command radius.
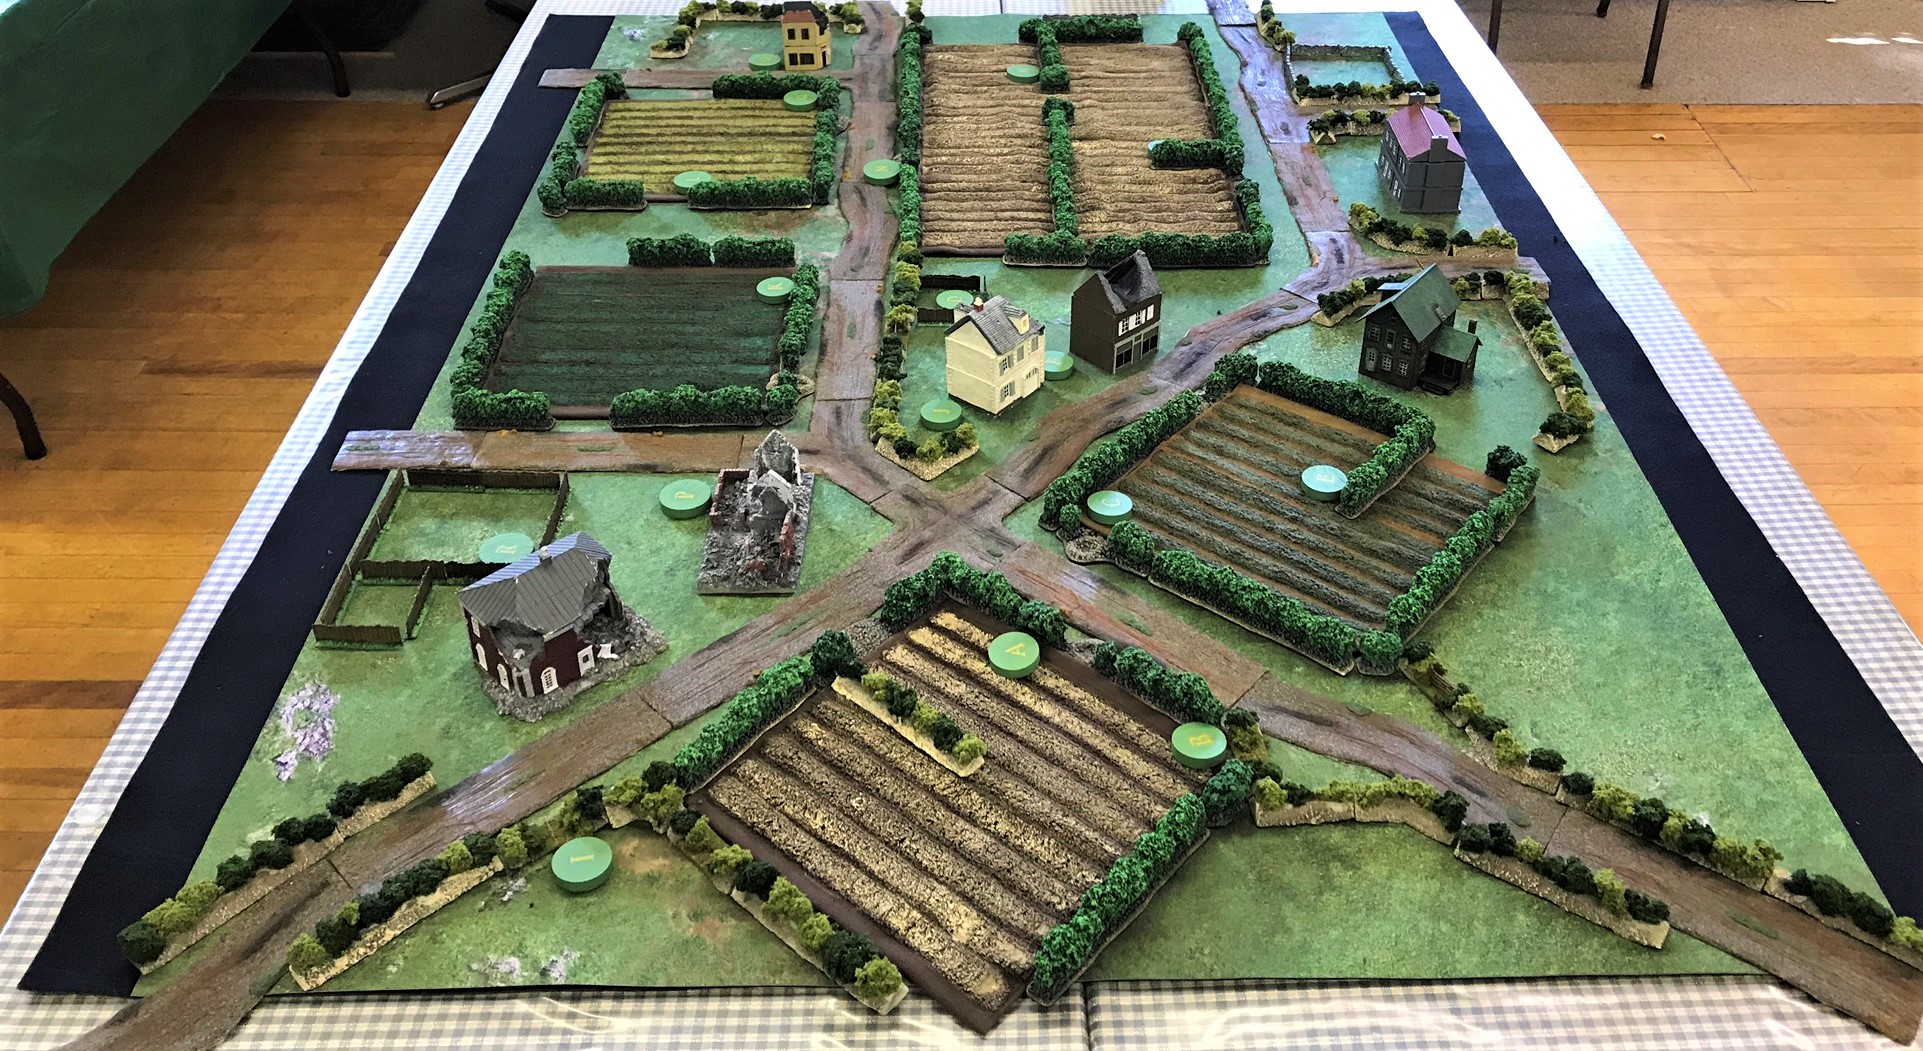
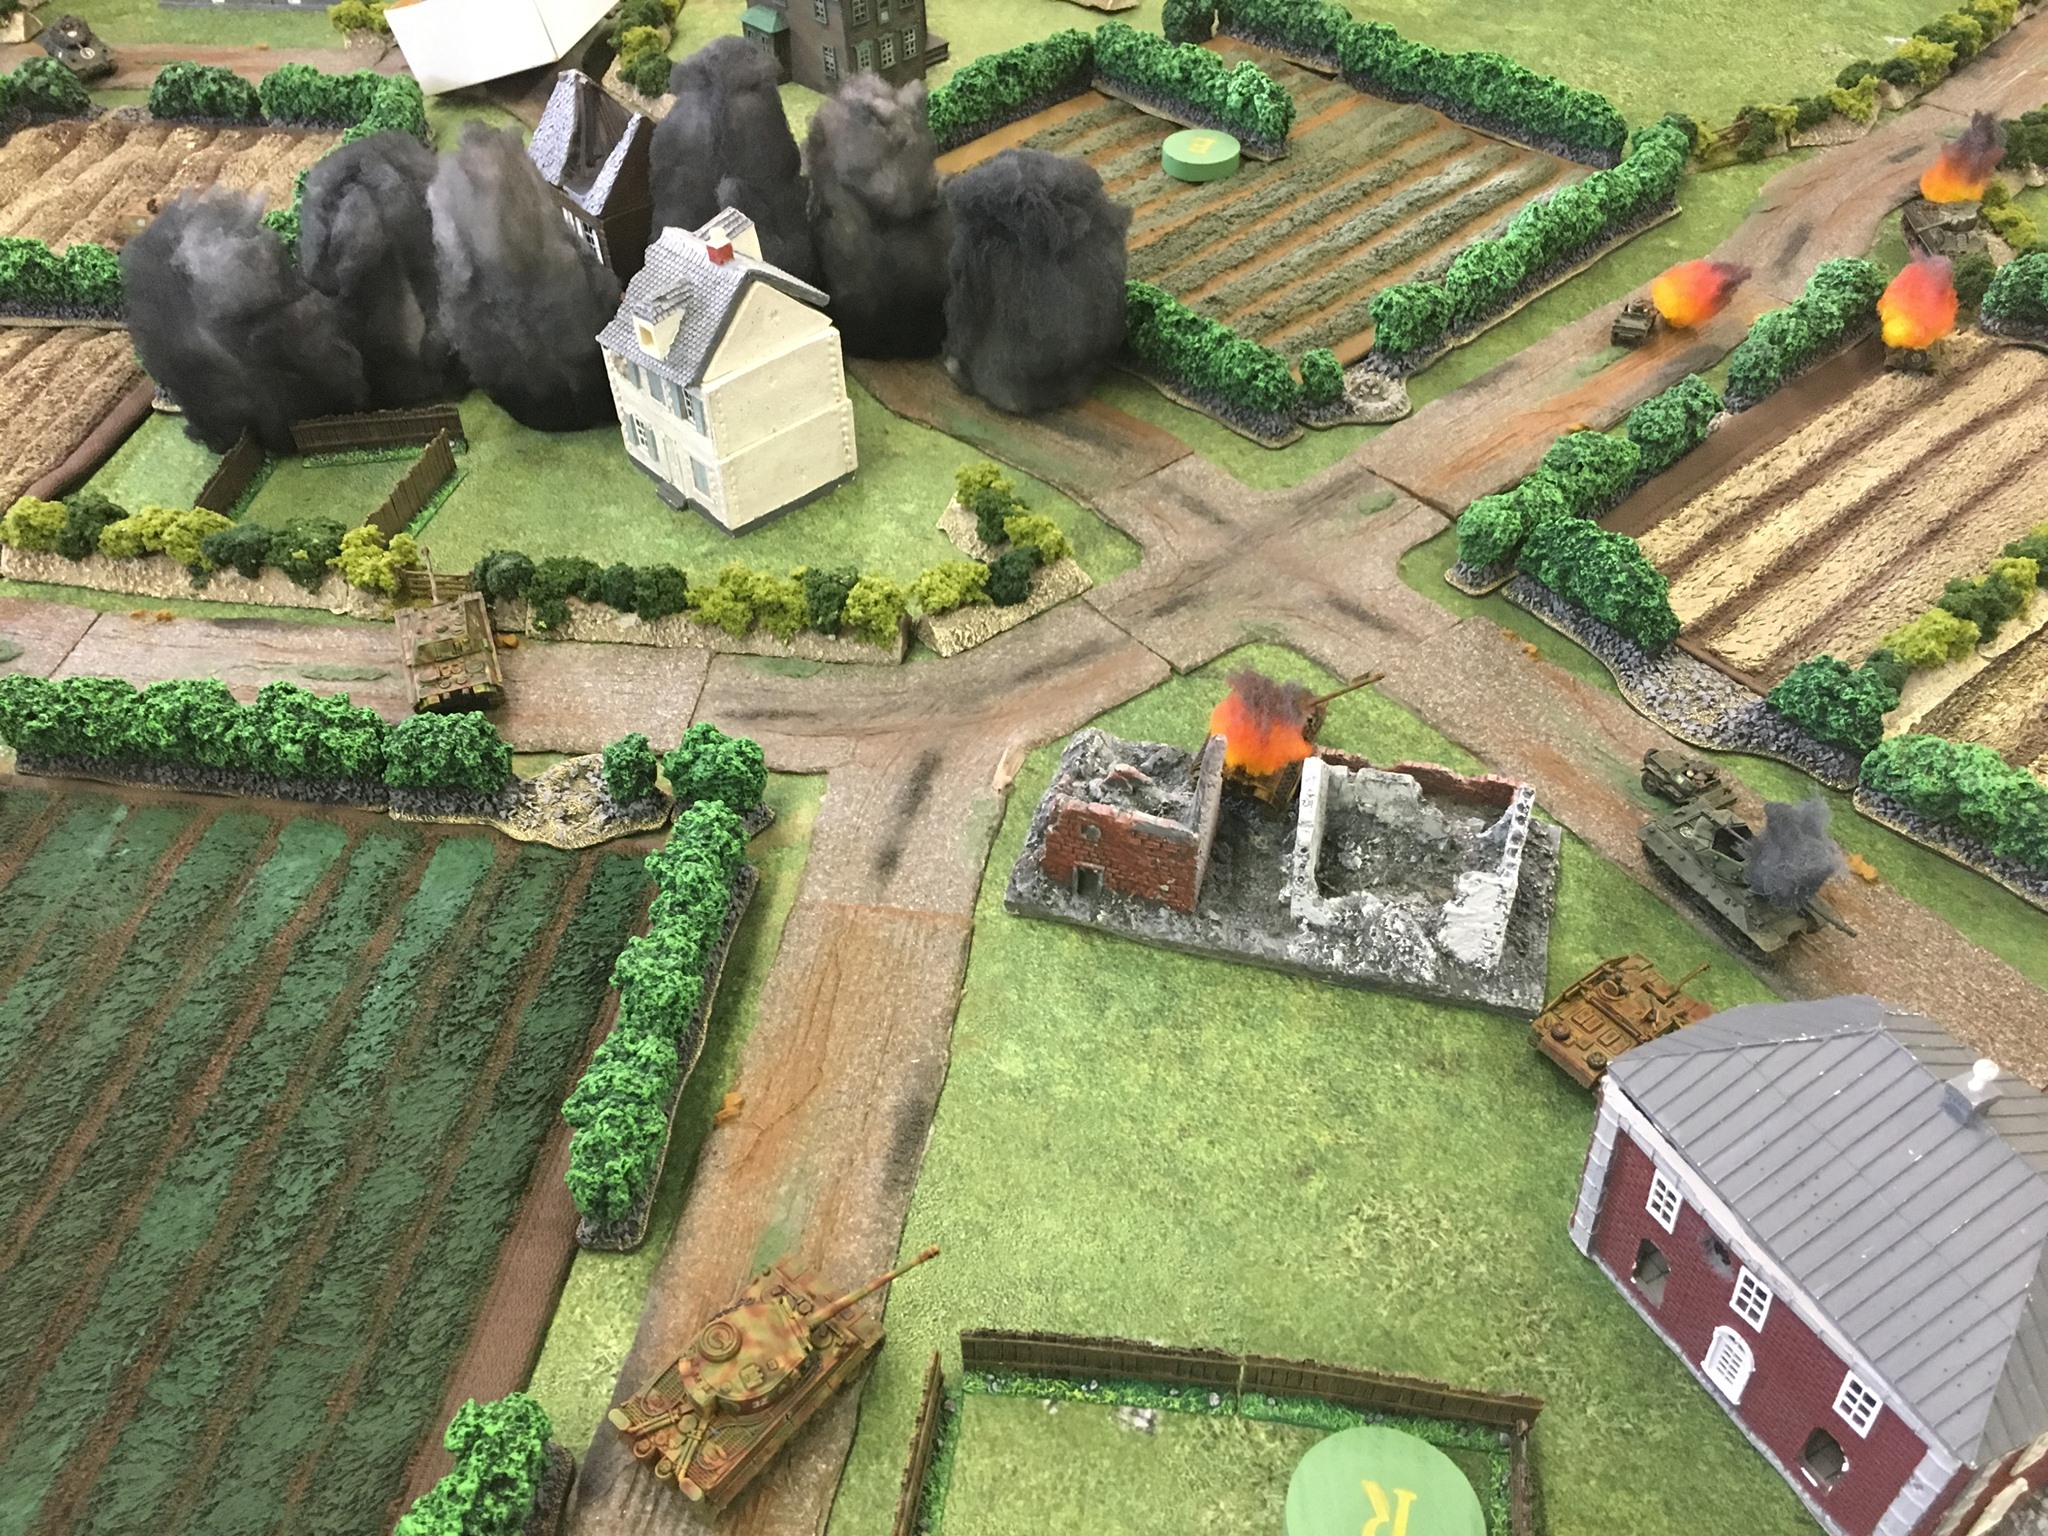
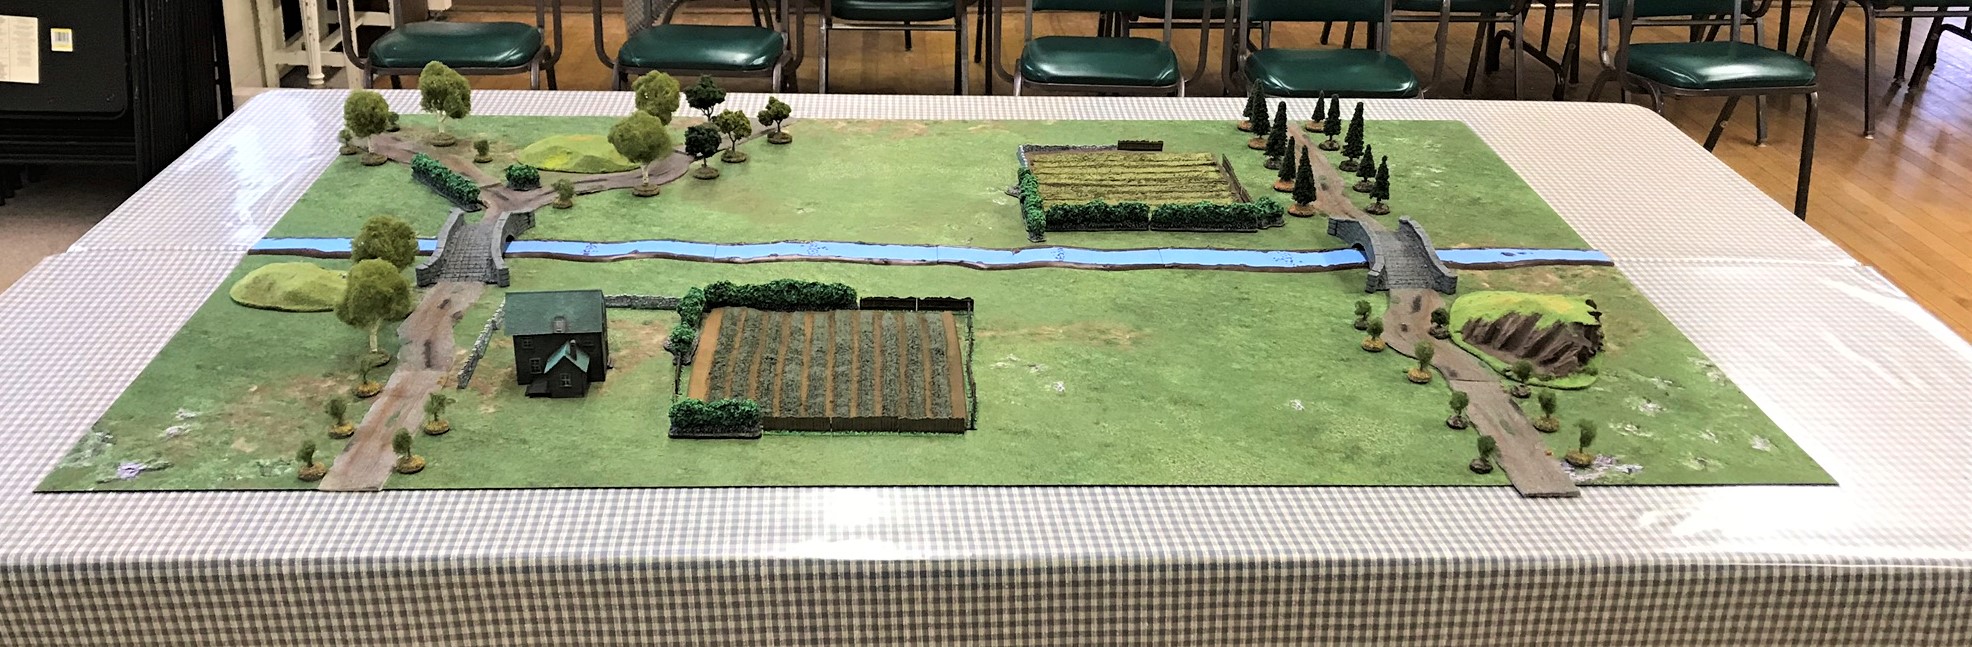
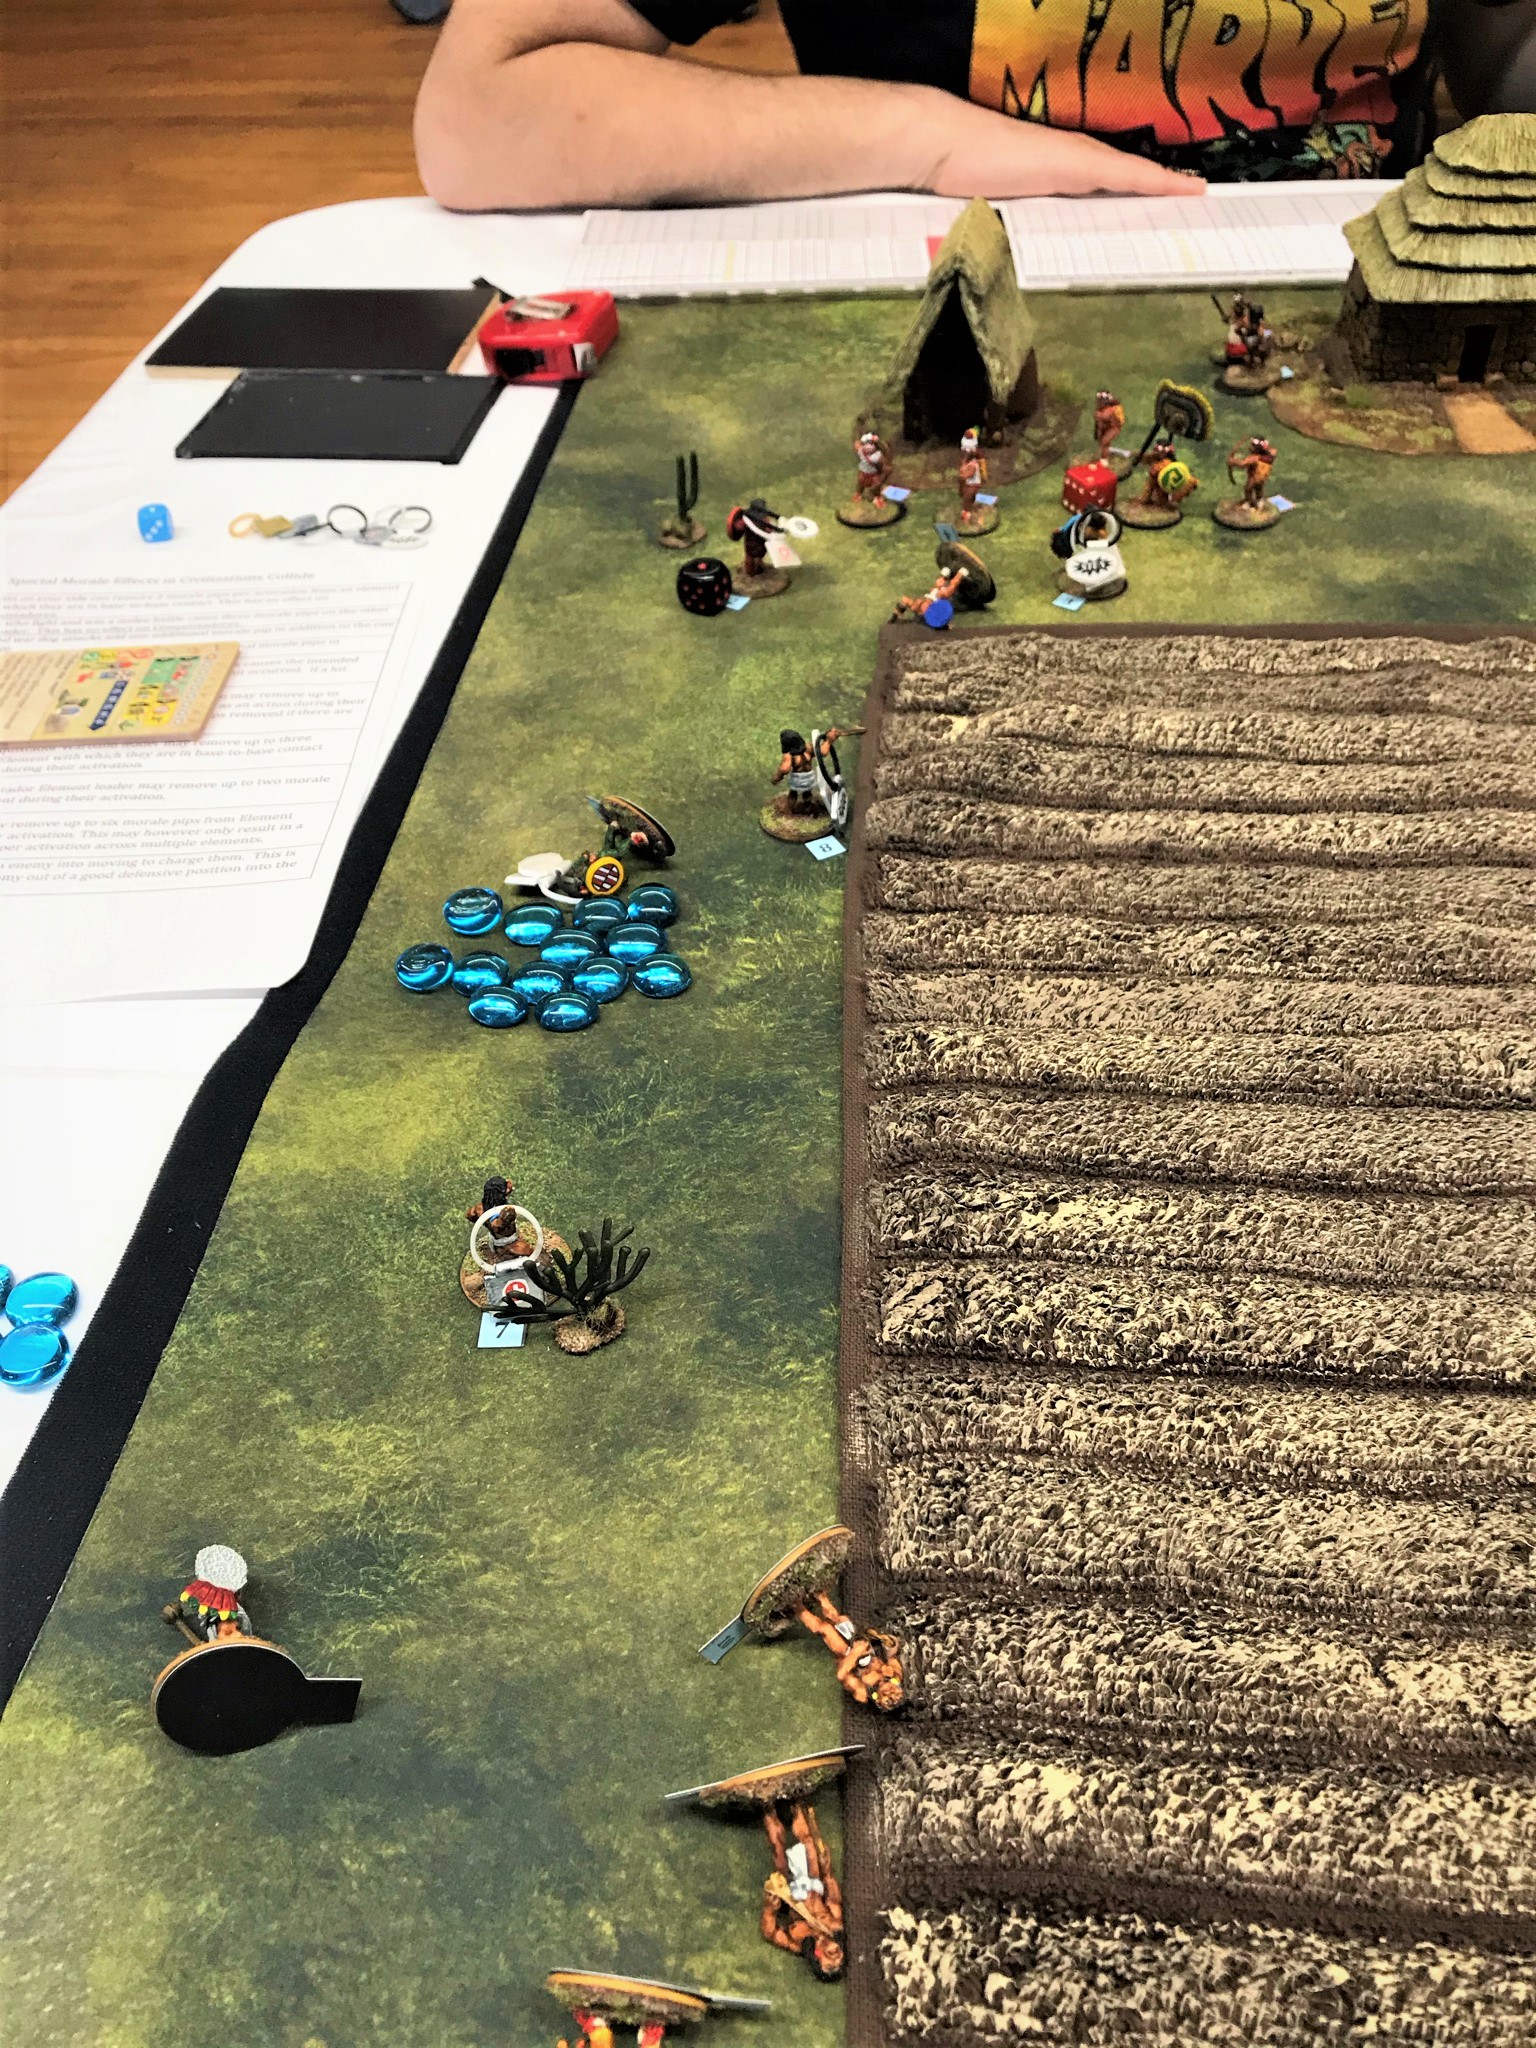
The map:

  • The fields are muddy and movement rate through them is at half-speed.

In this game, an element is 4-11 figures depending on type, and warbands are made up of 2-5 elements.

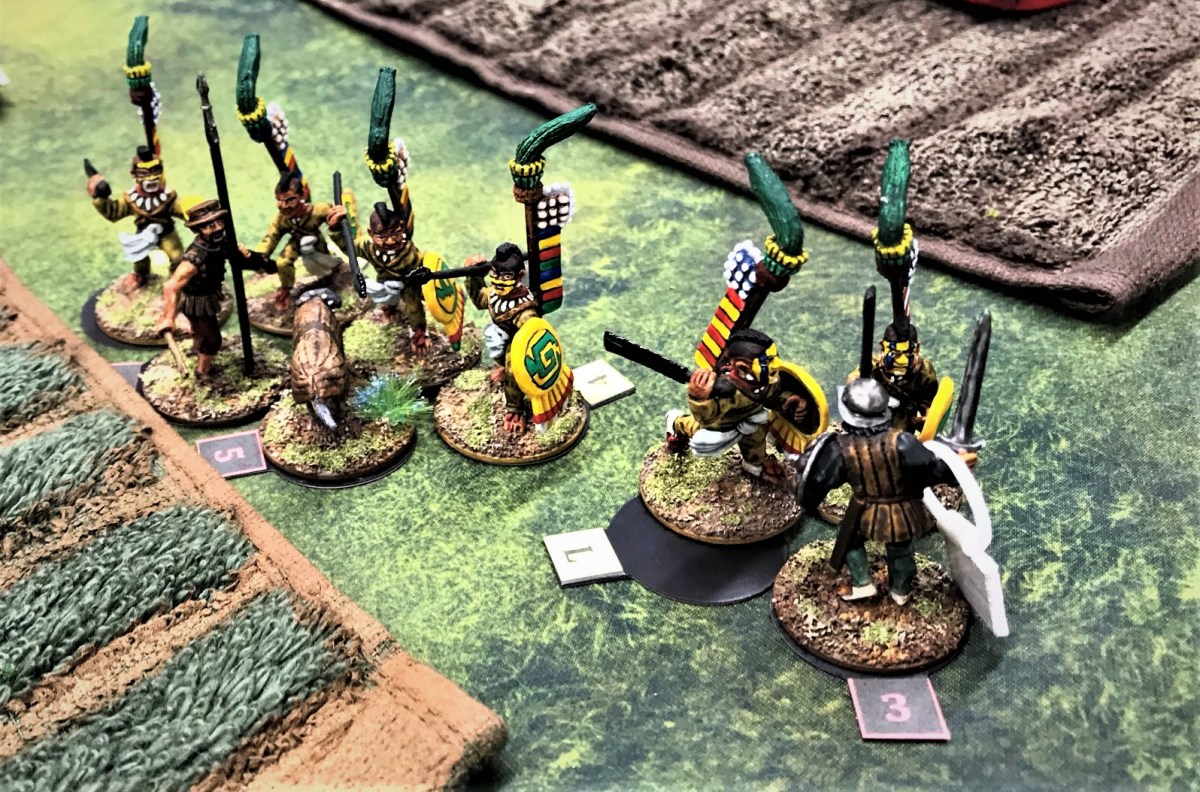
The Aztecs had an overall commander with his conch blower as a signaler. Under him was one warband leader commanding two “twinned” 11-figure veteran/novice elements, an elite 6 figure cuahchic (“Shorn Ones”) element, an elite 5-figure Eagle Warrior element, and two warrior priests.

The Spanish had an overall warband leader commanding an elite element of 5 figures and an elite element of 5 figures plus a war dog. The Tlaxcalans – who were separate but allied – had an elite warrior leader with 4 veteran bowmen.

The overall troop points were 54.75 for the Aztecs and 36.5 for the defending Spanish/Tlaxcalans. The fields were slightly moved for the actual game. Of note, the command radius for a warband leader is 24″ – so the Conquistadores have two command and control challenges. First, they start with one of their elements starting the game over 24″ away from the leader making them “pinned” – meaning they only get to activate half as much as normal until they can be made “unpinned” (not an easy task). Second, the Tlaxcalans are independent actors – meaning that the Spanish have limited command and control of them – but they are not limited by command radius restrictions either.

The Tlaxcalans ended up starting at 1, with the other two Conquistador elements at 2 and 3. The Conquistador leader was at C. The Aztecs deployed their elements (from the Aztec left to right) as follows: veteran/novice twinned element, cuahchic elite element, elite Eagle Warrior Element, and the other veteran/novice twinned element.

Scott looks over the tabletop. He would command the Tlaxcalans.
Glenn moves up his twinned veteran/novice element while his ally Chris watches…
…and promptly takes fire from a Spanish arquebus and a crossbow! The blue glass beads indicate morale checks that the Aztecs had to take and did pass here.

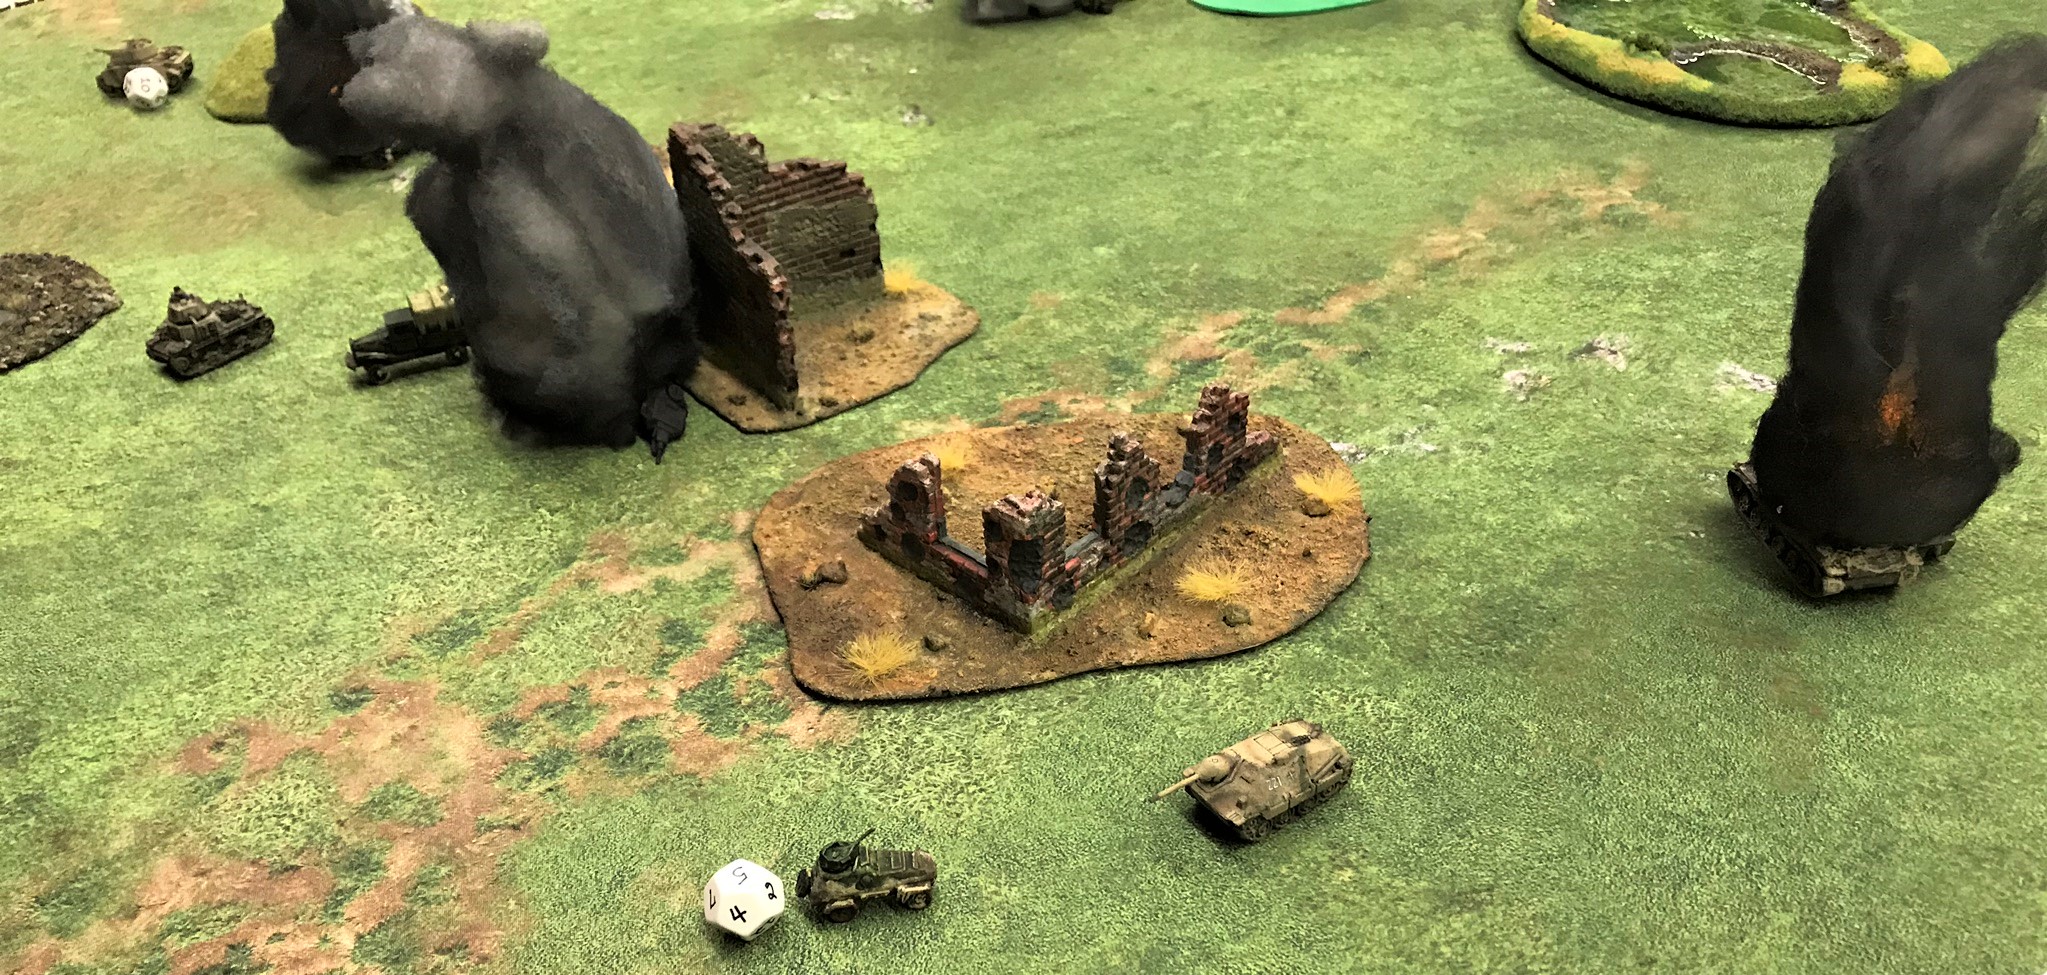
On the Aztec left, Chris moved up his veteran/novice twinned element to take on Scott’s Tlaxcalan bowmen. Historically, the Tlaxcalans were superior bowmen. Chris had to cross a lot of open ground, and the Tlaxcalans dispatched two novices from long range (novices typically are without armor). He then tried on a subsequent activation to charge into melee with the Tlaxcalans – a good move – but the Tlaxcalans were able to react and loose even more deadly arrows into the Aztecs.

Scott grins after sending an initial hail of lucky arrows into Chris’ approaching Aztecs. The incapacitated Aztecs are lying off their bases. The blue beads each indicate a morale check that the Aztec element would need to pass – and more would come…
Only 4 out of 11 figures made it to the Tlaxcalan bowmen, and they had little effect as the Tlaxcalans repelled their assault.

In the middle of the tabletop, the two elite Aztec elements were making good progress forward. The Conquistadores were lucky enough to unpin their handicapped element, making their defense much stronger. That element had a wardog, and they challenged the advance of the cuahchic and the Eagle Warrior elements. That scrum left the Conquistadores with several dead – including the war dog. The cuahchicqueh (plural of cuahchic) advanced, but the Eagle Warriors lost heart and failed morale – running away from the fight.

Then Chris had even more morale checks to make. Luckily for him he endured them, but his unit was pretty decimated. Chris’ Aztecs had 14 morale checks to make. They passed, but were a spent force.

The Shorn Ones (cuahchicqueh) do a number on the Spanish and their war dog.
The Shorn Ones advance to the cuezcomatl granary storage structure (objective B), while their Eagle Warrior comrades run away.
Here you see Chris’ Aztecs – or what’s left of them – and their pile of morale check pips.

Glenn’s advance on the right of the elite elements was making good progress. They had a bowman, an atlatl user, and several slingers in their veteran/novice element. His non-missile weapon-armed Aztecs charged into Leif’s Conquistador element, hoping to take them down (especially as they had the arquebus and the crossbow). Glenn and Leif both did damage to each other in the ensuing melee.

Leif defends against Glenn’s Aztec assault. At this point, the Aztecs were threatening also to take out the Conquistador officer.
Scott and Leif appear confident in their defense.
Leif – commanding the Conquistador officer – takes out an Aztec – but quickly three more of Glenn’s Aztecs gang up on the leader, who kills another, and wounds one more but…
…the Conquistador officer is overwhelmed by the Aztecs, and is incapacitated and dragged off for sacrifice. This left both of the remaining Conquistador elements in a “pinned” status – meaning that they would only activate half as much as an unpinned element – a significant disadvantage.
And finally, an Aztec Warrior Priest showed up to make sure the granary remained in Aztec hands.

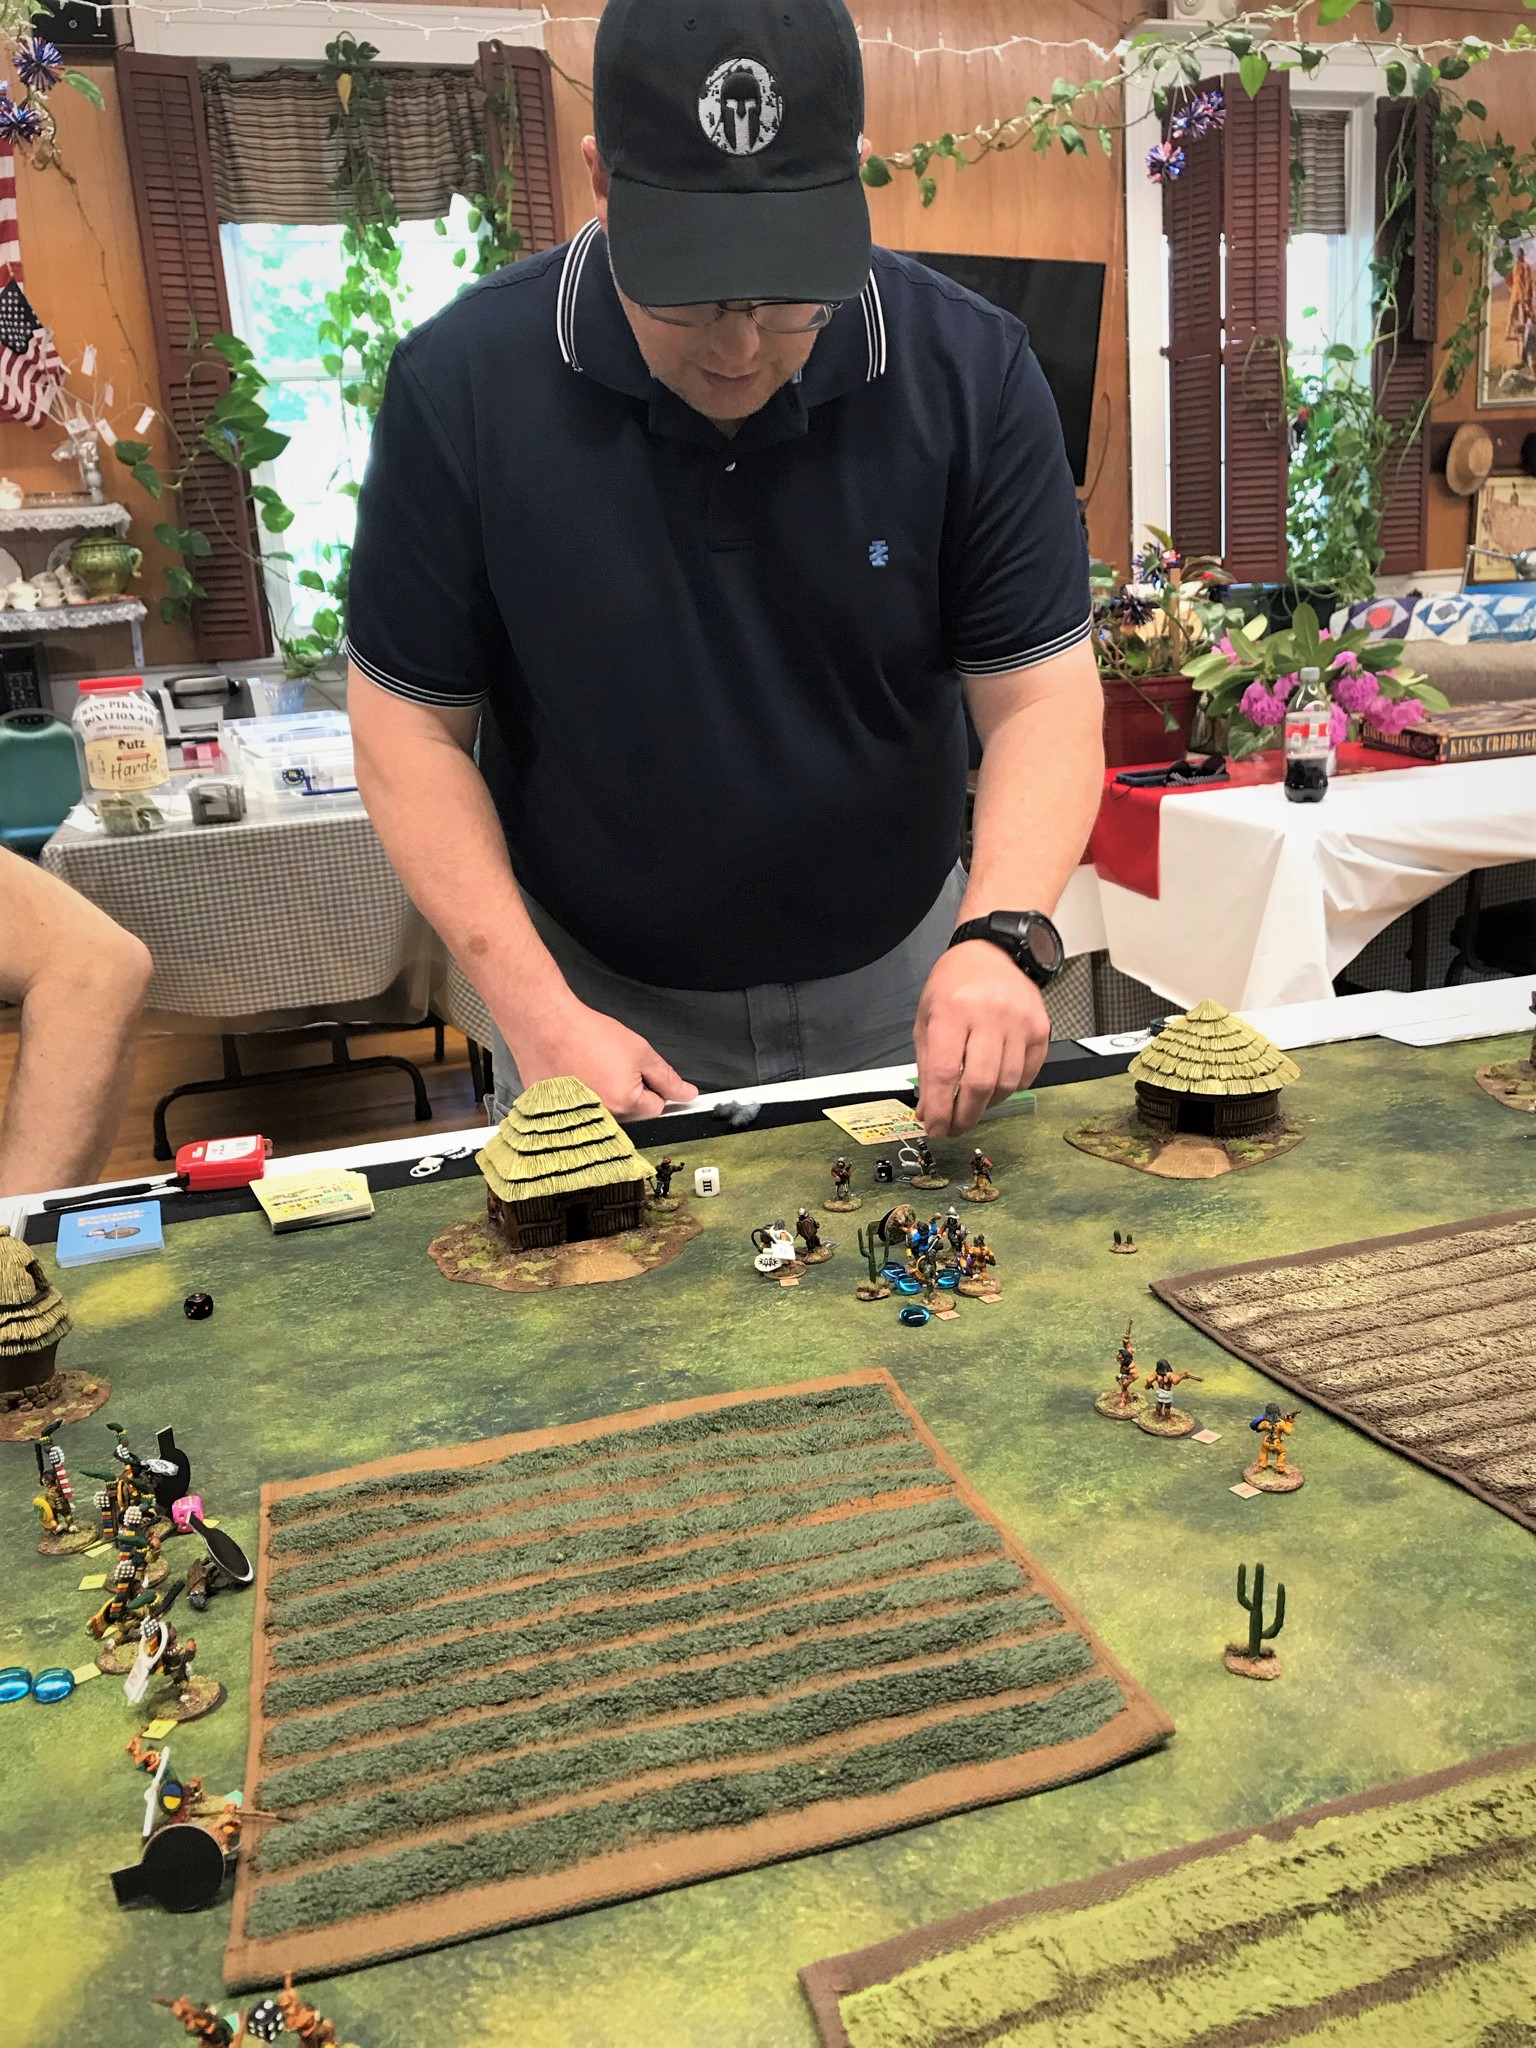
The Conquistadores were able to sprint one remaining unwounded trooper over to objective C (Noble’s House), gaining control of it, and its gold, for important end of the game points. The Tlaxcalans were also able to secure the maize storage structure (A). Meanwhile, the Aztecs gained control of the granary (B). The overall scoring led to a Spanish/Tlaxcalan victory with a score of 63-38. If the Spanish had not secured the Noble’s House and it’s gold, it would have been 48-38.

The players all had a good time and really enjoyed the game. Some are already on the way to buying their own copy of Feudal Patrol !

I do like the scenario -and I thank Buck Surdu and David Wood for an earlier week Zoom playtest. When I update my supplement (which is coming by year’s end or sooner), it will be one of the scenarios I add. I do need to finish off my cityscape and THAT is in progress.

I do thank Saturday’s players as well. It was soooo nice to finally have a face-to-face game for the Mass Pikemen’s Gaming Club. On the next go-around, I will adjust the forces slightly – probably giving another element to the Aztecs and maybe a falconet or another element to the Spanish – depending on the number of players. I will also add points for incapacitating or even capturing warband or higher leaders.

So, when will that be? June 26th at 1 PM at the Great Stories Comics and Gaming Store in Uxbridge, MA! The Mass Pikemen are taking this (and other future games) to a great hobby store, Great Stories in Uxbridge, MA. We will be gaming there and at our home in East Brookfield going forward – hopefully alternating between sites for gaming.

I hope that you enjoyed this battler report – let me know your thoughts in the comments section!

For all of my previous posts on games, units, and other projects for my 16th Century Spanish Conquest supplement for Feudal Patrol™ – “Civilizations Collide” – please see this page.

Battle of France 1940 at Mass Pikemen

The Mass Pikemen played an action-packed game at our February gaming session.  The game was a What a Tanker© game for my Battle of France, May-June 1940 scenario.  This also served as a final play test of the scenario before using it at upcoming gaming conventions (TotalCon 34, HAVOC, and HUZZAH!).

At the start of the game, each side gets 200 points to buy tanks and armored cars as well as Bonus Attack cards if the vehicle has a radio (all the Germans have radios, many French vehicles do not).  The French are defending and have the ability to deploy at secret positions known only to their side and the GM.  The French forces are divided – with half of the battlefield being under the responsibility of cavalry tanks, and half under infantry tanks.

The Germans are exiting wooded areas on two congested roads heading to two bridges over a river.  The German mission is to cross the board and exit the other side (and head to the English Channel) – and gain points for doing so.  There are also several possible fords over the river that are minor obstacles.

The French player may also spend points to wire either one or both bridges (or none) for demolition.  This status is also known only to the French side and the GM.  The French side may attempt to blow a bridge at any time, but failing to blow the bridge or allowing any Germans to cross makes subsequent demolition attempts more difficult.  If a bridge is blown while a vehicle is on it, that vehicle is destroyed.  Any side that destroys a vehicle gets points for that action as well.  As GM, I only announce who is ahead at the beginning of the turn, and I do not share the score so as to maintain a fog of war for the players and try to maintain a crew-focused battle.

1 Battle of France set up
Overview of the battlefield from the French side.  The French deploy infantry tanks left of the second road on the left, and cavalry tanks on the right of that road. 

2 Battle of France set up town
Detail of the town where most of the hidden positions are for the infantry tanks.  Both infantry and cavalry had access to Panhard 178’s and H35’s.

3 Battle of France French cav side
The right (French cavalry) side showing the river and the bridges.  The rocks in the river were designated as fords.

4 Battle of France Mike rolls dice
The German players deploy.

5 Battle of France Panzer 35(t) knocked out
From a hidden position, a Panhard 178 calls for anti-tank support.  Using a 47 mm anti-tank support card from the Bonus Attack cards, a Panzer 35(t) is torched before getting to a bridge, while a wary Panzer IVB watches.

6 Battle of France Panzer IVB on blown bridge knocked out
A German Sd.Kfz. (6-rad) recon car crosses the bridge without incident.  Feeling safe, the Panzer IVB tries to cross.  The French had waited for a bigger target, and successfully blew the bridge with the Panzer IVB on it – destroying the Panzer IVB.  In the rear, another Panzer 35(t) observes multiple burning comrades.

7 Battle of France Sd.Kfz. 231 knocked out by SOMUA
The Sd.Kfz. 231 (6-rad) recons around a building and finds a SOMUA S35.  The SOMUA easily kills the German scout car, but not before taking some damage from Bonus Attack card artillery.

8 Battle of France river forded by Pzjager I and 38(t)
The battle heats up.  The surviving Panzer 35(t) fords the river as does a Panzerjager I with another Panzer IVB behind them.  The French activate the hidden Panhard, and the SOMUA S35 takes some more minor damage.

9 Battle of France SOMUA finally taken out by 88
The SOMUA S35 is hit by 88 fire and finally taken down by accumulated damage.  The black smoke indicates that the tank is knocked out, but the crew survived.  I use orange smoke to indicate that both crew and tank are destroyed.  

10 Battle of France Panhard dispatches 38(t)
Having taken damage from the SOMUA, the last Panzer 35(t) is knocked out by a daring attack by the charging Panhard 178.

At this point the game ended, and the French had a solid victory with the score being 158-112.  The French also got bonus points for no German being able to traverse the board.  The Germans made a couple of unsuccessful Luftwaffe attacks which hindered them as well as the early casualties.The scenario is pretty solid and the gamers made key decisions that affected the game.  I did run this scenario and three other games at TotalCon 34.  I will share the results of what happened at TotalCon 34 on a future post and things went differently!.

Thanks for looking!

French FCM 36 tanks

During the Battle of France (May-June 1940), there was an amazing variety of vehicles on both the German and the French sides.  At this same time last year, I began putting together a collection of period 15mm/1:100 scale vehicles for this period.  These were discussed here.  I have previously posted about a couple of games (December 2018 and January 2019) that I ran using the What a Tanker™ rules from the UK’s Too Fat Lardies.  I have been hoping to return to this period and add more vehicles to both armies.  I am starting this augmentation by adding 3 FCM 36 light tanks to my fleet.

The FCM stands for Société Nouvelle des Forges et Chantiers de la Méditerranée, a shipbuilder in Toulon who manufactured this 1936 design – and delivered about 100 to the French Army up through 1938.  Cost and industrial manufacturing concerns limited further purchases.  They were a little more than 12 tons, with a crew of two.  The armor was fairly good – welded, and very sloped for tanks of the day.  It also had a diesel engine and reasonable range unlike many other contemporary French tanks.  However, like many other French tanks, it was armed with the weak Puteaux SA 18 37mm gun which definitely had challenges fighting German armor.  Notably, two battalions of FCM 36’s tried to repel the bridgehead that the Heinz Guderian had established across the Meuse, but they were too little and too late.  After the surrender of France, some of the FCM 36 chassis were converted to Marder I’s or self-propelled artillery.  Some of these conversions were involved in the Normandy Campaign of 1944.  Today, only one FCM 36 survives at Saumur.

I thought these would be a good addition to my French early-war tank collection.  In What a Tanker™, these are the cheapest tanks to buy point-wise.  The only source I found for these models was Old Glory.  They are metal, and quite small of course.

1 FCM 36 in package
The 3 FCM 36’s in the baggie.

2 FCM 36 before filing
I did need to do a bit of filing and cleanup of extraneous molding material and molding lines as you see here.  Yes, these are small!

3 FCM 36 before filing showing turrets pins
The turrets had a small molded pin for mounting on the molded hole on the chassis.  I needed to slightly elevate the turret or the underlying paint on the chassis would be worn off, even with a good varnishing.  I decided to drill out the pins and the holes with a 1/8″ drill bit.  I then used green stuff to fill in underneath the hollow chassis between the tracks and provide a “floor” for the magnets.  The magnets were put in place with Gorilla Glue in the chassis and the turrets.

4 FCM 36 after priming and base coat
You can see here my hodge-podge mounting scheme of the FCM 36’s for painting.  I used a 1/4″ square dowel and poster tack to mount the chassis for painting.  I primed these, and the used a German green-brown as a base coat.  This shot here is after the first camouflage color (blue green) was applied with my Iwata Micron airbrush.  Also, I only put the turrets on a tank when I am painting camouflage patterns.

5 FCM 36 after priming and base coat and more camo
Next, I applied the third color (brown) to the camouflage pattern.

6 Turrets after decal but before varnish
When I paint turrets, I find this helpful (as the magnets in the turrets hold the turrets to the magnets on the washers).  Also, I can easily apply the decals this way, and airbrush on the final two coats of matte varnish.

Lastly, I thought I’d share some group and individual shots and a bit about their debut on the tabletop the day after they were completed.


12 FCM top view
Top view showing the sloped octagonal turrets.


7 FCM 36 left sides
Left side of the FCM 36’s.

8 FCM 36 frontal armor view
Frontal view.


I used a blue diamond, a red heart, and a red club as decals which would also help identify these as different individual tanks on the tabletop.  From my research, FCM’s did not seem to have as many markings historically as other French tanks.

As stated above, these made their game debut this weekend at the December session of the Mass Pikemen Gaming Club.

13 First FCM 36 roll
My buddy Mike Morgan was on the French side, and chose the blue diamond FCM 36 as his tank.  He then rolled a perfect roll of 6 sixes!  The odds on that were 0.01286%!

14 FCM 36 Blue Diamond moves onto the board
Mike’s FCM 36 moves on the road.

15 FCM 36 Blue Diamond duels with a StuGA
His FCM 36 was stalked by a StuG A (player Chris), which kept missing it.

16 FCM 36 Blue Diamond duels with a StuGA, misses
Mike successfully maneuvered his tank to the German’s side, and shot point blank.  The dice deserted him as the StuG A took only minor damage.

17 FCM 36 Blue Diamond duels with two StuGA, who miss it
Smelling an easy kill, the Germans (Chris’s teammate Christine) brought up a second StuG A in the hunt.  It also missed the FCM 36.  Note – as there were only 15 StuG A’s in the German invasion force across France, this would have been highly unlikely!

18 Now the Panzer IIIE joins the fight
Then the Germans brought up even more to the hunt with a Panzer IIIE…

19 Panzer IIIE brews up FCM 36
And Mike’s plucky FCM 36’s luck finally wore out with the Panzer IIIE (Christine) knocking it out.

On the other side of the table, Mike’s teammate Tom managed to kill Christine’s Panzer 38(t) with a SOMUA S-35.  Mike got another FCM 36, and that was killed by Christine’s teammate Chris’s StuG A (in the shot below on the left).  Mike replaced his lost tank with an R35.  Tom drove his SOMUA around the building but frustratingly could not take a point-blank shot at the Panzer IIIE (as his dice roll failed him).  Mike had to leave, and my wife Lynn (no gamer just watching) took over the R35.  Lynn drove the tank to the side of Christine’s Panzer IIIE, and rolled three critical hits – and Christine failed to block any.  This knocked out the Panzer IIIE!

20 R35 avenges the FCM 36 after SOMUA misses
Lynn’s R35 avenges the burning FCM 36 (on right) by knocking out the Panzer IIIE.

21 Lynn is happy
Happy wife, happy life!  Tom and Lynn are all smiles here.

22 SOMUA is hit in rear by StuG A
In a final act, Christine maneuvered her remaining StuG A for a rear shot on Tom’s SOMUA S-35.  She successfully knocked out the SOMUA.

That ended the game, with the French winning a very narrow victory 32-31.  If Lynn had not rolled so well in killing the Panzer IIIE, the Germans would have won.  Thanks to the players for a great and fun game!

I have plans for more French and German tanks for this scenario.  I hope that you enjoyed this post, and feel free to share your thoughts and feedback with me in the comments section!  I have been behind on my blogging efforts and hope that I can share more with you soon!  Thanks for taking a look!

Also, as these were mostly done in November, I would add them as my contribution to Azazel’s MechaNovember painting challenge!

PAINTS, INKS, GLAZES, SHADES, WASHES, PIGMENTS, FLOCKING, GLUES AND MORE USED ON THESE VEHICLES:

  1. 1/8″ neodymium magnets
  2. Green stuff (kneadatite)
  3. Gorilla Glue
  4. Poster tack and ¼” square wooden dowels on plastic plates
  5. Vallejo “Surface Primer – Black”
  6. Vallejo “Flow Improver”
  7. Vallejo “Airbrush Thinner”
  8. Vallejo Model Air “German Green Brown”
  9. Vallejo Mecha Color “Green Blue”
  10. Vallejo Mecha Color “Brown”
  11. Battlefront “Black”
  12. Battlefront “Dark Gunmetal”
  13. Vallejo Model Air “Wood”
  14. Vallejo Mecha Weathering “Dark Rust” (wash)
  15. Army Painter “Light Tone” (shade)
  16. Vallejo Model Air “Satin” (varnish)
  17. Microscale Micro-Set
  18. Microscale Micro-Sol
  19. Microscale Liquid Decal Film
  20. Appropriate decals from Battlefront
  21. Citadel “Typhus Corrosion”
  22. Citadel “Ryza Rust”
  23. Army Painter “Strong Tone” (shade)
  24. Vallejo “Light Sienna” (pigment)
  25. Vallejo “Light Slate Grey” (pigment)
  26. Vallejo “Pigment Binder” (pigment)
  27. Vallejo Weathering Effects “European Splash Mud”
  28. Vallejo Mecha Varnish “Matt Varnish”


Allies Defeat Germans at Fort Devens Game Day

On October 19th, 2019, the Fort Devens Gaming Day was held at the Fort Devens Museum.  This was our monthly gaming day as an “away” game day for the Mass Pikemen Gaming Club.  Our club sponsored two games as Scott Howland ran a pulp game in another room which was very well-received. I believe it was similar to this one.

This was my second time attending this small convention and my first time as a game master there.  For nostalgia alone, I really looked forward to the event as I was stationed at the old Fort Devens before it was closed in the 1990’s.   It has since been converted to commercial uses and some US Army Reserve functions.  Running a game here was fun.

10192019 Normandy Breakout with contact info

Mike Morgan graciously helped me set up my game in the museum among the exhibits (as you will see below)).  Thanks so much Mike!  Mike also supported Scott as a player in his game, and that was very cool.  I ran my Normandy Breakout game for What a Tanker©.  We had seven players – including several from the Mass Pikemen.  On the German side were Chris, Peter, and Steve.  On the Allied side were Leif and Walter (US), and Evan and Alex (UK).

Both sides started with 150 points/chips to use during the game.  The Allies started with a 40 points worth of vehicles.  For the UK, they bought a Dingo scout car and a Churchill “TIM” (nicknamed for theimperfectmodeler aka TIM), along with an M5 Stuart, and an M8 Greyhound for the US.  The Germans spent slightly less, choosing to buy an SdKfz 231 scout car, a StuG IIIG, and a Panzer IVH for 36 points.

1 Set up
The players prepare for battle among the museum exhibits.

The Germans took up very good ambush positions – especially the Panzer IVH, which was hull-down behind a stone wall.  The M5 Stuart successfully reconned it, and the German fired point-blank at the light tank, missing it.  The Stuart then prudently backed up behind the hedgerow.  The Churchill “TIM” then moved up the road, to be also shot at, and again missed by the Panzer IVH.  Amazingly, the Churchill immediately reversed the bad German die rolls, and miraculously hit and knocked out the Panzer IVH for its first kill ring of the day.

2 Churchill takes out Pzkw IVH
The first exchange goes badly for the Germans as the Panzer IVH missed its first two targets (the M5 Stuart and the Churchill).  The retreating M5 is at top behind the hedgerow.  The Churchill “TIM” drives past the knocked out (with crew surviving) Panzer IVH.

The Allies then successfully reconned nine possible German positions at 2 points apiece, adding to their score.  They also successfully crossed the tabletop with an M8 Greyhound, gained the points, and respawned as another M8.  The Germans spent some points and respawned the destroyed Panzer IVH crew into a Panther D which drove up next to the burning Panzer IVH.  The Churchill “TIM” went Panther hunting.

Meanwhile, the Germans tried to put an end to the Allied reconnaissance successes.  The StuG IIIG ambushed both the M5 and the Dingo gaining them crucial points, which they used to buy a Marder III.  The Allies respawned both losses with similar models.

3 StuG IIIG takes out M5, while Churchill moves around Panther
The Churchill “TIM” at top maneuvers to attack a Panther in the rear.  In the foreground, The StuG IIIG takes out the M5…  

The Allies spent some chips to respawn the Dingo as a Cromwell IV nicknamed “IRO” aka imperialrebelork.  The Germans dropped some obscuring smoke in front of the Cromwell.

4 StuG IIIG takes out Dingo, while Churchill moves around Panther
…and then the Dingo.  The Germans dropped smoke to protect the StuG from the Cromwell IV “IRO”.  The Churchill “TIM” at top hunts the Panther D.

“TIM” continued its winning ways and managed a flank shot on the Panther D.  Its good dice rolling (and the German bad dice rolling) yielded a second kill ring for “TIM”.

5 Churchill gets second kill ring against Panther
The Churchill “TIM” takes out the Panther D.

The Germans were aghast at this expensive loss and vowed revenge.  The SdKfz 231 managed to call in a rare Luftwaffe air strike on the Churchill, which destroyed “TIM” after it had been so effective.

The British mourned this loss, and respawned it as an Achilles 17-pounder nicknamed “Per”.  The British also bought another Dingo and a Cromwell IV nicknamed “JNV” or justneedsvarnish.  The US bought an M10 Wolverine.  The Germans went for broke and bought a Jagdpanther and an SdKfz 233.

The StuG IIIG went head-to-head with the Cromwell “IRO”, and took it out.  The Jagdpanther caught the Achilles “Per” in the open and made short work of it.  In the meantime, the Allies successfully crossed a Dingo and an M8 Greyhound.  This resulted in denying the Germans any end of game bonus points for preventing more than two Allied vehicles crossing the table.

To make matters worse for the Germans, the respawned M5 Stuart knocked out a well-hidden Marder III with some help from a supporting infantry assault (see how I use bonus attack cards here) and well-placed 37mm rounds.  As the game was winding down, and it was clear the Allies had a commanding edge in the score, The Germans bought a Tiger I and converged all vehicles on the plucky M5.

6 Marder III taken out and other Germans seek vengeance
The Marder III burns, and the Tiger I and SdKfz 233 hunt the M5 Stuart… 

7 Stuart will not die
…and are joined by the Jagdpanther!

8 Traffic jam
This traffic jam at game’s end yielded no damage on the M5 Stuart – the dice had completely deserted the Germans.

At games end, the final score was Allies 193, Germans 142.  This game yet again delivered a different result.  Player choices, and player luck all made this game fun and unique.

This is my 12th post about my development and running of this scenario and the models that went into making it.  I started back in May 2019, so it’s been a lot of work, but one project that I really am proud of now.

I wanted to honor the history and the struggle of the Allies in the days after the D-Day landing 75 years ago.  I will continue to run the game, and at this point I really only need to add a StuG IV to be really complete vehicle-wise (and I have one to build!).  To read about previous games and related posts, see the following:

Thanks to the Fort Devens Museum, Peter Lowitt. and the guys at Fencing Frog Gaming Adventures for running the event.  I hope to see you next year, if not sooner.  I also hope that some of the players join us at The Mass Pikemen Gaming Club.

I hope you enjoyed this post and would love to read your feedback!


GASLANDS brings Maximum Carnage at Mass Pikemen’s Johnny Cab Invitational

Last Saturday, September 7th, Scott Howland ran a very fun game of GASLANDS at our September gaming session.  We had several new players and some young players with their dads (which was cool in and of itself).  We had played this game a few times before, and Scott had some really cool new terrain for the race.  His scenario was the “Johnny Cab Invitational” as a nod to the Johnny Cab in the 1990 film Total Recall.  Scott plans to run this game at CARNAGE in Killington, Vermont in November.

As I got to play I got to take a few more pictures – the race was a real thrill ride (pun intended).

09072019 GASLANDS at Mass Pikemen
The flyer for the game

1 Scott briefs the gamers
Getting ready to play.  Each of us got a different cab-type vehicle for the race.  On the right, new player Steven (sitting) and his dad Steven (in orange hat) joined us for the first time with his daughter in tow. 

2 Scott briefs the gamers
Here you can see the tabletop – we had to cross 5 gates in the race.  The cabs had weapons that were not active until you fully crossed gate #1.

3 and the race begins
The start of the race – you can see the starting gate on the right.  Vehicles were assigned at random – I had the little Johnny Cab in the foreground.  Above me in this photo respectively  were Mike and Leif’s yellow cabs on the edge of the tabletop.  In the starting gate from top to bottom were Christine in a VW truck/cab, Jack/Jared in a tracked cab, and Steven/Steven in a motorized rickshaw.

3 Johnny Cab Open
Johnny Cab!

4 Mike careens into Leif
The wrecked tractor trailer was part of the game terrain.  I’m on the right about to take my first (of many) flip outs.  On the right, Mike attempts to crash into Leif.  This would go (at first glance) badly for Mike as he rolled badly and got turned around back towards the starting gate.  He would end up crashing into the wall behind it and surviving to turn around…eventually.  Note that Scott has two welded dice to denote turn and gear segments – very cool.

5 Trying to cross gate 1
I try to get through the gate after both Christine and Jack crash into me.  I ended up flipped over by the right barrier – safe but damaged.

6 Scott GM's
Scott effectively GM’s!

7 Leif's Car is torched
As I was already through the gate I had to back up to get aligned.  I used a Molotov Cocktail on Leif’s cab and caught it on fire.  It soon exploded and I avenged a past Bolt Action whupping that Leif had put on me earlier!  Jack’s tracked cab was run into a wall at the top, while Steven’s rickshaw was closing for a kill.  Christine’s blue VW also shot at Leif with a machine gun.  Mike was busy out of the picture hitting a wall in 4th gear!

8 Steven's Rickshaw dies
Steven’s attack on Jack’s tracked cab fails.  Jack’s tracked cab returns fire, and destroys the rickshaw.  Christine’s VW tries to go around away from Jack.  I’m just surveying the carnage from the safe rear.  Mike is still back along the wall in the rear of the starting gate. 

9 Jared and Jack plot next moves
Jared and Jack discuss choices with the dice, while Leif looks at his burning cab.

10 Jack wipes out and explodes
Christine turns the corner and shoots up Jack’s cab – knocking it out of the game.  She then dropped caltrops behind her.  This left the VW, my Johnny Cab, and Mike still in the game.

11 I set Chris on fire and move in
Johnny Cab turned on the gas, and attempted to shoot at Christine’s blue VW with a machine gun, missing.  I threw another Molotov cocktail and hit, catching the VW on fire.

At this point, I closed for the kill.  Nothing remained between Johnny Cab and the race course but Christine’s damaged and burning vehicle.  Mike’s cab was far behind.  My machine gun missed again – but my third Molotov cocktail hit and unfortunately caused a chain reaction with Christine’s own unused Molotov cocktails.  The explosion damaged my Johnny Cab and destroyed it and the VW.  At this point, Mike was just getting back to Gate #1 after getting off the wall.  As the sole survivor, he won!  Amazingly, he won our last GASLANDS game as a survivor as well – enjoy your prize Mike – a free trip to Mars!  Your second trip!

12 Mike wins again!
The game ends.  Both cars in the foreground are destroyed – in the right rear one survives – Mike wins!

The game went very quickly even with many new players.  Scott’s vehicles and board were fantastically fun!  I lent my new blast markers to the game and I think they worked well (and were very popular with the younger players to be sure).  Thanks VERY MUCH to Scott for a well-run and fun game.

Our next session is a road trip to the Fort Devens Game Day on October 19th.  Scott will be running a pulp game there, and I will be running my Normandy Breakout game.  The November session for the Mass Pikemen will be on either November 2nd or November 9th from 2-7 PM, games TBD.

If you are interested in joining the Mass Pikemen, our Facebook group link is here.  Join us!


Normandy Breakout Game at Mass Pikemen

Last Saturday (August 24th) we had a very action-packed game of What a Tanker© using my Normandy Breakout scenario at the Mass Pikemen Gaming Club.  I have been tweaking the scenario, some rules, and improving the terrain and markers – and I believe the gamers who played really noticed all of the upgrades and changes.  I have been fortunate to get valuable feedback from the gamers which has been invaluable, and this game was no exception.  I have acted as a Game Master for this game a couple of times (discussed here), and this, the third iteration, was another great game that had the players highly engaged.

For this post, I will show some of the photos that tell the story – though simultaneously being a photographer and a GM are not always easy.  I appreciate the generosity of both Chris Rett and Ted Salonich helping with some photos – as well as playing of course!

The game scenario is:

After a successful D-Day landing and consolidation, the tanks of the Americans and the British are stymied in the hedgerows of Normandy. German armor has set up effective defensive positions in favorable terrain. However, the Allies do not know the exact locations of the German tanks, and the Germans have limited knowledge of where the Allied armor will be coming from and the direction to which they will try to break out. New rules that allow reconnaissance and the effects of other combat forces will challenge both sides in this action-packed game.

The Germans are in secret positions (basically ambush positions) that they choose in advance of the Allies arrival – which is also secret in terms of the exact vehicles that the Allies choose.  Both sides get to secretly select their vehicles (with some restrictions), and poker chips are used for the scoring.  The Germans here did stop the Allies from breaking out – though the Allies were able to gain more points by both effectively recon of enough blind positions and knocking out enough valuable German vehicles.  The final score was 117-109 in favor of the Allies – with the game score turning on the Allies knocking out a Jagdpanther on the last turn.  The casualties were:

  • Allies – 5 vehicles:
    • UK – 3 vehicles:
      • 2 Daimler Dingoes
      • 1 Firefly
      • 1 M10 Achilles
    • US – 2 vehicles:
      • 1 M3A1 Stuart
      • 1 M10 Wolverine
  • Germany – 3 vehicles:
    • 1 Sdkfz 233
    • 1 Panther D
    • 1 Jagdpanther

Let’s see what the day looked like!

4 map at session
The Allies moved on from here.  The British had the far left road, and the Americans had the far right road.  The middle road could be used by both Allies.  The wooden discs are possible German positions to be reconned.

5 map at session
A side view of the tabletop that better shows some of the (blind) possible German positions.

6 map at session
The view from the German side of the board that the Allies needed to cross.

1 Me as GM
Your properly attired GM.  (Photo by Chris Rett)

The Germans effectively used a Bonus Attack card to draw first blood – calling in a rare Luftwaffe attack on a Daimler Dingo.

7 Dingo hit by Luftwaffe
The Daimler Dingo hit by the Luftwaffe – my new blast/knocked out tank markers looked pretty amazing (and I am biased of course).

4 Jagdpanther hunts Stuart
A Jagdpanther prepares to engage an M3A1 Stuart from an excellent ambush position.  The Stuart decided to run around the corner and recon the disc on the left…(Photo by Chris Rett)

5 Surprise!
… and the Stuart “successfully” reconned the position – it went around the bocage to find the Elefant in the room. (Photo by Ted Salonich)

5a Surrprise
The Stuart fired its 37mm at the frontal armor of the Elefant.  No effect.  The Elefant returned fire, and blew away the Stuart.

9 Firefly knocked out by StuG G
A Panther D and a StuG G combine forces to knock out a Firefly near the burning Dingo.

10 Panther D knocked out by Achilles
An M10 Achilles fires at and knocks the Panther D into a ruined building, damaging it.  It gets a second shot, and rolls well enough to torch the Panther.

11 M18 Hellcat moves up to help British
The Americans move up an M18 Hellcat to help the Brits – it ended up moving behind the Jagdpanther and was able to destroy it.

8 Gamers
The gamers ponder their moves.

13 Last shot
The Allies called in a lot of artillery-delivered smoke to protect their vehicles.  It was effective.

6 Panther burns and Tiger I arrives
Here comes the Tiger!  Note the StuG G that ambushed the M10 Wolverine.  The crew of the M10 survived – as denoted by the black smoke versus the fiery smoke.  Also shows the Allied smoke screen in front of the Jagdpanther.

As the German vehicles are worth, in general, much more points, the loss of their expensive vehicles made a big difference.  Both sides played well, but I have to say the Germans were not very lucky with their dice at times.  

I will be tweaking the game scenario in a couple of ways:

  • Adding stopping bonuses for the Germans:
    • A 20-point bonus for the Germans if no Allied vehicles are able to breakout across the tabletop.
    • A 10-point bonus for the Germans if only one Allied vehicle is able to breakout across the tabletop.  If 2 or more cross, no German bonus.
    • Award the Germans 2 points for each unreconned point.  This will incentivize recon, but force the Allies to choose what is most important.  (The Allies already get 2 points for each reconned point.)
  • Allow a “banked 6” to be used for either an advantage on the next activation (per the rules) or as an automatic “6” on the next activation roll (determined by the player on the turn he banks it). Thanks Ted Salonich!

Thanks again to the all of the players.  And for those who follow this blog who wondered if their named vehicle got fried, only one Cromwell (“IRO”) deployed and did not get into action.  However, the M10 Achilles “Per” (named for Per from Roll a One) did get knocked out by one of the StuG G’s.   Sorry my Swedish friend!

Hope that you enjoyed this – and I will be running this game on Saturday at BARRAGE in Maryland (September 28th) and at the Fort Devens Game Day on October 19th.  I may also run it at other upcoming gaming cons if possible.  Thanks for looking!


Evil Nazi Scientists (and Nazi Zombies) battle Allied Commandos at Mass Pikemen Club

We had a very fun game of Pulp Alley last Saturday at the Mass Pikemen Gaming Club’s April session.  Scott Howland did a smashing job at running his scenario.  It involved four WWII (well, sort of) allies trying to seize key control points from evil Nazi Scientists and their reanimated zombie troops.

I played on the Allied side along with Jared (running a squad of Russians) and his son Jack (running an eagle-eyed group of Americans – replete with an eagle-headed leader).  My squad was a retro-sci-fi group of heavily armed dudes with jet-packs (those of you who have seen my sci-fi games know I love troops with jet-packs!).

We entered the game on four corners – and needed to seize various control points by turn 6.  Anything we did not seize would default to the evil side – which in this case was Scott’s son Ethan (controlling the mad scientists in the building) and Mike (controlling the reanimated Germans).  The control points were multiple: gaining possession of two alien bodies in a lab; gaining possession of three crates by the UFO; seizing some electronic gear in one of the labs; and accessing and downloading information from a couple of computers in the lab.

Only Ethan had played before, and the game went smoothly.  There were cards that you could play to affect action, and you could play them for your allies which was nice.

1 Pulp Alley
Scott, young Jack, and Mike prepare for the game.  

2 Pulp Alley
A view of the courtyard and the adjacent building.  The three crates were objectives, as was the electronic equipment on the right.

3 my crew at Pulp Alley
My crew – the 27th Rocket Patrol.

3a my crew at Pulp Alley
My data chart for the game for my crew.

4 zombie Nazis at Pulp Alley
Reanimated Nazi Zombies

5 zombie Nazi Scientists at Pulp Alley
Evil Nazi scientists and henchmen

6 Eagle eyed troops at Pulp Alley
Jack’s Eagle-eyed squad,  aptly named.

7 Alien bodies at Pulp Alley
Another of the objective points – alien bodies on slabs.

8 electro room
A better view of the electronics – that were dangerous to approach.

9 moving towards the Nazi Zombies and their objectives
I jet-packed my squad in behind the trucks.

9a moving towards the Nazi Zombies and their objectives
I then dispatched two zombies – and one of my guys was hit but recovered.  Things started off very well for me.

9b moving towards the Nazi Zombies and their objectives
However, Mike was able to counterattack and kill one of my squad and delay my getting to the objective crates.  By the time that I did get there, it was turn 6, and I failed two rolls with two troopers needed to pick up two crates, leaving them in the hands of the German zombies.

10 Russians brawl
On the other side of the game, Jared’s Russians brawled with a couple of zombies before getting into the lab.

11 Scott GM's the fight in the lab
Scott adjudicating combat with Jack’s troops in the building, while Jared and Ethan ponder their next moves.

12 computers fight back
Jack got a couple of his troopers into one of the rooms with a computer terminal.  They tried to download data, but the computer was booby-trapped, and they failed their saving rolls.

13 Mike and Ethan are relievd that the tide of battle has turned
Ethan and Mike on the right are feeling close to victory after a very bad start.

14 young Jack gets the alien body
The only victory point for the Allies came from Jack – who seized one of the alien bodies.  Our poor saving throws at the other objectives doomed the Allies.

All in all it was a fun quick game.  The final was 6-3 for the Evil Nazi Scientists.  I liked the figures and the set up a lot – very cool and thanks to Scott for running such a cool game.

Our next sessions are on May 11th and June 29th – likely some What a Tanker and some Retro-Sci-fi Combat Patrol!

GASLANDS Game at Mass Pikemen

Last Saturday Jared Burns ran a very fun game of GASLANDS at the February meeting of the Mass Pikemen gaming club. For those of you not familiar with the game, it involves an apocalyptic race/gladiatorial battle using Matchbox cars. The cars are armed with different weapons such as rams, machine guns, and armor, and in the scenario they were racing through three gates with the first car to finish all three as the winning car.

Each of us had two cars. Jared brought his car collection which he had very effectively weathered. Also, Scott Howland brought his cool GASLANDS cars, so we had a nice selection. Jared had also made some very nice dashboards which made play much easier.

1 gaslands feb
The game set up – it was nice as several of us were able to contribute terrain to make a fun tabletop.

2 gaslands feb
Scott Howland made a couple of very cool billboards that were very fun – including this Johnny Cab one from “Total Recall” and…

3 gaslands feb
…this one showing spaceship service to Mars.

4 gaslands feb
These are the two cars that I had in the game. The cab (from Scott) had a ram and a machine gun. The rusty car (from Jared) had a machine gun and a limited ammo mortar.

We all started at gate one, with no firing weapons to be active until we crossed the first gate. Several cars, including my cab, never made it through that first gate. My rusty car did, and turned back to attack Jared’s similarly-armed orange car. I rolled well, and Jared did not, with the result being I destroyed his car. Unfortunately, his ammo sympathetically detonated and both of my cars took damage from that blast.

5 gaslands feb

The first kill – but the ensuing explosion damaged both of my cars.

At the same time, Mike Morgan had been sidelined due to a starting box collision that left one of his cars just getting going. His other car was speeding dangerously towards the stadium wall (the edge of the tabletop), so he was not being engaged. Scott and Jared were both heading to the second gate and taking shots at each other along the way. Scott’s other car was in front of my rusty one, so I shot at it, and the dice were with me again. Boom.

At the top of this shot you see Scott’s (silver car) and Jared’s (blue car) doing a NASCAR run while heading towards the second gate. Mike’s cars are on the far right and far left trying to get back into the fight.

7 gaslands feb
Jared, Mike and Scott ponder their next moves.

Unfortunately, the act of shooting Scott’s car also caused an explosion that wrecked my rusty car, leaving me with only the cab.

8 gaslands feb
My rusty car, a victim of its own murderous aggressiveness!

This left Mike with two cars, and Jared, Scott and I with one, and mine could only ram. I saw them headed for gate two, so I headed there.

9 gaslands feb
My cab goes at the two survivors.

I did damage to Scott’s silver car, causing it to flip and hit the post, and explode. Both my cab and Jared’s blue car were caught in the explosion. This action took all three out of the game, leaving Mike with the only remaining cars and victory!

10 gaslands feb
The mashup that took out three cars.

The game ended and I think we all had a blast (pun unintentional) even though I inadvertently succeeded in destroying my own cars. Thanks to Jared for running a great game.

Our next session is on March 2nd at 2 PM during which we will be playing What a Tanker in North Africa!

French Chars defeat German Panzers (again!) at Mass Pikemen

The monthly gaming day for the Mass Pikemen featured a rematch between panzers of the German Wehrmacht and tanks of the French Army.  The scenario was one of May-June 1940, where equally-sized forces meet using the What a Tanker© rules and points system.  The players each got 8 points per player to acquire a tank of their own.  They deployed on opposite sides of the river, which also acted as an objective for the game.  The deploying sides were determined at random, and were roughly similar in terrain.

Poker chips were used for accounting and for tallying the score.  Points/chips were awarded for tank kills, and for having your tank at the end of the game on the enemy side of the river.  If your tank was knocked out, you re-spawned as a tank of the same value on the next turn, and the side of the player who killed you got chips equal to the value of the destroyed tank.  These chips could be used in several ways.  The team with the most chips would win, and chips could be used to purchase another tank, a tanker card, or upgrade an existing or re-spawning tank.  Alternatively, you could keep the chips towards your victory points.

This was a rematch from a previous session as it was new for several of the players.  The French started with two R35’s, and the German’s with a Panzer IIC and a Panzer IVD.  Two late-arriving players also got/purchased two more AFV’s, a French SOMUA S35 and a German Sturmgeschutz Ausf. A.

1 the board
The game tabletop – with some changes (notably roads) from the last run of the scenario.

2 the board
The game table before the battle.

On one flank, a shootout occurred between a Panzer IIC and an R35 over a bridge on the French left flank.  Initiative and the dice rolls went to the French R35, with the Panzer IIC taking temporary damage and being pushed back to its starting point, without damaging the R35.  The German light tank barely managed to survive, exited the board, and re-spawned on the opposite flank to join the battle there.  The little R35, a slow tank, had a long drive to rejoin the fray there.

3 this bridge ain't big enough for the two of us
This bridge ain’t big enough for both of us…

On the other flank, the other French R35 took up position at base of the other bridge.  Eventually, it got a few flank shots on the opposing Panzer IV, causing damage, and pushing it back.  The R35, smelling blood, advanced over the bridge, and took up a protected position by the farmhouse.  The Panzer IV had lost most of its command dice, and was heavily damaged.  Eventually, the R35 knocked it out.  At this time the newly-re-spawned Panzer II from the other flank deployed nearby, as did the StuG.  The Panzer IV was also re-spawned here, and the R35 was in deep trouble.  The new French player got his SOMUA S35 and hurried to relieve the R35.  The battle eventually became one of both sides driving around the farmhouse and trying to get advantageous shots.

4 r35 maneuvers against pz ivd
The R35 takes up position, and would hit the Panzer IV in the side multiple times.  Eventually it would cross the river and take up position by the farmhouse…

5 r35 kills pz ivd
…where it would finish off the Panzer IV.

6 r35 between a rock and a hard place, or a stug and a pz iic
Seeking revenge, a StuG III and a re-spawned Panzer II surround the R35.

7 r35 between a rock and a hard place, or a stug and a pz iic
Things are looking desperate for the R35.

9 somua s35 to the rescue
Here comes the cavalry in the form of the SOMUA S35, a fast cavalry tank.  The StuG is forced to take its aim off of the R35, and joins the re-spawned Panzer IV to face off against the SOMUA.

The Panzer IV got first activation, and missed the SOMUA!  The SOMUA then drove like a bat out of hell, taking up position behind the Panzer II that was menacing the R35.

10 tables turned on the pz iic
The tables turn as the SOMUA gets behind the Panzer II.

The Panzer II got activation next, and decided to avenge its comrade.  A flank shot destroyed the R35.  The next turn arrived with the SOMUA getting activation first, and lit up the Panzer II.  The Panzer II re-spawned on the other side of the board, hoping to get some victory points by driving to the other side of the river.  However, the R35 player re-spawned as well, and decided to use some of the French poker chips to get an upgrade, a heavy tank – the Char B1 bis – to confront this action.

11 char b1bis arrives
Here comes the Char B1 bis!

The Panzer II crossed the river at a ford by the bridge, and turned to face the Char B1, who had crossed the bridge.  As you see below, the Panzer II rolled a “10” for activation, while the Char B1 rolled a “7”, so it activated first.

(A side note here – in the rules, D6 are used for activation, but I have found that this leads to way to many “dice-offs” and slows play.  Instead, I use D12’s, and if a player banks a command die “6” for the next turn’s activation, he/she gets to add two to the roll, so the math works out the same as the original game).

Back to the standoff between the German David and French Goliath…the Panzer II hits the Char B1 with a double -six roll, allowing it to get two extra strike dice – great news for the Panzer II.  Unfortunately for him, the Char B1 is very heavily armored, and the hit fails to do any damage (well, maybe the paint).

12 a mismatched standoff
The face-off!

The Char B1 returned fire, and you can guess the results…

13 standoff ends
The Panzer II is destroyed by the Char B1 bis.

The surviving R35 finally made it to the other side of the board and took up position behind the StuG, who was more concerned with the SOMUA.  The R35 rolled well, the StuG did not, and the German assault gun brewed up into a ball of flame and smoke.  This left the Germans with only a Panzer IVD, and even with re-spawning, the game had gone too far in the French team’s favor.  The final score, with all the points for being on the other side of the river, kills, and purchase debits, was 58-14 in favor of the French.  I think the scenario is still balanced, but in the end maneuver and use of terrain both really matter in this game, and the French did better job of both in this game.  They also got some bad luck for sure.  I may add some points to the German side the next time I run this scenario.

14 the end
Mike Morgan and Chris Smedile survey the battlefield.

Hope that you enjoyed this post!  Please let me know your feedback in the comments section!

The next Mass Pikemen game will be on February 16th at 2 PM at the East Brookfield MA Senior Center (110 Pleasant Street), East Brookfield, MA.  We will be having a GASLANDS game run by Jared Burns.

8 the players having fun
Leif Magnuson, Chris Smedile, Chris Comeau, Jared Burns, and Mike Morgan having fun at Mass Pikemen!

CASUALTIES:

  • French:
    • 1 R35
  • German:
    • 2 Panzer IIC’s destroyed
    • 1 Panzer IIC evacuated
    • 1 StuG III Ausf. A
    • 1 Panzer IVD


“What A Tanker” Eastern Front battle at November Mass Pikemen Session

On November 10, 2018, the Mass Pikemen held their monthly gaming session with a game of What a Tanker set on the Eastern Front in 1942.  The scenario was a 1942/1943 one where a Soviet force consisting of 1 KV-1a heavy tank, 2 T-26 M1939 light tanks, 2 BA-64 armored cars, and a couple of Gaz trucks was surrounded and needed to break out through the Axis lines. It was my first chance to get all of my recently painted tanks on the tabletop.

Initially opposing the Soviets was a German force consisting of  2 Panzer IVd tanks and a 1 Panzer 38(t) tank.  Reinforcements were staggered for the Axis, and they consisted of a 1 Panzer IIIN tank, a Hetzer tank destroyer (Jagdpanzer 38), and an Italian M13/41.  It was imperative for the Soviets to exit the other side of the board with the KV-1 and the two trucks as quickly as possible.

The Germans moved on first – and one of the T-26’s was able to early on get a couple of shots in on one of the Panzer IVd’s, with the second one knocking it out.  This was a fun event for 7-year old Jack Burns who was playing in his first war game ever.  He was so excited to knock out the German tank.

1 Mike's Panzer IV death
The Panzer IIIN moves on the board as a reinforcement.  The second Panzer IVd takes advantage of its burning comrade’s smoky wreck.

The Soviets KV-1a was slow to move forward, and the T-26’s outran it.  The Panzer 38(t) moved up to the ruined factory and took aim at one of the T-26’s in the open.  It fired, and missed the Soviet.  Returning fire, the T-26 hit and knocked out the Panzer 38 (t).  Two down for the Axis!  Shortly after this, the other Panzer IVd peeked out from behind its brother, only to suffer the same fate from the plucky T-26.  Three down now!

2 Chris, Jared, Jack
Chris Smedile, Jared Burns, and Jack Burns advance their vehicles.  The Panzer 38 (t) is behind the wall in the center in a good defensive position, facing the T-26 that was to knock it out.

3 Chris C, Mike, Jared, Jack
Chris Comeau and Mike Morgan (and later myself) played the Axis.  This view shows the length of the board the Soviets needed to cross.  Each fighting vehicle had a magnetic dashboard, and its own colored dice.  Command Dice were always white though.

Let me add a side note here on my rules modifications for this scenario.  What a Tanker does not have rules for either armored cars or trucks.  I modified them here for the armored cars, which I made Fast (easier to always move), and Small (tougher to hit).  For their Armor, I only gave them a 1, which meant that any hit from a tank gun would very likely be enough to kill the BA-64.  As the BA-64 only had a machine gun, I gave them 2 modified Strike dice.  The modifications were twofold.  First, their range was 24″ (half that of the tanks).  Secondly, the BA-64’s would hit on a 6, but the only likely result of such a hit would be to force the target to button up if it was not already.  If the BA-64 player rolled double-6’s, I would allow 2 strike dice.  So the BA-64’s were harassers at best.  I had the Gaz trucks move last, with 2 D6 of movement (no command dice).  If they were hit, they were destroyed.

4 Chris celebrates his kill
Chris celebrates his second kill, while the Panzer 38 (t) burns.  You can see here behind the BA-64’s a D12, which I used for initiative rolls instead of D6’s and re-rolling for ties.  It worked much easier and was much less confusing.

Back to the battle!

At this low point, they got reinforcements in consecutive turns.  First, the Panzer IIIN came on in turn 2.  In turn 4, the Axis got the Hetzer and the M13/41.  The tide of battle was turning.

5 Hetzer chases KV-1a
The Hetzer ignores the BA-64 and sets out to hunt the KV-1a.

The Panzer IIIN moved up to the hill, awaiting the T-26 and a truck.  The German successively took both out, leaving the Soviets only with one T-26, one truck, the KV-1a, and the BA-64’s. The M13/41 rolled badly, and hid behind the Panzer IVd wrecks for better dice rolls, even taking humiliating fire from the BA-64’s that caused it to have to button up.

5 truck death
In the foreground, a Gaz truck burns.  The crew of the Panzer IIIN behind the hill looks at the burning T-26 in front of it.  In the left center, the Panzer 38 (t) burns, as do 2 Panzer IVd’s in the right rear.  On the left, the showdown between the lumbering KV-1a and the Hetzer is about to begin.

The Hetzer moves fast, and tried to move around to the rear of the KV-1a.  It succeeded, and missed with its initial rear shot.  The KV-1a immediately turned the tables, turning 180°, and rotating its massive turret towards the diminutive tank destroyer.  The Soviet again got initiative, firing not once, not twice, but three times – and unbelievably missing on all three attempts!  The saving grace for the Hetzer was its Small characteristic, which meant the KV-1a needed a “7” instead of a “6” to hit.

The Hetzer then got initiative and rolled its Command Dice well enough to fire but not to maneuver towards the Soviet behemoth’s vulnerable rear.  It decided to take a chancy shot at the frontal armor of the KV-1a.  It got 5 hits on 7 dice (needed a “5” or “6” to hit).  The Soviet player got zero saves, and the KV-1a was knocked out.

6 KV burns and truck faces m13 41
The KV-1a burns on the right, while the Hetzer and the M13/41 hunt the last truck (on the left).  The BA-64 attempted a ramming attack on the Hetzer to give the truck a chance to escape.

The BA-64 ramming attack did nothing to the Hetzer, which dispatched the armored car with one shot.  Meanwhile, the Italian M13/41 took out the last truck.  The surviving BA-64 was destroyed by the Italian, leaving the Panzer IIIN and a damaged T-26 in a showdown.  With the loss of the trucks and the KV-1a, the game was called an Axis victory.

7 final
Mike Morgan victoriously surveys the smoky battlefield.

The game was a fun one for winners and losers, with highs and lows for both.  Next time, I will probably give the Soviets a second KV-1a.

The next Mass Pikemen’s gaming session will be on Saturday, December 1st from 2-8 PM, at 110 Pleasant Street in East Brookfield, MA.  This is a change from our previous 3-9 PM time slot.  We will be playing What a Tanker again!

Please join us, and share your thoughts and feedback in the comments section below!

Frank Tank Rants

musings of a fat old bloke on tanks and wargames

Dragons of Lancasm

Games, miniatures, painting, books and more games

Tiny Painted Heroes

The Adventures of a lifelong Tabletop Gamer, Game Design hobbyist, and full-time Software Engineer

Home of the Grumpy Gnome

Tinkering with Artwork and Ideas

Steve's Paint Brush

Grimdark model making and mini painting

Wargamesculptors Blog

Life, Golf, Miniatures, & Other Distractions

Dead Dick's Tavern and Temporary Lodging

Life, Golf, Miniatures, & Other Distractions

Guru PIGS Blog

Guru's thoughts on wargaming, life, and the universe!

Wisely lead... without a head!

History, Miniatures and Wargaming

Kuribo's Painting

Fallout, MESBG, and Hellboy Painting, Terrain, Dioramas, and Battle Reports

Don't Give Greg Ideas

Seriously, just don't

War Across the Ages, and other dark horrors

A discussion of miniatures collecting, painting and gaming.

Classic Warhammer 40K

Painting diary focused on Warhammer 40K 2nd ed., 5th ed. WHFB, related GW games, and miscellaneous whimsy

Colonel Mustard

WW2 Modelling in 1/72 Scale

Bogenwald

Random painting and terrain making.

Pat's 1:72 Military Diorama's

Scale diorama tips and ideas

Arcade Dreams

Building the Arcade Dream

P.B.Eye-Candy

Phil's 20th century wargame pages

SP's Projects Blog

A futile fight against entropy or 'Every man should have a hobby'? Either way it is a blog on tabletop wargames, board games and megagames

30mmdave

Wargaming Plausible reality?

Faith&Steel

dave's gaming adventures: faithandsteel.wordpress.com

The Imperfect Modeller

Miniature Figure Painting and Diorama Modelling

Double Down Dice

Painting miniatures and rolling dice!

Just Needs Varnish!

My ongoing wargames projects!

miniaturepopcorns

Sculpting some worlds

Despertaferres

Wargaming with the ability of a dull nine year old

Dawn of the Lead

Miniature wargaming and the occasional zombie

Rantings from under the Wargames table

Wargames, Figures, Sculpting and Converting Miniatures

Simple as War

Miniatures & Terrains

Buck's Blog

Life, Golf, Miniatures, & Other Distractions

IRO aka Imperial Rebel Ork

- I model - therefore I am -

Azazel's Bitz Box.

Painting, Modelling, Miniatures, 1:6, Games... Whatever else I find interesting.

diggingforvictoryblog

Smallholding and Wargaming.......not always at the same time!

Shamutantis

Nørdblog numero uno

Harry Heckel

Writer/Game Designer