This blog is titled “Life, Golf, Miniatures, and Other Distractions” – and it’s not often that it’s about anything but miniatures. This post will definitely concern miniatures – but as the title suggests, a few other things are going to get added in after the miniature stuff.
Why you ask? Well, the long and short of my current predicament is that a member of my household is near the end, and I need to deal with the ramifications of that. It’s sad, but it’s time.
Oh, sorry, not a person, it’s my PC that is on its last legs – and it is already quite legless.
My PC has had multiple thermal shutdowns over the last few weeks – while in sleep mode! Argh! I decided that I would need to get a new desktop before I lose all my hobby work (plus everything else that is on the thing). I prefer a PC over a laptop, though I still look at WordPress on my iPhone and my iPad. I just compose on a PC. Anyways, I will be without a computer shortly – so I needed to get a post in. Therefore this post will cover some miniature stuff first and some fun (I think) extras – I hope that they will be somewhat interesting for you.
Plus, this is my largest list of hashtags ever (I think so anyways).
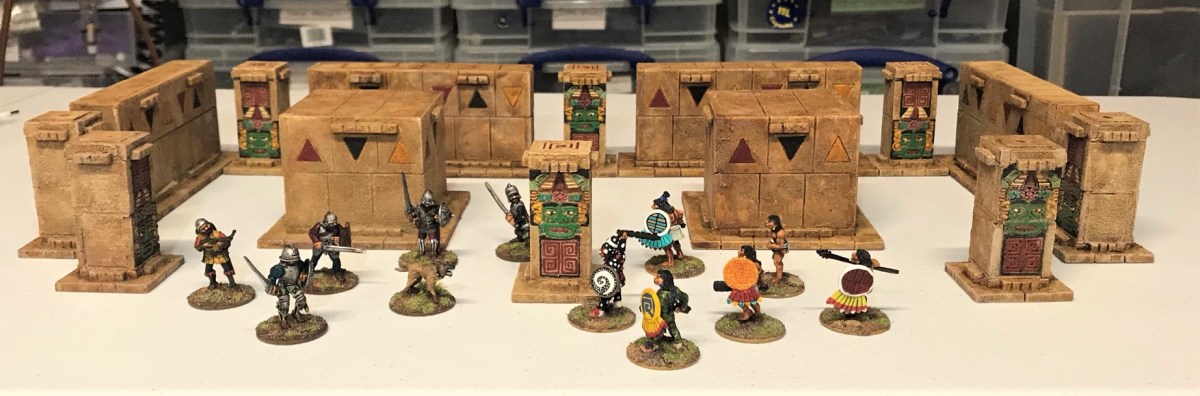
In my last post, as part of “Mark’s Aztec Building Challenge Contest” (which you should enter soon by the way!) I discussed how I assembled and painted 8 Temple Columns for my Aztec games of Feudal Patrol™ using my Civilizations Collide supplement. I had moved onto the MDF kits over my resin stuff as temperatures had been too cold here in Massachusetts to use rattlecans to prime outside. I truly enjoyed building and painting the MDF of my last post, and I certainly still have a love for using chinchilla dust.
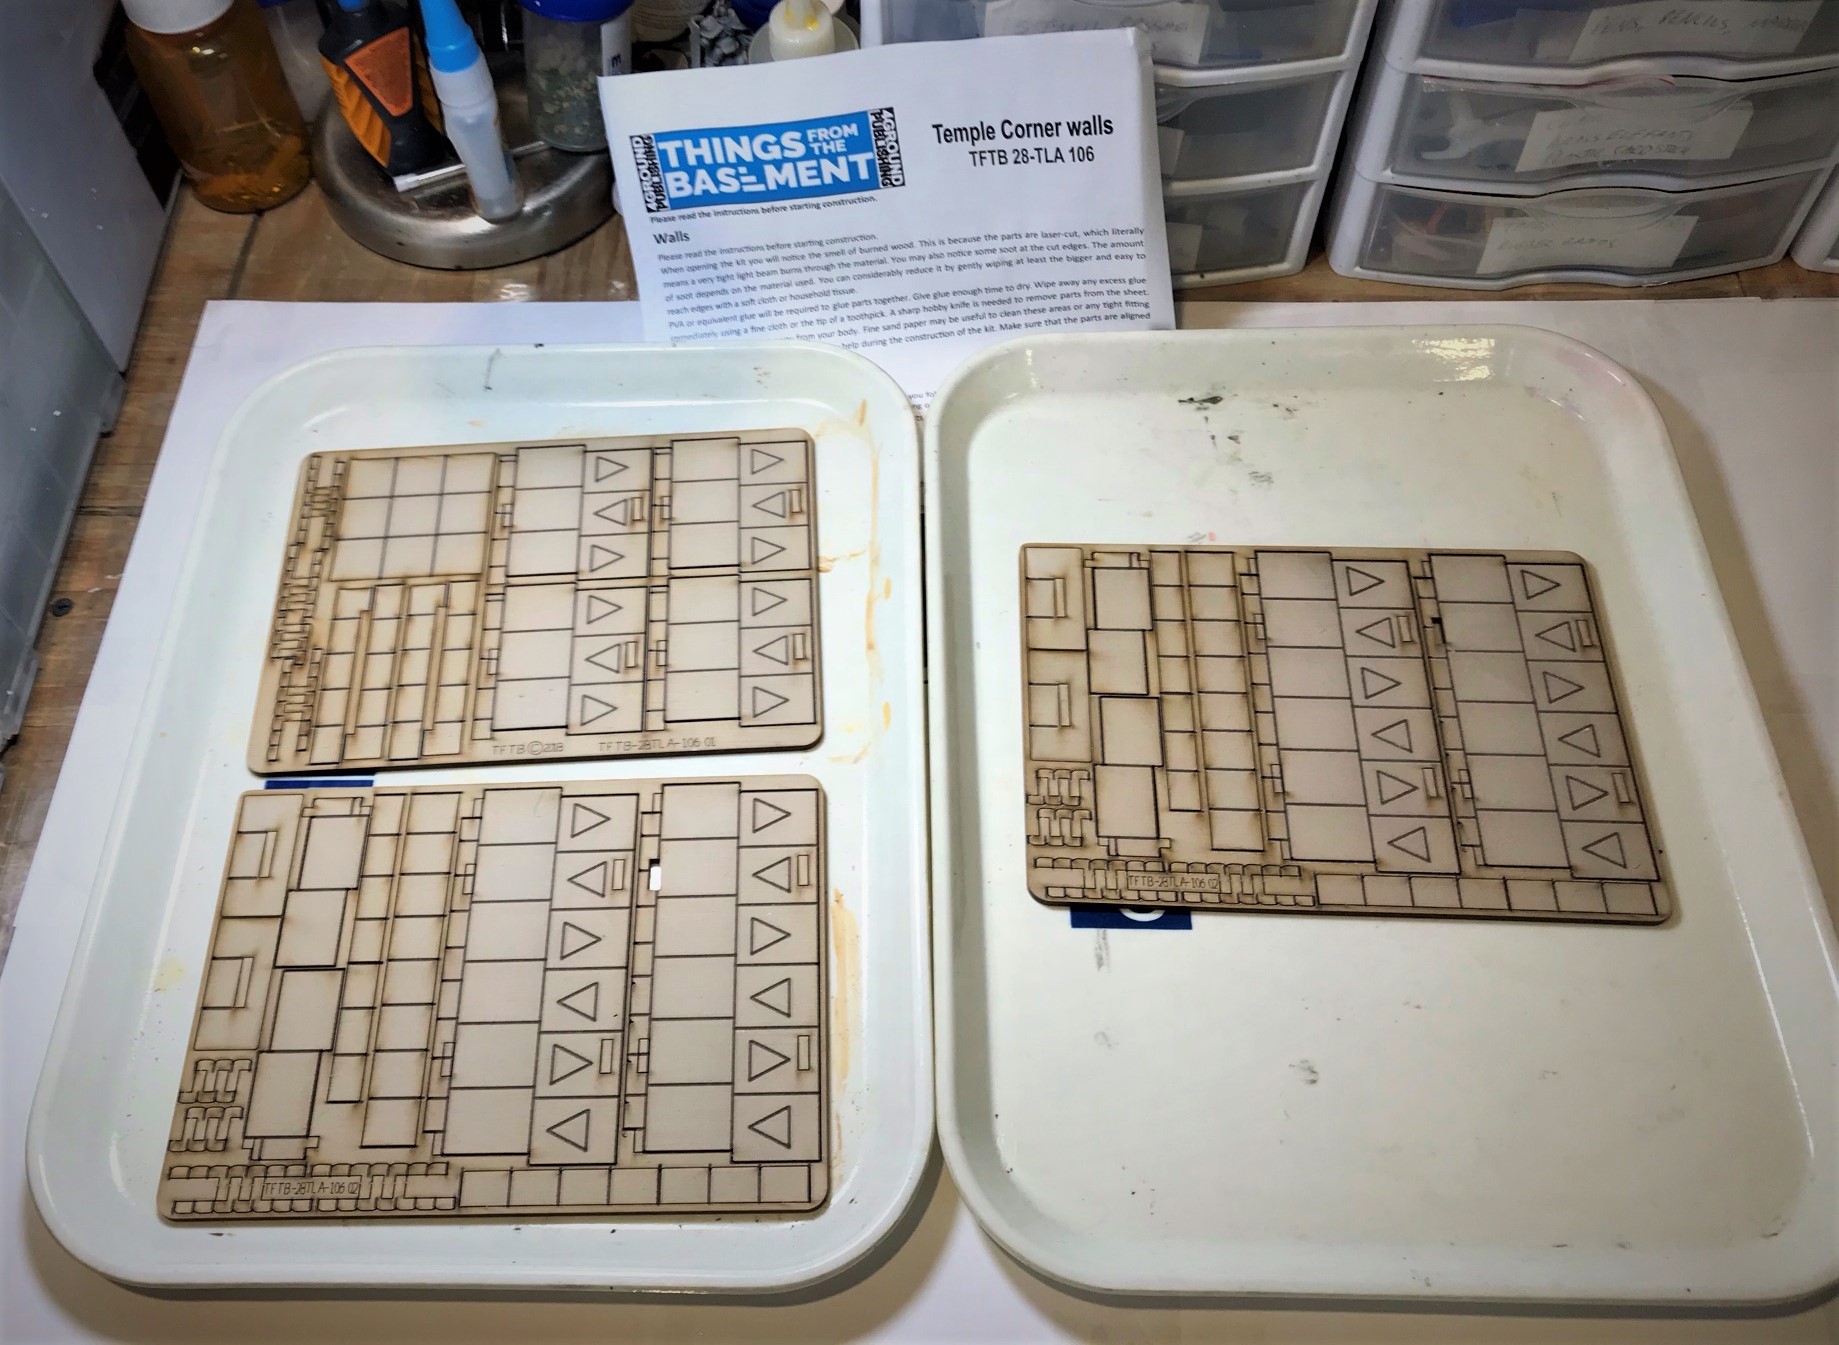
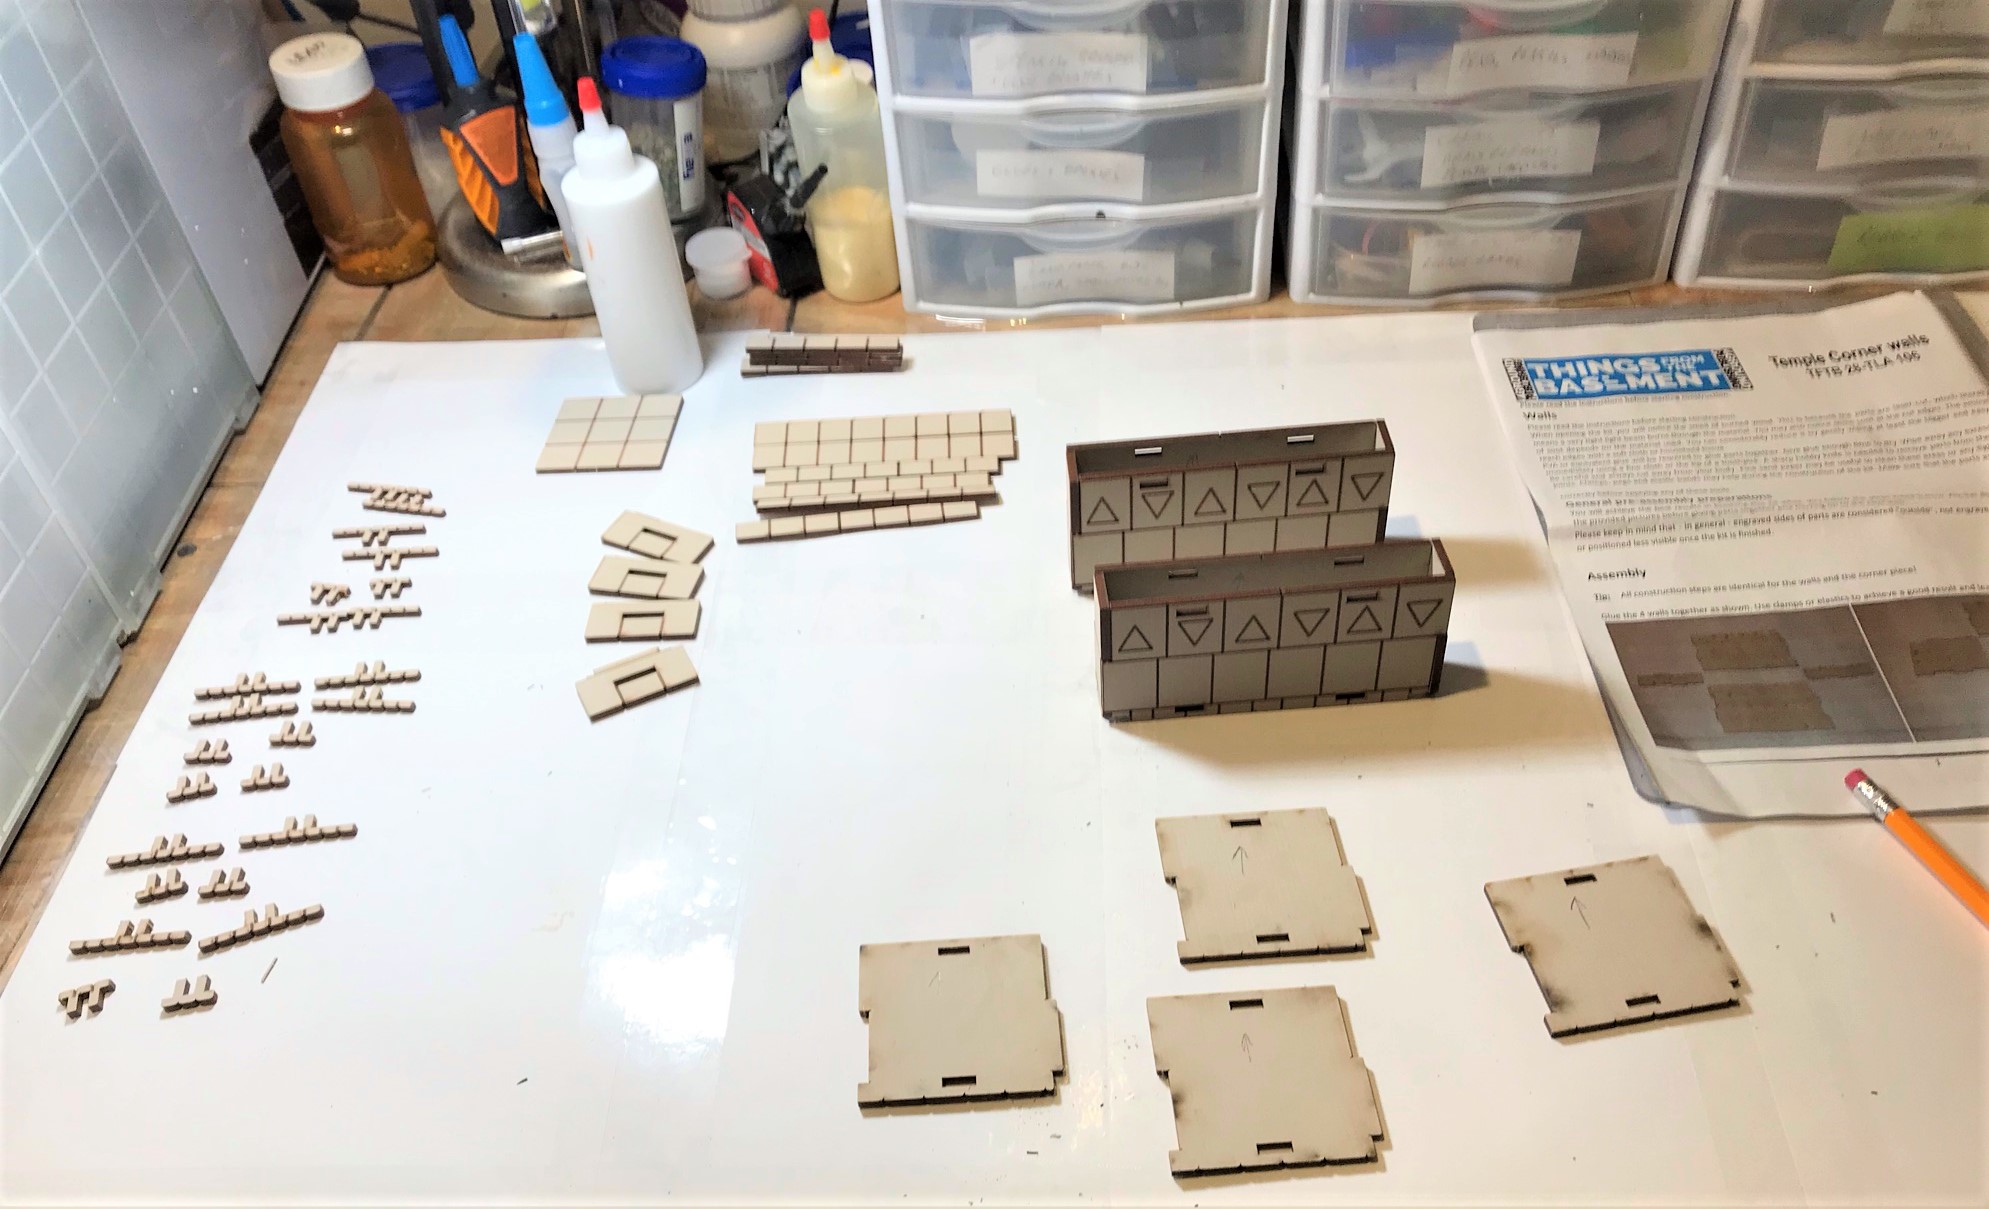
My next MDF effort would be two kits of the “Temple Corner Walls” – from Things From the Basement via 4Ground via Badger Games (see it here). Each kit had one square pillar-like structure and two walls – six in total. The kits are very nice and pretty easy to work with in my opinion. I basically used the second approach from last time – assemble first, then dust up with the chinchilla dust and paint them.
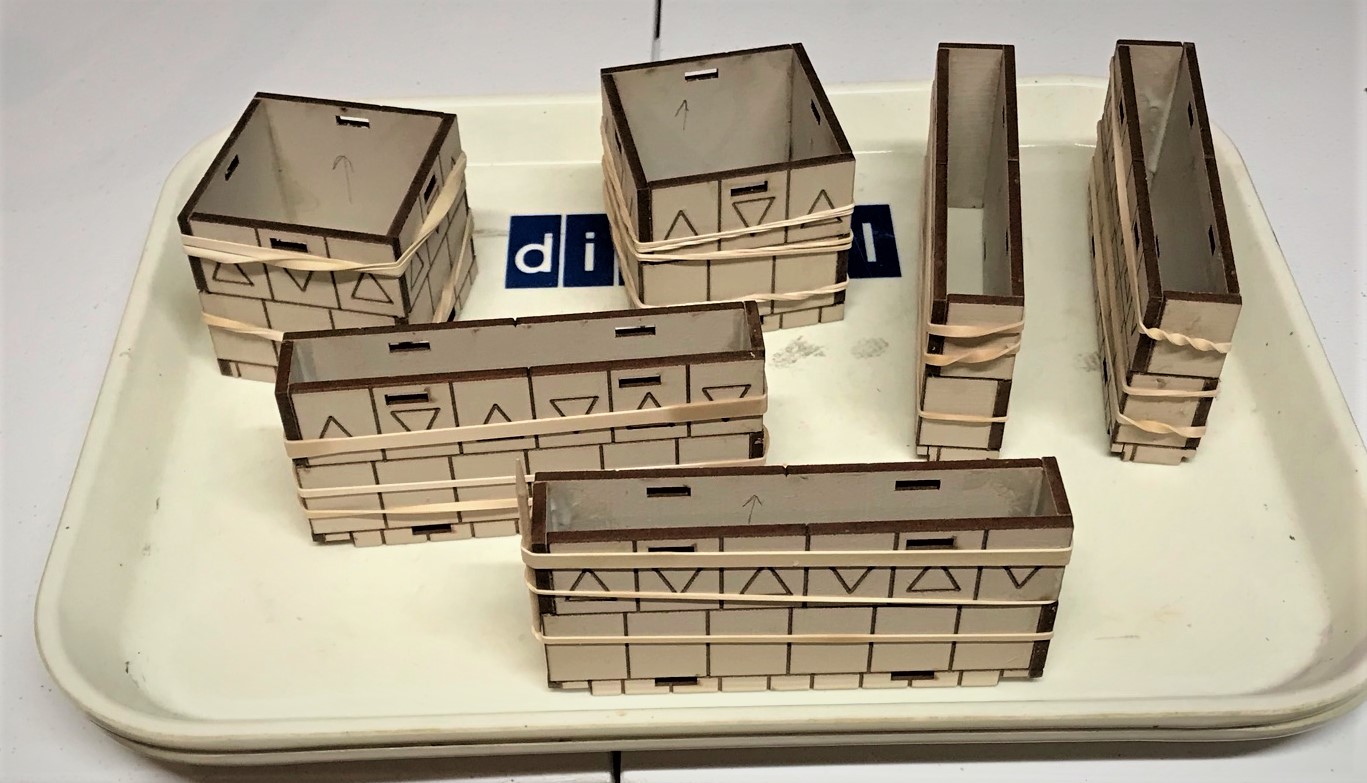
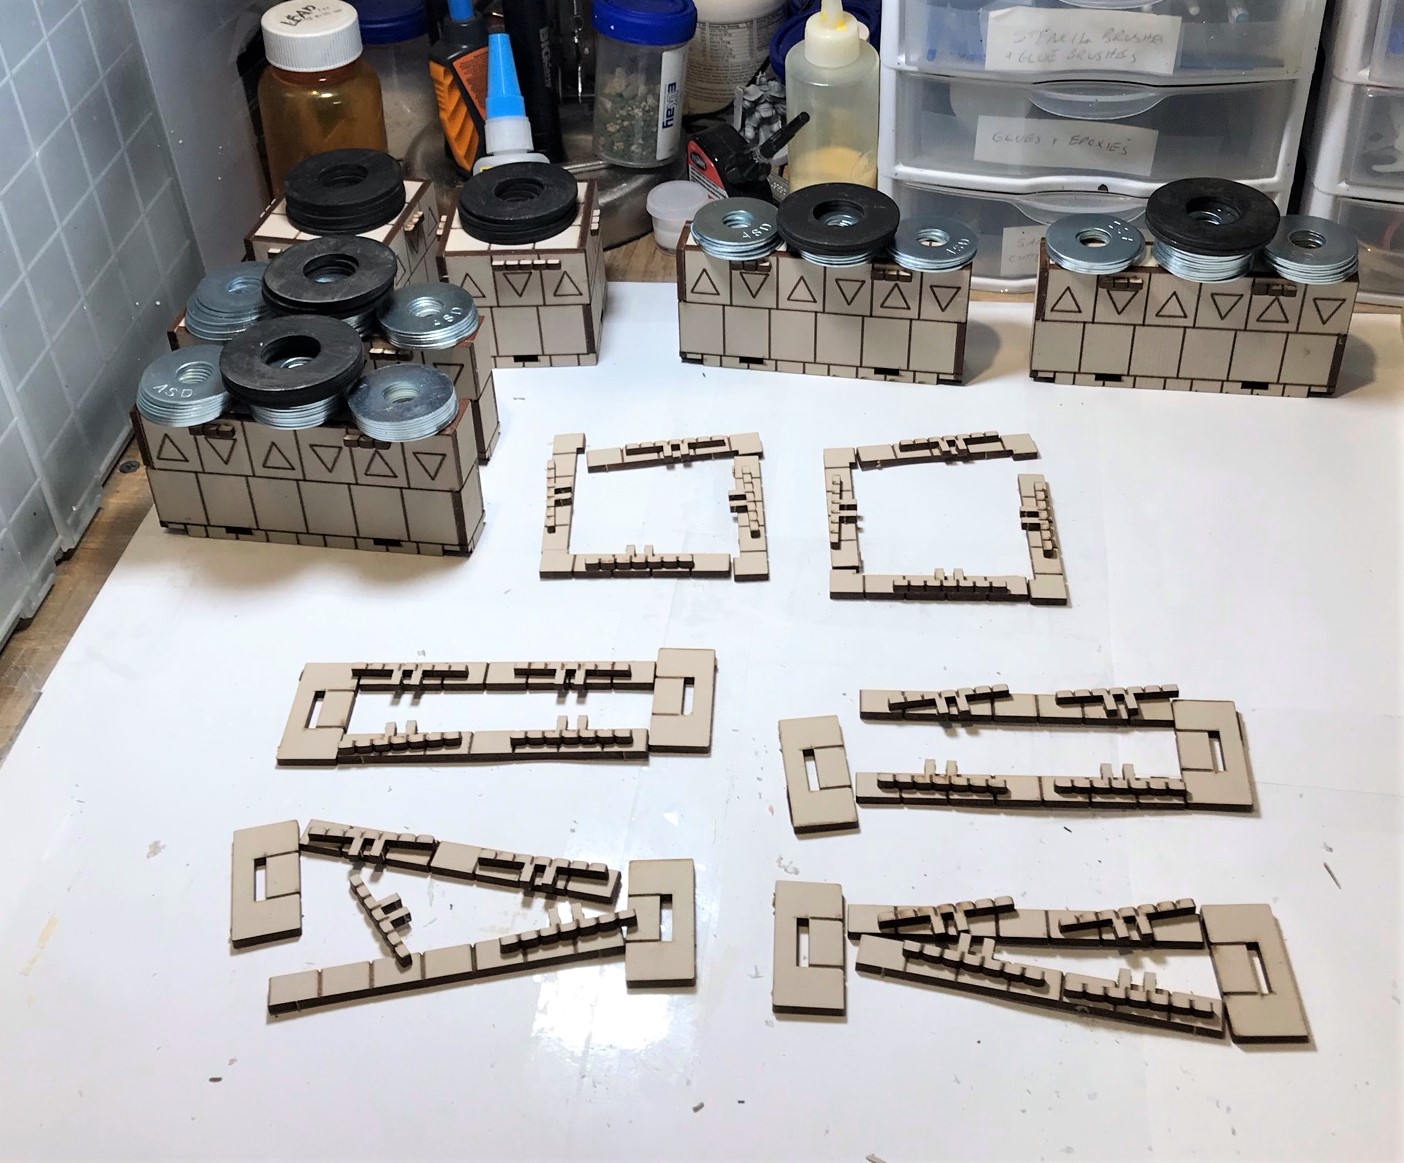
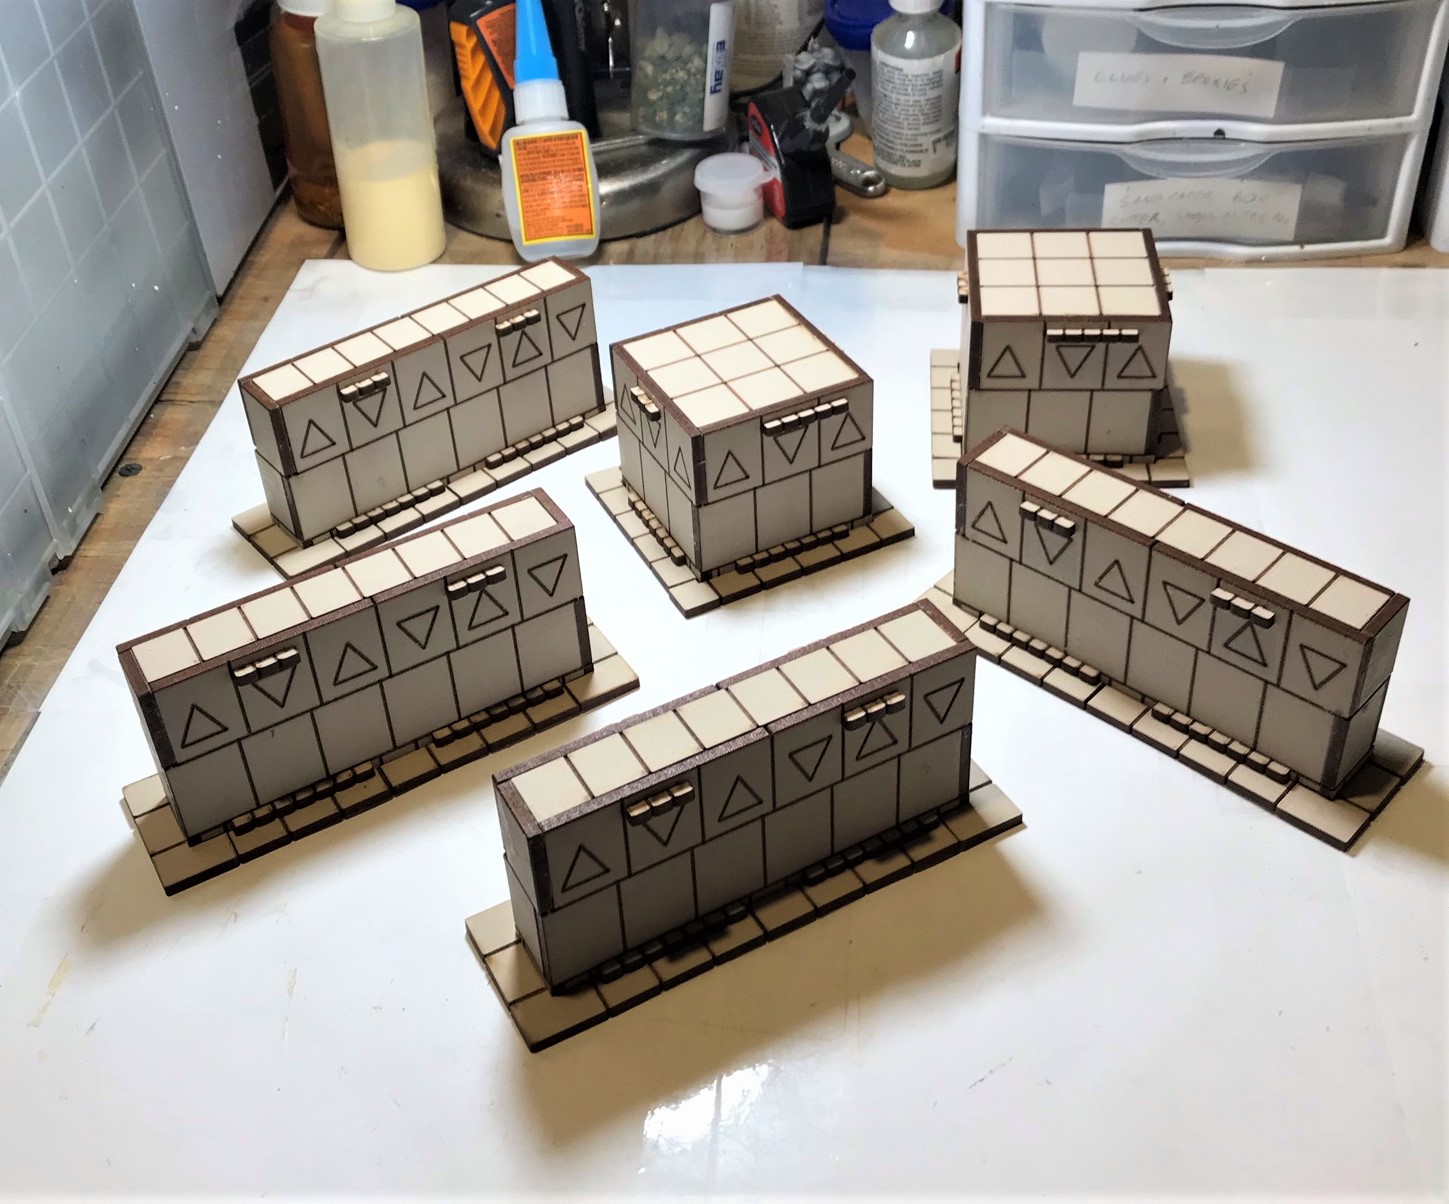
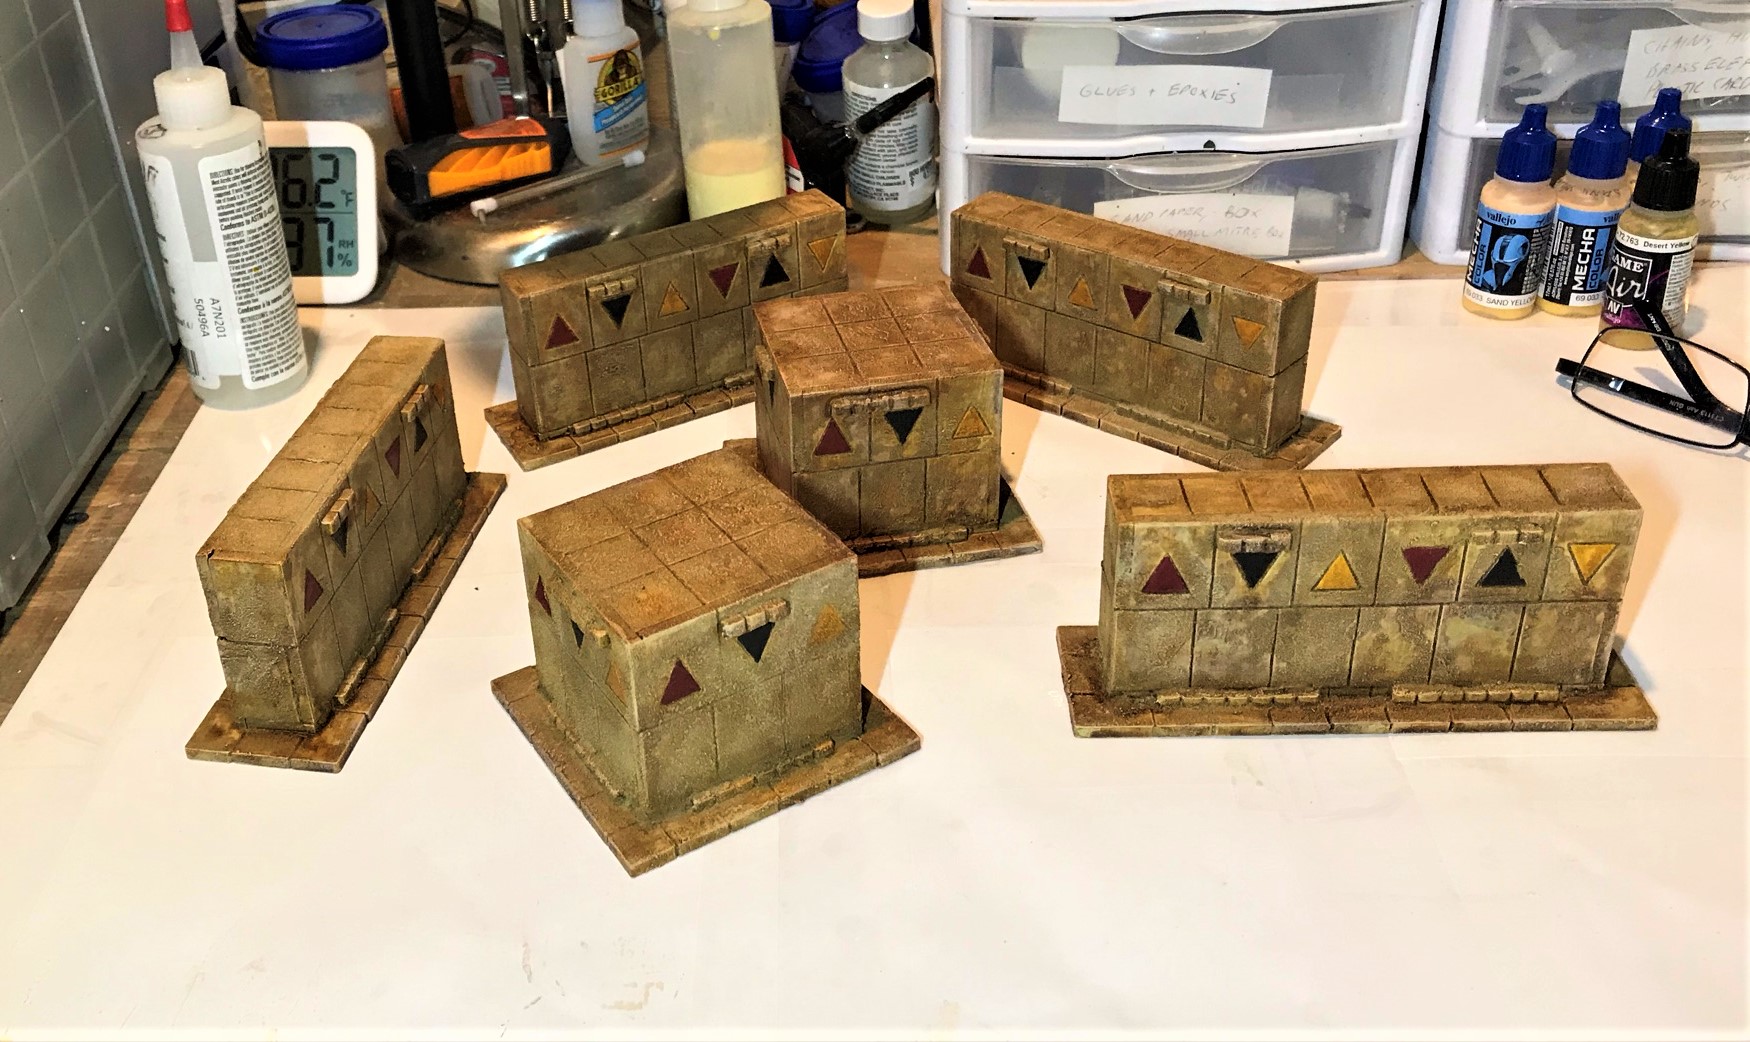
An example of one kit out of the bag after cleaning it off with a moist microfiber cloth.I have found with these MDF kits that it helps to dry fit first and organize the parts. Here you also see that I put an “up” arrow on the inside of the walls to help make sure that I did not assemble anything upside down.I assembled the wall sections first and let the PVA dry overnight.The next day, I added steel washers as weight to get the wall tops to glue flush to the previous step’s work. Then I glued to the bases (with the weights again).All of the “Temple Corner Walls” assembled and ready to get dusted up and painted.Here you see my early dry brushing after dusting – I use three colors to dry brush. I decided to paint the triangles in a red, black, and yellow pattern. You can see the paints that I used at the very end of this post.After I dry brushed the structures, I toned down the dry brushing with Army Painter “Light Tone”. Between the “thirst” of both the MDF and the chinchilla dust, I ended up using the better part of two bottles of the AP tone. Here, these are all complete.
I tried to use my spray booth again for some shots here but I did get some weird shadows and alternatively unwanted shine that I did not like. So I went with what you see below. I’ll need to investigate a light box (maybe).
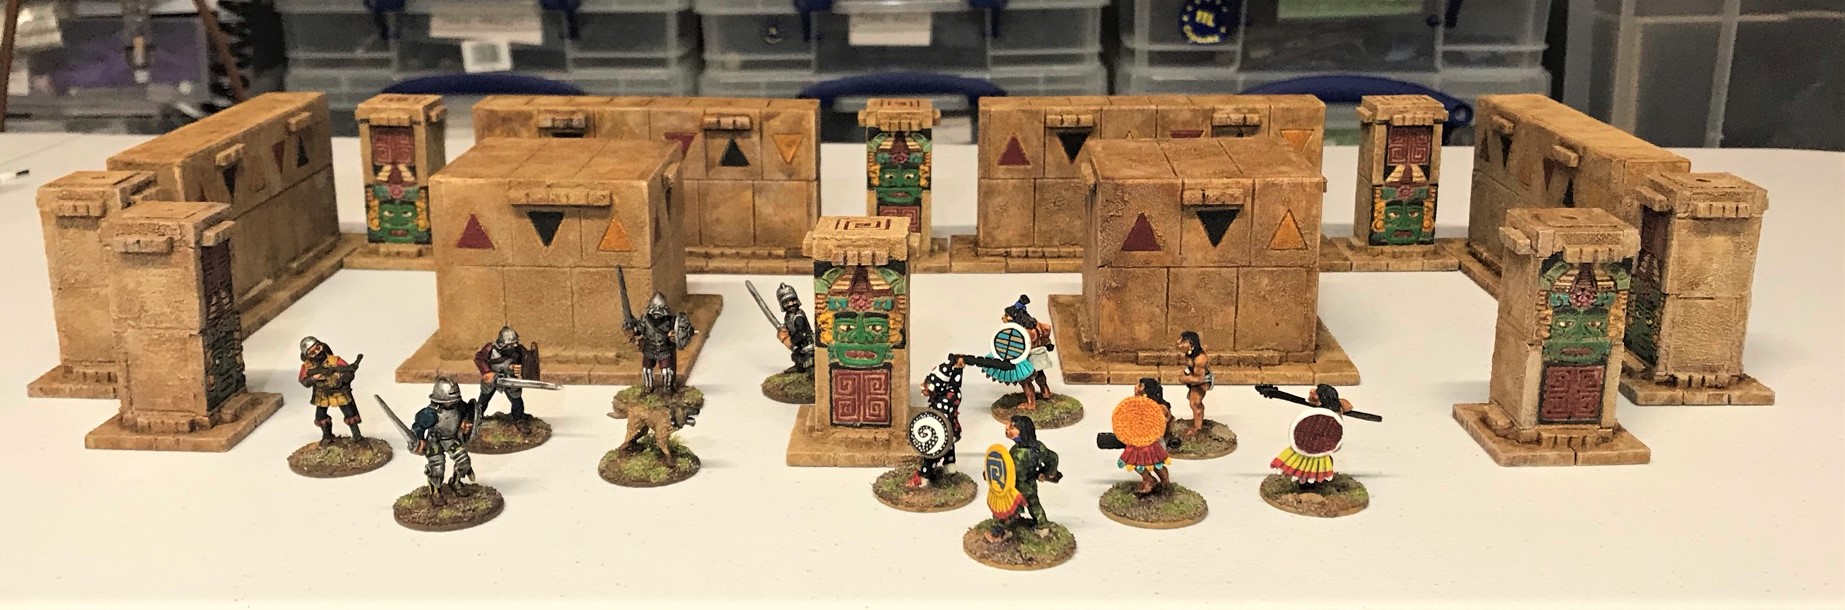
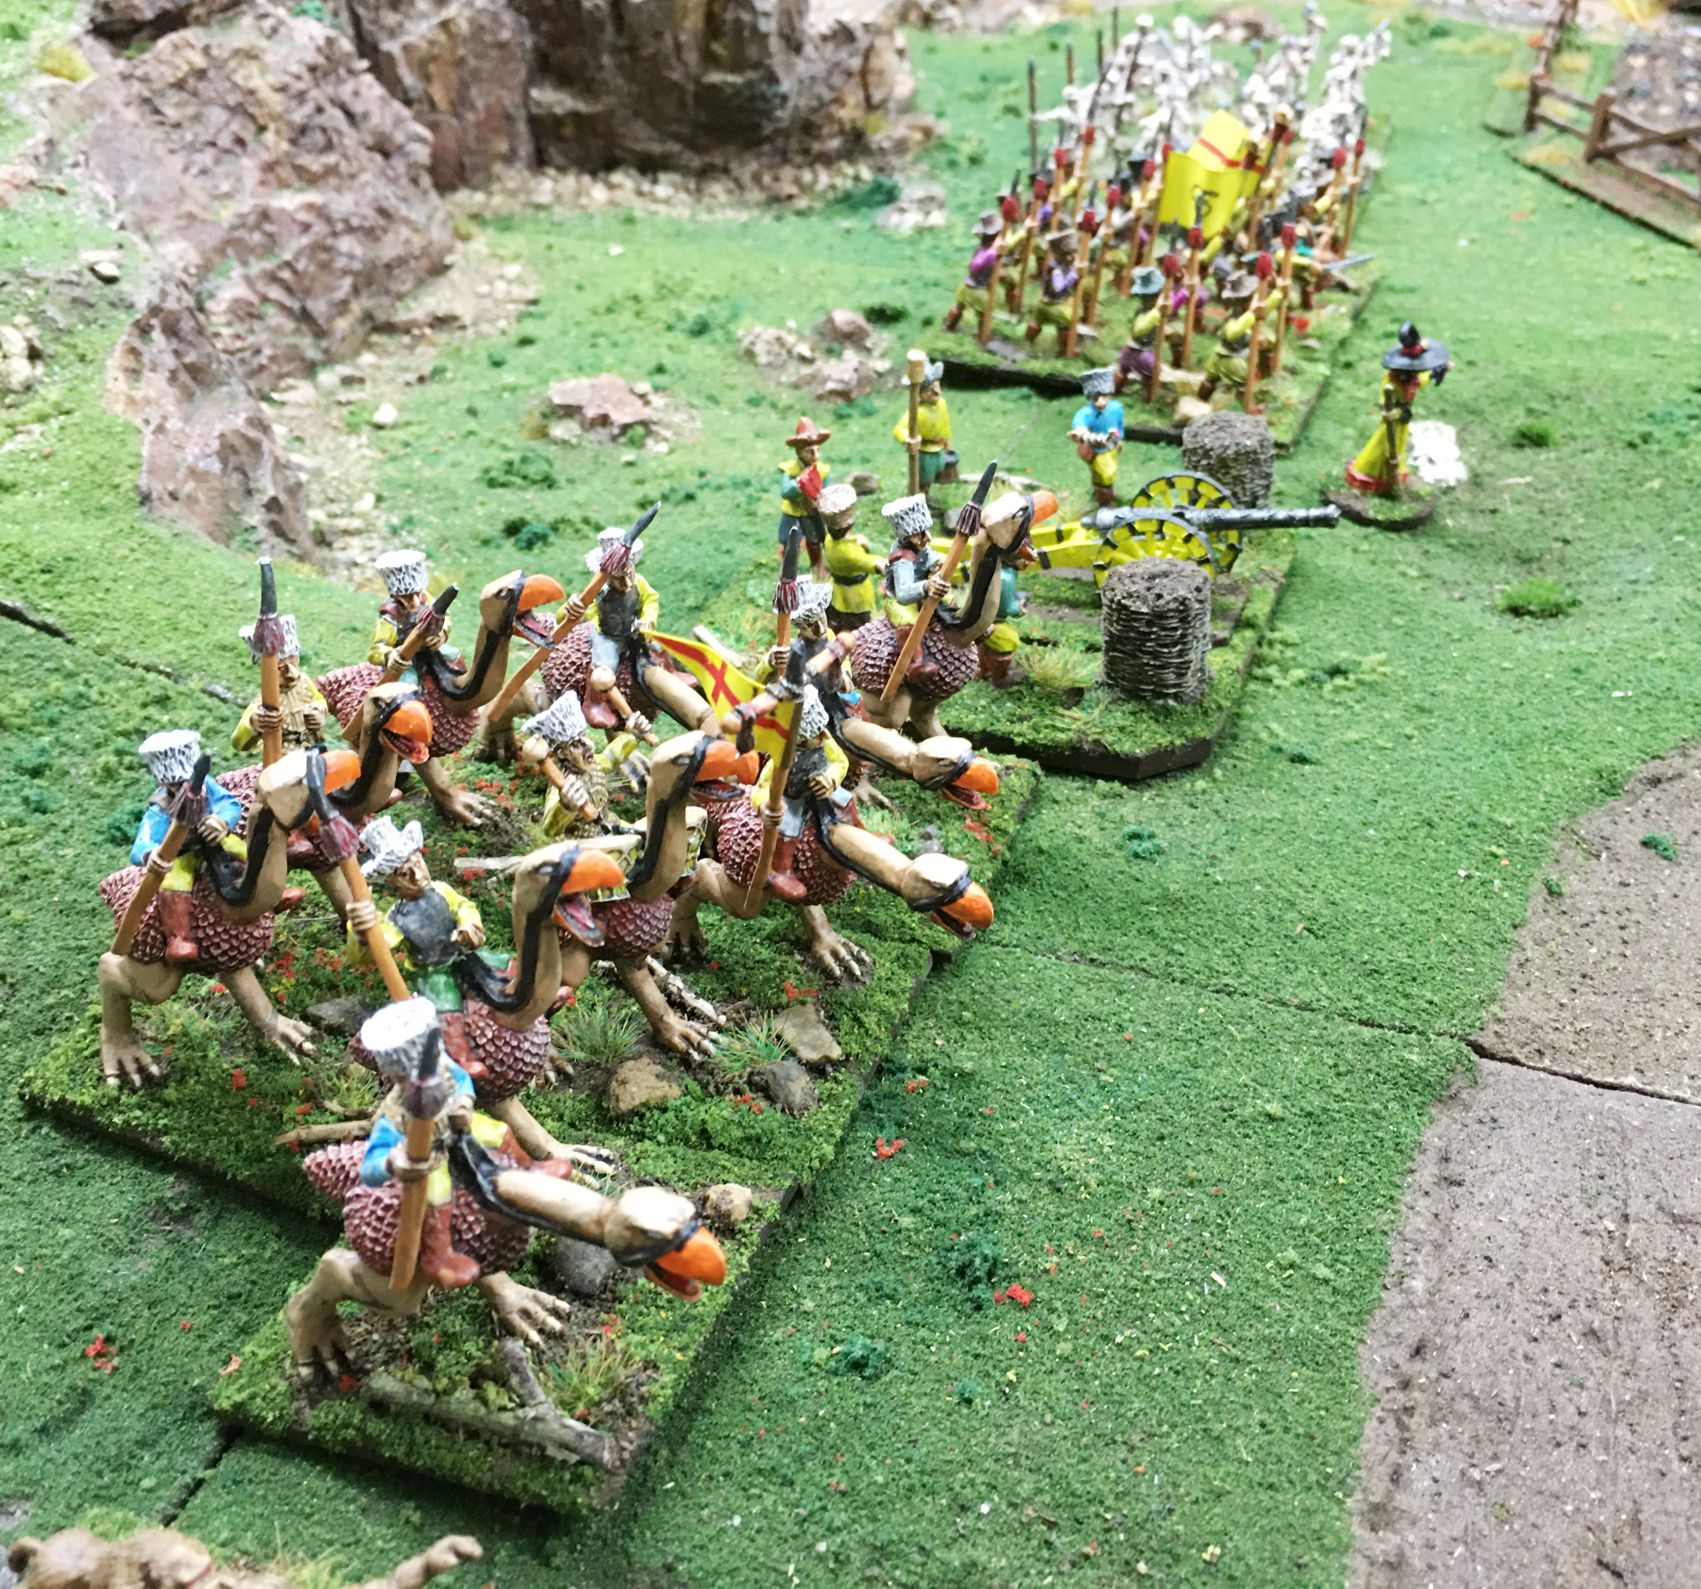
Here you see a fight among the “Temple Column Walls” (this post) and the “Temple Columns” (from my last post) between a squad of Conquistadores (and a wardog) against an Aztec squad and a supporting warrior priest. I think that I was successful at getting all to blend in well.
So, the Temple Corner Wall structures of this post are part of two “challenges”. The first is mine as mentioned earlier – “Mark’s Aztec Building Challenge Contest” – in which I will give away free prizes to blog followers for being the closest to guess how long it will take me to finish all these buildings. The second is from Ann’s Immaterium, and is called Ann’s “Paint the Crap You Already Own” challenge. These definitely count there – and I hope there will be more for this April challenge.
I have ordered some more “Light Tone” – and with my remaining MDF I’ll need it. In the meantime, as an update – it warmed up here this week so I was also able to get my outside priming done – see below!
I was able to prime this week! I can now vary what I decide to complete.
I also am planning an update to my Civilizations Collide supplement, which will have rules for the falconet and some new scenarios (in addition to an overall update). So that might slow up my progress, as also golf might (haven’t played yet this year though). I also have been – wait for it – GAMING!
Well, remotely anyways. I was lucky enough to play in a Combat PatrolTM game last Saturday via Zoom with Sally4th’s Chris Abbey. Chris (in the UK) set up a James Bond game based on the 1977 film The Spy Who Loved Me that he called “Nobody Does it Better” (Carly Simon song of the movie). It featured the scene in the bad guy’s (Stromberg) supertanker interior hold (that held a captured US sub). The action focused on the scene where escaping British, Russian, and American crews fight the Stromberg goons to stop a nuclear launch. We had US and UK players – and I had James Bond. Our objective was to advance up the gantry and throw a satchel charge at the control room doors and blow it open. We had a lot of twists and turns in the game – James Bond’s satchel charge misfired, and so did a Stromberg flamethrower that would have fried him. A last second satchel charge throw from the Americans missed, but the explosive charge slid up to the door and blew it! Success! Notably, I had invited our blogger buddy TIM who got to watch the game – and it was fun to share the experience with him.
Take a look at the tabletop below – amazing!
The tabletop before the game.Chris Abbey GM’s the game exceptionally well. We were moving up the gantry on the left – the control room was in the center of the far end.
I also had two other nice surprises. The first was in the mail from Buck Surdu – who sent me a couple of Wars of Ozz shirts. I did get in the Kickstarter for it (and the figures are available from Sally 4th and Old Glory in the US) -and the next project I plan to do is paint these figures.
Love these shirts and I will be happy to be wearing them at future gaming events! I won’t be bringing Caesar (our nearly 27 year old cockatiel) – he hates dice.
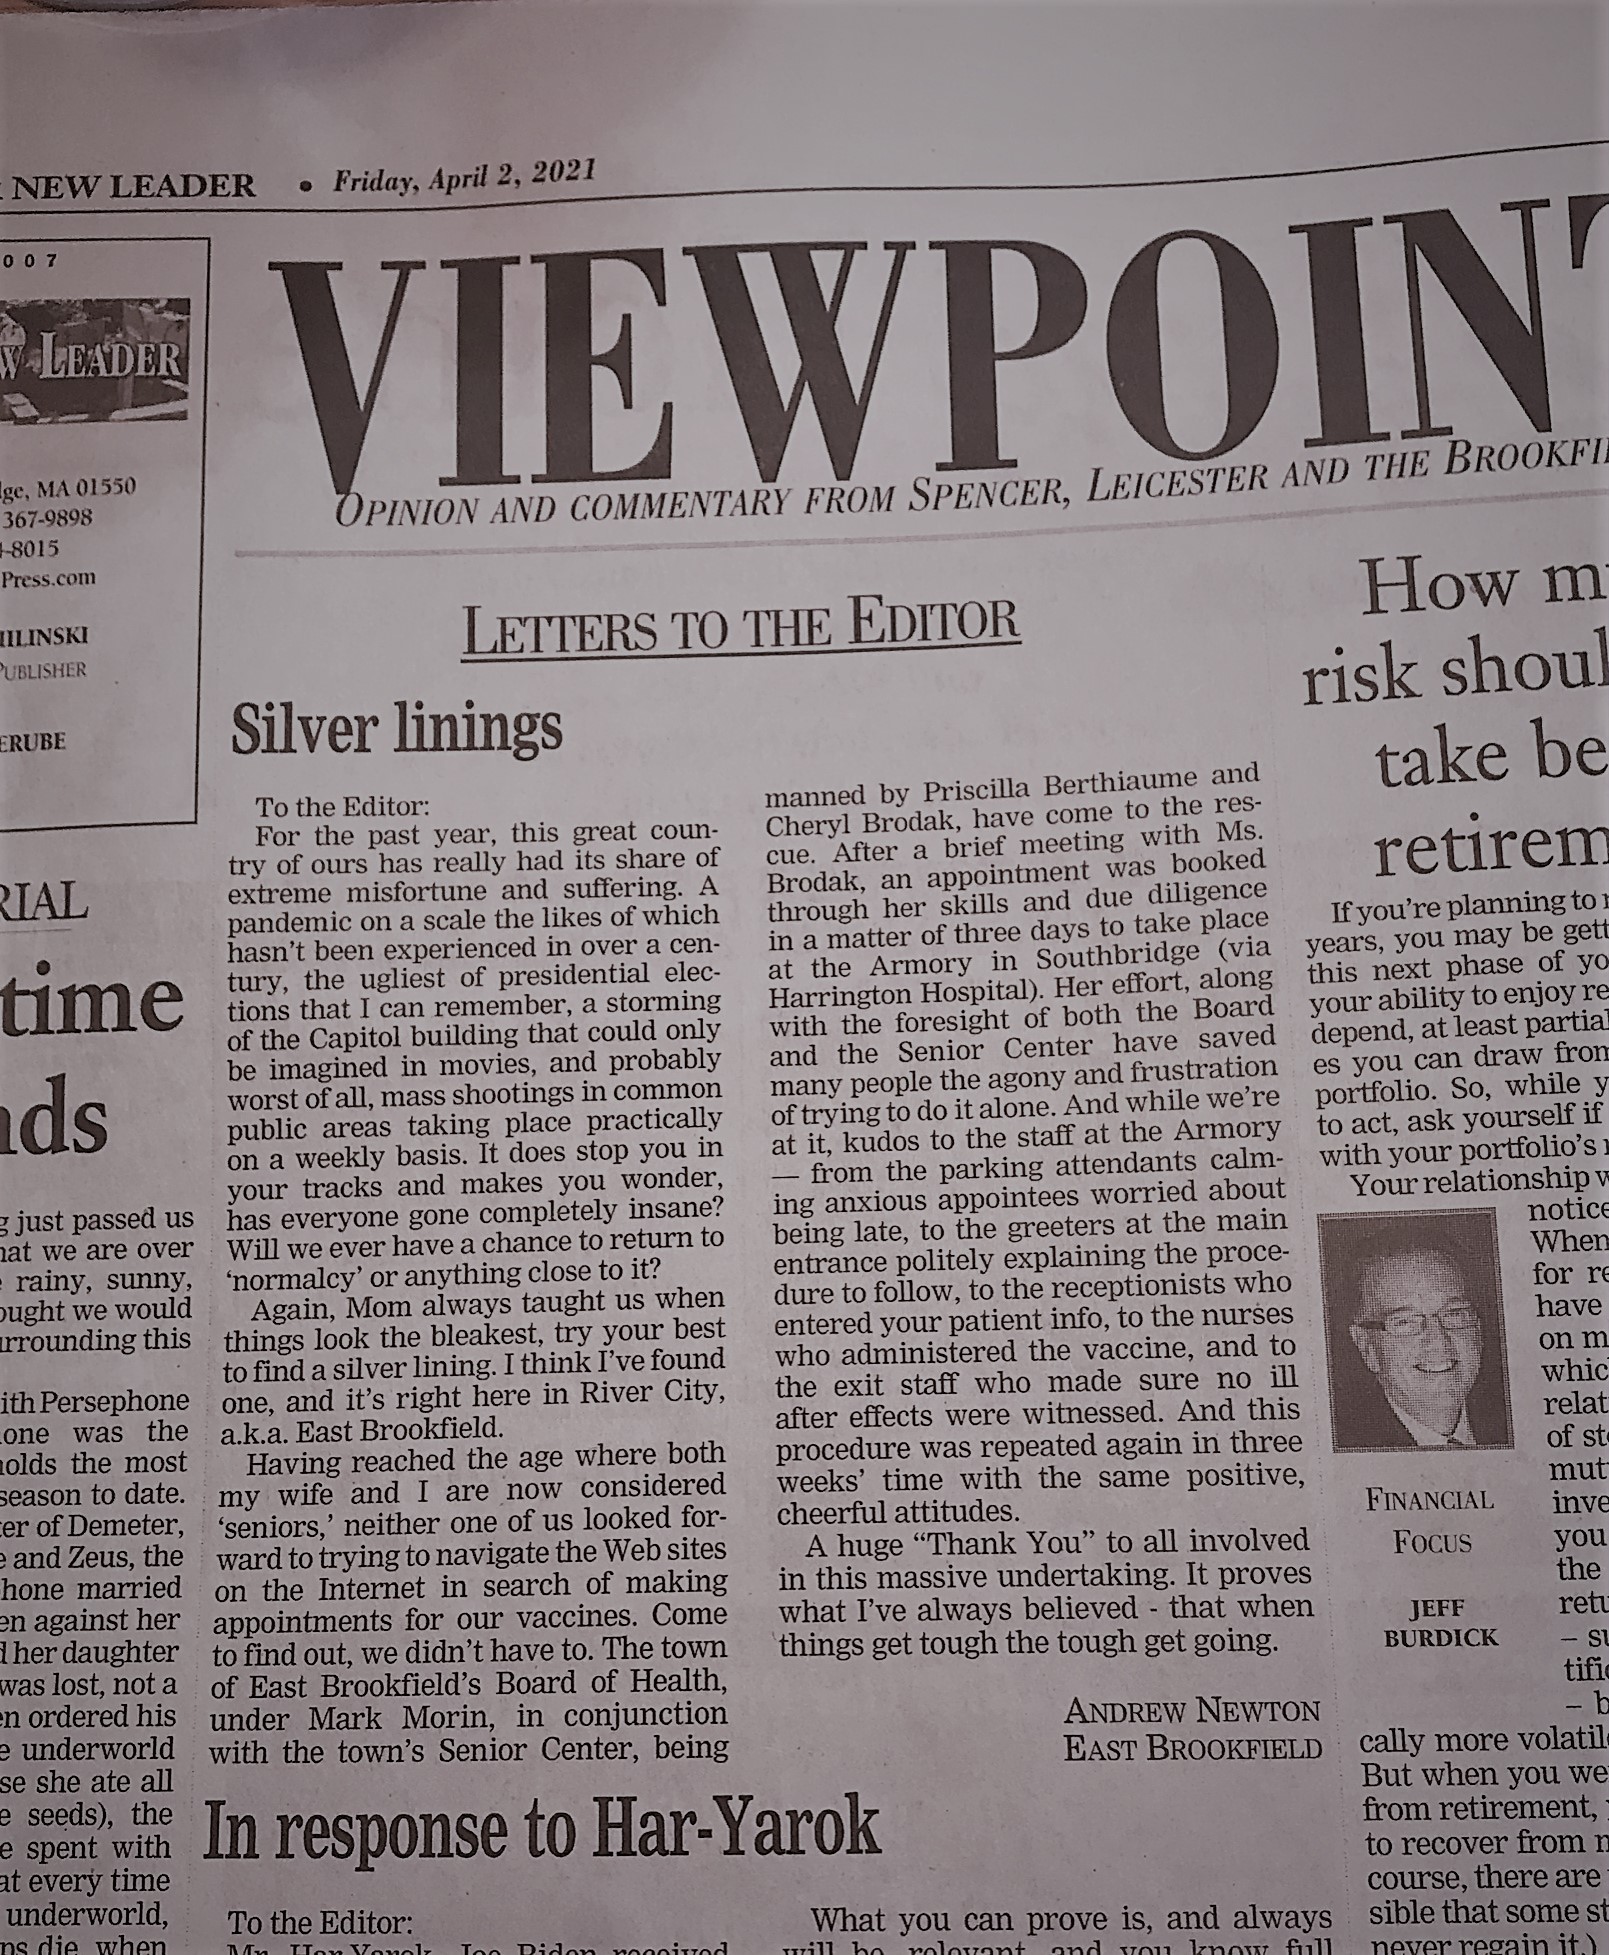
The second surprise came in our local weekly newspaper (see below). I’ll let Andy Newton’s words speak for themselves, but given the last few months, this was a heartwarming bonus for us.
From The Spencer New Leader
And though my computer is a problem, I did get the email from the Commonwealth of Massachusetts that has allowed me and my wife to get our first “jabs” this weekend! Take that COVID-19!
So, until my computer situation is better – I’ll be painting and following up on my iPad. Maybe I’ll be back this weekend – in any case, let’s discuss this post! So feel free to let me know your thoughts and comment – and to enter the contest. Take care all and thanks for looking!
Miscellaneous details and references for those interested in that sort of thing:
Previous posts on games, units, and other projects for my 16th Century Spanish Conquest supplement for Feudal Patrol™ – “Civilizations Collide”
Aztec Temple Corner Walls (Plus Some Life & Other Distractions Stuff Added In) (this post)
Perro de Guerra (Conquistador War Dogs). 13 figures total: Outpost Wargames Services #CONS6 “War Dogs” (8 war dogs); Eureka #100CON13 “Dog Handler and Dogs” (1 dog handler/pikeman and 4 war dogs)
Conquistador Foot Command, Crossbowmen, and a Couple of Officers. 11 figures total: Outpost Wargames Services #CONC1 “Conquistador Foot Command” (a leader, a banner bearer, a drummer, and a bugler); Eureka #100CON04 “Crossbowmen” (5 crossbowmen); and Eureka CONC1 “Conquistador Officer” and an unknown SKU officer (2 officers)
This looks to be an exciting new game! My buddy Buck Surdu has teamed up with Old Glory and Sally 4th on this project – the link is here. It launches on June 27th, 2020.
There’s a great description at Beasts of War here’s a snippet from that page:
Wars Of Ozz Kickstarter Coming Soon
The idea is that the rules here take Baum’s world and give it a little bit of a post-apocalyptic Earth twist. Things then get even more quirky with the addition of the “Madness Bomb” which got dropped into the mix during the “Last Great War” where survivors were mutated and chaos reigned until the Wizard finally arrived.
This then all distills down into a new mass battle game with miniatures sculpted and cast by the team at Old Glory. All of the miniatures are cast in lead/tin and are you’ll be able to buy armies to build up your mass of troops as well as characters to lead them into battle.
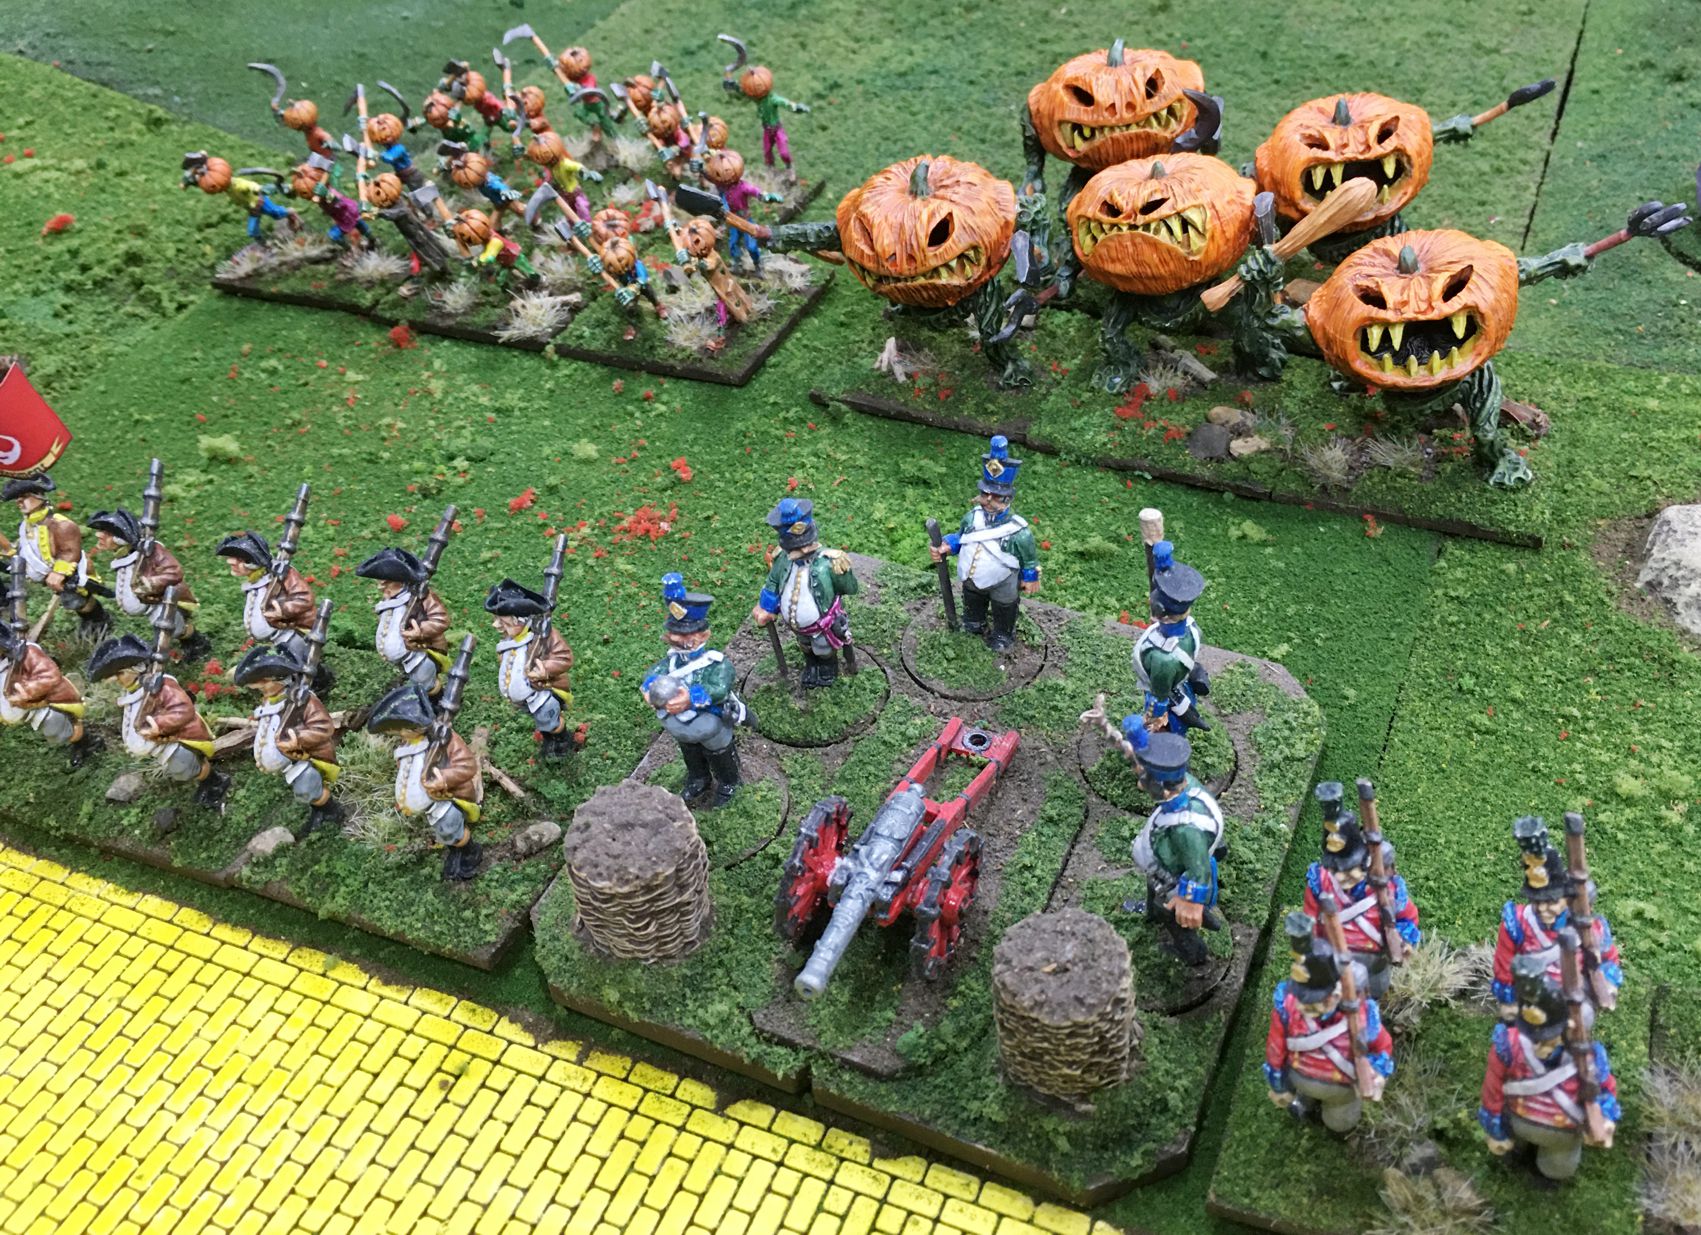
There is more there to check out, and the miniatures look amazing. Here’s a shot of the Pumpkin Men:
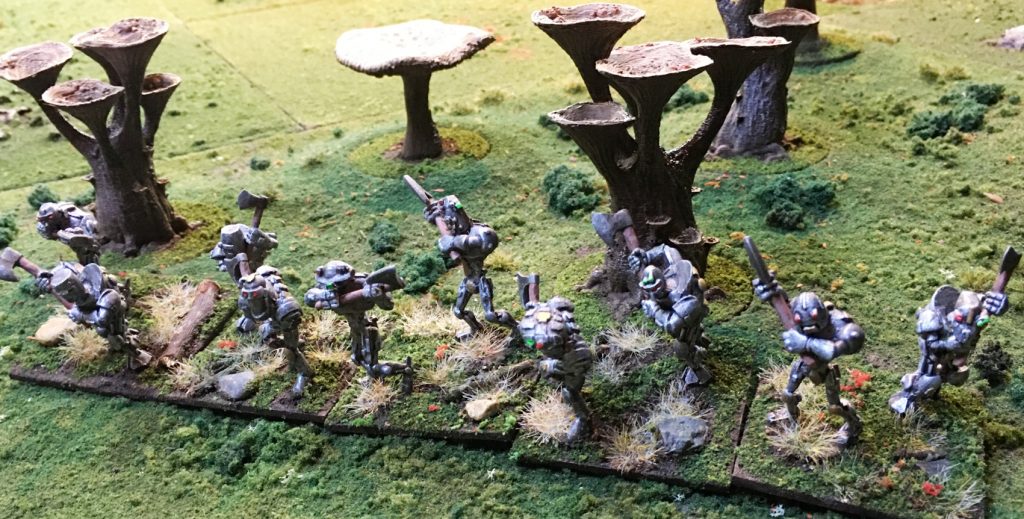
I love the Tin Men:
And whatever these are – they look cool!
Just to be clear, I have no financial stake in this whatsoever, though I will likely be diving in to get some of this stuff, as well as the rules.
Thought my followers would enjoy checking this out, what do you think?
This upcoming May-June will mark the 80th Anniversary of the Battle of France. The world was never the same afterwards. It was a cataclysmic defeat of the French Army – and there were many causes of it. Some key ones were that the leadership of the French Army believed that the lessons of WWI taught them that the key to victory was to fight a “methodical battle” with every aspect of the fighting and deployment of firepower tightly controlled from higher headquarters. By contrast, the German Army leadership preached the need of subordinates to act in accordance with the “commander’s intent”, and to take initiative down to the platoon level. French officers were taught to stay at their command posts and manage the battlefield at the highest level. German officers lead from the front, and made battlefield decisions in real time and exploited opportunities. Importantly, French losses in WWI curtailed the birthing and hence the availability of men of military age in 1940. German demographics managed to overcome their Great War losses and had plenty of available young men. The Germans also taught the world the value and use of the tank, armored forces, and especially combined arms – and were the first to do so. Thankfully, Great Britain is an island and that fact, plus the RAF, preserved the chance to defeat Hitler and save civilization.
Certainly, there are many, many other contributing causes to the crushing French defeat – far too many to review here – and I list several books later in this post that are what I consider must-reads for those wanting to understand this complex history. I also list good resources on the tanks and armored cars as well of course for the gamer and modeler that I have found useful. Understanding the Battle of France is not a simple case of one thinking that the Germans were destined to defeat the inferior French, or that the French were worthy of disdain on multiple levels.
Too often, I have found many of my countrymen (and others) dismissive of the French and the French Army based on the defeat of 1940. To understand the whole picture, one must go much deeper. My thoughts go to those killed in 1940 defending their country. Also, I consider the 1.8 million soldiers of the French Army of 1940 who survived this humiliating defeat, and were sent as POW’s to Germany after the Armistice until 1945 as unwilling laborers. Because of the Armistice agreement with Germany, their POW status would not change until the war was over. They returned to a France that not only was devastated physically, but one who lionized the Resistance (rightly) and blamed France’s initial loss on them. Hence, I doubt there will be much commemoration of this seminal battle by either the French or the Germans.
The true blame for the French defeat should be on the generals and the politicians of the Third Republic. The French Army leadership failed to develop a proper fighting doctrine and failed to train the French Army in the 1930’s to win a war in 1940. The politicians failed to ensure that France equipped and fielded a professional army to win a war in 1940. Did some individual French soldiers perform miserably? Absolutely – but that is true of every army in every conflict. As the French politicians supported a policy of national mobilization (levée en masse) instead of a professional army as espoused by some (like Charles de Gaulle did in his book Vers l’armée de métier). In essence, what occurred was that a well-trained and largely professional German army trounced a poorly-trained French one. Ironically, the French had more tanks than the Germans, and some were better, but they were employed ineffectively.
Speaking of equipment, and of course tanks, this post concerns mostly just that. This wraps up my build of French armor for the 80th Anniversary of the Battle of France. I started building my French armor in November 2018 (SOMUA S35’s and Renault R35’s here), then adding to it last month with some FCM 36’s (here), and some Hotchkiss H35 and H39’s (here). I already had two pre-painted Char B1 bis tanks, so I needed to add some more variety – as I will be doing next for the Germans as well.
I’ll also share some eye-candy on the completed models, and the materials that I used to paint them. As a quick aside, I had run low on my Battlefront paints. As a replacement a paint set I found (on eBay) was a Hataka French Early War Armor set. It looks to be out of production, hence my eBay acquisition. Hataka sounds like it might be a Japanese company, but it’s actually a Polish one. I had wanted proper colors, and while I did like the colors I used here, this was a difficult paint set to thin, especially in my airbrush. There was definitely a learning curve.
I ended up using a 0.5 mm needle – and close to 30 psi in my airbrush. Each bottle was 17 ml, and had an internal mixer of some type in them that you could hear when shaking them. The colors were great for French vehicles of 1940, but they took some getting used with both the airbrush and the standard brush.
Front of Hataka set box
Back of Hataka set box
Now, let’s discuss the vehicles!
AMC 35
The AMC 35 was a medium cavalry tank. It was also known as the Renault ACG-1. It had a good 47 mm gun, and was the first French tank with a two-man turret. It’s maximum speed approached 26 mph, due in part to a 180 hp engine, but also due its having less weight due to less than great armor at 25 mm thick. Only 100 of these were built. Thirteen were sold to the Belgians, and none were in any French units until after the crucial German breakthrough at Sedan on May 15, 1940. After that point, all reserve materiel was sent to fight. Therefore the crews would have had virtually no training on these tanks prior to combat, and training is indispensable. Compounding the issue of training, mechanically, the tanks were not overly reliable (though that is a common issue with French tanks of that era). Captured vehicles were only used by the Germans for driver training. One vehicle survives today that was recovered from a ravine and restored.
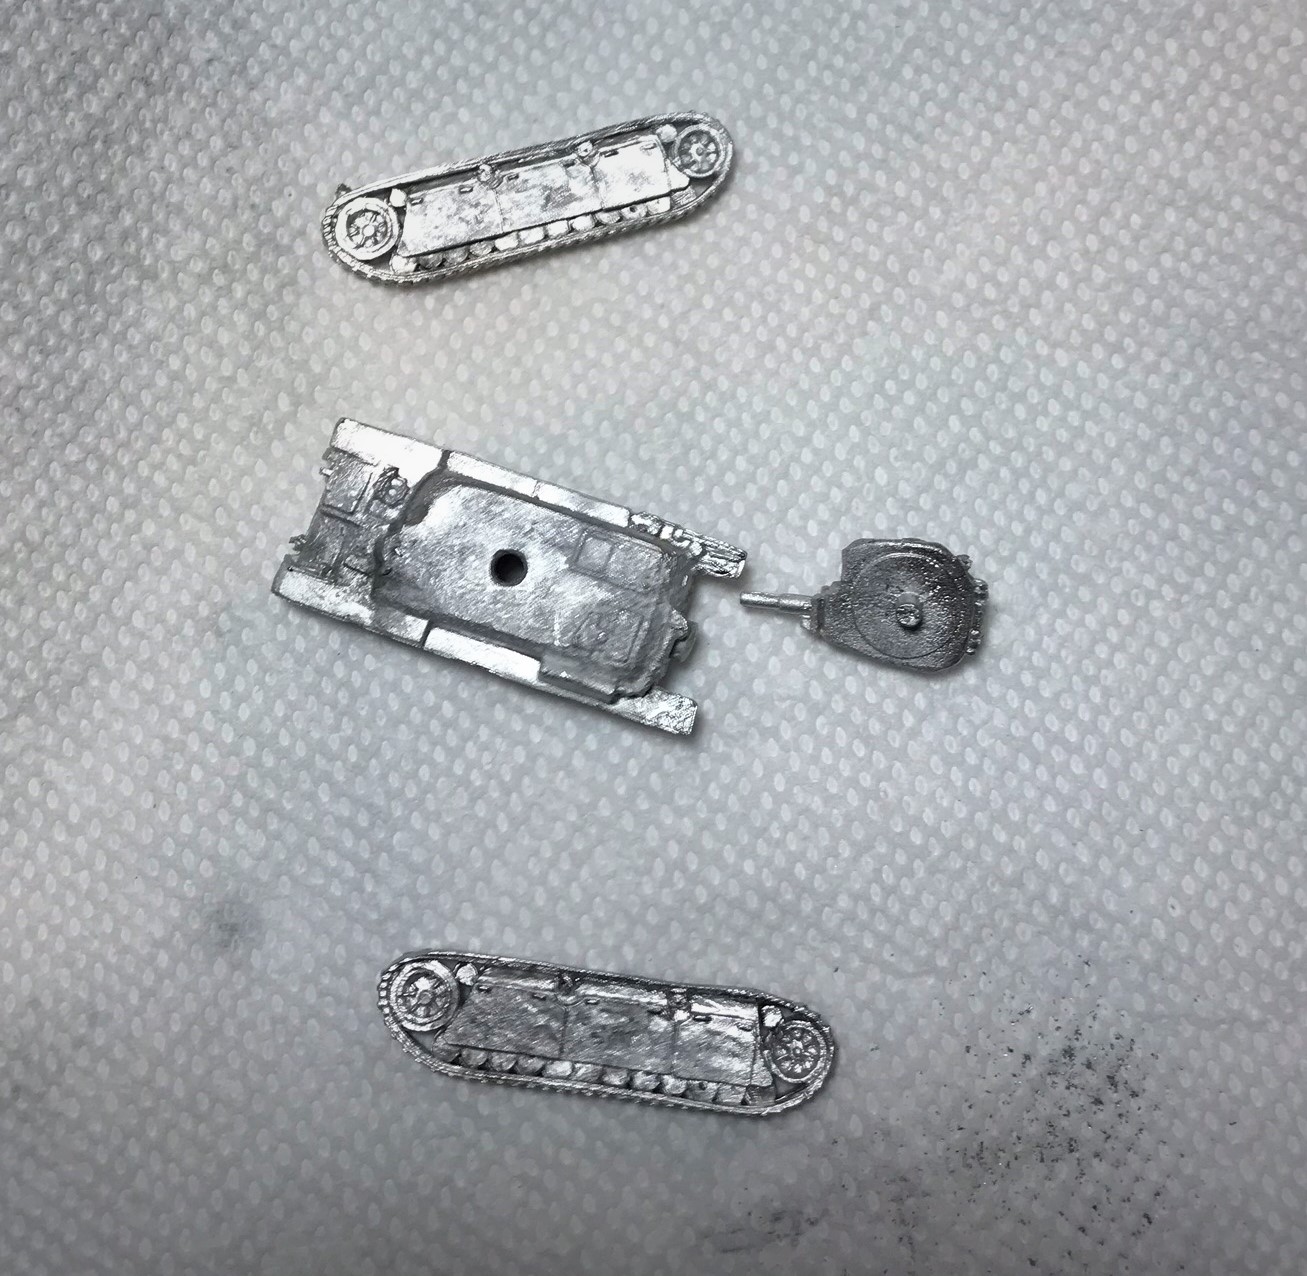
The models came from Old Glory, (come in packets of three) and were in pretty good shape. Some minor filing was needed to prep the models.
Three AMC 35 models from Old Glory
Assembled AMC 35 models
First, I base-coated the models
I used poster-tack for masking
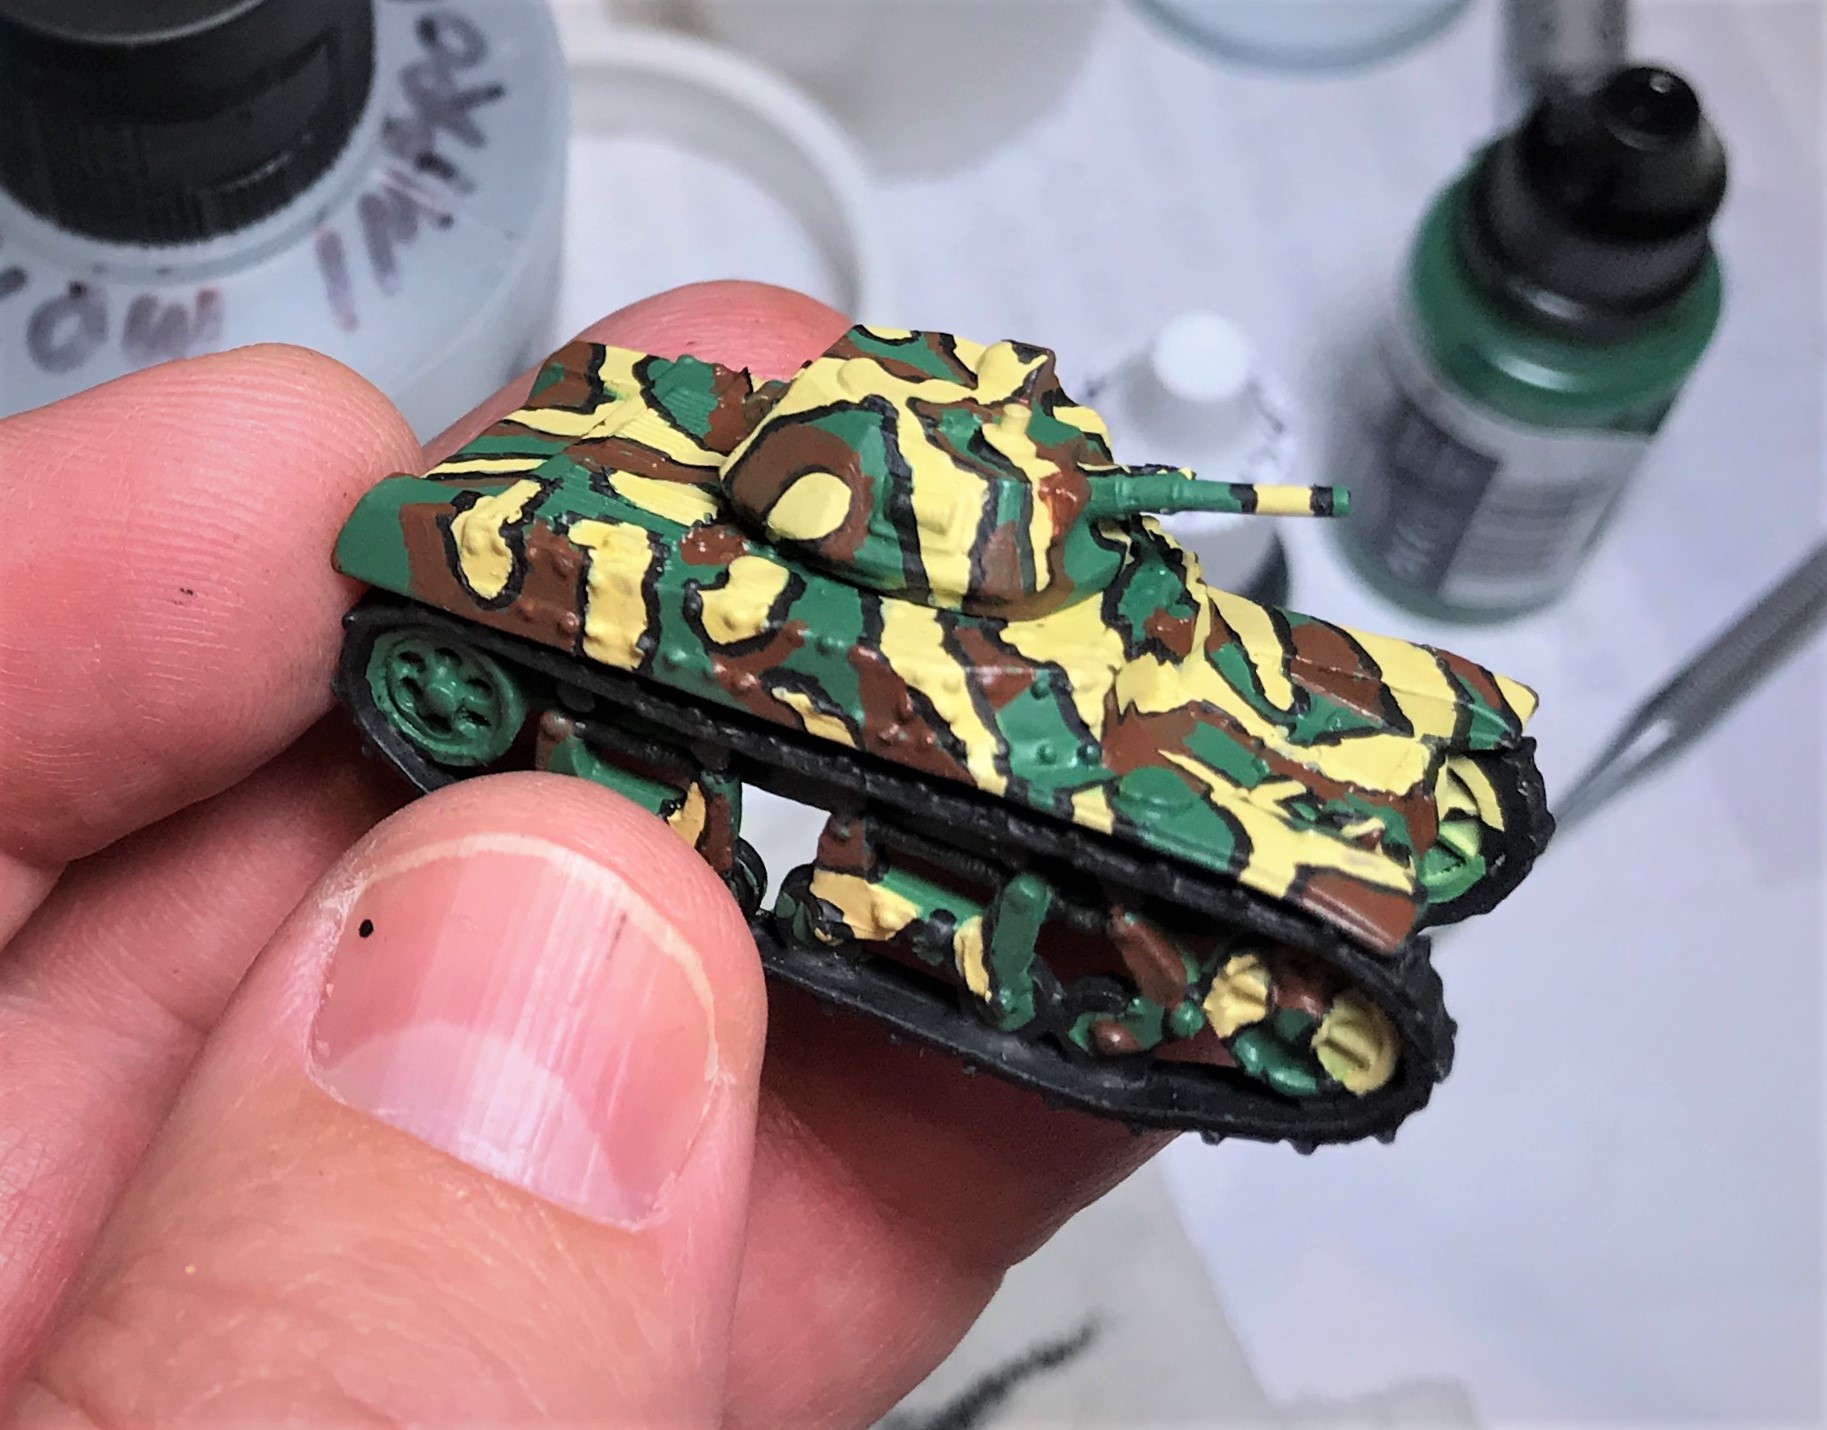
The Hataka paint was a bit thick, leaving a visible (almost raised) border next to my masking with poster tack. For the first time, I decided to line the paint borders by hand. I was a bit apprehensive, but I think it worked fine for the tabletop.
My first try at hand-lining the camouflage colors.
I then added browns and tried to smooth out overly thick lines by filling in with the green and yellow next to the black lines.
The AMC 35’s on my workbench with the image that I blew up and used as a guide (from B.T. White’s 1972 book with illustrations by John Wood – see citation in references below).
R40
The Renault R40 was an infantry tank, an improved version of the R35. Officially, it was just a variant of the R35 called Char léger modèle 1935 R modifié 1939. It had a longer 37mm gun with the ability to penetrate up to 40 mm of armor. The suspension was improved over the R35, and it looked very different than the original. Delays caused it to not be fielded except to the last two French Army tank battalions and to the Polish 10th Armoured Cavalry Brigade (which fought in France after the defeat of Poland). One major improvement was the inclusion of radios. Captured R35 and R40 vehicles were extensively used and converted to other uses by the Germans. None survive today.
The model came from QRF and was in reasonably good shape and needed little filing. It was also very reasonably priced. As this was a rare vehicle, having to buy only 1 was a plus. Painting was easy as there were neither any decals nor camouflage painting needed due to their being hurried to the front in 1940.
Nice easy 4 pieces
The chassis – I magnetized the hull and the turret for ease of play.
Completed R40.
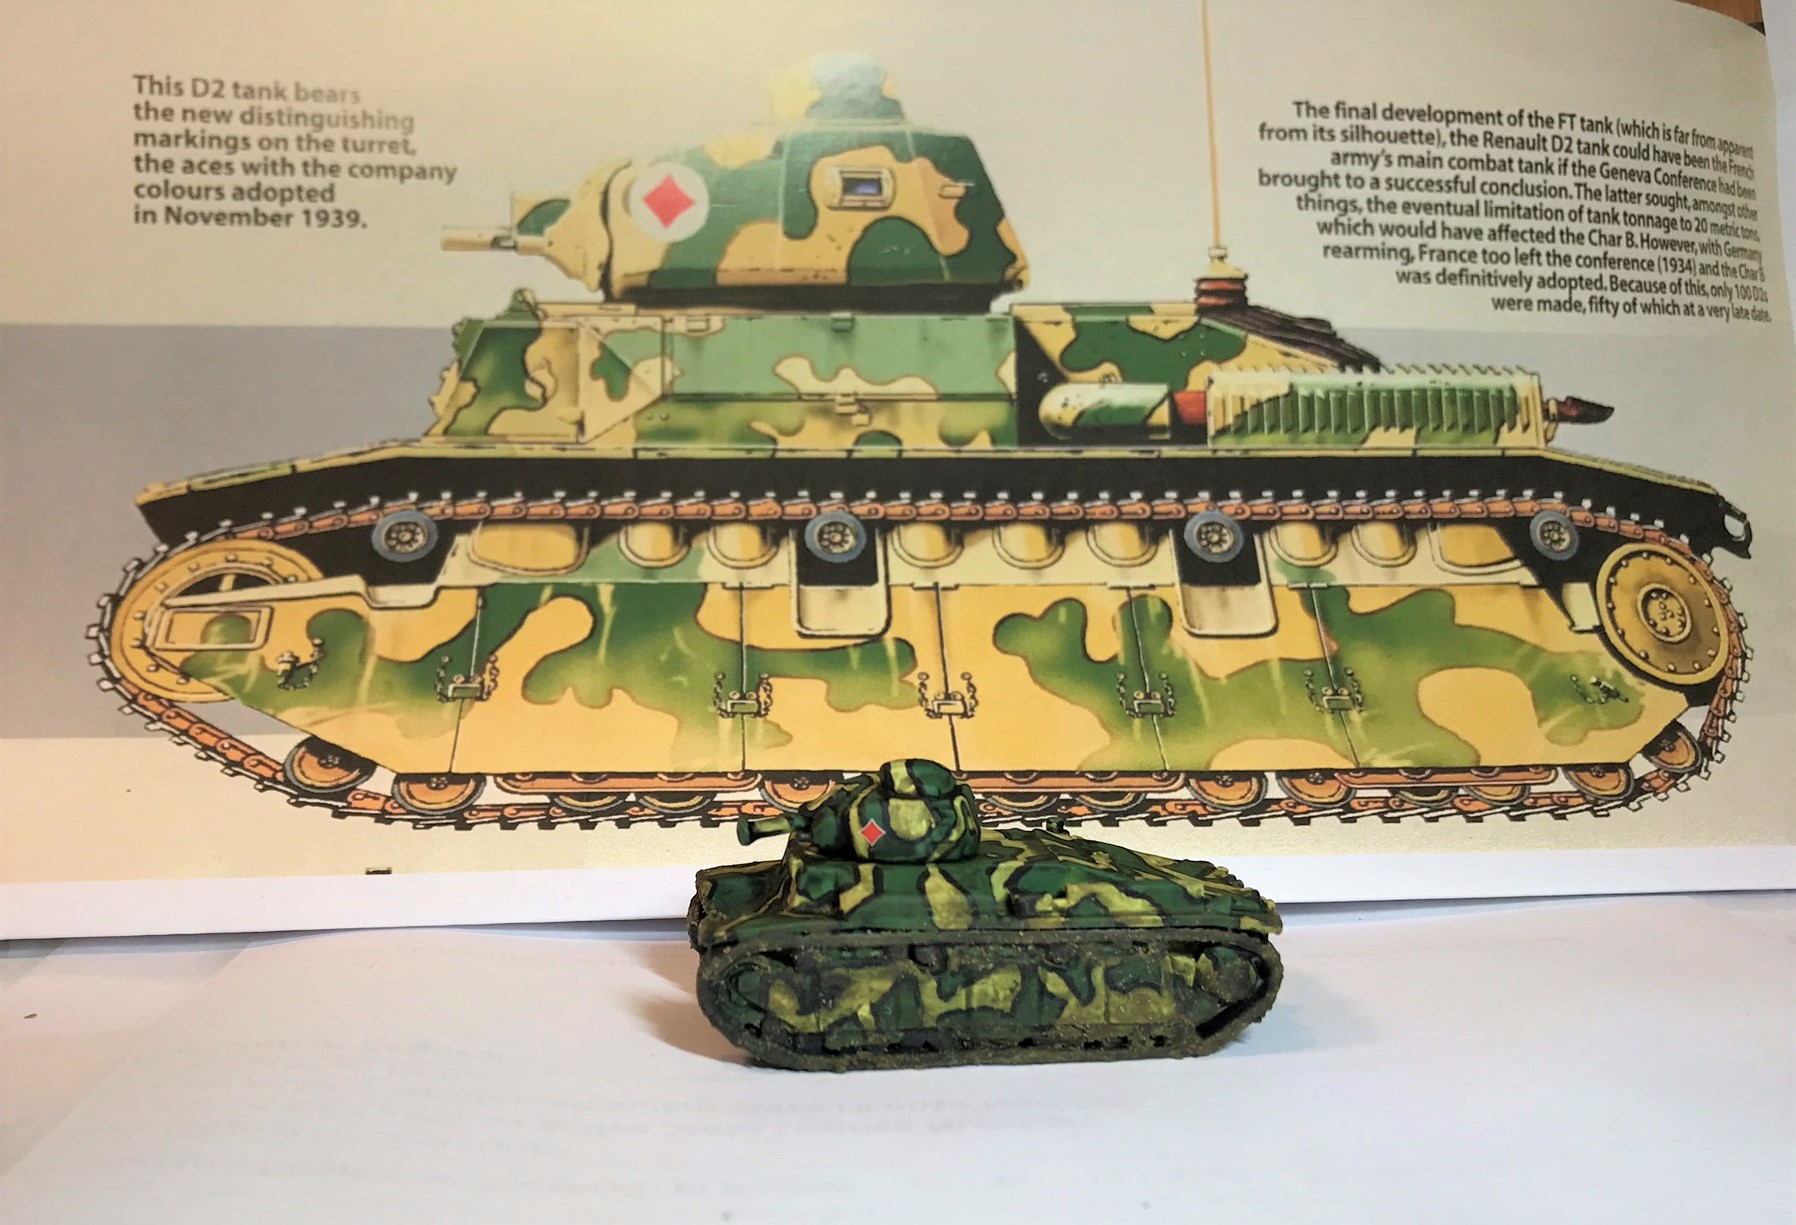
Char D2
The Char D2 was a medium infantry tank, also built by Renault. It was an interim design, a heavier and improved version of the Char D1, and it was supposed to bridge the gap until the Char B series could be built in sufficient numbers. However, the production of the Char B1 bis never attained the needed levels. Thus it served on the front lines – notably under Charles de Gaulle – and in some of the best tank battalions in the French Army. It had a 47 mm gun, and 40 mm of armor, and like the AMC 35, radios. After the fall of France, the Germans took off some D2 turrets and mounted them on armored trains in the Balkans. Only 100 were built, and none survived the war.
The model came from QRF as well. It was a bulky one, and needed a good bit of filing as there were a few dings and heavy mold lines. Still, at the price and needing to only buy one, it worked for me.
The Char D2 as received
Turret mold lines were heavy…
…as were some dings like this
Getting the Char D2 base coated – you can see some dings on the side and top that were not amenable to filing.
Early work on the camouflage scheme on the chassis.
Early work on the camouflage scheme on the turret. I did similar painting work to what I did with the AMC 35’s.
With the picture from Jean Restayn’s great book that I used as a guide. I considered painting the white circles under the diamond but decided not to as I thought this worked as is.
FT17
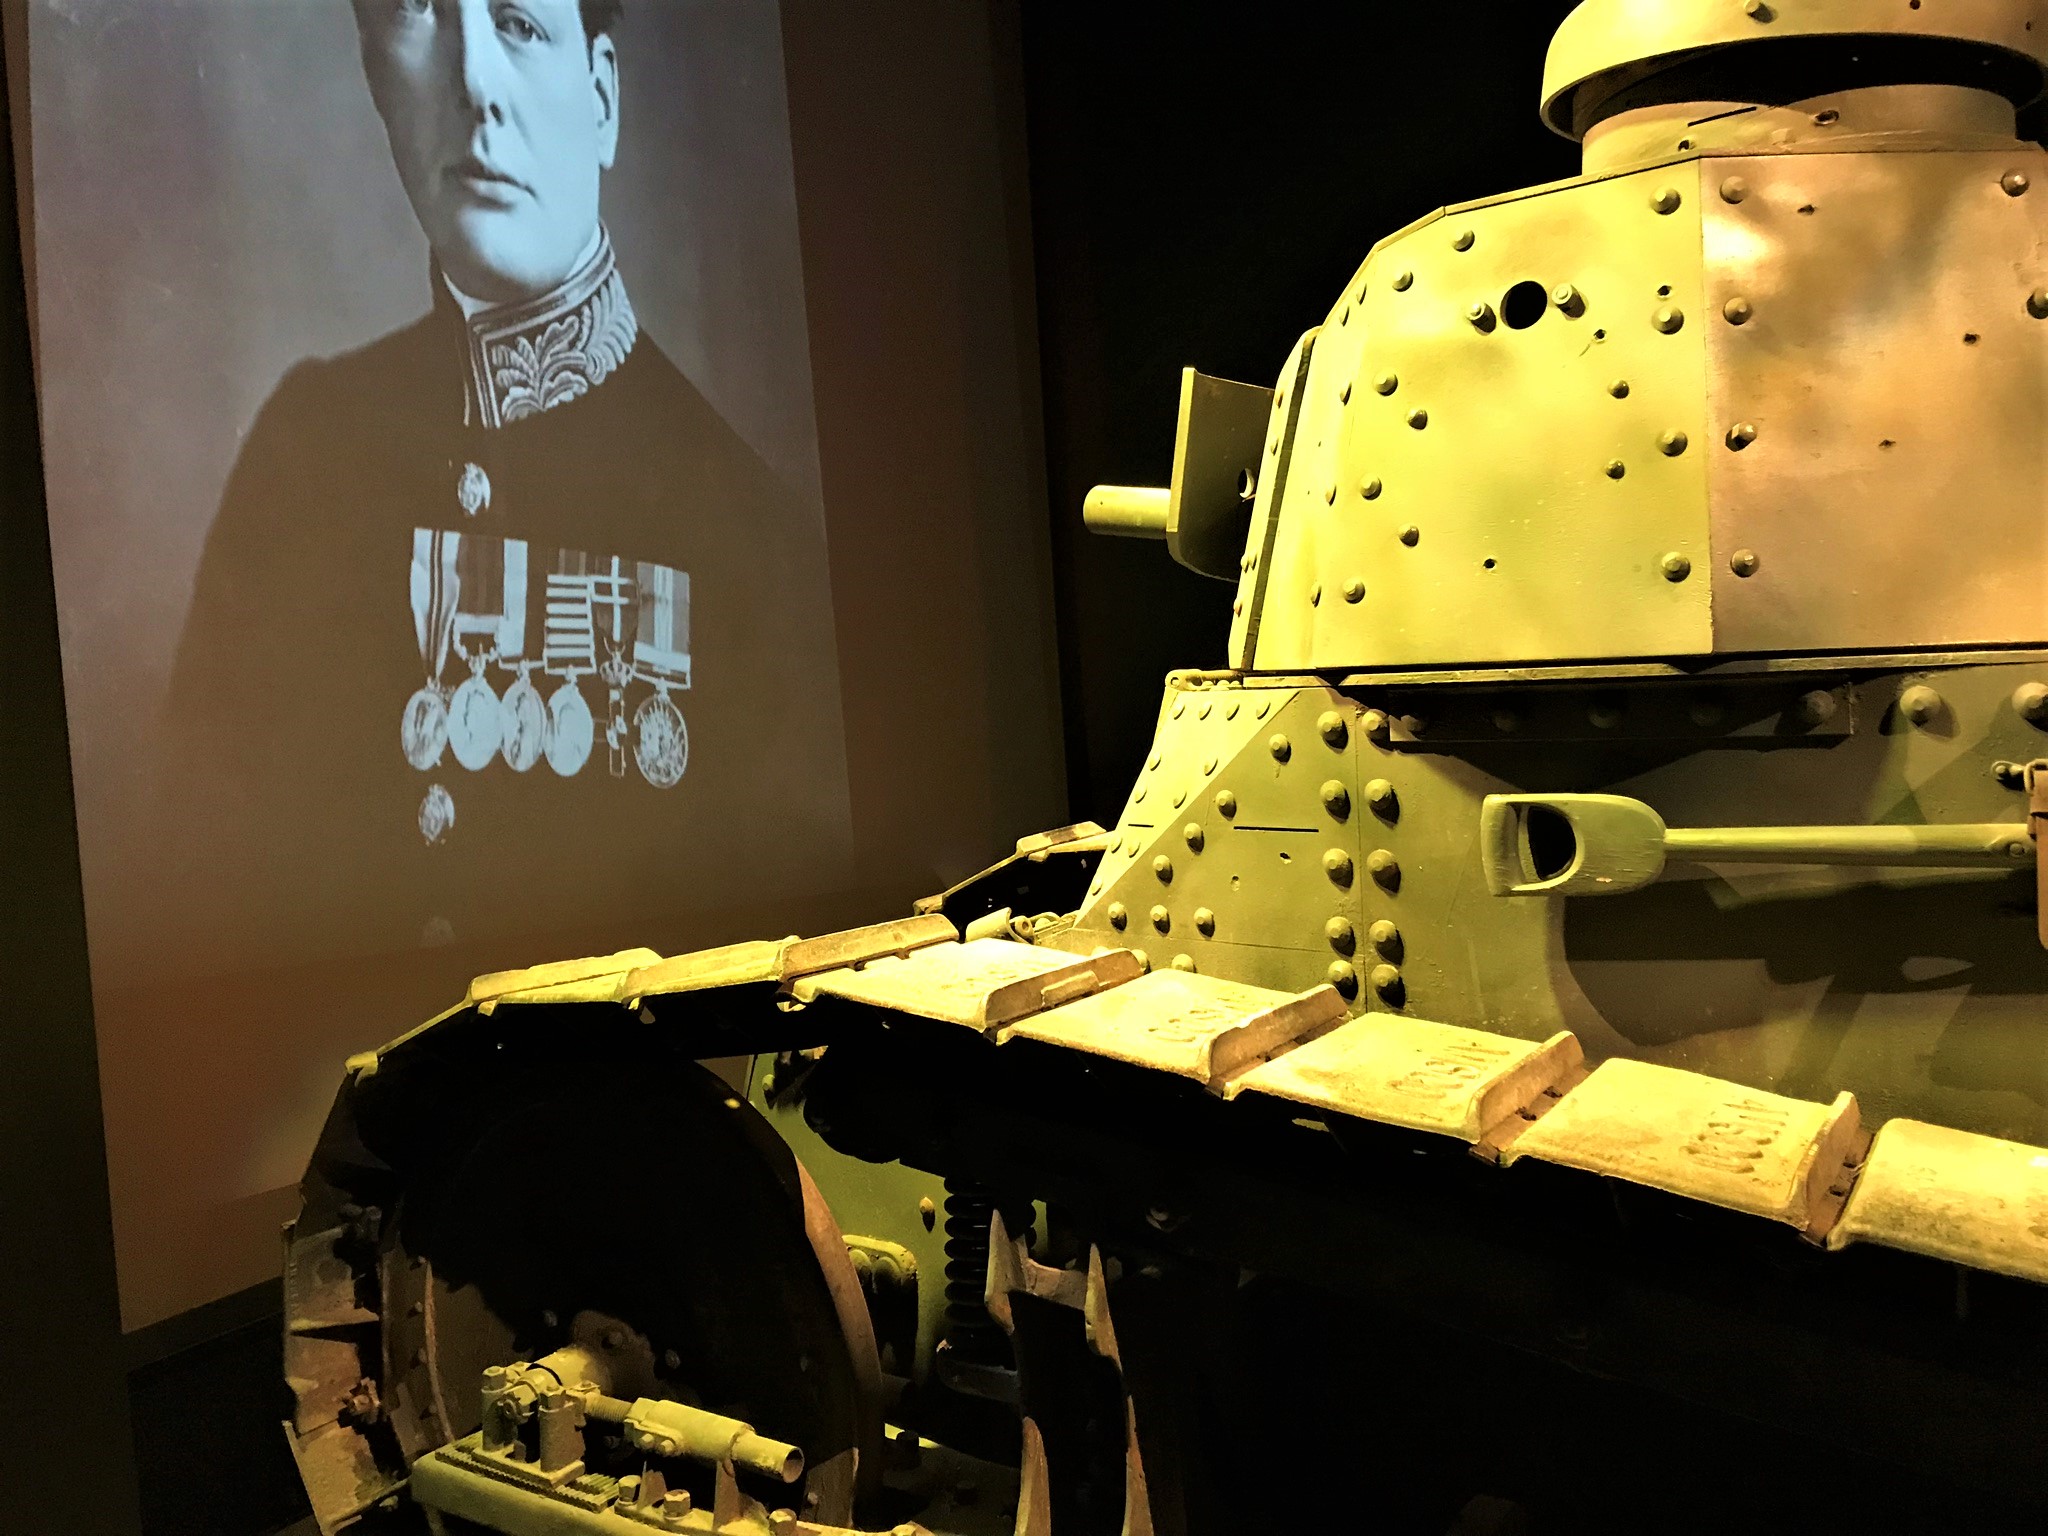
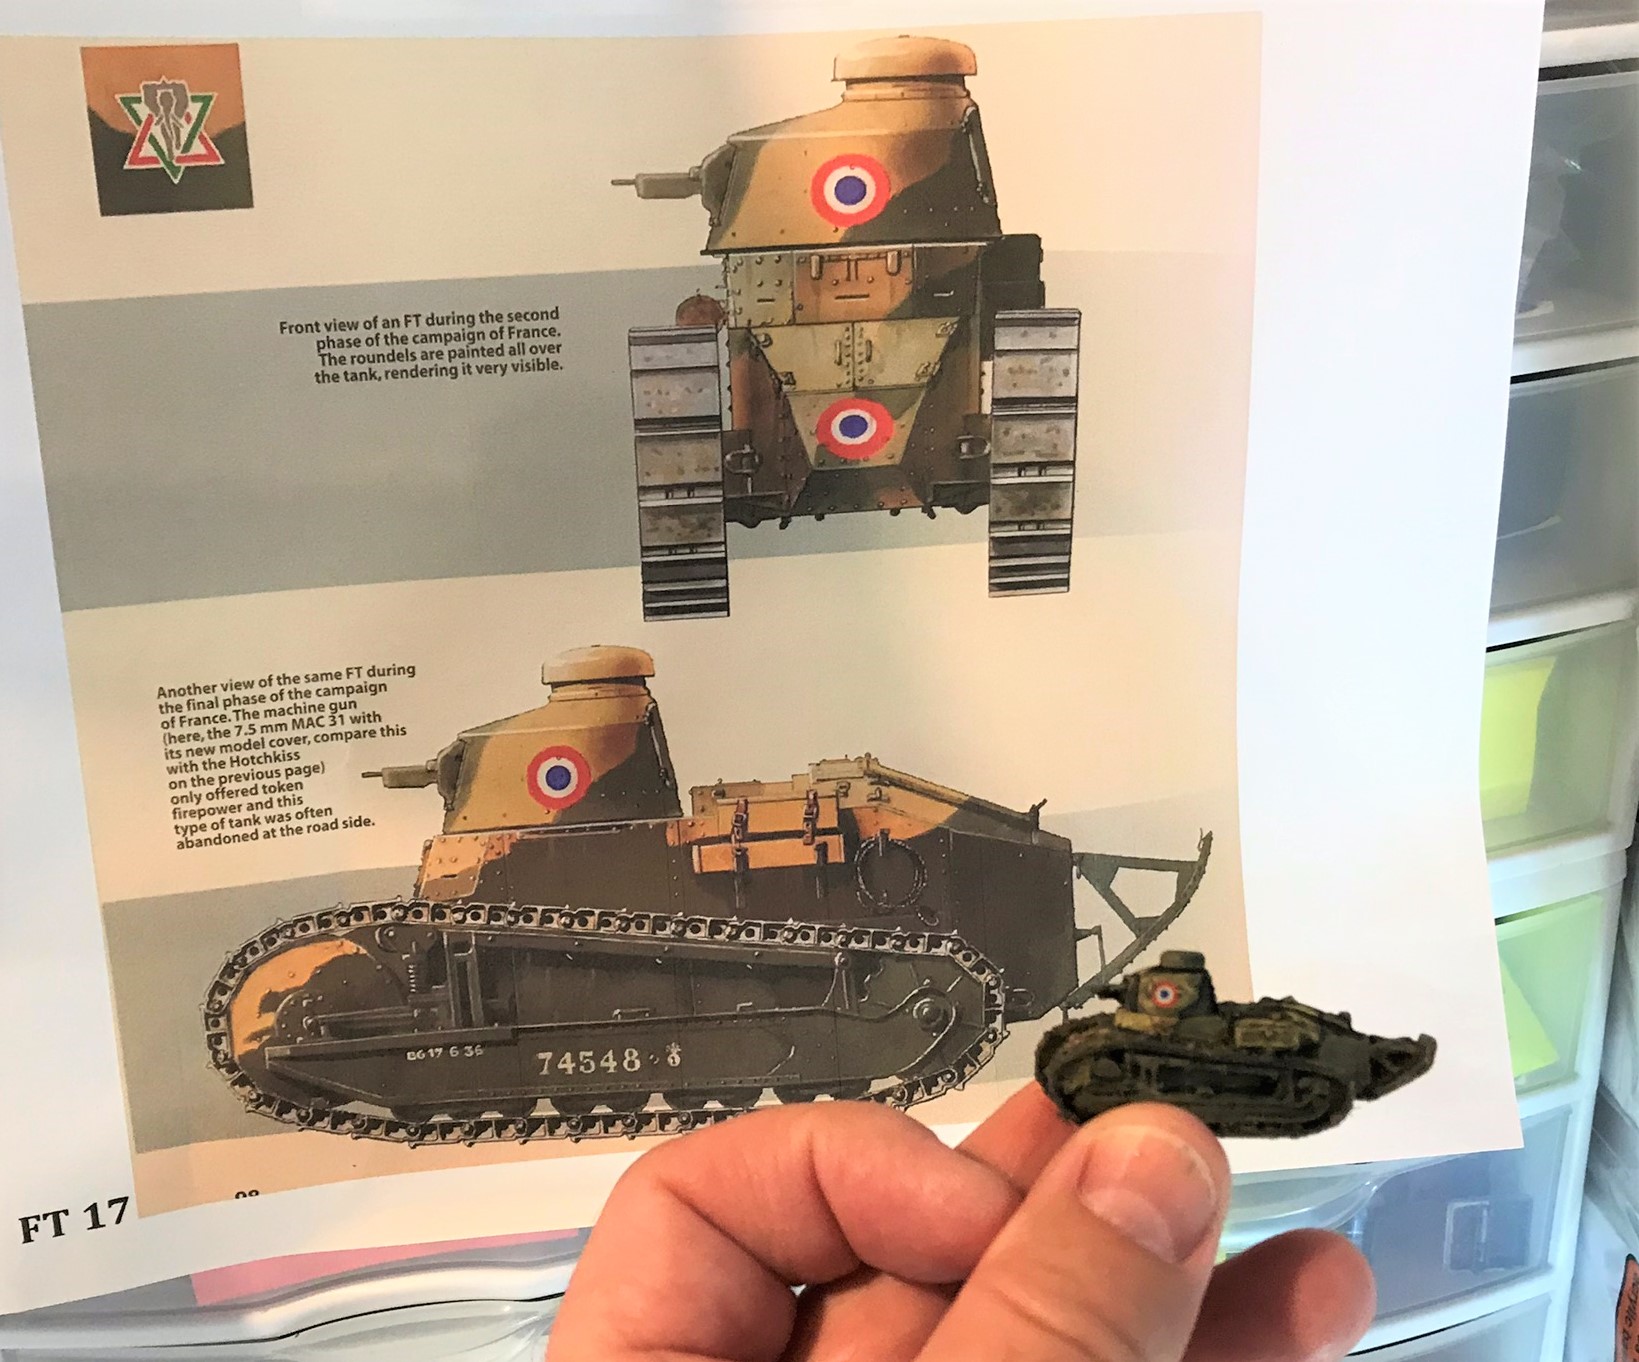
This WWI survivor was one I added to my force just because there were 504 FT17’s still serving in seven front-line tank battalions in 1939 – not counting over a hundred vehicles in French colonies. The FT17 infantry tank had the same 37 mm gun as many other French contemporaries like the R35, H35, and FCM 36. Armor was enough to stop small arms at best (maximum was 22 mm). Against the Wehrmacht, they were pretty ineffective. Many survive as over 3,000 were made by the French, and almost 1,000 under licence in the US (see below for one of those 35 miles from my house).
The model came from Peter Pig and was sold as a single. That worked for me, as I did not want a lot of these in the game. It was in good shape.
My FT 17 chassis after adding a roundel decal but before applying weathering effects.
My FT17 model with the Restayn page I used as a painting guide.
Panhard 178
The Panhard 178 (nicknamed the “Pan-Pan) was a superb 4×4 armored car for its day. It equipped French cavalry and infantry division reconnaissance units in 1940. It ended up being used by the Germans extensively after the Fall of France, and indeed was used after the war by the French until the 1960’s. It also equipped other forces, especially former French colonies. It had a good two-man turret, and its 25 mm gun could penetrate up to 50 mm of armor. It also was reasonably fast, and could do 26 mph off-road and almost 45 mph on the road. An assistant driver had controls in the vehicle’s rear allowing for fast reverse if needed. Protection was good for an armored car (20 mm armor in places), but as a recon vehicle its job was not taking on enemy tanks. Over 1,100 were built, and many survive today..
I plan to use them in my games as recon vehicles similar to what I did with my Normandy Breakout! scenario. They will be able to hide better than a tank, and I will be assigning them extra bonus attack cards from a French-specific deck. Likely I will make cards for French artillery, infantry, and anti-tank support, but no air support (the Germans’ recon will appropriately get that!).
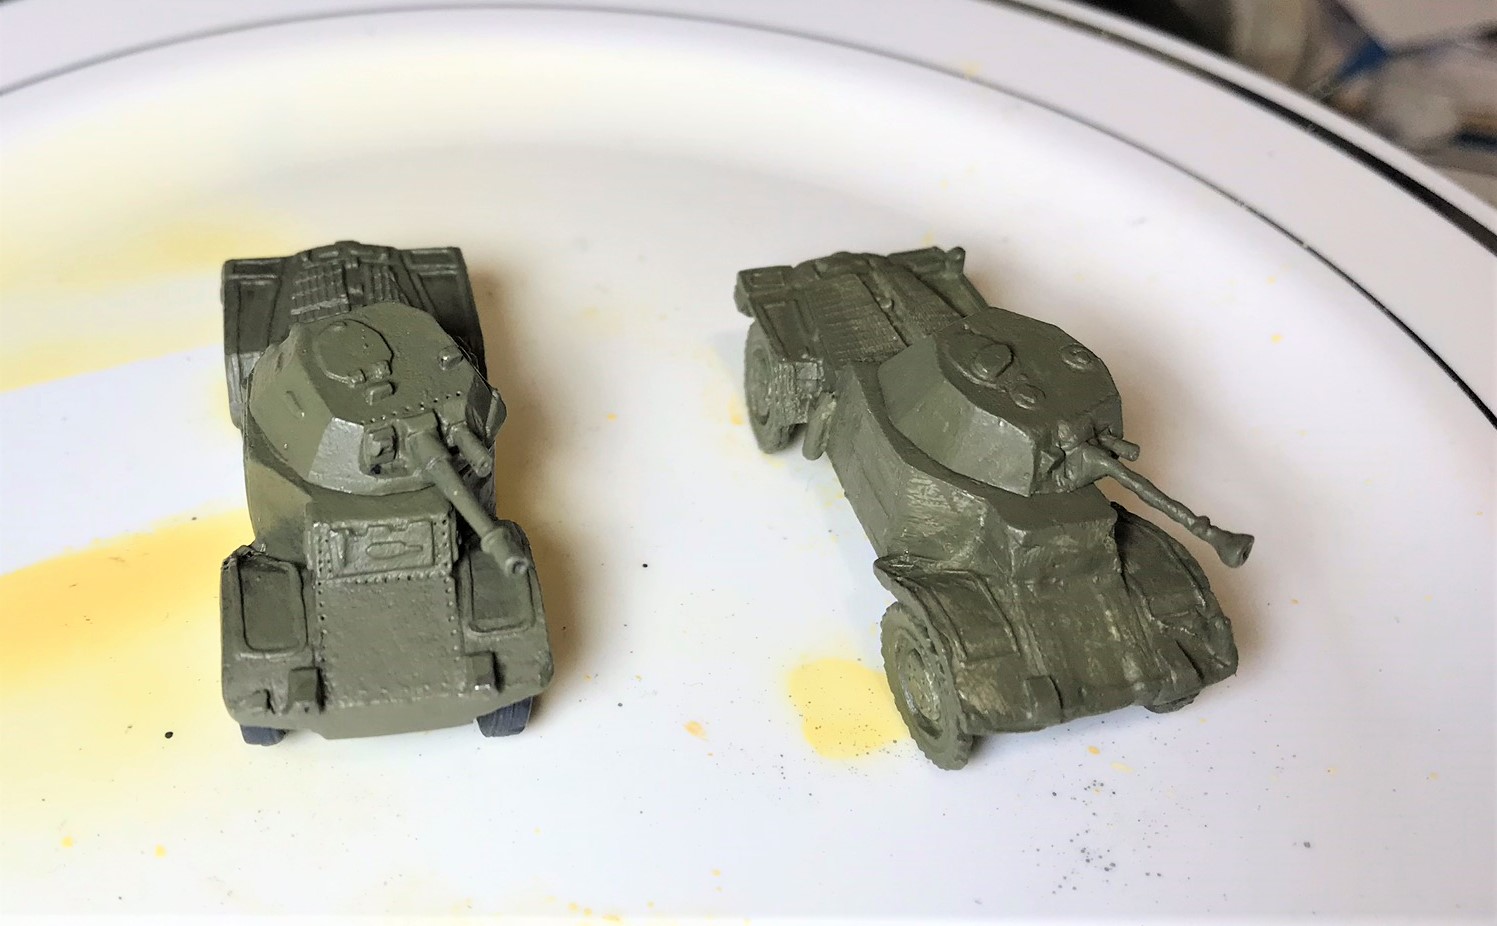
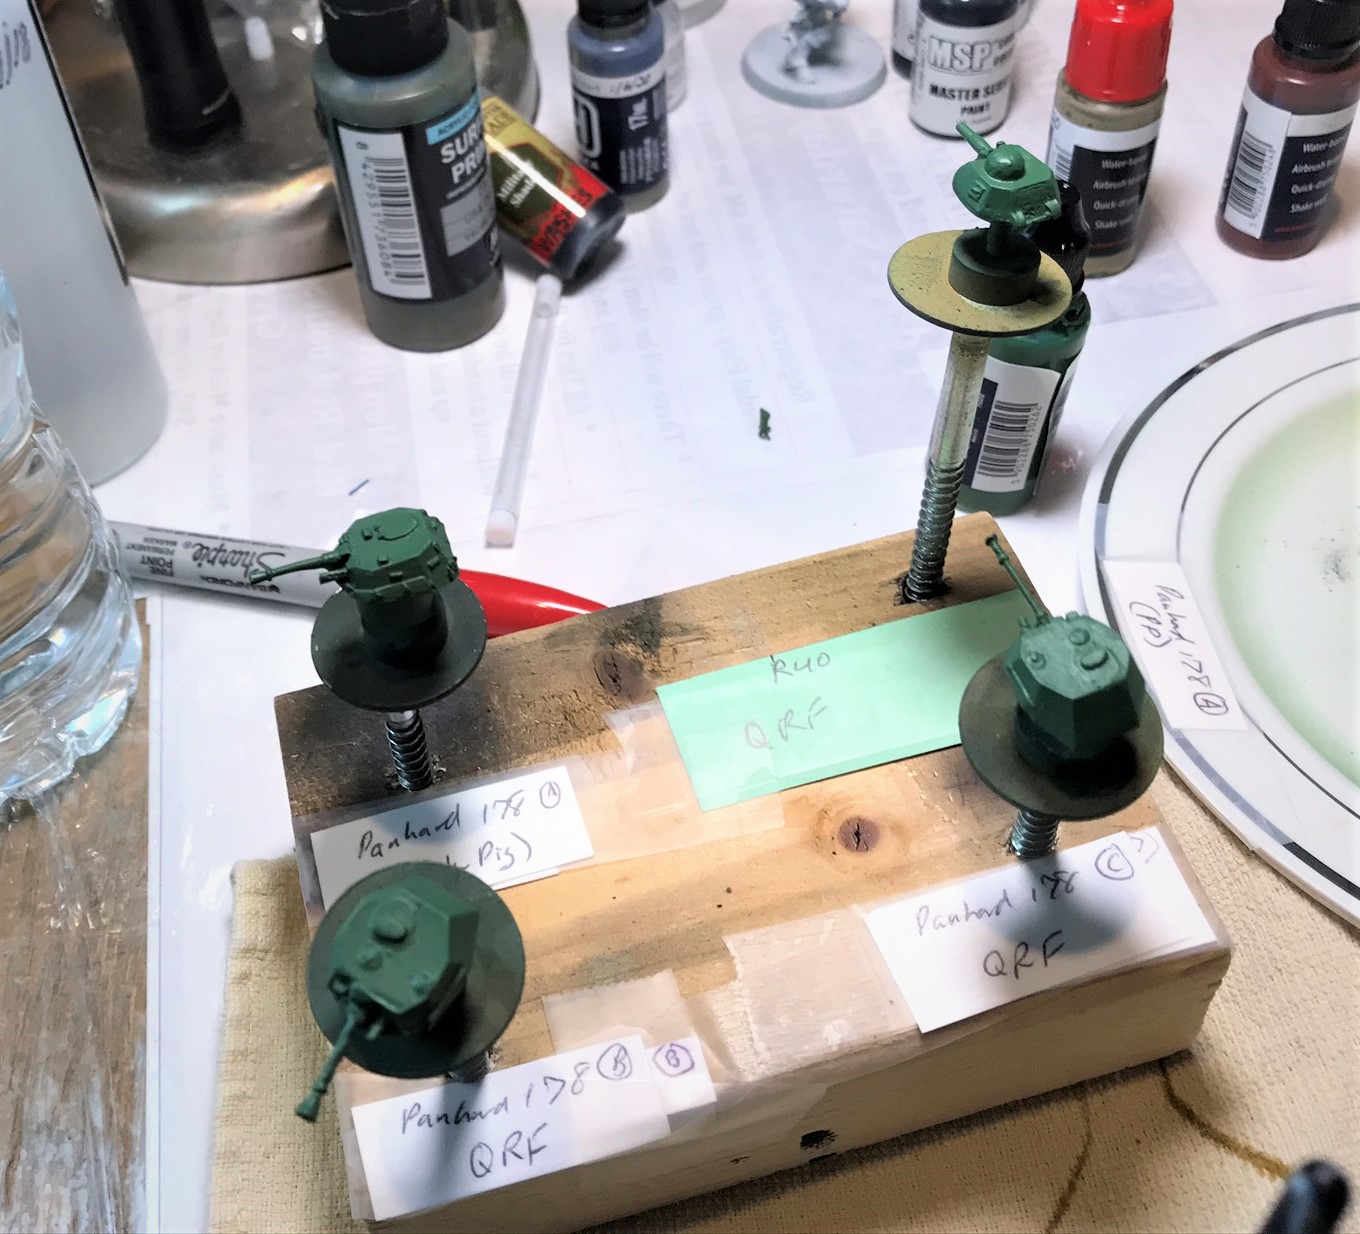
Here I got one Panhard 178 model from Peter Pig and two models from QRF. The Peter Pig model had a sleeve for the turret to fit into the chassis. I just added a magnet in the inside top to attract one of my blast markers if needed. The QRF models I magnetized as I usually do. The Peter Pig model is much more detailed. The QRF models were pretty disappointing and I needed to sculpt gun replacements for both (see below). The QRF models needed a lot of filing too. In the end, I think I made all three effectively for tabletop play – you of course can be the judge!
Peter Pig Panhard 178 Model
QRF Panhard 178 Models
The guns on the Panhard 178 models from QRF were in need of “stiffening”. You can also see the mold lines here too.
Here, the guns on the two left Panhard 178 (QRF) turrets have been replaced with paper clip wire placed into drill holes. I added green stuff to recreate the shape of the main gun that you see on the Peter Pig turret on the right.
The three Panhard 178’s after assembly with the new guns on the outer models.
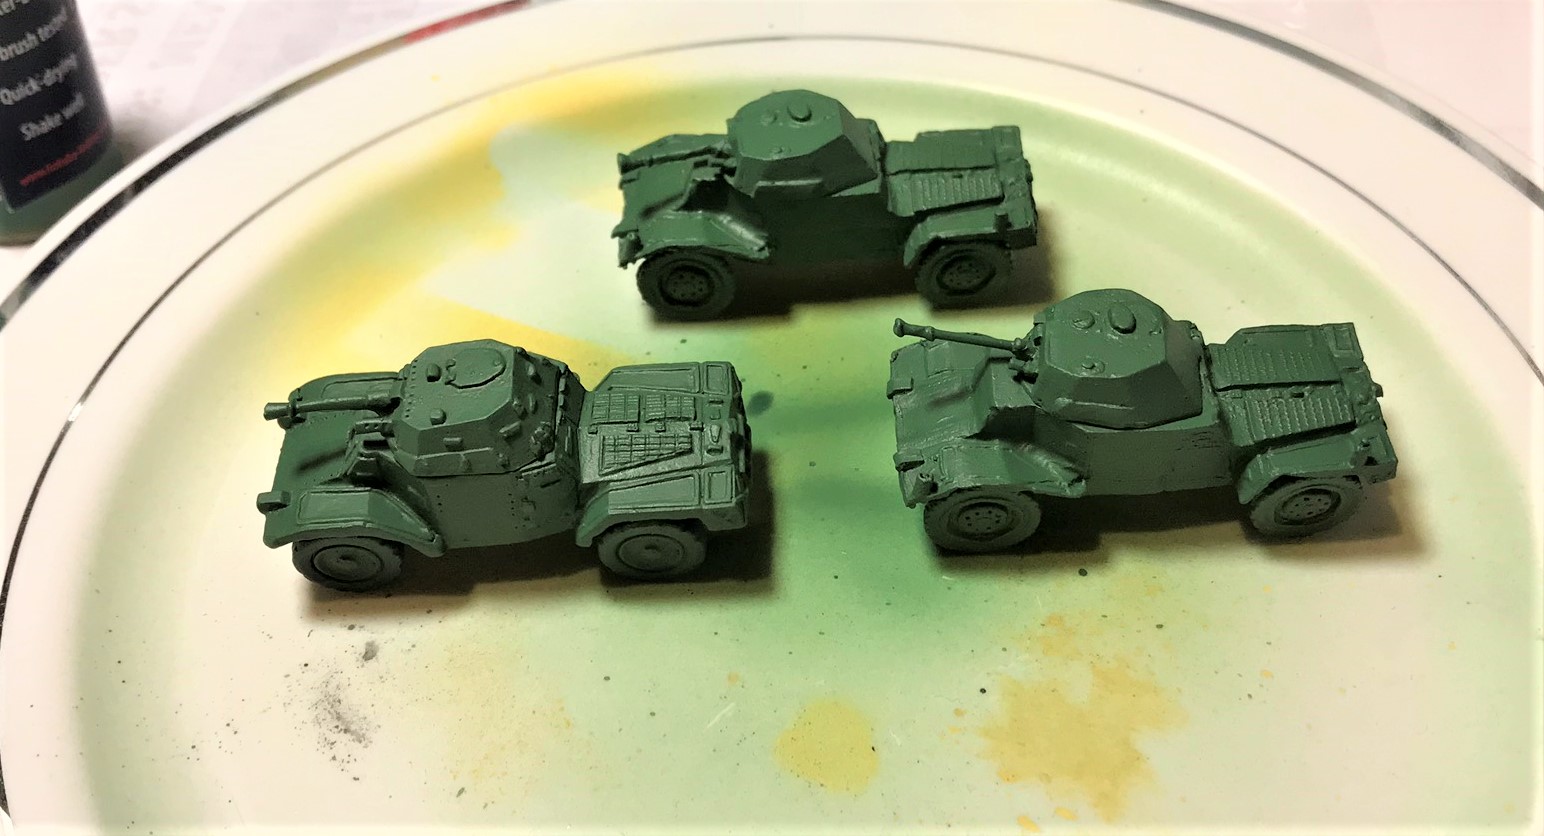
After priming – a comparison of the detail on the Peter Pig model on the left and the QRF model on the right.
Panhard 178 turrets after base coating with the Hataka paint.
The Peter Pig model chassis showing the sleeve well for the turret.
All three models base coated.
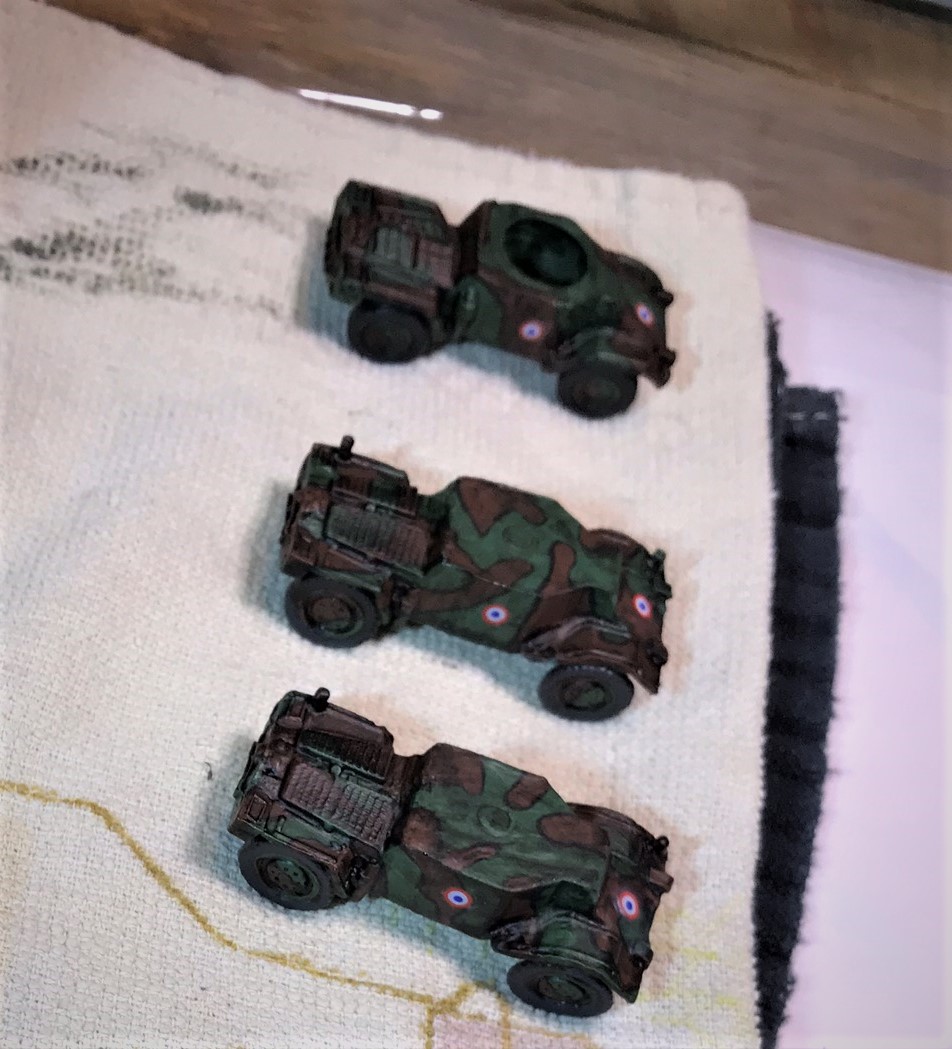
Masking for camouflage paint application.
The three after decals and varnish. Each turret got a different number for ease of play.
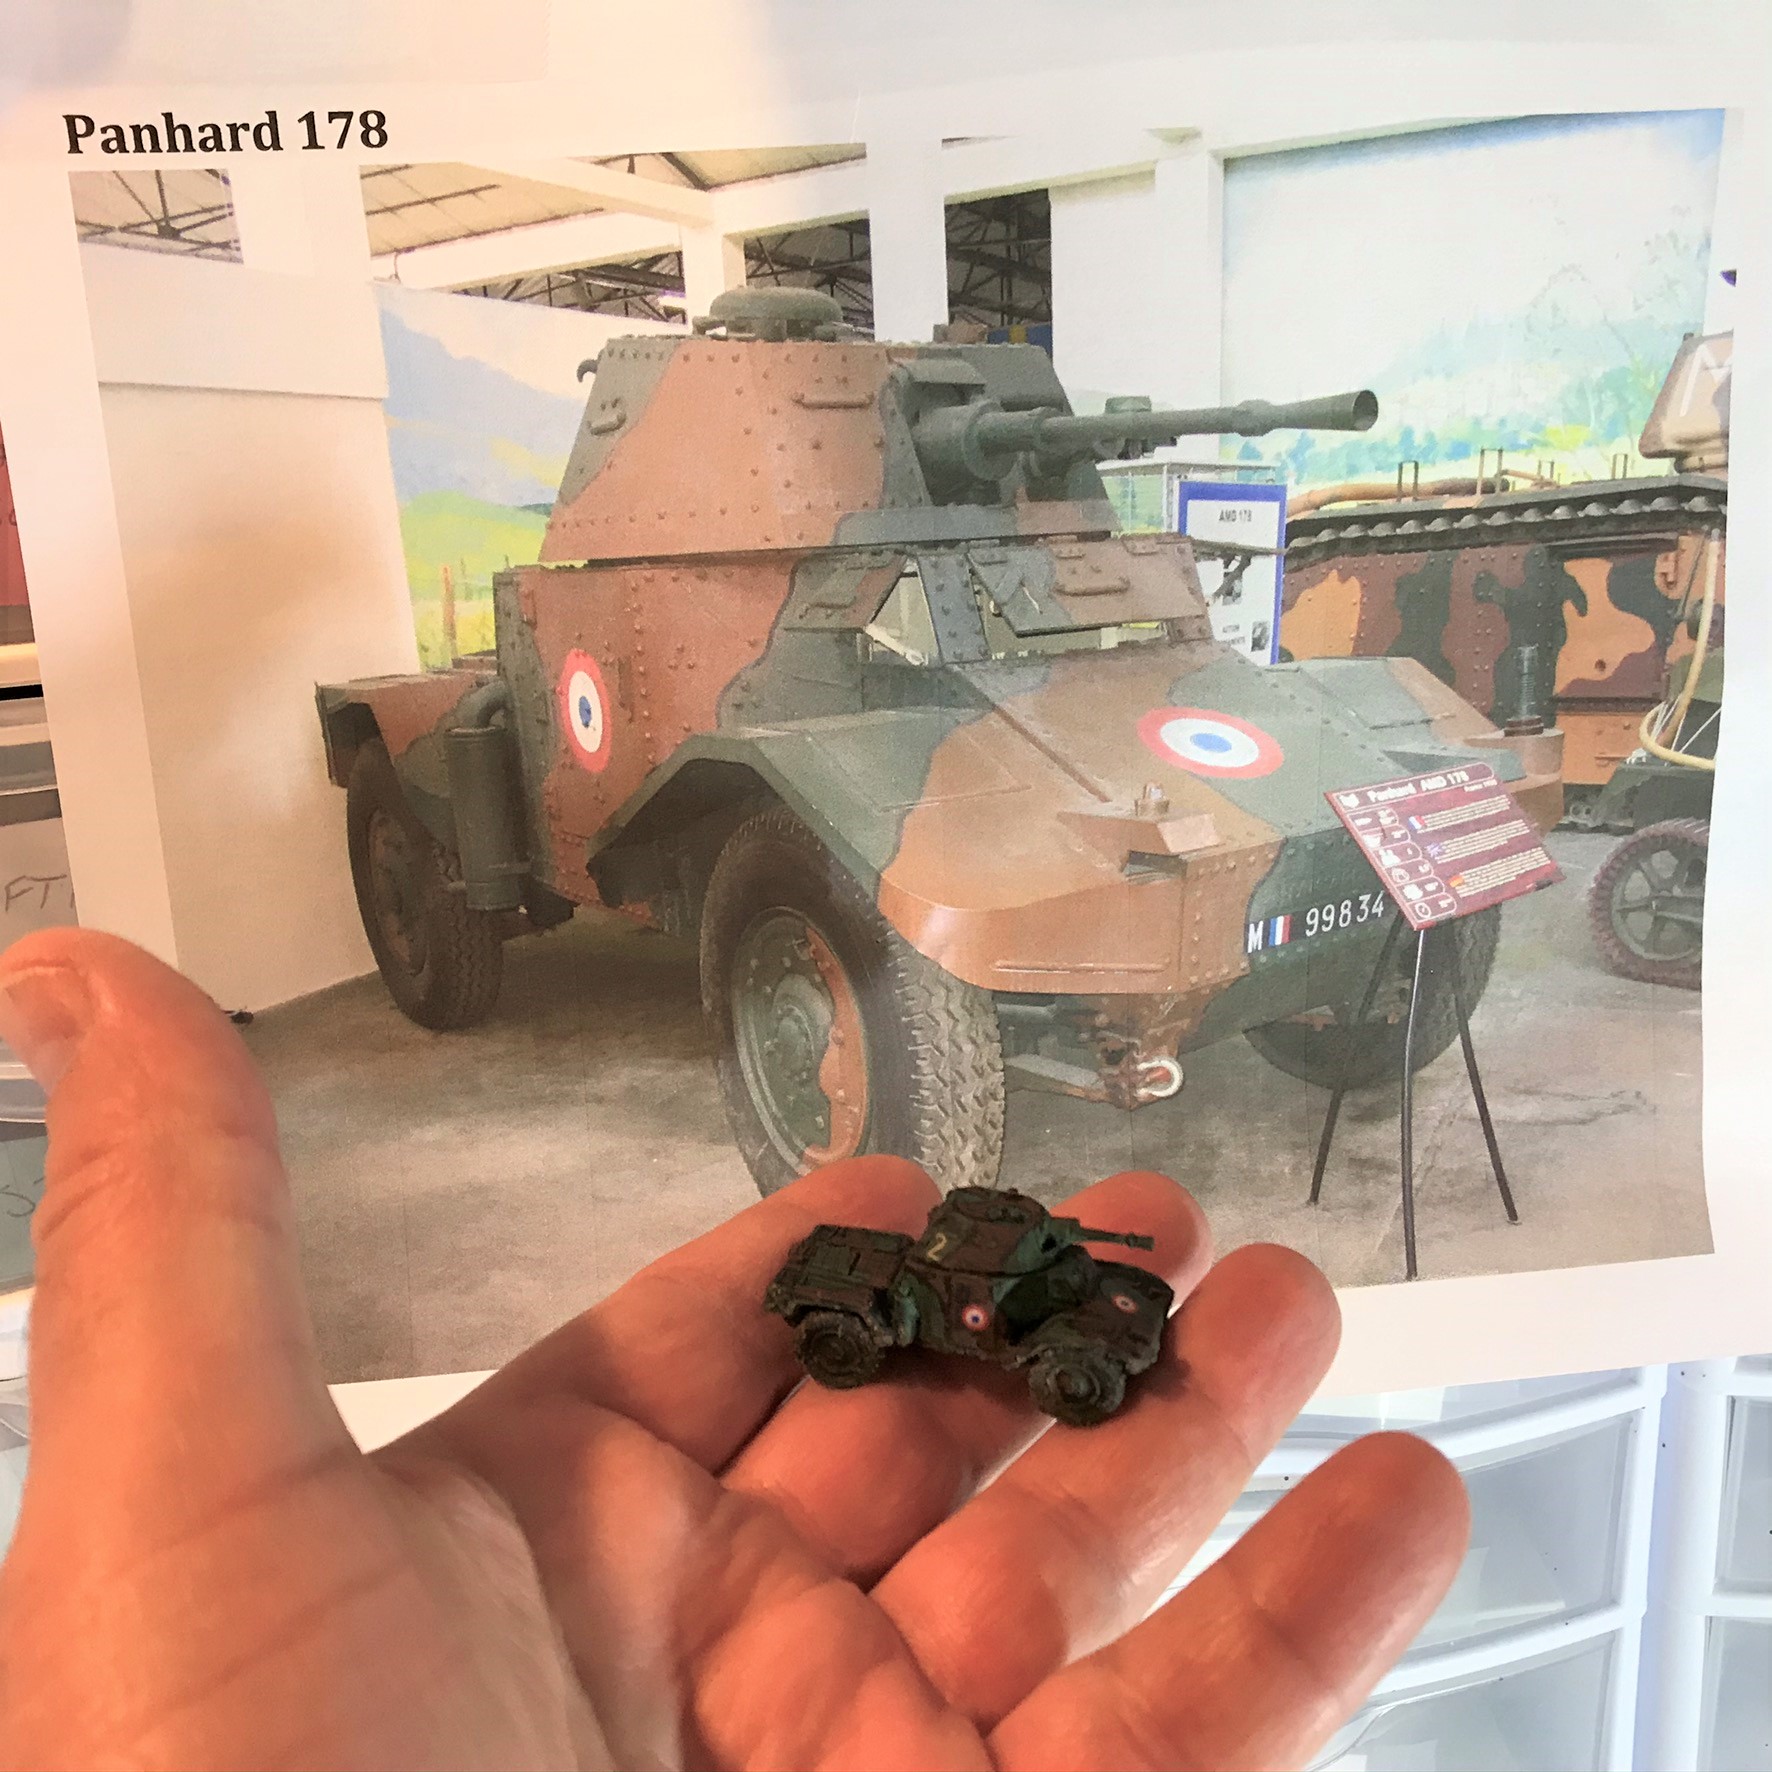
My Peter Pig Panhard 178 in front of an image of the one at the Musée des Blindés in France that I used as a painting guide.
Eye Candy
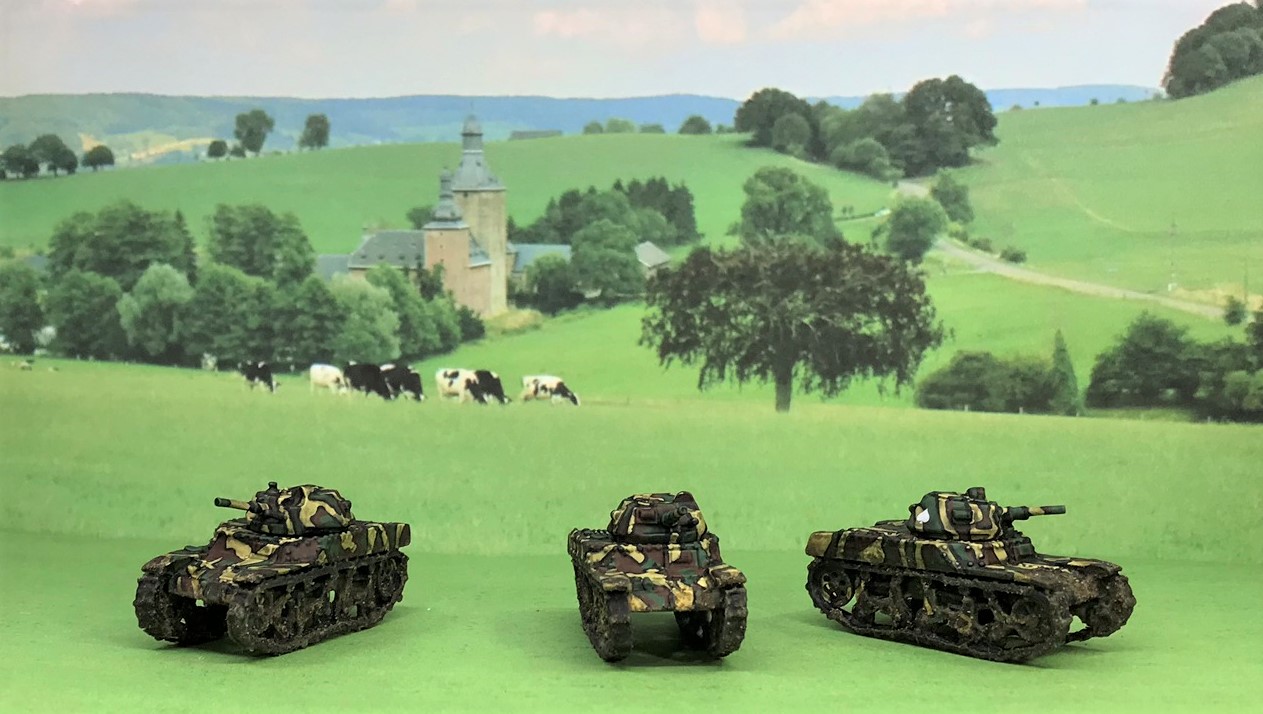
Now, please enjoy some close ups of the completed vehicle models against a backdrop of the French countryside!
AMC 35:
R40:
Char D2:
FT17:
Panhard 178:
Lastly, as these French models are far less known than say a later-war Sherman or a Tiger I – here are some size comparisons with a Char D2 and an AMC 35:
A Side Note on Photography
I try to make my posts visually appealing. My camera is an iPhone 7. I tried to use a technique offered by Per on his excellent blog Roll a One and use my computer monitor screen as a backdrop. While I really appreciated the suggestion, the lighting for me did not work and I got shine on the screen as shown below. Also, my cows were monster-size (though adequately-sized targets for my French tanks!)!
After seeing a post by Ted Salonich showing a photo booth for miniatures on a local hobby store’s (Great Stories) Facebook page, I was inspired to try my spray booth as a photo booth – and it worked quite well. I printed off the backdrop shot onto a piece of card stock, and using PowerPoint made a ground piece to match the connecting ground. I did this by making a new slide and cutting and pasting matching the grass background from the original backdrop slide. I started the fan and the backdrop image was sucked against the filter – and I was able to mount the booth floor with poster tack.
Too much shine, not level, and man, look at the size of those cows!
Sometimes I got the “crazing” of the screen with the monitor.
Shadows and scale posed problems for me.
This (above) was my last solution – and I used this for my eye-candy shots you saw above. I like it a lot – your thoughts?
Below is a shot taken in the spray booth.
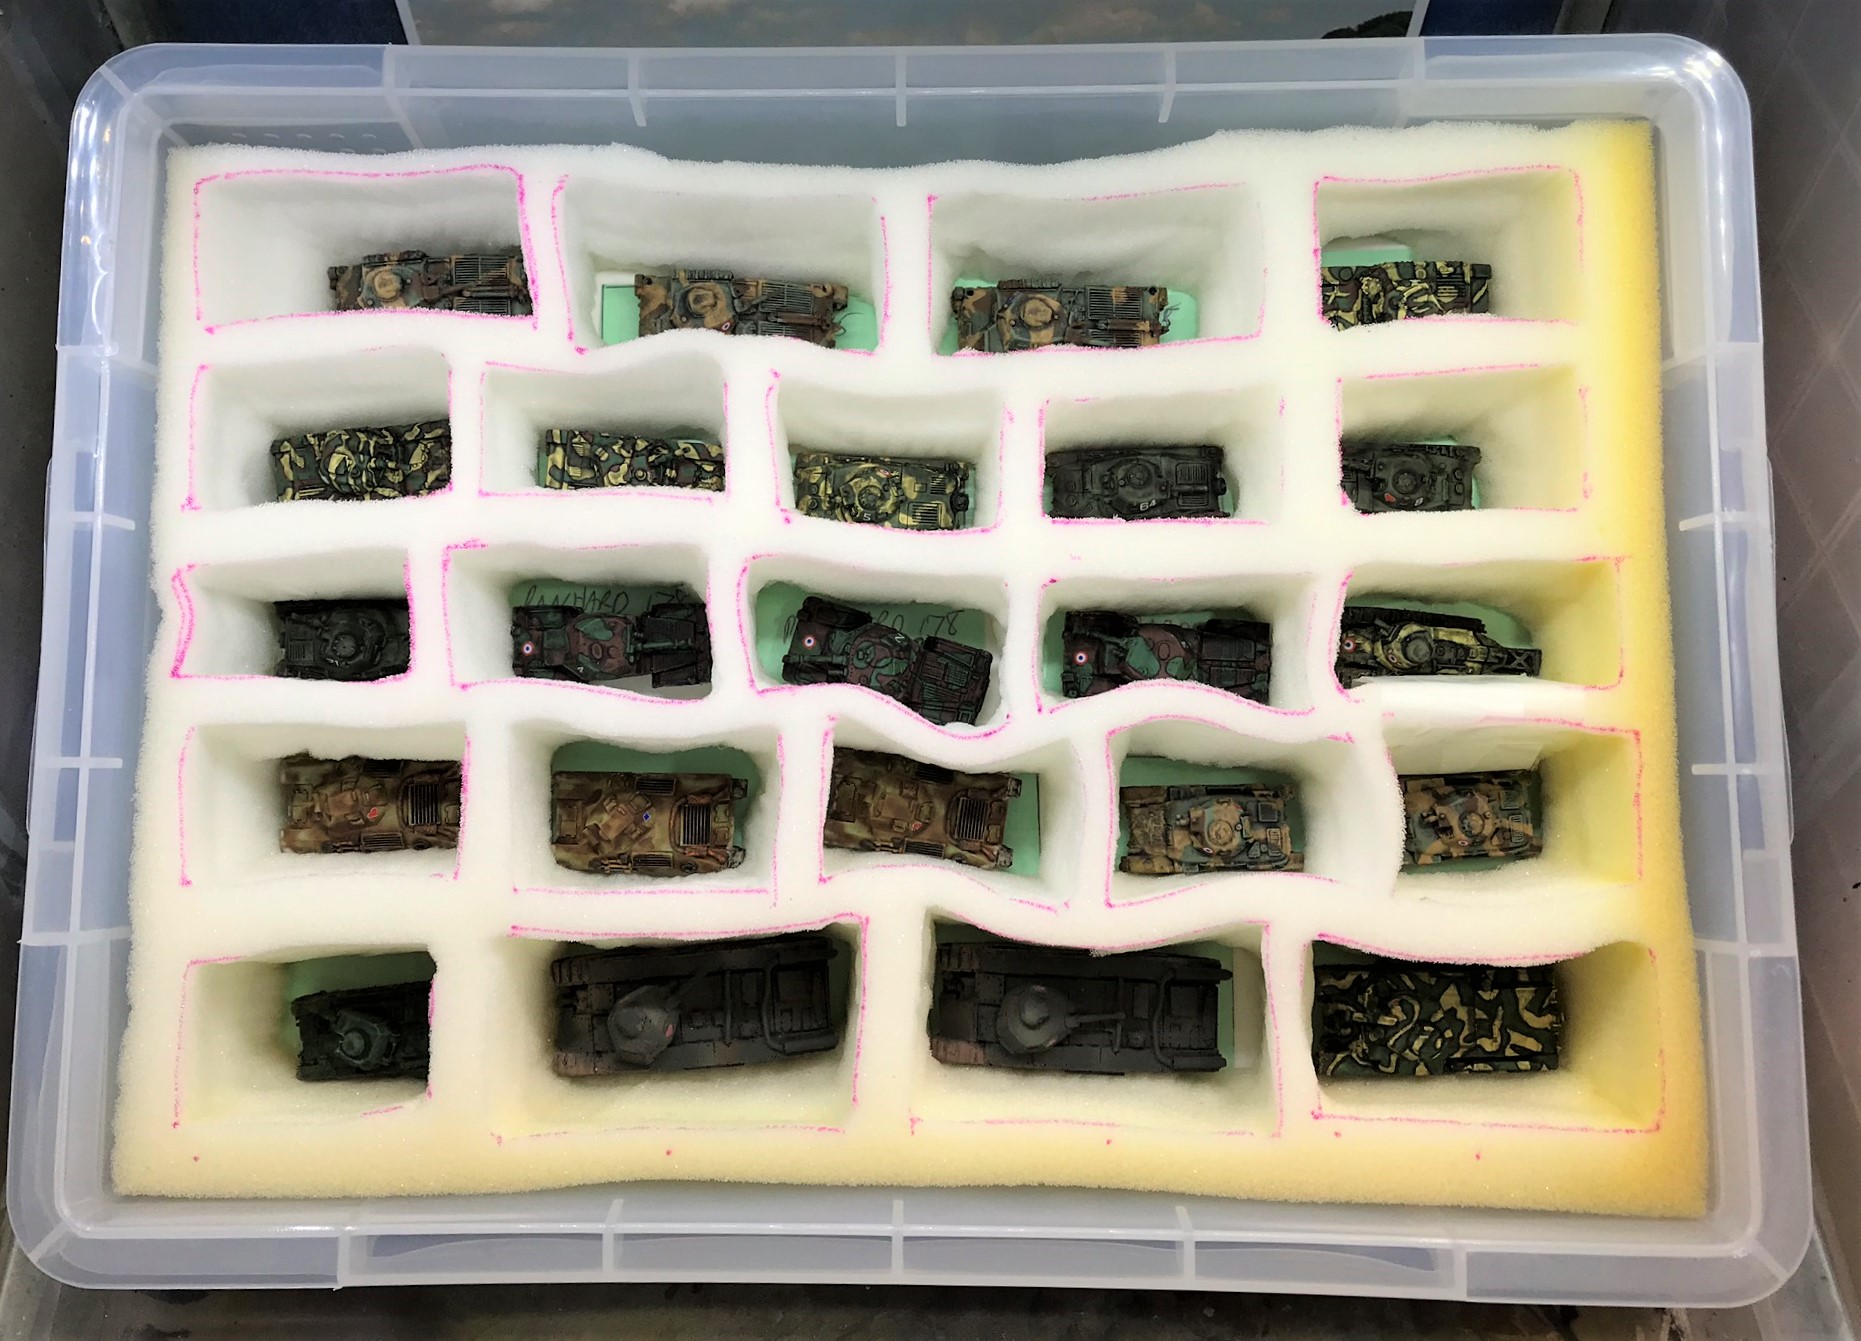
Storage and Transport
The storage and transport of miniatures to games is an issue. I have zero intention of having my models damaged or destroyed in transit. I use a 4-liter Really Useful Box, and cut a 2″ foam piece from Home Depot to fit snugly in the box. I cut up and lined the bottom with a similarly-sized piece of thin foam from Michael’s. Then I mock up sizes of the tanks with card stock and trace them onto the foam. I also take a photo to remember what tank goes where. Using a new and very sharp Exacto knife, I carefully remove the openings by cutting as vertically as possible. I start by patiently removing pieces from the middle and continue moving outward in a circle. I then affix the card stock pieces to the bottom of the hole openings with tape to mark the locations of the tanks. I thought I’d share this as it may help others.
The mock up.
My French Armor force in its new home.
References
Throughout this project I have used many of the books that I have as references – here are some I have used and strongly recommend. I do not get paid by anyone to recommend these, but I am sharing the links if you want to get them. I did study with BG Robert Doughty at West Point over 35 years ago – and he did give me my copy of the B.T. White book in 1984 – that I still have and used many times. There are certainly other books, but these I recommend. I will be using these in my next phase with my German tank additions.
For history of the conflict I recommend buying:
Doughty, Robert A. (1985). The Seeds of Disaster: the development of French Army Doctrine 1919-1939. Mechanicsburg, PA: Stackpole books. (available at Amazon here)
Doughty, Robert A. (1990). The Breaking Point: Sedan and the Fall of France, 1940. Mechanicsburg, PA: Stackpole books. (available at Amazon here)
Horne, Alistair. (1969, 1990). To Lose a Battle: France 1940. London: Penguin books. (available at Amazon here)
For modelers and gamers interested in the vehicles’ look and history:
Forty, G. and Livesey, J. (2017). The World Encyclopedia of Tanks & Armoured Fighting Vehicles. London: Lorenz Books. (available at Amazon here)
Jackson, R. (2009). Tanks and Armored Fighting Vehicles Visual Encyclopedia in color. London: Amber Books. (available at Amazon here)
Restayn, Jean. (2007). World War II Tank Encyclopedia in color 1939-1945. Paris: HISTOIRE & COLLECTIONS. (available at Amazon here)
Smithsonian Enterprises. (2017). Tank: the Definitive Visual History of Armored Vehicles. New York, NY: Penguin Random House. (available at Amazon here)
White, B.T. (1972). Tanks and other A.F.V.s of the Blitzkrieg Era 1939 to 1941. Dorset: Blandford Press. (available at Amazon here)
Zaloga, S. (2014). French Tanks of World War II (1): Infantry and Battle Tanks. New York, NY: Osprey. (available at Amazon here)
Zaloga, S. (2014). French Tanks of World War II (2): Cavalry Tanks and AFVs. New York, NY: Osprey. (available at Amazon here)
PAINTS, INKS, GLAZES, SHADES, WASHES, PIGMENTS, FLOCKING, GLUES AND MORE USED ON THESE VEHICLES:
Microscale Liquid Decal Film (except R40)
1/8″ neodymium magnets
Green stuff (kneadatite)
Gorilla Glue
Poster tack and ¼” square wooden dowels on plastic plates
Reaper MSP “Black Primer”
Vallejo “Flow Improver”
Vallejo “Airbrush Thinner”
Vallejo “Surface Primer – USA Olive Drab”
Vallejo “Black Grey”
Hataka “Jaune d’ochre” (only on AMC 35’s, Char D2, and FT17)
Hataka “Vert foncé”
Hataka “Terre d’ombre” (only on AMC 35’s and Panhard 178’s)
Hataka “Gris vert” (only on FT17)
Battlefront “Oxide Red” (only on R40 and FT17)
Citadel “Typhus Corrosion” (only on R40 and FT17)
Army Painter “Military Shader” (shade)
Battlefront “Dark Gunmetal”
Vallejo Model Air “Gloss Varnish” (except R40)
Vallejo Model Air “Satin Varnish” (except R40)
Microscale Micro-Set (except R40)
Microscale Micro-Sol (except R40)
Appropriate decals from Battlefront (except R40)
Vallejo Weathering Effects “European Thick Mud”
Vallejo Weathering Effects “European Splash Mud”
Vallejo Weathering Effects “Crushed Grass”
Vallejo Mecha Varnish “Matt Varnish”
Thanks for looking – please let me know your thoughts and feedback!
During the Battle of France (May-June 1940), there was an amazing variety of vehicles on both the German and the French sides. At this same time last year, I began putting together a collection of period 15mm/1:100 scale vehicles for this period. These were discussed here. I have previously posted about a couple of games (December 2018 and January 2019) that I ran using the What a Tanker™ rules from the UK’s Too Fat Lardies. I have been hoping to return to this period and add more vehicles to both armies. I am starting this augmentation by adding 3 FCM 36 light tanks to my fleet.
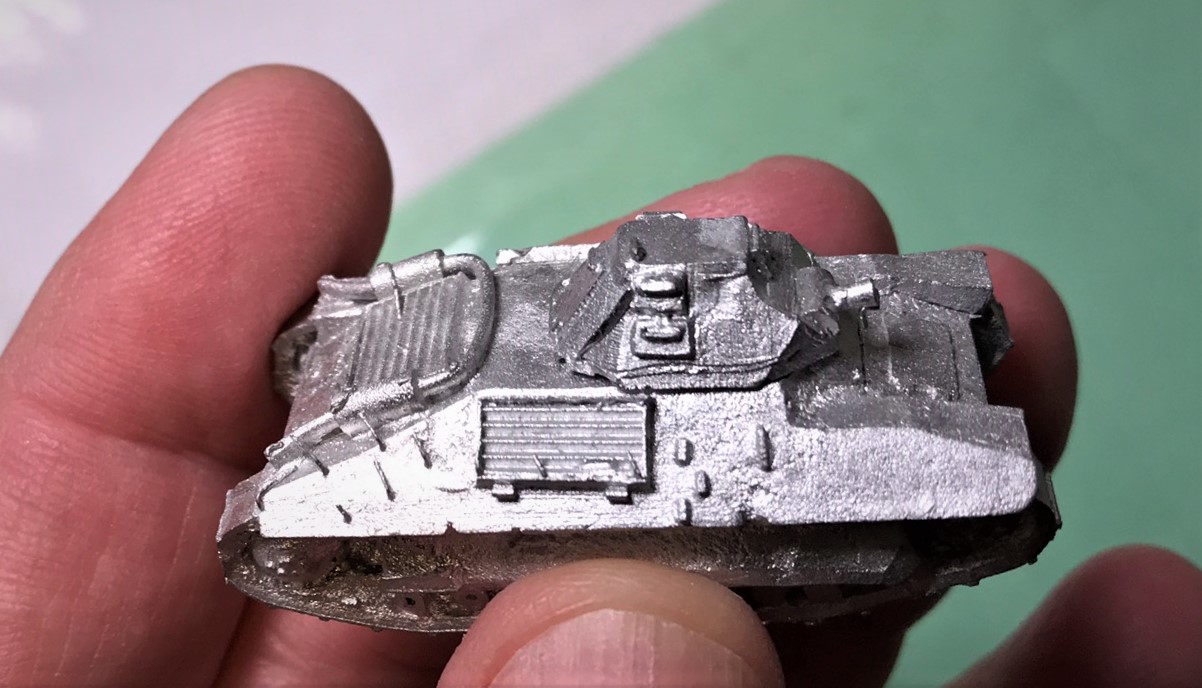
The FCM stands for Société Nouvelle des Forges et Chantiers de la Méditerranée, a shipbuilder in Toulon who manufactured this 1936 design – and delivered about 100 to the French Army up through 1938. Cost and industrial manufacturing concerns limited further purchases. They were a little more than 12 tons, with a crew of two. The armor was fairly good – welded, and very sloped for tanks of the day. It also had a diesel engine and reasonable range unlike many other contemporary French tanks. However, like many other French tanks, it was armed with the weak Puteaux SA 18 37mm gun which definitely had challenges fighting German armor. Notably, two battalions of FCM 36’s tried to repel the bridgehead that the Heinz Guderian had established across the Meuse, but they were too little and too late. After the surrender of France, some of the FCM 36 chassis were converted to Marder I’s or self-propelled artillery. Some of these conversions were involved in the Normandy Campaign of 1944. Today, only one FCM 36 survives at Saumur.
I thought these would be a good addition to my French early-war tank collection. In What a Tanker™, these are the cheapest tanks to buy point-wise. The only source I found for these models was Old Glory. They are metal, and quite small of course.
The 3 FCM 36’s in the baggie.
I did need to do a bit of filing and cleanup of extraneous molding material and molding lines as you see here. Yes, these are small!
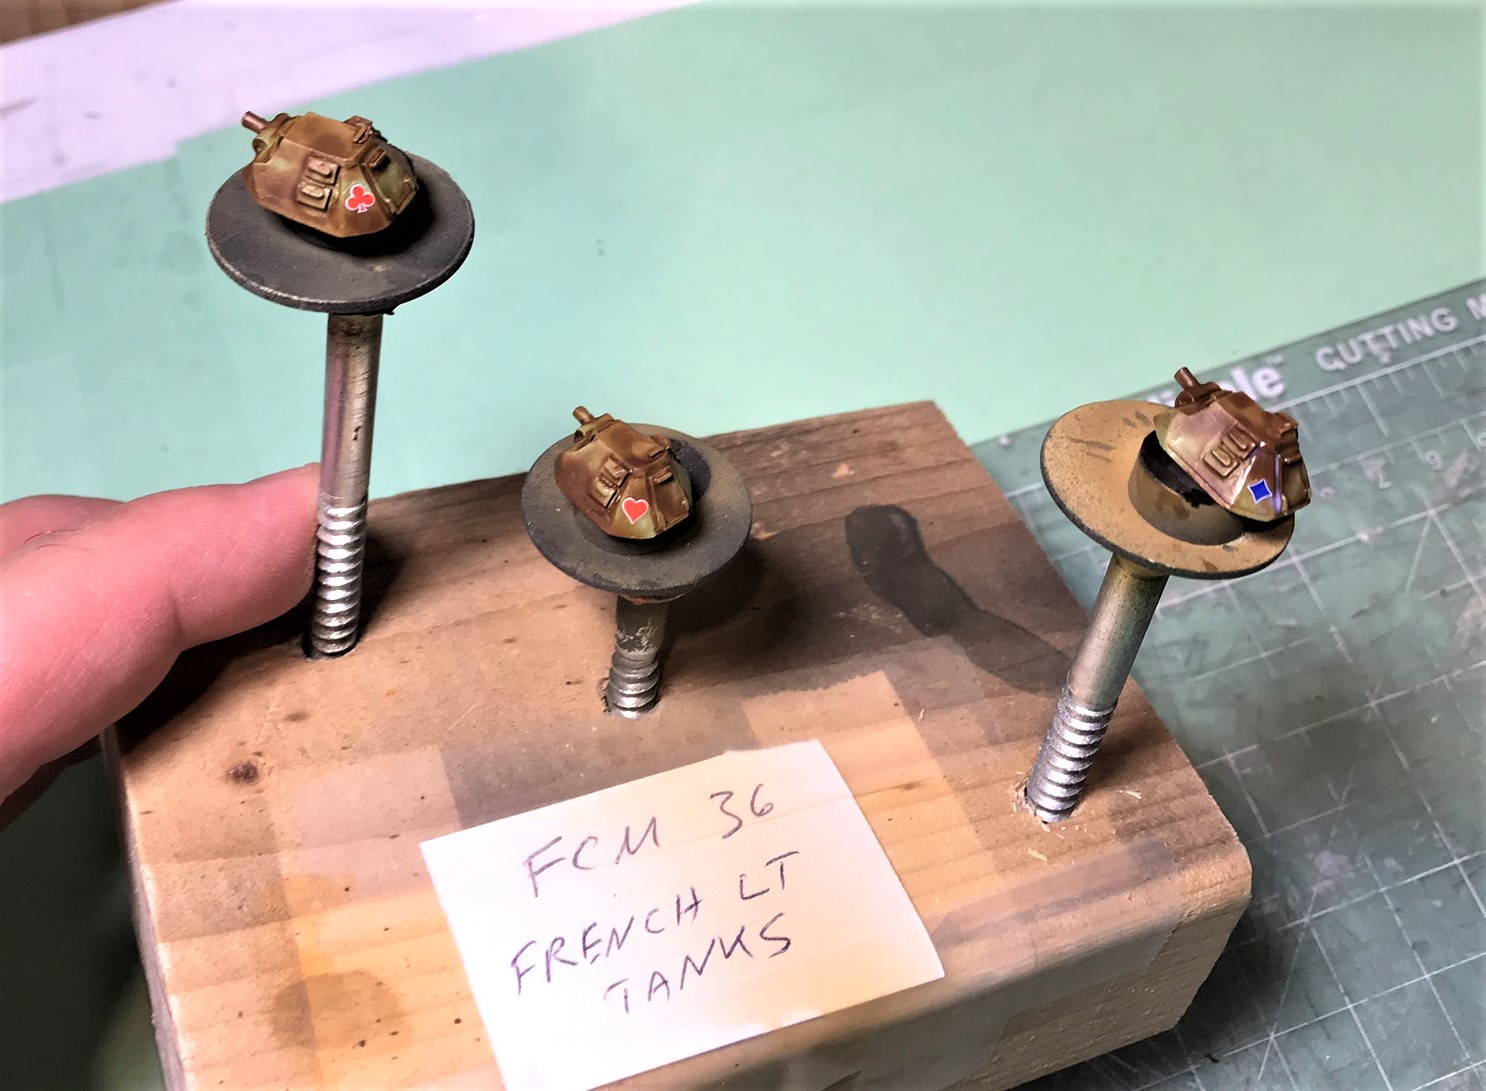
The turrets had a small molded pin for mounting on the molded hole on the chassis. I needed to slightly elevate the turret or the underlying paint on the chassis would be worn off, even with a good varnishing. I decided to drill out the pins and the holes with a 1/8″ drill bit. I then used green stuff to fill in underneath the hollow chassis between the tracks and provide a “floor” for the magnets. The magnets were put in place with Gorilla Glue in the chassis and the turrets.
You can see here my hodge-podge mounting scheme of the FCM 36’s for painting. I used a 1/4″ square dowel and poster tack to mount the chassis for painting. I primed these, and the used a German green-brown as a base coat. This shot here is after the first camouflage color (blue green) was applied with my Iwata Micron airbrush. Also, I only put the turrets on a tank when I am painting camouflage patterns.
Next, I applied the third color (brown) to the camouflage pattern.
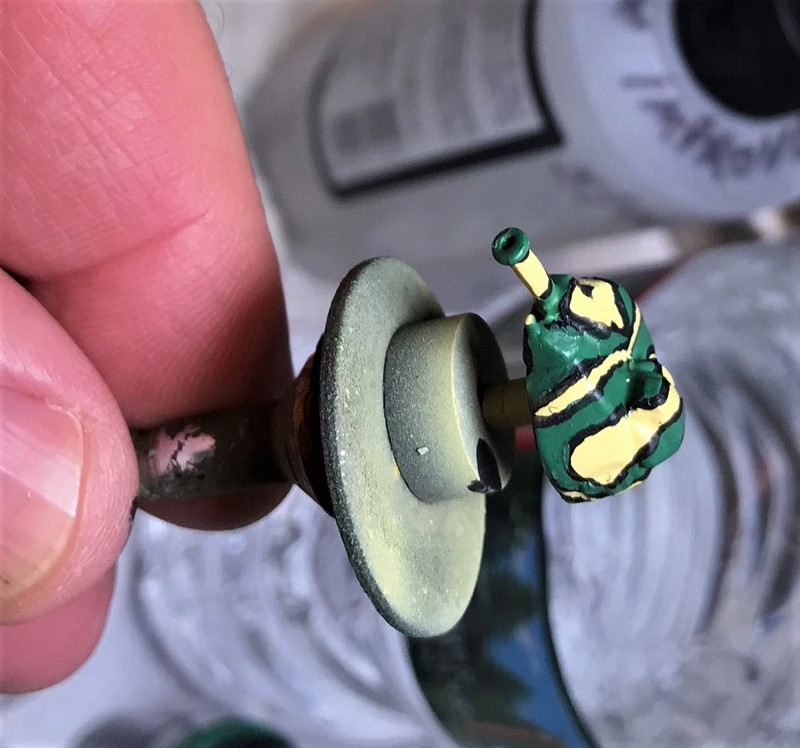
When I paint turrets, I find this helpful (as the magnets in the turrets hold the turrets to the magnets on the washers). Also, I can easily apply the decals this way, and airbrush on the final two coats of matte varnish.
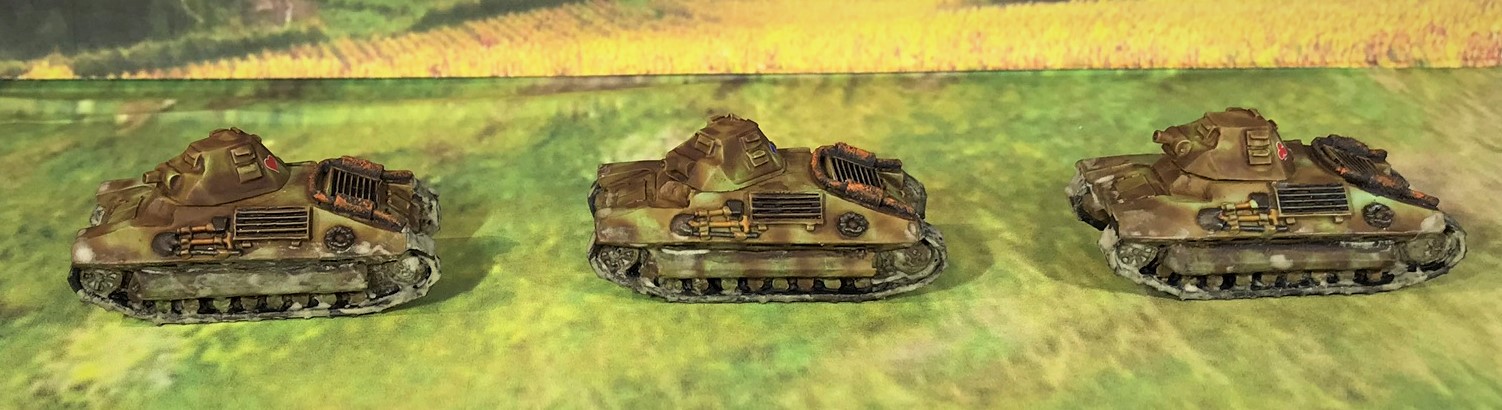
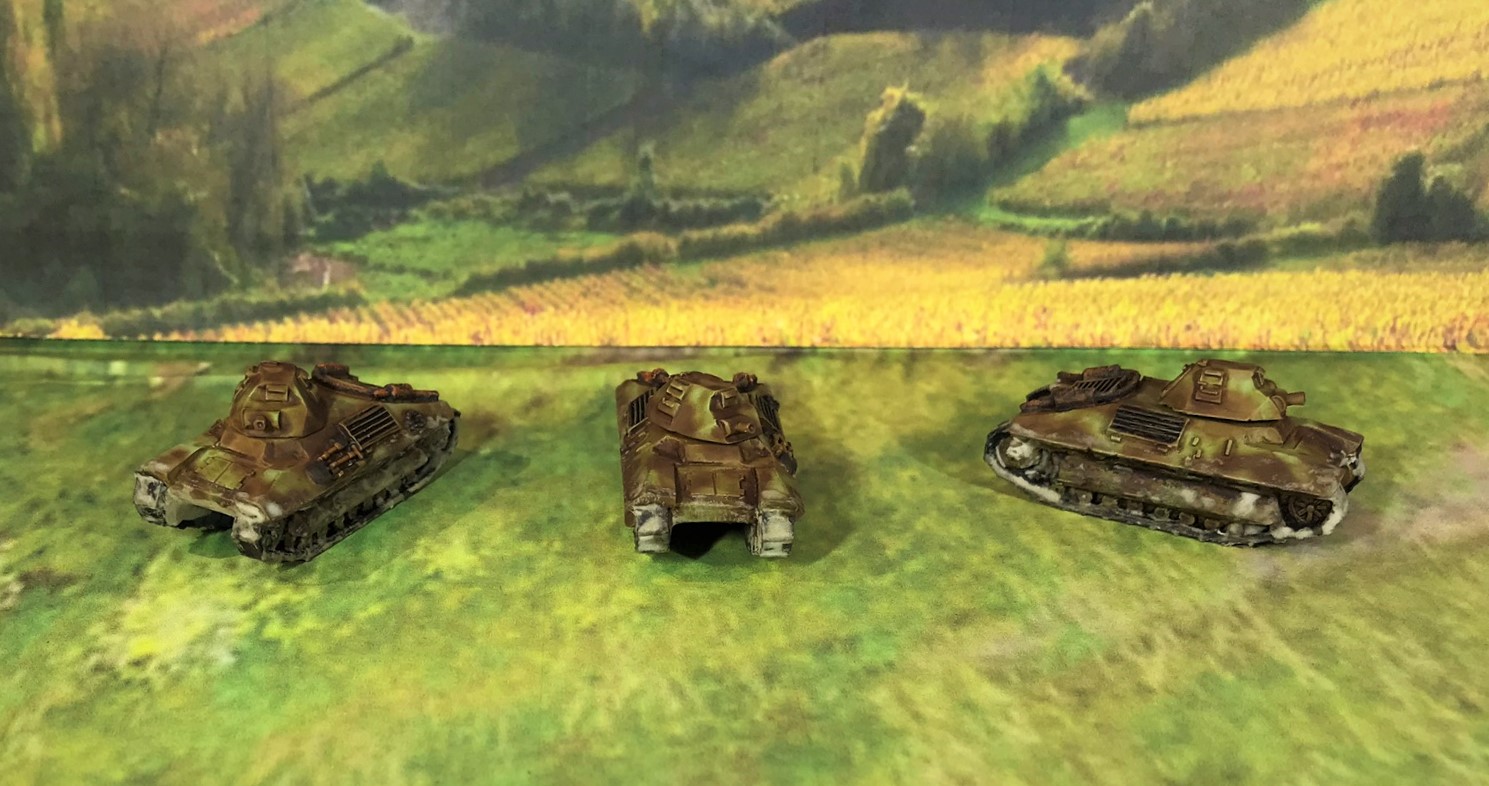
Lastly, I thought I’d share some group and individual shots and a bit about their debut on the tabletop the day after they were completed.
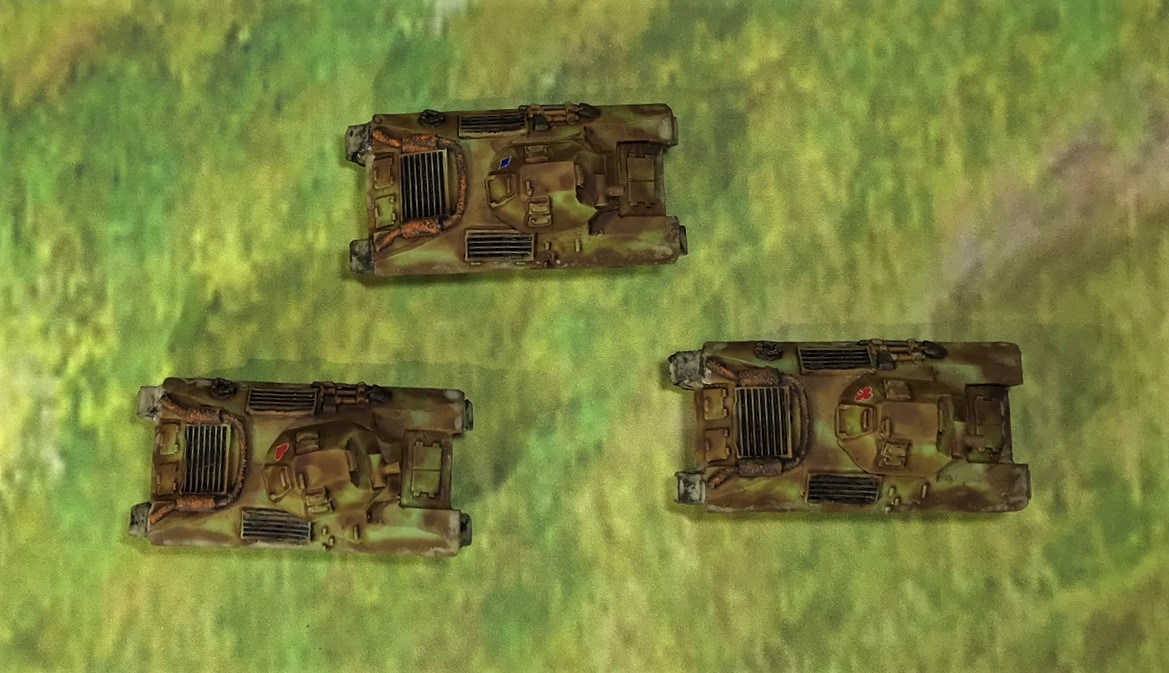
Top view showing the sloped octagonal turrets.
Left side of the FCM 36’s.
Frontal view.
I used a blue diamond, a red heart, and a red club as decals which would also help identify these as different individual tanks on the tabletop. From my research, FCM’s did not seem to have as many markings historically as other French tanks.
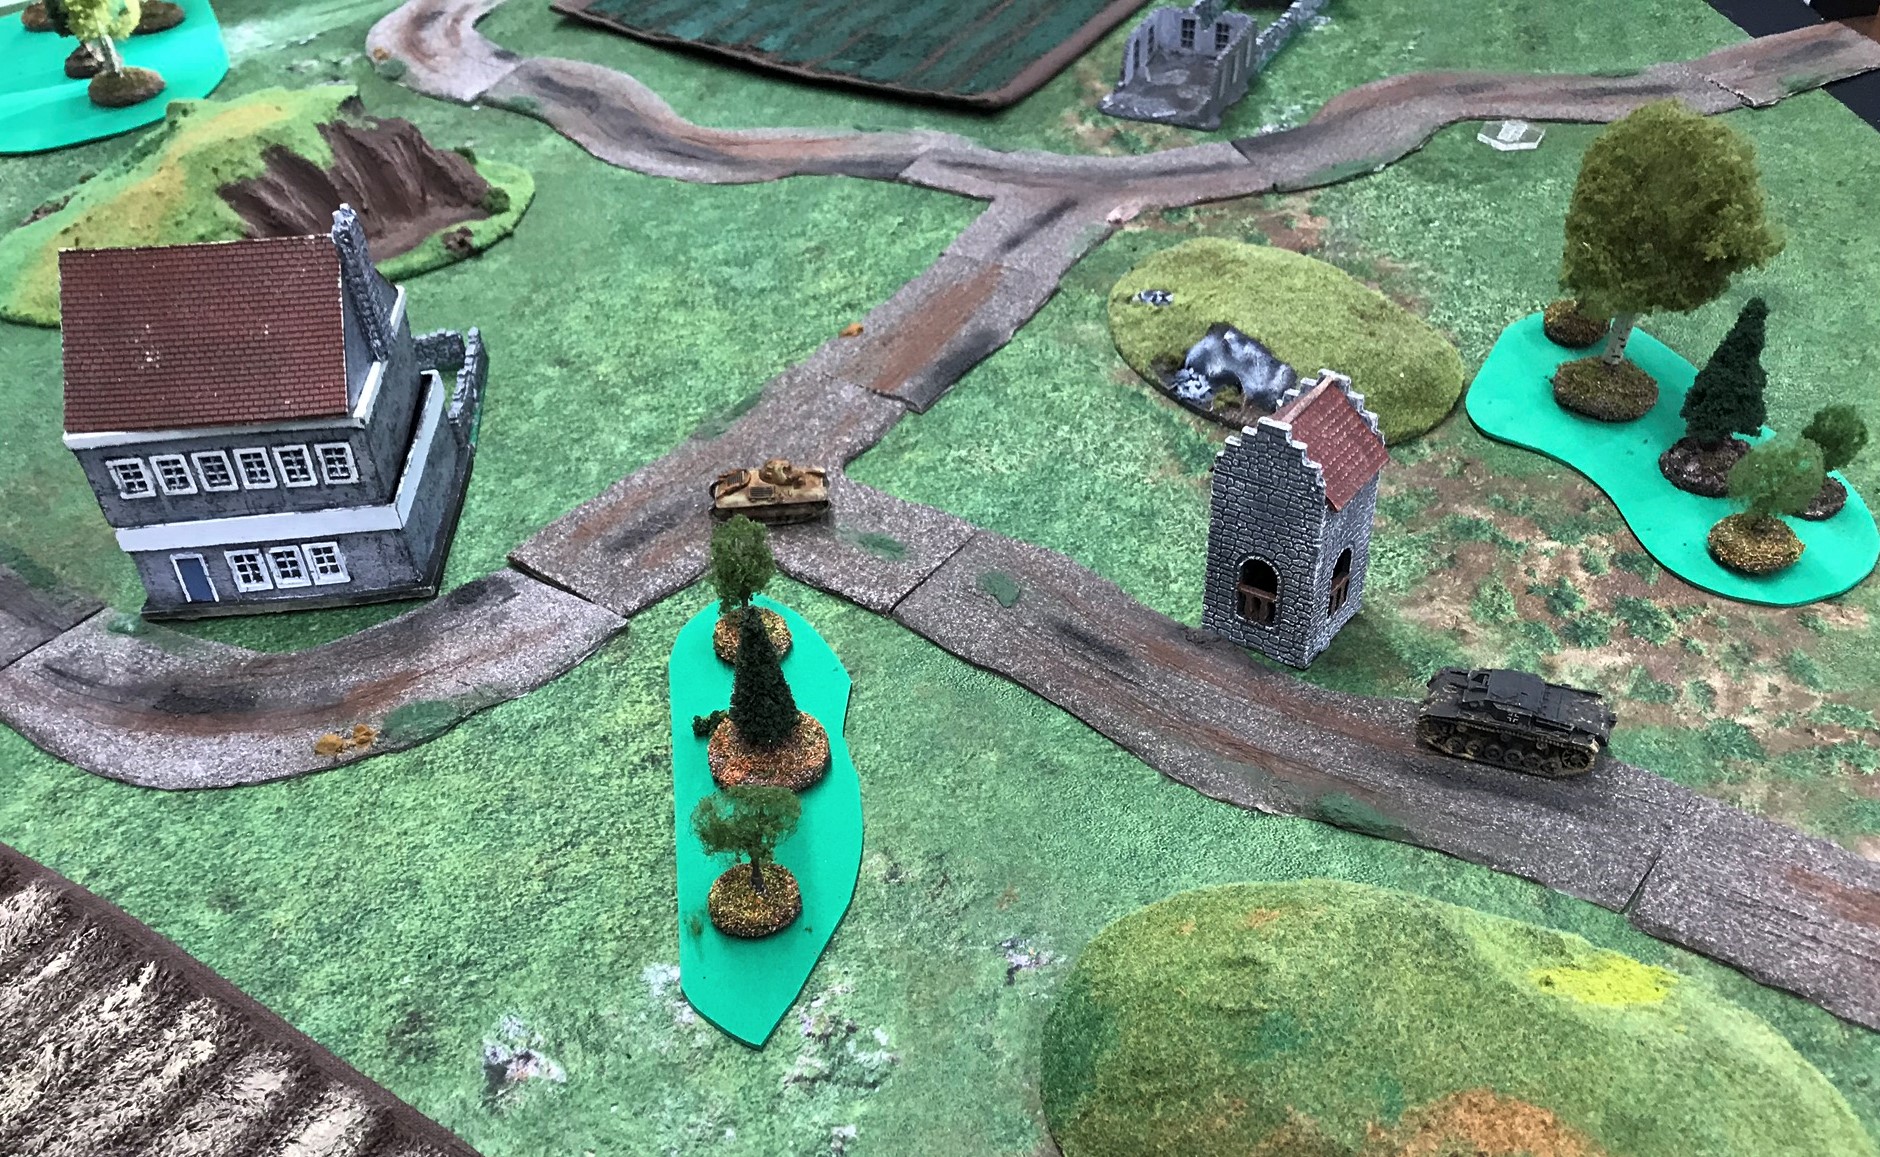
As stated above, these made their game debut this weekend at the December session of the Mass Pikemen Gaming Club.
My buddy Mike Morgan was on the French side, and chose the blue diamond FCM 36 as his tank. He then rolled a perfect roll of 6 sixes! The odds on that were 0.01286%!
Mike’s FCM 36 moves on the road.
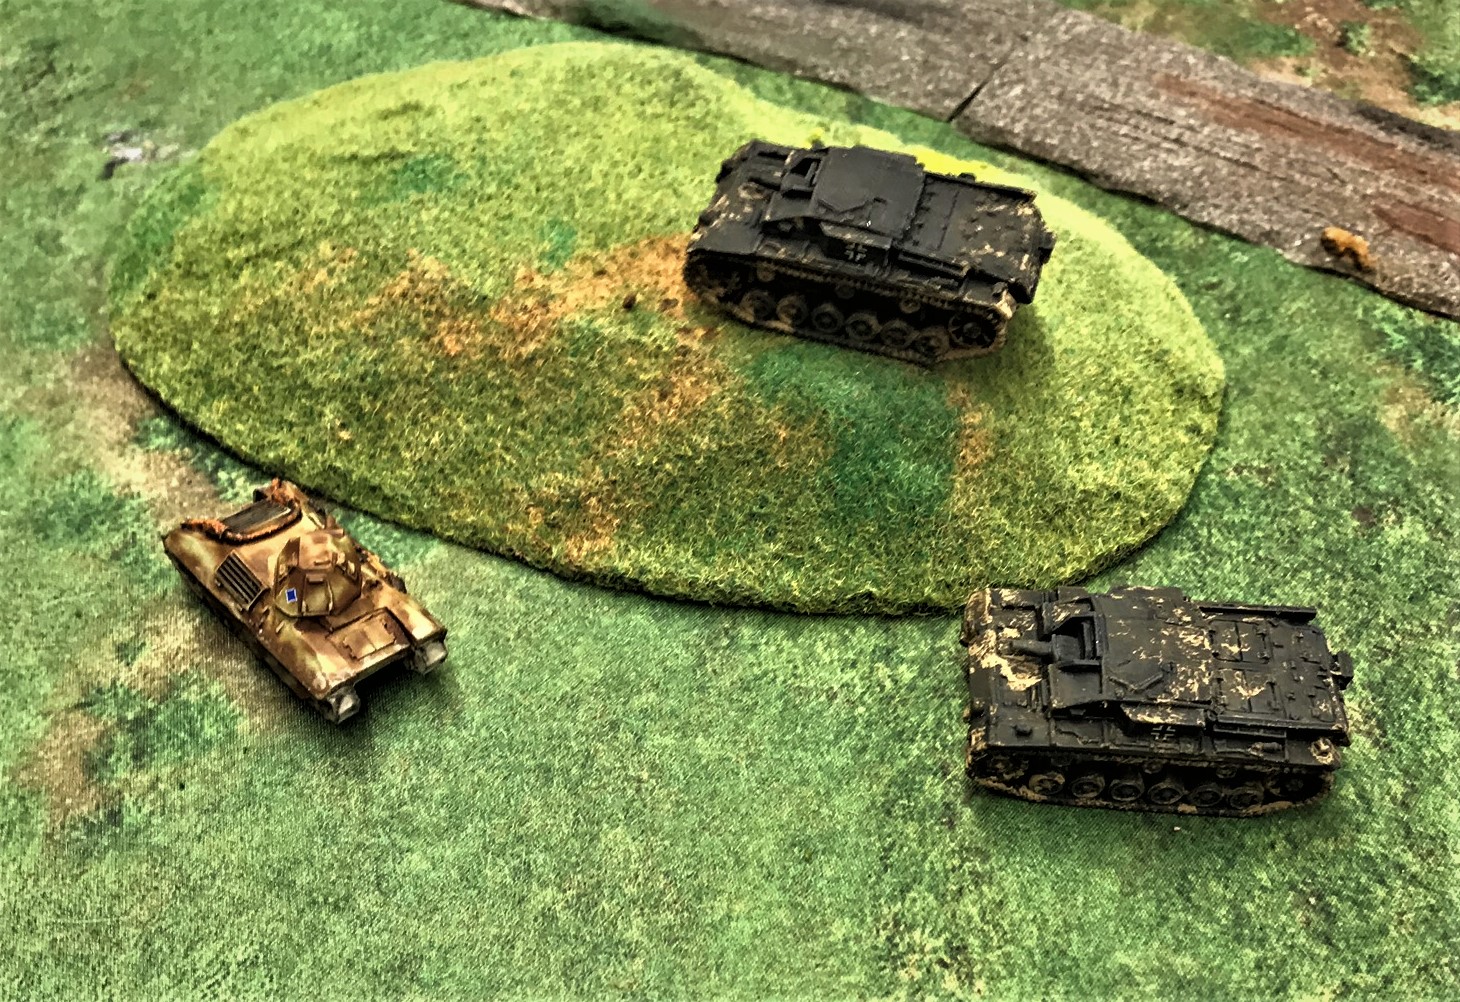
His FCM 36 was stalked by a StuG A (player Chris), which kept missing it.
Mike successfully maneuvered his tank to the German’s side, and shot point blank. The dice deserted him as the StuG A took only minor damage.
Smelling an easy kill, the Germans (Chris’s teammate Christine) brought up a second StuG A in the hunt. It also missed the FCM 36. Note – as there were only 15 StuG A’s in the German invasion force across France, this would have been highly unlikely!
Then the Germans brought up even more to the hunt with a Panzer IIIE…
And Mike’s plucky FCM 36’s luck finally wore out with the Panzer IIIE (Christine) knocking it out.
On the other side of the table, Mike’s teammate Tom managed to kill Christine’s Panzer 38(t) with a SOMUA S-35. Mike got another FCM 36, and that was killed by Christine’s teammate Chris’s StuG A (in the shot below on the left). Mike replaced his lost tank with an R35. Tom drove his SOMUA around the building but frustratingly could not take a point-blank shot at the Panzer IIIE (as his dice roll failed him). Mike had to leave, and my wife Lynn (no gamer just watching) took over the R35. Lynn drove the tank to the side of Christine’s Panzer IIIE, and rolled three critical hits – and Christine failed to block any. This knocked out the Panzer IIIE!
Lynn’s R35 avenges the burning FCM 36 (on right) by knocking out the Panzer IIIE.
Happy wife, happy life! Tom and Lynn are all smiles here.
In a final act, Christine maneuvered her remaining StuG A for a rear shot on Tom’s SOMUA S-35. She successfully knocked out the SOMUA.
That ended the game, with the French winning a very narrow victory 32-31. If Lynn had not rolled so well in killing the Panzer IIIE, the Germans would have won. Thanks to the players for a great and fun game!
I have plans for more French and German tanks for this scenario. I hope that you enjoyed this post, and feel free to share your thoughts and feedback with me in the comments section! I have been behind on my blogging efforts and hope that I can share more with you soon! Thanks for taking a look!


 front side")
 right side")
 rear view")
 right side")
 right rear side")