

It’s my blogaversary! I started this blog 6 years ago today on March 19th, 2015!! It all started with this post – The Story of the Nightmare Legion. It’s been a fun journey.
I started this blog to share my minis and to share stuff that I learned after an extended absence from the hobby. I wanted to help with lessons learned and the like. Since then it’s been a blast, and I really appreciate all of you who read and follow this little blog of mine! I certainly have been inspired by yours.
This current post was one with which I struggled as far as deciding on whether or not to do write it as it involves making stuff to make my games easier for the players and for me as a GM. In the end, I was encouraged to give it a go (thanks IRO and TIM!). So, this post will be more of a how to (and a throwback to some of my earlier projects) in terms of stuff I have conceived of, designed, and built for my Feudal Patrol™ games using my supplement Civilizations Collide. After reading this, you might have some new ideas, you might know about some new materials, or you might just think that I am nuts. After all, the stuff I will show took 3+weeks to make.
Now, before I go any further, I want to emphasize that I did not need to do any of these projects to play Feudal Patrol™. Period. I did because they suited my personal needs and – well – I get thoughts of stuff in my head that need realization.
Buck’s Feudal Patrol rules have more than adequate tools and game aids. They are fantastic. My goals here were for myself so that I can make my games easier for me mainly. Also, with 216 available figures for a game of Civilizations Collide, I needed some tools if I am going to provide CHOICE and AGENCY to my players.
To accomplish this, I have broken down my efforts into “challenges” with some supporting pics and links for the materials and tools. I hope that you find them interesting as they are really how I built “stuff” for my games.
The Under-Base Label Challenge
Challenge: The Conquistadores arrived in Mesoamerica in the early 16th Century and there had been many different Mesoamerican civilizations for centuries prior to that. “Uniforms” in this era were anything but uniform. In the game, Warbands and Elements within Warbands are composed of figures that are attired, armored, and armed differently. In terms of both figure identification and using the points system to build Elements and Warbands, this poses a challenge, especially with my 216 available figures. Having thought of this from the beginning of this project, I had kept an identification Excel spreadsheet for all 216 figures throughout the project – which helped immeasurably with having identification data for each figure. I did take many pictures and also wrote (somewhat illegibly as is my curse) on the bottoms of the figures’ bases with a Sharpie. However, I needed a clear and legible solution for the tabletop.
Goal: Make all figures easily and individually identifiable. Ideally, have a system that identifies each figure and the points cost for each under the 1” and 1.25″ steel washer bases.
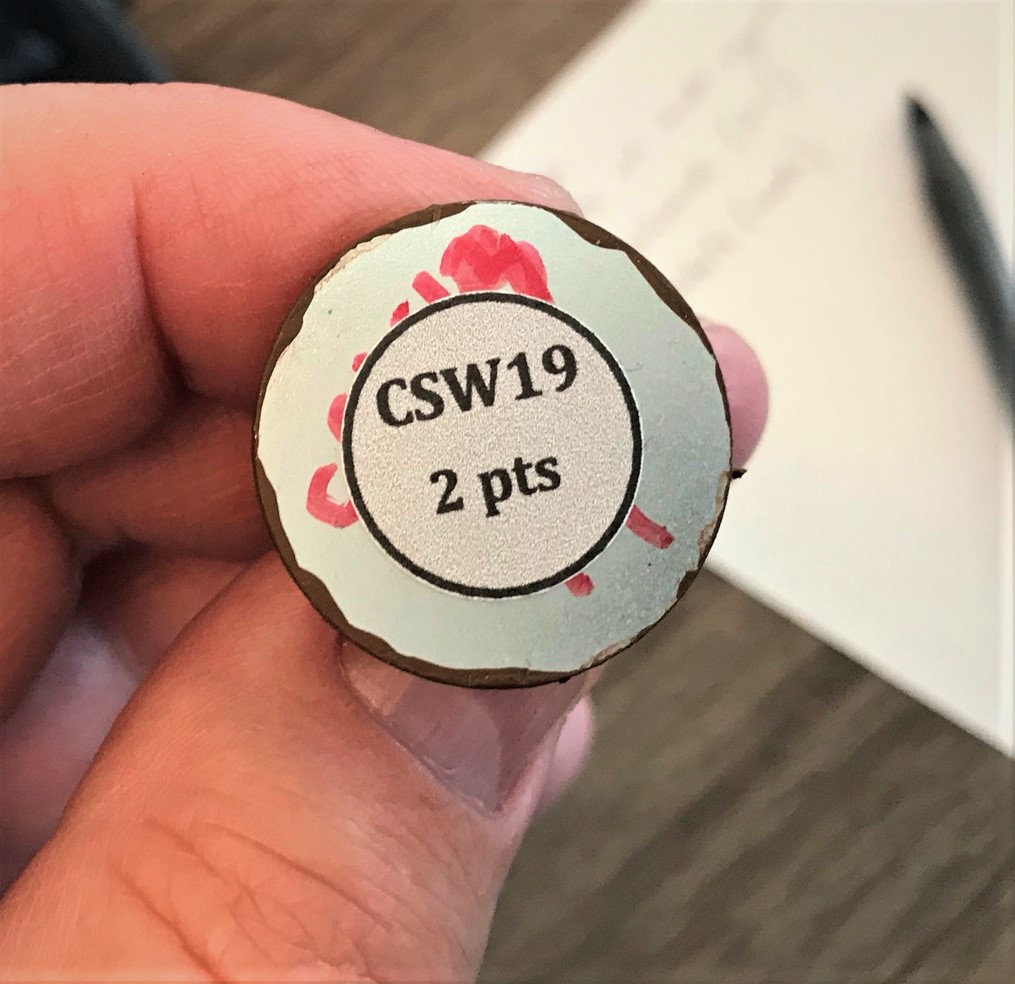
Solution: Create custom labels for use under the 1” and 1.25″ steel washer bases.
Process: Using PowerPoint, I designed a ¾” round label that has both the figure identification number and the figure point value on it. I cut and pasted additional circles and aligned them on the sheet for future removal. Alignment of the circles and editing them was easy with PowerPoint – and was very helpful in later steps with the paper trimmer. I filled one sheet or slide in PowerPoint full of the circles. At that point all I needed to do was to copy that entire sheet and make a second sheet, and so on. This enabled me to edit each circle on the subsequent sheets for all 216 figures. I inputted the figure numbers and the point values from my master spreadsheet onto the circles. I used a color code for the round labels by type – grey for the Conquistadores, gold for the Aztecs, and red for the Tlaxcalans. I also used a thick point circle on the border of the circles – I used 1.5 but I could have gone thicker. The thicker borders help with aligning them for punching out later. I then printed off the sheets of labels on Avery™ #8165 8.5” x 11” Trueblock® shipping labels that I bought at Staples. I took each sheet and used my Fiskars® SureCut™ Deluxe Paper Trimmer (from Michaels) to cut thin strips holding multiple labels. This made punching out the labels easier. I used my 5/8” punch from Michaels (Lever Punch, Circle by Recollections™), punch out the labels. Even though the punch was 5/8” versus the 3/4” circle – they aligned better – as the thick point border helped me to position the strip. The punch has a clear underside so you can see if you are aligned or not. I affixed the labels to the underside of each base of each of the 216 figures. I store and transport my figures in 11-liter Really Useful Boxes (which I bought from Staples but this UK company has their own website too in the US) lined with Aleene’s® Magnetic Tacky Sheets™ (which Michaels sometimes carries too). The labels did not impede the magnetic attraction that I needed because they were smaller in diameter than the 1” bases – and were centered on the washers – leaving enough steel available to get a “bite”.
End result: Every figure now has a printed label with its ID number and point value printed on it underneath as you see below.

The Really Useful Box Organization Challenge
Challenge: I can store and transport each of the figures in my Really Useful Boxes, but setting up a game and gathering figures from 216 figures for a warband can be too time-consuming if one has to look at each figure’s undersides! I needed to make my Really Useful Boxes even more useful.
Goal: Make my Really Useful Boxes more organized and more functional such that each figure has an easily identifiable slot for selection and also to speed pick up after a game.
Solution: Design and build a system within each Really Useful Box that facilitates easy figure identification for both gathering figures for a game and picking them up after a game while preserving any benefits for storage and transport.
Process: Each 11-liter Really Useful Box is about 12” x 14.5”. I could have gone through endless iterations of how to organize the figures so that they would fit, and never be 100% sure my set up would work in reality. I came up with an idea that I think worked. Here again I went to PowerPoint. Most of my figures are on 1” bases, but a few are on 1.25” bases. I decided that I would make 3/8” labeling strips in layers upon which I could affix the figure identification numbers. I wanted each figure to have 1/8” clearance on both sides, so each row would be 1.5”. To verify how this would work, I made shapes in PowerPoint at 50% scale such that they fit on the screen. The shapes included how much space I would need for each type of figure. This really worked – and is a process that I will use again. You can see below my rough plan. Once I had my rough design, employing my Fiskars® SureCut™ Deluxe Paper Trimmer I cut strips of card stock and affixed them to the magnetically-lines Really Useful Boxes with small balls of poster tack. Then I made a second set of card stock strips to go on top of the first sets, affixing them with poster tack. Lastly, I just printed off my Excel spreadsheet pages onto card stock with the figure identification numbers on them, trimmed them up, and affixing them to the now-raised card stock “line” with poster tack. For the Conquistador cavalry, I made little corrals as they were in need of a bit more support. I then put all of the figures into the boxes as you see below – I ended up needing 4 boxes.
End result: Every figure has a labeled slot as you see below.


The Movement Tray Challenge
Challenge: I needed a safer way to transport figures to and from the tabletop.
Goal: Design and make a couple of magnetically-lined movement trays.
Process: This was pretty simple. I just used some old 1/8” thick balsa wood under two Aleene’s® Magnetic Tacky Sheets™ and reinforced the glue with wood glue. After being weighted down, the sheets were firmly attached.
End result: Success – I have two movement boards!


The “Menu” Challenge
Challenge: Many of my games will be virtual, and some will be at convention games. I needed a simple way to convey two key concepts. First, I needed to present to the players the options that they had available with regards to figures’ stats and cost. Secondly, I needed to help them organize their troops – especially as Aztecs and Tlaxcalans have special organizations. In my games they are bigger and can have novice warriors attached. Normally, an Element in Feudal Patrol™ is 4-5 figures plus a leader figure. A Warband consists of 2-4 Elements plus a Warband Leader. To reflect how the Aztecs waged war, their Elements are bigger – adding up to 5 novice warriors to each Element (if they pay the point costs of course). This is useful as the novices can be assigned to drag away any incapacitated enemy for either sacrifice or slavery – which is historically in line with what they actually did do. Killing an enemy was regarded as “clumsy”. Additionally, each Mesoamerican Warband can have a Warrior Priest, who can both fight and help with Aztec or Tlaxcalan Morale results during a battle. At this point, my players could look at the figures in the boxes, but not have any information save the figure number, what he’s carrying and wearing, and the point value (if you pick one up to see the label). Certainly, this would not be efficient.
Goal: Design and make a simple way (a “menu” system) for players to make informed choices for both virtual and in-person games.
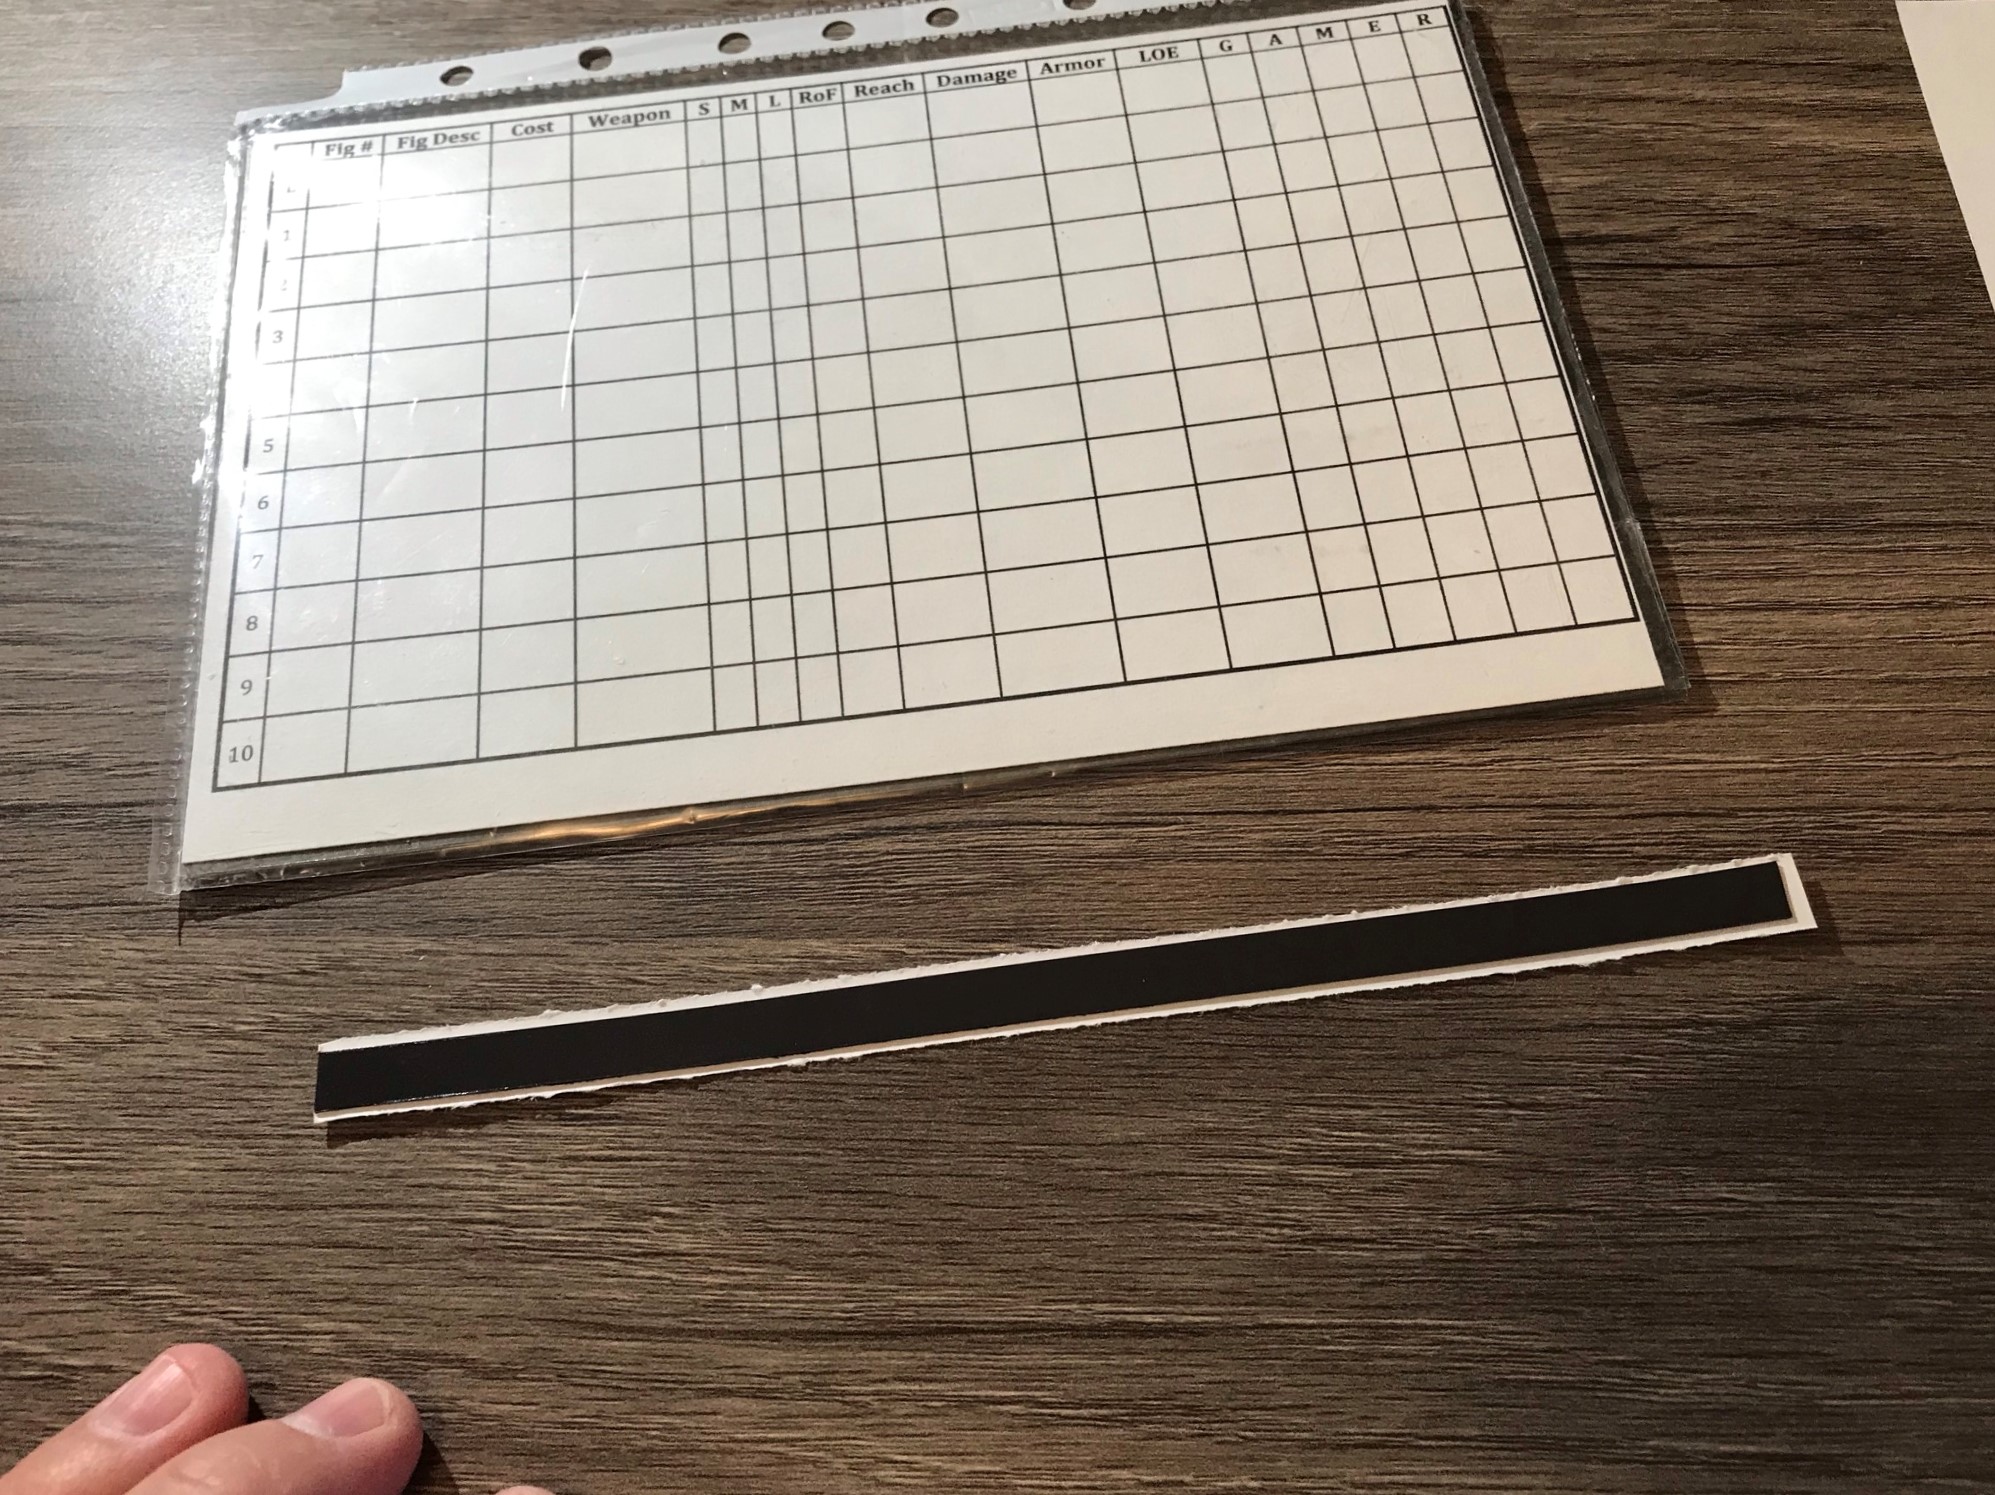
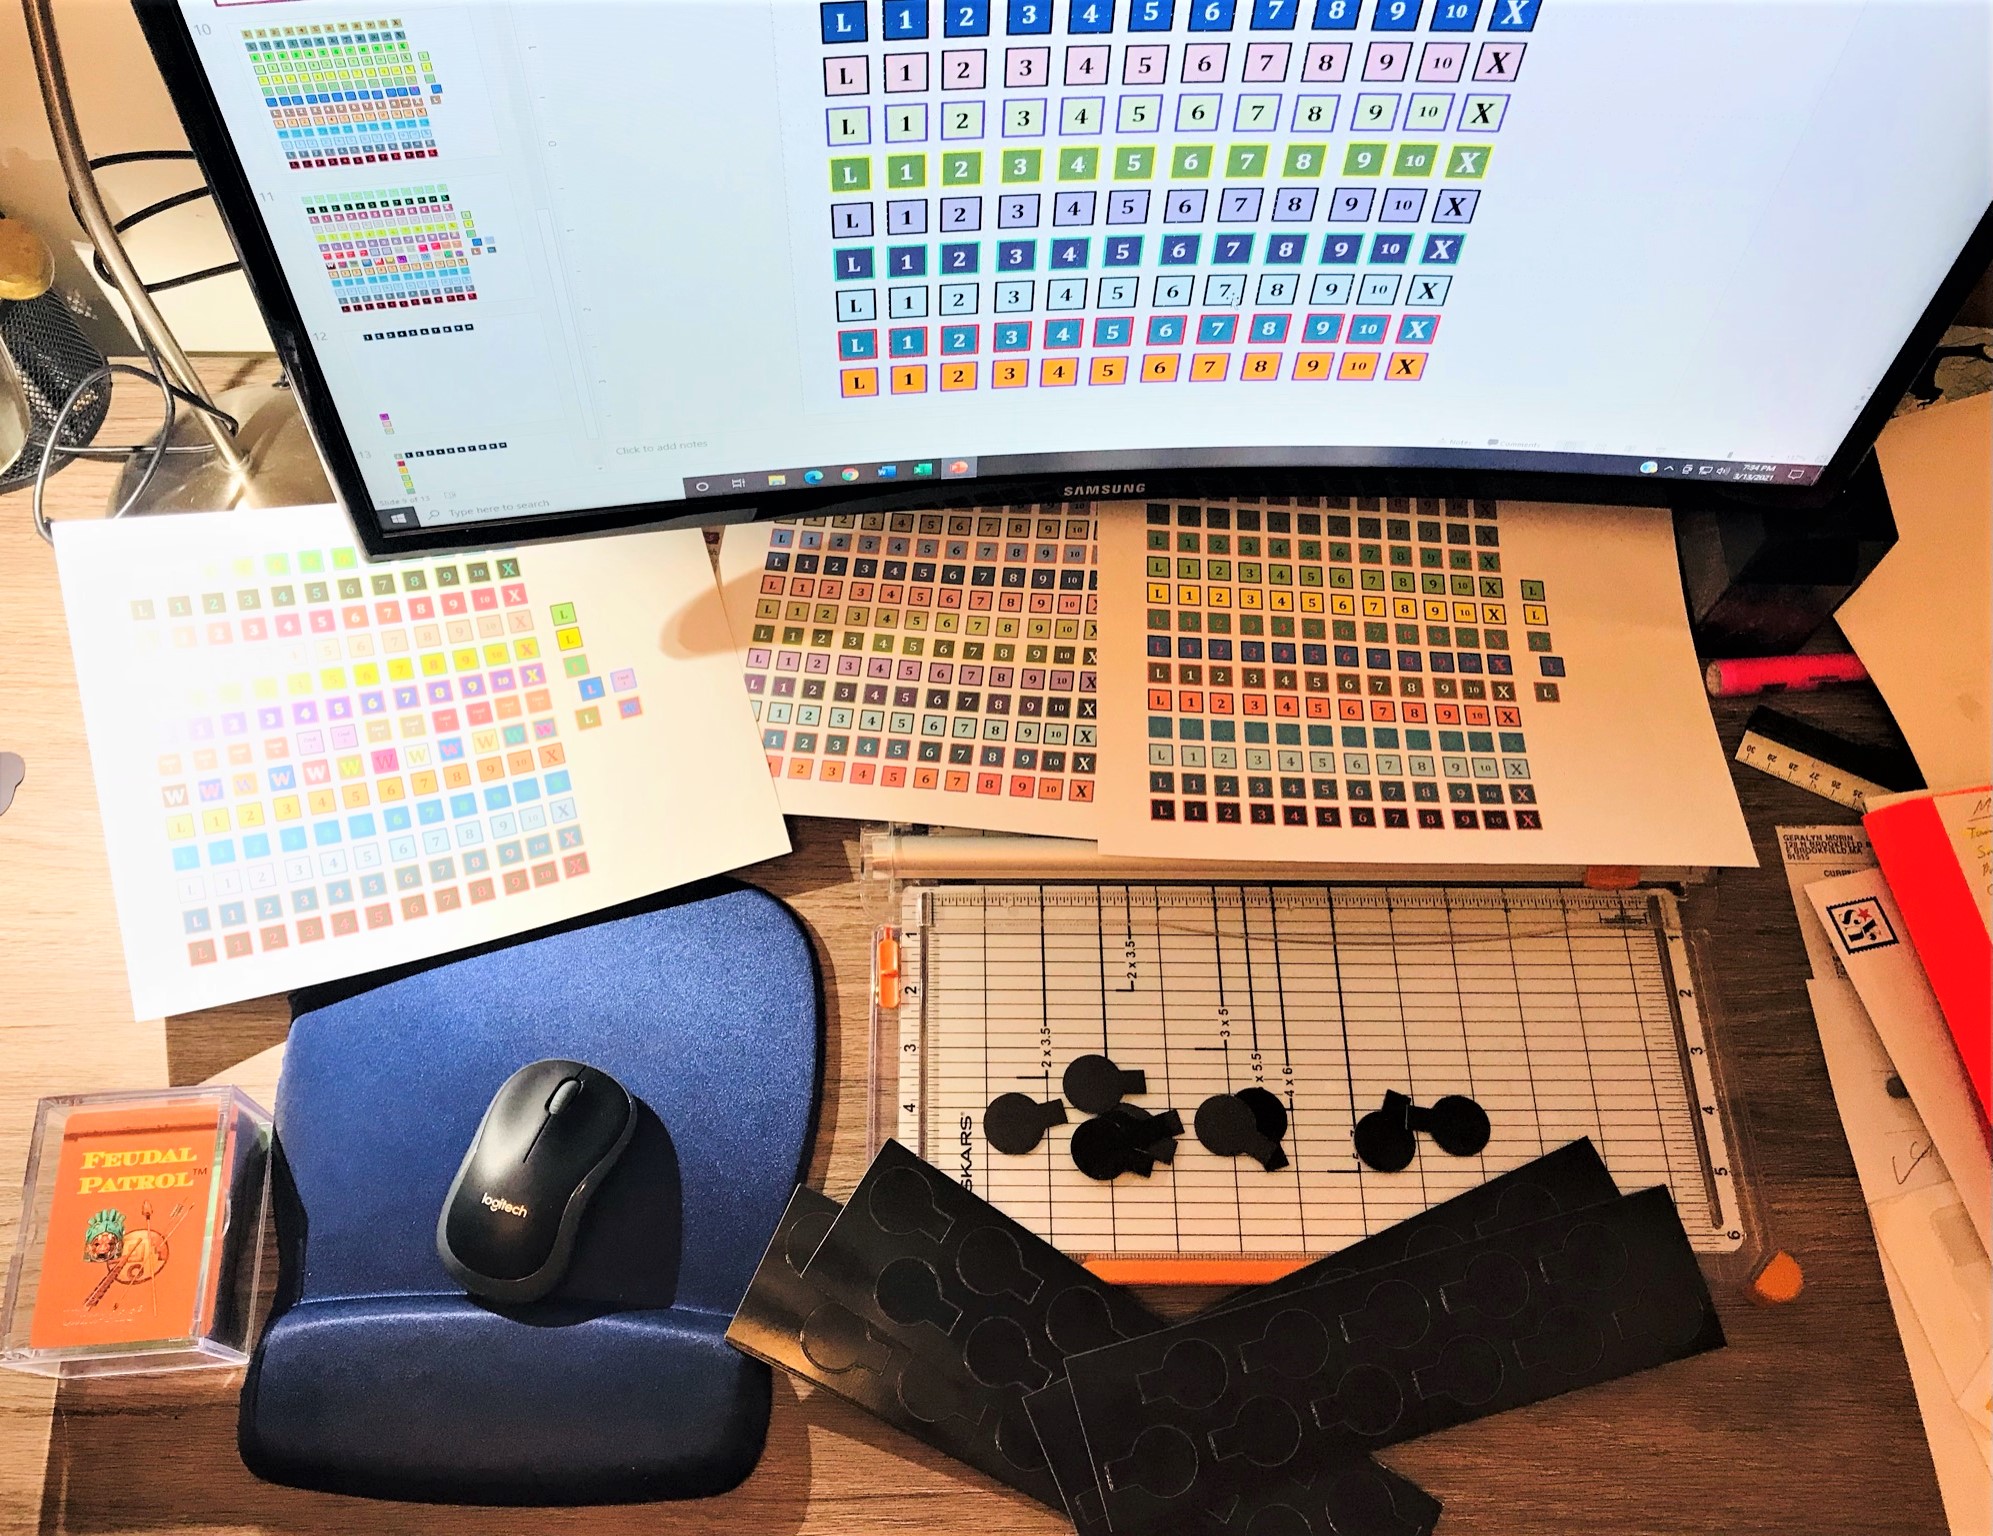
Process: What I did here was to go back to my Excel spreadsheet and size up the data to fit on a dashboard (more on that in a bit). Then I adapted Buck Surdu’s excellent data cards to fit on a single strip in Excel that would fit approximately 8” wide and 3/8” high. These I would make for each of my 216 figures – plus 4 additional to represent having the Army leader (Cortes or Pizarro) as a mounted versus dismounted choice for the Conquistadores. Each section of the Word document (basically a “menu” of figure choices) was organized as you see below. I then cut and pasted the strips from Excel into Word as pictures (paste special). I then added some brief information about the figures, as well as a picture of each of the 216 to help further identify the players’ options. Lastly, I created worksheets at the end of each “menu” to help the players build their forces. To do this, I went back to PowerPoint, and created the shapes that I wanted for the worksheets. I saved each individual slide as a JPEG (make sure you choose “Just This One” when it asks, and then edited the JPEG size. If it did not work, I just went back to the PowerPoint, resized, resaved as a JPEG, and repasted in Word. You can see the results below.
End result: I have three good menus that I can email or hand out to players at the beginning of a game and they will speed up the time for players to make their troop choices. As a side note, I prefer that players get to make choices in games!


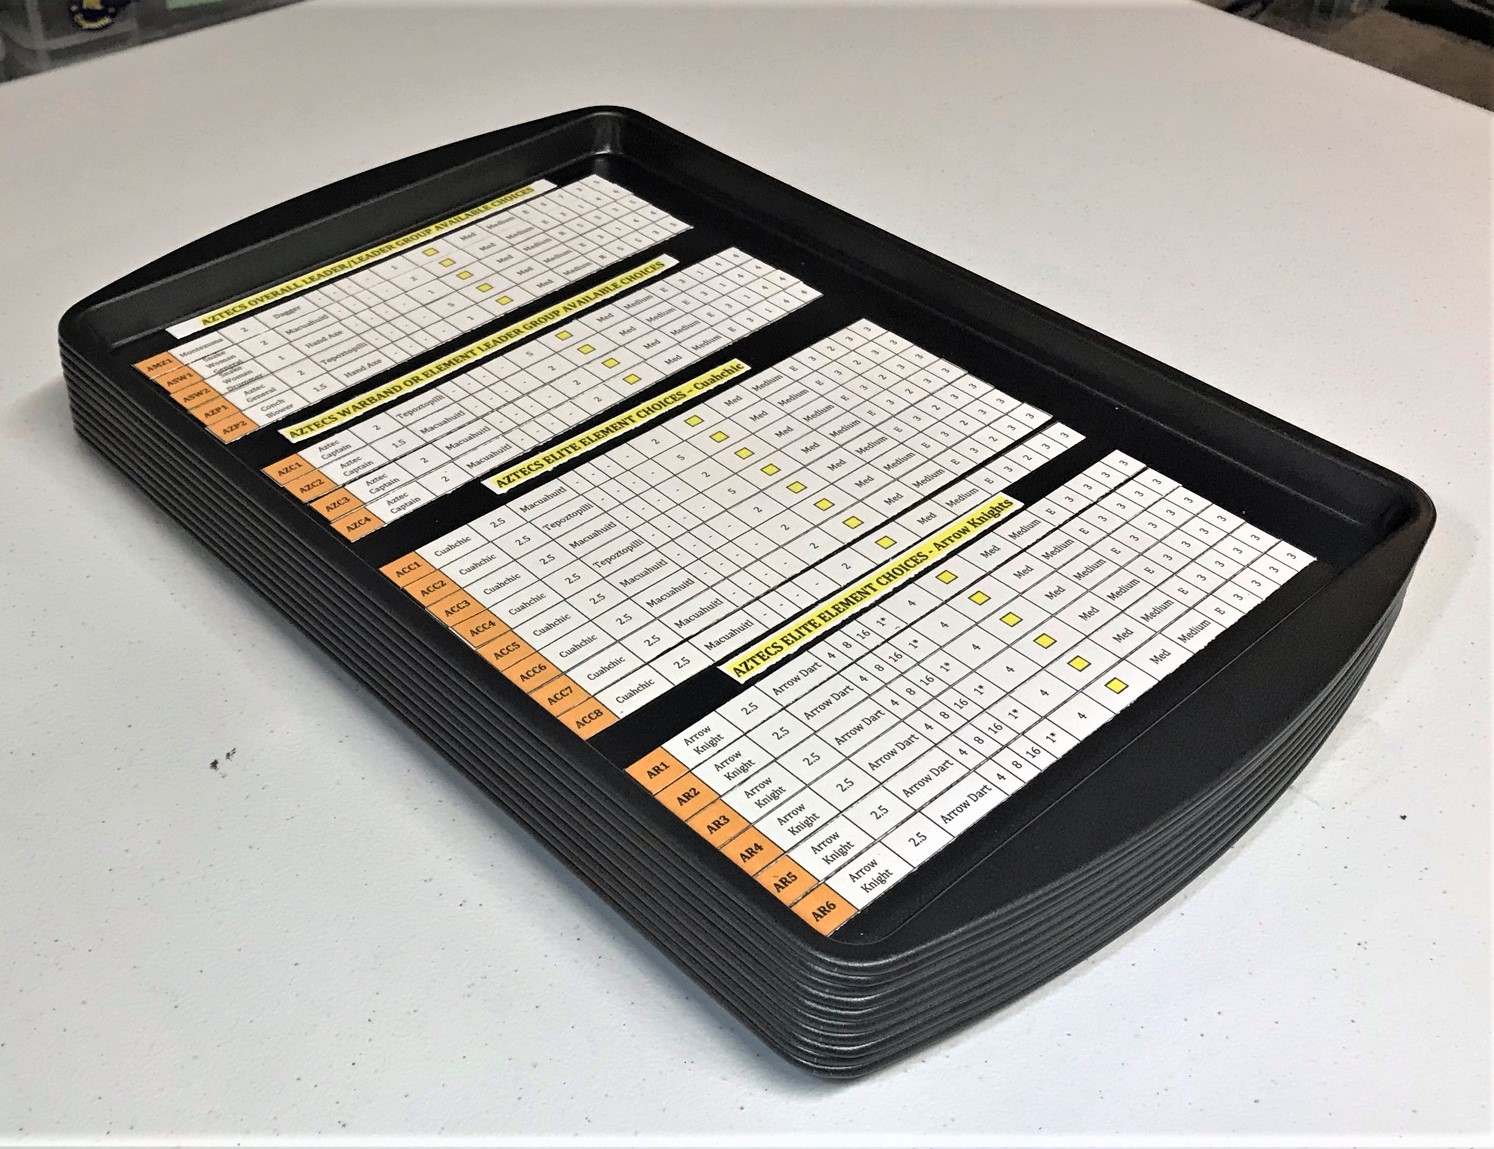
The Dashboard and Stat Strip Challenge
Challenge: The players need a quick and easy reference system that designates their troops’ stats, and one that does not take up a lot of space.
Goal: Design and build a system of sufficient dashboards and supporting elements of appropriate ease and flexibility such that the players can play easier and faster and have more fun.
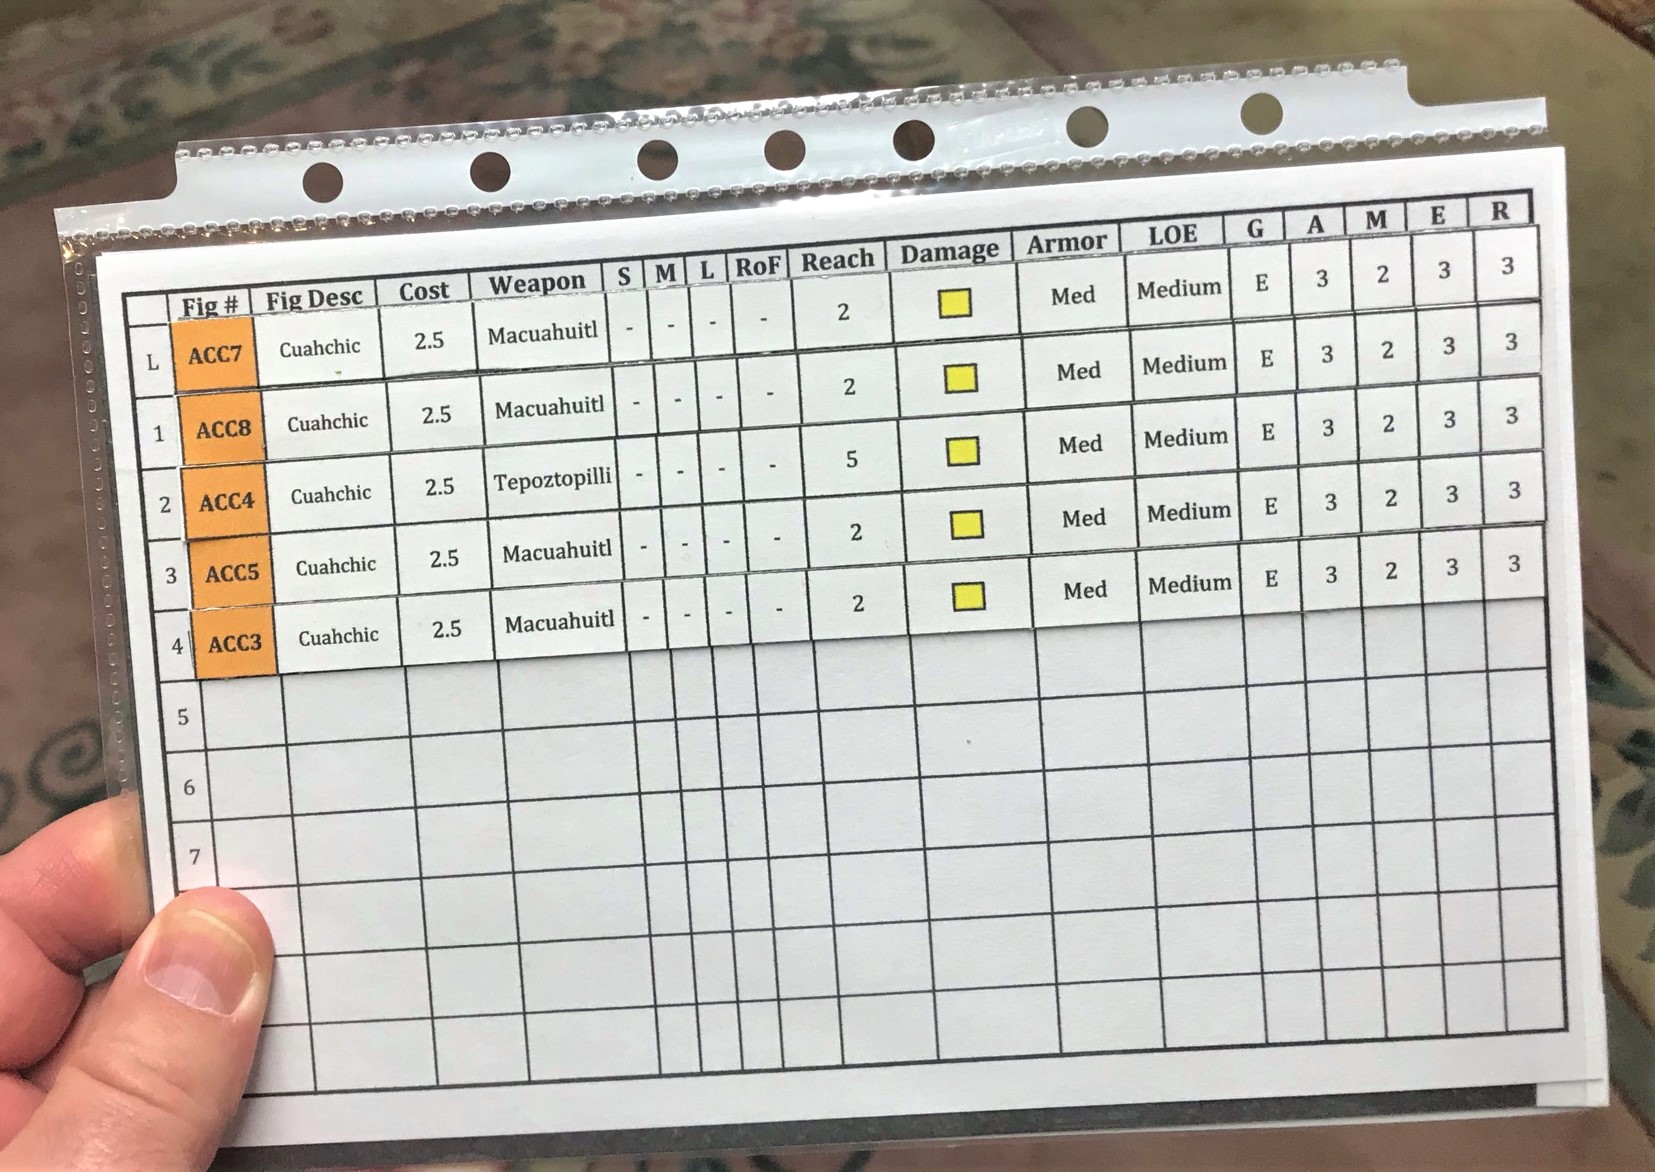
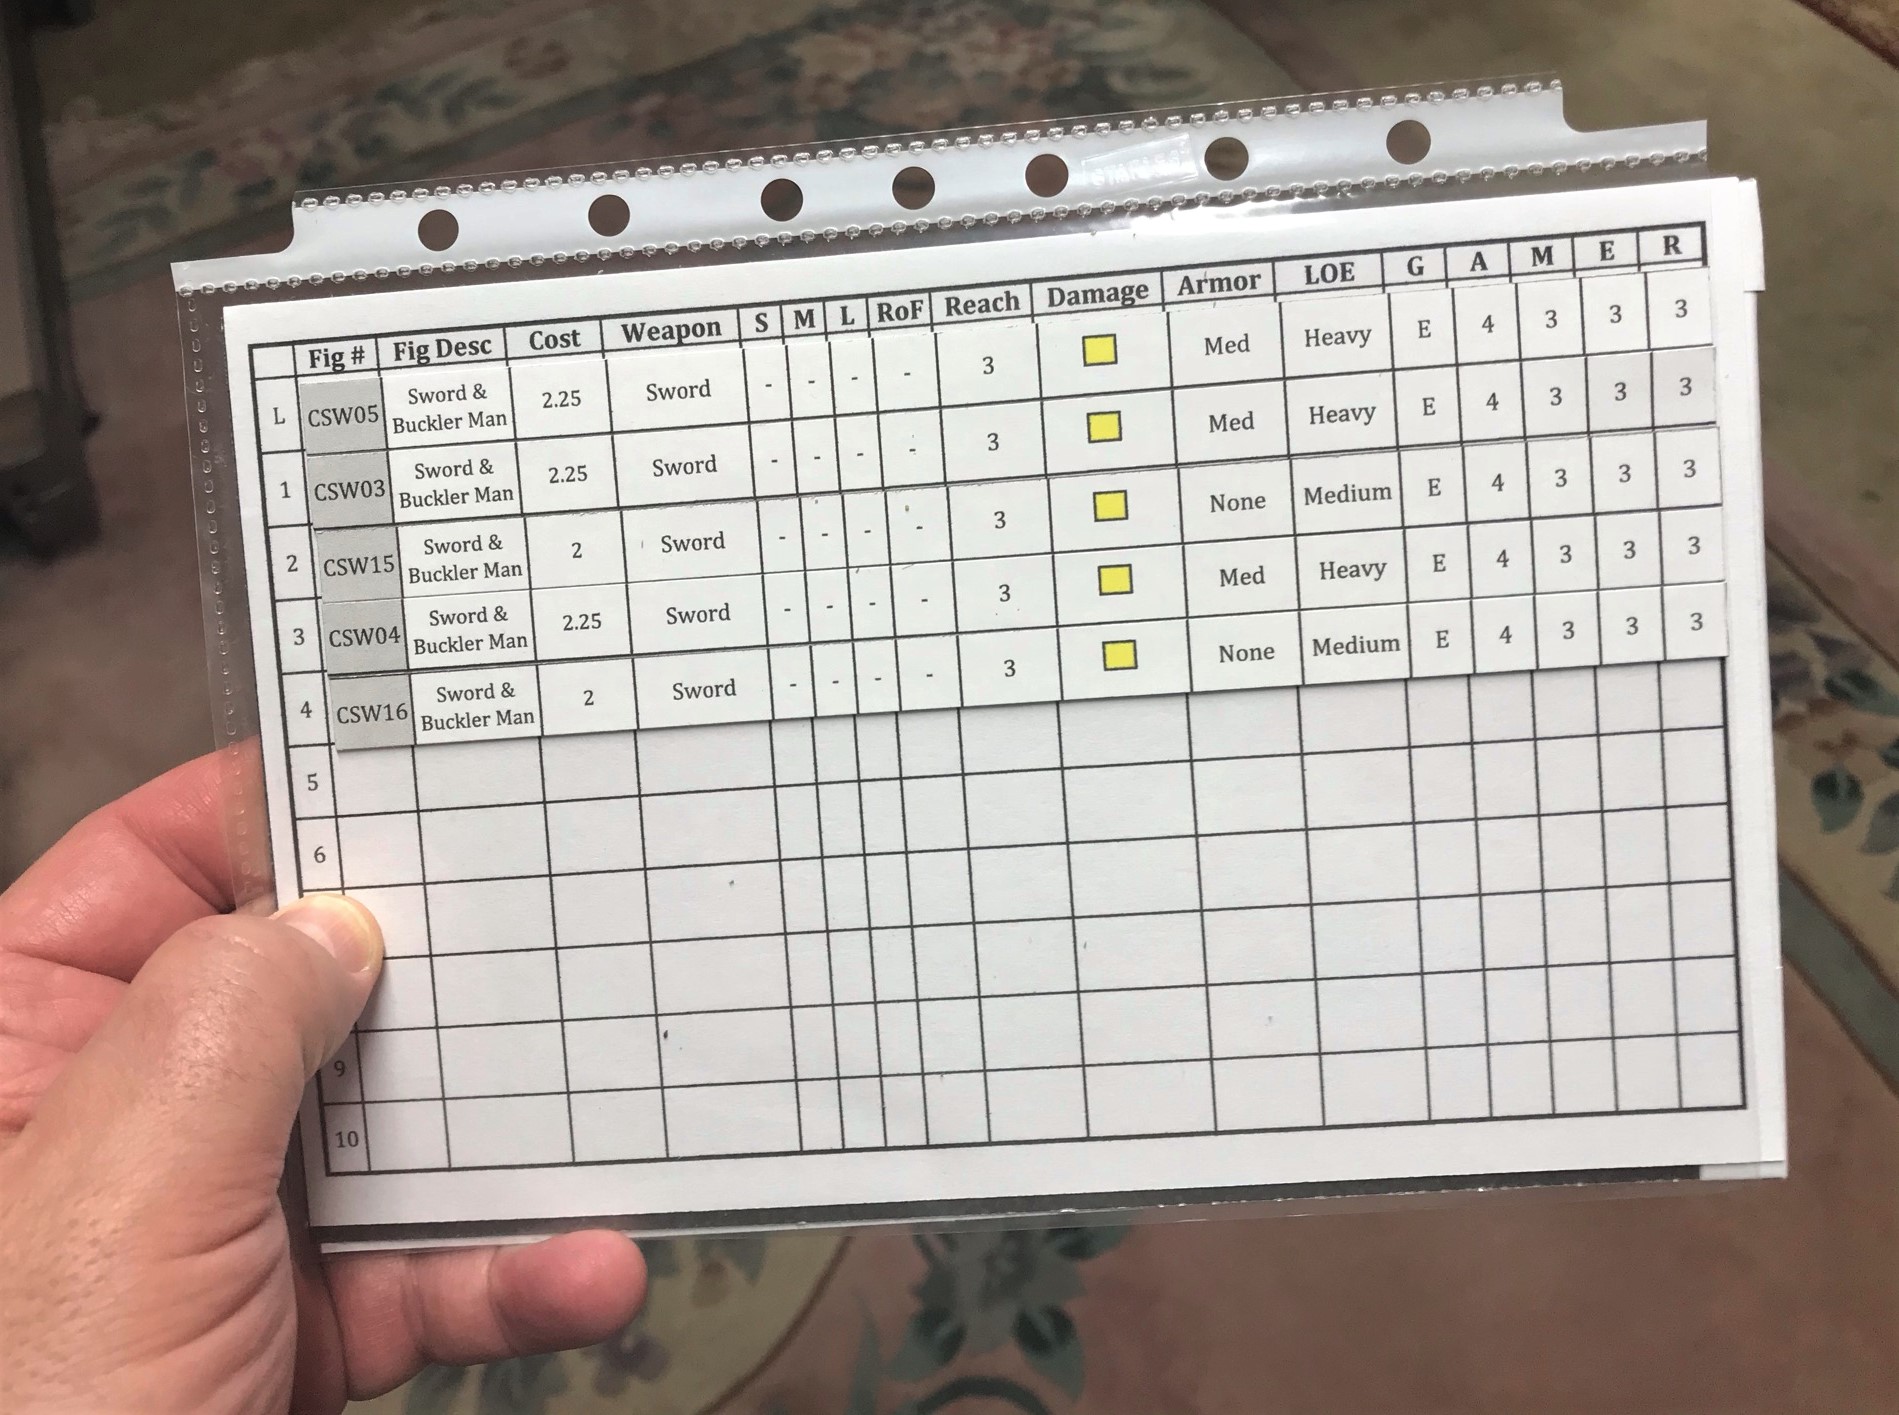
Process: I do like gaming systems and setups that are flexible – that is giving players adequate AGENCY. As you have read, the menus allow the players to make their choices, but to have them write down all data at the game’s beginning could be a bit of a pain. Plus, there can be a variety of differnt types of figures in some Elements. My solution was to build on what I already had been developing. I designed a dashboard in Excel that would accommodate being printed off on card stock and placed in a 5.5” x 8.5” sheet protector such as this one from Staples. And remember the stat lines from the menus? I used them to fit on the dashboards. How you say? Well first, I special-ordered steel base material in sizes of 5.5” x 8.5” from Wargames Accessories. The steel sheets do have some rough edges – which I covered with scrap pieces from the Avery shipping labels with no problems. These steel sheets fit inside the sheet protectors and under the dashboards – and I made 31 of these. Then I cut and pasted each individual stat lines into Word as pictures. Then I printed off each of these 216 + 4 stat lines (220 in total) onto strips of card stock and trimmed them with the paper trimmer to fit on the dashboards. To affix them to the dashboards, I needed magnetic strips – 220 of them. I found a really nice source on Amazon of 8.5” x 11” sheets made by Craftopia called Adhesive Magnetic Sheets that are the best that I have found. Again, my paper trimmer helped here to trim the magnetic strips to ¼” size width (fitting nicely under the 3/8” wide stat strips). I did need to replace my Fiskars blade once and augment that effort with scissors. Each of the 220 strips could be now be added to the dashboards, but how to organize and store these! My answer would come from Wal-Mart. Cookie sheets! I found inexpensive cookie sheets (see photo below) for $1.50 each that stack together. I organized the strips as you see below and added troop categories – basically mirroring the menus.
End result: I have a pretty decent system now for organizing a game. I have every figure’s stat line on a removable magnetically-backed card on 10 stackable cookie sheets. These stat lines fit perfectly on sheet protector-encased steel dashboards.


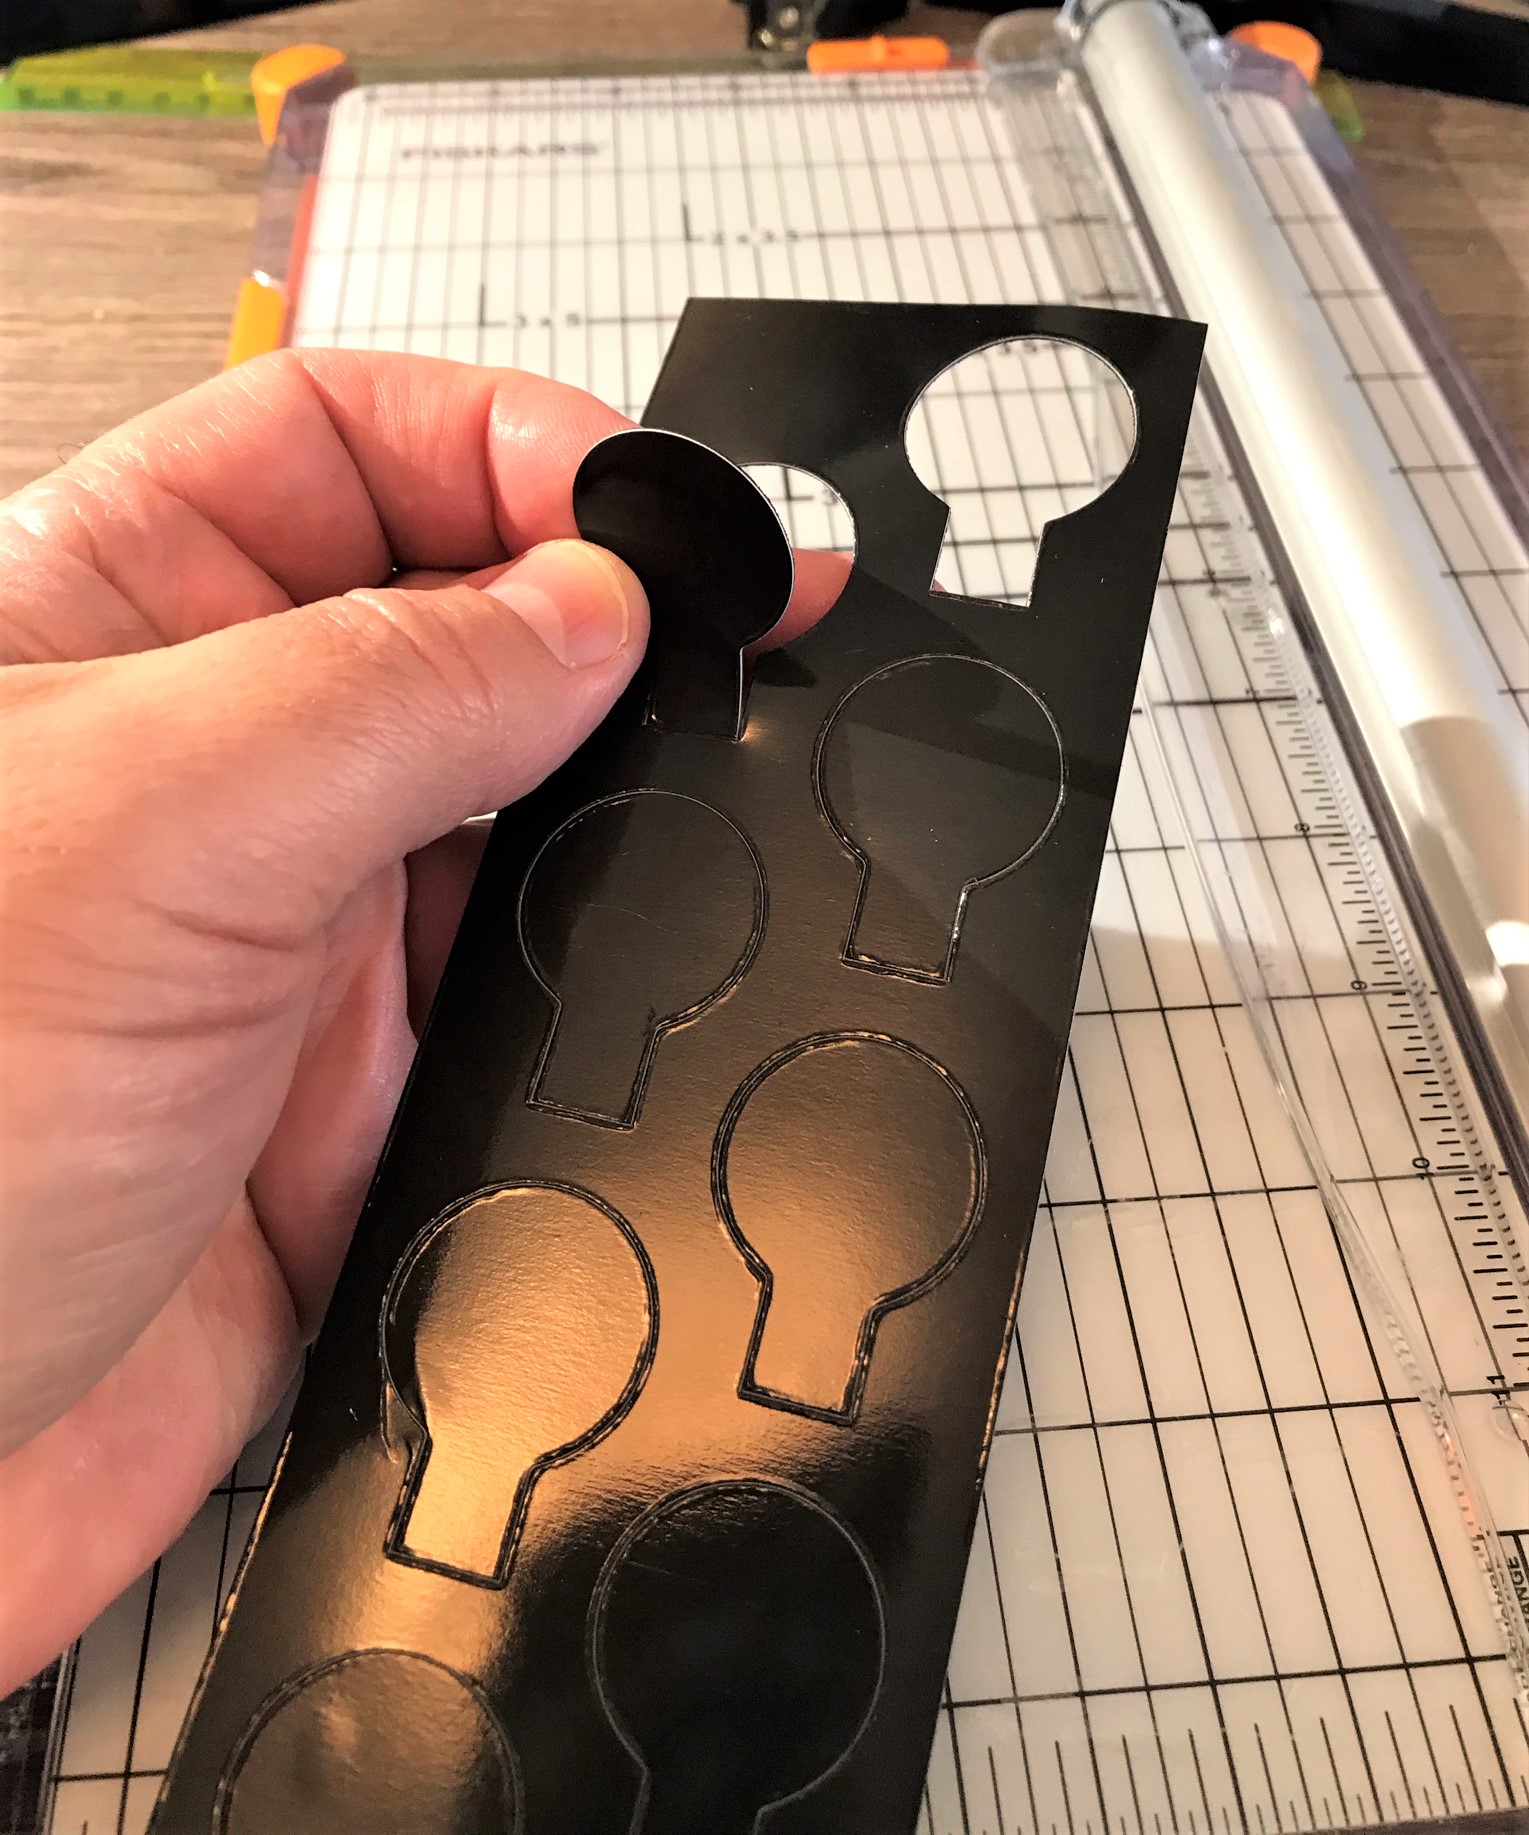
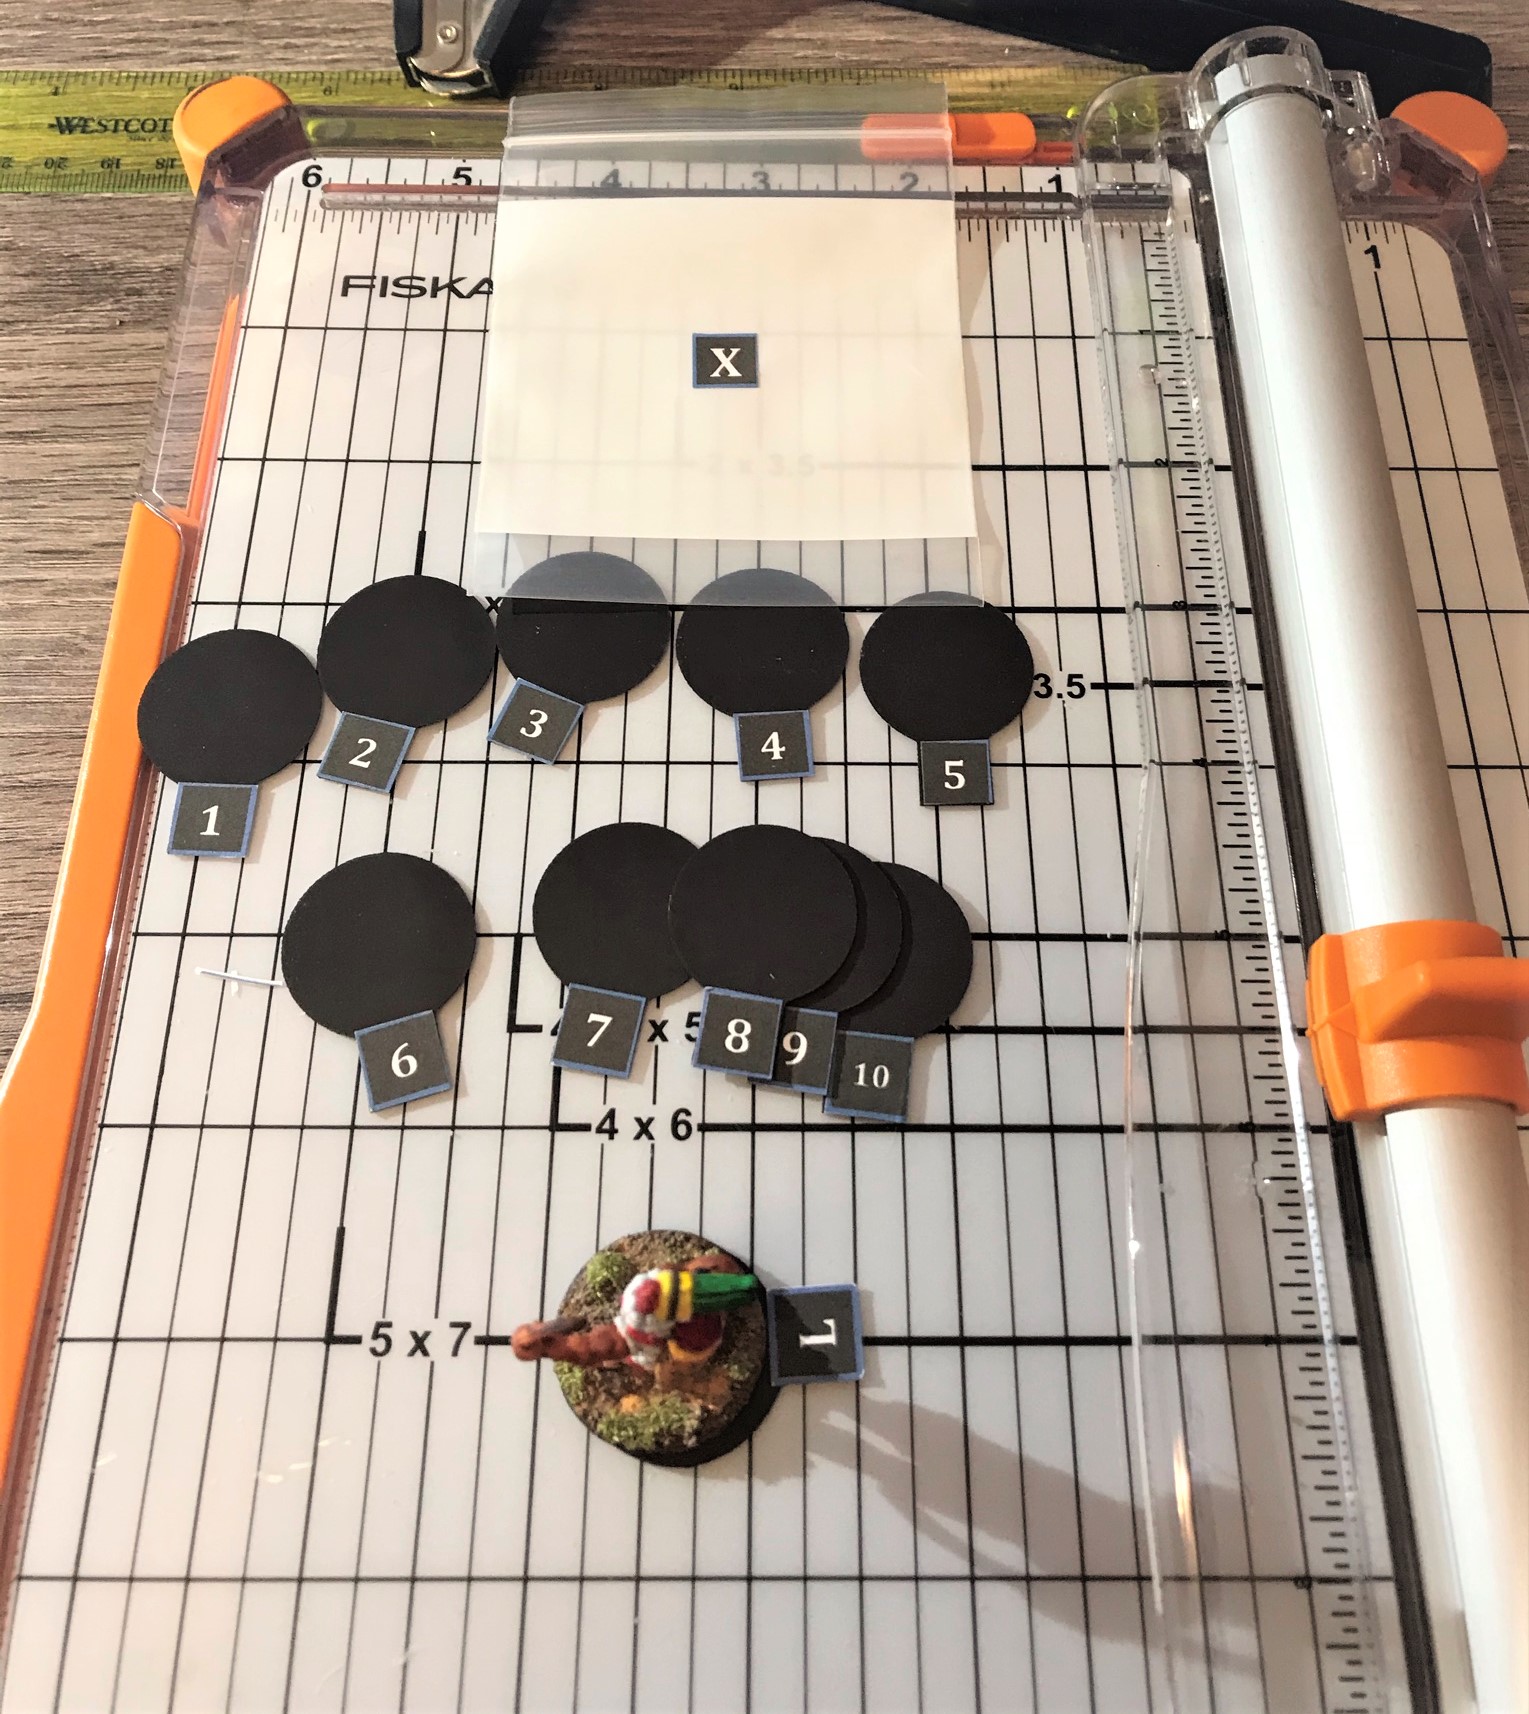
The Tabletop ID Challenge
Challenge: Using the dashboards is useful, but telling which figure is which on the tabletop can be a challenge, especially virtually. As with the previous challenges, the figure’s lack of uniformity poses a gaming identification challenge.
Goal: Design and create a system that would allow for easy identification of the figures but would not overly detract from the aesthetic of the game.
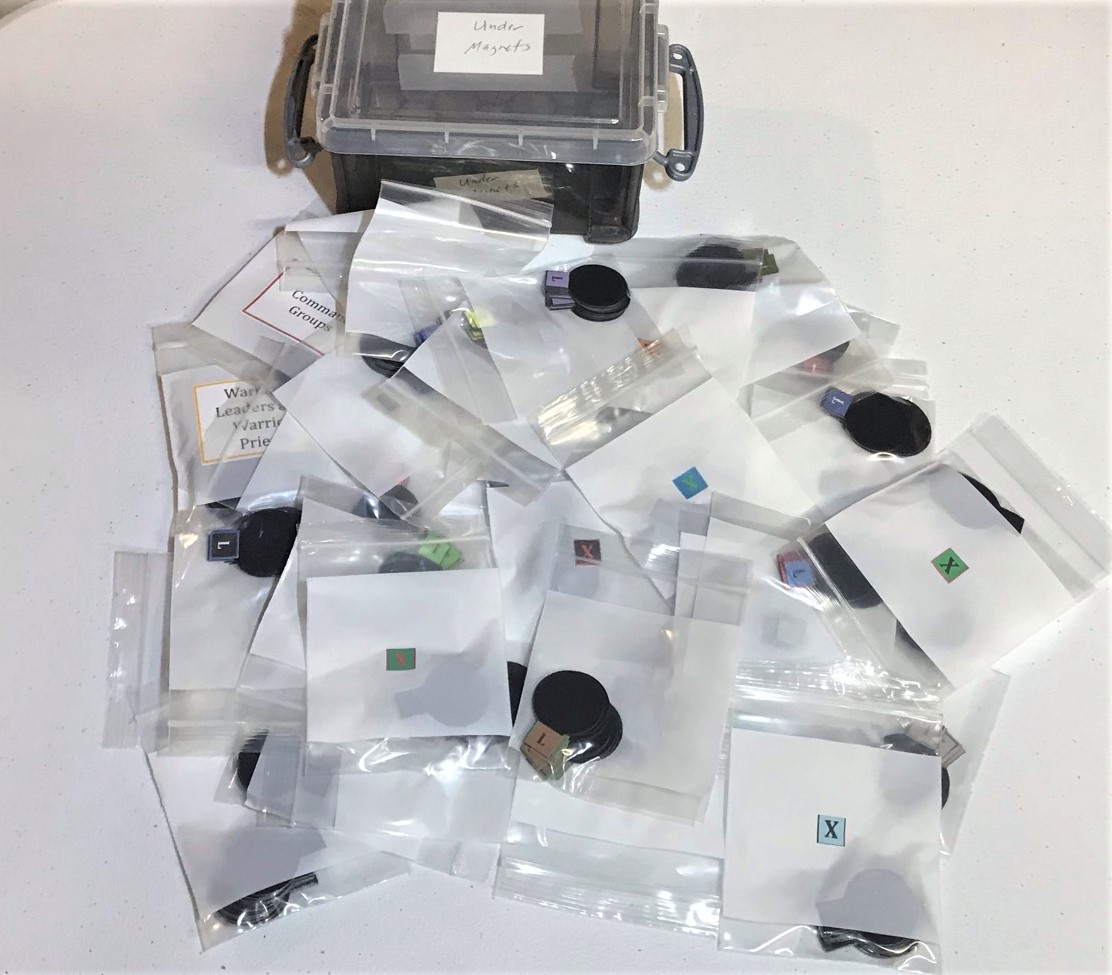
Process: I thought that as I used steel washers under my figures, my best option was to try something else in the realm of magnets. But what? I used some refrigerator magnets as prototypes of “under-magnets”, developed the concept, and then used PowerPoint to refine it. However, the concept of cutting out a few hundred magnets by hand was not appealing to me – plus I saw that they would look rough on the edges. I contacted Fridgedoor in Quincy, MA and worked with them to make me the magnets. There did not need to be any fancy printing on the bottom (non-magnetic) side as I knew that would be too tough and expensive. I had them make 20 mil thick sheets with each sheet having 11 of the under-magnets that could be easily popped out. One side (facing the figure) would be magnetic and the other printed black. The square jutting out on the magnetic side would be where I would affix labels for the figures. I used PowerPoint to make sets of differently colored and designed labels for the figures’ little jutting square. For the Elements, I made L, 1-10, and X (L for the Leader, 1-10 for the figure in the Element, and X for the baggie I would store them in). Then I printed them off, trimmed them, and affixed them. I ended up with 34 sets bags of under-magnets in individual little zip lock with ID numbers. This was made up of 33 sets of 11 and 1 set of 24 (different for Warband Leaders, Army Leaders, and Warrior Priests) for a grand total of 387 total under-magnets. I stored these in a small Really Useful Box, which in turn goes into another Really Useful Box for the game (see below).
End result: I have now a soup-to-nuts system for setting up and running my game more efficiently for both virtual and in-person games that is useful and easily transported.


I hope that you enjoyed this blog (and all the other ones for the last 6 years!). Just for kicks, please take a look at my very first post, The Story of the Nightmare Legion. Here’s hoping I keep doing more and reading and more of yours as well – and let me know if any of my somewhat insane stuff inspires you or if I need to be medicated – just asking!
And here’s a pic for IRO who asked for a T-shirt shot in March. Not ready for selfies I guess.

I’ll be announcing my next free giveaway contest soon – this time I’ve got some terrain to do and if you guess closest you can win stuff FREE from me. Just like in the last contest!
Don’t forget to let share your thoughts in the comments section!
Miscellaneous details and references for those interested in that sort of thing:
Previous posts on games, units, and other projects for my 16th Century Spanish Conquest supplement for Feudal Patrol™ – “Civilizations Collide”
- Game Aids and Tools for Feudal Patrol games using the Civilizations Collide Supplement (this post)
- And the Winners of “Mark’s Conquistador Contest” are…
- Conquistador Cavalry. 24 figures total: Outpost Wargame Services #CON5 “Conquistador Cavalry in light armour 1” (4 horses & 4 riders); Outpost Wargame Services #CON6 “Conquistador Cavalry in full armour” (4 horses & 4 riders); Eureka Miniatures “Moving Horses” #100ANM05 (8 horses used as casualty markers).
- Conquistador Falconet and Crew (Artillery). 3 figures total: Outpost Wargame Services #CONA1 “Falconet and Crew”.
- More Conquistador Sword and Buckler Men. 8 figures total Outpost Wargame Services #CON001 “Sword and Buckler Men”.
- Conquistador Sword and Buckler Men (Wargames Foundry). 18 figures total in three blister packs: Wargames Foundry #SB015 “Swaggering Swordsmen”, #SB016 “Brutal Sword and Buckler Men”, and #SB017 “Bold Bladesmen”.
- Perro de Guerra (Conquistador War Dogs). 13 figures total: Outpost Wargames Services #CONS6 “War Dogs” (8 war dogs); Eureka #100CON13 “Dog Handler and Dogs” (1 dog handler/pikeman and 4 war dogs)
- Conquistador Foot Command, Crossbowmen, and a Couple of Officers. 11 figures total: Outpost Wargames Services #CONC1 “Conquistador Foot Command” (a leader, a banner bearer, a drummer, and a bugler); Eureka #100CON04 “Crossbowmen” (5 crossbowmen); and Eureka CONC1 “Conquistador Officer” and an unknown SKU officer (2 officers)
- Merciless Adventurers (this post) – Wargames Foundry #SB014 (6 Conquistadores with arquebuses)
- Audacious Arquebusiers! – Wargames Foundry #SB012 (6 Conquistadores with arquebuses)
- Mark’s Conquistador Contest – for my loyal blog followers!
- Montezuma and Chieftains – Wargames Foundry #AZ011 for Feudal Patrol – 6 Aztec figures (Montezuma, 4 Chieftains, 1 Warrior Priest)
- Aztec Shock Troops – Cuachic Warriors aka The Shorn Ones – 8 Aztec cuachicqueh warriors
- Tloxtoxl and the Priests of the Great Temple, Wargames Foundry AZ021 – 2 warrior priests, 1 priestess, 1 priest, 1 leader, and 1 signaler
- Civilizations Collide – The Wars of the Aztecs, the Inca, the Maya, and the Conquistadores is now available as a FREE Download for Feudal Patrol™ – plus a Feudal Patrol™ review!
- 18 Aztec Novice Warriors for Feudal Patrol Walk into a Bar – 18 Novice Warriors
- Aztec Warrior Priests (painted as Tlaxcalans), Ral Partha 42-302, circa 1988 (this post) – 6 figures – 6 Tlaxcalan Warrior Priests
- Tlaxcalan Novices, Elite Warriors, and Command Group – 18 figures – 8 Novice Tlaxcalan Warriors, 8 Elite Tlaxcalan Warriors, 1 Tlaxcalan Captain, 1 Tlaxcalan Conch Blower
- Tlaxcalan Archers – 8 Veteran Tlaxcalan Archers
- Aztec Game for Feudal Patrol across thousands of miles – via Zoom!
- Aztec Snake Woman and Drummer – 1 Aztec General, 1 Aztec Drummer
- A June and July Jaguar Warrior Frenzy (plus some Aztec Veterans and a Warrior Priest to Boot) – 3 Aztec Veteran Warriors, 17 Jaguar Warriors, 1 Aztec Warrior Priest
- Doubling Down – Aztec Veteran Warriors – 24 Aztec Veteran Warriors
- Aztec Arrow Knights, Ral Partha circa 1988 – 6 Aztec Arrow Knights
- Aztec Eagle Warriors from Tin Soldier UK – 6 Aztec Eagle Knights
- Aztec Novice Warriors and a few Frinx – 12 Novice Warriors

These look great (and a happy 6th birthday to your BLOG)
LikeLiked by 2 people
Thanks brother!
LikeLike
Outstanding levels of detailed organisation and planing there Mark – and on so many levels as well (literally in the example of the figure transport/storage!)
It’s almost like you spent a significant amount of time in some sort of large, organised logistical setting….
LikeLiked by 5 people
Oh and a big congrats on the 6 years. Hope to see some more of the undead peek out into other genres one day… 😉
LikeLiked by 2 people
Cheers Az! Yeah, I can’t believe it’s been that long already. I’m afraid to think of how many unpainted skeletons lurk in my basement (though carefully organized ya know 😁)
LikeLiked by 1 person
As long as most of the skeletons are model kits and not the remains of your victims, I think it’s all okay. I believe the acceptable ratio is 80/20, so it can be handy to have an extra box of skeleton models on hand…
LikeLiked by 1 person
Yeah that’s true, no one needs extra victims!
LikeLiked by 1 person
Thanks Azazel! Yes, my brain engrams may have been a bit affected by my 4 years at USMA and the subsequent Army time as a Combat Engineer officer!
LikeLiked by 1 person
Ohhhh myyyyy God mate, this is incredible. So much effort and attention to detail. I really find your organisational skills so inspiring. I think I need to hire you to organise my Fungeon haha. I really like the labelling idea and it’s definitely given me food for thought for my CoffinWood project. I also really like the storage solutions. Very impressive Mark. Congrats on the 6 years. My six years is in May. Love the T too man and thanks for joining in on the fun 🤘🏼🤘🏼
LikeLiked by 4 people
I would love to be in your Fungeon, let alone be hired to organize it! To hang out, drink beer, and play games of course. Thanks for the congrats – yeah, we’re like blog brother twins almost on dates of birth eh? If you get any inspiration or ideas from this post, I am so thrilled. Ironically my wife sees my boxes and sees too many boxes, despite the fact that they stack perfectly against an unused wall in the basement!
LikeLiked by 1 person
Congratulations on the six years Mark, that’s some going! Other comments have beaten me to it in terms of your level of organisation and attention to detail. I always thought these were skills I had but I realise I am but a mere amateur! Looking forward to our catch up on Sunday mate. 🙂
LikeLiked by 4 people
Very kind of ya TIM and looking forward to sharing more in the next years and following yours as well. Though if I could make dioramas like yours, I’d run out of storage space very quickly – I’d never be able to part with them! I’m looking forward to our chat too!
LikeLiked by 1 person
Fair play Mark! You are the most organised gamer I’ve ever come across!
Here’s to the next six years!!!
LikeLiked by 2 people
Amen brother and thanks! I’m hoping to entice some Welshmen like you into a game!
LikeLiked by 1 person
Nice game aids, as said you take organisation to the next level mate!, congrats of the six year anniversary too.
Nice T shirt too 💂♂️
Cheers Roger.
LikeLiked by 3 people
Thank you Roger! Hope all is well with you!
LikeLike
Congrats mate! well done , I showed my wife this blog and she said ! do you understand all of what Mark has said! Ahh Yea! I’m not simple dear!! HA HA ! I think that’s why I’m not a Gammer! Its just that bit about reading instructions that I have problems with.
LikeLiked by 3 people
Thanks Aussie retiree! Pat, loved the comments! How about the TA?
LikeLiked by 1 person
Hey mate she is our hero as she is the only one in my mob that bothers , the rest of us are to lazy and only read them if things don’t work!!
LikeLiked by 1 person
Mark, this is all brilliant! 🙂 I can see why it’s taken quite a bit of time to do, but it’s impressive! Essential really for less regular, non-uniformed, armies and also really good for virtual games. I think sometimes people don’t appreciate how much can be done with Excel and PowerPoint (not Word, I hate Word) but you’ve really used them to help this whole thing along. I can relate to this because I use them to make record cards for my aeronefs and WW2 ships. Definitely impressive, and a great post to celebrate six years of blogging!
LikeLiked by 2 people
Glad that you can relate John (and I knew you would too). I do like Word for articles and such as the “Menu” booklets are designed to be just that – menus. I think learning to size up stuff so it aligns, plus copy and paste special (as a photo) were game changing discoveries for me. I call it bringing order from chaos! Thanks for the kind words buddy.
LikeLiked by 1 person
Firstly- happy blogaversary.
Secondly- that is some incredible work on the game aids. Having run demo games myself I can see how easy that it going to be for players to get into the game easily. The use of magnets is very clever and the baking sheets is a genius idea. Having played around with sheet steel for projects in the past I know it can have some sharp edges but they are idea.
Great post.
Cheers,
Pete.
LikeLiked by 2 people
Cheers Pete! Glad you get what I was going for here – I have participated in a few unorganized games and the really bad ones leave you with the feeling that you’ll never get back the hours of your life that were just wasted. I never want to do that to another person – and I try to avoid failing like that. The baking sheets were a nice discovery, and were far cheaper than steel sheets! And easier to store and stack too. Take care!
LikeLiked by 1 person
. . . and I forgot to mention the baking/cookie sheets – they look brilliant! 🙂
LikeLiked by 1 person
Thanks John, though if my wife makes chocolate chip cookies, they look better! 😁
LikeLike
Six years is commendable and something to be proud of but so are all these tools you’ve created for yourself and the players. The transportation and movement trays all look great and that is an area that I need to invest some time and thought into. I usually end up focusing on painting instead which is probably a mistake. Here’s to six more years of blogging and wargaming fun! 🙂
LikeLiked by 2 people
Thanks Kuribo, really appreciate that. Hopefully I’ve given you some food for thought – and yes, more wargaming and more fun are needed!
LikeLiked by 2 people
That’s incredible planning, and production. I wish I was gaming with you! Congrats on the 6th year anniversary.
LikeLiked by 2 people
Cheers Tarmor! Possibly you can be gaming with me virtually – I have had transatlantic games already.
LikeLiked by 1 person
Thanks. There’s 15 (or 9) hours difference between us, but that doesn’t mean something couldn’t be arranged virtually. 🙂
LikeLiked by 1 person
Congratulations on the anniversary, and long may you continue. As for the tools and process that is some next level detail and organisation Mark, fair play !
Great T-shirt as well
LikeLiked by 2 people
Cheers Dave and back at you. I appreciate your shout out on your blog too!
LikeLiked by 2 people
That’s some serious dedication to organization and storage! Must have taken you a while but it looks well worth the effort. Congrats on your anniversary!
LikeLiked by 3 people
Matt, at times it felt like it would never get done as lots of it was repetitive, but now I have it all on the computer and could far more easily replicate it for other forces and even other games, which is a plus. Thanks for the congrats!
LikeLiked by 1 person
Congratulations on the blog anniversary and this project. So well thought out, executed and documented from start to finish, it really is a master class in wargaming.
LikeLiked by 1 person
Aww, Subedai, so cool for you to say – really nice and appreciated. Now I gotta do more!
LikeLiked by 1 person
Wow, that’s a really impressive feat of organising and engineering! They look great, and I love how much attention you’ve given to detail.
LikeLiked by 1 person
Thanks Mikko!
LikeLiked by 2 people
There are some great ideas for keeping track of the orbat of the miniatures we have in our collections. In fact too many great ideas, so back to the drawing board for me, especially the magnetic base idea with the numbered tab.
LikeLiked by 1 person
Thanks Anthony and glad you’re here!
LikeLiked by 1 person