As readers of this blog know, I have been collecting figures from the now-defunct Archive Miniatures Star Rovers line. The figures from this line were made in the late 1970’s, and my goal is to get them collected and adapt them for use with Buck Surdu’s Combat Patrol™ card-based rules.
There was a lot of work on this project – so please enjoy the photos!
They show up from time to time on eBay, and my experience showed that the ones I found were more or less 25mm in scale. However, the Aphids I am going to describe here were a surprise as far as size goes as you will see. You have to be careful in acquiring these – there are a number of really bad recasters of these figures (and others) out there – selling them at exorbitant prices. I have been sure to be diligent before deciding to buy them.
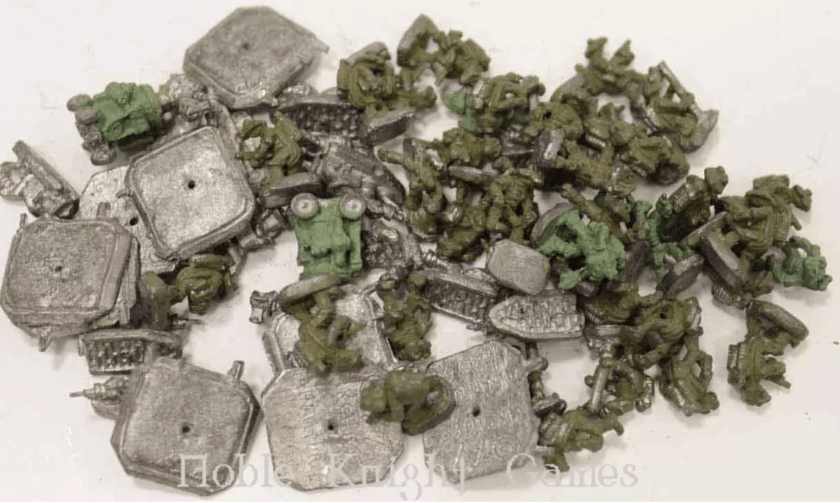
One listing is below. I had seen it several times from the Noble Knight Games store on eBay, but I was initially unimpressed. It looked like a hodge-podge of painted and unpainted figures and bases, and I could not tell what was there at first glance.
The Aphids listing picture from eBayOn a phone call to catch up, I had a discussion with Buck about the Star Rovers line, and he pointed this listing out to me, so I gave it another look. I compared this with Lost Minis Wiki Star Rovers page and saw that there were several figures that I did not have. They appeared to be different Aphids types, including Aphid Scouts on Grav-Cycles, Aphid Infantry, Aphid Officers, Aphid Mortar Crews, and a couple of robots. Archive had two different numbers for the same miniatures, and Lost Minis Wiki does not explain why – perhaps Archive changed the numbers with later production? In any case, they looked to be original, and I bought them. This set included the following miniatures (I list both catalog numbers here for completeness but I am sure that they are from the older group due to the robots being included):
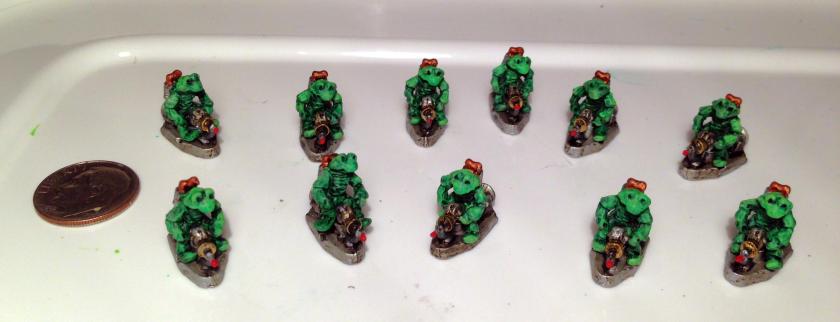
11 examples of Archive #2060/2314 Aphid Scout on Grav-Cycle (11 riders and 11 grav-cycles plus bases).
18 examples of Archive #2061/2315 Aphid Infantry.
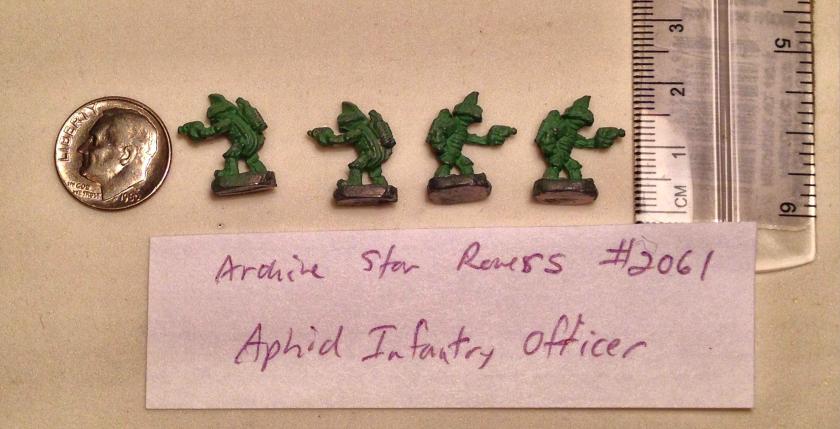
4 examples of Archive #2061/2316 Aphid Officer. The 2061 listing included 5 Aphid Infantry and 1 Officer while the 2316 was just the officer.
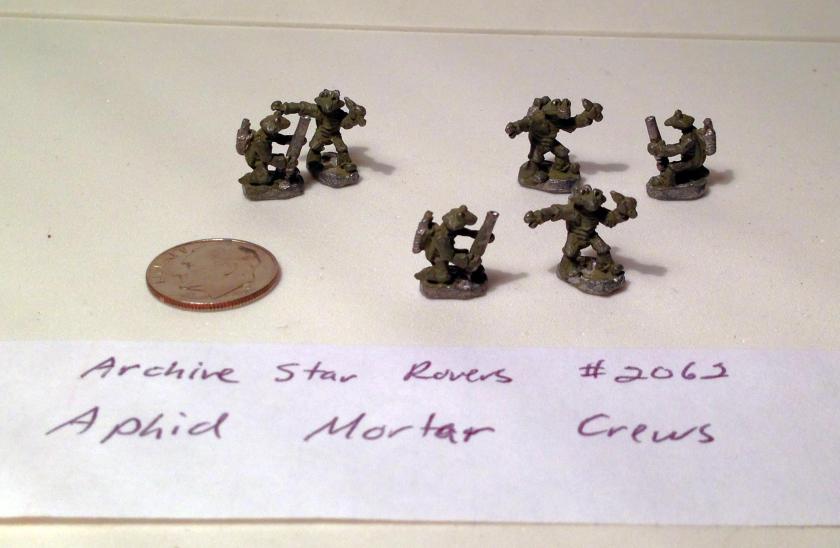
3 examples of Archive #2062/2317 Aphid Mortar Team (two figures per crew for 6 figures).
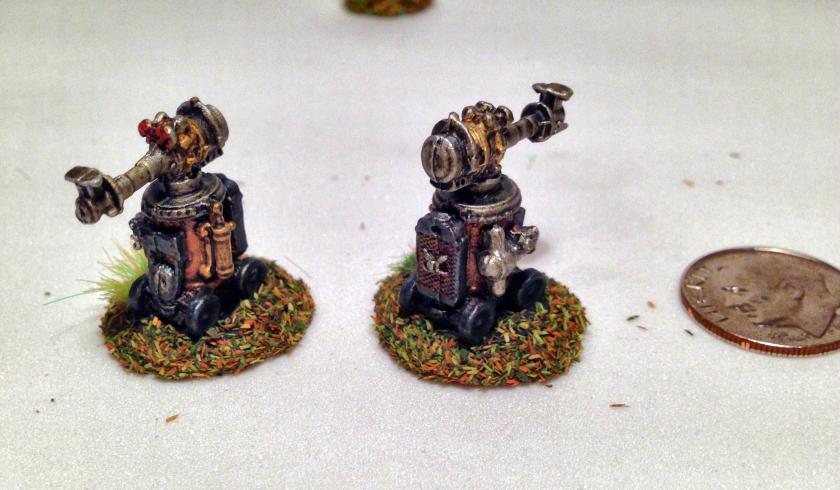
2 examples of Archive #2011A (no later listing) Robot Group. There were 3 robots originally in the set of different types.
Archive Miniatures Catalog detail showing the Aphids with the newer catalog numbersI will refer to the older numbers for the most part in this article as I think mine are older.
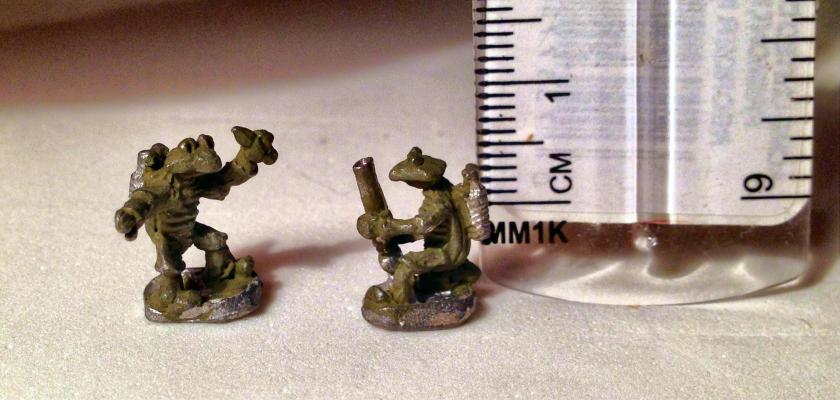
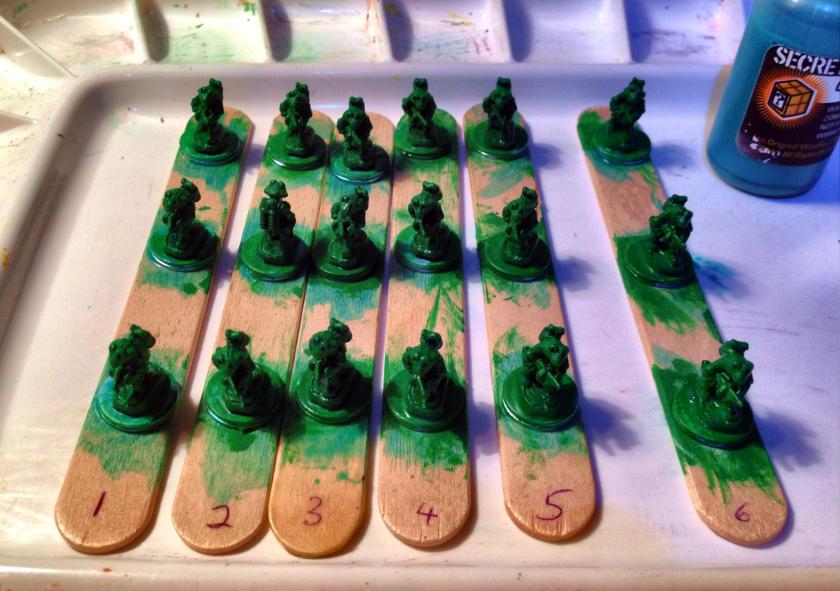
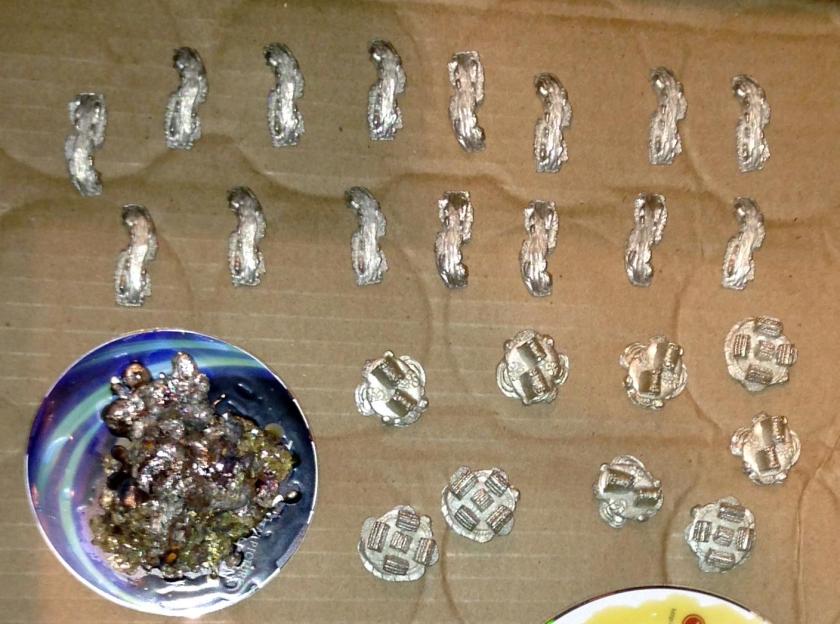
The figures were in good shape except for one scout rider who was missing a right leg and foot. Surprisingly, they were small – really small – maybe 12mm. The detail on them was appropriate for the time period – but as you can see from the eBay photo they were not greatly detailed. To me, this was a challenge to let the brush bring out the potential of the figures. Also, I thought that this acquisition presented me with an opportunity to field an entire platoon of Aphids for Combat Patrol™ games!
My first step was to strip all of them down of any residual paint – which I accomplished with a long (2 week) soak in Simple Green®. I prefer the blue type as it seems to work better (and smells nicer). This time I used some rifle cleaning tools (bore brushes) with plastic bristles in addition to tooth brushes to remove the old paint which was pretty thick.
The Aphid Scouts as received – just stacked together here
Aphid Scout base detail showing #2060Aphid Infantry as receivedAphid Infantry Officers as receivedAphid Mortar Crews as receivedClose up of Aphid Mortar Crew as received – this shows their size and how the previous owner had painted them
The two robots – look like self-propelled guns – in the form of a steam boiler!I decided that I should first work on the Aphids on Grav-Cycles as they would be the most difficult due to the needed assembly. There were 11 Aphids and 11 Grav-Cycles with bases. More research showed me that these originally came with piano wire to mount them – similar to the image below from Lost Minis Wiki:
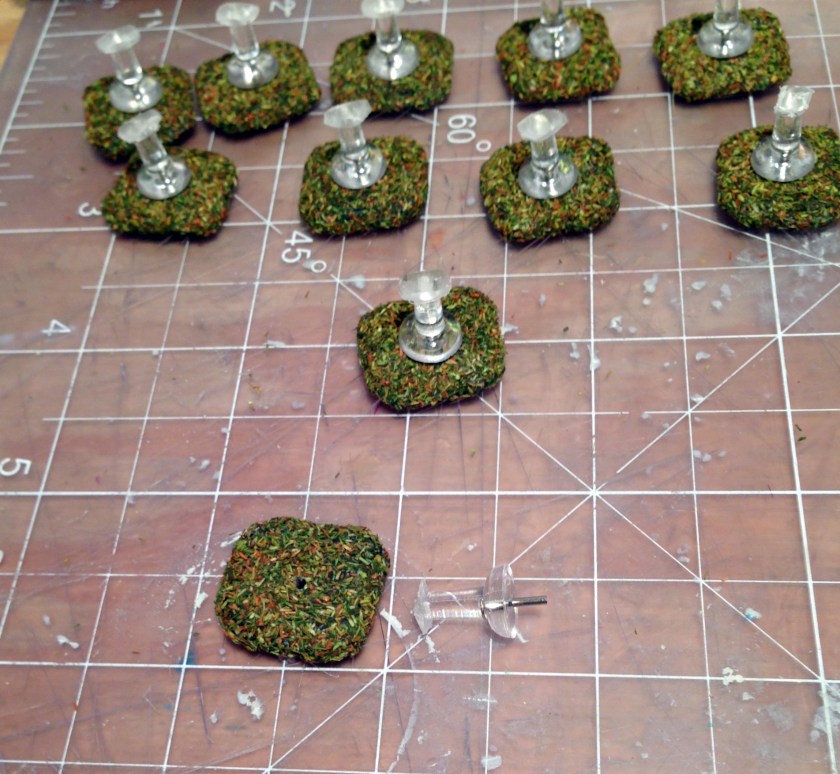
From Lost Minis WikiI did not have the piano wire and this did not seem to me to be a sturdy way of mounting the grav-cycles. I wanted a more permanent solution, but one that was cool as well. The cycles themselves seemed to had the wire in them at some point in the past, but nothing remained. The bases still had the holes. While shopping at Michael’s it hit me – I could use clear plastic push pins as mounting platforms.
To make this work, I needed a plan as I did not want to varnish the clear plastic and take away from the visual effect of flight that I was going to try to achieve. I mounted the bases on two stacked and centered ¾” steel washers using wood glue and let the combination dry overnight. I cleaned off the flash from the bases, filed them, and primed them with Krylon “Ultra-Flat” matte spray paint. After that I flocked them with 4Ground “Brown Leaves” using white glue. Once that glue was dry, I applied two coats of Testors “Dull Coat” to the bases. Using wire cutters, I trimmed off the pointed tips of the pins to be recessed in the washers when inserted into the bases. I then flattened and narrowed the rounded push pin tops with an Exacto knife, and sized them up with the base of the grav-cycles. This was to make a small flat mounting platform. However, I wanted more stability than super glue alone would give me. My pin vise was the needed tool to make this happen. Using my smallest drill bit, I made a hole in the top center of each push pin. Using E6000 epoxy, I affixed and mounted the push pins onto the bases. Once that had set, I mixed some Aves® Apoxie® Sculpt, and filled the bottom of the washer wells where the push pin tip was. This had the advantage of giving the structure more strength as well as some weight for stability on the gaming table. I cut some pieces of wire from a thin paper clip and glued them at a nearly vertical angle in the hole in the top of the push pin. This worked well as the wire was deep enough to secure the grav-cycle to the platform.
How I used push pins – note the narrowed and flattened tops. The paper clip wire was subsequently superglued into the holes in the pin topsI then moved on to painting the riders and their grav-cycles. This was more difficult as I could not mount these onto a suitable painting structure and paint them successfully – which took much longer. I basically had to paint the Aphid Scouts and Grav-Cycles in my hand.
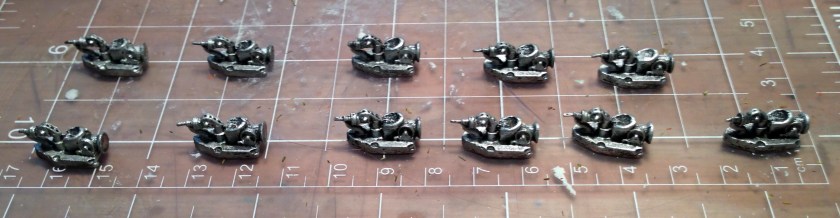
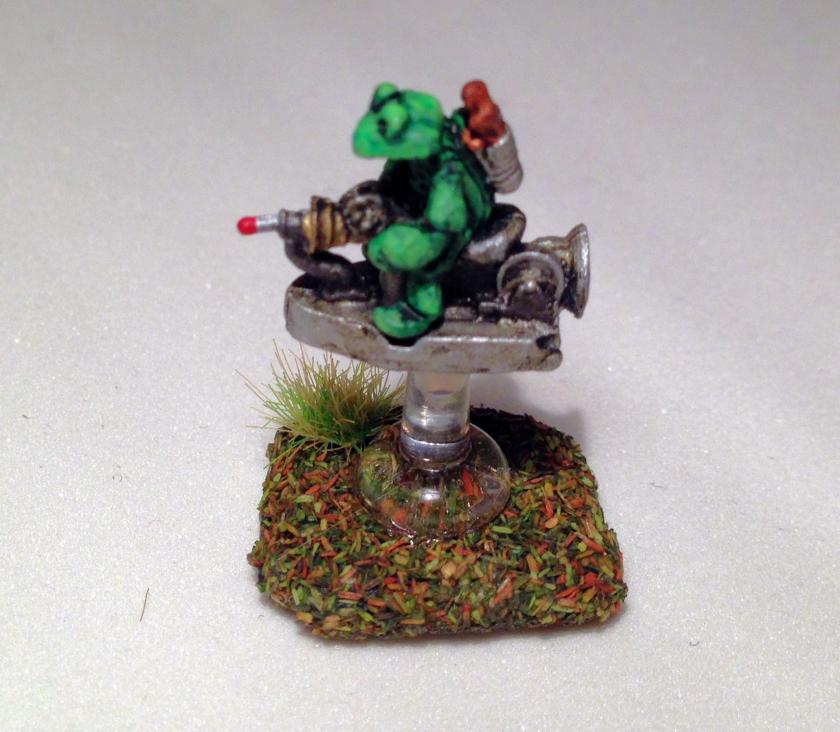
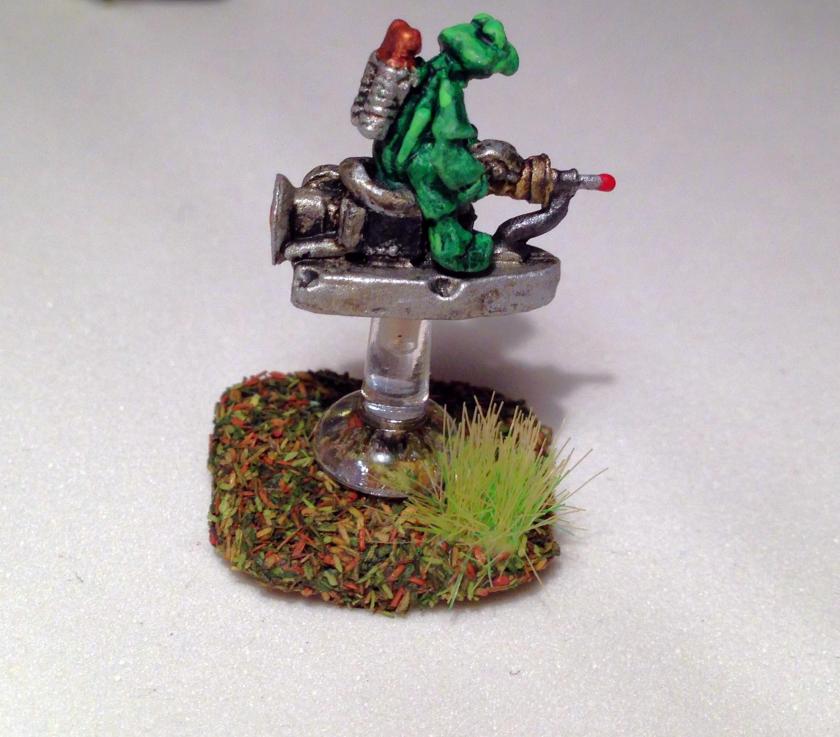
First I’ll discuss the cycles. I painted the deep recesses of the bottom of the grav-cycles successively with Americana “Deep Burgundy”, followed by Citadel “Spiritstone Red”. I wanted an “aviation” look to the cycles (which had flywheels and a big ray gun as part of the details!). I gave them a heavy dry brush of Tamiya “Flat Aluminum”.
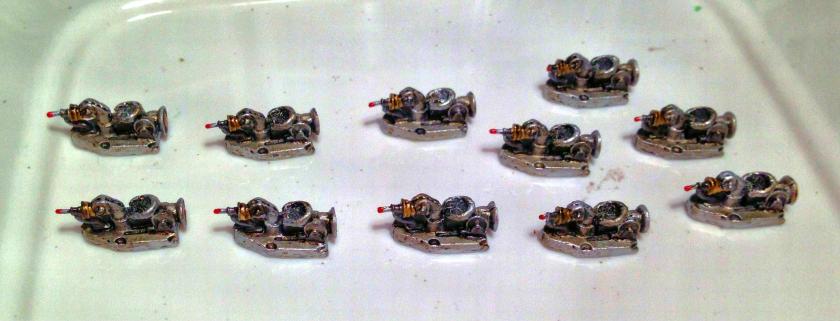
Grav-Cycles after dry brushingFor the details, I used Americana “Ebony” on the seat base and the center of the exhaust port. FolkArt “Gunmetal Gray” was my choice for the front ray gun support and the flywheel bracket, while the flywheel got Tamiya “Chrome Silver”. For the ray gun cowling, Martha Stewart Crafts “Pale Bronze” was my choice. For the tip of the ray gun, I used Craftsmart “Festive Red” metallic. For the exhaust port. I used a combination of Craftsmart “Bright Yellow”, Tamiya “Orange”, and “Festive Red” in a concentric circling pattern. Once this dried, I gave the cycles a wash with Secret Weapons Washes “Armor Wash”, and let that dry. Using “Flat Aluminum”, I highlighted the cycles’ edges and reflective surfaces. Lastly, I used two applications of the “Spiritstone Red” to bring out the ray gun tip even more.
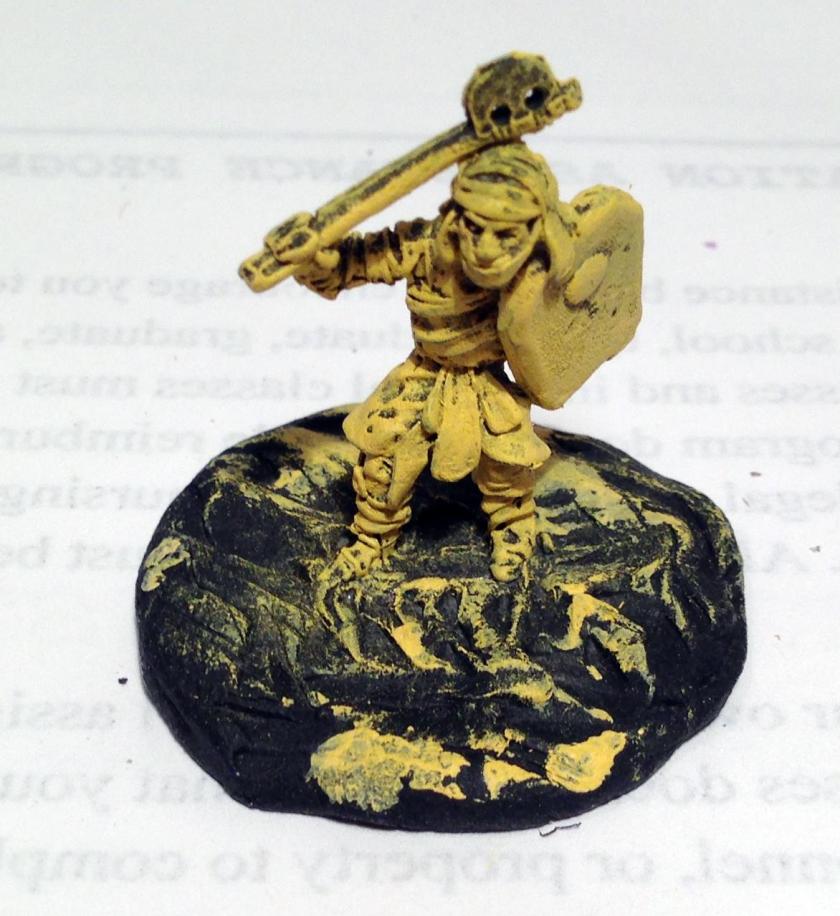
Grav-Cycles paintedLet’s discuss the riders and the other Aphids painting in general. As I wanted them to look similar (all in the same platoon and the same insect species), I wrote down each step of painting and washing and highlighting. That helps with reproducing the same effects. There are a few differences among each type but I’ll note those as I go along. The only special steps for the riders involved basically repairing the one missing leg on one figure. I used my pin vise, and drilled out a hole in the figure’s leg stump. I cut a piece of paper clip, and bent it at 90°, and superglued it in place. I sculpted a suitable leg with Aves® Apoxie® Sculpt, and let it harden overnight. It came out acceptably!
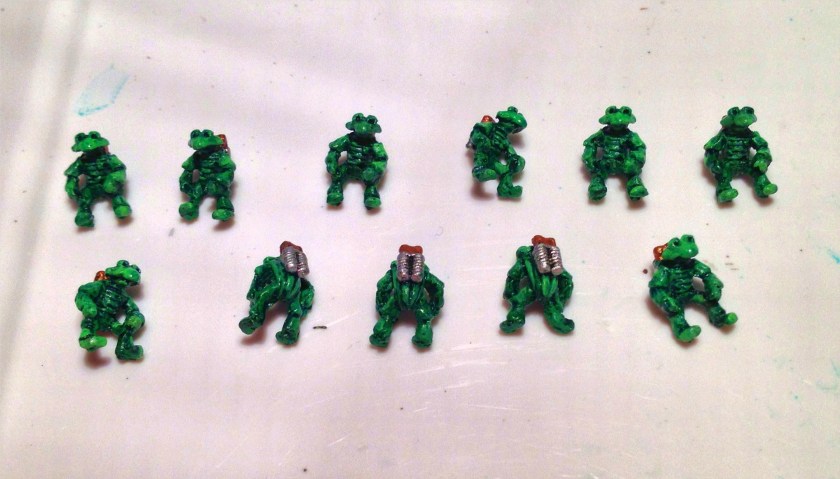
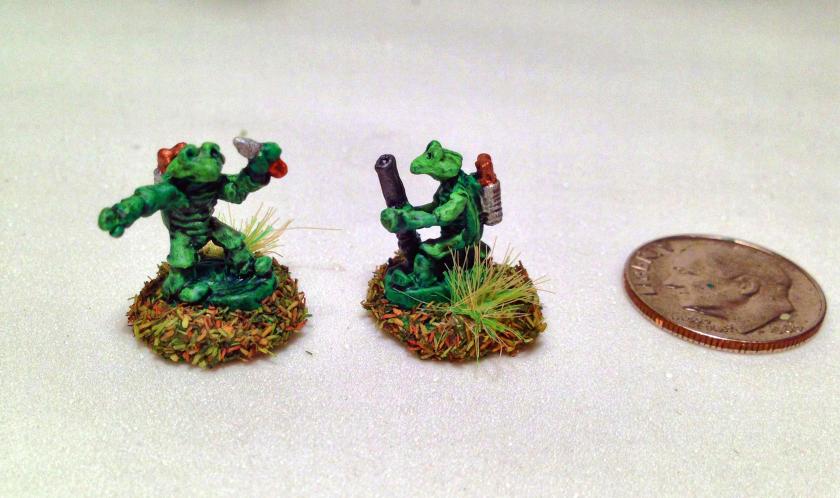
The painting of the Aphids followed the same basic pattern. I wanted to smooth over any rough areas, so I gave the figures a wash with Secret Weapons Washes “Green”. I then base coated the bunch with my old 1984 Polly-S “Slime Green” using a dry brushing technique.
Amazingly, this 32 year old paint is still good!Each of the Aphids (all types) was equipped with a couple of tanks on their backs, which I interpreted as being a breathing apparatus. For these, I used “Chrome Silver” on the tank bodies and Tamiya “Copper” on the valve sections. After this dried, I gave each Aphid a wash with Citadel “Nuln Oil Glossy”. I wanted glossy so as to bring out the small details that were recessed. Then I highlighted the flat chitinous surfaces of the head and thorax (these are insects) with Craftsmart “Apple Green” satin. To smooth out the colors, I applied yet another wash of “Green” to the Aphids’ shells and “Nuln Oil Glossy” to the ribs on the breathing tanks. For varnishing, I wanted to dull down the glossy a bit so the Aphids got two coats of Testors “Dullcoat”.
Riders painted and awaiting varnishingAfter varnishing and awaiting mounting
Let me get specific about the Aphid Scouts on Grav-Cycles, which were then ready for assembly. I glued the riders to the cycles. Then, I drilled a hole on the bottom of each cycle with my pin vise to fit the paper clip in the push pin with my smallest bit. I needed to also use an Exacto knife to clear the hole of filings and another push pin to start the pin vise (pilot hole). I had some of the riders come off during this process but was able to reglue them easily.
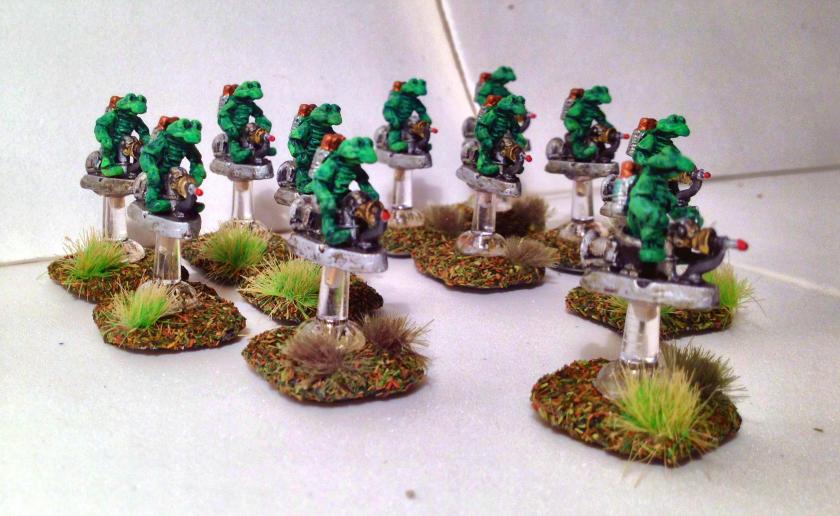
Hole drilled in bottom of cycleThese were then finally assembled. I used differently-colored flocking tufts from Army Painter to show their command and control relationships. They are organized as one squad in the platoon – with one squad leader, and two team leaders each leading teams of 4 grav-cycles. My thoughts initially are to treat the ray gun weapon as an automated analogue of a 37mm anti-tank gun and the vehicle as terrain-defying flying motorcycles.
Scouts out! The Aphid Grav-Cycle SquadClose up of figure left sideRight side of grav-cycle
Coming at you!The process of painting was the same for all of the Aphid Infantry, Aphid Officers, and Aphid Mortar Crews with some differences. First, they are all mounted on two #8 steel washers that have been glued together with wood glue. Second, the infantry is armed with tommy guns (I am assuming that Thompson submachine guns must have a thriving export market in the future!). I used my 1987 Deka Lack “Braun” for the wooden parts of the guns, and “Gunmetal Gray” for the metal ones.
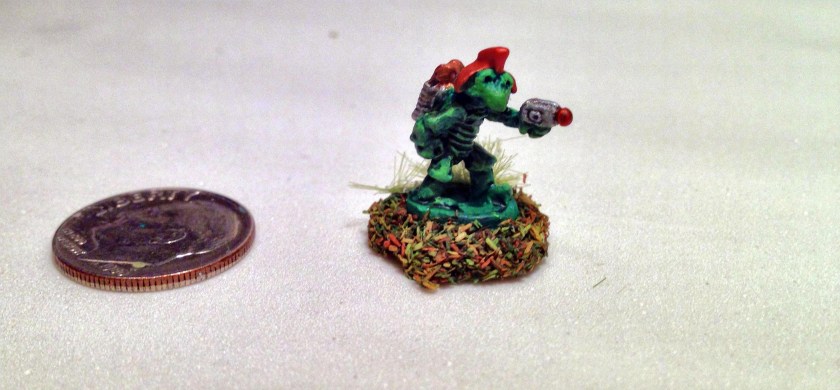
For the officers, three would be squad leaders and one would be the overall platoon leader. The officers’ laser pistols got painted with “Chrome Silver” and the tips got the “Spiritstone Red” treatment on top of Citadel “Gehenna’s Gold”. I chose “Flat Aluminum” for the squad leaders’ helmets, and “Gehenna’s Gold/Spiritstone Red” for the platoon leader’s. Once again, I used Army Painter tufts of different colors and locations to indicate command and control relationships. The platoon leader has three mortar crews and the two robots reporting to him as well. The only difference for the mortar crews was the mortar round and mortar tubes. For the small mortar rounds, I used “Chrome Silver” on the body and “Spiritstone Red” for the fins. The tubes got “Gunmetal Gray”.
Base coat on Aphid InfantryBase coat on Aphid OfficersBase coat on Aphid Mortar CrewsPainted and flocked, awaiting varnish and tuftsSquad Leader with his Aphid Infantry Squad armed with Thompson SMG’s. Tuft locations and color denote command relationships.One completed mortar crew. Each crew has its own tuft color, and reports to the platoon leader.Three completed squad leaders
Completed Aphid Platoon LeaderTo round out the platoon, there are the two Robot self-propelled guns. These look almost steam-punk-like in design. I went with a very metallic scheme for them. First, I gave the figures a wash with Secret Weapons Washes “Armor Wash”. The top part/gun turret was painted with “Flat Aluminum”, while the bottom of the chassis was painted with “Copper” . I painted the wheels and lower chassis with “Gunmetal Gray”. I added Citadel ” Auric Armor Gold” to some of the chassis attachments. For the radiator in the back (!) I used “Copper” framed with “Gunmetal Gray”. The whole assembly got a wash again, and then I painted the robotic insect eyes with Craftsmart “Festive Red” metallic. I highlighted the figure with the same paints again after the wash, and I was pretty happy with it.
From Lost Minis Wiki – Robot Group – I got two of the models on the top
Completed Robot Self-propelled GunsThe platoon structure (41 fighting figures) is as follows in summary:
Aphid Platoon Leader (1)
Scout Squad Leader for Aphid Scouts on Grav-Cycle (1)
Team A Leader, Grav-Cycle (1)
4 Aphids on Grav-Cycles
Team B Leader, Grav-Cycle (1)
4 Aphids on Grav-Cycles
1st Squad Leader for Aphid Infantry (1)
6 Aphid Infantry with Thompson SMG
2nd Squad Leader for Aphid Infantry (1)
6 Aphid Infantry with Thompson SMG
3rd Squad Leader for Aphid Infantry (1)
6 Aphid Infantry with Thompson SMG
Mortar Section A (2)
Mortar Section B (2)
Mortar Section C (2)
Robot Assault Gun Section (2)
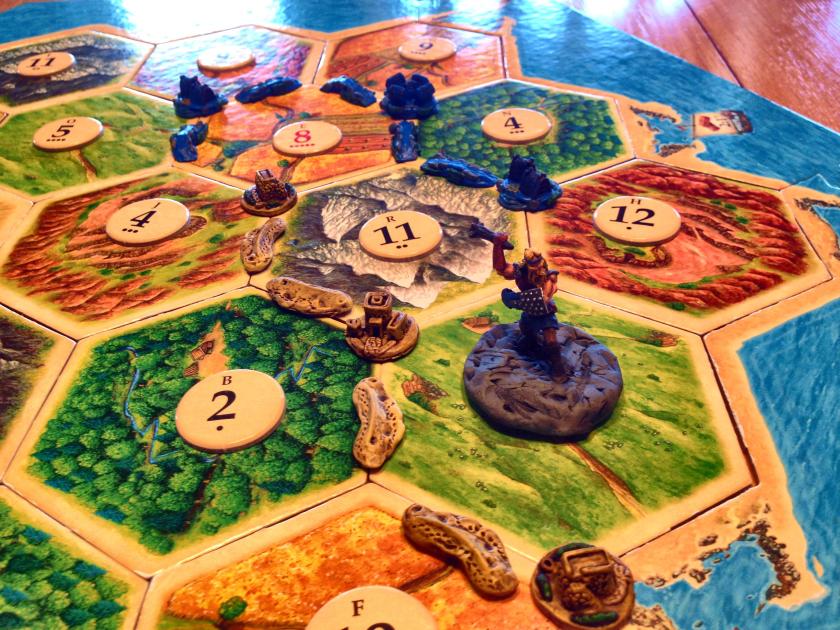
The Aphid PlatoonI have to say that this was a very challenging project – the figures were smaller than I am used to painting, and they were much less detailed. However, I am pretty proud of what I was able to do with it and look forward to seeing them in action in a game. It’s fun to bring nearly 40-year old figures back to life – especially with many old paints as well. I’m glad I got these, and am very happy with how they turned out. I’m planning on chatting with Buck about assigning combat values to them soon.
This is the story of the second game set that my daughter Ellen and her fiancé Chris got me for Settlers of Catan®. RAFM in Canada makes these and you can see their offerings here.
The first one I completed was the Egyptian set (1202), and this is the Viking set (1200). There are 25 pieces in each set – 15 roads, 5 settlements, 4 cities, and one themed robber. These would take the place of the generic wooden pieces that come with the game.
I saw these on the RAFM website before when I was looking through their offerings there Egyptian, Bavarian, and Chinese set in addition to the Viking one. Interestingly, the box cover shows incorrect game play – each city or settlement needs to be separated by two or more roads, and there is only one road here.
Cover of the box with incorrect play
Side of the box
There was very little flash on the robber, and none on the other pieces. I did the robber last, so I will show that work after the others. I cleaned them up with a quick scrub, then primed them with Krylon “Ultra-Flat Black” matte spray paint when I did my Slag Mound priming.
Before priming (with Slag Mounds)
The first challenge I had was in figuring out how to mount these for painting. Normally, I mount the figures on a washer and then mount the combination to a popsicle stick. Here, I was only going to use a washer for the robber as the other pieces were not really configured for mounting. I mounted each lightly to a popsicle stick with white glue. In the end, this procedure forced me to retouch all the figures’ sides as well as deal with painting and varnishing the undersides.
I decided to try to keep a blue theme to these pieces to match the box and for ease of play.
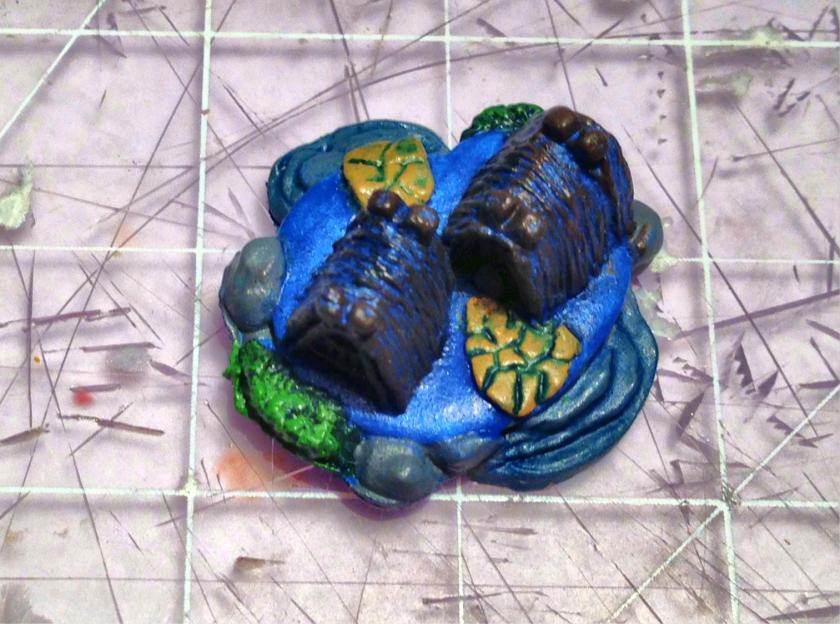
In the set, the roads were much more road-like than the sand dunes in the Egyptian set. The settlements and cities had a Viking row house look to them.
I needed to have a consistent color scheme as these are game pieces – and not traditional miniatures. I wanted them to be very bluish but have some details.
I used another old 1987 Deka Lack paint – “Blau” (blue) as my base color on all of the pieces. This made the roads look a bit like rivers, but for use as game pieces this is not a problem.
I used Americana “Zinc” on the rocks and steps, and Citadel “Caliban Green” on the foliage. For the pathways on the towns and cities, I used Citadel “Balor Brown”. I needed some highlighting for the structural parts of the buildings, so I used Citadel “Dryad Bark” to good effect. Following this, I used Secret Weapons Washes “Blue” to wash all the pieces. Then I added highlights to the foliage with “Dryad Bark” and Citadel “Niblet Green”. I removed the figures, touched up any bare spots, and moved to varnishing. I first varnished the set with Krylon “Clear Glossy” spray paint. I then varnished the topsides with two coats and the underside with one coat of Testors “Dull Coat”. I did this because they are board game pieces, with more need of paint protection.
Figures before application of varnish
Close up of a city and a town before varnish
Roads before varnish
Completed settlement
Completed city
Completed roads
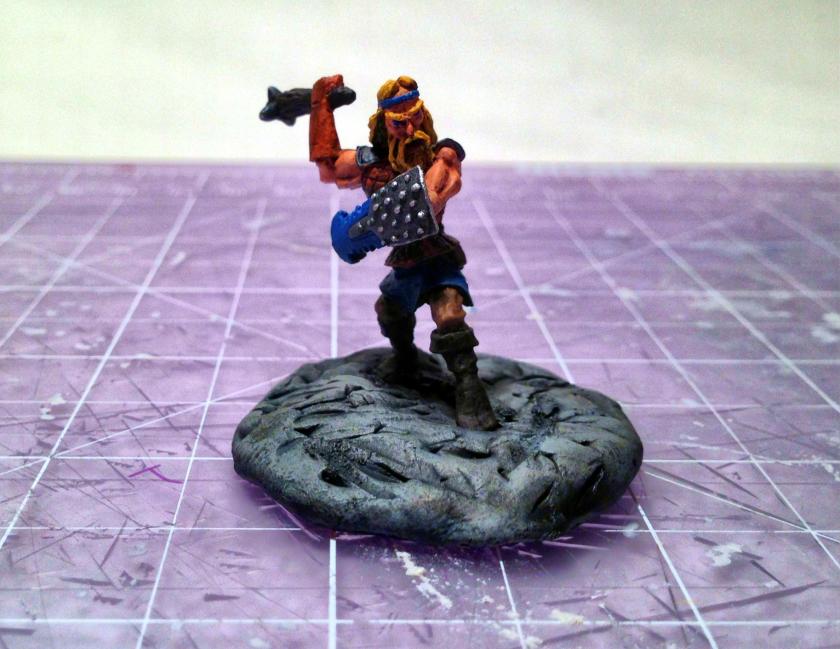
After this I moved on to the robber. It is a 28mm figure, dressed as a Viking berserker, armed with an spiked club. The first thing I did was to glue the figure to a larger 1.25″ steel washer with wood glue. Once that had dried, I used Apoxie Sculpt to create a base. I decided here as well that flocking the robbers would be messy and not useful.
Viking robber before priming
I primed the robber with Krylon “Ultra-Flat Black” matte spray paint. I then covered the whole figure and base with Americana “Ebony”. This was done in order to try a new dry brushing technique for armor that I saw Chris Palmer use in his blog. You can see his entry here.
I first dry brushed the robber’s shield and shoulder guards with FolkArt “Gunmetal Grey”. I drybrushed the base with Americana “Slate” which had a slight bluish hue to it.
I then worked on base coating the details. The club handle got a coat of Americana “Bittersweet Chocolate” with the spikes getting “Gunmetal Gray”. For the leather armor and gloves, I used my 1996 Armory “Leather Brown”. For his shield I used “Gunmetal Gray” and “Blau” to tie into the color theme for the set. His headband also got “Blau” for the same reason. I used “Bittersweet Chocolate” on the boots and his rope.
I then applied P3 “Midland Flesh” on the face and arms. For the hair, eyebrows, and beard, I used P3 “Sulfuric Yellow”. I did the sclera of the eyes with Americana “Snow” and “Blau” for the pupils (he is Scandinavian after all). I painted the lower lip with 1984 Polly-S “Demon Deep Red”. The boots got a coat of Americana “Raw Sienna”. I then used “Agrax Earthshade” on the blond areas and P3 “Flesh Wash” on the skin, and let the figure dry.
For his shirt, I chose another 1987 paint, Deka Lack “Dunkelblau” (dark blue). To highlight the club spikes and the bolts on the shield, I used Tamiya “Chrome Silver”. I highlighted his nose and cheekbones with FolkArt “Light Flesh”, then used P3 “Flesh Wash” again to make his arm muscles more pronounced and defined. I also used FolkArt “Light Flesh” to lighten his nose and forehead, and to highlight his arm musculature.
I used “Sulfuric Yellow” on the hair to highlight it. I darkened the leather armor and the base with Citadel “Nuln Oil”.
I then went around the figure and highlighted all the areas that I thought needed more “pop”. Lastly, once the figure was dry I then varnished it with two coats of Testors “Dull Coat”. I did this because they are board game pieces, with more need of paint protection.
Finished Viking robber
Overall, I am satisfied with the work – they are after all game pieces. I hope to get these into a game of Catan soon.
My daughter Ellen and her fiancé Chris got me a couple of game sets for Settlers of Catan® and I thought I’d take the opportunity to paint these up. RAFM in Canada makes these and you can see their offerings here.
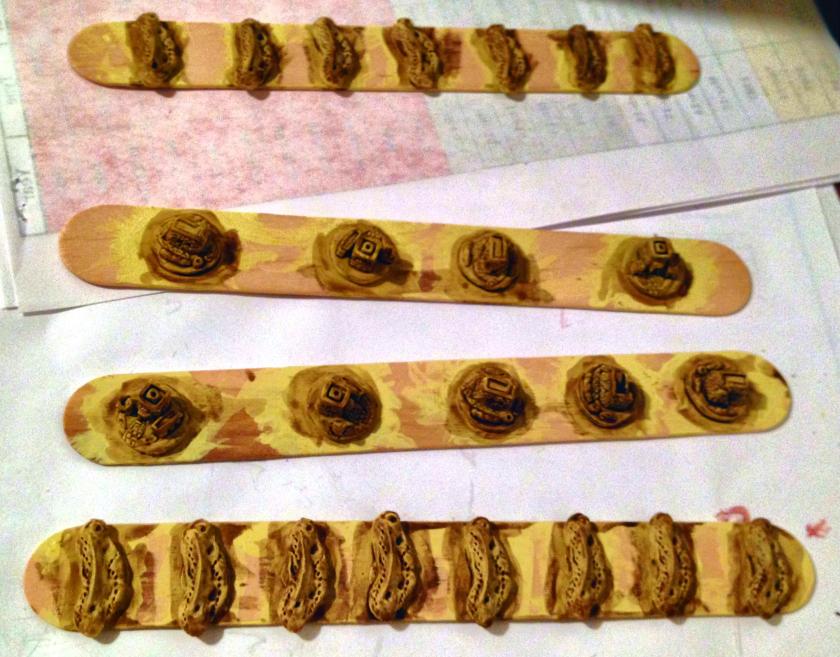
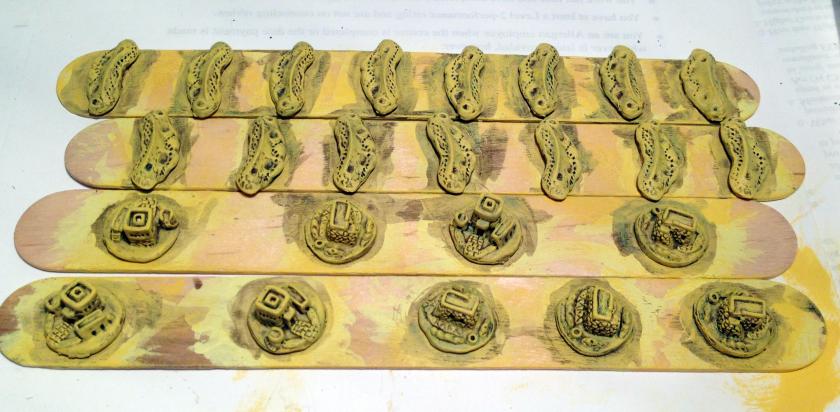
The first one I completed was the Egyptian set (1202). There are 25 pieces in each set – 15 roads, 5 settlements, 4 cities, and one themed robber. These would take the place of the generic wooden pieces that come with the game.
I saw these on the RAFM website before when I was looking through their offerings. There are Viking, Bavarian, and Chinese sets in addition to the Egyptian one. Interestingly, the box cover shows incorrect game play – each city or settlement needs to be separated by two or more roads, and there is only one road here.
Cover of the box with incorrect play
Side of box
There was very little flash on the robber, and none on the other pieces. I did the robber last, so I will show that work after the others. I cleaned them up with a quick scrub, then primed them with Krylon “Ultra-Flat White” matte spray paint.
Before priming (less the robber)
The first challenge I had was in figuring out how to mount these for painting. Normally, I mount the figures on a washer and then mount the combination to a popsicle stick. Here, I was only going to use a washer for the robber as the other pieces were not really configured for mounting. I mounted each lightly to a popsicle stick with white glue. In the end, this procedure forced me to retouch all the figures’ sides as well as deal with painting and varnishing the undersides.
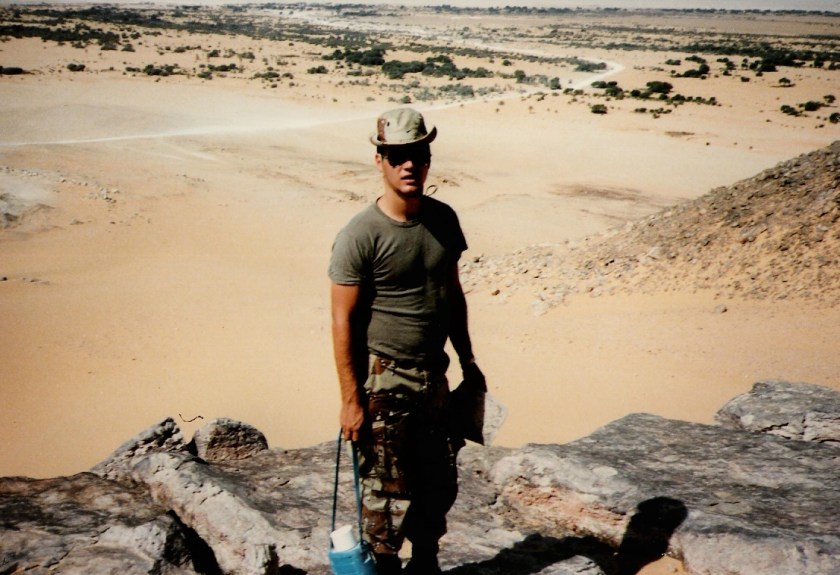
I decided to try to keep a desert theme to these pieces. I was somewhat familiar with this coloration due to previous experience in the desert. I led a Mobile Training Team at an airfield project in the Sahara Desert when I was a US Army Engineer officer.
1LT Morin back in the day…1986, Dirkou, Republic of Niger
In the set, the roads were merely sand dunes with two sets of footprints, and the settlements and cities were adobe-like structures (very similar to what I saw in the Sahara). However, I needed to have a consistent color scheme as these are game pieces – and not traditional miniatures. I achieved my coloration goals by making a 50/50 mix of my old 1987 Deka Lack “Gelb” (yellow) and Americana “Bleached Sand” and using that as a base coat. This finished off my “Gelb” after 29 years! I then applied a liberal amount of Citadel “Agrax Earthshade”.
After basing and first wash
I then highlighted these with a 50/50 mix of P3 “Sulfuric Yellow” and Americana “Desert Sand”.
After highlighting
Then I did a bit of detail work. On the settlements, I used Citadel “Balor Brown” on the wells and “Castellan Green” on the foliage. After another application of “Agrax Earthshade”, I used the previous mix of P3 “Sulfuric Yellow” and Americana “Desert Sand”to highlight again. I also highlighted the foliage with Citadel “Niblet Green”. Knowing that there was likely to be some bare spots from the gluing, I gently removed the pieces and painted the undersides and sides where there were some bare spots. I first varnished the set with Krylon “Clear Glossy” spray paint. After allowing the pieces to dry, I then varnished the topsides with two coats and the underside with one coat of Testors “Dull Coat”. I did this because they are board game pieces, with more need of paint protection.
Finished pair of roads
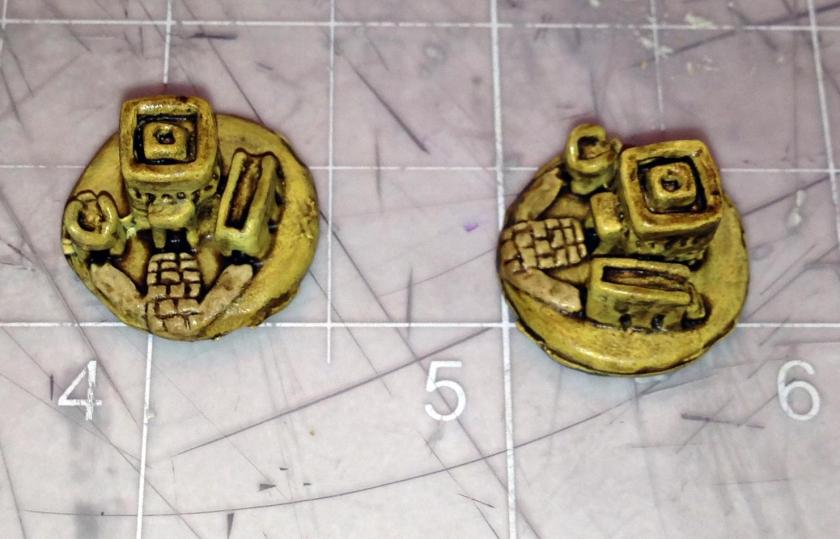
Two settlementsTwo cities
After this I moved on to the robber. It is a 28mm figure, dressed in desert garb, with an axe. The first thing I did was to glue the figure to a larger 1.25″ steel washer with wood glue. Once that had dried, I used Apoxie Sculpt to create a base. I decided that flocking the robbers would be messy and not useful.
Robber before priming
I first dry brushed the robber with the P3 “Sulfuric Yellow” and Americana “Desert Sand” 50/50 mix.
After first dry brushing
I then worked on base coating the details. The axe handle and the backside of the shield got a coat of Citadel “Dryad Bark”, and the axe got a coat of FolkArt “Gunmetal Gray”. I used P3 “Midland Flesh” on the face. For the shield, I used another 1987 paint, Deka Lack “Ocker” (ochre), which had more of a metallic tint. I then used “Agrax Earthshade” and let the figure dry.
I highlighted the figure and the base with “Sulfuric Yellow” and dry brushed some areas. Then I did the sclera of the eyes with Americana “Snow” and “Ebony” for the pupil and eyebrows. The boots and gloves got a coat of P3 “Bootstrap Leather”. To create an edge on the axe, I used Tamiya “Chrome Silver”. I highlighted his nose and cheekbones with FolkArt “Light Flesh”, then used P3 “Flesh Wash” to make it more tan. I used “Sulfuric Yellow” on the boss on the shield, then darkened it and the base with “Agrax Earthshade”.
Lastly, once the figure was dry I then varnished it with two coats of Testors “Dull Coat”.
Finished robber
Overall, I am satisfied with the work – they are after all game pieces. I hope to get these into a game of Catan soon.
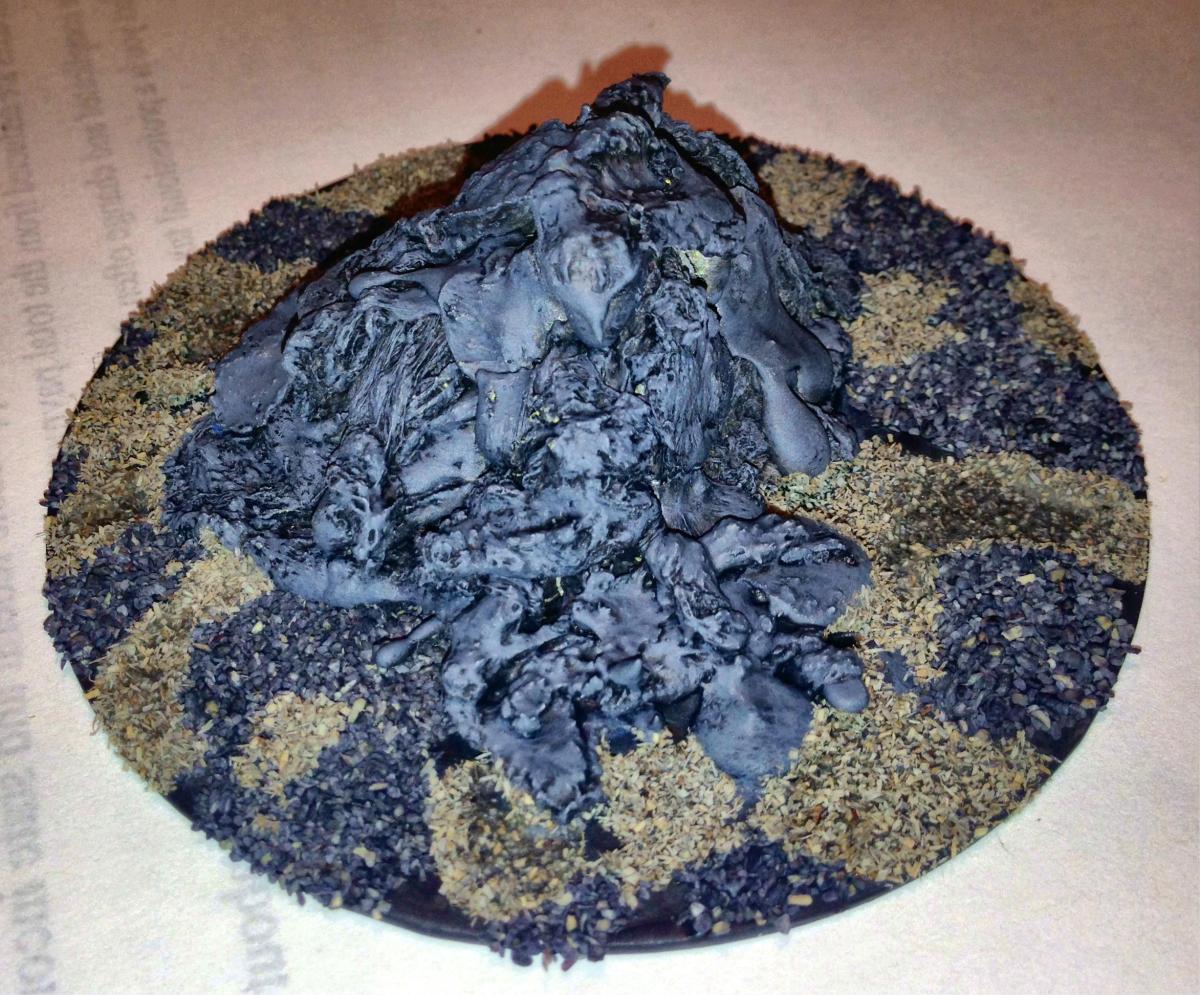
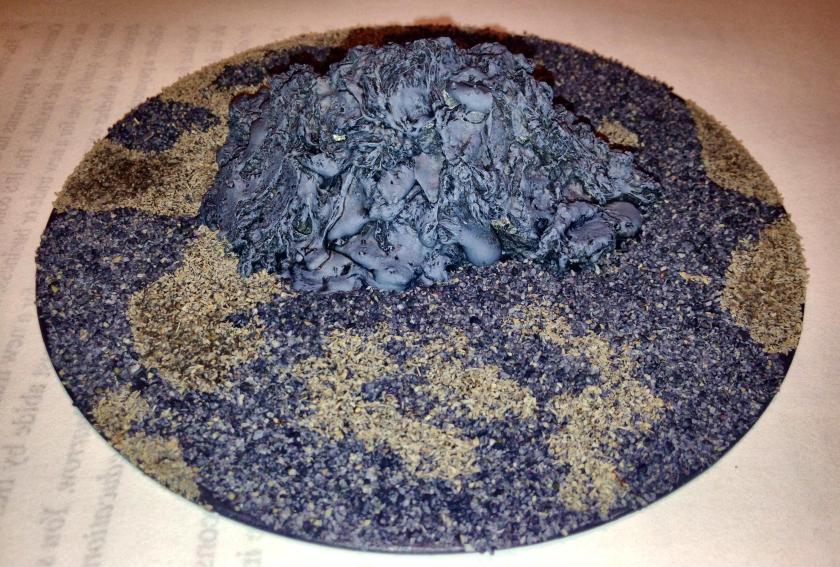
I have been casting miniatures with pewter for a while now, and I usually use a spoon to remove any impurities, slag, and ash that are floating on top of my crucible before I pour anything into the molds. Up to now, this material was useless to me. As I am now working on creating retro sci-fi units for Combat Patrol™ games, I came up with the idea of repurposing this material for needed terrain – like old lava flow mounds or industrial slag.
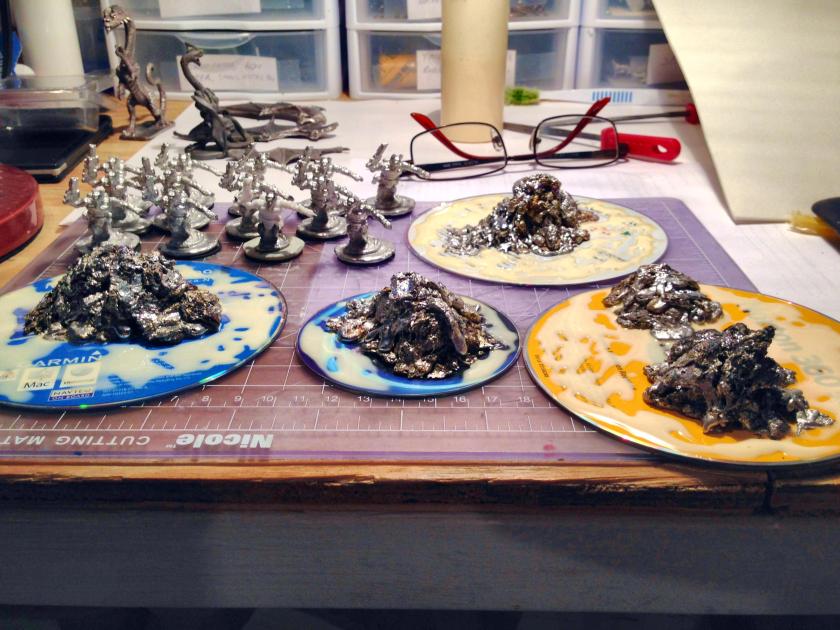
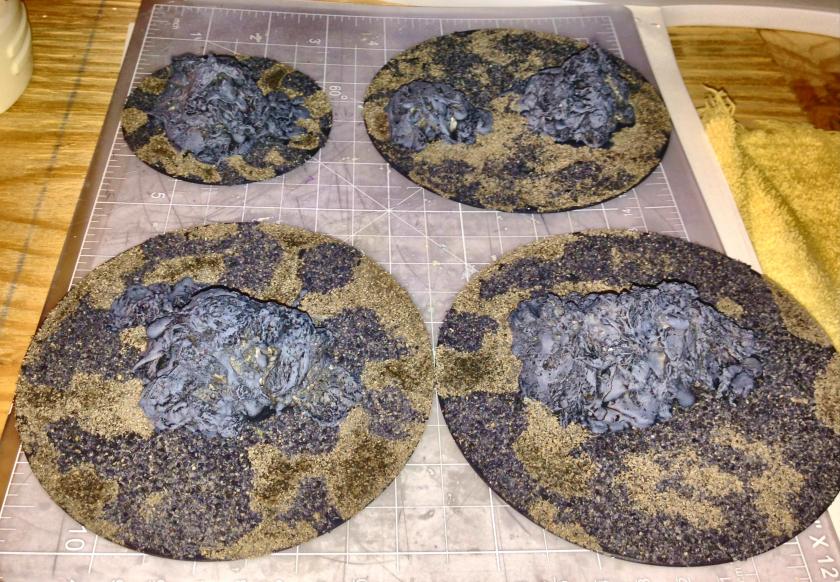
To finish up for October, I created four CD-mounted slag/lava mounds using three regular size CD’s and a smaller one. I used five slag piles, gluing each to the CD with wood glue and letting them sit overnight. I also applied a coat of wood glue to the surfaces of the CD’s for better paint and flocking adhesion down the line.
Step one – the slag is glued to the CD’s – and other projects look on!
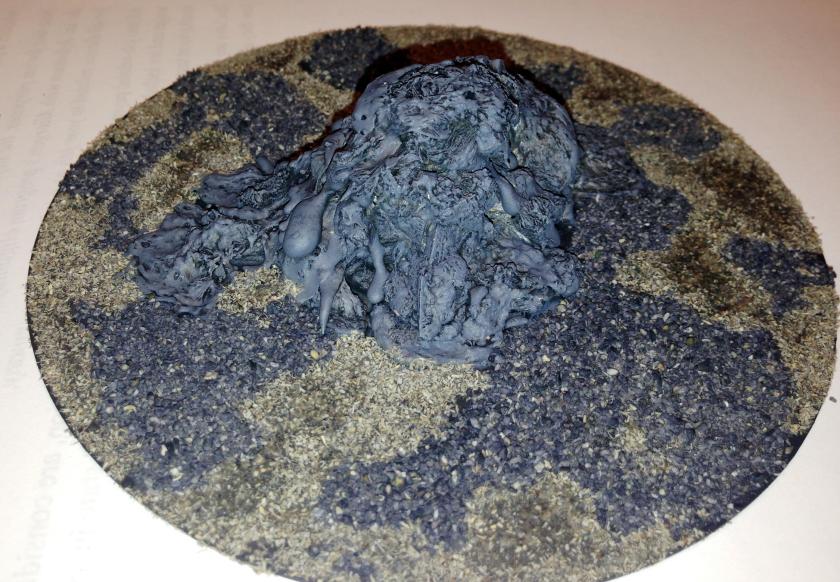
I then primed the group with Krylon “Ultra-Flat Black” matte spray paint. I took Reaper Master Series Paints “Grey Liner” and coated the slag and the CD’s. After this, I applied a coat of Citadel “Nuln Oil”. To bring out the highlights, I used Americana “Zinc” to dry brush the pieces.
After priming and dry brushing
I then let the pieces dry. Then, I used white glue to affix two types of flocking from Army Painter – “Ash Grey” and “Battlefield Black” in a random pattern. I applied two coats of Testors “Dull Coat”, allowing for adequate drying in between each.
The four pieces completed
I am pretty pleased with the results. It was not a difficult process at all. Of course, I will need to acquire a dark cloth for covering my tabletop battlefield with these. I thought about adding some grasses or tuft, but in the end went for a more wasteland look – devoid of life. I look forward to having figures use them as cover in a Combat Patrol™ game!


