

Some projects take a while – and this one was over 33 years in the making. As background, my first introduction to tabletop wargaming was in 1983 at West Point. My classmate Dave Wood (USMA 1984) introduced me to Buck Surdu (USMA 1985). Buck had set up a fantasy tabletop war game on a gaggle of desks in the Department of Foreign Languages, and from then on, a whole new gaming experience was open to me.
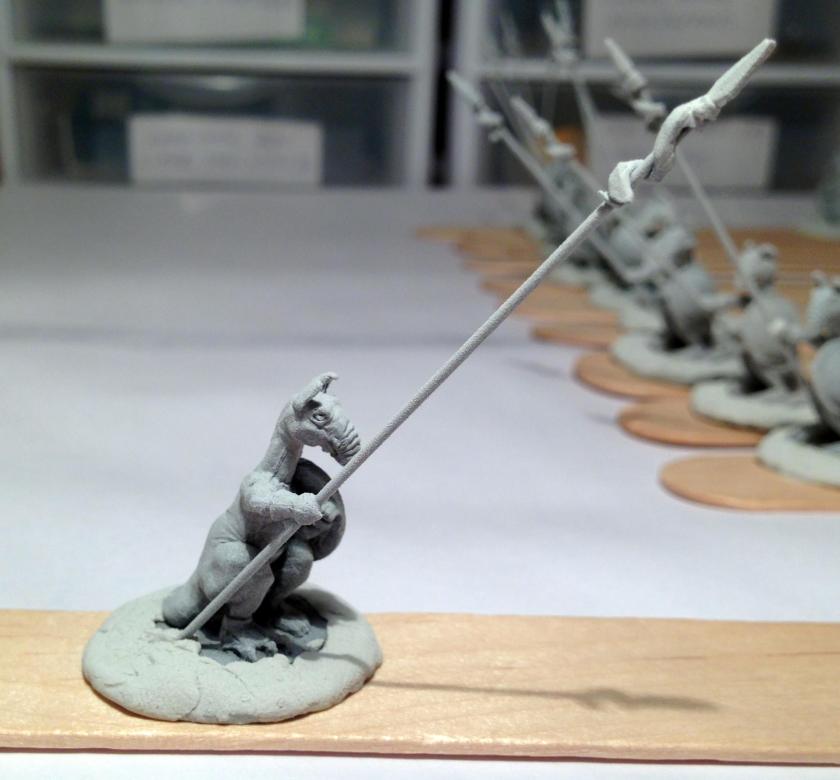
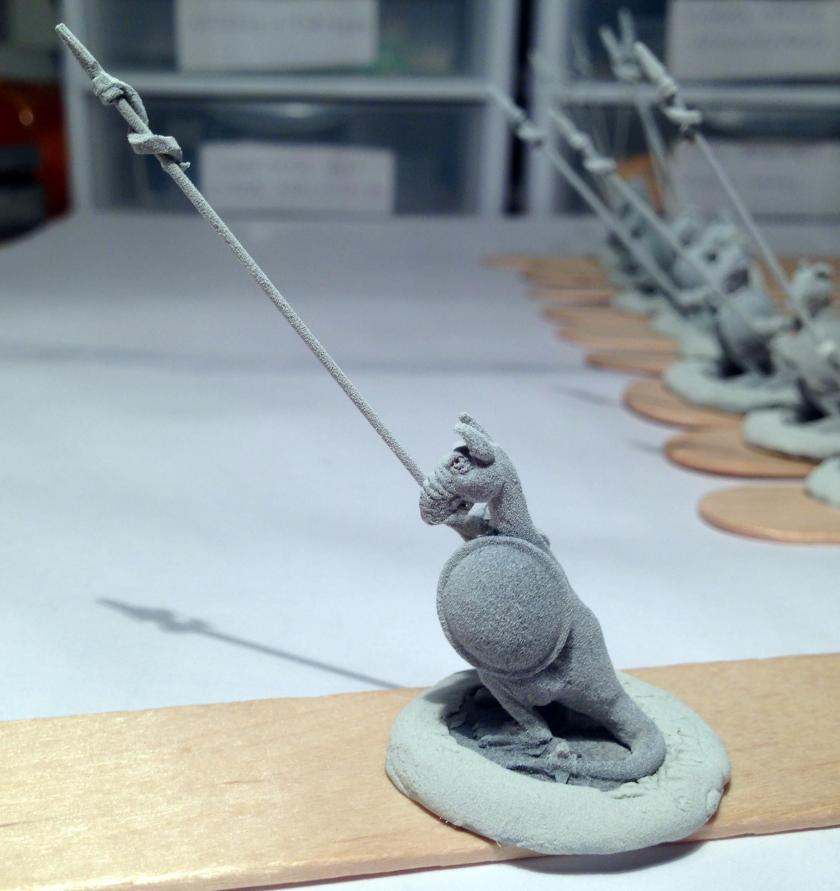
Buck wrote his own rules, and he and Dave had units of all kinds for the game. One type that Buck had was a unit of “Roomans”, which he referred to as “Beaks” as well. They were of course of the marsupial macropod (large foot) persuasion – more or less humanoid kangaroos. Of course, the word play of Romans/Roomans is evident as well. They were armed with pikes, had great movement and combat capabilities, and overall were just pretty cool. I wanted to get some, and every time I went to a hobby store in the 1980’s and 1990’s, I looked for Roomans. I had hardly any luck.
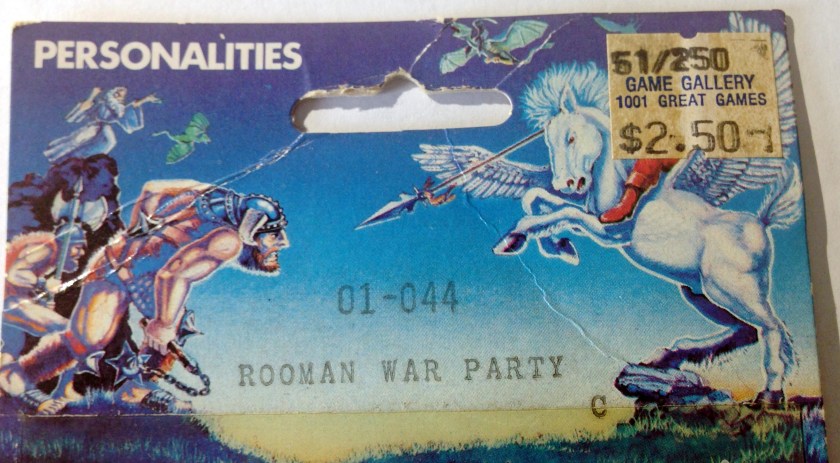
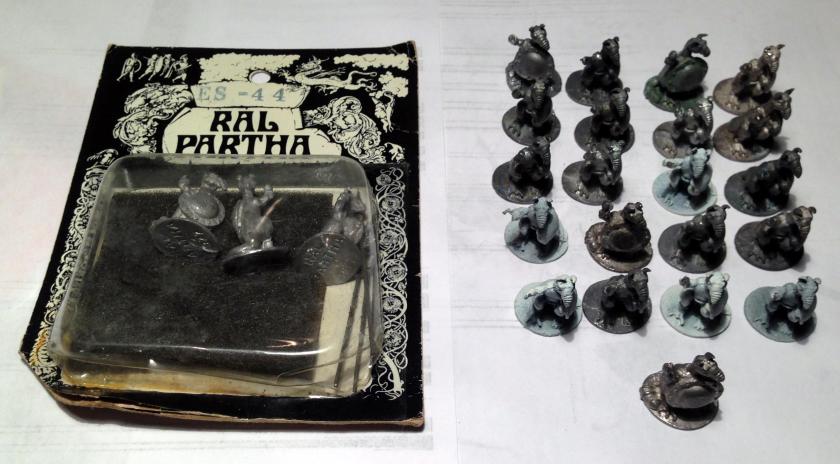
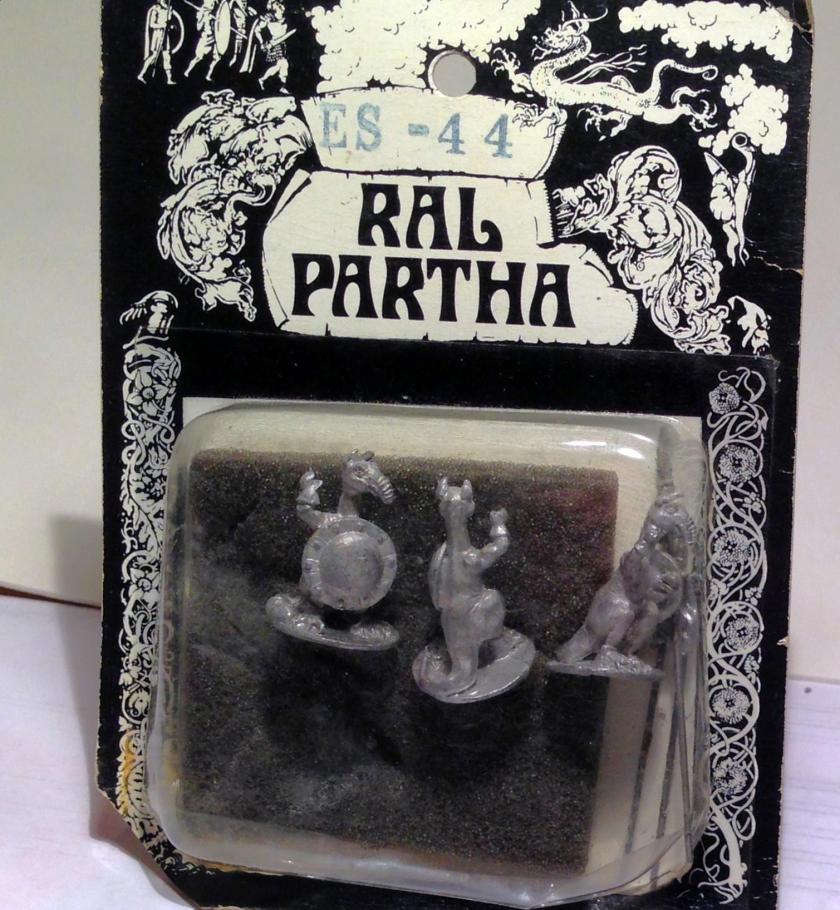
Little did I know back then that Ral Partha had produced only one type of blister pack of “Rooman War Party”, with production starting in 1977. The original numbering of the blister pack was ES-44, and in 1978 and later years that was changed to 01-044. This set was in the “Personalities and Things…That Go Bump in the Night” line from Ral Partha. Each pack in 1977 came with one Rooman with a shield in front, two Roomans with shields on the side, and three assembled pikes on piano wire. By this I mean that the 1977 pack had pikes that were in one piece with streamers rolled up under the business end of the pike. Later, Ral Partha changed the pikes to a two-piece type, where the point of the pike had smaller streamers coming off and would need to be glued to a piece of enclosed piano wire. This latter type was the most prevalent type made by Ral Partha.
Let’s get back to my search. As time went on, I became very frustrated in my attempts to locate any blister packs of Roomans. Today, I’d just look on the company web site or call them – but back then – well kids there was no internet – and that would be a very expensive long-distance toll call to Cincinnati (especially from West Germany where I spent most of the latter 1980’s in the Army). Alas, I found just one blister pack of Roomans at a hobby store around 1986 or 1987 – and that was it!
I put them away, awaiting the day when I would find another blister pack – and then I could make a unit of 6 figures perhaps…that wait was indeed over 33 years.
Now I must fast forward to my getting back into the hobby in 2014 and discovering eBay. Wow! Surely I will be able to find some Roomans on eBay! So, I searched and searched, and was able to find 18 loose Roomans either singly or in larger lots, plus one original 1977 blister package over the space of 18 months or so. Most times, they were called Goblins or Orcs by the sellers. Almost all had very bad paint jobs that needed to be stripped. This left me with 24 original Roomans.
I have not seen any in quite a while except for a poor recast here and there. Buck knew some contacts at Iron Winds Metals, and we inquired as to the status of the original molds, but unfortunately they were either lost or destroyed. This was sad. But I was able to get pikes from Melissa Morello at Iron Winds Metals that matched the post-1977 type as most of the Roomans I got on eBay either had the wrong weapon type or none at all. (THANK YOU MELISSA!) Of course, I also learned how to make gravity molds during this timeframe and now can make my own castings of the original Roomans for personal use. Iron Winds Metals told me that they are bringing back Roomans under a new name “Rues”, but to my knowledge that has not yet occurred.
The Roomans I acquired on eBay needed a lot of work to clean and strip. Some were painted with what appeared to be a tough lacquer. I used a combination of several sequential applications of Simple Green, vinegar, hot water, and pewter polish to remove old paint. I also needed to use a lot of toothbrush scrubbing and picking with a needle to get the old paint off.
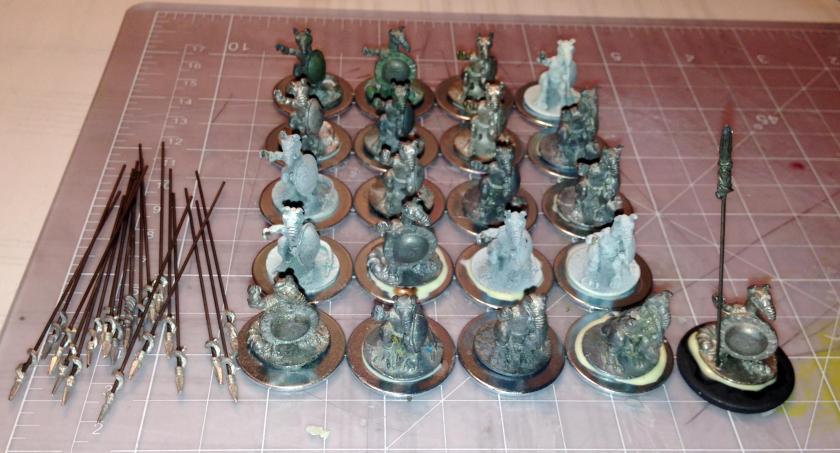
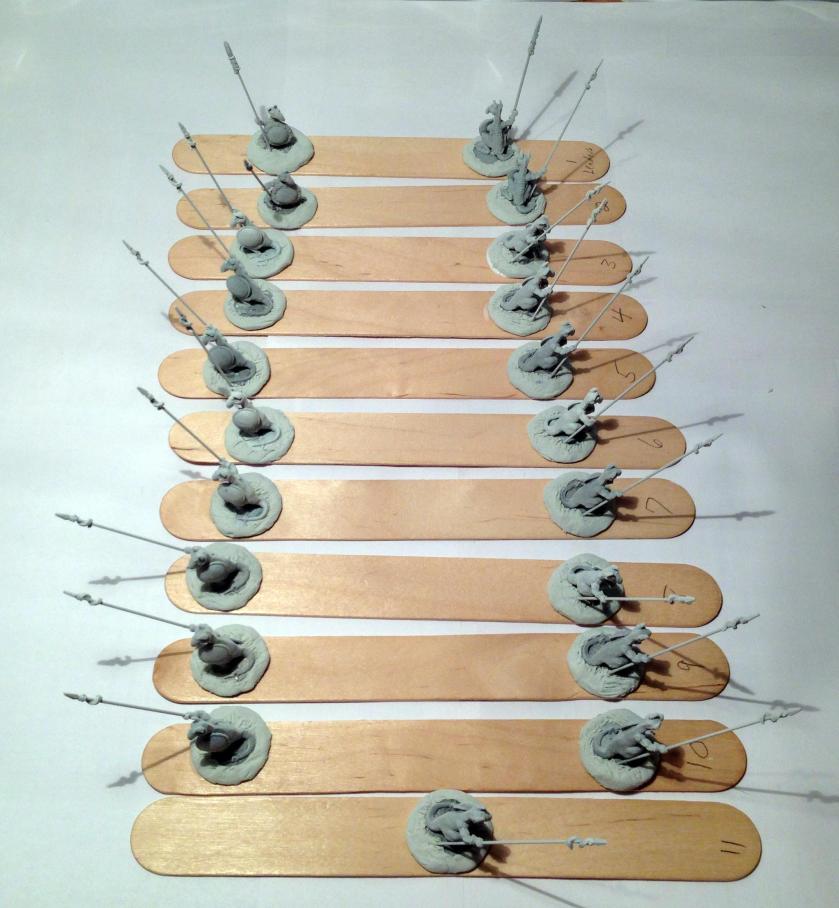
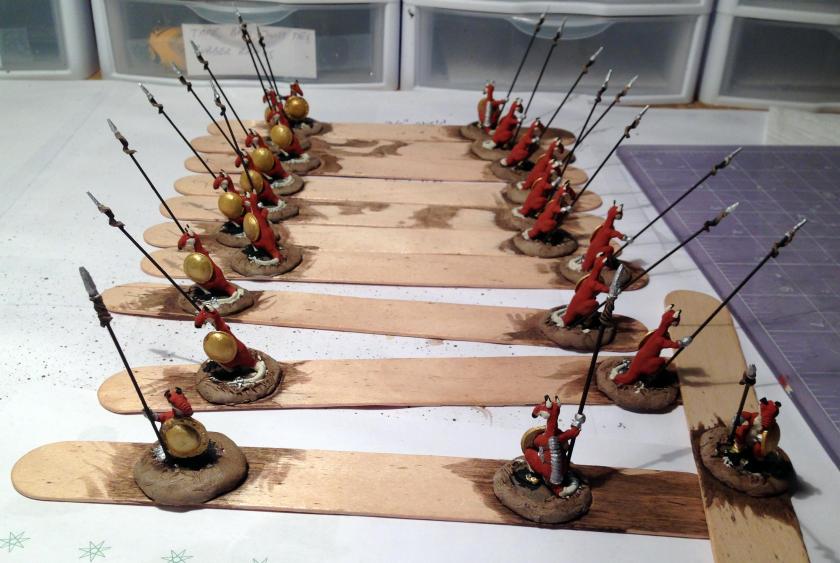
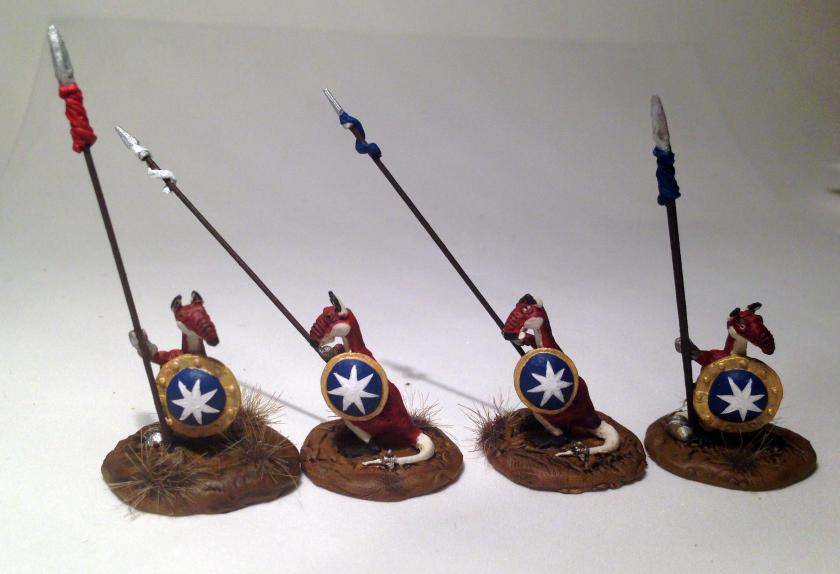
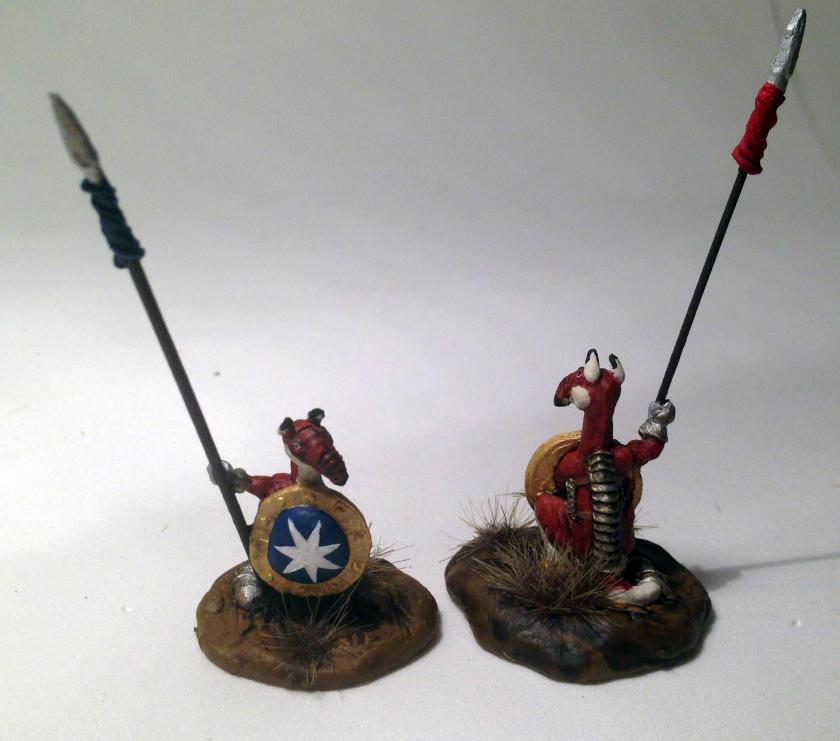
In August 2016, I gathered up my 24 original Roomans – and decided that I could not in good conscience open up my vintage 1977 blister given the difficulty in finding Roomans (let alone ones in an old blister pack). That left me with 21. I had two 1977-type pikes as well as the ones from Iron Winds Metals. I decided that I would incorporate the two old ones within the mob and use post-1977 style pikes to arm the remainder. One would be a leader, and the other 20 would form the mob or troop.
Yes, I said mob. A group of 10 or more kangaroos is referred to as a mob, a troop, or a court. Females (who are the only ones with pouches) are does, flyers, or jills. Males are referred to as bucks, boomers, jacks, or old men. Of course the term joey for the young is more commonly known. This means that my Roomans that have a shield in front are males (pouchless), while the rest are females (having pouches). Of course, being marsupials, and hopping ones at that, they have many unique qualities. If interested, here is a link: https://en.wikipedia.org/wiki/Kangaroo
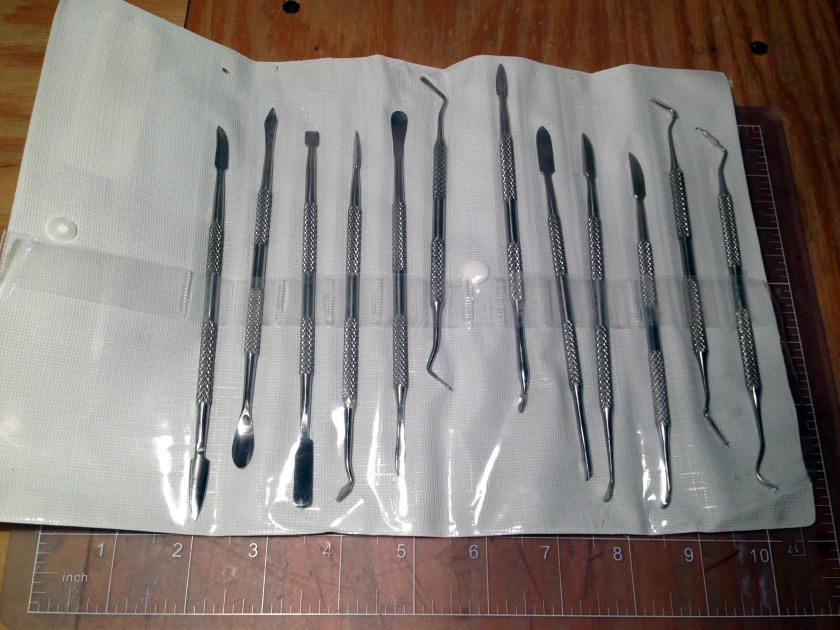
My first action was to glue the 19 newer pike heads to the piano wire with Scotch super glue, and the Roomans to 1″ steel fender washers with wood glue. This size worked better as the Roomans bases were too big for a ¾” washer. I used a slightly thicker 1″ washer for the leader. I gently bent the arms of the Roomans and oh-so-carefully opened their hands to hold the pikes at different angles. Some of the hands were not well-cast, and I fixed these with Aves Apoxie Sculpt (a two-piece clay that sets up hard as a rock in a day) https://www.amazon.com/Aves-Apoxie-Sculpt-White-pound/dp/B0013UFM7M/ref=sr_1_6?ie=UTF8&qid=1473111581&sr=8-6&keywords=apoxie+sculpt .
I then used the Apoxie Sculpt to cover the washers and create a sculpted ground around the figures (hiding the washers and the bases). This was made easier by using a set of wax carving tools that I got that looks like a dentist’s tool kit – but really works well with the Apoxie Sculpt https://www.amazon.com/HTS-156W1-Stainless-Steel-Carving/dp/B01D56Q69O/ref=sr_1_4?ie=UTF8&qid=1473111766&sr=8-4&keywords=wax+sculpting+tools .
After I let the glue dry and the clay set up, I primed the unit with Krylon “Ultra Flat White”. I used Elmer’s white glue to lightly affix the Roomans to large popsicle sticks for painting.
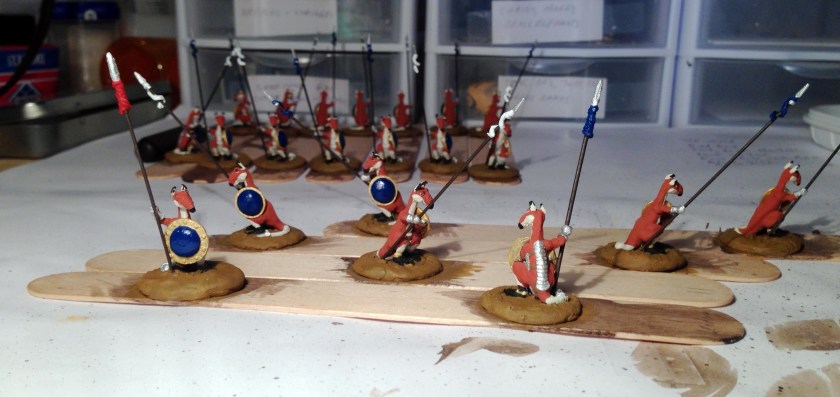
Now I needed to have a plan on colors. Buck always painted his Roomans green (he says that his are tropical). I wanted to check out real kangaroos and see their colors. There are two main types, the red and the grey, and the reds are larger. Therefore, I went with a scheme based on the red kangaroo.

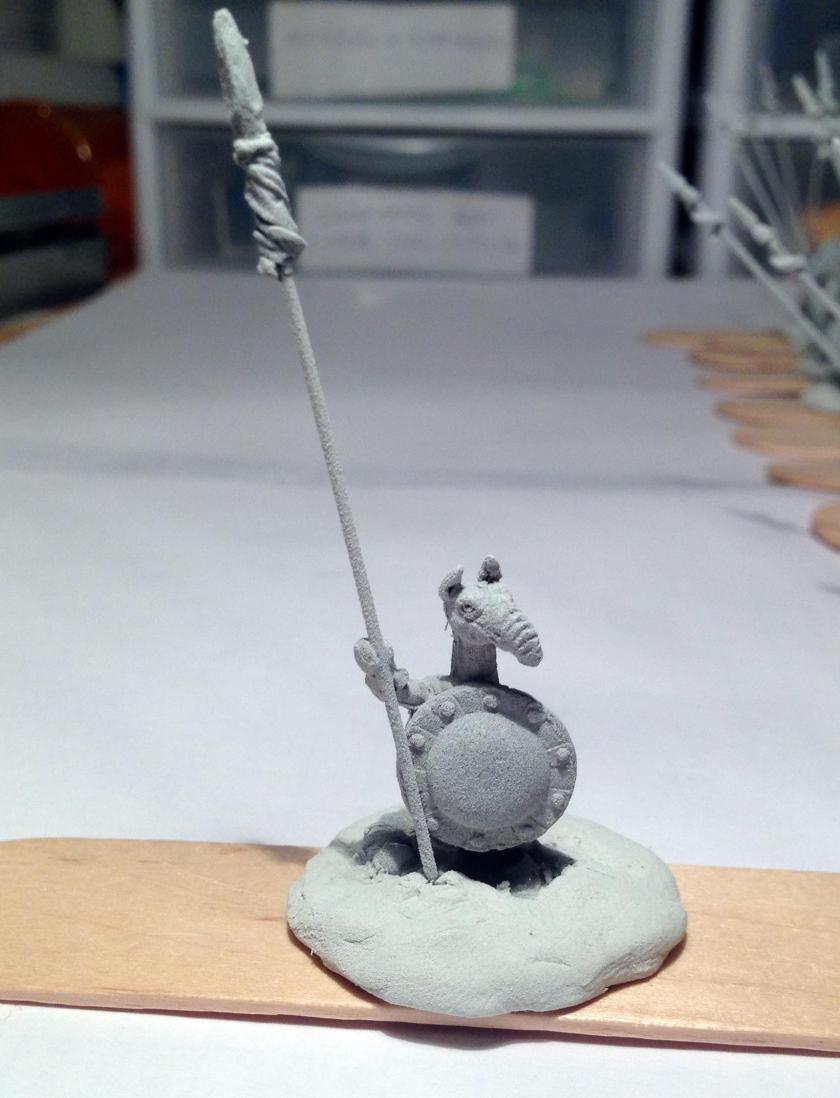
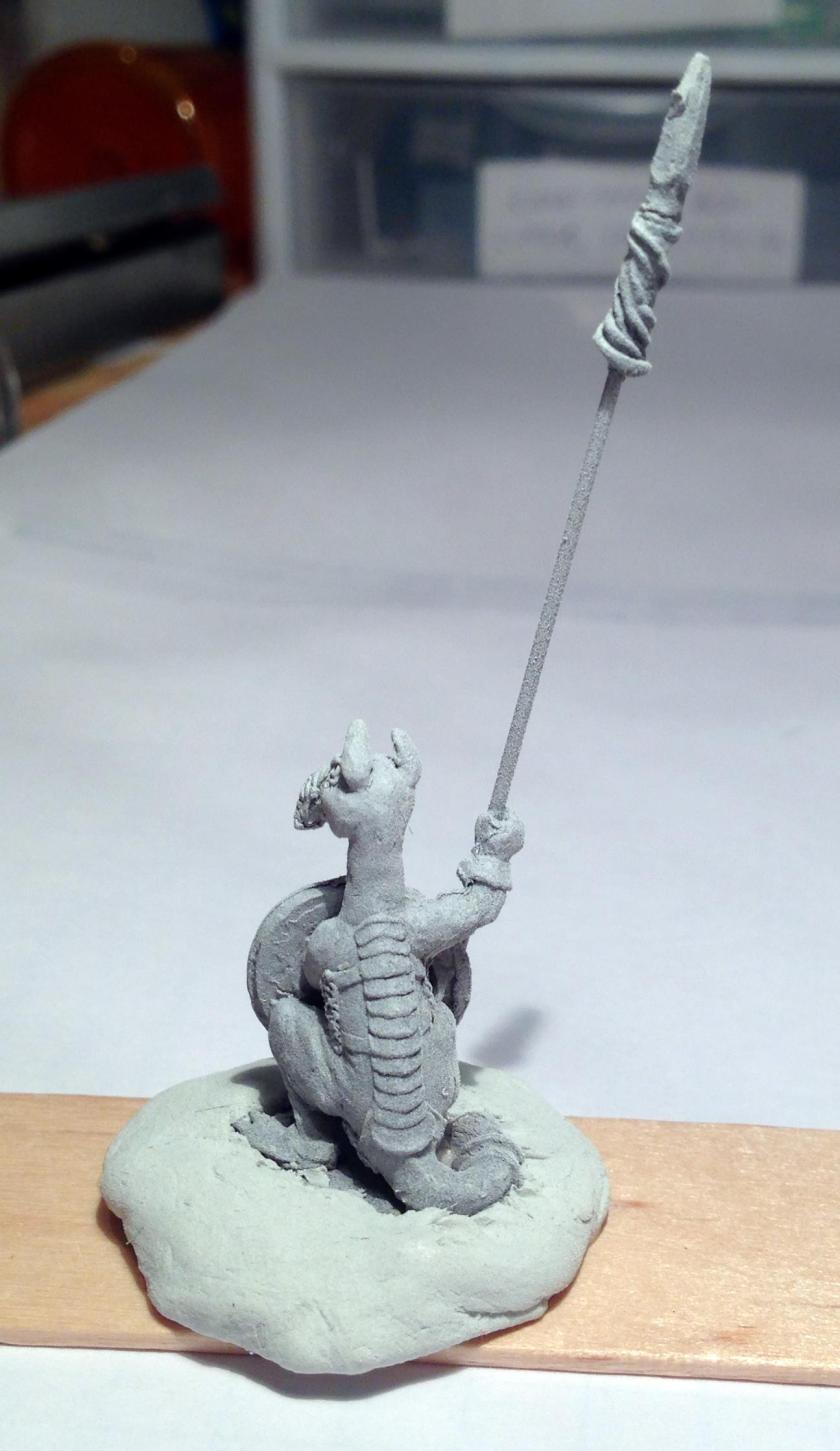
My first action was to use a light coat of Citadel “Agrax Earthshade” to the models. I wanted a good reddish-brown, and I looked in my paint supply, and had a nice candidate in the form of a 1996 bottle of Armory “Red Brown”. I used this for the fur outside of the feet and the belly. For the belly, I used Americana “Bleached Sand”. I also used that color up to the jaw muscles and lower jawline to help accentuate the glare and demeanor of the figures. I also used this for the eyes and for the ears. I used another 1996 paint – Armory “Gloss Black” – for the noses and to finish off the pupils of the eyes. For the feet, I went with Americana “Ebony”. I also used this color for the tips of the ears. The jack figures had two anklets, and the jills had one. These I painted with Martha Stewart Crafts “Pale Bronze”. I am not sure why the jacks had more jewelry than the jills!
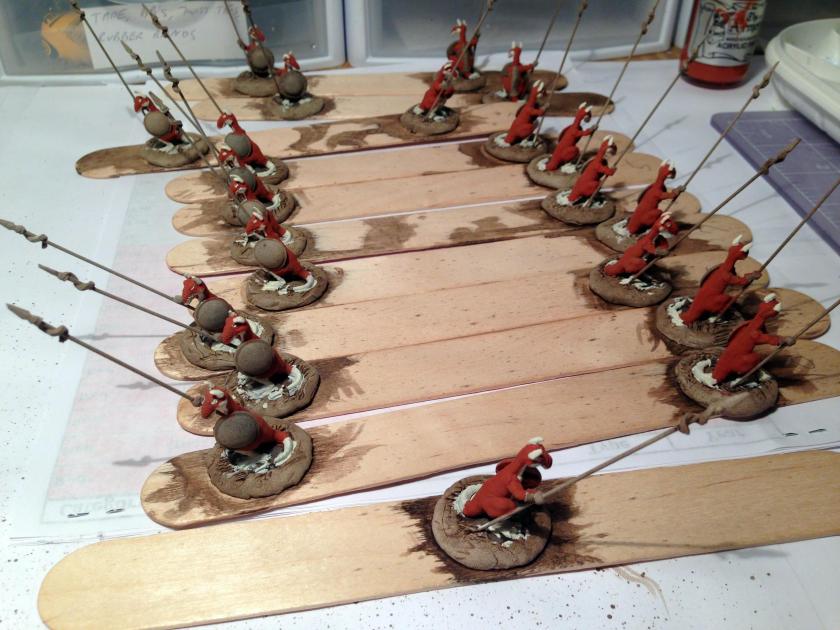
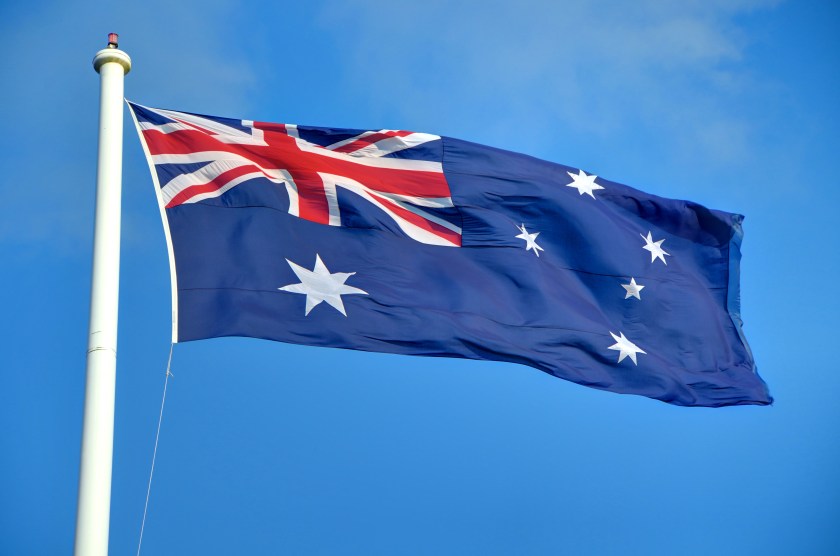
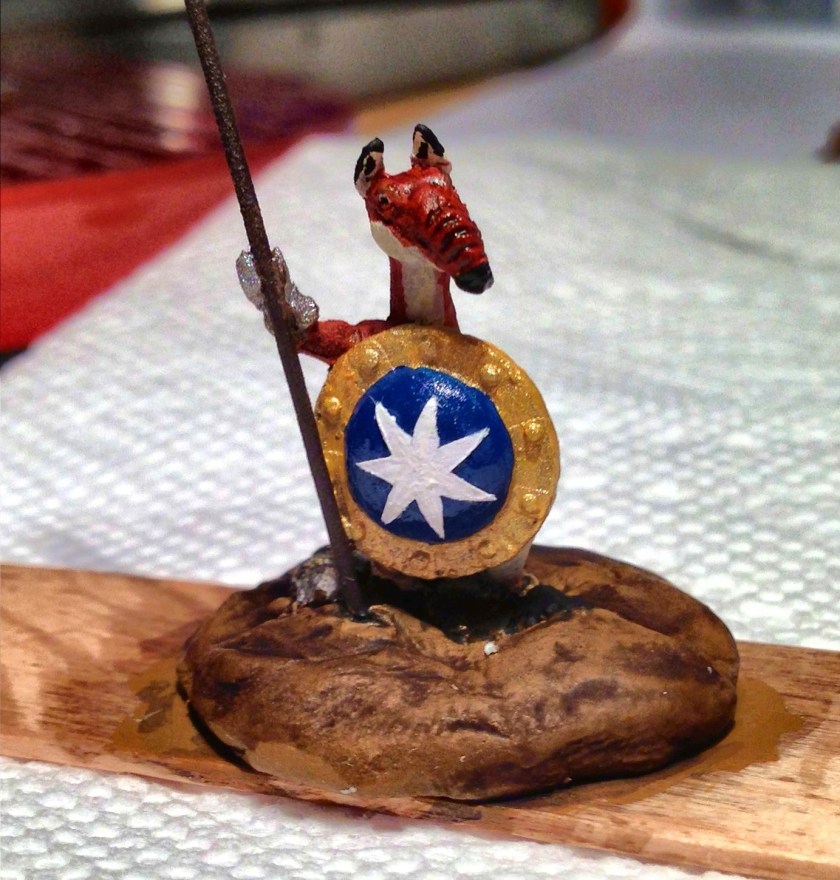
As I moved on to the other metallic – armor, tail spikes, shields, and pike heads – I paused to think of a good color scheme and theme for the unit that would tie it together. I particularly wanted a shield that would “pop”. Looking at Greek phalanxes, one usually sees a bronze shield with a pattern upon it. But these are not Greeks – they are Australians! I decided to use the colors and symbols of the Australian flag for the troop. For colors, I decided that the leader would have the red of the St. George’s Cross (in the Union Jack) on his pike streamer, with the rest of the streamers being evenly split between dark blue and white. The shields would have a dark blue center circle. There are a series of stars on the Australian flag. A seven-pointed star on the lower left quadrant represents the British Commonwealth. The other stars (four seven-pointed stars and one five-pointed star) represent the southern cross. I tried to draw a seven-pointed star, and that is nearly impossible. Additionally, the ones that I would use on the shields would need no be 1/8″ from top to bottom. My wife Lynn suggested I print them off from my computer. Luckily, I found some seven-pointed stars on the internet, and shrunk them down to size, and printed them off.
I used the “Pale Bronze” on the shields. For the tail weapons, pike heads, gauntlets, and armor (on the jacks) I used Tamiya X-11 “Chrome Silver”. For the shield straps and eyebrows, I used P3 “Bootstrap Leather”. I wanted the pikes to look like a hardwood – so I painted them with Citadel “Dryad Bark”.
I then needed to move forward with my Australian flag color scheme, For the leader’s streamer, I used Americana “Santa Red”. The other streamers got either a blue or white treatment with another of my older paints. For the dark blue streamers, I used Deka Lack “Dunkelblau”; for the white streamers I used Deka Lack “Weiβ” (Weiss). Both of these date from 1987 when I bought them when I was stationed in Karlsruhe, West Germany. I also used “Dunkelblau” on the shields’ centers. I then used Citadel “XV-88” on the bases.

I considered using some dry brushing on the figures at this point but decided against it. Basically, I wanted to darken the red fur and see if using a wash would do that and give some detail to the snouts and haunches of the Roomans. I mixed a 50/50 mix of two inks – Secret Weapons Washes “Just Red” and P3 “Brown Ink”, and carefully covered all the red fur sparing the lighter fur. I also used Secret Weapons Washes “Armor Wash” on all steel armor. I then added another coat of “Agrax Earthshade” to my sculpted bases to bring out the earthlike shapes of the ground. These washes really had a great effect and made the figures look like I desired, as well as bringing out important details that I feared to dry brush.
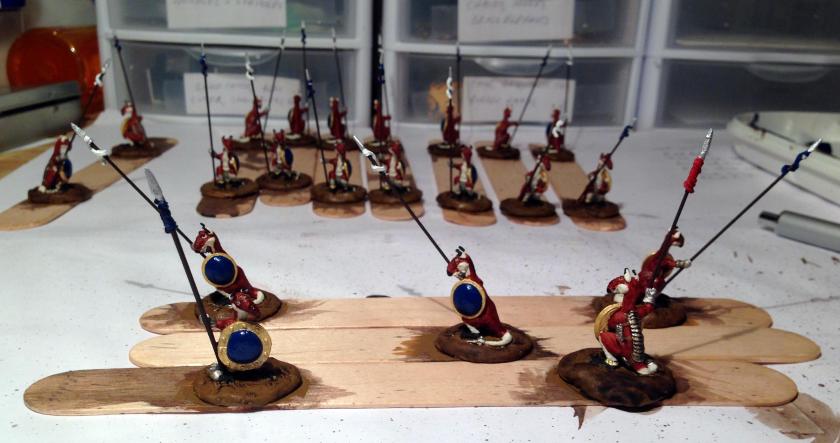
Let us return to the all-important seven-pointed stars that I printed off! I used my Exacto knife and carefully cut out 26 or so stars with the assistance of the 2.5 magnification of my Carson glasses. I used the best ones for the shields. I applied a light coat of Elmer’s white glue to the underside of each star with a Testors microsponge (this is a good use of this tool). I centered each star and ensured that each point was glued down.
Once the glue dried, I applied a coat of “Weiβ” to the stars and touched up the “Dunkelblau” around the shield where the glue seeped out. I then applied three coats of varnish sequentially – first Krylon “Clear Matte”, then two coats of Testors “Dull Coat”.
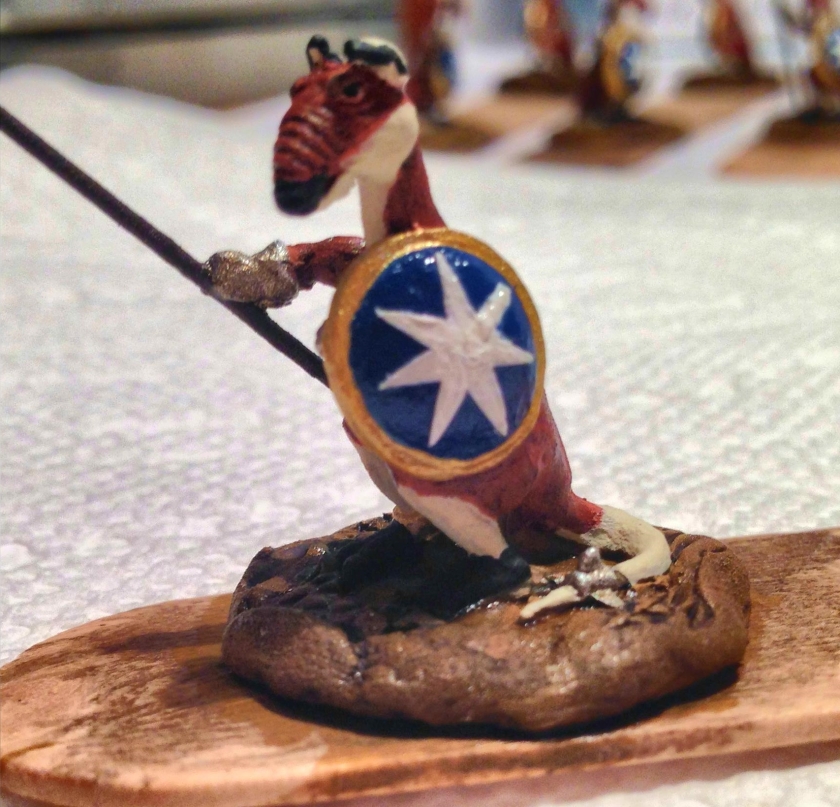
Lastly, I added some Army Painter “Wasteland Tuft” to give them the appearance of coming out of an Australian Desert.
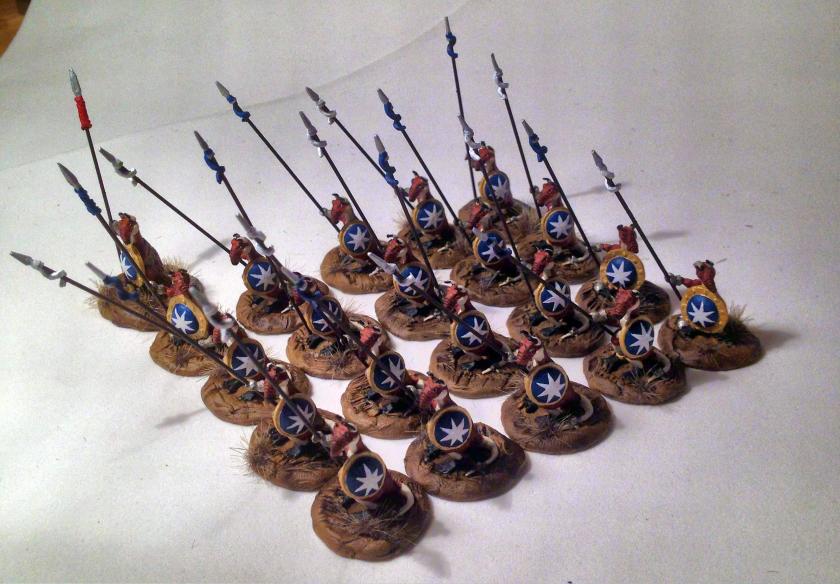
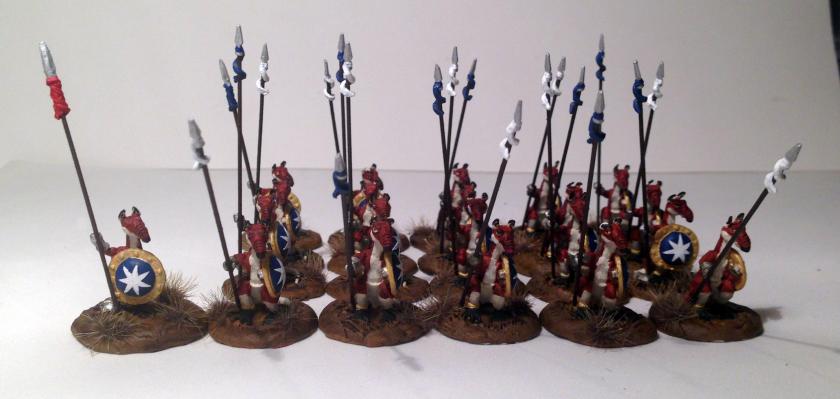
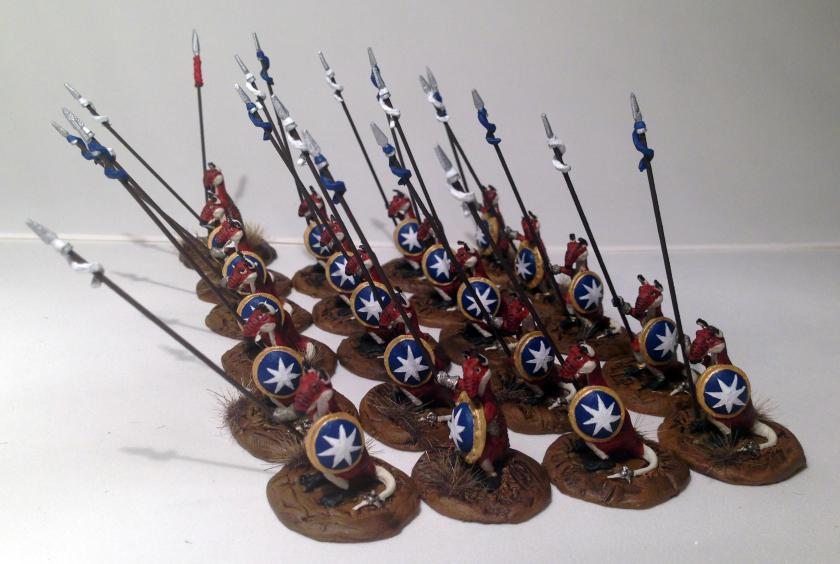

I am more excited and happy with this unit than I had even hoped to be! The unit looks positively awesome and the stars help it pop. As I build more units with my self-cast Roomans I can incorporate the same color scheme (though I believe my 1980’s paint supply will run out!).
A final note of thanks – to Buck and Dave for getting me into this hobby – and especially to Buck for starting me on this Quixotic quest for a Rooman unit all those years ago! I look forward to rolling dice and pushing lead with you soon!!

Awesome work, Mark. The final Roomans look terrific.
LikeLiked by 1 person
Thanks again for the inspiration!
LikeLike
A cool project with an interesting backstory and history as a project to boot. The white star looks great as a Greek-styled device on the deep blue background. When I get to doing my Greeks I’ll have to give one of them a 7-pointed star as a tribute/Easter egg to your Roomans. The figures themselves look great, particularly ranked up in their phalanx. If I can make *one* correction – the 7-pointed star represents the Australian Commonwealth, not the British Commonwealth – 1 point for each of the States and 1 to represent the Territories. But it’s all good. Any plans to expand in the future?
LikeLiked by 1 person
Thanks for the kind words and the feedback. I would not have known about the Australian Commonwealth- one main reason I wanted Aussie feedback! Always happy when I learn something!
I am planning on expanding with ones that I cast (try finding these on eBay – as we say here in Massachusetts they are wicked hard to find). Main reason that I went into casting is their rarity.
I may arm them with other weapons, or even do more conversions. Glad you liked them and look forward to your seven-pointed star on the Greeks – you honor me sir!
Lastly, Iron Wind Metals is supposed to be coming up with new “Rues” as they will be called – but not in a rush apparently!
LikeLiked by 1 person
No worries at all. I can understand needing to cast your own, especially for such long OOP models that are unlikely to be easy to find. I suspect that a fair few of the “oldhammer” models floating around eBay and sold as real are recast as well, but I guess if it makes the OOP stuff accessible, I have no problem with it -and I say this with a large and “valuable” collection of the real old stuff.
You could do a unit armed with kopis and shield, or xiphos and shield (or both) to keep the theme going. Perhaps even sculpt/mod some aspects onto your masters so the troops cast from them all have them in common. Chalcidian helmet with a Corinthian-style crest? 🙂
LikeLiked by 1 person
You certainly know your Greeks! I had to look up the terms, but as I have a large number of Greeks of different types that is good – again learning is a passion of mine. The good thing is now I can tell the recasts from the originals. There are so many, especially Star Rovers and Archive minis, that are horrible. Plus overpriced. On the Old School Miniatures Group Facebook page I got a very nice compliment from Nevile Stocken who sculpted many of the original Archive figs on the quality and detail of my castings given that I was using a gravity mold and not spin-casting, which was very cool. I’m putting my sci-fi units in the queue now, but then will return to the Roomans. Sculpting is new to me (only the sci-fi sphere tanks I recently posted about can count as really my sculpting – on a golf ball)! Great ideas though, and with all the minis I have I have a lot to work with!
LikeLiked by 1 person
Nice to get such compliments, and from the original sculptor, too! I look forward to seeing what you come up with down the line. I need to get onto some sci-fi painting myself, I’ve been doing a ton of Fantasy lately….
LikeLiked by 1 person