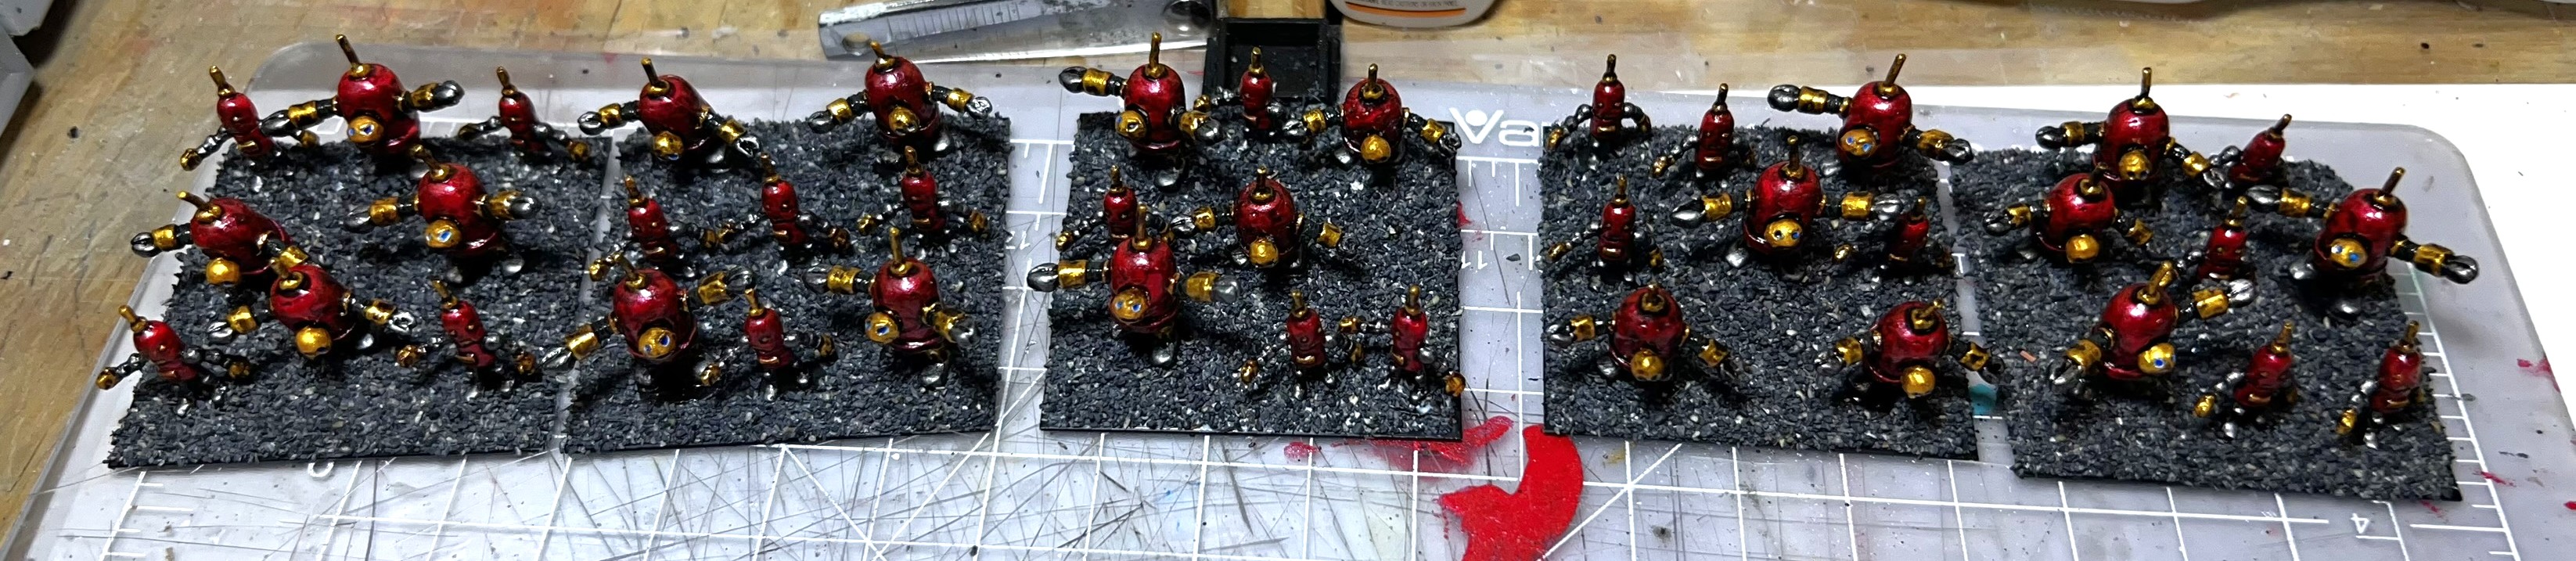
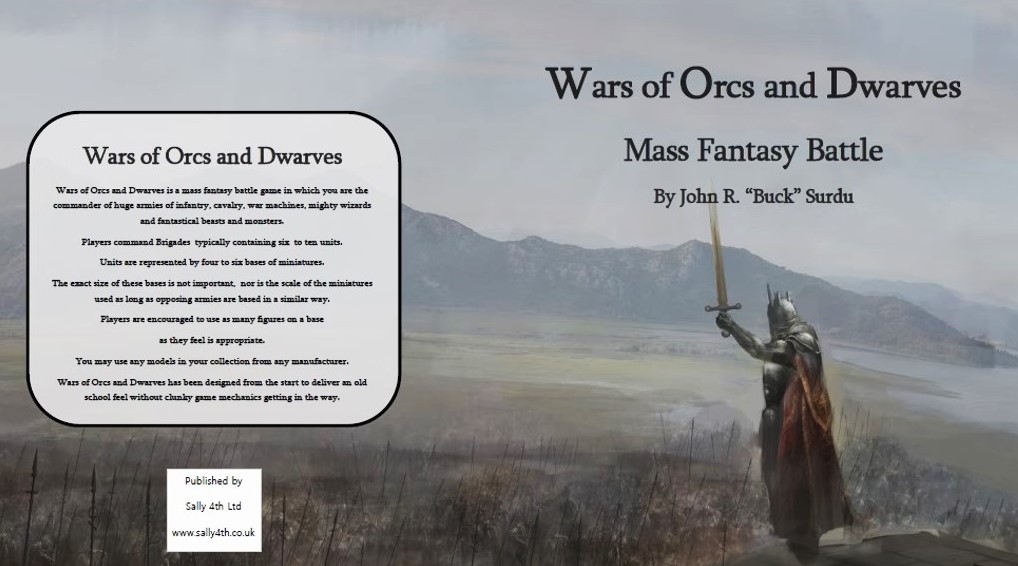
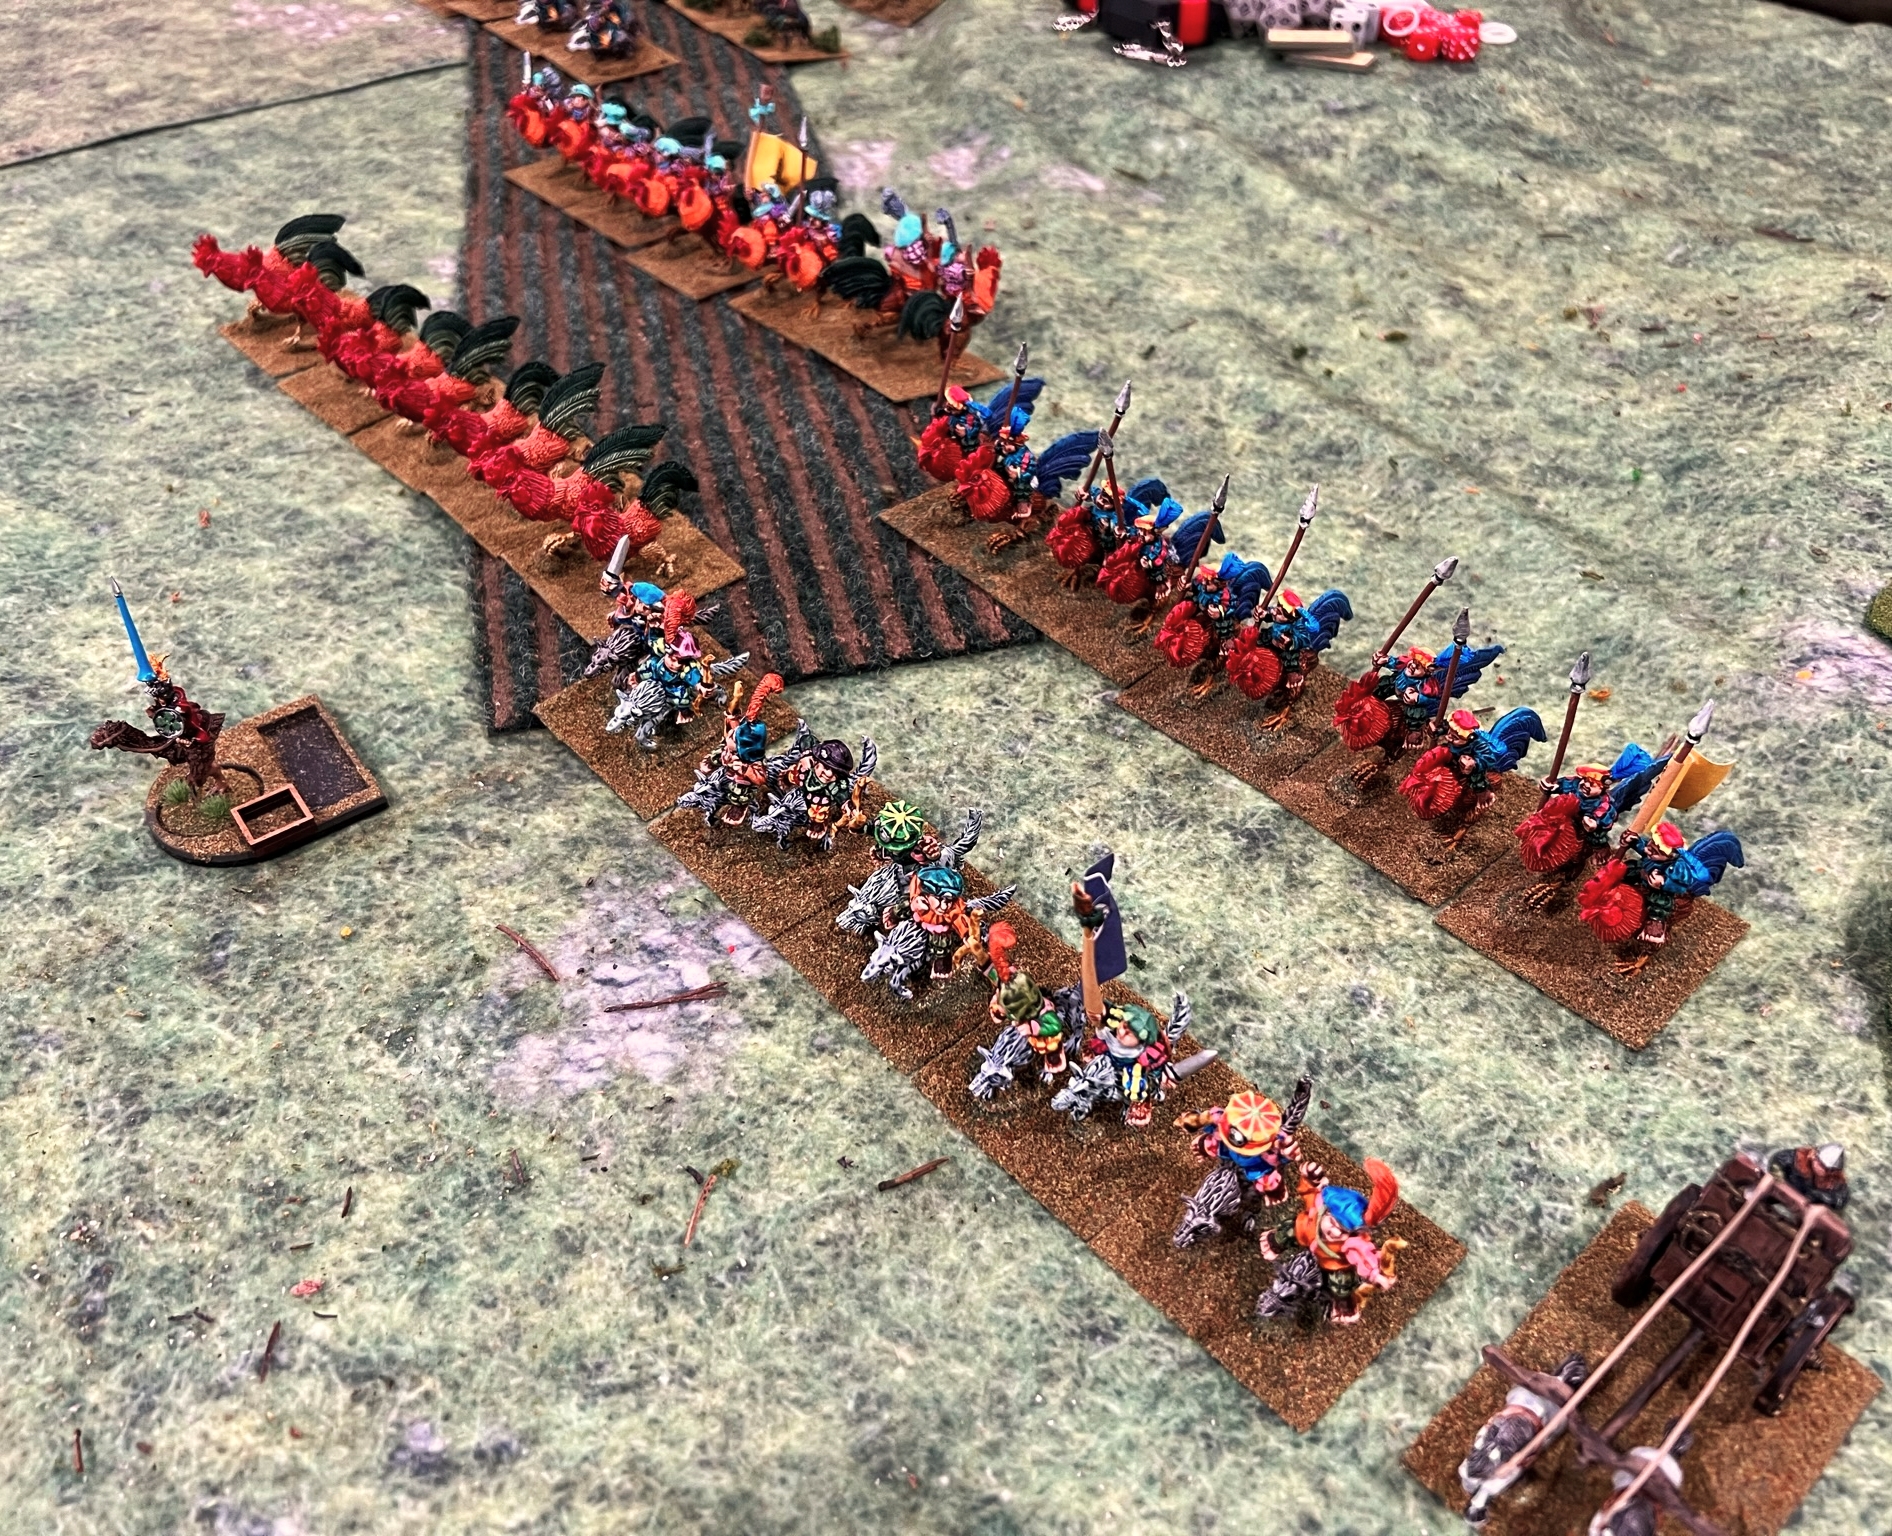
And now little bots from the apocalyptic ruins of the Industrial City!
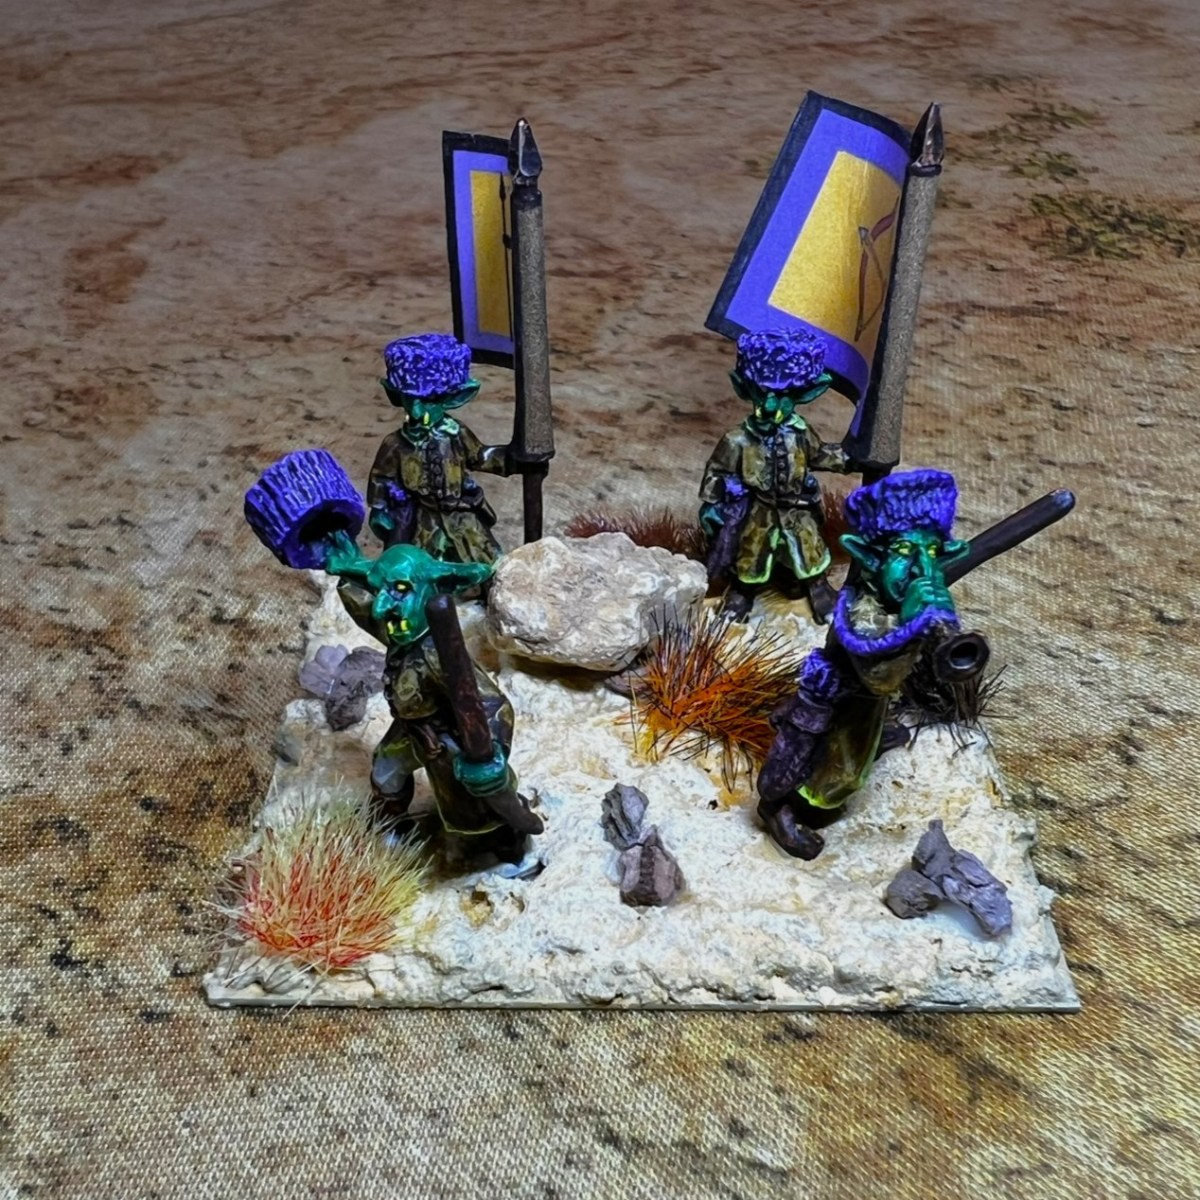
This unit is a part of Professor Nitpik’s Industrial City Army. This regiment is composed of 40 mini-mechanical men (robots), deployed on five 2″ bases. The figures are metal and 28mm in size.
I have described my work on the good Professor’s background and army in three previous posts that you can check out:
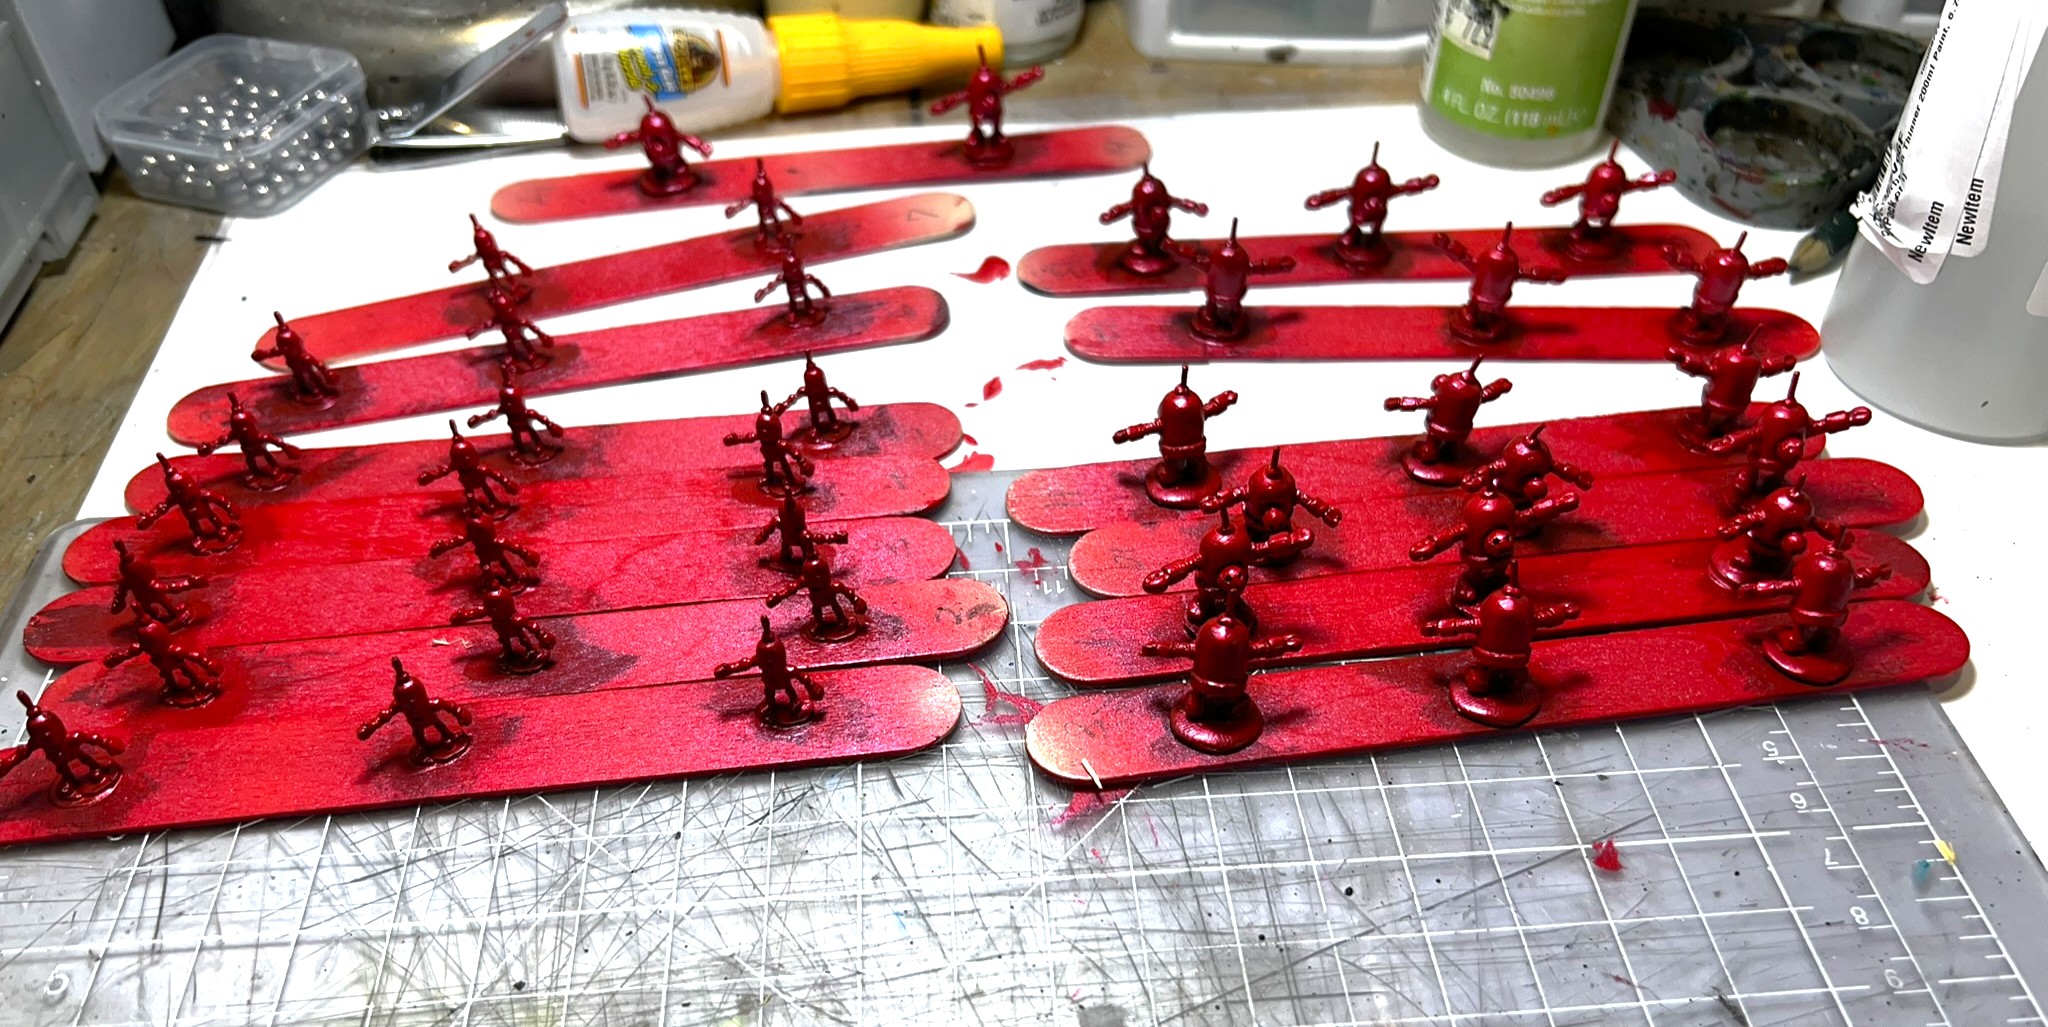
I decided to go red on gold again. I really liked the effect I got on the artillery battery.
After priming – a good airbrush application of Createx “Pearl Red” on April 15.
The pearlized red works well with pearlized copper. I faced a downside. It was unbeknownst to me that my spray booth filter needed cleaning before I started. As a result, my basement had some residual fumes after painting, which I otherwise never see. Luckily I always mask up when airbrushing.
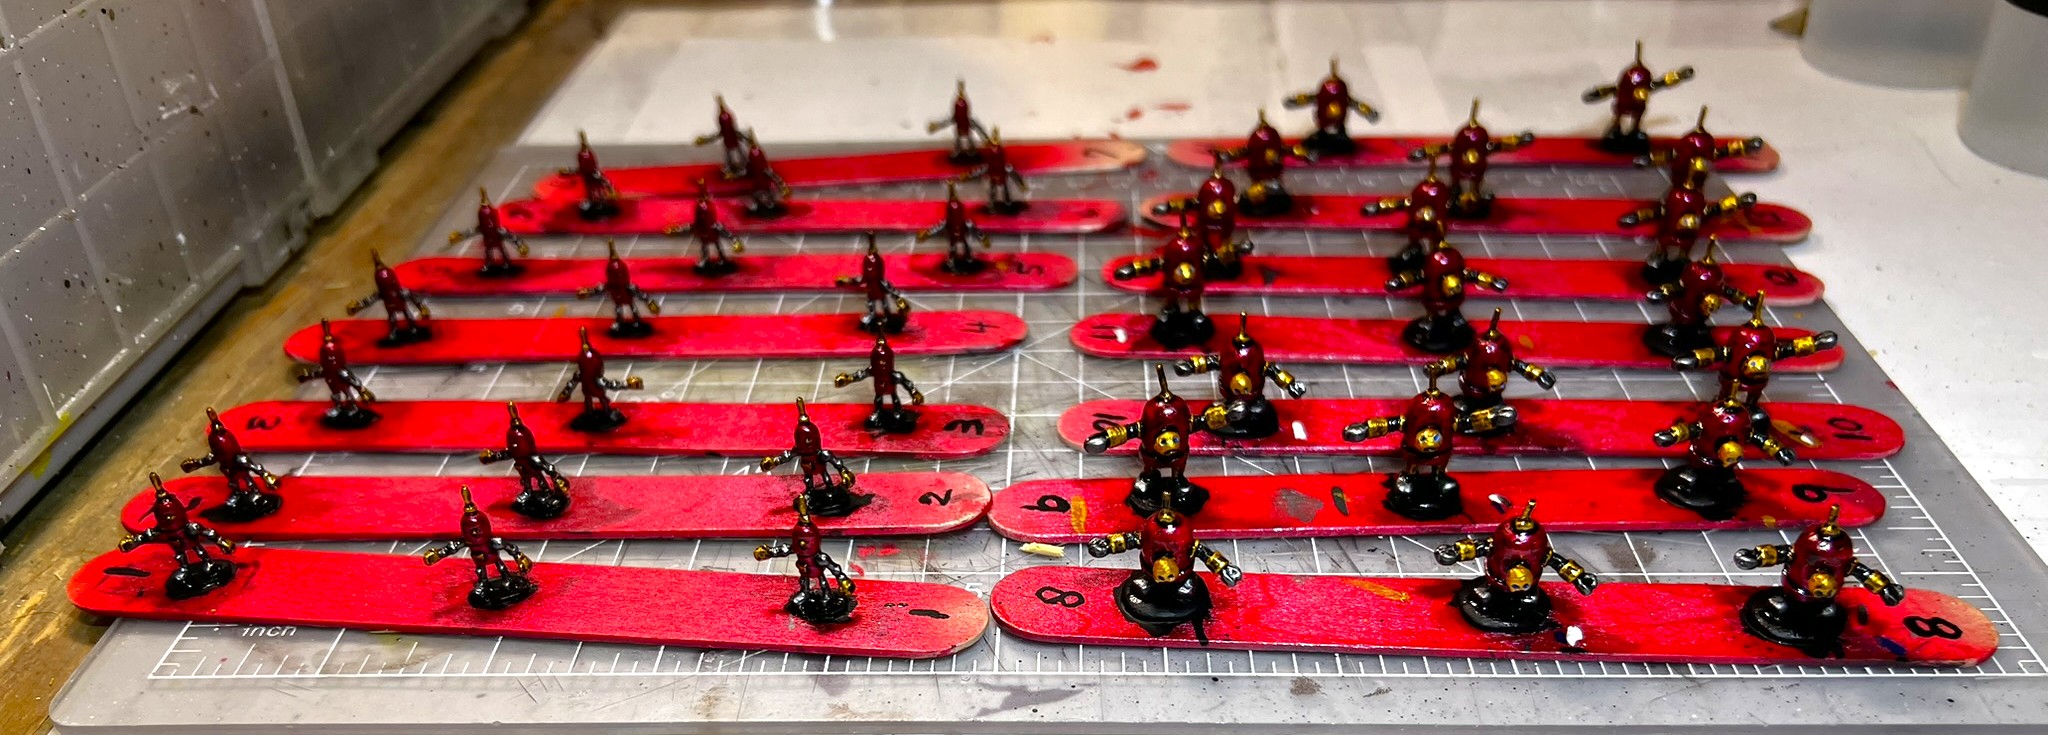
Finished hand brush painting these on April 16th, to include a wash.
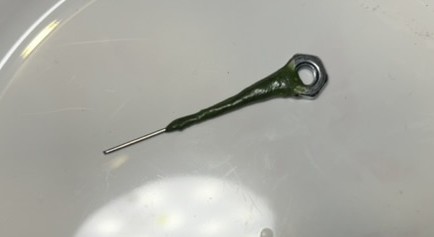
The regiment does not have a regimental commander. However, I thought it would be good to give them a standard. So I took a wire spear from my unused Aztec bits, and a nut. With some green stuff, I crafted an ersatz standard pole.
The standard pole.
I then varnished all the bots with a gloss coat. This allowed me to handle them and better mount them on the bases without causing any damage.
All glossied up.
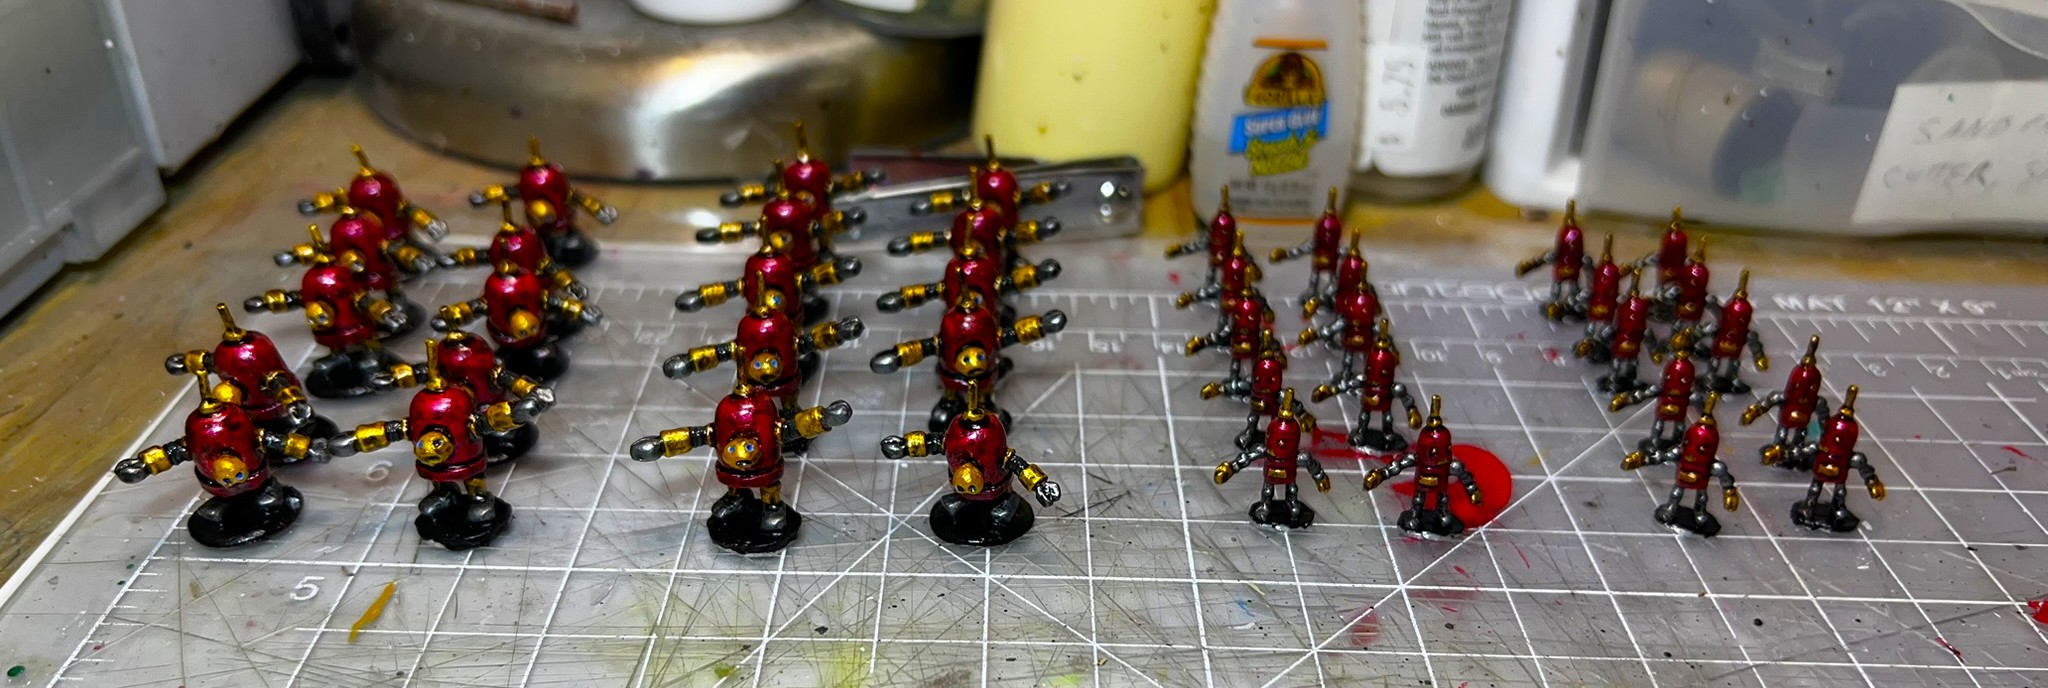
I mixed and matched the bots into different places on the bases. I also drilled out one bot claw and base to hold the standard. Next came a generous flocking of Army Painter “Black Battlefield”. I also added rusted bits and brick rubble before adding pigments.
Basing started.
After a matte varnishing, the last step was to add the standard!
April 19th – done!Close up of the command stand.The regiment in column formation.
That’s a wrap on this regiment – and for my Ozz painting for a while. I will be starting a new project in support of my upcoming HISTORICON 2025 games. Yes, I will still be running Wars of Ozz games – BUT I’m branching out a bit after painting over 1,000 (1,040 to date) Ozz figures…
Hint – I’ll be plowing new ground – but not totally new ground…yes, TANKS! But for which period and theater…hmmm….do you have a guess?
I will get back to Ozz painting sometime this year, so I can finish off my forces.
Here’s the Instagram link for a video that shows the command stand:
Want to learn more about Ozz and its world? If you want to check out the excellent Wars of Ozz figures’ range, there are two places to get them. You can also get the rules there. (I make no money from this.) The game rules and the figures are available from the next two places:
Below you’ll see the list of paints and the like that I used on this project. They are more useful for me when I need to recreate a color scheme in the future. They are not likely as useful for you as they are for me. I have had to refer back to a post more than once. This happens when I need to recreate a color theme. It also happens when I need to repair a unit. In any case, that’s why I post the lists.
Miscellaneous details and references for those interested in that sort of thing:
For my earlier posts on Wars of Ozz games, view this page. It includes figures, units, and other related projects.
PAINTS, INKS, GLAZES, SHADES, WASHES, PIGMENTS, FLOCKING, GLUES AND MORE THAT I USED ON THE MECHANICAL MINI SWARM WITH PULSE BLASTERS REGIMENT:
Popsicle sticks
PVA Glue
War Games Accessories Steel Bases (number 16)
Vallejo Surface Primer “Black”
Createx Wicked Colors “Pearl Red”
Createx Wicked Colors “High Performance Reducer”
ComArt “Opaque Carmine”
Createx Airbrush Colors “Pearl Copper”
Vallejo Model Air “Tire Black”
Vallejo Model Air “Gun Metal”
Vallejo Mecha Color “Off White”
Army Painter Warpaints Fanatics Effects “Blue Flux” (effect)
Citadel “Nuln Oil GLOSS” (wash/shade)
Aztec leftover wire spear
Steel nut
Green stuff (kneadatite)
Army Painter “Black Battlefields” (flocking)
Citadel “Gehenna’s Gold”
Gorilla Glue
Juweela 1:35 Debris
Juweela Metal Scrap Rusty
Juweelinis “Diorama Mix” – various metal scrap, tires, bricks
Vallejo “Carbon Black” (pigment)
Vallejo “Titanium White” (pigment)
Vallejo Acrylic Varnish “Gloss”
Vallejo Flow Improver
Vallejo Thinner
Vallejo Premium Color “Matte Varnish”
Pendraken 12mm dice frame
Card stock
Wars of Ozz flag from supplement
Black Sharpie Pen
Brown Sharpie Pen
If you have any questions or feedback – go for it in the “Comments” section! Thanks for looking as always!!
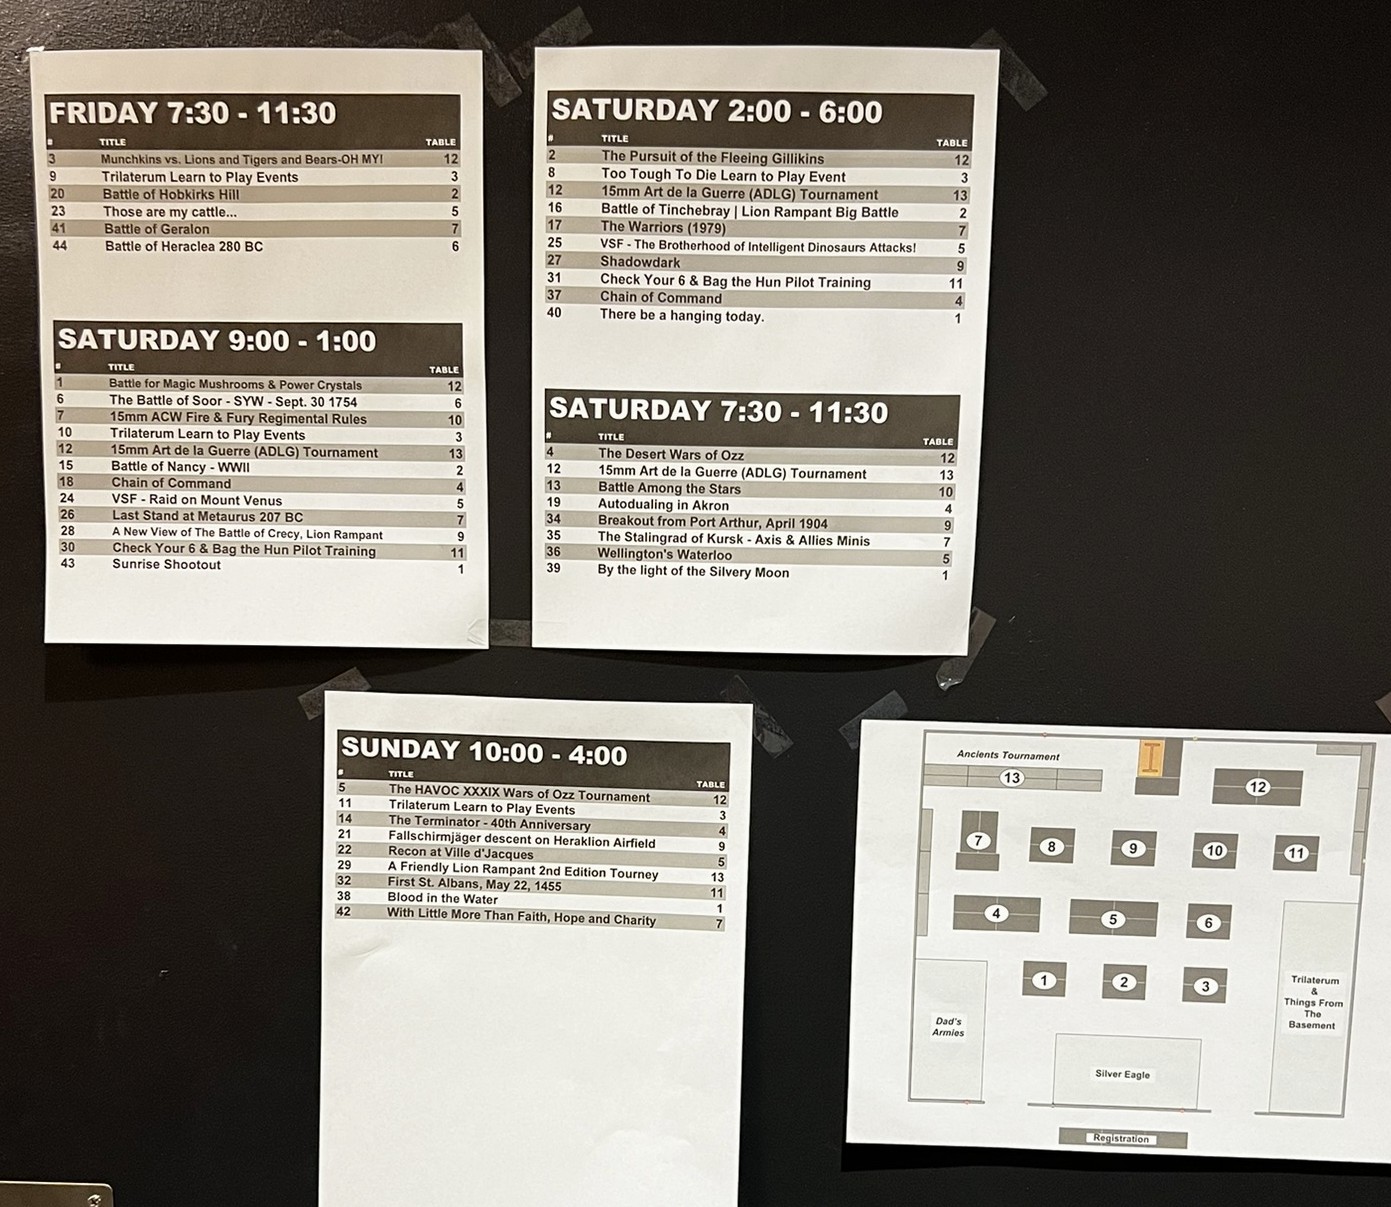
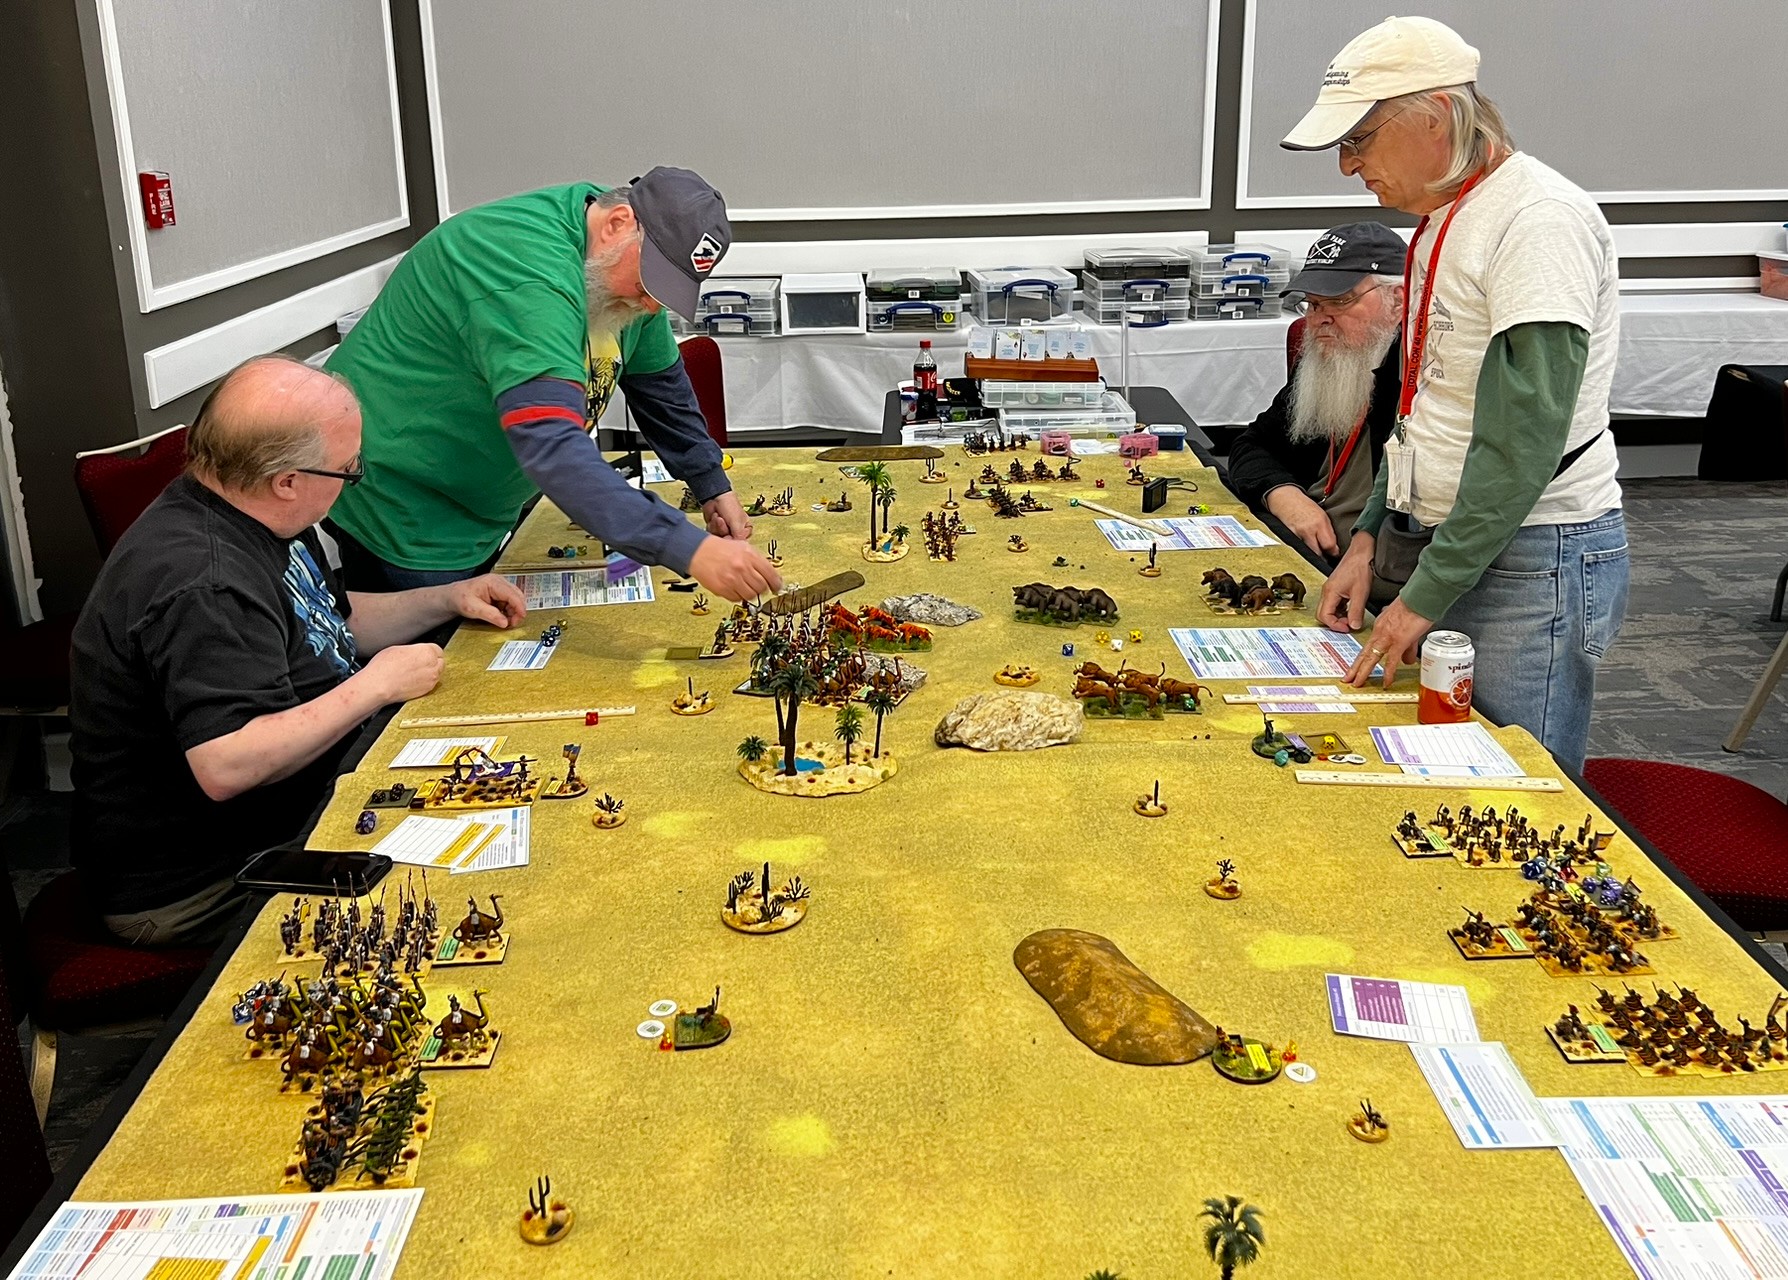
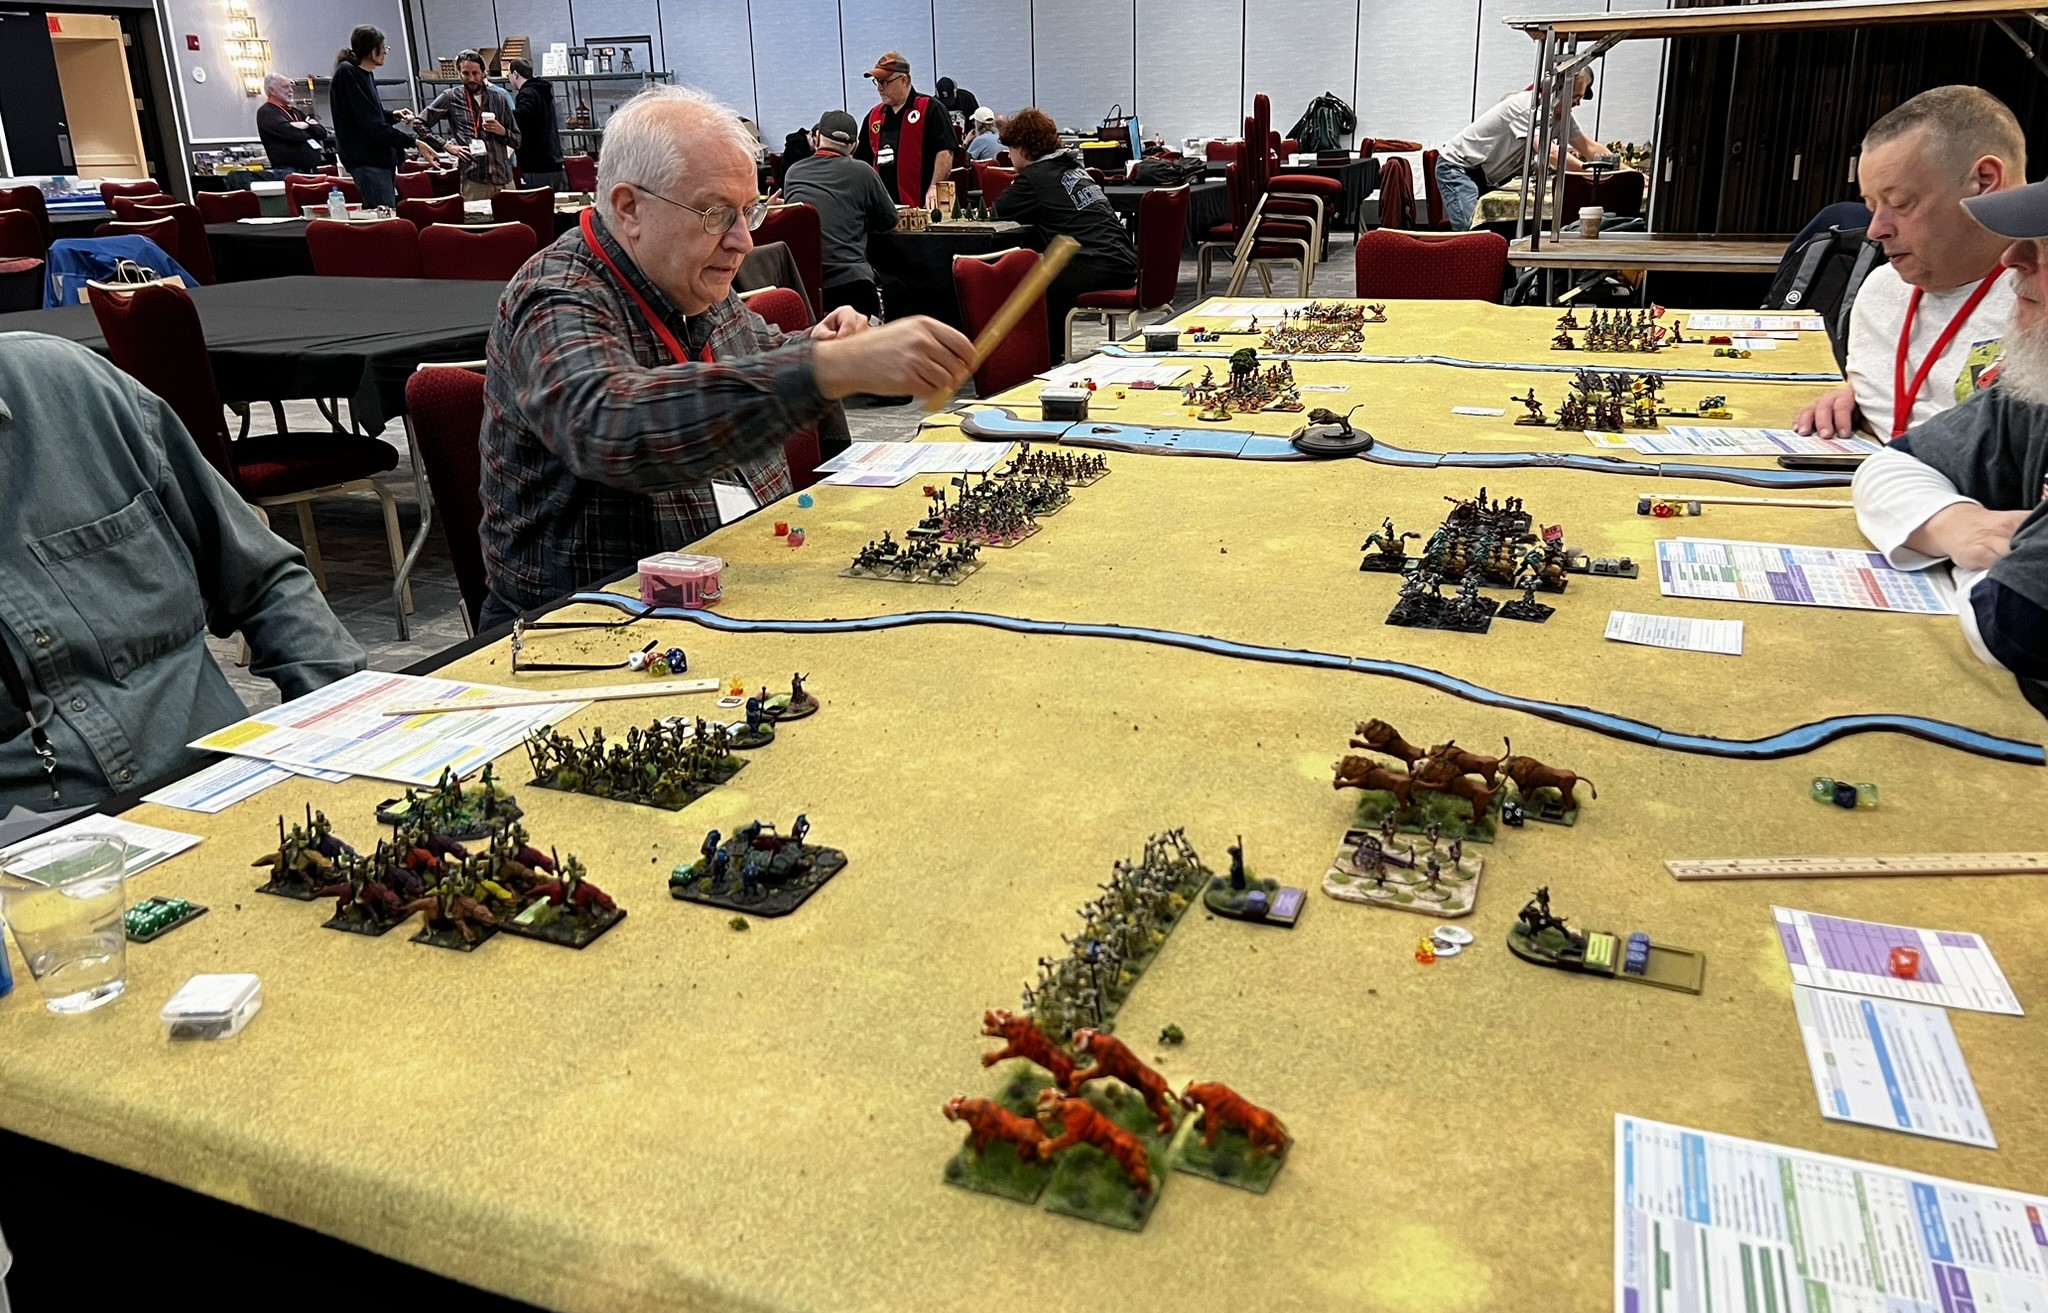
HAVOC XXXIX (aka HAVOC 2025) was held on the weekend of April 4-6, 2025 in Marlborough, Massachusetts. It is the annual tabletop wargaming convention for Battlegroup Boston (BGB). There were 36 4-hour games scheduled at the event. I ran 5 games of Wars of Ozz (one game on Friday, three on Saturday, and one on Sunday). Overall I think I had 27 players across my games.
The HAVOC XXXIX game line up
The Wars of Ozz games that I ran were titled:
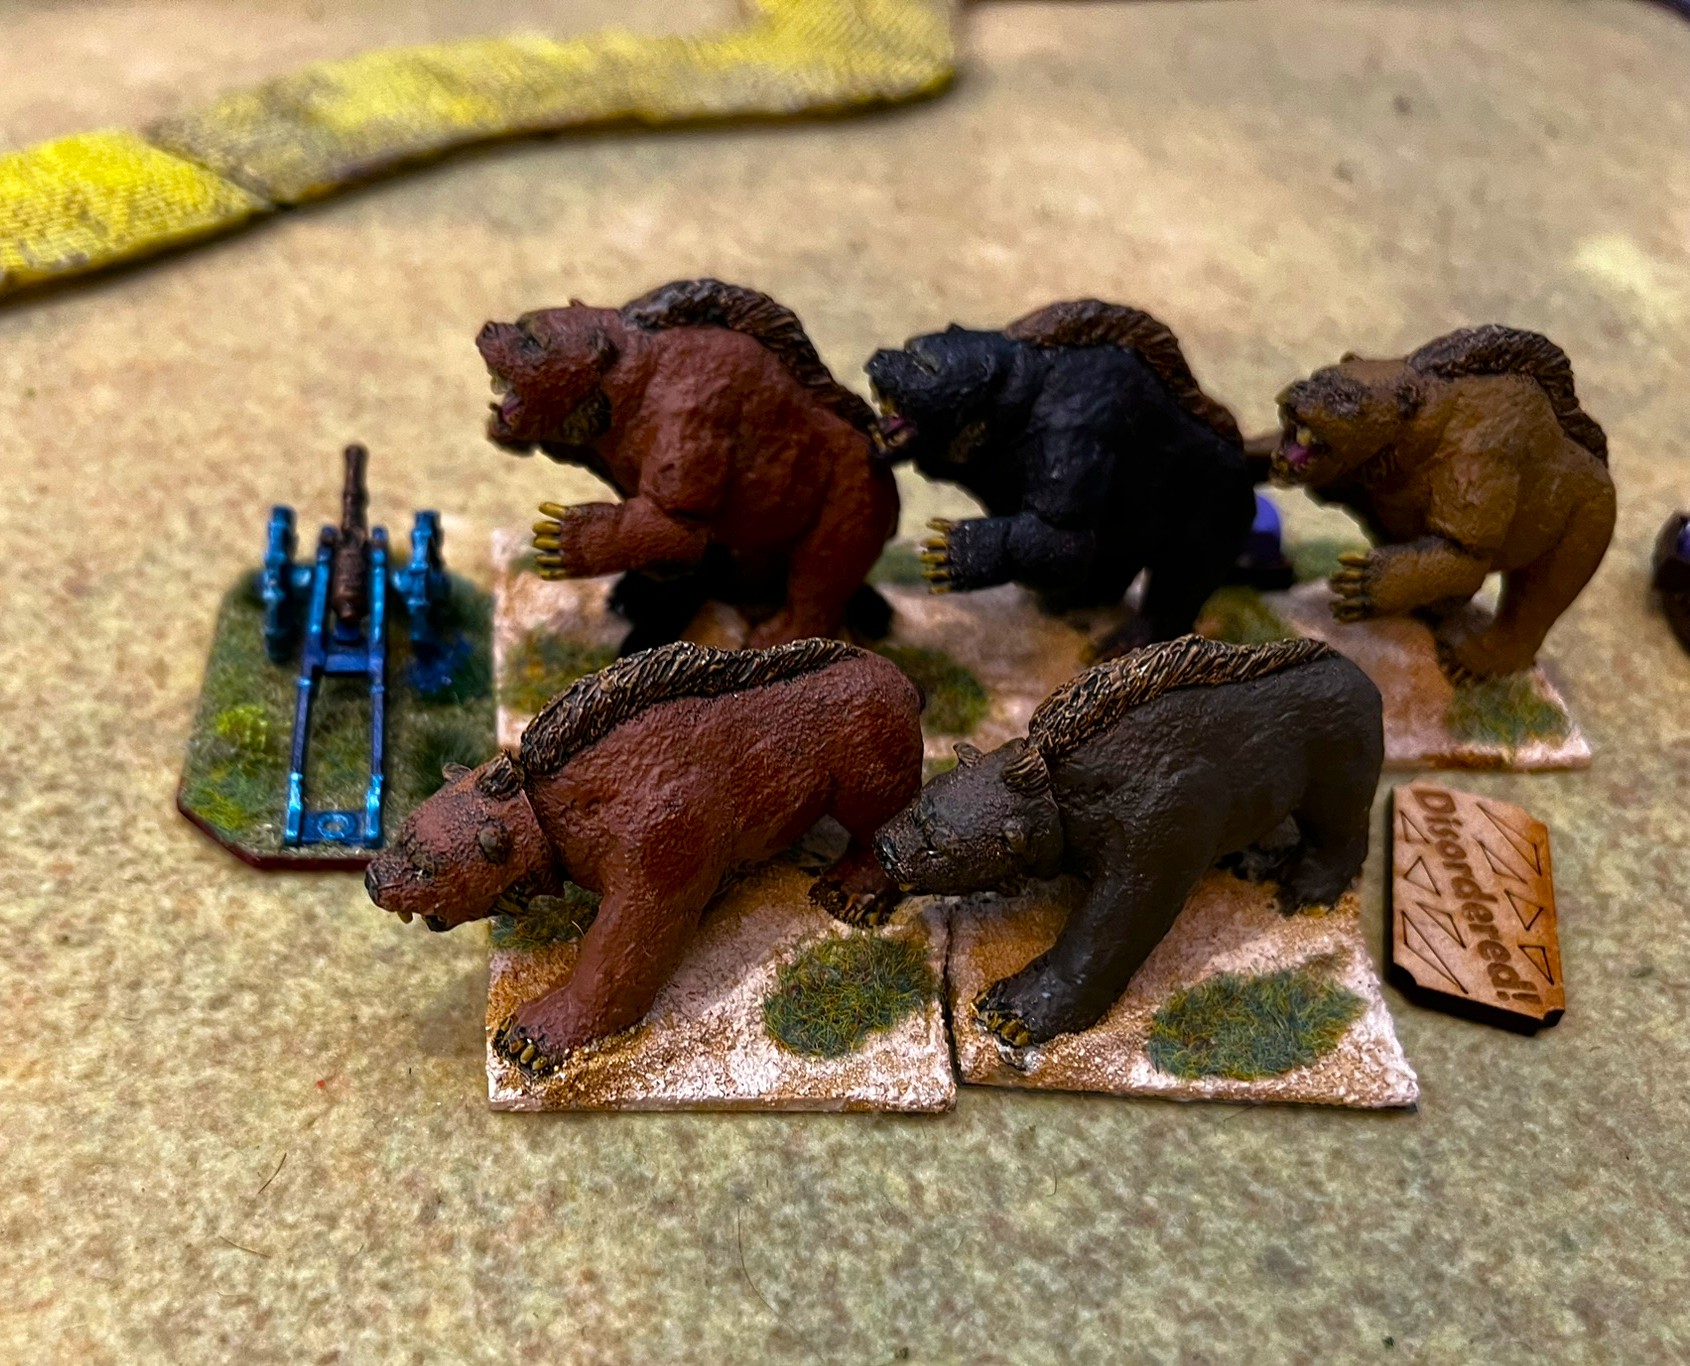
Friday evening: Munchkins versus Lions and Tigers and Bears – OH MY!
Saturday morning: Battle for the Magic Mushrooms & the Ancient Crystals of Power
Saturday afternoon: Rear Guard Action – The Pursuit of the Fleeing Gillikins
Saturday evening: The Desert Wars of Ozz
Sunday morning: The HAVOC XXXIX Wars of Ozz Tournament
Running so many games is indeed a challenge. I wish I could have posted about the other conventions I attended in February. These included COLD BARRAGE (3 games), TotalCon (10 games), and COLD WARS (3 games). These were done on three consecutive weekends in a row! So my apologies- blogging took a back seat. I hope to upload some photos of those events on Facebook. Yes hope.
For now, let’s take a look at each game at HAVOC 2025. Russ Dunaway had kindly supported my efforts with some prizes and giveaways that you’ll see.
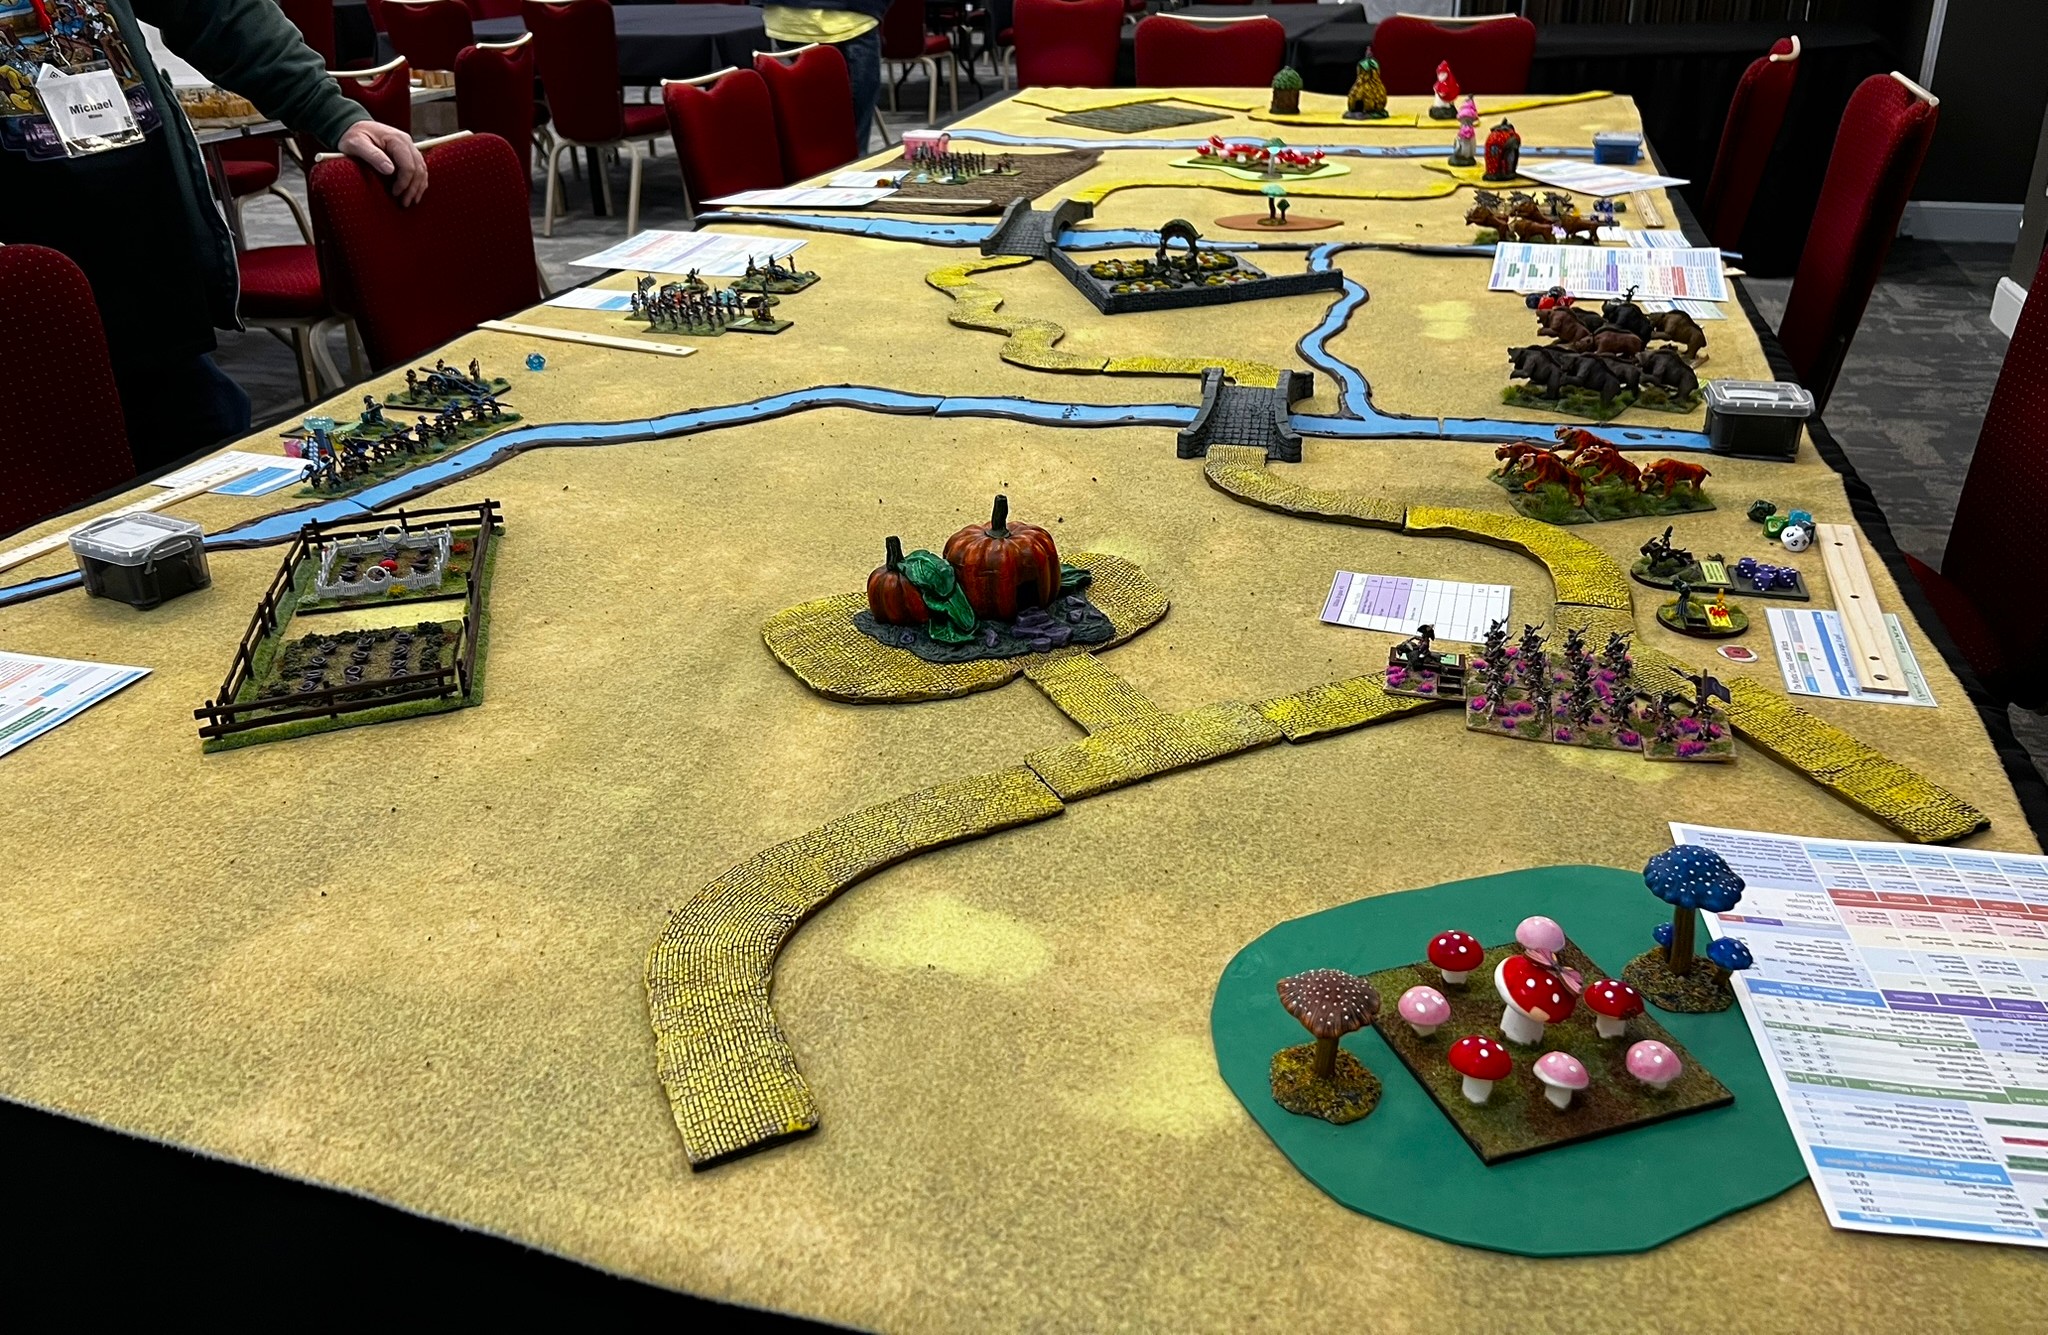
Munchkins versus Lions and Tigers and Bears – OH MY!
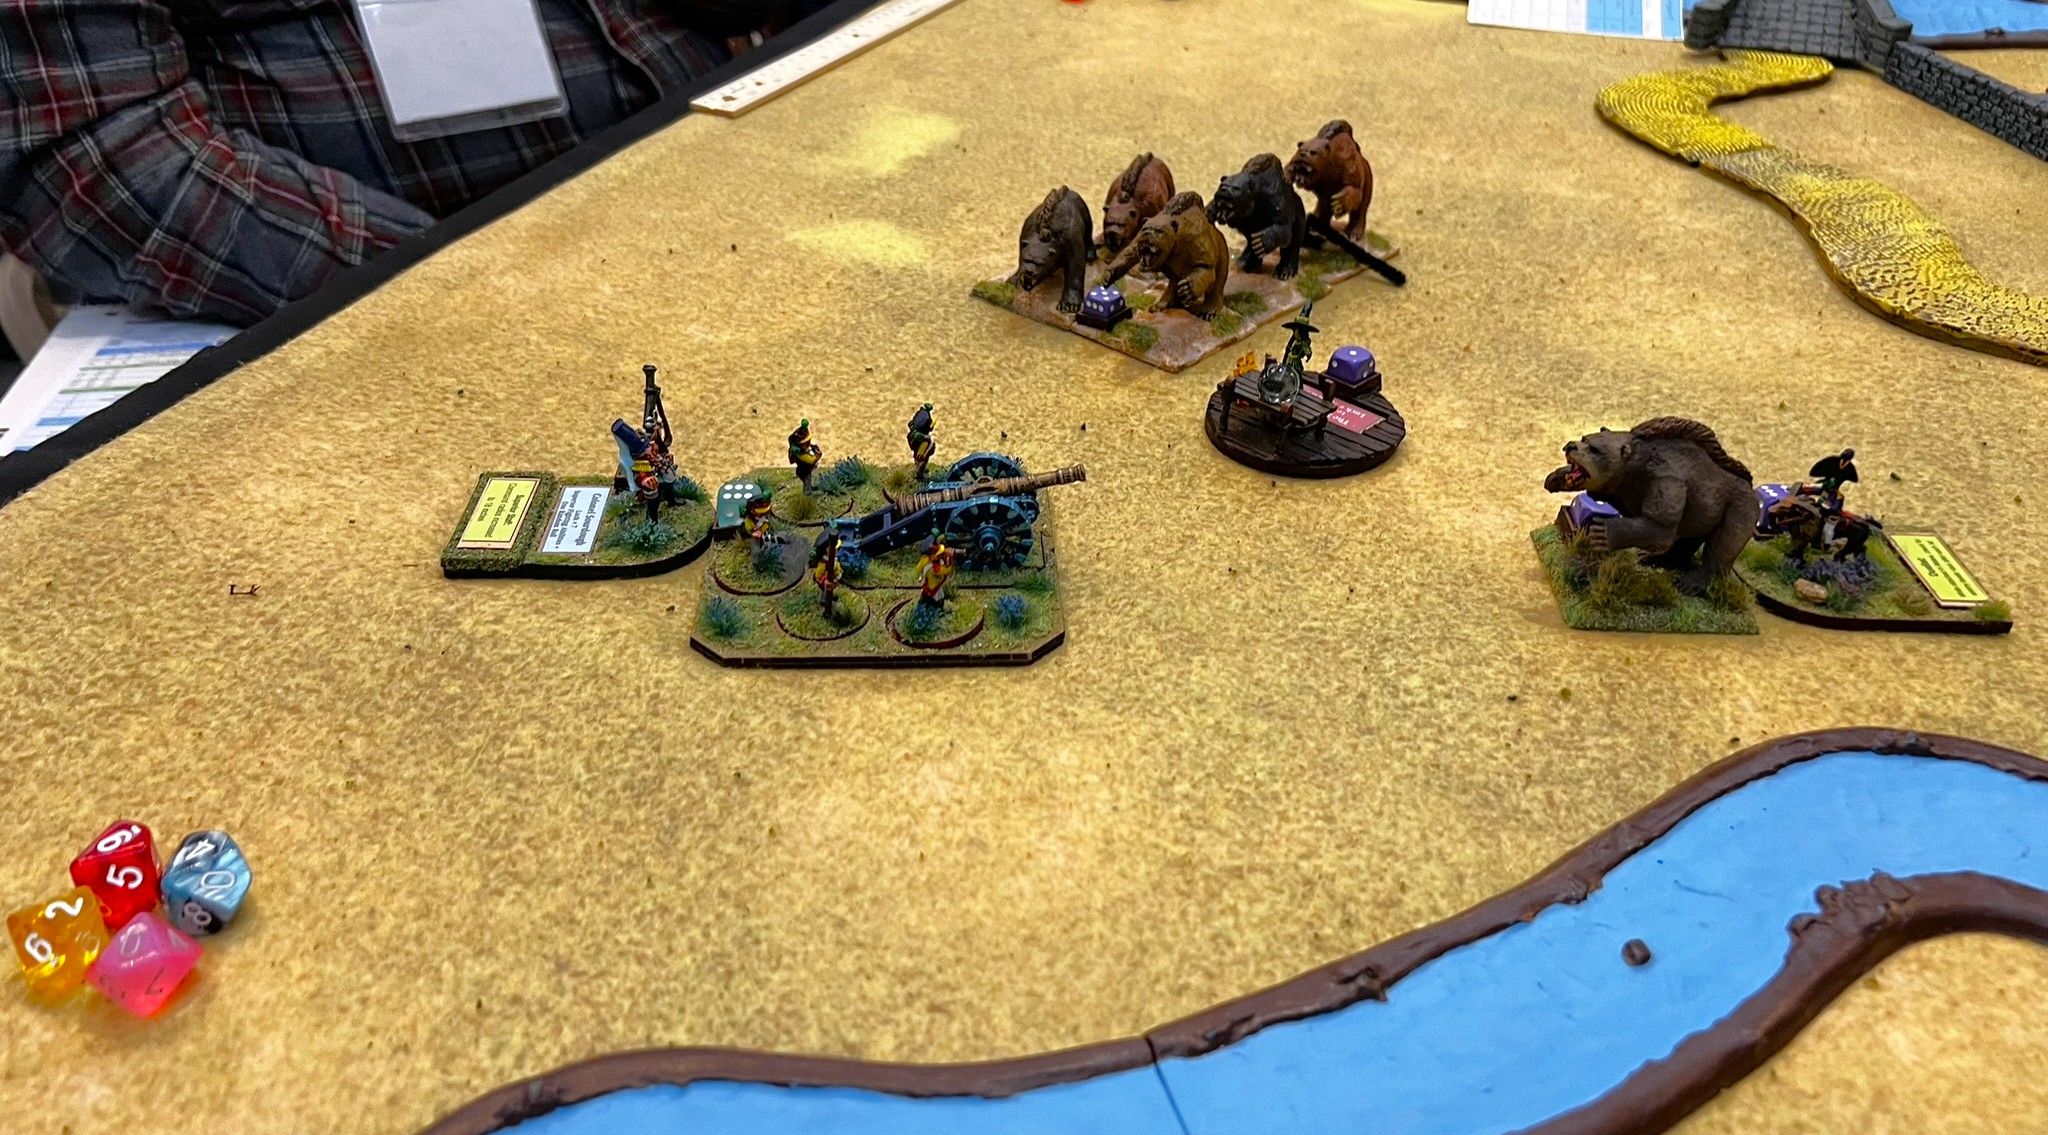
The Munchkins are fighting the Gillikin’s Lions and Tigers and Bears (OH MY!). This is a quick session of Wars of Ozz suitable for all ages, new players and experienced ones. Will move very quickly!
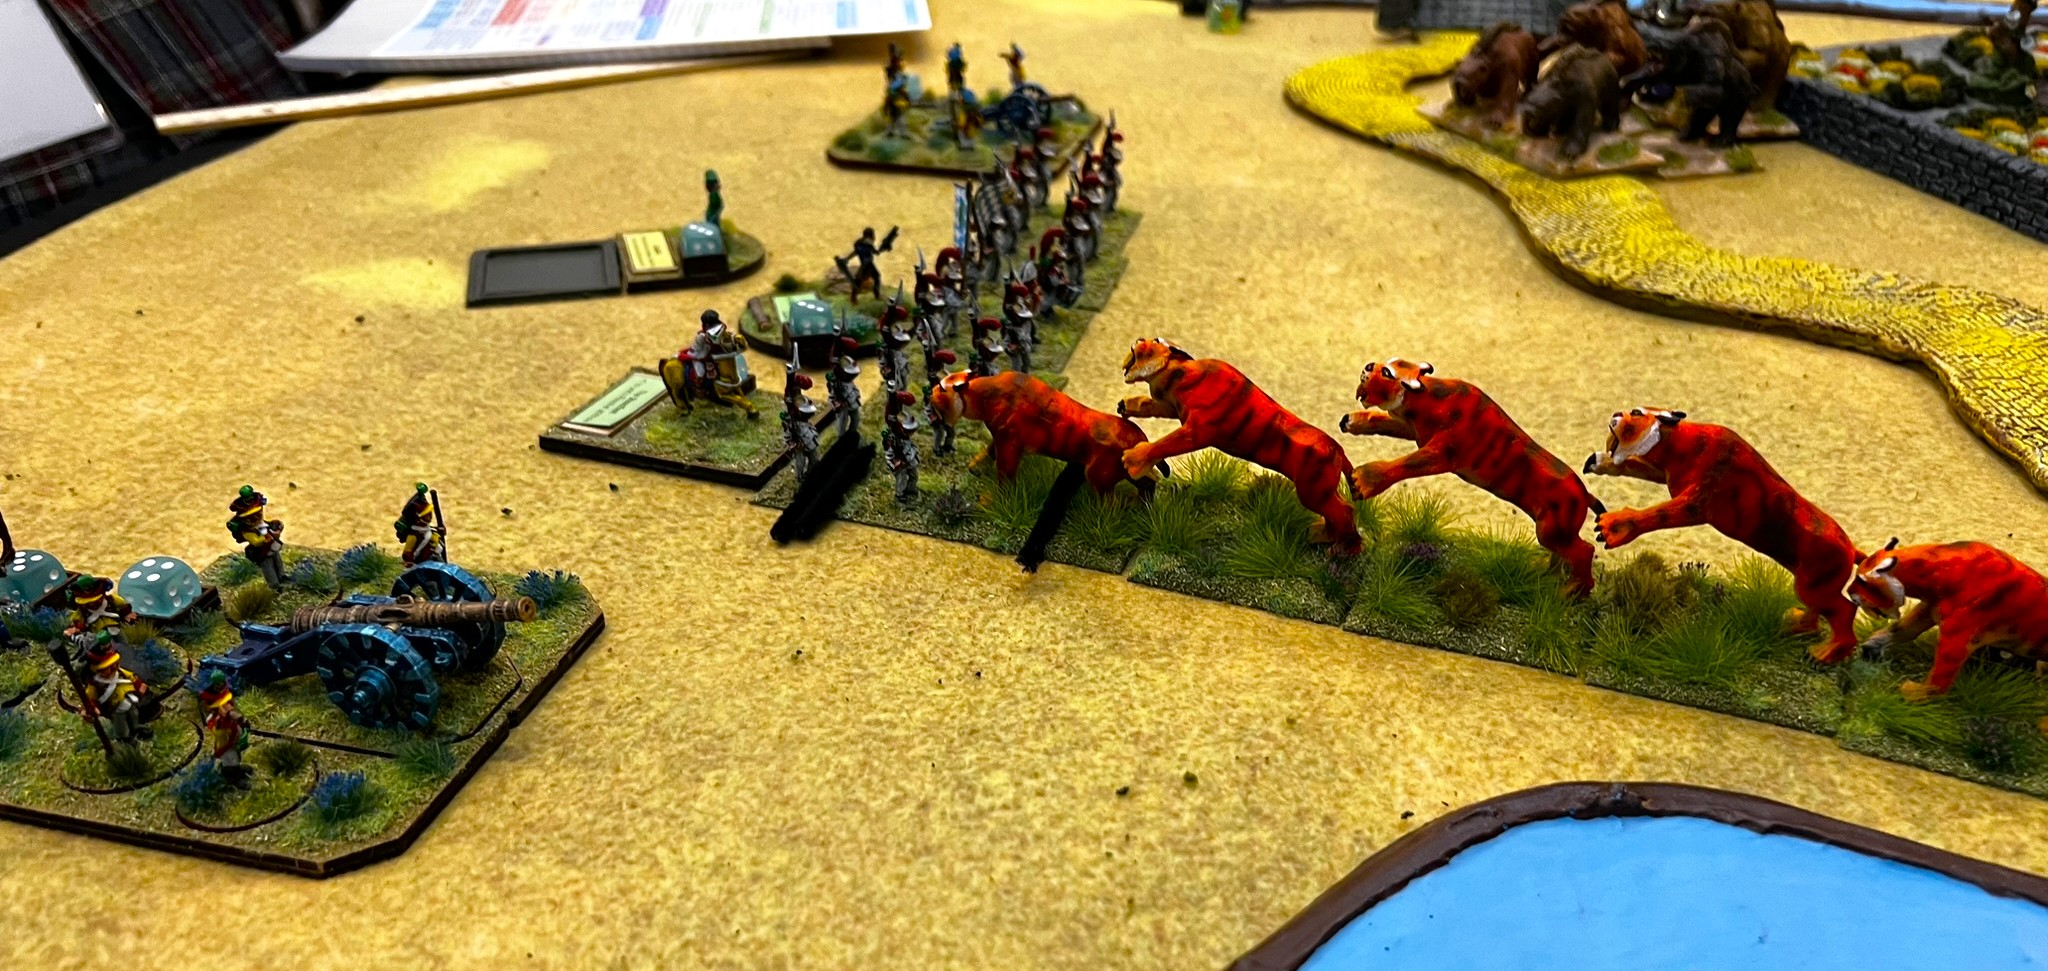
The set up. There were 3 Munchkin brigades (left side) versus 3 Gillikin brigades (right side). Each Gillikin Brigade was dominated by units of Dire Lions, Dire Bears, and Dire Wolves. The Gillikins had only 1 regiment with muskets. However, the Munchkins had artillery and excellent musketry. All brigades were small – 11 to 13 points each, with each side worth 35 points.The 6 players strategize.The Gillikins assault the Munchkins directly with their regiments of dire beasts. One regiment of musketry moves to move around a town to hit their right flank (at bottom of photo).The Munchkin Sharpshooter Regiment takes up position behind a river, flanked by a medium battery.The Gillikin 1st Infantry and the Mystic Crone (a witch) make their move to flank the sharpshooters. The town screened their approach.Colonel TikTok’s regiment was on the medium battery’s left. They watch as the first Dire Bear regiment approaches…their fire halts them……but the Dire Tigers make contact!Both the Tigers and Bears take hits coming in. The Munchkin infantry takes heavy damage. They hope one of the two artillery batteries will act quickly! Alas, a Dire Bear regiment dispatches the Munchkin Light Battery. Their gun is left behind to be torn asunder.The medium battery is now threatened! It too would be destroyed……as shown here.
All the Munchkins had left was an intact infantry regiment. That unit was on the far left flank and had been successful at holding off Dire Lions and Dire Wolves. Meanwhile, the sharpshooters position was finally taken by the Gillikin Infantry (commanded by Dan Eustace). Dan’s flanking maneuver had been one of the keys to their final victory. The final score was 13-11 in favor of the Lions, Tigers, and Bears of the Gillikins. Dan was awarded a set of the Wars of Ozz rules for his efforts!
Congrats Dan!
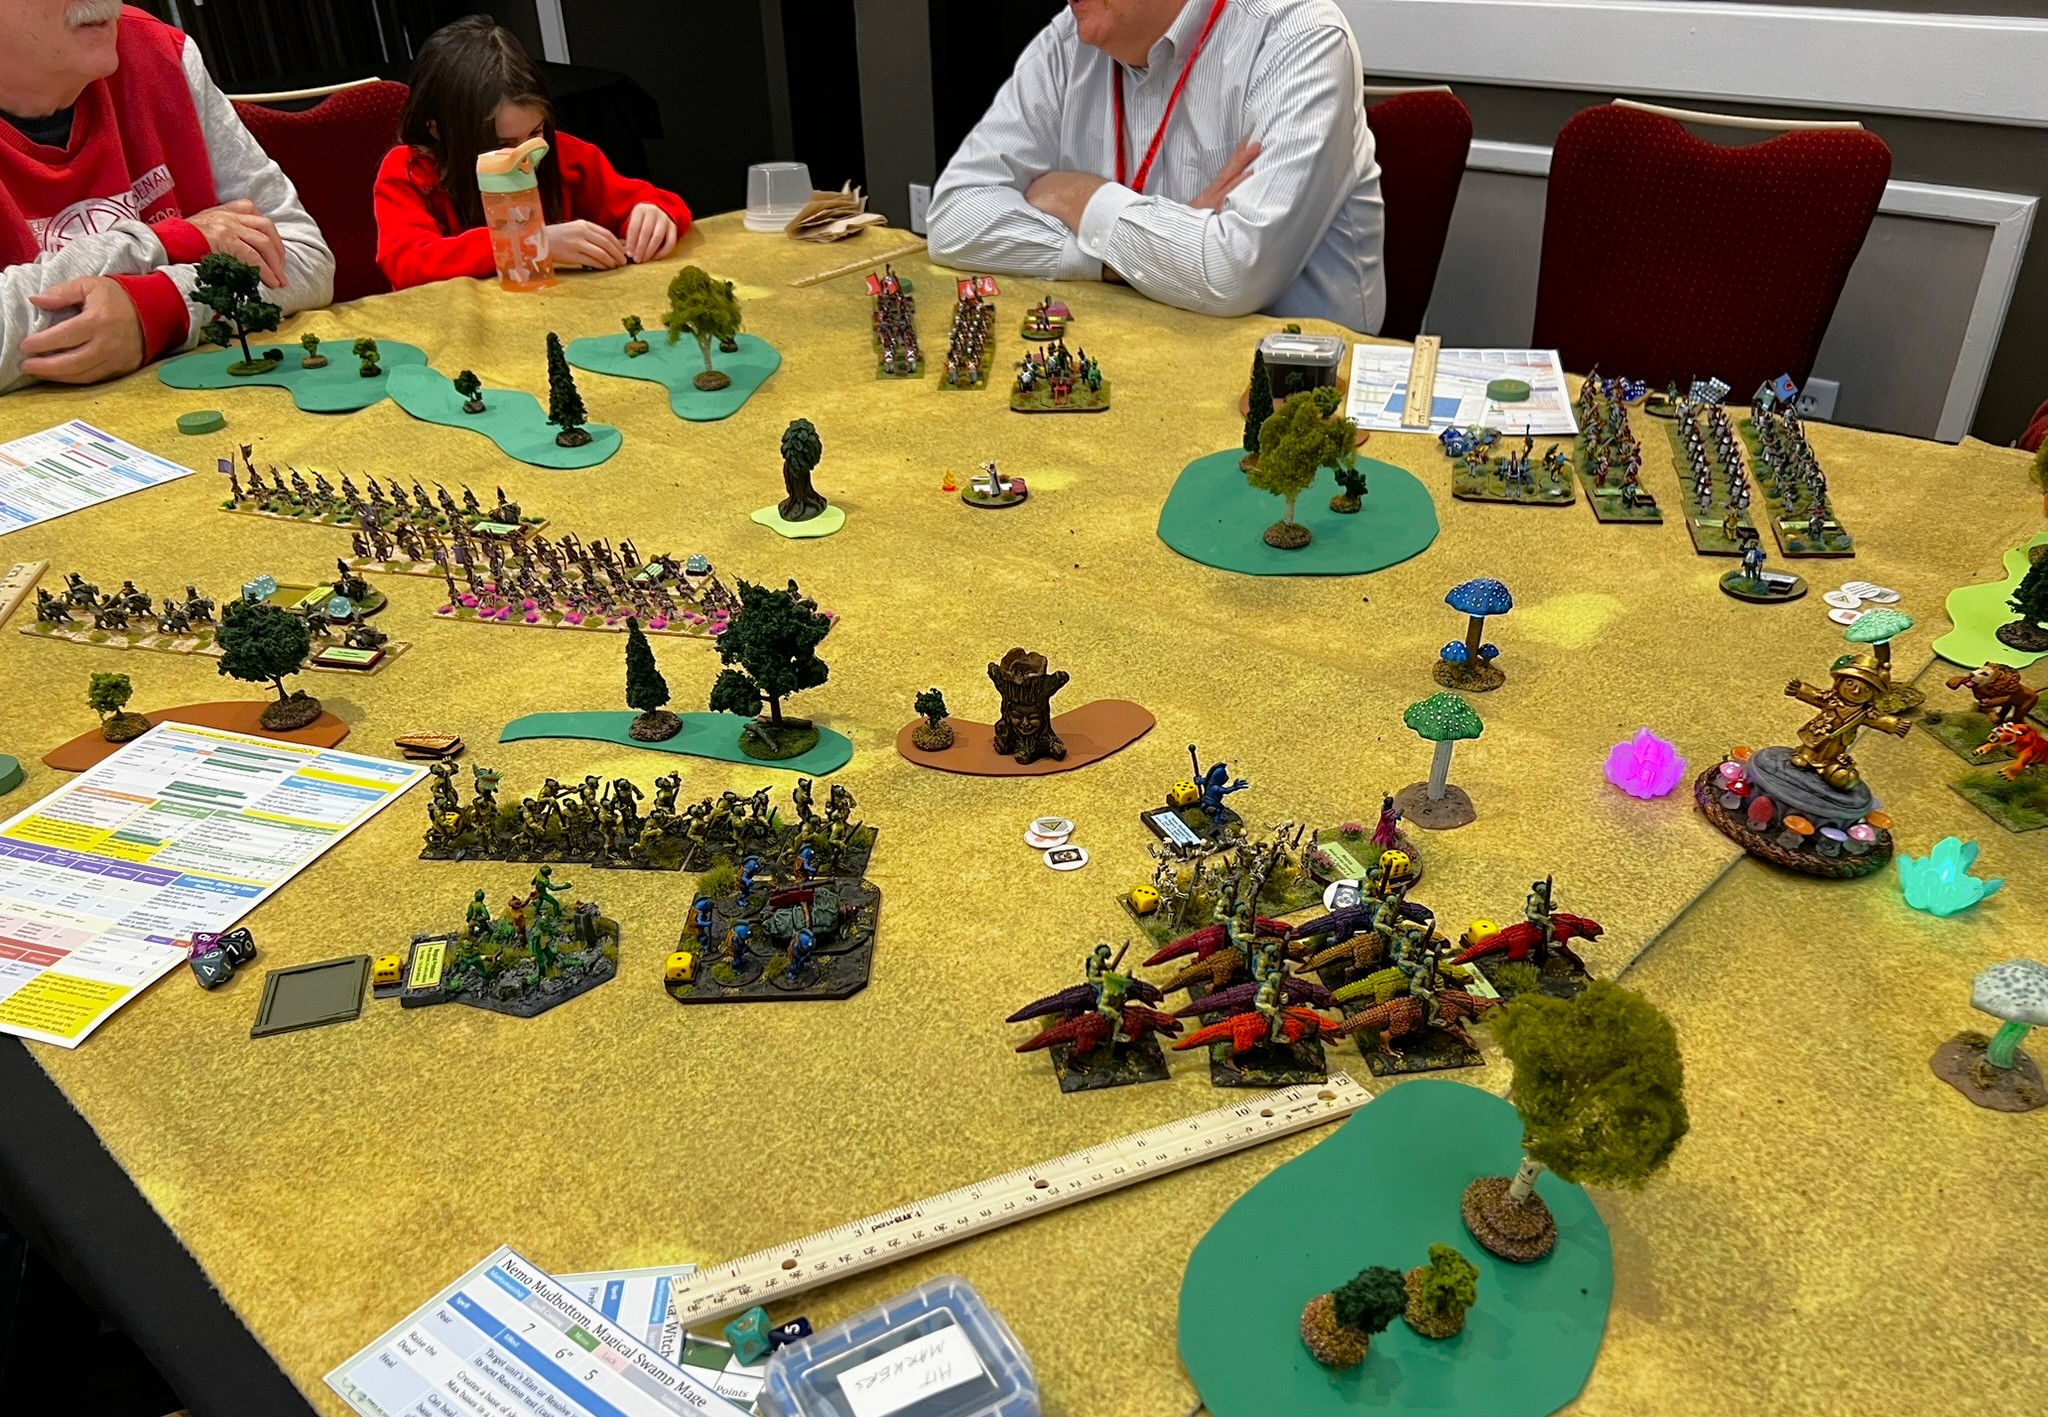
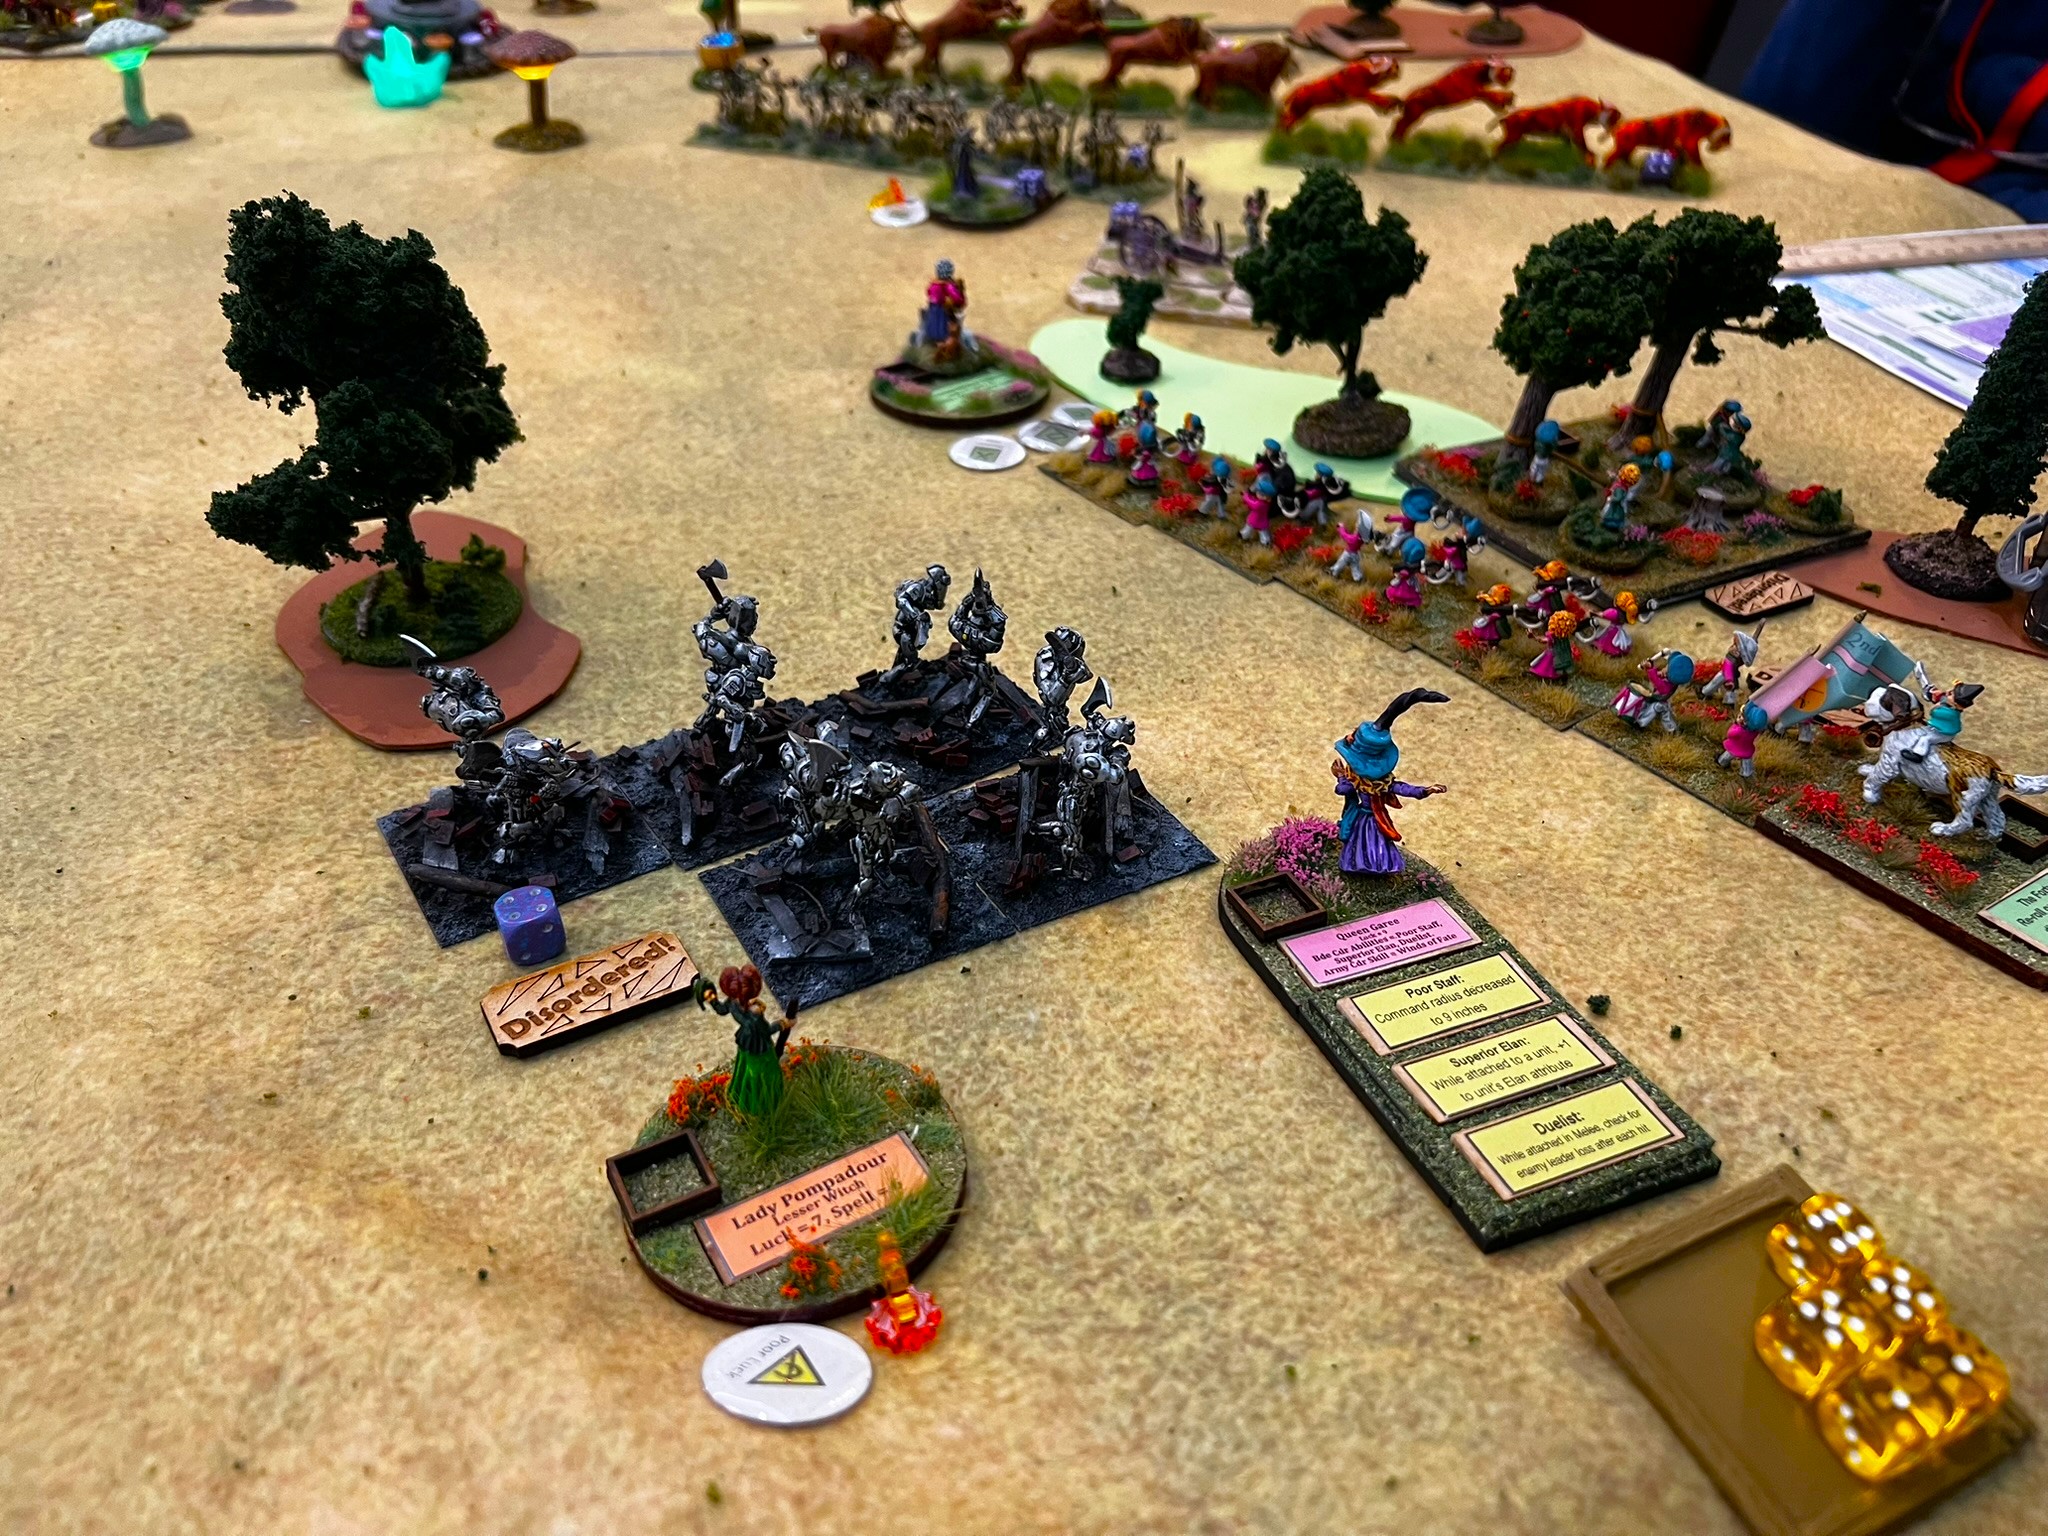
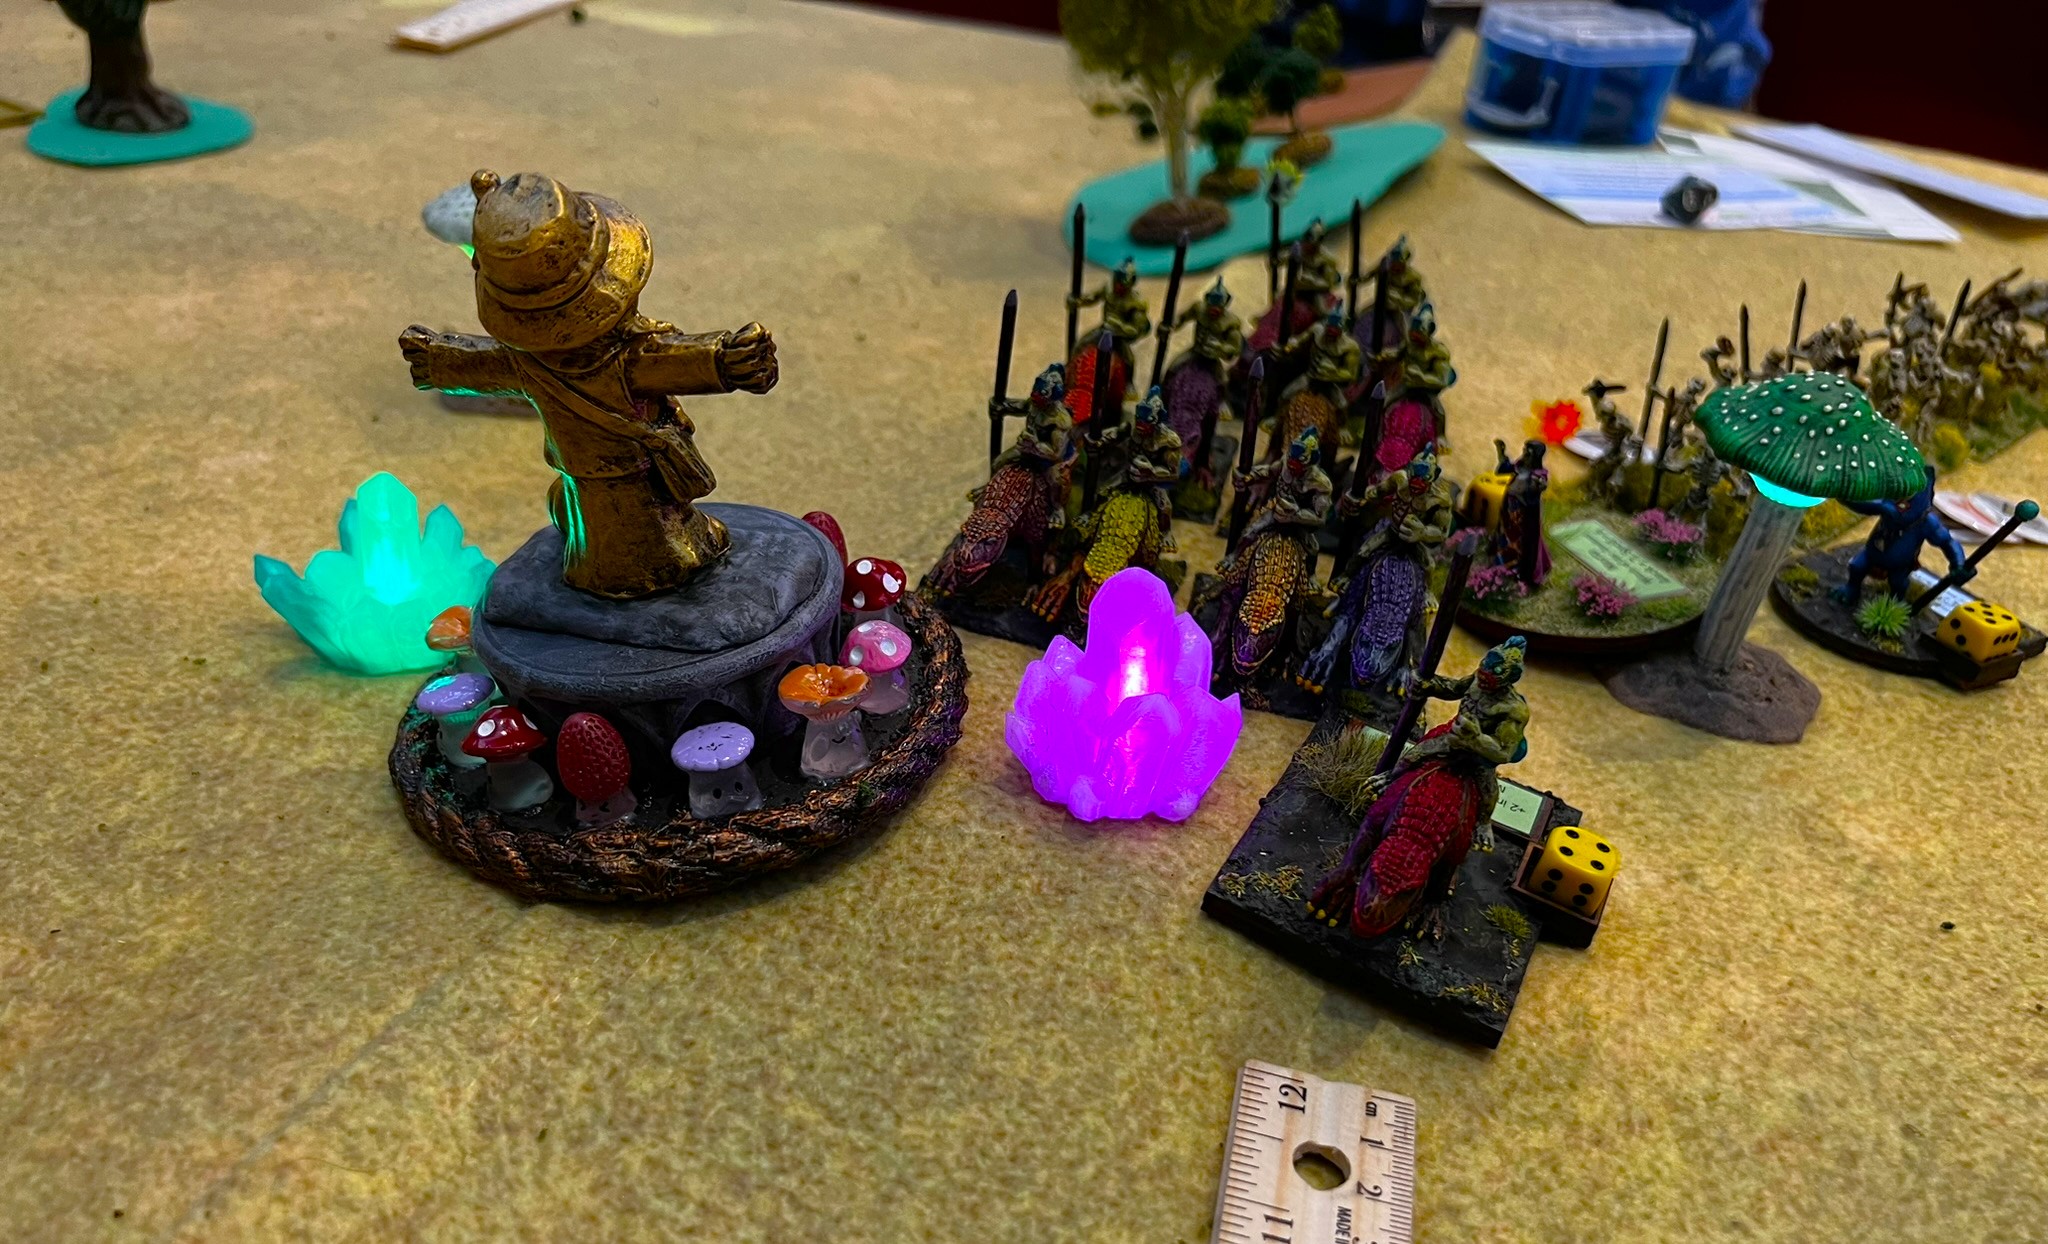
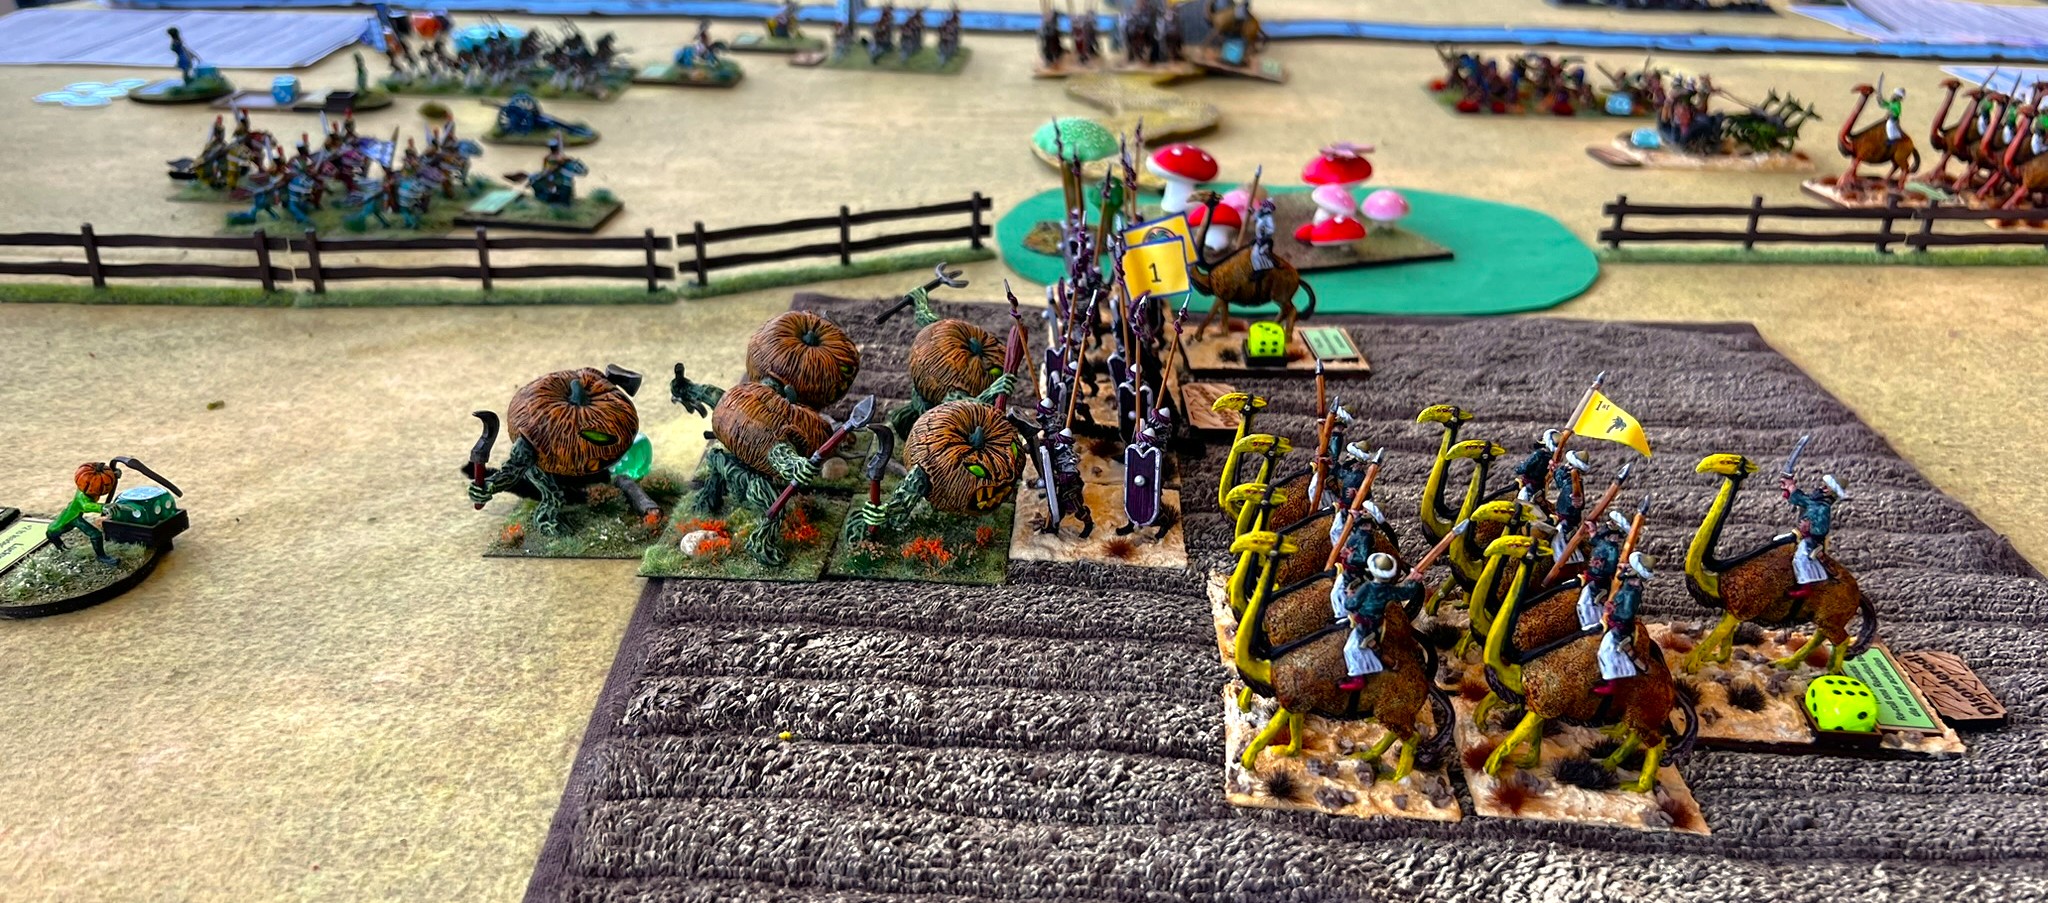
Battle for the Magic Mushrooms & the Ancient Crystals of Power
The world of Ozz is nothing if not magical – and there are many talismans & powerful weapons that spring up everywhere. In a remote section of Ozz, a wonderful magical find of a field of Magic Mushrooms near some rare Crystals of Power – has led to an Ozzian “Gold Rush”. Here, several Ozzian nations are scrambling to take seize & control of them. Factions have teamed up & are ready to fight to get these valuable resources and deny their capture by their enemies, but what will happen? Beginners are welcome. Rules will be taught. Players under 13 only with a playing adult.
I set this game up for 8 players. I ended up with two brigades being unused and two players acting as a team. So, 6 brigades competed here against each other. Here is a video of the set up:
Players checking out their forces at the start.Charles moves his Impkins towards the objectives. They are menaced by Professor Nitpik’s advance to their left, and the Gillikin’s advance to their right.Carter’s Pollywomp brigade moves towards the objectives, while Gillikins and Quadlings try to catch up.The Nitpik cavalry takes flanking artillery fire from both the Impkins and the Gillikins – and routs away!In revenge, the Elite Axemen move towards the Impkin infantry, who form line.Meanwhile, the 1st brigade of Gillikin’s Tigers seize a cache of crystals. They are shot at by Nitpik artillery, and rout – dropping their crystals. Their compatriot Lions grab a stash of mushrooms and hope to escape with their booty.Across the table, Carter deftly deploys a blocking force of Pollywomp infantry against the approaching 2nd Gillikin brigade. The Quadlings try to sneak through the woods unmolested.Carter’s block worked – and his cavalry seizes crystals while his infantry grabs mushrooms.On the other side of the table, the Tigers recover quickly. They grab mushrooms dropped by the Lions, who had been routed. The Gillikin’s skeletons grab the crystals previously dropped by the Tigers.
At that point the game ended due to time. Crystals were worth 10 points and mushrooms 5. Carter’s (on the left) Pollywomps and Tim and his wife’s Gillikins were tied for the win(they played together). Carter chose a Zoraster the Wizard miniature for his win, and the couple got a set of the rules.
Rear Guard Action – The Pursuit of the Fleeing Gillikins (Wars of Ozz)
This is one of my favorite scenarios.
The Gillikins have recently been defeated by the Munchkins and their allies in a major battle. The remnants of the Gillikin forces are desperately trying to withdraw to the safety of their lands. The Gillikins Empress, Arella the Witch, has her Summoning Bell to call up the Undead to join her troops in retreat. Their Munchkin enemies – as well as their Nitpik and Impkin allies – are in hot pursuit. Can the Gillikins make it to safety, or will the Munchkins prevail? Beginners are welcome. Rules will be taught. Players under 13 only with a playing adult.
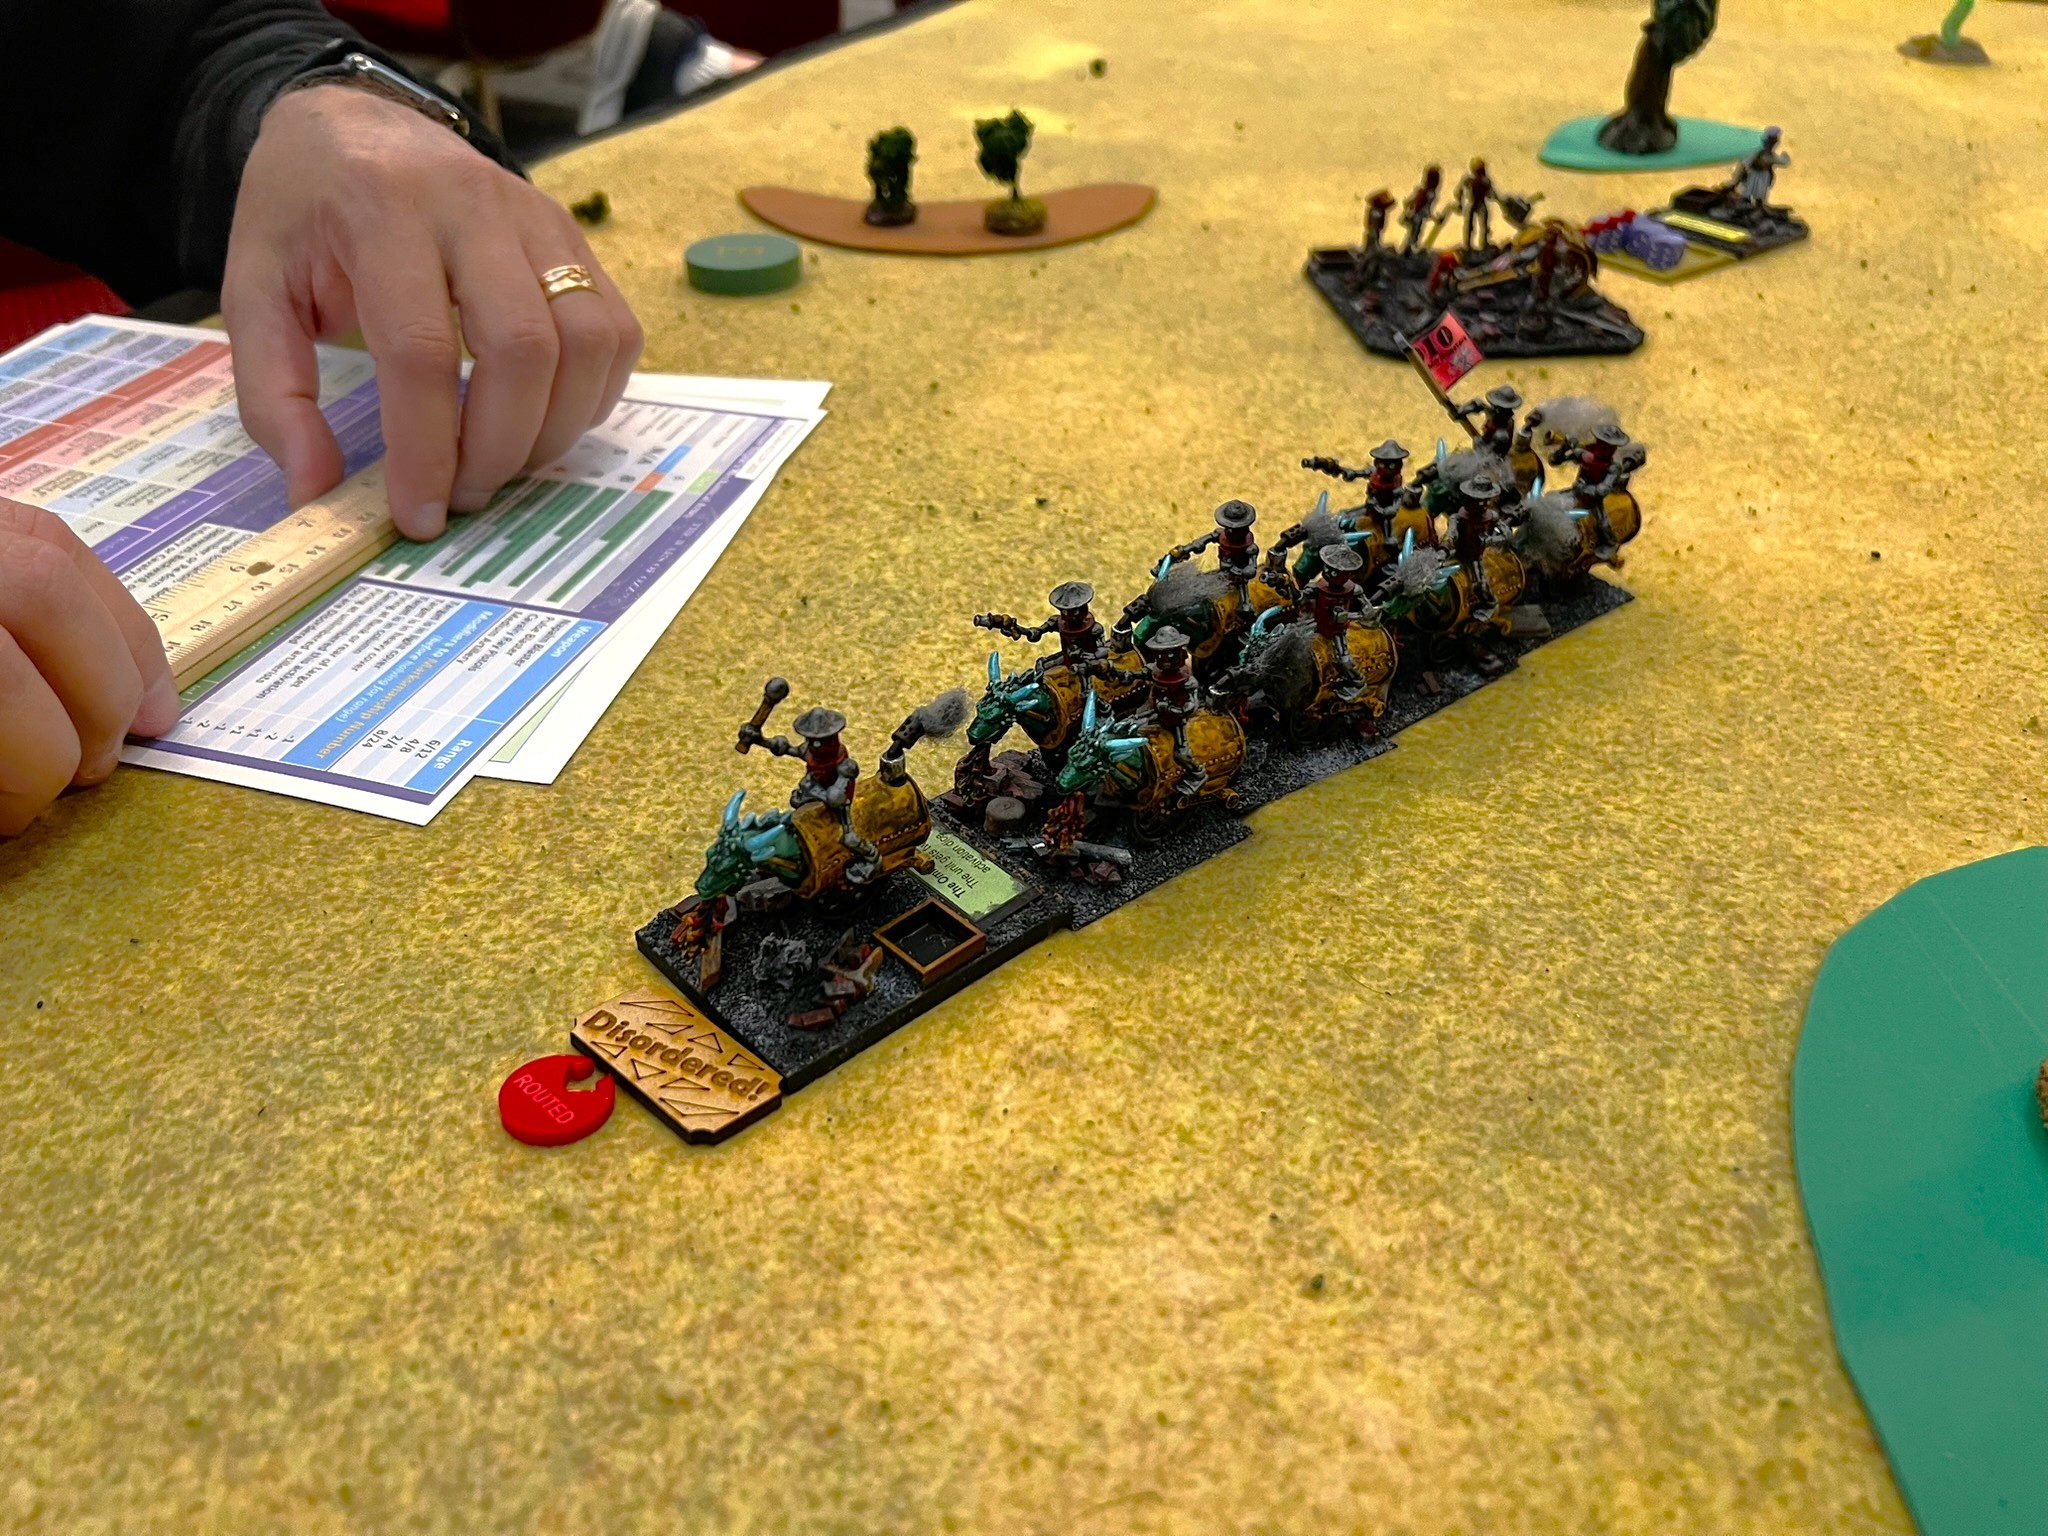
A full table for the start!Brad moves his Nitpik troops towards the Gillikins.The fleeing Gillikins and their Summoning Bell move forward towards safety.Slow-moving Munchkins do their best to catch the Gillikins on their left flank.Brad’s Nitpik cavalry wipes out a skeleton regiment and moves to hit the bell. The bell would not survive the encounter.Meanwhile, the Gillikins had successfully exited multiple regiments off the table. The Munchkin alliance had destroyed many Gillikins as well. The Munchkins moved to block the road to safety, leaving a Dire Bear regiment’s remnants to be destroyed.
The game ended in a tie! 26 bases were saved by the Gillikins and 26 bases were destroyed by the Munchkin Alliance! What a nail-biter!
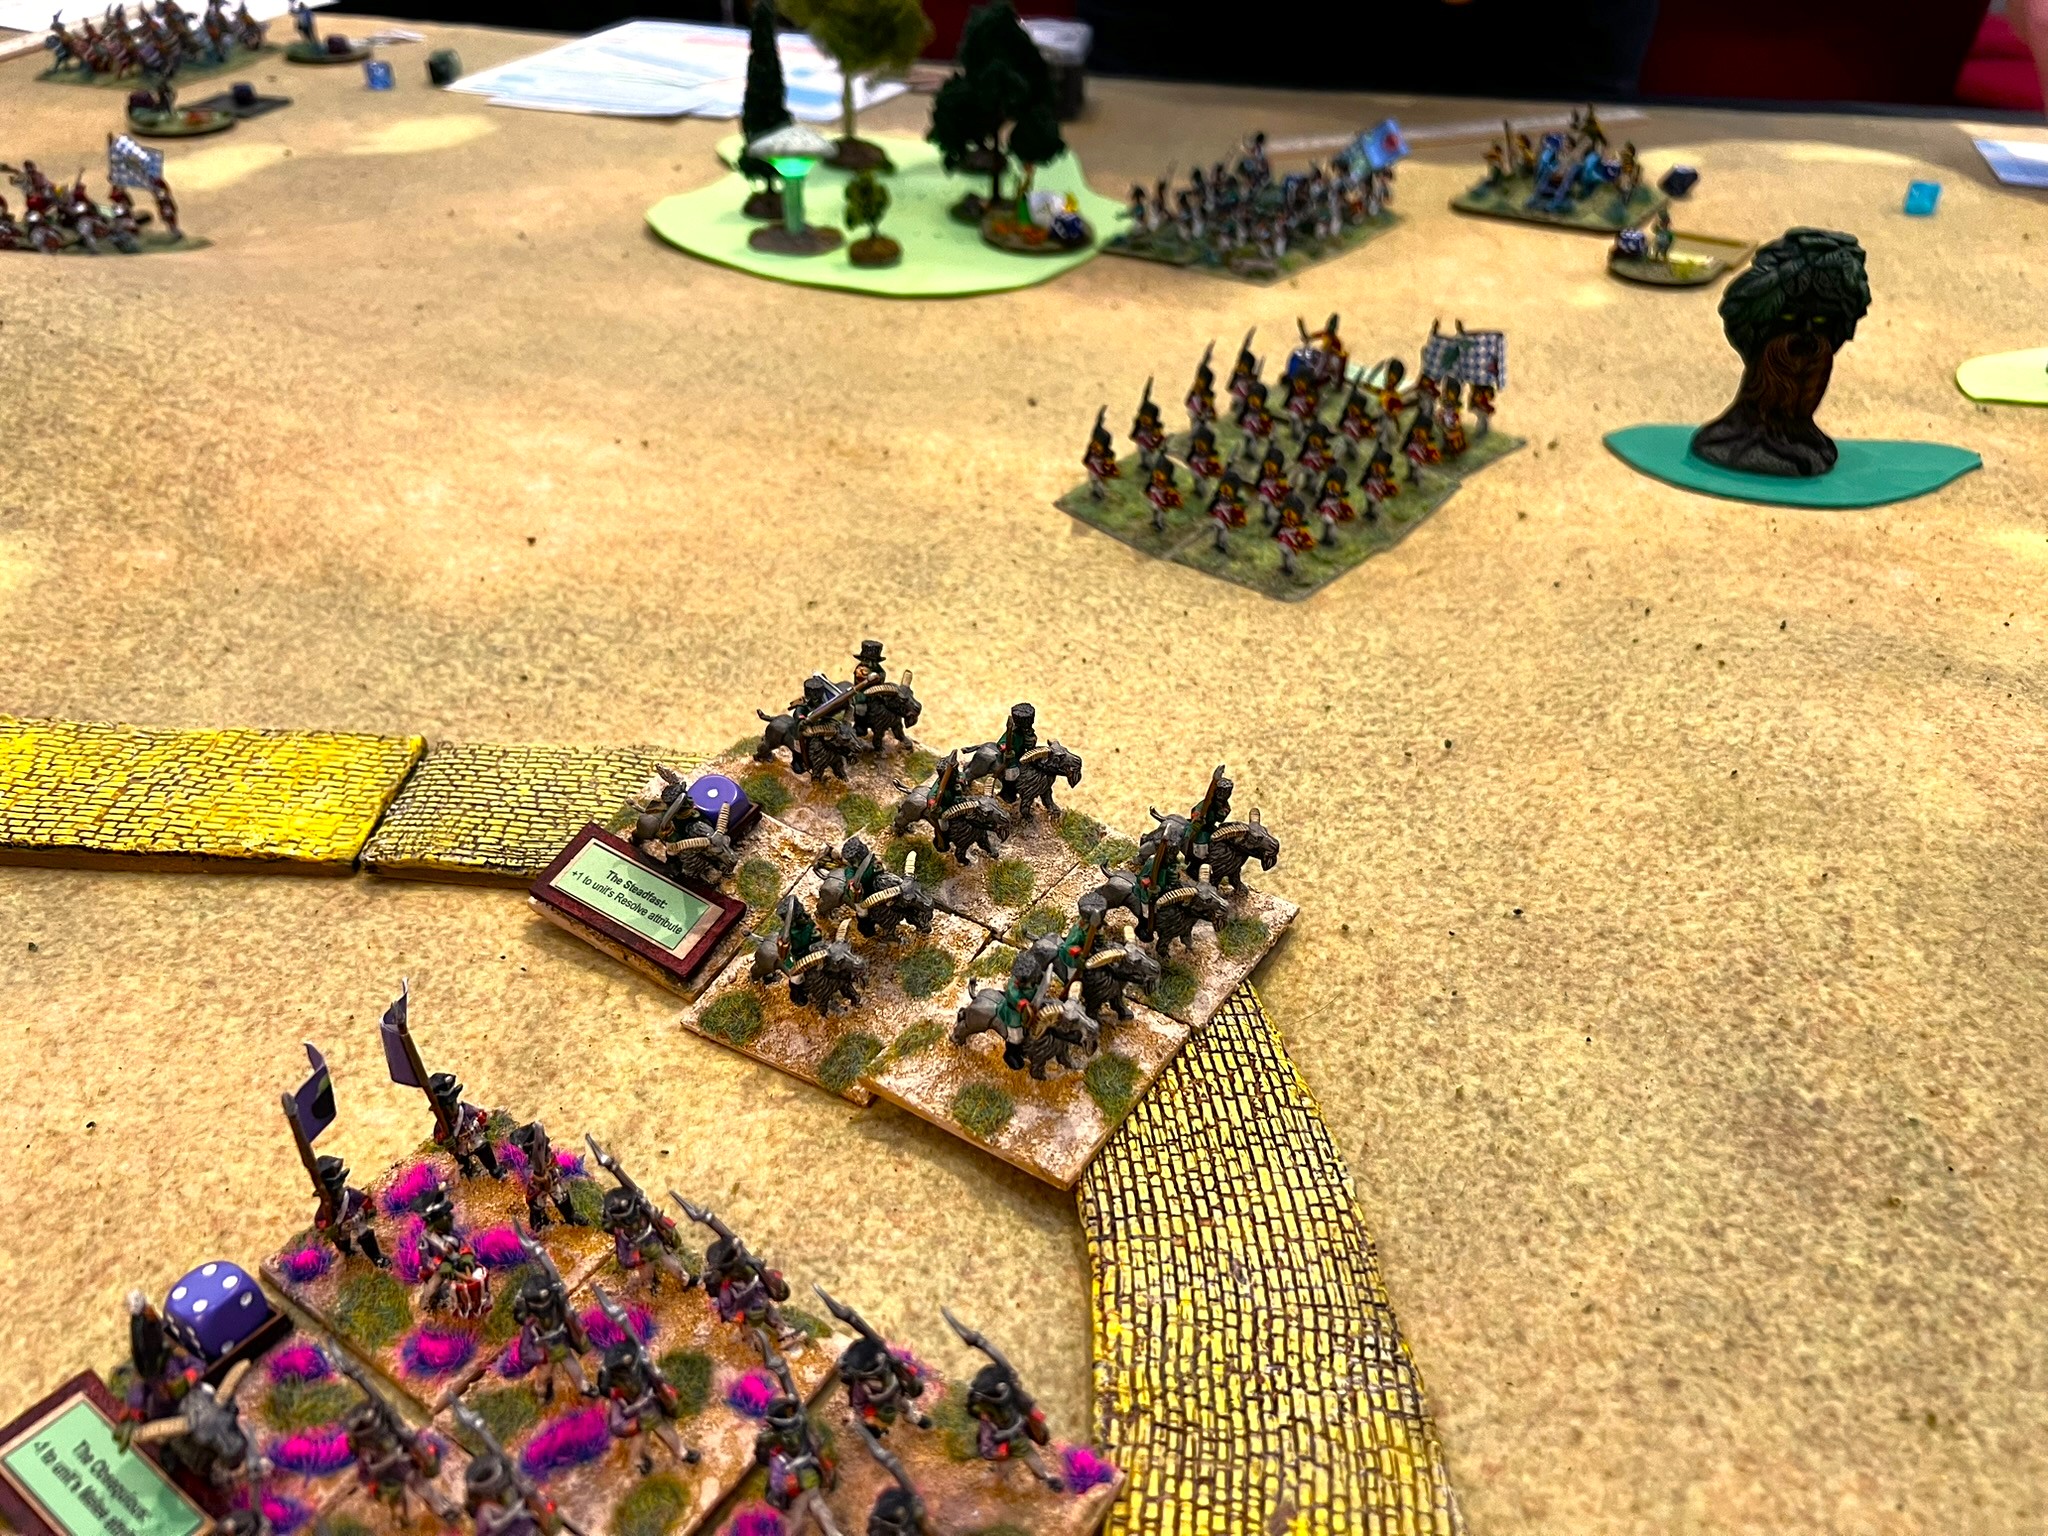
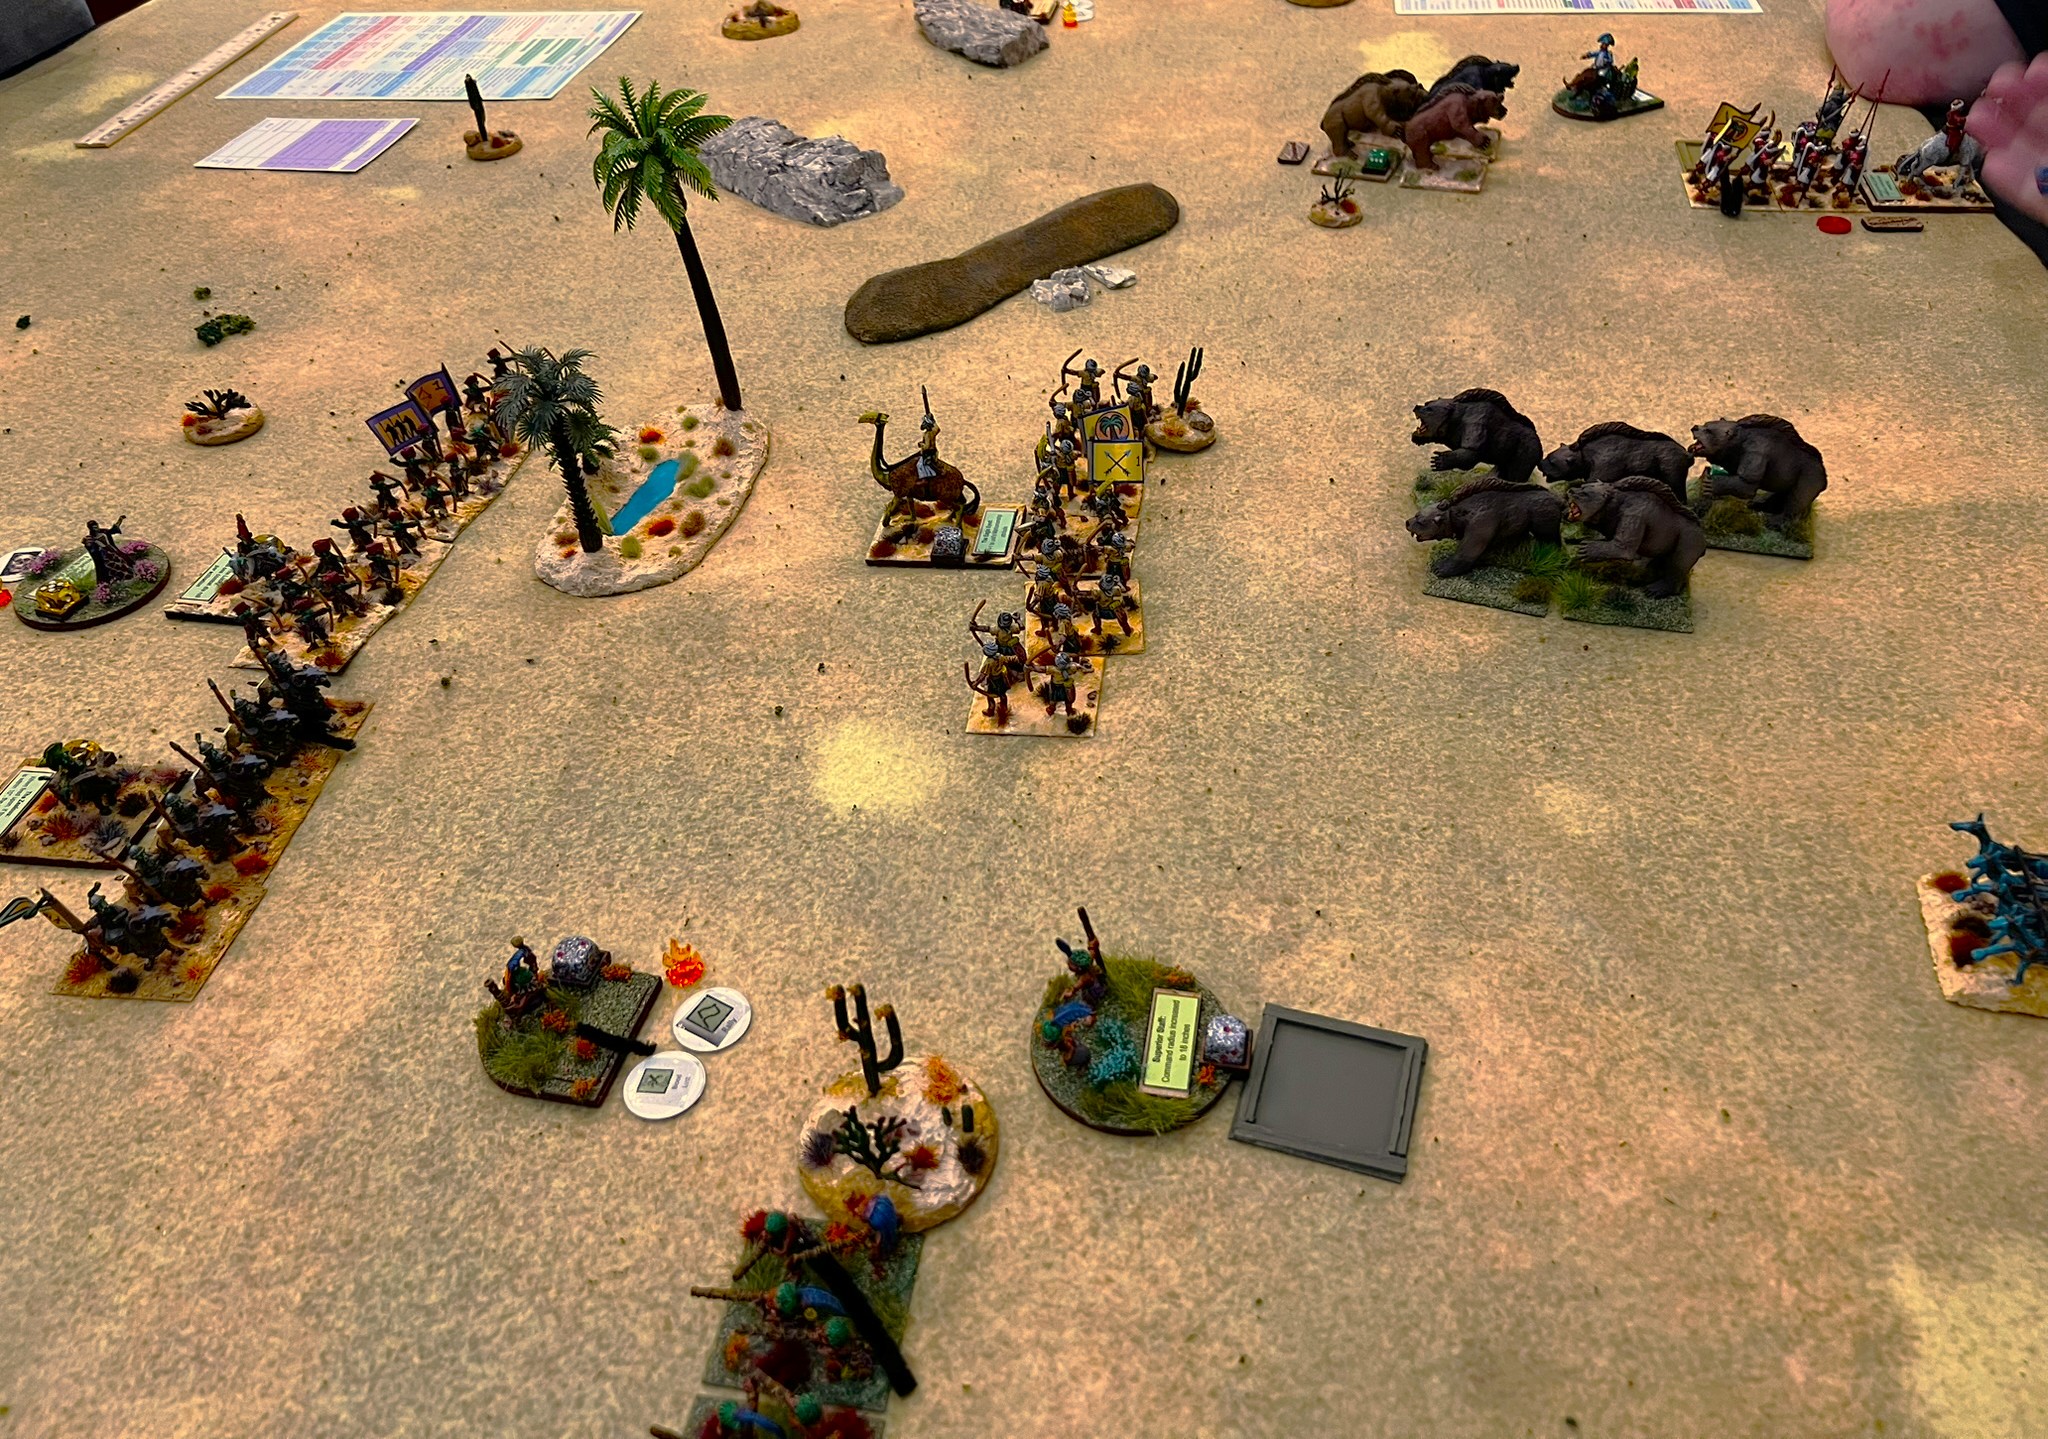
The Desert Wars of Ozz
Ozz has vast deserts, but they are not uninhabited. In fact, several races such as the Whim Whim and their mortal enemies the Temujicans vie for supremacy over these sandy tracts. Join this sweeping desert battle to control the deserts of Ozz and their hidden marvels and treasures. Will you be successful and prevail over your enemies – find out! Beginners are welcome. Rules will be taught. Players under 13 only with a playing adult.
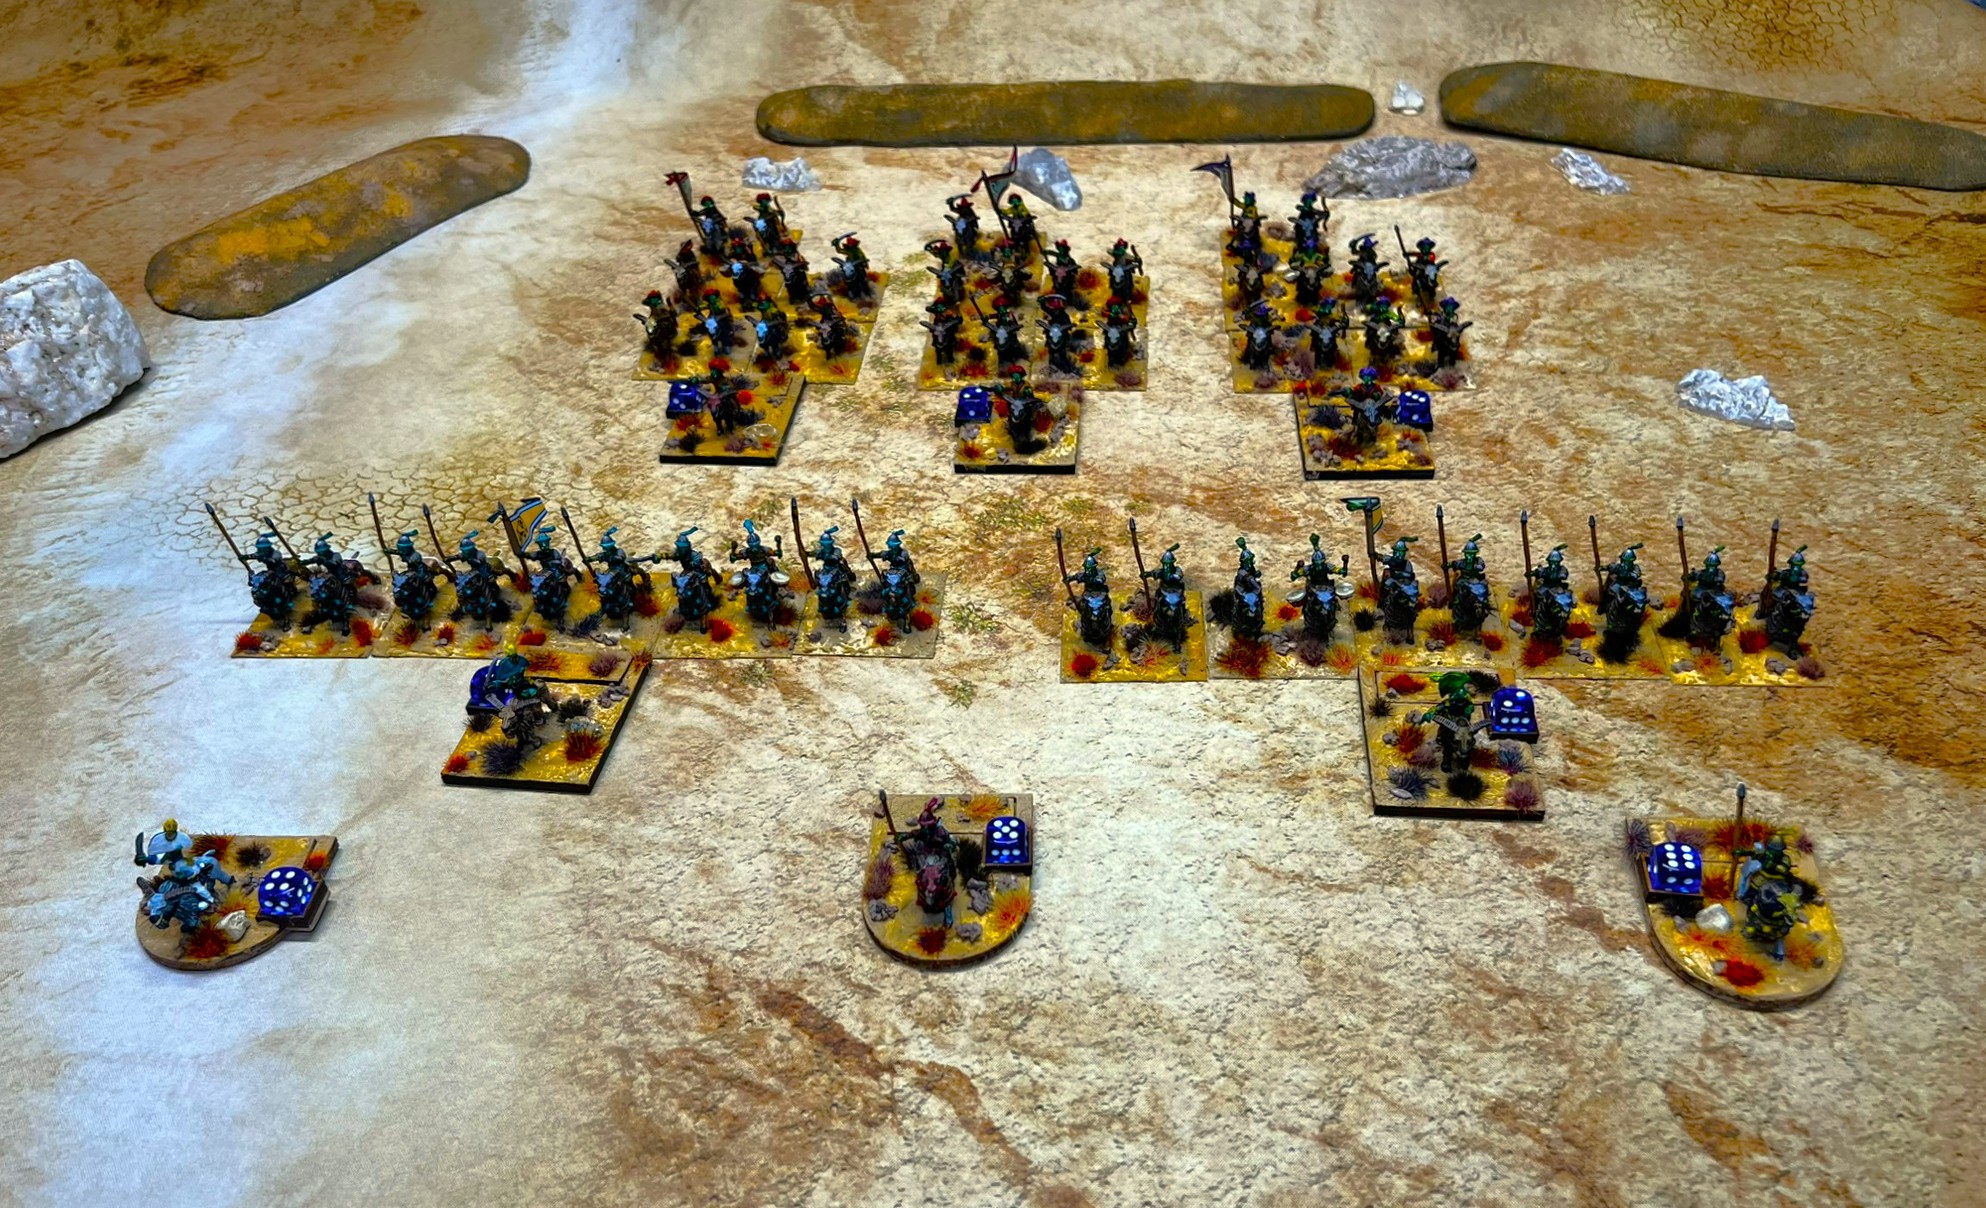
This Saturday night game was set up to accommodate 8 players. I only had 4 – so I scaled it down. The game’s objective was control of a single oasis. The contestants were a Temujican Brigade and a Gillikin brigade versus 2 Whim Whim brigades.
Brad moves his Whim Whim up, while teammate Mark and opponents Mike and Richard watch.The game became a mini-slugfest. In the end, the Temujican/Gillikins controlled the oasis for the win!
The HAVOC XXXIX Wars of Ozz Tournament
This was the final game of the convention.
At this tournament, players will be tested to see who is the best general in the Wars of Ozz. This is a playoff of evenly-valued brigades. This will be fast-paced. New players and old are welcome – but experience is a BIG plus – and there will be glory for the winner (and possibly prizes)! Do you have what it takes? Find out!
I can accommodate 8 players here, but only had 5. Each gets a 21-22 point brigade from a different faction at random. Each enemy base taken out is worth a point, with routed ones being worth half a point.
So based on a die roll, 4 players went into round one with 1 player getting a bye.
Each round lasted two turns. The winners in round one were the top three brigades so 1 player was eliminated. The player with the bye would face the strongest survivor from round 1. Bases would be made even in that match. Round two would reduce 4 players to just 2 players for the final championship. Lost bases would be lost forever and not make it into subsequent rounds.
The tournament begins!
Here is a video of the set up (not all brigades were used as described previously):
Pollywomps (Gregg) versus Gillikins (Eric). Gregg defeats Eric.
Gillikins (Rich) versus Nitpik (Brad). Rich defeats Brad.
Bye – Ken (Winkies)
After round 1, Rich graciously asked Brad to command his Gillikins in Round 2. Gregg and Eric were left to a rematch with their damaged units. However, Gregg was able to raise a number of Undead units with his spellcasters to offset his losses.
In Round 2, the match ups were:
Pollywomps (Gregg) versus Gillikins (Eric). Gregg defeats Eric again.
Gillikins (Brad) versus Winkies (Ken). Ken defeats Brad.
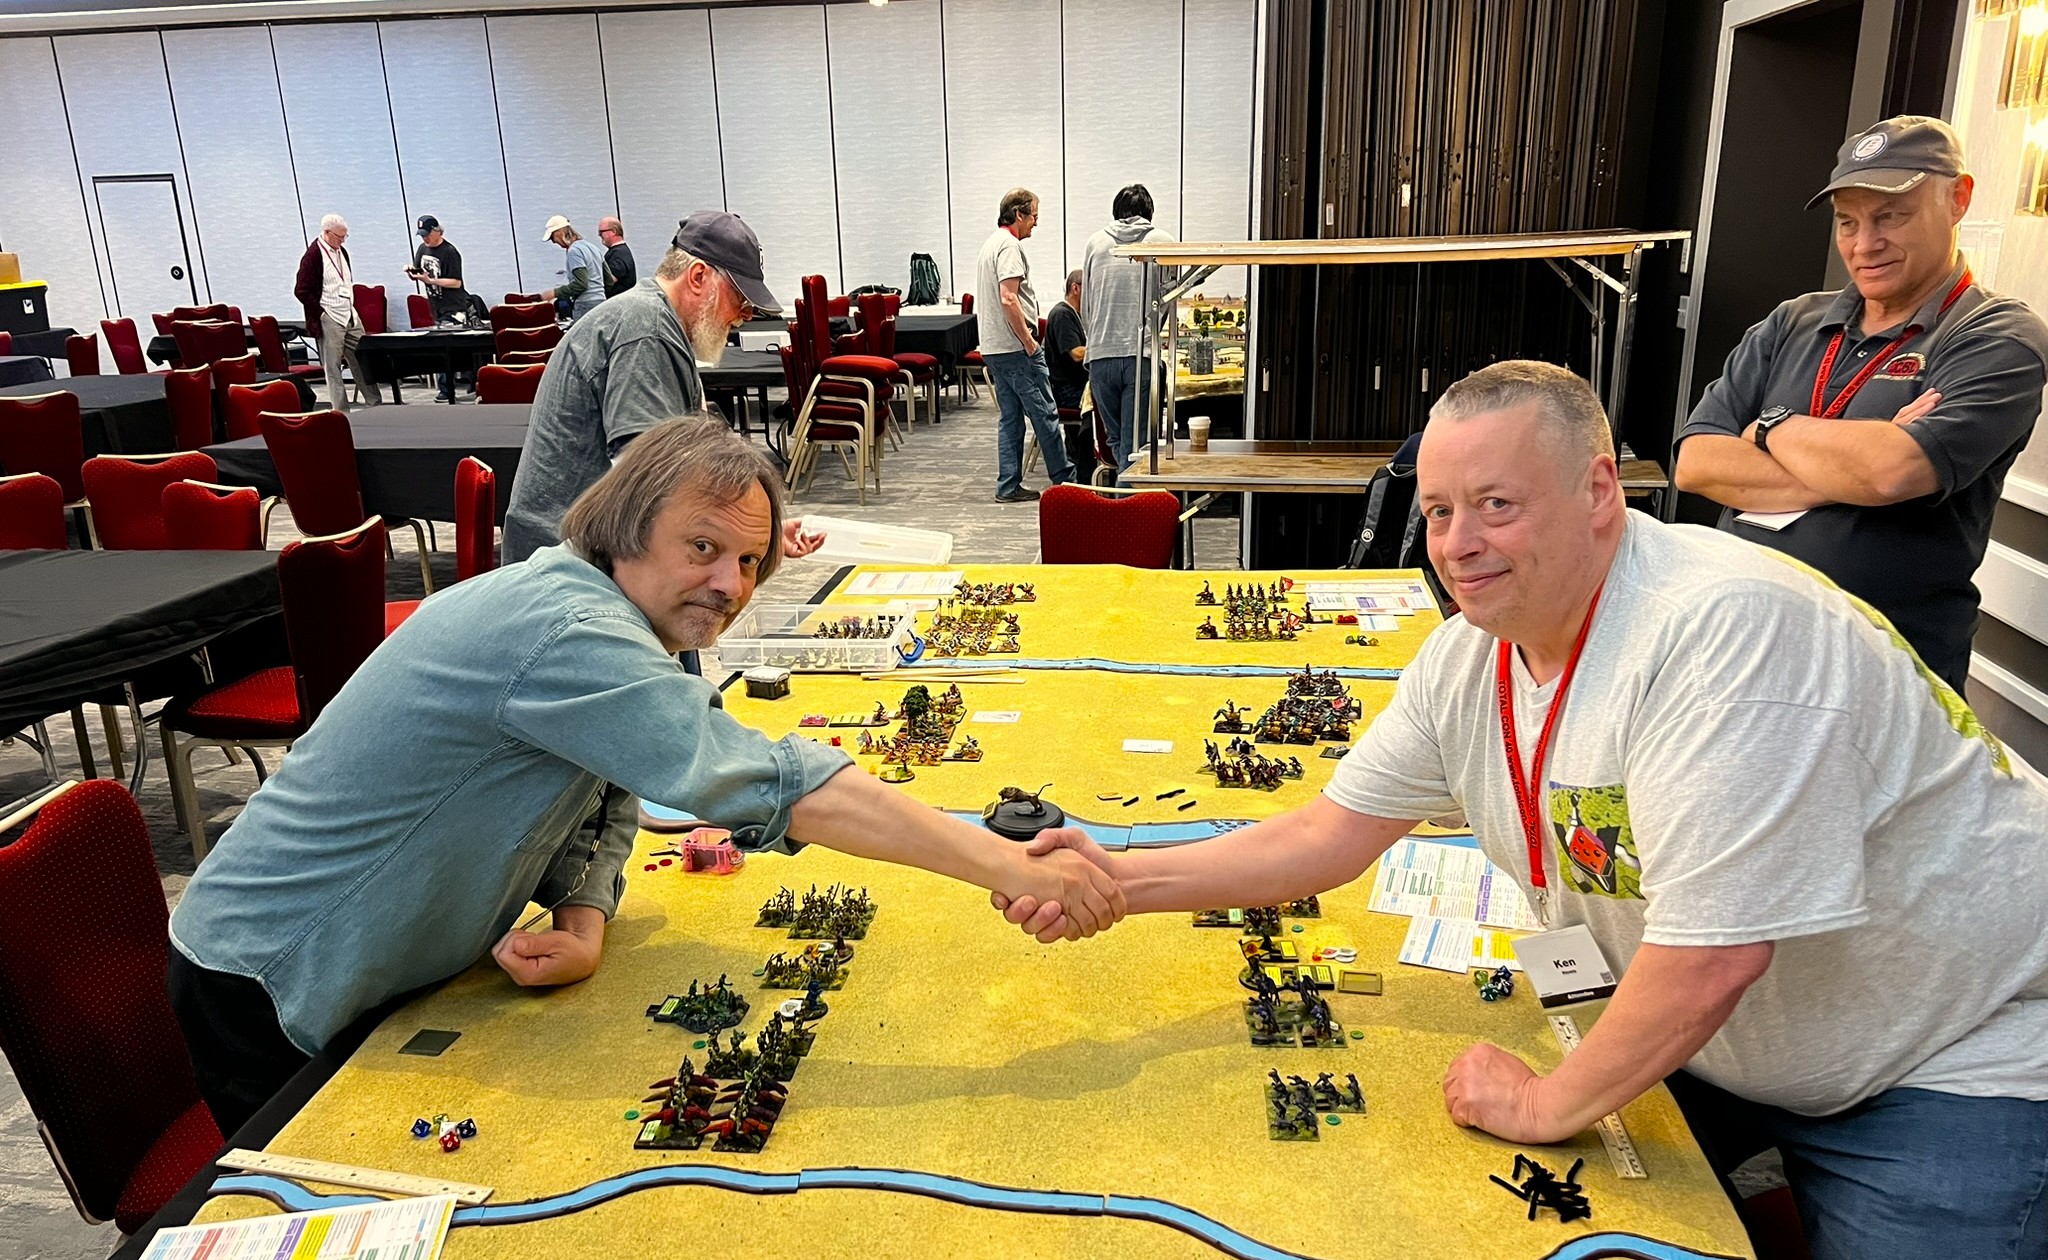
This set up the final round between Gregg’s Pollywomps and Ken’s Winkies – to the DEATH.
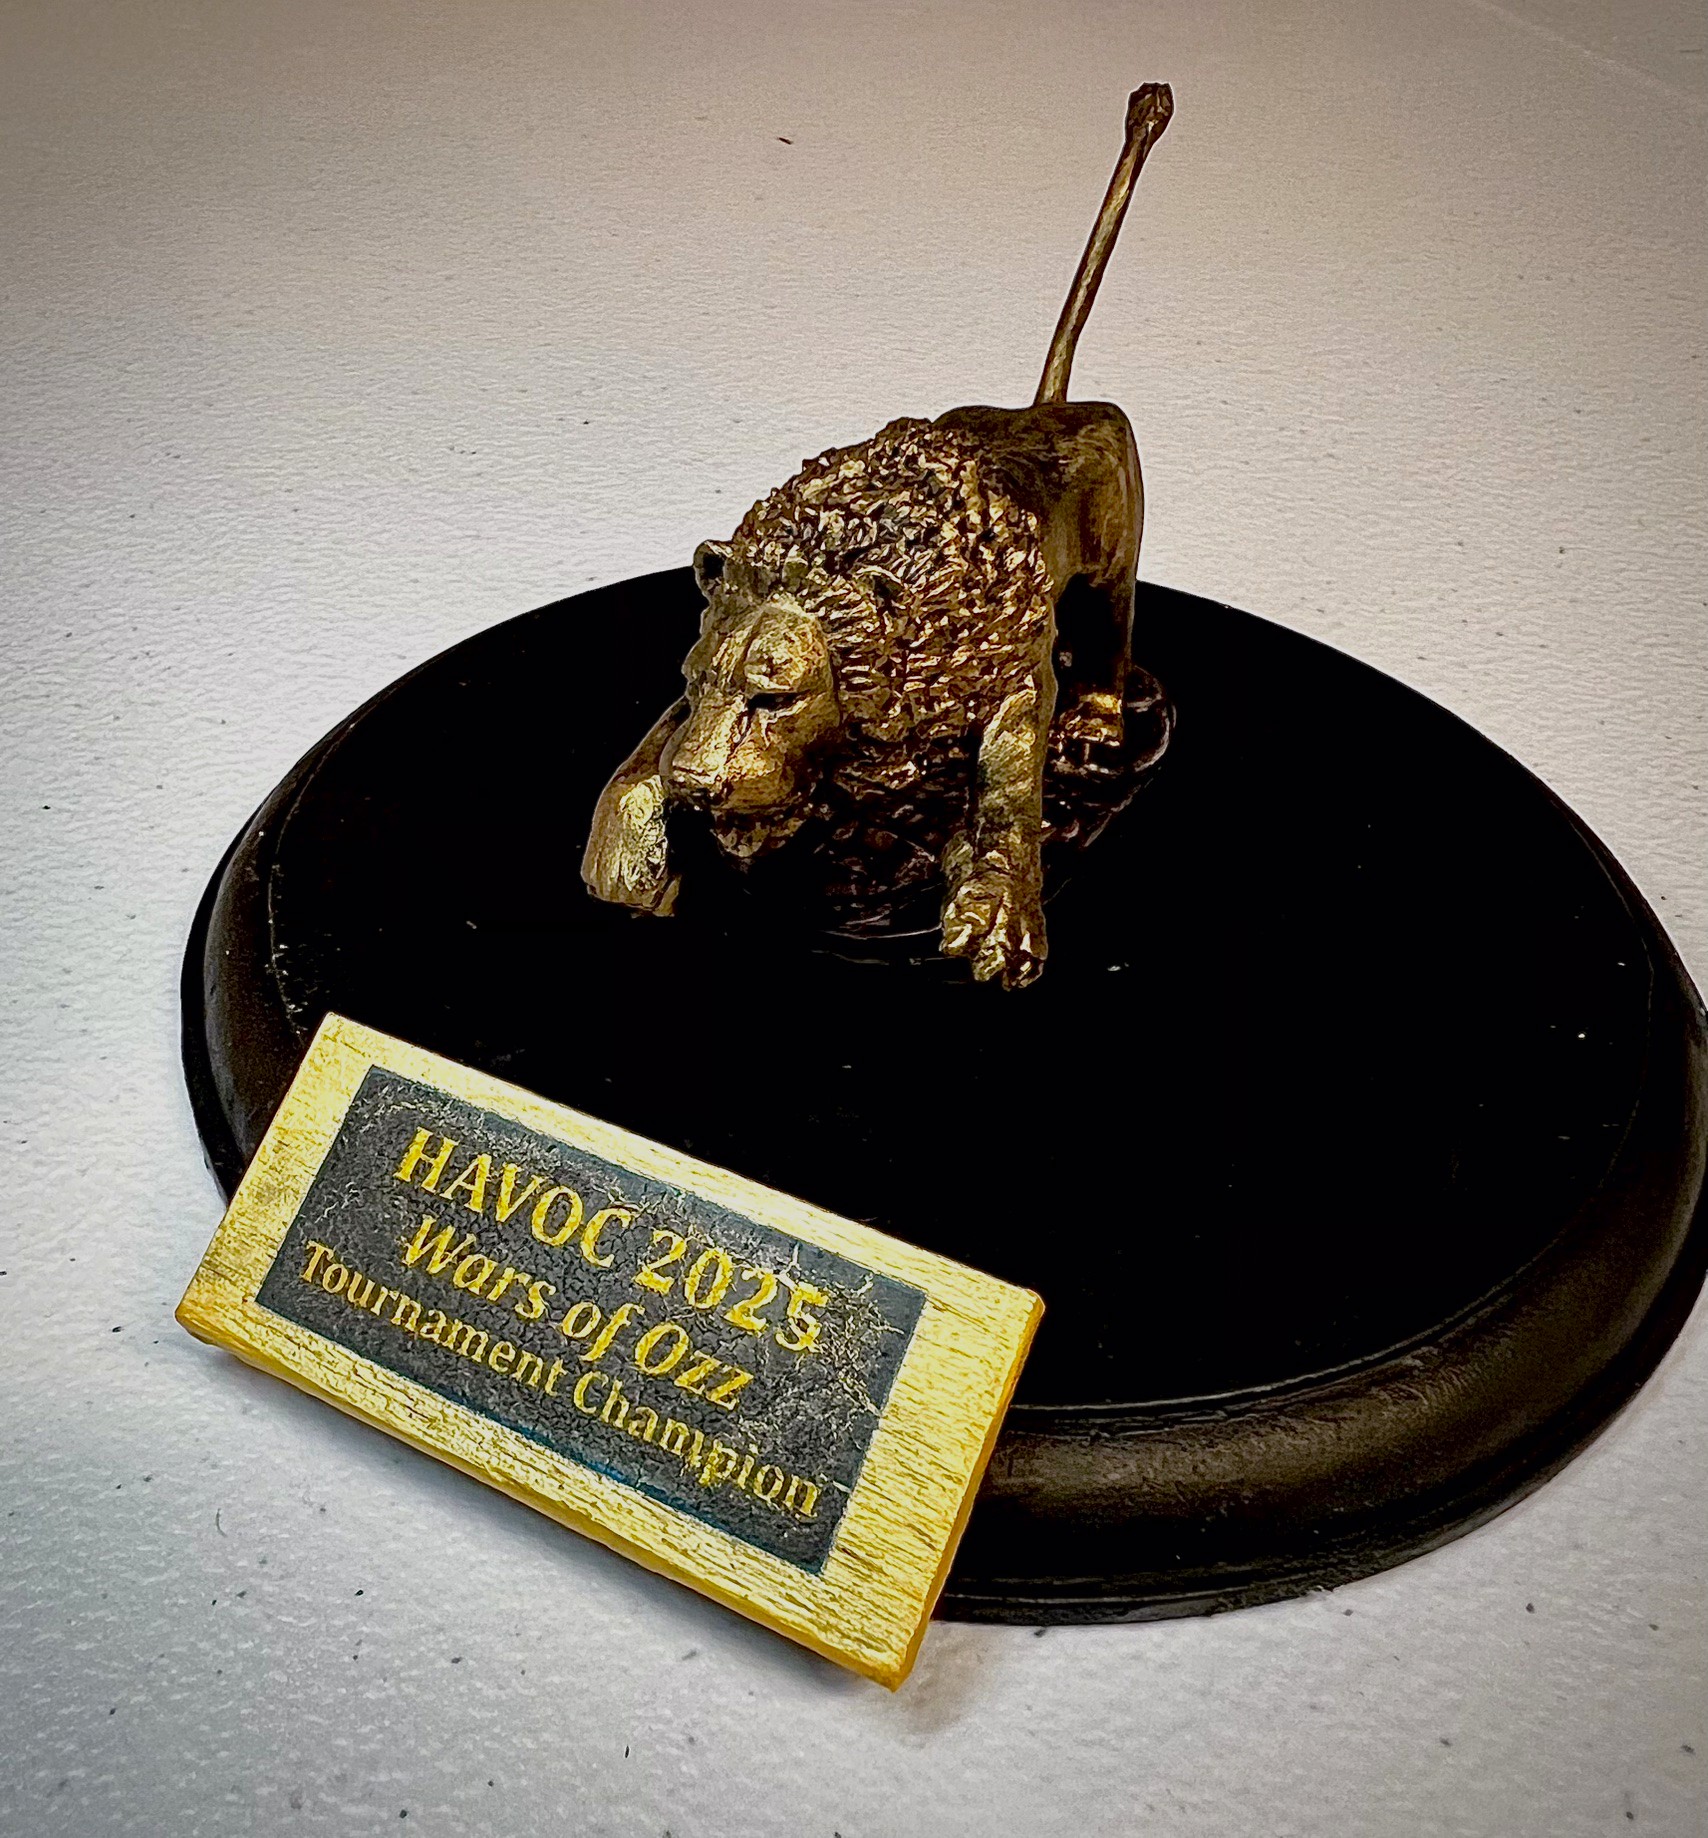
After a tough fight, Gregg’s Pollywomps came out on top! Congrats!
To the VICTOR! Gregg received the trophy – which I had made with a Dire Lion figure donation from Russ Dunaway!Gregg’s winning prize!
As a side note, there will be similar prizes awarded at HUZZAH 2025.
Thanks to all at Battle Group Boston for a great event and to Russ Dunaway for his support. Thanks to ALL the players.
Special thanks to Brad Gosselin for being an outstanding wingman for the ENTIRE convention…you rock buddy!!
Next up is MAYHEM, where some of these games will be run – then HUZZAH!
Thanks for looking – and feel free to share this post and or comment!
Miscellaneous details and references for those interested in that sort of thing:
For my earlier posts on Wars of Ozz games, view this page. It includes figures, units, and other related projects.
It’s that time again – when I review the past year and reflect a bit and look towards 2025. I do like to see what I did versus the goals that I set out to accomplish for myself back in January of 2024.
This post will also be where I set my 2025 goals for Life, Golf, Miniatures, & Other Distractions (after all that is the subject of this blog of mine since 2015). I use these goals to guide and motivate me, but I have seen that others can appreciate this type of post. 2023 was, like 2022, one very busy year on multiple hobby, golf, and life fronts. I did set some pretty aggressive goals for all aspects. Some were around gaming, some around hobby production, some were around golf, and more.
How did I do versus my 2024 goals?
Paint 365 figures or more
I thought that would be a stretch – but in the end I destroyed that particular benchmark, setting yet another personal high for the number of miniatures painted in one year ever. These were mostly figures for Wars of Ozz. I managed to paint 556 miniatures – 126 more than I did in 2023!
2024 Production
2023 Production
Complete 2 brigades of Quadlings for Wars of Ozz
My Quadlings at HAVOC in 2024
I’ll give myself a B+ here, as I painted up all the Quadlings that I currently have – 3 regiments of infantry, 2 batteries of artillery, one witch, and 3 individuals that can be brigade or army commanders. That is 79 figures in total, 1.24 25-point brigades’ worth. At some point I’ll get the Quadlings some cavalry.
Complete a brigade of Whim Whim & Noobi for Wars of Ozz
Whim Whim infantry and cavalry engage King Jack and his Great Pumpkinheads at EllisCon 2024
I think I get an A+ here as I painted up all my Whim Whim and Noobi in 2024. That army now is made up of of 7 regiments of infantry (5 Whim Whim, 2 Noobi), 4 cavalry regiments (all Whim Whim), 3 wizards (2 Noobi, 1 Whim Whim), and 7 individuals/leaders. I painted all of these except for 1 bannerman which was a gift from Buck Surdu. That is 216 figures in total, nearly three 25-point brigades’ worth, making them the largest painted contingent in my collection at present.
Complete a brigade of Temujicans for Wars of Ozz
5 regiments of Temujican Infantry4 regiments of Temujican infantry
I think I get another A+ here as I painted up all my Temujicans in 2024. That army now is made up of of 5 regiments of infantry, 4 cavalry regiments, and 3 individuals/leaders. That is 142 figures in total, exactly two 25-point brigades’ worth, making them worthy opponents for the Whim Whim.
Continue to run and play more games – and continue tracking them too
I ran a total of 30 games (all Wars of Ozz) in 2024 as a GM(I think I get an A+ as that is nuts). As for games played, I get a C- as I only played in 6 games.
Attend and run games at conventions. This would include TotalCon38, HAVOC, COLD BARRAGE, MAYHEM, HUZZAH!, HMGS Fall In, EllisCon, and others…
2024 Dave Award winner!2024 Best of Convention AwardRight after getting the HUZZAH! Award with happy players!
My 30 games that I GM’d came from these conventions. I was proud to have been awarded not one but TWO best of convention awards – one for HAVOC (the Award) and one for HUZZAH! So at least an A…ok A++😁
Complete one more scenario for my scenario booklet for Civilizations Collide
Total F here – never got to it.
Paint up a platoon from Wargames Supply Dump for Combat Patrol™
Total F here again – and sorry yet again Roger! With Ozz being a priority, I never got to it.
Try to get my Nomonhan WaT project off the ground. Note I said “try”. Again…
Same as last year…F. Maybe this year.
Get the Mass Pikemen more active
I have not been able to do this well at all. I do see many at conventions, which occupy a lot of my winter time. Once golf season starts, that takes precedence. I’ll try better this year.
Have another nice trip to Florida
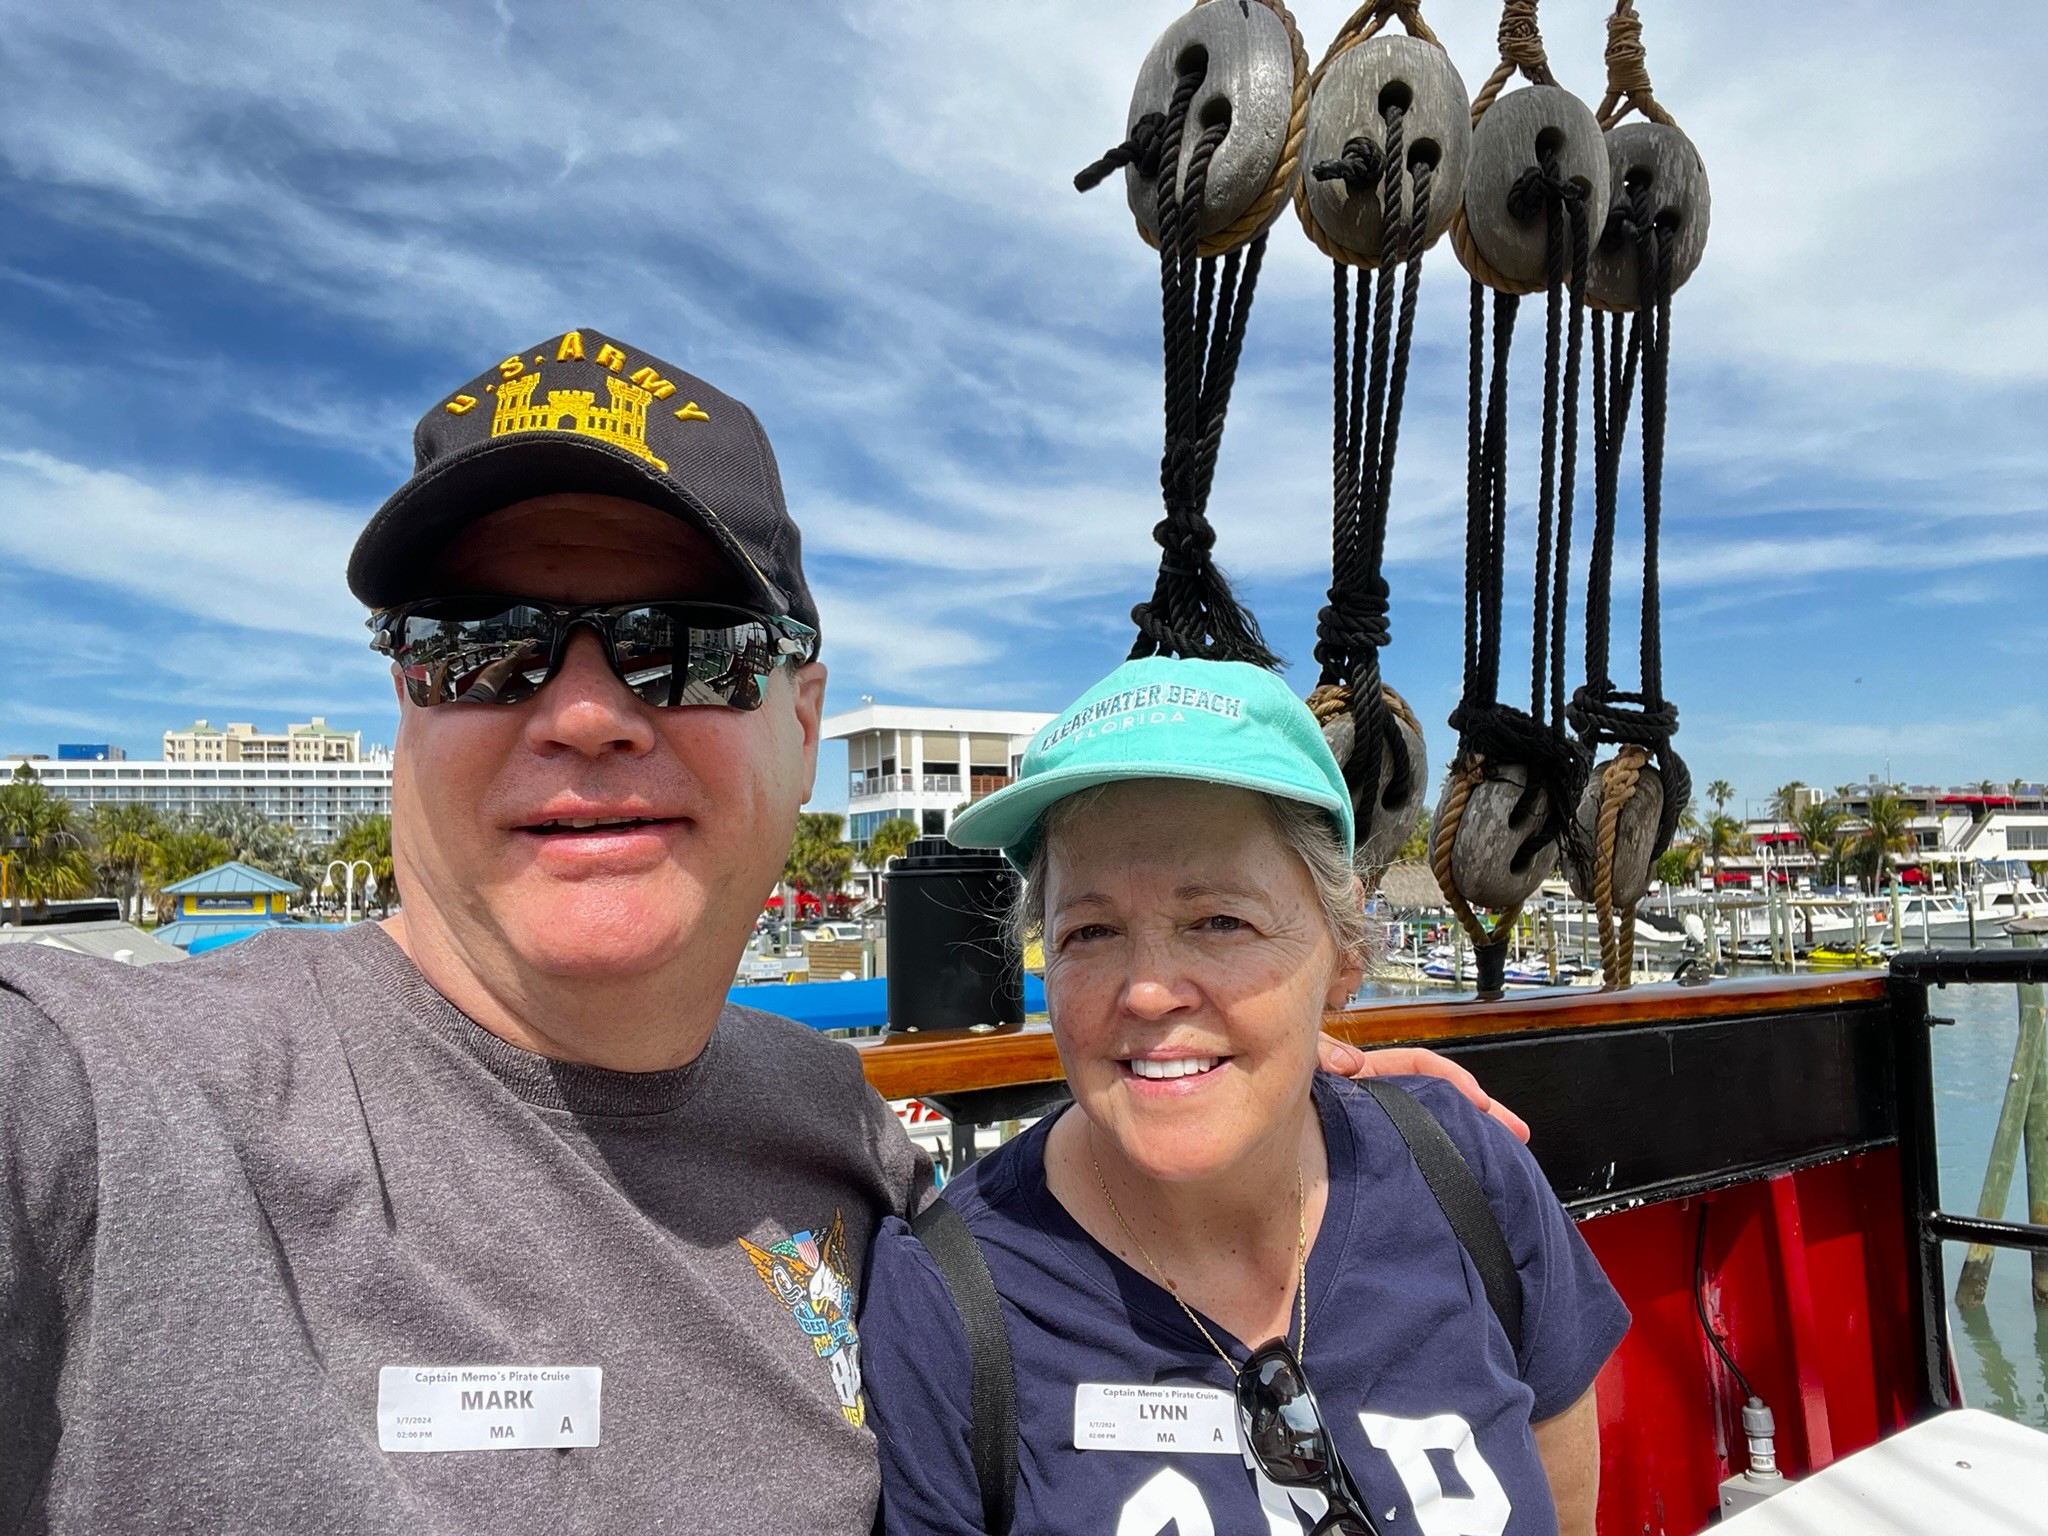
I think A++ – our trip was amazing to Clearwater Beach and Orlando was a blast!
At the JW Marriott in Clearwater BeachGreat hotel – the previous photo was taken from the balcony in the middle.Took the previous photo from Captain Memo’s Pirate Ship ride – was a LOT of fun.Had a great time hanging out with Tod and Tara Jeffers in Clearwater Beach. This place had amazing seafood.Then on to the Grande Vista in Orlando for golf lessons, golf, and relaxation!Lynn’s “favorite”sign at Grande VistaAction shot on the range! Hit the ball first then the turf!Even got to visit with the Surdu’s. I joined Buck for a Napoleonic game.
Post on the blog 50 times or more – make them of good quality
I think I get a B- here, as I think my output dropped a bit. I made 32 posts in 2024. Quality – well I let the readers determine that!
Be a good blog follower – still a goal but one that I cannot measure!
Ditto on this grade-wise – trying my best.
Have multiple Zoom chats with fellow hobbyists
Probably a C. Could do more and hope to this year.
Go to a golf school and get my golf handicap down below 16
My 2024 Handicap Review from Massachusetts golf.
As shown earlier , I did go to a golf school in Orlando -AND benefited greatly from lessons there. But, I think I made more progress with our club pro, Jim LeBlanc at Quail Hollow Golf and Country Club. My handicap went down to 16.1, so I’ll give myself an A-.
Update the Tour of the Brookfields on my blog.
Tom Orszulak and Lynn Morin high-five at the Tour of the Brookfields!
This worked very well at sharing information with the players and documenting each of the six regular tournaments and the FINALS. I think A is appropriate.
Play golf (in season) at least twice a week – get in 80 rounds
A+ here – as you saw, I had 102 rounds posted (some were 9-hole rounds of course), plus around 10 other events of 18 holes (scrambles).
Win my flight in the Club Championship
Fell short here again, but I was more competitive than in 2023. Bad play on Day 2 sunk me.
Defend in the Club Derby
That definitely did not happen – my partner Tom Orszulak had an injury, and the virus finally got me and knocked me out of any possibility of playing.
No golf that weekend…and it SUCKED.
Be a competitive golfer
I’d say I was – I did tie Matt Stepanski for 1st place in the year-long quest for the Quail Hollow Sunday Sweeps “Fedex Cup” run by Dennis Rice. I think I was competitive overall – helped by a dropping handicap.
Be a good friend
I guess so. Always a work in progress!
Personal Highs in 2024
Recovery from knee surgery.
For the third year in a row – the Florida trip and golfing with my wife Lynn – and she continues to get better. Her teams actually did better in the Tour of the Brookfields than I did!
Clearwater Beach, Florida. Wow!
Getting together with the Jeffers and Surdus in Florida.
Getting together with family especially my Mom, my daughter Ellen and my granddaughter Tabitha.
Winning my first “Dave” award for my Wars of Ozz game “determined to be the best game at the HAVOC (Convention) that year. The criteria for the best game includes excellent concept and execution in game play, and player enjoyment.”
Winning my first “Best in Convention” award for my Wars of Ozz games at the HUZZAH! Convention in Maine.
Knocking out 556 figures for the Wars of Ozz!
Having EXCELLENT wingmen in Brad Gosselin and Leif Magnuson at MULTIPLE conventions.
Getting together with Dave Wood, Buck Surdu, Greg Priebe, Chris Palmer, and Duncan Adams, Eric Schlegel, and all of the other HAWKS in person.
Getting together with Fitchburg High School buddies Bob McNamara, Phil Schoenig, Peter Collette, and St. Bernard’s HS pals Mike Sullivan, and Eddie Tarka (and Tom Orszulak) to honor our late friend Leo Thibault, who passed away way too young back in 2007. Best part was getting his widow Sandy there to surprise us all at the end.
Being on the Committees for the Tour of the Brookfields tournaments and the New England Service Academy golf tournaments.
Amazing Halloween Party at Quail Hollow!
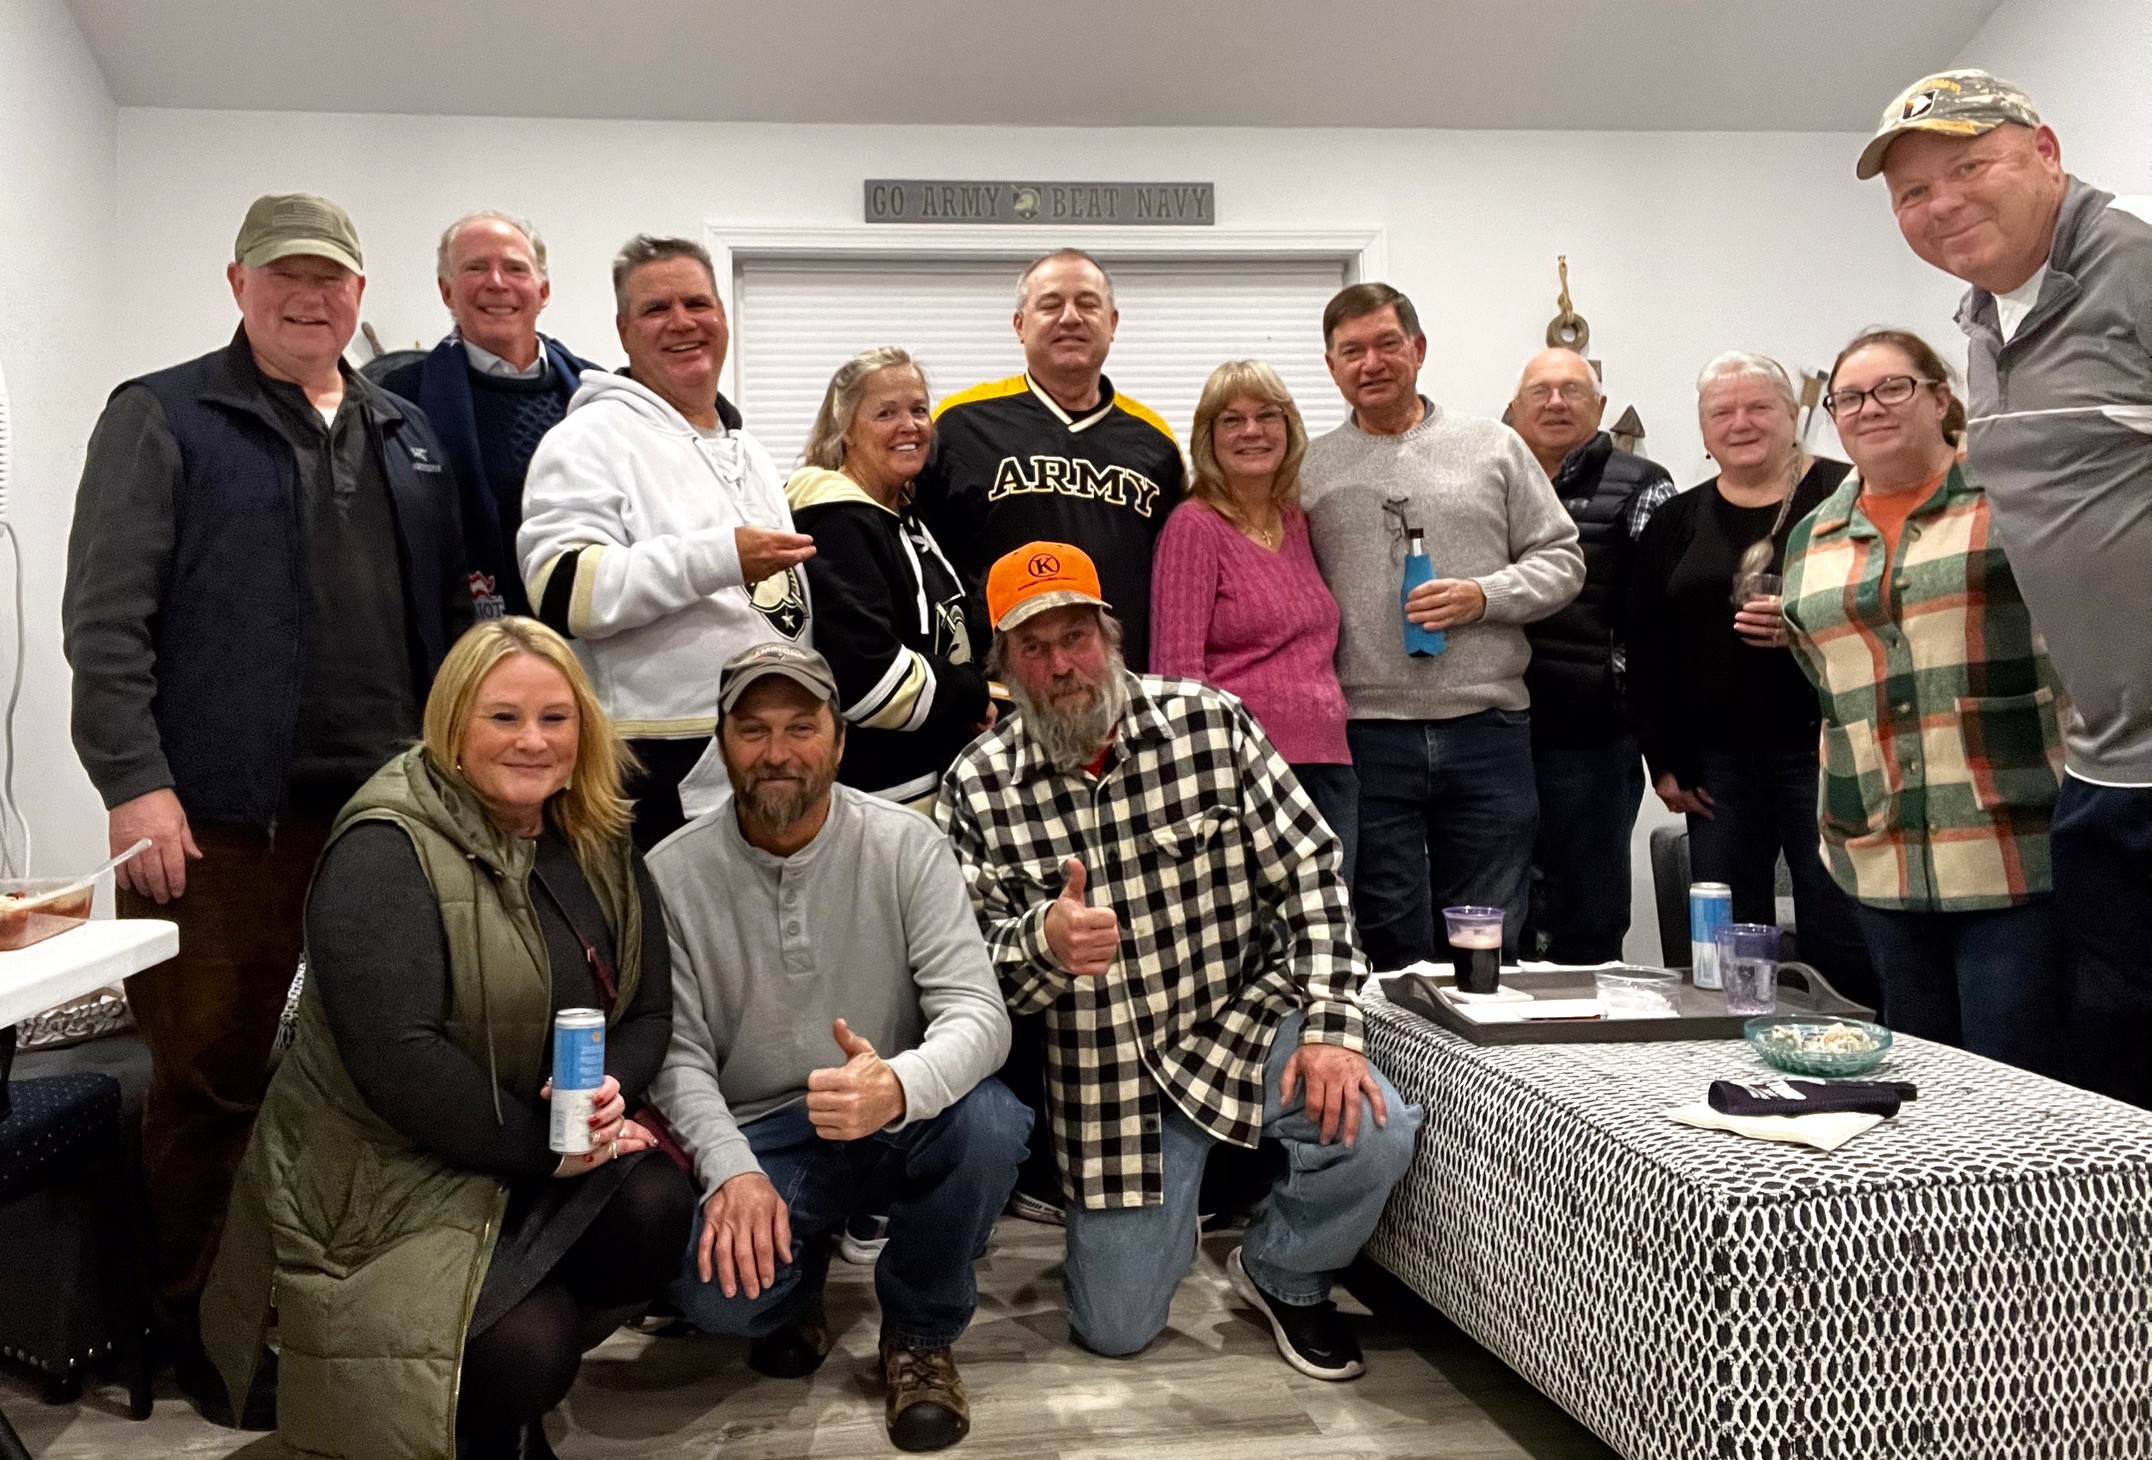
Great get together for an Army-Navy game watch party with amazing friends!
As a team, tying for first place for the Fedex Cup at Quail Hollow.
And again, being with my wife Lynn, every day (seriously, and she won’t likely read this).
Retirement is GREAT!
Ed Tarka, Bob McNamara, Phil Schoenig, me, Sandi Thibault, Mike Sullivan and Peter Collette at “The Leo”Halloween party!Army-Navy Game Watch PartyLynn and Tabitha – fun at Cracker Barrel!Me, Lynn, my Mom, Tabitha, Ellen, and Nick
Personal Lows for 2024
COVID.
Army losing to Navy…not personal, but always feels that way!
Life’s been pretty good otherwise!
My goals for 2025
Well, its time to set my Life, Golf, Miniatures, & Other Distractions goals for 2025.
Have a great Florida trip again.
Paint 500 figures or more.
Continue to run and play more games – and continue tracking them too.
Attend and run games at conventions. This would include TotalCon, HAVOC, COLD BARRAGE, HMGS COLD WARS, MAYHEM, HUZZAH!, HMGS HISTORICON,HMGS FALL IN, EllisCon, and others…
Get the Mass Pikemen more active.
.Complete the Musculite faction for Wars of Ozz.
Complete the Professor Nitpik faction for Wars of Ozz.
Complete the Ix faction for Wars of Ozz.
Complete the Noland faction for Wars of Ozz.
Paint up a cavalry regiment for the Harvest and the Quadling factions.
Complete one more scenario for my scenario booklet for Civilizations Collide.
Paint up a platoon from Wargames Supply Dump for Combat Patrol™ .
Try to get my Nomonhan WaT project off the ground. Note I said “try”. Again.
Paint SOME tanks.
Post on the blog 40 times or more – make them of good quality.
Be a good blog follower – still a goal but one that I cannot measure!
Have some Zoom chats with fellow hobbyists.
Get my golf handicap down below 14.
Update the Tour of the Brookfields on my blog.
Play golf (in season) at least twice a week – get in 90+ rounds.
Win my flight in the Club Championship.
Win the Club Derby
Be a competitive golfer.
Be a good friend.
Of course, again I must say THANK YOU to all who make the time to read this blog and comment on my stuff, craziness, and madness – Have a Happy 2025!
The first question that I am sure that you have is – “what the hell is a Temujican?“!
To answer that, let’s ponder the wild and wonderful world of the Wars of Ozz for a minute. Recently, my posts have shown the mighty Whim Whim and their leader, Sultan Whim. While the Whim Whim are indeed a force to be reckoned with in the Great Impassable Desert of the South- they do face a rival force in the Temujicans. These green-skinned desert nomads are cousins of the Gillikins (and are somewhat goblin-like).
Map of Ozz
As for the name “Temujicans”, it has an origin, and I had a hand in it. When the force was launched they were called “Eastern Desert” nomads. Rather mundane to be sure. The great Buck Surdu challenged several of us to come up with a better name that would evoke a historical reference for a cavalry-based force that could sweep across plains and deserts. My first thoughts went to considerations of the history of Genghis Khan:
Now you see. As he was born “Temujin”, and the Gillikins were their cousins, I came up with the name “Temujicans”. Thus this was adopted as the official name of the faction! I contributed!
In any case, I decided to start building my Temujican army with the four infantry regiments I had. While in the game they are more cavalry-oriented – I decided that starting with infantry was a reasonable way to get going on the faction. Like the Whim Whim, the Temujicans do not have artillery or musketry.
As cousins of the Gillikins, they do have access to units of “Mercenary Gillikin Longbows”, which are SKU OZZ-409. I had two of these regiments to paint. I also had two other infantry regiments of “Infantry with Command – Unknown Immortals”, which are SKU OZZ-533. All four regiments have 21 figures each for a total of 84 figures for this post. All are metal and 28mm – though both Gillikins and Temujicans are somewhat diminutive in stature. They are bigger than Munchkins though. The Unknown Immortals, have their faces hidden, and all have the same pose except for the leader, drummer and regimental commander. The MGL’s have multiple poses.
Mercenary Gillikin Longbowmen from the Wars of Ozz websiteUnknown Immortals from the Wars of Ozzwebsite
Both types are armed with bows, but the Mercenary Gillikins have longbows (regiments hereafter referred to as MGL). An advantage for the MGL’s is that longbows can fire over intervening troops. The Unknown Immortals have bows and spears.
The MGL’s cost 5 points apiece – and have values for Marksmanship, Melee, Resolve, and Elan of 6/10, 5/10, 6/10, and 5/10. Each brigade can have up to two of them. The Unknown Immortals cost 6 points and have similar values for Marksmanship, Melee, Resolve, and Elan of 6/10, 5/10, 5/10, and 6/10. There can be up to two regiments of Unknown Immortals in a Temujican brigade.
So why are Temujicans green skinned? In Wars of Ozz, all races, to include Gillikins and Temujicans, were affected by the viruses and mutagenics released in the Last Great War. One of those effects was mutation of humans (and others) into different races. Another was the effect of “color mania” – with different factions being affected differently. While the Army lists (found here) describe the Temujicans as being outfitted in different sandy and brown shades, I thought they must have some residual affinity for purples as the Gillikins do. Hence, I decided to use some magenta and purple colors on them. I also used some darker bronze for some of the metallics like buttons and badges. You will also notice some neon colors like yellow and yellow/orange as liners and shield colors. Additionally, like I did with the Whim Whim, I tried to have common colors among the units designated as 1st or 2nd. I did this so as to manage to make sense on the tabletop as I deploy brigades. This will be more clear after you see some photos, so let’s start with WIP shots and discussions
WIP Discussion and how the Project Progressed
I started back on October 14th, and finished all on November 2nd. In between all this I had several golf events plus a costume party! More on those in a bit. While there were 84 figures in total – the Immortals had each a shield, a bow holder, and a quiver.
First, I needed to do lots of filing!
The Unknown Immortals regiments in prep.Close up of the sprue that held the Immortal’s bow holder/sword handle combination, and a quiver with arrows.
Then it was on to washing and organizing it all:
All pieces for this Temujican infantry project filed, washed, and ready for assembly/painting on October 15th.
By October 24th I had made some progress on the accouterments and the figures.
As I mentioned, there was golf and Halloween too. I did end up shooting an 84 on my home course – which was a personal best – plus coming in tied for first in the year-long contest at my club – but I digress…
Plus for Halloween we had a nice visit from Elsa (aka Tabitha my granddaughter):
My daughter Ellen, Tabitha (as Elsa), and my wife Lynn
Then our Halloween party saw this couple (us) as Gru and a Minion:
Gru and his minion
Back to the Temujicans!
By October 29th, I was nearly finished with initial painting and assemblies:
Basing work on the figures followed:
Gluing the figures down AND SURGICALLY covering the bases with the sand paste and rocks took some time. I did not want a mess on the paint jobs, so typically I glued down 3 out of 4 of the figures first, then applied the paste, then added the final figure. Below you’ll see that after the paste dried, I added pigments to the bases. One regiment has no pigments as a comparator. I really like the effect of the three pigments I use on the sand paste – and recommend their use if you want a desert look.
Bases showing 3/4 with pigments.
Then I varnished the lot with an airbrush, and once that dried I added flocking tufts and rocks.
All the paints that I used are listed at the end of this post – but let’s share some…
Eye Candy
1st Mercenary Gillikin Regiment
1st Gillikin Mercenary Longbow Regiment in line formation. Their coats are reddish brown with a sallow yellow/orange liner.1st Gillikin Mercenary Longbow Regimental Commander. Note the magenta bicorne hat.Typical stand of the 1st Gillikin Mercenary Longbow Regiment.Command stand of the 1st Gillikin Mercenary Longbow Regiment.1st Gillikin Mercenary Longbow Regiment in column formation.
2nd Mercenary Gillikin Regiment
2nd Gillikin Mercenary Longbow Regiment in line formation. The coats are a sandy brown with neon yellow/greenish lining.1st Gillikin Mercenary Longbow Regimental Commander. Note the purple bicorne hat.Typical stand of the 2nd Gillikin Mercenary Longbow Regiment.Command stand of the 2nd Gillikin Mercenary Longbow Regiment.2nd Gillikin Mercenary Longbow Regiment in column formation.
1st Temujican Unknown Immortals Regiment
1st Temujican Unknown Immortals Regiment in line formation. Their coats are greenish brown. Their shields have alternating chevron colors of green (for Temujicans flesh color) and sallow yellow/orange.1st Temujican Unknown Immortals Regimental Commander. Note the magenta bicorne hat.Typical stand of the 1st Temujican Unknown Immortals Regiment.Command stand of the 1st Temujican Unknown Immortals Regiment.1st Temujican Unknown Immortals Regiment in column formation.
2nd Temujican Unknown Immortals Regiment
2nd Temujican Unknown Immortals Regiment in line formation.2nd Temujican Unknown Immortals Regimental Commander. Note the purple bicorne hat.Typical stand of the 2nd Temujican Unknown Immortals Regiment.2nd Temujican Unknown Immortals Regiment in column formation. I thought this showed the command stand pretty well.
Group Shots
Here are some group shots of all of the 4 regiments:
Video
Lastly, here is a very short video I took of all 4 regiments that is nice:
Alternatively, I did post the same video on Instagram with some music from Thin Lizzy:
I did think about how many “points” IRO or Wudugast would have given me for these 84 goblinoids for their “Orktober” painting extravaganza (if I was in it), but that’s more curiosity than anything else. Plus I really took until November 2nd to finish. Given that my 1984 West Point class was having our 40th reunion during that (last) weekend (which I did not attend) AND that Army beat Air Force in football too (which I did watch) – I did get to remember my 84 class with finishing these 84 figures.
So next I am on to the Temujican cavalry. I have two regiments of heavy and three of light, plus three brigade commanders to do. Onwards!
PAINTS, INKS, GLAZES, SHADES, WASHES, PIGMENTS, FLOCKING, GLUES AND MORE THAT I USED ON THE TWO REGIMENTS OF MERCENARY GILLIKIN LONGBOWMEN:
Square MDF Brigade Leader bases from Wars of Ozz Miniatures (used as regimental commander bases)
Wargames Accessories number 21 bases (2″ square steel bases)
Wargames Accessories number 17 (1.5″ X 1″ steel bases)
Temujican flag designs from Wars of Ozz Facebook page (printed on card stock)
Card stock
If you want to check out the excellent Wars of Ozz figures’ range – there are two places to get them and to get the rules (and I make no money from this btw). The game rules and the figures are available from the next two places:
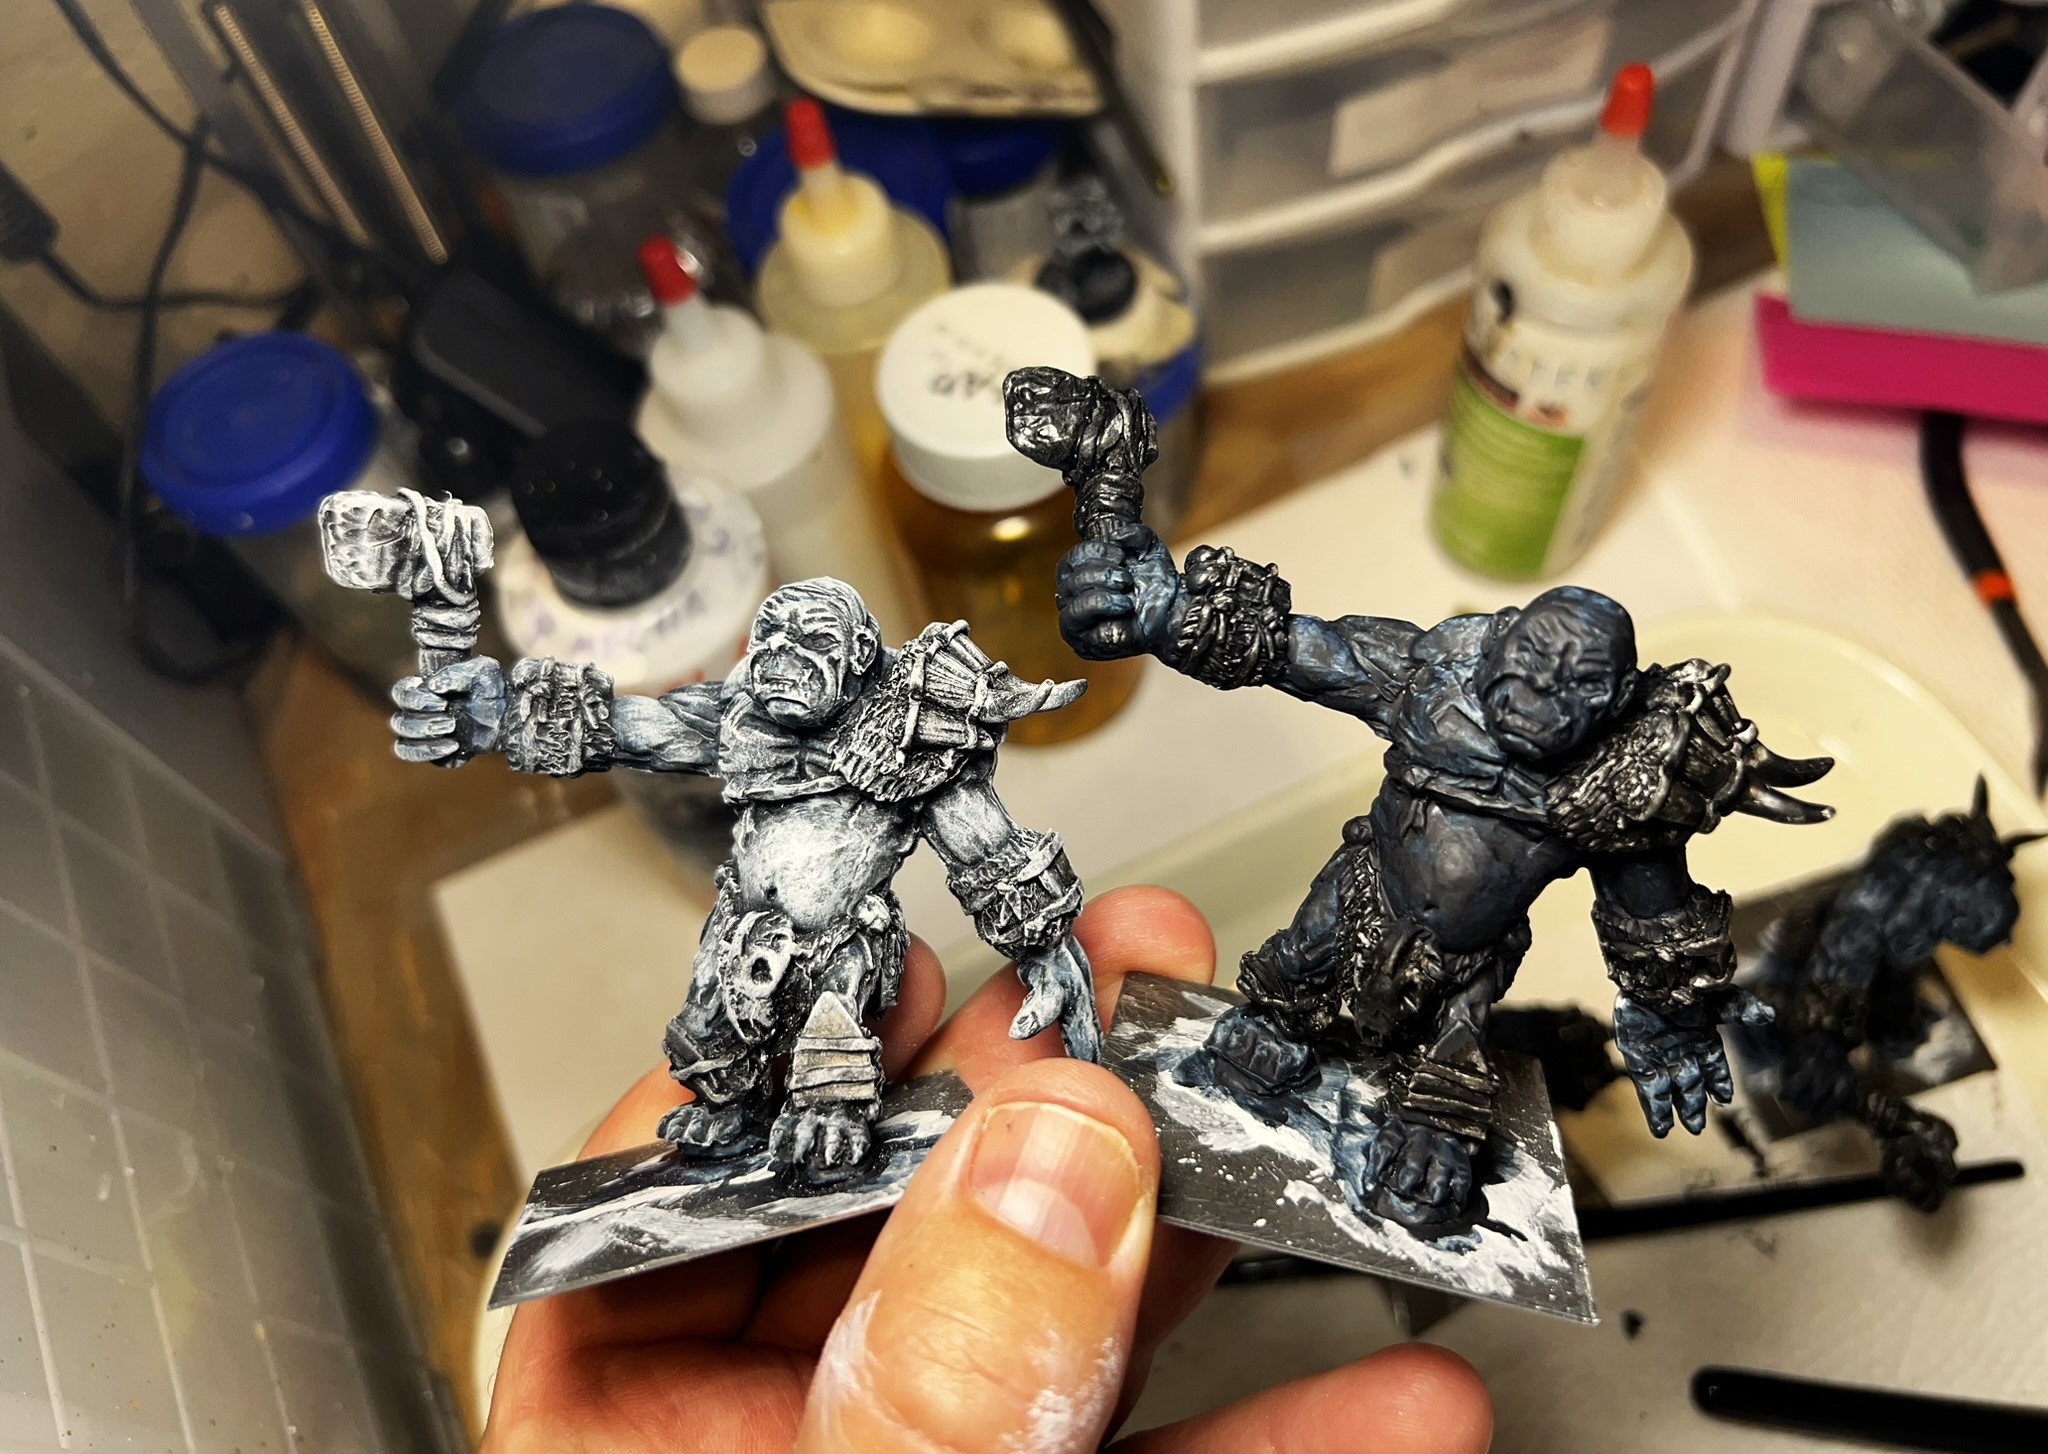
Earlier this year, two UK bloggers, Roger from “Rantings from Under the Wargames Table” in conjunction with Dave Stone of “Wargames Terrain Workshop” set out a painting challenge poll. I think Roger came up with the idea of a painting challenge where we all would paint the same figure. Roger sent out a poll on what type of figure would be chosen, and Dave volunteered to sculpt it.
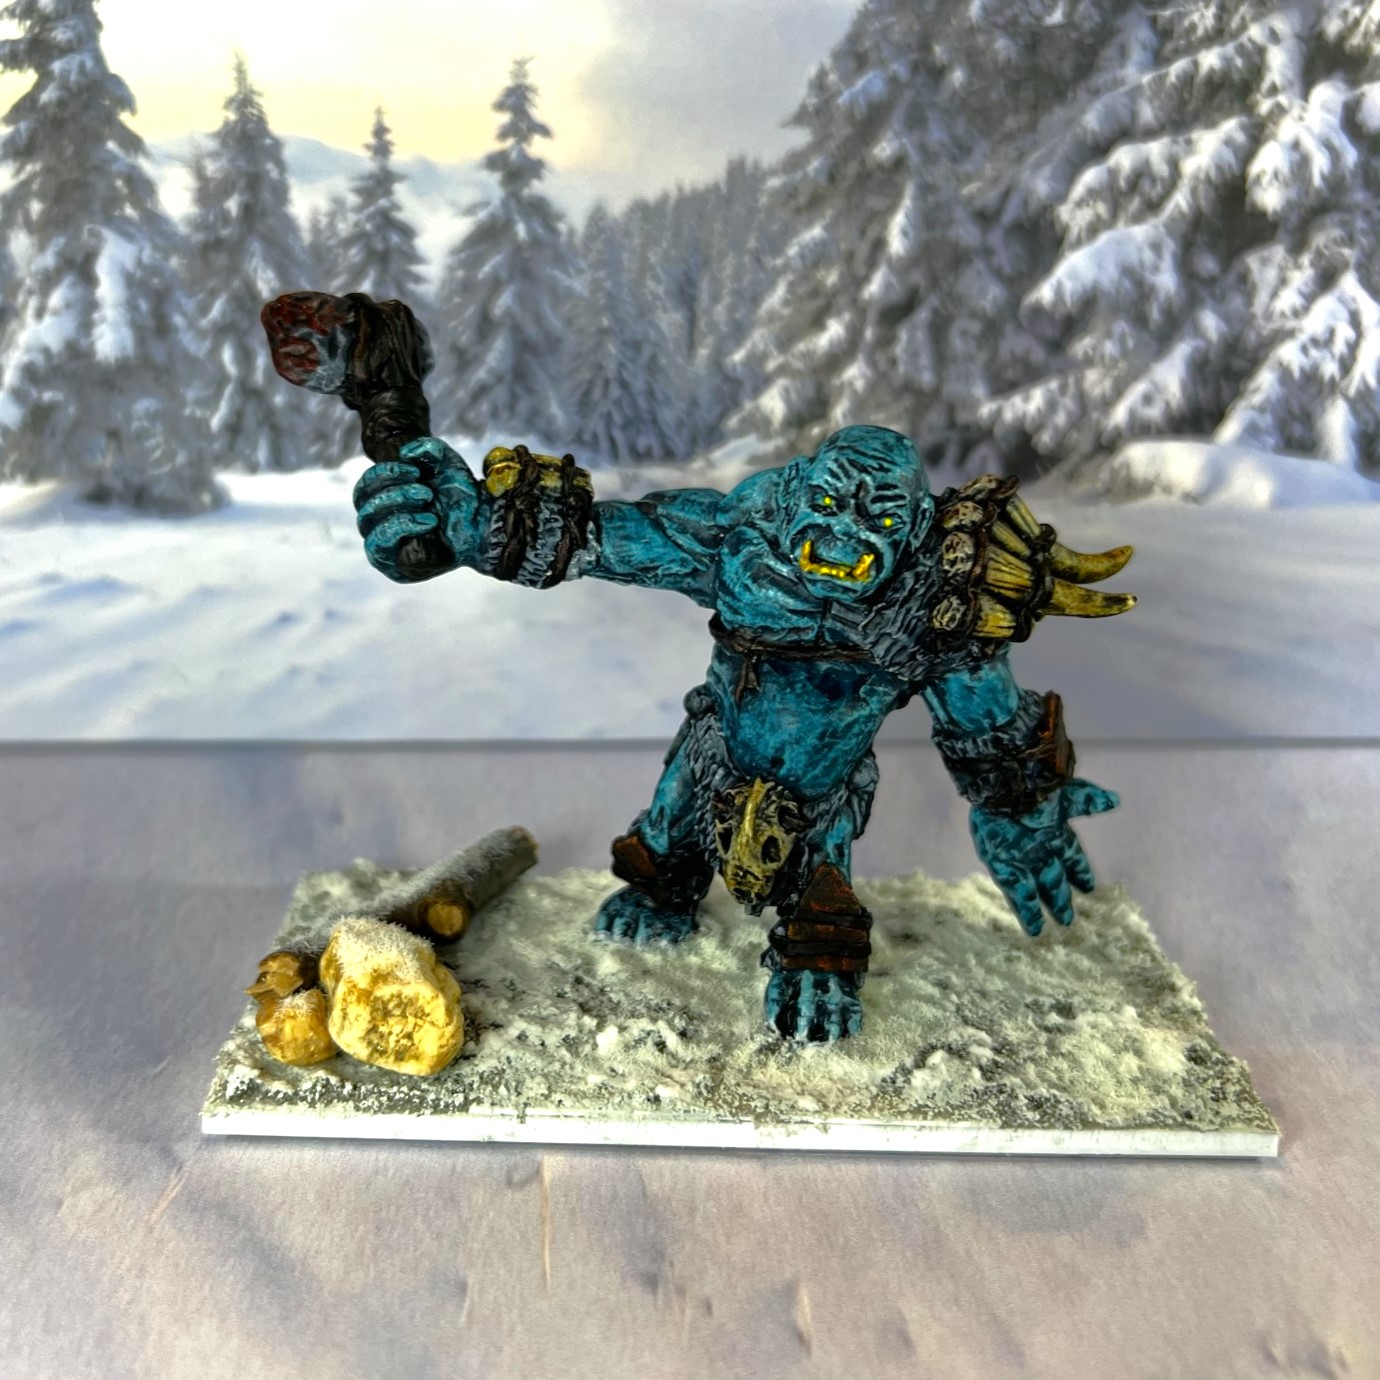
The poll results ended up with the selection of a common figure for us all to paint and share by the September in a “Paint What We’ve All Got” painting challenge. That figure selection ended up being an ogre: “Savage, armoured fantasy Ogre with a hand weapon”.
The genesis of this was Roger’s post on back on March 8th with the aforementioned readers’ poll. Dave’s March 28th post on the Challenge Ogre is here. Roger followed up on his blog here. Dave, who is a masterful sculptor and modeler, came up with the figure. The ogre figure carries a massive stone ax. He wears lots of bones on his wrists, and an animal pelt on his lower torso and a shoulder pelt. The shoulder pelt is festooned with multiple animal horns as well. Dave went with a Norse motif with the sculpt. Here is the original photo of the ogre sculpt from his blog:
Photo from Dave Stone’s blog showing the original sculpt that he then cast.
Once the challenge was set, I contacted Dave Stone and ordered five of the figures, which arrived in the spring. Why 5? So that I could have an entire regiment of them!
I had no idea as to when I would get to painting them -until recently – when I had decided that this was a good opportunity to accomplish a few things. First, this would let me have a small “palette cleansing” (pun intended) chance to paint something a little different than all the Ozz stuff that I have been painting lately. I do love the Ozz stuff but variety is the spice of life as they say.
Second, painting up a unit of these would be useful for a game of WOOD (Wars of Orcs and Dwarves). WOOD is basically a similar set of rules by Buck Surdu using his Wars of Ozz engine for mass fantasy battles with a few changes.
Lastly, it was an opportunity to participate in an intriguing and fun painting challenge with fellow bloggers across the globe.
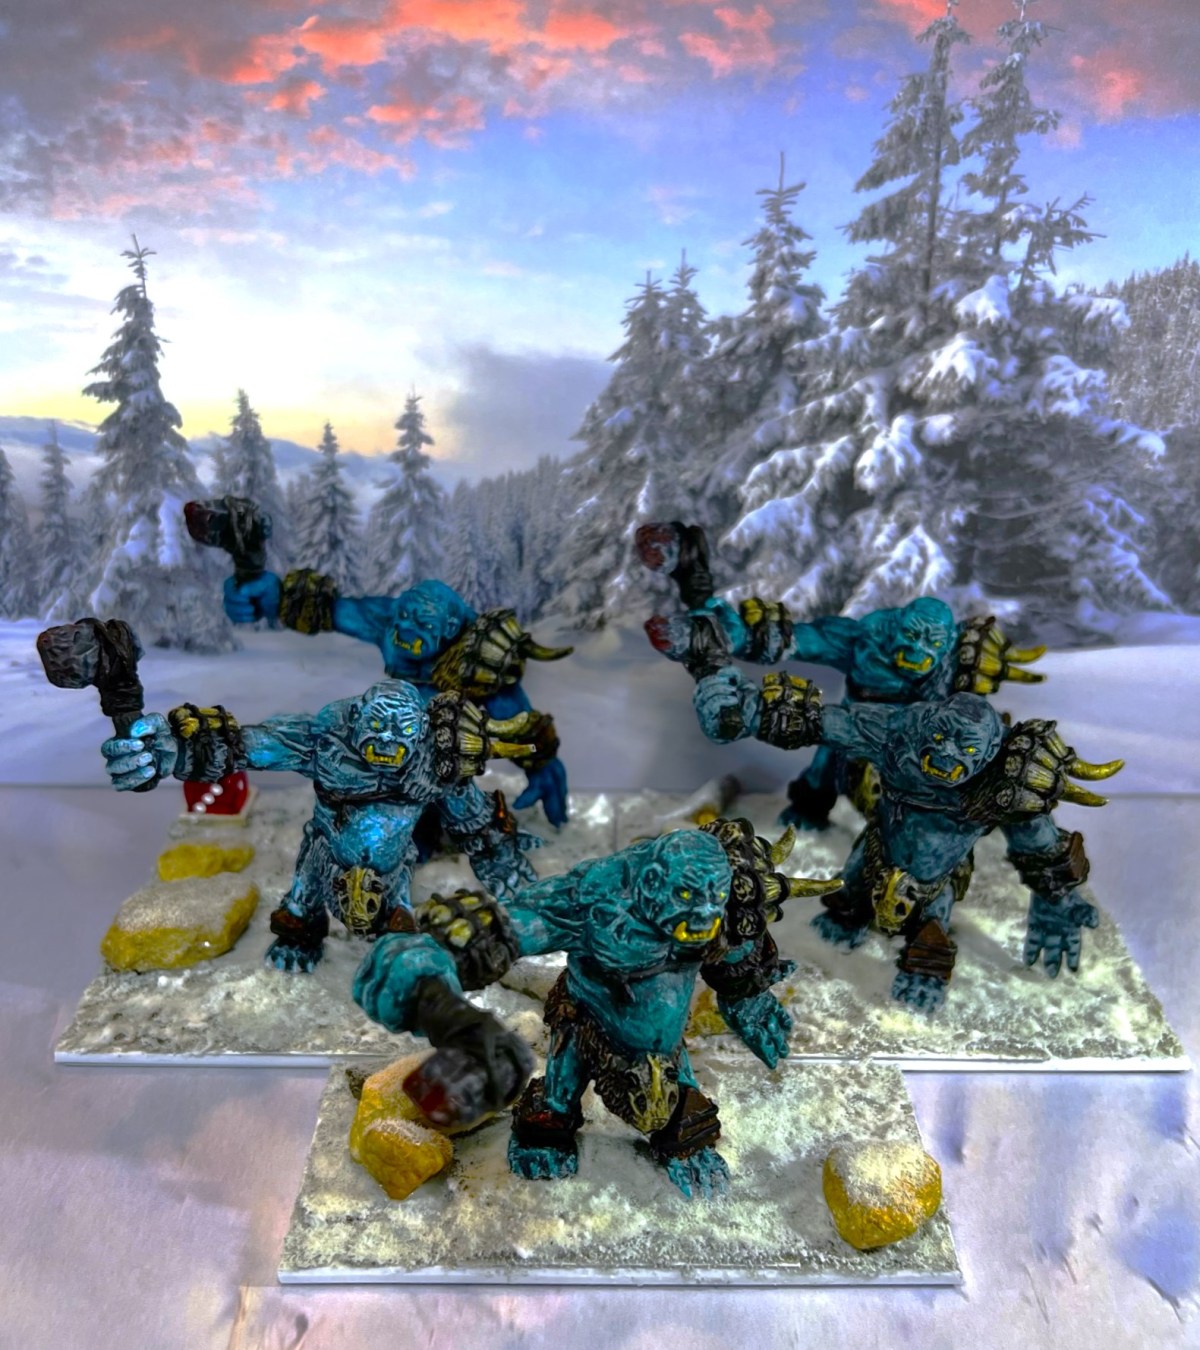
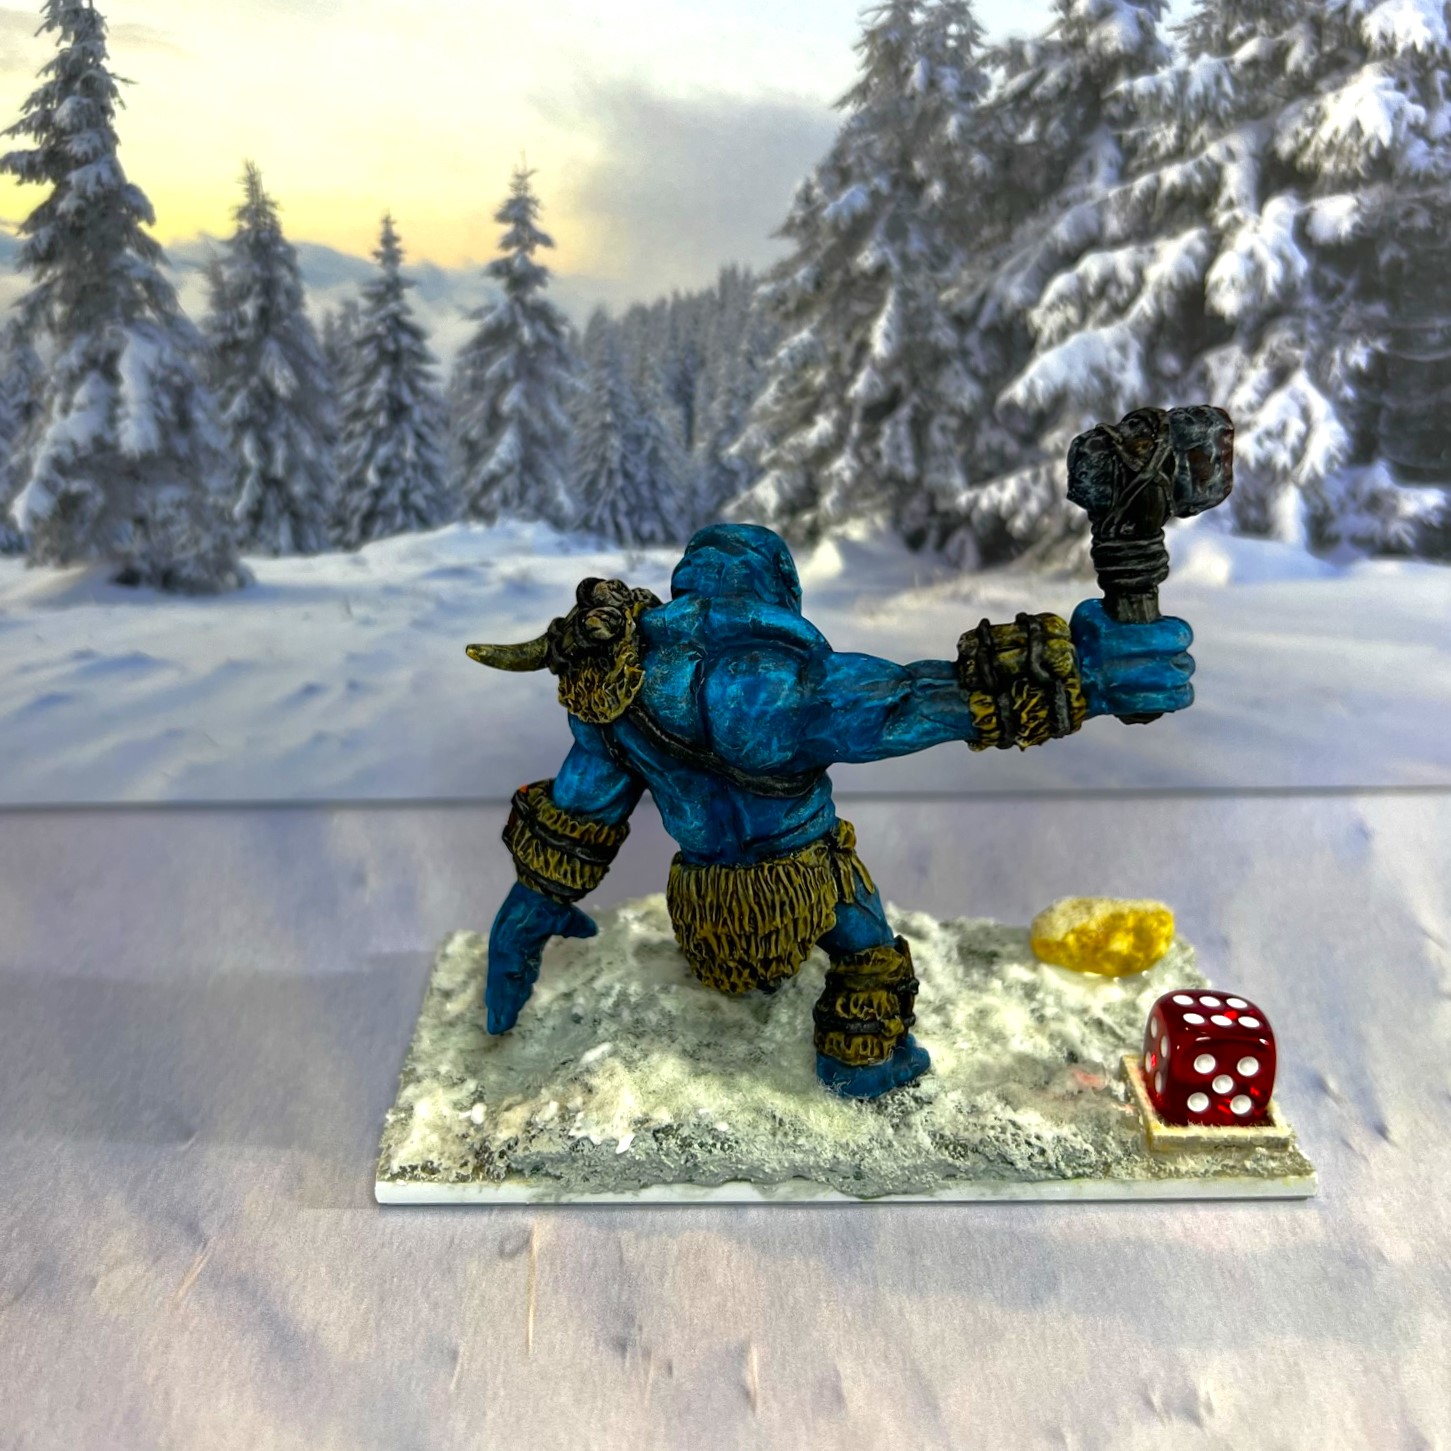
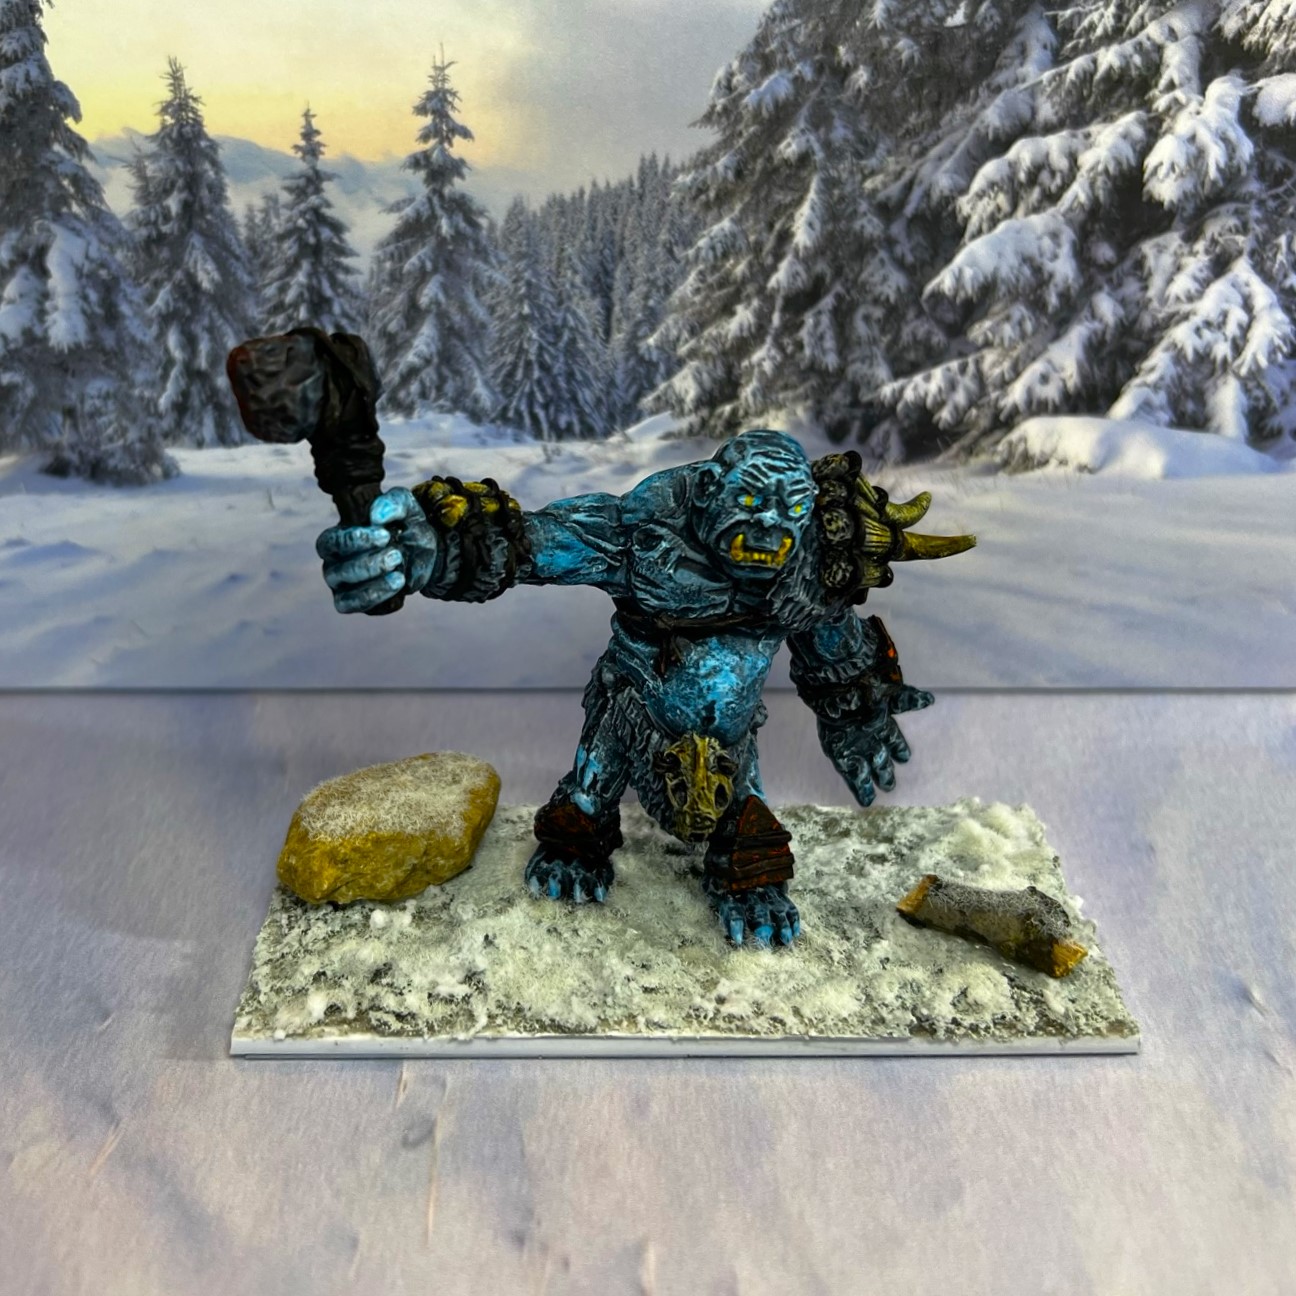
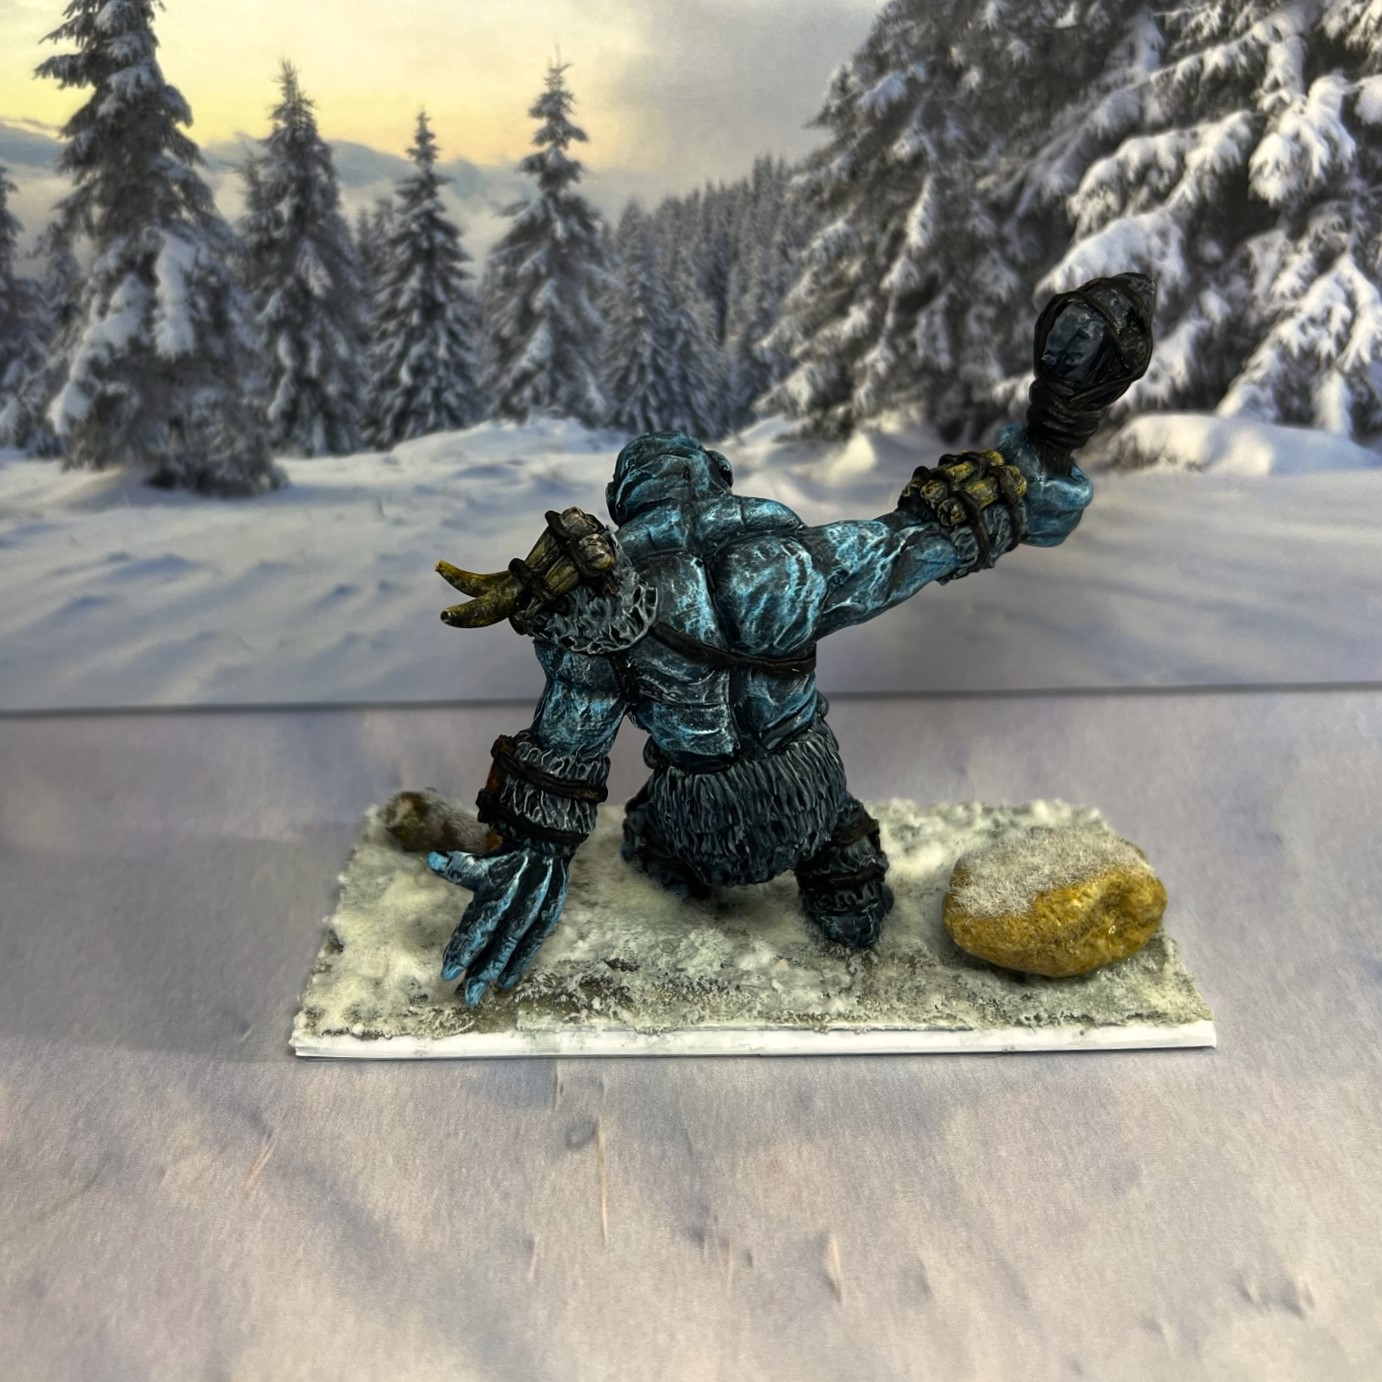
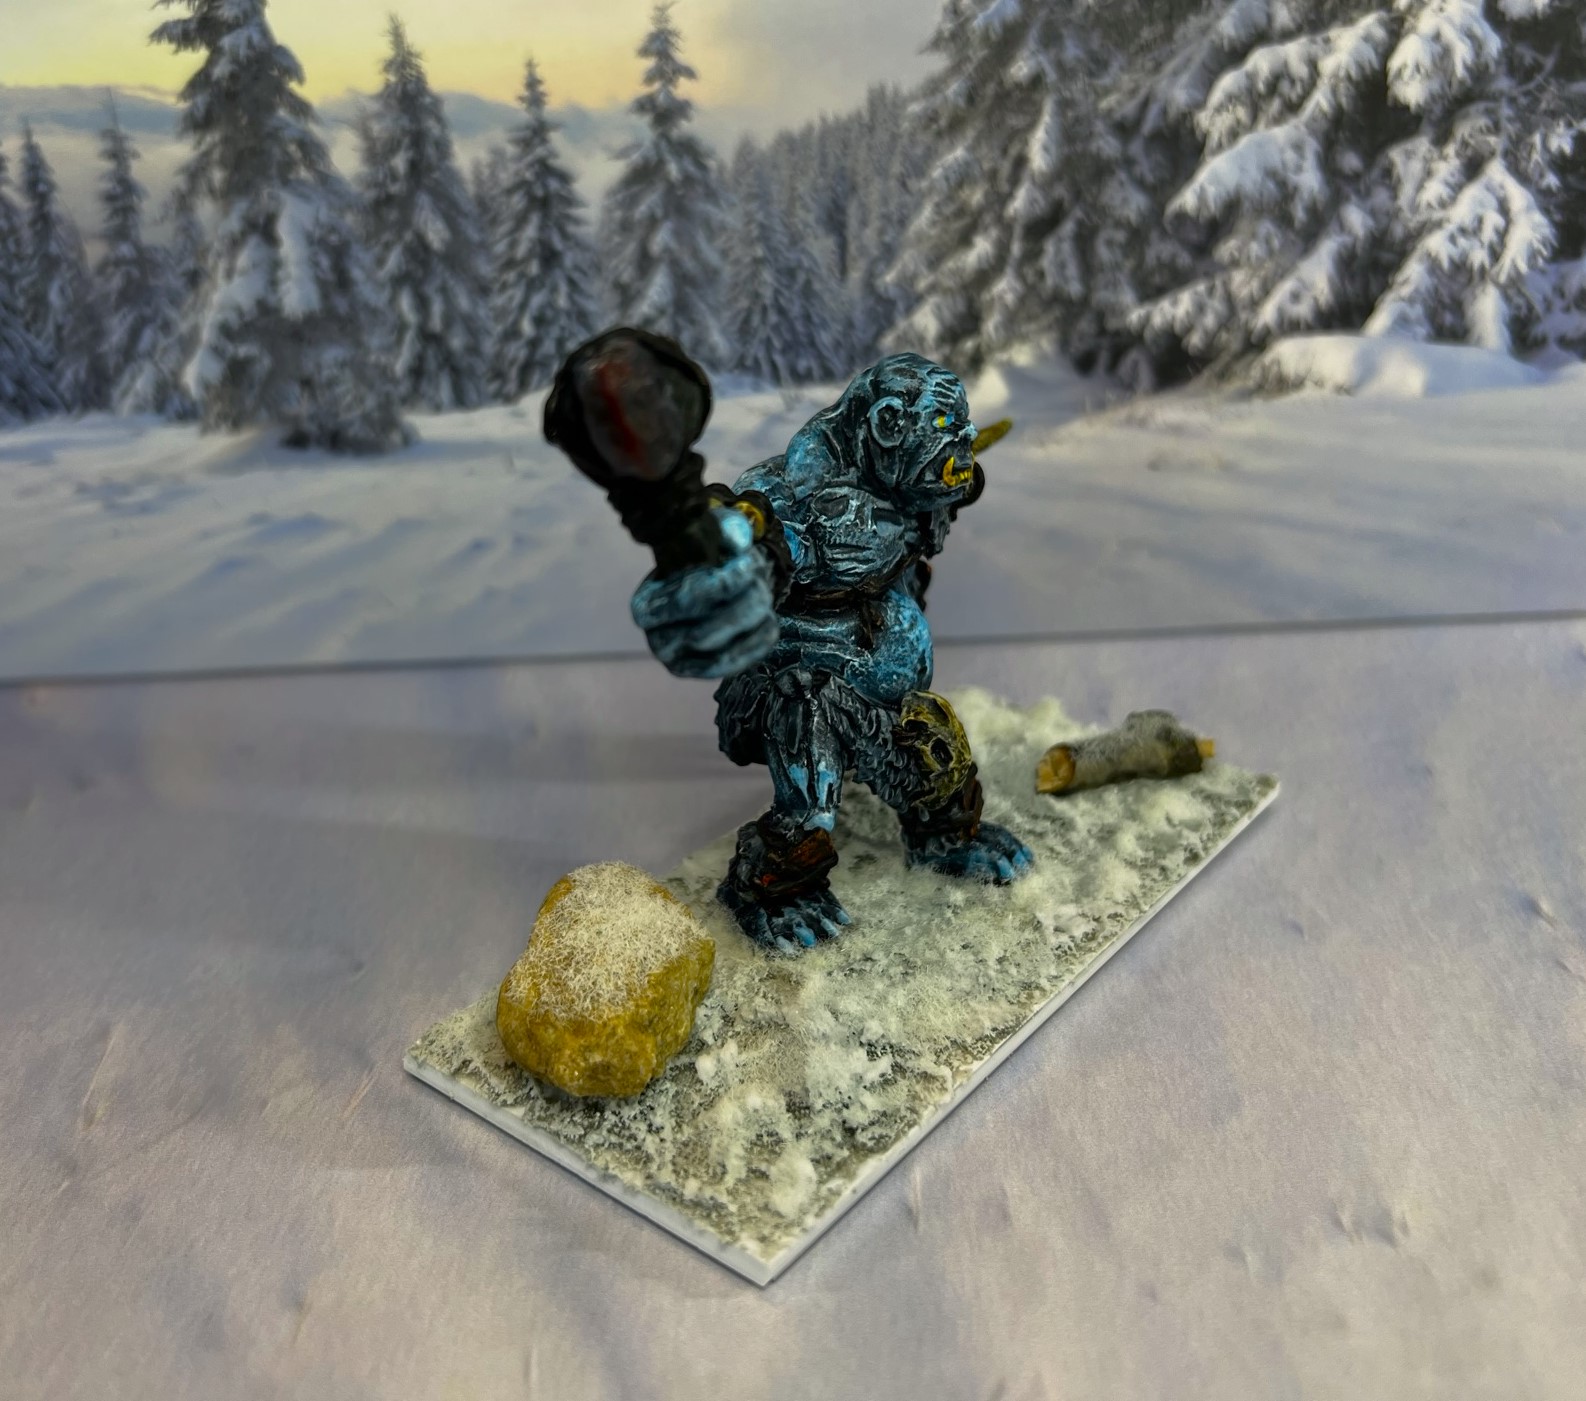
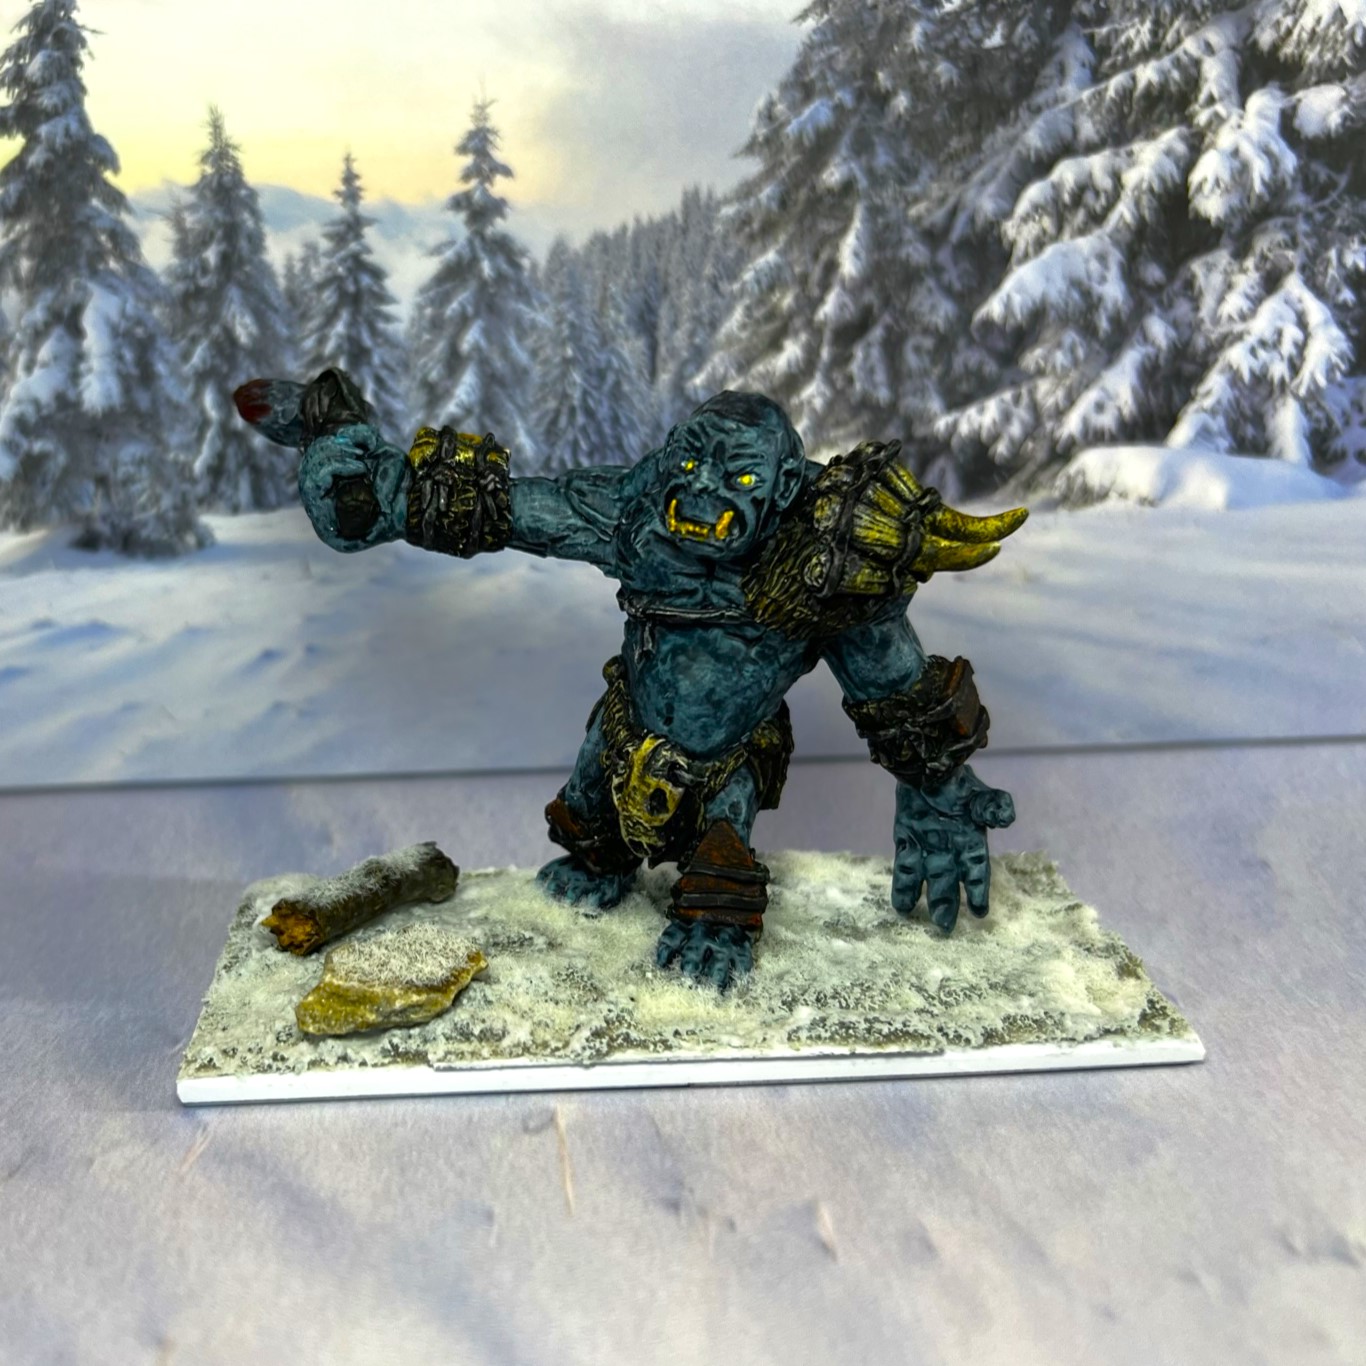
Again, the figures arrived sometime back in the late spring/early summer timeframe. Since then, I worked on other things that you’ve seen this blog. The packing Dave did of the figures was outstanding – they all arrived in excellent condition. After looking at the figures, I decided that I wanted to make them “frost ogres”, as they looked to me to be perfect for a winter environment. I debated between ice ogre and frost ogre. In the end I went with Frost Ogre. Yes, I know there are frost giants, ice trolls, and the like, but for fantasy stuff you can do whatever you want!
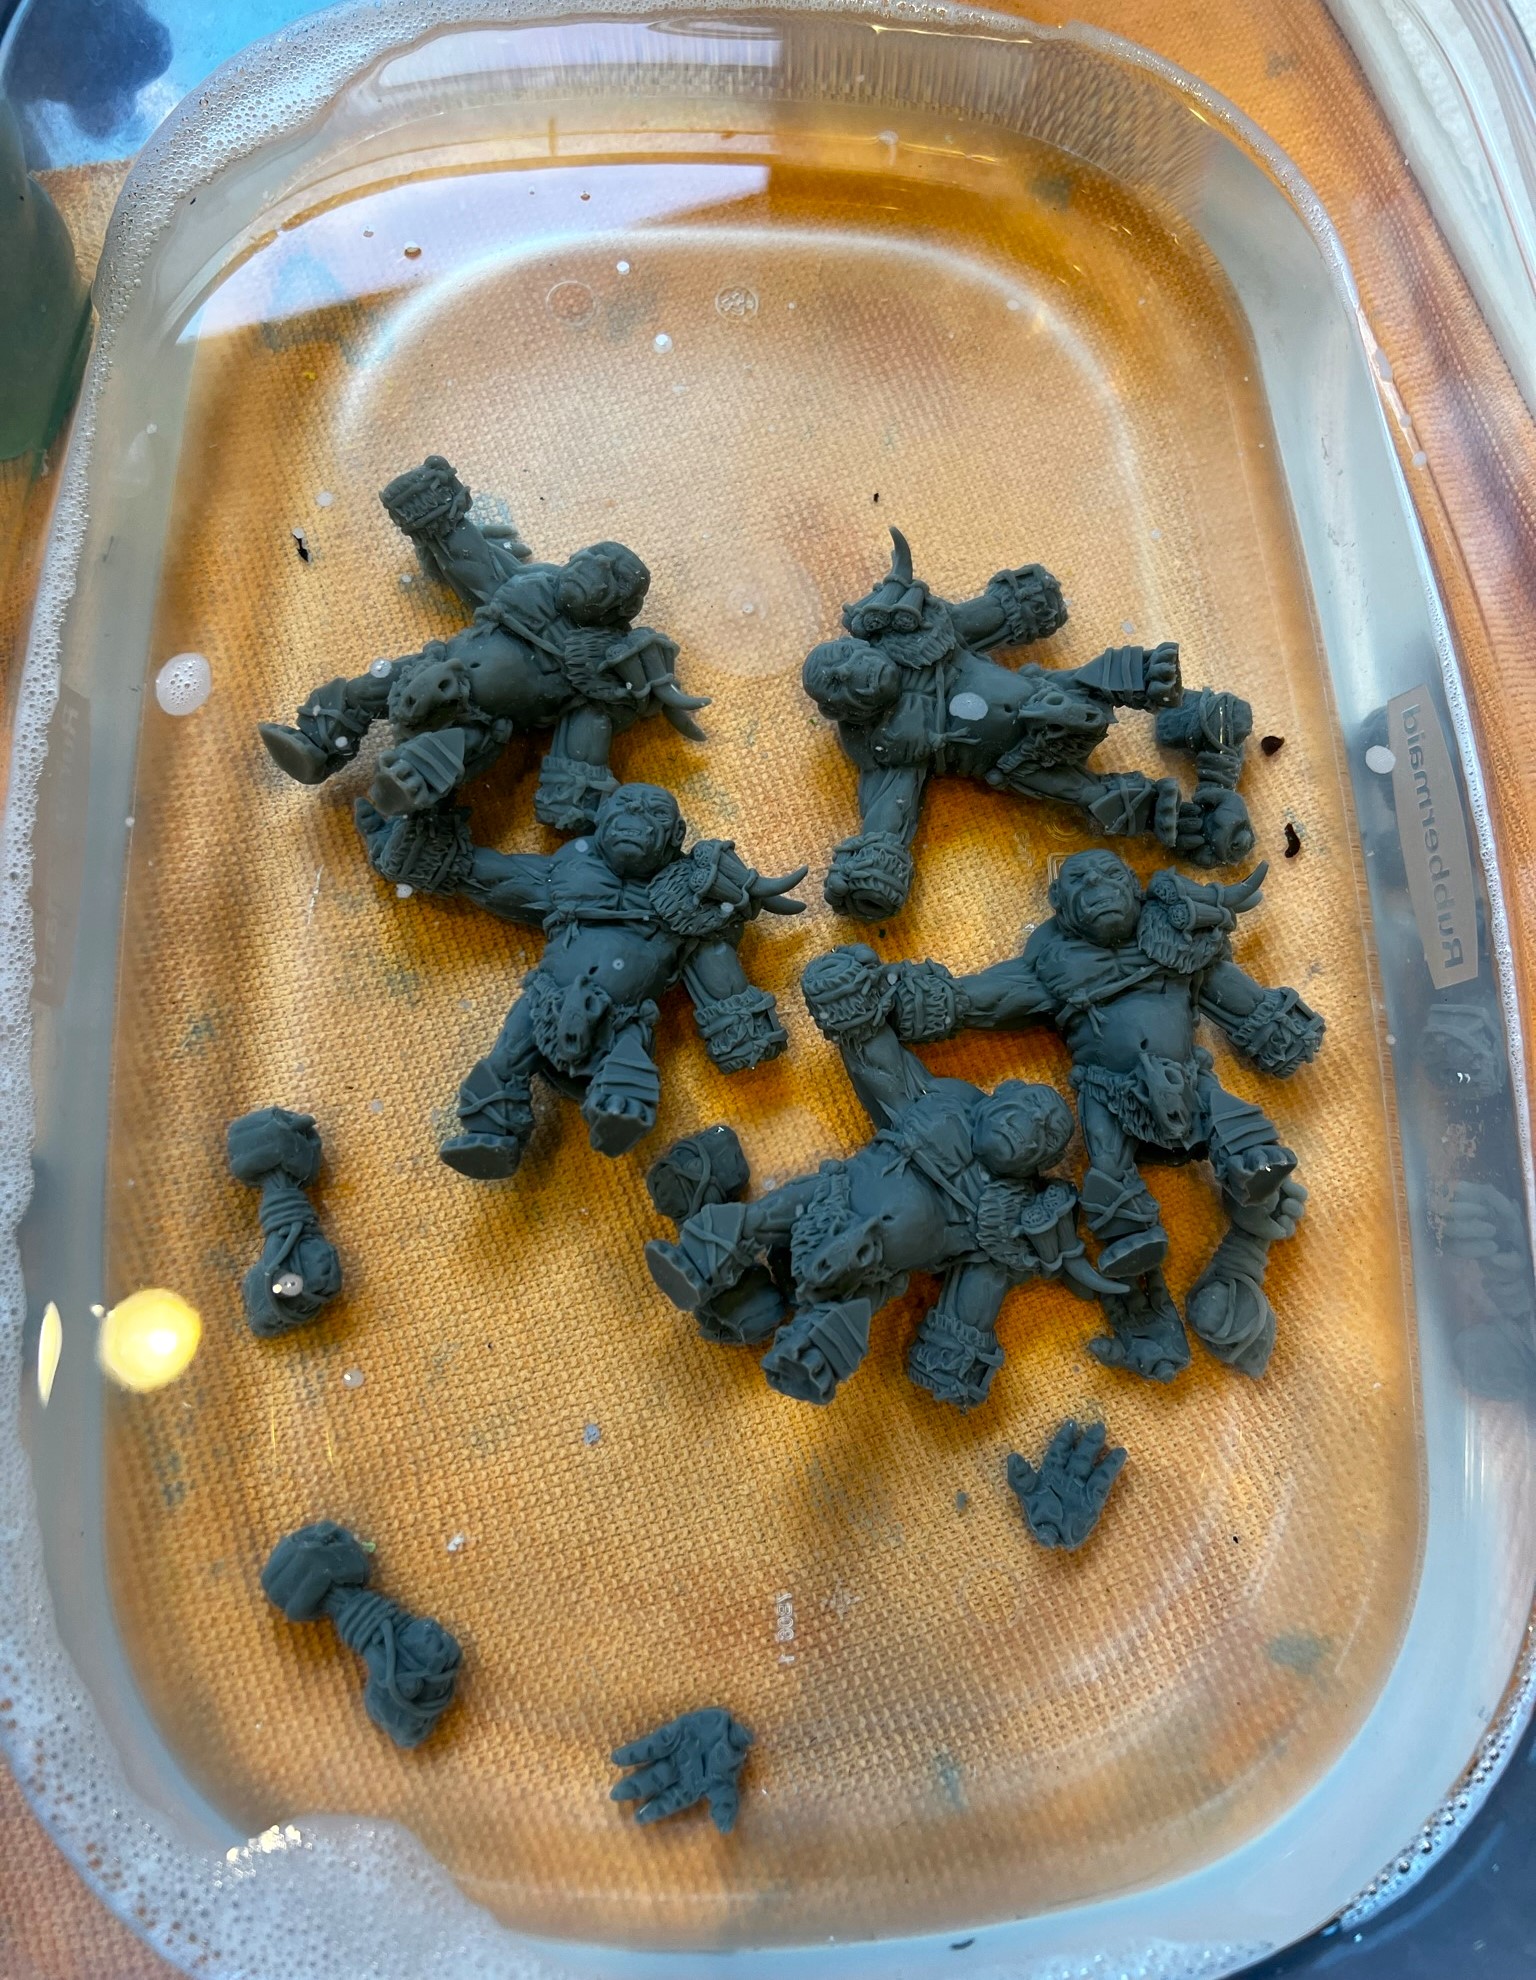
I gave them all a good scrubbing as I hate when paint does not stick well to resin.
Getting a good soak after scrubbing.Drying before assembly.
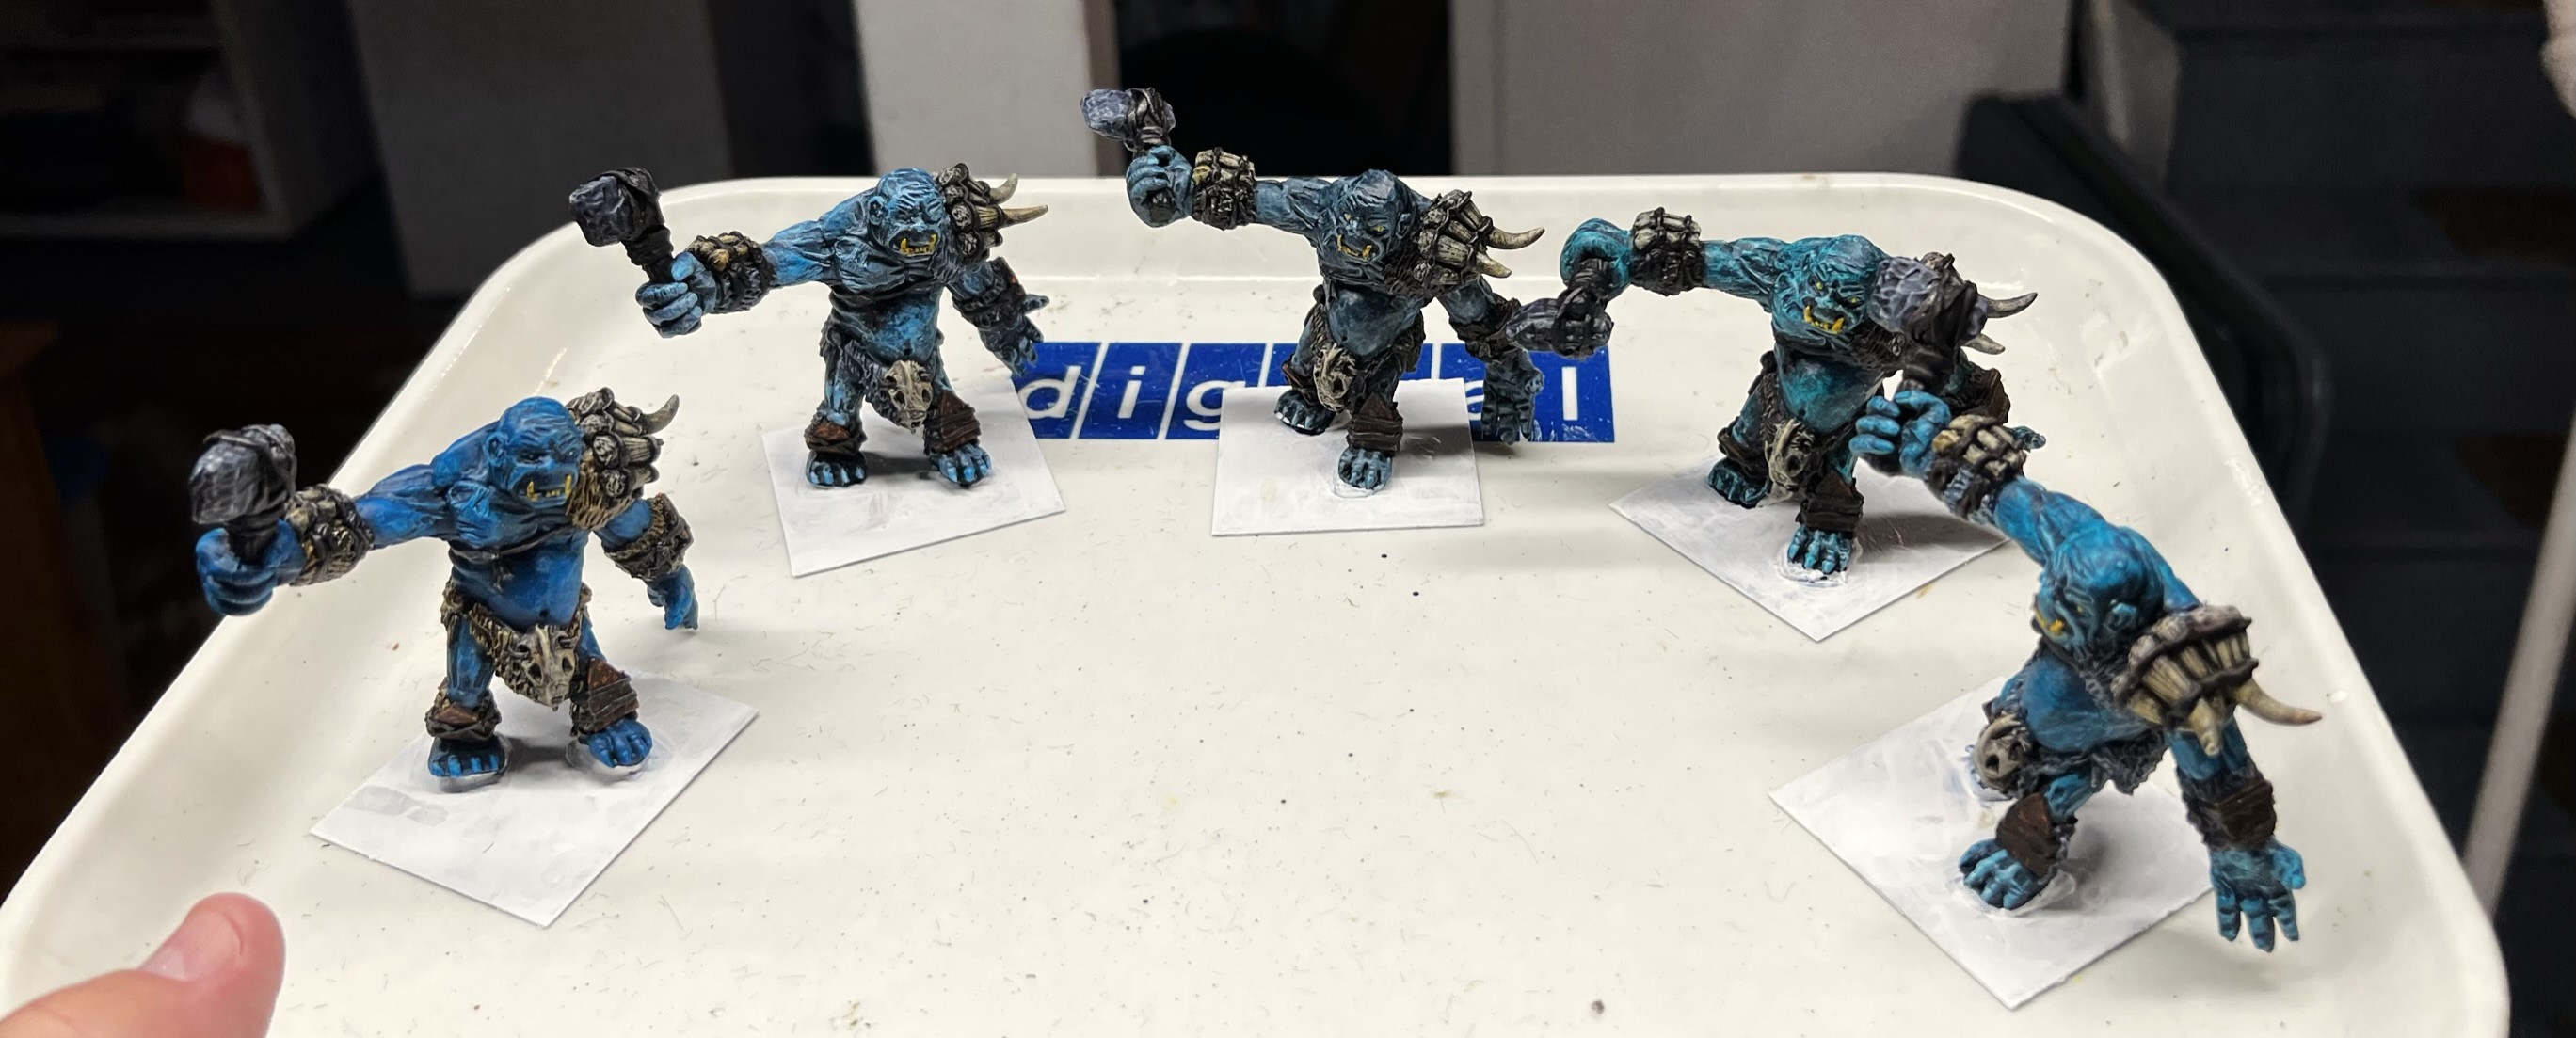
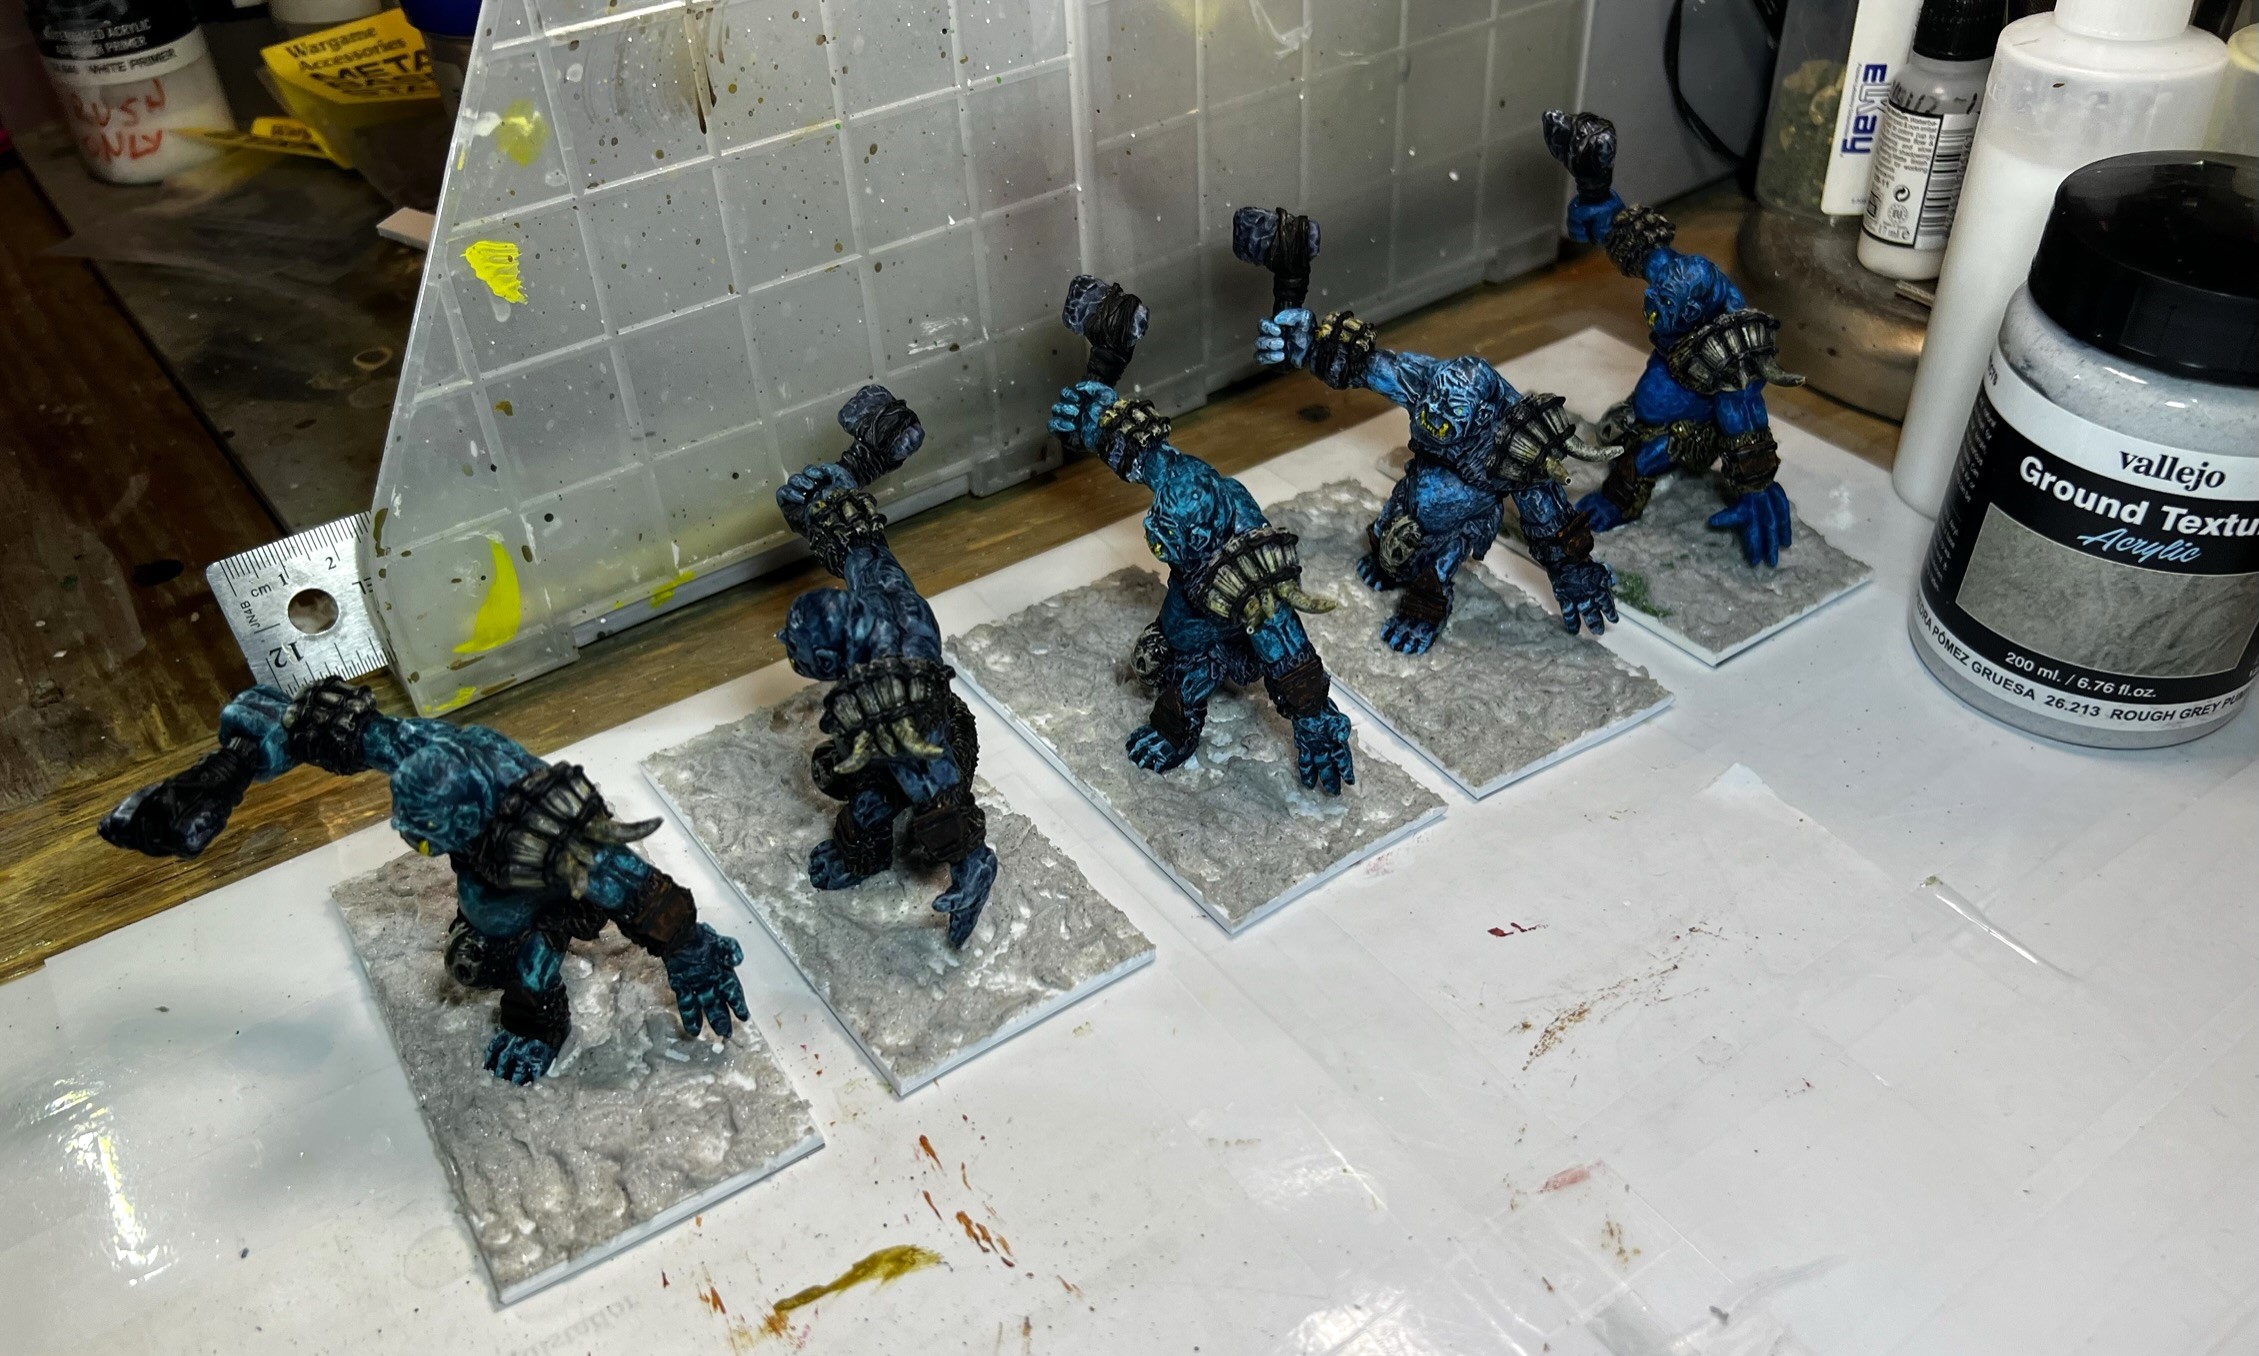
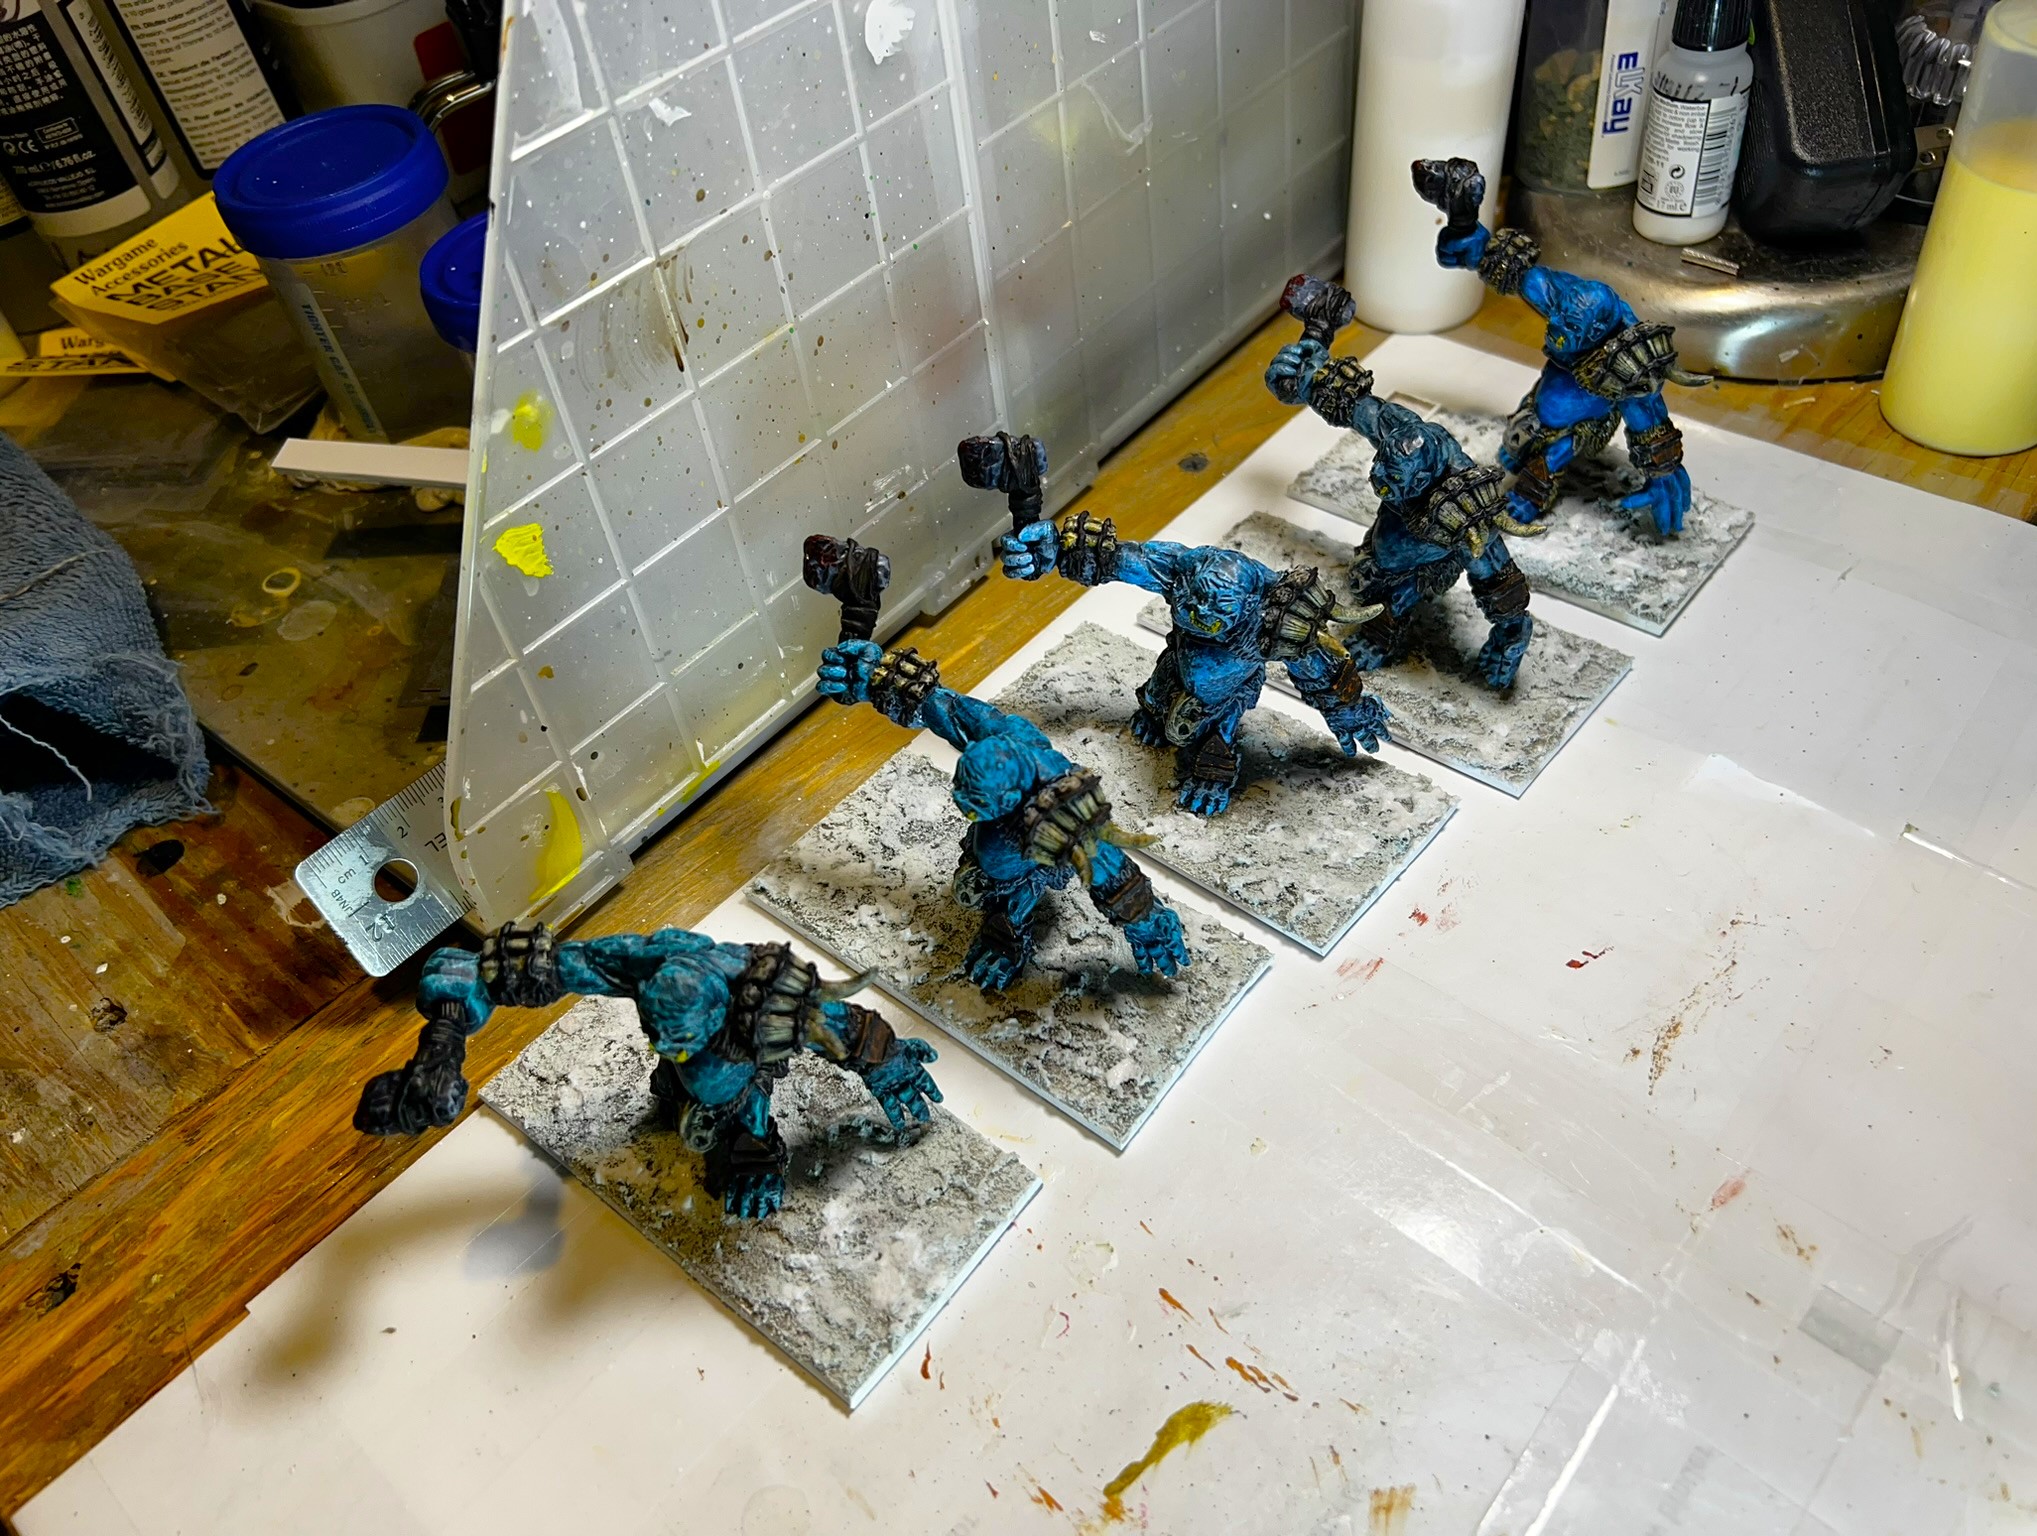
As far as basing goes, I knew that I would have to base them on larger bases than the 2” x 2” normally used for Ozz and WOOD. The figures are too large otherwise. And the WOOD rules happily accommodates such a situation. After some consultation with both Dave Wood and Buck Surdu, I decided to go with 2″ x 4″ in terms of basing. Instead of taking 4 hits like a 2” x 2” base, each Frost Ogre base will take 8 hits. So this will be a mighty regiment of Frost Ogres.
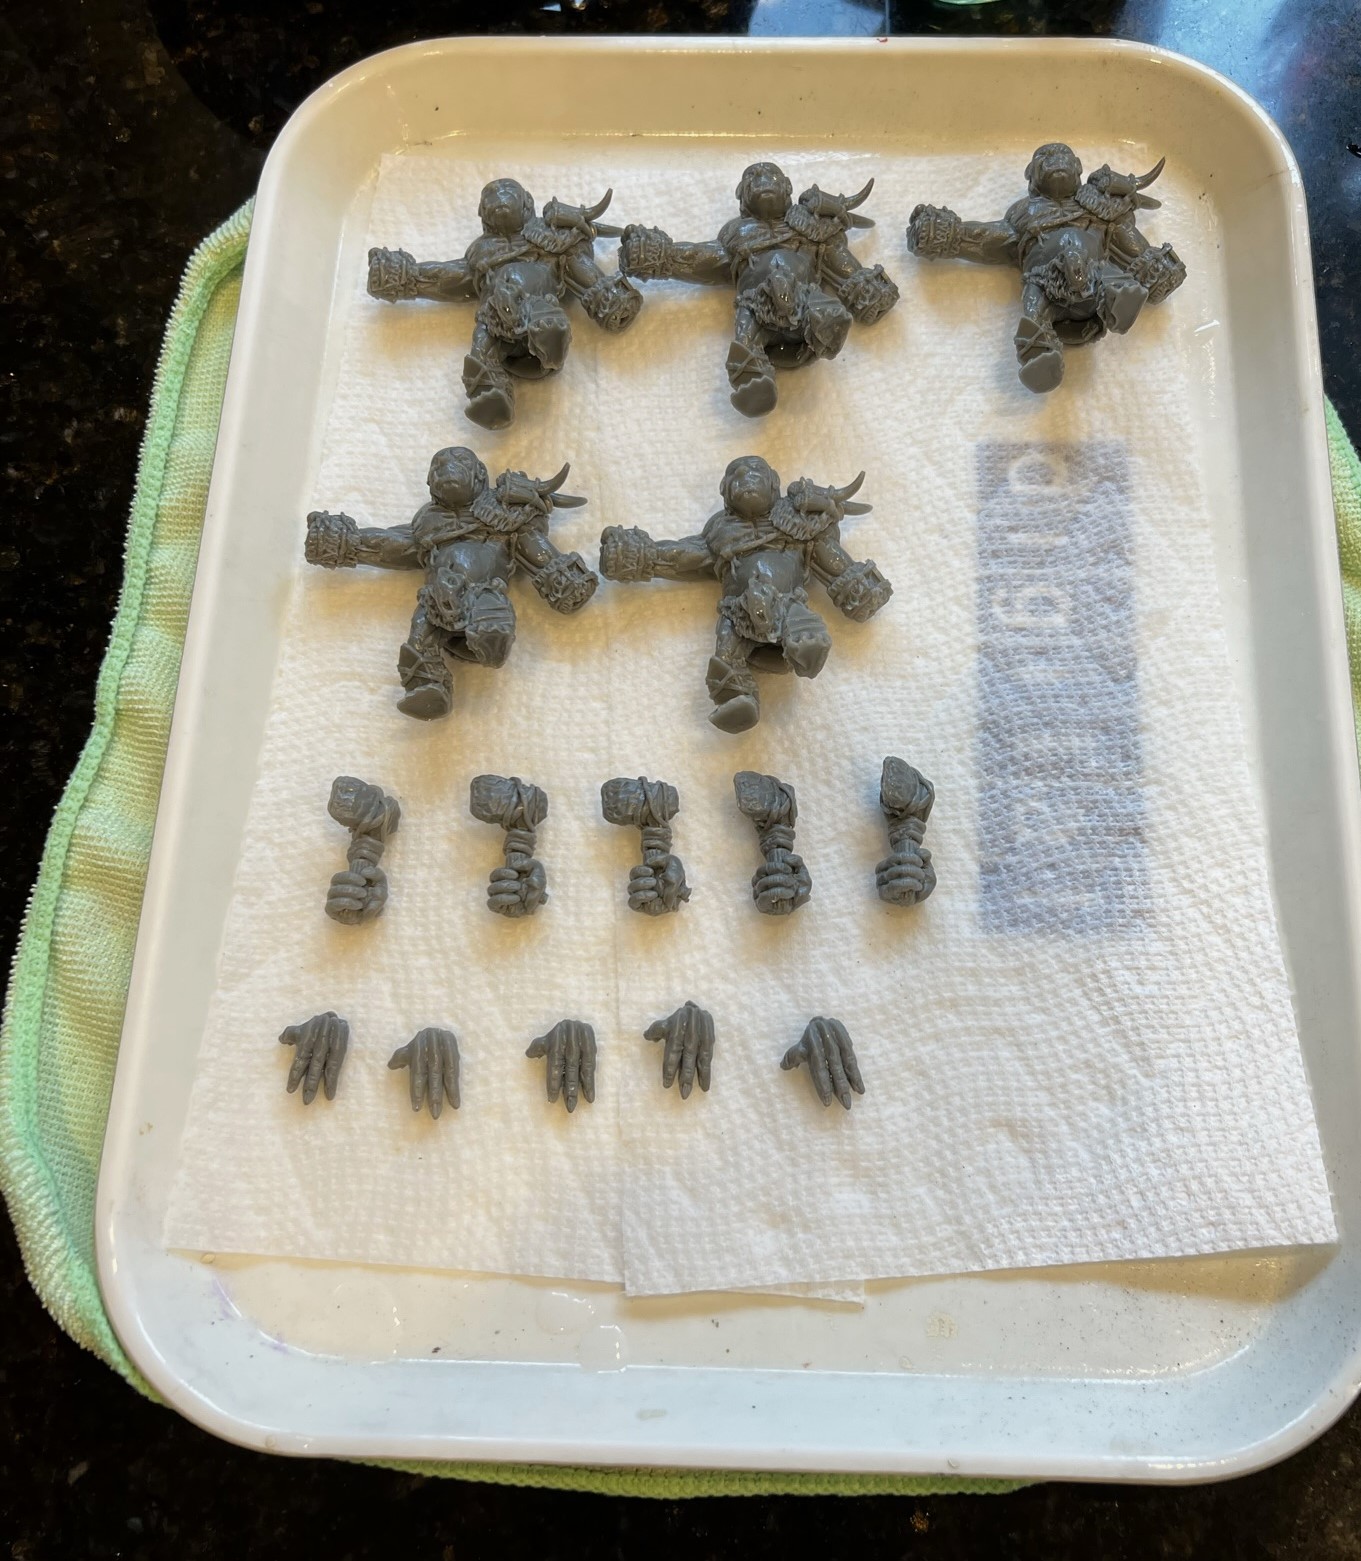
The figures themselves were 28mm scale and resin with wire internal supports (nice call on that Dave). They required a little bit of assembly as both hands needed to be attached. I assembled the figures by using green stuff instead of glue to affix the hands and to attach the feet to the steel bases. I’m not sure if that was a right or wrong decision, but I always feel a little bit cautious with regards to resin figures in terms of what might work for glue. As I ordered them without bases, so I could base them appropriately for WOOD, I would need to deal with that aspect, too. Initially, I considered adding a few secondary weapons in their left hands. However, as those hands has wide open palms, I eventually passed on doing so because it just didn’t look right. I initially based the figures on 2″ x 2″ steel bases for painting – with an eye to then base them permanently on 2″ x 4″ bases.
Assembled with the right and left hands in slightly different positions.
While giving them secondary weapons would have given me a chance to differentiate the figures, I decided that I would differentiate them instead by altering the position of the hands as well as through painting. By painting, I thought that I would give each of the ogres a slightly different bluish, flesh color, as befits a Frost Ogre. I would also differentially paint their pelts.
I started dabbling with/working on them at different times since June while I worked on this, that, and the other Ozz thing. While I am definitely not a hobby butterfly (apologies to IRO, I have nothing against hobby butterflies!), I did want to finish more of the Ozz stuff that I was working on that I’ve shared previously. But, finally, it was time for a short break to work on these…but in the process of working on them, I accidentally tipped over and broke one of the figures horns on the shoulder pad. This ticked me off – as it was shattered and not easily repairable. I didn’t want to risk resculpting the horn as I knew whatever I did would never look as good as what Dave done originally. In any case, I think that damage just added to the figures’ differentiation because the horn looked like it was battle damaged in the end. You can be the judge when you see the final figures in a bit.
Below, you’ll see some work in progress, pictures, and then afterwards, I’ll show some eye candy with a new background that I printed off that I think shows off the Frost Ogres in a nice winter environment.
WIP Shots
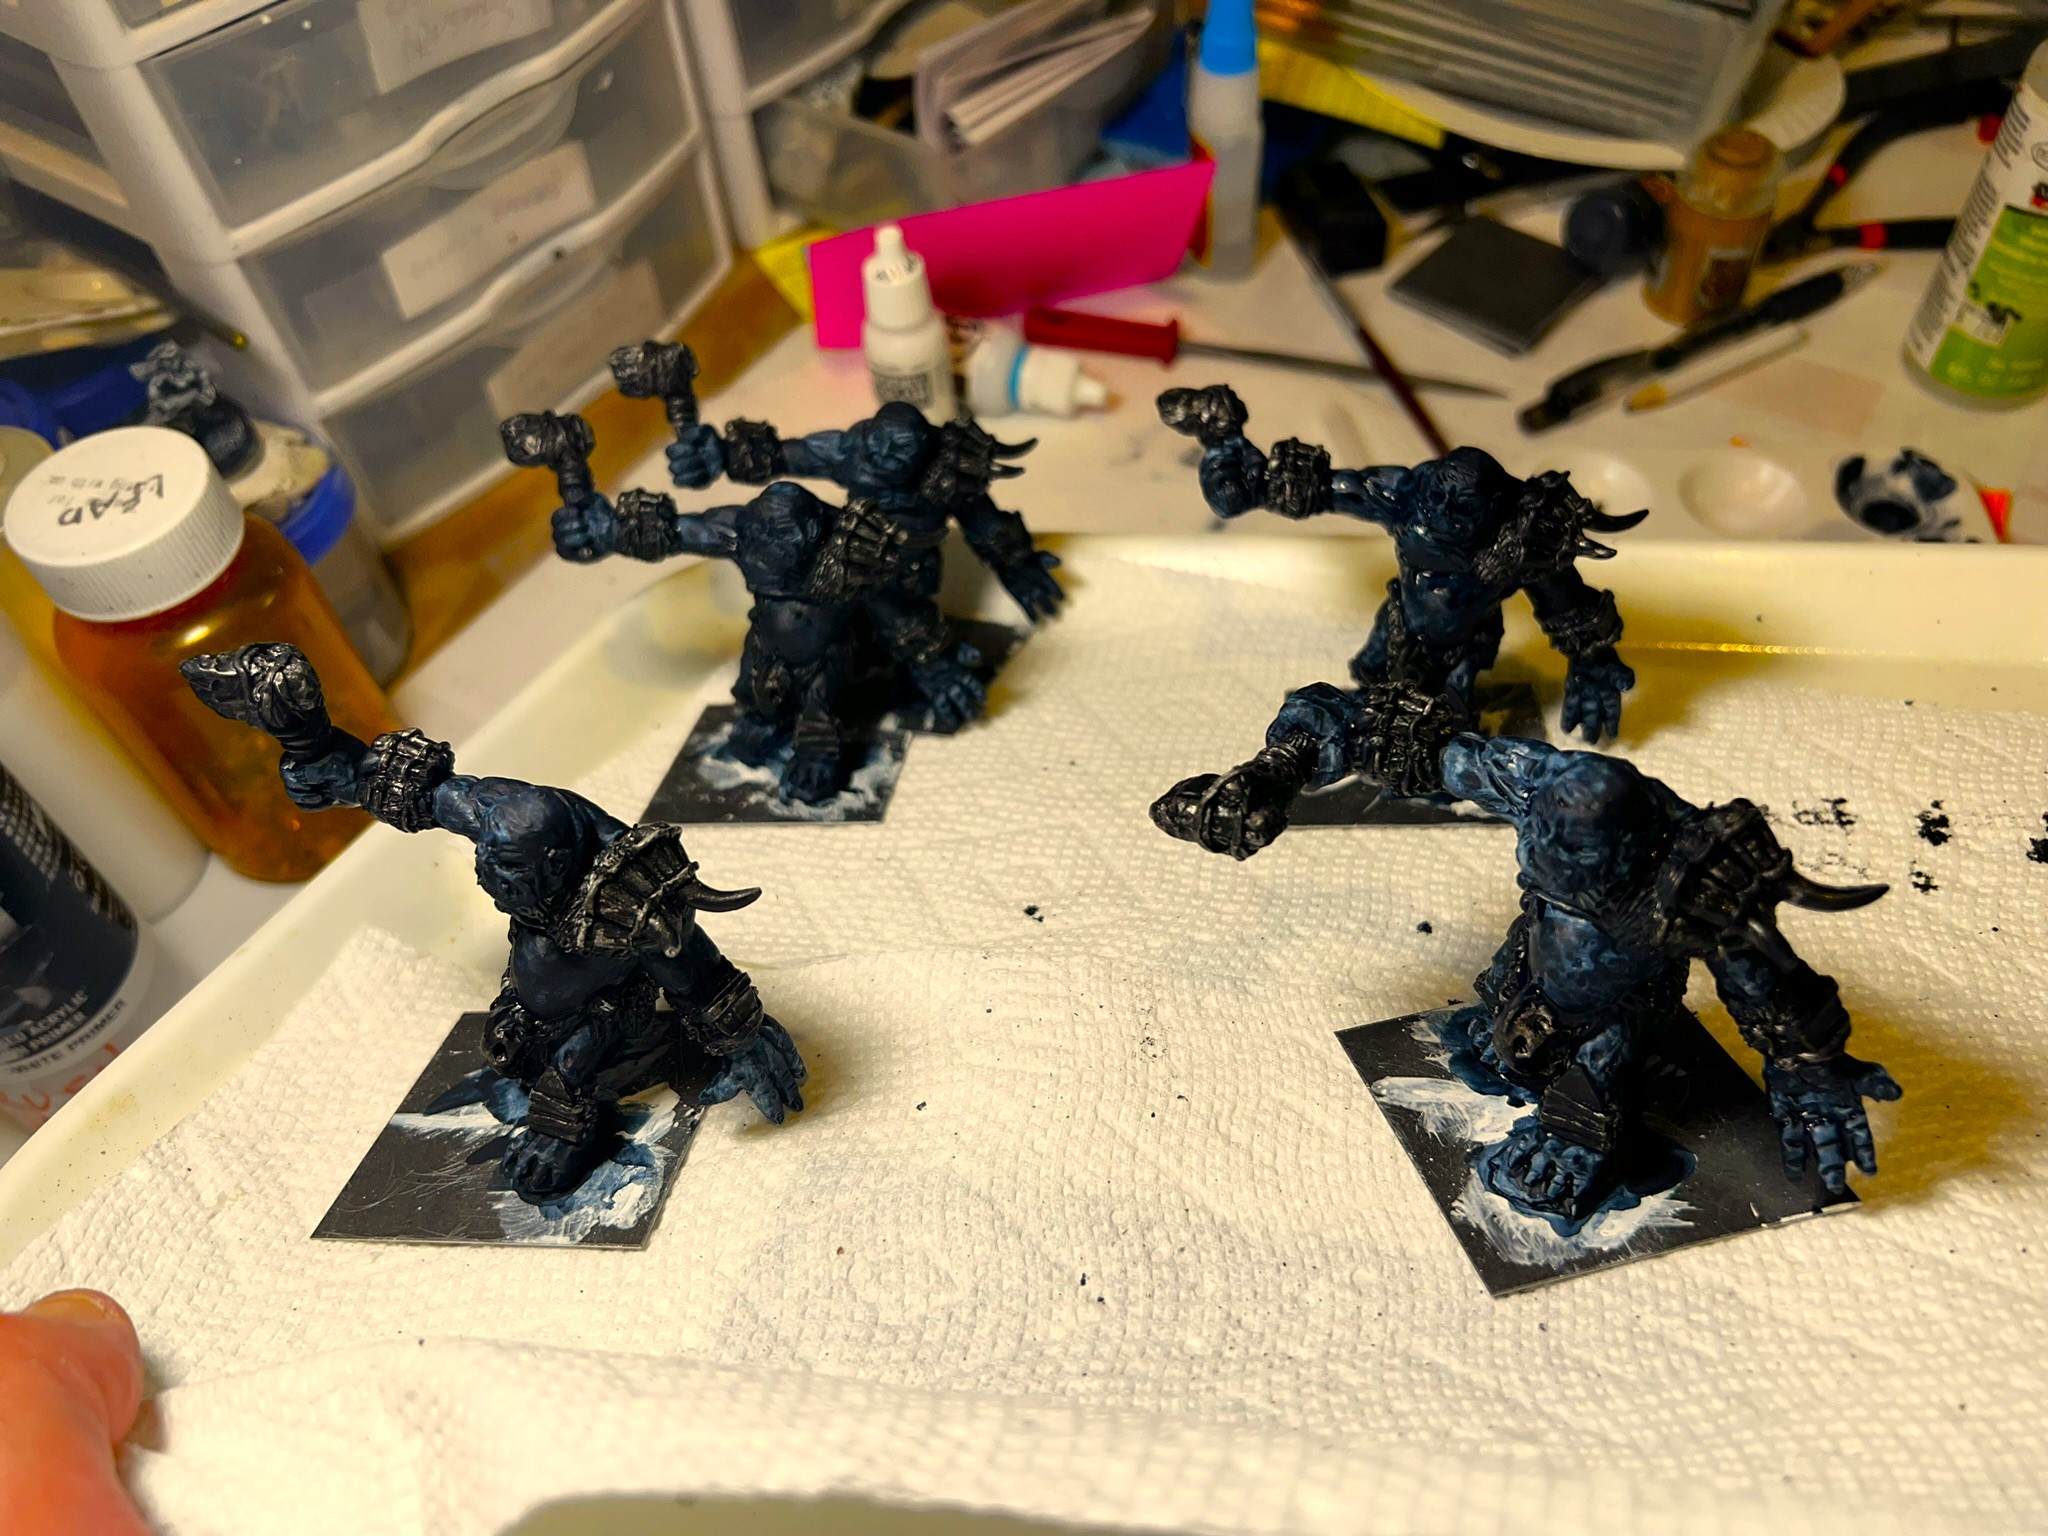
My approach to painting was to manually prime these with some white Vallejo primer that was left over. It wouldn’t flow through my airbrush anymore, but was still useful. Then, I washed the non-flesh parts with a dark wash, and the flesh parts with a Reaper MSP blue liner. That blue liner had laid unused in my paint collection for at least 5 years. This blue liner, I hoped, would give me an appearance/depth of color underneath for the future flesh tones.
Frost Ogres primed with black wash on non-flesh.Frost Ogres after blue liner on flesh.
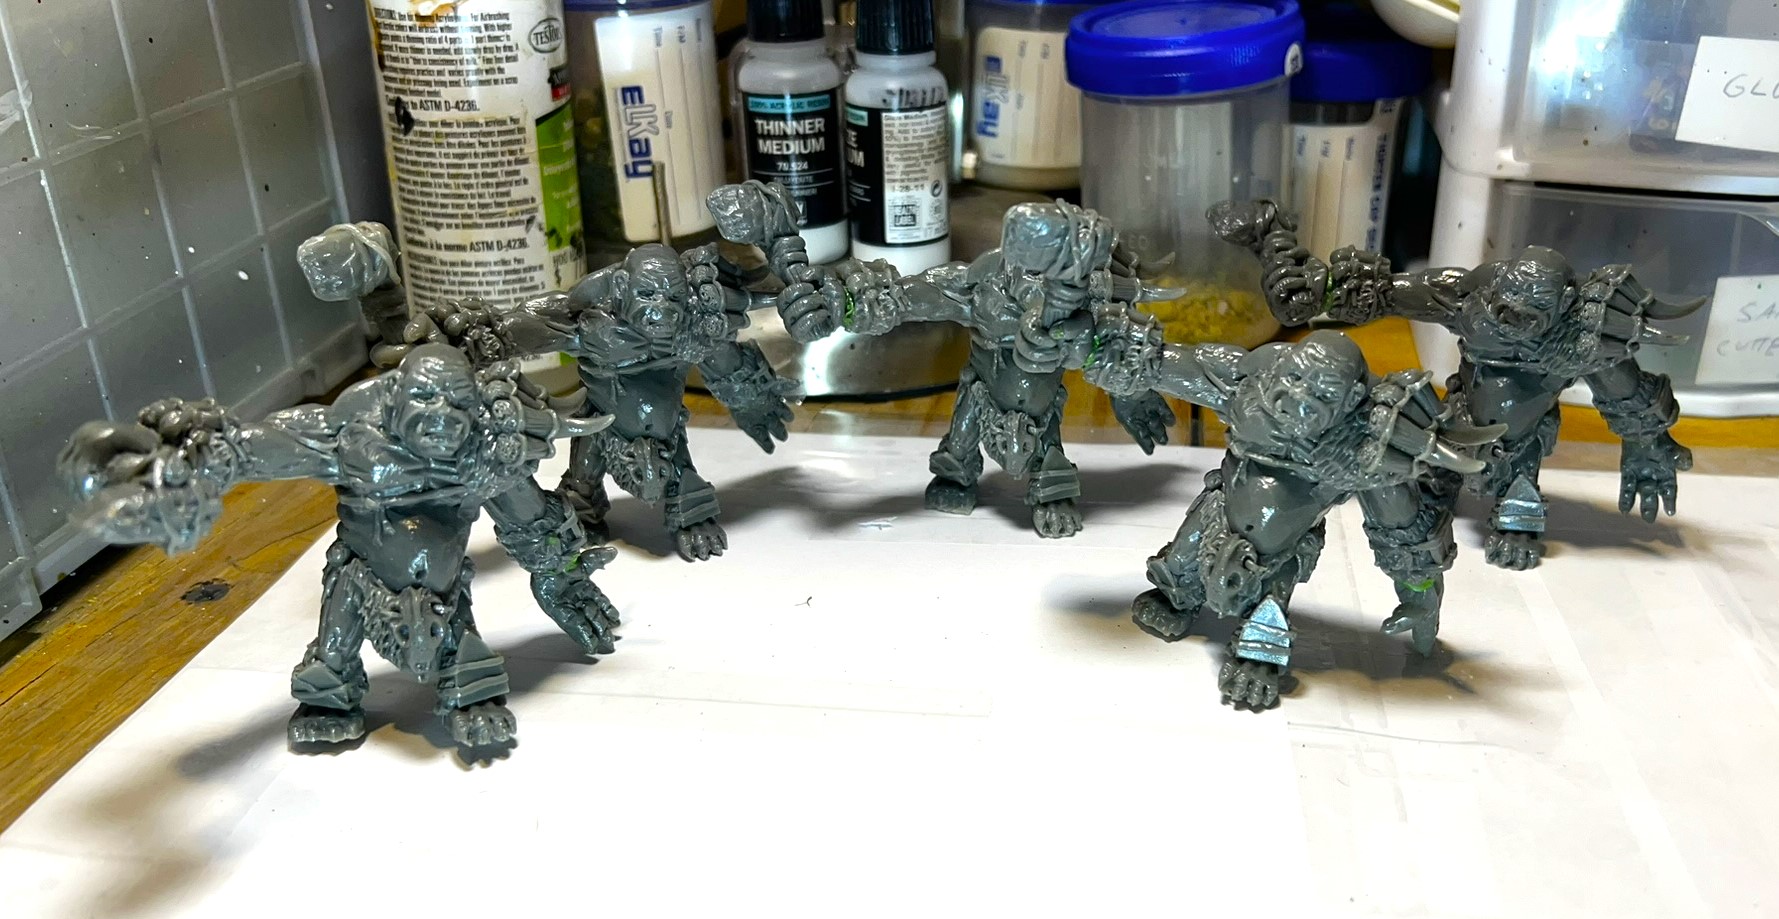
Subsequent to this, I would dry brush back over the blue and the dark with white.
The figure on the left has been dry brushed after the blue and black washes, while the one on the right has not yet gotten the white dry brush application.
Then I focused on the non-flesh areas of the models – horns, bones, pelts, and weapons.
Let’s get blue!
Lastly, I would then go with colors over the white that hopefully would be speed or contrast paints, washes, and highlights that could help with the looks I wanted. I initially chose the five colors below for flesh tones:
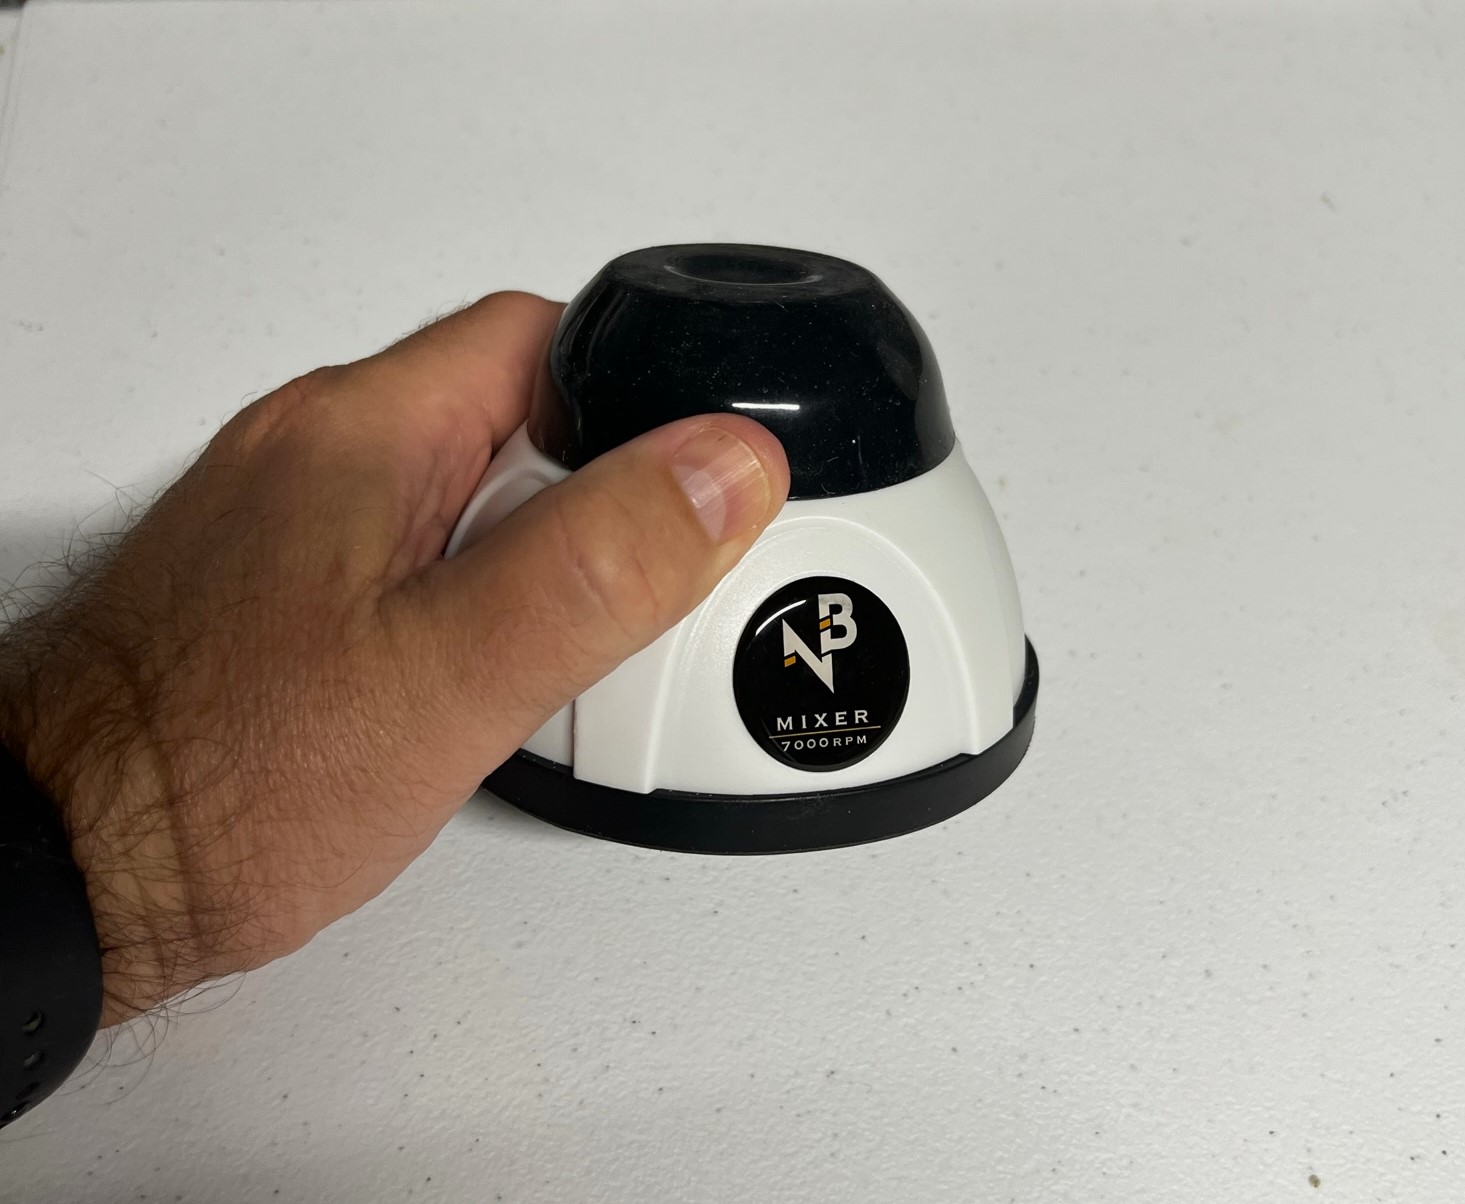
All were fine, except for the Citadel “Briar Queen Chill”, which was really more of a ghoulish green. I applied it, as I though “chill” and “frost” went together. But, I was not very happy. It was not bluish in the least – it was green. As I did not want one figure to look like the Incredible Hulk, I just went over this green with a Citadel “Drakenhof Nightshade” blue shade, which gave it a nice, somewhat turquoise-looking color. Not being a GW guy, I really wasn’t aware of what a briar queen was! I guess it’s sort of a witch. Another item, I also used a 7,000 RPM paint shaker on these – and it worked great to get the pigments really shaken up. The Army Painter speed paints all have steel balls in them, but the shaker is something I highly recommend, especially for the paints that tend to settle out a bit. At $46 US, its pretty good – you just have to recharge it with a USB cable.
Back to the models. As I went “blue” with these, I made sure that the colors would vary.
All slightly different with flesh tones.
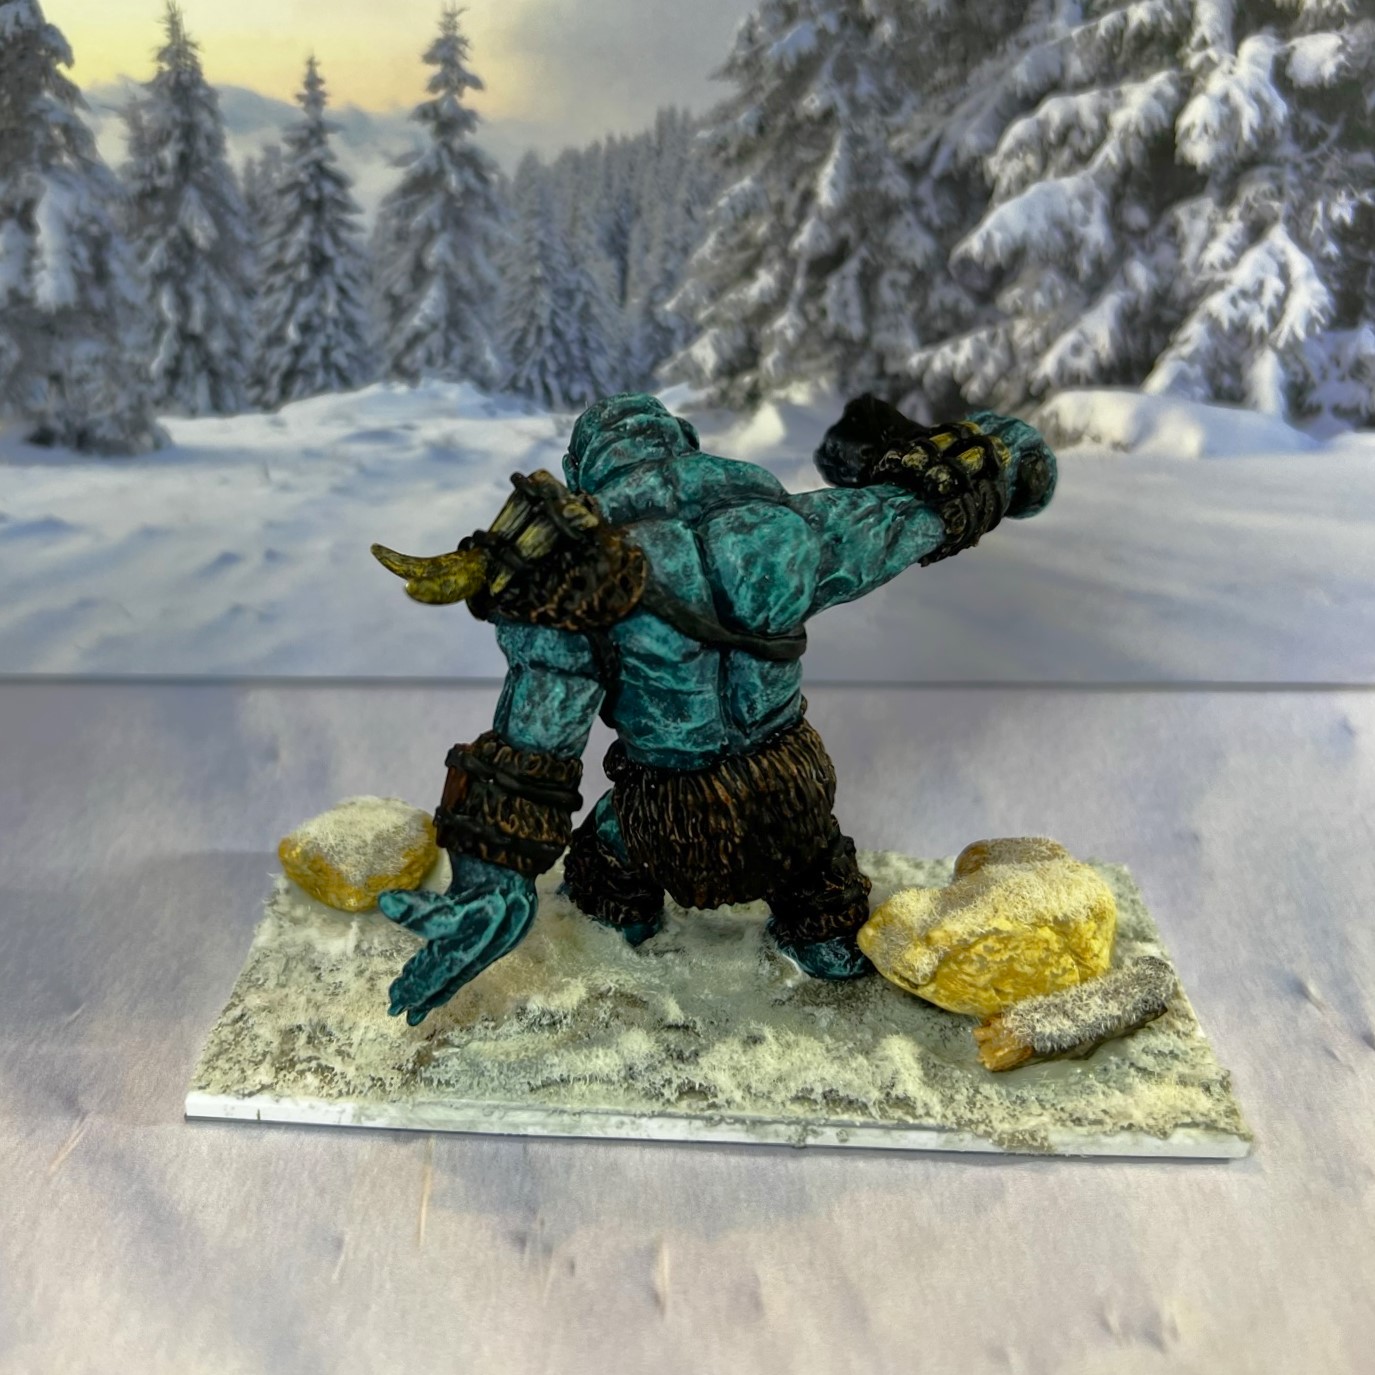
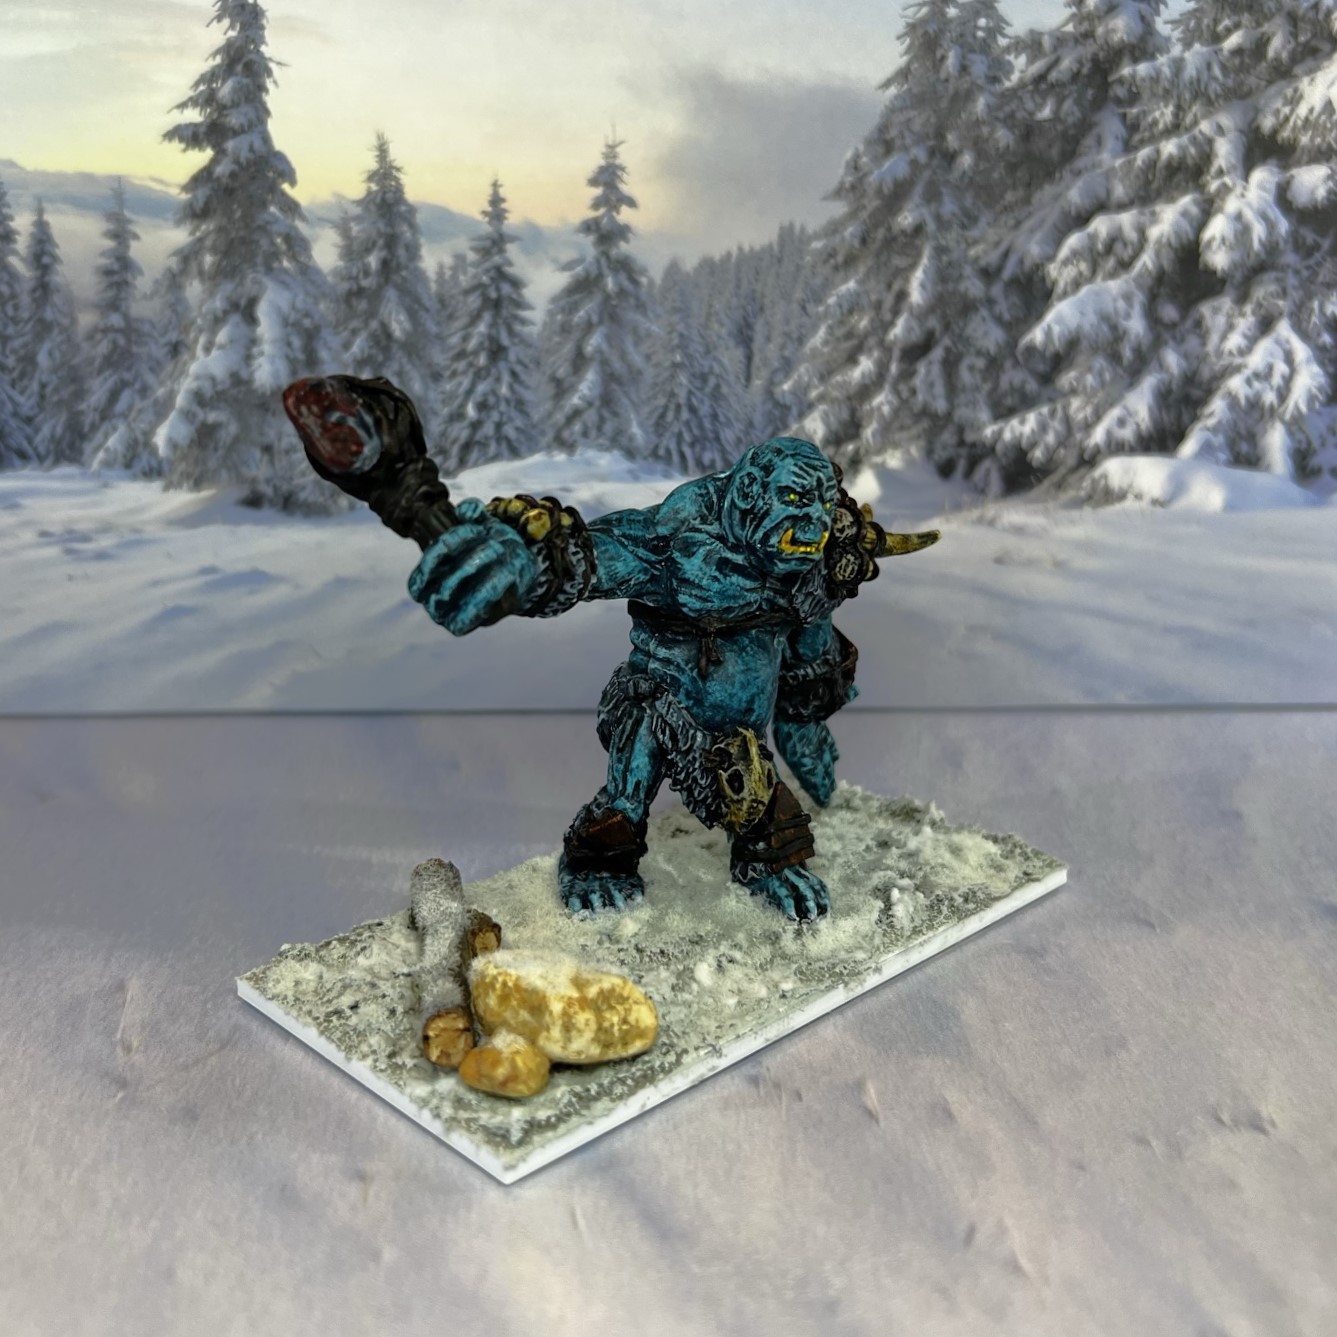
One of the major challenges in this project was dealing with the left hands. On one figure (base one), I had assembled the left hand too low to the ground. So, when I adjusted the basing to the 2″ x 4″ bases it, I just used some green stuff to alter its pose. I added each Frost Ogre’s Wargames Accessories 2″ square steel base (which I had mounted the ogres to with green stuff initially) to a 2″ x 4″ polystyrene plastic base. Then, I added two more steel 2″ bases underneath for transport/storage and magnetic attraction purposes.
Remounted on the larger 2″ x 4″ bases – time for varnish and flocking. There are also a pair of 2″ square steel bases under each figures polystyrene base.
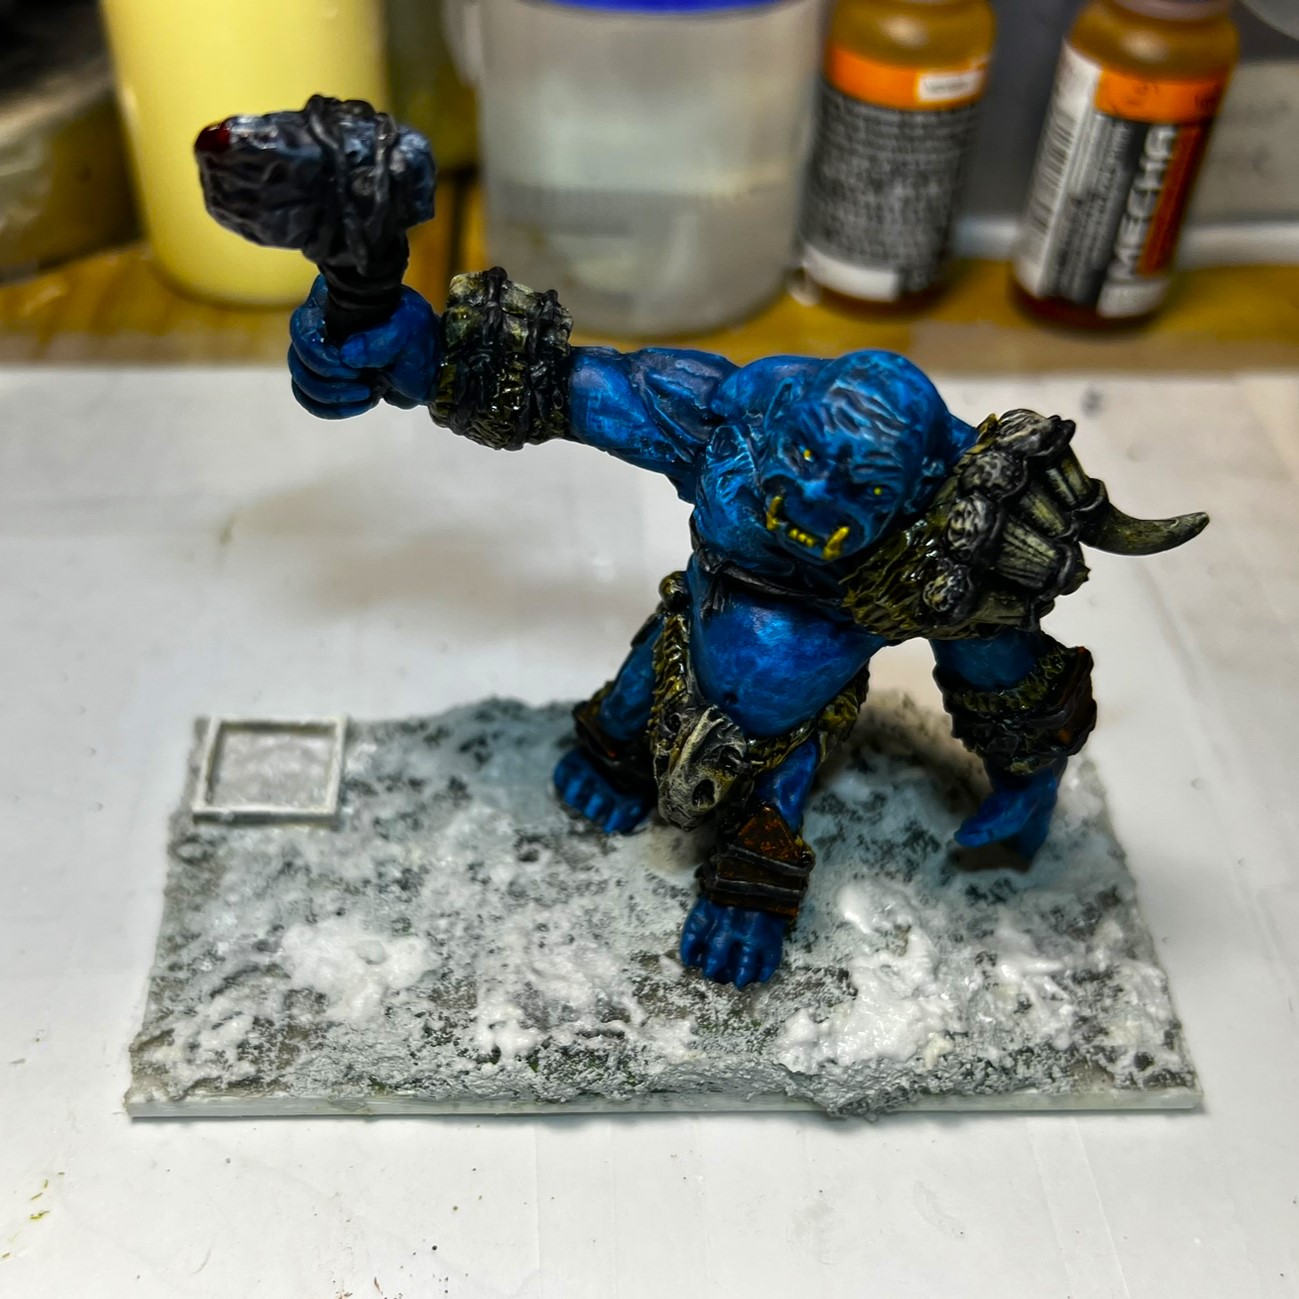
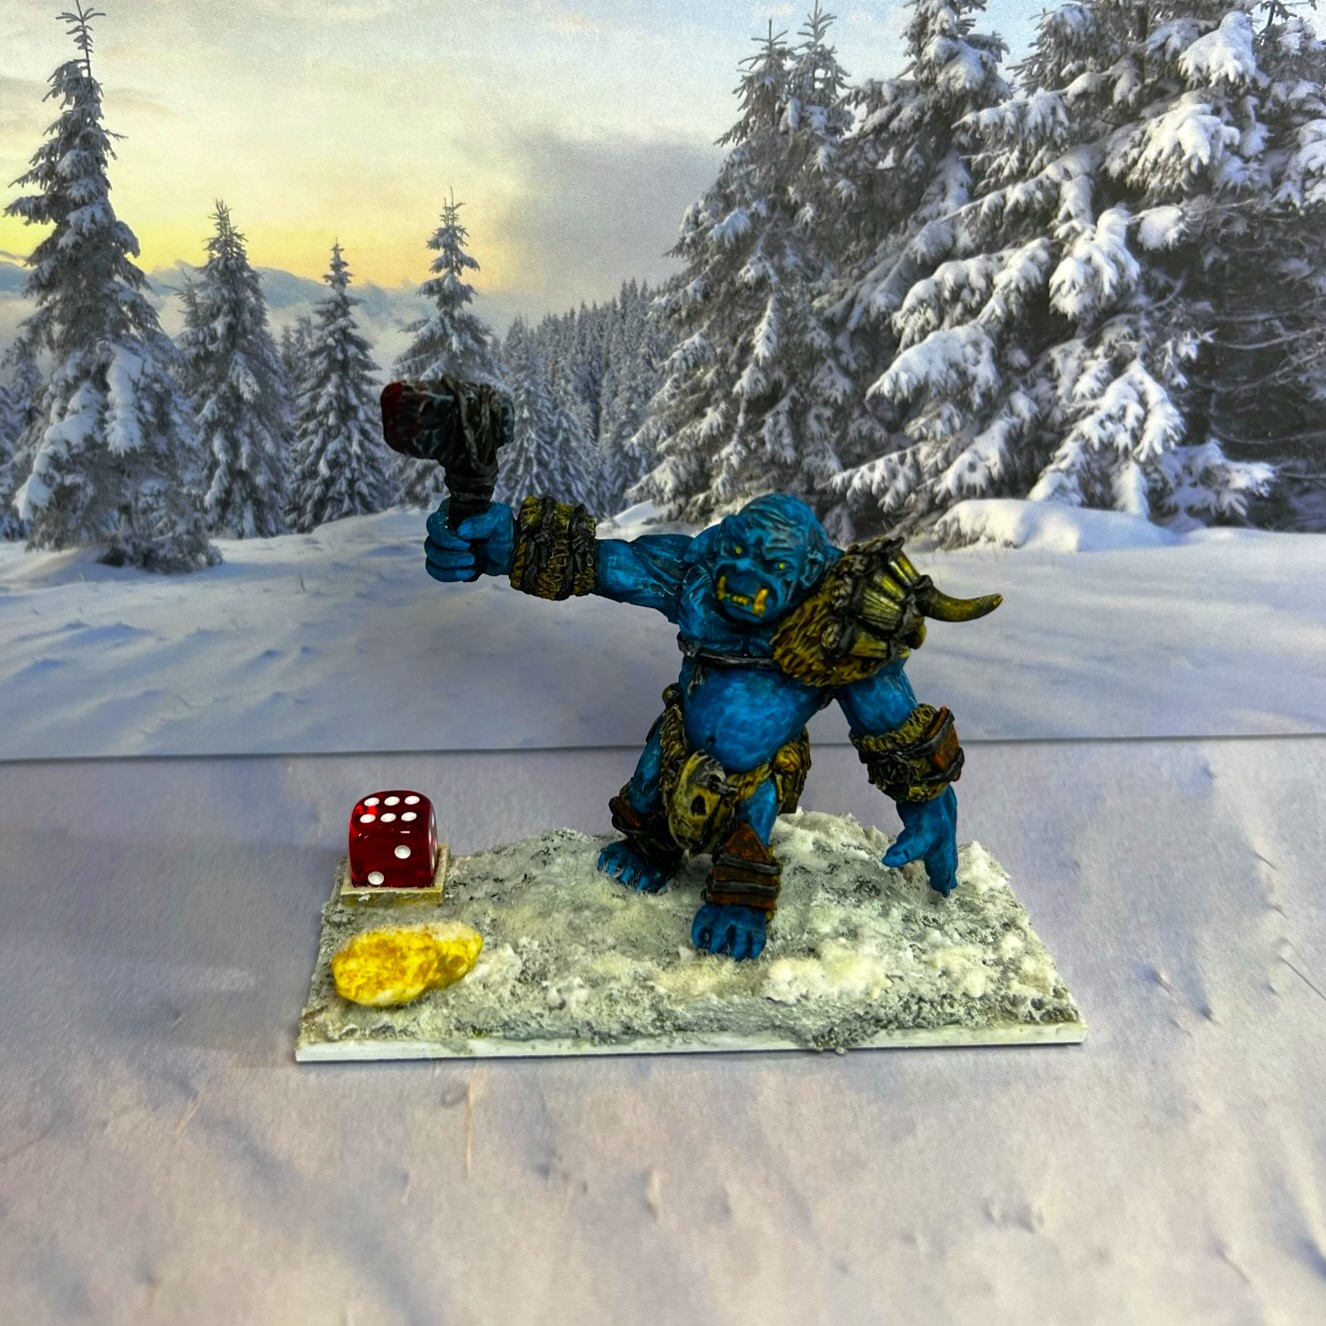
As for the snow flocking on the bases, I used several products. I started the gray Vallejo Ground Texture “Rough Grey Pumice”, followed by two Citadel texture paints (Mourn Mountain Snow” and “Valhallan Blizzard”. You can see all the paints that I use. at the end of this blog, for that special person who wants to know what I used, or for me because when I want to re-create an effect – or a painting scheme – I will never remember – unless I write it down. I also added a Pendraken 12mm dice frame to one figure, plus some rocks and oak twigs. And lastly, I sprinkled some Citadel “Snow” that had been in my supplies unused since 2015 over a light PVA on the bases.
Given that I used a number of contrast and speed paints in this project, and that I did not want to have any bleed, I did take a lot of time in between steps to let things dry. Or that’s just an excuse because I went golfing…
Grey pumice addedAll with grey pumiceAdded the 2 Citadel texture paintsWith dice frame and snowAdding twigs, rocks and snowCitadel SnowDry, baby, dry…it’s cold out there!
As promised, here is some:
Eye candy
Base 1
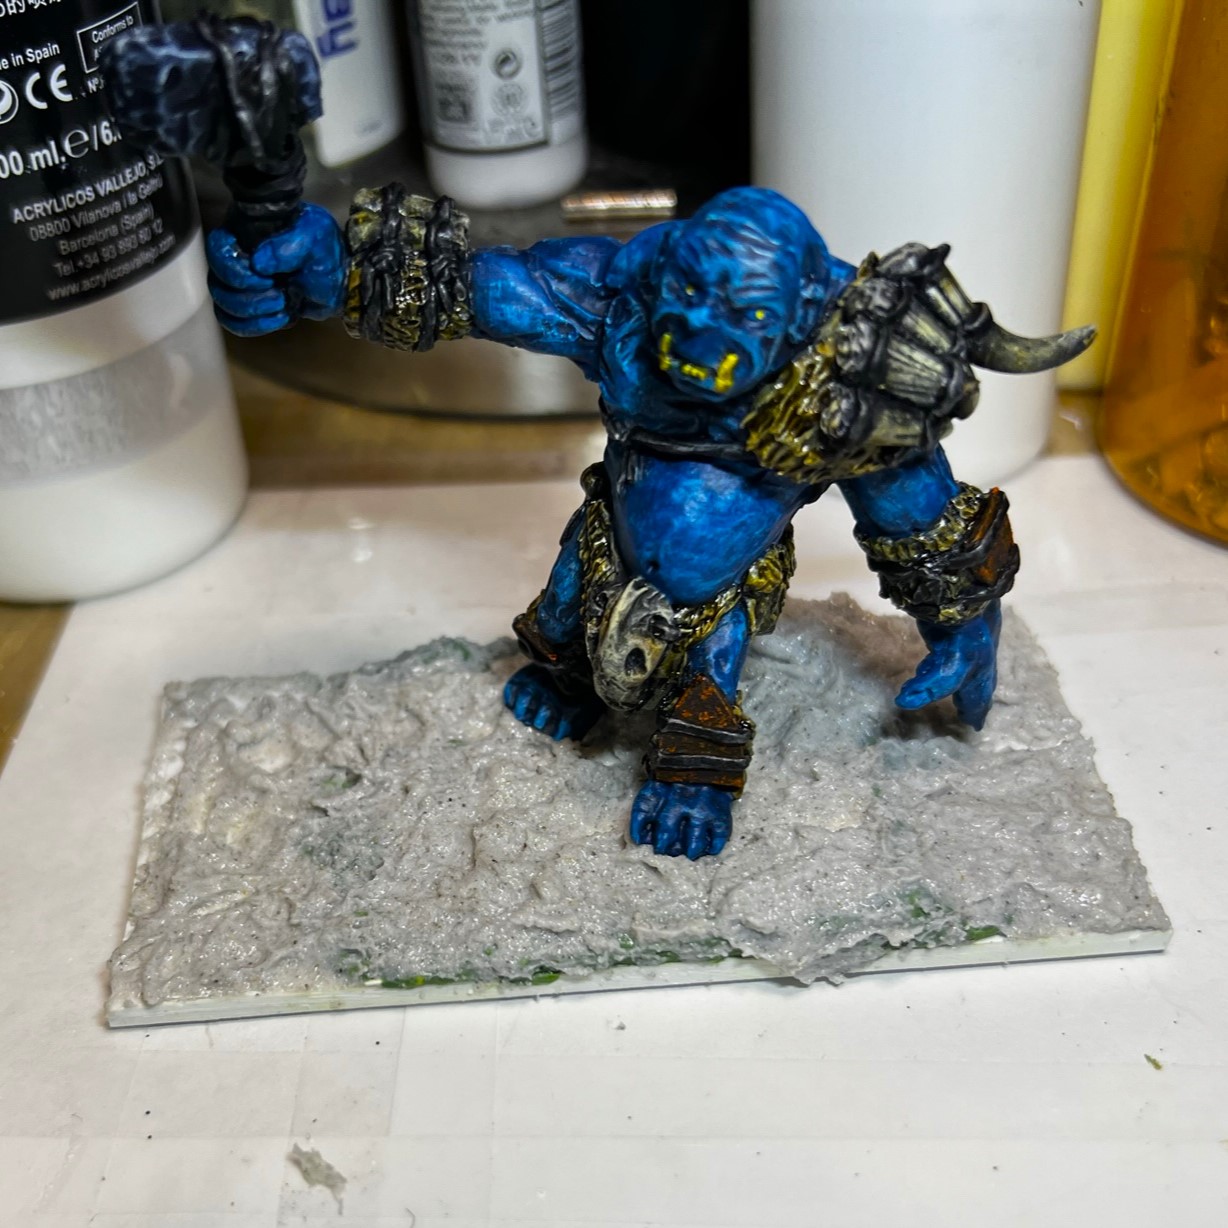
This is the base with the broken horn. Flesh tone is primarily Citadel “Frost Heart”. I gave this, the most blue figure, the dice frame.
Base 2
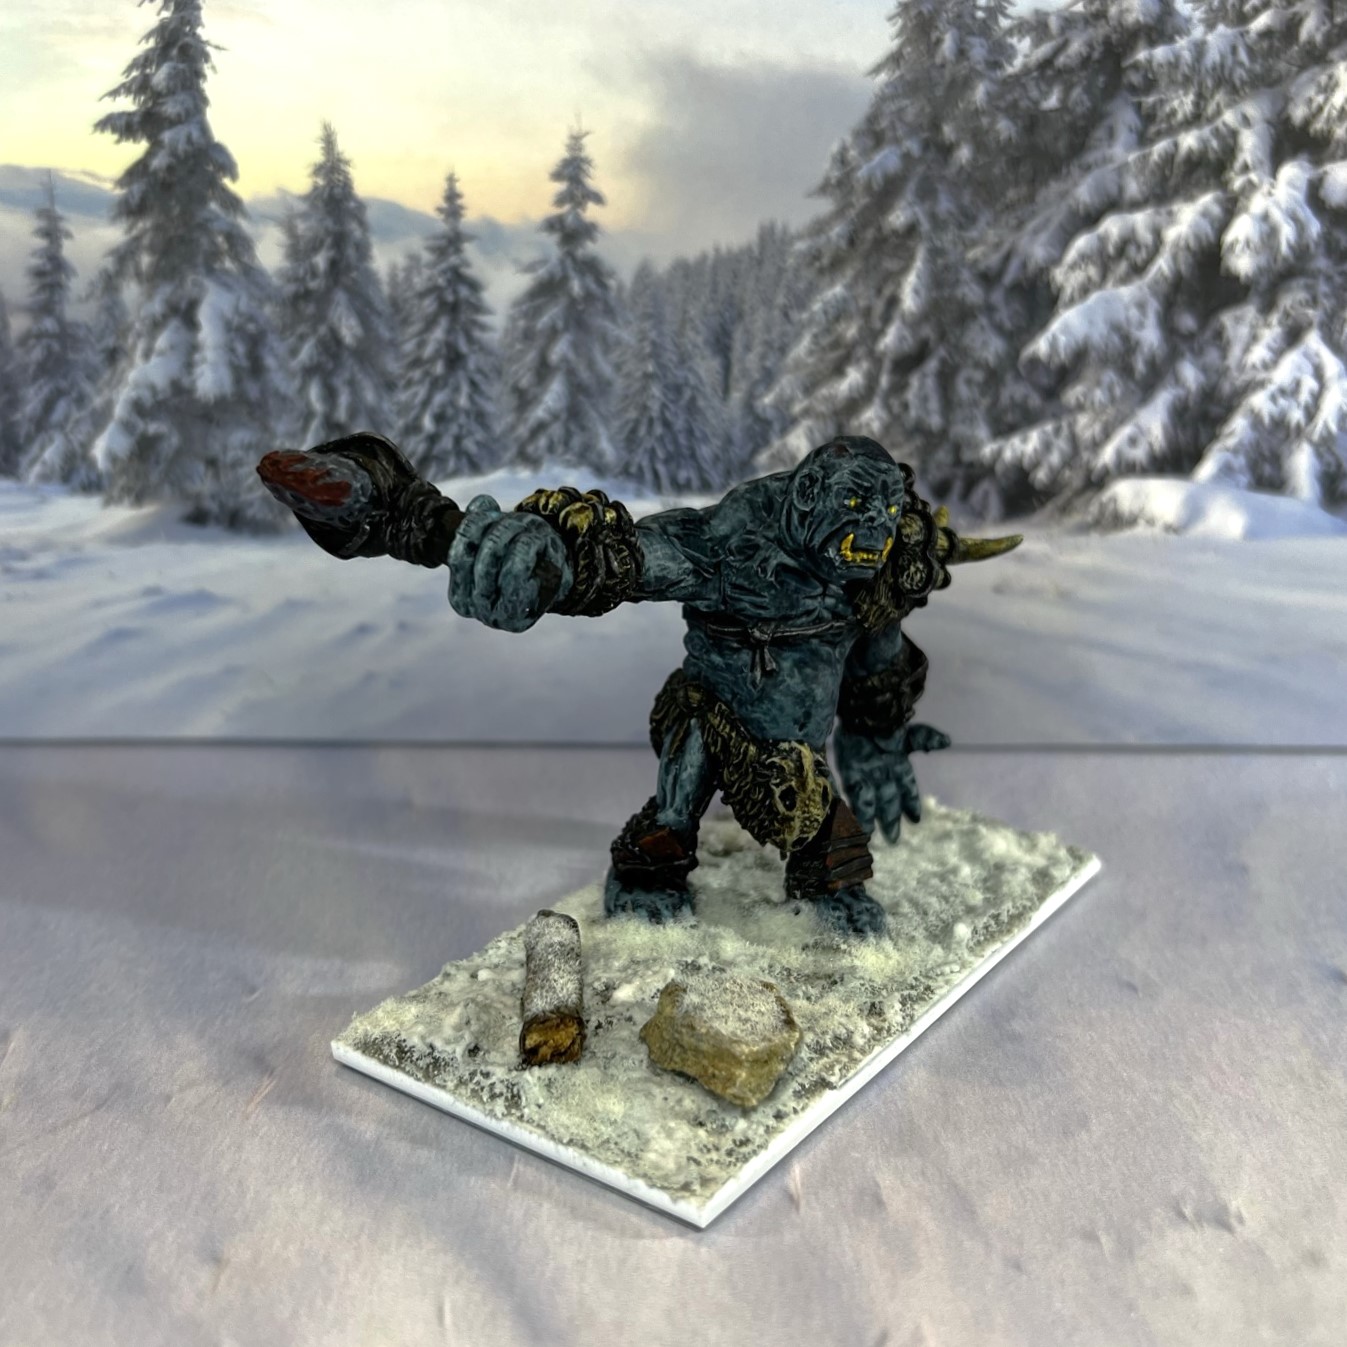
Flesh tone is primarily Citadel “Pylar Glacier”.
Base 3
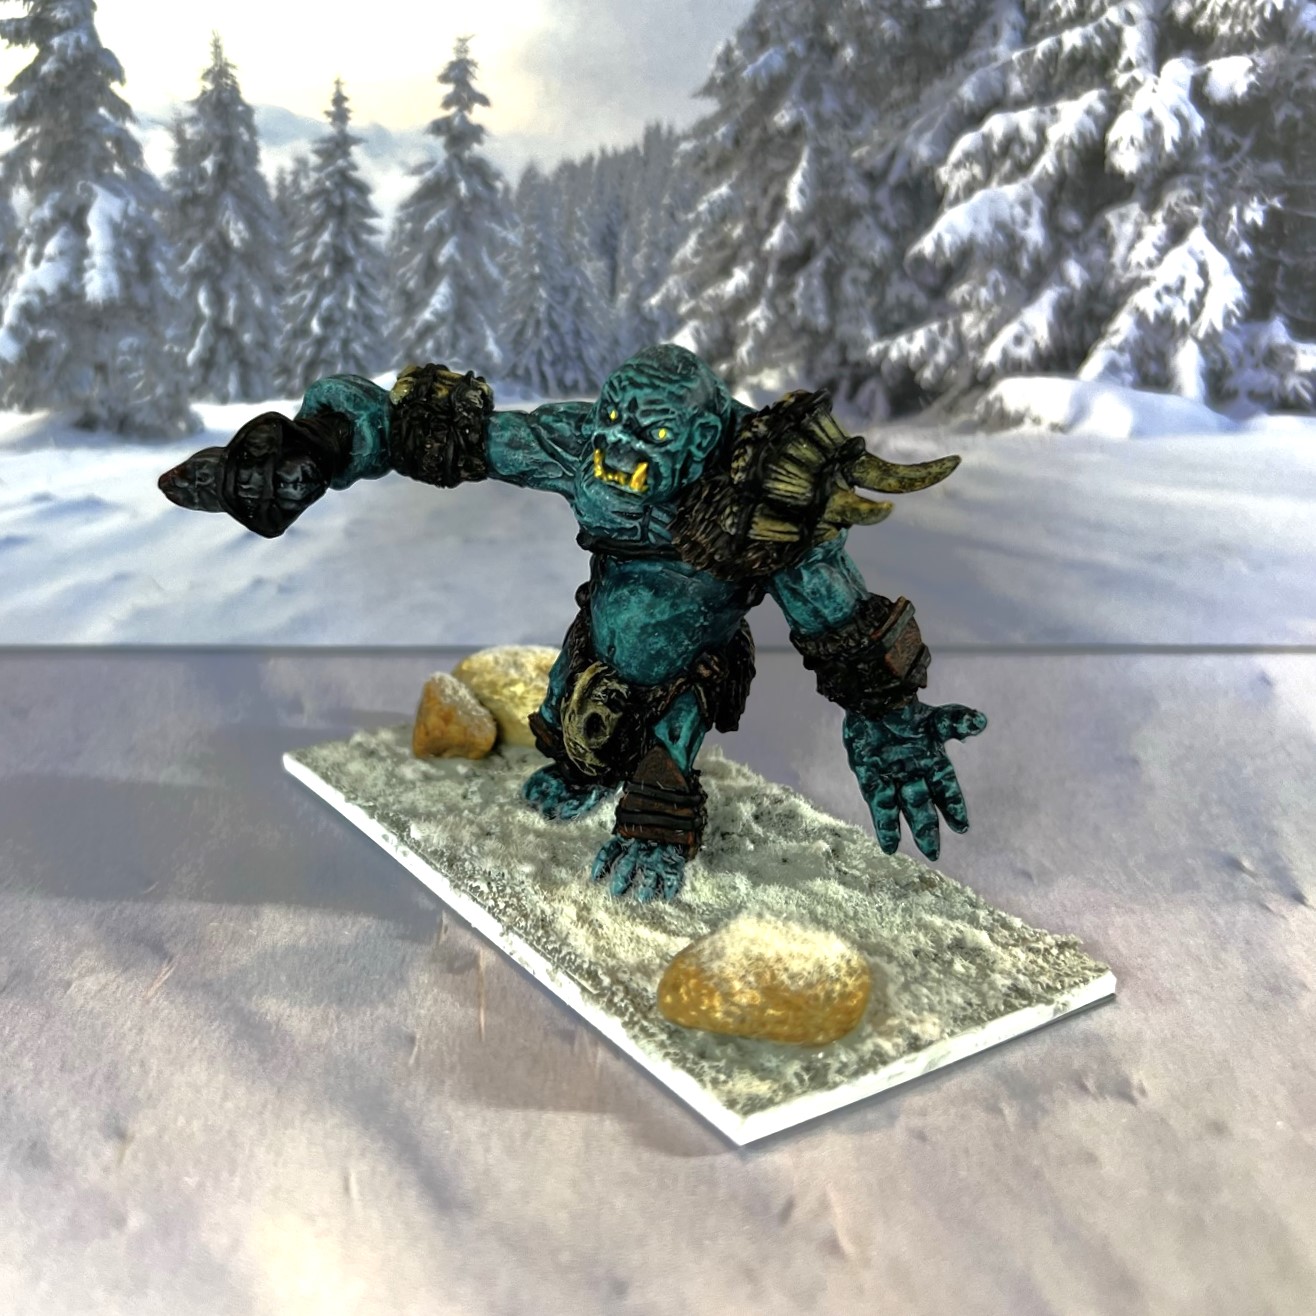
Flesh tone is primarily Citadel “Briar Queen Chill” washed with “Drakenhof Nightshade”.
Base 4
Flesh tone is primarily Citadel “Aethermatic Blue”.
Base 5
Flesh tone is primarily Army Painter “Caribbean Ocean”.
Group Shot
Thanks so much to Dave and to Roger for the opportunity to work on these! I am sure that there will be others’ entries which will put these to shame – and I do look forward to seeing everyone else’s take.
Meanwhile, I hope that you found these interesting! I am very happy to have the unit ready for a game of WOOD, even though that game may be far off in the future. I do have a number of older fantasy figures that I do plan on painting and basing or just rebasing for WOOD going forward. But this was the first unit that I decided to give a shot at doing because of the wonderful painting challenge. Again, I’m really looking forward to my fellow bloggers take on these ogres as well, PLUS the bonus of seeing yours!
If you have any comments, as always, let me know in the blog comment section below. As for my next project, I think I am going to get to some more Gillikin beasts completed as well as finish off the Great Land of Harvest forces for Ozz . Appreciate your taking a look here!
Miscellaneous details and references for those interested in that sort of thing:
For all of my previous posts on Wars of Ozz games, figures, units, and other related projects – please see this page.
For all of my previous posts on Wars or Orcs and Dwarves (WOOD), fantasy battle games, figures, units, and other related projects – please see this page.
PAINTS, INKS, GLAZES, SHADES, WASHES, PIGMENTS, FLOCKING, GLUES AND MORE THAT I USED ON THESE FROST OGRE FIGURES:
2″ square steel bases from Wargames Accessories (#21)
If want to acquire the rules for Wars of Orcs and Dwarves, there are two options (and I make no money from this btw).
You can get the rules from Sally 4th as a book (here) or as a PDF (here). Also, Noble Knight Games in the US has them – though currently they are listed as out of stock (as of September 2, 2023). They are due to have more hard copies in soon – and that link is here.
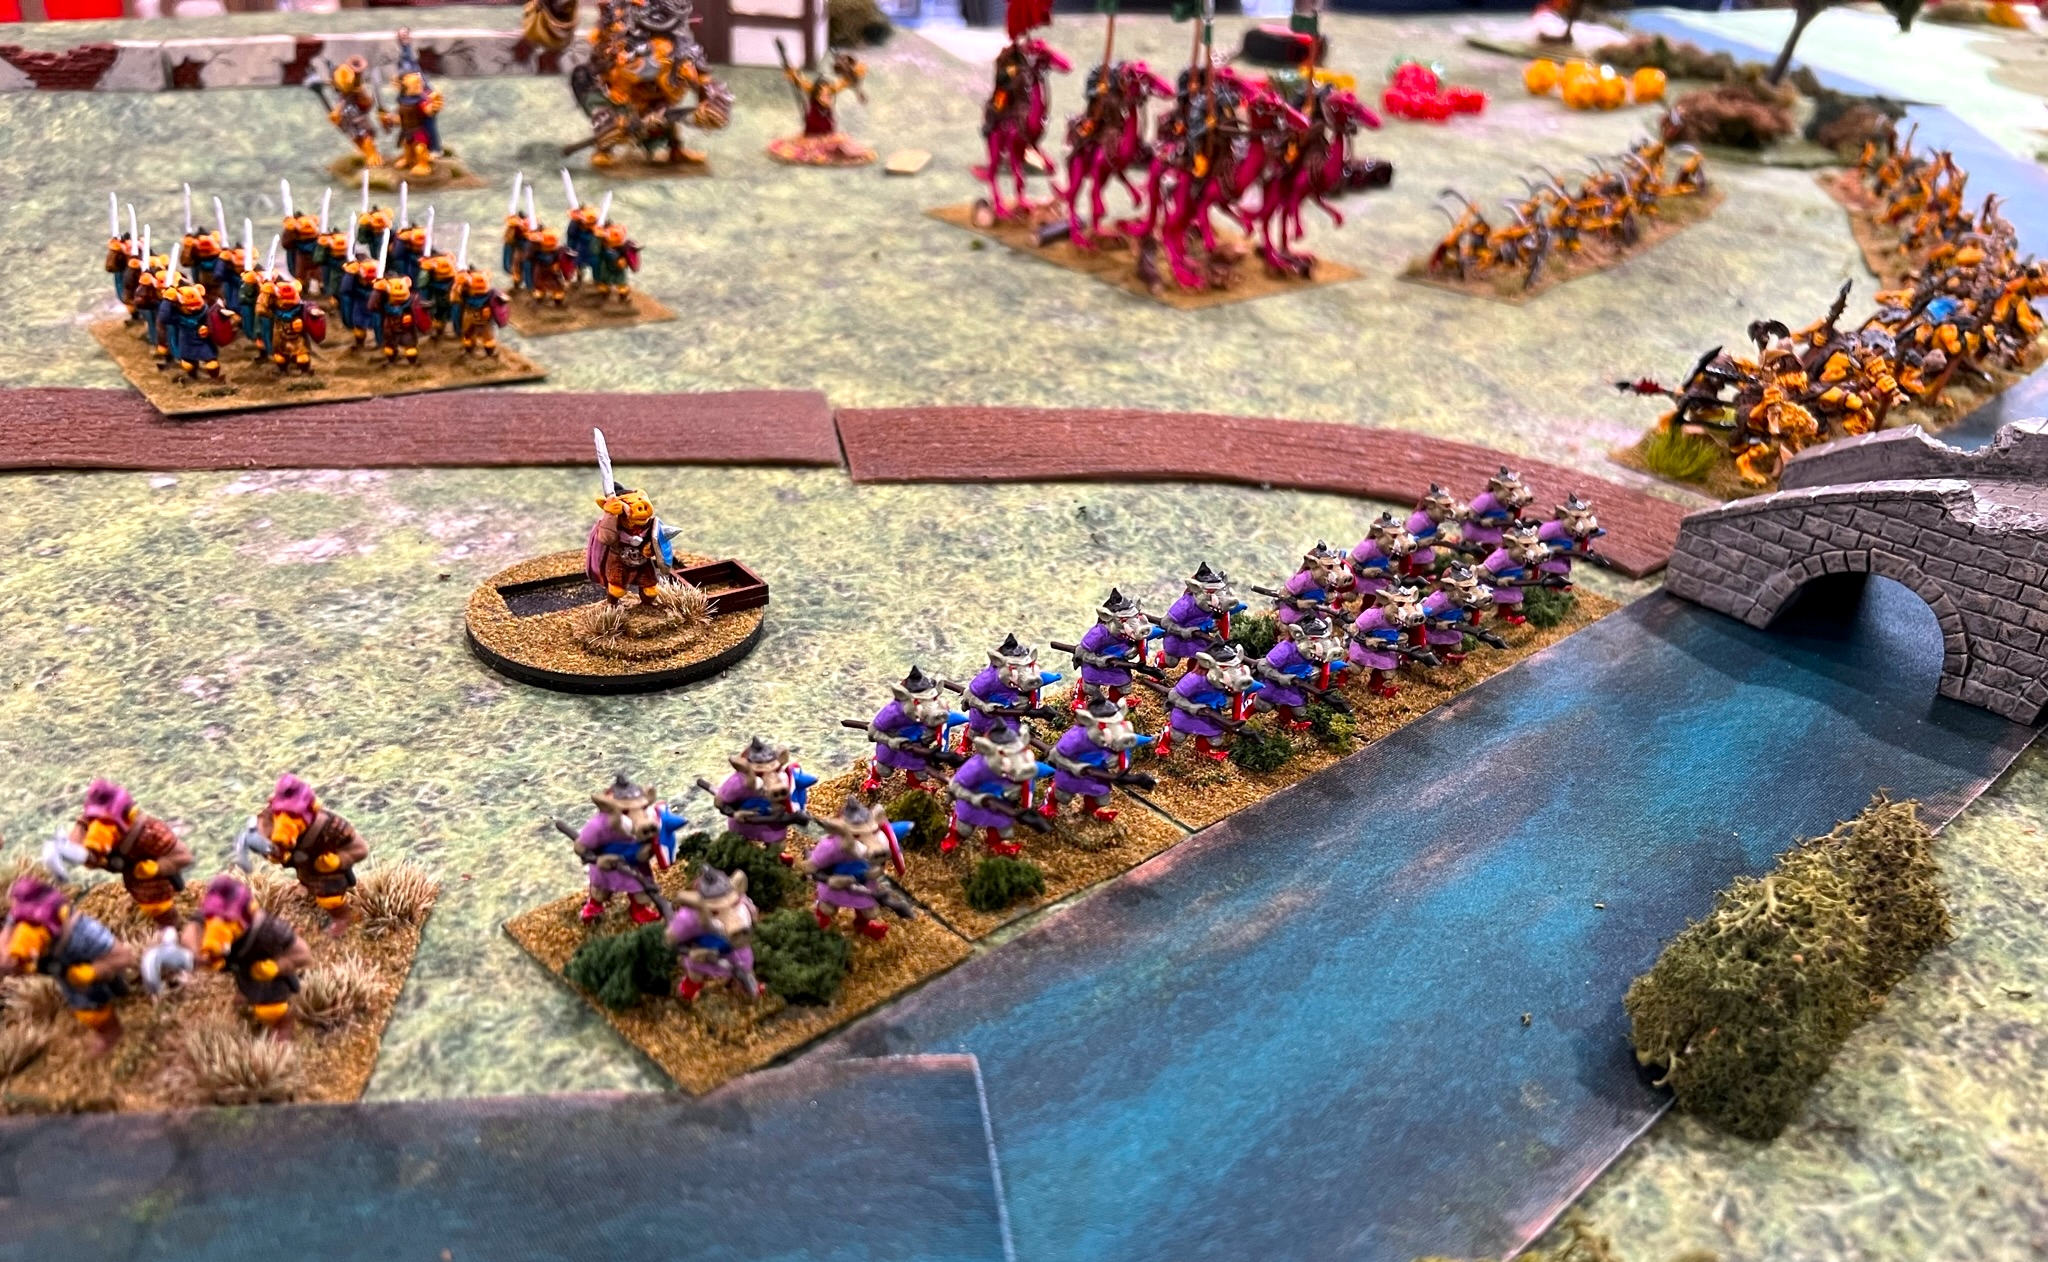
The Wars of Orcs and Dwarves (WOOD) mass fantasy battle game system is similar to the Wars of Ozz – except that now you can now dust off those fantasy minis you have from ANY manufacturer and have a great tabletop game.
The rules were written by my good friend Buck Surdu with a good amount of help from another great friend and West Point roommate Dave Wood. I have played in a few of the playtests as well as at RECON in Florida in April (described, among other things, here).
I had a blast – and I think most of you would as well.
The gaming possibilities are endless!
Here are a few pics from that game in Florida – it was a halfling raid on an Orc village – but any scenario is conceivable.
There is a Kickstarter from the publisher, Sally 4th that you can access here.
Here is a description of the game:
Written by John T ‘Buck’ Surdu and the team who brought you ‘Wars of Ozz’
Manufacturer / Range / Scale Neutral – Use what ever fantasy miniatures you have collected to fight epic massed battles.
Wars of Orcs and Dwarves will work with any scale of miniatures from 6mm – 32mm and beyond, from any manufacturer and from any genre. If you have an existing Warhammer or Lord of the Rings Army or maybe some historical Ancients, Dark Age or Medieval figures, you can use those to play Wars of Orcs and Dwarves.
Wars of Orcs and Dwarves is:
Mass fantasy tabletop gaming
Designed for solo, 2 player & team play
Features a balanced Magic System
Rulebook contains, army lists, scenarios and campaigns
Fun to play, streamlined, intuitive & based around reactive game play that keeps both sides continually involved
Game length 2-3 hours
Just to be clear, I have no financial interest in this – and I have backed the Kickstarter so that I can get the rules book and a PDF. I plan on working this into my gaming collection as I have a lot of fantasy stuff that needs a good game.
Again, there is a Kickstarter from the publisher, Sally 4th that you can access here.
Thanks for looking and checking out the Kickstarter!
I fell in love with the Ral Partha fantasy offerings many years ago. Iron Wind Metals has a 3rd Kickstarter going and it’s worth looking at, especially if you are into Dryads/Ents or Fae.
I apologize to my readers as its been a while since I have blogged, and as you will see I will be somewhat more active this week as I have completed some projects and now have a few things to actually write about! I expect that I will write three blog entries this week about projects that I have completed.
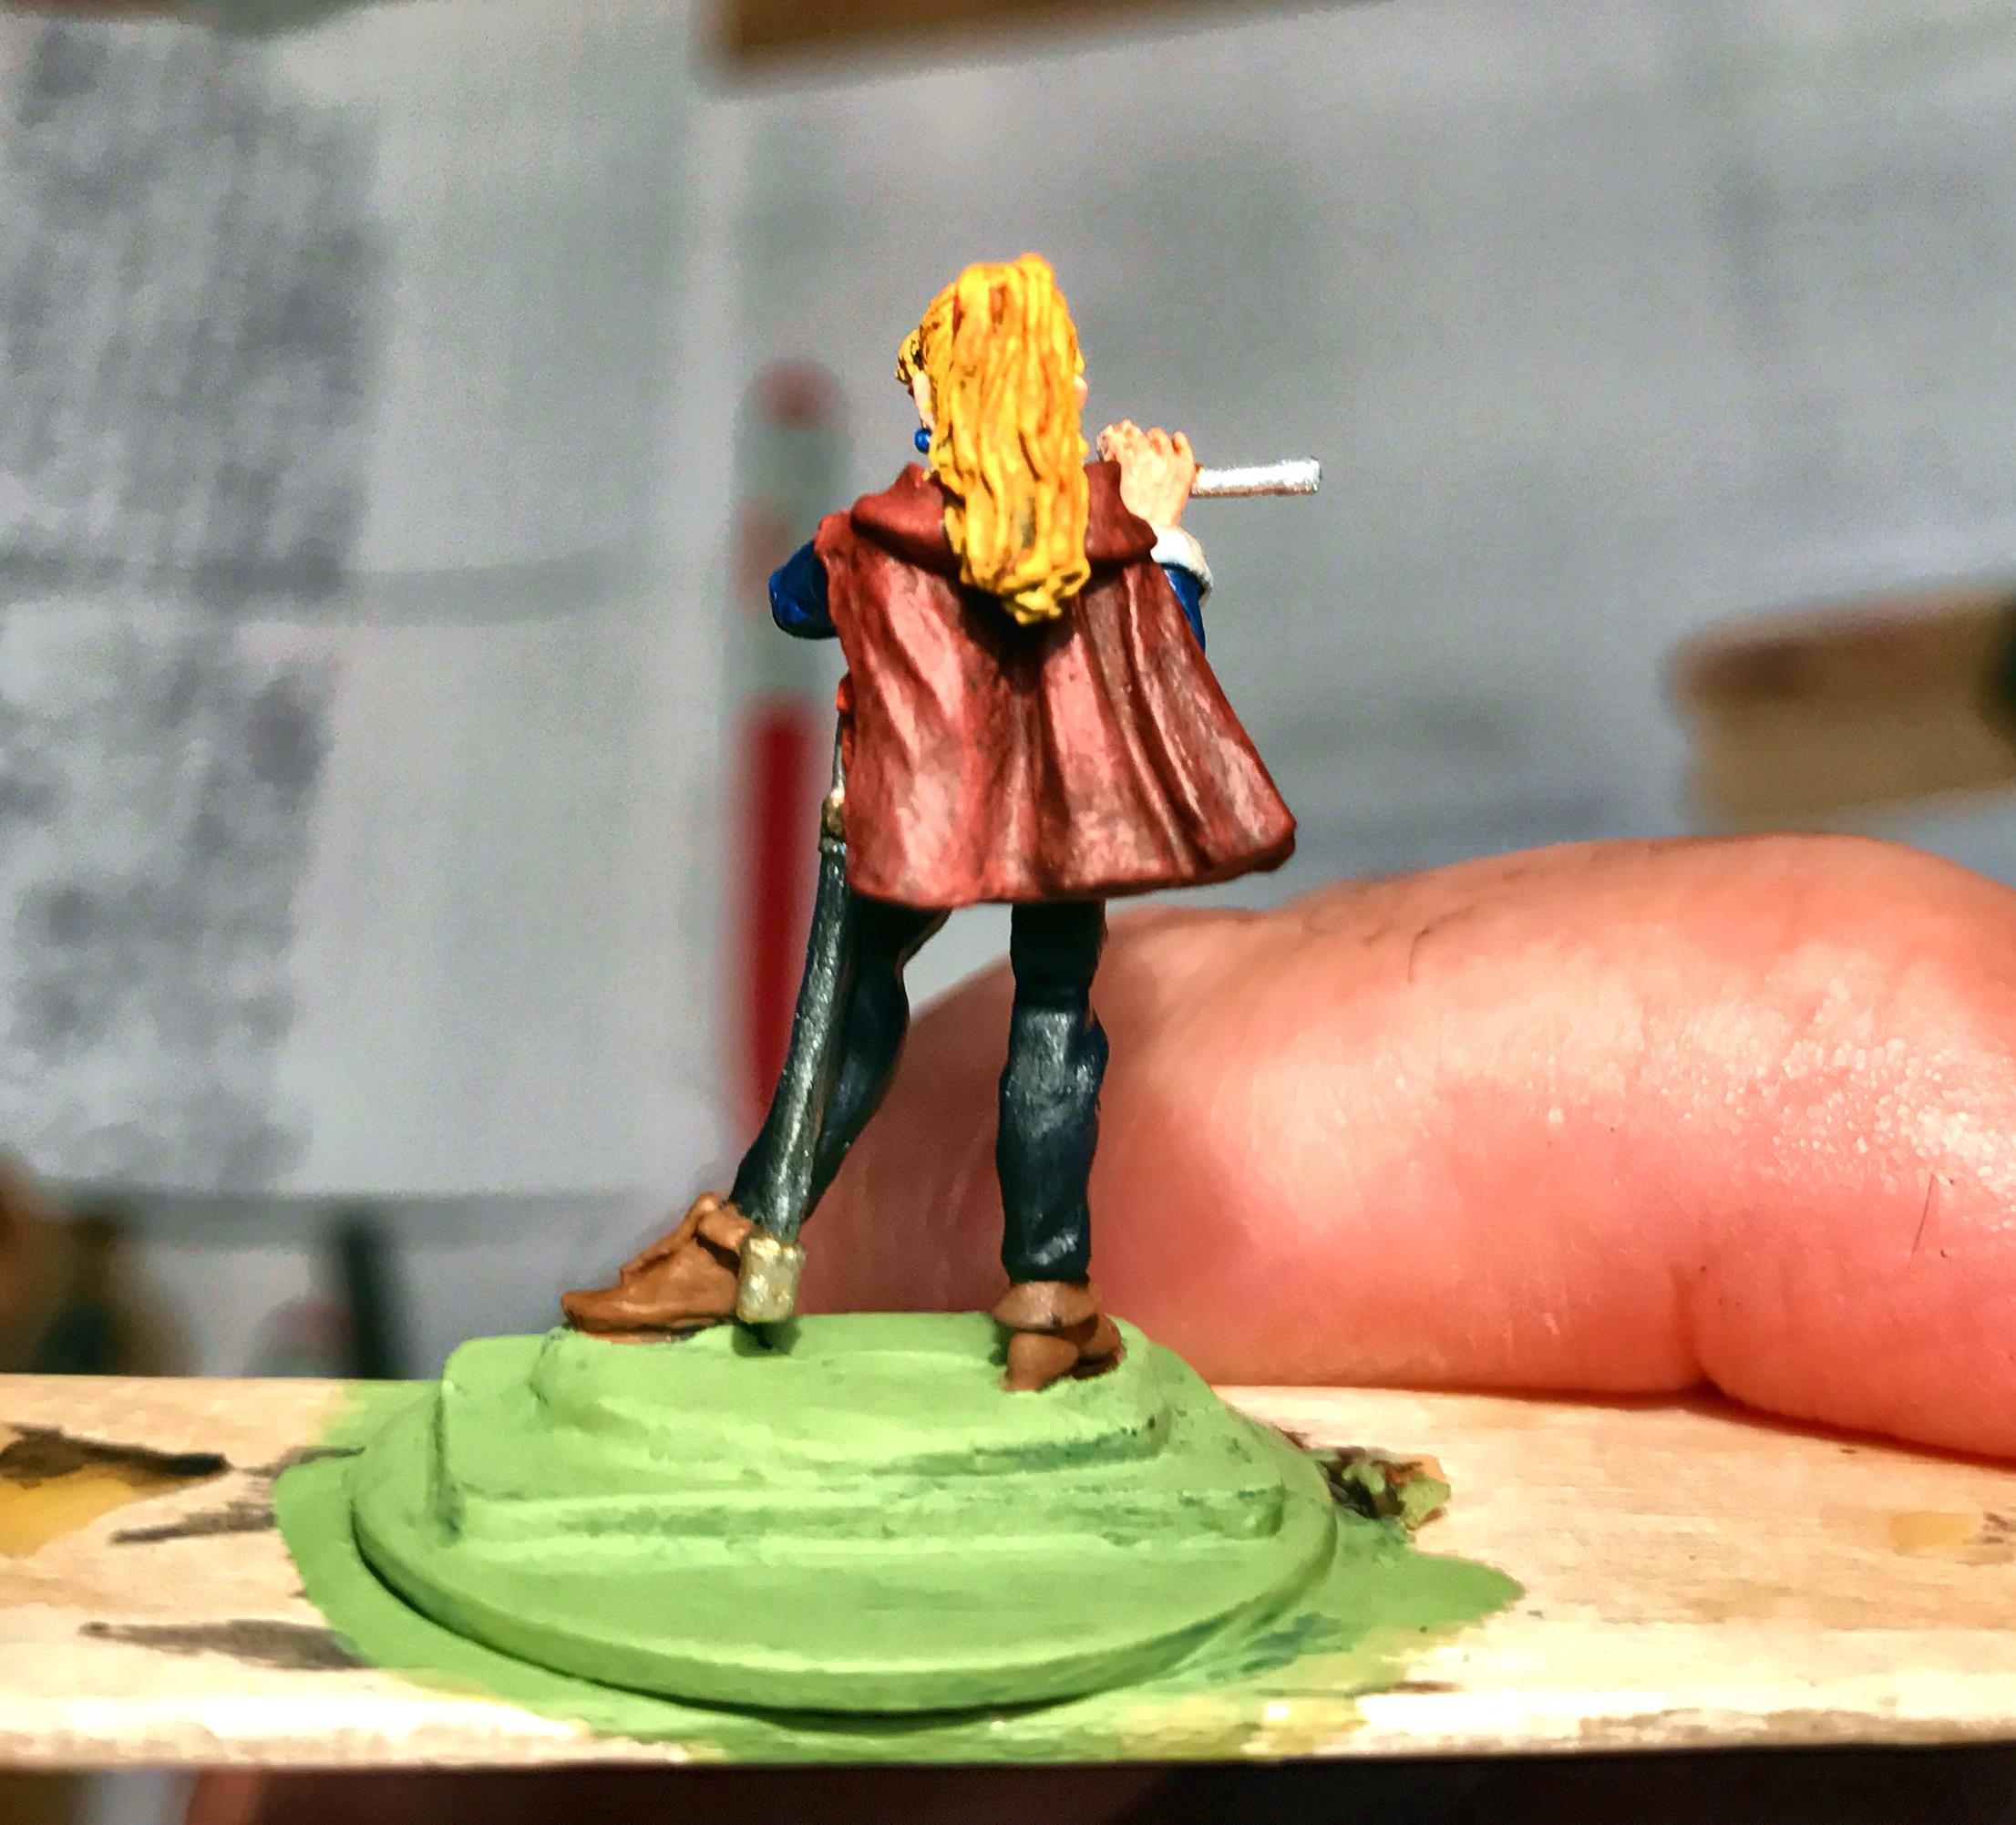
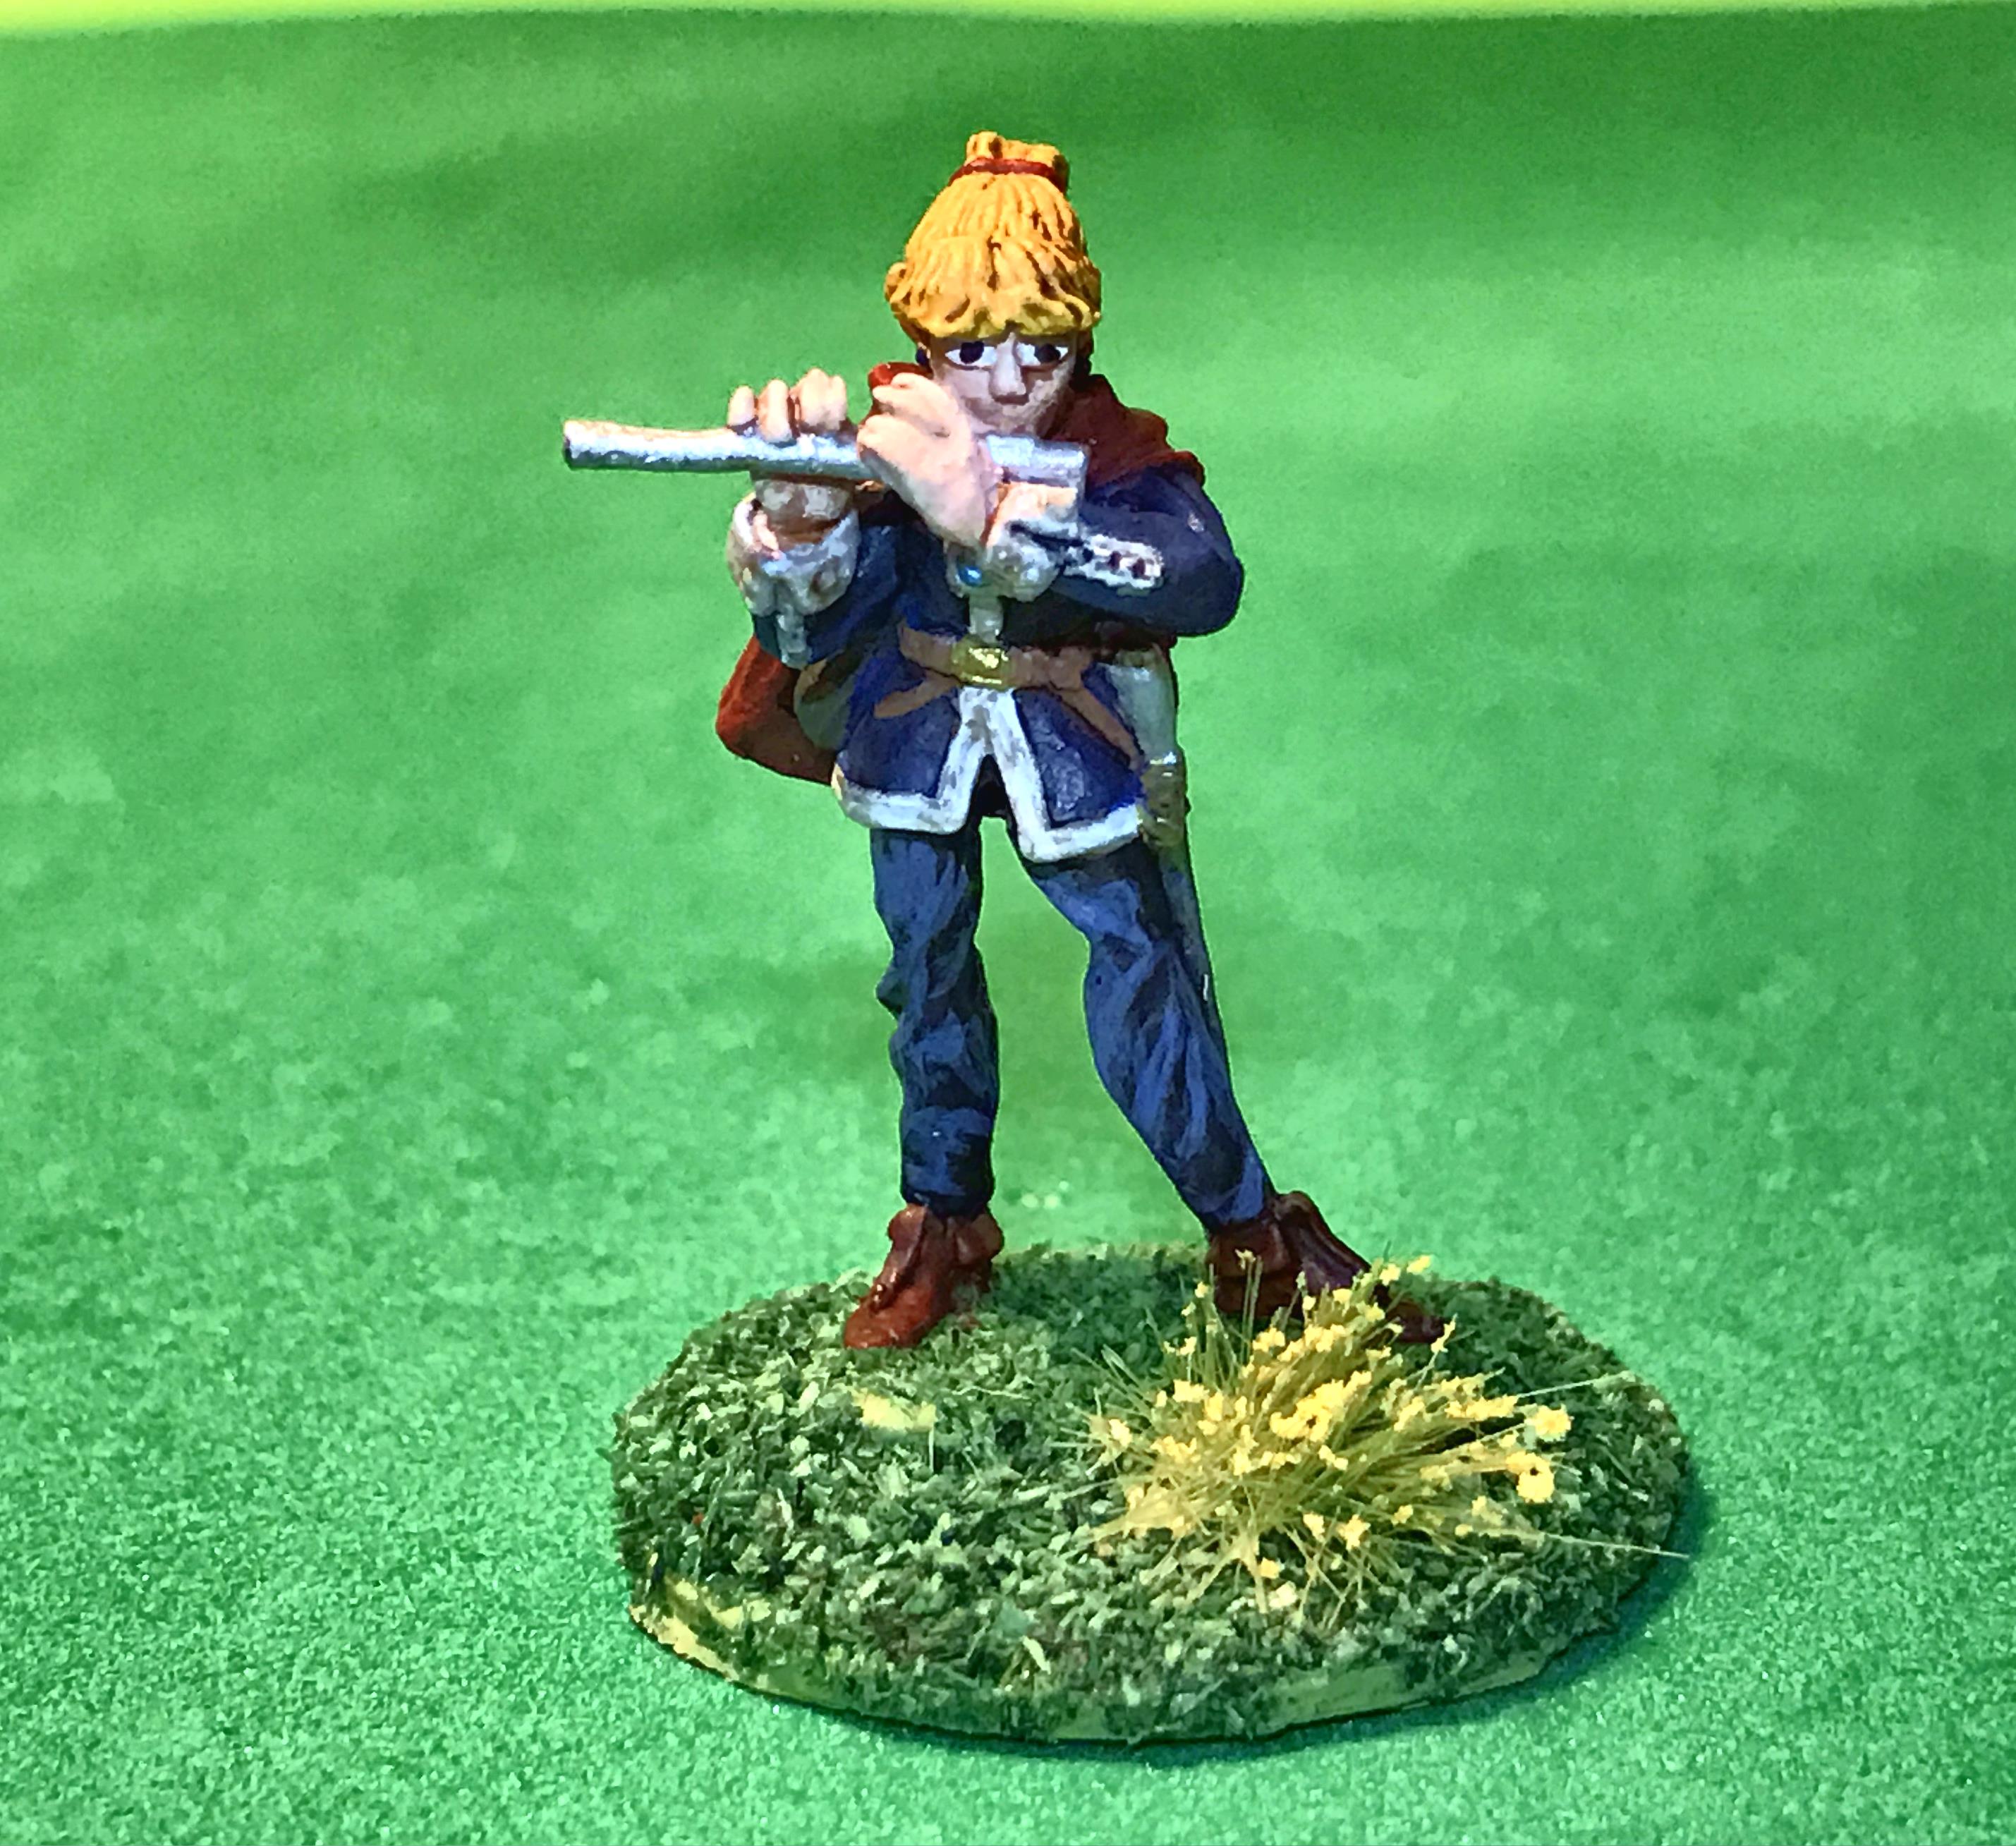
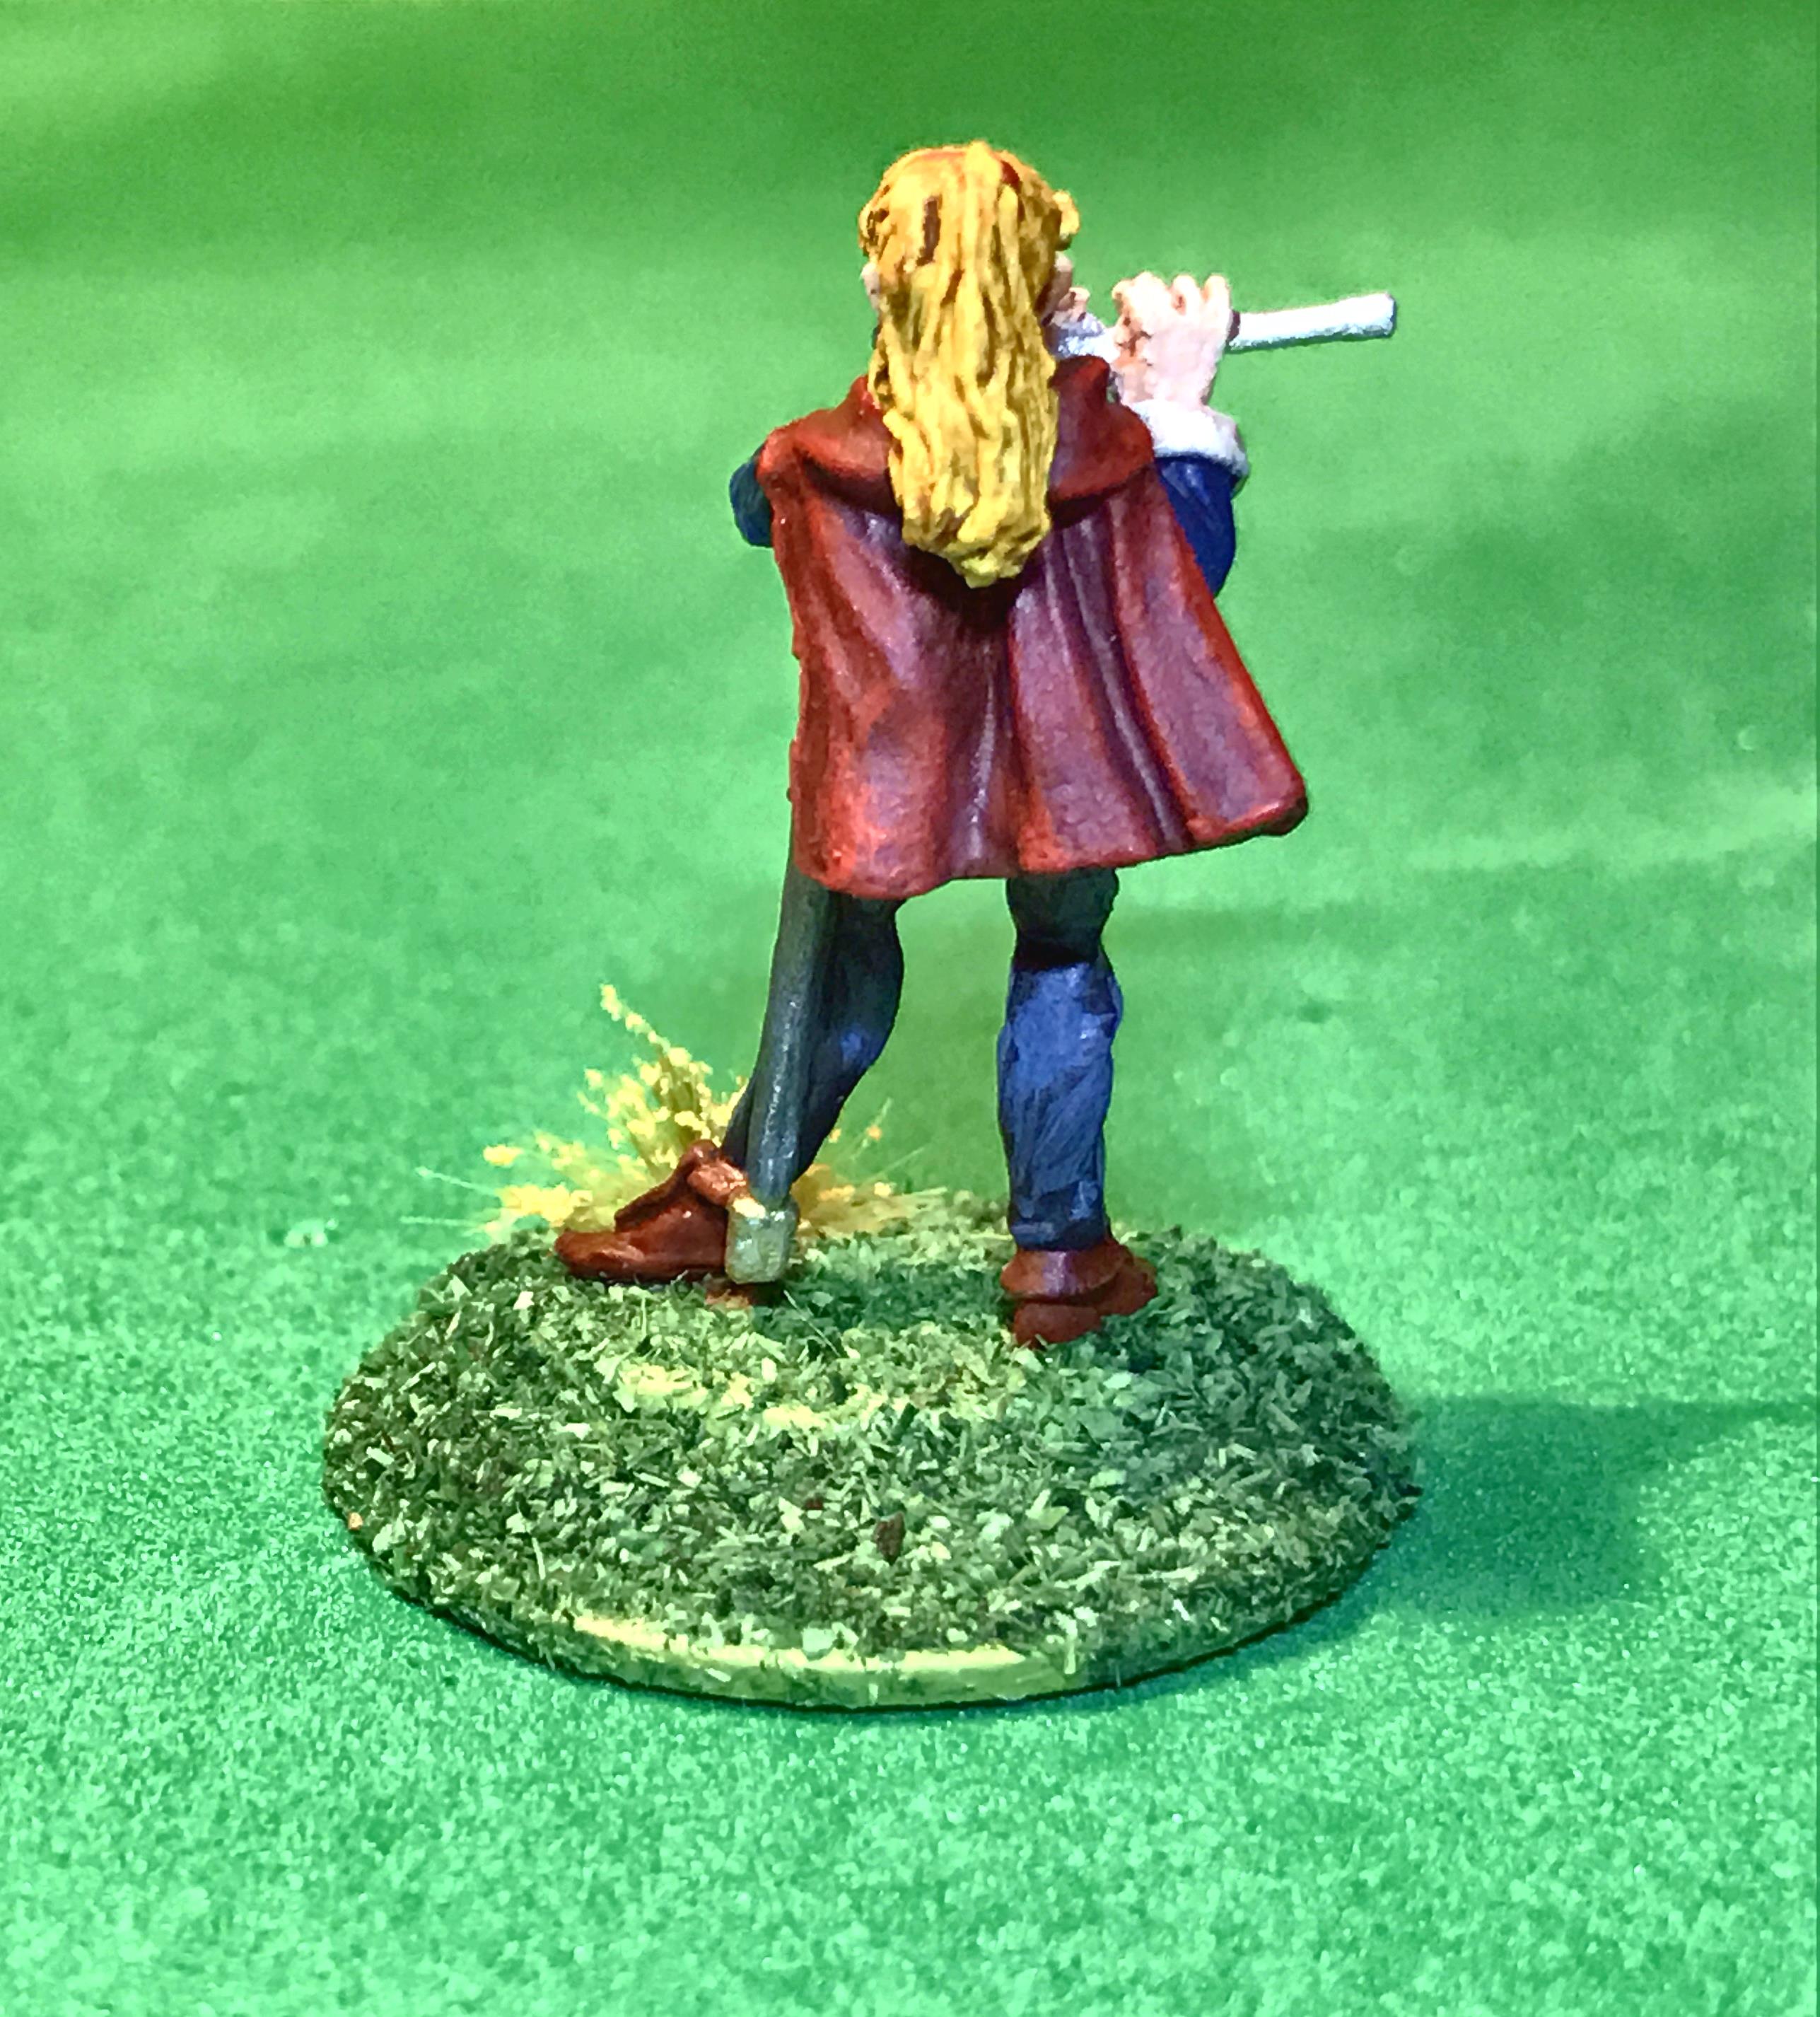
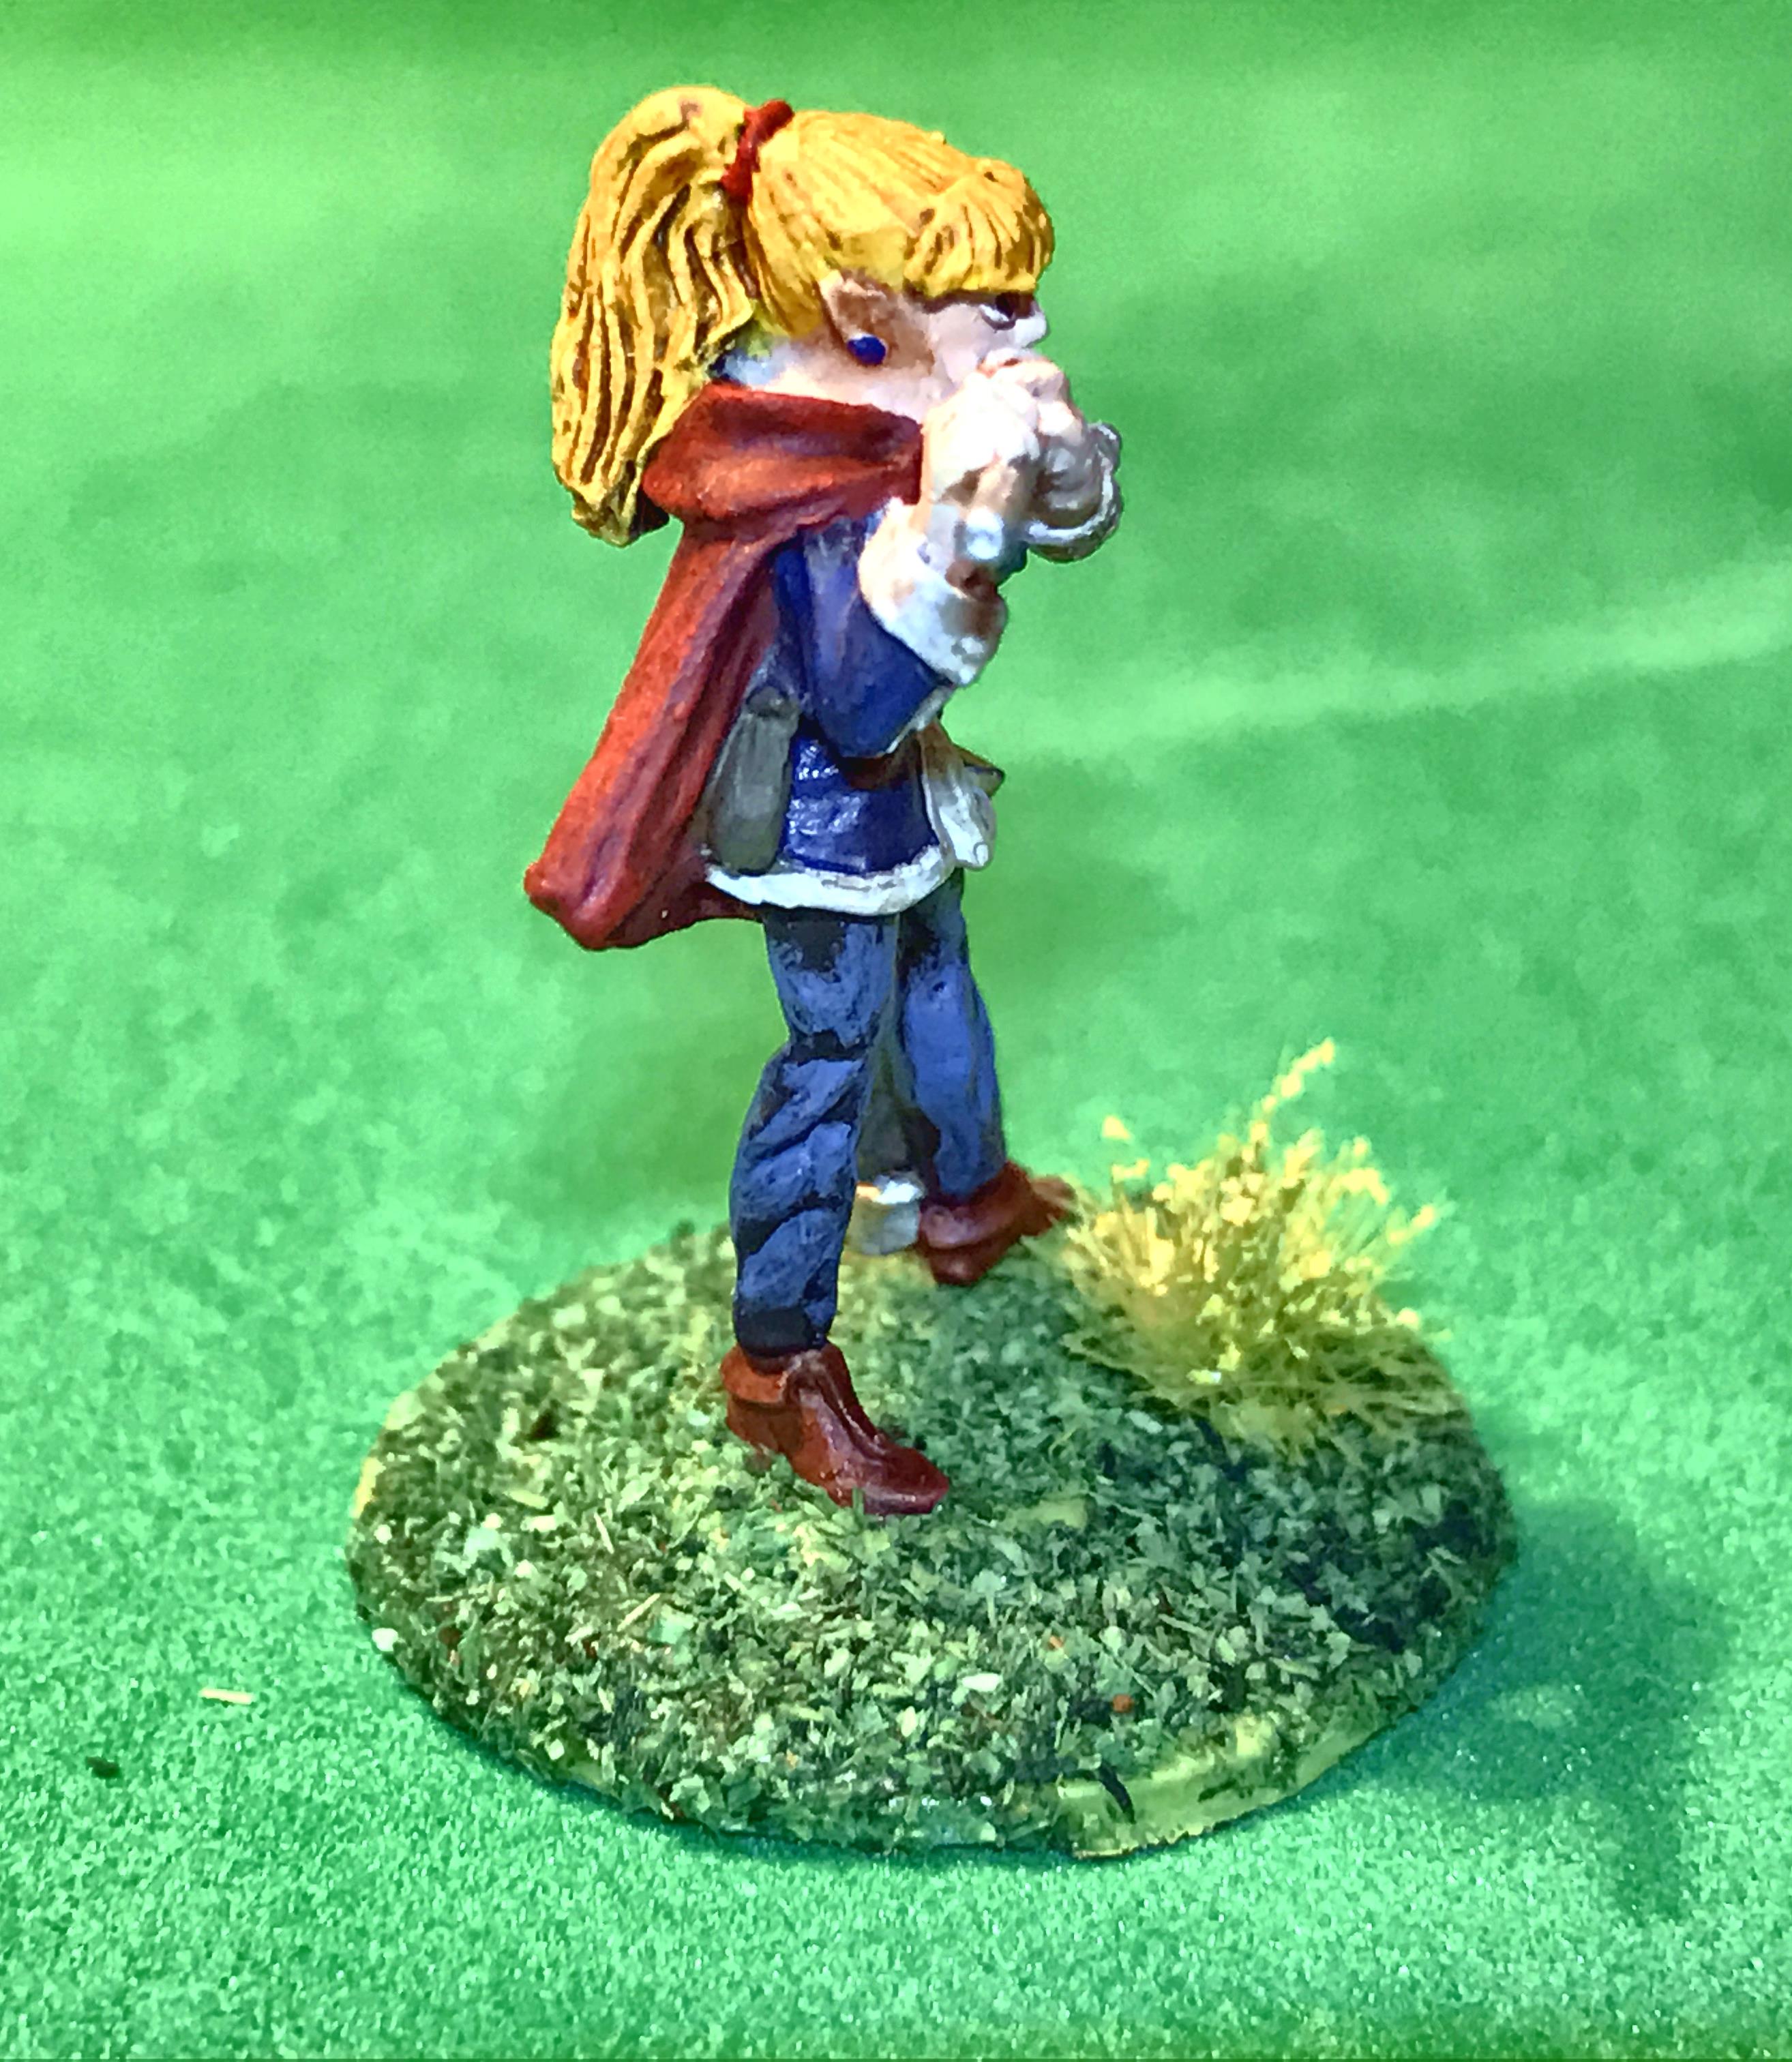
This is my first entry and concerns a RAFM Bard sculpted by Steven Koo in 1992 as part of the Women of the Ninth Meridian line. Here is a link to the 1994 catalog from DnD Lead website that shows that there were three in each set. The circled figure is the subject of this blog. The figure had pointed ears, so obviously she is an elf.
From the 1994 RAFM Catalog
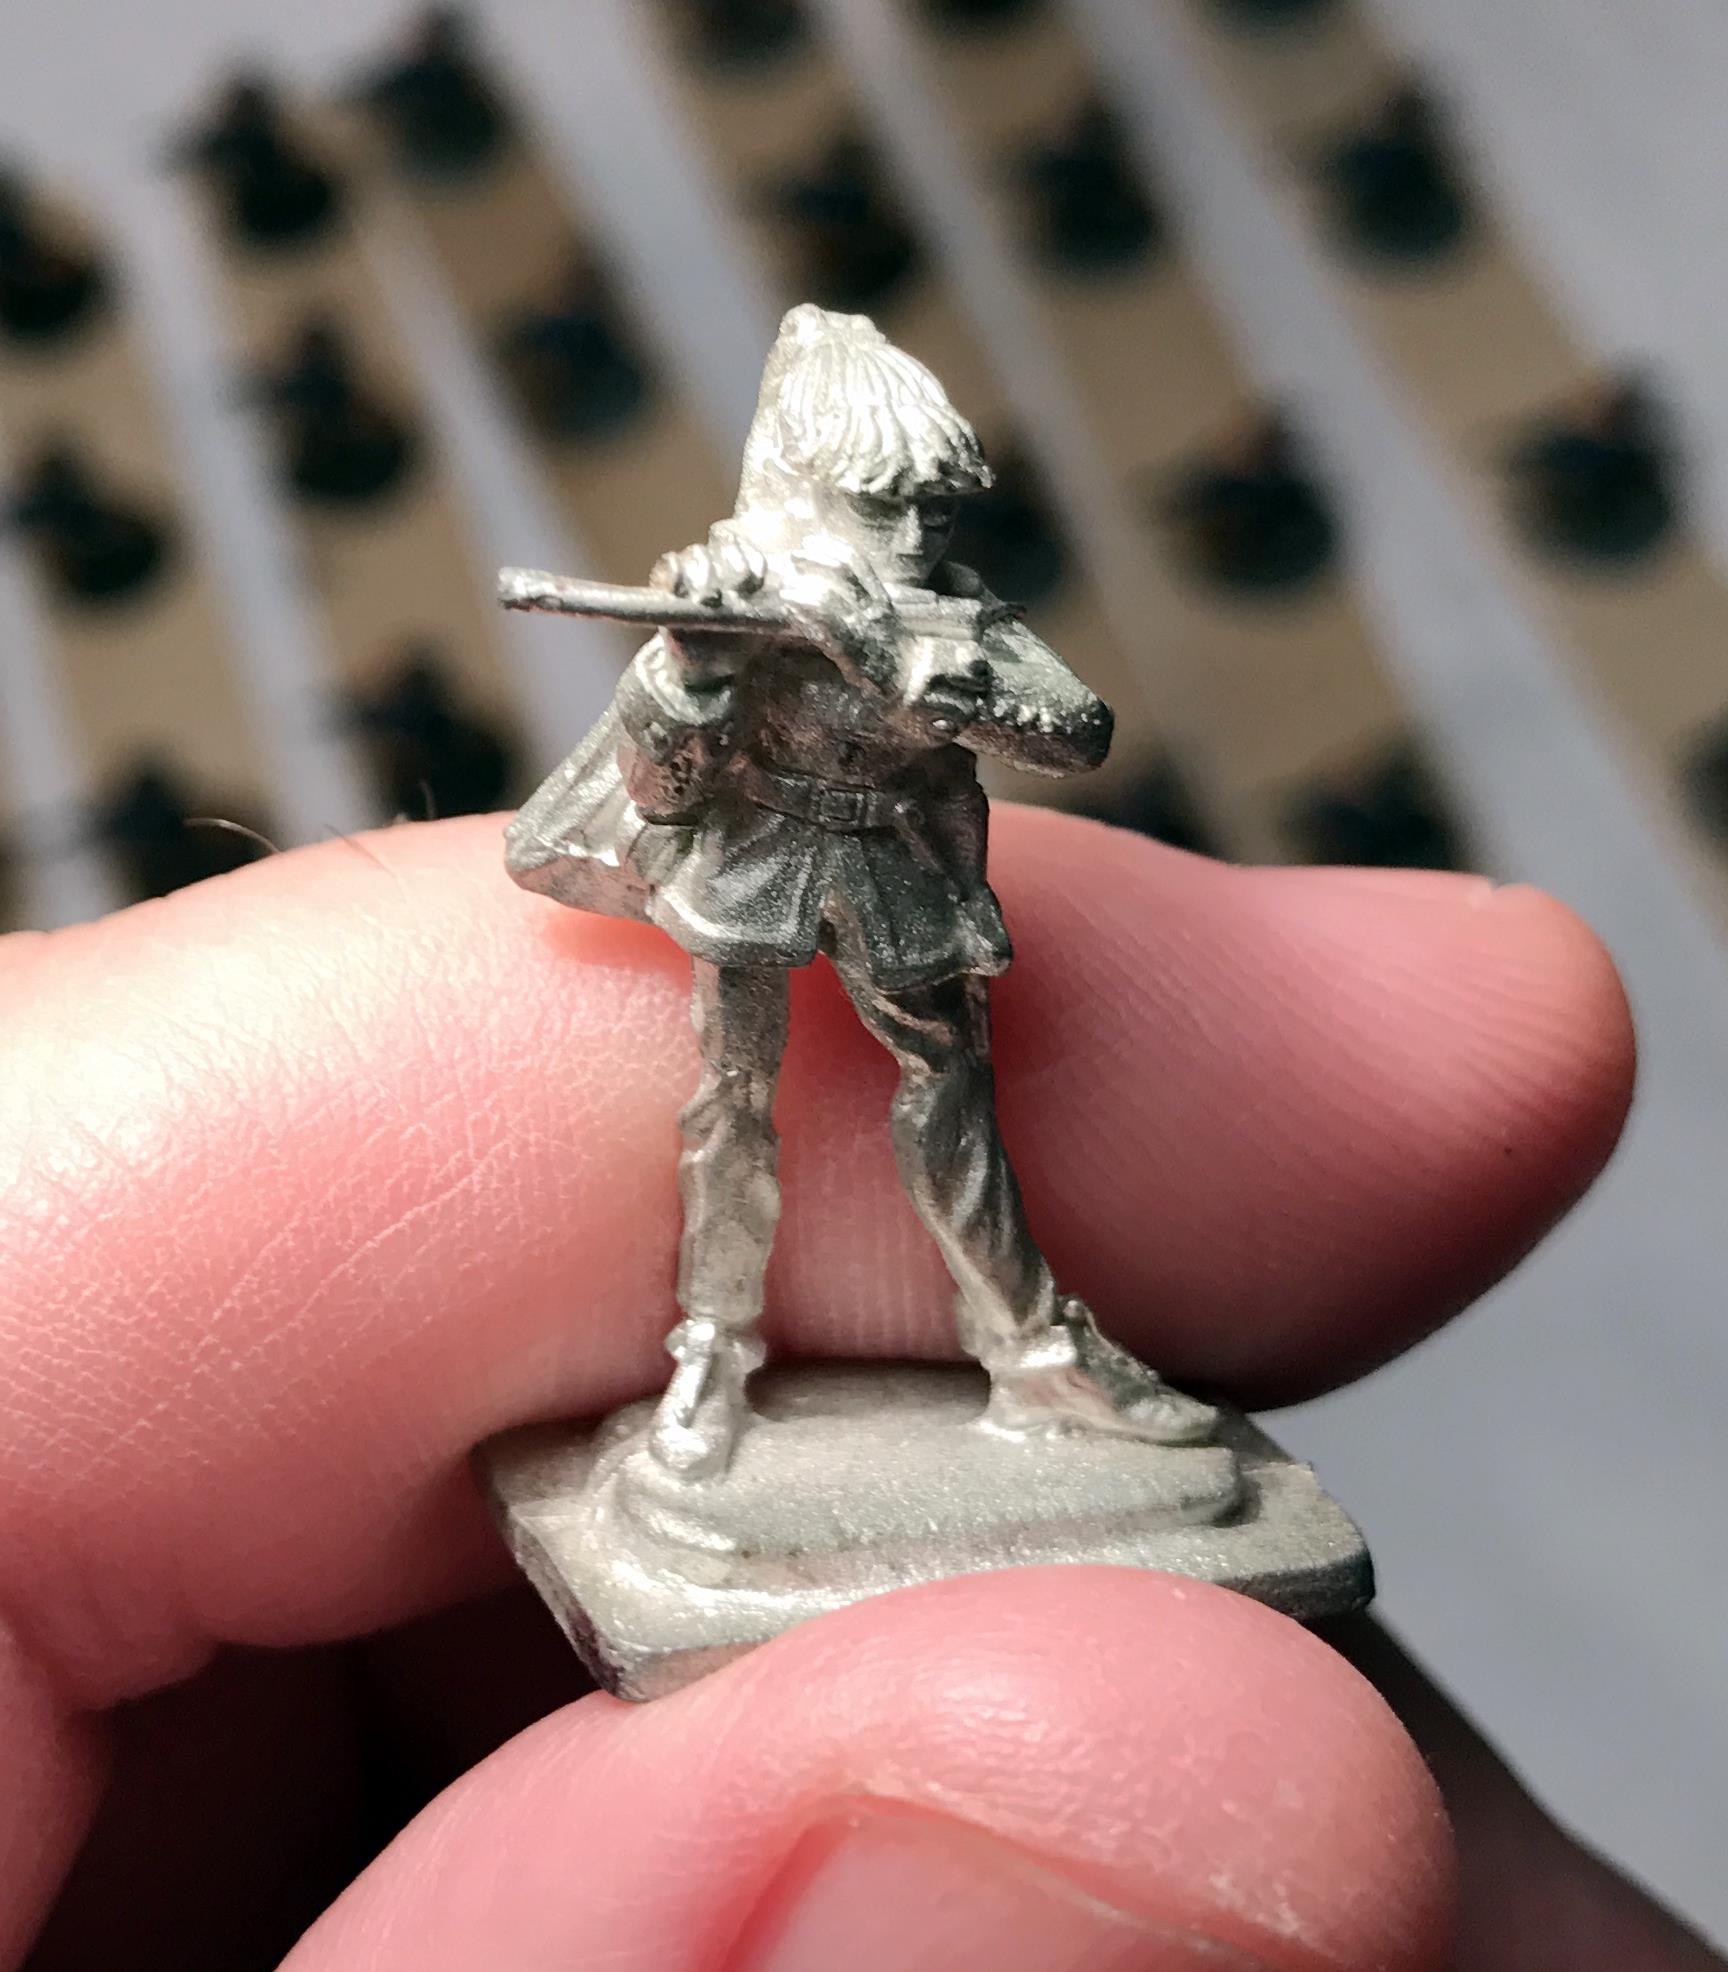
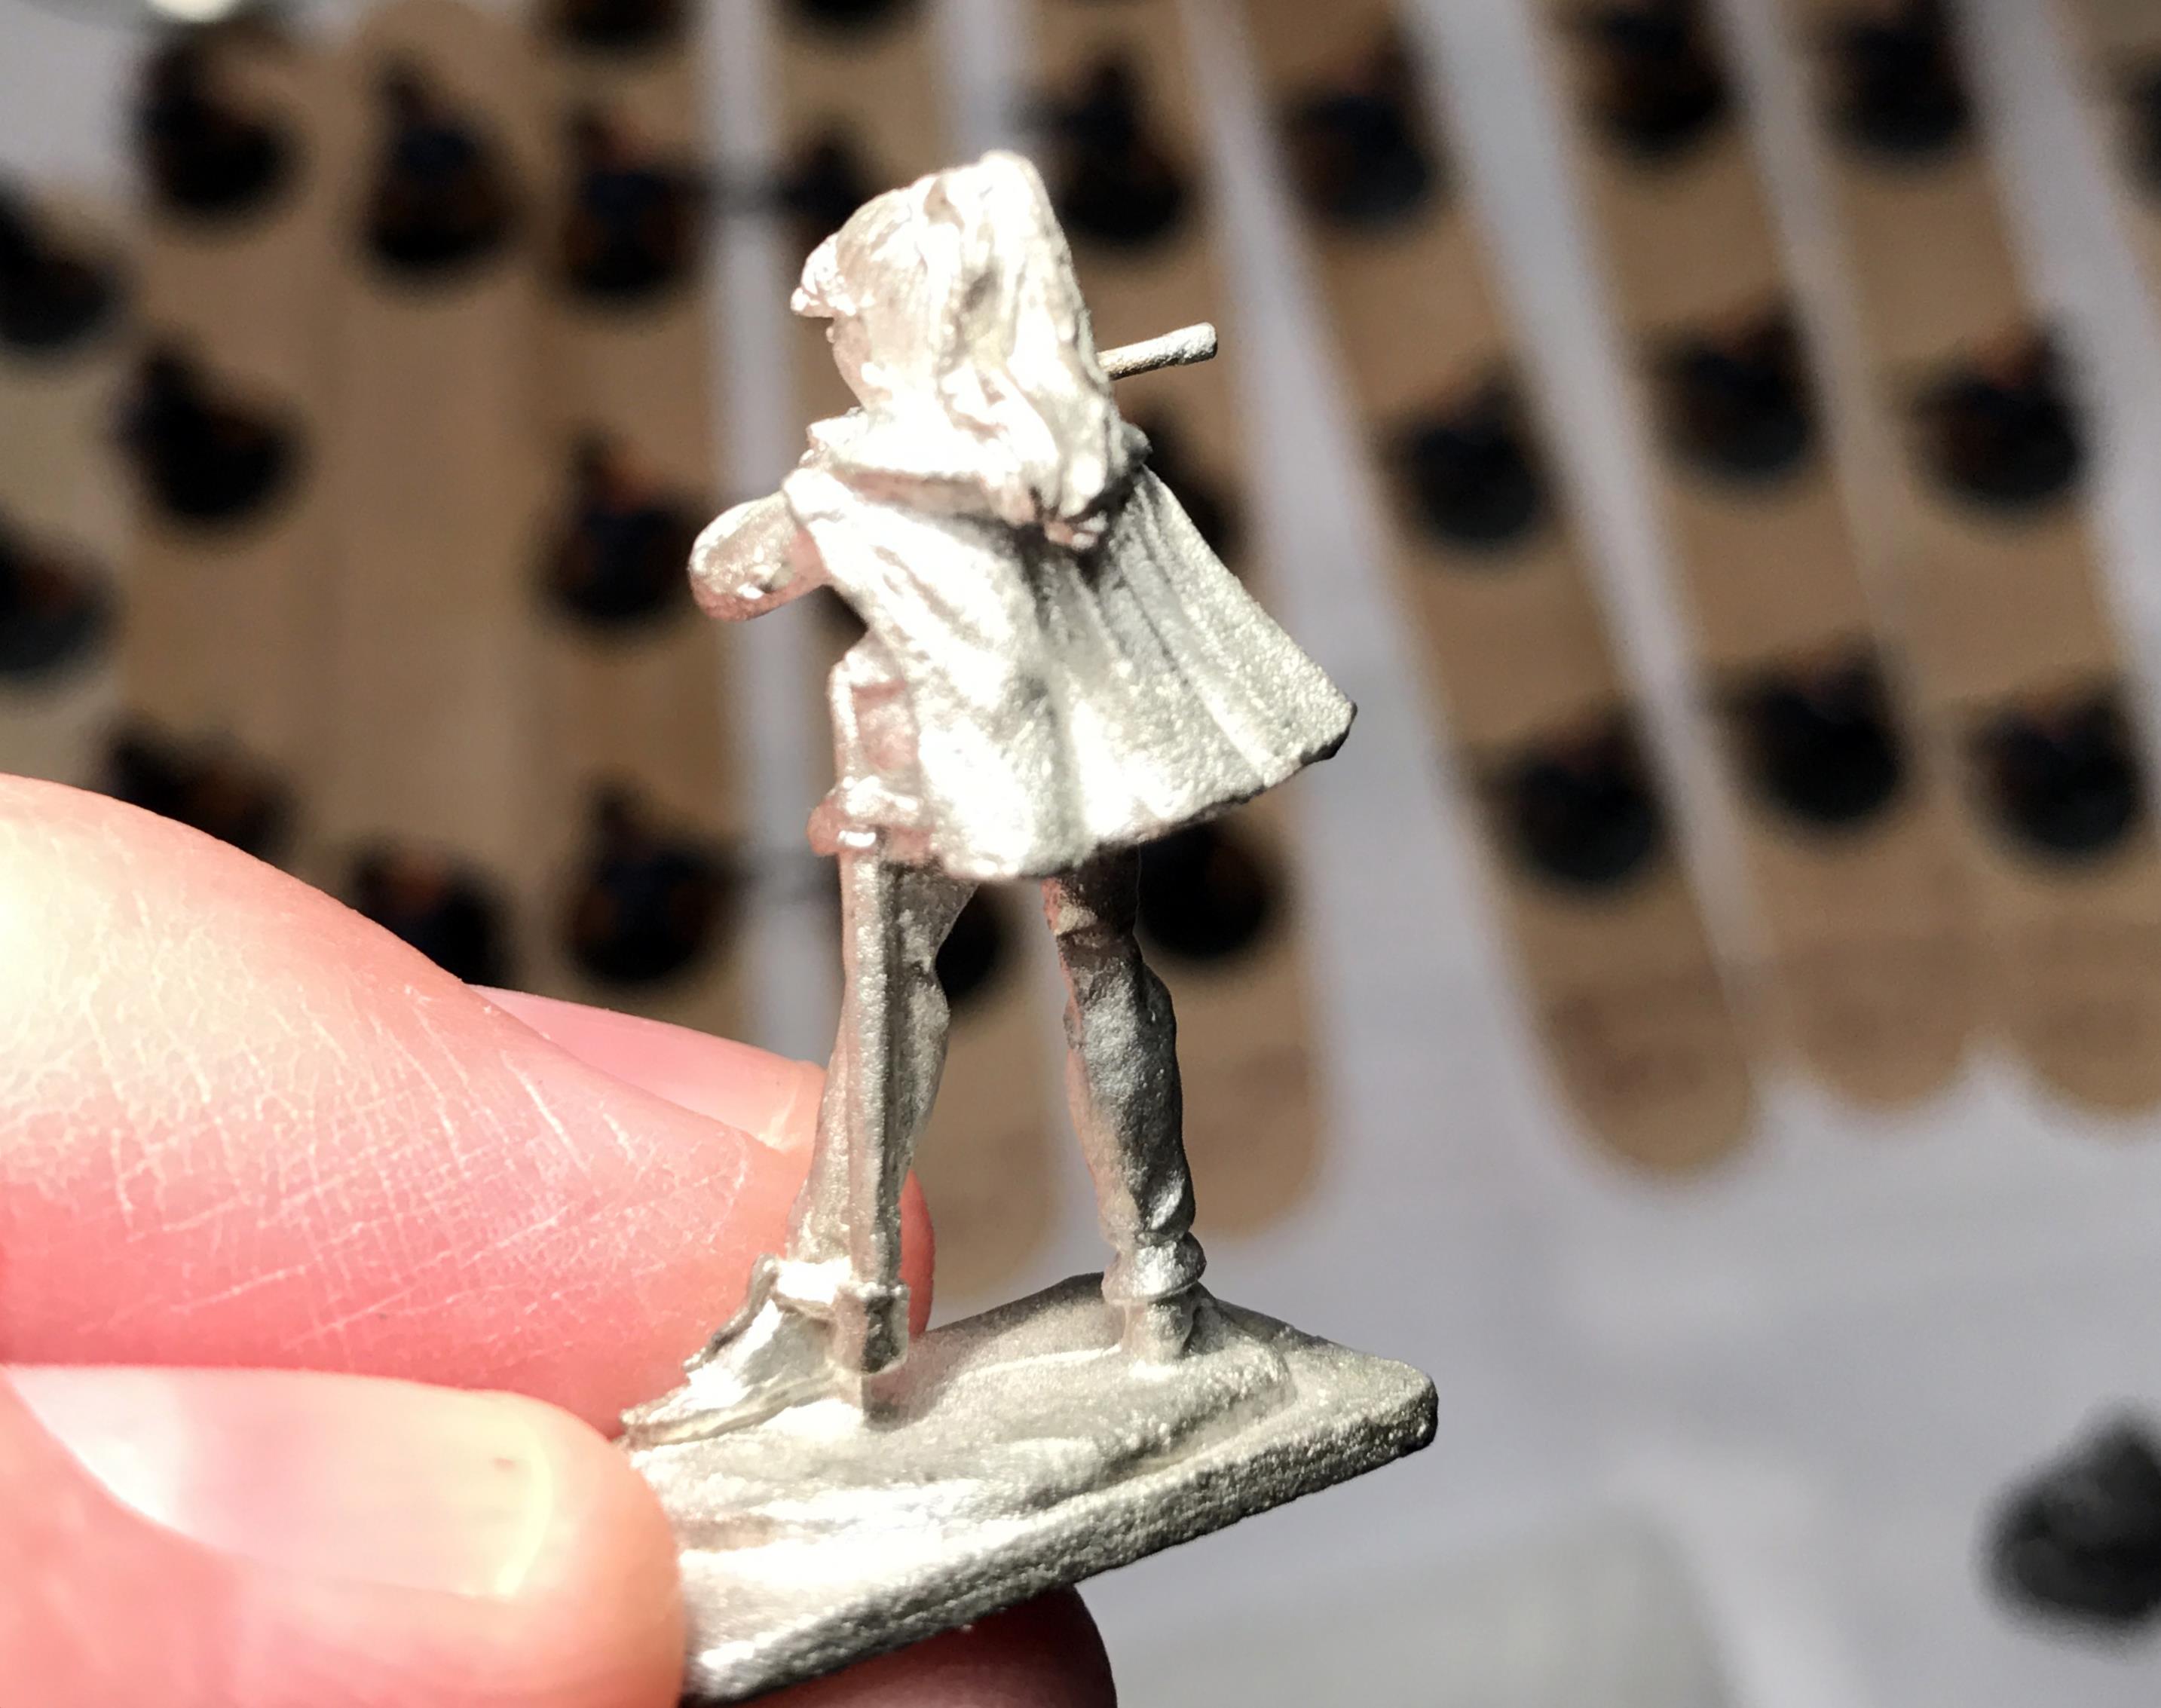
Chris Smedile’s birthday was coming up, so I offered him the chance to go through my assorted unpainted miniatures and pick a couple of figures that he would like me to paint for him. He picked two – this Bard, and a Reaper Chronoscope Bones figure (which you can read about here). It is 25mm in scale, cast in white metal (possibly lead-free), and had great detail.
Bard front view before painting
Rear view of Bard before painting
“RAFM 92”
I looked at the weather forecast as I wanted to finish this project in time to properly use spray varnish outside – and I need close to 70° F and low humidity for best effect. I wanted her to have a slight “Little Red Riding Hood” look.
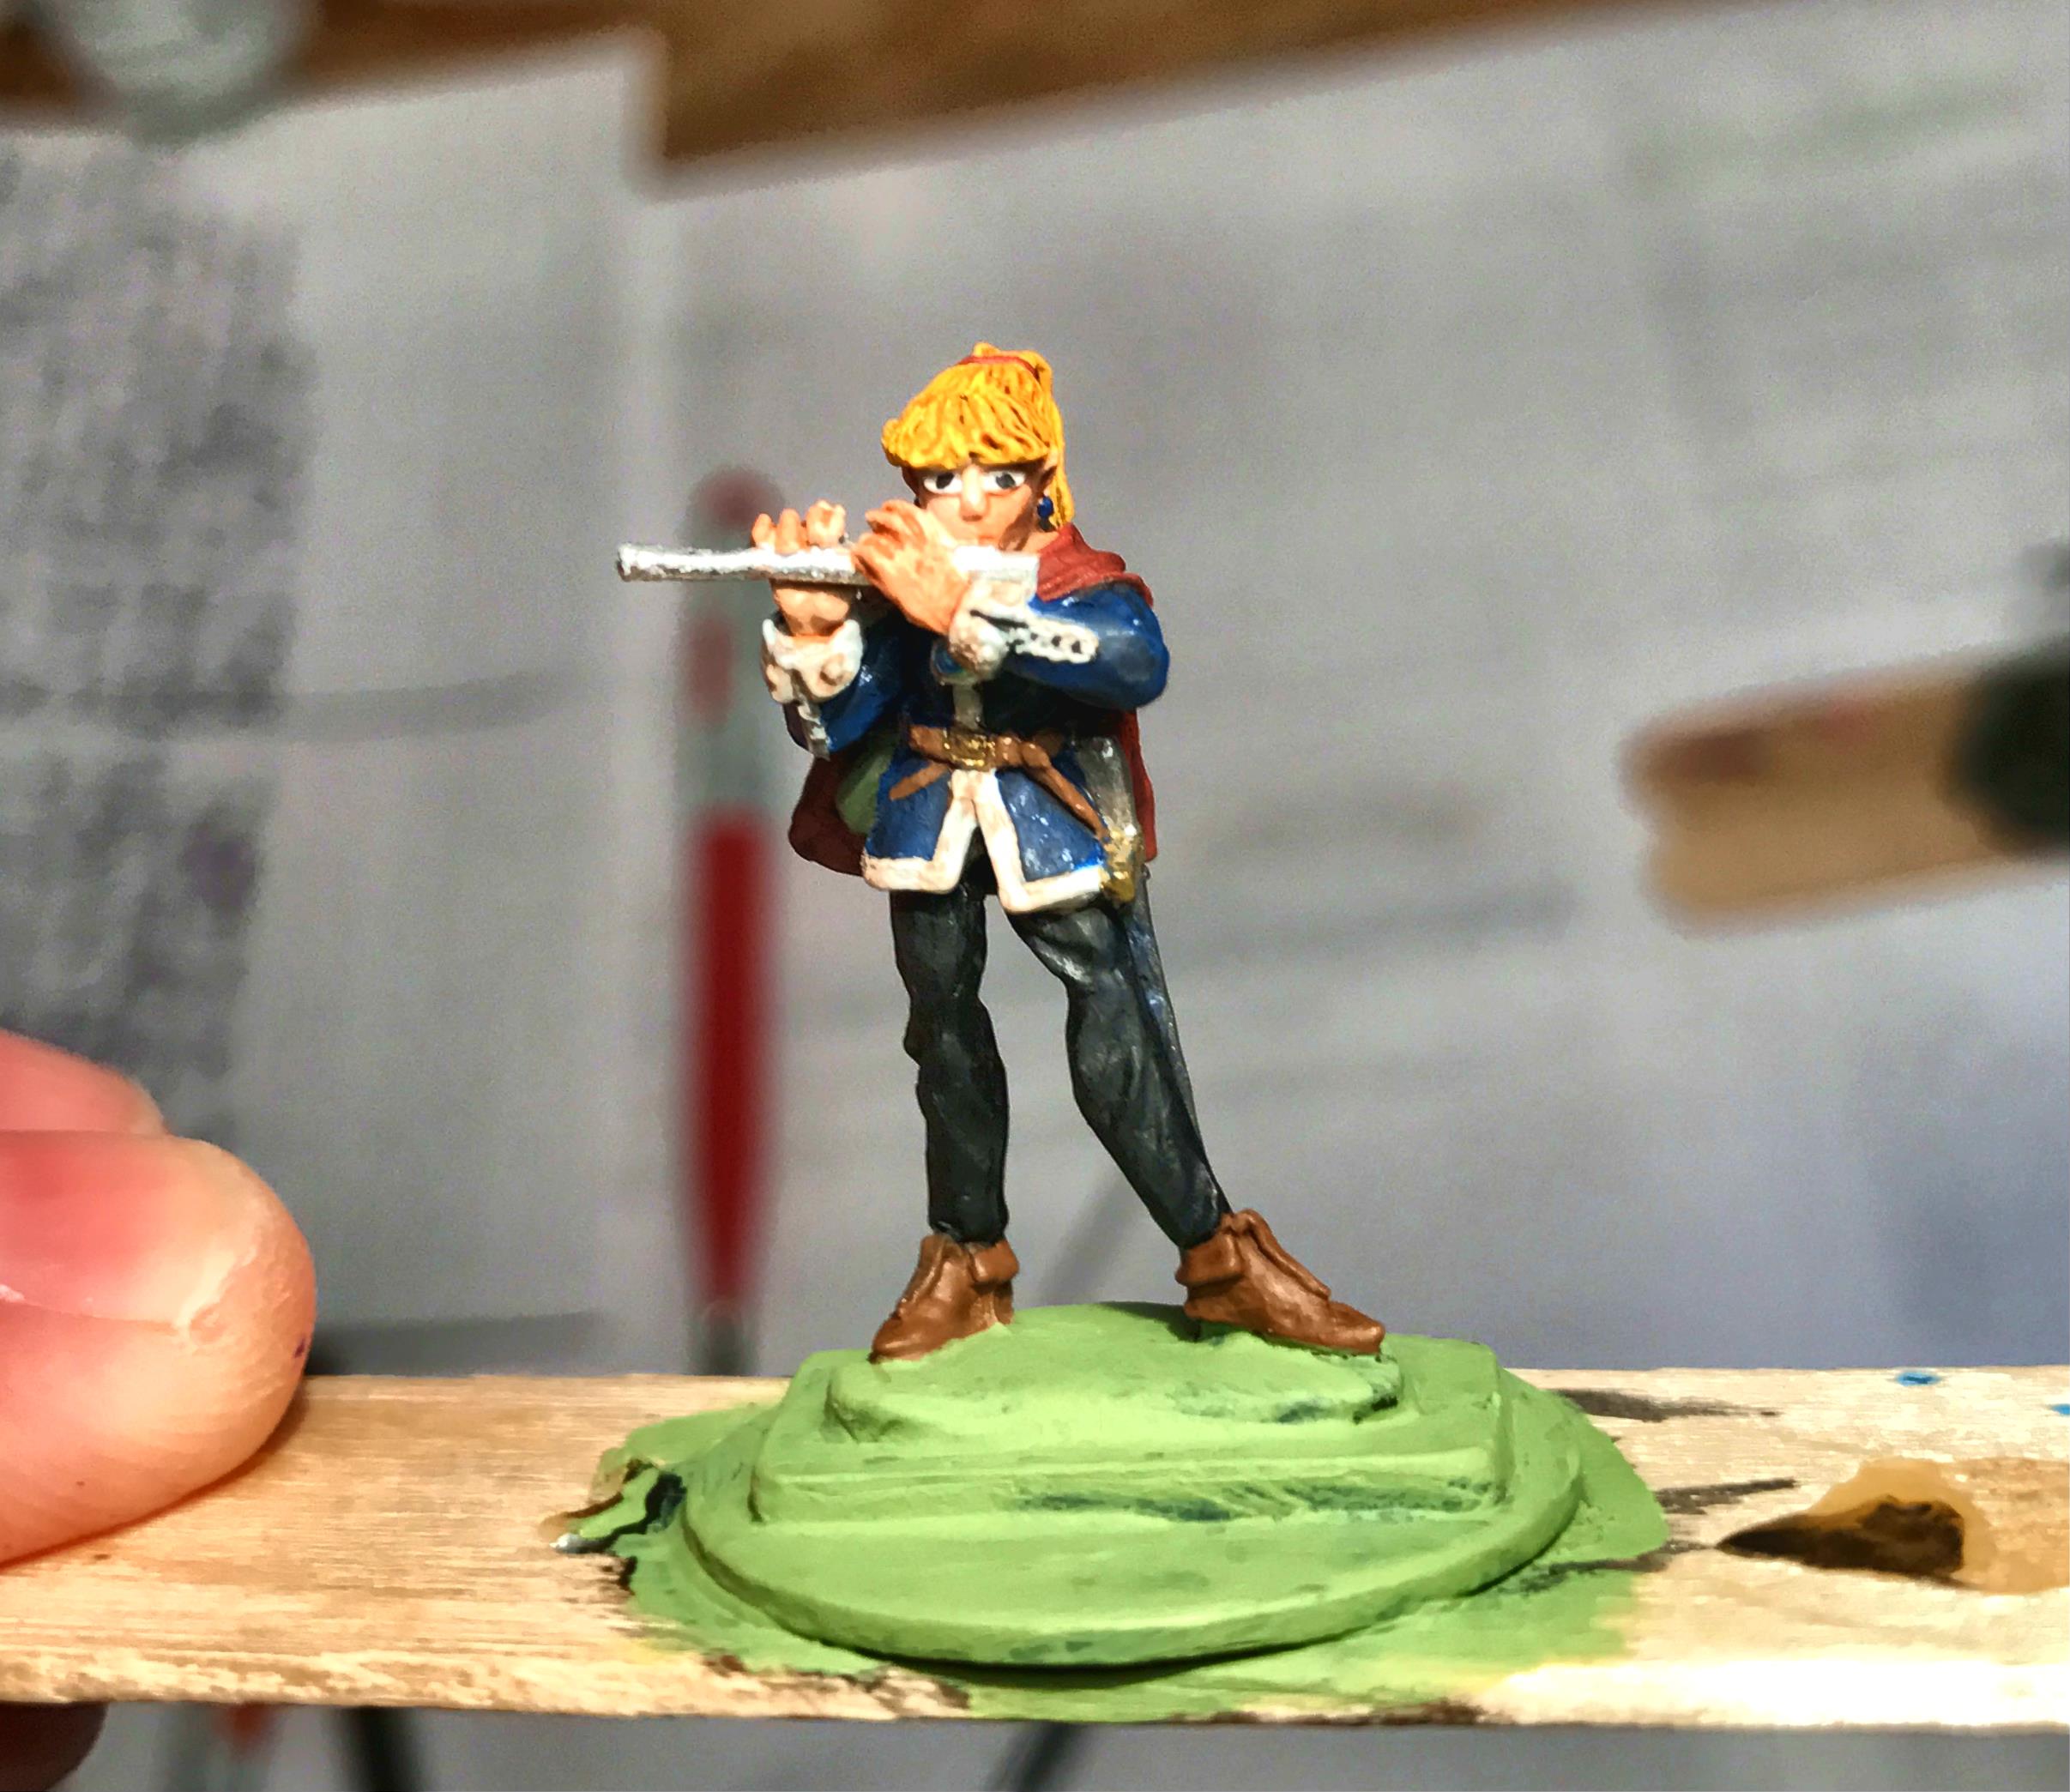
Beginning the base coat process, I started with the flesh, and used P3 “Ryn Flesh”. I painted her flute with Tamiya “Chrome Silver”. Using a pine tipped brush, I painted her eyes with Citadel “Ceramite White” and Reaper MSP “Blue Liner”. Moving on to her hair, I decided to go with blond. For that, P3 “Sulphuric Yellow” was my choice. For her tunic and her earrings, I went with a paint I purchased in West Germany in 1987, Deka Lack “Dunkelblau” (dark blue). She had a thin sword, and the scabbard I painted with Vallejo “Gun Metal”.
Moving on to her cape, I got another oldie but goodie paint from 1984. This was Polly-S “Demon Deep Red”, which ironically is older than Chris is!! I also used that color to base her hair ribbon. For her breeches, I based with Armory “Prussian Blue”. For the trim and cuffs on her tunic, I used another Deka Lack paint, “Weiss” (white). She had a canteen and a pouch on her belt. These I painted respectively with Vallejo “US Dark Green” and Armory “Brick Red”. For her leatherwork and straps, I decided on P3 “Bootstrap Leather”. I needed to finish her metallics, and so I painted her brooch and sword pommel with Vallejo “Silver”, and her belt buckle and scabbard tip with Vallejo “Bright Brass”. She has a jewel in her brooch, which I painted with Citadel “Soulstone Blue”. For her base, I used Americana “Hauser Light Green” so as to make later base applications better.
Bard, front, after base coat
Bard, back, after base coat
I then moved on to highlighting and shading the figure. For her hair, I used successive washes, first with P3 “Sunshine Yellow” and then with Citadel “Reikland Fleshshade”. I then used a wash on the tunic with Citadel “Agrax Earthshade”. I then lightly washed her hands with “Reikland Fleshshade”. To highlight her facial features, I mixed Polly-S “Elf Flesh” with P3 “Ryn Flesh” and applied it to her cheeks, nose, hand and fingers.
For her breeches, I shaded with “Agrax Earthshade”, followed by highlighting with a mix of “Weiss” and “Prussian Blue”. Lastly, I moved on to her cape and hair ribbon. Here, I darkened the cape with “Agrax Earthshade”, then highlighted it with Americana “Santa Red”. I also painted her hair ribbon with “Santa Red”.
To finish the base, I applied Army Painter “Moss Green” flocking with white glue. Then the figure got two coats of Testors spray “Dullcoat”, allowing for sufficient drying time between coats. To finish her, I added a yellow flower tuft from Army Painter “Meadow Flowers”.
Finished Bard, frontal view
Finished Bard, rear view
Finished Bard, side view
Overall, I was pleased with the work I did on the figure. It was a nice break from my very large Star Duck project.
Chris got it on his birthday, and he loved it! I am looking forward to hearing of her exploits!
Some projects take a while – and this one was over 33 years in the making. As background, my first introduction to tabletop wargaming was in 1983 at West Point. My classmate Dave Wood (USMA 1984) introduced me to Buck Surdu (USMA 1985). Buck had set up a fantasy tabletop war game on a gaggle of desks in the Department of Foreign Languages, and from then on, a whole new gaming experience was open to me.
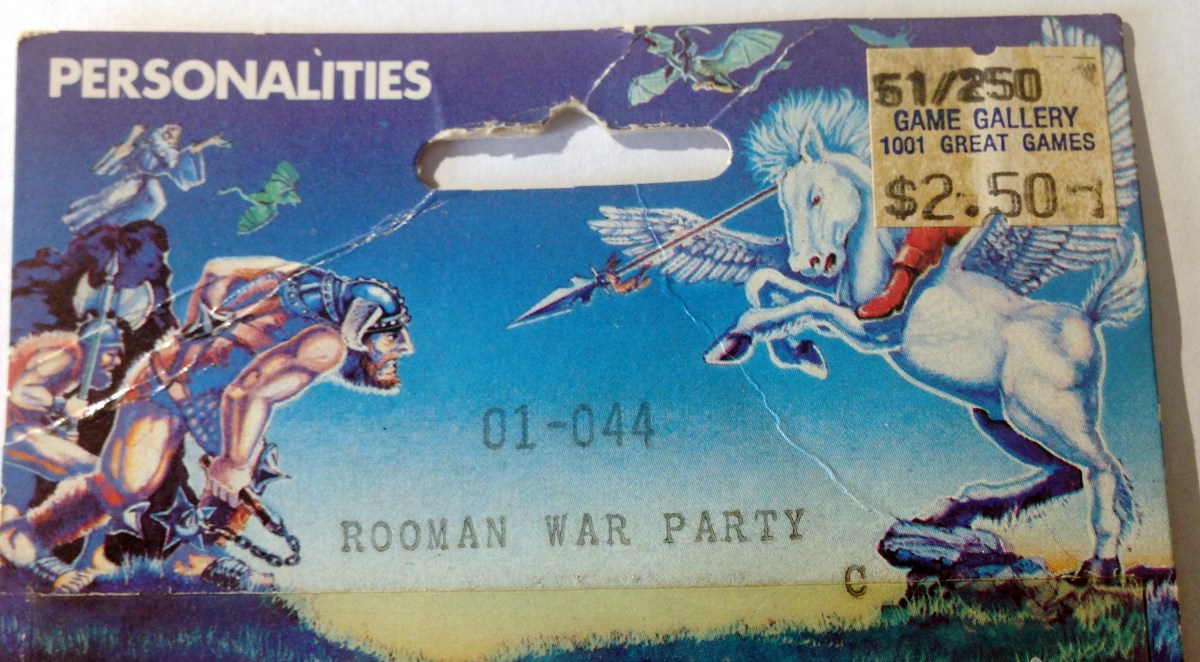
Buck wrote his own rules, and he and Dave had units of all kinds for the game. One type that Buck had was a unit of “Roomans”, which he referred to as “Beaks” as well. They were of course of the marsupial macropod (large foot) persuasion – more or less humanoid kangaroos. Of course, the word play of Romans/Roomans is evident as well. They were armed with pikes, had great movement and combat capabilities, and overall were just pretty cool. I wanted to get some, and every time I went to a hobby store in the 1980’s and 1990’s, I looked for Roomans. I had hardly any luck.
Little did I know back then that Ral Partha had produced only one type of blister pack of “Rooman War Party”, with production starting in 1977. The original numbering of the blister pack was ES-44, and in 1978 and later years that was changed to 01-044. This set was in the “Personalities and Things…That Go Bump in the Night” line from Ral Partha. Each pack in 1977 came with one Rooman with a shield in front, two Roomans with shields on the side, and three assembled pikes on piano wire. By this I mean that the 1977 pack had pikes that were in one piece with streamers rolled up under the business end of the pike. Later, Ral Partha changed the pikes to a two-piece type, where the point of the pike had smaller streamers coming off and would need to be glued to a piece of enclosed piano wire. This latter type was the most prevalent type made by Ral Partha.
Let’s get back to my search. As time went on, I became very frustrated in my attempts to locate any blister packs of Roomans. Today, I’d just look on the company web site or call them – but back then – well kids there was no internet – and that would be a very expensive long-distance toll call to Cincinnati (especially from West Germany where I spent most of the latter 1980’s in the Army). Alas, I found just one blister pack of Roomans at a hobby store around 1986 or 1987 – and that was it!
The Only Roomans I Ever Found in a Hobby Store
I put them away, awaiting the day when I would find another blister pack – and then I could make a unit of 6 figures perhaps…that wait was indeed over 33 years.
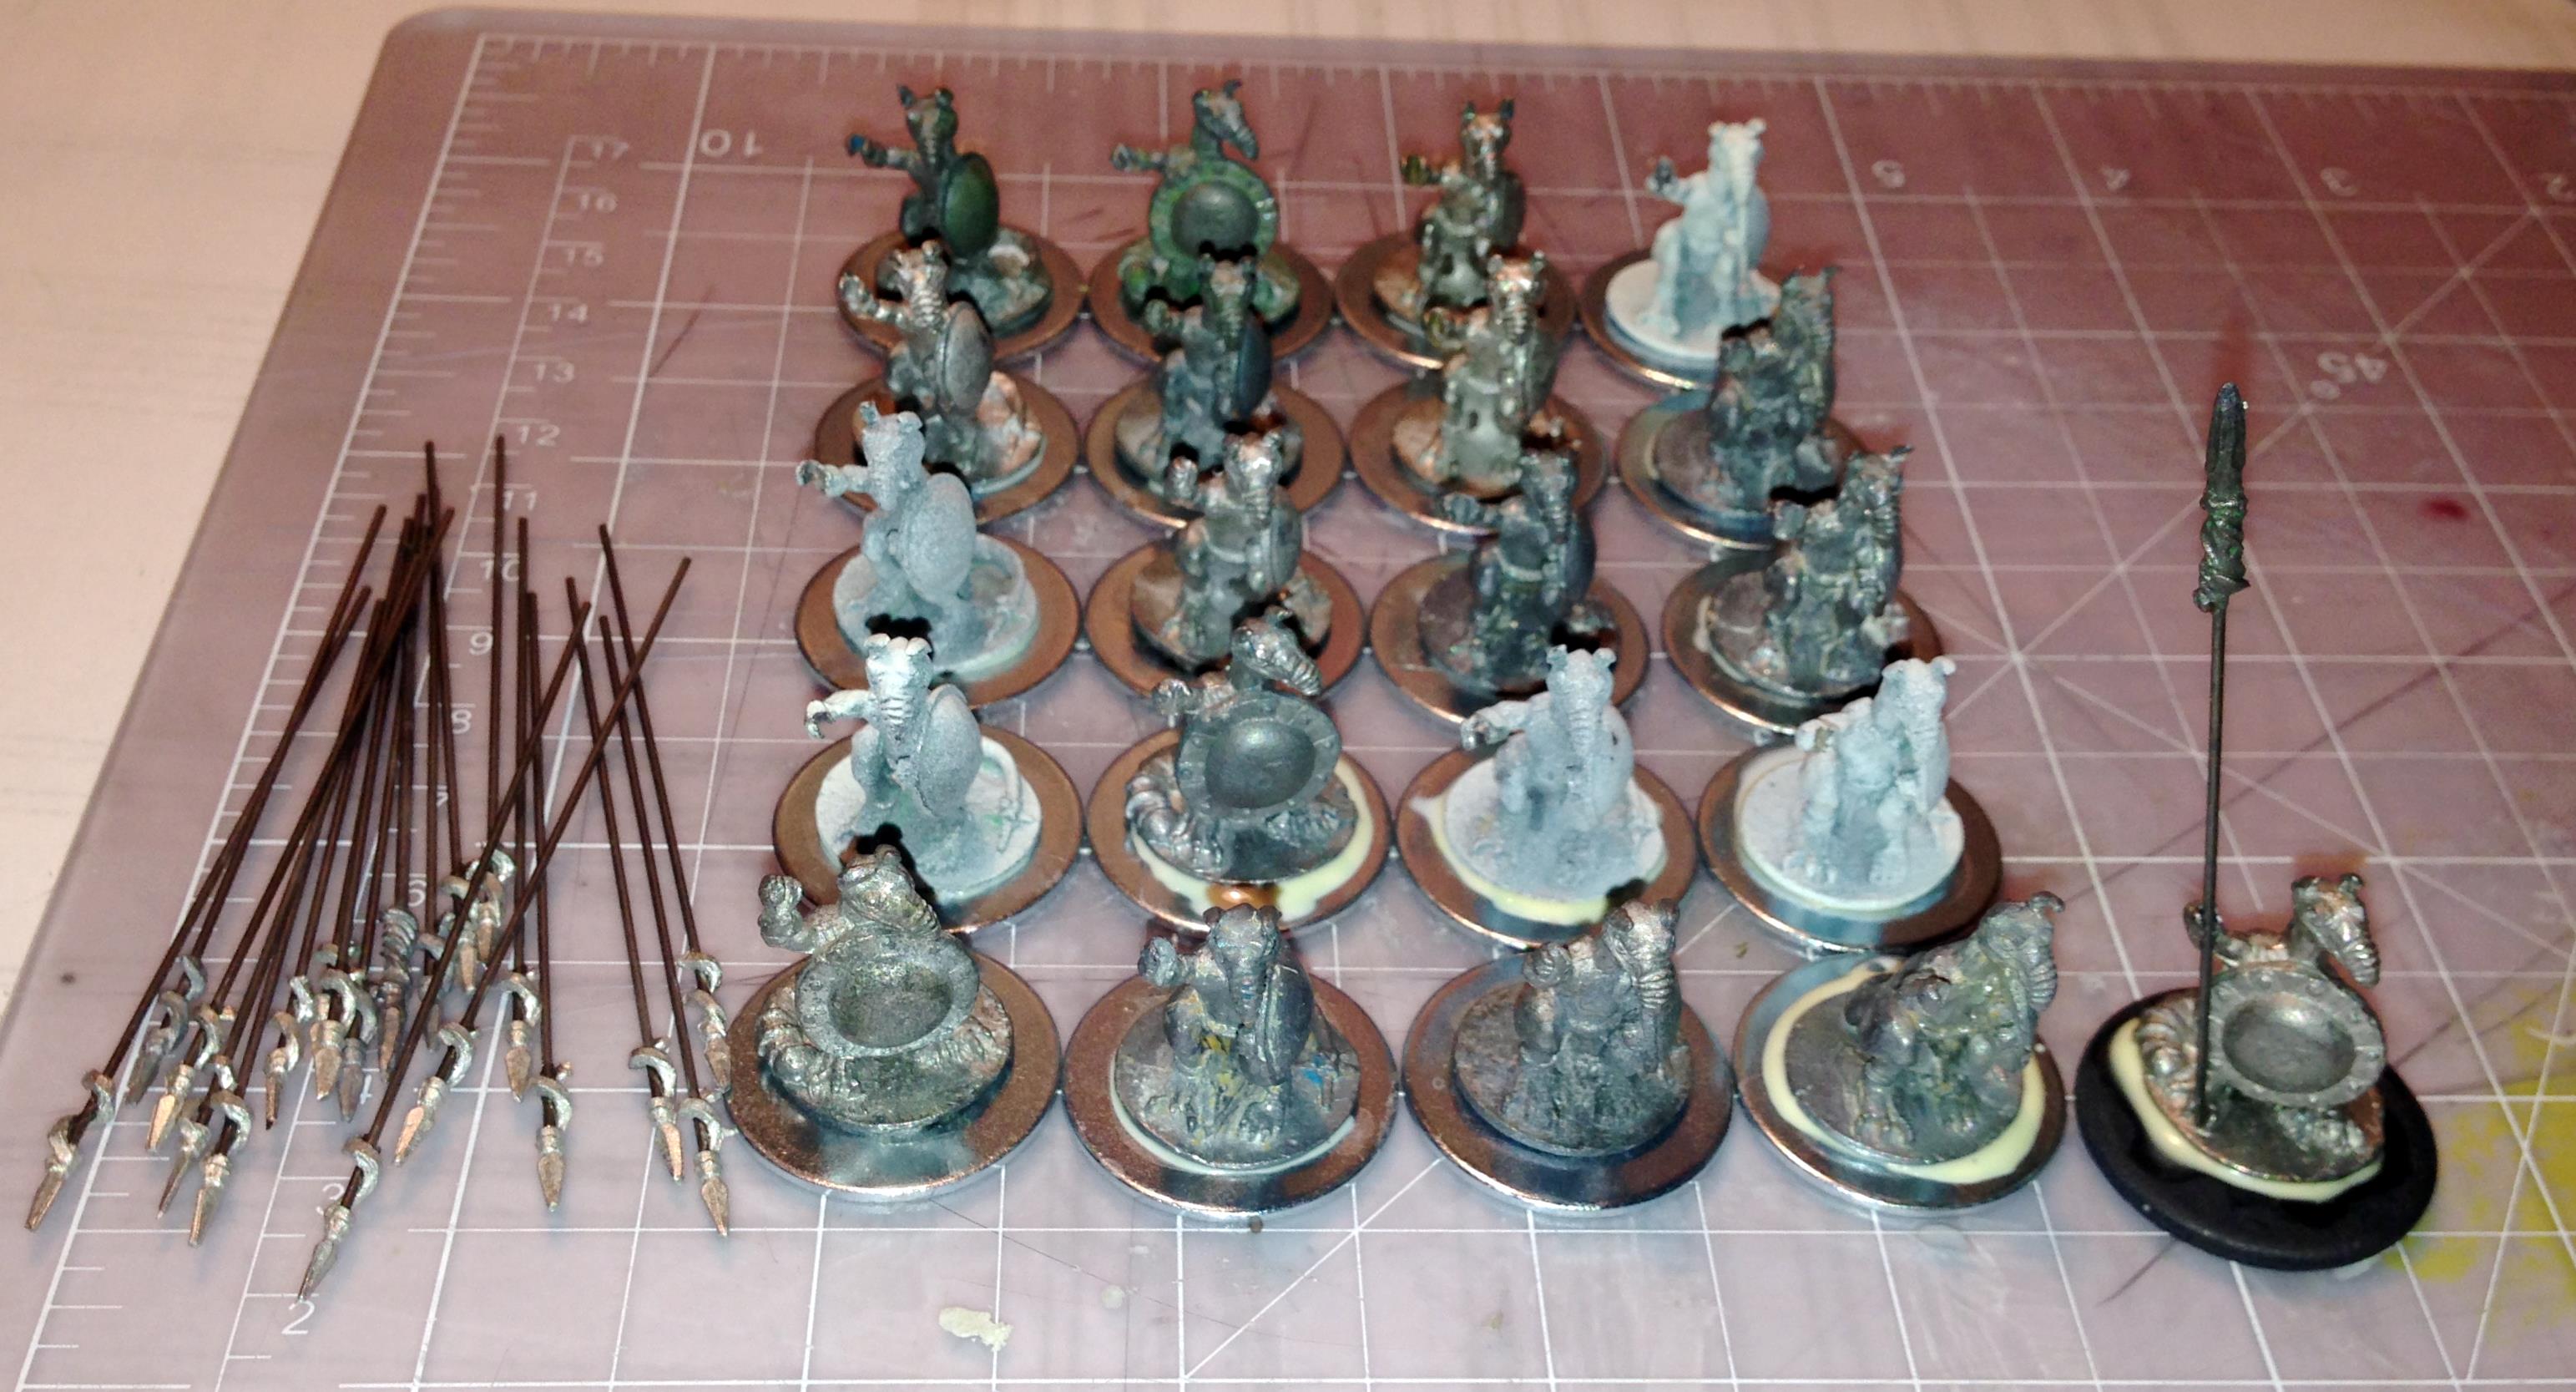
Now I must fast forward to my getting back into the hobby in 2014 and discovering eBay. Wow! Surely I will be able to find some Roomans on eBay! So, I searched and searched, and was able to find 18 loose Roomans either singly or in larger lots, plus one original 1977 blister package over the space of 18 months or so. Most times, they were called Goblins or Orcs by the sellers. Almost all had very bad paint jobs that needed to be stripped. This left me with 24 original Roomans.
I have not seen any in quite a while except for a poor recast here and there. Buck knew some contacts at Iron Winds Metals, and we inquired as to the status of the original molds, but unfortunately they were either lost or destroyed. This was sad. But I was able to get pikes from Melissa Morello at Iron Winds Metals that matched the post-1977 type as most of the Roomans I got on eBay either had the wrong weapon type or none at all. (THANK YOU MELISSA!) Of course, I also learned how to make gravity molds during this timeframe and now can make my own castings of the original Roomans for personal use. Iron Winds Metals told me that they are bringing back Roomans under a new name “Rues”, but to my knowledge that has not yet occurred.
The Roomans I acquired on eBay needed a lot of work to clean and strip. Some were painted with what appeared to be a tough lacquer. I used a combination of several sequential applications of Simple Green, vinegar, hot water, and pewter polish to remove old paint. I also needed to use a lot of toothbrush scrubbing and picking with a needle to get the old paint off.
In August 2016, I gathered up my 24 original Roomans – and decided that I could not in good conscience open up my vintage 1977 blister given the difficulty in finding Roomans (let alone ones in an old blister pack). That left me with 21. I had two 1977-type pikes as well as the ones from Iron Winds Metals. I decided that I would incorporate the two old ones within the mob and use post-1977 style pikes to arm the remainder. One would be a leader, and the other 20 would form the mob or troop.
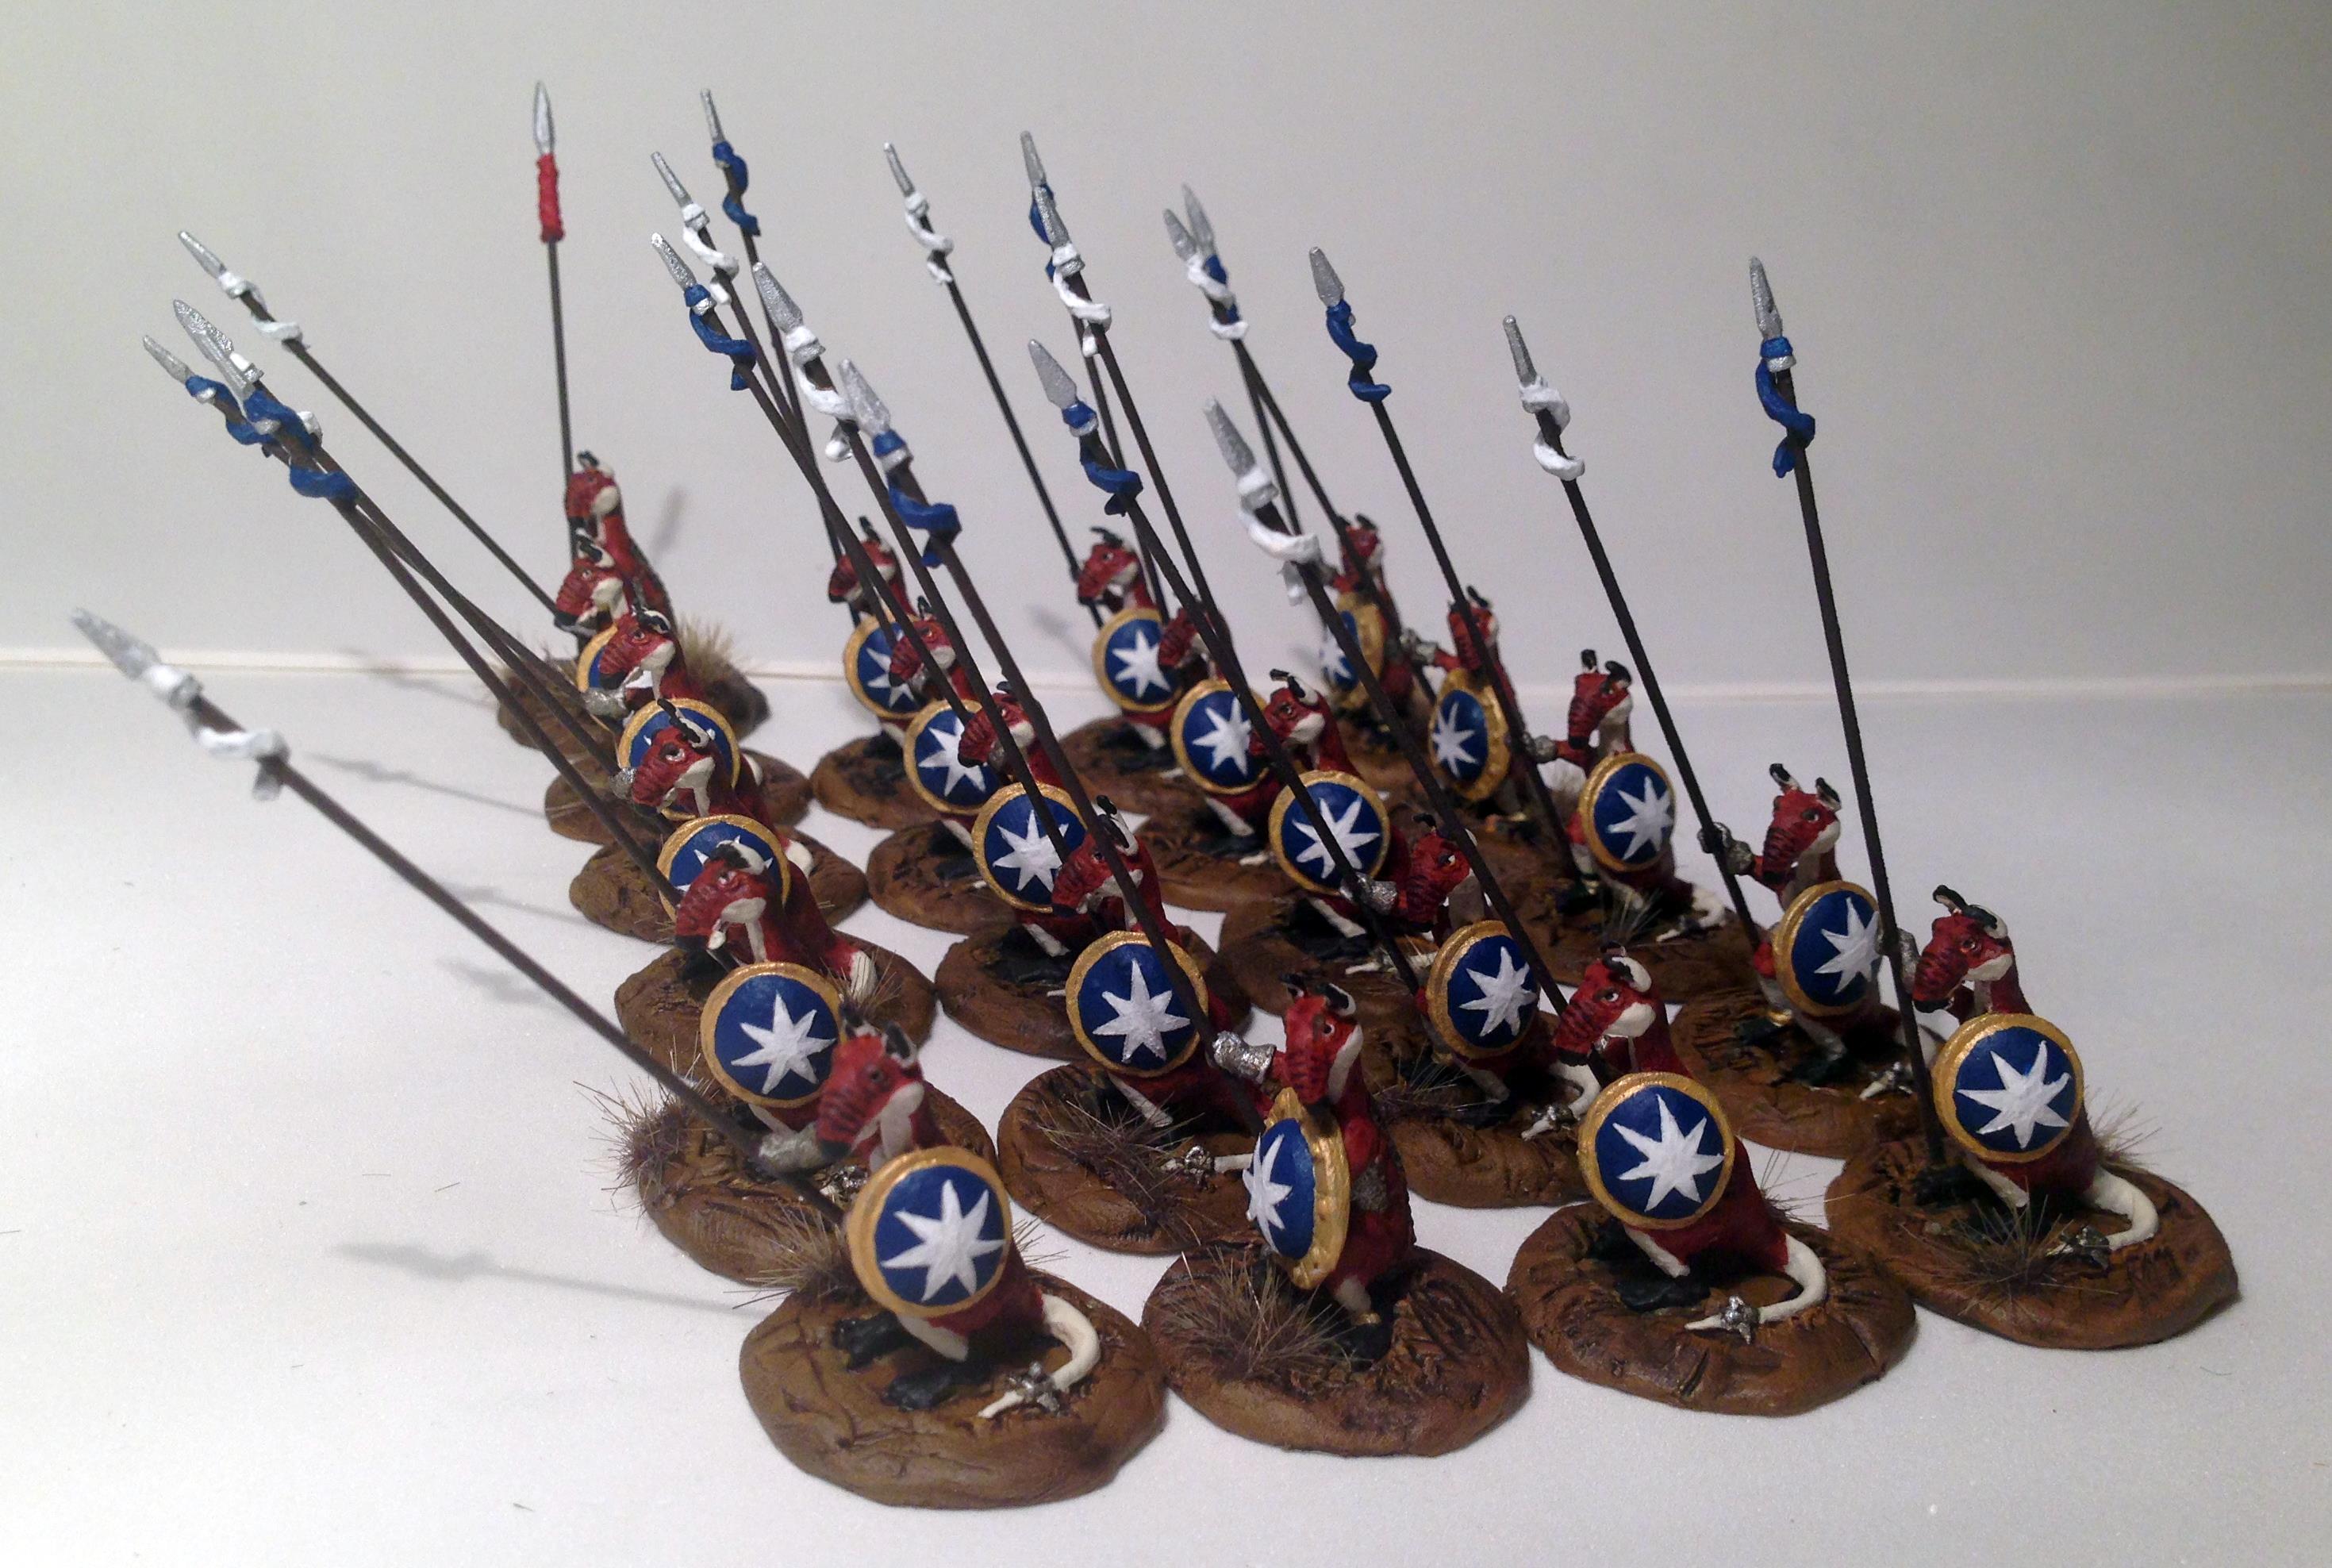
Yes, I said mob. A group of 10 or more kangaroos is referred to as a mob, a troop, or a court. Females (who are the only ones with pouches) are does, flyers, or jills. Males are referred to as bucks, boomers, jacks, or old men. Of course the term joey for the young is more commonly known. This means that my Roomans that have a shield in front are males (pouchless), while the rest are females (having pouches). Of course, being marsupials, and hopping ones at that, they have many unique qualities. If interested, here is a link: https://en.wikipedia.org/wiki/Kangaroo
My Original 1977 ES-44 Rooman War Party Blister and those destined for the Rooman Troop
Close up of the blister – note the 1977 pikes on the right
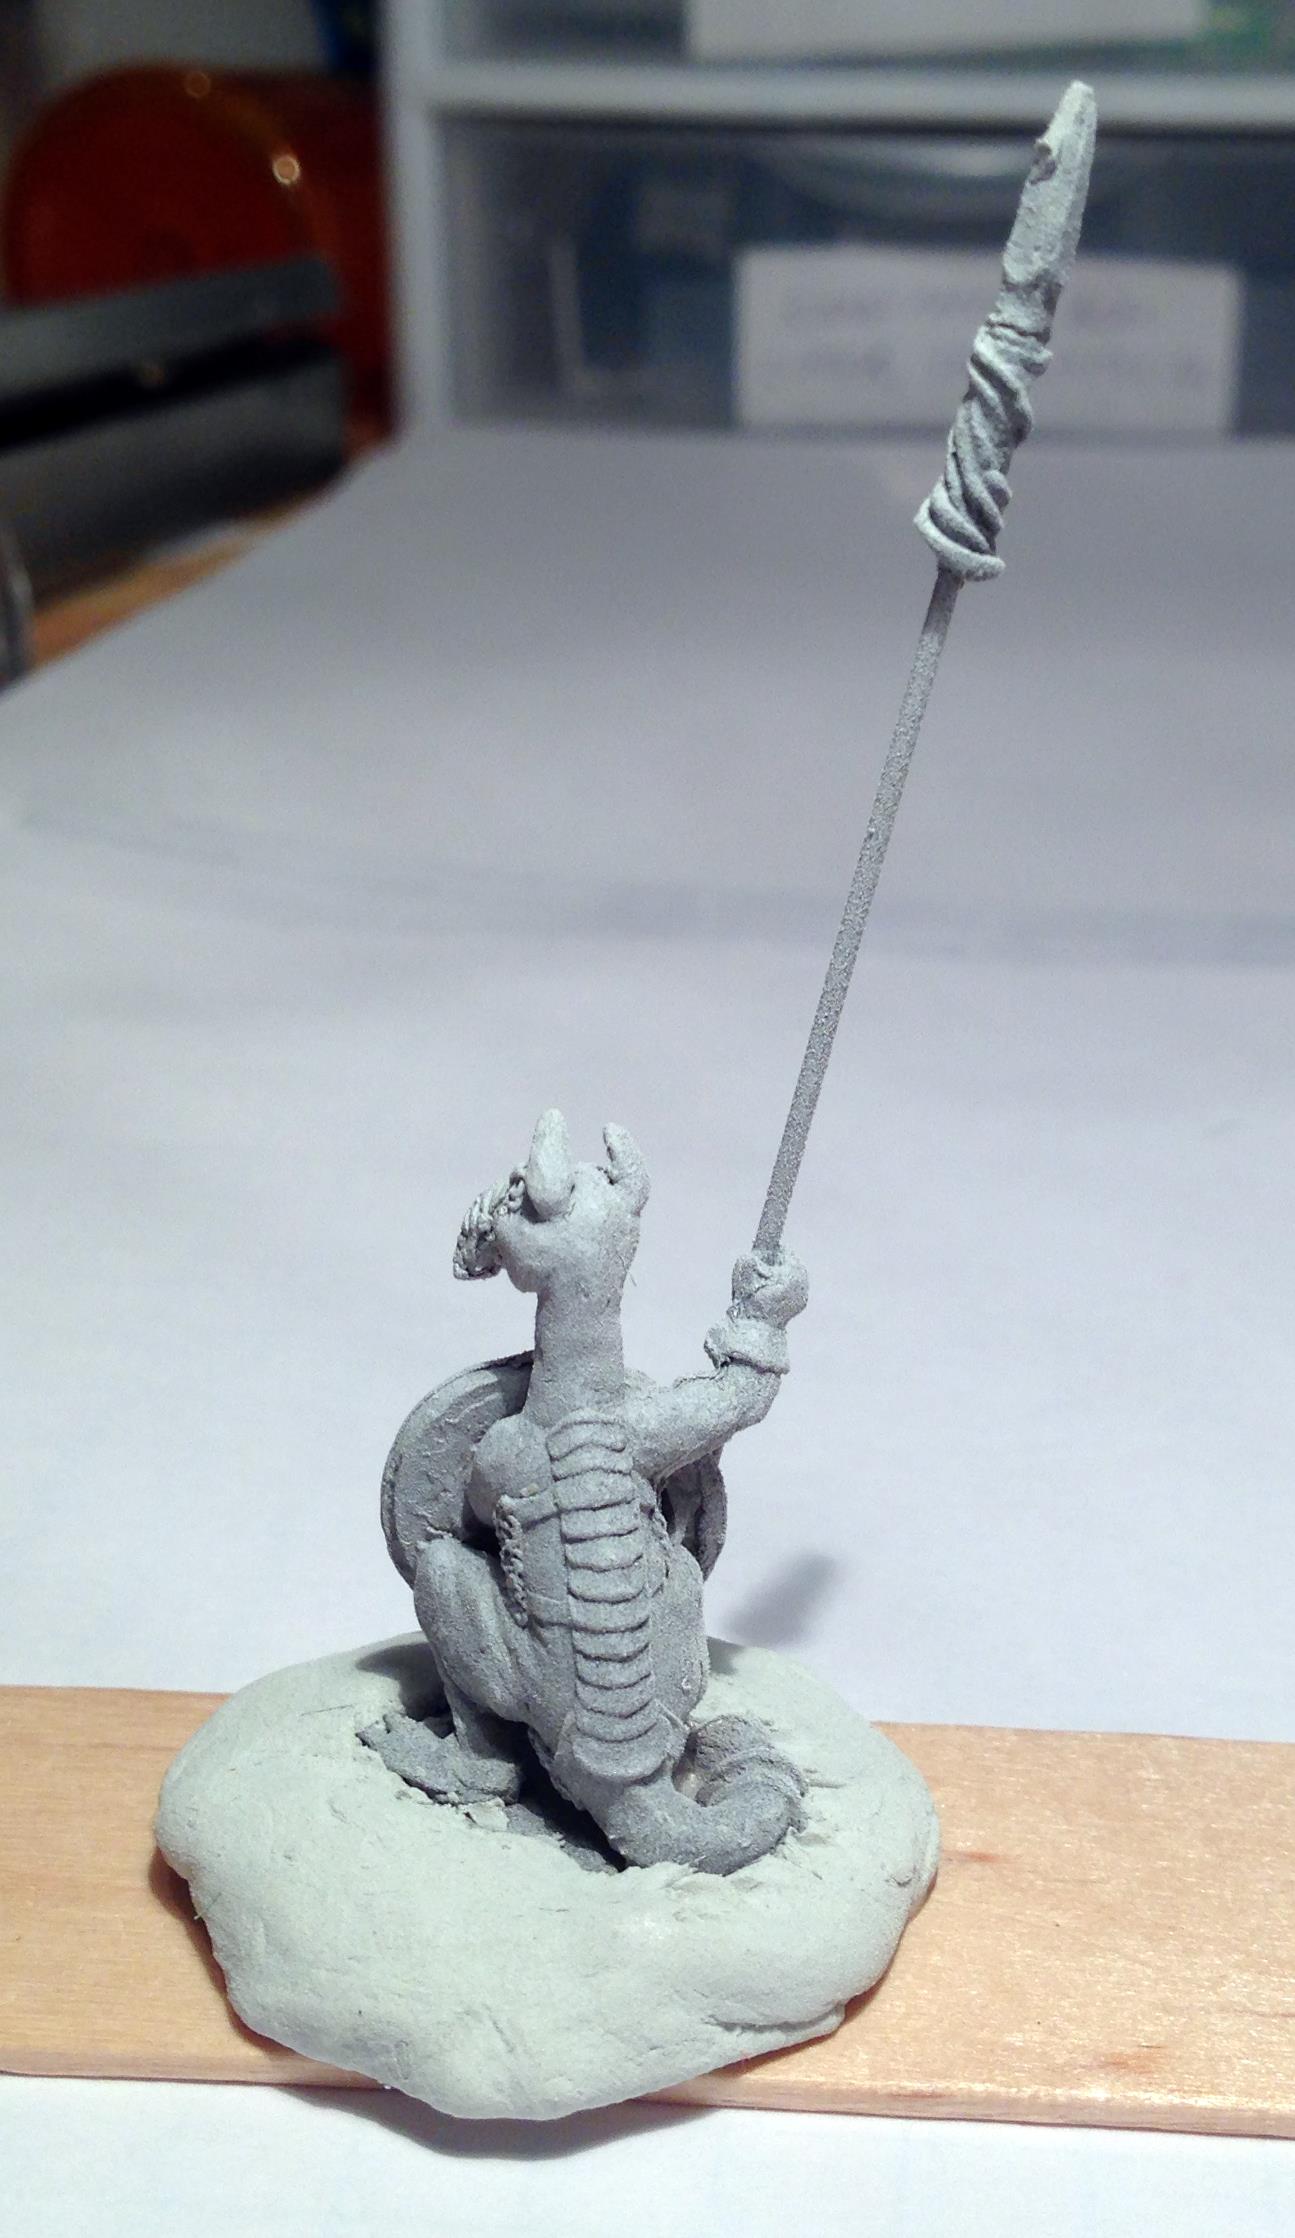
My first action was to glue the 19 newer pike heads to the piano wire with Scotch super glue, and the Roomans to 1″ steel fender washers with wood glue. This size worked better as the Roomans bases were too big for a ¾” washer. I used a slightly thicker 1″ washer for the leader. I gently bent the arms of the Roomans and oh-so-carefully opened their hands to hold the pikes at different angles. Some of the hands were not well-cast, and I fixed these with Aves Apoxie Sculpt (a two-piece clay that sets up hard as a rock in a day) https://www.amazon.com/Aves-Apoxie-Sculpt-White-pound/dp/B0013UFM7M/ref=sr_1_6?ie=UTF8&qid=1473111581&sr=8-6&keywords=apoxie+sculpt .
The Pikes and the Roomans, note the Rooman Leader holding the older type pike
My new sculpting tool set
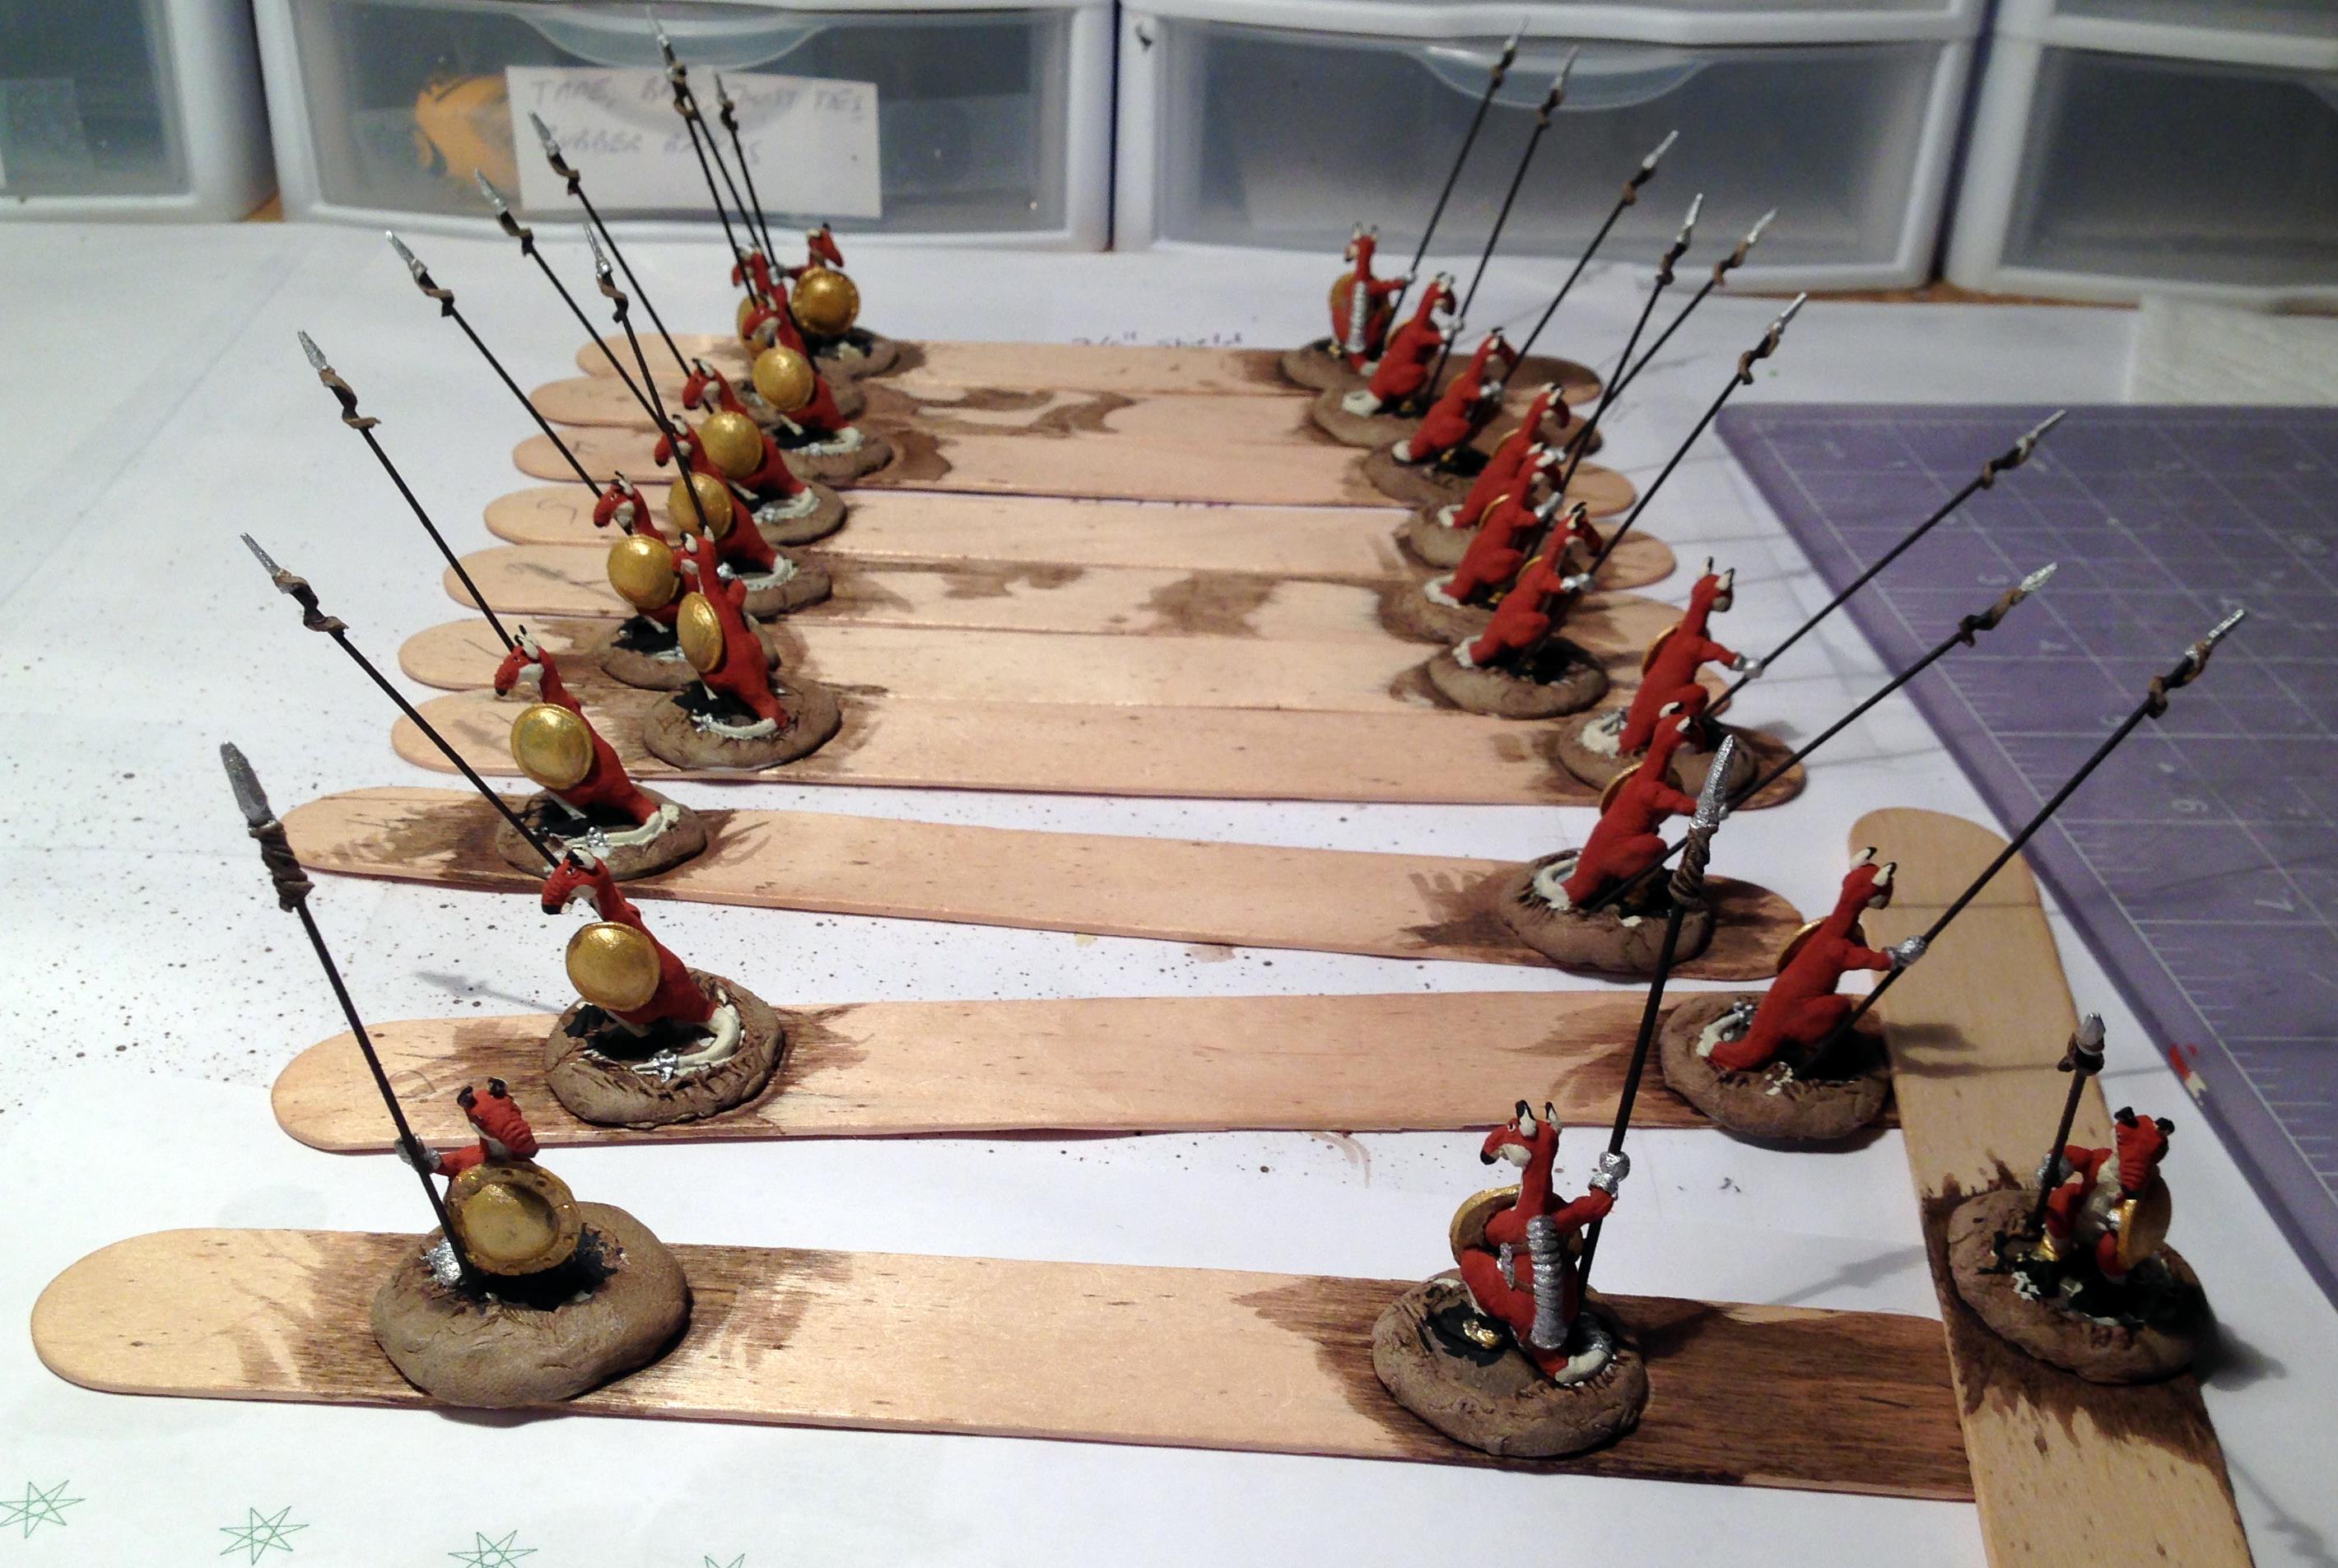
After I let the glue dry and the clay set up, I primed the unit with Krylon “Ultra Flat White”. I used Elmer’s white glue to lightly affix the Roomans to large popsicle sticks for painting.
Primed and Ready for paint
Rooman Leader Primed (front view)
Rooman Leader, primed (rear view)
Rooman Jill primed, pike side
Rooman Jill primed, shield side
Now I needed to have a plan on colors. Buck always painted his Roomans green (he says that his are tropical). I wanted to check out real kangaroos and see their colors. There are two main types, the red and the grey, and the reds are larger. Therefore, I went with a scheme based on the red kangaroo.
Red Kangaroo (male Jack)
My first action was to use a light coat of Citadel “Agrax Earthshade” to the models. I wanted a good reddish-brown, and I looked in my paint supply, and had a nice candidate in the form of a 1996 bottle of Armory “Red Brown”. I used this for the fur outside of the feet and the belly. For the belly, I used Americana “Bleached Sand”. I also used that color up to the jaw muscles and lower jawline to help accentuate the glare and demeanor of the figures. I also used this for the eyes and for the ears. I used another 1996 paint – Armory “Gloss Black” – for the noses and to finish off the pupils of the eyes. For the feet, I went with Americana “Ebony”. I also used this color for the tips of the ears. The jack figures had two anklets, and the jills had one. These I painted with Martha Stewart Crafts “Pale Bronze”. I am not sure why the jacks had more jewelry than the jills!
Early base coating
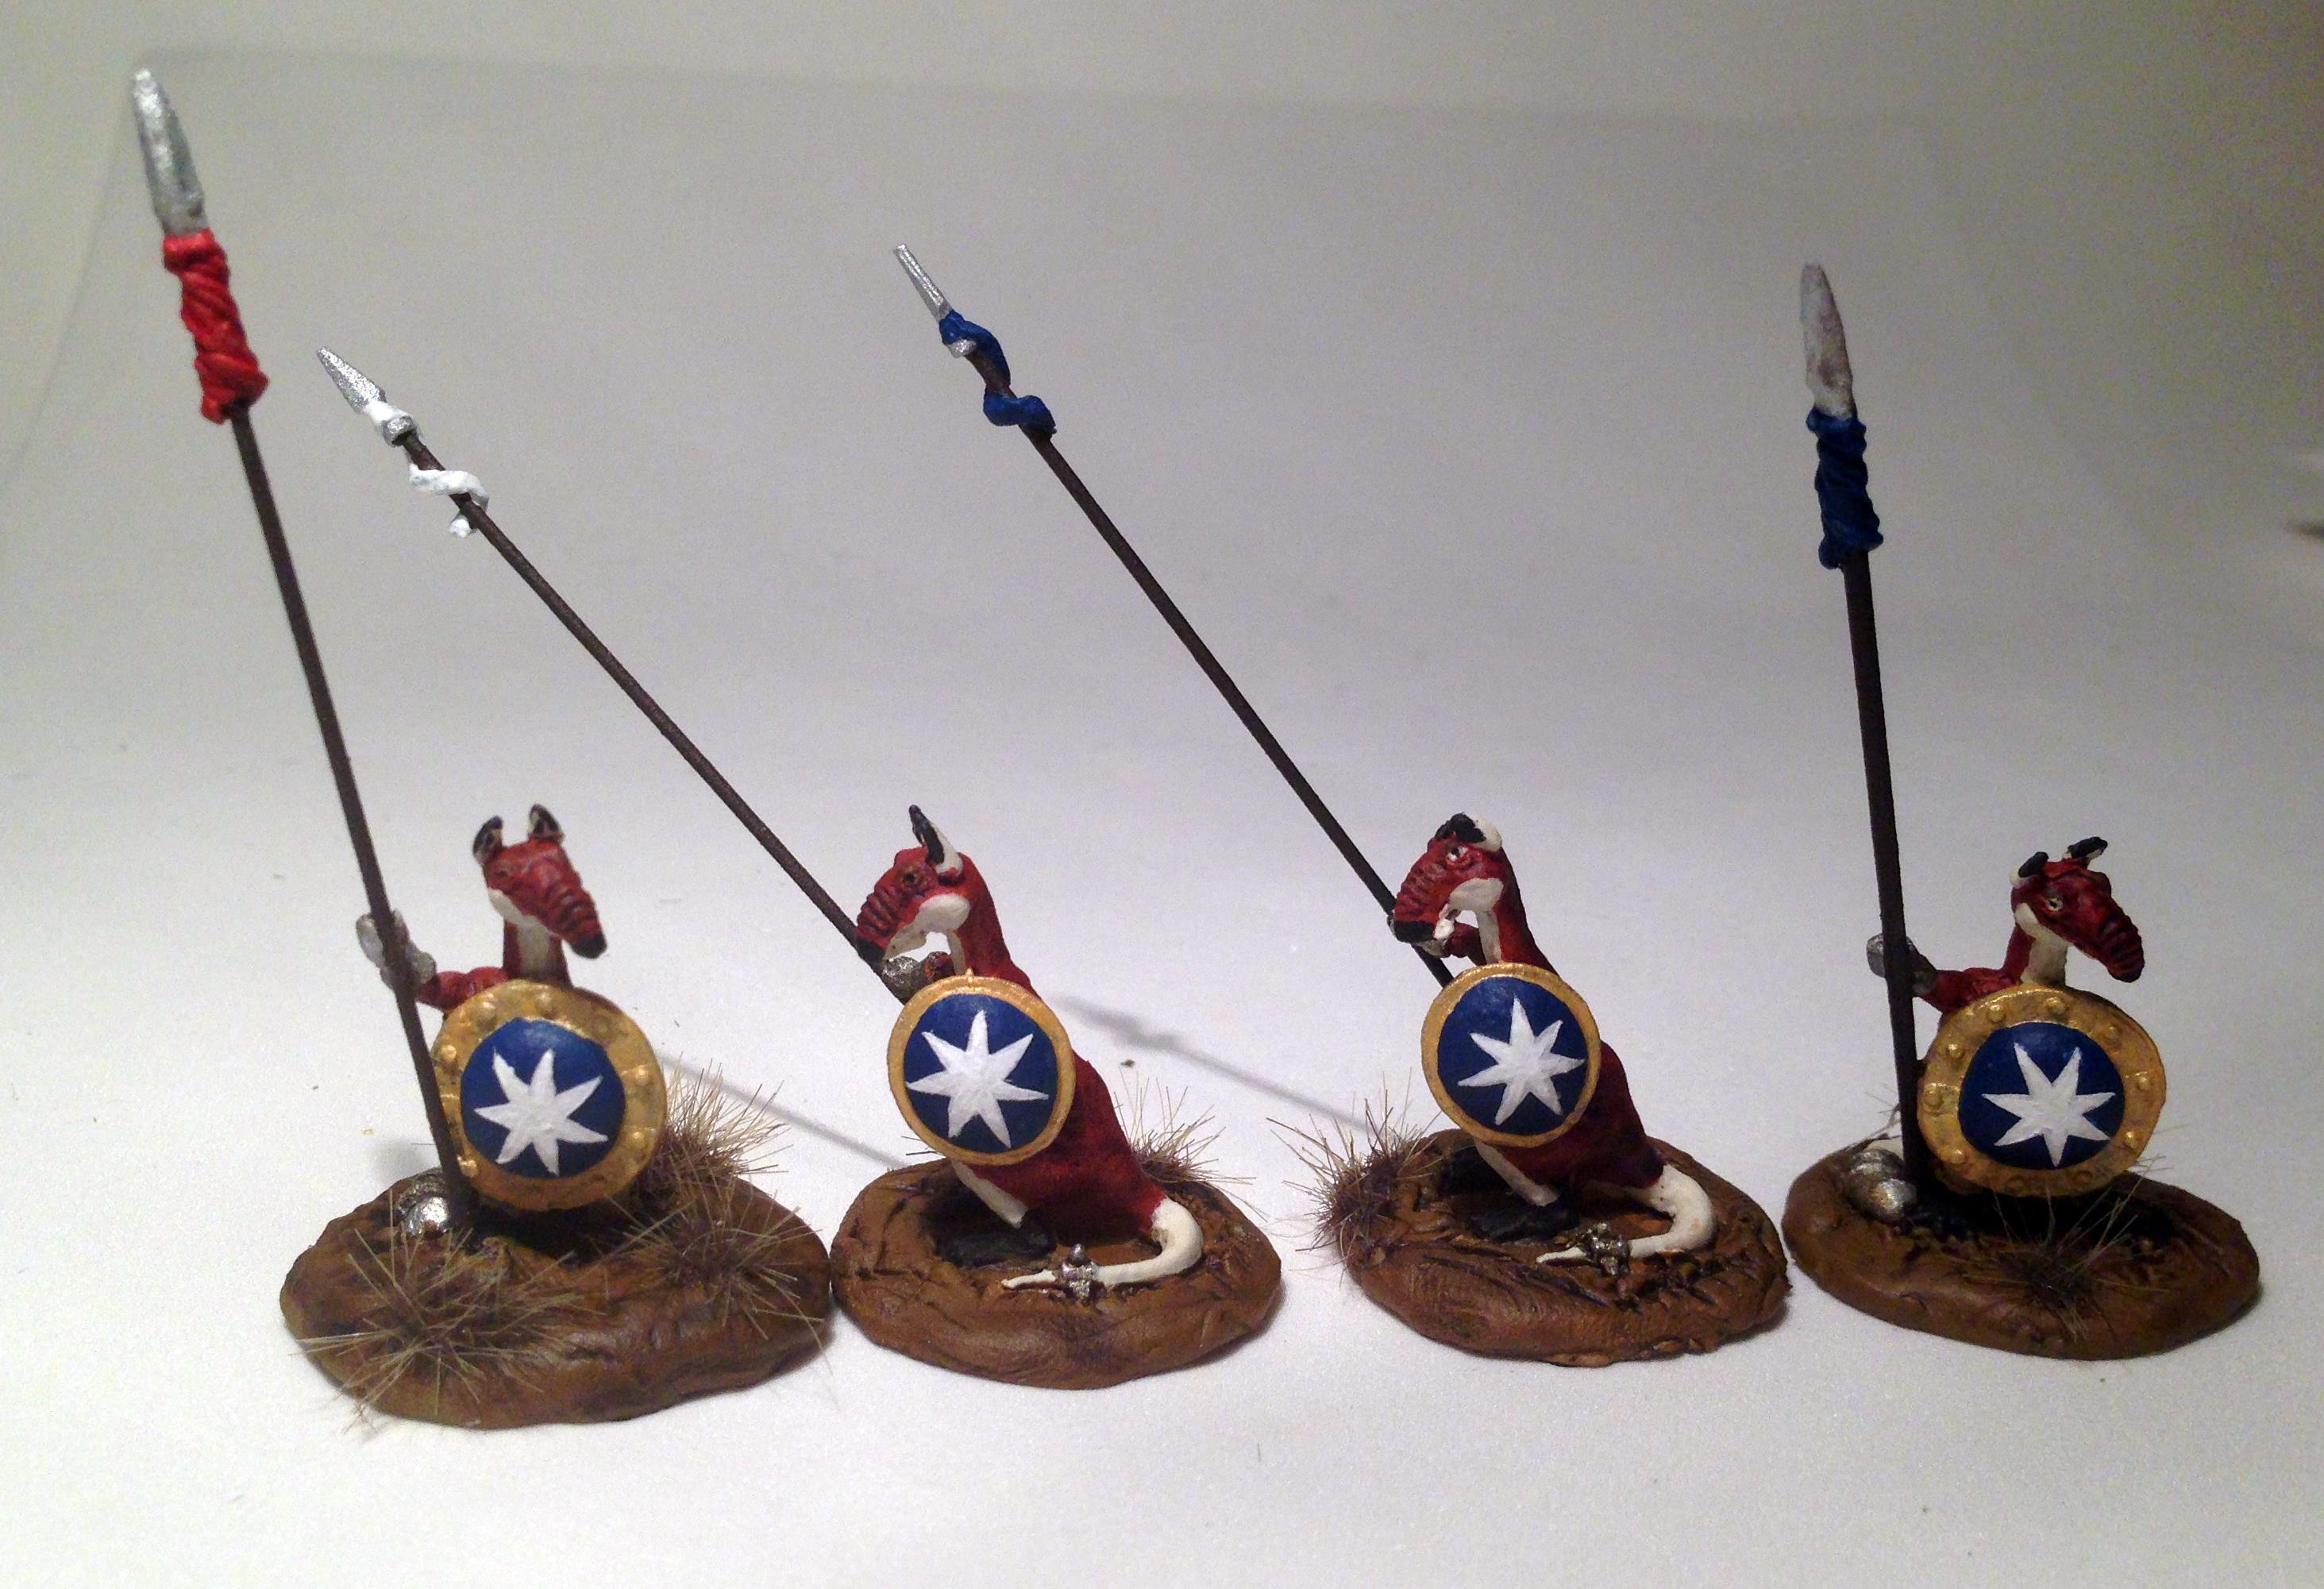
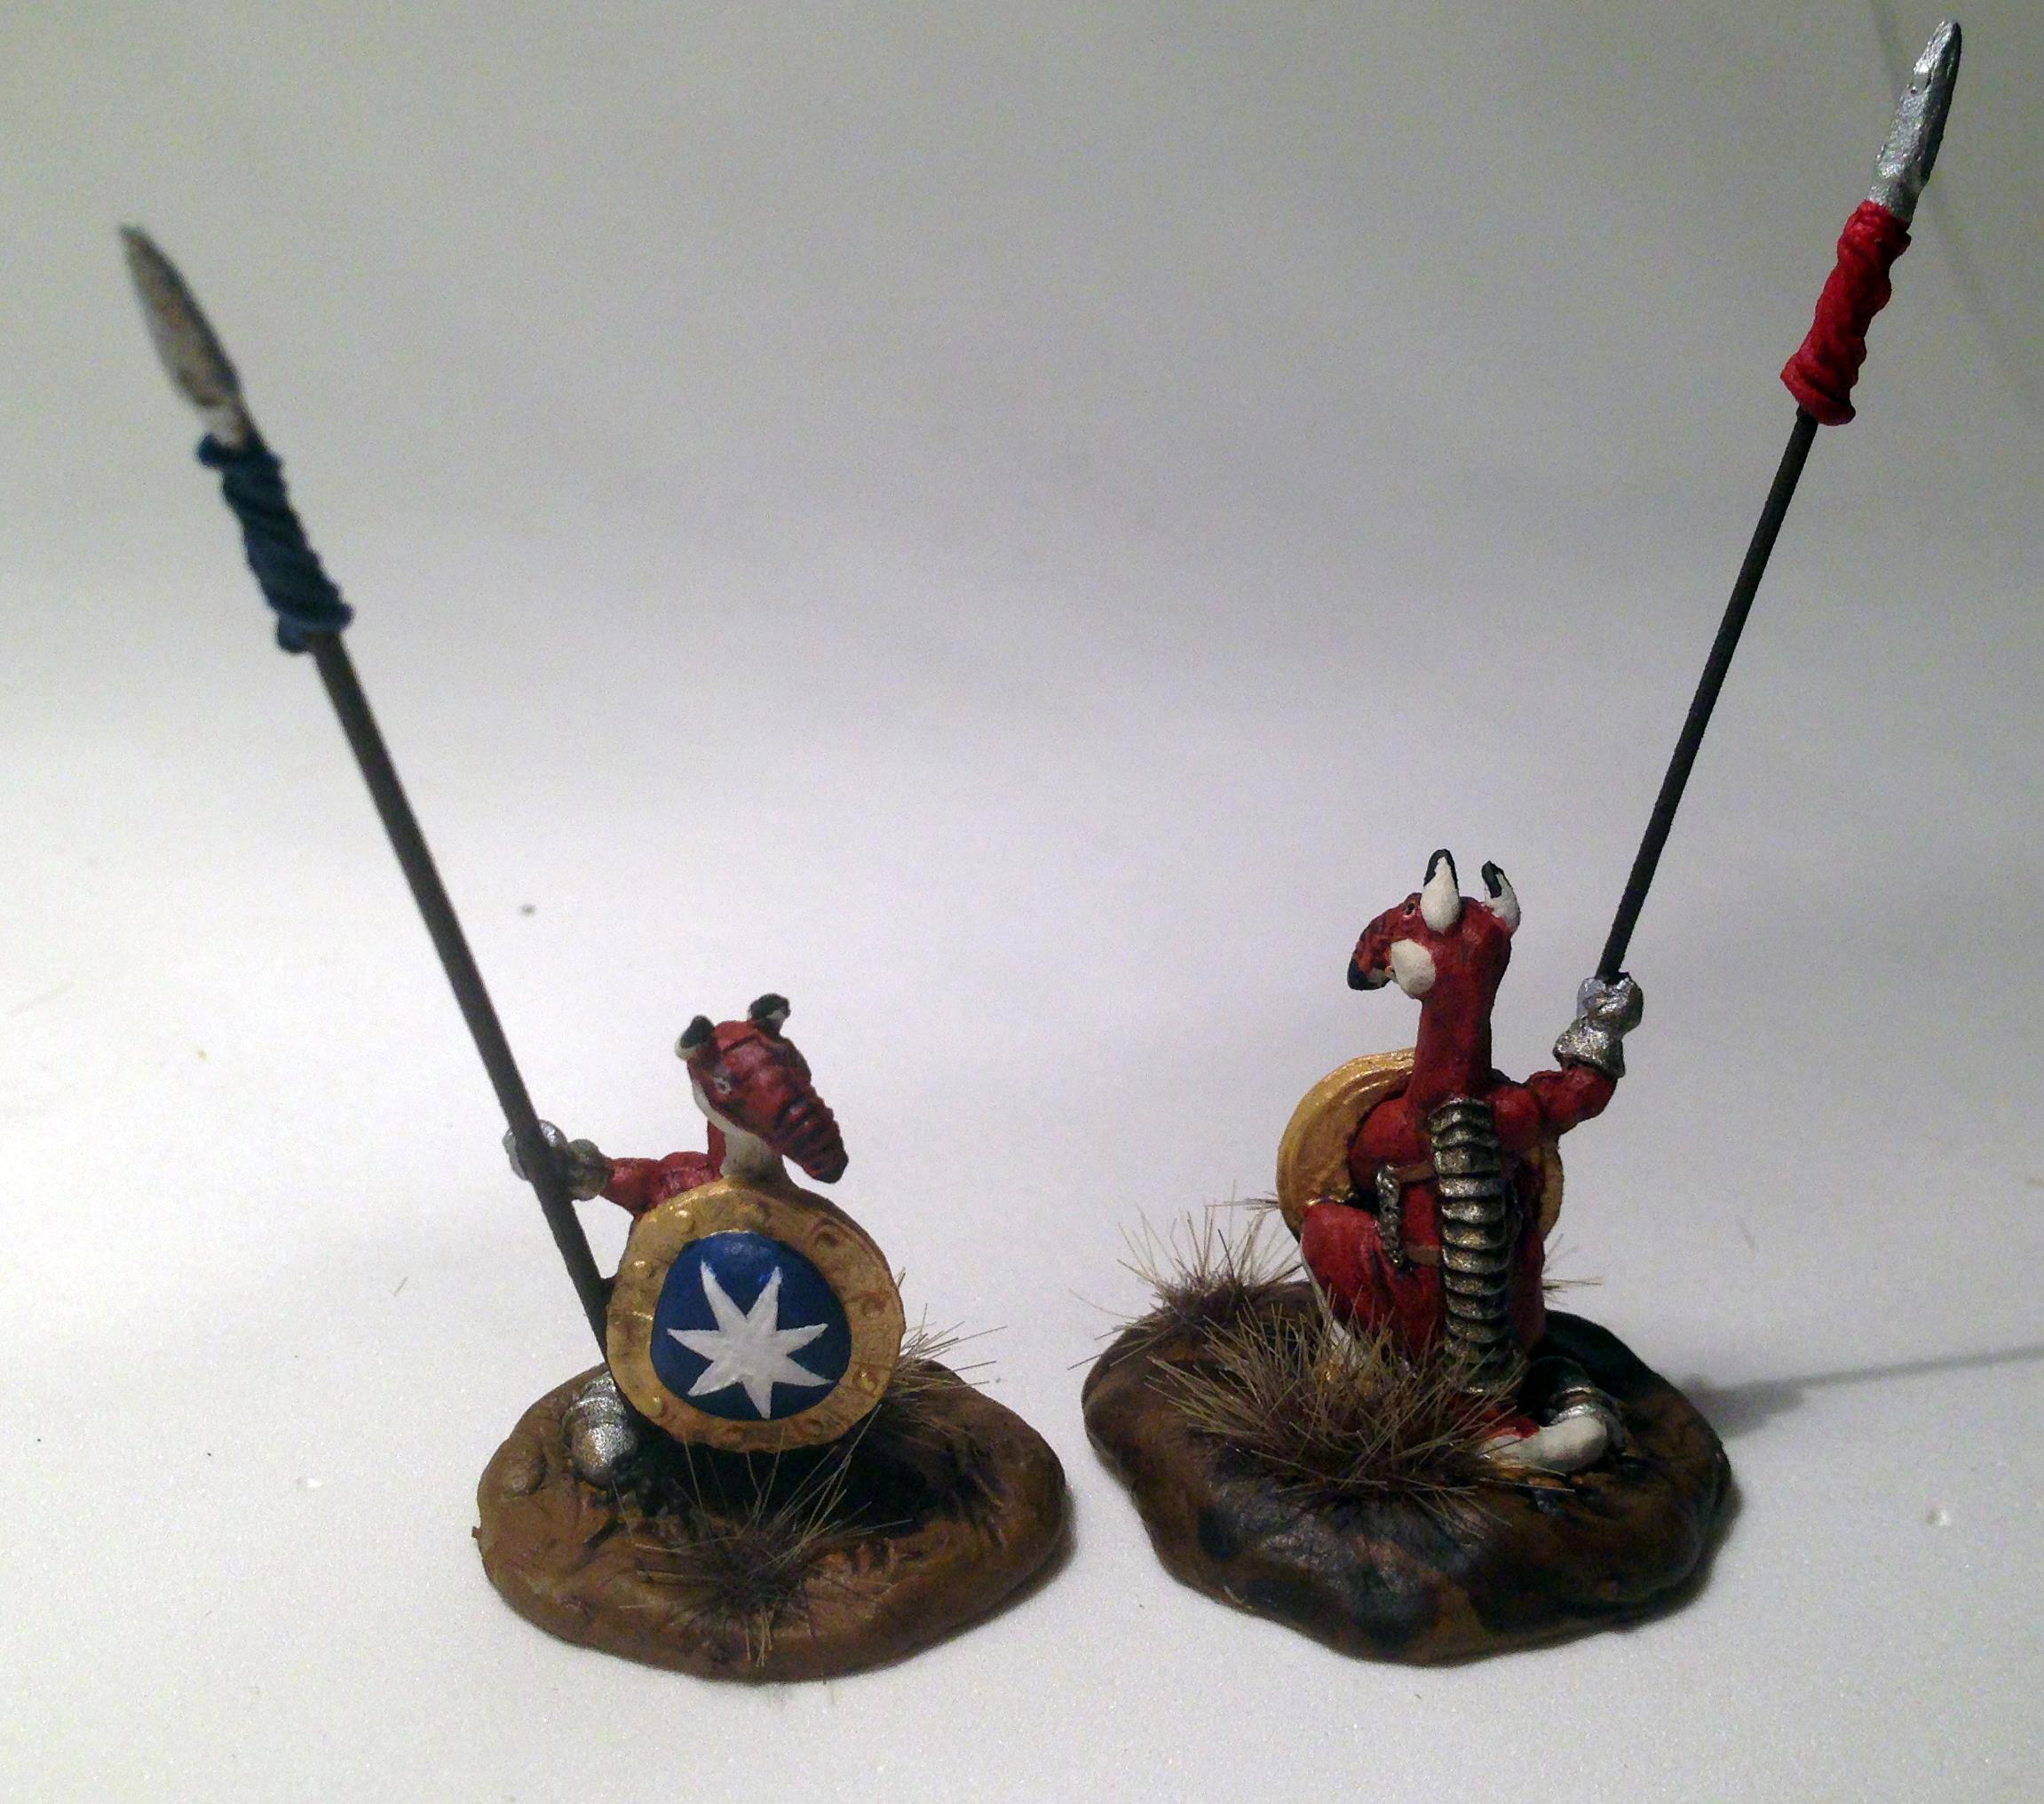
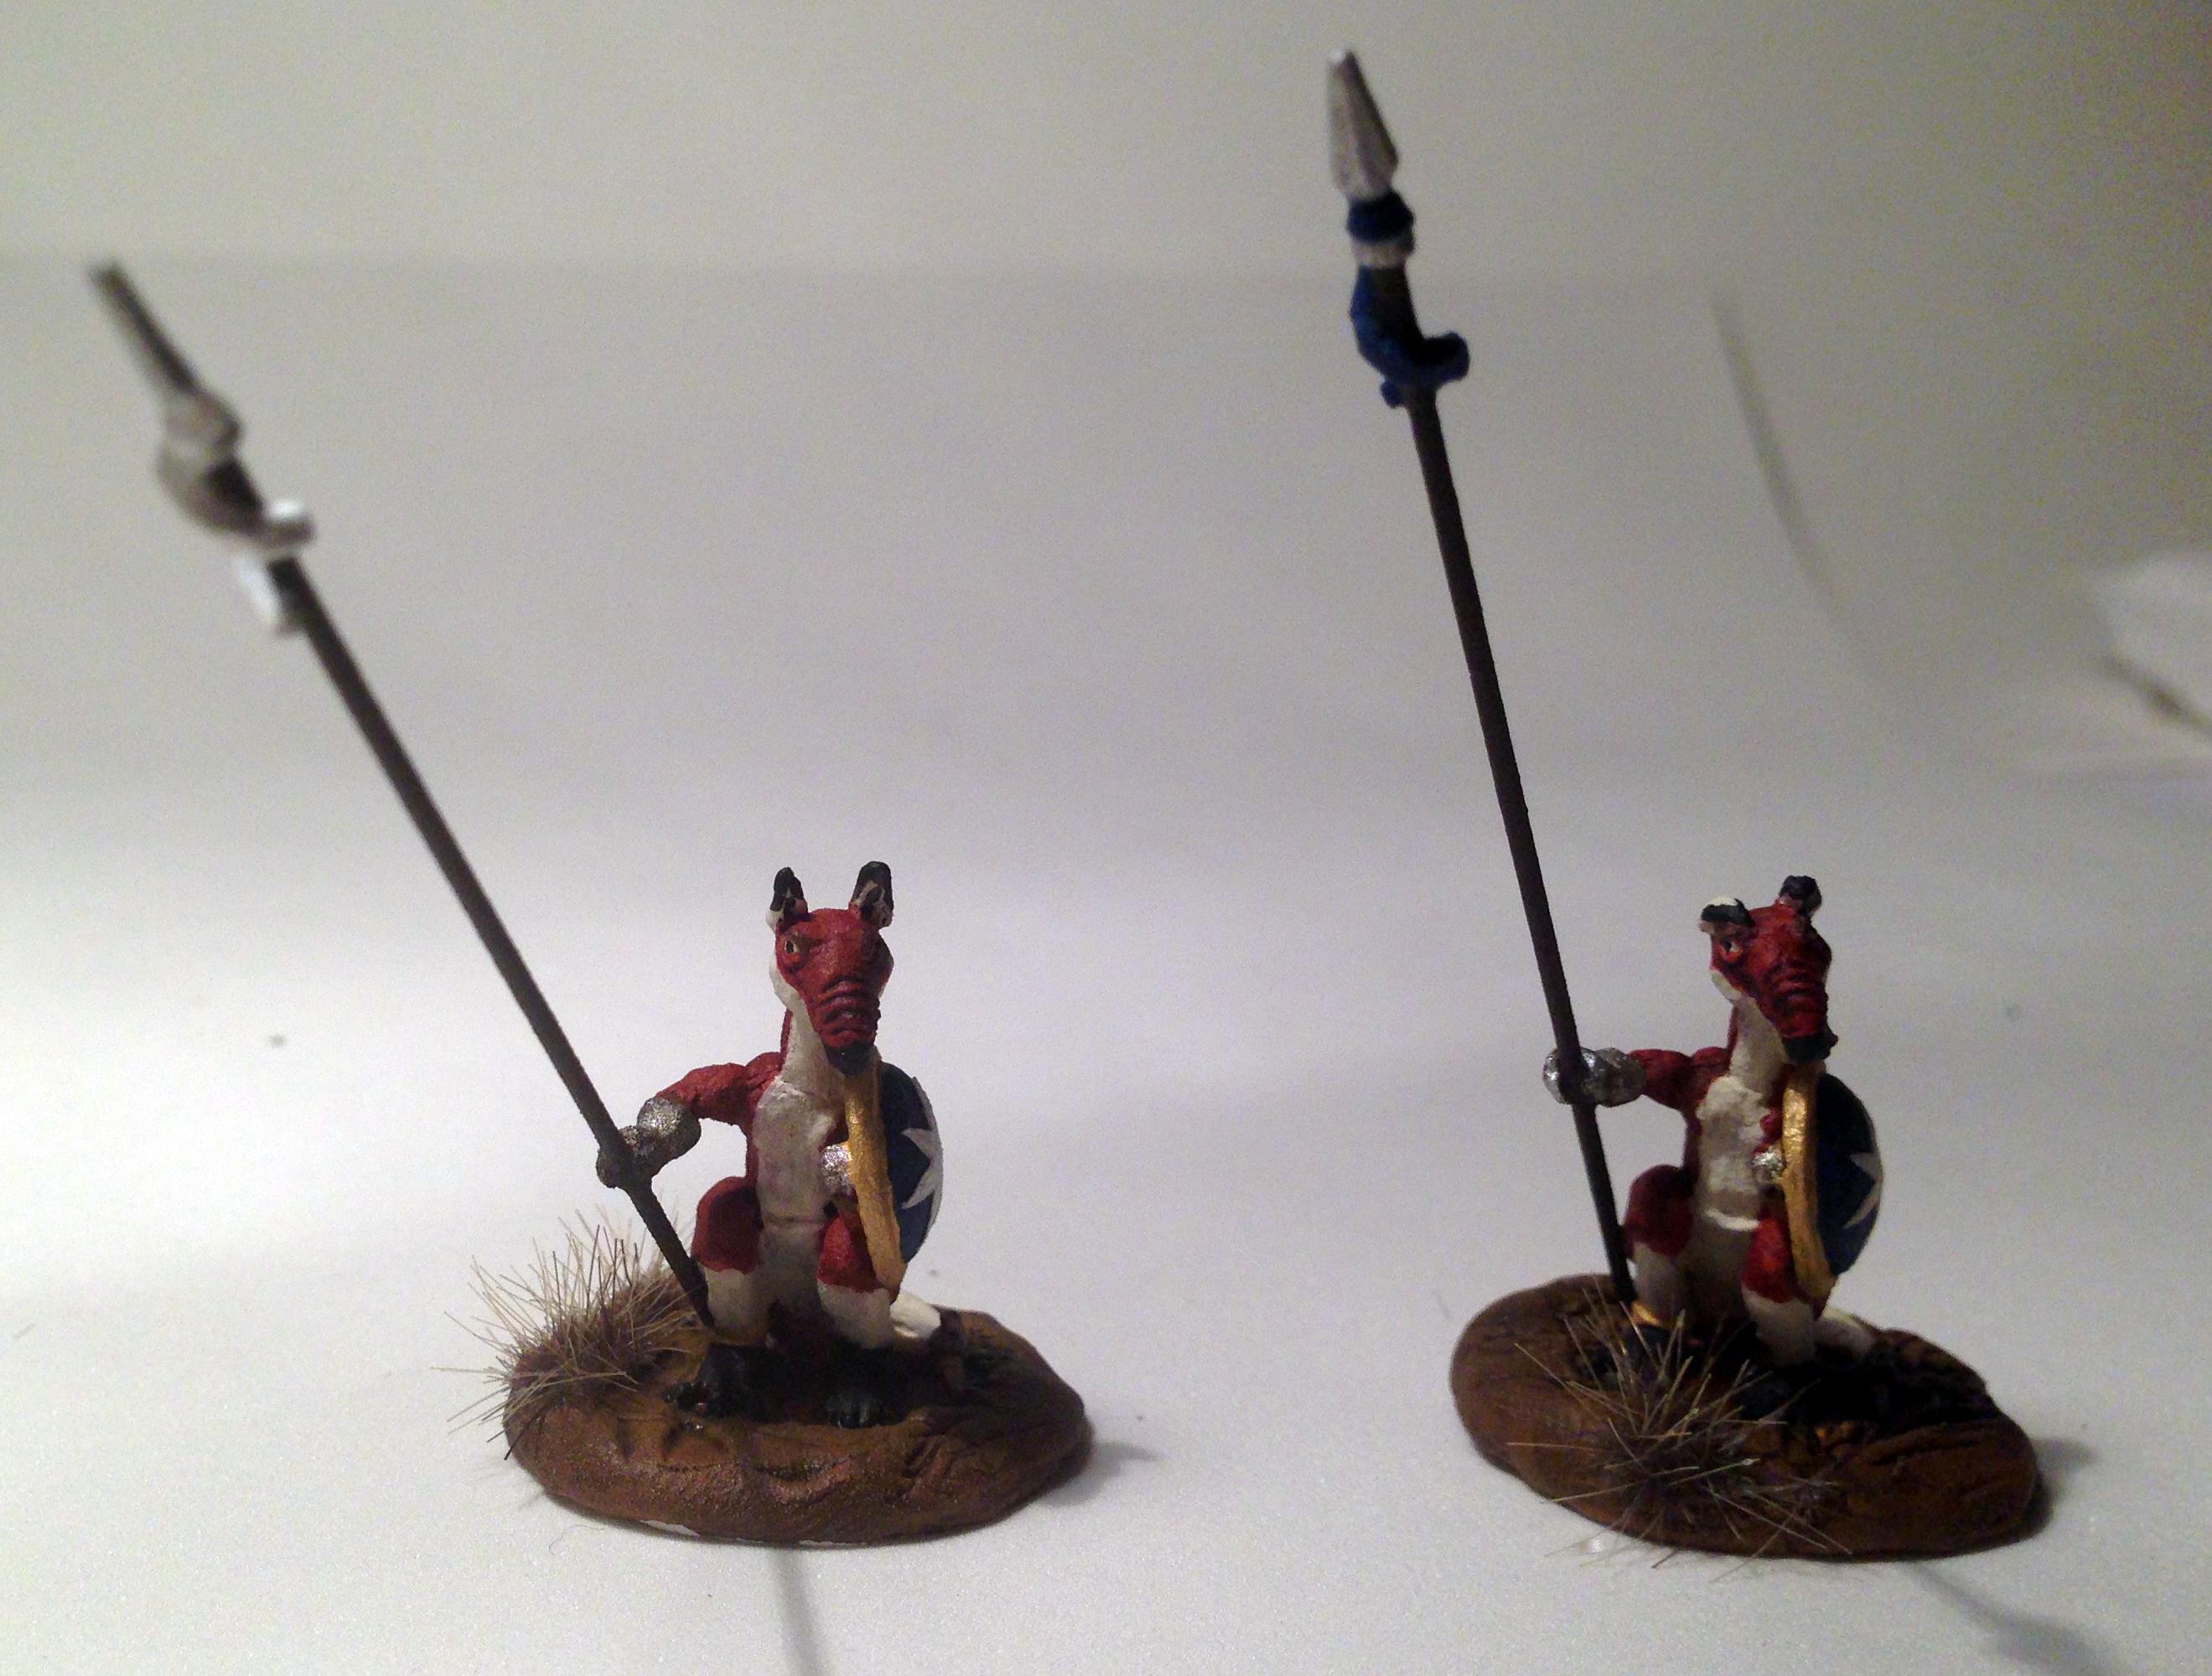
As I moved on to the other metallic – armor, tail spikes, shields, and pike heads – I paused to think of a good color scheme and theme for the unit that would tie it together. I particularly wanted a shield that would “pop”. Looking at Greek phalanxes, one usually sees a bronze shield with a pattern upon it. But these are not Greeks – they are Australians! I decided to use the colors and symbols of the Australian flag for the troop. For colors, I decided that the leader would have the red of the St. George’s Cross (in the Union Jack) on his pike streamer, with the rest of the streamers being evenly split between dark blue and white. The shields would have a dark blue center circle. There are a series of stars on the Australian flag. A seven-pointed star on the lower left quadrant represents the British Commonwealth. The other stars (four seven-pointed stars and one five-pointed star) represent the southern cross. I tried to draw a seven-pointed star, and that is nearly impossible. Additionally, the ones that I would use on the shields would need no be 1/8″ from top to bottom. My wife Lynn suggested I print them off from my computer. Luckily, I found some seven-pointed stars on the internet, and shrunk them down to size, and printed them off.
The Flag of Australia
I used the “Pale Bronze” on the shields. For the tail weapons, pike heads, gauntlets, and armor (on the jacks) I used Tamiya X-11 “Chrome Silver”. For the shield straps and eyebrows, I used P3 “Bootstrap Leather”. I wanted the pikes to look like a hardwood – so I painted them with Citadel “Dryad Bark”.
After metallic base coating – note seven-pointed stars in foreground
I then needed to move forward with my Australian flag color scheme, For the leader’s streamer, I used Americana “Santa Red”. The other streamers got either a blue or white treatment with another of my older paints. For the dark blue streamers, I used Deka Lack “Dunkelblau”; for the white streamers I used Deka Lack “Weiβ” (Weiss). Both of these date from 1987 when I bought them when I was stationed in Karlsruhe, West Germany. I also used “Dunkelblau” on the shields’ centers. I then used Citadel “XV-88” on the bases.
Completed base coated troop
Close up of Rooman leader after base coat
I considered using some dry brushing on the figures at this point but decided against it. Basically, I wanted to darken the red fur and see if using a wash would do that and give some detail to the snouts and haunches of the Roomans. I mixed a 50/50 mix of two inks – Secret Weapons Washes “Just Red” and P3 “Brown Ink”, and carefully covered all the red fur sparing the lighter fur. I also used Secret Weapons Washes “Armor Wash” on all steel armor. I then added another coat of “Agrax Earthshade” to my sculpted bases to bring out the earthlike shapes of the ground. These washes really had a great effect and made the figures look like I desired, as well as bringing out important details that I feared to dry brush.
After base coat and washes – nice darker hues
Let us return to the all-important seven-pointed stars that I printed off! I used my Exacto knife and carefully cut out 26 or so stars with the assistance of the 2.5 magnification of my Carson glasses. I used the best ones for the shields. I applied a light coat of Elmer’s white glue to the underside of each star with a Testors microsponge (this is a good use of this tool). I centered each star and ensured that each point was glued down.
Once the glue dried, I applied a coat of “Weiβ” to the stars and touched up the “Dunkelblau” around the shield where the glue seeped out. I then applied three coats of varnish sequentially – first Krylon “Clear Matte”, then two coats of Testors “Dull Coat”.
The Rooman Leader (a Jack) after varnishing
A Rooman Jill after varnishing
Lastly, I added some Army Painter “Wasteland Tuft” to give them the appearance of coming out of an Australian Desert.
Completed Rooman Troop, angled view
Completed Rooman Troop, front view
Completed Rooman Troop, flank view
Left to right, Rooman Leader, two Jills, and a Jack
A Jack and the Rooman Leader
Two Jills
I am more excited and happy with this unit than I had even hoped to be! The unit looks positively awesome and the stars help it pop. As I build more units with my self-cast Roomans I can incorporate the same color scheme (though I believe my 1980’s paint supply will run out!).
A final note of thanks – to Buck and Dave for getting me into this hobby – and especially to Buck for starting me on this Quixotic quest for a Rooman unit all those years ago! I look forward to rolling dice and pushing lead with you soon!!