Stonehouse Miniatures Aztec Terrain for my Tenochtitlan Cityscape

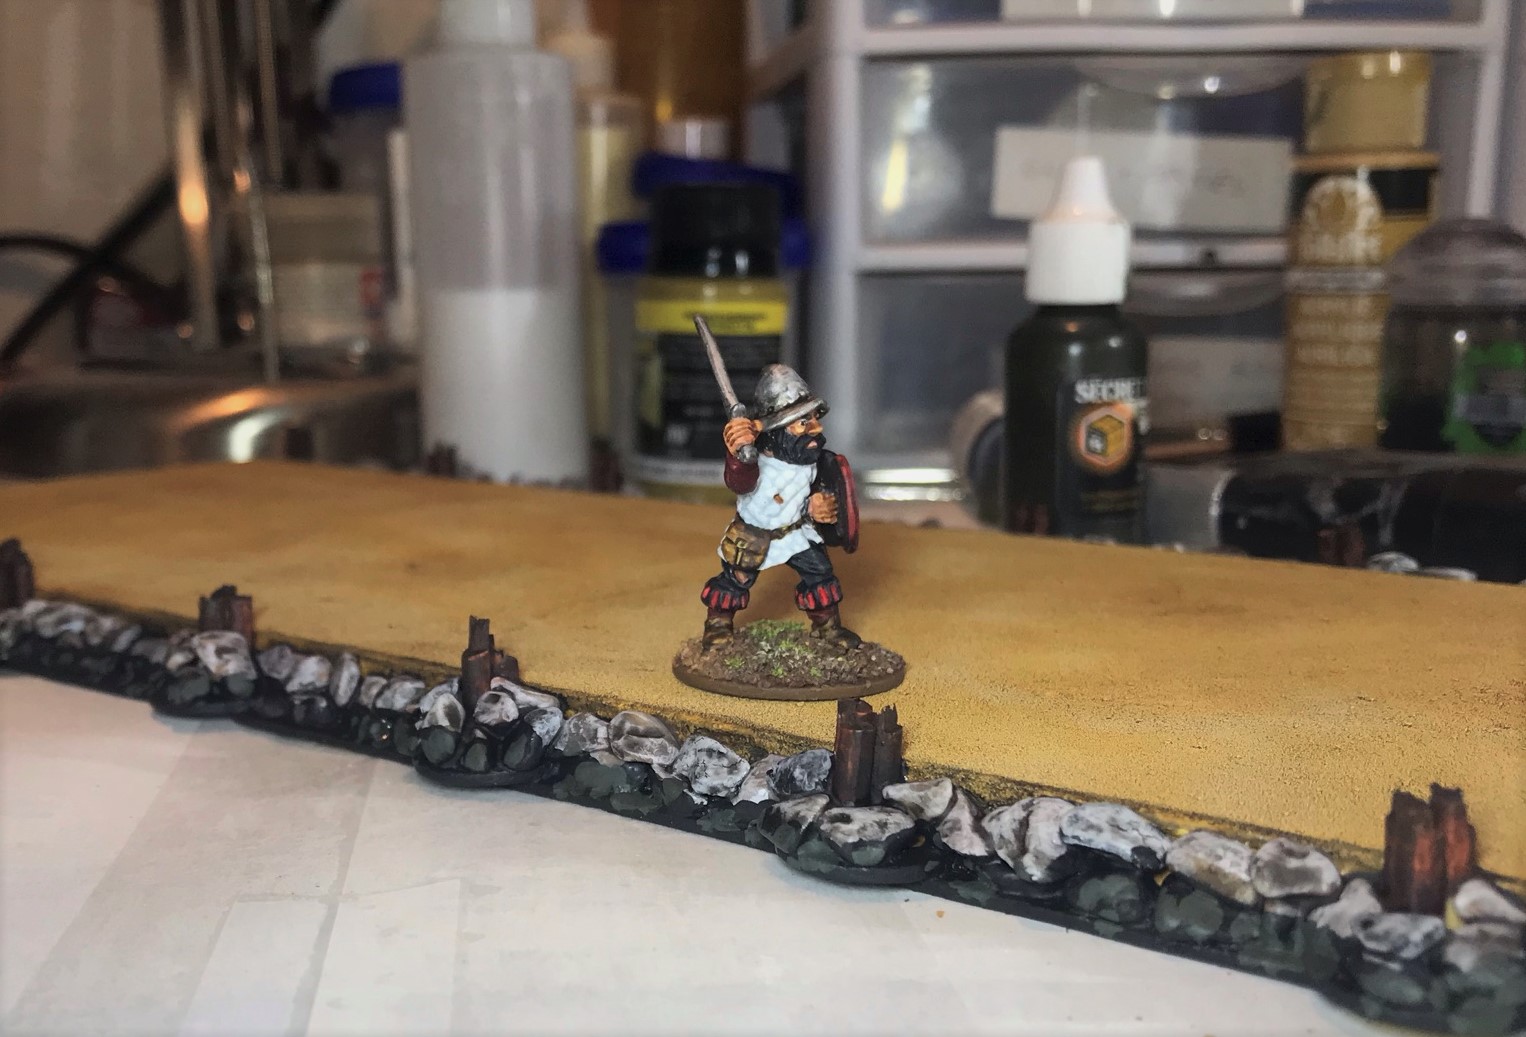
When I was at Historicon in November 2021, I ran my “Cortes’ Causeway Escape Attempt” scenario for a Feudal Patrol game for the Spanish Conquest in Mesoamerica (Aztecs vs. Conquistadores) using my supplement Civilizations Collide. One of the issues with my terrain with which I was not fully pleased was the Temple of Yopico model I was using. As readers of this blog may recall (the relevant post is here), I was using a relatively small pyramid that had been given to me that I had converted for the cityscape. Unfortunately, you could not put figures on it for gaming, and I had a template made for gaming with it – certainly this was not an ideal solution for a model of the Temple of Yopico.

My converted temple from last year.

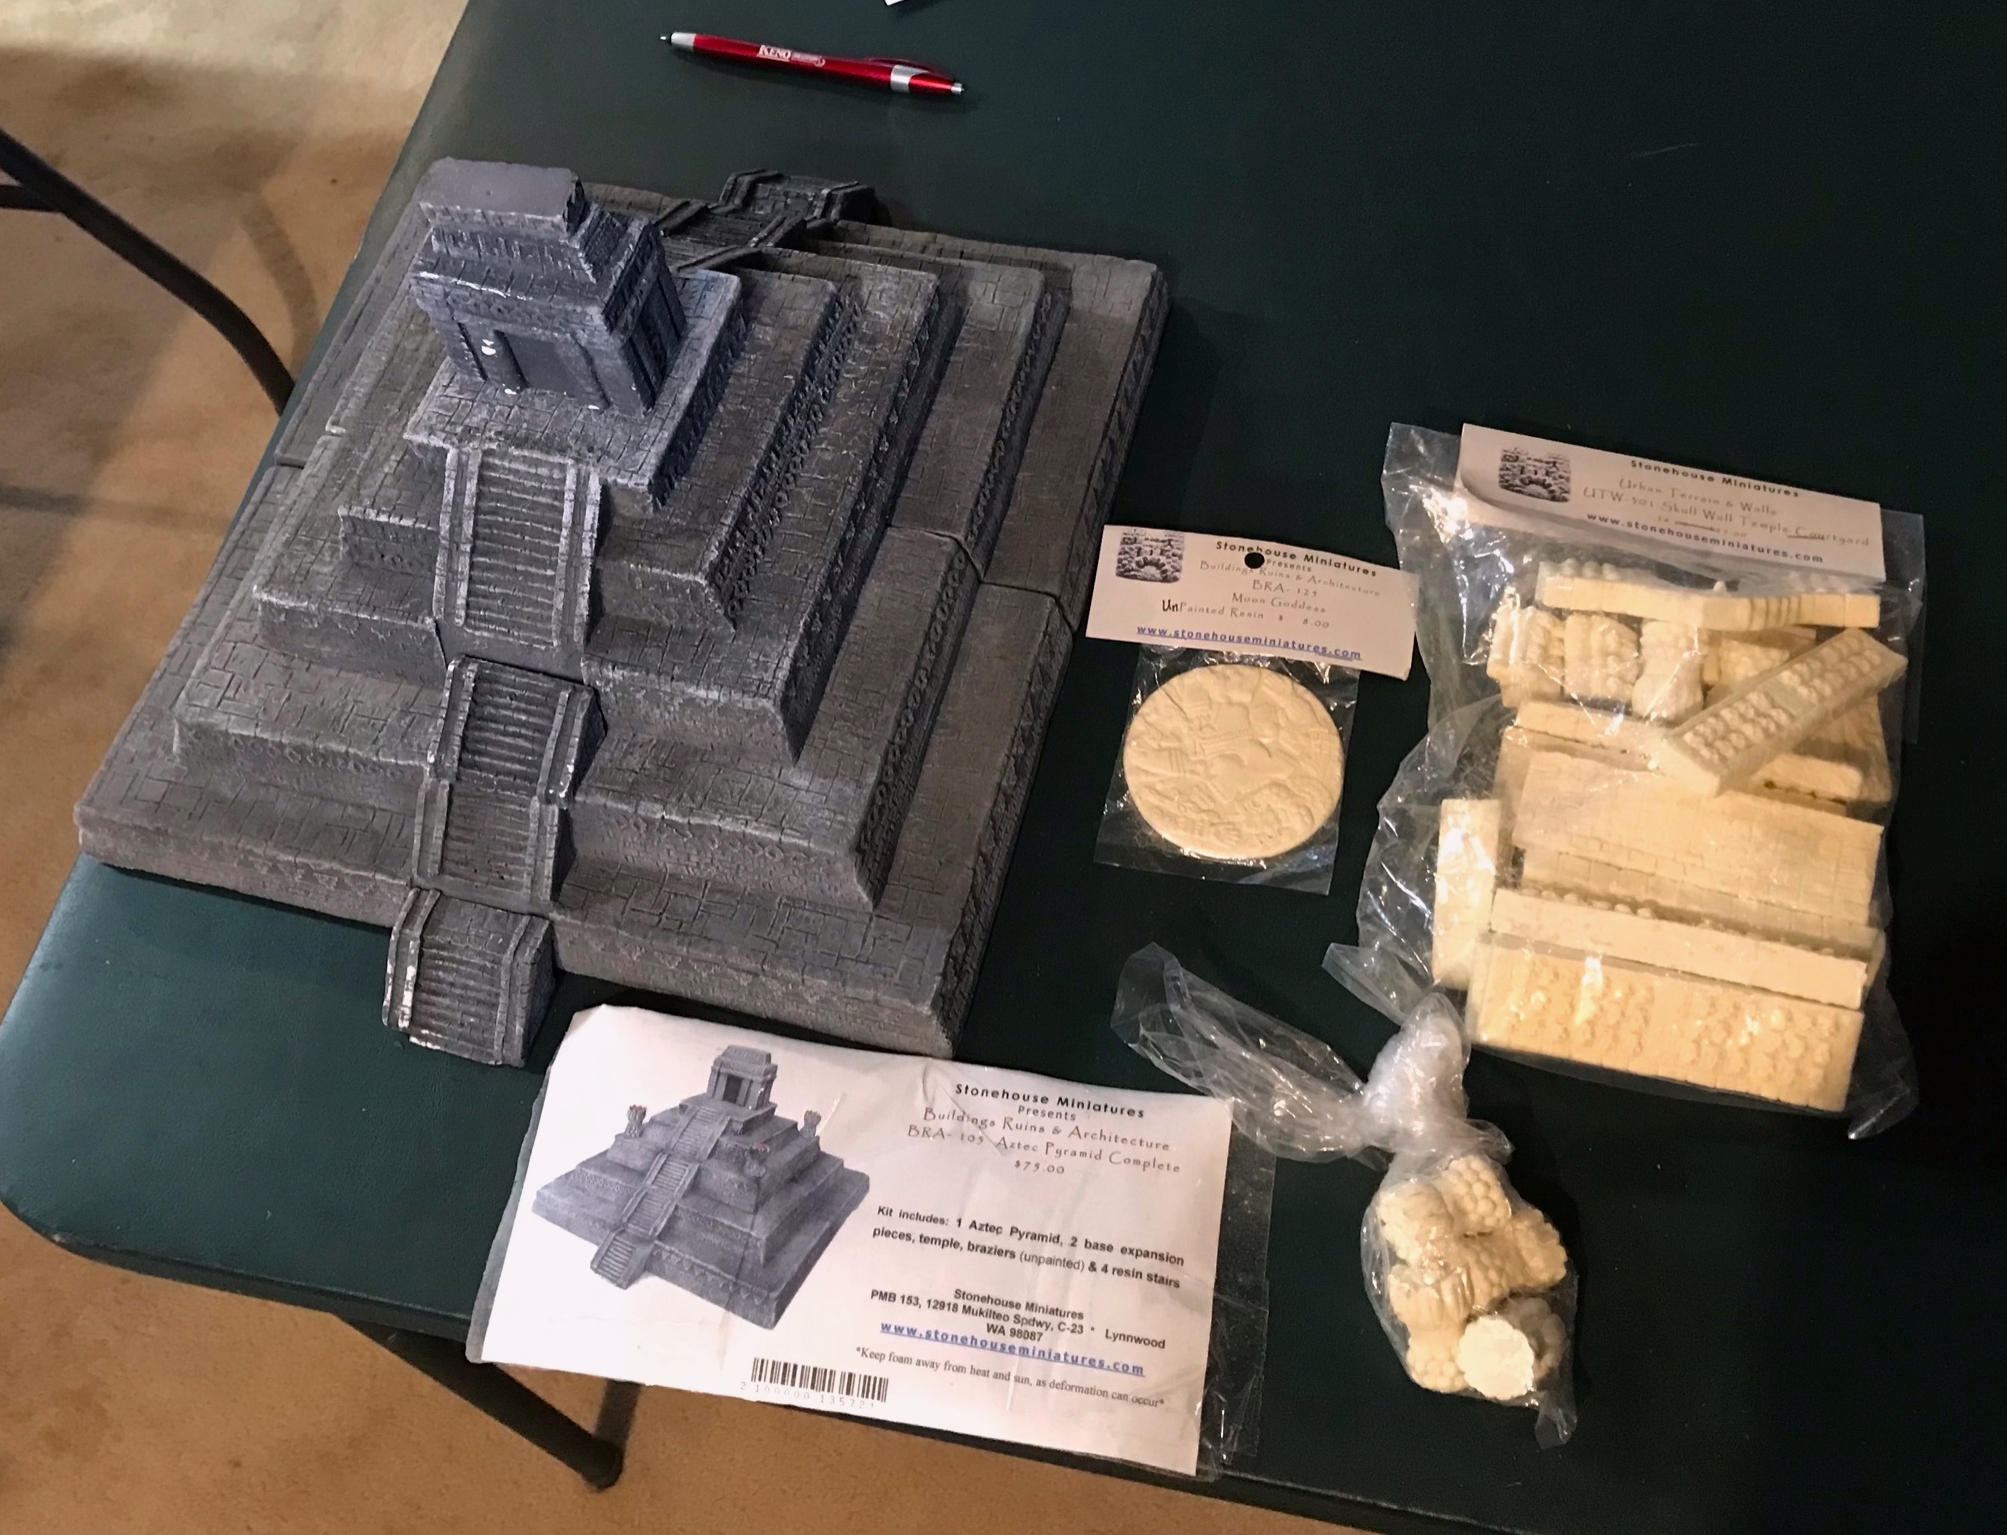
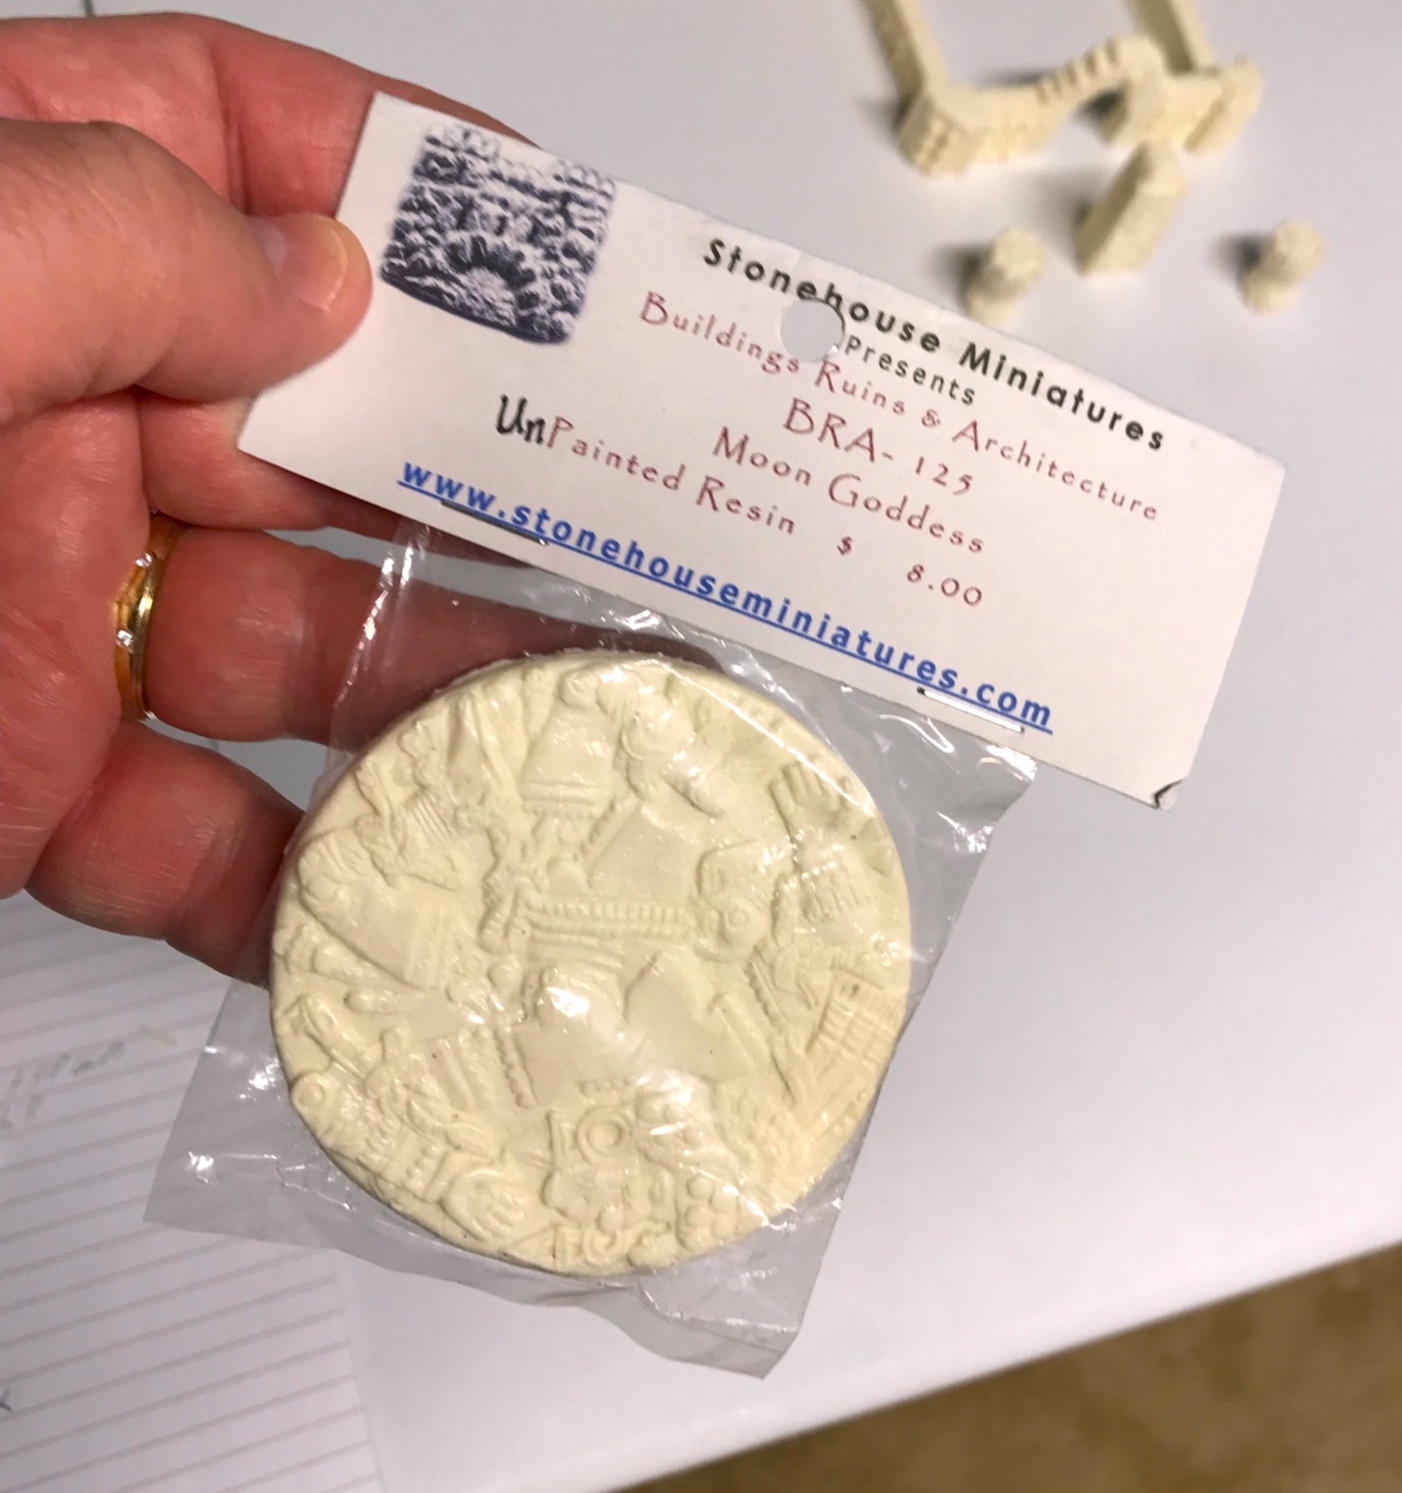
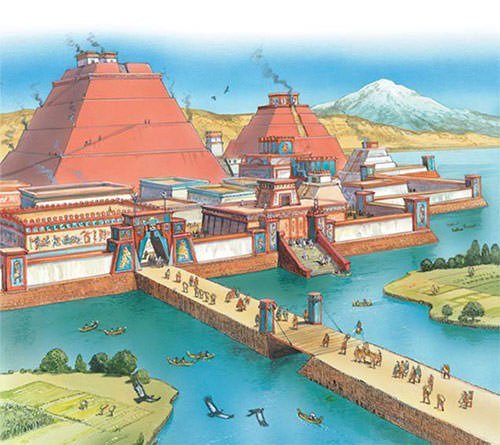
As fortune would have it, in very early February, I discovered that Stonehouse Miniatures sells a pretty good looking Aztec Pyramid made out of foam and resin pieces that looked to me like it would work for 28mm. They also had several other cool items like a skull wall temple courtyard and a moon goddess plaque in resin. I have usually found that most commercially Aztec terrain is made to look like ruins – more suitable for an Indiana Jones scenario or Ghost Archipelago than for Tenochtitlan in 1520. Happily, these new finds were not models of ruins! Yay! I ordered them and they arrived on Valentine’s Day. As 10 days later TotalCon 36 would begin, I needed to get moving forthwith!

The Stonehouse stuff that I ordered.

The temple was painted black, and the other resin was totally unpainted of course (as one would expect). My cityscape is more of an oxidized-limestone hue – so I had my work cut out for me. The three main pieces of the temple that were made of foam – not a material with which I had a lot of experience (but not zero). The rest were made of resin. However, with TotalCon 36 coming up rapidly February 24-27, I was a bit under the gun to get them done, along with some other stuff I made for my France 1940 What a Tanker game (about which I’ll share in details in a future post).

The new building on my tiles. Definitely, the pyramid color needs adjustment!

Given the timing constraints that I was under, I first proceeded to work on the temple, then on how to safely transport it, and finally onto finishing the other resin pieces – so I’ll describe that process here. With this approach, I could at least get the pyramid done, and if I could get to the other pieces before the convention, that would be great.

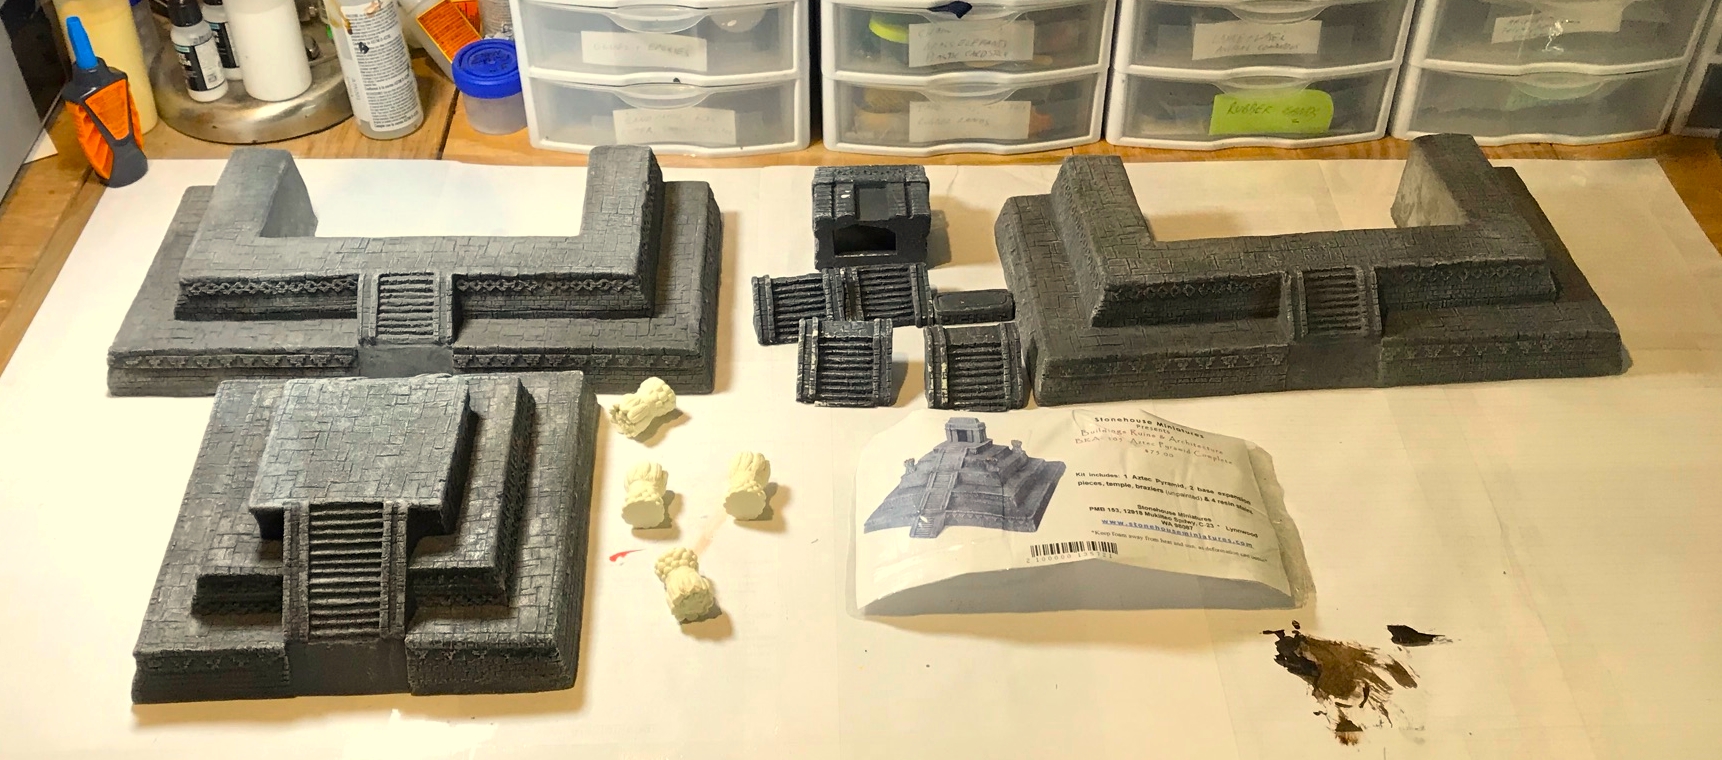
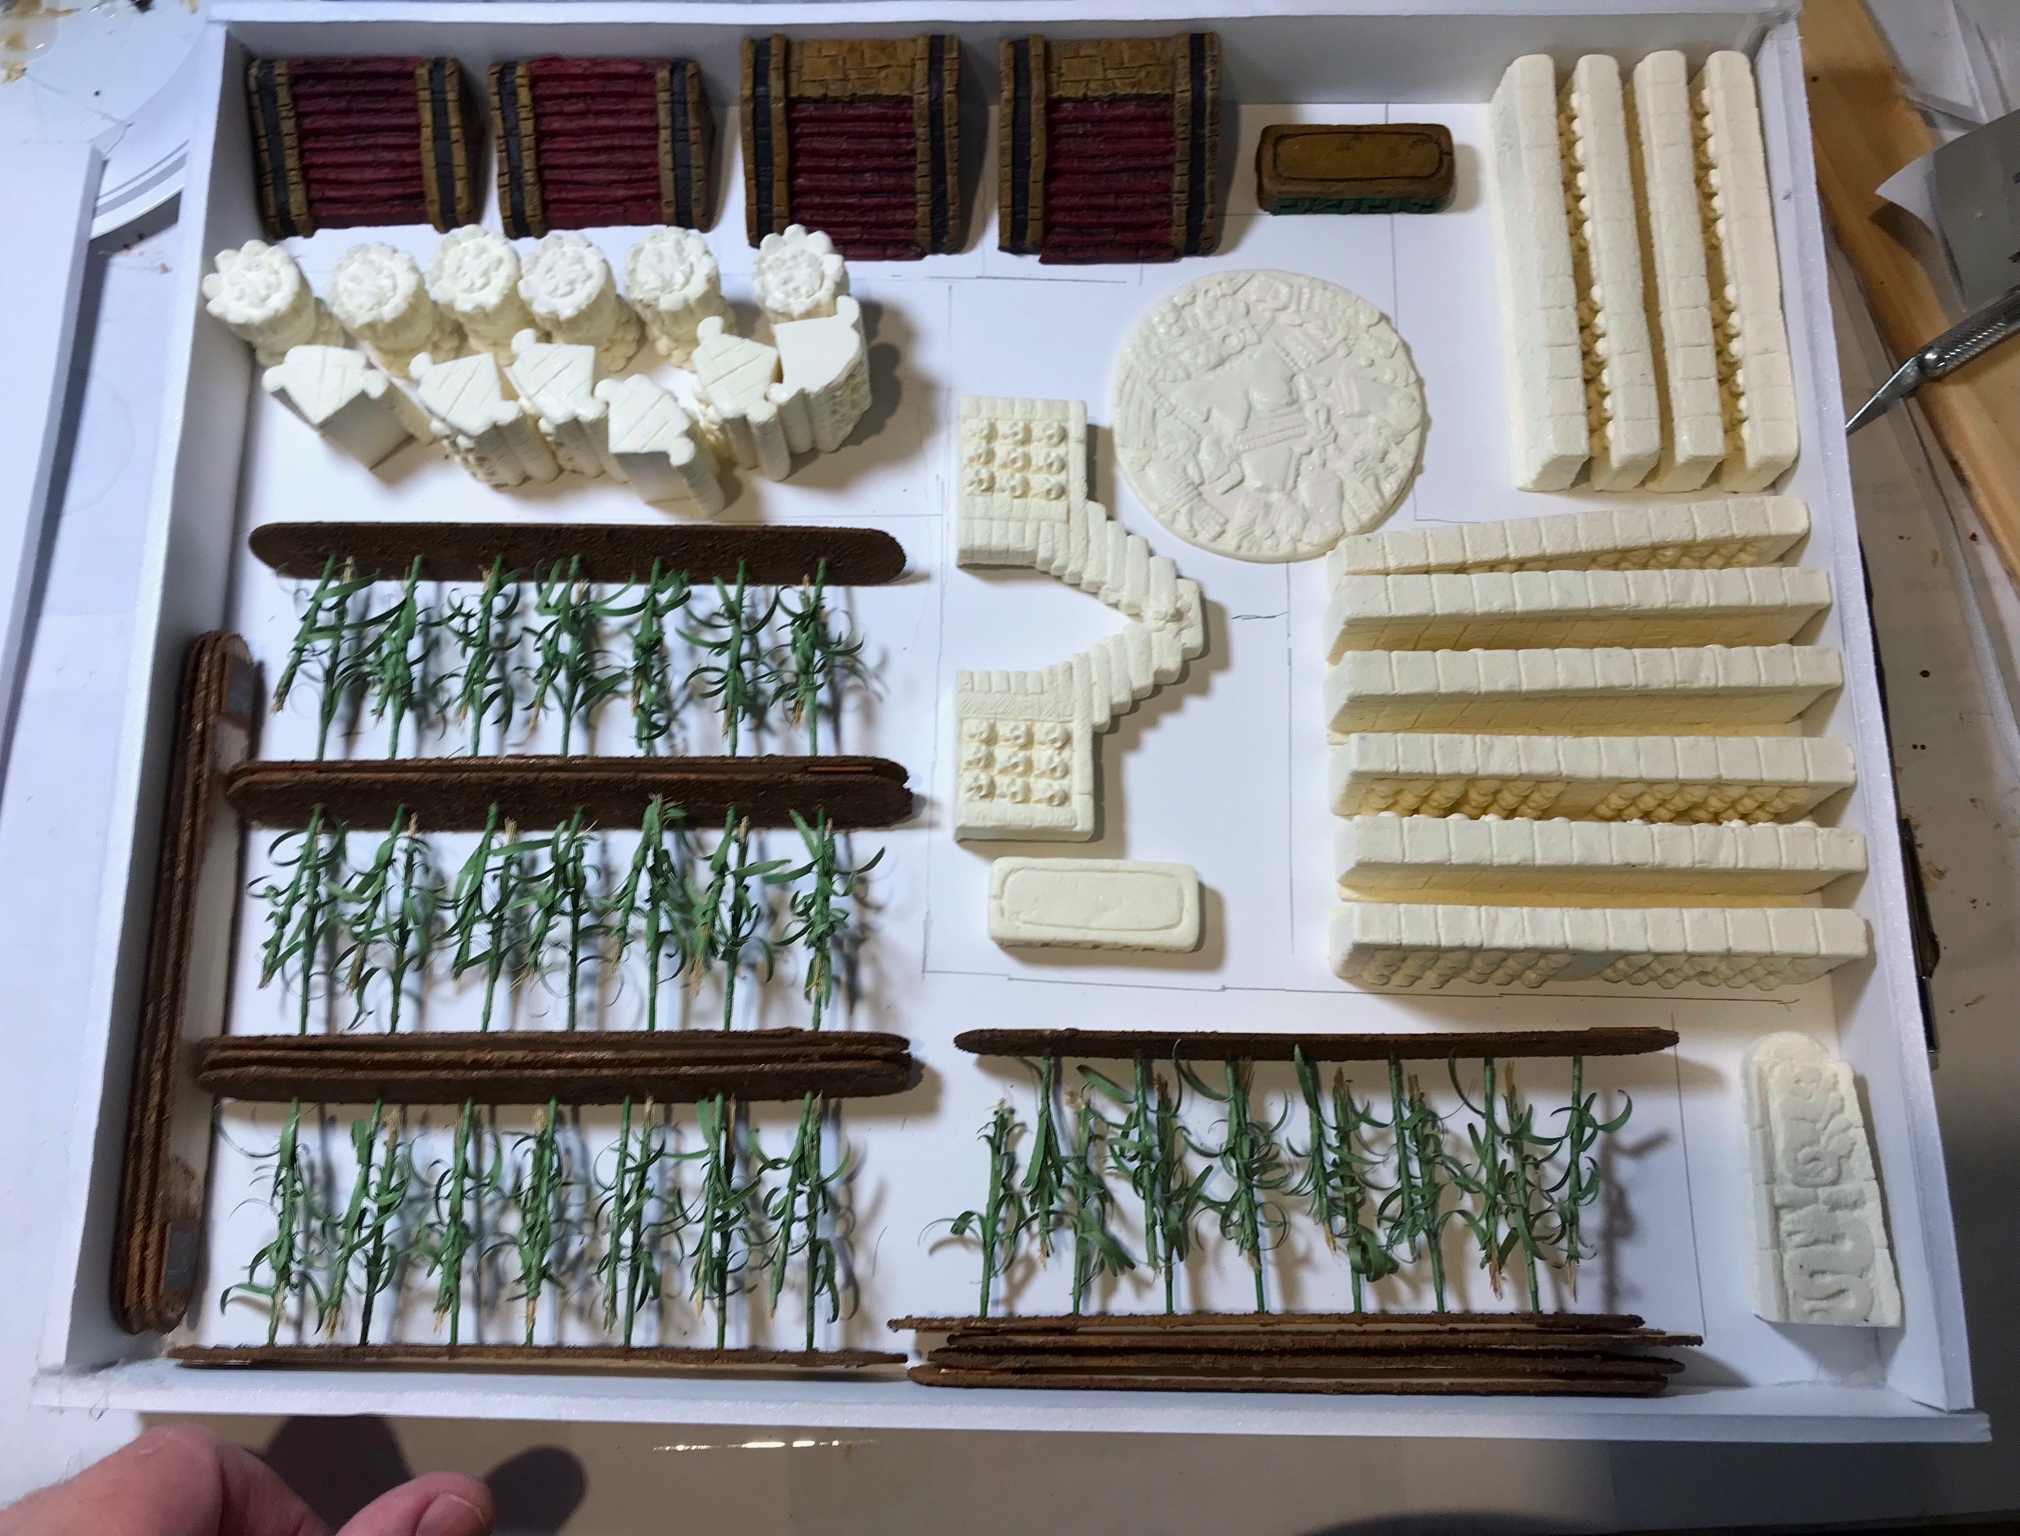
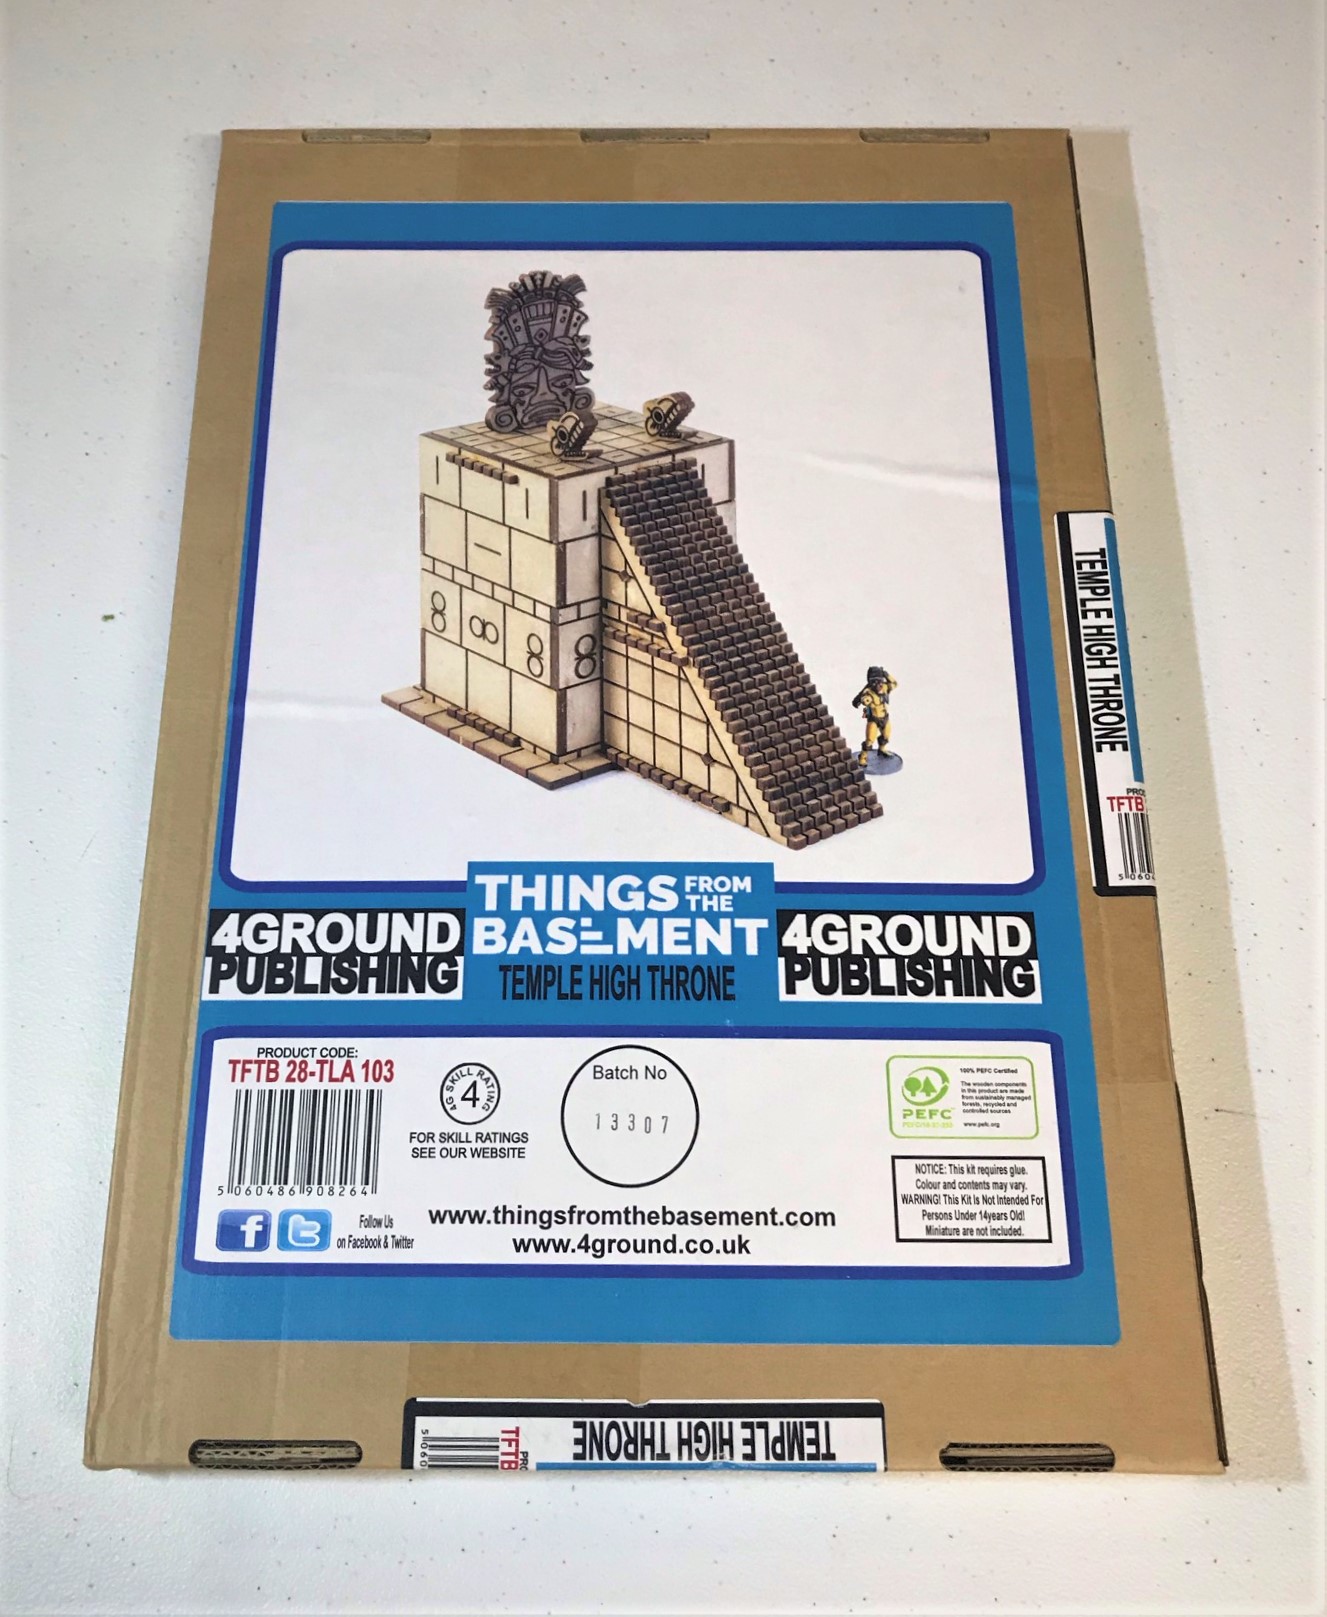
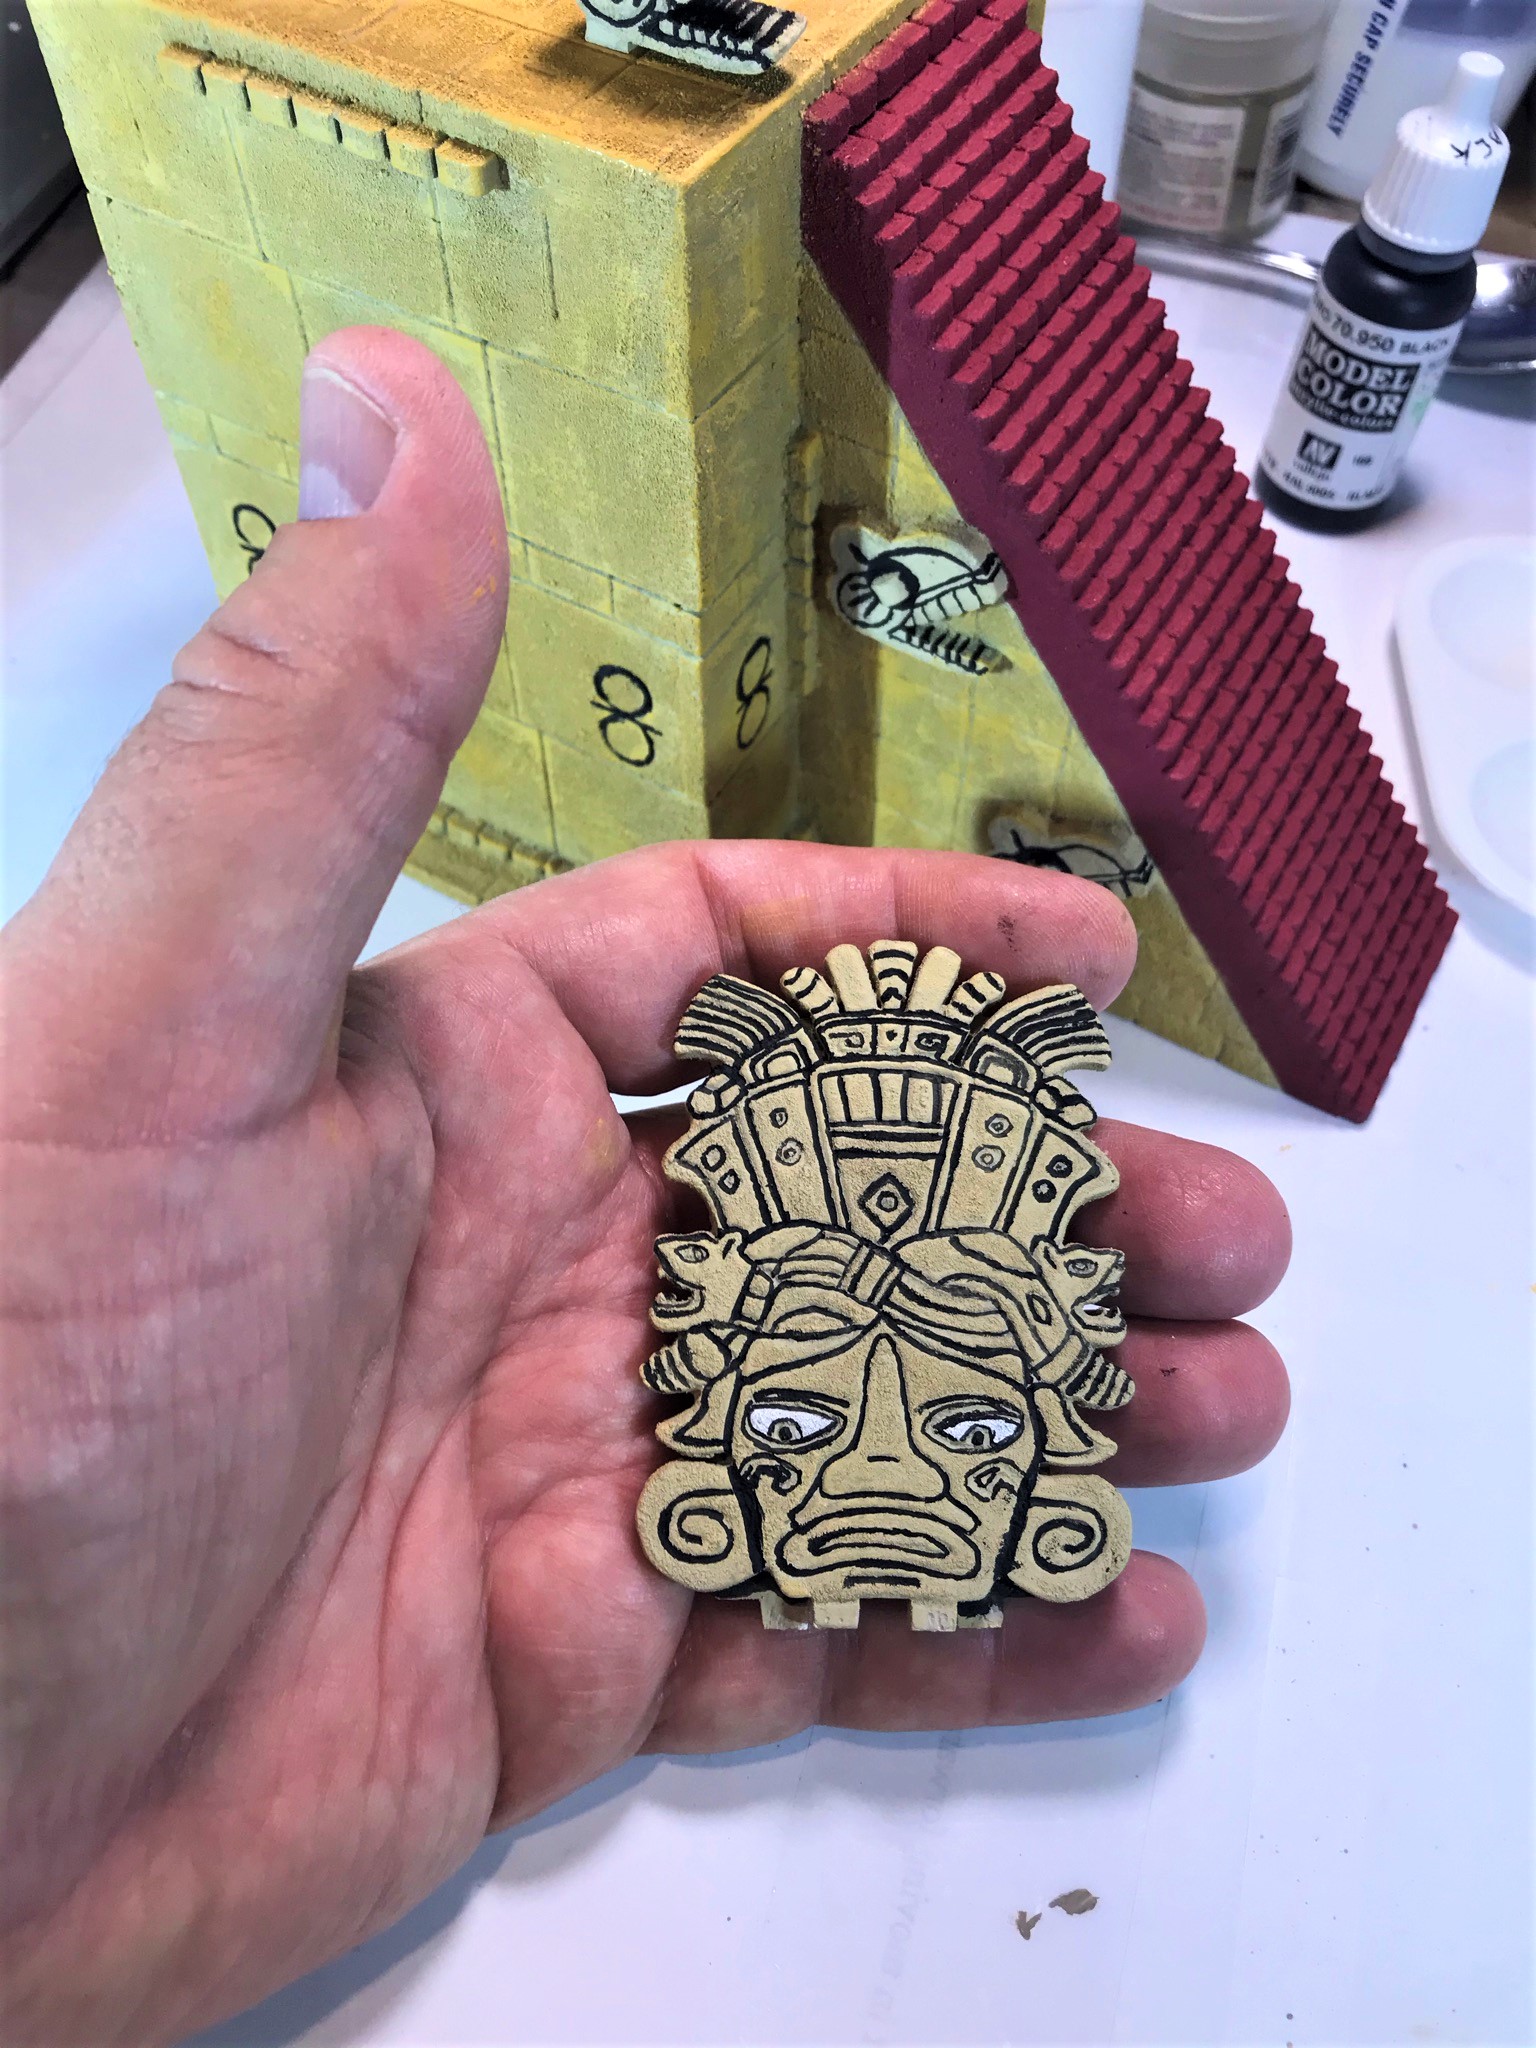
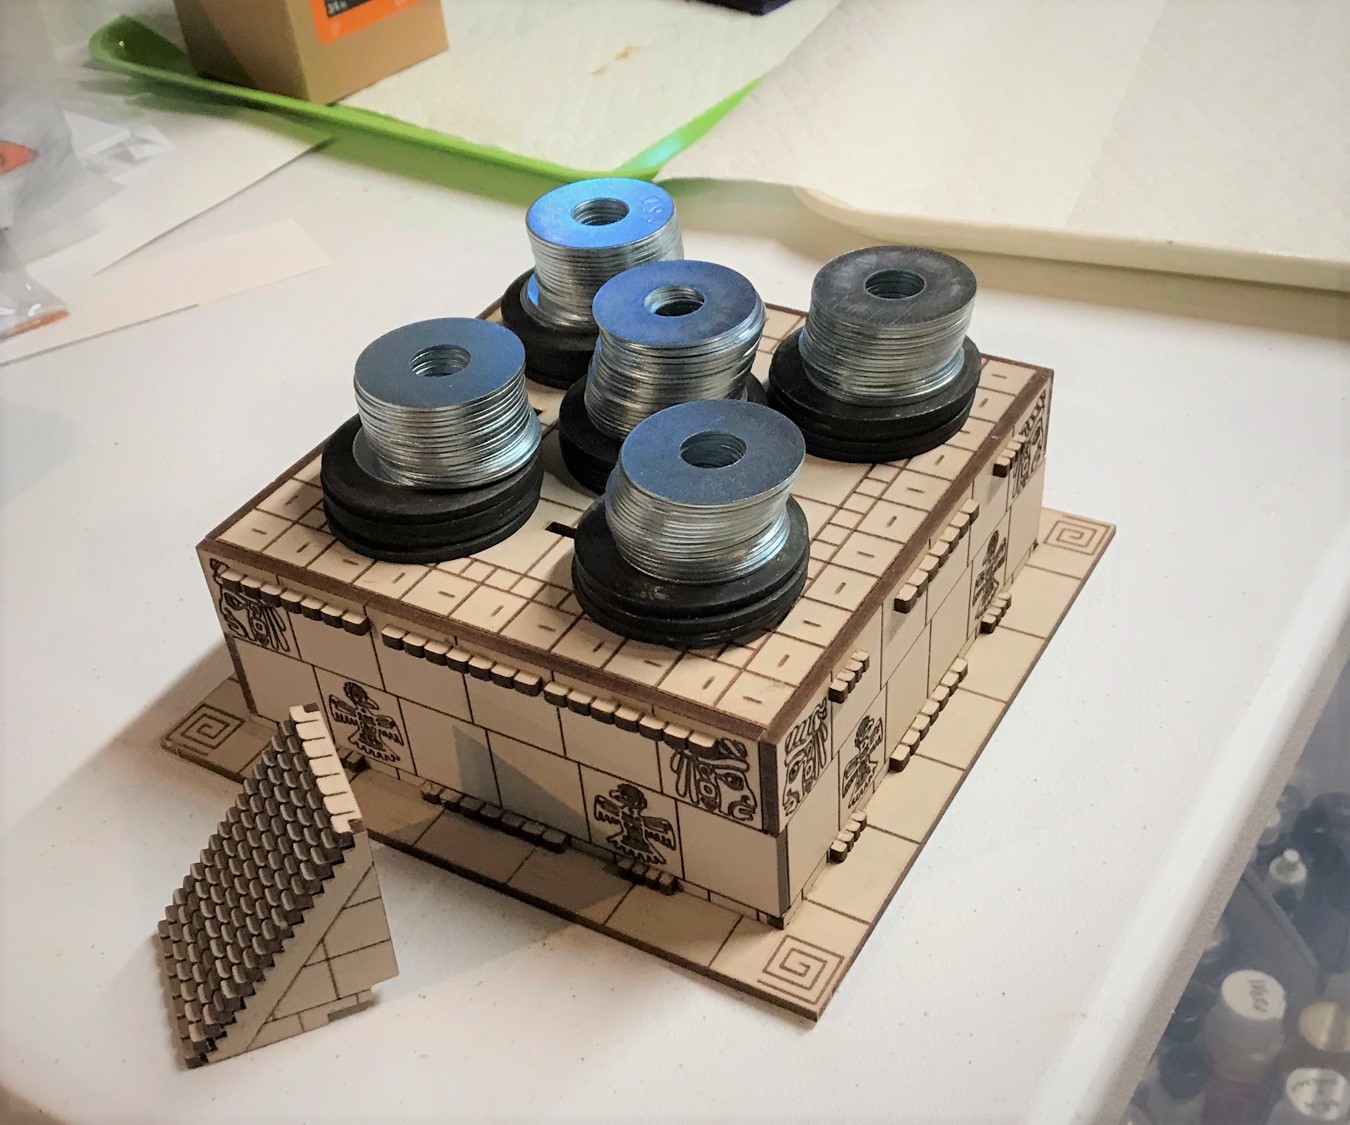
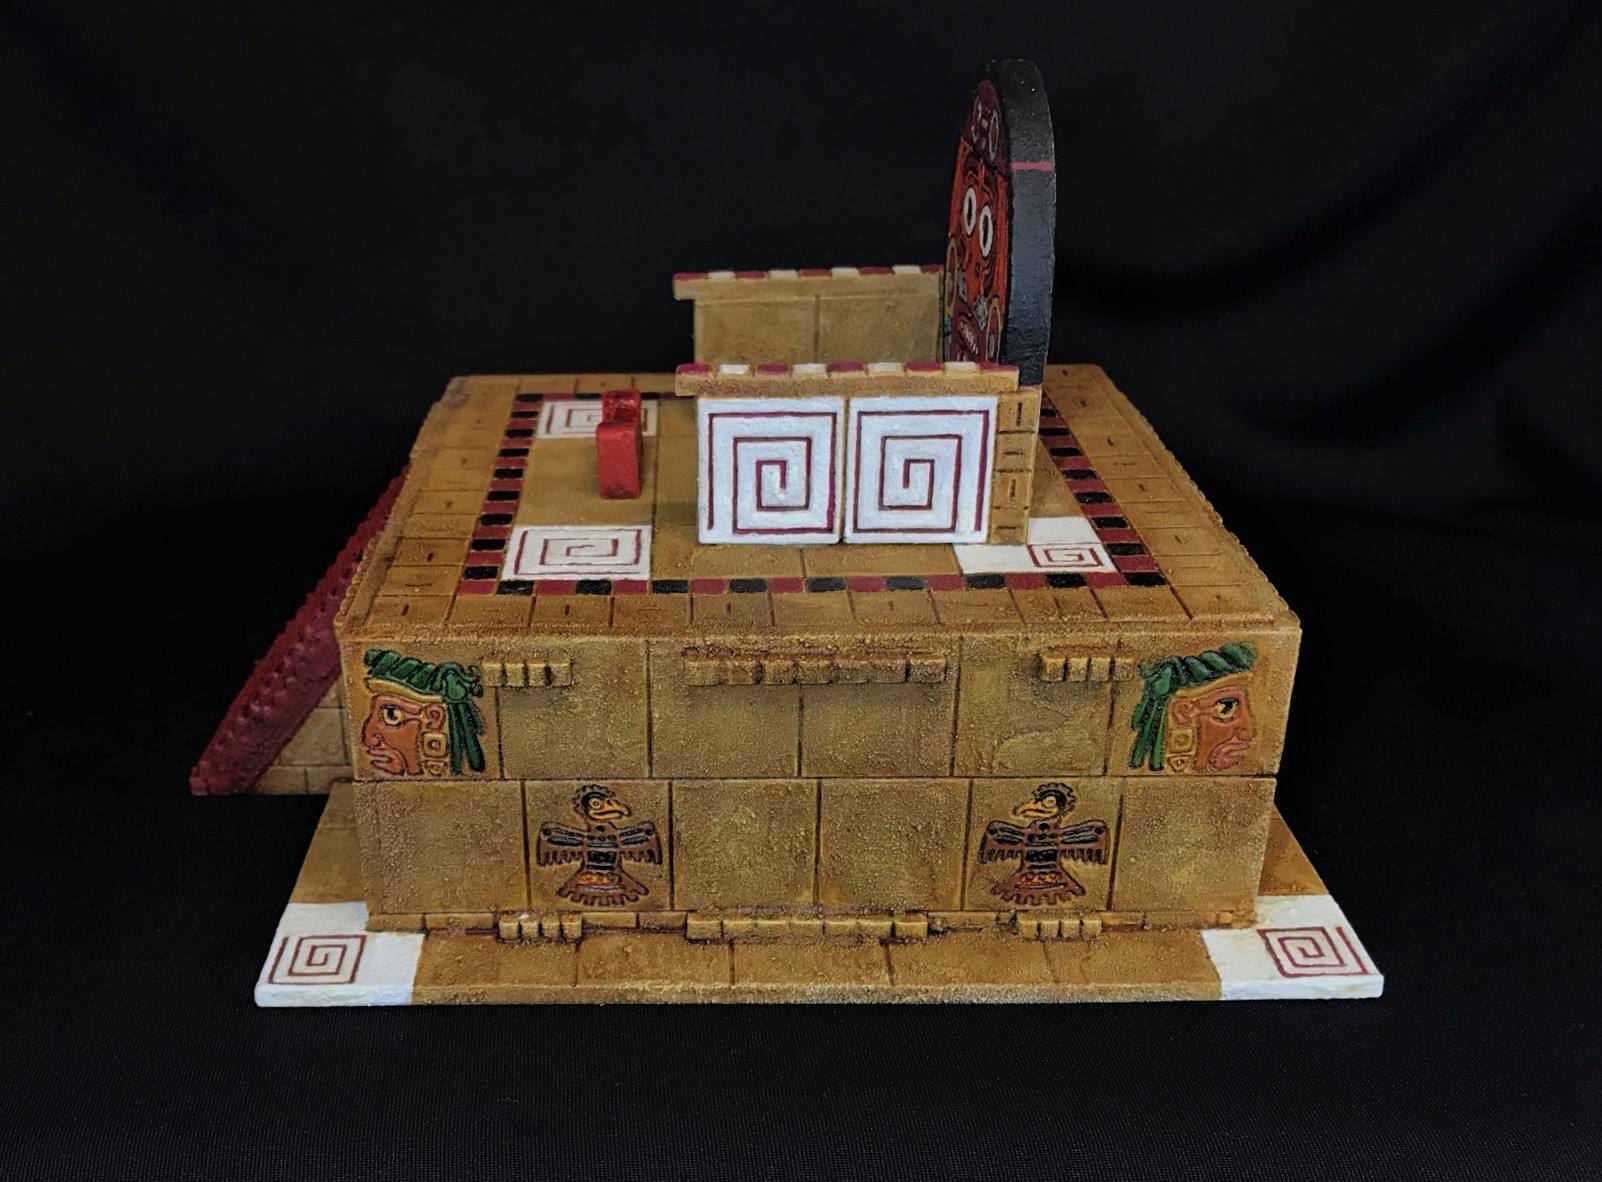
Let’s start with the pyramid. The model kit is designated BRA-105, “Aztec Pyramid Complete”, and includes 1 single-piece foam Aztec pyramid, 2 foam base expansion pieces, 4 sets of resin stairs, a resin temple (top piece), a resin sacrificial altar, and 4 resin braziers.

BRA-105, “Aztec Pyramid Complete” kit.

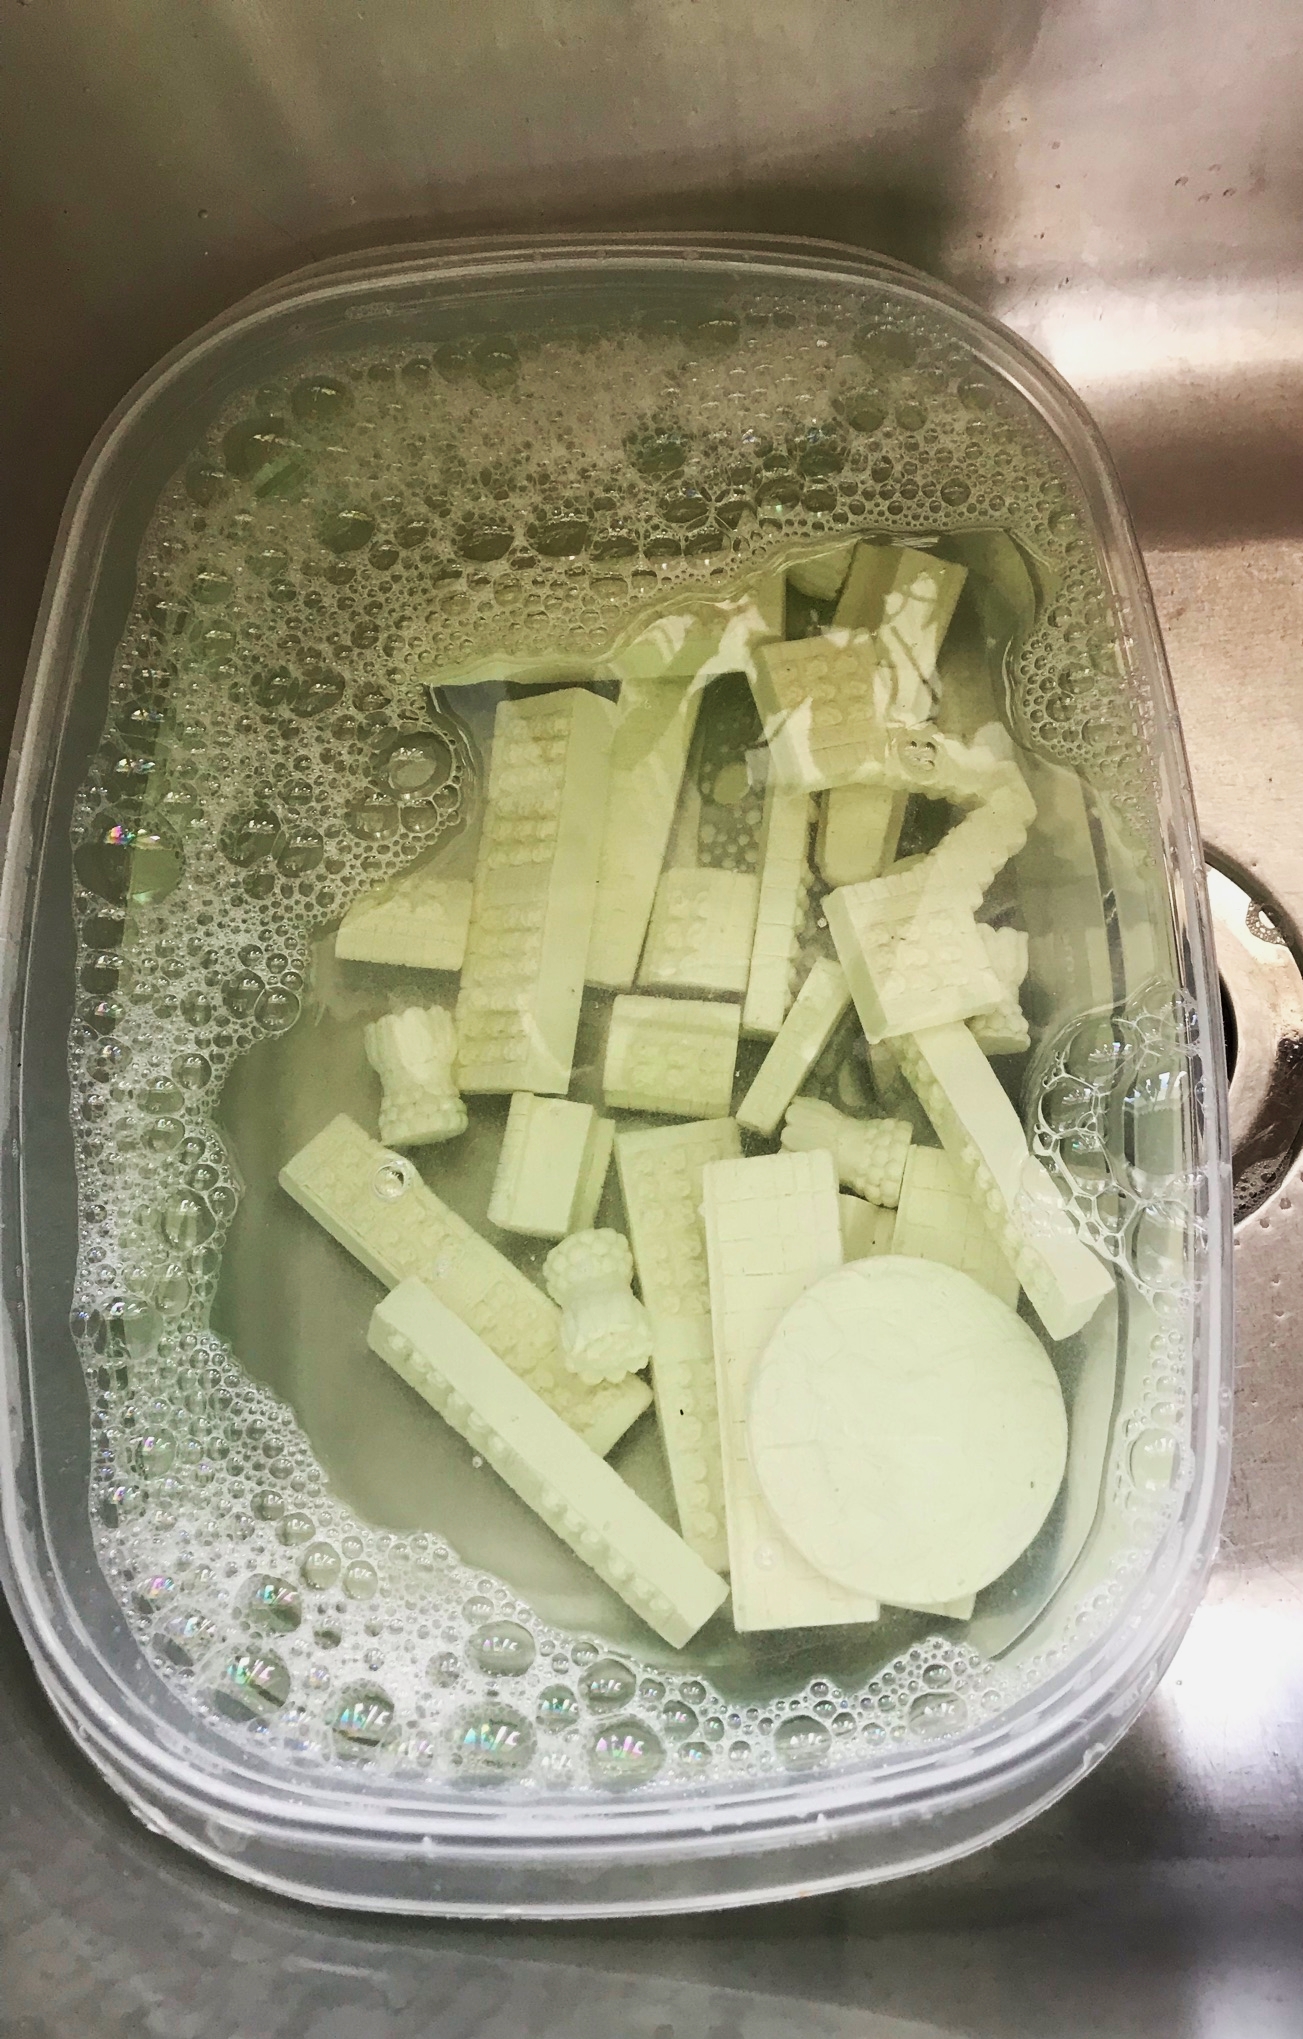
First, the issue of priming came up. While using my airbrush would not melt the foam if I primed it – as opposed to a rattlecan – I decided to consider the manufacturer’s black color as the prime. The braziers, the altar, and the other pieces that I got in my order (discussed later in this post) were all unpainted resin. I washed all of them first, scrubbed them, and let them dry while I worked on the pyramid.

Wash that resin!

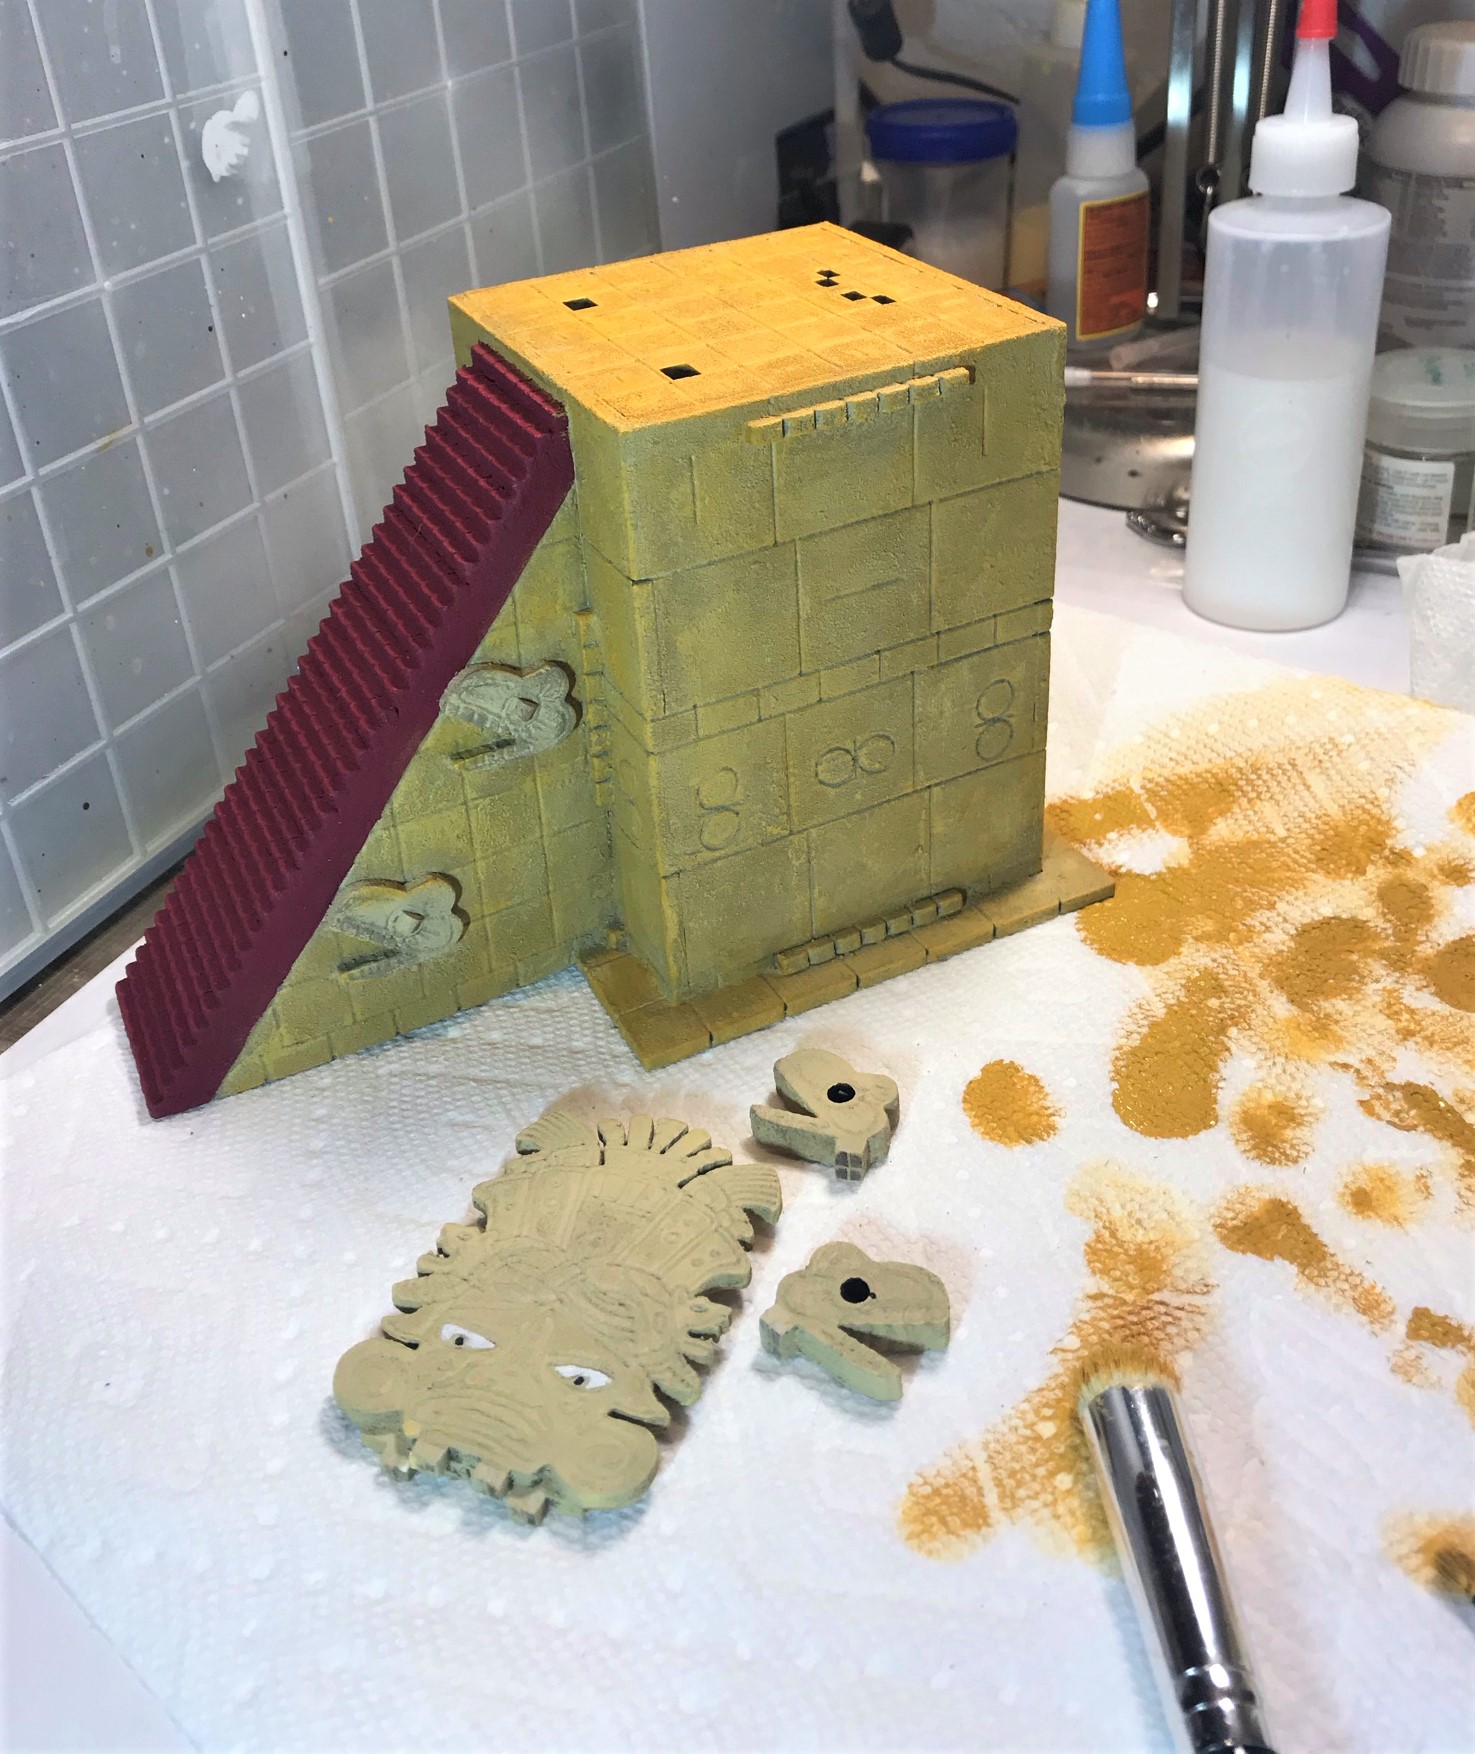
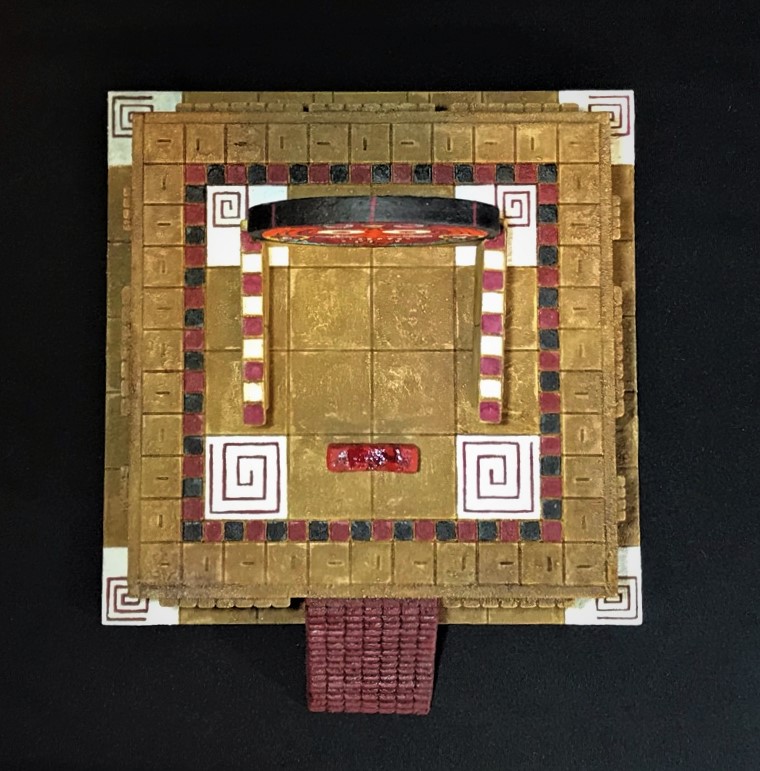
I had decided that a series of dry brushing applications would be my best bet to achieve the color I wanted – with details added afterwards. On the pyramid’s stairs, there were a few places that had exposed resin surfaces (where the black paint had not adhered). I would deal with those by spot-painting with black primer before I did further work on it. As for the painting process, lots of widespread dry bushing would ensue as the next steps. For the foam pieces, they were quite nice as tabletop wargaming terrain pieces go. The pieces had enough detail that even the small molding defects could be made to look like they were a result of weathering. This was especially the case around the bricks. I was concerned with the friability of the foam, so I proceeded with due caution and planning to deal with that vulnerability.

This is after the first dry brushing color was applied to the one on the left – with the untouched other half for comparison. The first two colors in sequence were Citadel “Tallarn Sand”, then Citadel “Karak Stone”.
The left piece has the second dry brushing color on it – the one on right is for comparison and just has the first color.
The first two dry brush applications on the pyramid are complete here.

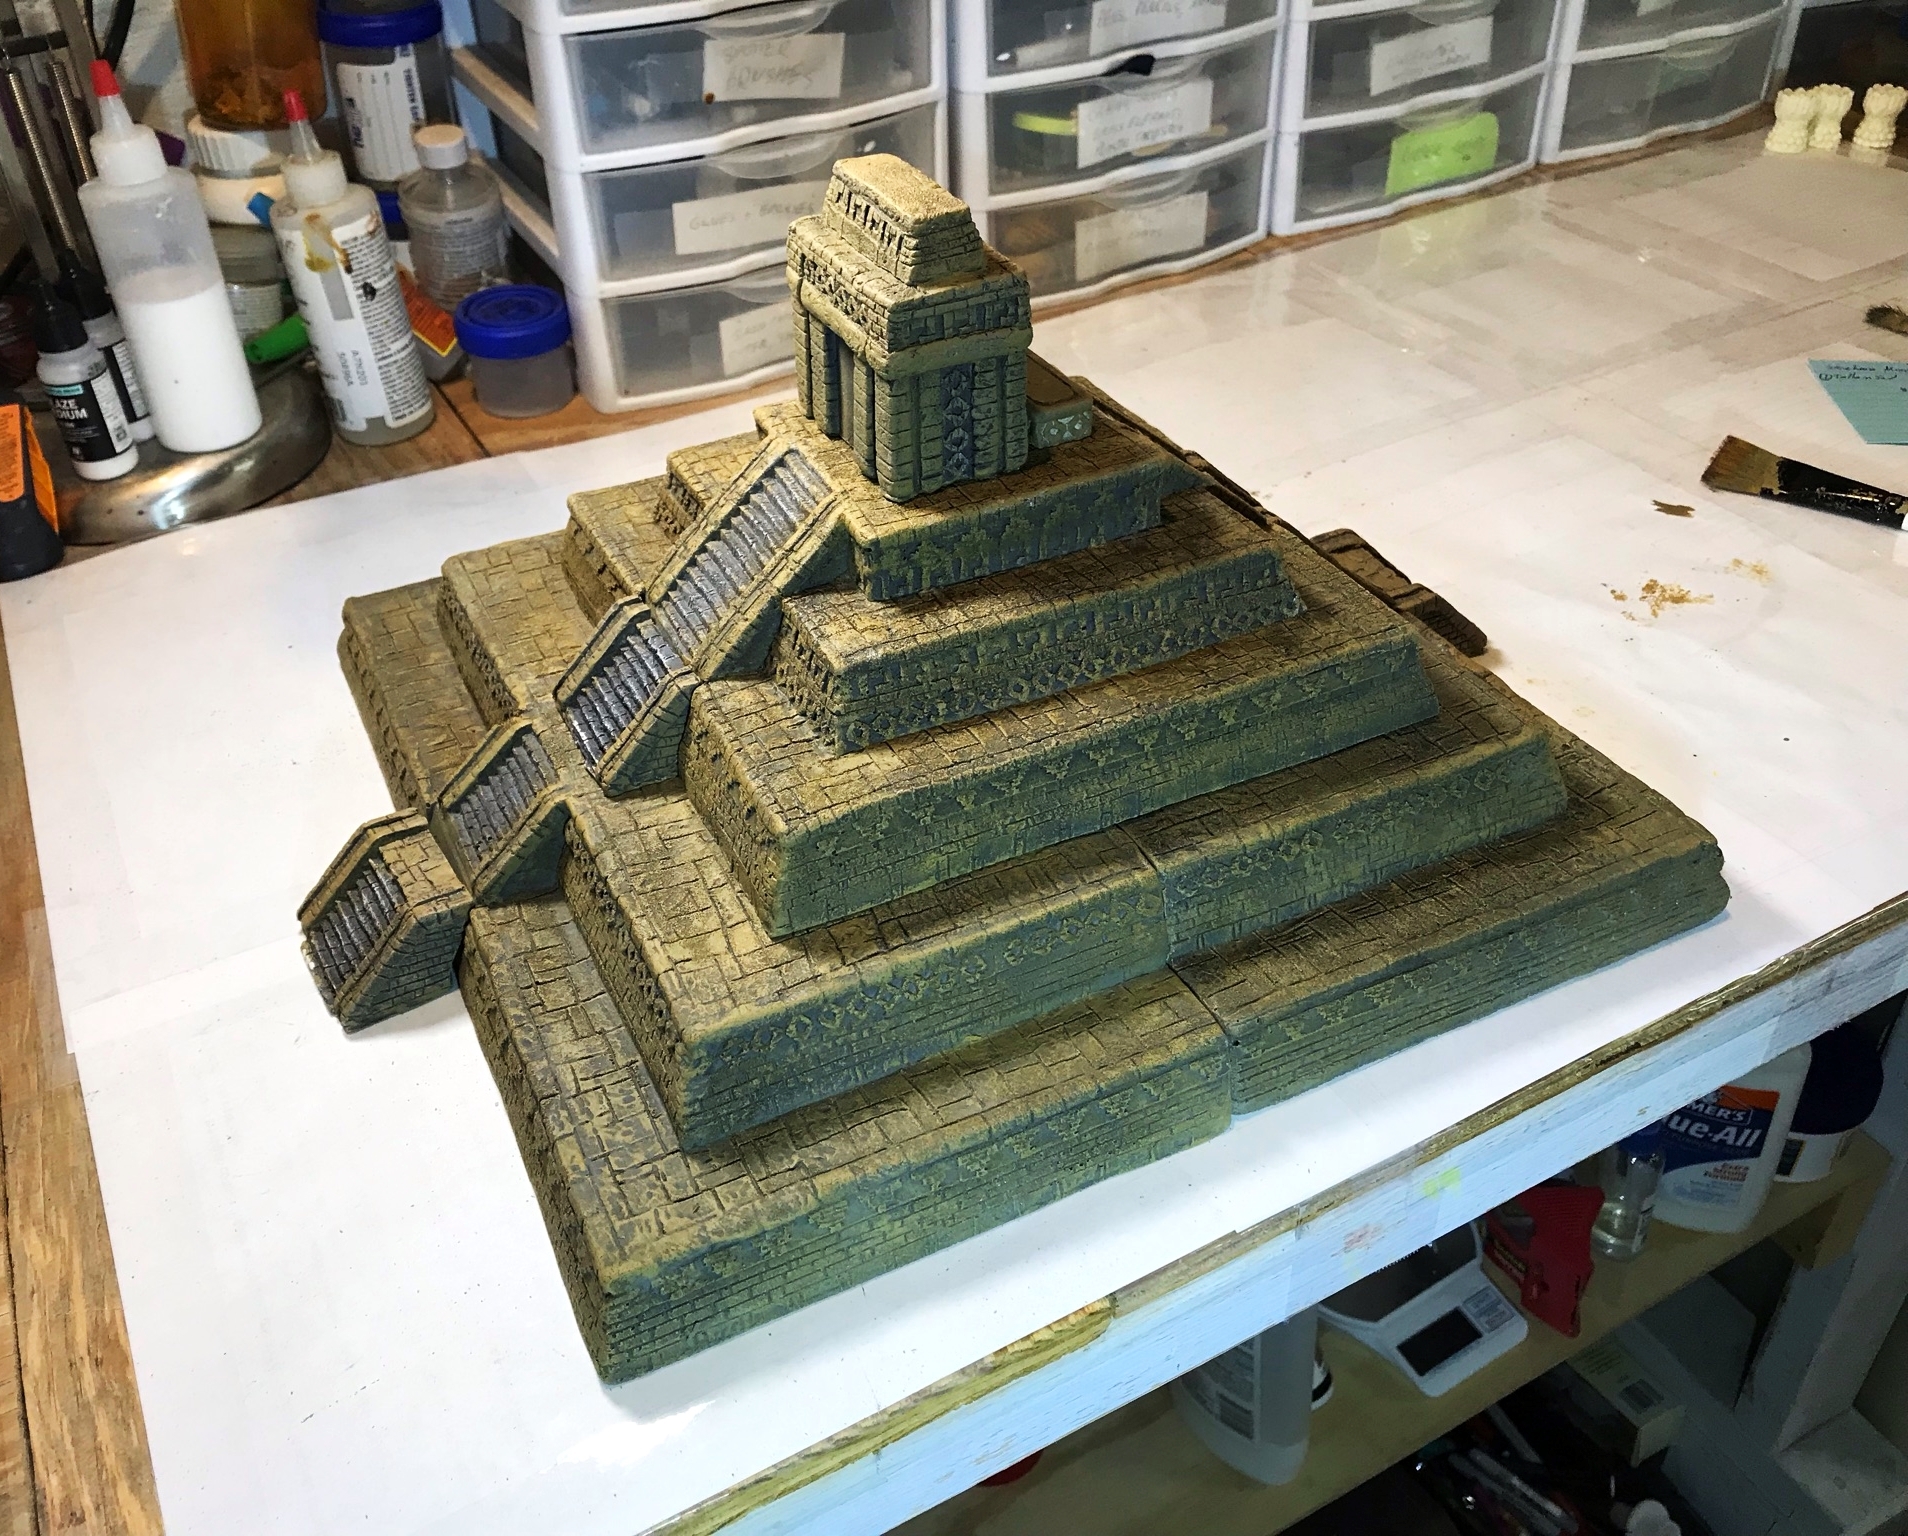
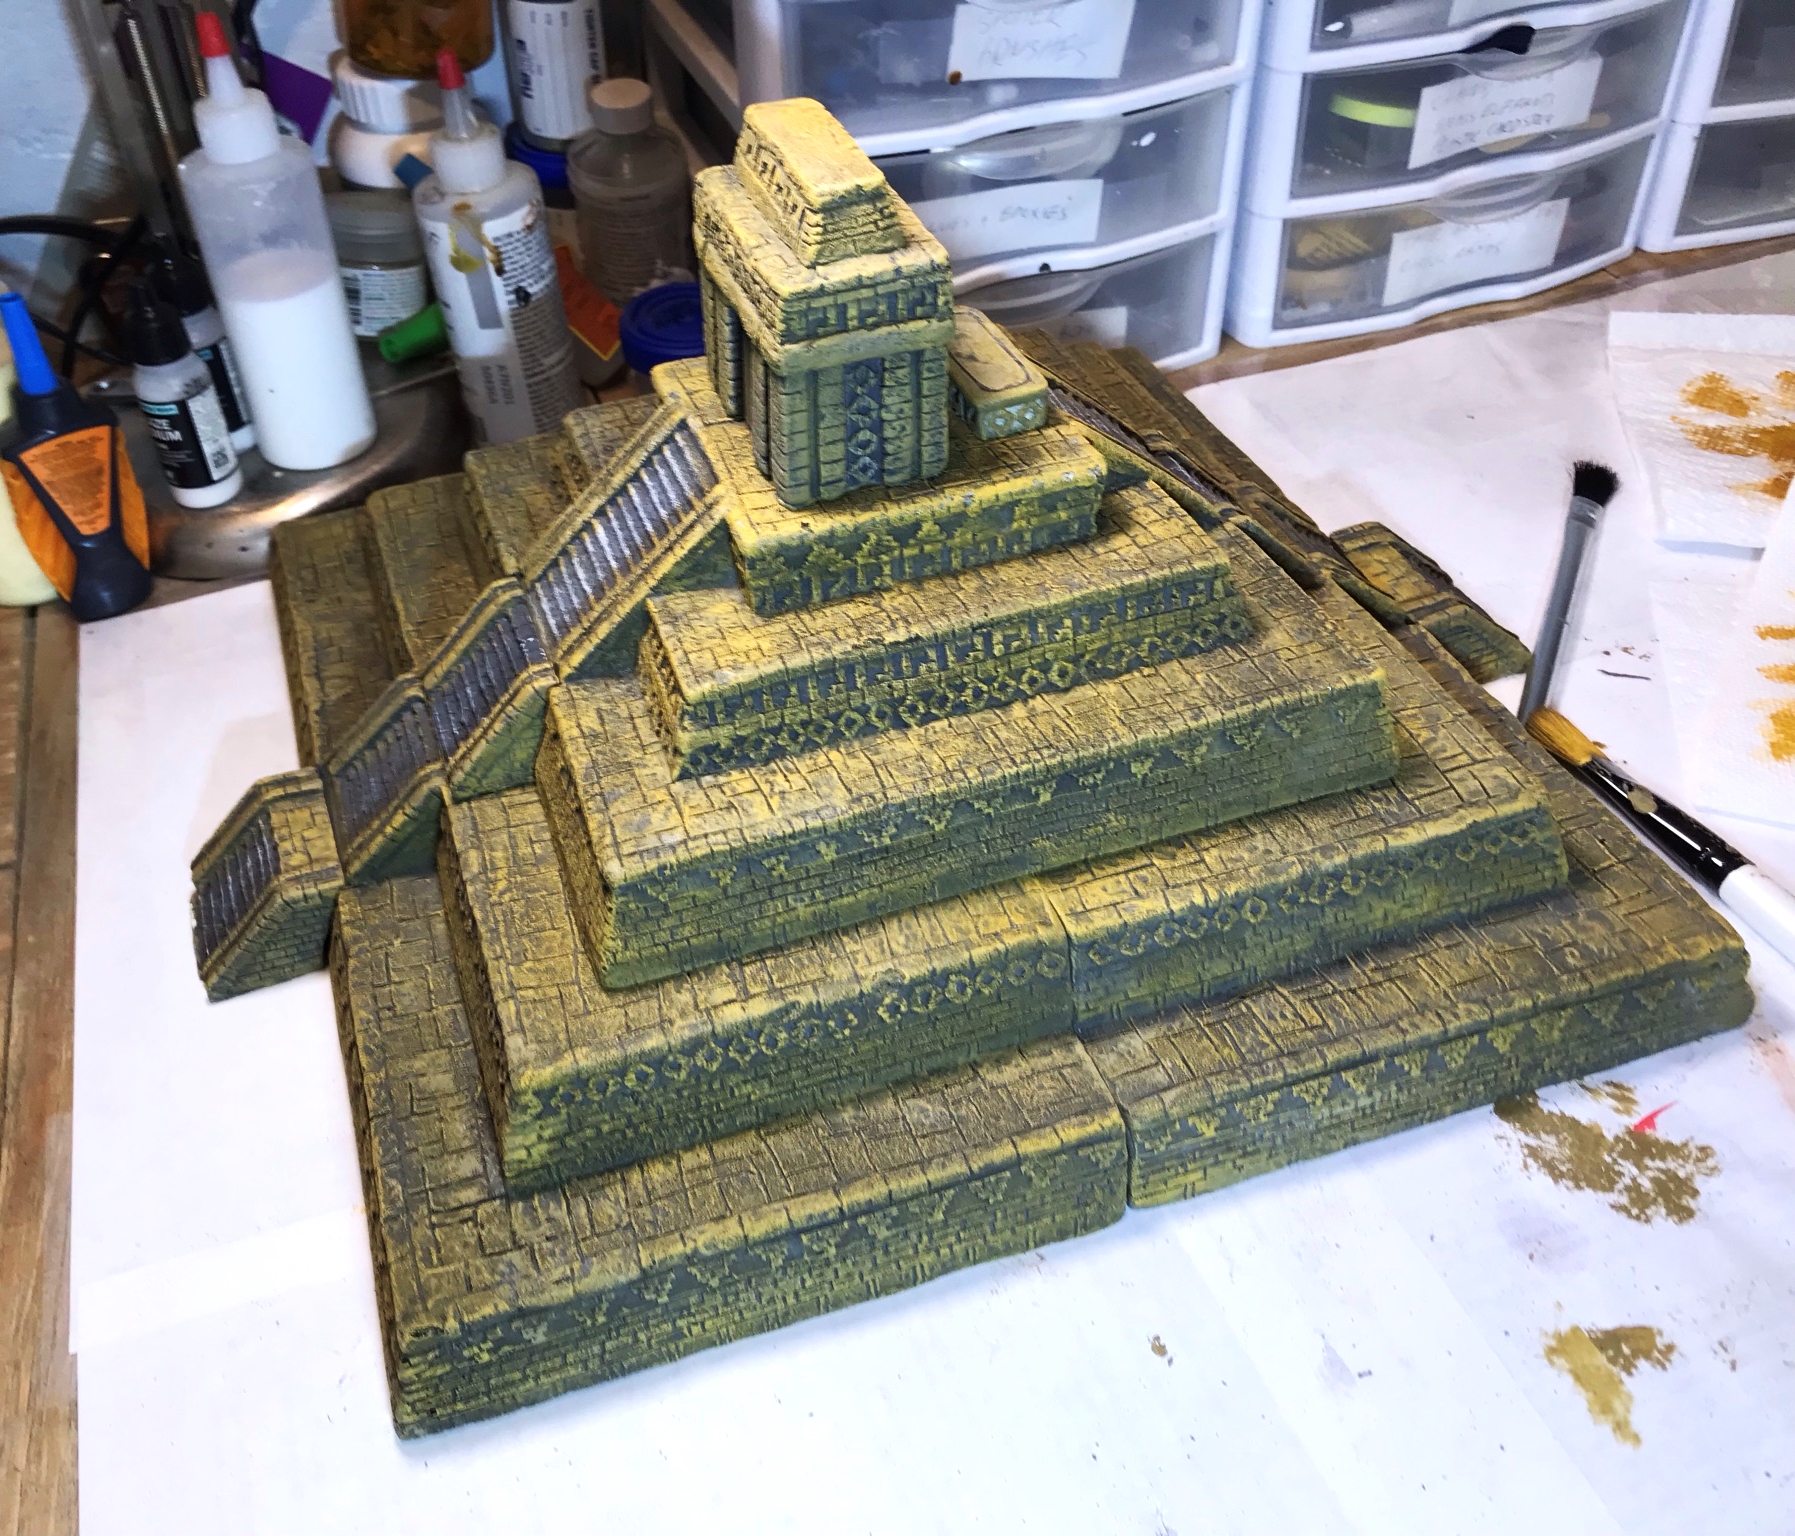
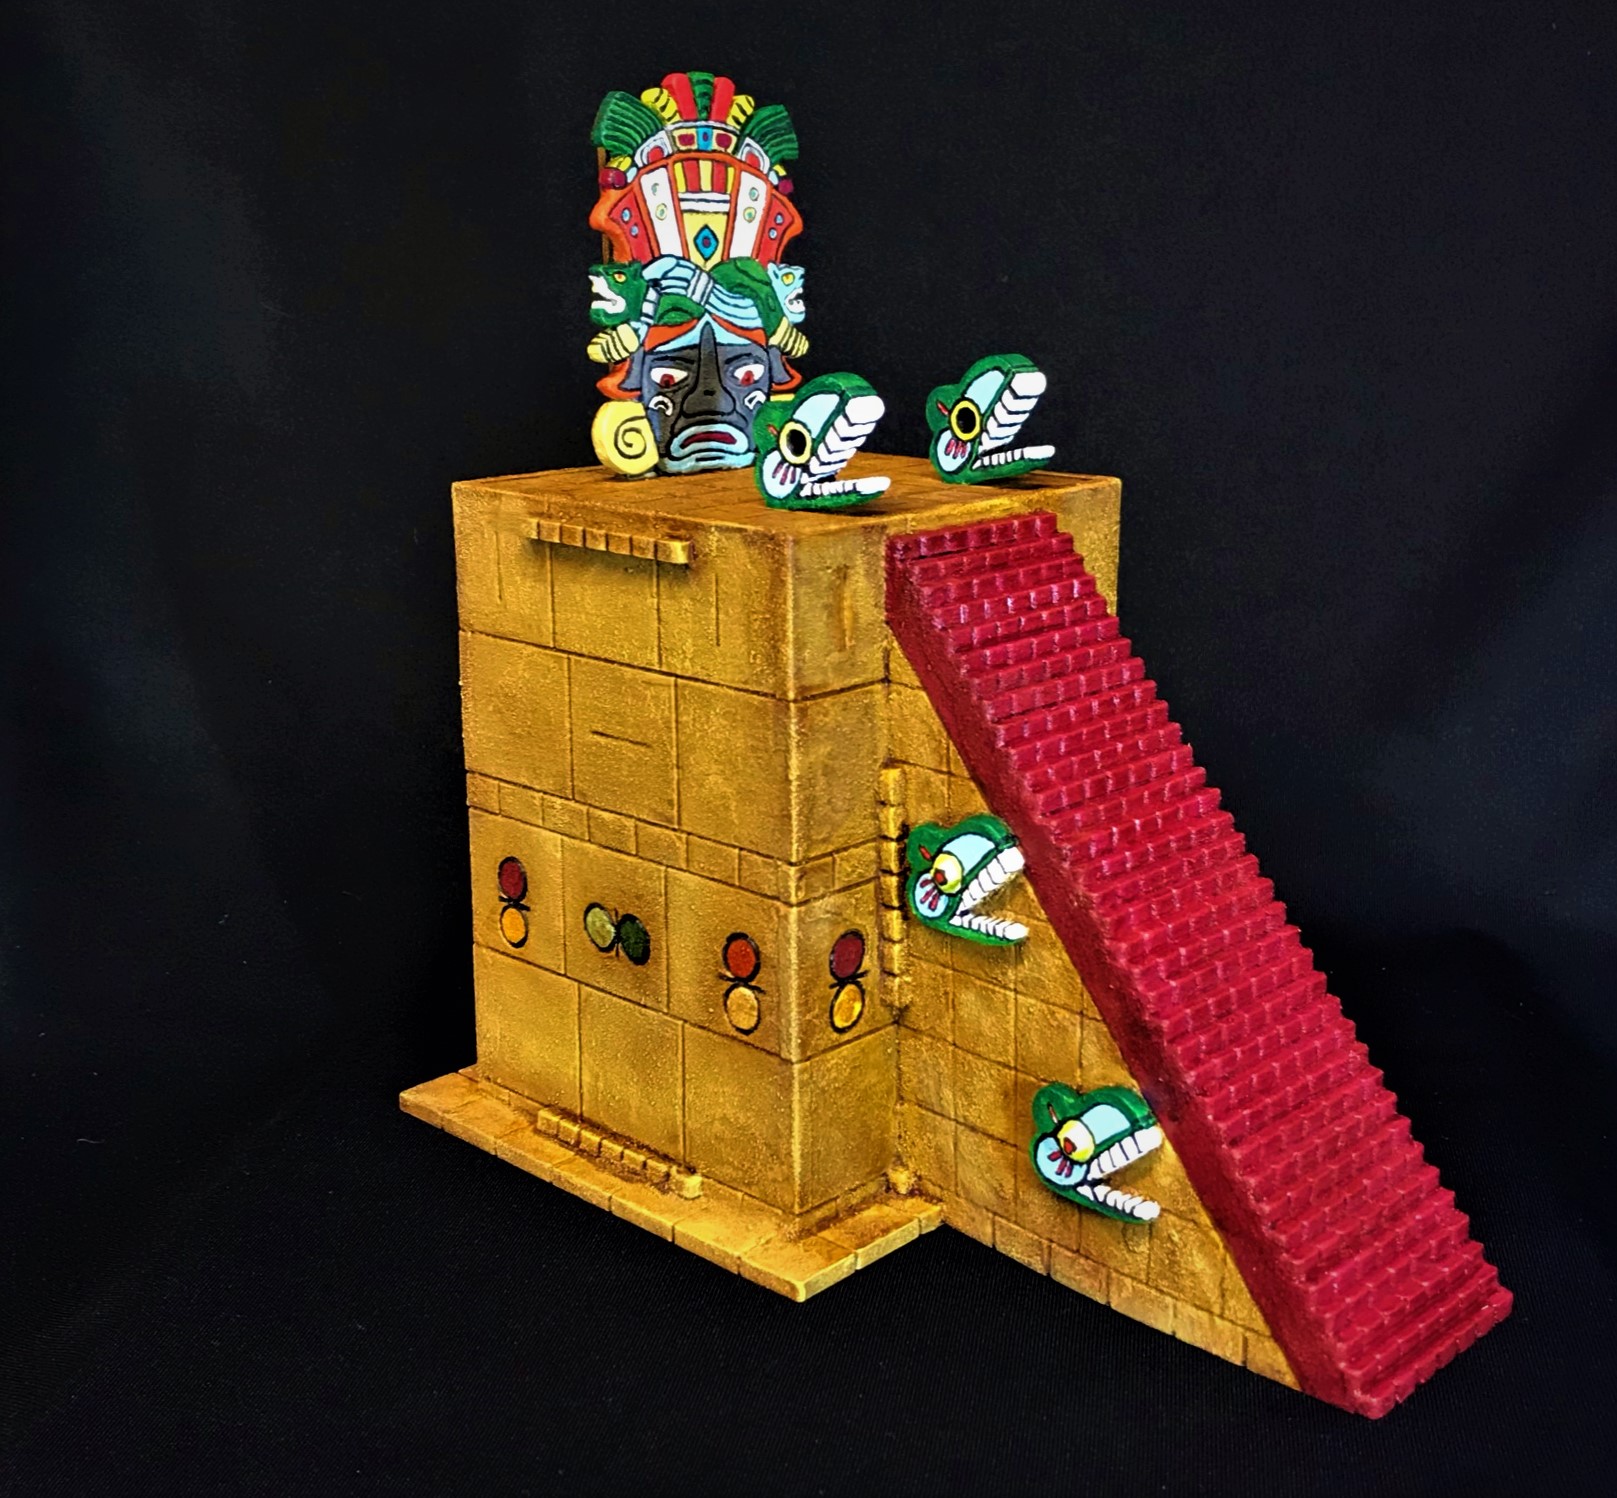
The last color to be dry brushed was a craft paint – FolkArt “Yellow Ochre”. I liked the way it worked on the pyramid.

After the yellow oche was added.

From then on I worked on the stairs (dealing with any remaining exposed resin as well) and added colors to the pyramid’s details. The underlying manufacturer’s black served well to define the deeper details, but washes were needed too.

Here you see the painted colors on the pyramid after the dry brushing applications but before the final wash and varnishing.

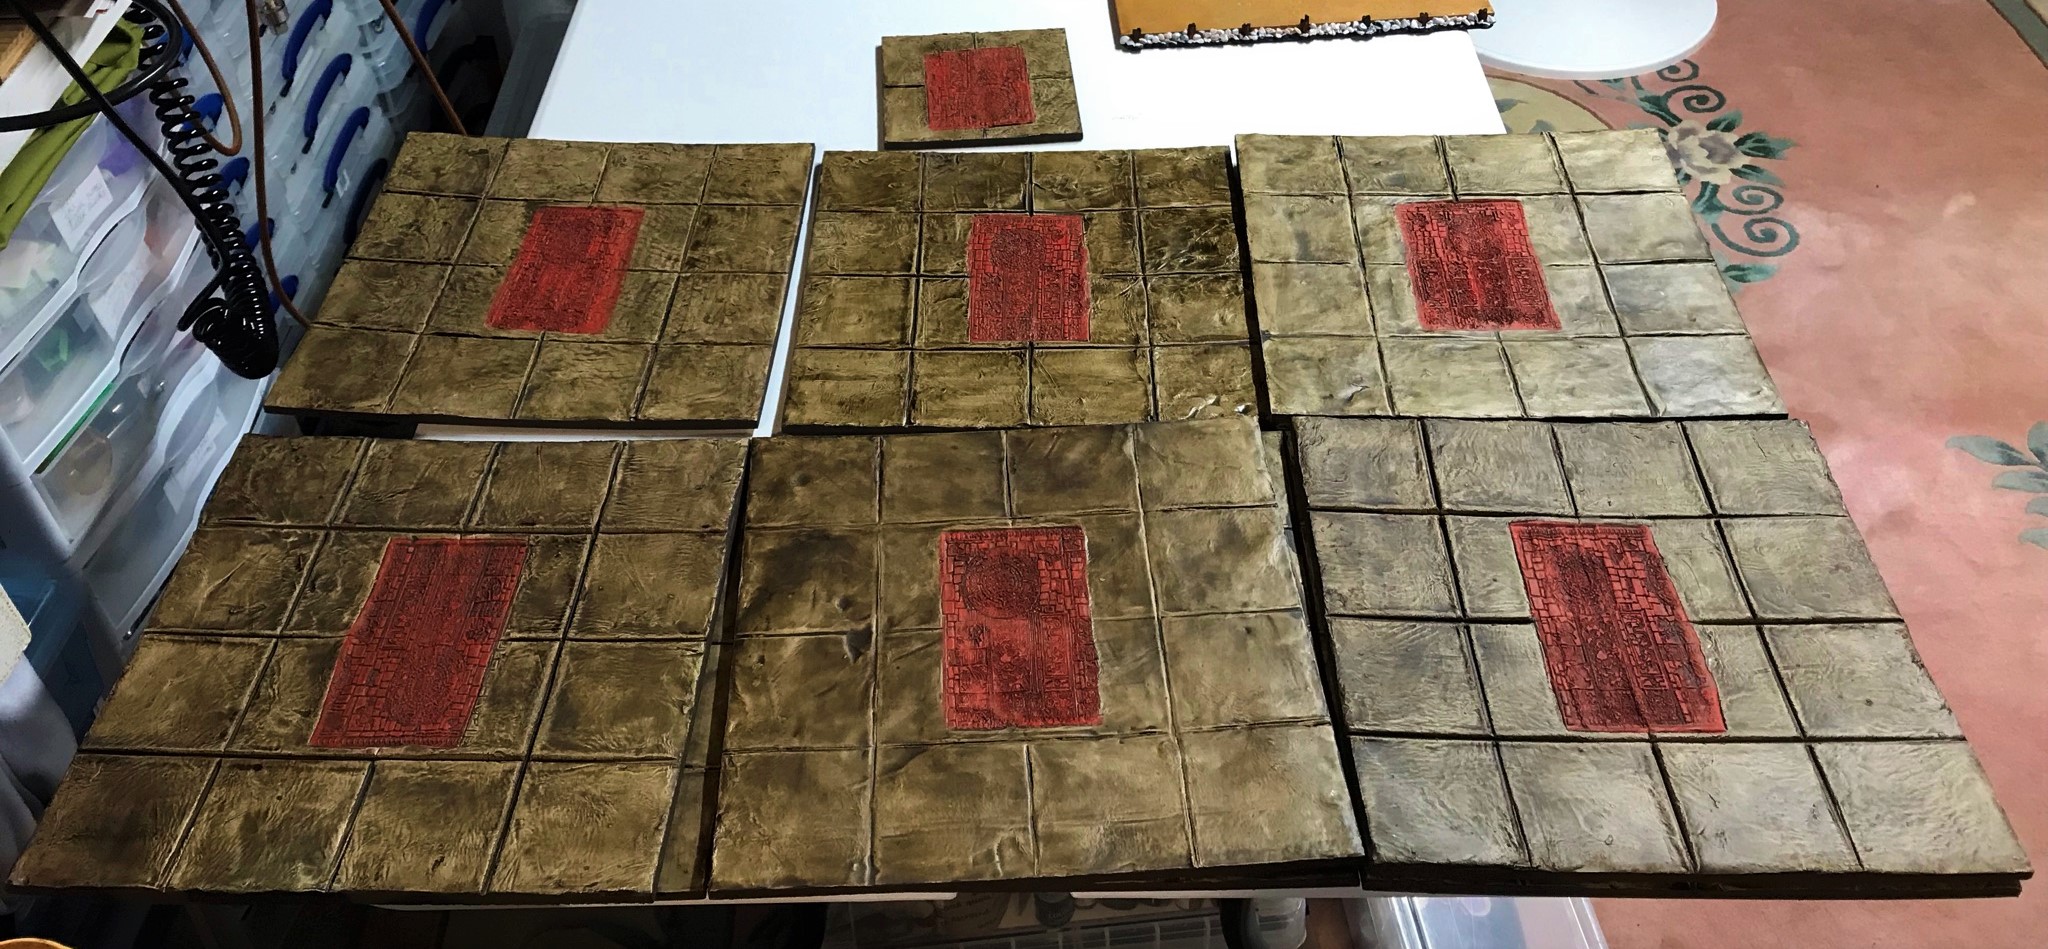
I then applied Army Painter “Light Tone” with a brush and let that dry, as well as Citadel “Carroburg Crimson” on the red stairs. Finally, I brush-applied a 50% thinned coat of Vallejo Mecha Color “Matt Varnish” to seal the porous foam and to help protect the paint on all of the pieces. These foam pieces were too big for my spray booth and in any case I thought that the foam would blow around too much from an airbrush.

Drying after washing and varnishing.

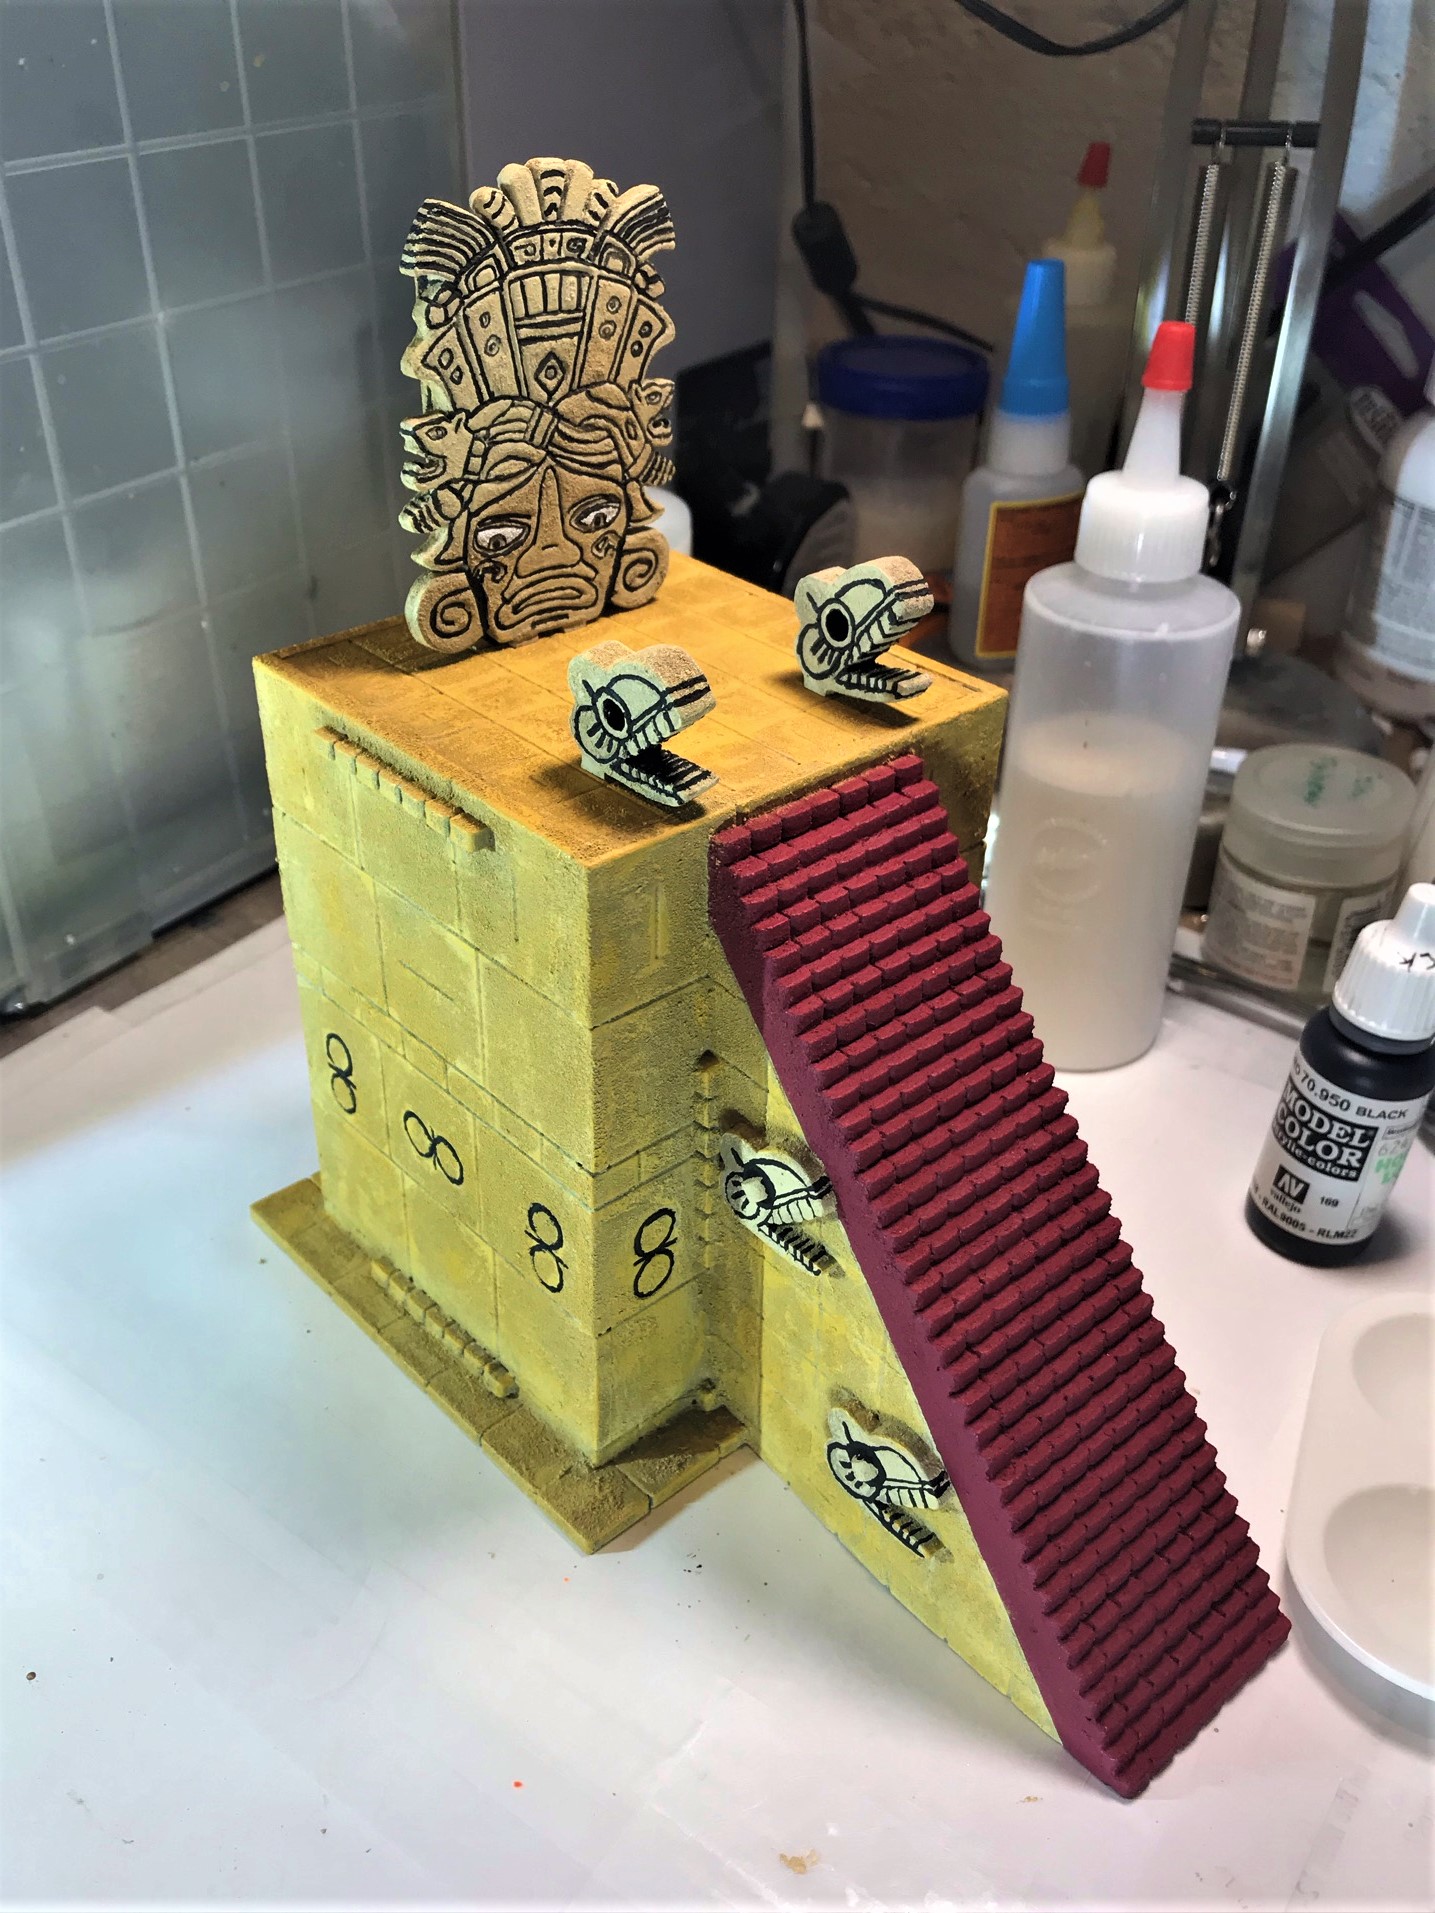
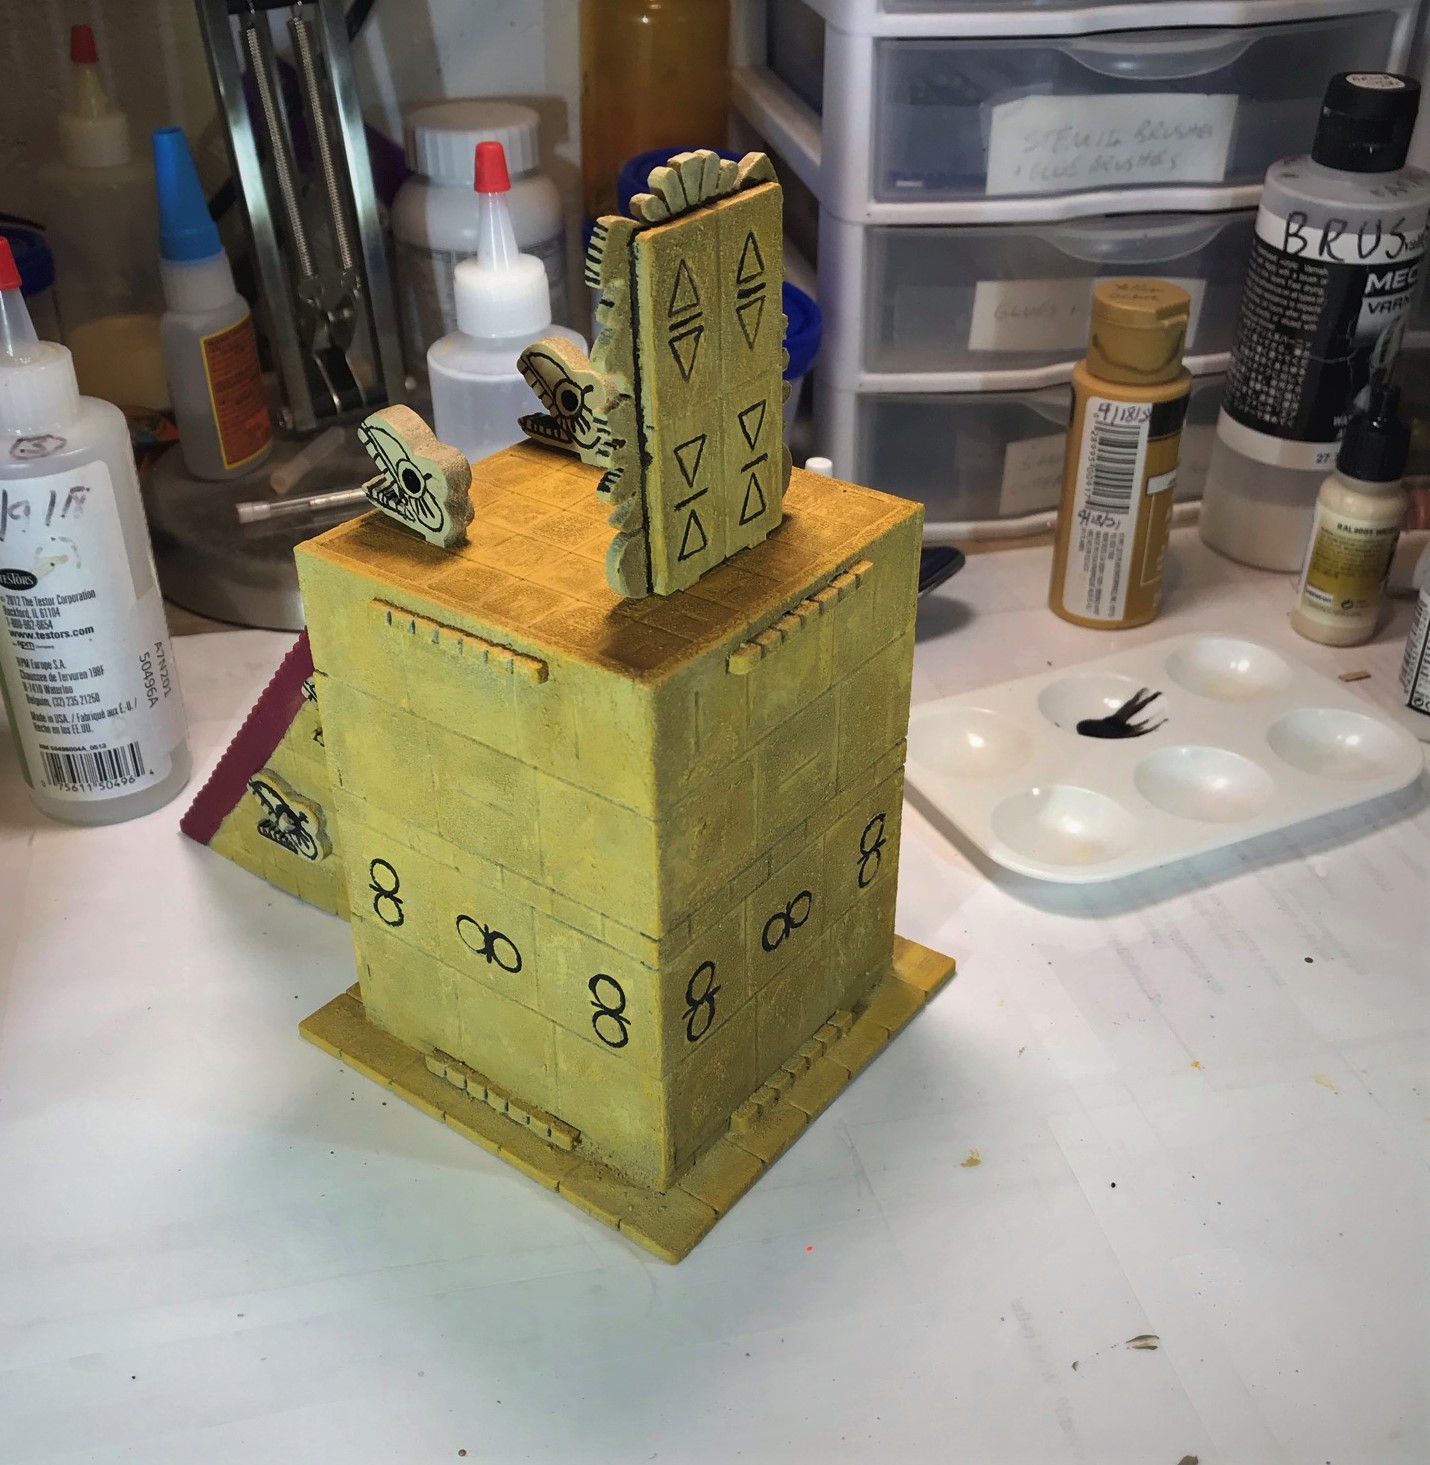
By February 18th, I could say that the pyramid was done, minus the braziers.

Pyramid done – angled view.
Pyramid done – side view.

I was pretty pleased with the final result, but I still needed to try to get the braziers done and a storage/transport solution built for it.

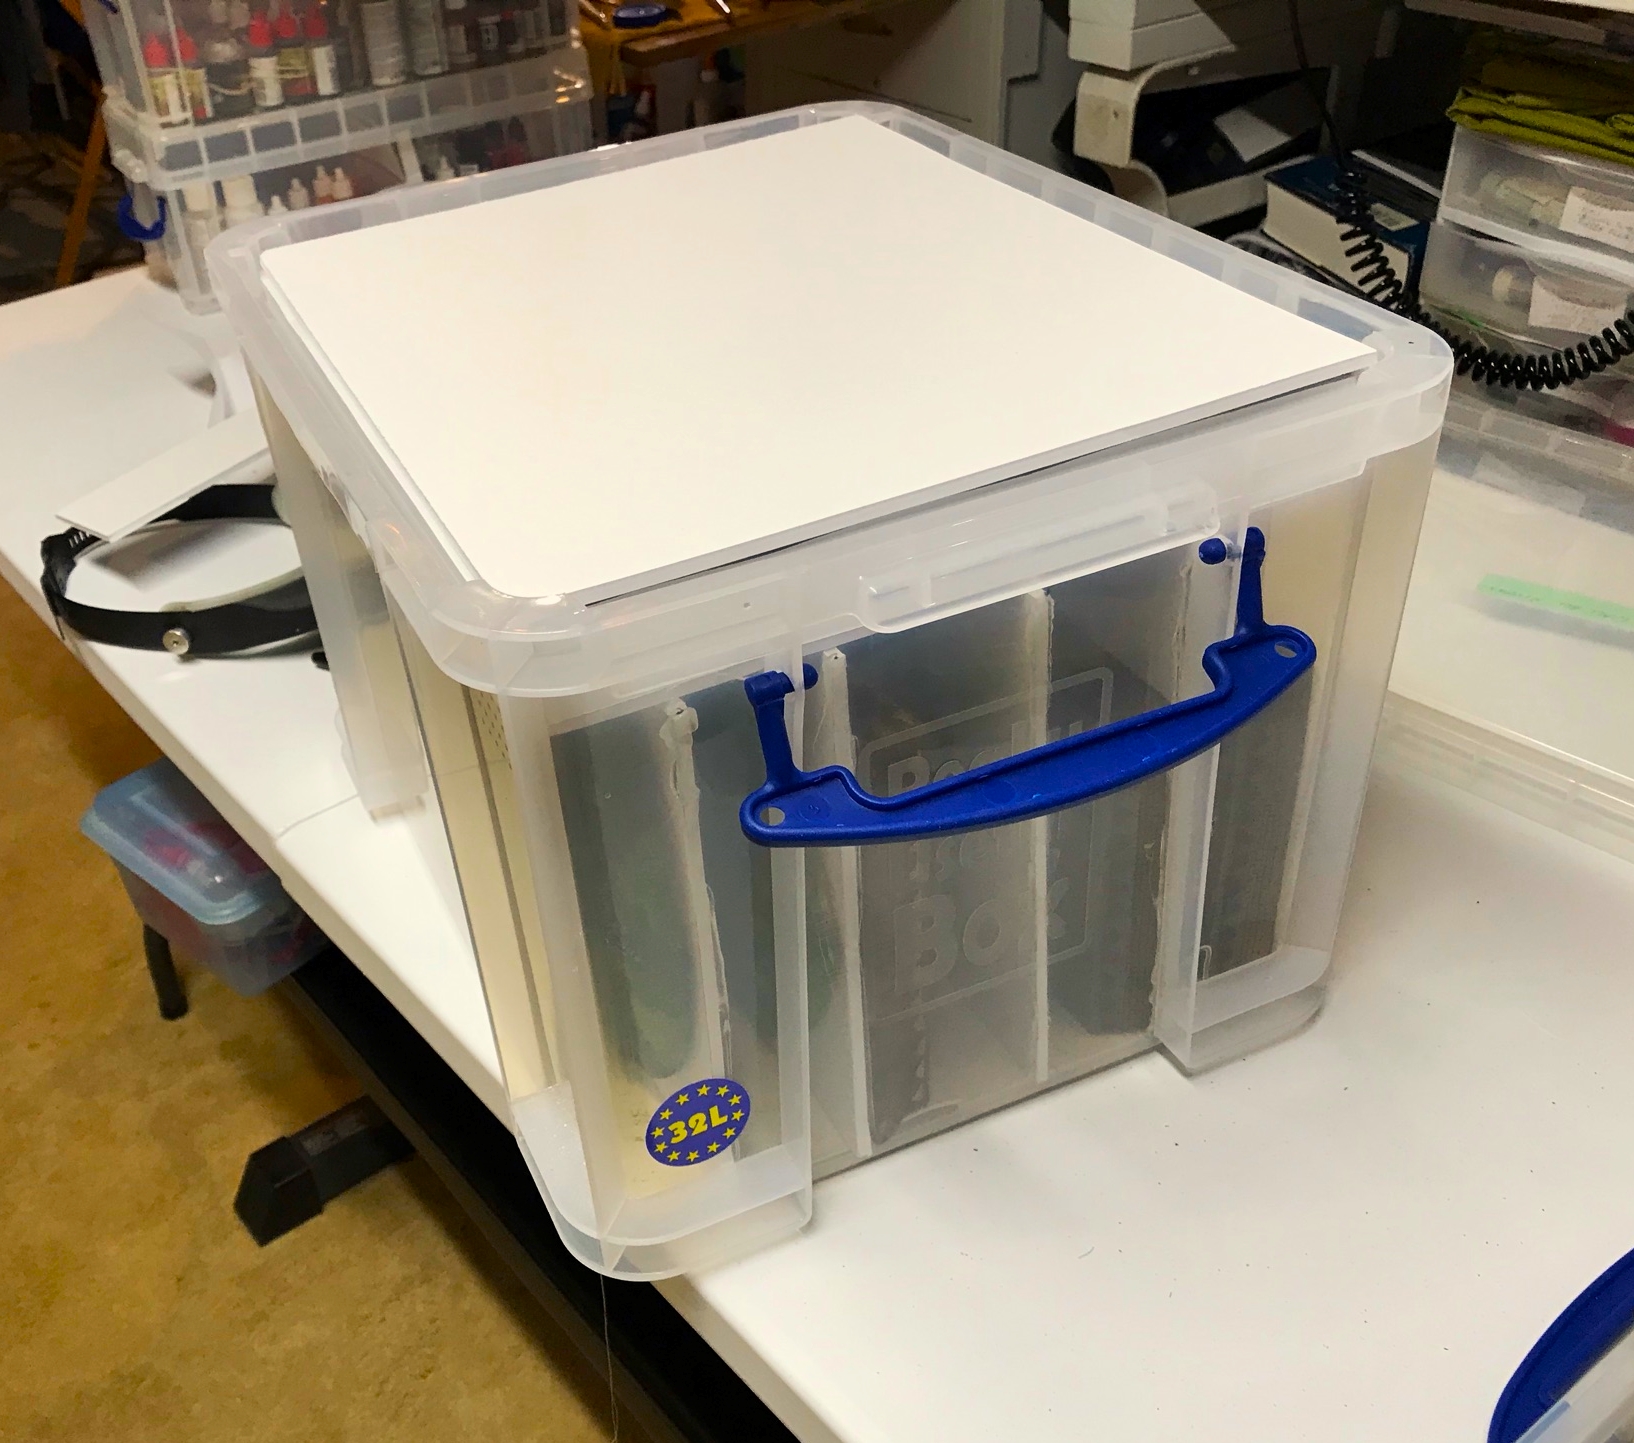
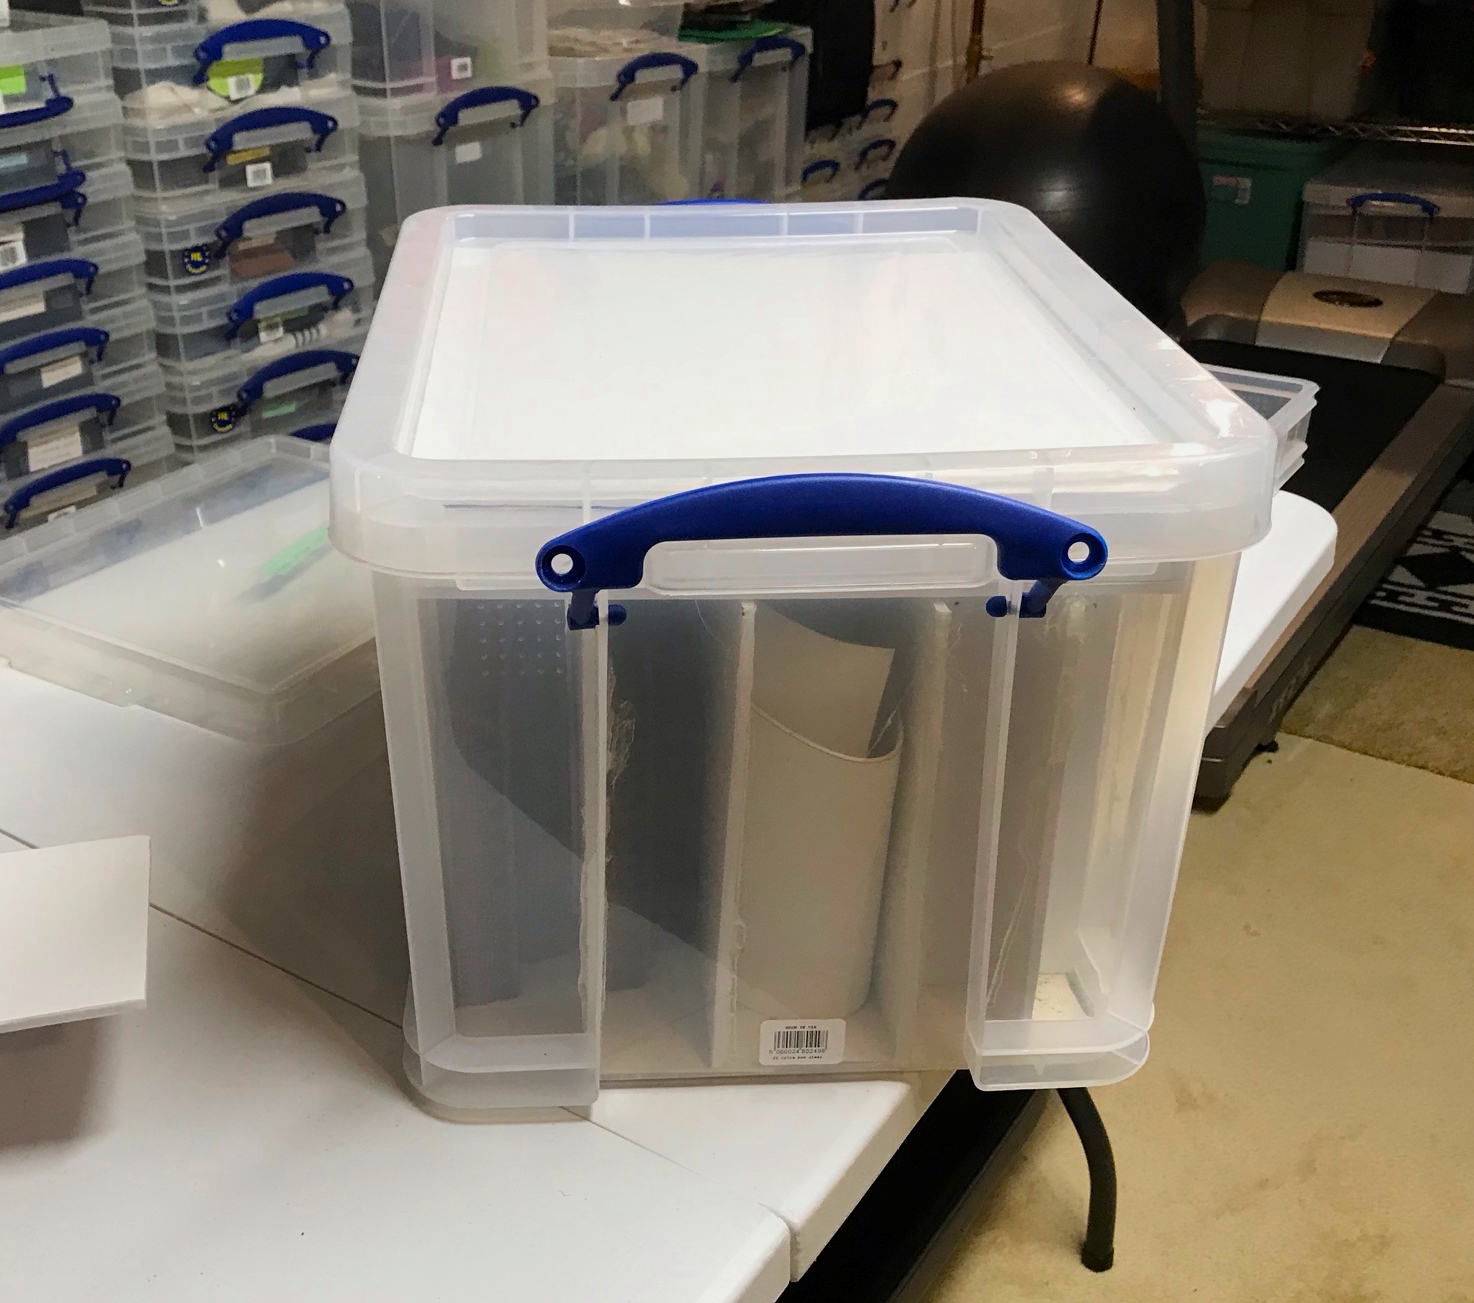
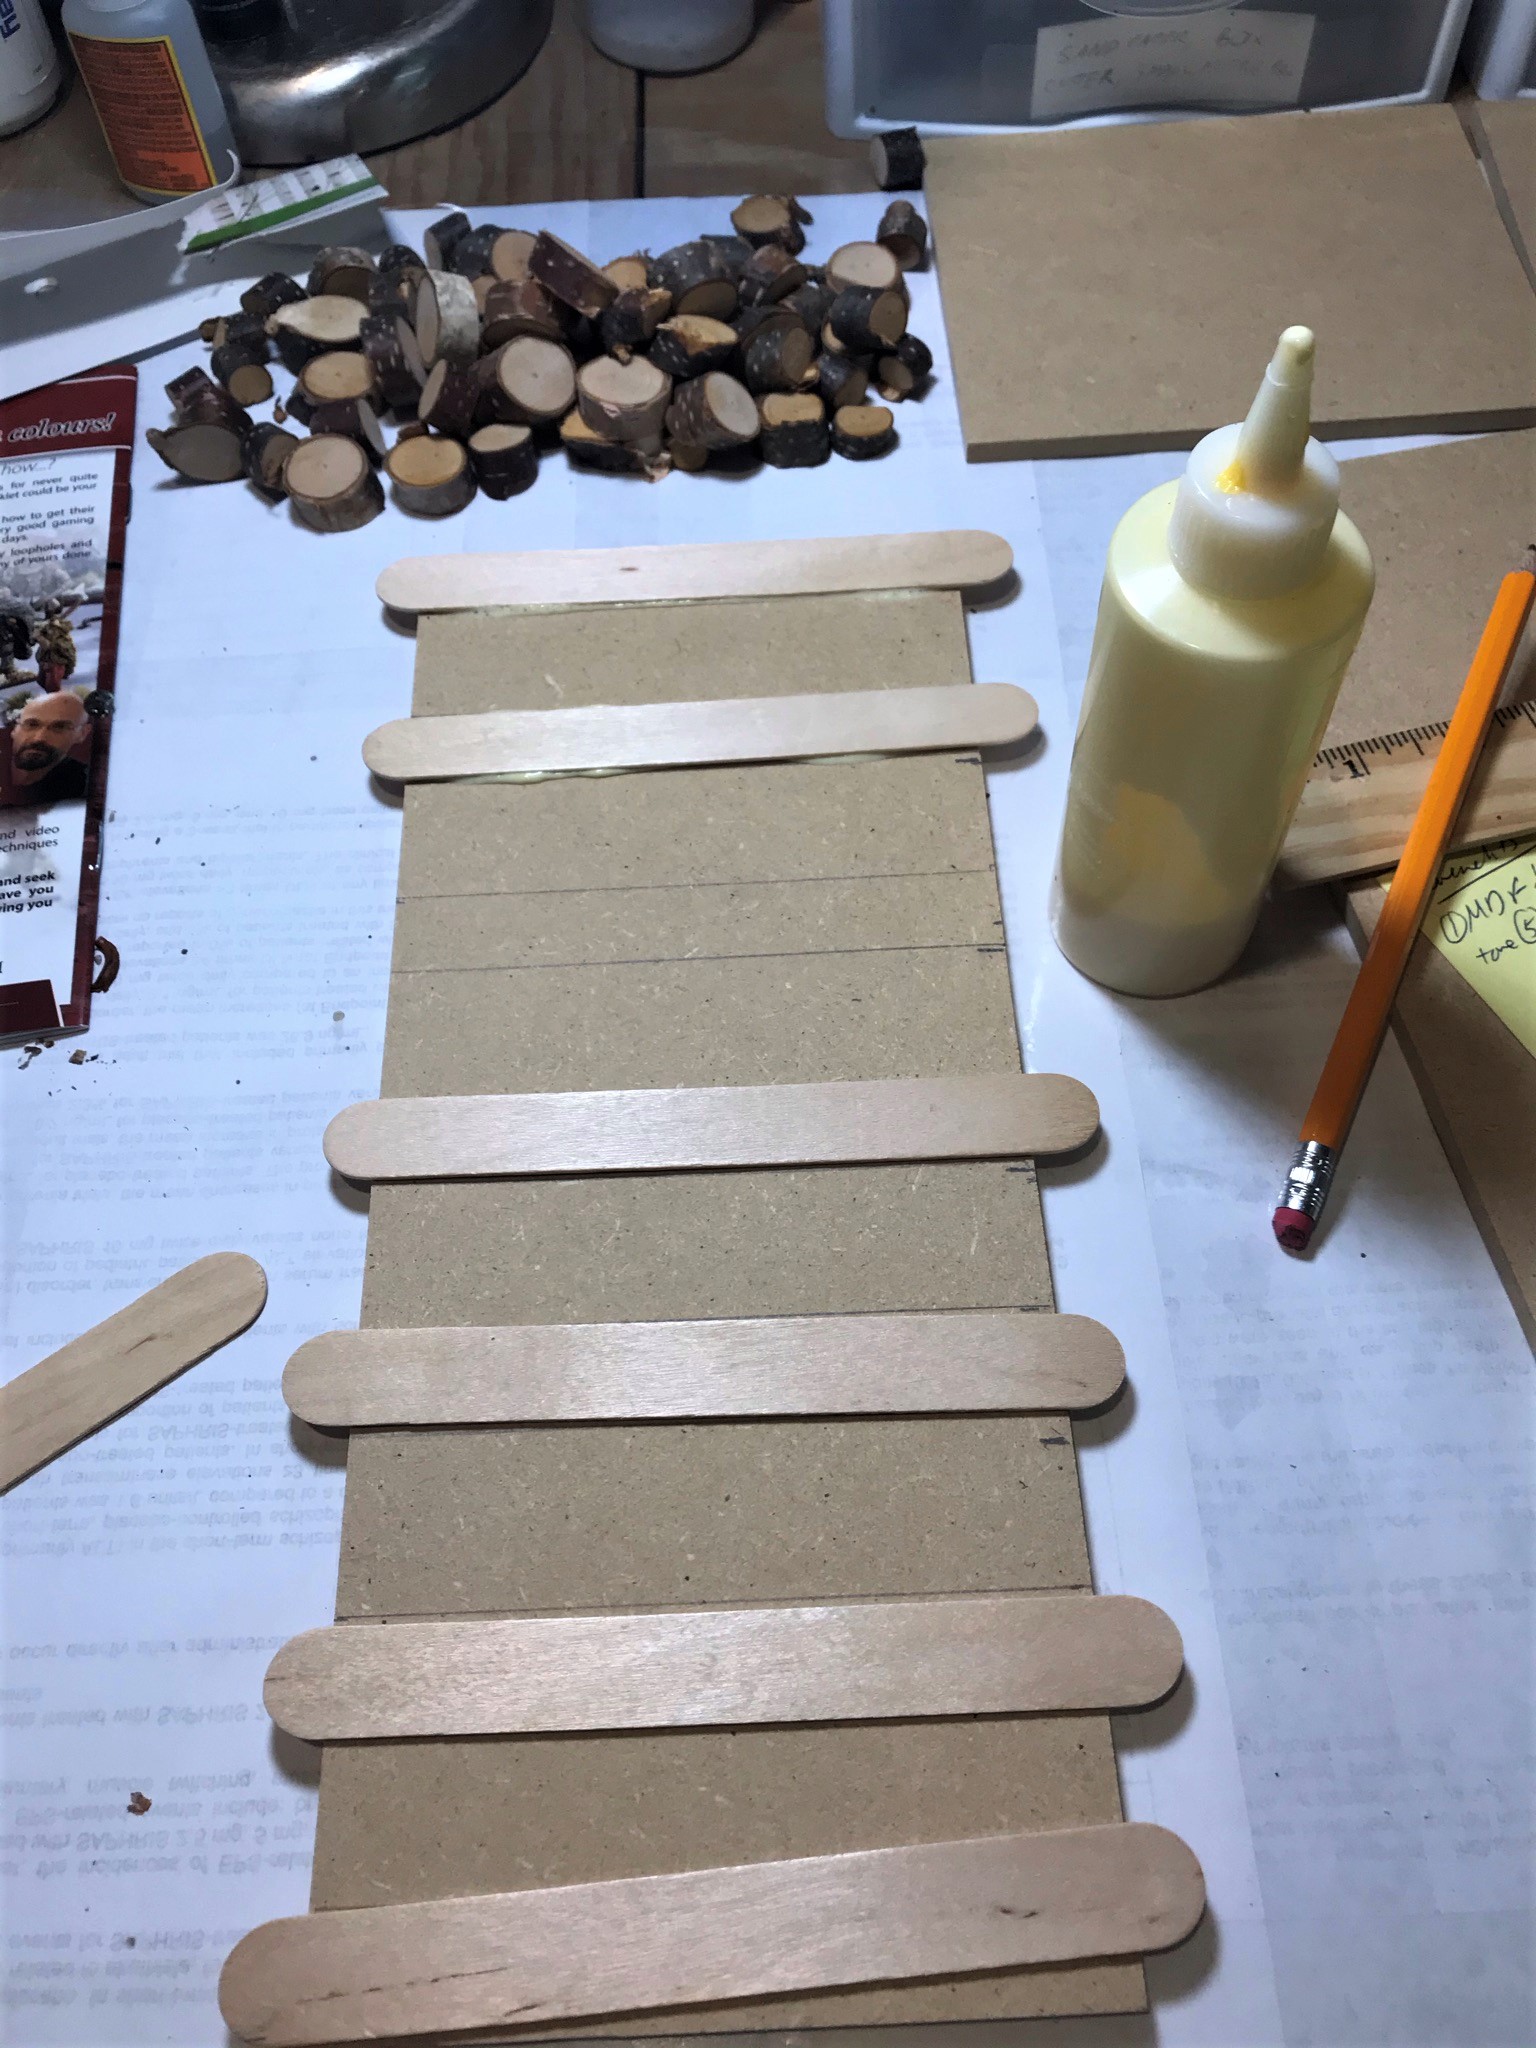
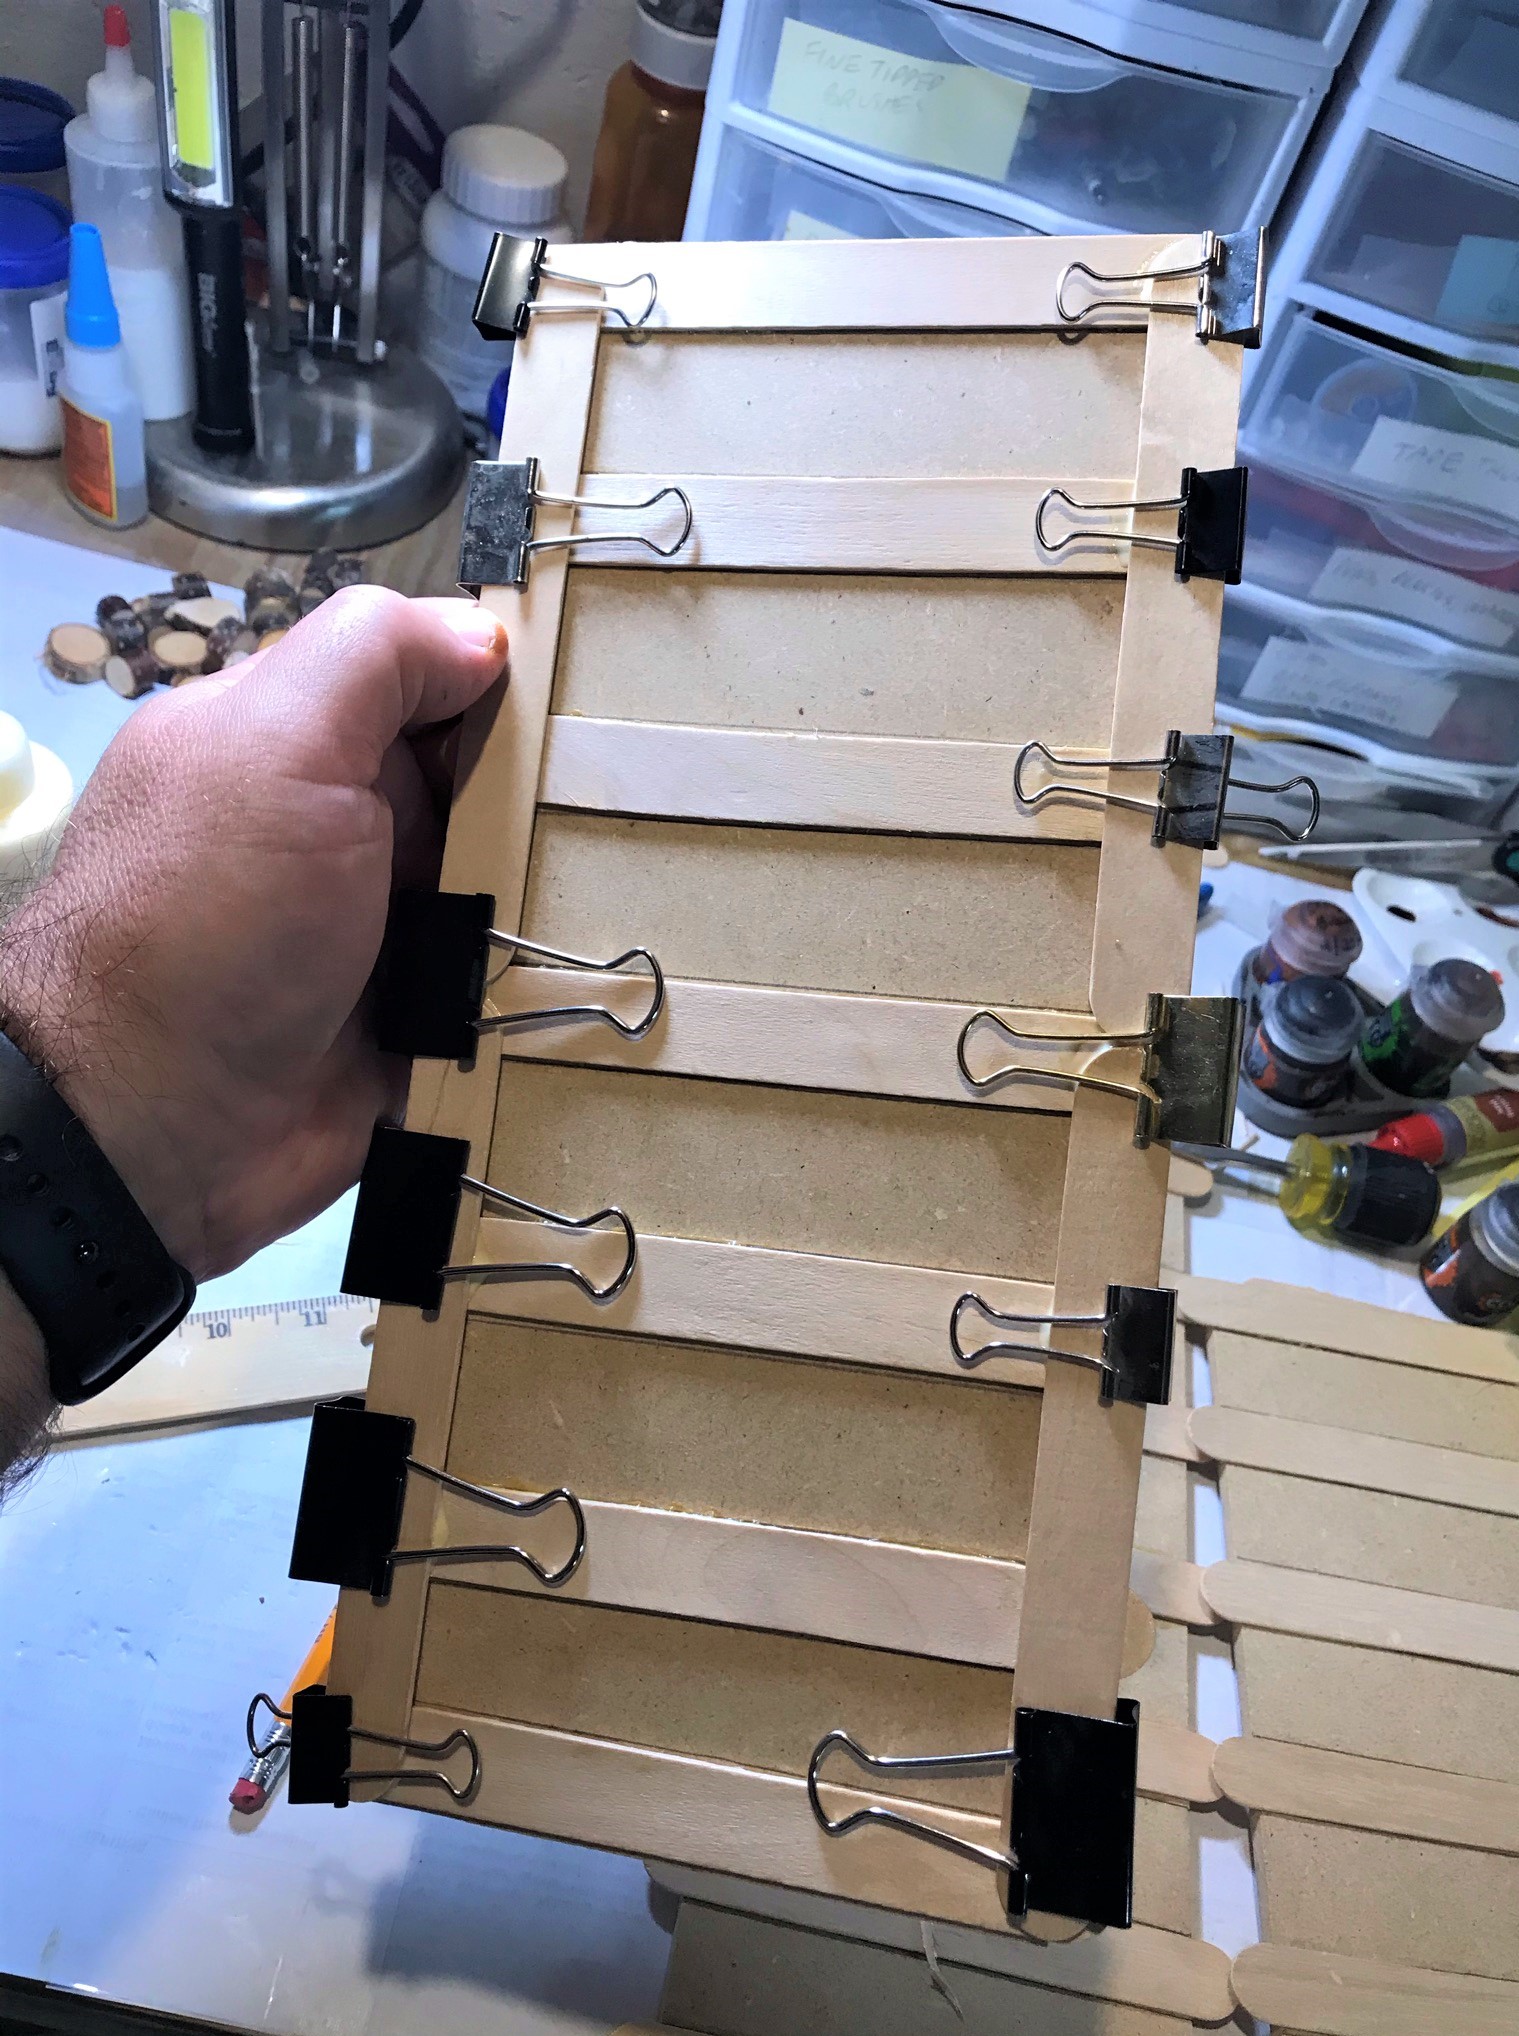
As being able to transport it and the other accouterments was imperative, I modified a 32-liter Really Useful box with hot glue and posterboard. This also allowed me to create a storage/transport solution for my hills that I use for the Battle of Otumba (of which more will be shared soon when I post about the game but you can see one of the hills in the background of my last post).

Let’s get back to the box. I measured the space that each piece would need in it and marked the box’s interior accordingly with a Sharpie. I lined the bottom of the box with thin sheets of foam from Michaels for cushioning. Then I cut the posterboard into sheets and hot glued those into the box. I left enough room at the top to build a storage box for the smaller pieces.

The storage/transport box’s main compartment as viewed from above. The two hills are shown here with the pyramid sections. The small resin temple is in the foam sheet roll as seen on the left as due to its size and heft (solid resin) it needed protection. On top of this would go the thinner storage box.

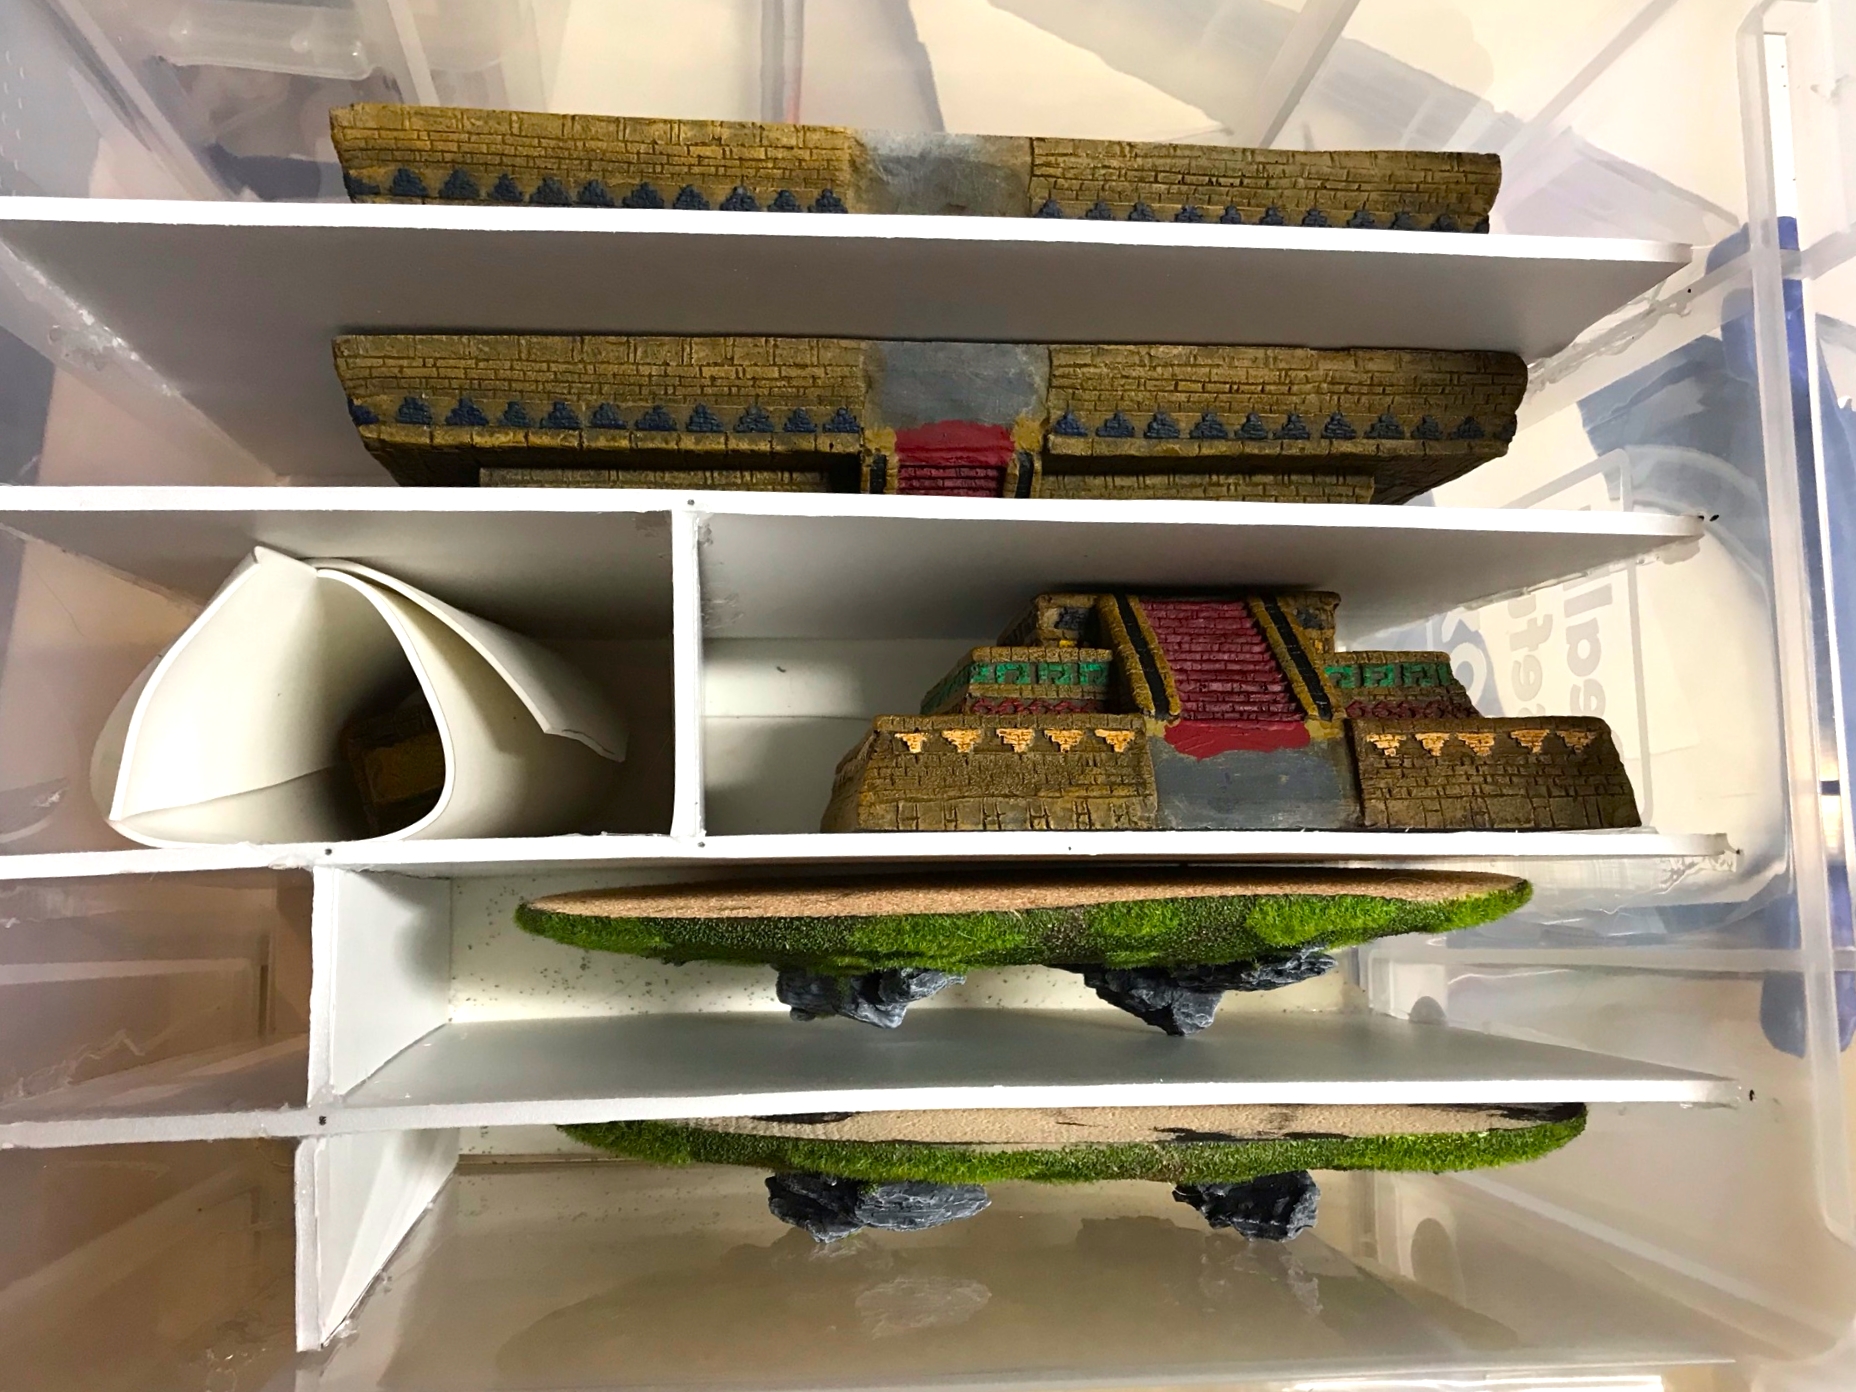
As discussed, I did have the pyramid’s braziers to do as well as the other smaller resin pieces – so I actually built the storage box for all of them before I painted them. This way at least I could get the pyramid to the convention.

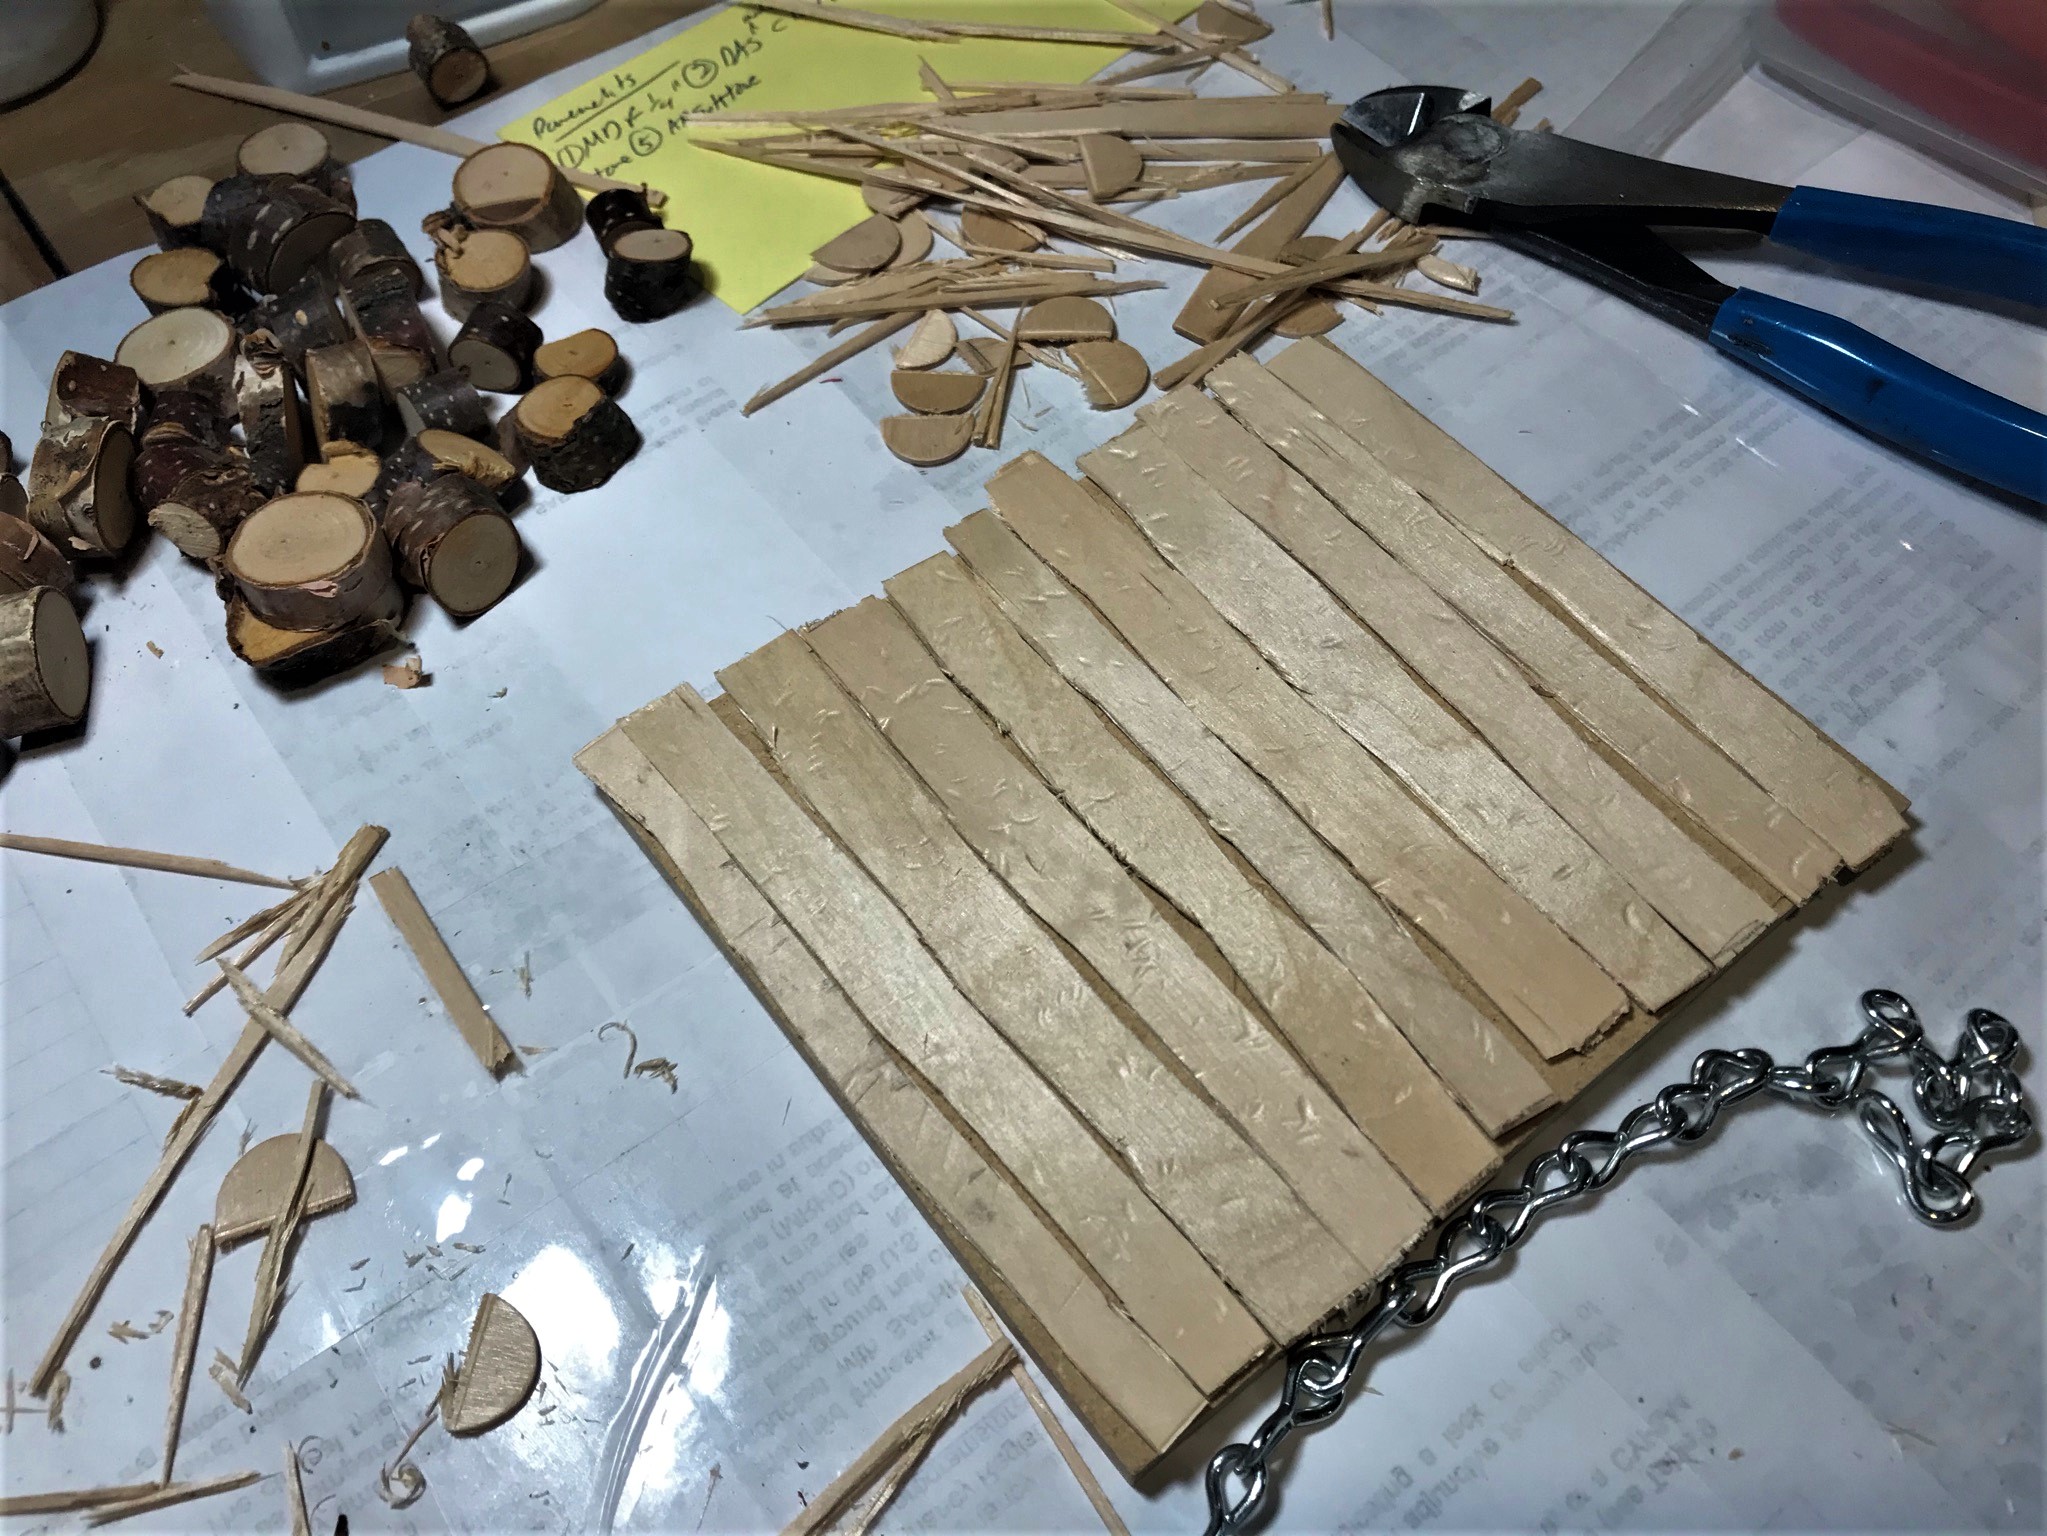
For the top storage box, I cut the bottom piece of posterboard out and made the sides with posterboard and hot glue. I used wooden toothpicks as pins to secure the posterboard while the hot glue set. This was a new technique for me that I had as an idea and one that worked great – I just broke the toothpicks in half and drove them into the posterboard with an unsharpened pencil immediately after the hot glue was applied. The toothpicks disappeared into the posterboard nicely.

Lastly, I made a posterboard top for the box and put it over the previously shown main compartment.

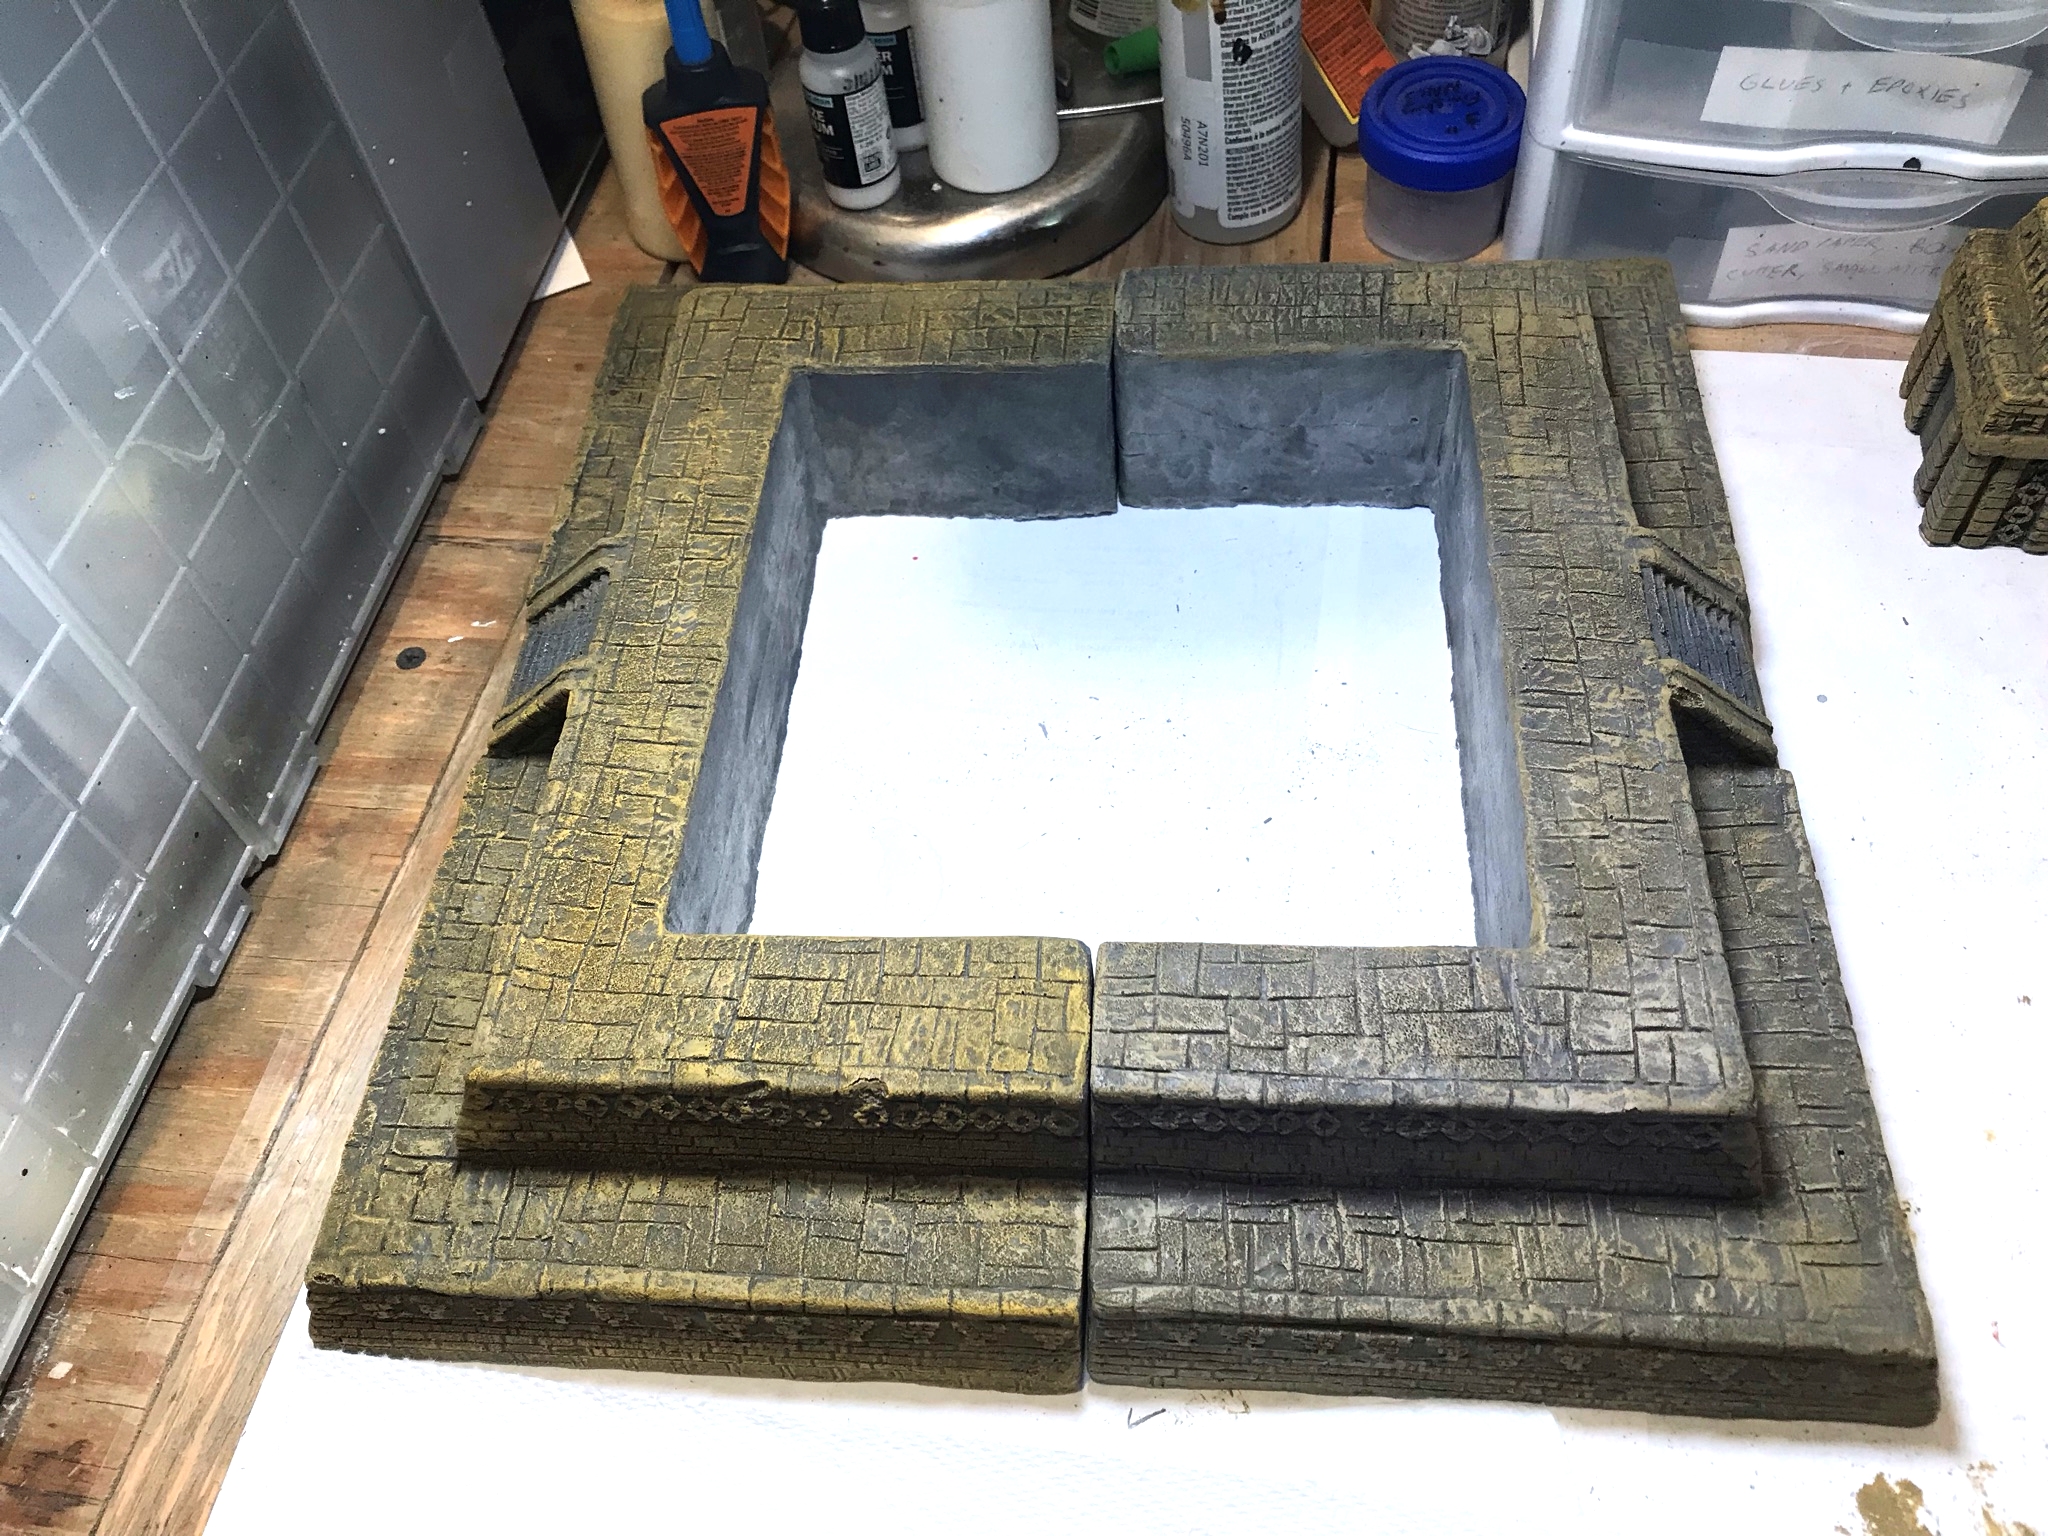
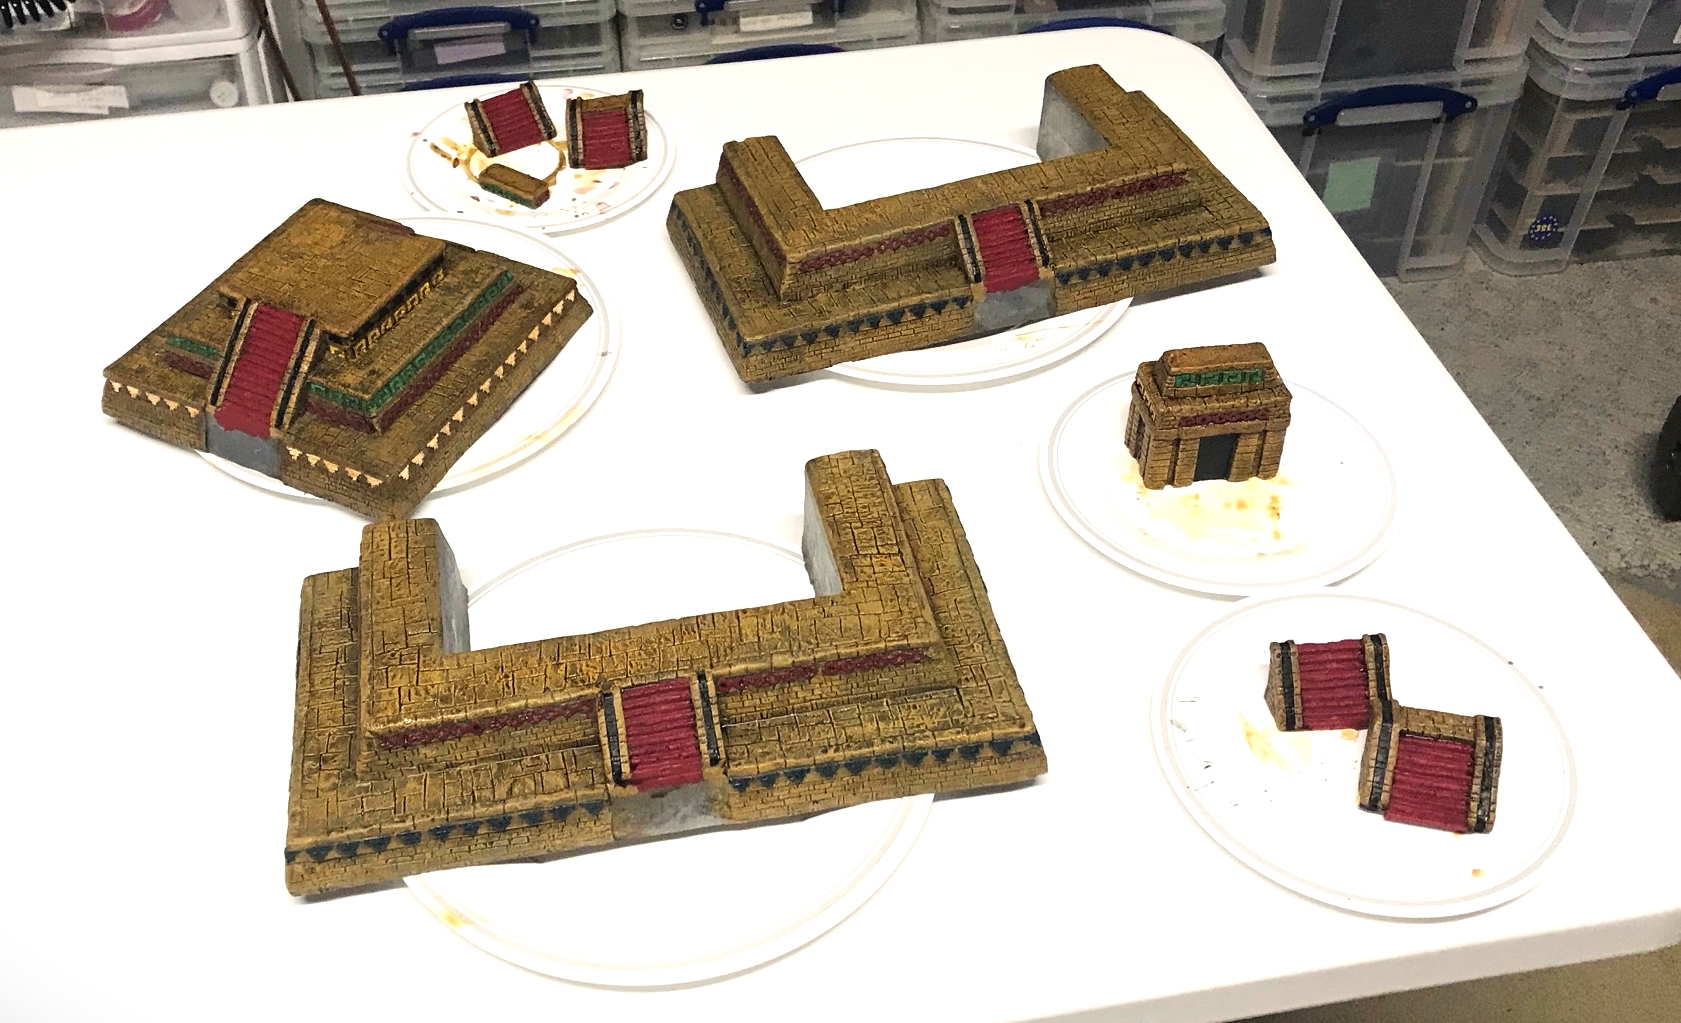
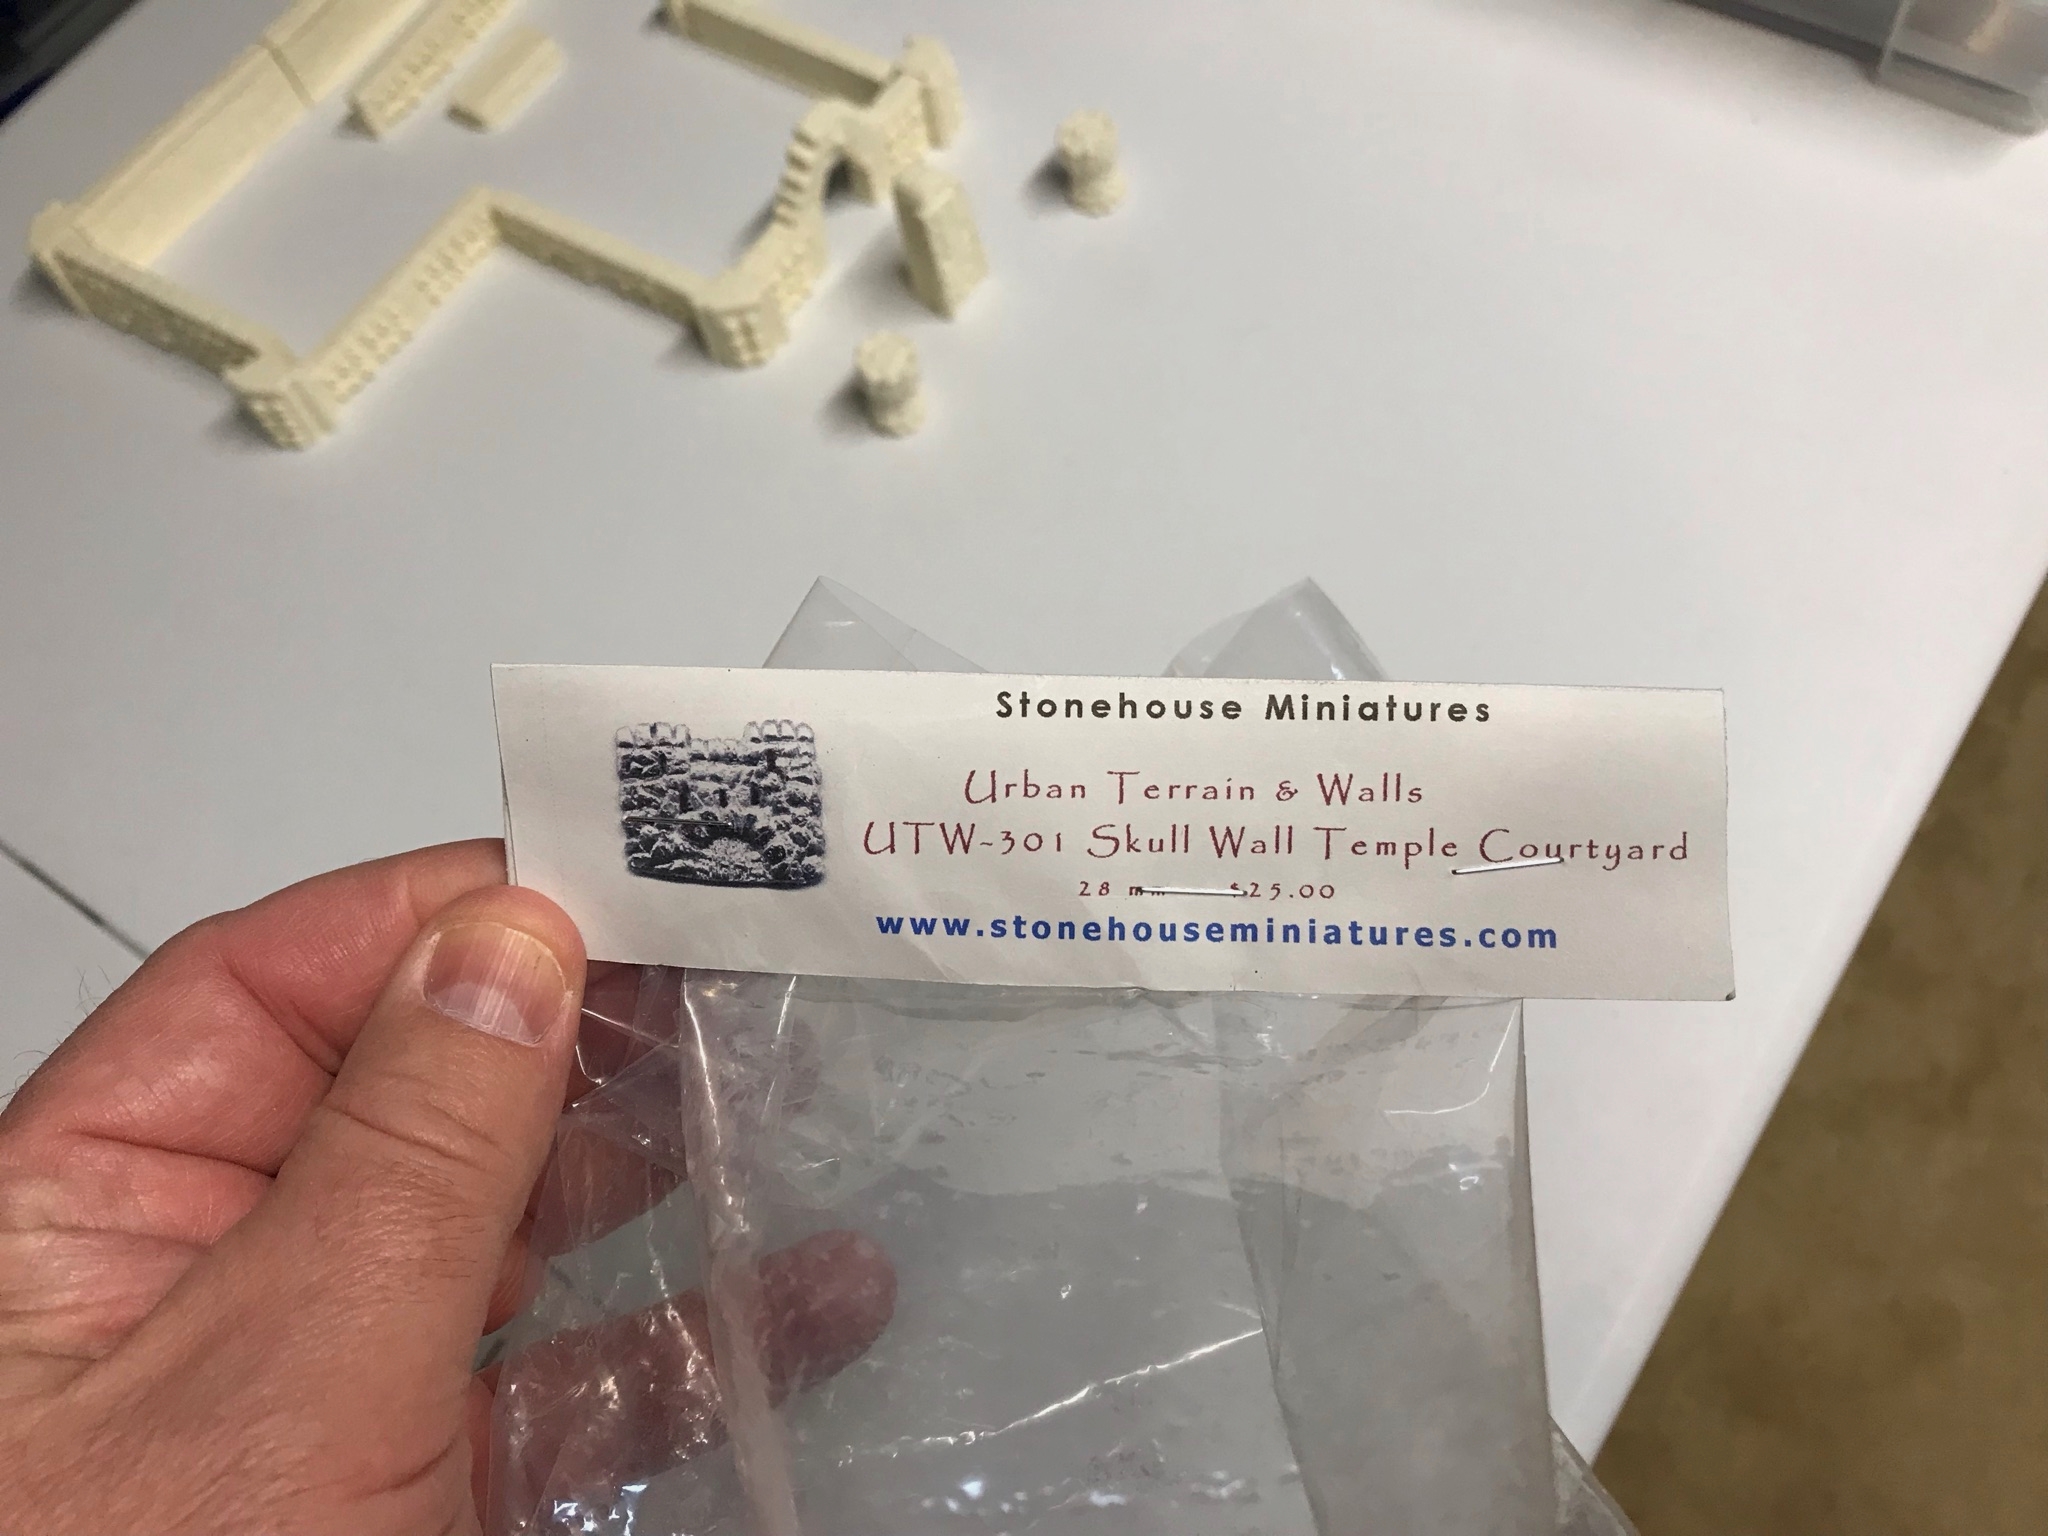
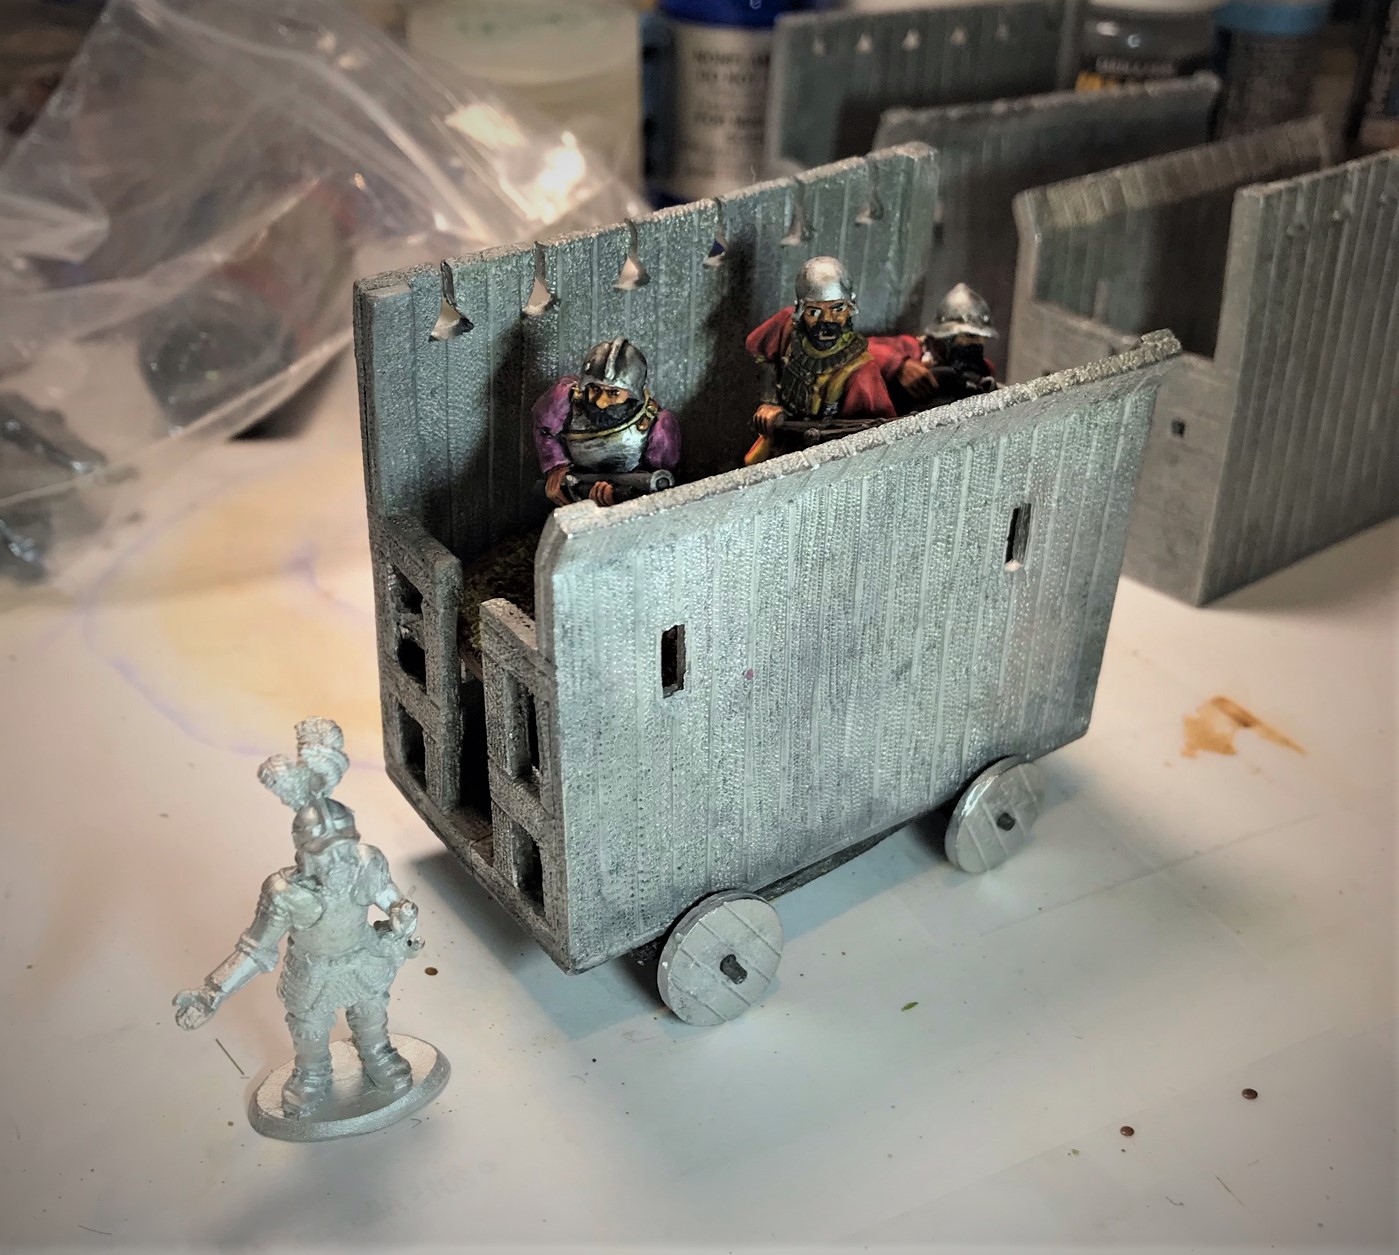
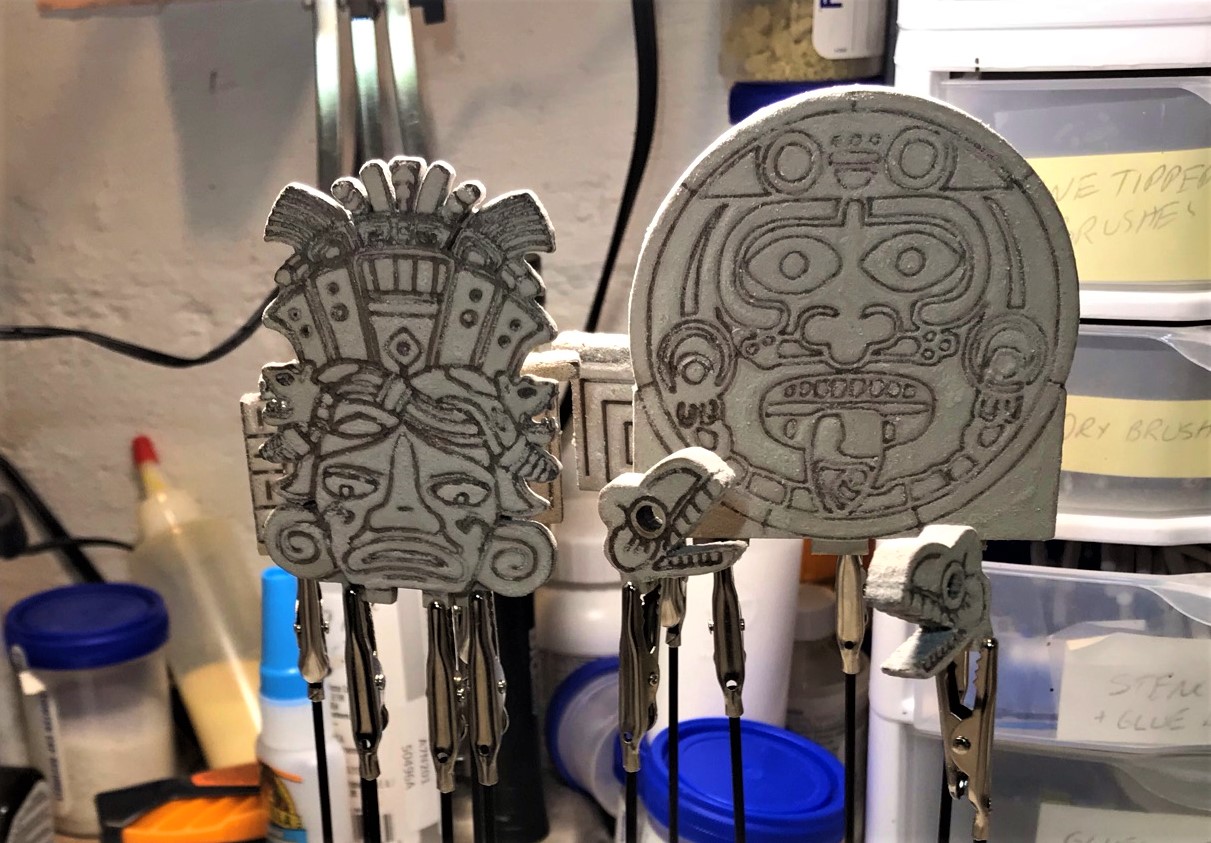
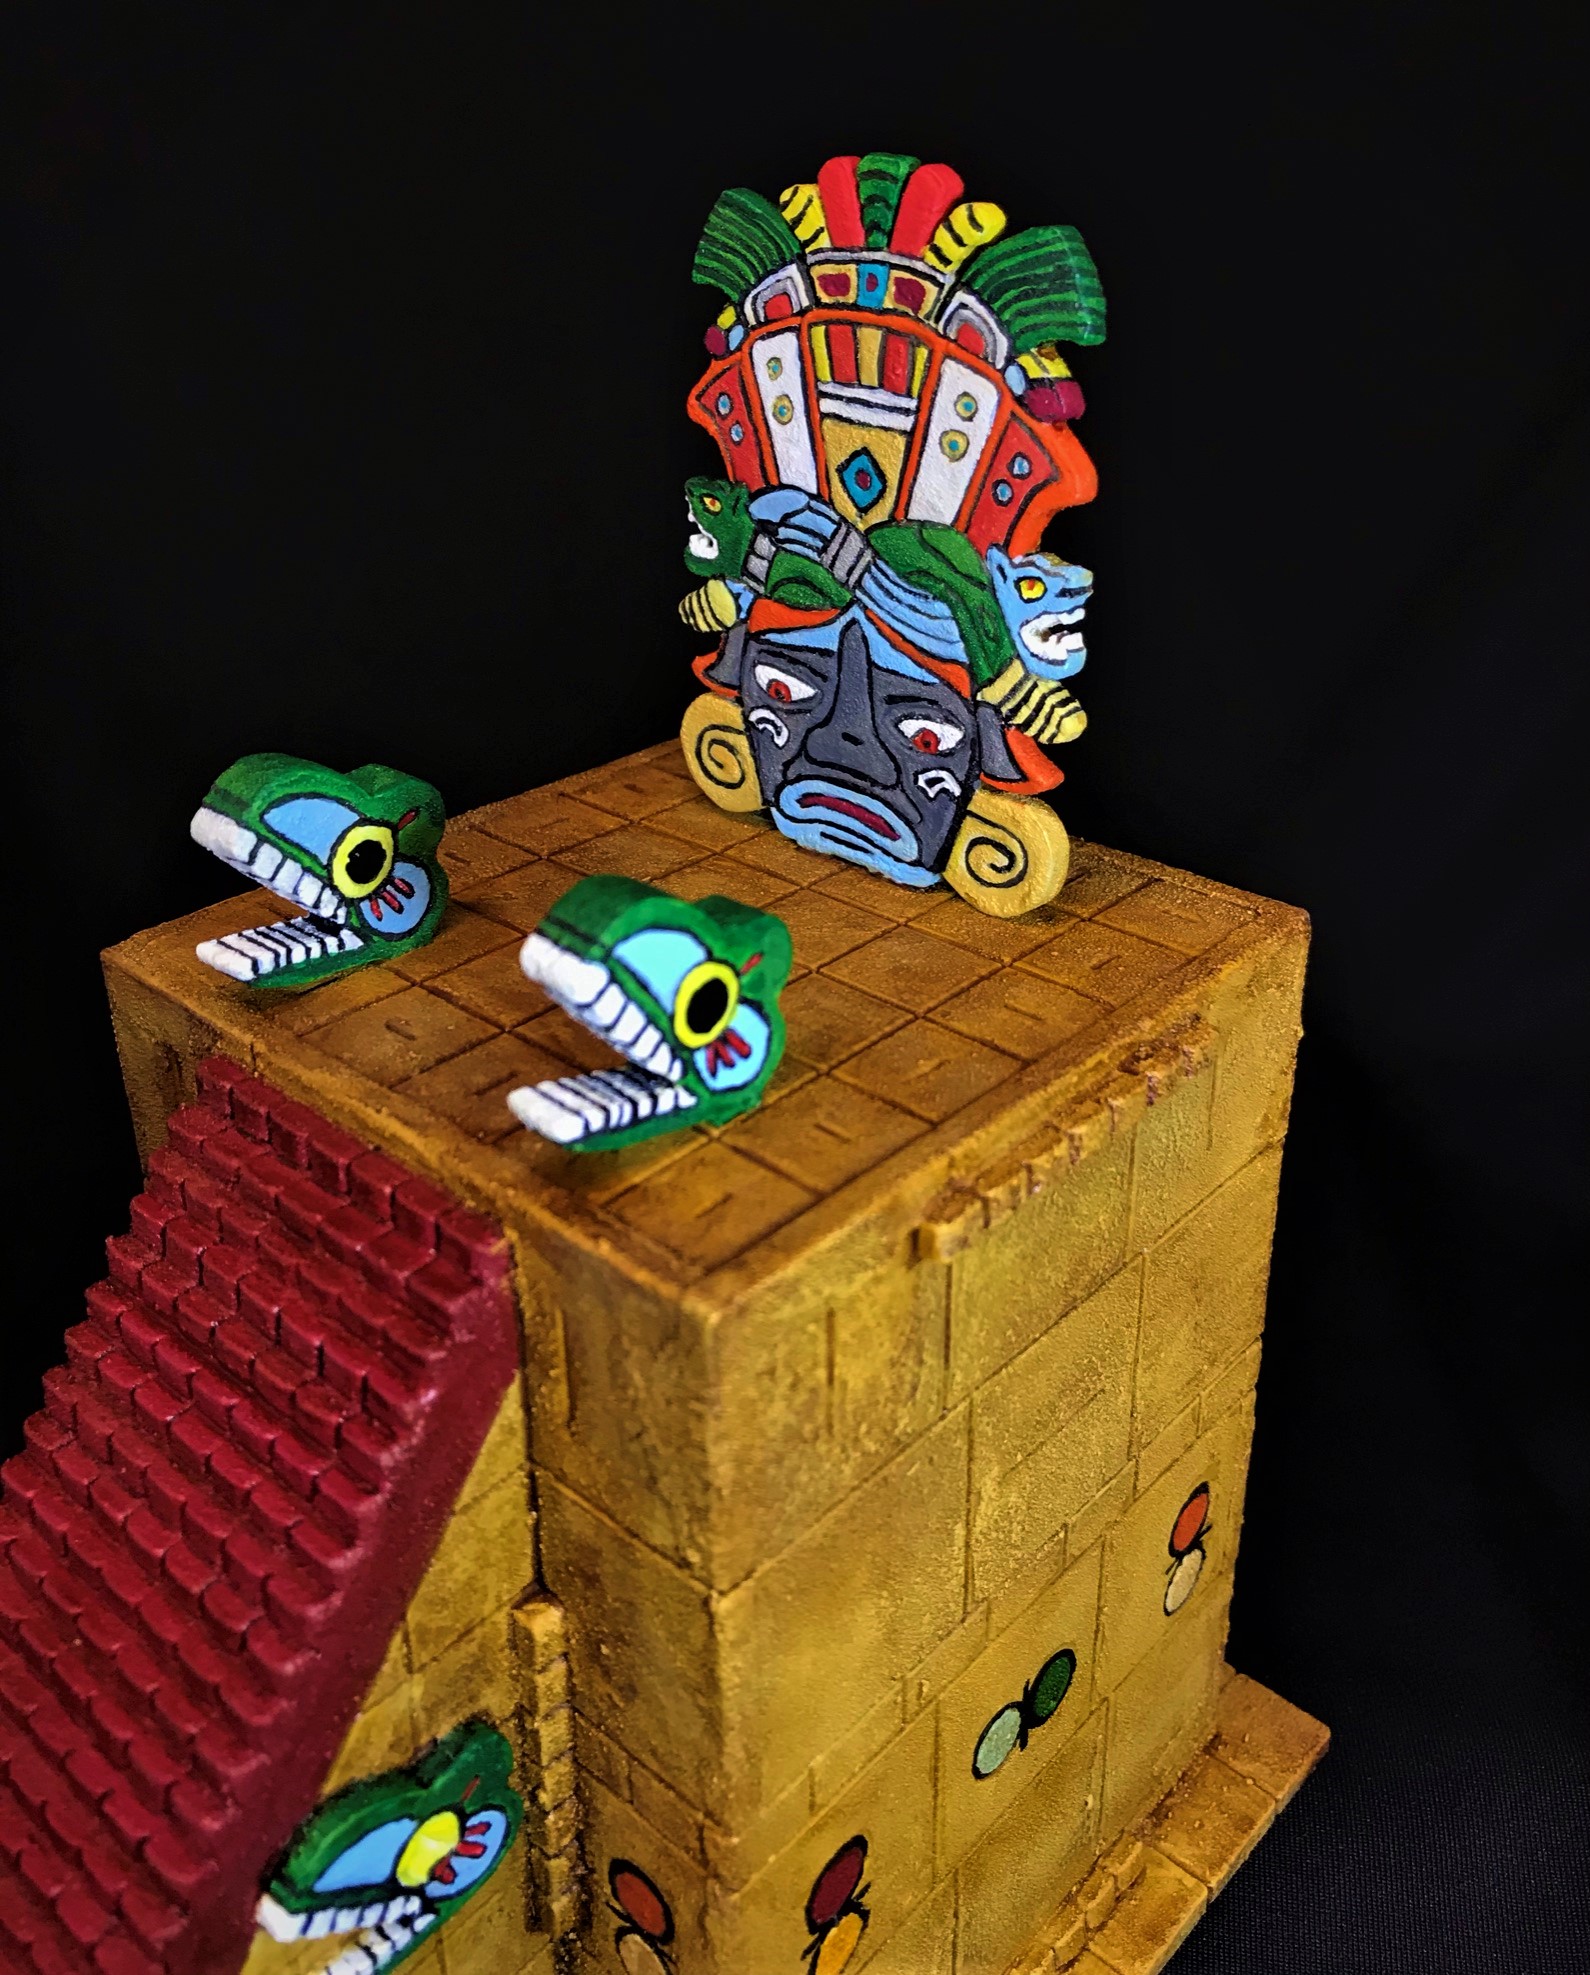
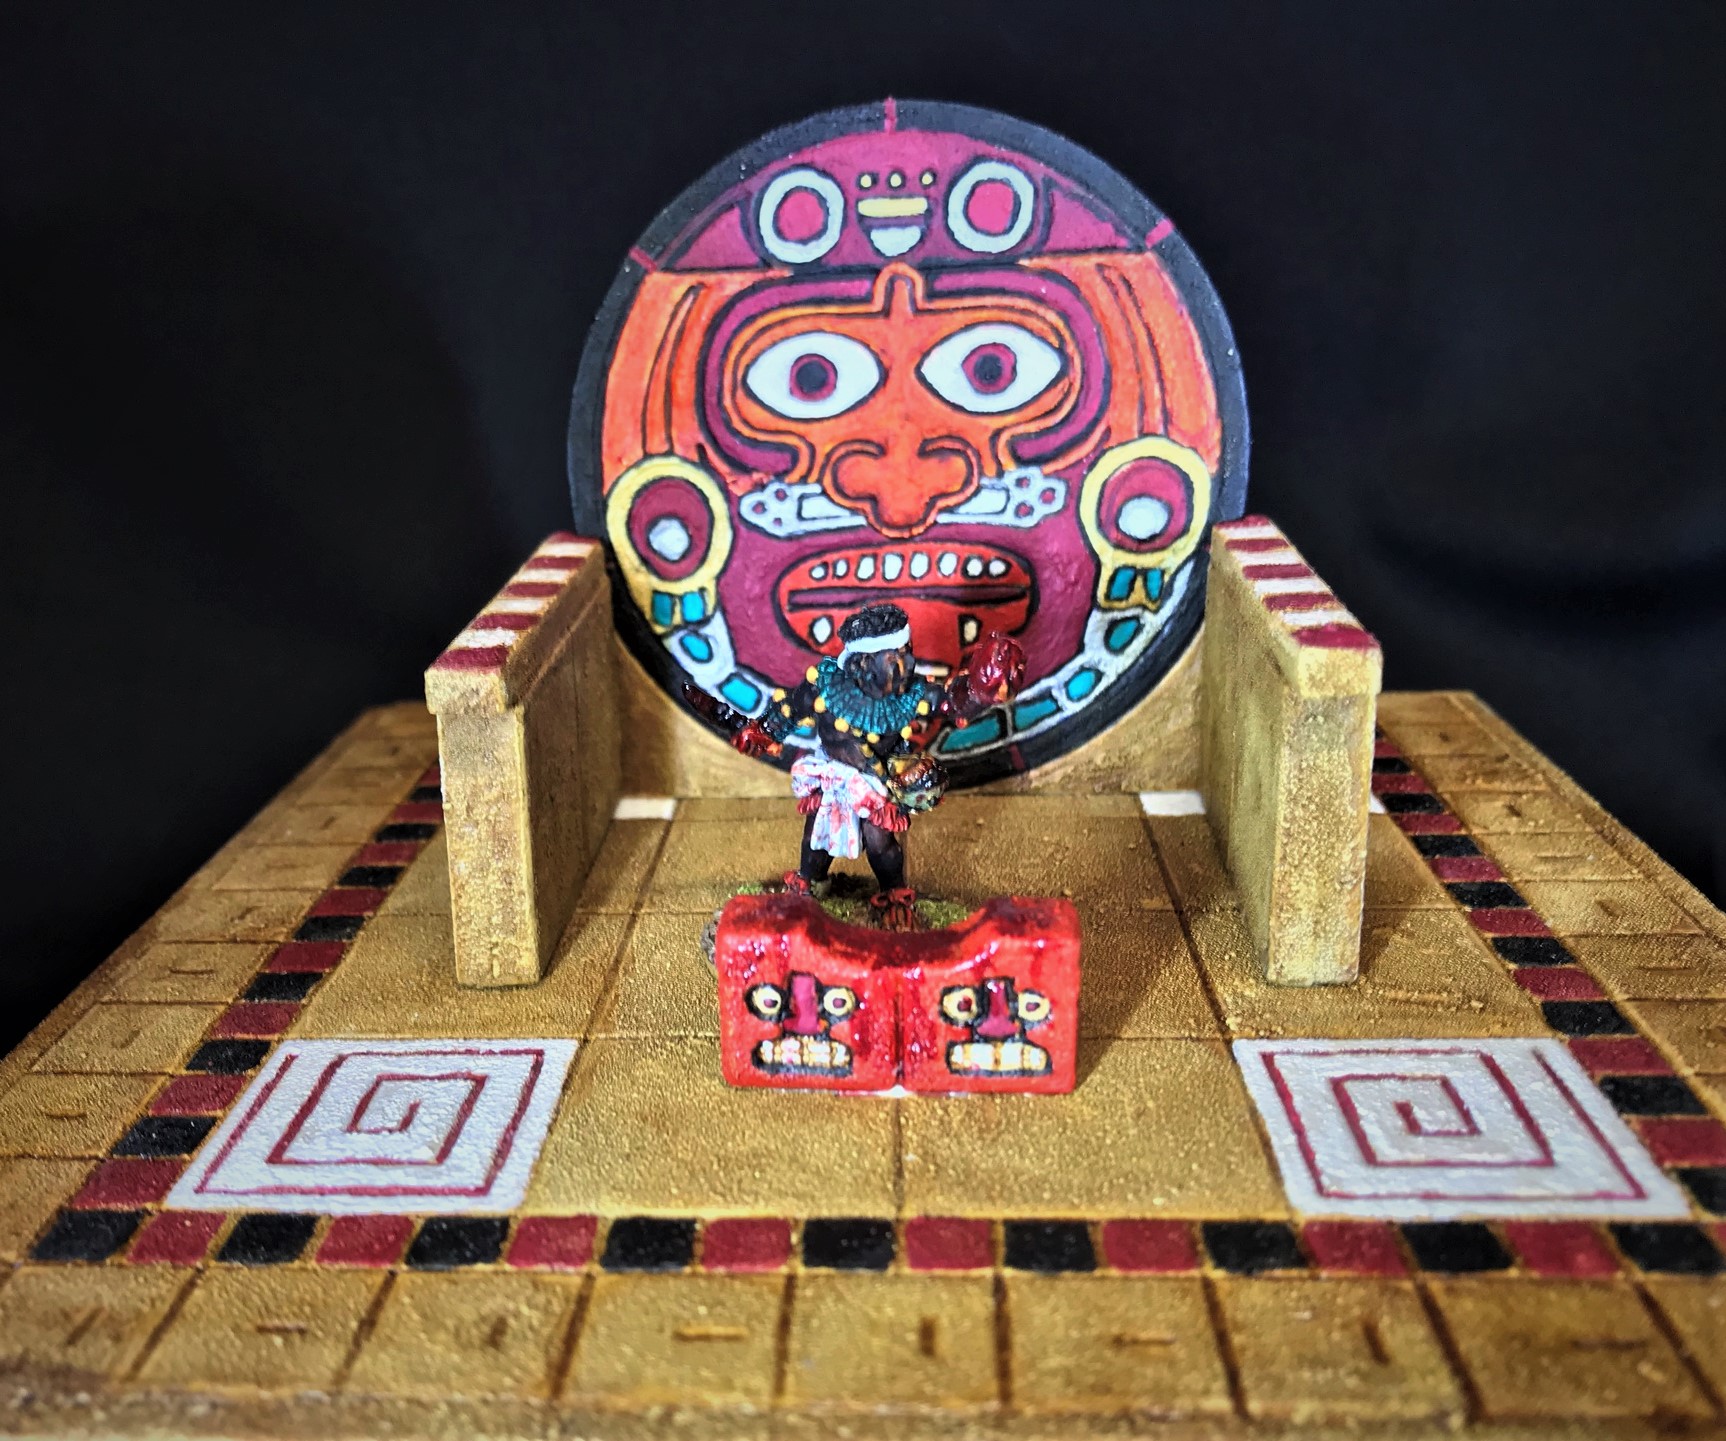
At this point it was February 19th and now I could attempt to finish the resin pieces. In addition to the braziers that came with the pyramid, I had UTW-301 “Skull Wall Temple Courtyard” and BRA-125 “Moon Goddess Plaque”. The UTW-301 contained 2 more braziers, a skull gate, 6 taller skull walls, 4 smaller skull walls, 6 corner skull wall pieces, a stellae, and yet another sacrificial altar. This kit appears to be no longer be offered on Stonehouse Miniatures website, but most of the components are there under other SKU’s. The BRA-125 was just the plaque. I decided that I could indeed try to finish these as well.

I needed to find a mounting solution for painting these – so used the same combination that I had previously used for tank turrets for the braziers and the corners. I just handled the walls and plaque carefully as I went along. After drilling the braziers, wall corners, stella, and altar out and mounting them on screws and magnets and then into wooden blocks, I moved on to painting all of these on February 22nd.

I brush-primed them with Vallejo Surface Primer “German Dark Yellow”, followed by a generous wash of Secret Weapon Washes now-discontinued) “Sewer Water”. As is my custom, I will list all the paints I used at the end of this post for those interested.

Despite my scrubbing and cleaning, I found some of the resin pieces quite resistant to painting. Still, with a second application of paint or by adding a bit of primer or wash, I was able to get them done.

Smaller remaining resin pieces mounted, primed, and washed.
Close up of the walls from above.

As the braziers were higher on the priority list (with 4 being part of the pyramid), I worked on them first. By the end of February 22nd, they were all done and drying.

Braziers – done!

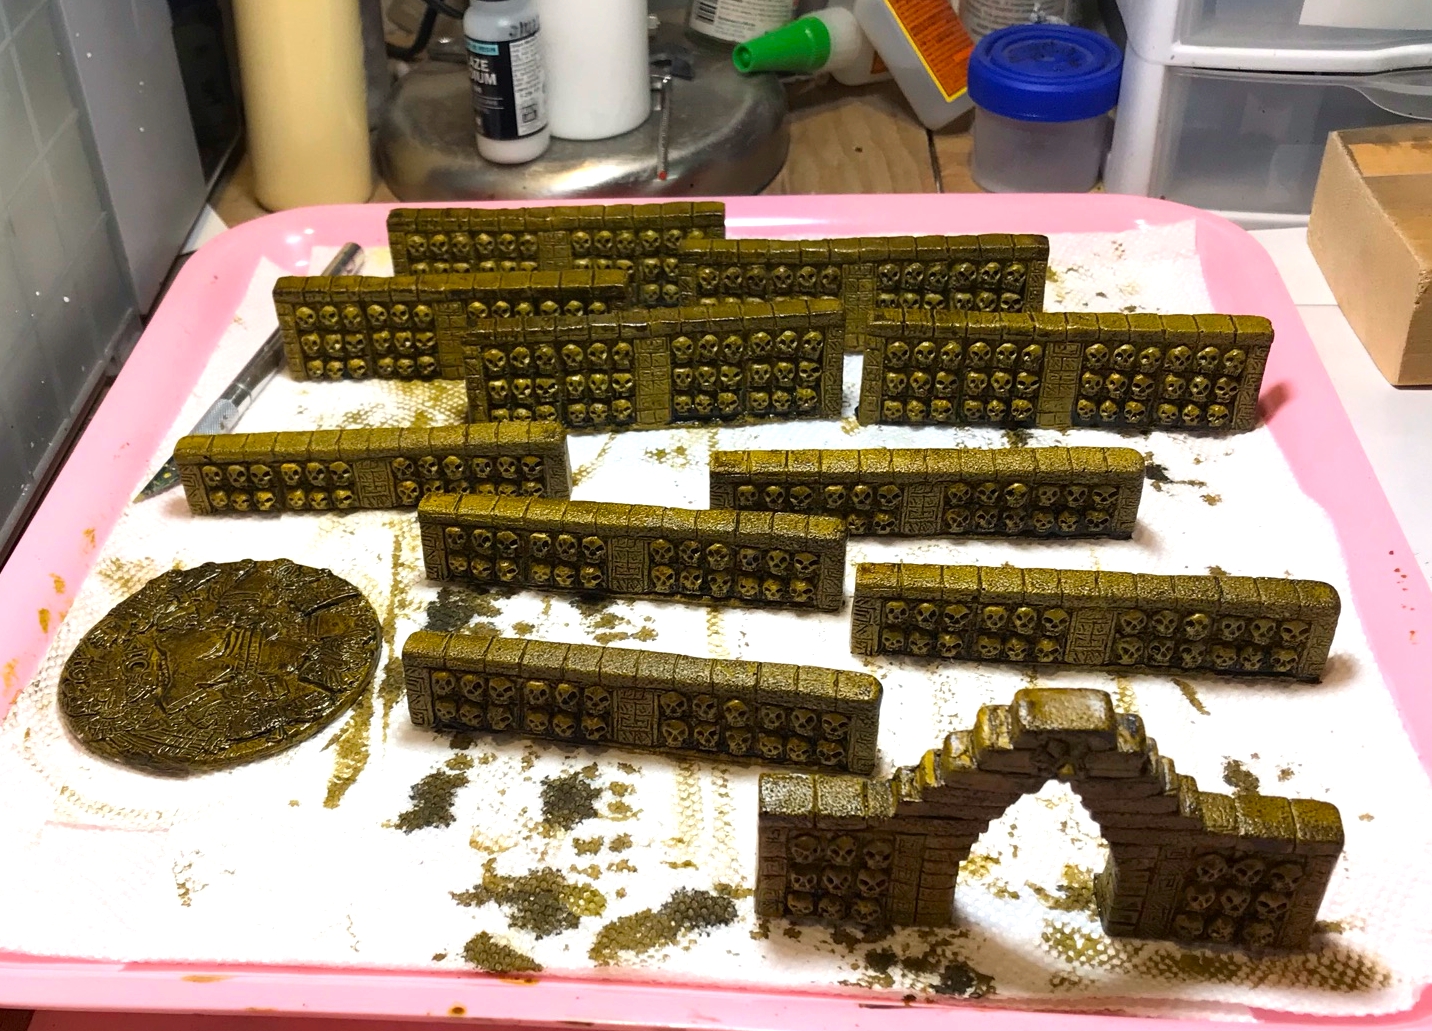
Then it was onto the other resin. The skull walls had some bubbles (that one would expect from any resin piece), but not many. In any case, I thought they should be dull and sallow-yellowish, reflecting the idea that these skulls had been on the racks for a long time. This also allowed me to camouflage any of the resin bubbles with dry brushing and washes. Besides, these skulls are so small that on the tabletop they would be background around my temples and buildings anyways.

I followed a similar dry brushing pattern as I used for the temple pyramid for the walls, with adaptations for the skulls themselves. By the end of the 22nd, all the resin was painted, varnished, and drying.

Walls and Moon Goddess Plaque done.

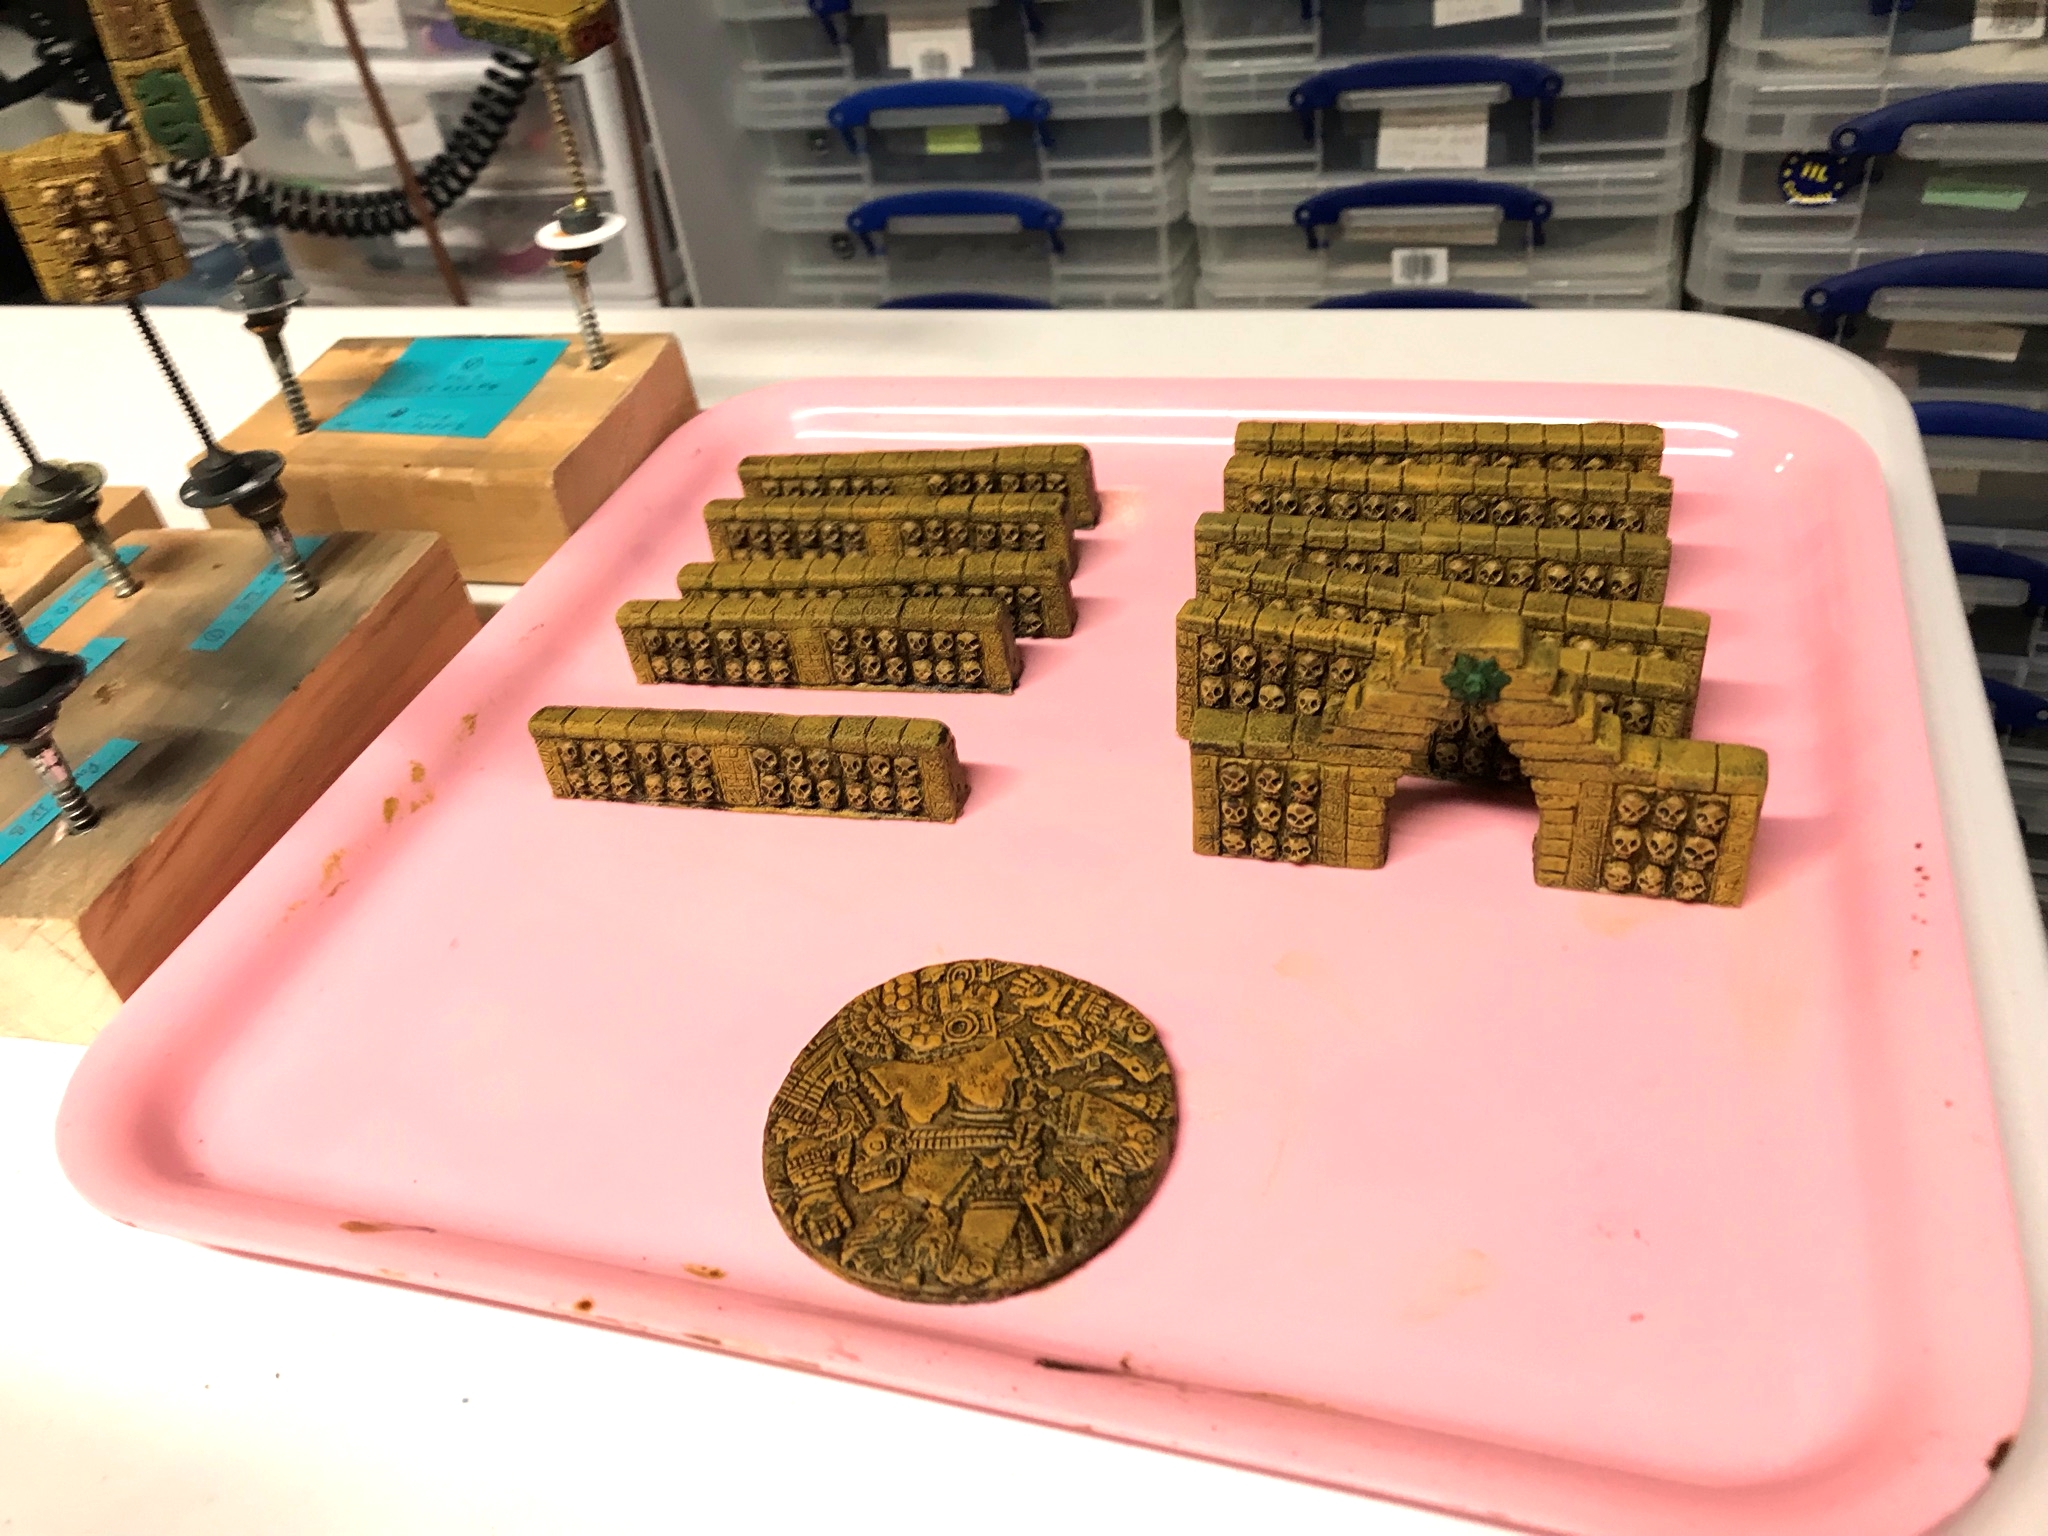
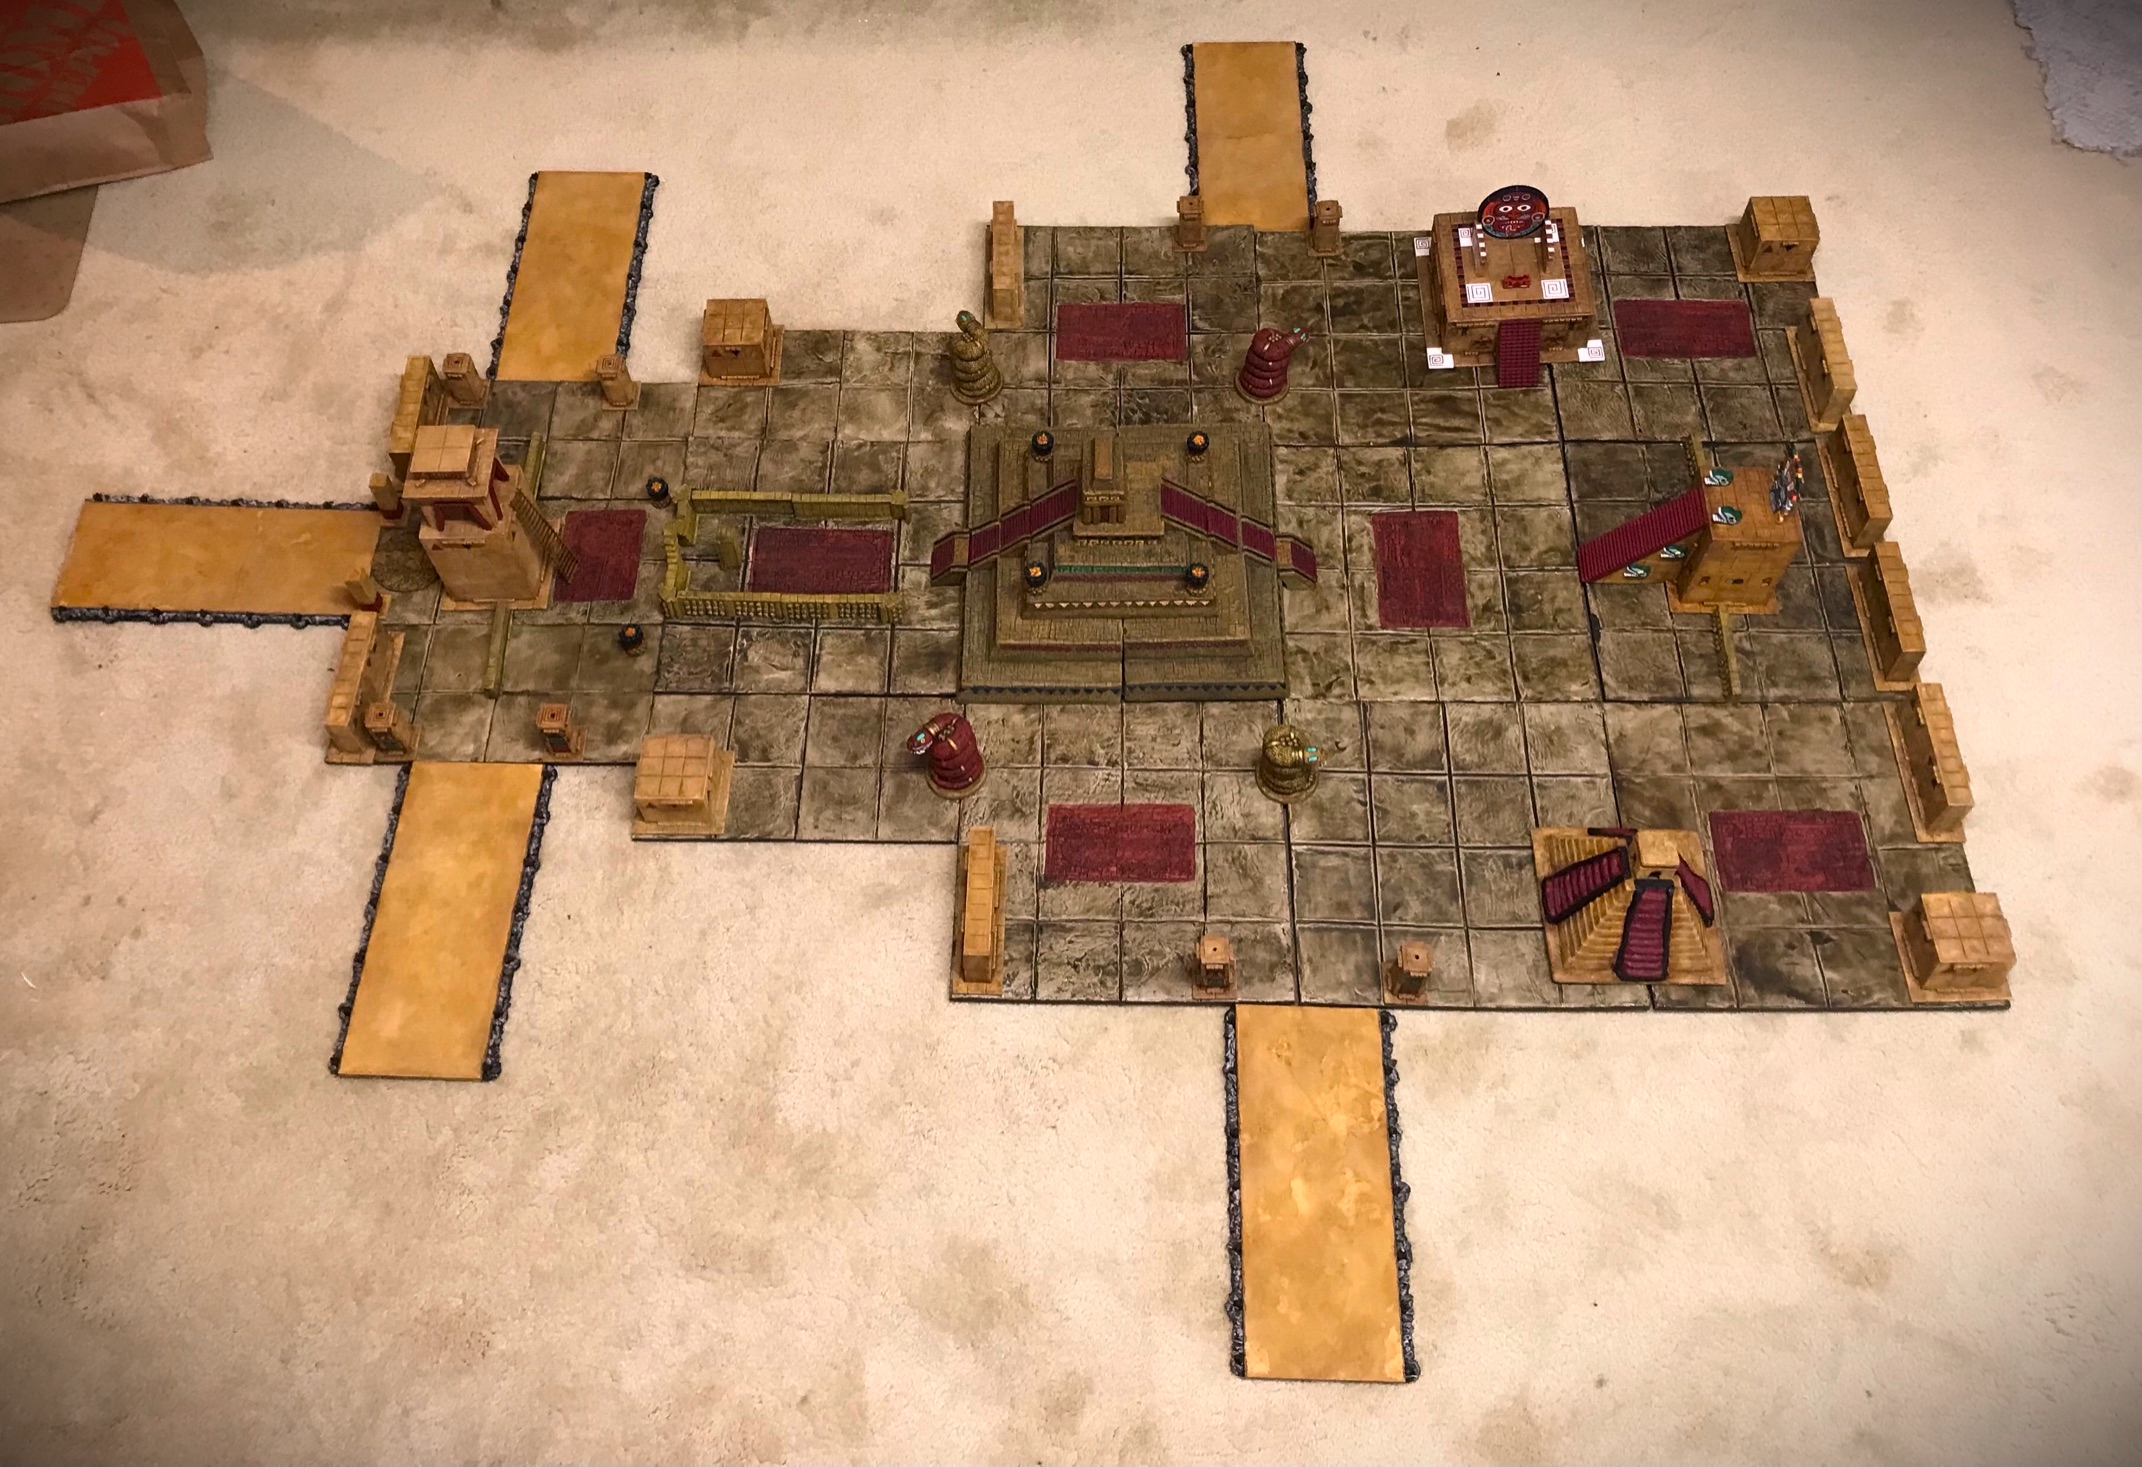
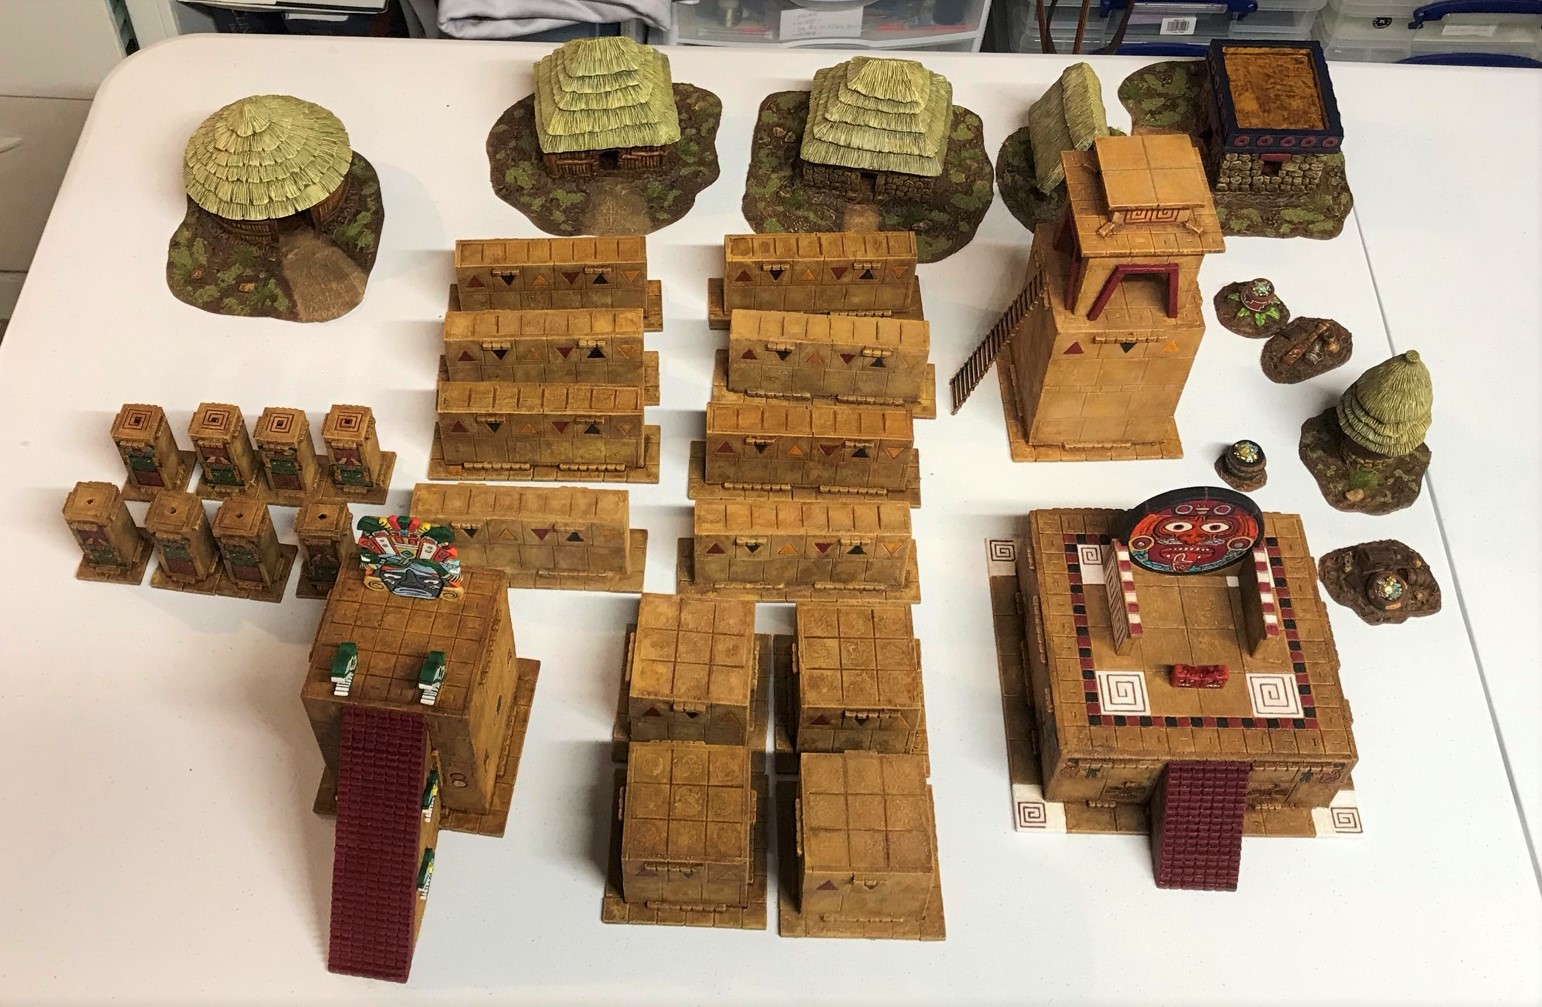
I played around with them on the next day (23rd) to see what configuration to use.

One possible configuration. I ended up deciding that all the skulls should face outward.

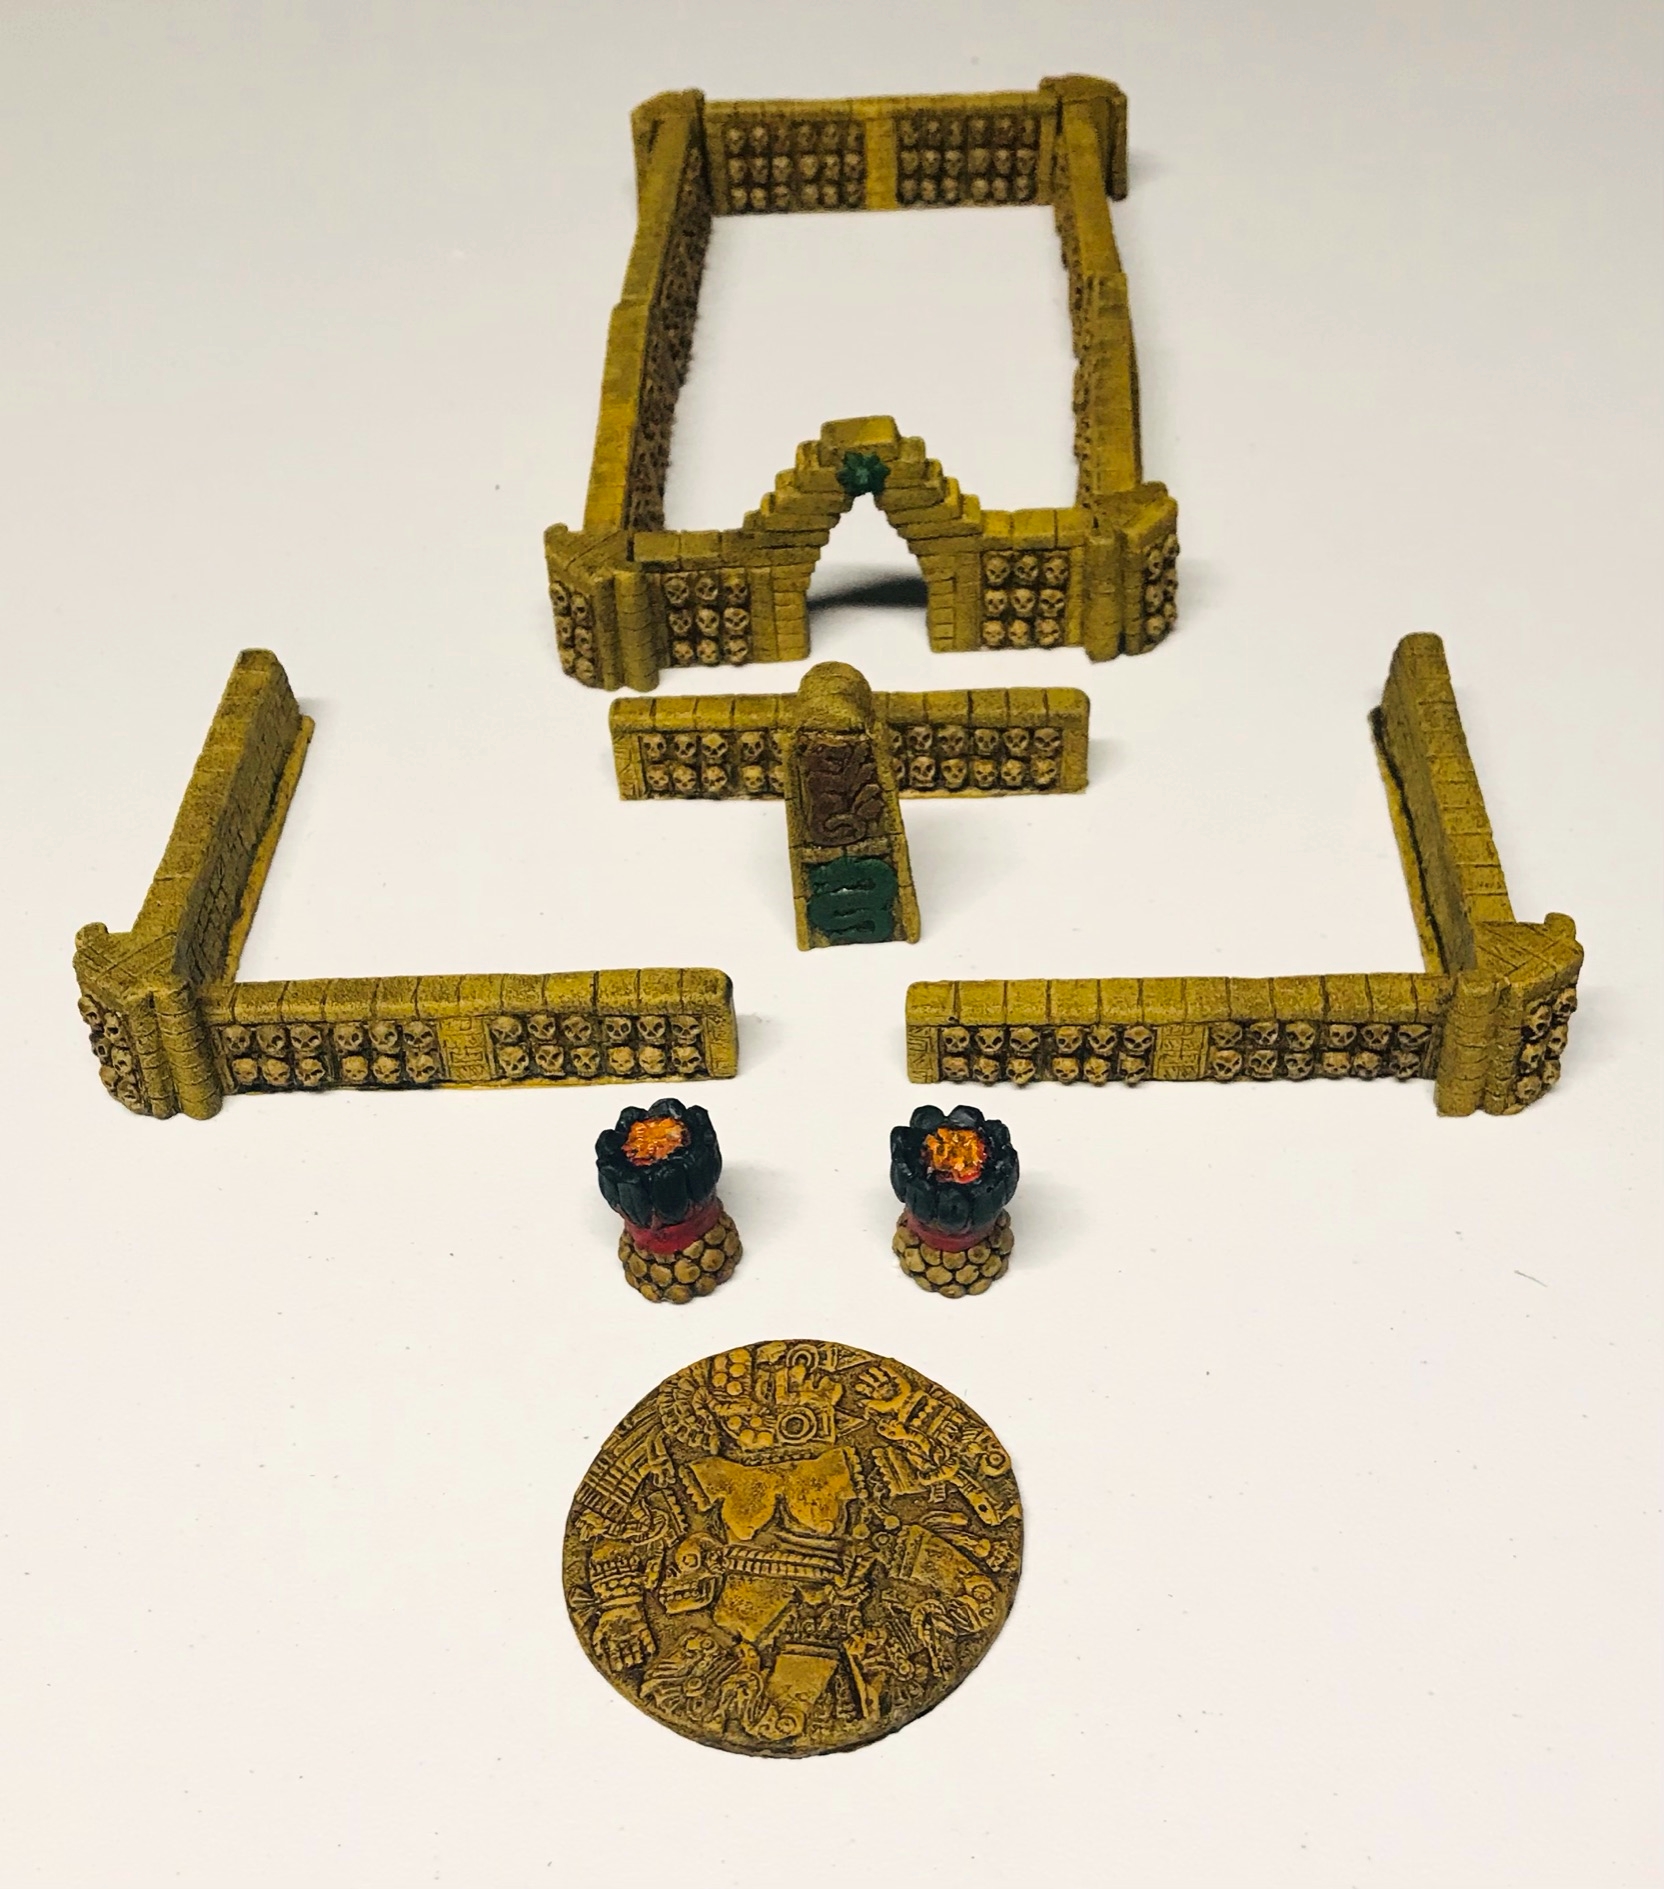
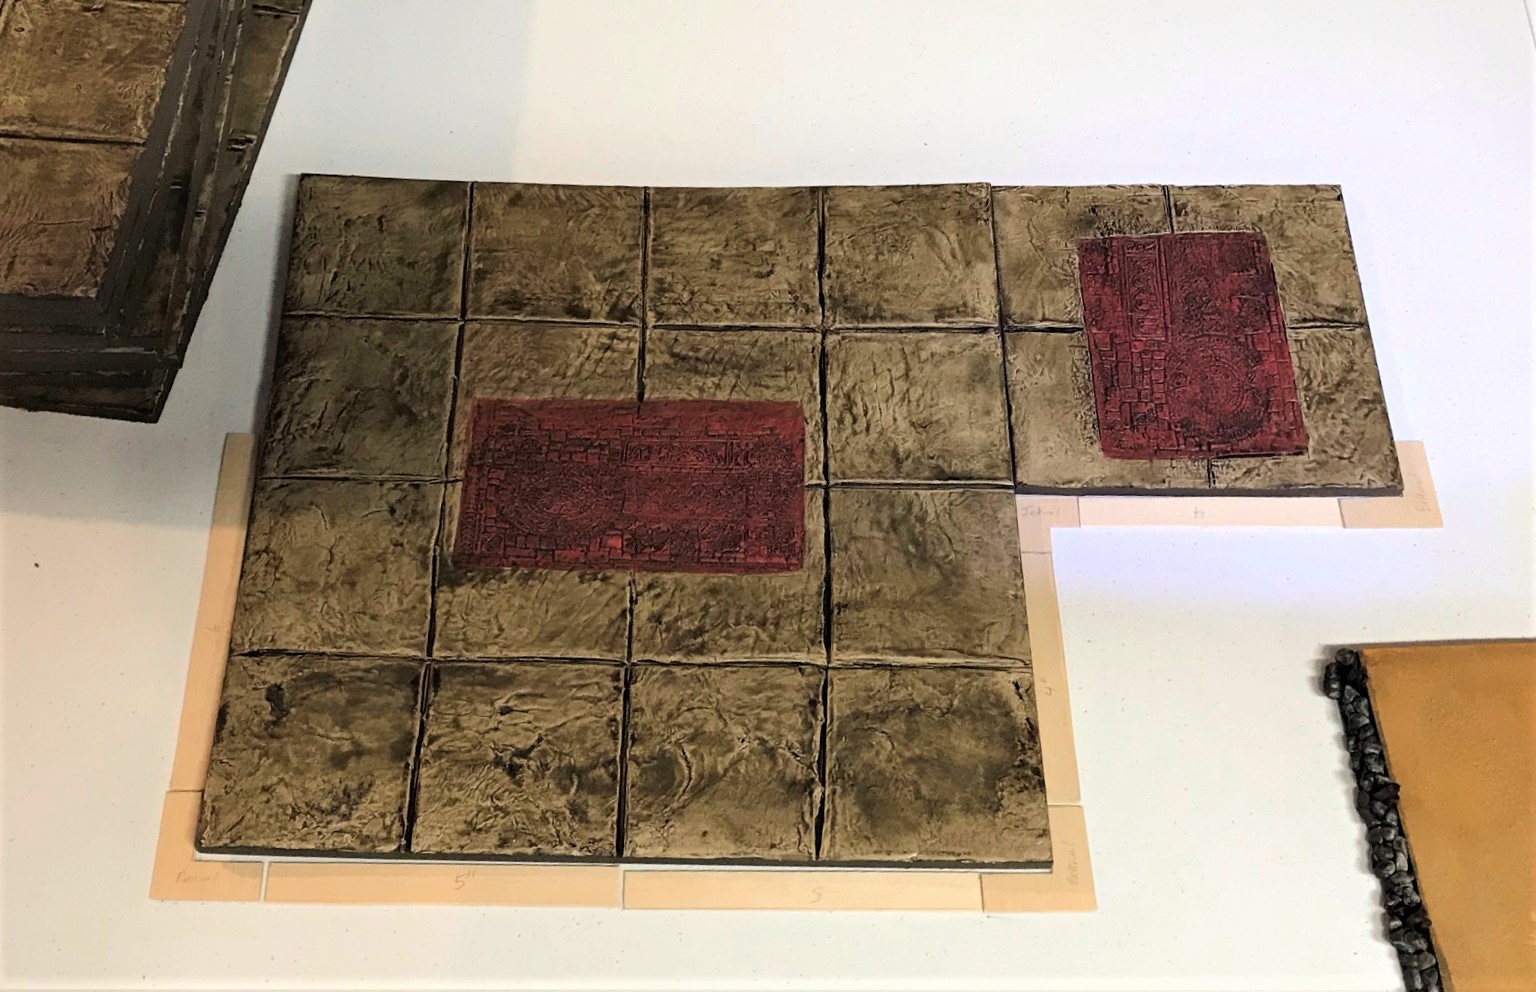
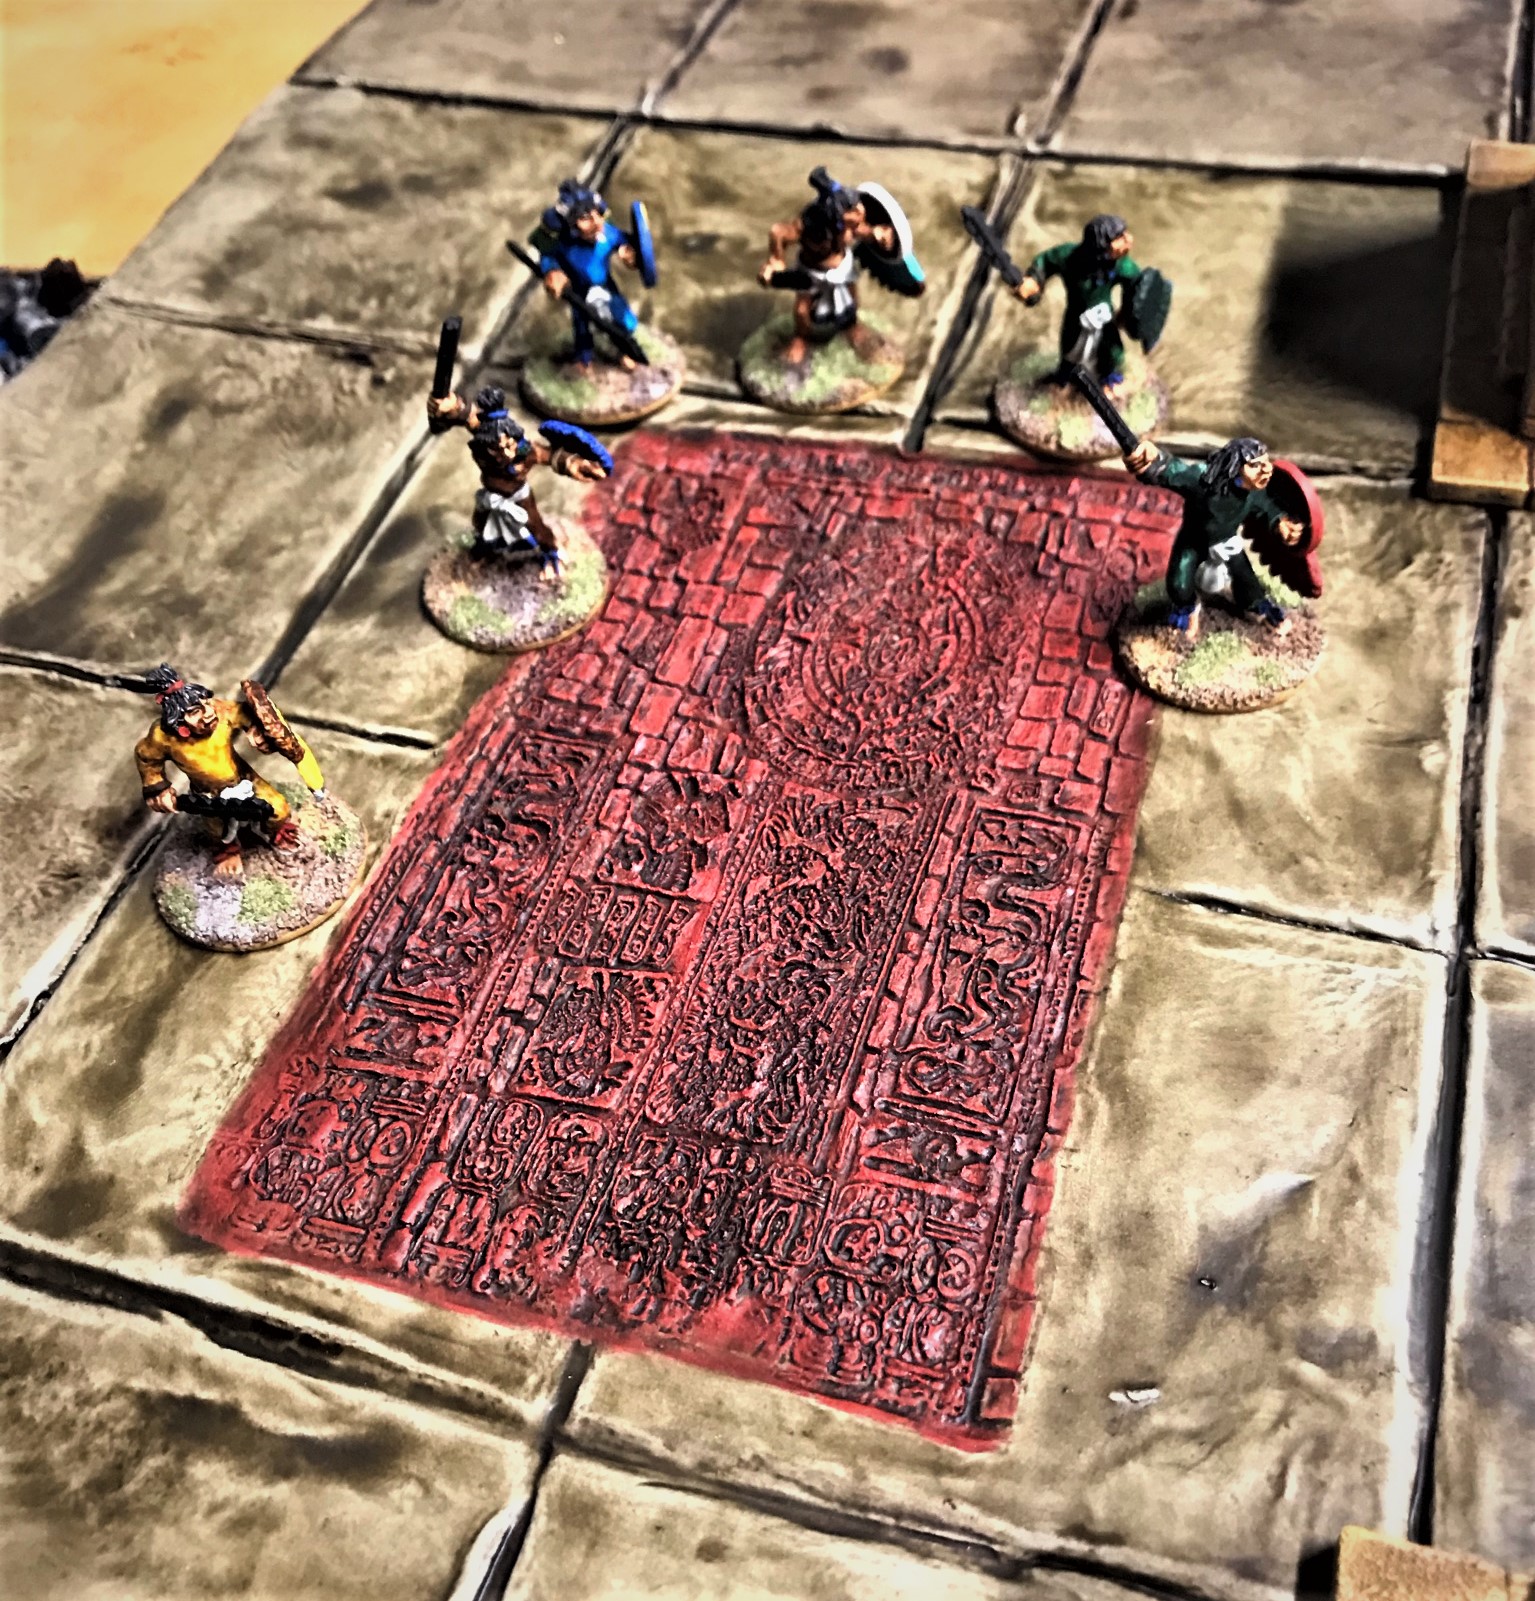
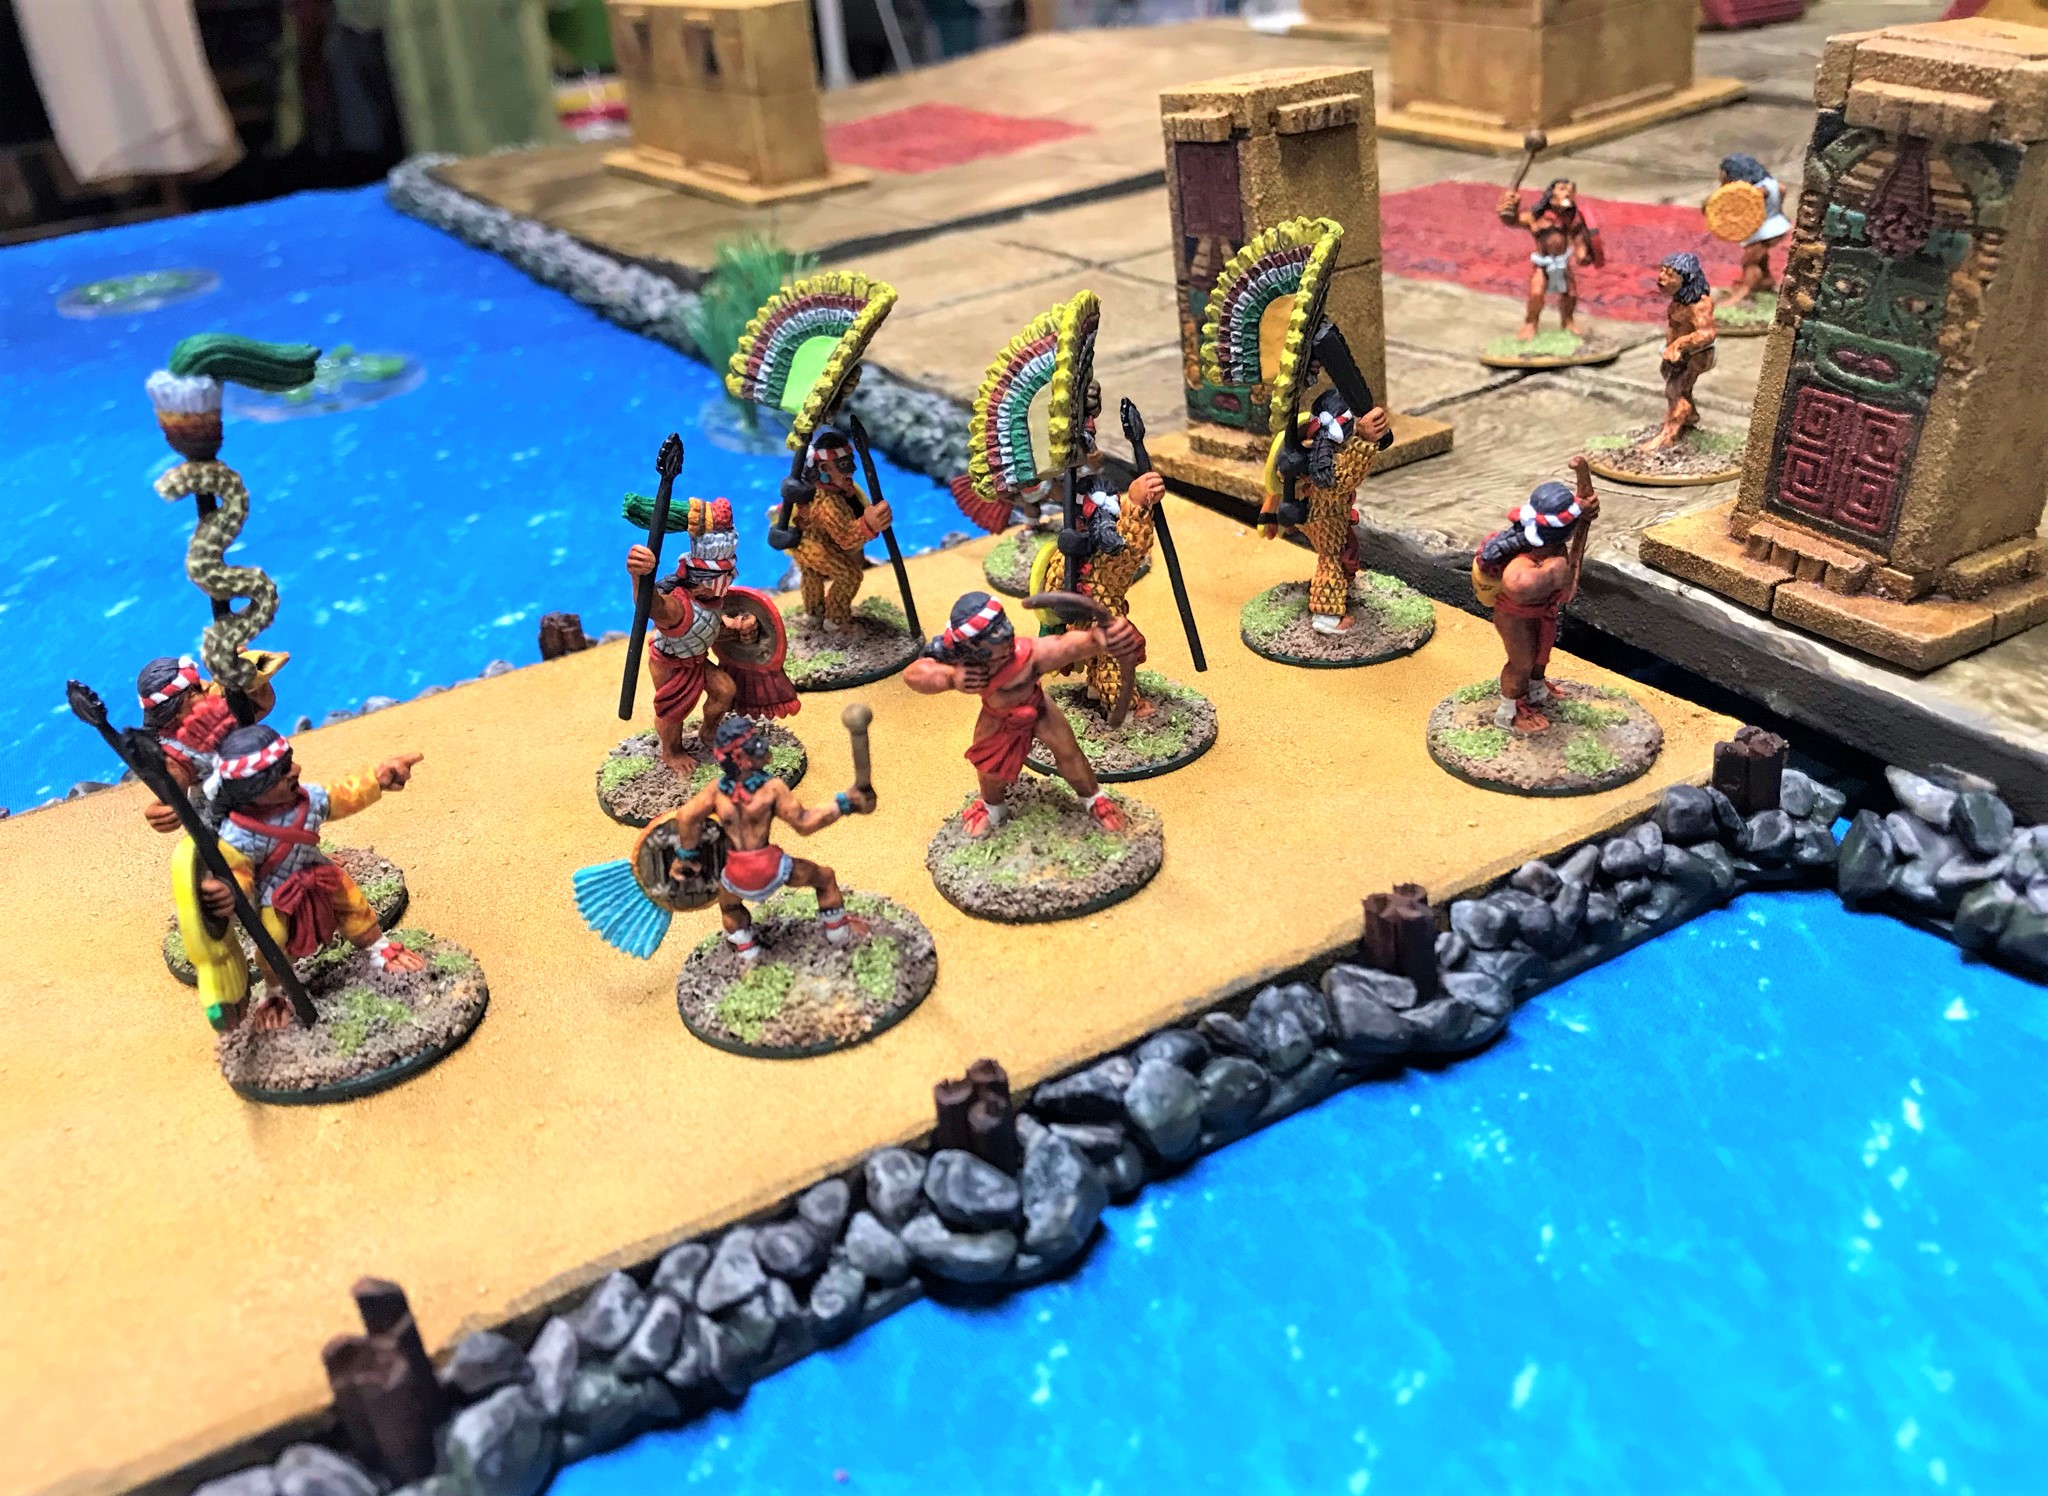
As it was the 23rd (and I would be packing my car that very day for travel the next morning for TotalCon 36), I partially mocked up the cityscape to see how all of the new pieces would look on my cellar floor. I decided to add the walls as a courtyard next to the pyramid and as eye candy on the side of another building.

Mock up on the floor – but it was time to pack!

I was successful (barely!) at getting all this done for TotalCon 36. At that convention, I ran 4 games – one each Thursday to Sunday, and each game is worth its own blog post. Therefore, I will be sharing more posts and pics of those in the coming days. I also want to catch up on others’ blog posts too, and do a catch up post on my garage+ building project (which has been taking up time too along with grandfather duties). Basically, for my blog followers, that’s why I went silent in February!

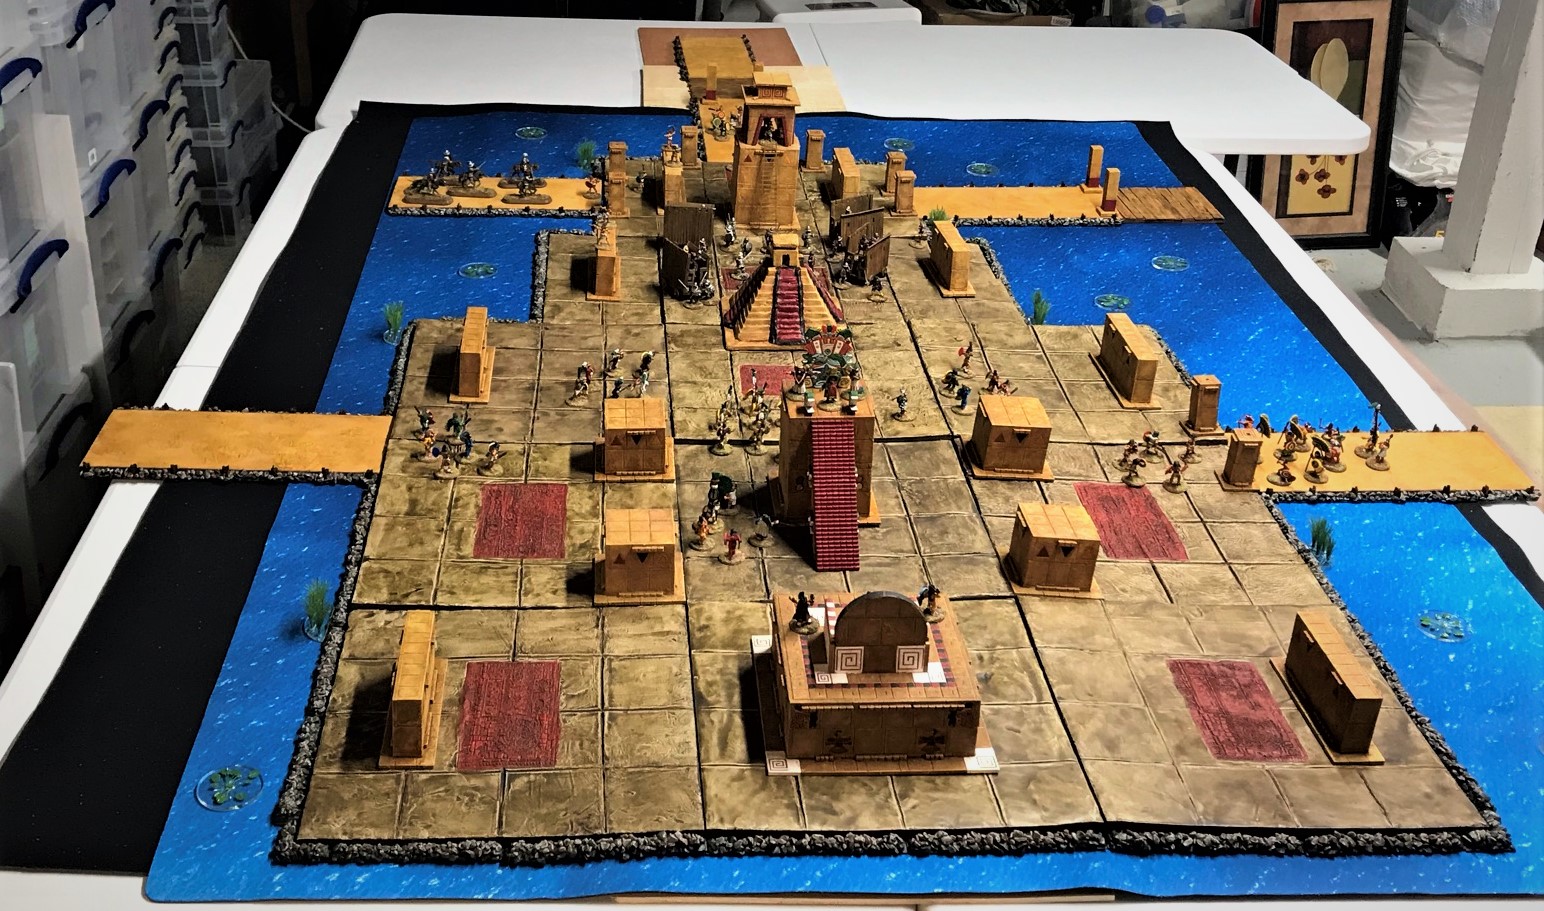
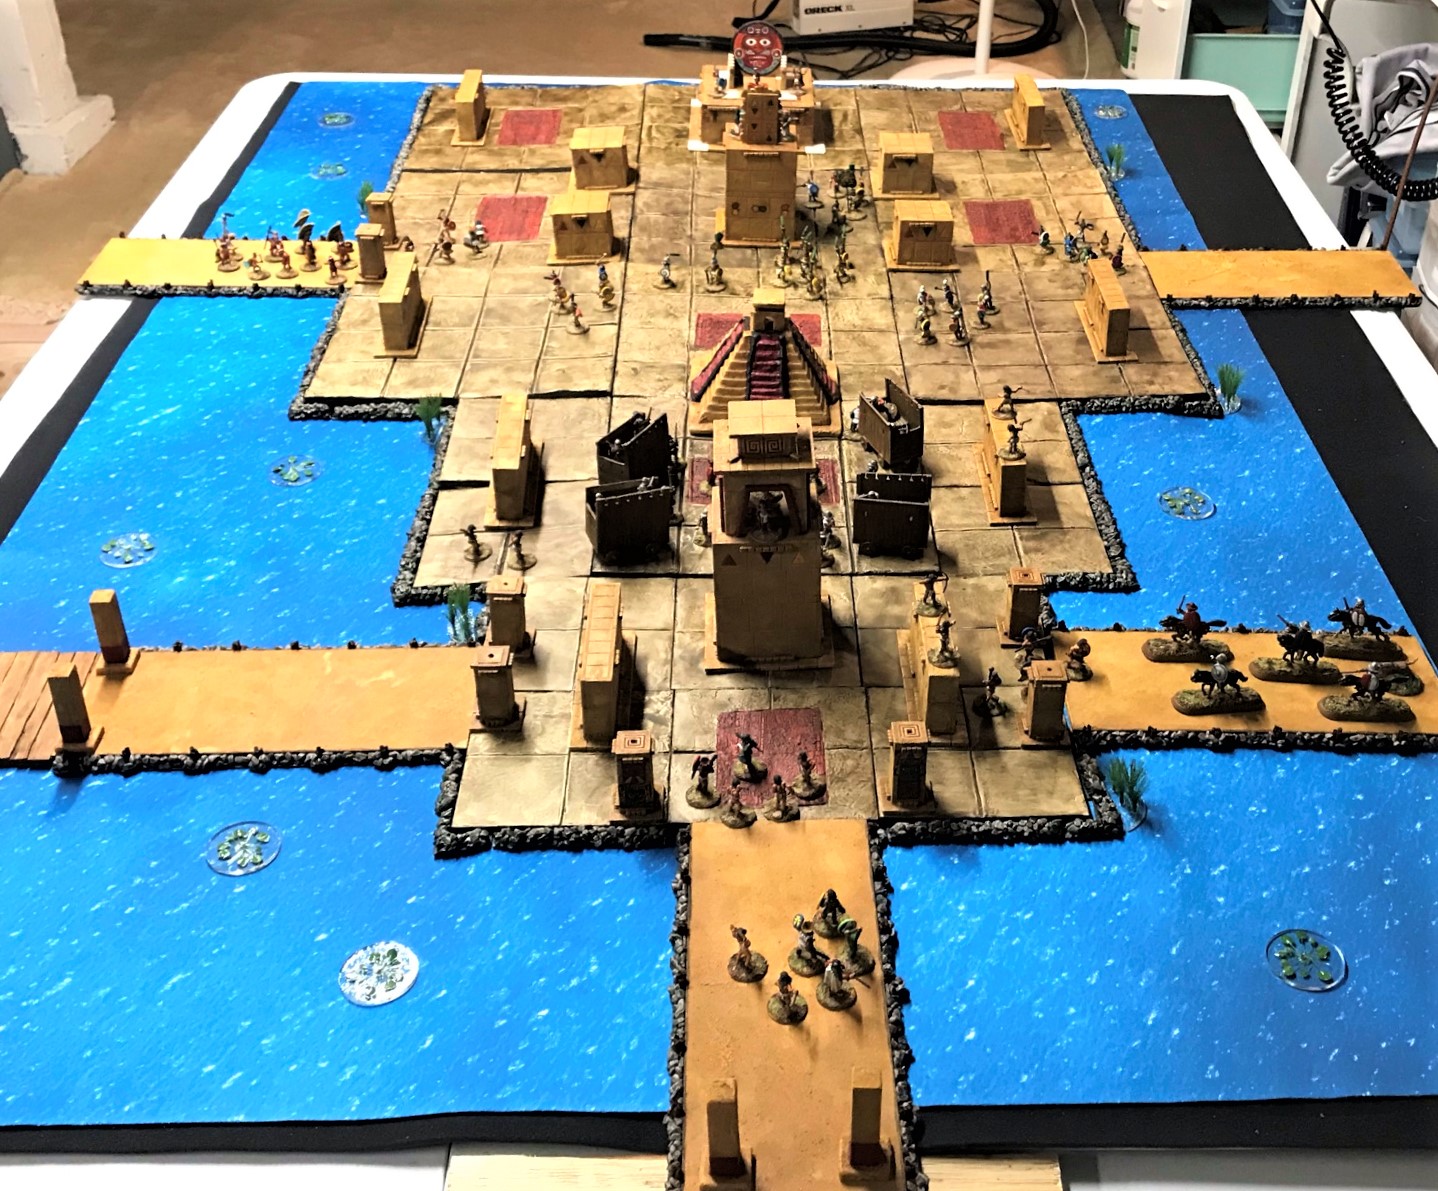
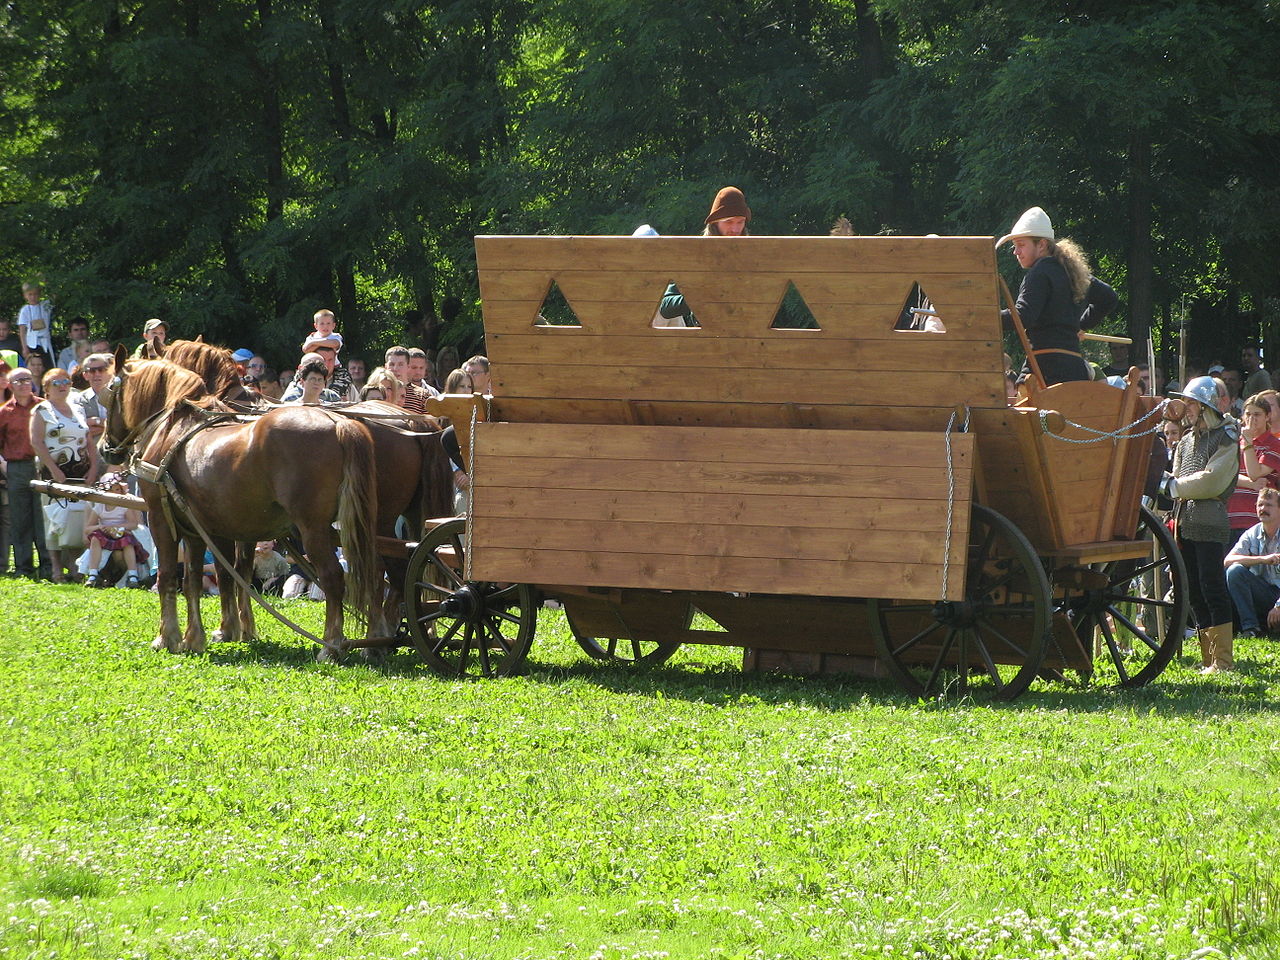
As a sneak peek, here below is what the temple looked like in action at the convention.

A preview of the action!

Thanks for taking a look and I hope this was fun for you. As stated, I’ve got more posts for you in the queue! I’ll try not to have you drink all these from a firehose – especially Roger!

Miscellaneous details and references for those interested in that sort of thing:

For all of my previous posts on games, units, and other projects for my 16th Century Spanish Conquest supplement for Feudal Patrol™ – “Civilizations Collide” – please see this page.

PAINTS, INKS, GLAZES, SHADES, WASHES, PIGMENTS, FLOCKING, GLUES AND MORE THAT I USED ON THESE TERRAIN PIECES:

On The Pyramid Structure:

  1. Citadel “Tallarn Sand”
  2. Citadel “Karak Stone”
  3. FolkArt “Yellow Ochre”
  4. Vallejo Model Color “Black”
  5. Armory “Dark Blue”
  6. Vallejo Model Color “White”
  7. Vallejo Game Color “Scarlet Red”
  8. Americana “Kelly Green”
  9. Americana “Cadmium Yellow”
  10. Citadel “Flash Glitz Yellow”
  11. Army Painter “Light Tone” (shade/wash)
  12. Citadel “Carroburg Crimson” (wash)
  13. Vallejo “Airbrush Thinner”
  14. Vallejo Mecha Varnish “Matt Varnish”

On The Smaller Resin Pieces:

  1. Vallejo Surface Primer “German Dark Yellow”
  2. Secret Weapon Washes “Sewer Water” (wash)
  3. Citadel “Tallarn Sand”
  4. Citadel “Karak Stone”
  5. FolkArt “Yellow Ochre”
  6. Vallejo Model Color “Black”
  7. Citadel “Skrag Brown”
  8. Citadel “Contrast Paint – Dark Angels Green”
  9. Citadel “Contrast Paint – Dark Oath Flesh”
  10. Citadel “Evil Sunz Scarlet”
  11. Citadel “Fire Dragon Bright”
  12. P3 “Blazing Ink” (ink)
  13. Citadel “Morghast Bone”
  14. Citadel “Contrast Paint – Skeleton Horde”
  15. Army Painter “Light Tone” (shade/wash)
  16. Vallejo “Airbrush Thinner”
  17. Vallejo Mecha Varnish “Matt Varnish”

On the Storage/Transport Box:

  1. 32-liter Really Useful Box
  2. Posterboard
  3. Hot Glue
  4. Toothpicks
  5. Foam sheets

Building an Aztec Cityscape – Part 5: Tenochtitlan – THE FINAL REVEAL

Yes! It’s finally time for the FINAL REVEAL of my Aztec cityscape. It’s been a labor of love – to recreate this tabletop for gaming. What game you ask? Why of course – Buck Surdu’s Feudal Patrol! I wrote the gaming supplement for Feudal Patrol™ games during the period of the Spanish Conquest. The supplement involves the Conquistadores, the Aztecs, the Tlaxcalans (and more Mesoamericans who fought the Aztecs), the Maya, and the Inca (in South America). I called it Civilizations Collide, and it’s a free download from Buck’s website or from Sally4th in the UK. If you have not checked this excellent game out – do it!

This is Part 5 of my series on “Building an Aztec Cityscape”. There are a lot of background history and WIP details in these posts that for brevity I won’t repeat here. However, if you have missed the other parts, they are listed below with their links:

As for wargaming the period of the Spanish Conquest 500 years ago, I want to be clear. It was brutal to be sure, and as I have stated often, there were no good guys on any side. I did not aim to glorify any aspect of the time, but to raise awareness and knowledge of it through wargaming.

From the start of this project, I wanted to create a unique and hopefully stunning tabletop for these games. I had a vision of creating a nice cityscape – an encompassing panorama that I had not seen anyone else do at any convention. Also, the cityscape needed to facilitate a fun gaming experience, so visually, I felt that had to go big. I had already painted 230 figures for the period. I had built many buildings too. Therefore, I wanted something that had the “flavor” of Tenochtitlan. However, with the tabletop designed for 28mm skirmish figures, (about 1″ tall), building a true-to-life and historically accurate Tenochtitlan would have required a gymnasium-sized playing area. I have seen stunning photos from SALUTE in the UK that were for 15mm gaming, but that scale went far beyond what I envisioned – or what was feasible for me. For travel to gaming conventions, the cityscape needed to be able to be broken down and transported easily. It needed to be useful for multiple games. This post will reveal my solution, for better or for worse.

I started out with historical research into several sources, and thinking about what I wanted and what I could do. After I had my initial concept, I then refined it into the two plans that I put on paper below.

First rough draft of the plan.
Then, I refined the plan.

The previous posts describe in more detail how I got here. So, let’s show some eye candy – and I will be posting on the Combat Patrol Facebook page and sharing a link to my IGTV page where you can view a video of the cityscape.

Here I set up some figures on the cityscape – many of these images were shown in previous posts – but here you get to see the whole thing!

Ta daa! Click on the images for a bigger view.
End view – the mat is from FLG.
Opposite lengthwise view
Angled view from the end.

As before, this is DEFINITELY (I think anyways) my last entry into Dave’s Season of Scenery Challenge! Thanks Dave for running the challenge and letting me be part of it. At least it’s the last part of the cityscape posts.

I also want to especially thank my wife for tolerating this bit of my madness. And of course I thank my old West Point comrades Buck Surdu and Dave Wood, Greg Priebe, Chris Palmer and the HAWKS, Chris Abbey at Sally4th, Dave at The Imperfect Modeler (especially for the chinchilla dust tip), GED at Gringo 40’s, IRO (for inspiration), Joerg Bender at Things From The Basement, the Uxbridge Historical Gaming Club and the Mass Pikemen Gaming Club.

A SPECIAL THANKS TO ALL the bloggers listed below who have taken the time to encourage me over this project. I am indebted to you all – you kept me focused, and motivated.

BLOGS I FOLLOW

Check out their blogs! As for the video link, here it is:

On IGTV: https://www.instagram.com/tv/CSxxc6hAL5-/

I’m not an award-winning videographer – but I hope that you enjoy the video.

What’s next? I will be going to my first HISTORICON and bringing both my cityscape and my rural tabletop. I will also be adding the two naval types (brigantines and war canoes) to the next version of my Civilizations Collide supplement – along with new scenarios and scenario-specific rules. I hope that you will like these. Yes, I have more work to do!

Please let me know your thoughts in the comments section – and thanks for looking!

For all of my previous posts on games, units, and other projects for my 16th Century Spanish Conquest supplement for Feudal Patrol™ – “Civilizations Collide” – please see this page.

Building an Aztec Cityscape – Part 4: Cortes’ War Wagons

War wagons!

War wagons were wooden carts for deploying missile troops. They had slits in them for crossbowmen and arquebusiers to be able to fire from while having some protection against enemy missile weapons. I think of them as wooden APC’s (WPC’s maybe?). Hernan Cortes used them as he was besieged in Tenochtitlan in 1520 – yes – over 500 years ago now.

This is Part 4 of my series on “Building an Aztec Cityscape”. The war wagons were so integral to the events in 1520 that I needed to have some as part of my cityscape. If you have missed the other parts, they are:

The first use of a war wagon in medieval Europe is ascribed to the Hussites during the Hussite Wars (1420-1434) in Bohemia. They were horse-drawn and would be linked together like a mobile fort.

A modern replica of a Hussite war wagon (from Wikipedia here).
Hussite war wagons deployed (image from New World Encyclopedia)

Nearly 100 years later, Cortes would build some similar ones. These would be constructed as a measure of desperation to escape the Aztec capital. Cortes’ war wagons were thrown together during the time when they were besieged by the Aztecs in Tenochtitlan.

I need to give you a condensed chronological synopsis – the history of this time is quite full of twist, turns, and intrigue. The timeline is confusing but important for context. Therefore, listed here below is a condensed chronology with respect to the use of war wagons and a couple of possible wargame scenarios that I am working to build:

  • November 18, 1518 – Cortes departs the Spanish colony of Santiago de Cuba with his expedition – before he could be detained by Lieutenant Governor Velazquez (who had originally commissioned his expedition). Cortes leaves abruptly so that the Governor (who had justifiable suspicions about Cortes and his motives) could not relieve and replace him prior to his departure.
  • February 1o, 1519 – After fitting out in Trinidad and San Cristobal de la Habana, Cortes sails for Mexico.
  • March 22, 1519- Cortes arrives in Mesoamerica. He will fight and win several battles with both the Maya and the Tlaxcalans up until later in 1519. By that time, his victories will have given him a few key assets. One of these, from the Maya, was a slave girl named Malintzin aka La Malinche who was to serve Cortes as a key translator, and later, his mistress. The second was a post-conflict alliance secured with the Tlaxcalans, whose warriors would provide the bulk of Cortes’ forces.
  • November 1, 1519 – Cortes begins his march to Tenochtitlan to try to meet Montezuma II.
  • November 8, 1519 – Cortes arrives at Tenochtitlan and meets Montezuma II. He and his contingent are welcomed to the city and stay in it.
  • November 14, 1519 – through a ruse, Cortes successfully seizes Montezuma II and makes of him a puppet/hostage.
  • March 5, 1520 – Meanwhile, back in Cuba, Lieutenant Governor Velazquez sends an expedition led by Panfilo de Narvaez to intercept Cortes
  • April 19, 1520 – Narvaez and his troops arrive in Mexico. Cortes, with some of his Conquistadores, leaves Tenochtitlan to deal with this internecine threat. He leaves behind a trusted lieutenant, Pedro de Alvarado, in charge of the remaining Spanish/Tlaxcalan forces in Tenochtitlan.
  • May 16, 1520 – The Aztec nobility and elite troops in Tenochtitlan celebrate the Festival of Toxcatl. It is a large assembly of all the elite and elite military of the city, who are unarmed and dancing in a city square or plaza. Alvarado, afraid that the celebration is a prelude to an attempted massacre on them, seals off the plaza where the dancing/celebration is taking place. His Conquistadores methodically move through the throng and murder or capture every possible Aztec. One of the captured elites is Cuitlahuac, Montezuma II’s brother.
  • May 29, 1520 – Back on the coast, Cortes defeats Narvaez (despite being outnumbered by Narvaez by 2:1). He incorporates Narvaez’ surrendered troops into his forces and returns with them to Tenochtitlan on June 24th . (This Conquistador-on-Conquistador fight would be a good possible scenario for a wargame (using my Civilizations Collide supplement to Buck Surdu’s Feudal Patrol rules).
  • June 2, 1520 – The Aztecs have been fully enraged since the festival massacre – and the situation is dire for the Conquistadores.
  • June 25, 1520 – In an attempt to mollify the Aztecs, Cortes releases Cuitlahuac. This was a rare strategic error. Immediately, Cuitlahuac, who rightly viewed his brother to be no more than a Spanish puppet, assumes Montezuma II’s powers and takes command of the siege of the Spanish as the new Aztec Emperor. The Spanish are besieged and are holed up in the Palace of Axayacatl. The Aztecs attempt to burn the Spanish out of the palace, but are repulsed by cannon and arquebus fire.
  • June 27, 1520 – Cortes forces Montezuma II to go to the roof of Palace of Axayacatl to plead with the Aztecs to stop the fighting. He is struck in the head by a rock from a sling and is gravely injured. At the same time, Cortes instructs his troops to scavenge wood from the Palace of Axayacatl and build several war wagons. His hope was that by using war wagons he could protect his own missile troops from the slings and arrows of the Aztecs – and make it easier for the Conquistadores to escape Tenochtitlan and survive.
  • June 28, 1520 – Cortes makes his first attempt with his war wagons to reach the causeways. He loads them with crossbowmen and arquebusiers, and supports them on the ground with sword and buckler men, and cannon (probably falconets and maybe lombards). Their movements are not powered by horses, but by the Spanish themselves. The Conquistadores fight bravely, but are pushed back. (This would be a possible scenario for a wargame on the cityscape with the war wagons).
  • June 29, 1520 – Cortes decides that the Temple of Yopico, a tall structure, was enabling the Aztecs to be able to hit his troops with enfilading missile fire from above. This is his second use of his war wagons, and he literally used them in a half-circle (yes, “circling the wagons”). He uses them similarly as before to help the Conquistadores to reach the Temple. This time they were tactically successful. However, the war wagons were to take so much damage that they are destroyed in the process. Cortes, beneath his personal banner, successfully leads his troops to ascend the 100 steps of the temple, killing many war priests and setting fire to the structure. But, the Conquistadores cannot hold the position against the Aztec numbers and are pushed back. (This – the assault on the Temple of Yopico – would be a second possible scenario for a wargame on the cityscape with the war wagons).
  • June 30, 1520 – Montezuma II either dies of his head wound, or is killed by the Conquistadores – accounts differ.
  • July 1, 2020 – La Noche Triste (the Night of Sorrows or the Sad Night) – the Spanish break out of Tenochtitlan at a high cost in lives, materiel, and looted treasure. (This – La Noche Triste – would be a possible scenario for a wargame on the cityscape and/or just the causeways with or without the war wagons).

Of course, then followed the Battle of Otumba, where Cortes used his cavalry to save his entire force against overwhelming odds. Eventually, he was able to regroup and with the help of brigantines, make a successful assault and conquer the city of Tenochtitlan. And yes, I have brigantines in the queue, along with war canoes. Plus I will be adding the two naval types (brigantines and war canoes) to the next version of my Civilizations Collide supplement – along with these two scenarios.

The only good image I can find of war wagon use comes from the cover of Sheppard, Si. (2018). Tenochtitlan: 1519-21. Oxford: Osprey Publishing, shown below. It is an excellent resource, and I do recommend it. There is a larger blow up of the same picture in the book – and you can see the war wagons in the lower right hand side at the base of the temple.

Enough background information (at least I hope). In looking for war wagons, I was challenged. I did consider scratch building some until I discovered these at Gringo 40’s in the UK in their 28mm Conquistador section.

From Gringo 40’s website.

Yes! I had found my solution! I ordered four from them, and the company was great. They even gave me a free Cortes figure (which I will paint soon I hope). Even better, these were solid METAL. Assembly was just adding the undercarriage axle supports, the wheels, and a wheel spacer. There are two benches inside and I can get two figures into the wagon. One challenge faced me that was new – no brush or angled brush would reach under the benches for painting. They do look nice though.

On the left is my 28mm Cortes figure, and the war wagons as received. The one with the figures in it is dry-fitted with the other pieces. While I have three figures in there, after painting them I’m now limiting that to two.
A close angle of the same shot as above. The only brush access to the bench undersides was restrictive through this end.
I gave the war wagons a spray prime – and then after a curing period, a brush prime – swirling a few cheap brushes like mops on the insides – getting as much primed as I could. This destroyed those brushes, but that was fine. Then I glued on the undercarriages and pressed them down.
After the previous step, I attached the wheels and spacers/holders for the wheels, and reapplied primer which as you see here was needed.

I then used various browns (I list all my paints and more at the end of this post). to approximate a used wood tone. After all, these war wagons were made from old recycled lumber. At this point in the project, I still wondered how I was going to get paint etc. under the benches, as well as how I was going to varnish them. As you may imagine, these are heavy! I decided that they needed a “dip” – in some Army Painter dip. To retrieve them without a huge mess, I used a pot I bought from a Salvation Army Thrift store, some twine from the hardware store, and an old piece of balsa.

The war wagons in brown, and the pot, dip, and twine.
How I was able to suspend the war wagons into the dip in the pot. I just had to restring each one after the dipping process.
After the dip.

I needed to do more shading and some dry brushing after the dip, and then I spray varnished them outside (as I could for once).

Nice enough to varnish outside! Not common weather in New England year-round, but it’s summer.
War wagons finished!

As this is the penultimate (love that word) post in the series, I will share some action shots below of the war wagons on the cityscape.

Battle in the Cityscape! Cortes tries to break out!
Trying to escape Tenochtitlan with their lives – and their gold – the Conquistadores fight towards the causeways.
Close up shot of a war wagon with an arquebusier and a crossbowman at the ready. The poor sword and buckler men get to push.

I think these will be very fun in a game. I just need to write rules specifically for their use.

The next post will be….(insert drumroll)…the FINAL REVEAL.

I hope to have a video link as well as pictures of the cityscape for you. These, because they are “vehicles” and were completed in July and August, all count as more of my entries into Dave’s Season of Scenery Challenge! Thanks so much for looking. I hope that you enjoyed the brief history and the war wagons themselves.

Please let me know your thoughts and ideas in the comments section! And the FINAL REVEAL is coming!!!

For all of my previous posts on games, units, and other projects for my 16th Century Spanish Conquest supplement for Feudal Patrol™ – “Civilizations Collide” – please see this page.

PAINTS, INKS, GLAZES, SHADES, WASHES, PIGMENTS, FLOCKING, GLUES AND MORE THAT I USED ON THESE TERRAIN PIECES/MODELS:

  1. Vallejo Surface Primer “German Green Brown”
  2. Gorilla Glue
  3. Vallejo “Flow Improver”
  4. Vallejo “Airbrush Thinner”
  5. Vallejo Model Air “Dark Yellow”
  6. Rustoleum Painters Touch “2x Ultra Cover Satin Ivory Silk” (spray)
  7. Vallejo Model Air “Sand (Ivory)”
  8. Vallejo Model Air “Wood”
  9. Vallejo Model Color “Wood Grain”
  10. Citadel “XV-88”
  11. Citadel “Skrag Brown”
  12. Army Painter “Soft Tone” (dip)
  13. Cotton Twine
  14. Army Painter “Strong Tone” (wash)
  15. Krylon “Clear Matte” (spray varnish)

Building an Aztec Cityscape – Part 3: Revetments, Lily Pads, and Cattails

The city of Tenochtitlan, the capital of the Aztec Empire, rose out of Lake Texcoco on an island. This island was connected to the mainland by a series of causeways. Reclaiming land from a water body usually involves building up a surface of large stones on its bottom. These would build up into a dry surface, and would usually be supported and protected by revetments. In the case of my Aztec cityscape, the pavements’ sides that I made of MDF had nothing on the edges (except paint) next to the waterline – and I thought that needed a bit of work.

Speaking of work and the pavements, if you are new to this 5-part series on my Aztec cityscape build, you can view the previous two parts by clicking on these links:

This post will cover the revetments that I made for the cityscape, as well as some HO scale lily pad and cattail bases that I added as eye candy (and possible obscuration of gaps and even MDF warpage). As before, I will similarly share my WIP photos as well as my lessons learned.

Readers of this blog know that I like a plan before building anything. I needed to figure out how many revetments to build – as I may or may not use all of my causeways or even my pavement tiles. Also, I had to figure out the sizes of inner corners versus outer corners (since they are differently sized up against the pavement tiles – so you just need to measure the side against the tiles).

My updated plan for building the cityscape.

I ended up following the same type of build and painting scheme as I did for the causeways – after all they had to match too aesthetically. As far as quantity, I ended up deciding to build 48 on 1/2″ strips of balsa. The breakout from the plan above came out to be:

  • 6″ sections (10)
  • 5″ sections (10)
  • 4″ sections (10)
  • 2″ sections (4)
  • 1″ sections (2)
  • External 1″ x 1″ corners (8)
  • Internal 1″ x 1″ corners (4)

I made templates from 3′ x 5″ cards and used them to size and cut up some basswood (balsa like but stronger and denser) into the strips for gluing the rocks.

The basswood.
Here you can see my templates, and the WIP. My inventory is building up in the top left.
After I cut a few, I dry-fitted them around a couple of pavement tiles and compared them to the causeways as well for width. It looked good at this juncture to continue.

Once the bass wood pieces were all cut, the gluing began, similar to the process I used on the causeways. Each pebble had to be glued one at a time in 2-3 courses of different sizes – while letting each course dry before moving on to the next one. In terms of pebbles, I estimate that for the 184 linear inches that I put about 10-15 pebbles per inch. That means for the revetments alone I glued an estimated 1,840 – 2,760 pebbles/rocks!! Add in the six two-sided foot-long causeways, and that makes an estimated 4,720 – 7,080 pebbles that I glued down. Ok, now I know why these took so long!

Mid-project showing different levels of rock-laying completion. Here are 48 – including two more 6″ prototypes.
Close up shot of progress later on in the project.

After all had dried, it was on to painting the two-tone colors, and adding slime and shade to the rocks.

After the two-tone priming.
Completed revetments.

Next, I made some lily pads and cattails on some acrylic bases. These were HO scale from JTT Scenics that I got on Amazon. The link for the lily pads is here and the link for the cattails is here. I wanted to be able to further differentiate the lake and to have some verticality of structure along the waterline – such as you see in the picture below.

A painting of Cortes at the Battle of Tenochtitlan (from Britannica). Note the cattails.

I bought some 2″ clear acrylic bases years ago (2017), and had some in storage. I thought they would work well for the lily pads. They come with removable protective paper over them so that they had no scratches.

Acrylic base – there are many suppliers on Amazon. Here is where I got mine.
The lily pads here are upside-down. The lily pads and their flowers are made on thin wire wound together – so if you cut the wire they all just fall apart. Initially, I used Gorilla Glue on the prototype, but decided to change course and fill the bottom of the wires and the holes with Vallejo “Transparent Water” Environmental Effect. Being careful not to overfill, this worked well and allowed me to cut the wires afterwards with no problems. I then used the water effect on the surface of the lily pads’ discs.
The lily pads after the surfaces got the water treatment. They are still pretty clear, and will be good on either a water or a swamp mat.

The cattails bases were basically half-moons I cut away (removing the center hole) with my scroll saw. Then I drilled holes to put 4 in each base. I used the Vallejo “Transparent Water” Environmental Effect in a similar way as the lily pads, and after I cut the cattail wires I placed the excess on the base as cattails that had fallen over.

The product – I had 24 cattails that I put on 6 discs.
Finished cattail bases.

Now, let’s see how they look on the gaming mat!

Pavement with revetments.
Revetments, lily pads and the cattails on the mat.
Extreme close up shot of the intersection of pavements, causeways, revetments, and cattails.

My goal with these was to create a visual distraction form the MDF edges. I think that they work fine – and of course you can let me know in the comments section if I am off-base (really, you can) or how you might have proceeded differently. Again, I tried meet the Aztec criteria of symmetry.

Once again, these all more of my entries into Dave’s Season of Scenery Challenge!

Thanks so much for looking – I hope it was helpful or at least interesting!

My next post will cover Cortes’ War Wagons that he employed with his troops in their breakout/ escape from Tenochtitlan during La Noche Triste.

For all of my previous posts on games, units, and other projects for my 16th Century Spanish Conquest supplement for Feudal Patrol™ – “Civilizations Collide” – please see this page.

PAINTS, INKS, GLAZES, SHADES, WASHES, PIGMENTS, FLOCKING, GLUES AND MORE THAT I USED ON THESE TERRAIN PIECES/MODELS:

  1. Basswood (1/16″ x 3″ x 24″ pieces) (on revetments)
  2. Ashland Decorative Filler (rocks) (on revetments)
  3. Elmer’s PVA Glue (on revetments)
  4. Vallejo “Surface Primer Grey” (on revetments)
  5. Reaper MSP “Black Primer” (on revetments)
  6. Citadel “Nuln Oil” (shade) (on revetments)
  7. Vallejo Environment “Slime Green Dark” (on revetments)
  8. JTT Scenery Products HO Scale Lily pads
  9. Gorilla Glue
  10. Clear 2″ Acrylic Bases with center holes
  11. Vallejo Weathering Effects “Transparent Water” (on acrylic bases)
  12. JTT Scenery Products HO Scale Lily pads

Building an Aztec Cityscape – Part 2: Pavements

An Aztec cityscape gaming table would be incomplete without the use of proper pavements. Tenochtitlan was not built to look hardscrabble. These pavements would need to go under the massive buildings I had to represent the city of Tenochtitlan, the capital of the Aztec Empire.  This post will cover the pavements I made for the cityscape. As I shared in my previous post, Building an Aztec Cityscape – Part 1: Causeways, Lifting Piers, and Removable Bridge Sections, I will similarly share my WIP photos as well as my lessons learned.

Many contemporary images of Tenochtitlan show a brilliantly white city. I am not convinced that this was its actual appearance. Much of the rock used would have been basaltic or limestone-like in quality. Both are subject to oxidation, and turn brownish-grey over time. That would be particularly true for pavements that were exposed daily to the intense rays of the sun. The painting below reinforced my decision not to go with a white/bleached appearance of stone structures for this project. I went more brownish/grayish.

A painting of Cortes at the Battle of Tenochtitlan (from Britannica). Note the brownish appearance of the masonry.

As with the causeways that I built, I used the MDF sheets I bought from Home Depot. They were 1/4″ thick sheets of 2′ by 4′ that Jeff Smith helped me to cut into ten 1’x 1′ and ten 6″ x 6″ sections. Then I laid them out to see if my initial layout concept would work. It did. But, unlike the causeways, I had an idea that the pavements should look weathered, and have some patterns sculpted onto them – Aztec patterns.

A few months prior I had learned from a friend in Maryland (Greg Priebe) that he had a surplus Aztec Roller from Green Stuff World (see it here). I was deep into painting the figures that I had at that point – but I traded some Ral Partha Vikings to him for it – with some idea that I would use it when I got to the point of building a cityscape – somehow. (THANKS GREG!!)

I was not going to like just having the MDF just be painted, I wanted a more tactile, almost 3D effect on them.

However, we are talking about 15 square feet of surface! I considered using green stuff and Apoxie Sculpt (both too expensive and potentially difficult for a huge build like this). I considered using modeling clay and then baking it and passed as that would end up potentially with either MDF on fire or a cause for my wife to terminate my existence for using her stove or both. After perusing YouTube for some ideas on sculpting on the MDF, I found this video from a guy named Luke in the UK where he used DAS clay mixed with PVA glue to use with Green Stuff Rollers. I decided that I would give that approach a go. I bought this DAS in white at Michaels.

Before I started, I needed to test and practice with the roller itself. It has a rectangular pattern, but it is a roller. Therefore, I would need to know where to start and where to stop. The solution came in borrowing some of my granddaughter Tabitha’s Play-Doh and marking a start and stop point on the roller with a Sharpie (and then returning the Play-Doh of course). This also let me figure out how large the imprint would be.

The roller pattern on Play-Doh as a test pattern.

The next step was to figure out the marking/sculpting plan for each pavement. I decided that having 3″ x 3″ squares would work well with both the larger and smaller MDF tiles. I needed to have a properly-sized template for the Aztec roller such that I could center it on the sculpted tiles. I planned to do 6 large tiles with the roller imprint, 4 without, and 9 small tiles without the roller imprint, and one with it. The roller imprint would be approximately 3″ x 5.5″.

Designing the larger (1′ x 1′) tile with the roller imprint centered.

It was now time to, well, get all messy and sticky with DAS and PVA. I used a smooth pastry roller (my own thank you not my wife’s), and a carpenter’s square (also mine!) to smooth out the DAS/PVA as well as to score lines in the mix at 3″ intervals. I used separate plastic tubs to mix the DAS/PVA and to clean my tools.

A tile without an imprint.
This shows how I sculpted the tile surfaces for the roller. The DAS/PVA mix is on top – and I used a roller and wet fingers to smooth the top. Then I marked off 3″ squares and drew the edge of the carpenter’s square across as a tool. If there was to be an imprint, I placed and traced the template as you see here. Then, I would use the Aztec roller to make the imprint.
An example of the rolled imprint. It was not always perfect, but I was able to smooth out the edges as best as I could. I expected to be able to make them work – and in the end they did. This was the worst example – I got better over time. In any case, when I was dry brushing I was able to make all look pretty good (though you can be the final judge).

The roller worked fairly well, though there was a learning curve to be sure. I definitely needed to have a tub of water, a brush, and microfiber towels to clean it (and my tools) constantly. The DAS/PVA on the MDF was left to dry over 24 hours. On a few of the larger tiles, I was surprised to see some of the MDF had a bit of warp from the drying clay/glue combo. The smaller pieces had none. Lesson learned. Certainly, finding enough flat surface for all 15 square feet to dry was not easy. I ended up using multiple card tables in the cellar. Yes, the wife was annoyed again. This whole process used up three packs of DAS – that’s 3 kilograms/6.6 pounds – of the stuff.

Drying tiles.

Once they had dried, the next question was how to paint them? I decided to use up my cans of Army Painter Strong Tone and Soft Tone (the dip), as they would be otherwise gathering dust in my paint shed. They theoretically would provide a bit of protection as well. Again, I also needed 24 hours of drying after application – yet again.

The Army Painter “dip” drying.
After the dip dried. I was happy with the way the pavements looked, except for the glossy effect.

Normally, I do not use spray varnishes, but these large pieces were good candidates for a spray of Krylon matte varnish. It was warm outside, so I gave them a coat. All went well – until some of the pieces – mainly one – started bubbling up like a cheese pizza. AHHHHH!

From what I could figure out, that was caused by the aerosolized solvent in the can vaporizing in the DAS and trying to release through the varnish and the dip surface. Luckily it was only on one large tile, but that tile took a rework and made this last at least a week or two longer as I tried to find the right combination to recreate a similar color. This took me into mid-July.

More drying time needed! Hell, drying SPACE. 15 square feet to go on a 24 square foot mat is a lot!

I then brush varnished and shaded all of the tiles. At this time I moved on to dry brushing the imprints with Citadel “Astorath Red”. I also darkened the edges with DecoArt “Raw Umber”. The tiles line up together on the lines nicely. Though some warp is visible, it is not horrible. I also went over all of the tiles and shaded them as needed so that the colors were similar and no untouched DAS/PVA was visible.

A comparison of the imprints before and after on the pavement tiles.
All six tiles with imprints.
Close up shot of a completed tile.
An imprinted tile with some Aztec warriors for comparison.

Of course, when you see the completed cityscape, you will be able to better judge how all of these came out. As they are modular, I should be able to use them in many ways. They certainly meet the Aztec criteria of symmetry. Also, these all can be part of Dave’s Season of Scenery Challenge!

At this point in the project, I noticed how the edges of the tiles were a distraction and needed some attention. I thought that seeing bare 90 degree edges and MDF sides coming out of a lake (or swamp) was a less than aesthetically correct situation for my cityscape. People would have built the city up from the lake – and that would have involved reclaiming the lake as dry ground. How? Well, I am sure that the Aztecs would have used slave labor to haul and deposit tons upon tons of rocks on the water’s edge.

My fix was to build some revetments around the cityscape’s edge plus some lily pads, and cattails – which will be the next installment in this series!

I hope that you enjoyed this part 2 and that you stay tuned for the rest – let me know your thoughts in the comments section and I appreciate your giving this a read!

For all of my previous posts on games, units, and other projects for my 16th Century Spanish Conquest supplement for Feudal Patrol™ – “Civilizations Collide” – please see this page.

PAINTS, INKS, GLAZES, SHADES, WASHES, PIGMENTS, FLOCKING, GLUES AND MORE THAT I USED ON THESE TERRAIN PIECES/MODELS:

  1. 2′ x 4′ MDF sheets – 1/4″ thick
  2. White DAS Air Dry Modeling Clay
  3. Elmer’s PVA Glue
  4. Army Painter “Strong Tone” (the “dip”)
  5. Army Painter “Soft Tone” (the “dip”)
  6. Krylon “Clear Matte” (spray varnish)
  7. Army Painter “Mid Brown” (wash)
  8. Citadel “Agrax Earthshade” (shade)
  9. Americana “Bleached Sand”
  10. Army Painter “Strong Tone” (wash)
  11. DecoArt “Raw Umber”
  12. Citadel “Astorath Red”
  13. Vallejo “Airbrush Thinner”
  14. Vallejo Mecha Varnish “Matt Varnish”
  15. Citadel “Nuln Oil” (shade)

Building an Aztec Cityscape – Part 1: Causeways, Lifting Piers, and Removable Bridge Sections

I have been working through July to build a representative 6′ x 4′ cityscape gaming table that would evoke the flavor of the city of Tenochtitlan, which was the capital of the Aztec Empire. On the arrival of Hernan Cortes in 1519, Tenochtitlan was populated by an estimated 200,000 to 400,000 people – making it even larger than contemporary London. It was built on an island in Lake Texcoco, and was linked to the mainland by multiple causeways. These causeways also had removable or liftable bridge sections. In effect, Lake Texcoco formed a “moat” around the city, making it impregnable to enemies for hundreds of years (until the Spanish Conquest occurred anyways). The causeways would be of major importance during all phases of the Spanish Conquest. Cortes met Montezuma II on a causeway for the first time. The Spanish and their Tlaxcalan allies would fight desperately at different times to both escape Tenochtitlan (La Noche Triste) and to return to conquer it afterwards. The nature and importance of the causeways were major aspects of these battles, so any representation of the city of Tenochtitlan needed to have causeways.

A 1524 map of Tenochtitlan showing the causeways (from History Today).
Detail of a Tenochtitlan causeway (from Learnodo Newtonic).
Cortes meets Montezuma on a causeway for the first time (from Pinterest).
A painting of Cortes at the Battle of Tenochtitlan (from Britannica).

To build a city of such size would be massive – and certainly beyond the scope of a reasonably-sized gaming table. My goals were to make something special – while ensuring that it was something that could be used in games of Buck Surdu’s Feudal Patrol in Mesoamerica (using my Civilizations Collide supplement). I wanted a diorama that could be played on. To that end, I have built many buildings and figures that have been previously shared in this blog. What I needed to add was the underlying structure of the city – “the cityscape”.

The work that I did to build and paint this cityscape was extensive and would overwhelm a single blog post. Hell, it almost overwhelmed me just building it! Therefore, I have decided to break my work on it into 5 posts that I will share over the next few days. There will be a lot of WIP shots on each category, leading up to a final reveal. I am also continuing with my weekly garage+ build posts (like here and here), and I have some golf stuff to add as well. This is “Life, Golf, Miniatures, & Other Distractions” after all! My blogging drought is coming to an end! As for the cityscape posts, here is the listing of what is on deck:

  • Building an Aztec Cityscape – Part 1: Causeways, Lifting Piers, and Removable Bridge Sections (this post)
  • Building an Aztec Cityscape – Part 2: Pavements
  • Building an Aztec Cityscape – Part 3: Revetments, Lily Pads, and Cattails
  • Building an Aztec Cityscape – Part 4: Cortes’ War Wagons
  • Building an Aztec Cityscape – Part 5: Tenochtitlan – THE FINAL REVEAL

To build the cityscape, I started off with building the causeways, but work on all of these components overlapped. Please enjoy them and hopefully this is useful for my fellow gamers, modelers, and hobbyists. Luckily, these all can be part of Dave’s Season of Scenery Challenge – which is fun as well.

Initially, I wanted to plan the cityscape layout for a 6′ x4′ mat. I drew a rough sketch, and decided that I would get two 2′ x 4′ sheets of 1/4″ MDF from Home Depot. My friend Jeff Smith (a fantastic woodworker) has a lot of tools – to include a nice table saw, which I do not have. As I needed more precise cuts than I could achieve with my Black and Decker skilsaw, I enlisted his help. He was able to cut all the pieces in no time at all (and again, thanks Jeff!!!).

My initial rough concept of how to use the MDF sheets. They would be the basis of all of the cityscape construction. The pavements and causeways are both planned here, as well as where I wanted it all to go.
Jeff cutting some causeways.

After the MDF was all cut, I laid out the pieces that I had on my FLG swamp mat, and arranged my buildings. Later, I would get a water mat from them, as I thought the swamp would not work as well. After the MDF concept layout, I was on to the building of the six causeways. I usually went through the process of doing one phase of work on one piece (like a prototype), and if that worked, moving on to the rest in similar phases.

My initial concept laid out on a swamp mat.

My causeway section prototype would be 5″ wide and a foot long. I spaced out some 6″ craft sticks evenly across the bottom and used wood glue to affix them. These would be to support the wooden piers and stones around them on the sides of the top surface. This worked ok, so I did all six with the cross-glued craft sticks.

Lining up the craft sticks on the bottom of the first causeway. At the top you can see some wood I was planning to use as piers – more on those shortly.
After I glued all the craft sticks across the bottoms, I weighted them down and let the glue set overnight.

While the glue was setting on phase I of the causeway undersides, I built the two removable bridge sections. These are 6″ long and the same width as the causeways. These would be analogous to a medieval drawbridge. I broke up craft sticks irregularly and dry-fitted them to the top of the bridge sections. Then, I weathered the wood by beating a small chain on and into them with a ball peen hammer. After this, I glued them on with wood glue and let dry overnight. I did not press these with weight as I wanted a less uniform surface of the bridge to represent wear and aging.

My chain and ball peen hammer weathering of the craft stick wood surface.
The weathered wood ready for gluing.

Then, I went back to the causeways. The cross-sections were ok, but I needed to have a way to add the revetments along the sides – so I added more craft sticks longitudinally on each side. They would jut out about 1/2″ on the side of the causeways.

Here you see four of the six causeways after the first gluing – and before adding more on the sides for the rocky revetments.
Here are the longitudinally-added craft sticks set with binder clips for overnight drying.

Once dry, I covered the surfaces with glue and then chinchilla dust.

After adding the chinchilla dust and allowing for drying. Next up would be the painting and shading of the causeways’ surfaces, then onto adding the piers and rocks.

I finished painting the removable bridge sections and build and painted 4 lifting piers out of square dowels and 1/8″ plywood.

The masked causeways ready for painting, along with the 4 lifting piers and the 2 removable bridge sections. I masked the sides as I wanted to have a clean gluing surface for the piers and rocks. Having an airbrush sped this process – especially relative to all of the gluing!
I base coated the causeways, lifting piers, and removable bridge sections (ignore the WIP pavements behind – that’s a sneak peek at the next post!)
All painted and shaded – except I wanted to add a bit more to the bridge sections…
…which you see here – I added some contrast to the planks.

Next, I moved on to the side piers and causeway revetments. The following day I grabbed a dry oak branch from the woods behind the house and cut it up. As each causeway section would need 14 wooden piers (seven per side), I figured I’d need 84 piers. So, I initially planned on using some birch wood discs I had plus the oak sections. I cut up the wood in sizes I thought would work well. However, as I laid it out (dry fit), I was not happy with the appearance. At all. Clearly, compared to a 28mm figure, the wood size was far in excess of what would have been used as piers along the causeways.

It was time to regroup. For piers, I then decided to use 1/8″ wooden dowels instead. I cut them up roughly to represent timber and glued them together in threes – and if you are doing the math, yes, that is cutting up and gluing together 252 pieces for the 84 piers. This project had a LOT of gluing and drying stages! I also found a nice source of rocks at Michaels – those little filler stones that some people use in glass vases. These were much cheaper than any hobby talus would have been. The time downside was that for effective placement I needed to glue one course of rocks at at a time – one rock at a time – with PVA – more gluing and waiting for drying…

Detail of the pier and rocks gluing. I cut the pier wood pieces irregularly as possible to add realism.
The first side of a causeway glued up with piers and rocks and a 28mm Conquistador for comparison. The PVA would dry and “suck” up nicely into the crevices.

I then painted the piers and added some shade to them.

Painted piers

For the rocks, I painted them with Vallejo “Grey Surface Primer, followed by a layer of Reaper “MSP Black Primer” on the bottom (where the rocks would have been by the lake), and added some slime to them there as well. After that, I added an aggressive layer of shading with Citadel “Nuln Oil”. The effect on the rocks was excellent. You can see a list of all the paints and other materials that I used at the end of this post.

Adding black primer to the bottom of the rocks over the grey primer in an irregular pattern to represent the water line.
After adding grey and black primers to the rocks.
Finished causeway with the Conquistador. Note the effect of the shading on the rocks.
Top view
A finished causeway, lifting piers, and removable bridge section on my new FLG water mat.
Tlaxcalans assault the city from the causeway (another sneak peek!)

With the causeways, removable bridge sections, and lifting piers, I now have terrain components that I can use for the cityscape. I also could use them for a causeway battle, and add war canoes in the lake with Aztecs shooting bows, slings, and atlatl at the Conquistadors and Tlaxcalans from the water.

I think you can see why I am breaking up this into multiple posts! This started in June and ended in July. My next post will focus on the design and building of the cityscape pavements. I hope you found this useful and will keep following this series – and please let me know your thoughts in the comments section.

Thanks so much for looking!

For all of my previous posts on games, units, and other projects for my 16th Century Spanish Conquest supplement for Feudal Patrol™ – “Civilizations Collide” – please see this page.

PAINTS, INKS, GLAZES, SHADES, WASHES, PIGMENTS, FLOCKING, GLUES AND MORE THAT I USED ON THESE TERRAIN PIECES/MODELS:

  1. 2′ x 4′ MDF sheets – 1/4″ thick
  2. Wood Glue
  3. Binder clips
  4. GOCREATE Jumbo Craft Sticks
  5. All Living Things Dry Dust Bath (chinchilla dust)
  6. Painters Masking Tape
  7. Vallejo “Flow Improver”
  8. Vallejo “Airbrush Thinner”
  9. Vallejo Mecha Color “Sand Yellow”
  10. Vallejo Game Air “Desert Yellow”
  11. Vallejo Model Air “Sand (Ivory)”
  12. Citadel “Seraphim Sepia” (shade)
  13. Vallejo Model Color “Dark Sand”
  14. Citadel “Ushabti Bone”
  15. FolkArt “Yellow Ochre”
  16. Vallejo Game Color “Red”
  17. Army Painter “Light Tone” (wash)
  18. Citadel “Agrax Earthshade” (shade)
  19. Elmer’s PVA Glue
  20. Gorilla Glue
  21. Ashland “Decorative Filler” (rocks)
  22. 1/8″ wooden dowels
  23. Vallejo Model Color “Wood Grain”
  24. Vallejo “Surface Primer Grey”
  25. Reaper MSP “Black Primer”
  26. Citadel “Nuln Oil” (shade)
  27. Vallejo Environment “Slime Green Dark”

Aztec Temple High Throne

At the center of Aztec life was their religion, which drove many of their cultural, military, political, and economic practices. The Aztecs had over 200 deities, of which the chief one was Huitzilopochtli, the patron god of the Mexica and of their capital Tenochtitlan. He was also the Aztec god of war.

In trying to replicate an appropriate Tenochtitlan cityscape for 28mm games of for Feudal Patrol games in Mesoamerica (using my Civilizations Collide supplement), I have been building and painting multiple types of resin and MDF buildings. This plan by necessity would be clearly downsized from the original, but should have the flavor of the era and location. The painting below from LFIllustration is one that I saw recently on my Pinterest feed. It that gives an idea of what I have been going for conceptually in terms of the cityscape, the farms, the causeways, and more if dealing with Tenochtitlan and its environs circa 1519-1521.

I really like this picture – note the war canoes by the causeway. This appears to be a depiction of Cortes’ arrival at Tenochtitlan and his meeting Montezuma II for the first time. Of course, the causeways would later play a major part in Cortes’ forces escape from and later return to (and conquest of) Tenochtitlan.

In order to motivate myself to get through my terrain building as efficaciously as possible, In mid-March I devised “Mark’s Aztec Building Challenge Contest”. This was to reward my followers with a guessing contest as to when I would finish all of the terrain in the challenge – as well as to give me impetus to getting through all I was setting out to do. As I wanted like terrain and building pieces to be matching/similar in color and texture, and I needed several paints, I did end up having some materials delays – and others that I have described previously as well. But finally, I have finished all of the pieces in the challenge! I will be posting the winners on a separate and subsequent blog post that will shortly follow this one, so I am adding a bit more suspense to the contestants – but not too much. I just felt I should give this piece its own due, and do a separate contest wrap-up.

So, you ask, what piece is it? Why, it’s “Temple High Throne”. It is another MDF kit. This one, like my previous Aztec MDF, also came from from Things From the Basement via 4Ground via Badger Games – you can see it here. Basically, it is a high raised platform, and as such, Montezuma II would have this platform as his throne overlooking Tenochtitlan in the temple complex. It is adorned with serpent/snake heads and a giant idol image of Huitzilopochtli. Overall, the kit was of good quality and I enjoyed building and painting it. I will have to add some rules about the steepness of the steps with regards to both movement up and down and melee combat.

I built and painted parts of the kit contemporaneously with the Temple Sacrificial Altar for economy of effort. I will go over some WIP and share some eye candy after that. As is my practice, I list the materials I used is at the end of this post for those interested. Also, as Huitzilopochtli is – at least to me – quite monstrous – and physically quite large here as well, I am adding this bad boy/building to the painting challenges being run by Angry Piper over at Dead Dick’s Tavern And Temporary Lodging called “Monster Mayhem 2021” (subject to his assent of course). I found the image below on line and used it as the basis for my painting of the large Huitzilopochtli idol. It’s a bit different than the others I have seen, but I thought it would be a good general guide.

Huitzilopochtli – I can spell this pretty easily now! I liked the charcoal and sky blue-colored face paint.
The kit box.
The model all glued together with the top idols just dry-fitted for planning.
The idols and the serpent heads were then given their chinchilla dust treatment. The idol face on the right is described in my last post.
I started multiple serial dry brushing and tone applications as you see here. I also decided the circle colors on the tower should match those of the Huitzilopochtli image, and that the serpents/snakes should as well. The chinchilla dust gives a great result to the dry brushing and tone applications.
As the chinchilla dust surface of the dusted model is quite rough and porous, I painted in the idols’ lines in the MDF with relatively thick black paint. While this felt like “paint by numbers”, I did find it gave a sufficiently primitive look while making later color choices more effective for me.
The rear view of the model shown above.
A close up view of Huitzilopochtli’s idol face after I lined it. I decided that I would paint the front and sides of the idol, basically treating it like a billboard in terms of color application.
Early painting of the idols and circles but before toning it all down on the sides. I did apply a diluted brush matte varnish to the idols as I wanted them to pop and not be dulled down by the tone. I thought that some poor Aztecs would have been enslaved to keep the idol paints fresh. You can tell me if that worked or not conceptually.
A face only a mother could love, and maybe not even then. The brush on varnish is still moist here.

After all the painting, I glued it together. A challenge was the Huitzilopochtli idol due to its height and its thinness. Both prevented using rubber bands during the gluing process, but I think it worked out ok. Now, I will share some eye candy shots of the completed model.

Front left side.
Back side.
Front right side.
Aztec Temple High Throne – close up shot of the top.
Montezuma, and an Aztec Captain and his conch blower signal the troops to muster…
And the Jaguar Warriors answer the call!

Thank you for taking a look. I have a few more buildings and some other stuff coming up for this project, as well as a rules update, but I’m pretty happy with the progress. I will share those shots on the next post, and eventually I hope to have a nice shot of all the terrain on the tabletop – I’m just not there yet. But, my gaming club is back LIVE on June 5th, so I’m close!

All my terrain so far.

For all of my previous posts on games, units, and other projects for my 16th Century Spanish Conquest supplement for Feudal Patrol™ – “Civilizations Collide” – please see this page.

PAINTS, INKS, GLAZES, SHADES, WASHES, PIGMENTS, FLOCKING, GLUES AND MORE THAT I USED ON THIS MODEL

  1. Elmer’s PVA Glue
  2. Poster tack
  3. Plastic Plates
  4. All Living Things Dry Dust Bath (chinchilla dust)
  5. Vallejo “Flow Improver”
  6. Vallejo “Airbrush Thinner”
  7. Vallejo Model Air “Sand (Ivory)”
  8. Citadel “Ushabti Bone”
  9. Vallejo Model Color “Dark Sand”
  10. Vallejo Model Color “Black”
  11. Vallejo “Thinner Medium”
  12. FolkArt “Yellow Ochre”
  13. Vallejo Game Air “Desert Yellow”
  14. Vallejo Model Color “White”
  15. Vallejo Mecha Color “Sky Blue”
  16. Citadel “Contrast Paint – Warp Lightning”
  17. Vallejo Model Air “Base Grey”
  18. Vallejo Model Color “Red”
  19. Martha Stewart Crafts “Pale Bronze”
  20. Citadel “Yriel Yellow”
  21. Vallejo Model Color “Clear Orange”
  22. Secret Weapon Washes “Sunshine” (ink)
  23. P3 “Red” (ink)
  24. Vallejo Game Color “Bloody Red”
  25. Vallejo Mecha Color “Sand Yellow”
  26. Vallejo Mecha Color “SZ Red”
  27. Vallejo Game Air “Moon Yellow”
  28. Vallejo Mecha Color “Turquoise”
  29. Vallejo Model Air “Silver”
  30. Army Painter “Light Tone” (wash)
  31. Vallejo Mecha Varnish “Matt Varnish”
  32. Army Painter “Mid Brown” (wash)

Aztec Temple Sacrificial Altar

Historically, the Aztecs and their Empire were well known for dominating Mesoamerica prior to the arrival of the Spanish. One of the more gruesome aspects of their way of making warfare involved the priority of capturing their enemies for both slavery and human sacrifice. A lowly commoner’s only way to ascend the social hierarchy in Aztec society was be a warrior who captured many enemy of perceived value (in other words not easy marks).

So, it became obvious that a suitable sacrificial altar-type building to drag these poor souls to their sad end would be necessary for games based in a city like Tenochtitlan. Obviously, in 28mm scale, I can only try to approximate the elements of a cityscape on a 6′ by 4′ tabletop, but the Aztecs would have had a place for ritual sacrifice as part of one.

In this post I will share my latest – and largest to date – MDF kit build for Feudal Patrol games in Mesoamerica (using my Civilizations Collide supplement). It is called Temple Sacrificial Altar and is scaled for 28mm figures. It has a large idol overlooking a small altar on a raised platform. This one, like my previous Aztec MDF, also came from from Things From the Basement via 4Ground via Badger Games – you can see it here.

The kit in its box.

This is part of “Mark’s Aztec Building Challenge Contest” (which you will read more about shortly in this blog post), as well as being part of not one but two painting challenges being kindly run by a couple of great bloggers. The first is “The Summer Solstice Painting Challenge” from Ann’s Immaterium. Its supposed to be an entry that you consider your “best”, and as I think you’ll see I think this building is one I feel qualifies – and this is my entry. The second is from Angry Piper over at Dead Dick’s Tavern And Temporary Lodging called “Monster Mayhem 2021”. As the idol on the building is pretty monstrous, and Angry Piper concurred – it’s my entry here too!

On to the project – the kit was an enjoyable build but much more detailed than previous attempts – so it took longer. Plus, as you’ll see, I had to do some circling back on the paint job. It happens. I did also dust this baby up with chinchilla dust again – and thanks again to The Imperfect Modeler (TIM) for introducing me to Chinchilla dust. There are a few WIP shots this time as well.

I started by wiping down the kit with a moist microfiber cloth.
Assembly was pretty easy. After earlier using rubber bands to secure the walls and stairs while they were being glued together, I used large washers to secure the top while it was being glued.
Next I dusted up the idol here (the dragon heads are for the next project) and the base.
Using my airbrush, I base coated everything.
I added the stairs and began painting. The model pieces are dry-fitted here and not glued yet. Here you see my initial – yes INITIAL – color choices for the idol. That would change.

Thanks to Pinterest, I got an image on my feed – of course on the day after I painted it – that would, well, make me somewhat aggravated but also allow me to take a new direction. The idol face apparently comes from an Aztec calendar – and the reddish image I saw on my feed fit my concept much better than what I originally chose.

I found that lining the recesses with black paint helped greatly. As the chinchilla dust is very absorptive (especially on MDF), I mostly used somewhat thicker paints – even craft paints with the brush. Otherwise, you can get some capillary effects. My list of the materials I used is at the end of the post.

More or less a repeat photo with the new idol shot – plus the little sacrificial altar dry fitted to the base.
I ended up using the white and red and black scheme you see here on the model. You also can see the highlighting of the chinchilla dust. I did find that I needed to go over the highlighting again with Army Painter Light Tone (the initial highlighting was over a toned-down base coat) – but I liked the final outcome.

It took me from the end of April to complete this model. I had some needed supplies finally arrive, allowing me to proceed. And I think now I’ve single-handedly bought the world’s supply of Army Painter “Light Tone”.

An aside as it affects how the contest challenge is proceeding. I had several delays beyond the supplies and repainting that I described, such as, well, golf, and mundane medical issues. Not that my game has been any good mind you! As for medical stuff, count my final COVID-19 jab that knocked me down a bit the next day (AND it was also at a golf tournament – bad call to schedule that on my part), plus a series of allergy/sinus issues, and a nearly broken toe (got a bit lucky with a bad bruise) – all causing me to slow down a bit. Oh yeah, multiple meetings and a town hearing to get (hopefully) approval to tear down and build a garage. And I still need another hearing! I hope to post on that IF AND WHEN I get approved.

The contest rolls on though.

A reminder on the contest!

Without further ado, let’s look at the final completed model and some Warrior Priests checking out the new digs.

Front view.
Top view. Note the bloody altar with a little BFTBG.
Detail of the front and the altar. There were two golden eagles and two faces on each side of the model. I also stuck with the red and white symbols on each corner.
Right side.
Rear of model.
Left side.
This Wargames Foundry warrior priest has the heart of a poor Conquistador – who was apparently already dragged away.
All my Warrior Priests (and a Priestess) checking out the new building. All are from Wargames Foundry, and you can see their stories here, here, and here.

All that I have left in the contest challenge is this model below. FYI, some work has been started.

Thanks for looking and I hope that you found this post enjoyable to read and check out. As always, please do let me know your thoughts in the comments section !

For all of my previous posts on games, units, and other projects for my 16th Century Spanish Conquest supplement for Feudal Patrol™ – “Civilizations Collide” – please see this page.

PAINTS, INKS, GLAZES, SHADES, WASHES, PIGMENTS, FLOCKING, GLUES AND MORE THAT I USED ON THIS MODEL

  1. Elmer’s PVA Glue
  2. Poster tack
  3. Plastic Plates
  4. All Living Things Dry Dust Bath (chinchilla dust)
  5. Vallejo “Flow Improver”
  6. Vallejo “Airbrush Thinner”
  7. Vallejo Model Air “Sand (Ivory)”
  8. Citadel “Ushabti Bone”
  9. Vallejo Model Color “Dark Sand”
  10. Vallejo Model Color “White”
  11. Vallejo Model Color “Red”
  12. Vallejo Model Color “Black”
  13. Vallejo “Thinner Medium”
  14. Vallejo Game Color “Bloody Red”
  15. Vallejo Game Color “Livery Green” (REPAINTED)
  16. Citadel “Waywatcher Green” (glaze) (REPAINTED)
  17. Citadel “Bloodletter” (glaze)
  18. Vallejo Game Air “Sun Yellow”
  19. Citadel “Lamenters Yellow” (glaze)
  20. DecoArt “Light Buttermilk”
  21. Vallejo Model Color “Dark Blue” (REPAINTED)
  22. Vallejo Mecha Color “Turquoise”
  23. Vallejo Model Air “Fluorescent Red”
  24. Vallejo Model Air “White”
  25. Vallejo Model Air “Silver”
  26. Martha Stewart Crafts “Pale Bronze”
  27. Citadel “Carroburg Crimson” (glaze)
  28. Citadel “Yriel Yellow”
  29. Vallejo Game Air “Beastly Brown”
  30. Citadel “Contrast Paint – Warp Lightning”
  31. Army Painter “Light Tone” (wash)
  32. Vallejo Mecha Varnish “Matt Varnish”
  33. Citadel “Blood for the Blood God”
Tiny Painted Heroes

The Adventures of a 50-Something Tabletop Gamer, Game Design hobbyist, and full-time Software Engineer

Home of the Grumpy Gnome

Tinkering with Artwork and Ideas

Steve's Paint Brush

Grimdark model making and mini painting

Wargamesculptors Blog

Life, Golf, Miniatures, & Other Distractions

Dead Dick's Tavern and Temporary Lodging

Life, Golf, Miniatures, & Other Distractions

Guru PIGS Blog

Guru's thoughts on wargaming, life, and the universe!

Wisely lead... without a head!

History, Miniatures and Wargaming

Kuribo's Painting

Fallout, MESBG, and Hellboy Painting, Terrain, Dioramas, and Battle Reports

Don't Give Greg Ideas

Seriously, just don't

War Across the Ages, and other dark horrors

A discussion of miniatures collecting, painting and gaming.

Classic Warhammer 40K

Painting diary focused on Warhammer 40K 2nd ed., 5th ed. WHFB, related GW games, and miscellaneous whimsy

Colonel Mustard

WW2 Modelling in 1/72 Scale

Bogenwald

Random painting and terrain making.

Pat's 1:72 Military Diorama's

Scale diorama tips and ideas

Arcade Dreams

Building the Arcade Dream

P.B.Eye-Candy

Phil's 20th century wargame pages

SP's Projects Blog

A futile fight against entropy or 'Every man should have a hobby'? Either way it is a blog on tabletop wargames, board games and megagames

30mmdave

Wargaming Plausible reality?

Faith&Steel

dave's gaming adventures: faithandsteel.wordpress.com

The Imperfect Modeller

Miniature Figure Painting and Diorama Modelling

Double Down Dice

Painting miniatures and rolling dice!

Just Needs Varnish!

My ongoing wargames projects!

miniaturepopcorns

Sculpting some worlds

despertaferres

Wargaming with the ability of a dull nine year old

Dawn of the Lead

Miniature wargaming and the occasional zombie

Rantings from under the Wargames table

Wargames, Figures, Sculpting and Converting Miniatures

Simple as WaR

Miniatures & Terrains

Buck's Blog

Life, Golf, Miniatures, & Other Distractions

IRO aka Imperial Rebel Ork

- I model - therefore I am -

Azazel's Bitz Box.

Painting, Modelling, Miniatures, 1:6, Games... Whatever else I find interesting.

diggingforvictoryblog

Smallholding and Wargaming.......not always at the same time!

Shamutantis

Nørdblog numero uno

Harry Heckel

Writer/Game Designer

The Lost and the Damned

Fantasy, sci-fi and historical miniature gaming

sho3box

Toy soldier wargaming stuff.