As I wrote back then in March (quoting myself) – and it’s still true:
…I want to emphasize that I did not need to do any of these projects to play Feudal Patrol™. Period. I did because they suited my personal needs and – well – I get thoughts of stuff in my head that need realization.
Buck’s Feudal Patrol rules have more than adequate tools and game aids. They are fantastic. My goals here were for myself so that I can make my games easier for me mainly.
Now, as time has gone on I have realized that I wanted a few more things to ease play for me as a GM – specifically to adapt to the period. I am sharing those here and my processes as they may prove useful for some, and just interesting for others.
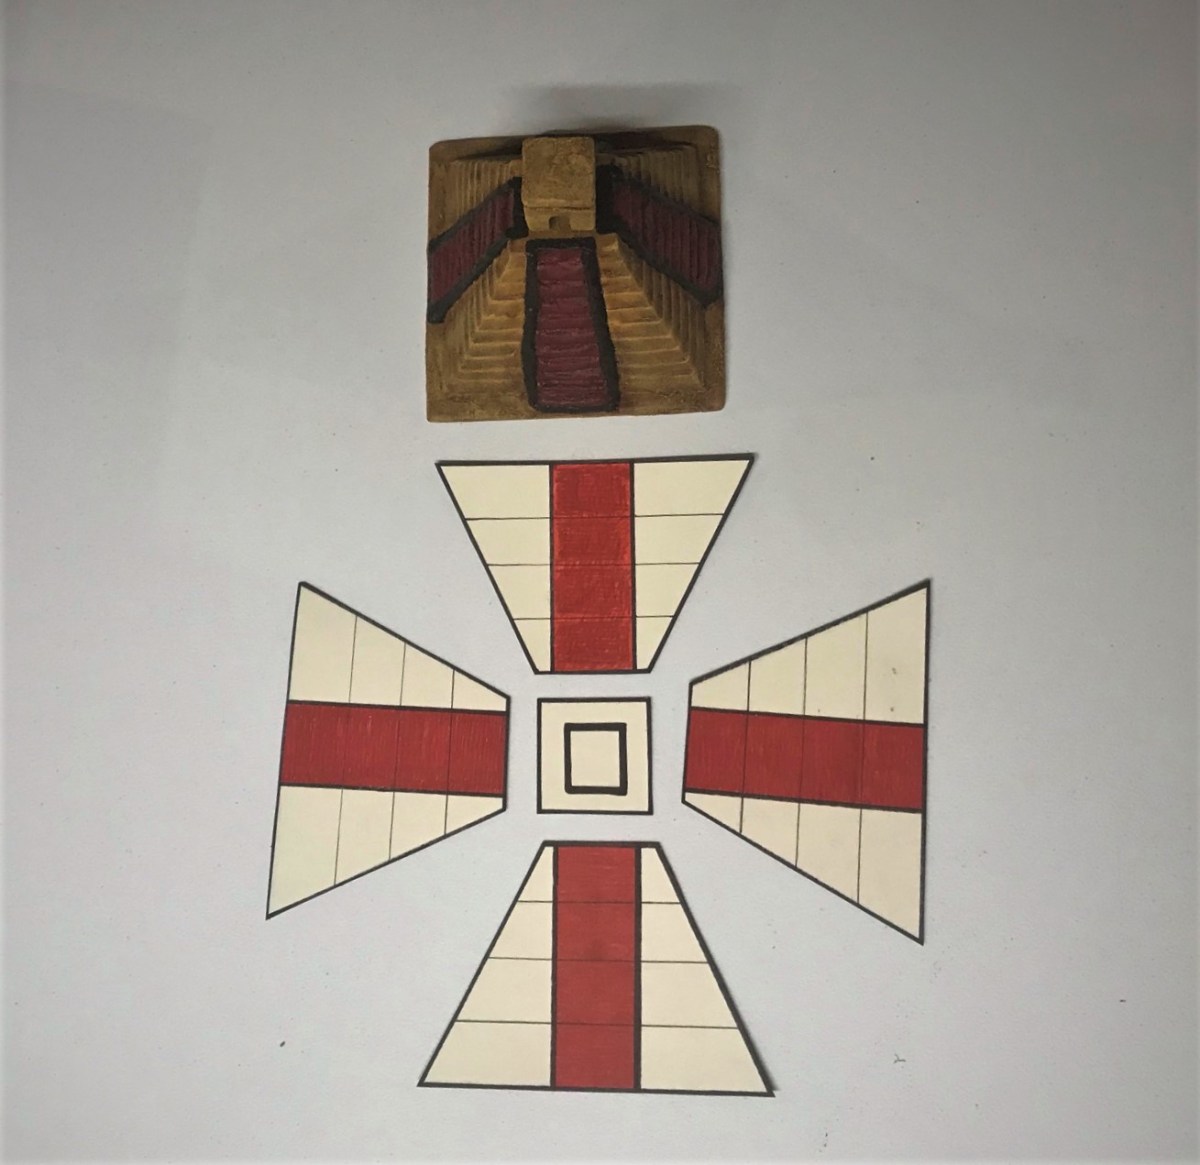
First, as far as steep-stepped structures (such as temples that one might expect to see in the Aztec or Mayan Empires), they pose a challenge gaming-wise. I have updated my rules for melee combat on these steps (but they are not yet published – but I use them). Most commercially available steep-stepped structures are either ruins (not ideal for depicting them in their heyday) or lacking adequate space on the steps to place figures during a game. Most of my figures are on 1″ bases, and getting them on the steps of my structures was not happening. I did not want them to be just big eye-candy on the tabletop. So what to do?
Make templates!
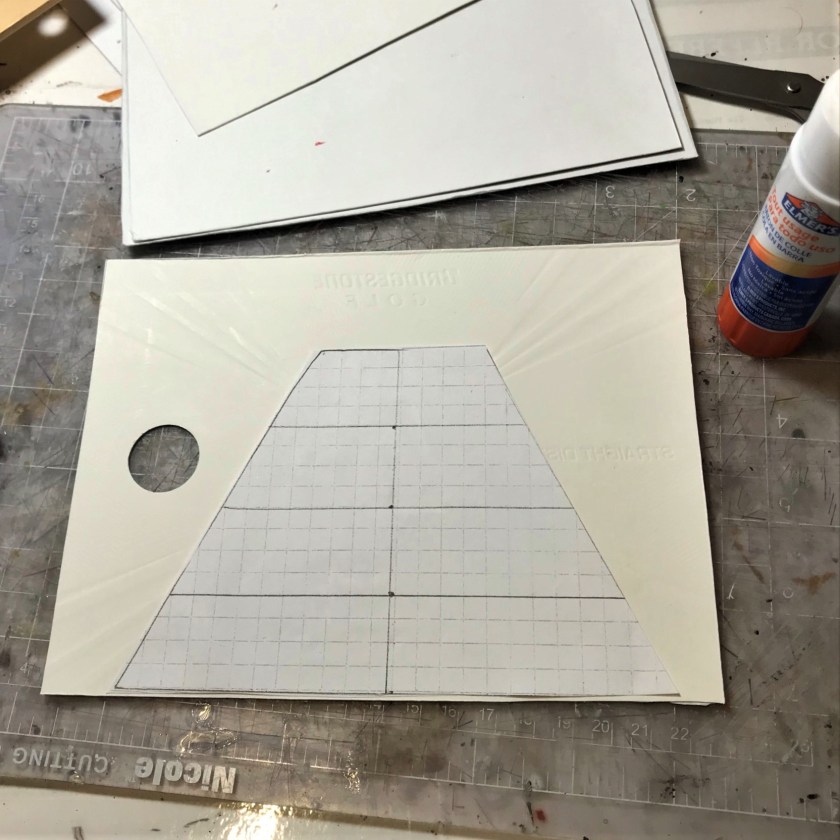
Below, I will share what I did and how – with the assumption that all my figures are 1″ based and that there would actually be sufficient depth in real life for them to stand on the steep steps in single rows.
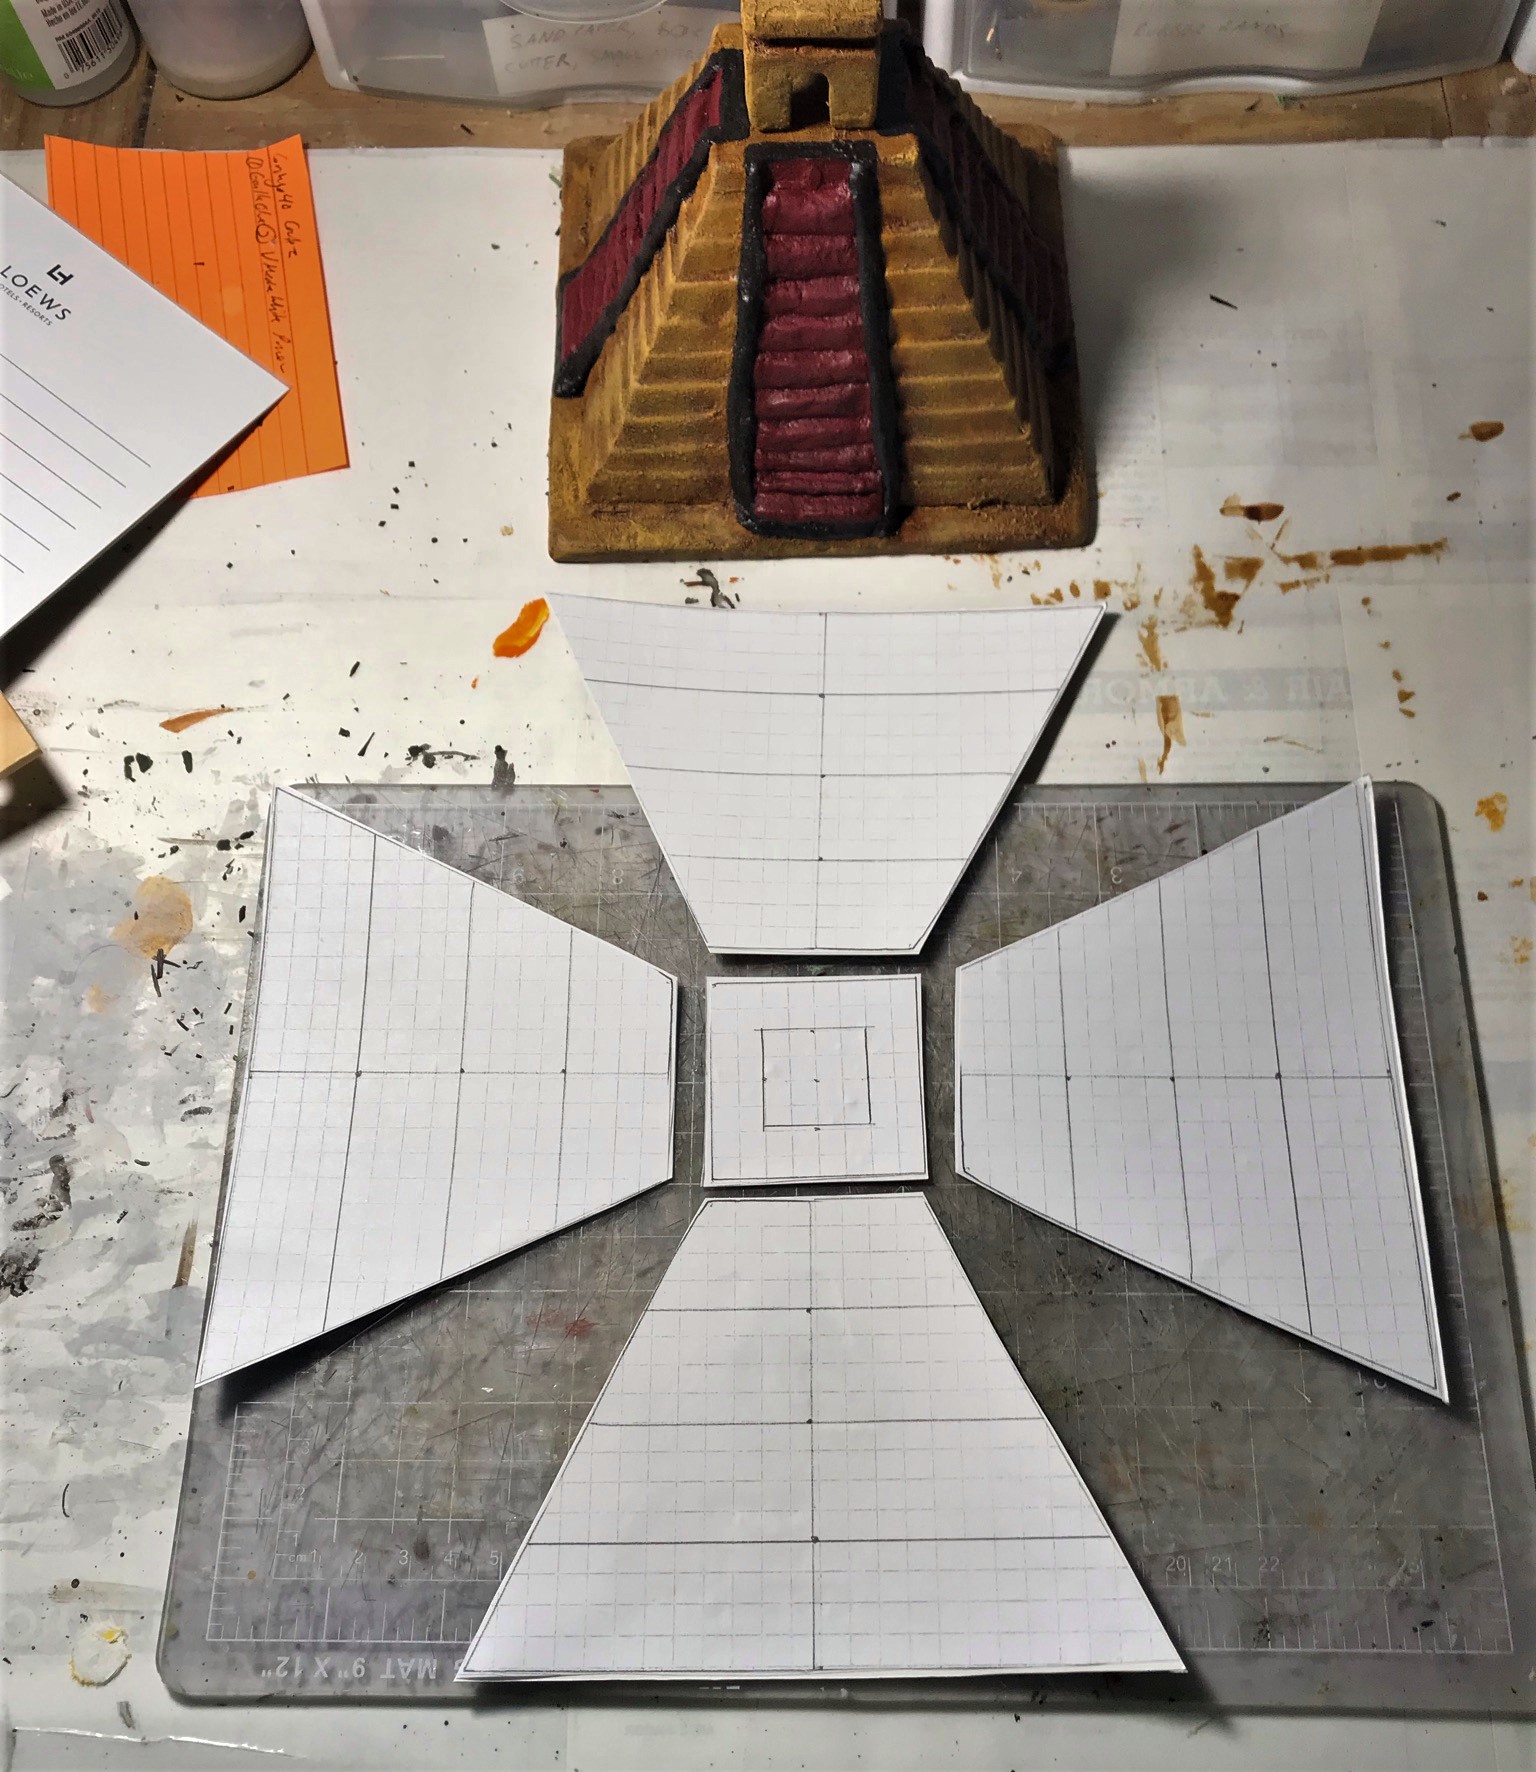
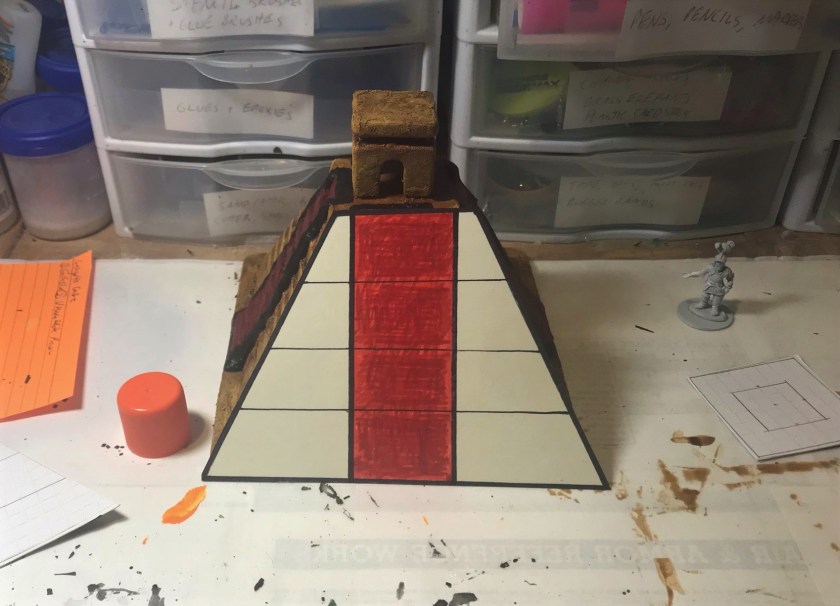
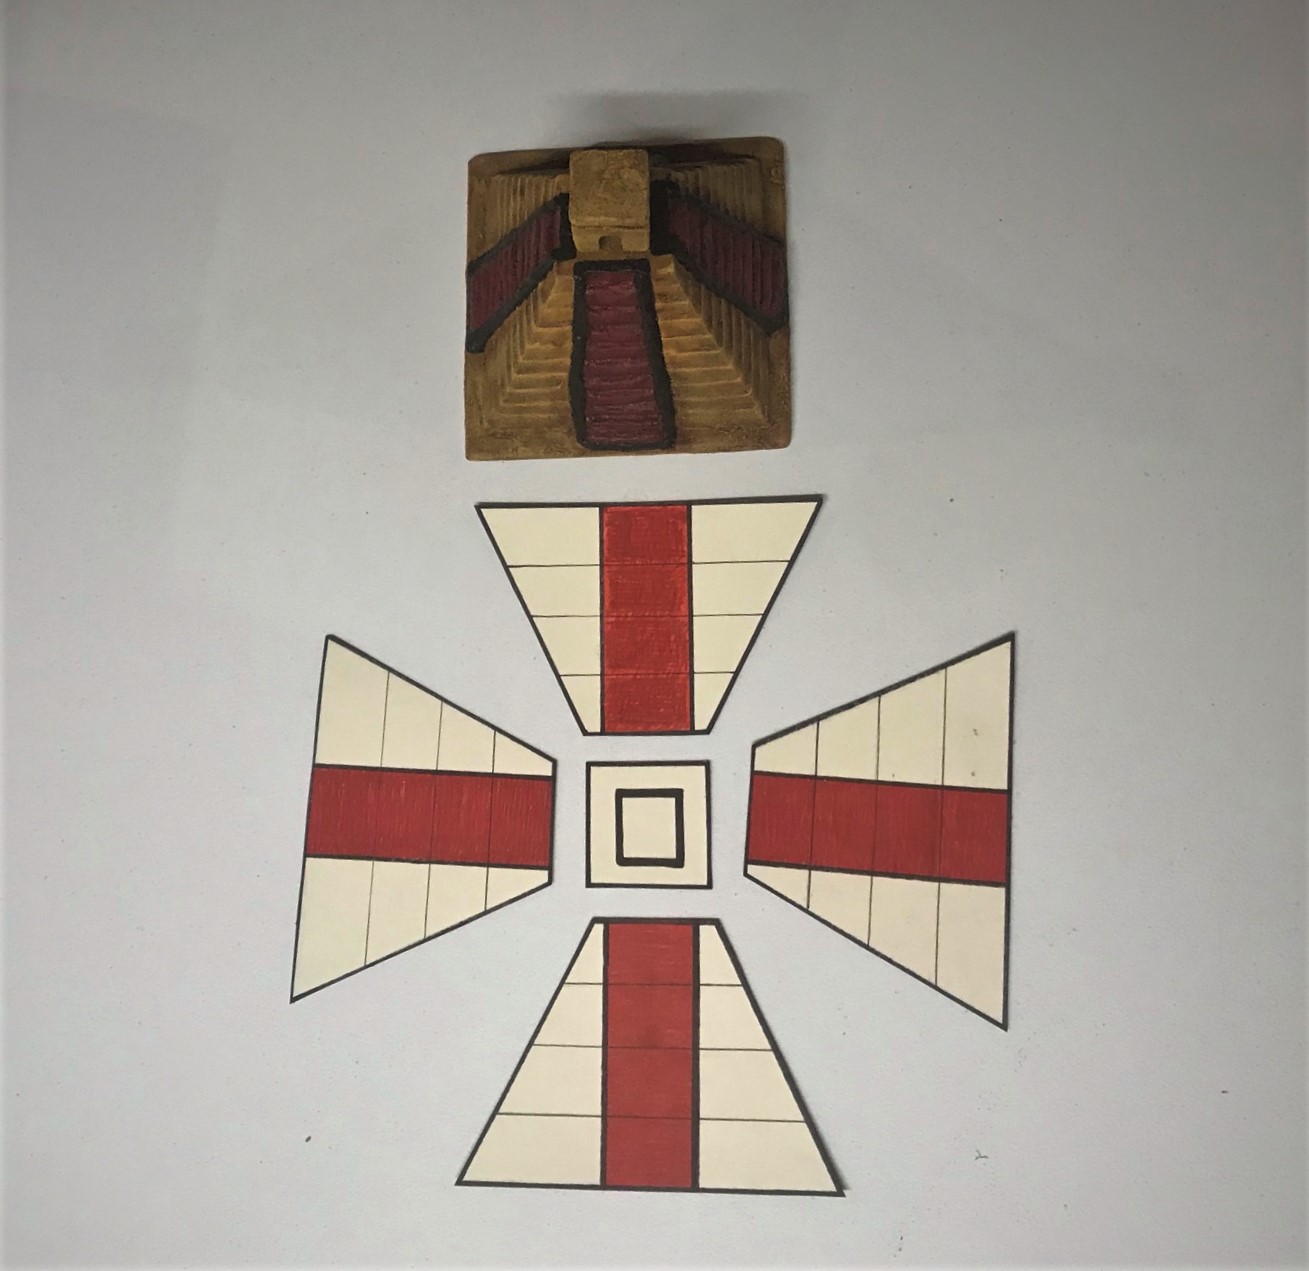
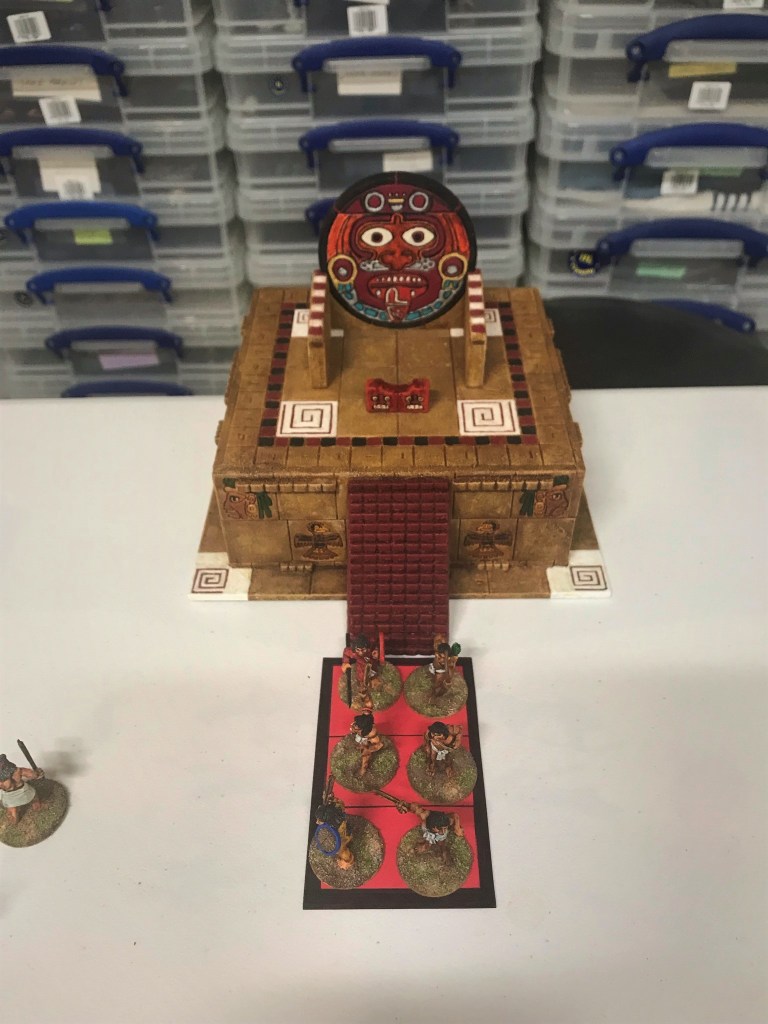
The main need was for the small temple that I am using as The Temple of Yopico in Tenochtitlan. I figured out the size of the sides and the top, and adjusted for 1″ steel washer bases. You can see that each side should allow for 14 figures plus one on the top. After drawing these, I then I cut out the graph paper templates. Ready for backing
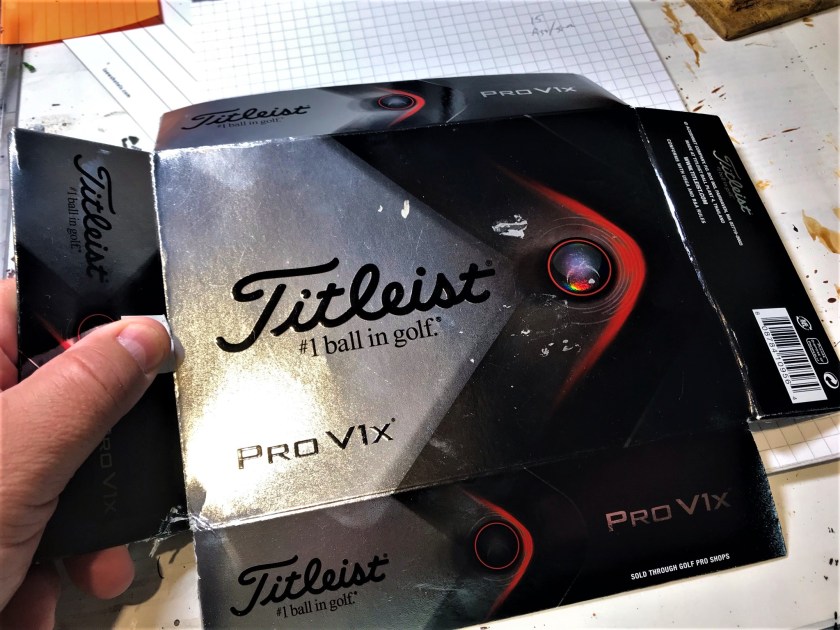
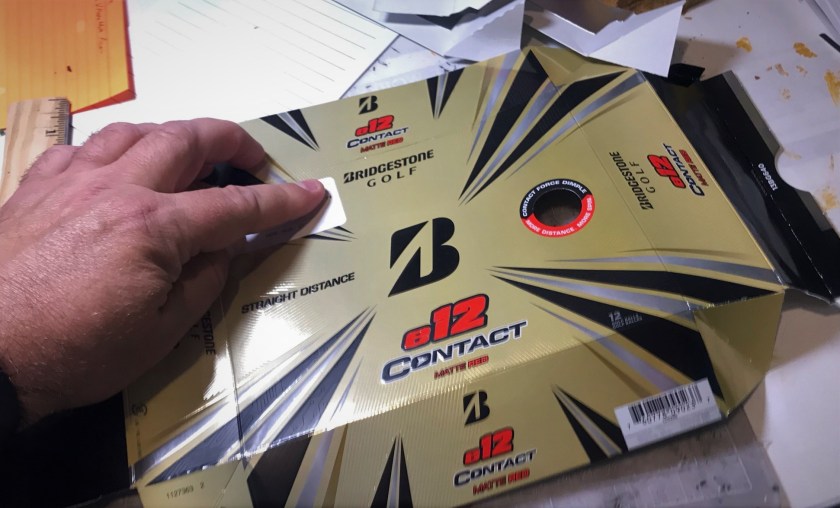
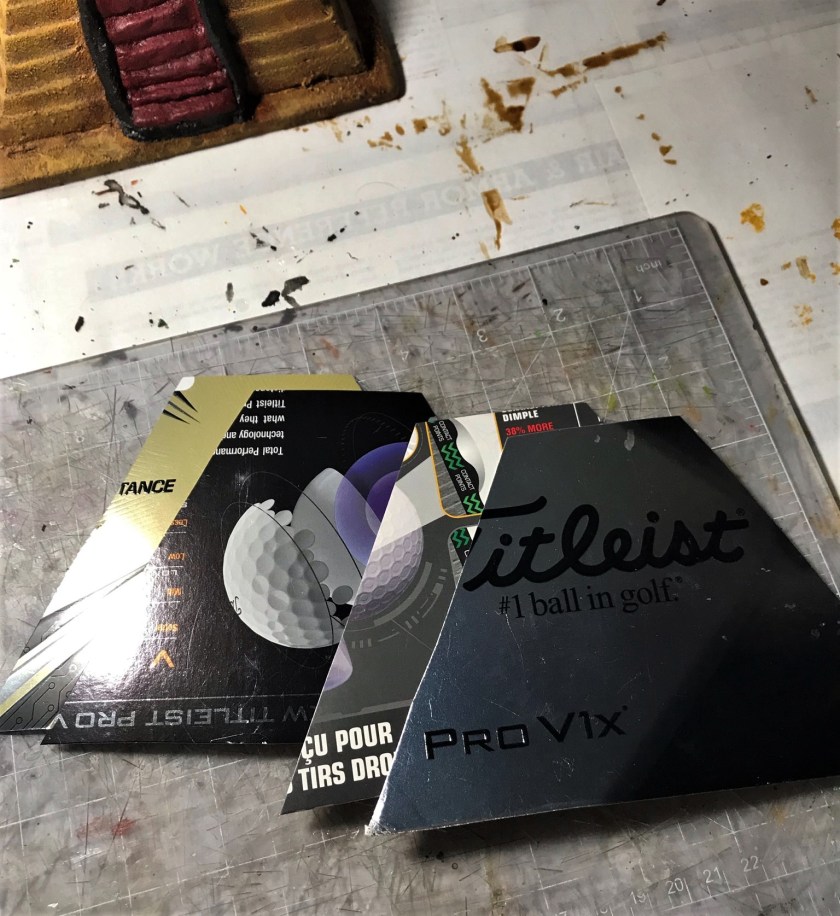
Clearly these needed some heft – and my other main hobby, golf, allowed for some good cardboard backings with a glue stick application. I pressed them down with a book and a 25 pound dumbbell.
Cut up box…
….and another…
…mount as backing…
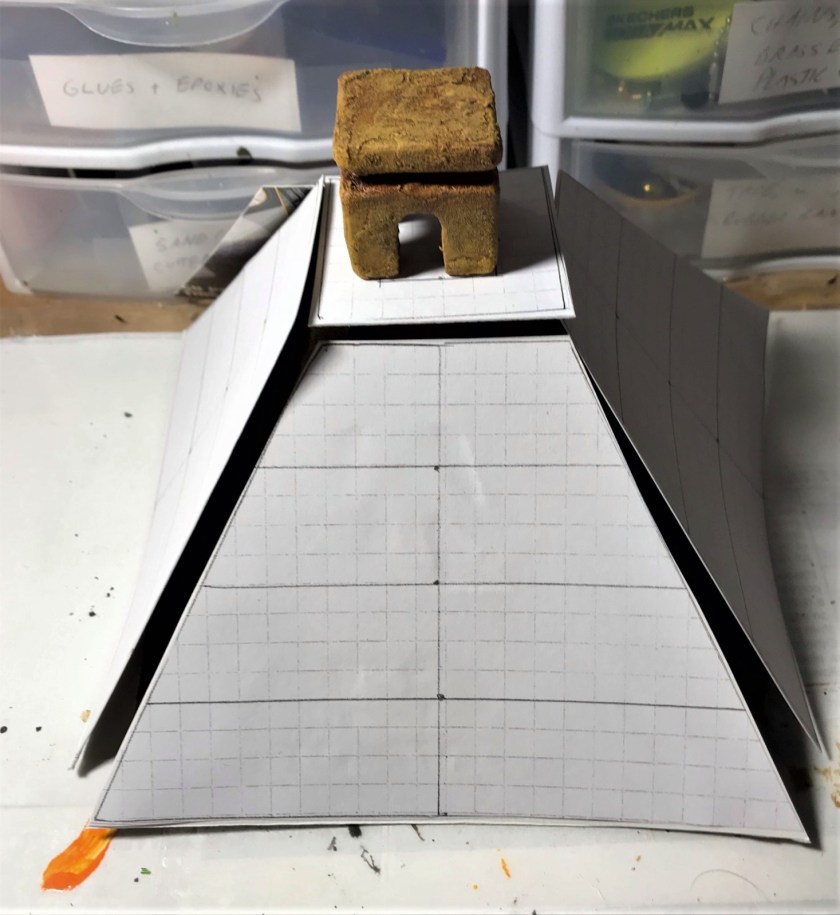
…mounted…
…press for strong attachment…
…and check against the temple for size!
Template phase 1
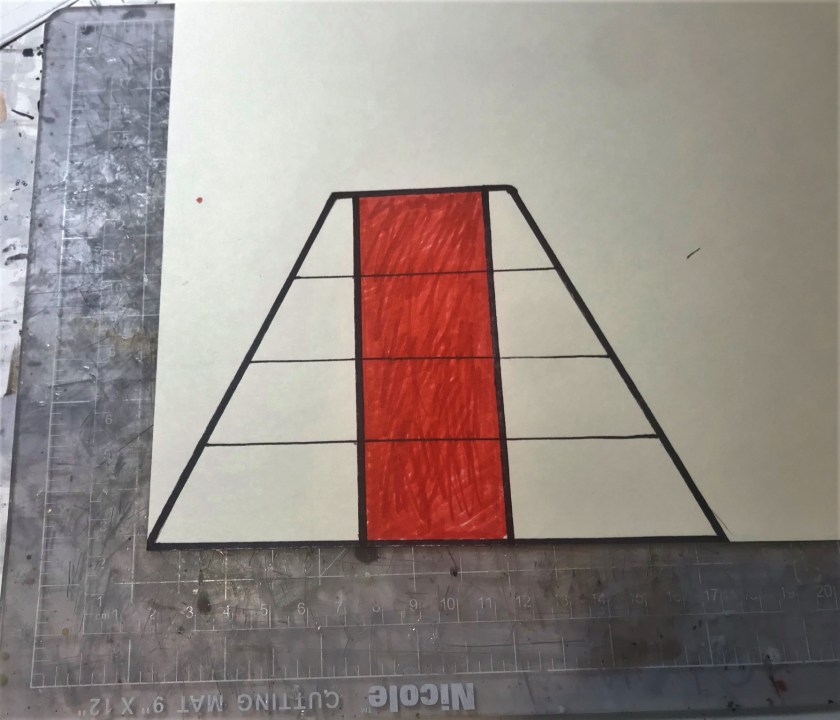
For phase 2, I traced the templates onto card stock, and in pencil drew in the lines. Next, cut out the card stock. Then I used red and black Sharpie pens to outline the steps and edges and color in. Add the glue stick, and press again under the weight.
The card stock
Sized up with the temple
Phase 2
I am pretty happy with the results and look forward to using them.
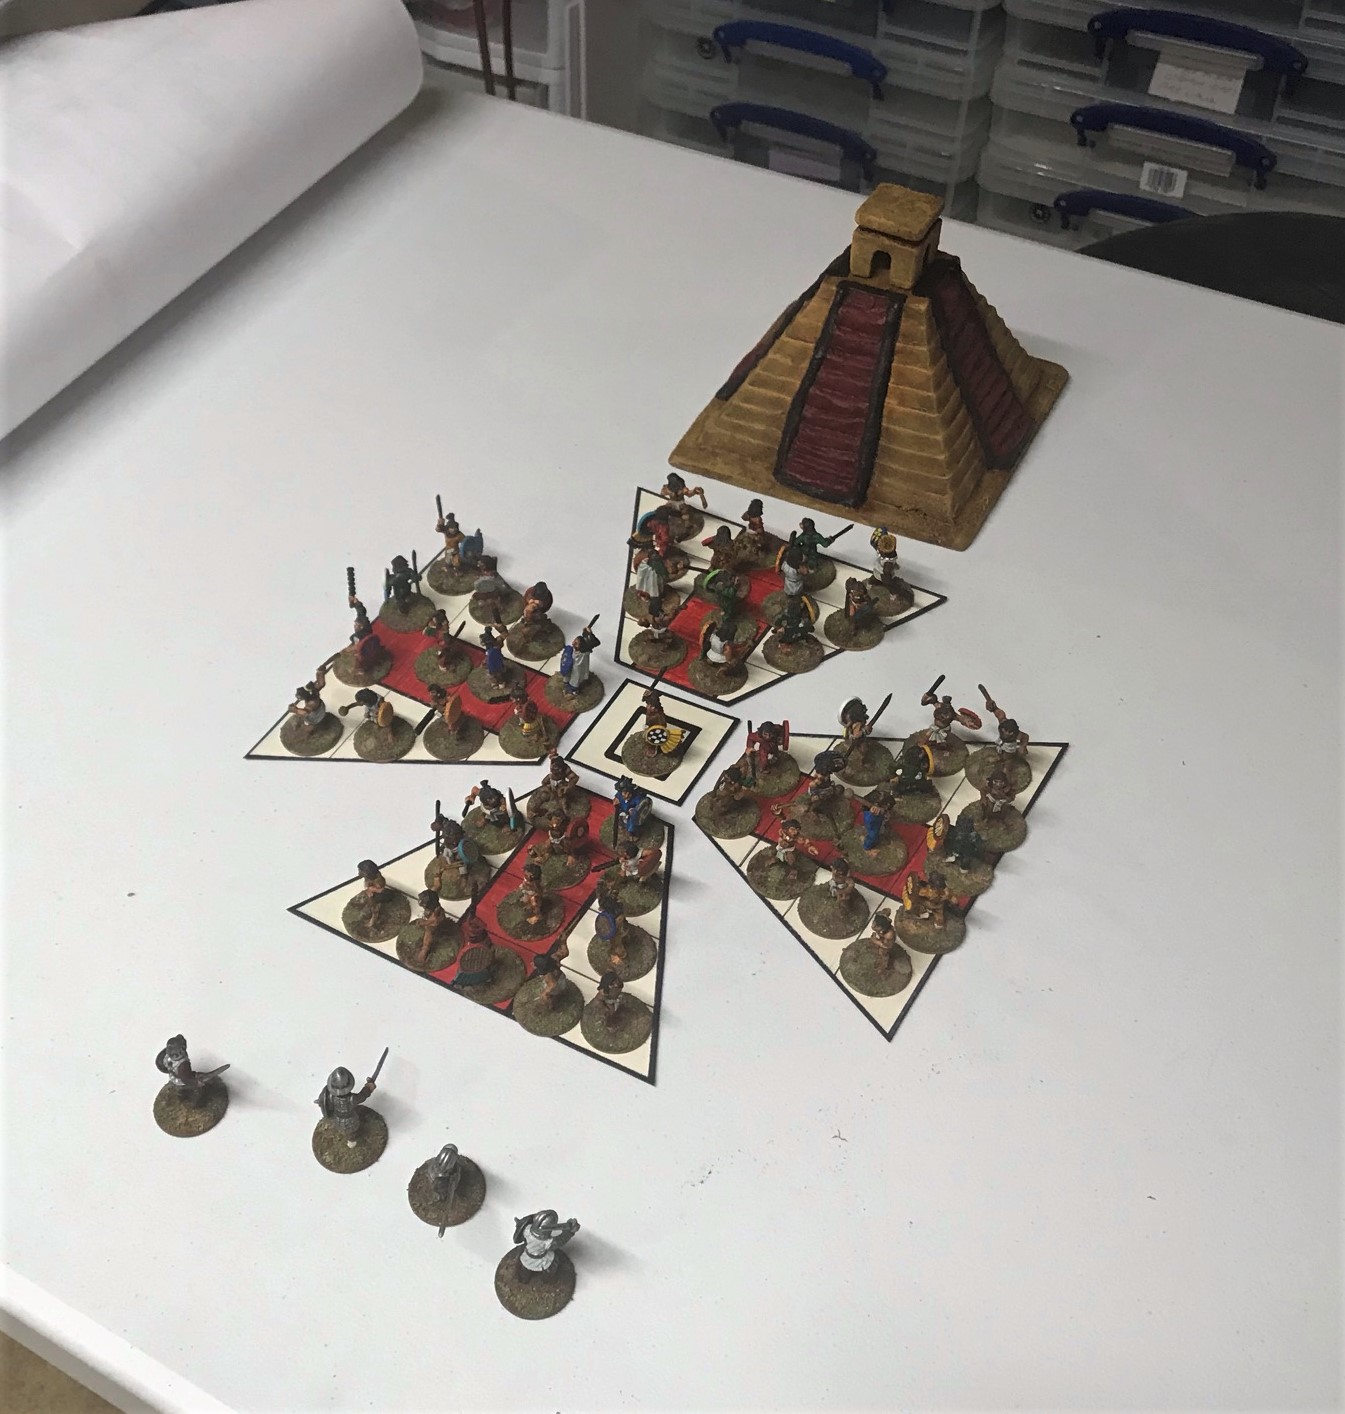
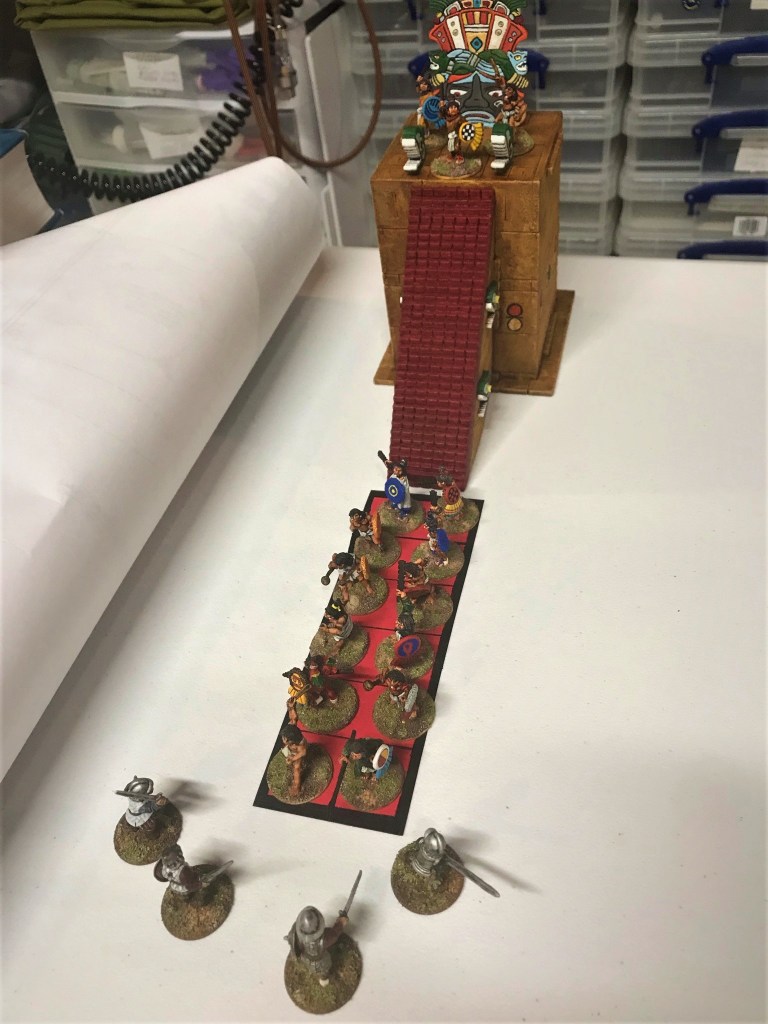
Final templatesA mock up of the templates with them full of Aztecs facing off against some Conquistadores. In games, I will have these templates setup off of the table for resolving combat but am showing it next to the temple for comparison.
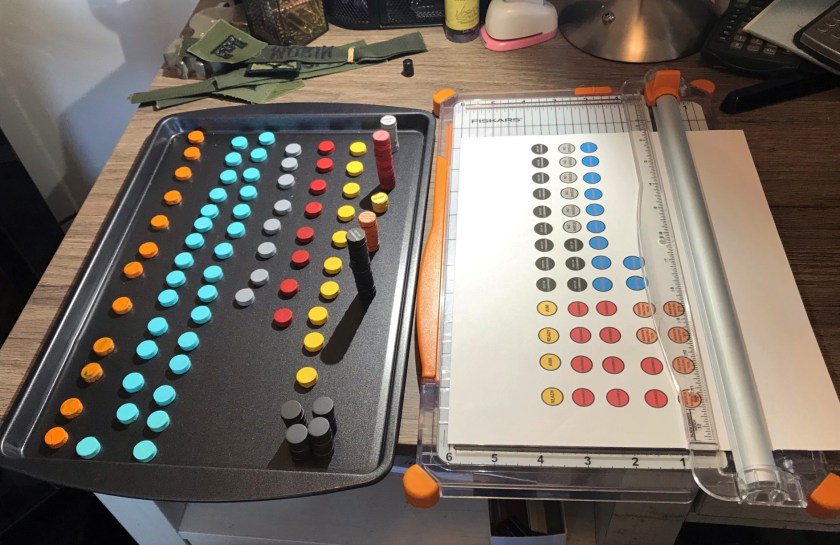
The next marker project was a continuation of my previous one that I mentioed above with some additions. In a game, Elite troops such as Jaguar or Eagle Warriors (and more) can go “berserk” – basically making a fanatical charge until either they kill an enemy or are killed. There are advantages and disadvantages to trying this as a player. I found that if Aztecs went into “berserk” mode on the battlefield, I needed to differentiate that on the tabletop, as some figures would, while others might not – plus they tended to charge far afield on the tabletop. To remedy this, and for better availability, I wanted more of the same magnetic markers. I did the same as you saw previously – using cheap magnets and craft paints and printing off labels that I cut out. As I use steel bases, magnets are a good help.
Old and new painted magnets
Punch out labels
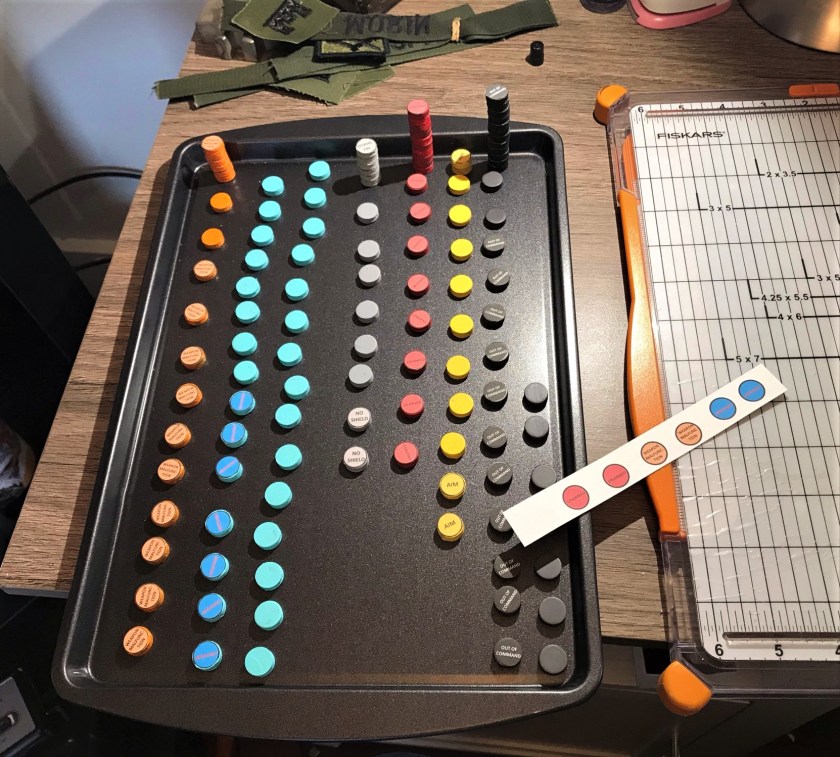
In progress
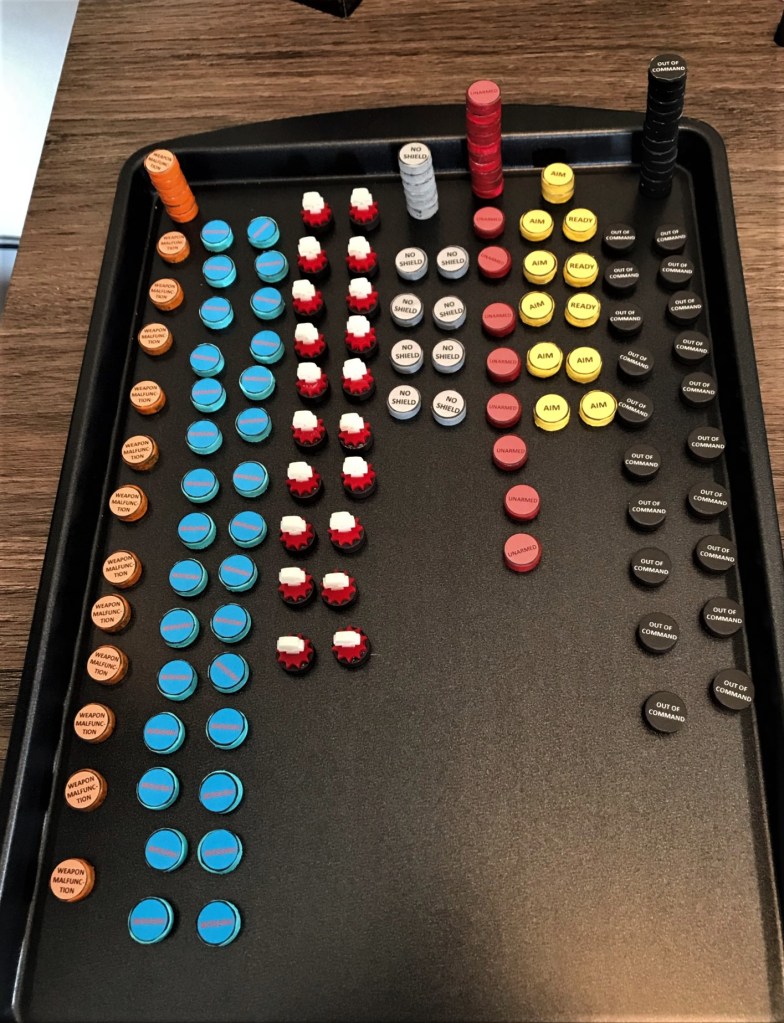
All magnets complete
Magnetic markers
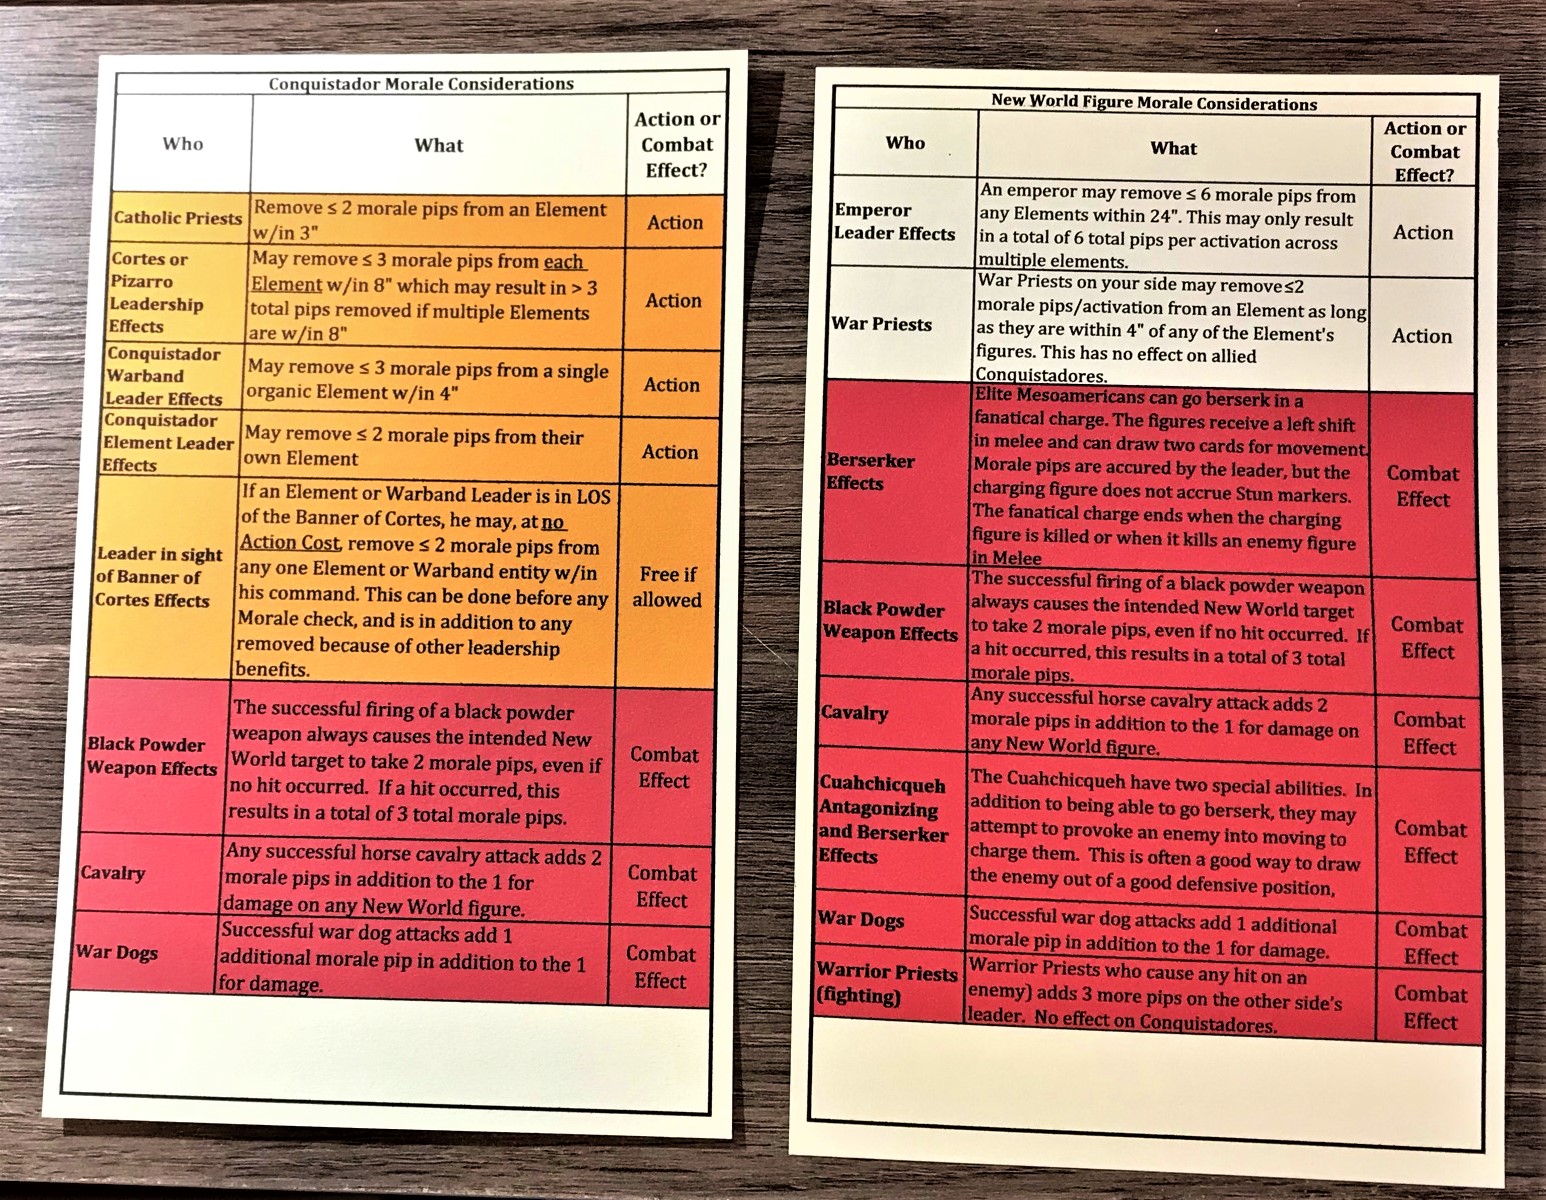
Lastly, I printed off some new 2-sided 5″ x 8″ cards with all the special Morale rule differences for my game versus other eras/theaters. Mine are meant to evoke the nature of the Spanish Conquest.
Morale Cards – and yes I see the typo!
Now, I as I write this I am getting ready to hit the road for a fun weekend of gaming with some old friends. Well, we are all getting older at this point I guess…beats the alternative!
I am hoping to share a good post on all the games when I return. Also I need to do a follow up on the garage+ project as a LOT is happening. If you are unfamiliar with my garage+ project, you can catch up on all of them here.
Miscellaneous details and references for those interested in that sort of thing:
For all of my previous posts on games, units, and other projects for my 16th Century Spanish Conquest supplement for Feudal Patrol™ – “Civilizations Collide” – please see this page.
Clearly, 500 years ago, the Catholic Faith of the Spanish Conquistadores was a huge part of their culture. One only need look at The Banner of Cortes to see that. As such, they were accompanied by priests that said Mass for them and worked – and did fight – alongside them in Mesoamerica 500 years ago. Remember, for them, in 1518-1521 it had only been a little over 20 years since they had successfully had the Reconquista and reclaimed the Iberian Peninsula from the Moors after 700 years of occupation. More recently, the Conquistadors had seen success in the Italian Wars. Much of that success was attributed to Providence to be sure.
For my Civilizations Collide scenarios for games of Feudal PatrolTM , I have updated my rules for priests on both sides. The updated supplement is soon to be made available for download, as is a planned 16-scenario booklet. In these games, the beneficial effect of Catholic Priests is that they can help reduce the number of Morale Checks that the Spanish might need to take as a result of combat and casualties, as they motivate them to fight on. They can also defend themselves, albeit understandably less effectively than a traditional Sword and Buckler Man.
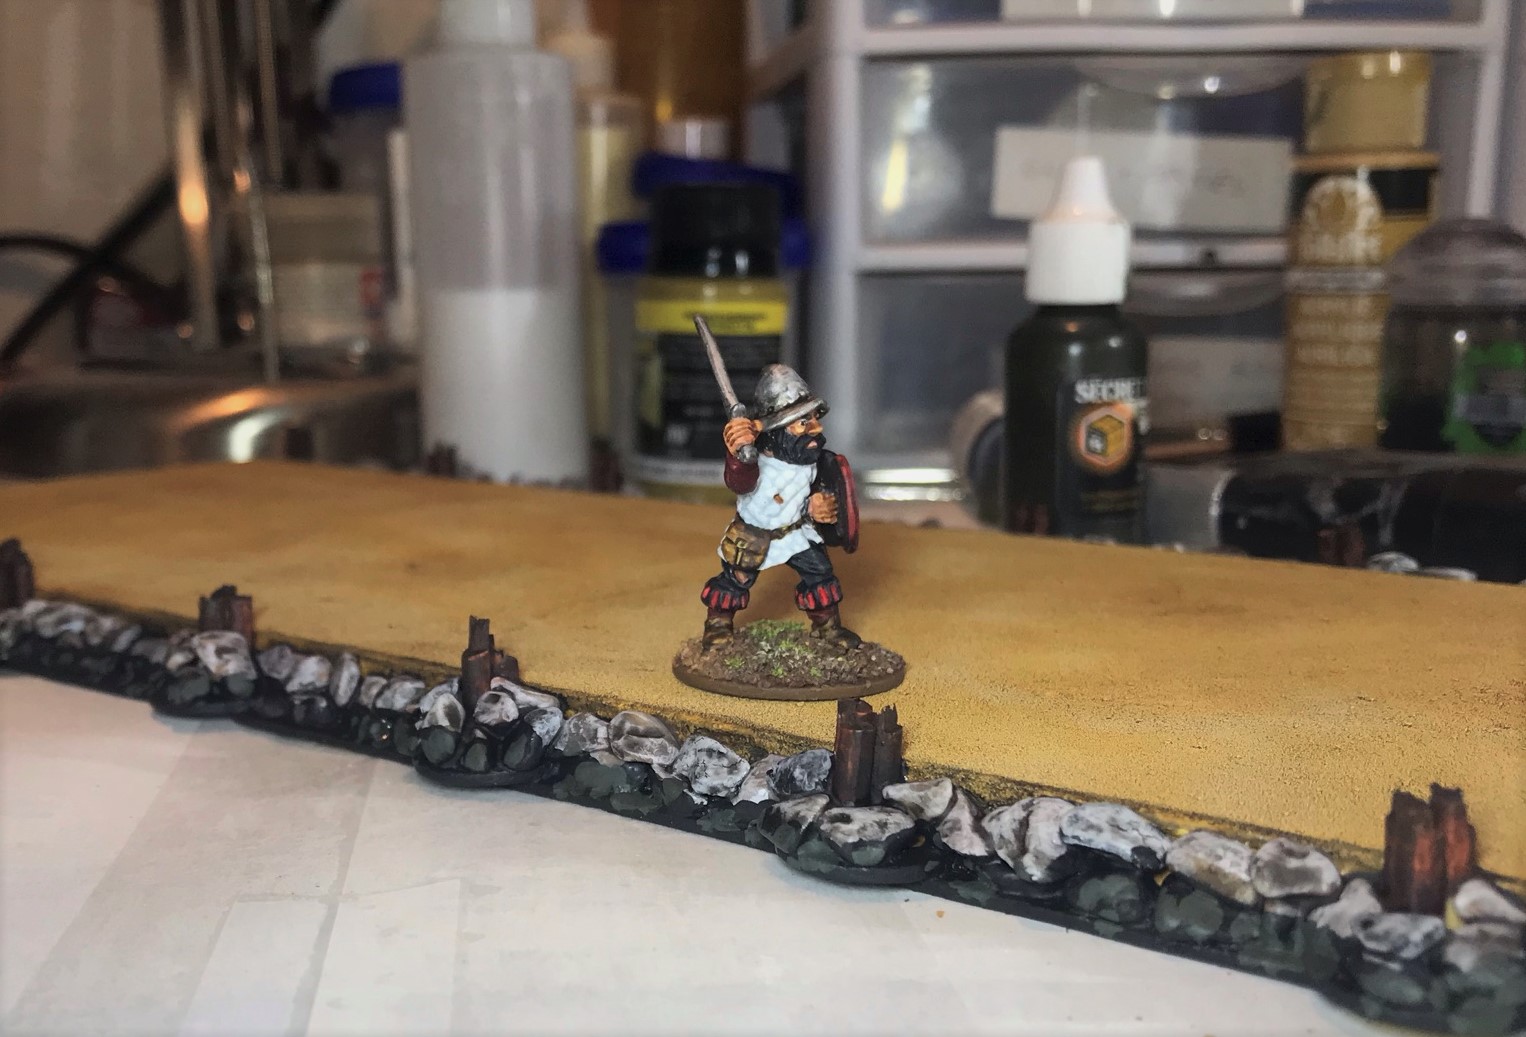
While I have many Sword and Buckler Men figures, no appropriate figures to use as priests were in my unpainted mountain. After a good search I did find a few at Badger Games from Gripping Beast/Saga and Conquest Games. These looked quite medieval, but to my knowledge I would not think that religious garb or holy garments really changed much over the centuries back then. These were probably designed for the era of Viking raids. Plus, the two that I got that were from Conquest games were monks. And yes, as a practicing Catholic, I am familiar with the differences! Still, these looked the part as best as I could tell, so I bought them. They are 28mm and metal. As for painting research, I used the only plate I found in John Pohl’s Aztecs and Conquistadores(page 168) showing a priest as a guide for painting. Clearly, a monkish look – in black – was going to be fine for the tabletop.
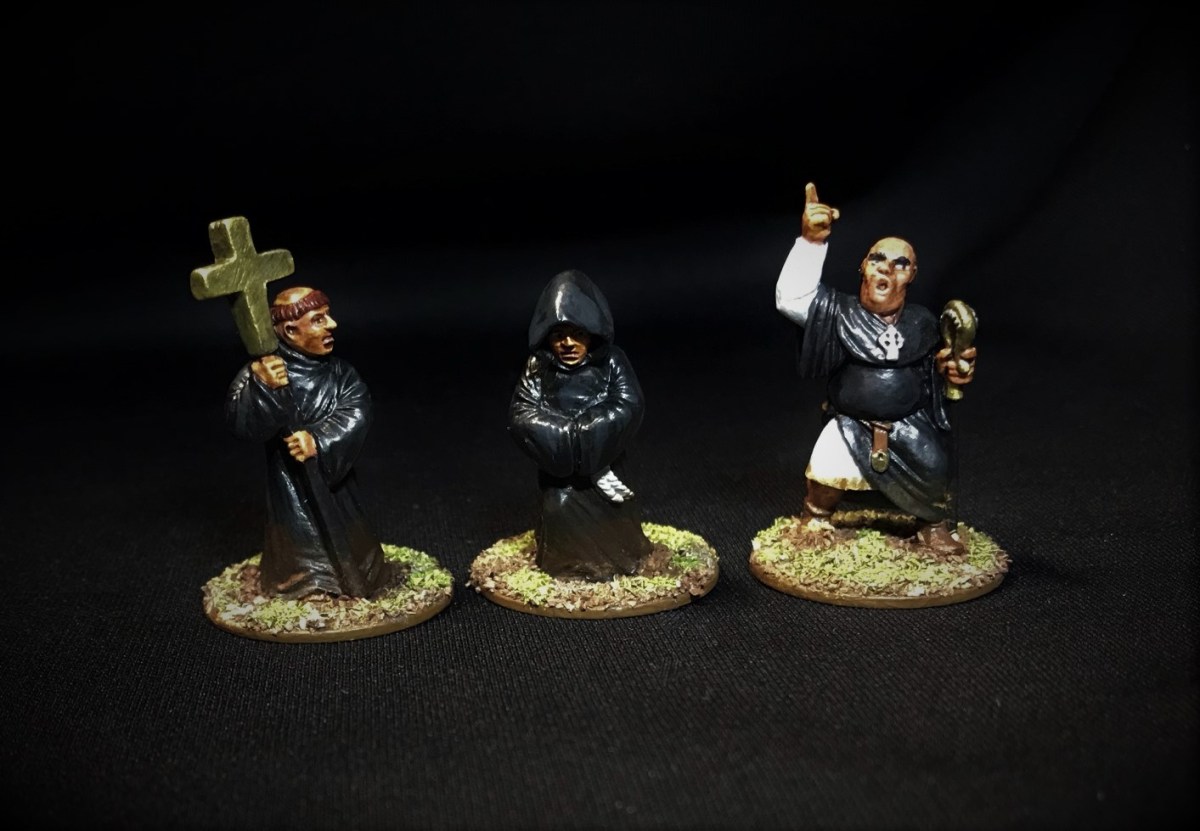
With Historicon and some upcoming gaming looming as early as three days from today, I painted the three up quickly right after I finished Hernan Cortes. I’m fairly happy with them for gaming the period.
The two Conquest Game figures were both monks, the Gripping Beast/Saga one was called a priest:
Catholic Priest/monk figure from Conquest Games Ecclesiastics/Monks Line via Badger Games (#CG CGMM121f Monk in Cowl) – designated CCP2 by me
Catholic Priest/monk figure from Conquest Games Ecclesiastics/Monks Line via Badger Games (#CG CGMM121g Monk with Holy Cross) – designated CCP1 by me
Catholic Priest figure from Gripping Beast/SAGA Priests Line via Badger Games (#SPR06 Christian Priest 2) – designated CCP3 by me
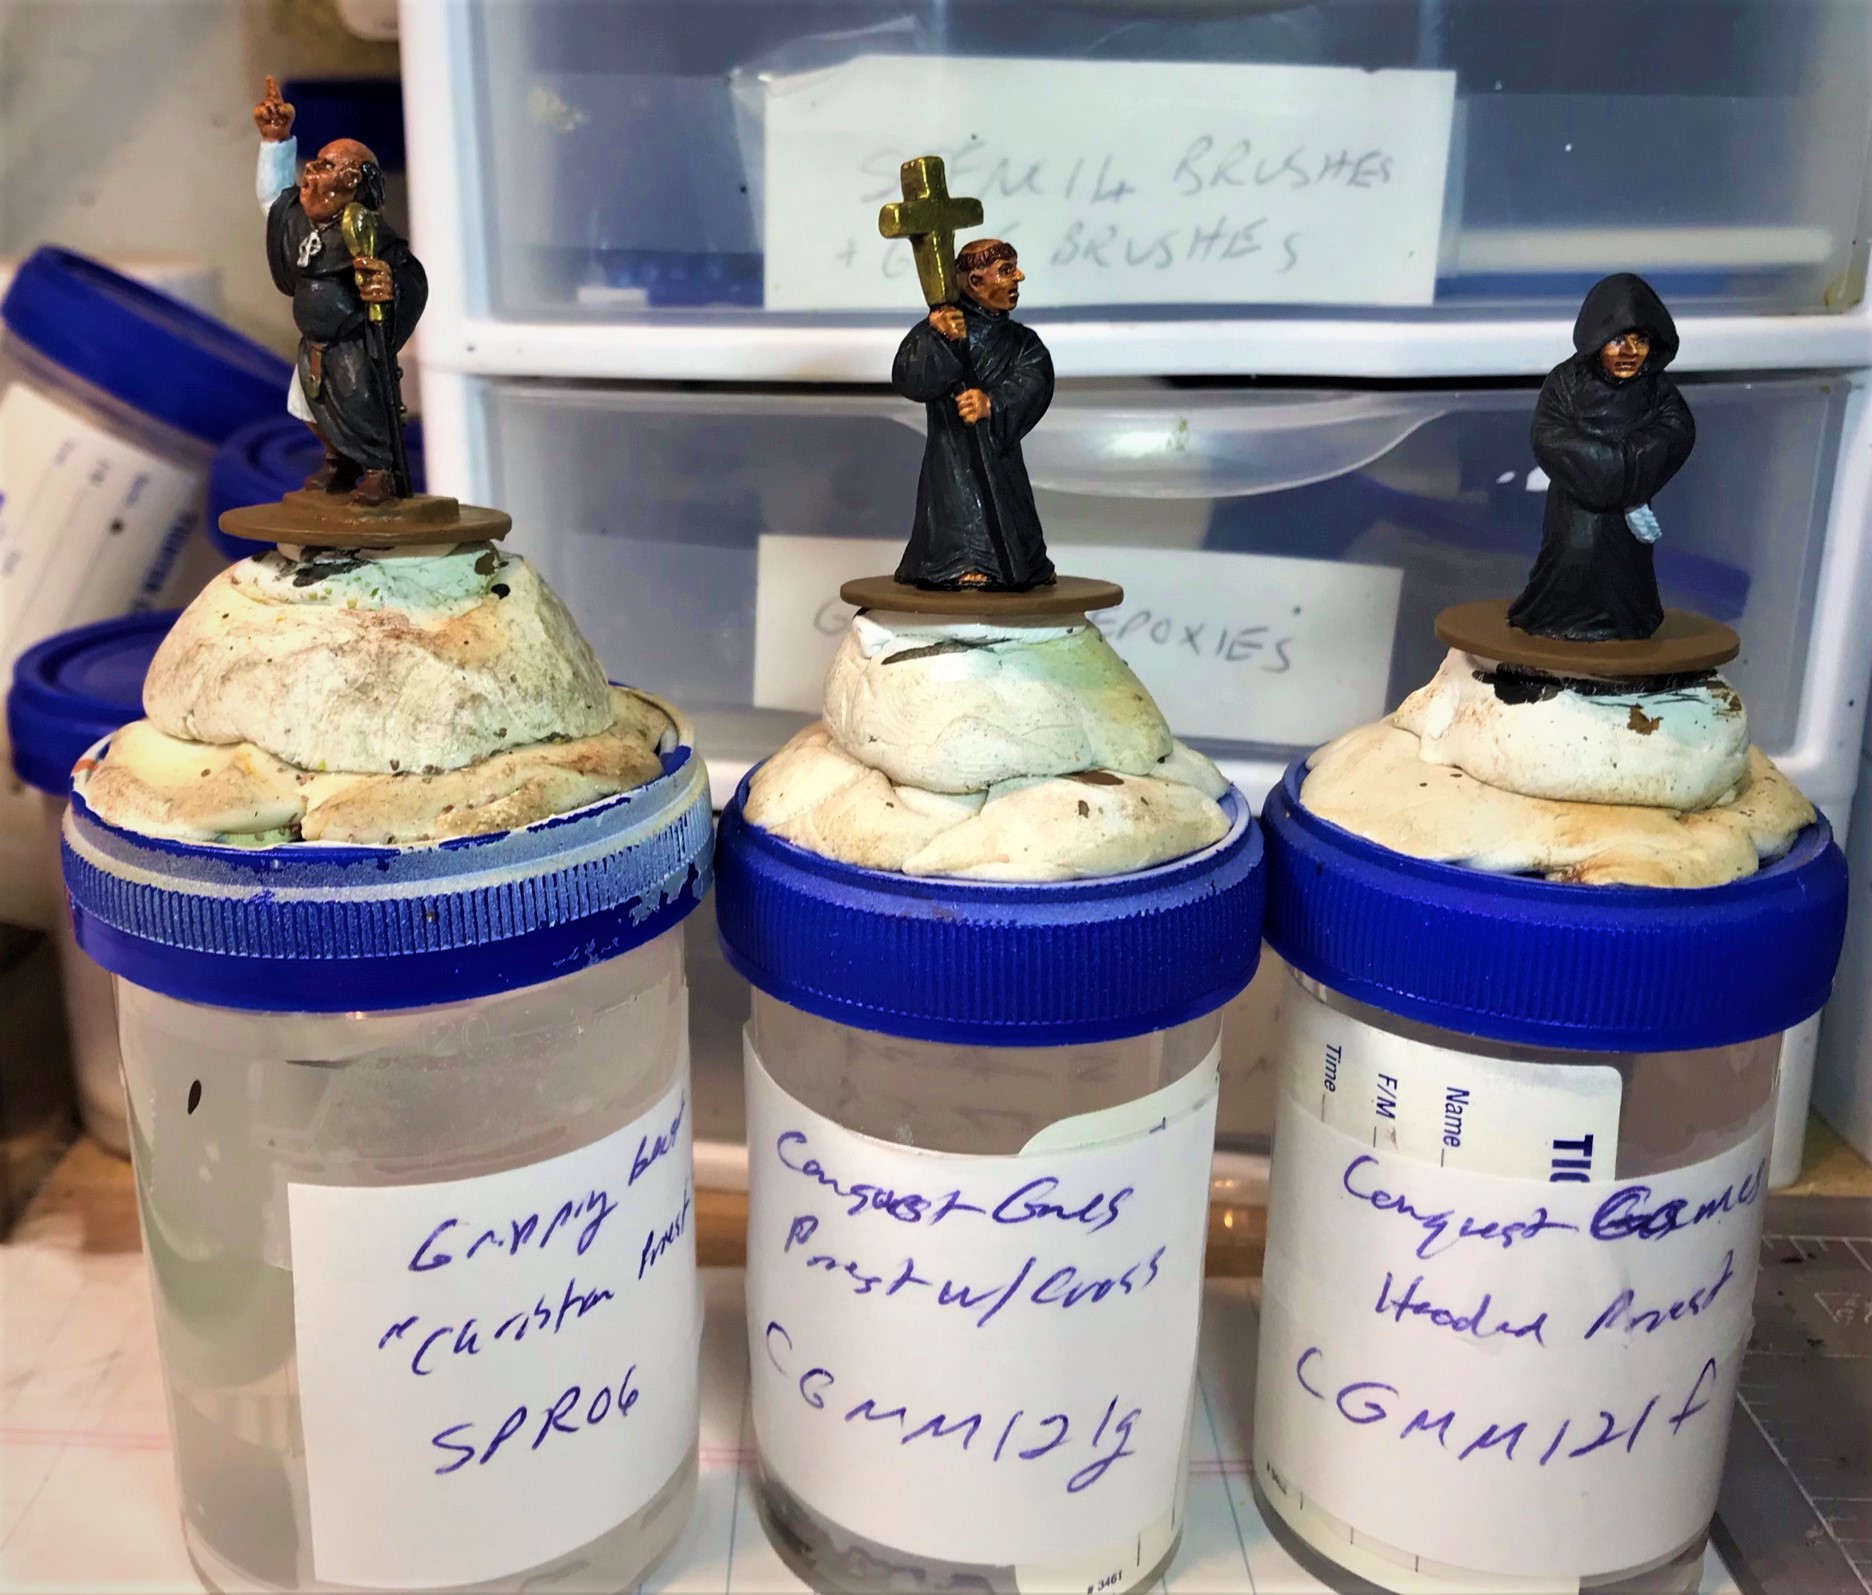
The three as receivedI removed the slotted bases from the two Conquest Games figures and based them all on good old steel washers. You can see a glaze on the steel washers – that’s Gorilla Glue, which I use to improve later paint adhesion on them (especially the rims).
As I was hurrying to get these done, I took few WIP shots, but here you go below:
Primed upPainted (base coat) and ready for some final touches
I want to mention a few areas of, well, let’s say minor challenges in painting these. First – and as someone without this condition I want to be sensitive. Two of them have shaven and/or bald pates. Painting shaved heads/bald heads was a new one for me and took a bit of experimentation to get acceptable results. After all, I would expect that these men of the cloth would have tanned up a bit facially. Still, the head and face on CCP3 (the Gripping Beast/SAGA figure) was not that easy to get right. Secondly, for all three you can imagine that their cloaks would have been less than pristine. I used some pigments for that. Lastly, highlighting black robes with gray was something I did want to play with here.
CCP1, 2, and 3. My three Priests. CCP3 actually has a sword in addition to his staff.
I like CCP 1 the best and CCP3 the least – mainly because of the face being a bit mushy. CCP2 is quite mysterious.
Well, now they have joined the ranks of the Conquistadores. Off to gaming with ye!
I hopefully have one more pre-Historicon post to share with you later today on gaming aids – if I can get it done before I have to pack. Then I’ll be silent for a bit and hopefully get a good post-weekend post on the gaming.
Miscellaneous details and references for those interested in that sort of thing:
For all of my previous posts on games, units, and other projects for my 16th Century Spanish Conquest supplement for Feudal Patrol™ – “Civilizations Collide” – please see this page.
PAINTS, INKS, GLAZES, SHADES, WASHES, PIGMENTS, FLOCKING, GLUES AND MORE THAT I USED ON THESE CATHOLIC PRIEST FIGURES:
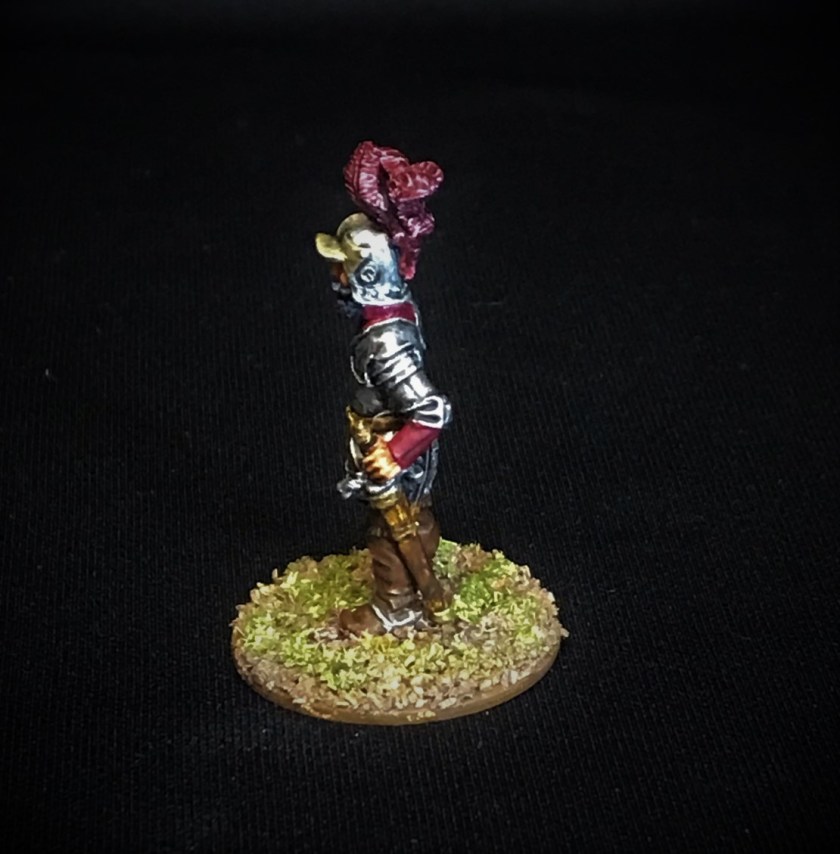
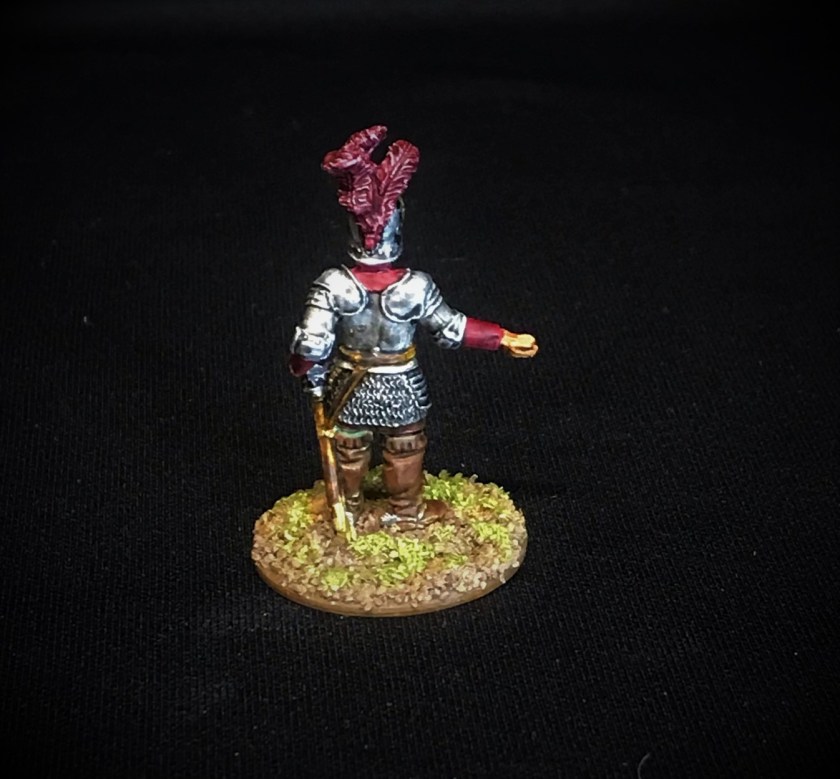
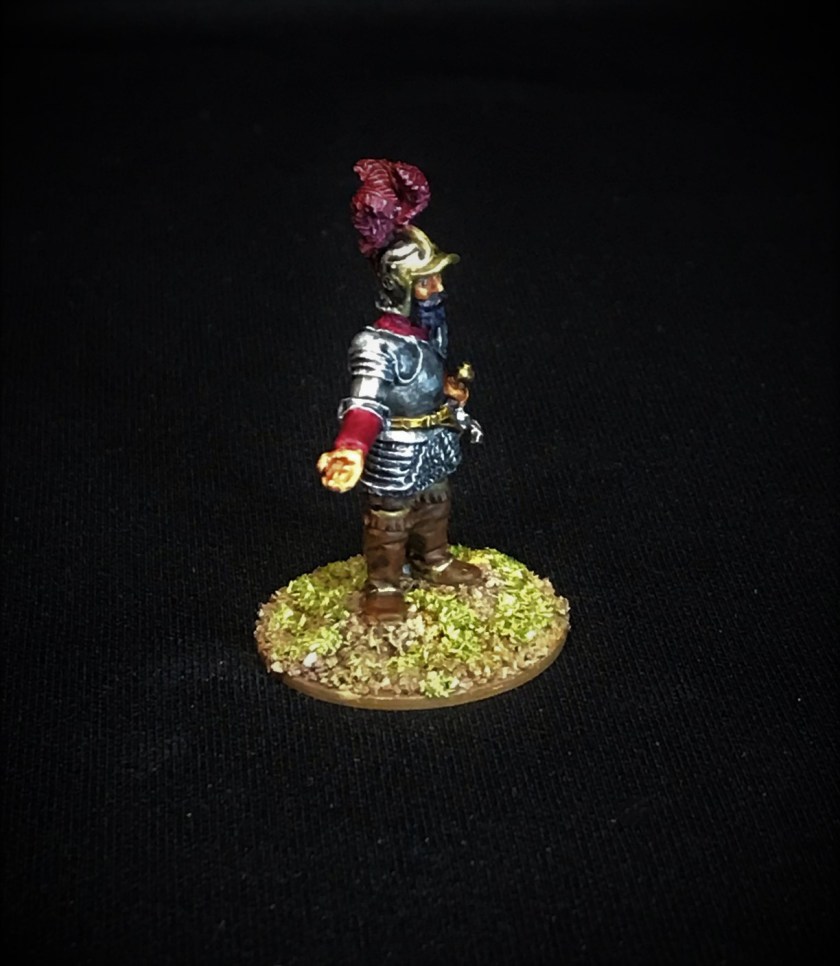
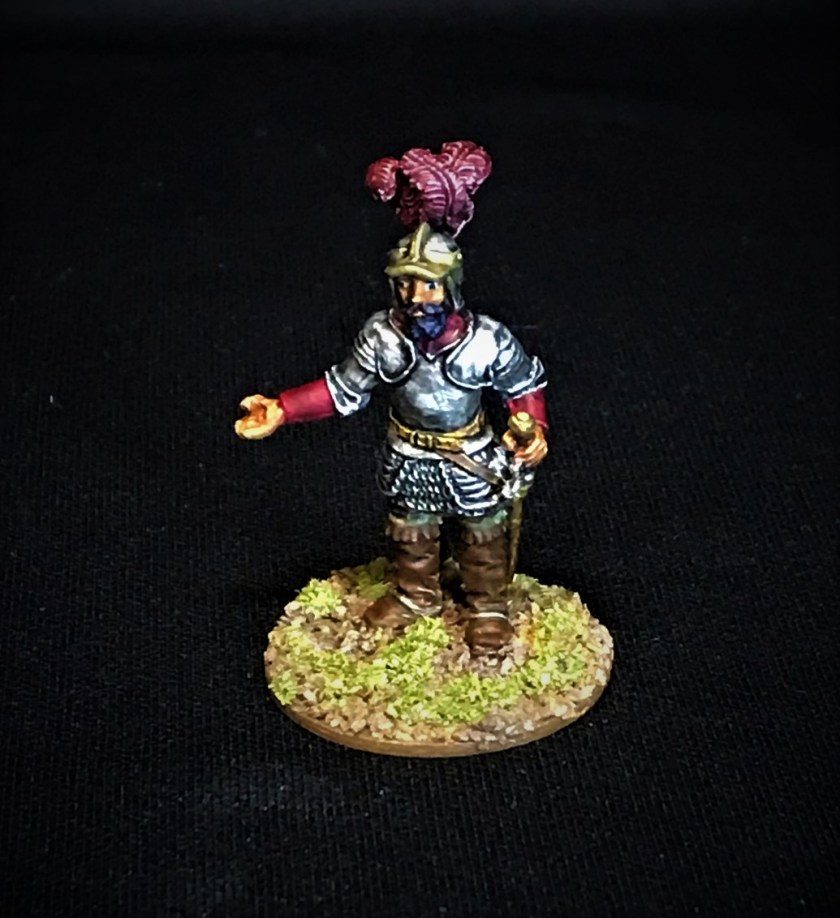
Or, let’s just call him Cortes for short – to avoid all the accent marks, surname confusion, and titles!
I got this figure from Gringo 40’s excellent collection of Conquistadores. It is from Gringo 40s Conquistadores line (#CONQP1 Cortez). The figure is 28mm in size, metal, and overall an excellent sculpt. I will be heading back to them for more figures. I had not painted a figure since I completed the war wagons back in August (also from Gringo 40’s), and really not a soldier since February. I am surprised at how much terrain took up the intervening time – as well as my garage (and now if you’ve not seen these you can see all of my garage+ project posts all in one place – here). But, let’s get back to Cortes.
In his early 30’s, Hernan Cortes made his way into the history books as a Conquistador and the vanquisher of the Aztec Empire. He lived to his early 60’s. Now, there are plenty of negative things to say about his life – and by no means am I considering him a “good guy” – just as I would not do that for Montezuma or any Aztec either. Both combatants were pretty damn brutal in so many ways. They were all men of their time – not today – and if you want to check out the Wikipedia page on Cortes you’ll get a flavor. He was remarkable in many ways, good and bad, and he was complex. I wanted a true Cortes figure for my Civilizations Collide scenarios for games of Feudal PatrolTM .
Of course, Cortes played a major role in the Spanish Conquest 500 years ago, especially as a combat leader. He also is bearded, and my good friend Roger over at Rantings Under The Wargame Table threw out a challenge for Mo’vember around such guys. Therefore, he is my submission for Roger’s challenge.
I was able to paint him up pretty quickly – and it felt great to paint again.
Primed and ready for Mo’vemberEarly work on base coatBase coated Cortez before washes and highlights addedHighlighted and washed – and very shiny – though I knew the matte varnish would help tone this down) some. I played with several metals here.Flocked and varnishedFinished off with some grass and some touch up shading
And add a label:
I enjoyed painting Cortes. I tried to give his armor different shading and tones while maintaining an overall proper look. The photo gallery below is not as good a group of shots as I’d like – it was tough to get the lighting correct – he’s thankfully not that shiny (as you saw above).
Cortes
I thought I’d add a picture of Cortes and Montezuma II. Cortes will get a lot more play in my scenarios anyways, but his picture is a little less shiny and better here, so here it is.
The two major figures in the Aztec Empire’s Fall
I hope that you enjoyed this – I have one more related post to do prior to this week’s Historicon game (I’m running it there on Saturday morning).
Miscellaneous details and references for those interested in that sort of thing:
For all of my previous posts on games, units, and other projects for my 16th Century Spanish Conquest supplement for Feudal Patrol™ – “Civilizations Collide” – please see this page.
PAINTS, INKS, GLAZES, SHADES, WASHES, PIGMENTS, FLOCKING, GLUES AND MORE THAT I USED ON THIS HERNAN CORTES FIGURE:
Yes! It’s finally time for the FINAL REVEAL of my Aztec cityscape. It’s been a labor of love – to recreate this tabletop for gaming. What game you ask? Why of course – Buck Surdu’s Feudal Patrol™! I wrote the gaming supplement for Feudal Patrol™ games during the period of the Spanish Conquest. The supplement involves the Conquistadores, the Aztecs, the Tlaxcalans (and more Mesoamericans who fought the Aztecs), the Maya, and the Inca (in South America). I called it Civilizations Collide, and it’s a free download from Buck’s website or from Sally4th in the UK. If you have not checked this excellent game out – do it!
This is Part 5 of my series on “Building an Aztec Cityscape”. There are a lot of background history and WIP details in these posts that for brevity I won’t repeat here. However, if you have missed the other parts, they are listed below with their links:
Building an Aztec Cityscape – Part 5: Tenochtitlan – THE FINAL REVEAL (this post)
As for wargaming the period of the Spanish Conquest 500 years ago, I want to be clear. It was brutal to be sure, and as I have stated often, there were no good guys on any side. I did not aim to glorify any aspect of the time, but to raise awareness and knowledge of it through wargaming.
From the start of this project, I wanted to create a unique and hopefully stunning tabletop for these games. I had a vision of creating a nice cityscape – an encompassing panorama that I had not seen anyone else do at any convention. Also, the cityscape needed to facilitate a fun gaming experience, so visually, I felt that had to go big. I had already painted 230 figures for the period. I had built many buildings too. Therefore, I wanted something that had the “flavor” of Tenochtitlan. However, with the tabletop designed for 28mm skirmish figures, (about 1″ tall), building a true-to-life and historically accurate Tenochtitlan would have required a gymnasium-sized playing area. I have seen stunning photos from SALUTE in the UK that were for 15mm gaming, but that scale went far beyond what I envisioned – or what was feasible for me. For travel to gaming conventions, the cityscape needed to be able to be broken down and transported easily. It needed to be useful for multiple games. This post will reveal my solution, for better or for worse.
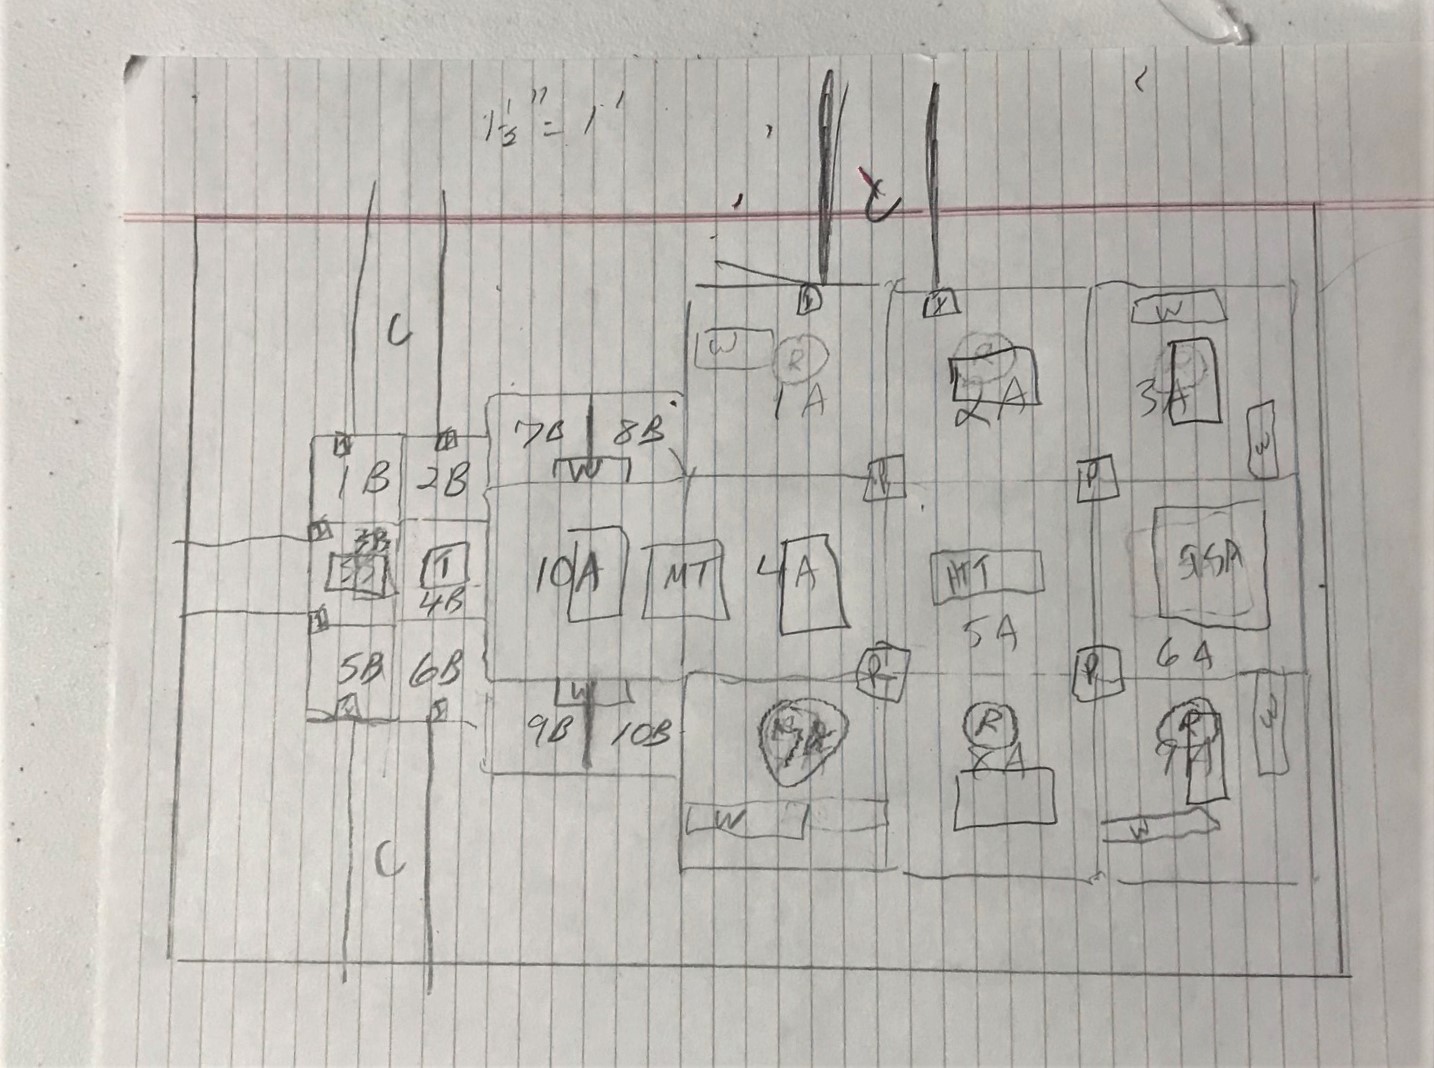
I started out with historical research into several sources, and thinking about what I wanted and what I could do. After I had my initial concept, I then refined it into the two plans that I put on paper below.
First rough draft of the plan.Then, I refined the plan.
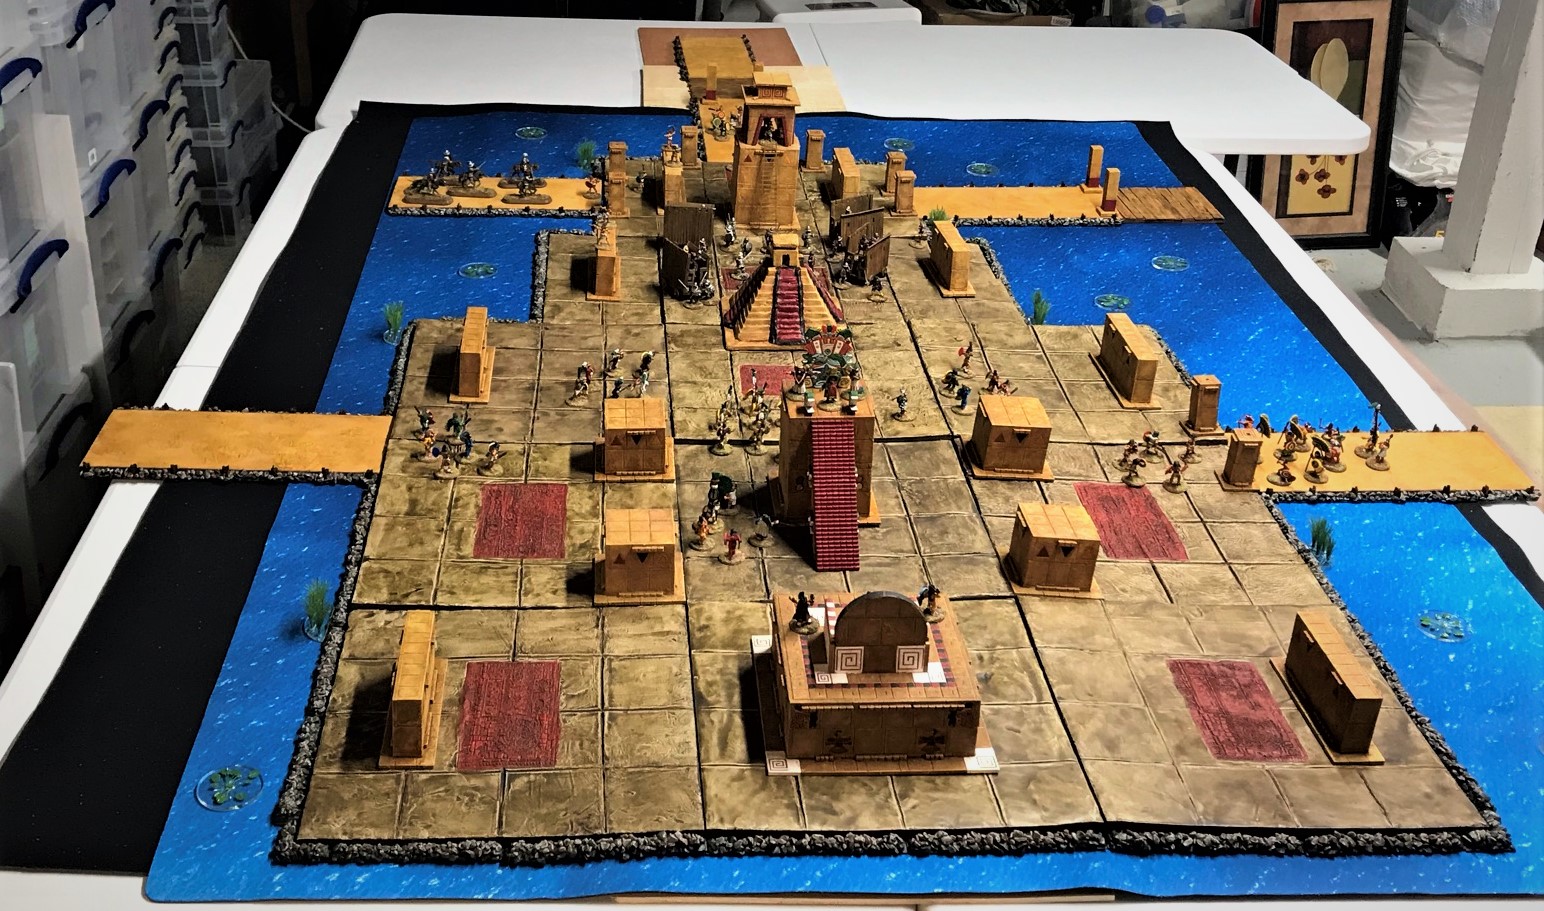
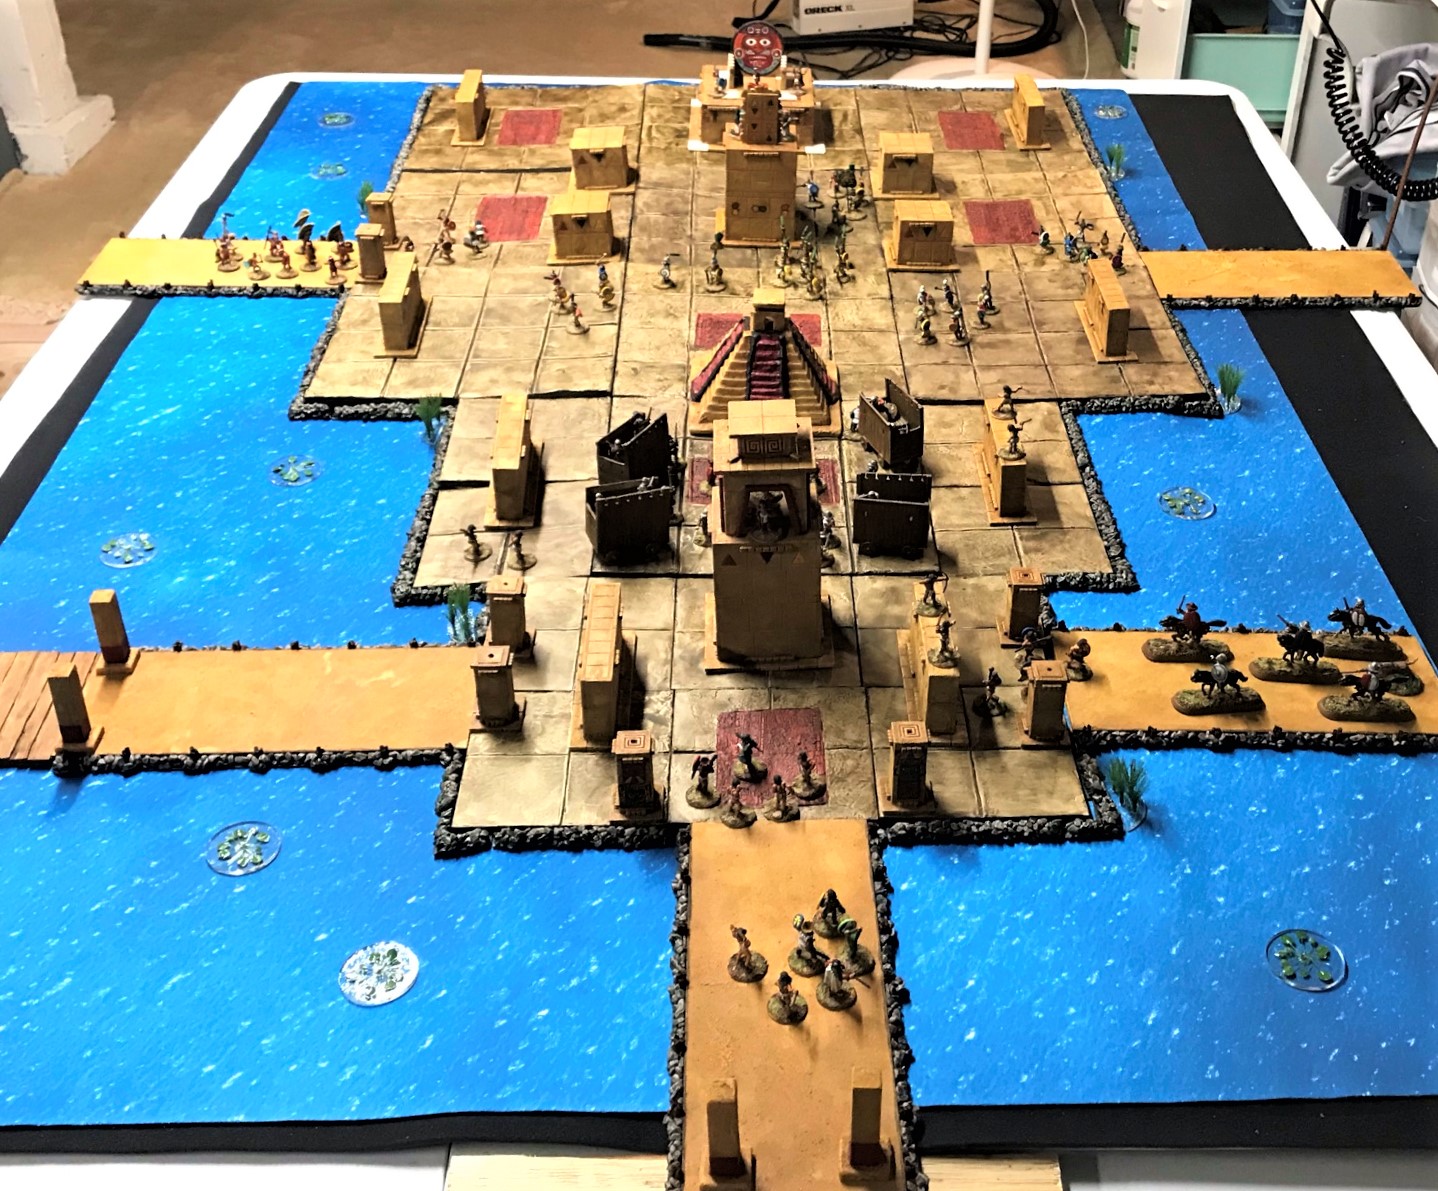
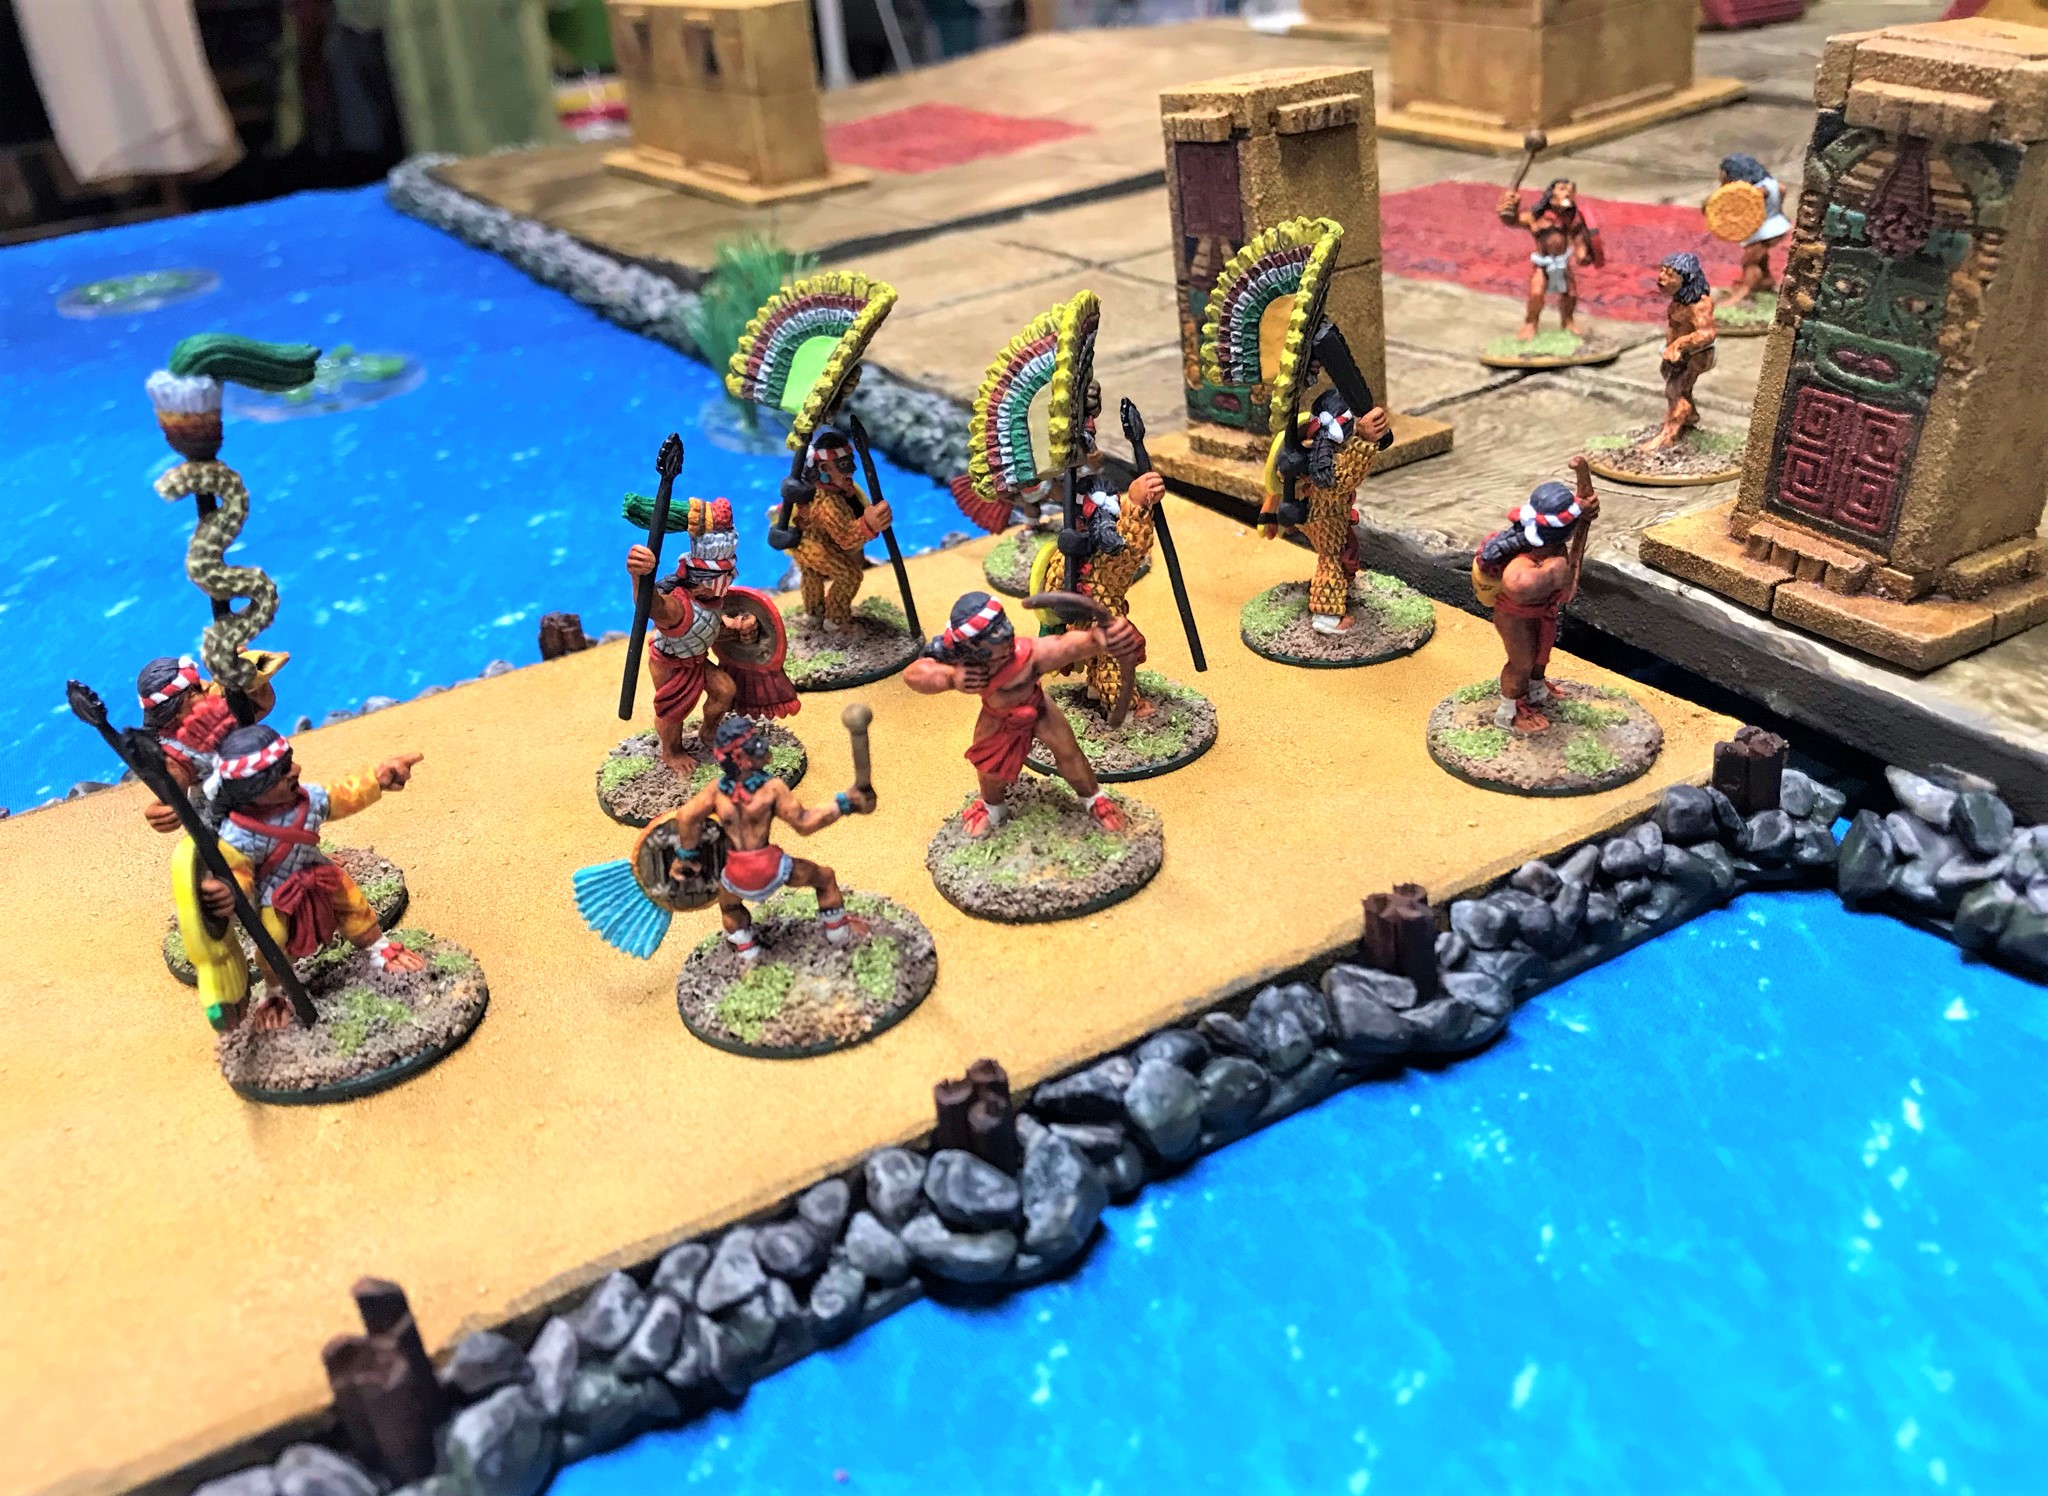
The previous posts describe in more detail how I got here. So, let’s show some eye candy – and I will be posting on the Combat Patrol Facebook page and sharing a link to my IGTV page where you can view a video of the cityscape.
Here I set up some figures on the cityscape – many of these images were shown in previous posts – but here you get to see the whole thing!
Ta daa! Click on the images for a bigger view.End view – the mat is from FLG.Opposite lengthwise viewAngled view from the end.
As before, this is DEFINITELY (I think anyways) my last entry into Dave’s Season of Scenery Challenge! Thanks Dave for running the challenge and letting me be part of it. At least it’s the last part of the cityscape posts.
I also want to especially thank my wife for tolerating this bit of my madness. And of course I thank my old West Point comrades Buck Surdu and Dave Wood, Greg Priebe, Chris Palmer and the HAWKS, Chris Abbey at Sally4th, Dave at The Imperfect Modeler (especially for the chinchilla dust tip), GED at Gringo 40’s, IRO (for inspiration), Joerg Bender at Things From The Basement, the Uxbridge Historical Gaming Club and the Mass Pikemen Gaming Club.
A SPECIAL THANKS TO ALL the bloggers listed below who have taken the time to encourage me over this project. I am indebted to you all – you kept me focused, and motivated.
I’m not an award-winning videographer – but I hope that you enjoy the video.
What’s next? I will be going to my first HISTORICON and bringing both my cityscape and my rural tabletop. I will also be adding the two naval types (brigantines and war canoes) to the next version of my Civilizations Collide supplement – along with new scenarios and scenario-specific rules. I hope that you will like these. Yes, I have more work to do!
Please let me know your thoughts in the comments section – and thanks for looking!
For all of my previous posts on games, units, and other projects for my 16th Century Spanish Conquest supplement for Feudal Patrol™ – “Civilizations Collide” – please see this page.
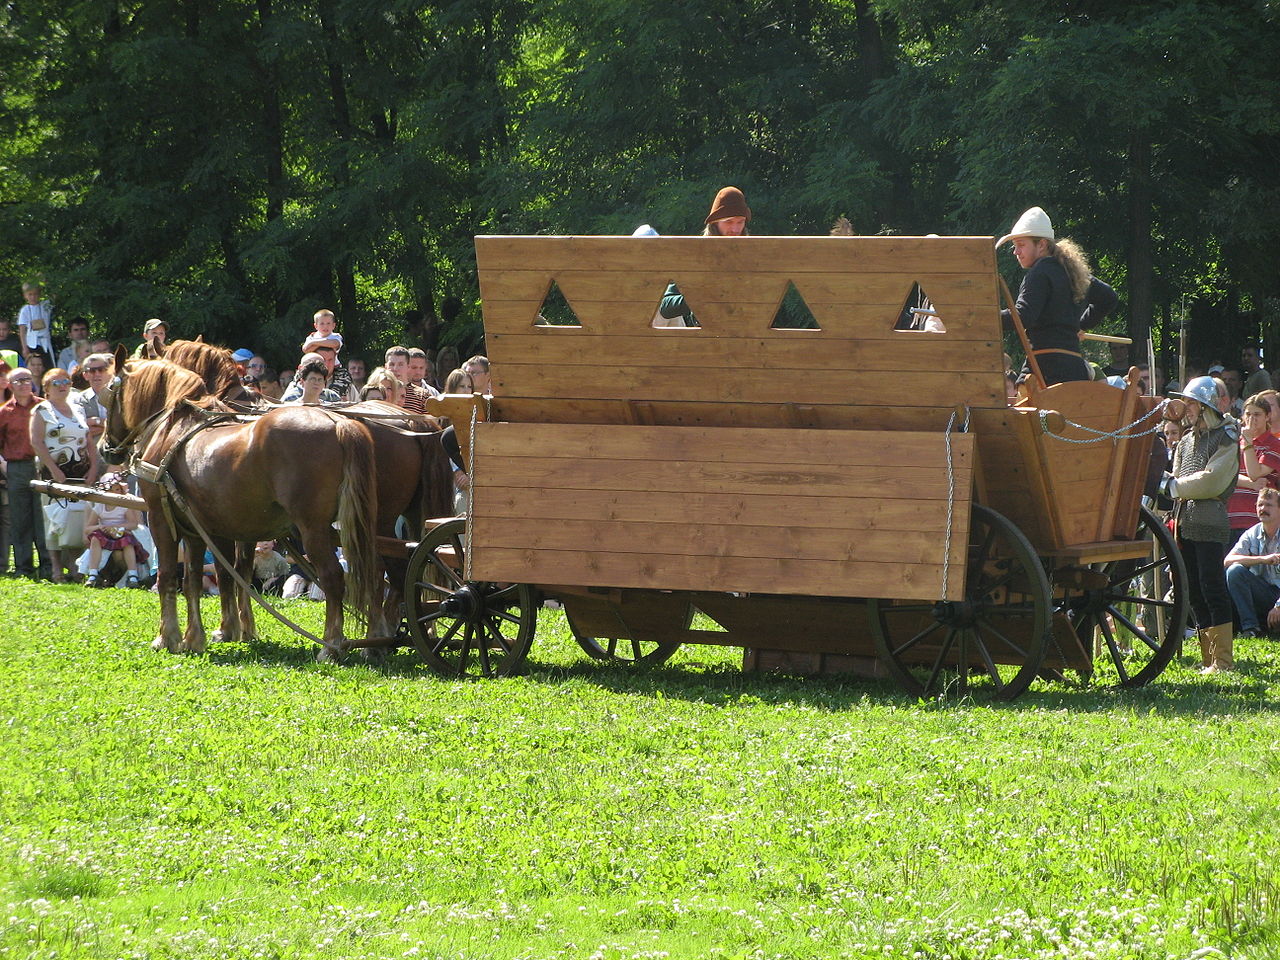
War wagons were wooden carts for deploying missile troops. They had slits in them for crossbowmen and arquebusiers to be able to fire from while having some protection against enemy missile weapons. I think of them as wooden APC’s (WPC’s maybe?). Hernan Cortes used them as he was besieged in Tenochtitlan in 1520 – yes – over 500 years ago now.
This is Part 4 of my series on “Building an Aztec Cityscape”. The war wagons were so integral to the events in 1520 that I needed to have some as part of my cityscape. If you have missed the other parts, they are:
The first use of a war wagon in medieval Europe is ascribed to the Hussites during the Hussite Wars (1420-1434) in Bohemia. They were horse-drawn and would be linked together like a mobile fort.
Nearly 100 years later, Cortes would build some similar ones. These would be constructed as a measure of desperation to escape the Aztec capital. Cortes’ war wagons were thrown together during the time when they were besieged by the Aztecs in Tenochtitlan.
I need to give you a condensed chronological synopsis – the history of this time is quite full of twist, turns, and intrigue. The timeline is confusing but important for context. Therefore, listed here below is a condensed chronology with respect to the use of war wagons and a couple of possible wargame scenarios that I am working to build:
November 18, 1518 – Cortes departs the Spanish colony of Santiago de Cuba with his expedition – before he could be detained by Lieutenant Governor Velazquez (who had originally commissioned his expedition). Cortes leaves abruptly so that the Governor (who had justifiable suspicions about Cortes and his motives) could not relieve and replace him prior to his departure.
February 1o, 1519 – After fitting out in Trinidad and San Cristobal de la Habana, Cortes sails for Mexico.
March 22, 1519- Cortes arrives in Mesoamerica. He will fight and win several battles with both the Maya and the Tlaxcalans up until later in 1519. By that time, his victories will have given him a few key assets. One of these, from the Maya, was a slave girl named Malintzin aka La Malinche who was to serve Cortes as a key translator, and later, his mistress. The second was a post-conflict alliance secured with the Tlaxcalans, whose warriors would provide the bulk of Cortes’ forces.
November 1, 1519 – Cortes begins his march to Tenochtitlan to try to meet Montezuma II.
November 8, 1519 – Cortes arrives at Tenochtitlan and meets Montezuma II. He and his contingent are welcomed to the city and stay in it.
November 14, 1519 – through a ruse, Cortes successfully seizes Montezuma II and makes of him a puppet/hostage.
March 5, 1520 – Meanwhile, back in Cuba, Lieutenant Governor Velazquez sends an expedition led by Panfilo de Narvaez to intercept Cortes
April 19, 1520 – Narvaez and his troops arrive in Mexico. Cortes, with some of his Conquistadores, leaves Tenochtitlan to deal with this internecine threat. He leaves behind a trusted lieutenant, Pedro de Alvarado, in charge of the remaining Spanish/Tlaxcalan forces in Tenochtitlan.
May 16, 1520 – The Aztec nobility and elite troops in Tenochtitlan celebrate the Festival of Toxcatl. It is a large assembly of all the elite and elite military of the city, who are unarmed and dancing in a city square or plaza. Alvarado, afraid that the celebration is a prelude to an attempted massacre on them, seals off the plaza where the dancing/celebration is taking place. His Conquistadores methodically move through the throng and murder or capture every possible Aztec. One of the captured elites is Cuitlahuac, Montezuma II’s brother.
May 29, 1520 – Back on the coast, Cortes defeats Narvaez (despite being outnumbered by Narvaez by 2:1). He incorporates Narvaez’ surrendered troops into his forces and returns with them to Tenochtitlan on June 24th . (This Conquistador-on-Conquistador fight would be a good possible scenario for a wargame (using my Civilizations Collide supplement to Buck Surdu’s Feudal Patrol™rules).
June 2, 1520 – The Aztecs have been fully enraged since the festival massacre – and the situation is dire for the Conquistadores.
June 25, 1520 – In an attempt to mollify the Aztecs, Cortes releases Cuitlahuac. This was a rare strategic error. Immediately, Cuitlahuac, who rightly viewed his brother to be no more than a Spanish puppet, assumes Montezuma II’s powers and takes command of the siege of the Spanish as the new Aztec Emperor. The Spanish are besieged and are holed up in the Palace of Axayacatl. The Aztecs attempt to burn the Spanish out of the palace, but are repulsed by cannon and arquebus fire.
June 27, 1520 – Cortes forces Montezuma II to go to the roof of Palace of Axayacatl to plead with the Aztecs to stop the fighting. He is struck in the head by a rock from a sling and is gravely injured. At the same time, Cortes instructs his troops to scavenge wood from the Palace of Axayacatl and build several war wagons. His hope was that by using war wagons he could protect his own missile troops from the slings and arrows of the Aztecs – and make it easier for the Conquistadores to escape Tenochtitlan and survive.
June 28, 1520 – Cortes makes his first attempt with his war wagons to reach the causeways. He loads them with crossbowmen and arquebusiers, and supports them on the ground with sword and buckler men, and cannon (probably falconets and maybe lombards). Their movements are not powered by horses, but by the Spanish themselves. The Conquistadores fight bravely, but are pushed back. (This would be a possible scenario for a wargame on the cityscape with the war wagons).
June 29, 1520 – Cortes decides that the Temple of Yopico, a tall structure, was enabling the Aztecs to be able to hit his troops with enfilading missile fire from above. This is his second use of his war wagons, and he literally used them in a half-circle (yes, “circling the wagons”). He uses them similarly as before to help the Conquistadores to reach the Temple. This time they were tactically successful. However, the war wagons were to take so much damage that they are destroyed in the process. Cortes, beneath his personal banner, successfully leads his troops to ascend the 100 steps of the temple, killing many war priests and setting fire to the structure. But, the Conquistadores cannot hold the position against the Aztec numbers and are pushed back. (This – the assault on the Temple of Yopico – would be a second possible scenario for a wargame on the cityscape with the war wagons).
June 30, 1520 – Montezuma II either dies of his head wound, or is killed by the Conquistadores – accounts differ.
July 1, 2020 – La Noche Triste (the Night of Sorrows or the Sad Night) – the Spanish break out of Tenochtitlan at a high cost in lives, materiel, and looted treasure. (This – La Noche Triste – would be a possible scenario for a wargame on the cityscape and/or just the causeways with or without the war wagons).
Of course, then followed the Battle of Otumba, where Cortes used his cavalry to save his entire force against overwhelming odds. Eventually, he was able to regroup and with the help of brigantines, make a successful assault and conquer the city of Tenochtitlan. And yes, I have brigantines in the queue, along with war canoes. Plus I will be adding the two naval types (brigantines and war canoes) to the next version of myCivilizations Collide supplement – along with these two scenarios.
The only good image I can find of war wagon use comes from the cover of Sheppard, Si. (2018). Tenochtitlan: 1519-21. Oxford: Osprey Publishing, shown below. It is an excellent resource, and I do recommend it. There is a larger blow up of the same picture in the book – and you can see the war wagons in the lower right hand side at the base of the temple.
Enough background information (at least I hope). In looking for war wagons, I was challenged. I did consider scratch building some until I discovered these at Gringo 40’s in the UK in their 28mm Conquistador section.
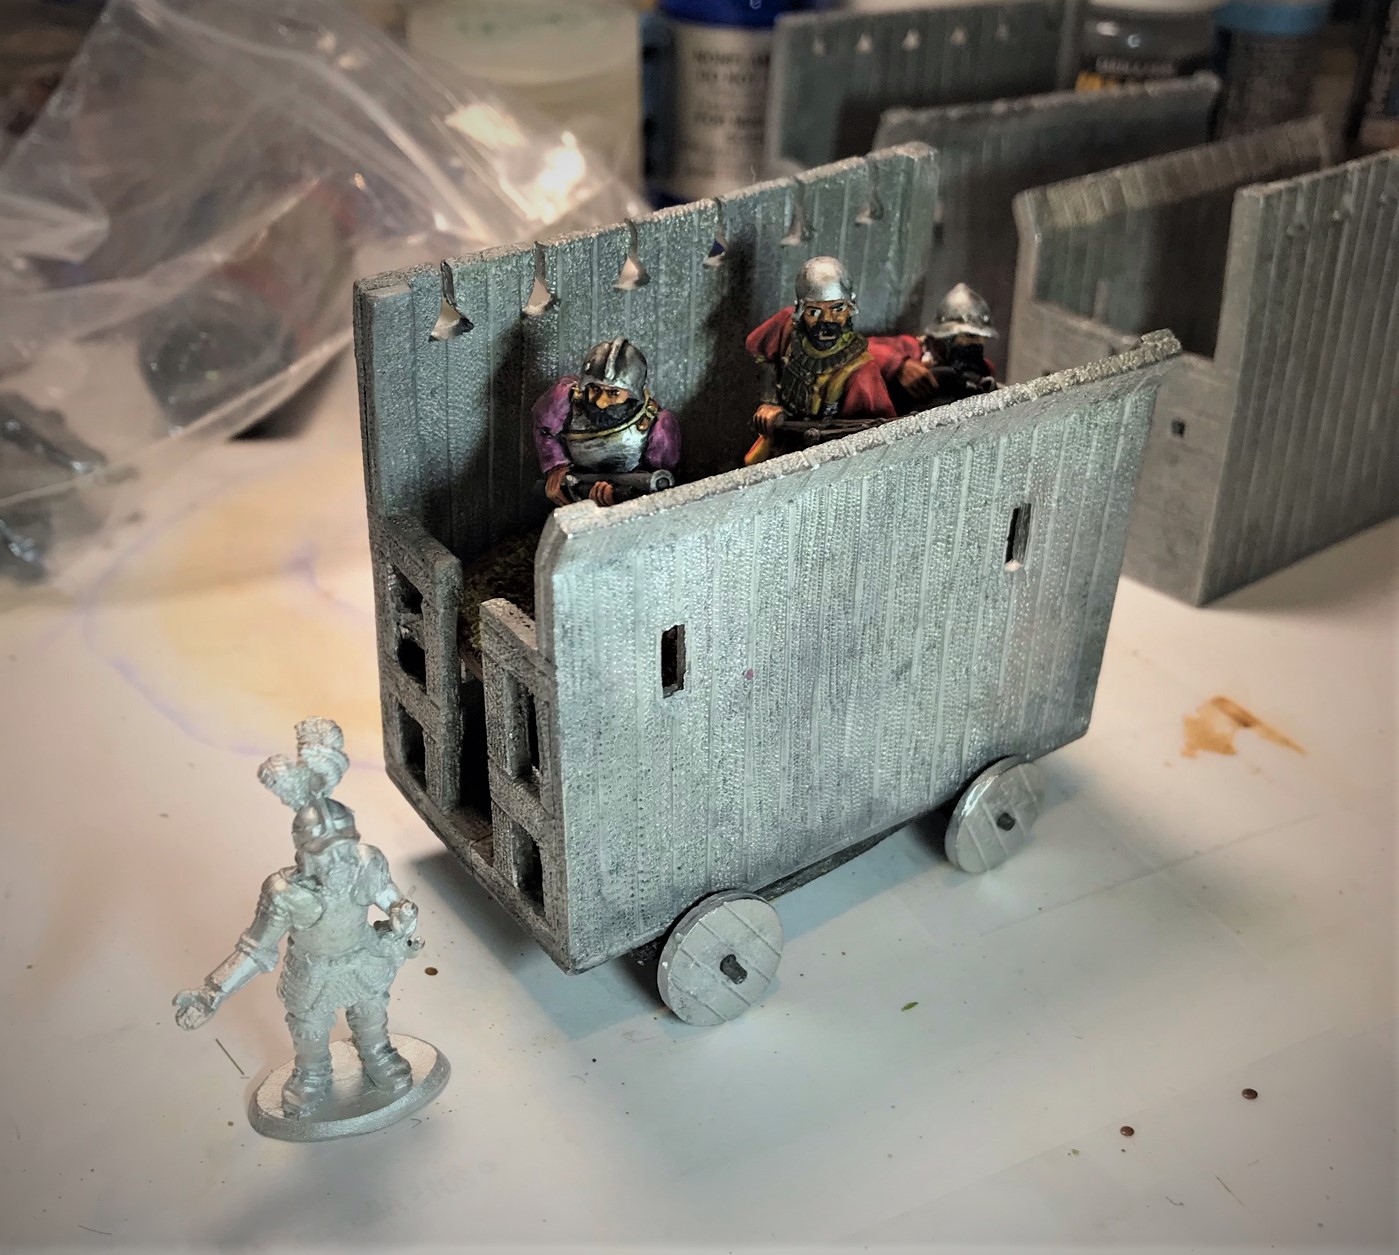
Yes! I had found my solution! I ordered four from them, and the company was great. They even gave me a free Cortes figure (which I will paint soon I hope). Even better, these were solid METAL. Assembly was just adding the undercarriage axle supports, the wheels, and a wheel spacer. There are two benches inside and I can get two figures into the wagon. One challenge faced me that was new – no brush or angled brush would reach under the benches for painting. They do look nice though.
On the left is my 28mm Cortes figure, and the war wagons as received. The one with the figures in it is dry-fitted with the other pieces. While I have three figures in there, after painting them I’m now limiting that to two. A close angle of the same shot as above. The only brush access to the bench undersides was restrictive through this end.I gave the war wagons a spray prime – and then after a curing period, a brush prime – swirling a few cheap brushes like mops on the insides – getting as much primed as I could. This destroyed those brushes, but that was fine. Then I glued on the undercarriages and pressed them down.After the previous step, I attached the wheels and spacers/holders for the wheels, and reapplied primer which as you see here was needed.
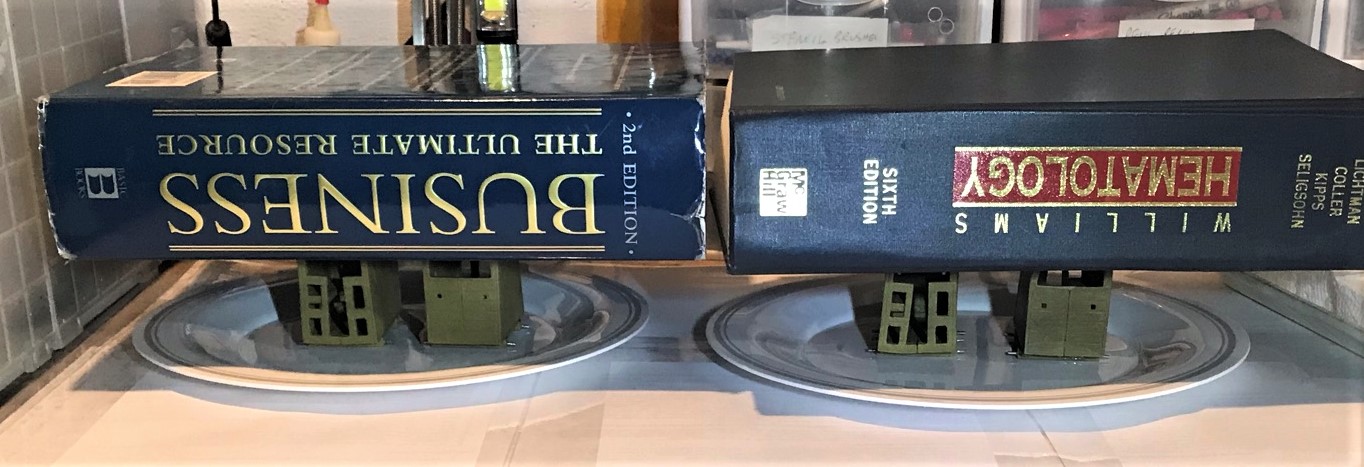
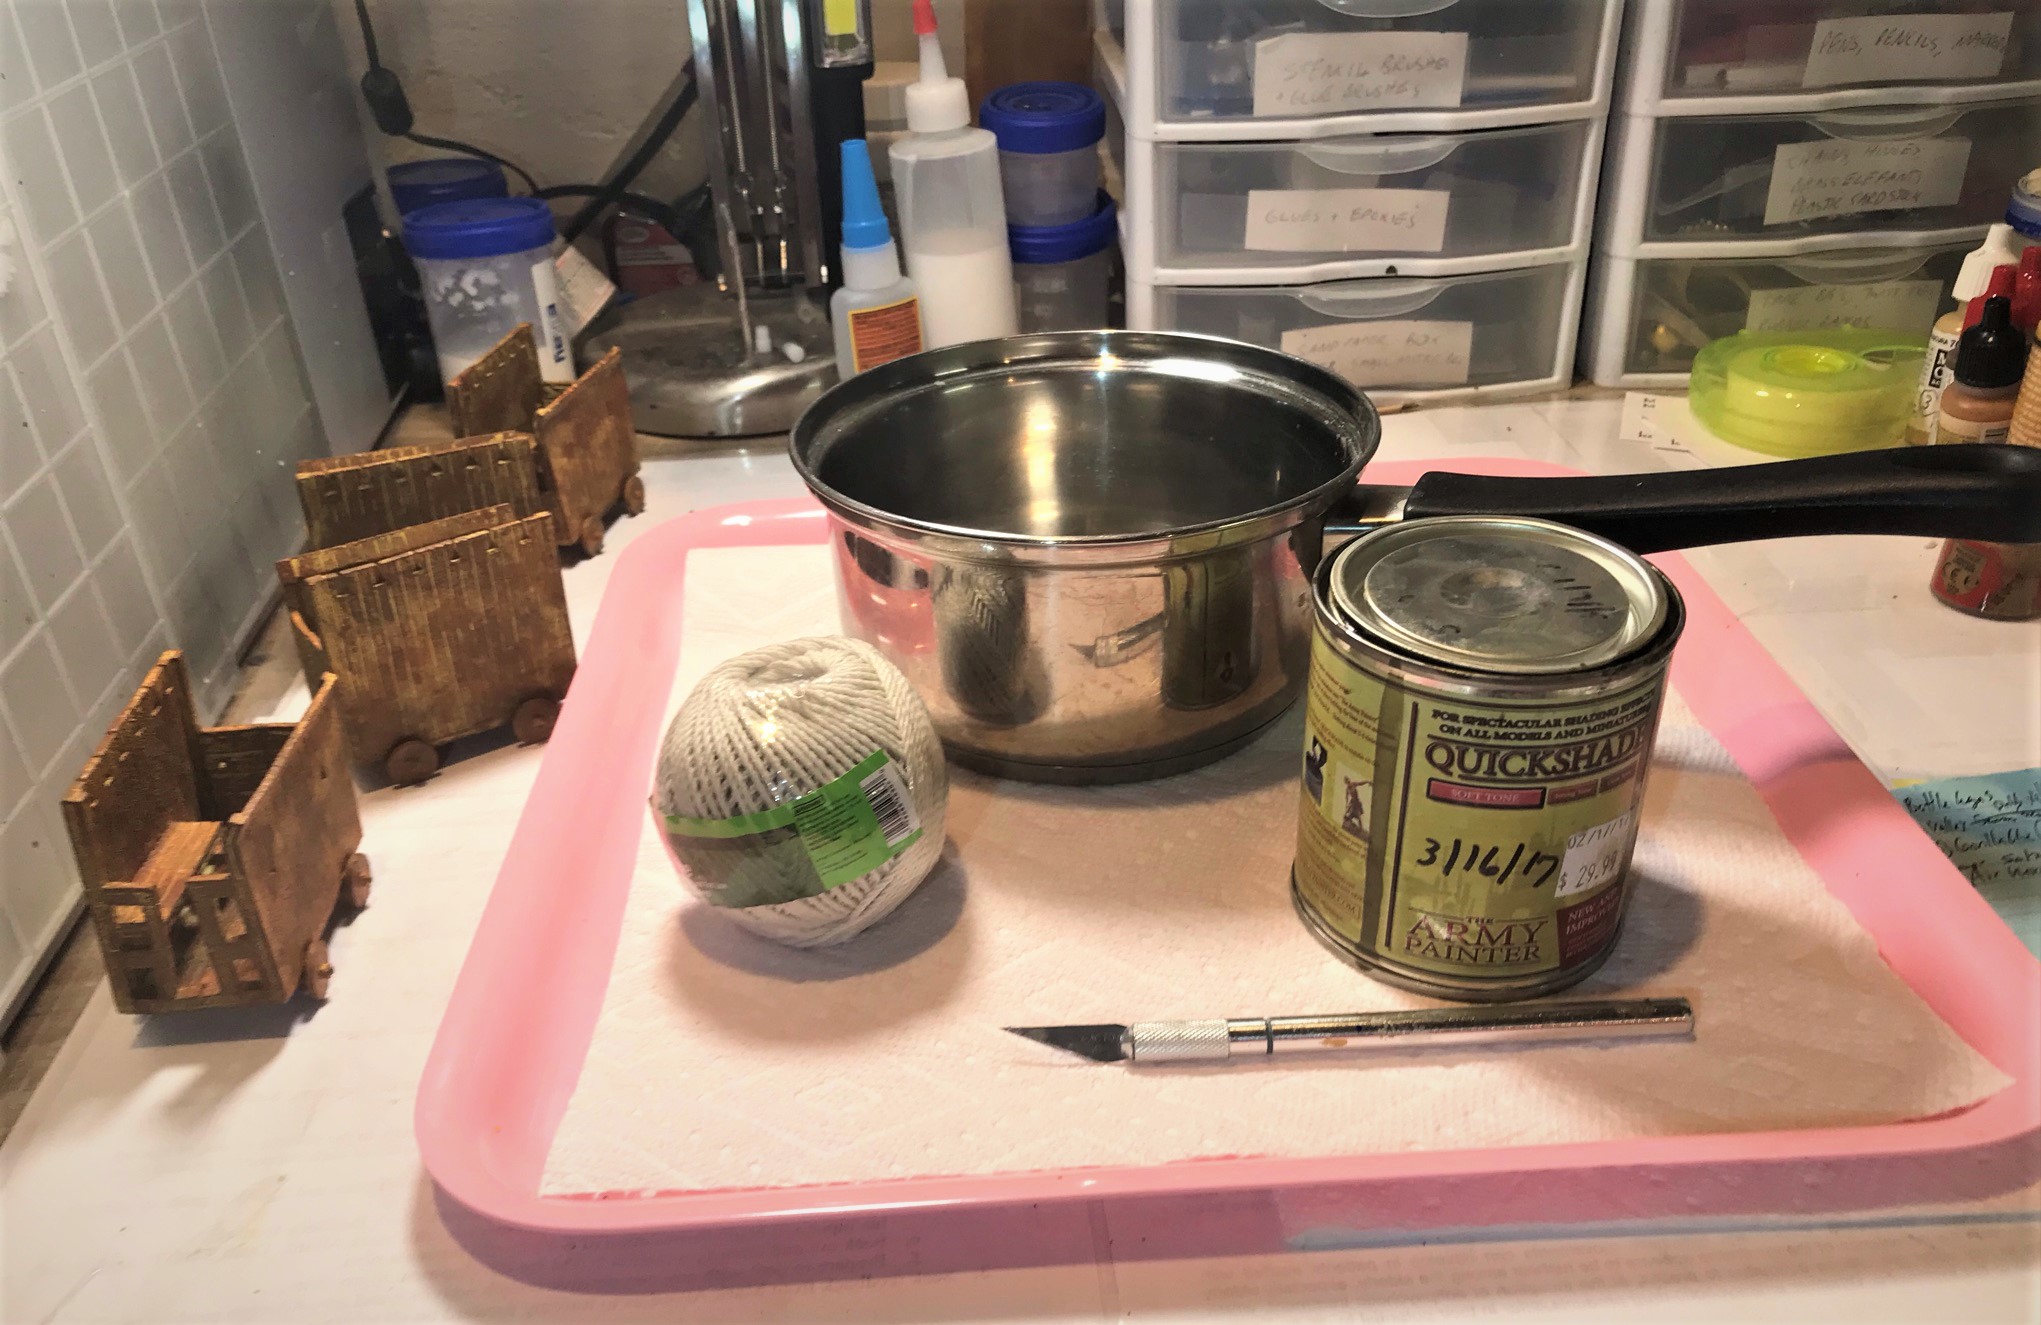
I then used various browns (I list all my paints and more at the end of this post). to approximate a used wood tone. After all, these war wagons were made from old recycled lumber. At this point in the project, I still wondered how I was going to get paint etc. under the benches, as well as how I was going to varnish them. As you may imagine, these are heavy! I decided that they needed a “dip” – in some Army Painter dip. To retrieve them without a huge mess, I used a pot I bought from a Salvation Army Thrift store, some twine from the hardware store, and an old piece of balsa.
The war wagons in brown, and the pot, dip, and twine.How I was able to suspend the war wagons into the dip in the pot. I just had to restring each one after the dipping process.After the dip.
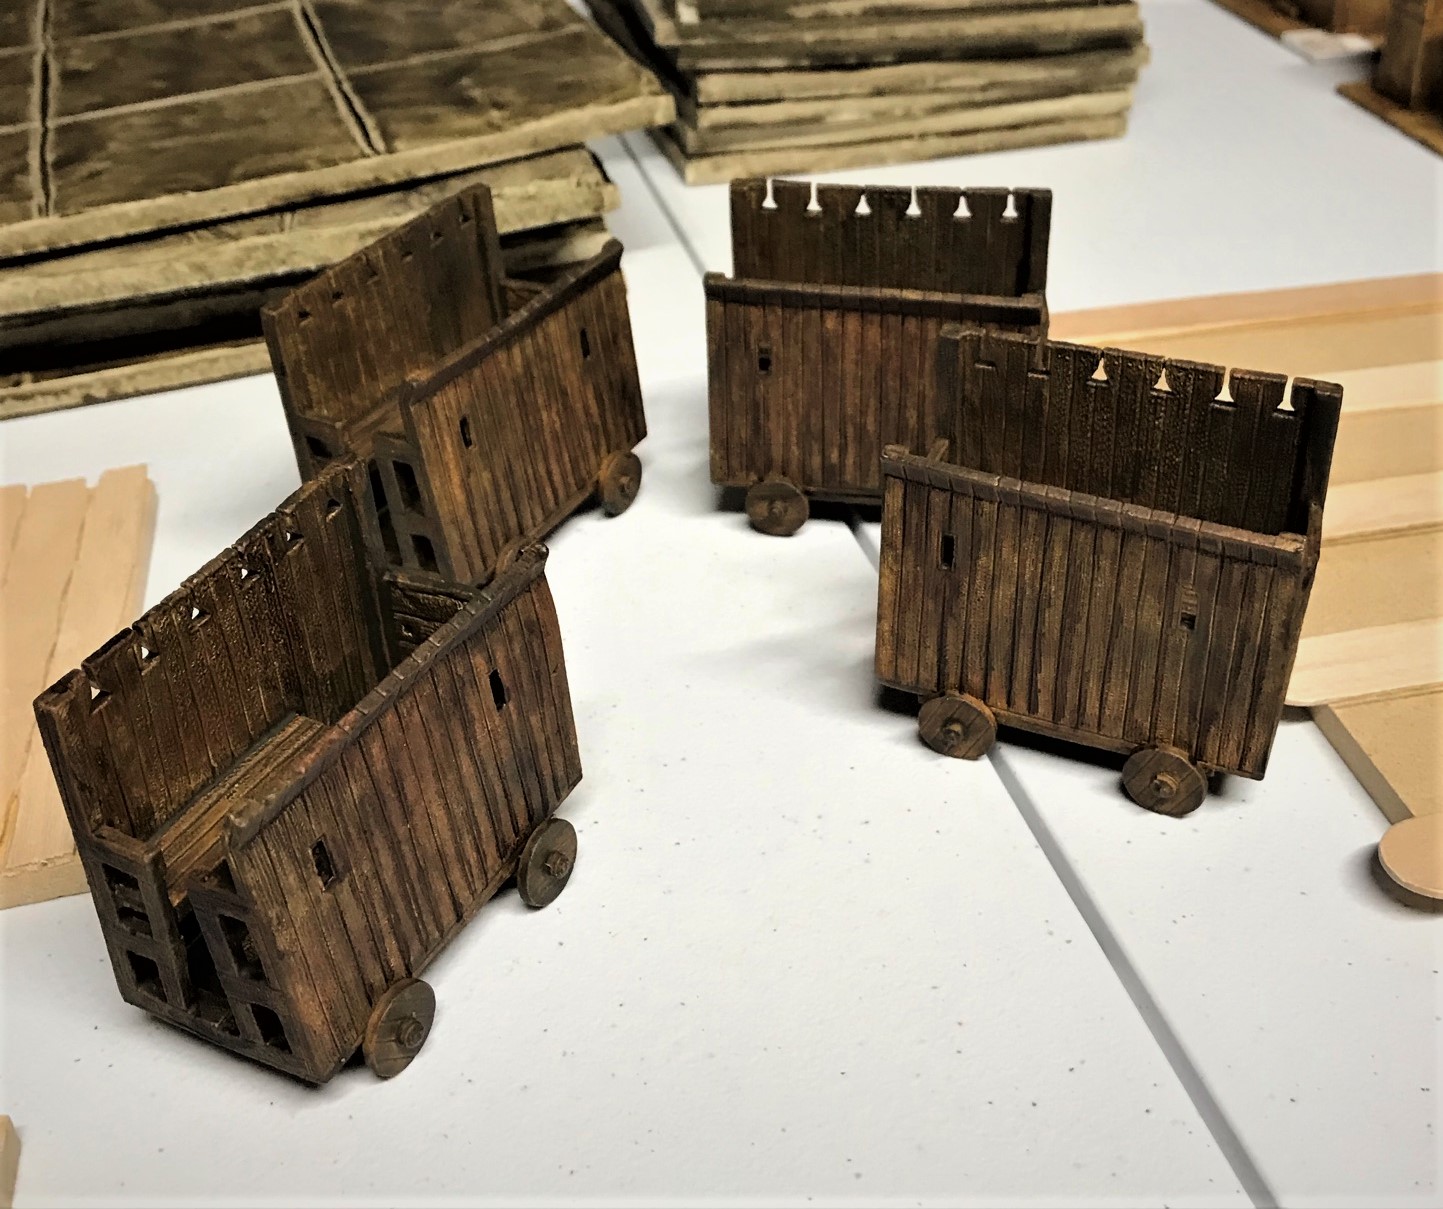
I needed to do more shading and some dry brushing after the dip, and then I spray varnished them outside (as I could for once).
Nice enough to varnish outside! Not common weather in New England year-round, but it’s summer.War wagons finished!
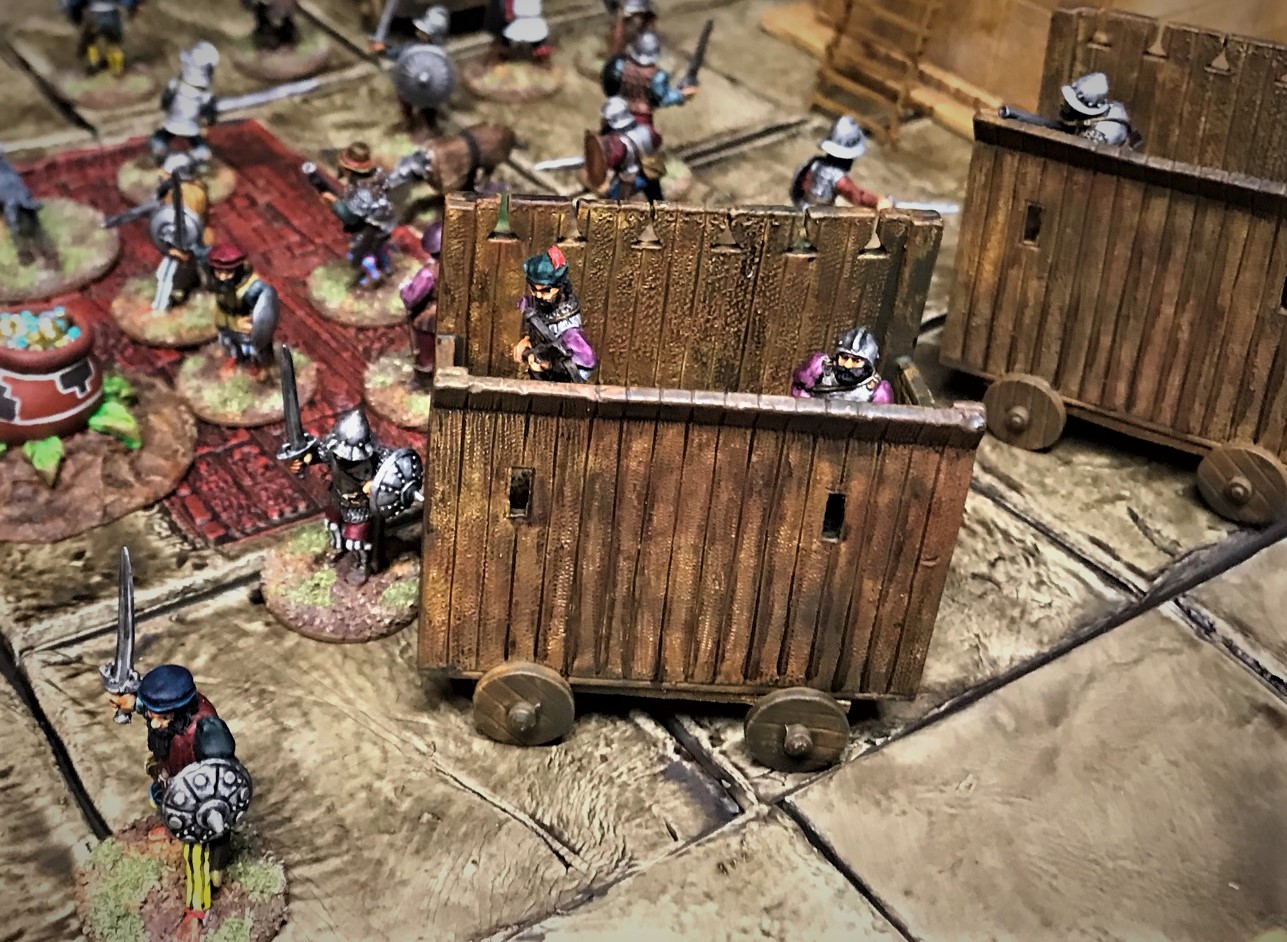
As this is the penultimate (love that word) post in the series, I will share some action shots below of the war wagons on the cityscape.
Battle in the Cityscape! Cortes tries to break out!Trying to escape Tenochtitlan with their lives – and their gold – the Conquistadores fight towards the causeways. Close up shot of a war wagon with an arquebusier and a crossbowman at the ready. The poor sword and buckler men get to push.
I think these will be very fun in a game. I just need to write rules specifically for their use.
The next post will be….(insert drumroll)…the FINAL REVEAL.
I hope to have a video link as well as pictures of the cityscape for you. These, because they are “vehicles” and were completed in July and August, all count as more of my entries into Dave’s Season of Scenery Challenge! Thanks so much for looking. I hope that you enjoyed the brief history and the war wagons themselves.
Please let me know your thoughts and ideas in the comments section! And the FINAL REVEAL is coming!!!
For all of my previous posts on games, units, and other projects for my 16th Century Spanish Conquest supplement for Feudal Patrol™ – “Civilizations Collide” – please see this page.
PAINTS, INKS, GLAZES, SHADES, WASHES, PIGMENTS, FLOCKING, GLUES AND MORE THAT I USED ON THESE TERRAIN PIECES/MODELS:
The city of Tenochtitlan, the capital of the Aztec Empire, rose out of Lake Texcoco on an island. This island was connected to the mainland by a series of causeways. Reclaiming land from a water body usually involves building up a surface of large stones on its bottom. These would build up into a dry surface, and would usually be supported and protected by revetments. In the case of my Aztec cityscape, the pavements’ sides that I made of MDF had nothing on the edges (except paint) next to the waterline – and I thought that needed a bit of work.
Speaking of work and the pavements, if you are new to this 5-part series on my Aztec cityscape build, you can view the previous two parts by clicking on these links:
This post will cover the revetments that I made for the cityscape, as well as some HO scale lily pad and cattail bases that I added as eye candy (and possible obscuration of gaps and even MDF warpage). As before, I will similarly share my WIP photos as well as my lessons learned.
Readers of this blog know that I like a plan before building anything. I needed to figure out how many revetments to build – as I may or may not use all of my causeways or even my pavement tiles. Also, I had to figure out the sizes of inner corners versus outer corners (since they are differently sized up against the pavement tiles – so you just need to measure the side against the tiles).
My updated plan for building the cityscape.
I ended up following the same type of build and painting scheme as I did for the causeways – after all they had to match too aesthetically. As far as quantity, I ended up deciding to build 48 on 1/2″ strips of balsa. The breakout from the plan above came out to be:
6″ sections (10)
5″ sections (10)
4″ sections (10)
2″ sections (4)
1″ sections (2)
External 1″ x 1″ corners (8)
Internal 1″ x 1″ corners (4)
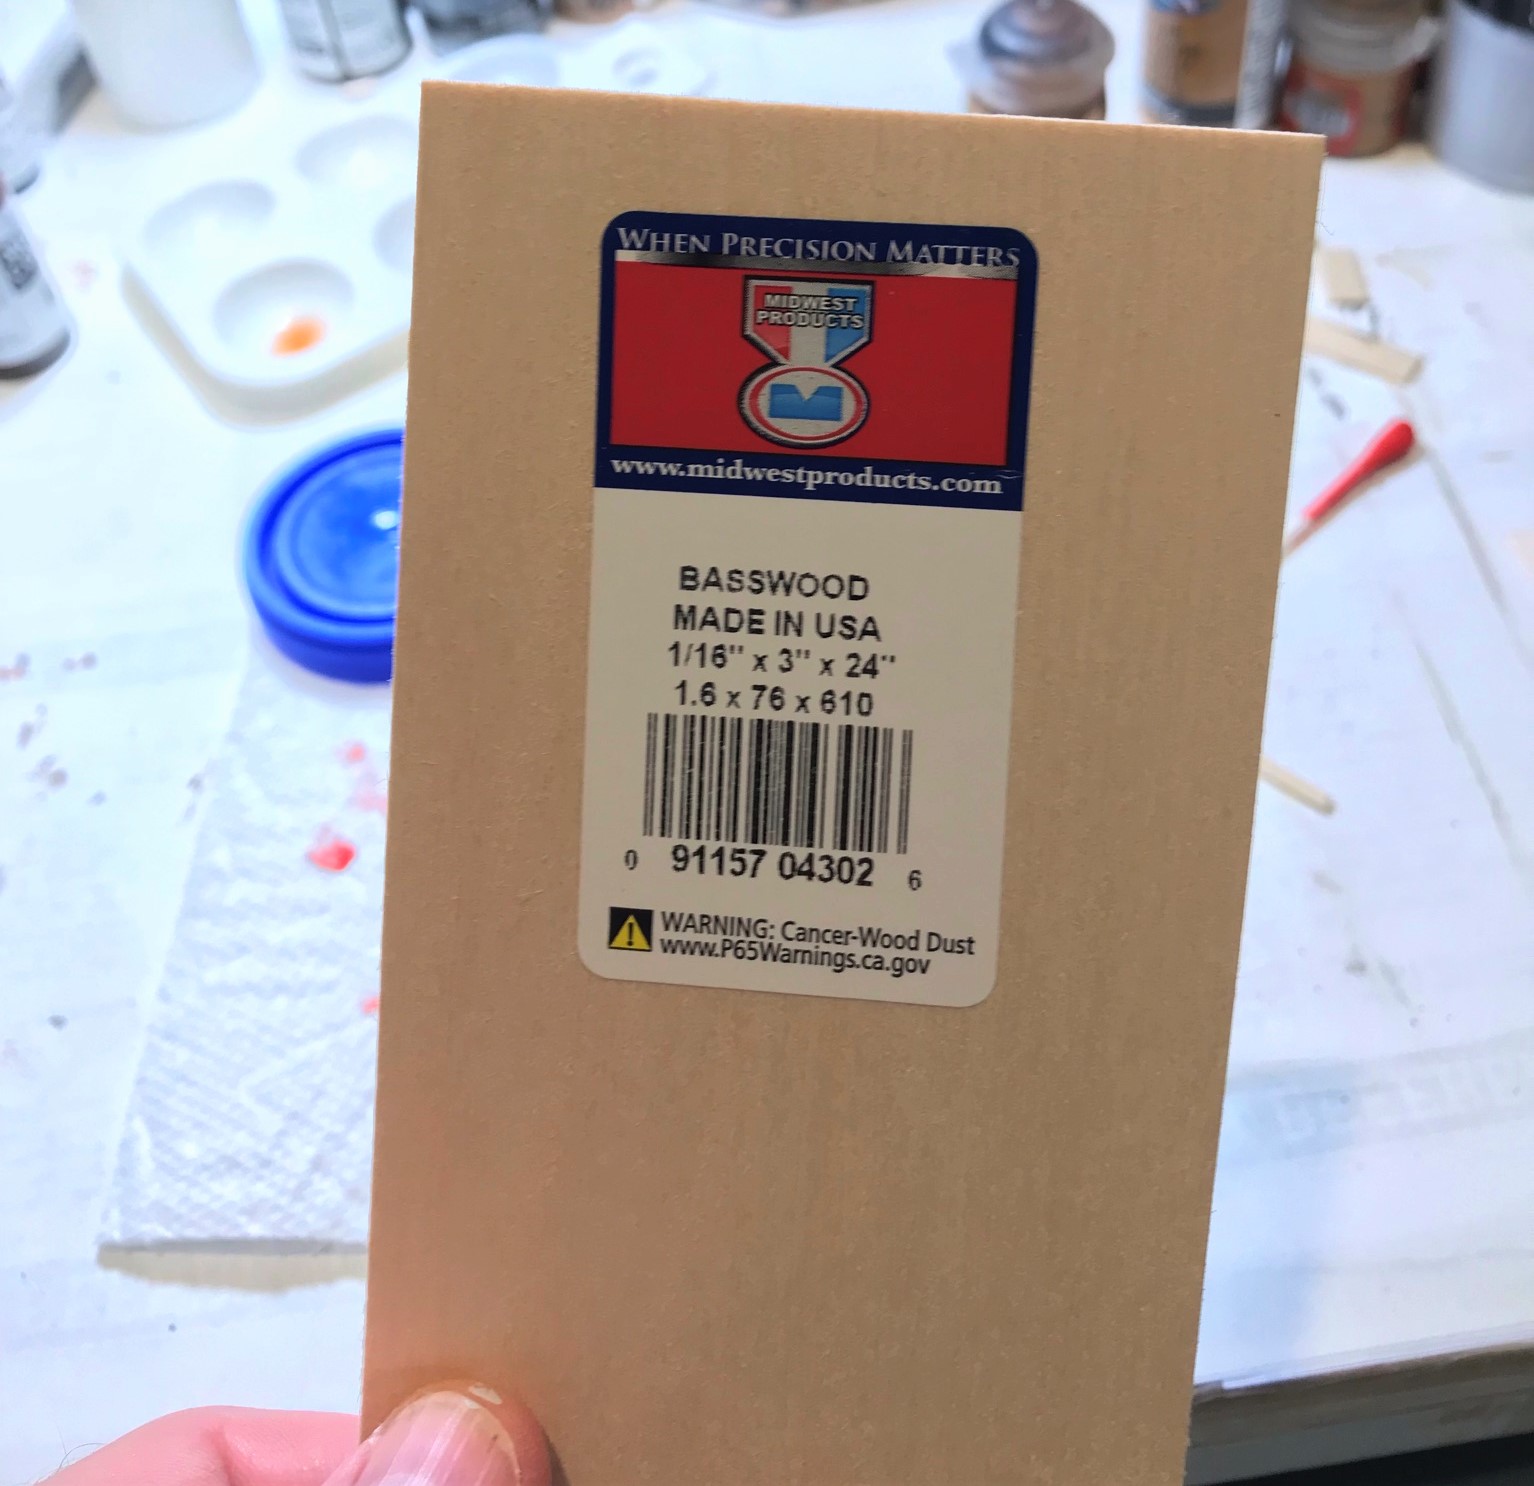
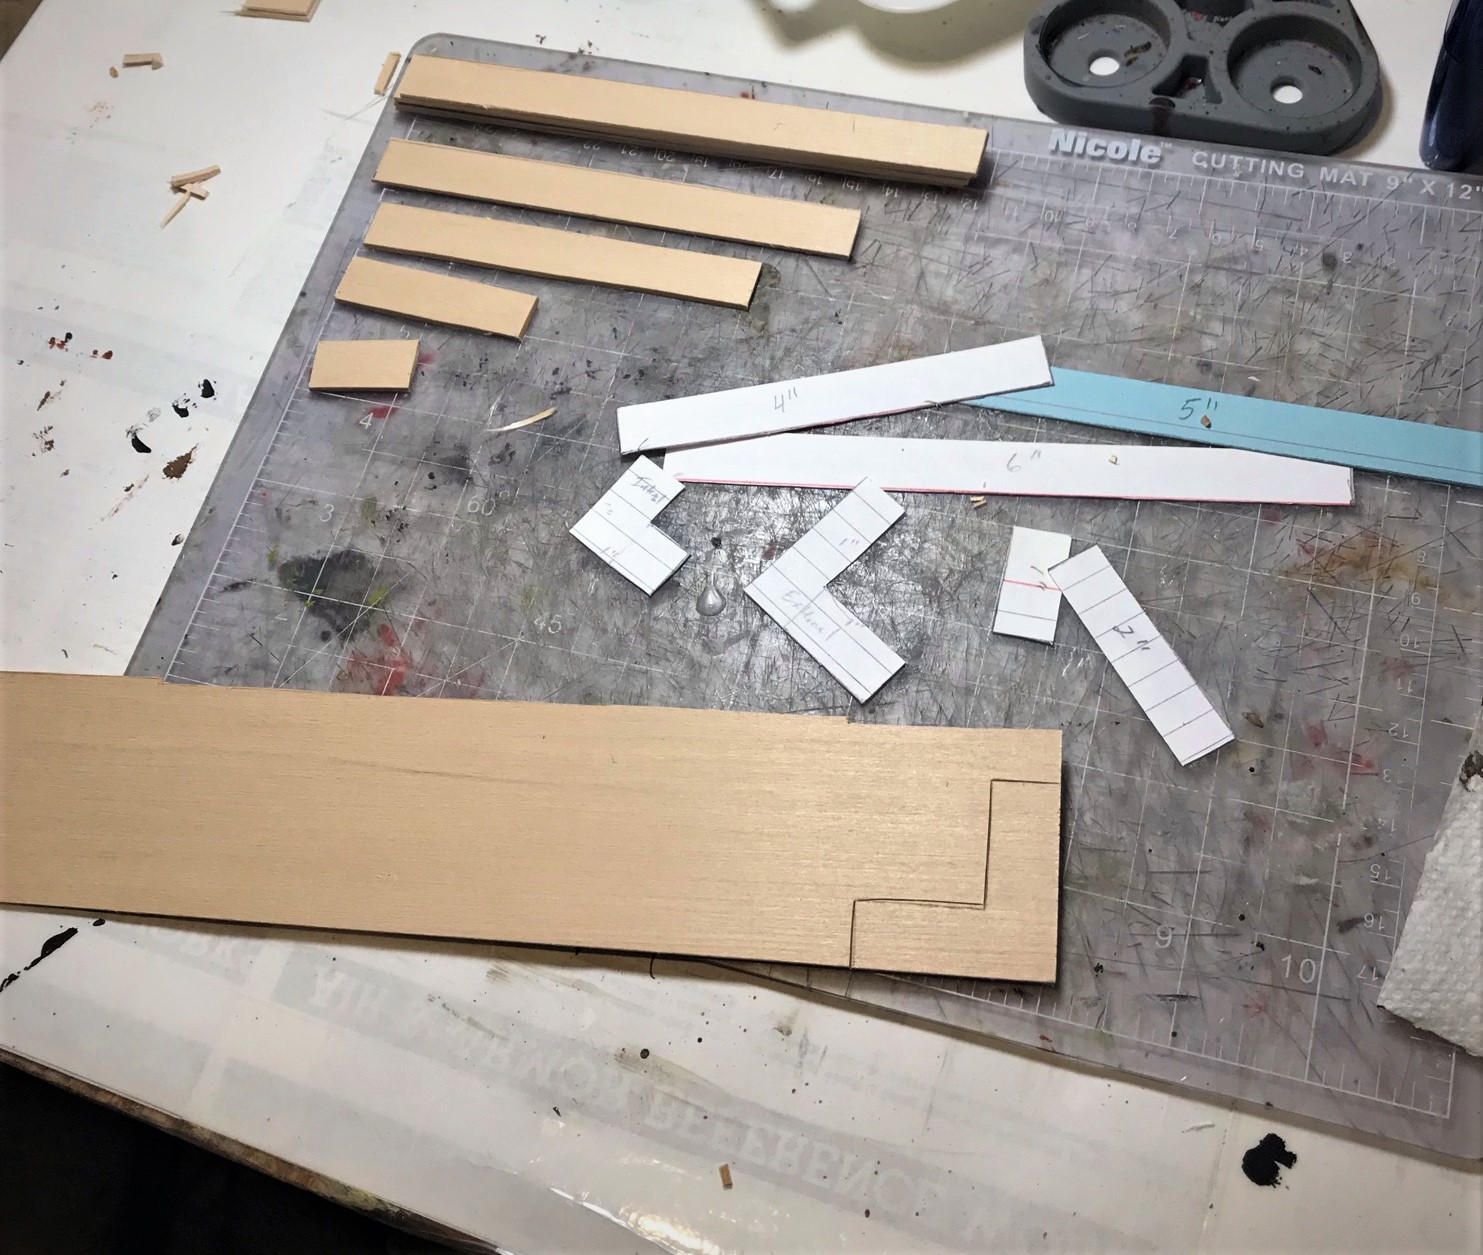
I made templates from 3′ x 5″ cards and used them to size and cut up some basswood (balsa like but stronger and denser) into the strips for gluing the rocks.
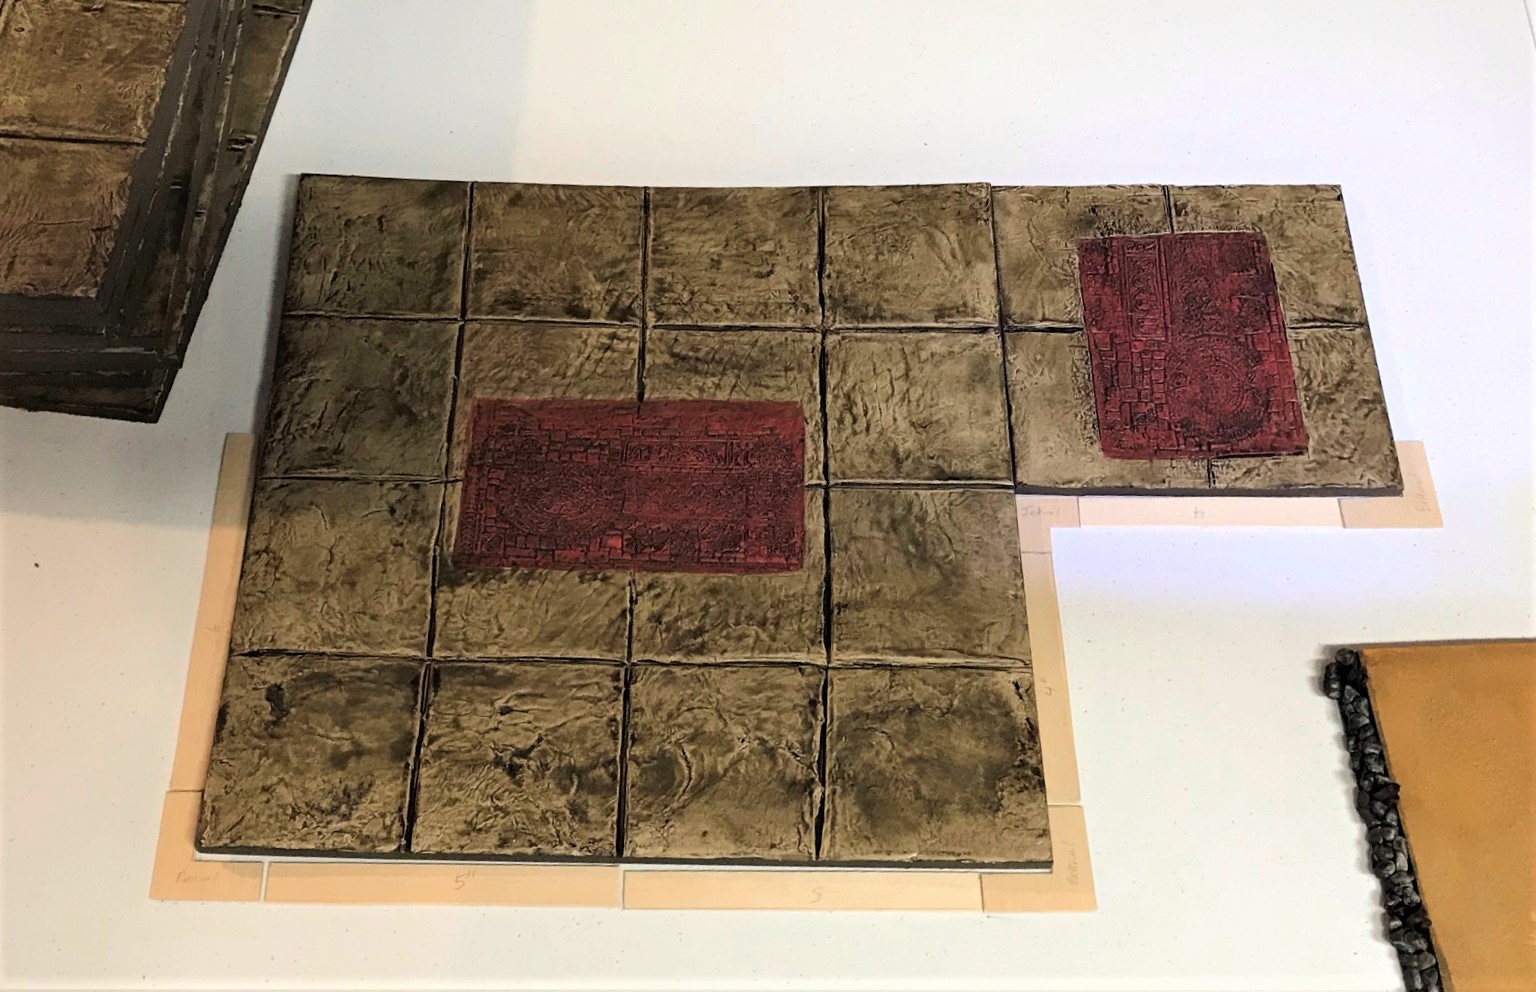
The basswood.Here you can see my templates, and the WIP. My inventory is building up in the top left.After I cut a few, I dry-fitted them around a couple of pavement tiles and compared them to the causeways as well for width. It looked good at this juncture to continue.
Once the bass wood pieces were all cut, the gluing began, similar to the process I used on the causeways. Each pebble had to be glued one at a time in 2-3 courses of different sizes – while letting each course dry before moving on to the next one. In terms of pebbles, I estimate that for the 184 linear inches that I put about 10-15 pebbles per inch. That means for the revetments alone I glued an estimated 1,840 – 2,760 pebbles/rocks!! Add in the six two-sided foot-long causeways, and that makes an estimated 4,720 – 7,080 pebbles that I glued down. Ok, now I know why these took so long!
Mid-project showing different levels of rock-laying completion. Here are 48 – including two more 6″ prototypes.Close up shot of progress later on in the project.
After all had dried, it was on to painting the two-tone colors, and adding slime and shade to the rocks.
After the two-tone priming.Completed revetments.
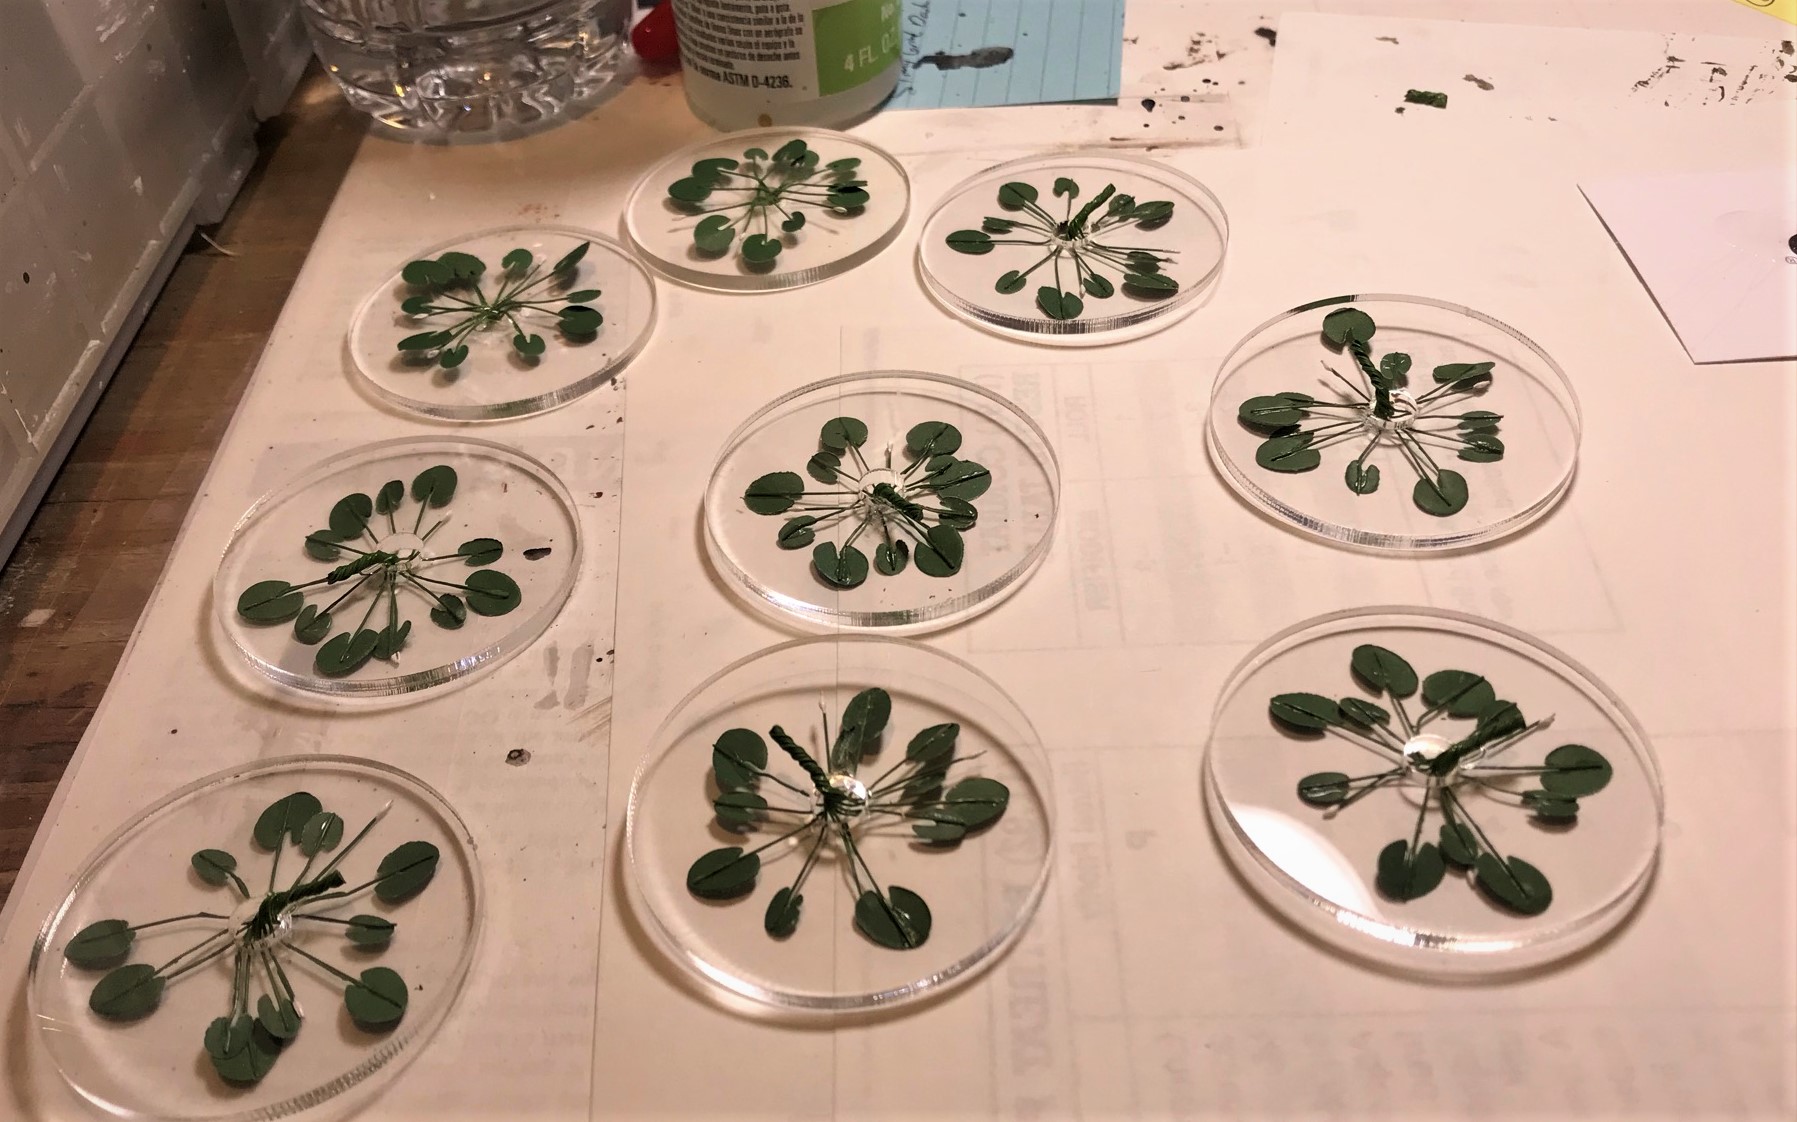
Next, I made some lily pads and cattails on some acrylic bases. These were HO scale from JTT Scenics that I got on Amazon. The link for the lily pads is here and the link for the cattails is here. I wanted to be able to further differentiate the lake and to have some verticality of structure along the waterline – such as you see in the picture below.
A painting of Cortes at the Battle of Tenochtitlan (from Britannica). Note the cattails.
I bought some 2″ clear acrylic bases years ago (2017), and had some in storage. I thought they would work well for the lily pads. They come with removable protective paper over them so that they had no scratches.
Acrylic base – there are many suppliers on Amazon. Here is where I got mine.The lily pads here are upside-down. The lily pads and their flowers are made on thin wire wound together – so if you cut the wire they all just fall apart. Initially, I used Gorilla Glue on the prototype, but decided to change course and fill the bottom of the wires and the holes with Vallejo “Transparent Water” Environmental Effect. Being careful not to overfill, this worked well and allowed me to cut the wires afterwards with no problems. I then used the water effect on the surface of the lily pads’ discs.The lily pads after the surfaces got the water treatment. They are still pretty clear, and will be good on either a water or a swamp mat.
The cattails bases were basically half-moons I cut away (removing the center hole) with my scroll saw. Then I drilled holes to put 4 in each base. I used the Vallejo “Transparent Water” Environmental Effect in a similar way as the lily pads, and after I cut the cattail wires I placed the excess on the base as cattails that had fallen over.
The product – I had 24 cattails that I put on 6 discs.
Cutting the discs
Randomly drilling the discs
Very clear acrylic even after drilling.
Making the cattail bases.Finished cattail bases.
Now, let’s see how they look on the gaming mat!
The revetments help fix the gap – here before…
…and after placement.
Revetment comparison.Pavement with revetments.Revetments, lily pads and the cattails on the mat.Extreme close up shot of the intersection of pavements, causeways, revetments, and cattails.
My goal with these was to create a visual distraction form the MDF edges. I think that they work fine – and of course you can let me know in the comments section if I am off-base (really, you can) or how you might have proceeded differently. Again, I tried meet the Aztec criteria of symmetry.
Thanks so much for looking – I hope it was helpful or at least interesting!
My next post will cover Cortes’ War Wagons that he employed with his troops in their breakout/ escape from Tenochtitlan during La Noche Triste.
For all of my previous posts on games, units, and other projects for my 16th Century Spanish Conquest supplement for Feudal Patrol™ – “Civilizations Collide” – please see this page.
PAINTS, INKS, GLAZES, SHADES, WASHES, PIGMENTS, FLOCKING, GLUES AND MORE THAT I USED ON THESE TERRAIN PIECES/MODELS:
Basswood (1/16″ x 3″ x 24″ pieces) (on revetments)
Ashland Decorative Filler (rocks) (on revetments)
Elmer’s PVA Glue (on revetments)
Vallejo “Surface Primer Grey” (on revetments)
Reaper MSP “Black Primer” (on revetments)
Citadel “Nuln Oil” (shade) (on revetments)
Vallejo Environment “Slime Green Dark” (on revetments)
JTT Scenery Products HO Scale Lily pads
Gorilla Glue
Clear 2″ Acrylic Bases with center holes
Vallejo Weathering Effects “Transparent Water” (on acrylic bases)
An Aztec cityscape gaming table would be incomplete without the use of proper pavements. Tenochtitlan was not built to look hardscrabble. These pavements would need to go under the massive buildings I had to represent the city of Tenochtitlan, the capital of the Aztec Empire. This post will cover the pavements I made for the cityscape. As I shared in my previous post, Building an Aztec Cityscape – Part 1: Causeways, Lifting Piers, and Removable Bridge Sections, I will similarly share my WIP photos as well as my lessons learned.
Many contemporary images of Tenochtitlan show a brilliantly white city. I am not convinced that this was its actual appearance. Much of the rock used would have been basaltic or limestone-like in quality. Both are subject to oxidation, and turn brownish-grey over time. That would be particularly true for pavements that were exposed daily to the intense rays of the sun. The painting below reinforced my decision not to go with a white/bleached appearance of stone structures for this project. I went more brownish/grayish.
A painting of Cortes at the Battle of Tenochtitlan (from Britannica). Note the brownish appearance of the masonry.
As with the causeways that I built, I used the MDF sheets I bought from Home Depot. They were 1/4″ thick sheets of 2′ by 4′ that Jeff Smith helped me to cut into ten 1’x 1′ and ten 6″ x 6″ sections. Then I laid them out to see if my initial layout concept would work. It did. But, unlike the causeways, I had an idea that the pavements should look weathered, and have some patterns sculpted onto them – Aztec patterns.
The initial plan
Jeff cutting the MDF
Dry-fitting the MDF on a swamp mat
A few months prior I had learned from a friend in Maryland (Greg Priebe) that he had a surplus Aztec Roller from Green Stuff World (see it here). I was deep into painting the figures that I had at that point – but I traded some Ral Partha Vikings to him for it – with some idea that I would use it when I got to the point of building a cityscape – somehow. (THANKS GREG!!)
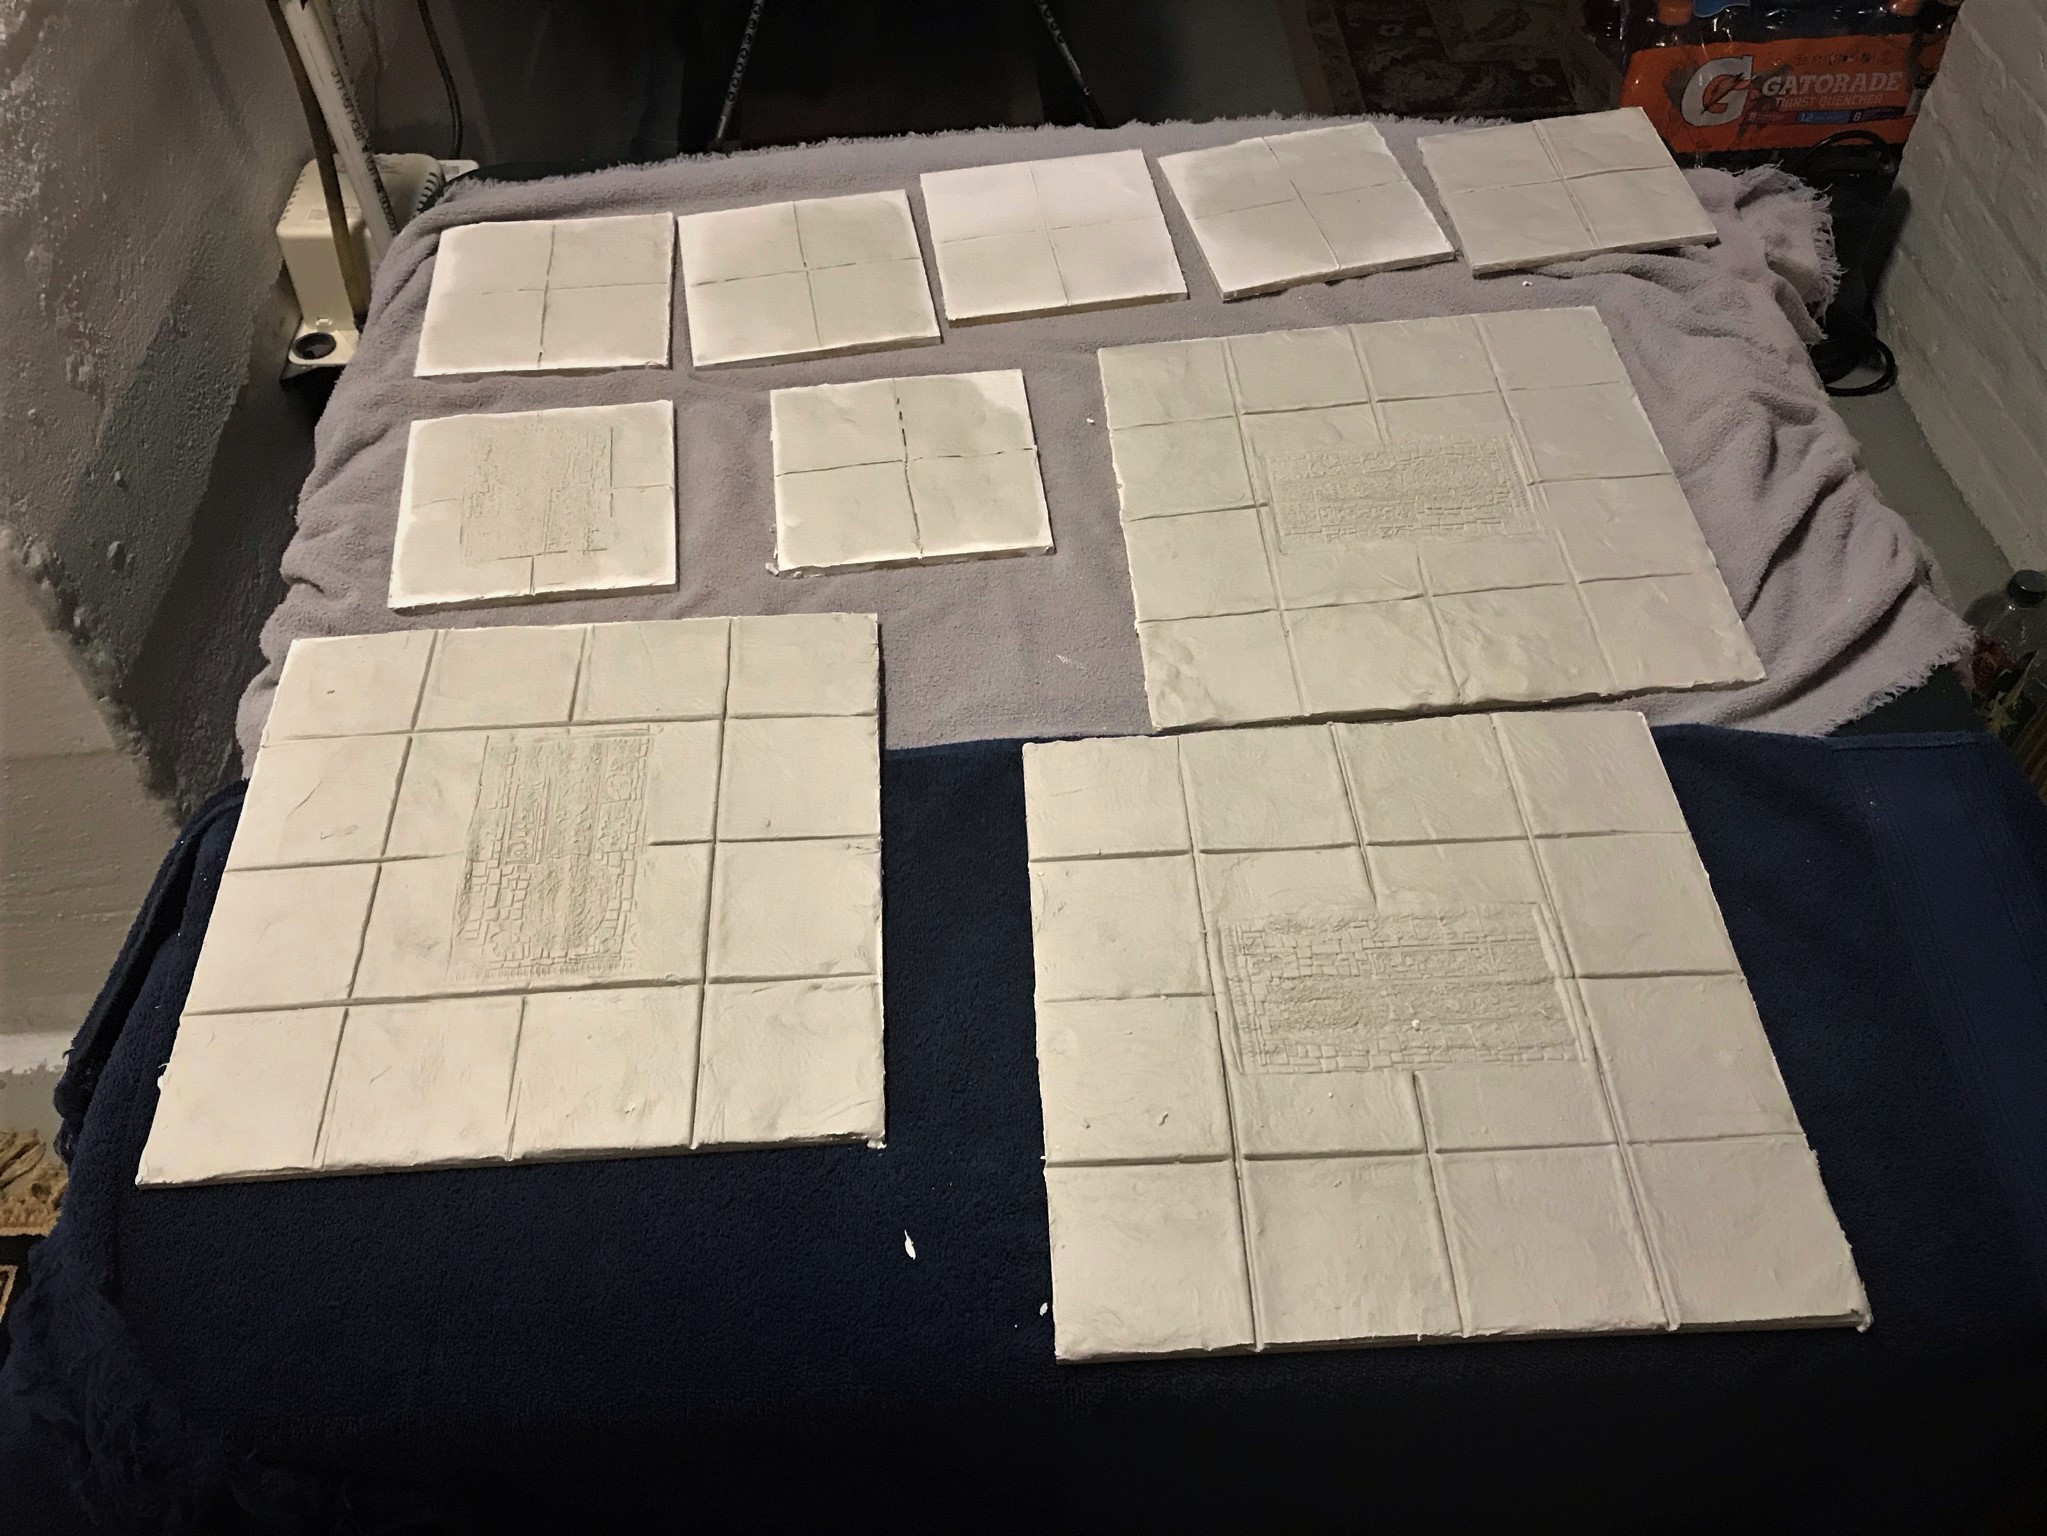
I was not going to like just having the MDF just be painted, I wanted a more tactile, almost 3D effect on them.
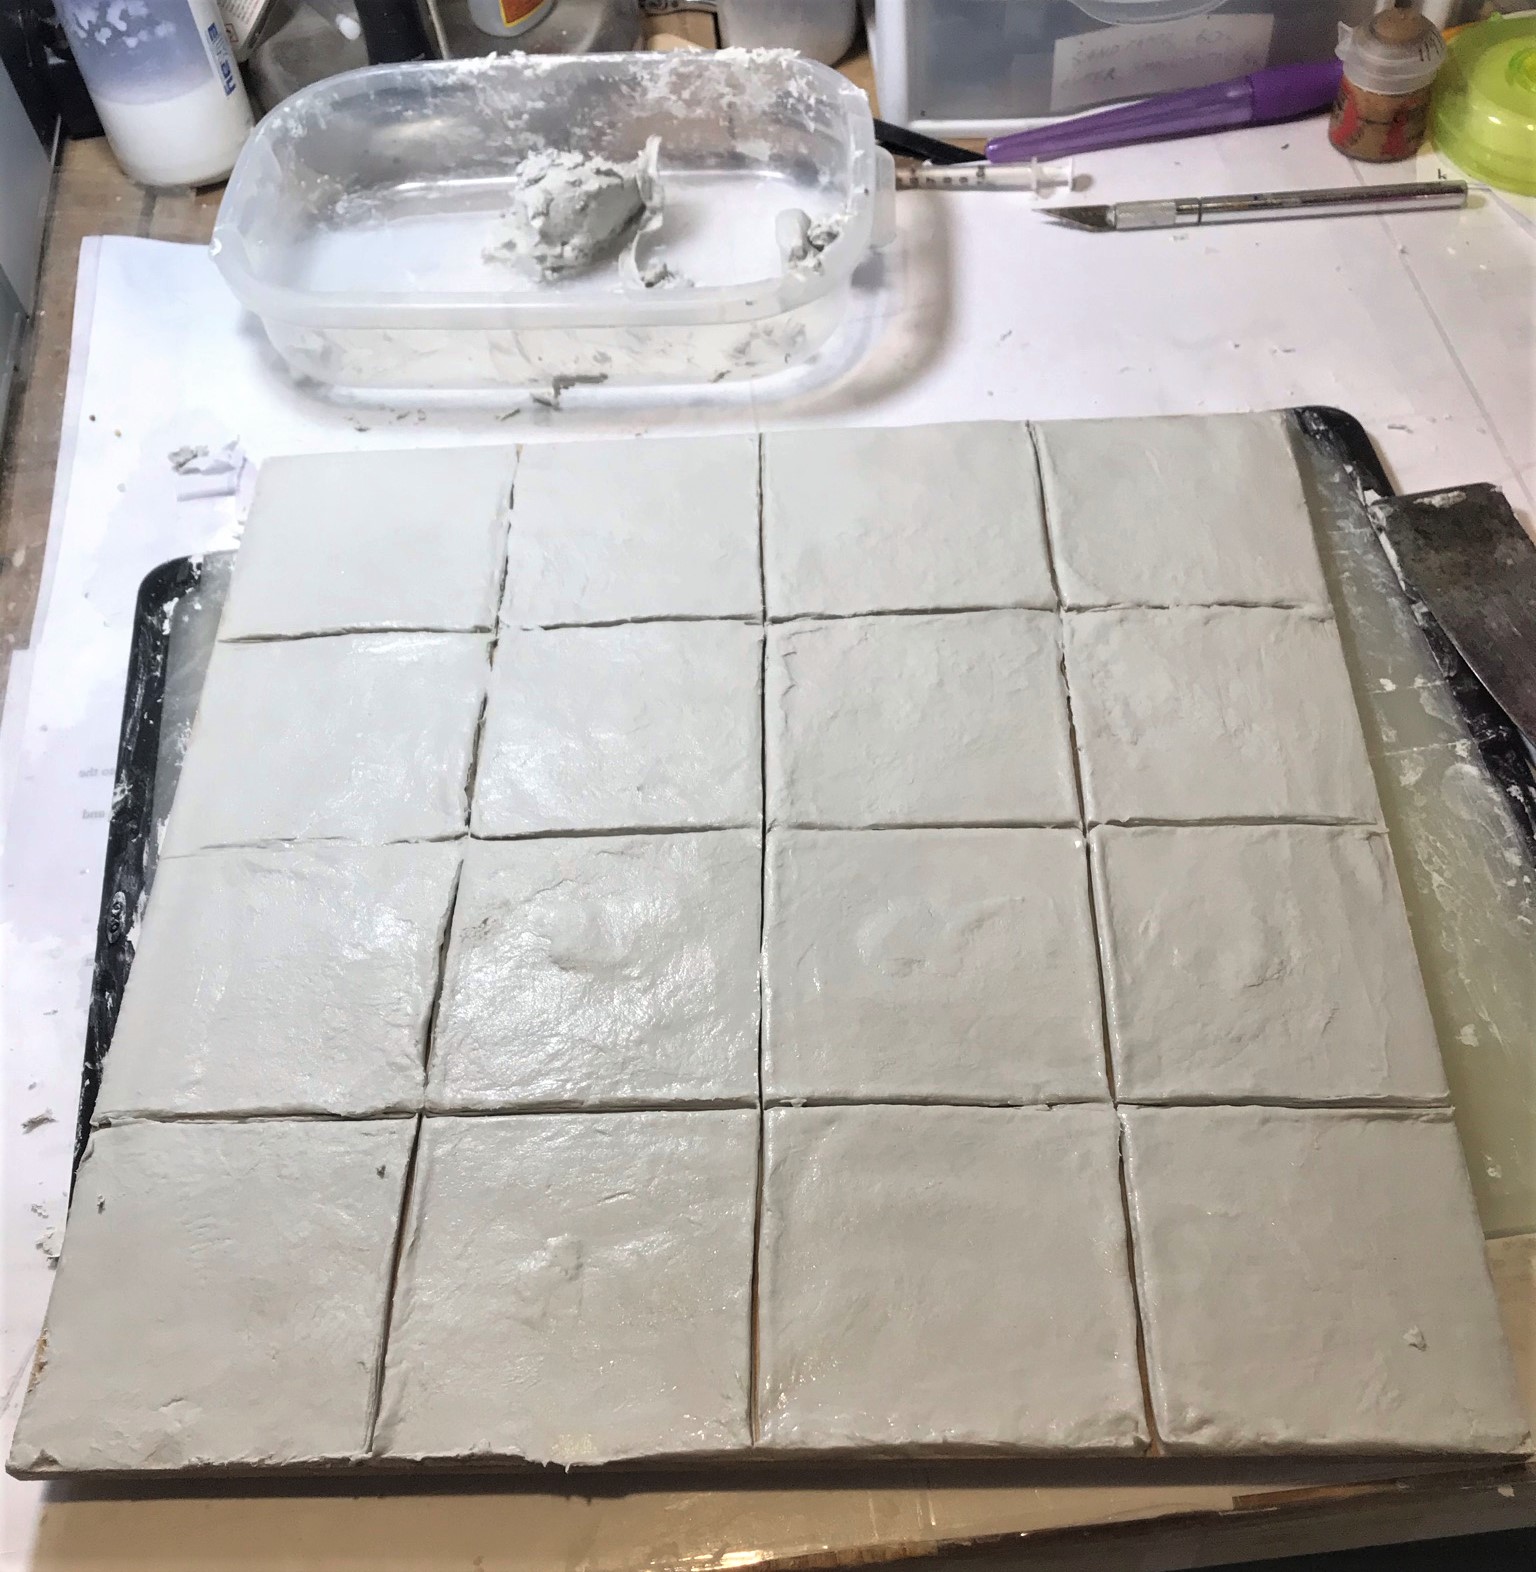
However, we are talking about 15 square feet of surface! I considered using green stuff and Apoxie Sculpt (both too expensive and potentially difficult for a huge build like this). I considered using modeling clay and then baking it and passed as that would end up potentially with either MDF on fire or a cause for my wife to terminate my existence for using her stove or both. After perusing YouTube for some ideas on sculpting on the MDF, I found this video from a guy named Luke in the UK where he used DAS clay mixed with PVA glue to use with Green Stuff Rollers. I decided that I would give that approach a go. I bought this DAS in white at Michaels.
Before I started, I needed to test and practice with the roller itself. It has a rectangular pattern, but it is a roller. Therefore, I would need to know where to start and where to stop. The solution came in borrowing some of my granddaughter Tabitha’s Play-Doh and marking a start and stop point on the roller with a Sharpie (and then returning the Play-Doh of course). This also let me figure out how large the imprint would be.
The roller pattern on Play-Doh as a test pattern.
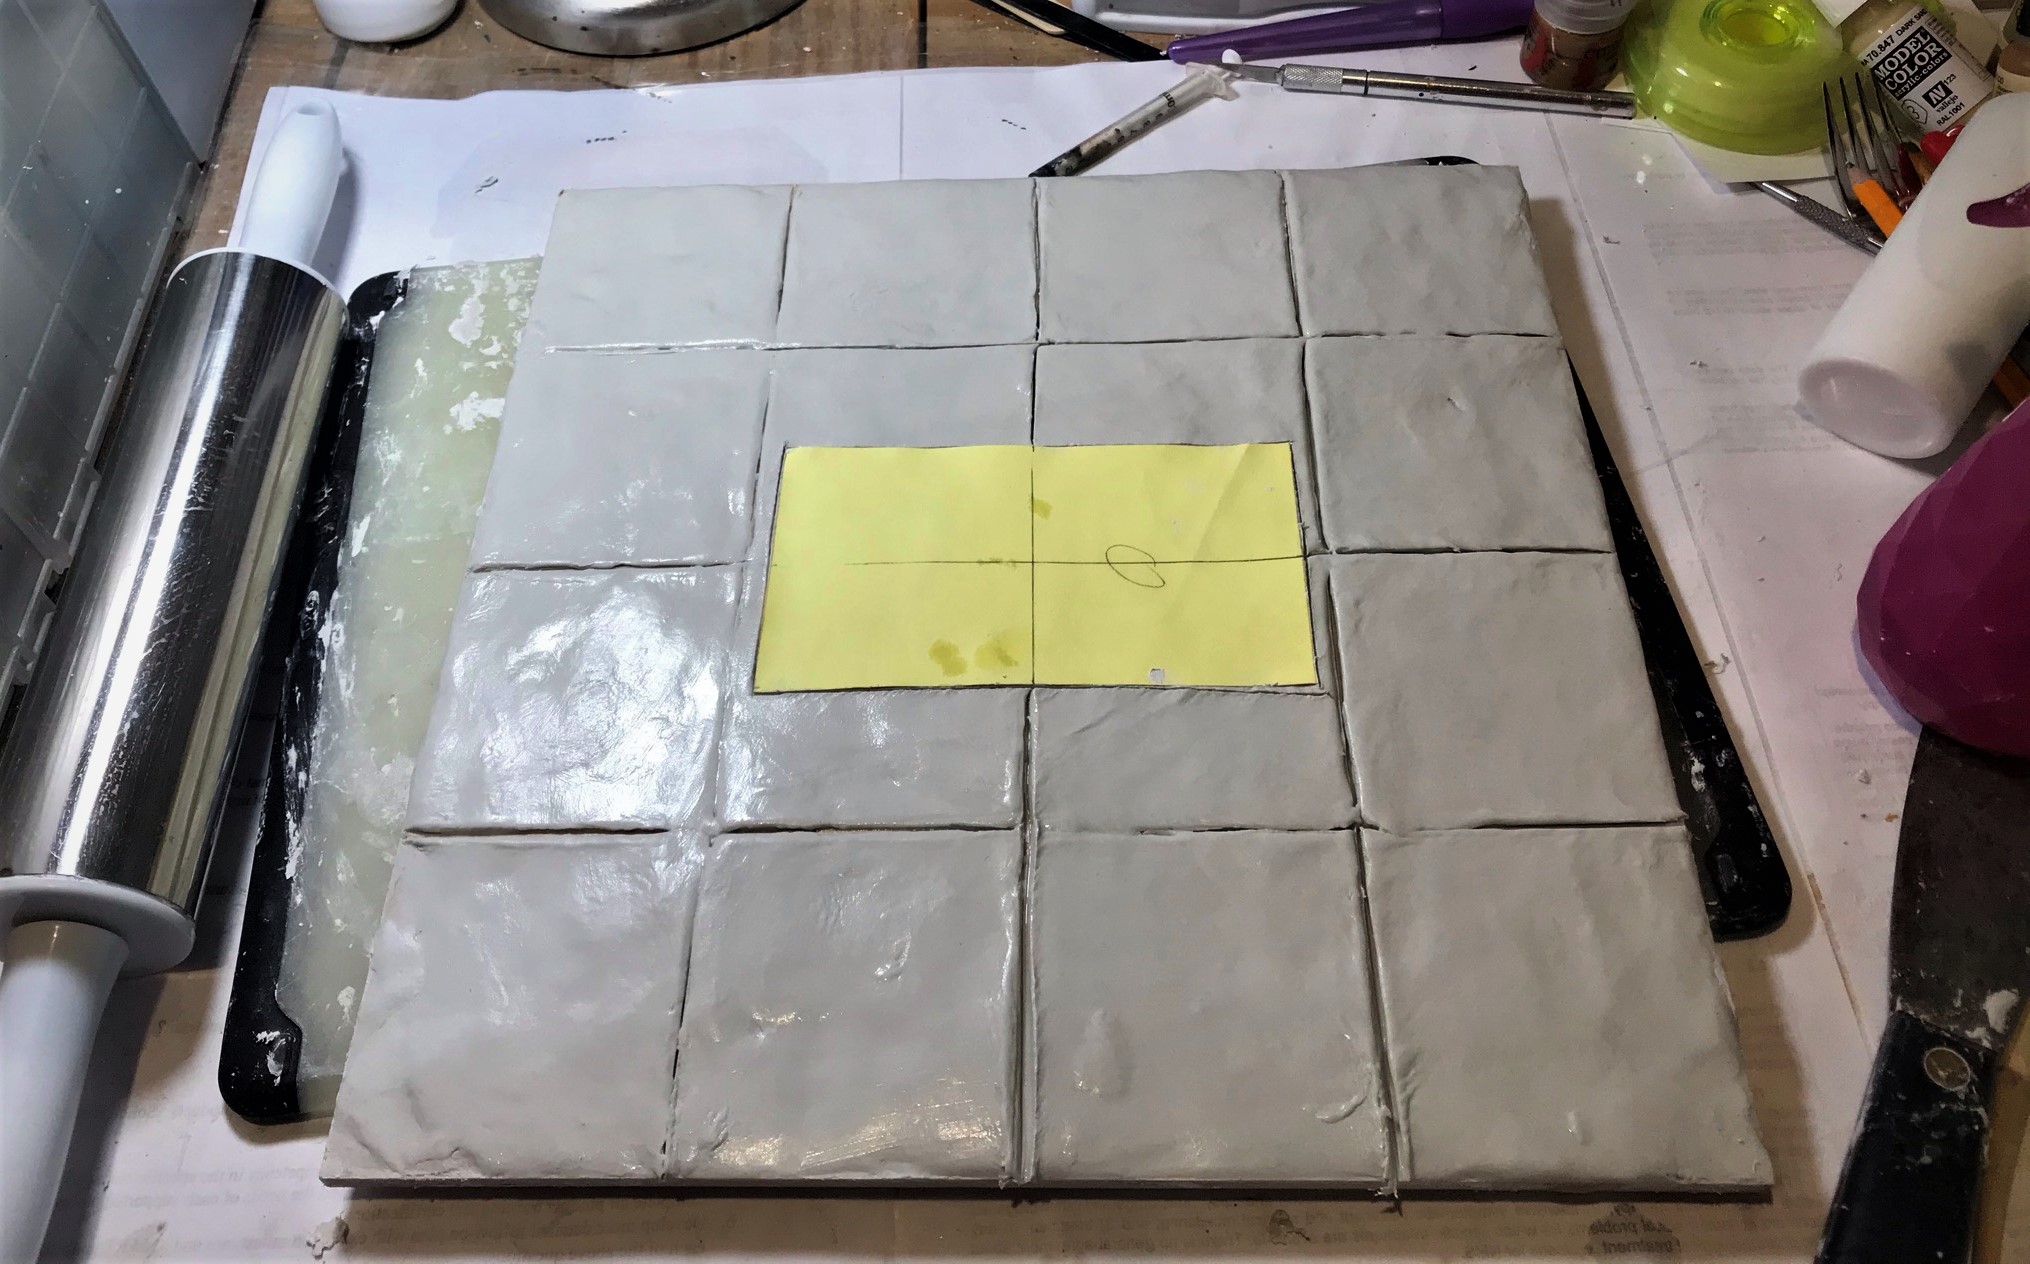
The next step was to figure out the marking/sculpting plan for each pavement. I decided that having 3″ x 3″ squares would work well with both the larger and smaller MDF tiles. I needed to have a properly-sized template for the Aztec roller such that I could center it on the sculpted tiles. I planned to do 6 large tiles with the roller imprint, 4 without, and 9 small tiles without the roller imprint, and one with it. The roller imprint would be approximately 3″ x 5.5″.
Designing the larger (1′ x 1′) tile with the roller imprint centered.
It was now time to, well, get all messy and sticky with DAS and PVA. I used a smooth pastry roller (my own thank you not my wife’s), and a carpenter’s square (also mine!) to smooth out the DAS/PVA as well as to score lines in the mix at 3″ intervals. I used separate plastic tubs to mix the DAS/PVA and to clean my tools.
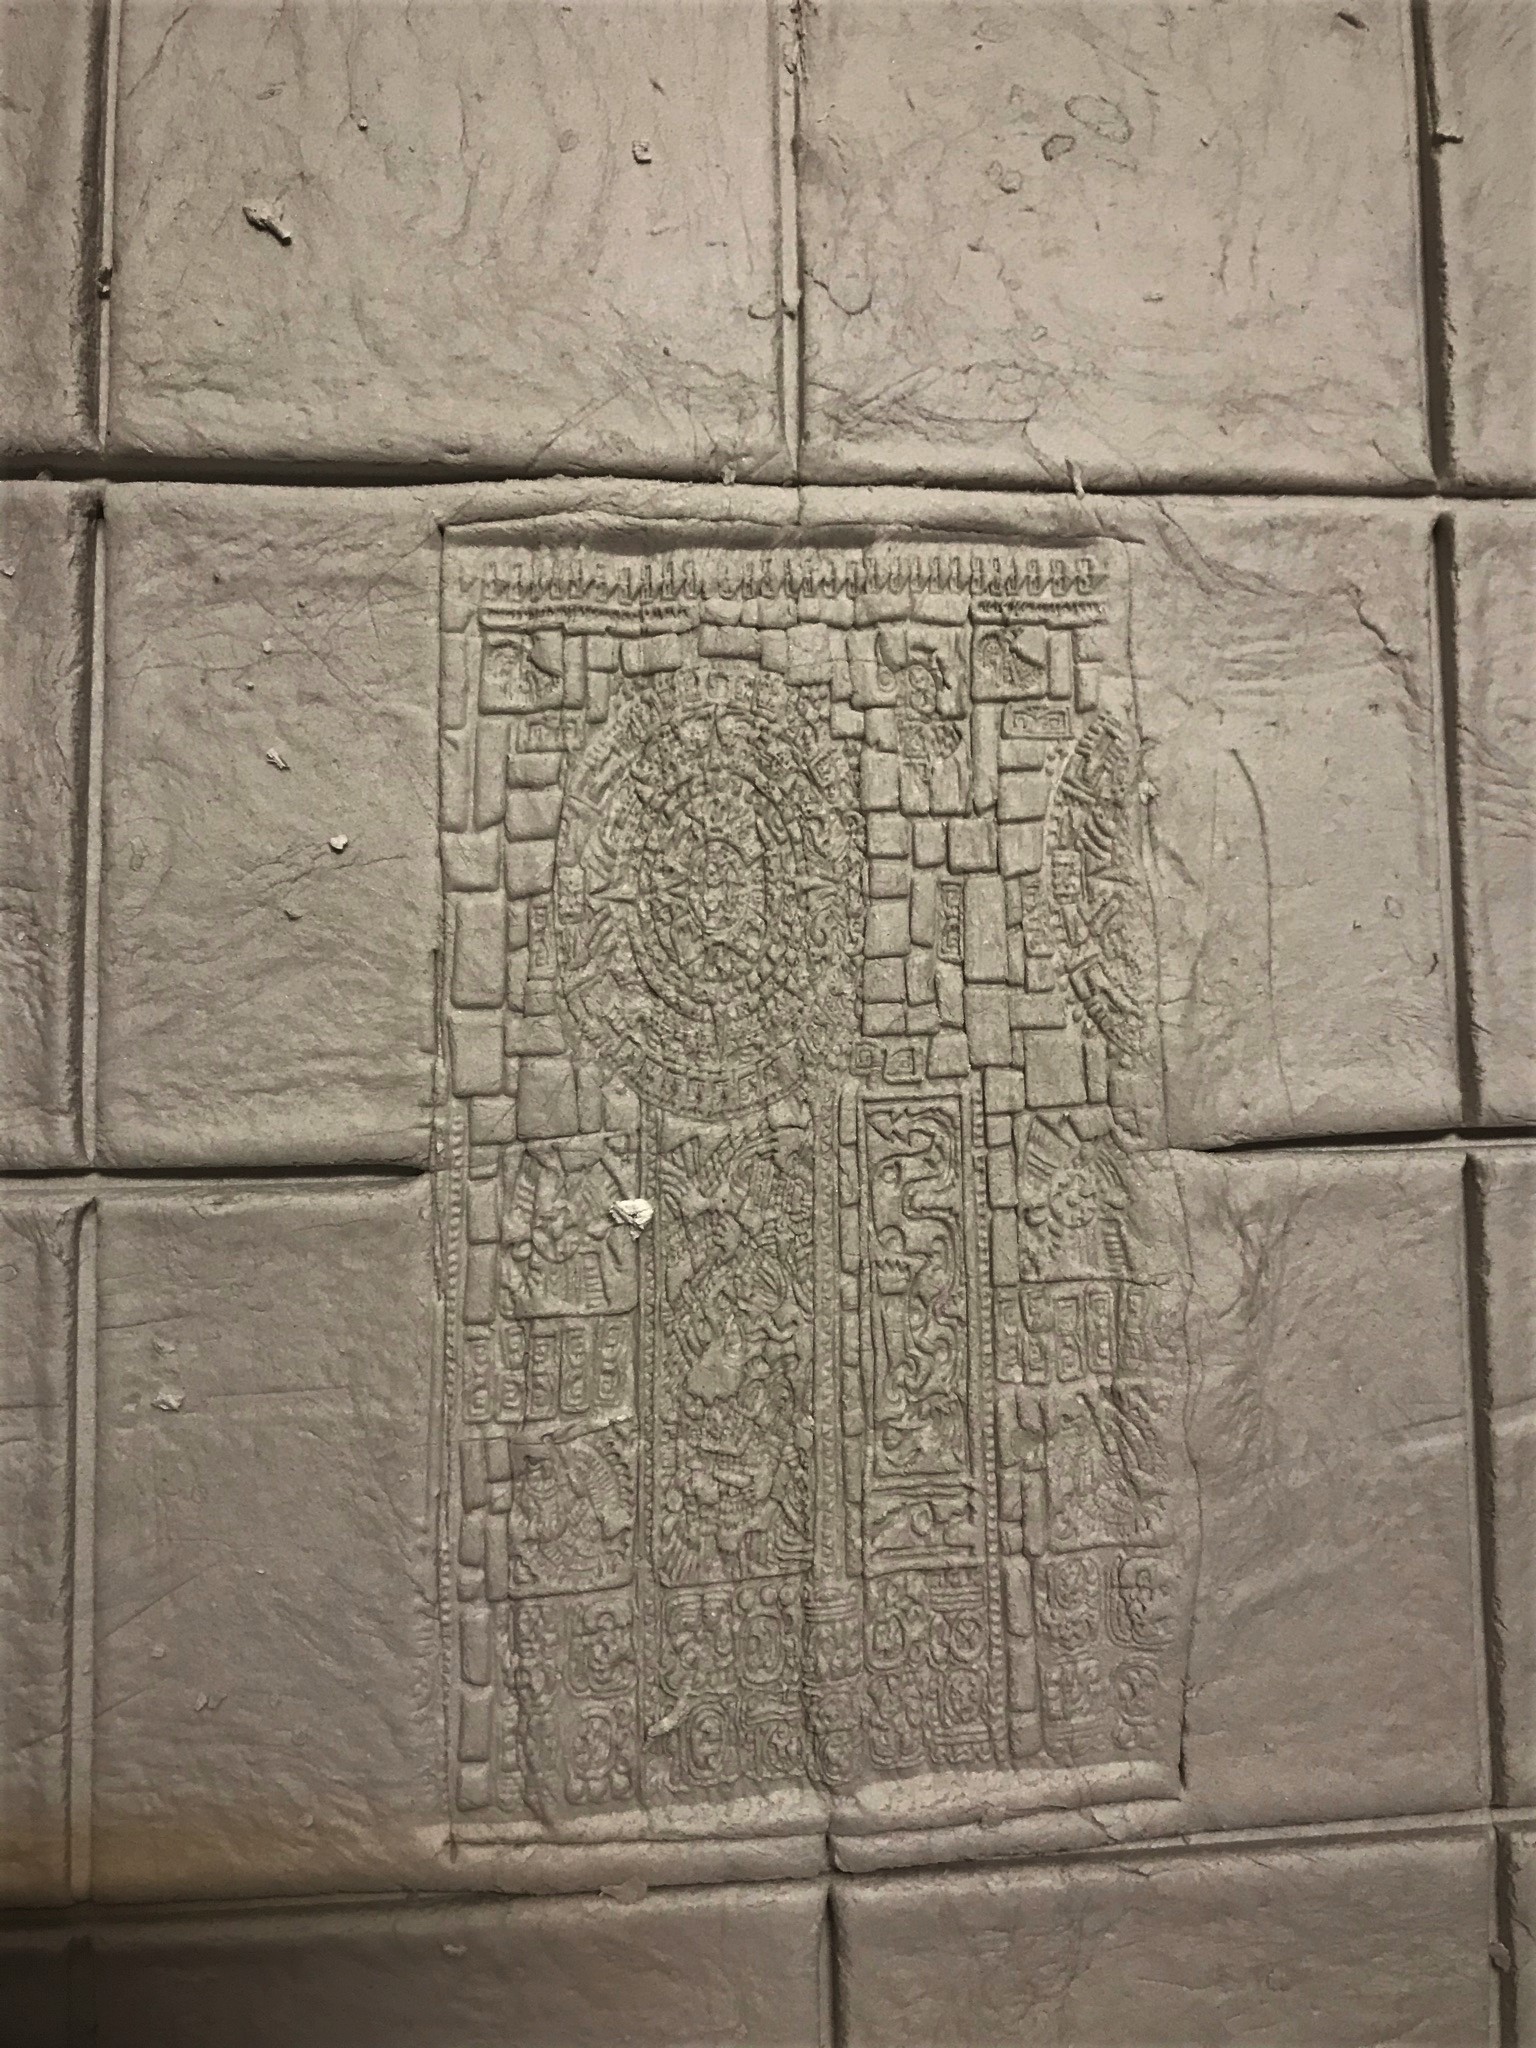
A tile without an imprint.This shows how I sculpted the tile surfaces for the roller. The DAS/PVA mix is on top – and I used a roller and wet fingers to smooth the top. Then I marked off 3″ squares and drew the edge of the carpenter’s square across as a tool. If there was to be an imprint, I placed and traced the template as you see here. Then, I would use the Aztec roller to make the imprint.An example of the rolled imprint. It was not always perfect, but I was able to smooth out the edges as best as I could. I expected to be able to make them work – and in the end they did. This was the worst example – I got better over time. In any case, when I was dry brushing I was able to make all look pretty good (though you can be the final judge).
The roller worked fairly well, though there was a learning curve to be sure. I definitely needed to have a tub of water, a brush, and microfiber towels to clean it (and my tools) constantly. The DAS/PVA on the MDF was left to dry over 24 hours. On a few of the larger tiles, I was surprised to see some of the MDF had a bit of warp from the drying clay/glue combo. The smaller pieces had none. Lesson learned. Certainly, finding enough flat surface for all 15 square feet to dry was not easy. I ended up using multiple card tables in the cellar. Yes, the wife was annoyed again. This whole process used up three packs of DAS – that’s 3 kilograms/6.6 pounds – of the stuff.
Drying tiles.
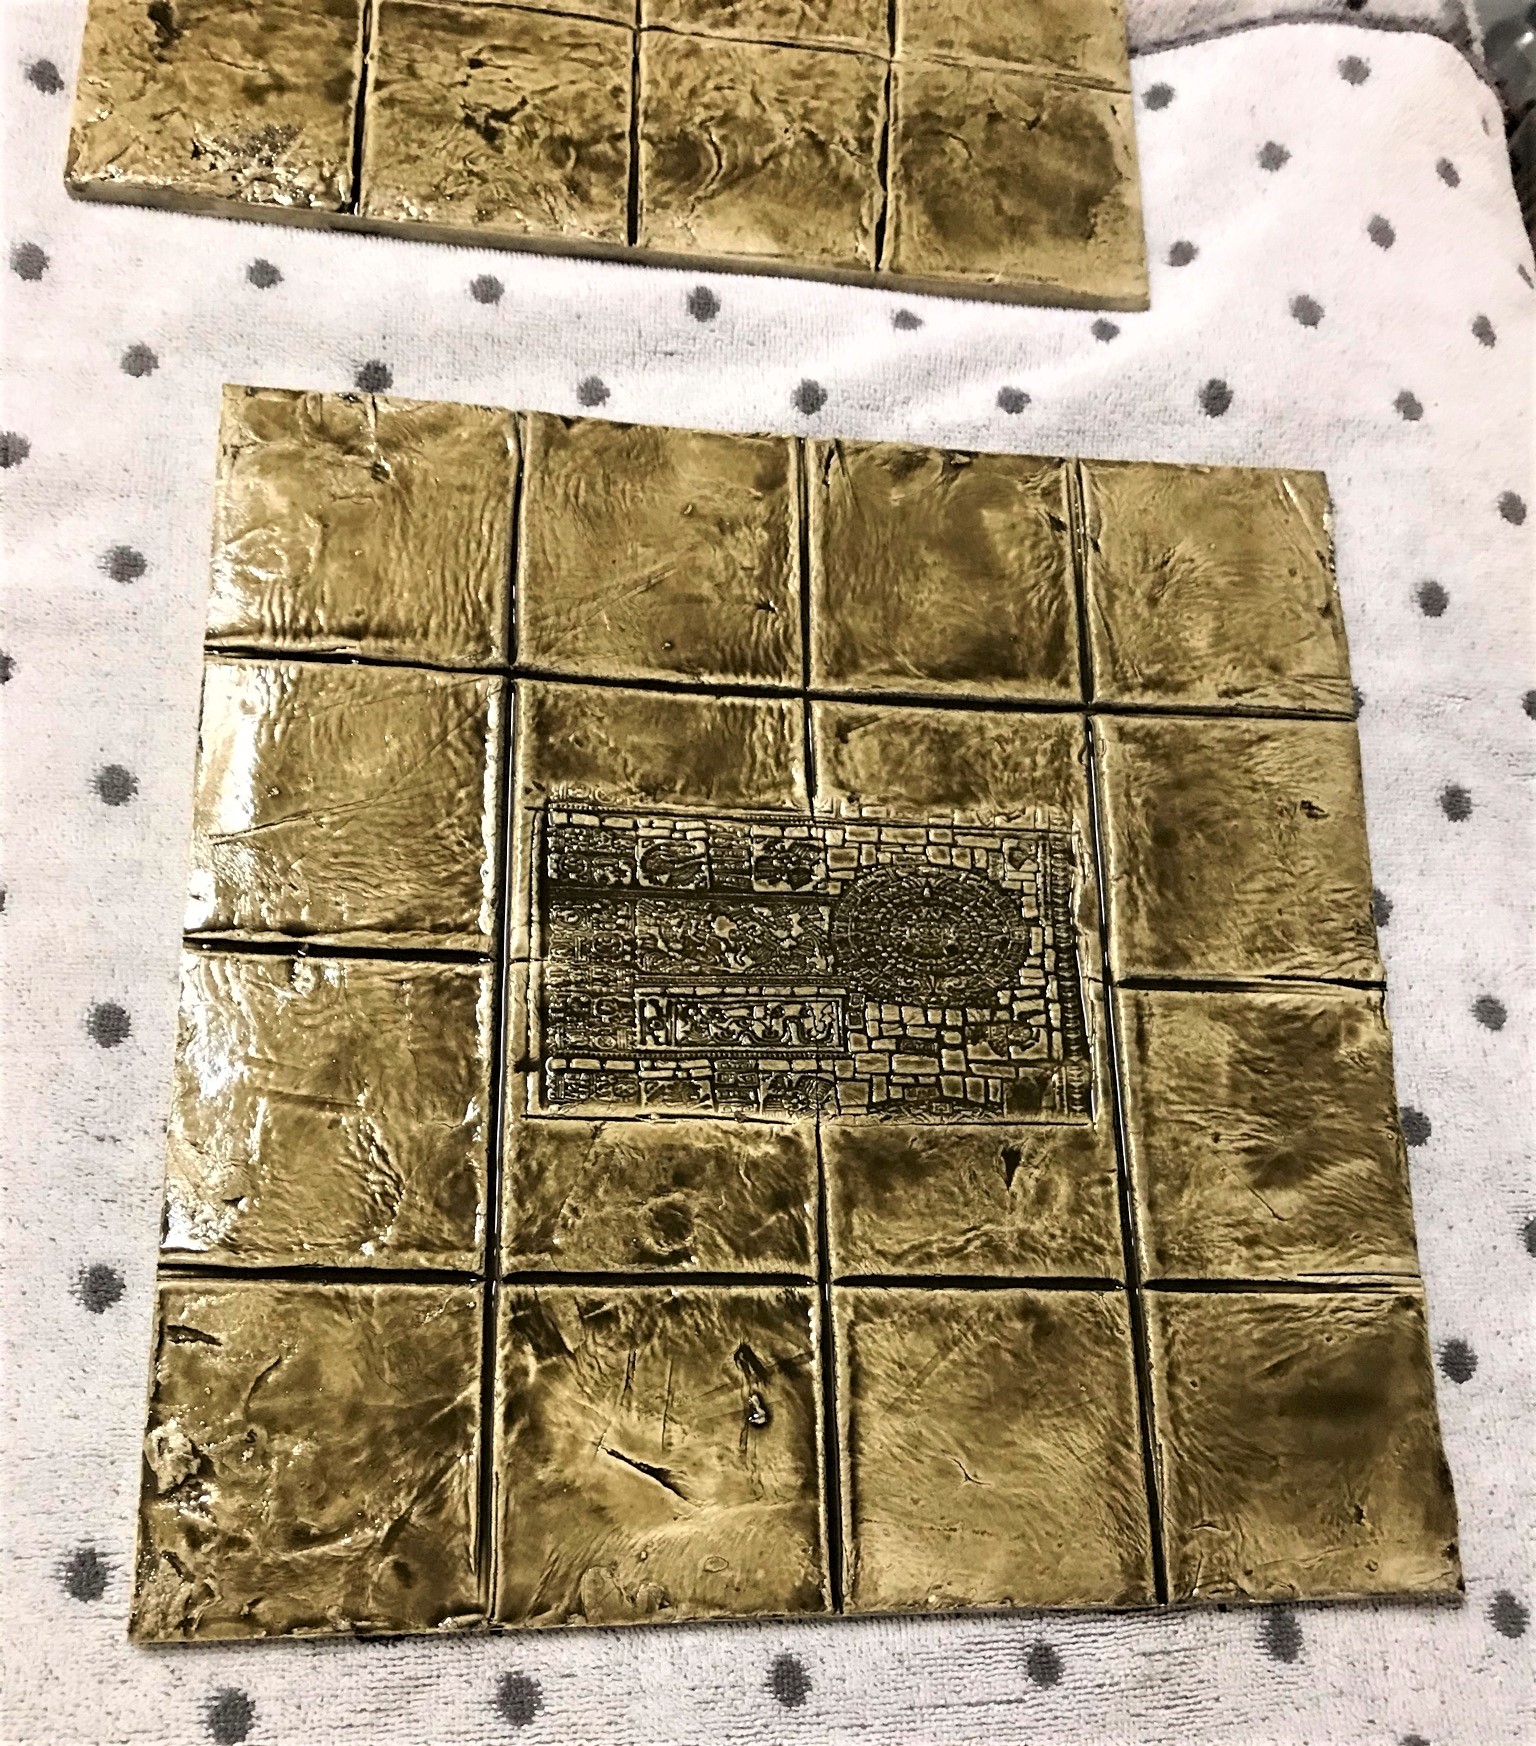
Once they had dried, the next question was how to paint them? I decided to use up my cans of Army Painter Strong Tone and Soft Tone (the dip), as they would be otherwise gathering dust in my paint shed. They theoretically would provide a bit of protection as well. Again, I also needed 24 hours of drying after application – yet again.
The Army Painter “dip” drying.After the dip dried. I was happy with the way the pavements looked, except for the glossy effect.
Normally, I do not use spray varnishes, but these large pieces were good candidates for a spray of Krylon matte varnish. It was warm outside, so I gave them a coat. All went well – until some of the pieces – mainly one – started bubbling up like a cheese pizza. AHHHHH!
From what I could figure out, that was caused by the aerosolized solvent in the can vaporizing in the DAS and trying to release through the varnish and the dip surface. Luckily it was only on one large tile, but that tile took a rework and made this last at least a week or two longer as I tried to find the right combination to recreate a similar color. This took me into mid-July.
More drying time needed! Hell, drying SPACE. 15 square feet to go on a 24 square foot mat is a lot!
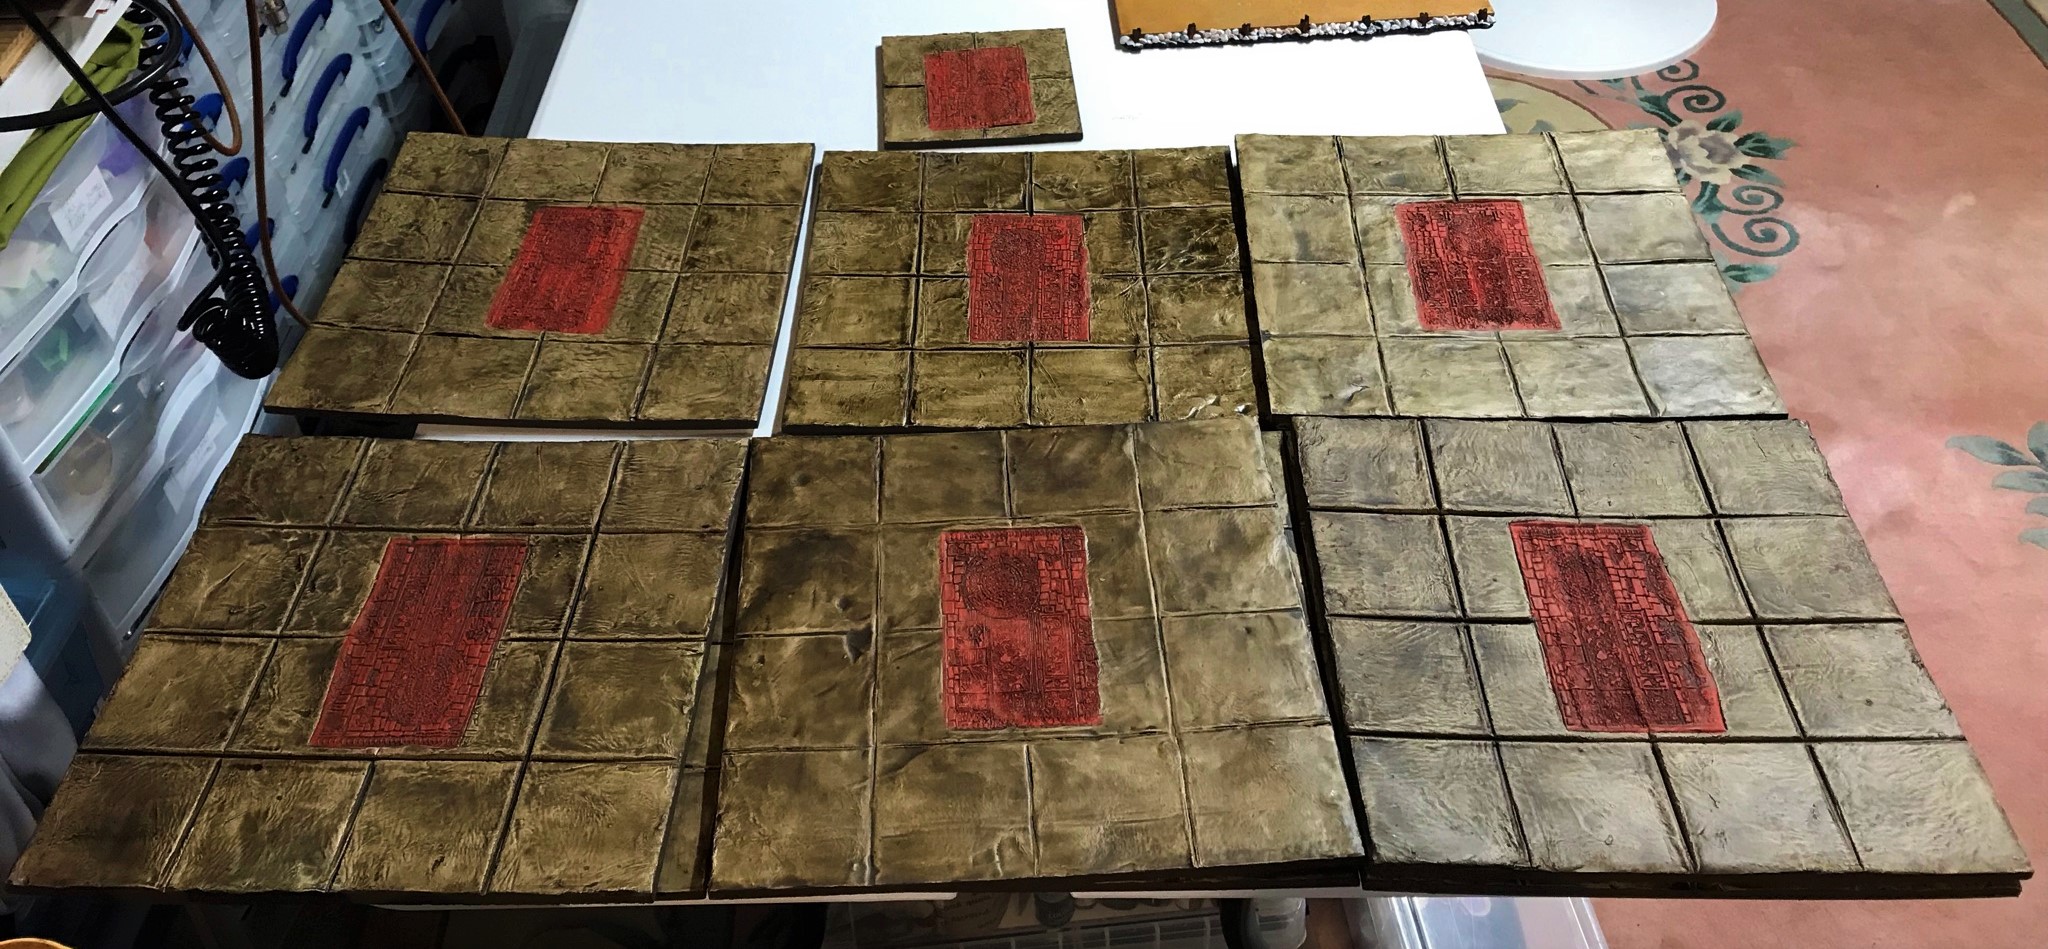
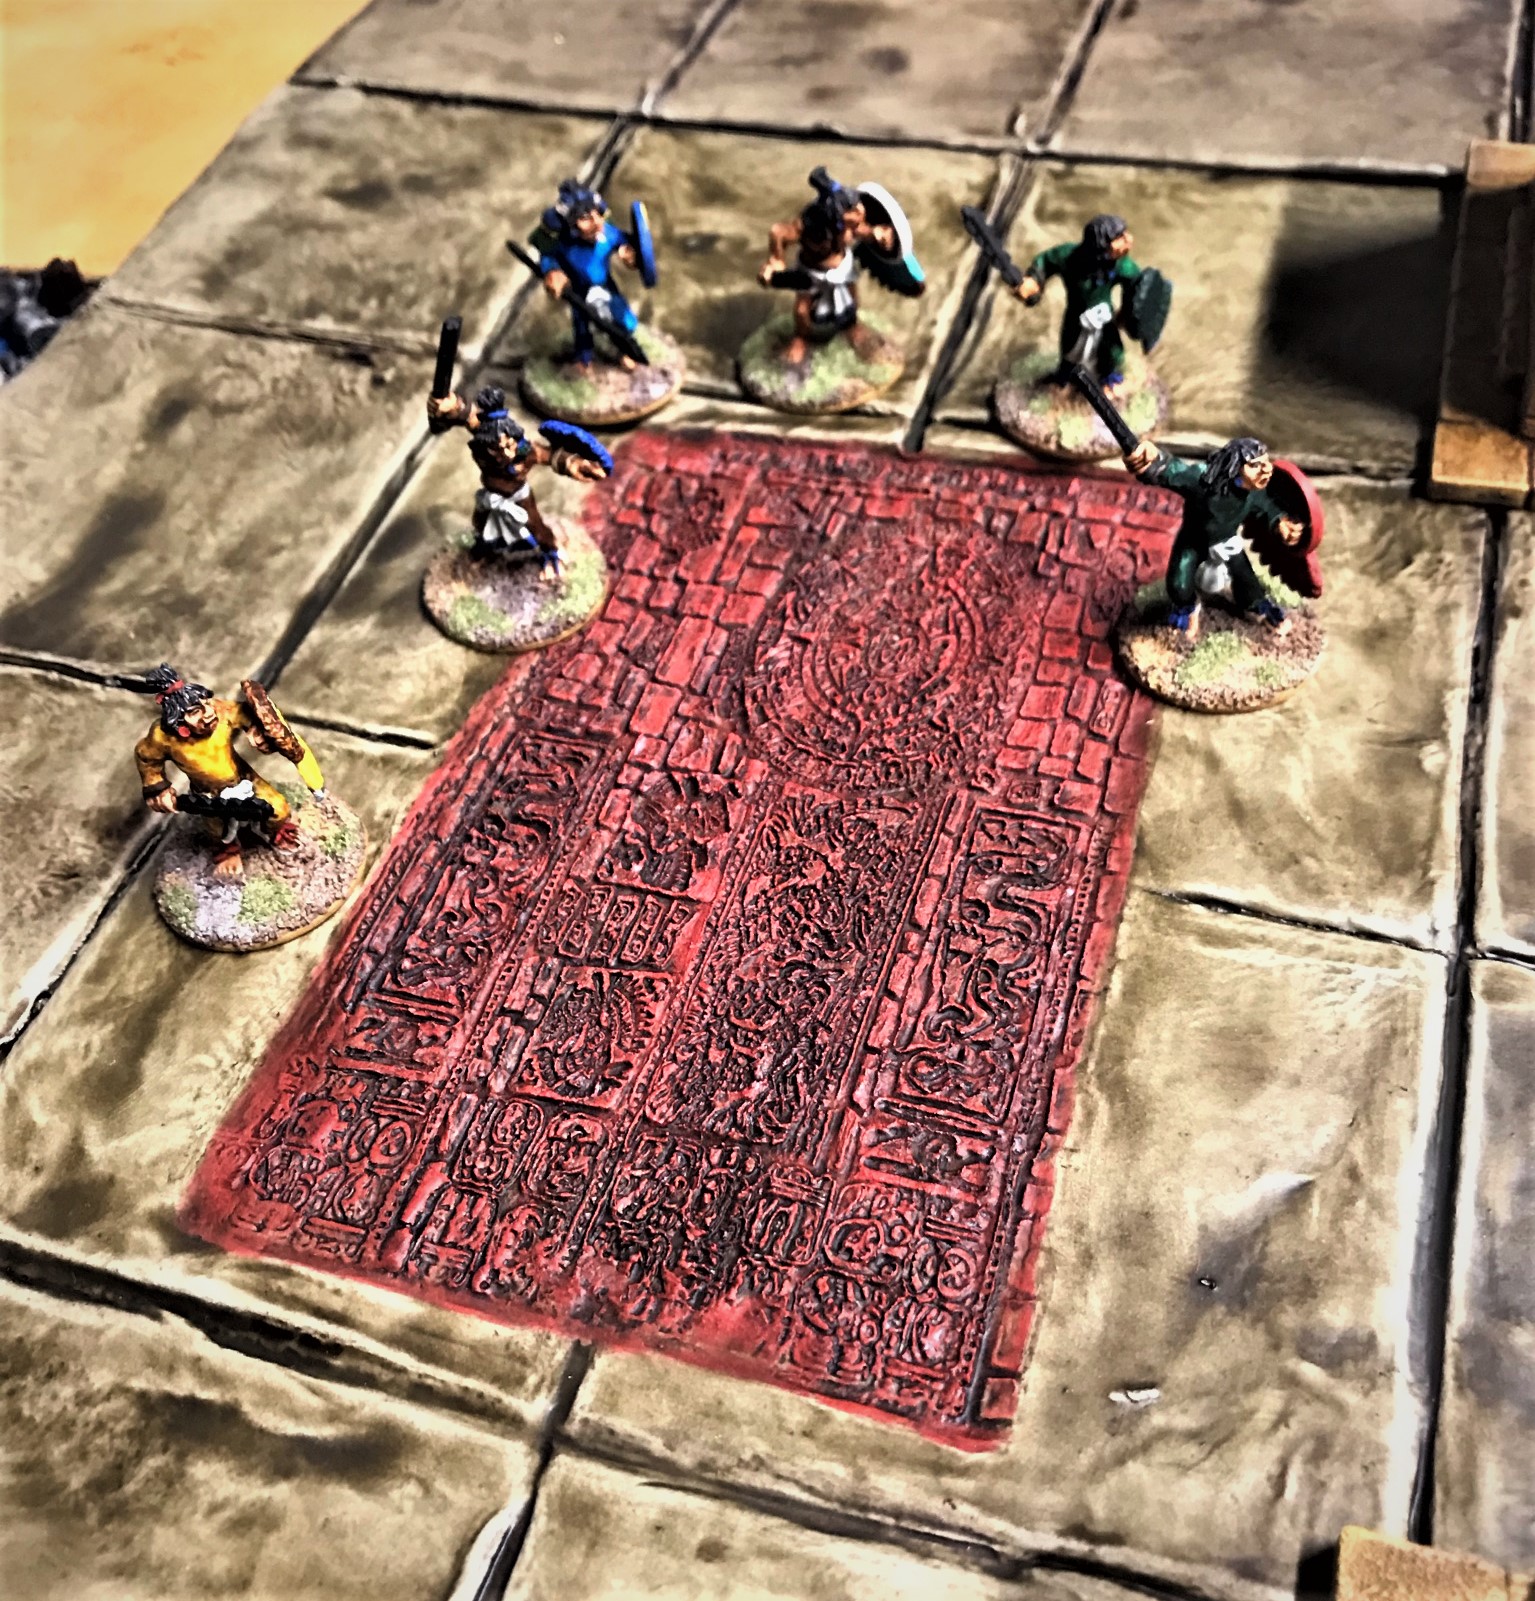
I then brush varnished and shaded all of the tiles. At this time I moved on to dry brushing the imprints with Citadel “Astorath Red”. I also darkened the edges with DecoArt “Raw Umber”. The tiles line up together on the lines nicely. Though some warp is visible, it is not horrible. I also went over all of the tiles and shaded them as needed so that the colors were similar and no untouched DAS/PVA was visible.
A comparison of the imprints before and after on the pavement tiles.All six tiles with imprints.Close up shot of a completed tile.An imprinted tile with some Aztec warriors for comparison.
Of course, when you see the completed cityscape, you will be able to better judge how all of these came out. As they are modular, I should be able to use them in many ways. They certainly meet the Aztec criteria of symmetry. Also, these all can be part of Dave’s Season of Scenery Challenge!
At this point in the project, I noticed how the edges of the tiles were a distraction and needed some attention. I thought that seeing bare 90 degree edges and MDF sides coming out of a lake (or swamp) was a less than aesthetically correct situation for my cityscape. People would have built the city up from the lake – and that would have involved reclaiming the lake as dry ground. How? Well, I am sure that the Aztecs would have used slave labor to haul and deposit tons upon tons of rocks on the water’s edge.
My fix was to build some revetments around the cityscape’s edge plus some lily pads, and cattails – which will be the next installment in this series!
I hope that you enjoyed this part 2 and that you stay tuned for the rest – let me know your thoughts in the comments section and I appreciate your giving this a read!
For all of my previous posts on games, units, and other projects for my 16th Century Spanish Conquest supplement for Feudal Patrol™ – “Civilizations Collide” – please see this page.
PAINTS, INKS, GLAZES, SHADES, WASHES, PIGMENTS, FLOCKING, GLUES AND MORE THAT I USED ON THESE TERRAIN PIECES/MODELS:
I have been working through July to build a representative 6′ x 4′ cityscape gaming table that would evoke the flavor of the city of Tenochtitlan, which was the capital of the Aztec Empire. On the arrival of Hernan Cortes in 1519, Tenochtitlan was populated by an estimated 200,000 to 400,000 people – making it even larger than contemporary London. It was built on an island in Lake Texcoco, and was linked to the mainland by multiple causeways. These causeways also had removable or liftable bridge sections. In effect, Lake Texcoco formed a “moat” around the city, making it impregnable to enemies for hundreds of years (until the Spanish Conquest occurred anyways). The causeways would be of major importance during all phases of the Spanish Conquest. Cortes met Montezuma II on a causeway for the first time. The Spanish and their Tlaxcalan allies would fight desperately at different times to both escape Tenochtitlan (La Noche Triste) and to return to conquer it afterwards. The nature and importance of the causeways were major aspects of these battles, so any representation of the city of Tenochtitlan needed to have causeways.
A 1524 map of Tenochtitlan showing the causeways (from History Today).Detail of a Tenochtitlan causeway (from Learnodo Newtonic).Cortes meets Montezuma on a causeway for the first time (from Pinterest).A painting of Cortes at the Battle of Tenochtitlan (from Britannica).
To build a city of such size would be massive – and certainly beyond the scope of a reasonably-sized gaming table. My goals were to make something special – while ensuring that it was something that could be used in games of Buck Surdu’s Feudal Patrol™ in Mesoamerica (using my Civilizations Collide supplement). I wanted a diorama that could be played on. To that end, I have built many buildings and figures that have been previously shared in this blog. What I needed to add was the underlying structure of the city – “the cityscape”.
The work that I did to build and paint this cityscape was extensive and would overwhelm a single blog post. Hell, it almost overwhelmed me just building it! Therefore, I have decided to break my work on it into 5 posts that I will share over the next few days. There will be a lot of WIP shots on each category, leading up to a final reveal. I am also continuing with my weekly garage+ build posts (like here and here), and I have some golf stuff to add as well. This is “Life, Golf, Miniatures, & Other Distractions” after all! My blogging drought is coming to an end! As for the cityscape posts, here is the listing of what is on deck:
Building an Aztec Cityscape – Part 1: Causeways, Lifting Piers, and Removable Bridge Sections (this post)
Building an Aztec Cityscape – Part 2: Pavements
Building an Aztec Cityscape – Part 3: Revetments, Lily Pads, and Cattails
Building an Aztec Cityscape – Part 4: Cortes’ War Wagons
Building an Aztec Cityscape – Part 5: Tenochtitlan – THE FINAL REVEAL
To build the cityscape, I started off with building the causeways, but work on all of these components overlapped. Please enjoy them and hopefully this is useful for my fellow gamers, modelers, and hobbyists. Luckily, these all can be part of Dave’s Season of Scenery Challenge – which is fun as well.
Initially, I wanted to plan the cityscape layout for a 6′ x4′ mat. I drew a rough sketch, and decided that I would get two 2′ x 4′ sheets of 1/4″ MDF from Home Depot. My friend Jeff Smith (a fantastic woodworker) has a lot of tools – to include a nice table saw, which I do not have. As I needed more precise cuts than I could achieve with my Black and Decker skilsaw, I enlisted his help. He was able to cut all the pieces in no time at all (and again, thanks Jeff!!!).
My initial rough concept of how to use the MDF sheets. They would be the basis of all of the cityscape construction. The pavements and causeways are both planned here, as well as where I wanted it all to go.Jeff cutting some causeways.
After the MDF was all cut, I laid out the pieces that I had on my FLG swamp mat, and arranged my buildings. Later, I would get a water mat from them, as I thought the swamp would not work as well. After the MDF concept layout, I was on to the building of the six causeways. I usually went through the process of doing one phase of work on one piece (like a prototype), and if that worked, moving on to the rest in similar phases.
My initial concept laid out on a swamp mat.
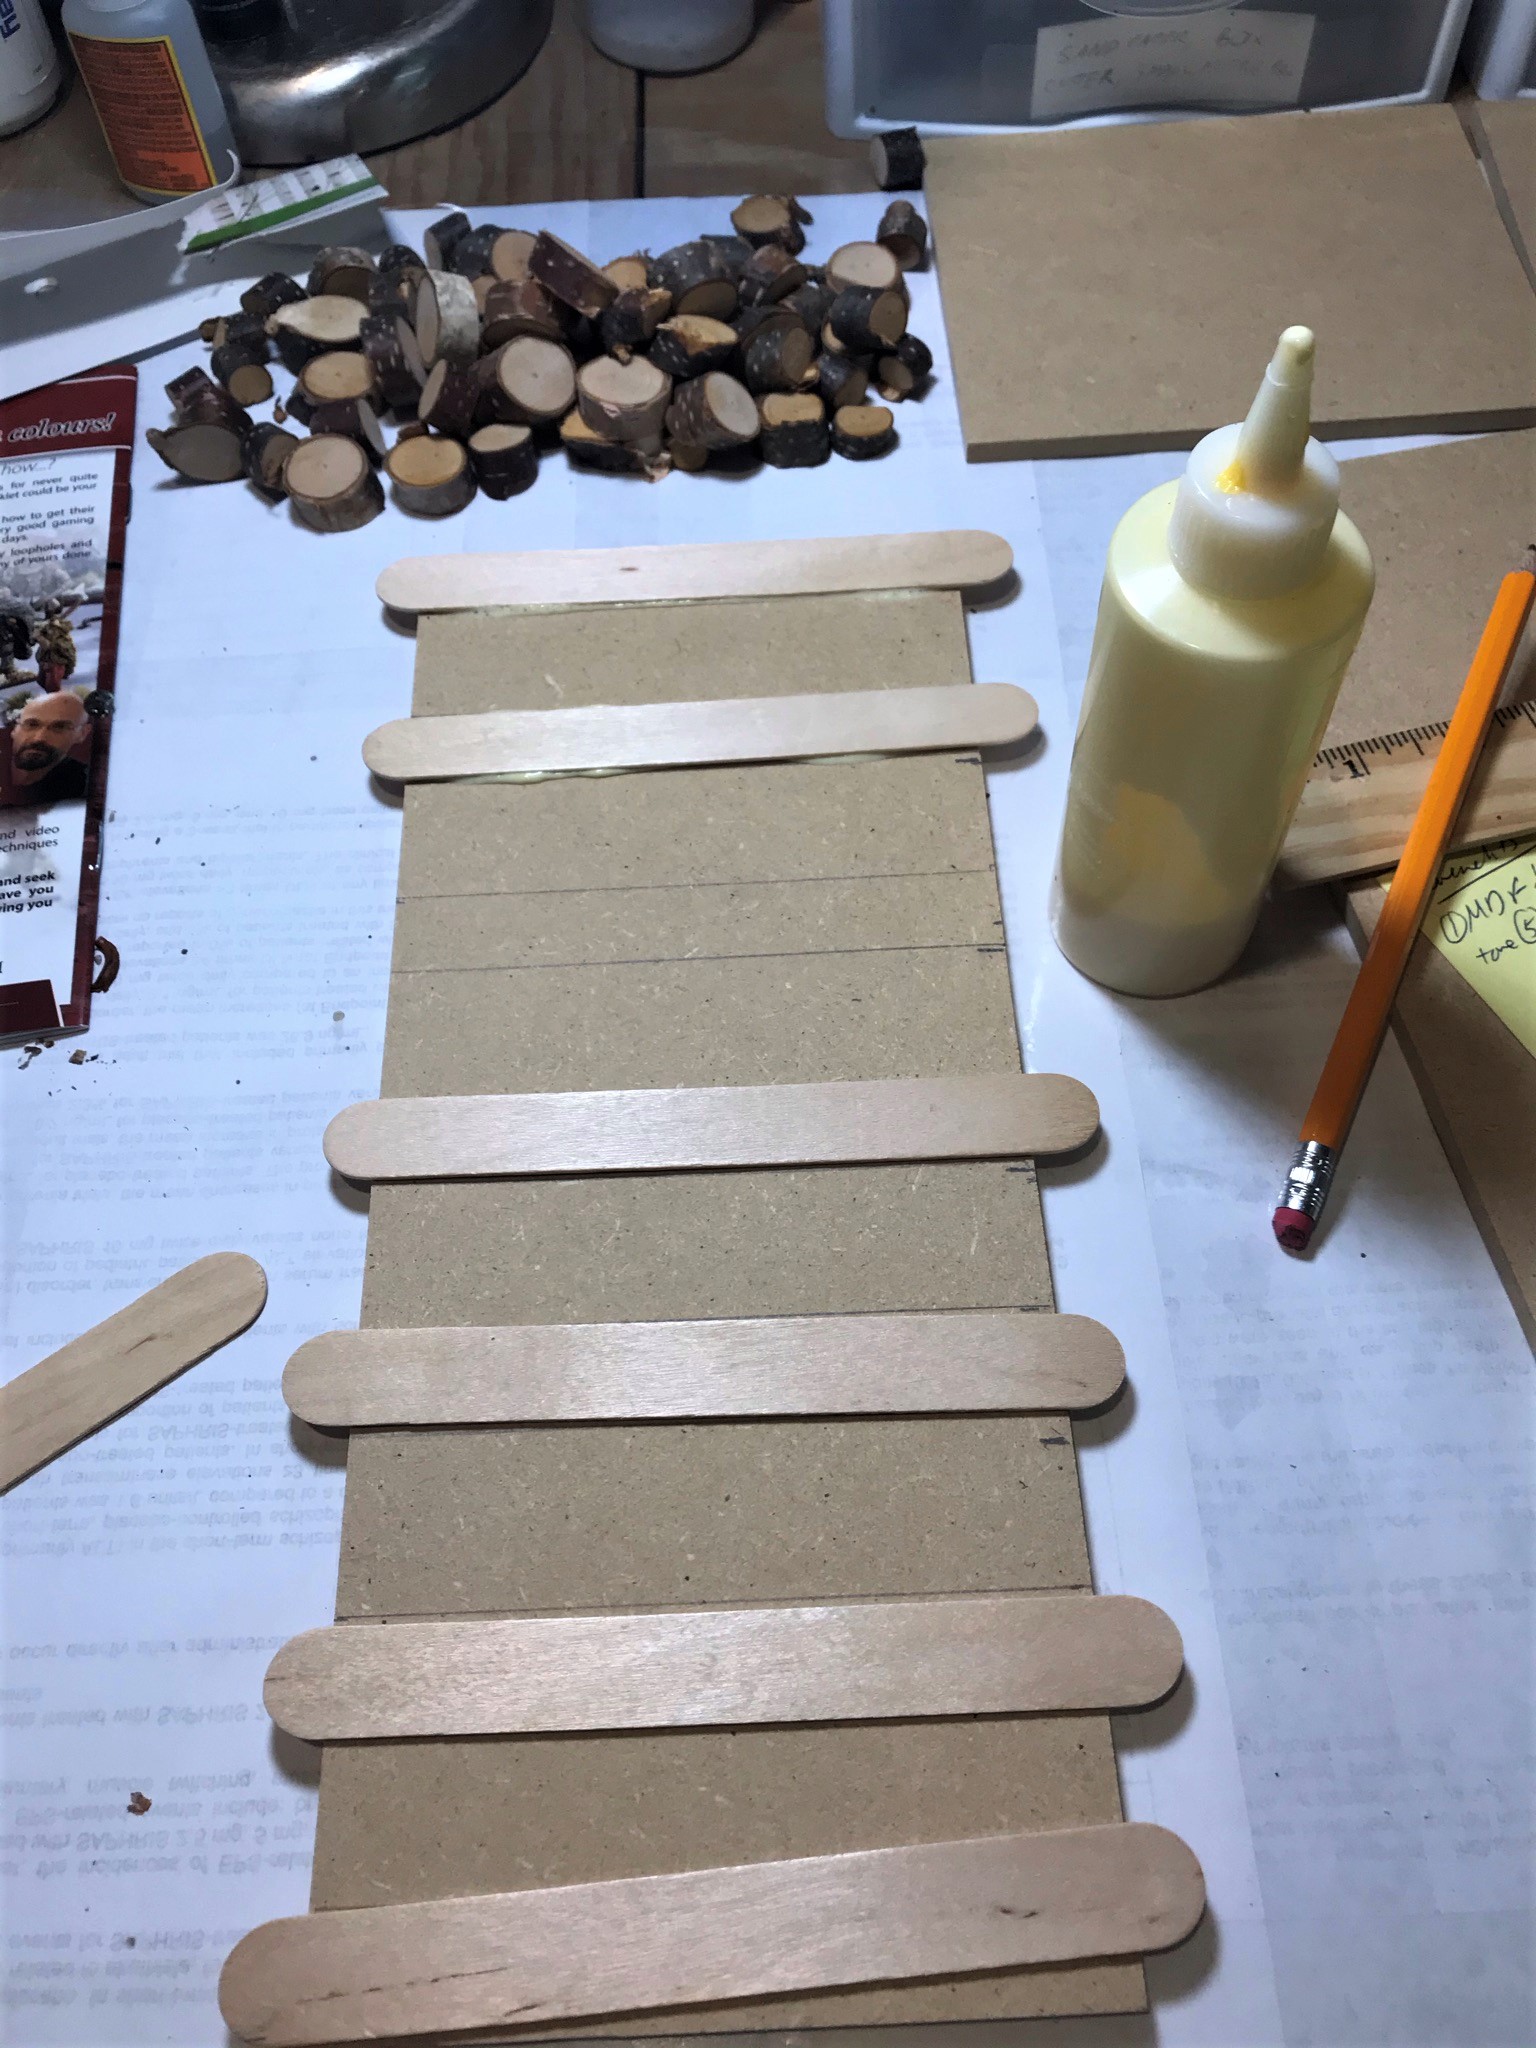
My causeway section prototype would be 5″ wide and a foot long. I spaced out some 6″ craft sticks evenly across the bottom and used wood glue to affix them. These would be to support the wooden piers and stones around them on the sides of the top surface. This worked ok, so I did all six with the cross-glued craft sticks.
Lining up the craft sticks on the bottom of the first causeway. At the top you can see some wood I was planning to use as piers – more on those shortly.After I glued all the craft sticks across the bottoms, I weighted them down and let the glue set overnight.
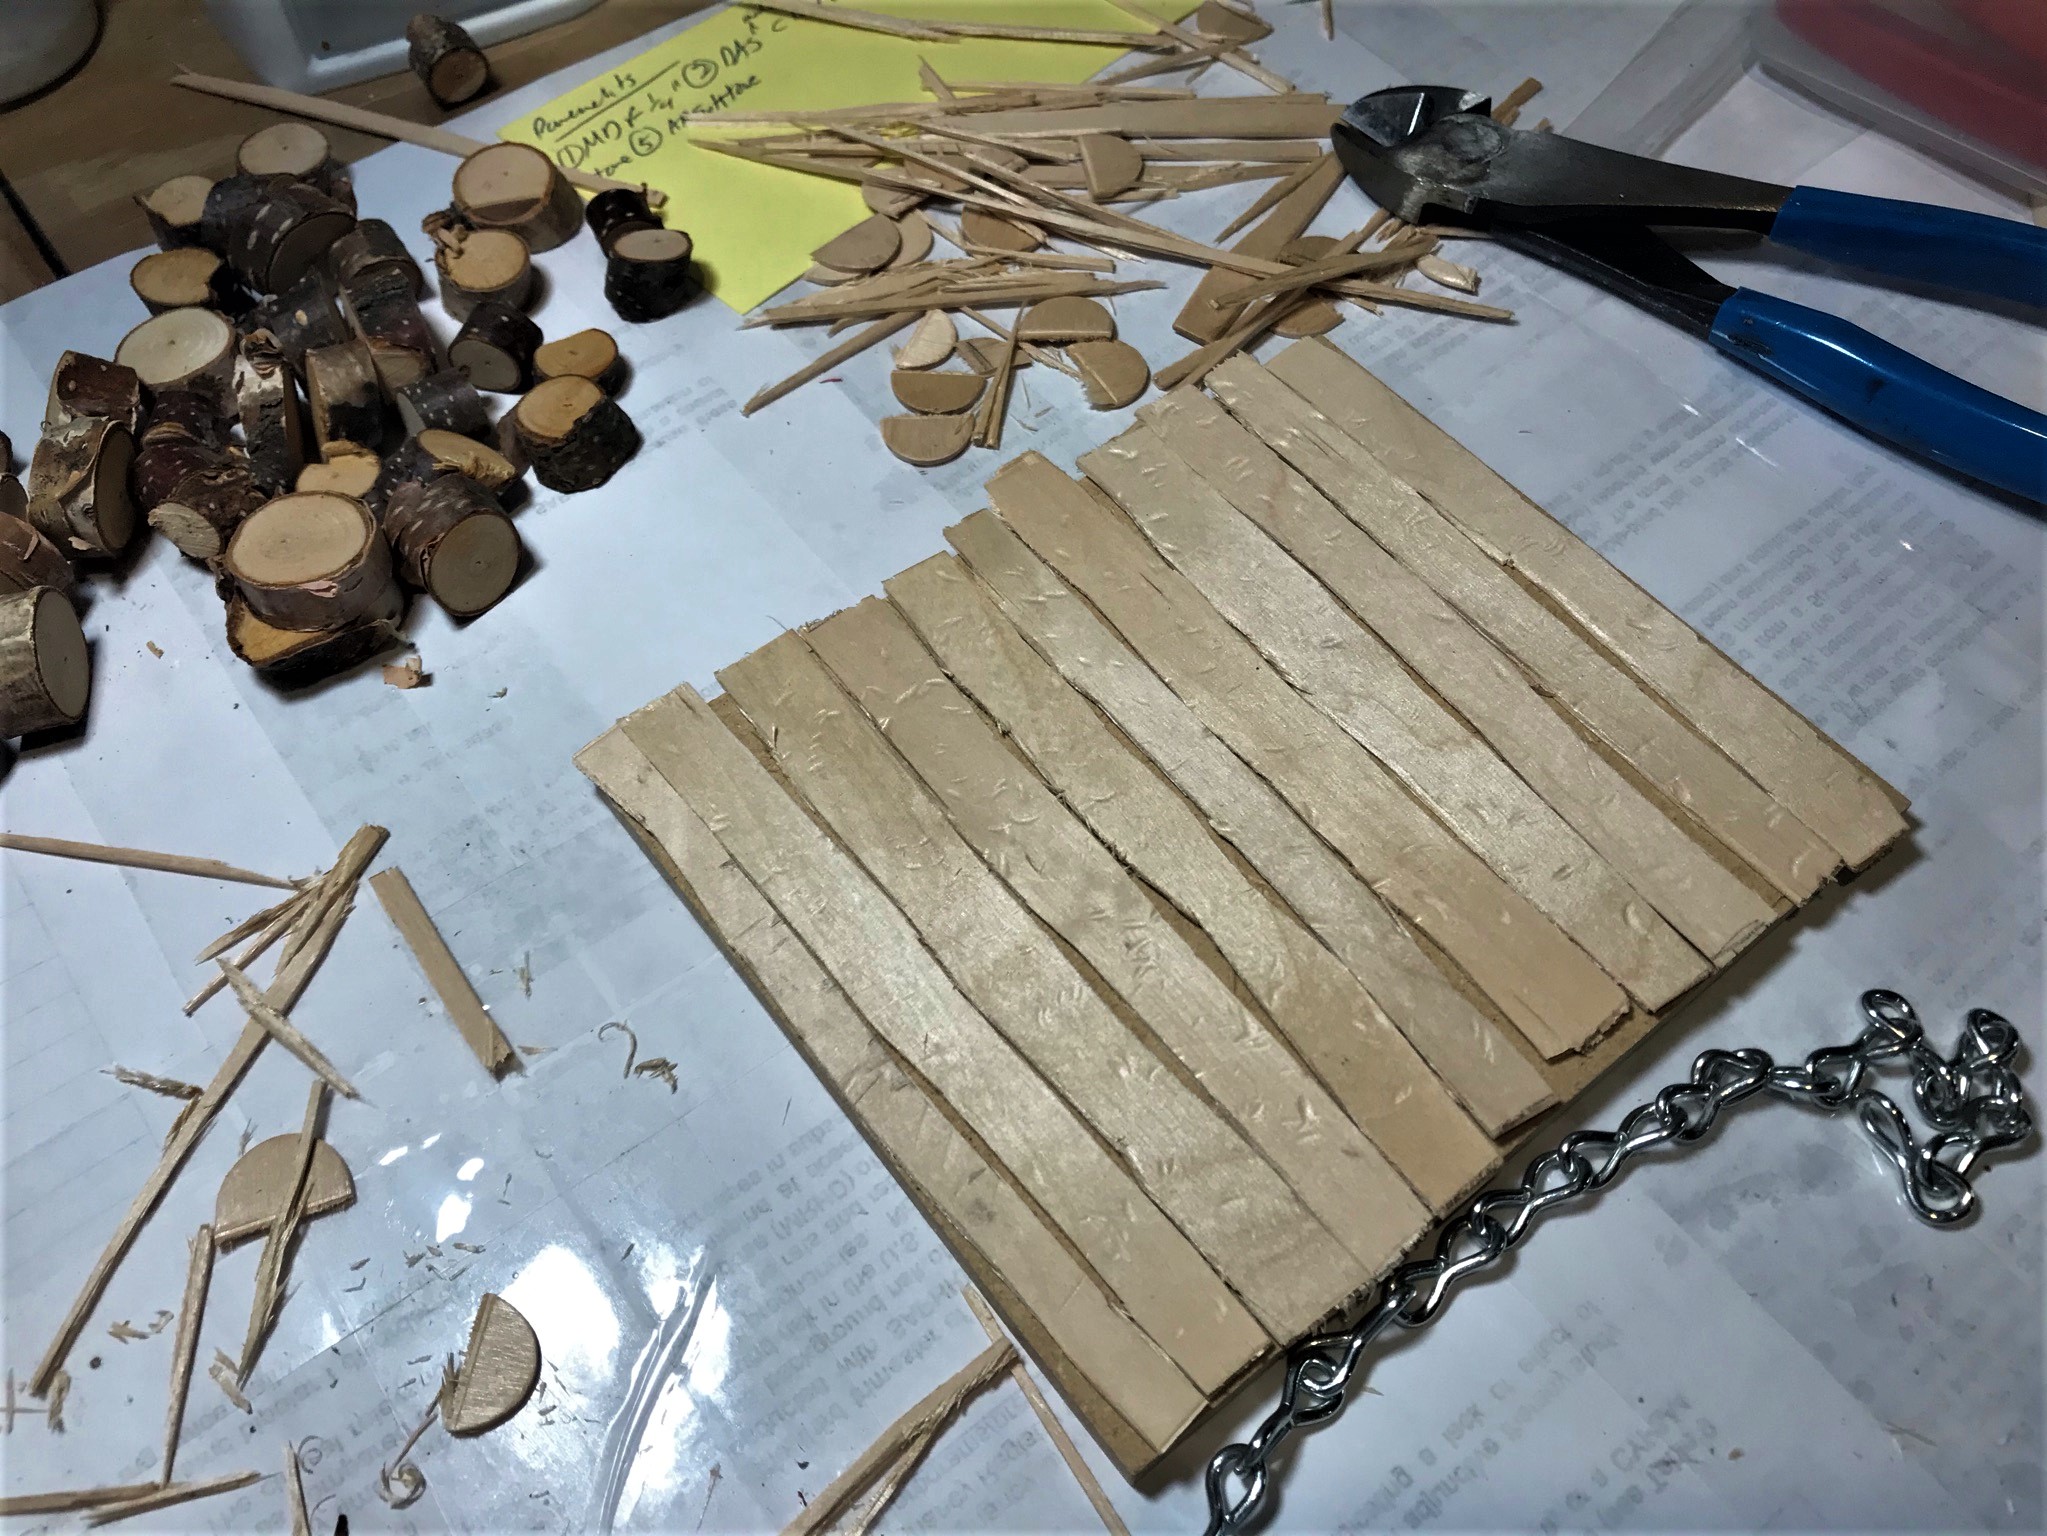
While the glue was setting on phase I of the causeway undersides, I built the two removable bridge sections. These are 6″ long and the same width as the causeways. These would be analogous to a medieval drawbridge. I broke up craft sticks irregularly and dry-fitted them to the top of the bridge sections. Then, I weathered the wood by beating a small chain on and into them with a ball peen hammer. After this, I glued them on with wood glue and let dry overnight. I did not press these with weight as I wanted a less uniform surface of the bridge to represent wear and aging.
My chain and ball peen hammer weathering of the craft stick wood surface.The weathered wood ready for gluing.
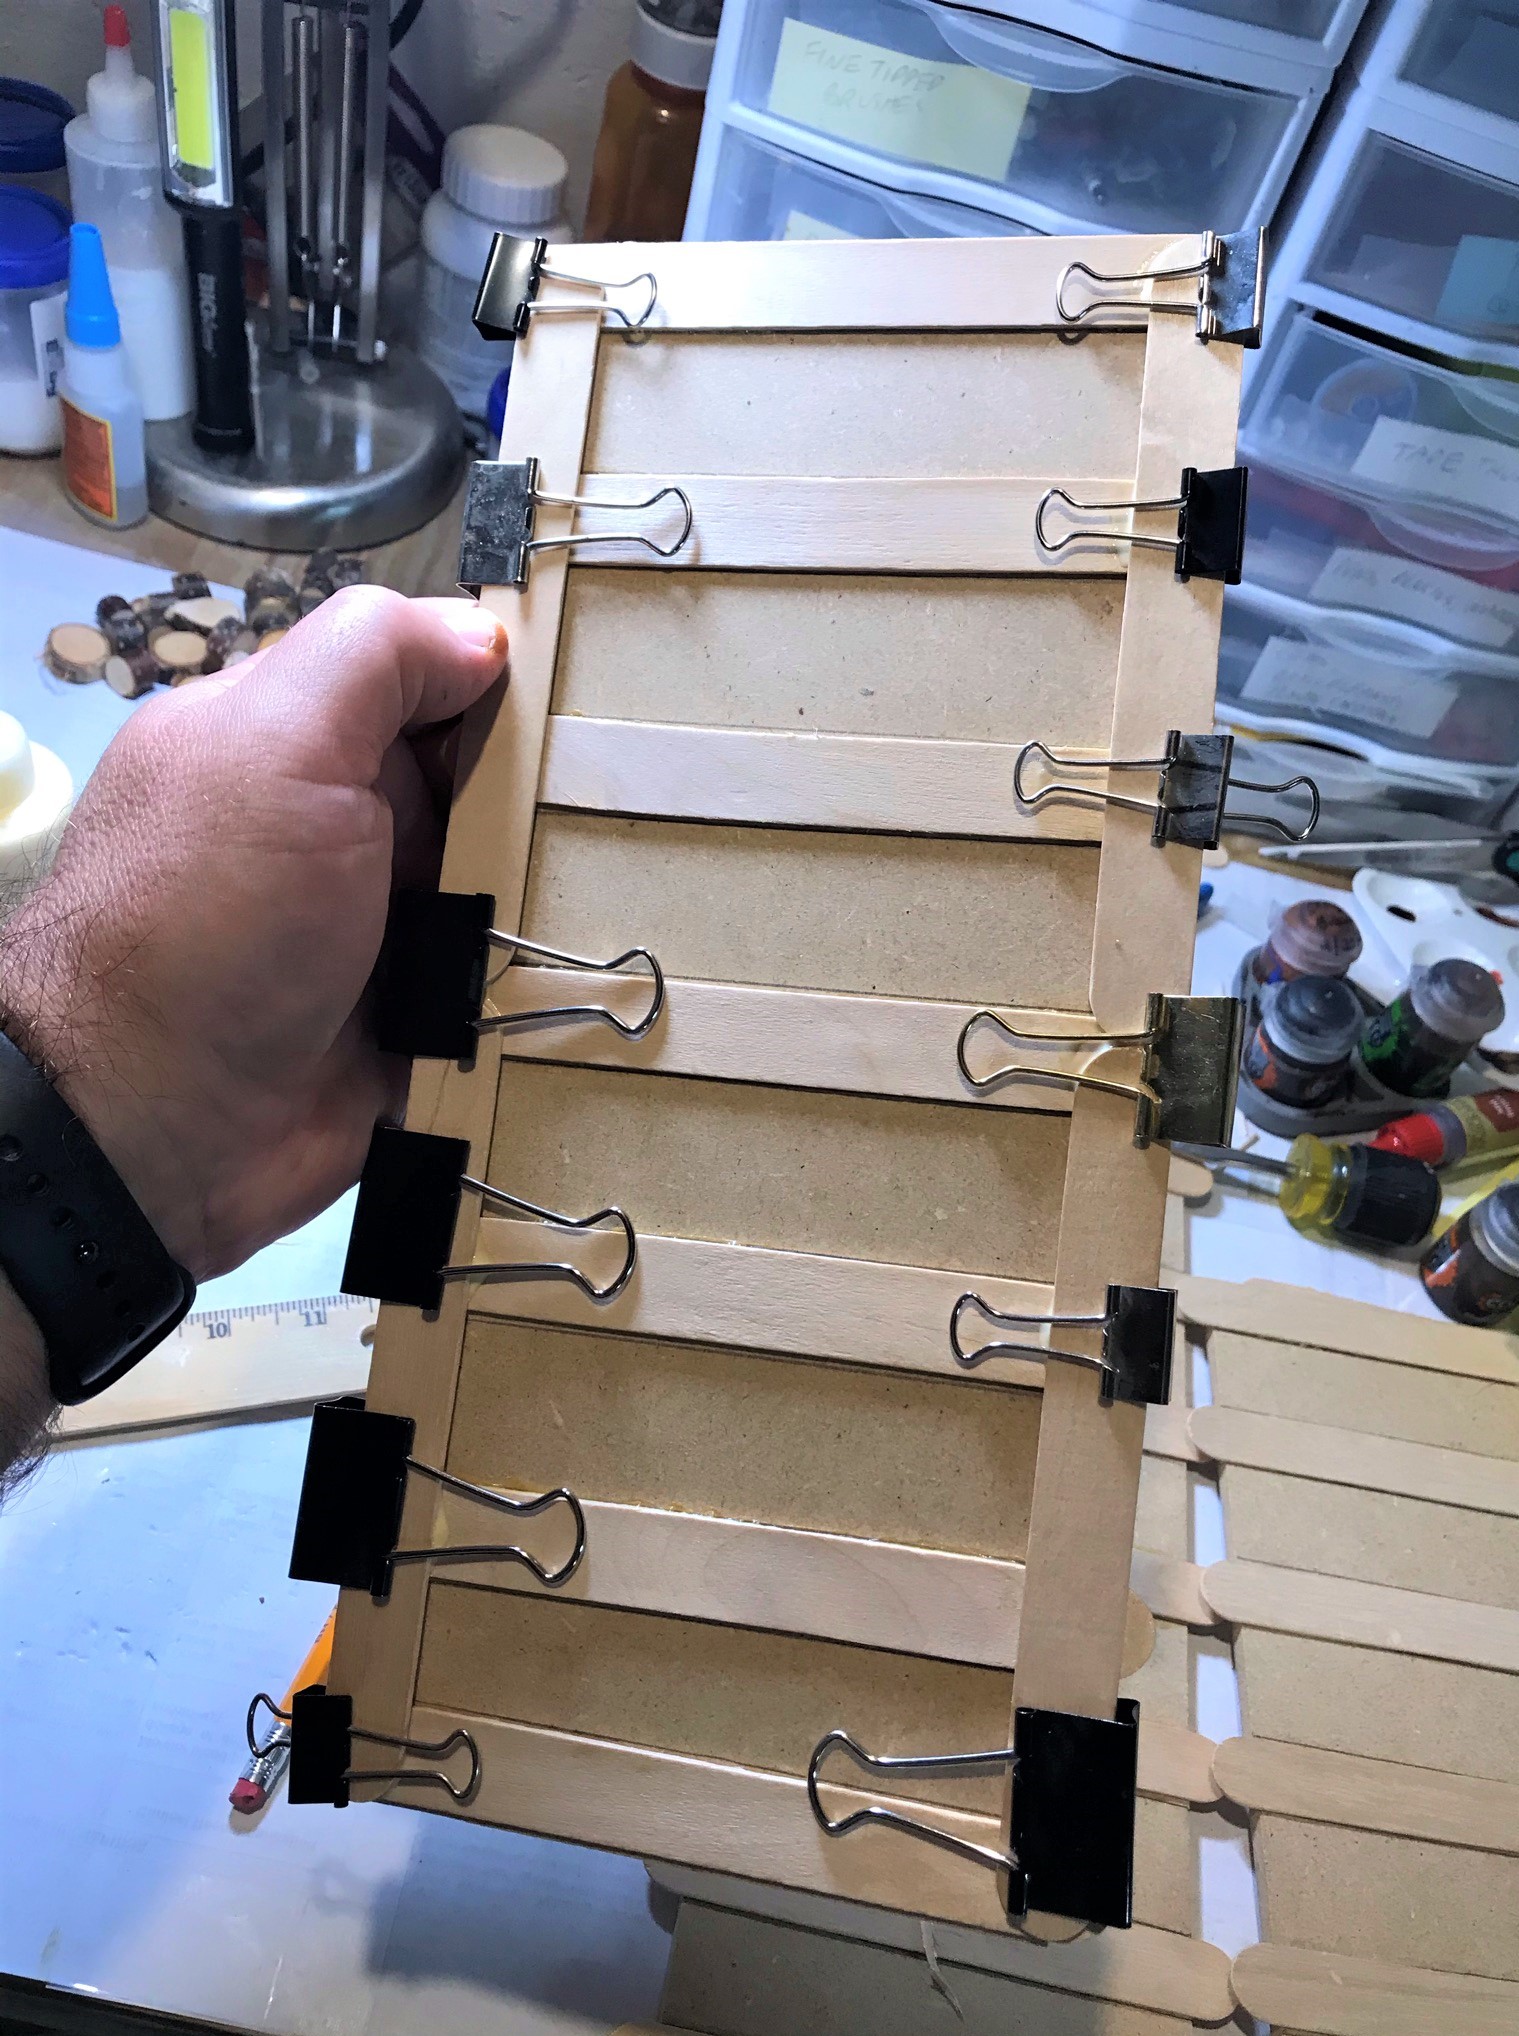
Then, I went back to the causeways. The cross-sections were ok, but I needed to have a way to add the revetments along the sides – so I added more craft sticks longitudinally on each side. They would jut out about 1/2″ on the side of the causeways.
Here you see four of the six causeways after the first gluing – and before adding more on the sides for the rocky revetments.Here are the longitudinally-added craft sticks set with binder clips for overnight drying.
Once dry, I covered the surfaces with glue and then chinchilla dust.
After adding the chinchilla dust and allowing for drying. Next up would be the painting and shading of the causeways’ surfaces, then onto adding the piers and rocks.
I finished painting the removable bridge sections and build and painted 4 lifting piers out of square dowels and 1/8″ plywood.
The masked causeways ready for painting, along with the 4 lifting piers and the 2 removable bridge sections. I masked the sides as I wanted to have a clean gluing surface for the piers and rocks. Having an airbrush sped this process – especially relative to all of the gluing!I base coated the causeways, lifting piers, and removable bridge sections (ignore the WIP pavements behind – that’s a sneak peek at the next post!)All painted and shaded – except I wanted to add a bit more to the bridge sections……which you see here – I added some contrast to the planks.
Next, I moved on to the side piers and causeway revetments. The following day I grabbed a dry oak branch from the woods behind the house and cut it up. As each causeway section would need 14 wooden piers (seven per side), I figured I’d need 84 piers. So, I initially planned on using some birch wood discs I had plus the oak sections. I cut up the wood in sizes I thought would work well. However, as I laid it out (dry fit), I was not happy with the appearance. At all. Clearly, compared to a 28mm figure, the wood size was far in excess of what would have been used as piers along the causeways.
The oak and birch wood pier candidates
Laid out, I saw that these were not the right size or appearance. The finished surfaces of the causeways that you see here were ok though.
It was time to regroup. For piers, I then decided to use 1/8″ wooden dowels instead. I cut them up roughly to represent timber and glued them together in threes – and if you are doing the math, yes, that is cutting up and gluing together 252 pieces for the 84 piers. This project had a LOT of gluing and drying stages! I also found a nice source of rocks at Michaels – those little filler stones that some people use in glass vases. These were much cheaper than any hobby talus would have been. The time downside was that for effective placement I needed to glue one course of rocks at at a time – one rock at a time – with PVA – more gluing and waiting for drying…
Detail of the pier and rocks gluing. I cut the pier wood pieces irregularly as possible to add realism.The first side of a causeway glued up with piers and rocks and a 28mm Conquistador for comparison. The PVA would dry and “suck” up nicely into the crevices.
I then painted the piers and added some shade to them.
Painted piers
For the rocks, I painted them with Vallejo “Grey Surface Primer, followed by a layer of Reaper “MSP Black Primer” on the bottom (where the rocks would have been by the lake), and added some slime to them there as well. After that, I added an aggressive layer of shading with Citadel “Nuln Oil”. The effect on the rocks was excellent. You can see a list of all the paints and other materials that I used at the end of this post.
Adding black primer to the bottom of the rocks over the grey primer in an irregular pattern to represent the water line.After adding grey and black primers to the rocks.Finished causeway with the Conquistador. Note the effect of the shading on the rocks.Top viewA finished causeway, lifting piers, and removable bridge section on my new FLG water mat.Tlaxcalans assault the city from the causeway (another sneak peek!)
With the causeways, removable bridge sections, and lifting piers, I now have terrain components that I can use for the cityscape. I also could use them for a causeway battle, and add war canoes in the lake with Aztecs shooting bows, slings, and atlatl at the Conquistadors and Tlaxcalans from the water.
I think you can see why I am breaking up this into multiple posts! This started in June and ended in July. My next post will focus on the design and building of the cityscape pavements. I hope you found this useful and will keep following this series – and please let me know your thoughts in the comments section.
Thanks so much for looking!
For all of my previous posts on games, units, and other projects for my 16th Century Spanish Conquest supplement for Feudal Patrol™ – “Civilizations Collide” – please see this page.
PAINTS, INKS, GLAZES, SHADES, WASHES, PIGMENTS, FLOCKING, GLUES AND MORE THAT I USED ON THESE TERRAIN PIECES/MODELS:
The Mass Pikemen returned to tabletop wargaming with live face-to-face interactions on June 5th! We played a game of Feudal Patrol™ in Mesoamerica (using my Civilizations Collide supplement. The game scenario was as follows:
Surprise Raid on Outpost
A Tlaxcalan village is being raided by the Aztecs, seeking to take wealth, food, and prisoners. The Aztecs know the majority of the Tlaxcalan troops are with the Conquistadores elsewhere, and expect an easy task. Unbeknownst to the Aztecs, there are some Spanish troops at this town who will help to defend it.
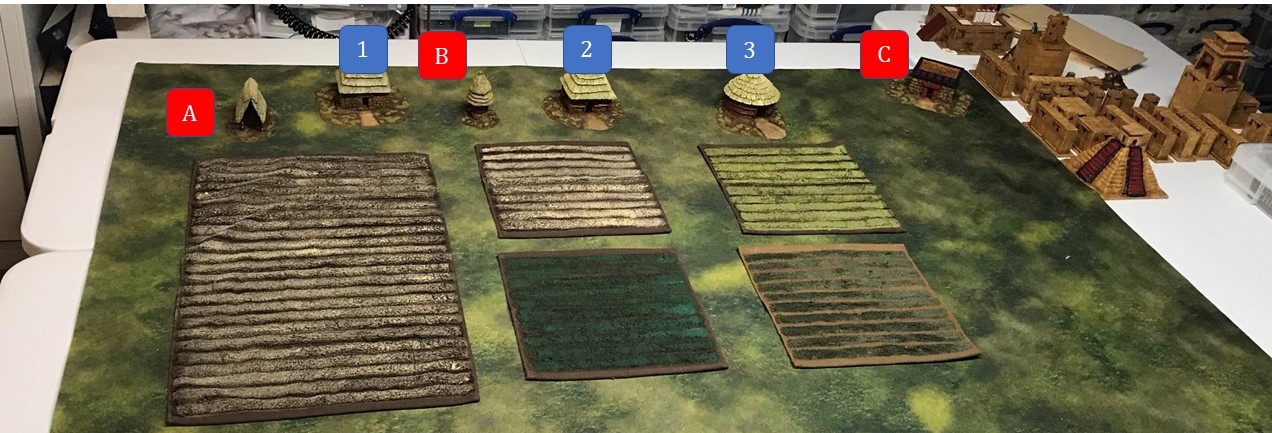
The battlefield.
Objectives:
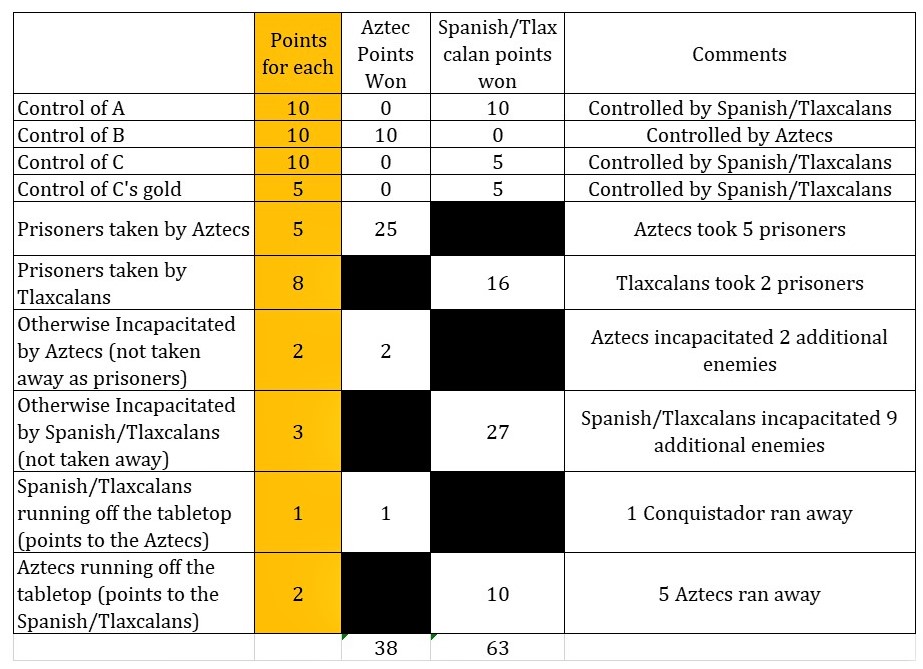
A: a maize storage structure – 10 points to either side for control
B: Cuezcomatl Granary Structure – 10 points to either side for control
C: Tlaxcalan Noble’s House – 10 points to either side for control, 5 more for securing the gold inside and having possession of it.
Additionally, the attacking Aztecs gain 5 points for each prisoner taken, 2 points for each enemy otherwise incapacitated, and 1 point for any enemy that runs off the tabletop. The defenders gain 8 points for each prisoner taken by Tlaxcalans, and 3 points for each enemy otherwise incapacitated, and 2 points for any enemy that run off the tabletop.
Deployment and special rules:
Aztecs:
All Aztecs troops deploy anywhere on the south side of the tabletop 6” from the long end of the mat.
The Aztec Warband Leader controls two Warrior Priests
Conquistadores and Tlaxcalans:
The Conquistador leader (a Warband Leader) deploys from C.
Each of the three Spanish/Tlaxcalan elements deploy in 1,2, and 3 and are hidden from the Aztecs but predetermined before the game start. This means that some will be out of command and cannot swap dice at the beginning of the game (24” command radius). At start, they can be outside of their huts.
Tlaxcalan element cannot swap dice, and cannot be considered out of command radius.
The map:
The fields are muddy and movement rate through them is at half-speed.
In this game, an element is 4-11 figures depending on type, and warbands are made up of 2-5 elements.
The Aztecs had an overall commander with his conch blower as a signaler. Under him was one warband leader commanding two “twinned” 11-figure veteran/novice elements, an elite 6 figure cuahchic (“Shorn Ones”) element, an elite 5-figure Eagle Warrior element, and two warrior priests.
The Spanish had an overall warband leader commanding an elite element of 5 figures and an elite element of 5 figures plus a war dog. The Tlaxcalans – who were separate but allied – had an elite warrior leader with 4 veteran bowmen.
The overall troop points were 54.75 for the Aztecs and 36.5 for the defending Spanish/Tlaxcalans. The fields were slightly moved for the actual game. Of note, the command radius for a warband leader is 24″ – so the Conquistadores have two command and control challenges. First, they start with one of their elements starting the game over 24″ away from the leader making them “pinned” – meaning they only get to activate half as much as normal until they can be made “unpinned” (not an easy task). Second, the Tlaxcalans are independent actors – meaning that the Spanish have limited command and control of them – but they are not limited by command radius restrictions either.
The Tlaxcalans ended up starting at 1, with the other two Conquistador elements at 2 and 3. The Conquistador leader was at C. The Aztecs deployed their elements (from the Aztec left to right) as follows: veteran/novice twinned element, cuahchic elite element, elite Eagle Warrior Element, and the other veteran/novice twinned element.
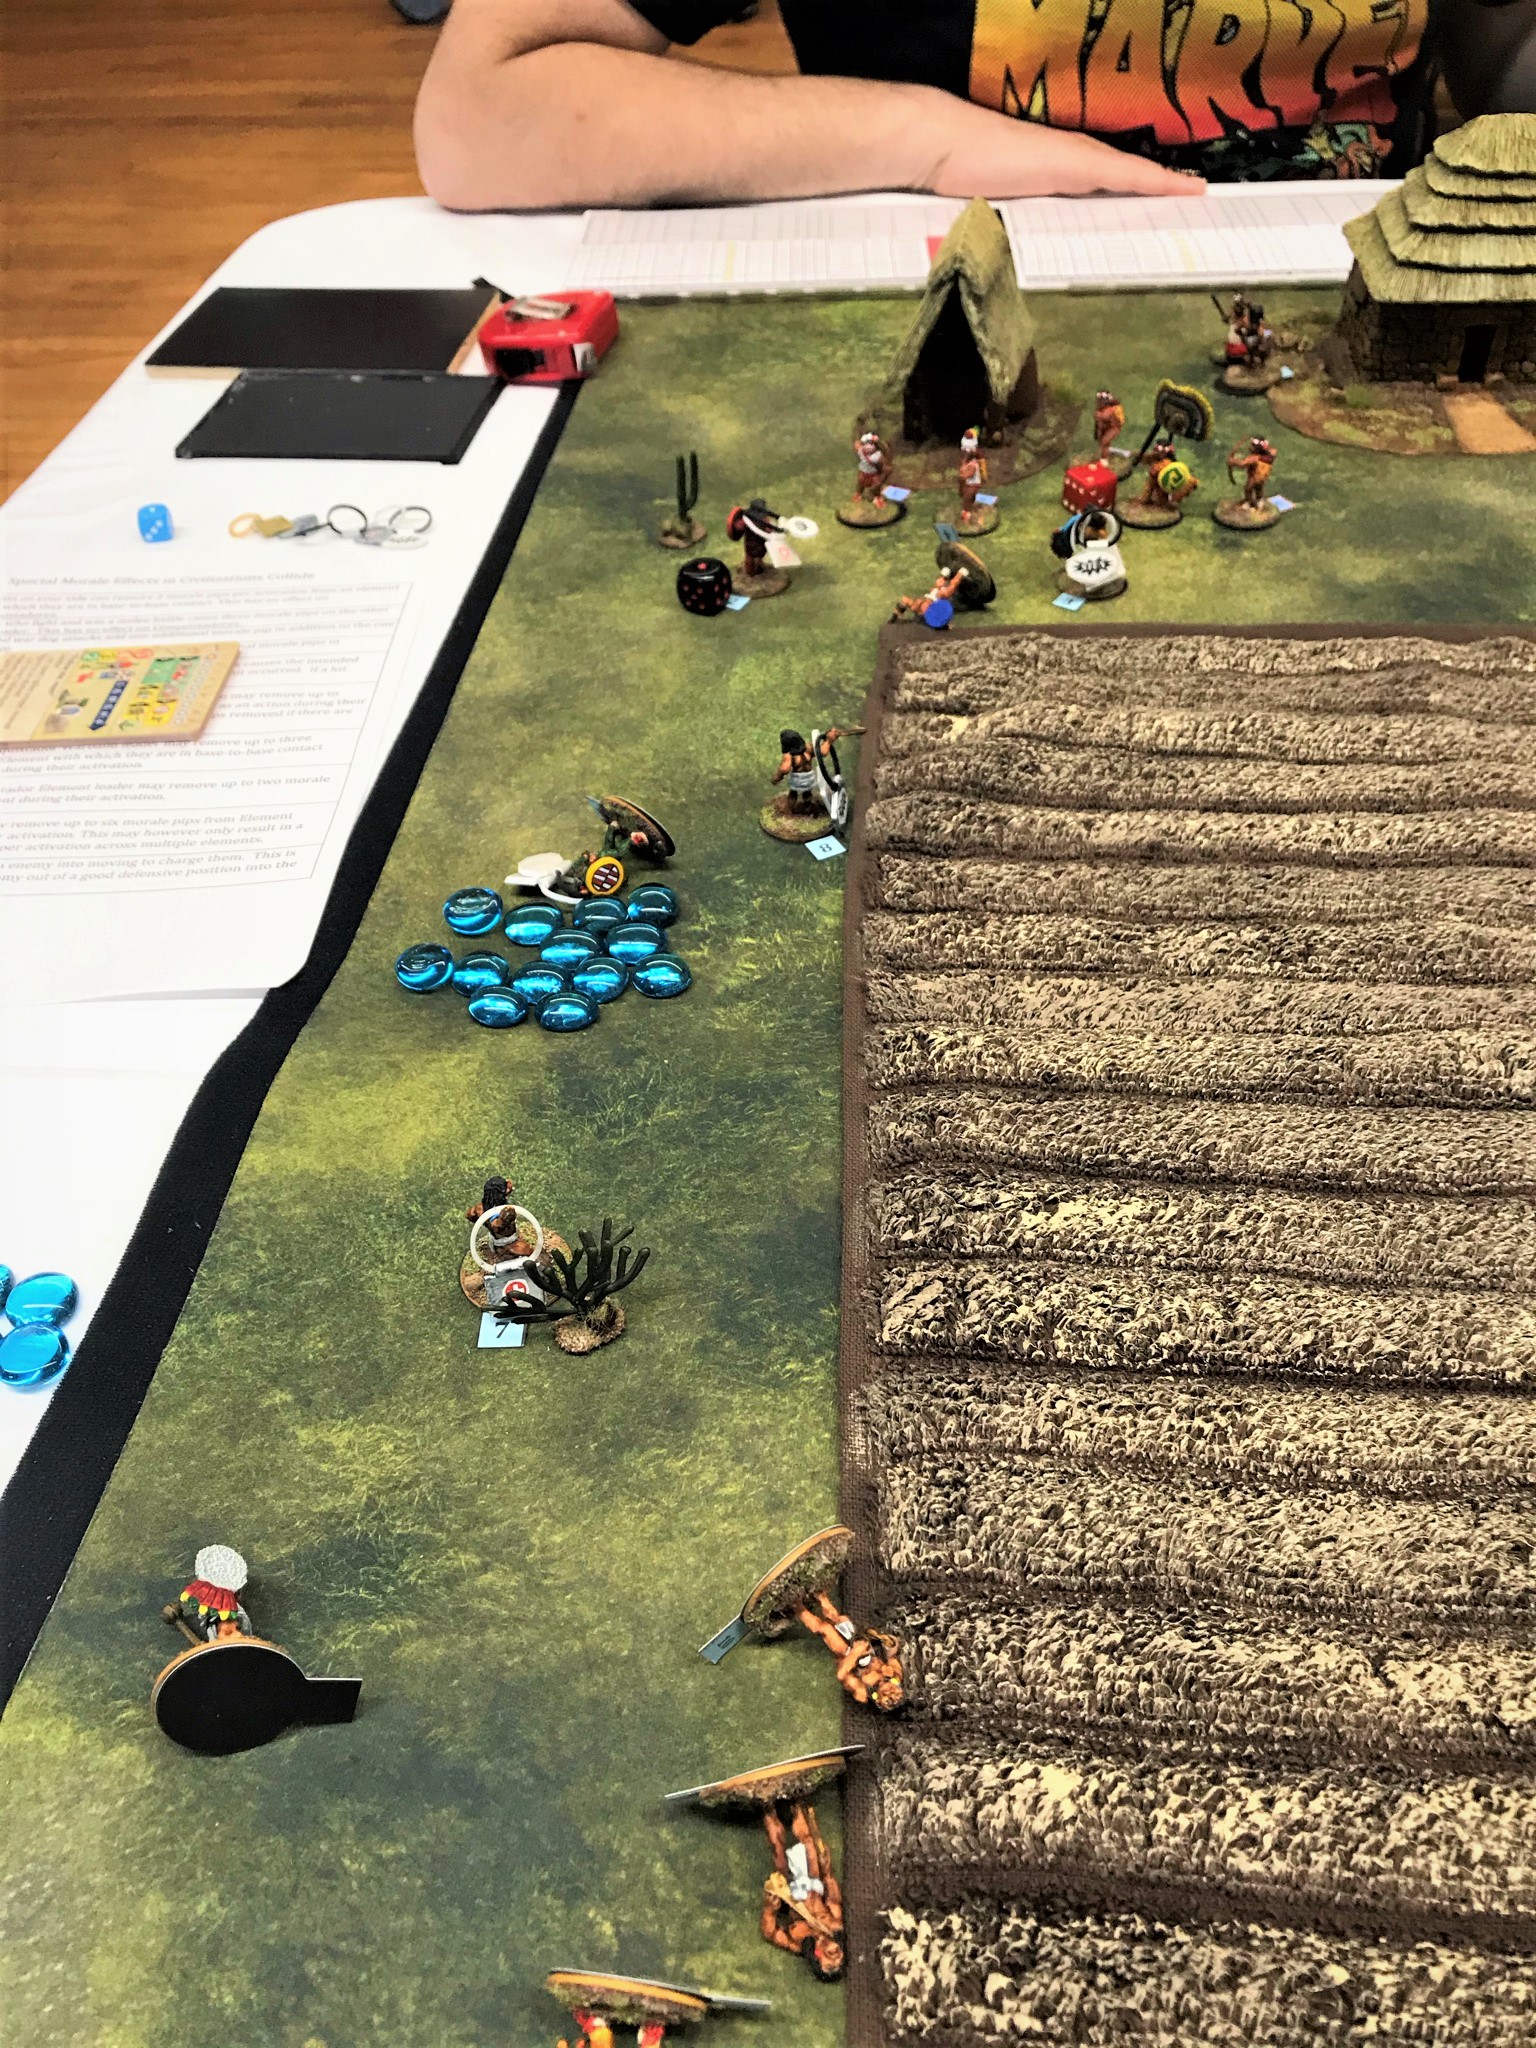
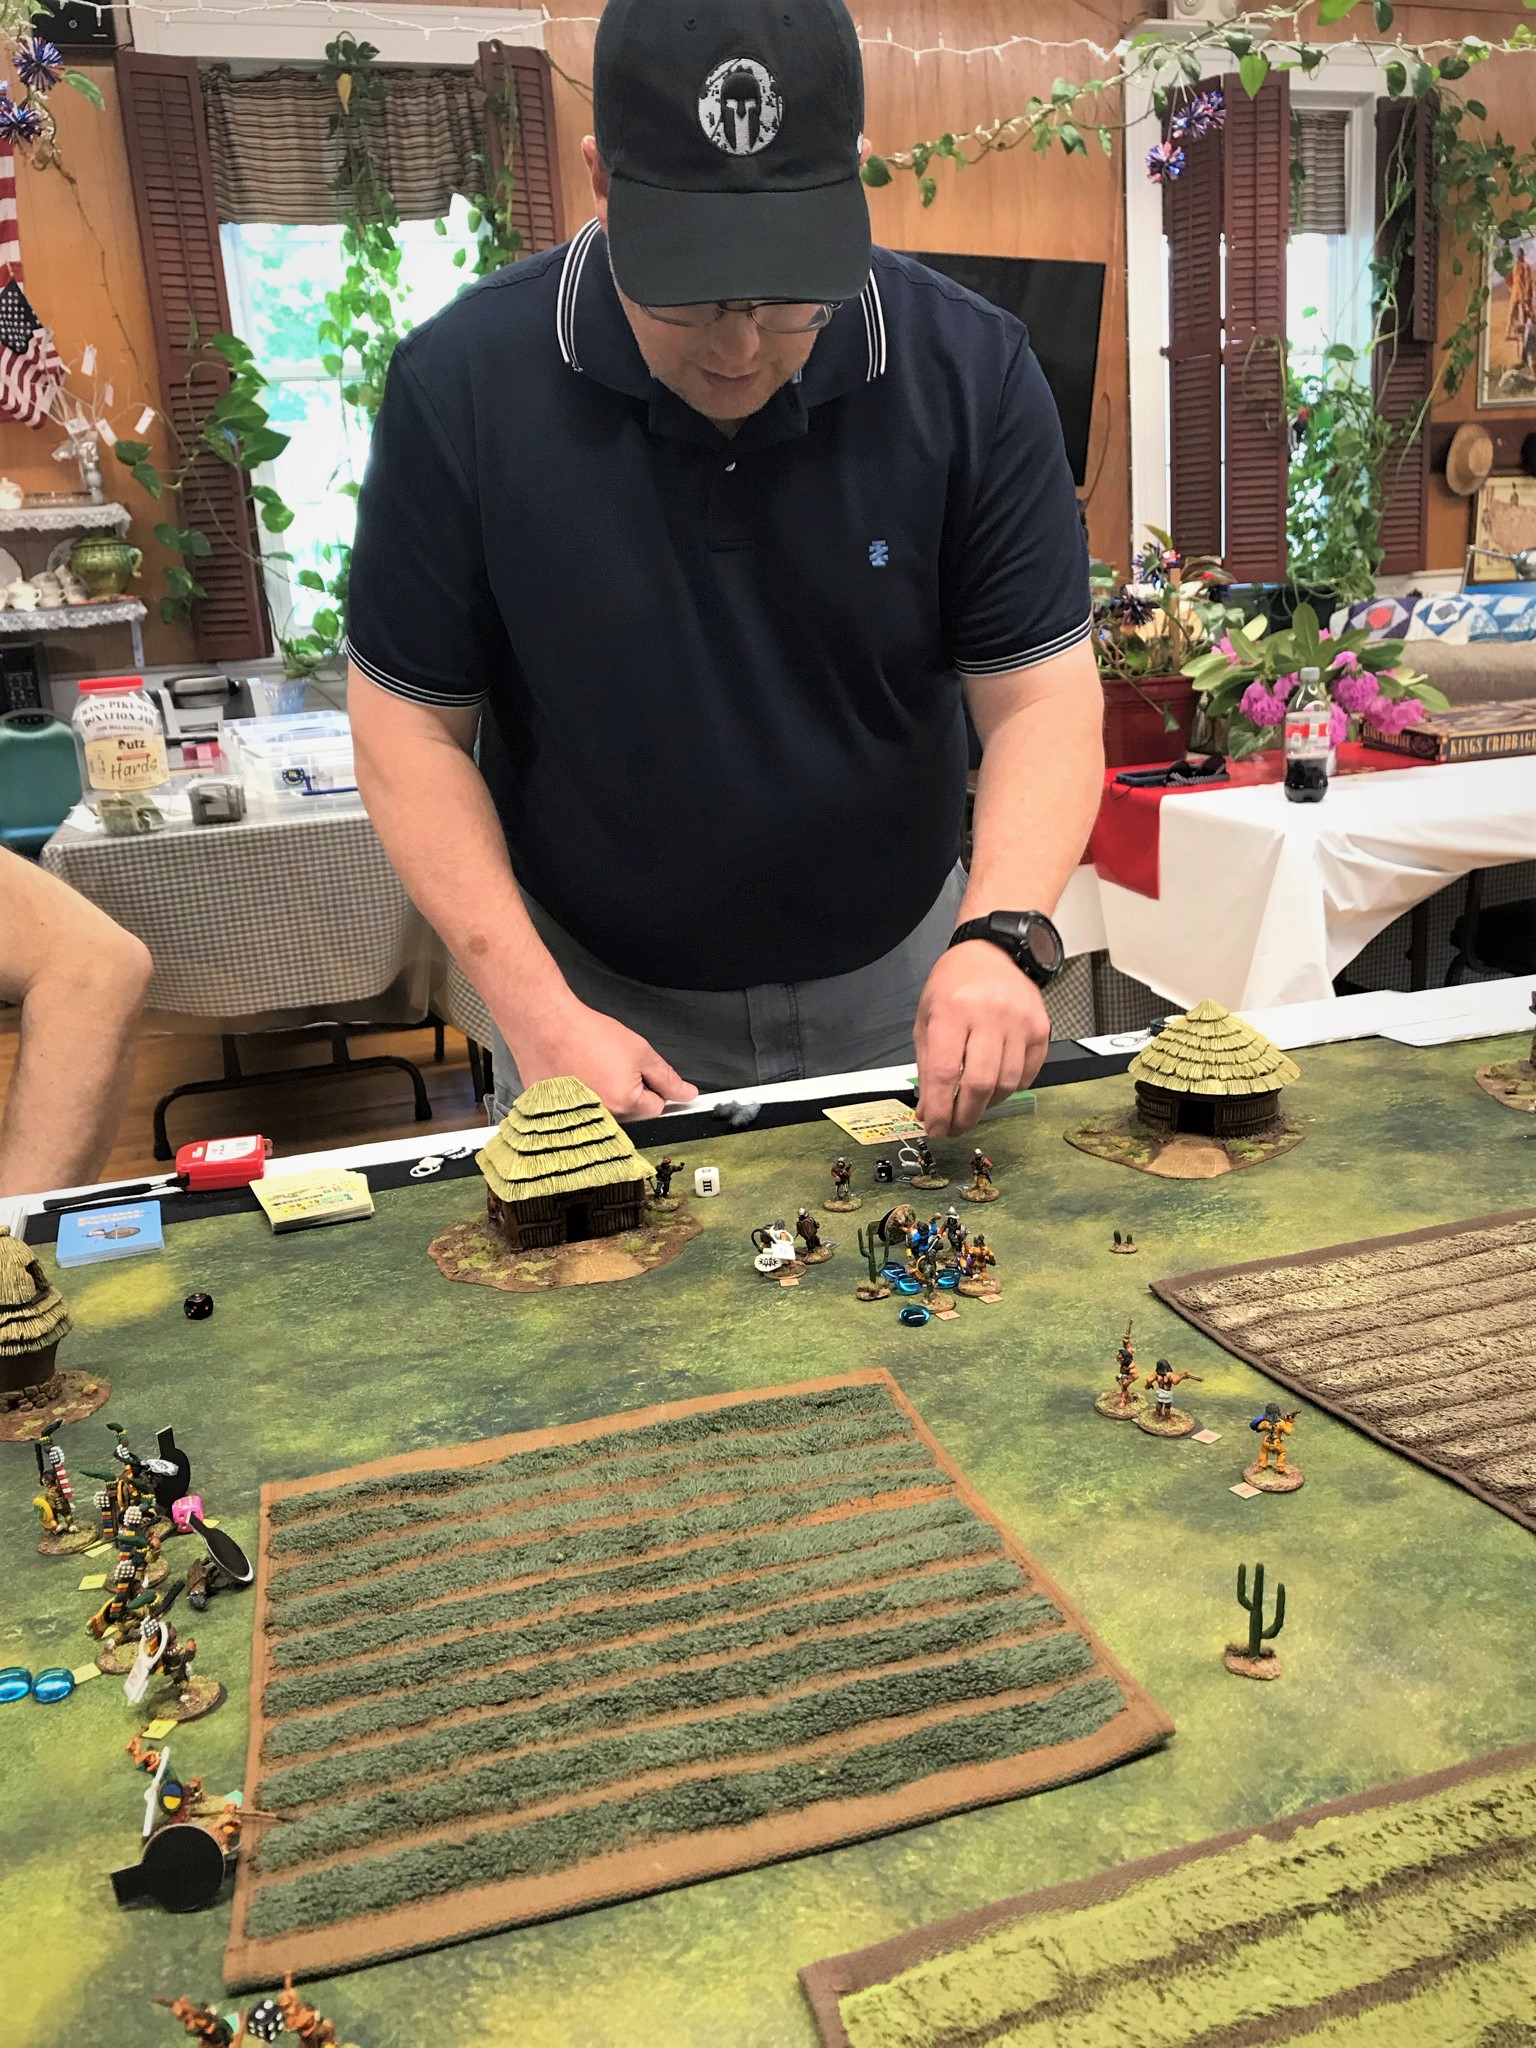
Scott looks over the tabletop. He would command the Tlaxcalans.Glenn moves up his twinned veteran/novice element while his ally Chris watches……and promptly takes fire from a Spanish arquebus and
a crossbow! The blue glass beads indicate morale checks that the Aztecs had to take and did pass here.
On the Aztec left, Chris moved up his veteran/novice twinned element to take on Scott’s Tlaxcalan bowmen. Historically, the Tlaxcalans were superior bowmen. Chris had to cross a lot of open ground, and the Tlaxcalans dispatched two novices from long range (novices typically are without armor). He then tried on a subsequent activation to charge into melee with the Tlaxcalans – a good move – but the Tlaxcalans were able to react and loose even more deadly arrows into the Aztecs.
Scott grins after sending an initial hail of lucky arrows into Chris’ approaching Aztecs. The incapacitated Aztecs are lying off their bases. The blue beads each indicate a morale check that the Aztec element would need to pass – and more would come…Only 4 out of 11 figures made it to the Tlaxcalan bowmen, and they had little effect as the Tlaxcalans repelled their assault.
In the middle of the tabletop, the two elite Aztec elements were making good progress forward. The Conquistadores were lucky enough to unpin their handicapped element, making their defense much stronger. That element had a wardog, and they challenged the advance of the cuahchic and the Eagle Warrior elements. That scrum left the Conquistadores with several dead – including the war dog. The cuahchicqueh (plural of cuahchic) advanced, but the Eagle Warriors lost heart and failed morale – running away from the fight.
Then Chris had even more morale checks to make. Luckily for him he endured them, but his unit was pretty decimated. Chris’ Aztecs had 14 morale checks to make. They passed, but were a spent force.
The Shorn Ones (cuahchicqueh) do a number on the Spanish and their war dog.The Shorn Ones advance to the cuezcomatl granary storage structure (objective B), while their Eagle Warrior comrades run away.Here you see Chris’ Aztecs – or what’s left of them – and their pile of morale check pips.
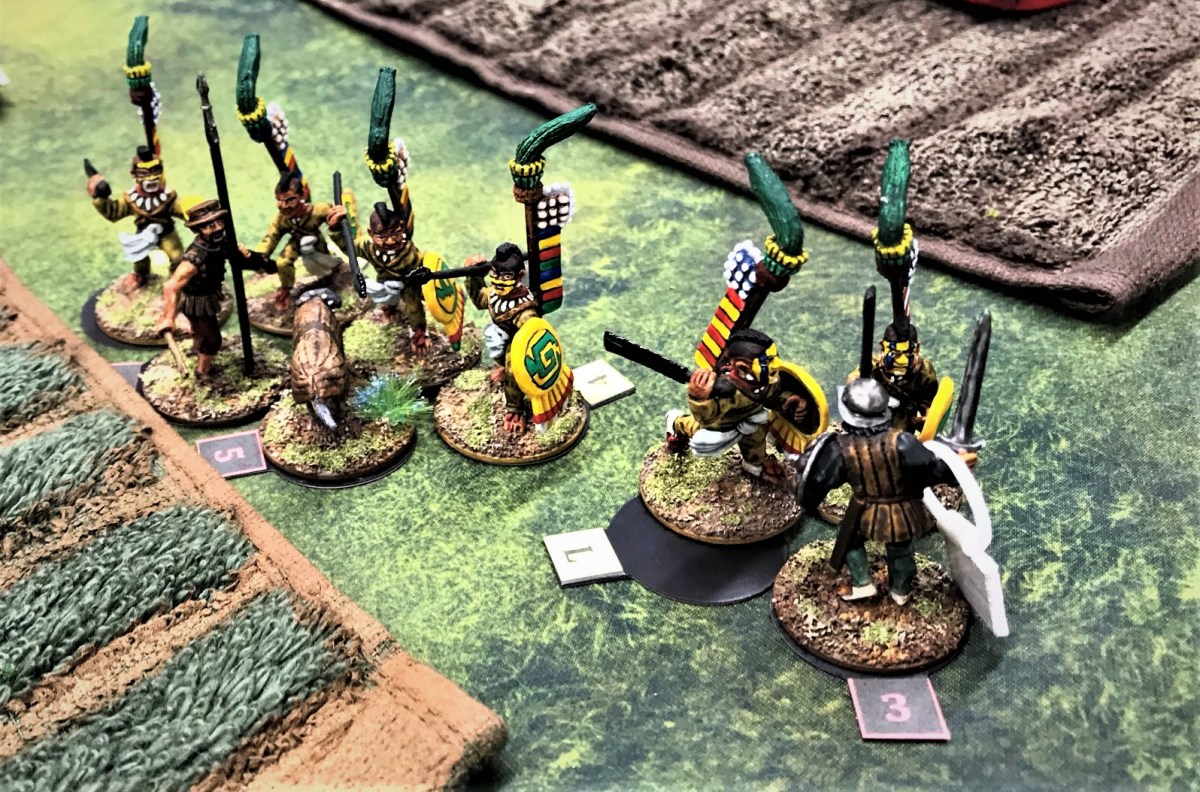
Glenn’s advance on the right of the elite elements was making good progress. They had a bowman, an atlatl user, and several slingers in their veteran/novice element. His non-missile weapon-armed Aztecs charged into Leif’s Conquistador element, hoping to take them down (especially as they had the arquebus and the crossbow). Glenn and Leif both did damage to each other in the ensuing melee.
Leif defends against Glenn’s Aztec assault. At this point, the Aztecs were threatening also to take out the Conquistador officer.Scott and Leif appear confident in their defense.Leif – commanding the Conquistador officer – takes out an Aztec – but quickly three more of Glenn’s Aztecs gang up on the leader, who kills another, and wounds one more but……the Conquistador officer is overwhelmed by the Aztecs, and is incapacitated and dragged off for sacrifice. This left both of the remaining Conquistador elements in a “pinned” status – meaning that they would only activate half as much as an unpinned element – a significant disadvantage.And finally, an Aztec Warrior Priest showed up to make sure the granary remained in Aztec hands.
The Conquistadores were able to sprint one remaining unwounded trooper over to objective C (Noble’s House), gaining control of it, and its gold, for important end of the game points. The Tlaxcalans were also able to secure the maize storage structure (A). Meanwhile, the Aztecs gained control of the granary (B). The overall scoring led to a Spanish/Tlaxcalan victory with a score of 63-38. If the Spanish had not secured the Noble’s House and it’s gold, it would have been 48-38.
The players all had a good time and really enjoyed the game. Some are already on the way to buying their own copy of Feudal Patrol™ !
I do like the scenario -and I thank Buck Surdu and David Wood for an earlier week Zoom playtest. When I update my supplement (which is coming by year’s end or sooner), it will be one of the scenarios I add. I do need to finish off my cityscape and THAT is in progress.
I do thank Saturday’s players as well. It was soooo nice to finally have a face-to-face game for the Mass Pikemen’s Gaming Club. On the next go-around, I will adjust the forces slightly – probably giving another element to the Aztecs and maybe a falconet or another element to the Spanish – depending on the number of players. I will also add points for incapacitating or even capturing warband or higher leaders.
So, when will that be? June 26th at 1 PM at the Great Stories Comics and Gaming Store in Uxbridge, MA! The Mass Pikemen are taking this (and other future games) to a great hobby store, Great Stories in Uxbridge, MA. We will be gaming there and at our home in East Brookfield going forward – hopefully alternating between sites for gaming.
I hope that you enjoyed this battler report – let me know your thoughts in the comments section!
For all of my previous posts on games, units, and other projects for my 16th Century Spanish Conquest supplement for Feudal Patrol™ – “Civilizations Collide” – please see this page.
This blog is titled “Life, Golf, Miniatures, and Other Distractions” – and it’s not often that it’s about anything but miniatures. This post will definitely concern miniatures – but as the title suggests, a few other things are going to get added in after the miniature stuff.
Why you ask? Well, the long and short of my current predicament is that a member of my household is near the end, and I need to deal with the ramifications of that. It’s sad, but it’s time.
Oh, sorry, not a person, it’s my PC that is on its last legs – and it is already quite legless.
My PC has had multiple thermal shutdowns over the last few weeks – while in sleep mode! Argh! I decided that I would need to get a new desktop before I lose all my hobby work (plus everything else that is on the thing). I prefer a PC over a laptop, though I still look at WordPress on my iPhone and my iPad. I just compose on a PC. Anyways, I will be without a computer shortly – so I needed to get a post in. Therefore this post will cover some miniature stuff first and some fun (I think) extras – I hope that they will be somewhat interesting for you.
Plus, this is my largest list of hashtags ever (I think so anyways).
In my last post, as part of “Mark’s Aztec Building Challenge Contest” (which you should enter soon by the way!) I discussed how I assembled and painted 8 Temple Columns for my Aztec games of Feudal Patrol™ using my Civilizations Collide supplement. I had moved onto the MDF kits over my resin stuff as temperatures had been too cold here in Massachusetts to use rattlecans to prime outside. I truly enjoyed building and painting the MDF of my last post, and I certainly still have a love for using chinchilla dust.
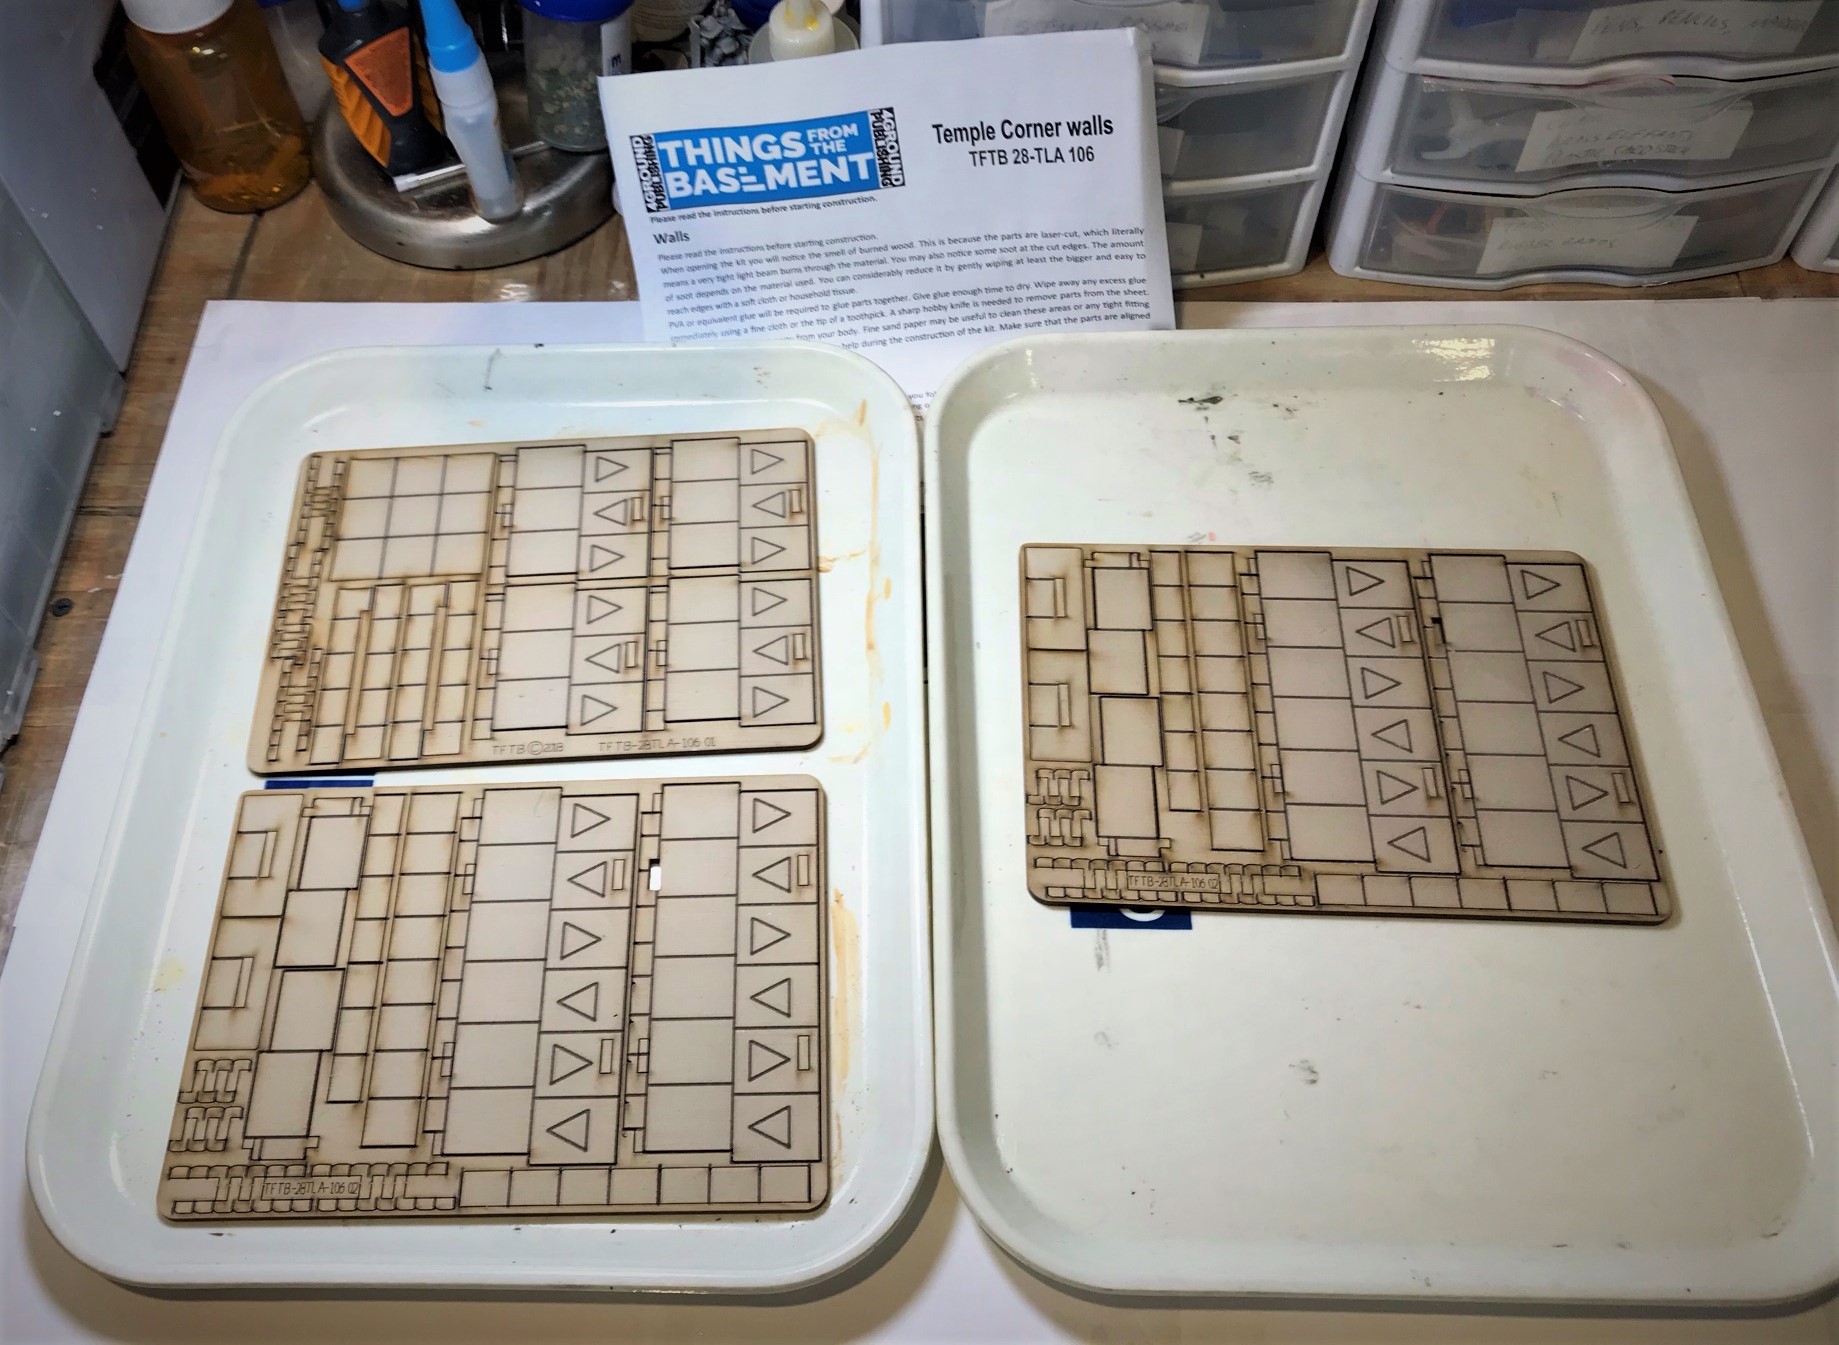
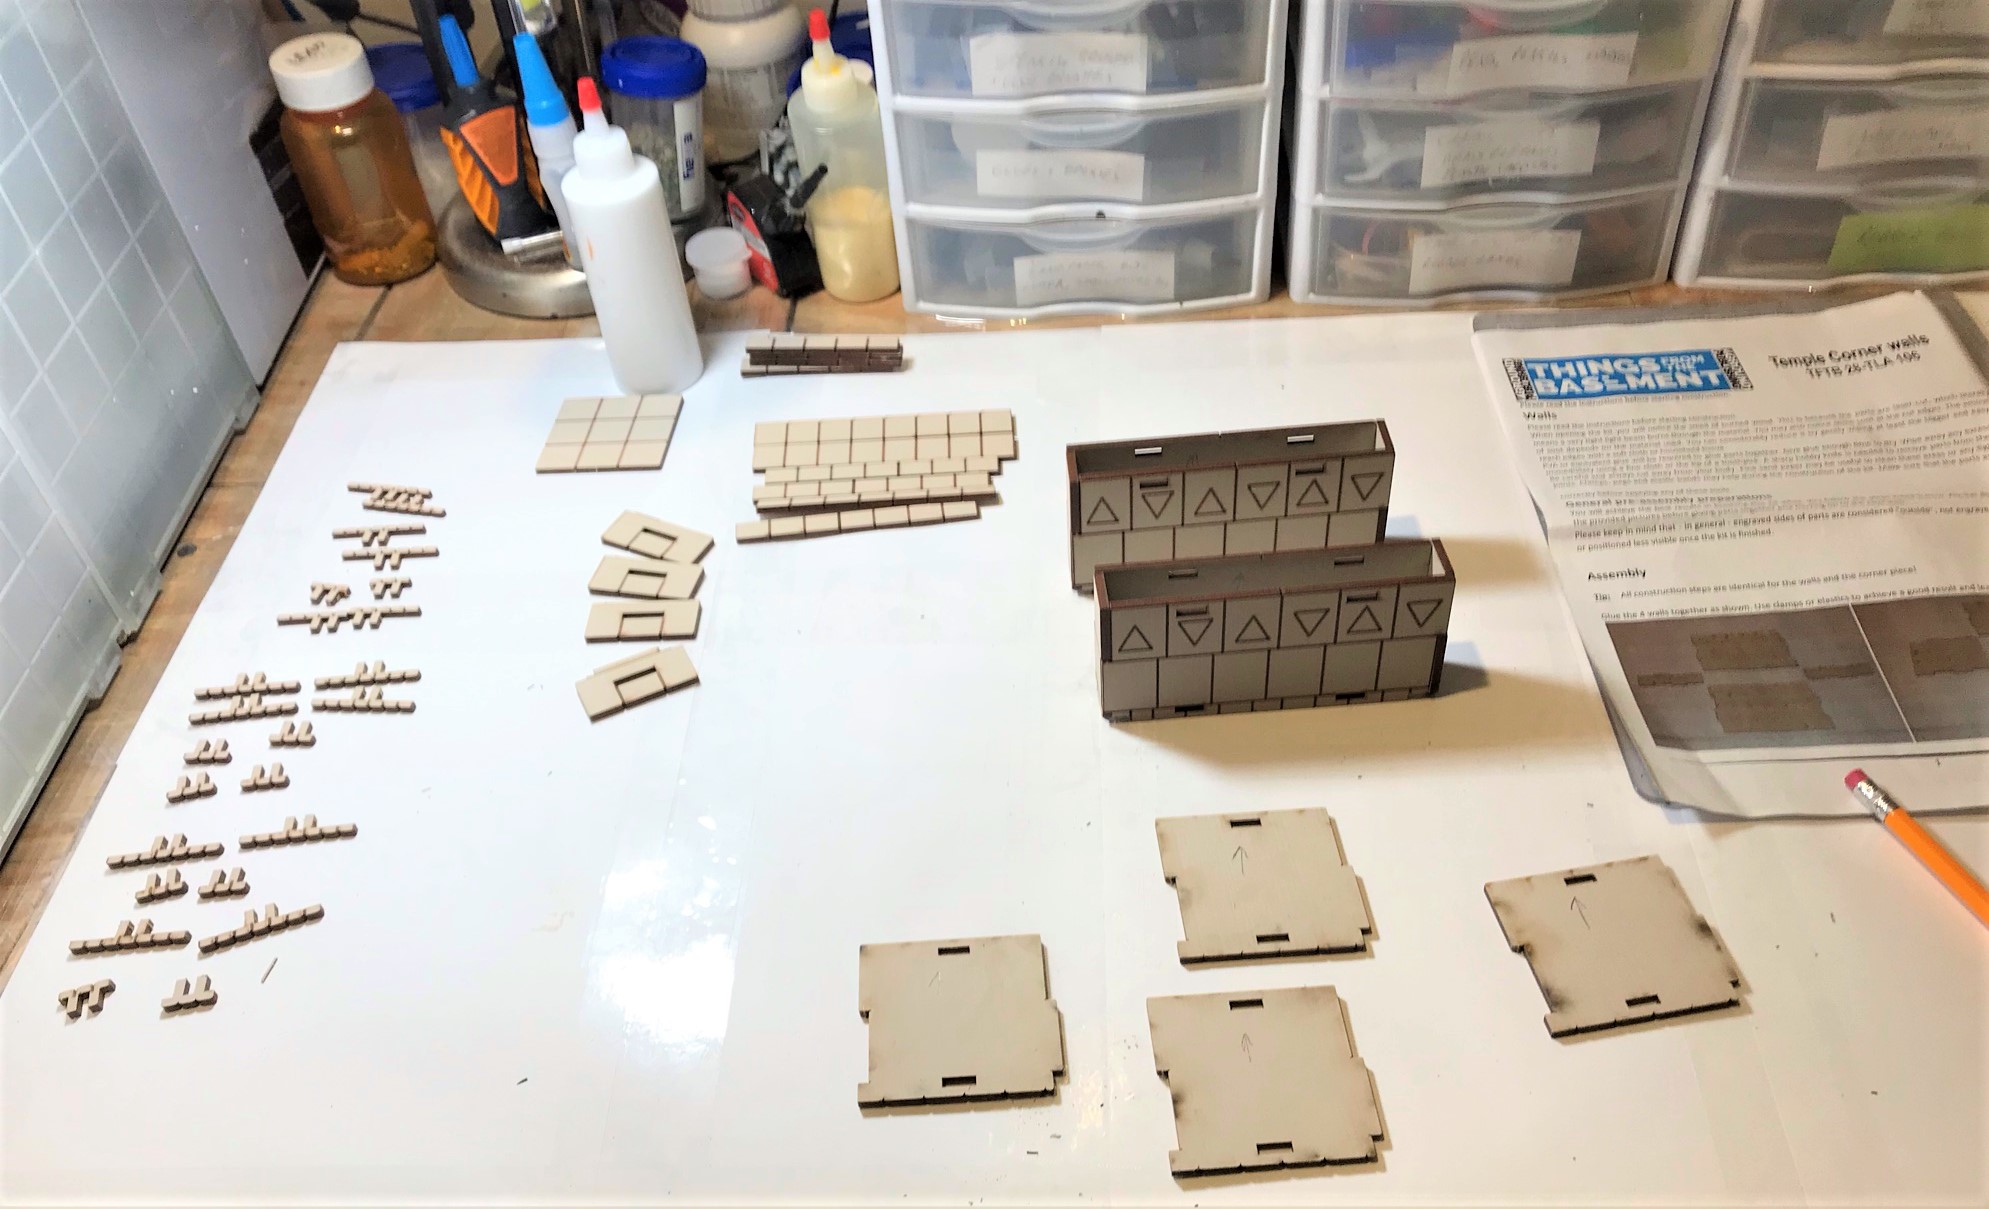
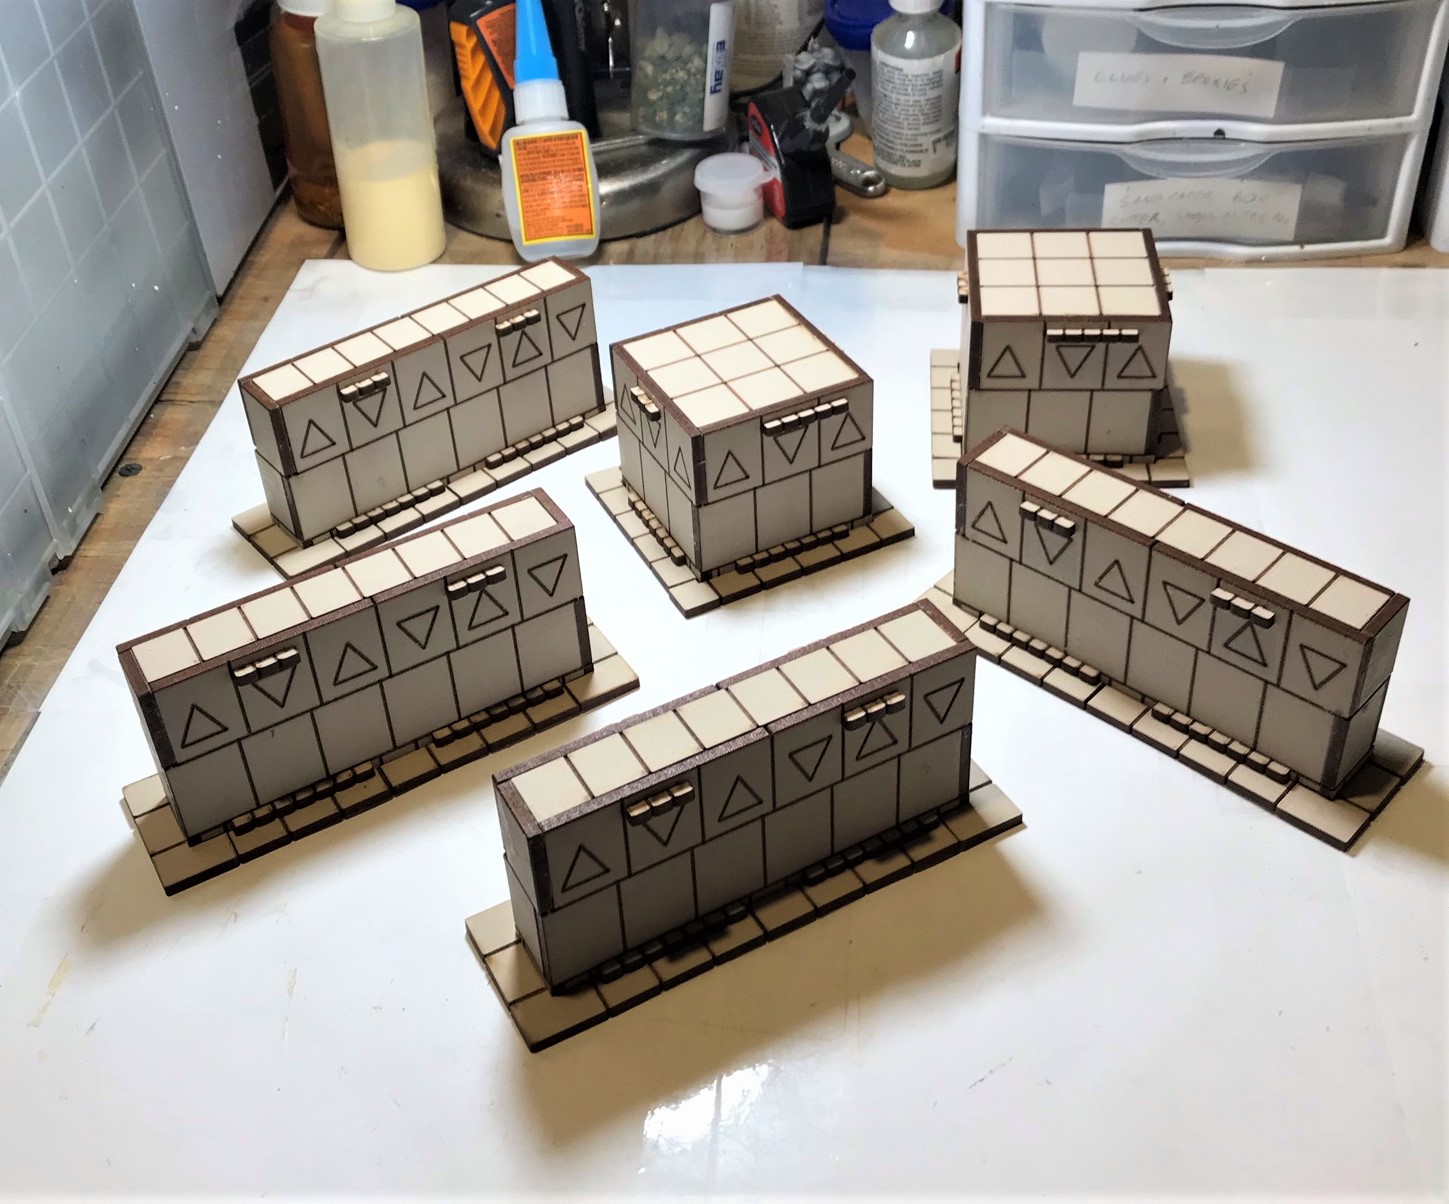
My next MDF effort would be two kits of the “Temple Corner Walls” – from Things From the Basement via 4Ground via Badger Games (see it here). Each kit had one square pillar-like structure and two walls – six in total. The kits are very nice and pretty easy to work with in my opinion. I basically used the second approach from last time – assemble first, then dust up with the chinchilla dust and paint them.
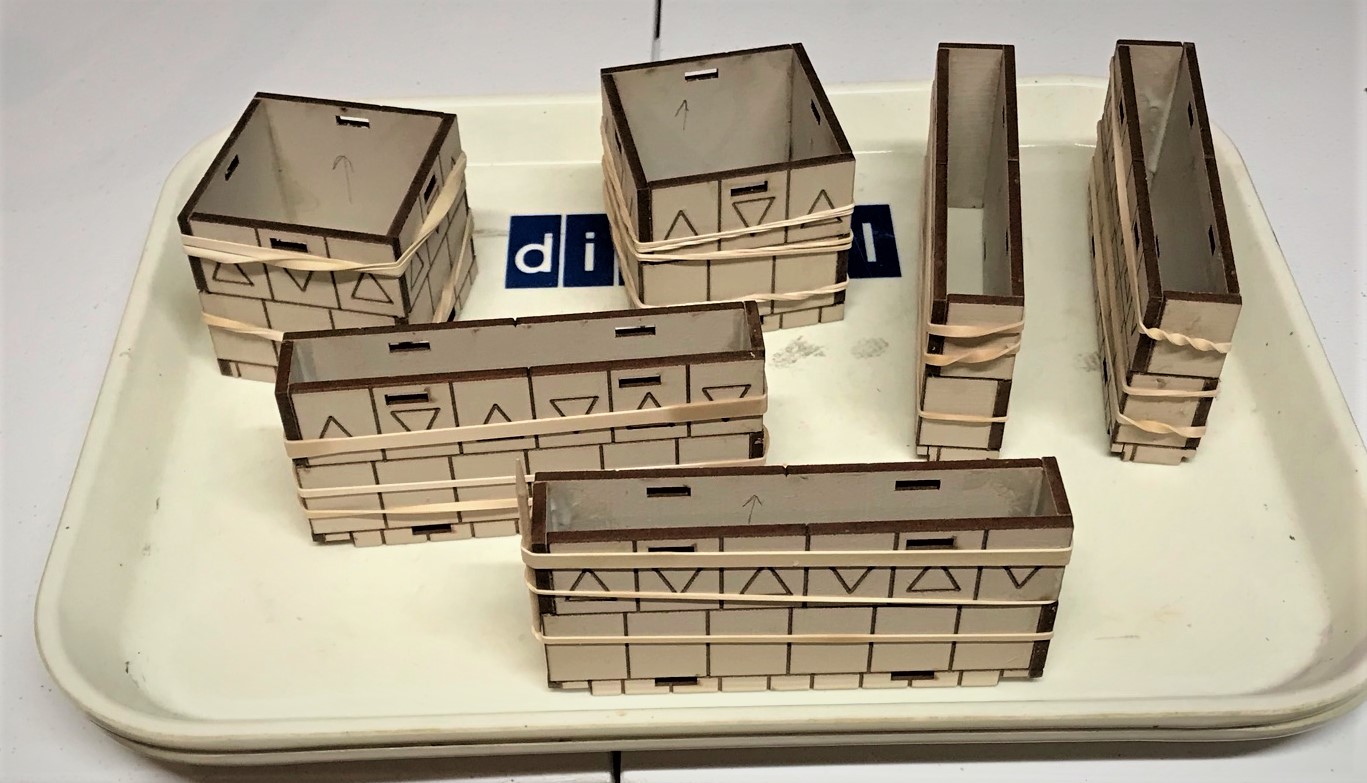
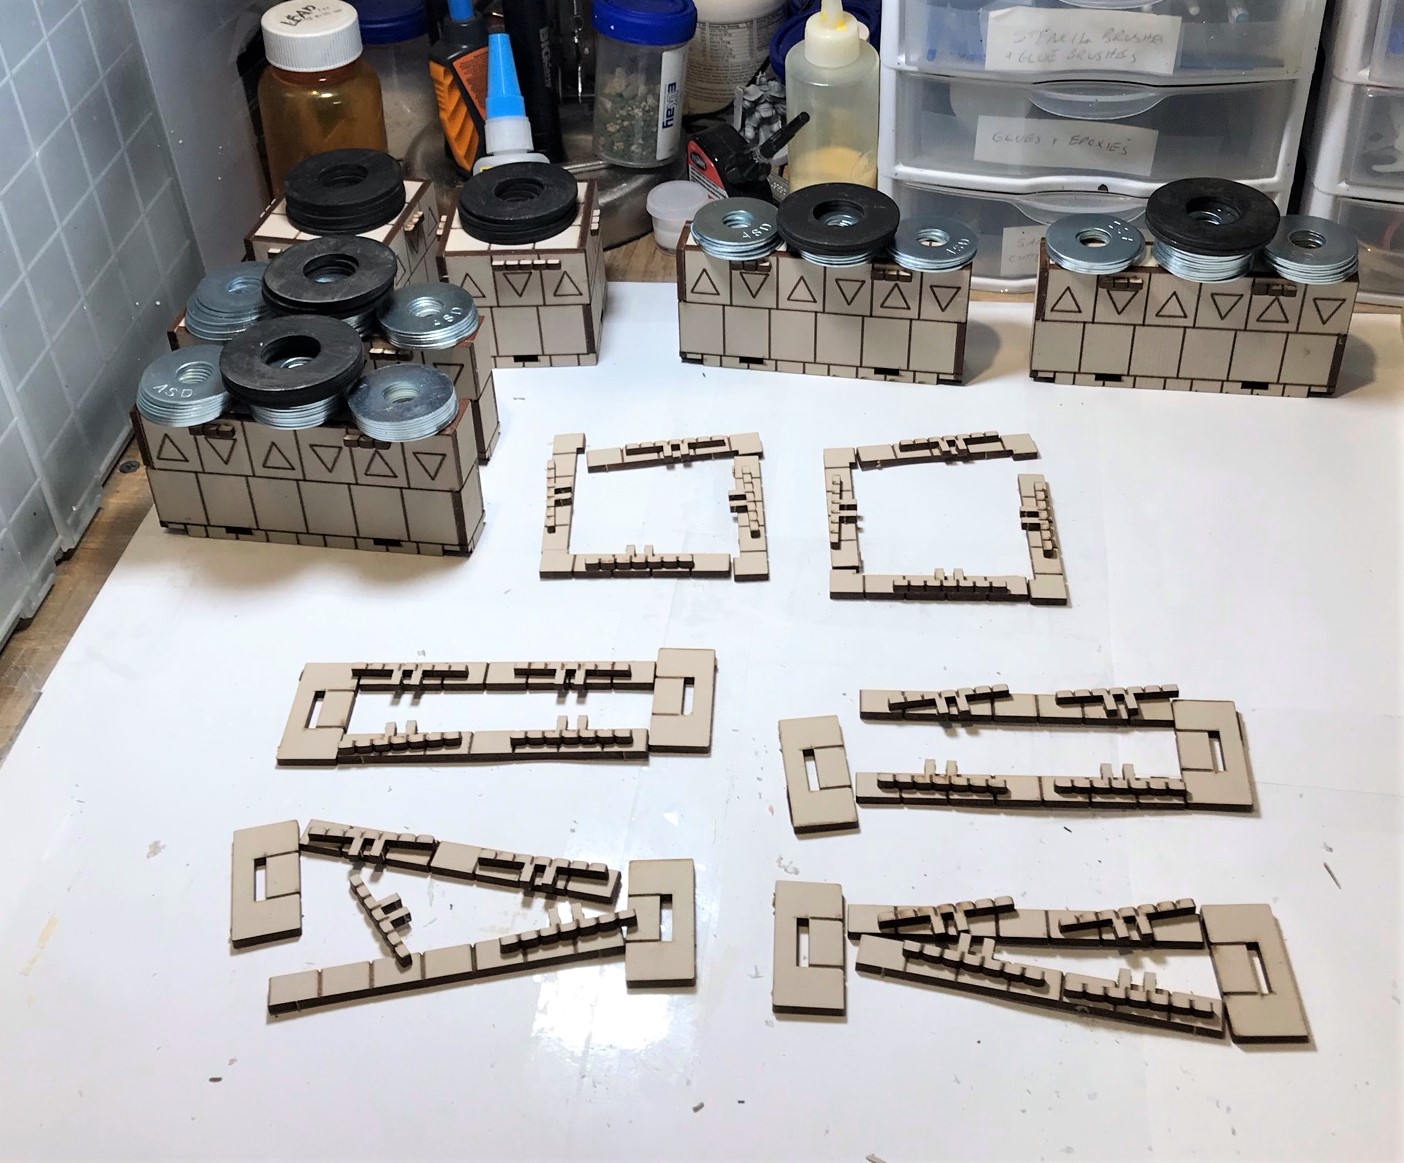
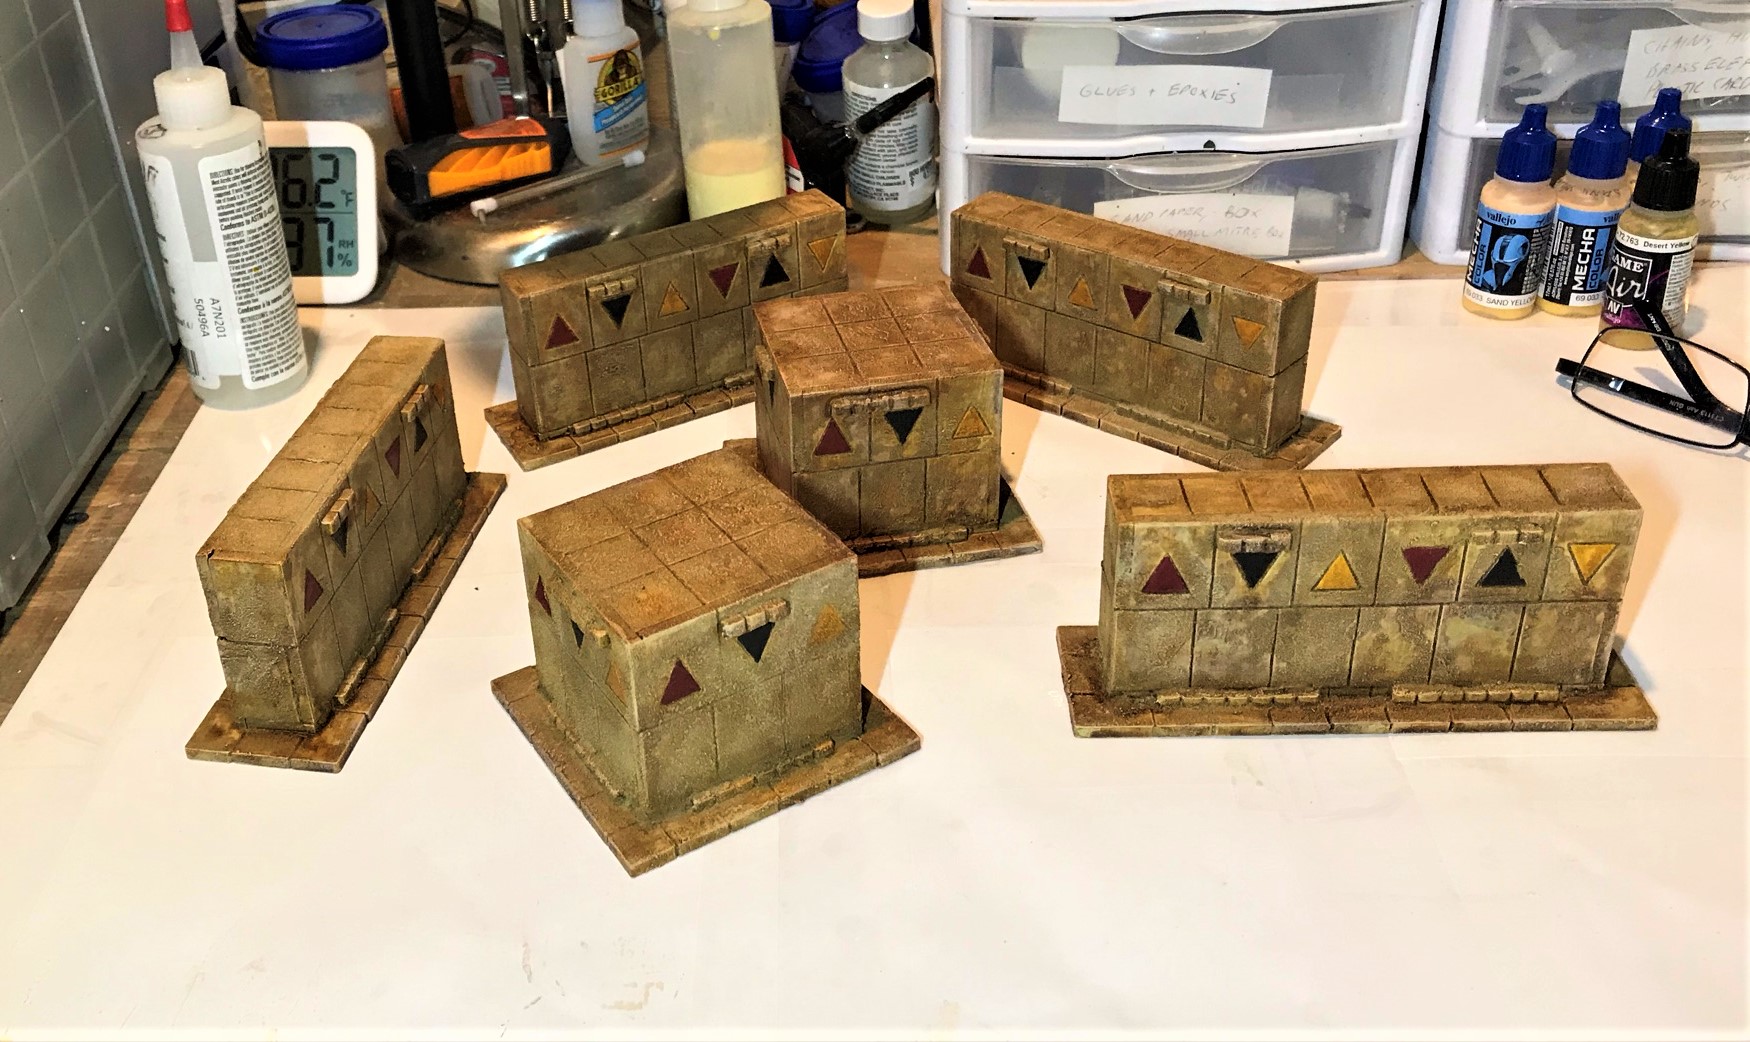
An example of one kit out of the bag after cleaning it off with a moist microfiber cloth.I have found with these MDF kits that it helps to dry fit first and organize the parts. Here you also see that I put an “up” arrow on the inside of the walls to help make sure that I did not assemble anything upside down.I assembled the wall sections first and let the PVA dry overnight.The next day, I added steel washers as weight to get the wall tops to glue flush to the previous step’s work. Then I glued to the bases (with the weights again).All of the “Temple Corner Walls” assembled and ready to get dusted up and painted.Here you see my early dry brushing after dusting – I use three colors to dry brush. I decided to paint the triangles in a red, black, and yellow pattern. You can see the paints that I used at the very end of this post.After I dry brushed the structures, I toned down the dry brushing with Army Painter “Light Tone”. Between the “thirst” of both the MDF and the chinchilla dust, I ended up using the better part of two bottles of the AP tone. Here, these are all complete.
I tried to use my spray booth again for some shots here but I did get some weird shadows and alternatively unwanted shine that I did not like. So I went with what you see below. I’ll need to investigate a light box (maybe).
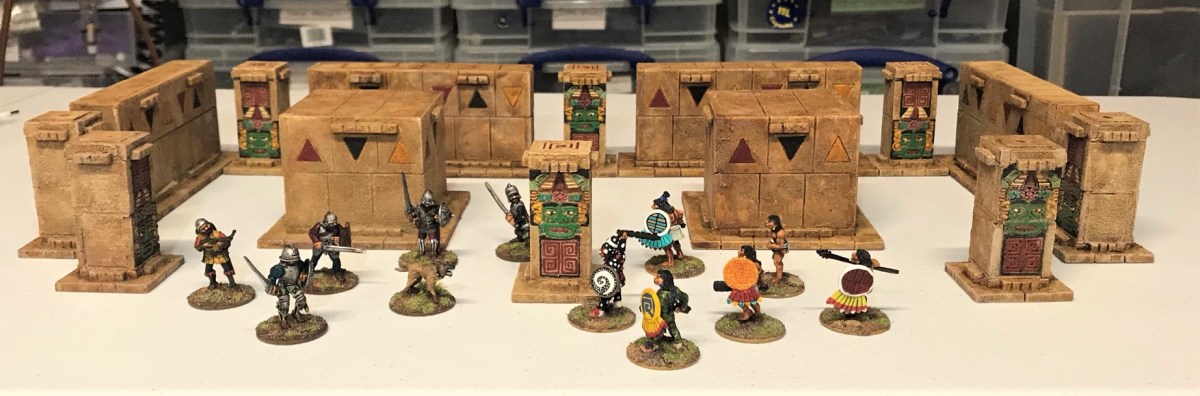
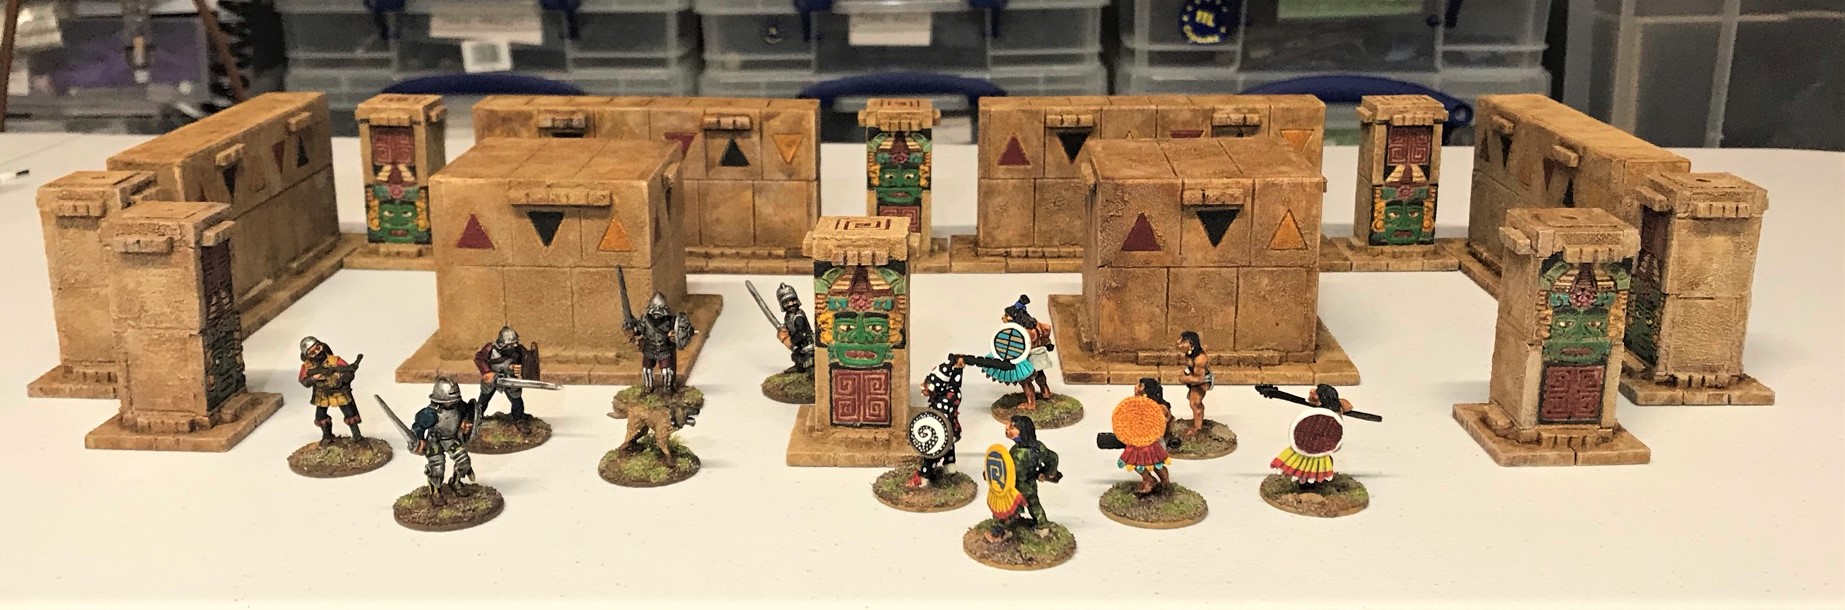
Here you see a fight among the “Temple Column Walls” (this post) and the “Temple Columns” (from my last post) between a squad of Conquistadores (and a wardog) against an Aztec squad and a supporting warrior priest. I think that I was successful at getting all to blend in well.
So, the Temple Corner Wall structures of this post are part of two “challenges”. The first is mine as mentioned earlier – “Mark’s Aztec Building Challenge Contest” – in which I will give away free prizes to blog followers for being the closest to guess how long it will take me to finish all these buildings. The second is from Ann’s Immaterium, and is called Ann’s “Paint the Crap You Already Own” challenge. These definitely count there – and I hope there will be more for this April challenge.
I have ordered some more “Light Tone” – and with my remaining MDF I’ll need it. In the meantime, as an update – it warmed up here this week so I was also able to get my outside priming done – see below!
I was able to prime this week! I can now vary what I decide to complete.
I also am planning an update to my Civilizations Collide supplement, which will have rules for the falconet and some new scenarios (in addition to an overall update). So that might slow up my progress, as also golf might (haven’t played yet this year though). I also have been – wait for it – GAMING!
Well, remotely anyways. I was lucky enough to play in a Combat PatrolTM game last Saturday via Zoom with Sally4th’s Chris Abbey. Chris (in the UK) set up a James Bond game based on the 1977 film The Spy Who Loved Me that he called “Nobody Does it Better” (Carly Simon song of the movie). It featured the scene in the bad guy’s (Stromberg) supertanker interior hold (that held a captured US sub). The action focused on the scene where escaping British, Russian, and American crews fight the Stromberg goons to stop a nuclear launch. We had US and UK players – and I had James Bond. Our objective was to advance up the gantry and throw a satchel charge at the control room doors and blow it open. We had a lot of twists and turns in the game – James Bond’s satchel charge misfired, and so did a Stromberg flamethrower that would have fried him. A last second satchel charge throw from the Americans missed, but the explosive charge slid up to the door and blew it! Success! Notably, I had invited our blogger buddy TIM who got to watch the game – and it was fun to share the experience with him.
Take a look at the tabletop below – amazing!
The tabletop before the game.Chris Abbey GM’s the game exceptionally well. We were moving up the gantry on the left – the control room was in the center of the far end.
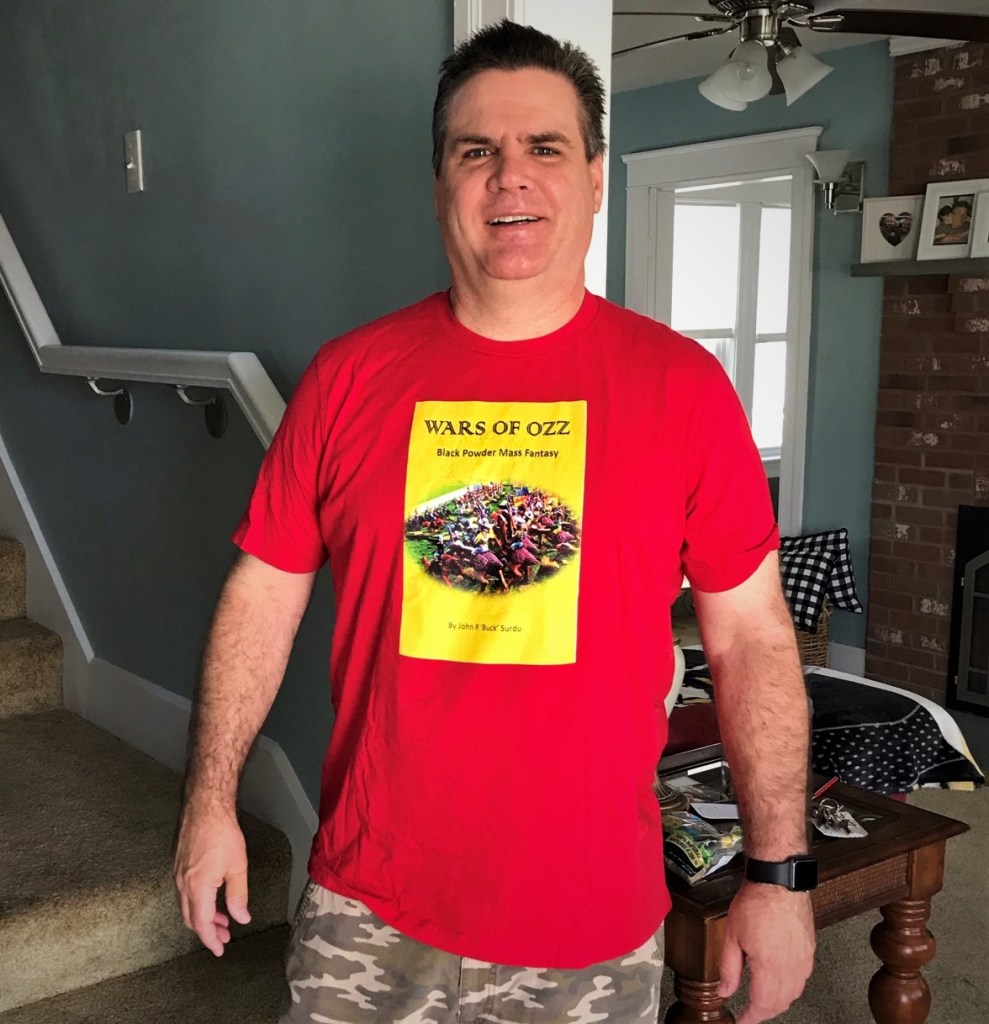
I also had two other nice surprises. The first was in the mail from Buck Surdu – who sent me a couple of Wars of Ozz shirts. I did get in the Kickstarter for it (and the figures are available from Sally 4th and Old Glory in the US) -and the next project I plan to do is paint these figures.
Love these shirts and I will be happy to be wearing them at future gaming events! I won’t be bringing Caesar (our nearly 27 year old cockatiel) – he hates dice.
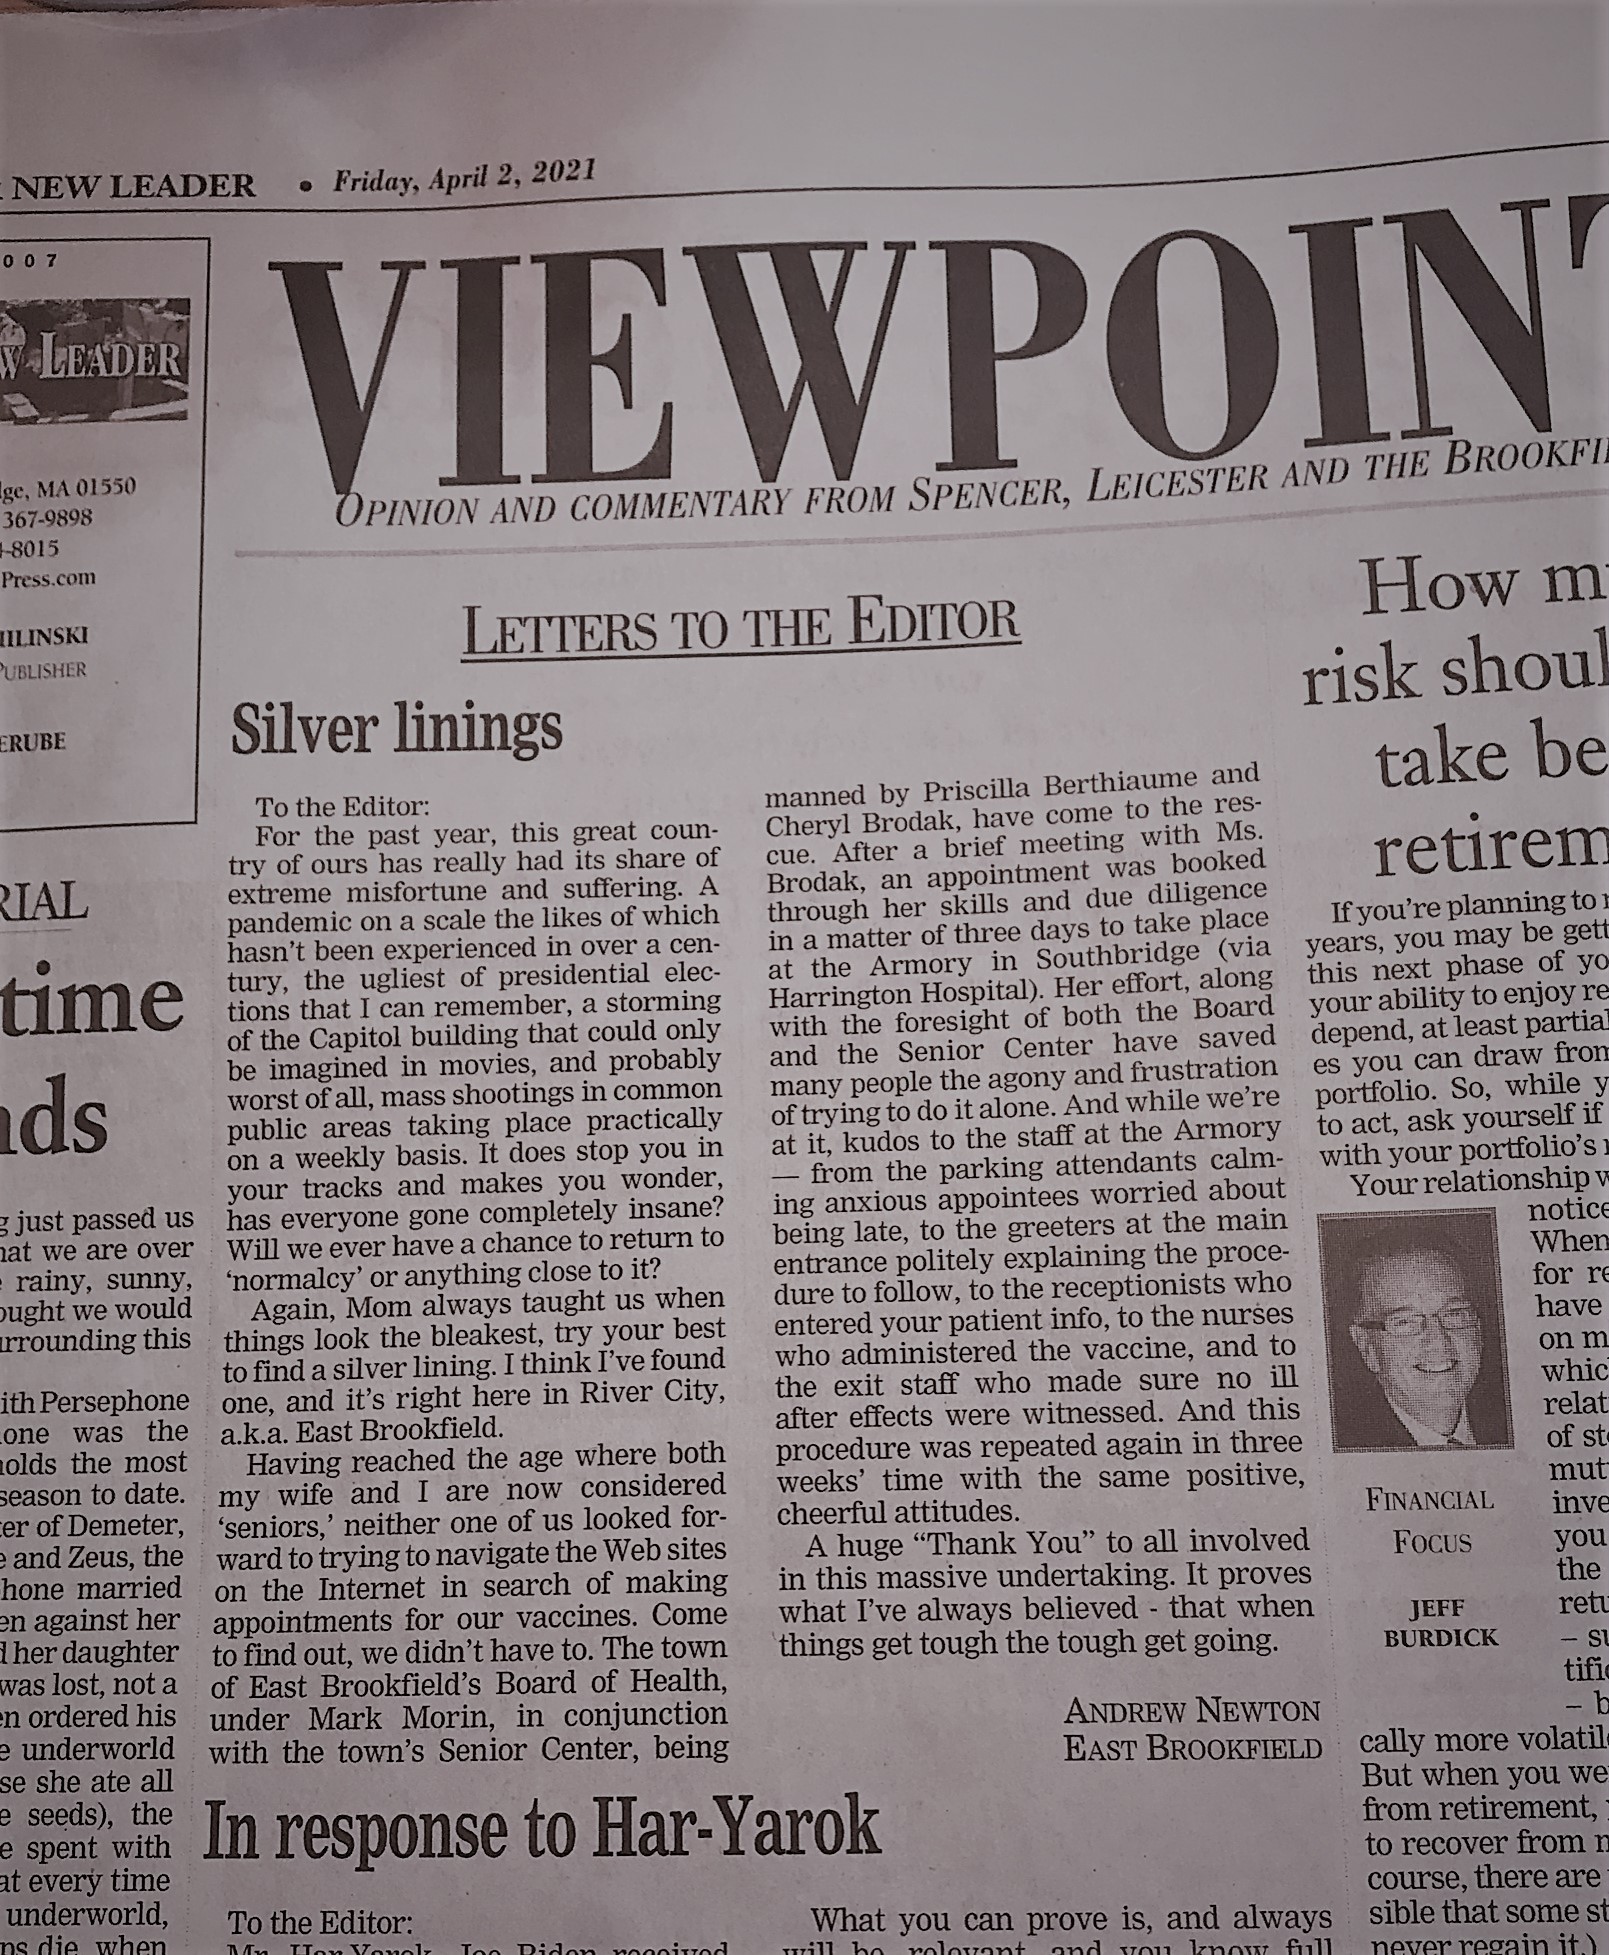
The second surprise came in our local weekly newspaper (see below). I’ll let Andy Newton’s words speak for themselves, but given the last few months, this was a heartwarming bonus for us.
From The Spencer New Leader
And though my computer is a problem, I did get the email from the Commonwealth of Massachusetts that has allowed me and my wife to get our first “jabs” this weekend! Take that COVID-19!
So, until my computer situation is better – I’ll be painting and following up on my iPad. Maybe I’ll be back this weekend – in any case, let’s discuss this post! So feel free to let me know your thoughts and comment – and to enter the contest. Take care all and thanks for looking!
Miscellaneous details and references for those interested in that sort of thing:
Previous posts on games, units, and other projects for my 16th Century Spanish Conquest supplement for Feudal Patrol™ – “Civilizations Collide”
Aztec Temple Corner Walls (Plus Some Life & Other Distractions Stuff Added In) (this post)
Perro de Guerra (Conquistador War Dogs). 13 figures total: Outpost Wargames Services #CONS6 “War Dogs” (8 war dogs); Eureka #100CON13 “Dog Handler and Dogs” (1 dog handler/pikeman and 4 war dogs)
Conquistador Foot Command, Crossbowmen, and a Couple of Officers. 11 figures total: Outpost Wargames Services #CONC1 “Conquistador Foot Command” (a leader, a banner bearer, a drummer, and a bugler); Eureka #100CON04 “Crossbowmen” (5 crossbowmen); and Eureka CONC1 “Conquistador Officer” and an unknown SKU officer (2 officers)


