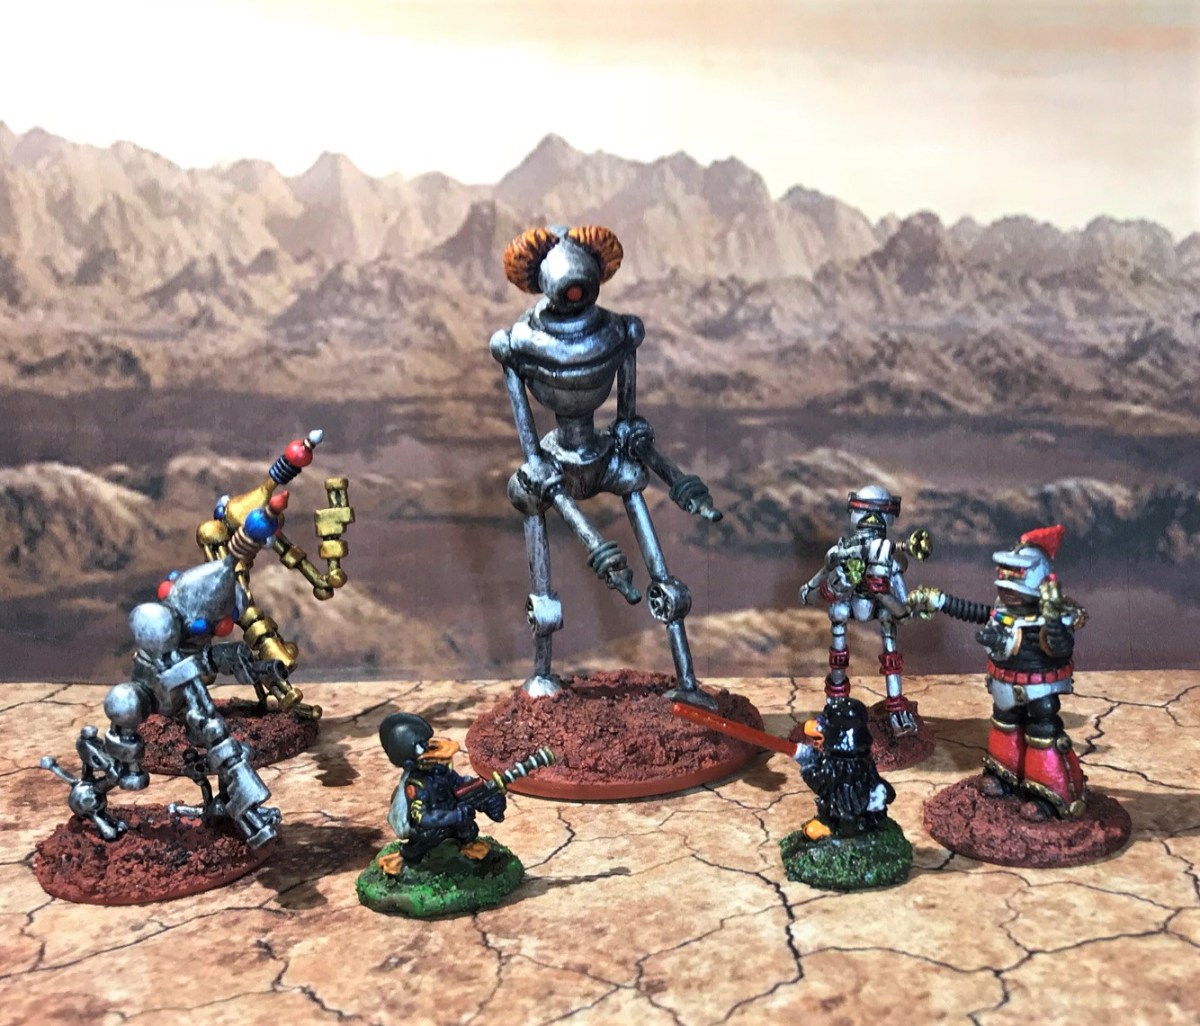
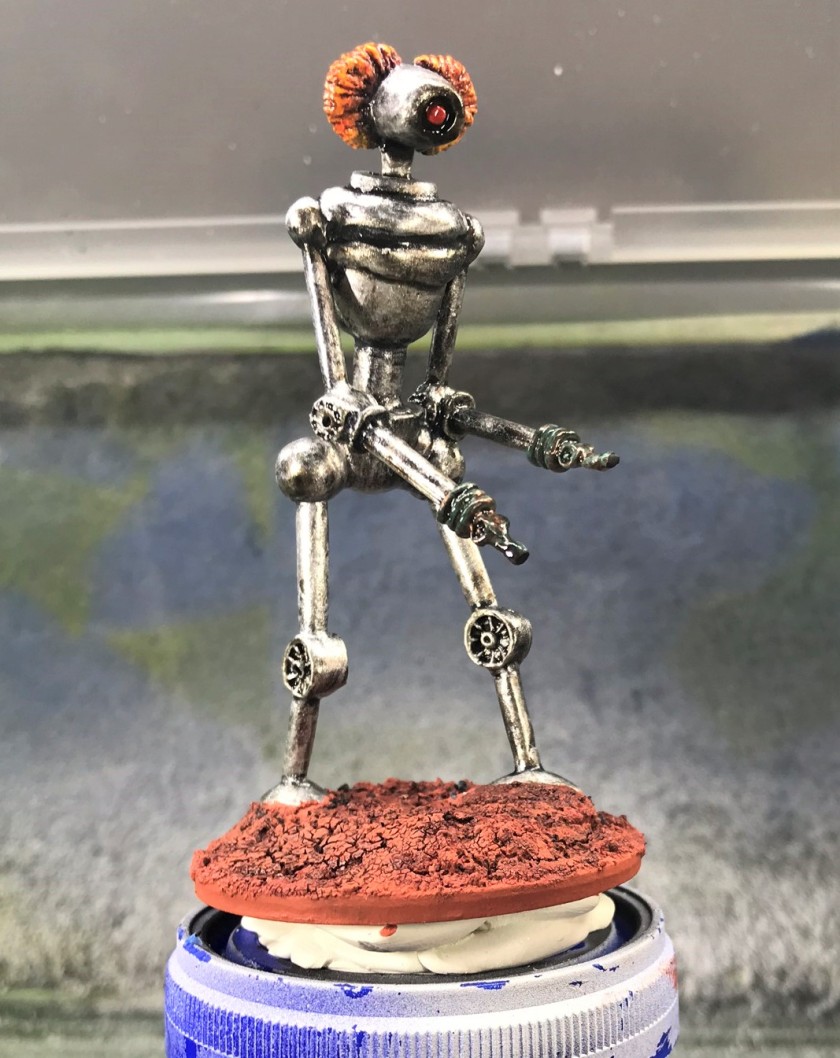
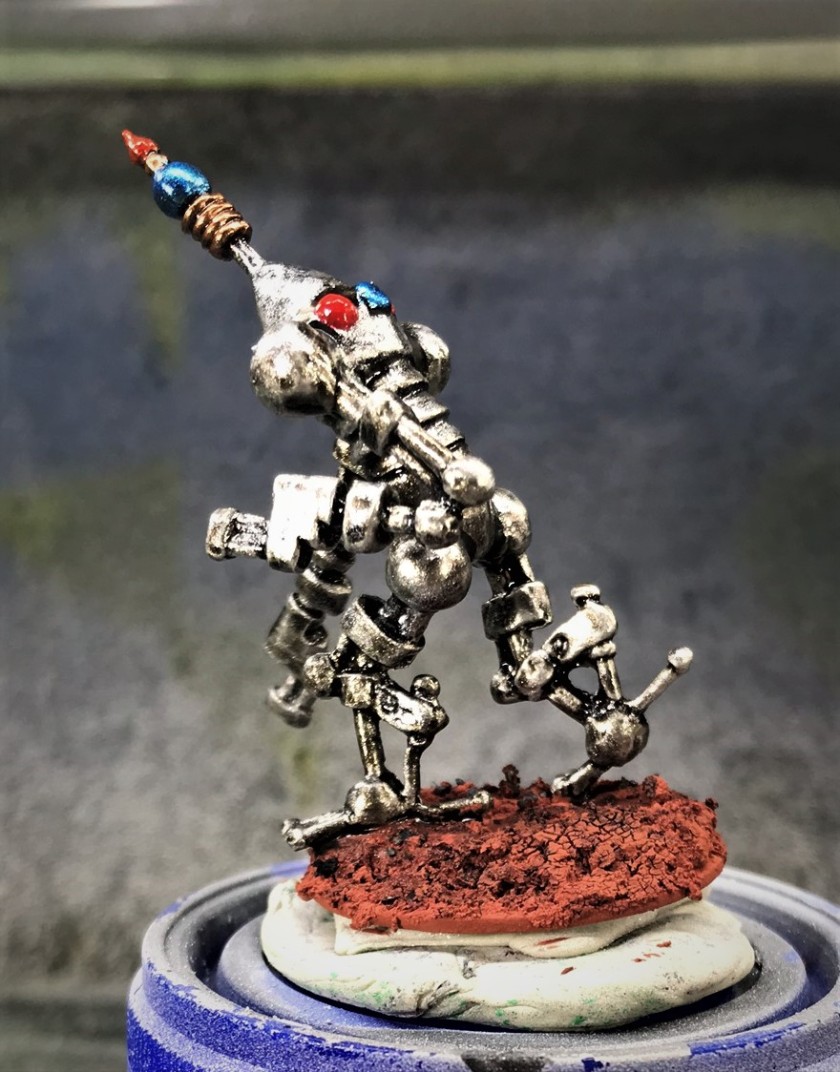
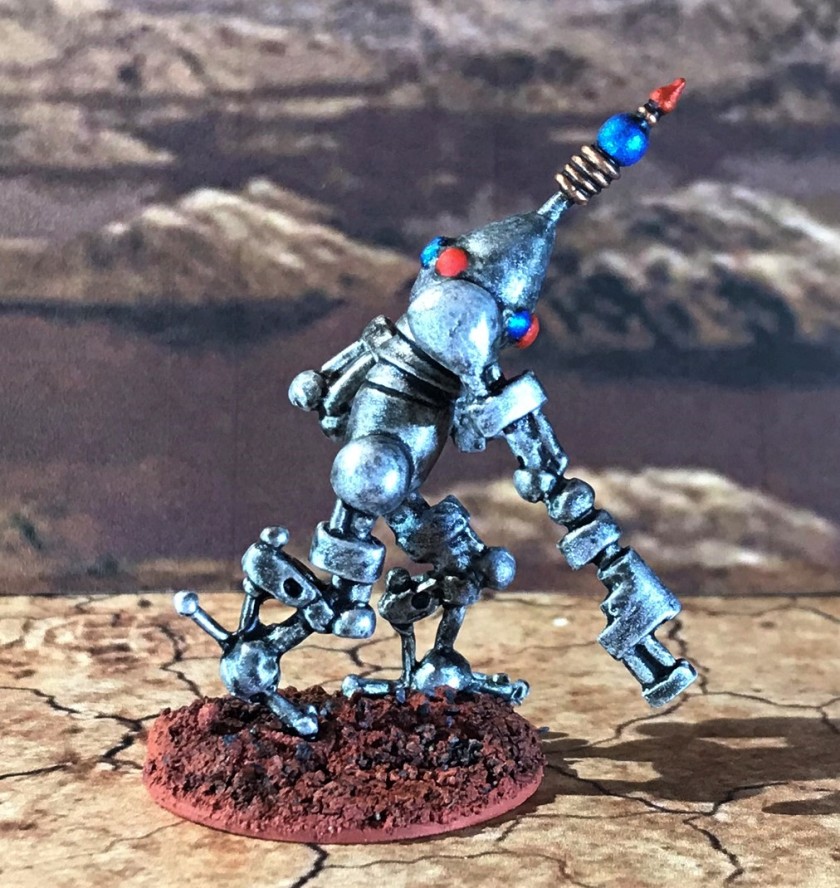
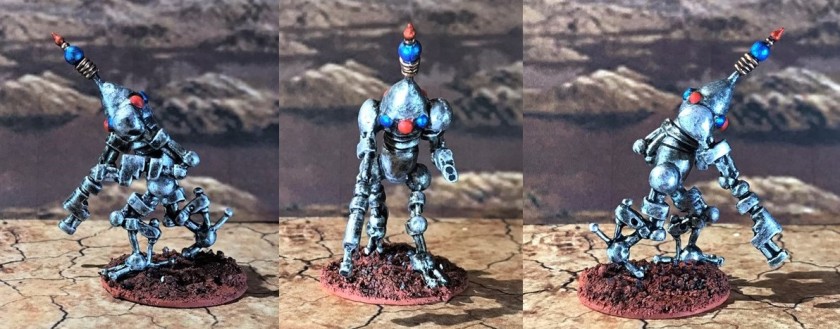
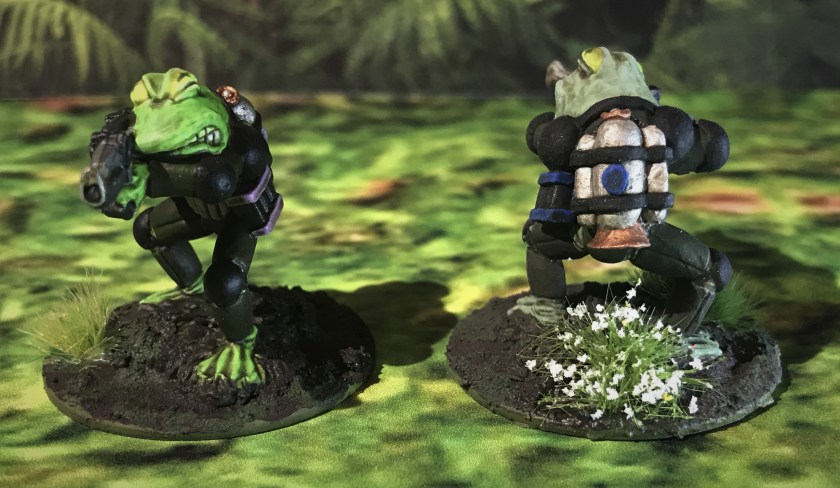
I was fortunate enough to get a couple of Archive Miniatures robots from the Star Rovers line that I could add to my Mark III Warbot Platoon for use in Combat Patrol™ retro sci-fi games. The first was “Roberker”, a Giant Robot (Archive #2010), which I had only seen before on Lost Minis Wiki and on David Wood’s blog. It is nearly 3½”/85mm tall, and was supposedly one of the largest robots on the market in 1978. It is armed with nozzles on its arms, so I think it is more or less a giant flame-throwing robot. Nevile Stocken commented on FaceBook that it was his creation, and inspired by Fred Saberhagen’s Berserker novels. The second was another late 1970’s Stocken creation, “Juggerbot” (Archive #2009 or Archive #2331), which I had a version of already, but only one, which I use as the platoon leader. I decided to make this one the assistant platoon commander/platoon sergeant.
This same good friend, David Wood (UK version), knew that I was on the hunt for these and graciously provided them so that I could augment my Warbots. Additionally, Azazel’s blog had put out an “April Assembly” challenge, that these two could certainly be participants.
The models are both challenges for assembly – so I needed to make sure that they were structurally sound for the tabletop. First, I will review Roberker, then Juggerbot. I list the paints I used at the end of this post for those interested.
Roberker
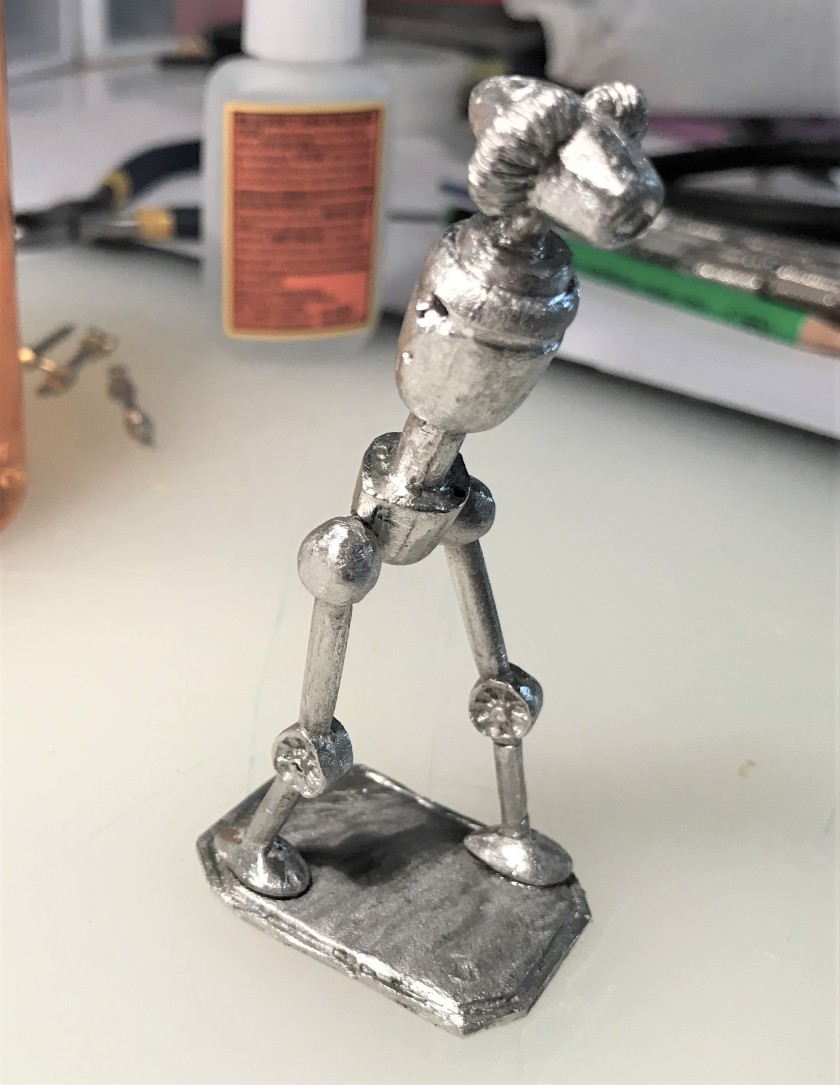
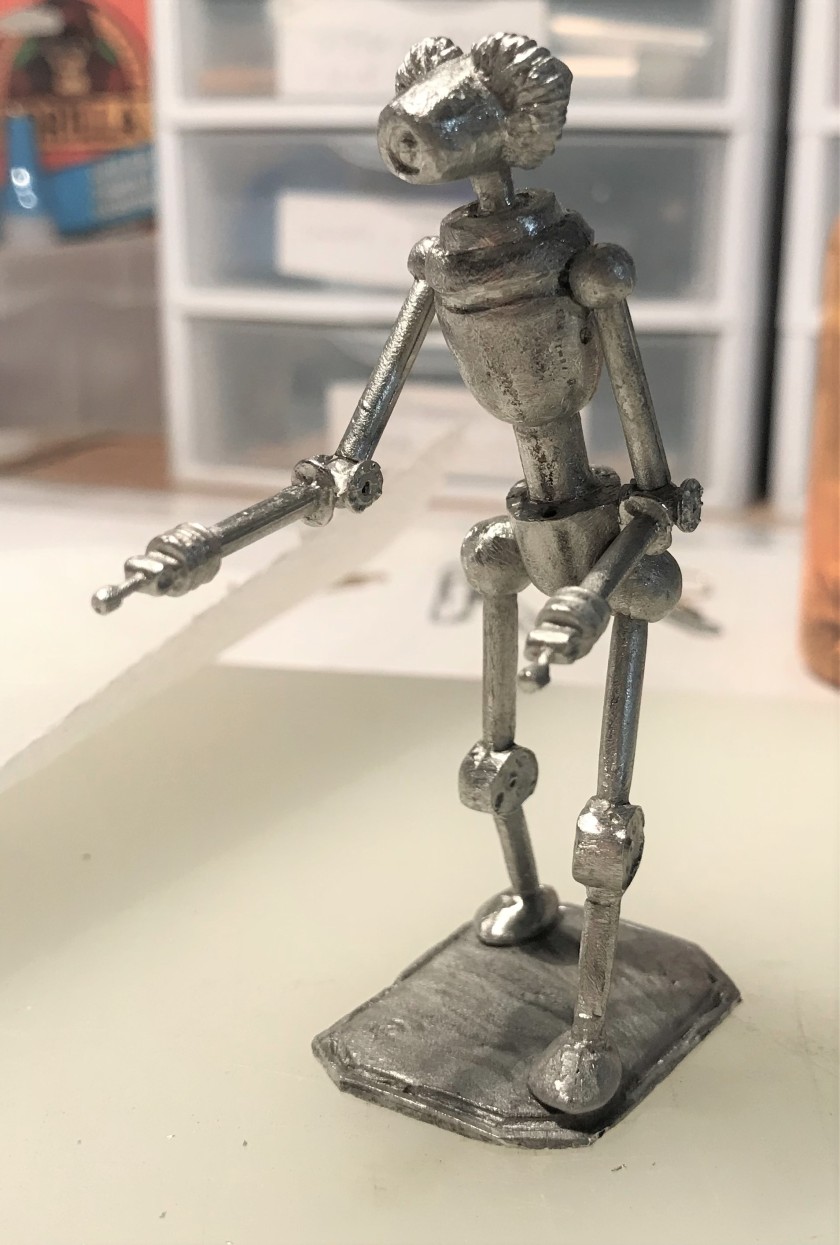
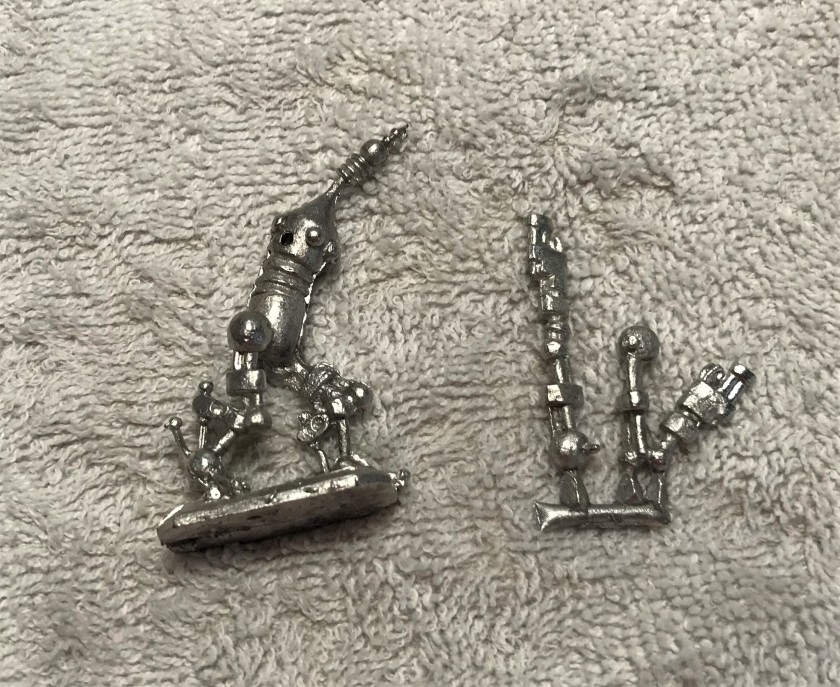
I trimmed and sanded the mold lines as best as I could. Roberker was described by David and Nevile as “a swine to pin”. I now know the truth of that very British expression. I spent most of a day drilling and pinning the arms, legs, and head. Using Gorilla glue, I made initial connections of the parts. Then, I used kneadatite (green stuff) in several places. Specifically, I needed to have strength for the spindly arms and legs. I augmented the pinning by adding a superficial kneadatite belt around the chest and shoulder areas, and by making sure that the legs and hips were married. Lastly, I made a strong base connection with the green stuff.
Roberker pieces after cleaningRoberker original baseFirst gluing of legs, torso, and headI then glued the arms, but saw that reinforcement was neededHere, you can see the kneadatite reinforcements that I made. This really made the model very strong.Roberker is no small robot!
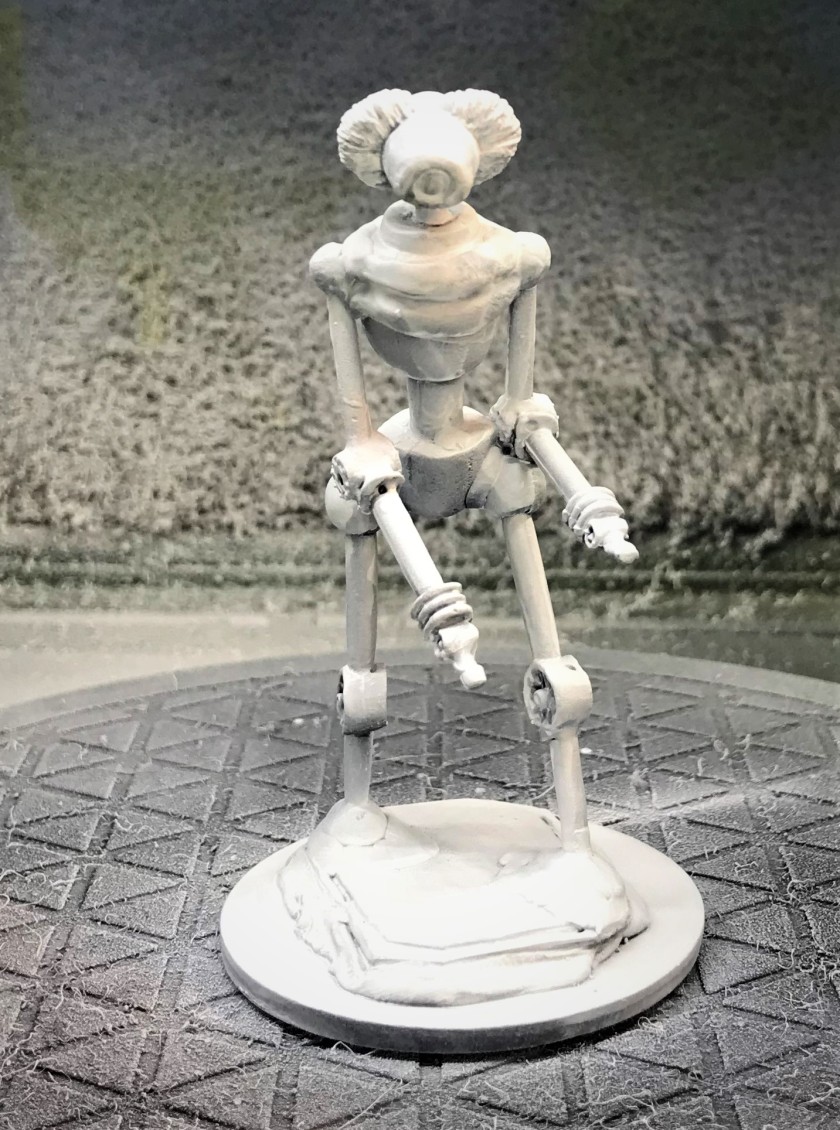
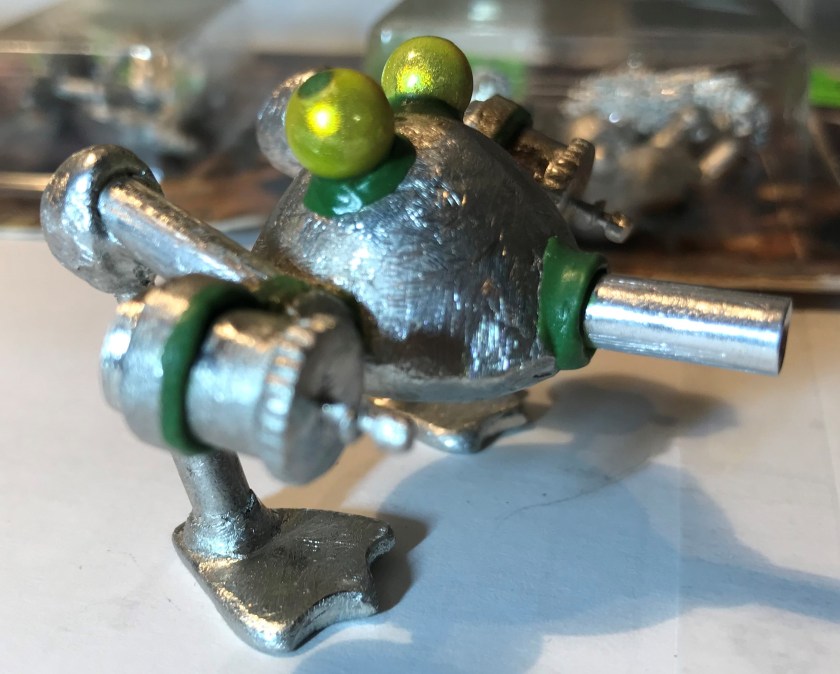
I then based the figure on a 2″ steel washer, which is relatively heavy and will protect the model from being prone to tipping over. I then primed, painted, and varnished the model similar to the way that I did the Mark III Warbots. I did however want the figure to look like it had flames coming out of its head, and that it had a sooty appearance having torched many of its victims over the years. Also, for the hand nozzles, I went with a copper and verdigris look.
Roberker after airbrush primingRoberker painted and ready for varnishRoberker completed, front viewFour-way view of the model
I am very happy with how Roberker came out – and he will be a terror on the tabletop I am sure.
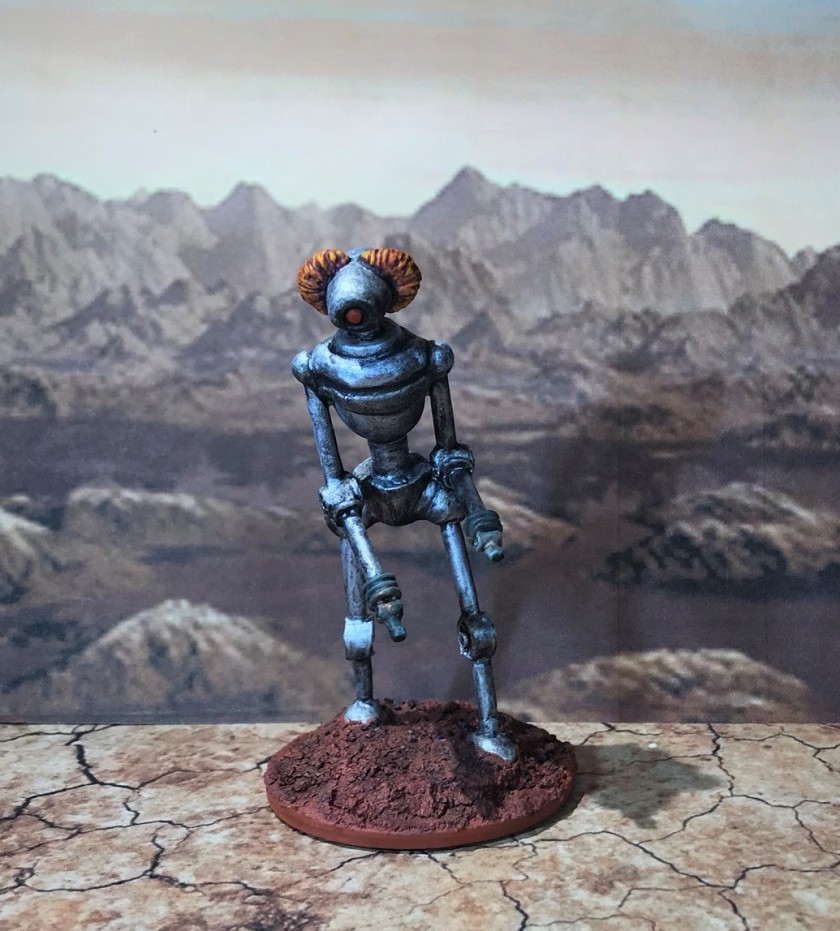
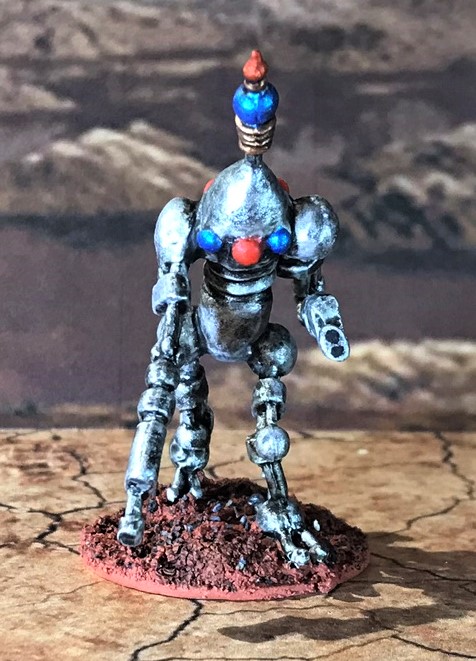
Juggerbot
As I said, this is my second Juggerbot. My first is the platoon leader and he is basically golden. This one was to be similar to the Mark III Warbots in color scheme and treatment. Here as well, I trimmed and sanded the mold lines as best as I could. I did also need to do a bit more work with the pinning and the green stuff here as well. That is because I wanted to have a slightly different positioning of the arms, which necessitated making a “vest” of green stuff that covered the shoulders and the top conic section of the robot.
Juggerbot as receivedMy original Juggerbot (the Platoon Leader on left) and his new assistant commander on the right in progress. Note that I was able to give the arms different positioning with the kneadatite “vest”Side view of the two JuggerbotsJuggerbot after airbrush primingPainted and awaiting varnishingThe completed new Platoon Sergeant Juggerbot, right side viewComing at you!Three way view of the new Juggerbot model
This model met my expectations – now the command and control of the Warbot platoon will be more robust.
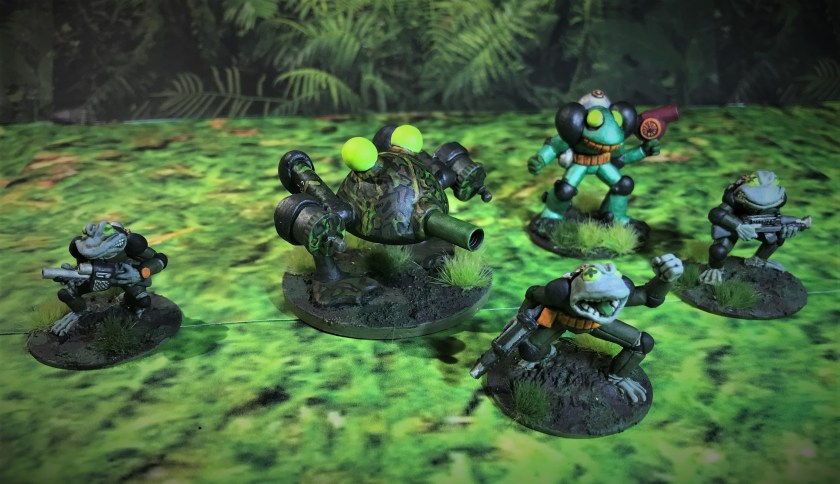
This shows the size of my different retro sci-fi figures. From left to right, the Warbot Juggerbot Platoon Sergeant, the Warbot Juggerbot Platoon Leader, SFC Mallard, Roberker, Duck Wader, a Mark III Warbot, and a Khang Robot Squad Leader. It looks dire for the two Star Ducks!
Thanks for looking – please let me know what you think in the comments section at the bottom.
Finding a gaming convention that is close by to my home has been somewhat frustrating for me over the last few years. Since I returned to the hobby, I have attended a few BARRAGE events in Maryland , but that’s it.
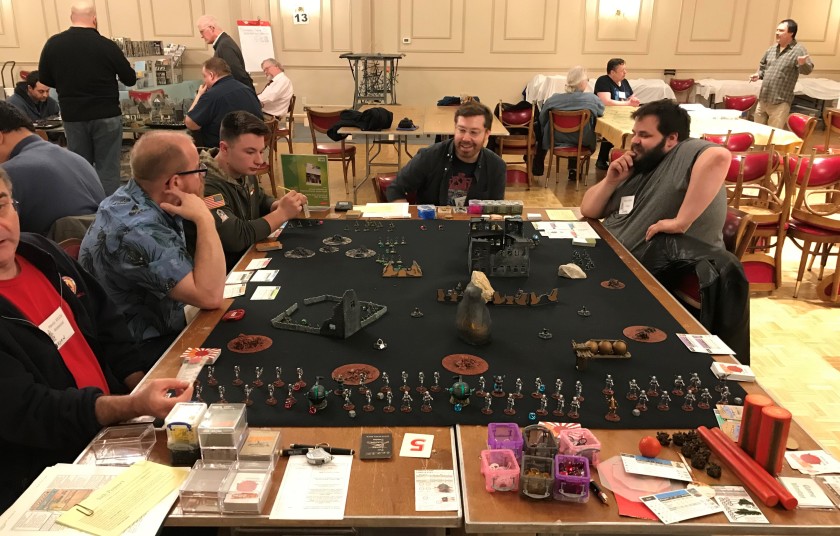
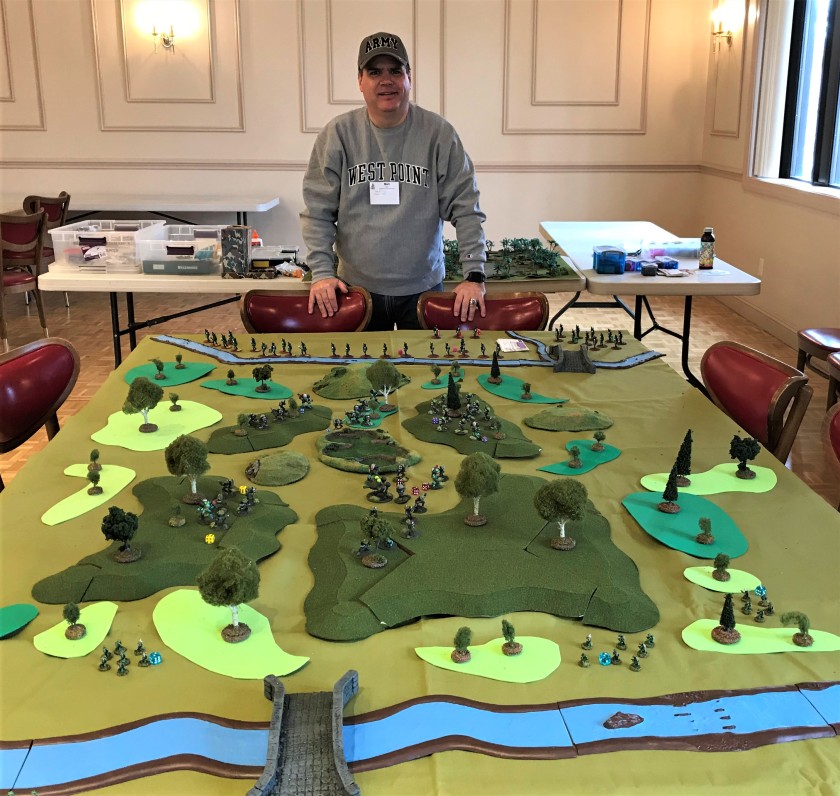
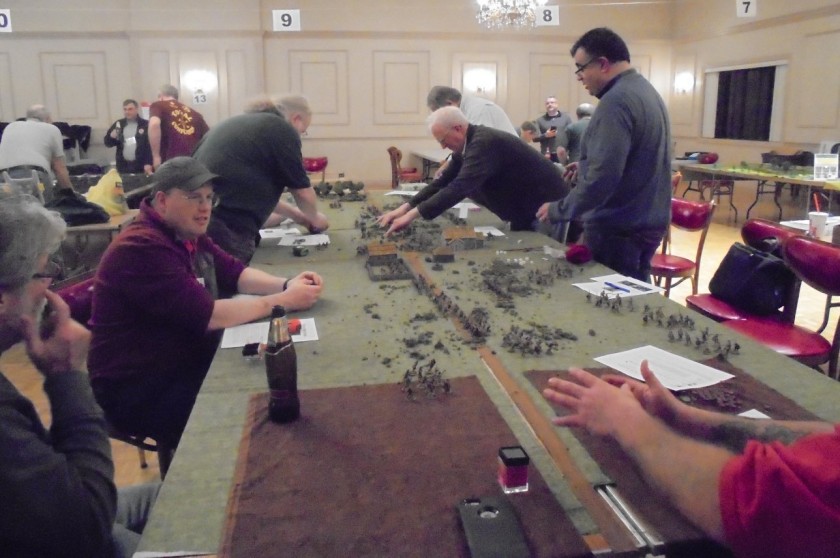
Imagine then that there was a con 15 miles from my home AND that they have been having it for 34 years (and I never knew!). The event was the three-day (Friday night, Saturday, and Sunday) HAVOC convention, run annually by Battlegroup Boston. This year was HAVOC XXXIV, and I learned of it through the New England Wargame Groups List page on FaceBook. It ran from April 6-8, and I am really glad that I could attend, but it was a last-minute decision. I was also hoping to let folks know about our group, The Mass Pikemen’s Gaming Club in Central Massachusetts.
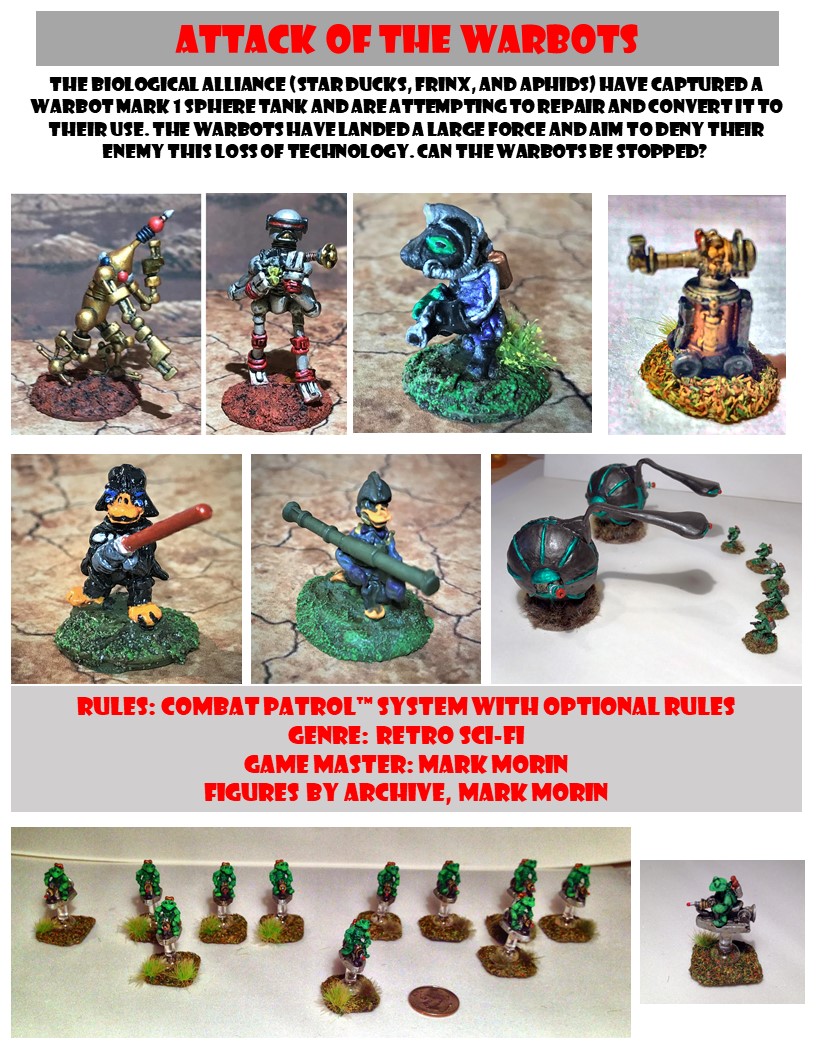
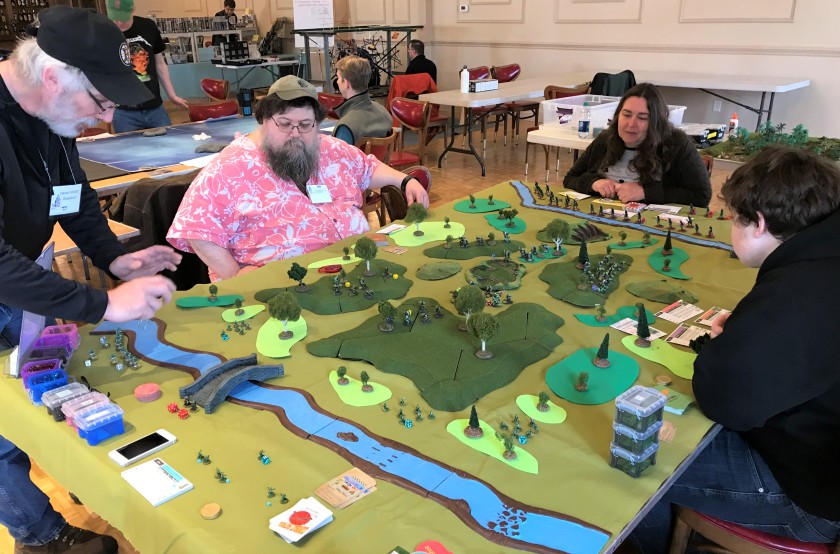
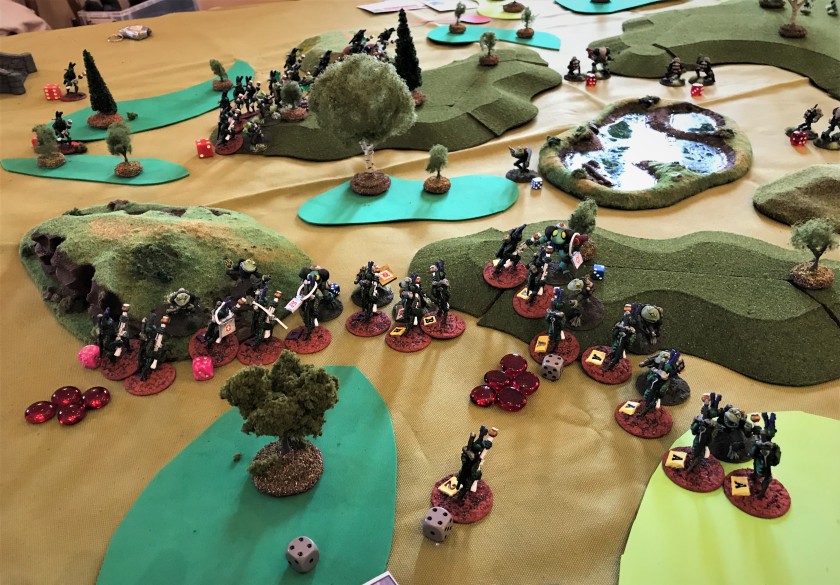
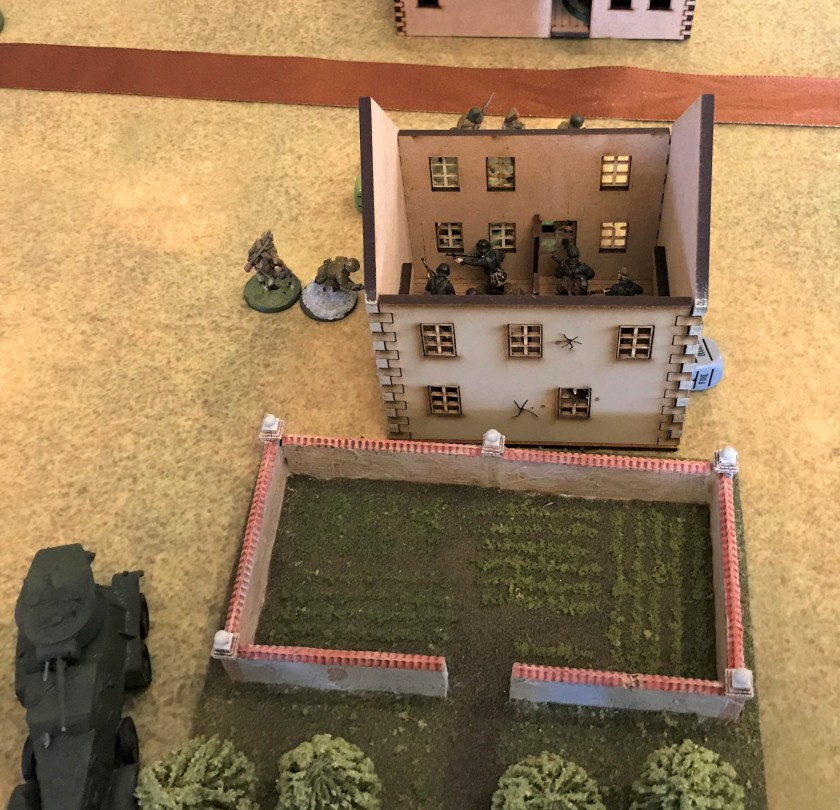
Back in March, I went to the HAVOC web page, and I also saw that they were looking for game masters. I needed to wait to see if I could attend. Ultimately, I was able to not only attend the event, but to run two retro sci-fi games using the Combat Patrol™ system. The first game I ran was on Friday night. It was “Attack of the Warbots” using figures from the Archive Star Roversline from the late 1970’s (Mark III Warbots, Star Ducks, Aphids, and Power-Armored Frinx) along with my Mark 1 Sphere tanks). There were also some Wargames Supply Dump Robo-Sentry guns acting as stationary defenses.
In this blog, first I’ll discuss the two games I ran, then share some photos and eye candy of some of the convention.
My flyer for the game
I managed to get 7 players for the game, which was great. I did not get as many pictures as I would have liked as I was running the game. The players really had a great time and there was a lot of action. No one had ever seen these figures before, and the mass of the Mark 1’s surprised them all! I used a number of Armorcast sci-fi structures as well on the board, and they worked great.
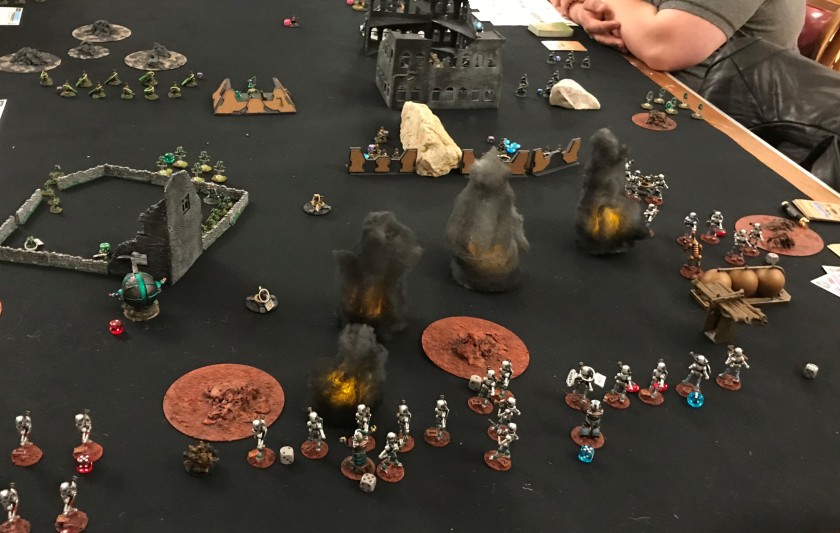
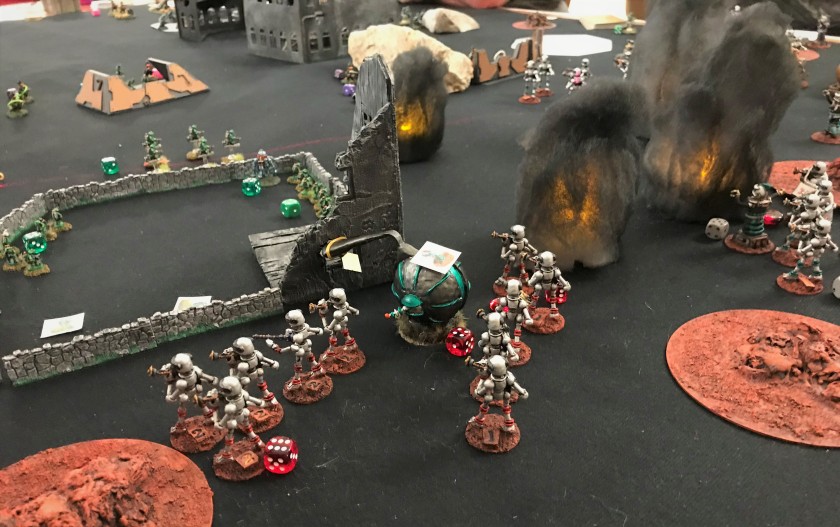
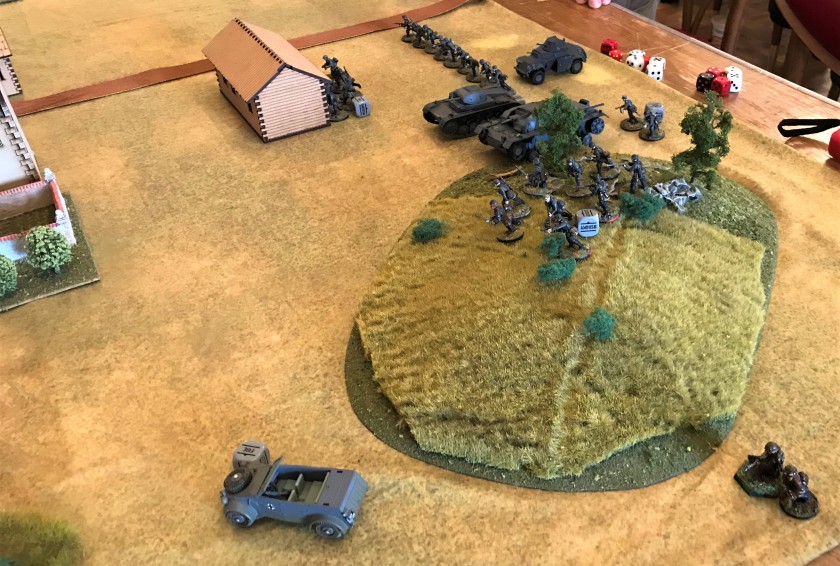
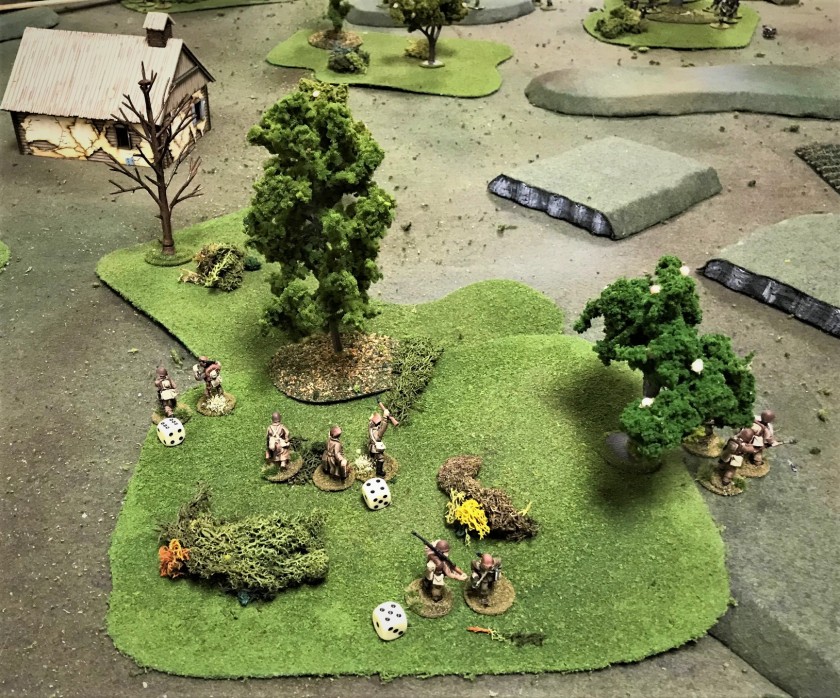
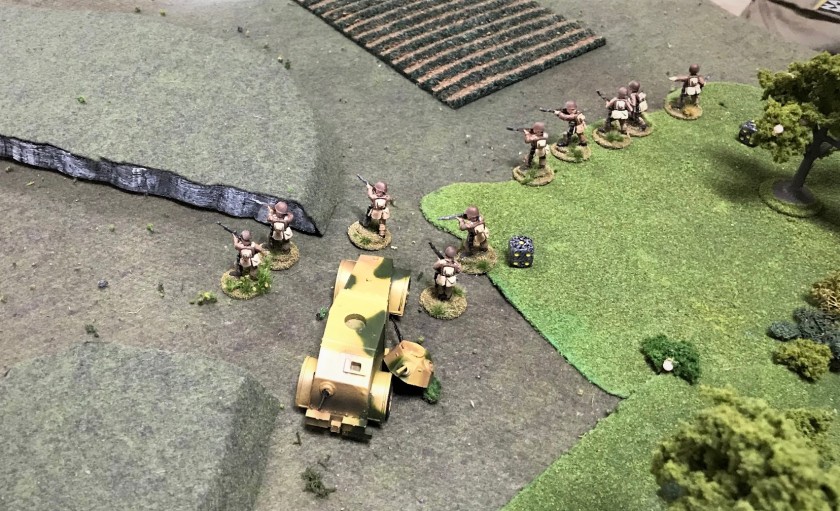
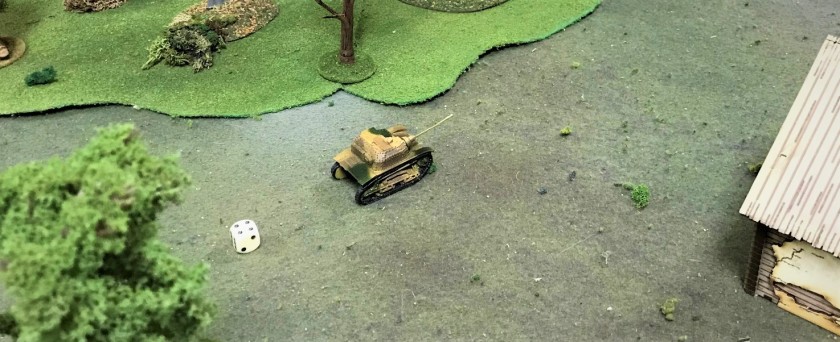
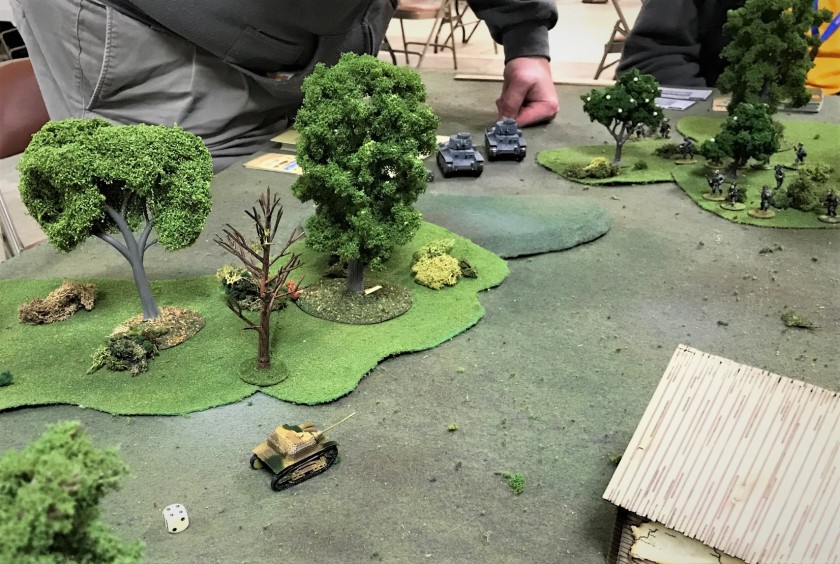
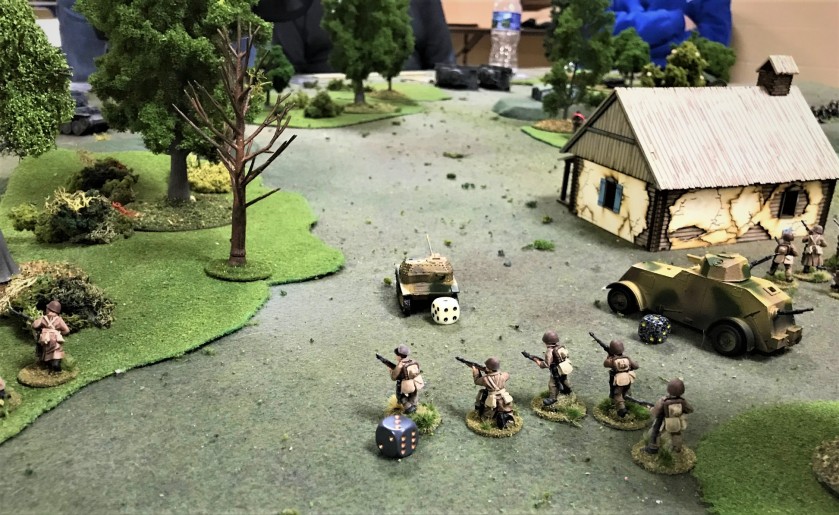
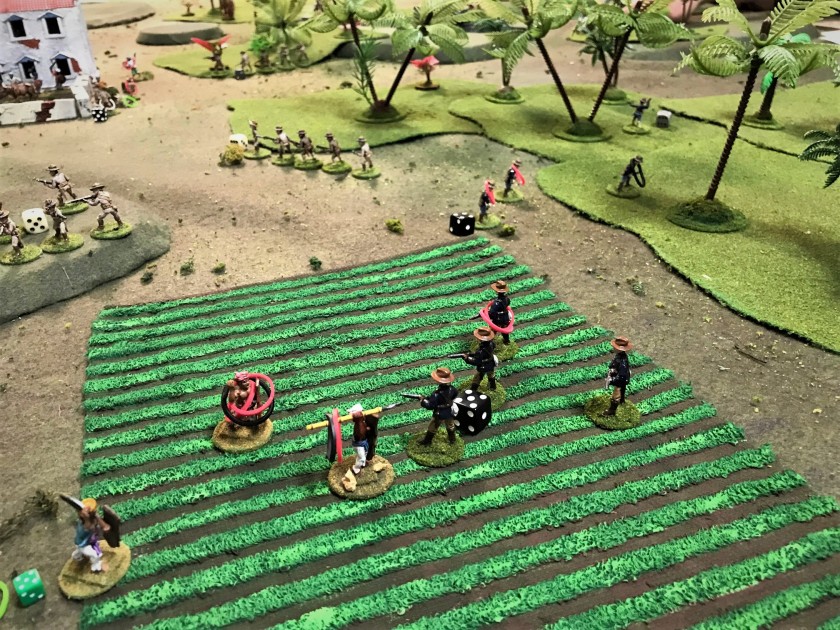
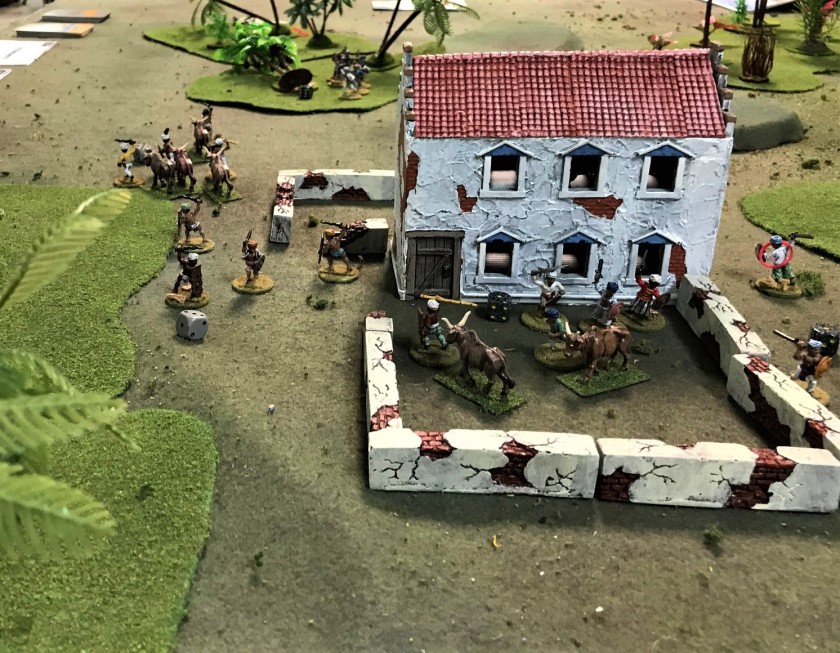
The Warbots make their assault. Their goal was to recapture a Mark 1 Sphere tank behind the building on the right center (which the Frinx were attempting to repair for their own use). A Robo-Sentry gun has been taken out by the Warbots and burns in the middle.Frinx anti-tank fire from the factory’s 2nd floor knock out a Warbot Mark 1 Sphere tank between the slag mounds, and more Robo-Sentry guns burn. The remaining Mark 1 prepares to use its Death Ray on the Aphids on the left. The Mark 1’s attempt to fry the Aphids fails and its weapon malfunctions. Seizing the opportunity, the Aphid platoon leader leaps onto the tank from the second floor and attempts to destroy it with a satchel charge.The satchel charge attack failed to penetrate the Mark 1. Frinx bazookas then hit the tank while the platoon leader was on top of it. The Mark 1 was immobilized by this AT fire, but the Aphid platoon leader was killed by the same attack. Note the card on the tank – I use cards with pictures on them to denote casualties for infantry.
While all this was going on, the Warbots on the right closed with the Robo-Sentry guns and the Star Ducks defending the wall. In this game, I have the Warbots use the Japanese Combat Patrol™ deck, which has different morale results. A morale card result caused one Warbot team to make a Banzai charge at the last surviving Robo Sentry gun, which was jammed. This enabled the Star Ducks to hit the team with direct fire. When the Banzai charge was over, another morale check caused this same team to flee the game, stifling this assault. The Frinx just got their captured tank fixed as the game was out of time. Due to the casualties inflicted by the Warbots, I called the game a draw. The players all were highly excited by the game and loved the ease of use of the Combat Patrol™ decks for all aspects of the game.
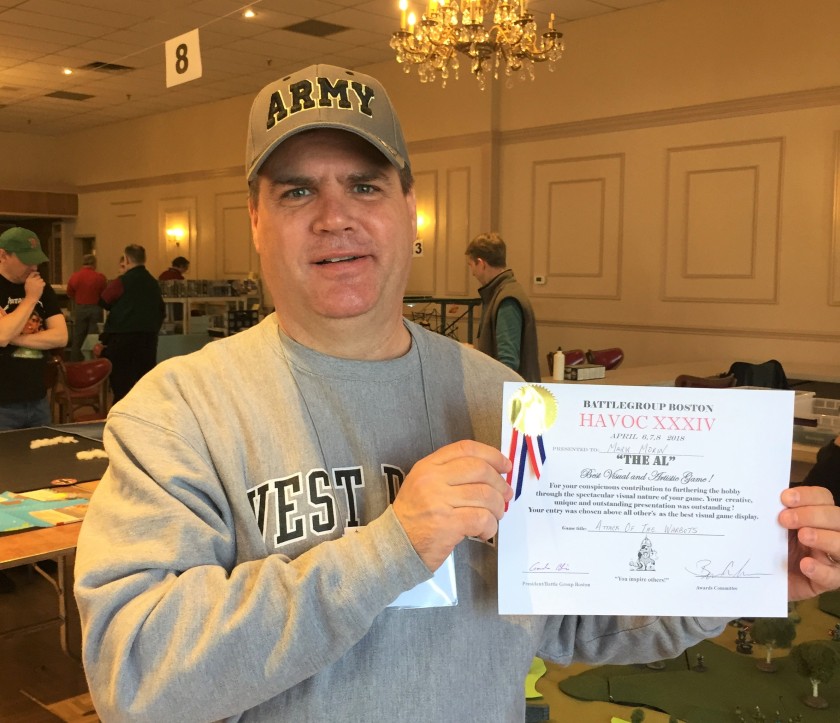
Unbeknownst to me at the time, my game was nominated for the “Al Award”. From the HAVOC website, this is “presented for the game with the most stunning visual appeal. Our crack team of experts (expert team of cracks) will vote on the game that made us say “Wow!”.” I was honored to be nominated, but even more so to win! Thanks so much for this to Battlegroup Boston! A great con it was to be sure – and I felt very welcome here by all the club members.
A true honor! Thanks so much Battlegroup Boston!
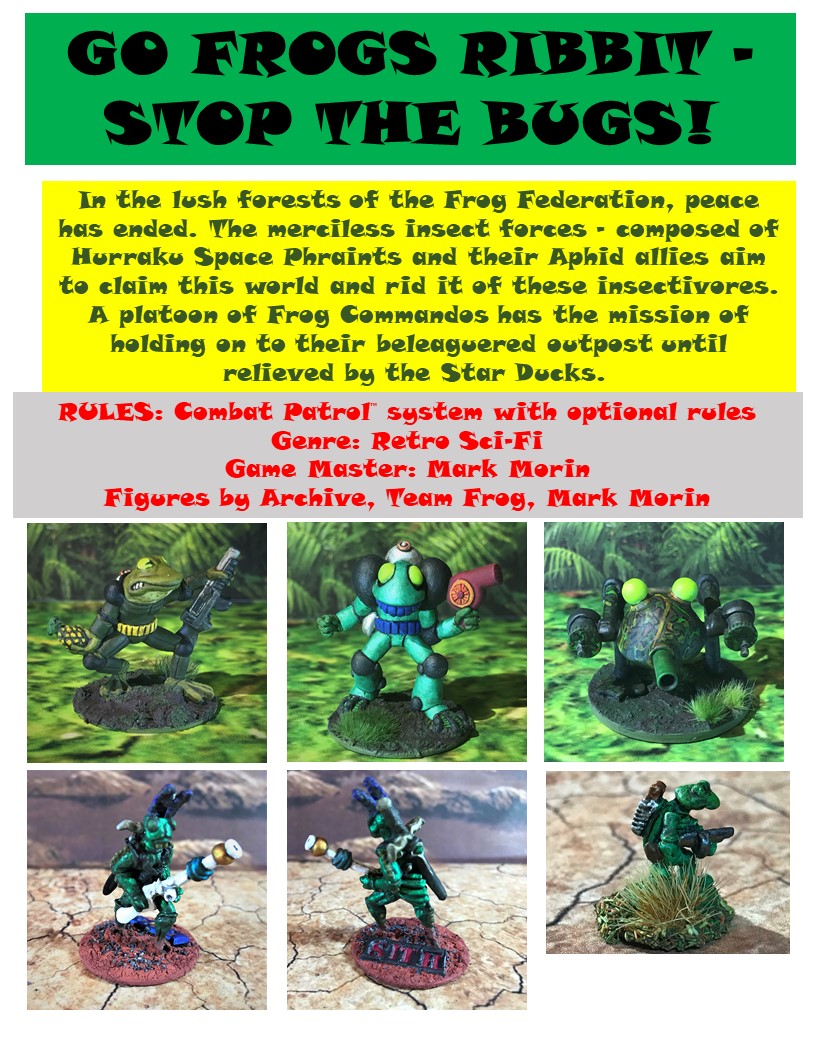
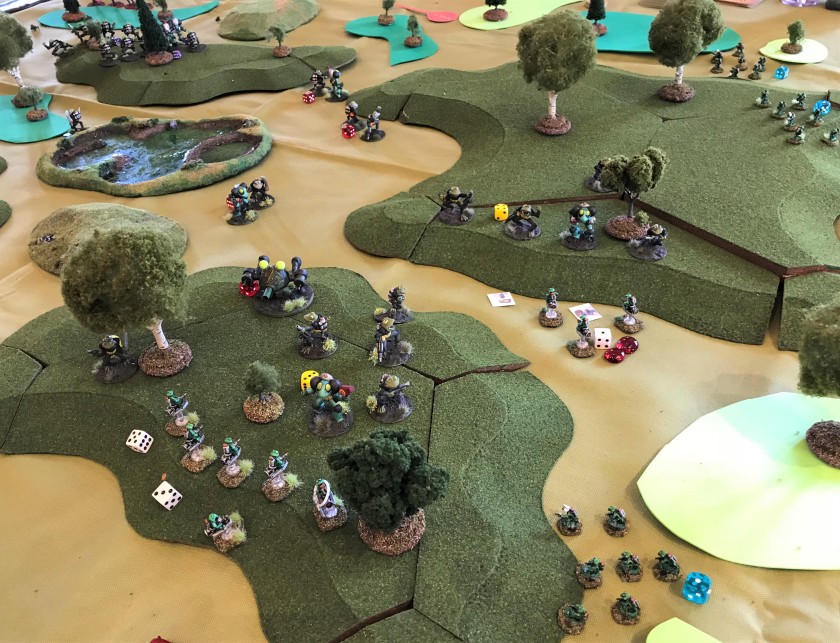
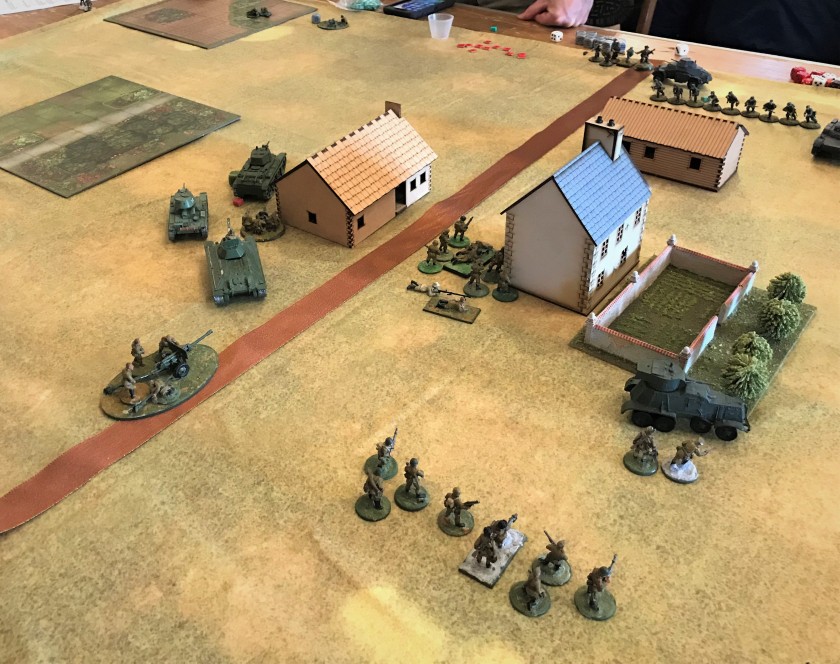
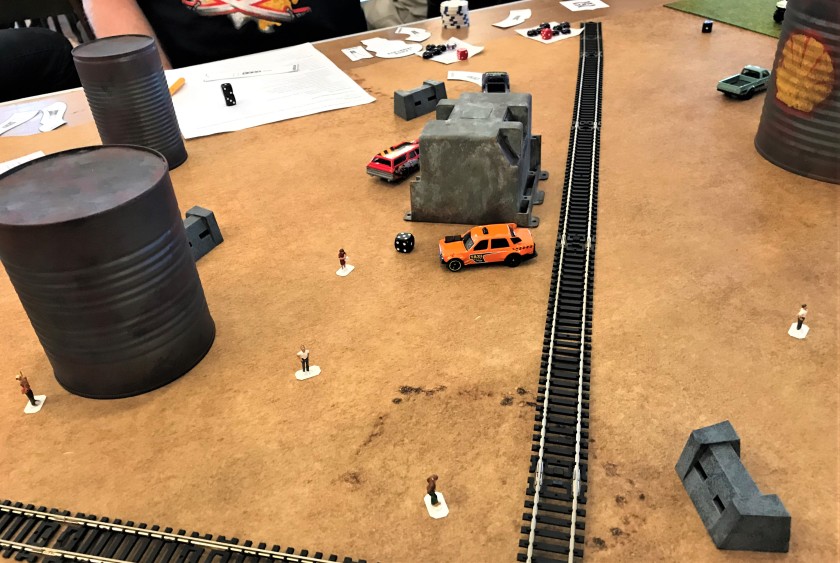
The second game I ran was on Sunday, which was “GO FROGS RIBBIT – STOP THE BUGS”. It was a battle between the F.R.O.G. Commandos (with Star Duck reinforcements) and two Archive Star Rovers foes – the aforementioned Aphids and the Hurraku Space Phraints. So, basically, it was insectivores versus insects, albeit big bugs. The Frogs were defending a wooded area between two rivers and specifically their sacred pond. The insects’ objective was to seize the pond, and to dispatch as many amphibians as possible along the way with extreme prejudice.
My game flyer for this game
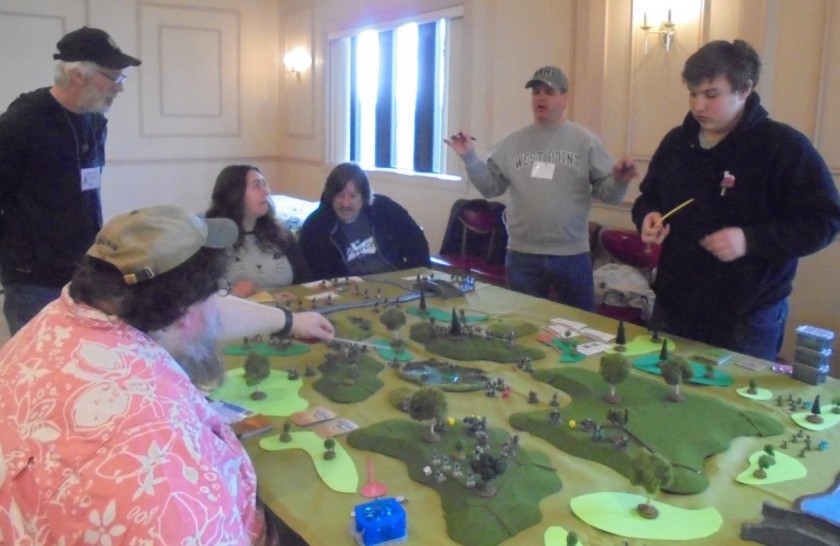
I ended up with four players for this game – one for each attacking bug side on opposite sides of the board. Star Ducks would reinforce the Frogs as a special event card was pulled during the game. The Frogs would use the regular decks, while the bugs would use the Japanese decks. The Space Phraints also had a Sith. Here again, the players quickly adapted to the Combat Patrol™ deck. All were new to the game.
My set up – Aphids attack from the south, Space Phraints from the north. Terrain posed a challenge for the attacker because their long range weapons advantages were nullified.The players listen as I brief – photo by Mike Paine
The Aphids got into the fray first with their Grav Cycles, while the Aphid infantry and the Space Phraints advanced.
Aphid Grav Cycles prepare to jet across the river
The Aphid Grav Cycles charge into the two 2nd squad Frog positions (two teams by the yellow dice). The Frogs prepare to respond with Frogbot’s chain guns, their assault rifles, and a flame thrower. The Aphids attacking on the right have begun to take heavy casualties.Aphid attacks are torched. The leader of the one on the right lost all of his troops and ended up committing ritual suicide from a morale check card.
The Aphids however did effectively draw the Frogs to their attack, weakening the side facing the Hurraku Space Phraints. This would have consequences.
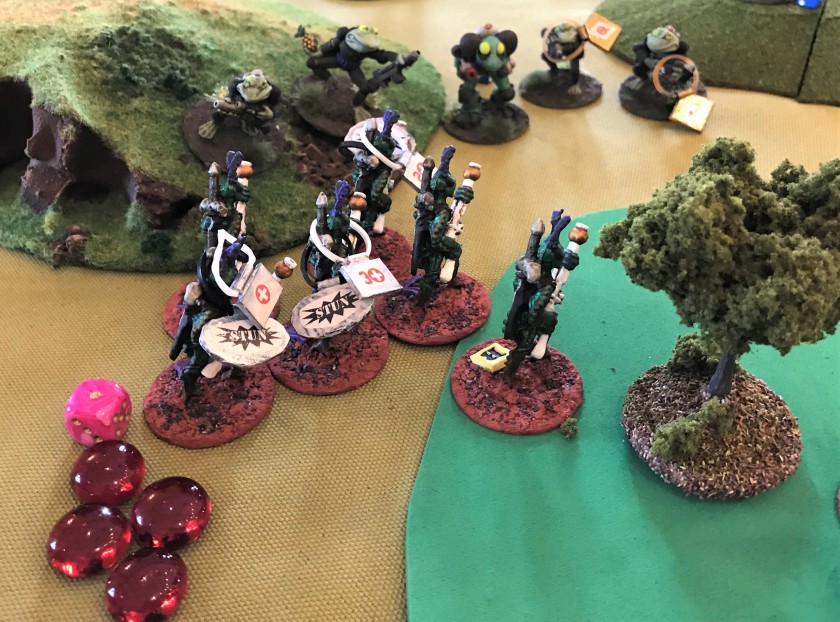
The Frogs 1st Squad maneuvers towards the Hurraku1st Squad’s assault rifles inflict heavy damage on the advancing Hurraku Space Phraints. The red beads represent morale checks for the HurrakuThen the Frogs used their flamethrower on them…
At this point, the Hurraku gambled and turned the tide of battle. Linda (the Hurraku player) decided to take advantage of her Sith’s power of “Rage”. This ability causes a Banzai attack. This also removes all stun markers from her troops while they charge at the enemy and engage solely in hand-to-hand combat (or just melee as we are talking about bugs and Frogs). The Hurraku also all have the same activation number until the banzai charge ends, resulting in a true mass attack. Here (in melee) the Hurraku have an advantage as they are very tough fighters. They also move fast normally, and the “Rage” improves that movement by a factor of two.
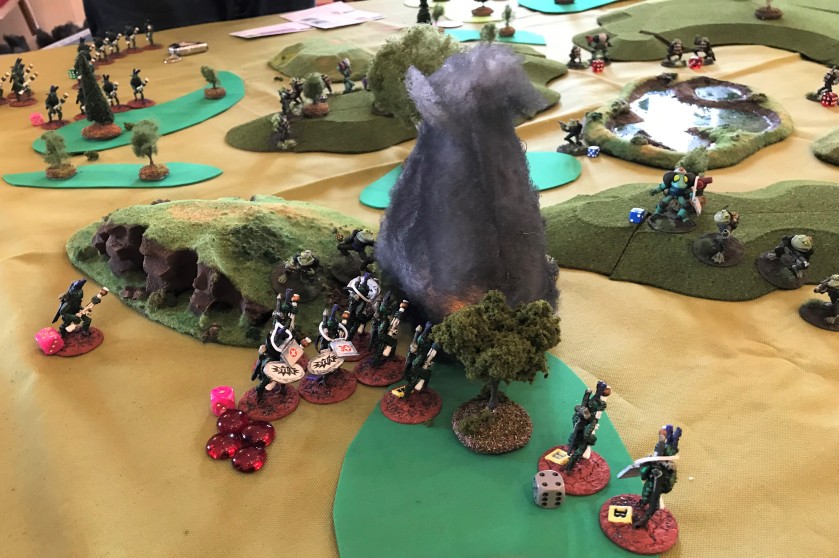
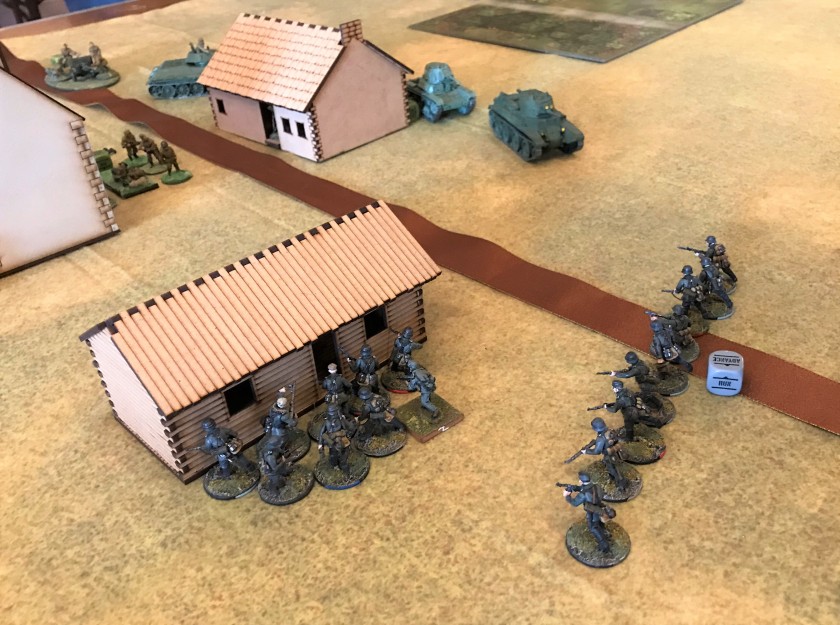
BANZAI! TO THE POND!The other flank is swarmedThe Frogs are devastated by the assault. Cards denote dead Frogs. Blue beads represent morale checks for the Frogs, which were mounting up quickly. During a Banzai charge, attackers do accrue morale checks, but are not stunned. They also activate all at the same time. The attackers would end their charge after a special card is pulled from the Action Deck – so it can go on for a while. In this game, it never ended.
At this point, a Star Duck squad jet packed in as reinforcements, but it was not enough. They jet-packed in to defend the pond.
Star Ducks reinforce Frogs for a last standA Hurraku Space Phraint reaches the sacred pond and wins the game
The players here had a good time and were good sports. The tide swung from one side to the other. In the end, the “Rage” Banzai charge was decisive.
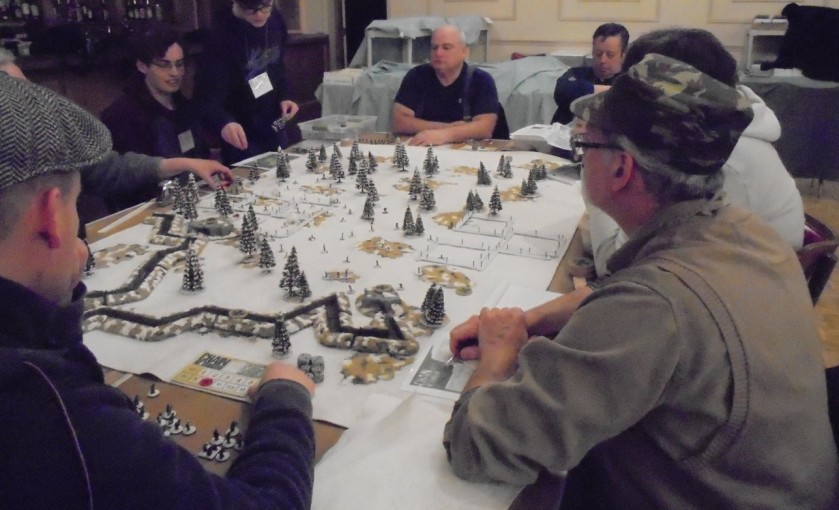
I will now share some photos of the two games I played on Saturday morning and afternoon (I did not play Saturday night). I played a Bolt Action scenario run by Friedrich Helisch. The scenario was a 1941 German attack on a Russian-held village. David Shuster was on the Russian side, while Friedrich and I played the Germans. This was my first try at Bolt Action.
The battle begins as Germans move towards the village
David Shuster moves his Russians upView from the Russians sideGermans successfully storm the first building
Germans successfully take the second buildingThe Sturmgeschutz is hit
This was a points-based game, and our taking of the second building allowed us to win by 1 point, so it was very close. As for the rules, I am on the fence, but more than willing to try them again at some point in the future.
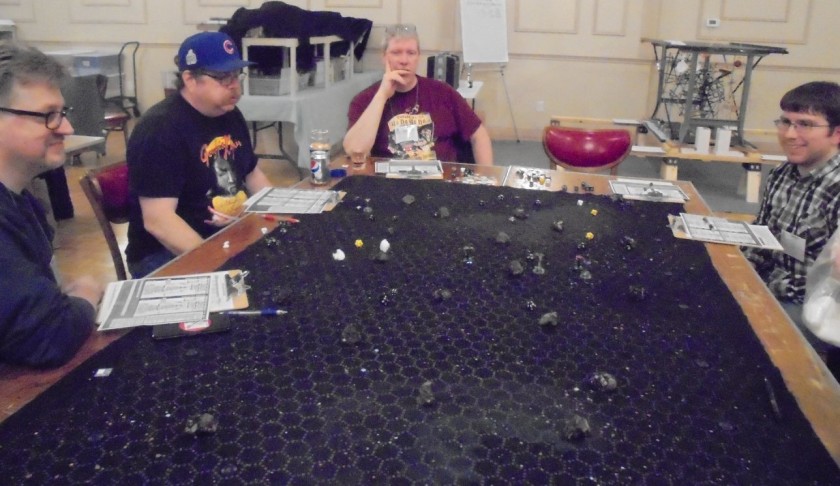
The second game I played was a Gaslands scenario. I had heard this was an interesting game and thought I’d try it out. In this game you get so many points to choose and arm 2-3 vehicles (performance car, regular car, and pickup truck). The goal is to run over (3 points) or shoot (1 point) pedestrians (in homage to Death Race 2000) instead of the usual zombies on the game board. You can attack your opponents, but their destruction does not get you points (you do eliminate the competition). The movement is very much like X-Wing.
I played with two other players, who chose to max out two vehicles, while I did three lesser-armed vehicles. I chose to go after the competition and eventually had one of two vehicles to be the last on the tabletop. However, at this point the game masters deploy invulnerable Monster trucks to hunt you down and end the game. I just missed my last pedestrian which would have tied me for first. The game masters (Michael Eichner and Erich Eichner) did a nice job, and this was a fun game. The table looked great too.
The game starts – I had the red carsAfter using a flamethrower on a white car, I t-boned the orange one, but flipped over the structureGame play – photo by Mike Paine
I thought that I should share some photos of the rest of the con. I did not get to see as much as I would have liked, but there were a lot of very cool games. Kudos to all the folks at Battlegroup Boston, as well as the GM’s and players! Please share your thoughts in the comments section – thanks for reading this blog!
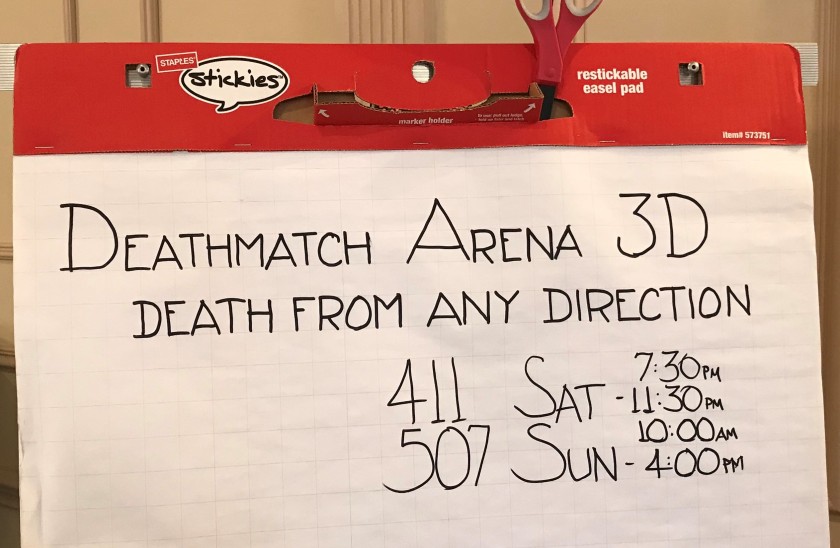
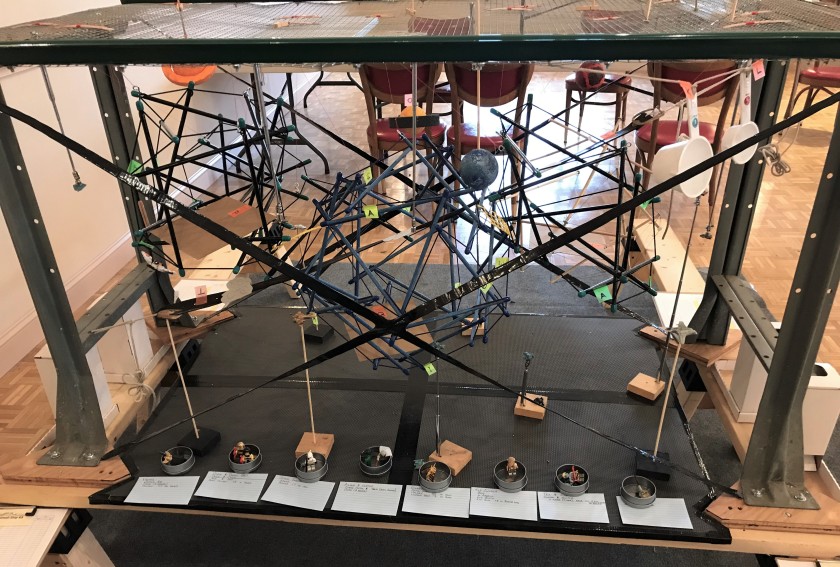
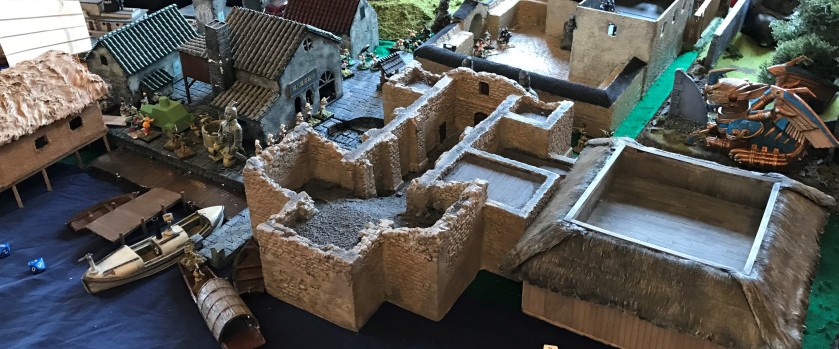
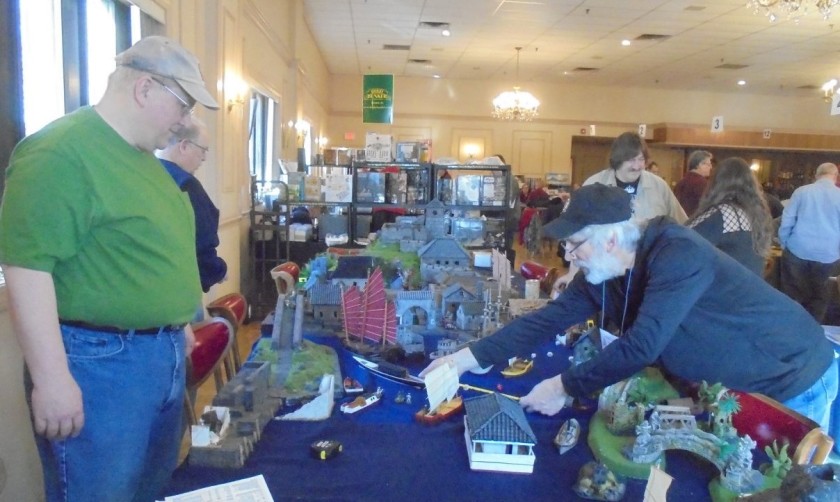
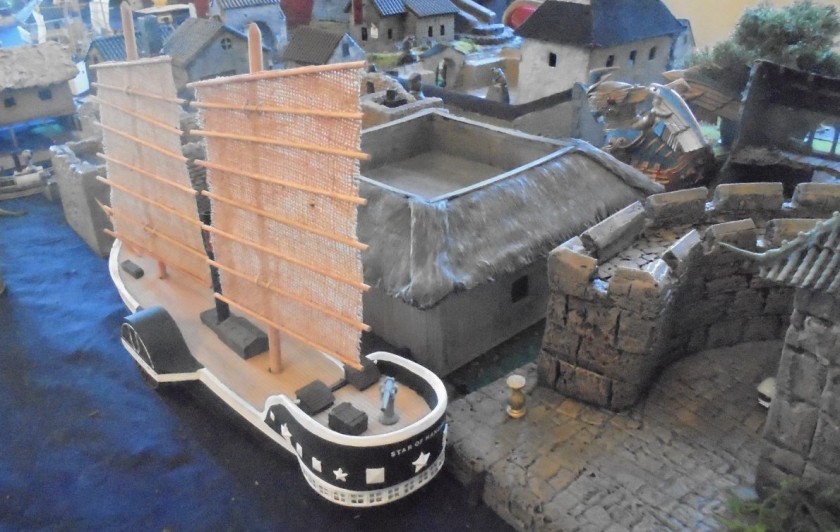
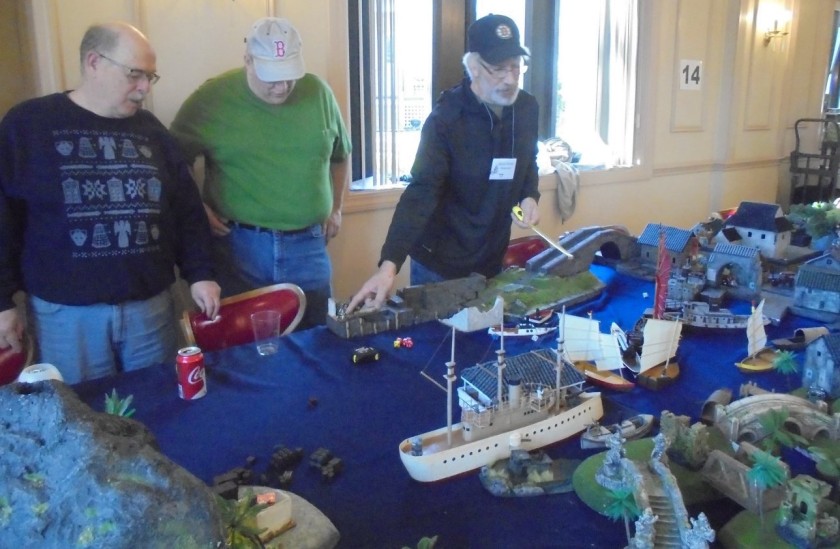
A view of the con Saturday morning. There were two rooms.Tim Allen had a magnificent home game using LegosThe Deathmatch Arena 3D gameCharacters from Deathmatch Arena 3DLion Rampant game (big game!) run by Richard F. Wareing – photo by Mike PaineThomas Ballou ran a Battle of the Hurgen Forest scenario – photo by Mike PaineBruce Carson ran a Silent Death Smash game – photo by Mike PaineMike Paine’s immense game – spectacular! Eye candy for this below, some I borrowed from Mike Paine with permission
Game play – photo by Mike PaineNice sampan -photo by Mike PaineBeautiful terrain, so complex – photo by Mike PainePhoto by Mike PaineGame play – photo by Mike PaineChinese bombard – photo by Mike Paine Nice American gunboat – photo by Mike Paine
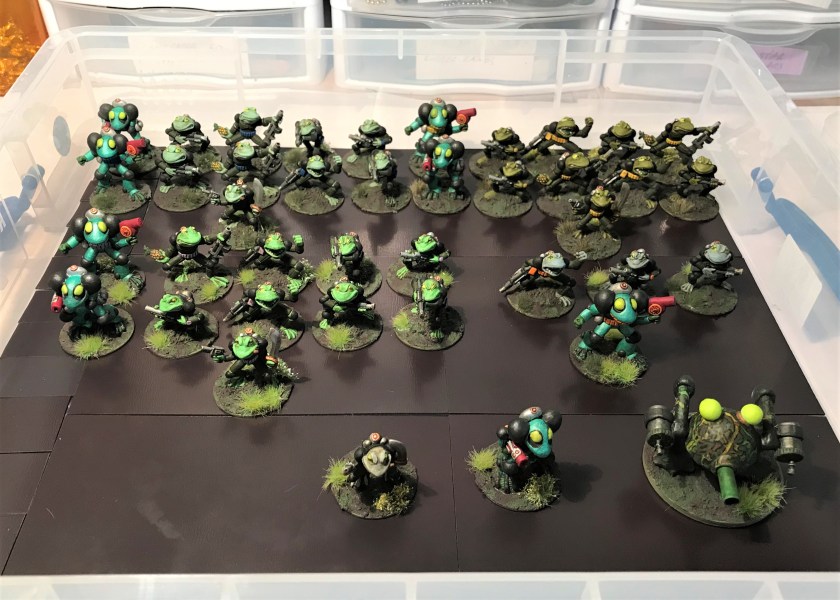
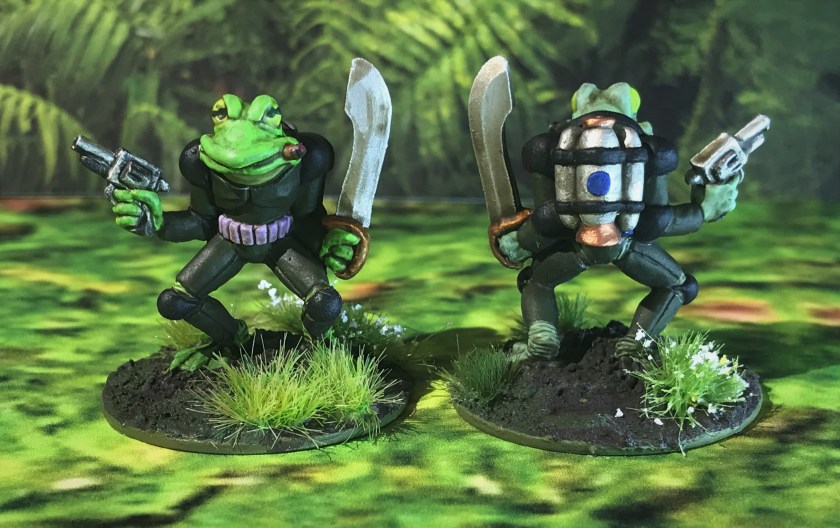
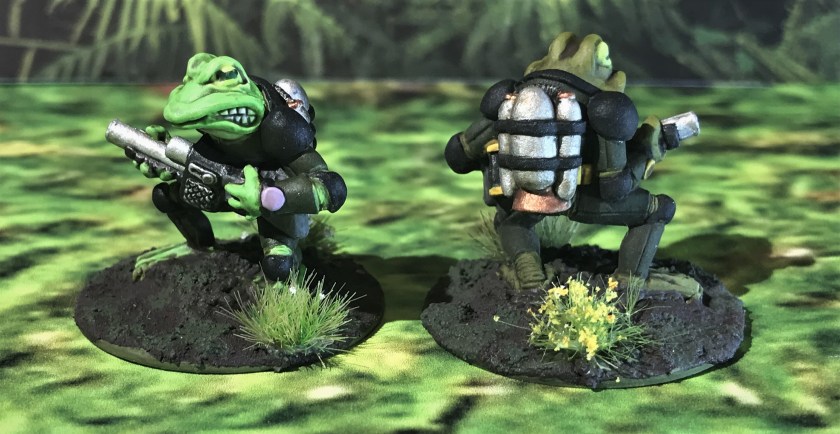
In the spirit of bringing more miniatures back from the commercial grave, I happily share with you my latest project – a F.R.O.G. Commandos platoon. This unit consists of 40 figures. All of them except 1 figure were made of metal. In the Critter Commandos universe, F.R.O.G. stands for “Federated Republics of GreenEarth”, one of several cartoon nations created by the Team Frog founder, Paul Arden Lidberg. None of these are currently available commercially.
The unit also includes a Frogbot (Crittertek). This project also enabled me to participate in a painting challenge “Squad March” put out by Azazel on his blog. This contest required a unit of at least 3 figures, and I am sure that this one qualifies! It did take up the month of March for sure.
I was able to do this because I managed to get another box of F.R.O.G. Commandos from Chris Palmer at BARRAGE in January. Originally, each box (a re-purposed VHS tape box no less) came with 8 figures and a d10. I had been slowly collecting many different figures from the line, but Chris’ addition of 8 frogs allowed me to create a platoon for Combat Patrol™.
I managed to successfully finish my project just in time for the end of March. I had come across figures from the Critter Commandos line, which was initially put out sometime between the late 1980’s and early 1990’s by the Team Frog Studios company. Later, the figures were also marketed by Nightshift Games. The figures are all creations of the late Steve Lortz, who also made the Star Ducks and other figures for Archive. I just love his stuff, they are a lot of fun. Also, when I was at West Point, I was in company F-4, whose mascot was a Frog (GO FROGS RIBBIT! was our cry). So I had another motivator here as well.
The photo below is what I had assembled for the project. On the top you see the Frogbot, but he was definitely not together as I will discuss later. The miniatures are around 28mm in scale.
So I needed a plan – I decided that I did not want more than 1 figure per fire team to be the same figure, but as you see above, I had a hodgepodge collection. I worked it out as follows – this unit consists of 40 figures:
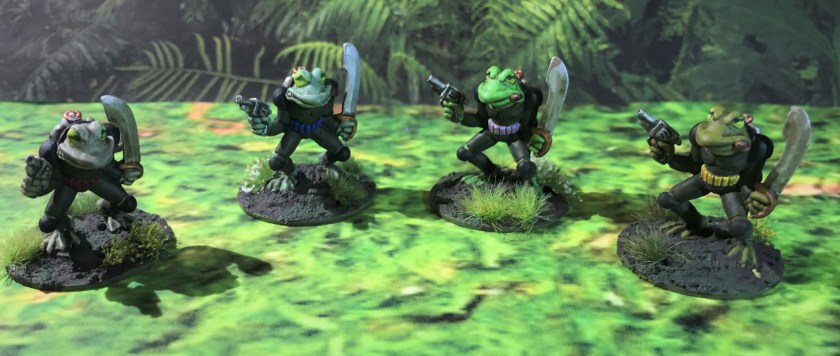
Command section (2 each – platoon leader and platoon sergeant)
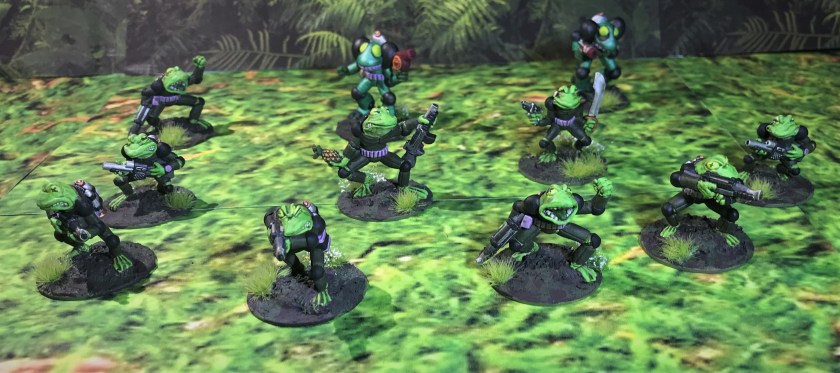
Three full squads (11 each) led by a squad leader each consisting of:
Two teams of 5 (Team Leader and 4 F.R.O.G. Troopers)
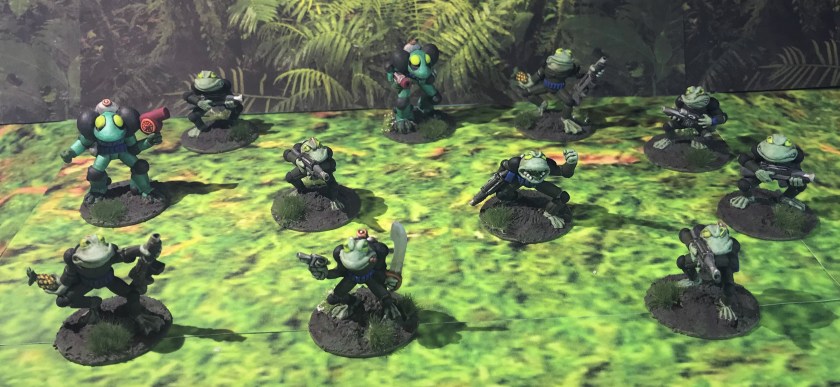
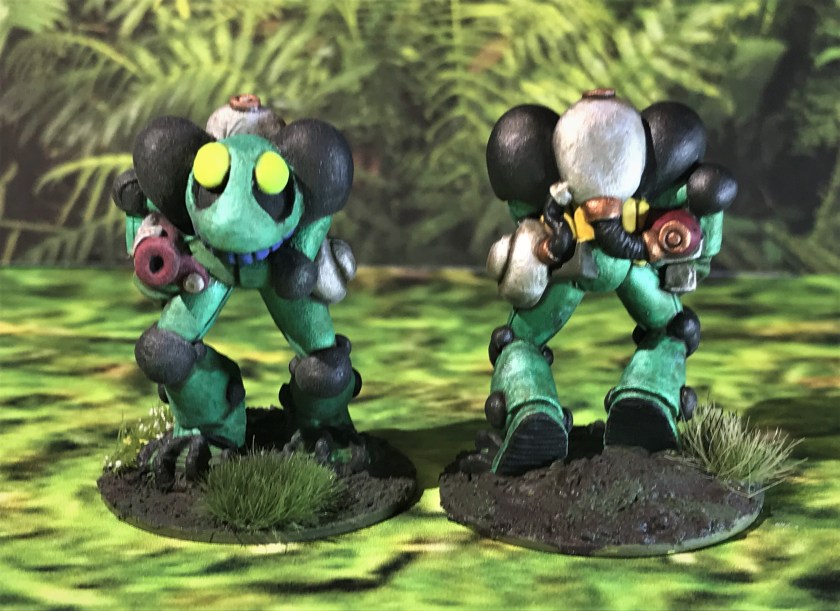
1 Heavy Weapons/Recon section consisting of a Section Leader, 3 F.R.O.G. troopers, and a Frogbot.
My plan
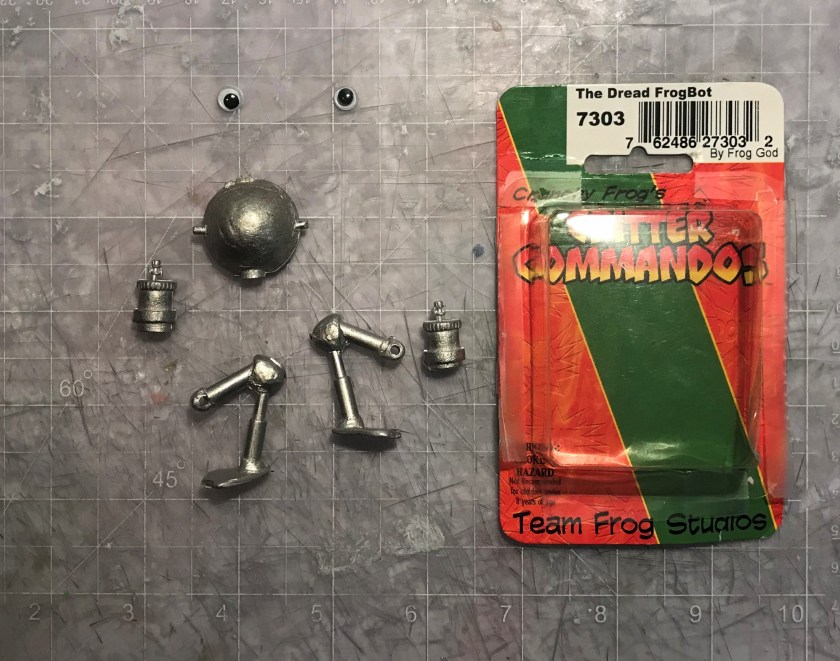
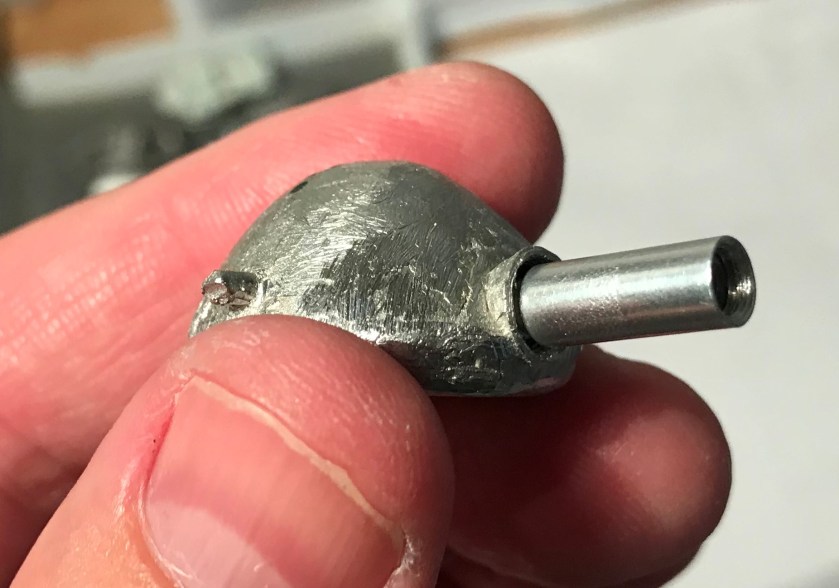
It took a bit to clean and file all of these figures. They had some casting issues (mainly cracks) that I repaired with kneadatite (green stuff). I then moved on to the Frogbot, which was not a Lortz creation. I had bought it on eBay with a number of other Critter Commandos, and it deserves a few notes.
All I had for the Frogbot
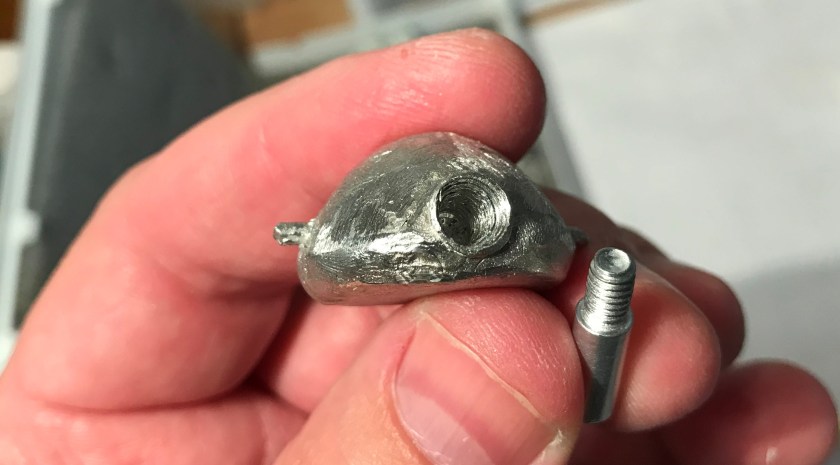
The kit was incomplete. There was no main gun, but there was a small hole in the front of the main body. Pinning was not possible because the legs were made of some kind of tubing., and the plastic “googly eyes” you see above would not meet my standards. Clearly, there needed to be some changes. First, I filed the main chassis down to remove as many casting crevices as possible. I then got a short bolt extender, and patiently reamed out the small hole to affix the extender as a main gun for the model.
The reamed out hole and bolt extenderMain gun – check!
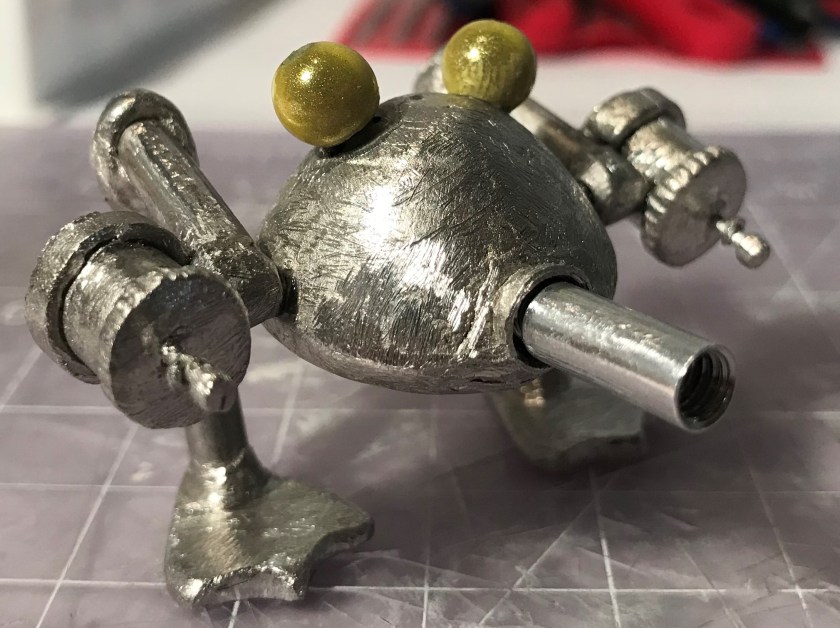
Then I needed to make it look, well, froggy. The eyes were an issue, so I bought some cheap beads at Michael’s. Using some dollhouse hinge screws that I drilled into the Frogbot chassis as mounts, I affixed the beads as sensors/eyes after reaming them out slightly. Then I carefully glued the rest of the model together.
Assembled Frogbot
While I really was happy with the figure, the engineer in me thought that it was too structurally weak. So I used green stuff to reinforce the legs and chain guns, as well as to fill in around the eyes and create a mantlet for the gun.
Structurally reinforced Frogbot
I was now ready to prime the lot. I used my airbrush to prime the figures. Without going into painting detail here, I will show the figures and the progression of the project. I list the paints I used at the end of this post for those interested.
First, the lot before mounting on 1¼” washers and priming
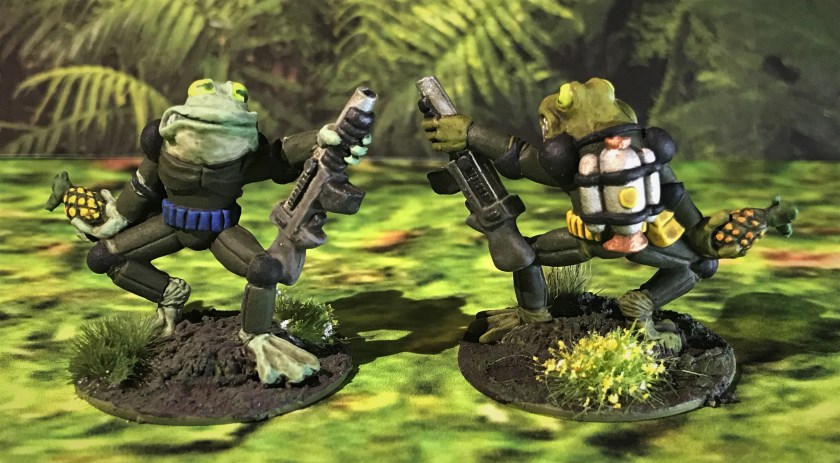
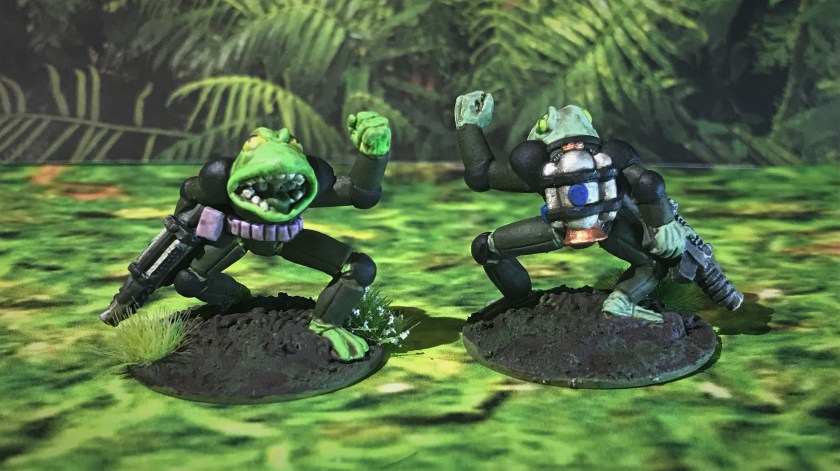
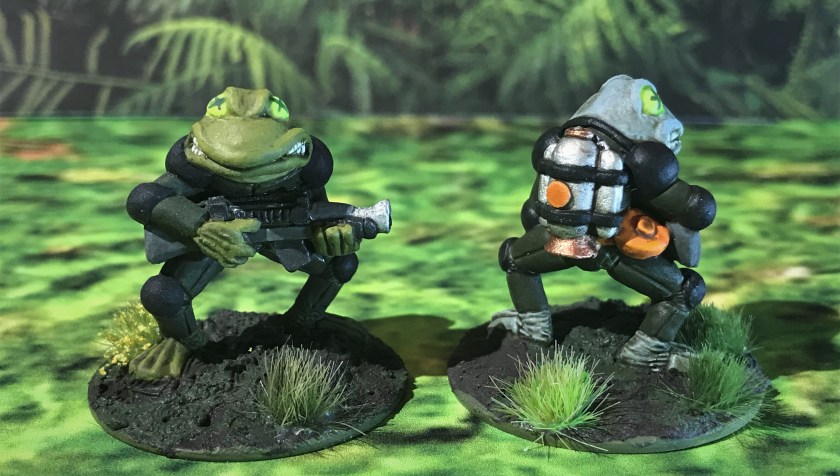
I decided to give each sub unit its own different amphibian skin color and color for accouterments, while keeping the majority of the uniforms the same. This was to help with tabletop identification.
Command group got greenish skin and red for accouterments
First squad got greenish blue skin and dark blue for accouterments
Second got yellowish green skin and yellow for accouterments
Third squad got bright green skin and purple for accouterments
Heavy Weapons/Recon Section got grayish green skin and orange for accouterments
1st Squad base coatedSecond Squad base coatedThird Squad base coated
Once the painting was complete, I used Army Painter “Quickshade” (strong tone) to shade the models, followed by a coat of Vallejo “Matte Varnish”. I then highlighted the models, and then added another coat of varnish with my airbrush. I used Army Painter tufts (Jungle, Swamp, Woodland, and Meadow Flowers) to further assist in tabletop differentiation.
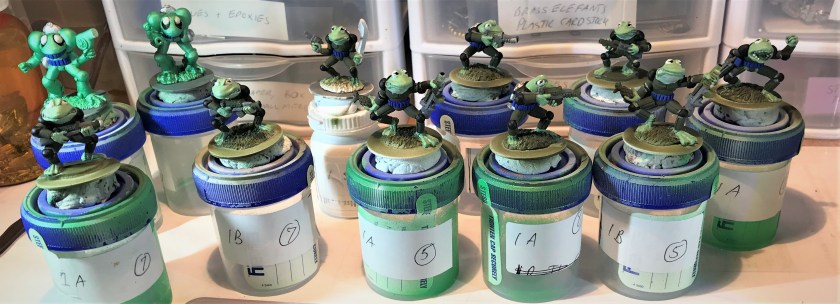
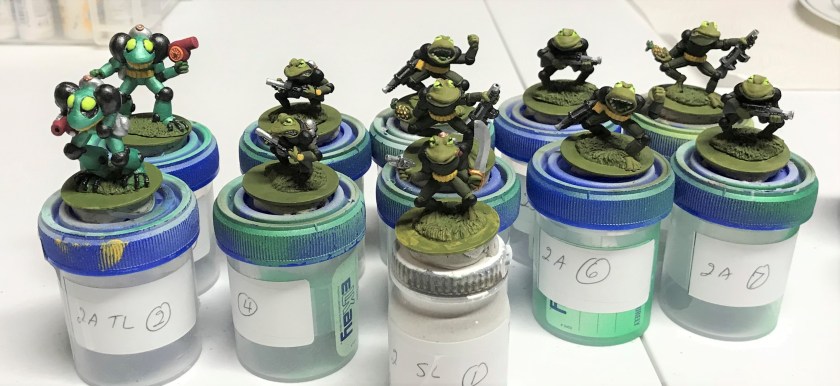
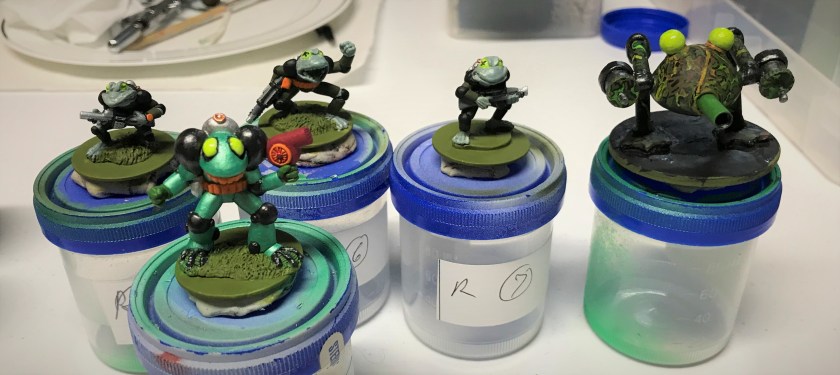
Heavy Weapons/Recon Section before shading and warnishingThe entire platoon in the box awaiting transportThe 4 leaders showing their different skin tones and accouterment colorsFirst SquadSecond SquadThird SquadHeavy Weapons Section
There were 8 different poses plus the Frogbot, so here are some front and back poses. You can see some of the differentiating features here as well.
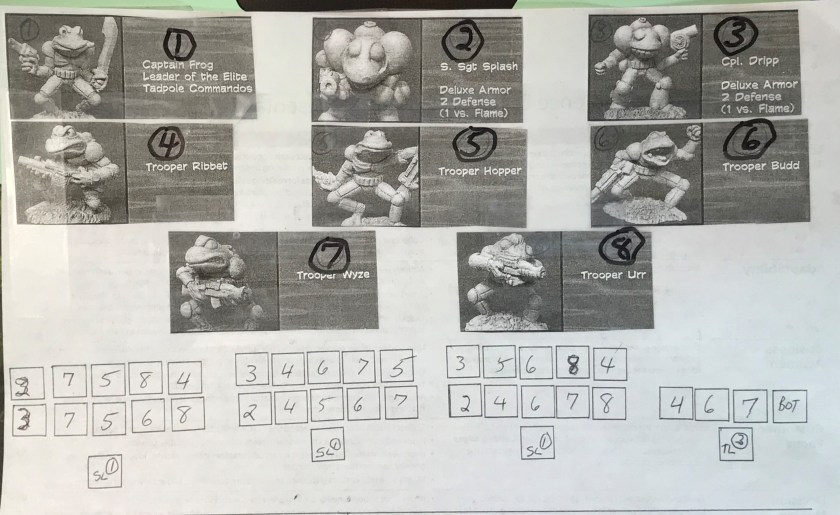
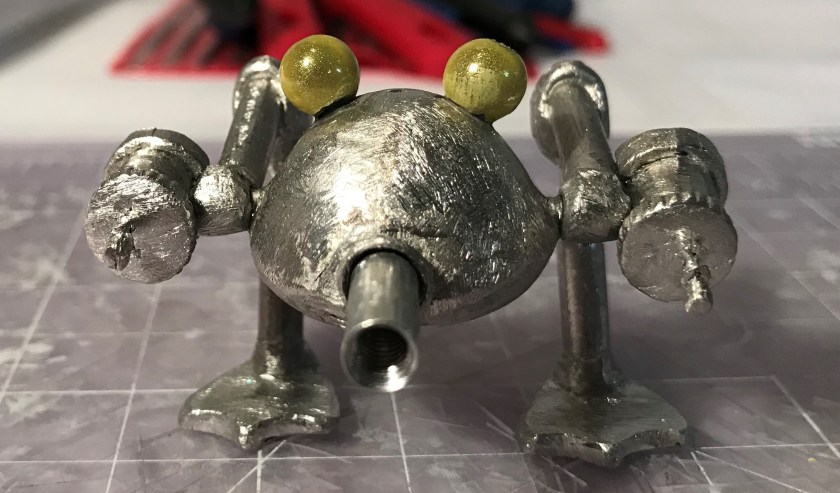
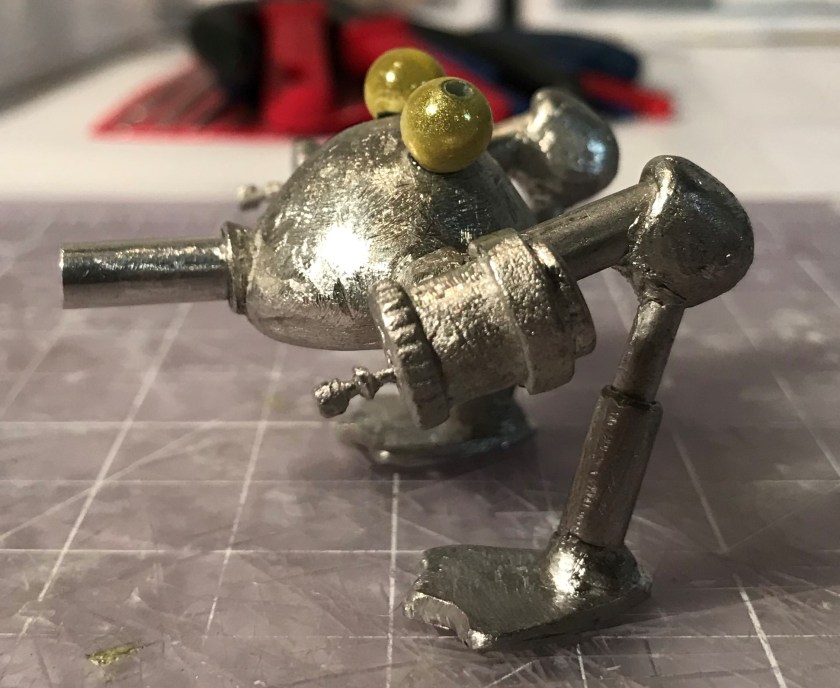
Figure 1 ” Captain Frog” with revolver and swordFigure 2 – “Staff Sergeant Splash” with flame throwerFigure 3 – “Corporal Dripp” with flame thrower looking like a hair dryerFigure 4 – “Trooper Ribbet” with assault rifleFigure 5 – “Trooper Hopper” with assault rifle and pineapple grenadeFigure 6 – “Trooper Bud” with assault rifleFigure 7 – “Trooper Wyze” with assault rifle and an antitank mineFigure 8 – “Trooper Urr” with assault rifleThe Frogbot. Note the middle photo with the shout out to “F-4” on the back. The camouflage pattern is inspired by Japanese WWII tank patterns.
I am very happy with this project, and hope that you enjoyed it as well.
Thanks to:
My wife (for putting up with me during this project – again)
Chris Palmer – for the box and inspiration!
Buck Surdu – for the inspiration and some old paints from Polly S
Dave Wood – for starting me on this hobby back when we were roomies
All my readers – for inspiring me and sharing their feedback!!
PAINTS AND FLOCKING USED:
Vallejo “Surface Primer – White”
Vallejo “Camouflage Olive Green”
Vallejo Model Air “Aluminum”
Vallejo Mecha Color “Light Green”
Vallejo Mecha Color “Deep Green”
Vallejo Mecha Color “Yellow Fluorescent”
Vallejo Game Air “Sick Green”
Vallejo Game Air “Beastly Brown”
Vallejo Game Air “Black”
Vallejo “Dark Blue”
Vallejo “Neutral Gray”
Vallejo Model Air “Steel”
Polly S “Interior Green”
Vallejo Model Air “Black”
Citadel “Retributor Armour”
Vallejo Game Air “Sun Yellow”
Vallejo “US Dark Green”
Citadel “Yriel Yellow”
Vallejo “Red”
Citadel “Imperium Primer”
Vallejo “Glaze Medium”
Vallejo “Thinner medium”
Testors “Universal Acrylic Thinner”
Citadel “Waywatcher Green”
Citadel “Coelia Greenshade”
Citadel “Athonian Camoshade”
Citadel “‘Ardcoat”
Citadel “Fire Dragon Bright”
P3 “Sulfuric Yellow”
P3 “Red Ink”
Vallejo “Yellow Green”
Vallejo “Sunny Skin Tone”
Vallejo Game Air “Moon Yellow”
Vallejo Mecha Color “Purple”
Vallejo Game Air “Escorpena Green”
Vallejo Mecha Color “Green”
Vallejo Mecha Color “Purple”
Vallejo Mecha Color “Green”
Vallejo Mecha Color “Green Blue”
Vallejo Model Air “Copper”
Vallejo Model Air “Gun Metal”
Vallejo Model Air “Medium Gunship Gray”
Polly S “WWII German Armor Dark Brown”
Vallejo “Japanese Uniform WWII”
Citadel “Nuln Oil”
Polly S “Venetian Dull Red”
Vallejo Model Air “Wood”
Army Painter “Quickshade – Strong Shade”
Vallejo “Matt Varnish”
Citadel “Stirland Mud”
Citadel “Lustrian Undergrowth”
Polly S “British Brown Drab”
Army Painter “Woodland Tufts”
Army Painter “Swamp Tufts”
Army Painter “Jungle Tufts”
Army Painter “Meadow Flowers”
Thanks again – please share your thoughts in the comments section!
I cannot make Cold Wars this year – but these are some great options for those attending! See below!
From Buck Surdu’s Blog
Buck F: 215: Hold as Long as Possible (1) Friday, 9:00 AM, 4 hrs, Players: 6 GM: Buck Surdu & HAWKS Sponsor: None, Prize: None Period: World War II, Scale: 28mm, Rules: Combat Patrol™: WWII. ItisthePhilippinesinearly1942. The Americans are retreating slowly toward Bataan. A platoon of infantry, along with a handful of Stuart tanks, must […]
Back in November, I was happy to have an extended game of Combat Patrol™ using resurrected Archive Miniatures Star Rovers figures (specifically, Star Ducks, Frinx, Aphids, and Mark III Warbots). My old West Point buddies Dave Wood and Buck Surdu made the trek up from Maryland, and my daughter Ellen and her fiance Chris Smedile joined us for a fun game which was described here.
The game was a blast – and afterwards I thought that I could make some improvements that would make play easier and improve the tabletop aesthetics. The retro sci-fi aspect brought in some new elements. In a WWII game, I would normally use small rubber bands to designate the status of a figure with regards to wounds, being stunned, or being out of ammunition. This is to eliminate a lot of bookkeeping which can bog down a game. I also use glass beads to represent morale checks. In a WWII game, this works fine as most figures can only take 3 wounds before they are incapacitated. However, in the retro sci-fi game, I added other elements. One of these was allowing the Star Ducks to use their jet packs three times per game. Another was the Mark III Warbots, which can take up to 6 or 7 wounds, and who may take critical hits (see chart below) that adversely impact their capabilities.
One issue with their high endurance this is that the Warbots can end up looking like they just arrived on Maui after getting several garlands of leis once the action gets going (see photo below).
Who just arrived in Maui?
I also introduced two breaching arc weapons and a plasma ball breacher that would be key elements of the Mark III Warbots capabilities. As a Army Engineer officer veteran, I thought that this would be fun, and I wanted some cool templates to represent these game elements. Lastly, I wanted to be able to have the casualties remain on the tabletop as a depiction of what happened during the game. This does not always work, so now I make casualty cards for my units that are sized to the figures size (I discussed this previously here).
So my list of improvements became:
Create casualty cards for each unit/figure (done)
Create templates for the plasma weapons (discussed in this post)
Create specialized markers (placards with decals) for use with retro sci-fi Combat Patrol™ games (discussed in this post)
With any new project, I like to try new techniques and learn from trying them out. Here, I decided to try to use my airbrush to do more than prime, base coat, and varnish. I also wanted to use my computer and make decals for the placards. I had not really done any of these things in this way before, so I was going into uncharted waters. I will first discuss the plasma weapons, and then the placards.
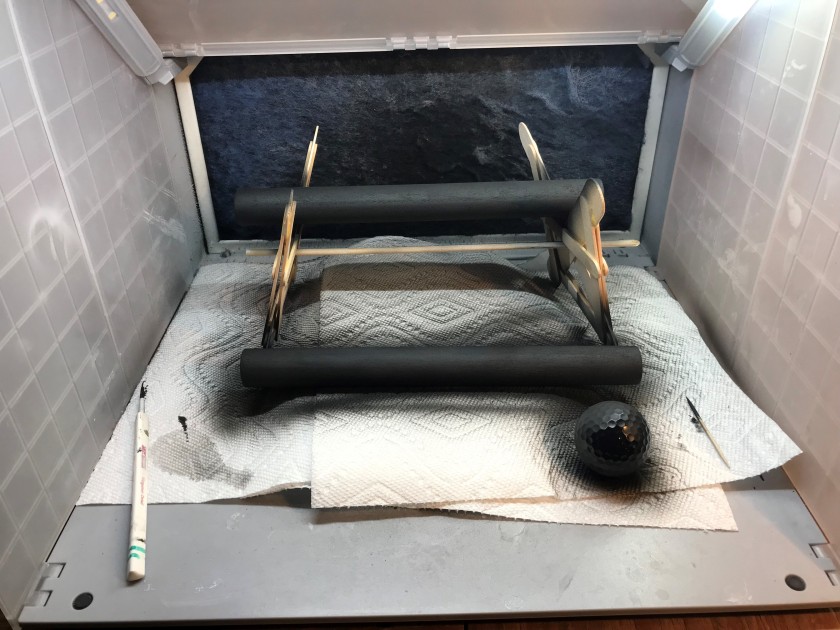
For the arc weapons and the plasma ball, I wanted something easy to sue that was durable and vibrant. The Warbots arc weapons can either shoot a 2″ cone (door-sized) for a distance of 5″, or fire a 1″ cone (window-sized) for a distance of 10″. This is to allow them to breach obstacles. The other weapon fires a plasma ball that can make holes (or dissolve stuff/enemies) – think of a really effective M203 grenade launcher. I found a some hardwood (oak or maple) dowels at Home Depot that would work well size-wise. As a golfer, I sacrificed one old Pinnacle for the plasma ball, and mounted it on a 1¼” washer (I don’t play Pinnacles anyways!).
I used my circular saw and cut the dowels to size, and sanded them up a bit. Originally, I had thought I could use decals on them, but decided that I could not sand and varnish them enough for proper alignment and adhesion. Besides, this gave me the chance to play with my airbrushes. I gave them all a prime coat of Vallejo “Surface Prime Gray”, followed by Vallejo “Game Air Black”. I had some challenges with painting the longer templates due to their sizes and being too wobbly to reliably stand up for airbrushing. I made a cradle of sorts out of popsicle sticks that worked adequately – notwithstanding that I needed to be sure each coat was dry before I rotated them.
The dowel sanded and ready for priming5″ template after base coat applicationWorking through base coat application on 10″ template and ball
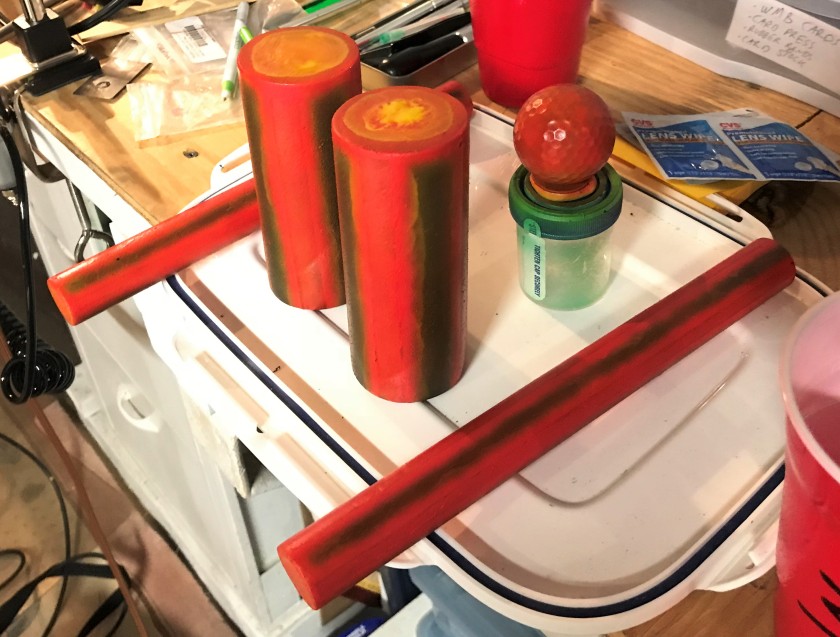
I used some Tamiya airbrush masking tape to make the center beam, and a crossing pattern where the beam would come out of the arc weapon. I started off with Createx “Brite Yellow”. I should have noticed that the label said “TRANSPARENT”! This took a few applications (that was a learning point). I then airbrushed Vallejo “Light Orange” closer to the masking and around the ends. I then removed the masking, and used Vallejo “Vermilion” on the beam centers and the cross on the ends. Lastly, I painted “Brite Yellow” on the ends and as edging on the beams (worked better). I did the same with the ball , but in a mottled pattern. They are not my best work, but they will serve the purpose.
Warbot Arc and Plasma Weapon templates completedFORE – Warbot on the left fires plasma ball at a Frinx and a Star Duck (he missed!)Warbot Arc Weapon (5″) in action, rear viewWarbot Arc Weapon in action, showing the end you don’t want to be onWarbot 10″ Arc Weapon
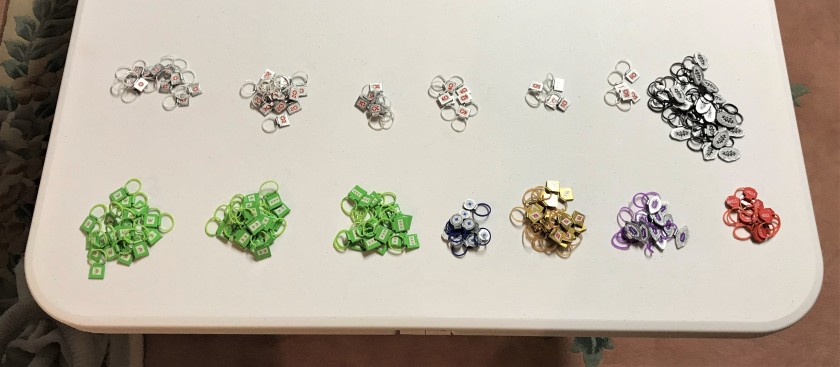
The greater portion of the work came with the making of the placards. I decided that I would make the following 185 placards made for use in Combat Patrol™ retro sci-fi. Why that many – well that was basically an educated guess based on most games that I have played.
50 wound markers
15 1-wound markers
15 2-wound markers
6 3-wound markers
6 3-wound markers
6 4-wound markers
4 5-wound markers
4 6-wound markers
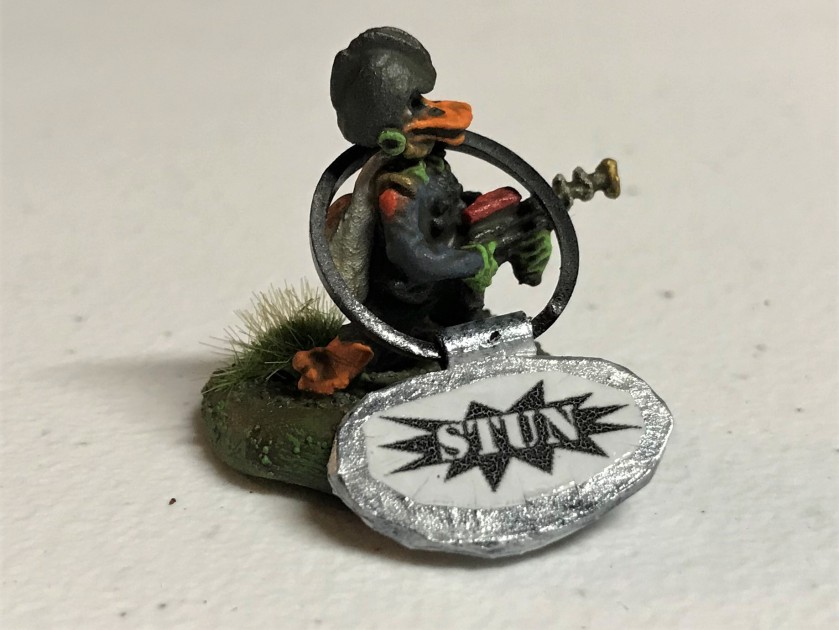
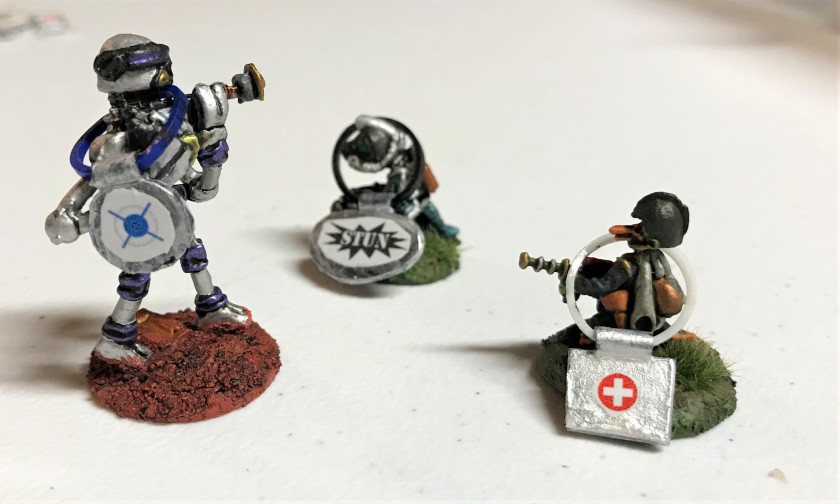
25 stun markers
10 critical hit – optics/sensors markers damage for Mark III Warbots
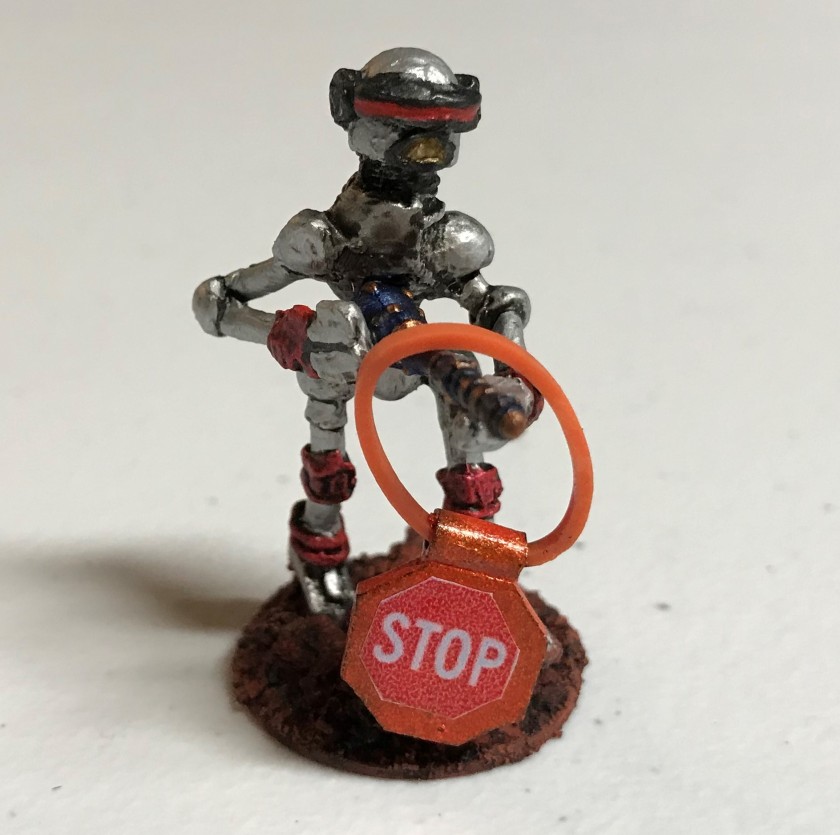
10 critical hit – mobility damage (“STOP”) markers for Mark III Warbots
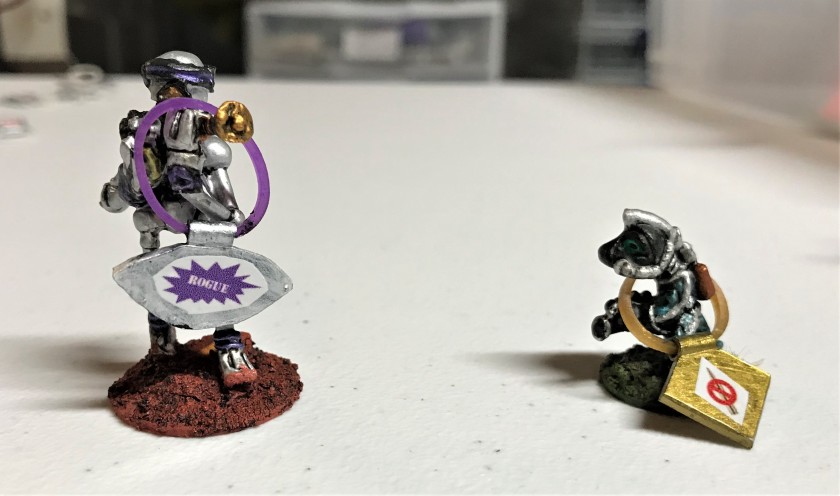
10 critical hit – CPU damage (“ROGUE”) markers for Mark III Warbots
20 out of ammunition markers
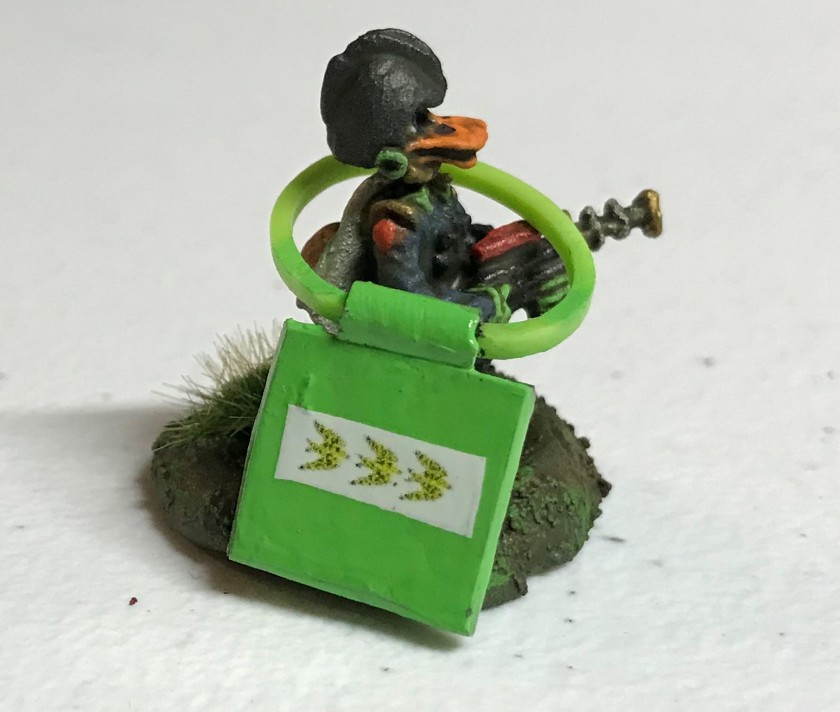
60 jet-pack use markers
20 for one use of jet pack in the game
20 for two uses of jet pack in the game
20 for three uses of jet pack in the game
My first effort was to try to sculpt with Apoxie Sculpt and to use stamps. I was very unhappy with the product, as I thought they would be difficult to read and not reliably reproducible.
My first effort at placards – not good enough
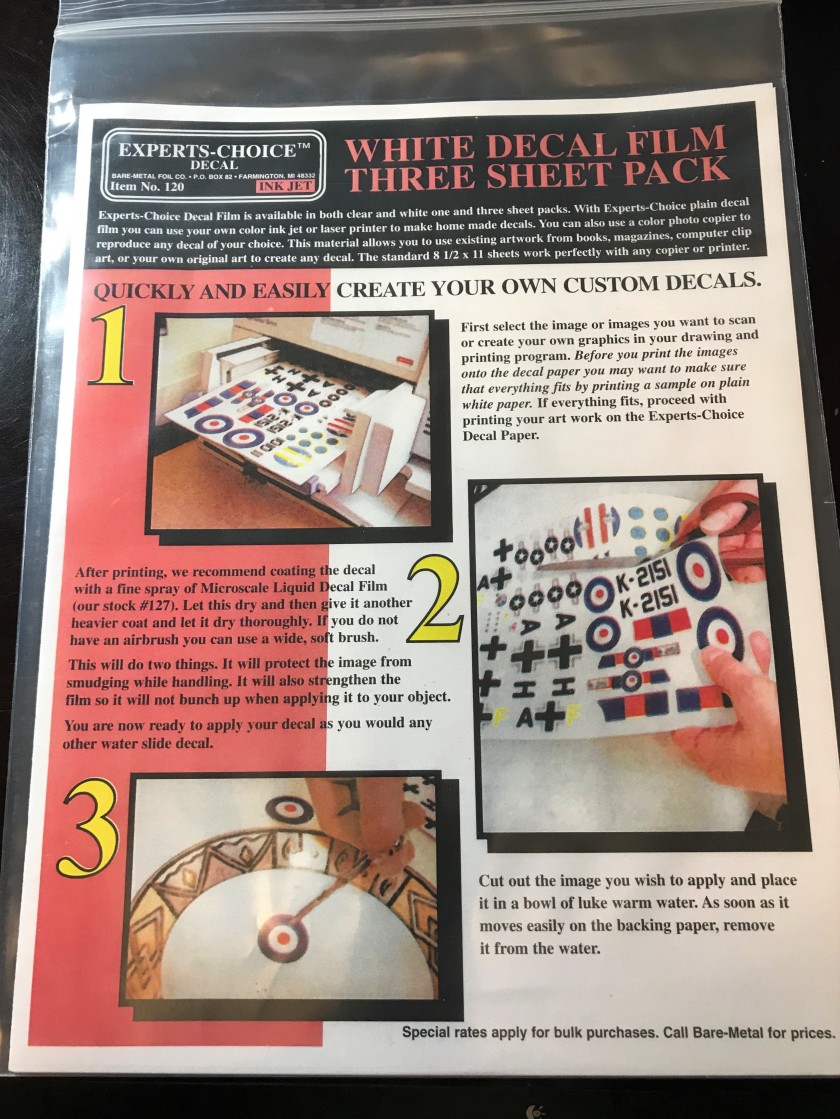
I then changed plans and decided to try to use polystyrene to see if that would work in conjunction with decals that I could print off on my HP Printer. I found a couple of decal products that I could print with – one was clear and from Testors and one white and was from Bare-Metal Foil Company. The Testors product has (6) 5.5″ x 8.5″ sheets, while the Bare-Metal Foil product was 8.5″ x 11″. I went with the Bare-Foil product for this as I thought it would be easier to print with and it had more space. I did notice that it had a white backing, which I thought would help with visibility once the decals were on the placards. Obviously, some uses would be better with a clear backing, so consider that.
I drew up some mock-ups out of paper to size my placards. I wanted them to have distinct colors (matching their rubber bands) and distinct shapes. Once I had the shapes, I designed the decals . I used Microsoft PowerPoint and Google to select images and shapes. This allowed me make a full landscape page image of the proposed decal. I would then save that PowerPoint slide as a JPEG, and insert that JPEG into a Microsoft Word document. I would then change the size of the JPEG (keeping the aspect ratio locked) and print off different sizes until they matched the mock-up placards. Once that was complete, I copied the requisite number of decals into the Word document, leaving adequate space for later removal by Exacto knife on the actual decal paper. I thought that one decal was adequate instead of double-siding the placards.
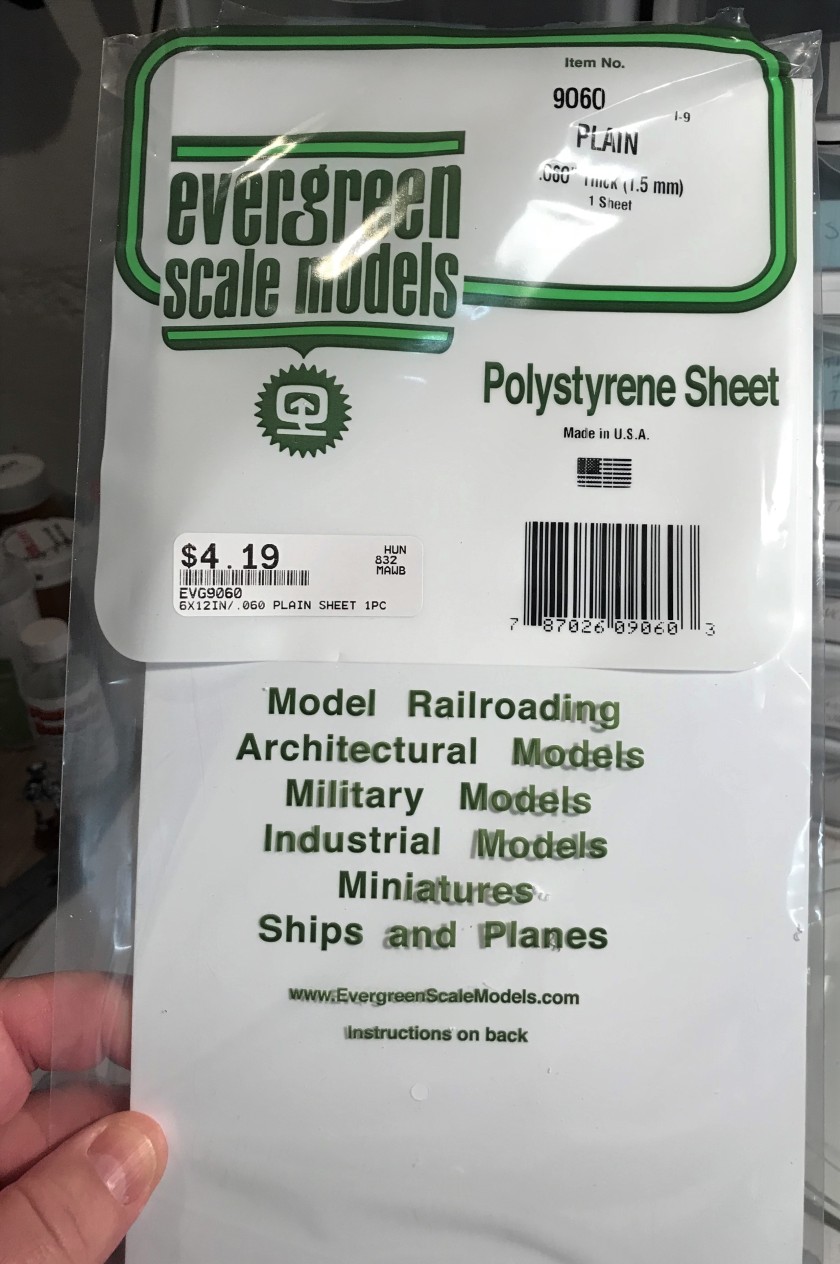
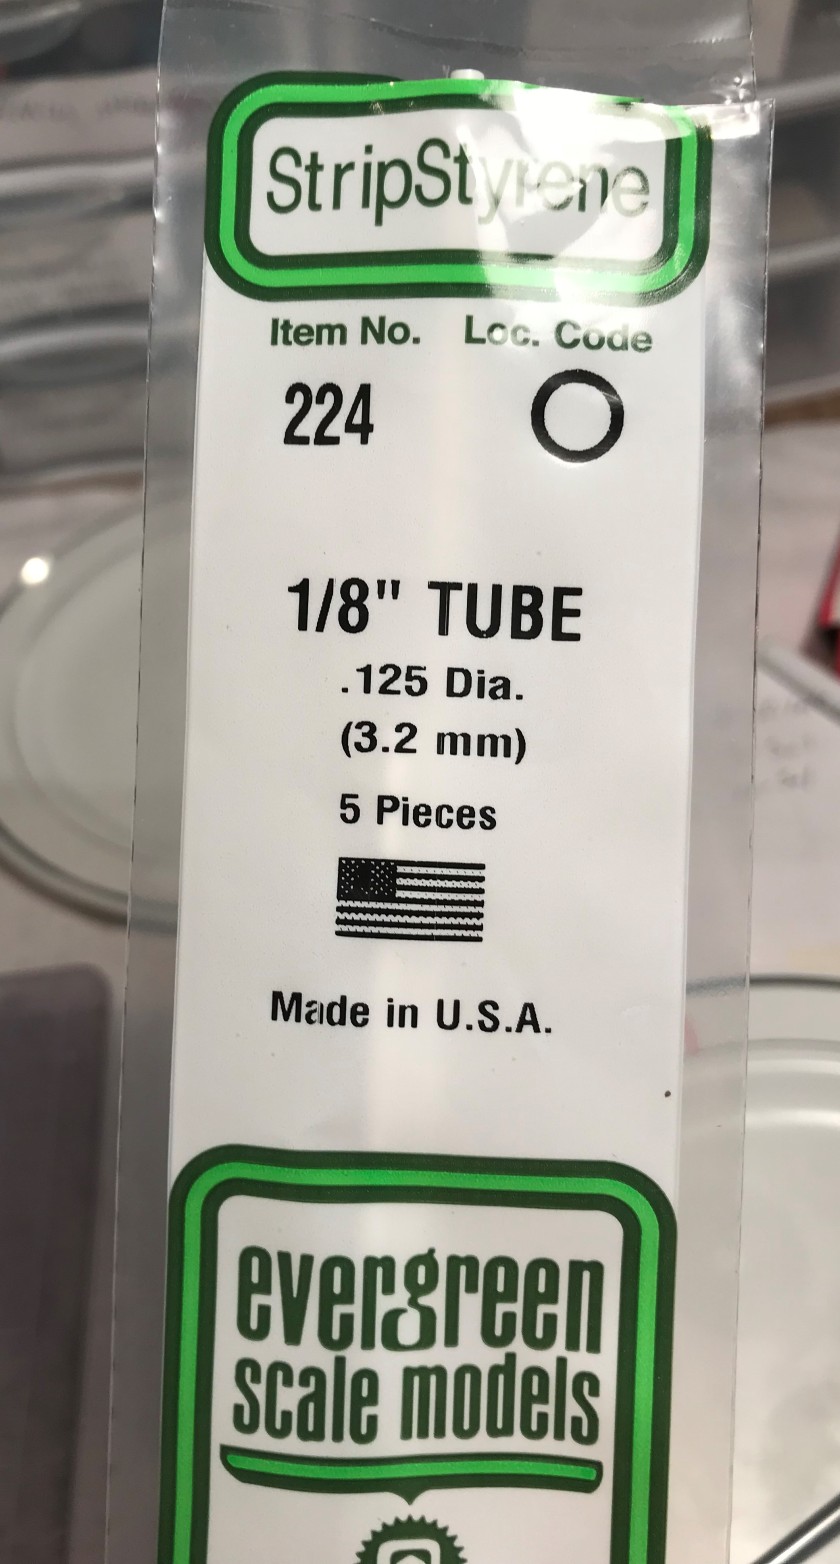
Before I could print off the decals, I needed the placards. I got .080″ thick Evergreen polystyrene sheets and 1/8″ tubes. These bond well by using Plastruct Bondene plastic solvent cement. I cut the shapes out with a template, and cut the tubes into 1″ sections. I then evenly split the sections lengthwise. Lastly, I cut the tubes into ¼” lengths. I took differently colored rubber bands, and slid them into the lengthwise cuts on the tubes. Then with the Plastruct Bondene, I attached the placards and the tubes. You do not need much of this stuff – and its good to hold the pieces together for a count of 10. I waited a few minutes, and reapplied the solvent over the attachment and the lengthwise cuts, sealing in the rubber bands as the cuts welded. The small rubber bands are the same as what we used before – they come from Michael’s and are used for some sort of young girls’ weaving crafts. I made 185 of these placards!
The solvent – be careful and read the label!Polystyrene SheetsPolystyrene tubes
Then came the painting of the placards. I should have used my airbrush to prime them, but I wanted to use up some Citadel “Imperium Primer” I has. Plus, they were a little awkward to paint due to their configuration. After priming both sides, I laboriously (again I should have airbrushed) hand painted the placards as follows:
Wound, Stun, Optics, and Rogue markers with FolkArt “Champagne” (metallic)
Mobility Damage markers with Createx “Pearl Copper”
Out of ammunition markers with Vallejo “Bright Brass” (metallic)
Jet-pack use markers with Americana “Apple Green”
Once painted, and having painfully learned my lesson in terms of not using airbrush paints, I used my airbrush to coat the placards with Vallejo “Mecha Varnish Gloss”. This helps the decals to slide on properly.
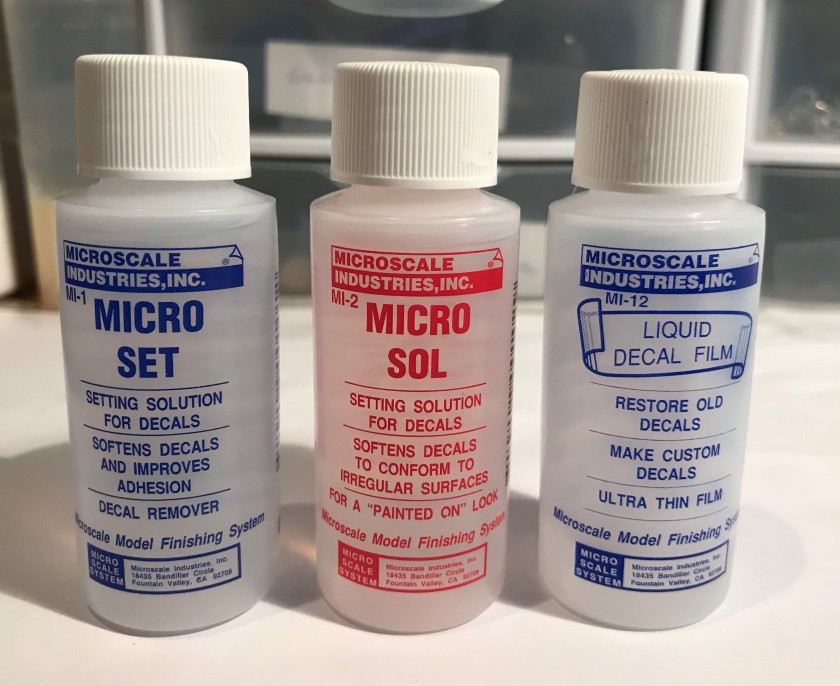
Printing off the decals was new for me. Apparently, there are several steps in addition to printing the decals! First, once you print the decals, you need to apply a couple of coats of a Microscale Liquid Film product (better done with an airbrush, but you can brush it by hand, allowing each coat to dry of course). This application protects the colors. Then the decals can be removed with an Exacto knife from the printed sheet and put into water, but wait, more stuff needed! You also need Microscale Micro Set applied to the surface prior to applying the waterslide decals. This product improves adhesion. then put on the decal, adjusting its location with a toothpick. Let this fully dry, and then another product, Micro Sol, is used to soften the decal and tack it down. Lastly, get the Microscale Liquid Decal Film back out, and put another coat on of that, and let it dry. This will log up any brush you use, so use an old one. Now the decal is protected! Again, repeat 184 more times…for this project.
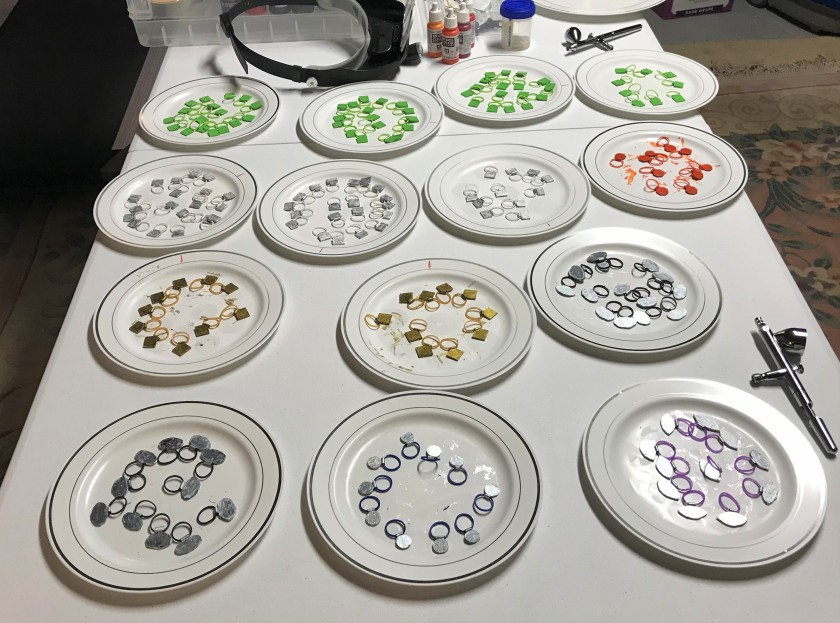
My decal sheetMy printed decals after airbrushing with Liquid Decal FilmThe three magic decal solutionsPainted placards drying awaiting decalsCompleted placardsWound markers – these are 1/2″ x 3/8 “Star Duck with a placard indicating he has used his jet pack three times, which is the maximum per game that I allow. This one placard takes the place of three rubber bands.A stunned Star DuckA CPU-damaged (“Rogue”) Warbot faces off with a Frinx whose weapon is unfortunately out of ammunition or jammedThe Warbot on the left received a critical hit to its optics/sensors, and cannot engage as well with its weapon. The Frinx in the back is stunned, and the Star Duck on the right has one wound.This Warbot with an Arc breaching weapon has taken a critical hit and cannot move, limiting its ability to penetrate an obstacle.
I have organized all of these into really useful boxes with extra rubber bands (in case I don’t have enough placards for some reason). Hopefully I get to play test their use soon.
Thanks for reading – and I hope you find this helpful! Please let me know in the comments section dear reader!
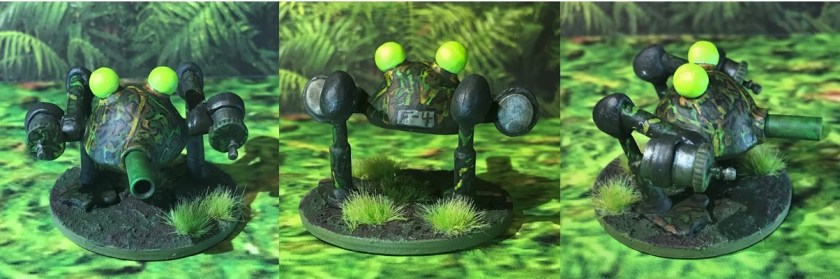
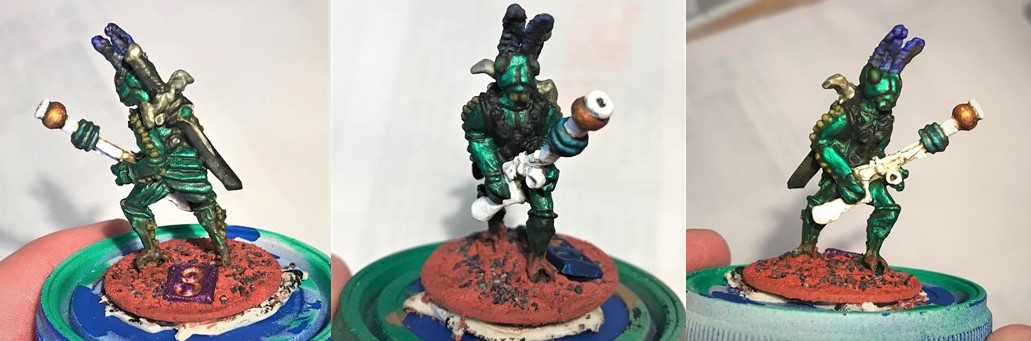
Back in early 2016, I found an interesting miniature on eBay that I had never seen before. It was from the Archive Star Rovers line. It was a large bug-like creature with a large blaster and a huge sword on its back. It reminded me of a deadly grasshopper. Doing a little research, I learned that the figure was made around 1979-1981, and was designated as Archive #2318, “Hurraku Space Phraint”.
From the Archive Catalog in my Star Rovers game from 1981
I immediately thought that a group of these figures would make a great platoon for a retro-sci-fi game of Combat Patrol™. However, like many Star Rovers figures they proved to be very scarce. Eventually I decided that I would need to cast my own to make such a unit (you can read about that effort here).
I made a mold, and recast a bunch of these, and shared some with my good friend Buck Surdu. Buck called them “Space Bugs” (which of course they are), and painted up a unit himself – you can see his work on these here. I really liked what Buck had done with his and his use of glitter paint. His work inspired me to seek a way to get a shine on mine without being, well, overly shiny. Meanwhile, my Space Phraints waited as other projects and personal stuff got in the way (as it always does!).
Over time I researched and dug deeper. I found that there is quite an interesting back story to these bugs. I discovered that Phraints were originally in the Arduin Grimoire RPG system, which was a contemporary competitor to TSR’s Dungeons and Dragons system in the mid-to-late 1970’s. It was written and marketed by David Hargrave and his company, Grimoire Games. Phraints played a major role in Arduin, and were prominently shown on their rules systems covers (see below). One of the main differences from D&D was that Arduin went from fantasy to futuristic sci-fi all in the same universe.
Apparently (and unsurprisingly) there were a series of lawsuits by TSR against Hargrave, and his company, alleging trademark infringement, etc. It’s history at this point, but truly a fascinating (and drama-filled) chapter in the early era of fantasy and sci-fi gaming. If you would like to learn more about that kerfuffle, here is a good link.
So where did Archive come in? Archive Miniatures had the license for the Arduin line. According to Archive founder Nevile Stocken, the original Phraint figure was a Steve Lortz sculpt in their Arduin figure line (#783). Nevile adapted the original Phraint figure and created the Hurraku Space Phraint. He did this by removing the hive the front foot was resting on, as well as the quiver on the back. This leaned the figure forward. The large sword on the front was removed and replaced the quiver on the back. The Hurraku was then given what Nevile described as a BFG (“big f’ing gun”). The Phraints are truly interesting, and this is another great link on their characteristics. I like that they are emotionless – and incapable of lying.
OK, enough Phraint back story (hope it was interesting anyways). Back to the platoon making!
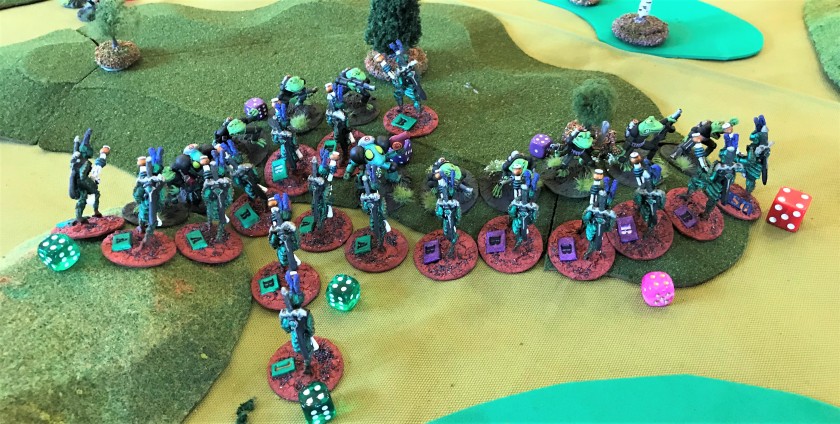
Originally, I had 39 Space Phraints. It was time to clean and file the metal miniatures, which are large for the ranges 25mm scale (the Space Phraints are about 1¾” or 44 cm tall). Overall, I found it difficult at most times during the project to discern the difference between my recasts and the originals, except during this phase. However, upon better inspection, I found 3 figures out of 39 that were not of acceptable quality, so I went to 36 figures for the unit, with the unfortunate three going to the remelt pile.
I ended up with 36 Space Phraints (1 original, and 35 recasts), for the platoon. It would consist of 3 squads composed of 2 teams of 5, each led by a squad leader, making each squad having 11 figures. Additionally, there would be a Platoon Leader, a Platoon Sergeant, and a Sith Knight. The Sith Phraint would be great fun to game with when I use Greg Priebe’s Star Wars supplement for Combat Patrol™. I decided to make the figures look the same so as to reinforce the “hive” effect. In other words, they would look to unfortunate opponents as a swarm of huge humanoid insects. To us they all look alike, while to the Space Phraints, they do not.
Cleaning and filing of the figures took some time. I use a high tin content when I cast, so this was not quickly accomplished. I also needed to repair some swords that were too short, some blaster stocks that did not cast well, and some foot talons with green stuff (kneadatite). I’m not the greatest (or worst I imagine) with green stuff, but I think that it worked out well (you be the judge dear reader!). I also used a small pin vise bit to round out the blaster ends. The figures are very much in line with those of the era of the late 1970’s. This is not to say that they are not good, but they are much less crisp than today’s plastic and resin models. Plus, 35/36 were obviously my recasts, and some details are lost in that process. For me, all this meant was that I needed to really work with my painting to realize my vision for them.
After cleaning and filing – the one darker figure is the original Space Phraint. Three of these 39 were not good enough and are in my future remelt pile.
I mounted the figures with gorilla glue to 1¼” steel washers, and the washers to specimen bottles with poster tack. Simultaneously, I also began to search for a suitable base color, and I wanted to have something green that was not too glossy – I wanted subtle iridescence. This would mimic the sheen you see on some grasshoppers as their chitin reflects the sunlight. As I have an airbrush and compressor now, I decided upon a novel approach (for me anyway). I would use a pearlized airbrush paint with Createx Airbrush Colors “Pearl Green”.
This airbrush paint is designed for model hot rods and muscle cars. I thought that this would work and that I could shade and highlight later as needed. So, I airbrush-primed all of the figures with Vallejo Gray Surface Primer, and let that harden for 24 -48 hours. Then I broke out the “Pearl Green”. I needed a higher pressure to use this paint (40 vs 20-25 psi for the primer). I also did thin it a bit, and I was able to get good coverage of the figures with my airbrush. The Createx line is made for airbrushing, which is a plus.
After base coat of “Pearl Green”Unit after “Pearl Green” application
After that, I grabbed my regular brushes as I wanted to shade the figures for ease of painting, which I accomplished with Citadel “Nuln Oil GLOSS”. The pearlized paints are very smooth, especially after airbrushing, and I found that the gloss version of Nuln Oil worked better on this base coat of green than the plain one. It really got into the nooks and crannies and stayed there.
After initial shading
For the antennae, I wanted something that would be closer to what a bug would have and not be like a bunny’s ear. For this I used Vallejo “Dark Blue” and washed it with Secret Weapons Washes “Purple”. The eyes, to me, needed to be special. I built up the eyes with serial light coats of Vallejo “Gloss Black”, followed by a 50/50 mix of Vallejo Mecha Color “Yellow Fluorescent” and “Green Fluorescent”. Lastly, I topped the eyes off with a small drop of “Yellow Fluorescent”. This approach really gave the eyes character, and gave the impression of a compound eye structure.
Close up of the eyes (sorry for the blurry image but this head is only 1/2″ long including antennae)
On the bandoleer, I went with Vallejo “Game Air Black”. I decided not to try to highlight them at all as I had too much variability among casts with regards to their details. I also thought that the contrast from the black would be greater with the green chitin which was what I wanted. For the blaster, I went with the last of my 1987 West German Deka Lack “Weiss”, followed by highlighting with Vallejo “Gloss White”.
Moving to the rear of the figures, I painted the swords’ pommels and hilts with Vallejo “Steel” and the grip with a mix of Vallejo “Gunmetal” and “Game Air Black”. Each sword’s scabbard had an inlay and a jewel. The inlay and jewel got Vallejo “Chrome”. After the “Chrome” had dried, I lightly applied Citadel “Waystone Green” on the jewel to achieve a crystalline appearance. For the scabbard and the straps, I stayed with “Game Air Black” to continue the contrasting effect with the chitinous green.
I then went to the front of the figure and dealt with the blaster. For a further contrast, I painted the bulb at the end gold with Citadel “Retributor Armor” . The blaster rings got a covering of “Chrome” followed by an application of Citadel “Soulstone Blue”. To highlight the lobster-like claw structures on the arms and calves and the mandibles, I used Vallejo “Yellow-Green”.
Painted front, before shading
Painted back, before shading
As I earlier said, the upside of the “Pearl Green” is its effect – and the downside is that for subsequent paint applications adhesion is less than other paints. To address the need for both shading and for paint protection on the tabletop, I brushed Army Painter “Quickshade-Soft Tone” over all of the models. I tried my best to sop up any extra pooling shade. I then let these dry and harden for 48 hours. A couple of figures picked up some paper towel fibers at some point, but that was remedied easily with a wet brush once everything was dry.
During this drying period, I sculpted placards for the bases out of Apoxie Sculpt. I wanted the Space Phraints to look the same, but for gaming purposes, there needs to be some differentiation for the players (especially those of a certain age). Apoxie Sculpt is much better than green stuff for this purpose. I mixed this two-piece material, and spread it thinly over my cutting board. Using rubber stamps, I made placards for each figure, and some more for future projects. These I allowed to dry and harden for 24 hours. At that point, I removed and trimmed them, and applied them to the bases with gorilla glue. I primed them with Citadel “Imperium Primer”. For a placard painting scheme, I brush painted:
Vallejo “Signal Red” and “Retributor Armor” for the platoon leader (PL)
Createx “Pearl Blue” and “Retributor Armor” for the platoon sergeant (PSG)
Vallejo’s “Metallic Black” and “Red” for the Sith (SITH)
Createx “Pearl Green” and “Retributor Armor” for the 1st squad leader (1)
Createx “Pearl Green” and Vallejo “Silver” for the 1st squad team leaders (A and B)
Createx “Pearl Green” and Vallejo “Game Air Black” for the 1st squad troopers (A and B)
Martha Stewart Crafts “Duckling” and “Retributor Armor” for the 2nd squad leader (2)
Martha Stewart Crafts “Duckling” and Vallejo “Silver” for the 2nd squad team leaders (A and B)
Martha Stewart Crafts “Duckling” and Vallejo “Game Air Black” for the 2nd squad troopers (A and B)
Createx “Pearl Plum” and “Retributor Armor” for the 3rd squad leader (3)
Createx “Pearl Plum” and Vallejo “Silver” for the 3rd squad team leaders (A and B)
Createx “Pearl Plum” and Vallejo “Game Air Black” for the 3rd squad troopers (A and B)
PlacardsPlacards mounted awaiting paint
Once my shade had dried, I highlighted chitinous areas with the “Pearl Green” that may have been overly darkened. I also used Vallejo “Game Air Dead White” and “Retributor Armor” to highlight on the blasters as the Quickshade needed some adjustments here.
I then moved on to the bases, and used a combination of Citadel “Martian Ironcrust” and Army Painter “Black Battlefield” flocking to cover the bases. I learned at this point that I should have trimmed the poster tack from the edge of the bases at an earlier stage in the project. This would have made addressing the edges easier. As it was, I removed the edges, and used Citadel “Martian Ironearth” on the edges to cover any unpainted parts of the bases. I also dry brushed the Space Phraints’ feet with “Martian Ironearth” to replicate their walking on the red planet and catching its dust.
When using either “Martian Ironcrust” or “Martian Ironearth”, I always use a hand-held blow dryer after to dry and crack the paint for a better effect. Now it was time to apply a matte varnish and remove the shine from the models.
After the Army Painter Quickshade and highlighting…I need varnish!
I applied two coats of Vallejo “Matte Varnish” with my airbrush, allowing for 4 hours between coats. I was really happy with the results – the iridescent effect that I wanted was achieved!
After the matte varnish, achieved green iridescence!!
I detached the Space Phraints from the bottles, and retouched their bases, but finally they were done. I decided to take some formation shots and some action shots below. For Combat Patrol™ games, I plan to have them be able to climb walls without penalty, and to be able to use two cards for movement. Additionally, to replicate their emotional state, I will have them use the Japanese deck for morale results.
I am very proud of these – it was a very large and long project.
As always will appreciate any feedback in the comments section.
Thanks for looking and as promised, here are some more photos below – enjoy!
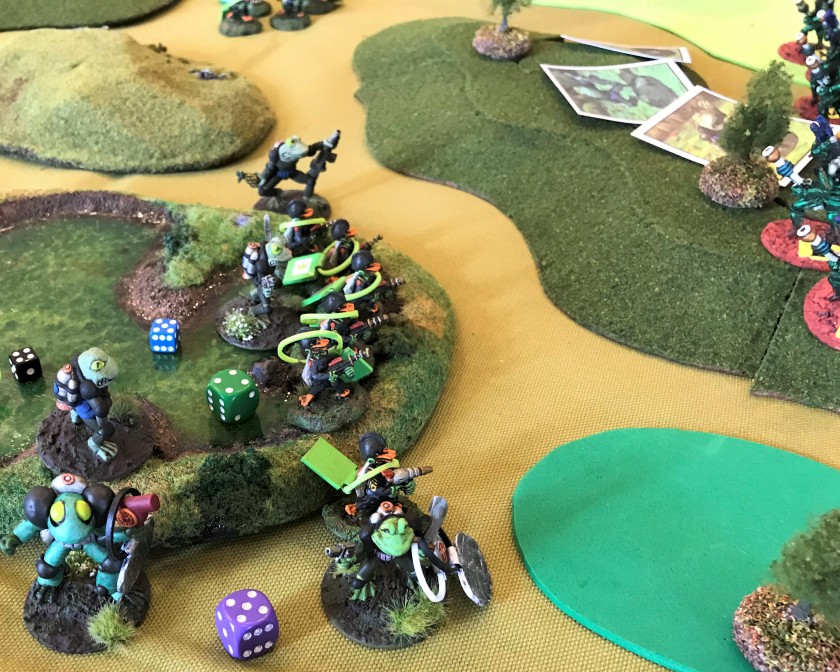
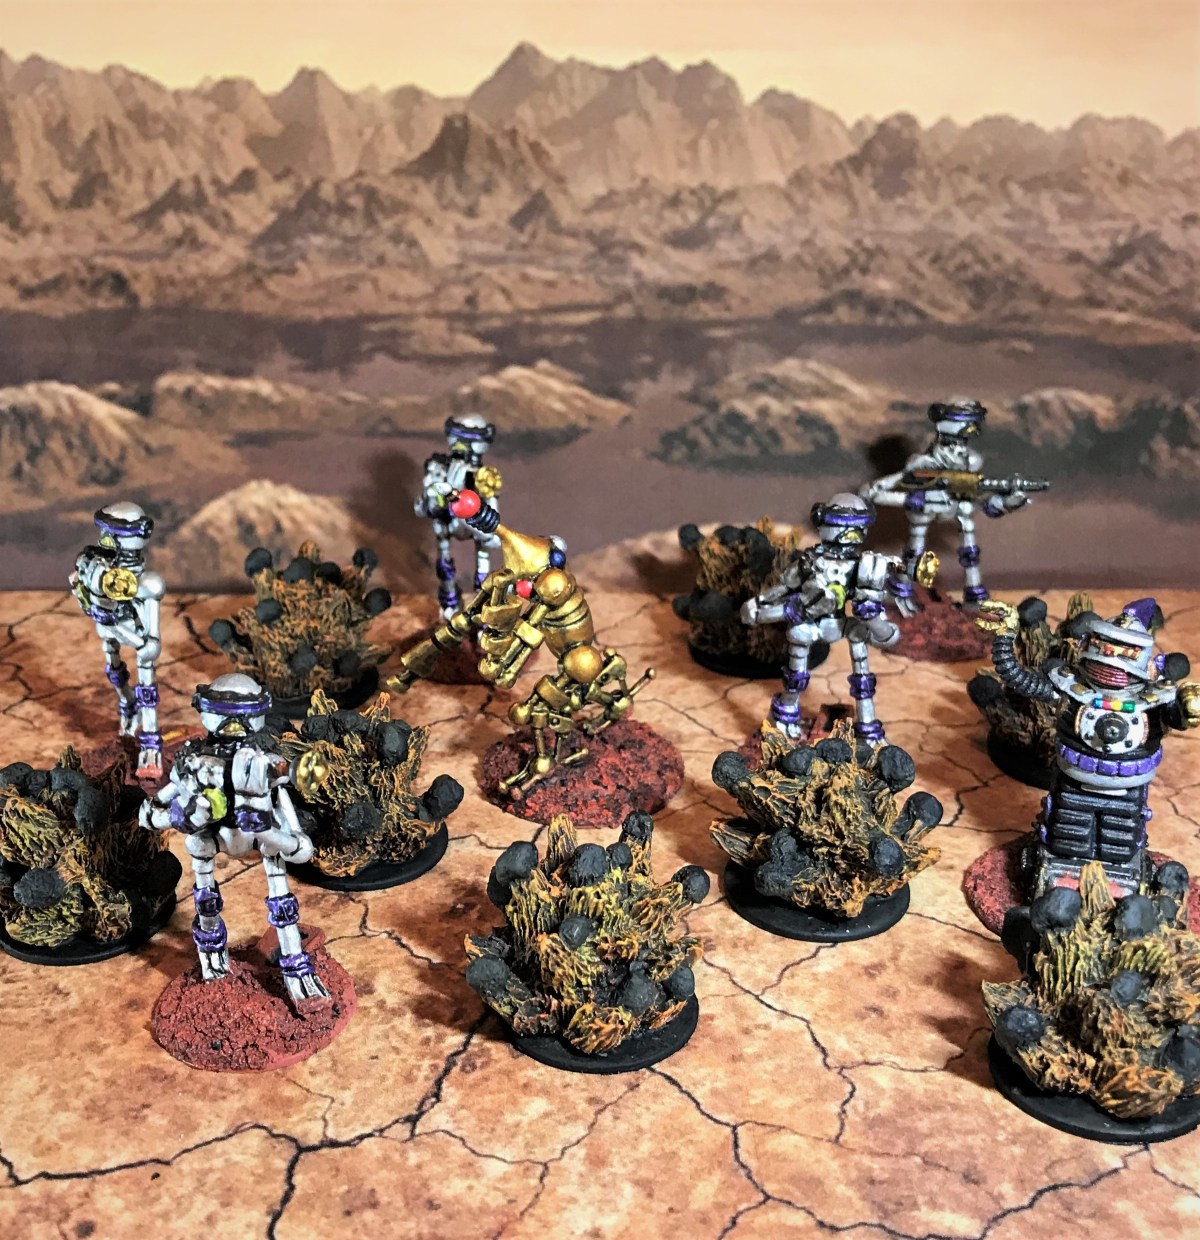
Command Group out front1st Squad2nd Squad3rd SquadPlatoon formationTop view of command group2nd squad view from the rear2nd squad moves through a refinery of Armorcast terrain3rd squad defends a bunker1st squad in the ruins
When I have wanted to demonstrate the effects of a grenade or a small explosion on a tabletop war game, I have been using cotton balls or other similar things, and this has not been a satisfactory practice for me. I wanted to have some better effects for grenade use in Combat Patrol™ games.
I saw some nice resin ones (ACFX034 Grenade Blasts) from Armorcast in their cinematic effects line. These were reasonably priced and looked good. I picked up 4 packs of two from their website.
As delivered
I washed them and let them dry, and then mounted them to 1″ steel washers that I had previously primed with Gorilla glue. I left the pyramid-like under-sprues attached as I thought that this would help with painting the blasts near the bases.
This approach did help, but I wish that I had cut them prior to painting them as this would have made removal easier later. I also tried my best to catch any areas that needed to be cleaned up in the way of excess resin. I mounted the washers with poster tack to the tops of specimen and old aspirin bottles for painting.
Using my airbrush, I primed them with Vallejo “Gray Surface Primer”. Once this was dry, I gave the blasts an airbrush coat of Vallejo “Game Air Black”.
After priming and first base coat of black paint
After this, I switched to the brush and gave the blasts a generous application of Citadel “Nuln Oil”. Then it was just a process of using series of dry brushings on the blasts working from bottom to top in varying degrees of color:
Polly -S “Demon Deep Red” (a survivor paint from 1984)
Americana “Primary Red”
Citadel “Fire Dragon Bright”
P3 “Sulfuric Yellow”
I then gave the entire surface a wash with Secret Weapons Washes “Sunshine Wash”. Lastly, I painted the blast rocks/ejecta with Vallejo “Gray Black”. At this point, I needed to remove the sprues and remount on the washers. I did this with a sprue cutter to minimize paint damage, but if I had done this earlier by sawing almost through the sprue I would have been better off and had less to fix!
Using gorilla glue, I reattached the blasts to the washers, and pushed the washers into the poster tack on the bottles.
Fully base-coated
I used Citadel “Imperial Primer” to cover up the unpainted parts of the metal bases, and then applied Army Painter “Quickshade” (Strong Tone) with an old brush. I let this sit for a couple of days to harden and to dry. I then followed up on this with an airbrush application of Army Painter “Anti-Shine” varnish (just one coat). This suitably dulled the shine from the Quickshade.
I plan to use these blasts to both designate where grenades or small explosions occur, but and to leave on the board as temporary impediments to line of sight. They are close enough to the Combat Patrol™ small explosion template in my view for that use (see below).
Star Ducks throw a couple of grenades at the Red Mark III Warbots and their Khang Robot leaderThe attacking Purple Warbot Squad and Juggerbot are bracketed by a flurry of small explosionsThe small explosion template and the Grenade BlastBOOM! First painting project of 2018 done!
I have to say that I like these, and am looking forward to using them in a game soon!
Thanks for looking – please share your thoughts in the comments section!
This gaming convention was held January 19-20 in Havre de Grace, MD, which is close to Aberdeen. It was a blast and well-run by the HAWKS gaming club.
I played many games over many time periods and genres. Mostly I played a lot of Combat Patrol™ games!
Second Boer War (modified Combat Patrol™)
Poland 1939 (Combat Patrol™)
Napoleonic Era -Bridge at Vittoria (Fate of Battle)
Civil War skirmish (Brother vs. Brother)
Star Wars (modified Combat Patrol™)
Moro Insurrection (modified Combat Patrol™)
Tavern LARP (Blood and Swash)
You can see many more photos here of all the games, including the LARP that concluded the 1.5 days of gaming. I’m here wearing a Boston Bruins sweater or a West Point sweatshirt in these photos.
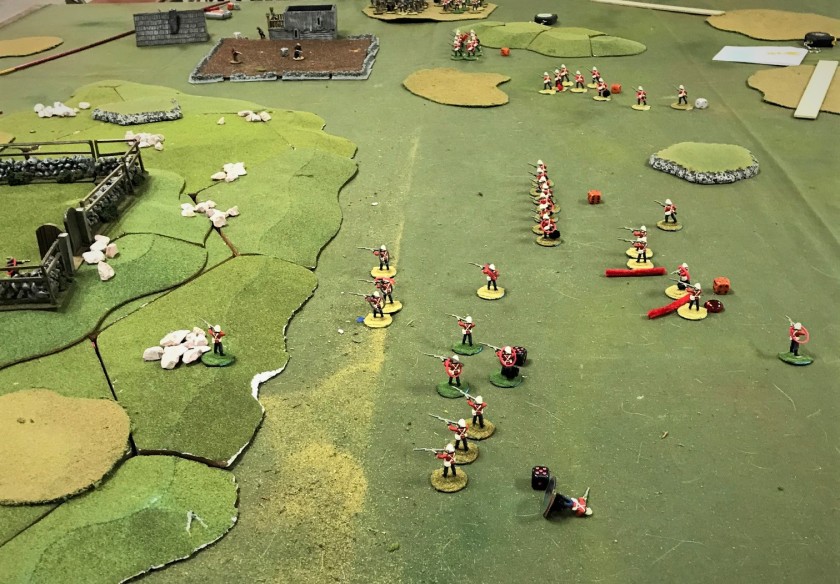
The first game I played was a Second Boer War scenario where the British were attacking the Boers defending a hill and farmstead. I played the Boers. The Brits needed to kill or capture the Boer leader, which they failed to do, so this was a good start for my day.
The British advanceThe British advance on the Boers. Their objective was the Boer leader in the farmhouse at the rear of the hill.Boers defending a wallThe Boers defending the wall in front of the farmhouse. These were fairly shot up by the Brits, but the Brits failed to capitalize on their marksmanshipDave Wood runs the gameBoers on the left flank get shot up in a fieldThe Brits haltThe Boer leader survives
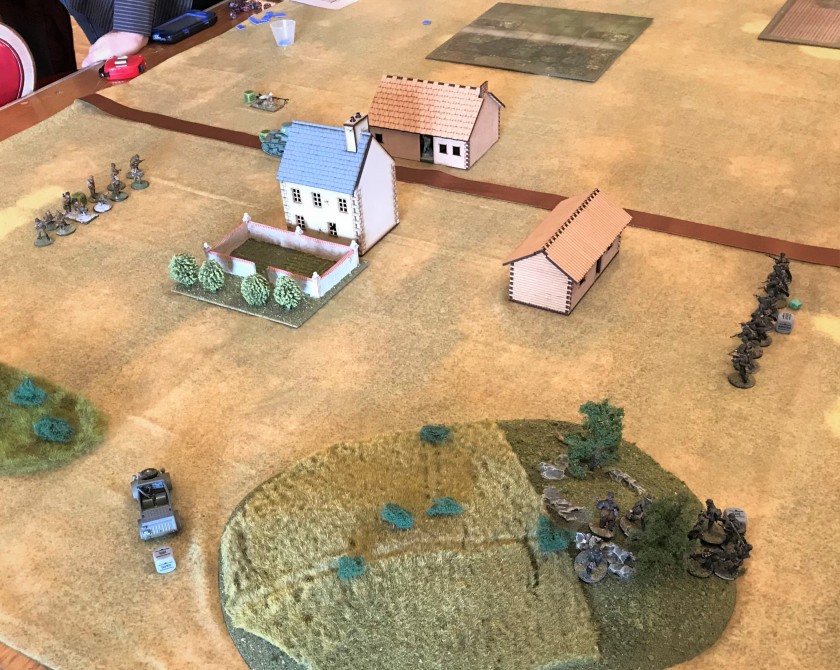
The second game that I played in was a scenario involving a German attack on the Poles in 1939, run by Buck Surdu. I was on the Polish side with two other players. The Germans had 4 Panzer 38(t)’s, and several squads of infantry, including some antitank rifles. The Poles had about the equivalent amount of infantry, but fewer machine guns. For armor, they had two TKS tankettes, one with a 20mm gun, and one with a machine gun. They also had 2 Wz. 28 armored cars. The surprise of the game was that German armor was decimated by the TKS with the 20mm (killed 3/4 of the panzers before being knocked out by the last panzer). In the end the game was called a German victory, but I felt we acquitted ourselves well.
Polish infantry moves through the woodsA Polish armored car is knocked out on the first turnThe TKS tankette that could…TKS tankette that knocked out 3 Pz 38tPolish infantry advance behind the armor. They were to be decimated by German machine guns in the woods to the left.The last stand of the TKS tankette
The next day I first played a Napoleonic scenario run by Dave Wood. I played on the French/Swiss side against a Portuguese and British attacking force. Their objective was the Vittoria Bridge. Eventually we were routed.
British and Portuguese attack from the rightInitial French defenses on the hill – bridge is on right.British advanceFrench troops hold the town, but were bypassedFrench cavalry charges to no availThe tide of battle turnsThe bridge is lost after the Swiss are dispatchedThe French survivors are surrounded
I then played in a Civil War skirmish for a short time between games using the Brother vs. Brother rules. It ended up being a draw.
I then moved on to a Star Wars Combat Patrol/Frostgrave mash up scenario, where I was on the side of the Droids vs. Clones of the Republic. We were supposed to grab crates of goods and move them off the battlefield. Our sides leader was killed on turn 1, and later the game had to be halted due to GM Greg Priebe’s refrigerator blowing up at home…sorry Greg!
The last game was a Moro Insurrection scenario involving US and Moro troops trying to seize cattle from a pen. We had about 6 players. Buck Surdu ran this game using the Combat Patrol™ rules. I had a squad of US infantry that got caught in the open by the Moros, and got pretty shot up. It was a very bloody affair, with the Moros winning by getting the cattle.
Both sides head for the steak dinners…My squad before getting shot up and failing moraleThe Moros assault my squadAnother squad shoots up the Moros and helps mine, but too lateMoros head off to a feast
The last event was a LARP using the Blood and Swash rules. Three teams competed for a treasure chest. I was a Man-at-Arms, and got involved in a pretty close battle with Buck Surdu, another Man-at Arms. I nearly killed Buck, but he managed to kill me first. The good news for Buck was that his side won.
I had a great time, and want to thank all the HAWKS for a great gaming convention!!
I have been getting ready for Christmas, but I wanted to get at least a few things done hobby-wise before 2018 rings in. Last month, we had a rousing sci-fi game using Buck Surdu’s Combat Patrol™card-based rules (you can read about that game here).
We were able to use the new Japanese South Pacific decks for robot morale checks, and incorporated many of the rules from Greg Priebe’s superb Star Wars supplement. We also used some of my rule additions for Mark III Warbot casualties, special weapons, and a few other nuances.
One of the issues came in the way of finding an easier way of denoting casualties on the table and making play a little easier. As you can see below, we just tipped over the figures, and that became crowded! I do like to see the casualties on the table as it gives a nice account of what occurred in the game, but perhaps there is a better way? Also, given that the Warbots take many wounds, I also am making some play aids specifically for them and their weapons (and I will cover this work in a future blog entry).
Casualties litter the field/table last month
As for the casualties, Buck suggested that I could create some cards for the casualties that would take the place of the “dead” miniature on the table. This would allow for showing the results of the battle, and enable an easier playing experience.
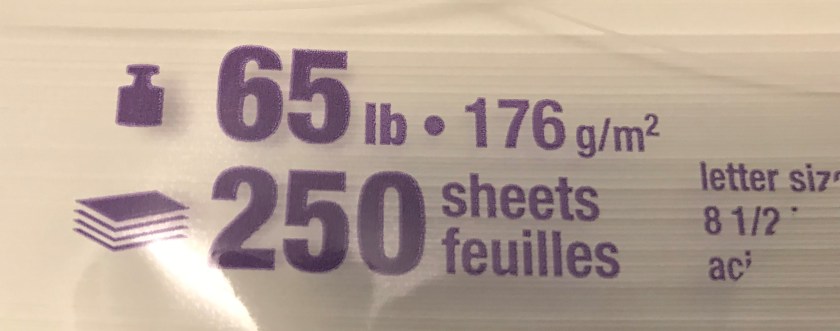
For this project, I bought a Fiskars® paper cutter from Michael’s. I had a 40% off coupon so I got it pretty cheaply. I used white 65-lb. card stock from Staples for the cards.
Fiskars paper cutter
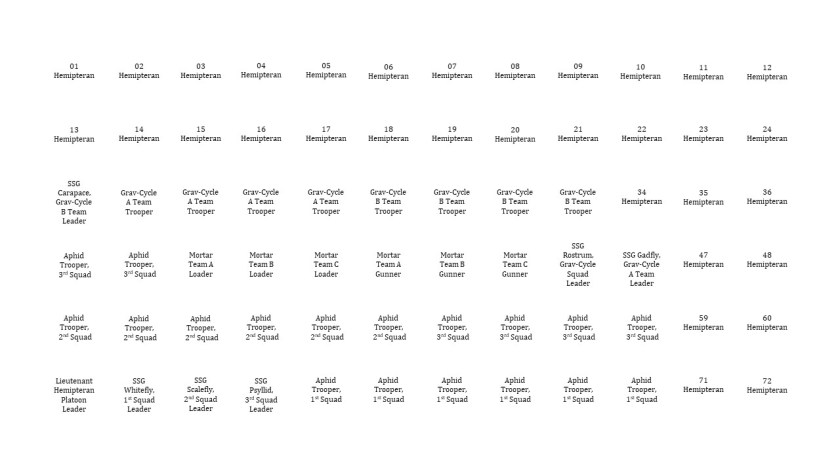
I started out last week with the Aphid platoon. My goal was to make the card sizes as close to the actual miniature sizes as possible. The Aphids are really small, so their cards were small. I experimented with Microsoft PowerPoint, using the grid lines tool, and comparing what I printed with the actual miniatures. I ended up making the Aphids cards about ¾” – 3/8″ high by ¾” wide. I had a lot of variability as I got used to using the paper cutter. The pictures that I inserted into PowerPoint had different aspect ratios, and I remedied this when I moved on to the Star Ducks.
I do recommend using the aspect ratio tool when cropping pictures for this type of work. Additionally, the grid line tool in PowerPoint allowed me to make exact front and back cards by making sure that the sizes were the same and aligned. The easiest way to do this is to import your photos first, and then copy that slide. Then, you replace the photos on the second slide with the written cards. By printing these on both sides of the paper (use regular paper first, not card stock to check), they will line up perfectly. The only caveat I need to add is that you need to pay attention to the cards as you will need to reverse the text in the blocks so as to match the pictures – see below.
My PowerPoint page of 39 Aphid photos – note the reversing of texts below on the text portion The text section – I numbered these text box blocks and put up to the light to see which text went where – each is an individual text box
I printed these on card stock with a “thick paper” setting on my printer, and used two-side printing. I then cut them out using the Fiskars tool. There is a learning curve to the tool, and it worked out fine. The Aphids on Grav-Cycles were not sized to the miniatures, but I wanted all of the Aphids cards in their deck to be the same size, so I can live with that discrepancy. I did however want to improve for the next group of cards – which was for the Star Ducks.
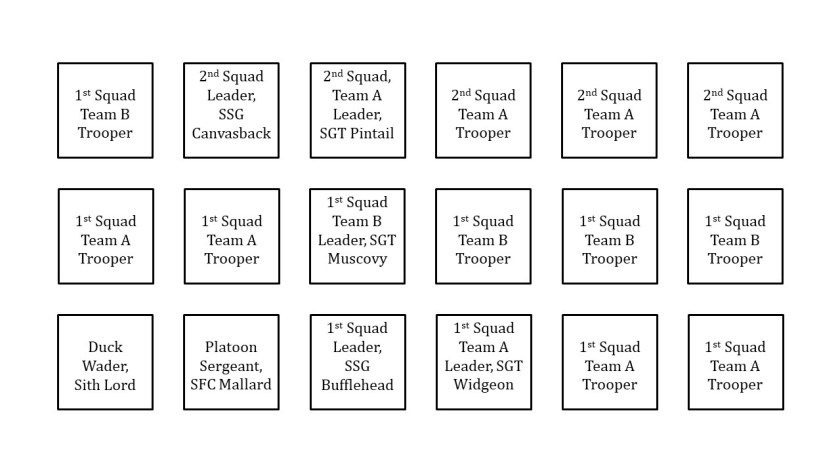
Here, I needed to make bigger cards, and went with 1½” by 1½”. I made a few important changes in my processes. First, I used the “aspect ratio” function when I cropped the photos – in this case using the “square” aspect. I also added a 2-point thick line on the pictures and the text boxes, which really made cutting easier. Lastly, I colored the cards text-printed side with light orange hue, to match their bills! I plan on having future unit casualty cards with different colors on the printed sides.
Page 1 of my cards (photo side). These when printed on a standard sheet of paper approximated the true sizes of the miniatures.The text block side of the PowerPoint, with adjustments so that the two-sided printing would line up properly. These were then colored orange as below.The photo sides of the cards after cutting – they are 1.5″ square
The printed sides of the cards with the orange backgroundsClose up of the cards
These were much better – and I feel confident that I can finish off cards for the Frinx and Mark III Warbots soon. My goal is that when I next run a game that these aids will make play even easier than Combat Patrol already is! These are not perfect, but are close enough and stiff enough to avoid becoming paper canoes!
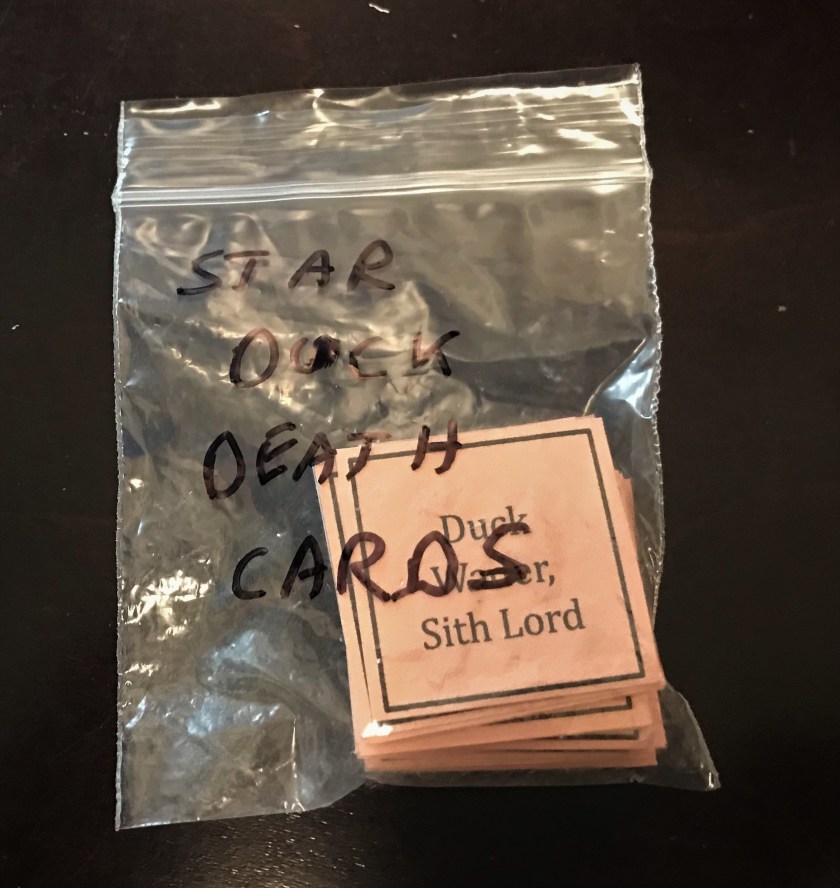
Casualty cards, Death cards, whats the difference!
Please let me know what you think in the comments section – thanks for looking!


