My daughter Ellen and her fiancé Chris got me a couple of game sets for Settlers of Catan® and I thought I’d take the opportunity to paint these up. RAFM in Canada makes these and you can see their offerings here.
The first one I completed was the Egyptian set (1202). There are 25 pieces in each set – 15 roads, 5 settlements, 4 cities, and one themed robber. These would take the place of the generic wooden pieces that come with the game.
I saw these on the RAFM website before when I was looking through their offerings. There are Viking, Bavarian, and Chinese sets in addition to the Egyptian one. Interestingly, the box cover shows incorrect game play – each city or settlement needs to be separated by two or more roads, and there is only one road here.
Cover of the box with incorrect play
Side of box
There was very little flash on the robber, and none on the other pieces. I did the robber last, so I will show that work after the others. I cleaned them up with a quick scrub, then primed them with Krylon “Ultra-Flat White” matte spray paint.
Before priming (less the robber)
The first challenge I had was in figuring out how to mount these for painting. Normally, I mount the figures on a washer and then mount the combination to a popsicle stick. Here, I was only going to use a washer for the robber as the other pieces were not really configured for mounting. I mounted each lightly to a popsicle stick with white glue. In the end, this procedure forced me to retouch all the figures’ sides as well as deal with painting and varnishing the undersides.
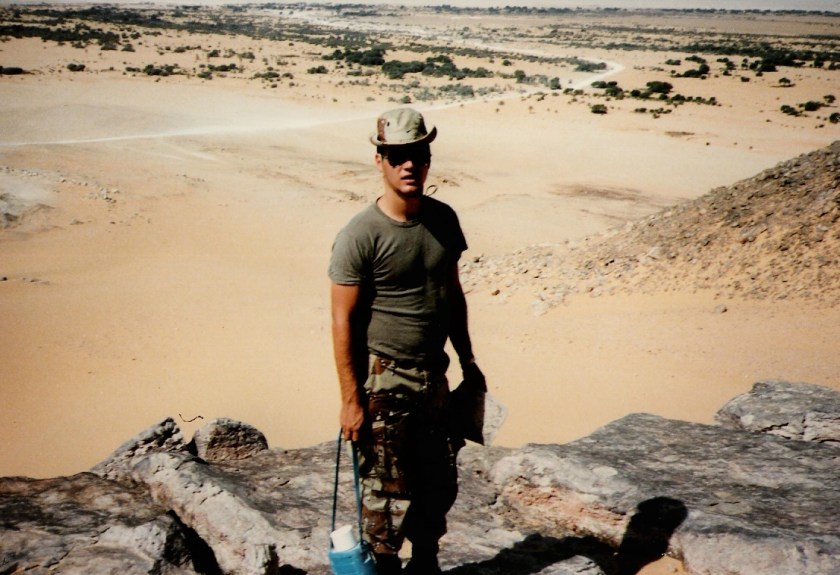
I decided to try to keep a desert theme to these pieces. I was somewhat familiar with this coloration due to previous experience in the desert. I led a Mobile Training Team at an airfield project in the Sahara Desert when I was a US Army Engineer officer.
1LT Morin back in the day…1986, Dirkou, Republic of Niger
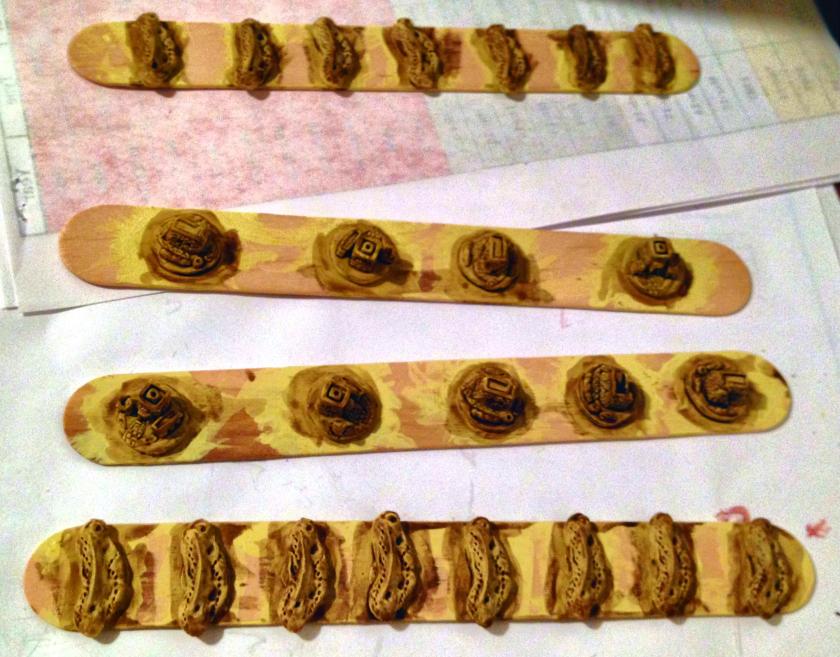
In the set, the roads were merely sand dunes with two sets of footprints, and the settlements and cities were adobe-like structures (very similar to what I saw in the Sahara). However, I needed to have a consistent color scheme as these are game pieces – and not traditional miniatures. I achieved my coloration goals by making a 50/50 mix of my old 1987 Deka Lack “Gelb” (yellow) and Americana “Bleached Sand” and using that as a base coat. This finished off my “Gelb” after 29 years! I then applied a liberal amount of Citadel “Agrax Earthshade”.
After basing and first wash
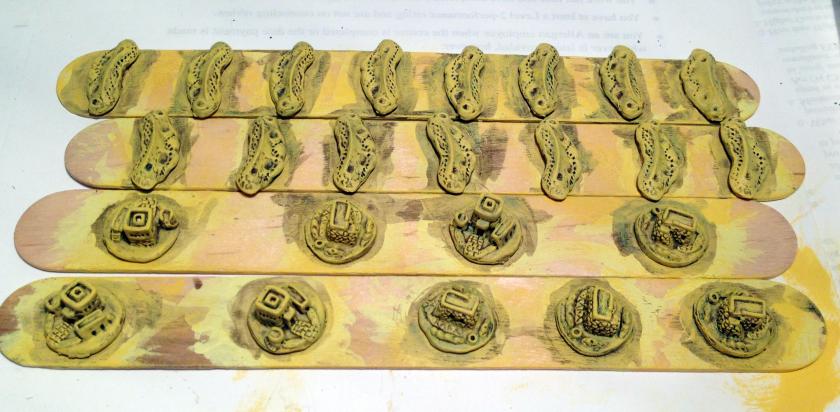
I then highlighted these with a 50/50 mix of P3 “Sulfuric Yellow” and Americana “Desert Sand”.
After highlighting
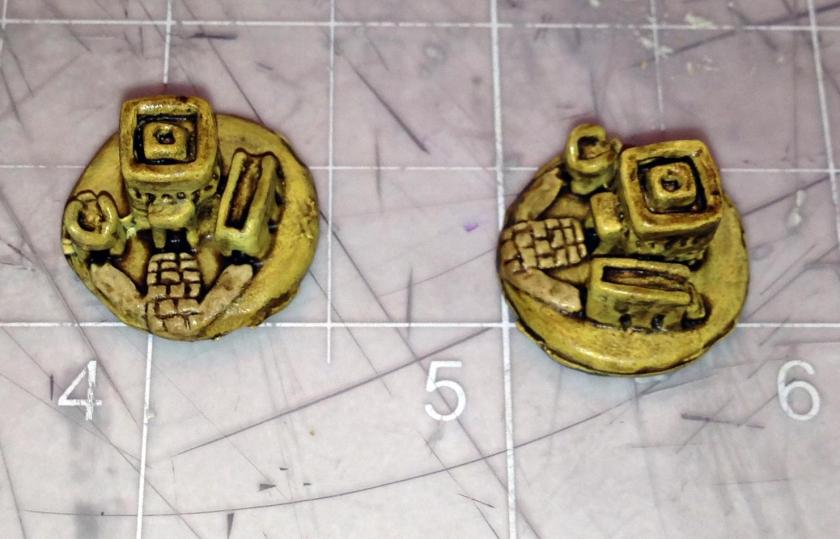
Then I did a bit of detail work. On the settlements, I used Citadel “Balor Brown” on the wells and “Castellan Green” on the foliage. After another application of “Agrax Earthshade”, I used the previous mix of P3 “Sulfuric Yellow” and Americana “Desert Sand”to highlight again. I also highlighted the foliage with Citadel “Niblet Green”. Knowing that there was likely to be some bare spots from the gluing, I gently removed the pieces and painted the undersides and sides where there were some bare spots. I first varnished the set with Krylon “Clear Glossy” spray paint. After allowing the pieces to dry, I then varnished the topsides with two coats and the underside with one coat of Testors “Dull Coat”. I did this because they are board game pieces, with more need of paint protection.
Finished pair of roads
Two settlementsTwo cities
After this I moved on to the robber. It is a 28mm figure, dressed in desert garb, with an axe. The first thing I did was to glue the figure to a larger 1.25″ steel washer with wood glue. Once that had dried, I used Apoxie Sculpt to create a base. I decided that flocking the robbers would be messy and not useful.
Robber before priming
I first dry brushed the robber with the P3 “Sulfuric Yellow” and Americana “Desert Sand” 50/50 mix.
After first dry brushing
I then worked on base coating the details. The axe handle and the backside of the shield got a coat of Citadel “Dryad Bark”, and the axe got a coat of FolkArt “Gunmetal Gray”. I used P3 “Midland Flesh” on the face. For the shield, I used another 1987 paint, Deka Lack “Ocker” (ochre), which had more of a metallic tint. I then used “Agrax Earthshade” and let the figure dry.
I highlighted the figure and the base with “Sulfuric Yellow” and dry brushed some areas. Then I did the sclera of the eyes with Americana “Snow” and “Ebony” for the pupil and eyebrows. The boots and gloves got a coat of P3 “Bootstrap Leather”. To create an edge on the axe, I used Tamiya “Chrome Silver”. I highlighted his nose and cheekbones with FolkArt “Light Flesh”, then used P3 “Flesh Wash” to make it more tan. I used “Sulfuric Yellow” on the boss on the shield, then darkened it and the base with “Agrax Earthshade”.
Lastly, once the figure was dry I then varnished it with two coats of Testors “Dull Coat”.
Finished robber
Overall, I am satisfied with the work – they are after all game pieces. I hope to get these into a game of Catan soon.
I have been collecting various examples of the long-defunct Archive Miniatures Star Rovers line of figures from 1977. This month, I have had some health issues that precluded being able to sit down (long story and a pain if you know what I mean). Therefore, I chose to work on making molds and casting, focusing on Star Rovers, which is something I do standing up.
My overall goal is to create squad-sized units of these “lost” but very cool minis. I want these to set up and play games of Buck Surdu’s Combat Patrol™, as well as to see if I can create a scenario using the Star Rovers figures that I have collected. Combat Patrol™ was created as a WWII skirmish card-based miniatures rules set, but it has been successfully adapted to other historical periods as well as Star Wars™ scenarios. To learn more about Combat Patrol™, click here.
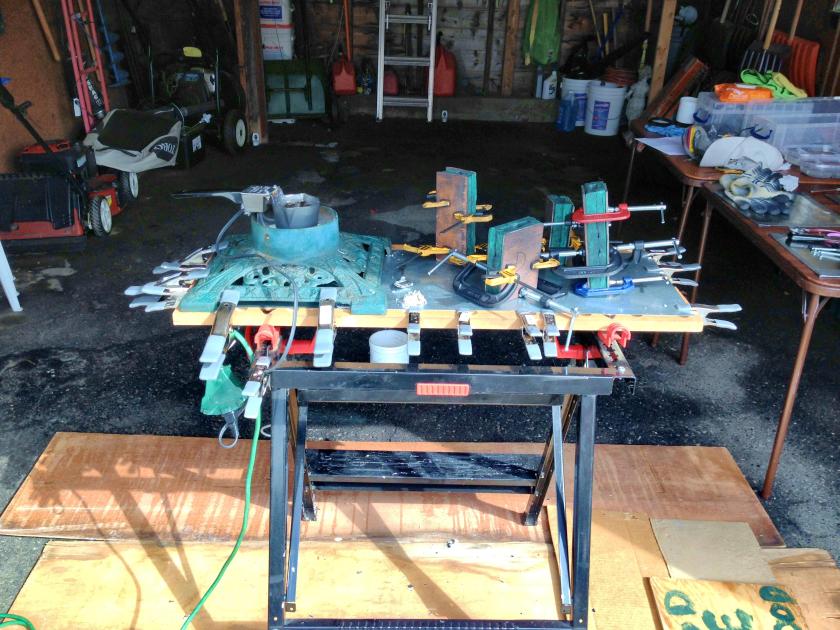
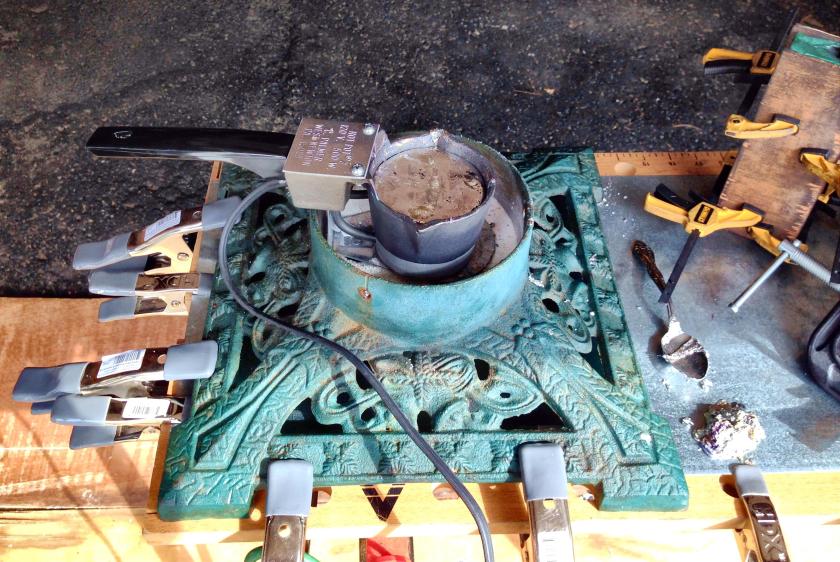
Before I get to the figures and the making of the molds, I wanted to share information about my casting set up. I basically use pewter and I use a Hot Pot 2 crucible with a Lyman pyrometer to measure the alloy’s temperature.
I also use appropriate safety equipment!
The Hot Pot 2 holds about 4 pounds of molten metal, and is used for making bullets, fishing sinkers, and miniatures. Unfortunately, it comes with a tripod stand which teeters and is prone to tipping. Why the manufacturer did not use four legs on the stand for stability is beyond me. After a couple of spills (where I dodged the 650° F contents and had a lovely clean up) I was determined to have a new set up. Currently I have 1′ x 1′ steel sheets clamped to my old Sears Craftsman® work bench that I have had for close to 30 years. My friend Jeff Smith came up with an idea that proved to be a great fix. He had an old cast iron (heavy) Christmas tree stand he was not using. I filled the large holder with play sand to raise the bottom up and put the tripod into the sand in the tree well. This provided great stability and rendered the set up virtually spill-proof. I clamped the tree stand to my work bench (after extending my bench depth about an inch). This worked great and I am very happy with my new casting set up.
My new set up in the garage – clamped molds on the right
Close up of use of the iron Christmas tree stand to hold the Hot Pot 2, clamped to the workbench
To learn more about the Archive Miniatures Star Rovers line click here.
I cannot find any reliable sources to buy these figures – I only find them sporadically on eBay. This is why I recast them for personal use and for gifts.
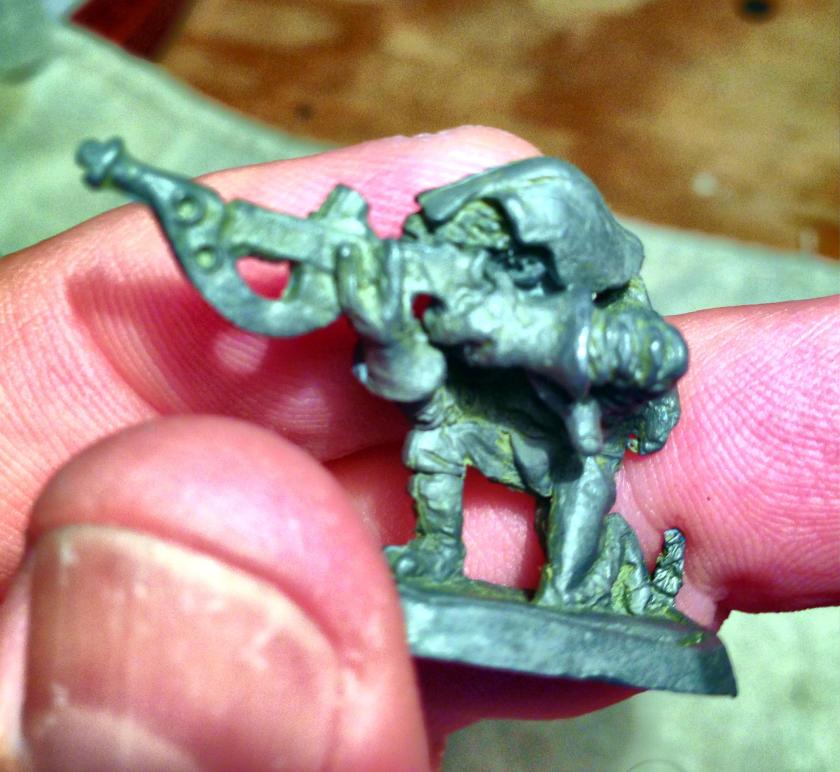
My first mold in October was for the Space Phraints. These are 9 foot tall emotionless insect men that were in the old Arduin game. These are armed with huge swords and a ray gun.
I found a nice synopsis on Phraints from Saundby.com that you can see here. The photos below show the original I got on eBay (the blue clay you see came from the mold-making process and is easily removed).
Space Phraint front
Space Phraint back
Below is the first mold half set up for the Space Phraint. I used an old metal mold plug to create my flow aperture along with some golf tees my wife gave me a while back for Christmas. I also used toothpicks to create air flow vents and release points for better casting. I also wrote a mirror image of the word “PHRAINT” on the clay. The QuickSil is measured and mixed and put into the mold press for curing. I generally wait 28 minutes for it to cure – and I use a hand-held hair dryer to warm the outside of the press to assist in curing the RTV (room temperature vulcanizing) compound.
Space Phraint mold in the mold press – first half
Removing the first half of the mold from the mold press before removing the blue clay from the RTV
The first mold half of the Space Phraint mold
I then put the first half back into the mold press, applied a releasing cream to any wooden surfaces of the press that QuickSil would touch as well as the green set up rubber RTV. I then measured and mixed more QuickSil and repeated the process. After I made the mold, I cut out wooden backings for the mold from 1/8″ plywood using my scroll saw.
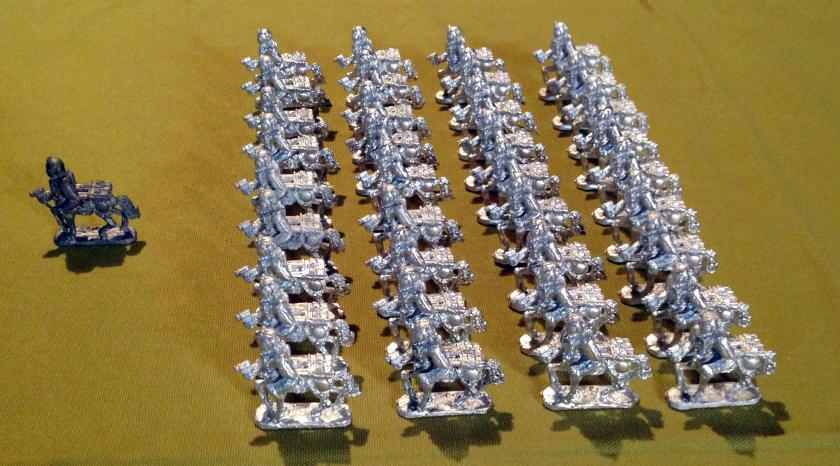
The Space Phraint mold was very successful and needed little modification during the casting process. I was able to cast 42 figures from this mold.
A formation of Space Phraints led by the original
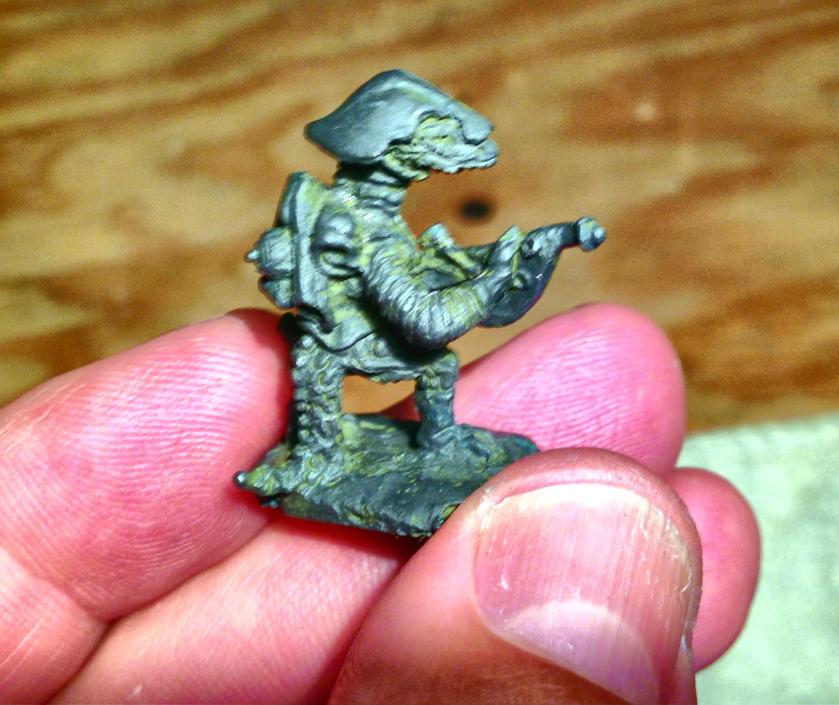
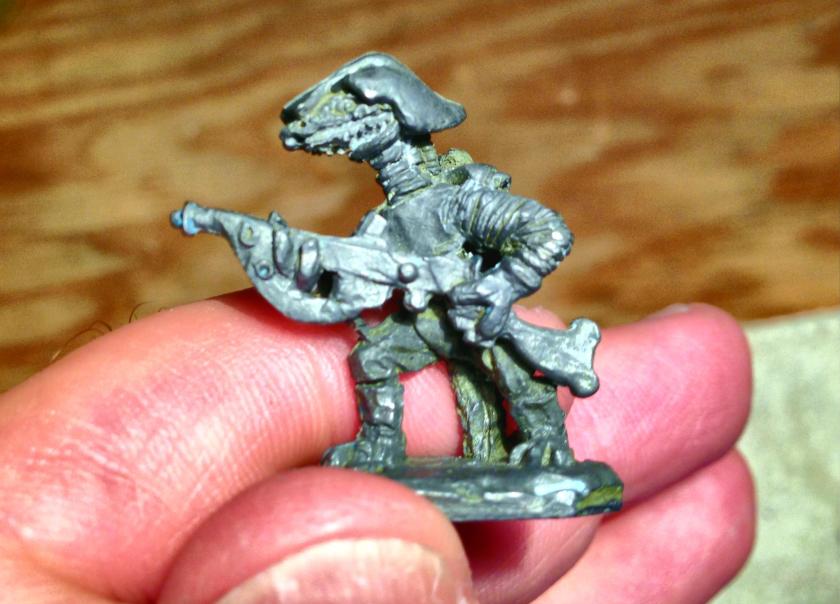
The next mold is a Mark III Warbot. As far as I can tell, there are no Mark I or II’s in Star Rovers! He is clunky and retro looking, with a very cool ray gun/blaster. He reminded me of Bender from Futurama, though he was created in 1977!
Mark III Warbot front
Mark III Warbot back
I followed a similar process in making this mold as described above.
Mark III Warbot first mold half
Mark III Warbot mold completed
This also was a successful mold. I cast 42 figures using it.
A formation of Mark III Warbots led by the original
I then moved onto the Space Centaur, who has rocket packs on his back, but is only armed with a laser pistol! This was my first try at making a mold of a four-legged creature. The mold itself needed more tweaking during the casting process than I like in terms of cutting vents and opening up spaces. I believe that I should have used more of a cone-shaped pour aperture for the mold. Here I used a small hotel soap and golf tees to shape the pouring well – and I think that works less effectively than a cone. I also had leaking issues with the mold initially. I solved these with adding more C-clamps when casting.
I was able to cast 36 figures with this mold.
Master Space Centaur figure
A formation of Space Centaurs, led by the original
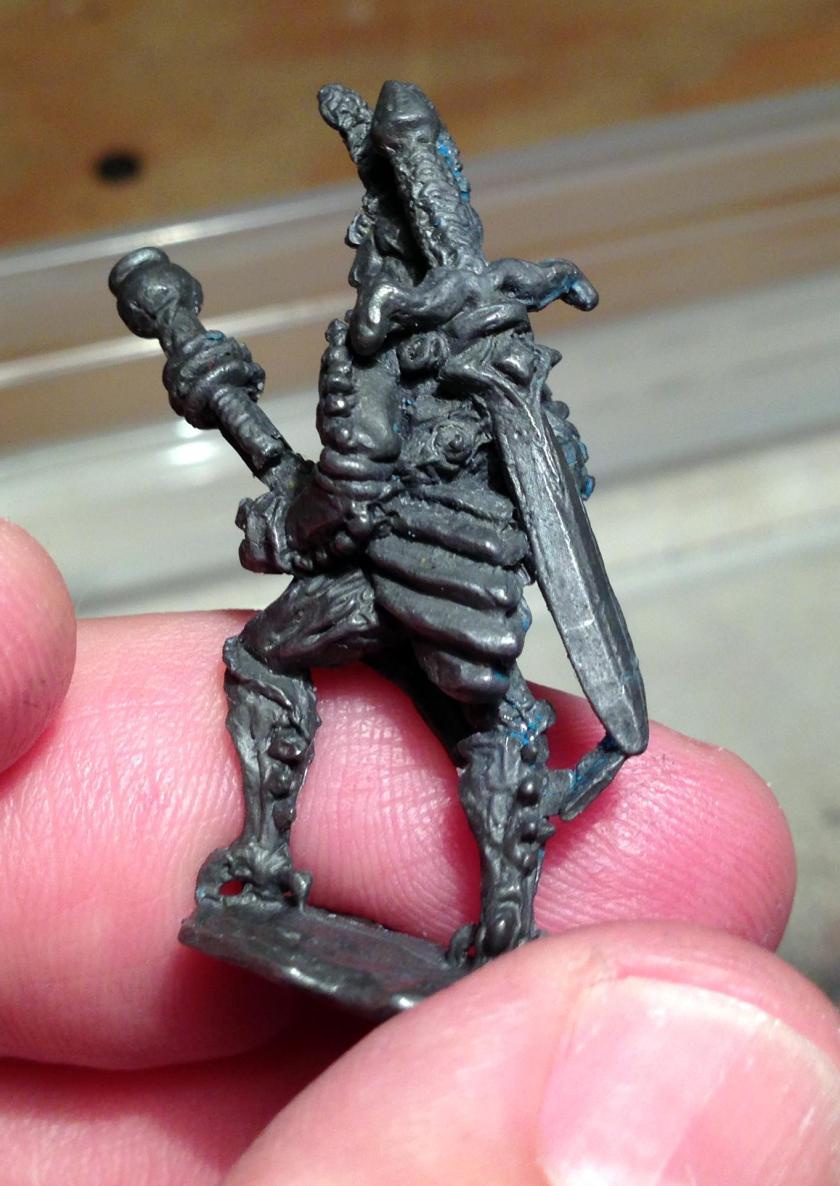
The last two figures that I worked on were Dragonspawn Infantry. There were actually three made by Archive, but I do not have the prone figure, only the crouching and kneeling ones. My guess from these pictures is that they were originally painted but then stripped.
Kneeling Dragonspawn Trooper, right side
Kneeling Dragonspawn Trooper, left side
Standing Dragonspawn Trooper, right side
Standing Dragonspawn Trooper, left side
I tried a new mold design – two figures in one mold. I wanted to see if this would be more efficient. It was not, primarily I believe that the cone aperture design works better, especially a tall one. Here I used another hotel soap and golf tees – and I had a lot of casting failures with this mold. With some adaptations during the casting process (making the pouring aperture and tees wider), my success rate improved, but the overall mold leaked a lot and was a pain to work with. At one point, some of the RTV came off in a figure, but this did not seem to be a major issue with subsequent castings.
My attempt at a new mold design – less than fully successful
I was able to cast 24 good figures of each type, but I probably had a 50% failure rate overall.
Two Dragonspawn formations with master in front
I cast 168 miniatures in total with the four molds. Some I am giving to friends, while the rest I an putting into the painting queue.
October production on the table
I learned some new things about the process, and got a new casting set up that is much safer. My next casting will be in a few months – I really want to start painting now that the weather is turning colder, and get them into a Combat Patrol™ game!
Some projects take a while – and this one was over 33 years in the making. As background, my first introduction to tabletop wargaming was in 1983 at West Point. My classmate Dave Wood (USMA 1984) introduced me to Buck Surdu (USMA 1985). Buck had set up a fantasy tabletop war game on a gaggle of desks in the Department of Foreign Languages, and from then on, a whole new gaming experience was open to me.
Buck wrote his own rules, and he and Dave had units of all kinds for the game. One type that Buck had was a unit of “Roomans”, which he referred to as “Beaks” as well. They were of course of the marsupial macropod (large foot) persuasion – more or less humanoid kangaroos. Of course, the word play of Romans/Roomans is evident as well. They were armed with pikes, had great movement and combat capabilities, and overall were just pretty cool. I wanted to get some, and every time I went to a hobby store in the 1980’s and 1990’s, I looked for Roomans. I had hardly any luck.
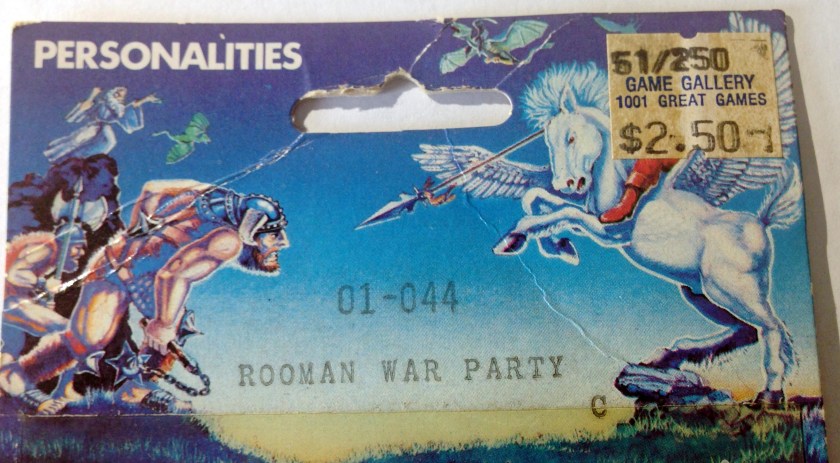
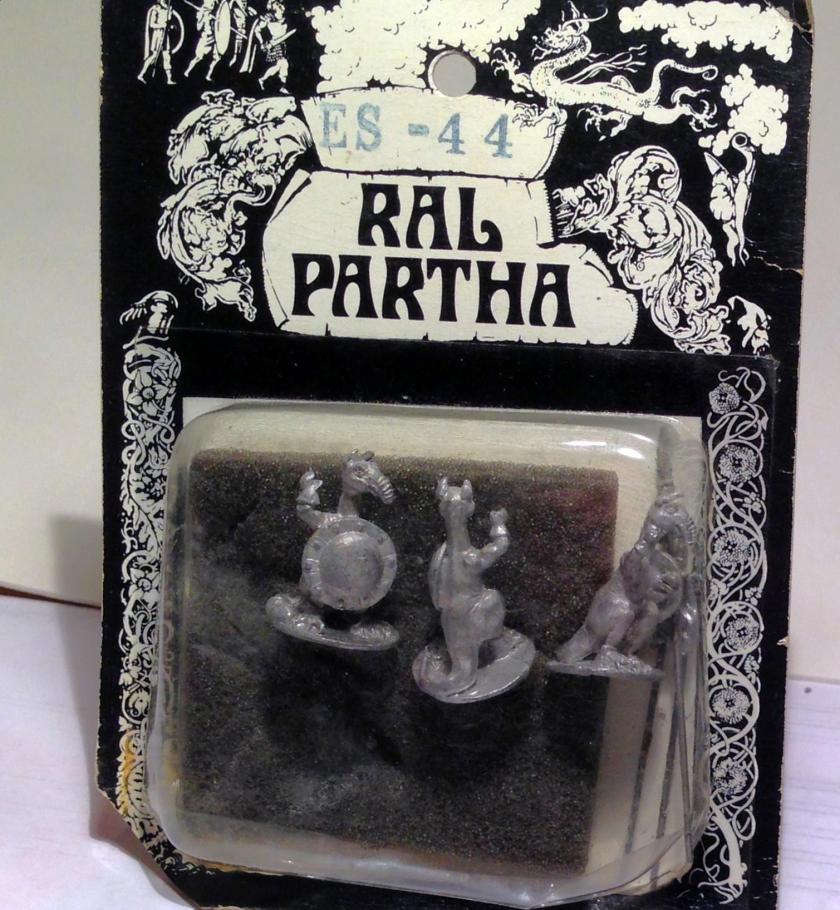
Little did I know back then that Ral Partha had produced only one type of blister pack of “Rooman War Party”, with production starting in 1977. The original numbering of the blister pack was ES-44, and in 1978 and later years that was changed to 01-044. This set was in the “Personalities and Things…That Go Bump in the Night” line from Ral Partha. Each pack in 1977 came with one Rooman with a shield in front, two Roomans with shields on the side, and three assembled pikes on piano wire. By this I mean that the 1977 pack had pikes that were in one piece with streamers rolled up under the business end of the pike. Later, Ral Partha changed the pikes to a two-piece type, where the point of the pike had smaller streamers coming off and would need to be glued to a piece of enclosed piano wire. This latter type was the most prevalent type made by Ral Partha.
Let’s get back to my search. As time went on, I became very frustrated in my attempts to locate any blister packs of Roomans. Today, I’d just look on the company web site or call them – but back then – well kids there was no internet – and that would be a very expensive long-distance toll call to Cincinnati (especially from West Germany where I spent most of the latter 1980’s in the Army). Alas, I found just one blister pack of Roomans at a hobby store around 1986 or 1987 – and that was it!
The Only Roomans I Ever Found in a Hobby Store
I put them away, awaiting the day when I would find another blister pack – and then I could make a unit of 6 figures perhaps…that wait was indeed over 33 years.
Now I must fast forward to my getting back into the hobby in 2014 and discovering eBay. Wow! Surely I will be able to find some Roomans on eBay! So, I searched and searched, and was able to find 18 loose Roomans either singly or in larger lots, plus one original 1977 blister package over the space of 18 months or so. Most times, they were called Goblins or Orcs by the sellers. Almost all had very bad paint jobs that needed to be stripped. This left me with 24 original Roomans.
I have not seen any in quite a while except for a poor recast here and there. Buck knew some contacts at Iron Winds Metals, and we inquired as to the status of the original molds, but unfortunately they were either lost or destroyed. This was sad. But I was able to get pikes from Melissa Morello at Iron Winds Metals that matched the post-1977 type as most of the Roomans I got on eBay either had the wrong weapon type or none at all. (THANK YOU MELISSA!) Of course, I also learned how to make gravity molds during this timeframe and now can make my own castings of the original Roomans for personal use. Iron Winds Metals told me that they are bringing back Roomans under a new name “Rues”, but to my knowledge that has not yet occurred.
The Roomans I acquired on eBay needed a lot of work to clean and strip. Some were painted with what appeared to be a tough lacquer. I used a combination of several sequential applications of Simple Green, vinegar, hot water, and pewter polish to remove old paint. I also needed to use a lot of toothbrush scrubbing and picking with a needle to get the old paint off.
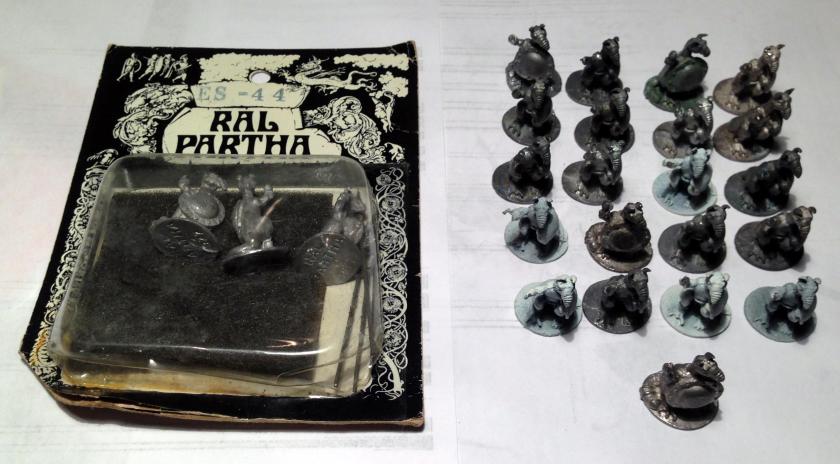
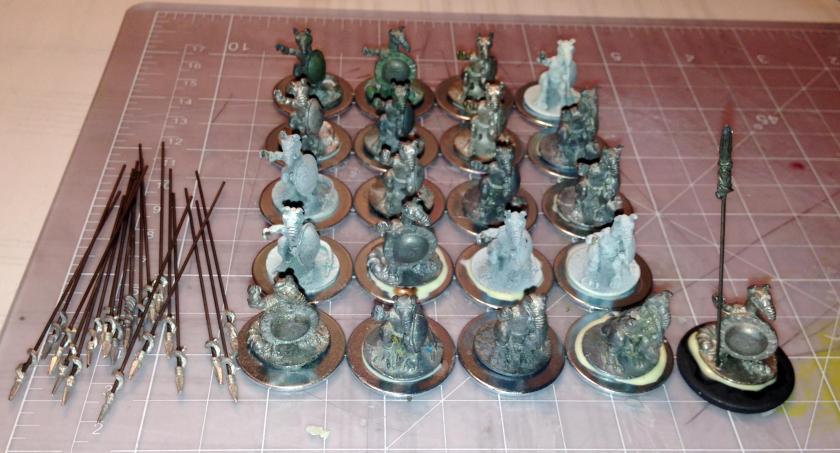
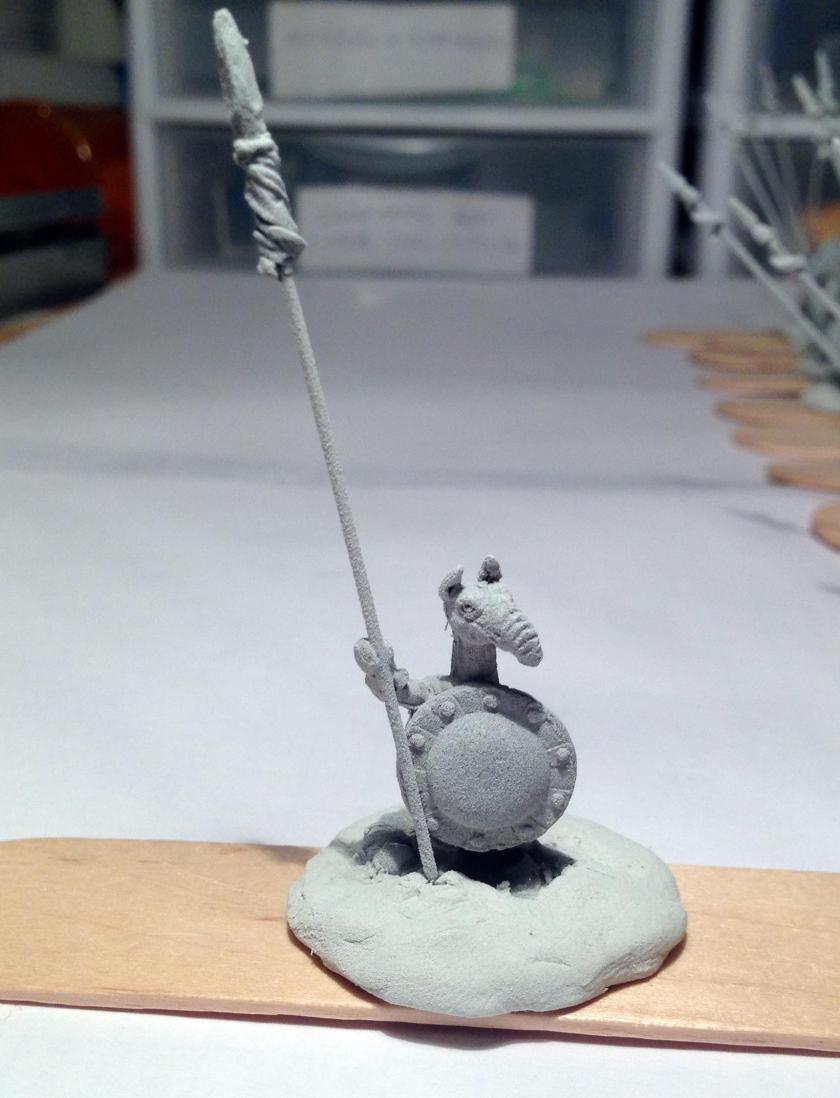
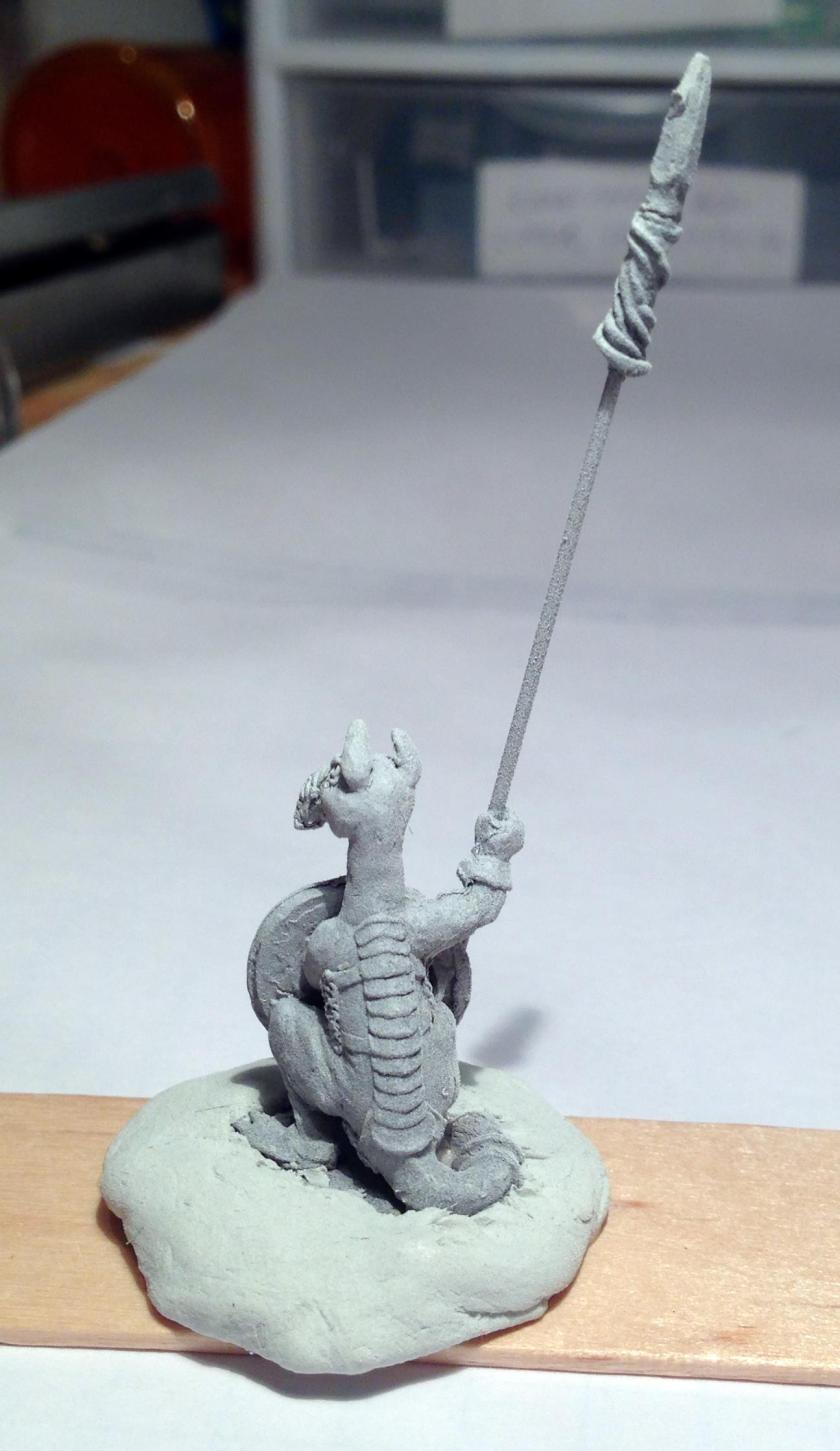
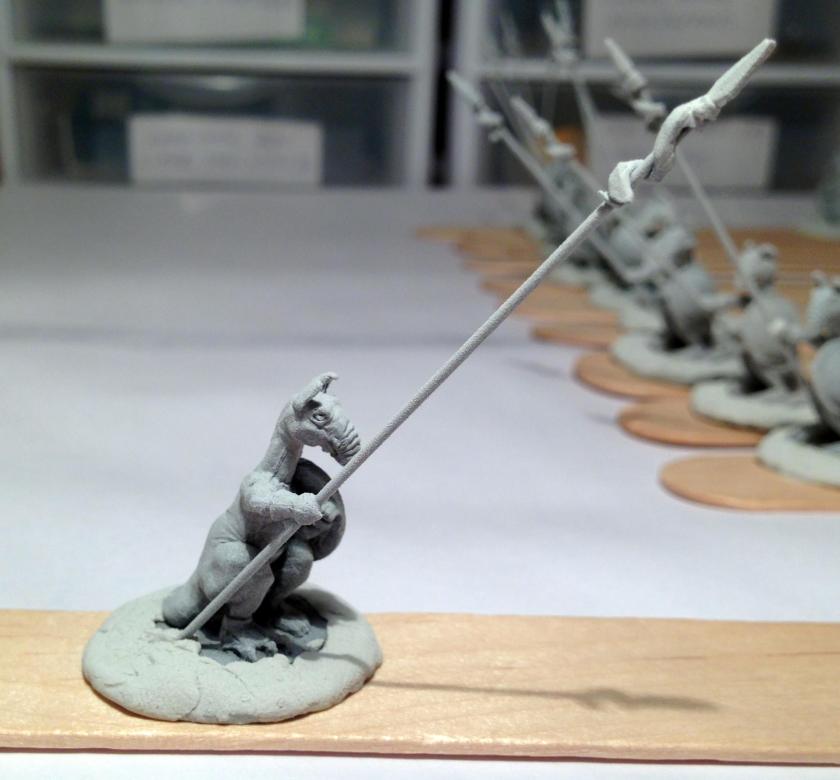
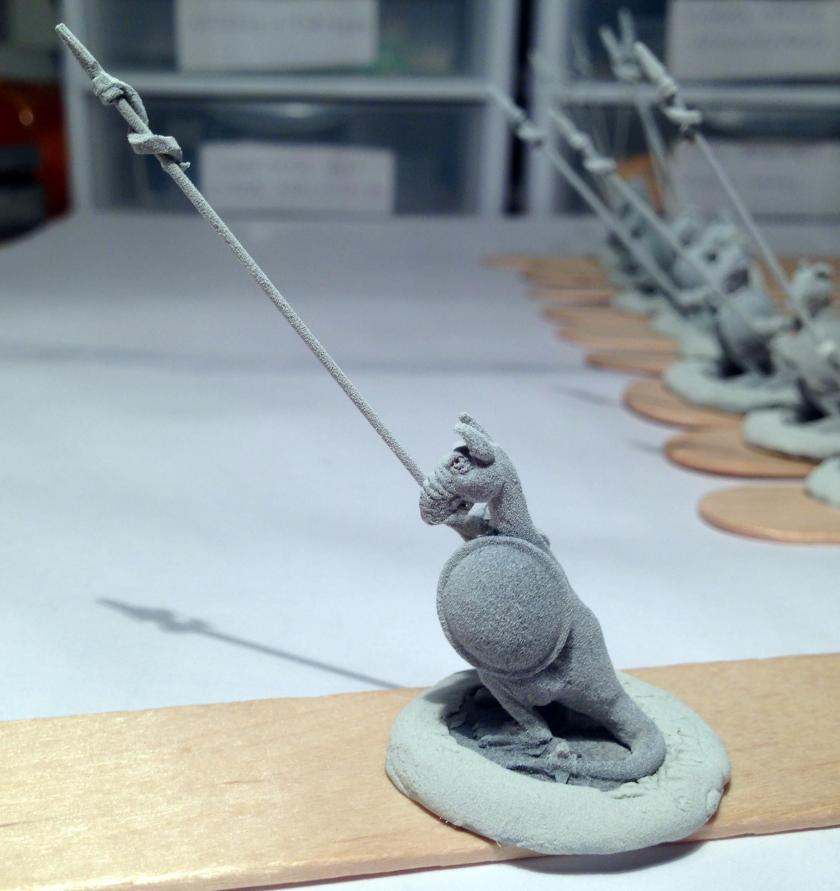
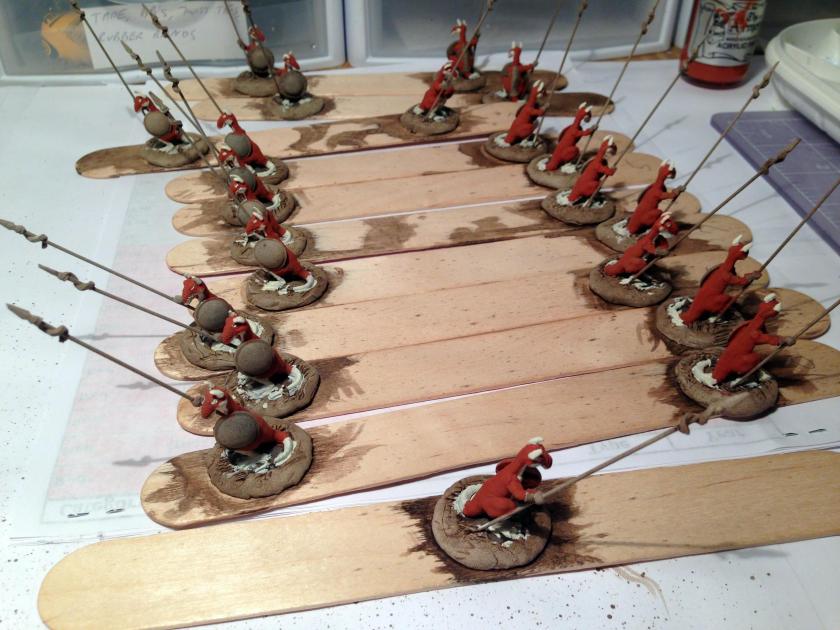
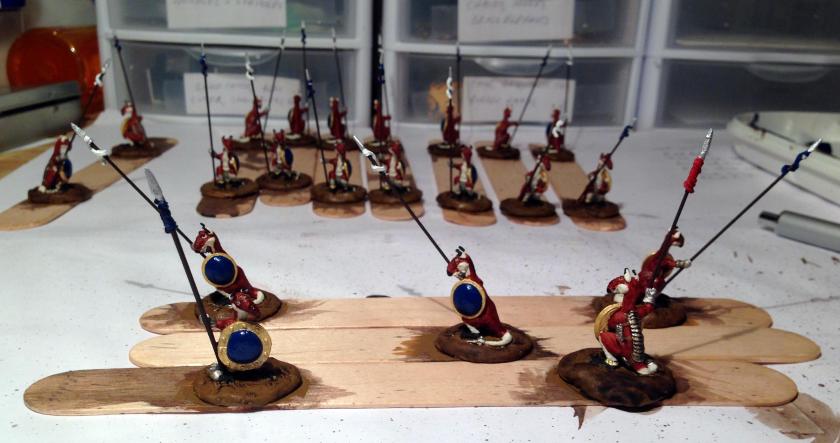
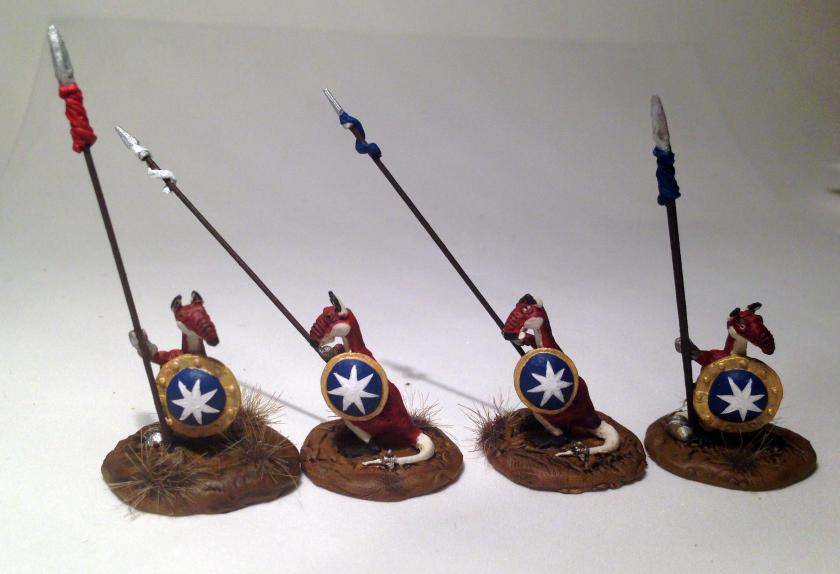
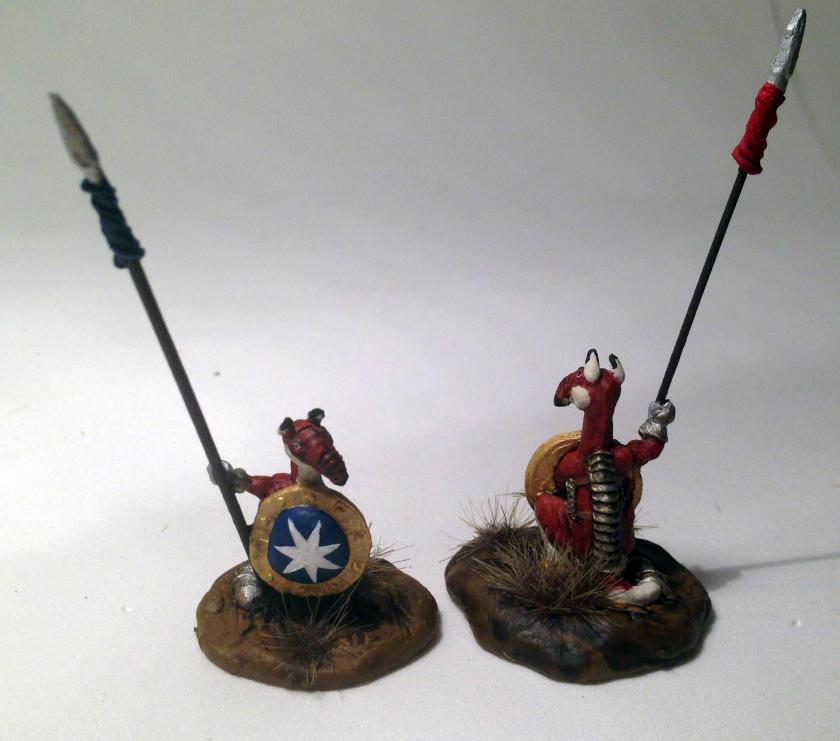
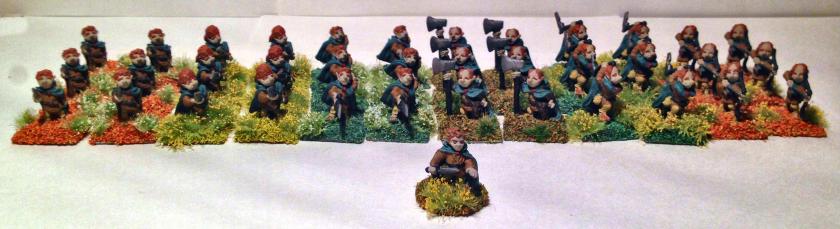
In August 2016, I gathered up my 24 original Roomans – and decided that I could not in good conscience open up my vintage 1977 blister given the difficulty in finding Roomans (let alone ones in an old blister pack). That left me with 21. I had two 1977-type pikes as well as the ones from Iron Winds Metals. I decided that I would incorporate the two old ones within the mob and use post-1977 style pikes to arm the remainder. One would be a leader, and the other 20 would form the mob or troop.
Yes, I said mob. A group of 10 or more kangaroos is referred to as a mob, a troop, or a court. Females (who are the only ones with pouches) are does, flyers, or jills. Males are referred to as bucks, boomers, jacks, or old men. Of course the term joey for the young is more commonly known. This means that my Roomans that have a shield in front are males (pouchless), while the rest are females (having pouches). Of course, being marsupials, and hopping ones at that, they have many unique qualities. If interested, here is a link: https://en.wikipedia.org/wiki/Kangaroo
My Original 1977 ES-44 Rooman War Party Blister and those destined for the Rooman TroopClose up of the blister – note the 1977 pikes on the right
My first action was to glue the 19 newer pike heads to the piano wire with Scotch super glue, and the Roomans to 1″ steel fender washers with wood glue. This size worked better as the Roomans bases were too big for a ¾” washer. I used a slightly thicker 1″ washer for the leader. I gently bent the arms of the Roomans and oh-so-carefully opened their hands to hold the pikes at different angles. Some of the hands were not well-cast, and I fixed these with Aves Apoxie Sculpt (a two-piece clay that sets up hard as a rock in a day) https://www.amazon.com/Aves-Apoxie-Sculpt-White-pound/dp/B0013UFM7M/ref=sr_1_6?ie=UTF8&qid=1473111581&sr=8-6&keywords=apoxie+sculpt .
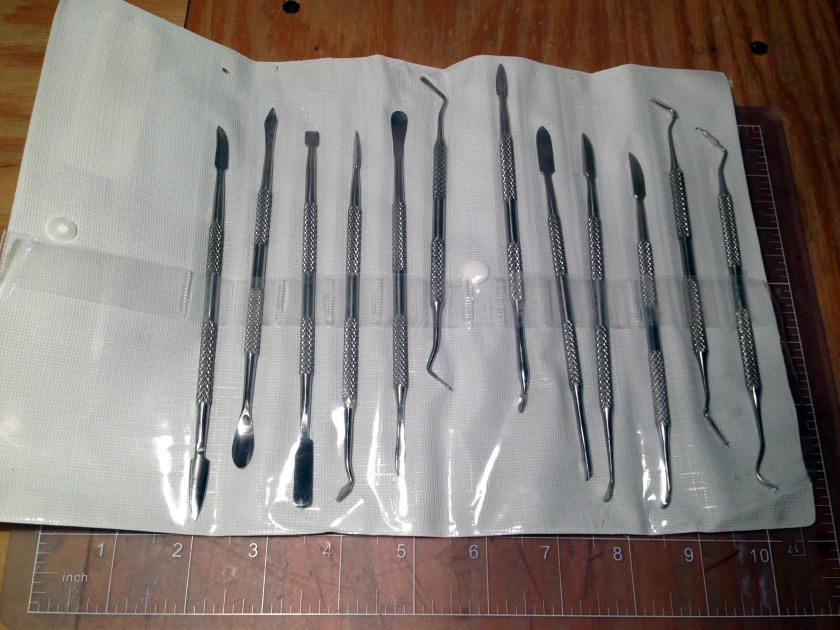
The Pikes and the Roomans, note the Rooman Leader holding the older type pikeMy new sculpting tool set
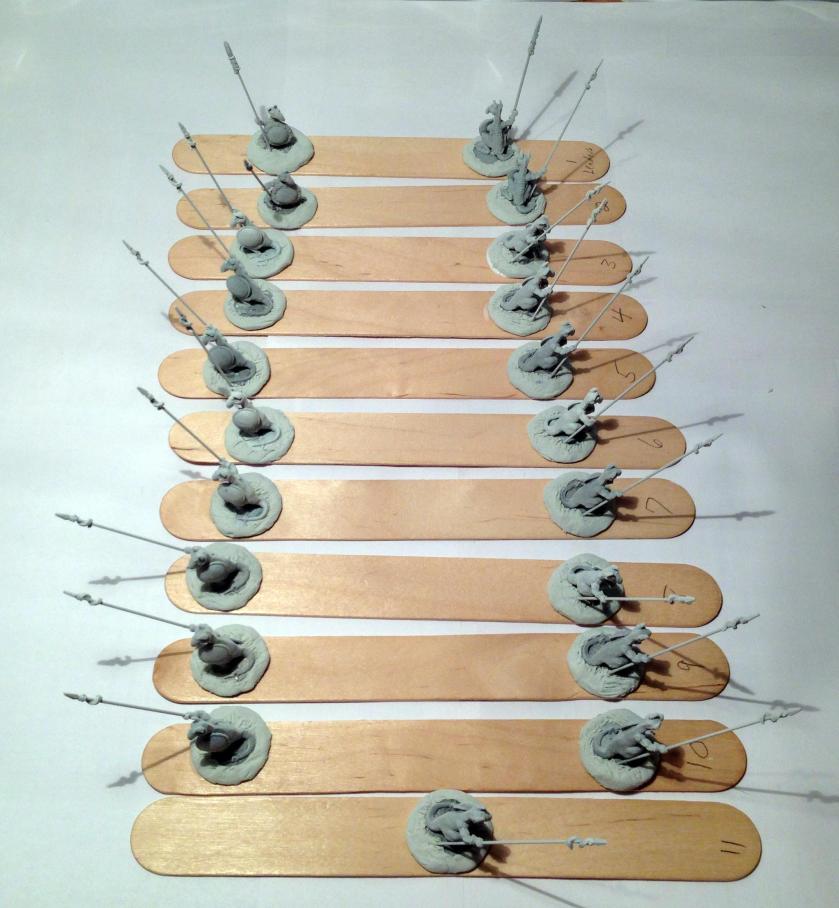
After I let the glue dry and the clay set up, I primed the unit with Krylon “Ultra Flat White”. I used Elmer’s white glue to lightly affix the Roomans to large popsicle sticks for painting.
Primed and Ready for paintRooman Leader Primed (front view)Rooman Leader, primed (rear view)Rooman Jill primed, pike sideRooman Jill primed, shield side
Now I needed to have a plan on colors. Buck always painted his Roomans green (he says that his are tropical). I wanted to check out real kangaroos and see their colors. There are two main types, the red and the grey, and the reds are larger. Therefore, I went with a scheme based on the red kangaroo.
Red Kangaroo (male Jack)
My first action was to use a light coat of Citadel “Agrax Earthshade” to the models. I wanted a good reddish-brown, and I looked in my paint supply, and had a nice candidate in the form of a 1996 bottle of Armory “Red Brown”. I used this for the fur outside of the feet and the belly. For the belly, I used Americana “Bleached Sand”. I also used that color up to the jaw muscles and lower jawline to help accentuate the glare and demeanor of the figures. I also used this for the eyes and for the ears. I used another 1996 paint – Armory “Gloss Black” – for the noses and to finish off the pupils of the eyes. For the feet, I went with Americana “Ebony”. I also used this color for the tips of the ears. The jack figures had two anklets, and the jills had one. These I painted with Martha Stewart Crafts “Pale Bronze”. I am not sure why the jacks had more jewelry than the jills!
Early base coating
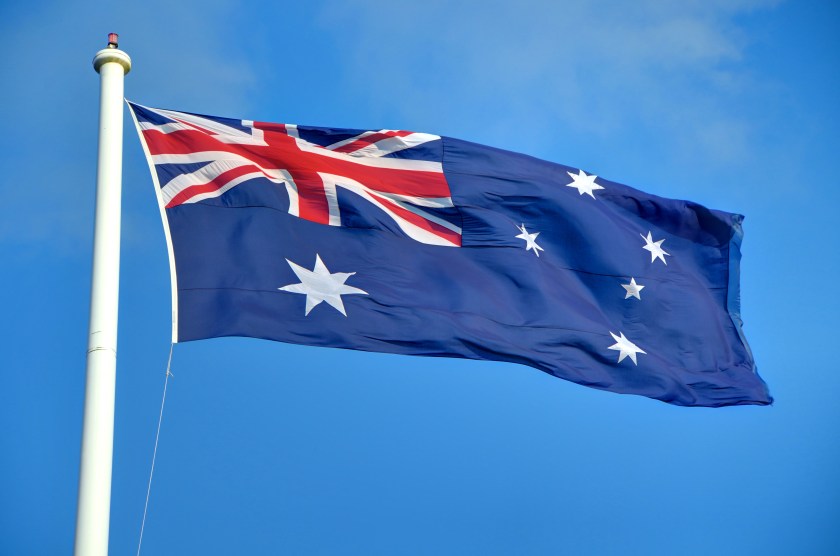
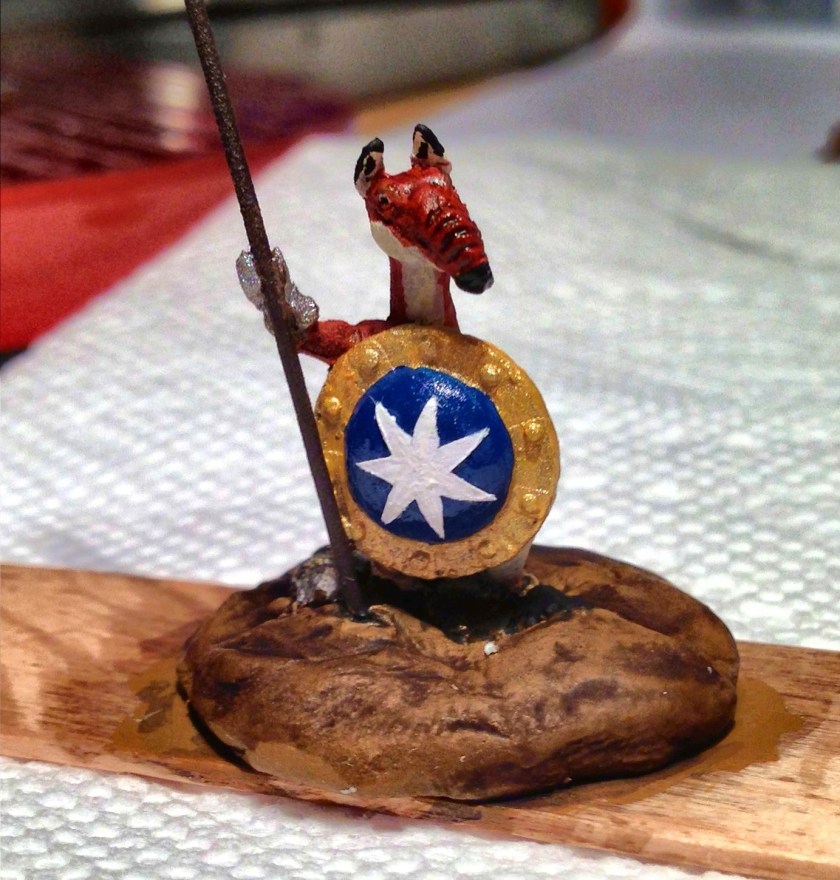
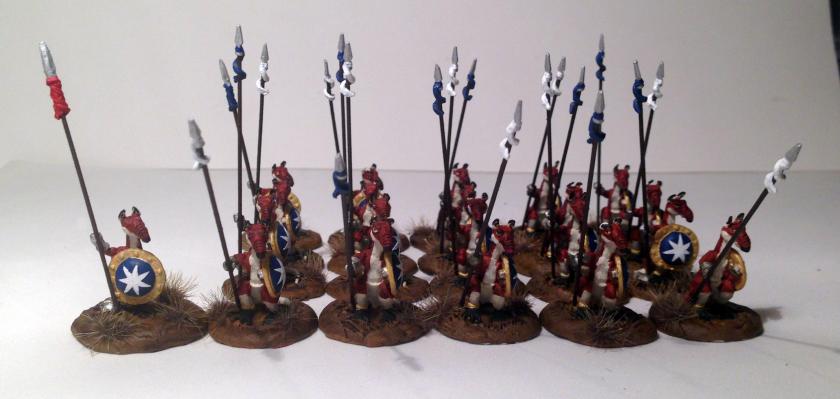
As I moved on to the other metallic – armor, tail spikes, shields, and pike heads – I paused to think of a good color scheme and theme for the unit that would tie it together. I particularly wanted a shield that would “pop”. Looking at Greek phalanxes, one usually sees a bronze shield with a pattern upon it. But these are not Greeks – they are Australians! I decided to use the colors and symbols of the Australian flag for the troop. For colors, I decided that the leader would have the red of the St. George’s Cross (in the Union Jack) on his pike streamer, with the rest of the streamers being evenly split between dark blue and white. The shields would have a dark blue center circle. There are a series of stars on the Australian flag. A seven-pointed star on the lower left quadrant represents the British Commonwealth. The other stars (four seven-pointed stars and one five-pointed star) represent the southern cross. I tried to draw a seven-pointed star, and that is nearly impossible. Additionally, the ones that I would use on the shields would need no be 1/8″ from top to bottom. My wife Lynn suggested I print them off from my computer. Luckily, I found some seven-pointed stars on the internet, and shrunk them down to size, and printed them off.
The Flag of Australia
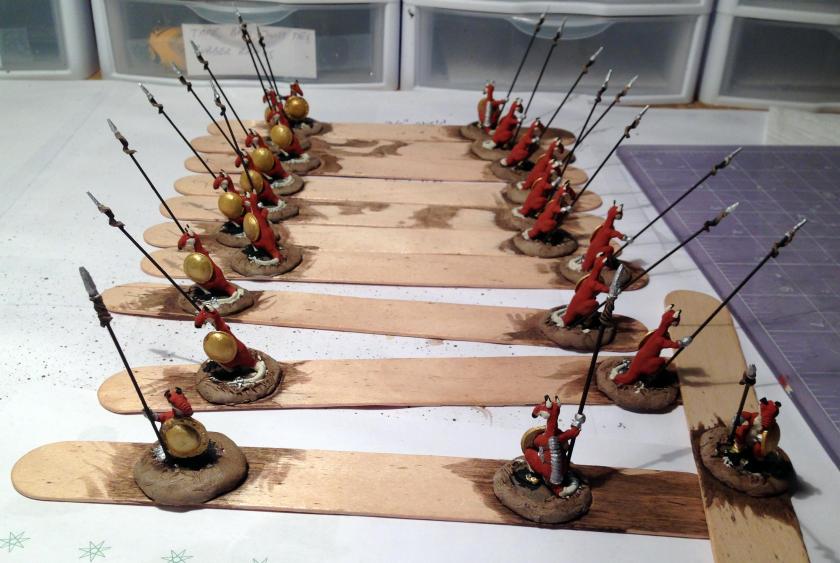
I used the “Pale Bronze” on the shields. For the tail weapons, pike heads, gauntlets, and armor (on the jacks) I used Tamiya X-11 “Chrome Silver”. For the shield straps and eyebrows, I used P3 “Bootstrap Leather”. I wanted the pikes to look like a hardwood – so I painted them with Citadel “Dryad Bark”.
After metallic base coating – note seven-pointed stars in foreground
I then needed to move forward with my Australian flag color scheme, For the leader’s streamer, I used Americana “Santa Red”. The other streamers got either a blue or white treatment with another of my older paints. For the dark blue streamers, I used Deka Lack “Dunkelblau”; for the white streamers I used Deka Lack “Weiβ” (Weiss). Both of these date from 1987 when I bought them when I was stationed in Karlsruhe, West Germany. I also used “Dunkelblau” on the shields’ centers. I then used Citadel “XV-88” on the bases.
Completed base coated troopClose up of Rooman leader after base coat
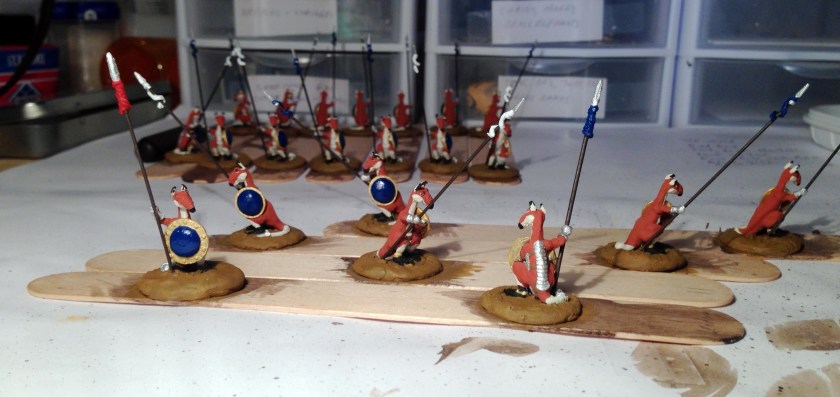
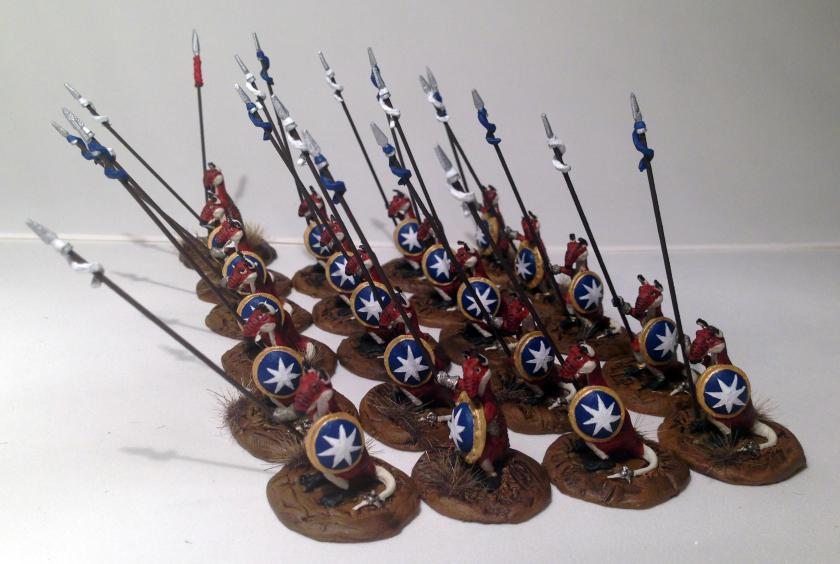
I considered using some dry brushing on the figures at this point but decided against it. Basically, I wanted to darken the red fur and see if using a wash would do that and give some detail to the snouts and haunches of the Roomans. I mixed a 50/50 mix of two inks – Secret Weapons Washes “Just Red” and P3 “Brown Ink”, and carefully covered all the red fur sparing the lighter fur. I also used Secret Weapons Washes “Armor Wash” on all steel armor. I then added another coat of “Agrax Earthshade” to my sculpted bases to bring out the earthlike shapes of the ground. These washes really had a great effect and made the figures look like I desired, as well as bringing out important details that I feared to dry brush.
After base coat and washes – nice darker hues
Let us return to the all-important seven-pointed stars that I printed off! I used my Exacto knife and carefully cut out 26 or so stars with the assistance of the 2.5 magnification of my Carson glasses. I used the best ones for the shields. I applied a light coat of Elmer’s white glue to the underside of each star with a Testors microsponge (this is a good use of this tool). I centered each star and ensured that each point was glued down.
Once the glue dried, I applied a coat of “Weiβ” to the stars and touched up the “Dunkelblau” around the shield where the glue seeped out. I then applied three coats of varnish sequentially – first Krylon “Clear Matte”, then two coats of Testors “Dull Coat”.
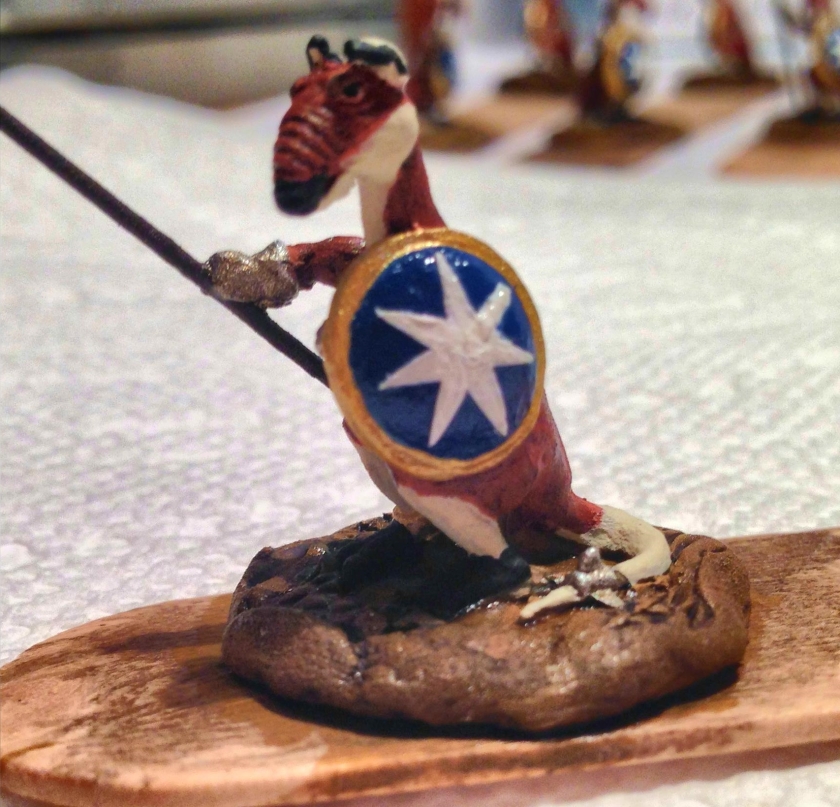
The Rooman Leader (a Jack) after varnishingA Rooman Jill after varnishing
Lastly, I added some Army Painter “Wasteland Tuft” to give them the appearance of coming out of an Australian Desert.
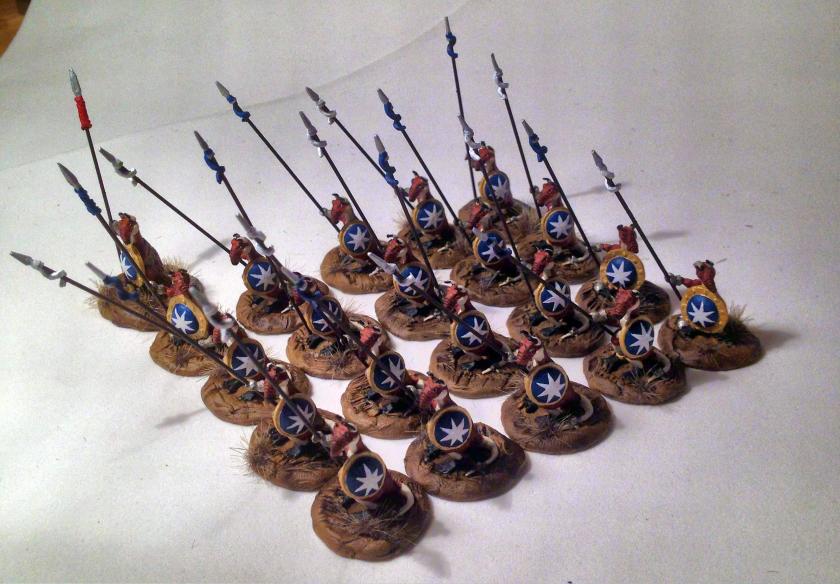
Completed Rooman Troop, angled viewCompleted Rooman Troop, front viewCompleted Rooman Troop, flank viewLeft to right, Rooman Leader, two Jills, and a JackA Jack and the Rooman LeaderTwo Jills
I am more excited and happy with this unit than I had even hoped to be! The unit looks positively awesome and the stars help it pop. As I build more units with my self-cast Roomans I can incorporate the same color scheme (though I believe my 1980’s paint supply will run out!).
A final note of thanks – to Buck and Dave for getting me into this hobby – and especially to Buck for starting me on this Quixotic quest for a Rooman unit all those years ago! I look forward to rolling dice and pushing lead with you soon!!
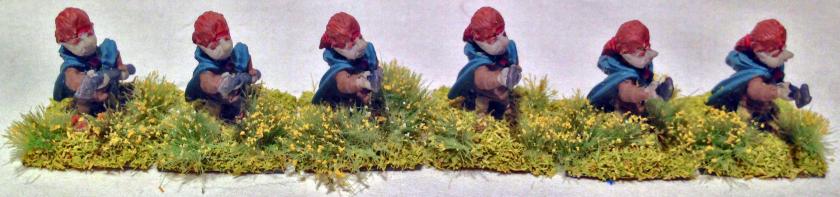
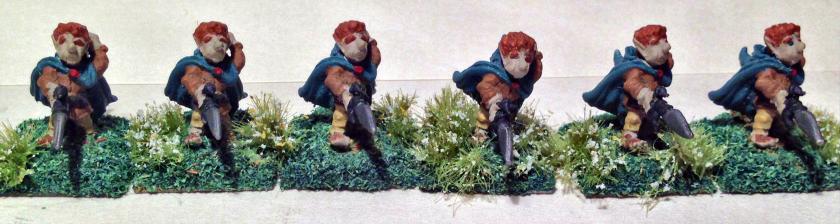
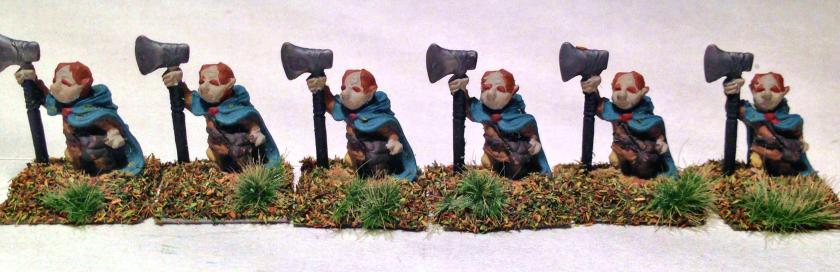
Dave Wood was kind enough to give me an entire 24 figure battalion of 1977 Minifig World of Greyhawk (42 “Halfling Fighters”). They are 25mm figures, so the photos below are enlarged.
After checking with Dave, we are sure that I painted some of these in the 1982-1984 timeframe while we were roommates at West Point. A fading memory of my painting the eyebrows and the furry halfling feet somehow was still kicking around in my brain. This gift jogged that memory to life! Back then, Dave had a lot of figures (well, some things do not change). I offered to paint some and he was kind enough to let me. These were armed with axes, hobbit swords, hobbit spears, short bows, hobbit daggers, and what looked like adzes or mattocks. At some point later, Dave remounted the figures on flat steel bases and flocked them a yellow greenish color.
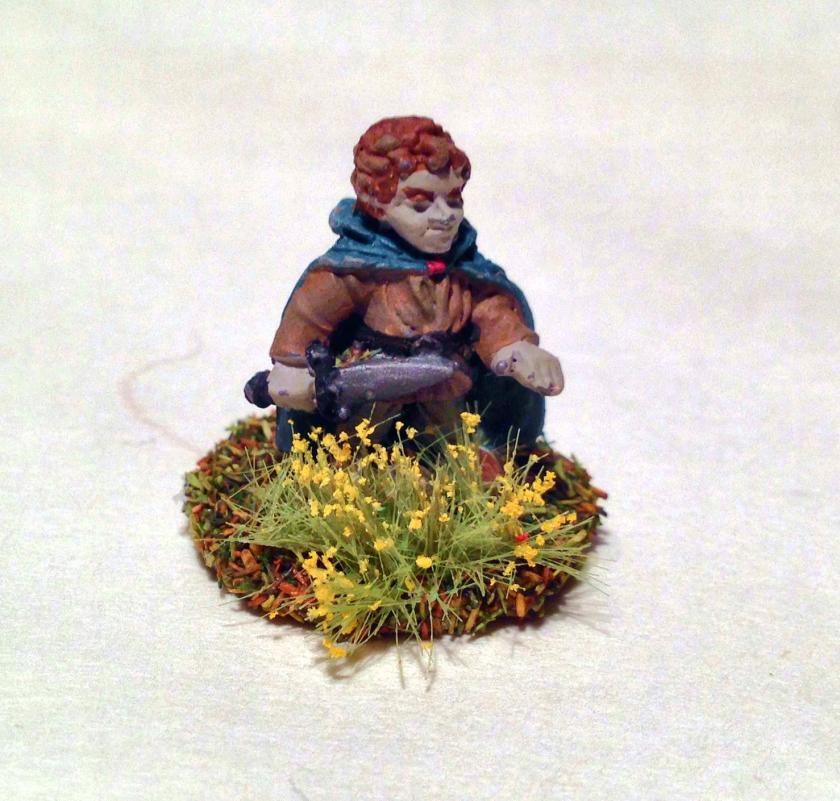
There was also a Grenadier leader that he had included with the group. This figure originally came in a 1980 boxed set (Grenadier #2002 Halflings). This set had 9 halfling figures in the box. The leader was “C” Halfling Thief“. He does look the leader type. He was mounted on a small washer and similarly flocked. Here is the list of the figures that came in the set from Lost Minis Wiki: http://www.miniatures-workshop.com/lostminiswiki/index.php?title=Image:G-asfs-2002z.jpg
I have several of these in my collection from eBay.
Back in the 1980’s, it was easy for younger eyes to discern which one of the Minifig halflings had which weapon. As those days are past, I decided to reflock the bases so that they would be easier for play on the tabletop. I used a variety of flocking and grasses and meadow flowers to make them look slightly different from afar.
I did not want to do anything with the paint jobs except ensure that they were varnished. I was unsure as to whether they were already varnished or not, so they got two coats of Testors “Dullcoat” after flocking. I added all the flowers and tufts after the varnish applications were dry. The results are below.
Minifig World of Greyhawk 42 Halfling Fighters with daggers. Bases are flocked with 4Ground “Copper Leaves” and Army Painter white “Meadow Flowers”
Minifig World of Greyhawk 42 Halfling Fighters with spears. Bases are flocked with 4Ground “Green Leaves” and Army Painter yellow “Meadow Flowers”
Minifig World of Greyhawk 42 Halfling Fighters with Swords. Bases are flocked with Army Painter “Grass Green” and white “Meadow Flowers”
Minifig World of Greyhawk 42 Halfling Fighters with Axes. Bases are flocked with 4Ground “Brown Leaves” and Army Painter “Wilderness Tuft”
Minifig World of Greyhawk 42 Halfling Fighters with mattocks/adzes. Bases are flocked with Army Painter “Grass Green” and yellow “Meadow Flowers”
Minifig World of Greyhawk 42 Halfling Fighters with short bows. Bases flocked with 4Ground “Copper Leaves” and Army Painter yellow “Meadow Flowers”
Grenadier Halfling 2002C used as leader for the battalion. Base flocked with 4Ground “Brown Leaves” and Army Painter yellow “Meadow Flowers”
I thought the use of different colored flowers and tufts would give the unit a hint of their origin – a happy, peaceful agrarian Shire. I think that this color scheme worked, and I really like the effects.
The Halfling Battalion
Overall, I am very happy to add this unit to my armies. Thanks Dave!
Buck My buddy Ma’k made some molds of these long out-of-production figures. They are ducks from the RuneQuest line. He gave them to me a few months back, and this weekend I was able to get them painted. A view of some of the ducks Another view I painted half with the “sun” design on […]
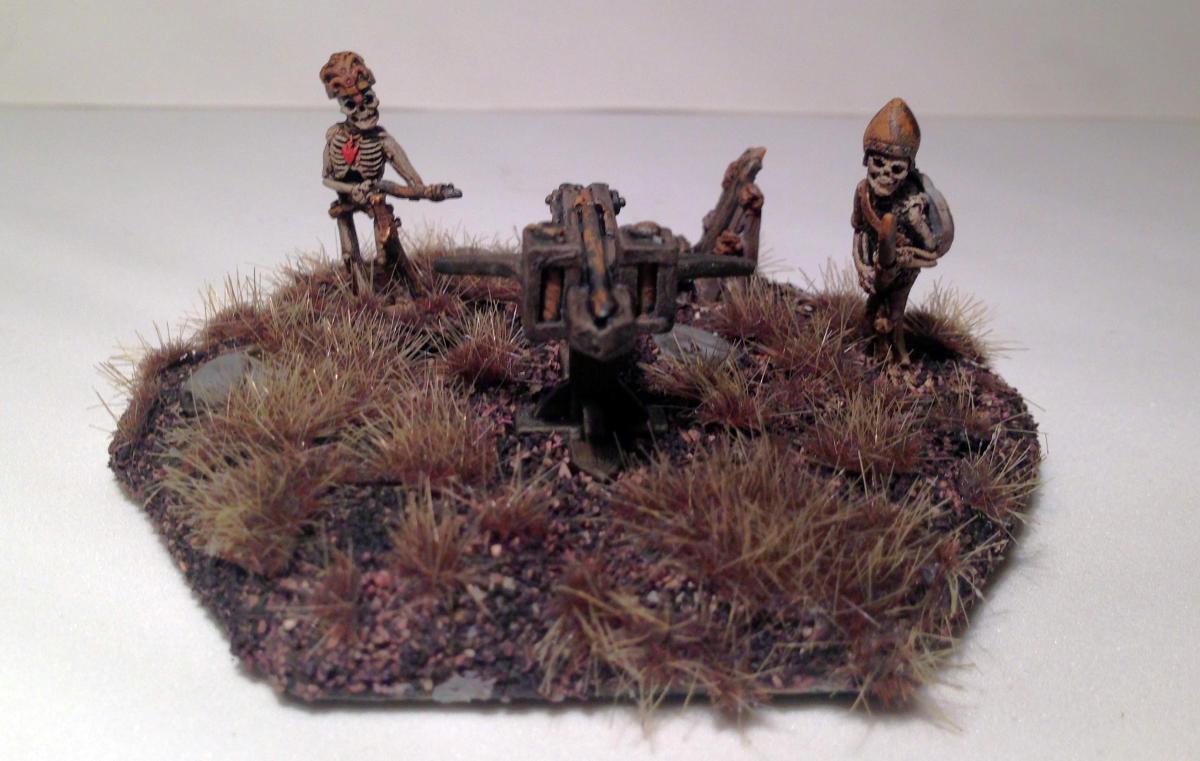
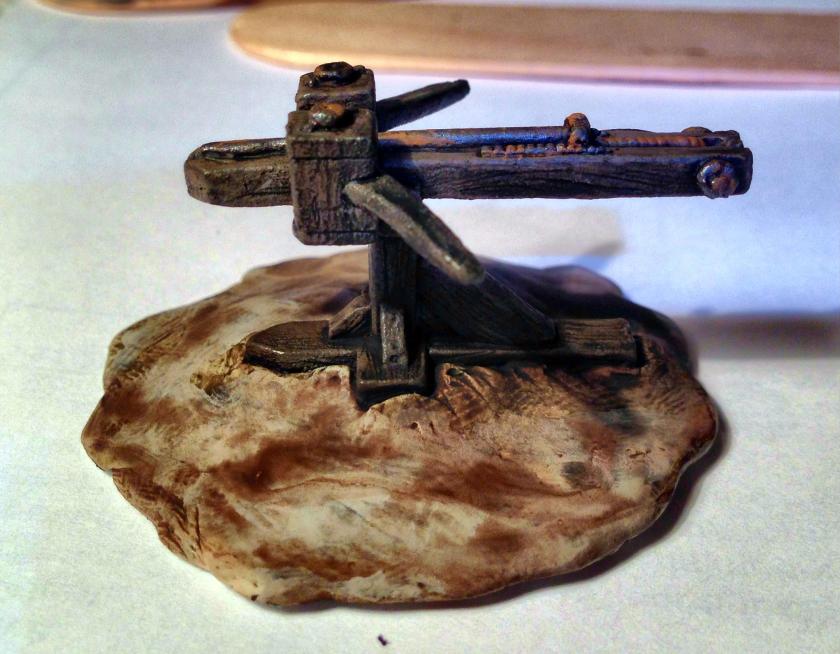
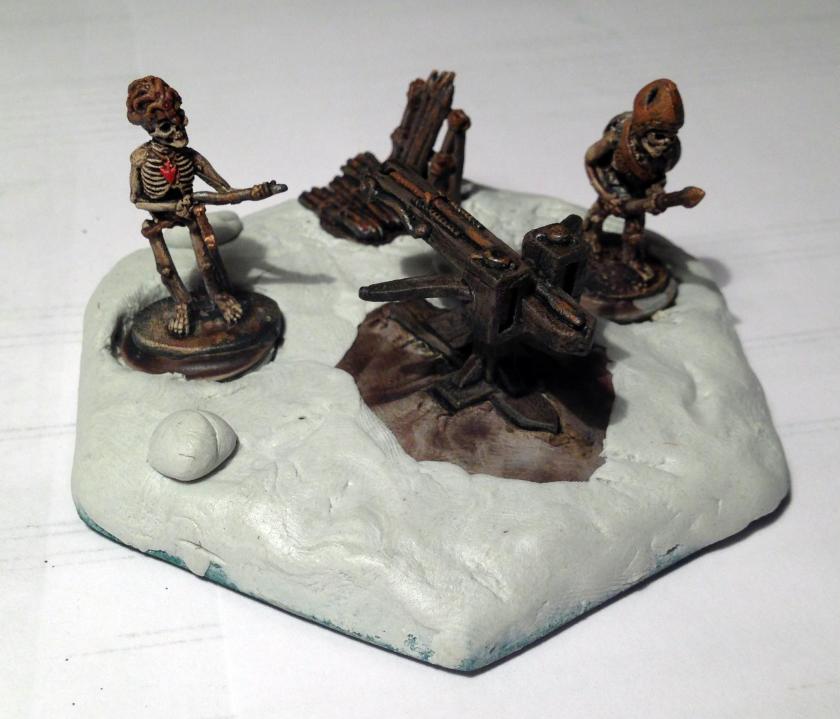
My skeleton army needed a crew-served weapon for War Must Be. I saw an old 1984 Grenadier Models “Dart Thrower and Undead Crew” on eBay and I bought it. It originally was in the Fantasy Lords (First Series), and is listed on Lost Minis Wiki as 130, although there are markings of “A47” on the bottom of the figures. Here is the link: http://www.miniatures-workshop.com/lostminiswiki/index.php?title=Image:G-flbp-130.jpg
I thought I would treat this kit as a small ballista.
The set as acquired
Bottom of set
Later on, I came across a stand of bolts and small cannonballs tucked into another miscellaneous lot I got on eBay. I cut away the cannonballs and saved the bolts as ammunition for this crew-served weapon.
Bolt stand added
I drilled a small hole in the base of the dart thrower top and bottom, and used a small piece of paper clip wire to secure the two with Scotch super glue. with my scroll saw, I cut a 3″ beveled hexagonal base from 1/8″ luan. I put each of the crew on a ¾” steel washer and the weapon on a 1″ steel washer. I lightly glued each to a popsicle stick for painting. I primed the set with Krylon “Ultra Flat Black” spray paint.
After priming
I washed all the figures with Secret Weapons Washes “Heavy Body Black”. I painted the dart thrower with Citadel “Dryad Bark”, followed by a wash with Citadel “Agrax Earthshade”. I then added P3 “Bootstrap Leather” to the bolts. This looked too new to me – and I thought the wood should look old and weathered. Plus, I thought the bolts and metals needed more rust. So I mixed Craftsmart “Grey” and the “Dryad Bark” in a 5:1 ratio, and redid the wood with dry brushing. For the crew, I dry brushed with Citadel “Ushabti Bone”. Then I applied “Agrax Earthshade” to the bolt stand, and washed the crew with Secret Weapons Washes “Sewer Water”. To get a more gray look on the bolt stand and the weapon, I used Secret Weapons Washes “Stone” as another wash, followed by more dry brushing with the 5:1 ratio mix as before.
Then I went back for more dry brushing on the crew with an even mix of “Ushabti Bone” and Americana “Ivory”, followed by a second dry brush mix of Americana “Bleached Sand”. For the metallic, I used Folk Art “Gunmetal Gray” on all helmets, bolts, and metal parts on the dart thrower. For any leather straps on the crew, I painted with “Bootstrap Leather”. I still wanted a more weathered look on the wood, so I mixed P3 “Red Black” ink and Craftsmart “Grey” paint for another wash. That achieved the look I wanted.
For the jewel on the crewmember’s amulet I used 1996 Armory “Red”. The choice for the rust on the helmet was my trusty 1983 Polly-S “Rust”.
Dart Thrower Painted
Crew and Bolts, side one
Crew and Bolts, side two
Now, my next task was to assemble this set. I affixed the dart thrower and the bolts to the hexagonal base. I applied a couple of washers (for the adhesion of the clay), and chiseled out holes for the crew. I drilled a hole and put a ¼” neodymium magnet in each. I put multiple 1″ steel washers on the model’s underside to secure the neodymium magnets and to provide for future magnetic storage.
Ready for the sculpting clay
I then varnished the model components with a coat of Krylon “Clear Matte” and a coat of Testors “Dull Coat”, allowing for drying in between applications.
Then I mixed a two-piece sculpting clay (Aves Apoxie Sculpt) and applied it to the base. I sculpted a few undulations and rocks as well into the base. I carefully applied a coat of “Agrax Earthshade” to the base, and then flocked it with Army Painter “Brown Battleground”.
This was not “dead” enough, so I used Citadel “Nuln Oil” on the flocking, which darkened it up a lot.
After adding Apoxie Sculpt
After darkening the flocking
I then applied Army Painter “Wasteland Tuft” in a random pattern so as to disguise the crew’s placement wells.
The final unit, front
Back view
With crew removed, top view
This will make a nice addition to my skeleton army.
I am catching up as I can in my blog on projects that I have completed in August and September. Last year, I was looking on eBay for some interesting Ral Partha additions to my fantasy armies. Specifically, some large creatures that Wizards could control in my War Must Be game. In the game, Wizards can use a Mundane Spell (His Master’s Voice) to control a large creature such as the giant scorpion, giant tarantula, or giant spiders that I have previously described in this blog. They use some of their action chips to accomplish this.
His Master’s Voice Spell Card
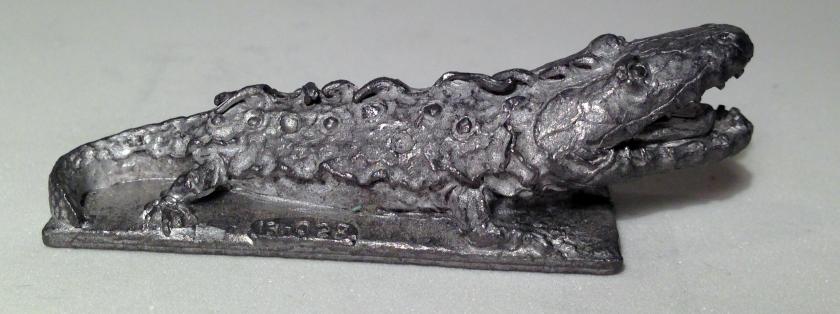
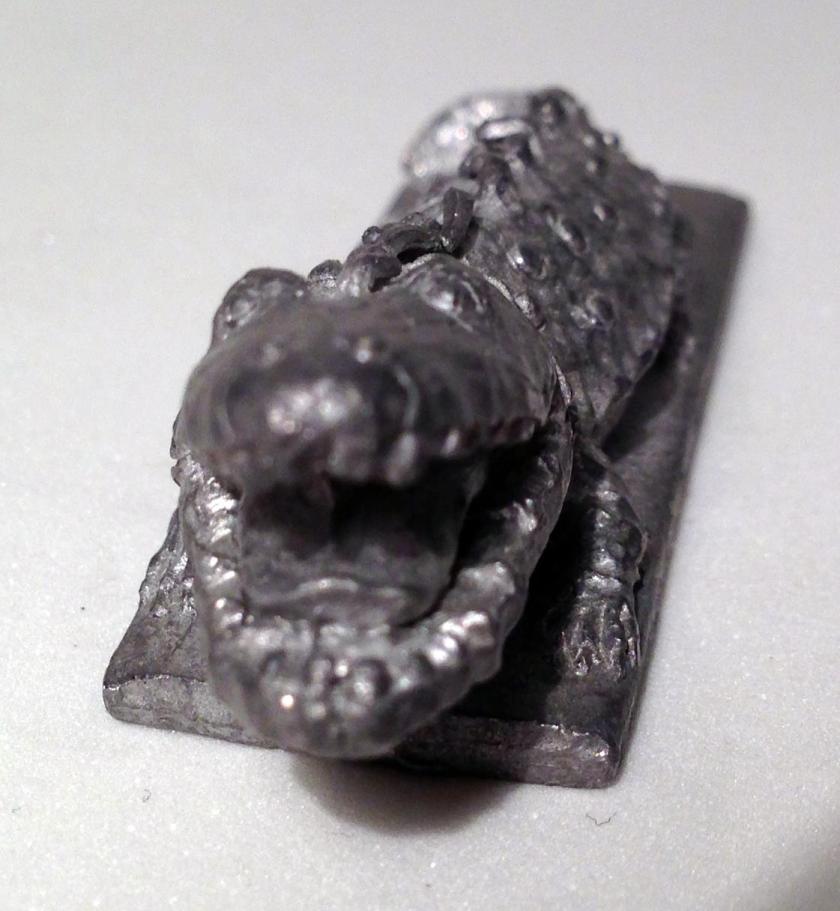
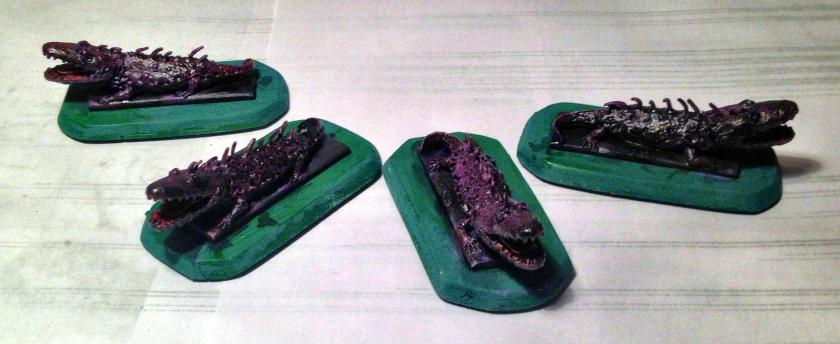
Once again, I happened upon an eBay find that intrigued me. There was a group of four “Fire Breathing Salamanders” available, and my imagination took over – this would be like having a Wizard controlling a living flame thrower – pretty cool stuff. Each will have a limited number of powerful short range flame attacks in the game, in addition to tooth and claw capabilities. These figures were sculpted by Dennis Mize as part of the Children of the Night line, and were designated 13-028, and released in 1982.
Unpainted Fire Breathing Salamander, side view
Unpainted Fire Breathing Salamander, business endBottom of figure – waiting 34 years to get painted!
Way back in February, I primed these in Jeff Smith’s heated workshop with Krylon “Ultra Flat Black” spray paint with a gaggle of other figures. Later in the spring, I mounted one on a 3½” beveled hex base made out of 1/8″ luan, but it did not look correct for play. Subsequently, I remounted all four on bases that were roughly octagonal or elliptical, which worked better. I glued two 1″ steel washers to the bottom of each base for future magnetic storage.
Initial basing of primed figure which I changed to different bases
As inspiration, I wanted to give these the coloring of a salamander that is native to Massachusetts that I had seen only rarely. I believe that it was a blue-spotted salamander, and the memory I had was of a blackish blue to purple-skinned creature with light spots.
Blue Spotted Salamander
The Dennis Mize figures were more alligator-like, but this was my starting point.
I began by painting the interior of the mouth with Americana “Primary Red”. I mixed equal parts of American “Dioxazine Purple” and “Ebony” for the upper skin. For the lower belly and the spots, I used an equal mix of “Dioxazine Purple”and Americana “Buttermilk”. For the eyes, I used straight “Dioxazine Purple”. I then washed the figures’ skin with Secret Weapons Washes “Purple”, and the mouth with SWW “Heavy Body Black”. I drybrushed the figures with Americana “Lavender”, and then applied two more sequential washes with SWW “Sewer Water” and “Heavy Body Black” as I tried to get a shade that I was happy keeping. This seemed to work adequately.
After base coating and initial series of washes
After dry brushing and more washes
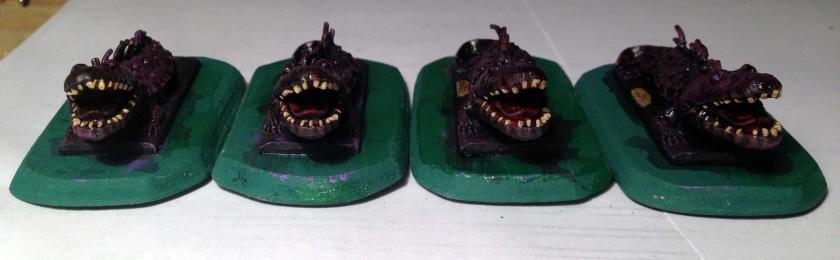
For the teeth and eyes , I used Citadel “Ushabti Bone” and “Wild Rider Red” respectively. I added an iris with veteran 1984 Polly-S “Slime Green”.
Smile!
I then touched up the nails with a mix of the “Ebony” and “Dioxazine Purple”, and added some more “Ushabti Bone” to the spots, then another two washes – first with the SWW “Purple” watered down a bit, and then a light one with Citadel “Agrax Earthshade”.
There is a small plaque on each figure with 13-028 on it. These I painted with Martha Stewart Crafts “Brushed Bronze” and washed with SWW “Heavy Body Black” to highlight the numbers.
Fire Breathing Salamanders painted before flocking of bases
I used Army Painter “Moss Green” flocking, and I was not happy with the effect. These creatures needed to look as if they were crawling out of a swamp or tall elephant grass. I wanted better. I used two coats of varnish sequentially – Krylon “Clear Matte” and Testors “Dull Coat” to seal the paint job ensuring adequate drying time between coats. Then I moved back to the bases.
Detail of plaque and initial flocking
The four after varnishing
I had a good number of Army Painter “Swamp Tuft” and “Jungle Tuft” accessories that I thought would do the trick, and this approach did work. The trick here was to cut the “Jungle Tuft” in half on the cellophane before using and mixing in the “Swamp Tuft”. I affixed these with Elmer’s white glue. This had the advantage of hiding the rectangular base lines and give the “crawling through grass” impression.
The Fire Breathing Salamanders
Overall, I am very happy with the results. I really think that the final basing, which took some time and a lot of gluing, was worth the effort. I look forward to watching them roast some enemies at the behest of their Wizards!
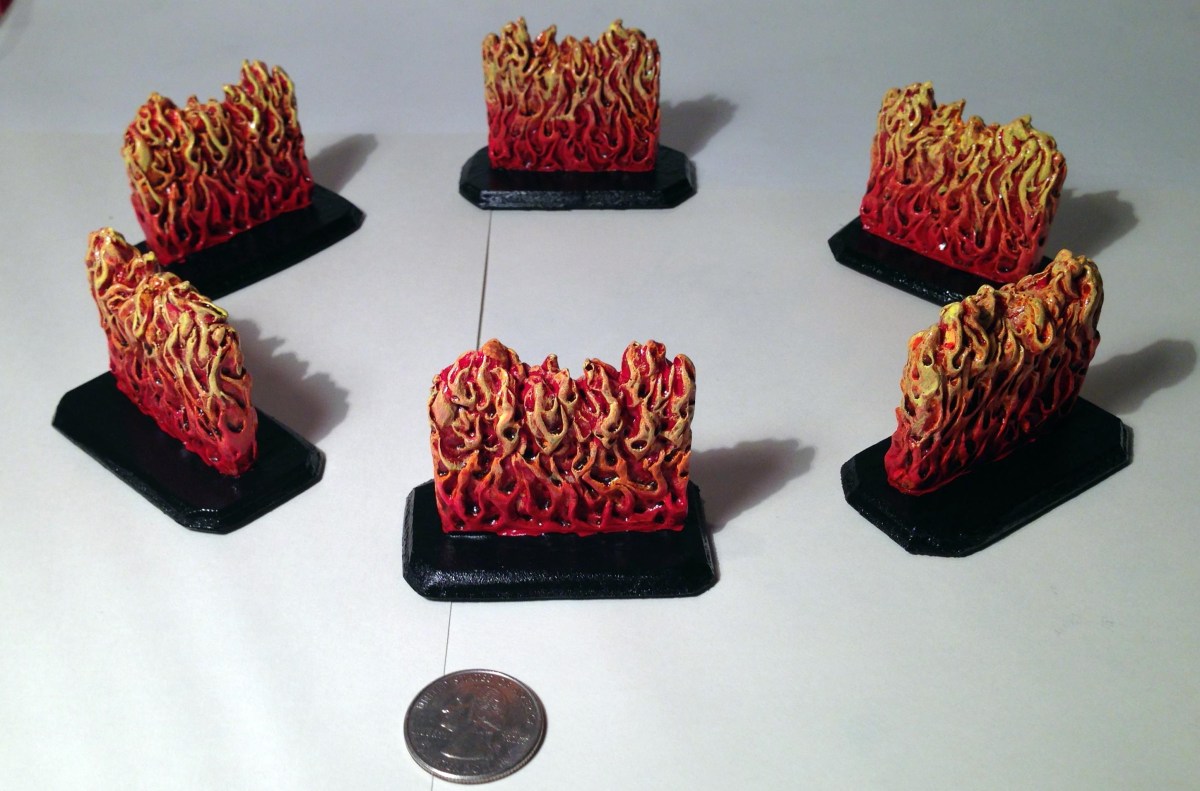
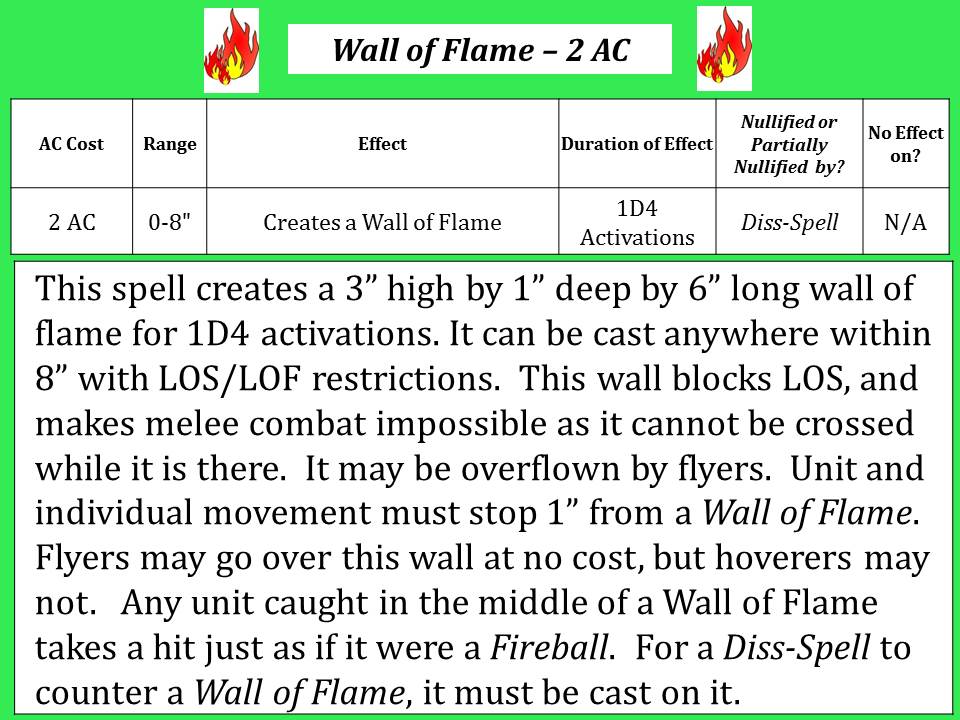
Luckily, I found a listing at Noble Knight Games (or possibly on their eBay site) for 6 Ziterdes Fire Walls that would serve my purposes well. They were resin (not metal). Ziterdes makes very high quality German hobby products, and Noble Knight games has many of them for sale.
Ziterdes Fire Walls in package I soaked them in dish soap and cleaned them with a toothbrush (something I learned from Chris Palmer – thank you Chris!). I had cut several bases out of 1/8″ plywood with my scroll saw so I used these for mounting the Walls of Flame. I also mounted two 1″ steel washers to the underside of each base for magnetic attachment in my storage boxes. I painted the bases with Americana “Jungle Green”.
Walls of Flame mountedThen, I used up the last of my Armory “Red” from 1996 to base coat the walls. I had wanted to use my Armory “Scarlet” as well but that had become unusable after 20 years!
After that dried, I then applied Americana “Primary Red”, followed later by a wash with Secret Weapons Washes “Ruby”. After that I highlighted the walls with Citadel “Wild Rider Red”.
I thought it appropriate to use some of my German 1986 Deka-Lak “Gelb” (Yellow) for flame highlights with a drybrushing technique (after all these are a German product). For the middle part of the flames, I used Tamiya “Orange X-6”. Then I washed them sequentially with Secret Weapons Washes “Just Red” and “Ruby”, allowing both to dry in between. I thought the bottom of the flames needed a deeper red, so I went back to using Americana “Simply Red” as a highlight at the lower end of the flames.
I second-guessed my use of green for the bases. Would not all the organic material at the base of a Wall of Flame be burned? Therefore, I went with Americana “Ebony/Lamp Black”.
For varnishing, I went with Krylon “Clear Glossy” as I wanted the walls to be as bright as possible.
Final product!I am very happy with how these came out. They really “pop”!
I will use them as walls of flame, and also potentially as fireballs for my wizards, discharges from flame weapons and even as breaths of flames for dragons. My Fire Breathing Salamanders will use them as well!
I am behind on my blogging as I have been a little under the weather and, ahem, I cannot sit down without pain! So blogging is a bit challenging! The good news (if any) is standing is fine and I have completed a few projects that I’d like to document.
I have made Spell Cards for my fantasy miniatures war game War Must Be. Among the Spell Cards is a Mundane Spell called Buzz that enables a Wizard to summon a swarm once per game. Hence, I needed some swarms!
Spell Card for a Buzz spell
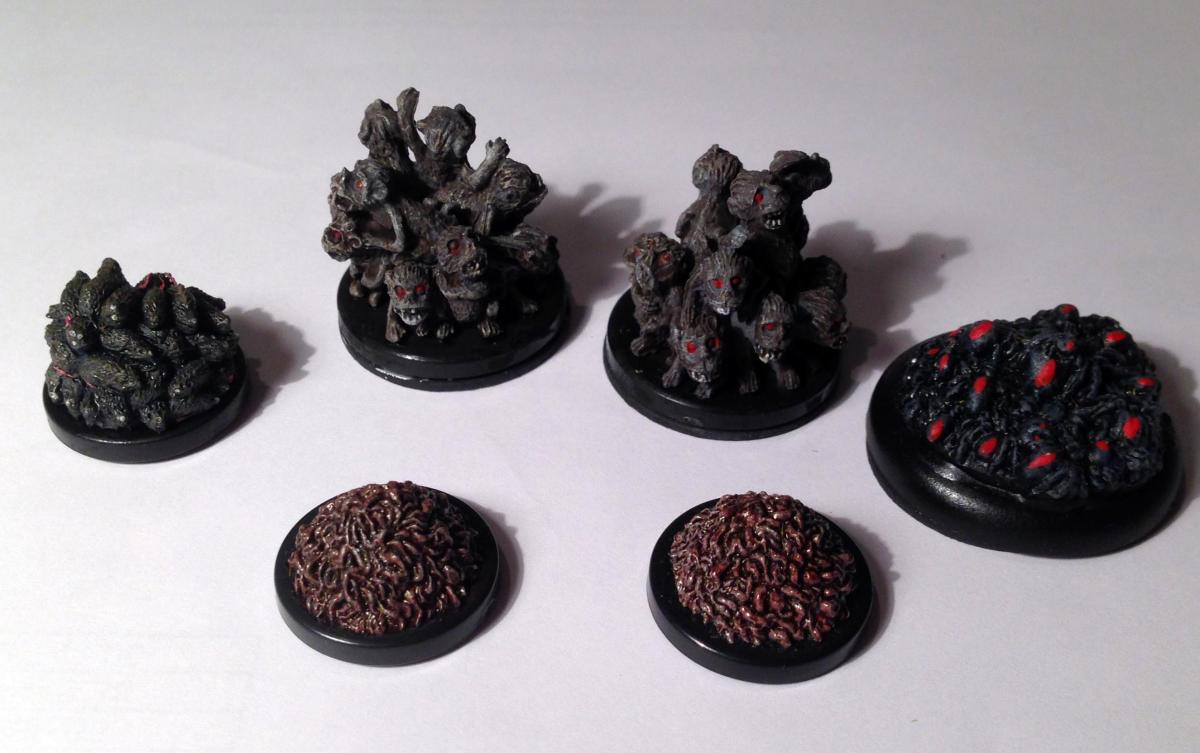
The swarms that I found on eBay are below.
I don’t think that they were made unpainted but I am unsure.
In the front row, I have two grub swarms (Wizkids), and in the back row there are left to right a rat swarm (Wizkids), two monkey swarms (Wizkids), and a Reaper Vermin black widow spider swarm. I painted the grub swarms with Citadel’s Dryad Bark and applied a wash with Citadel’s Agrax Earthshade to each. I also applied the same wash to the others. Each swarm got an appropriately sized washer glued to its underside so as to be easily stored in my magnetically-lined storage boxes.
In the end it is irrelevant which type of swarm is summoned as they all have similar effects in the game.
While I was looking for the original picture that Buck just posted about (“The Final Act”), I found an original printout from the USMA computer lab (same paper with the green and white striped backing) of The Athelfrog’s Castle, by Buck Surdu. This was the first Tunnels & Trolls game I ever played, with Buck as the GM.
I have been reading through it and laughing a lot – wishing we could go back at this oldie but goodie campaign.
The pages are perforated but still not torn apart. I imagine Buck printed this off under the nose of the “gold coats” (the old computer lab assistants). See back then, there were only mainframes for us to use and we had to go to the computer lab!
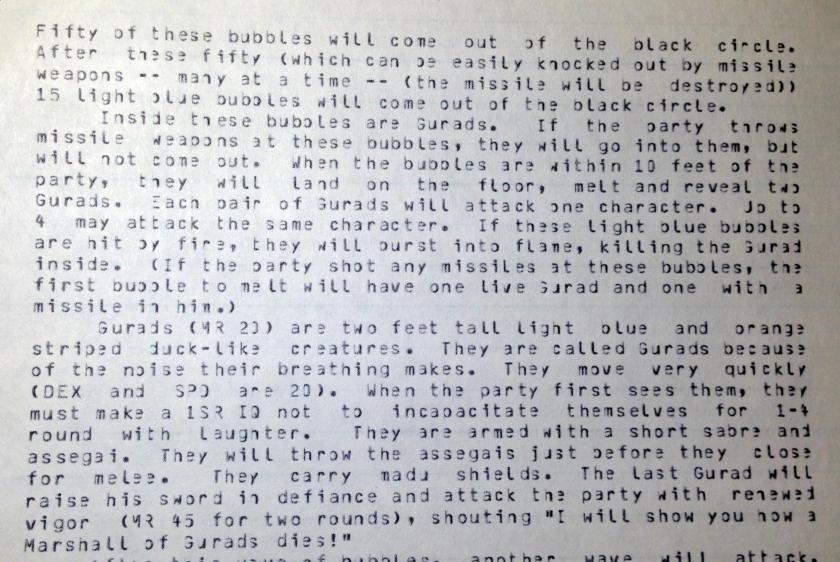
The old printer matrix from back then is funny to see! But wait, here also is the debut of the Gurad!
Except from Cover – note Surdu Specific Monster 1
Here is the interesting part from the room where they appeared – read and enjoy!!
Where do Gurads Come From Daddy?
Anyways, I also found rules Buck wrote for clerics, special equipment, weapons expertise, and more for Tunnels and Trolls. He’s still at it – now with multiple publications over the last including Combat Patrol ™ which is a pretty cool system. His creativity and imagination are truly great and personally inspiring – if only he was closer to Massachusetts! Thanks for the memories Buck!


