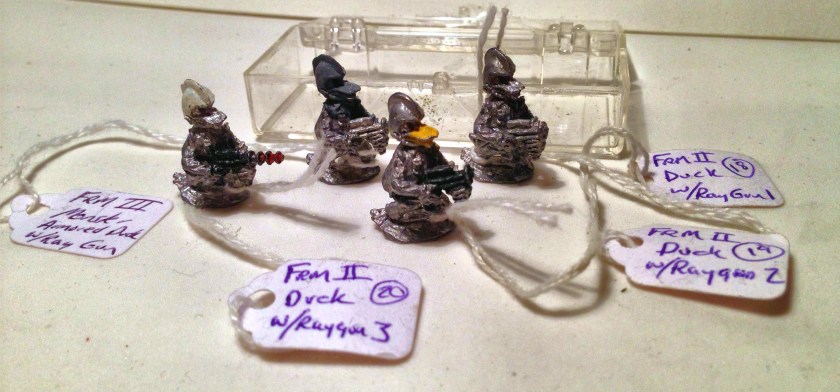
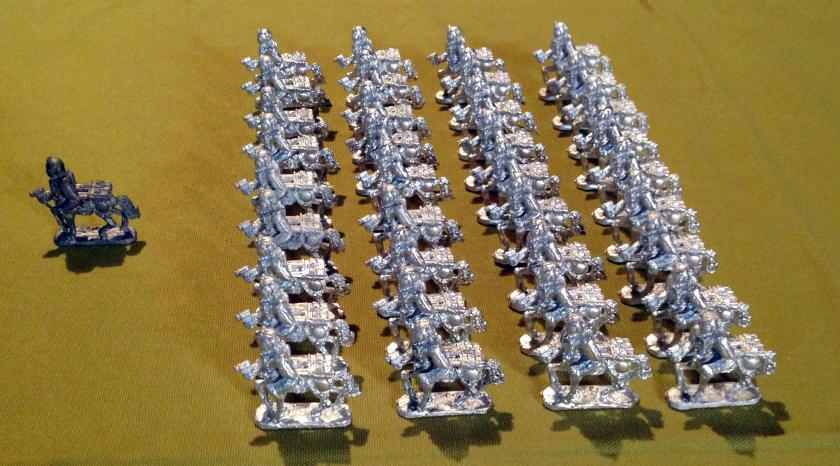
I have long been searching for the Archive Miniatures Frinx on Glyptodon (#2042) from the Star Rovers line. This three-figure kit was made in 1978, and was composed of two power-armored Frinx riding a glyptodon. So what is a glyptodon? A glyptodon is basically a prehistoric armadillo – and the size of a small car. Its a quirky kit, reminiscent of a Tusken Raider riding a Bantha in Star Wars.
At long last, my good friend Buck Surdu acquired one kit at exorbitant price on eBay. The plan was to create some Frinx recon sections for use in retro-sci-fi games using the Combat Patrol™ gaming system by recasting.
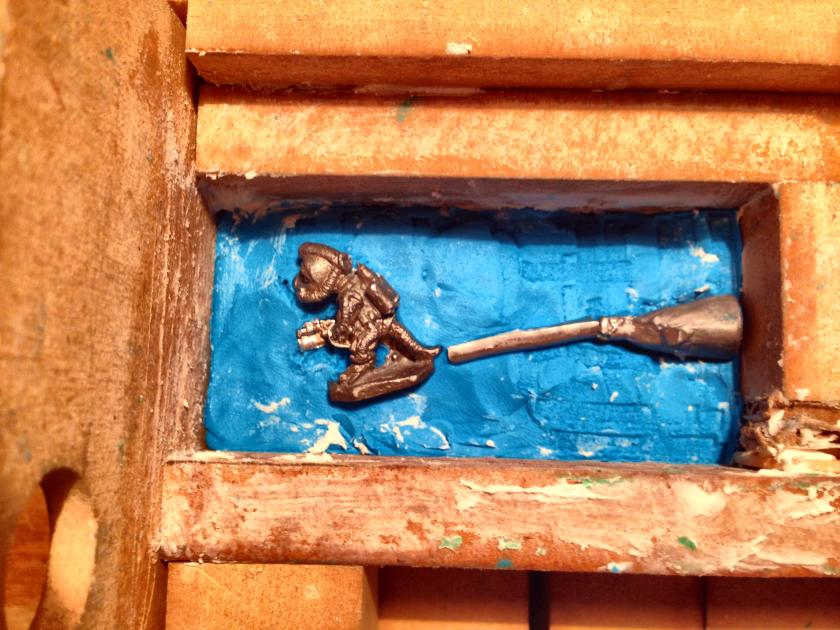
The original kit in unopened bag
Archive card in bag
Contents of the kit
The kit itself held two glyptodon halves, two rear feet, two bridle bits, one metal reins set, one forward facing Frinx, and one Frinx facing right. Clearly, I needed to consolidate in order to effectively cast this set via gravity casting. My first decision was to abandon any idea of casting the metal reins. I wanted to use the bridle bits, and use some string or similar material for reins when I paint the kit.
The bridle bits were very small as you see below. I used a small pin vise and drilled out a place for the bits on the glyptodon. I secured the bits with super glue, then filled in around them with green stuff. I also opened the bridle bits up, for if I left them closed they would not been locked in by the Quick-Sil and would not have cast well.
The small bridle bits
The other challenge was that the original glyptodon figure was not well formed or cast. There were large seam lines and gaps on each side. My concern was that this gap would wreak havoc with molding as the Quick-Sil RTV that I use would easily expand into every crevice. It also would look lousy.
Good view of the gap between the glyptodon halves on the right side
Similar gap issue on the left. Note the rear feet are unattached.
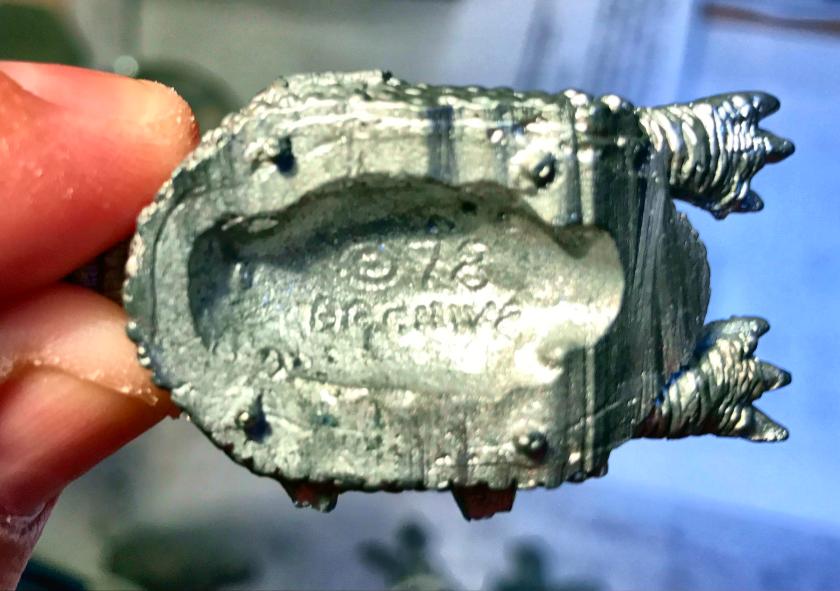
Interior view of the bottom glyptodon half – note the Archive 78
Top half of the glyptodon
As you can see, because the glyptodon was in two pieces with a hollowed out middle, I needed to address this and the seam issue. Therefore, I decided to fill the middle and the gaps with green stuff. I then affixed the rear feet with super glue, followed by adding green stuff around the gaps there as well.
Green stuff to the rescue
Nice view of the modified bridle bits
While I smoothed out the seam lines, I still had unsightly lines that would show up on every cast. I decided to use more green stuff to add a band of tiny armor plates around the base to smooth out the seams – and it worked. I thought that I should keep the figure as original as possible, so the additional plates were left as a lower band, and not over the whole figure.
The glyptodon with its new armor plates added, left side view – no unwanted lines!
Rear view after adding armor plates
Right side view after adding armor plates
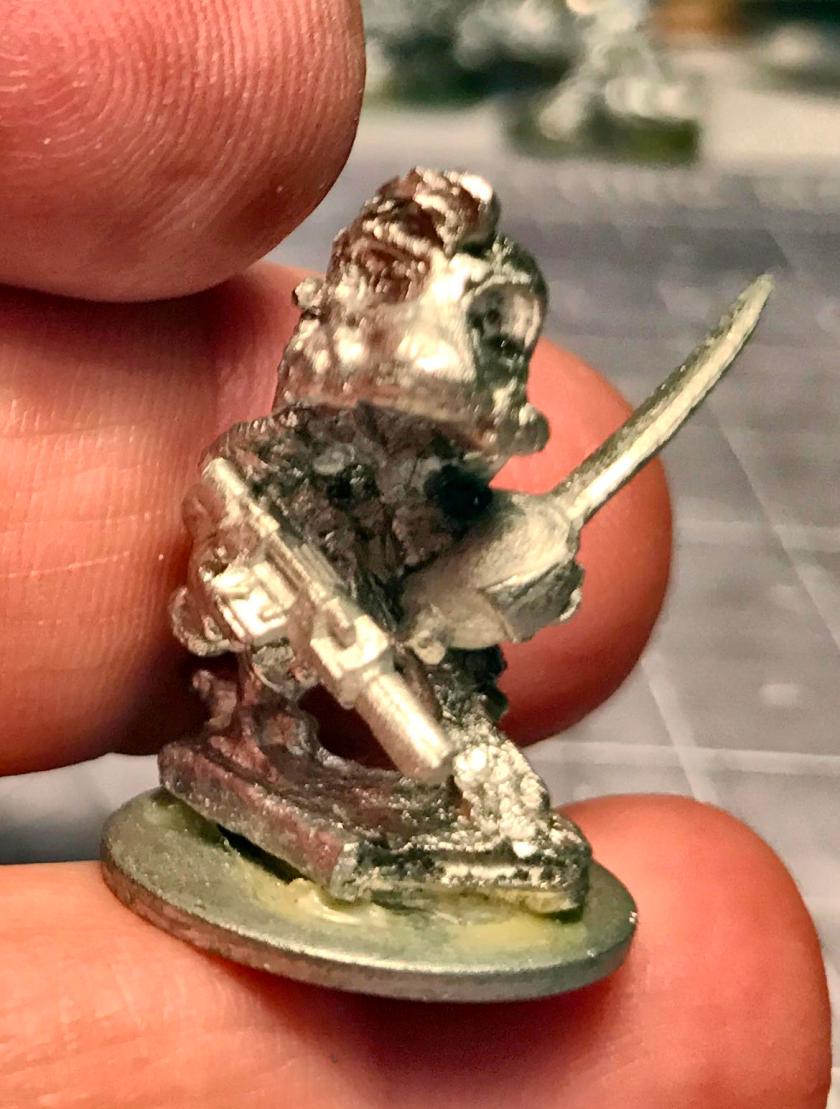
I then moved on to the riders, and was surprised to see the beginnings of lead rot under their saddles. This discovery made me very happy that I was going to preserve this kit through cleaning and ultimately recasting. I did my best to clean off the oxidation with soap, water, a toothbrush, and an aqueous pewter cleaner.
Lead rot begins…before cleaning
Ready for molding
I made two new mold designs – one for the glyptodon and one basic type for the two riders as shown below. The major concerns that I had with the glyptodon mold were easy flow of alloy, adequate venting, and adequate cooling with so much molten metal. With the smaller molds, I had the same, but I really just wanted great details.
First half of the glyptodon mold
First half of the front Frinx rider
First half of the rear Frinx rider
All three molds completed
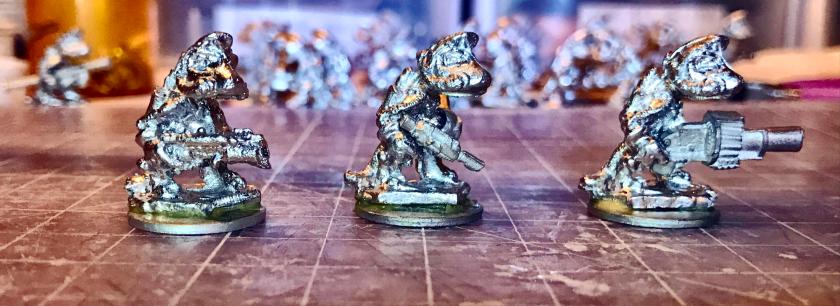
All three molds worked well, with small modifications to ensure good casting. I was able to successfully cast 14 sets (42 total figures).
14 sets!
You can see below a comparison of the recasts and the master figure.
Frontal view of recast and modified master figure
View of right side
Rear view
Left side view
They are officially now in my painting queue (which has grown a bit long so I will wait to cast more figures until I have painted some). Overall, I am pleased with how they came out – please let me know your thoughts in the comments section!
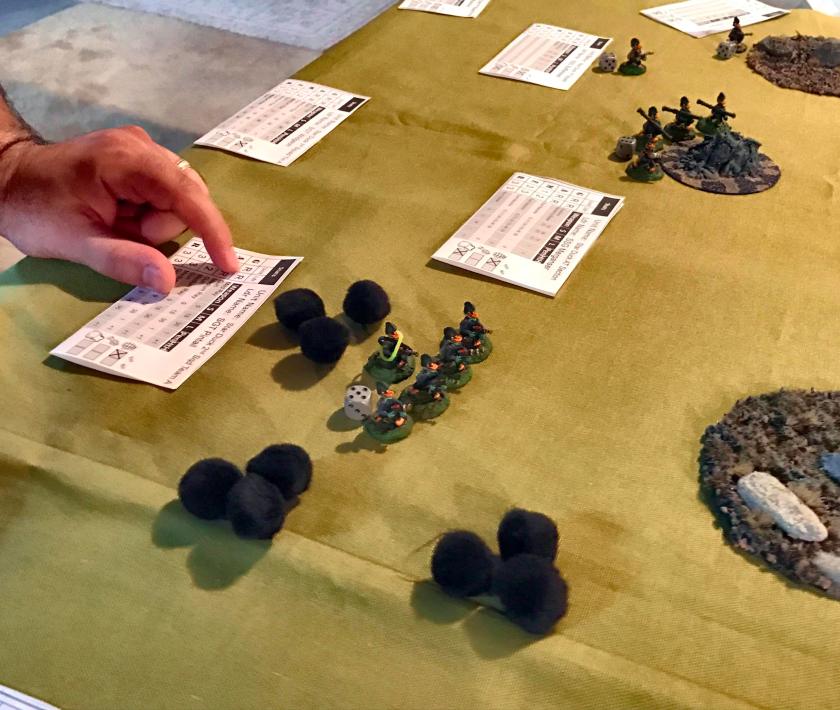
It’s been a bit busier on the gaming front. Jared Burns (USAFA ’04) and I (USMA ’84) got together last Sunday afternoon in preparation for the launch of the Mass Pikemen Gaming Club . We play-tested Combat Patrol™ with Star Rovers figures that I have previously posted about in this blog, as well as an X-Wing game.
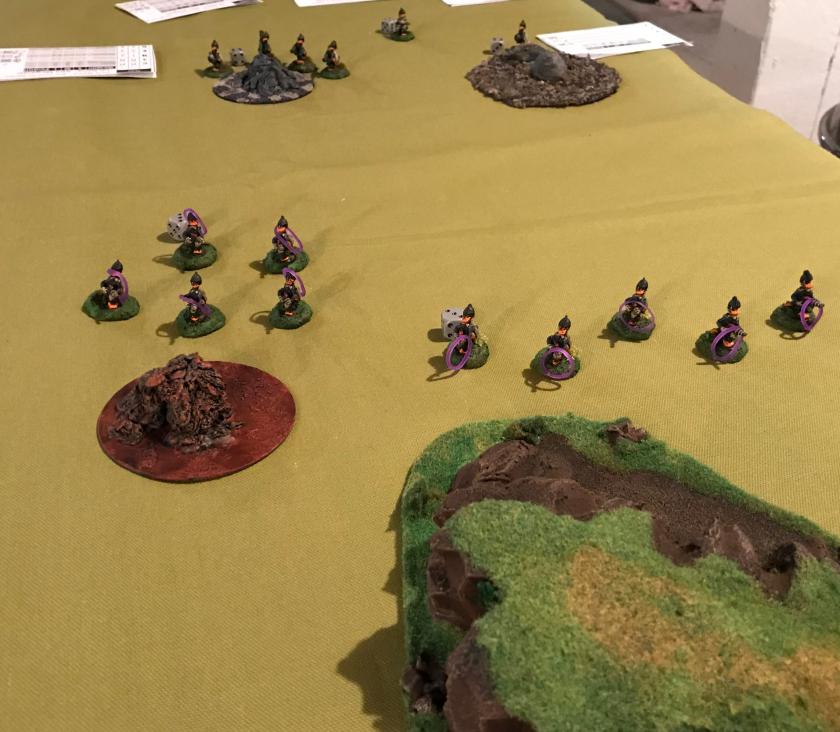
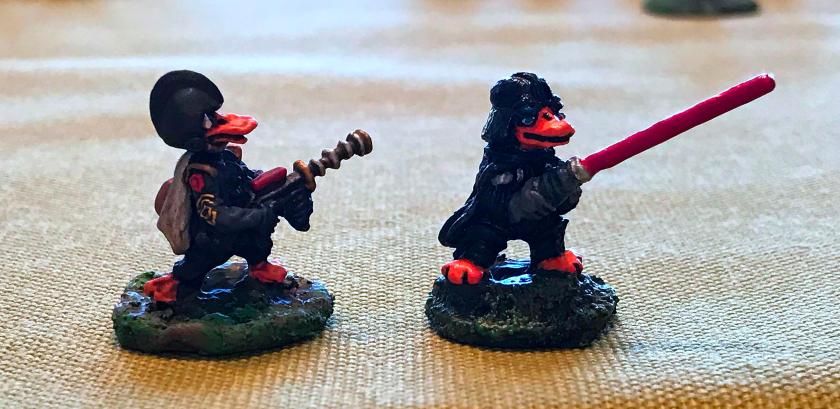
The scenario was one where the Frinx and some Aphids were protecting RT22 in a bunker behind an old factory. The Star Ducks, led by Duck Vader, were attacking to seize RT22, using their jet packs to quickly assault through the open ground which the Frinx had covered with anti-tank weapons. I gave the Star Ducks 3 chances in the game to use their jet packs at 3 movement cards per try – and that worked well rules-wise.
Highlights of the battle! There was a grenade-throwing fest in the center (one of my grenades scattered back into me adding to my losses) between one Star Duck team and a green Aphid team. This resulted in multiple casualties, especially when one of my Aphid’s grenade attacks rebounded from a rock, but the Star Ducks had the better of that fight.
I gave Duck Vader the ability to deflect incoming direct fire, but I got lucky. Duck Vader was in the open at short range and got lit up by two Frinx bazookas and the Frinx platoon sergeant with an automatic grenade launcher. End even though I gave him a 5 endurance, his goose (or rather duck) was cooked with about 7 wounds. His demise then caused the entire Star Duck force to lose heart, effectively ending the game.
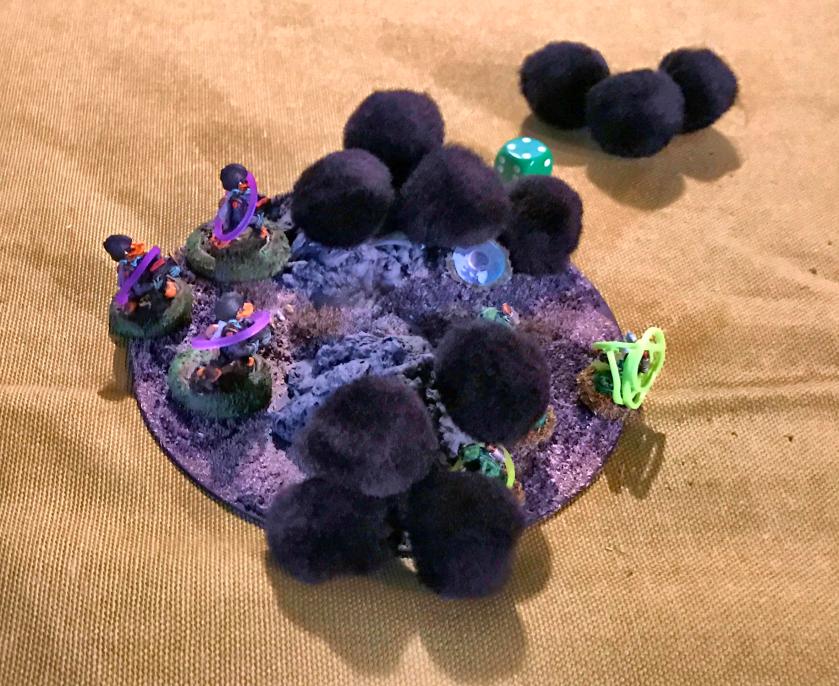
The Star Ducks effectively advance on the escarpment. The purple bands indicate jet pack uses.
The Frinx guard the factory ruins with anti-tank weapons and an automatic grenade launcher.
A green (in terms of morale and literally!) Aphid Squad awaits its doom from a storm of grenades.
Star Ducks deploy.
The Star Ducks take multiple incoming rockets, wounding a team leader.
The Star Ducks put the hurt on the Aphids with a storm of grenades.
In the foreground, the Star Duck AT team prepares to rain doom on the Frinx. In the upper left, the Aphids attempt to return grenade for grenade, only to bounce them back at themselves.
In the upper center, the Star Ducks jet pack and prepare to flank the Frinx. However, in the foreground, Duck Vader is mortally wounded.
The viewpoint of the Frinx who killed Duck Vader.
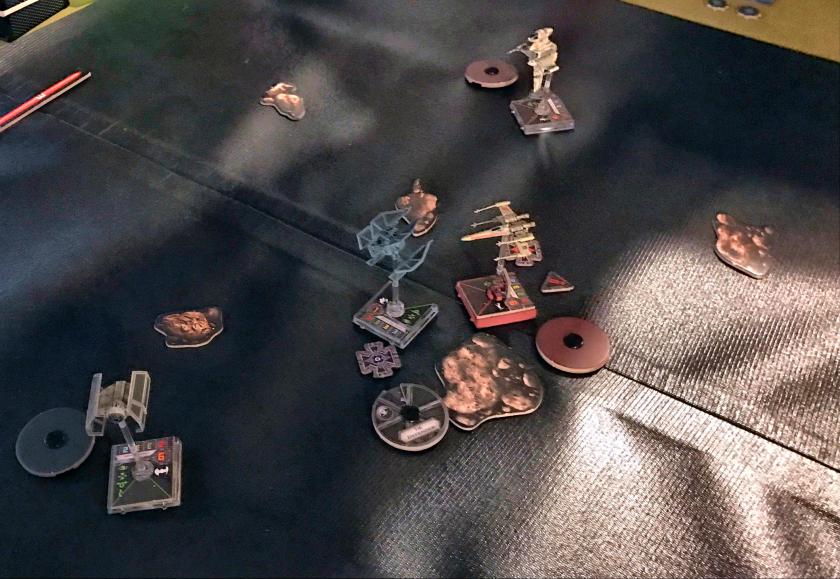
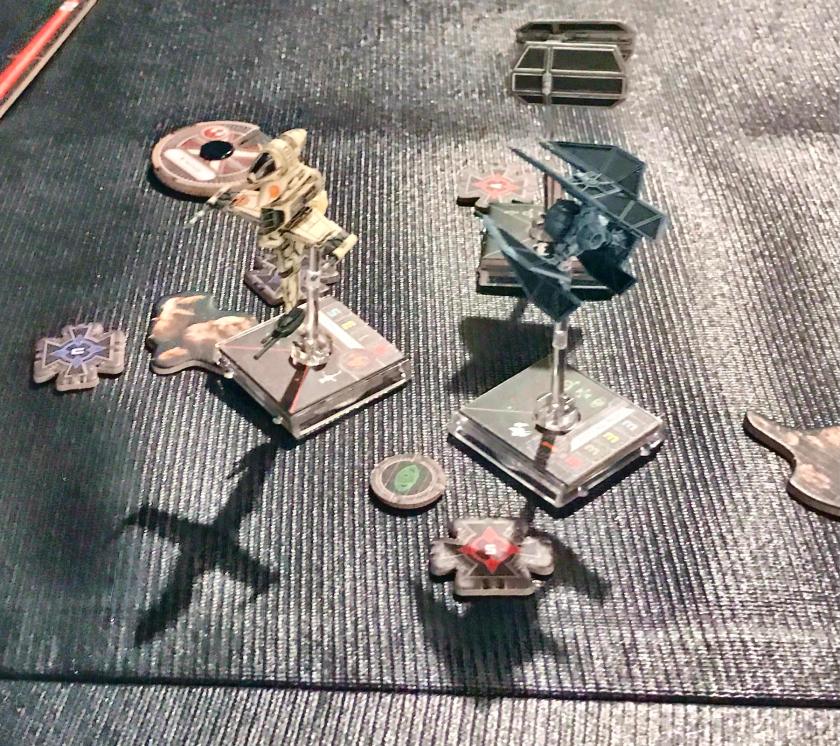
We then played X-Wing, and it was time for the USAF guy to beat (really thrash) the Army guy…ironic…he was the Empire so the day evened out. It was a good playtest for our first game night on July 27th. Jared did a nice job in teaching me the game – and then avenging the previous game. He was the Empire, and I was the Rebels with two ships each.
I successfully pilot my X-Wing into an asteroid…and fail to hit the Empire’s ships.
With my X-Wing dispatched, the Empire finishes off my hapless B-Wing.
I really liked the game and the ease at which I learned the basics. Thanks to Jared for a great day!
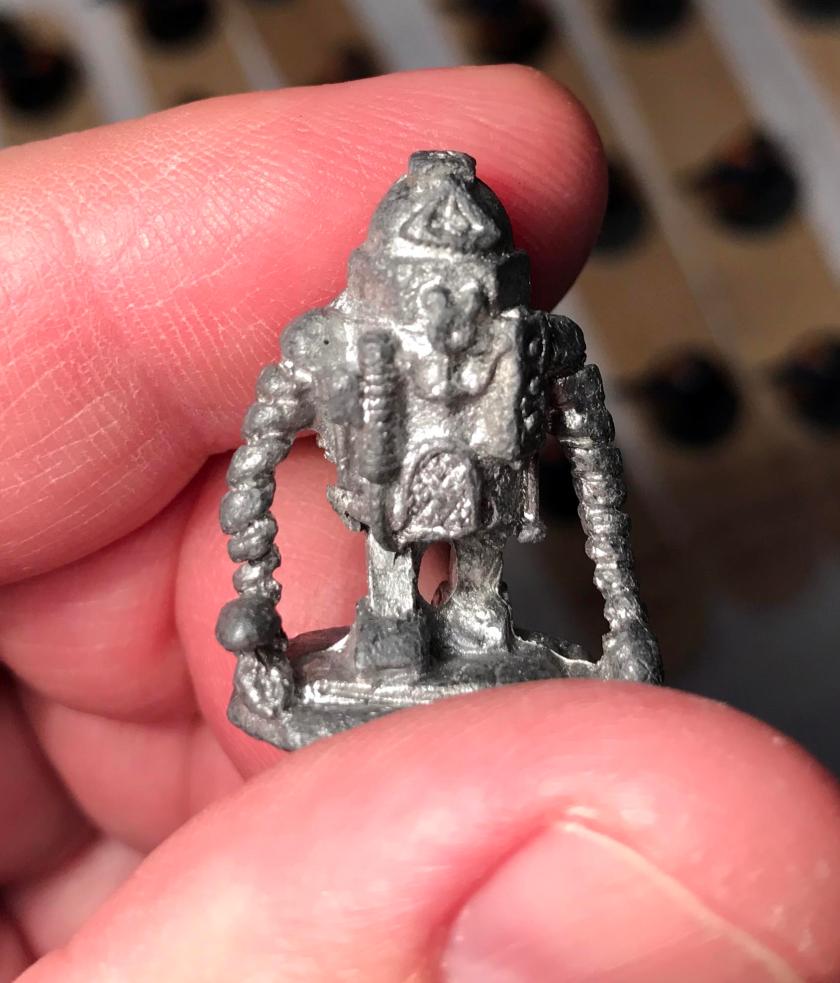
I found a small robot miniature on eBay, listed as “Hardy Toot Toot” from the Archive Miniatures Star Rovers line of miniatures and game. Using The Lost Mini’s Wiki , I was able to see it listed as “Hardy Toot Toot/RV86”. This did not make sense to me as When I looked at the Archive Miniatures catalog from 1981, there was no such listing. I reached out to my fellow miniature collectors on Facebook, notably David Wood (the British version) and Nevile Stocken (who was Archive and probably sculpted this figure) but still I had no luck at identifying it. All I knew was it was between 36 and 40 years old.
Frontal view of figure as I got it from eBay
Side/rear view of the figure as received
Bottom of the figure with “77” (year sculpted) and “Archive”
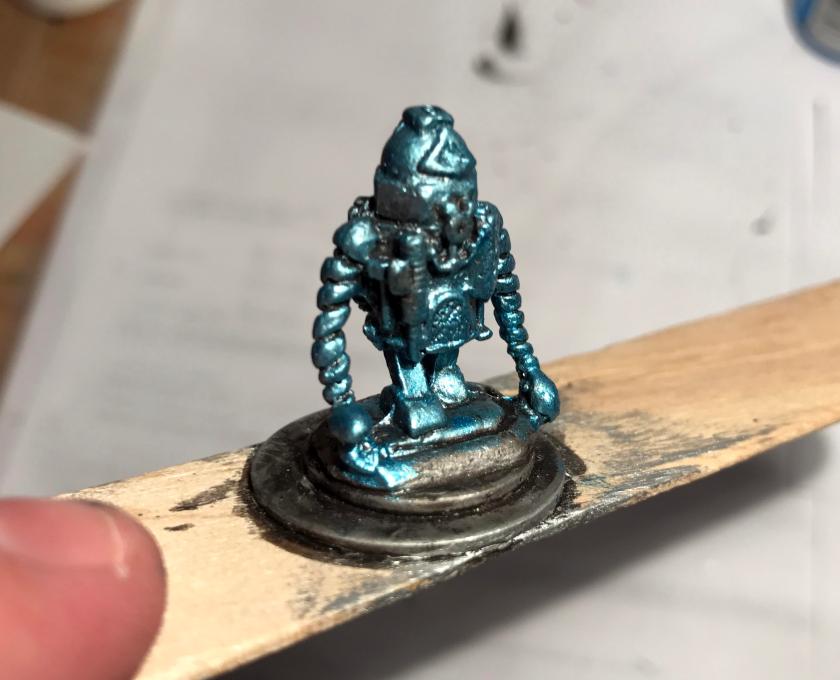
While I continued to research which figure this actually was, I filed down any unneeded edges, cleaned it in soap and water and let it dry. I then glued it to a 1″ steel washer with wood glue. Then I lightly glued the washer base to a popsicle sick for ease of painting. Next, I brush primed it twice with Citadel “Imperium Primer” thinned with Testors “Universal Acrylic Thinner”. I then gave it a heavy dry-brush application of Tamiya “Chrome Silver”. The figure then waited for a few weeks…
After priming and initial dry brushing with Chrome Silver
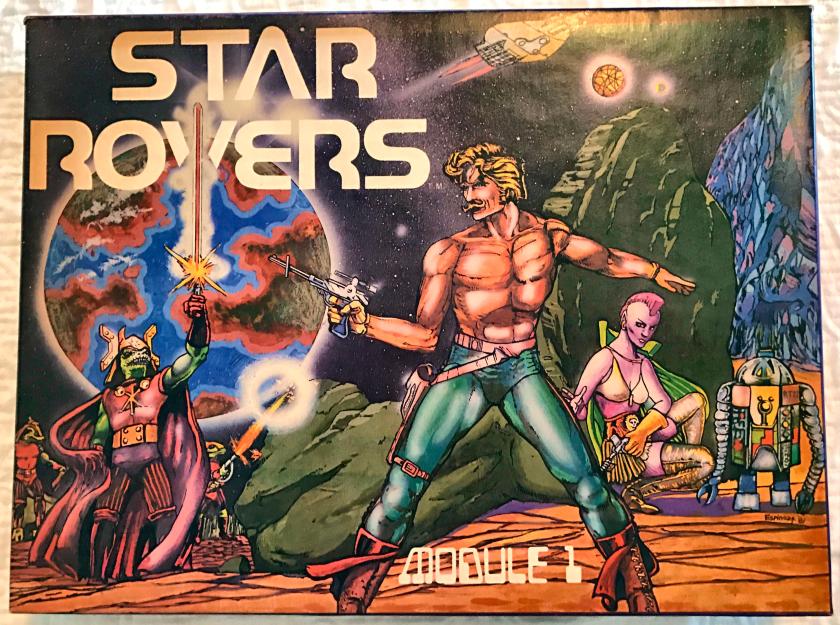
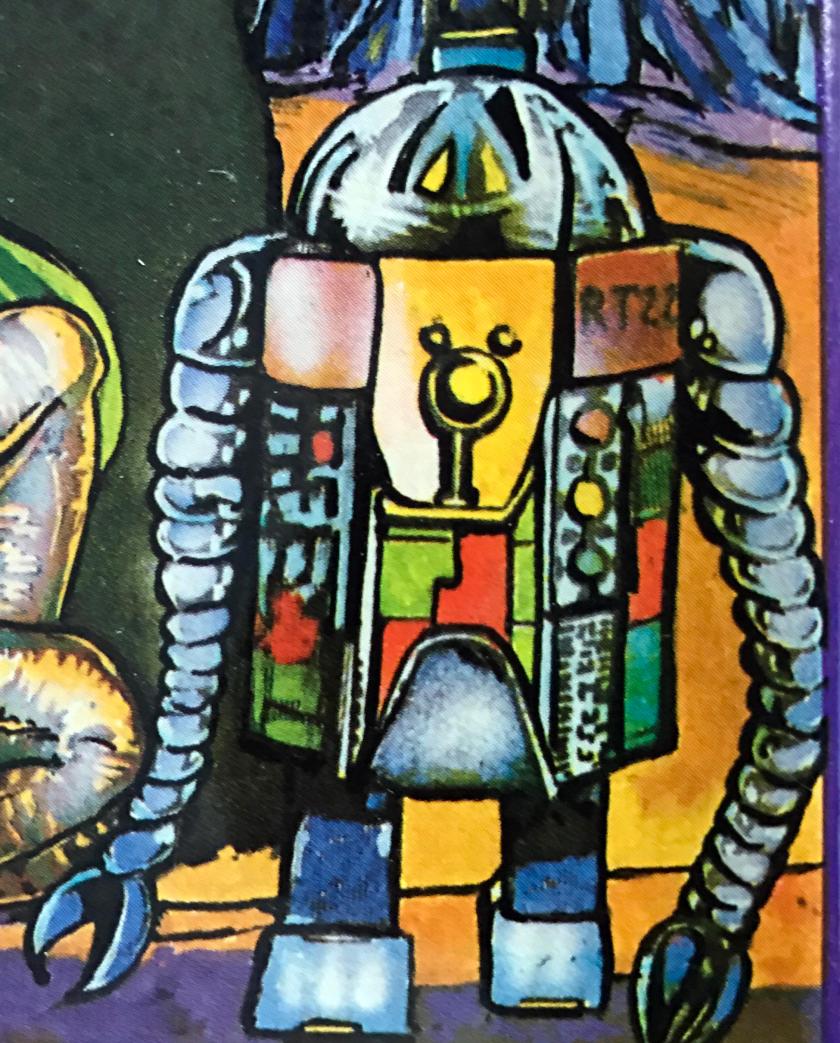
Luckily and surprisingly, I heard back from Nevile Stocken that he thought the figure was on the box cover of the Star Rovers game – which I have! By the way, RV86 is the Robot Cook (2203).
Star Rovers box cover – the robot in question is in the lower right hand corner
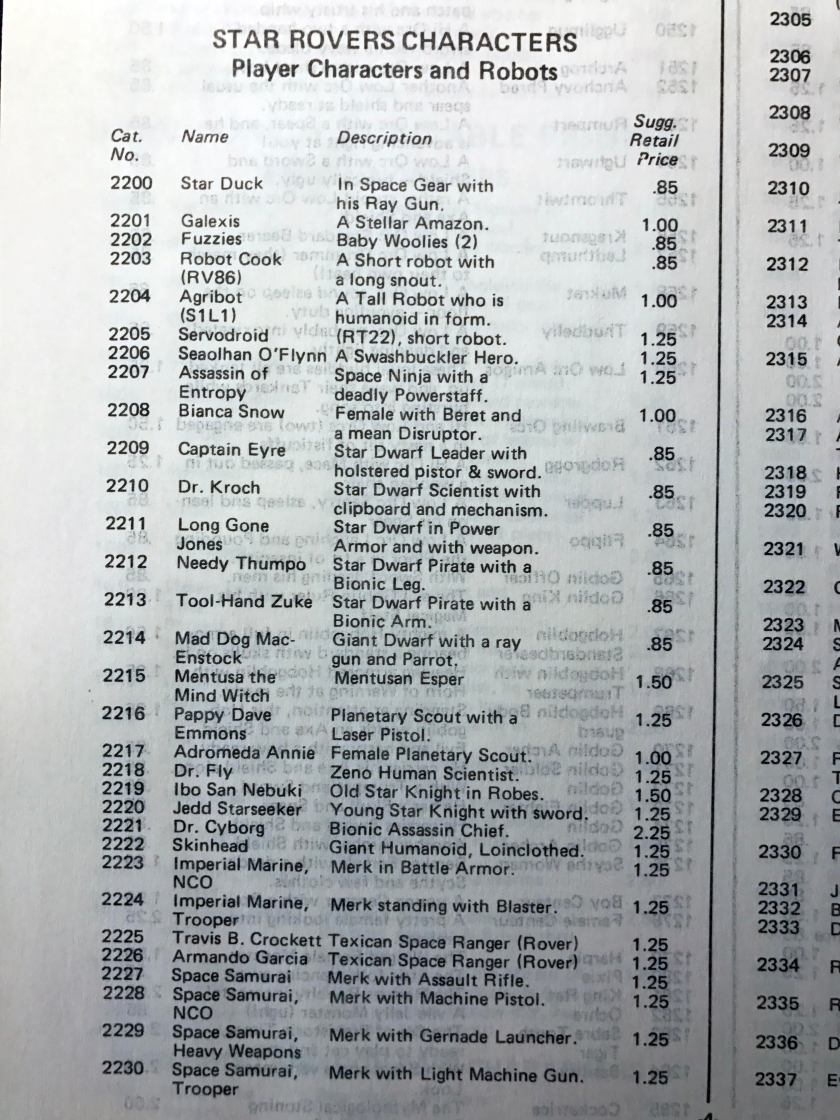
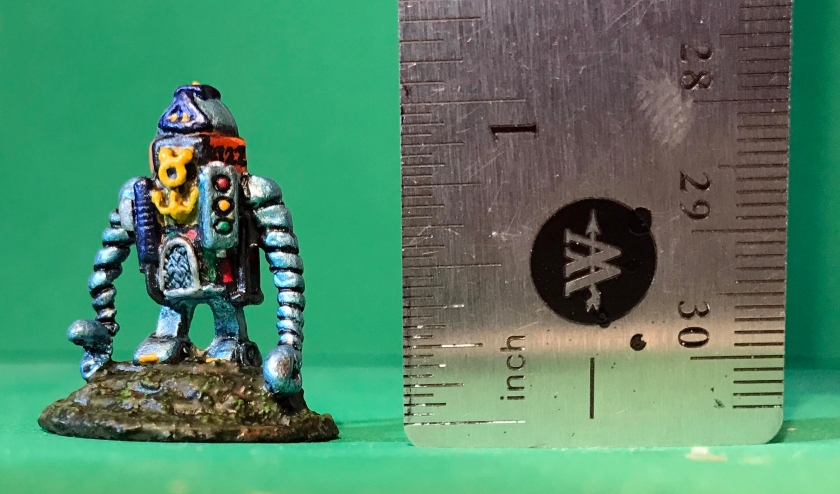
I took a picture of it with my iPhone, cut and pasted it into a PowerPoint file, and printed it. When blown up to 8½” x 11″, I could clearly see on the robot “RT22”! Mystery solved! I verified this by cross-referencing with the catalog as shown below. It was listed as 2205, “Servodroid, RT22, Short Robot”, and retailed for $1.25 back in the day. Many of the old Archive Star Rovers figures were named with a clever nod to Star Wars characters, and this RT22 certainly can claim to be one as a somewhat satirical R2D2.
It has a name – RT22!
The catalog page with 2205 listedZooming into the listing
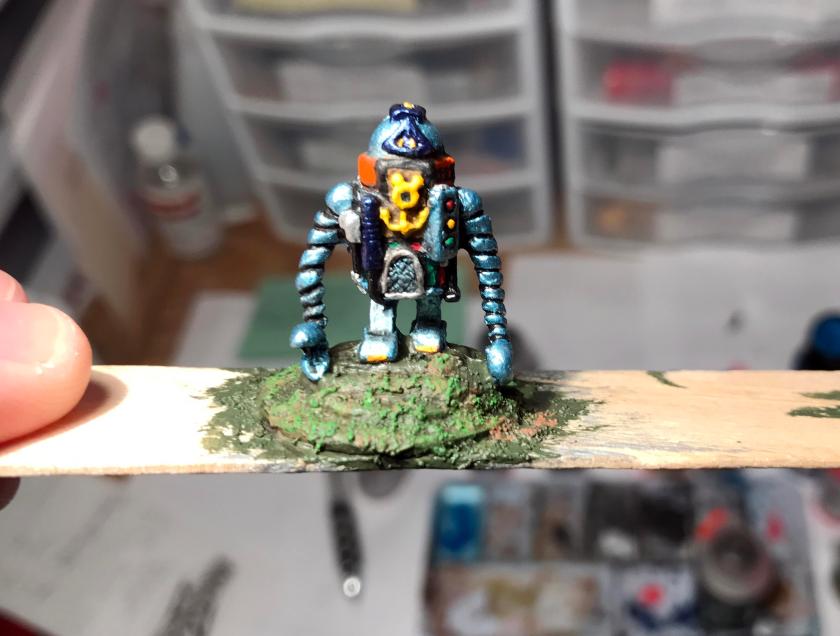
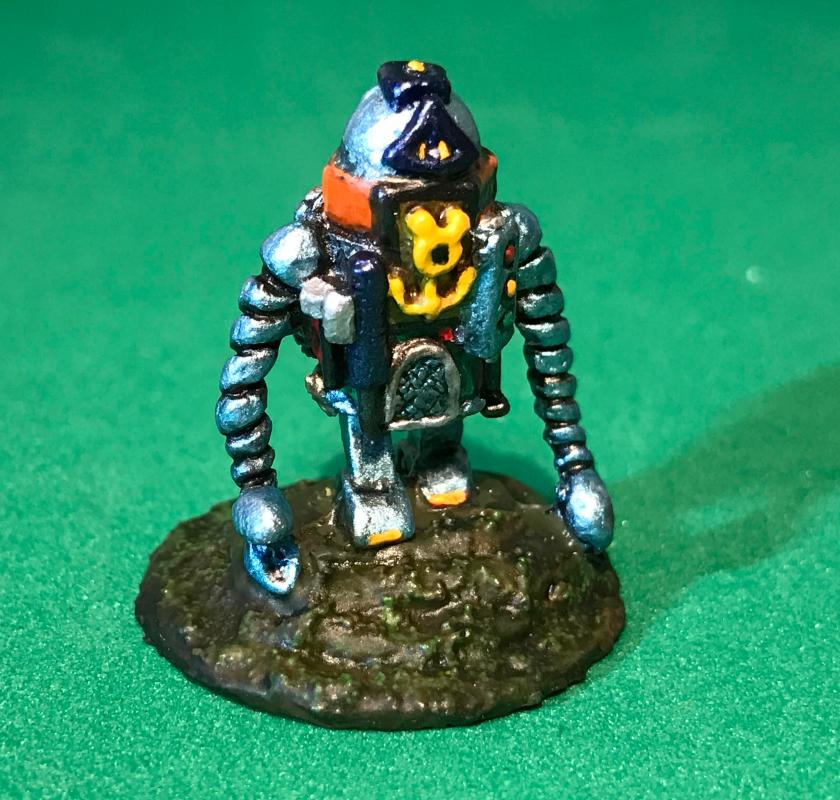
I decided that it would be a neat idea to honor the colors on the robot’s depiction on game box and try to replicate them on the RT22. To achieve the metallic light blue shown on the box, I used a 50/50 blend of Tamiya “Chrome Silver” and Craftsmart Ultra-Bright Metallic “Sapphire”. That seemed to do the trick, and I gave the entire figure a heavy dry brushing with the combination.
After the second dry brushing
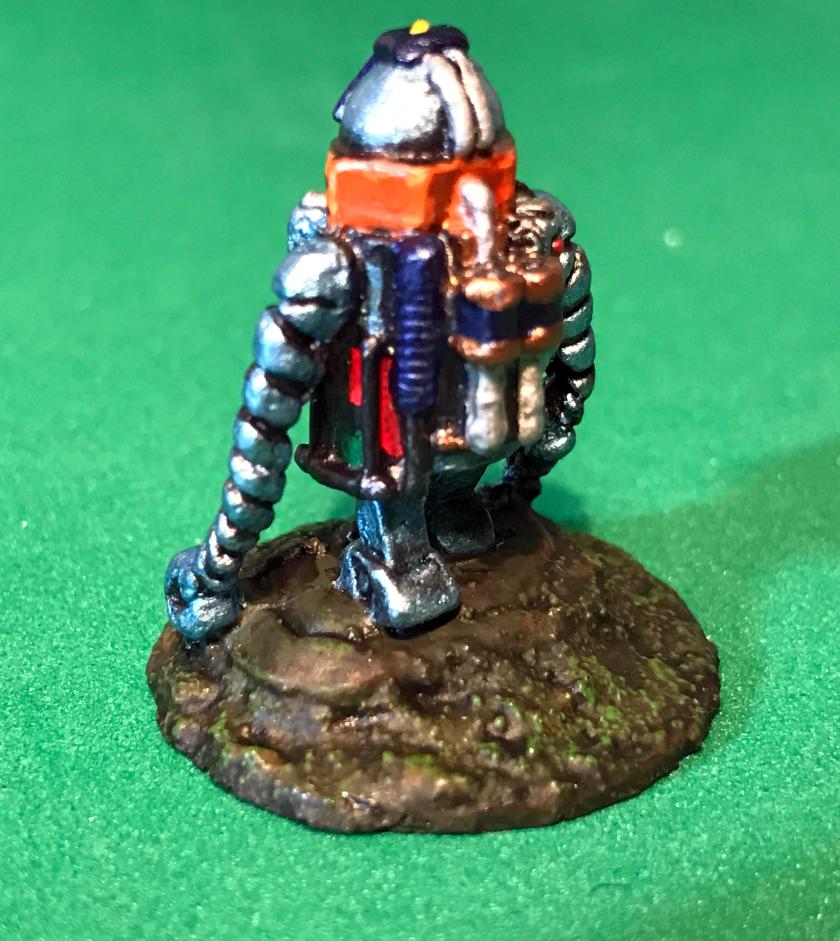
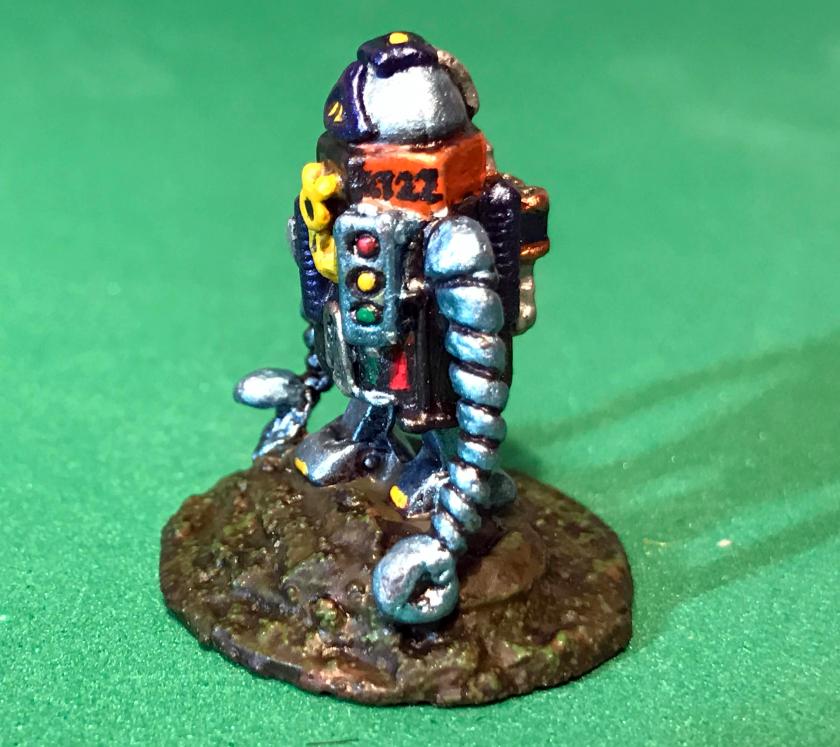
I then looked at the drawing of RT22, and there were some subtle differences between it and the figure. To give depth to the figure, I used a couple washes with Citadel “Nuln Oil”. Then, I wanted to replicate the drawing as much as possible, so I used Americana “Kelly Green” and Vallejo “Vermilion” on the body’s lower parts in squares thinly outlined with Vallejo Model Air “Black”. On what looks like an anchor (with Mickey Mouse ears) on the front, I used Vallejo Model Air “Gold” on the background, and Citadel “Yriel Yellow” on the raised portion. The robot had two traffic signals on it – yes really – forward and aft. I used “Kelly Green”, “Yriel Yellow”, and Vallejo Model Air “Signal Red” on the stoplight signals. I then used the Vallejo Model Air “Black” metallic to outline the gold and on the brackets under its arms. I outlined the arch-like structure in front and various wires on the top, back, and sides with Vallejo Model Air “Aluminum”. On the top, I painted the raised structure ridges and its springs with Vallejo “Arctic Blue” – with “Yriel Yellow” highlights as an eye and on the top of the robot. On the top “ring” part of the robot (which was more akin to a hex nut), I used first a light coat of Vallejo Model Air “Fluorescent Red” (which was more orange than red). I then outlined on the angled edges with a thin line of “Aluminum”. I then used two more layers of “Fluorescent Red” on the ring. The rear battery packs got an application of Vallejo Model Air “Copper” and “Arctic Blue”. I then selectively used “Nuln Oil” where I needed more depth on the figure.
For highlights, I used Craftsmart “Bright Yellow” on all the “Yriel Yellow” surfaces. On the arms and chassis, I employed a lighter mix (more “Chrome Silver”, less “Sapphire”) of the original combination with which I started the light blue dry brushing. I also used a little of both yellows on the tips of the robot’s feet to match the box.
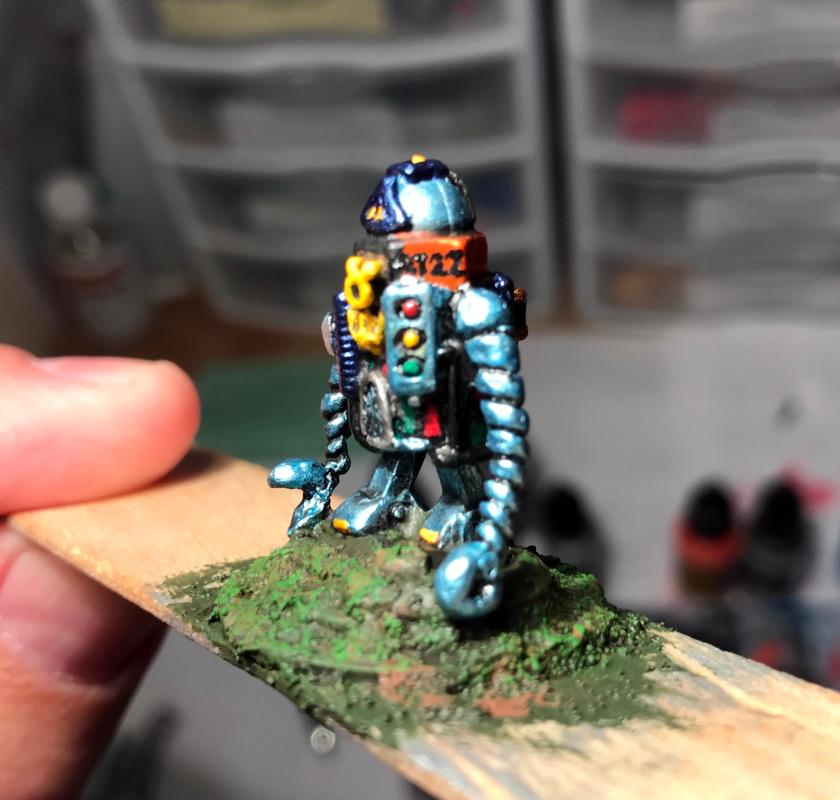
Perhaps the most difficult part of the project was writing the “RT22” on the miniature as shown on the drawing. That was indeed a delicate task that took a steady hand!
I then moved on to the base – and used Citadel “Lustrian Undergrowth” to conceal the washer and make the ground on which figure stood to be more realistic. I really like this paint as it has a rough consistency and takes both dry brushing and application of washes really well.
Once that had dried, I applied Citadel “Agrax Earthshade” to the base, and let it dry. I then dry brushed the base sequentially with Armory “Musket Brown” and Citadel “Niblet Green”.
After the application of Lustrian Undergrowth on the base (still wet)After the Lustrian Undergrowth on the base has dried and been dry brushed, frontal viewLeft side view – note the “RT22”Right side view
I then moved on to the varnishing of the figure. As it was a robot, with a very metallic surface, I thought best to use a coat of Krylon clear “Glossy”, followed by two coats of Testors “Dullcoat”, allowing for adequate drying between applications. This worked well, but the base was still too shiny. To fix that, I used a combination of Citadel “Athonian Camoshade” and Army Painter “Anti-shine” brush varnish. It seemed to do the trick.
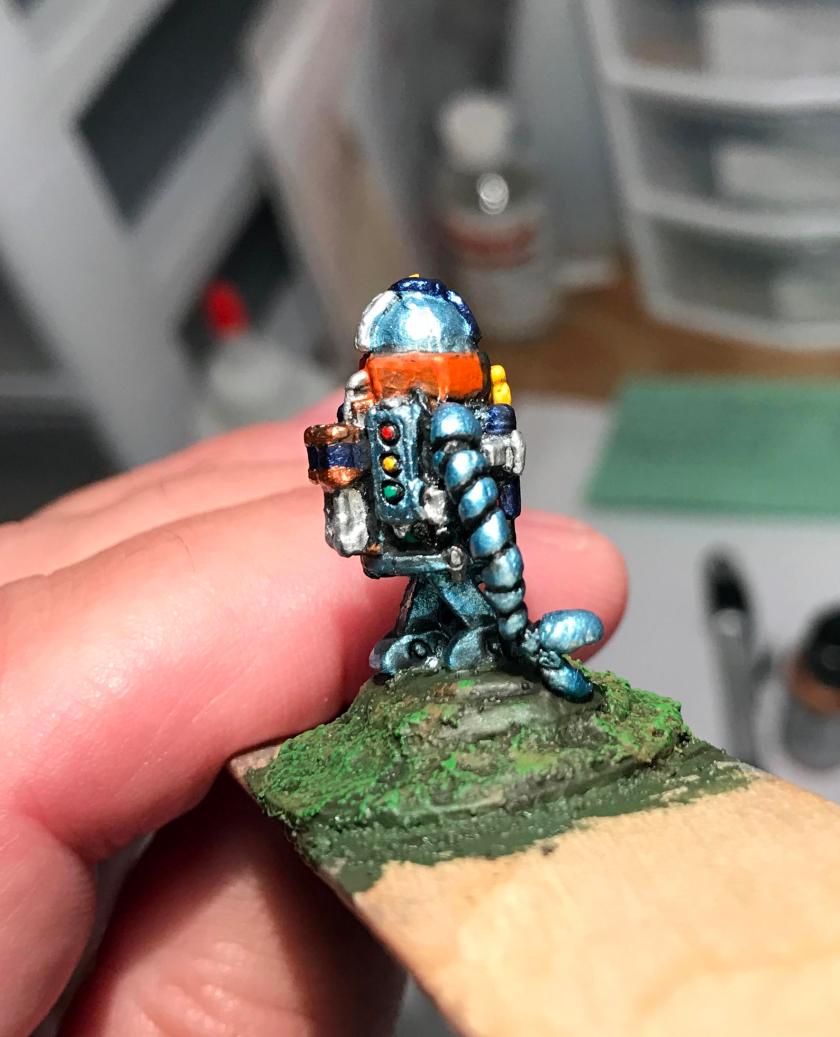
Drying in the sun – but my base is still too shiny!RT22, completed, in front of the enlarged box photo I used as a guide Close up of figure with ruler for scale – about 1.25″ or 25mm or so
Frontal view of RT22 – note duller baseRear view of completed RT22Side view of completed RT22
The research for this project took a lot longer than the actual painting did. I have submitted corrections to The Lost Minis Wiki, so future collectors may be helped. As for this figure, I plan to use it as part of an objective in a sci-fi version of Combat Patrol™.
Just like R2D2 perhaps?
In any case, I am pretty happy with the miniature, and I am especially glad I used the color scheme from the box. I think it is quirky, and still fun! Feel free to let me know your thoughts!
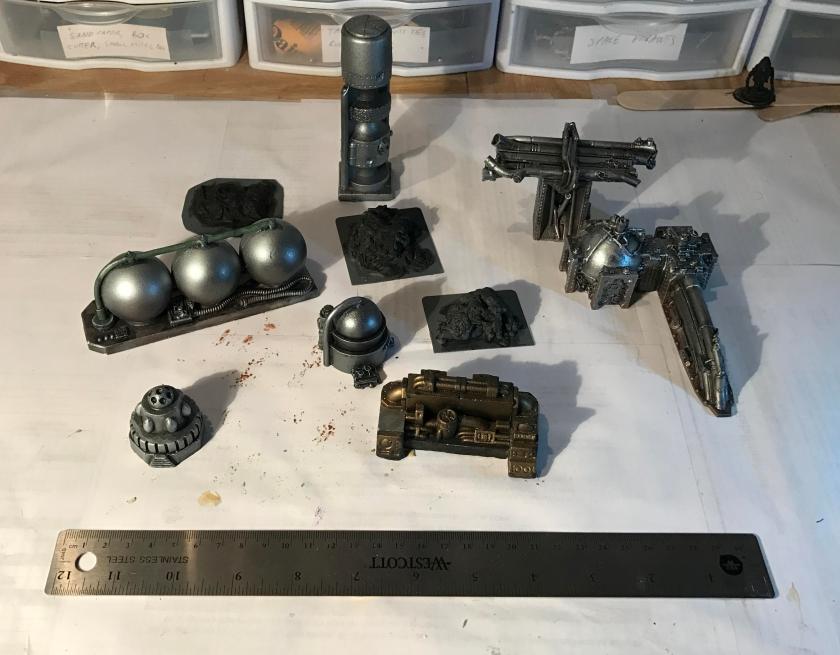
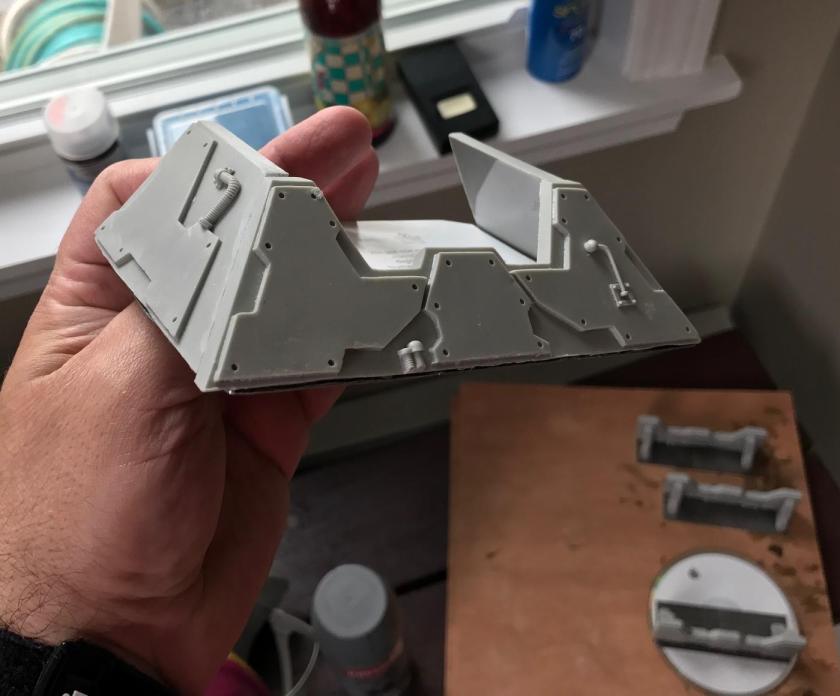
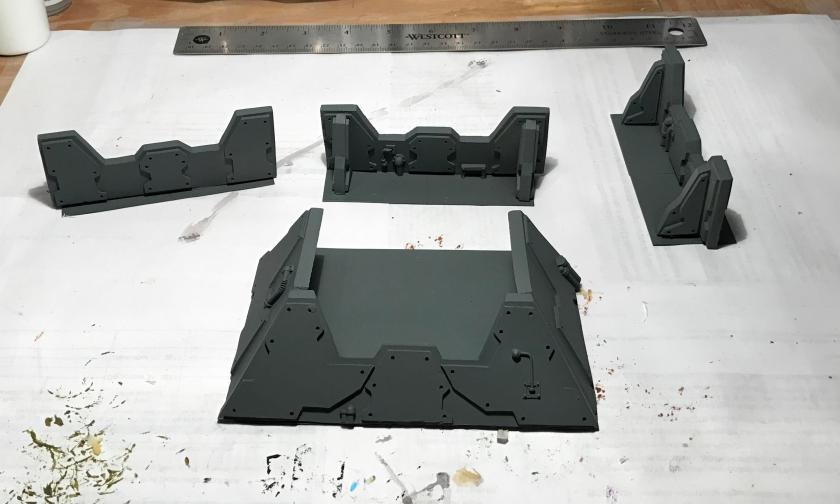
This month, in between other projects and recovery, I worked on several terrain pieces for use with my Star Rovers figures and the Combat Patrol™ gaming system. Some I got earlier in the year from WorldWorks Games on Amazon, others I got on eBay that were from Armorcast Battlefield Scenery, others I made – and some I just don’t know who made them. I’m hoping to use these at The Battle Standard in Auburn soon after coordinating with the owner, Jared Brodeur.
Normally I have more detail (how-to), but I lost most of the details of these terrain projects, as I had a few that I had to rework. I think the pictures below are hopefully sufficient. I was really happy to try new techniques with rust applications using a “pointillism” technique with a combination of Polly-S (“Rust”) and Vallejo (“Rust” 71.069 and 71.080) paints. I mounted all of the terrain pieces on flat steel basing pieces.
The mostly Armorcast “set” I got on eBay were various refinery or industrial pieces that were airbrushed silver and gold, and that did not work for me. I wanted the industrial ones to be more dirty and rusty. I ended up painting some of them with various colors, and then using Army Painter Quickshade “Soft Tone” to shade. I was not happy with most of these results, especially the Quickshade effects. I repainted them, some with bright colors for the newer pieces of terrain, and with rust for the grittier ones, and then used spray varnish to seal. Luckily, the Testors “Dullcoat” actually had a “crackling” chemical effect on one of the industrial tanks which worked well – (note – this was not an Armorcast piece and was likely homemade with some type of Styrofoam). I was surprised as there was already a lot of paint and varnish on it at that point – but it was minimal and I liked it anyways.
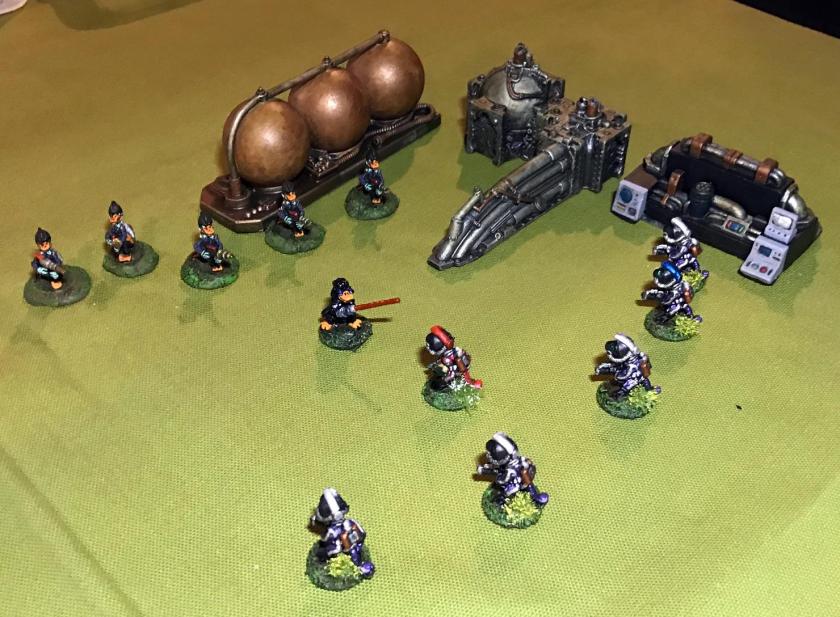
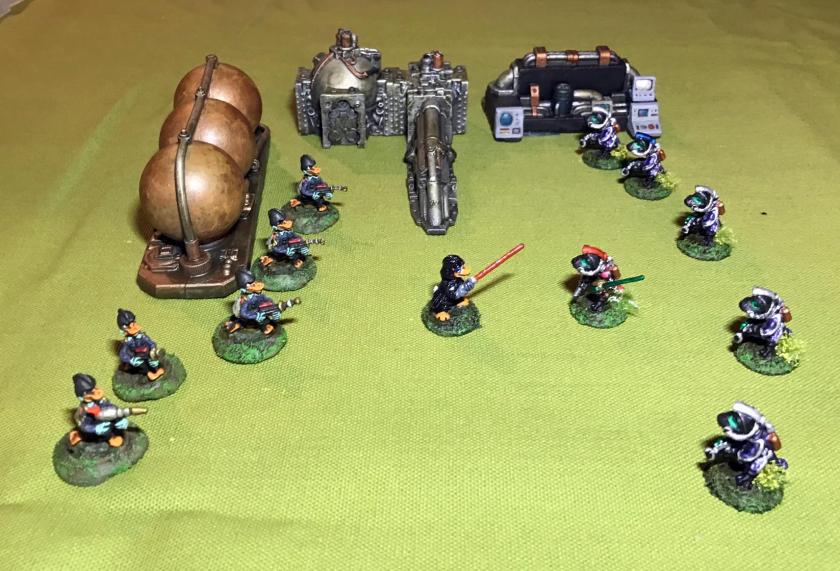
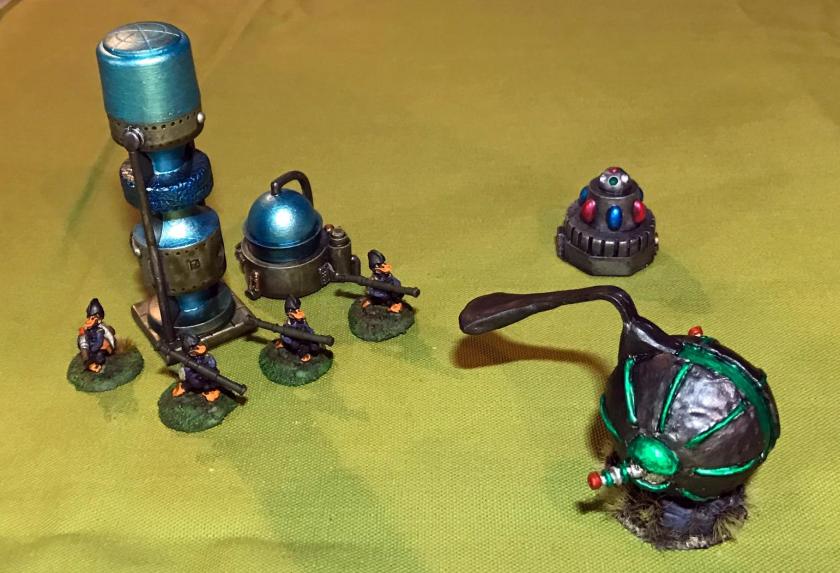
The initial set of mostly Armorcast terrain I got on eBay, plus the slag mounds I made. This is how I got them. The triple tank is the homemade one that the varnish affected. The pipeline/industrial terrain after repainting (and repainting). Duck Vader and his Star Ducks confront Power-Armored Frinx led by their platoon leader. Frontal view of the skirmish – light saber versus light cutlass! Aphids on Grav-Cycles swing around a ruined overhead pipeline to swarm attack a Frinx Mark 1 Sphere tank Star Duck Bazookaducks ambush a Mark 1 in front of a large moisture condenser, a cryo unit, and a small power unitThe WorldWorks Games set consisted of a bunker, and three barricades. They are for 28mm for sure. The bunker was used, and difficult to assemble well with super glue. I ended up using steel base material, popsicle sticks, wood glue, and cardboard to assist in the construction. Here, I really liked my use of the rust pattern that I discussed earlier.
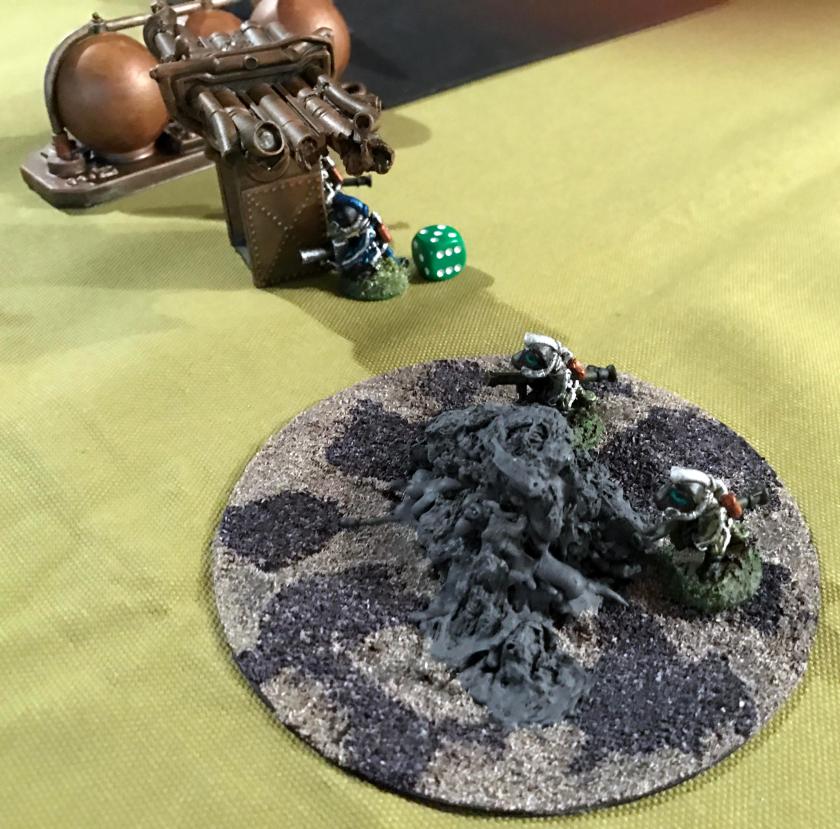
Assembled barrier before priming Assembled bunker, front view, before priming Assembled bunker, back view, with cardboard mounted on popsicle sticks mounted on steel bases Bottom of the bunker – I needed to trim the steel bases and file off sharp edges After priming with gray A Star Duck Mortarduck crew operates from the finished bunker Three Mark 1 Sphere tanks set up in defensive positions behind the barriersLastly, I had three slag mounds that I mounted on two old CD’s. The slag was a byproduct of my casting projects. For these, I had a “Red Planet” plan, and used Citadel “Martian Ironcrust” and “Martian Ironearth” to good effect, as well as different washes.
An Aphid squad and their robot assault gun patrol the slag moundsIt’s a good start and I’m sure I could use some buildings and other things, but that I will get to in due time!
This was a very large project that ended up with producing a 45-figure platoon. I hope that you find this story interesting, if only to see the determination I had to have to see this through! I am going to give some background, and then show the photos for the finished unit. After that, I will give a detailed description for my fellow hobbyists as to how I completed the various aspects of this unit – this will allow you to see the final product earlier in the blog – and those who want more details can go past the completed photos to see more detail.
The beginning -my original 4 Star Ducks from an eBay estate sale. Note the broken ray guns. The broken ones made good candidates for conversions.
My Duck Vader box from eBay – this was a reproduction by Dark Ages miniatures, which like Archive, is no more. Note Nevile Stocken’s name is misspelled.
Background
I first saw the Archive Star Ducks (#2002) and Duck Vader (#2326) on the Lost Minis Wiki as I was researching some other Archive Star Rovers figures. These were made by Archive between 1977 and 1981 or so. They are made of lead and tin alloy. These were sculpted by Nevile Stocken. He sent me the drawing below via Facebook Messenger.
The rights to some of Archive’s figures have been sold off a few times. Several have been reproduced, but they are not currently in production. I searched through eBay, and these are very hard to find. I did manage to find only 4 Star Ducks and one Duck Vader, but that paltry number does not make a unit. My stretch goal was to create a platoon for use with Buck Surdu’s Combat Patrol™ system for tabletop skirmish gaming. I thought that I would need about 40 or more figures to make the unit, and I ended up with 45, which is a good size for a traditional platoon. In this process, I ended up making a mold and casting 40 for myself and some for Buck as previously described in this blog and Buck’s. I converted 4 Squad Leaders with War Games Supply Dump retro sci-fi weapons – which I was lucky to get as WSD closed on March 31st, 2017. I converted 6 figures to make up the mortar crew, to include making the mortars, ammo boxes, and mortar rounds. I also converted three figures to make up an Anti-Tank section (now known as the Bazookaducks) by arming them with Reaper Chronoscope bazookas.
Platoon Organization
The platoon is composed of 45 figures as described below. Five of the figures, including the platoon sergeant and the platoon leader are original castings. The remaining 40 are all Star Ducks that I cast over the last year.
Star Duck Platoon
Platoon leader – Duck Vader (1)
Platoon Sergeant (1)
Duckfoot Mortar Section (6 figures)
Mortar Crew 1 (3 converted Star Duck figures as crewducks)
1 loader
2 crewducks
Mortar Crew 2 (3 converted Star Duck figures as crewducks)
1 loader
2 crewducks
First Squad (11 figures with tan gloves)
Squad Leader (1 converted figure with WSD weapon)
Team A (5 figures)
Team Leader (1) and 4 Star Ducks
Team B (5 figures)
Team Leader (1) and 4 Star Ducks
Second Squad (11 figures with light blue gloves)
Squad Leader (1 converted figure with WSD weapon)
Team A (5 figures)
Team Leader (1) and 4 Star Ducks
Team B (5 figures)
Team Leader (1) and 4 Star Ducks
Third Squad (11 figures with light green gloves)
Squad Leader (1 converted figure with WSD weapon)
Team A (5 figures)
Team Leader (1) and 4 Star Ducks
Team B (5 figures)
Team Leader (1) and 4 Star Ducks
Bazookaduck Section (4 figures with dark red gloves)
Squad Leader (1 converted figure with WSD weapon)
Bazookaducks (3 Star Ducks with Reaper Anti-Tank weapons)
The Completed Duck Platoon
Platoon Sergeant and Duck Vader, Platoon Leader, frontal view. The Platoon Sergeant is an E-7 (Sergeant First Class). Duck Vader is a First Lieutenant.
Platoon Sergeant and Duck Vader, Platoon Leader, reverse view. Both are original.
The 4 Squad Leaders, converted with WSD weapons. Each is an E-6 (Staff Sergeant). From right to left, 1st, 2nd, 3rd Squad and AT Section leader. I used different colors on the gloves, lapels, and helmet buttons to differentiate them for tabletop play.
The team leaders for each line infantry squad, with the same coloration of the Squad Leaders but with original Star Duck weapons. The B teams for each squad have a unique tuft. These are E-5’s (Sergeants).
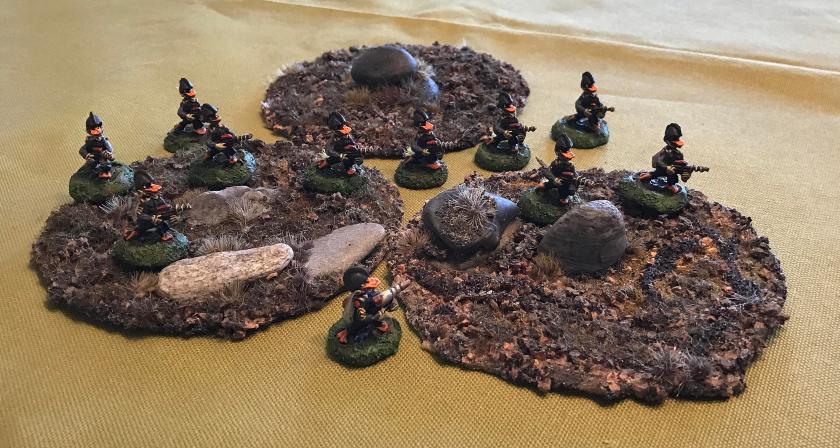
First Squad moves out.
Second Squad defends the lava mounds.
Third Squad assembles.
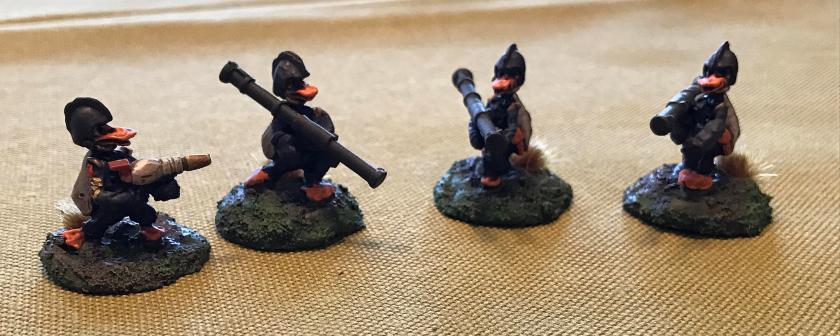
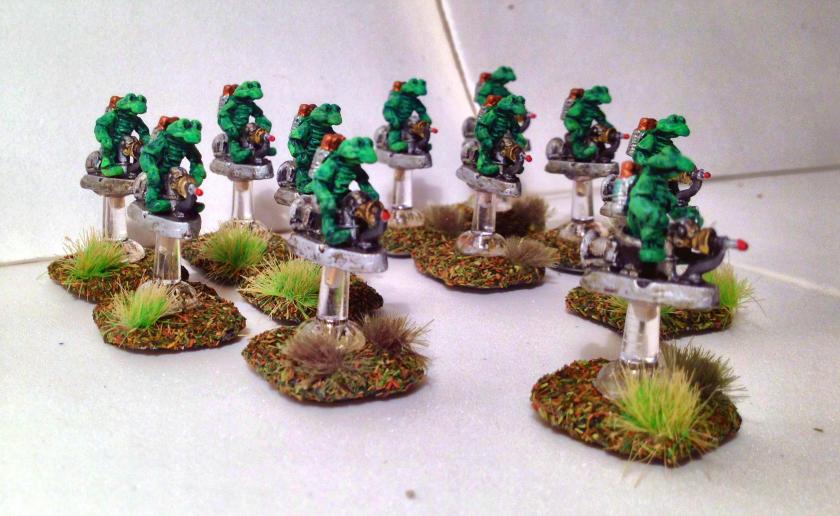
The Bazooka Ducks face off against Frinx Sphere tanks. For scale, the sphere tanks are golf ball sized.
The Bazookaduck Section Leader (an E-5), and the three Bazookaducks with Reaper Chronoscope bazookas.
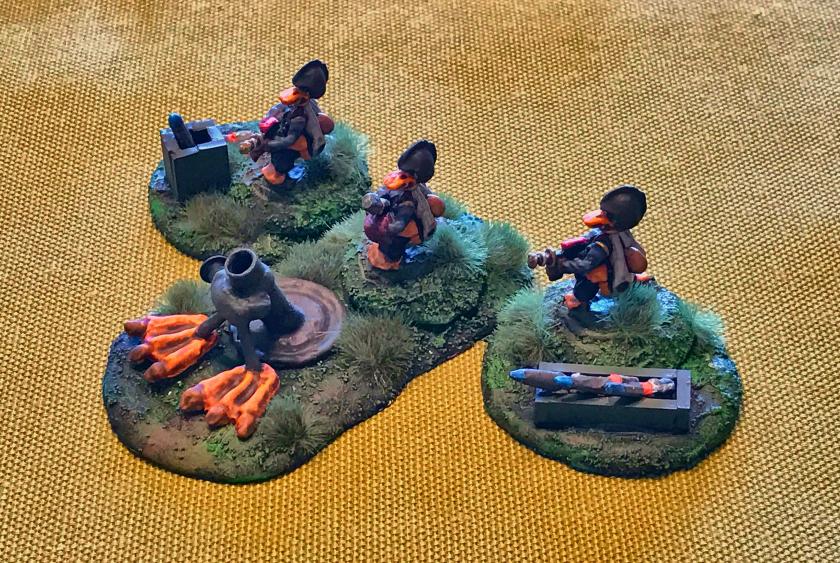
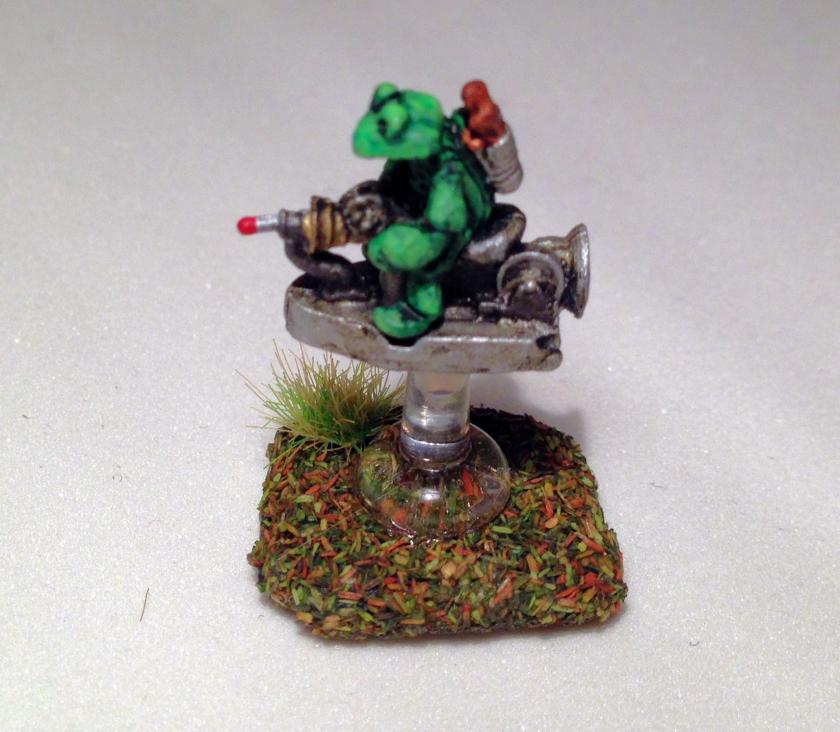
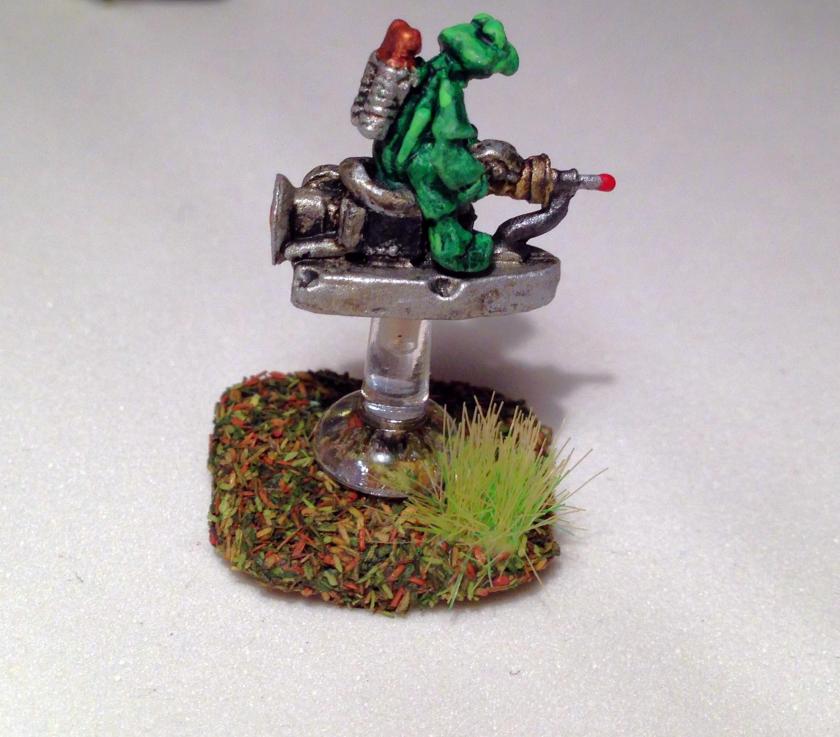
Mortarduck crew A with Duckfoot mortar. The two outer crewmen have ammo boxes and rounds to prepare for the loader. The loader is converted and holds a scratch-built round. The mortar is scratch-built from a washer, a bolt extender, paper clips, servo parts, and green stuff. Brown tufts designate this as crew A.
Reverse view of crew A.
Mortarduck crew B. Made similarly to crew A, except this crew has green tufts.
Reverse view of crew B.
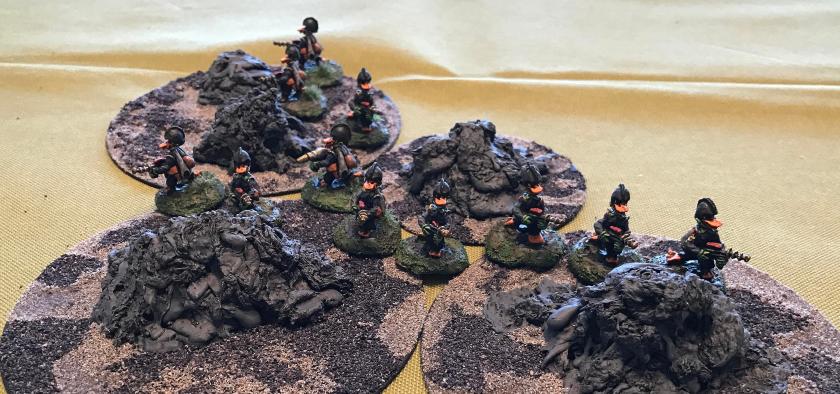
The Star Duck Platoon in formation, view from the right.
Star Duck Platoon, reverse view.
Overall, I am very happy with the unit. I did use Army Painter Quickshade (Soft Tone) which darkened them much more than I expected. The effect was acceptable, but some of my identifying colors were muted.
I will now go into the how-to’s of the making of the unit.
How to Section
Conversions
All of the figures that I converted were missing the ray gun ends. These were either original casts or my own. I used a jewelry saw, wood carving knives, files, an awl, and an Exacto knife to remove the ray guns and make room for the weapons. Some of the figures lost limbs in this process, but I was able to use green stuff to recreate arms and hands for these figures. I drilled any “amputees” with a pin vise, and used 24 gauge wire as an armature for these.
a. Mortars and Mortarducks
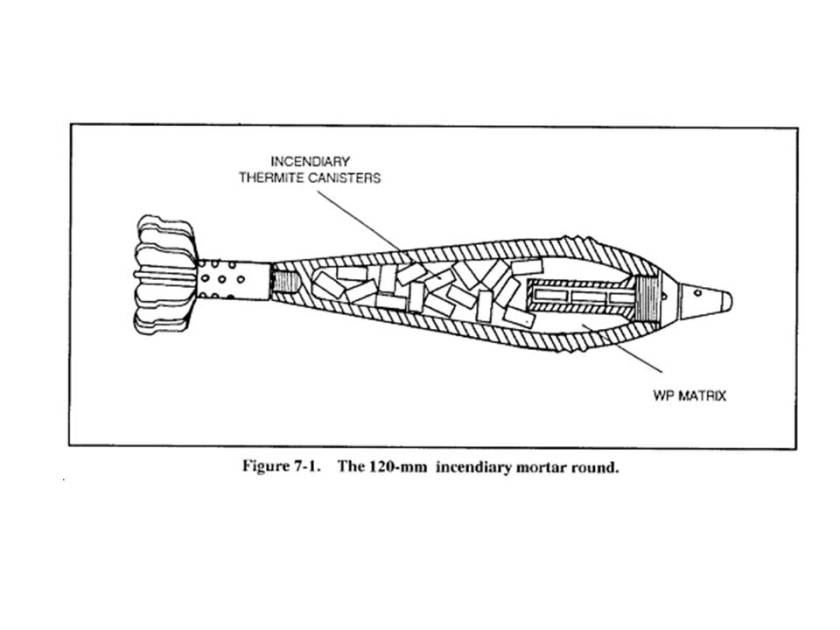
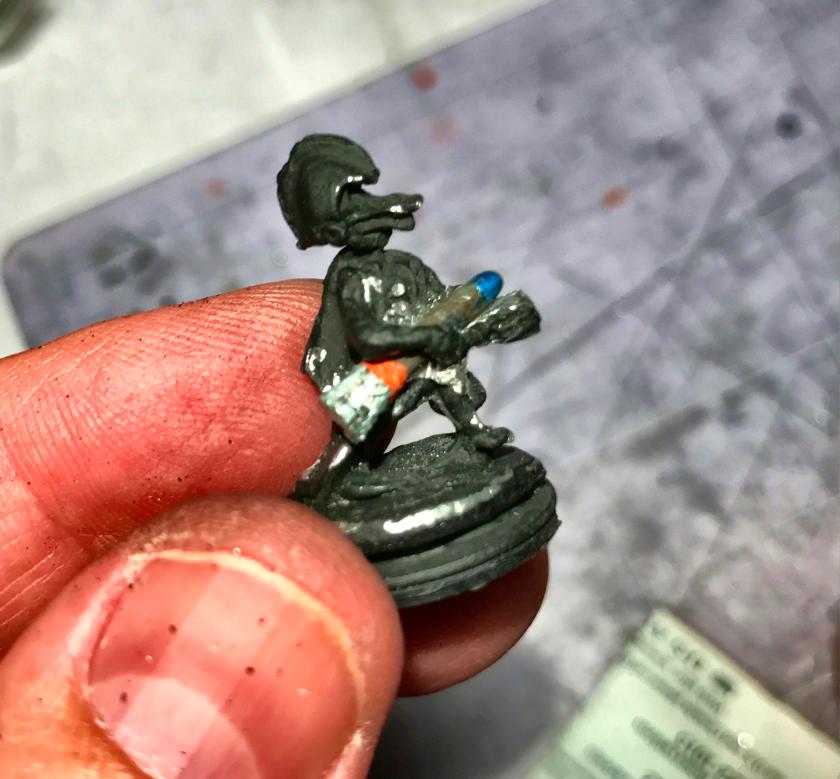
The mortars and mortarducks were the first conversions I attempted for this unit. I envisioned two teams of three – made up of a loader, and two crewducks with ammunition boxes. I made the ammo boxes from Plastruct styrene plastic and special styrene adhesive. I had acquired some Army Painter green stuff, and decided to give it a go for the mortars and rounds. I ended up using my steel sculpting tools, but quickly learned that I needed something different for green stuff, so I got some silicone- tipped tools that worked much better (less stickiness problems). I used paperclip wire with the green stuff for the mortar legs and the rounds. I tried to make a form for the mortar round bases out of 1/8″ plywood, with mixed success. Eventually, I found that correction with an Exacto knife was a good way to go. I made the bases with Apoxie Sculpt and steel washers. In the case of the mortar base, this made sense as I was able to make a strong base with room for the loader using two slightly different washers. The mortars themselves were made with screw extenders, washers, and servo parts for a model airplane. Testors super glue was the means by which I glued the rounds to the loaders and the ammo boxes. Additionally, I found that having some small hobby mirrors from Michaels made the sculpting and assembly process much easier. I decided to leave the two crewducks with their original weapons as the loader conversion had proved to be a lot of work and I did not think it made a difference as I already had the ammo boxes.
My mortar plan and notes
Idea for mortar round sculpts
Initial work on the mortar and the rounds
Early stage in sculpt
Early stage in sculpt, side view
Middle stage of sculpt, before Duckfoot alteration
Duckfoot mortars!
Mortar Rounds completed and painted
Mortarduck loader conversion in progress
b. Bazookaducks
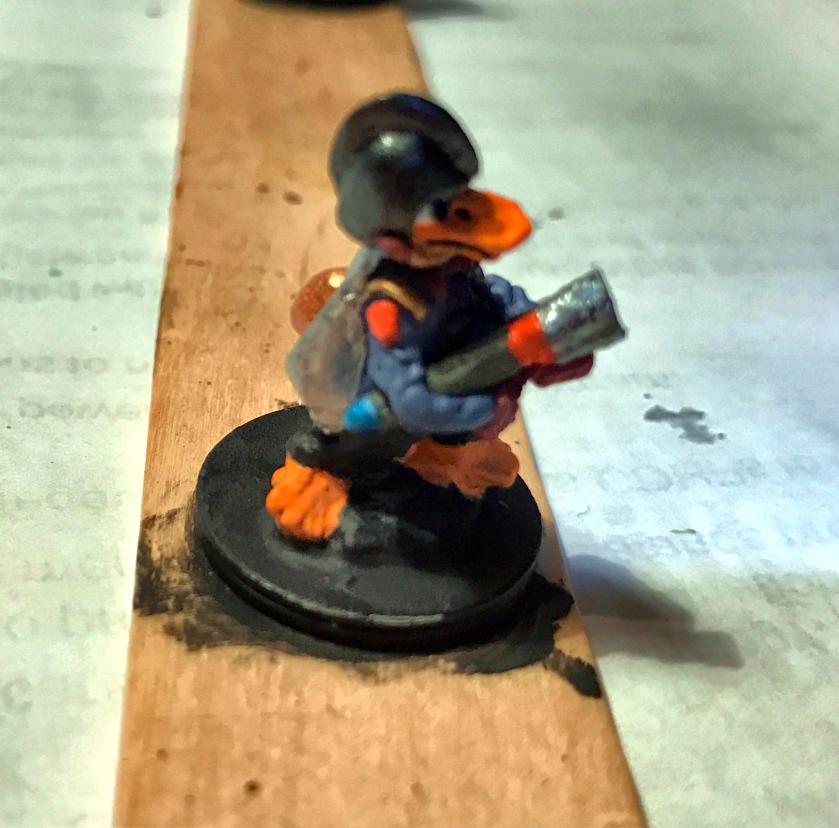
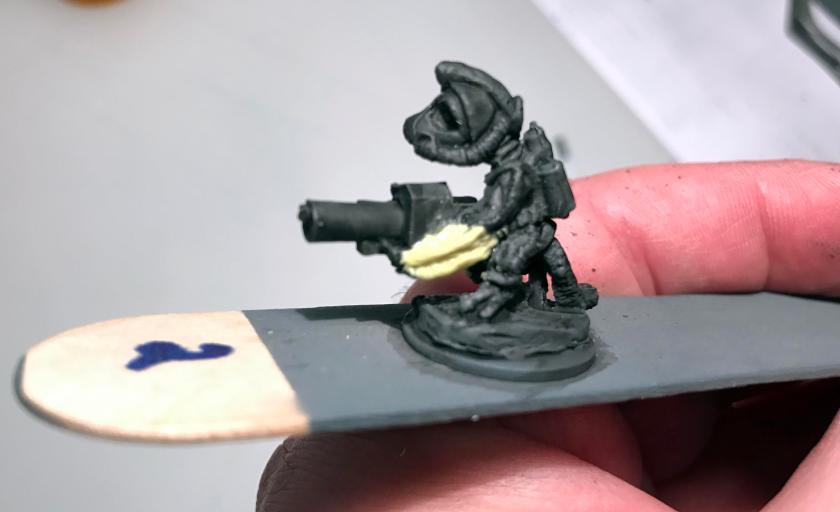
I wanted the unit to have an anti-tank capability beyond the mortars. I had previously converted some Frinx for this purpose, and decided to do the same for the Star Ducks. The bazookas are from Reaper and came with several other weapons. I basically carved away the ray gun and made the bazookas “fit”. There were amputees in this group, but I think the conversions worked well.
c. Squad Leaders
The squad leaders were simply converted with the same tools. I gave them the War Games Supply Dump blasters from the Dirk Garrison line.
3. Painting and Basing
The biggest challenge with painting was the color orange – I had not used it much before – and it took several iterations of trying different combinations until I found what I liked.
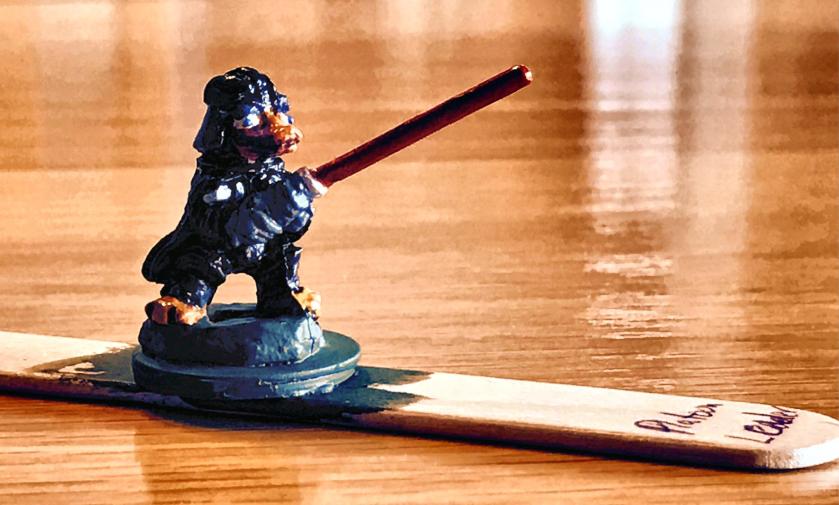
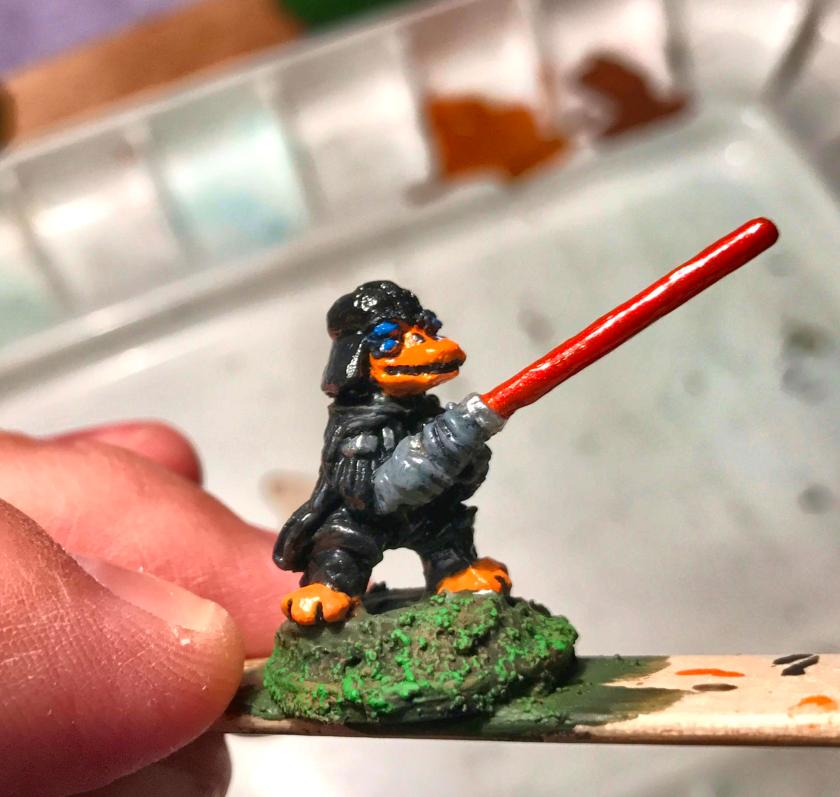
a. Duck Vader
The sequence was as follows:
Citadel “Imperium Primer” as a brush primer
Armory “Gloss Black” on helmet
Craftsmart “Orange” on feet and bill
Tamiya “Orange” on feet
Citadel “Ceramite White” on face and tail
Reaper MSP “Blue Liner” around eyes and pupils
Vallejo “Aluminum” on light saber beam
Vallejo “Chrome” on light saber handle
Vallejo “Steel” on chest details
Vallejo “Medium Gunship Gray” on gloves
P3 “Cygnar Blue Highlight” on eyes
Citadel “The Fang” on eyebrows
Citadel “Castellan Green” on base
Citadel “Nuln Oil Gloss” on cape and fingers
Citadel “Spiritstone Red” on light saber
P3 “Flesh Wash” on tail
Highlight cape with Vallejo “Black Grey”
Vallejo “Black” and “Glazing Medium” on cape and mouth slit
Deka Lack “Weiss” highlight on tail and face
Vallejo “Gloss Varnish” on helm
Army Painter “Anti-shine Varnish” on figure
Base coated
Finished Duck Vader
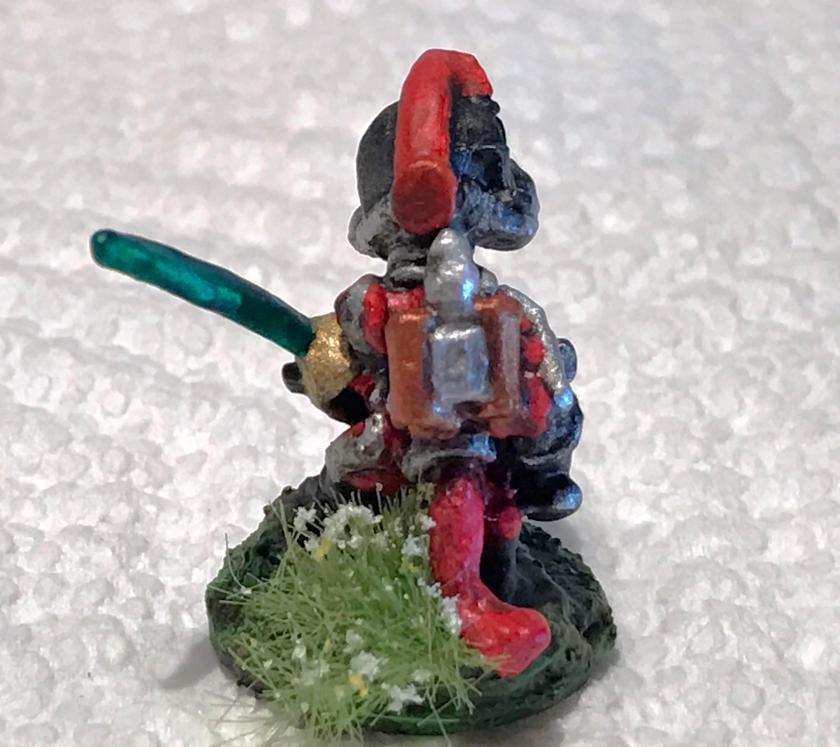
b. Mortar and mortar rounds
The sequence was as follows:
Citadel “Imperium Primer” as a brush primer
Armory “Gloss Black” on mortar base
Vallejo “US Dark Green” on mortar rounds
Tamiya “Titanium Silver” on mortar round tips and base
Craftsmart “Orange” on Duckfoot mortar feet
Tamiya “Orange” on feet
Citadel “Athonian Camoshade” wash on mortars
P3 “Sulfuric Yellow” on toes of mortar feet
Highlight with Tamiya “Orange” on feet
Citadel “Soulstone Blue” on mortar tip/fuse
Vallejo “Olive Drab” on mortar and rounds
Vallejo “Steel” and “Black Metallic” on mortar fins
Citadel “Fire Dragon Bright” on mortar rounds
Mounted the mortars and boxes and rounds on bases
Bases painted with Citadel “Lustrian Undergrowth”
Bases shaded with Citadel “Seraphim Sepia”
Bases highlighted with Armory “Musket Brown”
Bases highlighted with Citadel “Niblet Green”
Mortar dipped in Army Painter “Quickshade (Soft Tone)”
Mounted mortar and rounds got coat of Testors “Dullcoat”
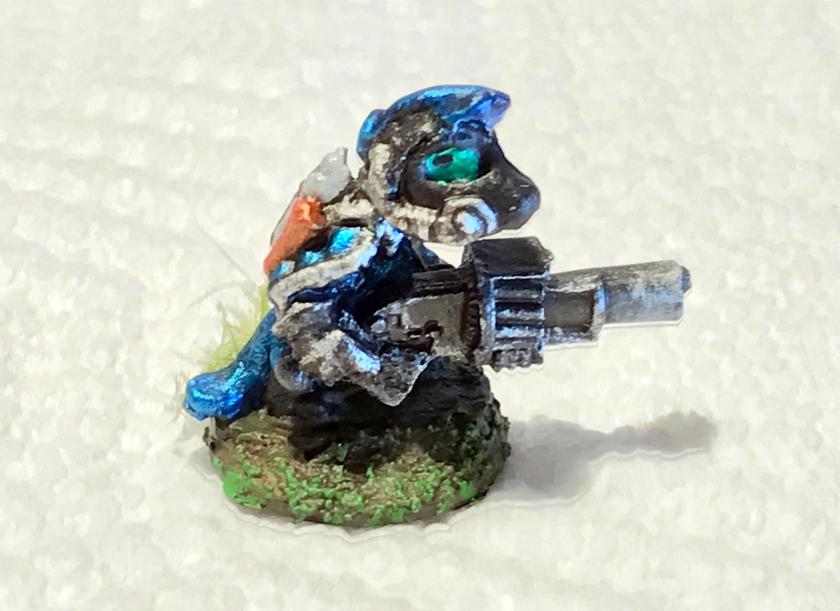
c. Star Ducks
Citadel “Imperium Primer” as a brush primer
Citadel “Nuln Oil” on figures
Citadel “Ceramite White” on face and tail
Citadel “Fire Dragon Bright” on feet and bills
Reaper MSP “Blue Liner” around eyes and pupils
Citadel “Soulstone Blue” on eyes
Citadel “The Fang” on the jacket
Vallejo “Metallic Black” on helmets and infantry ray guns
Vallejo “Copper” on fuel tanks
Americana “Ebony” on trousers
Vallejo “Black” on mouth slit
Vallejo “Aluminum” on jet venturi on back
Vallejo “Gold” and “Chrome” on ray guns
Polly-S “Goblin Flesh” and Vallejo “Glaze Medium” on holsters
Vallejo “German Grey” on ammo pouches
Vallejo “Signal Red” on ray gun scopes
Vallejo “Gold”, “Chrome”, “Copper”, and “Signal Red” on WSD blasters
Different glove colors on lapels, helmet buttons, and gloves: Platoon Sergeant – Vallejo Metallic “Arctic Blue”; 1st Squad – Citadel “Ushabti Bone”; 2nd Squad – Americana “Bahama Blue”; 3rd Squad – Americana “Apple Green”; Bazookaducks – Polly-S “Demon Deep Red”; Mortarducks – Americana “Dioxazine Purple”
Armory “Musket Brown” and Vallejo “Neutral Grey” on cigars
Vallejo “Black” on bill vents
Vallejo “Light Orange” and “Glaze Medium” as glaze on bills and feet
Vallejo “US Dark Green” on bazookas
Citadel “Athonian Camoshade” wash on bazookas
Milliput (yellow) on bases
Bases painted with Citadel “Lustrian Undergrowth”
Bases shaded with Citadel “Seraphim Sepia”
Bases highlighted with Armory “Musket Brown”
Bases highlighted with Citadel “Niblet Green”
Figures dipped in Army Painter “Quickshade (Soft Tone)”
Figures coated with an application of Testors “Dullcoat”
Used various Army Painter tufts and meadow flowers on bases to designate teams
Base coated and ready for varnishClose-up of unit pre-varnishMortarduck loader, pre-varnishPlatoon Sergeant, post-dipPlatoon post dip, with Milliput added to bases
To wrap up, I am very happy that the unit is done. I am on the fence as to the use of the Army Painter “Quickshade” – the figures are darker and well-shaded, and should be well protected, but some details are obscured. I enjoyed my new Vallejo products and found that they really worked well. I also learned that orange as a color requires multiple applications and glazing to work well.
I learned much that I can use for future projects, and I hope that you enjoyed this blog entry.
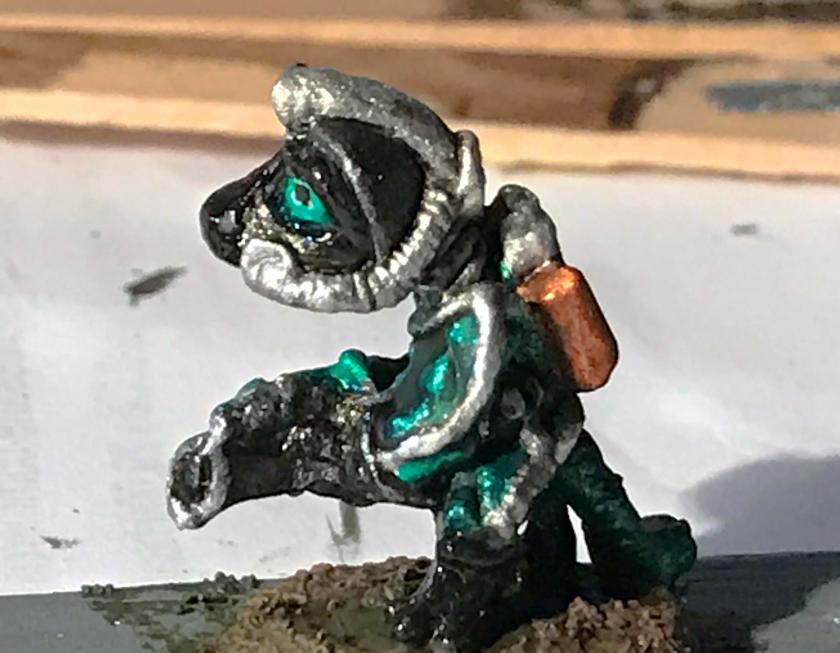
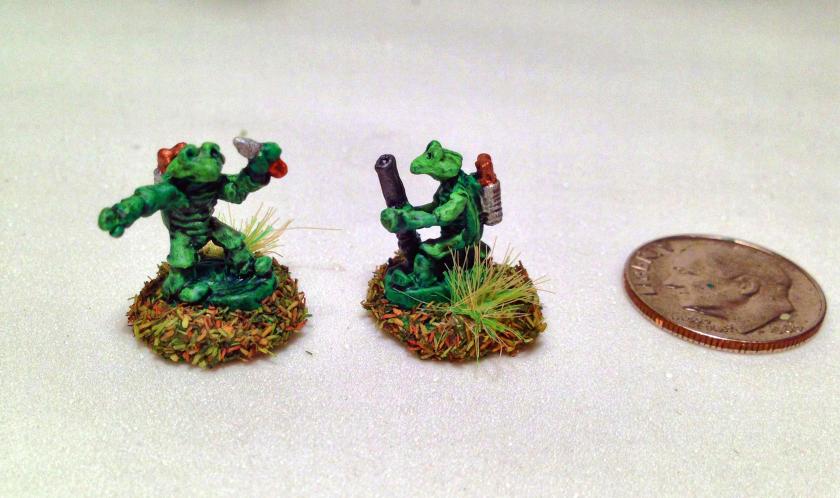
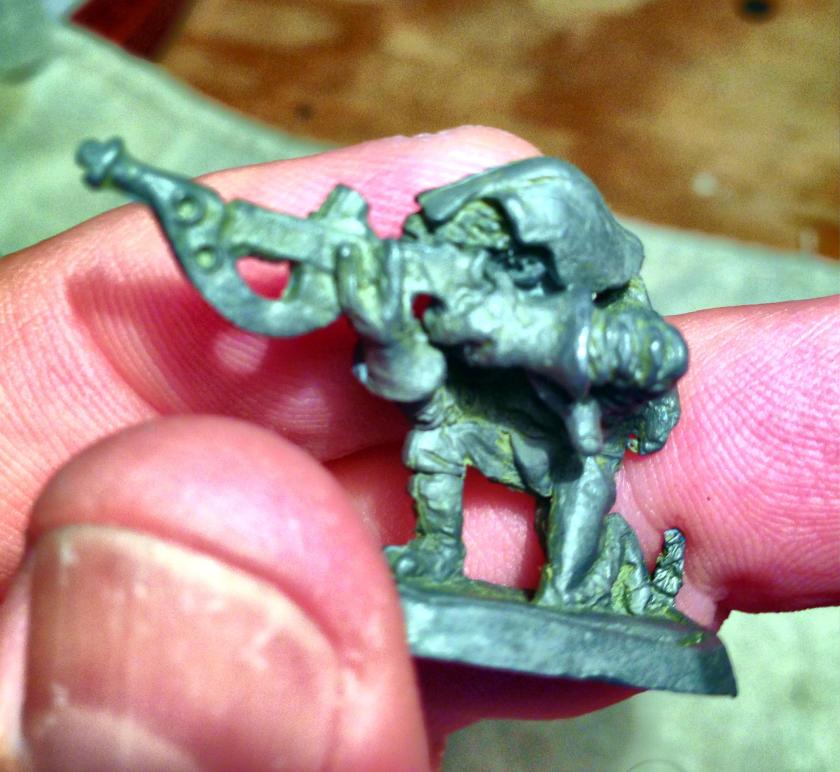
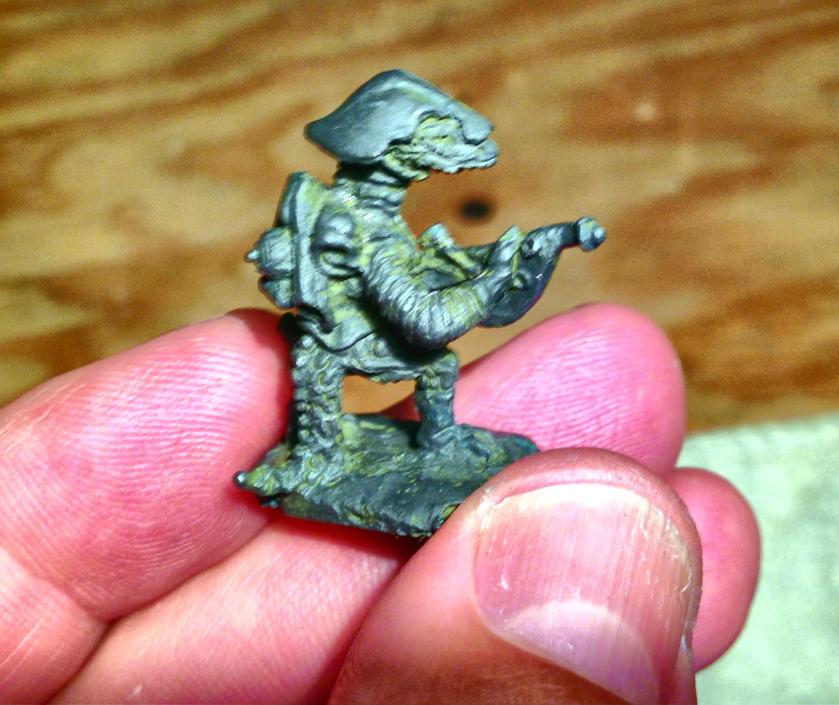
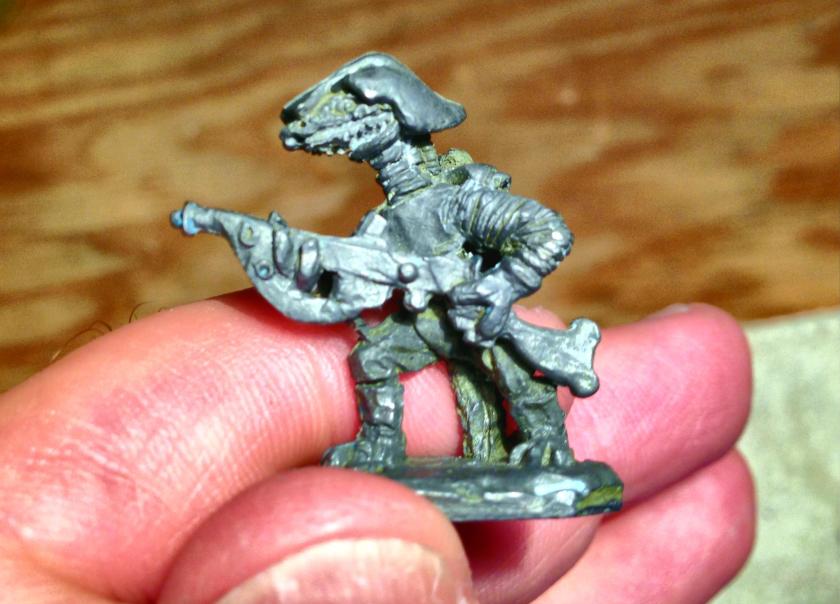
As described earlier in this blog (here), I had acquired and cast some Archive Star Rovers figures – “Power-Armored Frinx” (#2040 or #2305) last year. As these were made between 1977 and 1981, it became difficult to acquire enough of them for a unit, and Archive no longer exists to purchase them. I cast several of them for myself and friends.
My goal was to create a platoon-sized unit of these Frinx for a retro-sci-fi battle using Combat Patrol™. My concept of these figures is that they are reptilian, and that they wear suits of “power-armor” that protect them, while negatively affecting their movement. They are armed with a blaster-type weapon. My castings did not pick up the details of the helmets which had a light-like feature similar to that of a miners helmet. What they did pick up yielded a look similar to a beret (if a helmet could become a beret), and I incorporated that feature into my painting scheme.
For fun, below is a catalog shot that came with my Star Rovers game. Note that it lists “Frinx” and “Nude Frinx”. I do have one of the latter, and its a Frinx out of armor!
Catalog scan from Archive Star Rovers game
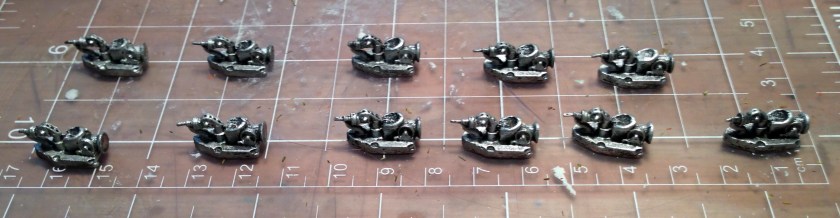
Mold with Power-Armored Frinx
After I had 32 figures, I organized them for the platoon. I needed to convert several troopers to make a platoon leader, a platoon sergeant, and an anti-tank section. I also plan on attaching the Mark 1 Sphere tanks I previously created into the platoon. The organization of the platoon is below.
Power-Armored Frinx platoon structure (32 fighting figures plus 3 vehicles):
Frinx Platoon Leader (1 Frinx with blaster pistol and light cutlass)
Frinx Platoon Sergeant (1 Frinx with automatic grenade launcher)
AT section (3 Frinx with bazookas)
Jade Squad (9 Frinx)
Squad Leader (1 Frinx with blaster rifle, also leads Jade A team)
A Team – 4 Frinx Infantry with blaster rifles
B Team Leader (1 Frinx with blaster rifle, also leads Jade B team)
3 Frinx Infantry with blaster rifles in Jade B team
Pearl Squad (9 Frinx)
Squad Leader (1 Frinx with blaster rifle, also leads Pearl A team)
A Team – 4 Frinx Infantry with blaster rifles
B Team Leader (1 Frinx with blaster rifle, also leads Pearl B team)
3 Frinx Infantry with blaster rifles in Pearl B team
Amethyst Squad (9 Frinx)
Squad Leader (1 Frinx with blaster rifle, also leads Amethyst A team)
A Team – 4 Frinx Infantry with blaster rifles
B Team Leader (1 Frinx with blaster rifle, also leads Amethyst B team)
3 Frinx Infantry with blaster rifles in Amethyst B team
Sphere Tank Section (3 Mark 1 Sphere Tanks with heat rays and ray guns)
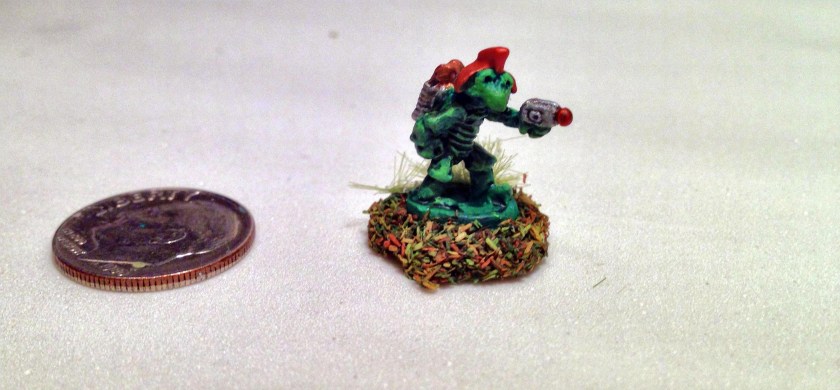
I used a jewelry saw and some blades to remove the blaster on two figures, as well as the left arm on the platoon leader. I had some sci-fi weapons that I had gotten on eBay and from Buck Surdu (perhaps from War Games Supply Dump). I gave the platoon leader a light cutlass (instead of a light saber) and a blaster pistol.
Platoon Leader after conversion
I then moved on to the AT section, which reports to the platoon sergeant. After removing the blaster and shaving some space, I used a pin vise drill to make space for the bazookas on 3 Frinx. I used 3 bazookas from 3 Reaper Chronoscope Weapons Pack III’s (#5o234). I split the bazookas in half and sized them to the figures. For the platoon sergeant, I removed the blaster, and gave him a cool automatic grenade launcher.
AT Frinx after conversion.
Source of bazookas
A trooper, the converted platoon leader, and the converted platoon sergeant
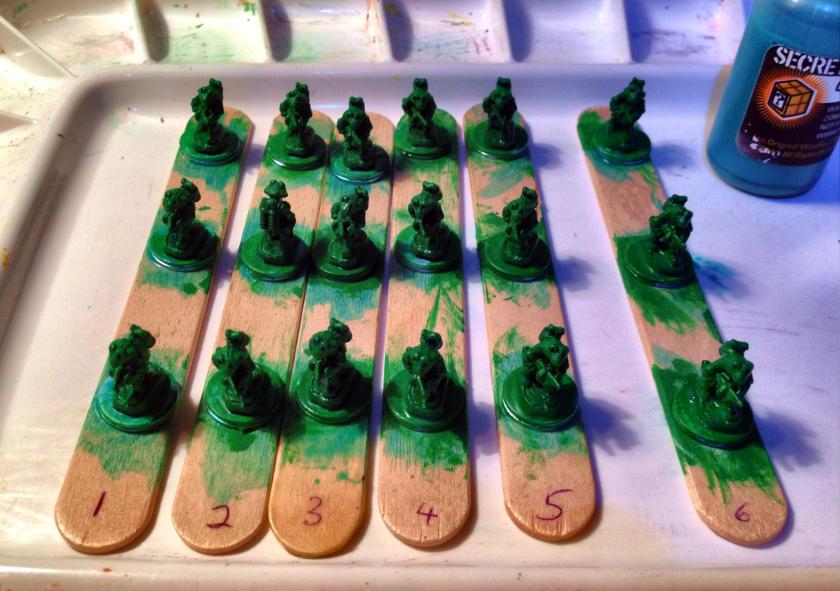
I mounted all the figures on ¾” steel washers with wood glue, and let them dry. Subsequently, I used white glue to lightly mount the figures to numbered popsicle sticks. I covered the numbers with scotch tape, and primed the lot with Krylon “Ultra Flat Gray”. I then removed the tape so as to know what stick I was working on and have a reference point for the beginning and the end as painting units can cause one to forget. Using Citadel “Nuln Oil”, I gave the unit a wash to better identify their features. This gave me a surprise for the platoon sergeant!
All primed
The automatic grenade launcher already had a couple of hands on it! The Frinx hands are gloved – similar to say 1920’s Mickey Mouse for lack of a better comparison. I had to create a left arm with Milliput for the figure that would cover up the left glove and extend to the left hand under his weapon. For the right extra hand, I filled in the fingers with Milliput and made it look like part of the grenade launcher.
Platoon Sergeant – before conversion on left side
New arm for him!
Platoon Sergeant with extra hand?
Turned extra hand into stock
As far as my painting scheme, I wanted to try something new – and use a lot of metallic paint for a few purposes. First, to create the image of the “power armor” I used a series of DecoArt metallic paints. These had a side benefit of also allowing me to easier differentiate my squads into three (Jade, Pearl, and Amethyst). I used other Citadel Technical Paints to denote leaders, and parts of weapons. Additionally, I used a few Tamiya metallic paints as I will describe. The net effect of the metallic was to make this a difficult project due to the thicknesses of the metallic paints – but I think the results worked (but the reader can be the judge). These photos are ok, but I found it difficult to get the lighting right for them.
Basically, I had to abandon the typical assembly line approach I normally take to when painting units due to the properties of the metallic paints (especially the viscosity and the clotting). Thinning helped, but to get the desired effects I went slow and methodically. Each figure was base coated with a DecoArt Dazzling Metallic or Craftsmart metallic main color (DecoArt “Festive Red” for the platoon leader, Craftsmart “Sapphire” for the platoon sergeant, DecoArt “Festive Green” for the AT section, DecoArt “Crystal Green” for the Jade squad, DecoArt “Peacock Pearl” for the Pearl squad, and Craftsmart “Amethyst” for the Amethyst squad. Tamiya “Chrome Silver” was my choice for the breathing regulators, straps, part of the blaster sights, and the center of the helmets. Tamiya “Gun Metal” was what I used for the blasters and the remainder of the helmets. For the Frinx faceplates, gloves, and boots, I used another metallic, Craftsmart “Onyx”. The main part of the breathing tanks was coated with another metallic, DecoArt “White Pearl”, while the tanks themselves got Tamiya “Copper”. Inside the faceplates, I painted the eye wells with Citadel “Ceramite White”, then dotted the eyes with “Onyx”. Using Citadel Technical “Waystone Green”, I filled in the rest of the eye well, creating an eye. I ten used Citadel “‘Ardcoat” to create a lens-like effect on the faceplate – this took a while as I had to do one side at a time, and let each dry. I also used the “Chrome Silver” as a base for “Waystone Green” on parts of the blasters, the platoon leader’s light cutlass, and on the team leaders’ helmets. For the squad leader’s and platoon sergeant’s helmets, I used the same approach but with another Citadel Technical paint, “Soulstone Blue”. The platoon leader’s helmet got Citadel “Spiritstone Red” (yet another “Technical” paint).
I then used “Nuln Oil” for shade, and highlighted all the areas overly darkened by it with the original colors to add depth. For the black gloves, I used highlights of “Chrome Silver” intermixed and slightly covered by “Onyx”. For the bazookas, I used my first Vallejo paint, “US Dark Green” – and I loved the paint. It was so easy to use after all the metallics! I shaded the bazookas with Citadel “Athonian Camoshade”.
For the bases, I tried a new approach to hide the raised bases. Using Citadel “Lustrian Undergrowth” (a thick “Texture” product), I carefully filled in around each base. This was better than I thought as far as effects. After the bases were dry, I washed them with Citadel “Seraphim Sepia” and let them dry. I was able to dry brush the bases successively with Armory “Musket Brown” and Citadel “Niblet Green”. Due to the cold weather, I was not able to varnish at home. Luckily, my friend Jeff Smith has a nice heated workshop that he was kind enough to let me use. There I gave the platoon a couple of coats of Testors “Dullcoat”.
Lastly, I used tufts to better differentiate for play between A and B teams on the squads. Jade team A got one Army Painter “Swamp Tuft”. Pearl Team A got Army Painter “Wilderness Tuft”. Amethyst Team A got Army Painter yellow “Meadow Flowers”. The platoon leader and platoon sergeant got white “Meadow Flowers”.
Midway progress
Lots of Frinx!
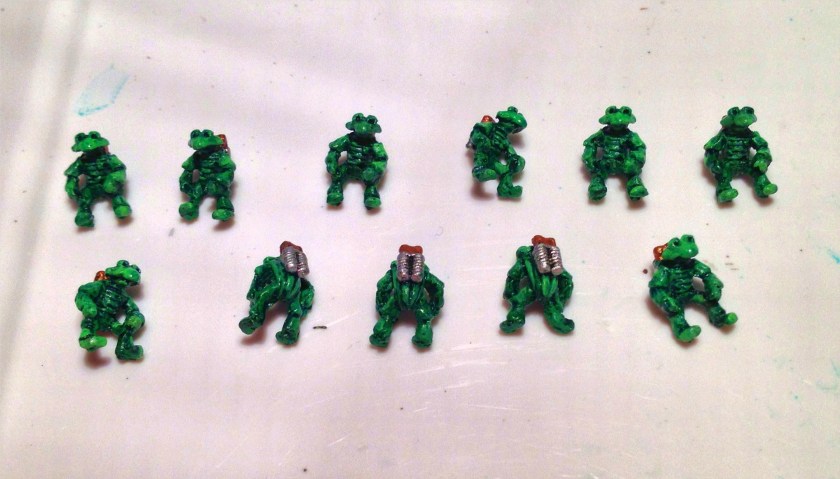
Close up of Jade team Frinx after base coat
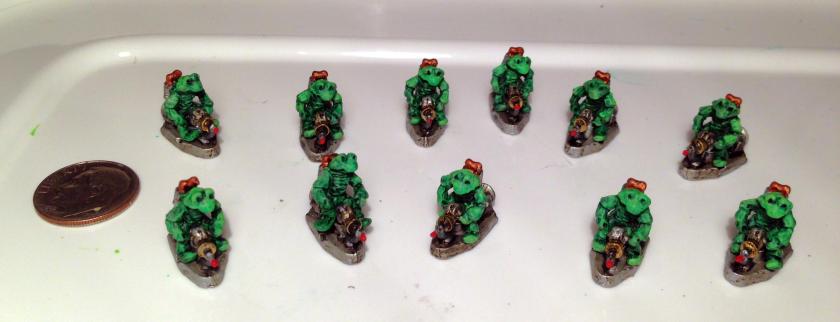
After painting and off to the varnishing
Assembled platoon less sphere tanks
Amethyst Squad, side view
Platoon Leader with light cutlass
Blaster side
Rear view of PL
Platoon Sergeant, weapon view
Platoon sergeant, rear view
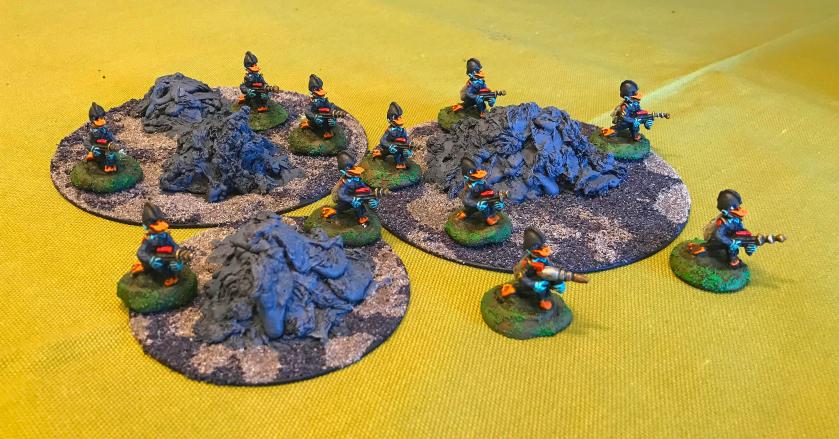
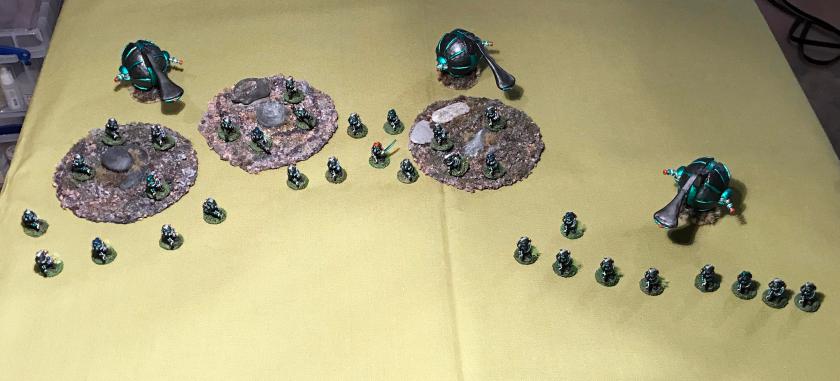
AT Section
Supported by Mark 1 Sphere Tanks
On the move
The Power-Armored Frinx Platoon deployed
I tried a number of new things for this project and learned some things:
Multiple metallic paints
Tamiya – use their thinner, it works better than water and can rejuvenate old Tamiya paints
Craftsmart and DecoArt – thick stuff, but will work
Citadel products
“‘Ardcoat” – great for lenses over Citadel Technicals
“Lustrian Undergrowth” (Texture) – works well on bases and drybrushes well
Technicals (“Soulstone Blue”, “Spiritstone Red”, “Waystone Green” – all good, but need to consider what you use as base and drying time
“Seraphim Sepia” and “Athonian Camoshade” are nice washes
Conversions – sometimes the details are not immediately visible on additions! Use a wash on gray or white primer to see details
I am happy to begin the 2017 blogging season with a very complicated project. While I began work on this project in December, I had been thinking about it since last May.
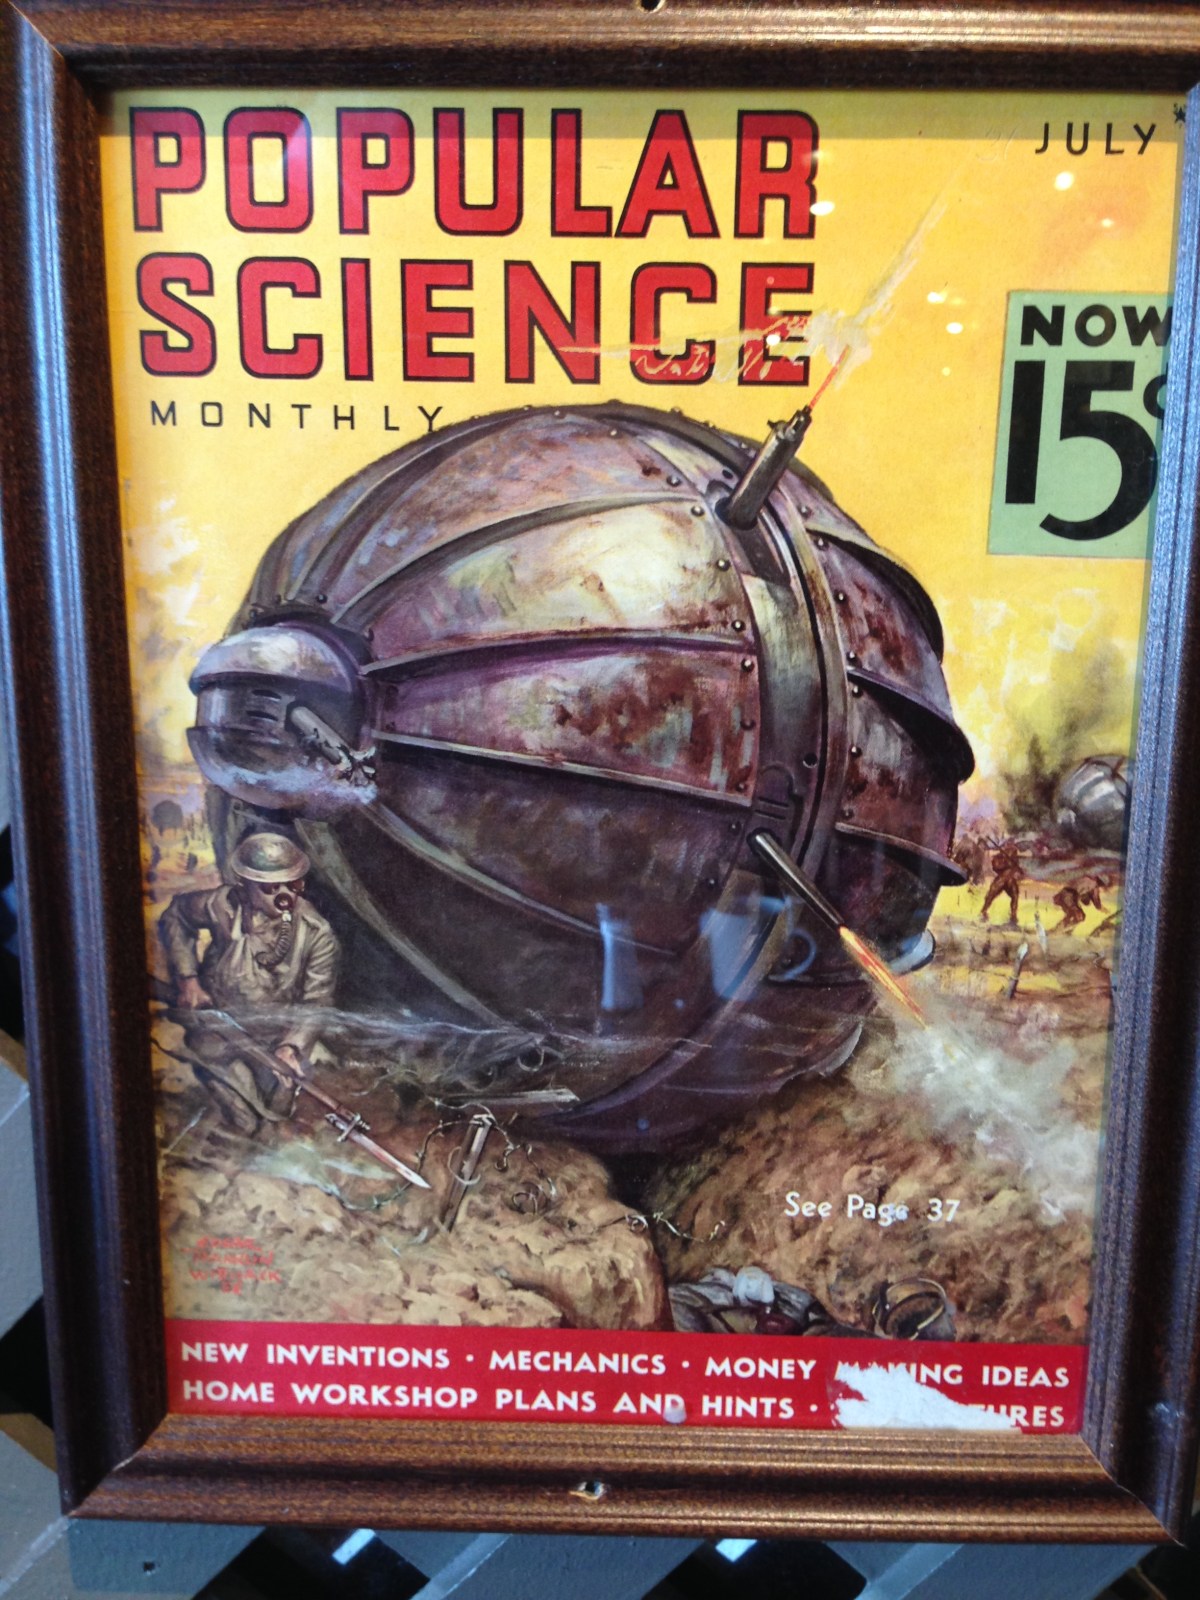
So what happened in May 2016? I was traveling for work, and sat down in a Cracker Barrel in Connecticut for breakfast (Uncle Herschel’s with a sweet tea of course). For those of you who have never been to a Cracker Barrel, there are always old photos and curios all over the walls. I looked to my left, and saw this on the wall:
What started this journey
I was amazed at this and wanted to dig in more and learn the date of this issue of Popular Science magazine and see what the article said. The article was just a paragraph with another picture – here is the link and a shot of the July 1936 article on page 37.
The page 37 article
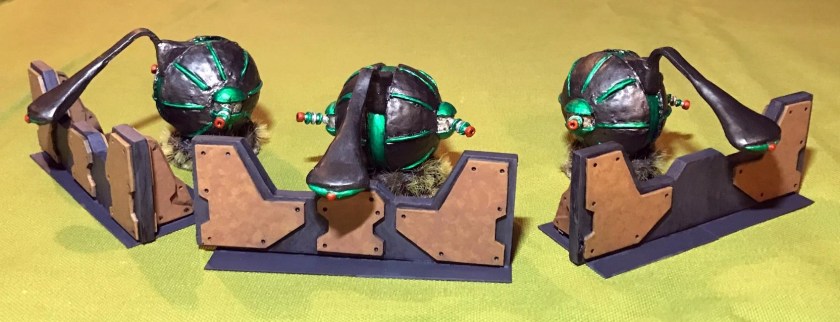
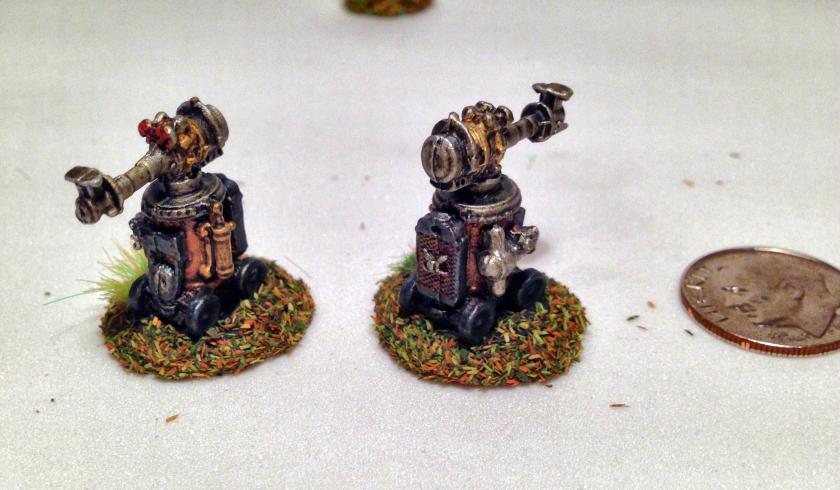
The concept of the “tumbleweed tank” tank was one of two outer shell halves rotating independently on rollers over a solid stationary sphere. More or less, the outer halves acted as the vehicle’s treads. I do not believe that anyone ever tried to build this as a combat vehicle, but I still found the concept fascinating and worthy of a project.
During the intervening months, I conceived of an idea that I could make a model of the tank, build a mold, and cast it for tabletop wargaming. As I have been building units of Star Rovers figures for sci-fi Combat Patrol™, my first thought was to make a retro-sci-fi tank, probably for the Frinx. I was not enthusiastic about the weapons design as shown in the magazine – machine guns alone would make this a very boring retro sci-fi tank. I also considered making it modular – so that I could adapt different weapons for it.
While thinking about it, I wanted to have a great sphere – and my sculpting experience is at best weak to nonexistent. I have seen a few blogs that I follow where folks are sculpting their own figures, and that helped to inspire me. As I also cast – this was a chance to go from beginning to end with the project. But what to use?
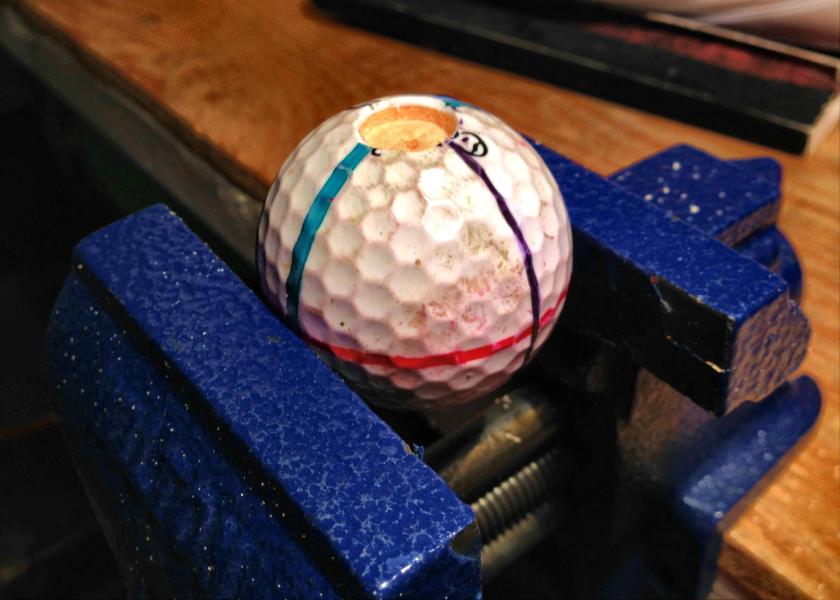
The answer came easily to me as a golfer – a golf ball! That would be an easy thing to work with and would afford me a chance to see what works. I had an idea that I wanted it to be armed with ray guns in the side sponsons. I had not decided on the main weapon, when I had a brainstorm – 1953’s War of the Worlds Martian Heat Rays!
1953 movie posterThe Martian ship
So with this plan, I went forward to try to create my new Mark 1’s (what else to call them!). I thought that I could learn from the project (and I have). I used a “Line ’em Up” golf accessory to create lines on a used Callaway golf ball, and drilled a ½” hole in the side of the ball on two sides. I like the Callaway for this as it has hexagonal dimples.
First drill hole into the Callaway
After this, I used a Plastruct 2mm x 4.8mm styrene strip to size up the gap between the ball halves. I used my Dremel to cut the outer surface of the ball – it ended up being messy and needed a lot of Exacto knife work. The Dremel cutting blade tends to melt the outer ball cover – another lesson learned
After cutting the chassis ridge with my Dremel
I then needed to create the tread ridges. I used an Exacto knife to carve small channels along the lines for the treads. This took a lot of cutting! Using some old plastic membership cards, I cut out each tread, sized them to the holes, and glued them in with super glue.
Tread ridges cut from plastic membership cards
I then drilled a ¼” hole for the attachment of a main weapon – which I would cast separately with the sponsons in a single mold. To build a base for the model, I used three 1¼” washers, and glued them together with wood glue. I then covered them with Apoxie Sculpt, leaving a hole to mount the ball to the base with a wood screw through the washer. This ended up being a base that I feel in the end was a little too tall, but usable, and castable.
A Callaway golf ball converted into the tank chassis
I originally was going to use Milliput or Apoxie Sculpt for the sponsons – when I discovered these ½” Button Plugs from Lara’s Crafts – which were the right shape and fit perfectly into the holes on the sides (got lucky here). I bought a set of Niji woodcarving knives (which I wish I had when I was carving the treads and the middle gap!) and used them to make the sponson shells. After trial and error (where I learned the hard way that I needed to wear a cutting glove with these very sharp knives), I carved two sponsons and sanded down the middle slots.
Making the button plugs into sponsons
I initially thought that I needed to smooth out the golf ball dimples and the tread cuts, so I first tried with Apoxie Sculpt, with poor results. My next attempt was with Citadel “Liquid Green Stuff”, which was better, but I think was an unneeded step.
The master figure and sponsons mid-project
I drilled a 1/8″ hole in the sponson shell, and mounted a short piece of Evergreen Scale Models strip styrene 1/8″ tube. For the ray guns, I turned to the use of model airplane parts. I used two Dubro products – a 2mm socket head cap screw with three 2 mm flat washers superglued to it. To line up the washers evenly, I found that using toothpicks on both sides and underneath to define the gaps and make the washers relatively parallel worked well. I inserted the guns into the ends of the styrene, after coring out the ends of the styrene rods for a better fit. Eventually, I primed the sponsons black with Citadel “Imperium Primer”, as I wanted there to be less tackiness to the Quick-Sil from the wood.
Nice view of the ray guns in the sponsons
Another view of the ray gun sponson
I then moved onto the main weapon, the heat ray. In the 1953 movie, the heat ray was rectangular, leading to the distinctive head. I eyeballed the length, and designed the head. I sculpted it in two stages, with the “eye” section being attached to the neck, which itself was on the Plastruct strip styrene.
Designing the heat ray – this worked!
Initial heat ray sculpt on styrene strip
I cut the styrene strip to size, and used more Apoxie Sculpt to make a mount that would fit into the main weapon recess. After it hardened, I saw that I would have to bend it in my mold, or otherwise I would have a very turtle-like appearance. As the styrene is flexible, this was not a problem. I made two two-piece molds with Castaldo Quick-Sil – one for the chassis and one for the weapons. I also tried some new innovations with venting with the use of some more model airplane parts – in this case flexible fuel lines that I cut for venting. As you can see below, I bent the heat ray in the mold to my desired shape.
Weapons mold before Quick-Sil
After first half molded
Chassis mold before Quick-Sil
Chassis mold after first half molded
In the end, the mold for the weapons worked very well, needing little work on the finished weapons. However, the chassis mold had a few issues. First, I knew as a golfer that golf balls compress when struck. What I did not realize was that there would be a strong interaction of the flattish sponson holes and the pressure exerted by the curing Quick-Sil on them at 90° angles. As a result, the cast ball would be visibly compressed somewhat. Additionally, the flow was not perfect – leading to my needing to add Apoxie Sculpt to the finished models’ chassis. Lastly, because the mold for the chassis was thick, and the casting was large, it took a long time to cool, and used a lot of metal (see phots for weight below in the blog). Unfortunately I discovered this when I opened the mold once and the metal flowed out! I will incorporate these lessons learned into the Mark 2’s.
The master and the molds
Shrinkage! Was he in the pool? (Apologies to George Costanza and Jerry Seinfeld)
I managed to successfully cast two chassis, and decided to use the master as well as I already had the mold. So I cast three sets of weapons, and assembled three tanks in total. I used some Apoxie Sculpt to fill in the gaps in the back where flow was less than ideal -and this worked fine. Next, I mounted the assembled tanks to a 1 5/8″ steel washer for magnetic storage in my gaming boxes.
Assembled tanks
I then primed the tanks with Citadel “Imperium Primer” – I must say I like this as a brush primer – it’s a nice product.
Primed tanks
After priming, I moved on to painting them. Painting these proved to be challenging, especially the fully-cast models, due to the weight of the models. The metal ones weighed about 14 ounces, while the master weighed in at 4 ounces!
I used Citadel “XV-88” on the base and the chassis gaps. For the chassis and the heat ray, I based with Tamiya “Gun Metal”. I used several light coats and had a shiny finish to deal with – but a smooth one. The trick with Tamiya is a wet brush and a lot of shaking and shaking again. I then used another Tamiya metallic, “Chrome Silver” to paint the sponsons, the tread ridges, and the business end of the heat rays. I painted the tips pf the ray guns and the “eye” of the heat ray with “XV-88” and Citadel “Gehenna’s Gold” in anticipation of future colors. The base I gave an application of Americana “Ebony”.
After base coat
I then used my new Citadel Technical paints. Remember that the Martian craft had orbs that were glowing green. To recreate that feel, I applied two coats of Citadel “Waystone Green” to the sponson tops and bottoms, the tread ridges, the chassis gaps, and the main portion of the heat ray. I also painted the first and last rings of the ray guns with this technical paint. I wanted the slot of the sponson to be a bit darker – and Secret Weapons Washes “Armor Wash” helped me to achieve that look. For the tips of the ray guns and the “eye” of the heat ray, Citadel “Spiritstone Red” gave a nice focal character to the weapons.
After highlights
To accent the green, I shaded areas around the “Waystone Green” with Citadel “Nuln Oil GLOSSY”. As I was going to dull down the overall shiny paint job, I thought this would work better – and I think it did. I drybrushed the bases with Citadel “Mechanicus Standard Gray”, and then applied a light flocking with Army Painter “Ash Grey” on the washer alone.
Ready for varnish!
I was now ready to varnish, and for the first time I used Army Painter’s “Anti-Shine” matte varnish. This is an aqueous varnish. I liked it, and am excited as varnishing in New England in the winter is always a logistical challenge. I uses 2 parts varnish to 1 part water, and applied with a fan brush lightly. It came out nice and smooth. After it dried, I sprayed the models with Testors “Dullcoat” is my cellar bulkhead after I got it warm enough. This enabled venting of the fumes outside after I was done and kept my wife from killing me when she got home!
To finish the models, I needed to deal with the elevated bases. Using a lot of Army Painter “Wasteland Tuft” applied with white glue, I was able to create an image of the tanks plowing through grass. They are heavy though, but sturdy.
This is a heavy model!!! In English and metric units!
The master weighs a lot less!
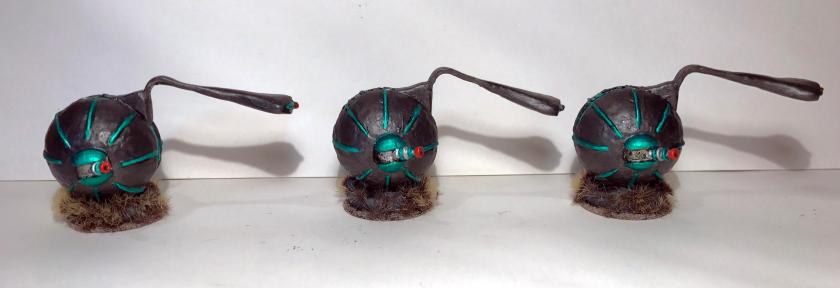
Here are some close up photos of the final product.
Run!
Convoy!
Nice group shot
I am very happy with how these came out. If I get enough interest, I may offer some for sale as kits. Certainly, these are my first real creations from conception to creating to molding to casting to painting. I learned a lot, and I am sure that my next iterations will be better.
They will be an excellent part of my Frinx forces for Combat Patrol™!
As readers of this blog know, I have been collecting figures from the now-defunct Archive Miniatures Star Rovers line. The figures from this line were made in the late 1970’s, and my goal is to get them collected and adapt them for use with Buck Surdu’s Combat Patrol™ card-based rules.
There was a lot of work on this project – so please enjoy the photos!
They show up from time to time on eBay, and my experience showed that the ones I found were more or less 25mm in scale. However, the Aphids I am going to describe here were a surprise as far as size goes as you will see. You have to be careful in acquiring these – there are a number of really bad recasters of these figures (and others) out there – selling them at exorbitant prices. I have been sure to be diligent before deciding to buy them.
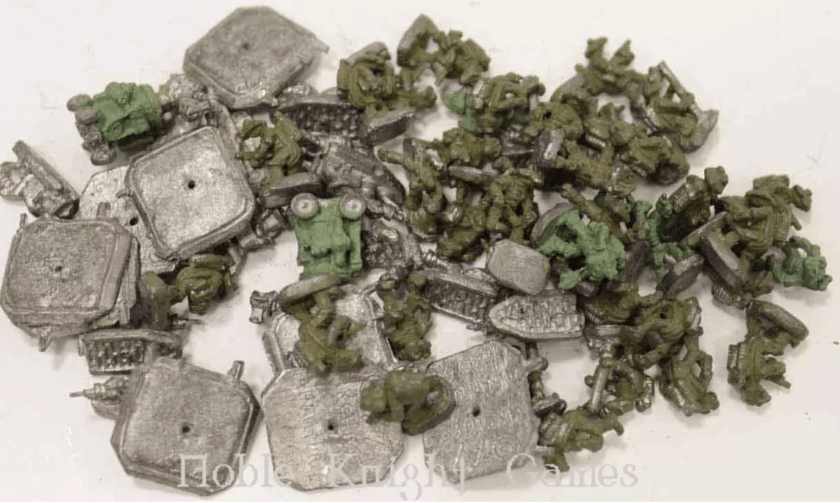
One listing is below. I had seen it several times from the Noble Knight Games store on eBay, but I was initially unimpressed. It looked like a hodge-podge of painted and unpainted figures and bases, and I could not tell what was there at first glance.
The Aphids listing picture from eBayOn a phone call to catch up, I had a discussion with Buck about the Star Rovers line, and he pointed this listing out to me, so I gave it another look. I compared this with Lost Minis Wiki Star Rovers page and saw that there were several figures that I did not have. They appeared to be different Aphids types, including Aphid Scouts on Grav-Cycles, Aphid Infantry, Aphid Officers, Aphid Mortar Crews, and a couple of robots. Archive had two different numbers for the same miniatures, and Lost Minis Wiki does not explain why – perhaps Archive changed the numbers with later production? In any case, they looked to be original, and I bought them. This set included the following miniatures (I list both catalog numbers here for completeness but I am sure that they are from the older group due to the robots being included):
11 examples of Archive #2060/2314 Aphid Scout on Grav-Cycle (11 riders and 11 grav-cycles plus bases).
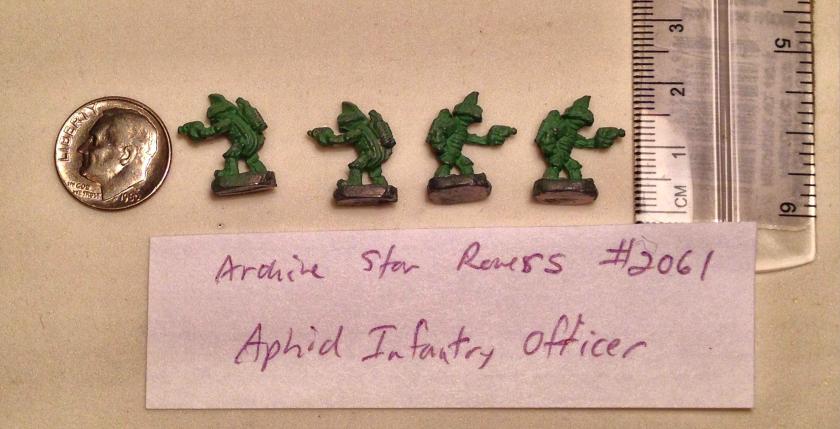
18 examples of Archive #2061/2315 Aphid Infantry.
4 examples of Archive #2061/2316 Aphid Officer. The 2061 listing included 5 Aphid Infantry and 1 Officer while the 2316 was just the officer.
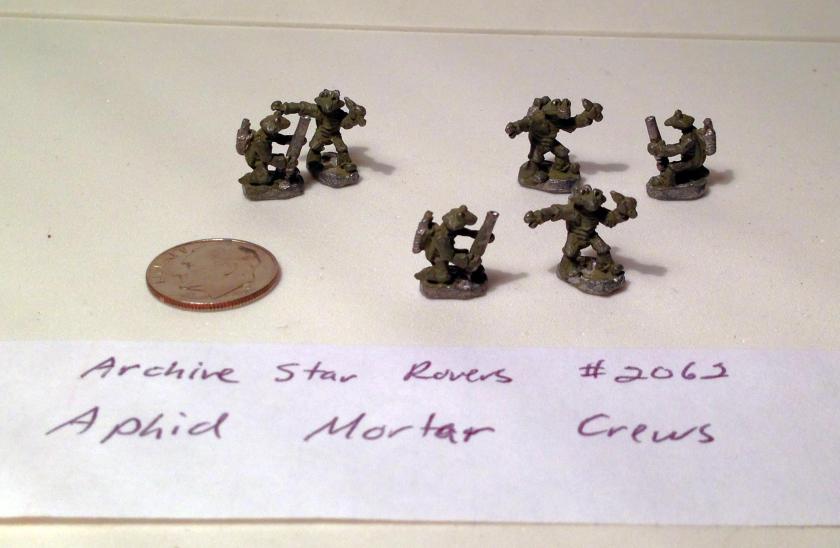
3 examples of Archive #2062/2317 Aphid Mortar Team (two figures per crew for 6 figures).
2 examples of Archive #2011A (no later listing) Robot Group. There were 3 robots originally in the set of different types.
Archive Miniatures Catalog detail showing the Aphids with the newer catalog numbersI will refer to the older numbers for the most part in this article as I think mine are older.
The figures were in good shape except for one scout rider who was missing a right leg and foot. Surprisingly, they were small – really small – maybe 12mm. The detail on them was appropriate for the time period – but as you can see from the eBay photo they were not greatly detailed. To me, this was a challenge to let the brush bring out the potential of the figures. Also, I thought that this acquisition presented me with an opportunity to field an entire platoon of Aphids for Combat Patrol™ games!
My first step was to strip all of them down of any residual paint – which I accomplished with a long (2 week) soak in Simple Green®. I prefer the blue type as it seems to work better (and smells nicer). This time I used some rifle cleaning tools (bore brushes) with plastic bristles in addition to tooth brushes to remove the old paint which was pretty thick.
The Aphid Scouts as received – just stacked together here
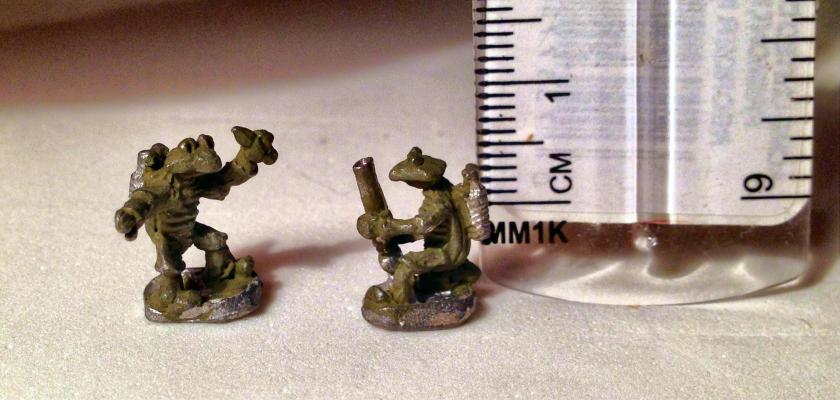
Aphid Scout base detail showing #2060Aphid Infantry as receivedAphid Infantry Officers as receivedAphid Mortar Crews as receivedClose up of Aphid Mortar Crew as received – this shows their size and how the previous owner had painted them
The two robots – look like self-propelled guns – in the form of a steam boiler!I decided that I should first work on the Aphids on Grav-Cycles as they would be the most difficult due to the needed assembly. There were 11 Aphids and 11 Grav-Cycles with bases. More research showed me that these originally came with piano wire to mount them – similar to the image below from Lost Minis Wiki:
From Lost Minis WikiI did not have the piano wire and this did not seem to me to be a sturdy way of mounting the grav-cycles. I wanted a more permanent solution, but one that was cool as well. The cycles themselves seemed to had the wire in them at some point in the past, but nothing remained. The bases still had the holes. While shopping at Michael’s it hit me – I could use clear plastic push pins as mounting platforms.
To make this work, I needed a plan as I did not want to varnish the clear plastic and take away from the visual effect of flight that I was going to try to achieve. I mounted the bases on two stacked and centered ¾” steel washers using wood glue and let the combination dry overnight. I cleaned off the flash from the bases, filed them, and primed them with Krylon “Ultra-Flat” matte spray paint. After that I flocked them with 4Ground “Brown Leaves” using white glue. Once that glue was dry, I applied two coats of Testors “Dull Coat” to the bases. Using wire cutters, I trimmed off the pointed tips of the pins to be recessed in the washers when inserted into the bases. I then flattened and narrowed the rounded push pin tops with an Exacto knife, and sized them up with the base of the grav-cycles. This was to make a small flat mounting platform. However, I wanted more stability than super glue alone would give me. My pin vise was the needed tool to make this happen. Using my smallest drill bit, I made a hole in the top center of each push pin. Using E6000 epoxy, I affixed and mounted the push pins onto the bases. Once that had set, I mixed some Aves® Apoxie® Sculpt, and filled the bottom of the washer wells where the push pin tip was. This had the advantage of giving the structure more strength as well as some weight for stability on the gaming table. I cut some pieces of wire from a thin paper clip and glued them at a nearly vertical angle in the hole in the top of the push pin. This worked well as the wire was deep enough to secure the grav-cycle to the platform.
How I used push pins – note the narrowed and flattened tops. The paper clip wire was subsequently superglued into the holes in the pin topsI then moved on to painting the riders and their grav-cycles. This was more difficult as I could not mount these onto a suitable painting structure and paint them successfully – which took much longer. I basically had to paint the Aphid Scouts and Grav-Cycles in my hand.
First I’ll discuss the cycles. I painted the deep recesses of the bottom of the grav-cycles successively with Americana “Deep Burgundy”, followed by Citadel “Spiritstone Red”. I wanted an “aviation” look to the cycles (which had flywheels and a big ray gun as part of the details!). I gave them a heavy dry brush of Tamiya “Flat Aluminum”.
Grav-Cycles after dry brushingFor the details, I used Americana “Ebony” on the seat base and the center of the exhaust port. FolkArt “Gunmetal Gray” was my choice for the front ray gun support and the flywheel bracket, while the flywheel got Tamiya “Chrome Silver”. For the ray gun cowling, Martha Stewart Crafts “Pale Bronze” was my choice. For the tip of the ray gun, I used Craftsmart “Festive Red” metallic. For the exhaust port. I used a combination of Craftsmart “Bright Yellow”, Tamiya “Orange”, and “Festive Red” in a concentric circling pattern. Once this dried, I gave the cycles a wash with Secret Weapons Washes “Armor Wash”, and let that dry. Using “Flat Aluminum”, I highlighted the cycles’ edges and reflective surfaces. Lastly, I used two applications of the “Spiritstone Red” to bring out the ray gun tip even more.
Grav-Cycles paintedLet’s discuss the riders and the other Aphids painting in general. As I wanted them to look similar (all in the same platoon and the same insect species), I wrote down each step of painting and washing and highlighting. That helps with reproducing the same effects. There are a few differences among each type but I’ll note those as I go along. The only special steps for the riders involved basically repairing the one missing leg on one figure. I used my pin vise, and drilled out a hole in the figure’s leg stump. I cut a piece of paper clip, and bent it at 90°, and superglued it in place. I sculpted a suitable leg with Aves® Apoxie® Sculpt, and let it harden overnight. It came out acceptably!
The painting of the Aphids followed the same basic pattern. I wanted to smooth over any rough areas, so I gave the figures a wash with Secret Weapons Washes “Green”. I then base coated the bunch with my old 1984 Polly-S “Slime Green” using a dry brushing technique.
Amazingly, this 32 year old paint is still good!Each of the Aphids (all types) was equipped with a couple of tanks on their backs, which I interpreted as being a breathing apparatus. For these, I used “Chrome Silver” on the tank bodies and Tamiya “Copper” on the valve sections. After this dried, I gave each Aphid a wash with Citadel “Nuln Oil Glossy”. I wanted glossy so as to bring out the small details that were recessed. Then I highlighted the flat chitinous surfaces of the head and thorax (these are insects) with Craftsmart “Apple Green” satin. To smooth out the colors, I applied yet another wash of “Green” to the Aphids’ shells and “Nuln Oil Glossy” to the ribs on the breathing tanks. For varnishing, I wanted to dull down the glossy a bit so the Aphids got two coats of Testors “Dullcoat”.
Riders painted and awaiting varnishingAfter varnishing and awaiting mounting
Let me get specific about the Aphid Scouts on Grav-Cycles, which were then ready for assembly. I glued the riders to the cycles. Then, I drilled a hole on the bottom of each cycle with my pin vise to fit the paper clip in the push pin with my smallest bit. I needed to also use an Exacto knife to clear the hole of filings and another push pin to start the pin vise (pilot hole). I had some of the riders come off during this process but was able to reglue them easily.
Hole drilled in bottom of cycleThese were then finally assembled. I used differently-colored flocking tufts from Army Painter to show their command and control relationships. They are organized as one squad in the platoon – with one squad leader, and two team leaders each leading teams of 4 grav-cycles. My thoughts initially are to treat the ray gun weapon as an automated analogue of a 37mm anti-tank gun and the vehicle as terrain-defying flying motorcycles.
Scouts out! The Aphid Grav-Cycle SquadClose up of figure left sideRight side of grav-cycle
Coming at you!The process of painting was the same for all of the Aphid Infantry, Aphid Officers, and Aphid Mortar Crews with some differences. First, they are all mounted on two #8 steel washers that have been glued together with wood glue. Second, the infantry is armed with tommy guns (I am assuming that Thompson submachine guns must have a thriving export market in the future!). I used my 1987 Deka Lack “Braun” for the wooden parts of the guns, and “Gunmetal Gray” for the metal ones.
For the officers, three would be squad leaders and one would be the overall platoon leader. The officers’ laser pistols got painted with “Chrome Silver” and the tips got the “Spiritstone Red” treatment on top of Citadel “Gehenna’s Gold”. I chose “Flat Aluminum” for the squad leaders’ helmets, and “Gehenna’s Gold/Spiritstone Red” for the platoon leader’s. Once again, I used Army Painter tufts of different colors and locations to indicate command and control relationships. The platoon leader has three mortar crews and the two robots reporting to him as well. The only difference for the mortar crews was the mortar round and mortar tubes. For the small mortar rounds, I used “Chrome Silver” on the body and “Spiritstone Red” for the fins. The tubes got “Gunmetal Gray”.
Base coat on Aphid InfantryBase coat on Aphid OfficersBase coat on Aphid Mortar CrewsPainted and flocked, awaiting varnish and tuftsSquad Leader with his Aphid Infantry Squad armed with Thompson SMG’s. Tuft locations and color denote command relationships.One completed mortar crew. Each crew has its own tuft color, and reports to the platoon leader.Three completed squad leaders
Completed Aphid Platoon LeaderTo round out the platoon, there are the two Robot self-propelled guns. These look almost steam-punk-like in design. I went with a very metallic scheme for them. First, I gave the figures a wash with Secret Weapons Washes “Armor Wash”. The top part/gun turret was painted with “Flat Aluminum”, while the bottom of the chassis was painted with “Copper” . I painted the wheels and lower chassis with “Gunmetal Gray”. I added Citadel ” Auric Armor Gold” to some of the chassis attachments. For the radiator in the back (!) I used “Copper” framed with “Gunmetal Gray”. The whole assembly got a wash again, and then I painted the robotic insect eyes with Craftsmart “Festive Red” metallic. I highlighted the figure with the same paints again after the wash, and I was pretty happy with it.
From Lost Minis Wiki – Robot Group – I got two of the models on the top
Completed Robot Self-propelled GunsThe platoon structure (41 fighting figures) is as follows in summary:
Aphid Platoon Leader (1)
Scout Squad Leader for Aphid Scouts on Grav-Cycle (1)
Team A Leader, Grav-Cycle (1)
4 Aphids on Grav-Cycles
Team B Leader, Grav-Cycle (1)
4 Aphids on Grav-Cycles
1st Squad Leader for Aphid Infantry (1)
6 Aphid Infantry with Thompson SMG
2nd Squad Leader for Aphid Infantry (1)
6 Aphid Infantry with Thompson SMG
3rd Squad Leader for Aphid Infantry (1)
6 Aphid Infantry with Thompson SMG
Mortar Section A (2)
Mortar Section B (2)
Mortar Section C (2)
Robot Assault Gun Section (2)
The Aphid PlatoonI have to say that this was a very challenging project – the figures were smaller than I am used to painting, and they were much less detailed. However, I am pretty proud of what I was able to do with it and look forward to seeing them in action in a game. It’s fun to bring nearly 40-year old figures back to life – especially with many old paints as well. I’m glad I got these, and am very happy with how they turned out. I’m planning on chatting with Buck about assigning combat values to them soon.
I have been collecting various examples of the long-defunct Archive Miniatures Star Rovers line of figures from 1977. This month, I have had some health issues that precluded being able to sit down (long story and a pain if you know what I mean). Therefore, I chose to work on making molds and casting, focusing on Star Rovers, which is something I do standing up.
My overall goal is to create squad-sized units of these “lost” but very cool minis. I want these to set up and play games of Buck Surdu’s Combat Patrol™, as well as to see if I can create a scenario using the Star Rovers figures that I have collected. Combat Patrol™ was created as a WWII skirmish card-based miniatures rules set, but it has been successfully adapted to other historical periods as well as Star Wars™ scenarios. To learn more about Combat Patrol™, click here.
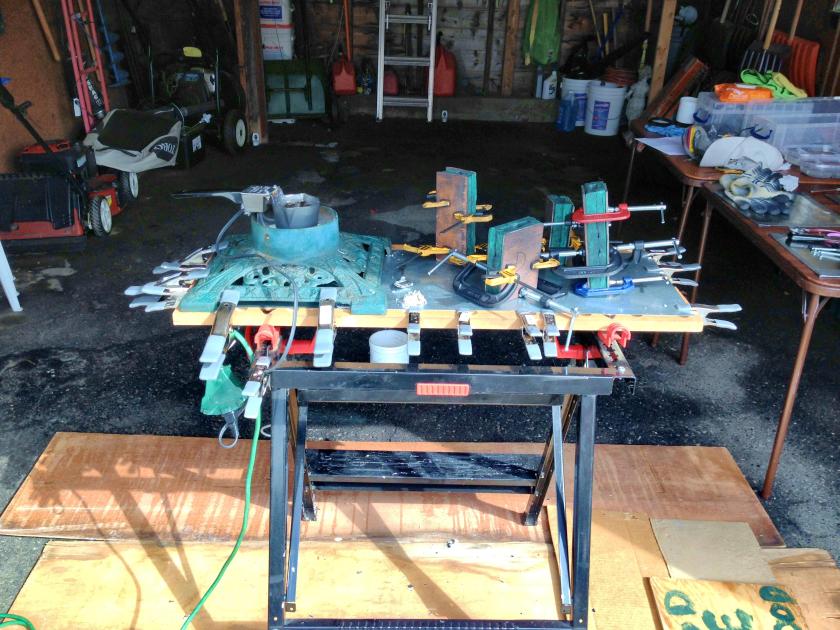
Before I get to the figures and the making of the molds, I wanted to share information about my casting set up. I basically use pewter and I use a Hot Pot 2 crucible with a Lyman pyrometer to measure the alloy’s temperature.
I also use appropriate safety equipment!
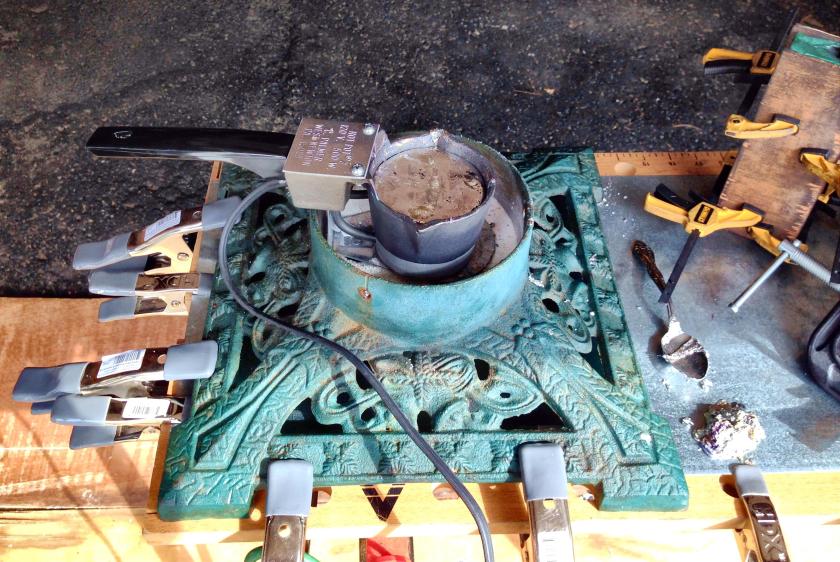
The Hot Pot 2 holds about 4 pounds of molten metal, and is used for making bullets, fishing sinkers, and miniatures. Unfortunately, it comes with a tripod stand which teeters and is prone to tipping. Why the manufacturer did not use four legs on the stand for stability is beyond me. After a couple of spills (where I dodged the 650° F contents and had a lovely clean up) I was determined to have a new set up. Currently I have 1′ x 1′ steel sheets clamped to my old Sears Craftsman® work bench that I have had for close to 30 years. My friend Jeff Smith came up with an idea that proved to be a great fix. He had an old cast iron (heavy) Christmas tree stand he was not using. I filled the large holder with play sand to raise the bottom up and put the tripod into the sand in the tree well. This provided great stability and rendered the set up virtually spill-proof. I clamped the tree stand to my work bench (after extending my bench depth about an inch). This worked great and I am very happy with my new casting set up.
My new set up in the garage – clamped molds on the right
Close up of use of the iron Christmas tree stand to hold the Hot Pot 2, clamped to the workbench
To learn more about the Archive Miniatures Star Rovers line click here.
I cannot find any reliable sources to buy these figures – I only find them sporadically on eBay. This is why I recast them for personal use and for gifts.
My first mold in October was for the Space Phraints. These are 9 foot tall emotionless insect men that were in the old Arduin game. These are armed with huge swords and a ray gun.
I found a nice synopsis on Phraints from Saundby.com that you can see here. The photos below show the original I got on eBay (the blue clay you see came from the mold-making process and is easily removed).
Space Phraint front
Space Phraint back
Below is the first mold half set up for the Space Phraint. I used an old metal mold plug to create my flow aperture along with some golf tees my wife gave me a while back for Christmas. I also used toothpicks to create air flow vents and release points for better casting. I also wrote a mirror image of the word “PHRAINT” on the clay. The QuickSil is measured and mixed and put into the mold press for curing. I generally wait 28 minutes for it to cure – and I use a hand-held hair dryer to warm the outside of the press to assist in curing the RTV (room temperature vulcanizing) compound.
Space Phraint mold in the mold press – first half
Removing the first half of the mold from the mold press before removing the blue clay from the RTV
The first mold half of the Space Phraint mold
I then put the first half back into the mold press, applied a releasing cream to any wooden surfaces of the press that QuickSil would touch as well as the green set up rubber RTV. I then measured and mixed more QuickSil and repeated the process. After I made the mold, I cut out wooden backings for the mold from 1/8″ plywood using my scroll saw.
The Space Phraint mold was very successful and needed little modification during the casting process. I was able to cast 42 figures from this mold.
A formation of Space Phraints led by the original
The next mold is a Mark III Warbot. As far as I can tell, there are no Mark I or II’s in Star Rovers! He is clunky and retro looking, with a very cool ray gun/blaster. He reminded me of Bender from Futurama, though he was created in 1977!
Mark III Warbot front
Mark III Warbot back
I followed a similar process in making this mold as described above.
Mark III Warbot first mold half
Mark III Warbot mold completed
This also was a successful mold. I cast 42 figures using it.
A formation of Mark III Warbots led by the original
I then moved onto the Space Centaur, who has rocket packs on his back, but is only armed with a laser pistol! This was my first try at making a mold of a four-legged creature. The mold itself needed more tweaking during the casting process than I like in terms of cutting vents and opening up spaces. I believe that I should have used more of a cone-shaped pour aperture for the mold. Here I used a small hotel soap and golf tees to shape the pouring well – and I think that works less effectively than a cone. I also had leaking issues with the mold initially. I solved these with adding more C-clamps when casting.
I was able to cast 36 figures with this mold.
Master Space Centaur figure
A formation of Space Centaurs, led by the original
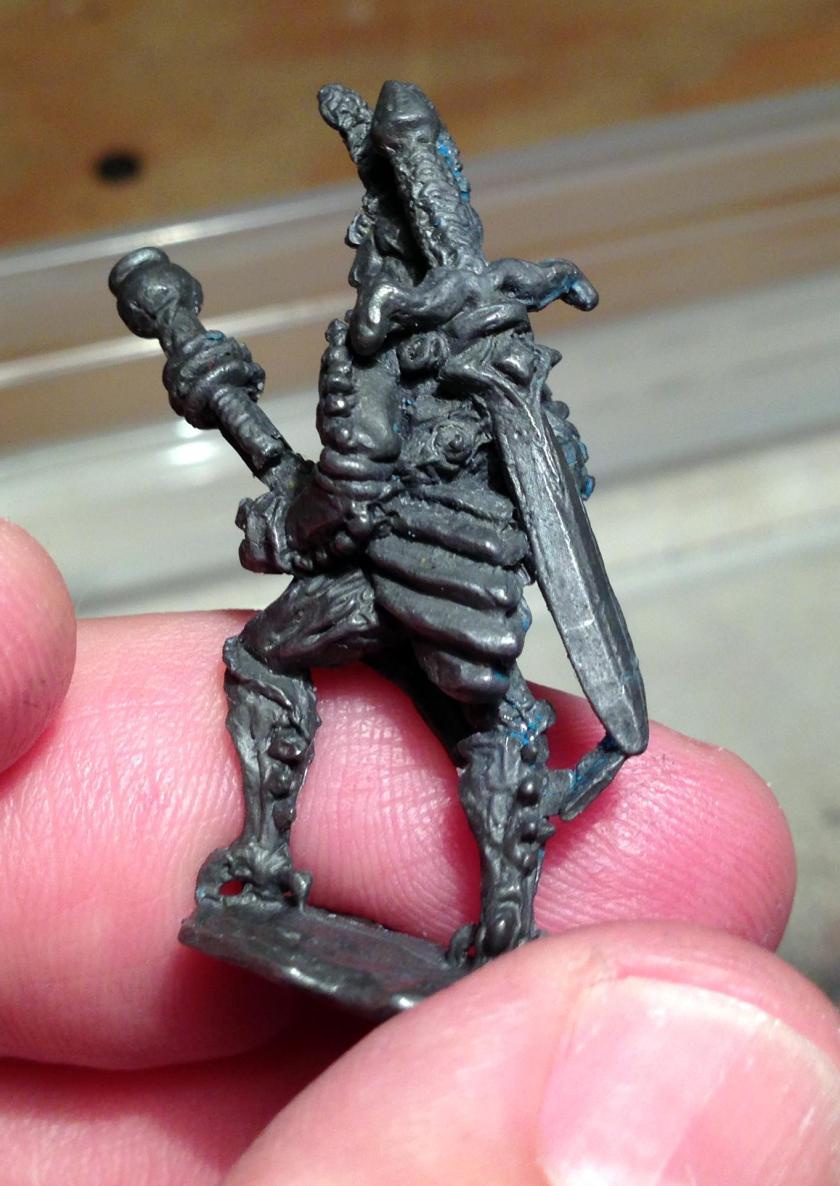
The last two figures that I worked on were Dragonspawn Infantry. There were actually three made by Archive, but I do not have the prone figure, only the crouching and kneeling ones. My guess from these pictures is that they were originally painted but then stripped.
Kneeling Dragonspawn Trooper, right side
Kneeling Dragonspawn Trooper, left side
Standing Dragonspawn Trooper, right side
Standing Dragonspawn Trooper, left side
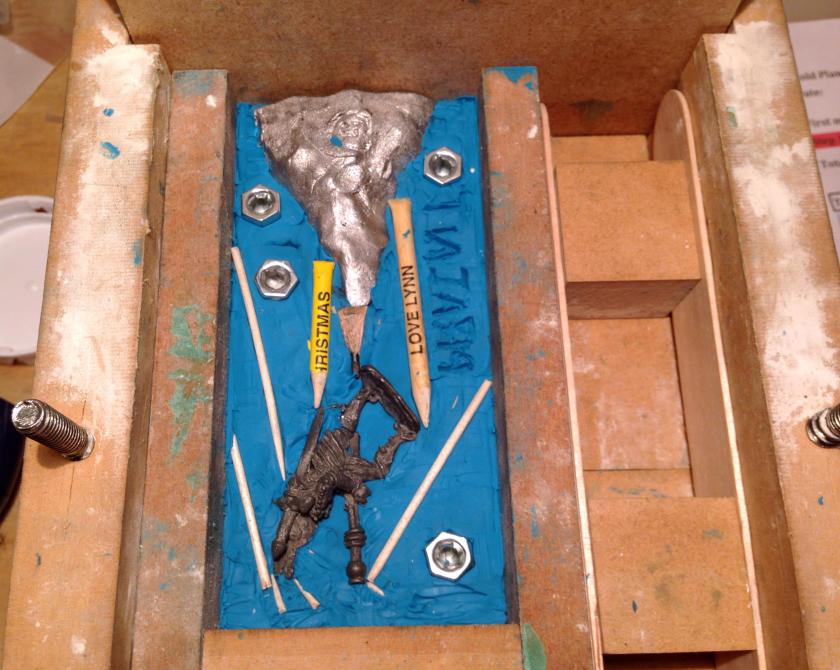
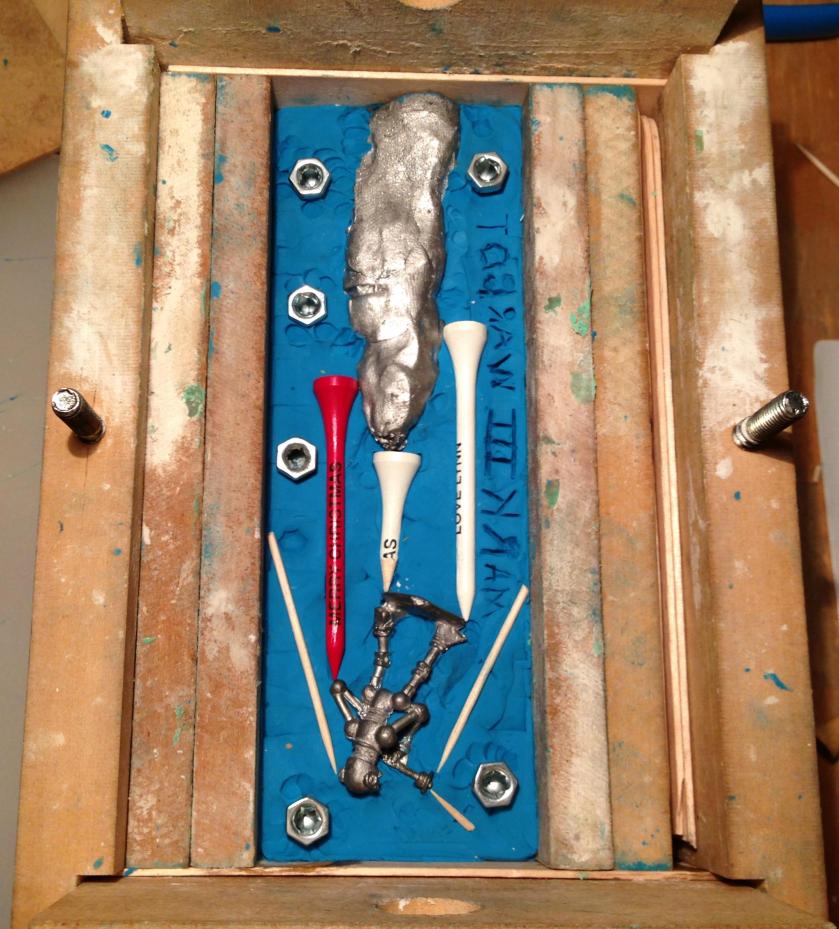
I tried a new mold design – two figures in one mold. I wanted to see if this would be more efficient. It was not, primarily I believe that the cone aperture design works better, especially a tall one. Here I used another hotel soap and golf tees – and I had a lot of casting failures with this mold. With some adaptations during the casting process (making the pouring aperture and tees wider), my success rate improved, but the overall mold leaked a lot and was a pain to work with. At one point, some of the RTV came off in a figure, but this did not seem to be a major issue with subsequent castings.
My attempt at a new mold design – less than fully successful
I was able to cast 24 good figures of each type, but I probably had a 50% failure rate overall.
Two Dragonspawn formations with master in front
I cast 168 miniatures in total with the four molds. Some I am giving to friends, while the rest I an putting into the painting queue.
October production on the table
I learned some new things about the process, and got a new casting set up that is much safer. My next casting will be in a few months – I really want to start painting now that the weather is turning colder, and get them into a Combat Patrol™ game!


