I have been accused of having a Boston accent, but this is not really true – I have a Worcester accent, or properly a Worcester County accent. Throughout my military and civilian career, my pronunciation of my name, Mark, sounds to others like Ma’k. My good buddy Buck Surdu has often shortened it to “Ma’k” on his blog posts. Last weekend (right before Thanksgiving) he and my other good buddy, Dave Wood, made the drive up from Maryland on a traffic-filled Friday afternoon for a Saturday full of gaming – and it was called “Ma’k Con”. My wife Lynn really helped out as well with her keeping us well fed. This blog post is about the gaming we crammed into that Saturday.
Buck and Dave got me into tabletop wargaming when we were back at West Point. Since then, Buck has published a myriad of rules for gaming, and Dave has contributed to many of those rule sets. The most recent rules that Buck published is a fantastically easy to play and streamlined card-based system for skirmish-level combat in WWII called Combat Patrol™. It is truly flexible, and has had optional rules and supplements written to cover different possible scenarios, to include the South Pacific theater, the Winter War, the Falklands War, the Napoleonic era, and even the Star Wars universe. These can be downloaded for free from his website, and the cards are available in the US from Drive Thru Cards and in the EU from Sally Forth. The rules are also available in book form from both On Military Matters and Sally Forth.
Buck recently added a new set of cards for the South Pacific, which have different morale results for Japanese troops. Readers of this blog know that I have been collecting and assembling units from the old Archive Miniatures Star Rovers line of figures, specifically Star Ducks, Power-Armored Frinx, Aphids, and Mark III Warbots. Additionally, I have been supplementing these forces with Khang Robots, weapons, Robo-Sentry Guns from War Games Supply Dump, and my own sculpt of a sphere tank. I also used some weapons from Bombshell Miniatures.
I decided that I would combine aspects from different Combat Patrol™ rules for a fun retro sci-fi game. Specifically, I would use the new South Pacific deck for morale results for robots, the new vehicle-mounted flame thrower template for my sphere tanks’ death rays, and the Sith rules from the Star Wars supplement. Also, I added in several rules from the optional rules. Lastly, I added my own special rules for the Mark III Warbots and their leader, Juggerbot, to account for possible effects that weapons fire could cause on their behaviors and capabilities.
Upon arrival in Massachusetts, Buck surprised Dave and I with uniform t-shirts from West Point that we would have worn to gym or when we played sports. It was called Gym-A (Gym-Alpha) and we wore it for Saturday’s game marathon. Admittedly, both Buck and Dave wore it better than I did. We were also joined by my daughter Ellen Morin and her fiancé Chris Smedile.
Buck Surdu, me, and Dave Wood (US version for you UK followers) in our Gym-A shirts
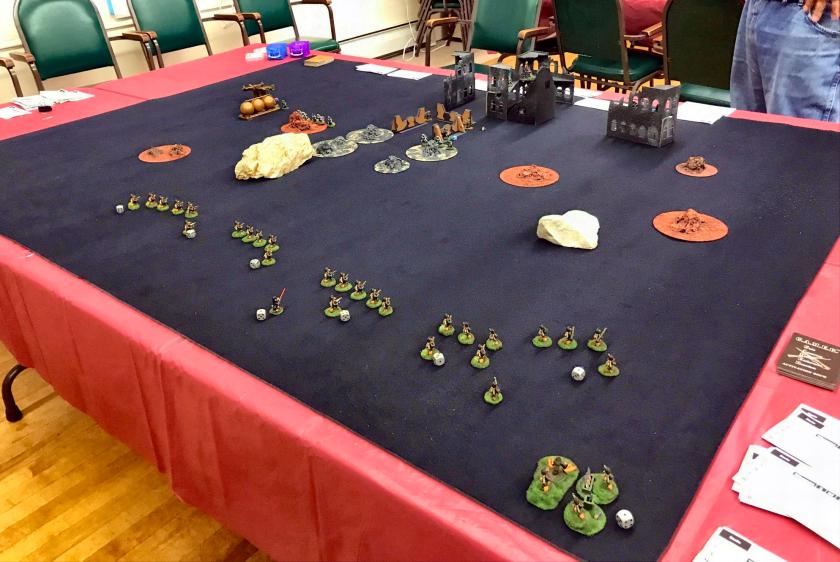
The scenario was one where the Star Ducks, Aphids, and Frinx were allied against the cybernetic horde of attacking robots. The non-metallic forces had captured a robot Mark 1 Sphere tank. The Frinx were attempting to repair it so it could be used against the robots, who were to have two Mark I Sphere tanks of their own in the assault. The tanks have two side mounted laser cannons, and a Death Ray (think 1953 War of the Worlds movie). Dave and Ellen had the robots, while Buck, Chris and I defended.
Dave and Ellen prepare to attack. The Aphids are in the ruined building to the front, and there are the Robo-Sentry Guns acting as speed bumps to their front.
The Robo-Sentry guns slowed the attacking robots slightly, but allowed Aphid and Star Duck mortar fire to hit the Warbots near Juggerbot, damaging the robot leader, and causing some of his robots to go rogue, or blow up. When they went rogue, they would attack the nearest figure. Juggerbot ended up dealing with such a problem.
The battle begins with the Warbots clearing the Robo-Sentry gun defenses.
Normally, in Combat Patrol™ games, figures can take a certain number of hits, usually three wounds, before they die or are incapacitated. In this game Frinx had 4 wounds (because of their power-armor), most line Star Ducks had 3, and Warbots had 6. However, I allowed for critical hits as outlined below. This had a nice balancing effect on the game.
Warbot Critical Hit Chart – lots of 4’s and 5’s happened!
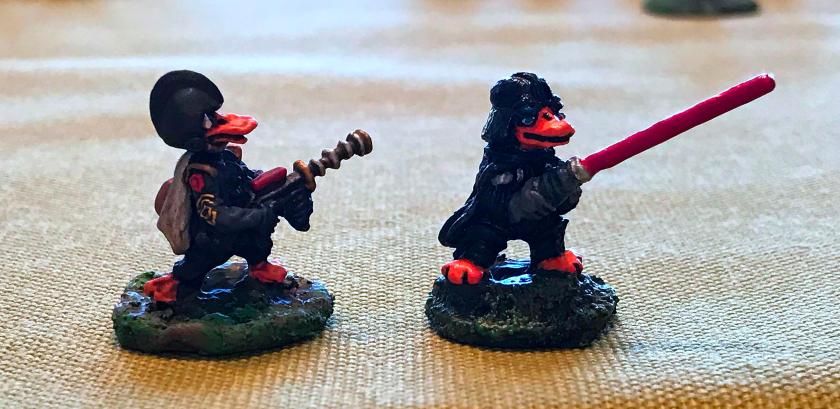
The Warbots also had some devastating energy weapons. The opposing forces had two “Sith Lords” (Duck Wader from the Star Ducks and Lt. Ma’k from the Frinx) with special powers from the Star Wars supplement. Early in the game, Buck moved Duck Wader up to engage the Warbots, only to get vaporized along with some Aphids by an arc weapon blast.
Duck Wader (center) near the corner where he was shortly vaporized thereafterThe Frinx AT section moves up – only to never make an impact
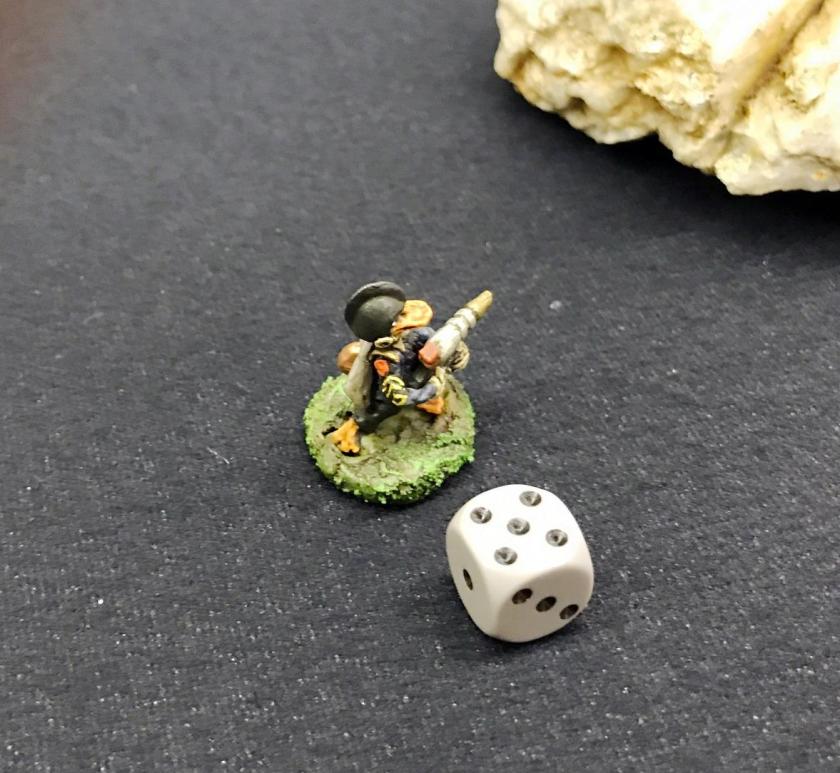
The other Sith, Lt. Ma’k, used his Force powers to fly into the middle of a group of 8 immobilized Warbots (they had drawn a “Hold until Death” morale result due to Frinx fire, but the robots could still fire).
Lt. Ma’k (a Frinx) then tried a Sith power – Force Blast – which damaged some robots’ weapons and caused them to explode. Additionally, friendly mortar rounds landed there (Lt. Ma’k did not care) and eventually he succumbed, as did several Warbots. Simultaneously, Juggerbot finally was destroyed by Aphids on Grav-Cycles. As he was the platoon leader, his destruction led to his unit becoming pinned – and only activating on black cards. This really had the effect of reducing the entire robot platoon’s combat effectiveness.
Lt. Ma’k (by the purple die) makes his last stand. Note the black die for the Warbot Green Team 2 due to a “Hold until Death” morale role. Later the entire Warbot platoon would get black dice (“pinned”) when Juggerbot was destroyed.The death (destruction) of JuggerbotAphids an Grav-Cycles make a desperate charge before dying to the last bug – but they sealed Juggerbot’s fateFrinx on Glyptodon cavalry move up before being taking heavy fire and being routed
At this point, the carbon-based living got very lucky and fixed their captured Sphere tank earlier than would have been expected due to Chris pulling some great cards. However, the robots got reinforcements in the form of two of their own Sphere tanks, a squad of Warbots, plus 2 self-propelled robot guns. Chris and Buck were able to immobilize one tank with some very lucky shots. The other annihilated a squad of Buck’s Star Ducks with a Death Ray Blast.
Buck’s Star Ducks are hit by Death Ray fireSome of Buck’s Star Ducks jet pack onto the immobilized Mark I Sphere tank. Their satchel charges (6) attacks all failed to destroy the tank.
By now it was dinnertime and pizza called, plus we wanted to move to the next game. It looked like a slight victory for the living forces, but casualties were high! The game turned out well and I may redo this scenario at Barrage in Maryland in January. Buck’s account of the battle is the next entry in this blog.
Surveying the carnageGreat Game!
Then we moved onto a play test of Dave’s micro-armor game of “The Battle of Nikolayevka (Nikitowka)” using the Look Sarge No Charts rules. This was a breakout of Italian forces on the Eastern Front in 1943 as part of the Battle of Stalingrad. So we had Italians and some Germans attacking a small town held by the Russians. The link above describes the historical battle well.
Buck attacked with a combined German/Italian force on the right half of the battlefield and I attacked along the left half. Dave defended. It was a tough slog, with the Russian artillery (they had no armor) making progress difficult. Later in the game Dave had us command reinforcements in the form of the Italian stragglers from an earlier phase in the battle. It was a good scenario, and interesting to see a primarily Italian versus Russian scenario.
Initial set up – Italians and Germans (on left) fight into the town to the right of the railway crossing (in light orange)Another view showing the town in the upper right. The attackers needed to get into the town so as not to freeze to death.Assaulting the rail line defensesBuck tries to get into the town
I think Dave will have a very good scenario for an upcoming convention!
The day flew by, and I am so appreciative that we West Point Old Grads had the chance to game together. Thanks to Buck and Dave, and Chris and Ellen! And of course, Lynn for her logistical support!!
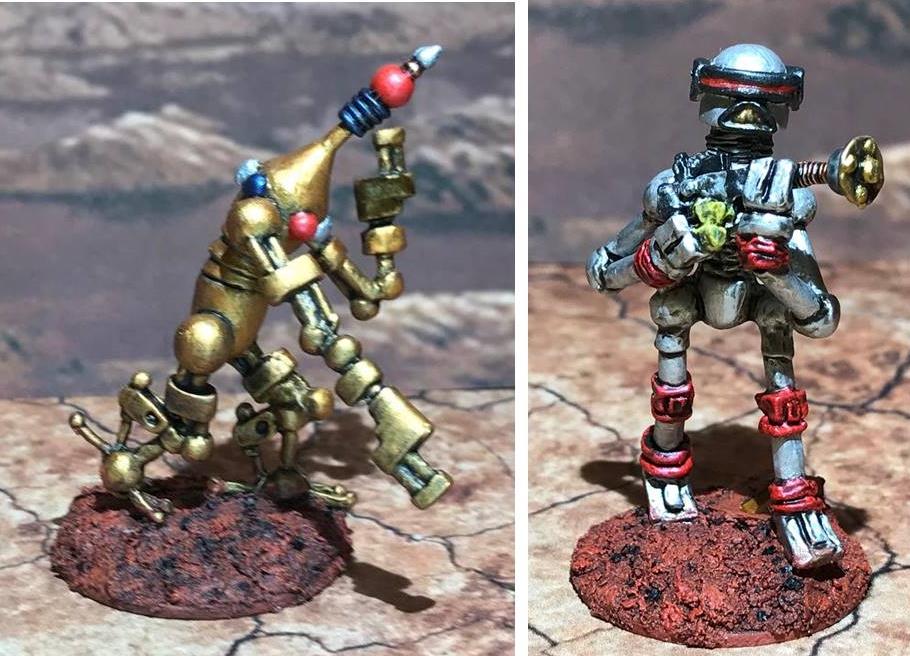
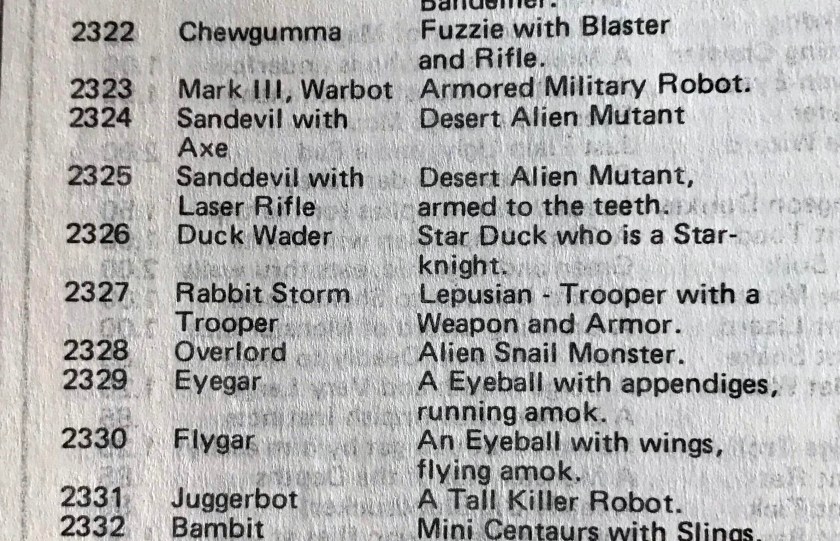
Followers of this blog may have wondered where I have been, why have I not been posting? Well, I have been working on building a platoon of Archive Miniatures “Mark III Robots” (#2323). The platoon will be led by Archive Miniatures “Juggerbot” (#2331). Both of these sculpts are from the vibrant imagination of Nevile Stocken, who was way ahead of his time with his work. Given that these figures were from the late 70’s and early 80’s, I have to think that they were inspired (especially the visors) by the original Cylons from the 1978 TV series Battlestar Galactica. I loved that show when I was a kid! So, I had to make them shiny!
Mark III Warbot inspiration?
These will be used in upcoming games using the Combat Patrol™ set of card-based rules. The figures are effectively 25-28mm, being large robots (larger than humans).
This long project started with making a mold and casting 38 out of the 40 Mark III Robots as described previously here. I wish that I could have just bought them, but my time machine is broken…and that made purchasing them an impossibility. The platoon will have 4 squads of 10 (5 per team), plus 4 squad leaders, and Juggerbot – so the platoon is composed of a total of 45 figures.
The original Mark III’s (there were no Mark I’s or II’s!) were from the Star Rovers line of figures made by Archive in the 1979-1981 timeframe. They are very tough to find on eBay or anywhere else. I managed to acquire two originals, but only one was fully intact, and it became the master for my recasting efforts. The other original I converted with another weapon.
I found the Juggerbot kit on eBay, and decided that it would make an excellent platoon leader. For squad leaders, I have four War Games Supply Dump Khang Robots that were previously described in this blog here. Each Khang is color-coded (red, green, blue, and purple), and each squad in my platoon follows that scheme. Each Mark III Warbot Squad consists of the Khang Squad Leader, and two teams of five Warbots.
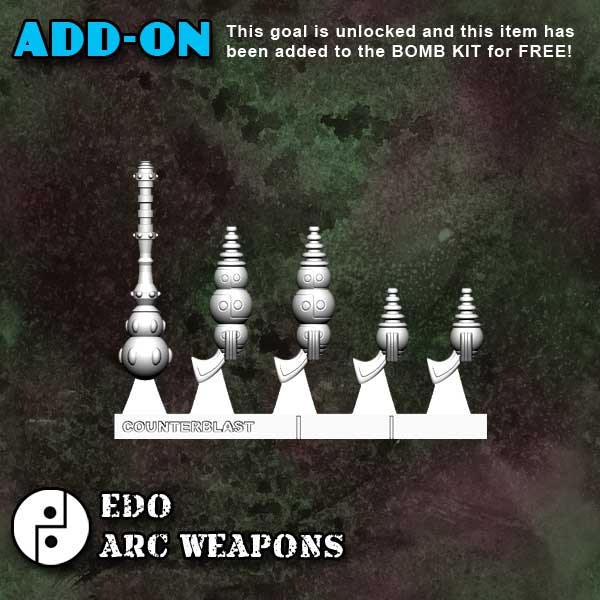
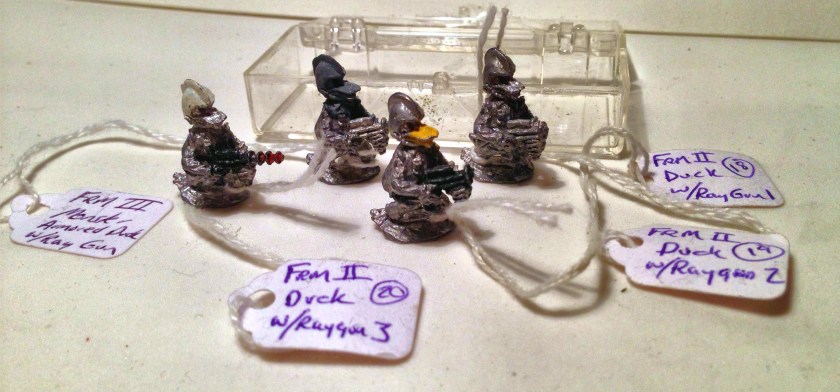
I converted one Warbot per team with a special weapon. Each squads’ Team 1 had a conversion with Bombshell Miniature’s “particle beam weapon” (BOM36016). I gave the Team 2’s two different weapons each. Two teams got Bombshell Miniatures large “arc weapon” as their conversion, while the other two got a large War Games Supply Dump retro sci-fi weapon from the WP01 “Weapons Pack 1”. All of the conversions I did were with these weapons, which are no longer available from either Bombshell or the now-shuttered War Games Supply Dump.
Conversion of these figures, as well as cleanup in terms of cutting and filing were major efforts in this project. I use mostly tin (about 67%) in my casting, and this made sawing away and filing pieces from them tedious as they are not as soft as a higher-lead alloy would be. Still, I was able to convert 7 of my castings plus the extra original for a total of 8 conversions. In most cases, I needed to bend the arms to accommodate the new weapons. My concept was for Team 1 to have one Warbot with a higher rate of fire weapon, while the Team 2’s would have specialized breaching or anti-armor capabilities.
My original Mark III Warbot with weapon intact. I had one other with a broken weapon, which I converted to another weapon.
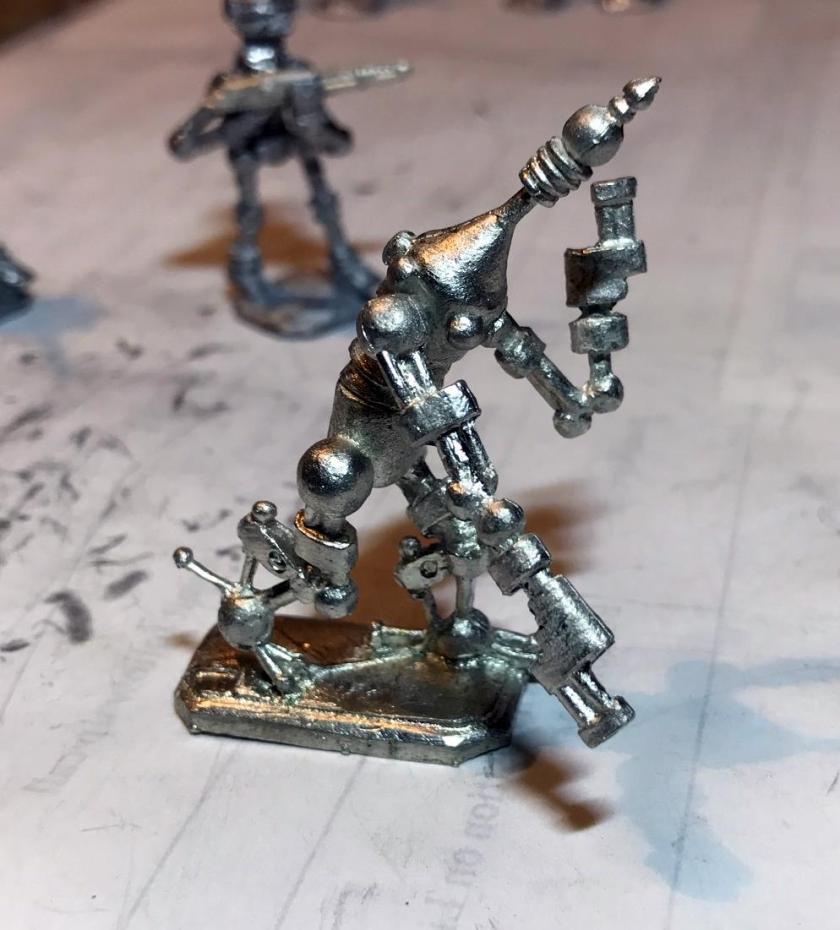
Juggerbot as received from eBay – obviously cast from a mold in the post-Archive eraJuggerbot contents – needed some TLC…glue, and pressure while the glue setAssembled and straightened Juggerbot
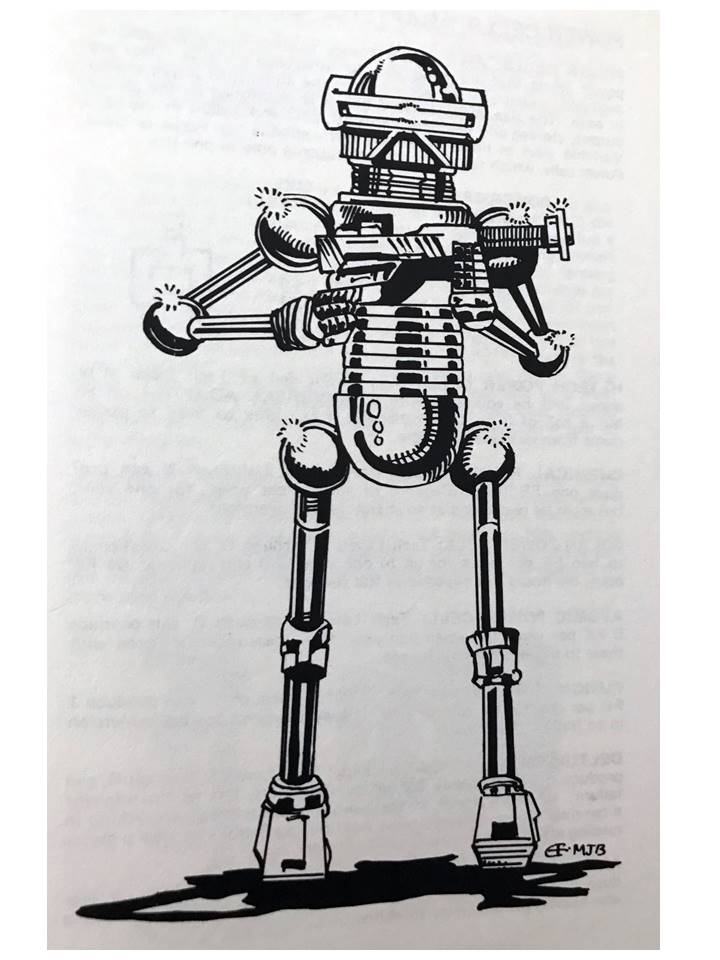
Bombshell Miniatures arc weapon sprue -I used two of the ones on the far leftI used the far left particle beam weapon for each Team 1 conversionFrom the 1981 catalogJuggerbot drawing from the 1981 Star Rovers game rule bookMark III Warbot drawing from the 1981 Star Rovers game rule book
After cleaning up the figures, I made a plan to complete the conversions. I also wanted to try a few new things in making this platoon. I wanted to use my new airbrushes and spray booth, and I wanted to use poster tack on specimen bottles and grocery store coins to have greater ease of painting with both the airbrushes and traditional brushes.
After cleanup but before conversion – I ended up using 2 arc weapons (far left), 2 of the WSD weapons (2nd from left), and 4 of the particle beam weapons (far right) in my conversionsAfter conversion – arc weapon on left, particle beam on rightWar Games Supply Dump weapon conversionMounted on steel washers and ready for the poster tack and the specimen jars
After all of my conversions were complete, I mounted the figures on steel washers for eventual magnetized storage. I had to use a bigger washer for Juggerbot. The platoon was then affixed to outdated grocery store bonus coins and specimen bottles or just to the bottles themselves with poster tack. In the future, I will not use the coins, as it was just easier to use the bottles minus the coins. I used an Aztec airbrush to prime the figures with gray Vallejo “Surface Primer”, giving the figures 24 hours to dry. I had read that doing that is desirable so that this primer paint can harden.
Primed on the specimen jars
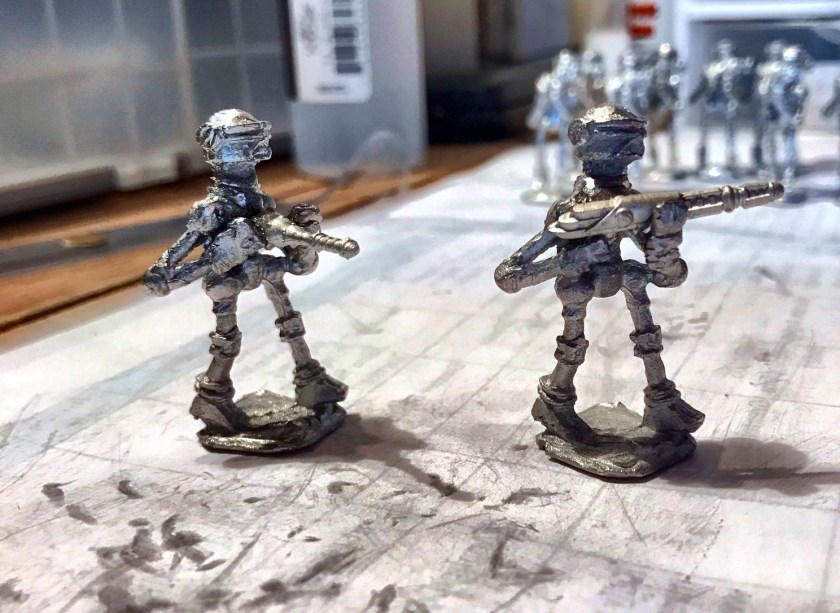
I then used Createx “Wicked Aluminum” airbrush paint (very sparkly) to base coat the Warbots using an Iwata Eclipse air brush – and I found this brush to be a much easier tool than the Aztec. I used Vallejo Model Air “Gold” to base coat Juggerbot with the airbrush.
Juggerbot base coatedClose up of Warbots base coated
I saw that the Createx paint had given the Warbots the appropriate shiny starting point for further development of the paint scheme I wanted, which was to be very retro sci-fi metallic, and reminiscent of the Cylons. Then I went back to the regular brush!
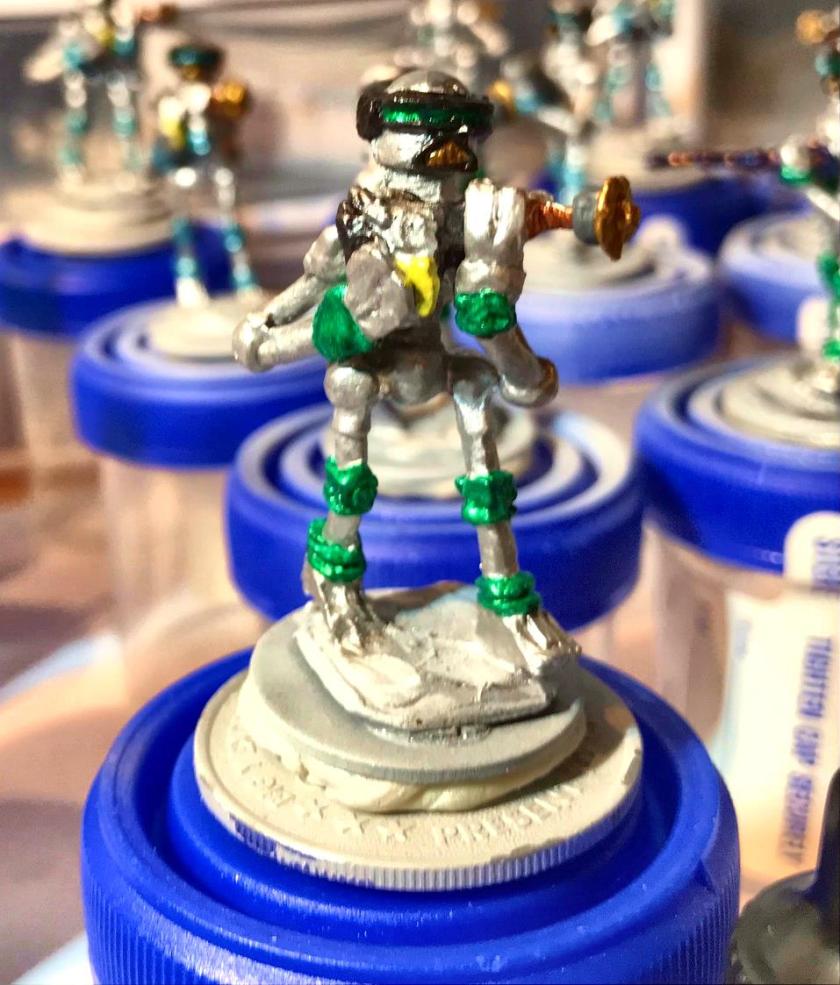
For my color schemes of red, blue, green, and purple on the Warbots, I went with DecoArt “Festive Red”, “Peacock Pearl”, “Crystal Green”, and Craftsmart “Amethyst” respectively. These metallic paints are great, but thick, and not easily thinned. Still, they worked well and I put these colors on the ankle, knee, and wrist joints for ease of tabletop play. I chose to use them as well for the visor interior colors, with Vallejo Model Air metallic “Black” for the outer parts of the visors. I then used “Gold” for the Warbot voice boxes and weapons tips on the unconverted troopers. “Black” was my choice for the rest of the weapons, offset with Vallejo Model Air “Steel” and Martha Stewart Crafts “Duckling” (this was a nod to my friend Buck Surdu, whose love of all things ducky and his take on the Mark III Warbots helped me plan out my approaches here).
For the common weapon barrels, I employed Vallejo Model Air “Copper”, and complemented them with Vallejo Model Air “Medium Gunship Gray”. Juggerbot had several lights on him, so Vallejo Model Air “Arctic Blue” and “Signal Red”, and “Aluminum” helped me with these details. I used these as well on the conversion weapons.
I then used several applications of Citadel “Nuln Oil Gloss” and “Black” on Juggerbot to shade the recesses of the figure. Moving back to the Warbots, I used “Aluminum” on the bodies, then similar to what I did with Juggerbot, I shaded with “Black” and “Nuln Oil Gloss”. Interestingly, I found that the inks really rolled off the figures, and the “Black” paint really helped with the shading.
I then added a healthy coat of Citadel “Ardcoat” to all visor and lighted surfaces. As a final highlight for Juggerbot and the Warbot weapon tips, I used Citadel “Retributor Armour”.
Juggerbot mid-stageEarly stage painting of Red Squad WarbotEarly stage painting of Purple Squad WarbotEarly stage painting of Green Squad Warbot
I decided that I wanted to be able to differentiate between the two teams within each squad. To do this, I experimented with kneadatite (green stuff) and Apoxie Sculpt and some numbered stamps. I found that the Apoxie Sculpt was easier to form, stamp, and once dry, cut. I applied these numbers to the figures’ bases with Gorilla Glue.
Figures with the numbers applied
I used Citadel “Imperium Primer” on the Apoxie Sculpt numbers, then added Citadel “Martian Ironearth” to them. Then, I built up the bases with Citadel “Martian Ironcrust” with a light sprinkle of Army Painter “Black Battleground” for more texture. After using both “Ironearth” and “Ironcrust”, I dried them to a crackly surface with a hand-held hair blow dryer. I highly recommend this technique.
After a day of drying, I dry brushed the bases with Armory’s “Red Brown” and “Brick Red”. I filled the numbers in with “Imperium Primer” for all troopers, with the team leaders getting “Retributor Armour” on theirs. Then it was back to the paint booth for two coats of varnish, this time with an Iwata Neo airbrush, allowing for adequate drying between applications.
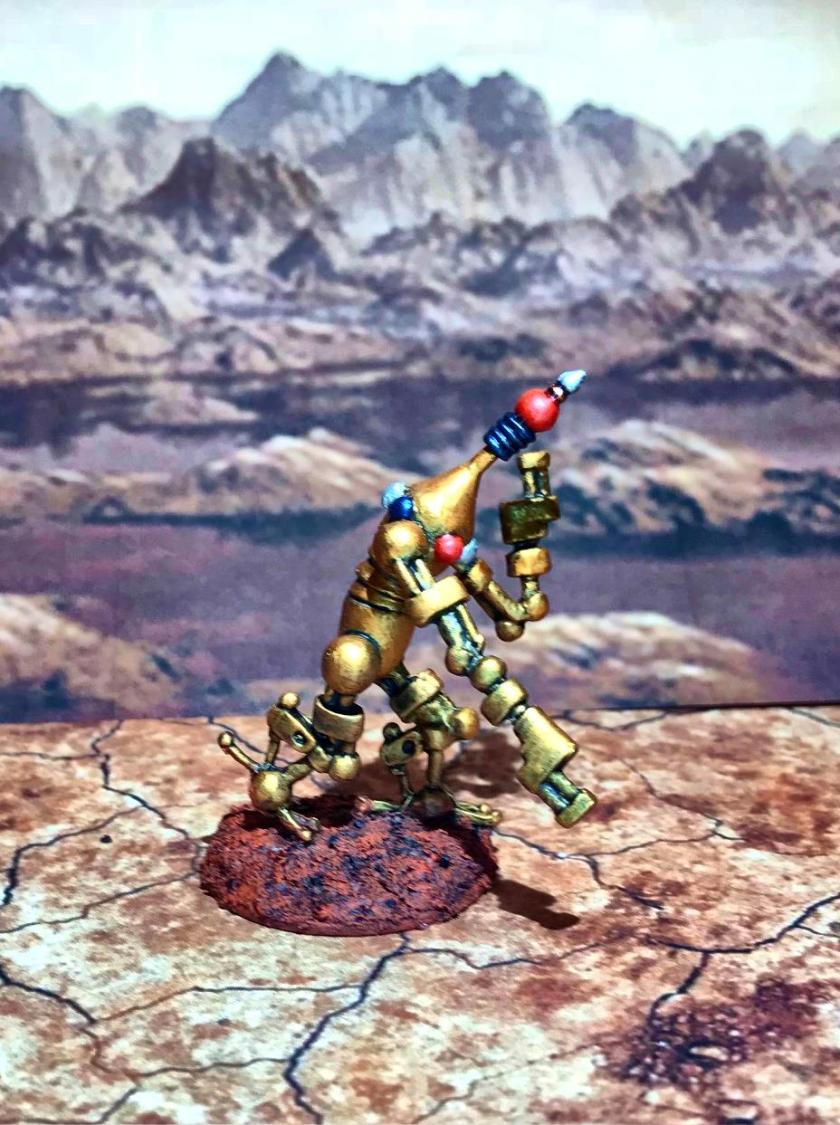
Juggerbot ready for varnishThe platoon all varnished
I now needed to remove the figures from the bottles and coins. The poster tack was easier to remove when I did not use the coins. I lightly painted the underside of the bases with Craftsmart “White” so I could use a black fine-tipped Sharpie to write information on the figures’ bottoms.
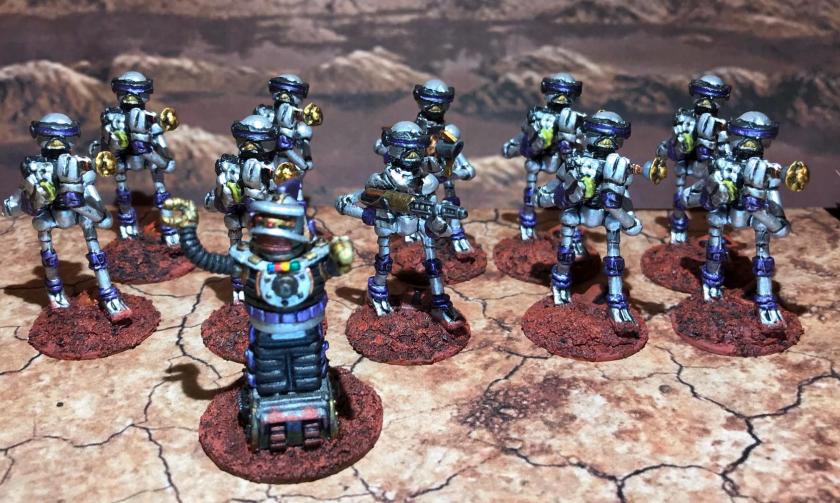
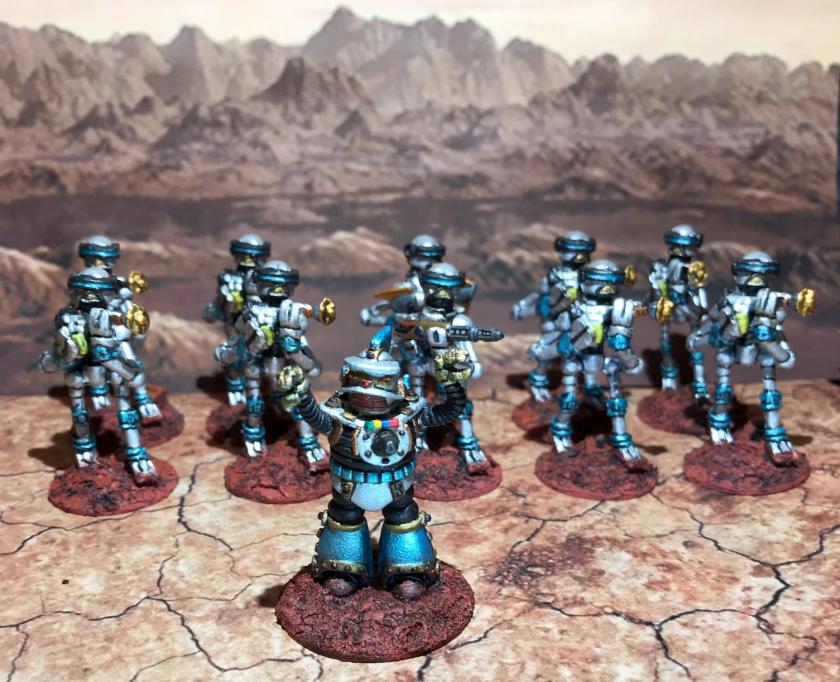
Red Team 1 conversion with particle beam weapon – this is the other original Warbot that had a broken weaponGreen Warbot Squad with Khang Robot Squad LeaderLeft to right, regular trooper, particle beam weapon conversion, and arc weapon conversion of Green SquadPurple Warbot Squad with Khang Robot Squad LeaderLeft to right, regular trooper, particle beam weapon conversion, and War Games Supply Dump weapon conversion of Purple Squad Blue Warbot Squad with Khang Robot Squad LeaderLeft to right, regular trooper, particle beam weapon conversion, and War Games Supply Dump weapon conversion of Blue SquadFear the Juggerbot!Coming at youMr. Universe poseThe back viewAssembled Mark III Warbot Platoon, front viewAssembled Mark III Warbot Platoon, side view
I cannot express enough how much I like this platoon! The figures started off pretty rough, but in the end, I was able to make a nice unit for tabletop gaming. It did take me a couple of months, but it was worth it. They will be in action this upcoming weekend, as they make their tabletop debut – stay tuned, and let me know your thoughts below!
To round out September, the Mass Pikemen Gaming Club ran a game during which the Star Ducks attacked the positions held by the Power-Armored Frinx. Both of these forces are from Archive Miniatures circa 1979-1981. You can learn more about their origins here. Click on Star Ducks or Power-Armored Frinx to learn more about their platoons. We used the Combat Patrol™ system, with modifications to approximate the abilities of the Star Ducks to use their jet packs, and the durability of the Frinx as a result of their power armor. The Frinx also had the support of two Archive RVS86 “Robot Cooks” which were analogous to small self-propelled guns.
Two RV86 supported the Frinx
The scenario was one where the Frinx, led by Lieutenant Ma’k were defending some old ruined buildings that held some lost technology – and the Star Ducks, led by Duck Vader, were hell-bent on getting into the building and killing Frinx in general. The Frinx, on their part, desired to dispatch the Star Ducks with extreme prejudice.
The Star Ducks advance in the foreground, the Frinx defend the buildings and barriers.
The Star Ducks used their jet packs to quickly advance towards the buildings on the Frinx’s left flank. You can see the small purple rubber bands on the Star Ducks, which indicate the number of “jumps” that they have taken. Due to limited fuel, the Star Ducks have only three jumps per game, but they do help!
Approaching the Frinx positions, the Star Ducks move quickly using their jet packs.
The initiative switched to the Frinx, who then bracketed them with bazooka fire. The white rubber bands indicate wounds, while the glass beads indicate a team must take a morale check for each one the next time they are activated. We use red rubber bands to denote a weapon that has jammed or is out of ammunition. We also use black rubber bands to denote figures who are stunned.
The smoke from the Frinx anti-tank rockets surrounds the Star Ducks, as they take wounds from the explosions
In the middle of the table, a pitched ray gun/blaster battle left several dead and wounded Frinx. The Star Duck team making this assault was however, annihilated, as Frinx Staff Sergeant A’Haze led his Frinx ably and directed their fire.
The Star Ducks do significant damage to the Frinx defending the barriers and slag mounds – note the dead Frinx, the multiple wounds, and the multiple morale pips. The Star Duck A team was wiped out here.
The only Star Duck survivor in this area was Staff Sergeant Bufflehead.
SSG Bufflehead watches his A team die valiantly.
And then this happened…and the other RV86 was immobilized as well by bazooka fire from the other flank.
Meanwhile, back at the buildings, the Star Ducks jumped again, going over the ruined buildings, and assaulting the Frinx from the rear. This move was met effectively by the Frinx with Platoon Sergeant First Class Grengelu’s automatic grenade launcher, wounding and killing several Star Ducks.
After the vertical envelopment, the Frinx make the Star Ducks pay. Note Frinx LT Ma’k in the upper floor on the left – his blaster also hit several Star Ducks.
However, there were enough Star Ducks to close with the Frinx in hand-to-hand melee (or is it claw-to-wing?) and begin to clear the buildings. SFC Grengelu was overcome and killed in the scrum.
Everybody gets in the fight!
SSG Bufflehead is surrounded by Frinx in melee
At this point, the game was called due to time and was determined to be a draw. While the Star Ducks had cleared one building completely, and another one partially, they still had a couple more to go. Casualties were high on both sides!
The game was a lot of fun and the battle was touch and go all night. Once again, Buck Surdu’s Combat Patrol™ system demonstrated its great versatility and ease of play!
I hope you enjoyed this battle report – please share your feedback in the comments section!
This was a very large project that ended up with producing a 45-figure platoon. I hope that you find this story interesting, if only to see the determination I had to have to see this through! I am going to give some background, and then show the photos for the finished unit. After that, I will give a detailed description for my fellow hobbyists as to how I completed the various aspects of this unit – this will allow you to see the final product earlier in the blog – and those who want more details can go past the completed photos to see more detail.
The beginning -my original 4 Star Ducks from an eBay estate sale. Note the broken ray guns. The broken ones made good candidates for conversions.
My Duck Vader box from eBay – this was a reproduction by Dark Ages miniatures, which like Archive, is no more. Note Nevile Stocken’s name is misspelled.
Background
I first saw the Archive Star Ducks (#2002) and Duck Vader (#2326) on the Lost Minis Wiki as I was researching some other Archive Star Rovers figures. These were made by Archive between 1977 and 1981 or so. They are made of lead and tin alloy. These were sculpted by Nevile Stocken. He sent me the drawing below via Facebook Messenger.
The rights to some of Archive’s figures have been sold off a few times. Several have been reproduced, but they are not currently in production. I searched through eBay, and these are very hard to find. I did manage to find only 4 Star Ducks and one Duck Vader, but that paltry number does not make a unit. My stretch goal was to create a platoon for use with Buck Surdu’s Combat Patrol™ system for tabletop skirmish gaming. I thought that I would need about 40 or more figures to make the unit, and I ended up with 45, which is a good size for a traditional platoon. In this process, I ended up making a mold and casting 40 for myself and some for Buck as previously described in this blog and Buck’s. I converted 4 Squad Leaders with War Games Supply Dump retro sci-fi weapons – which I was lucky to get as WSD closed on March 31st, 2017. I converted 6 figures to make up the mortar crew, to include making the mortars, ammo boxes, and mortar rounds. I also converted three figures to make up an Anti-Tank section (now known as the Bazookaducks) by arming them with Reaper Chronoscope bazookas.
Platoon Organization
The platoon is composed of 45 figures as described below. Five of the figures, including the platoon sergeant and the platoon leader are original castings. The remaining 40 are all Star Ducks that I cast over the last year.
Star Duck Platoon
Platoon leader – Duck Vader (1)
Platoon Sergeant (1)
Duckfoot Mortar Section (6 figures)
Mortar Crew 1 (3 converted Star Duck figures as crewducks)
1 loader
2 crewducks
Mortar Crew 2 (3 converted Star Duck figures as crewducks)
1 loader
2 crewducks
First Squad (11 figures with tan gloves)
Squad Leader (1 converted figure with WSD weapon)
Team A (5 figures)
Team Leader (1) and 4 Star Ducks
Team B (5 figures)
Team Leader (1) and 4 Star Ducks
Second Squad (11 figures with light blue gloves)
Squad Leader (1 converted figure with WSD weapon)
Team A (5 figures)
Team Leader (1) and 4 Star Ducks
Team B (5 figures)
Team Leader (1) and 4 Star Ducks
Third Squad (11 figures with light green gloves)
Squad Leader (1 converted figure with WSD weapon)
Team A (5 figures)
Team Leader (1) and 4 Star Ducks
Team B (5 figures)
Team Leader (1) and 4 Star Ducks
Bazookaduck Section (4 figures with dark red gloves)
Squad Leader (1 converted figure with WSD weapon)
Bazookaducks (3 Star Ducks with Reaper Anti-Tank weapons)
The Completed Duck Platoon
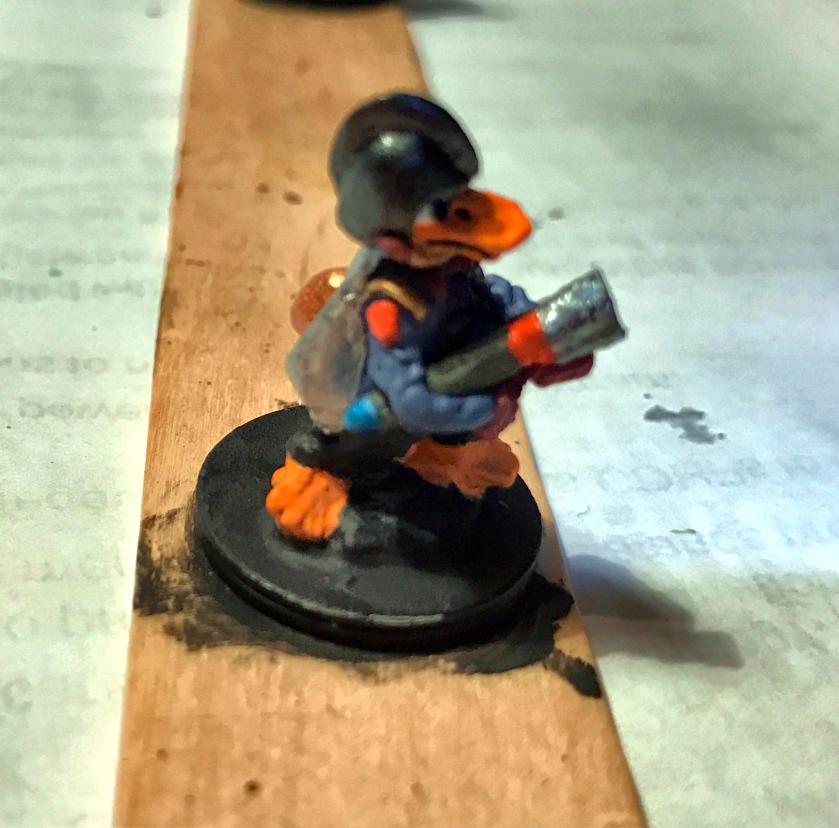
Platoon Sergeant and Duck Vader, Platoon Leader, frontal view. The Platoon Sergeant is an E-7 (Sergeant First Class). Duck Vader is a First Lieutenant.
Platoon Sergeant and Duck Vader, Platoon Leader, reverse view. Both are original.
The 4 Squad Leaders, converted with WSD weapons. Each is an E-6 (Staff Sergeant). From right to left, 1st, 2nd, 3rd Squad and AT Section leader. I used different colors on the gloves, lapels, and helmet buttons to differentiate them for tabletop play.
The team leaders for each line infantry squad, with the same coloration of the Squad Leaders but with original Star Duck weapons. The B teams for each squad have a unique tuft. These are E-5’s (Sergeants).
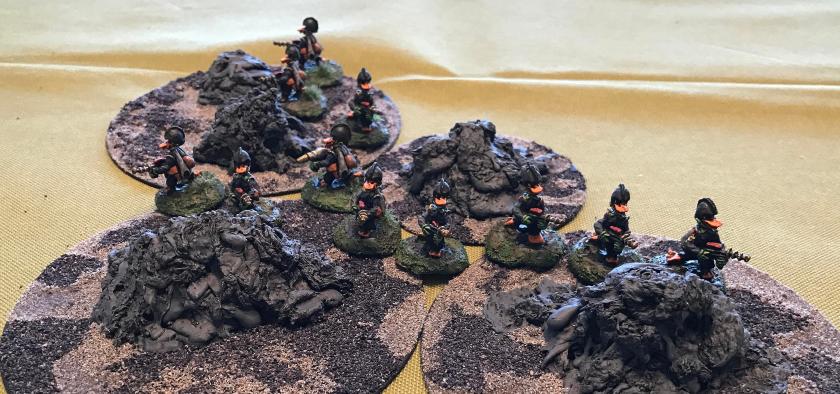
First Squad moves out.
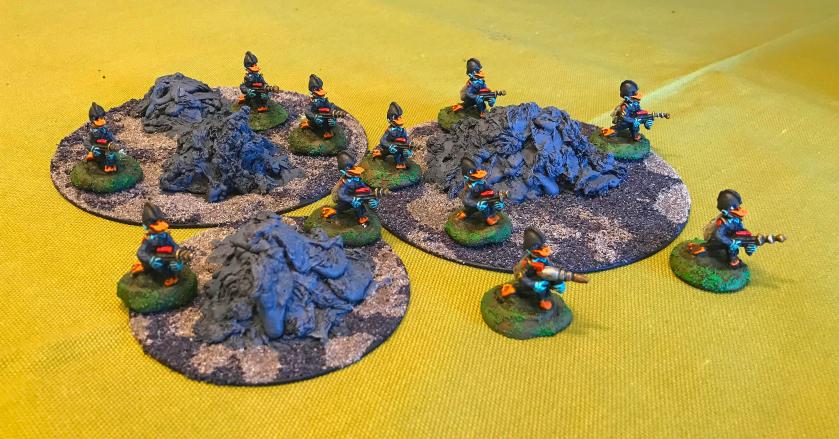
Second Squad defends the lava mounds.
Third Squad assembles.
The Bazooka Ducks face off against Frinx Sphere tanks. For scale, the sphere tanks are golf ball sized.
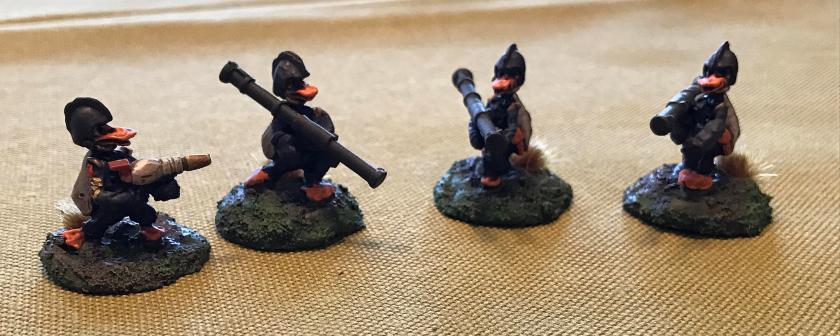
The Bazookaduck Section Leader (an E-5), and the three Bazookaducks with Reaper Chronoscope bazookas.
Mortarduck crew A with Duckfoot mortar. The two outer crewmen have ammo boxes and rounds to prepare for the loader. The loader is converted and holds a scratch-built round. The mortar is scratch-built from a washer, a bolt extender, paper clips, servo parts, and green stuff. Brown tufts designate this as crew A.
Reverse view of crew A.
Mortarduck crew B. Made similarly to crew A, except this crew has green tufts.
Reverse view of crew B.
The Star Duck Platoon in formation, view from the right.
Star Duck Platoon, reverse view.
Overall, I am very happy with the unit. I did use Army Painter Quickshade (Soft Tone) which darkened them much more than I expected. The effect was acceptable, but some of my identifying colors were muted.
I will now go into the how-to’s of the making of the unit.
How to Section
Conversions
All of the figures that I converted were missing the ray gun ends. These were either original casts or my own. I used a jewelry saw, wood carving knives, files, an awl, and an Exacto knife to remove the ray guns and make room for the weapons. Some of the figures lost limbs in this process, but I was able to use green stuff to recreate arms and hands for these figures. I drilled any “amputees” with a pin vise, and used 24 gauge wire as an armature for these.
a. Mortars and Mortarducks
The mortars and mortarducks were the first conversions I attempted for this unit. I envisioned two teams of three – made up of a loader, and two crewducks with ammunition boxes. I made the ammo boxes from Plastruct styrene plastic and special styrene adhesive. I had acquired some Army Painter green stuff, and decided to give it a go for the mortars and rounds. I ended up using my steel sculpting tools, but quickly learned that I needed something different for green stuff, so I got some silicone- tipped tools that worked much better (less stickiness problems). I used paperclip wire with the green stuff for the mortar legs and the rounds. I tried to make a form for the mortar round bases out of 1/8″ plywood, with mixed success. Eventually, I found that correction with an Exacto knife was a good way to go. I made the bases with Apoxie Sculpt and steel washers. In the case of the mortar base, this made sense as I was able to make a strong base with room for the loader using two slightly different washers. The mortars themselves were made with screw extenders, washers, and servo parts for a model airplane. Testors super glue was the means by which I glued the rounds to the loaders and the ammo boxes. Additionally, I found that having some small hobby mirrors from Michaels made the sculpting and assembly process much easier. I decided to leave the two crewducks with their original weapons as the loader conversion had proved to be a lot of work and I did not think it made a difference as I already had the ammo boxes.
My mortar plan and notes
Idea for mortar round sculpts
Initial work on the mortar and the rounds
Early stage in sculpt
Early stage in sculpt, side view
Middle stage of sculpt, before Duckfoot alteration
Duckfoot mortars!
Mortar Rounds completed and painted
Mortarduck loader conversion in progress
b. Bazookaducks
I wanted the unit to have an anti-tank capability beyond the mortars. I had previously converted some Frinx for this purpose, and decided to do the same for the Star Ducks. The bazookas are from Reaper and came with several other weapons. I basically carved away the ray gun and made the bazookas “fit”. There were amputees in this group, but I think the conversions worked well.
c. Squad Leaders
The squad leaders were simply converted with the same tools. I gave them the War Games Supply Dump blasters from the Dirk Garrison line.
3. Painting and Basing
The biggest challenge with painting was the color orange – I had not used it much before – and it took several iterations of trying different combinations until I found what I liked.
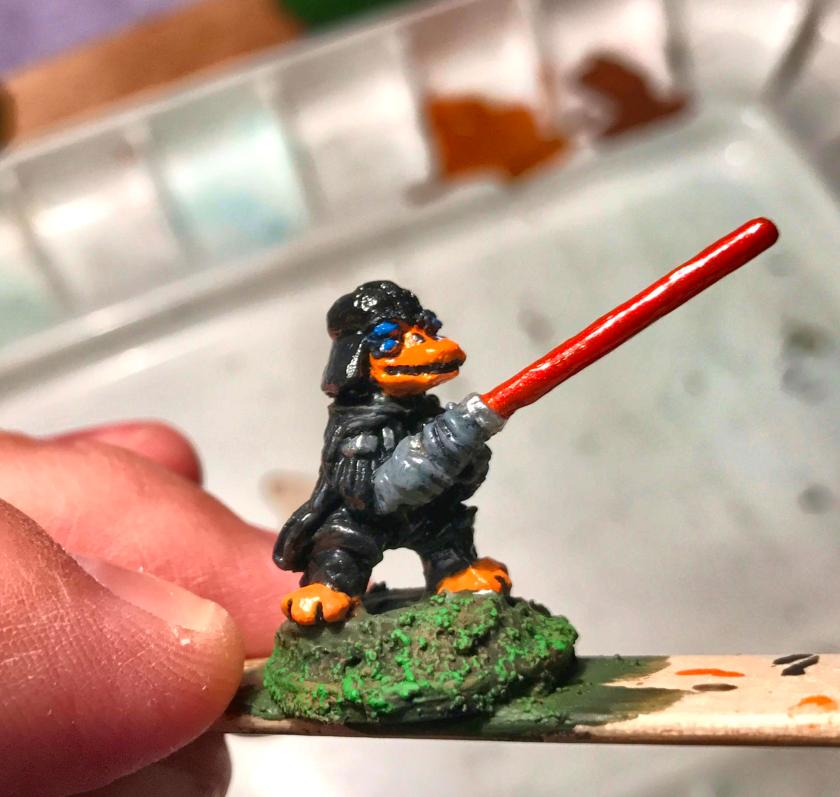
a. Duck Vader
The sequence was as follows:
Citadel “Imperium Primer” as a brush primer
Armory “Gloss Black” on helmet
Craftsmart “Orange” on feet and bill
Tamiya “Orange” on feet
Citadel “Ceramite White” on face and tail
Reaper MSP “Blue Liner” around eyes and pupils
Vallejo “Aluminum” on light saber beam
Vallejo “Chrome” on light saber handle
Vallejo “Steel” on chest details
Vallejo “Medium Gunship Gray” on gloves
P3 “Cygnar Blue Highlight” on eyes
Citadel “The Fang” on eyebrows
Citadel “Castellan Green” on base
Citadel “Nuln Oil Gloss” on cape and fingers
Citadel “Spiritstone Red” on light saber
P3 “Flesh Wash” on tail
Highlight cape with Vallejo “Black Grey”
Vallejo “Black” and “Glazing Medium” on cape and mouth slit
Deka Lack “Weiss” highlight on tail and face
Vallejo “Gloss Varnish” on helm
Army Painter “Anti-shine Varnish” on figure
Base coated
Finished Duck Vader
b. Mortar and mortar rounds
The sequence was as follows:
Citadel “Imperium Primer” as a brush primer
Armory “Gloss Black” on mortar base
Vallejo “US Dark Green” on mortar rounds
Tamiya “Titanium Silver” on mortar round tips and base
Craftsmart “Orange” on Duckfoot mortar feet
Tamiya “Orange” on feet
Citadel “Athonian Camoshade” wash on mortars
P3 “Sulfuric Yellow” on toes of mortar feet
Highlight with Tamiya “Orange” on feet
Citadel “Soulstone Blue” on mortar tip/fuse
Vallejo “Olive Drab” on mortar and rounds
Vallejo “Steel” and “Black Metallic” on mortar fins
Citadel “Fire Dragon Bright” on mortar rounds
Mounted the mortars and boxes and rounds on bases
Bases painted with Citadel “Lustrian Undergrowth”
Bases shaded with Citadel “Seraphim Sepia”
Bases highlighted with Armory “Musket Brown”
Bases highlighted with Citadel “Niblet Green”
Mortar dipped in Army Painter “Quickshade (Soft Tone)”
Mounted mortar and rounds got coat of Testors “Dullcoat”
c. Star Ducks
Citadel “Imperium Primer” as a brush primer
Citadel “Nuln Oil” on figures
Citadel “Ceramite White” on face and tail
Citadel “Fire Dragon Bright” on feet and bills
Reaper MSP “Blue Liner” around eyes and pupils
Citadel “Soulstone Blue” on eyes
Citadel “The Fang” on the jacket
Vallejo “Metallic Black” on helmets and infantry ray guns
Vallejo “Copper” on fuel tanks
Americana “Ebony” on trousers
Vallejo “Black” on mouth slit
Vallejo “Aluminum” on jet venturi on back
Vallejo “Gold” and “Chrome” on ray guns
Polly-S “Goblin Flesh” and Vallejo “Glaze Medium” on holsters
Vallejo “German Grey” on ammo pouches
Vallejo “Signal Red” on ray gun scopes
Vallejo “Gold”, “Chrome”, “Copper”, and “Signal Red” on WSD blasters
Different glove colors on lapels, helmet buttons, and gloves: Platoon Sergeant – Vallejo Metallic “Arctic Blue”; 1st Squad – Citadel “Ushabti Bone”; 2nd Squad – Americana “Bahama Blue”; 3rd Squad – Americana “Apple Green”; Bazookaducks – Polly-S “Demon Deep Red”; Mortarducks – Americana “Dioxazine Purple”
Armory “Musket Brown” and Vallejo “Neutral Grey” on cigars
Vallejo “Black” on bill vents
Vallejo “Light Orange” and “Glaze Medium” as glaze on bills and feet
Vallejo “US Dark Green” on bazookas
Citadel “Athonian Camoshade” wash on bazookas
Milliput (yellow) on bases
Bases painted with Citadel “Lustrian Undergrowth”
Bases shaded with Citadel “Seraphim Sepia”
Bases highlighted with Armory “Musket Brown”
Bases highlighted with Citadel “Niblet Green”
Figures dipped in Army Painter “Quickshade (Soft Tone)”
Figures coated with an application of Testors “Dullcoat”
Used various Army Painter tufts and meadow flowers on bases to designate teams
Base coated and ready for varnishClose-up of unit pre-varnishMortarduck loader, pre-varnishPlatoon Sergeant, post-dipPlatoon post dip, with Milliput added to bases
To wrap up, I am very happy that the unit is done. I am on the fence as to the use of the Army Painter “Quickshade” – the figures are darker and well-shaded, and should be well protected, but some details are obscured. I enjoyed my new Vallejo products and found that they really worked well. I also learned that orange as a color requires multiple applications and glazing to work well.
I learned much that I can use for future projects, and I hope that you enjoyed this blog entry.
As readers of this blog know, I have been collecting figures from the now-defunct Archive Miniatures Star Rovers line. The figures from this line were made in the late 1970’s, and my goal is to get them collected and adapt them for use with Buck Surdu’s Combat Patrol™ card-based rules.
There was a lot of work on this project – so please enjoy the photos!
They show up from time to time on eBay, and my experience showed that the ones I found were more or less 25mm in scale. However, the Aphids I am going to describe here were a surprise as far as size goes as you will see. You have to be careful in acquiring these – there are a number of really bad recasters of these figures (and others) out there – selling them at exorbitant prices. I have been sure to be diligent before deciding to buy them.
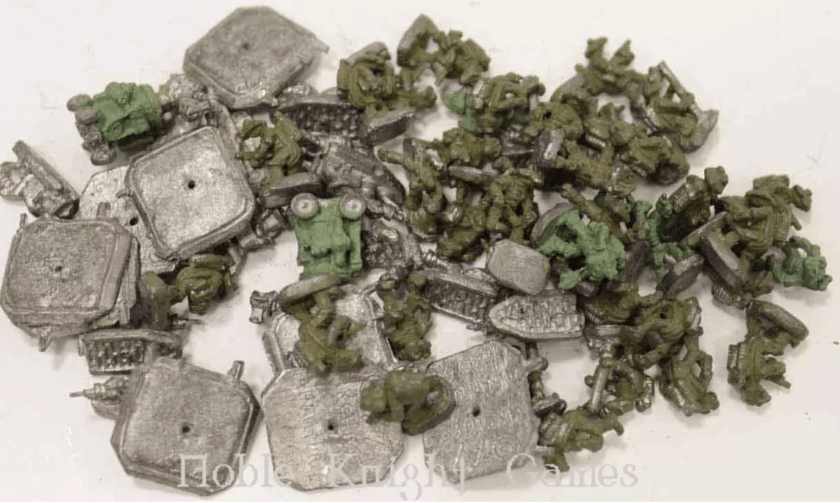
One listing is below. I had seen it several times from the Noble Knight Games store on eBay, but I was initially unimpressed. It looked like a hodge-podge of painted and unpainted figures and bases, and I could not tell what was there at first glance.
The Aphids listing picture from eBayOn a phone call to catch up, I had a discussion with Buck about the Star Rovers line, and he pointed this listing out to me, so I gave it another look. I compared this with Lost Minis Wiki Star Rovers page and saw that there were several figures that I did not have. They appeared to be different Aphids types, including Aphid Scouts on Grav-Cycles, Aphid Infantry, Aphid Officers, Aphid Mortar Crews, and a couple of robots. Archive had two different numbers for the same miniatures, and Lost Minis Wiki does not explain why – perhaps Archive changed the numbers with later production? In any case, they looked to be original, and I bought them. This set included the following miniatures (I list both catalog numbers here for completeness but I am sure that they are from the older group due to the robots being included):
11 examples of Archive #2060/2314 Aphid Scout on Grav-Cycle (11 riders and 11 grav-cycles plus bases).
18 examples of Archive #2061/2315 Aphid Infantry.
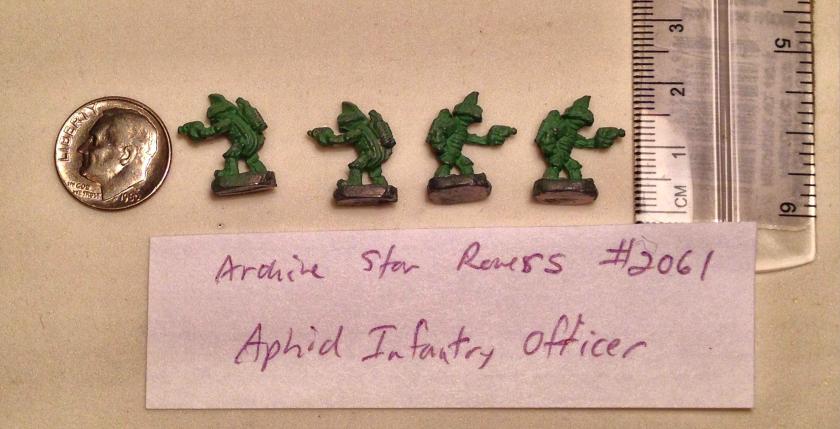
4 examples of Archive #2061/2316 Aphid Officer. The 2061 listing included 5 Aphid Infantry and 1 Officer while the 2316 was just the officer.
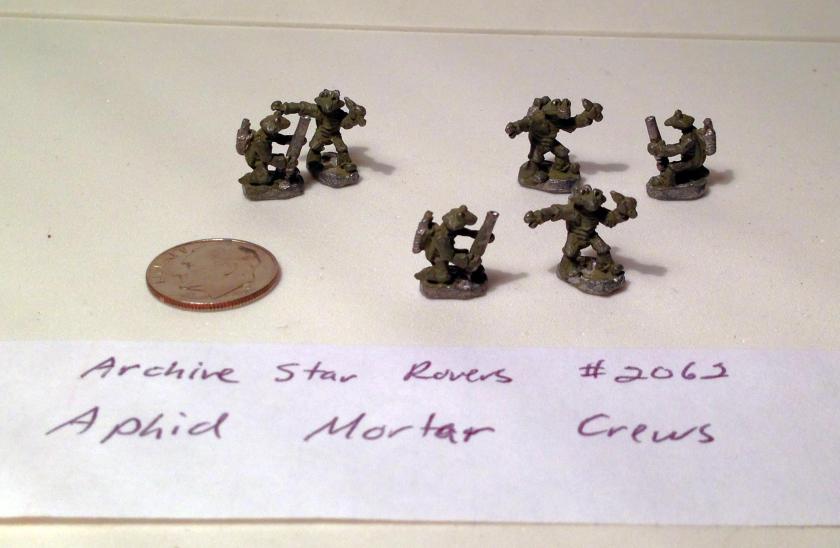
3 examples of Archive #2062/2317 Aphid Mortar Team (two figures per crew for 6 figures).
2 examples of Archive #2011A (no later listing) Robot Group. There were 3 robots originally in the set of different types.
Archive Miniatures Catalog detail showing the Aphids with the newer catalog numbersI will refer to the older numbers for the most part in this article as I think mine are older.
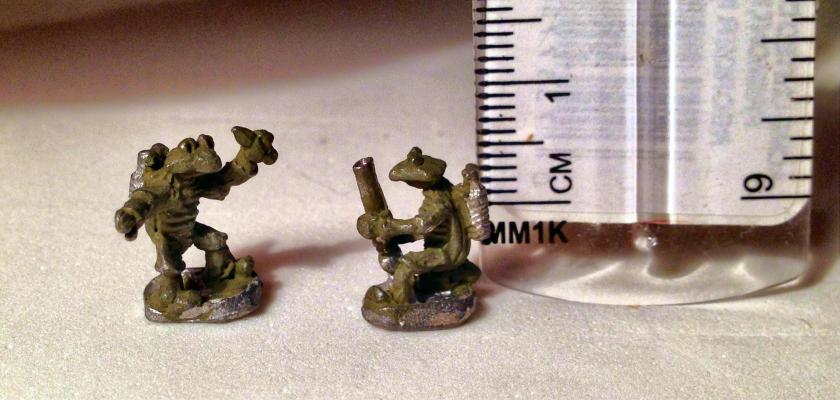
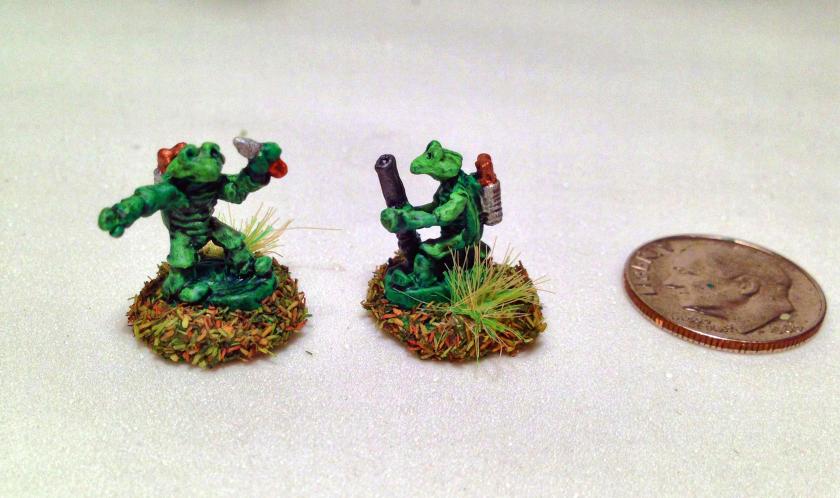
The figures were in good shape except for one scout rider who was missing a right leg and foot. Surprisingly, they were small – really small – maybe 12mm. The detail on them was appropriate for the time period – but as you can see from the eBay photo they were not greatly detailed. To me, this was a challenge to let the brush bring out the potential of the figures. Also, I thought that this acquisition presented me with an opportunity to field an entire platoon of Aphids for Combat Patrol™ games!
My first step was to strip all of them down of any residual paint – which I accomplished with a long (2 week) soak in Simple Green®. I prefer the blue type as it seems to work better (and smells nicer). This time I used some rifle cleaning tools (bore brushes) with plastic bristles in addition to tooth brushes to remove the old paint which was pretty thick.
The Aphid Scouts as received – just stacked together here
Aphid Scout base detail showing #2060Aphid Infantry as receivedAphid Infantry Officers as receivedAphid Mortar Crews as receivedClose up of Aphid Mortar Crew as received – this shows their size and how the previous owner had painted them
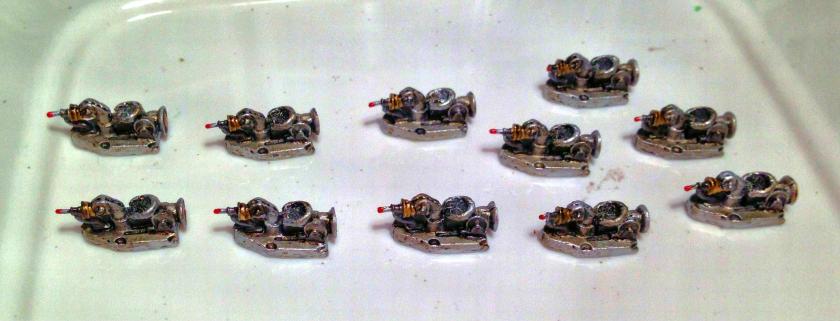
The two robots – look like self-propelled guns – in the form of a steam boiler!I decided that I should first work on the Aphids on Grav-Cycles as they would be the most difficult due to the needed assembly. There were 11 Aphids and 11 Grav-Cycles with bases. More research showed me that these originally came with piano wire to mount them – similar to the image below from Lost Minis Wiki:
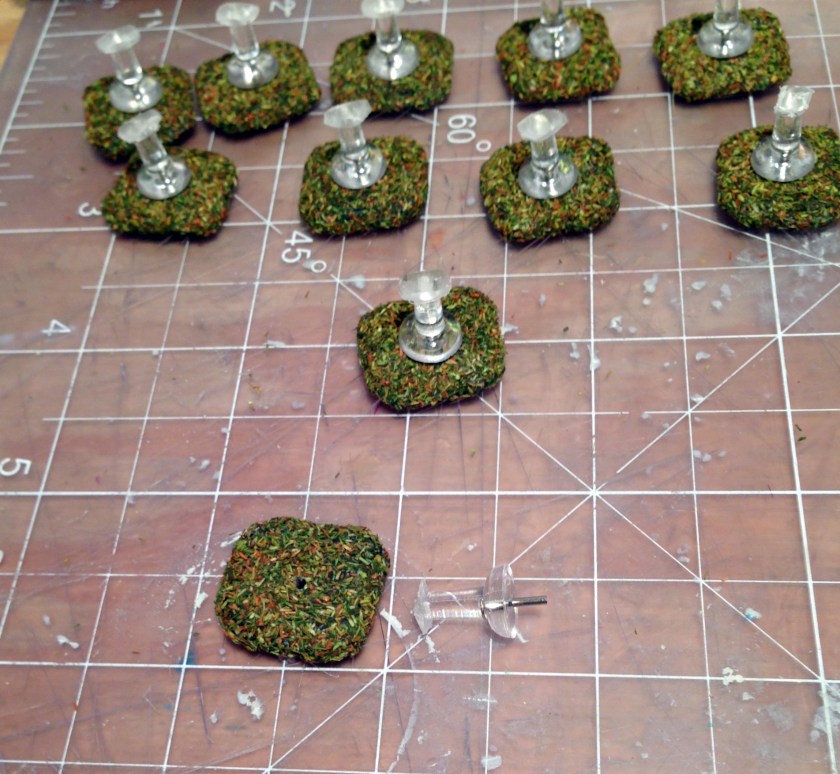
From Lost Minis WikiI did not have the piano wire and this did not seem to me to be a sturdy way of mounting the grav-cycles. I wanted a more permanent solution, but one that was cool as well. The cycles themselves seemed to had the wire in them at some point in the past, but nothing remained. The bases still had the holes. While shopping at Michael’s it hit me – I could use clear plastic push pins as mounting platforms.
To make this work, I needed a plan as I did not want to varnish the clear plastic and take away from the visual effect of flight that I was going to try to achieve. I mounted the bases on two stacked and centered ¾” steel washers using wood glue and let the combination dry overnight. I cleaned off the flash from the bases, filed them, and primed them with Krylon “Ultra-Flat” matte spray paint. After that I flocked them with 4Ground “Brown Leaves” using white glue. Once that glue was dry, I applied two coats of Testors “Dull Coat” to the bases. Using wire cutters, I trimmed off the pointed tips of the pins to be recessed in the washers when inserted into the bases. I then flattened and narrowed the rounded push pin tops with an Exacto knife, and sized them up with the base of the grav-cycles. This was to make a small flat mounting platform. However, I wanted more stability than super glue alone would give me. My pin vise was the needed tool to make this happen. Using my smallest drill bit, I made a hole in the top center of each push pin. Using E6000 epoxy, I affixed and mounted the push pins onto the bases. Once that had set, I mixed some Aves® Apoxie® Sculpt, and filled the bottom of the washer wells where the push pin tip was. This had the advantage of giving the structure more strength as well as some weight for stability on the gaming table. I cut some pieces of wire from a thin paper clip and glued them at a nearly vertical angle in the hole in the top of the push pin. This worked well as the wire was deep enough to secure the grav-cycle to the platform.
How I used push pins – note the narrowed and flattened tops. The paper clip wire was subsequently superglued into the holes in the pin topsI then moved on to painting the riders and their grav-cycles. This was more difficult as I could not mount these onto a suitable painting structure and paint them successfully – which took much longer. I basically had to paint the Aphid Scouts and Grav-Cycles in my hand.
First I’ll discuss the cycles. I painted the deep recesses of the bottom of the grav-cycles successively with Americana “Deep Burgundy”, followed by Citadel “Spiritstone Red”. I wanted an “aviation” look to the cycles (which had flywheels and a big ray gun as part of the details!). I gave them a heavy dry brush of Tamiya “Flat Aluminum”.
Grav-Cycles after dry brushingFor the details, I used Americana “Ebony” on the seat base and the center of the exhaust port. FolkArt “Gunmetal Gray” was my choice for the front ray gun support and the flywheel bracket, while the flywheel got Tamiya “Chrome Silver”. For the ray gun cowling, Martha Stewart Crafts “Pale Bronze” was my choice. For the tip of the ray gun, I used Craftsmart “Festive Red” metallic. For the exhaust port. I used a combination of Craftsmart “Bright Yellow”, Tamiya “Orange”, and “Festive Red” in a concentric circling pattern. Once this dried, I gave the cycles a wash with Secret Weapons Washes “Armor Wash”, and let that dry. Using “Flat Aluminum”, I highlighted the cycles’ edges and reflective surfaces. Lastly, I used two applications of the “Spiritstone Red” to bring out the ray gun tip even more.
Grav-Cycles paintedLet’s discuss the riders and the other Aphids painting in general. As I wanted them to look similar (all in the same platoon and the same insect species), I wrote down each step of painting and washing and highlighting. That helps with reproducing the same effects. There are a few differences among each type but I’ll note those as I go along. The only special steps for the riders involved basically repairing the one missing leg on one figure. I used my pin vise, and drilled out a hole in the figure’s leg stump. I cut a piece of paper clip, and bent it at 90°, and superglued it in place. I sculpted a suitable leg with Aves® Apoxie® Sculpt, and let it harden overnight. It came out acceptably!
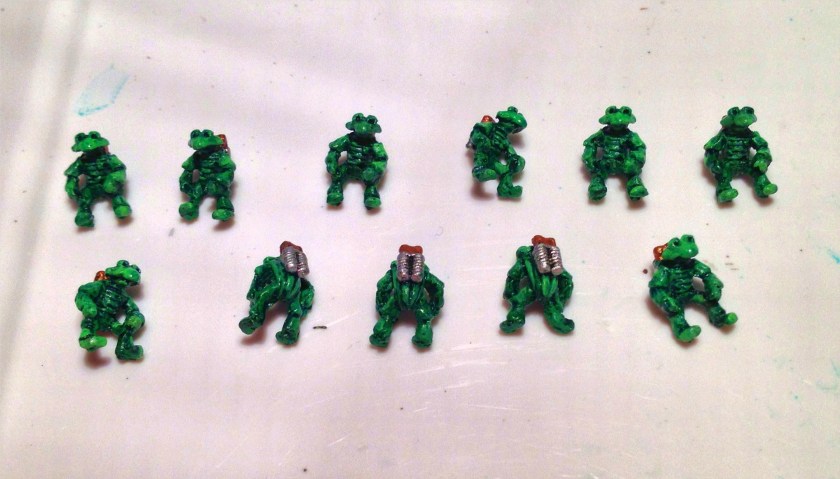
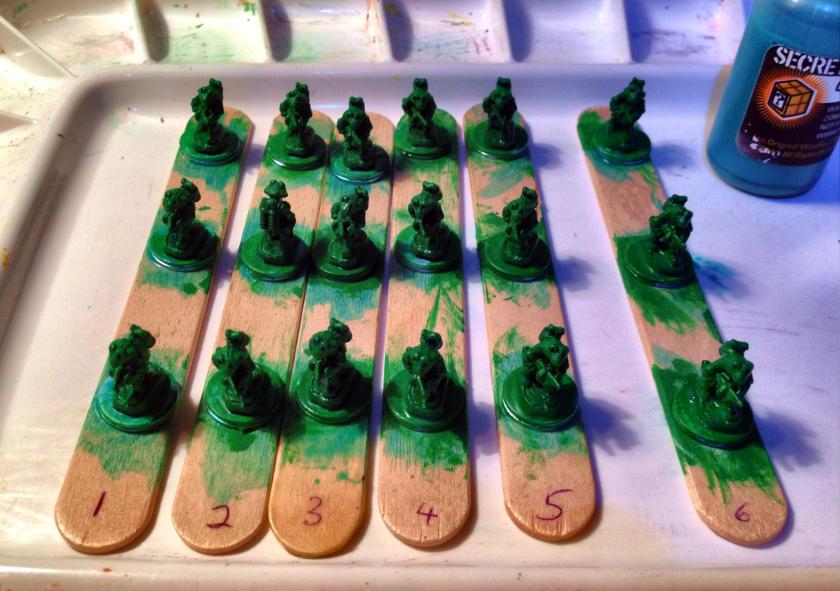
The painting of the Aphids followed the same basic pattern. I wanted to smooth over any rough areas, so I gave the figures a wash with Secret Weapons Washes “Green”. I then base coated the bunch with my old 1984 Polly-S “Slime Green” using a dry brushing technique.
Amazingly, this 32 year old paint is still good!Each of the Aphids (all types) was equipped with a couple of tanks on their backs, which I interpreted as being a breathing apparatus. For these, I used “Chrome Silver” on the tank bodies and Tamiya “Copper” on the valve sections. After this dried, I gave each Aphid a wash with Citadel “Nuln Oil Glossy”. I wanted glossy so as to bring out the small details that were recessed. Then I highlighted the flat chitinous surfaces of the head and thorax (these are insects) with Craftsmart “Apple Green” satin. To smooth out the colors, I applied yet another wash of “Green” to the Aphids’ shells and “Nuln Oil Glossy” to the ribs on the breathing tanks. For varnishing, I wanted to dull down the glossy a bit so the Aphids got two coats of Testors “Dullcoat”.
Riders painted and awaiting varnishingAfter varnishing and awaiting mounting
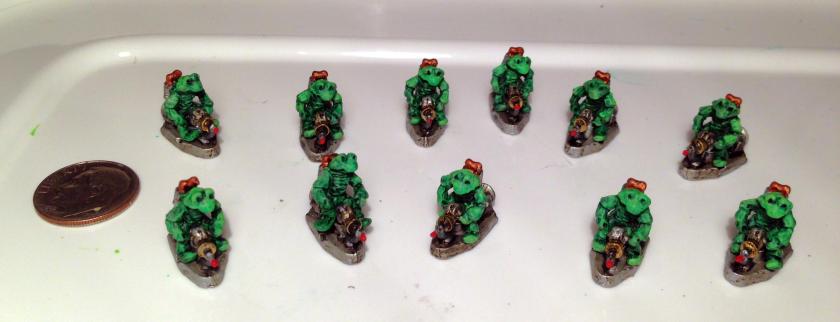
Let me get specific about the Aphid Scouts on Grav-Cycles, which were then ready for assembly. I glued the riders to the cycles. Then, I drilled a hole on the bottom of each cycle with my pin vise to fit the paper clip in the push pin with my smallest bit. I needed to also use an Exacto knife to clear the hole of filings and another push pin to start the pin vise (pilot hole). I had some of the riders come off during this process but was able to reglue them easily.
Hole drilled in bottom of cycleThese were then finally assembled. I used differently-colored flocking tufts from Army Painter to show their command and control relationships. They are organized as one squad in the platoon – with one squad leader, and two team leaders each leading teams of 4 grav-cycles. My thoughts initially are to treat the ray gun weapon as an automated analogue of a 37mm anti-tank gun and the vehicle as terrain-defying flying motorcycles.
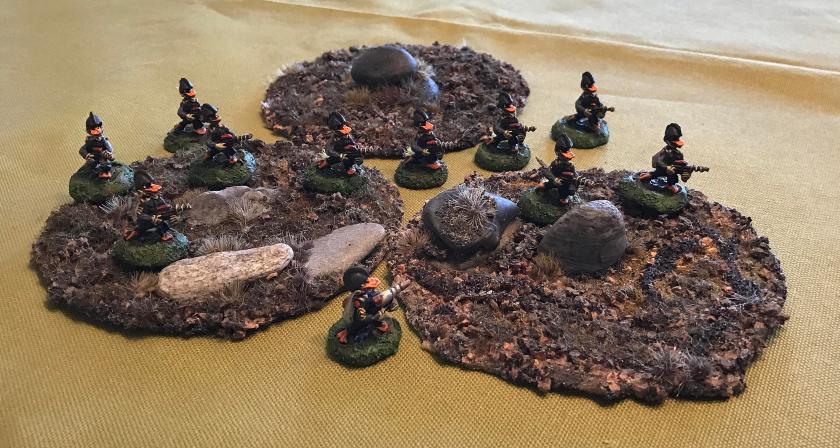
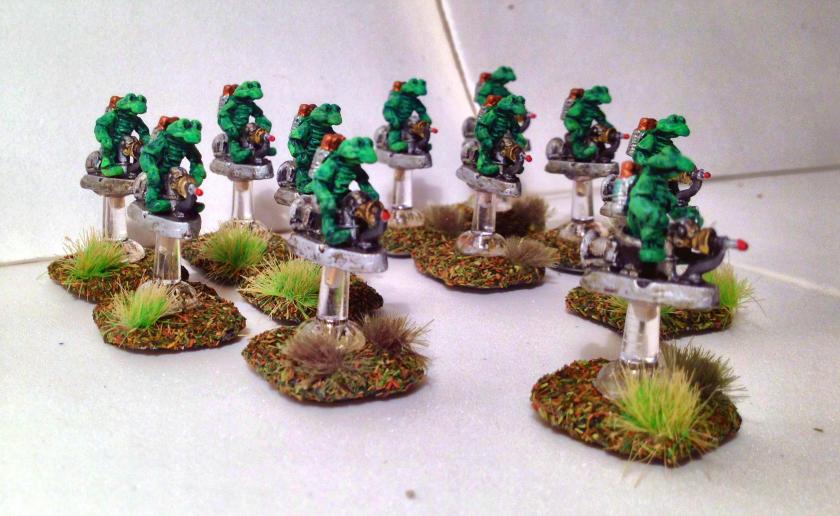
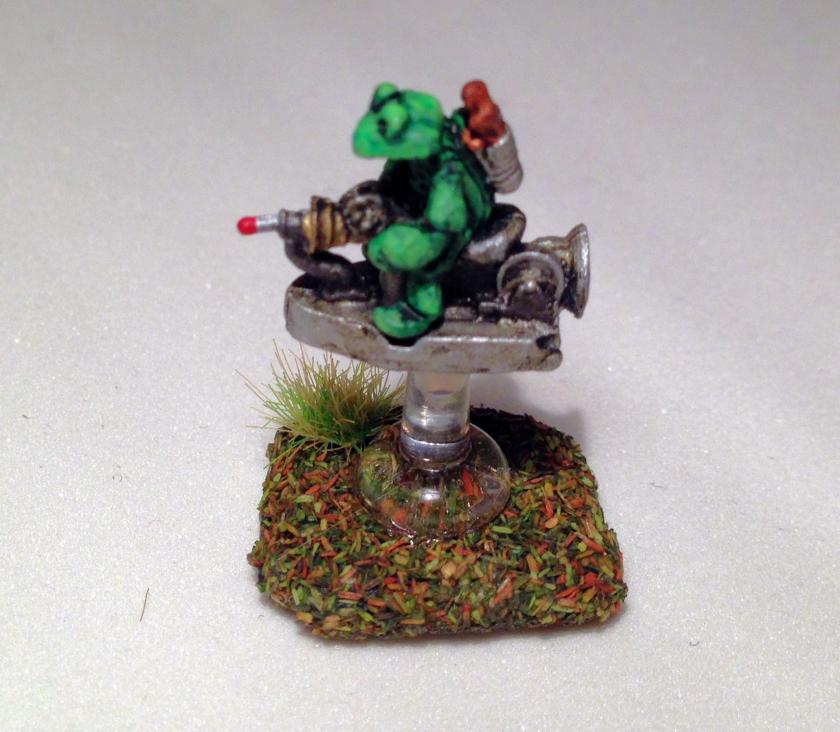
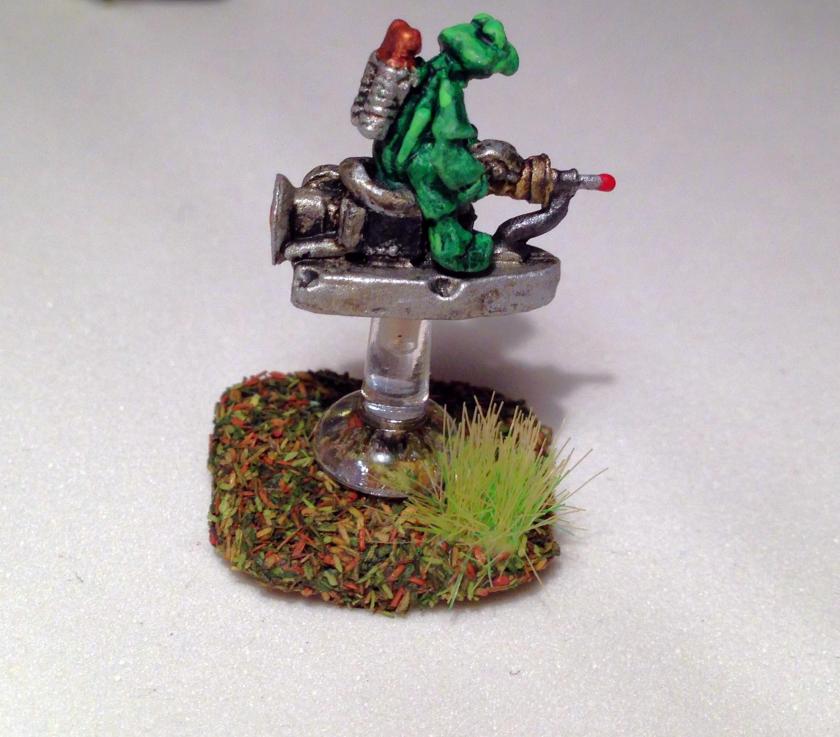
Scouts out! The Aphid Grav-Cycle SquadClose up of figure left sideRight side of grav-cycle
Coming at you!The process of painting was the same for all of the Aphid Infantry, Aphid Officers, and Aphid Mortar Crews with some differences. First, they are all mounted on two #8 steel washers that have been glued together with wood glue. Second, the infantry is armed with tommy guns (I am assuming that Thompson submachine guns must have a thriving export market in the future!). I used my 1987 Deka Lack “Braun” for the wooden parts of the guns, and “Gunmetal Gray” for the metal ones.
For the officers, three would be squad leaders and one would be the overall platoon leader. The officers’ laser pistols got painted with “Chrome Silver” and the tips got the “Spiritstone Red” treatment on top of Citadel “Gehenna’s Gold”. I chose “Flat Aluminum” for the squad leaders’ helmets, and “Gehenna’s Gold/Spiritstone Red” for the platoon leader’s. Once again, I used Army Painter tufts of different colors and locations to indicate command and control relationships. The platoon leader has three mortar crews and the two robots reporting to him as well. The only difference for the mortar crews was the mortar round and mortar tubes. For the small mortar rounds, I used “Chrome Silver” on the body and “Spiritstone Red” for the fins. The tubes got “Gunmetal Gray”.
Base coat on Aphid InfantryBase coat on Aphid OfficersBase coat on Aphid Mortar CrewsPainted and flocked, awaiting varnish and tuftsSquad Leader with his Aphid Infantry Squad armed with Thompson SMG’s. Tuft locations and color denote command relationships.One completed mortar crew. Each crew has its own tuft color, and reports to the platoon leader.Three completed squad leaders
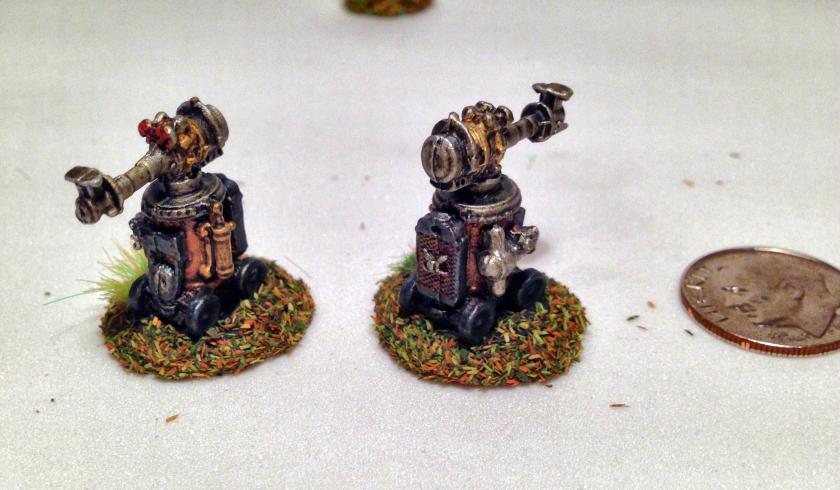
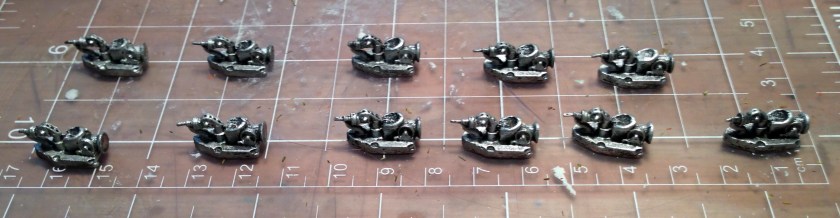
Completed Aphid Platoon LeaderTo round out the platoon, there are the two Robot self-propelled guns. These look almost steam-punk-like in design. I went with a very metallic scheme for them. First, I gave the figures a wash with Secret Weapons Washes “Armor Wash”. The top part/gun turret was painted with “Flat Aluminum”, while the bottom of the chassis was painted with “Copper” . I painted the wheels and lower chassis with “Gunmetal Gray”. I added Citadel ” Auric Armor Gold” to some of the chassis attachments. For the radiator in the back (!) I used “Copper” framed with “Gunmetal Gray”. The whole assembly got a wash again, and then I painted the robotic insect eyes with Craftsmart “Festive Red” metallic. I highlighted the figure with the same paints again after the wash, and I was pretty happy with it.
From Lost Minis Wiki – Robot Group – I got two of the models on the top
Completed Robot Self-propelled GunsThe platoon structure (41 fighting figures) is as follows in summary:
Aphid Platoon Leader (1)
Scout Squad Leader for Aphid Scouts on Grav-Cycle (1)
Team A Leader, Grav-Cycle (1)
4 Aphids on Grav-Cycles
Team B Leader, Grav-Cycle (1)
4 Aphids on Grav-Cycles
1st Squad Leader for Aphid Infantry (1)
6 Aphid Infantry with Thompson SMG
2nd Squad Leader for Aphid Infantry (1)
6 Aphid Infantry with Thompson SMG
3rd Squad Leader for Aphid Infantry (1)
6 Aphid Infantry with Thompson SMG
Mortar Section A (2)
Mortar Section B (2)
Mortar Section C (2)
Robot Assault Gun Section (2)
The Aphid PlatoonI have to say that this was a very challenging project – the figures were smaller than I am used to painting, and they were much less detailed. However, I am pretty proud of what I was able to do with it and look forward to seeing them in action in a game. It’s fun to bring nearly 40-year old figures back to life – especially with many old paints as well. I’m glad I got these, and am very happy with how they turned out. I’m planning on chatting with Buck about assigning combat values to them soon.
I have been collecting various examples of the long-defunct Archive Miniatures Star Rovers line of figures from 1977. This month, I have had some health issues that precluded being able to sit down (long story and a pain if you know what I mean). Therefore, I chose to work on making molds and casting, focusing on Star Rovers, which is something I do standing up.
My overall goal is to create squad-sized units of these “lost” but very cool minis. I want these to set up and play games of Buck Surdu’s Combat Patrol™, as well as to see if I can create a scenario using the Star Rovers figures that I have collected. Combat Patrol™ was created as a WWII skirmish card-based miniatures rules set, but it has been successfully adapted to other historical periods as well as Star Wars™ scenarios. To learn more about Combat Patrol™, click here.
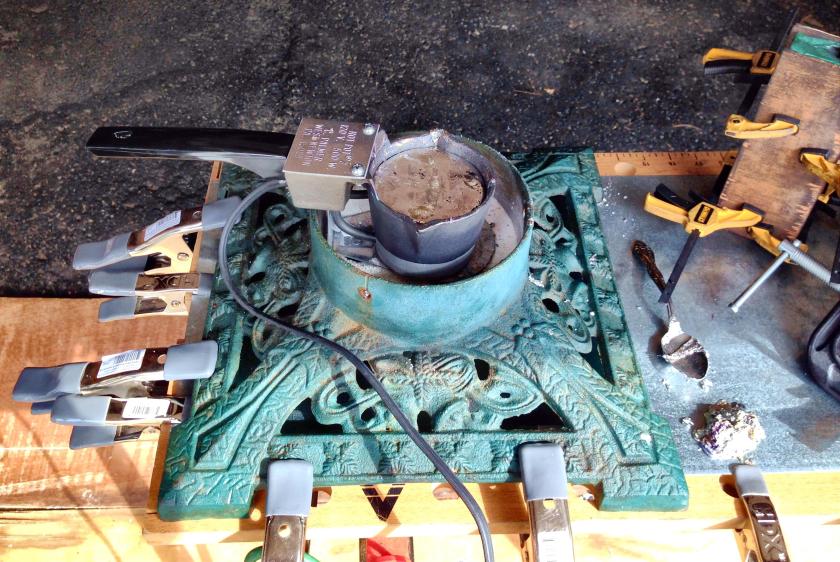
Before I get to the figures and the making of the molds, I wanted to share information about my casting set up. I basically use pewter and I use a Hot Pot 2 crucible with a Lyman pyrometer to measure the alloy’s temperature.
I also use appropriate safety equipment!
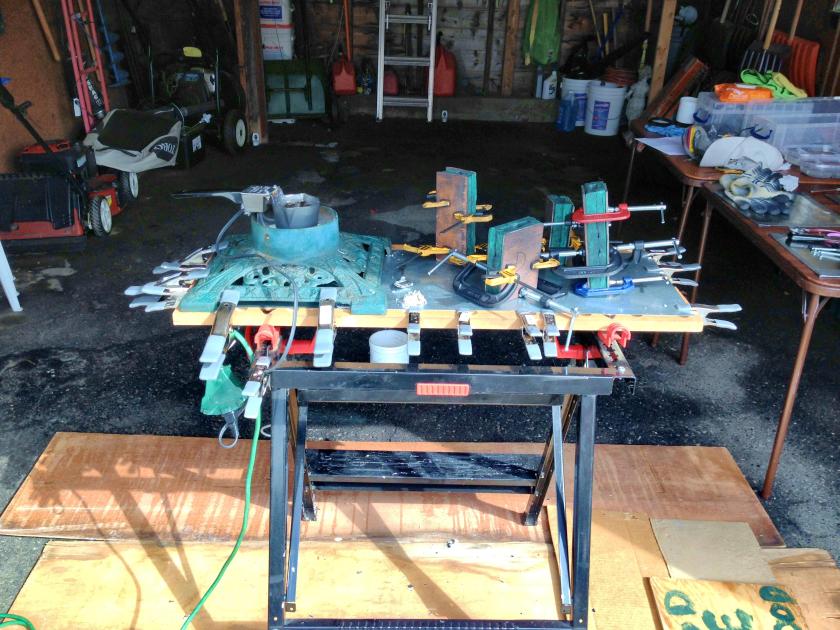
The Hot Pot 2 holds about 4 pounds of molten metal, and is used for making bullets, fishing sinkers, and miniatures. Unfortunately, it comes with a tripod stand which teeters and is prone to tipping. Why the manufacturer did not use four legs on the stand for stability is beyond me. After a couple of spills (where I dodged the 650° F contents and had a lovely clean up) I was determined to have a new set up. Currently I have 1′ x 1′ steel sheets clamped to my old Sears Craftsman® work bench that I have had for close to 30 years. My friend Jeff Smith came up with an idea that proved to be a great fix. He had an old cast iron (heavy) Christmas tree stand he was not using. I filled the large holder with play sand to raise the bottom up and put the tripod into the sand in the tree well. This provided great stability and rendered the set up virtually spill-proof. I clamped the tree stand to my work bench (after extending my bench depth about an inch). This worked great and I am very happy with my new casting set up.
My new set up in the garage – clamped molds on the right
Close up of use of the iron Christmas tree stand to hold the Hot Pot 2, clamped to the workbench
To learn more about the Archive Miniatures Star Rovers line click here.
I cannot find any reliable sources to buy these figures – I only find them sporadically on eBay. This is why I recast them for personal use and for gifts.
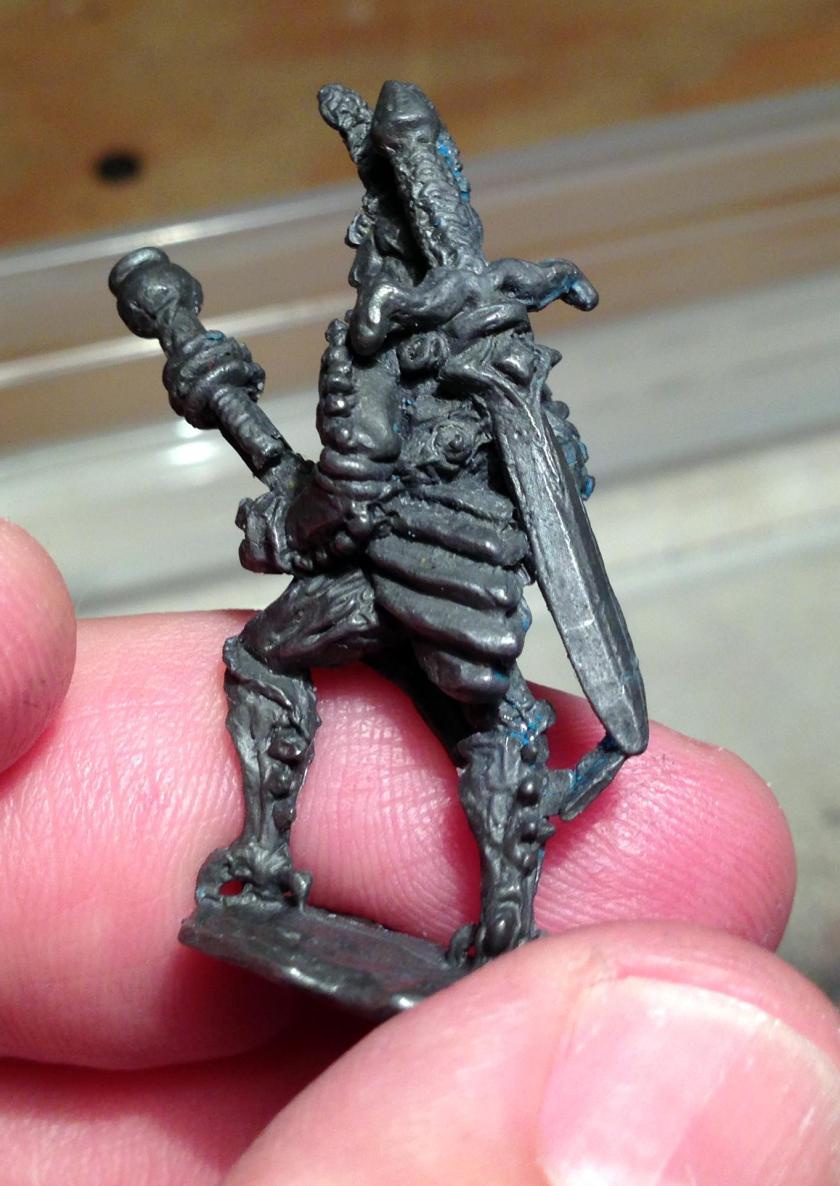
My first mold in October was for the Space Phraints. These are 9 foot tall emotionless insect men that were in the old Arduin game. These are armed with huge swords and a ray gun.
I found a nice synopsis on Phraints from Saundby.com that you can see here. The photos below show the original I got on eBay (the blue clay you see came from the mold-making process and is easily removed).
Space Phraint front
Space Phraint back
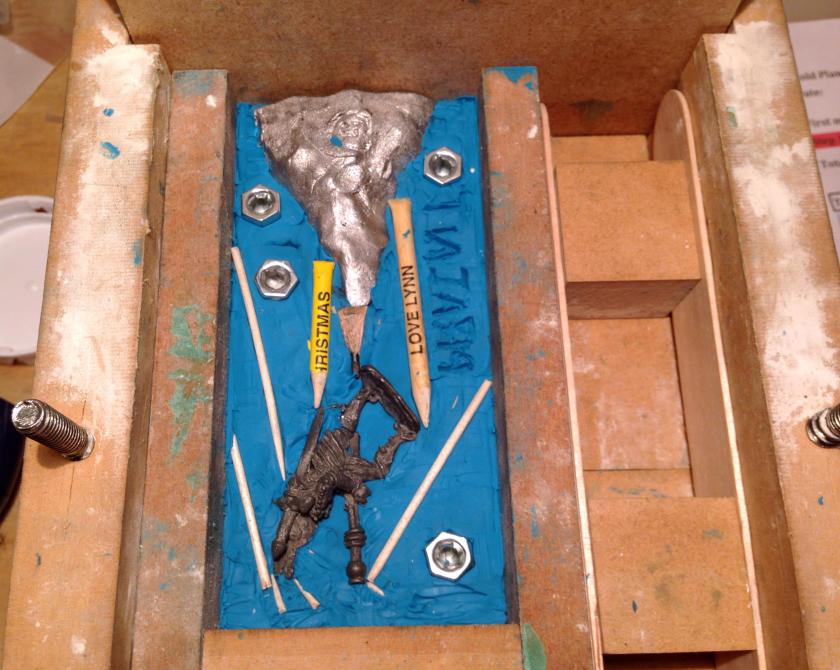
Below is the first mold half set up for the Space Phraint. I used an old metal mold plug to create my flow aperture along with some golf tees my wife gave me a while back for Christmas. I also used toothpicks to create air flow vents and release points for better casting. I also wrote a mirror image of the word “PHRAINT” on the clay. The QuickSil is measured and mixed and put into the mold press for curing. I generally wait 28 minutes for it to cure – and I use a hand-held hair dryer to warm the outside of the press to assist in curing the RTV (room temperature vulcanizing) compound.
Space Phraint mold in the mold press – first half
Removing the first half of the mold from the mold press before removing the blue clay from the RTV
The first mold half of the Space Phraint mold
I then put the first half back into the mold press, applied a releasing cream to any wooden surfaces of the press that QuickSil would touch as well as the green set up rubber RTV. I then measured and mixed more QuickSil and repeated the process. After I made the mold, I cut out wooden backings for the mold from 1/8″ plywood using my scroll saw.
The Space Phraint mold was very successful and needed little modification during the casting process. I was able to cast 42 figures from this mold.
A formation of Space Phraints led by the original
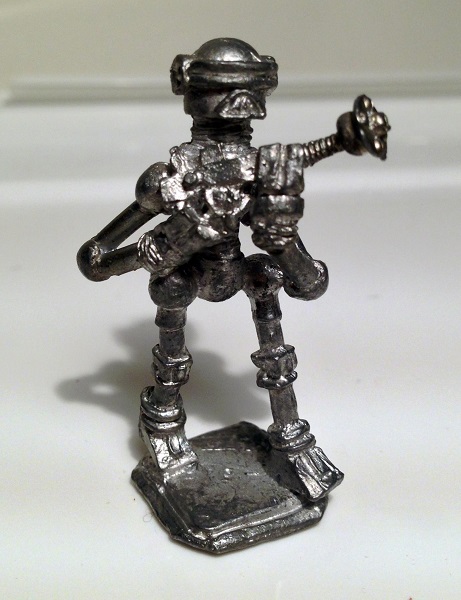
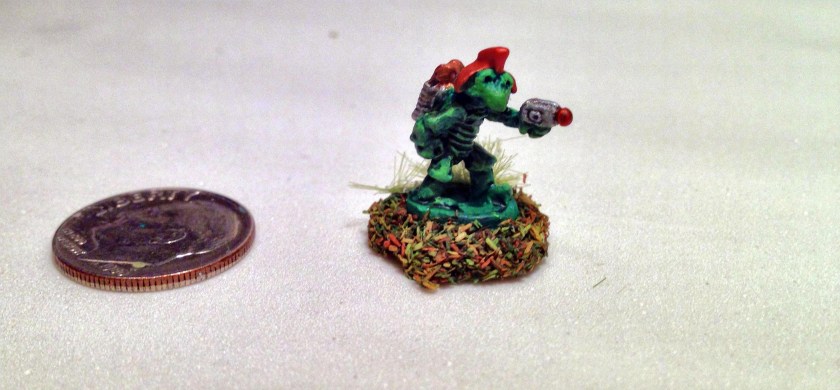
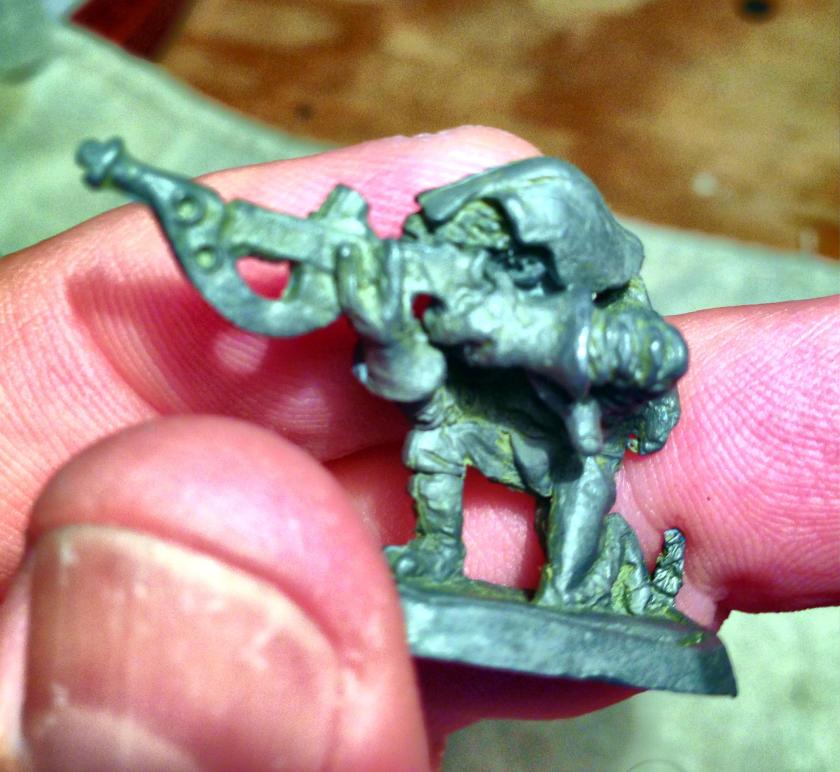
The next mold is a Mark III Warbot. As far as I can tell, there are no Mark I or II’s in Star Rovers! He is clunky and retro looking, with a very cool ray gun/blaster. He reminded me of Bender from Futurama, though he was created in 1977!
Mark III Warbot front
Mark III Warbot back
I followed a similar process in making this mold as described above.
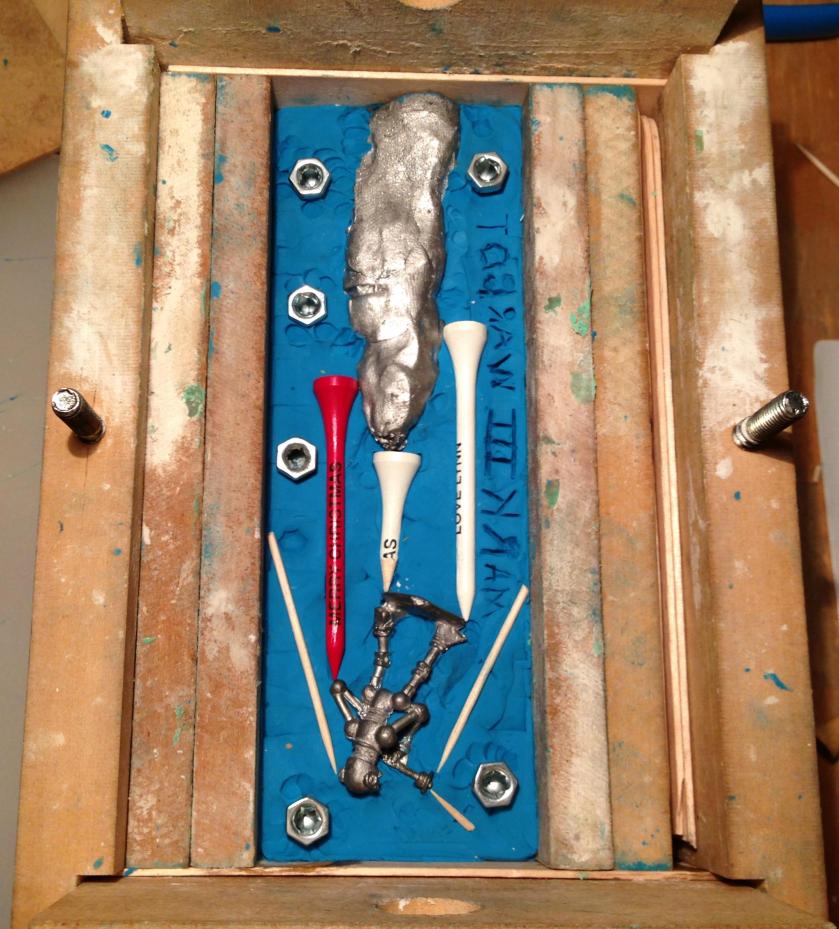
Mark III Warbot first mold half
Mark III Warbot mold completed
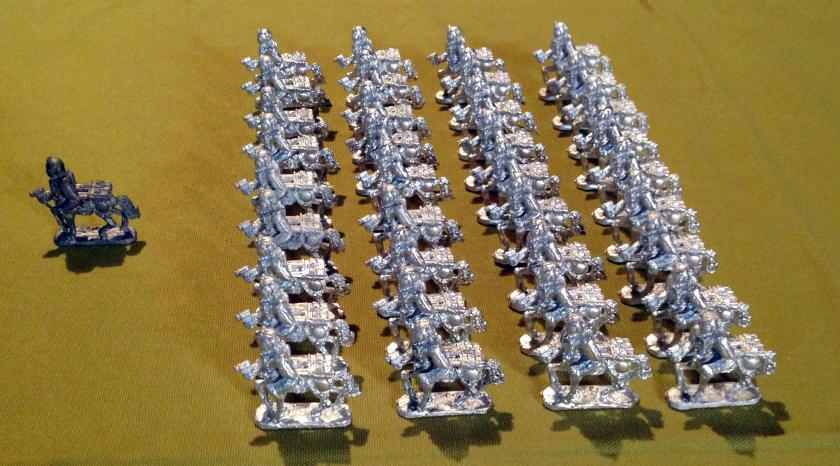
This also was a successful mold. I cast 42 figures using it.
A formation of Mark III Warbots led by the original
I then moved onto the Space Centaur, who has rocket packs on his back, but is only armed with a laser pistol! This was my first try at making a mold of a four-legged creature. The mold itself needed more tweaking during the casting process than I like in terms of cutting vents and opening up spaces. I believe that I should have used more of a cone-shaped pour aperture for the mold. Here I used a small hotel soap and golf tees to shape the pouring well – and I think that works less effectively than a cone. I also had leaking issues with the mold initially. I solved these with adding more C-clamps when casting.
I was able to cast 36 figures with this mold.
Master Space Centaur figure
A formation of Space Centaurs, led by the original
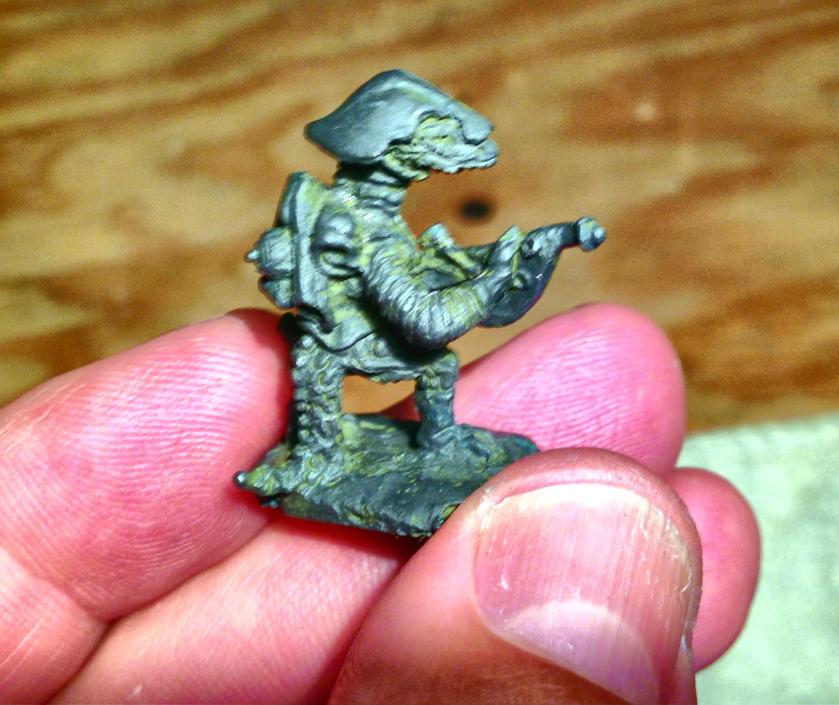
The last two figures that I worked on were Dragonspawn Infantry. There were actually three made by Archive, but I do not have the prone figure, only the crouching and kneeling ones. My guess from these pictures is that they were originally painted but then stripped.
Kneeling Dragonspawn Trooper, right side
Kneeling Dragonspawn Trooper, left side
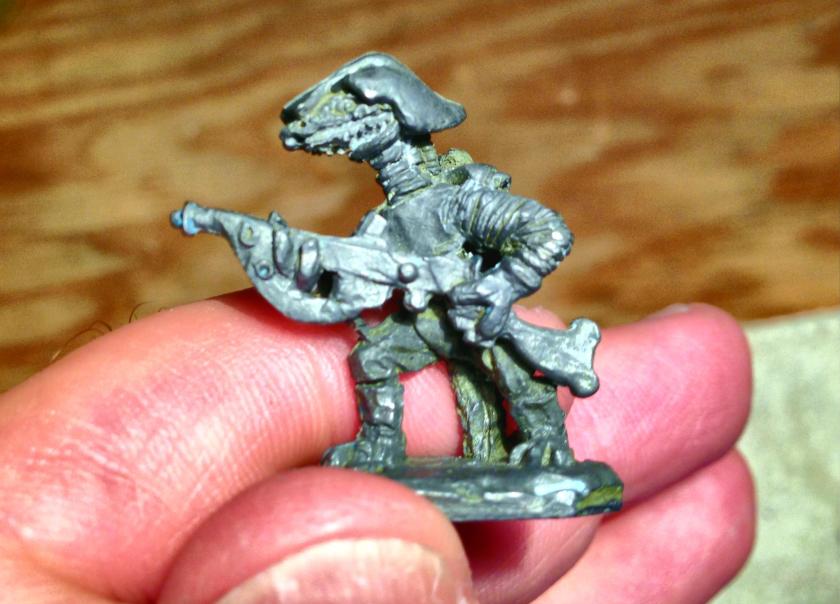
Standing Dragonspawn Trooper, right side
Standing Dragonspawn Trooper, left side
I tried a new mold design – two figures in one mold. I wanted to see if this would be more efficient. It was not, primarily I believe that the cone aperture design works better, especially a tall one. Here I used another hotel soap and golf tees – and I had a lot of casting failures with this mold. With some adaptations during the casting process (making the pouring aperture and tees wider), my success rate improved, but the overall mold leaked a lot and was a pain to work with. At one point, some of the RTV came off in a figure, but this did not seem to be a major issue with subsequent castings.
My attempt at a new mold design – less than fully successful
I was able to cast 24 good figures of each type, but I probably had a 50% failure rate overall.
Two Dragonspawn formations with master in front
I cast 168 miniatures in total with the four molds. Some I am giving to friends, while the rest I an putting into the painting queue.
October production on the table
I learned some new things about the process, and got a new casting set up that is much safer. My next casting will be in a few months – I really want to start painting now that the weather is turning colder, and get them into a Combat Patrol™ game!


