My recent efforts on the hobby front have been focused on multiple projects. Some of these are figures and vehicles, others are terrain-oriented. These are all in support of the games I will run at multiple 2026 gaming conventions.
This year, I will be running Wars of Ozz and What a Tanker games. I am also getting back into retro sci-fi skirmish games with Combat Patrol:WWII. I have not run these games in a while and they were always a lot of fun. To that end, I decided to add more terrain to the mix.
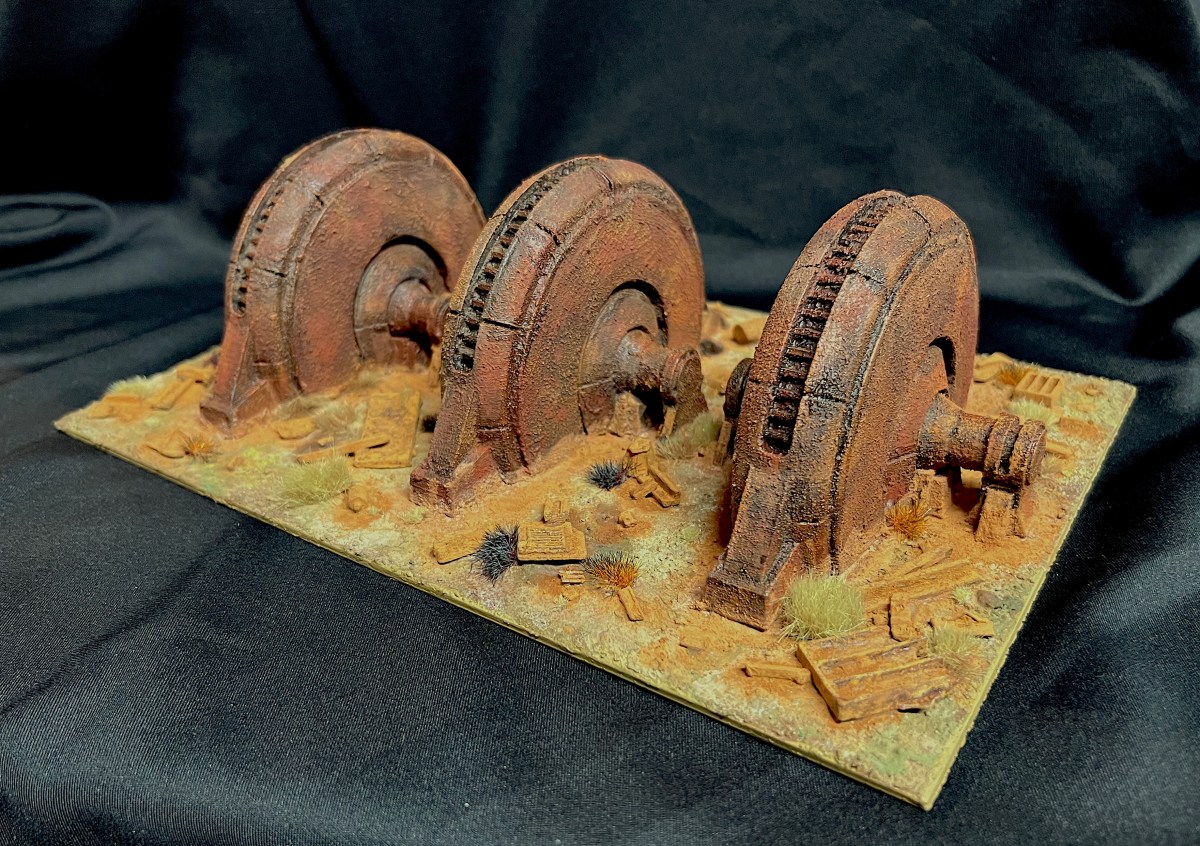
As background, a friend, Chris Rett, 3D-printed three excellent generators for me way back in 2018 (I think). These were great terrain pieces. At that point I was still immersed in retro sci-fi skirmish gaming with Combat Patrol:WWII as my preferred system. However, I was on the cusp of jumping my focus to WWII What a Tanker games. Thus, the generators took a back seat. My gaming then went in sequence to What a Tanker, then Feudal Patrol for the Spanish Conquest in Mesoamerica. Finally, I moved on to Wars of Ozz. Recently, I felt a need for a bit more variety as I mentioned – so terrain is what I hit first.
The three generators would be useful for retro sci-fi apocalyptic planet scenarios. They would also be useful for some Wars of Ozz scenarios. This includes any involving Professor Nitpik and the Industrial City. That city was wrecked over 300 years ago in the “Last Great War”. Plus I could use it as part of a “Space Cowboys” apocalyptic scenario.
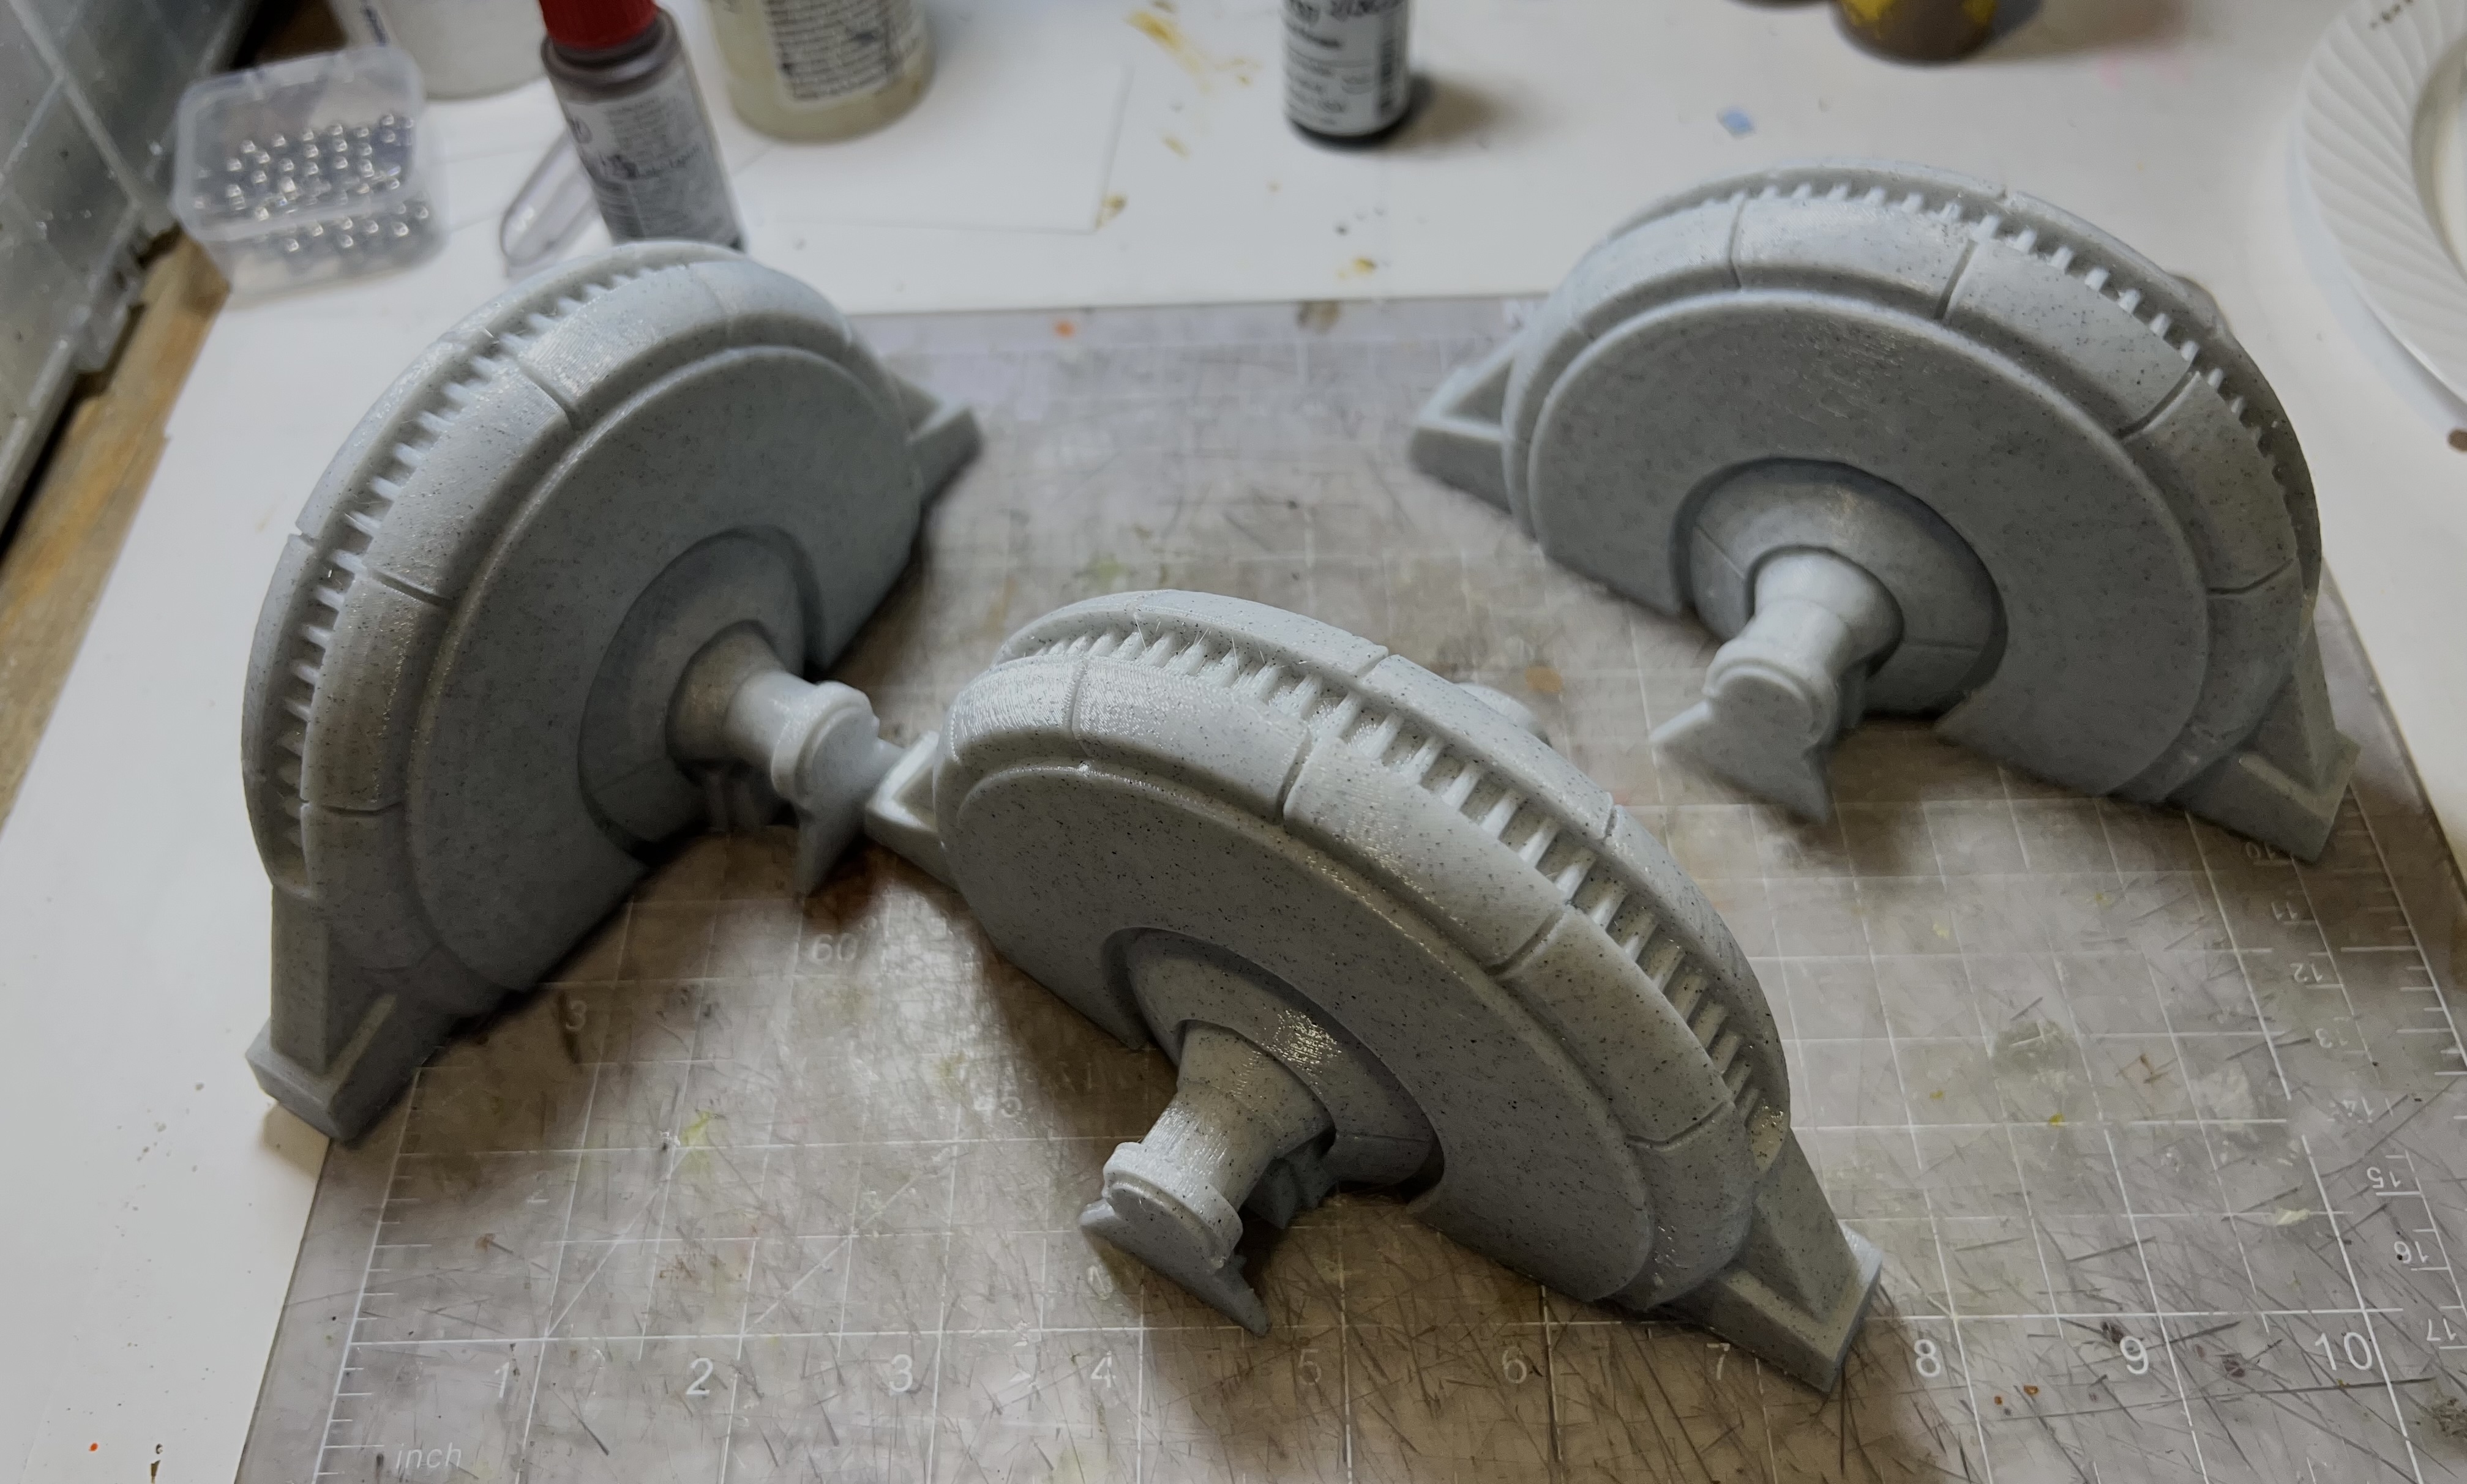
The generators at the start of the project.
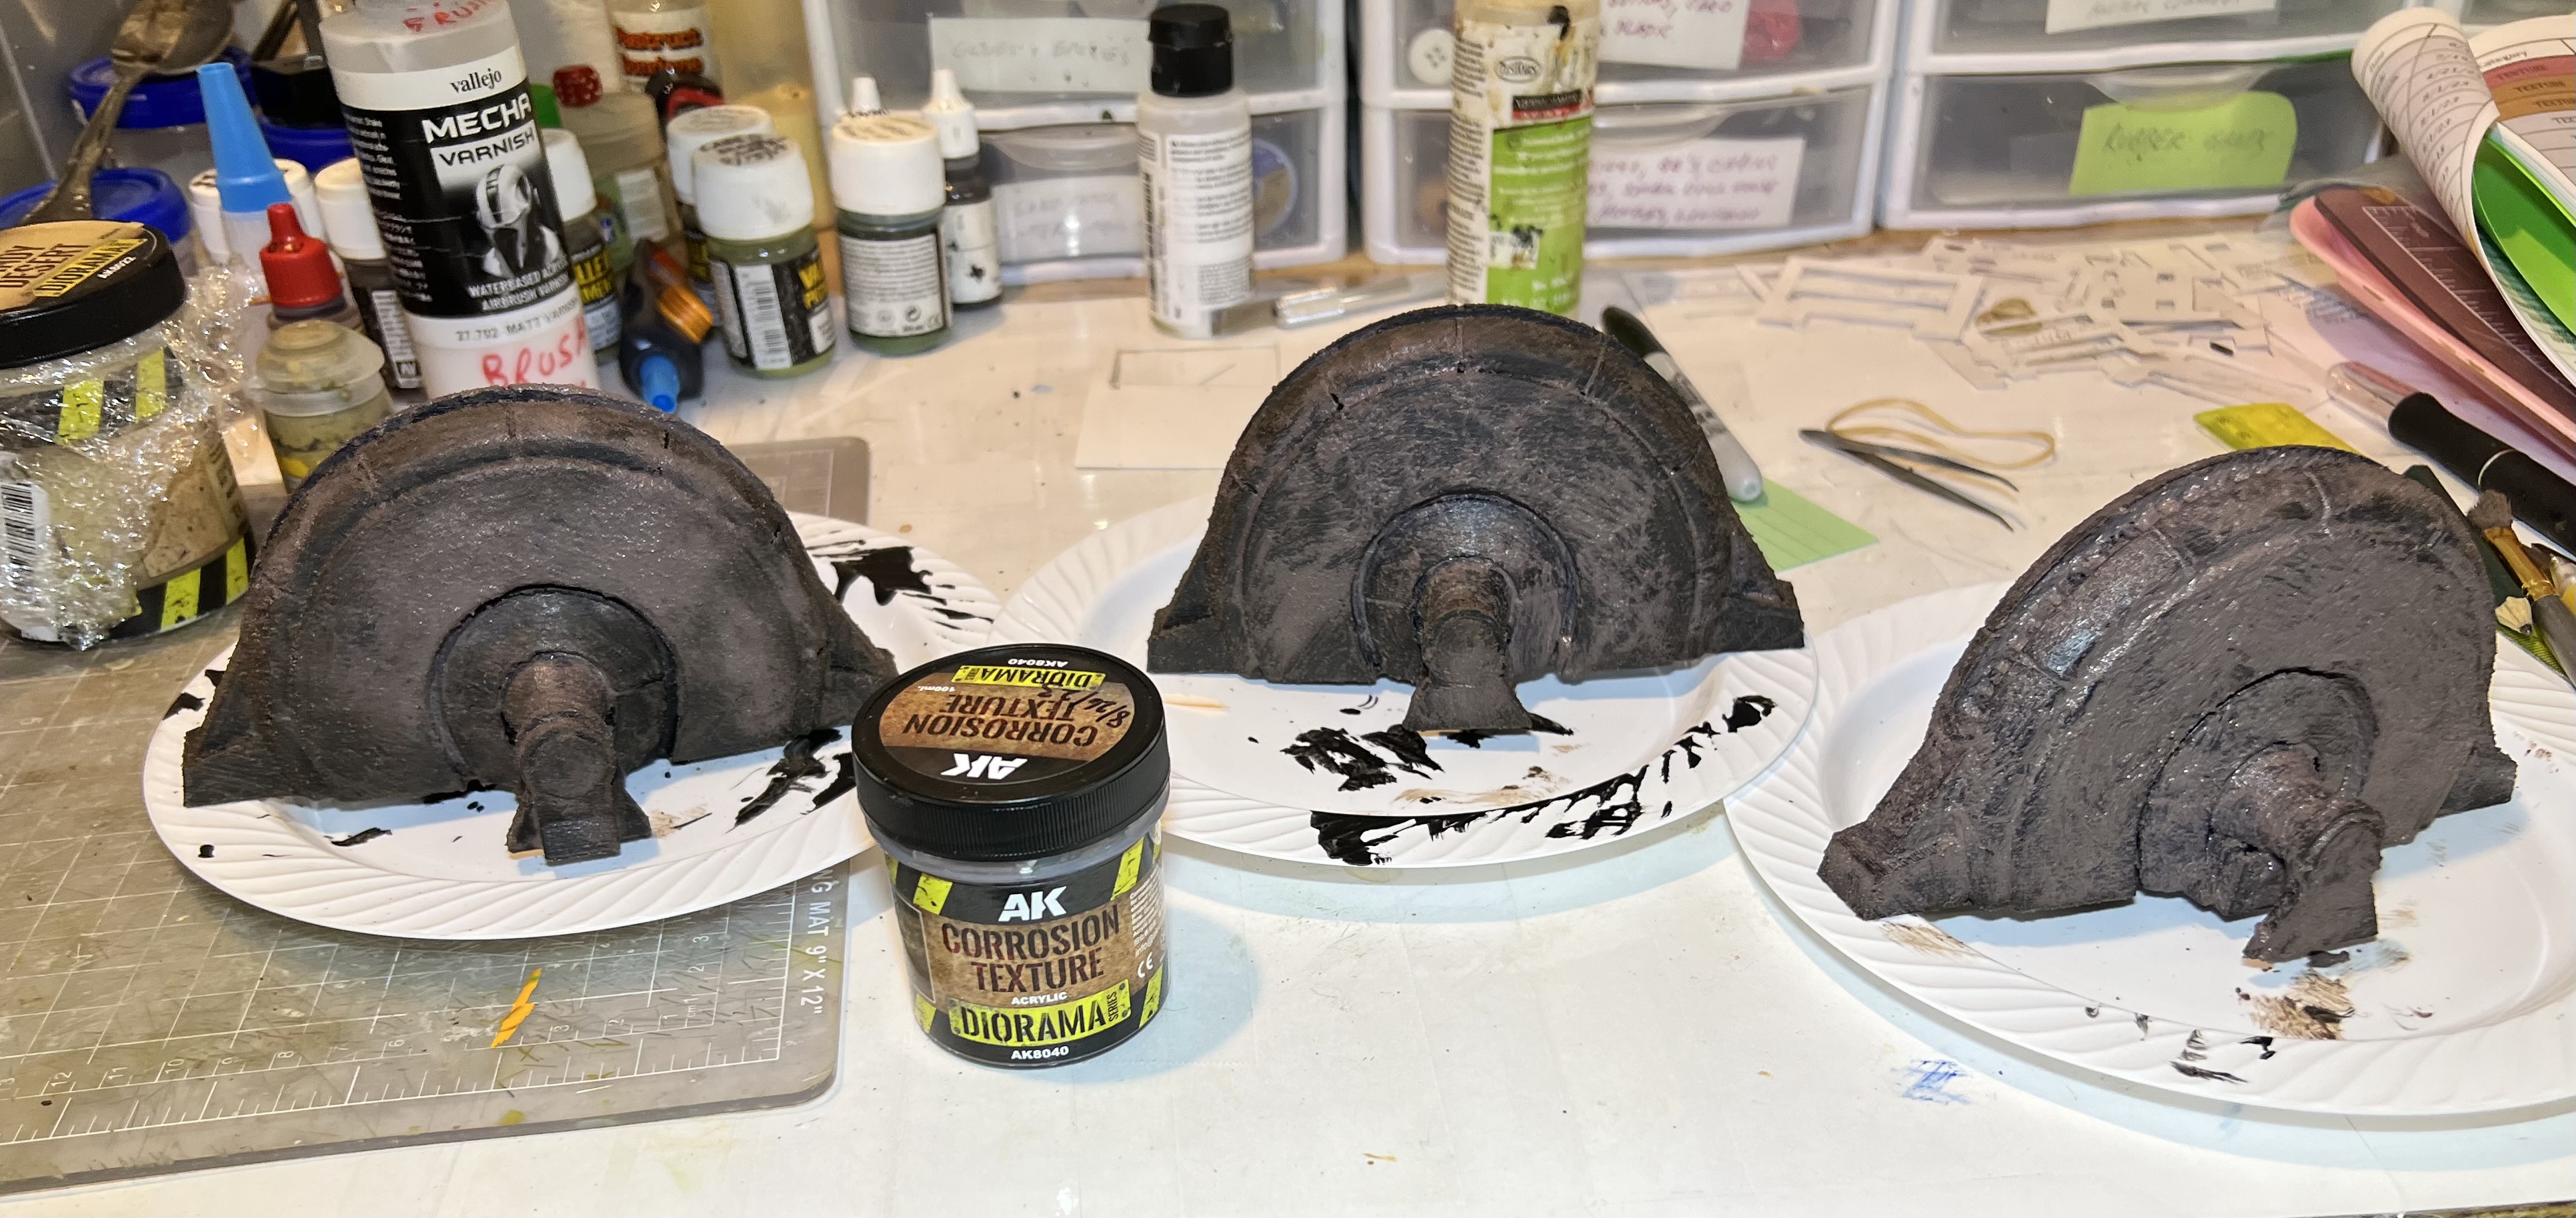
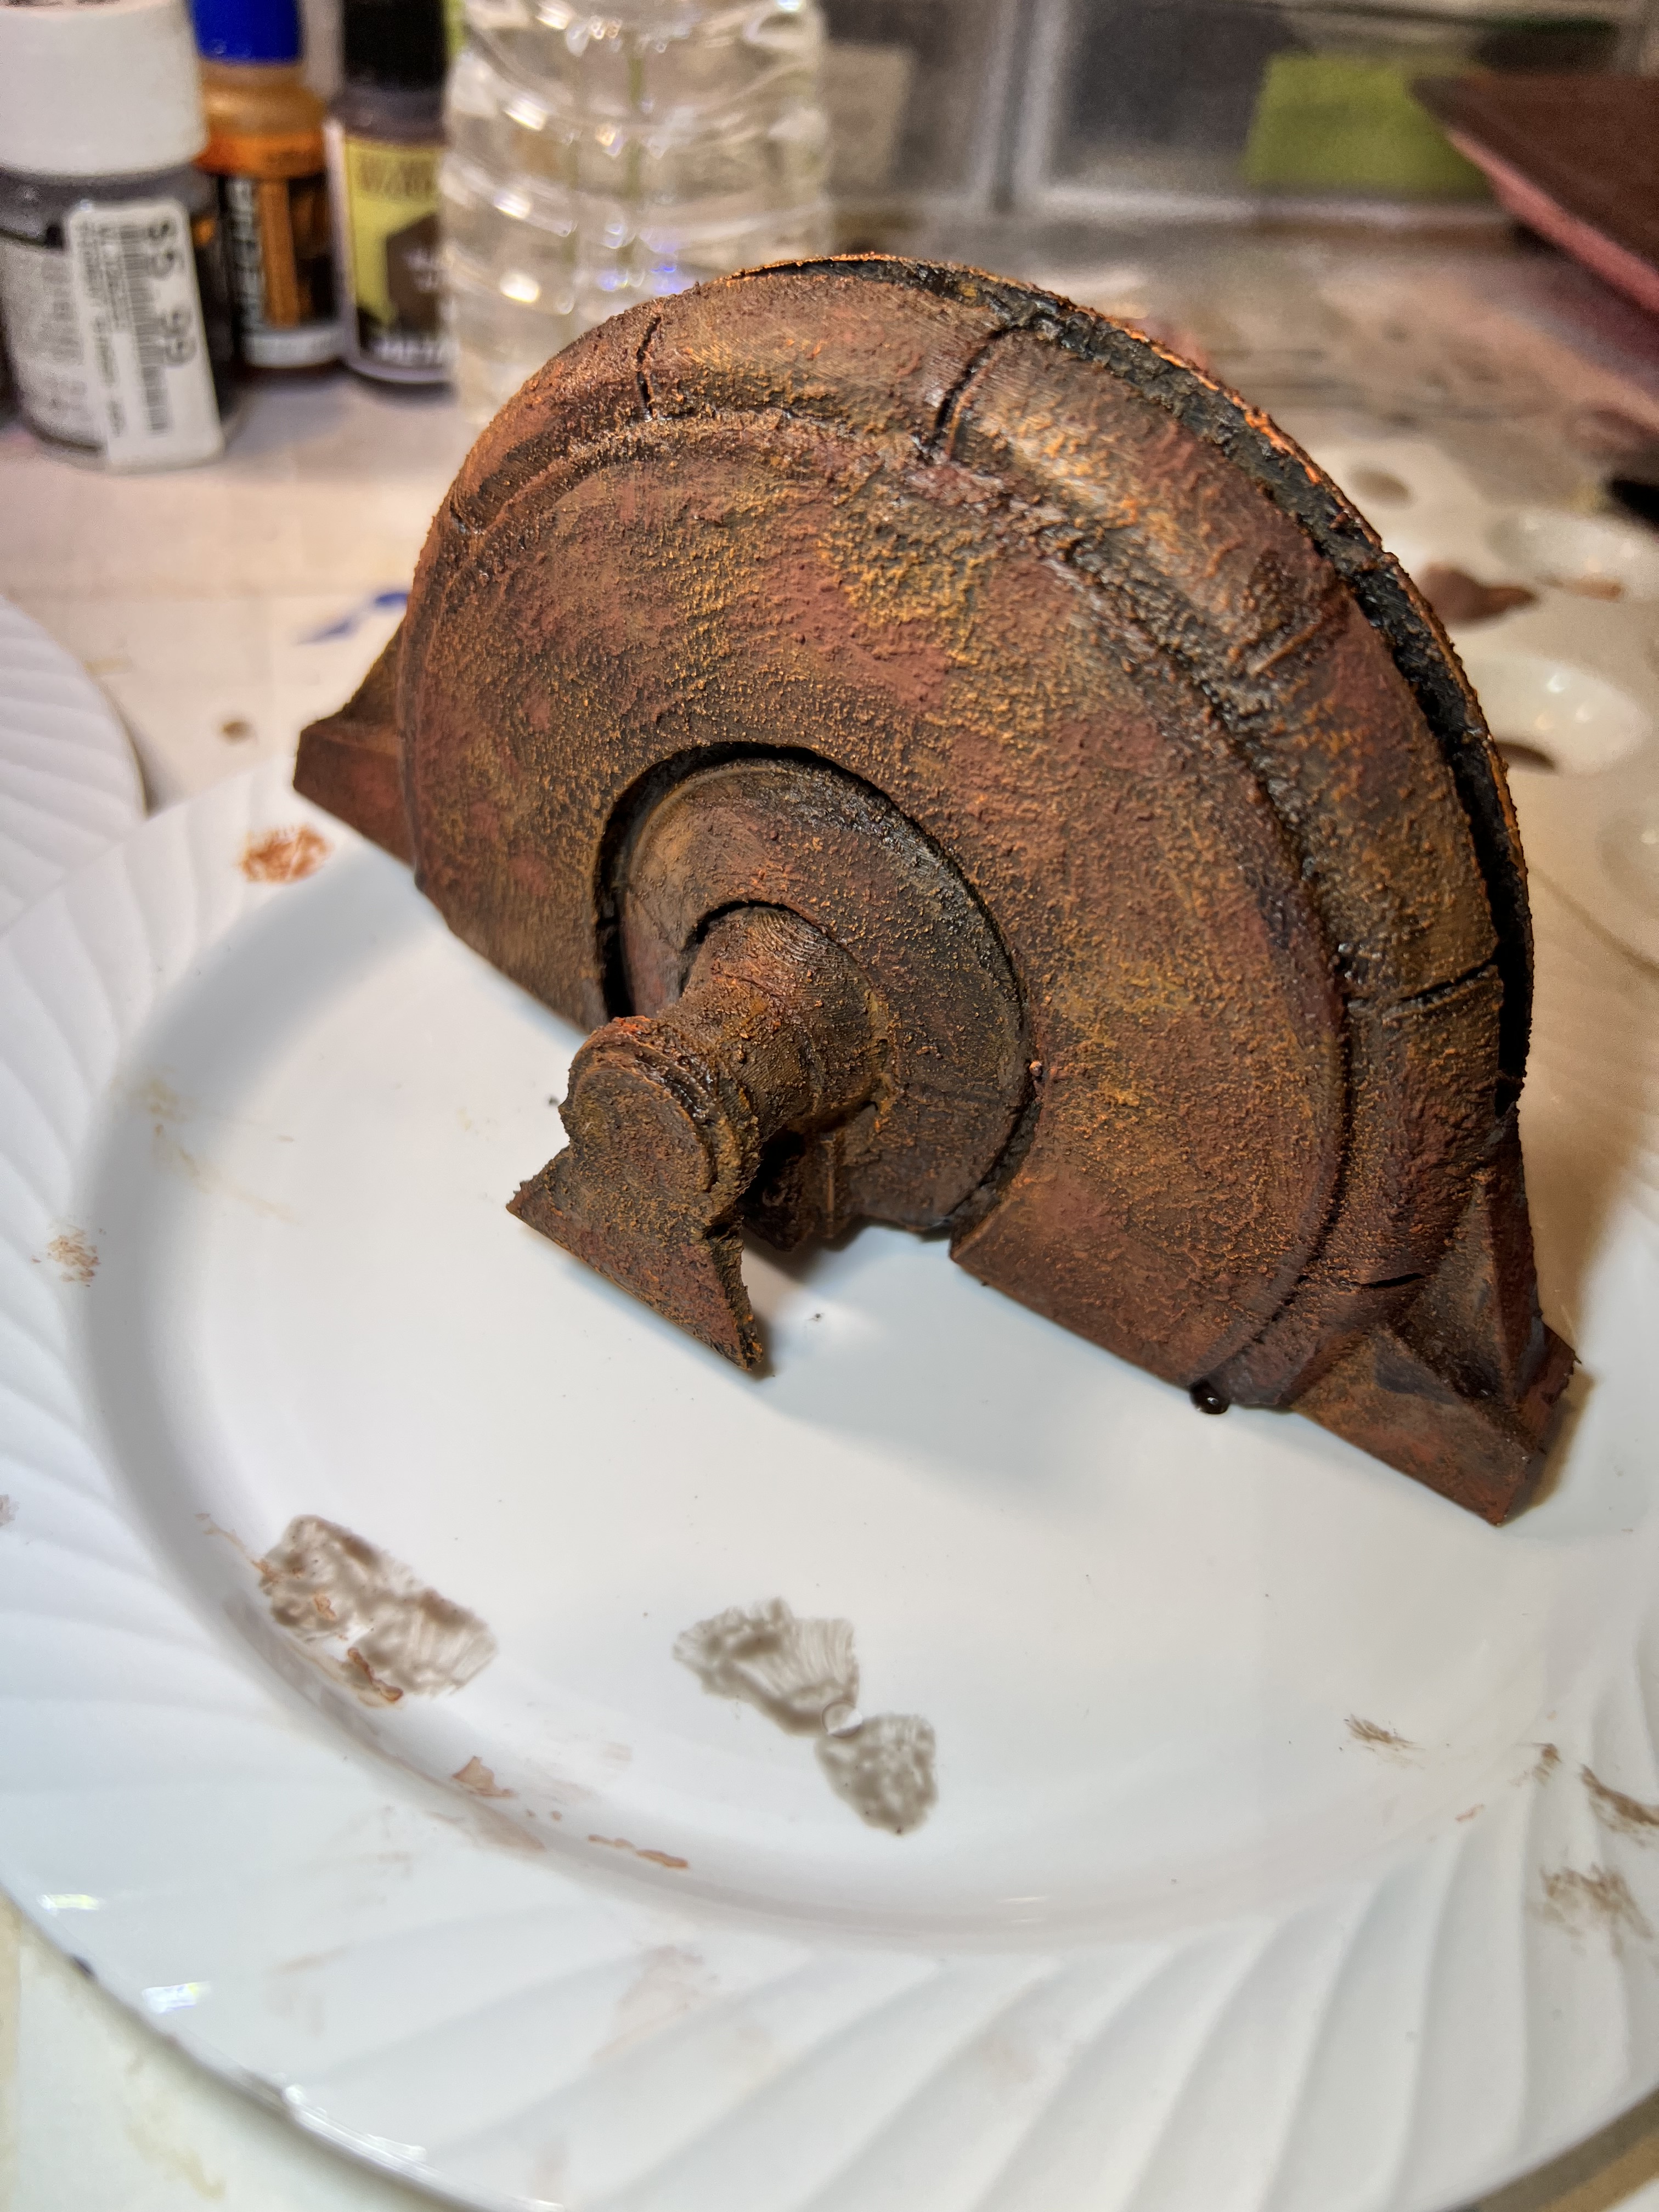
I primed the pieces. Then I used AK “Corrosion Texture” on it. This allowed me to use different rust pigments and paints on it.
Primed with corrosion texture added and drying here.
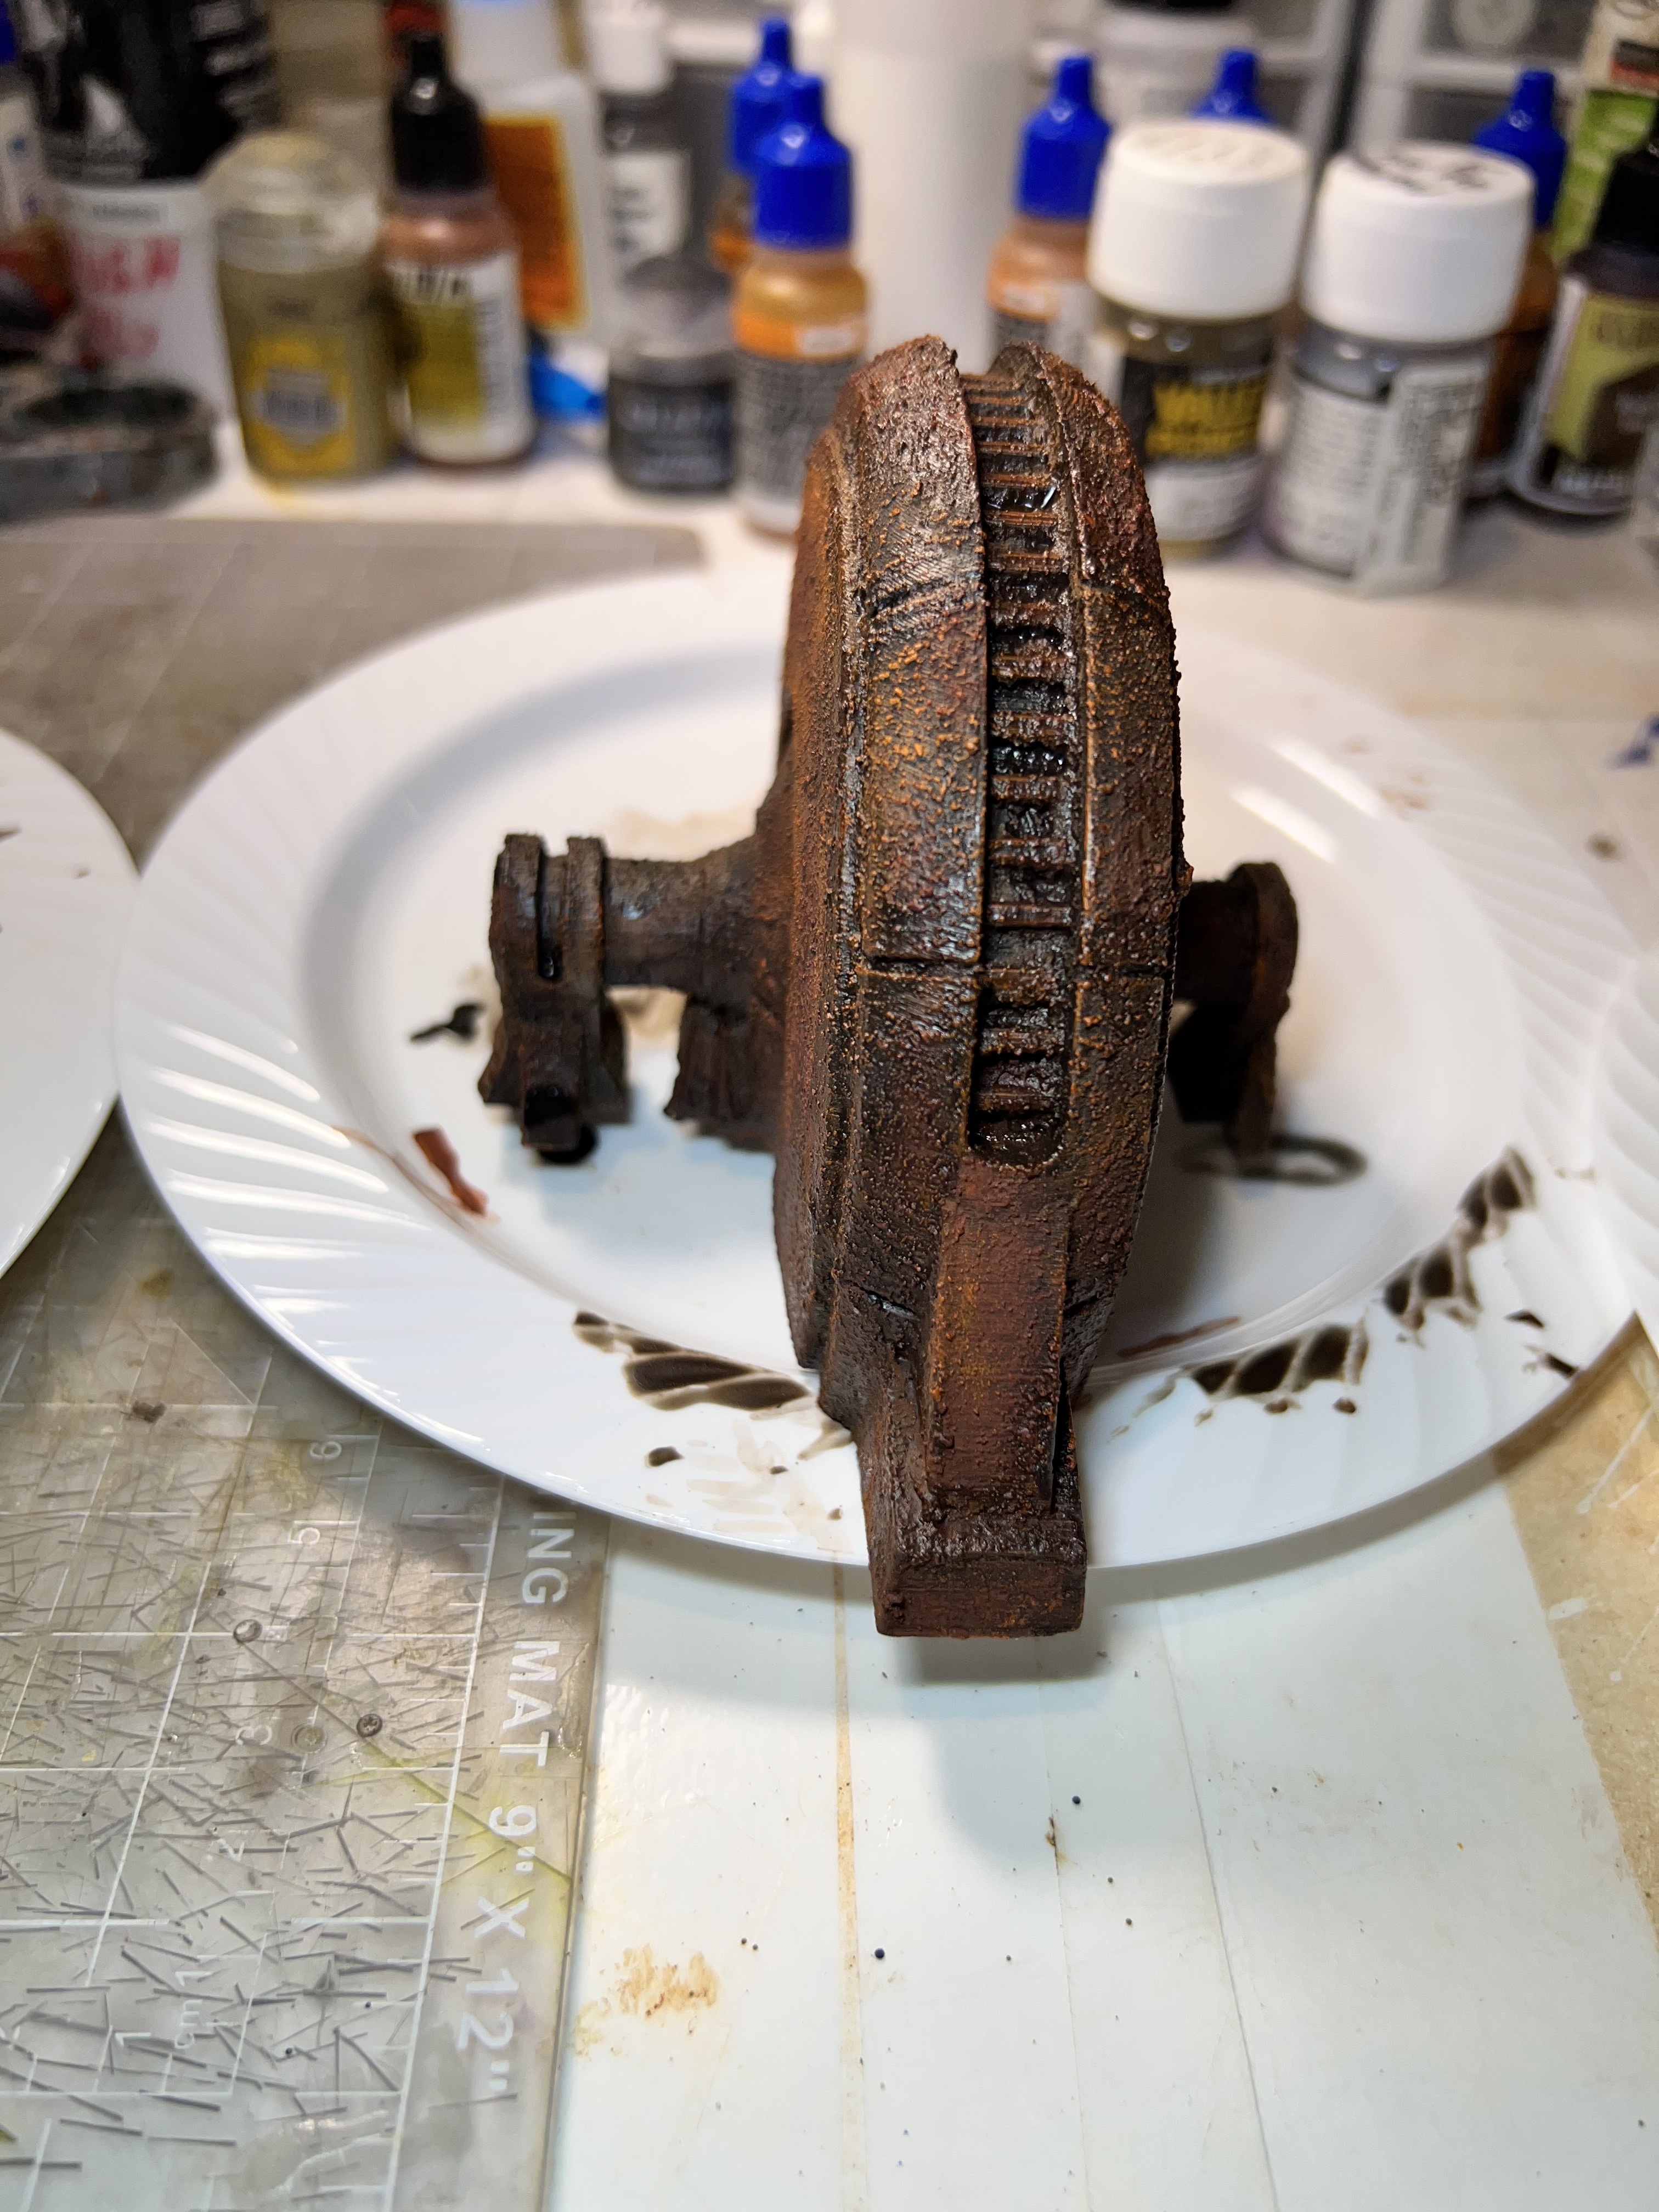
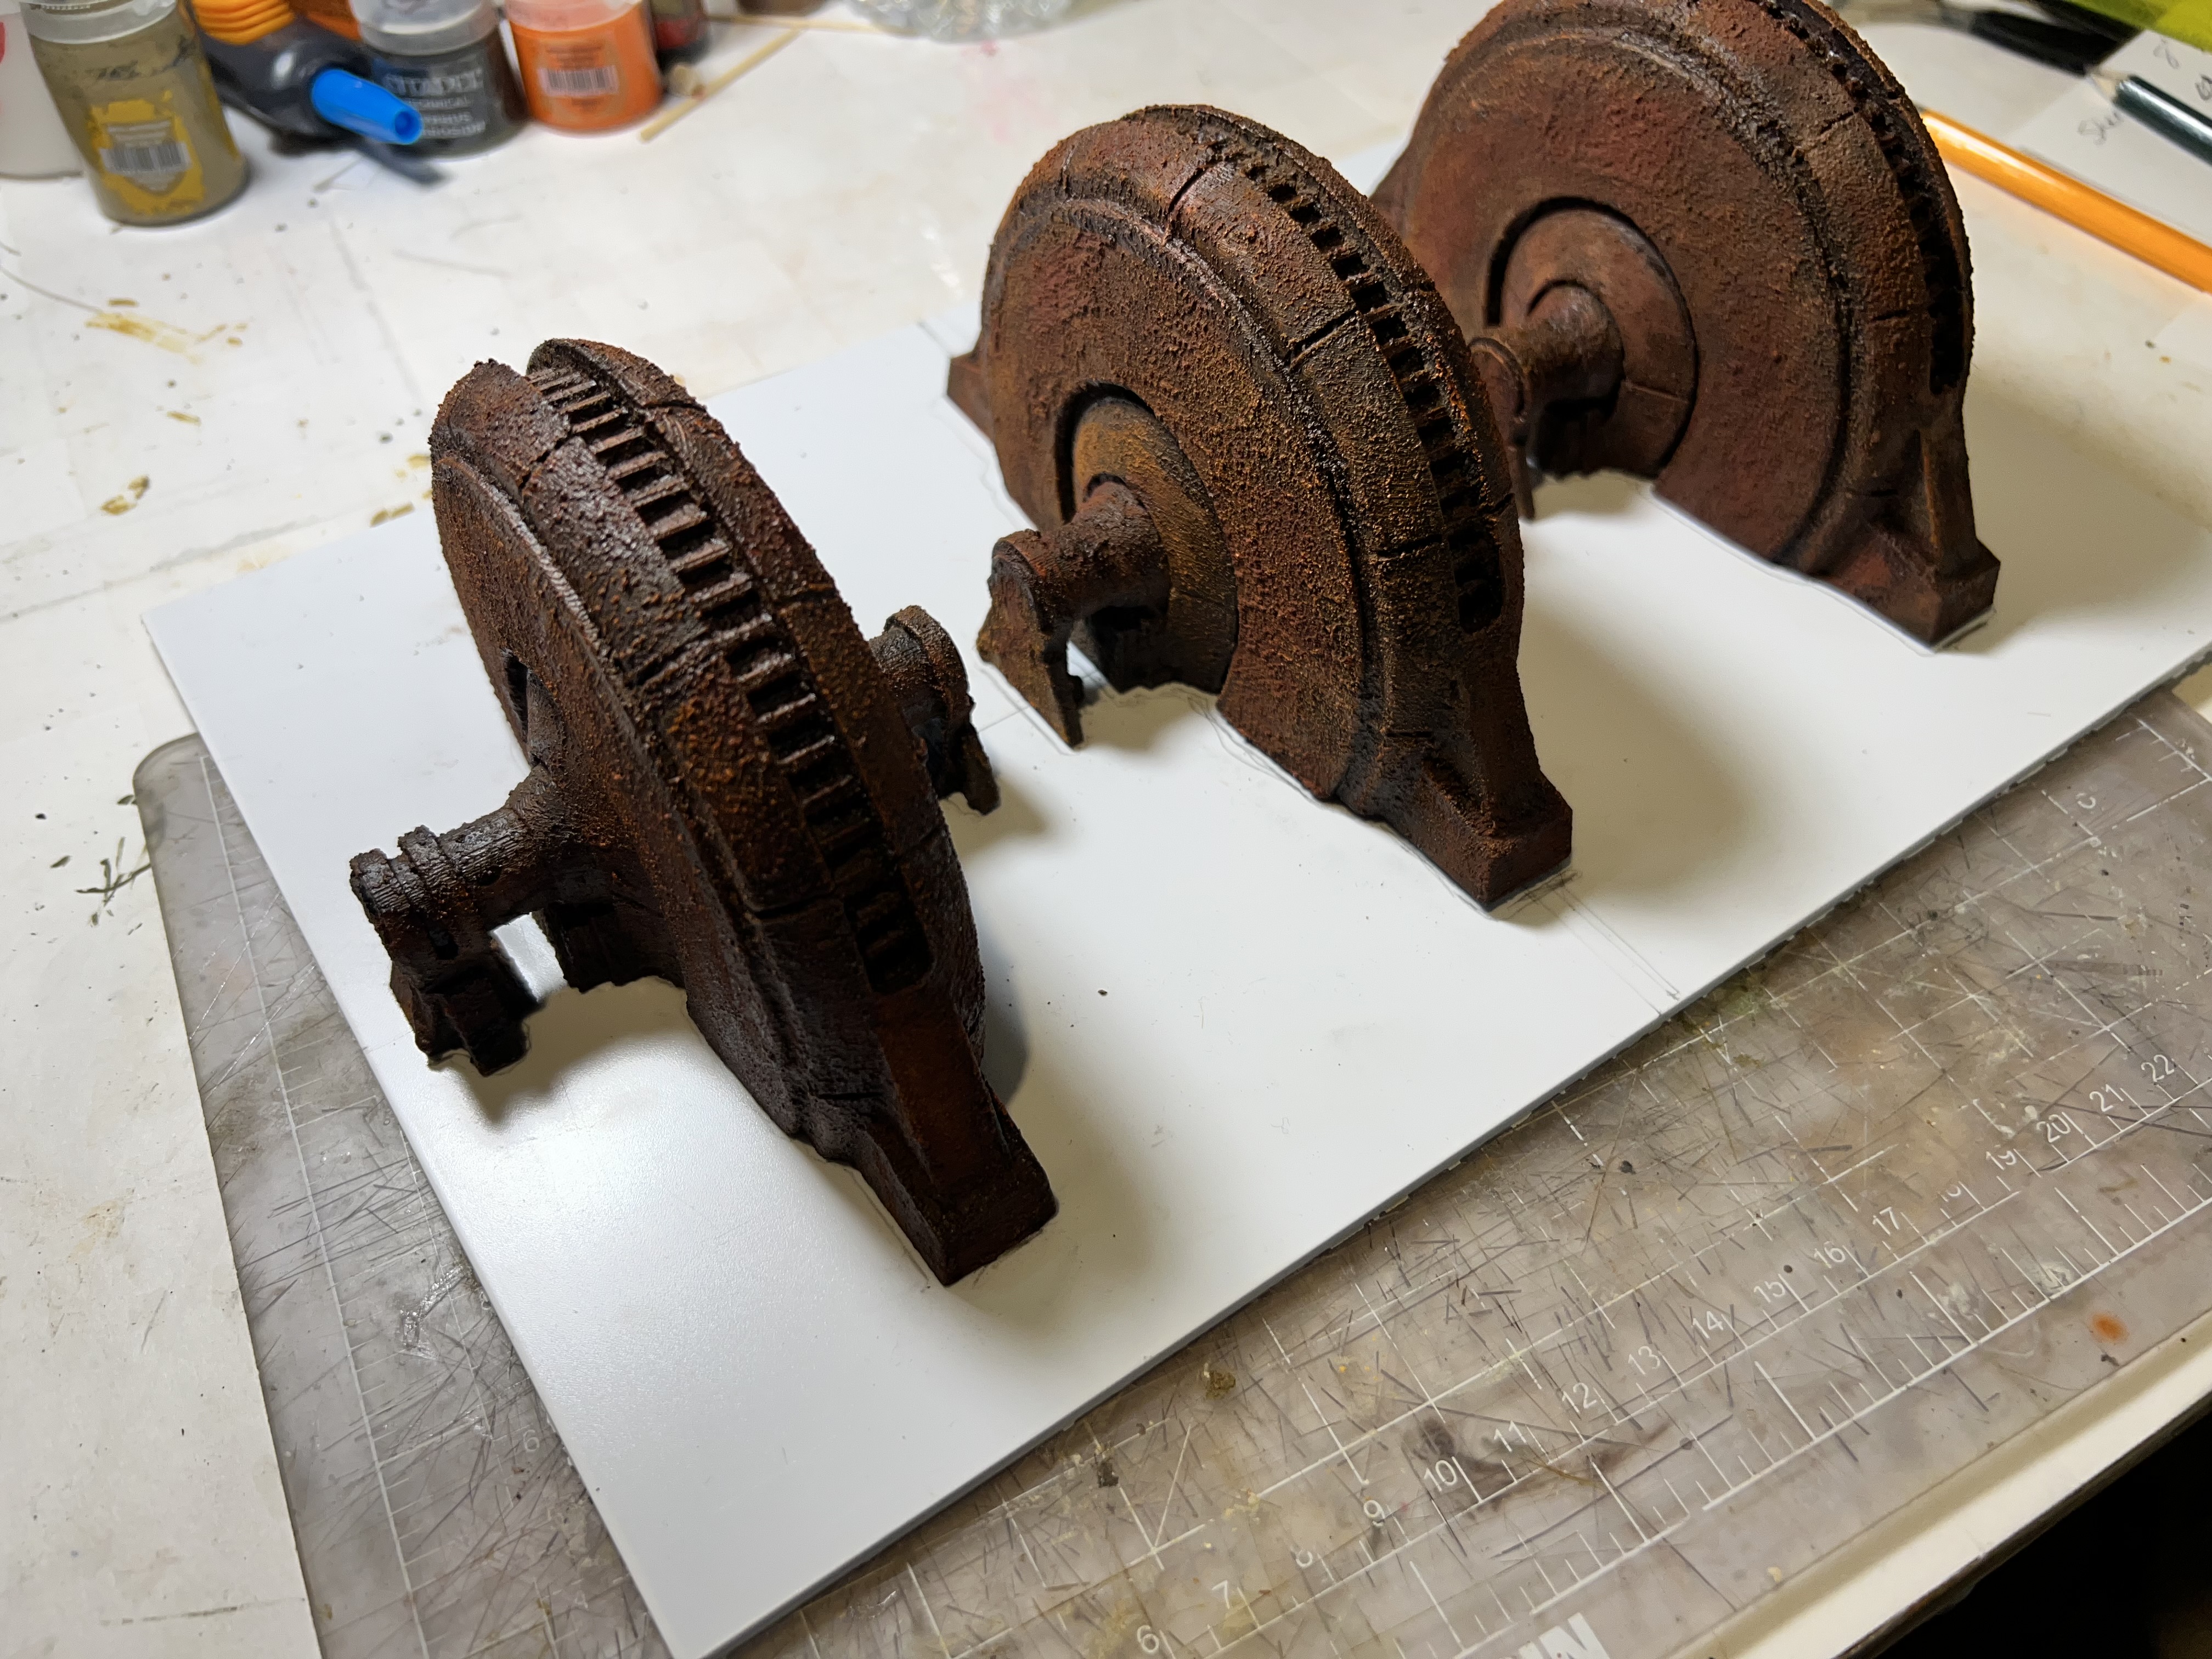
After the corrosion texture dried, I used the paints and pigments to “rust them up”.
All rusted up!
Two of the models were identical – so I planned on using them symmetrically on a polystyrene base. Using sand and PVA, I had a substrate for the rust pigments.
Here I measured carefully to align the three equidistantly on the base. Then, I traced out on the base where they would be glued. The one odd generator is in the center.Here you see the sand applied over the PVA. Note that where the generators would go is not covered with any glue/sand mixture.
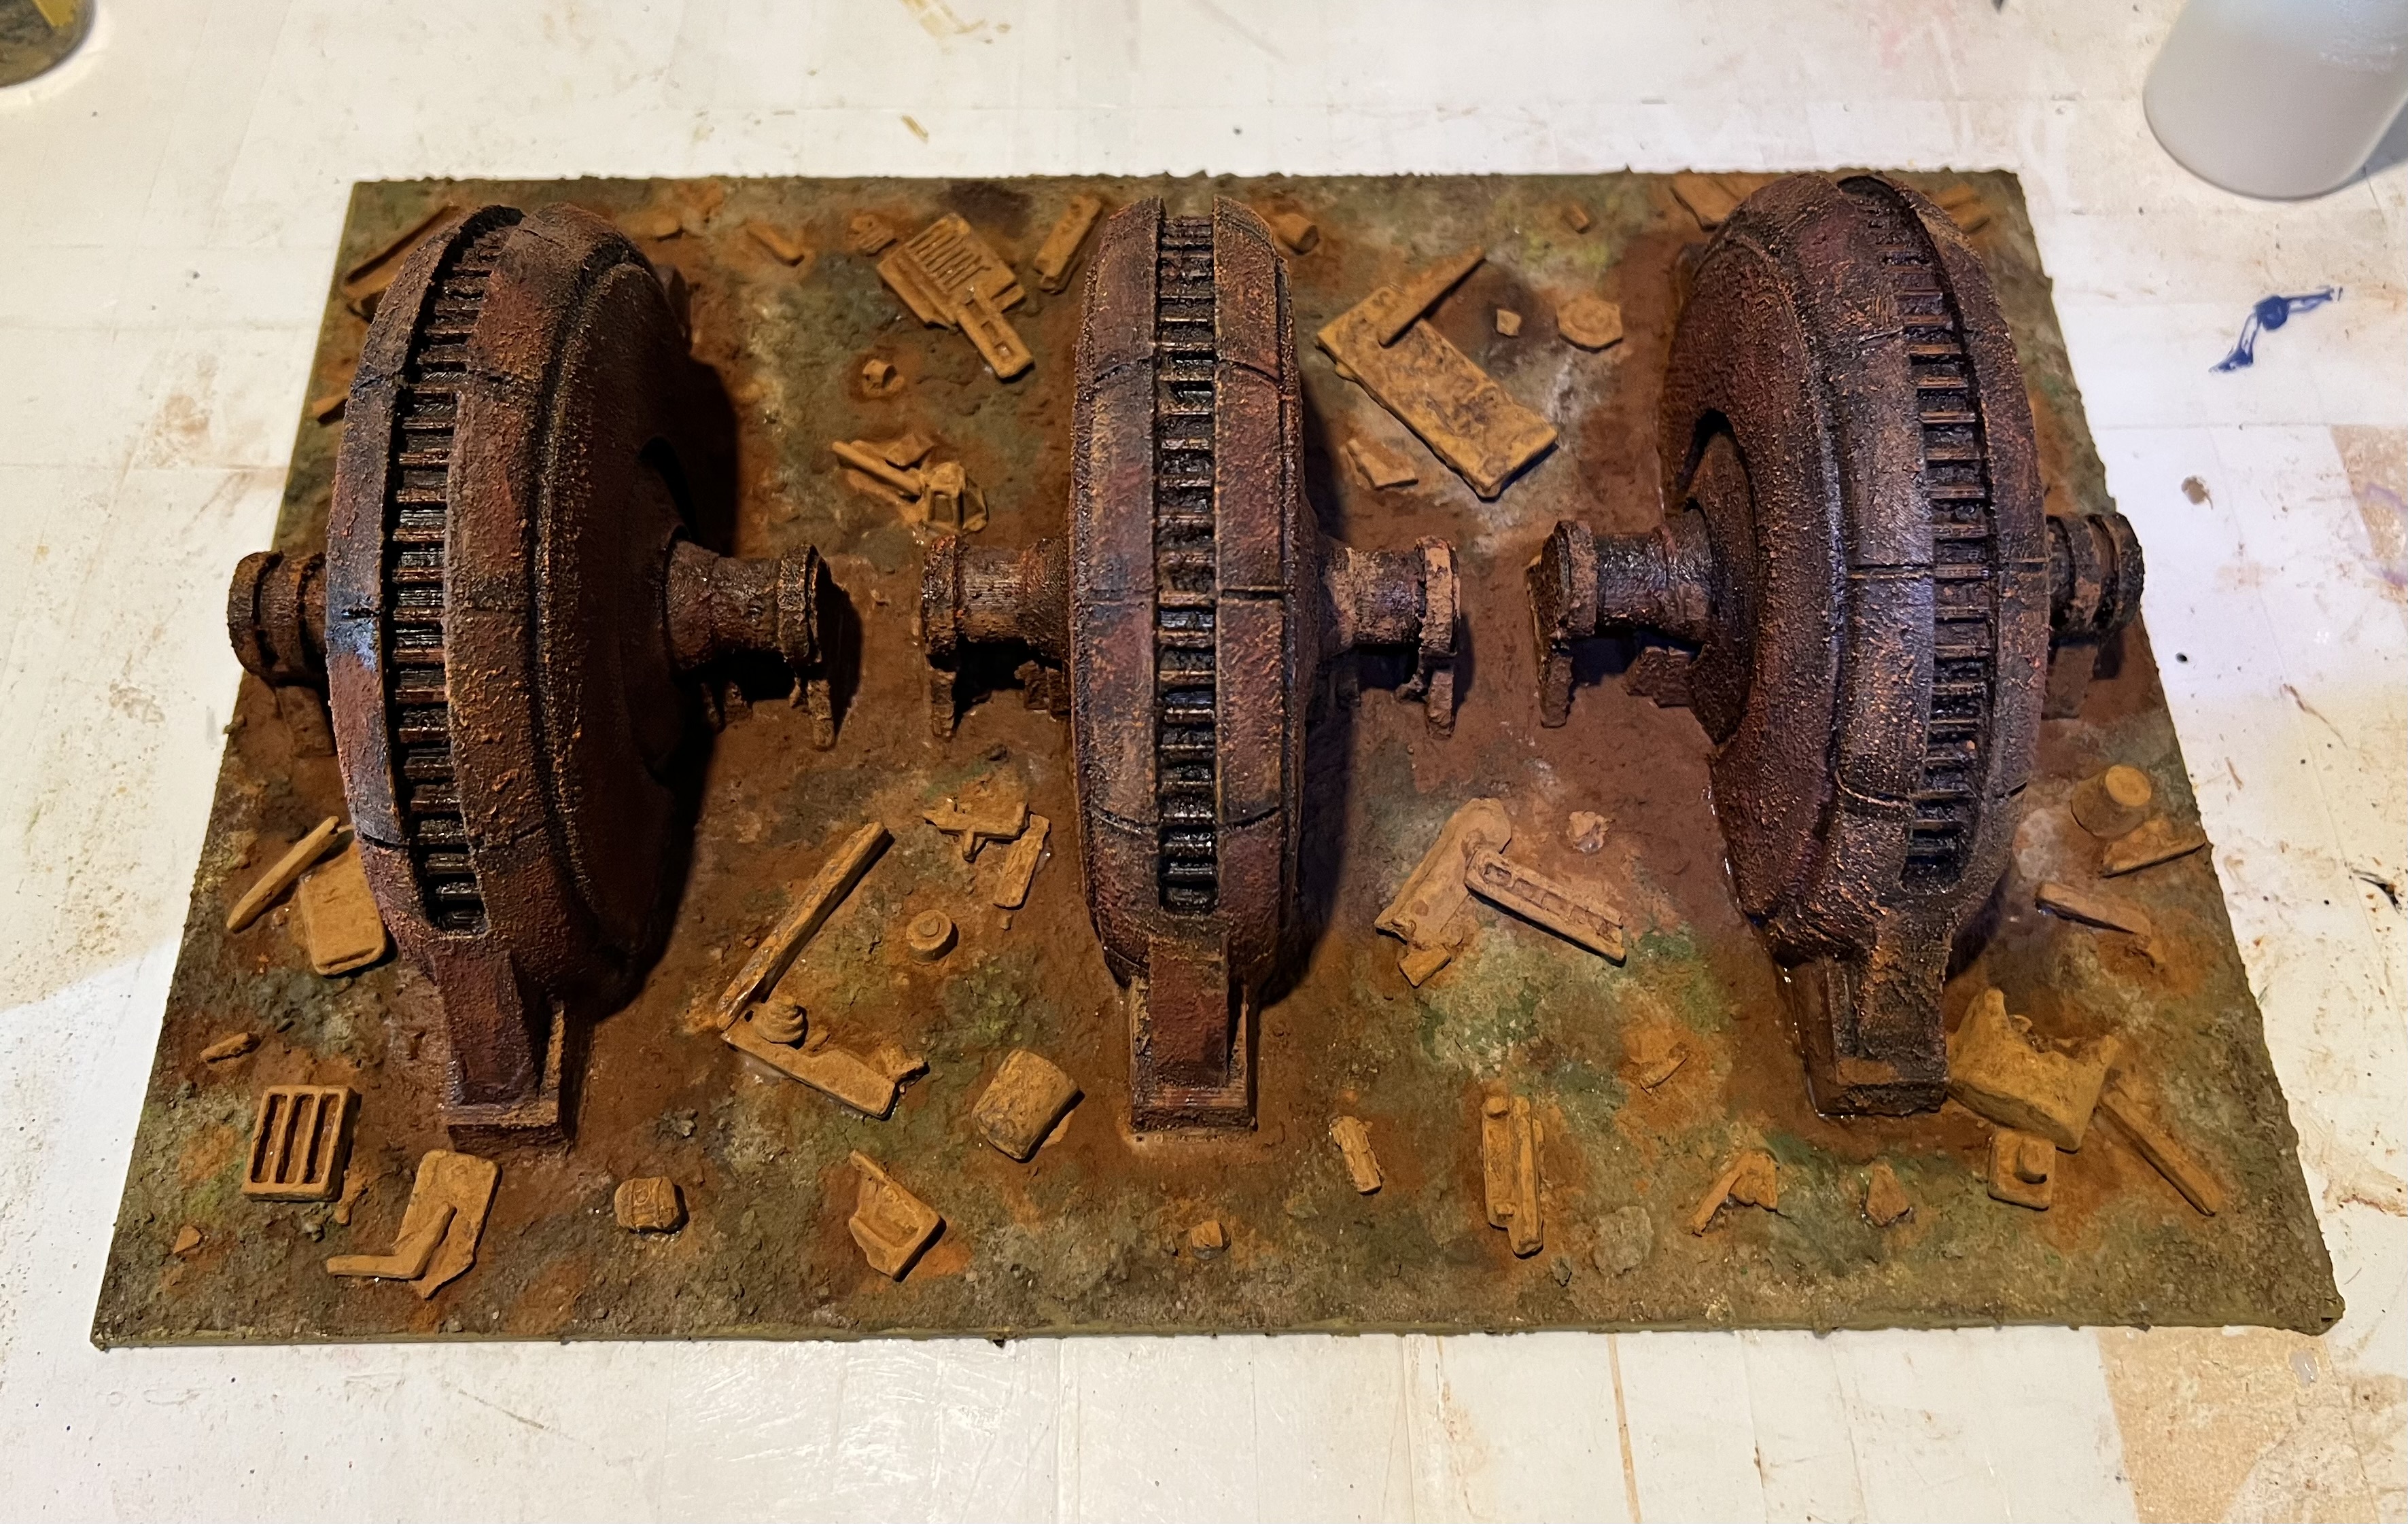
Once the sand mix had hardened, I assembled the pigments as you see below. I fixed all the pigments with pigment binder, as I have found that other liquids can dissolve the PVA/sand bonds.
Ready for gluing down the generators. Then, adding pigments to the base. As is my habit, I list all the materials that I used at the end of this post. This practice served me well here as older posts I did on rusty walls had some pearls that I forgot.
The generators were secured to the base by Gorilla Glue. Once that dried, I added the pigments to the base and fixed them with the binder. I then decided that there should be more detritus and wreckage here. I added some of my rusty Juweela scrap pieces. Then, I applied more rust pigments to them. These actions are shown in the gallery below.
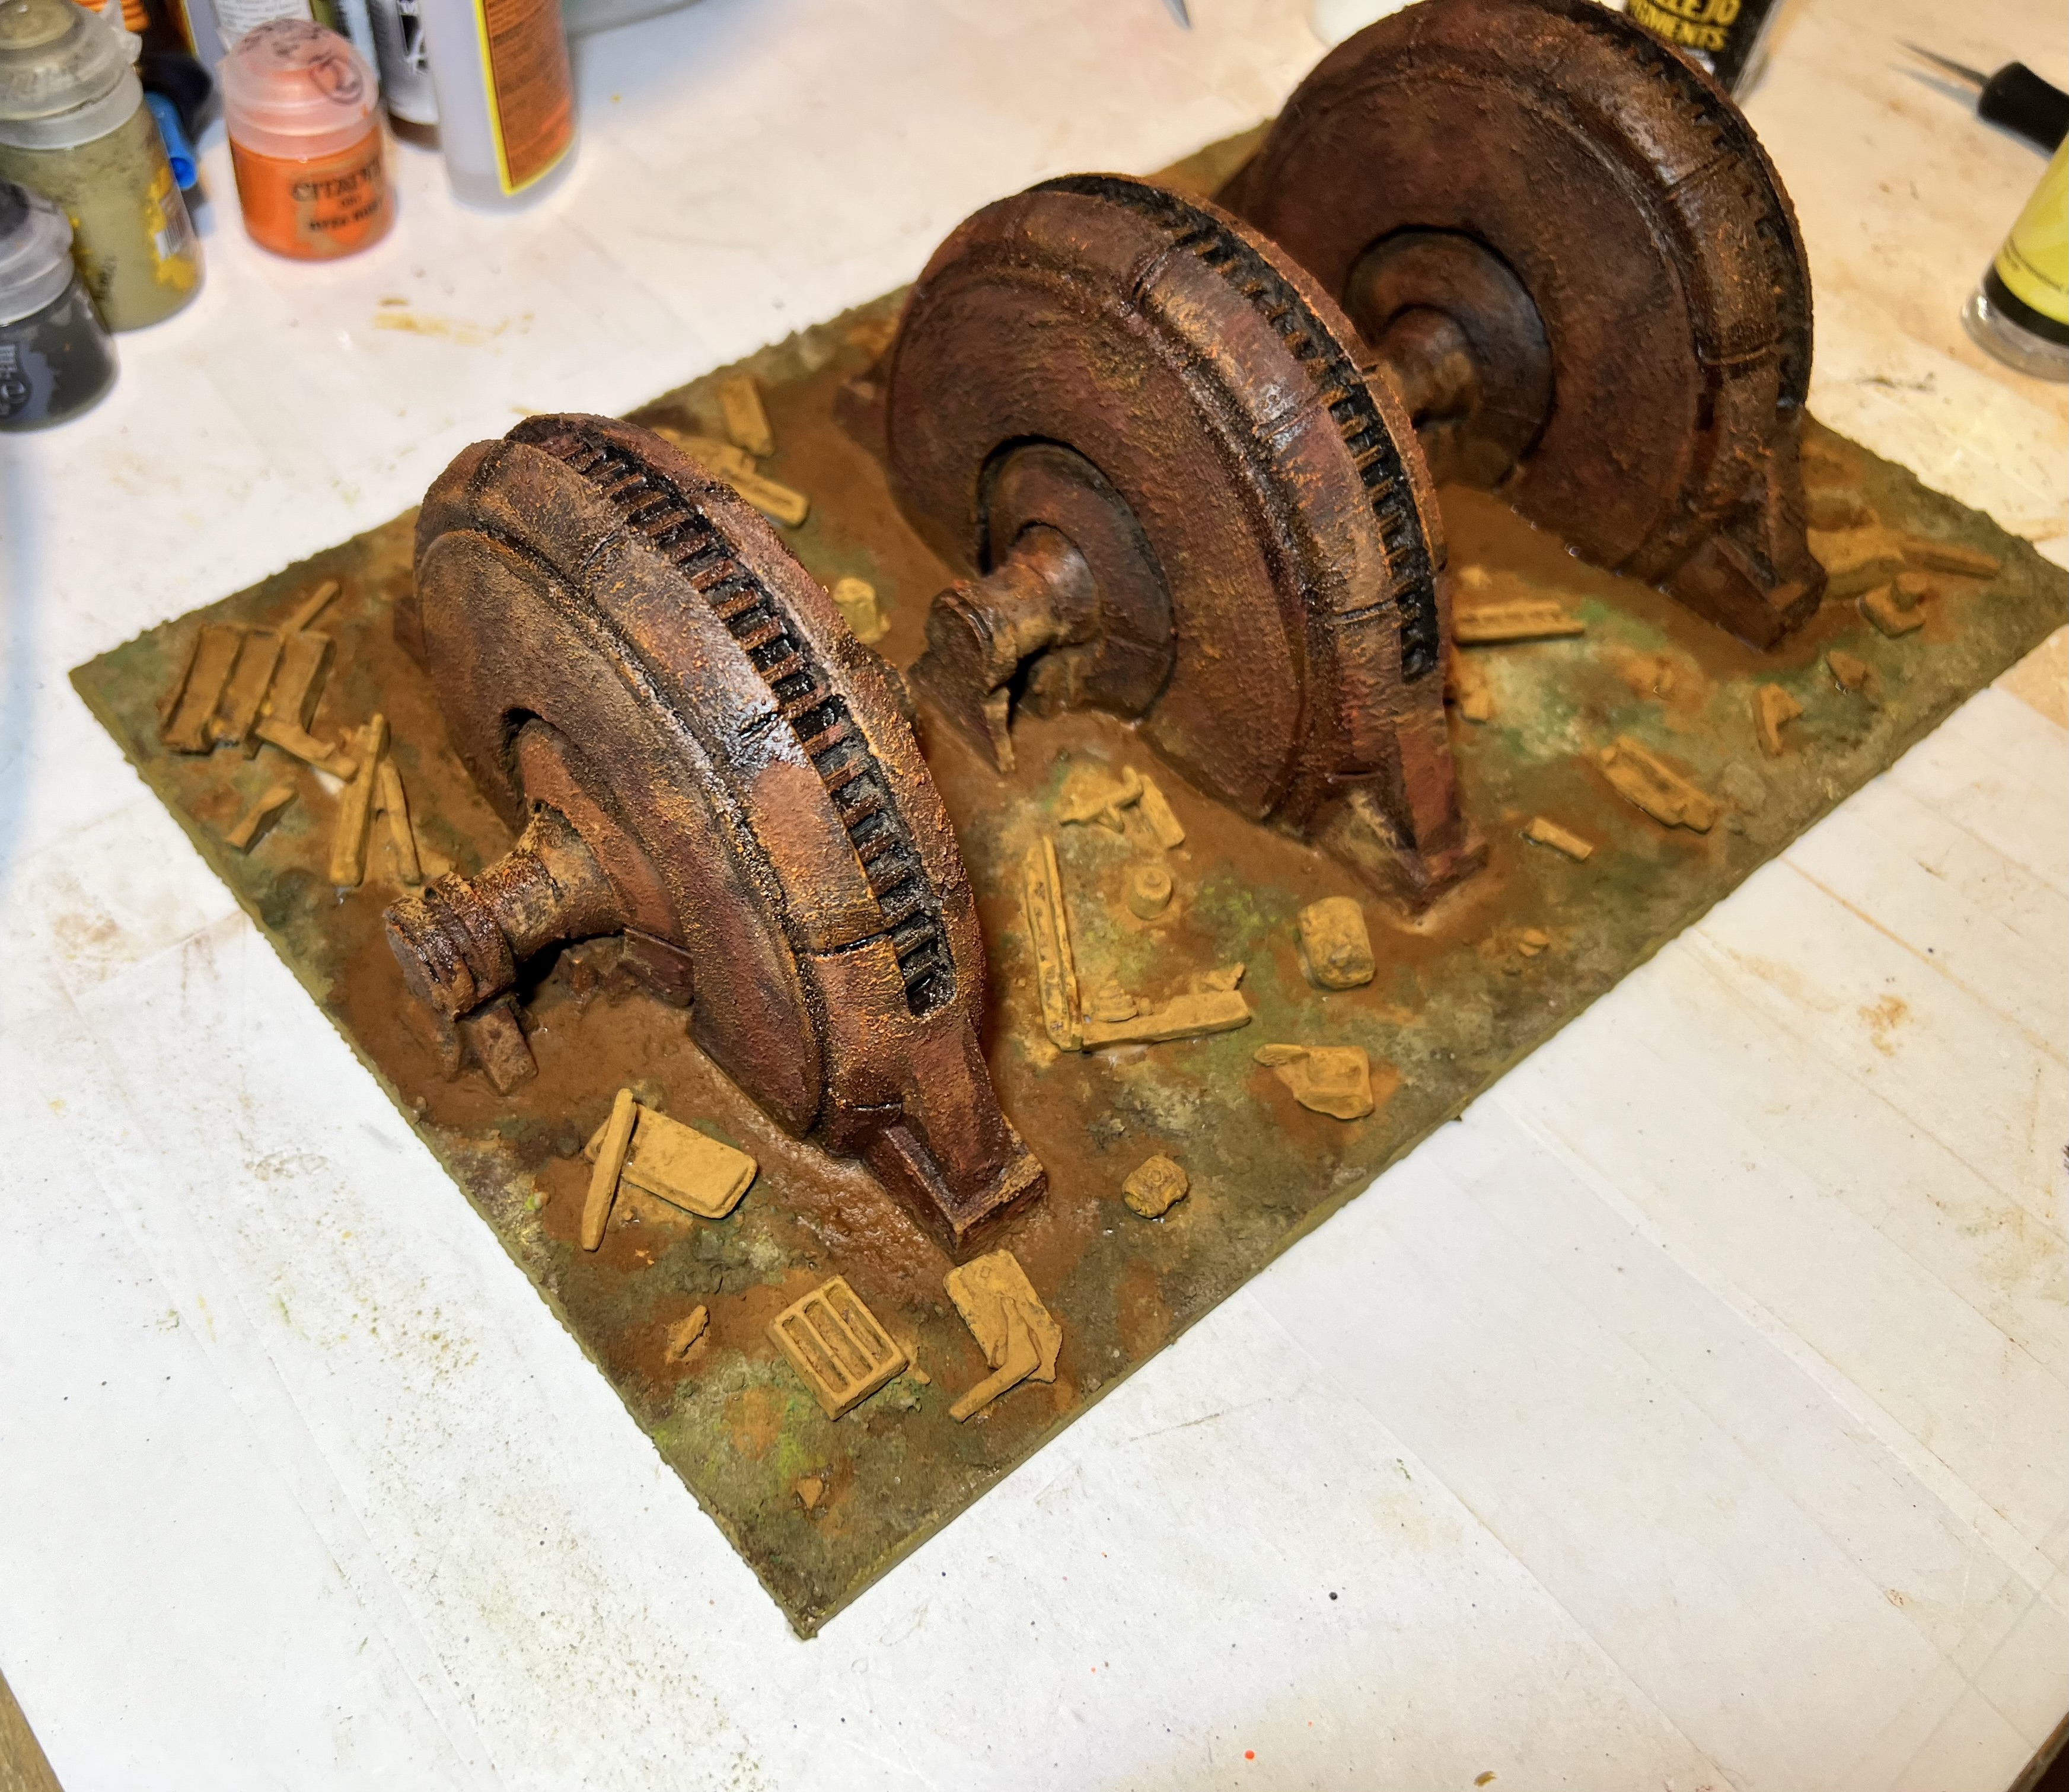
Finally, in an effort to add some wasteland life to the piece, I added multiple different flocking tufts. Here are some finished shots.
Thanks again to Chris Rett for this gift, and sorry it took me so long to finally complete it!
I’m looking forward to having this on the tabletop. It will be a companion piece to my rusty walls and ruined buildings. It will also complement my ruined chemical plant. I will be making other pieces soon. Stay tuned! I hope that you found this interesting or useful. Let me know in the comments section.
Until next time.
For all of my previous posts on terrain projects, please see this page.For all of my previous posts on sci-fi projects, please see this page..
PAINTS, INKS, GLAZES, SHADES, WASHES, PIGMENTS, FLOCKING, GLUES AND MORE THAT I USED ON THIS MODEL
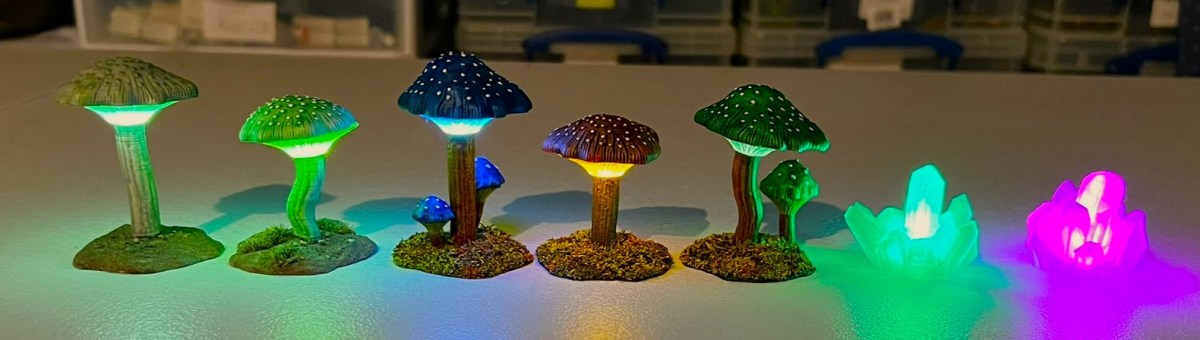
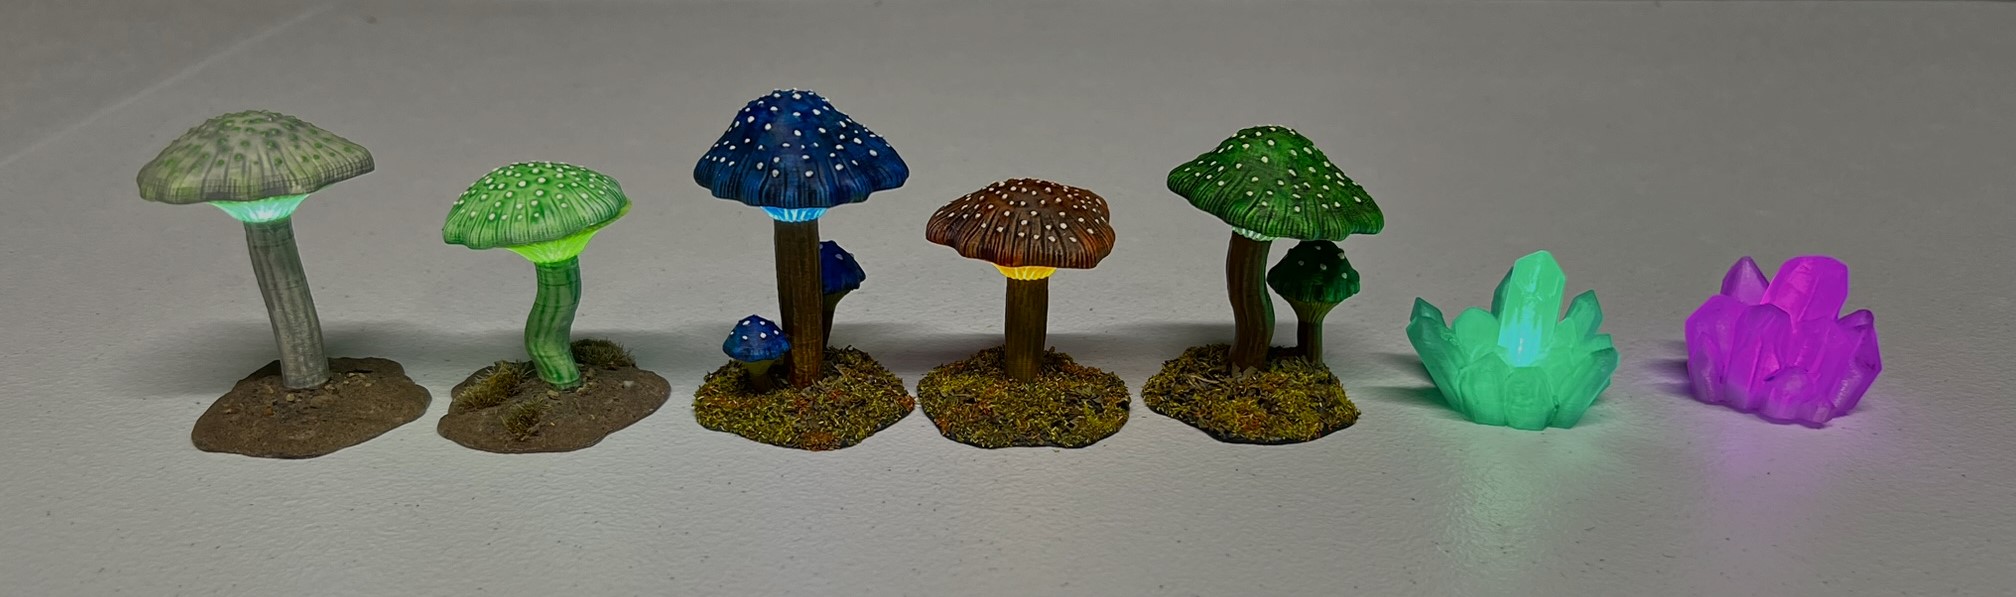
A while back I received a nice gift of a couple of fully-painted LED-lit resin mushrooms from Buck Surdu. I have been using them on my tabletop set ups this year and they always add a nice touch for a Wars of Ozz game.
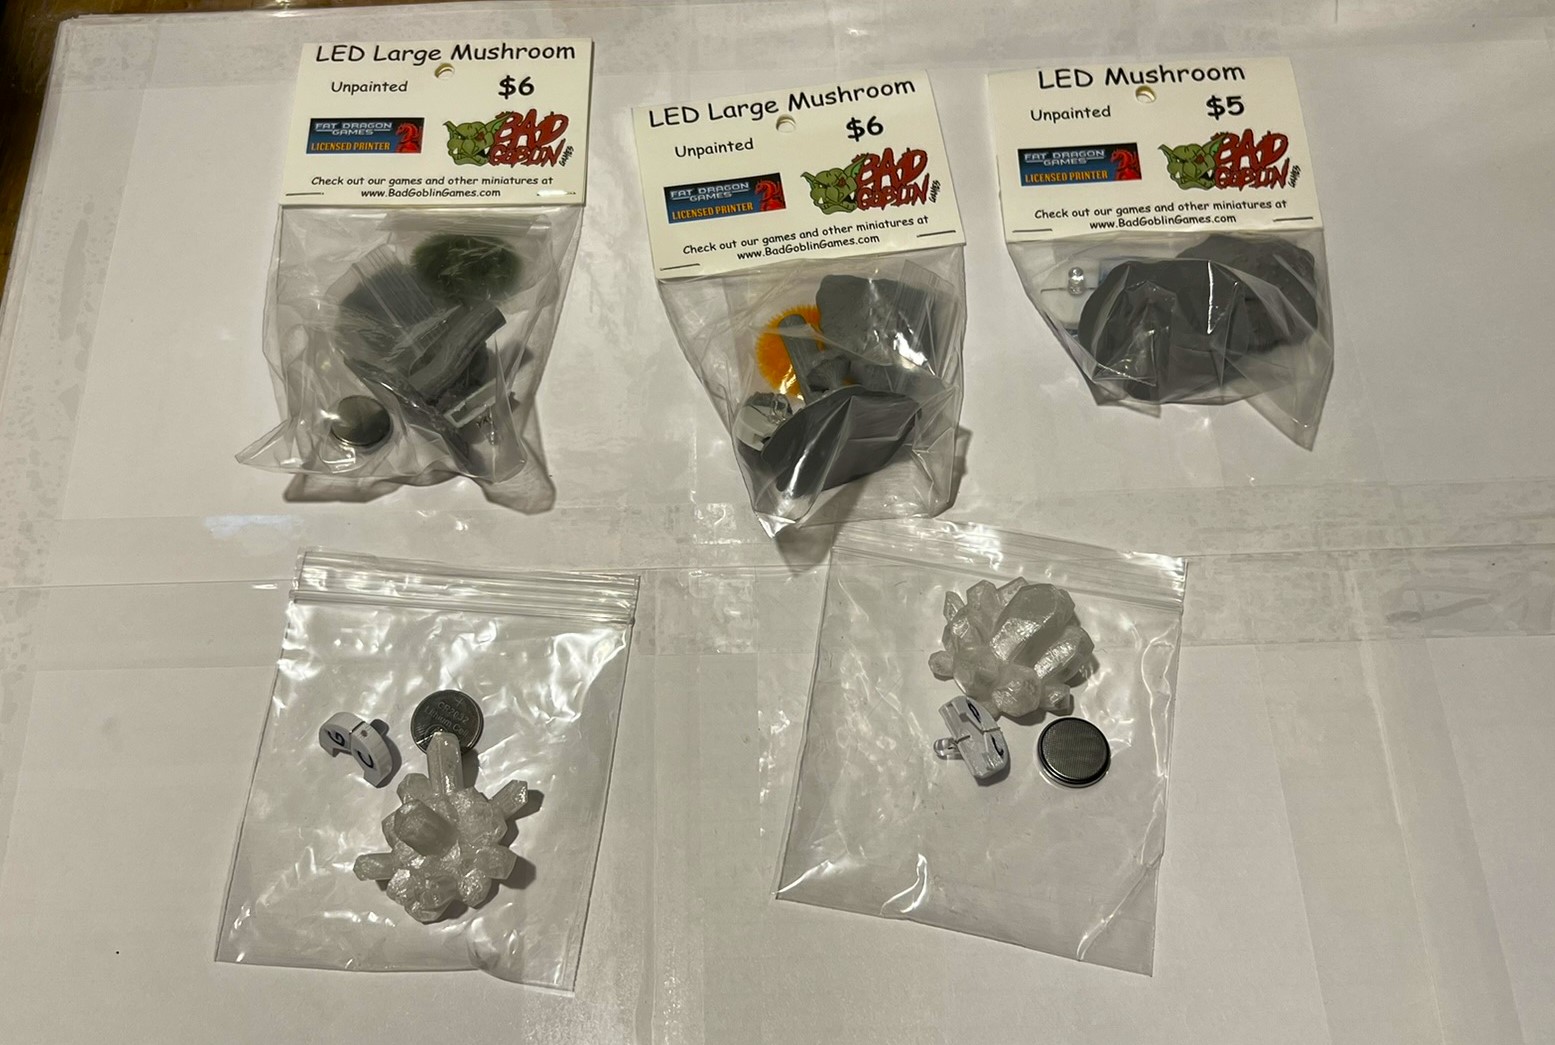
I have found that not all gaming halls are well-lit, so nicely-lighted terrain definitely brings a new visual element to the games. When I went to Historicon, I heard that a vendor was selling them, so I went down to the hall and bought three mushrooms as well as two crystals. All were unpainted (painted ones were available too but I preferred to paint mine). The nice thing with these is that the insertable lights and the batteries came with the mushrooms/crystals. In fact, they were nearly sold out by Saturday morning!
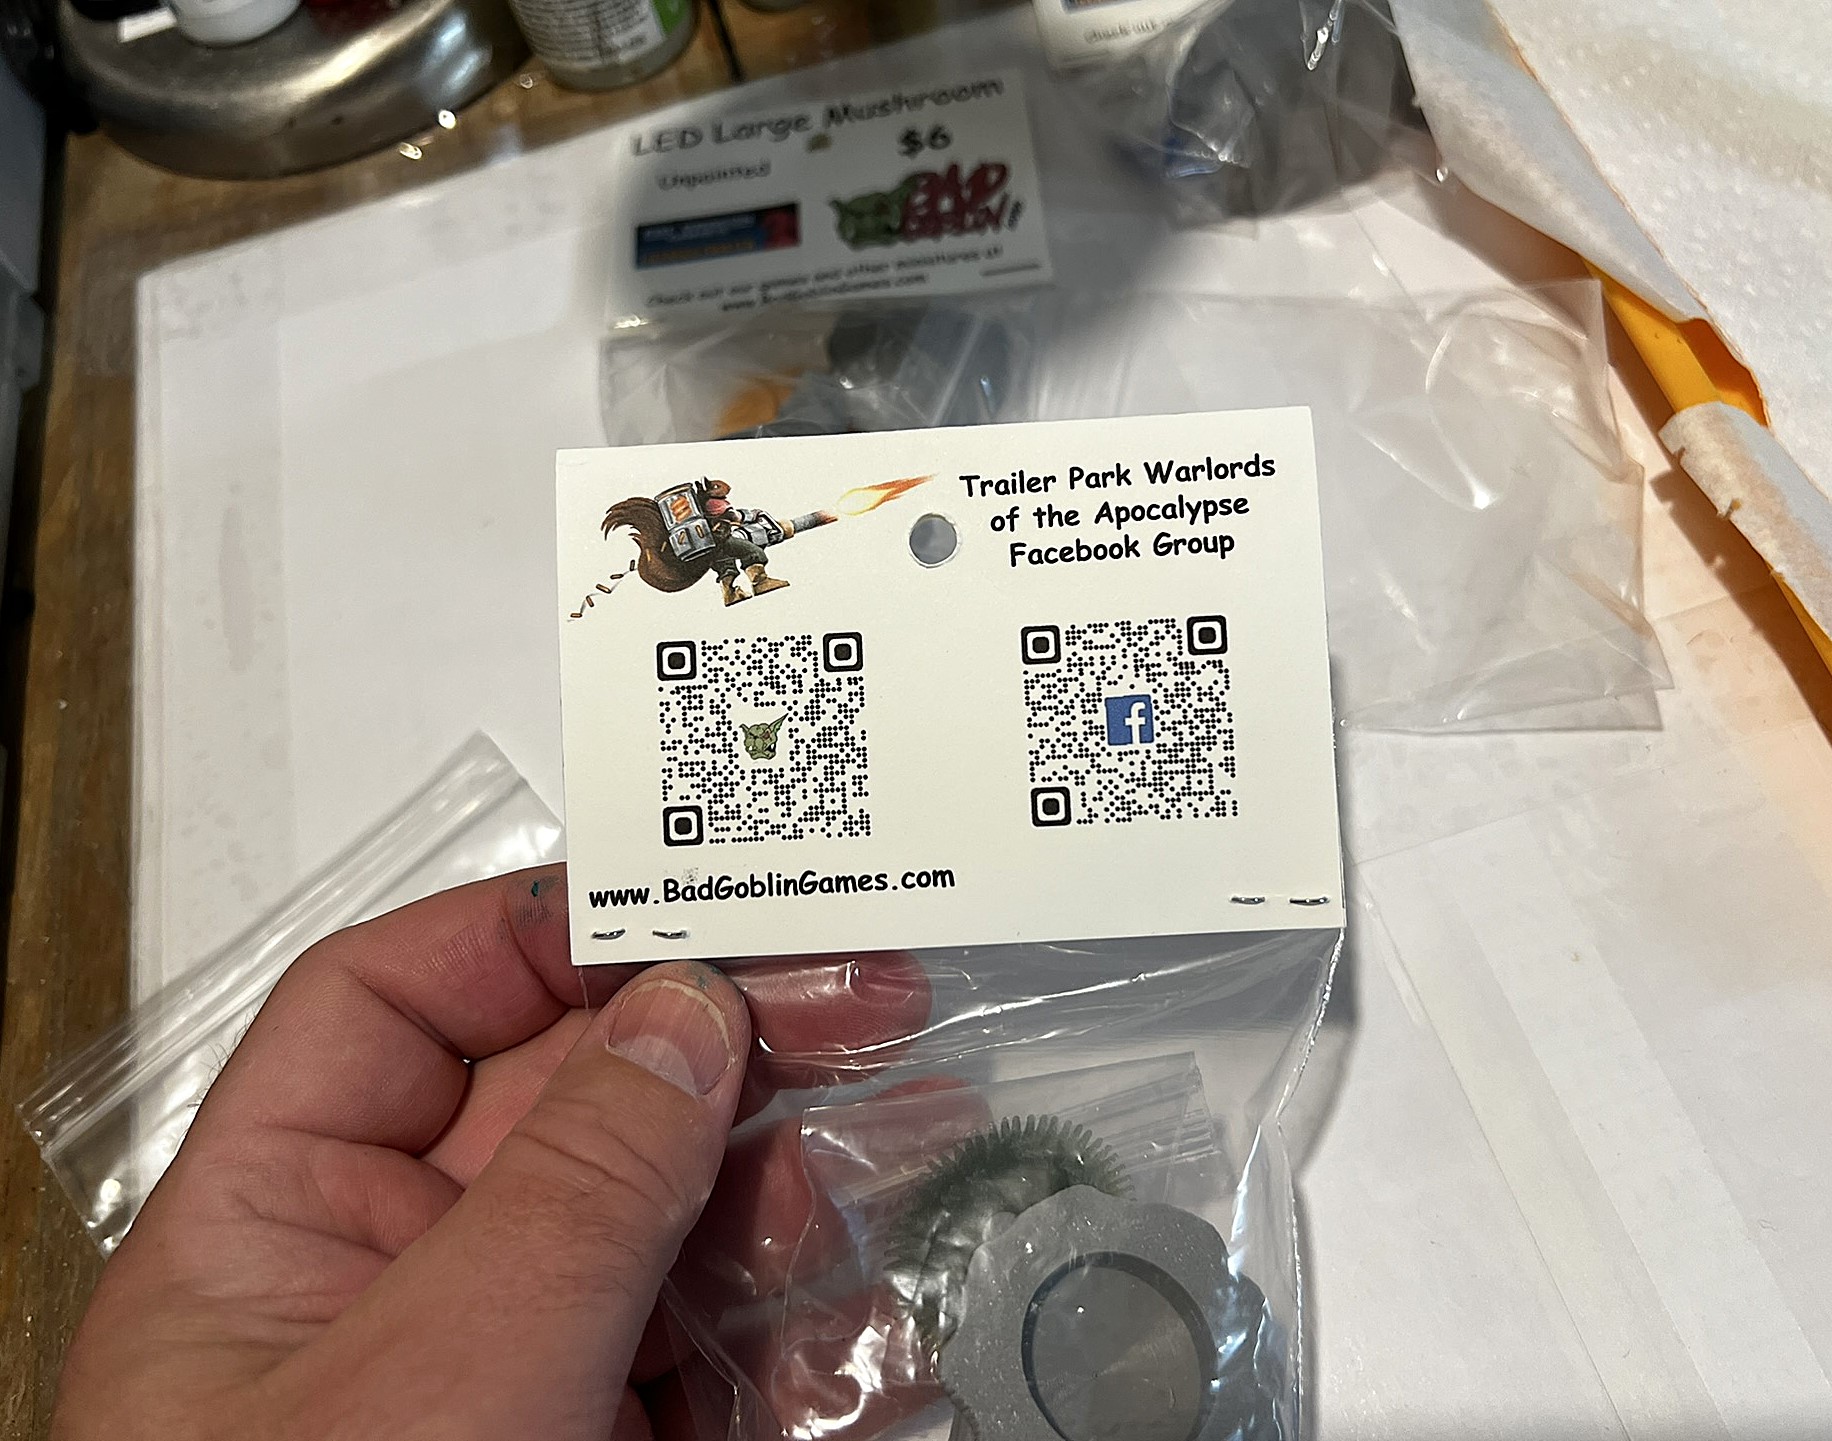
I have previously played with using little tea lights to make smoke/blast markers for What a Tanker games (see here). I am not a 3-D printer, and prefer metal stuff, but have used many things that have been 3-D printed before. In the vendor hall, I believe the seller was a 3-D printer and the booth there was for Bad Goblin Games.
After coming home, I did some digging on-line, but I could not find the products on their website. Looking further on the packaging, I saw a reference to Fat Dragon Games. There I found the links for the STL files available for purchase for both the mushrooms and the crystals – but as far as whether the lights and batteries came with the purchase – I think only the files do. I cannot find anywhere the little lights could come from that fit here, but if interested I’d contact the vendors on their websites.
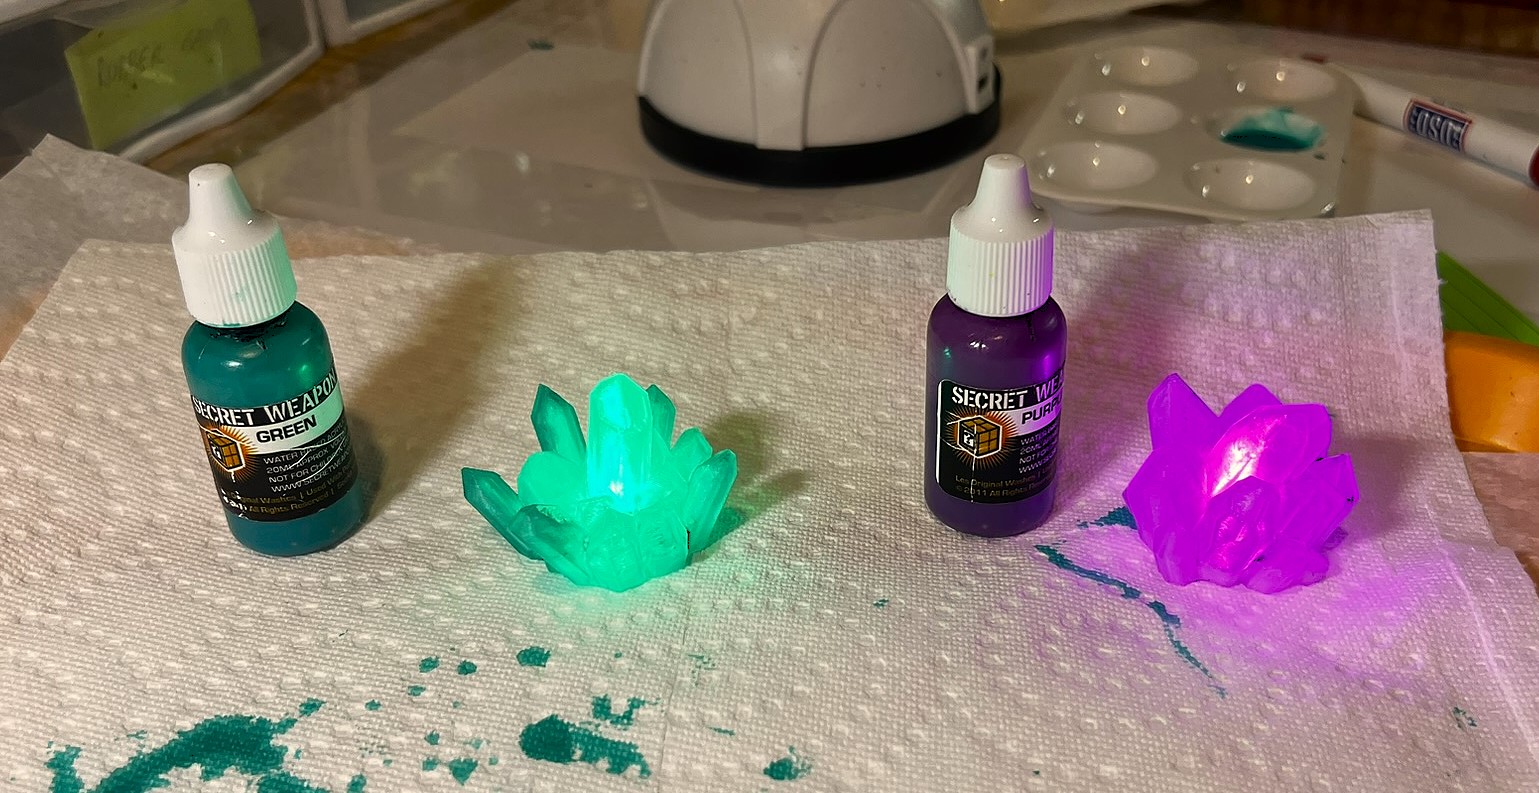
The mushrooms and the crystals as purchased. The mushrooms came with white lights and had green, orange, and blue discs that accented those colors. The two crystals came with green and purple lights. All had batteries. The back of the package with QR code and website listing.
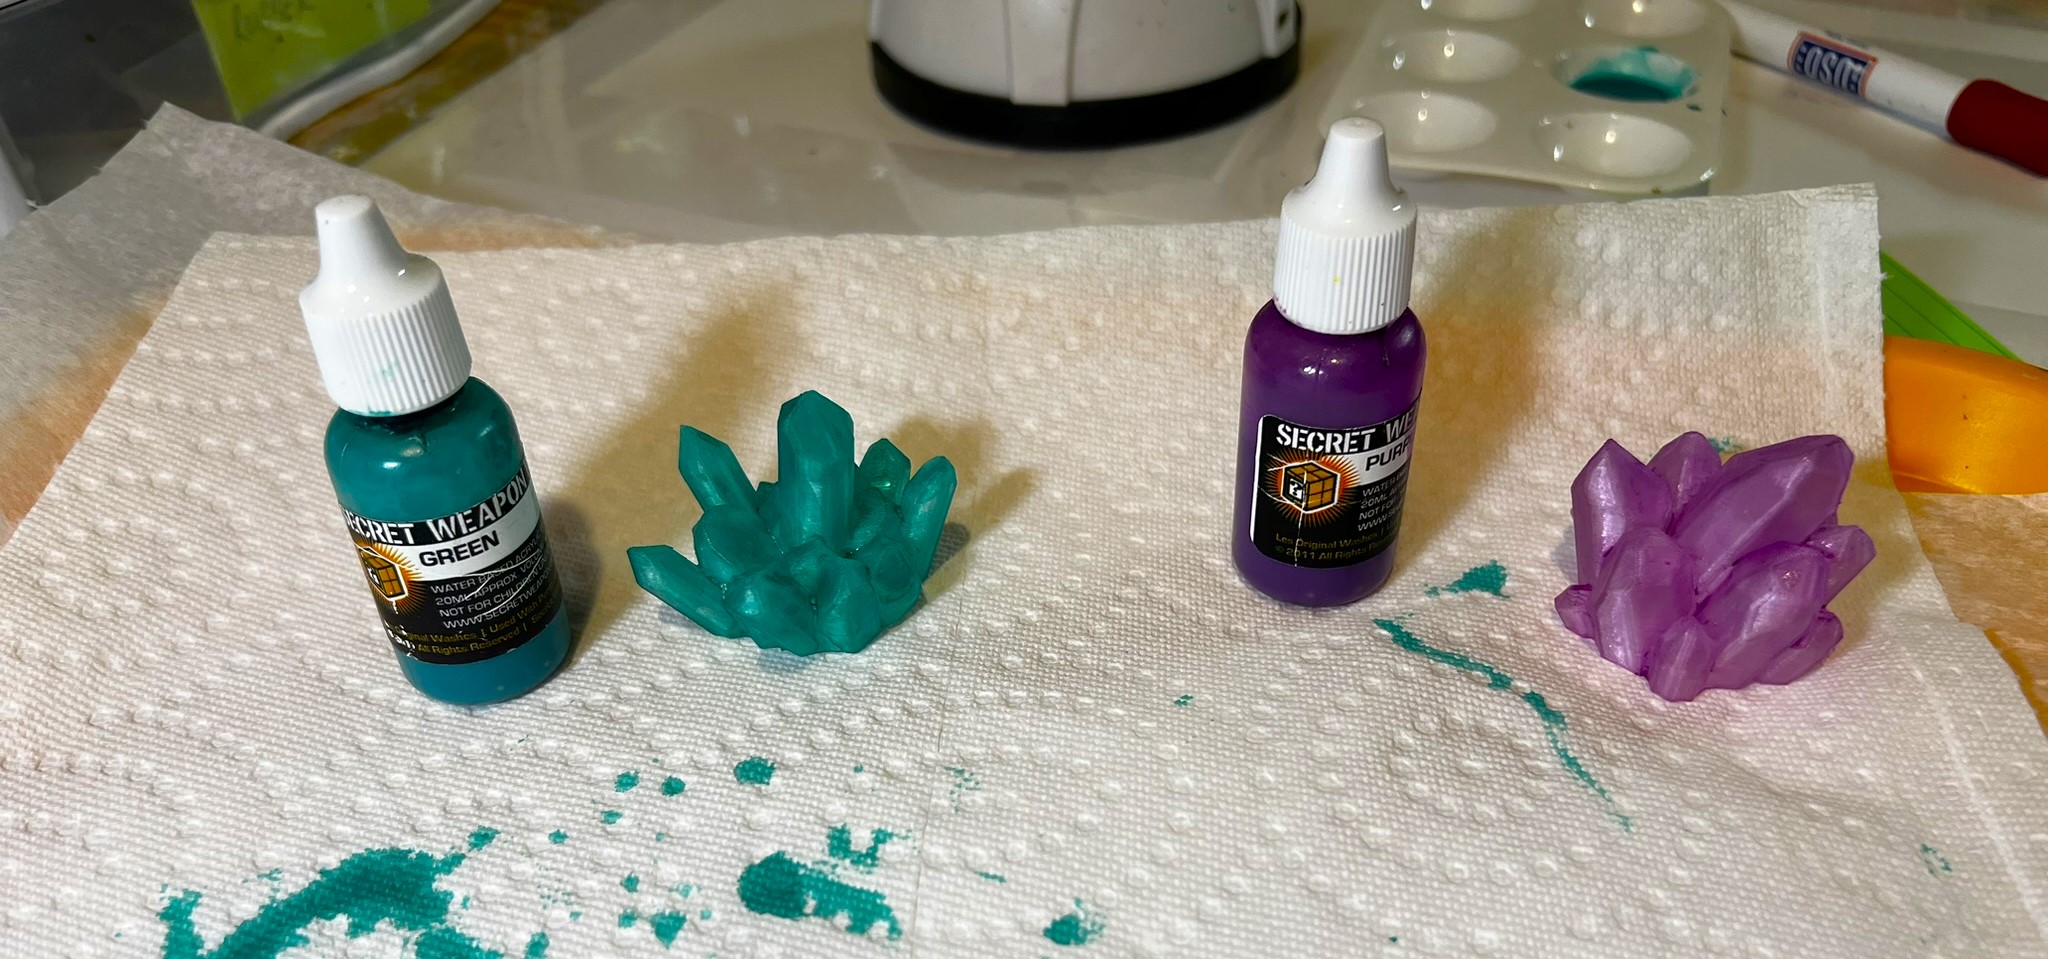
The crystals were made of clear white resin, and their green and purple lights did give them a nice glow. But if you’ve ever read this blog before, you KNOW that I always try to add another level to a project. So I added some Secret Weapon Washes for effect – and they worked really well.
The crystals after washes added……and lit!
Here is a short video of the crystals:
Crystals done!
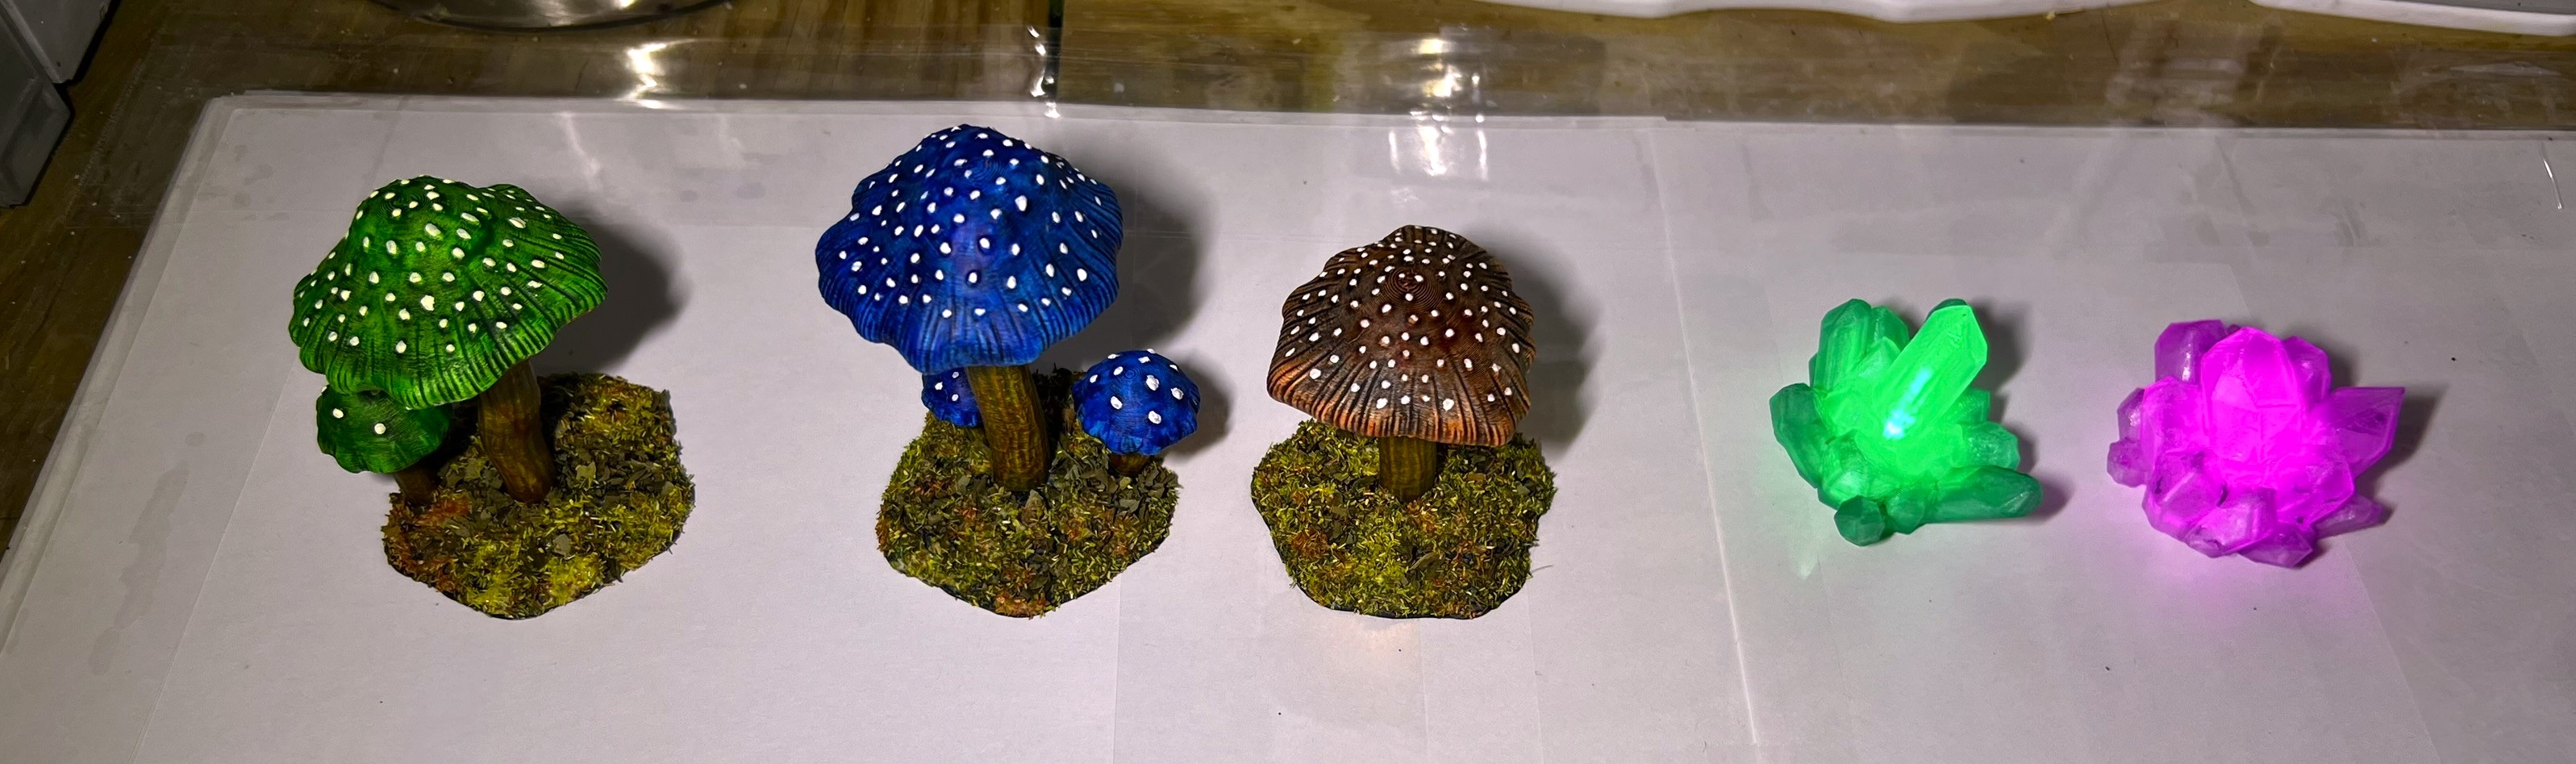
I then moved on to washing, assembling, priming, and painting the mushrooms. I used a number of paints (see list at end) to achieve the look that I wanted. For flocking the bases, I went with a leaf-litter look.
The three mushrooms and crystals from the top.Here you see the little lights and how they nest in the mushroom stands and the bottom of the crystals. The mushroom caps fit right over the lights which are inserted light-down. The batteries are flat CR2023’s.Close up of the mushrooms showing their colors.My current collection – the two green ones on the left are from Buck……and now lit up in a darkened room!
Lastly, I made another brief video of these that I think you’ll enjoy.
Miscellaneous details and references for those interested in that sort of thing:
For all of my earlier posts on Wars of Ozz games, figures, units, and other related projects – please see this page.
PAINTS, INKS, GLAZES, SHADES, WASHES, PIGMENTS, FLOCKING, GLUES AND MORE THAT I USED ON THESE LED CRYSTALS AND MUSHROOMS:
Secret Weapon Washes “Purple” (wash on crystal)
Secret Weapon Washes “Green” (wash on crystal)
Vallejo Surface Primer “Black”
Vallejo Model Color “Off White”
Citadel “Contrast Paint – Apothecary White”
Army Painter “Speed Paint – Fire Giant Orange 1.0”
Citadel “Contrast Paint – Contrast Medium”
Army Painter “Speed Paint – Shamrock Green 2.0”
Citadel “Contrast Paint – Talassar Blue”
Citadel “Contrast Paint – Bad Moon Yellow”
Citadel “Contrast Paint – Iyanden Yellow”
Army Painter “Speed Paint – Burnt Moss 2.0”
Elmer’s PVA Glue
Loose crushed leaves (oregano, basil? I don’t know! Got these flocking materials for free or in a raffle box at HUZZAH! in May. They gave good texture under the 4-Ground leaves.)
4-Ground “TSM 123 Loose Foliage Brown Leaves”
4-Ground “TSM 124 Loose Foliage Copper Leaves”
4-Ground “TSM 124 Loose Foliage Green Leaves”
As you may want to check out the excellent Wars of Ozz figures’ range – there are two places to get them and to get the rules (and I make no money from this btw). The game rules and the figures are available from the next two places:
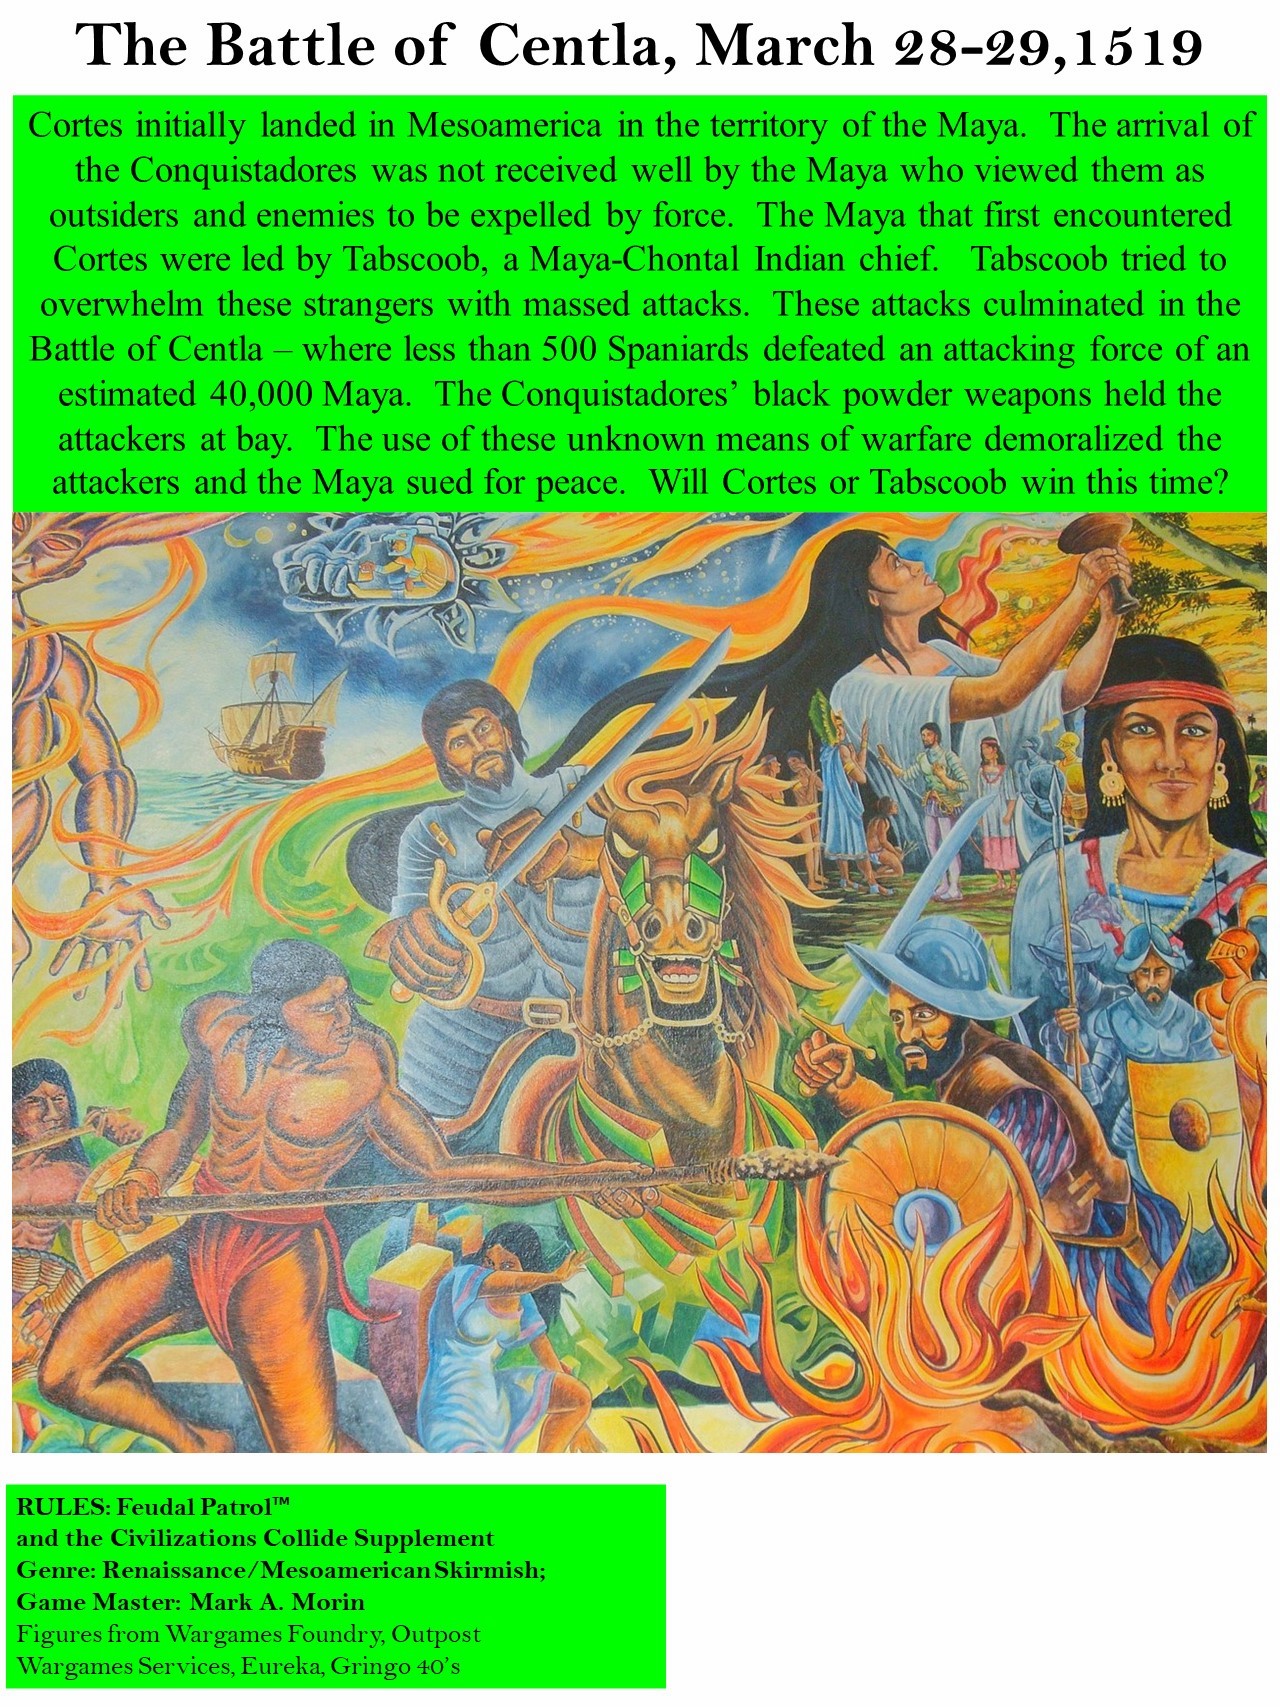
The scenario involves a beach area with a jungle nearby and a Maya city. The Conquistadors start on the beach and try to move inland. You can see a description of the game in my recent TotalCon 37 recap post. Below is a set up of the battle – note the seven printed green card stock areas at the juncture between the jungle and the beach near the ends of the jungle paths. These areas I described as being easy to cross (no movement penalty) but providing a degree of concealment and cover – basically a scrub-type area.
I used these card stock pieces in lieu of the 7 scatter terrain jungle bases that I ordered from our blogger friend Dave Stone of Wargames Terrain Workshop in the UK back at the turn of the year. I even sized my card stock pieces to match the ones that I ordered from Dave.
Dave built them post-haste – and sent them to me via the Royal Mail on January 11th – so we both thought I’d get them in time to prepare for the February 23rd TotalCon37 convention. Unfortunately, a combination of a cyber attack on the Royal Mail and labor strikes in the UK combined and conspired to keep them from arriving at my home until Wednesday February 22nd – one day before the convention. As I wanted to detail them for the game, and I did not have enough time to give them the justice I wanted with less than a day’s preparation, I decided to work on them after TotalCon 37 so that they’d be ready for Cold Wars. I want to say that Dave was great in following up with me and this situation was definitely not his fault. The seven bases that I bought were as follows:
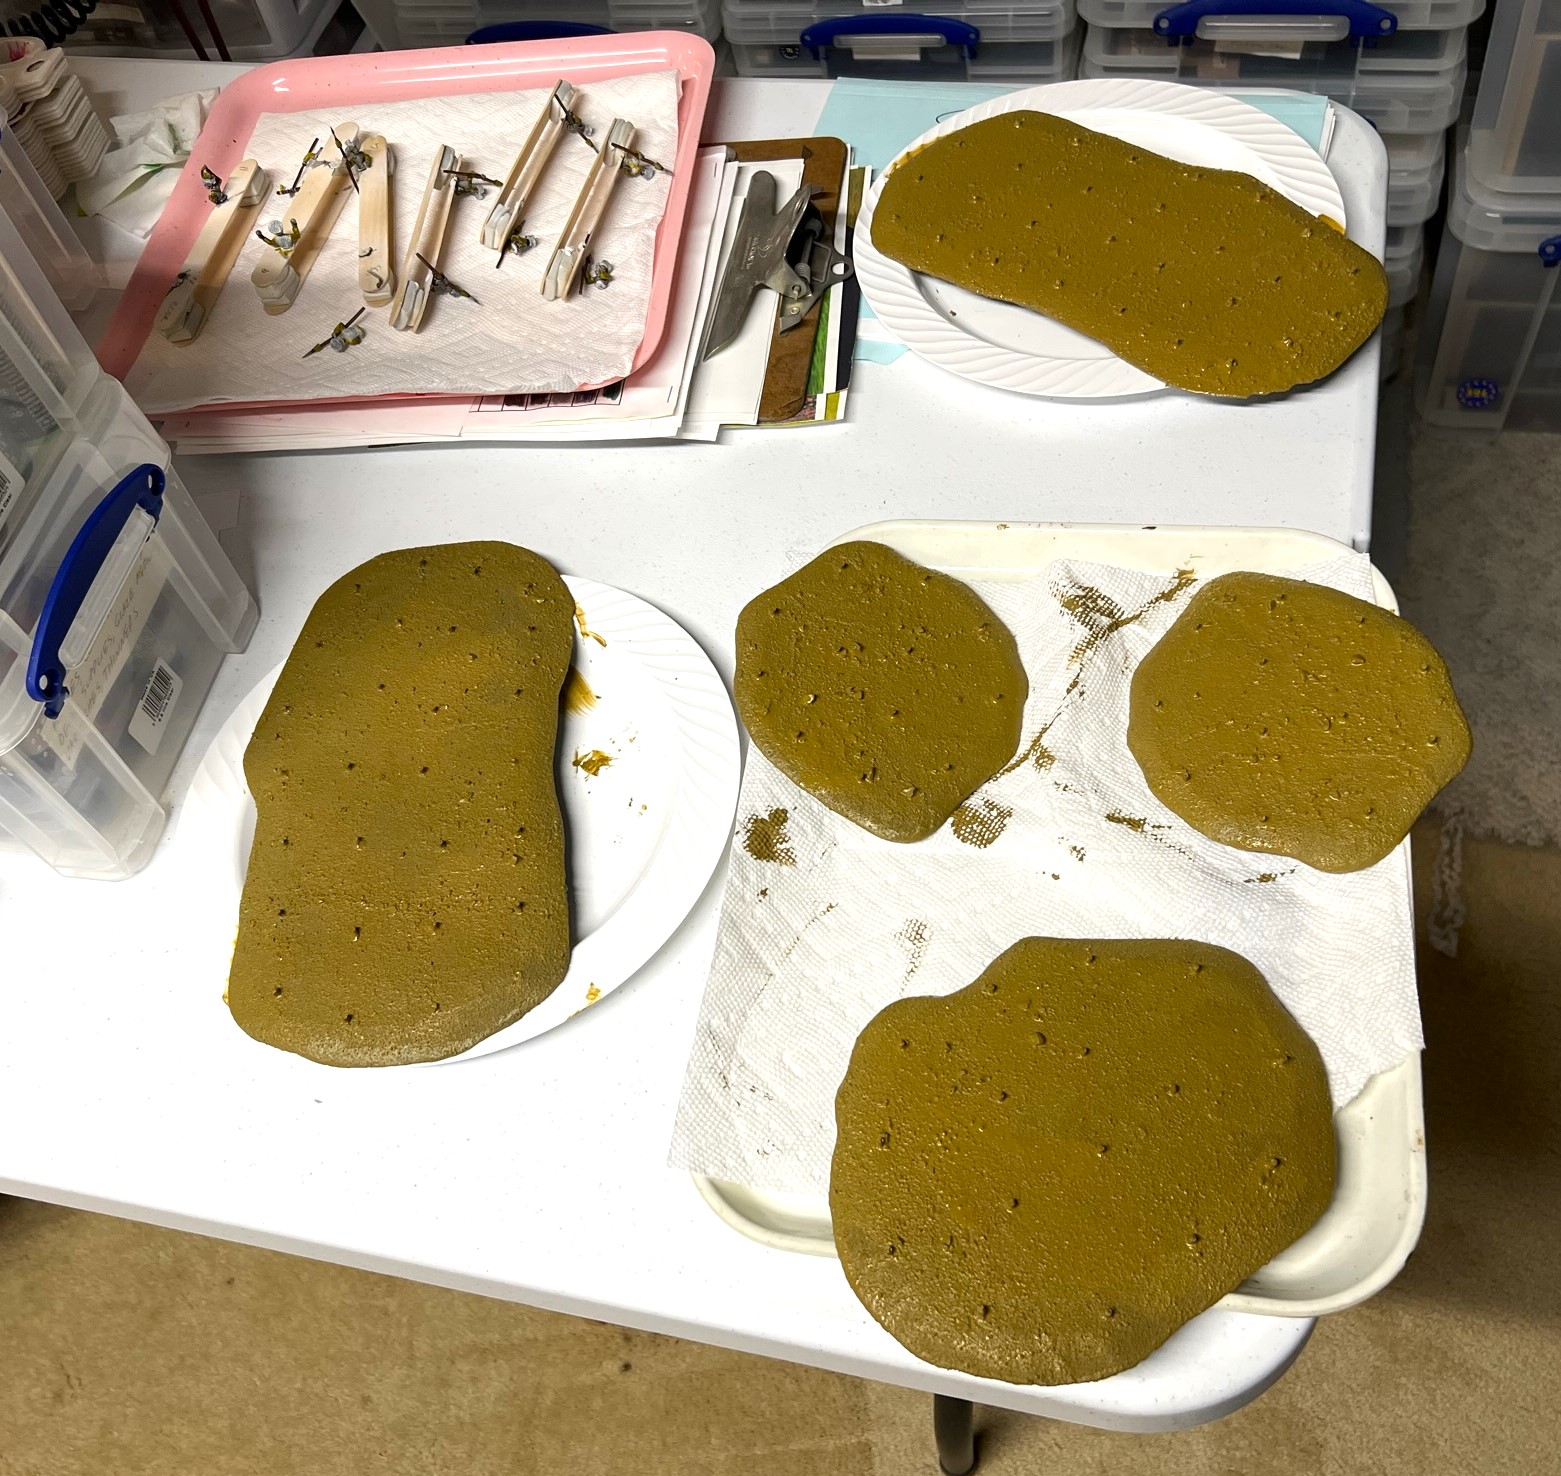
I started them on February 27th and worked on them alongside some Winkie cavalry (that I will post about next). All of the 7 bases came unpainted with a very generous supply of different plastic foliage on sprues – which allowed me to customize them. The bases themselves were resin with multiple small conical prongs with which to attach the plants. Dave recommended attaching them with green stuff – but I went with Apoxie Sculpt as I had some mixed already for a box handle I needed to repair.
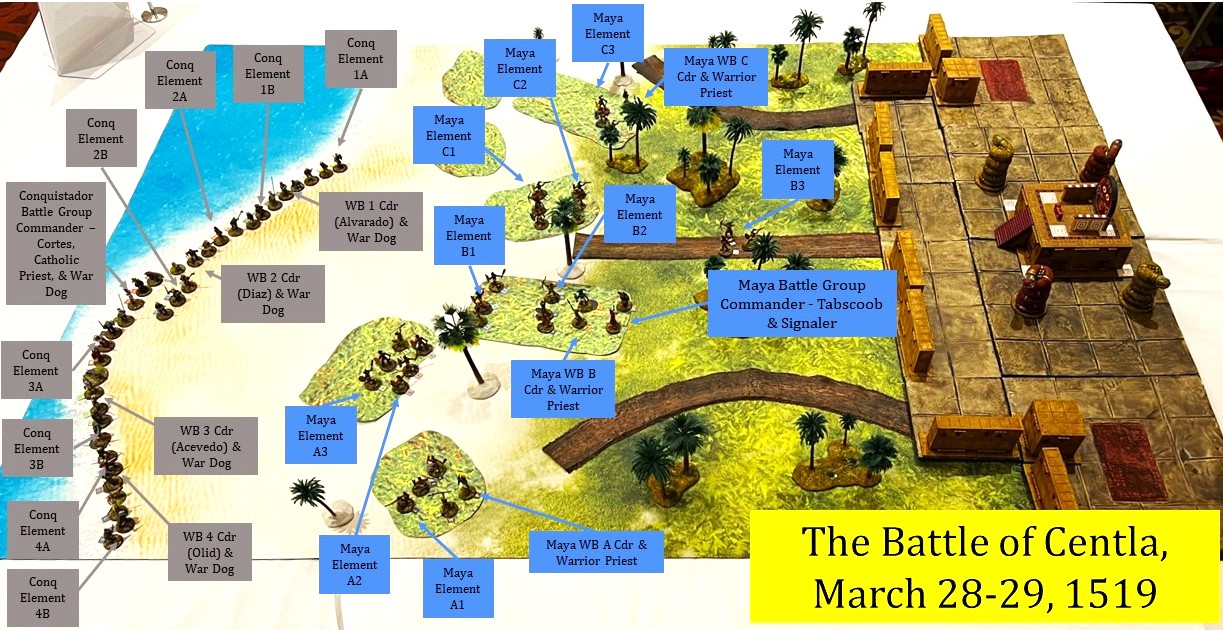
The first steps were to wash the resin and the foliage so that paints and washes would adhere properly.
Washing the plastic foliage and the bases.Two of the washed resin bases showing the prongs, right before priming – on the right!
I primed the bases green-brown and let them dry overnight. I list all the paints and other materials at the end of the blog for those interested in that type of information.
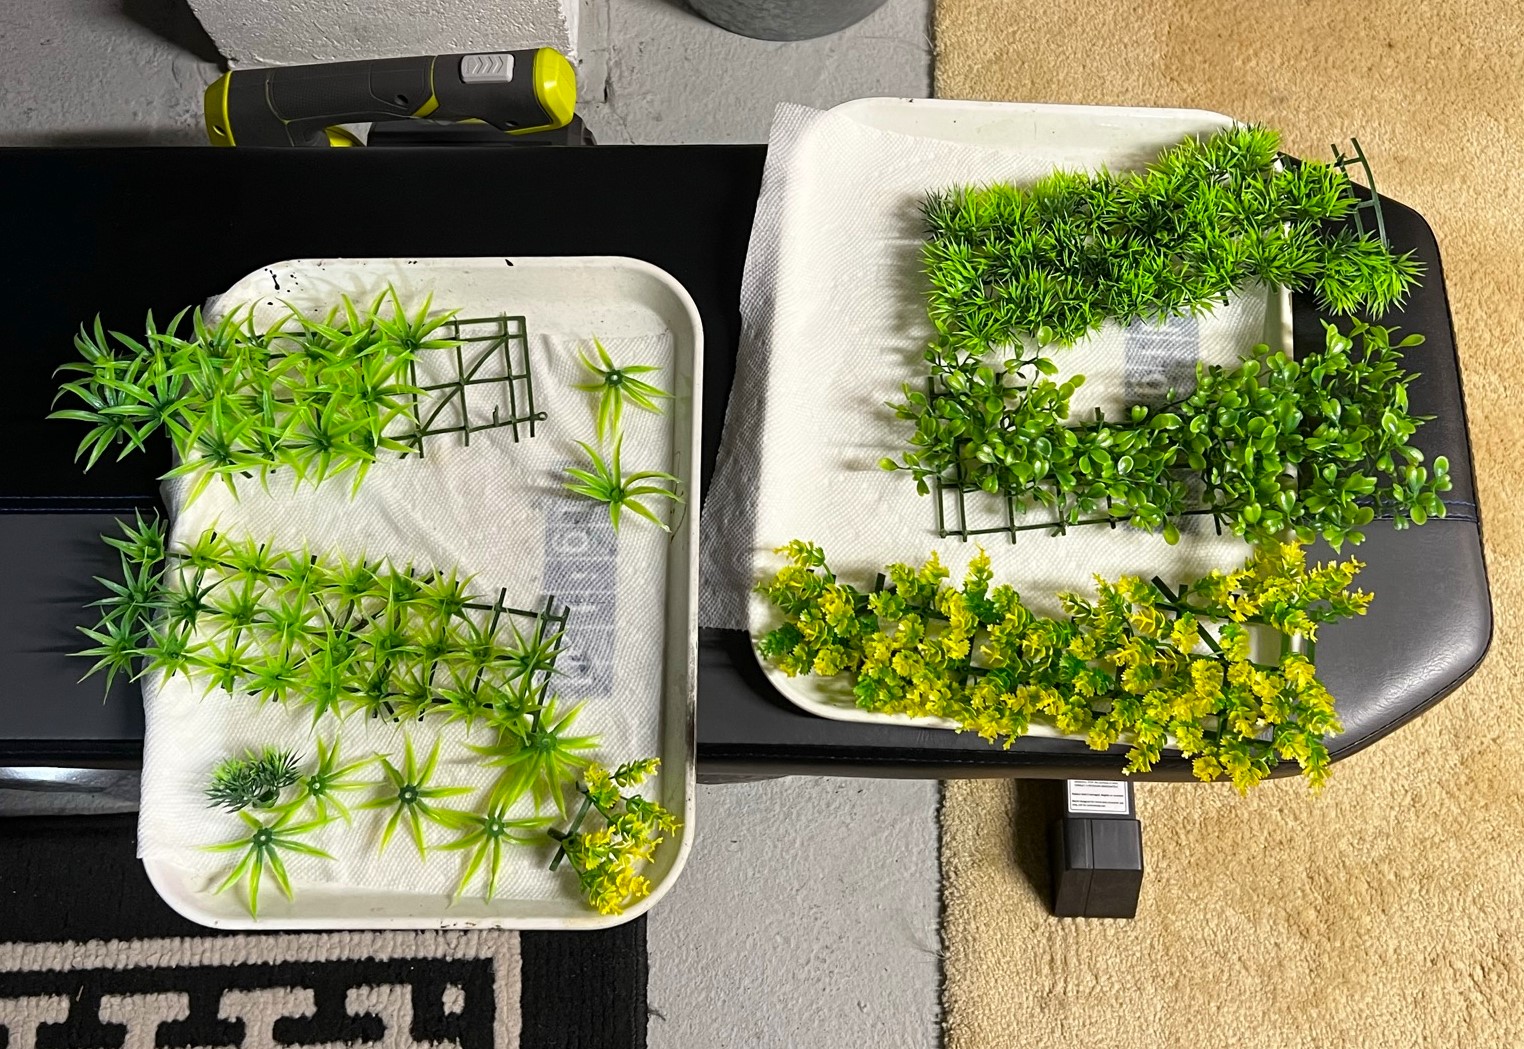
Five of the seven bases primed and drying.Lots of available foliage!
Then, I then mocked out where I would apply the foliage with 1.25″ washers. When I was happy, I applied the foliage with Apoxie Sculpt to 5 of the bases and let that cure overnight. Why five and not seven? Well, as I said, I was also working on Winkie cavalry, and two of the primed bases were hiding under a paper towel and I missed them.
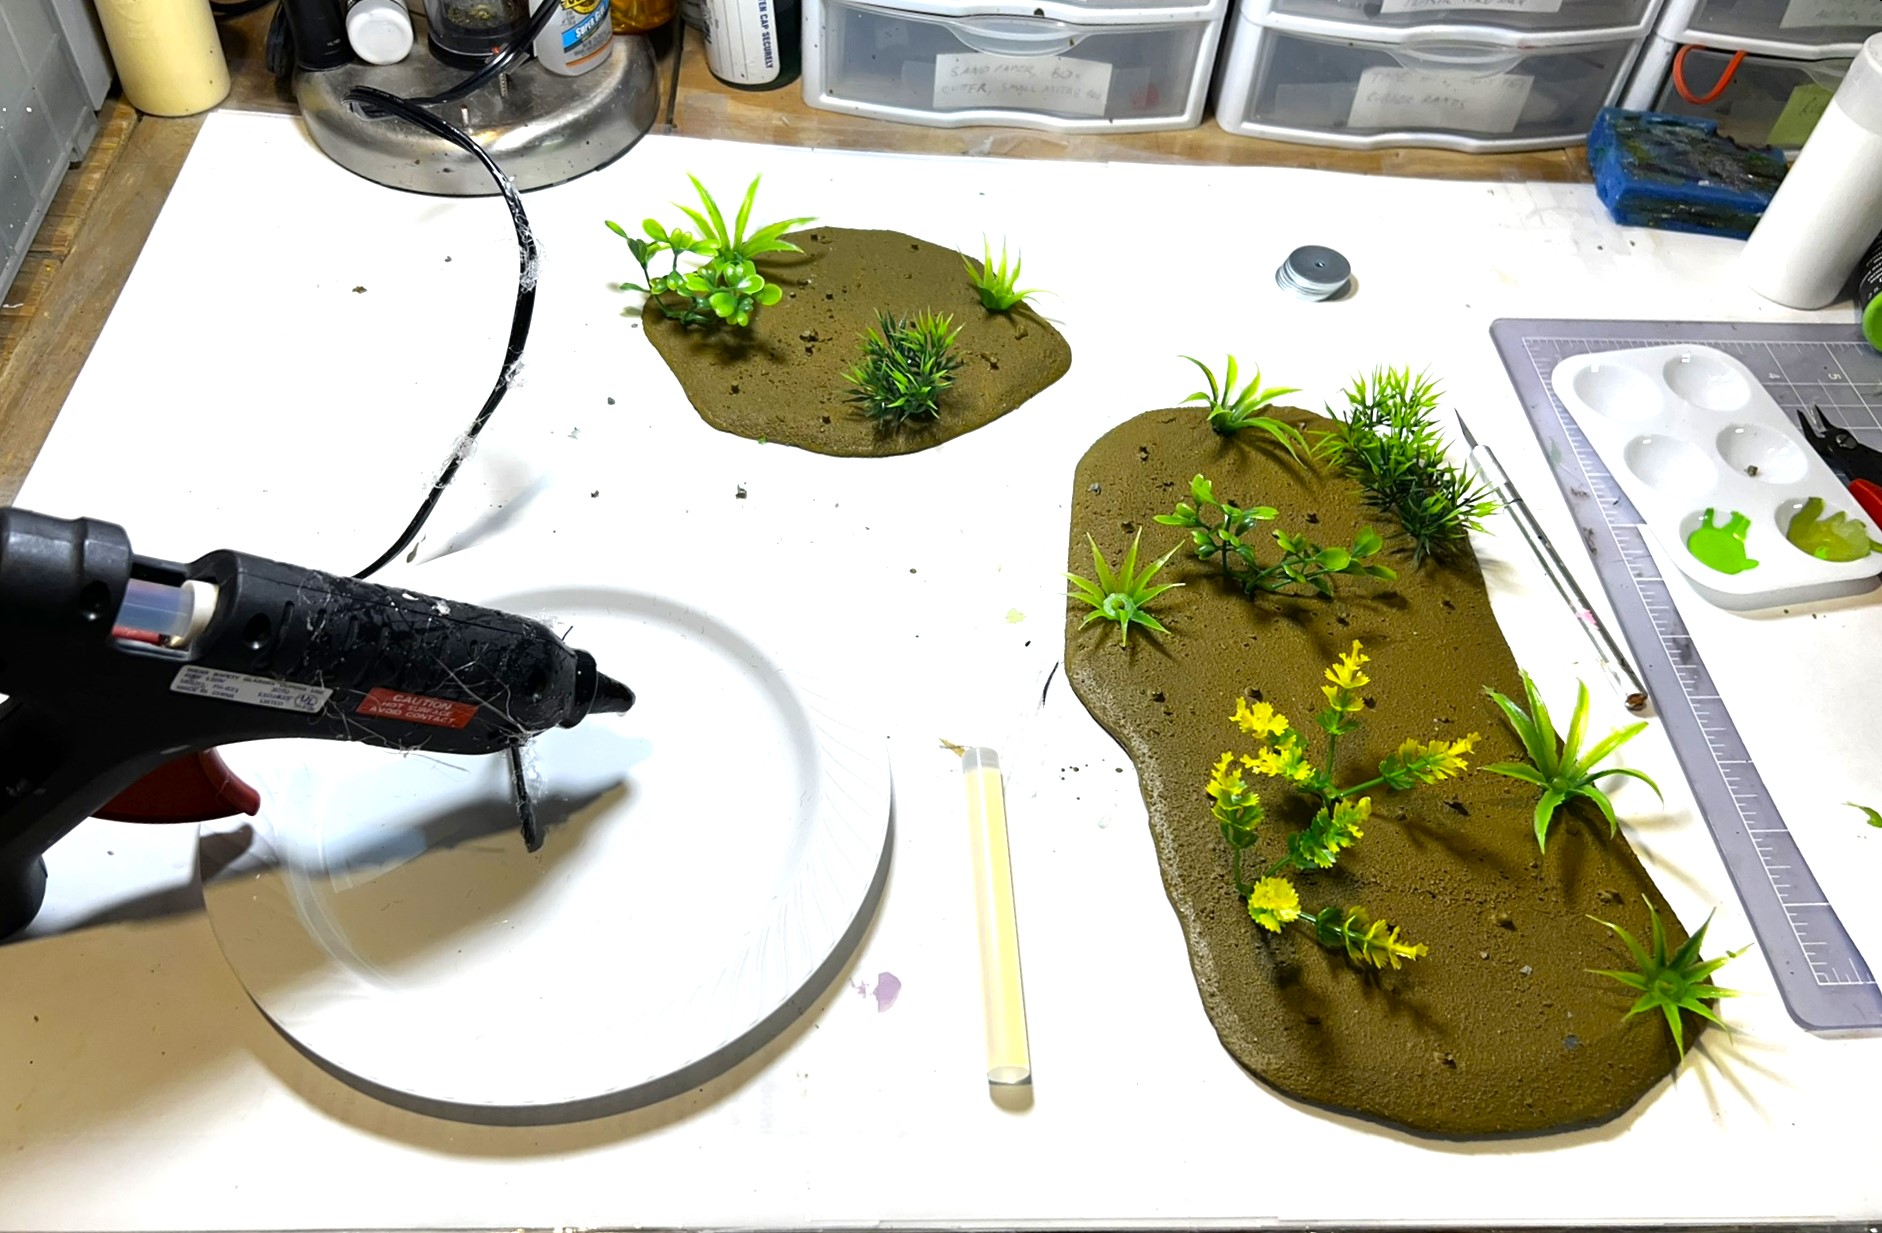
Small base with foliage affixed with Apoxie Sculpt.The 5 non-missing bases with the foliage attached as above – plus the extra prongs have been removed down to the base level.
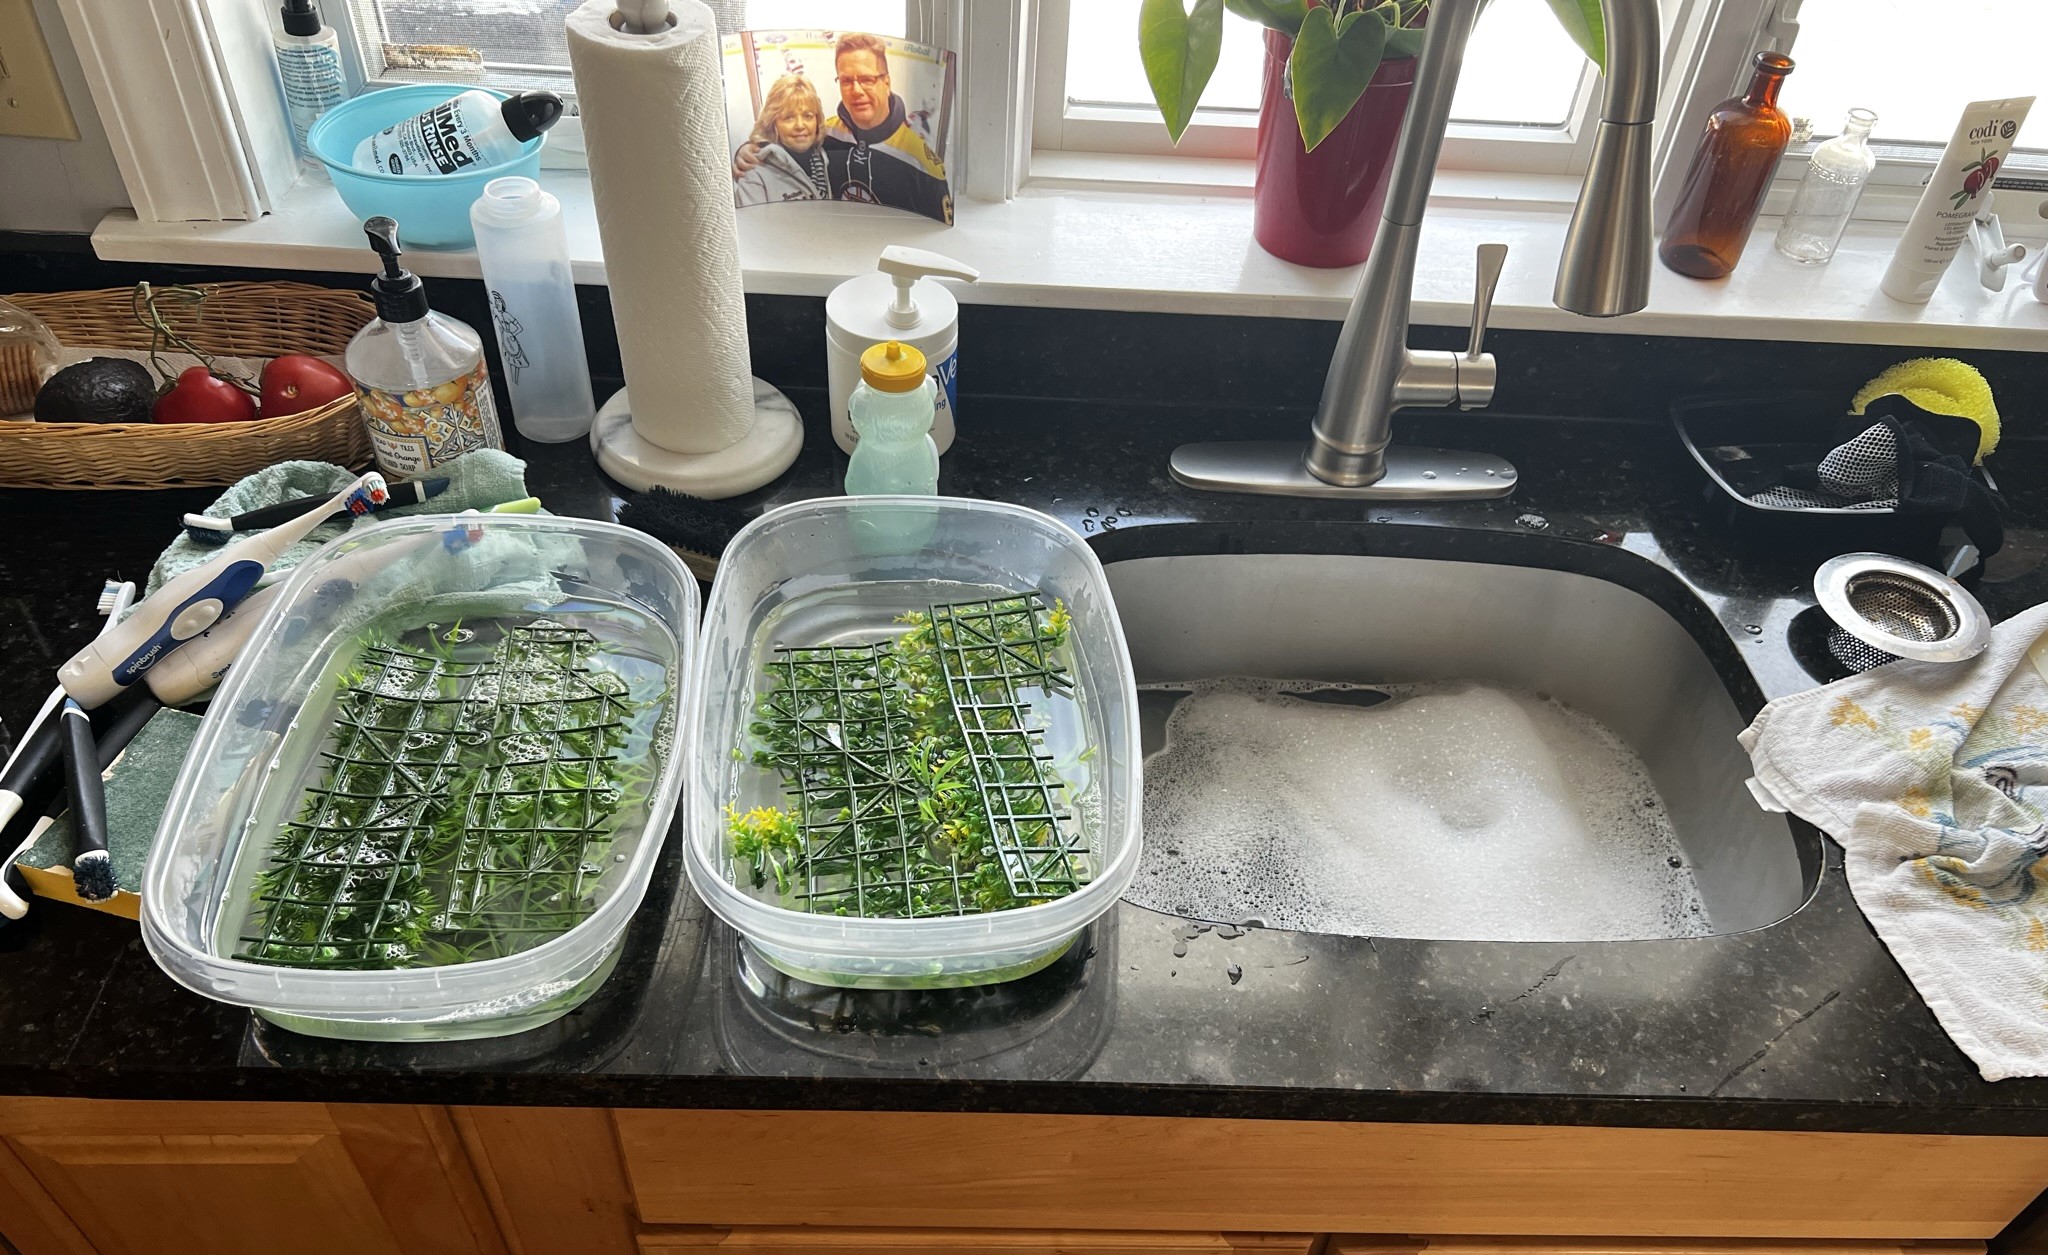
The next day, the Apoxie Sculpt had cured, I did a quick inventory and I was concerned that I did not buy enough bases! After finding the hidden two, I decided that I did not have the luxury of time to wait another day to wait for Apoxie Sculpt to cure on these last two – so I went with hot glue – which worked great and instantly. I then painted over the Apoxie Sculpt and glue with a couple of green craft paints. Next, I applied three successive green hobby washes to the foliage, and let that dry. Then I cut off the remaining prongs, and applied brown texture paint over the places where the prongs had been removed.
Glue gun to the rescue.The 7 bases are shown here after I added the brown texture paint over the removed prong locations. These are shown over the card stock stand-ins I used at TotalCon 37 – so size-wise I was pretty close. Note that the washes on the foliage have lessened the plastic look significantly.
At this point I moved on to adding multiple pigments (like 7!). My goal was to blend the edges to look as if they bordered a beach, with a more jungle-like ground surface towards the centers of the bases. I added the 7 pigments, and fixed them with Vallejo thinner and let them dry.
First pigments session.
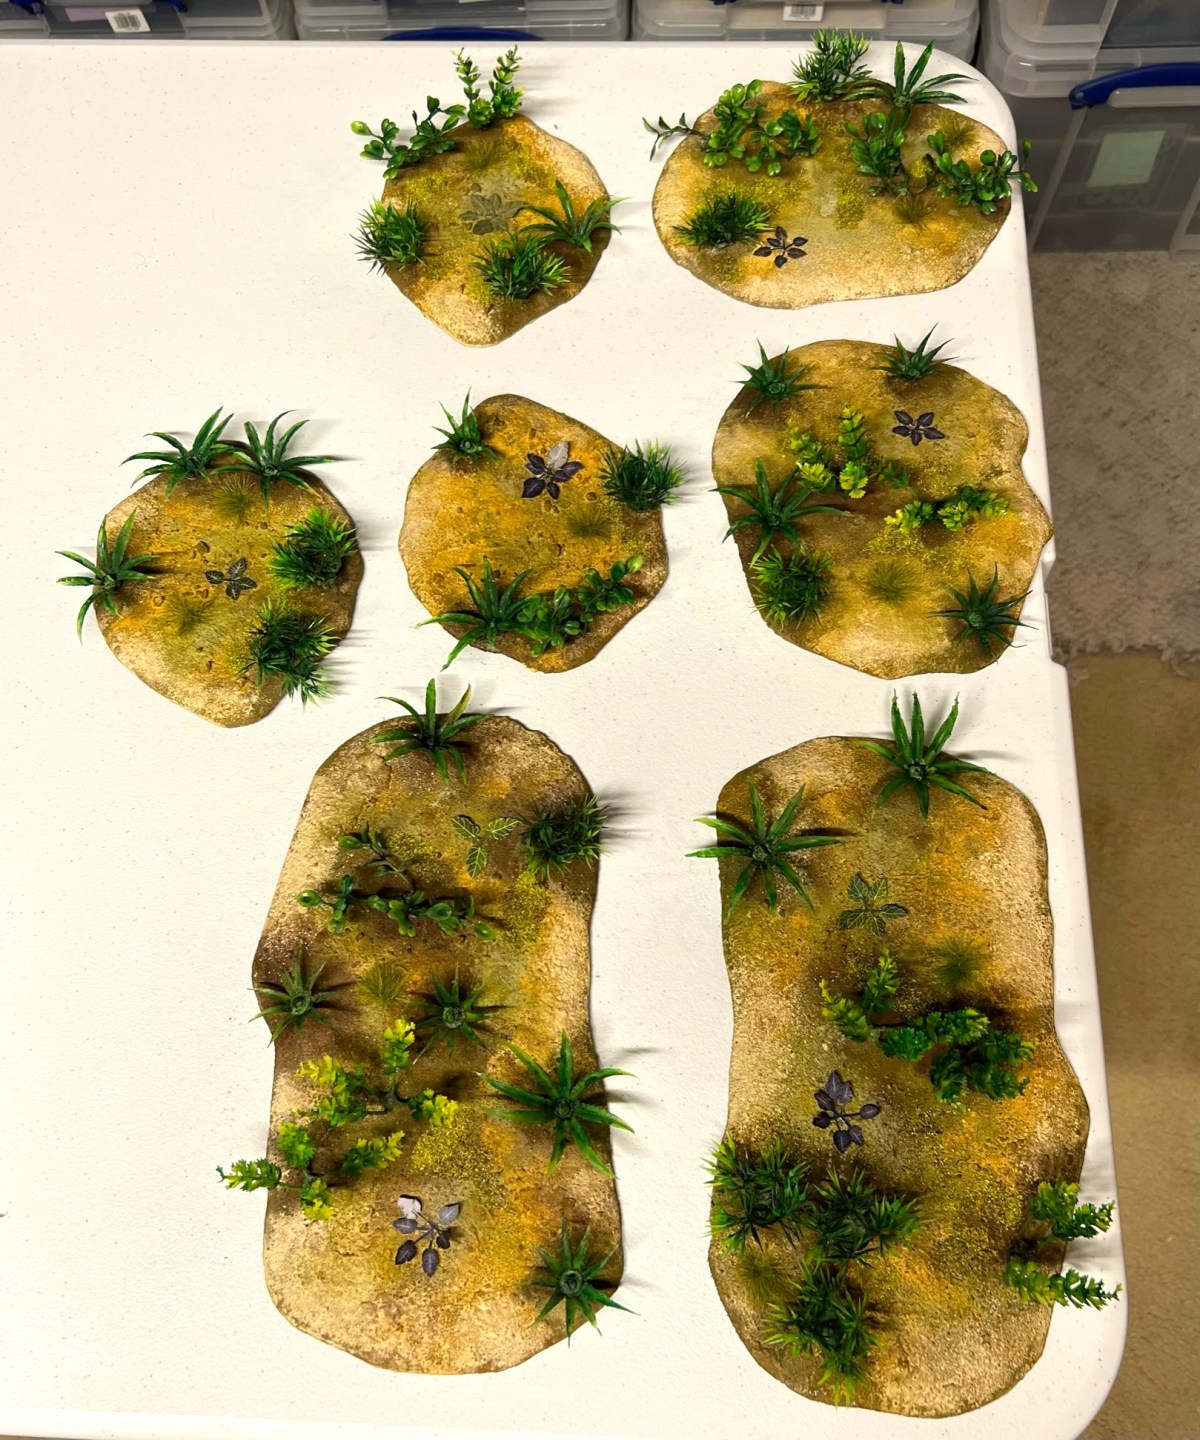
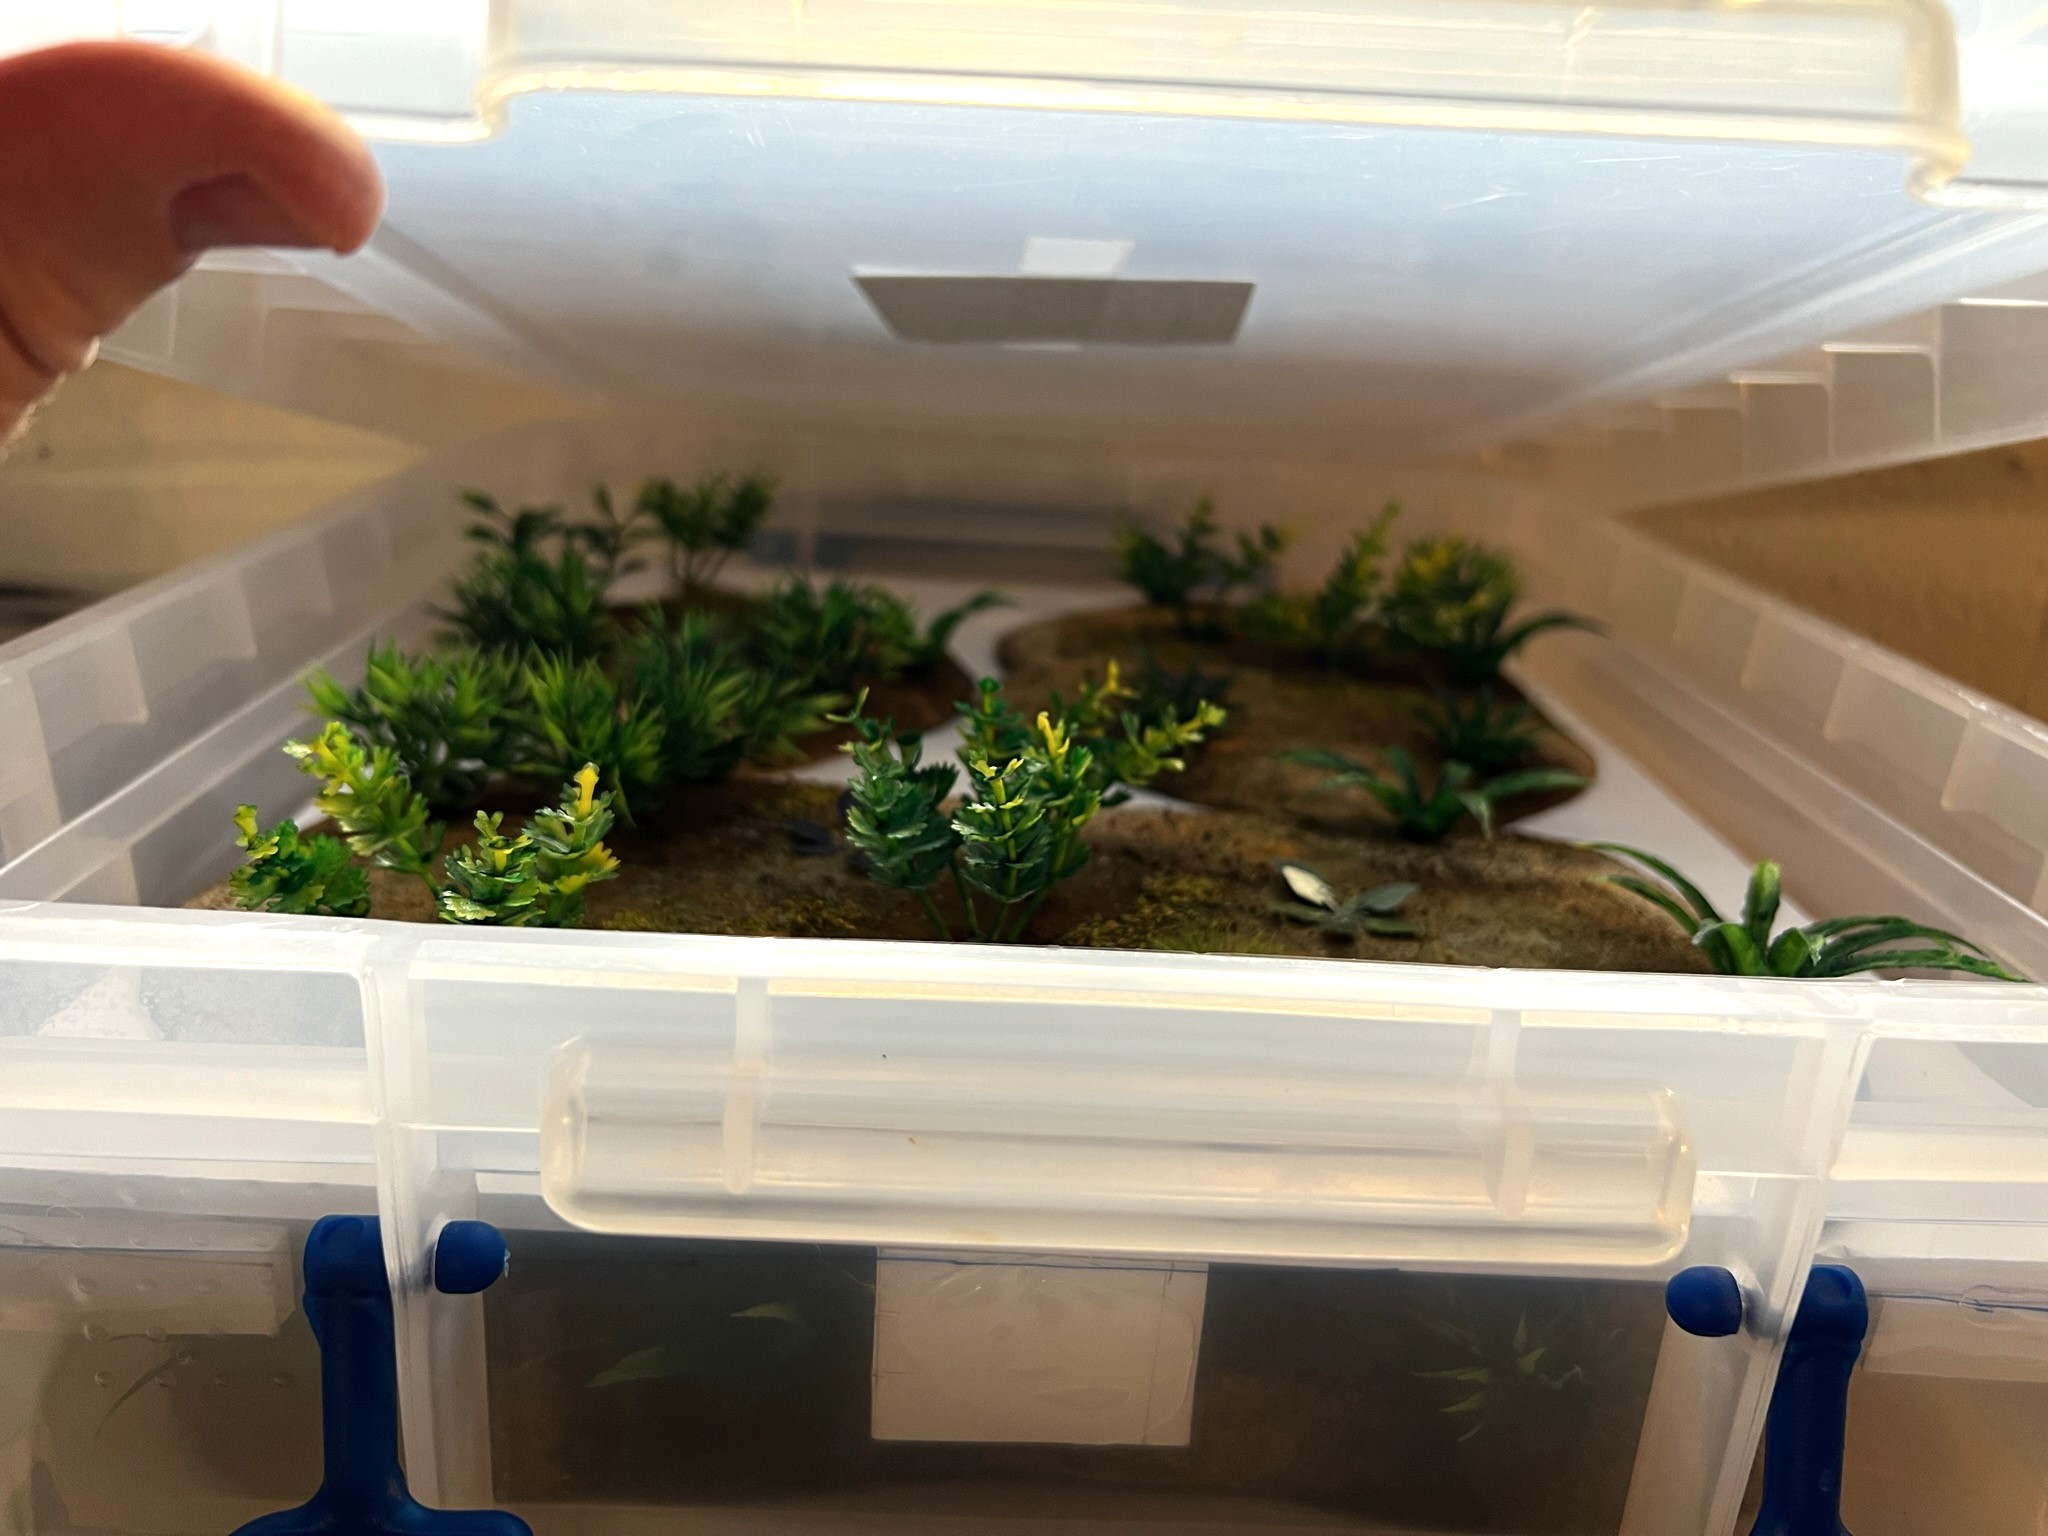
I was not satisfied with the first go with the pigments. I felt that the blends could be better – especially the transition from the beach areas inward. I also was not happy with the beach-bordering areas themselves. With that, I gave it a second attempt to address the shortcomings. That did address the issues – and then I added some scatter leaves and some laser cut low lying Gamers Grass plants that I bought from Things from the Basement at TotalCon – plus some Shadow’s Edge Miniatures jungle tufts.
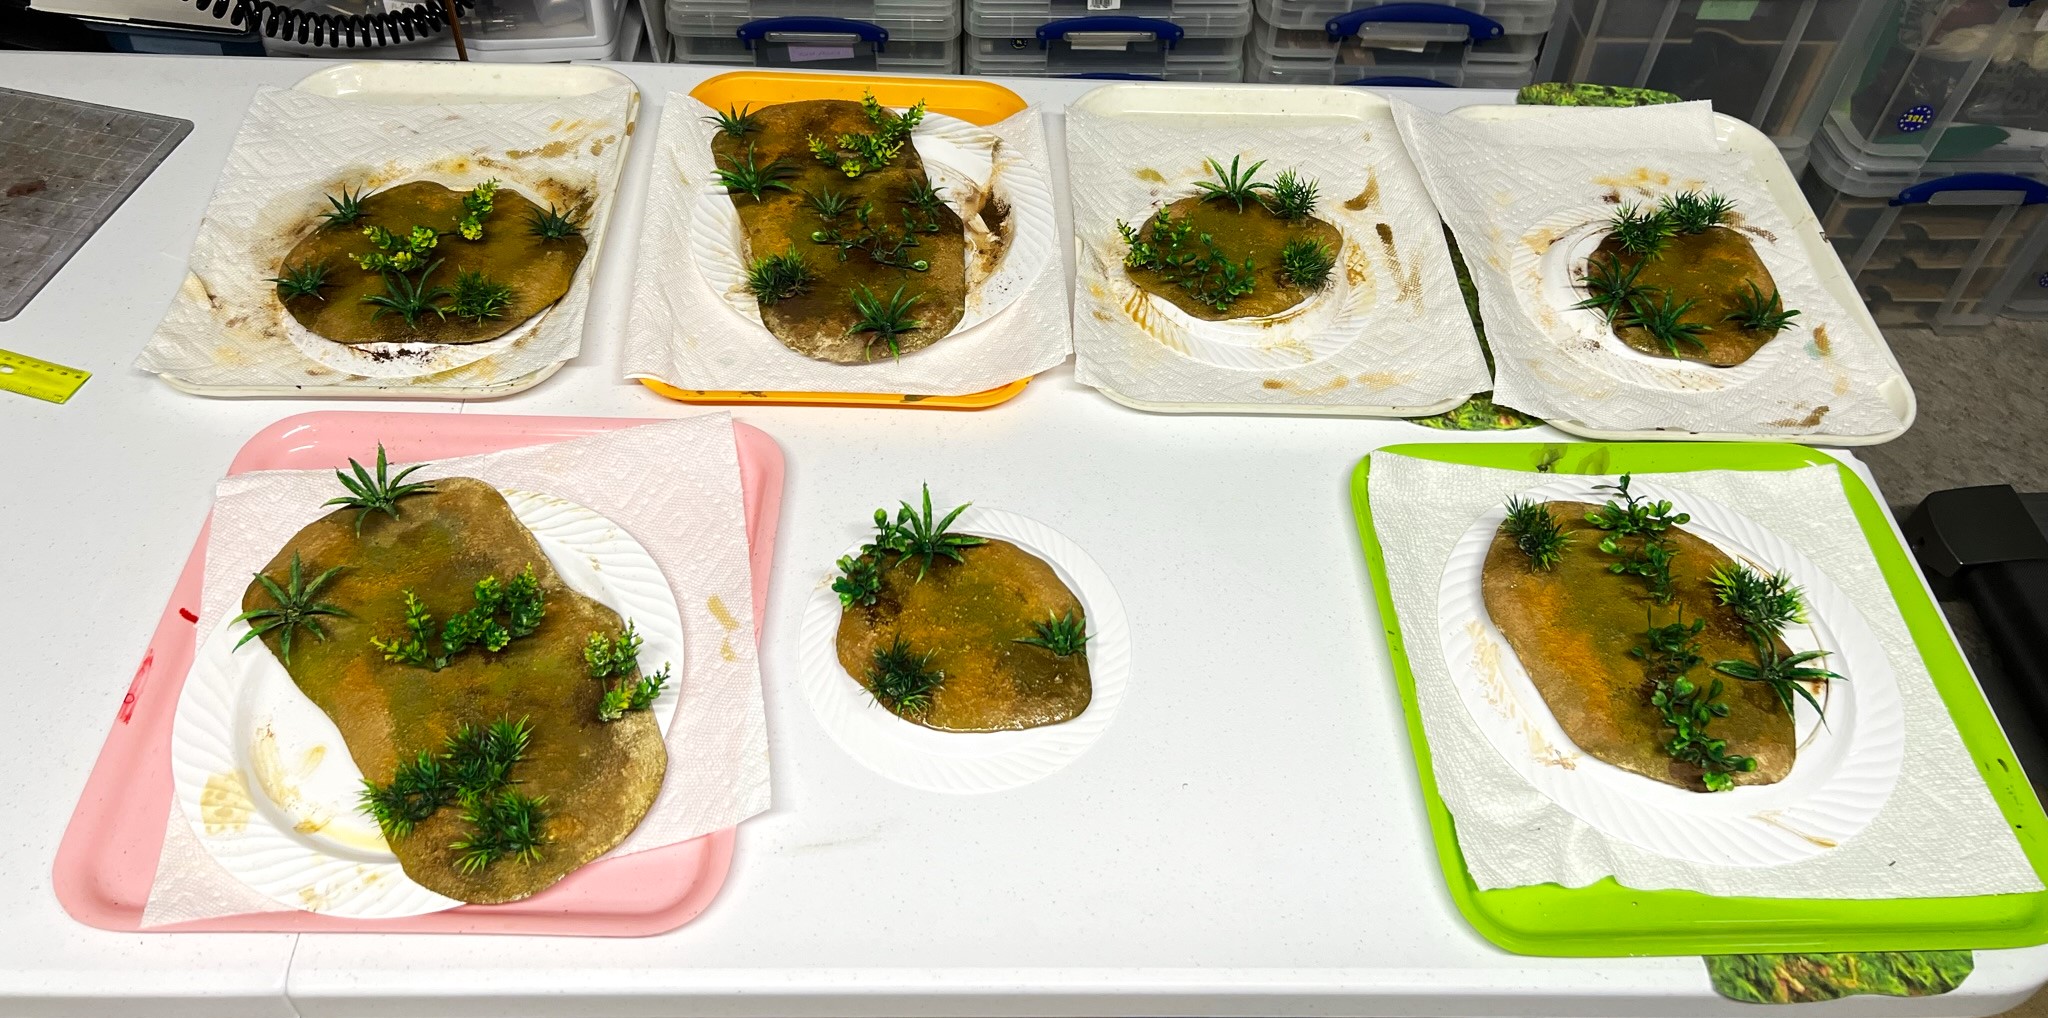
I was pretty happy with the final products seen below.
The seven bases completed. Note the added low-lying plants and tufts.Close up of a medium base with a conquistador halberdier and an “underdressed” Maya novice for scale. For the Maya’s sake, let’s hope there are very few thorns.
I can see using these bases for many other games – and I believe that they work well with my jungle bases with the palm trees. As to now storing and transporting them – I modified a 32-liter Really Useful Box with hot glue and posterboard/foam board into a three-level “apartment” Jungle Box. The bottom level is lined with adhesive magnetic sheets (my jungle bases with the palm trees have steel washers embedded underneath). The jungle paths also fit in here rolled up with the trees being upright. The next two levels fit the seven bases described here – four on one, and three on another. Both levels are made of posterboard and are resting on posterboard pieces that I hot-glued to the walls of the box. I did need to make the level that is immediately above the trees into three pieces so that I could get it by the supports of the top level (which is in one piece). No levels will crush any foliage (thankfully). Voila – a Jungle Box ready for Cold Wars transport!
The top level – rests on one solid piece of foam board.Side view of the Jungle Box showing the three levels.
I hope this was useful to those of you considering similar projects. I do highly recommend Dave Stone’s stuff – I also previously shared his Aztec Style Serpent Statues that have been very popular at my games. Check him out!
My next post will be coming (hopefully) somewhat quickly as I need to finish preparations and packing up for Cold Wars. It will show my Winkie Zilk-riding cavalry – stay tuned! For my fellow bloggers, I’m trying to keep up with you, and know that I always read your posts and try to give you feedback. This month is, however, nuts, so I might be a bit tardy, mea culpa. As always, much thanks for taking a look – and let me know what you think!
Miscellaneous details and references for those interested in that sort of thing:
For all of my previous posts on games, units, and other projects for my 16th Century Spanish Conquest supplement for Feudal Patrol™ – “Civilizations Collide” – please see this page.
PAINTS, INKS, GLAZES, SHADES, WASHES, PIGMENTS, FLOCKING, GLUES AND MORE THAT I USED ON THESE JUNGLE BASES:
Two totally unrelated things conspired to make me jump off my Spanish Conquest/Mesoamerican hobby path for just a short August detour. The first was my desire to participate in Dave Stone’s Season of Scenery challenge. I did get in that last year with my cityscape build for Tenochtitlan, the Aztec capital. My challenge this year was that I really did not need any more scenery for those games. The second thing – and we are talking about scenery here – was right in my back yard.
Woodstock.
Yes, that Woodstock from the late Charles Schulz’s Peanuts. Or rather the resin yard sculpture of Woodstock that we have had in the back yard for so many years that I don’t remember when we got it. Plus, I grew up reading the strip and still do in the reruns in the daily newspaper (which, yes, I still get daily). I think Peanuts still holds up.
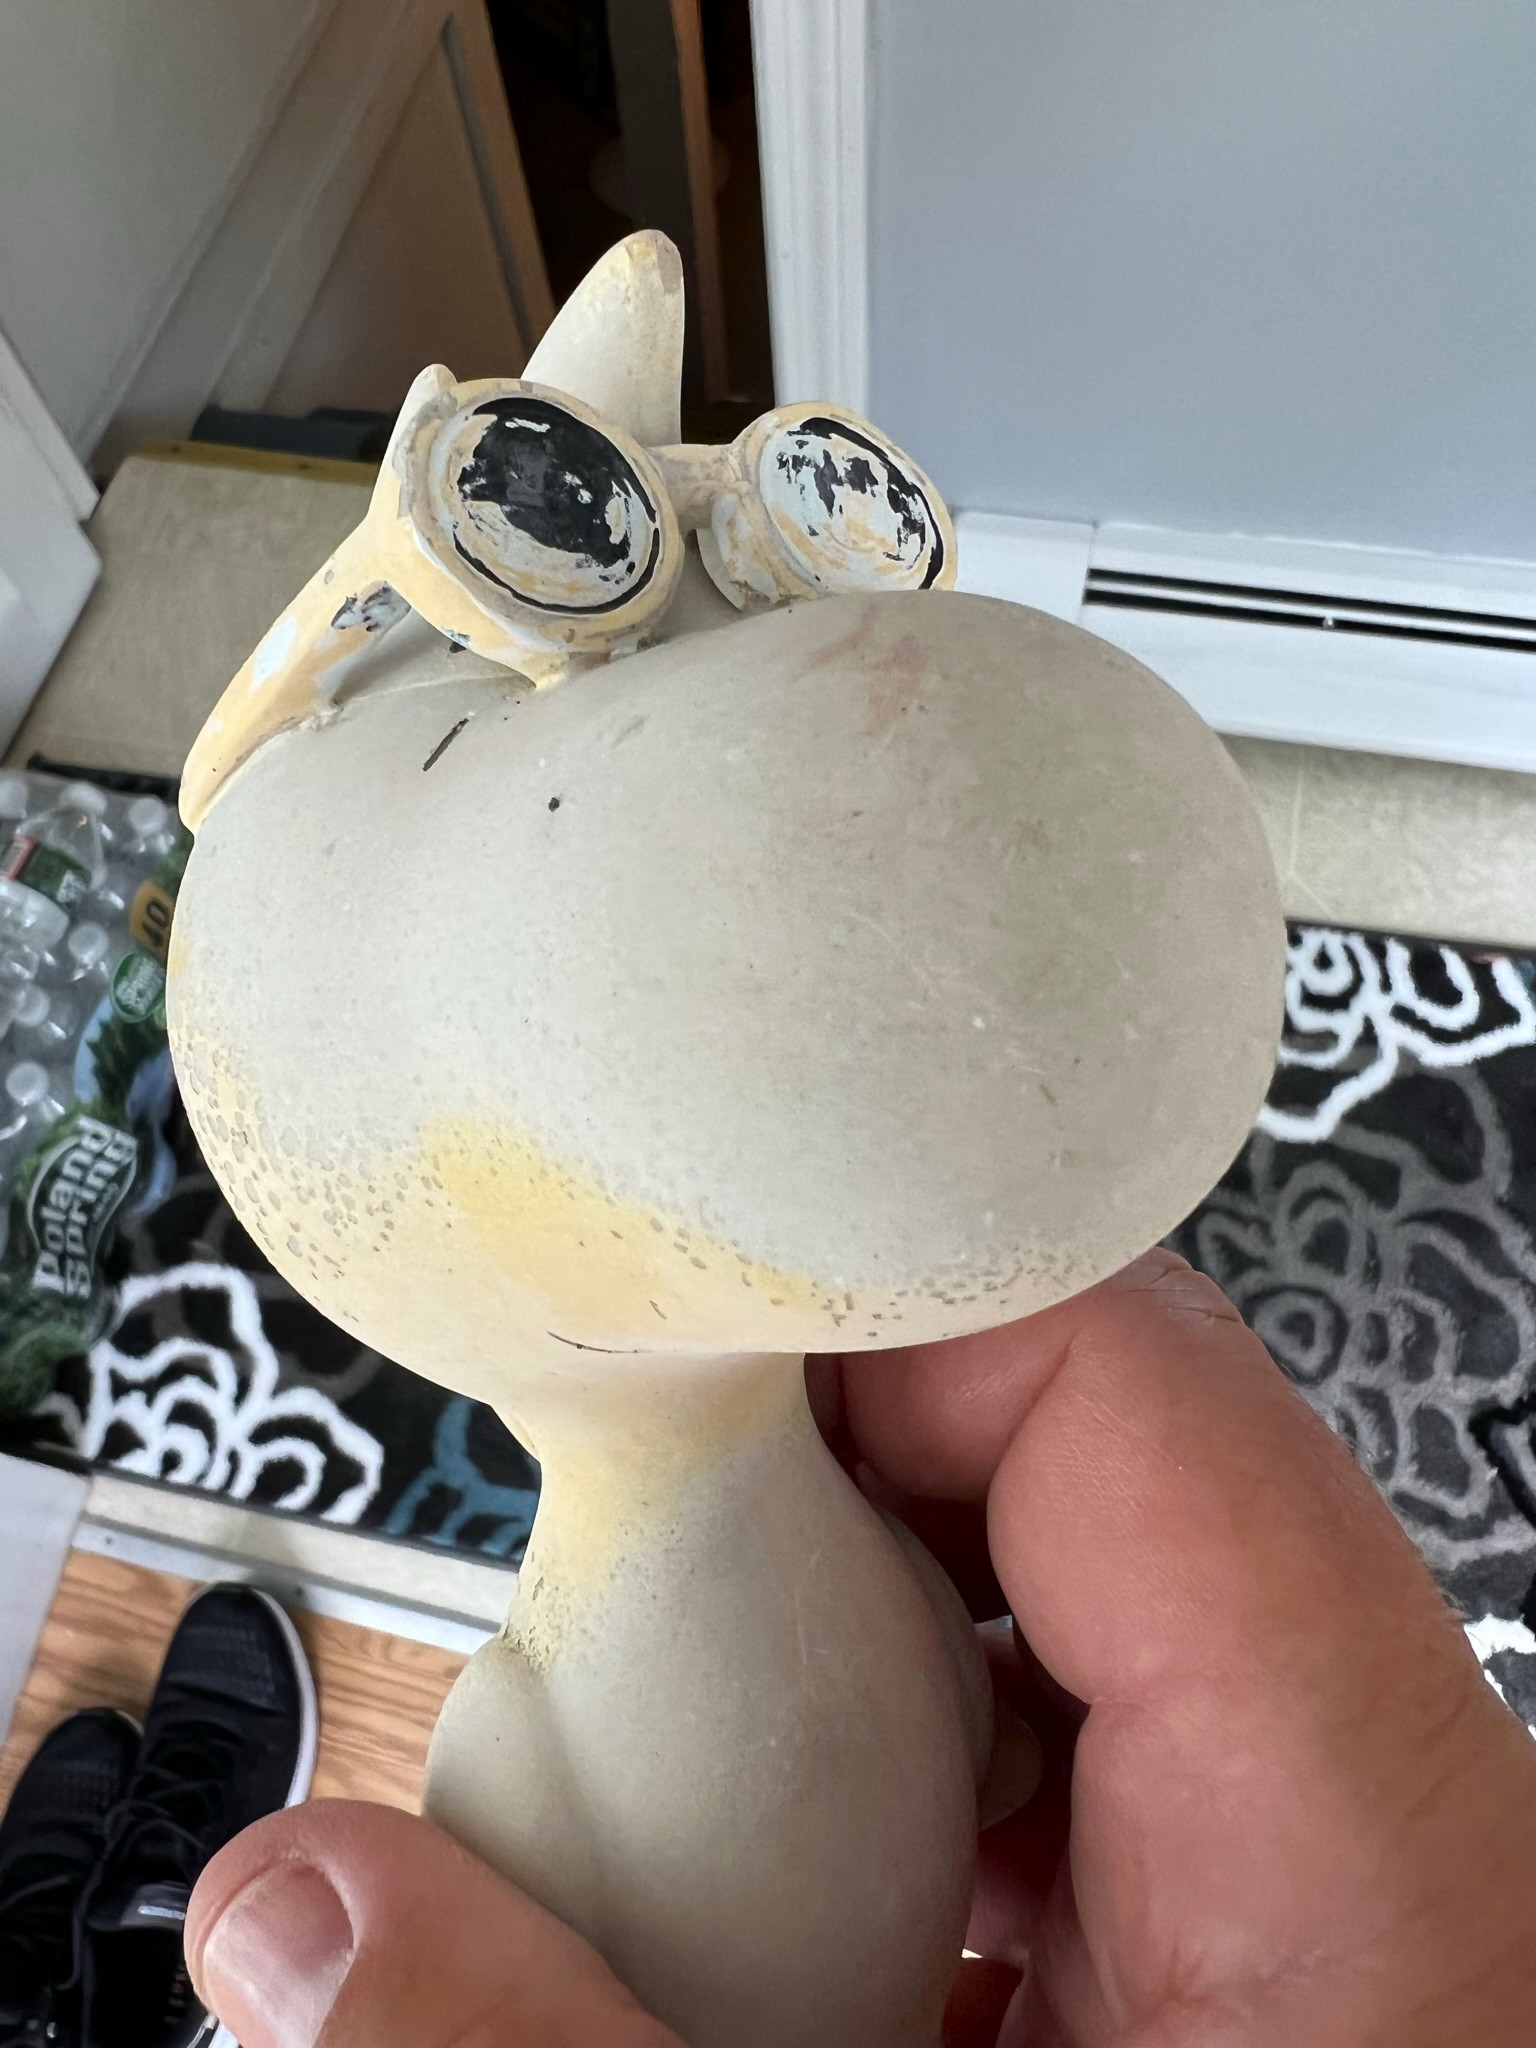
Woodstock looks somewhat like a cockatiel (but Schulz never would specify exactly what kind of bird he intended him to be).
In any case, as Caesar was part of our family, we naturally have had several bird-themed decorations inside and outside of the house. One of these is the aforementioned resin yard sculpture/ornament of Woodstock wearing sunglasses while lounging on a chaise lounge for many years. The New England sun, snow, heat and rain have taken their collective toll on the dude. But, back to my original point, he’s part of the scenery! And he is a fond reminder of Caesar. So, as such, I decided to rehab Woodstock for my backyard and for Dave Stone’s Season of Scenery.
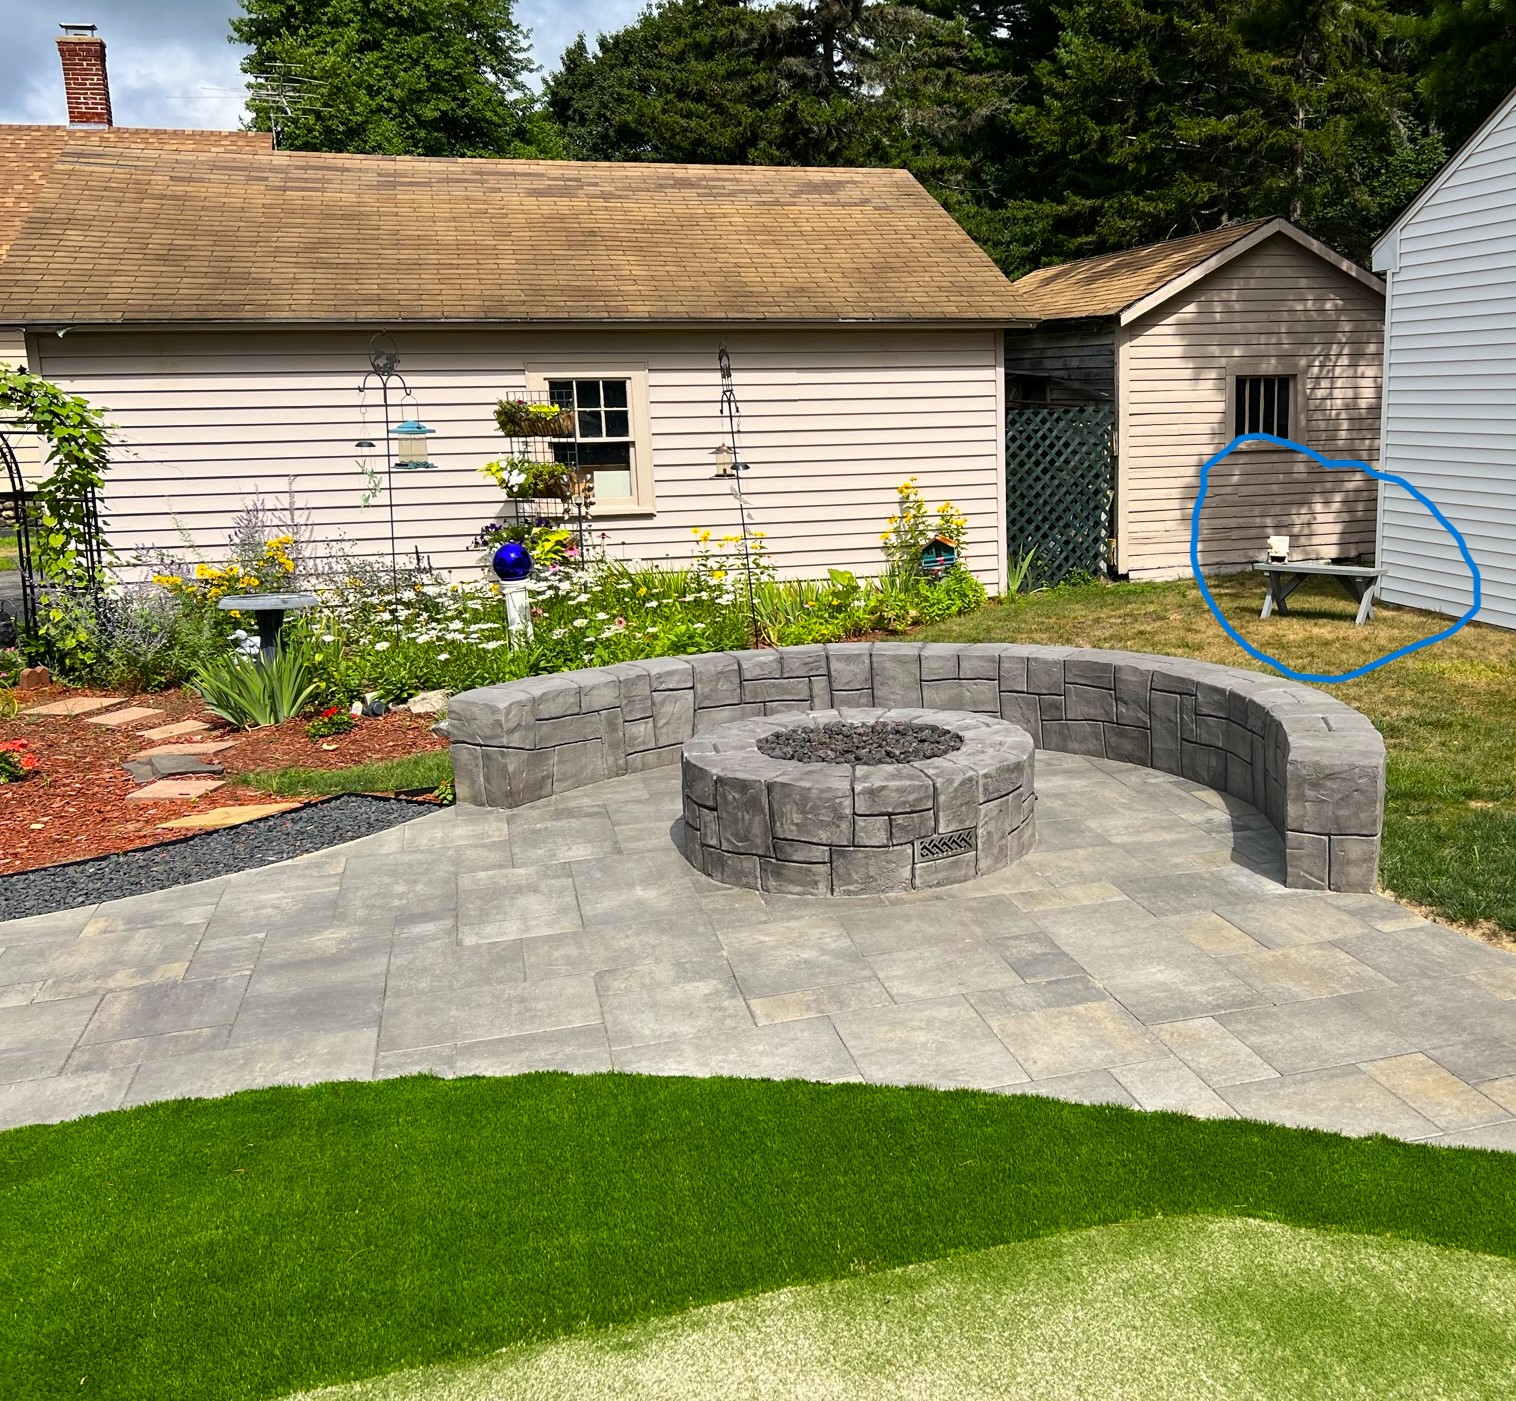
View from the putting green towards the fire pit and the flower garden behind it – see the circled bench!
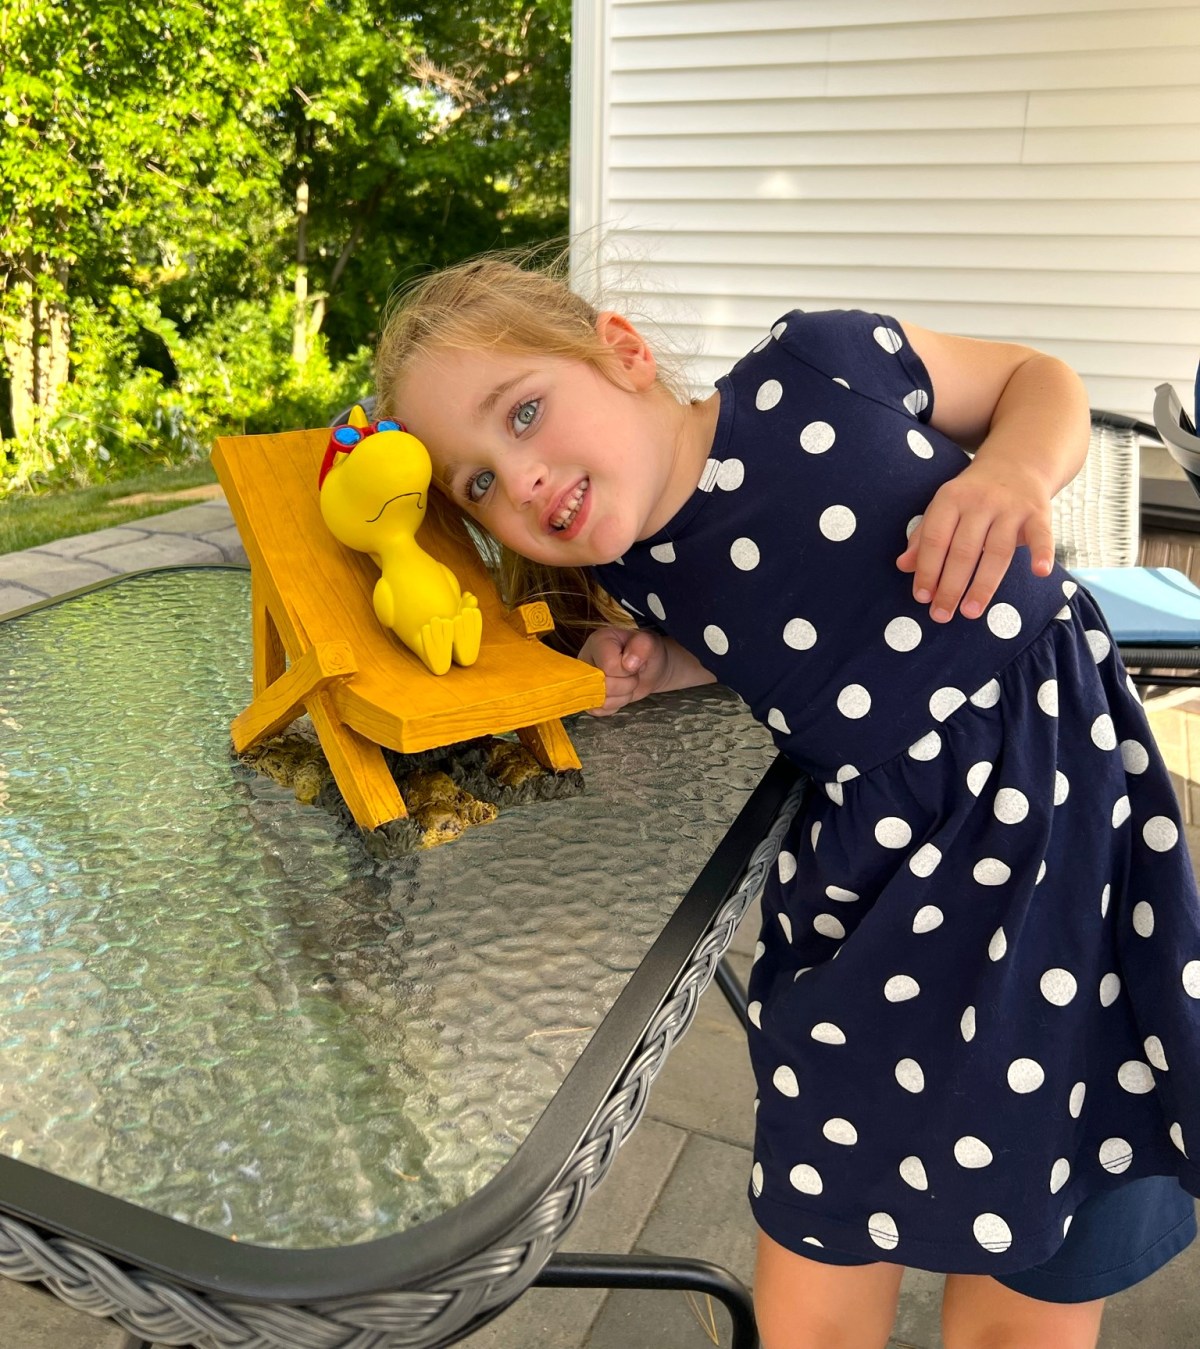
And it’s been quite hot this summer – and we are in a drought so my grass (not the artificial putting green) are pretty burnt. You can see below that Woodstock has long since been separated from his chair. My granddaughter Tabitha does likes to hold him. As he’s no longer affixed, I thought I’d rehab Woodstock and keep him removable but also make him more secure on his chaise lounge as well. Therefore, as fate would have it, I could do that and use him for Dave’s annual scenery challenge!
Right sideLeft side
I decided to use a combination of paints and varnishes – craft paints, old primers that are no longer good to airbrush with (i.e. too prone to clot and jam up an airbrush), and some rattlecan varnishes and lacquers left over from my pre-airbrush days. Add to that some other paints (which I list at the end of this post for those interested).
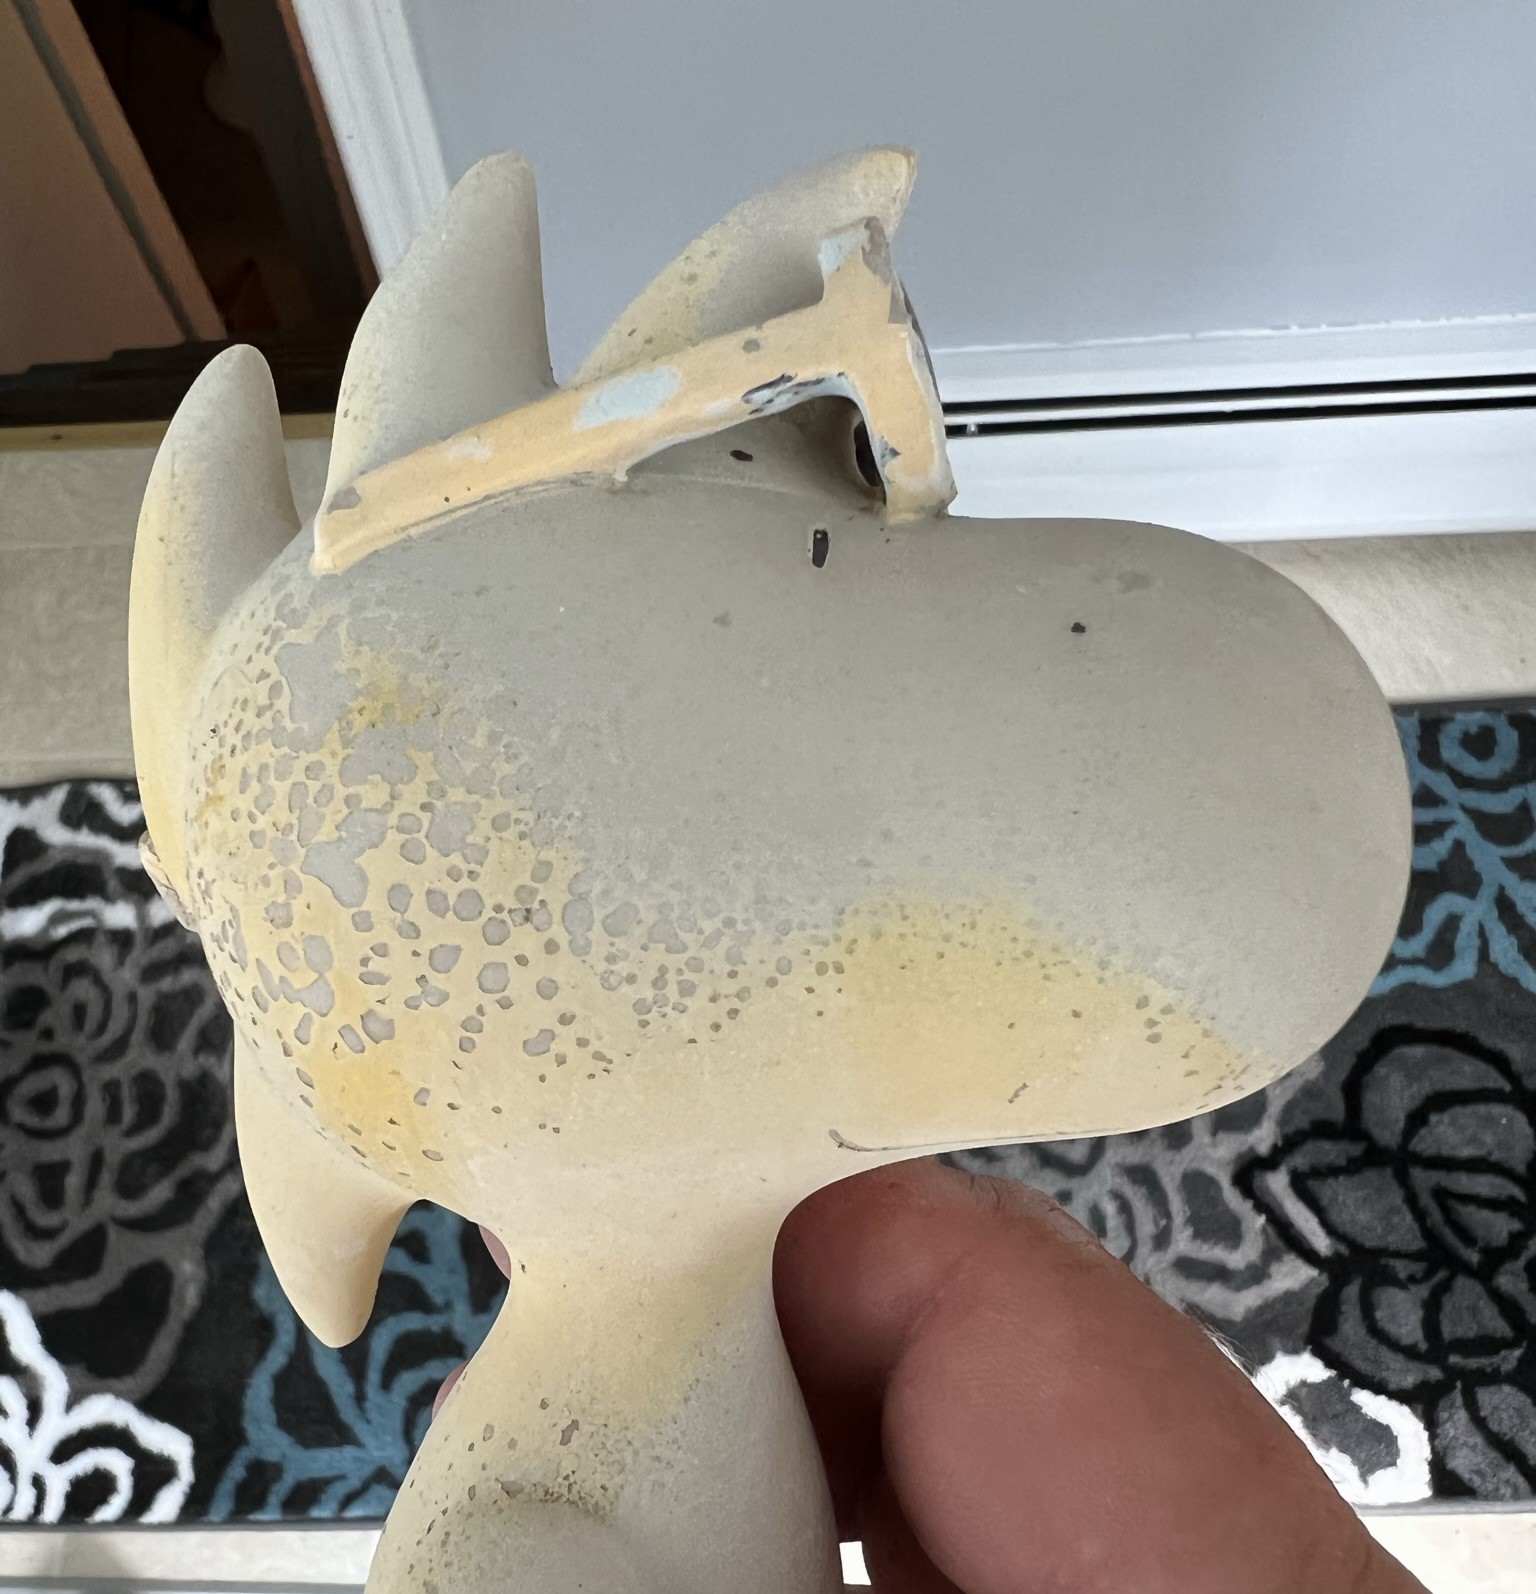
First, I washed and scrubbed the piece – it had a good amount of grime on it and I wanted the primers to really adhere. A few ants had taken up residence in it as well and kept wandering out at random times despite the cleaning.
The old paint was mostly gonebut after a good washI had this.
The chaise lounge also had a good-sized crack that I repaired with green stuff.
Green stuff repair.
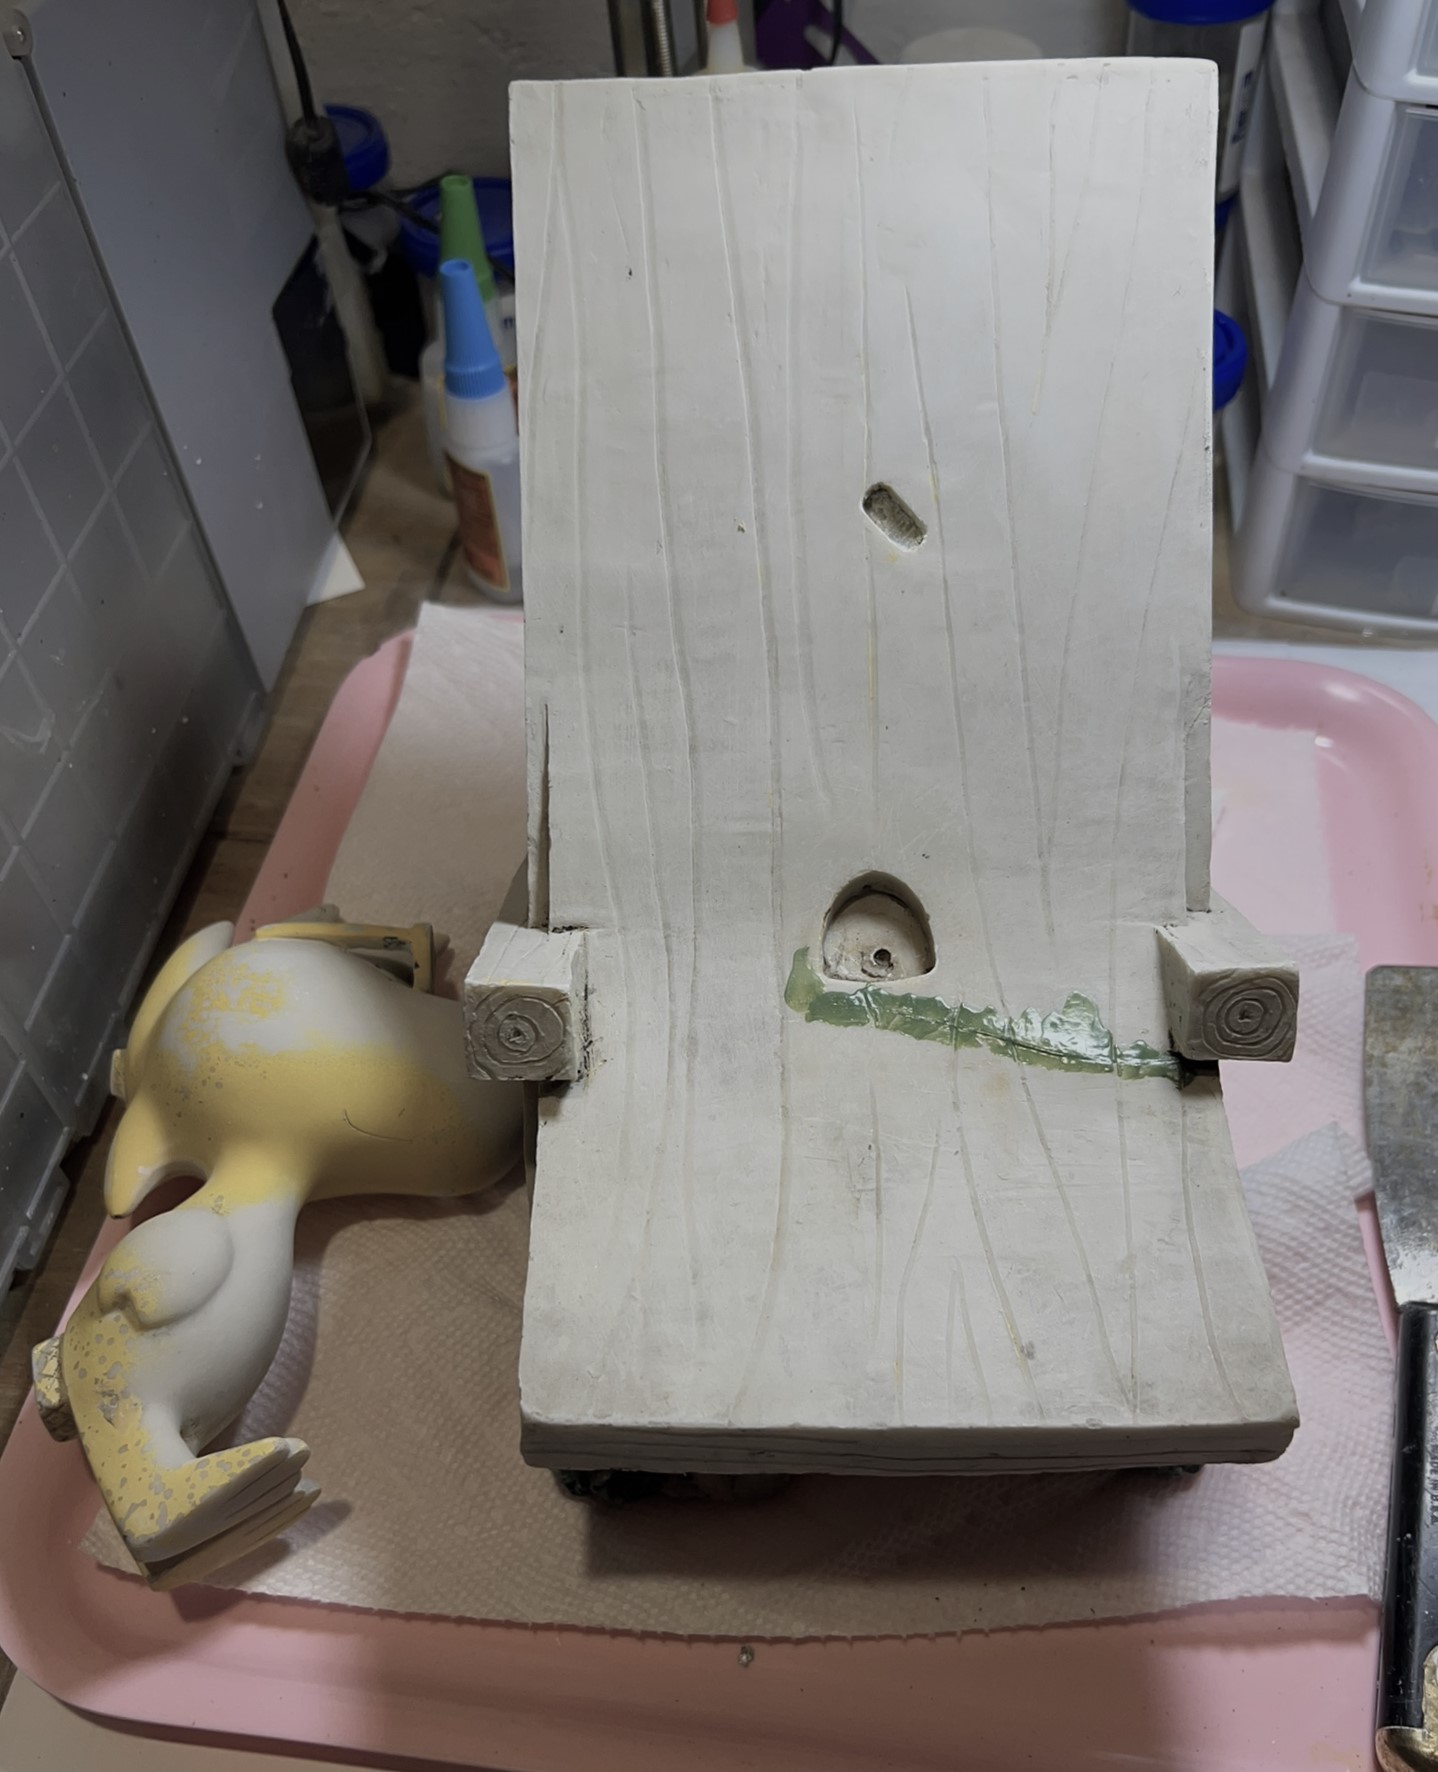
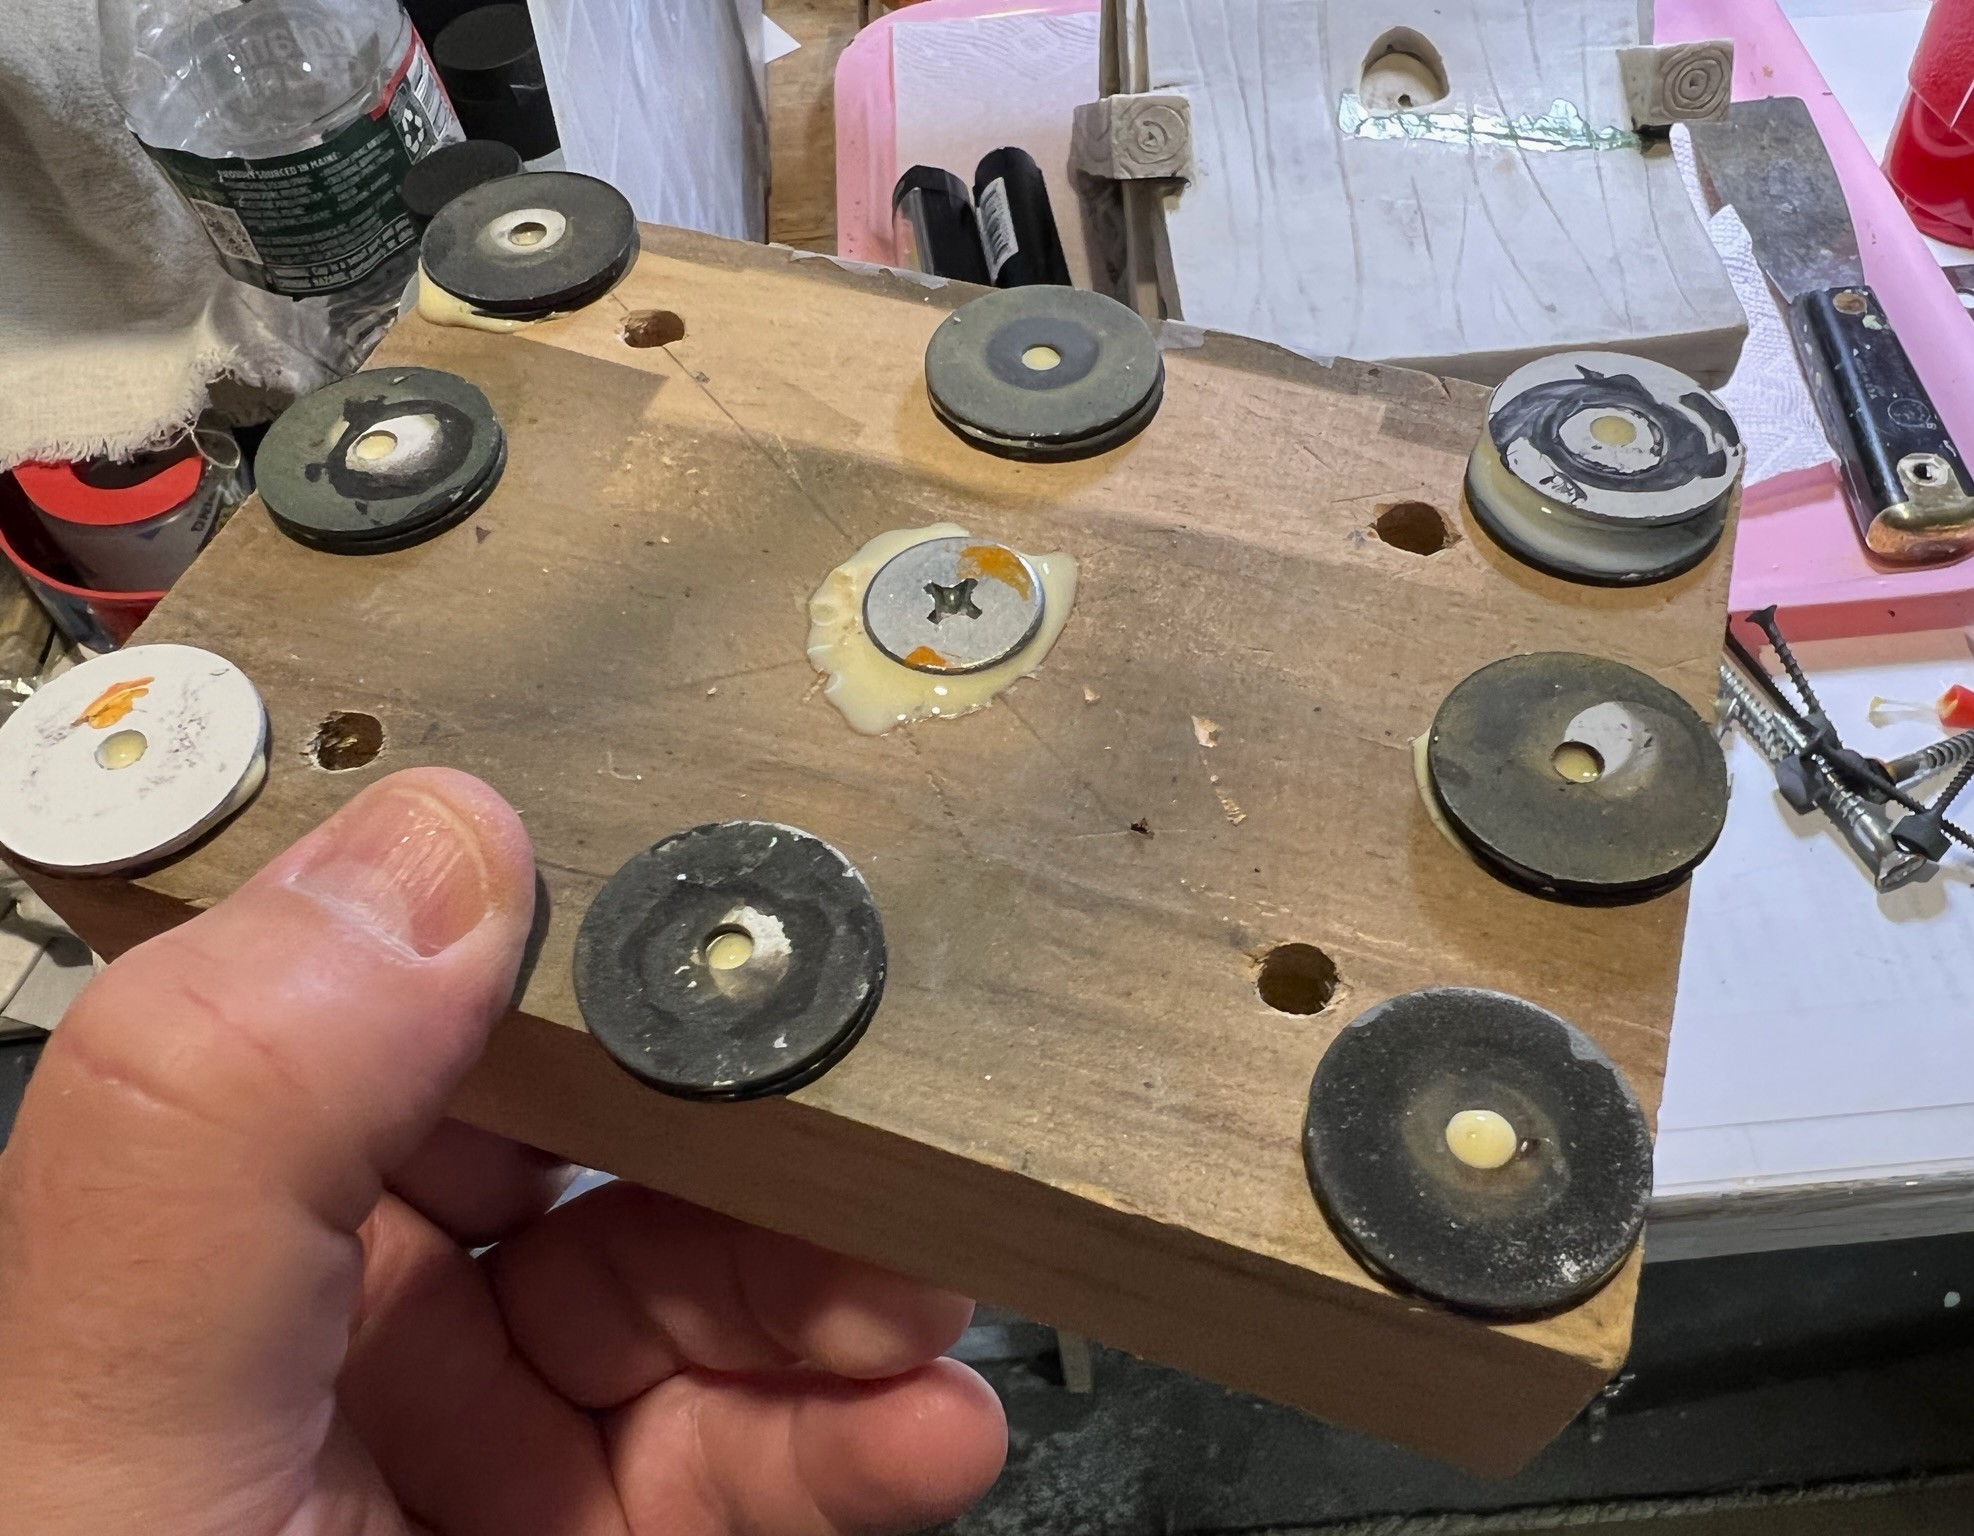
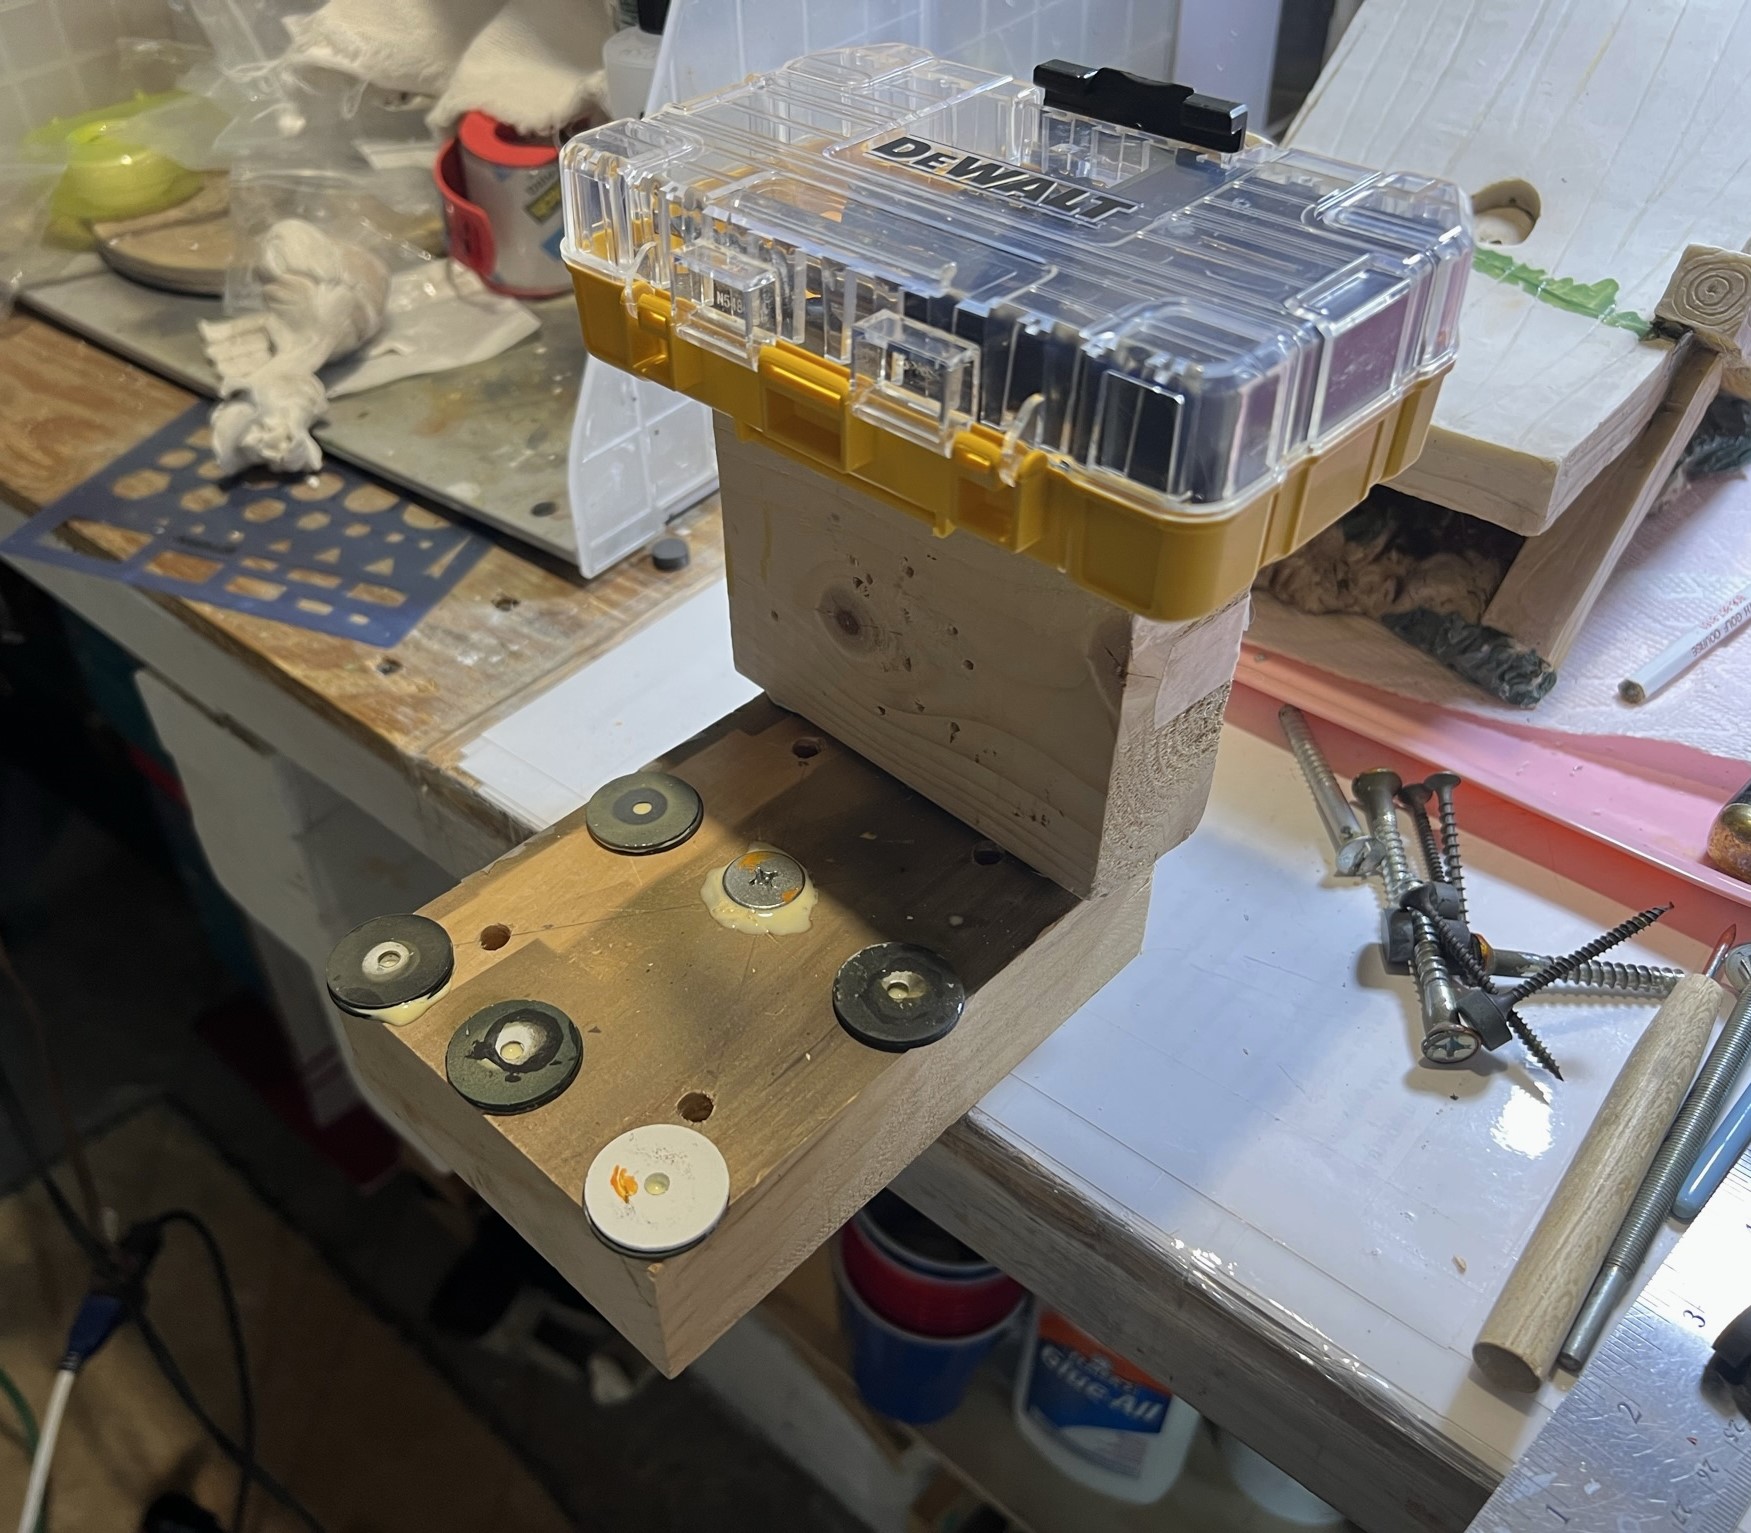
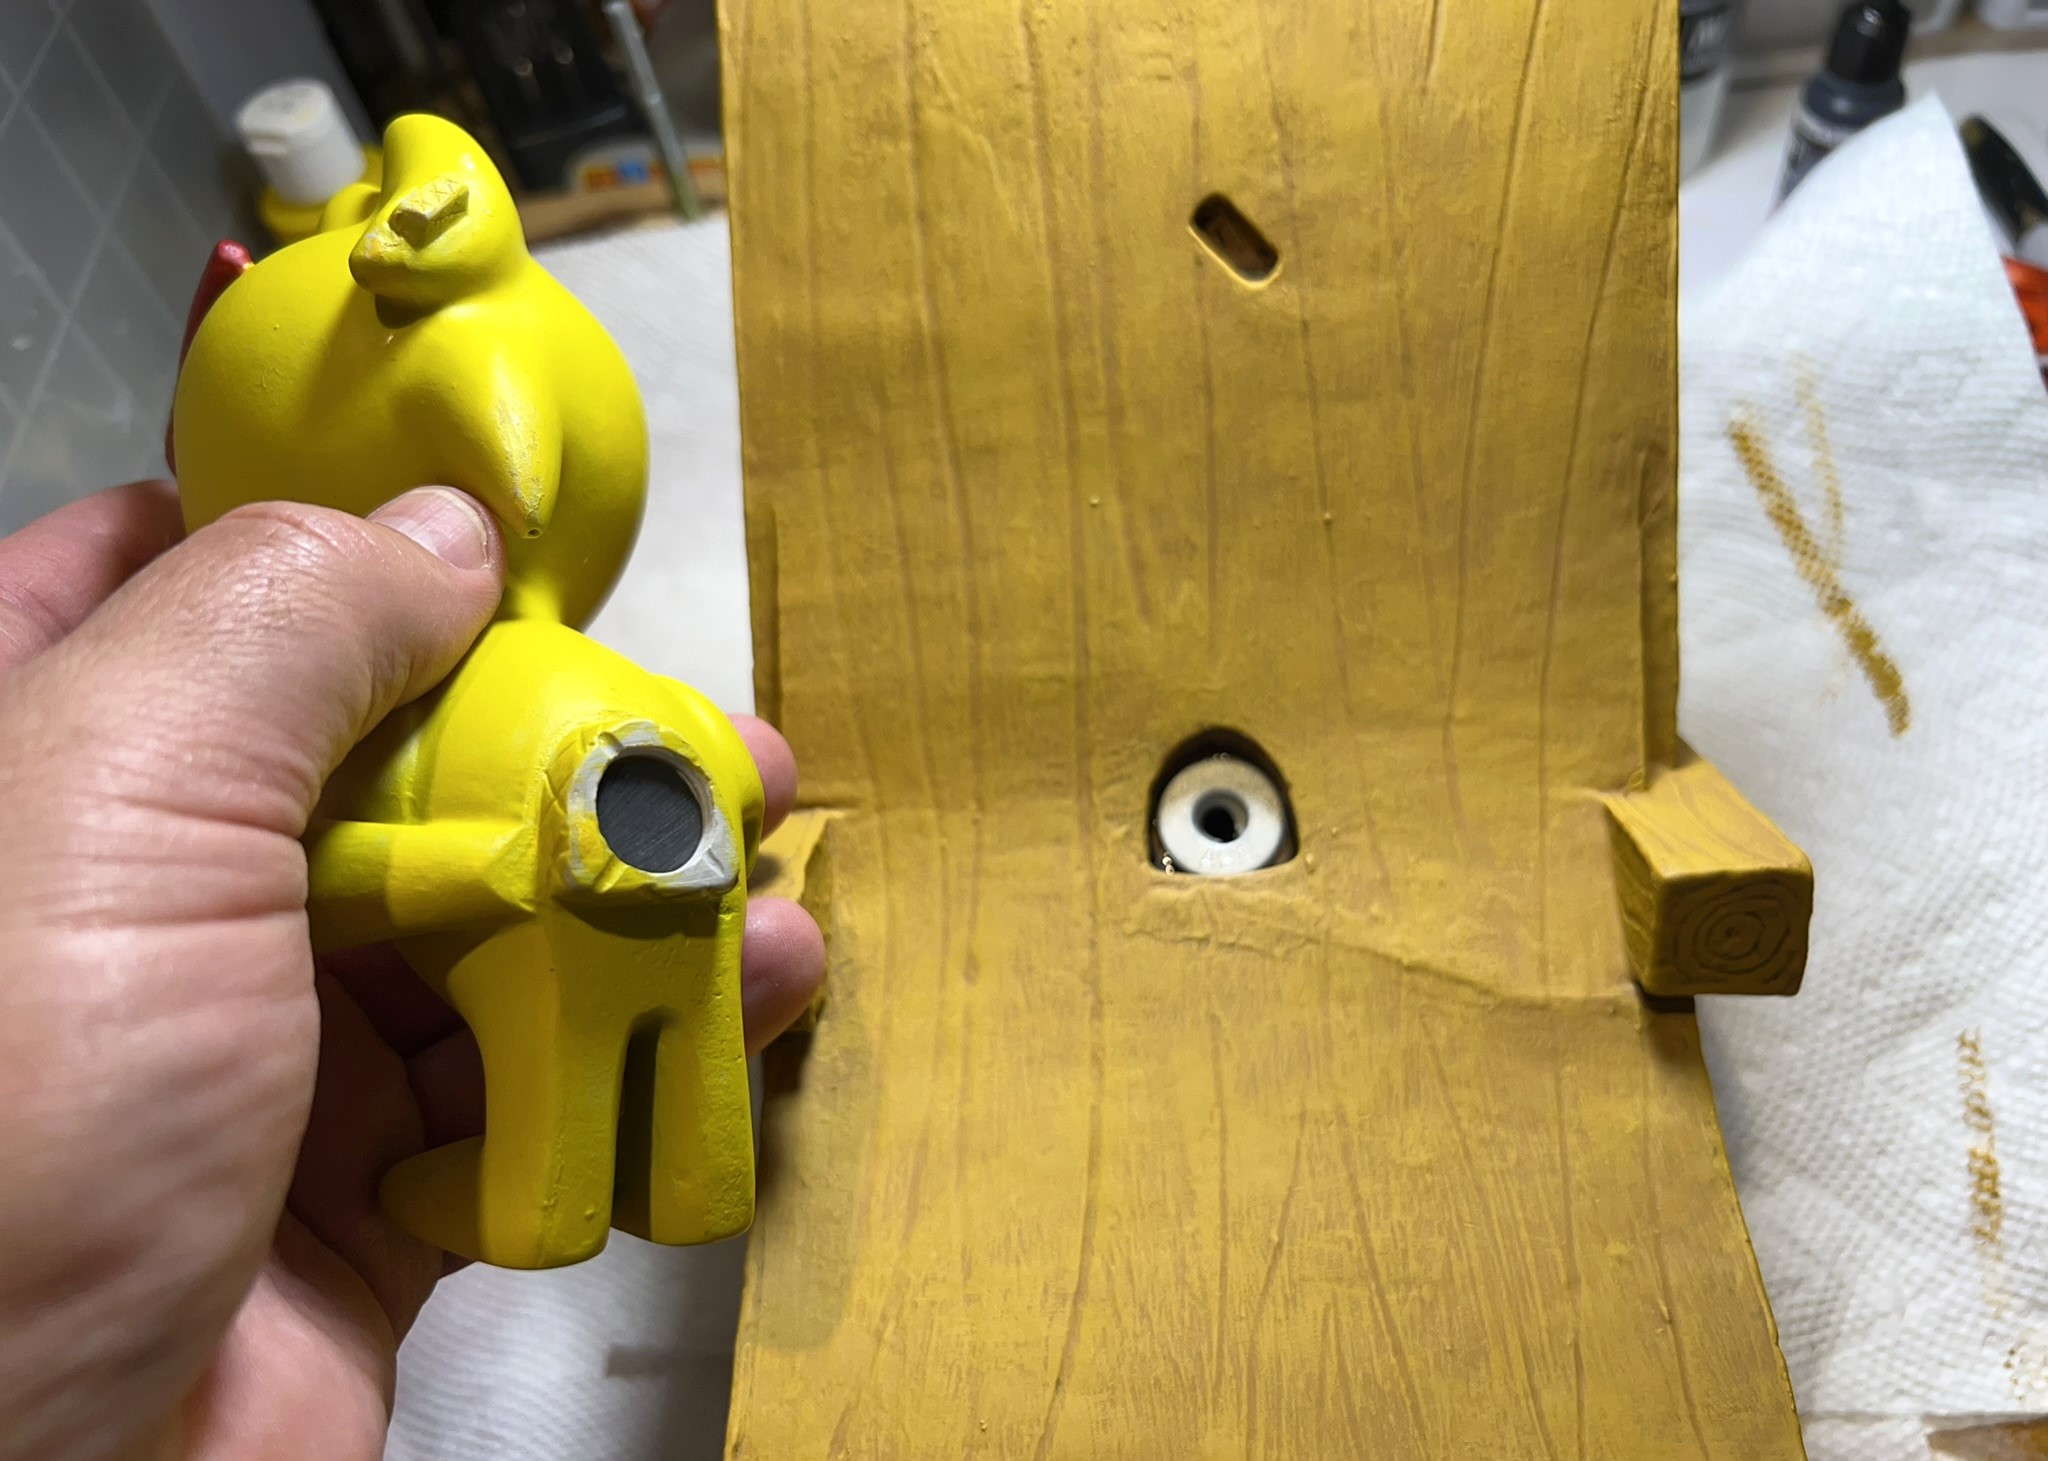
The next challenge was how to paint the two pieces without handling them. For the chaise lounge, I just did each side and allowed for drying. For Woodstock, I needed a support jig – so I built one. The drilling also allowed for magnet insertion later with a bigger hole centered on the smaller one (not shown immediately below but later on in this post).
1st, choose the magnet size and trace…then find the center.Gently support the model in a towel in the vise, and drill a pilot hole.Then drill a deeper hole for the support bolt for the jig. I still needed a bigger hole for the magnet that was not as deep.
As for the jig itself, I reused a blot of wood that had a few holes that I had used to support 15mm tank turrets on previous projects. I had a longer bolt for the support that I drilled from the bottom side, and added several washers so that the bolt head would not touch the ground when flipped over and supporting Woodstock. I secured all the washers and the bolt with wood glue.
The bottom of the jig showing the washers and the support bolt in the middle.I let the glue on the jig set overnight. The long support bolt is unseen up against the edge. I used another block and the DeWalt drill bits case to weigh it down while drying.
For Woodstock, I scribed over his mouth and eyes with an awl before priming him. I then secured Woodstock and brush primed with some older primer that was no longer suitable for the airbrush but was still good enough for the brush.
Woodstock on the jig, primed.
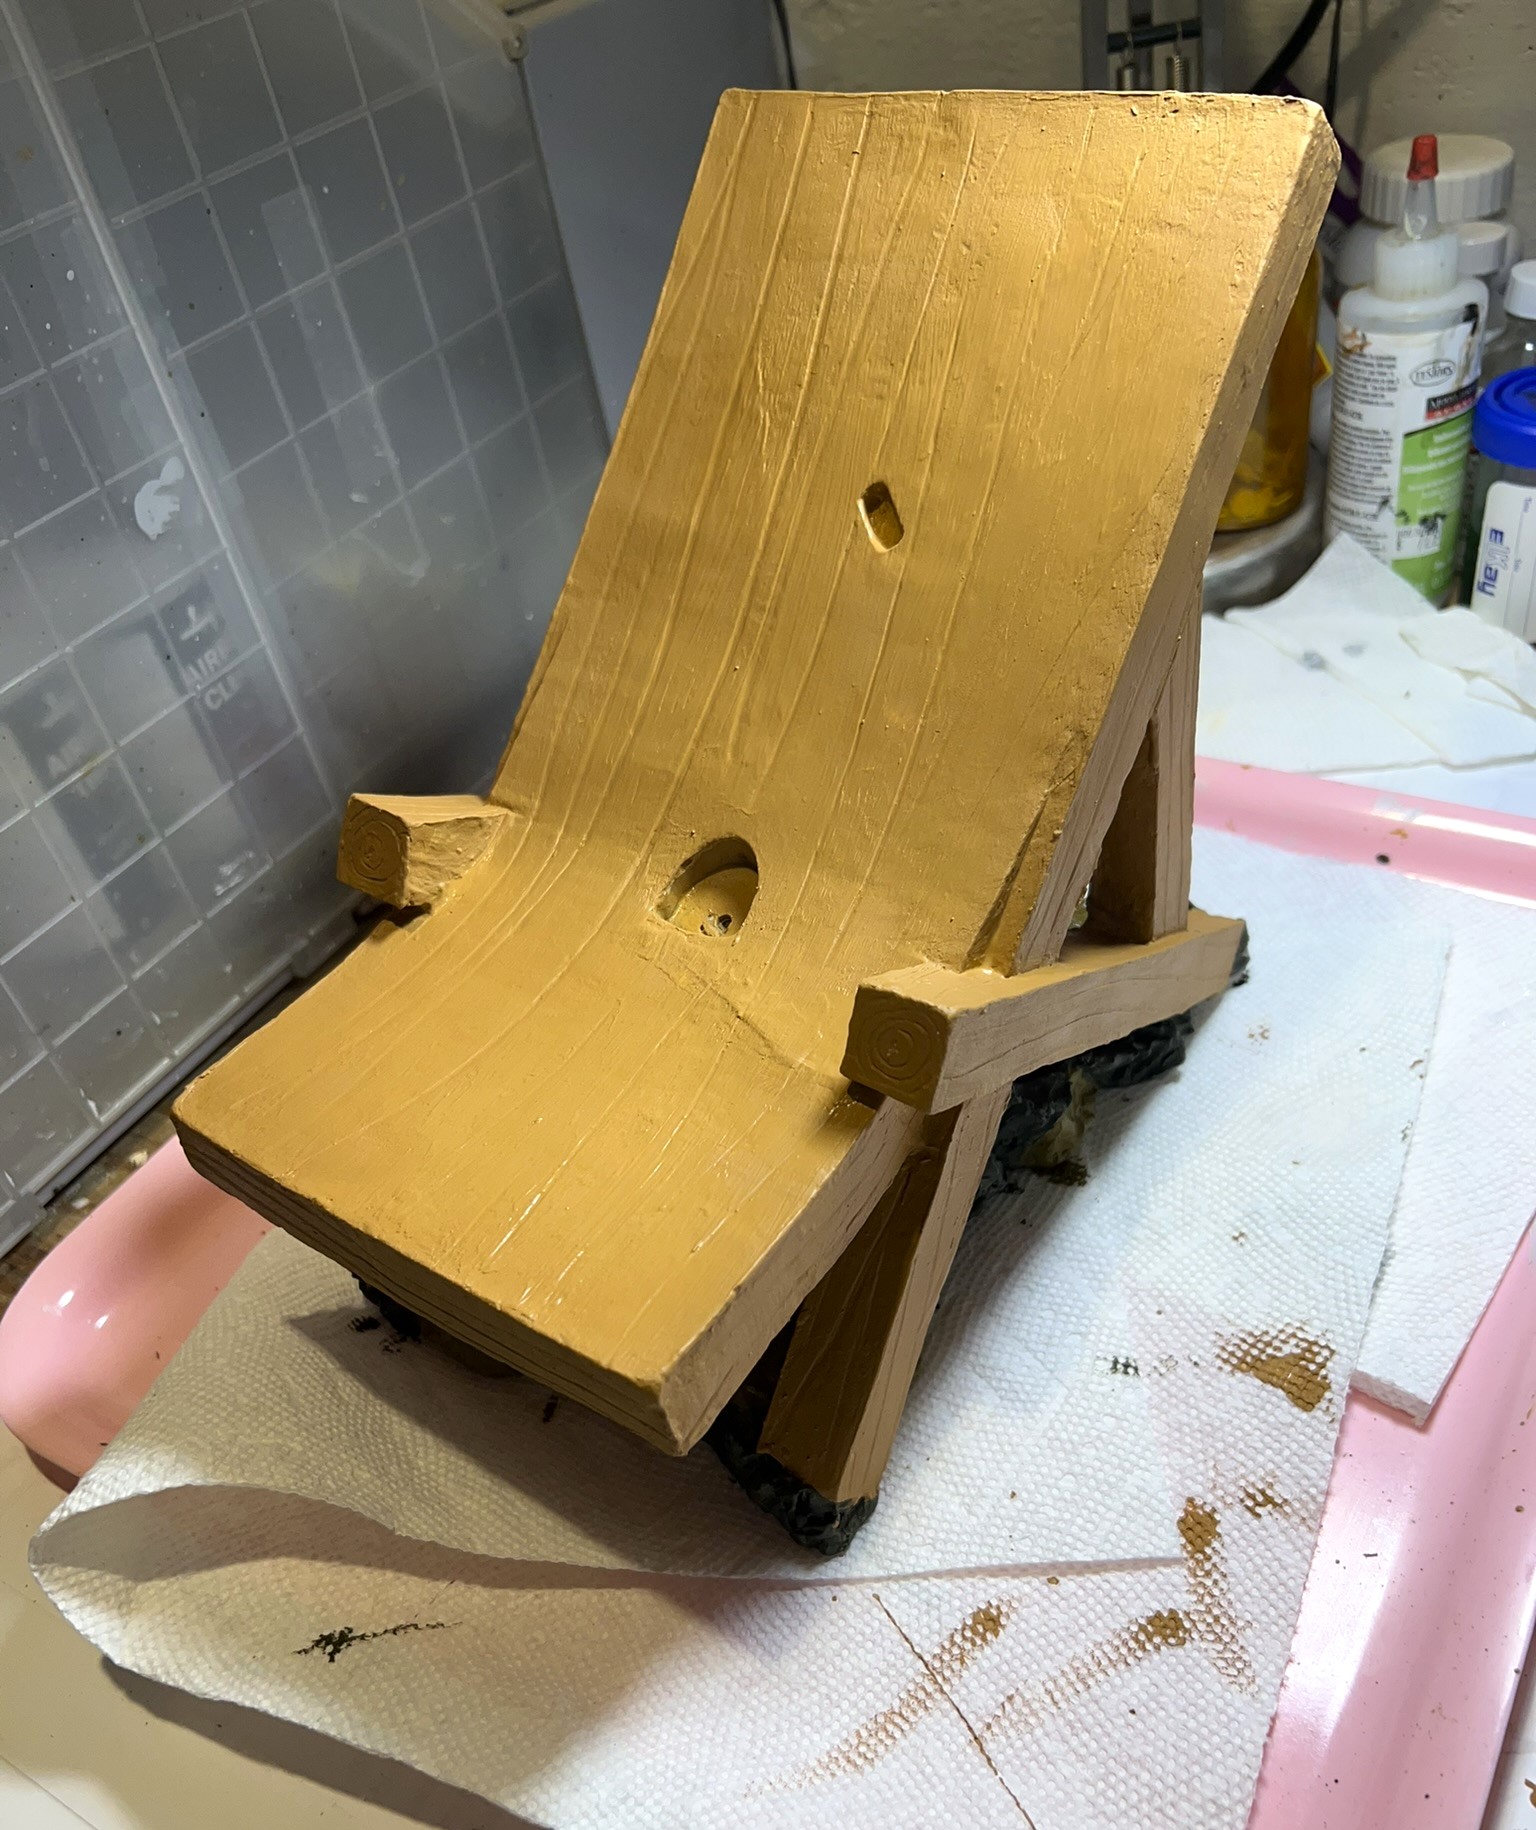
From here, it was onto the chaise lounge base. It needed to be primed both on top and on the bottom as there were some rock-like and bush-like structures underneath that were not well-defined. These I painted and then added a glossy wash for depth. Over the repair, I had previously etched the wood grain of the chaise lounge.
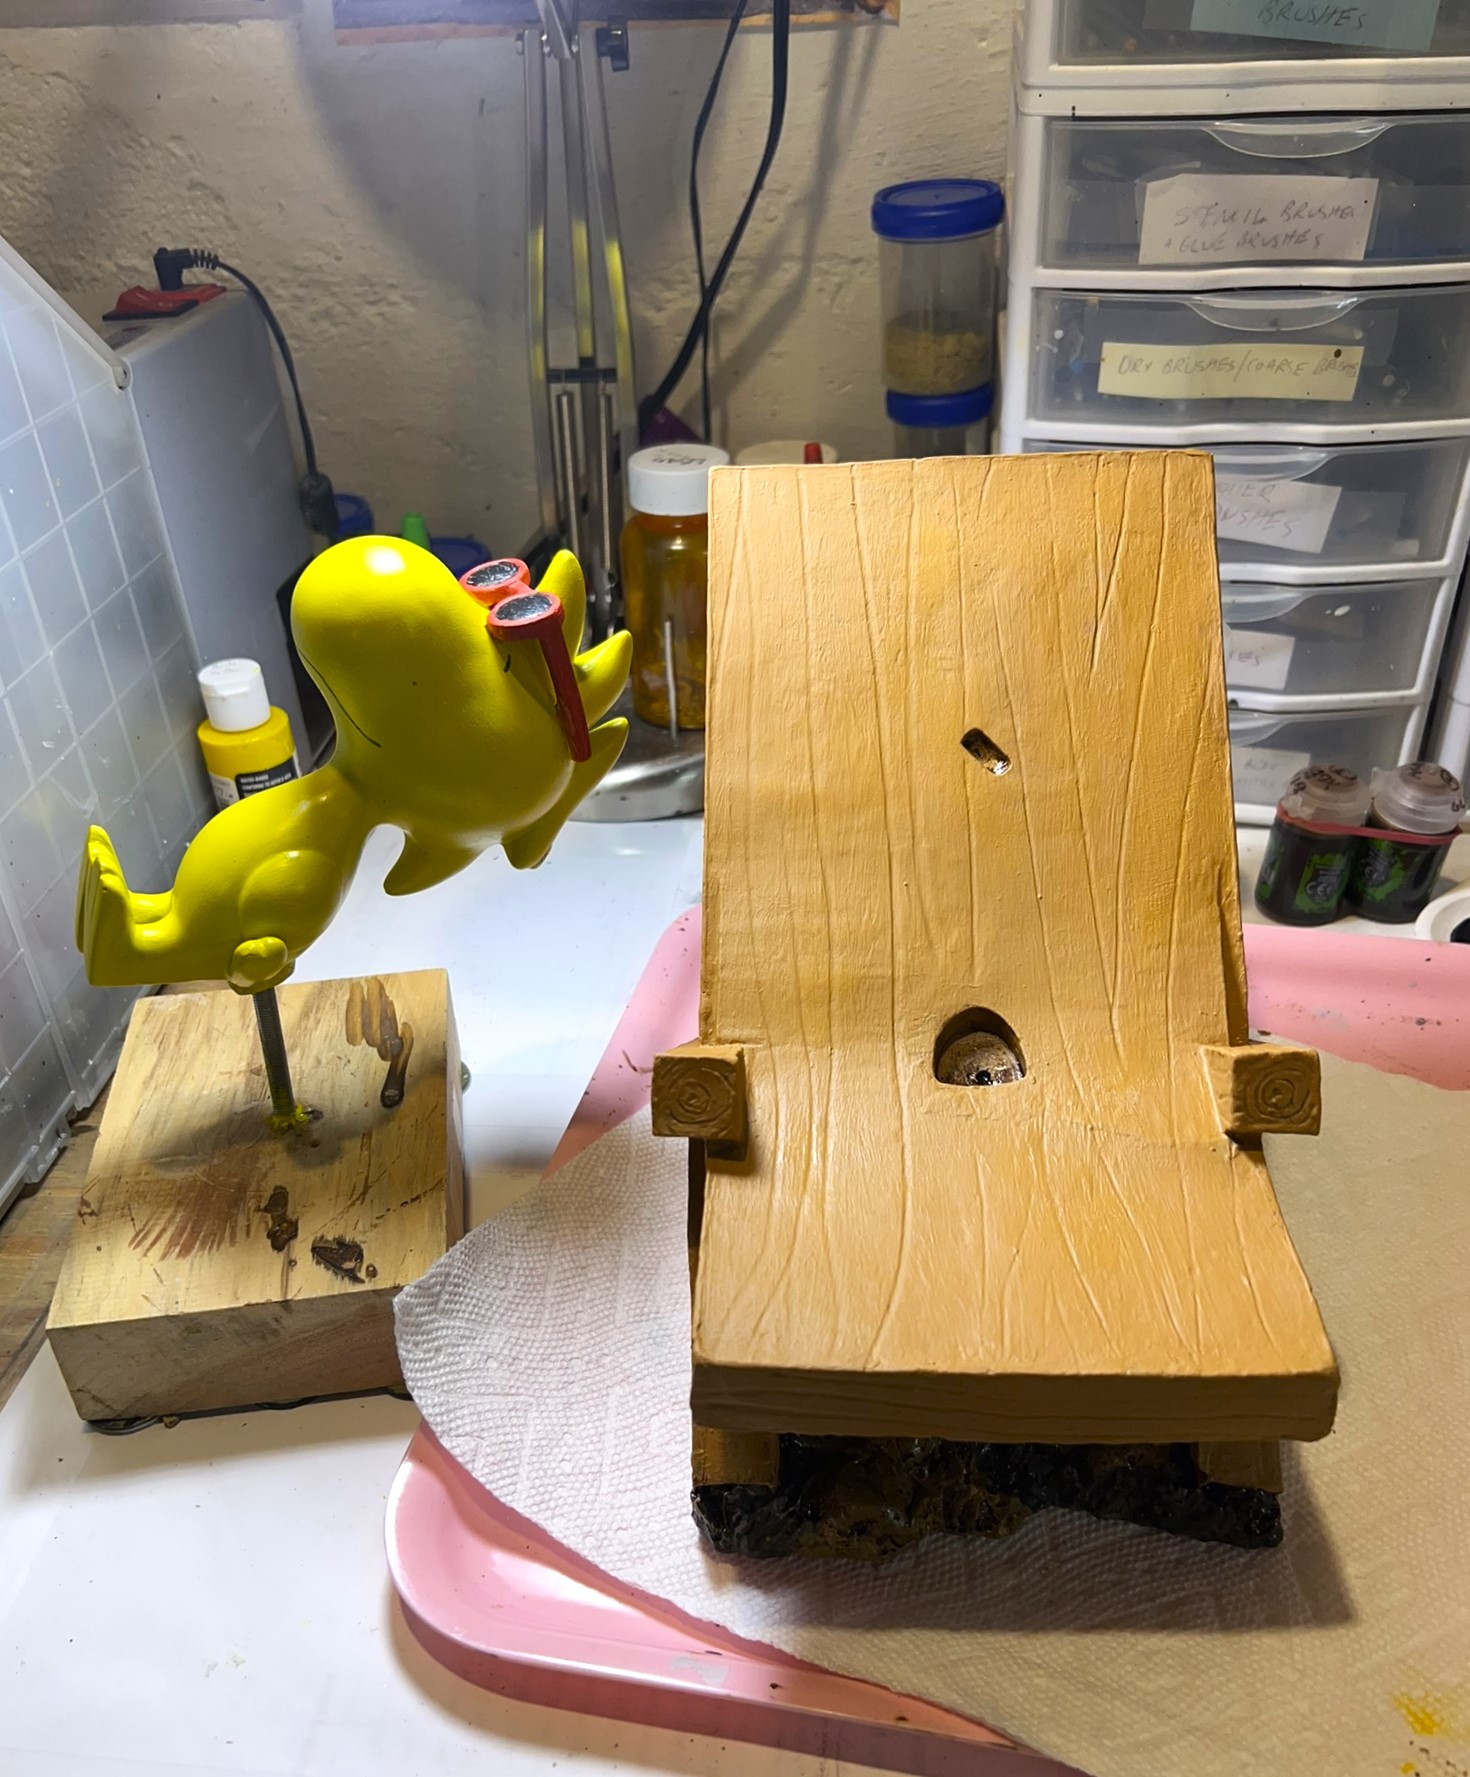
I still wanted more definition in the wood grain. I tried a wash but the result was highly unsatisfactory – it came out horribly blotchy. So I repainted the base chair and decided to dry brush it instead- which worked much better. After all, it should retain a “cartoony” look right? I used an airbrush yellow paint with a brush on Woodstock and painted his eyes, mouth, and sunglasses.
Getting closer to the finish. This is after I repainted the chair but before the dry brushing.After dry brushing the chair. I added a bluish color to the sunglasses (not shown here).
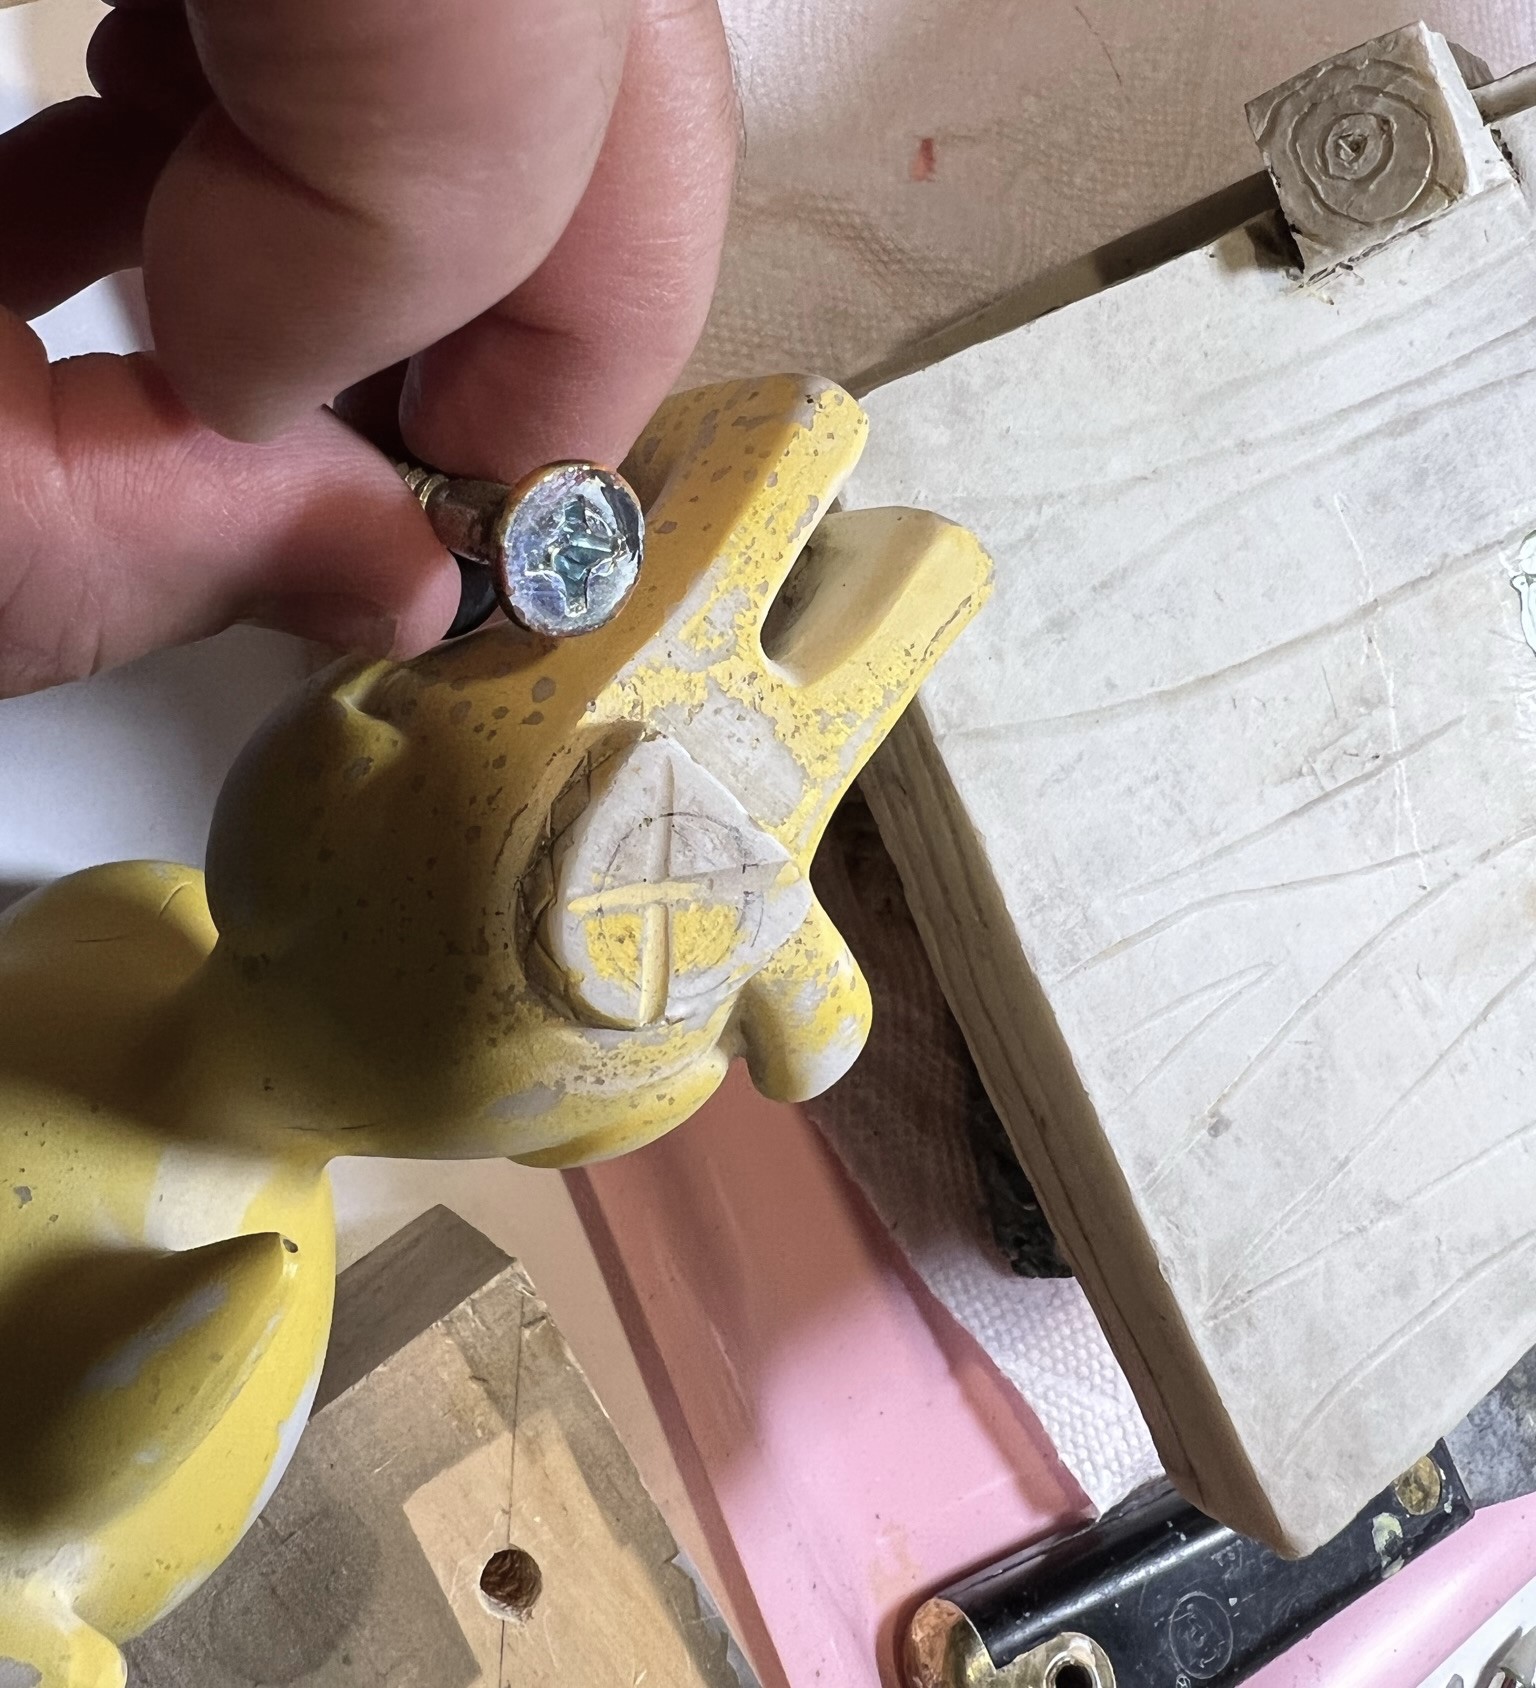
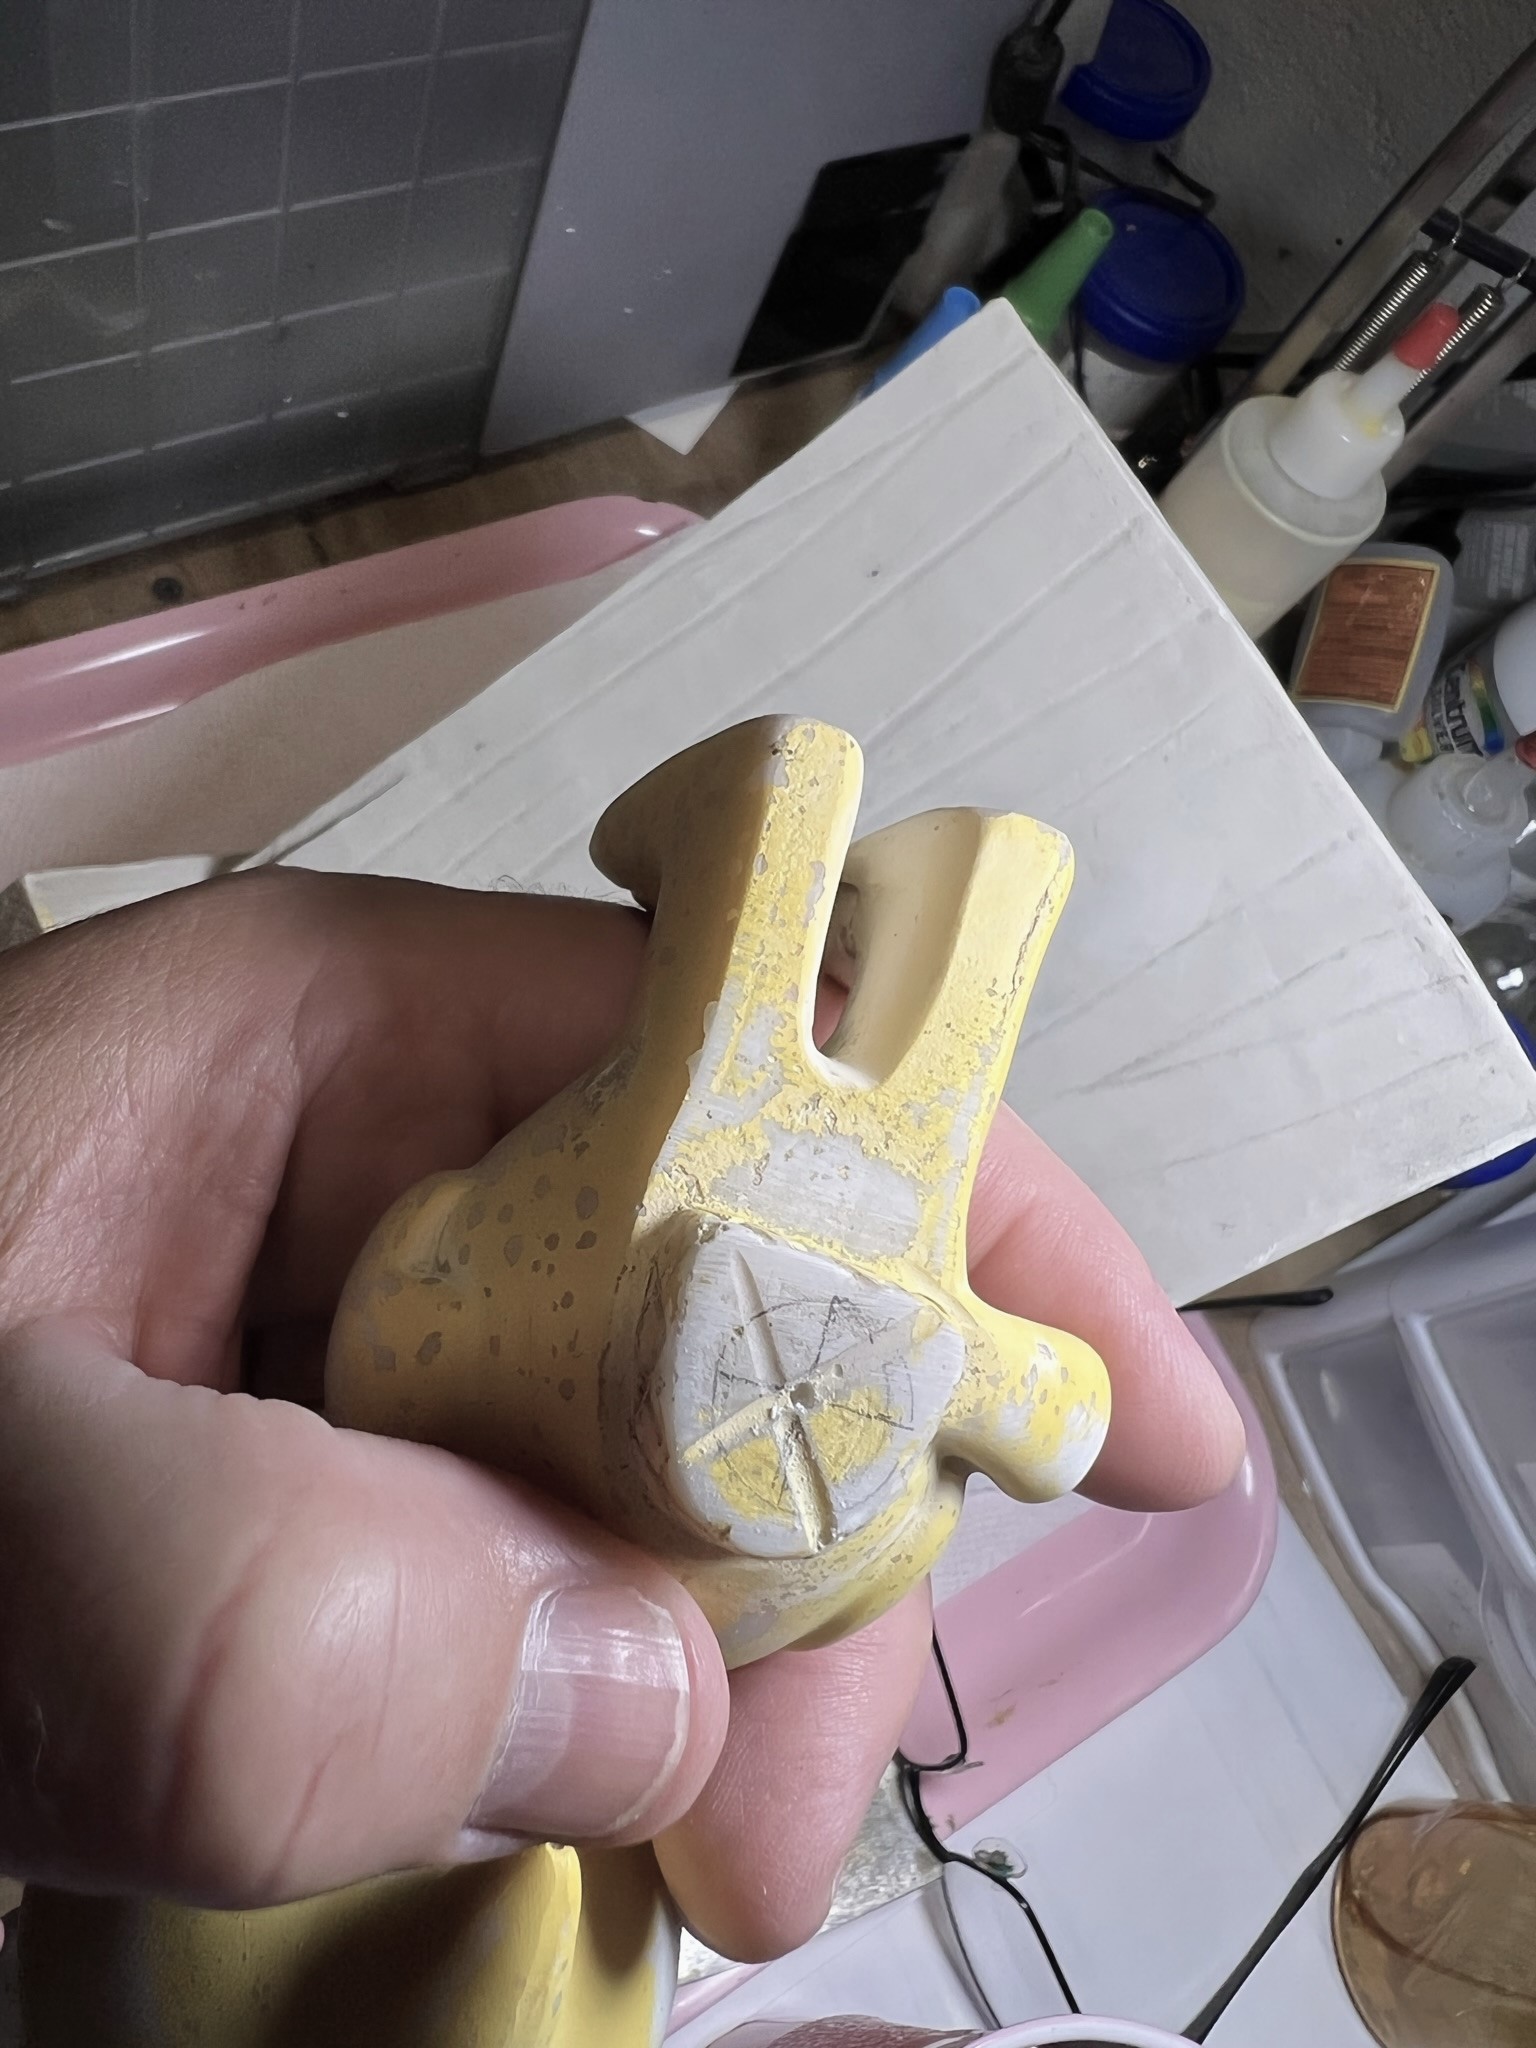
Before I was to varnish, I needed to install Woodstock’s magnet and a washer into the base. Originally I planned to put in a magnet into the base too – but upon drilling it I discovered that the base was more hollow than I knew (hence the ants too). So, I chose to insert a 3/4″ zinc-coated washer and secured the gap with E6000 epoxy.
The magnet and the washer will allow Woodstock to be removed with a little effort but not fall out at rest.
All that remained was to apply varnish and lacquer. Luckily, I still had some old rattlecans from my pre-airbrush days – and I gave each a couple coats of good coverage.
Finished!
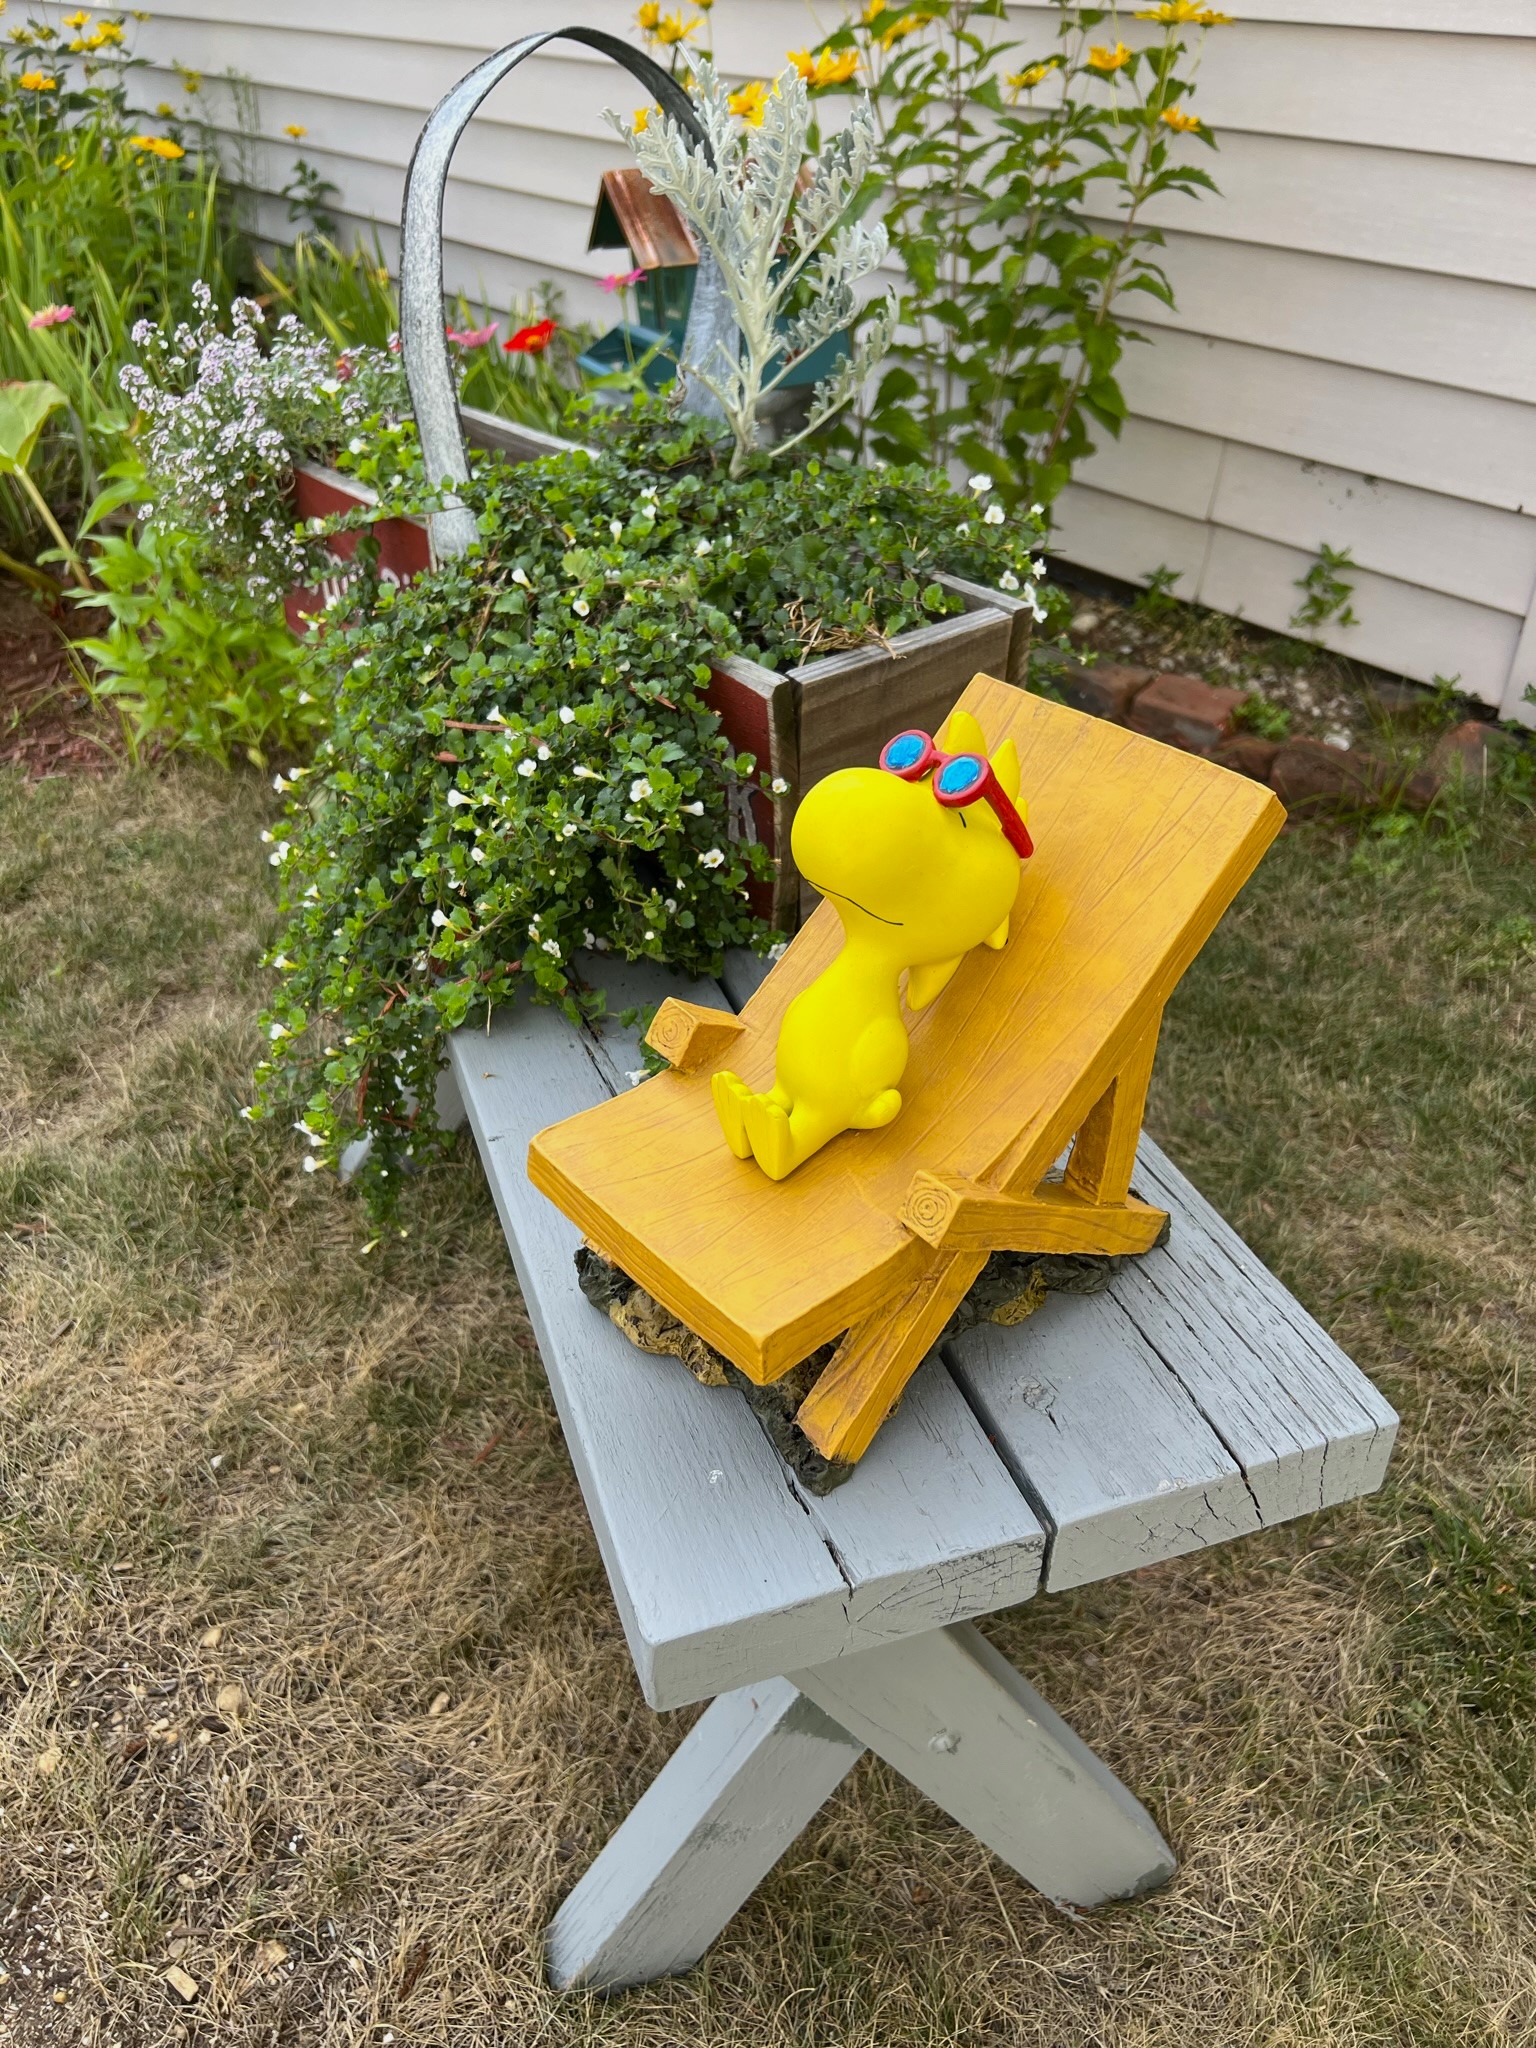
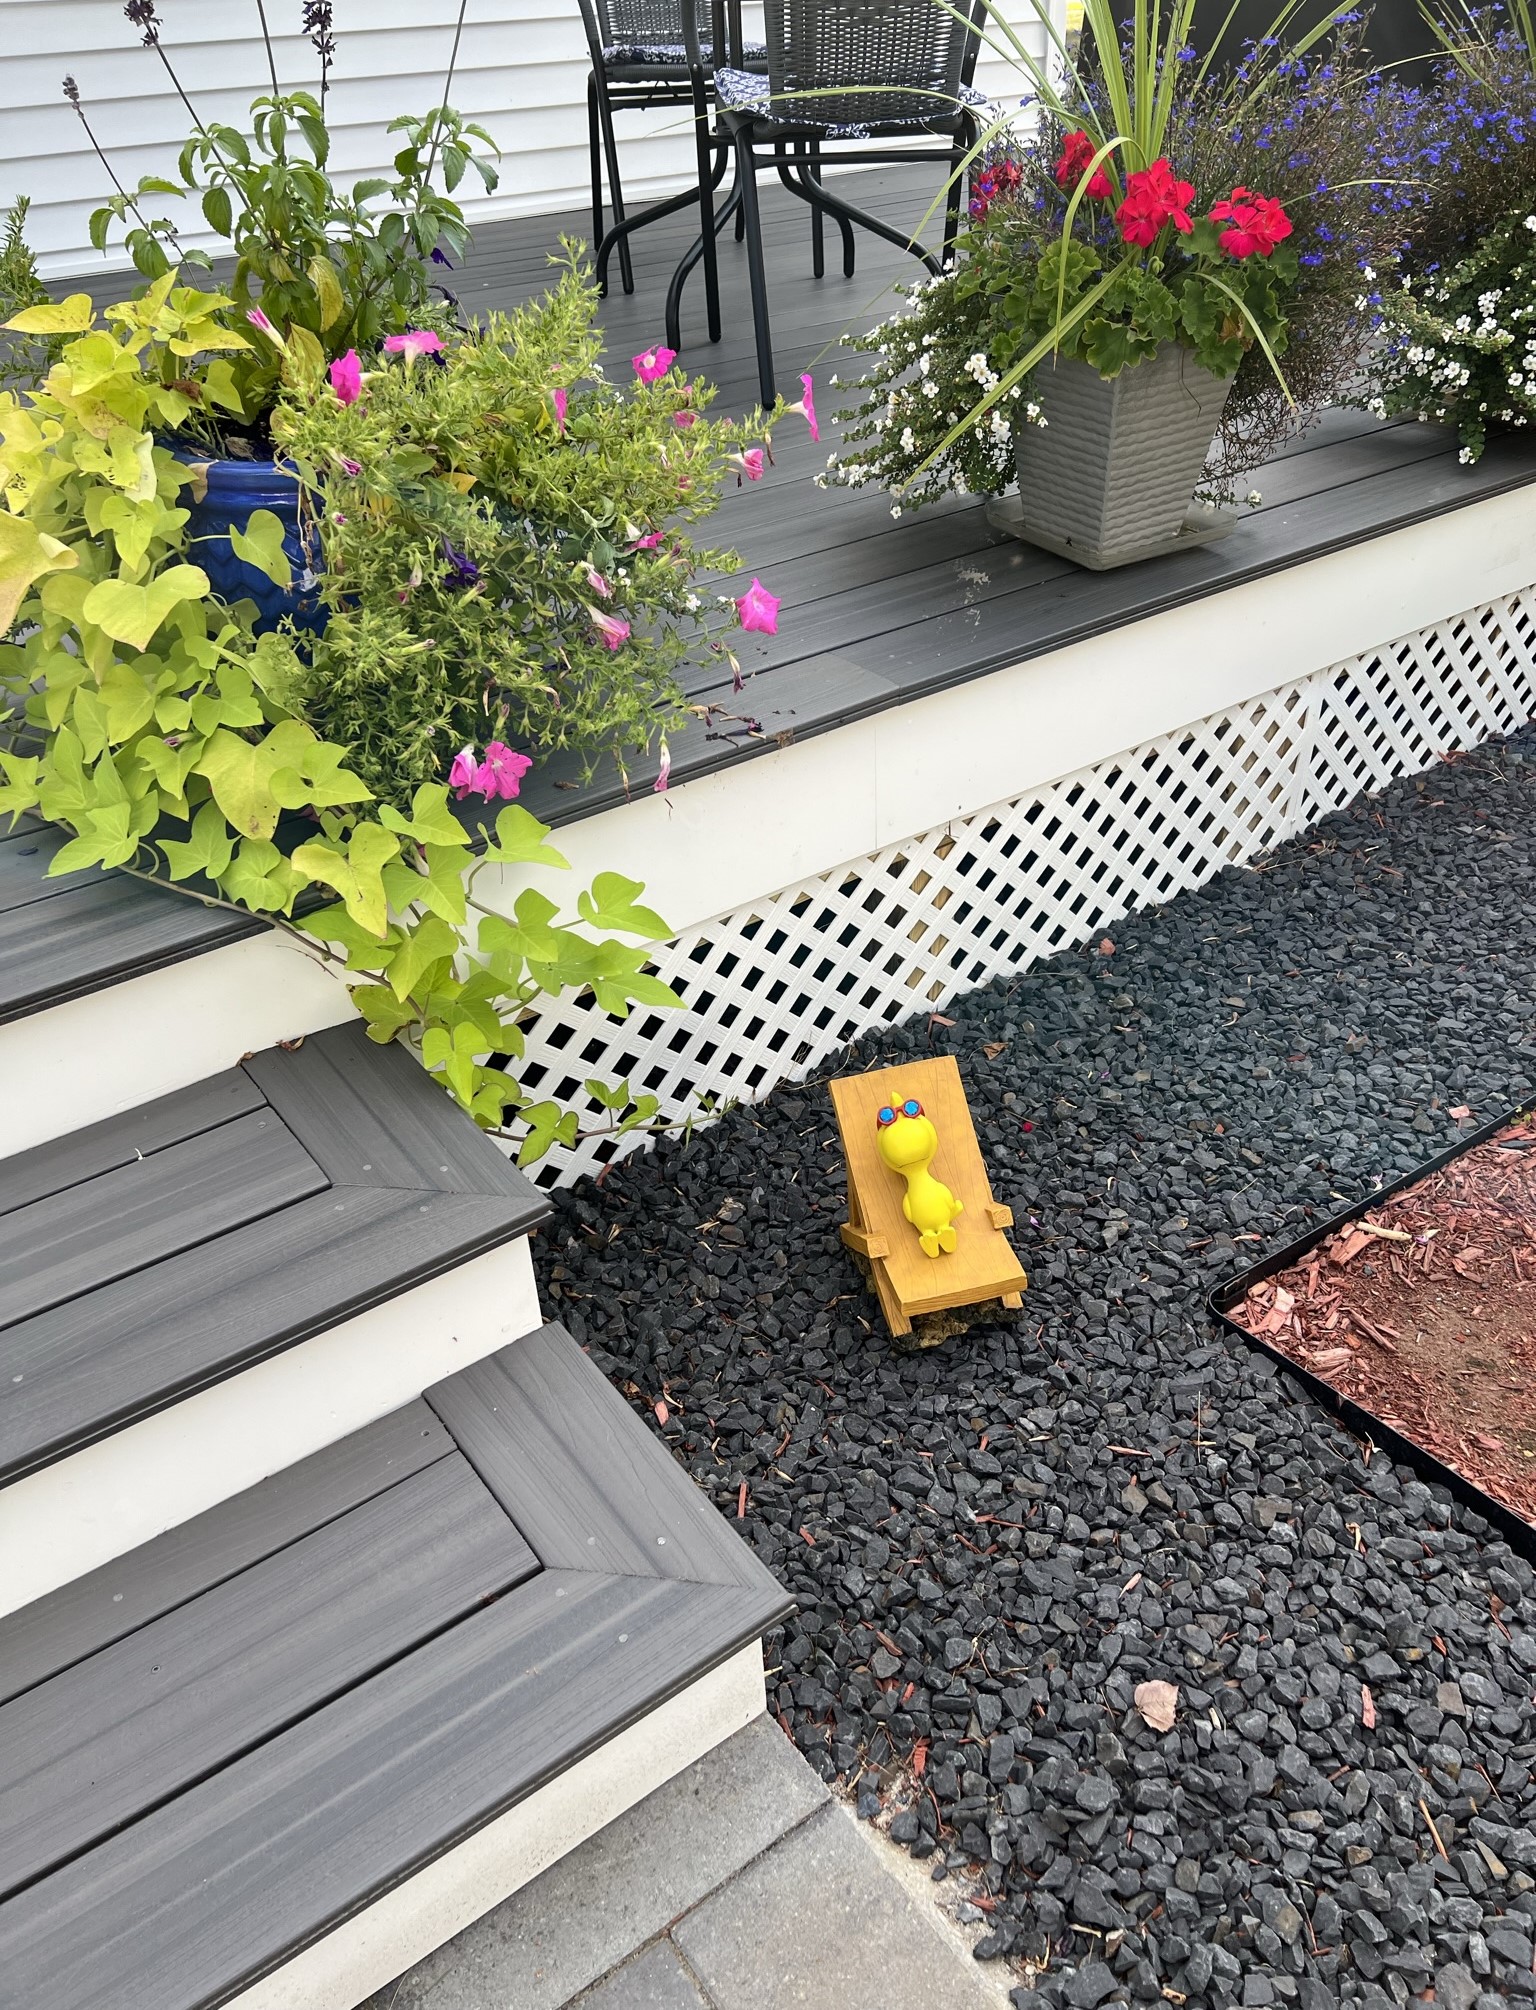
So how does he look in the yard?
On the bench!By the house back deck!Before and after!
Most importantly, Tabitha approves!
Thanks for looking at this little diversion from my normal pace – hope you found it as fun as I did! Or Tabitha!
PAINTS, INKS, GLAZES, SHADES, WASHES, PIGMENTS, FLOCKING, GLUES AND MORE THAT I USED TO REHAB WOODSTOCK AND HIS CHAISE LOUNGE:
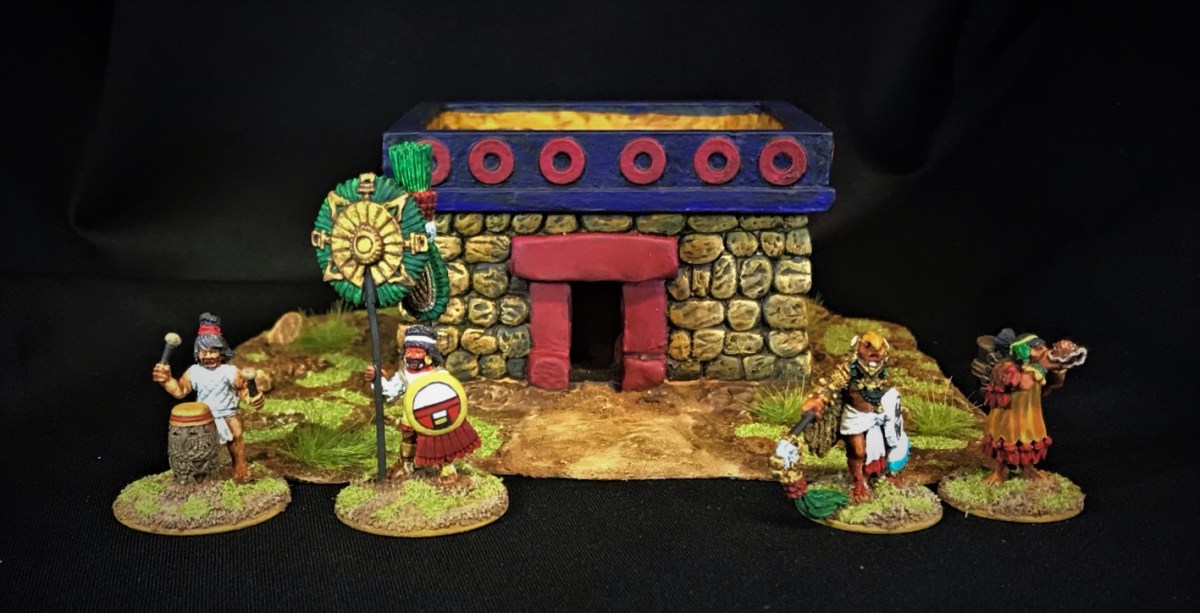
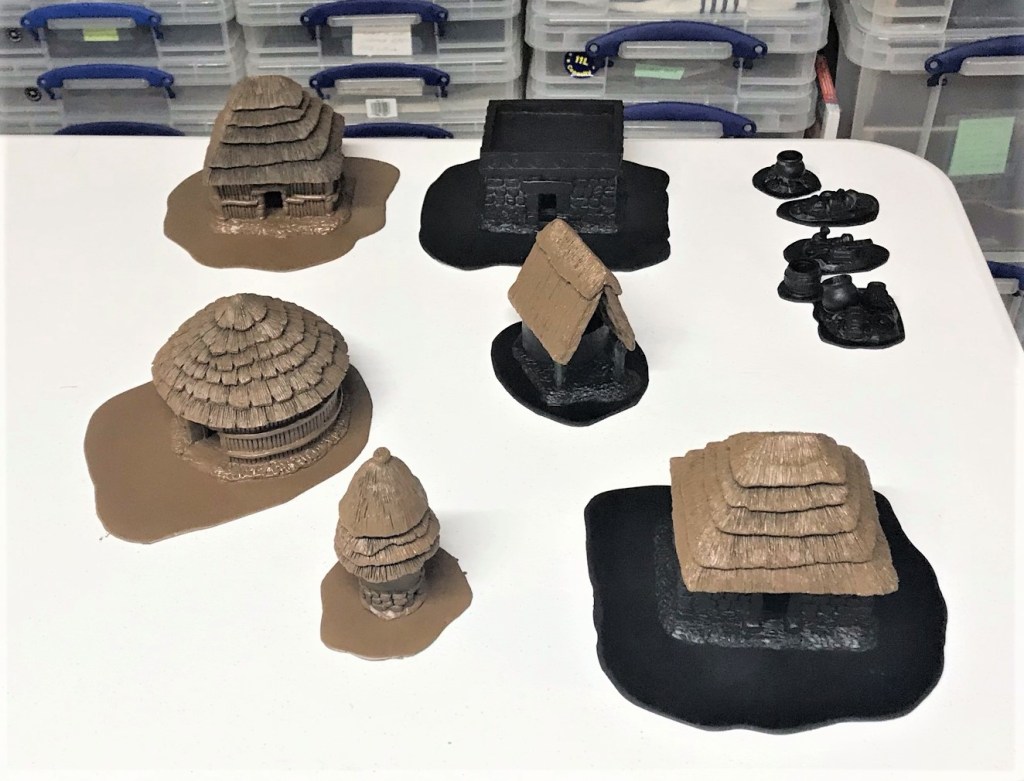
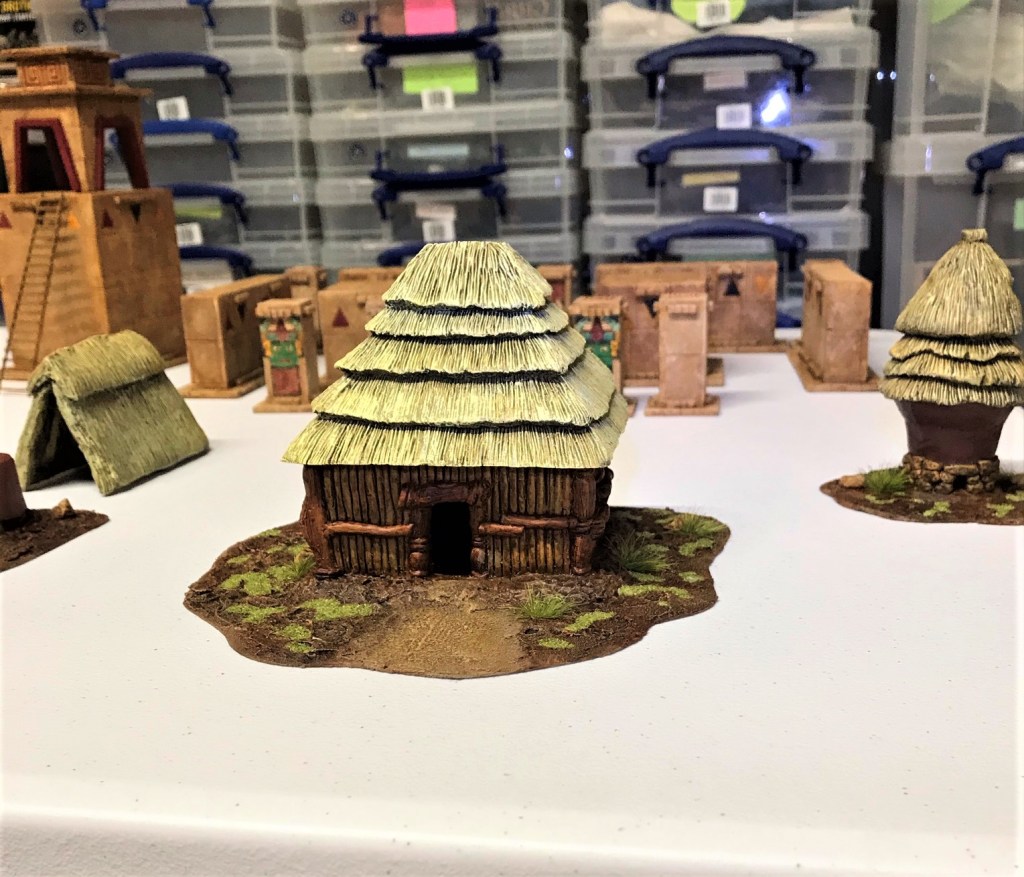
This post will cover the Aztec resin terrain/structures from Acheson Creations that I have recently finished for my Feudal Patrol™ games in Mesoamerica (using my Civilizations Collide supplement). I purchased 6 structures from the company, and they were kind enough to throw in some scatter terrain that I believe will prove to be quite useful. The six buildings plus the 4 scatter pieces are all part of “Mark’s Aztec Building Challenge Contest“, as are all of the MDF I listed in the original contest post. While the buildings in this post would be probably more suited to a rural setting versus a cityscape, I think that the scatter terrain will be useful in several gaming ways.
Originally, my plan was to do finish all of the MDF structures first, and then move on to the resin ones. That concept did not pan out as I ran out of some key items for the MDF. The MDF need to match exactly so that visually the collection makes a nice panorama.
So, those shortages moved me onto the resin, which I had luckily prepped for priming back in March. I thought Acheson had made the recommendation to prime with Rustoleum “Painters Touch Ultra Cover Flat Black” – a rattlecan – something I usually avoid. (Now that I looked back at his website, that recommendation is not there?) Anyways, I got another delay in priming as the Massachusetts weather also did not play nice (it’s been cold and we even got 6″ of snow on April 16th).
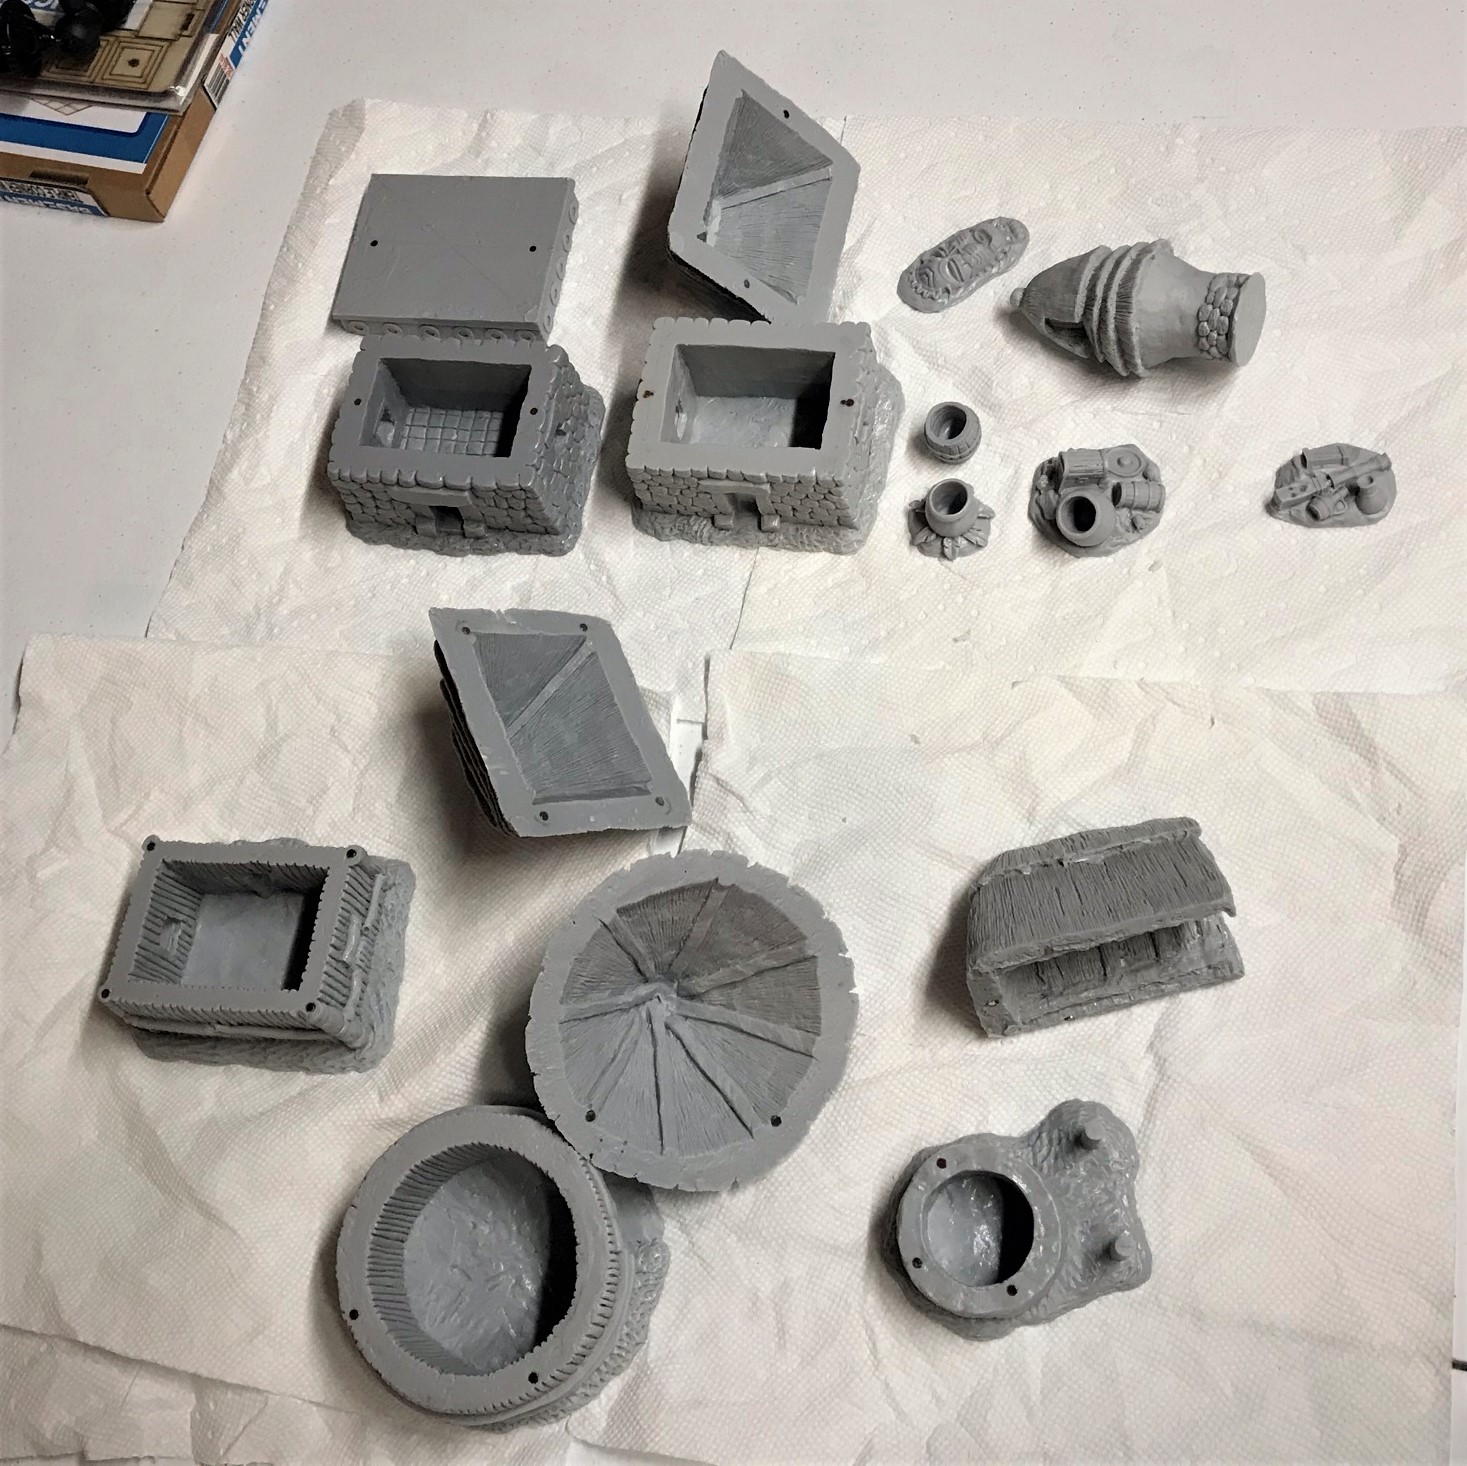
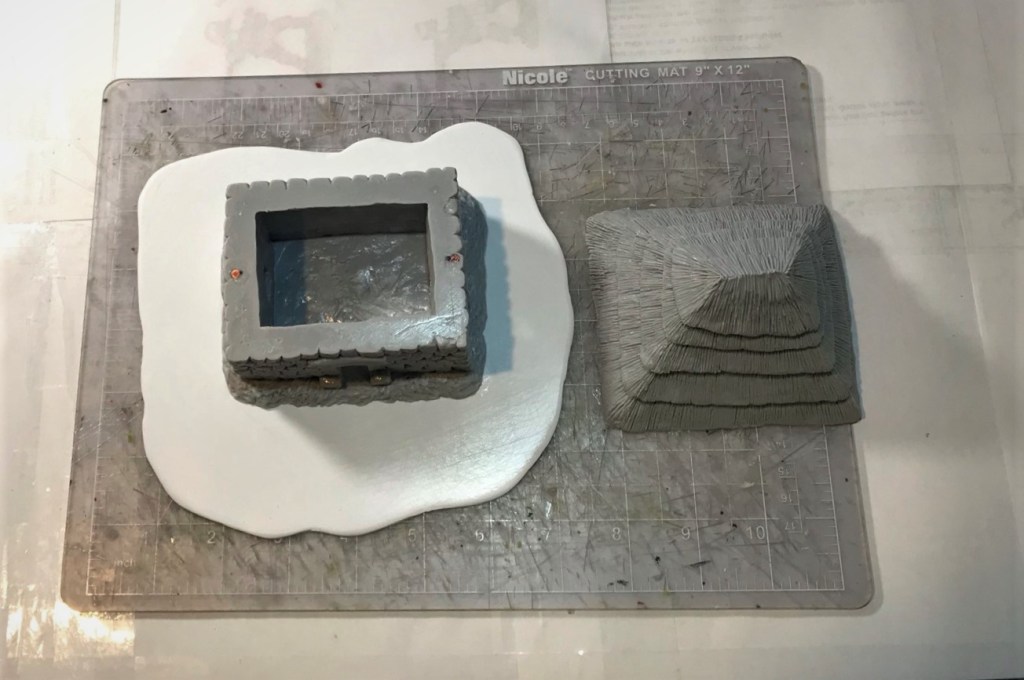
I thought it prudent – prior to priming them – to give all a thorough scrubbing and washing. I also saw a need to install 1/8″ neodymium magnets for the resin structures with roofs – to make them more stable (and stay on the buildings during games). This would be useful on the tabletop and yet keep them easy enough to open up for gaming. I used different patterns for the magnets as you will see below – so the roofs won’t end up on the wrong buildings in error.
Subsequent to washing, I based these pieces back in March on 1.5mm sanded styrene card – so as to appear more flush with the tabletop. When the weather finally cooperated (one day), I primed them all with that flat black and then sprayed a coat of Army Painter “Leather Brown” over the pieces that would be lighter or brown. This group of pieces all needed different paints – I am listing what I used by type at the end of this post (this helps me remember for future consideration and projects but you may find it useful too). As I started them all before April began, these will be 10 more entries in the April painting challenge from Ann’s Immaterium called Ann’s “Paint the Crap You Already Own” challenge.
The pieces washed and with neodymium magnets installed. I would also have to figure out how to paint and finish the inside of the roofs so that I could mount them for the roofs’ exterior painting. I would mount all of these on styrene card.
The pieces mounted on styrene card and primed.
One major difference here with these pieces versus how I have painted previously is my use of Army Painter “Soft Tone” (the “dip”) applied with a brush. This is an oil-based product, which I do not employ usually, mainly as I hate the need for cleanup with paint thinner. However, I thought that it would be a good use for the stuff that I bought back in 2017 – especially on the thatched roofs as it would both shade and provide a varnish-like protection. I could then dry brush over them with abandon and dull the dip’s shine with a final matte varnish.
I would need to finish the roofs’ interiors prior to the outside – and I basically treated them as separate pieces to be worked on.
Below, you will see I broke each of the pieces out so you can get an idea of the transformation. I must give a shout out to TIM of The Imperfect Modeler who graciously gave me some excellent advice for these pieces.
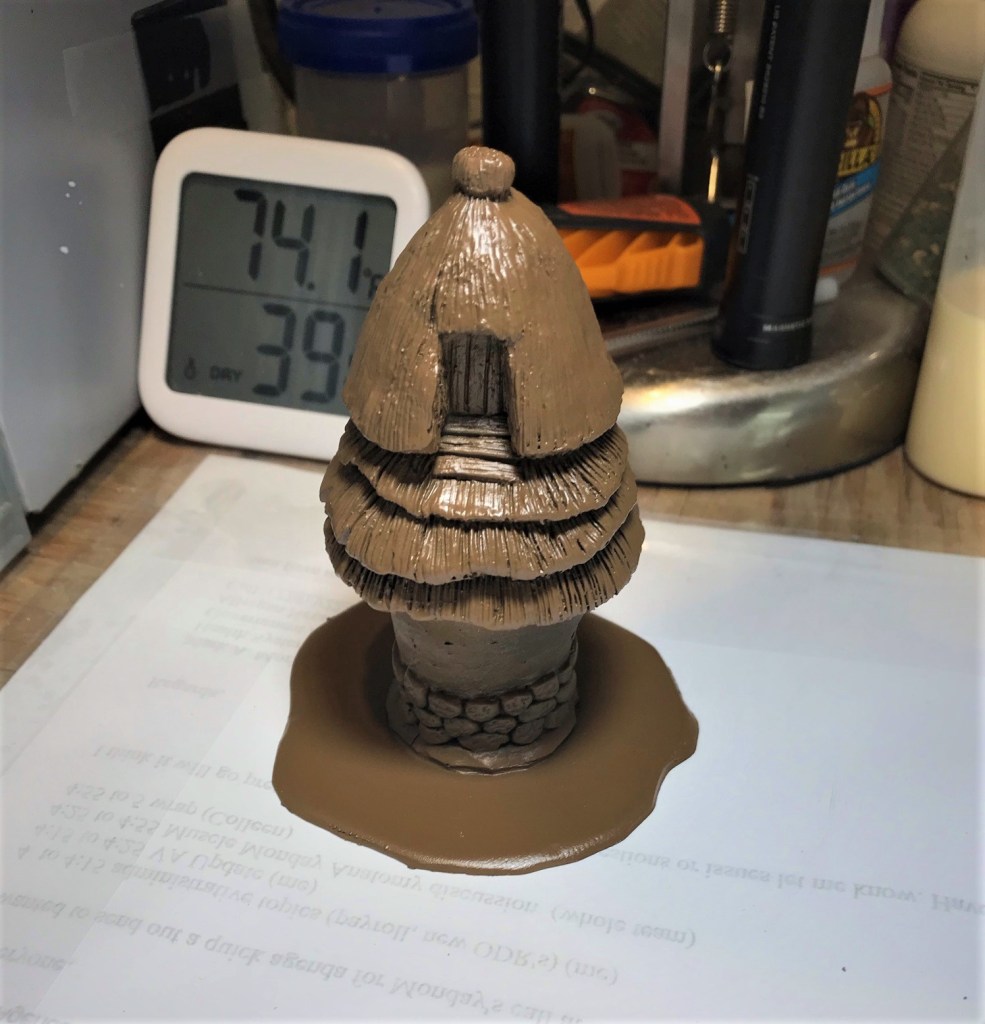
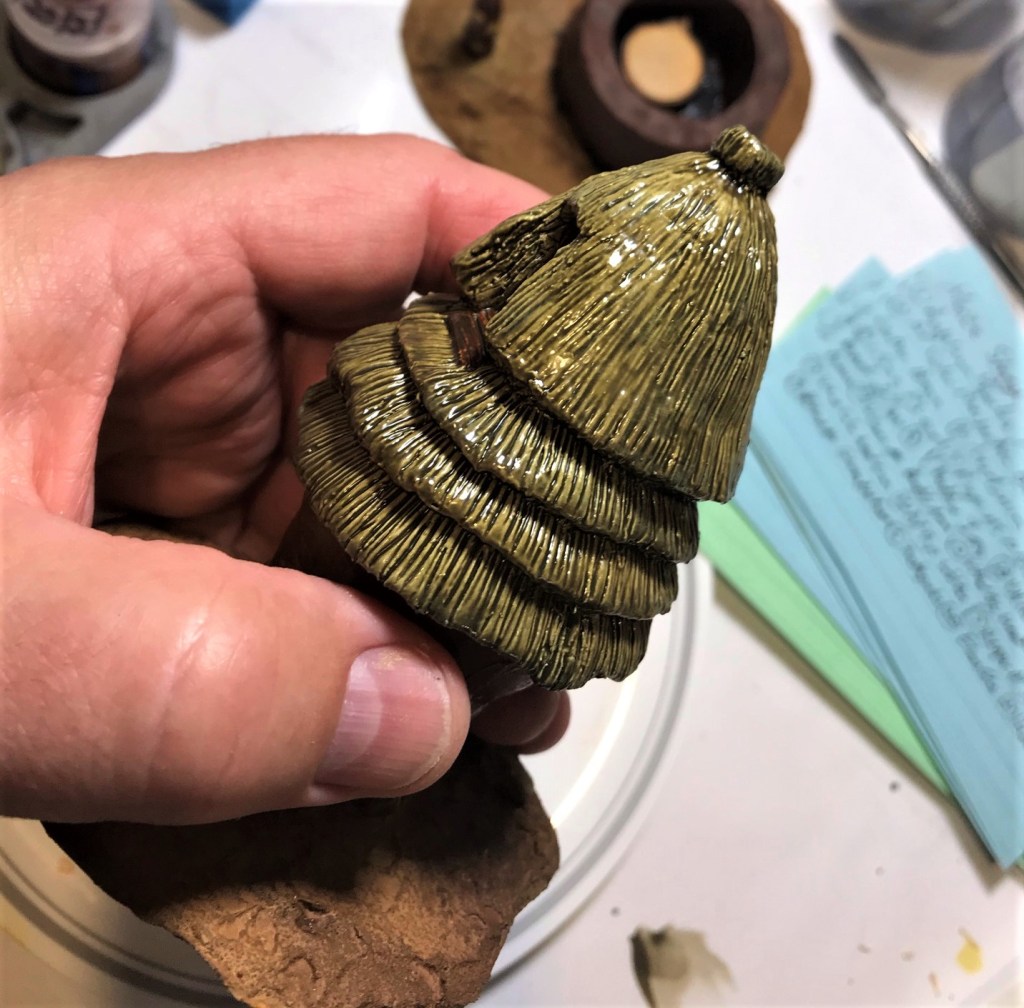
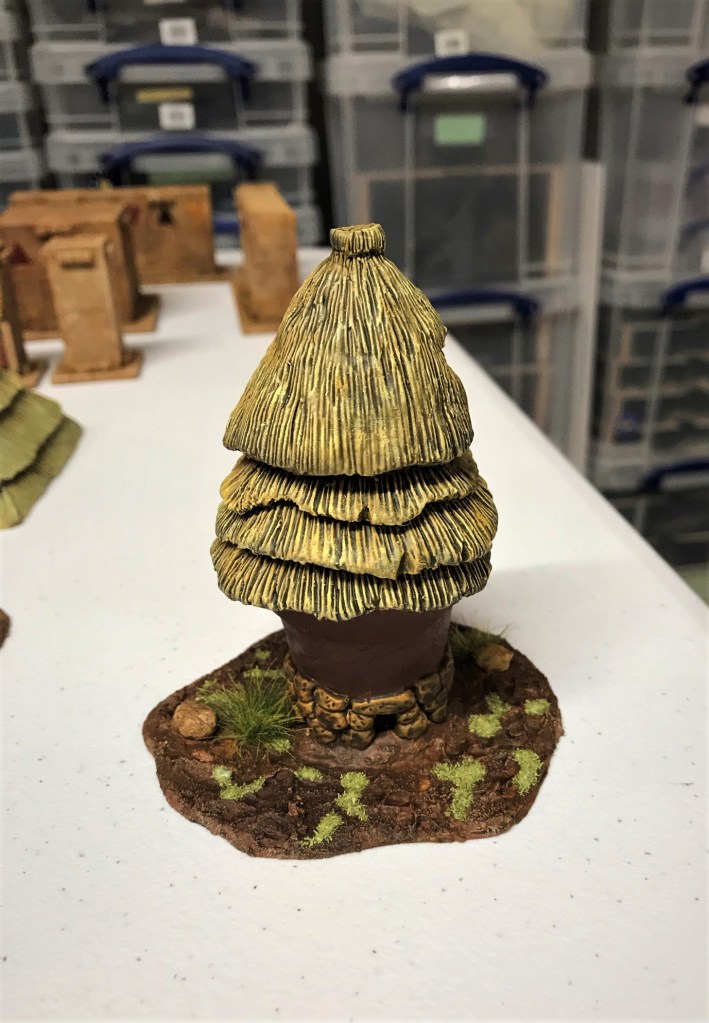
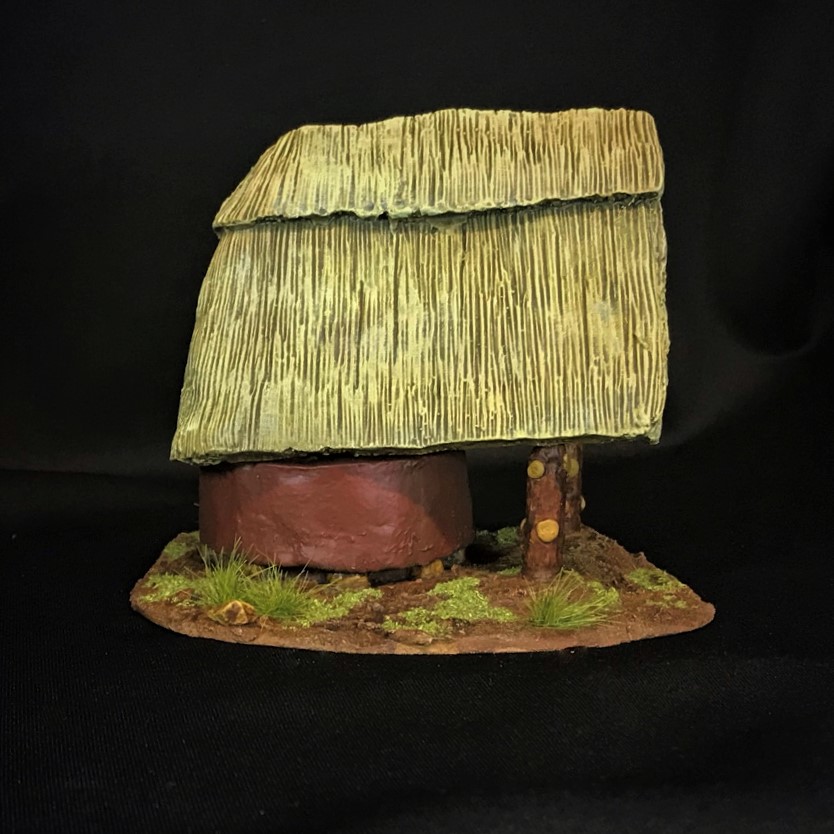
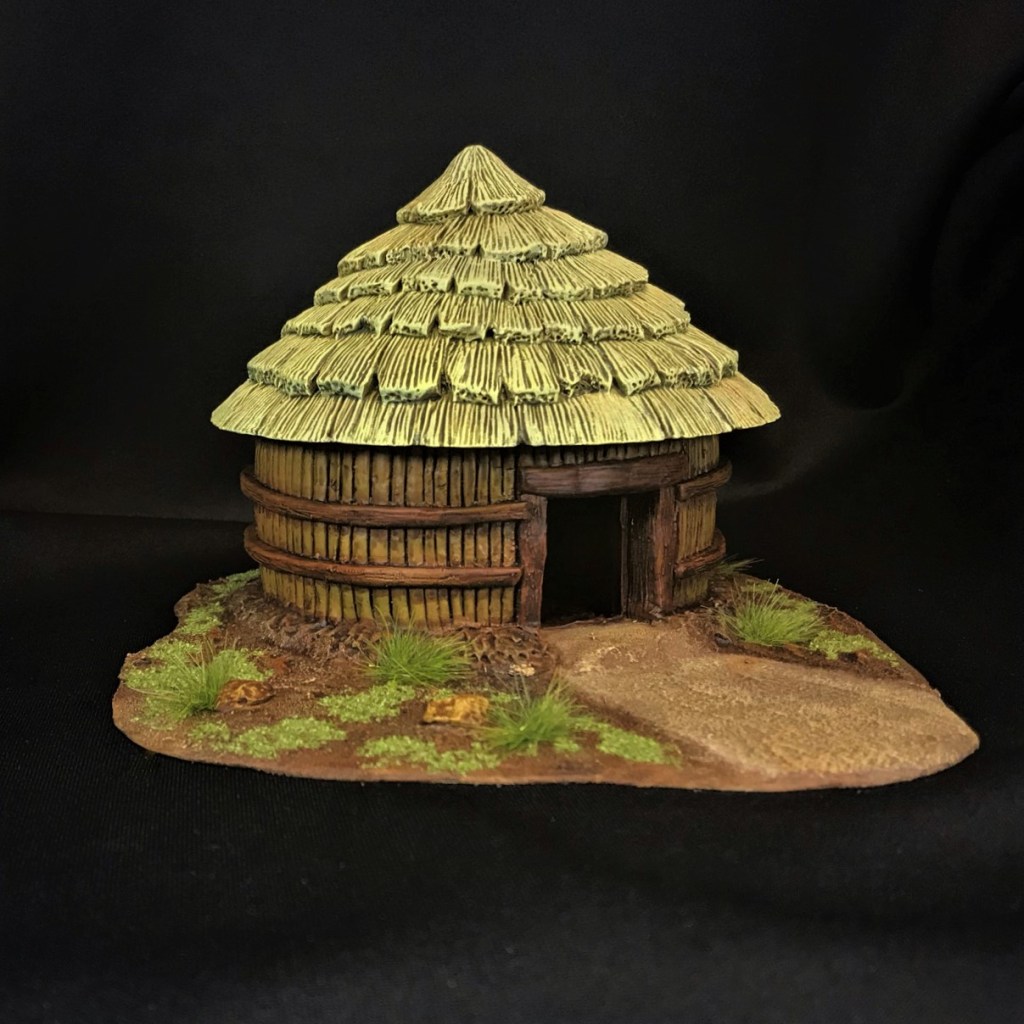
Cuezcomatl Granary Structure
The term cuezcomatl refers to a granary storage structure that was used in Mesoamerica before the arrival of the Spanish and even up to today in some rural areas (see reference here). The model was interesting to paint, and working on it also helped me to prepare for the other thatched roofs. In the end, I decided to use Army Painter Soft Tone (the “dip”) with a brush. This allowed me to both get some good detail shading as well as to protect the model. I can see this model being useful as a terrain piece, as well as an objective marker. The Aztecs were quite avid practitioners of raiding their neighbors for food as well as captives (or anything else that they wanted to take), as were all Mesoamerican peoples of the era. The Aztecs were just more adept at the practice.
Unprimed and on its card base
Primed
Added texture to the base
I base coated the piece, then used the dip as a shade, then later I did a lot of dry brushing
The finished terrain piece
Progress on the Cuezcomatl
Cuezcomatl Granary Structure (door side)
Cuezcomatl Granary Structure (back side)
Jaguar Warriors seize an enemy cuezcomatl
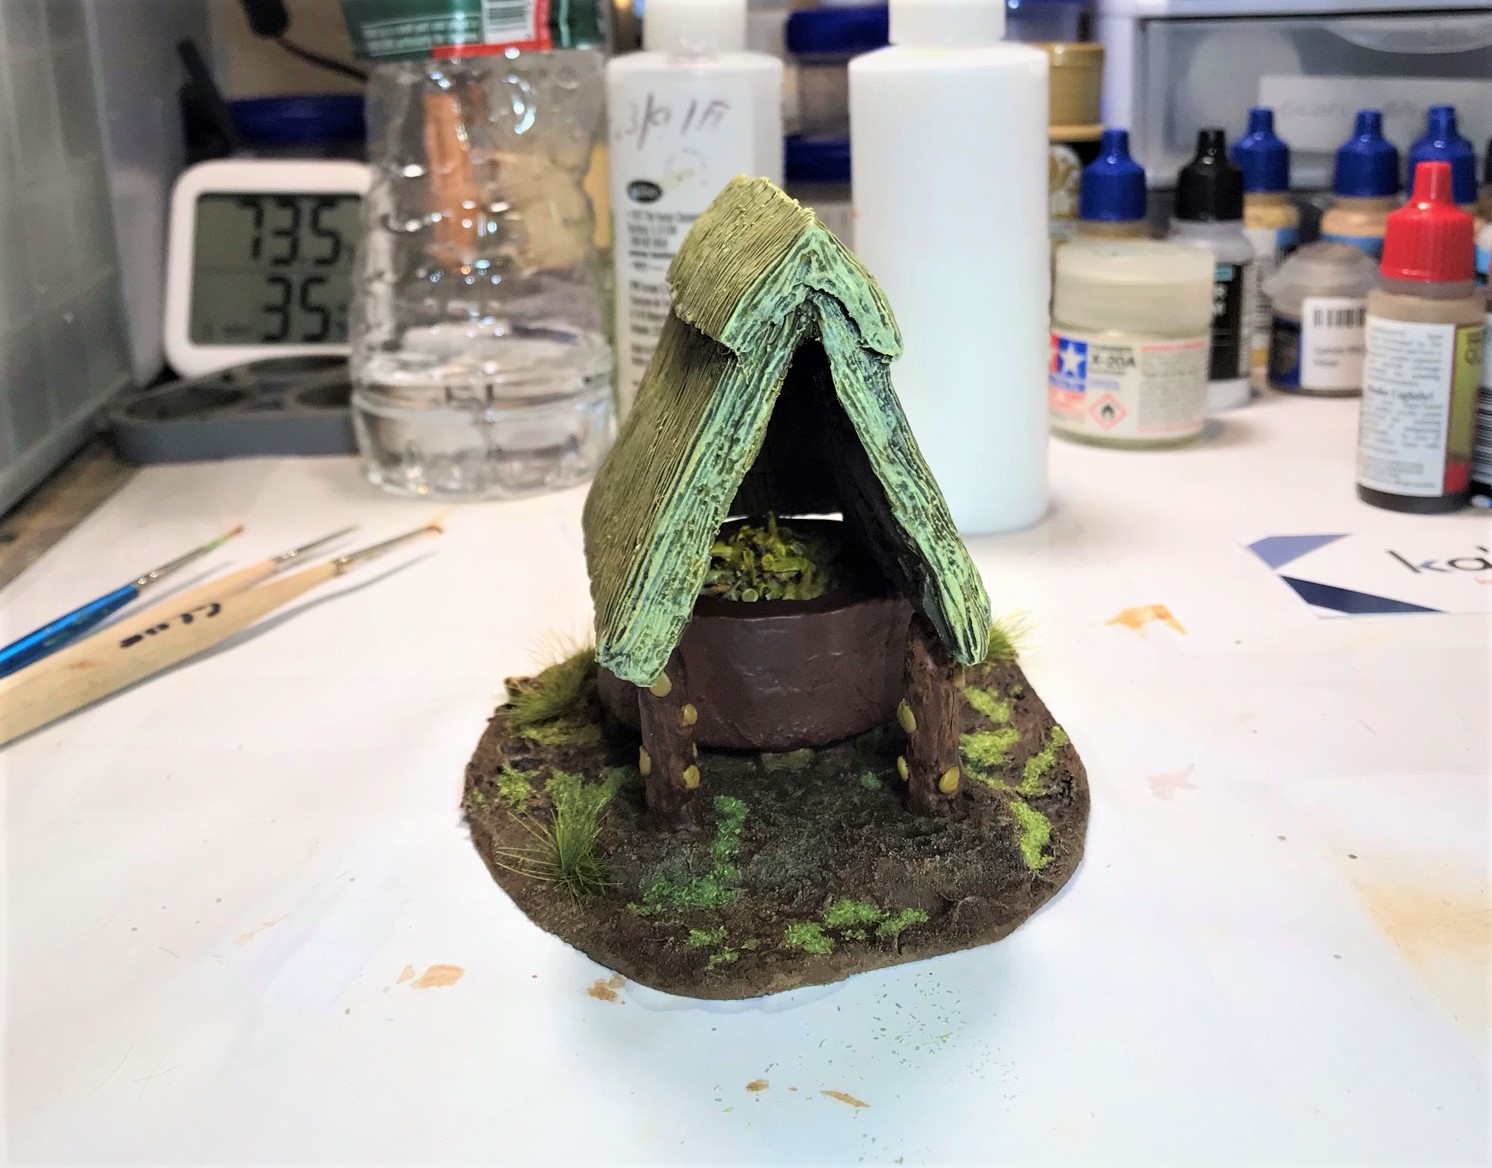
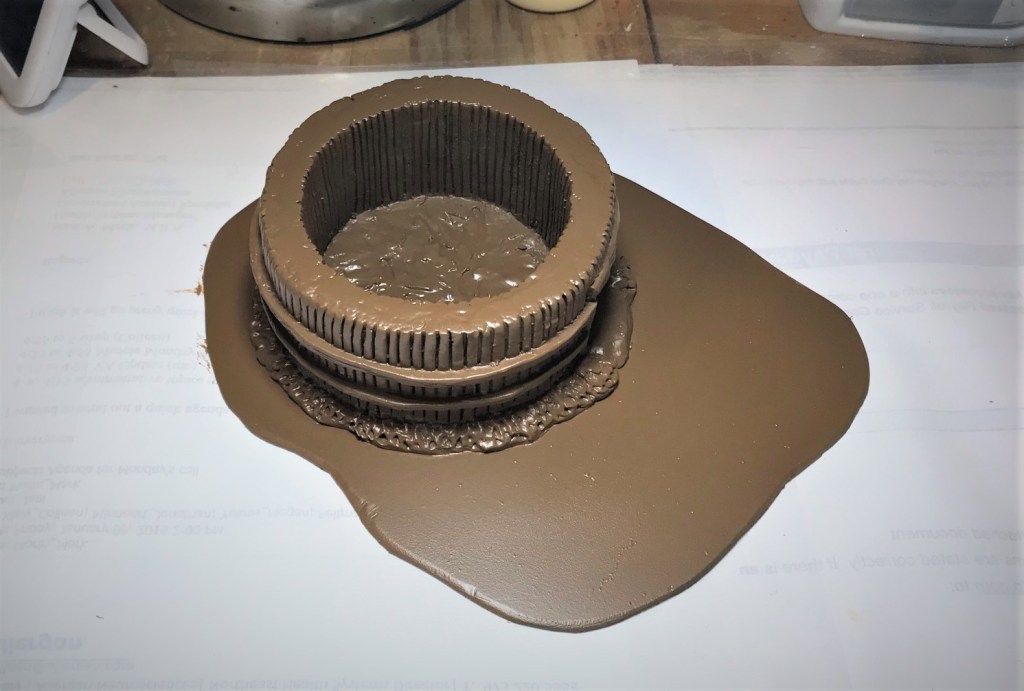
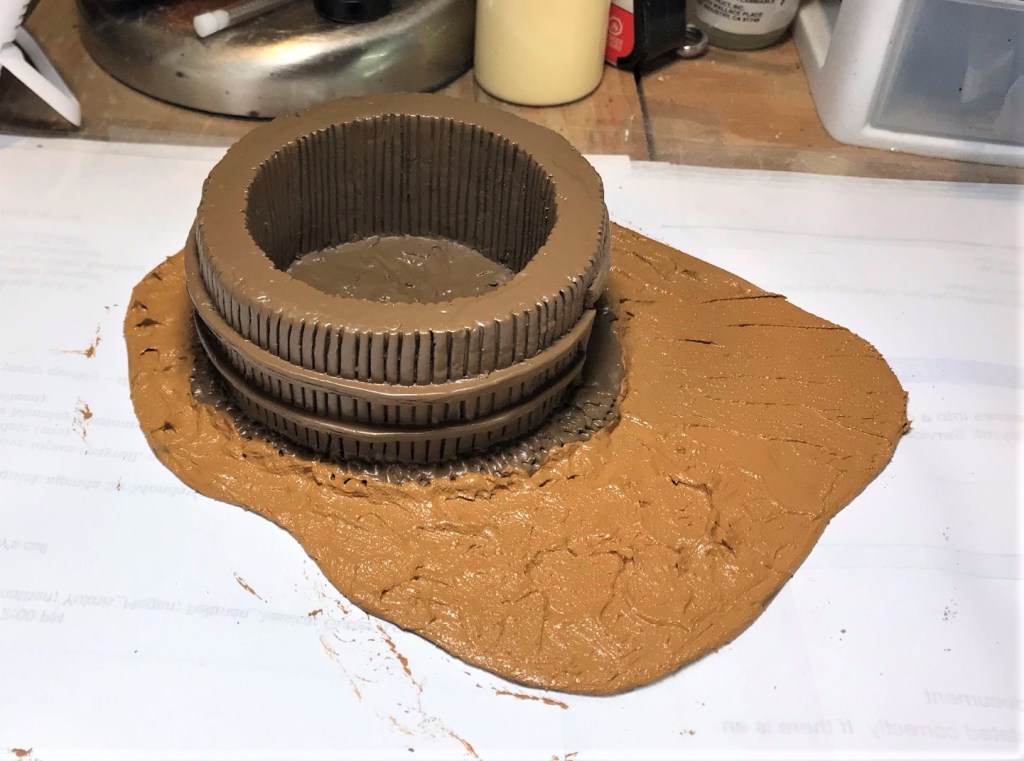
Maize Storage Structure
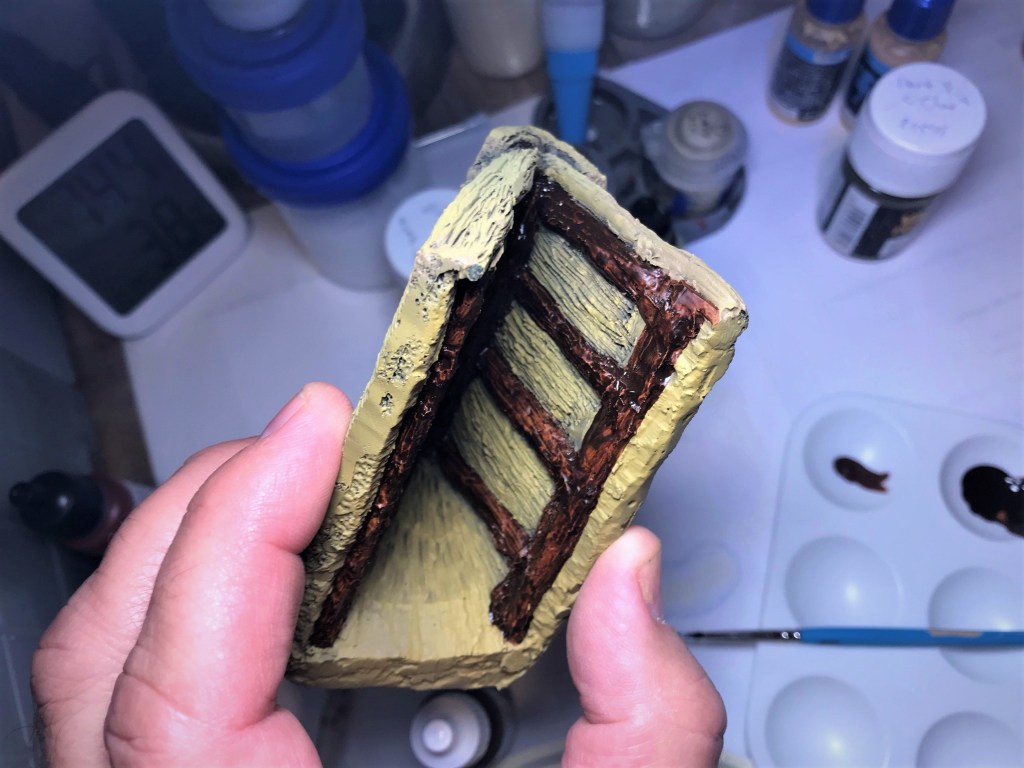
This piece had a few areas that I worked to improve upon. One was to fill an open storage well with “maize” – or at least something that could approximate it. Another was to convert the dowel-like smooth front pillars into a more convincing-looking pair of period wooden supports. The pillars did have a slight wood grain, but I wanted to make them more rustic. Lastly, I did need to do some drilling and magnet installation so as to allow the piece to stay together. As with all of the other pieces here with separate roofs, I needed to finish the inside of the roof (including up to varnishing) before I finished the outside.
Similar to the cuezcomatl piece, this one can serve as both terrain and an objective marker due to the food storage bounty.
The base of the Maize Storage Structure primed. Note the altered sculpted posts.
After adding the Vallejo texture.
The underside and inside of the roof – I needed to drill carefully for the magnets.
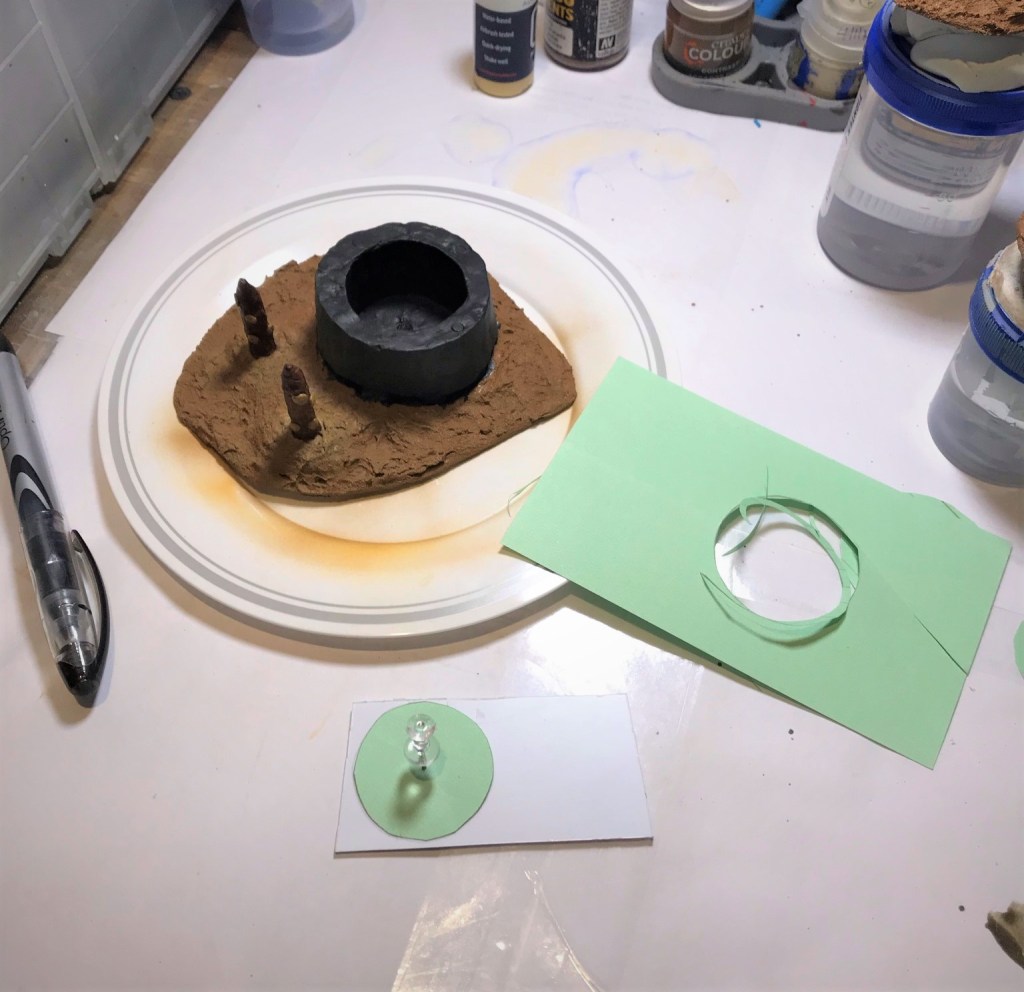
Made a template out of card for a base for the maize.
I wanted the base to fit.
Used shaved and cut toothpicks as maize. This is a test to see how many I would need.
Used a piece of birch wood to support the card.
I made a paper form to hold the toothpick shards and PVA glue to make a “maize mass”.
The maize well and the maize mass drying.
The finished piece with roof off.
The maize building process I used broken out.Structure completed.
With roof off showing maize
Back of piece
Left side
Right side
Aztec Veterans defend the maize.
Aztec Peasant/Farmer’s House
I had three peasant houses – this is the first one.
The piece with magnets installed and on the styrene base awaiting priming weather
Primed with black and then brown.
Main painting completed prior to final shading.
Completed and united with its roof.
Progress on the Aztec Peasant/Farmer’s House
Right side
Back side
Left side
Front – showing pathway of chinchilla dust.
Novice warriors defend a peasant’s house – maybe not even theirs at the beginning of the day!
Huaxtec House
The Huaxtec were a people who lived near the east coast of Mexico. They were related to the Maya and were conquered by the Aztecs. I found this structure to be quite striking visually and I have to imagine that it was somewhat common. In any case, it was different than the others, so I thought it worth adding. The only issue that this piece presented was that the roof size did not line up as easily for the magnets – but enough to make a couple work enough to keep the roof on.
You can see the two magnetic positions that I could drill.
Primed.
Added Vallejo texture to the base.
Finished bottom.
Finished with the roof.
Huaxtec House progress
Finished front view of Huaxtec house.
Back view.
The Aztecs pillage the Huaxtec House.
Aztec Stone House
The third type of house is an Aztec Stone House. This is one of the two stone houses in the group. I decided that I would go for more of a sandstone or light limestone look for these.
An example of how I created a template to make sure that the roof and building magnets lined up.
On styrene base showing magnets installed
Primed in black
Added Vallejo earth texture
After pigments and early base dry brushing
Aztec Stone House progress
Right side
Back side
Left side
Front of Aztec Stone House
Aztec Veteran and Novice Warriors deploy from the stone house
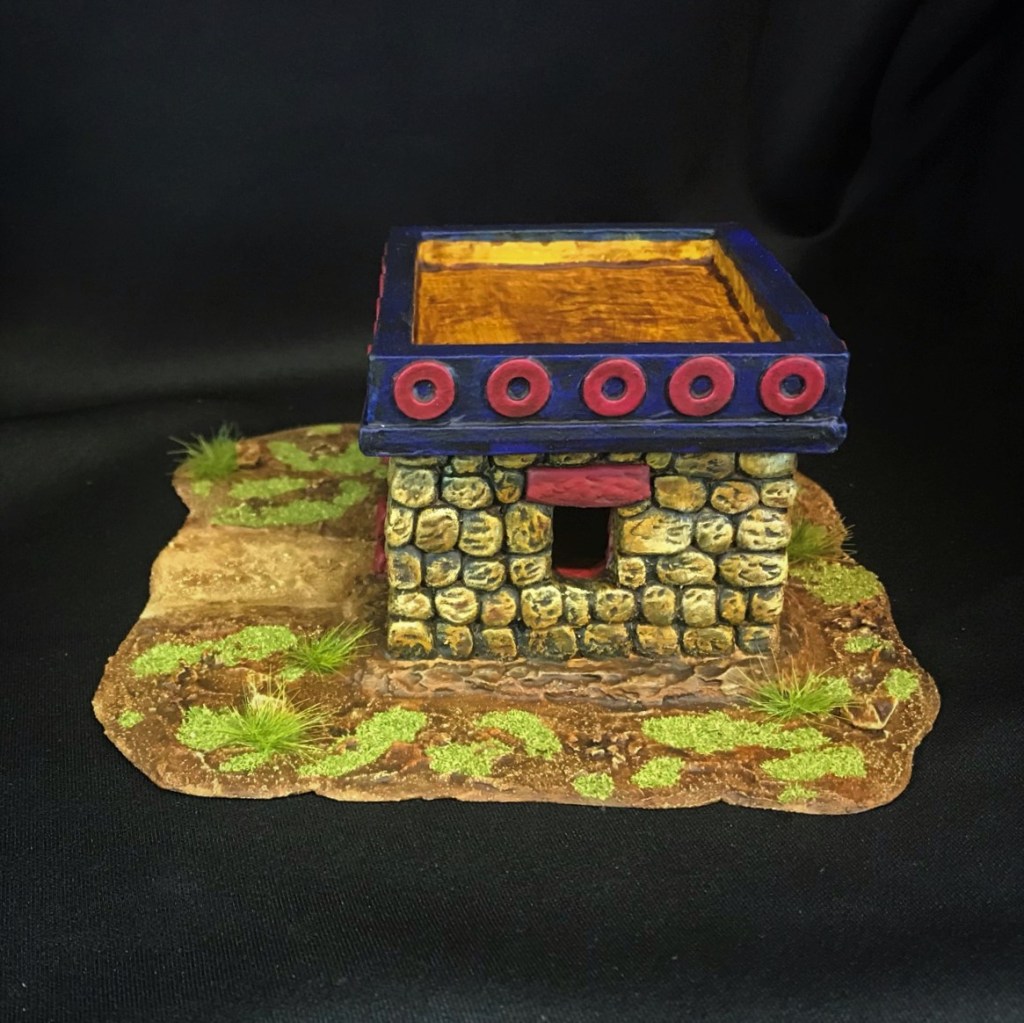
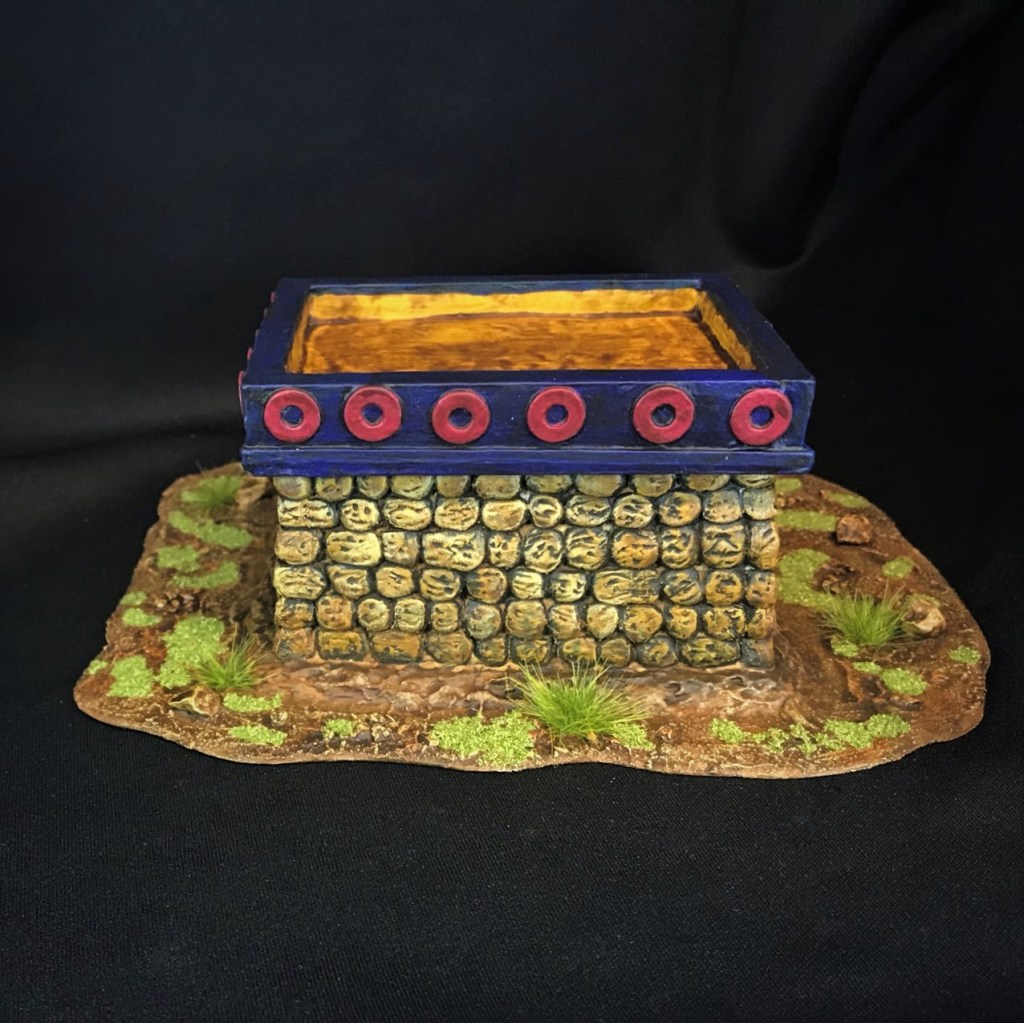
Aztec Noble’s House
The Aztec Noble’s house had an interesting roof and a bit of opportunity for some color.
Using a template with thumbtacks to align the roof and magnets
Magnets installed and structure based
Primed
Added Vallejo texture to the base
After adding some talus, chinchilla dust, I dry brushed
Aztec Noble House progress
Left side
Back
right side
Front of Aztec Noble’s House
The Aztec Snake Woman (General) and a Noble Captain depart for battle.
Miscellaneous Scatter Terrain
It was a nice surprise to get this scatter terrain. I used all of it except one – which was an African mask. I based it and primed it but did not paint it. As I will not likely use it, it will be another (5th!) prize in “Mark’s Aztec Building Challenge Contest“.
These will be nice treasure markers for the games. I played with some shiny (and tiny) beads (from Japan) and Swarovski glittery crystals from Michaels to make the treasure and fill the pots over some steel BB’s. I also had a chance to do some minimal Aztec freehand work on the pots.
Cleaned and based freebies – the mask on the right is another prize in the contest now.
Primed and based textured.
The leafy pot that I added the freehand to – loosely based on a design I saw online.
This marker had bones, skulls, a treasure chest, and more.
Some larger gold and silver items.
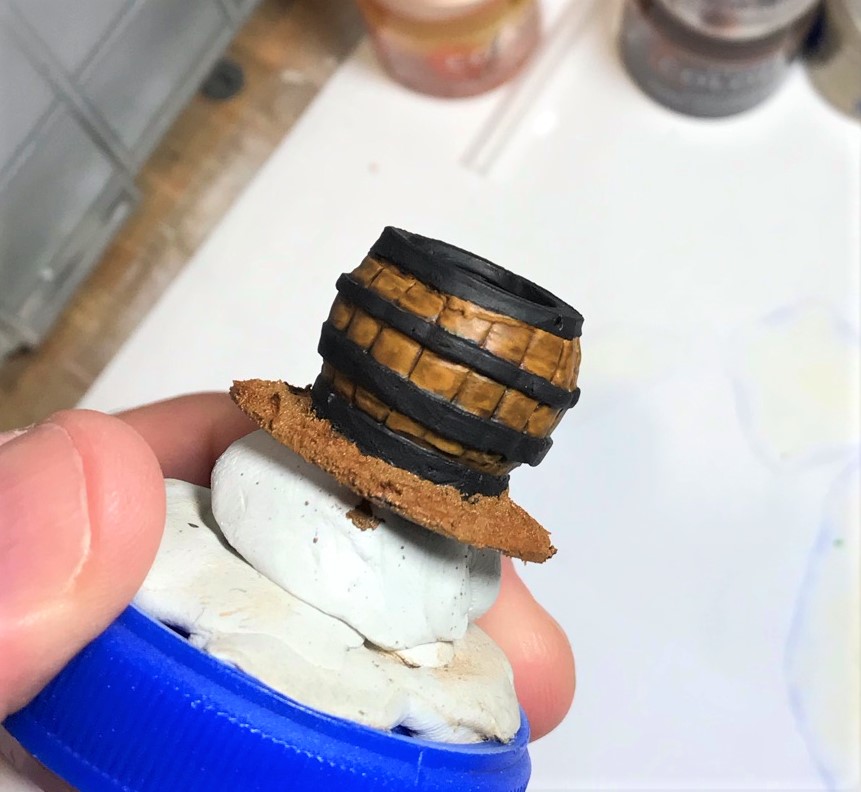
A barrel – I was going to make it a water barrel but made it full of treasure instead.
Tiny little beads – gold (2 sizes), silver, and turquoise.
Treasure!
Scatter Terrain progressThe Leafy Pot treasure. Why is it on leaves? You got me – I don’t know!
The “Bones” treasure marker, replete with two skulls, a partial skeleton, a barrel, a pot, a treasure chest and an old sack. The gold staff treasure – with a treasure chest, a silver carafe, a gold vase, and a large gold staff of some type.Top view of the treasuresElite Warriors – Cuachiqueh (“Shorn Ones”) – protect Montezuma’s gold.
That rounds out my pieces for April. I now have just two more pieces of MDF left for the contest – though I do have more planned terrain and structures – keep following!
Coming up next – these last two MDF.
I’d love to hear any feedback on these – and I did use a different photo set up as well – so let me know on that too if you want. Getting my last “jab” this weekend, as well as trying to play in two golf tournaments – so when will I get done and end the contest…who knows?
As far as Acheson, I must give them a very positive review on these resin pieces. Check out their stuff here. Their offerings and ranges are quite extensive across many periods. The sculpting is good and the details are nice, and the extras they threw in were very cool too. And other than the freebies that they threw in, I have not been paid by them in any way.
Thanks for looking and please let me know what you think in the comments section!
For all of my previous posts on games, units, and other projects for my 16th Century Spanish Conquest supplement for Feudal Patrol™ – “Civilizations Collide” – please see this page.
The next sections are references on the paints I used – mainly for me – so skip the rest if you are so inclined. Thanks for looking and I hope that you’ll let me know what you think about these models.
PAINTS, INKS, GLAZES, SHADES, WASHES, PIGMENTS, FLOCKING, GLUES AND MORE THAT I USED ON THESE STRUCTURES AND PIECES: