In my last post I shared about King Jack and the Great Pumpkin Heads of the Great Land of Harvest. I’m sure that some of you thought – hey – are all of their inhabitants that big? Surely, to have greater pumpkin heads – there must indeed be lesser ones, right?
Indeed there are!
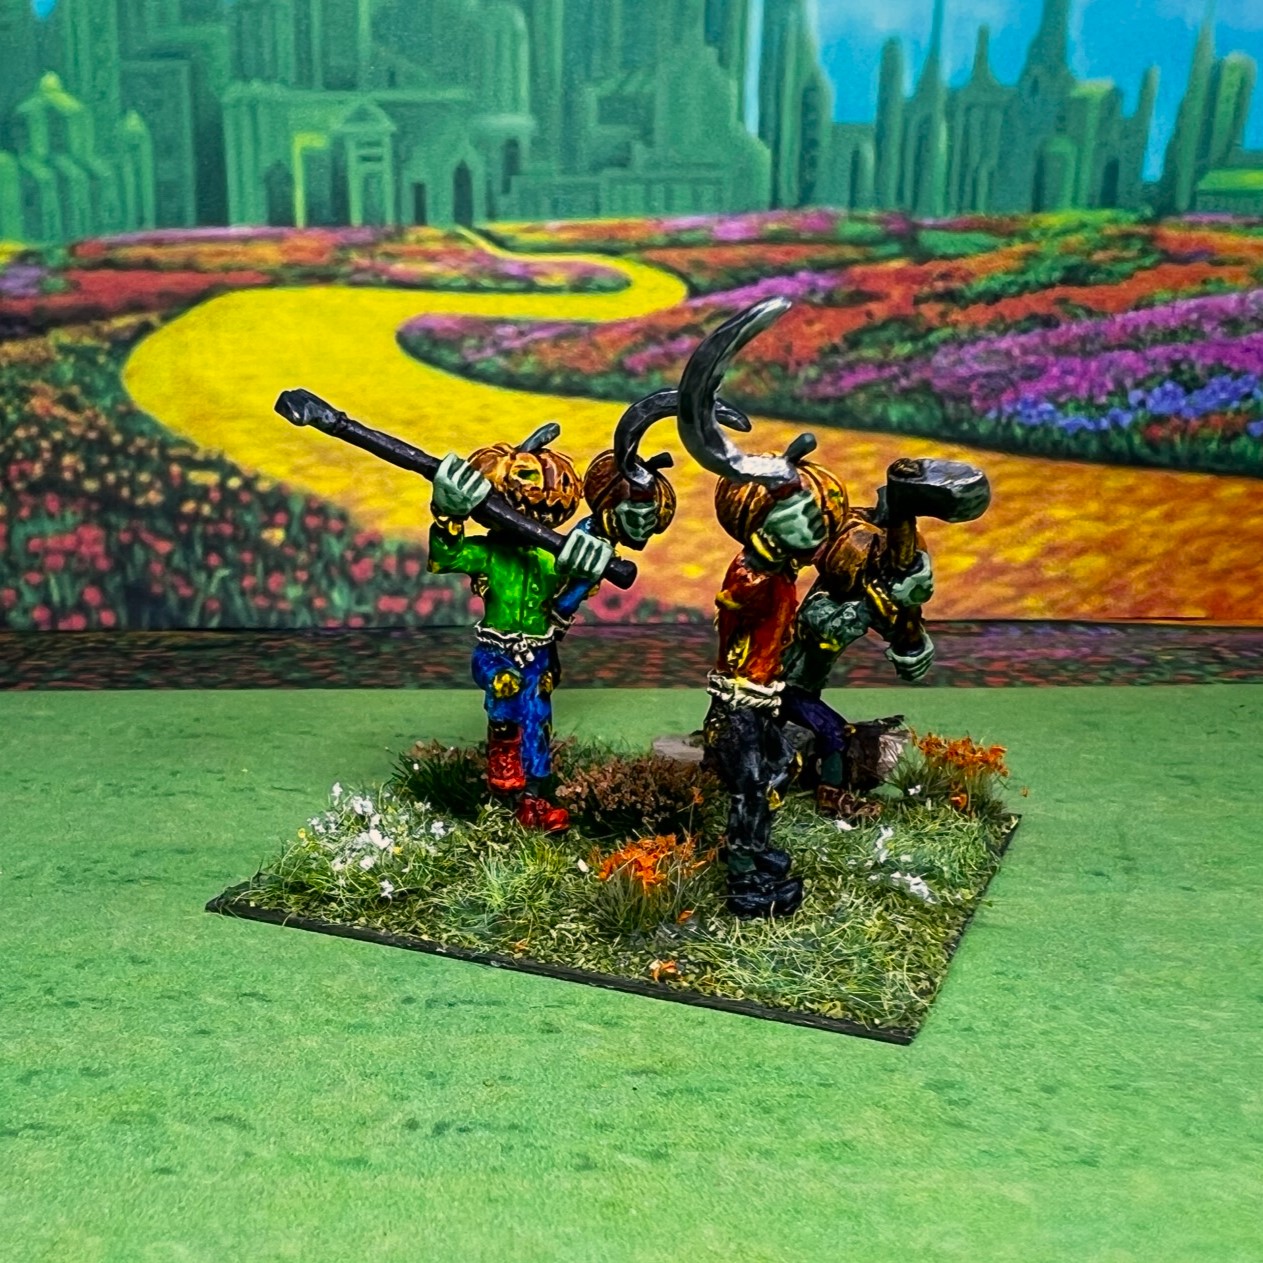
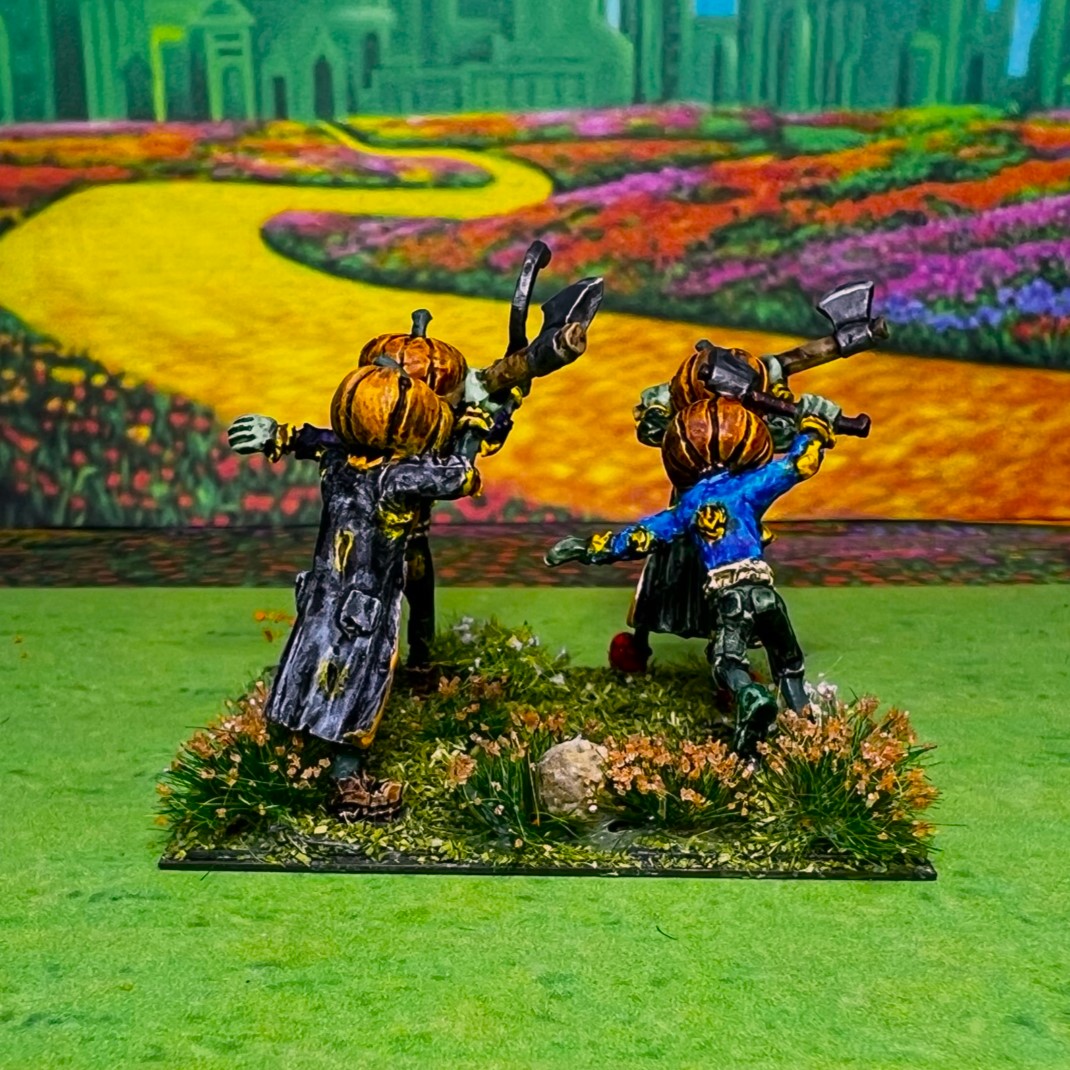
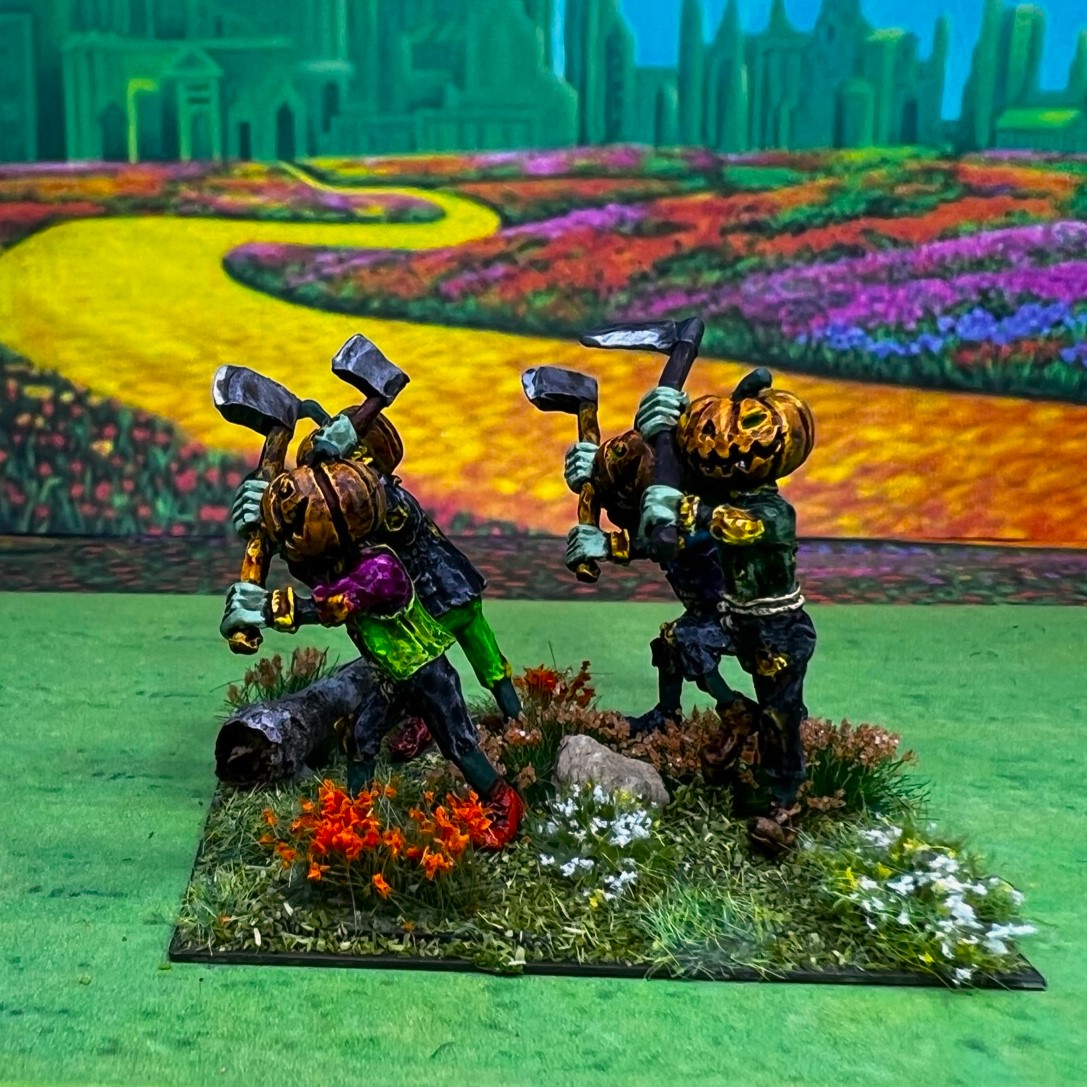
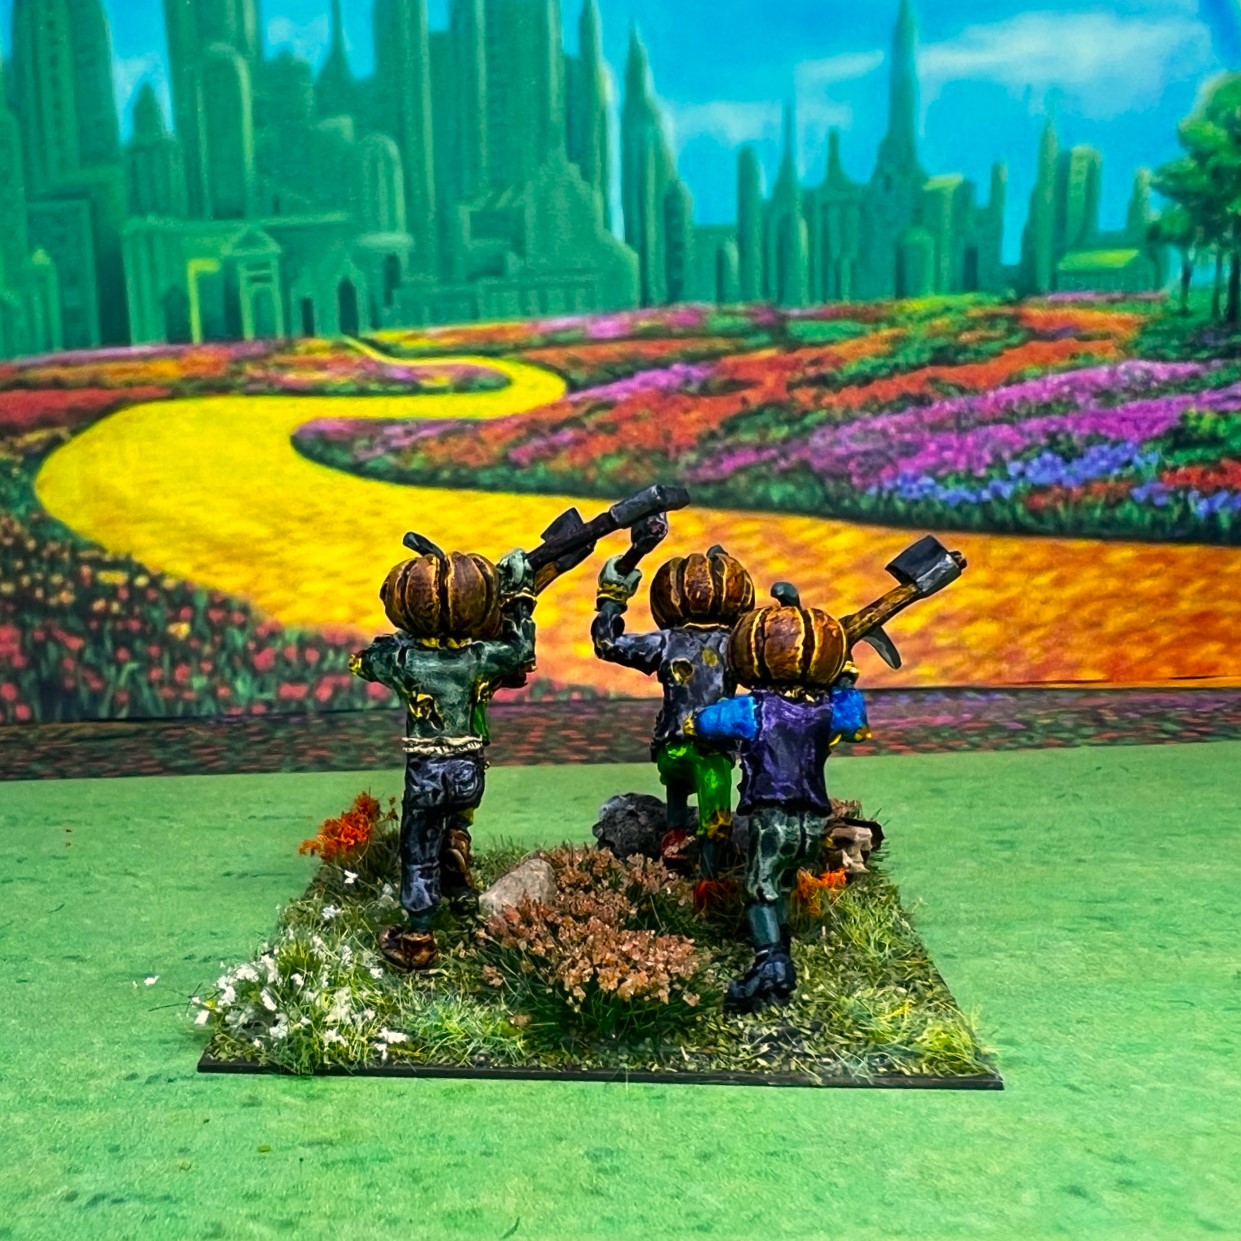
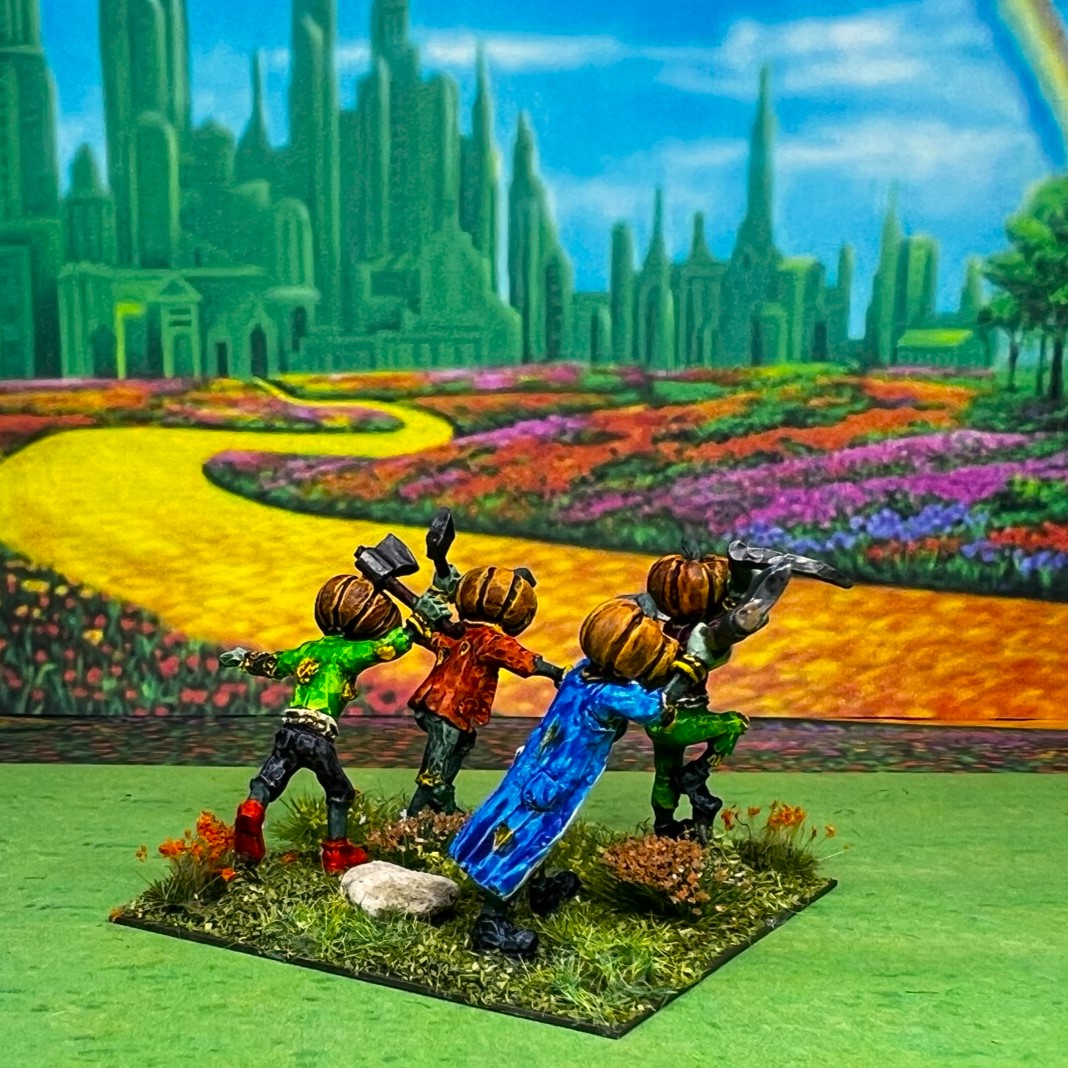
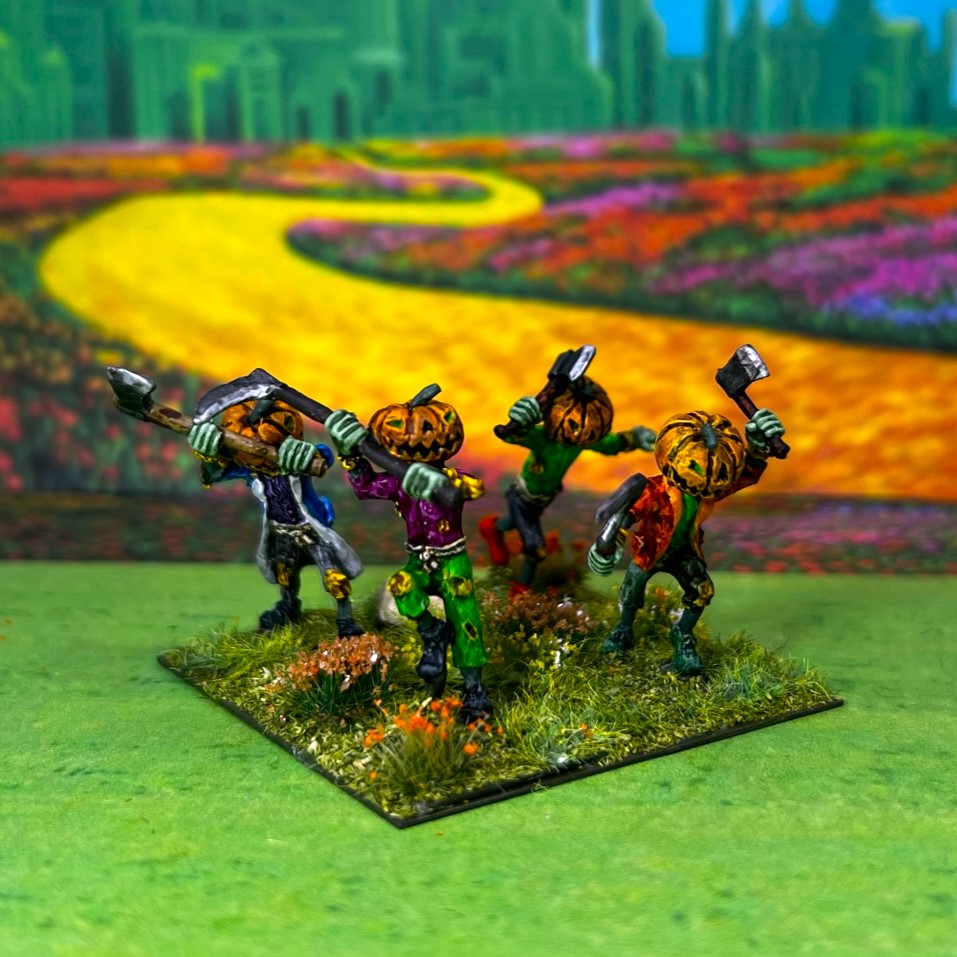
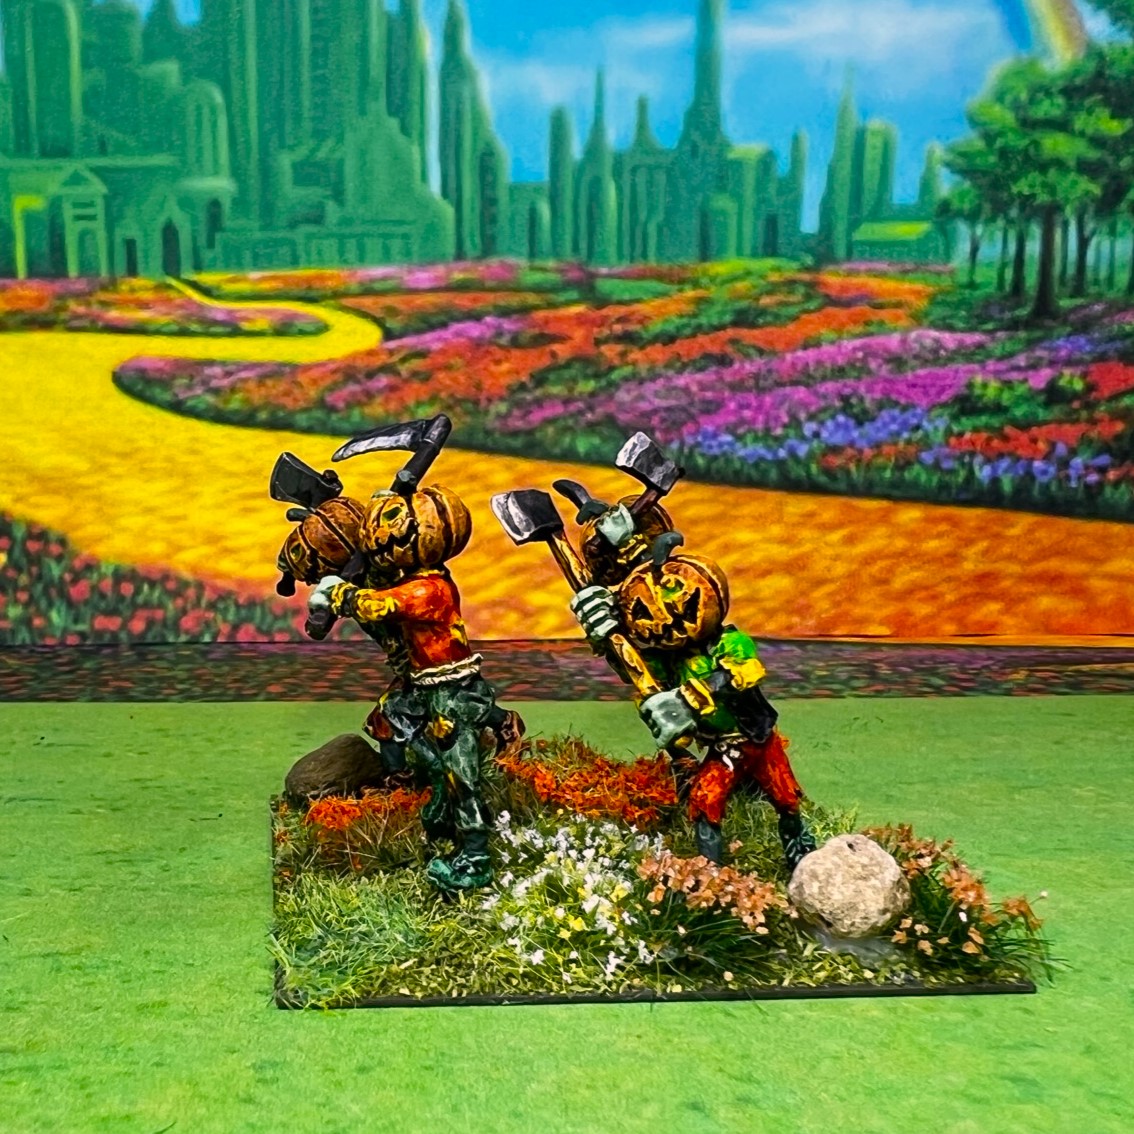
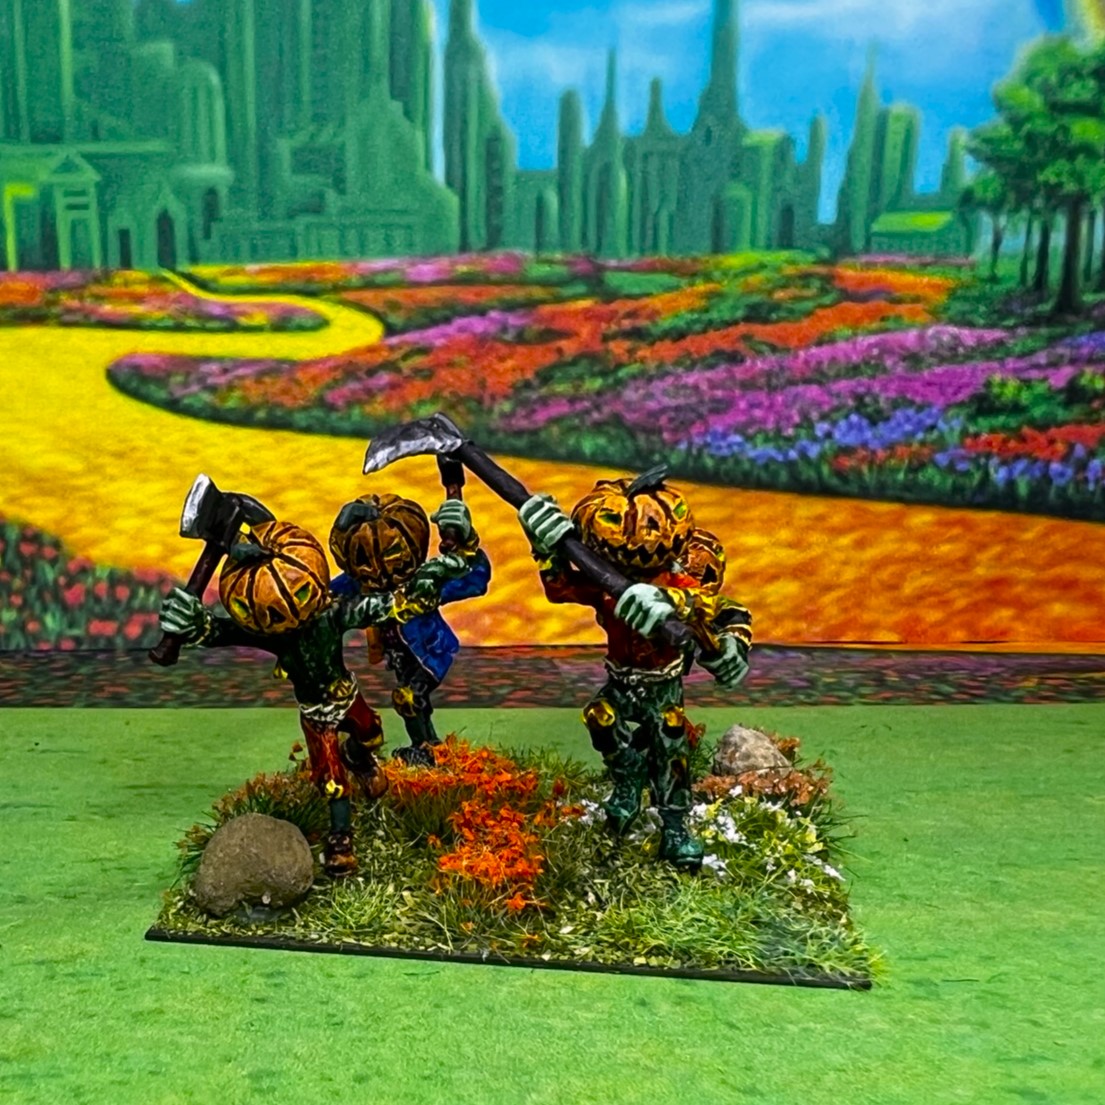
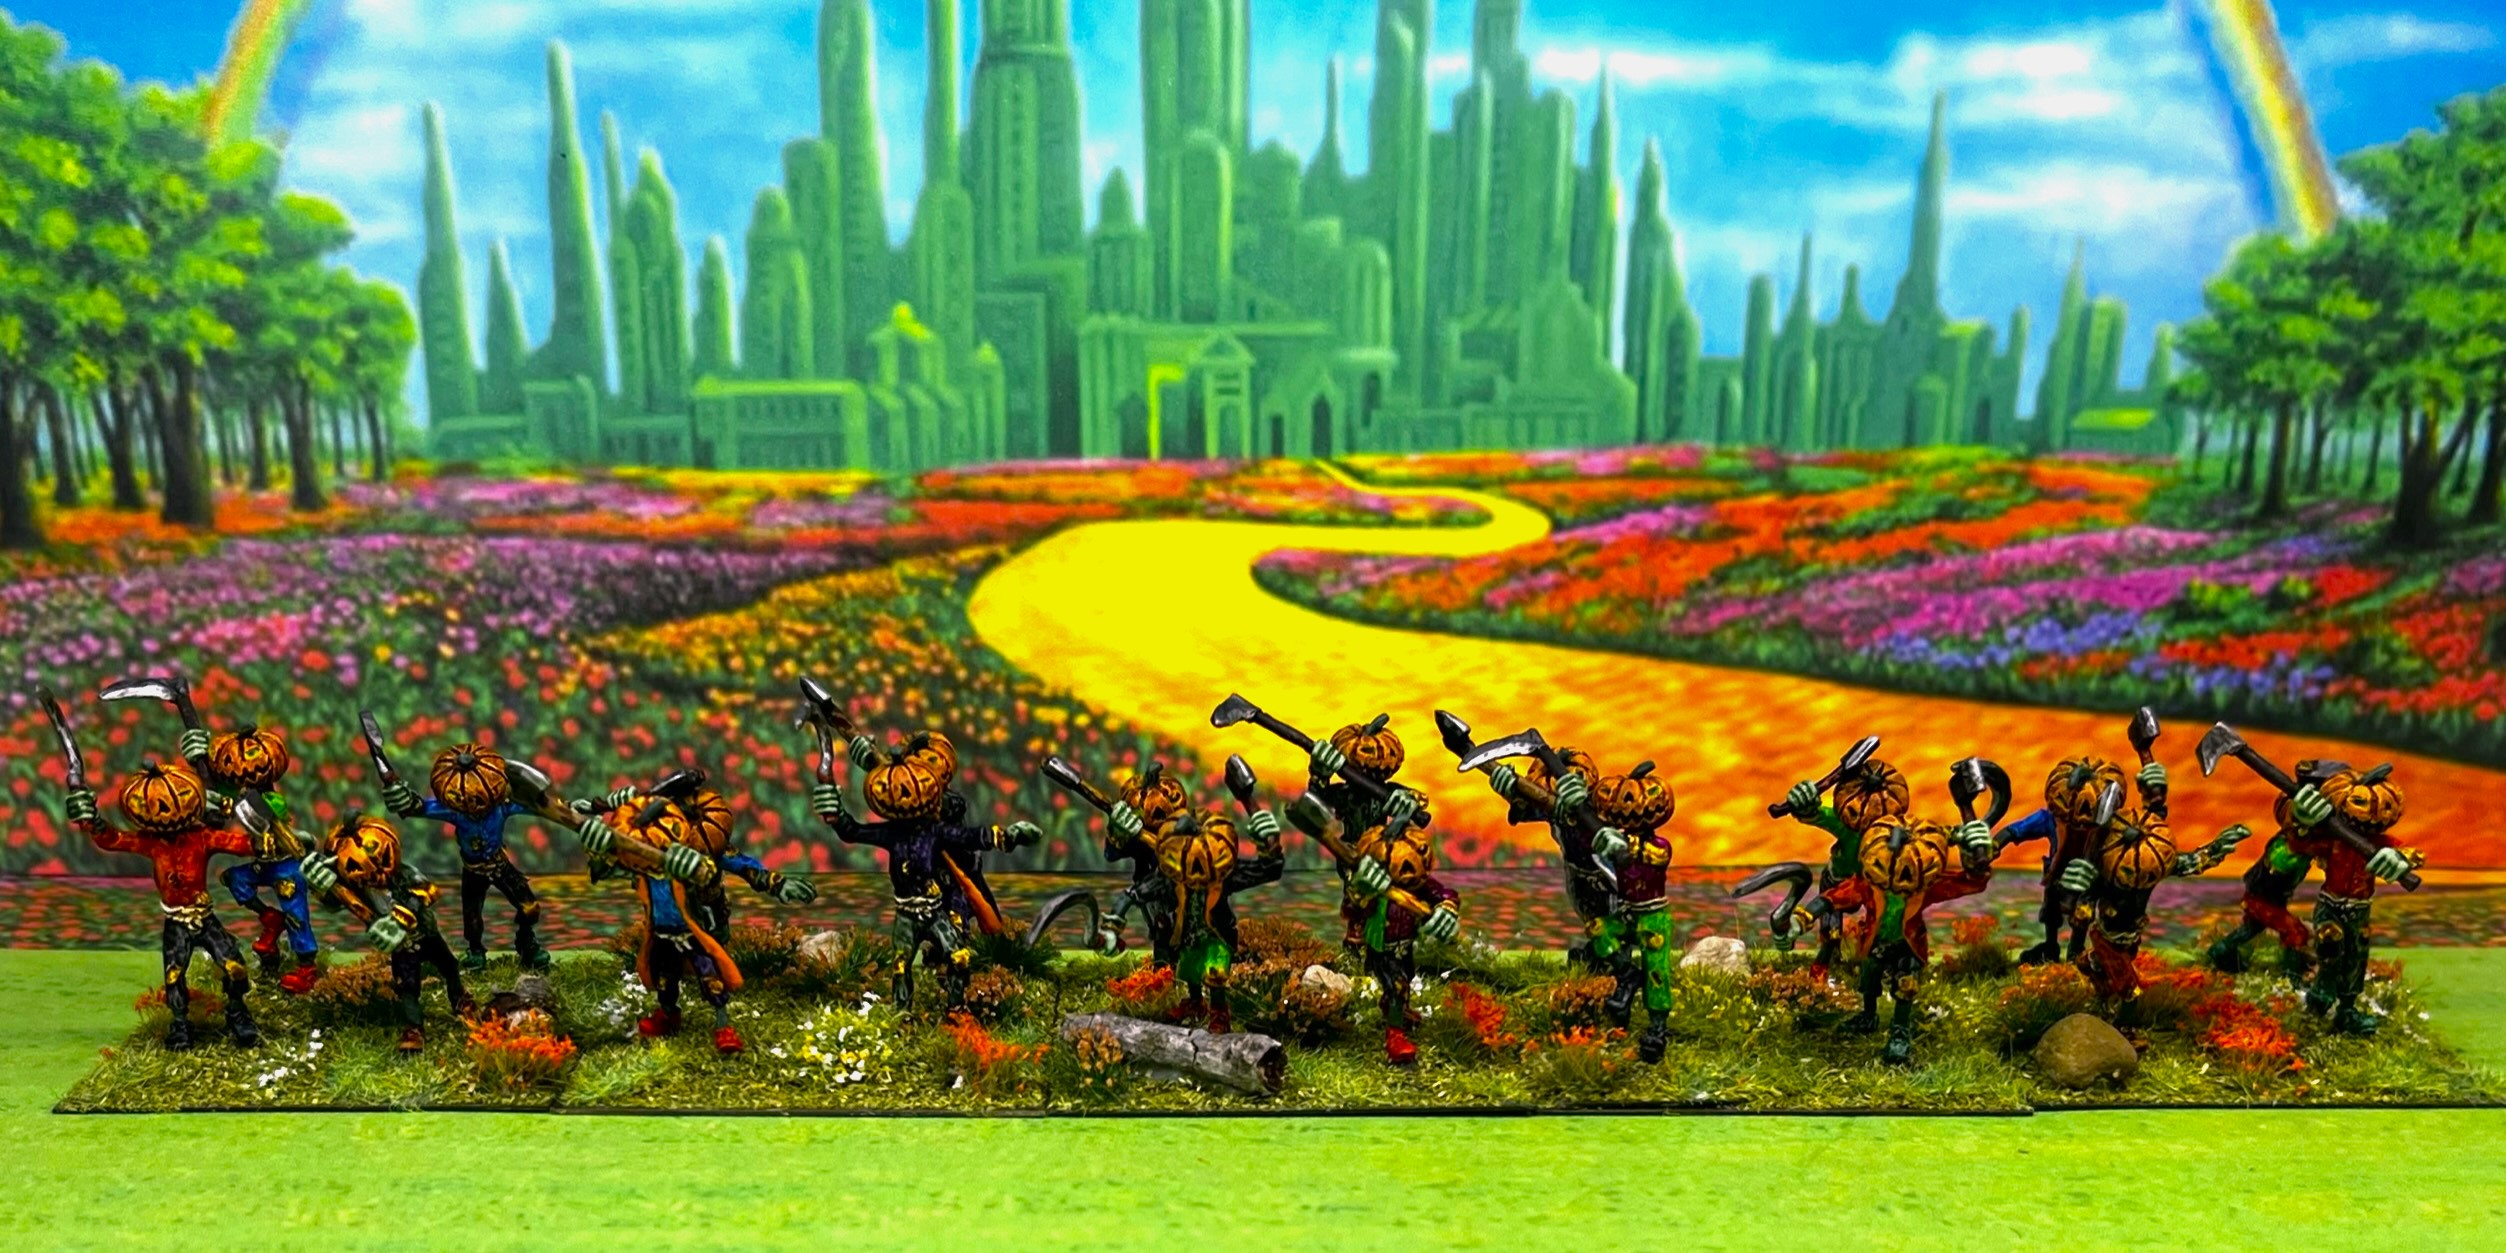
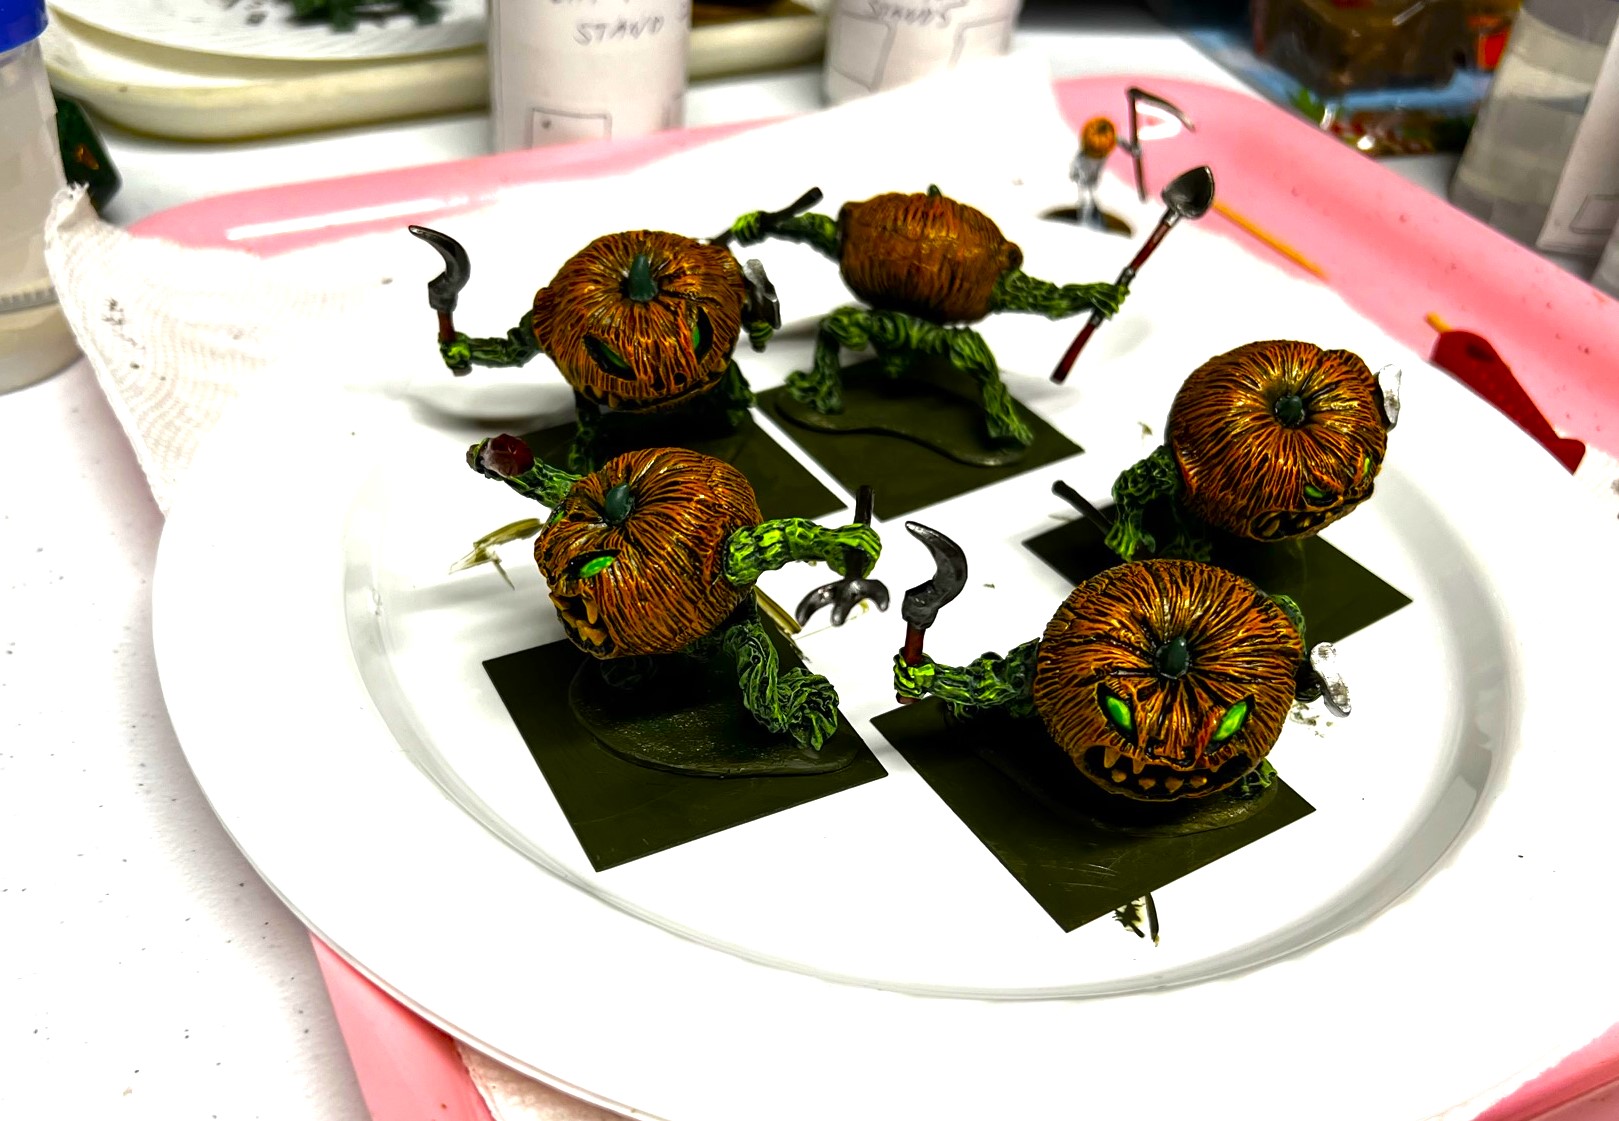
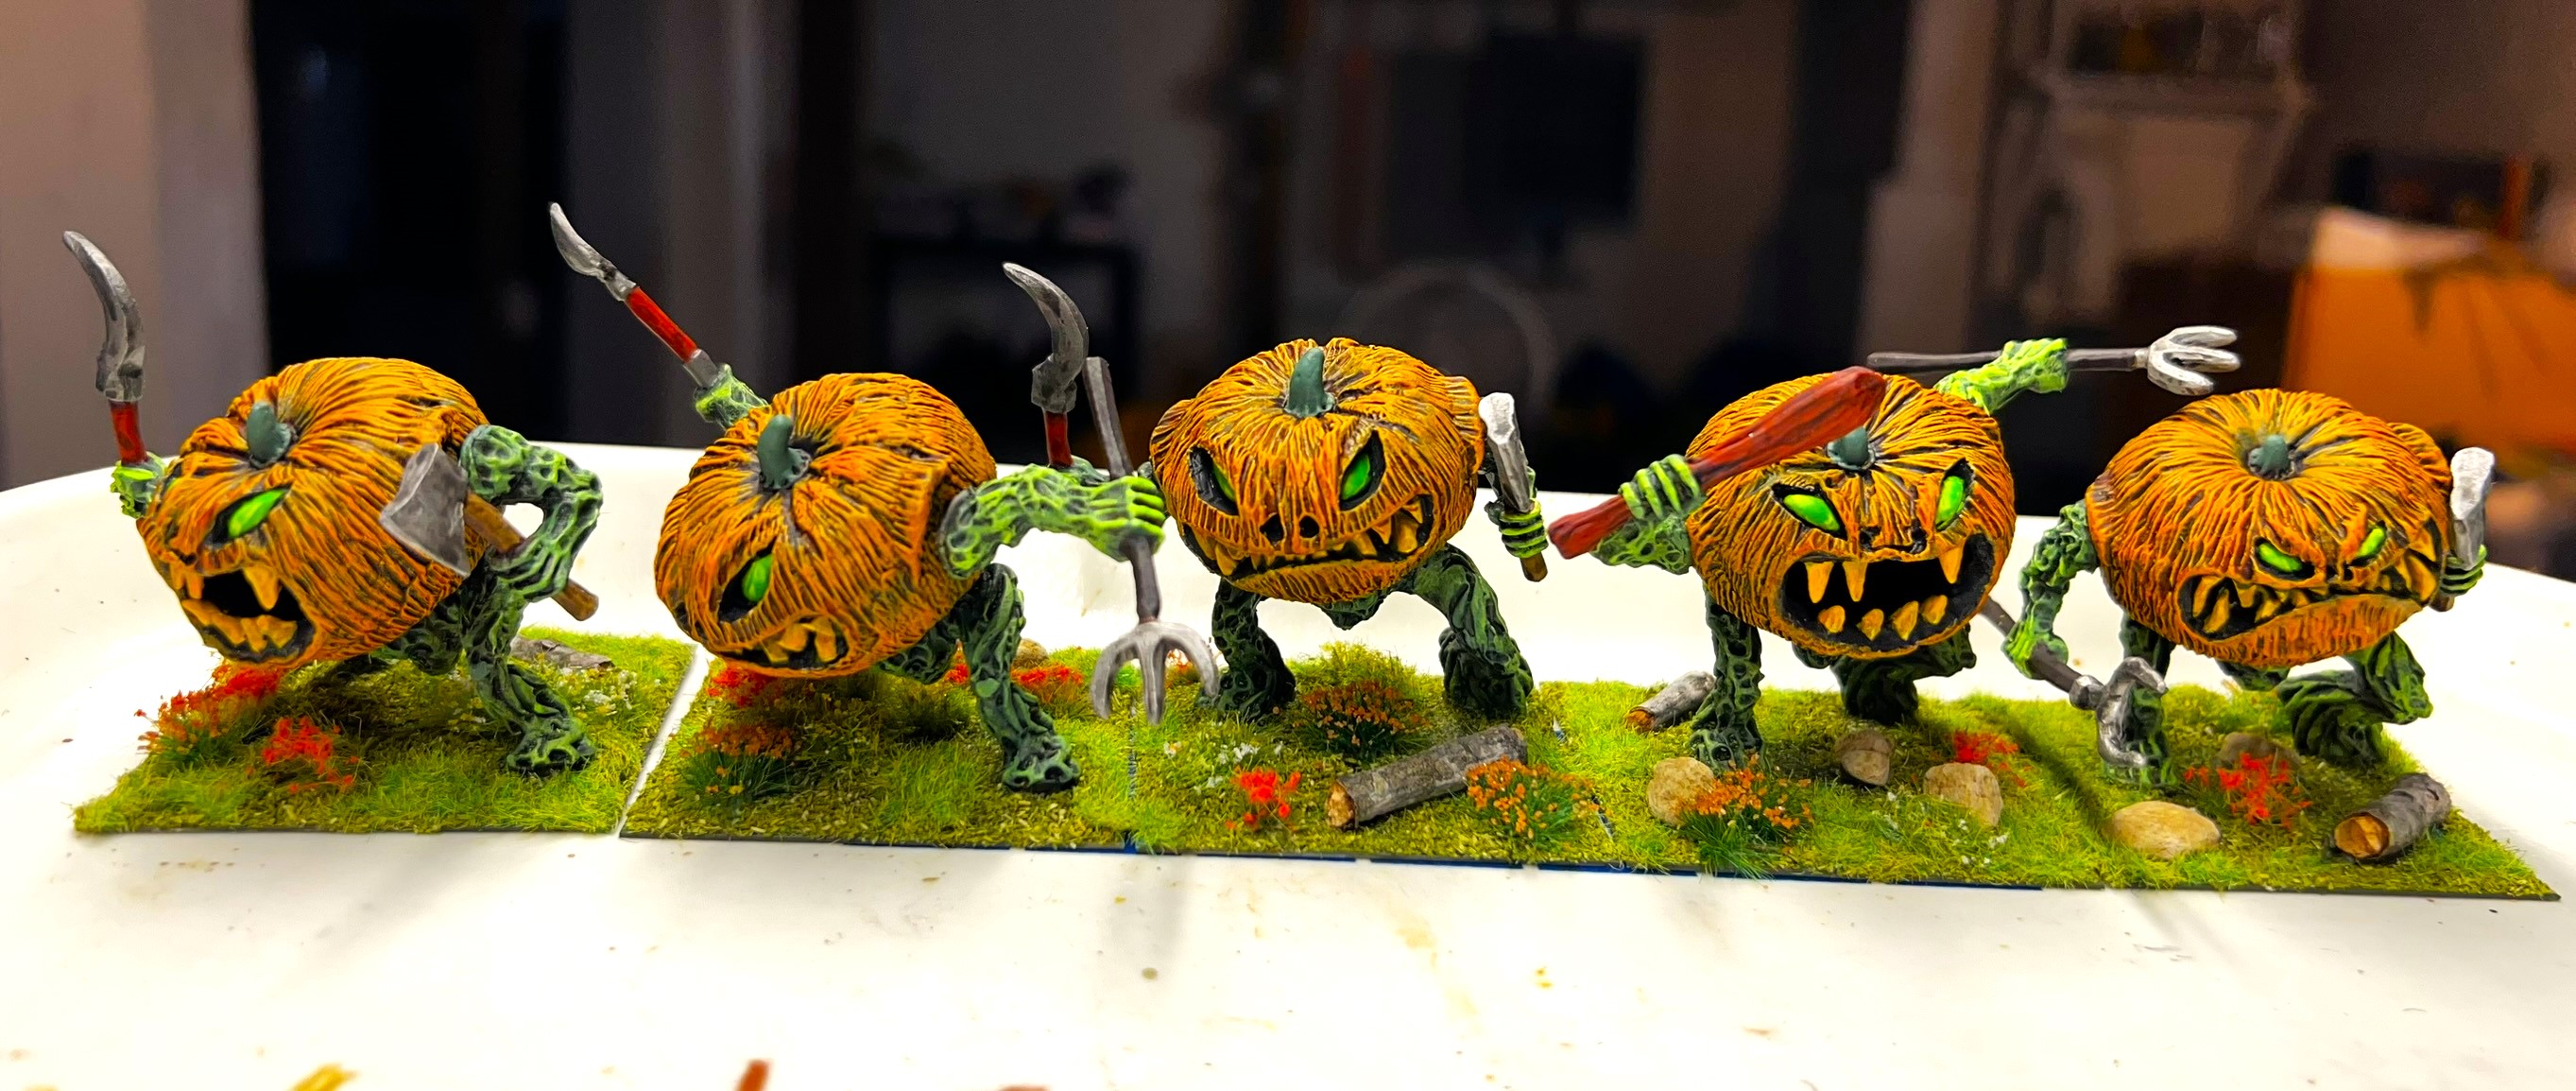
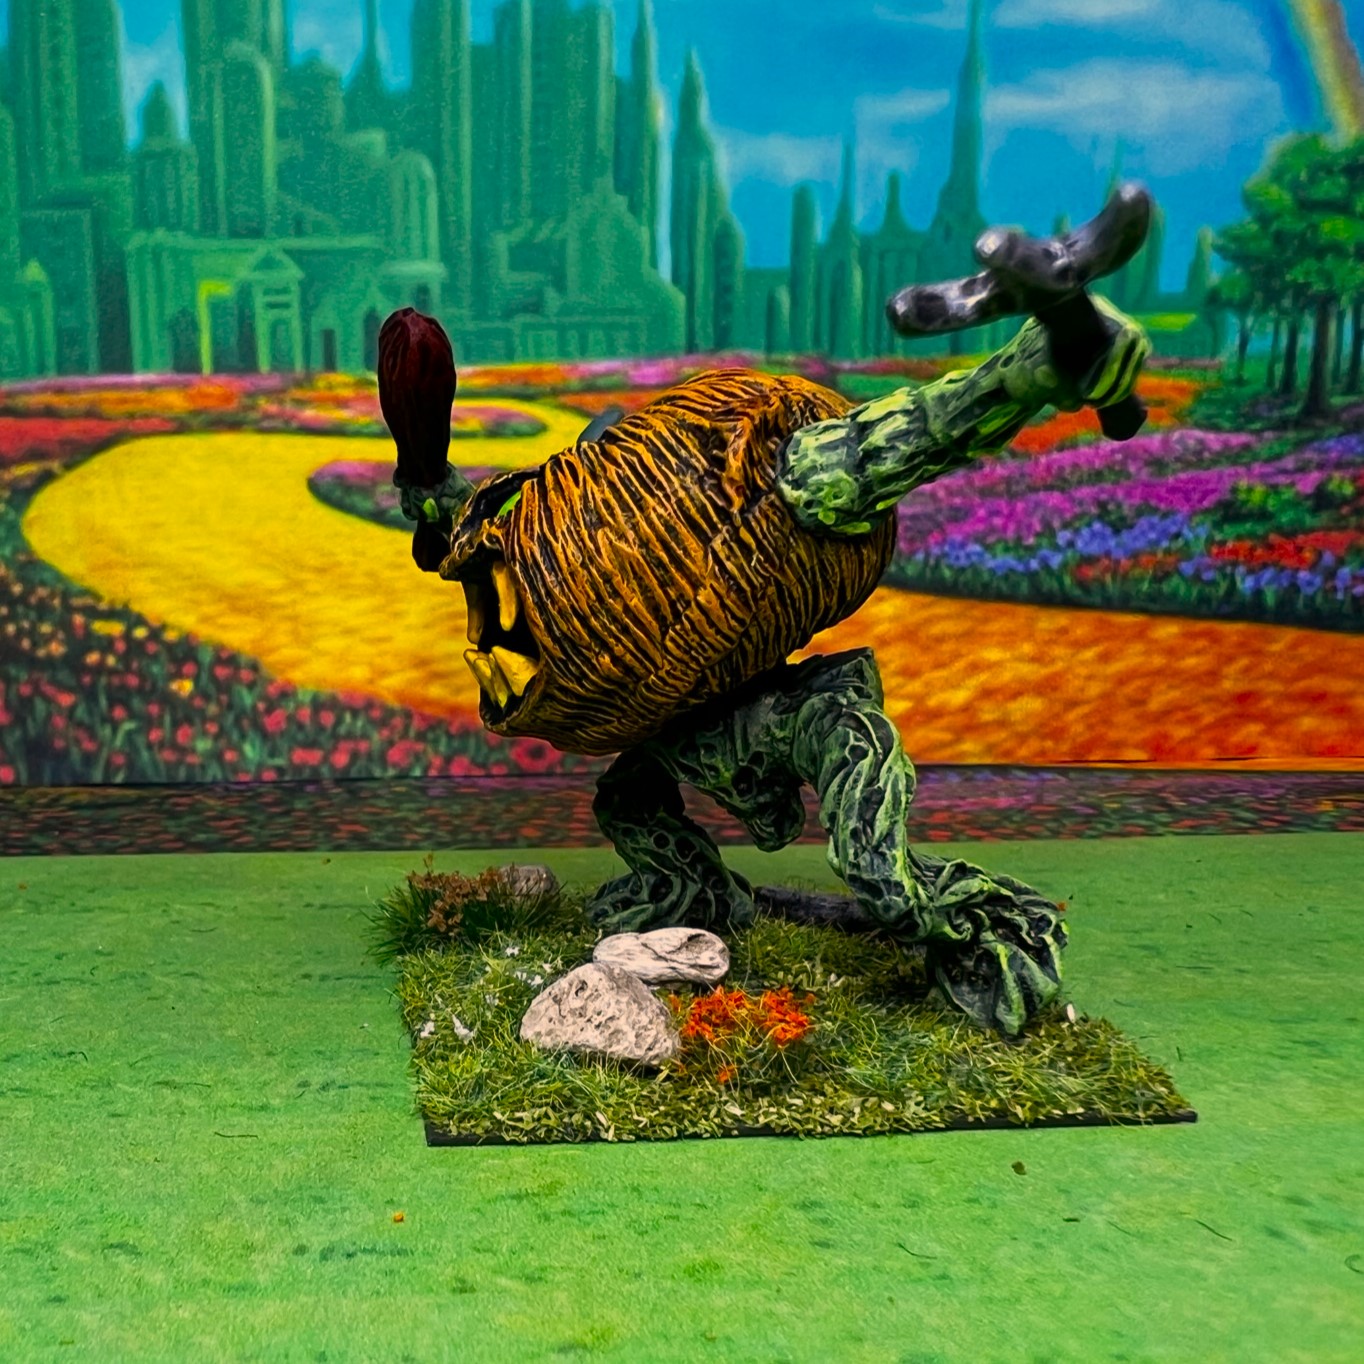
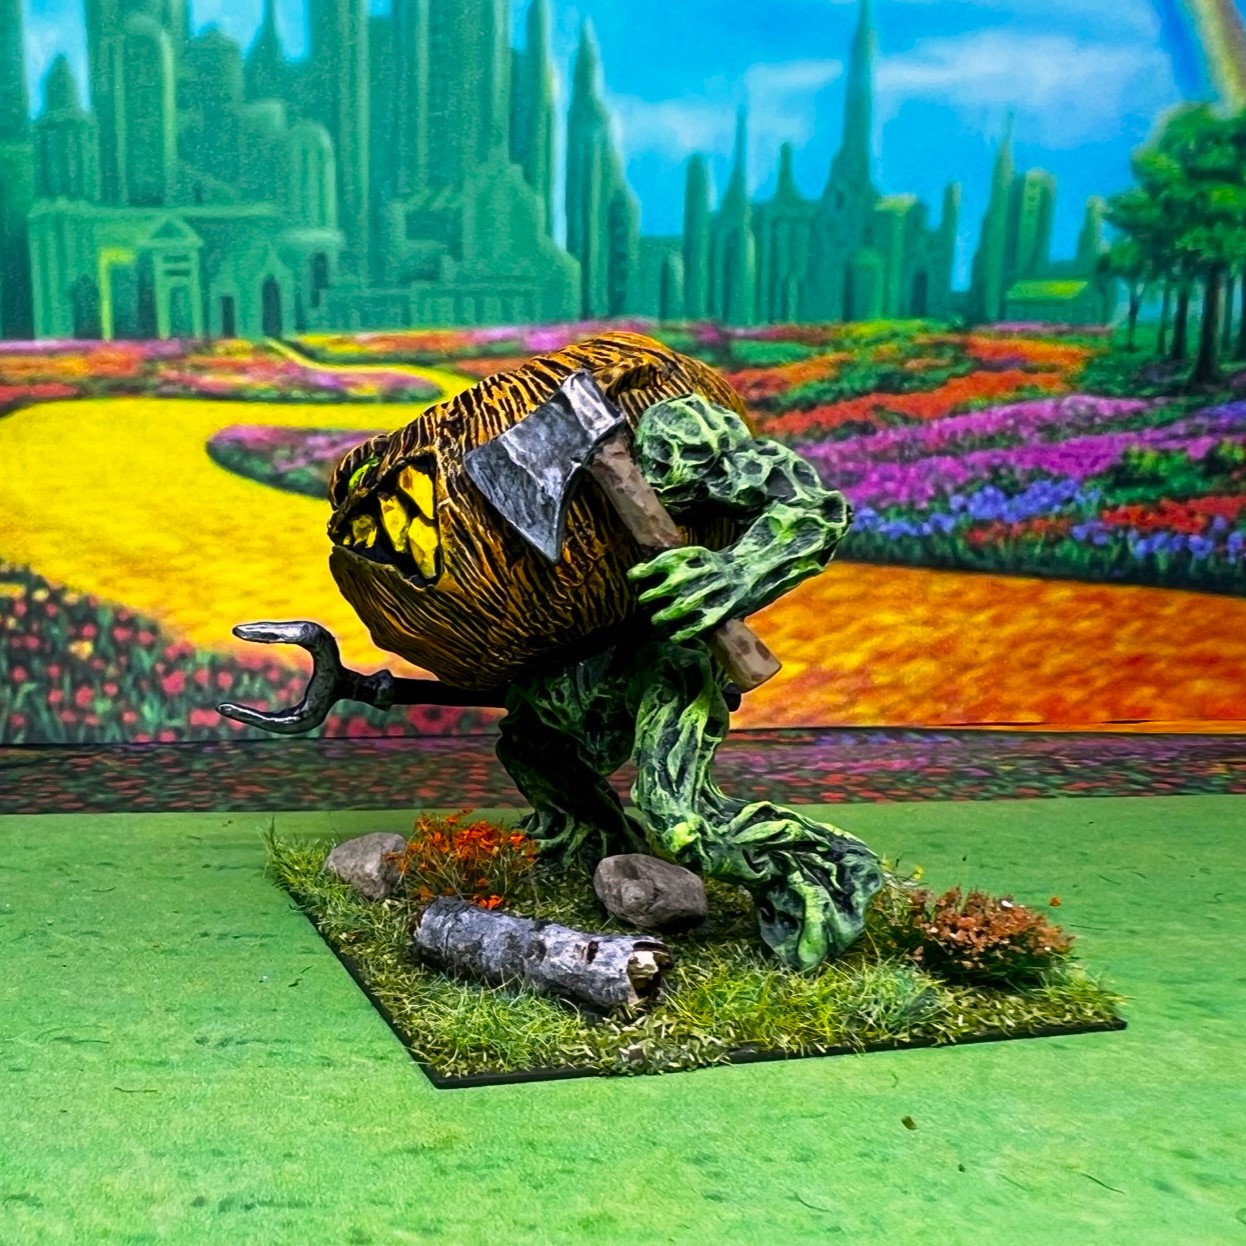
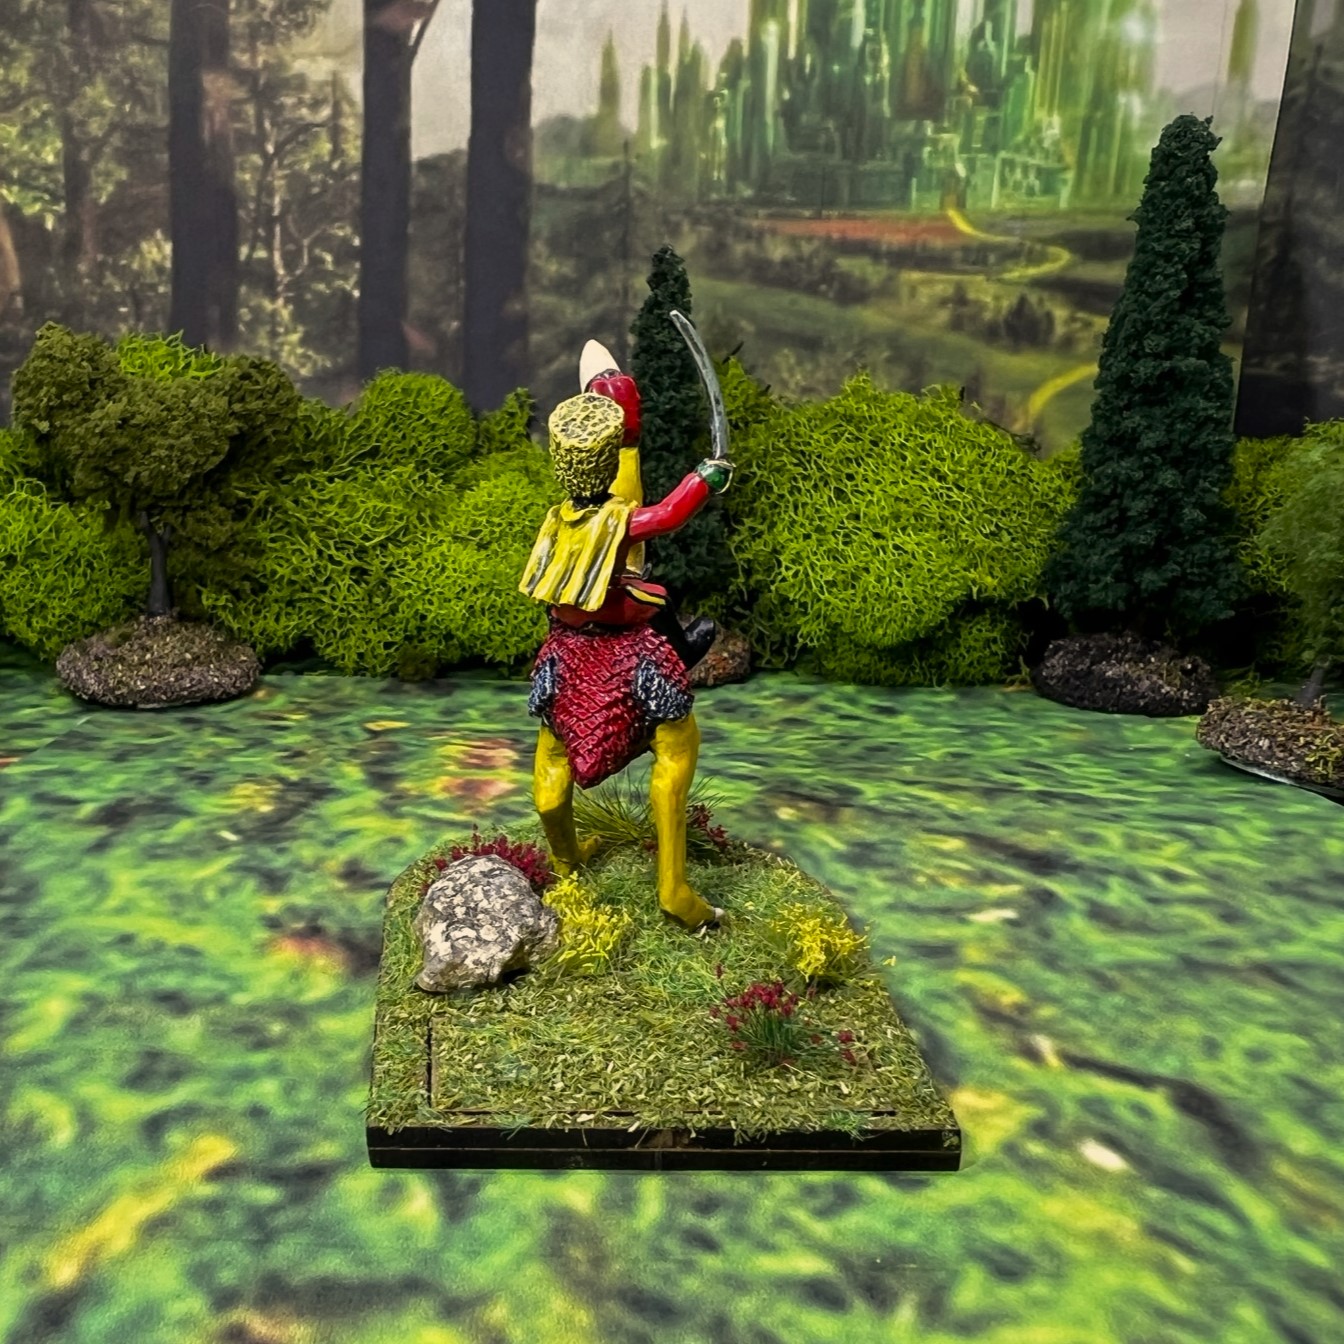
There are several units of lesser pumpkin heads and individual pumpkin head generals – more human-sized ones anyways. I have completed a couple that I will be sharing, starting with this post on my regiment of Lesser Pumpkin Heads. The lesser pumpkin heads are pretty skinny dudes. They can move effortlessly (without cost) through woods, but otherwise they are an average unit.
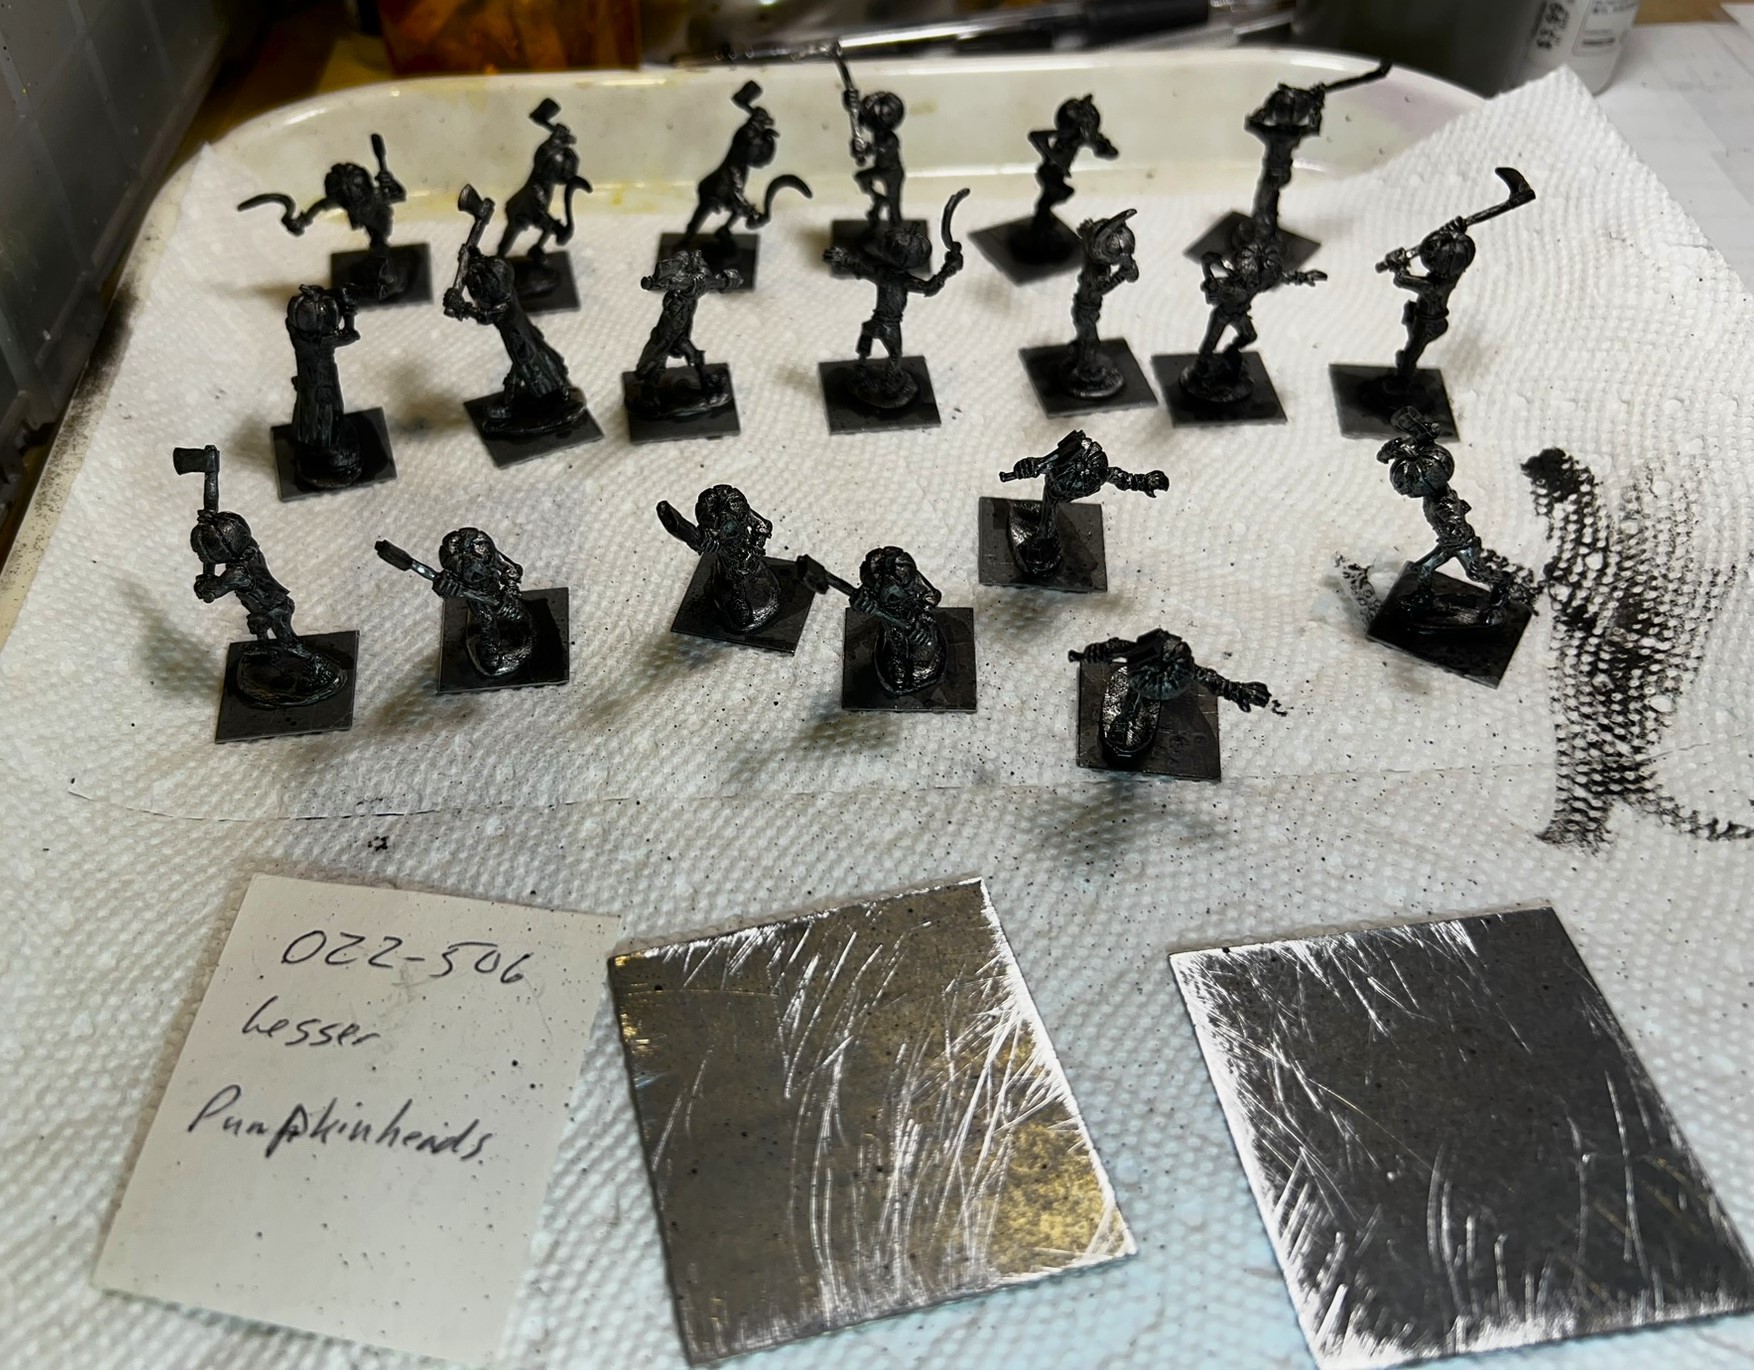
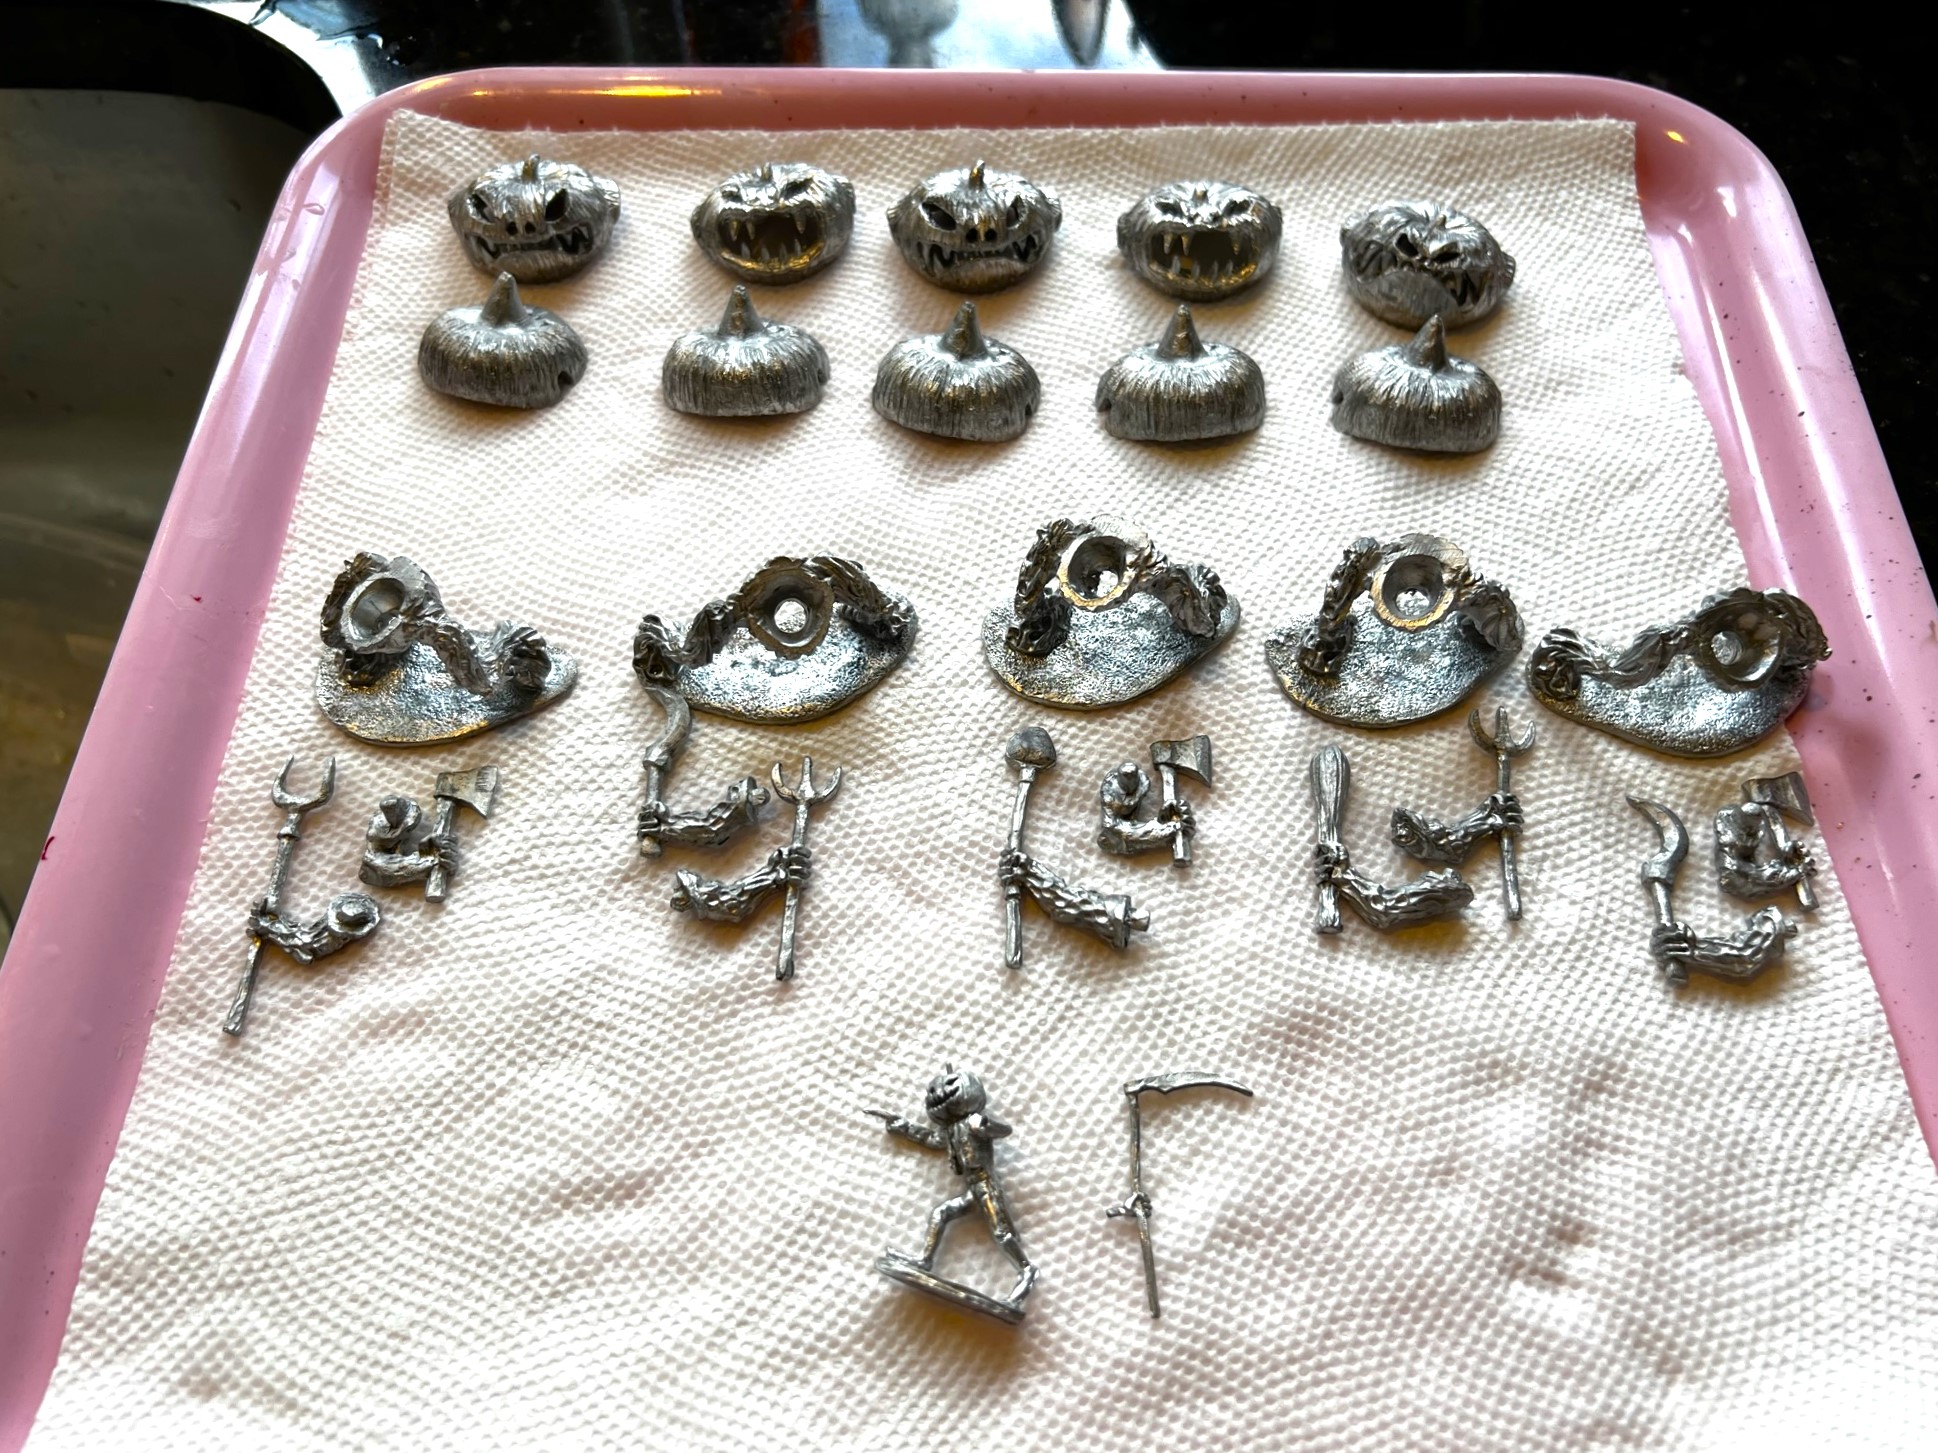
The Lesser Pumpkin Heads (let’s shorten that to LPH) are part of the Wars of Ozz figures and their SKU# is OZZ506 and can be seen here. The unit is comprised of 20 metal figures, appropriately armed with hatchets, axes, sickles, and scythes – but the unit required no assembly. As with all standard Ozz units the figures are based 4 at a time on five 2″ square bases, but there is no Regimental Commander here.
My goal was to organize them to appear to be a rabble-type force. Unlike the disciplined units of the Munchkins or even the Gillikins, I don’t see these as being very organized in battle with regards to uniforms and drill. I also mixed up their clothing colors, weapons, and flocking such that no two of the five bases looked exactly alike. I did use the basic colors of the Great Pumpkin Heads for the LPH – and especially the yellow-green eyes. Here though, I also needed to show straw (like the stuffing of a scarecrow) coming out of the holes in their clothes and near their wrists.
I’ll share a few WIP shots and then some eye candy. These were also worked on (especially due to the need for orange) simultaneously with King Jack and 4 of his other units in various states of completion at the same time.
I’ll start with assembly of the figures and then move to describing the painting process. I used a number of contrast and speed paints, but did also use highlights and washes. All of the paints that I used will be listed at the end as I normally do for those interested (and for my own reference in the future should I need that information).
WIP Shots…
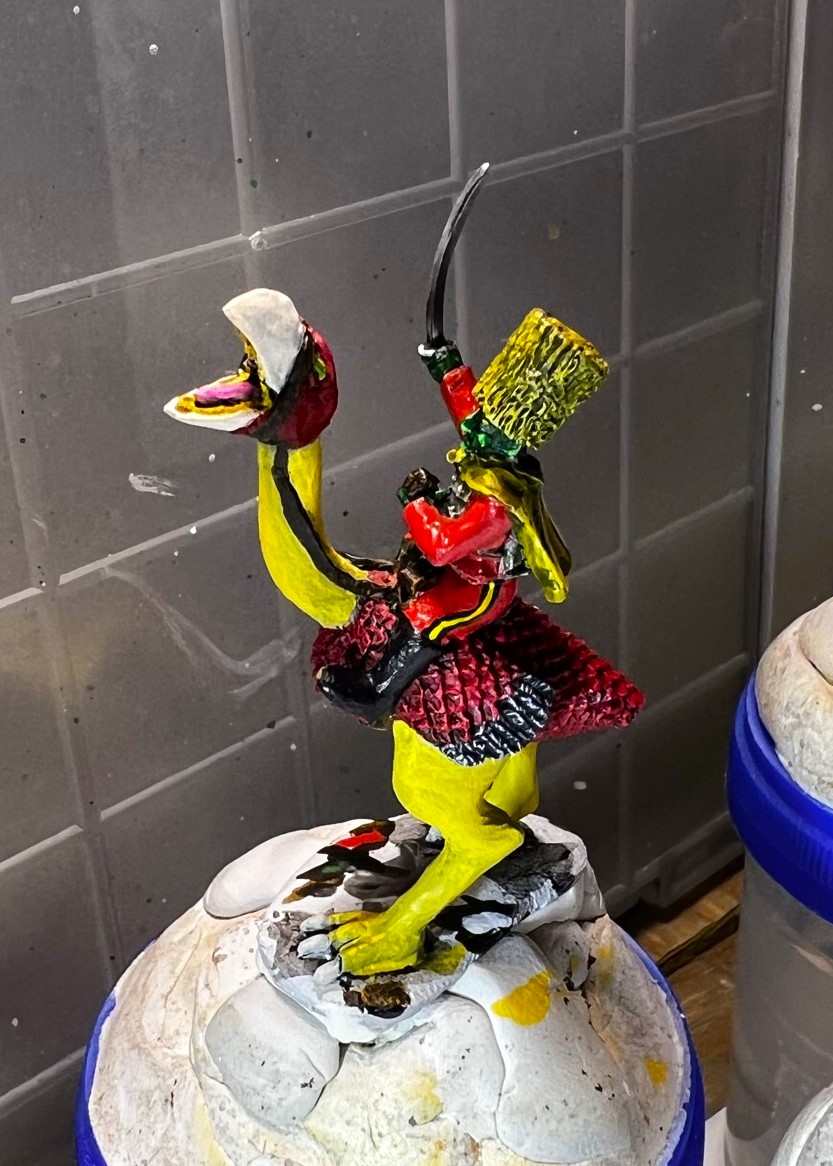
The Lesser Pumpkin Heads here all cleaned up and ready for priming.
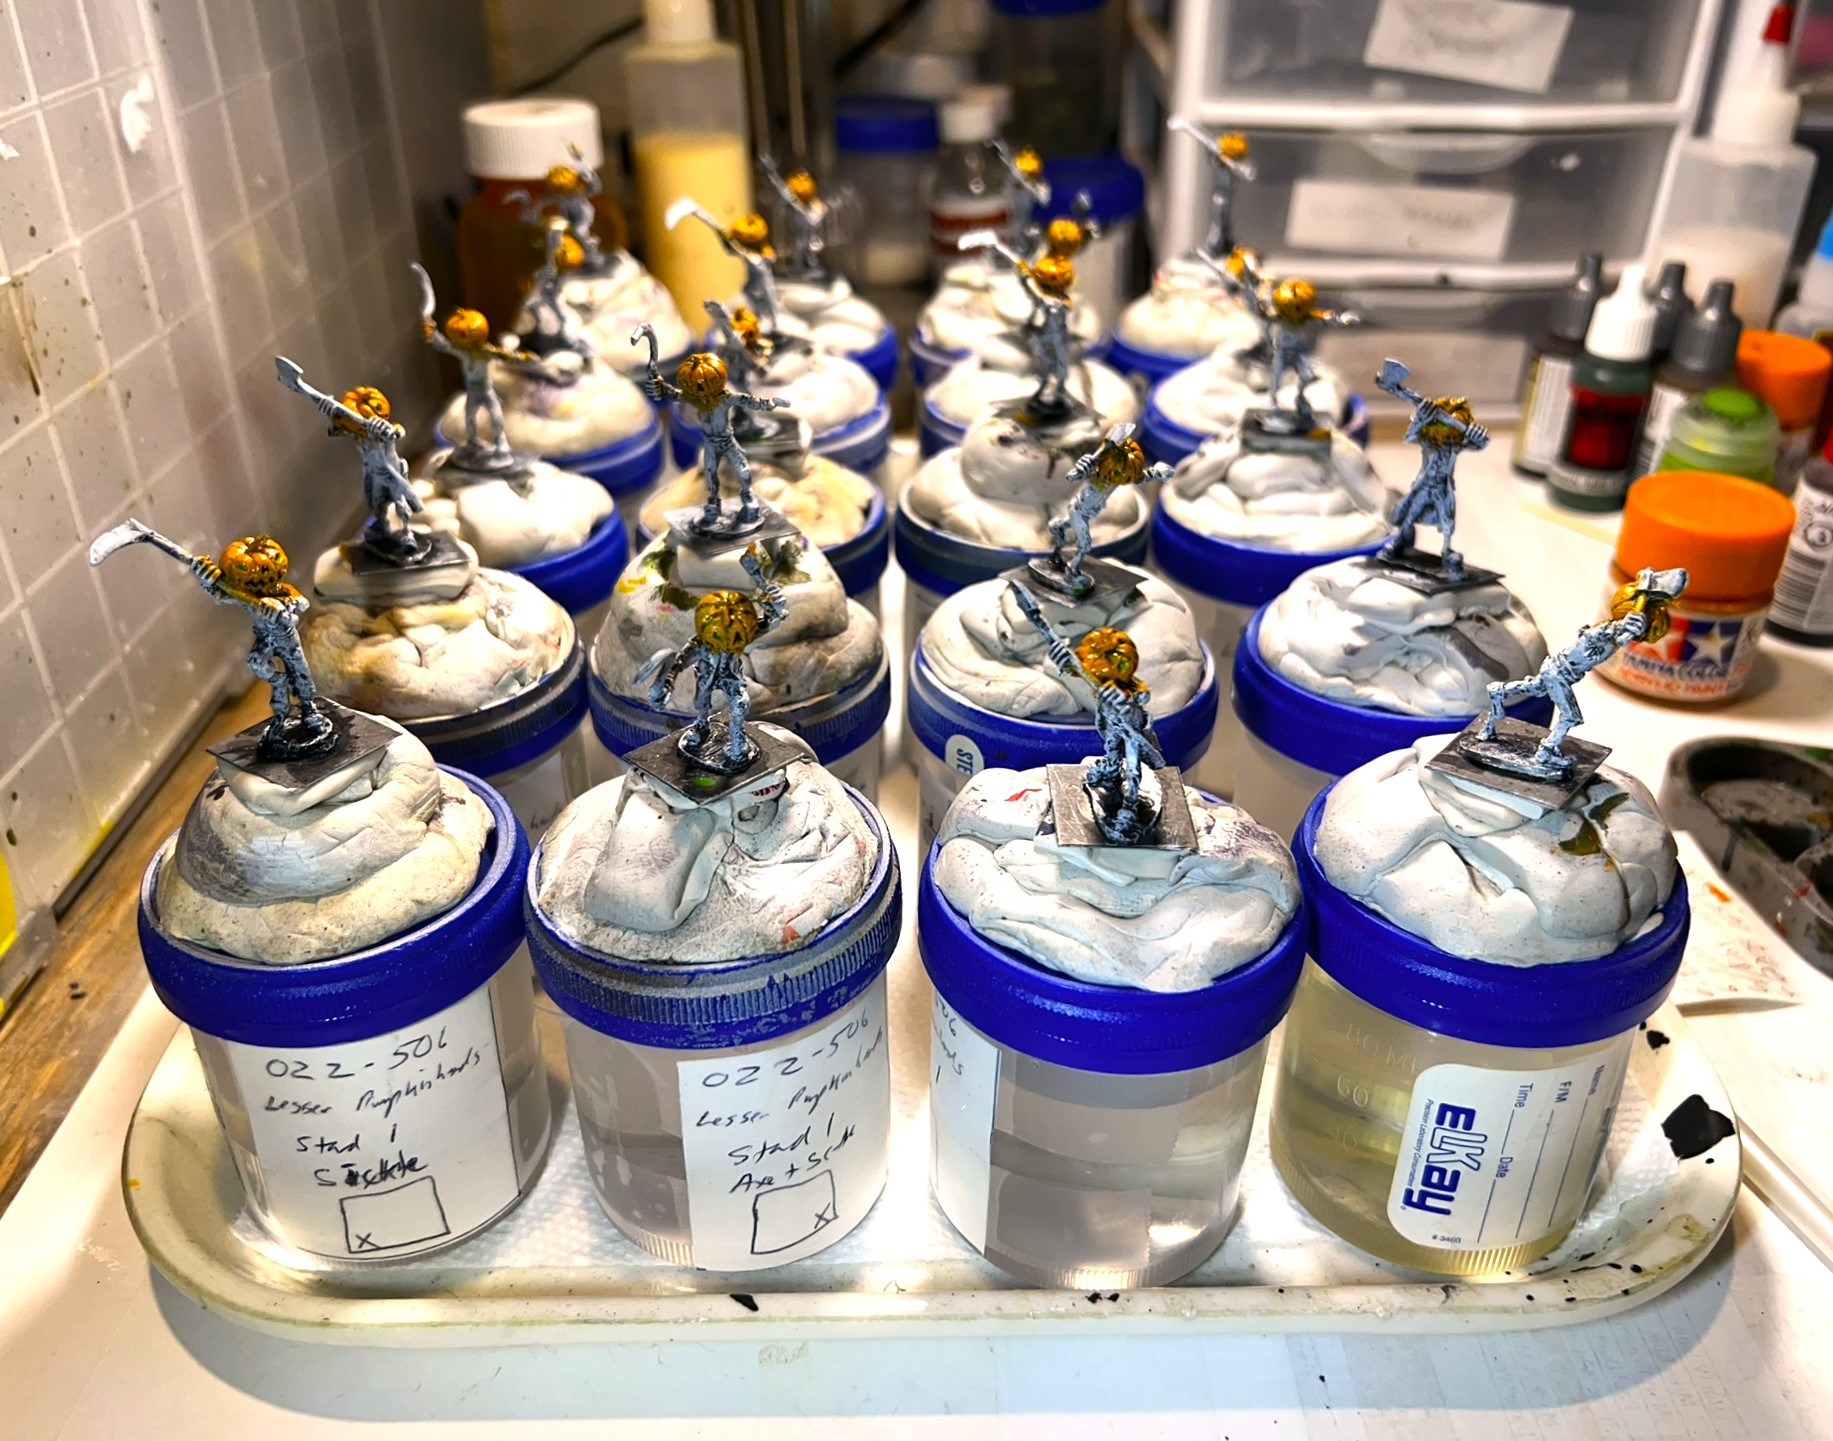
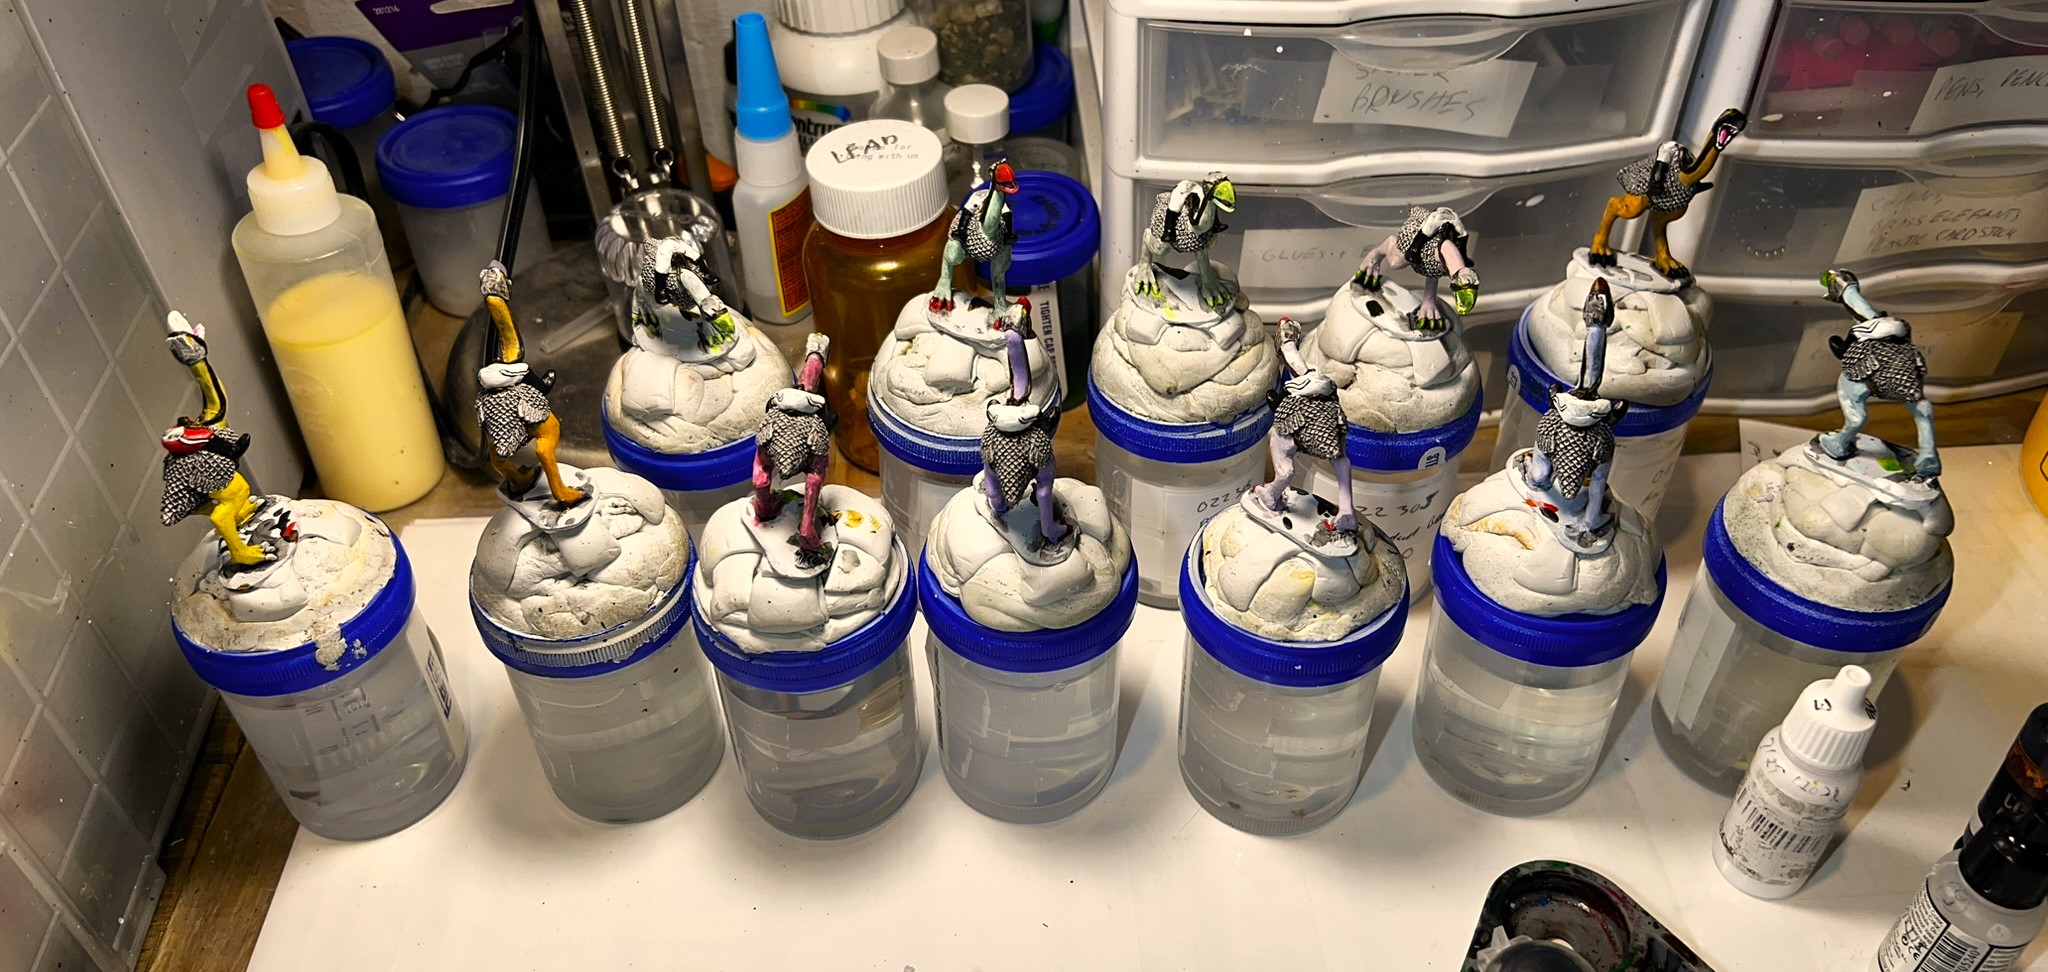
I chose to “pre-base” the LPH on 3’4″ square steel bases for three reasons. First, so that I could more easily attach them to my poster tack covered specimen jars, second so that they would be easier to paint, and third to make it easier to affix the LPH to their final resting place – the 2″ square steel bases – done later in the process.
The LPH are primed in black here and are on the 3/4″ steel bases with a couple of 2″ square bases in front for reference. Early painting progress on April 11th.
By April 17th, I had made some progress on the LPH.
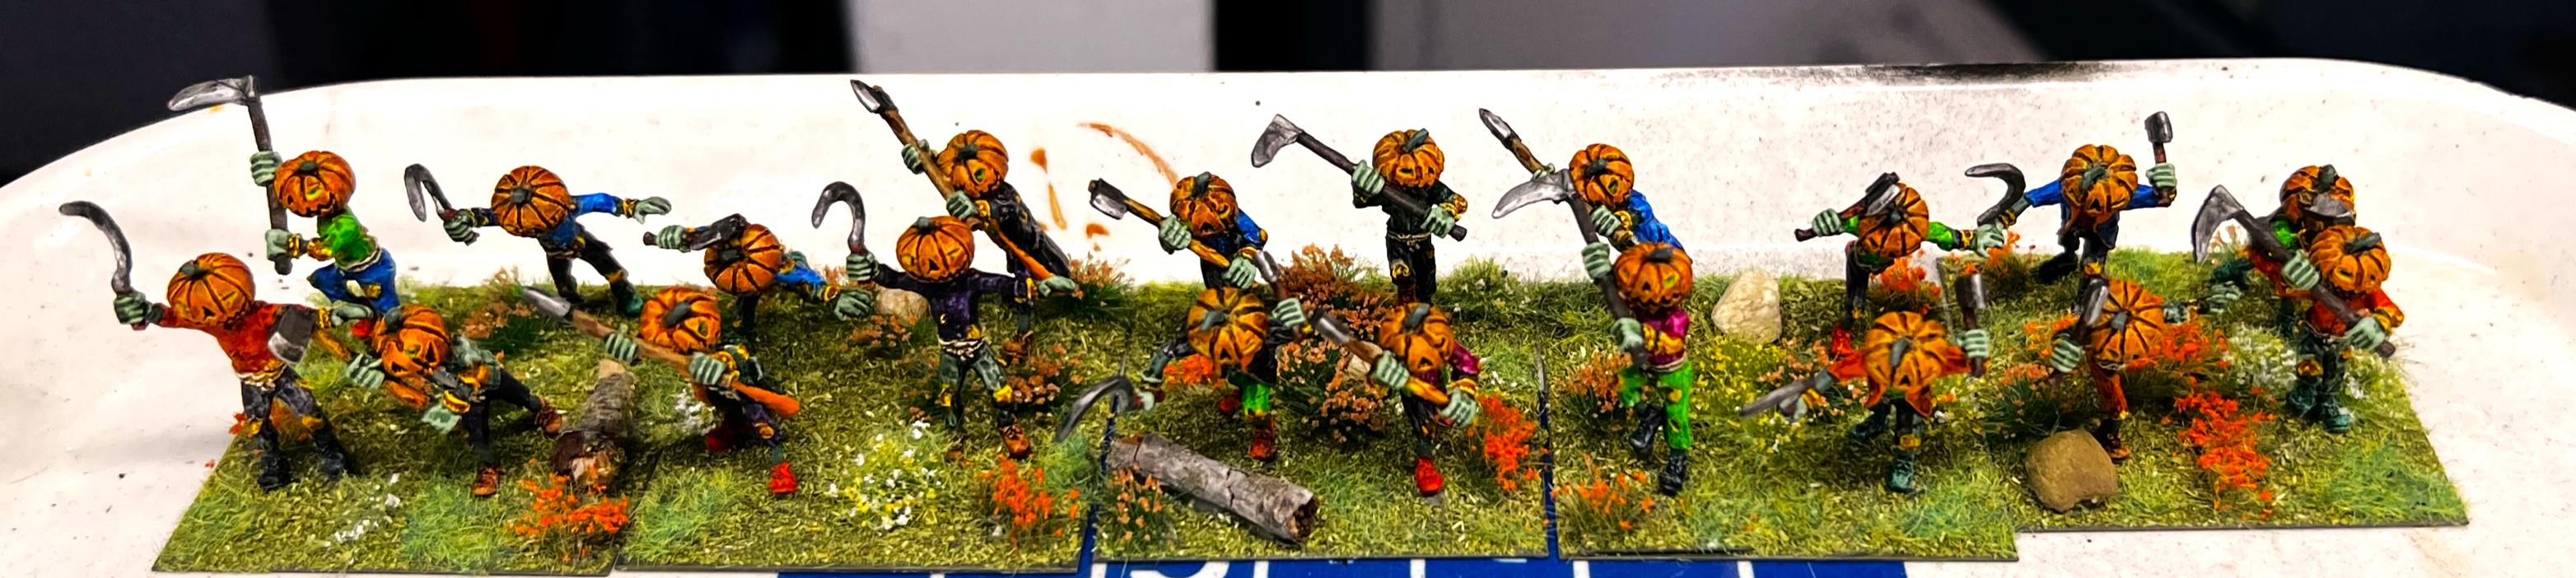
April 17th progress.By 4/20, the LPH regiment was done.
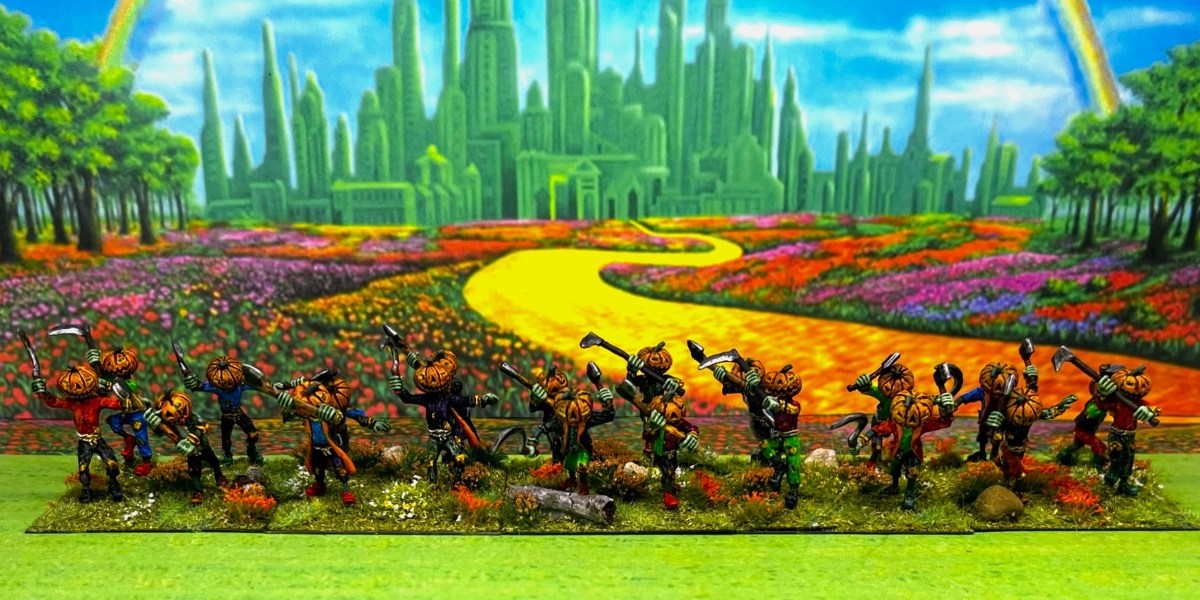
As you can see, the regiment has a lot of color – which will be better viewed in the next section. Some of these photo groups will be four image galleries and some three.
Eye Candy
Stand 1
Stand 2
Stand 3
Stand 4
Stand 5
Group shot…
That wraps up the Lesser Pumpkin Heads infantry. I also have a unique artillery unit of theirs next that I think you’ll enjoy. Thanks for taking a look and any feedback.
And yes, I still have more to come…
Miscellaneous details and references for those interested in that sort of thing:
For all of my previous posts on Wars of Ozz games, figures, units, and other related projects – please see this page.
PAINTS, INKS, GLAZES, SHADES, WASHES, PIGMENTS, FLOCKING, GLUES AND MORE THAT I USED ON THIS LESSER PUMPKIN HEAD REGIMENT:
2″ square steel base from Wargames Accessories (#21)
3/4″ square steel bases from Wargames Accessories (#A9)
Army Painter “Battlefields Grass Green” (flocking)
Army Painter “Battlefield Field Grass” (flocking)
Army Painter “Battlefields Field Grass” (flocking)
Army Painter “Battlefields Meadow Flowers” (flocking)
Shadow’s Edge Miniatures “6mm Dark Forest Orange Tufts” (flocking)
Gamer’s Grass “Orange Flowers” (flocking)
Small stones (flocking)
Small oak twigs (flocking)
Again, as you may want to check out the Wars of Ozz figures’ range – there are two places to get them (and I make no money from this btw). The game rules and the figures are available from the following two places:
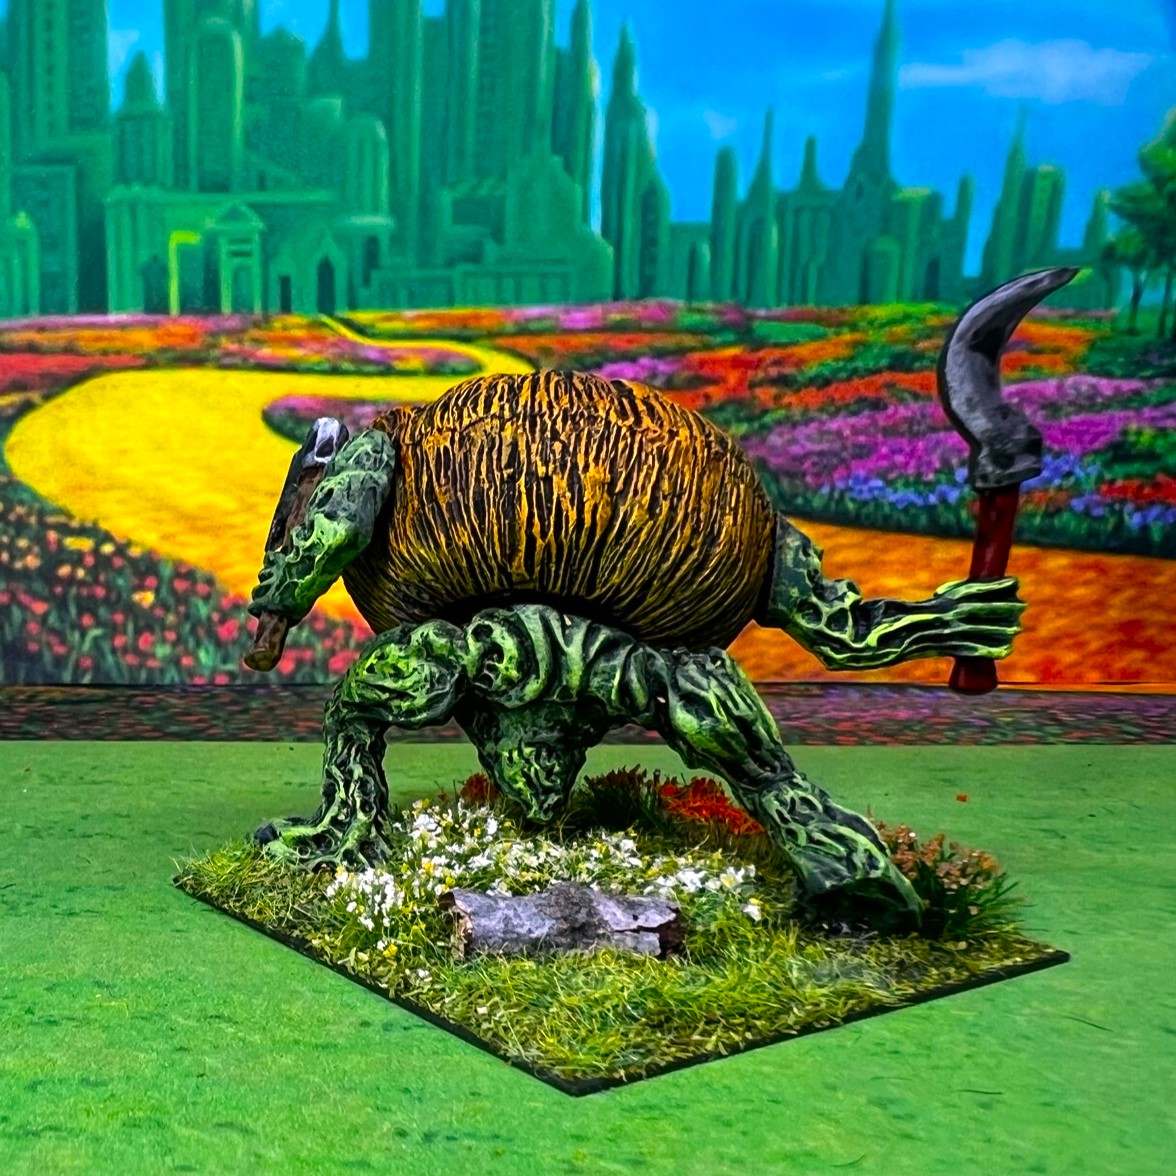
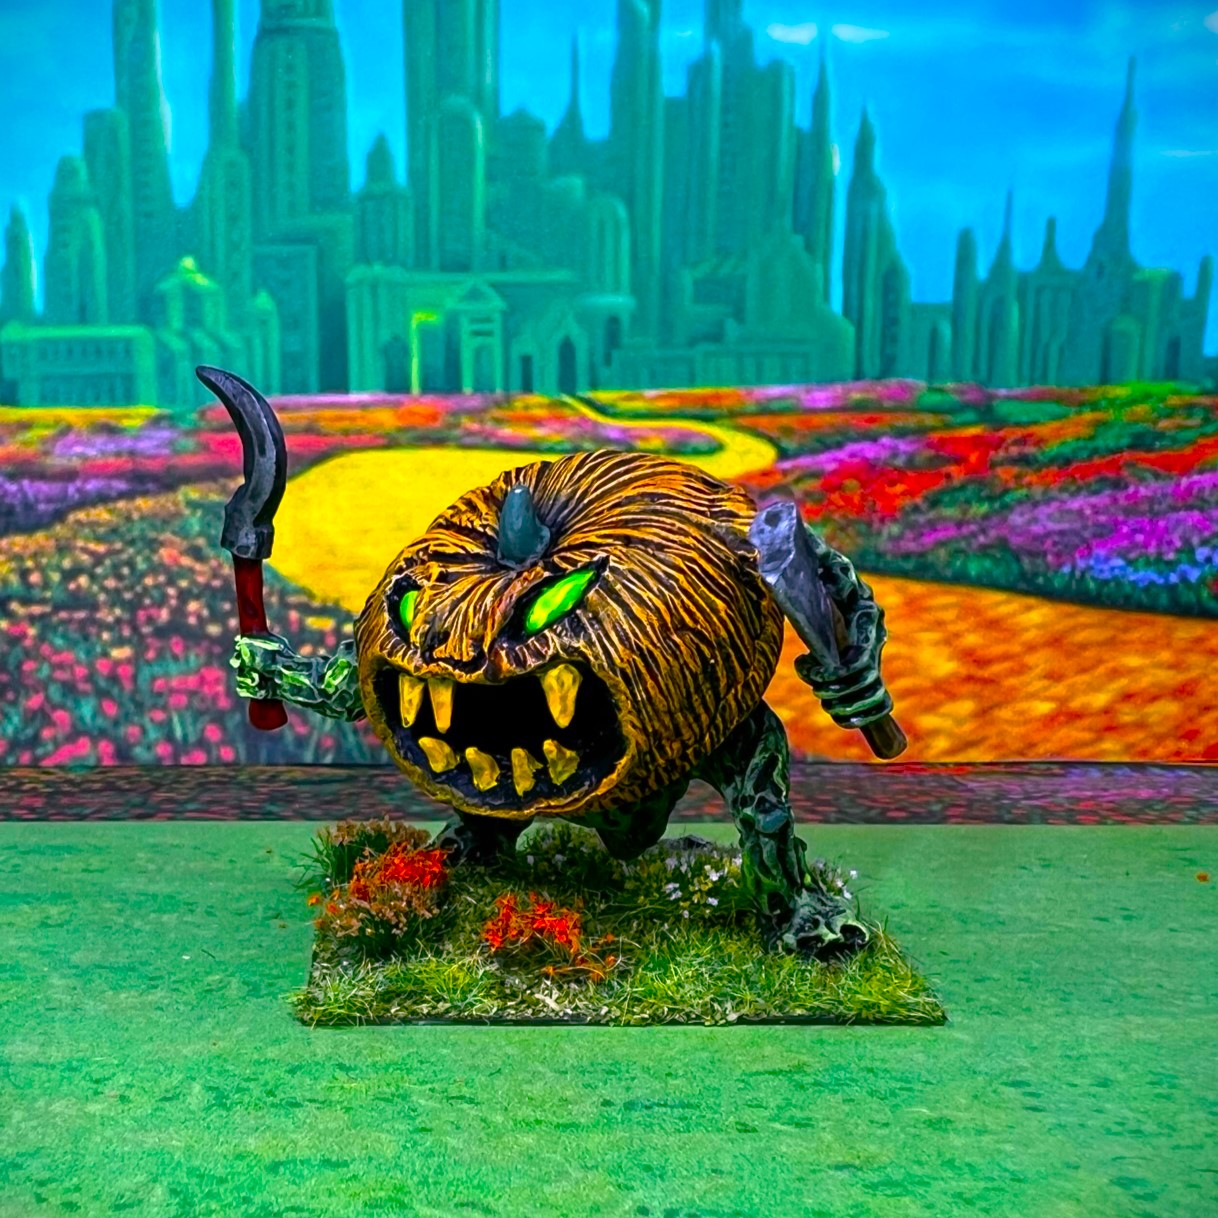
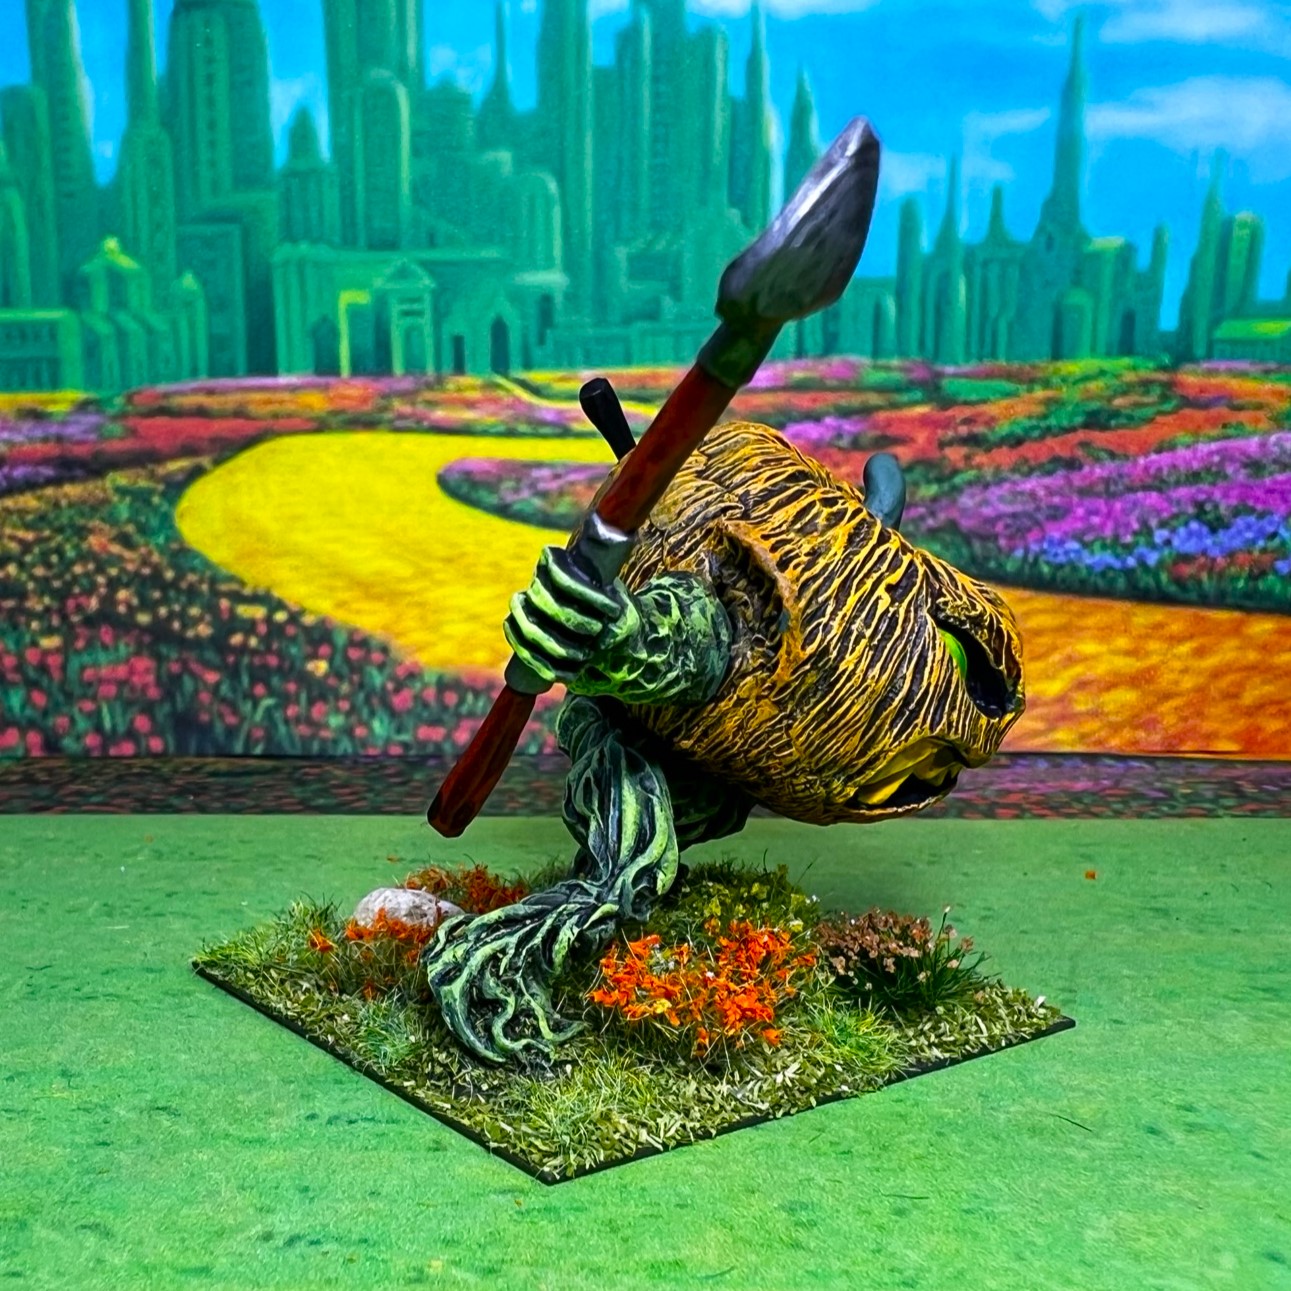
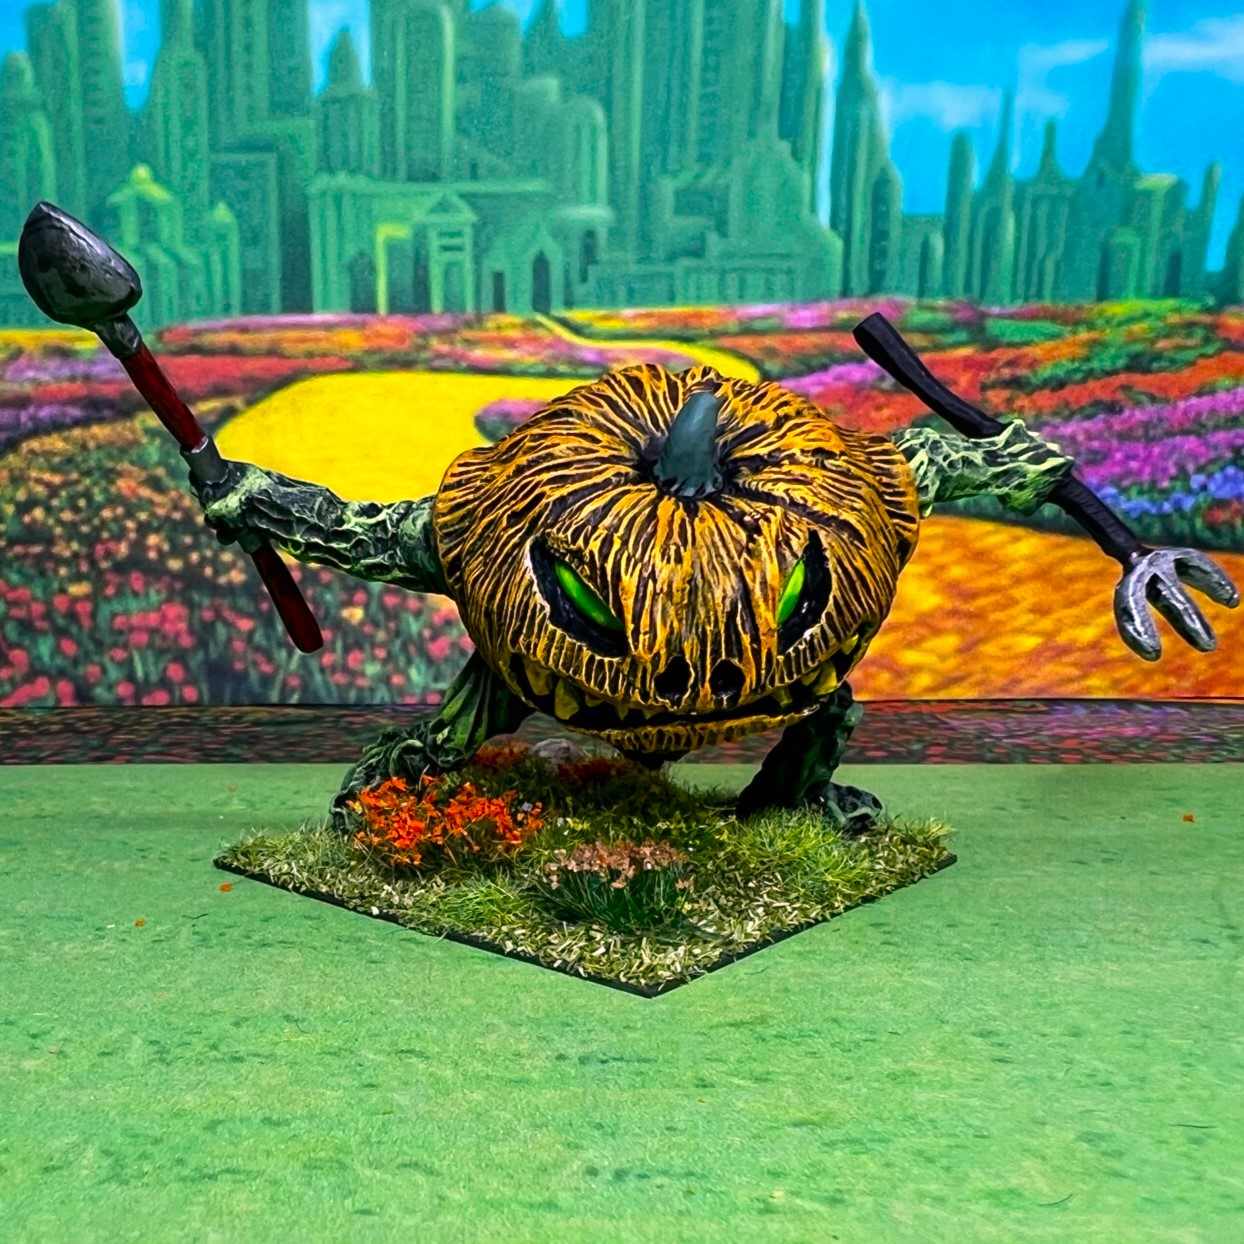
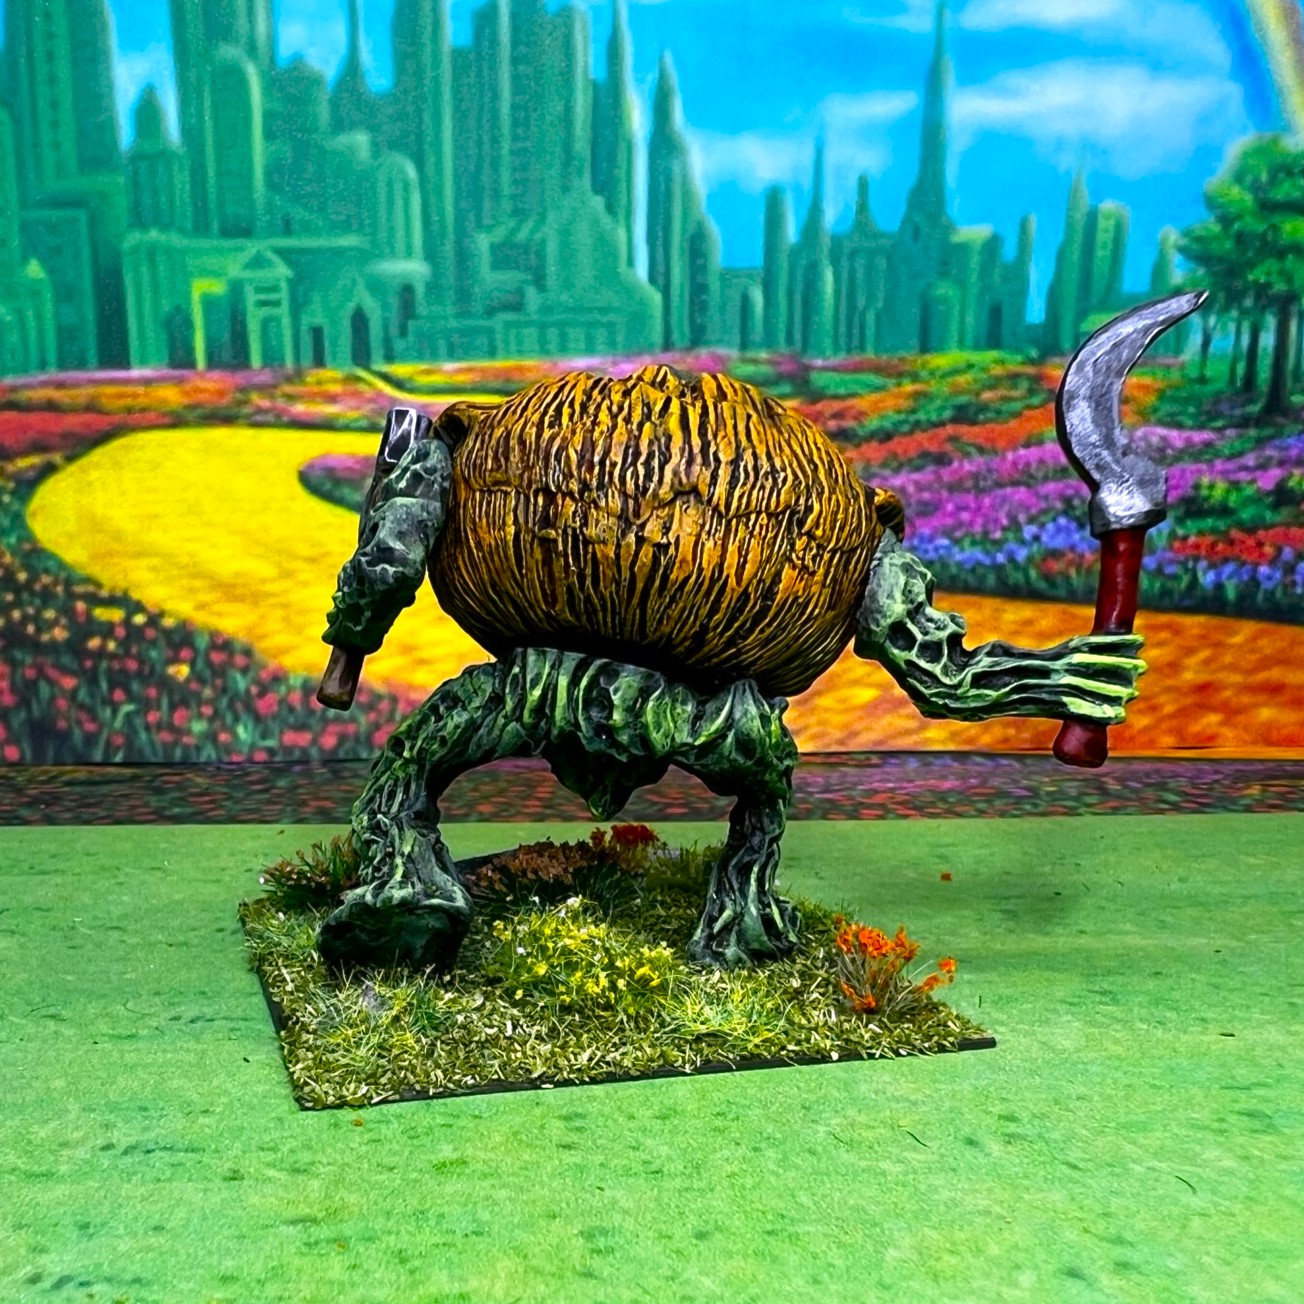
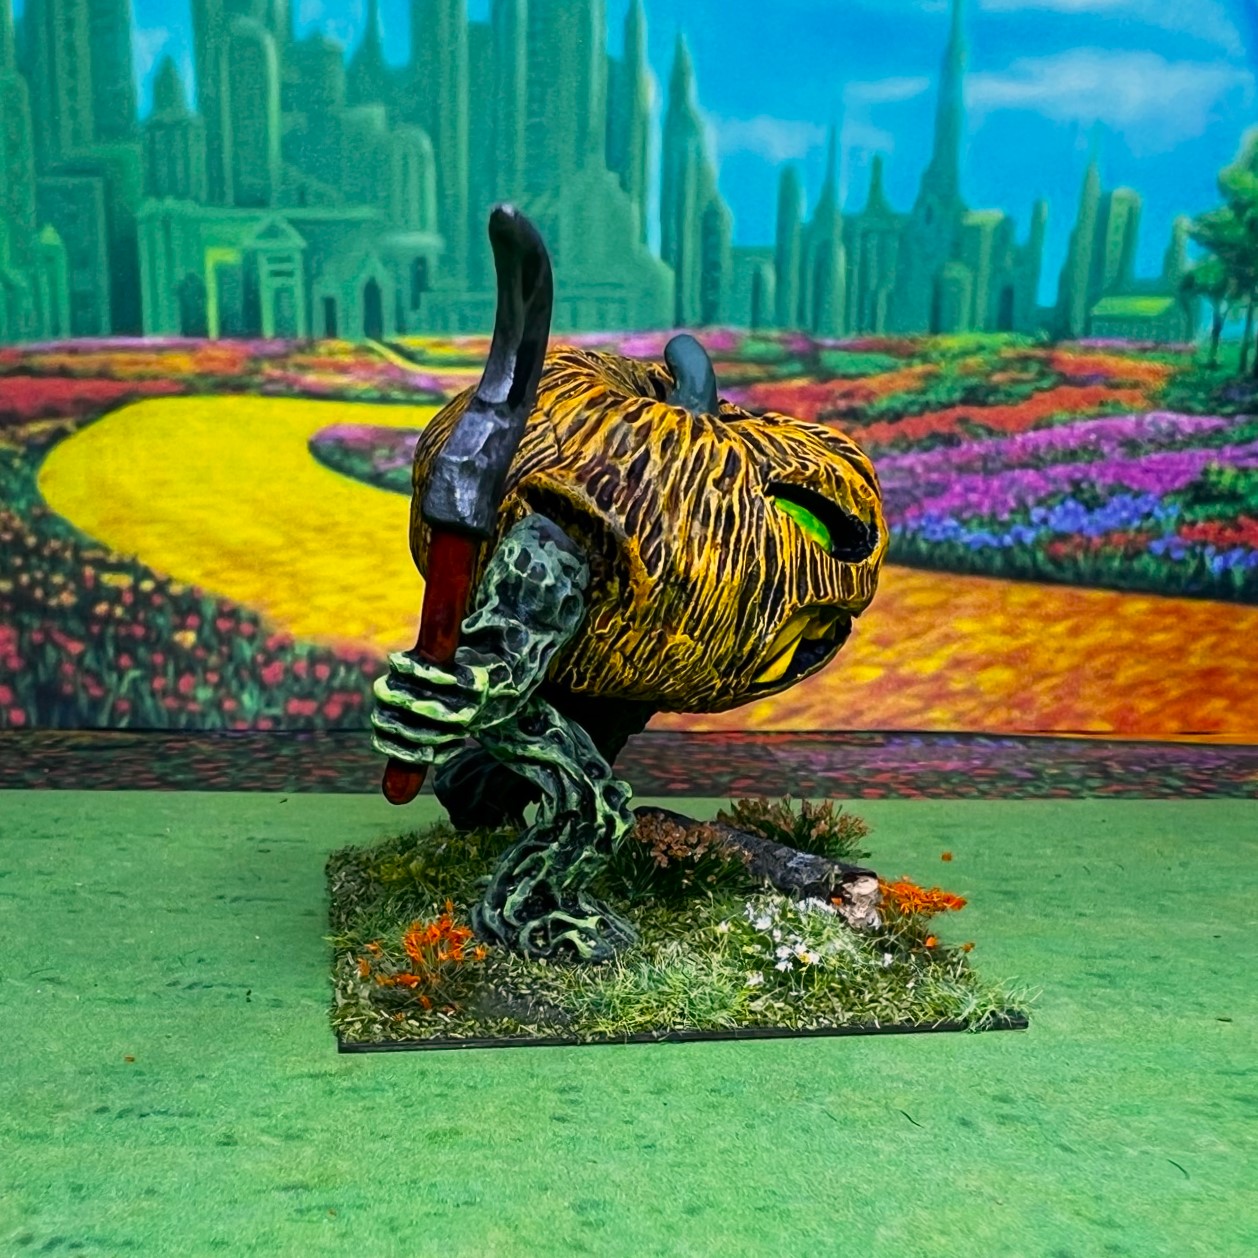
Since I returned home from the HAVOC convention, I have been busy trying to complete a new faction for games of The Wars of Ozz. This faction will consist of several regiments from “The Great Land of Harvest” and features many anthropomorphic troops – especially of the garden variety. This post will focus on their leader, King Jack, and the scariest unit in Ozz – the Great Pumpkin Heads.
According to The Wars of Ozz the Great Land of Harvest was spared the destructive forces of the Last Great War – primarily because of the need to protect its fertile lands…
However, the same could not be said for the inhabitants. Madness bombs, plague gases, and mutagenic viruses were unleashed on soldiers and civilians alike. By the time the war ended, the natives of the Great Land of Harvest were twisted and raving mockeries of what they once had been…Most of the mutations were grotesqueries, little more than piles of mewling flesh that died quickly. Some clung on, just viable enough to survive for a few generations. Fewer still thrived. Most successful of these are the pumpkinheads. Were they once humans who developed bizarre pumpkin-like heads – or did the pumpkin plants suddenly stumble up on new legs, dumbfounded by their new forms? Nobody remembers and the pumpkinheads have no language to explain themselves, only wordless moans and roars. Still, they are intelligently wonderful mimics who learned how to survive and fight by watching and copying their neighbours…One among them developed the ability to speak and with that proclaimed himself the King of the Pumpkinheads…so the reign of King Jack began…under his guidance, the pumpkinheads have formed several organized warbands that he hires out to whatever general will hire them.
Wars of Ozz, section 2.6.2 The Great Land of Harvest, Page 42
The figures in this faction are wonderful – and I will be sharing several of them in separate posts. I’ll share a few WIP shots and then some eye candy. Given that all pumpkinheads needed a lot of orange, it made sense to combine the painting – so unusually for me – I simultaneously had King Jack and 4 of his units in various states of completion at the same time.
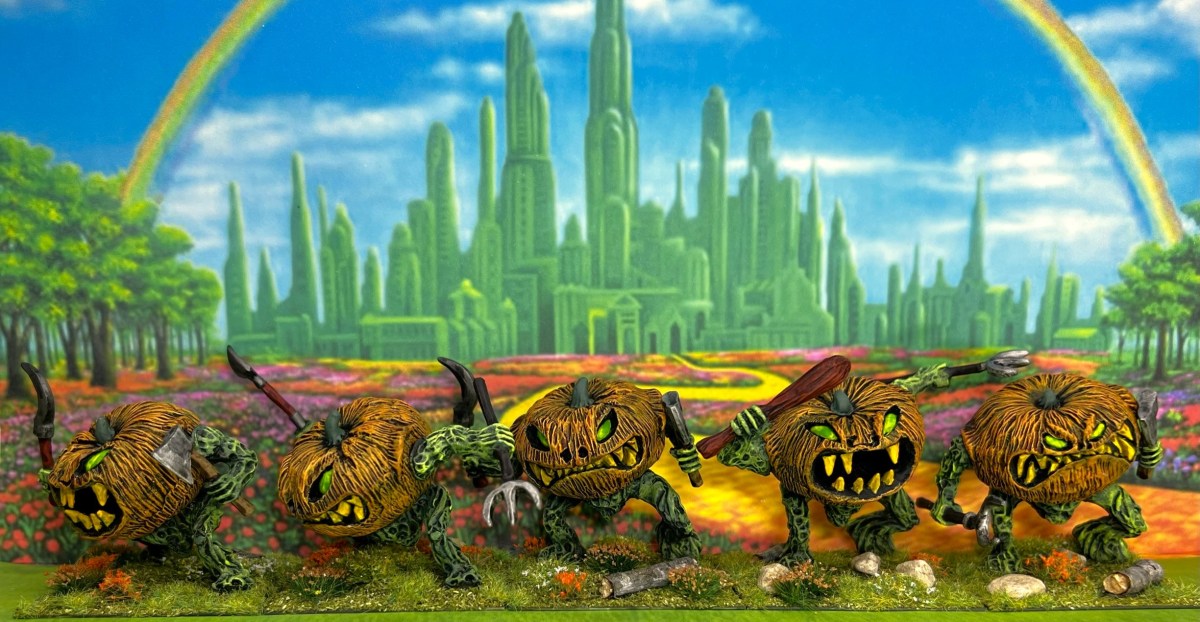
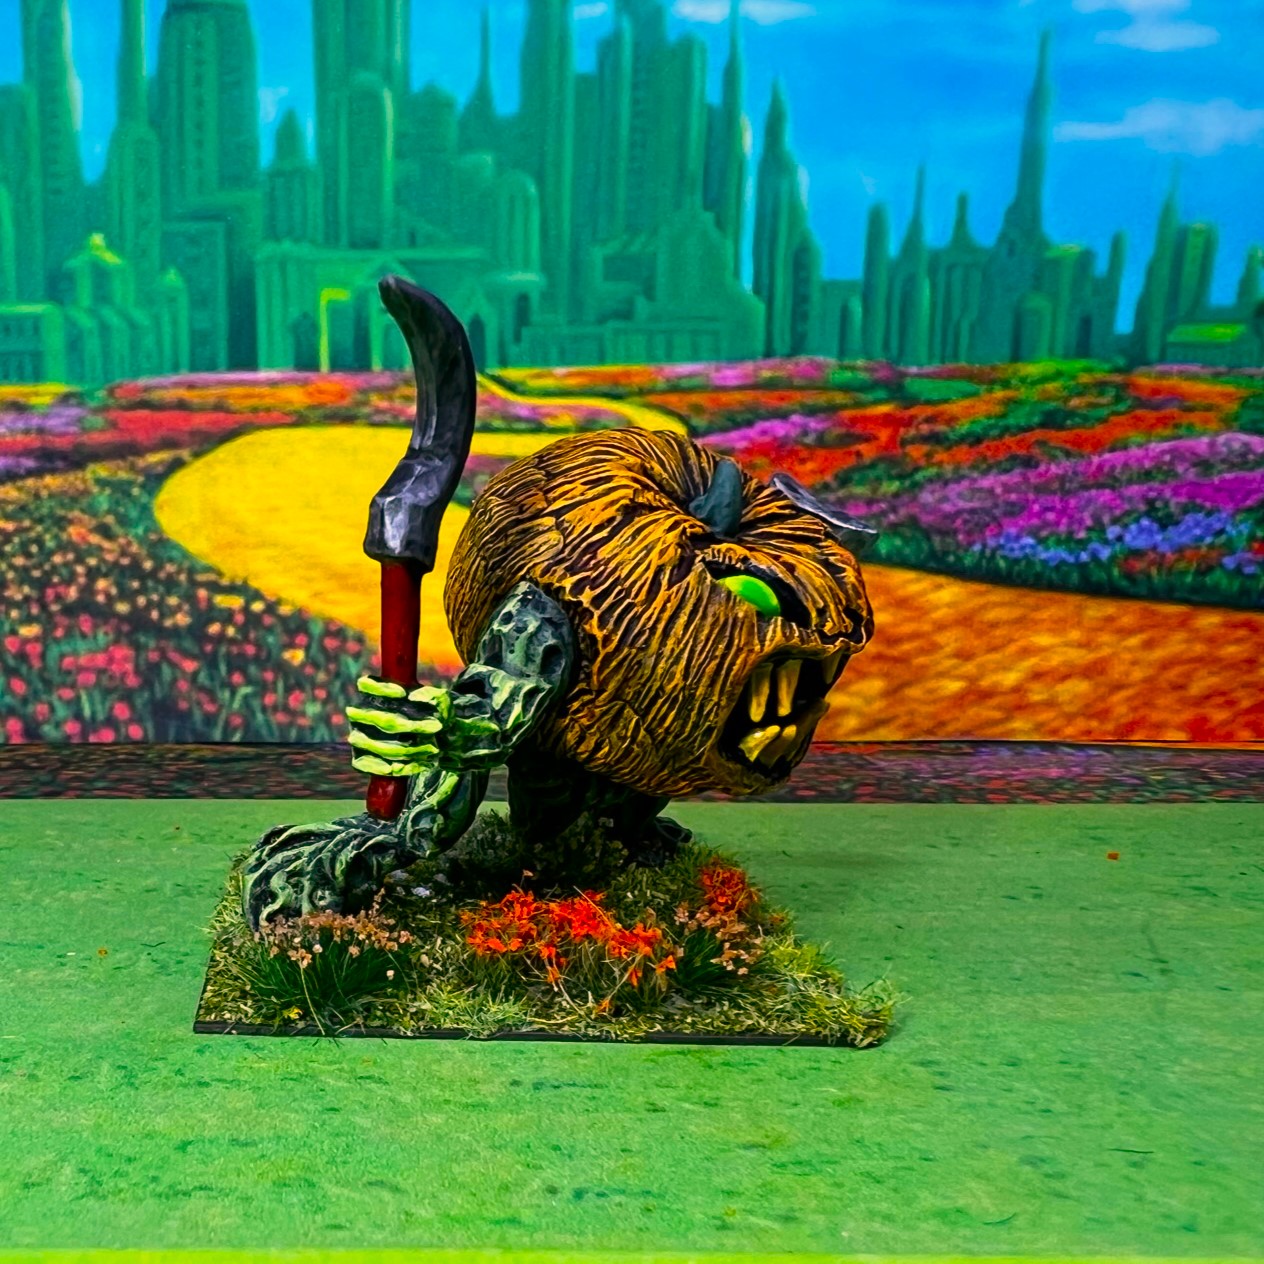
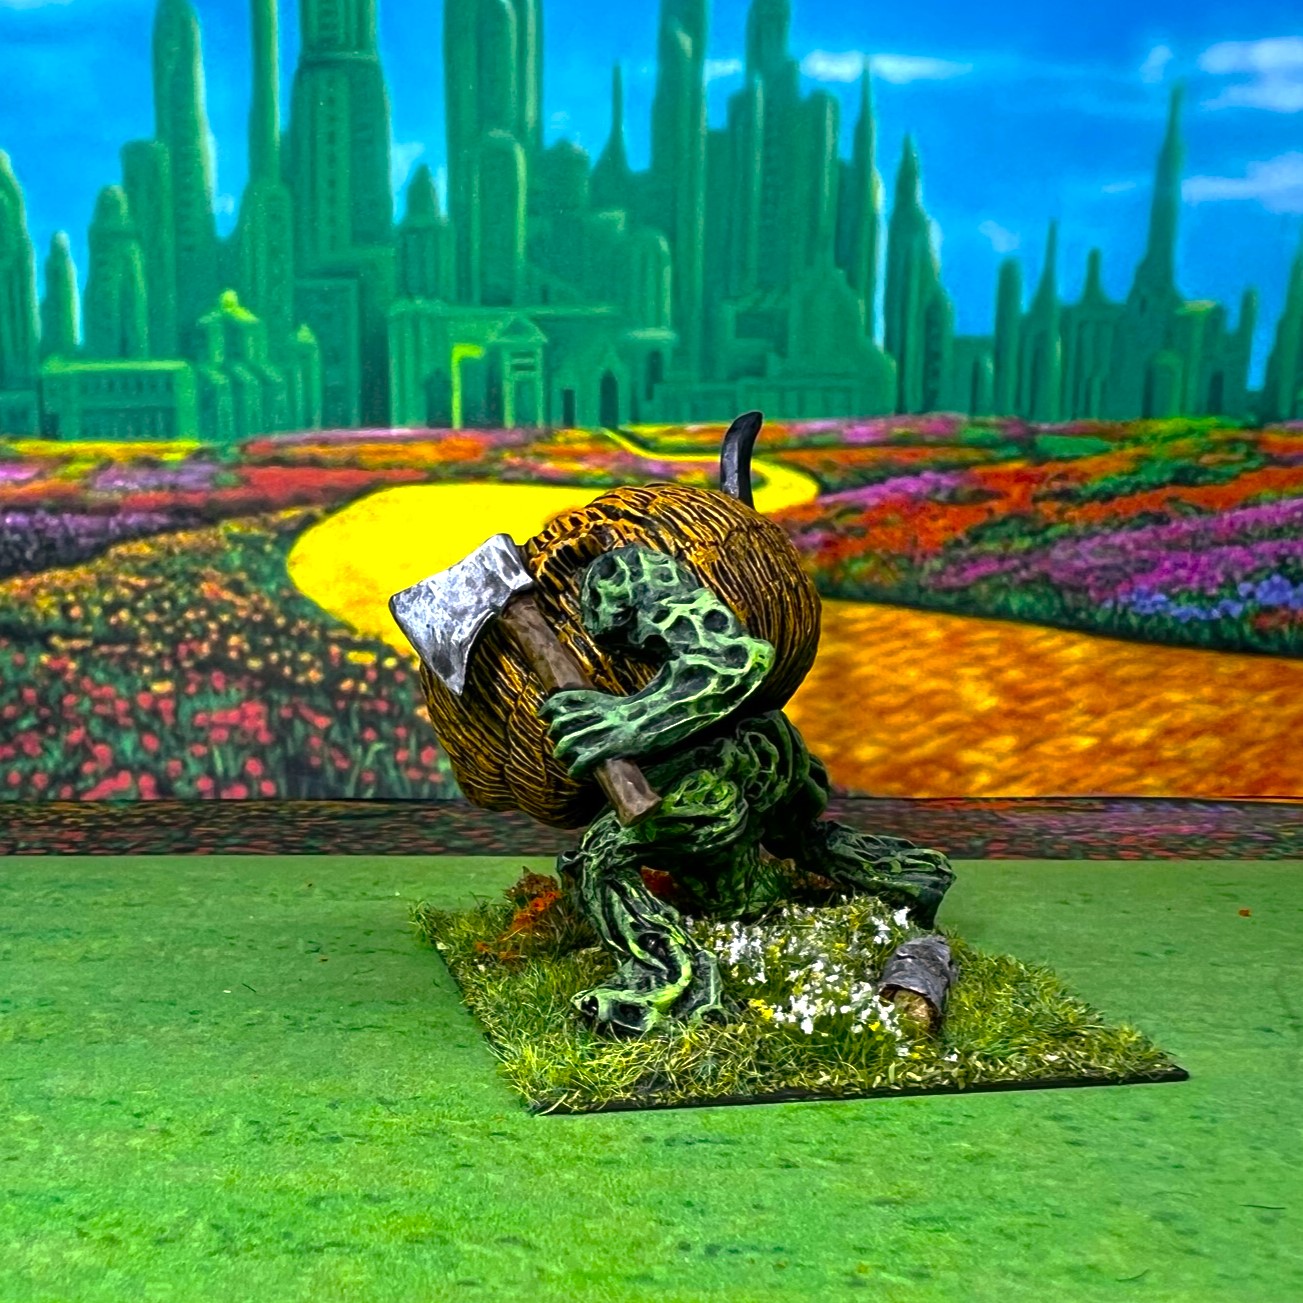
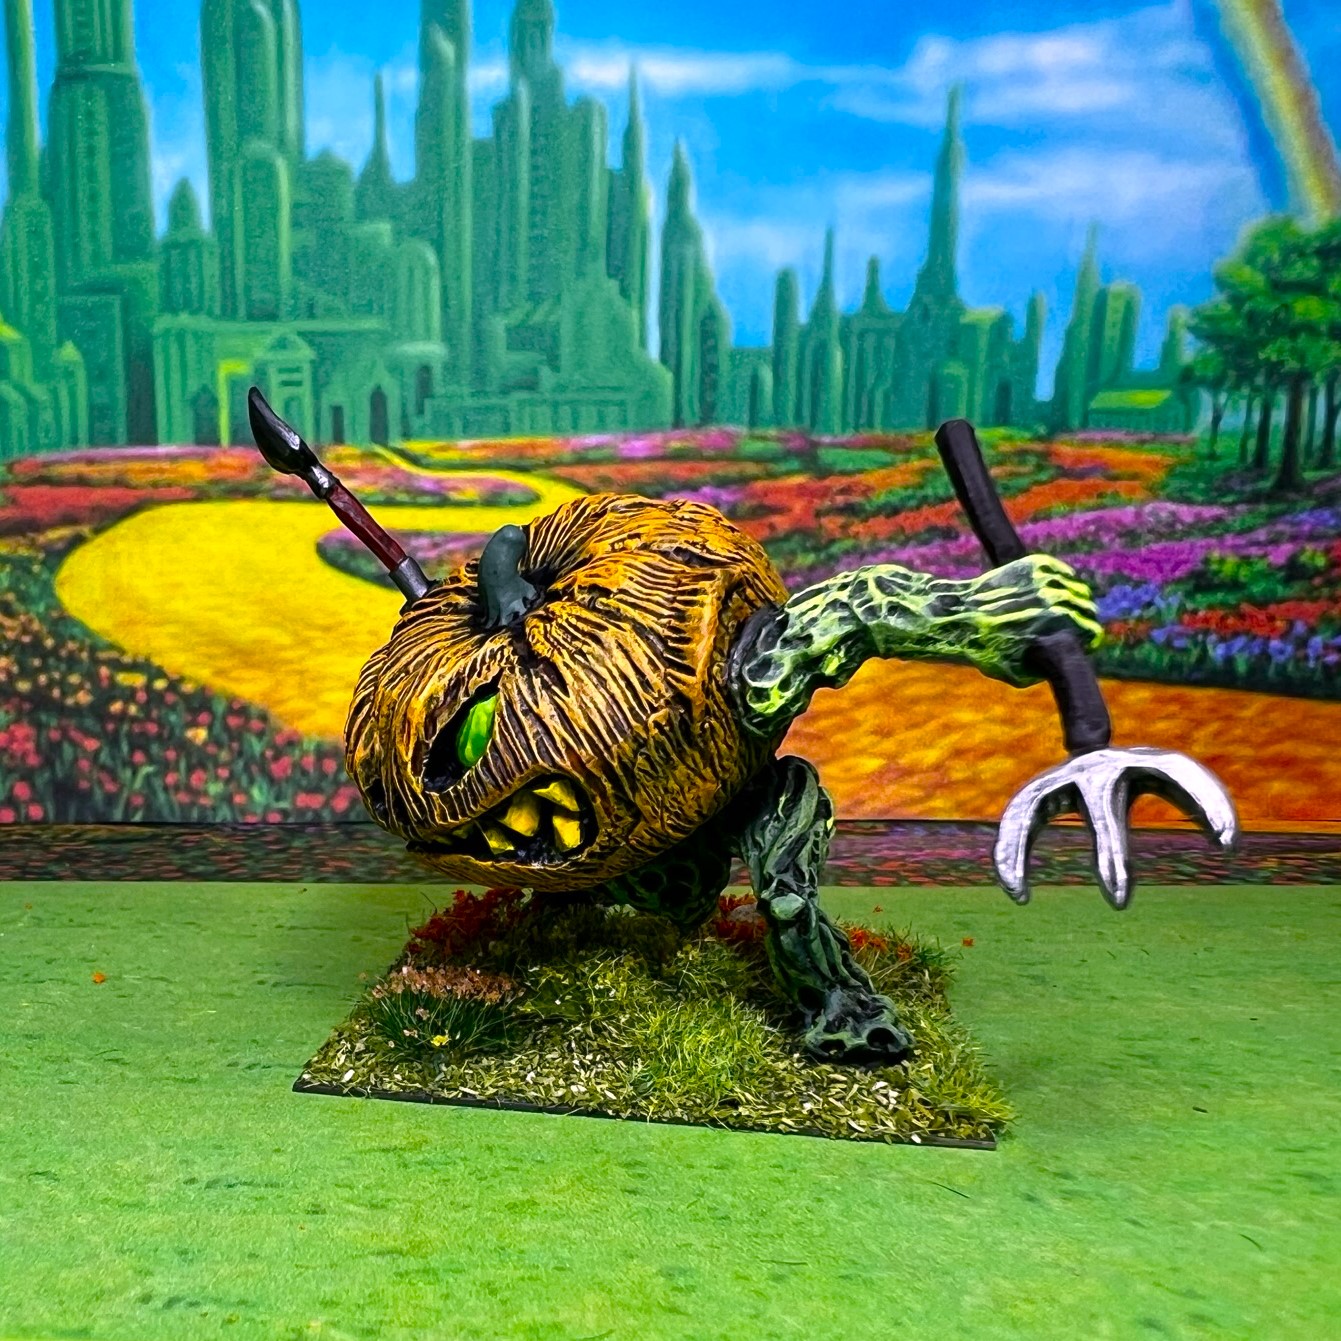
King Jack’s SKU# is OZZ504 (I bought the unmounted version) and can be seen here. For the Great Pumpkin Heads, The SKU# is OZZ505 and can be seen here. The figures come in multiple pieces (two pieces for the heads, a lower torso and two arms with various weapons). The unit consists of are 5 relatively large figures based on five 2″ square bases, but there is no Regimental Commander. The figures are metal – 28mm scale – but giants!
In the game, any unit fighting the Great Pumpkin Heads does so with a point loss of Resolve and Elan!
I’ll start with assembly of the figures and then move to describing the painting. I decided that I would work with subcomponents and then do a final assembly and touch up.
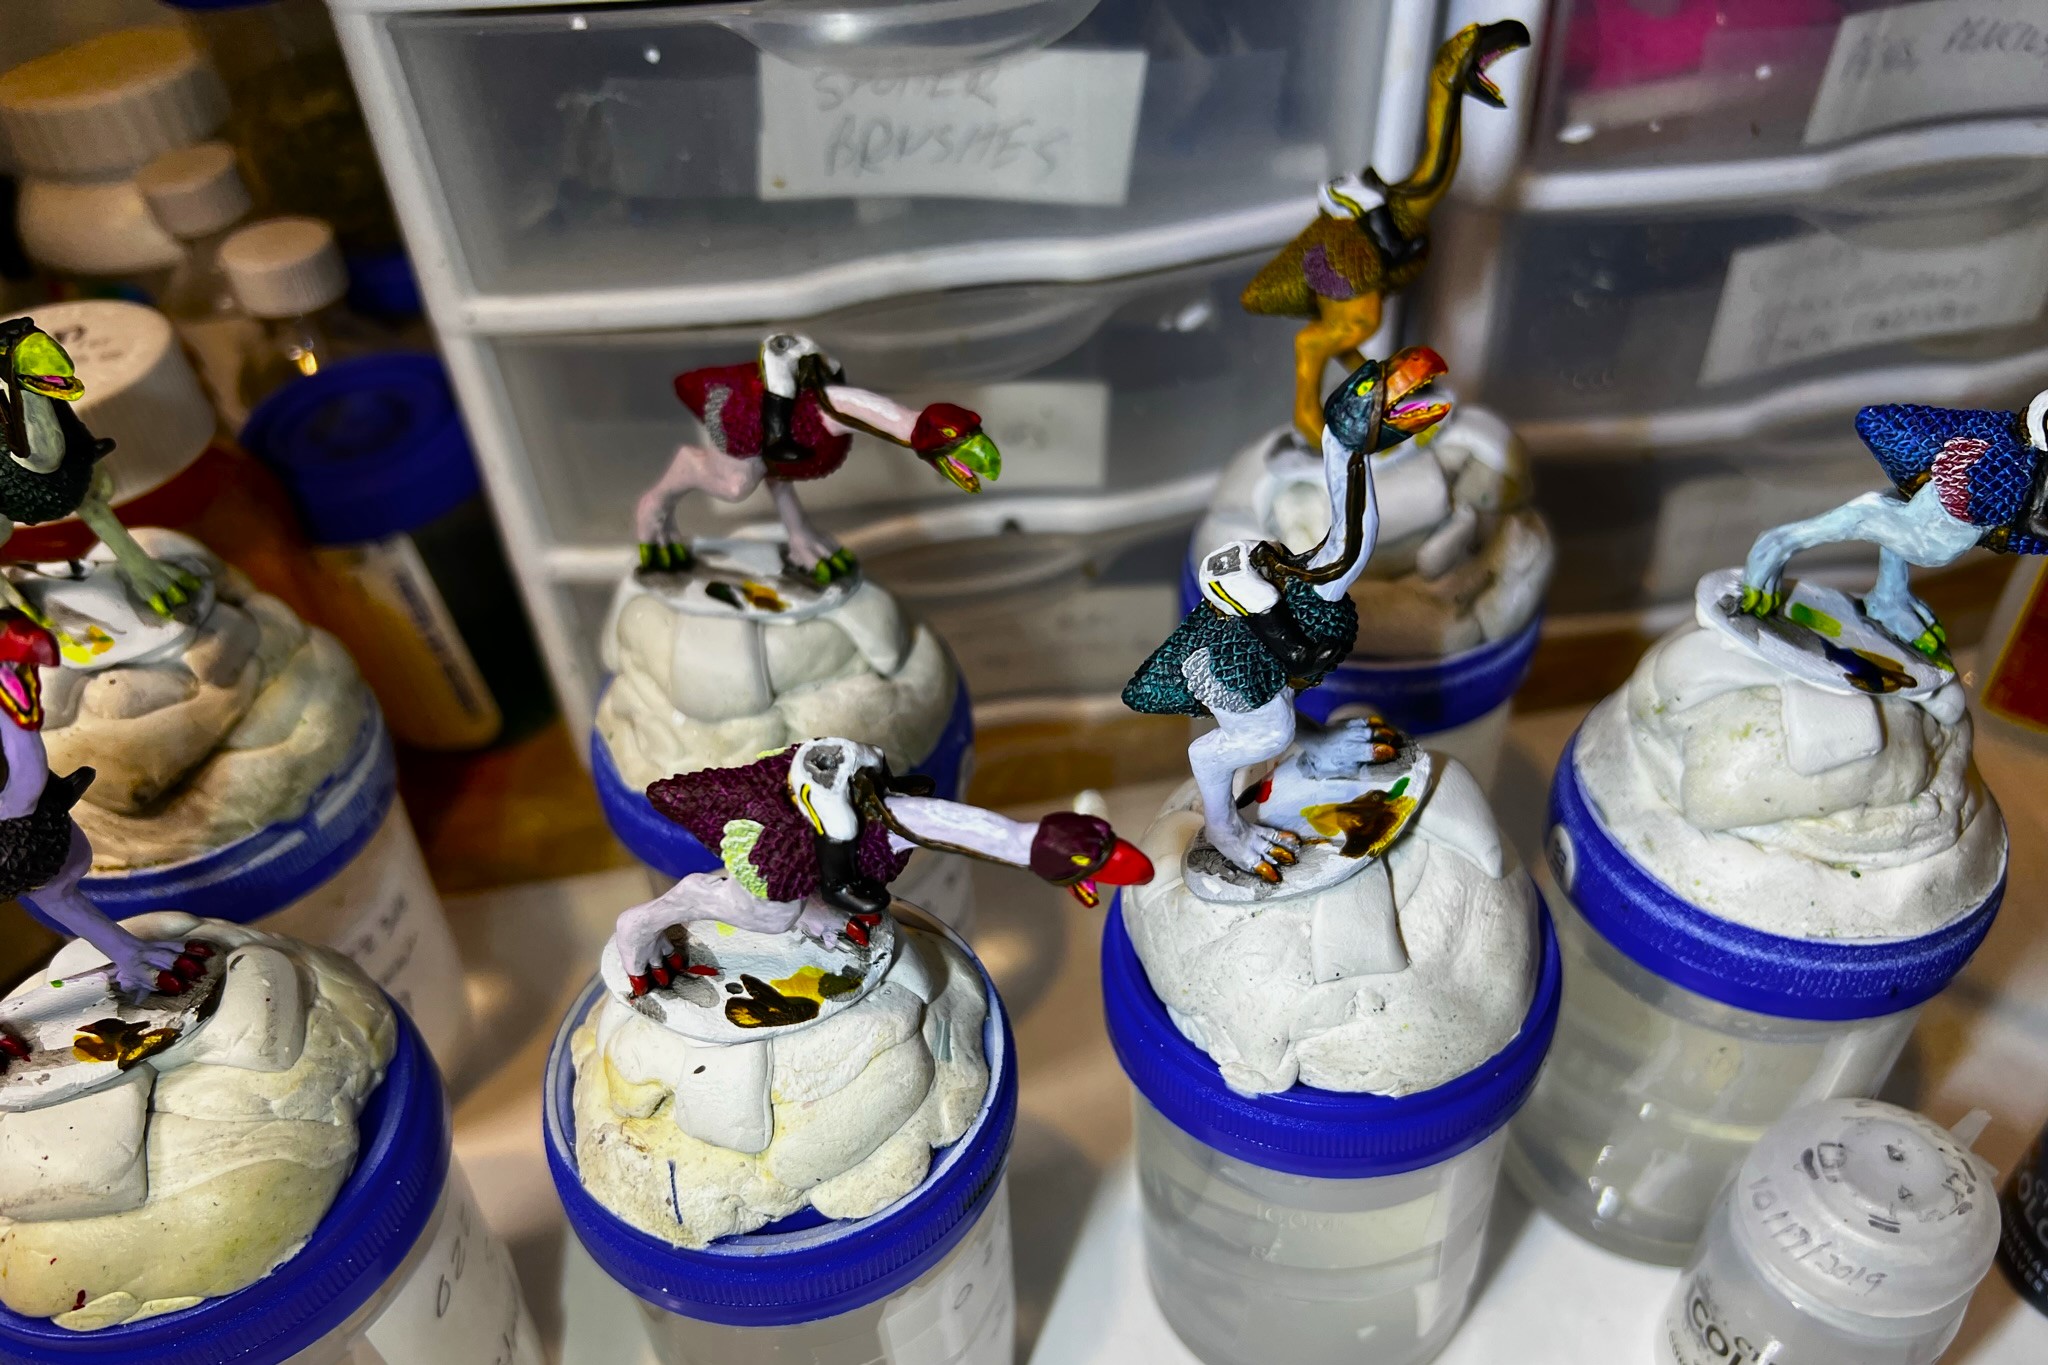
WIP shots…
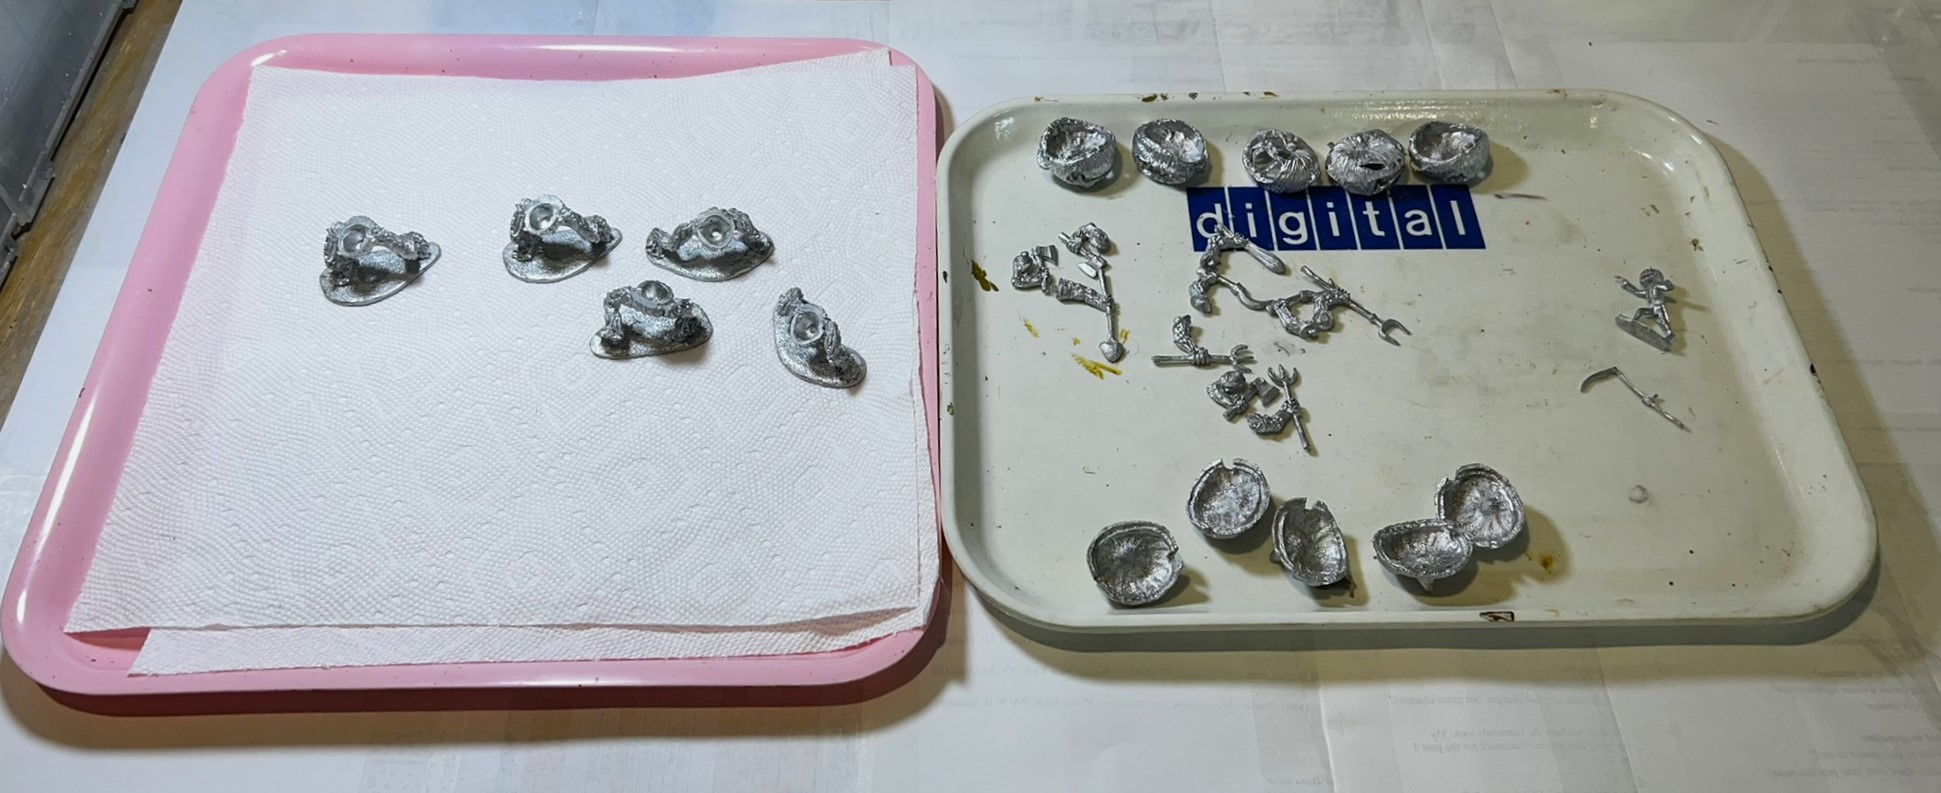
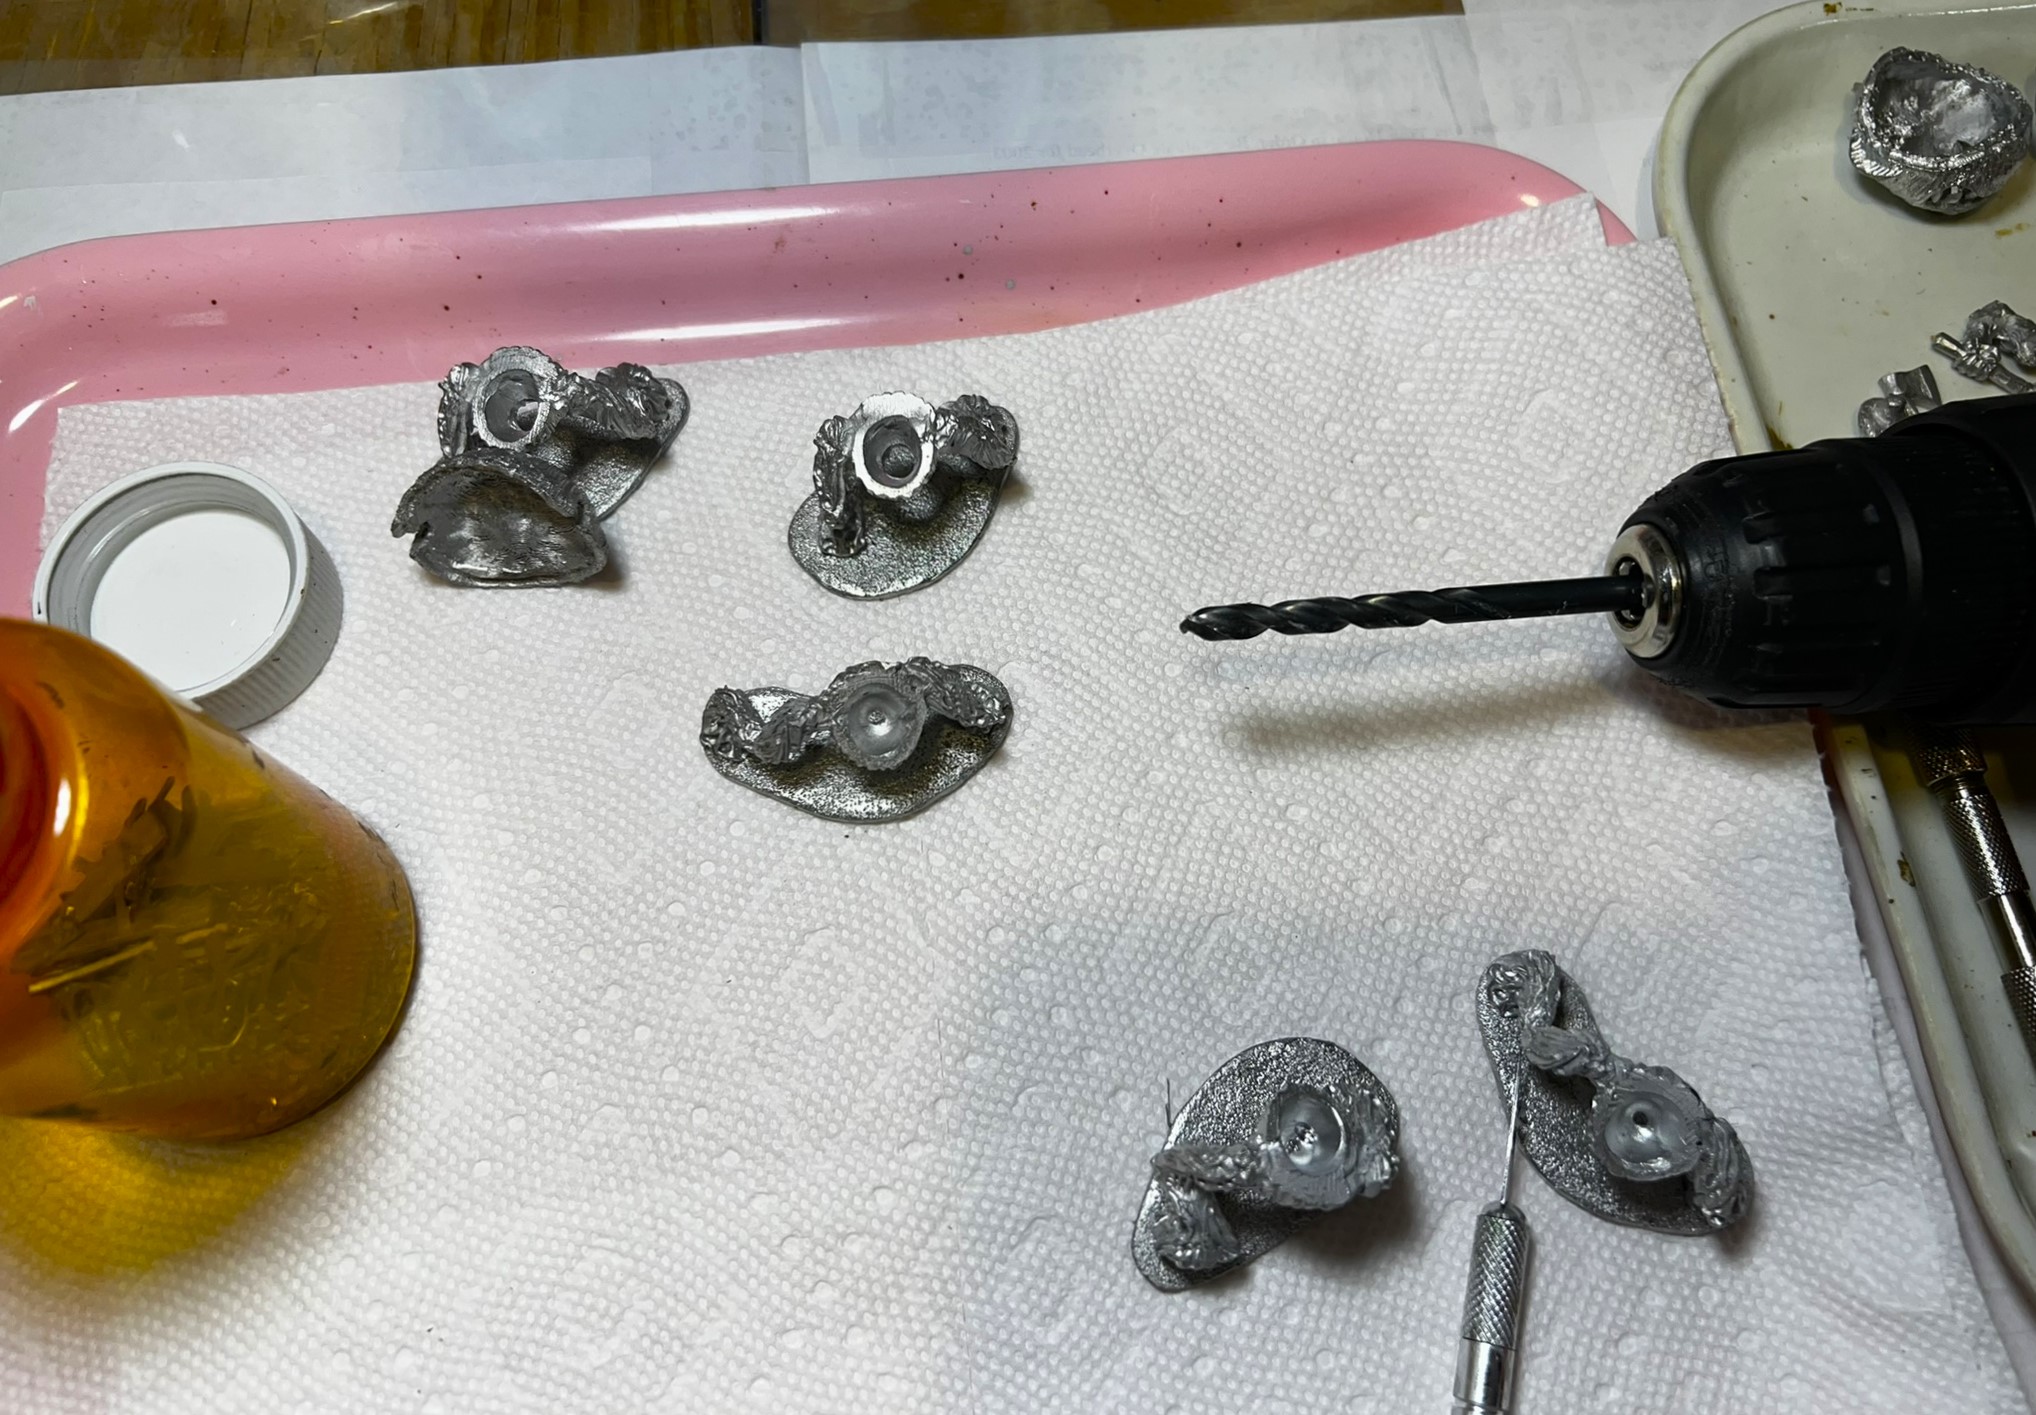
The figures as received. King Jack is on the right.I drilled out the torso bases so as to have a better fit for the giant heads. The bottoms of these holes would need to be sculpted with green stuff afterwards.All figures washed and drying – you can see the holes in the torsos.
I then decided that I did not want the eyes to be simple vacant pits of darkness. The origin of the creatures of the Great Land of Harvest suggests some strange way that they were animated to life. To represent this, and for ALL of my future Harvest troops, I decided that glowing yellow-green eyes would look great. For the Great Pumpkinheads, that meant sculpting their eyes with green stuff before assembling them.
The green stuff eyes in place.
Under the torso holes, I also sculpted and shaped the wells to match the rest of the legs.
Here you see the resculpted torsos.
Usually I prime my figures with an airbrush and in white. This time, I brush primed them in black. I would then dry brush serially white then orange on the figures and keep the shape of the recesses of the pumpkin looking darker. Similarly, I could make sure that the arms and the legs looked the same. If I had assembled then painted – it would have been more difficult – especially given the weight of the heads.
I primed all except the eyes and the weapons which would come later. For King Jack, I just primed him with black all over.Next, I brush primed the teeth and eyes in white, and the weapons in black. The arms and torso were primed in green.
Then it was time to give the teeth and the eyes some starting color.
Giving the teeth and eyes some starting color.
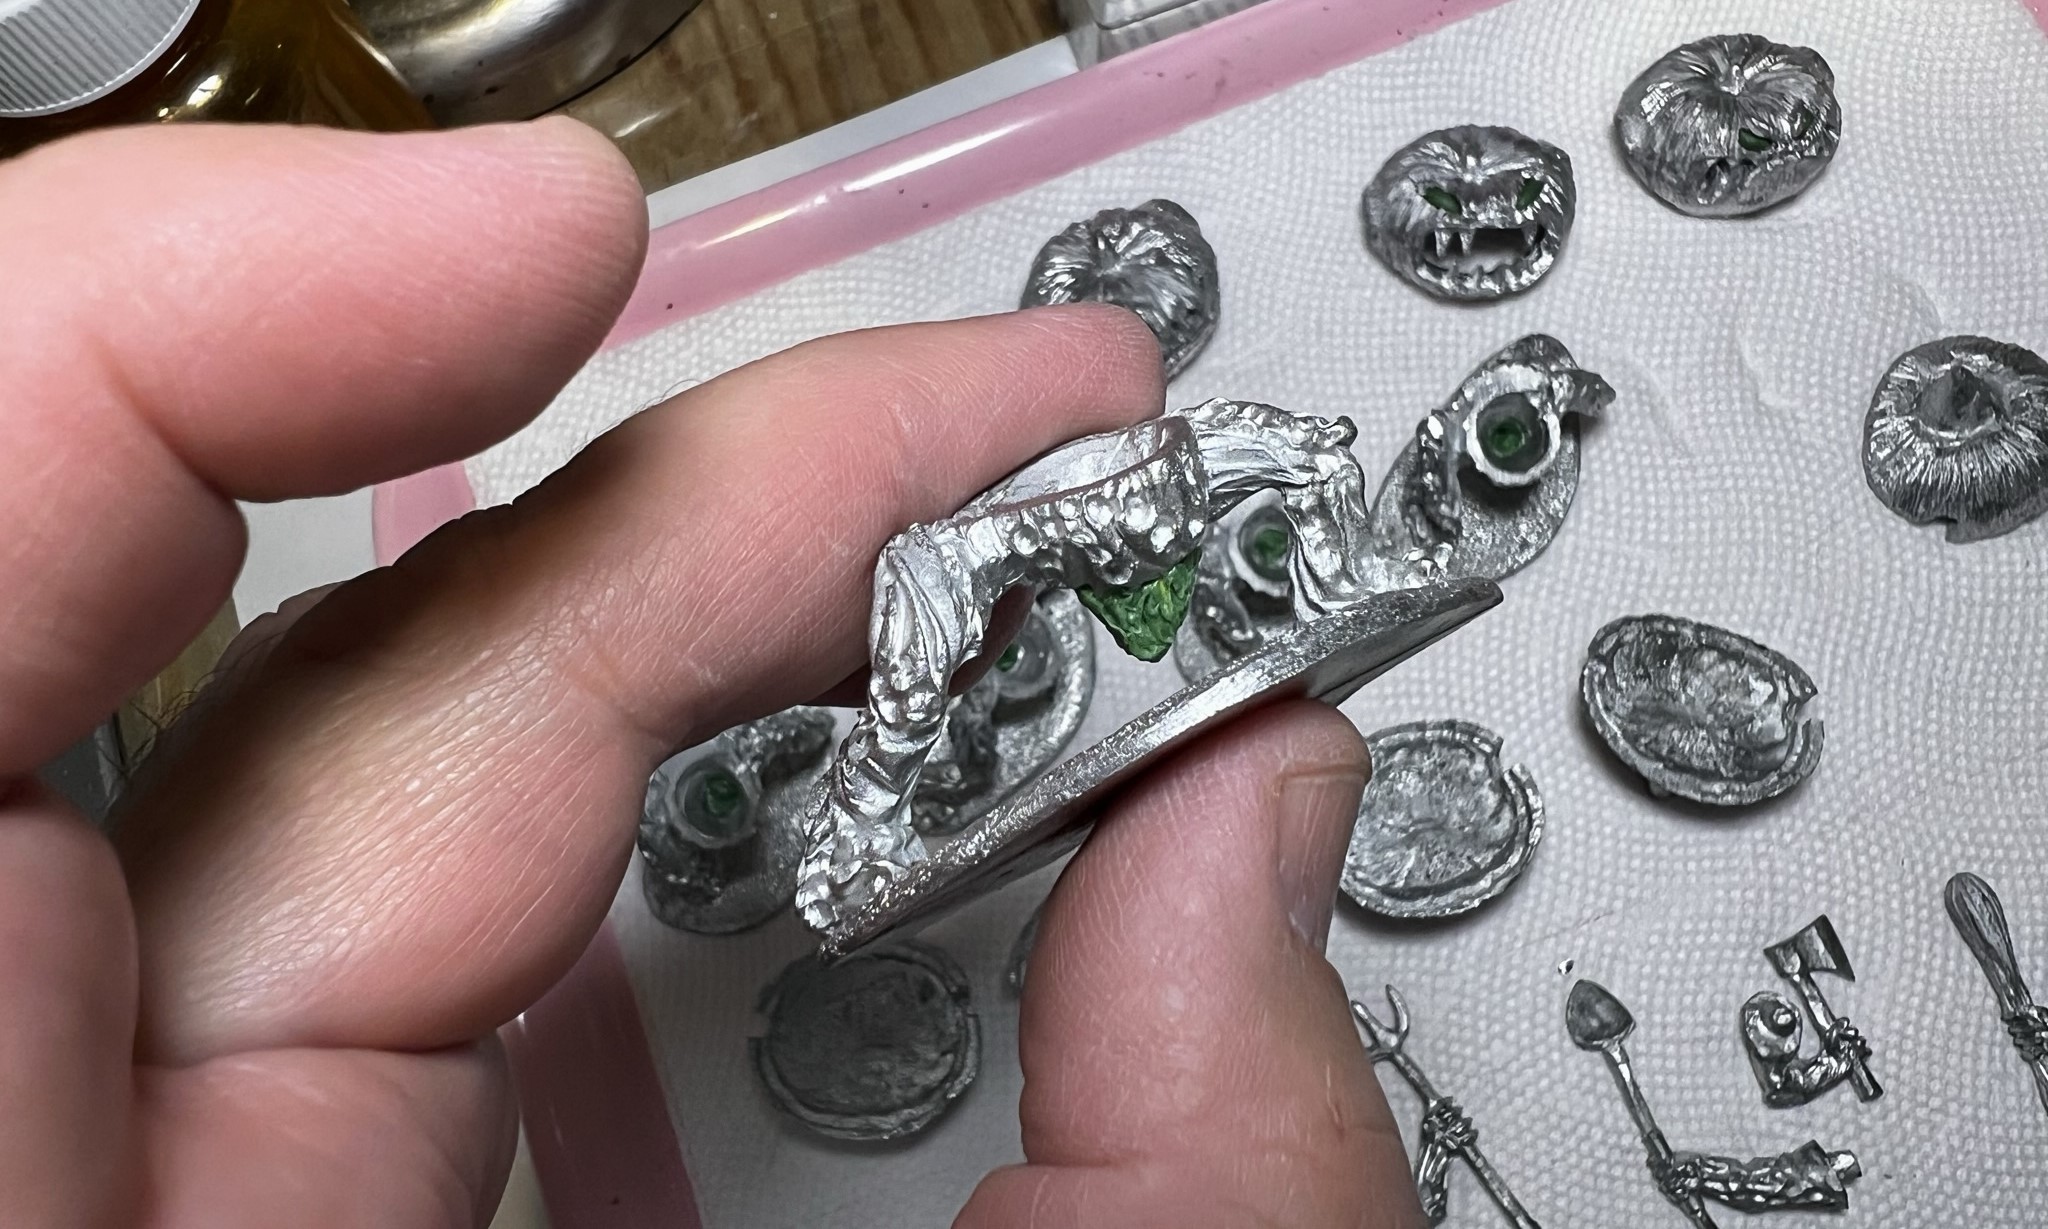
Once I assembled the heads – it was clear to me that I’d need to cover up some mold lines with green stuff. As these are big metal models, this task was not a surprise. I did my best to mirror the pumpkinheads shape and recesses. I’m not Roger, but I did try my best to do what I thought he’d do.
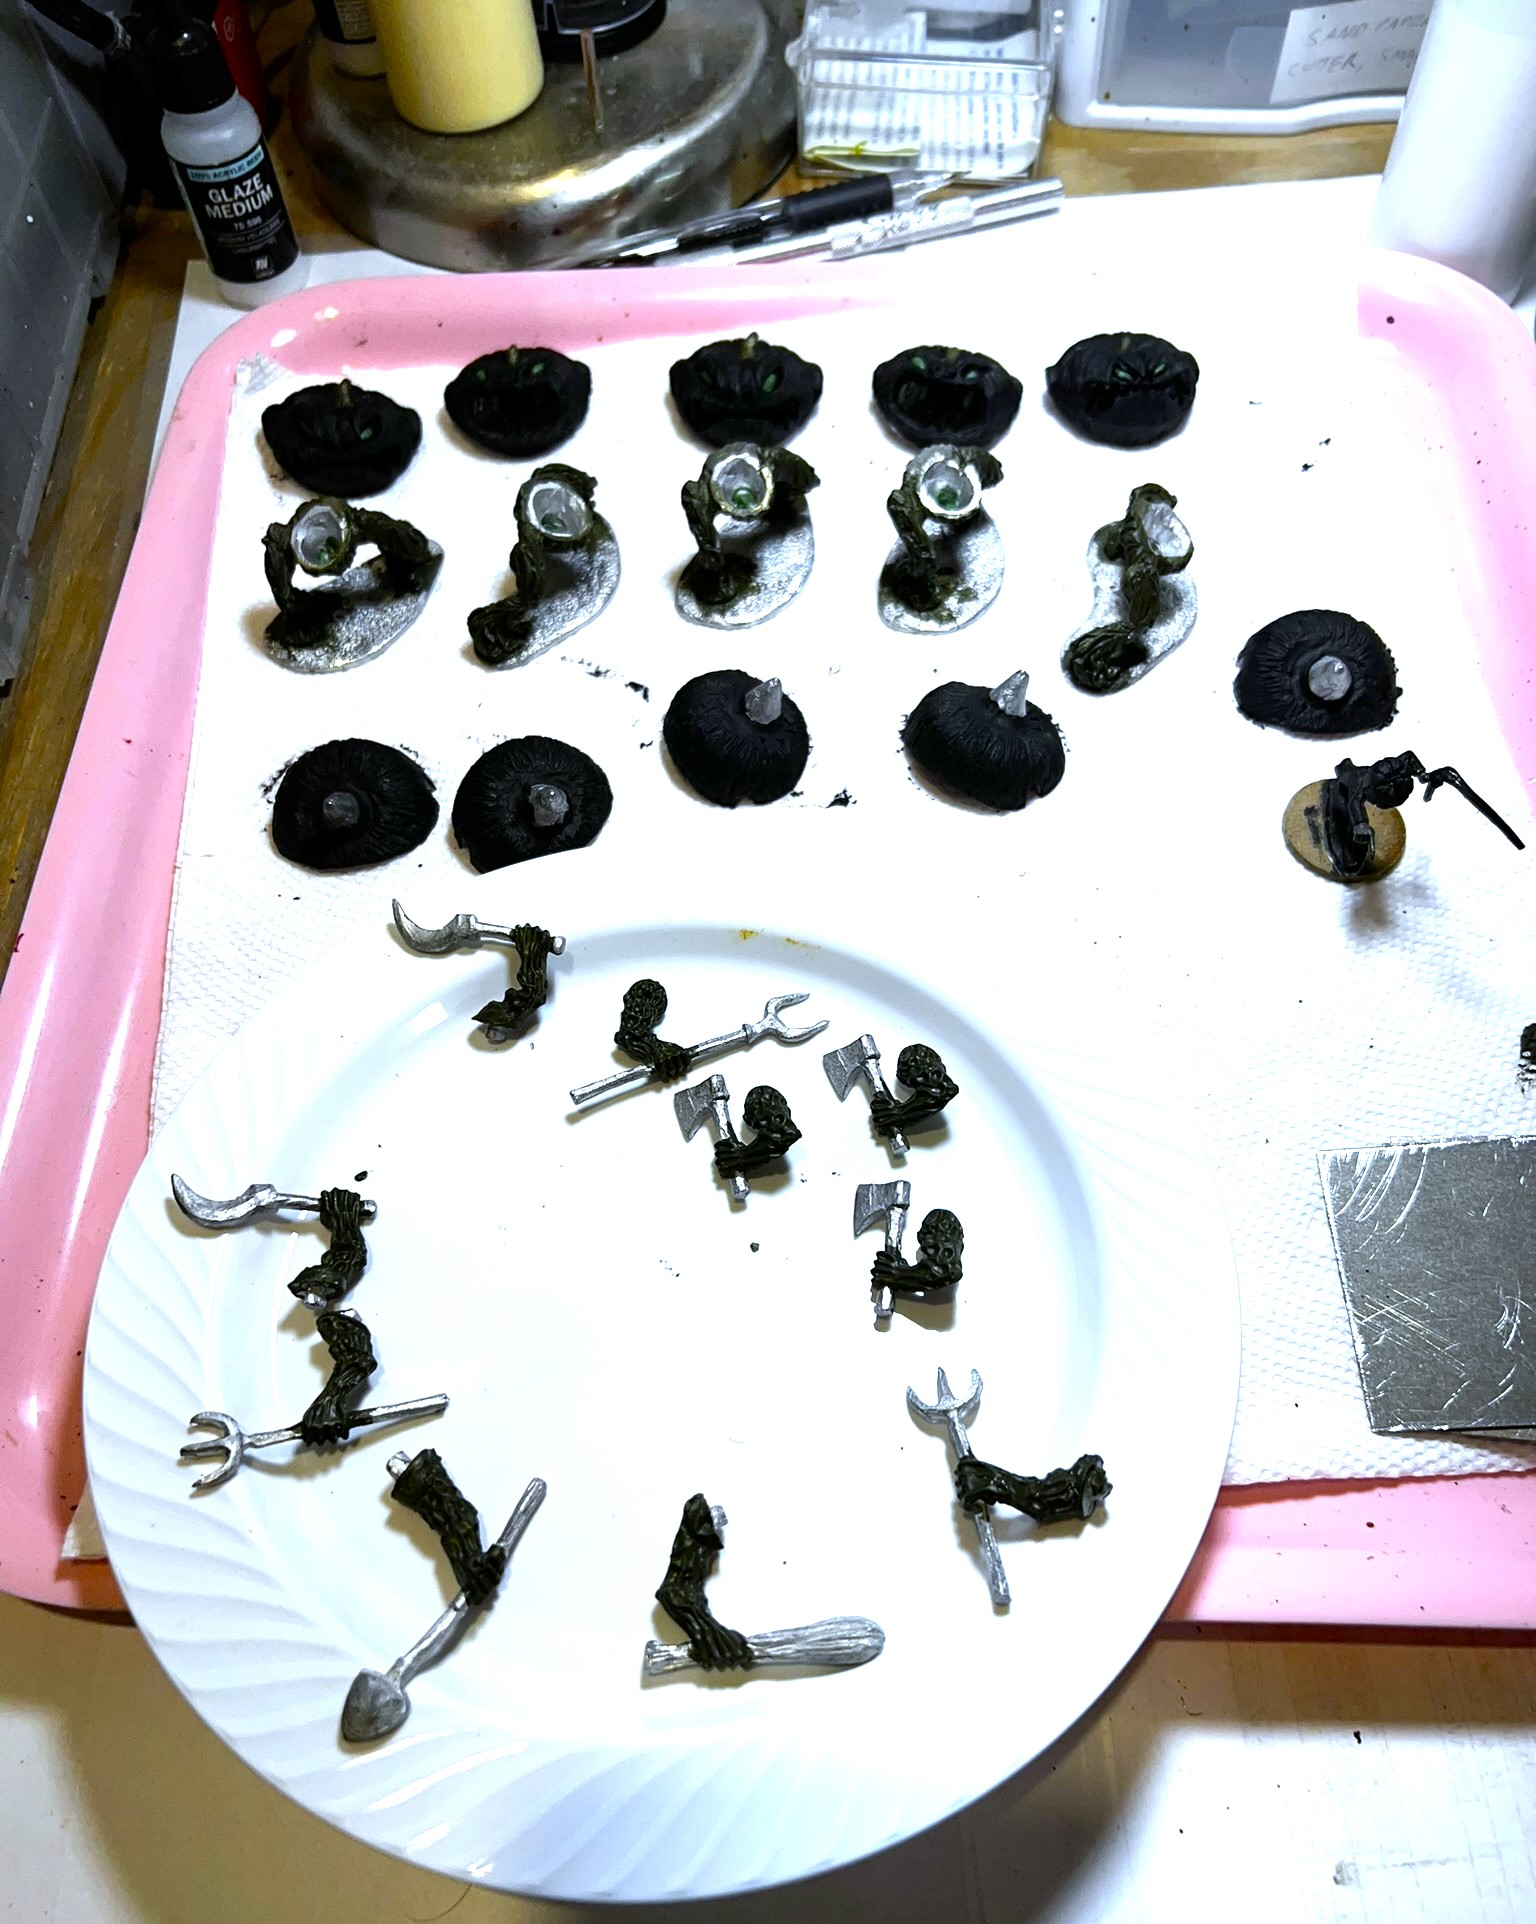
The pumpkinheads upside down showing the arm holes and the green stuff filling on the mold lines. The pointy sections are designed to go in the torso holes. After this, I brush applied a second coat of black primer.
After the primer had dried, I dry brushed with white then orange – Tamiya Orange – that I bought for one of my daughter’s school projects in 1996! (It was a Trojan horse diorama we built together).
Dry brushed white.
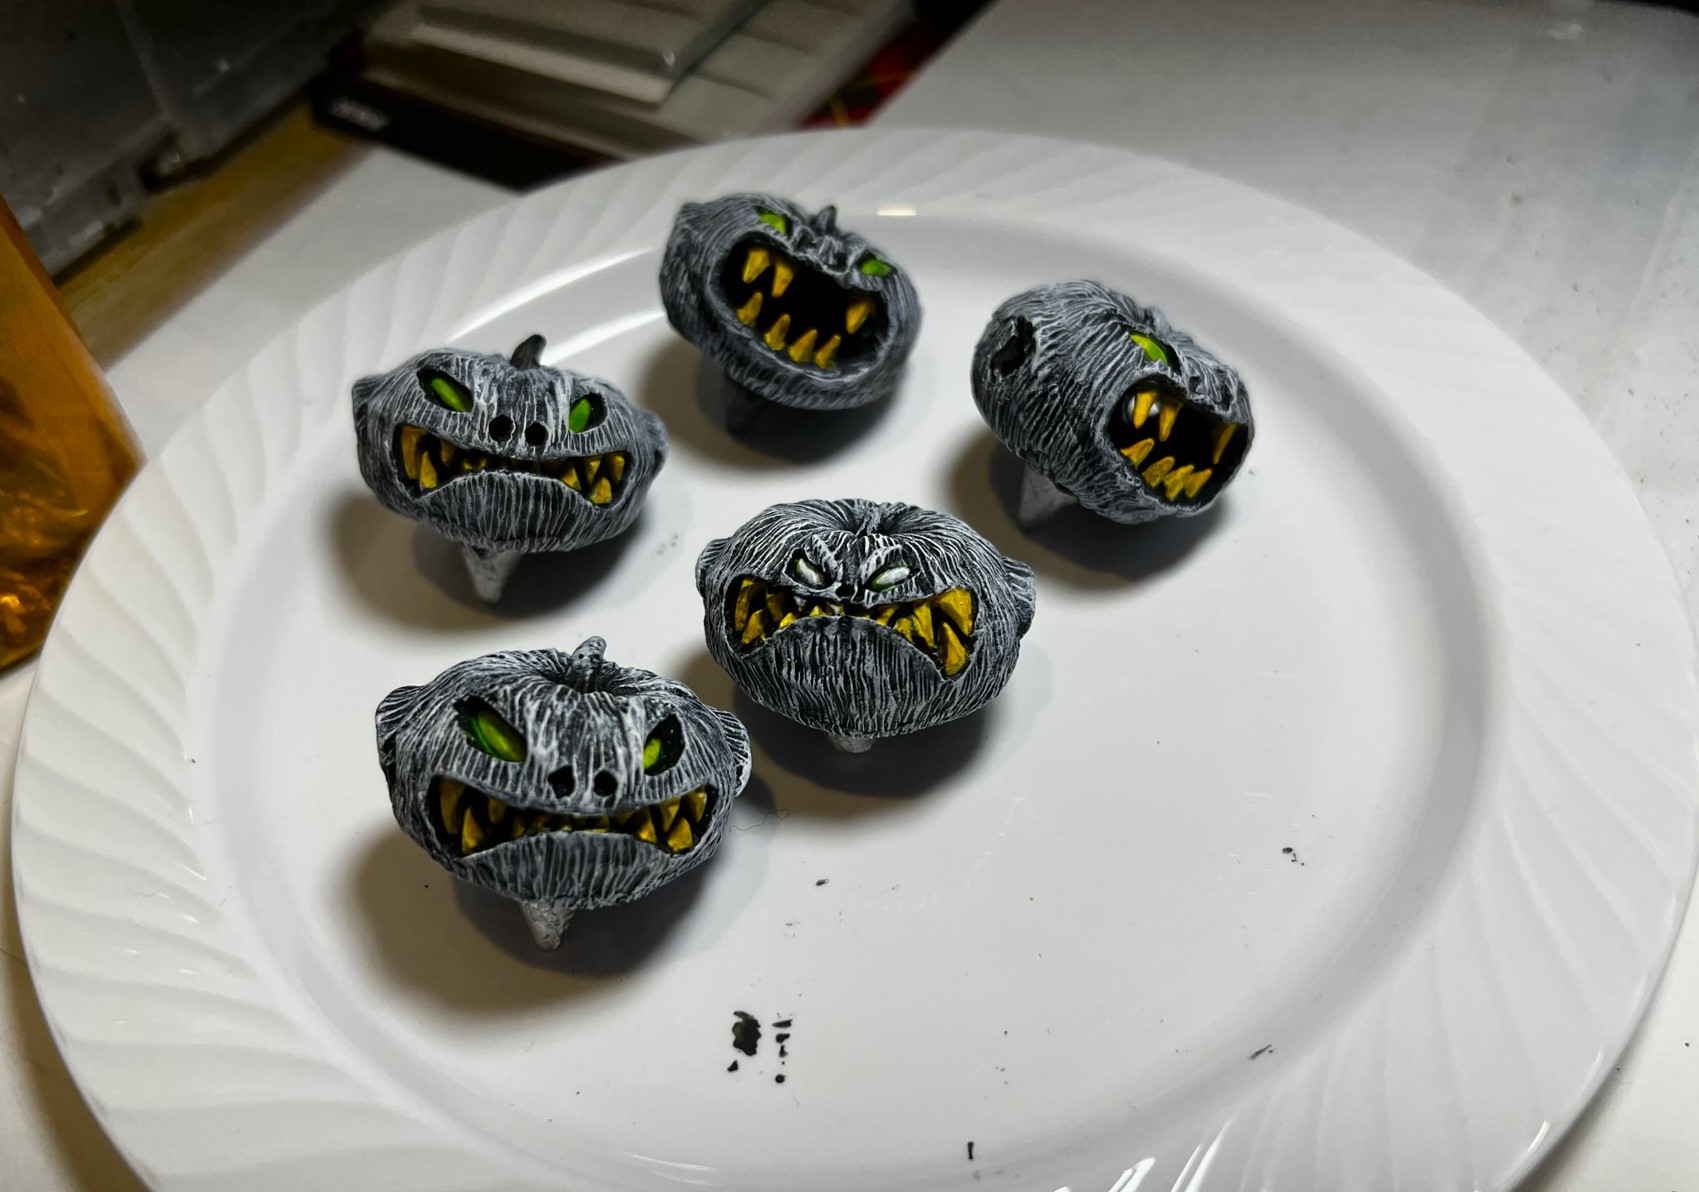
After the orange dried, I applied Army Painter Mid Brown wash, and then after that dried I highlighted the pumpkinheads with Vallejo Light Orange (I list all paints used at the end of the post for those who might want to know). Then I affixed the heads to the torsos and arranged a suitable mix of weapons/arms for variety.
Got heads and torsos now – need arms!
Then I attached the arms and removed the assembled figures from the specimen jars – and put them on 4″ square steel bases with Gorilla Glue.
Finally on bases.Ready for varnish!
I airbrush varnished the figures with a gloss then a matte coat.
Varnished – but we need flocking they cry!
I used a lot of flocking for the bases (I love making bases complex).
Ready for eye candy!
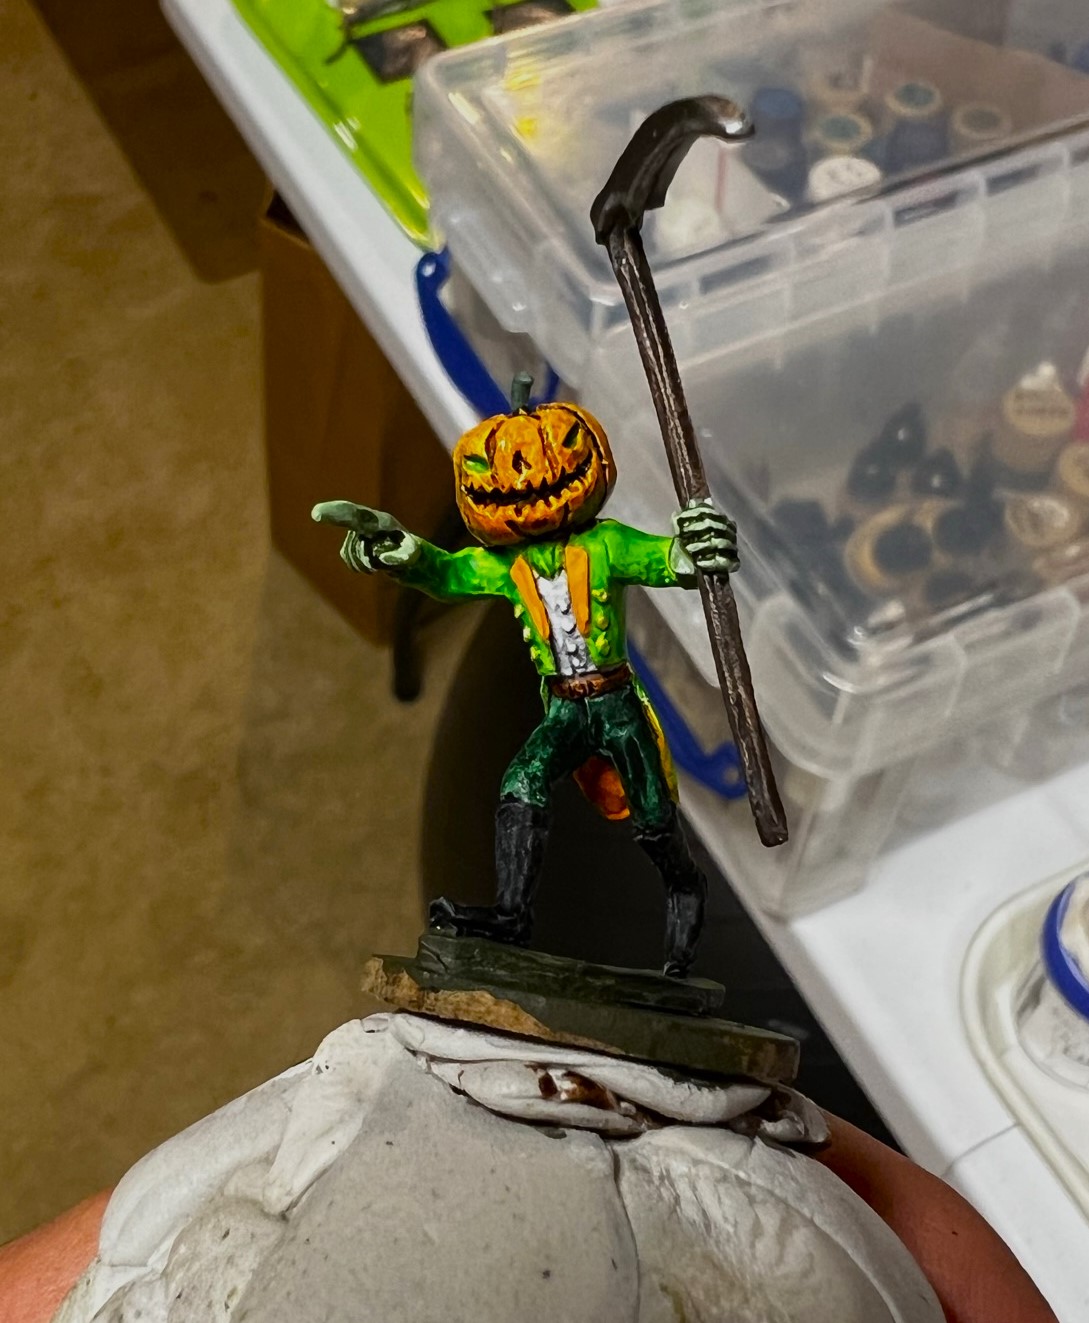
King Jack was finished about the same time. He would need to go on an MDF base.
King Jack painted.
Now, for some…
Eye Candy…
King Jack
Stand 1
Stand 2
Stand 3
Stand 4
Stand 5
Regimental Shot
And yes, I still have more to come…
Miscellaneous details and references for those interested in that sort of thing:
For all of my previous posts on Wars of Ozz games, figures, units, and other related projects – please see this page.
PAINTS, INKS, GLAZES, SHADES, WASHES, PIGMENTS, FLOCKING, GLUES AND MORE THAT I USED ON THIS GREAT PUMPKINHEAD REGIMENT & KING JACK:
Green Stuff
Gorilla Glue
Regimental MDF base from Old Glory/Wars of Ozz Miniatures
2″ square steel base from Wargames Accessories (#21)
Mounted Brigade Commander MDF base from Old Glory/Wars of Ozz Miniatures
Elmer’s PVA Glue
Reaper “09214 Black Primer”
Vallejo Surface Primer “Russian Green”
1 1/4″ x 1″ steel base from Wargames Accessories (#FOW1)
Poster tack
Vallejo Mecha Surface Primer “White”
Vallejo “Airbrush Thinner”
Army Painter “Green Tone” (wash/shade)
Citadel “Contrast Paint – Imperial Fist”
Citadel “Tesseract Glow”
Battlefront “Gunship Green”
Vallejo Model Color “White”
Battlefront “Black”
Tamiya “Orange”
PS Model Color “British Brown Drab”
Vallejo Model Air “Green Brown”
Vallejo Model Air “Dark Brown”
Vallejo Model Air “Brown”
Vallejo Model Air “Dark Steel”
Citadel “Ironbreaker”
Vallejo Model Air “Light Steel”
Citadel “Nuln Oil GLOSS” (wash)
Vallejo Game Color “Livery Green”
Army Painter “Mid Brown” (wash/shade)
Vallejo Game Air “Escorpena Green”
Army Painter “Speed Paint – Grim Black”
Army Painter “Speed Paint – Holy White”
Citadel “Contrast Paint – Contrast Medium”
Vallejo Model Color “Light Orange”
Martha Stuart Crafts “Pale Bronze”
Vallejo “Flow Improver”
Vallejo Mecha Varnish “Gloss Varnish”
Vallejo Mecha Varnish “Matte Varnish”
Army Painter “Battlefields Grass Green” (flocking)
Army Painter “Battlefield Field Grass” (flocking)
Army Painter “Battlefields Field Grass” (flocking)
Army Painter “Battlefields Meadow Flowers” (flocking)
Shadow’s Edge Miniatures “6mm Dark Forest Orange Tufts” (flocking)
Gamer’s Grass “Orange Flowers” (flocking)
Small stones (flocking)
Small oak twigs (flocking)
Again, as you may want to check out the Wars of Ozz figures’ range – there are two places to get them (and I make no money from this btw). The game rules and the figures are available from the following two places:
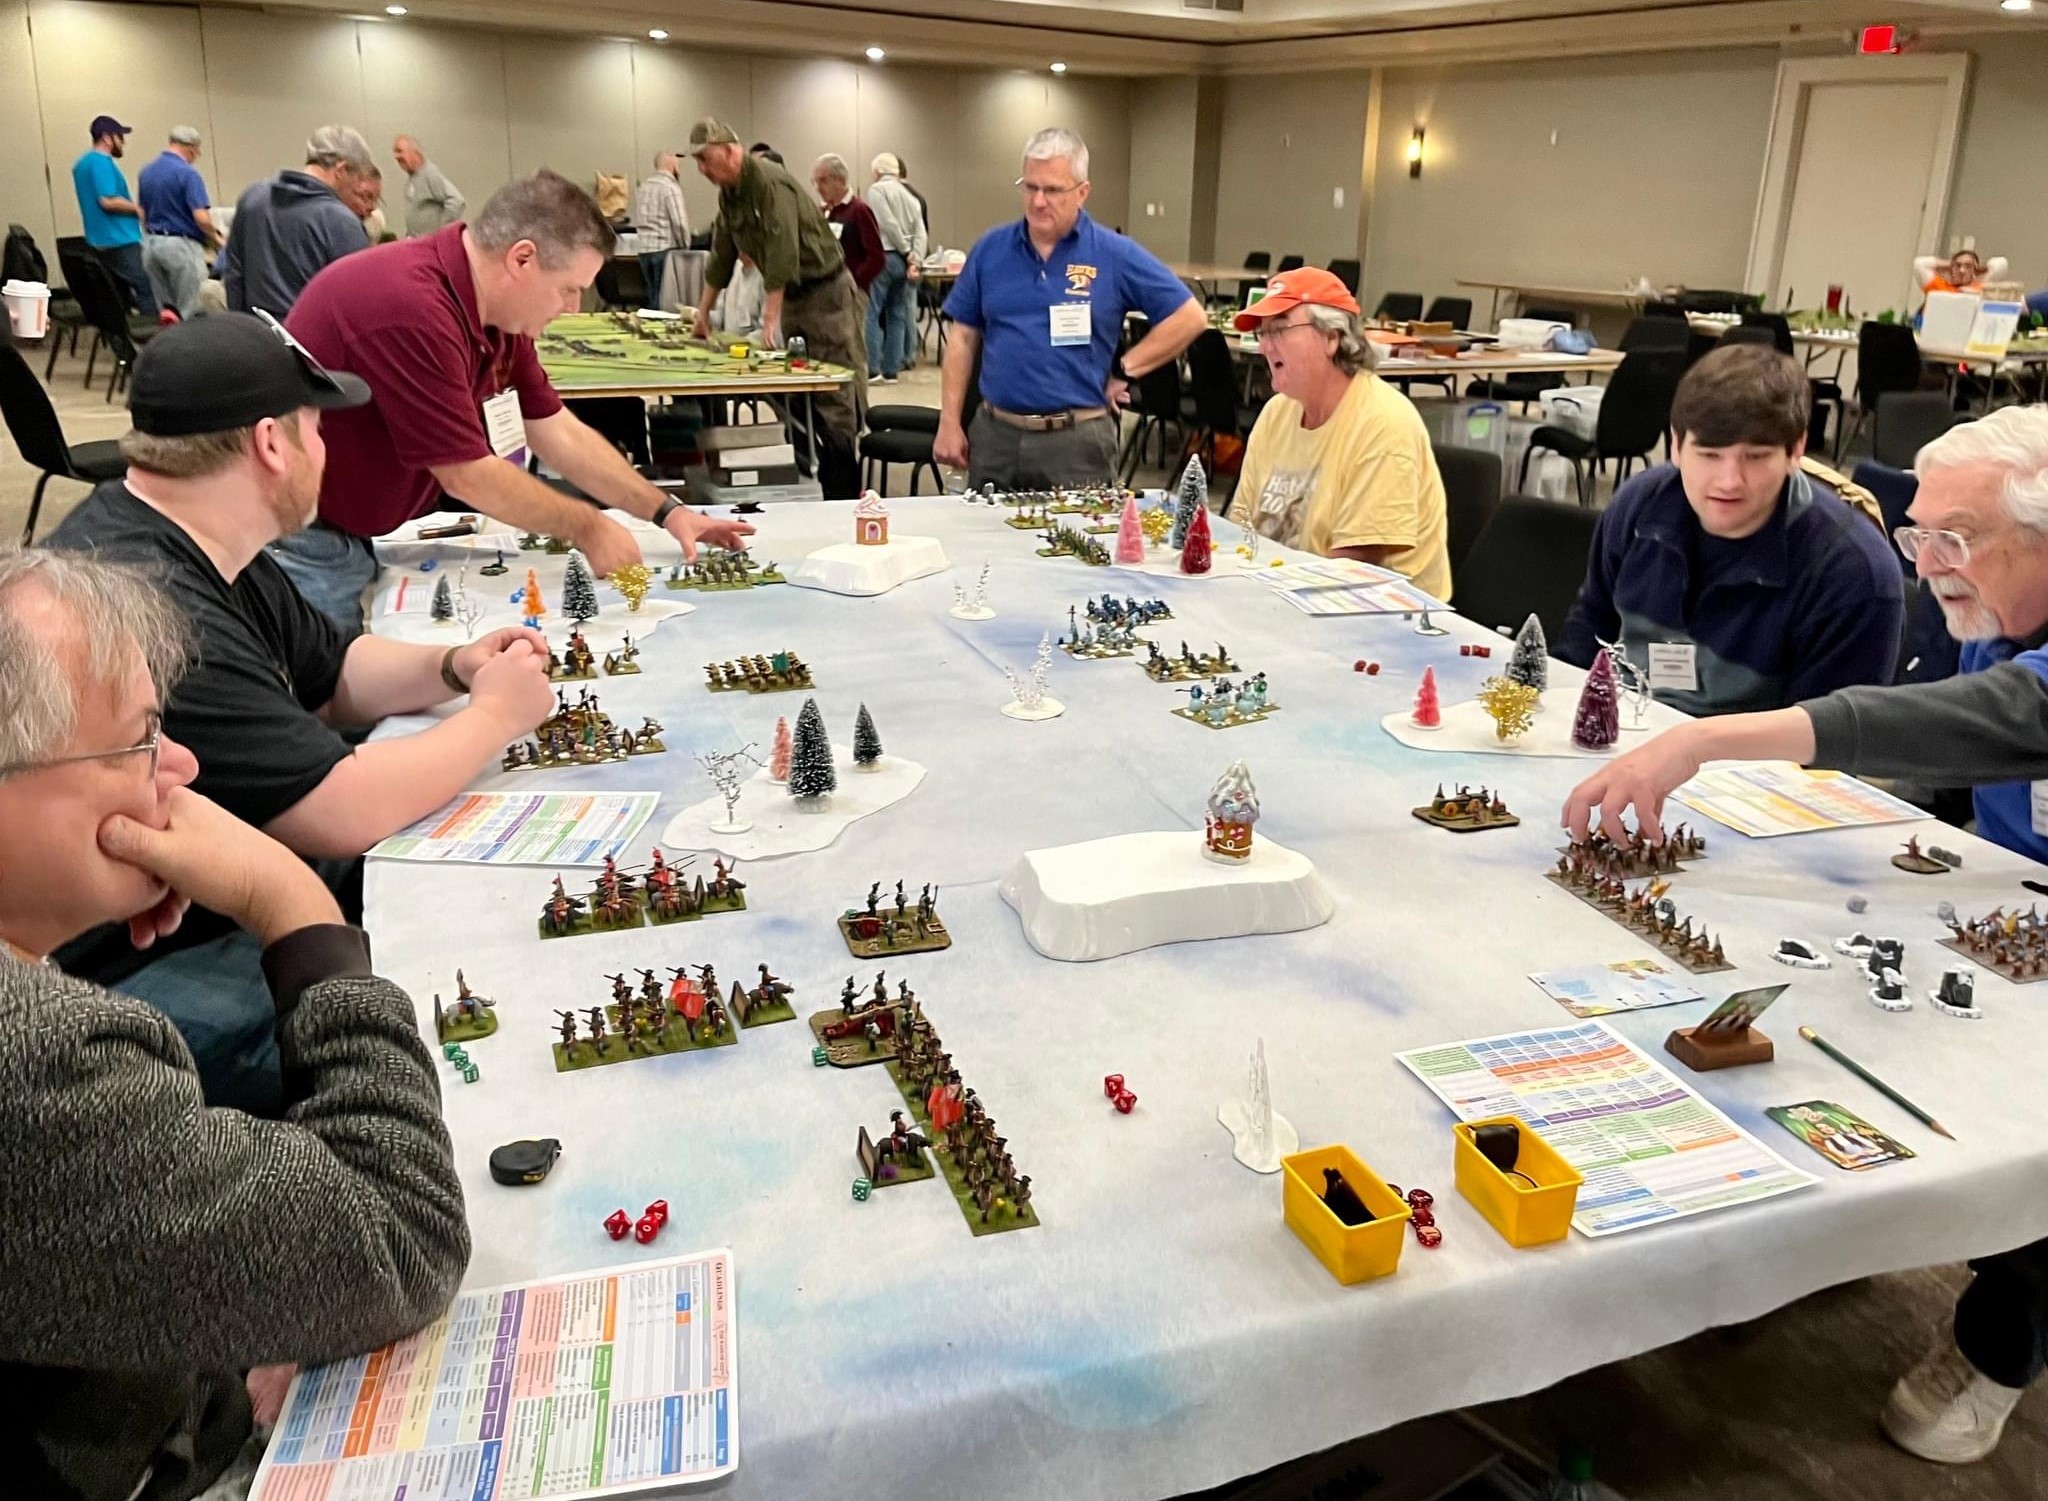
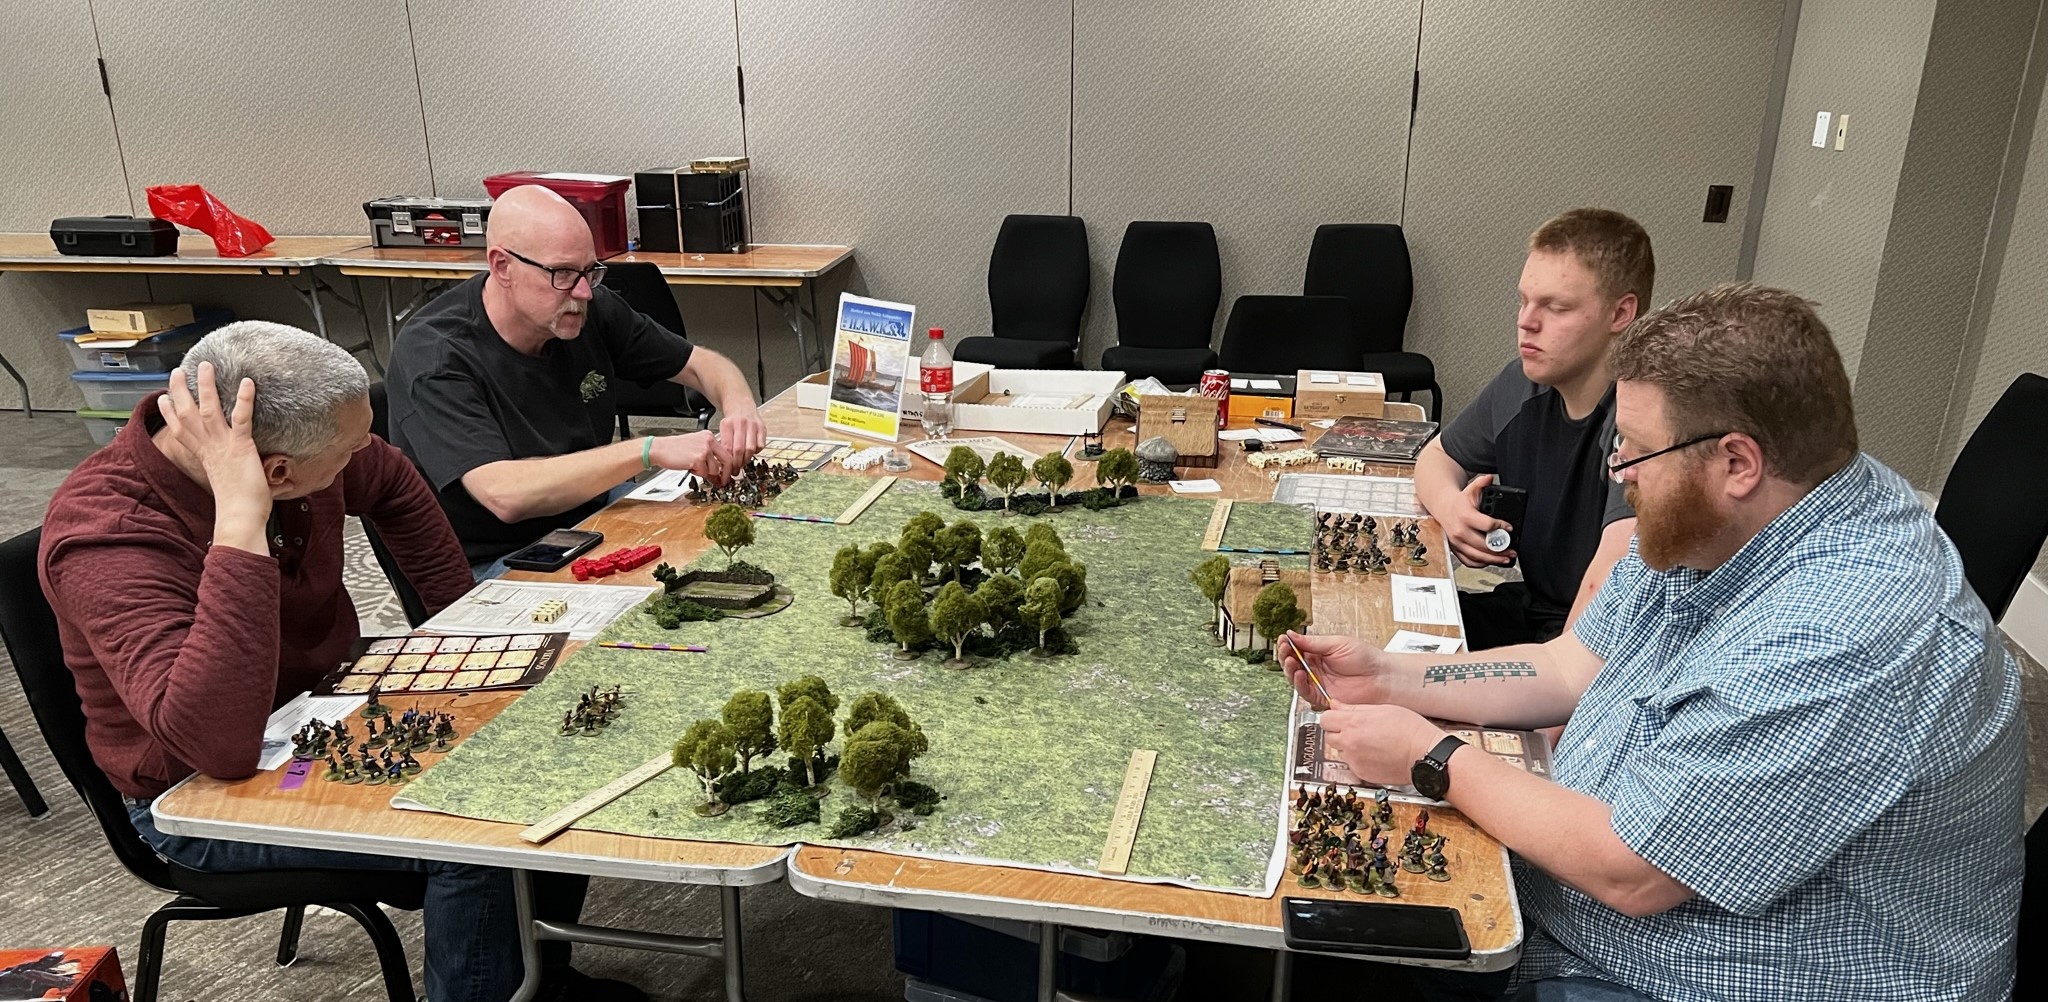
At the HAVOC gaming convention in Marlborough, Massachusetts I ran four games – two Wars of Ozz and two Feudal PatrolTM games between March 31st and April 2nd. Hopefully shortly, I will be sharing some of my own pictures and a few links about HAVOC in future posts – BUT FIRST…
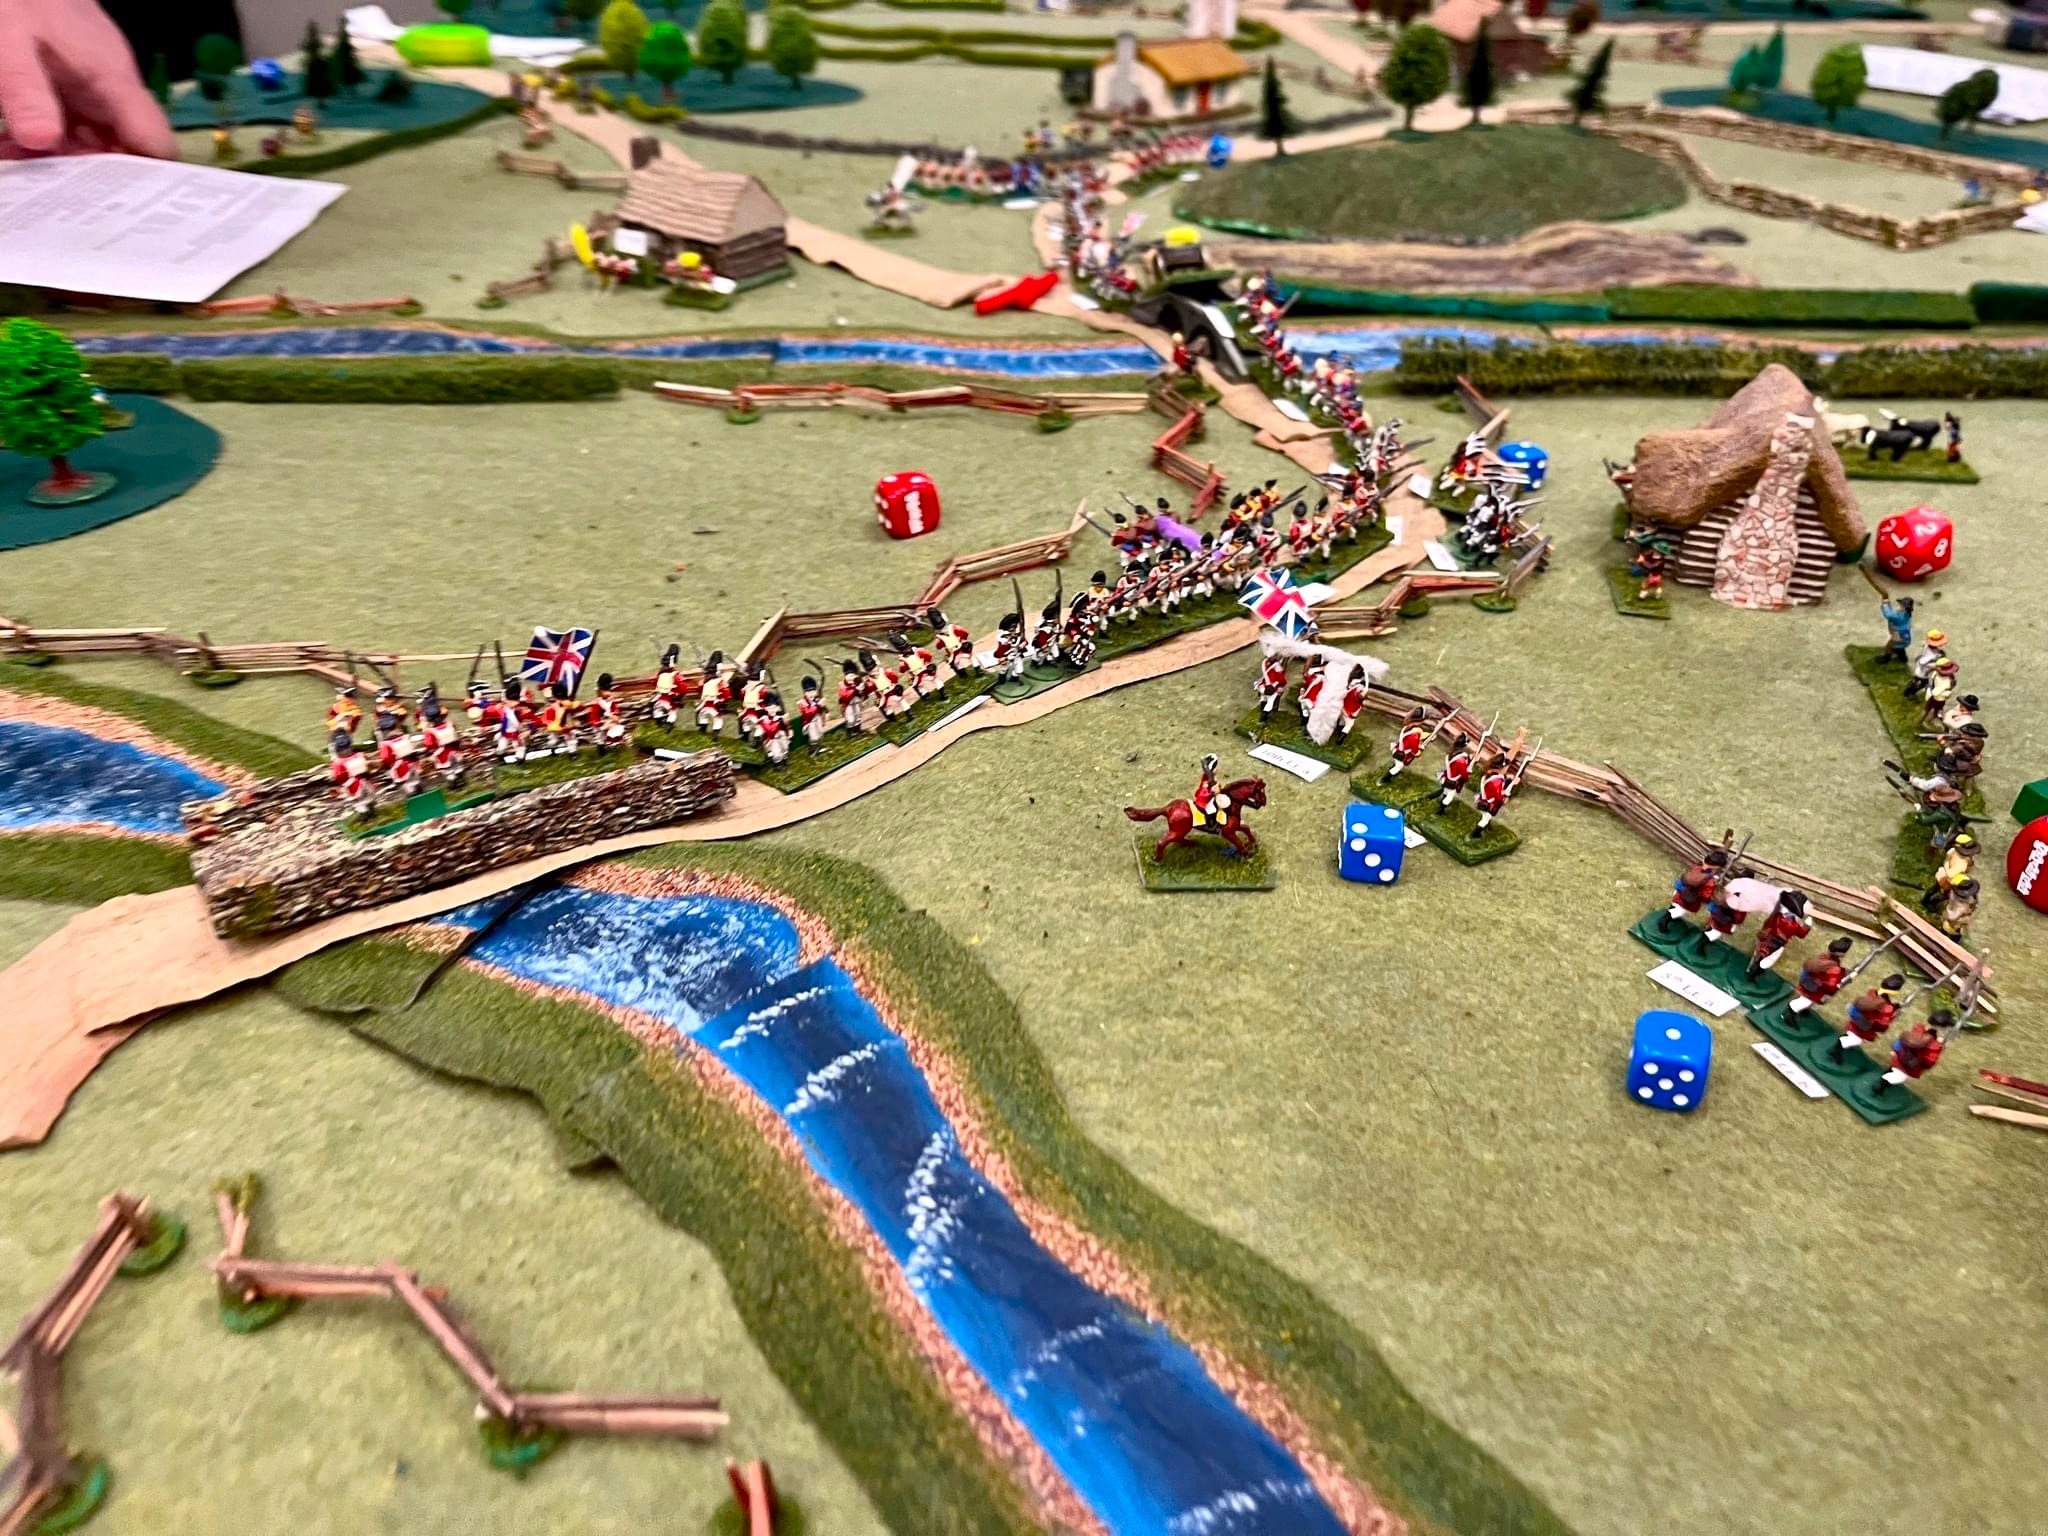
My first Ozz game was on Friday night, and I had a full table of 6 players – all new first-timers to the game. During that game, one of my players, my friend Bradley Gosselin, took copious notes and photos of that game. I noticed him doing this and assumed that he wanted to really learn the rules. To my humble surprise, he said, no, he was hoping to do a battle report and that I would be welcome to using it in my blog! It’s not often that one of my players does me such an awesome honor – and so – thanks Brad – here is your wonderful report – I could not have done better!
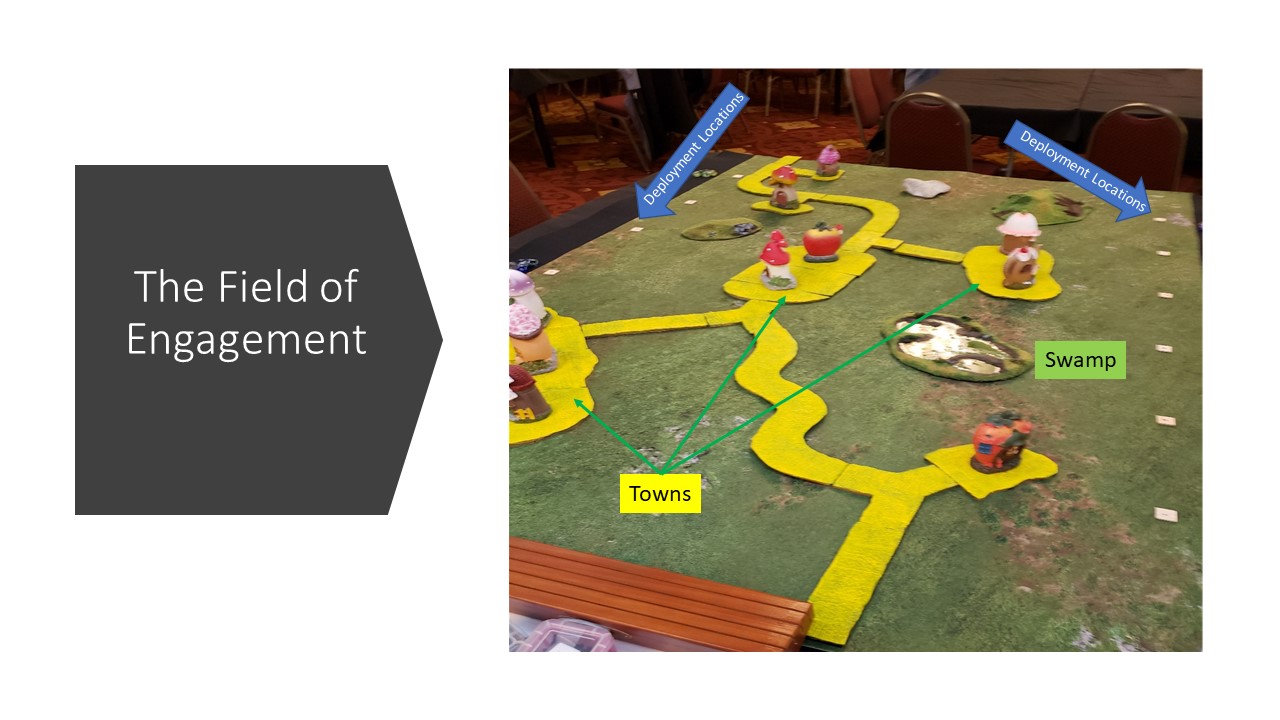
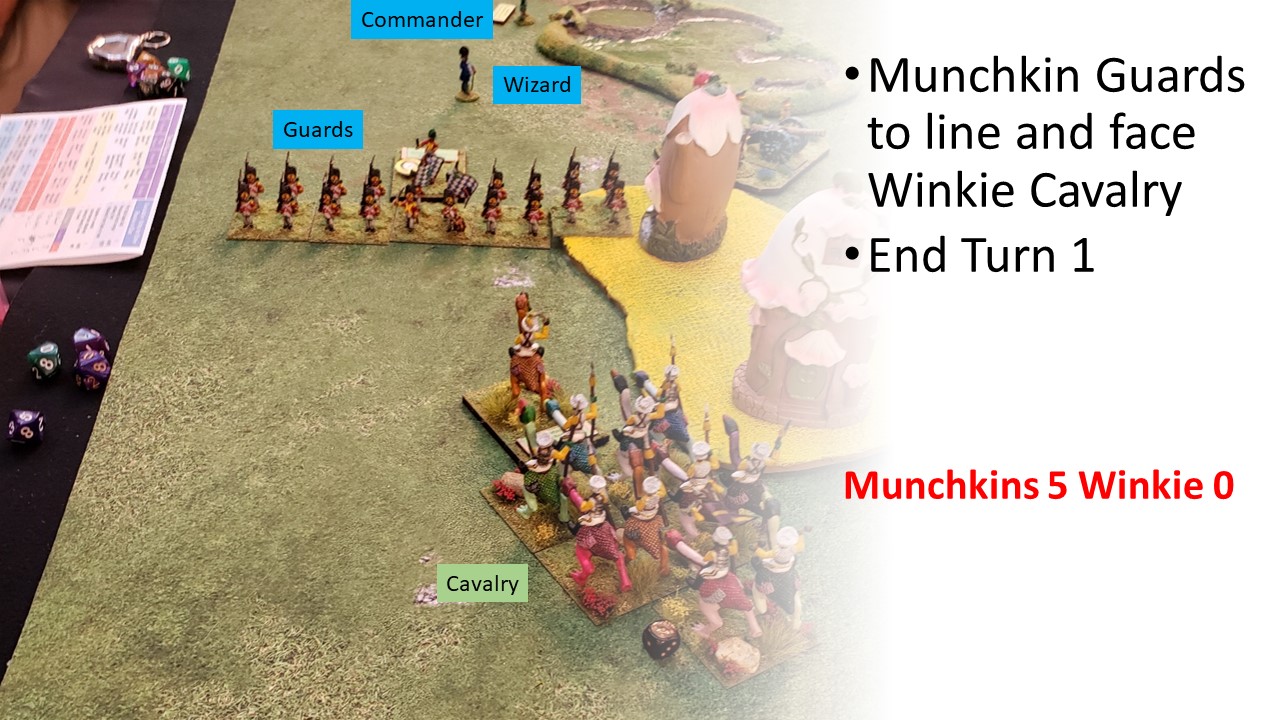
Game Set Up
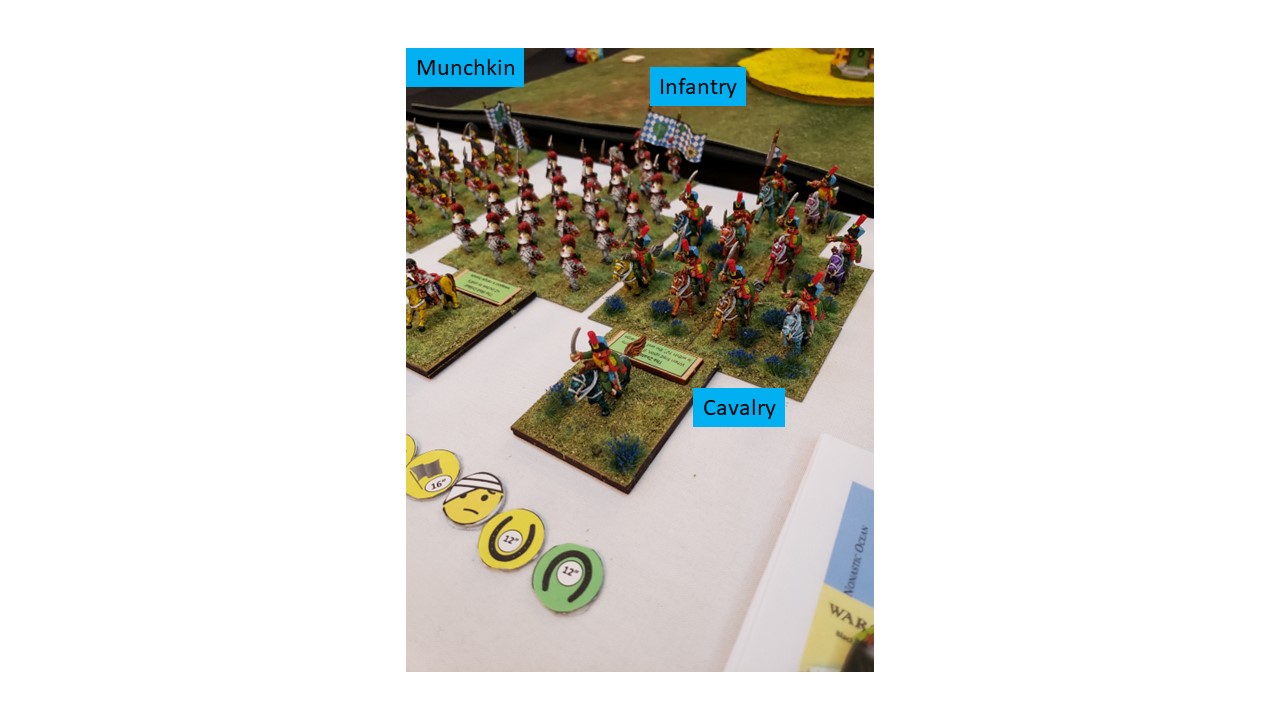
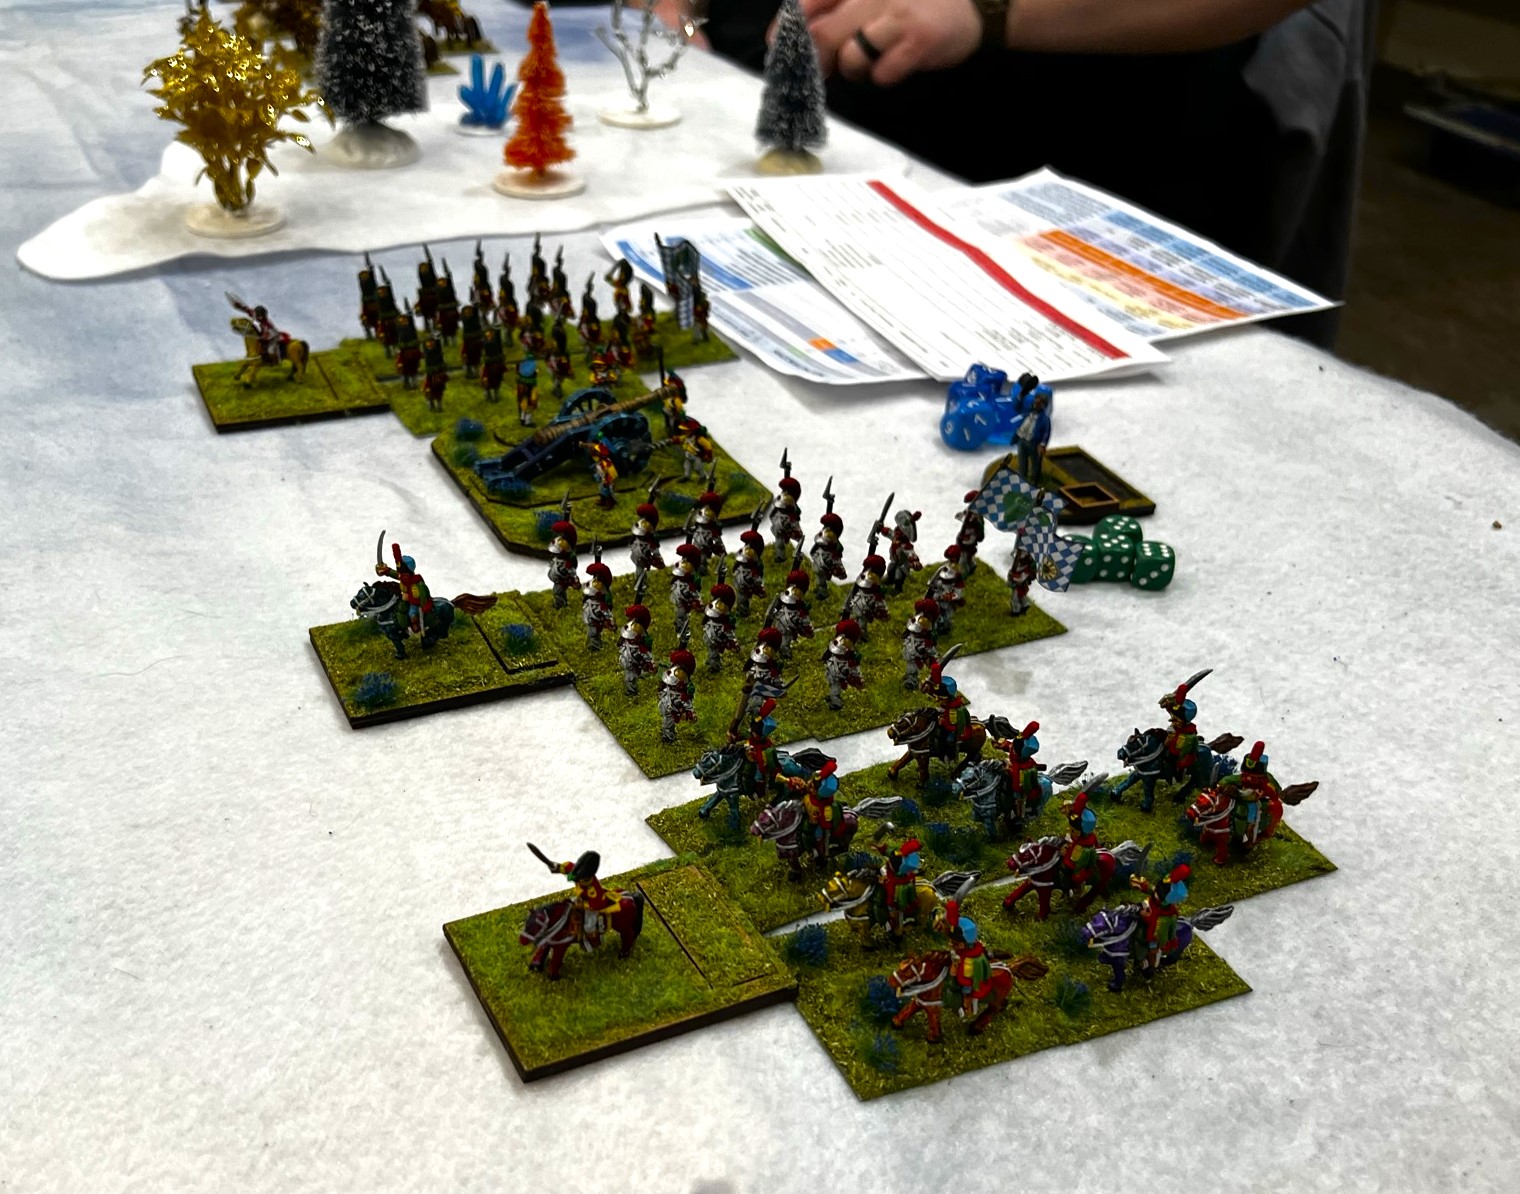
There were two brigades facing each other – Winkies and Munchkins. Each base/stand of troops or artillerist taken out is worth 1 point to the other side. The deployment is randomly determined.
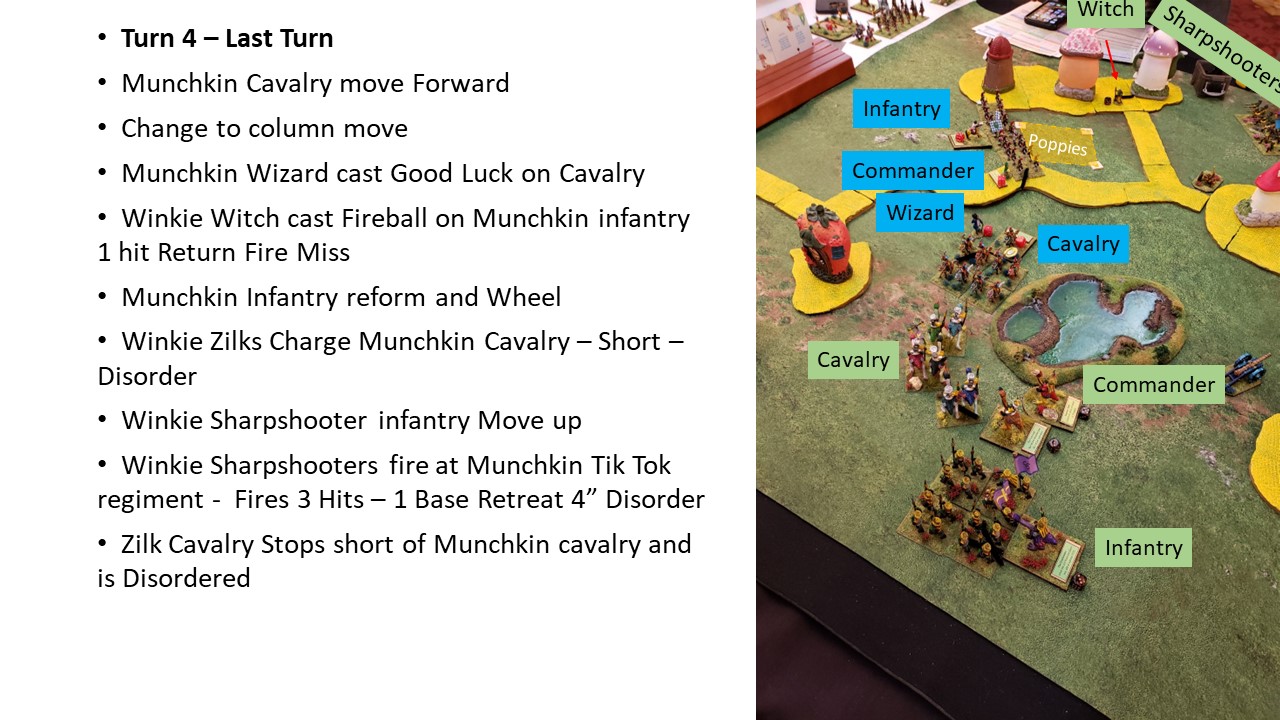
Turn 1
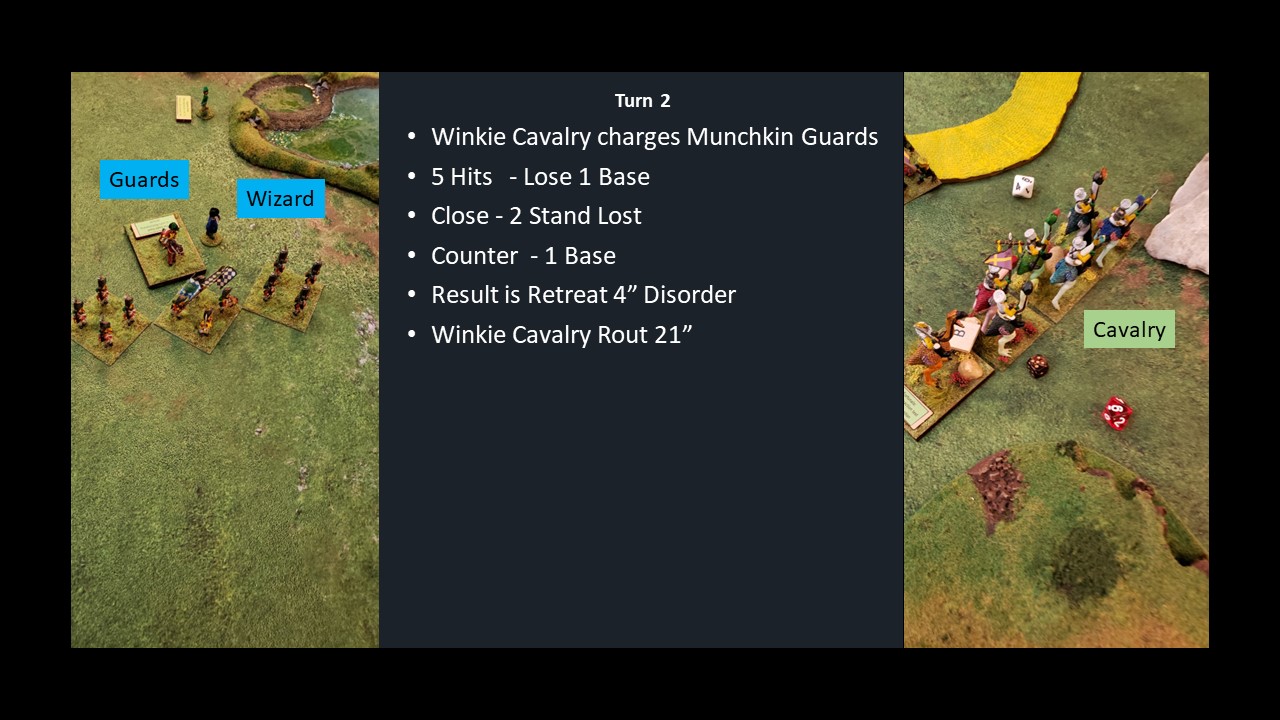
Turn 2
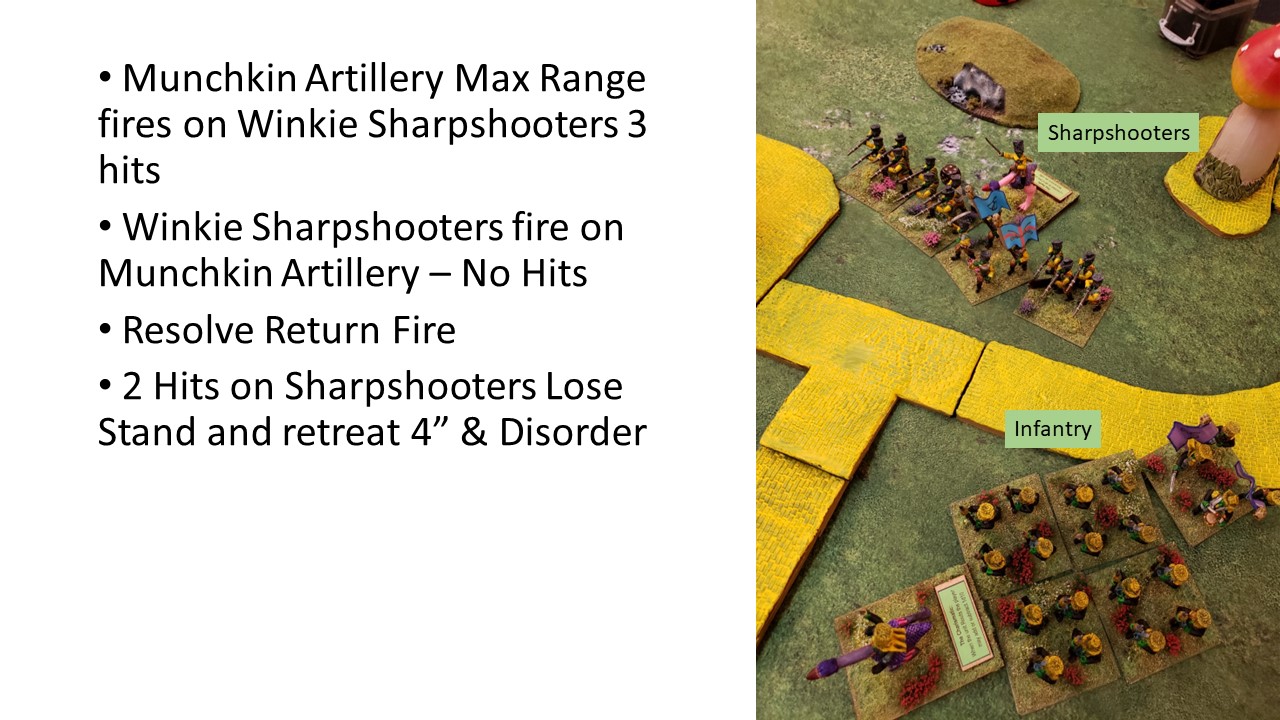
Turn 3
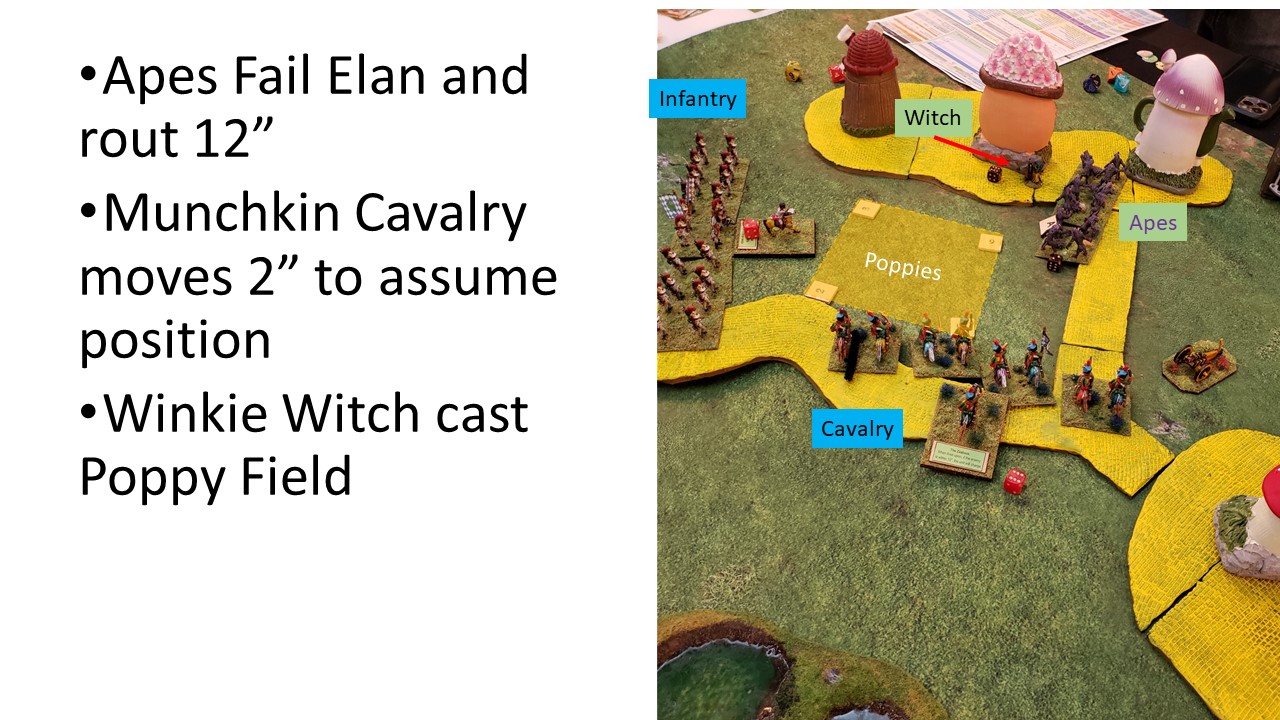
Turn 4
So, in the end the Munchkins prevailed over the Winkies! Thanks Brad for all the work on this (and he might have more on other HAVOC games – stay tuned). The players had a good time and really picked up the rules quickly.
The game was quick and bloody (as it’s supposed to be). Though both sides did well – the Munchkins did a wee bit better.
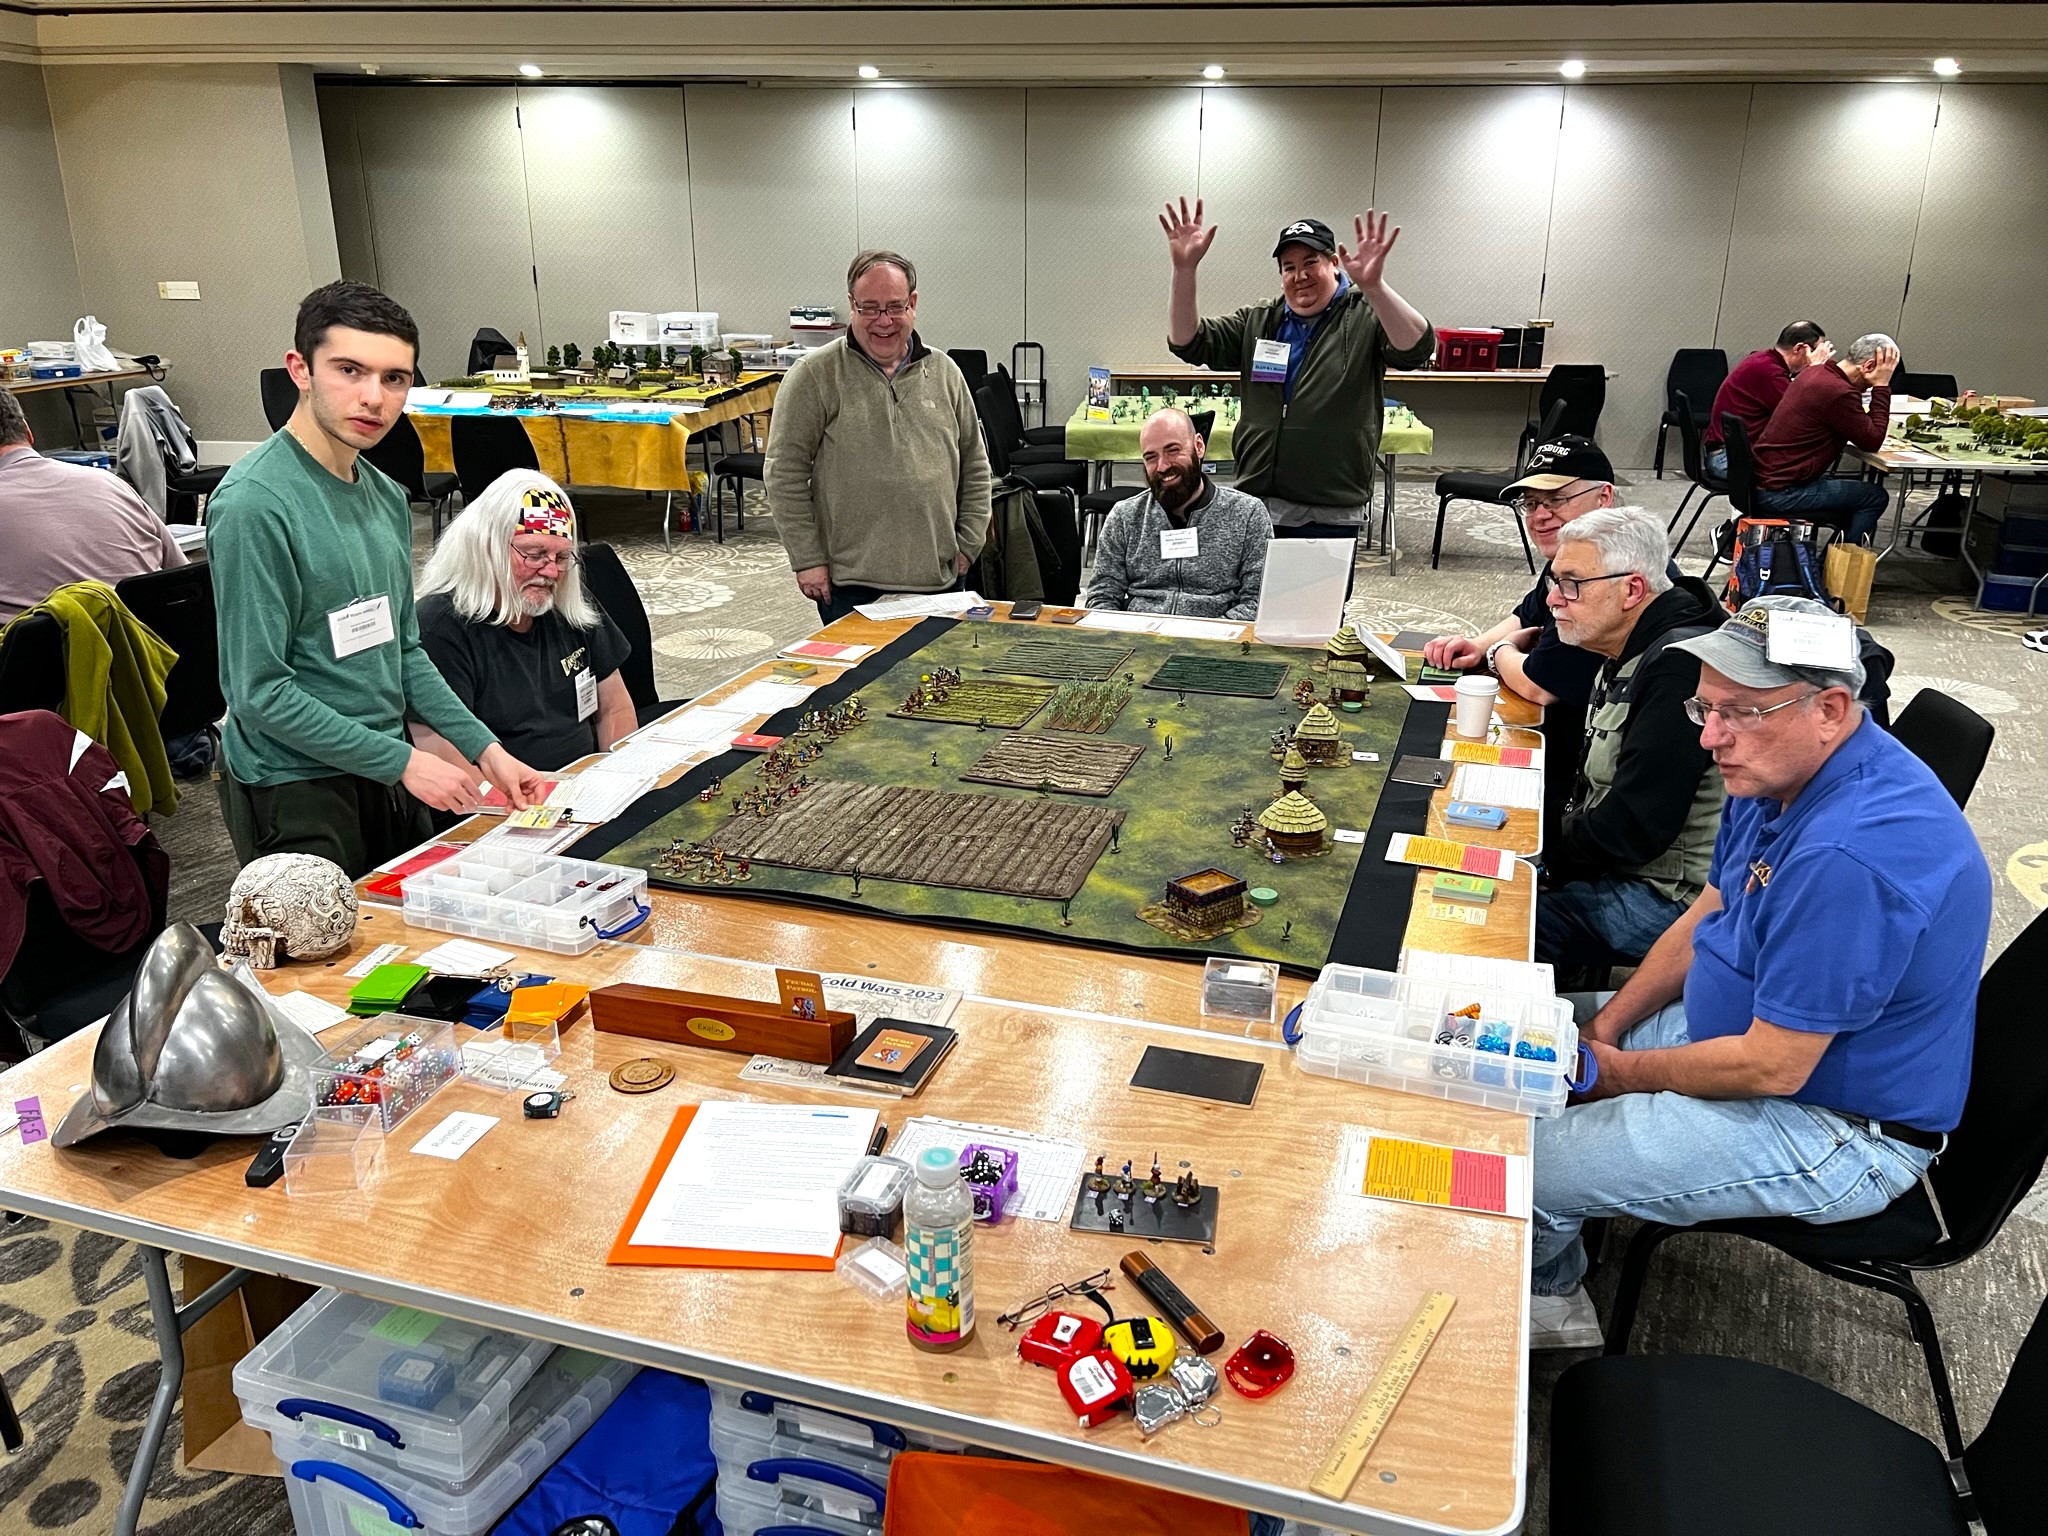
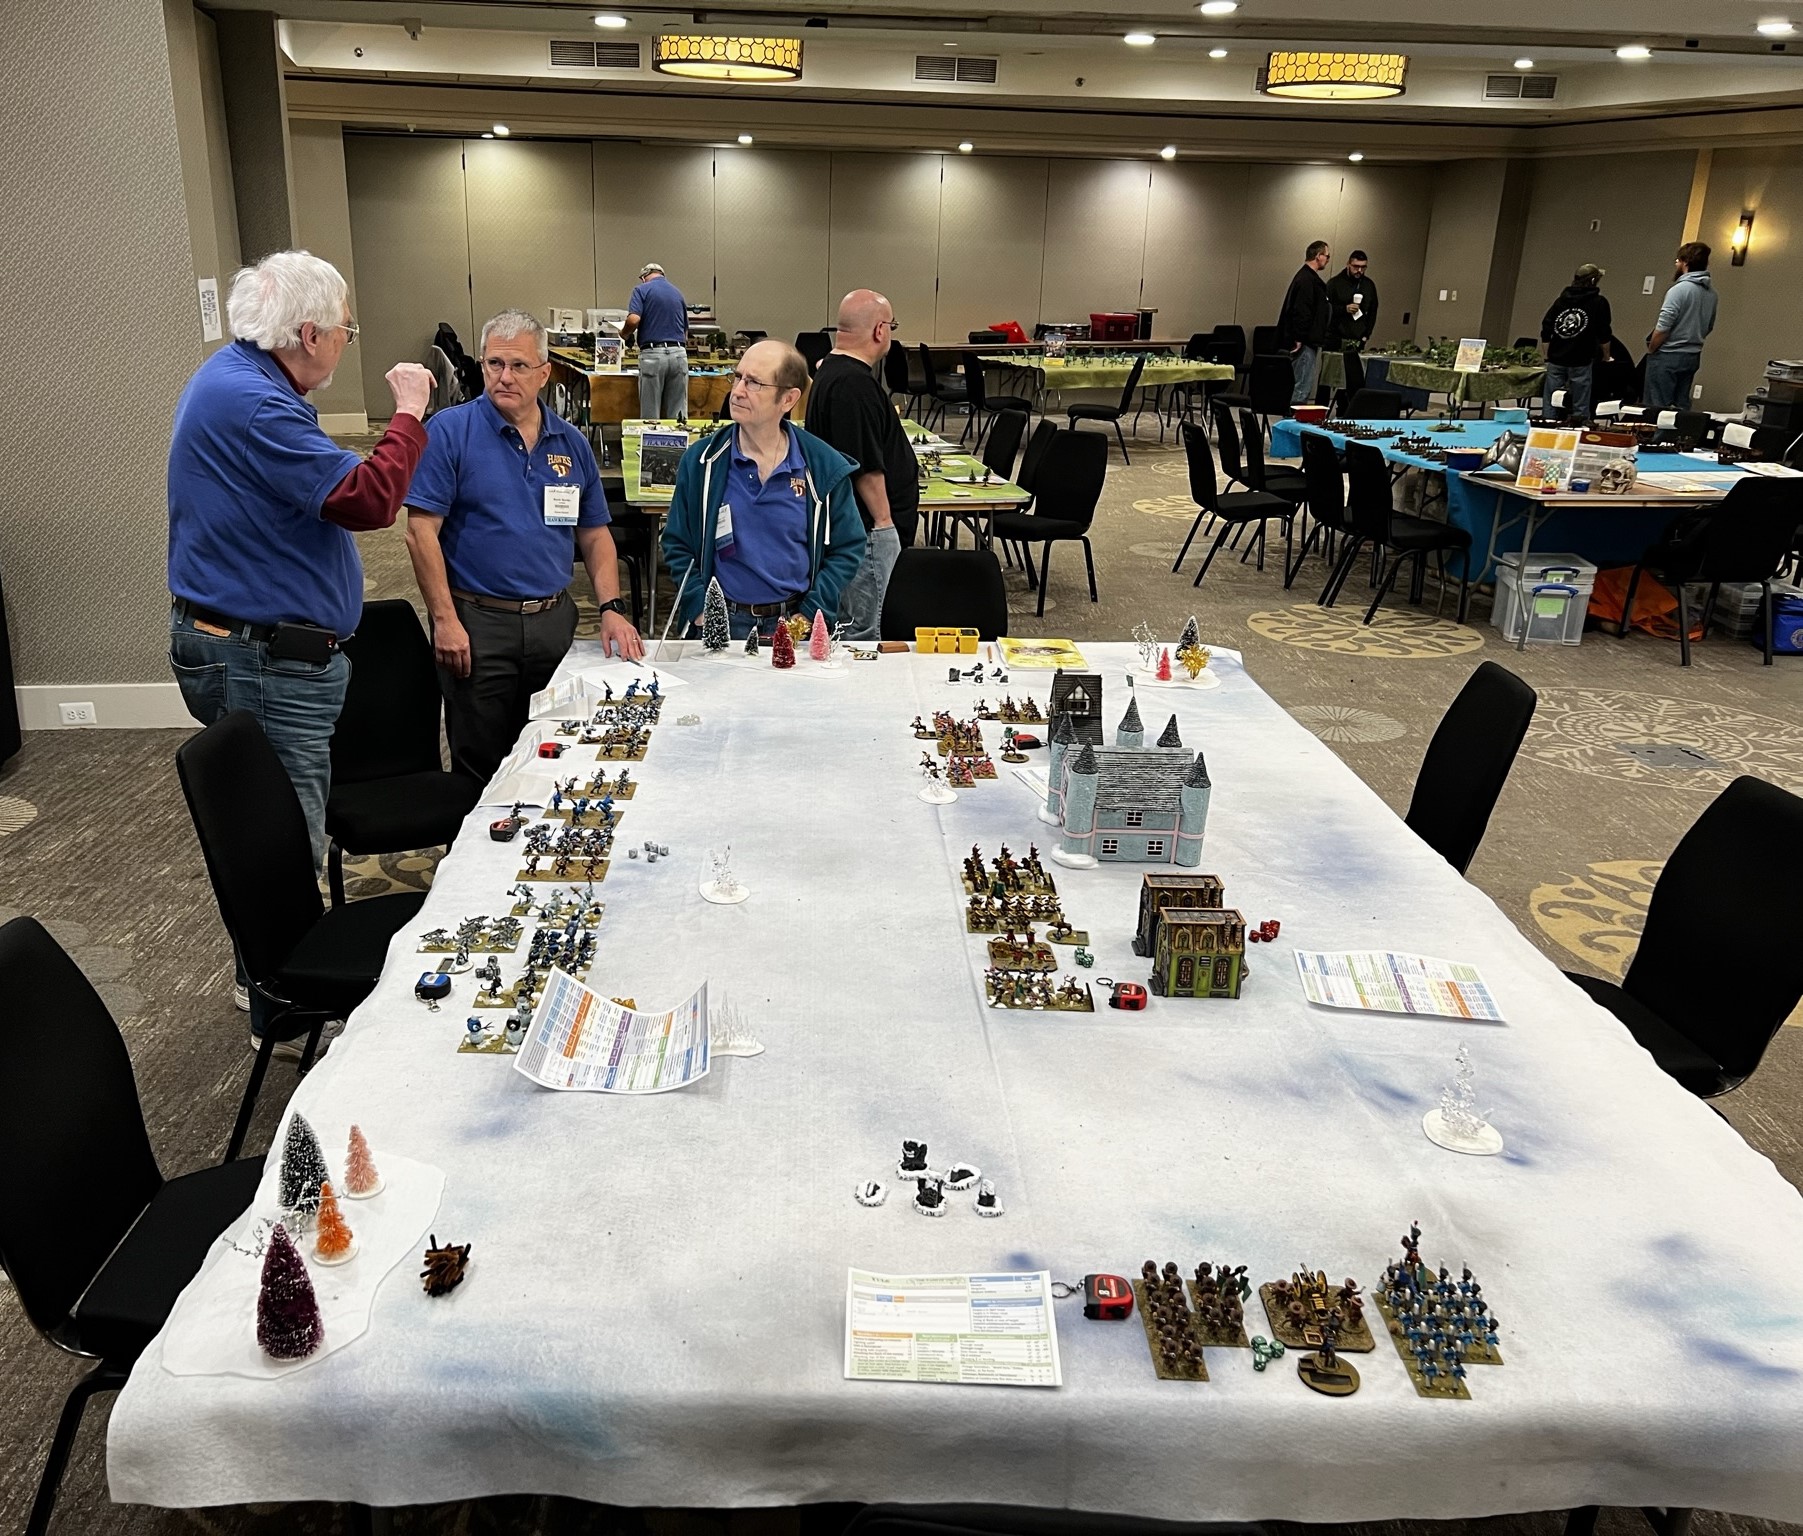
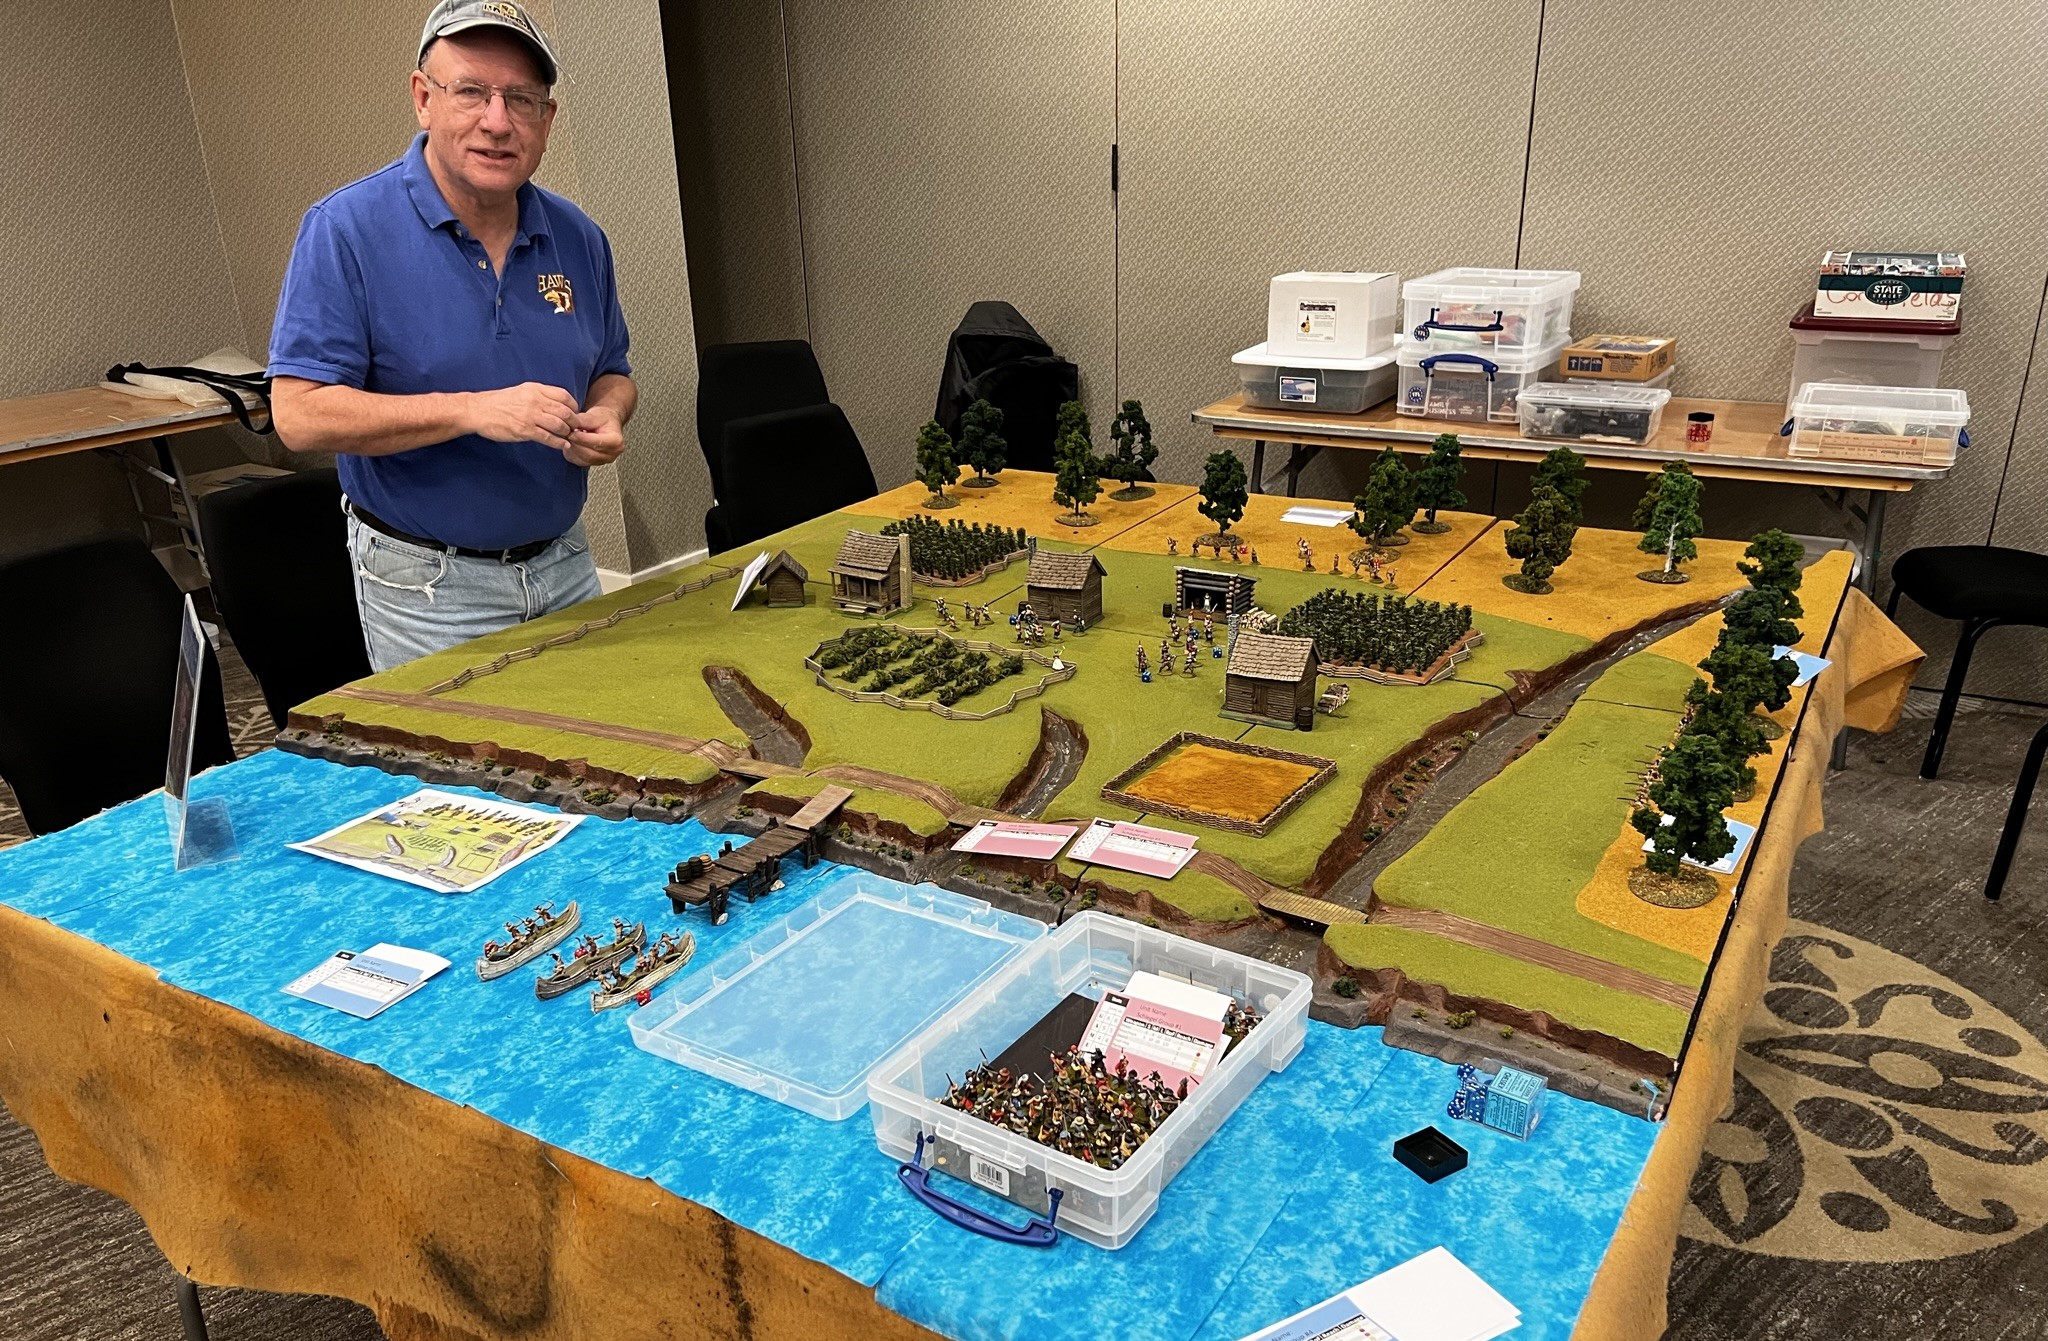
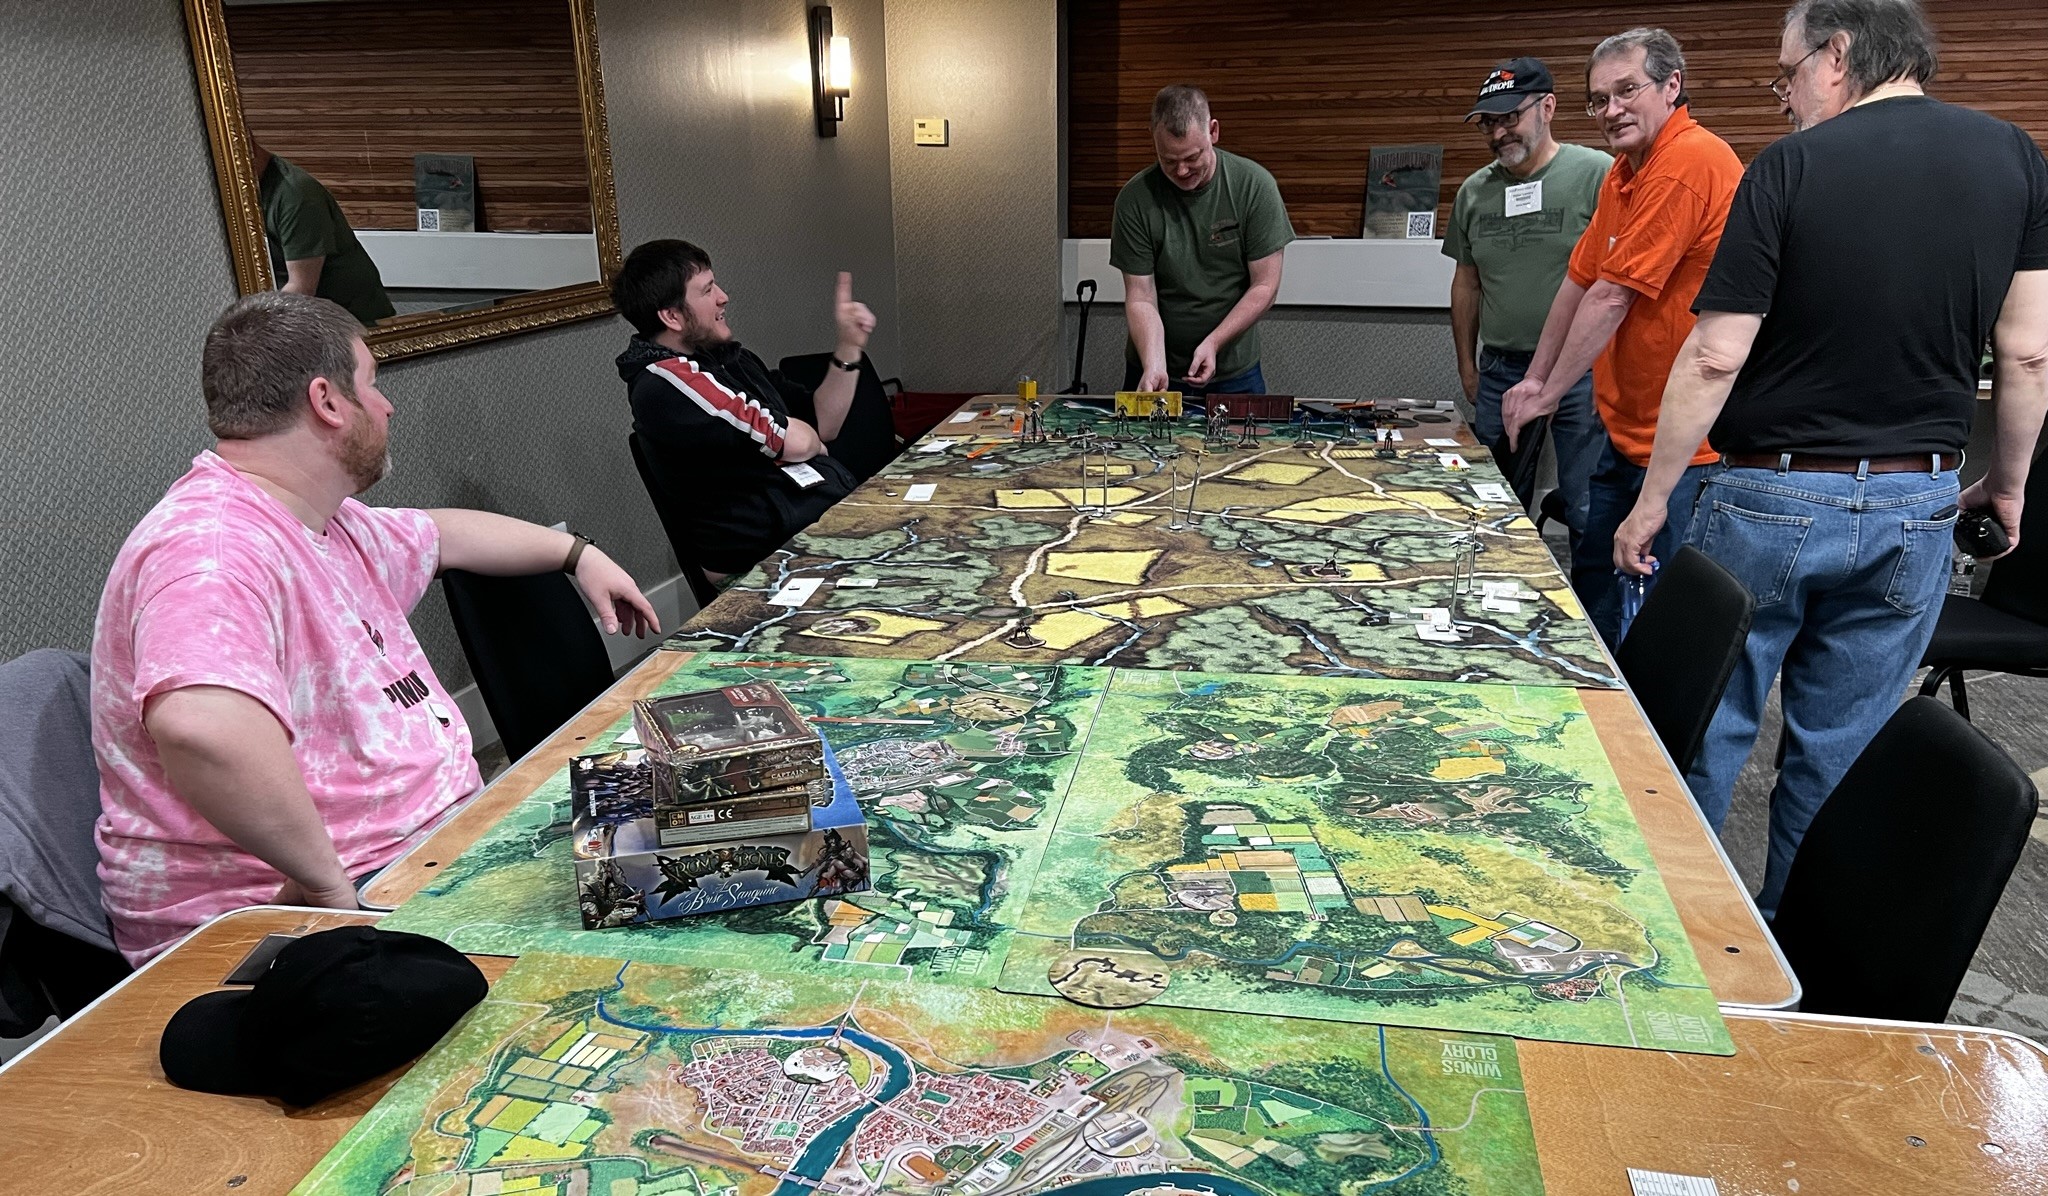
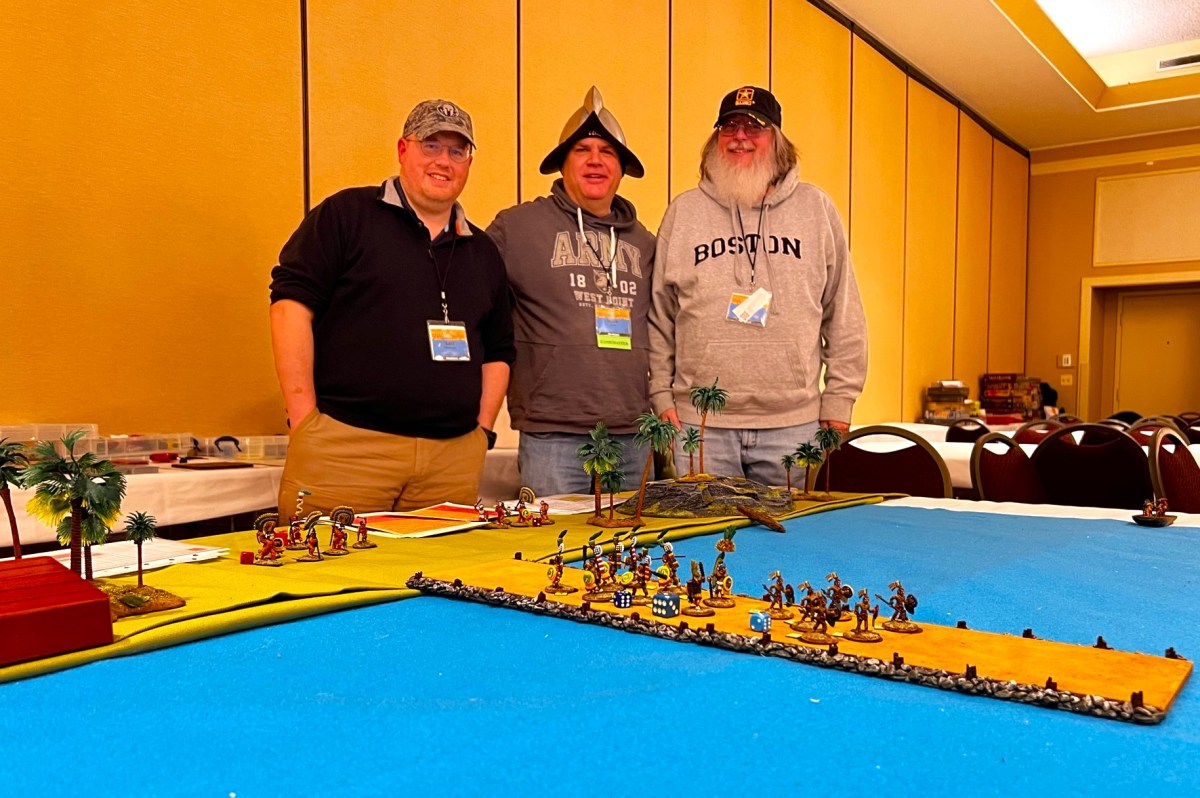
Last weekend the Cold Wars 2023 gaming convention was held in Valley Forge, PA at the Valley Forge Casino Resort. I participated as a game master and as a player. I ran three games of Feudal Patrol, played in two games of Wars of Ozz, and participated as a player in an American War of Independence (AWI) game. I really enjoyed the convention – and personally had some special moments as you will soon see in this post. I, a Massachusetts “carpetbagger”, am grateful once again for the welcome, hospitality, and friendship of the HAWKS club, especially Buck Surdu, Greg Priebe, Chris Palmer, Dave Wood, and Eric Schlegel – who all contributed to making my experience a memorable one. I also want to thank the players who chose to play in my games. I also must thank the HMGS staff and volunteers for making the convention work so well.
I thought the best way to share this with my readers was to focus on photographs – with a little bit of description. Some of these photos came from Chris Palmer and others on Facebook, and some are from myself.
AWI Playtest
This was on Thursday night in the HAWKS room and was a playtest of a set of rules being worked on by Buck Surdu, Chris Palmer, and Greg Priebe and other HAWKS. Basically it is taking the Wars of Ozz/Eagles and Empires engine and applying it to the AWI. I needed to set up my first game (The Battle of Centla) so that I could play on Friday morning in a Wars of Ozz game without any concerns. I played on the British side with 3 line regiments and two grenadier regiments. I had nothing but open field in front of me and a mission to take out an American gun battery that was surrounded by colonial infantry in soft cover commanded by Chris Palmer.
The set up for the AWI playtest. You can also see my Battle of Centla game all set up for Friday in the background.
I advanced my troops as quickly as possible but got shredded by canister as I git close – though I did do some – but not enough – damage to Chris.
At the start……my casualties overflow…
I got trounced but it was not a situation that I think I could have attempted differently, but hey, it’s a game and a playtest at that.
…and a satisfied Chris surveys the battlefield!
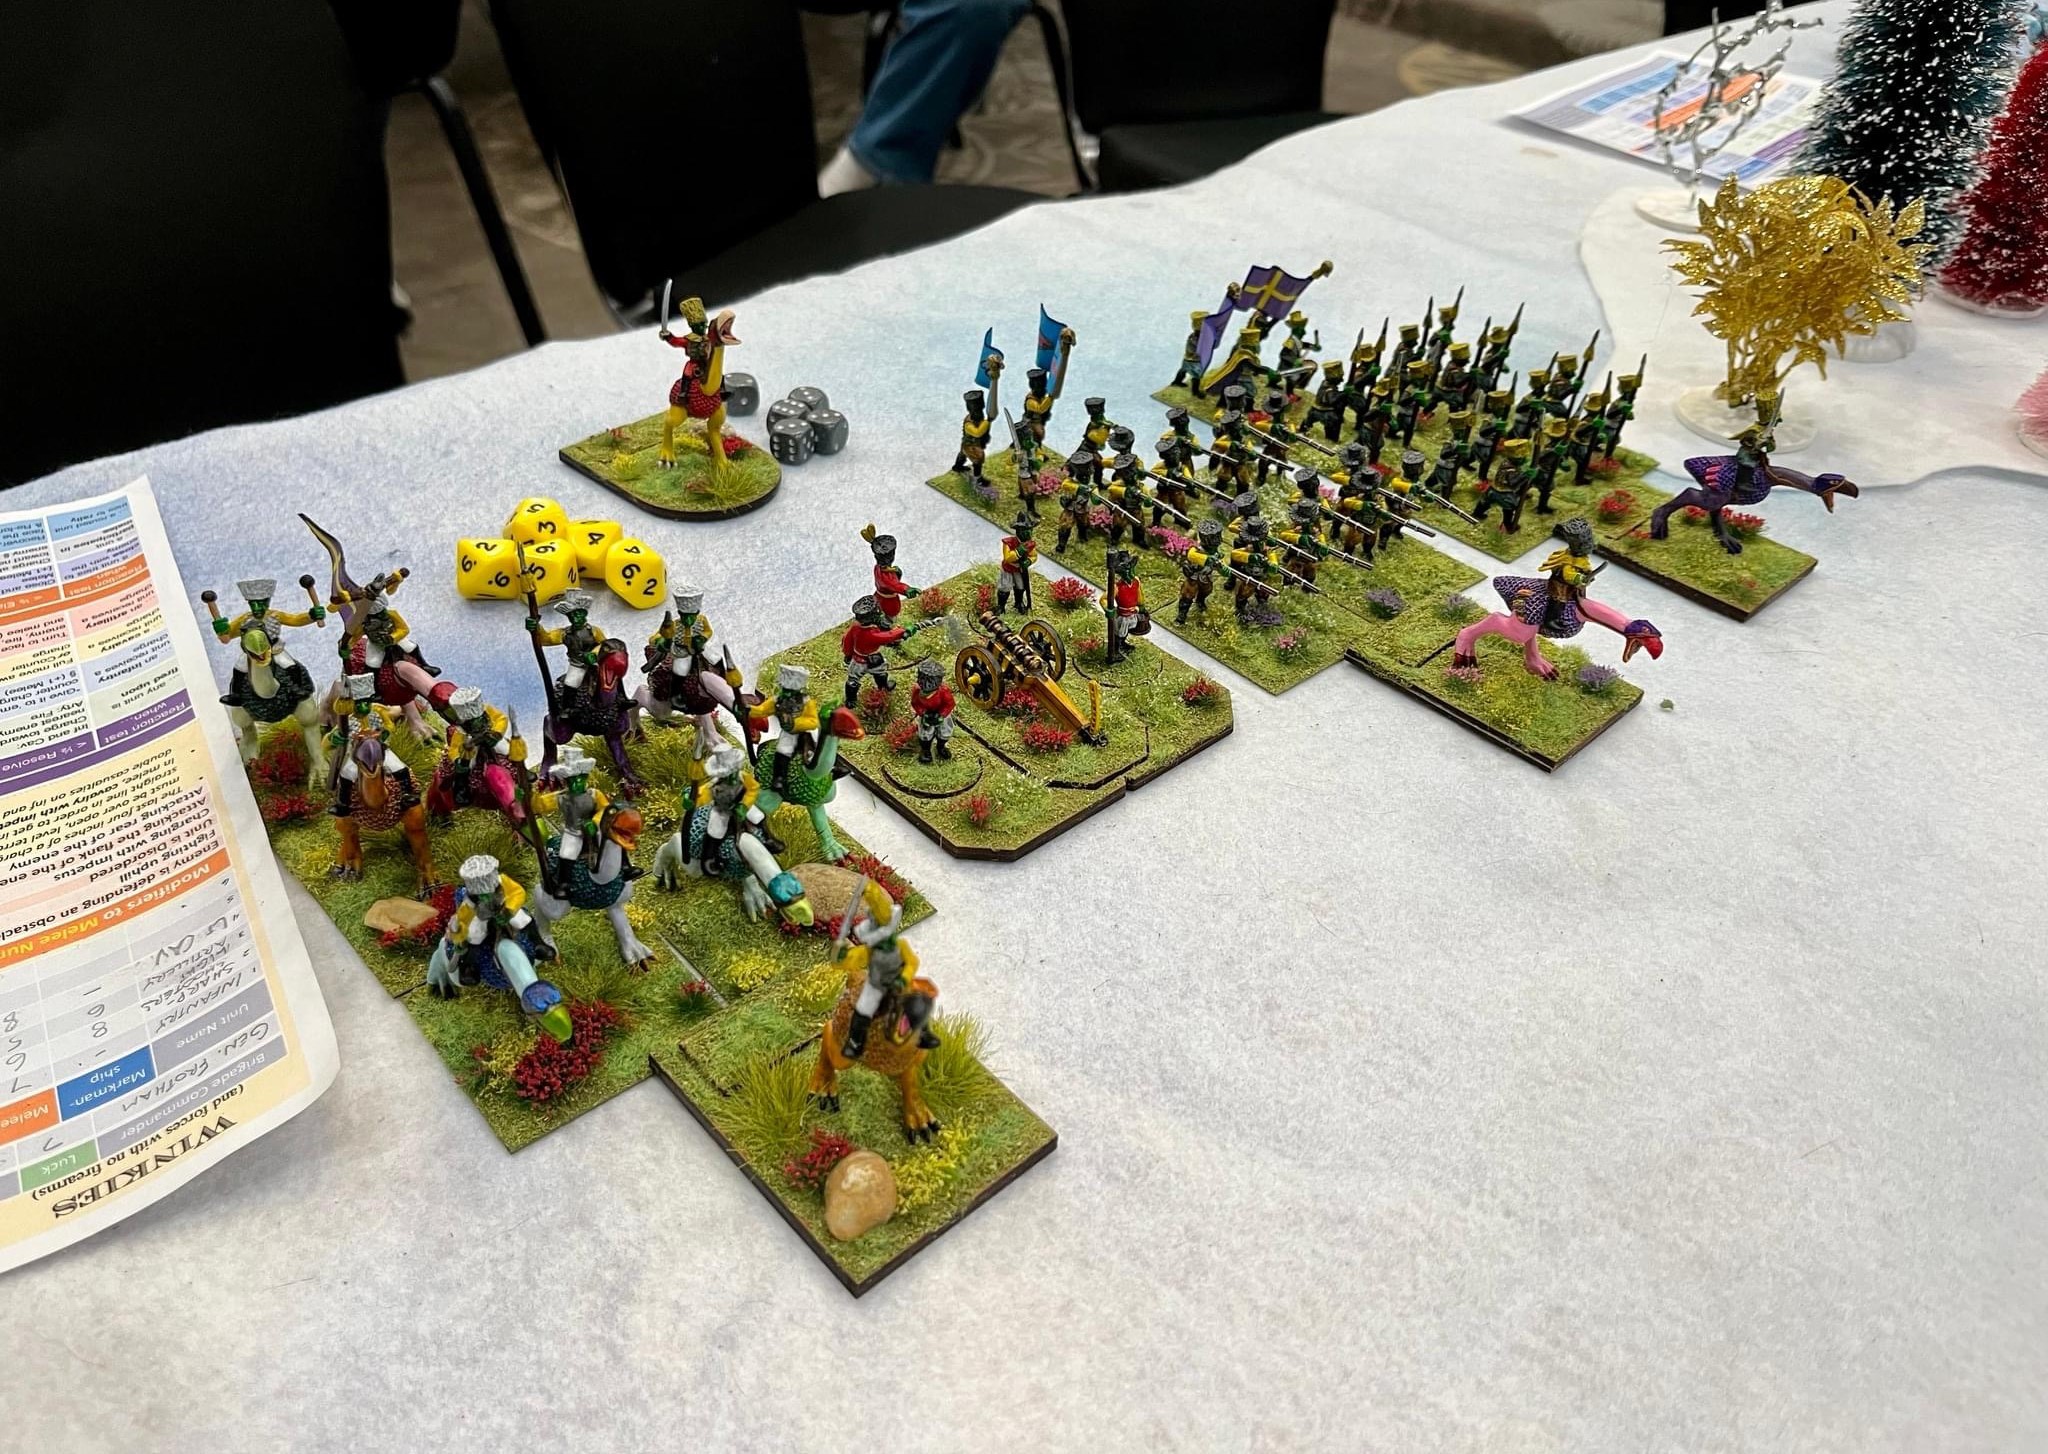
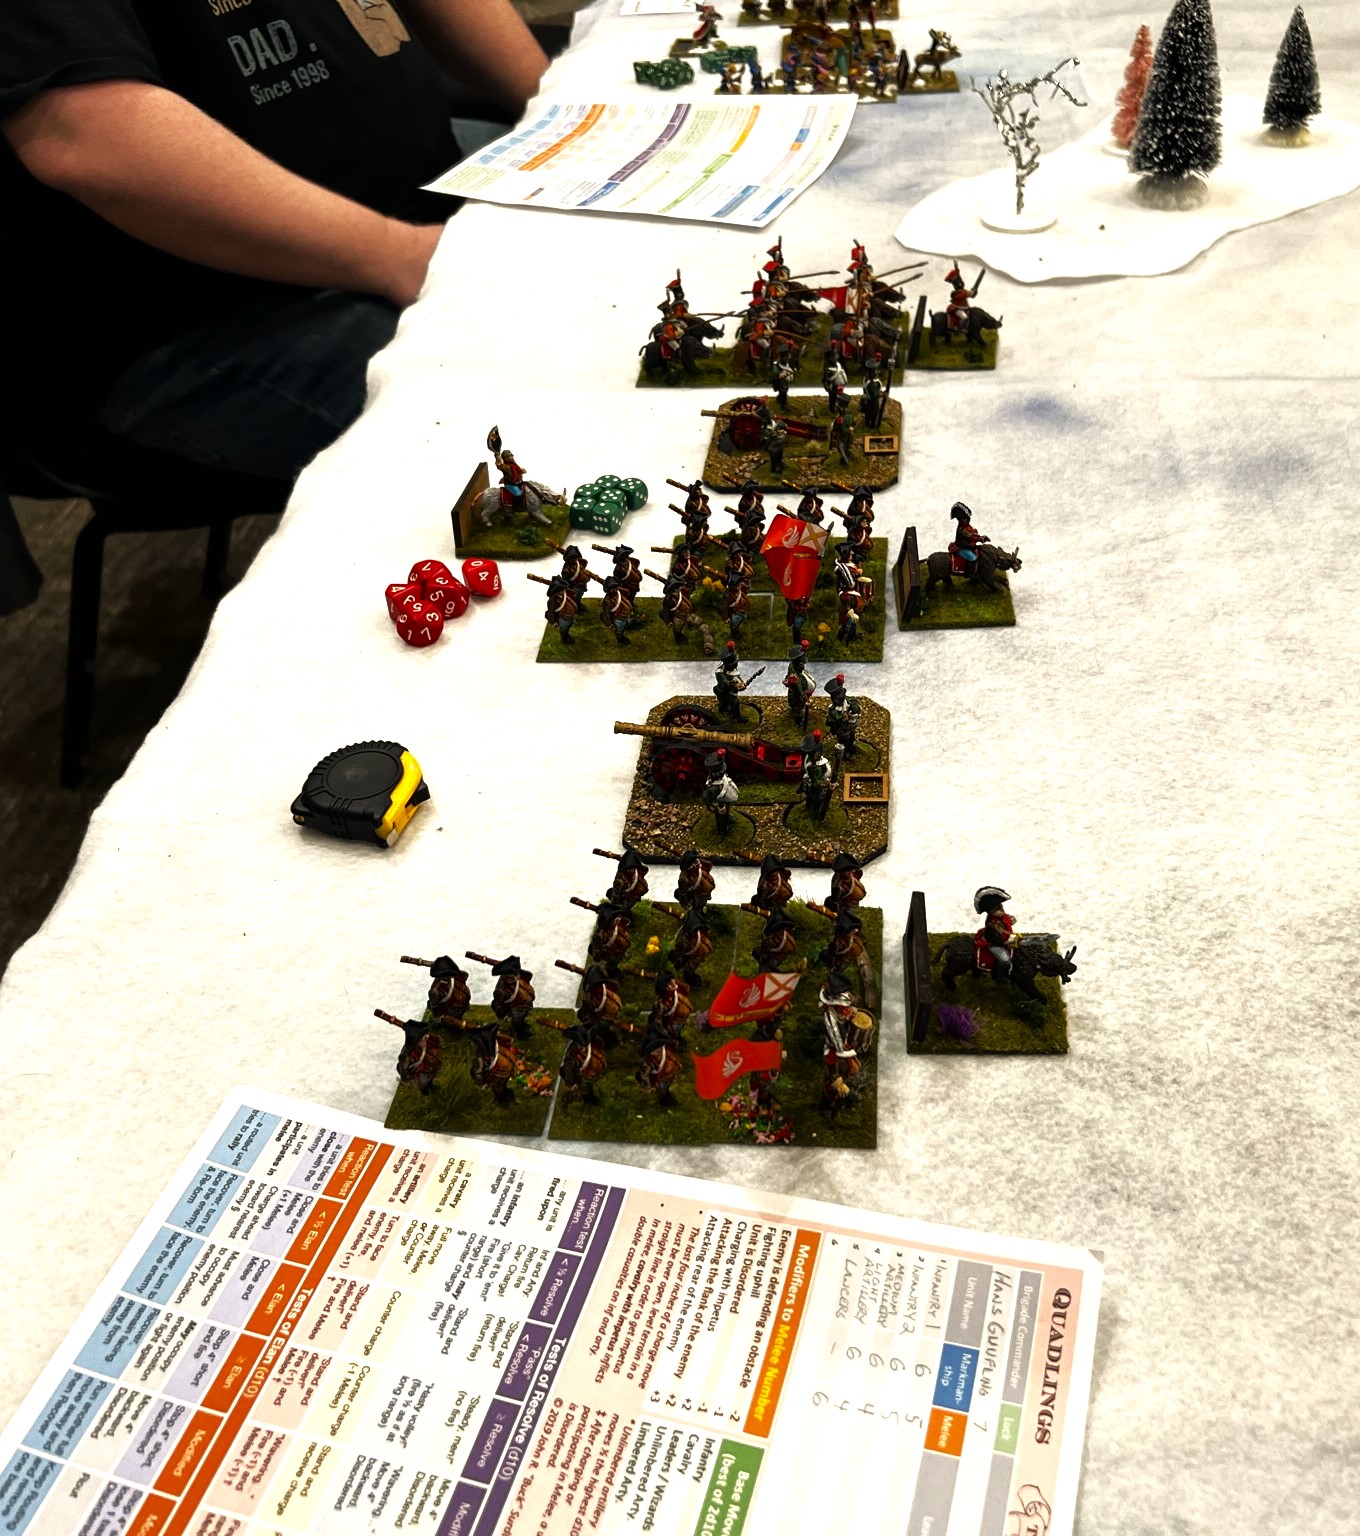
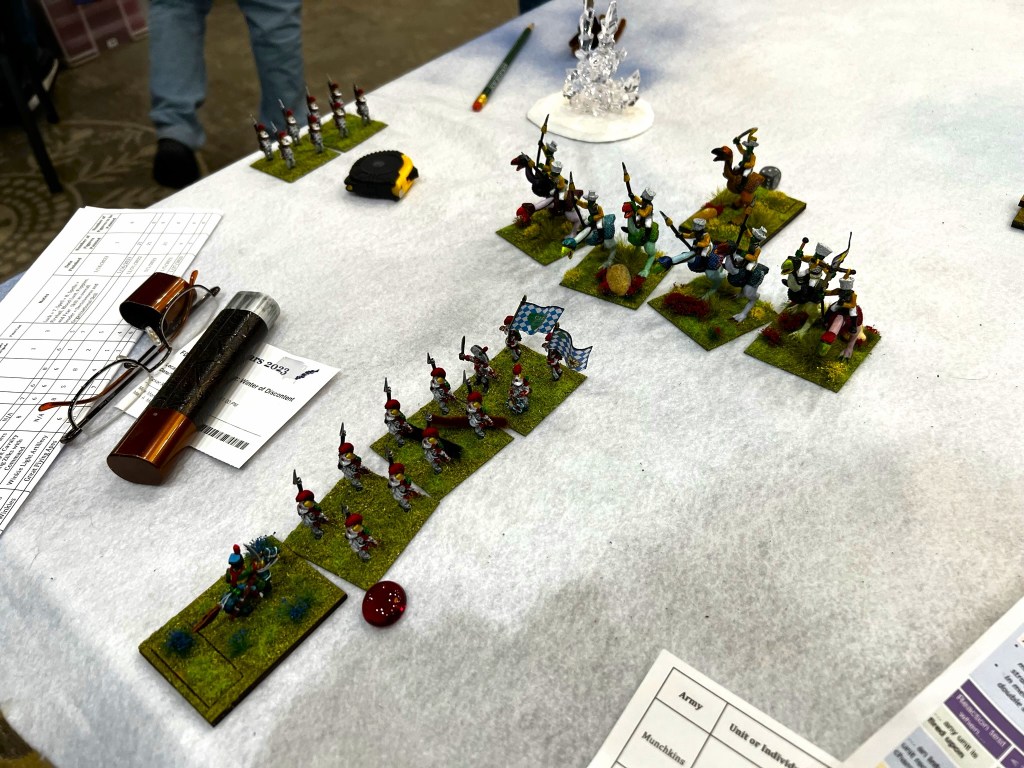
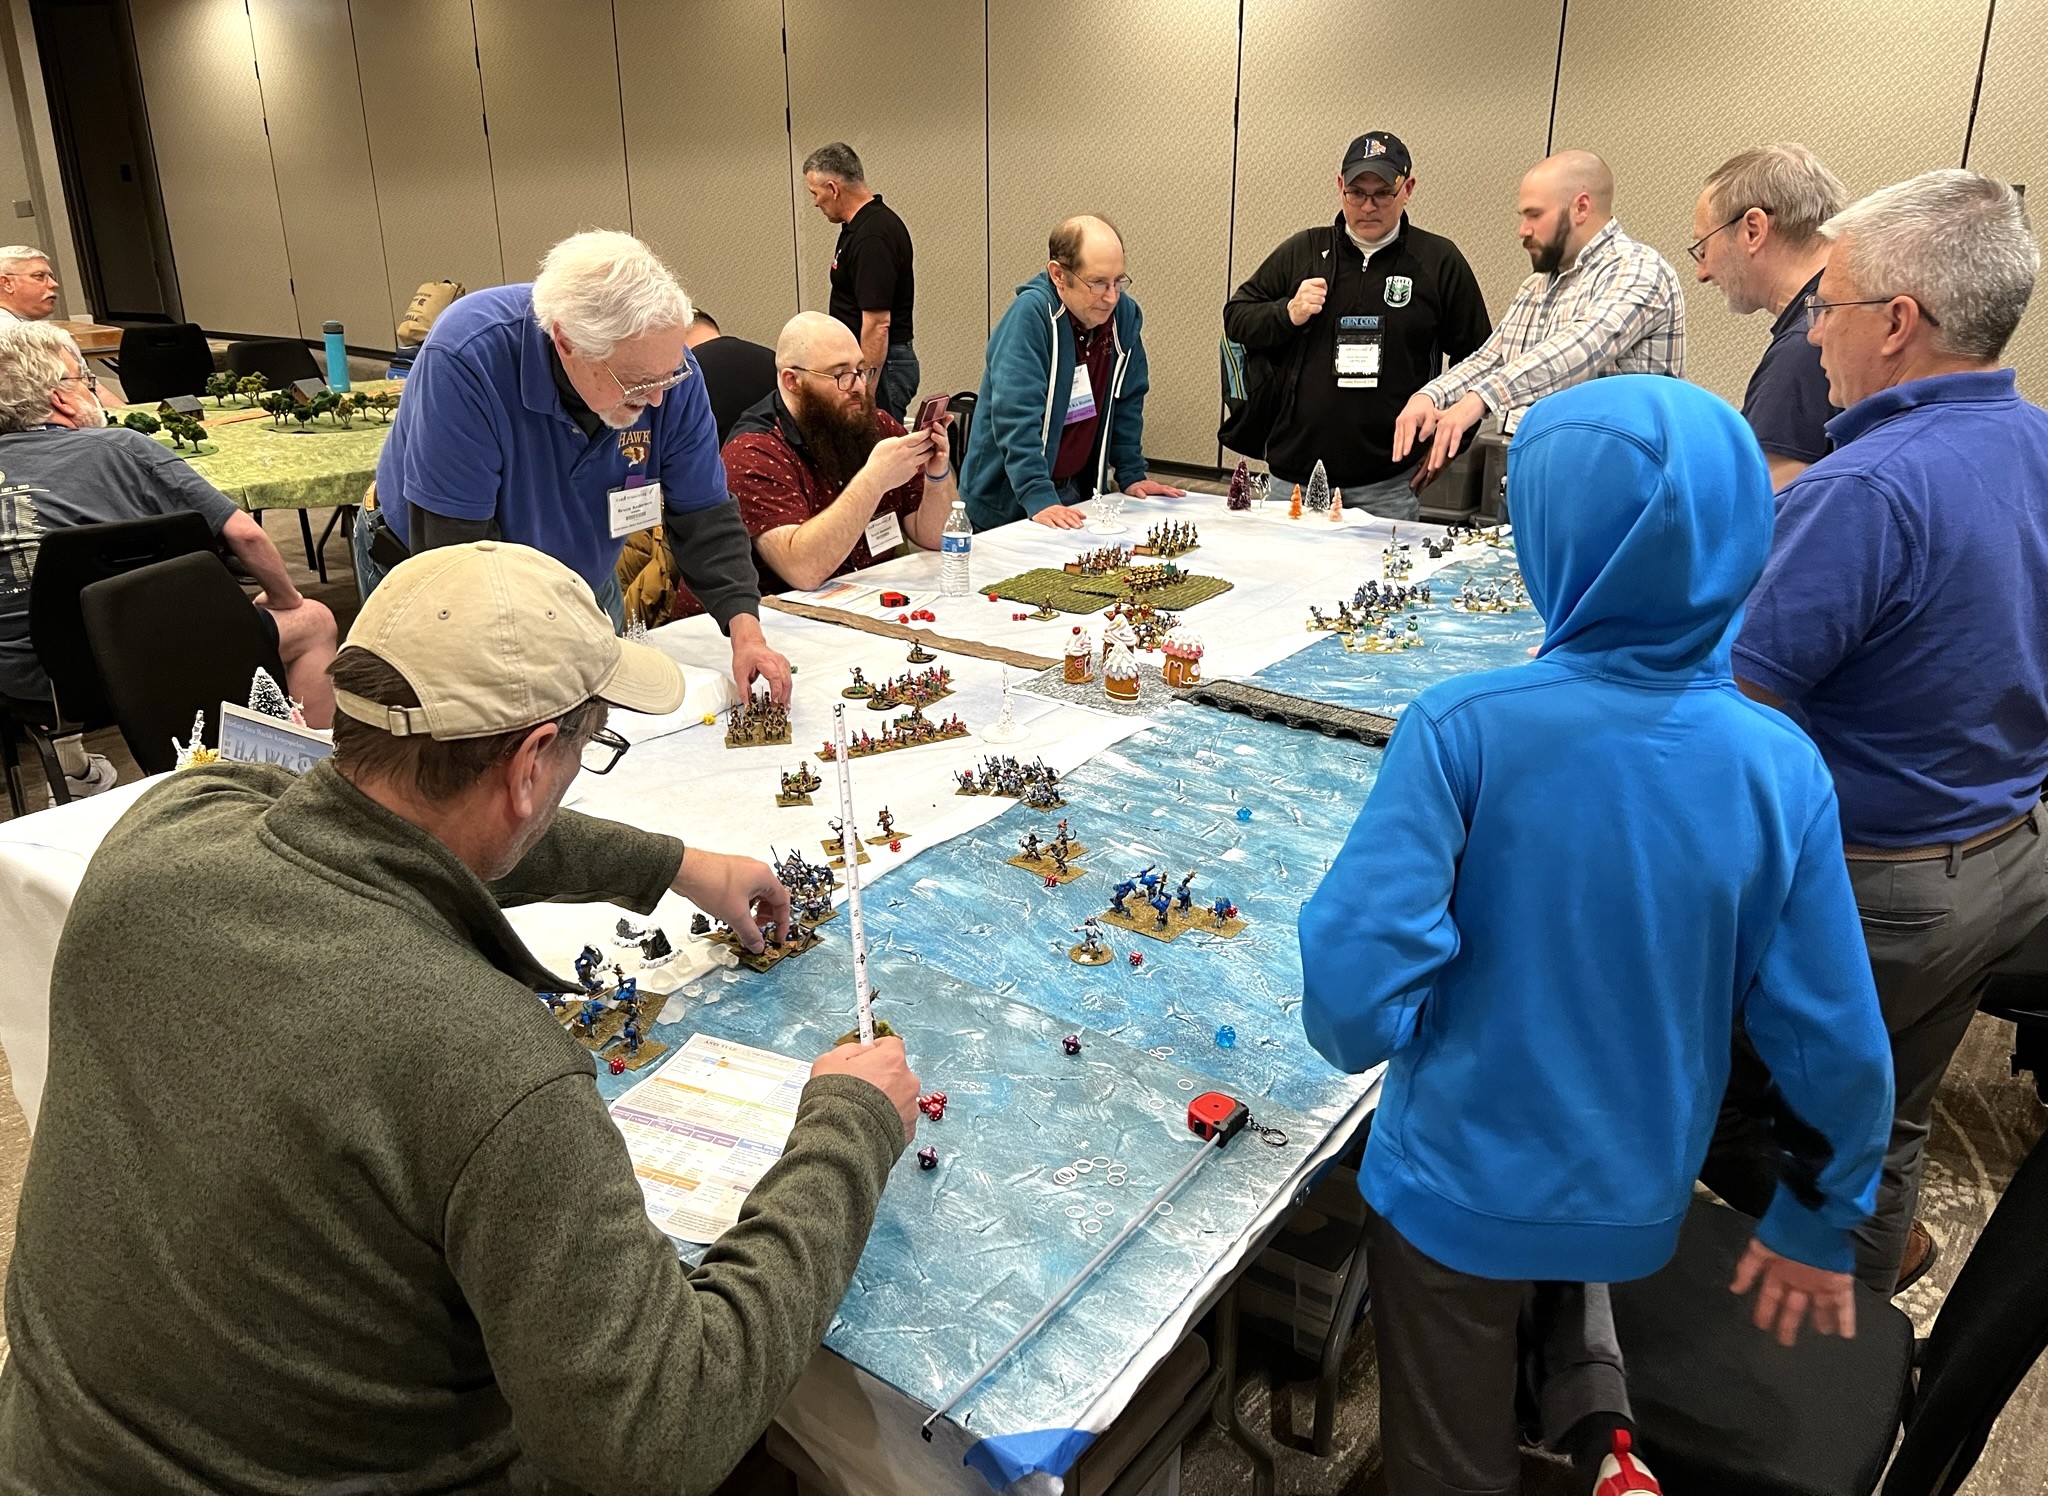
Wars if Ozz – Winter of Discontent (Wars of Ozz)
This was a “bring your own brigade” game GM’d by Chris Palmer – and to help I brought both my Winkie and my Munchkin brigades in case they were needed. As it turned out, I commanded the Munchkins, and faced my own Winkies!
Several different factions are shown below.
MunchkinsWinkiesAnti-Yule
And here are some more – click on the images for a better view:
GnomesQuadlingsYule Forces led by Bobbo Natale – Teddy Bear Infantry, Elves, and Toy Soldier Cavalry
The board was fairly open with some hills and woods in a wintery scene.
The game set up.
It was a fun game, though I felt like I was a bit torn fighting my own troops!
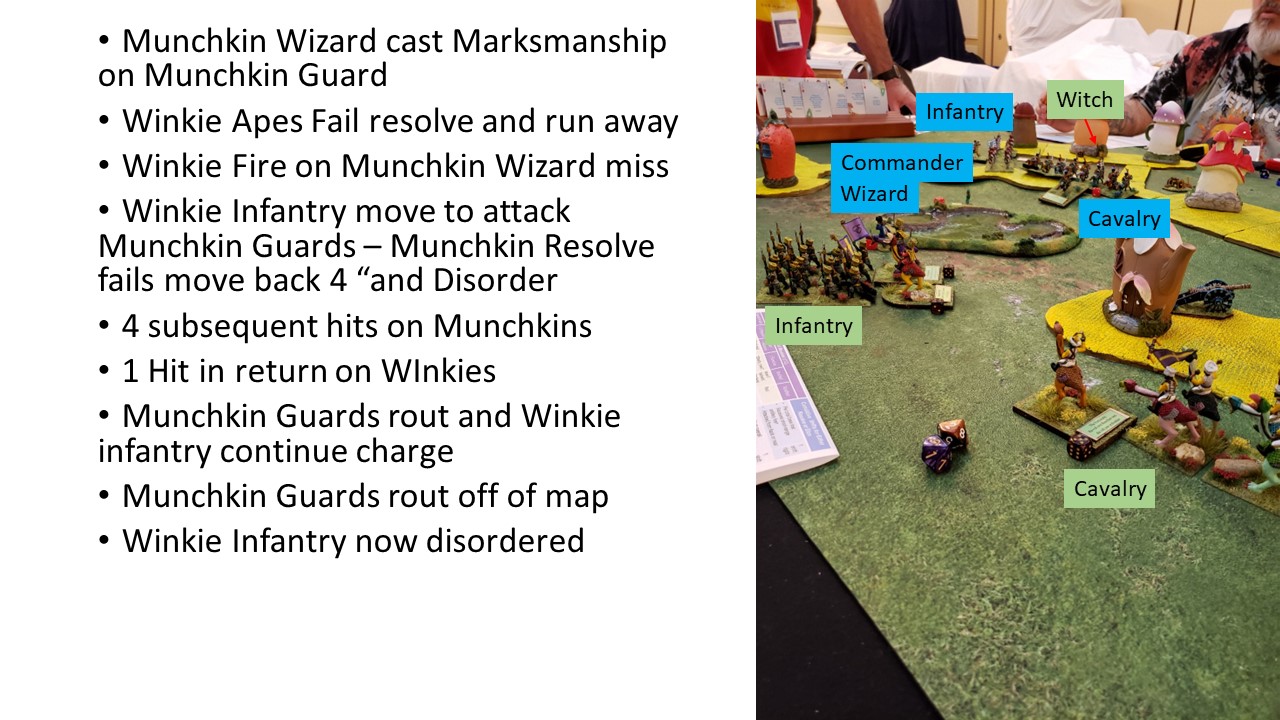
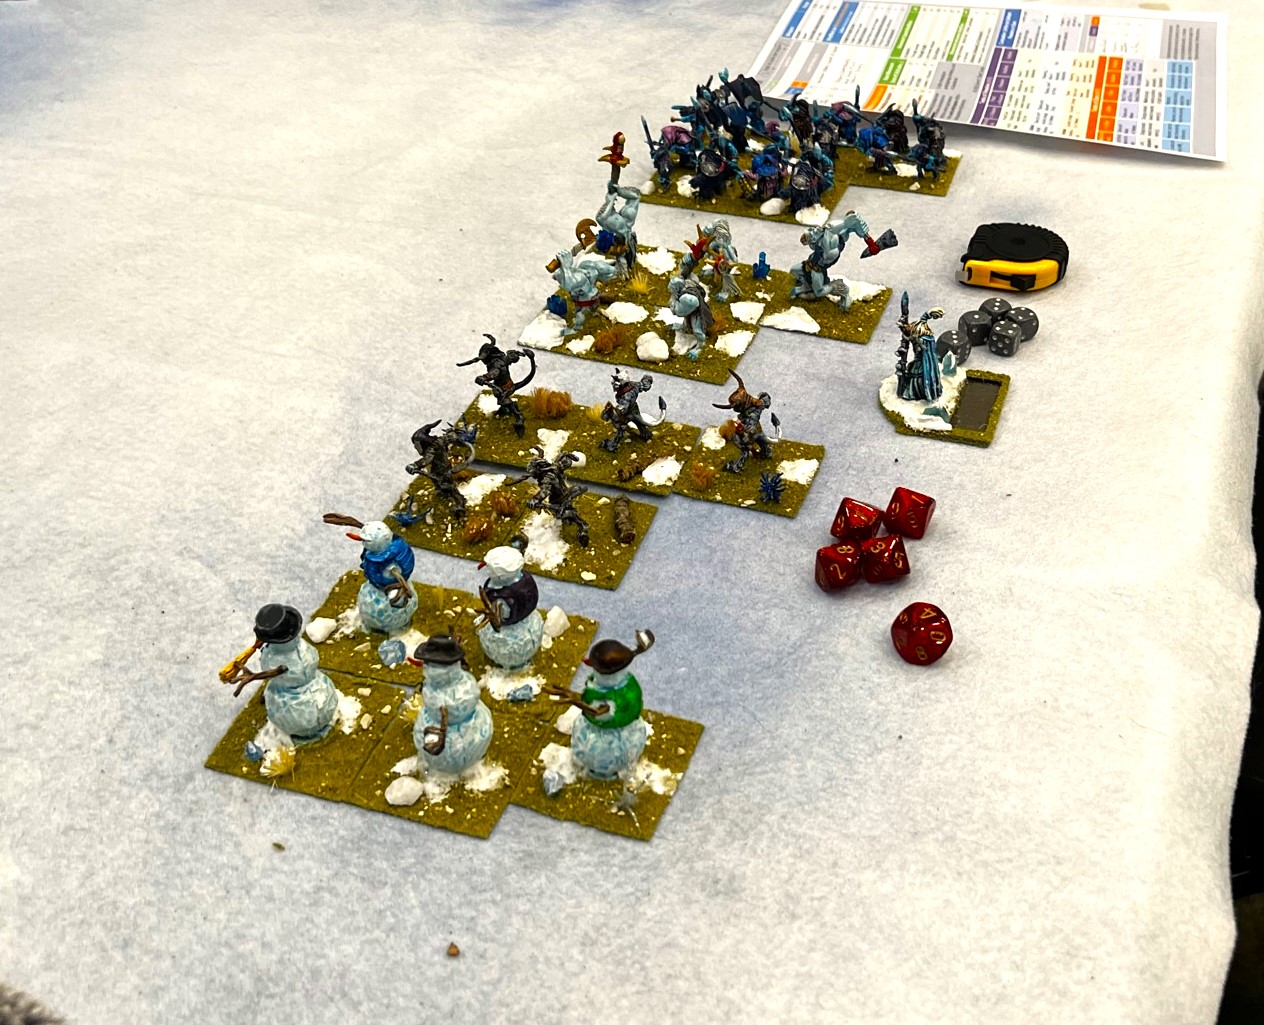
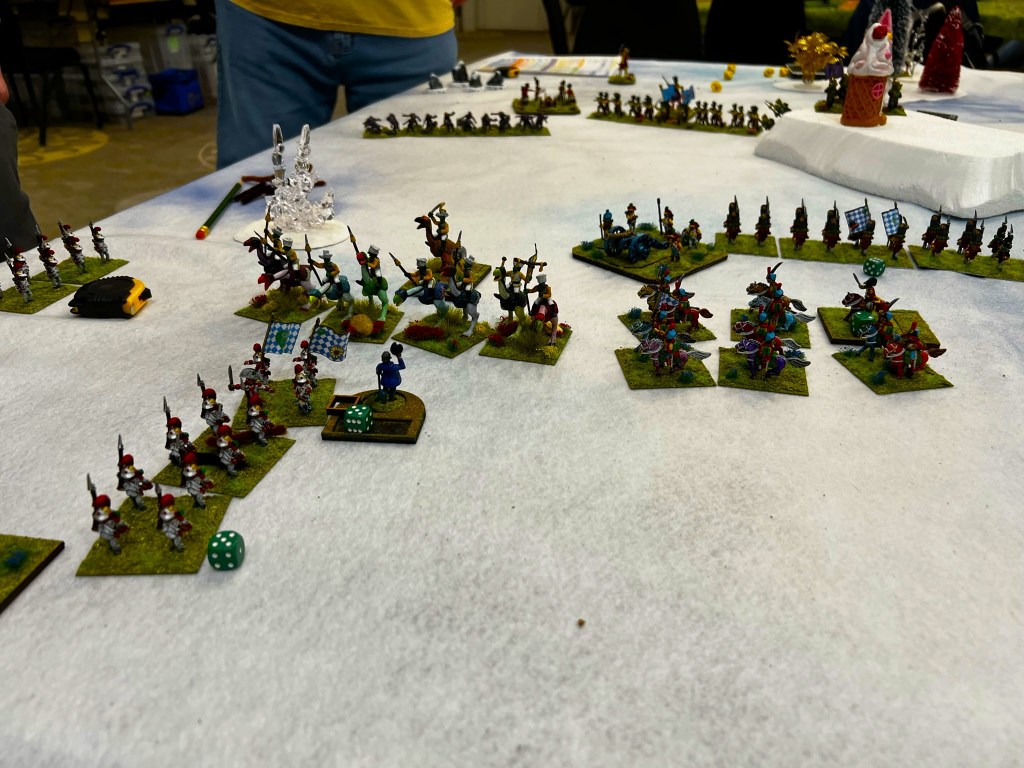
Moving my forces out.Looking across to my fun opponents – here I have moved Colonel Tik-Tik’s regiment on the left into line to optimize missile fire – but the Winkie zilk-riders went into line and smashed into them.
That Winkie cavalry attacking player rolled 5 dice for hits – not a single miss (the roll was amazing) – and those hits would be doubled due to impetus. All 5 hit rolls yielded 10 hits – and that took out fully 50% of Tik-Tok’s regiment in one fell swoop. Tik-Tok routed, but I was able to rally it and keep it in the game.
I deploy……but the zilks roll fantastic movement……and hit the infantry! No misses!with 50% casualties after one hit, Colonel Tik-Tok’s Infantry routs away from the zilk riders.
While successful in their attack, the 20th Winkie Light Cavalry was now disordered – and my Munchkin battery and my own pony riding cavalry took the opportunity to hit the zilks from both the flank and the rear, and sent them into a retreat.
“Avenge our dead” – was the cry of the survivors of Colonel Tik-Tok’s infantry as their brethren close on the hated Winkie zilk riders of the 20th Winkie Light Cavalry.
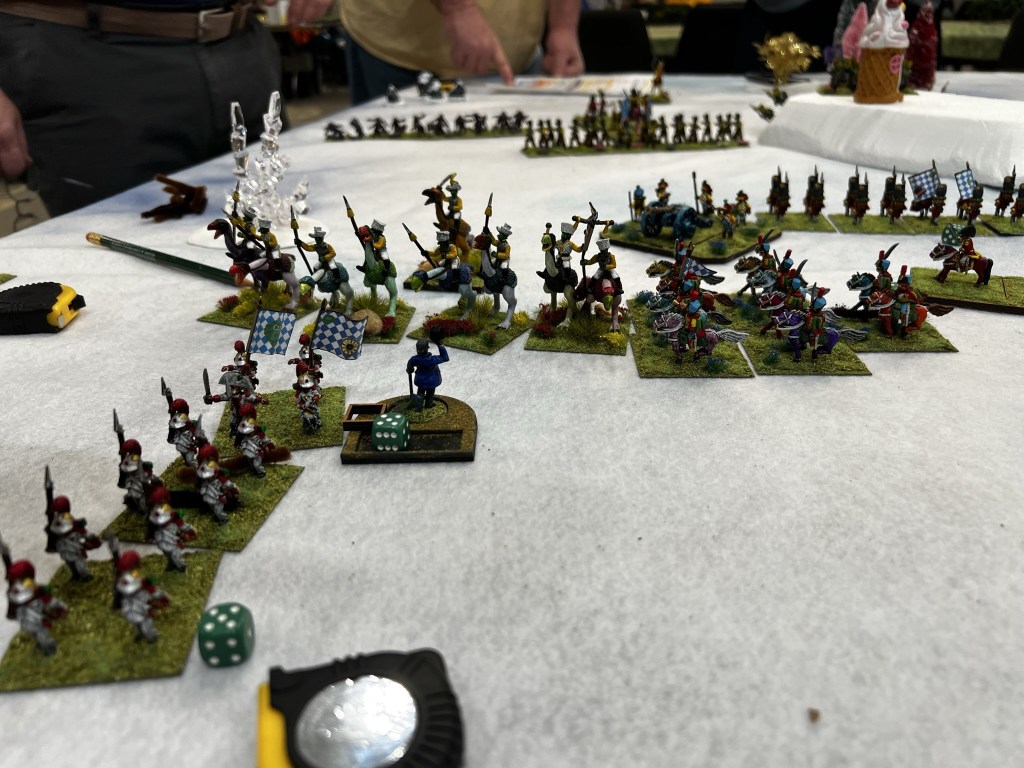
The Winkies then attacked – buy mainly piecemeal – and the Munchkins were able to hold and repel both charges by the Winkie Sharpshooters and their ally the Lesser Apes. The artillerists did abandon their gun when the apes hit, but short range canister and a round of melee had already sent the Lesser Apes packing.
The Munchkins hold!
In the middle of the game was a big scrum between the brigade of Ice Trolls, Elves, Dark Elves, and that of the Teddy Bear Infantry, Teddy Bear Artillery, and the Toy Soldier Cavalry.
Scrum in the middle.
The game was a “good guys” victory!
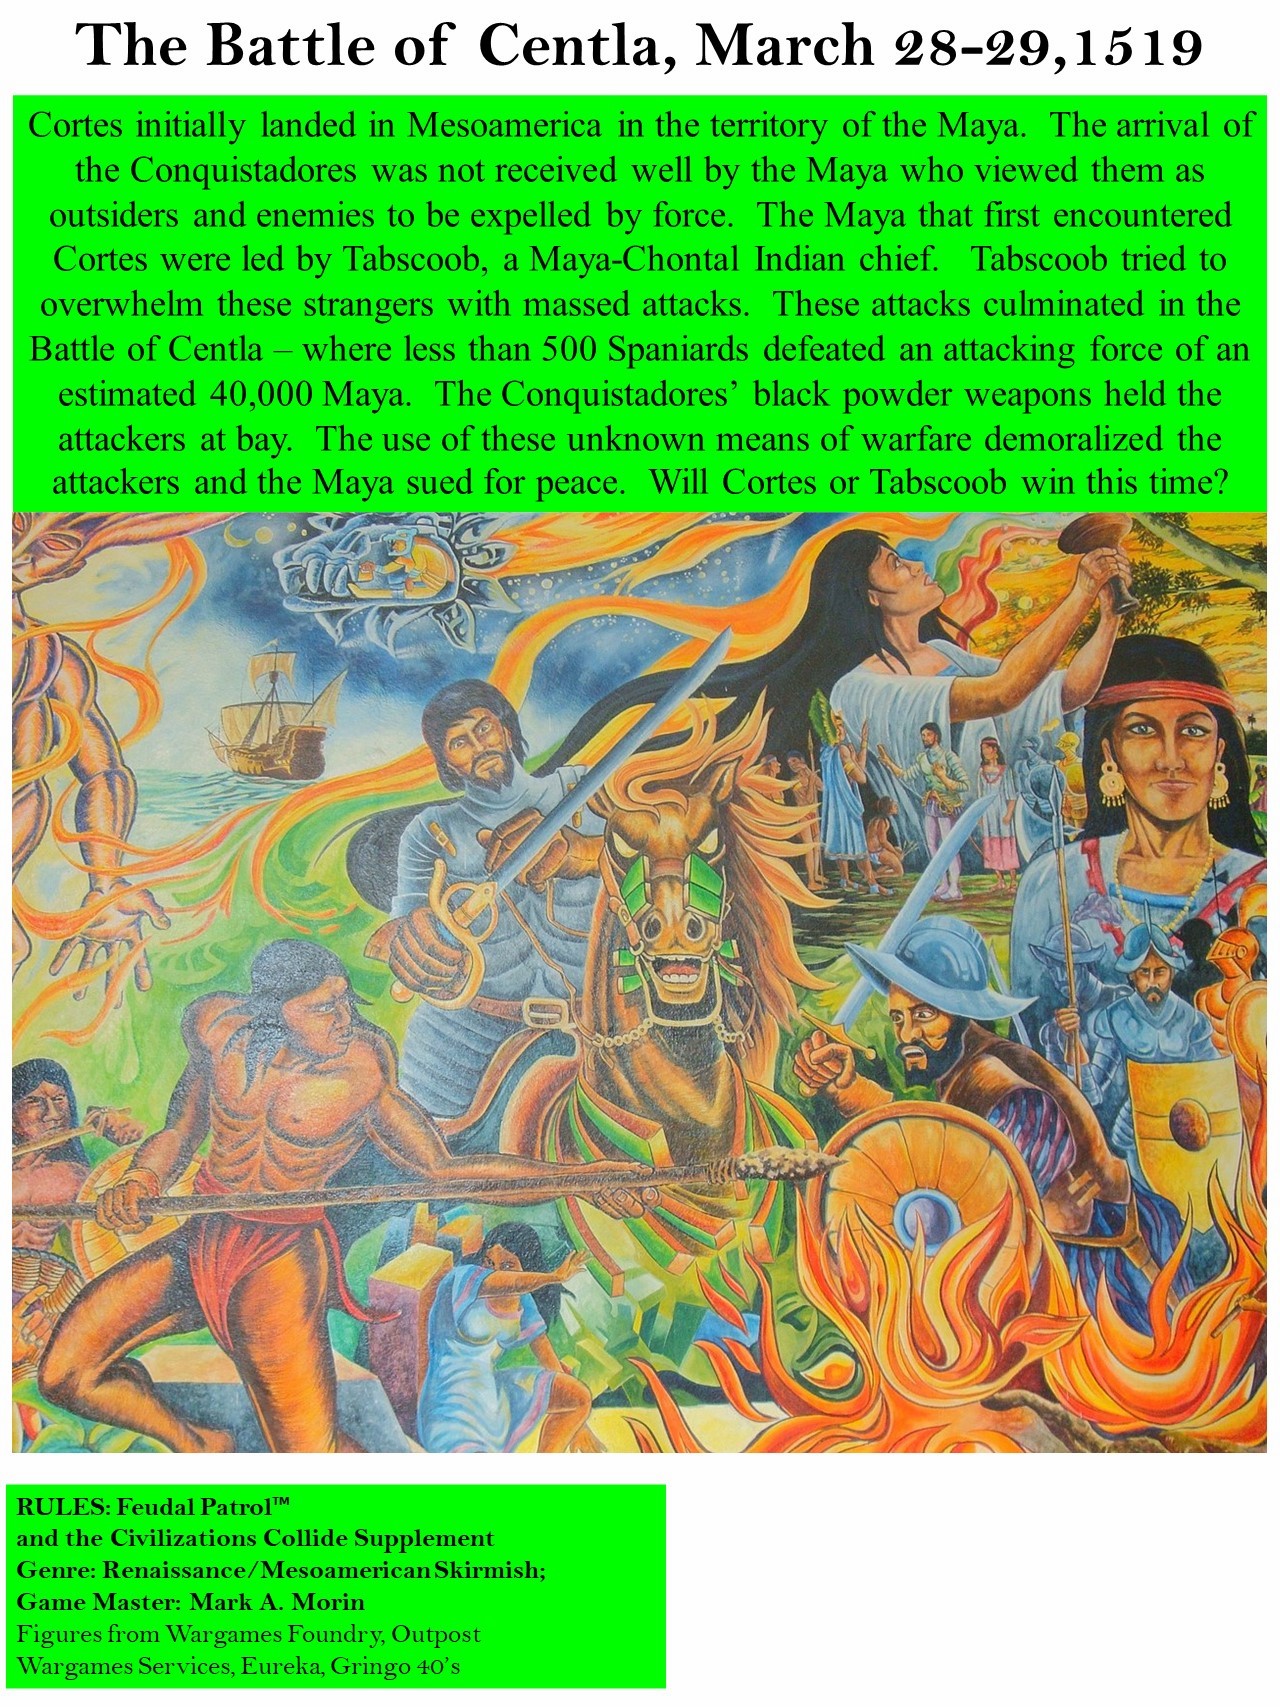
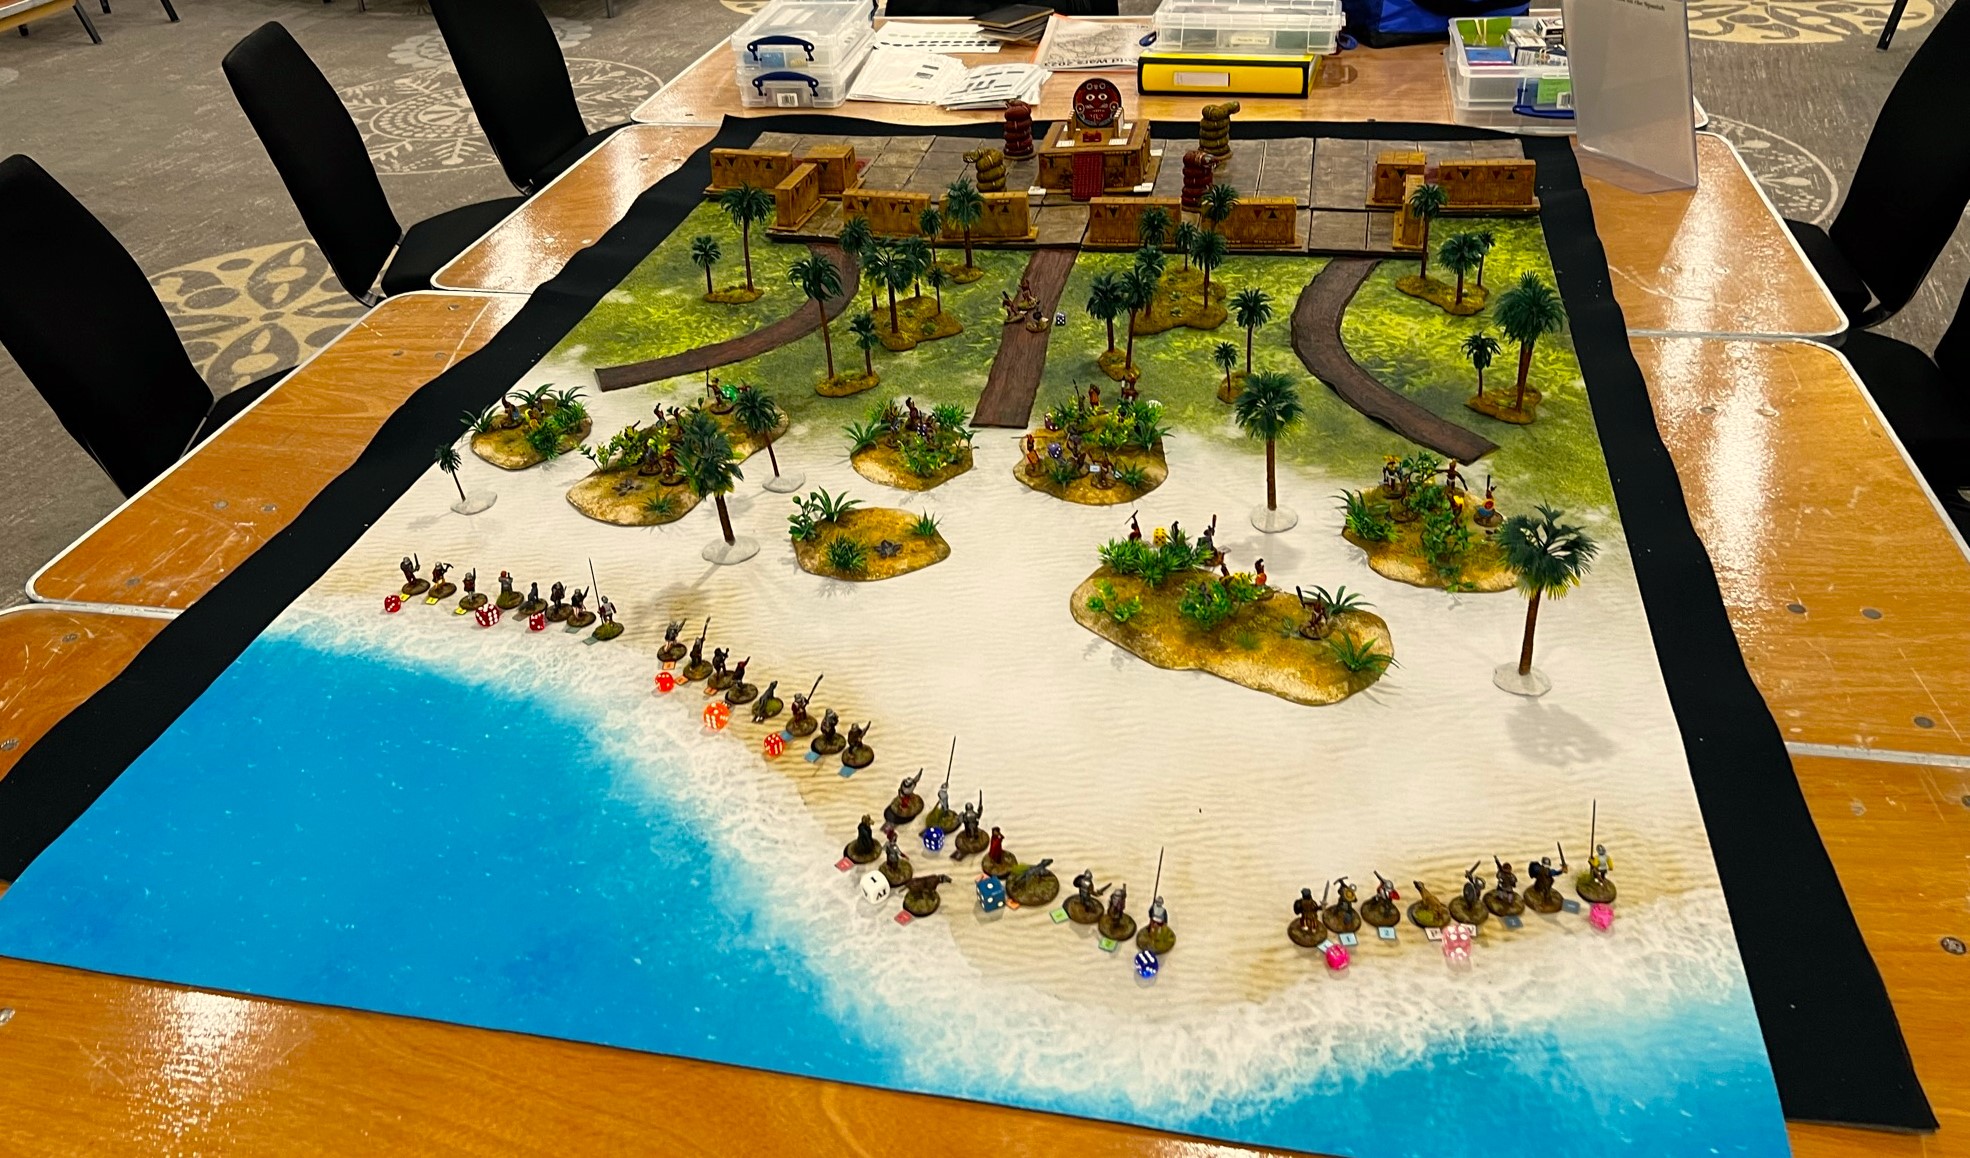
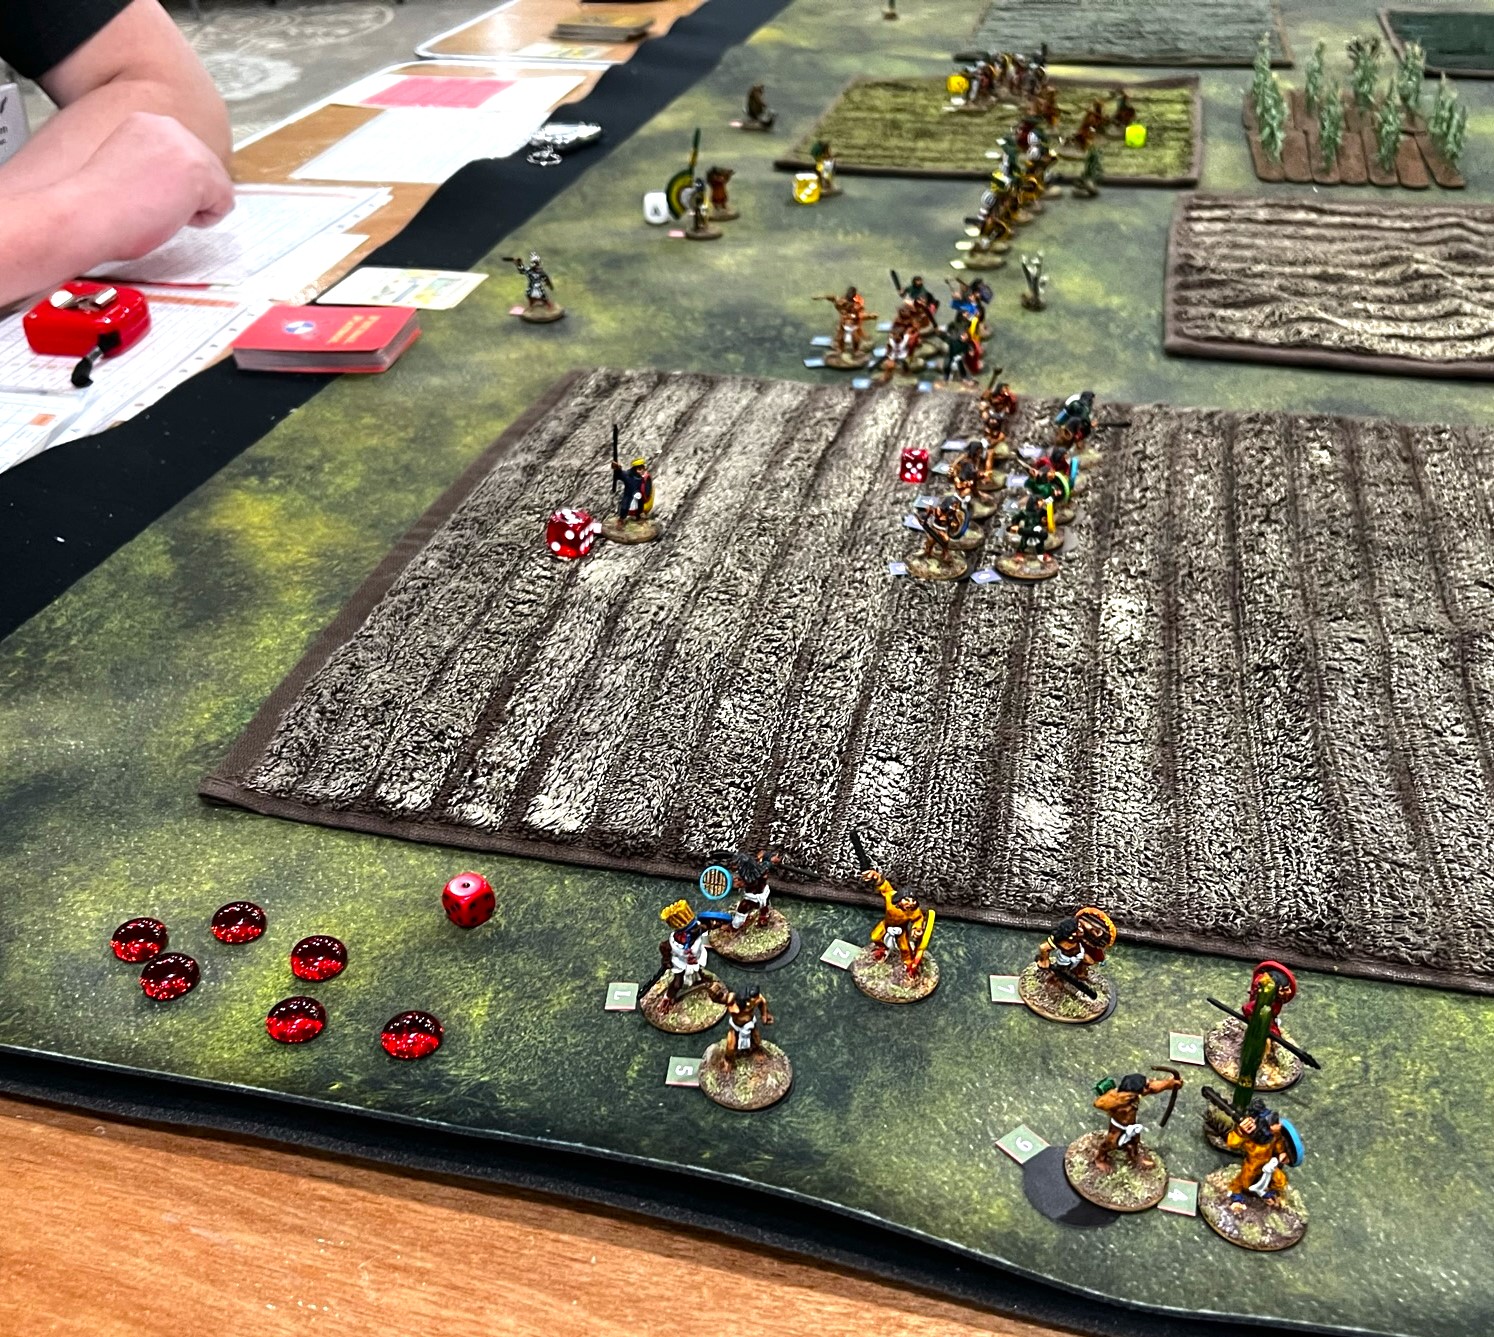
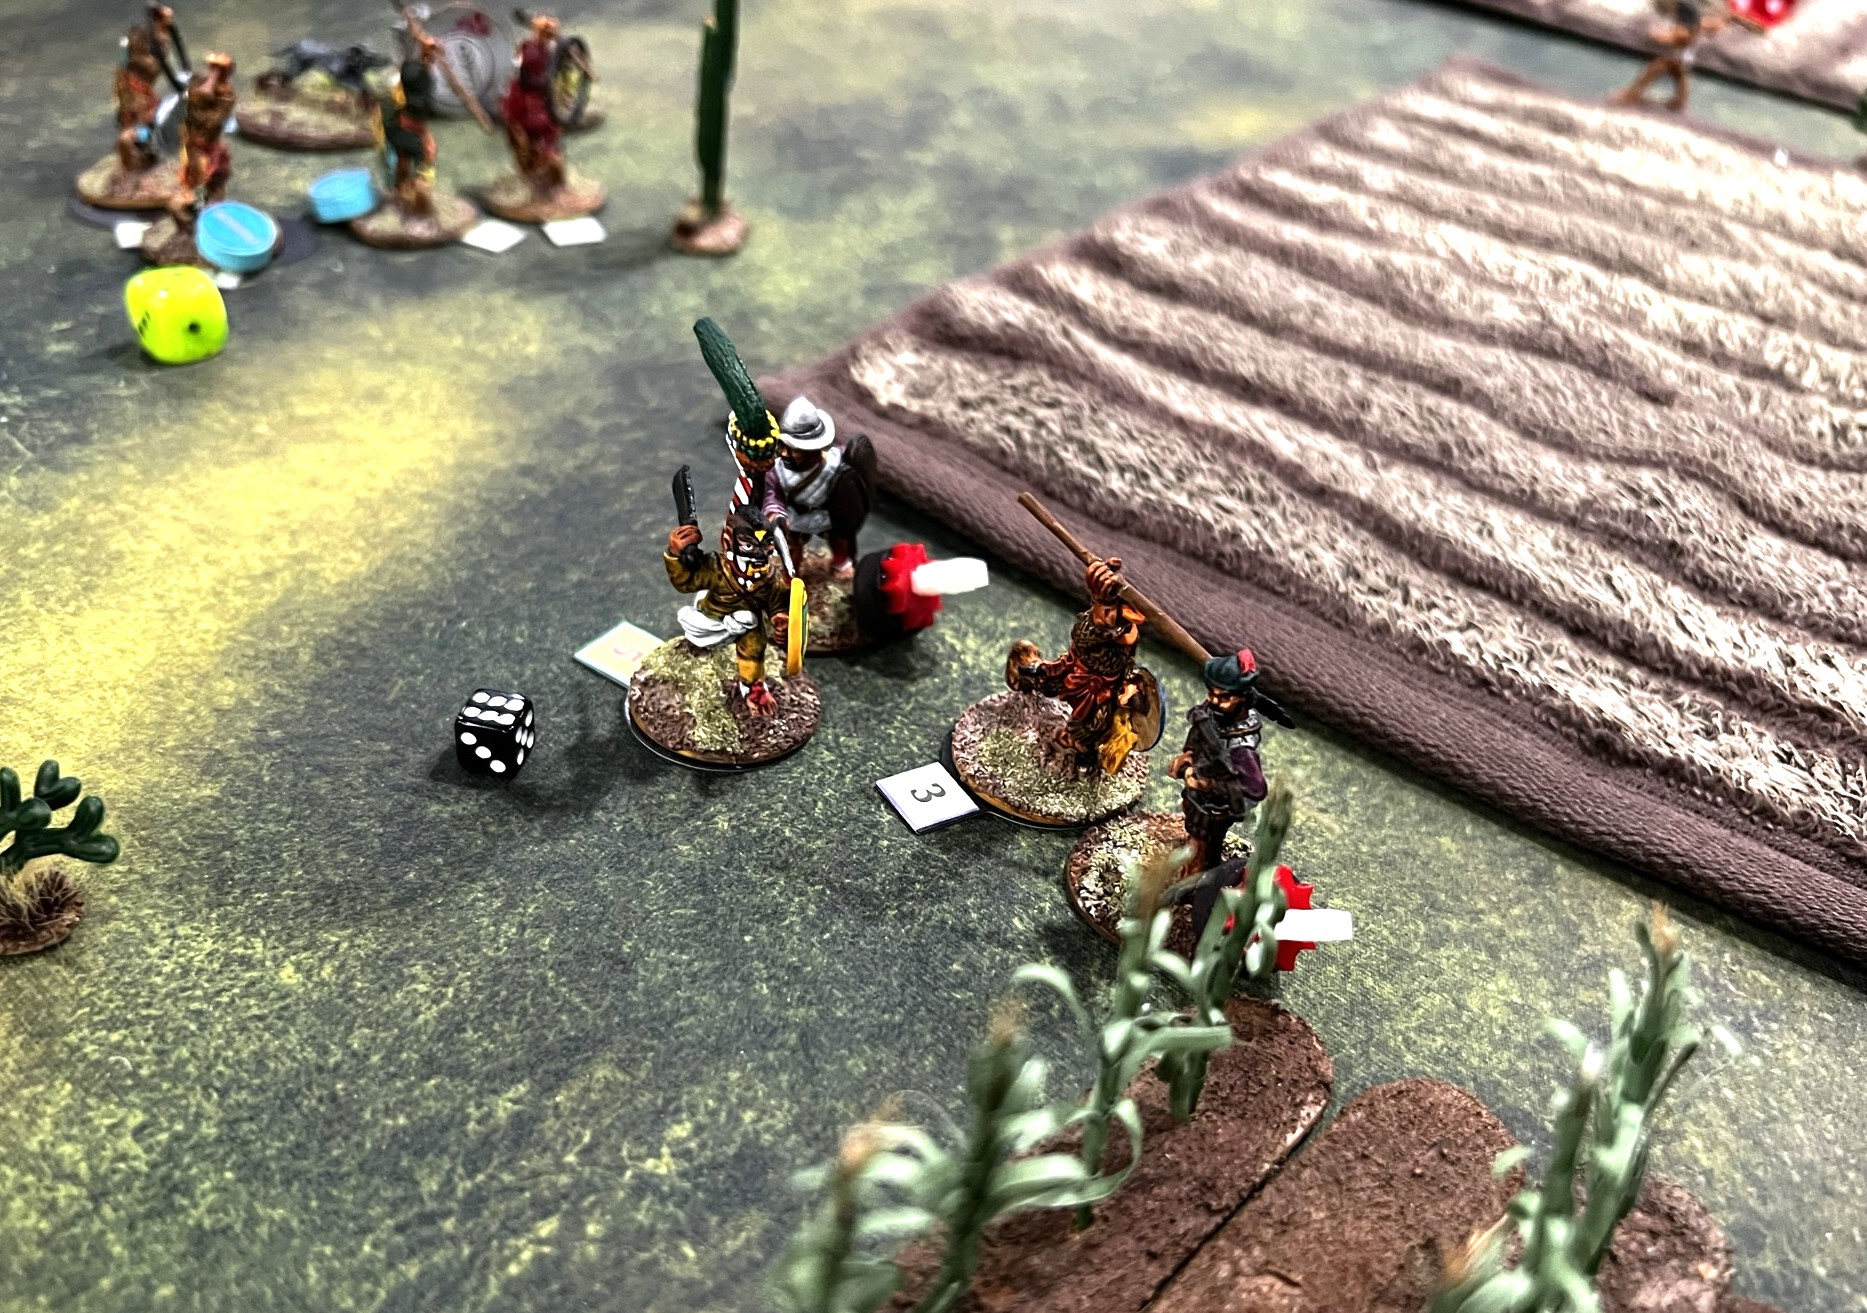
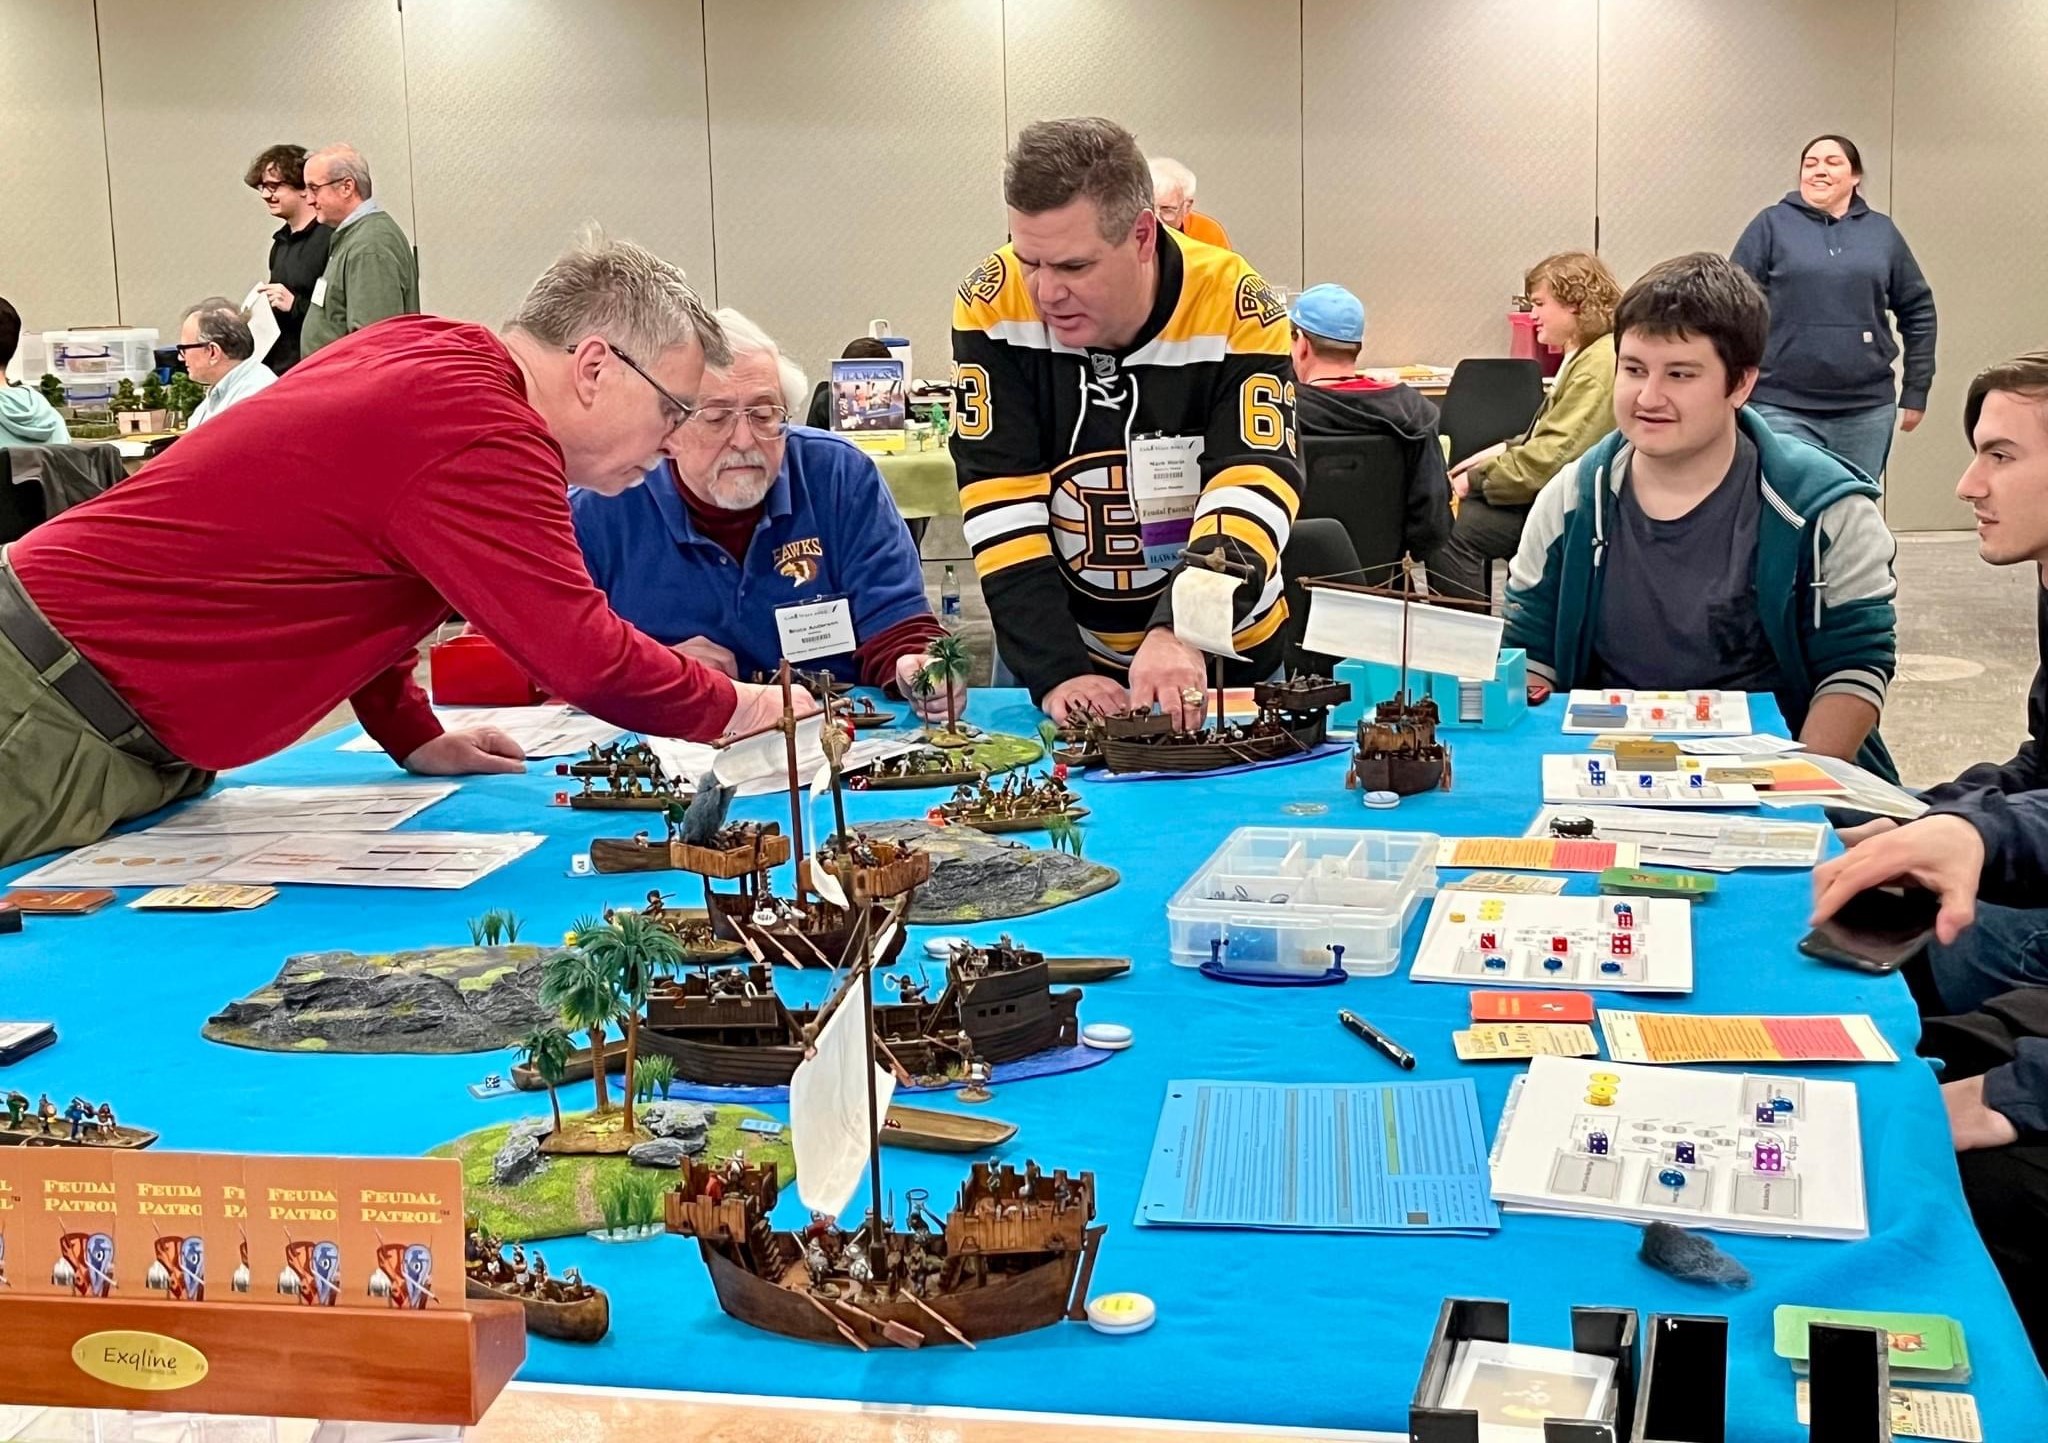
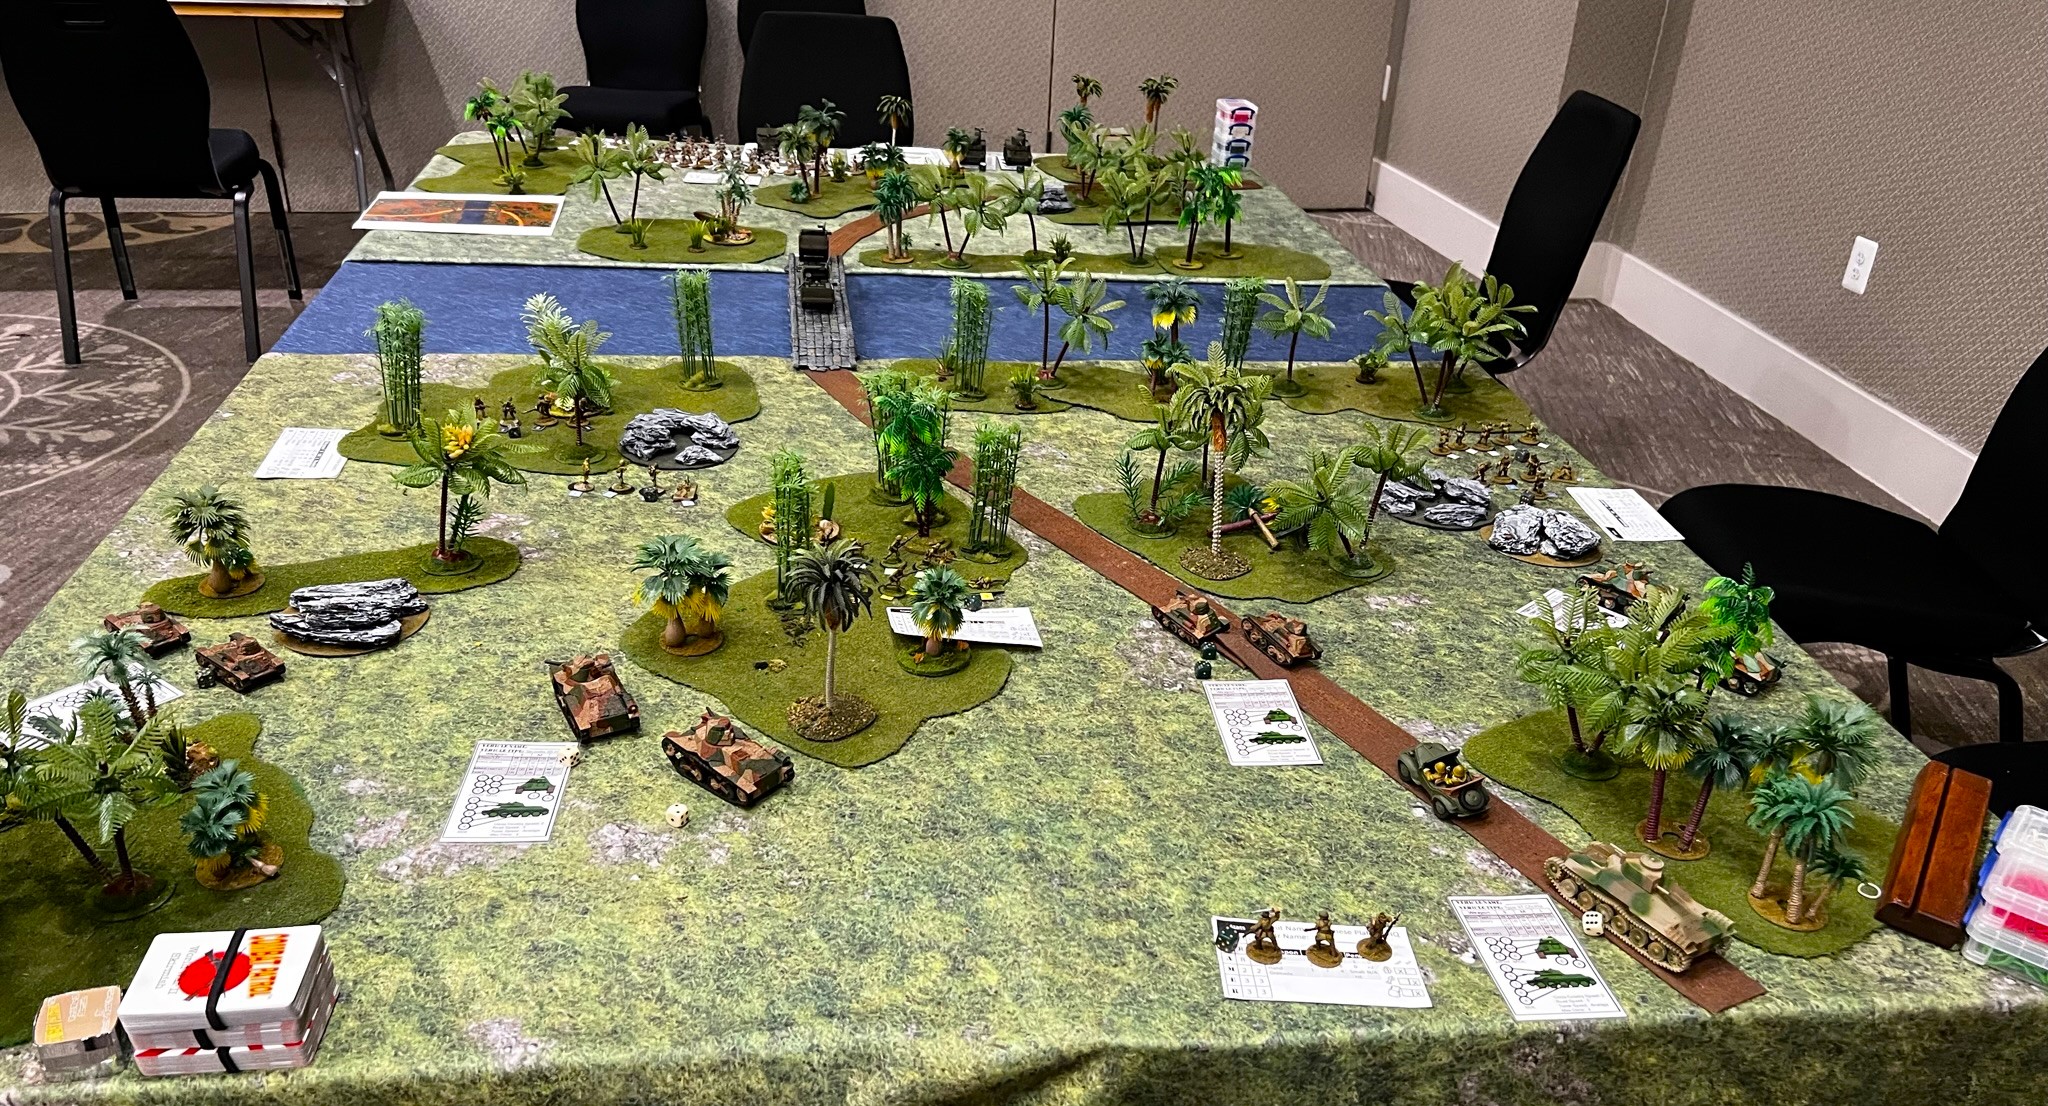
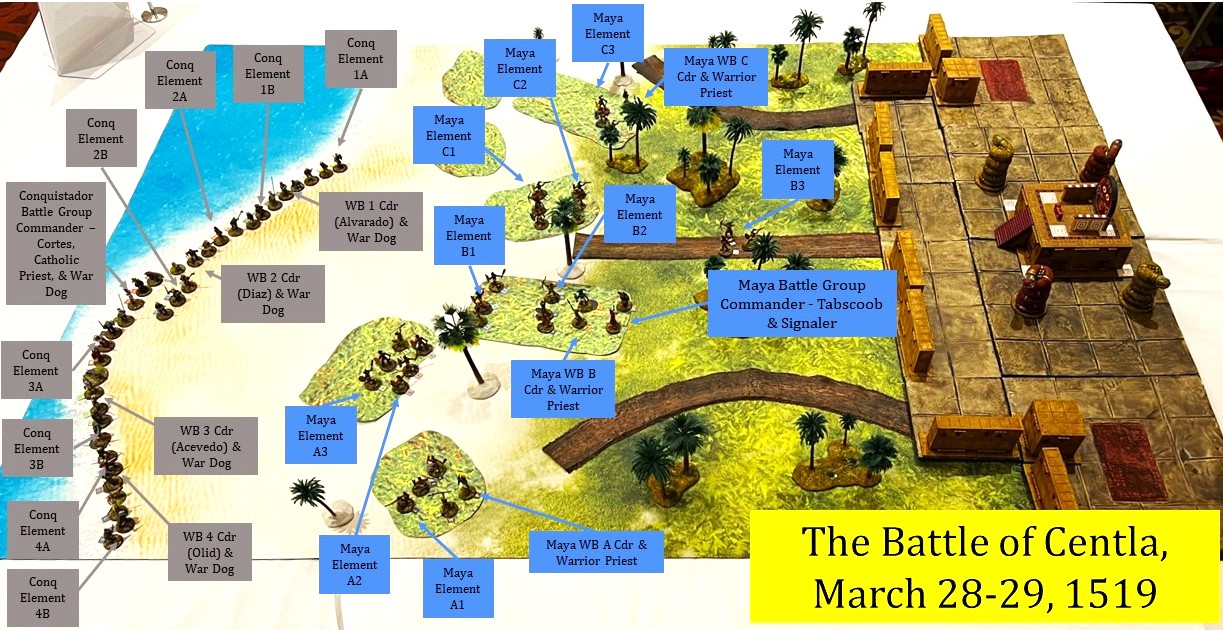
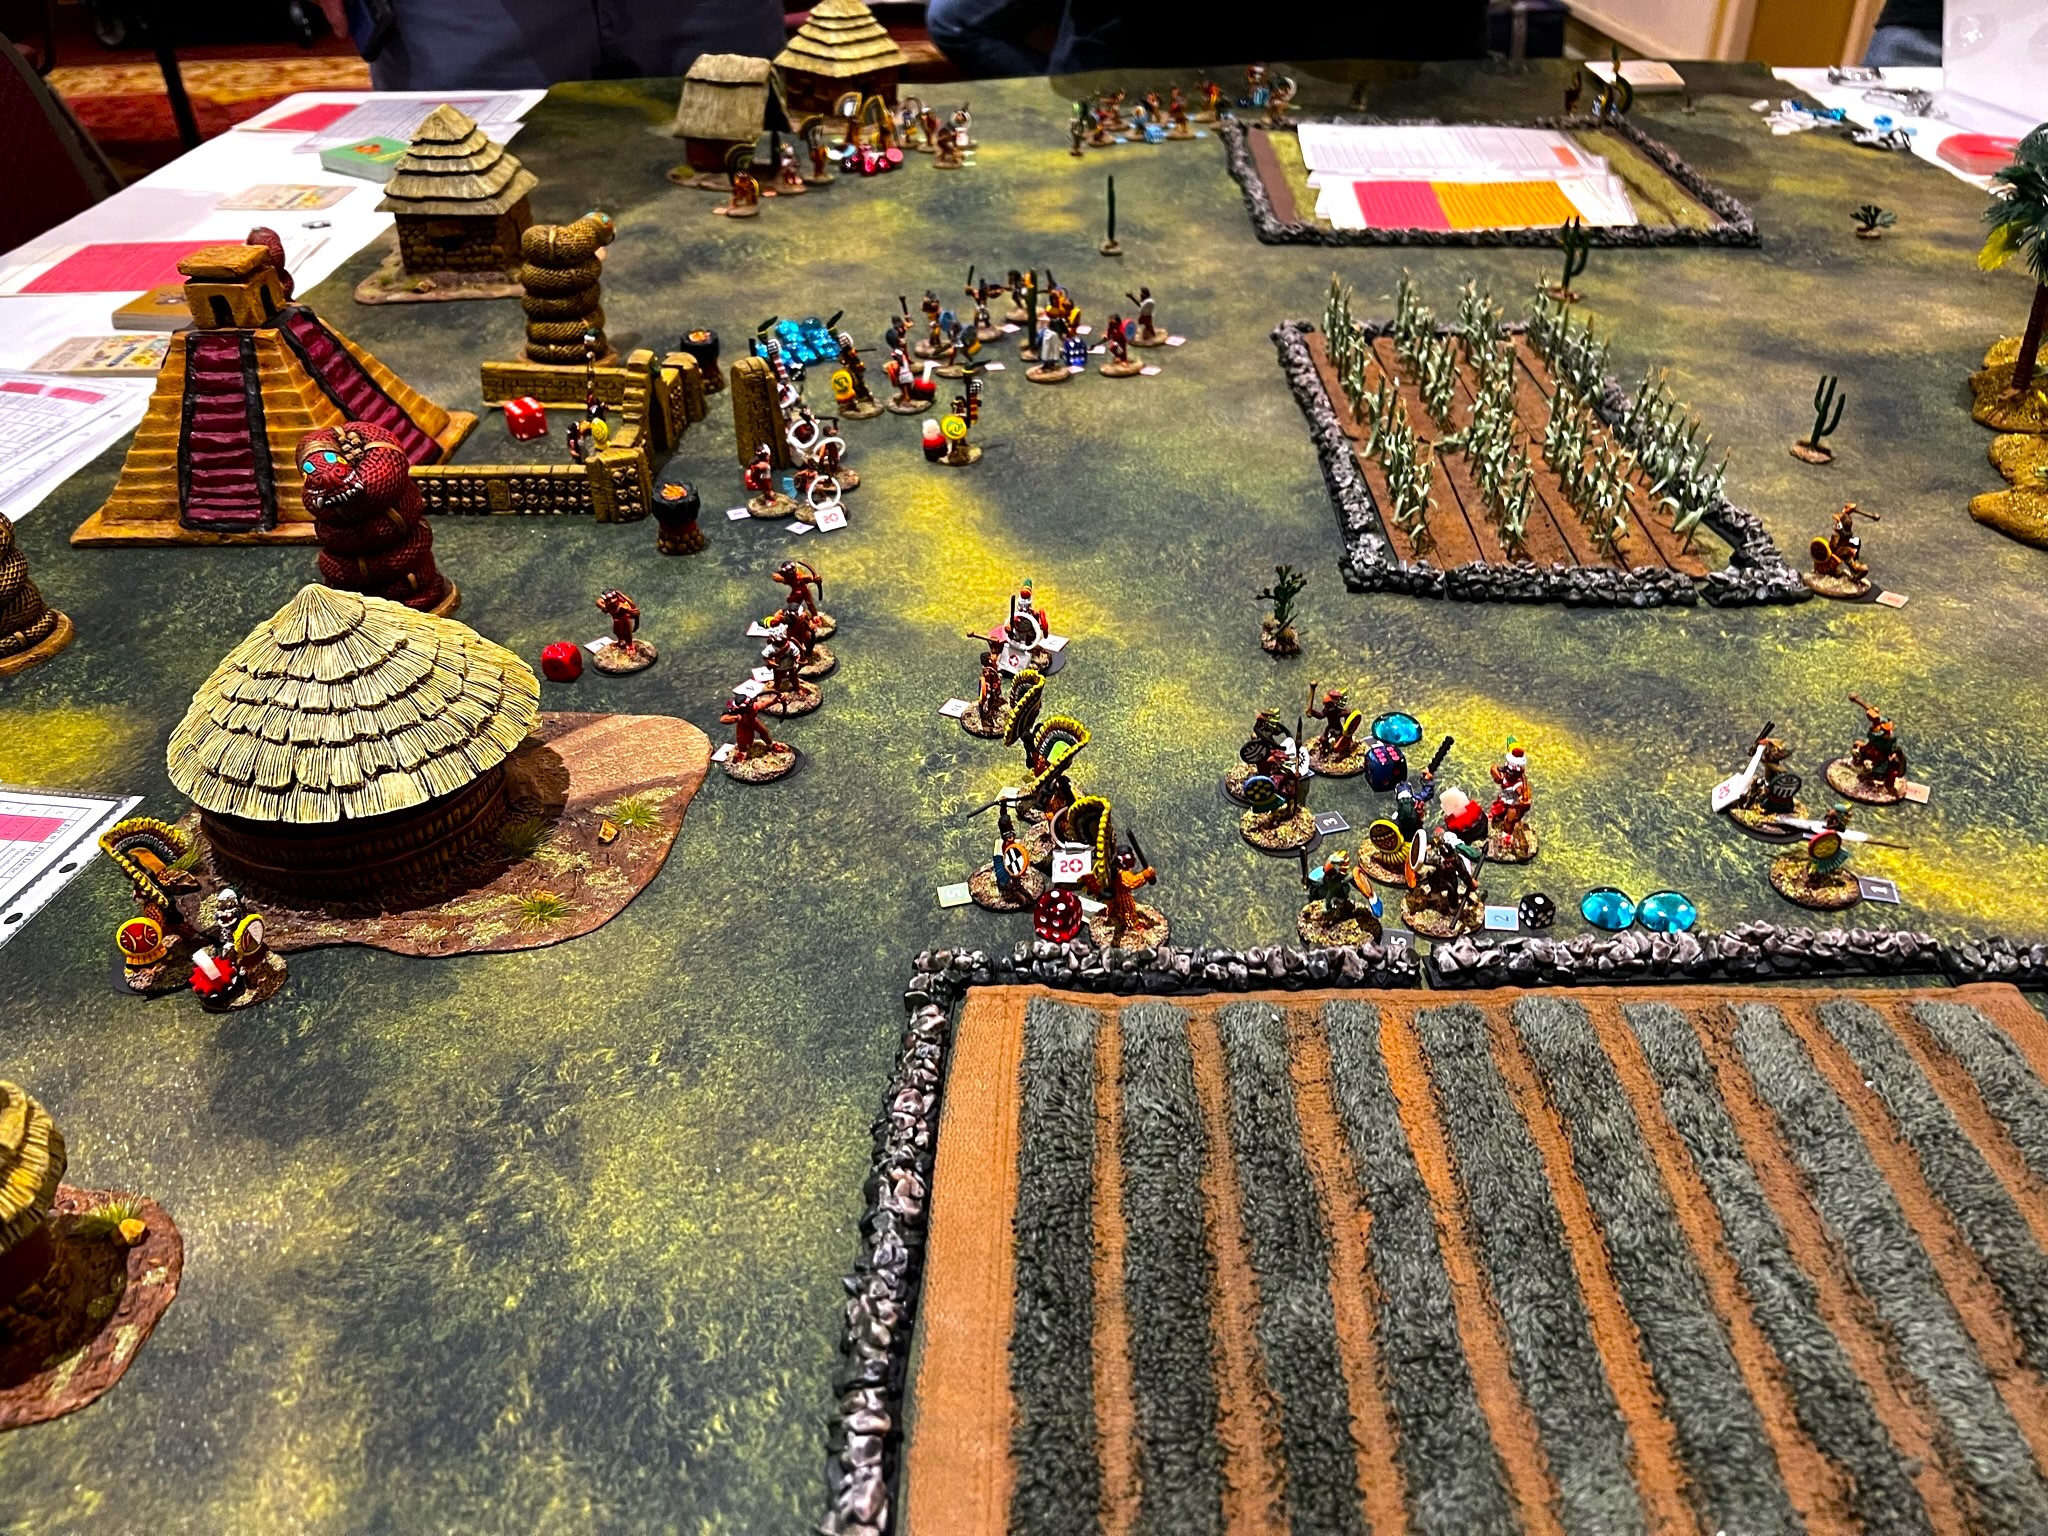
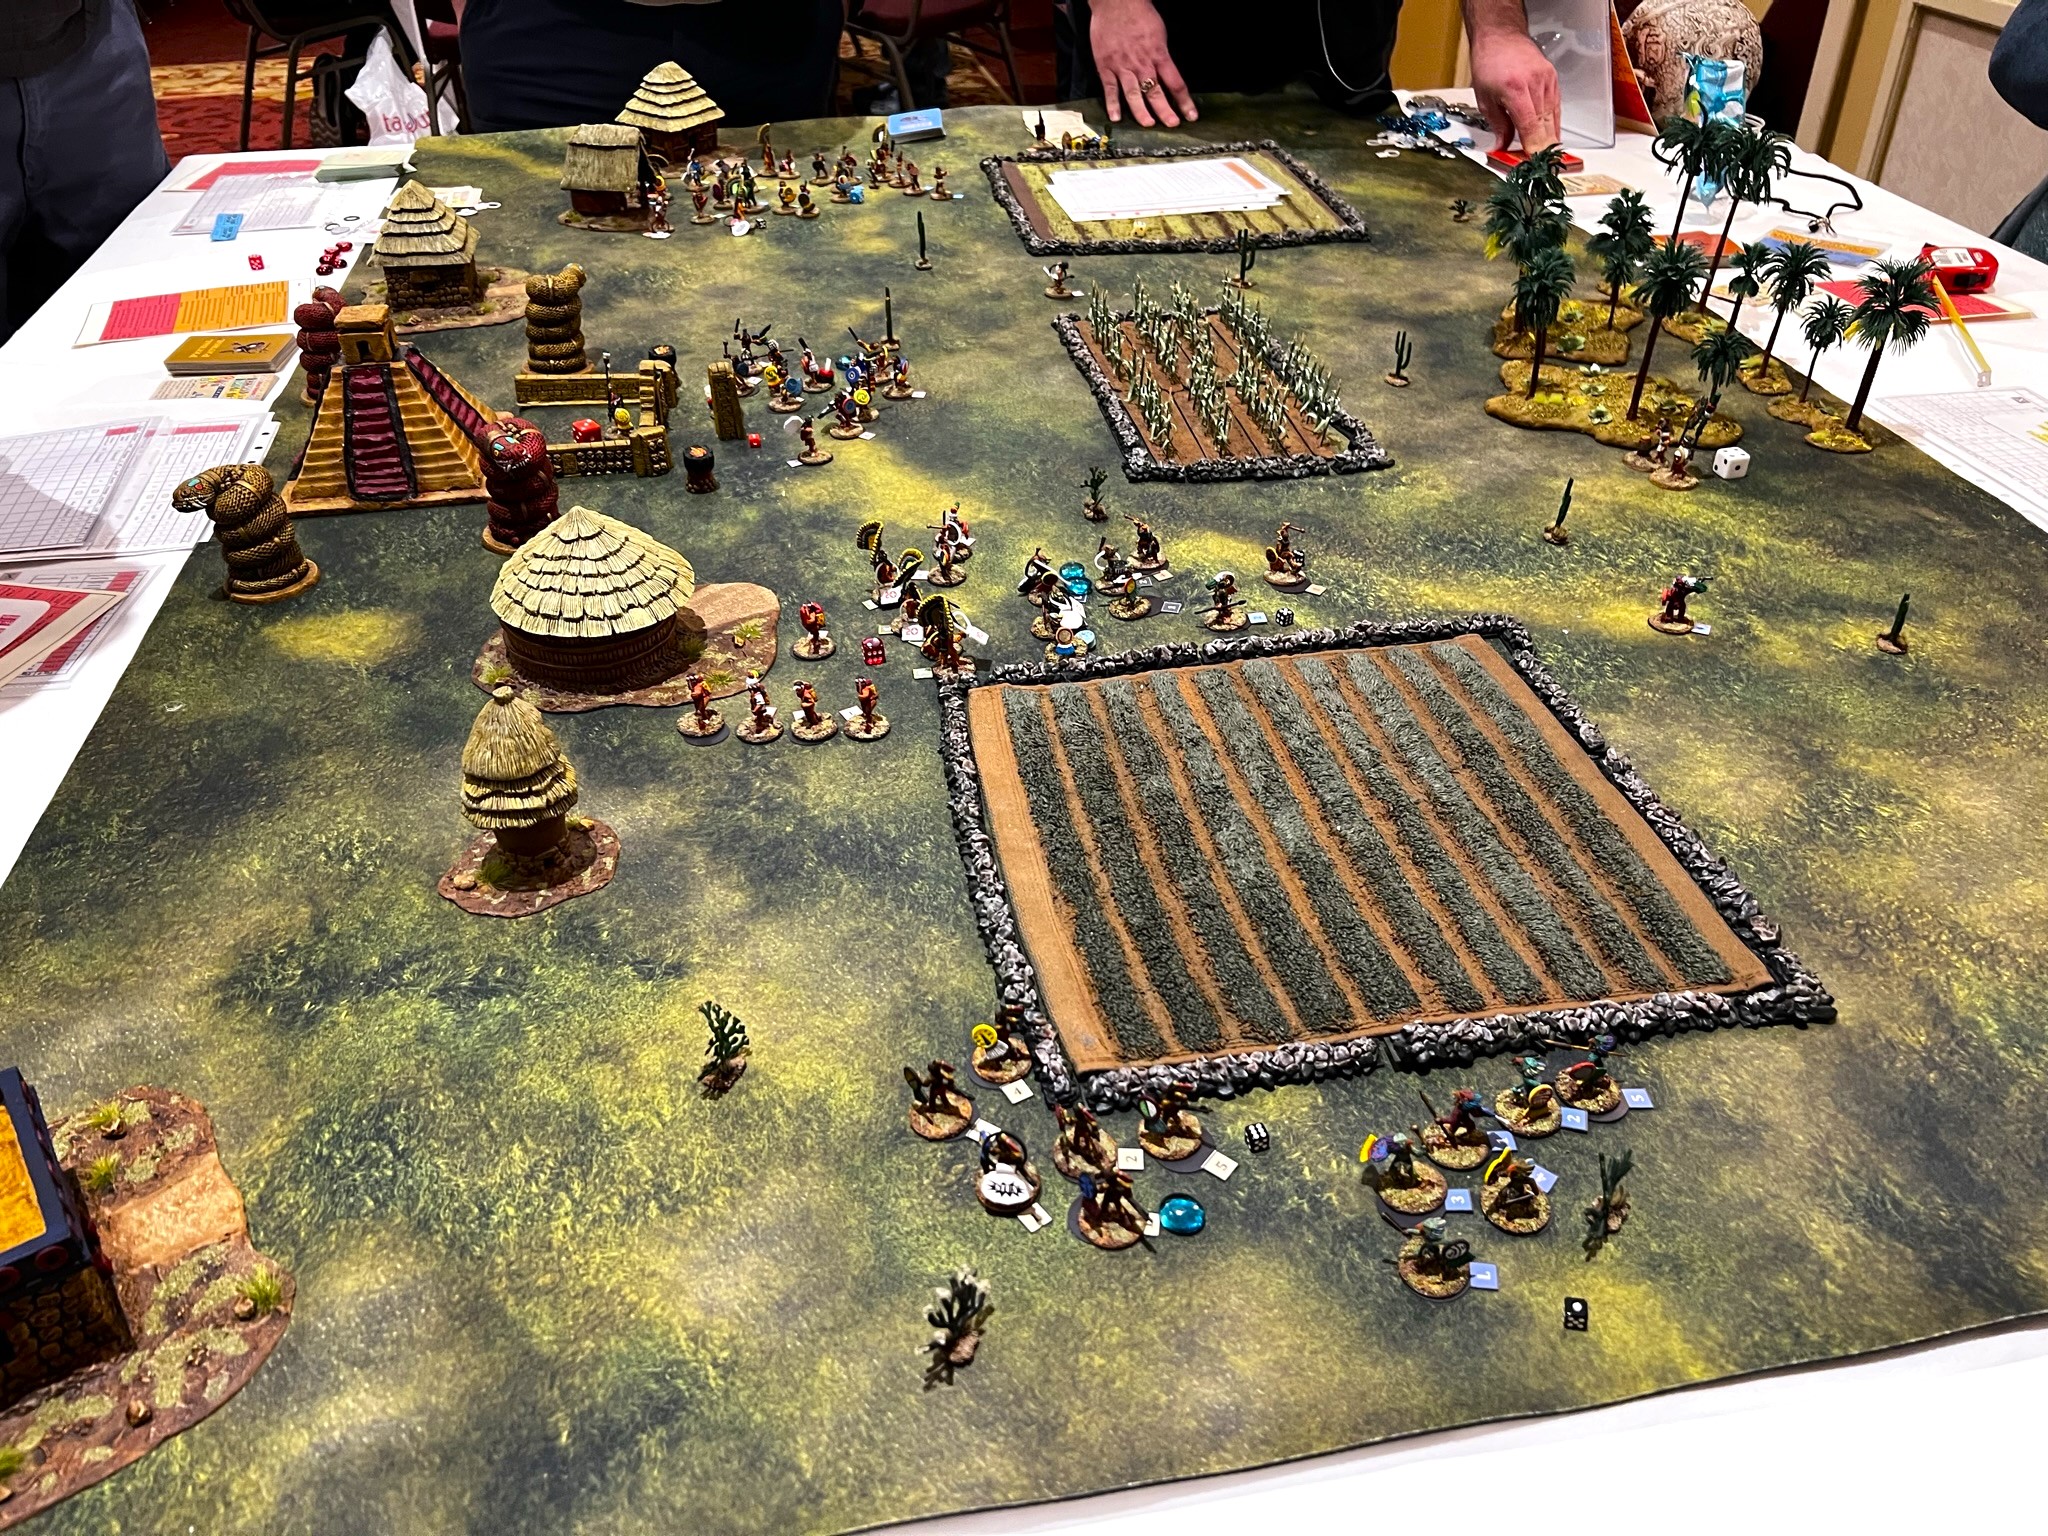
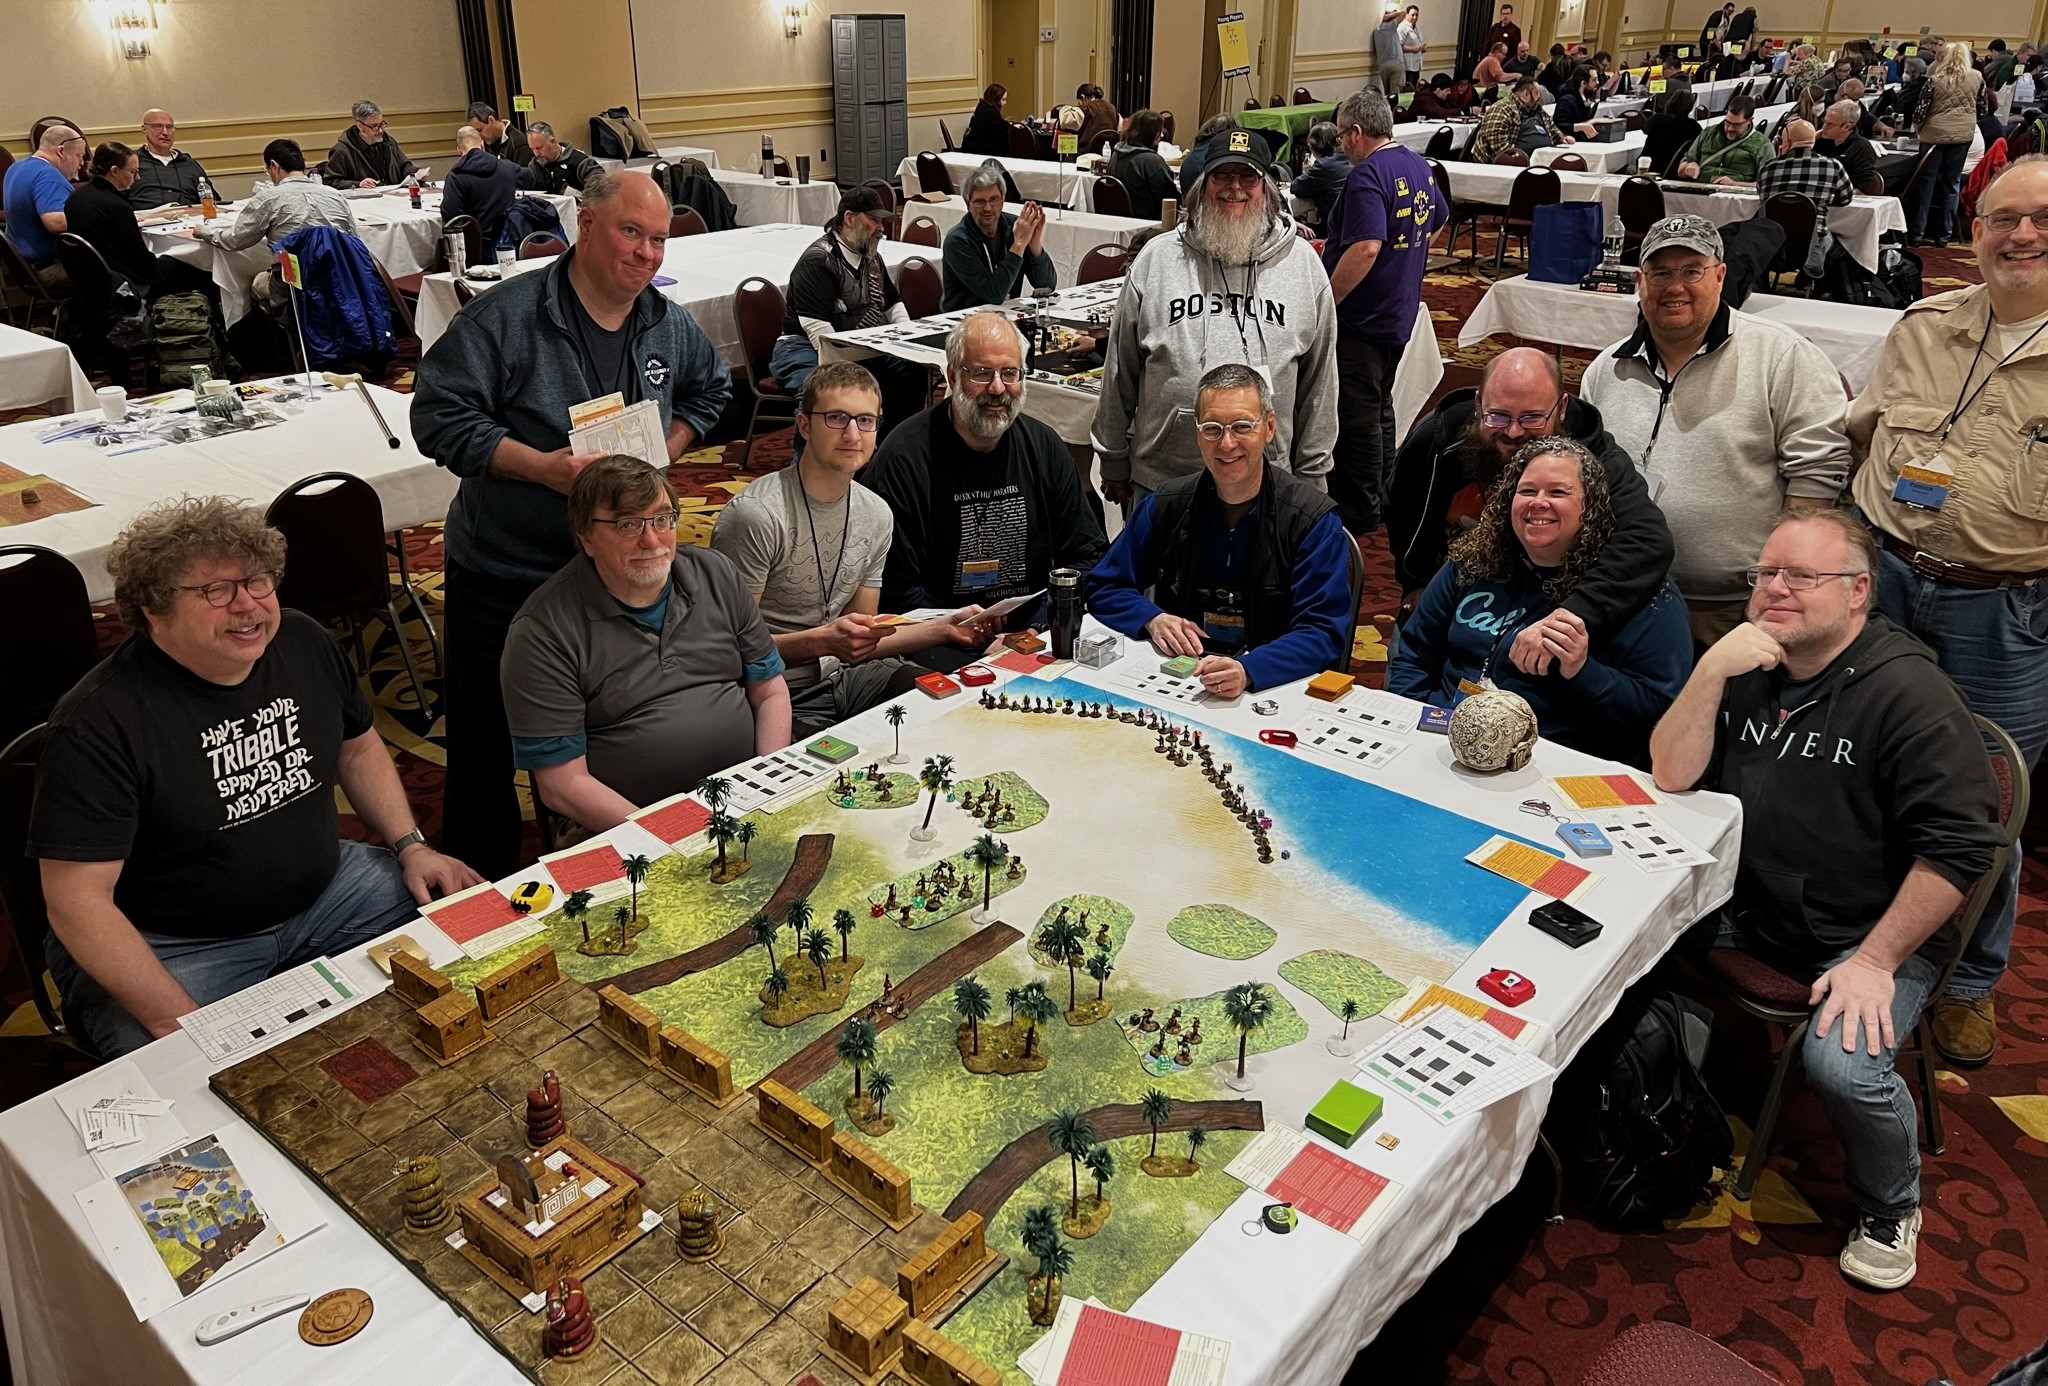
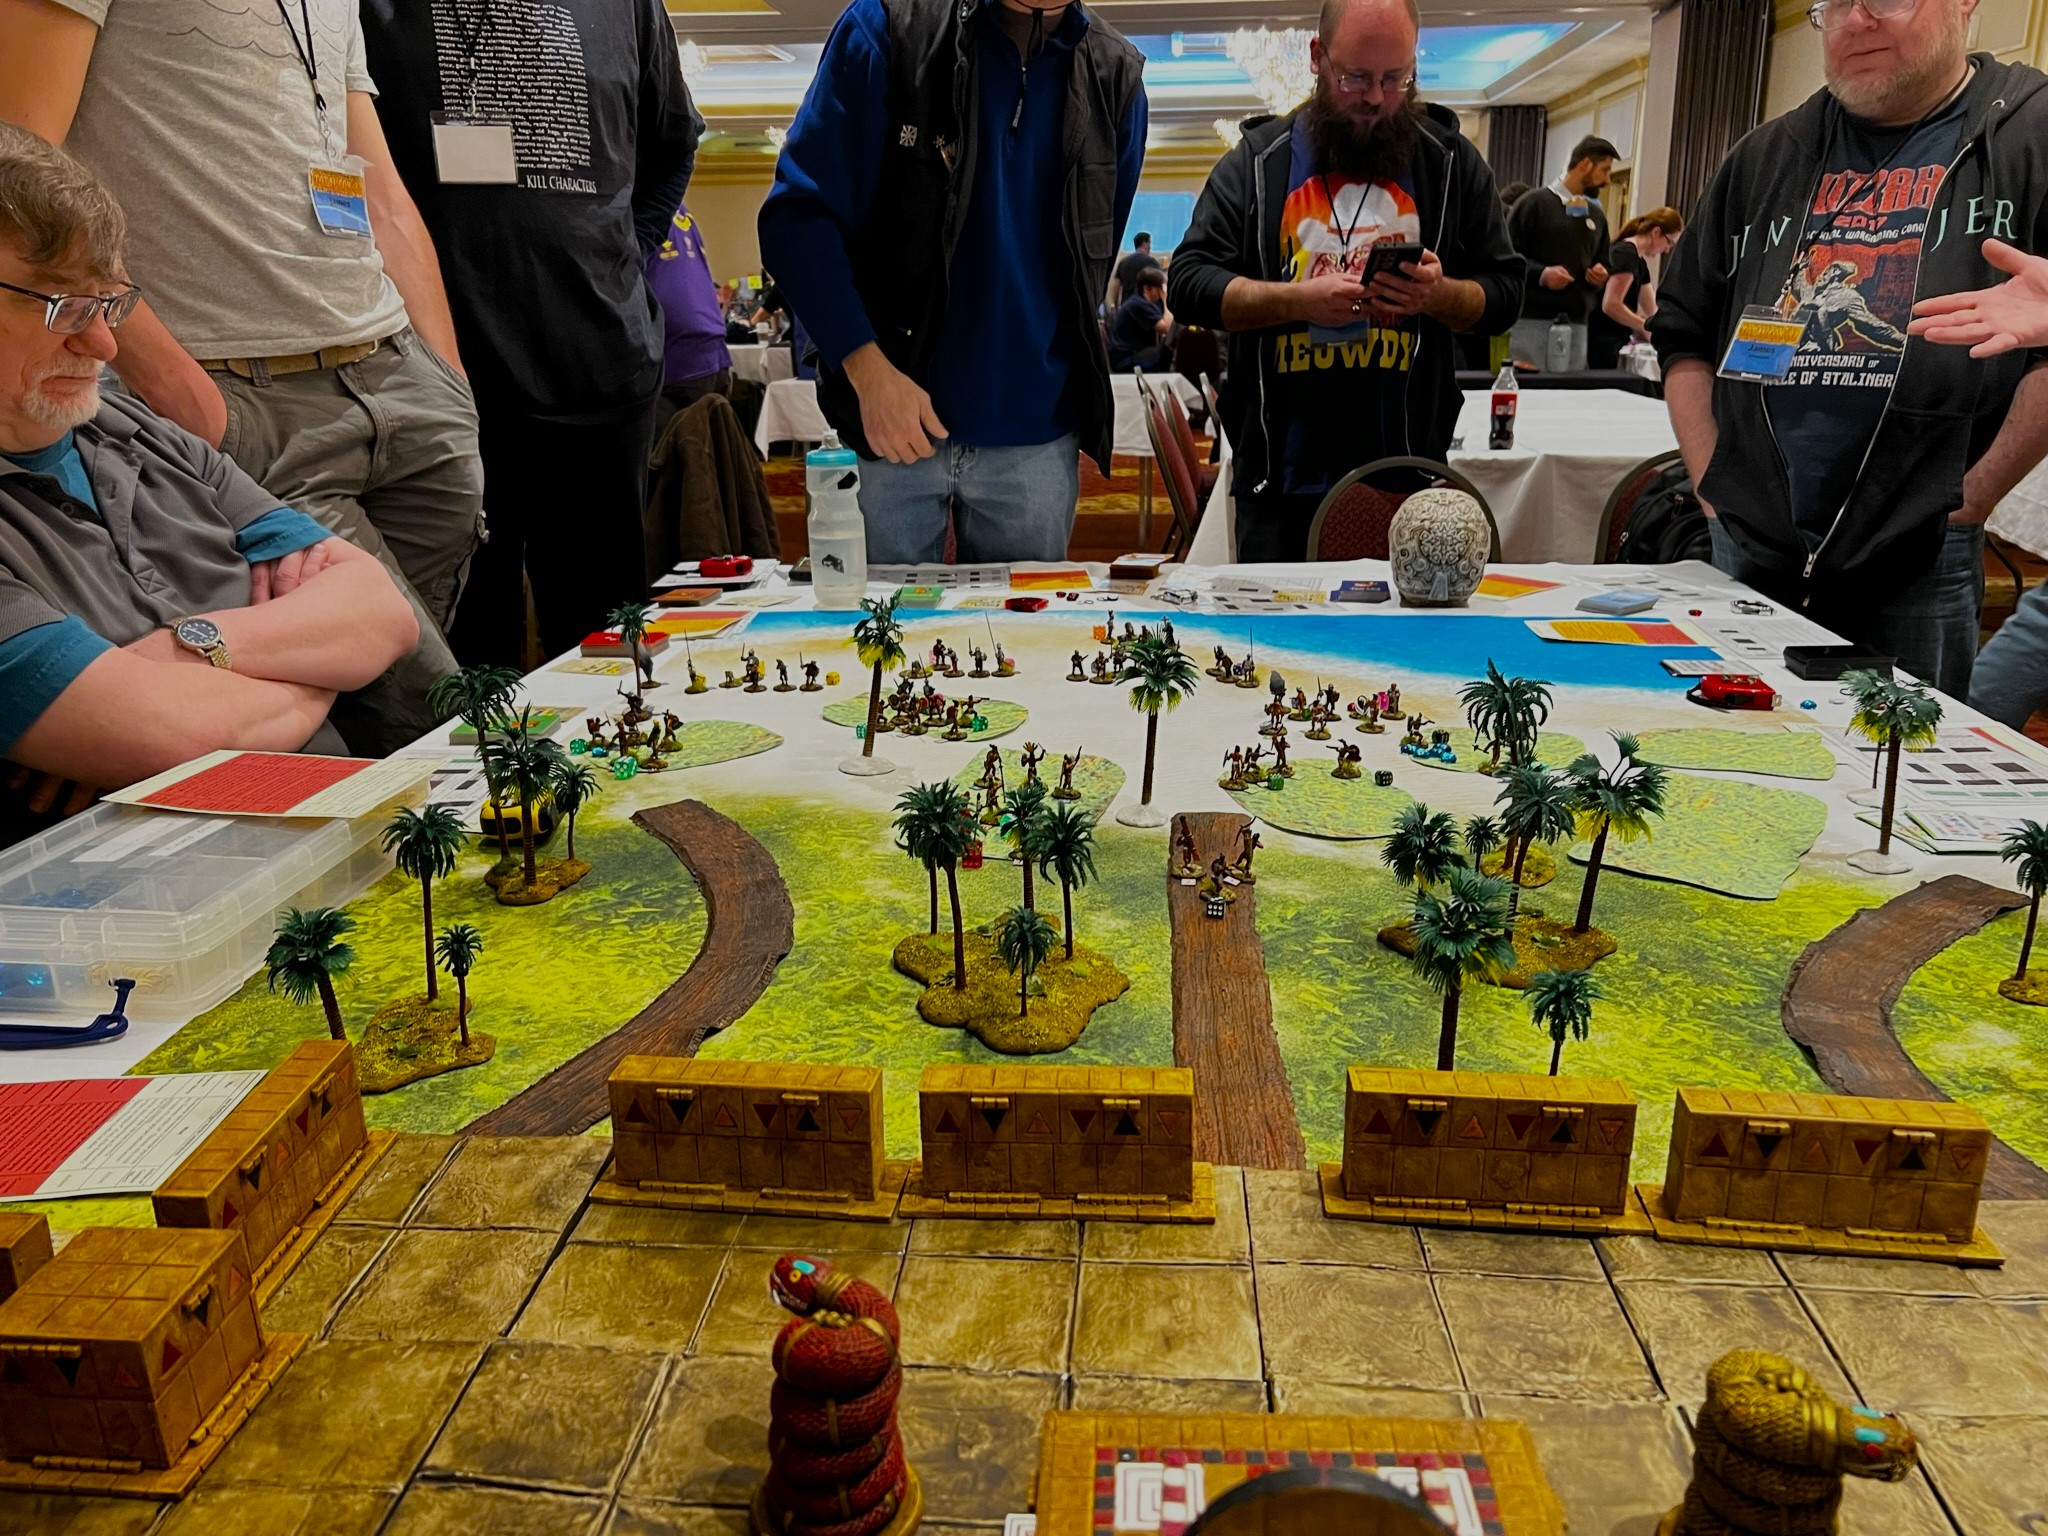
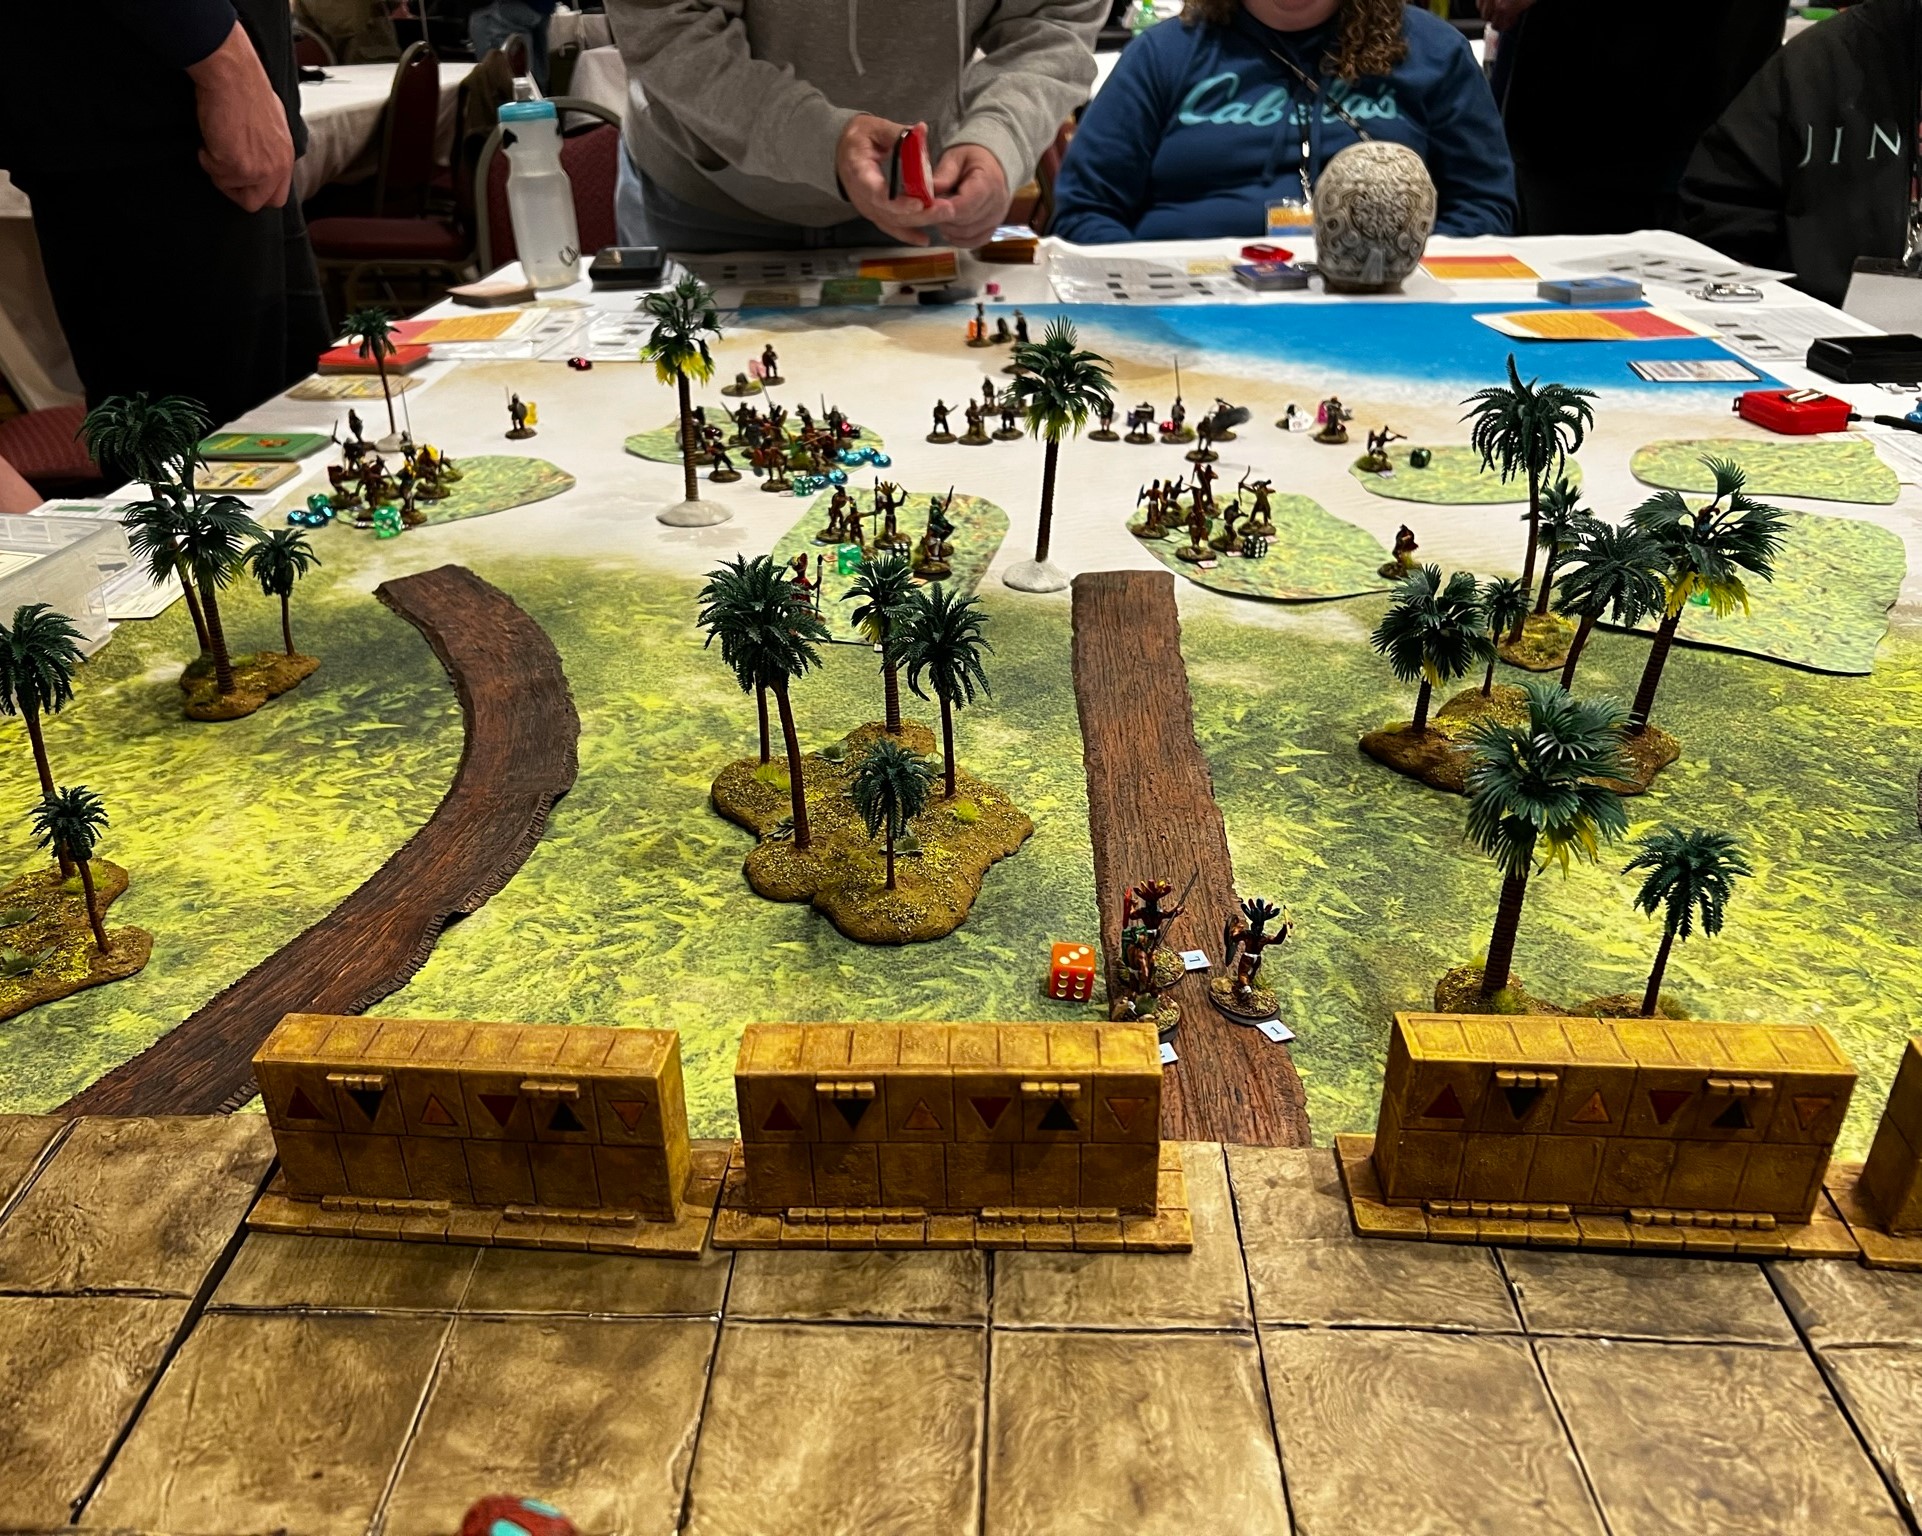
The Battle of Centla (Feudal Patrol)
On Friday afternoon, I ran the Feudal Patrol game of the Battle of Centla – a battle between the Maya and the Conquistadores under Hernan Cortes.
The Spanish needed to reach the Maya city or kill 50% of the Spanish, or kill Tabscoob, the Maya leader. The Maya needed to prevent the Spanish from achieving their victory conditions, kill Cortes, or kill 50% of the Conquistadores. In the game, the Maya do get reinforcements, and the Spanish do not. Time is not on the Spanish players’ side.
The game set up – the Spanish are on the beach.Maya moving onto the beach.Buck Surdu joins the game replacing a departing player – and commands Cortes.
The Spanish were not initially as aggressive as I expected – though as the game progressed they did start to advance.
Buck and I confer on his troops’ data.Battles on the beachThe Conquistadores’ advance is held up due to atlatl attacks.
Unfortunately, the Spanish needed to take some risks – and Buck moved Cortes up and into the fight. This was very appropriate given the state of the game at that point. A Maya warrior got a lucky hit on him and cut off his leg – yielding a victory for the Maya. This game is very cool – I have run it several times and both sides have won in the past.
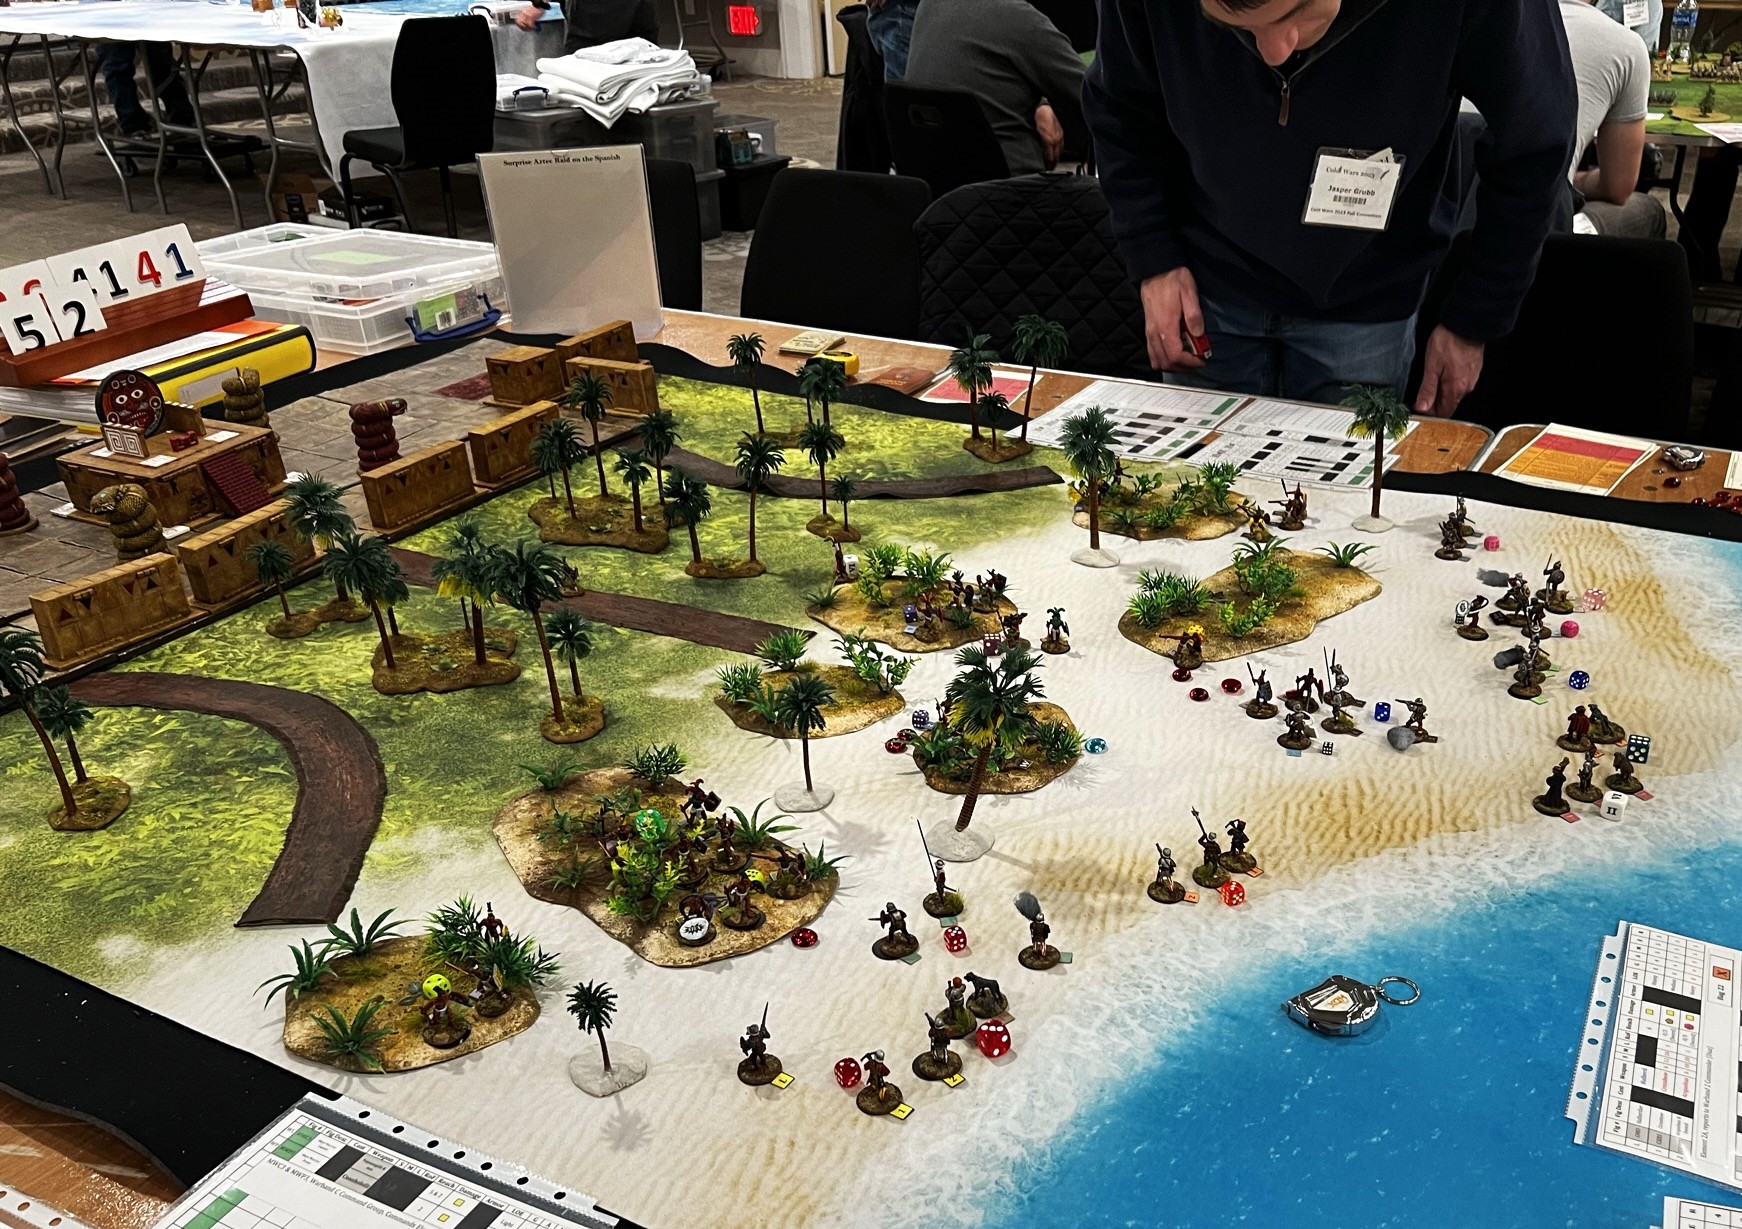
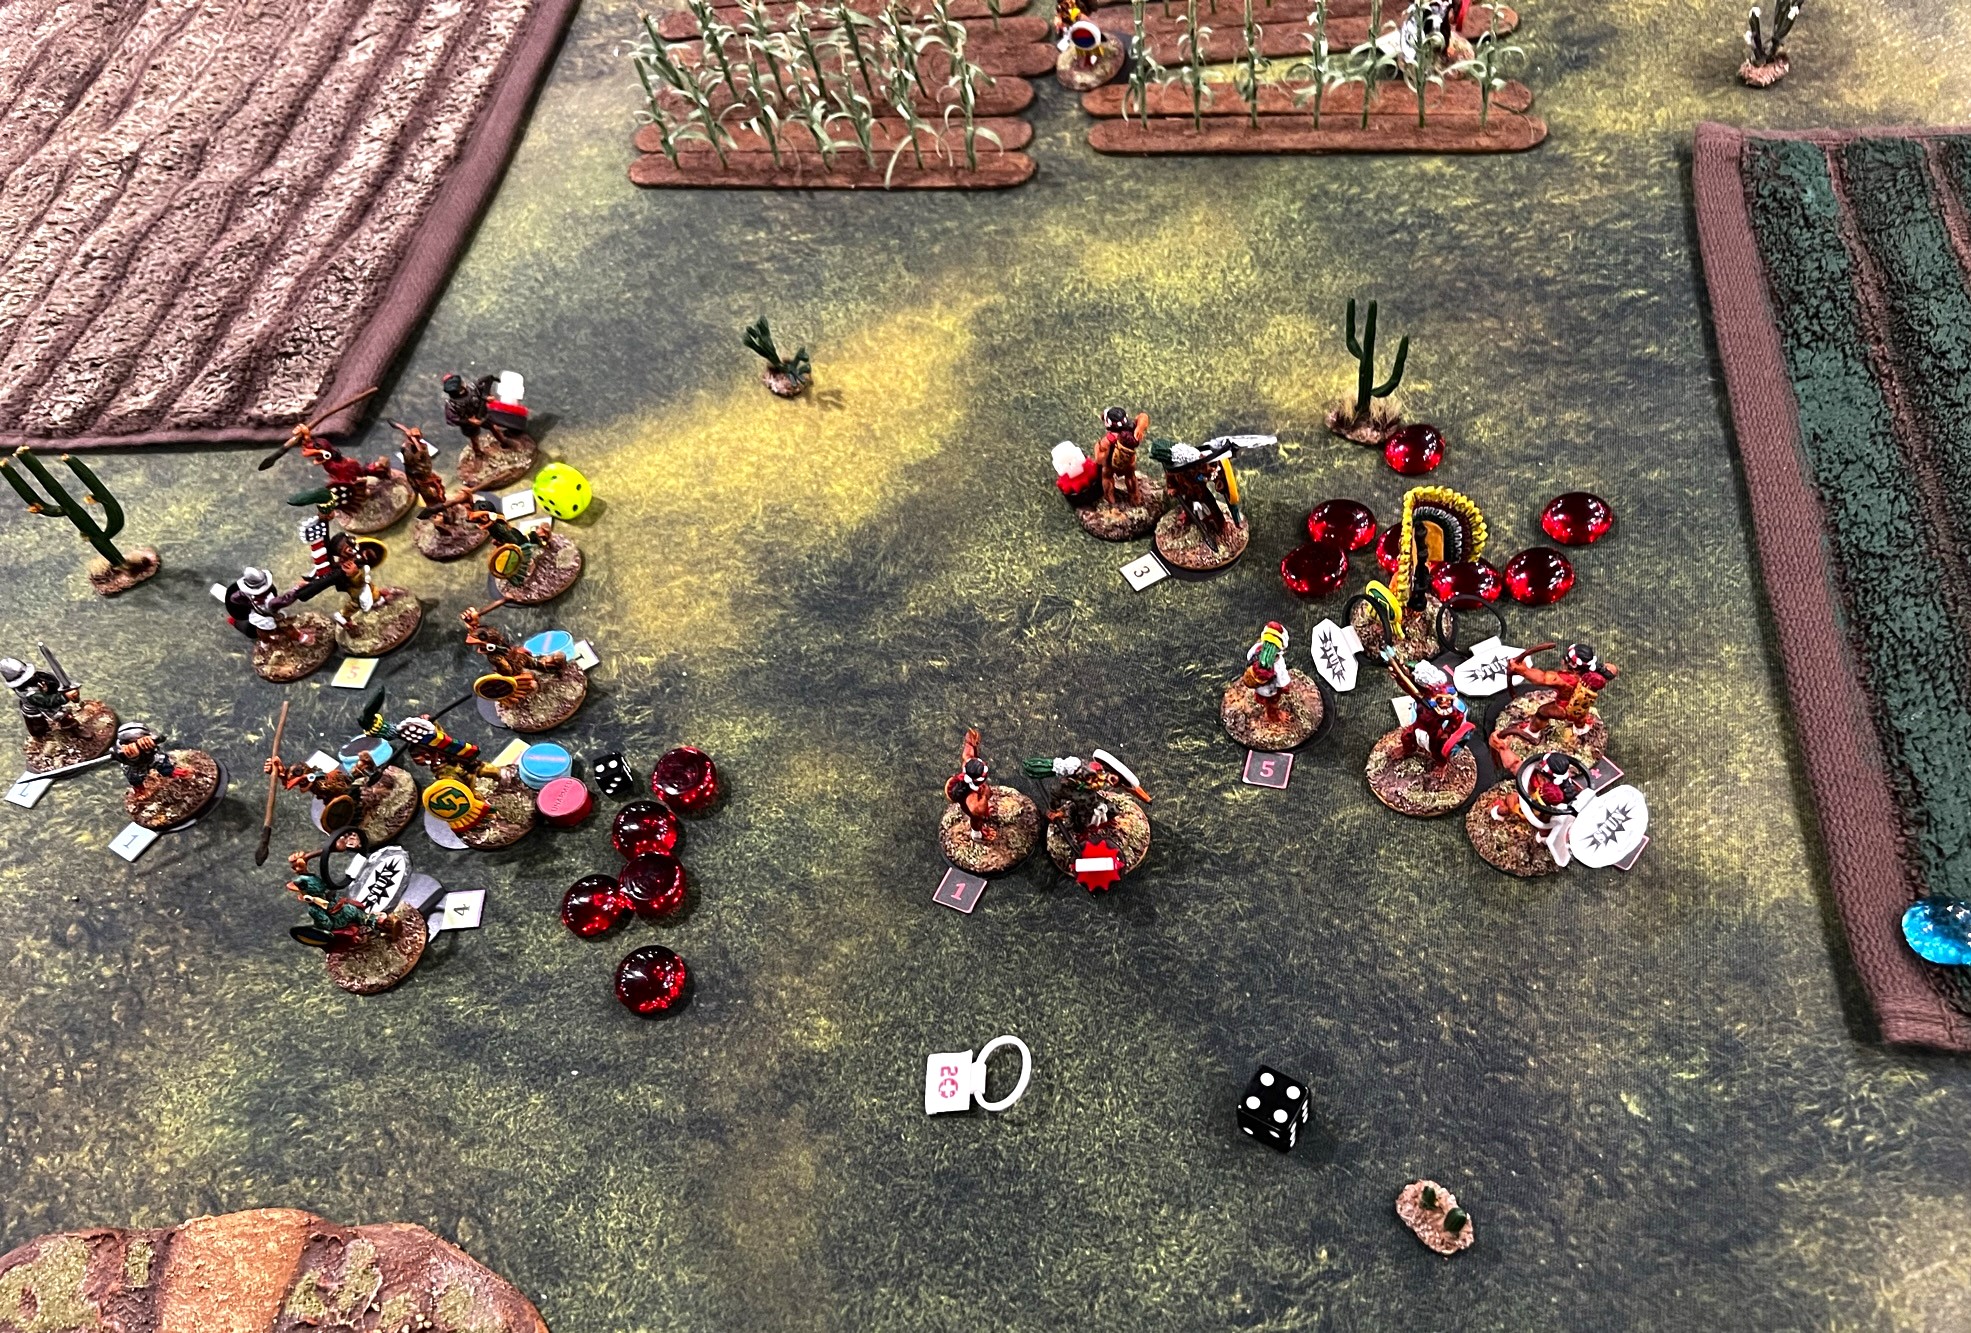
Surprise Aztec Raid on the Spanish Outpost (Feudal Patrol)
After the Friday afternoon game (Centla), I quickly got my next game ( this was held on Friday evening) set up with a lot of help from Buck, Dave Wood, and Greg for Friday night. This is a scenario as described below:
The game went back and forth and it was not clear at all which side would eventually win. There was a lot of action.
The game at the start – the Aztecs needed to cross muddy field to reach the Spanish and the Tlaxcalans. There were also food and gold objectives, and of course VP for inflicting casualties or taking captives.Greg Priebe advances his Aztec commander, Asupacaci and his warrior priests.
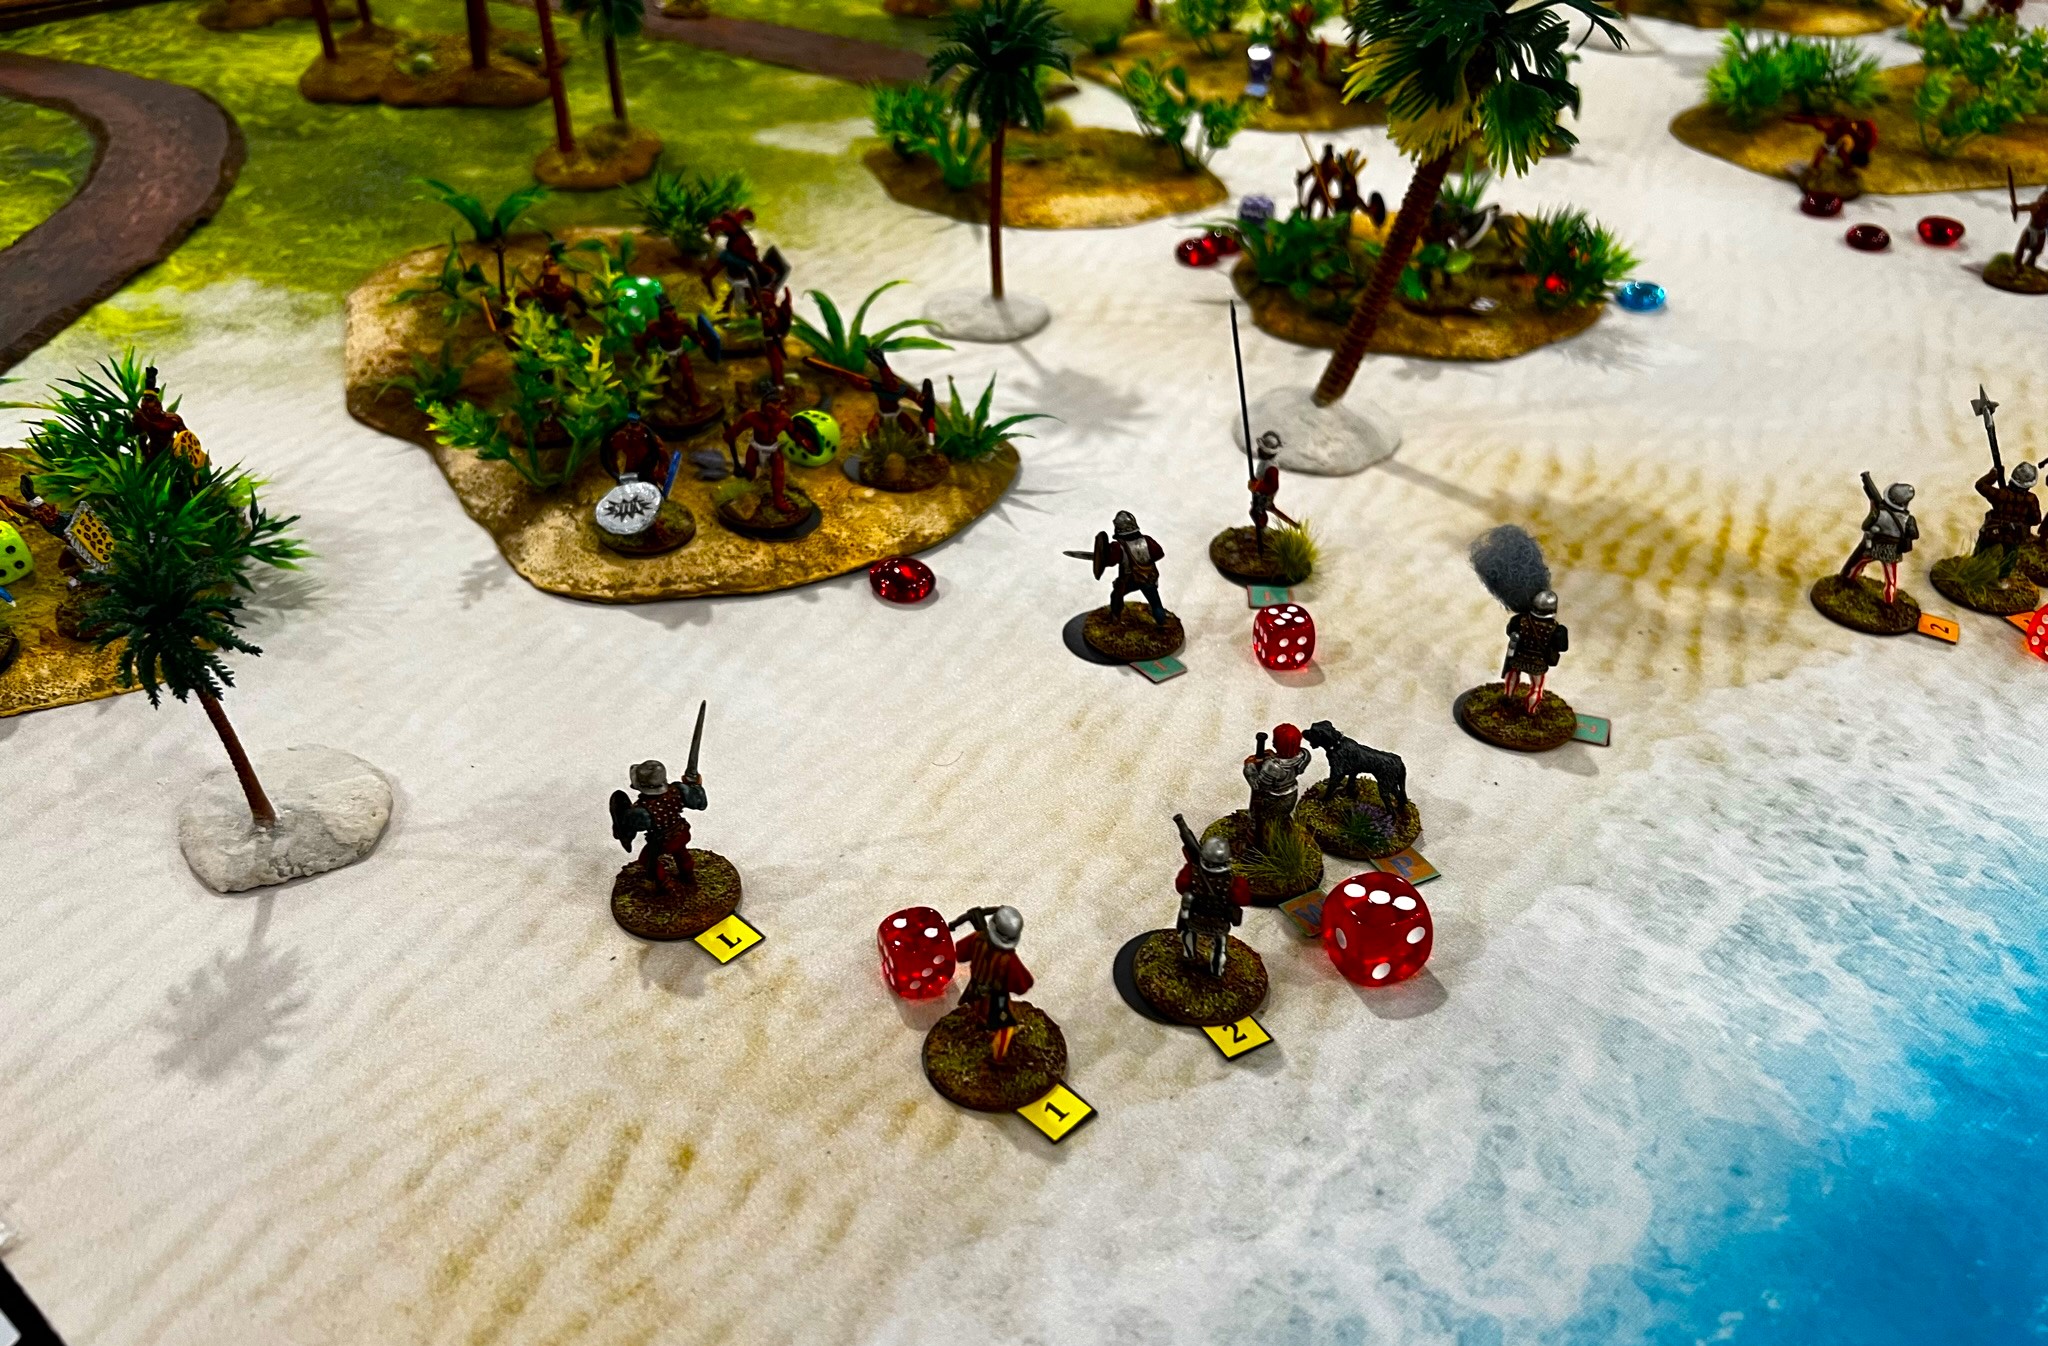
The Spanish used their war dogs and arquebuses to good effect – but the Aztec Elite troops berserked and fought bravely.
Arquebuses fire.Aztecs collect many morale pips for getting shot at by the arquebusiers.The Spanish fire their falconet.The berserking Cuachicqueh engage the Conquistadores.
Finally, both the Aztecs and the Tlaxcalans started taking prisoners for sacrifice – and gaining victory points in the process. Eric Schlegel successfully fired his falconet again with langridge at a swarm of Aztecs, taking out several of them in the last turn. This was to be pivotal.
Tlaxcalans get into the melee.Morale pips pile up on both sides.Captives are taken.Unlucky prisoners being dragged away by both sides to a fate worse than simple death.
I tallied the points – and it was a TIE! 46-46! I call that play-balanced!
I then set up my massive Battle of Lake Texcoco, which would be played on Saturday afternoon. This way I would have all the time I needed to enjoy my next game as a player on Saturday morning – which would be the Wars of Ozz game described next.
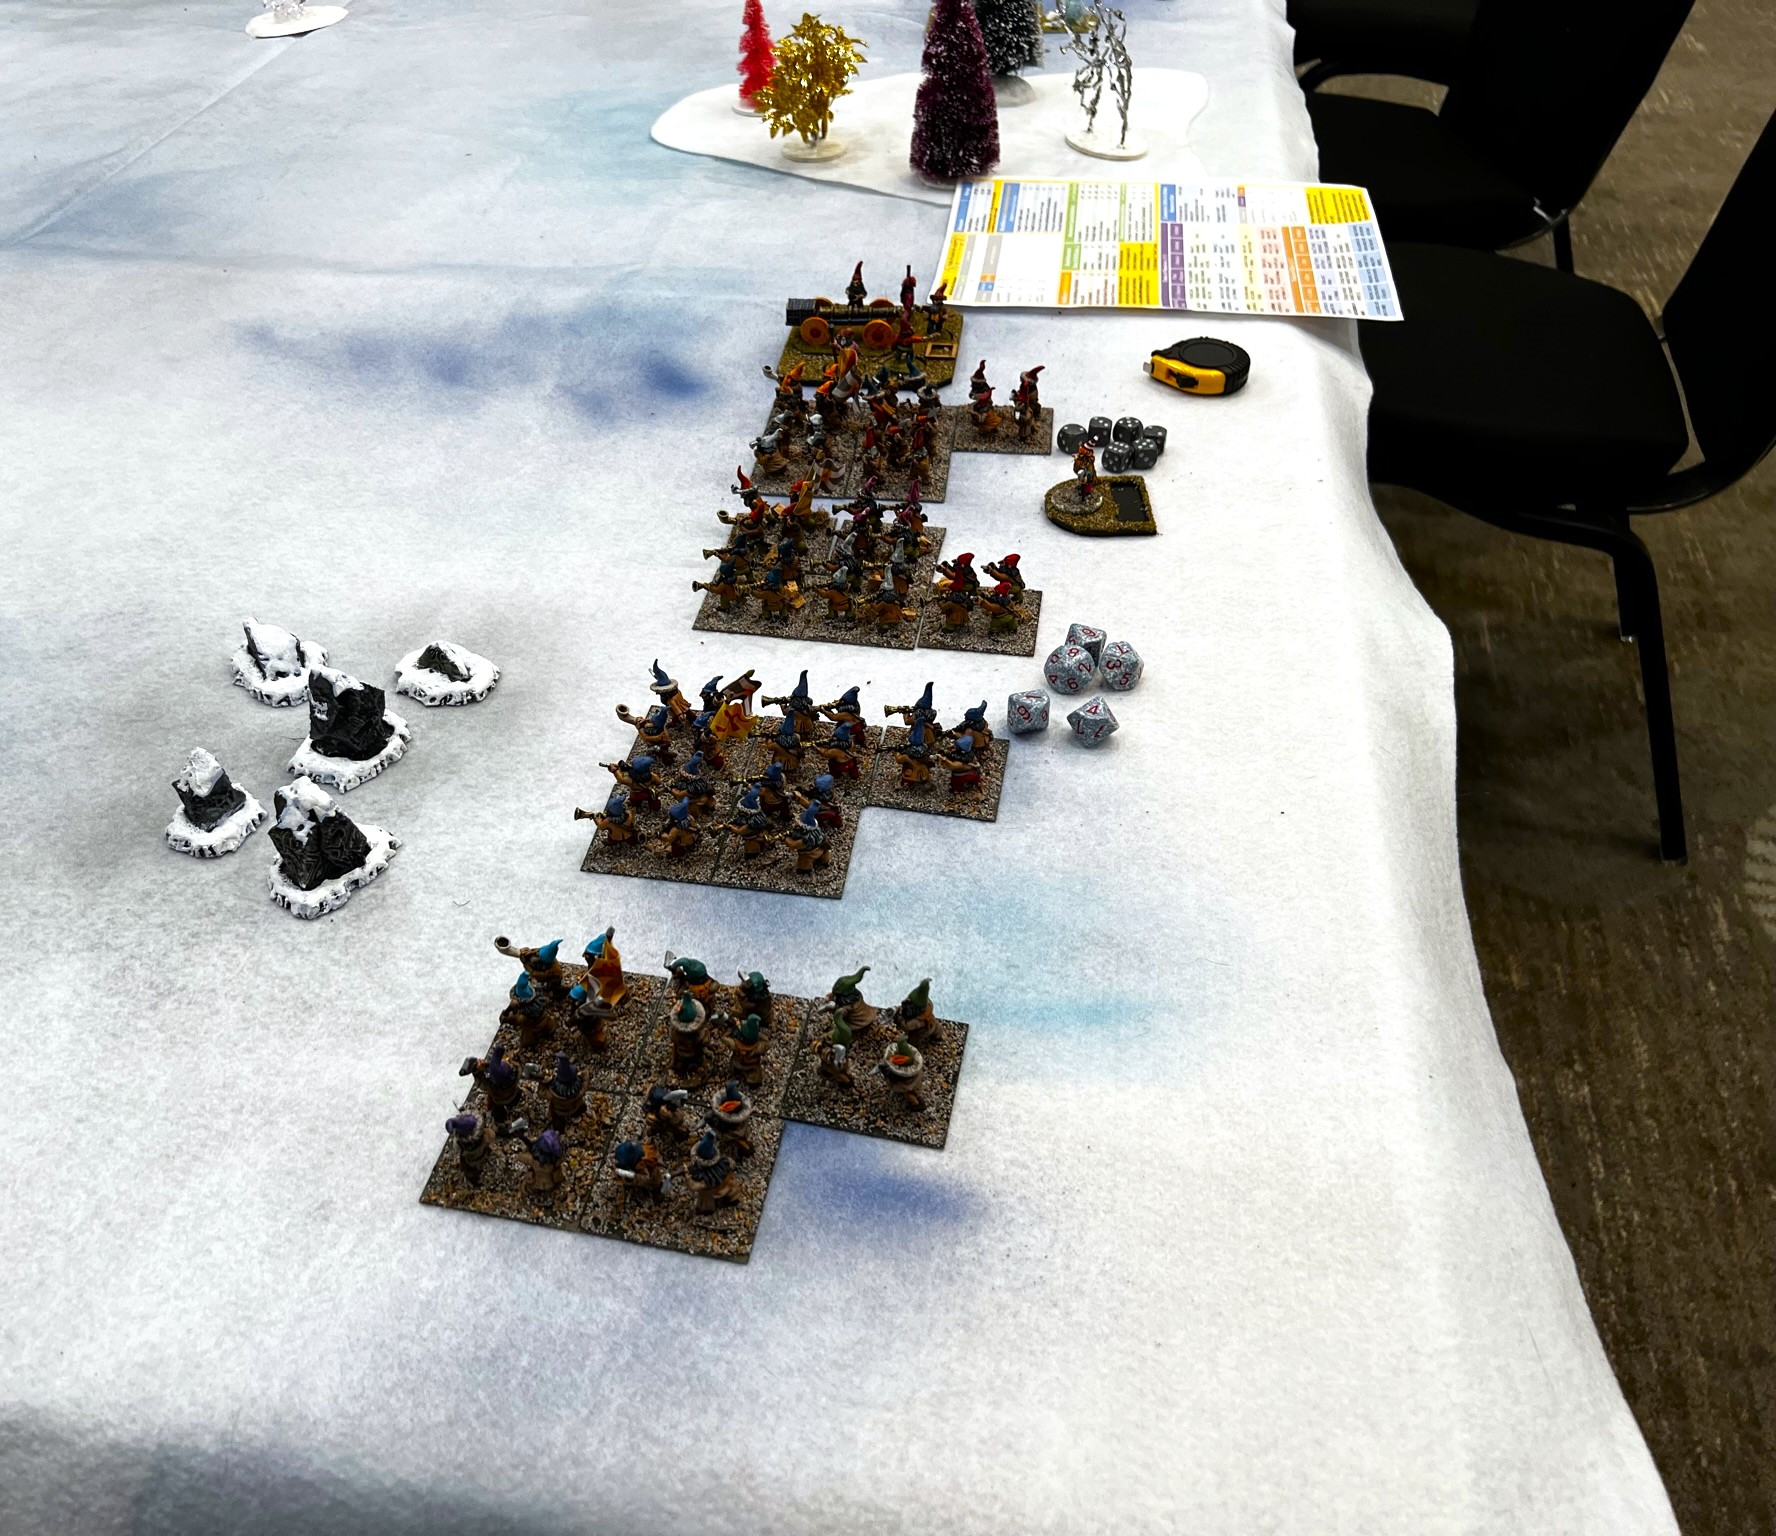
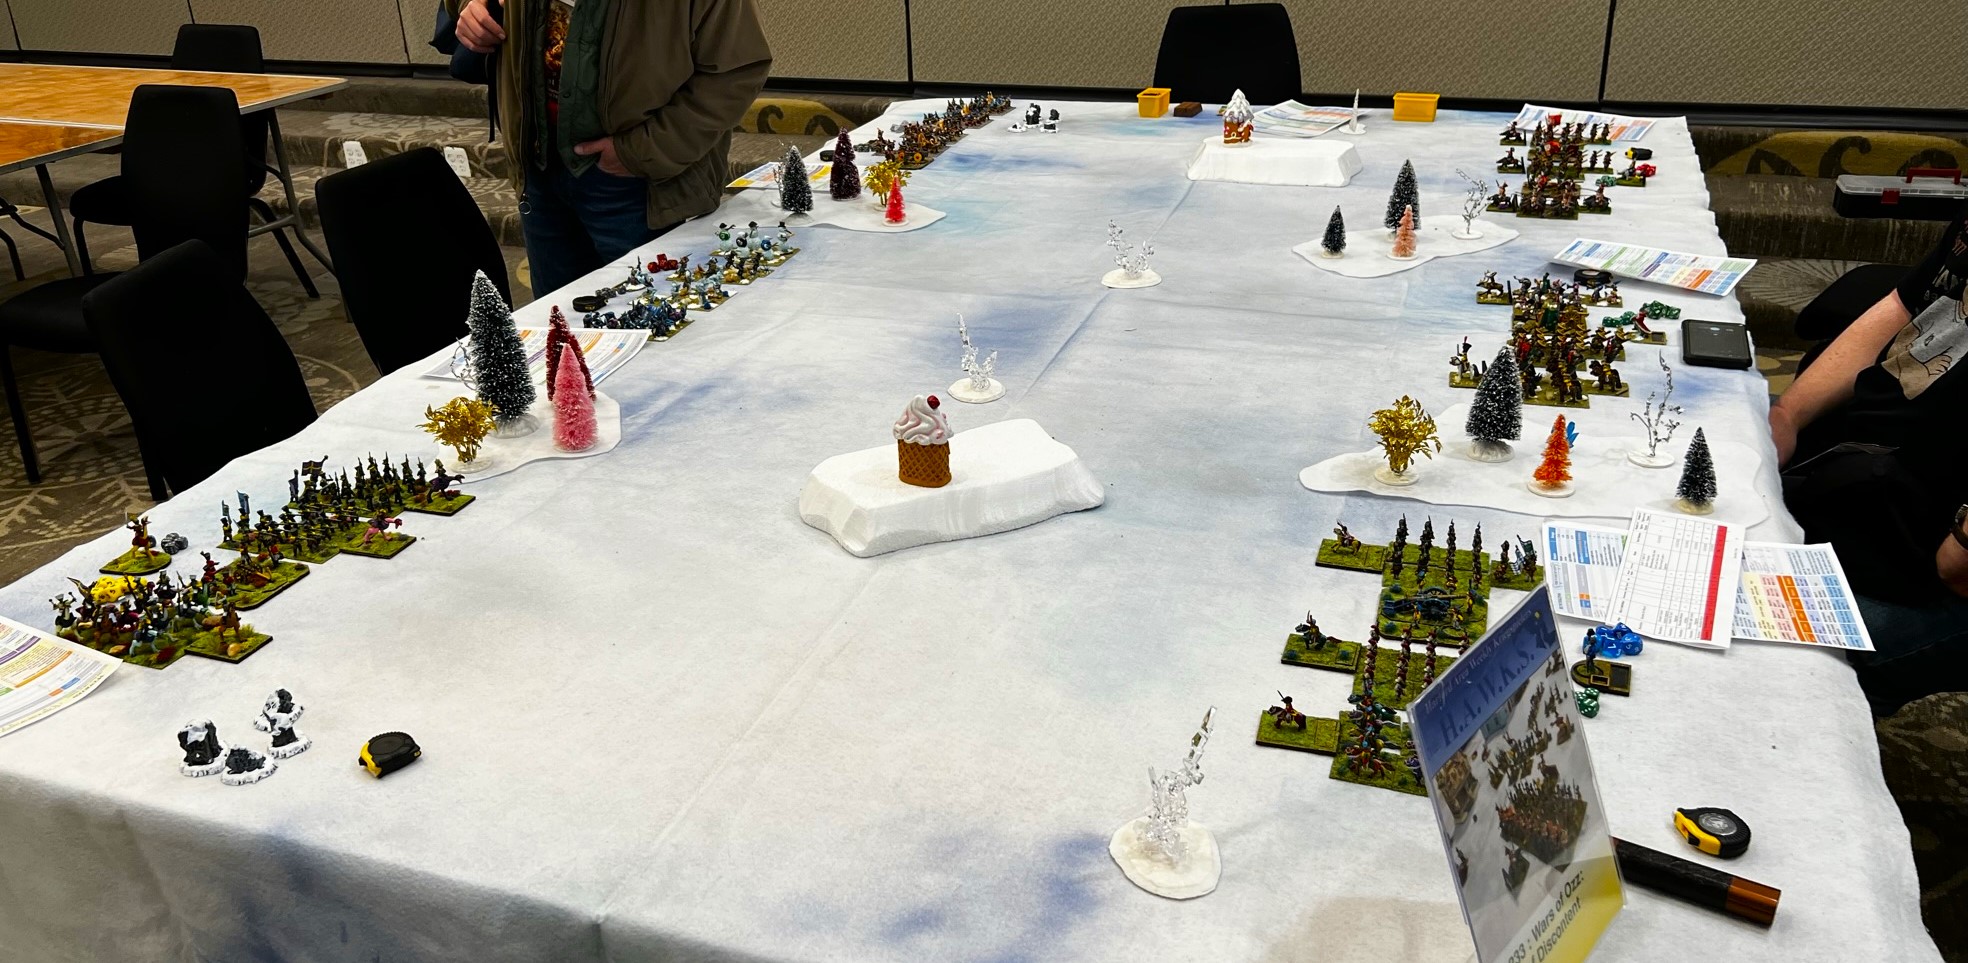
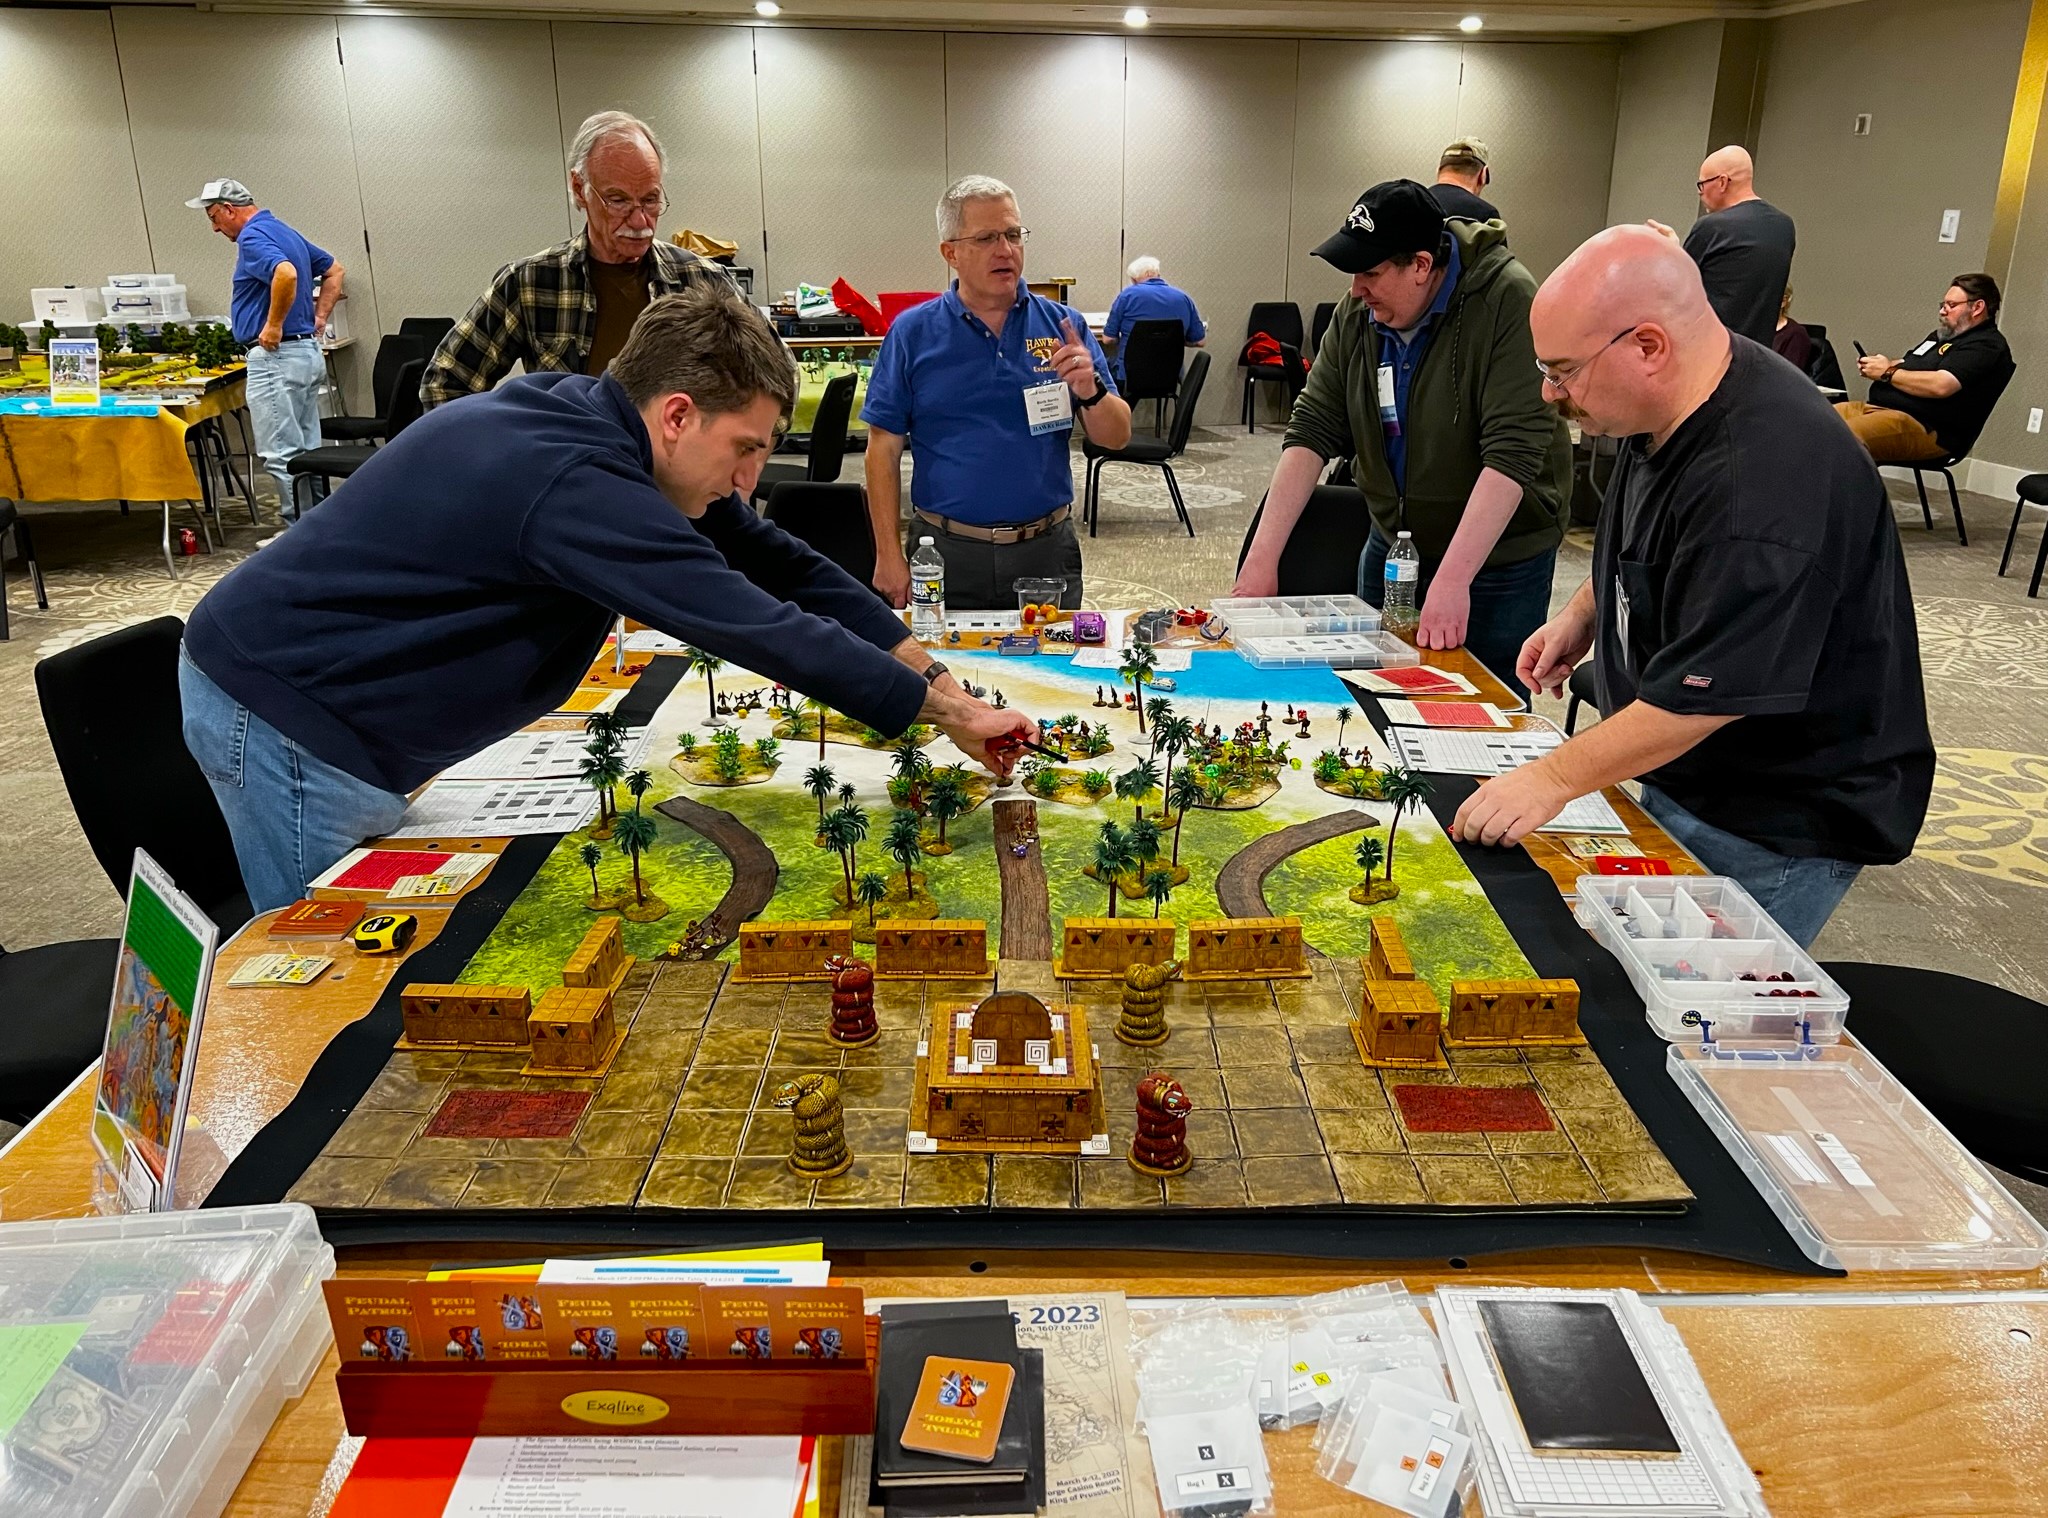
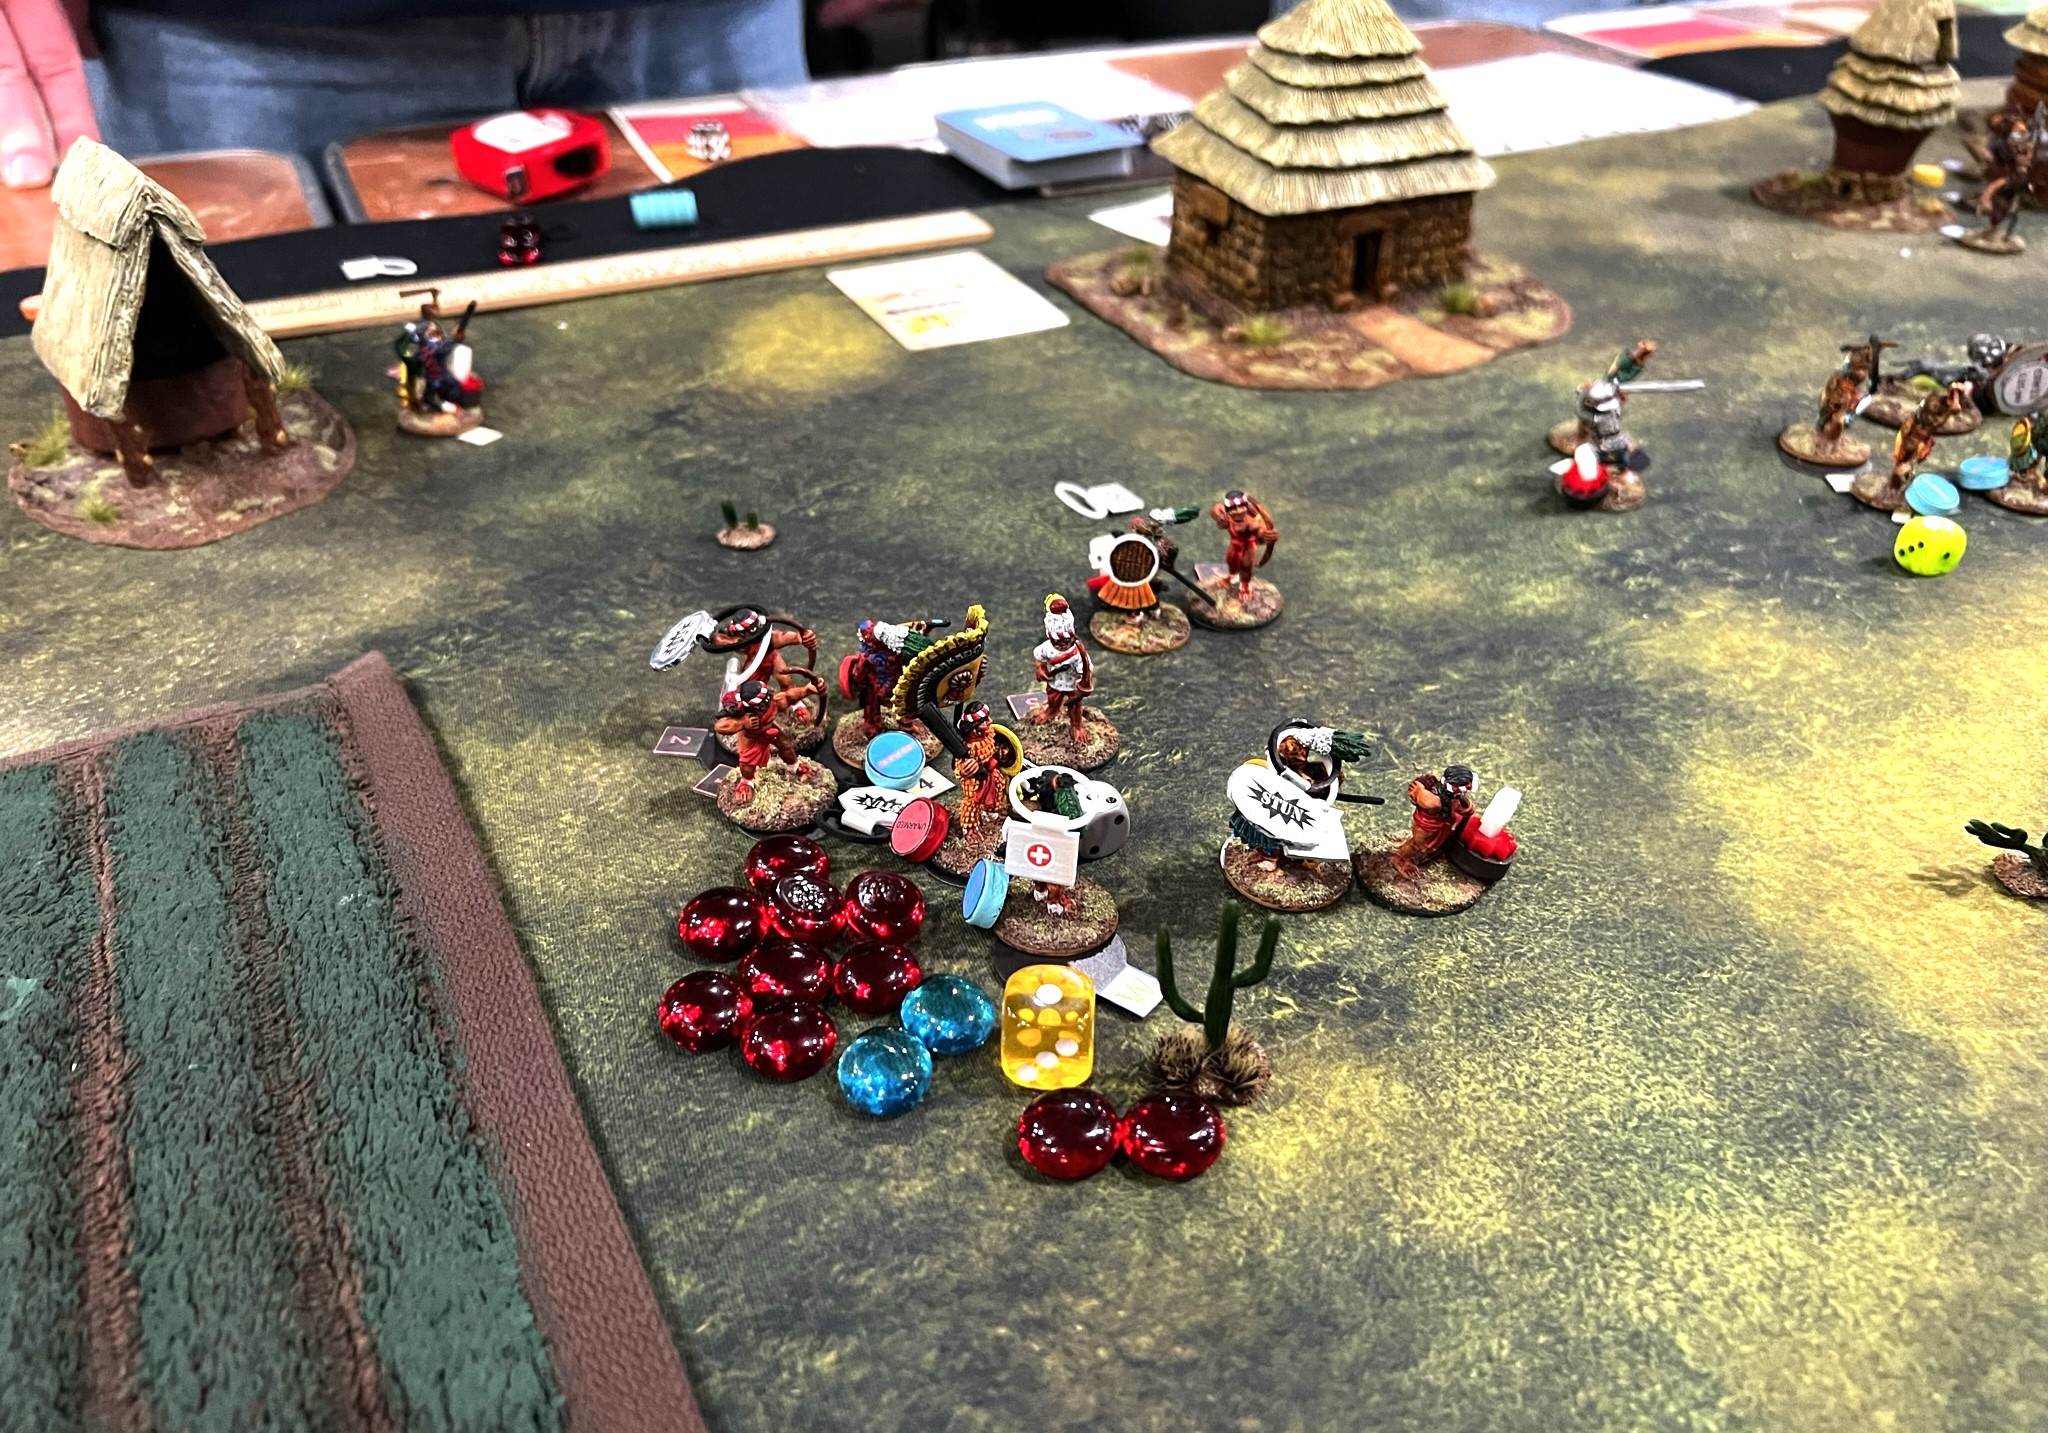
War to Save Yule: Battle for the Bauble of Time (Wars of Ozz)
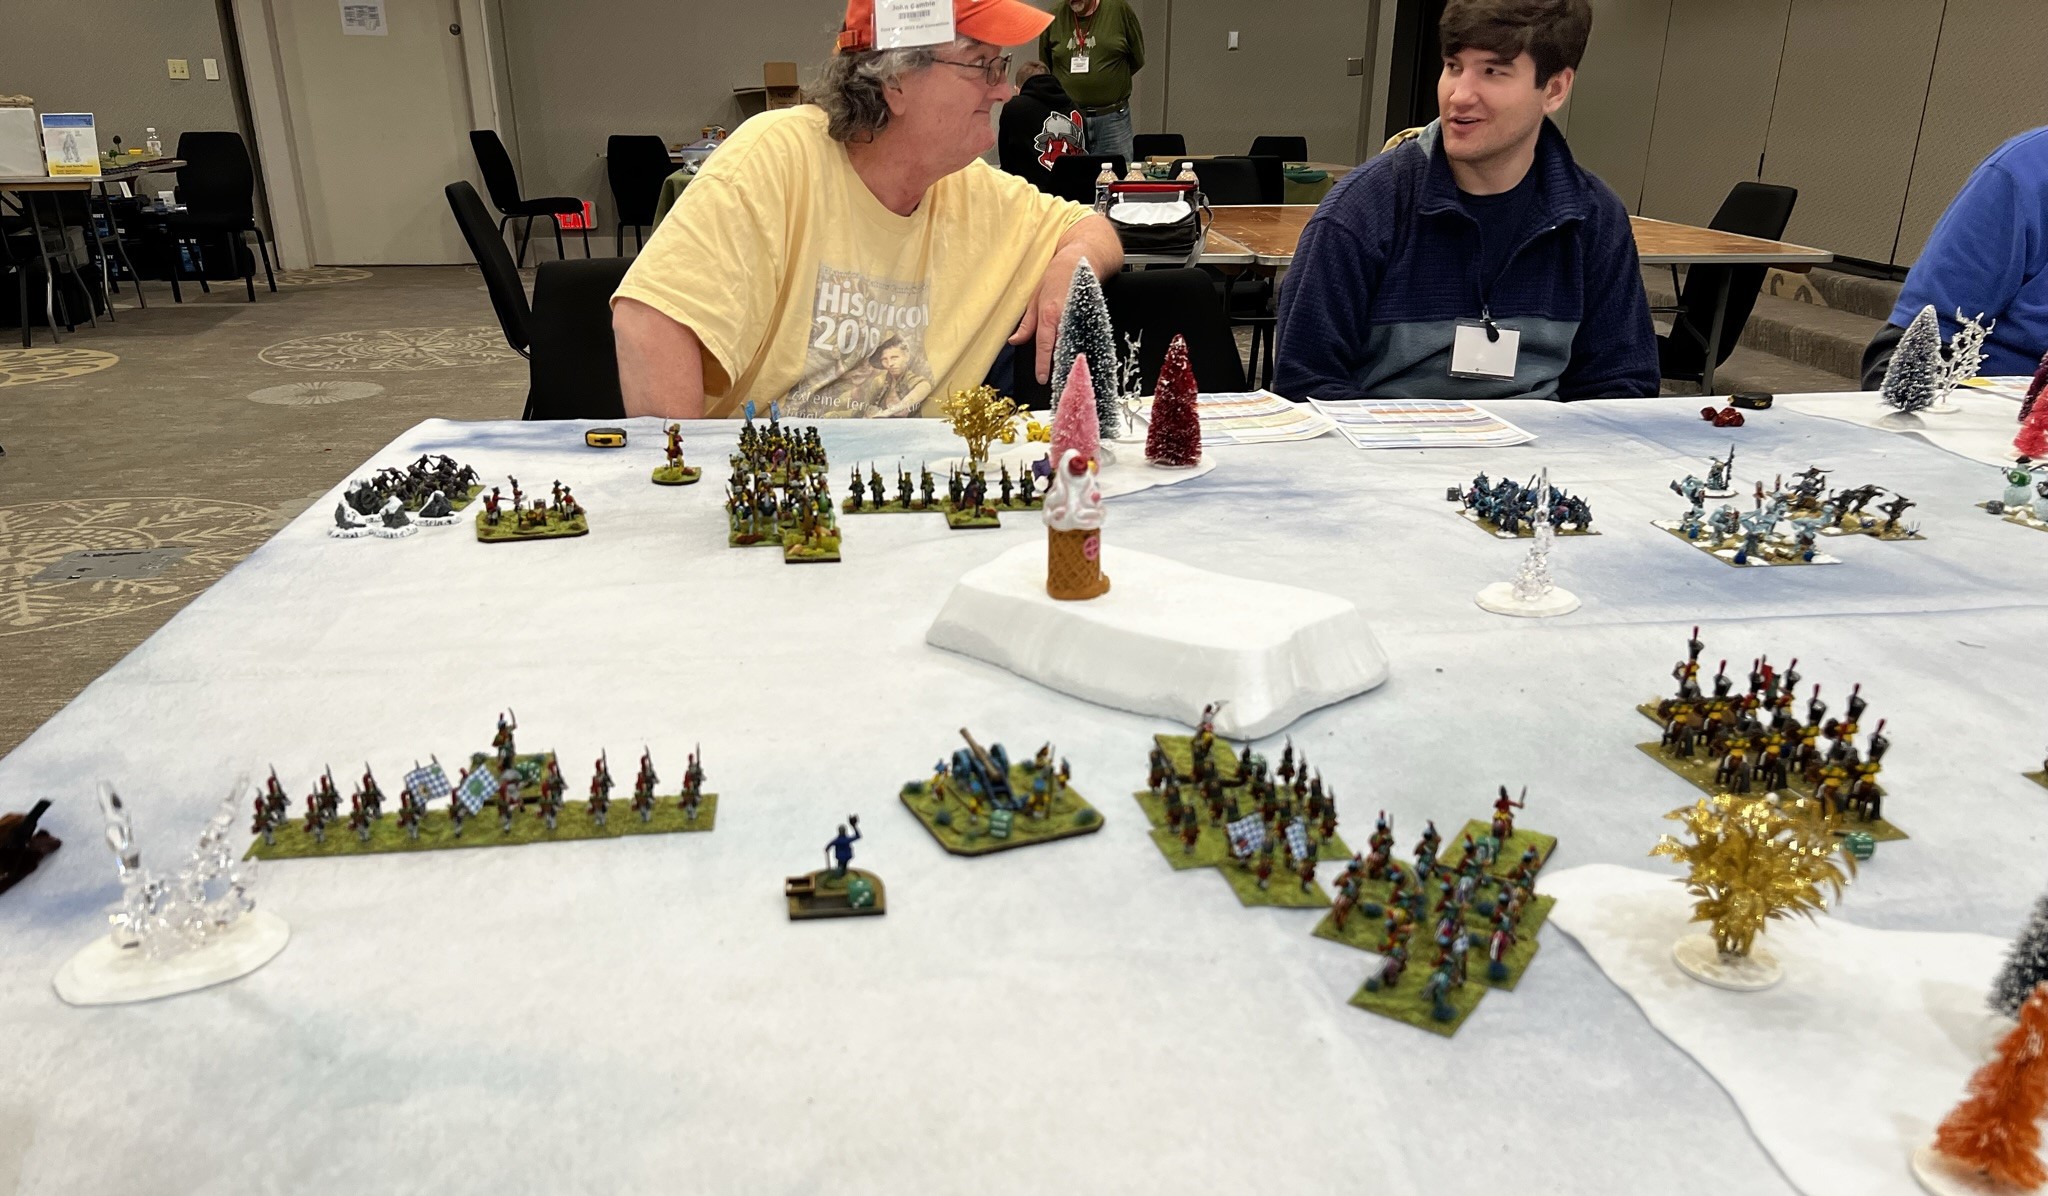
After a short sleep, I played in another Ozz game on Saturday morning. This one was the second of three linked Wars of Ozz scenarios that Chris Palmer and Buck Surdu ran pitting the forces of the Ice Queen, Aurora, versus those of Babbo Natale (really Santa). Aurora wants to seize the Bauble of Time – a magic item that can bend time and lets Babbo deliver all his toys in one night. Of course, Aurora wants it for her own evil purposes. The Bauble was hidden in one of three buildings – and the neither the forces of Yule or Aurora knew which one. The goal of the attacking Ice Queen was to search each of the three areas – which meant that her forces needed to clear defenders from them first. I played on the Yule side in this game, on the Yule’s far left flank.
The game set up. Bruce, Buck, and Chris discuss the scenario.
The three possible search zones were as shown below.
The 3 search zones and defending Yule.The 3rd zone up close (Yule left flank)My game view – Teddy Bear infantry, artillery, & Toy Soldier infantry.Teddy Bear Infantry base.Toy Soldier Infantry base.
Here is a photo of me by Chris surveying the battlefield:
A view towards my position. Aurora’s forces were attacking from the right here. I think I look tired!Opposite view as Chris briefs the players earlier.
The forces defending the buildings/search zones on the Yule right and center were overwhelmed. Only the one on the Yule left held.
Ice Trolls hit the Yule center.My Toy Soldier Infantry are engaged by Krampus troops.
The odds were in favor of the Ice Queen at this point with 2/3 search zones in her control.
Bruce tries to fight off the Ice Trolls.
In the end we were lucky as the Bauble was in the last search zone and safe from the Ice Queen, so a victory for us. Chris would run a second follow on game later that I will share a few pictures of at the end of this post with others that I did not play in or GM. I did play in the 3rd linked game as well – more on that game in a bit.
The game ends.
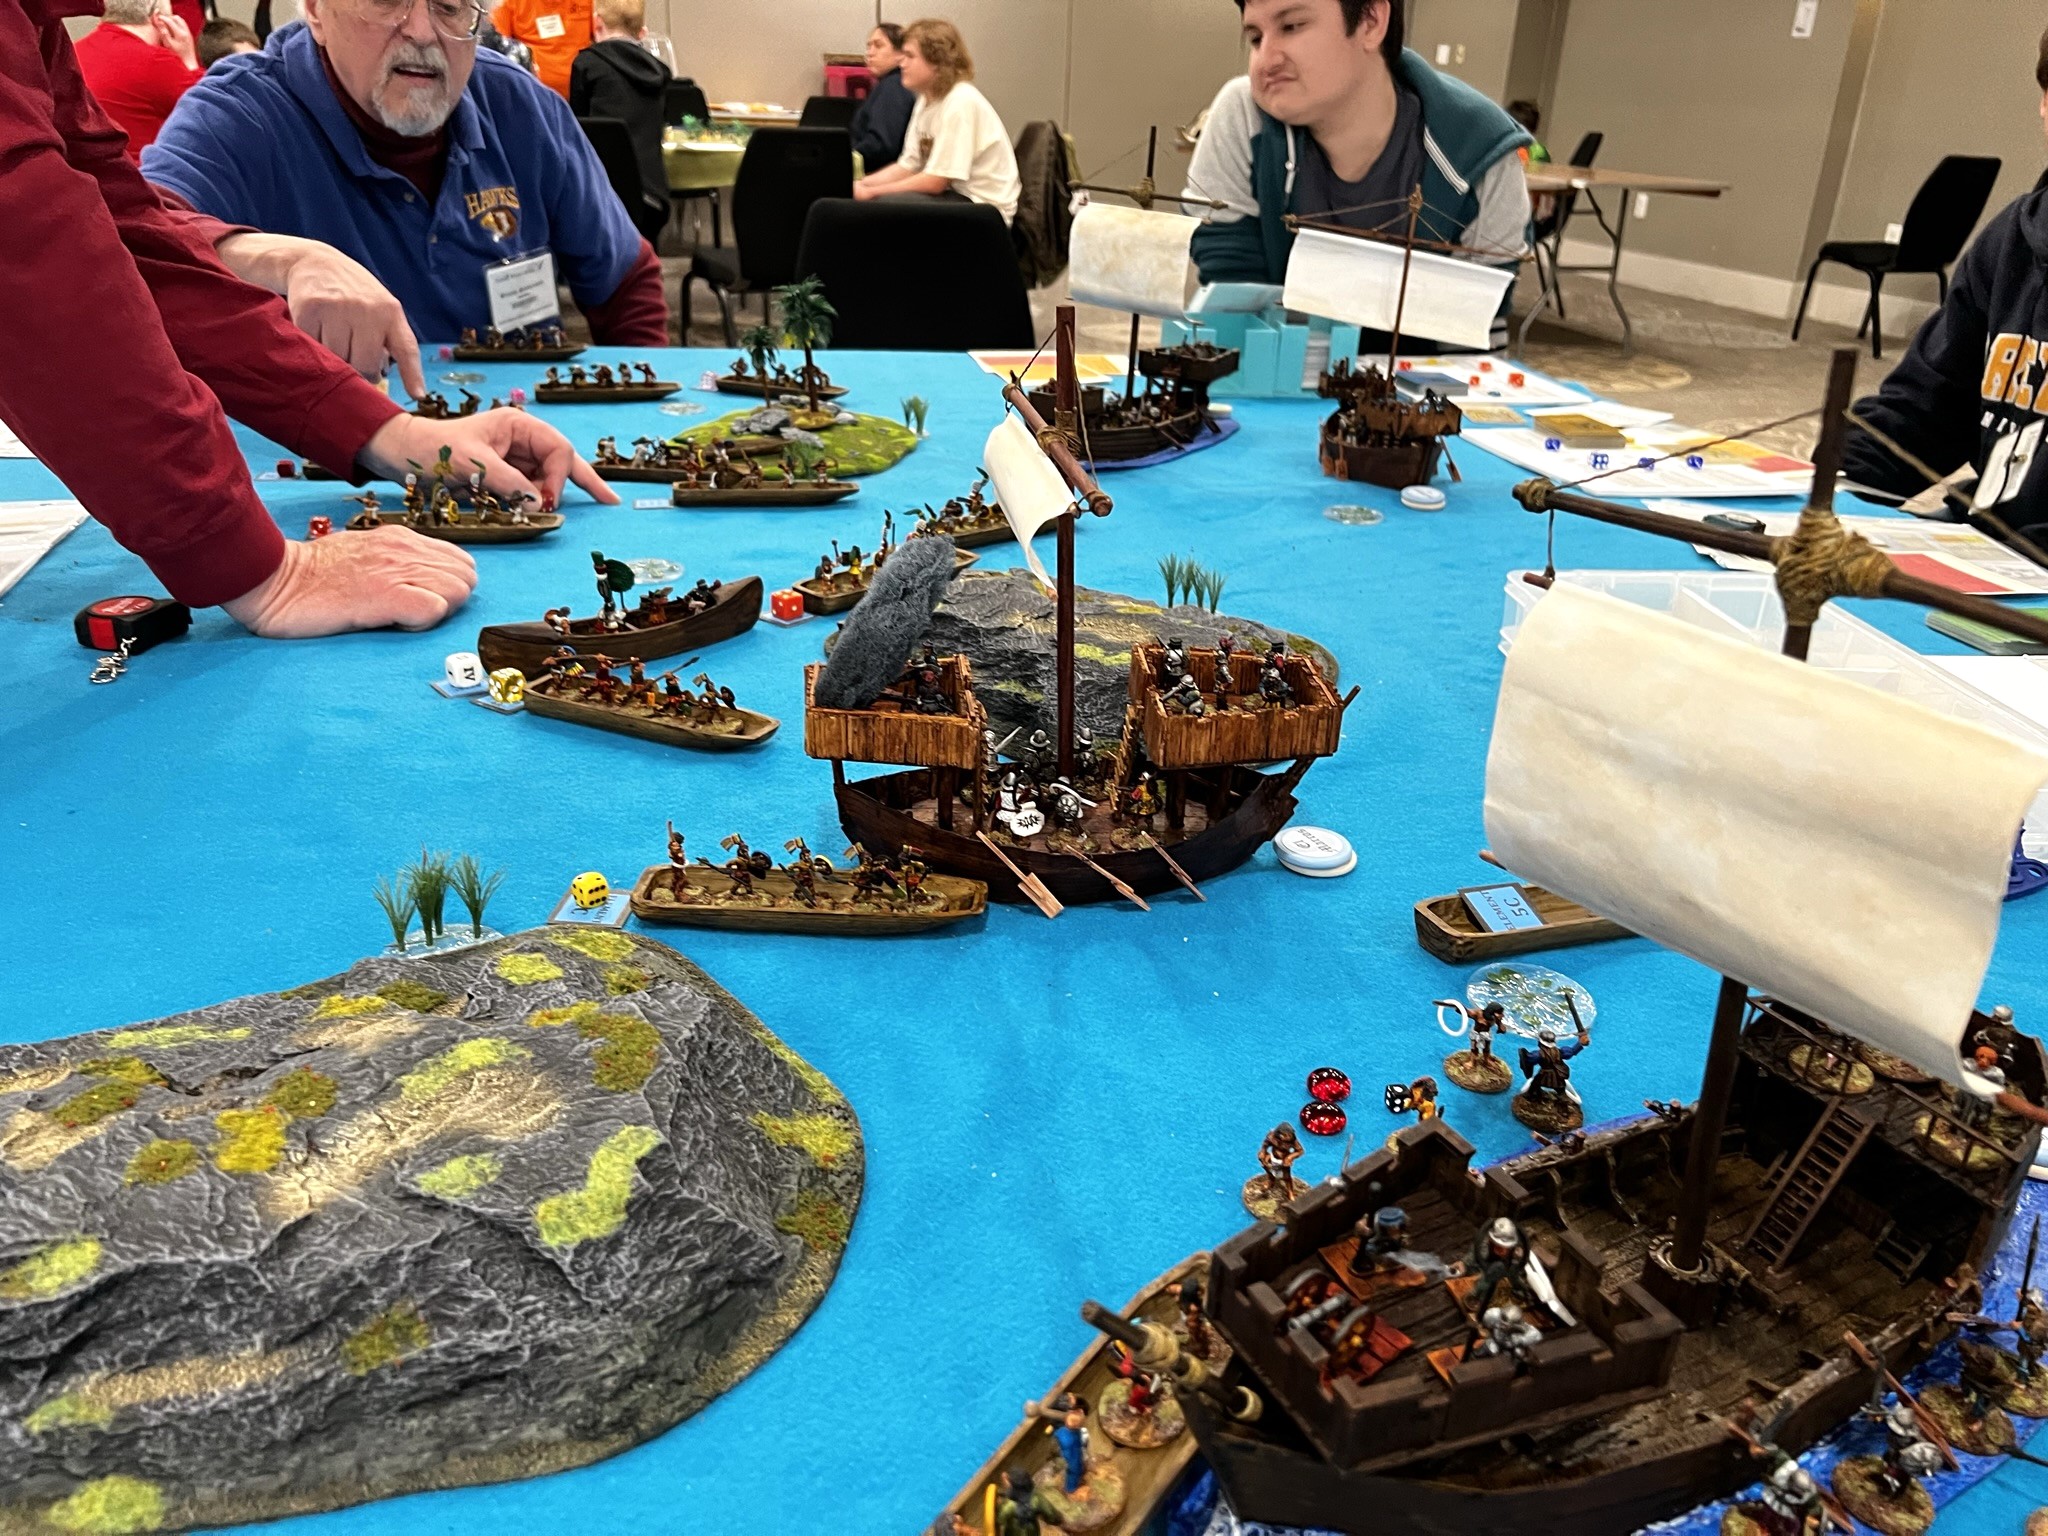
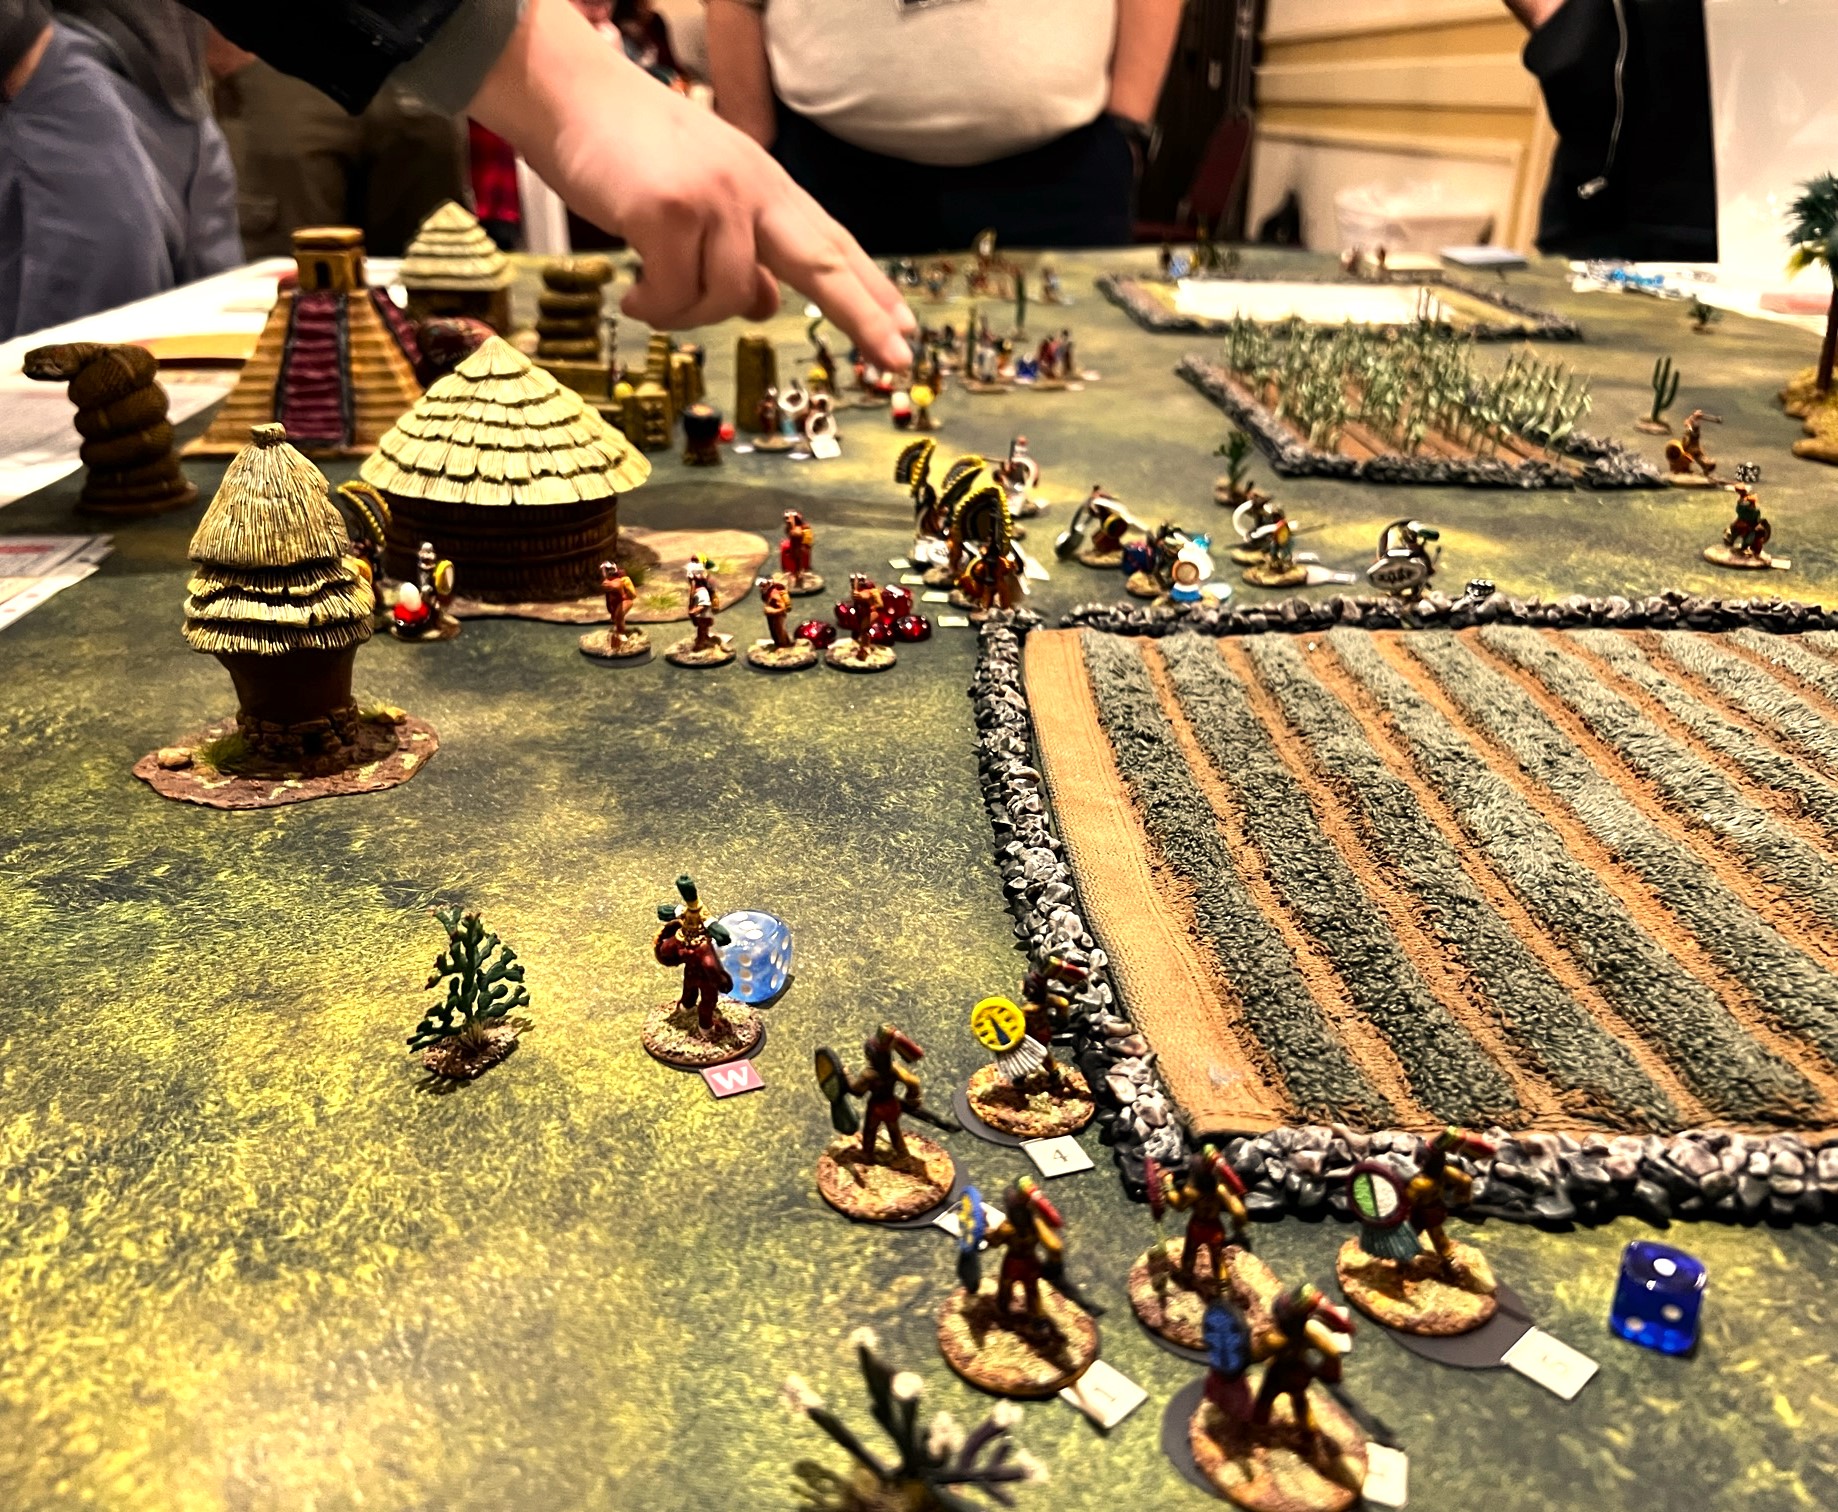
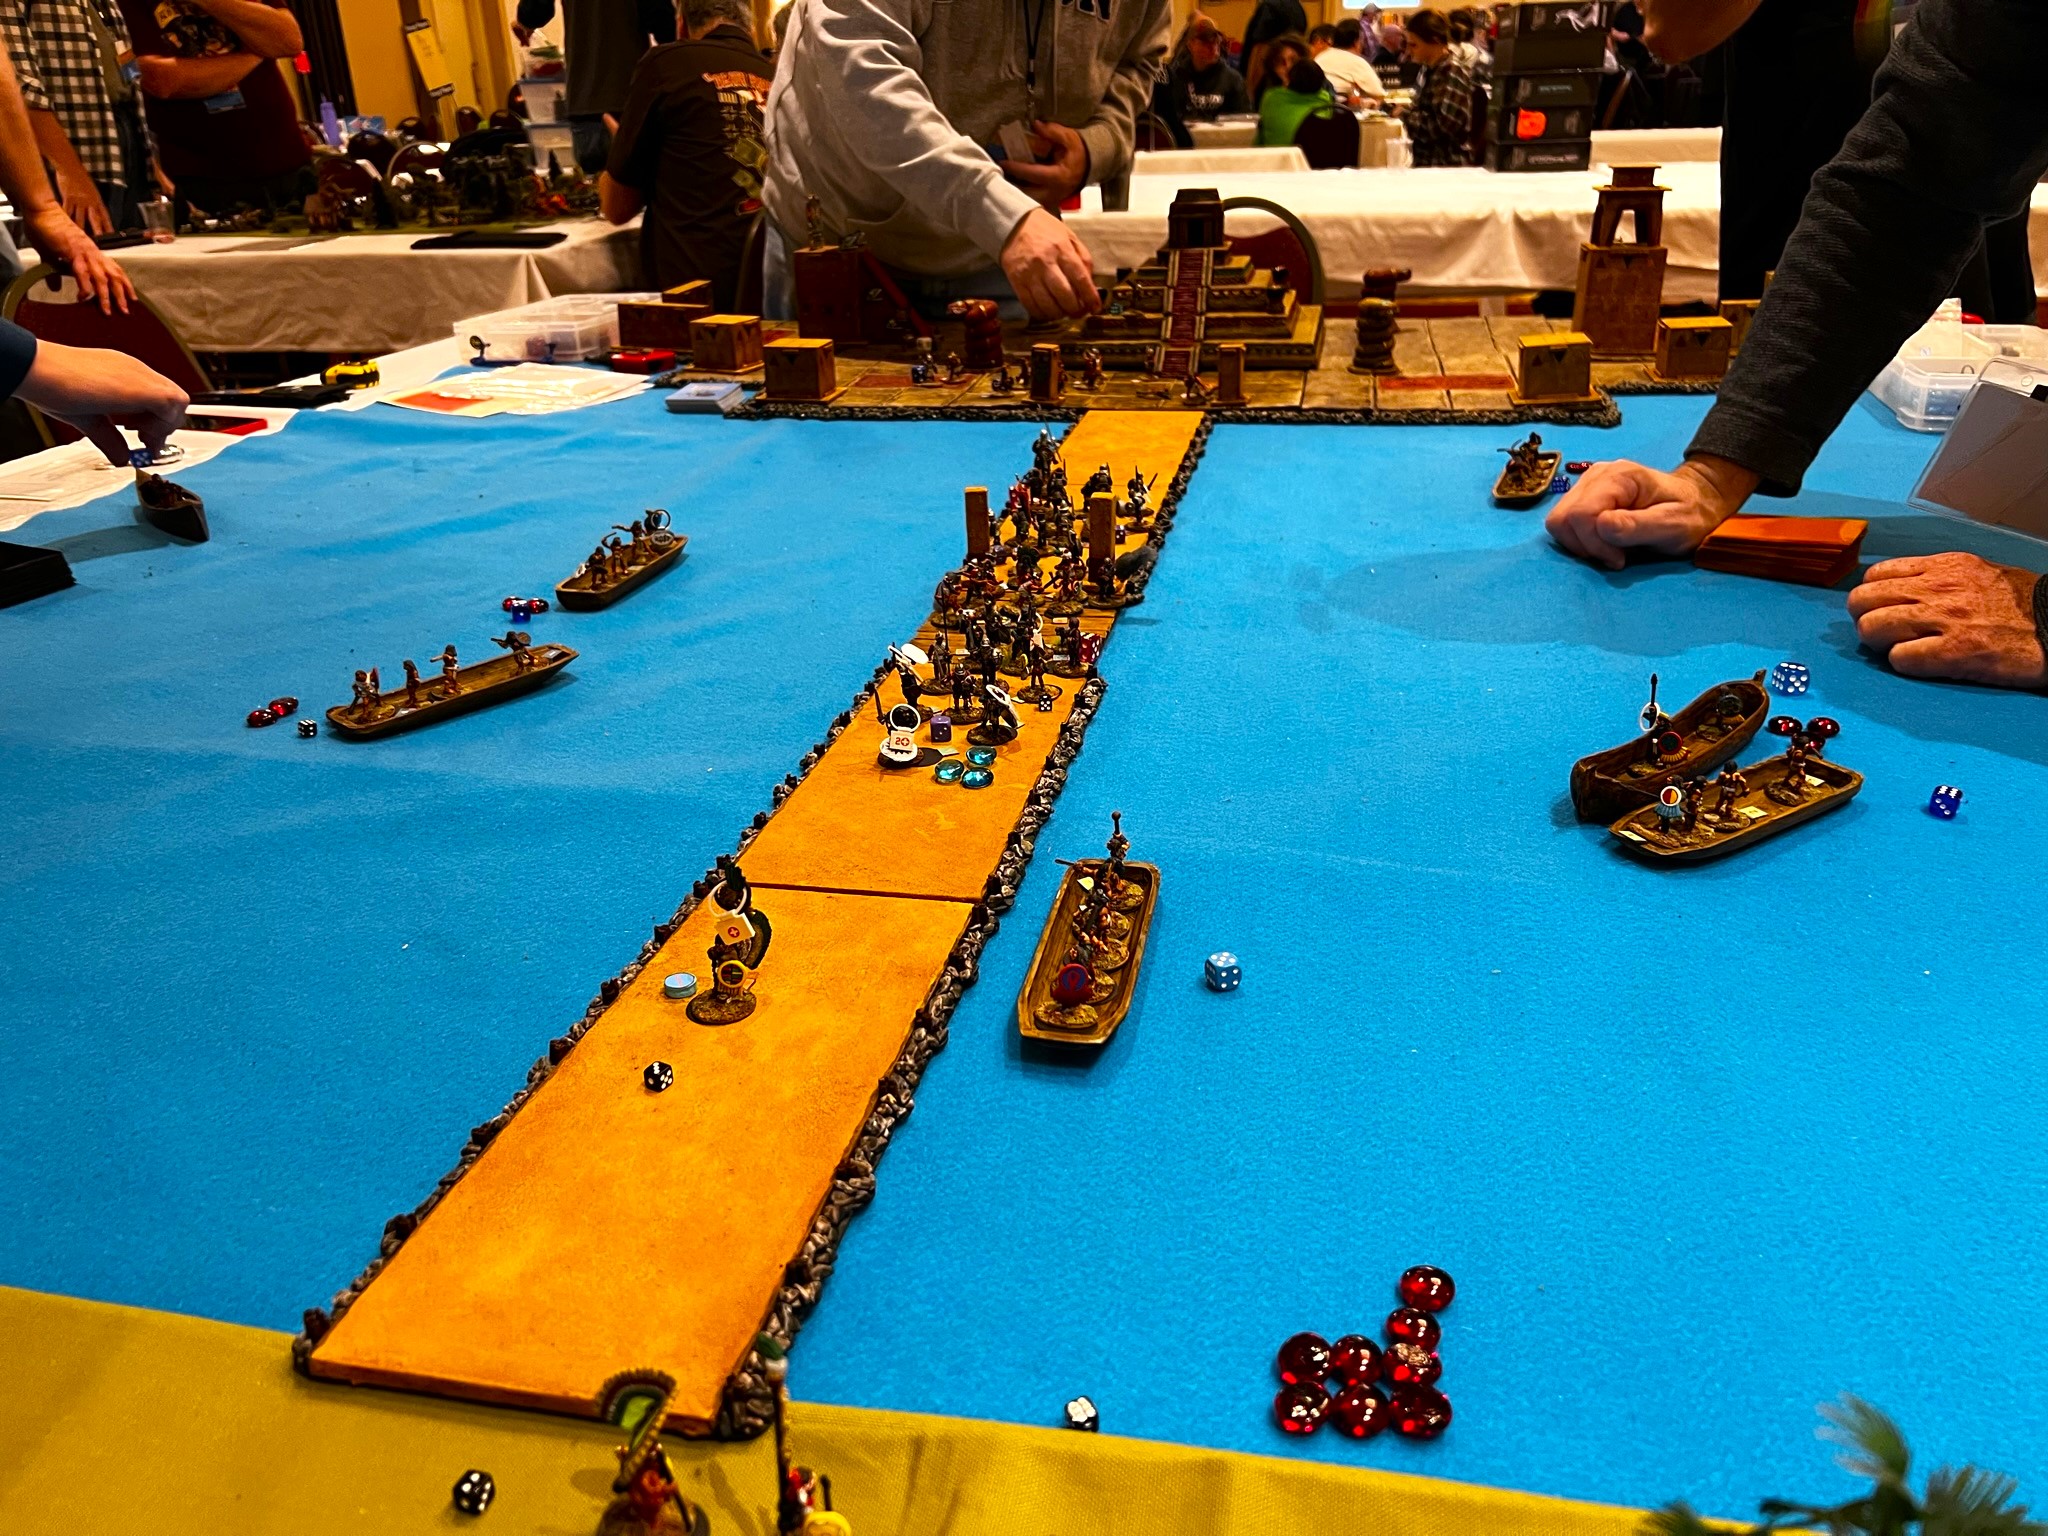
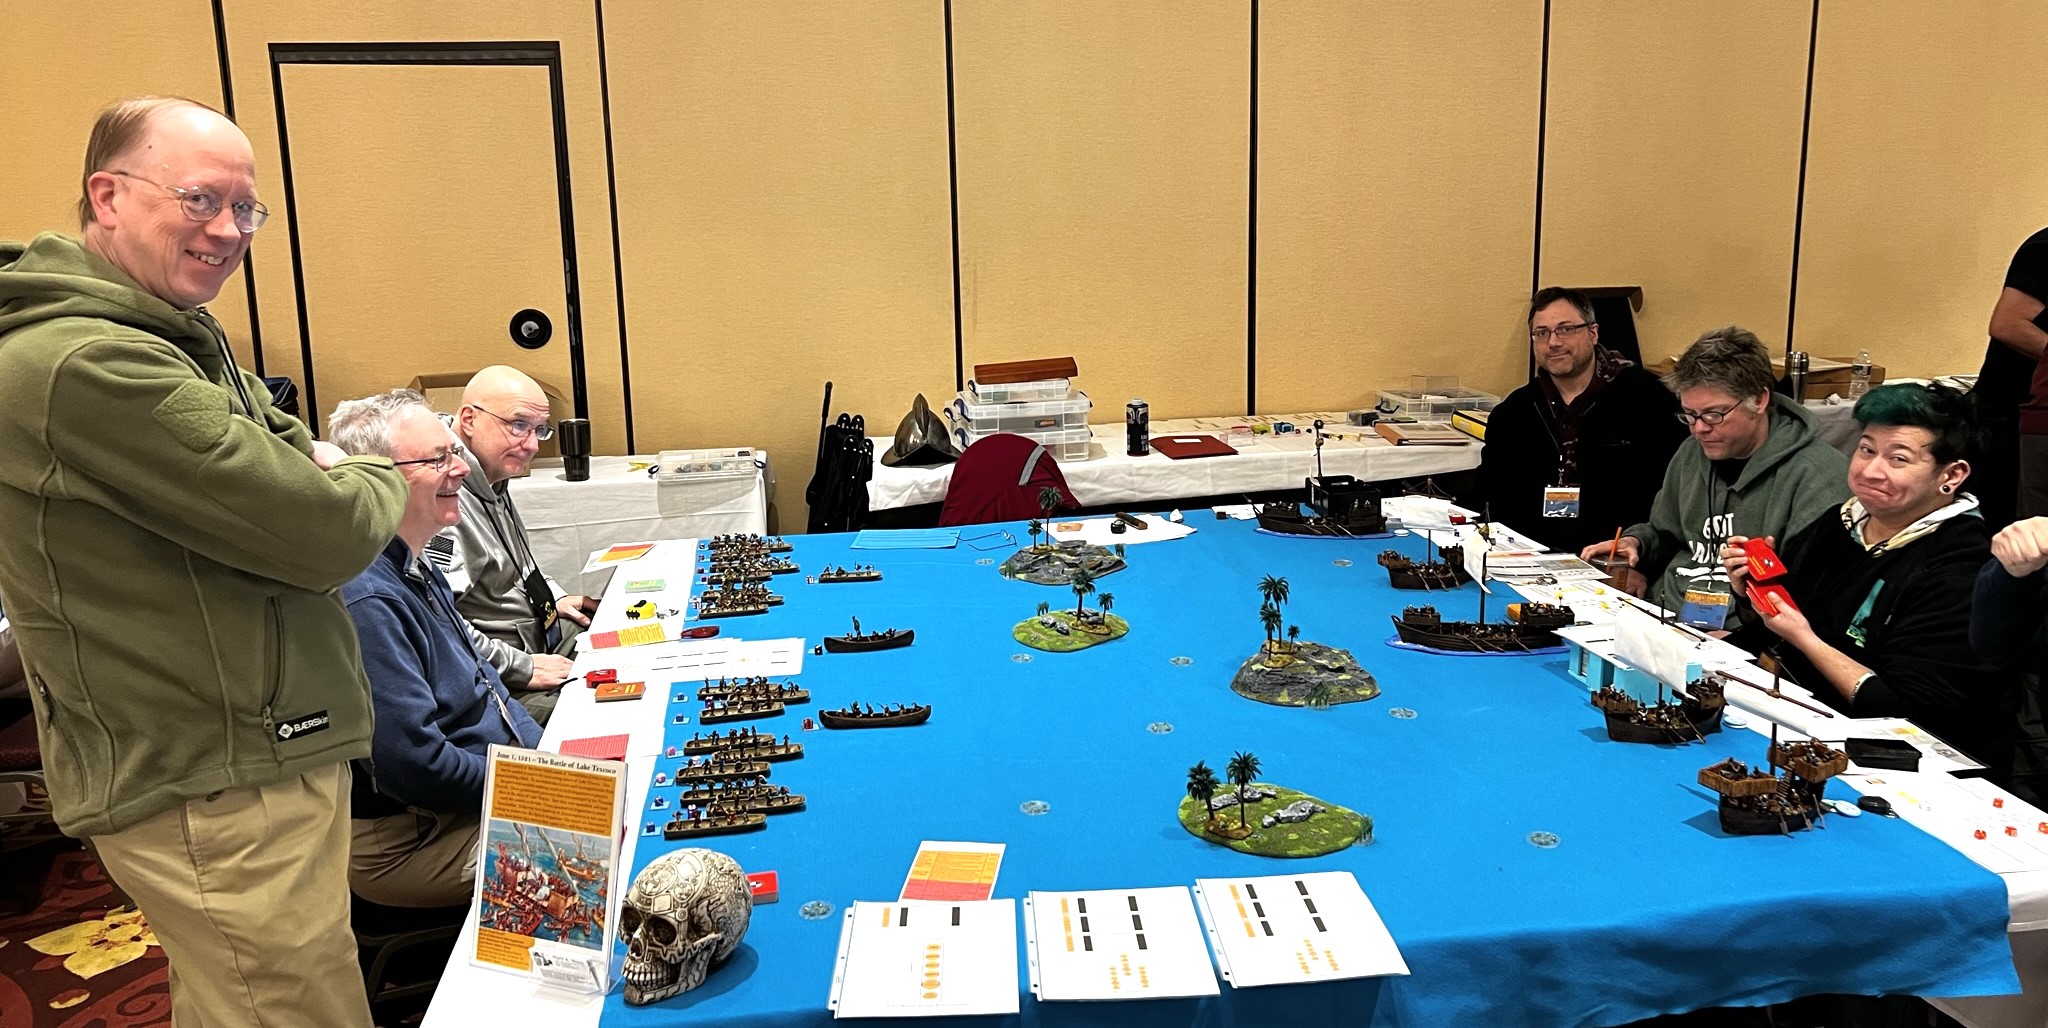
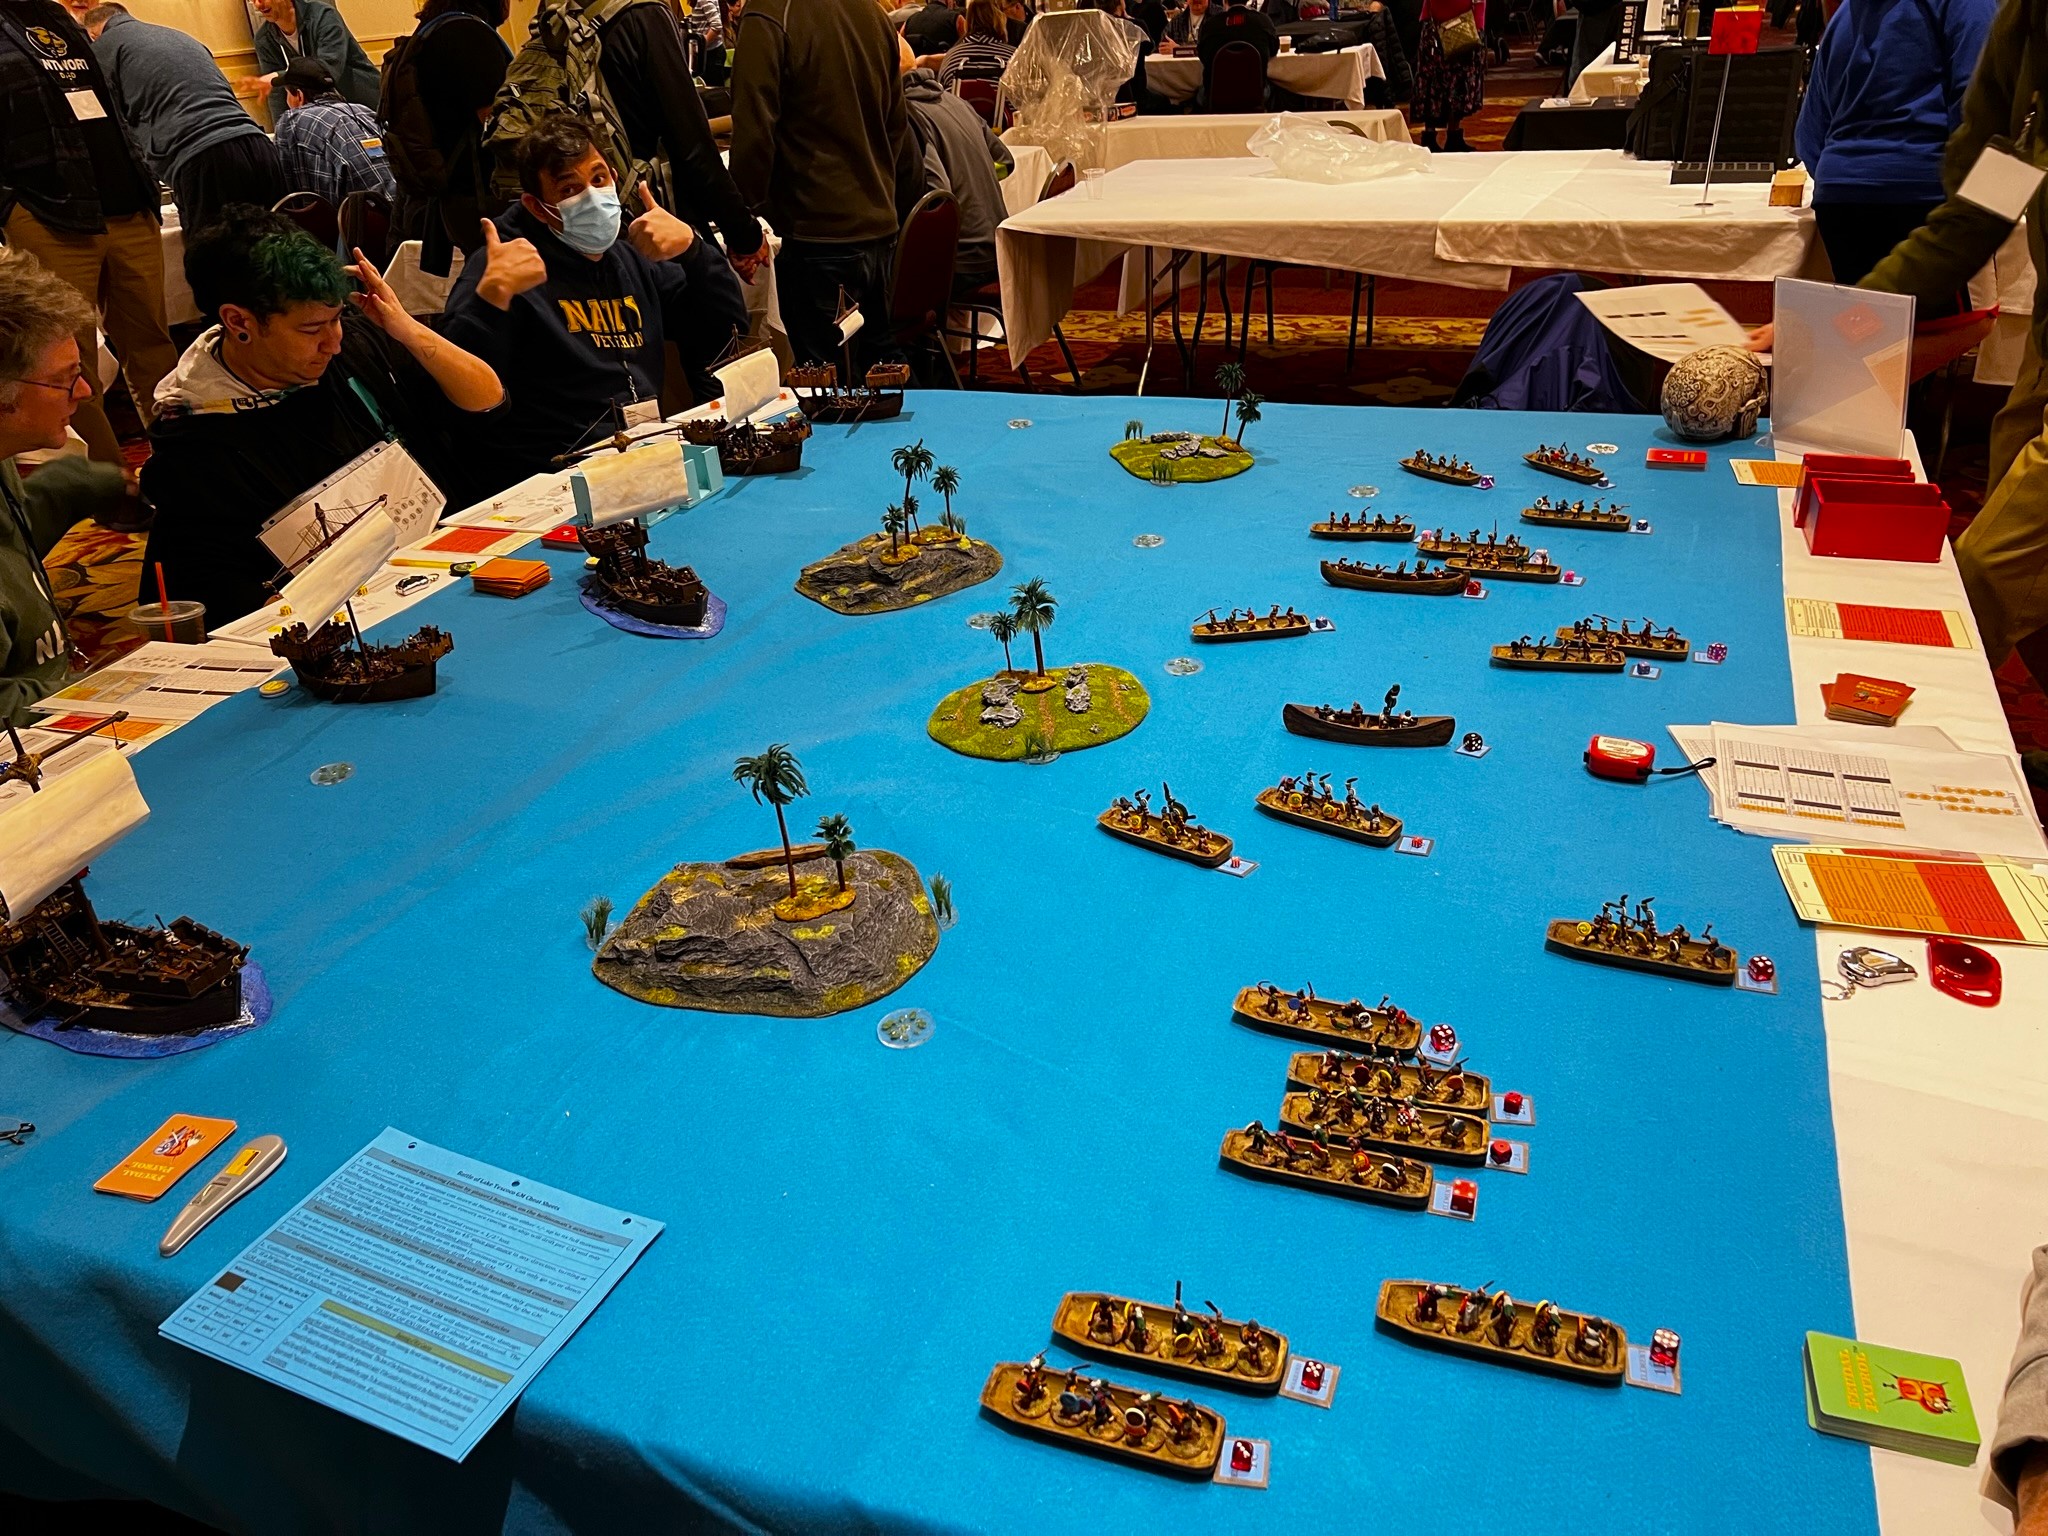
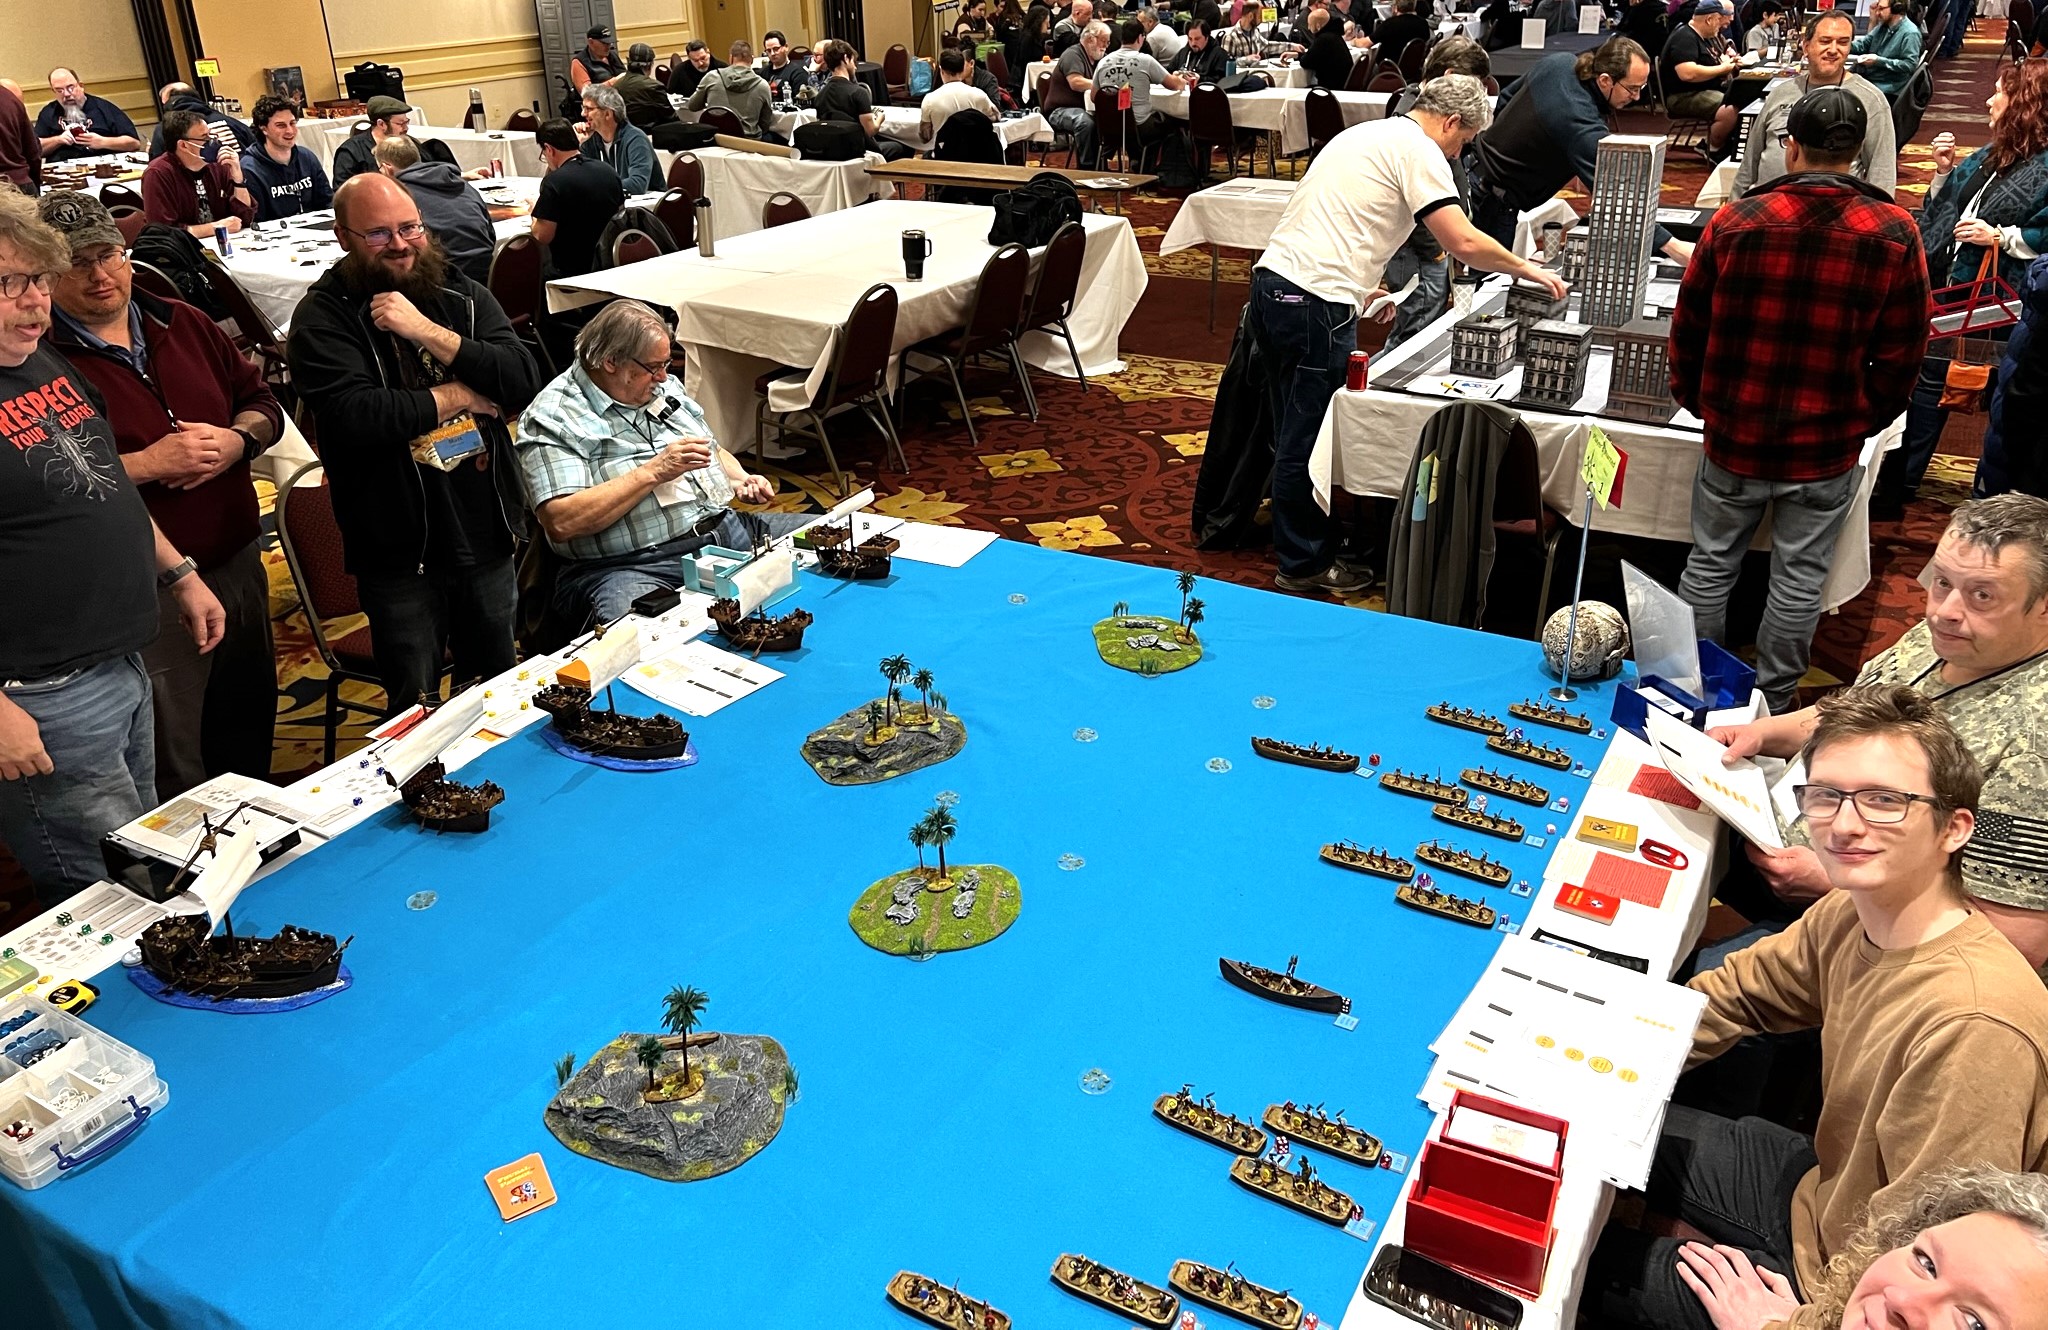
The Battle of Lake Texcoco (Feudal Patrol)
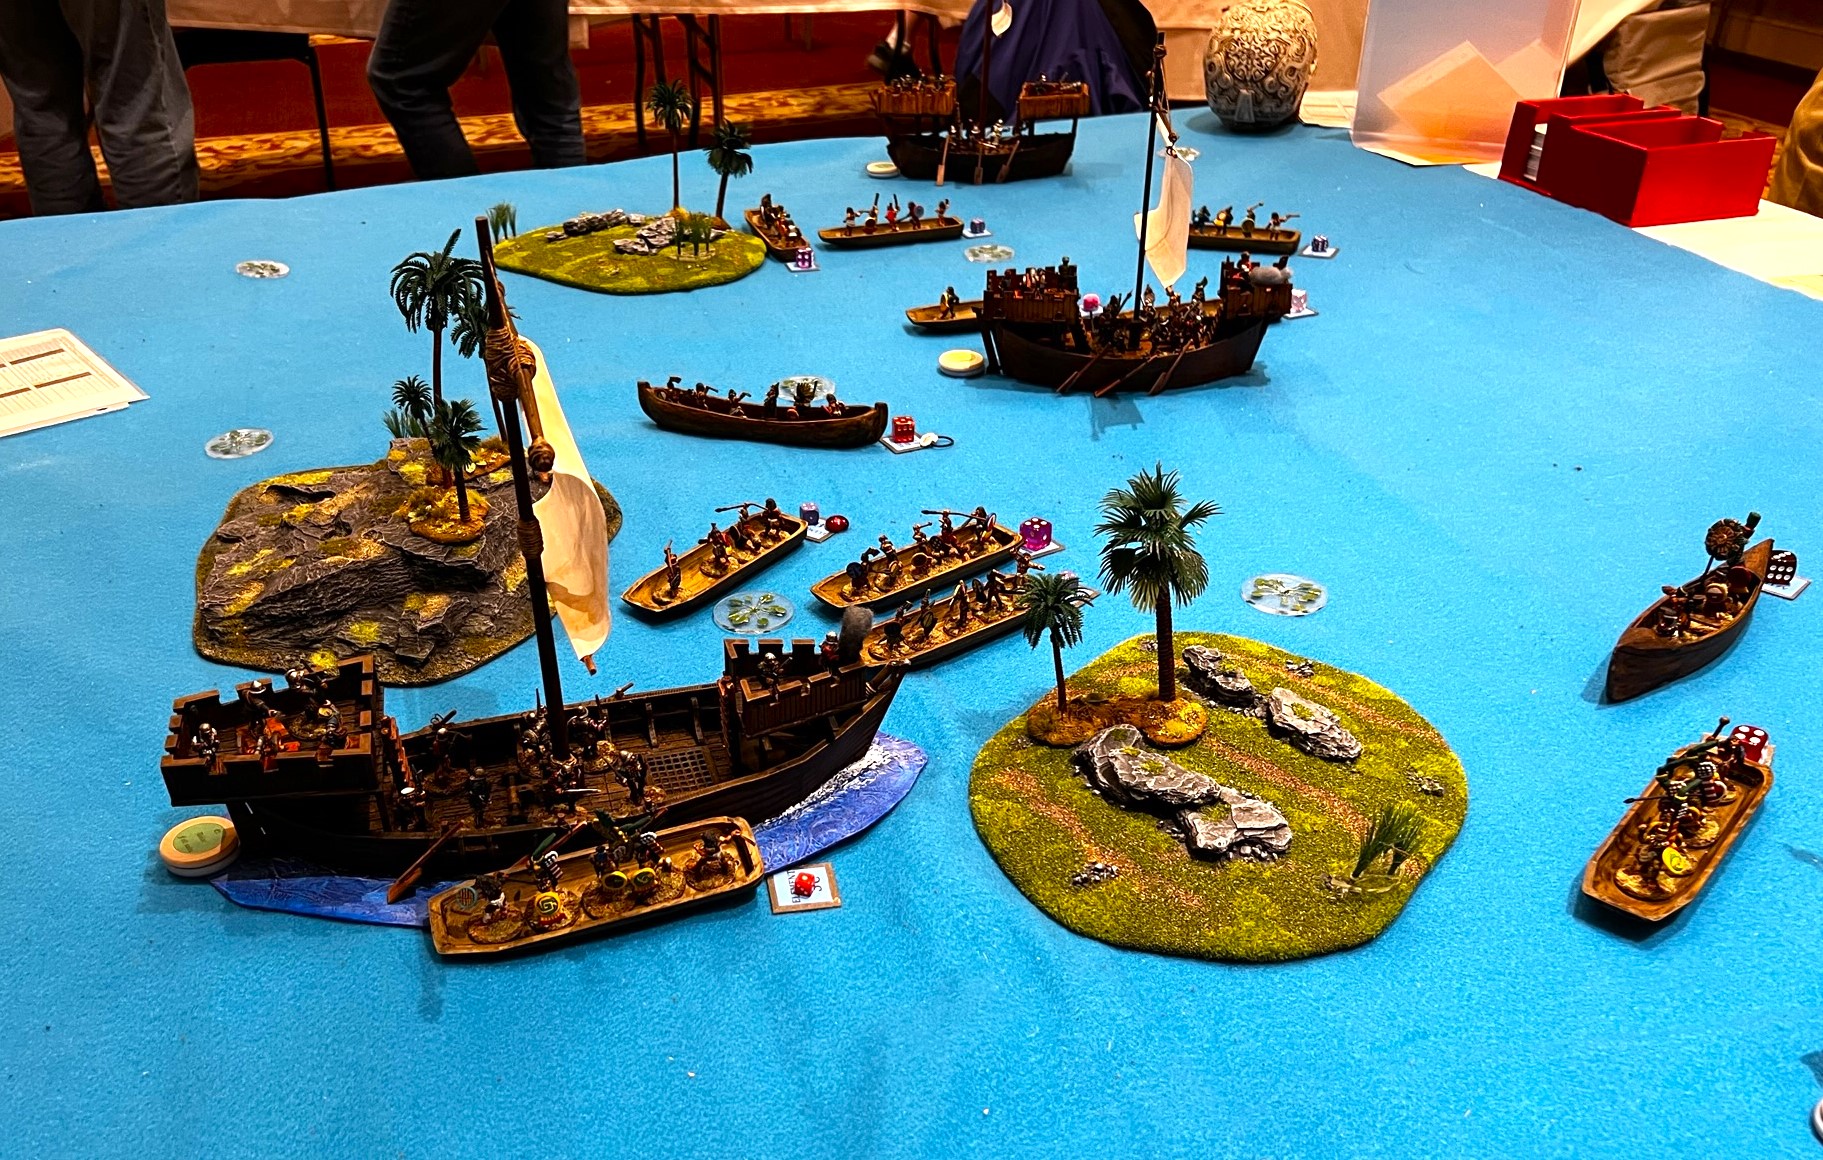
I always look forward to running this game – yes it’s massive but more importantly a lot of fun. Basically there are 5 brigantines loaded with conquistadores and primitive cannon (lombards or falconets) that need to cross the tabletop and shell the other side of the table – where the Aztec capital of Tenochtitlan is located. Opposing them are 21 war canoes filled with Aztecs hell-bent on boarding the invaders’ ships and stopping them. VP are awarded for shelling the city, boarding a brigantine, sinking canoes, and for casualties on both sides. The Spanish have to try to navigate the uncharted waters to do this too.
The set up for the game.
The players were excellent!
The start of the game.
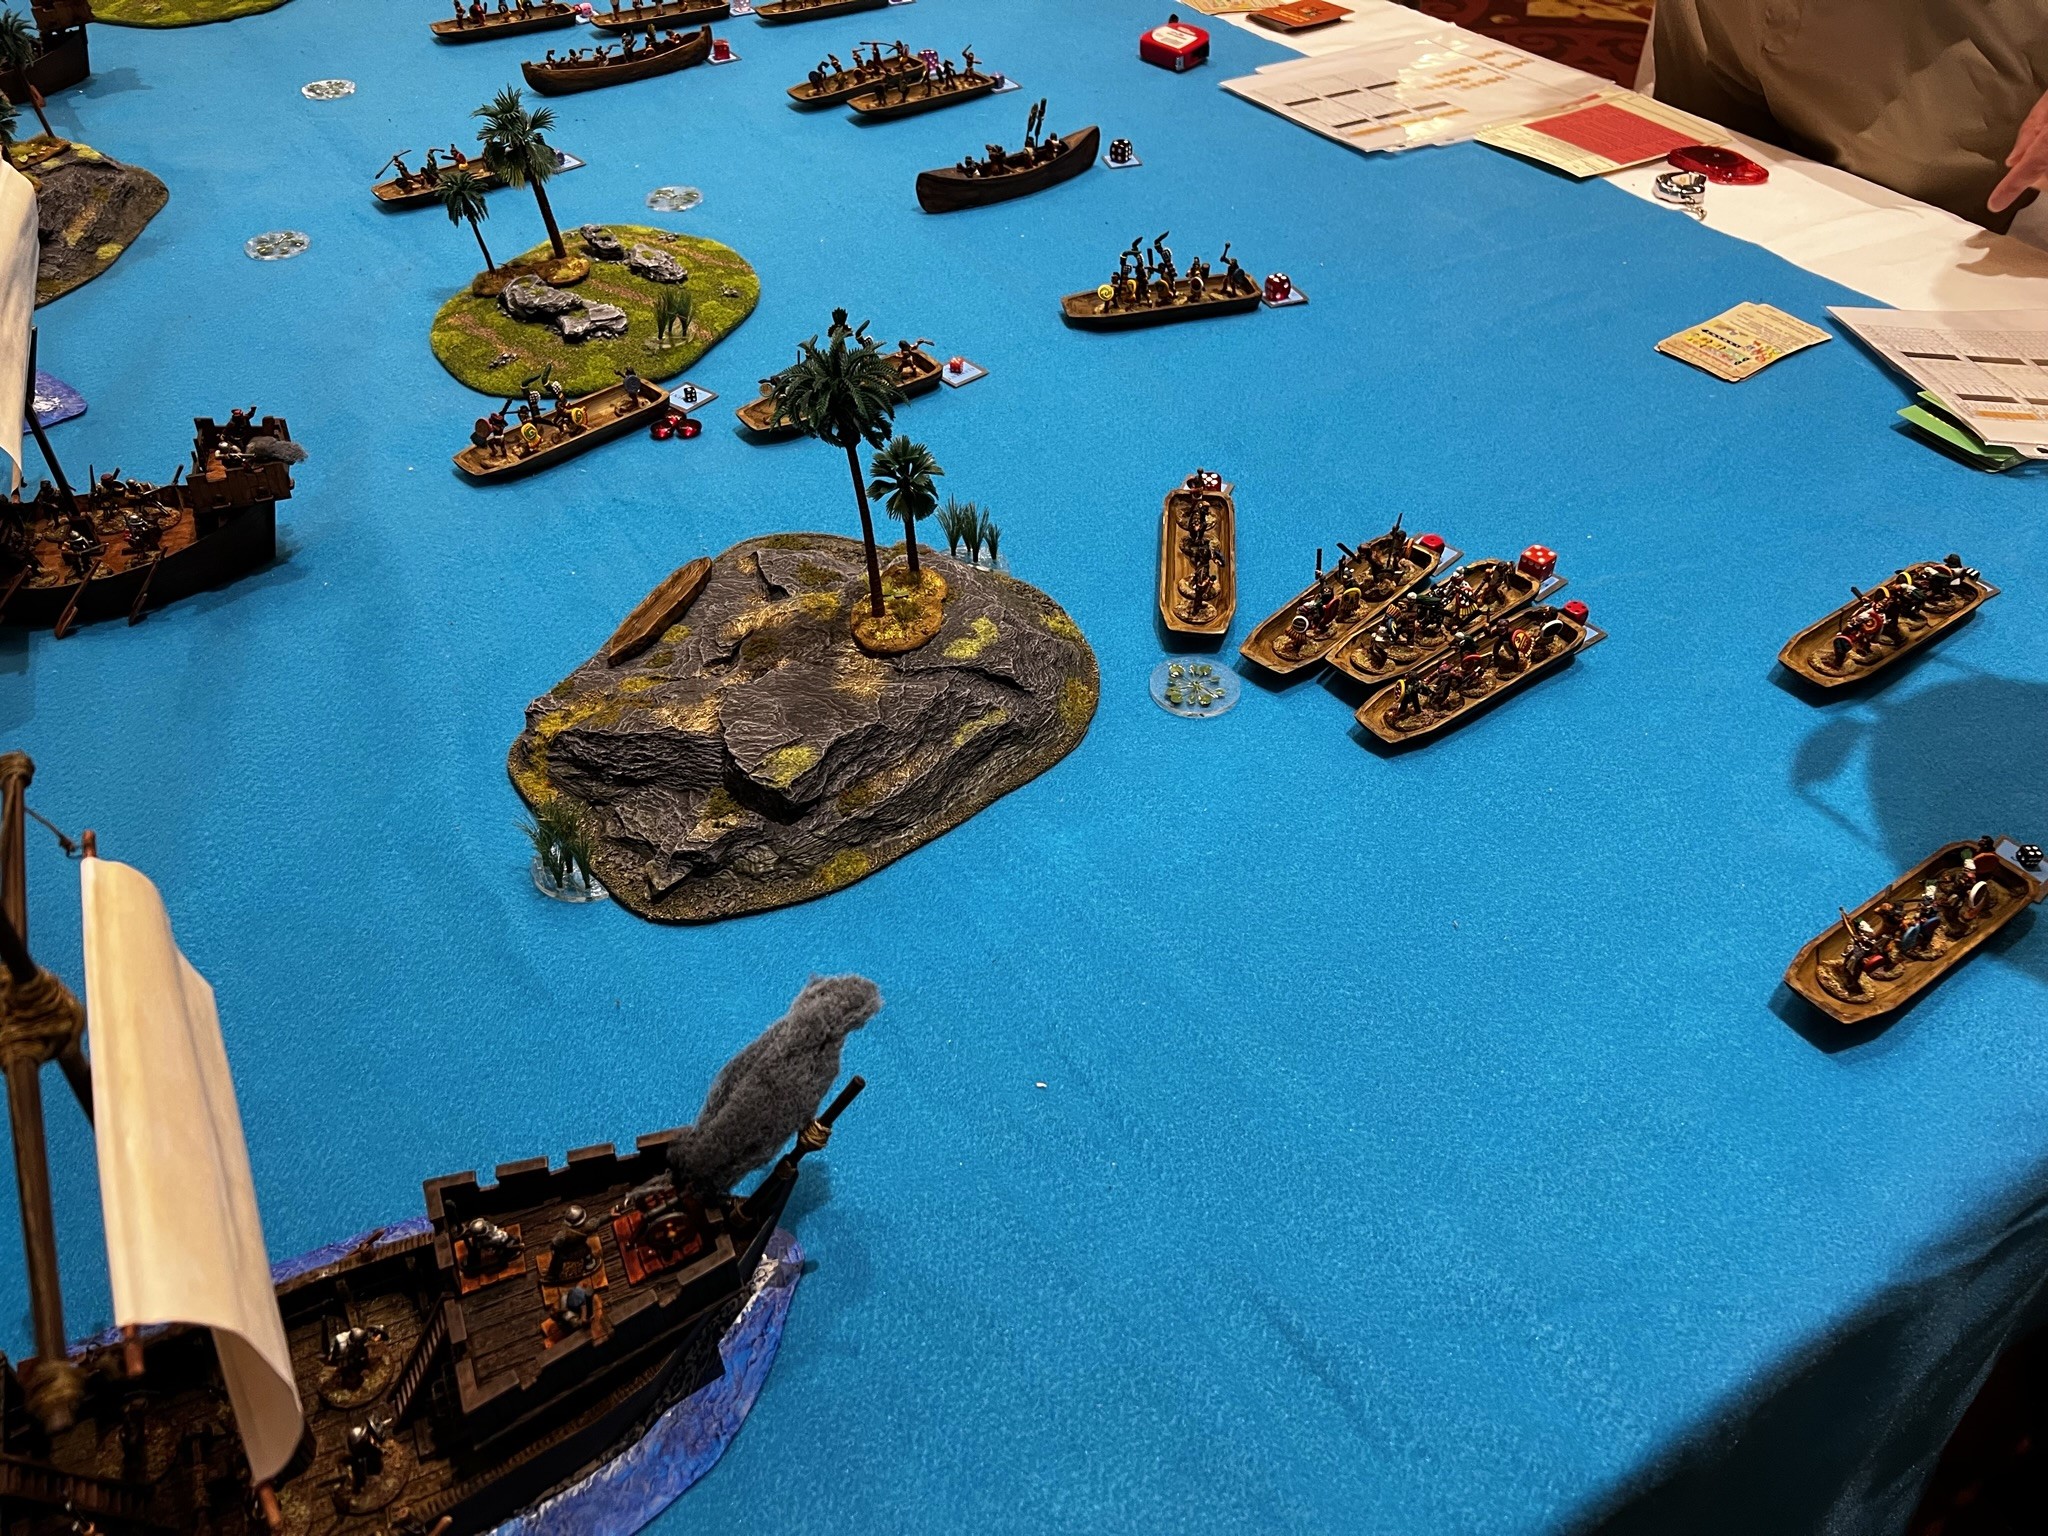
The Spanish moved out and avoided collisions with each other or the islands. Only one got stuck on an underwater obstacle (El Gregorio) – resulting in the Aztecs getting a “Burst of Exuberance” which allowed it to be boarded first. Eventually, all of the brigantines would be boarded to greater or lesser extent.
Boarding!
The Spanish held on and were able to get three ships to shell the city.
Tenochtitlan takes its first hit of solid shot from El Marcos.A photo from Chris Palmer showing me helping to adjudicate a fight.The battle rages on the lake.
Of course, there was even more boarding!
El Marcos is boarded.
The game was pleasantly and briefly interrupted at this point by the HMGS staff. As it turned out, my game was selected to be honored with a “PELA” award for the time slot. PELA stands for “Pour Encourager Les Autres” which in English translates to “For Encouraging the Others”. These awards are defined by HMGS as going:
“to the games that best embody the positive traits of miniatures gaming, such as well-painted figures, great looking terrain, interesting scenarios, enjoyable rules, good sportsmanship, and an enjoyable time – events that do the most to “encourage others”.”
This was something as a GM that you can really appreciate! I was really honored – and it was nice to get applause from the room and my table too. I think that there were about 30+ games in my time slot – so this was tough to get. The award was a lovely knight figure on a plinth and a voucher for the vendor hall. Thanks HMGS, it has a place of honor at home! Thanks players!
I am awarded a PELA!The PELA among Spanish casualties (hey, I was still running the game!).
In the end, the Spanish narrowly won the game by a score of 367-316. If the Conquistadores had made one less shot into Tenochtitlan, it would have been only a one shot victory.
As this was my last game to GM, I was able to get most of it picked up (thanks again to the HAWKS for all the help) – and get into playing my last game of the convention.
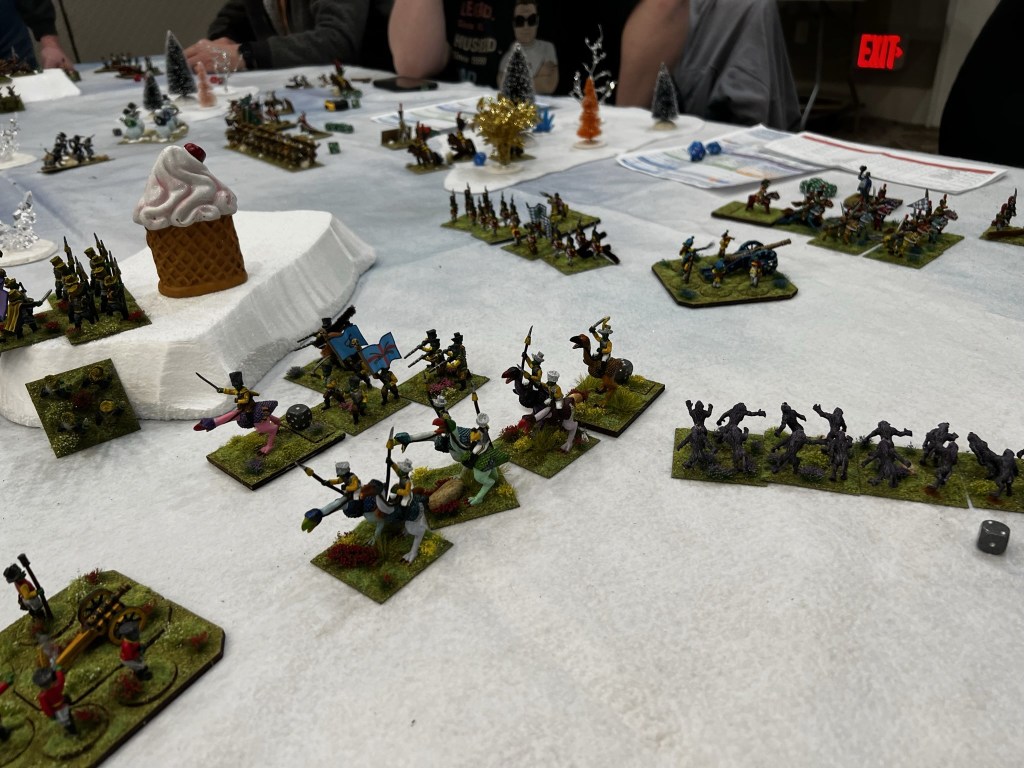
War to Save Yule – Ambush or Fighting Retreat (Wars of Ozz)
This was the third Ozz linked game run by Buck Surdu. In the second game, the forces of Yule held on to the Bauble of Time. Here, the Ice Queen’s forces are ambushing a convoy of Babbo Natale who is trying to get the Bauble to a safe place. I did not get as many pictures of this game – but I played on the side of the Ice Queen this time. We ended up taking the Bauble (Giant Evil Snowmen charged the convoy and stole it). It was a lot of fun.
My Ice Trolls take a beating from the Toy Soldier cavalry.
I was on the far left flank of the Ice Queen’s forces – and I after the Toy soldier cavalry and the Teddy Bear artillery beat up my Ice Trolls and Krampus, I was able to flank the Teddy Bear battery with Dark Elves. This attack sent them fleeing and the rear middle of the battlefield became congested with forces. Meanwhile, Chris Palmer valiantly pursued the Snowmen with the Toy Soldier cavalry. Luckily for our side, the Snowmen escaped into woods where the cavalry would not move as quickly – with the Bauble. Victory!
My Dark Elves move up the Yule flank.Snowmen abscond with the captured Bauble!
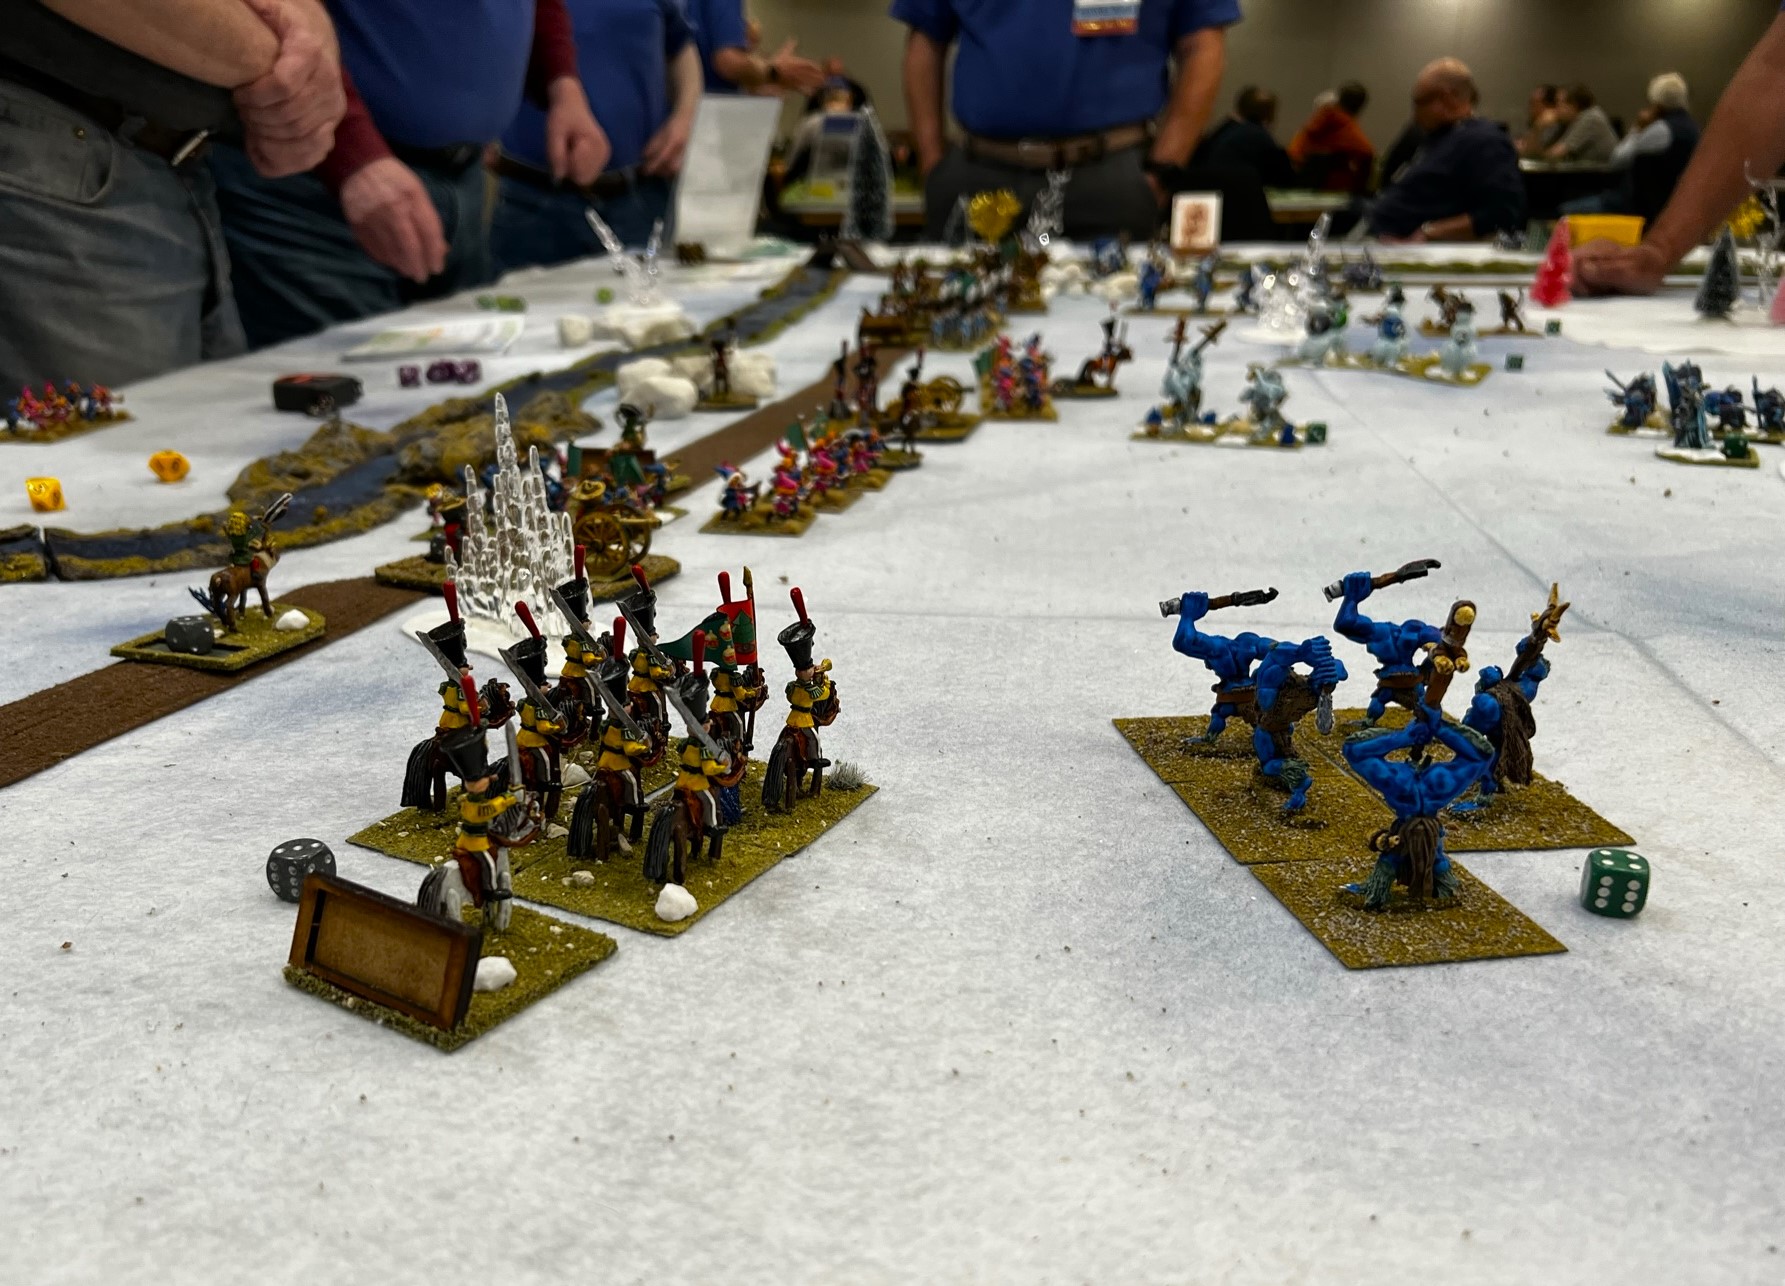
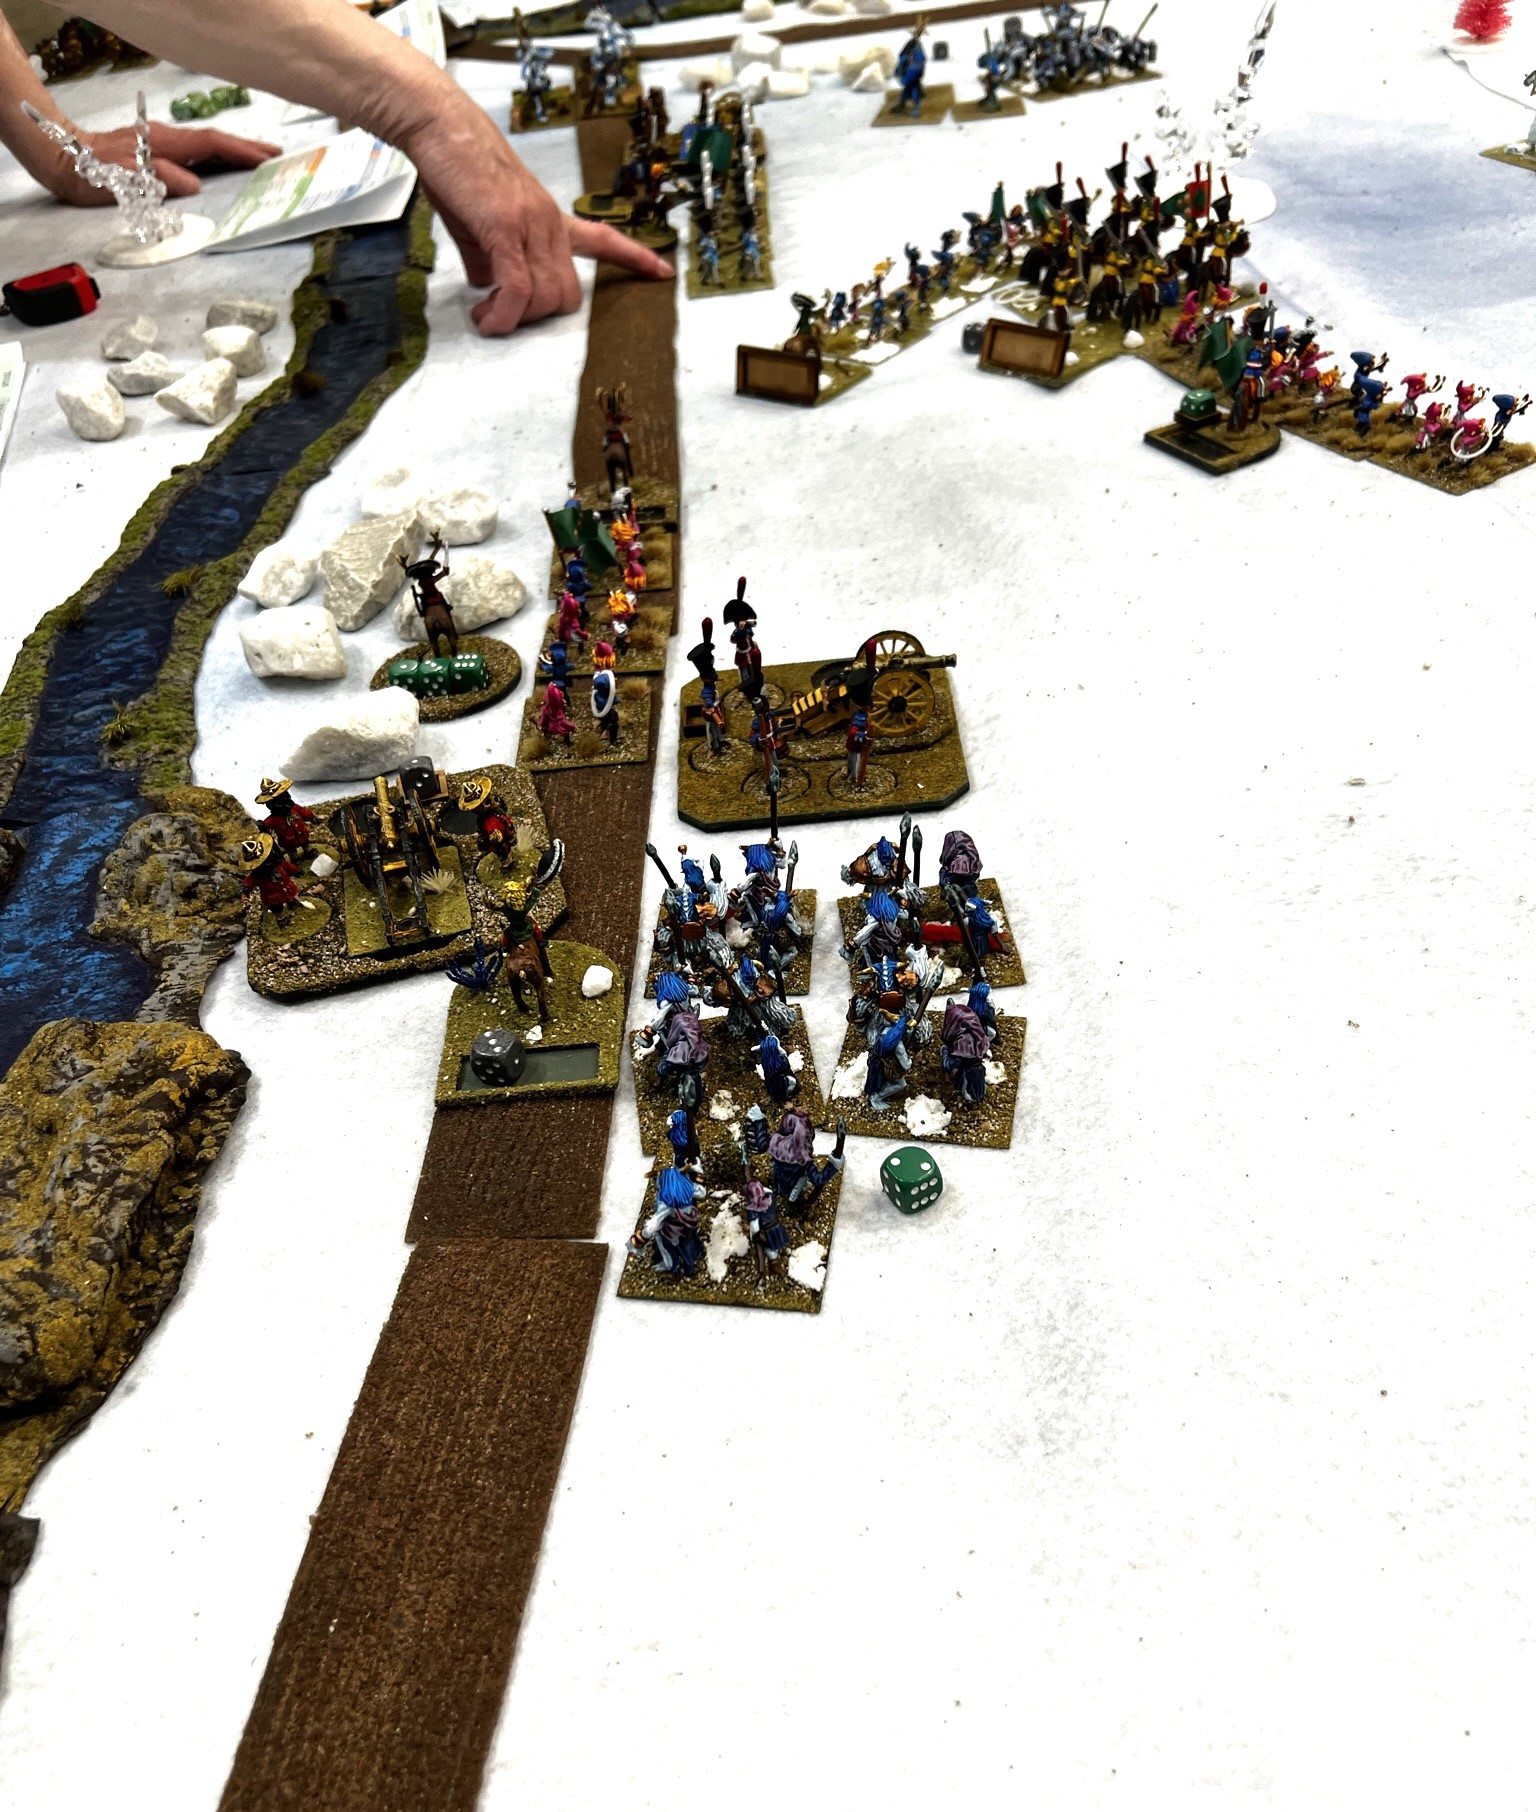
Other Game Photos
There were of course many other games – and I tried to get some photos of them plus I have included many from Chris Palmer. This is not all of the games at Cold Wars by any means.
For the gamers, please enjoy these here! For the GM’s, kudos on the work you put in on some amazing games, and apologies in advance if I get any descriptions wrong here.
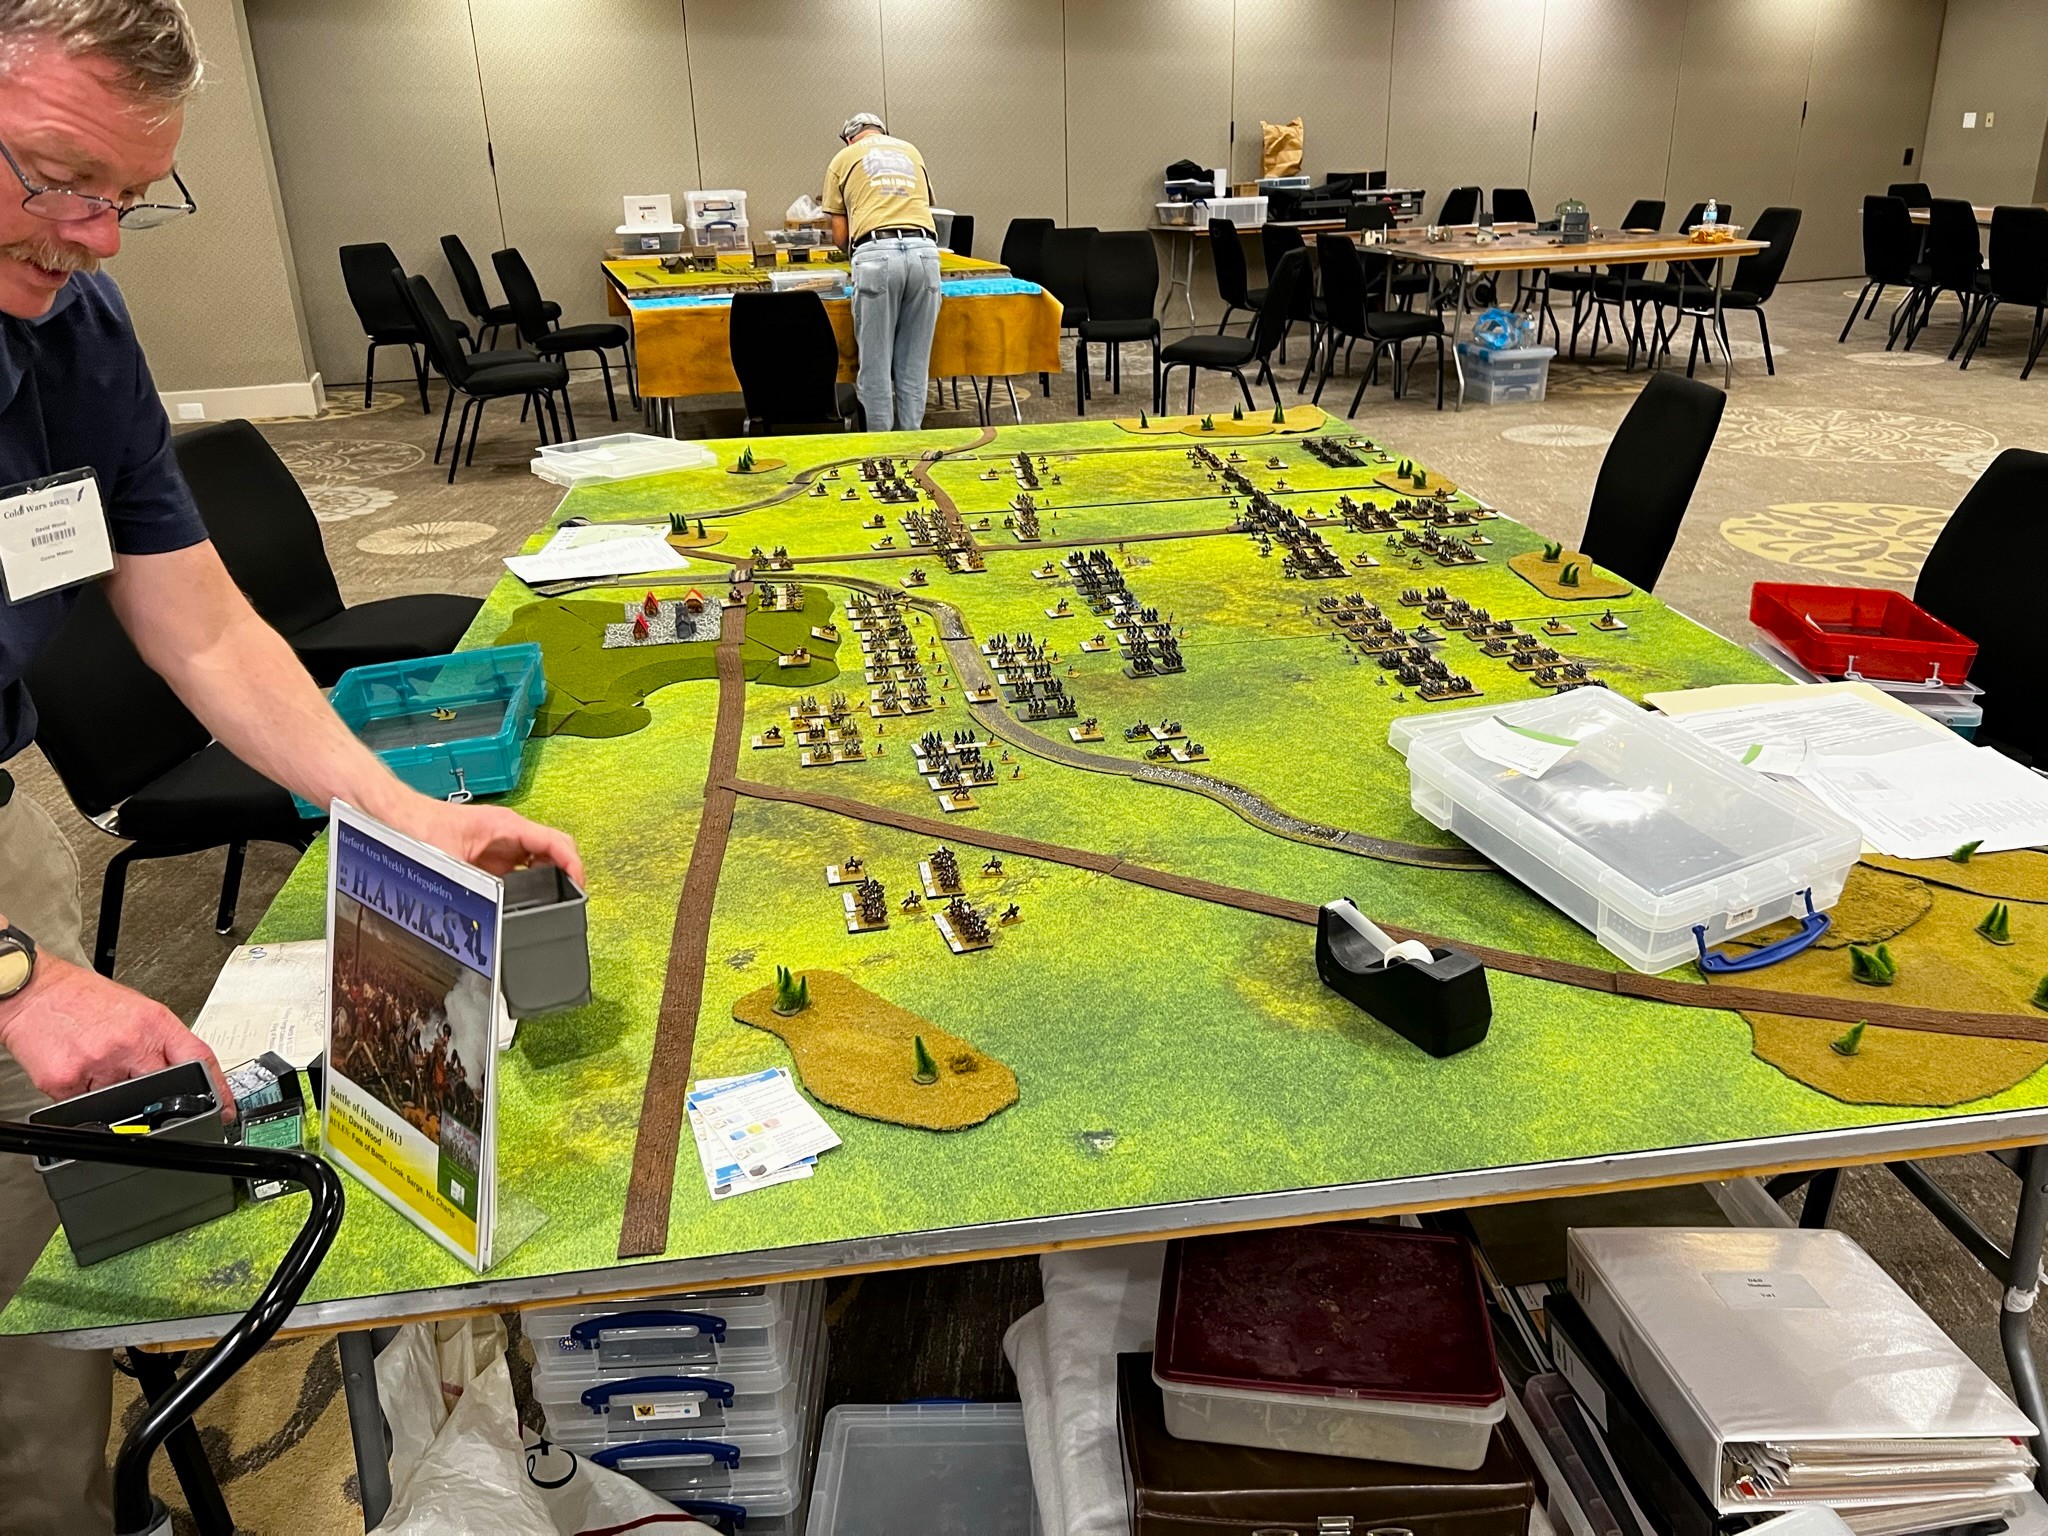
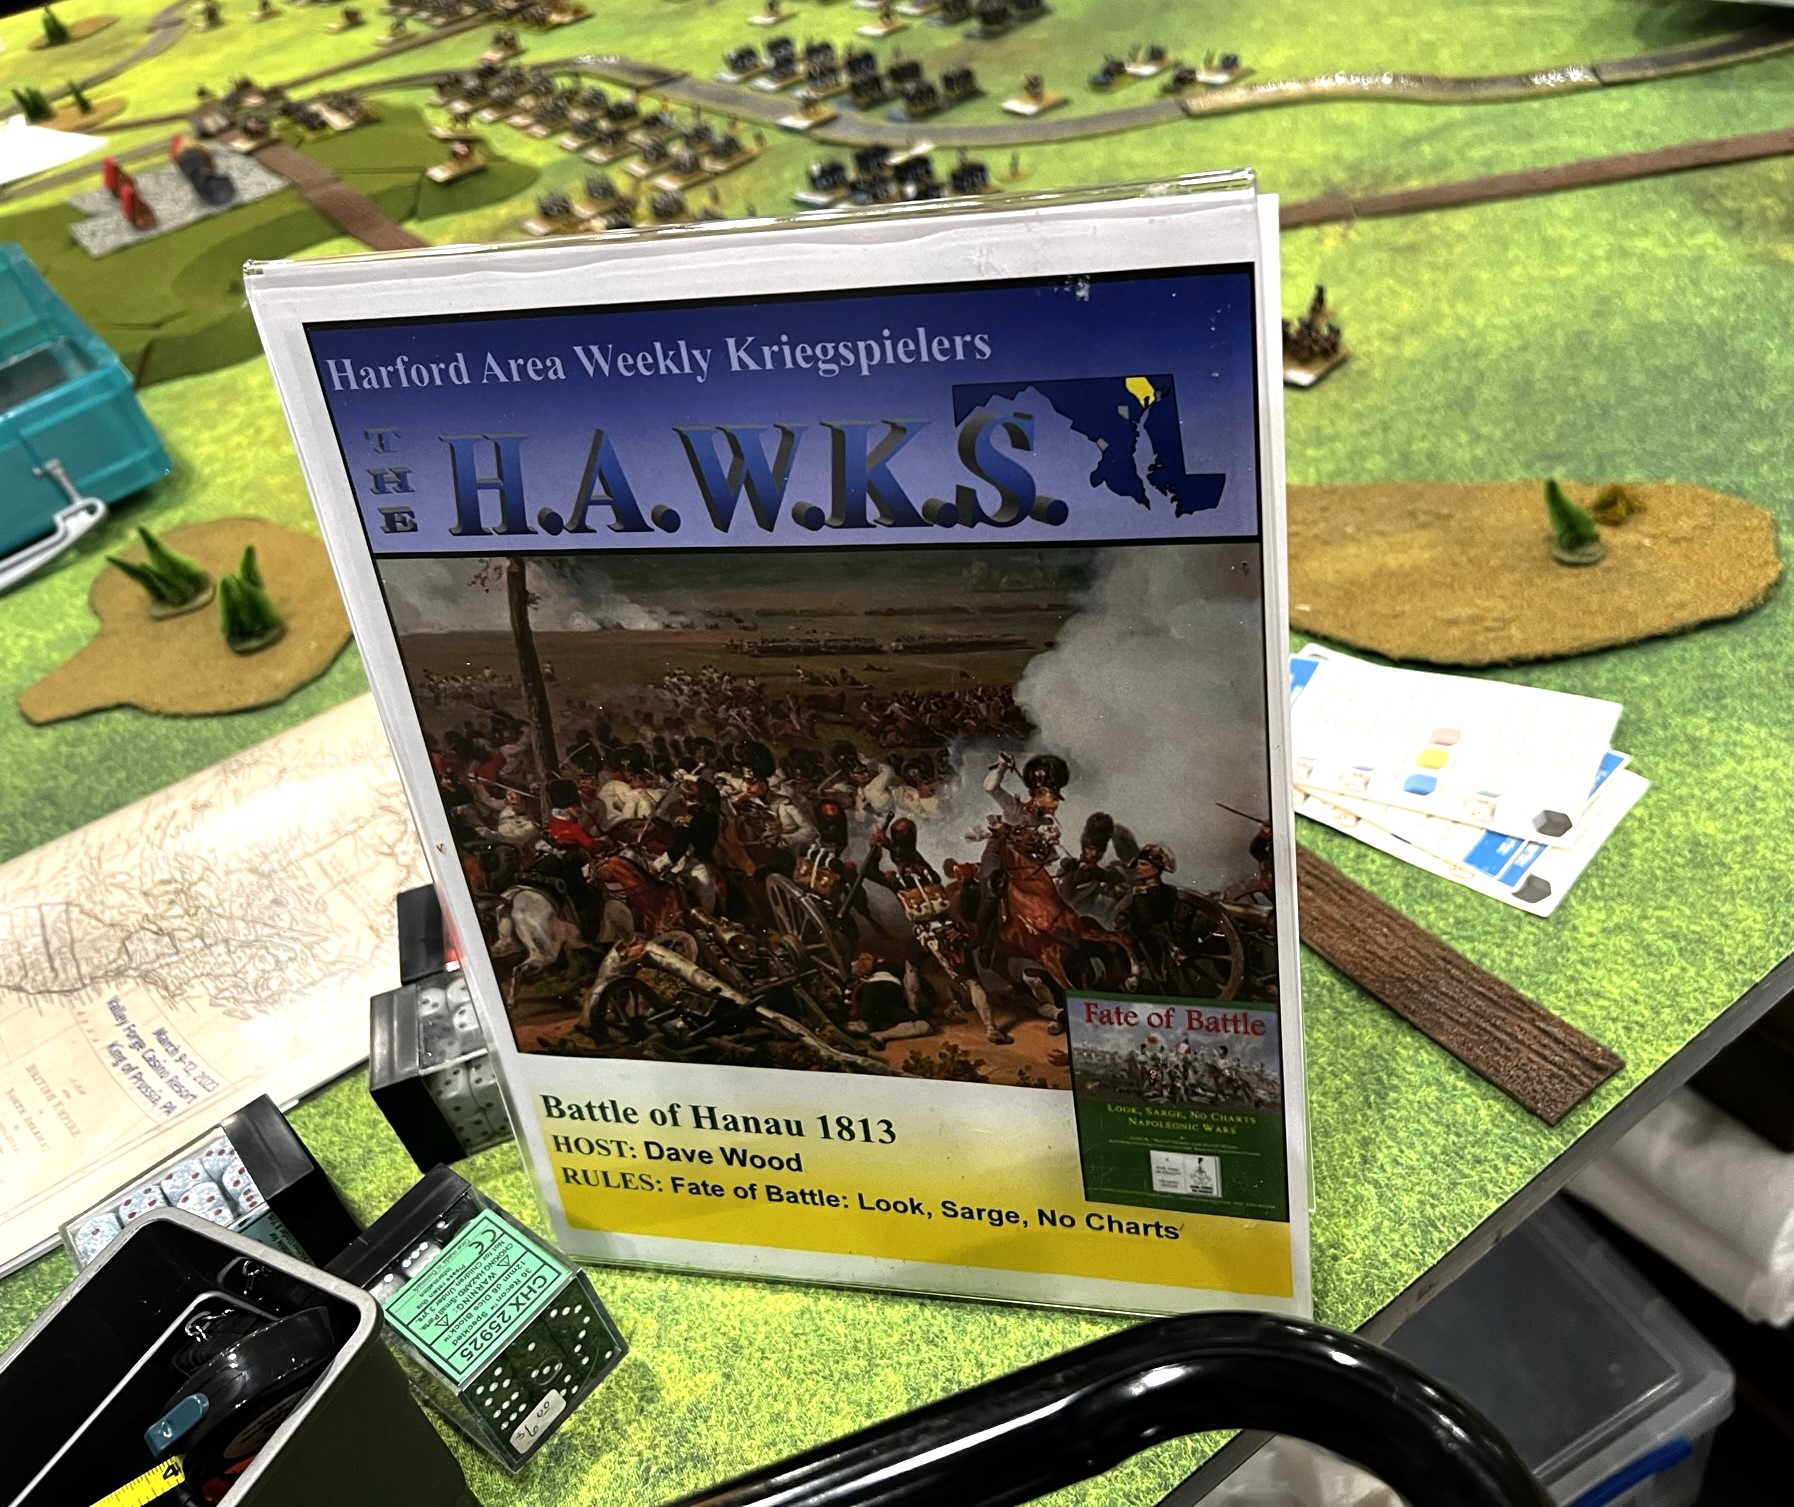
Battle of Hanau, 1813
Dave Wood’s Fate of Battle game in 10mm looked amazing.
The Natives Return to Schlegel’s Ferry
Eric Schlegel had a really cool board for his colonial Chesapeake game of Feudal Patrol.
Let’s Play Combat Patrol – France 1940
Greg Priebe ran a France 1940 scenario for Combat Patrol.
Greg and Buck survey Greg’s set up.
Wars of Orcs and Dwarves (WOOD) Playtest
Dave Wood ran a few WOOD games with amazing set ups.
War to Save Yule – River of Ice (Wars of Ozz)
This was the first of the linked Ozz games. This is the one that I did not play in as I was running my Aztec raid game.
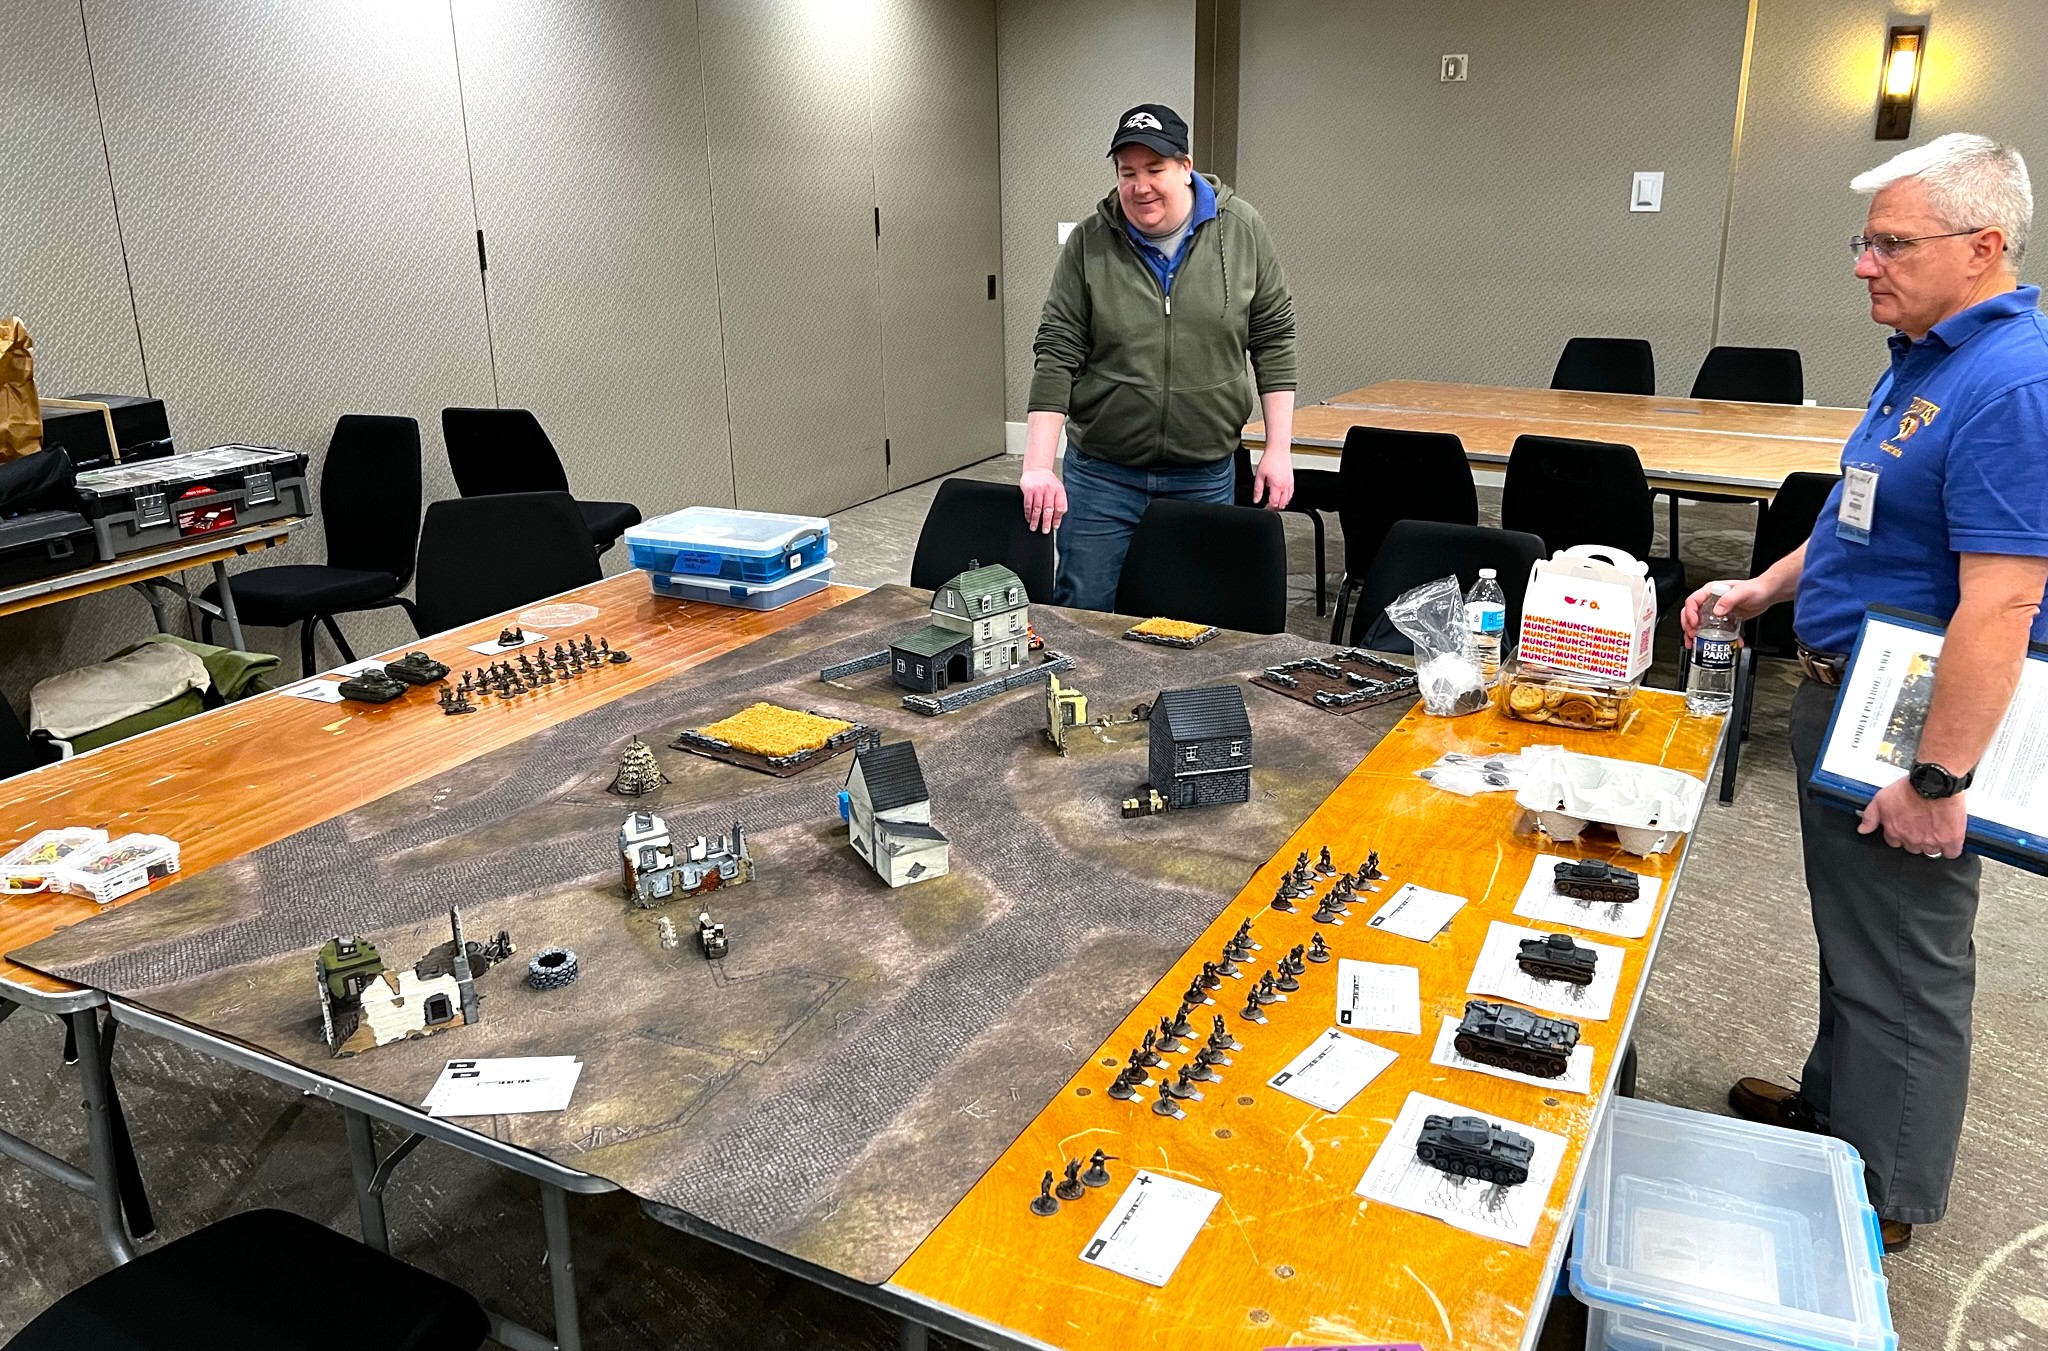
Counterattack Near Dubno (Battleground WW2)
Don Hogge’s always popular WW2 games are so cool. This was a 28mm game set on the Eastern Front on June 28th, 1941.
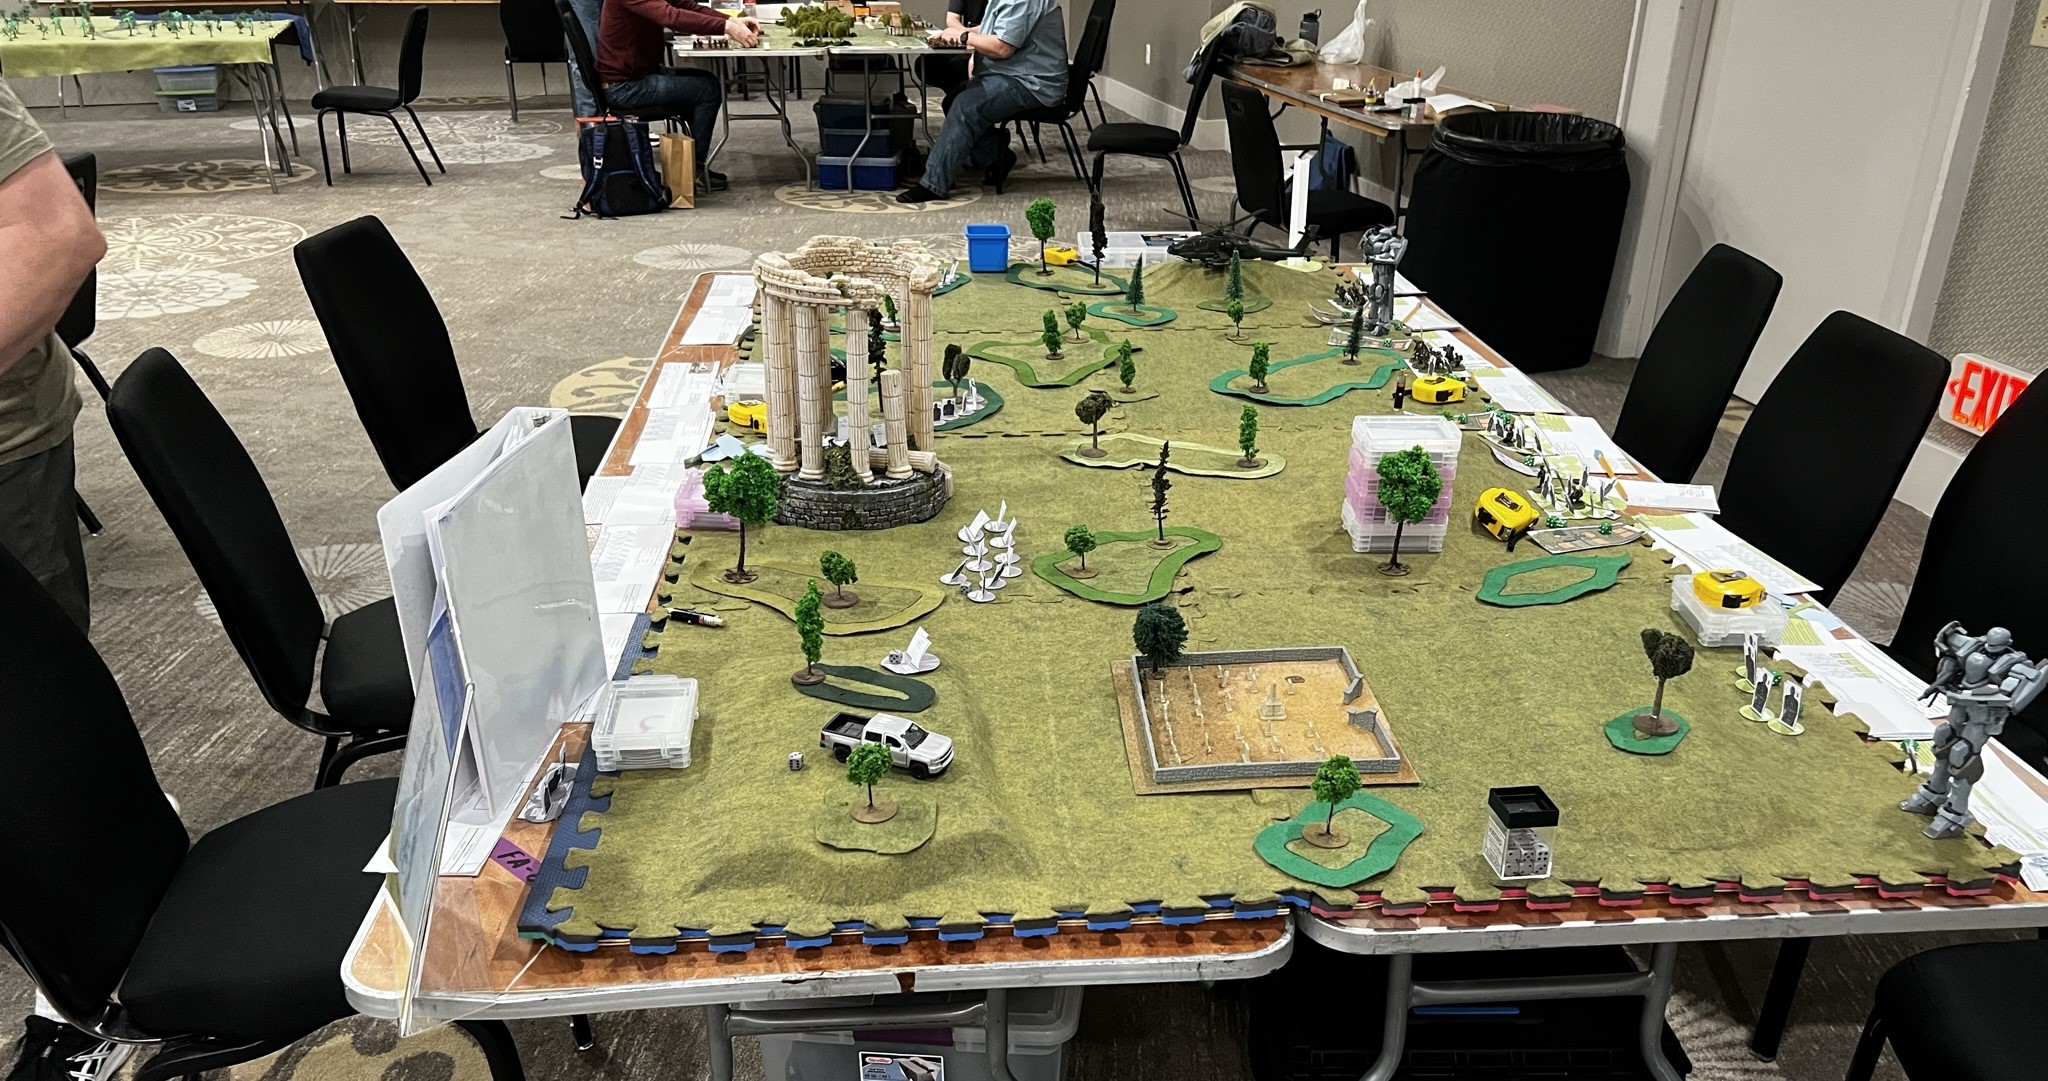
Forest Encounter (Mobile Suit Gundam: The Gravity Front)
Here’s a look at Kevin Fischer’s game set up.
Got Skogskatter (SAGA)
James McWilliams ran a couple of SAGA games.
Pierce’s Hill, Philippines 22 December 1941 (Combat Patrol)
Buck Surdu ran a very cool looking game set during the Japanese invasion of the Philippines in 1941. He worked hard to get the 1941 look right – and he nailed it.
Let’s Play Feudal Patrol! – Viking Raid
Greg ran his introductory Feudal Patrol Viking Raid game and had a full table!
Can the Ratlings save their homeland again from the army of the Necromancer? (Wars of Orcs and Dwarves)
Dave Wood ran yet another visually stunning game – and for fun he used my Winkie Cavalry and Infantry in the game, plus my Lesser Apes. The feedback I got was that they acquitted themselves very well while I was off in Mesoamerica!
Game view.My Winkies!Another viewDave running his huge WOOD game.
Al Capone Comes to Schlegel’s Ferry (Blood & Swash)
Another great use of Eric’s terrain for a 1920’s game.
A truly engaged table deals with smuggling and gangsters in the 1920’s.
Concord to Lexington – Theme
Geoff Graff ran this game of 15mm figures set in my home state in the beginning of the AWI.
Test of Honour – The Last Yamashiro (Test of Honour – Quick Play)
I saw this in the adjoining room to the HAWKS – WOW what a set up! GM was David Hill.
This is a HUGE game!
At the other end of this beauty was a harbor and ships too.
Beautiful set up – nice to see young gamers too.
WWI – Battle of Gnila Lipa (Fall of Eagles WWI)
This set up caught my eye as well – GM David Rollins had a huge table for this battle between the Austrians and the Russians in WWI.
Mars Attacks – Beach Head! (Wings of Glory Tripods and Triplanes)
What a concept – Martians in Tripods taking on Spads and Nieuports in the aftermath of a post-WWI meteor shower! GM was Mike Jacobs.
As I said, this is a big post but I hope that it was enjoyable to look at. Sorry if a game you were or that you ran in was not included – but I’m sure somewhere else there are photos for the world (at least I hope so)!
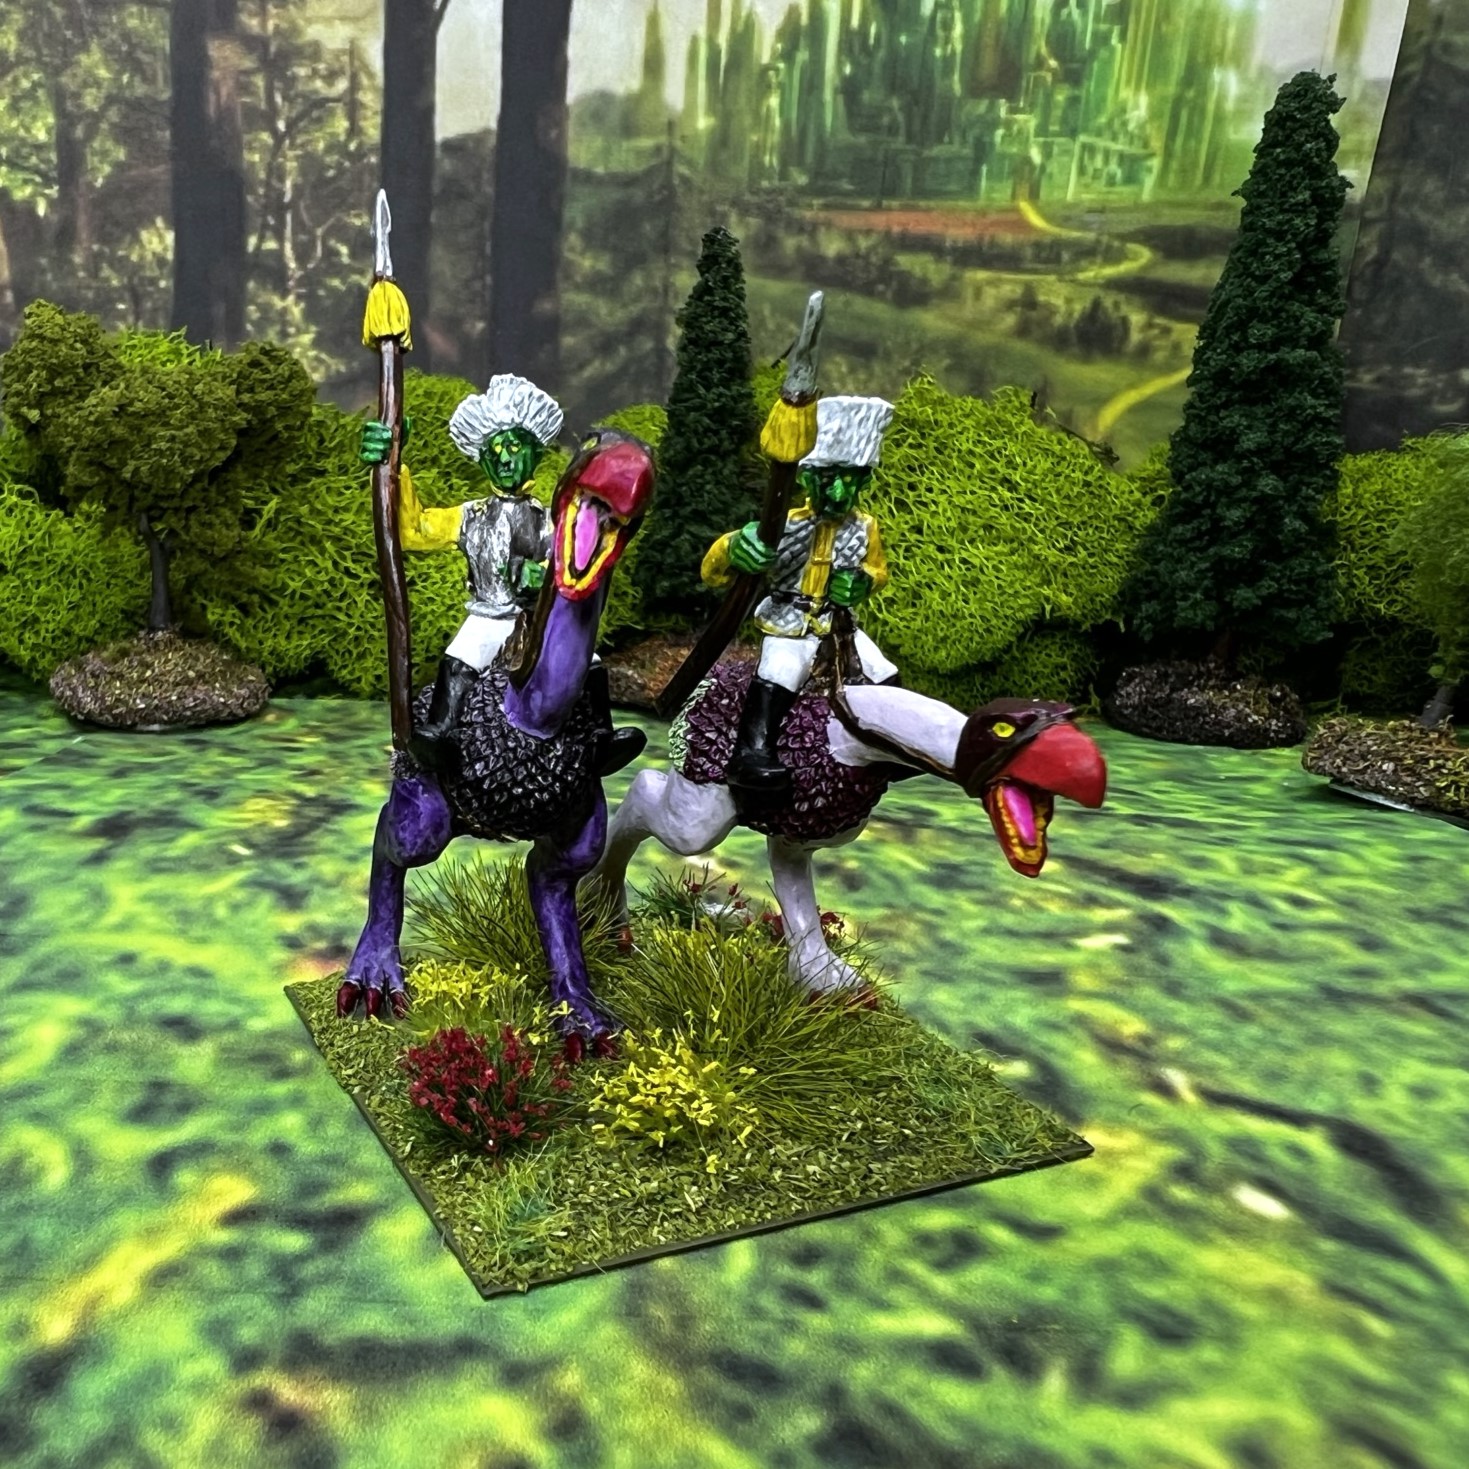
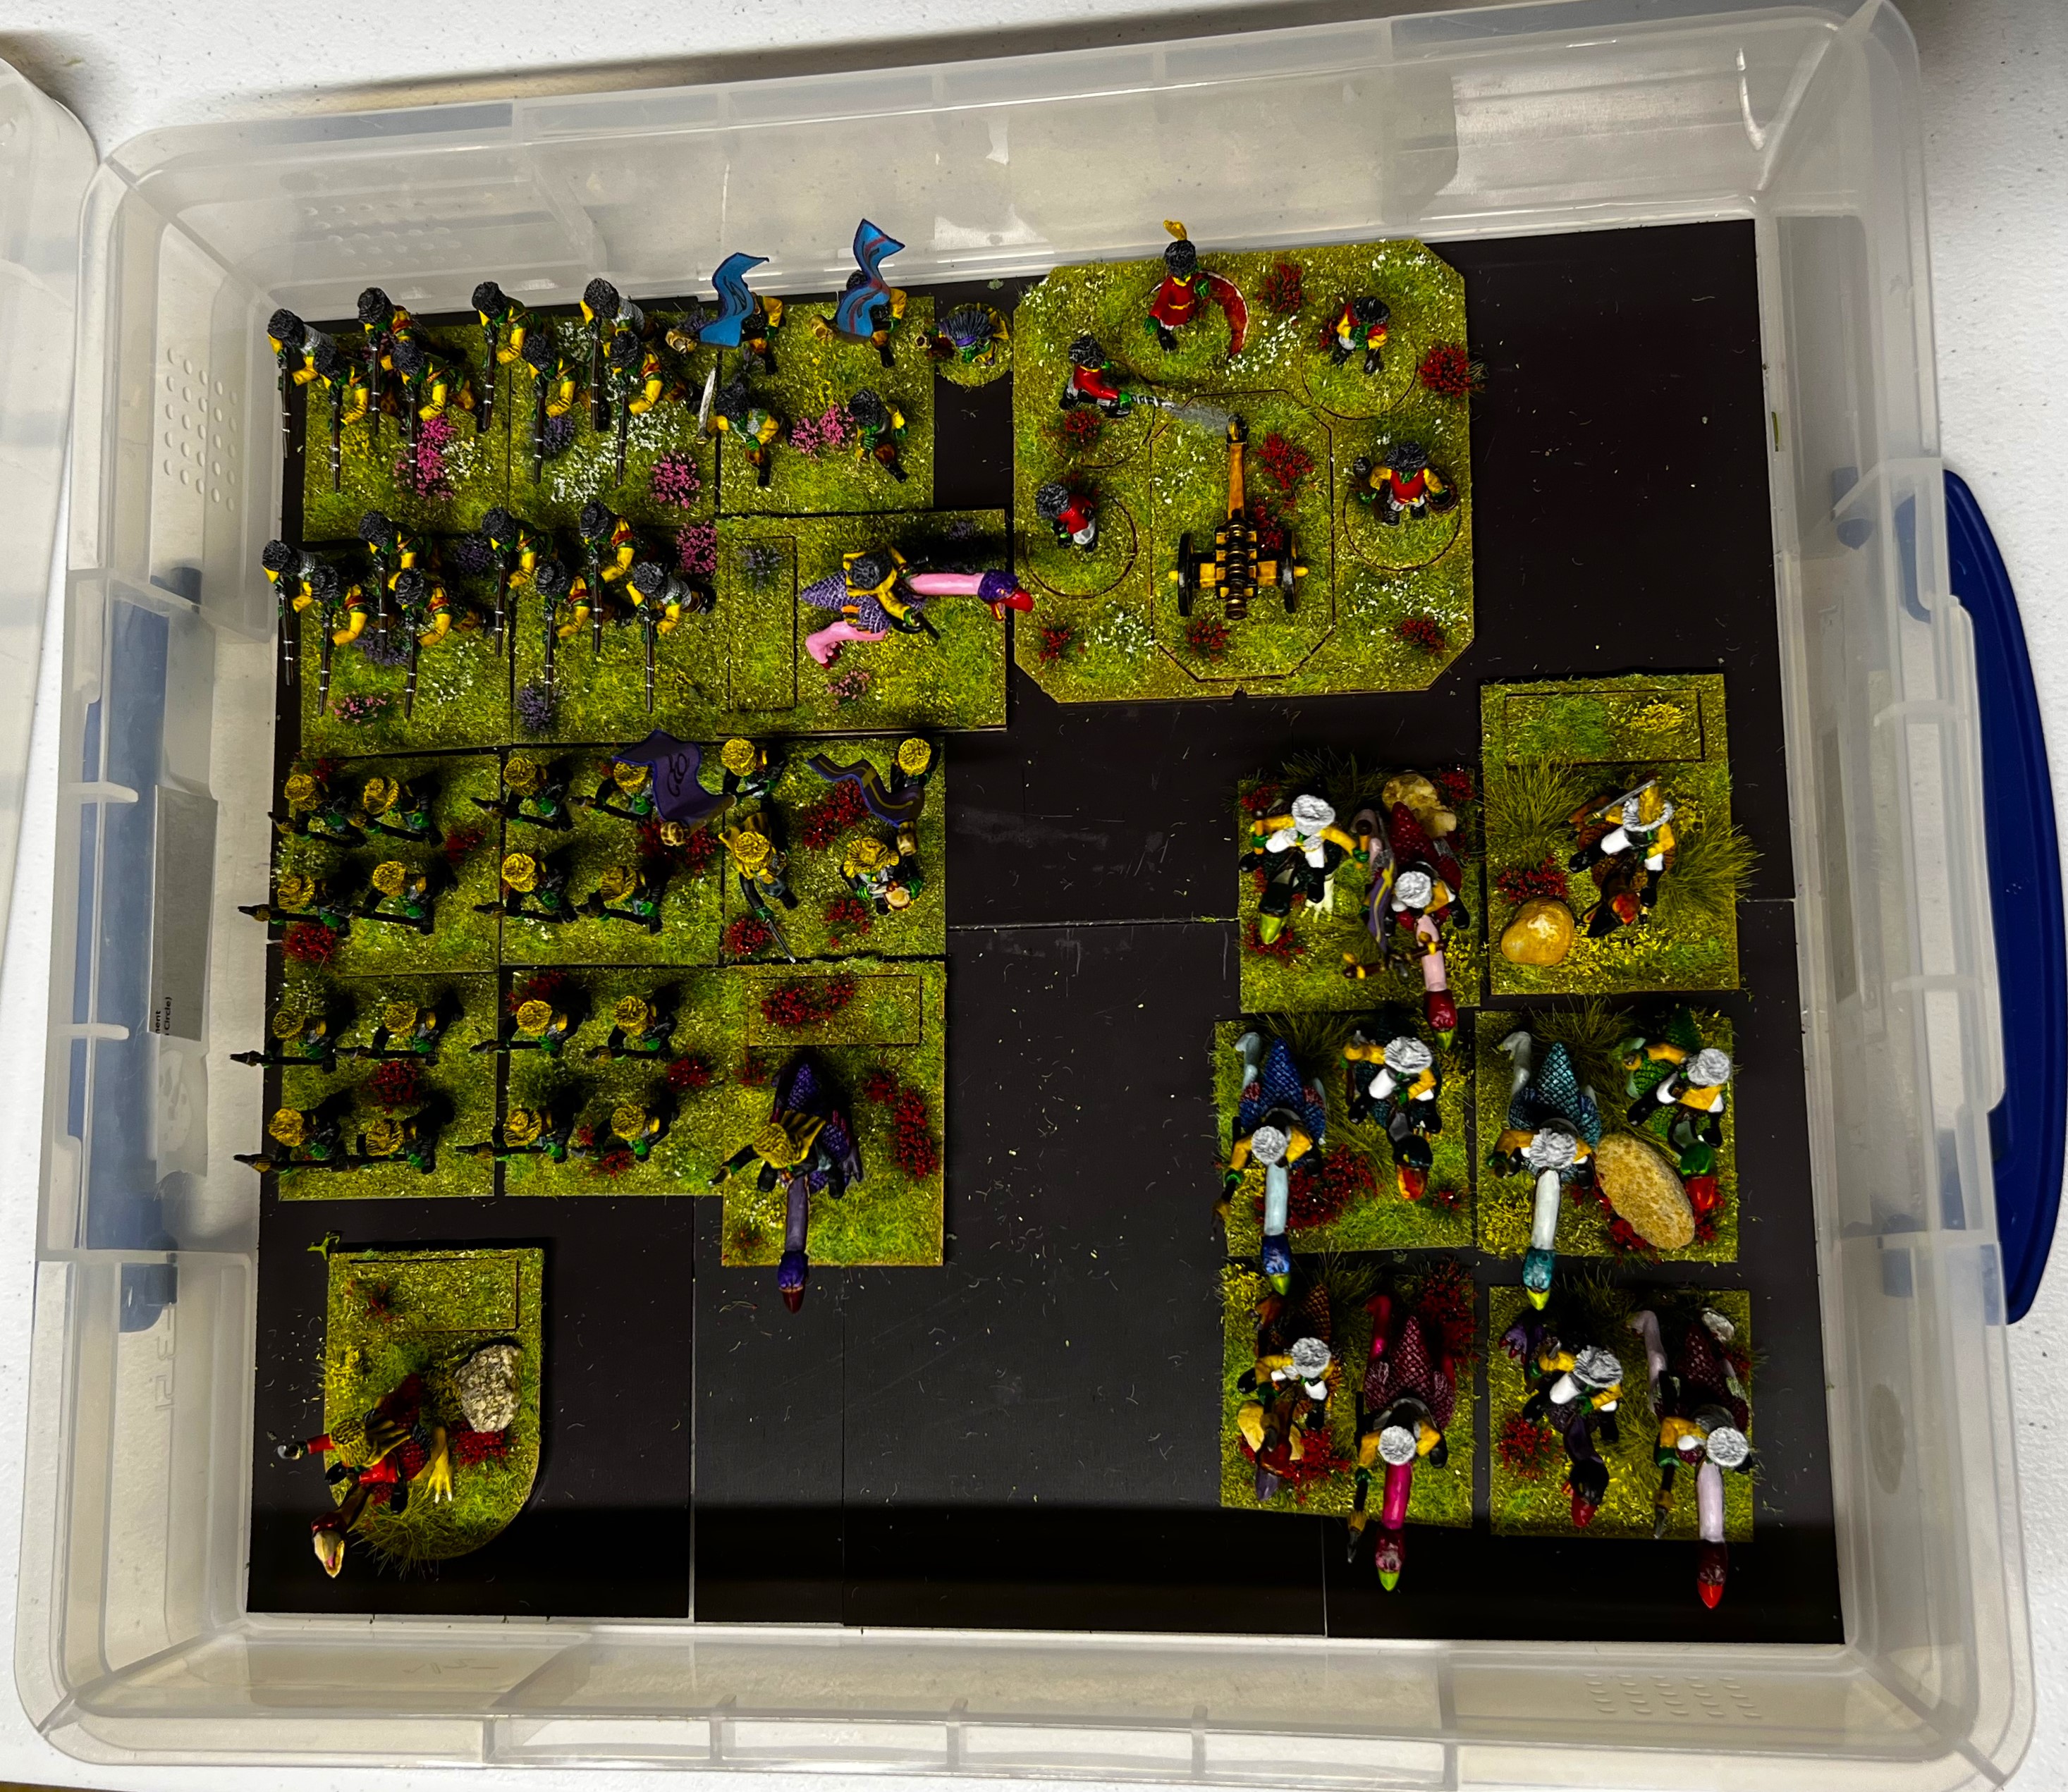
With it being my late winter-early spring “wargaming convention season”, I have been working on multiple projects simultaneously. As I mentioned in my last post Jungle Bases from Wargames Terrain Workshop, I’d be sharing a post on my Winkie cavalry which I finished recently – along with the Winkie Brigade Commander on his specially-shaped MDF base.
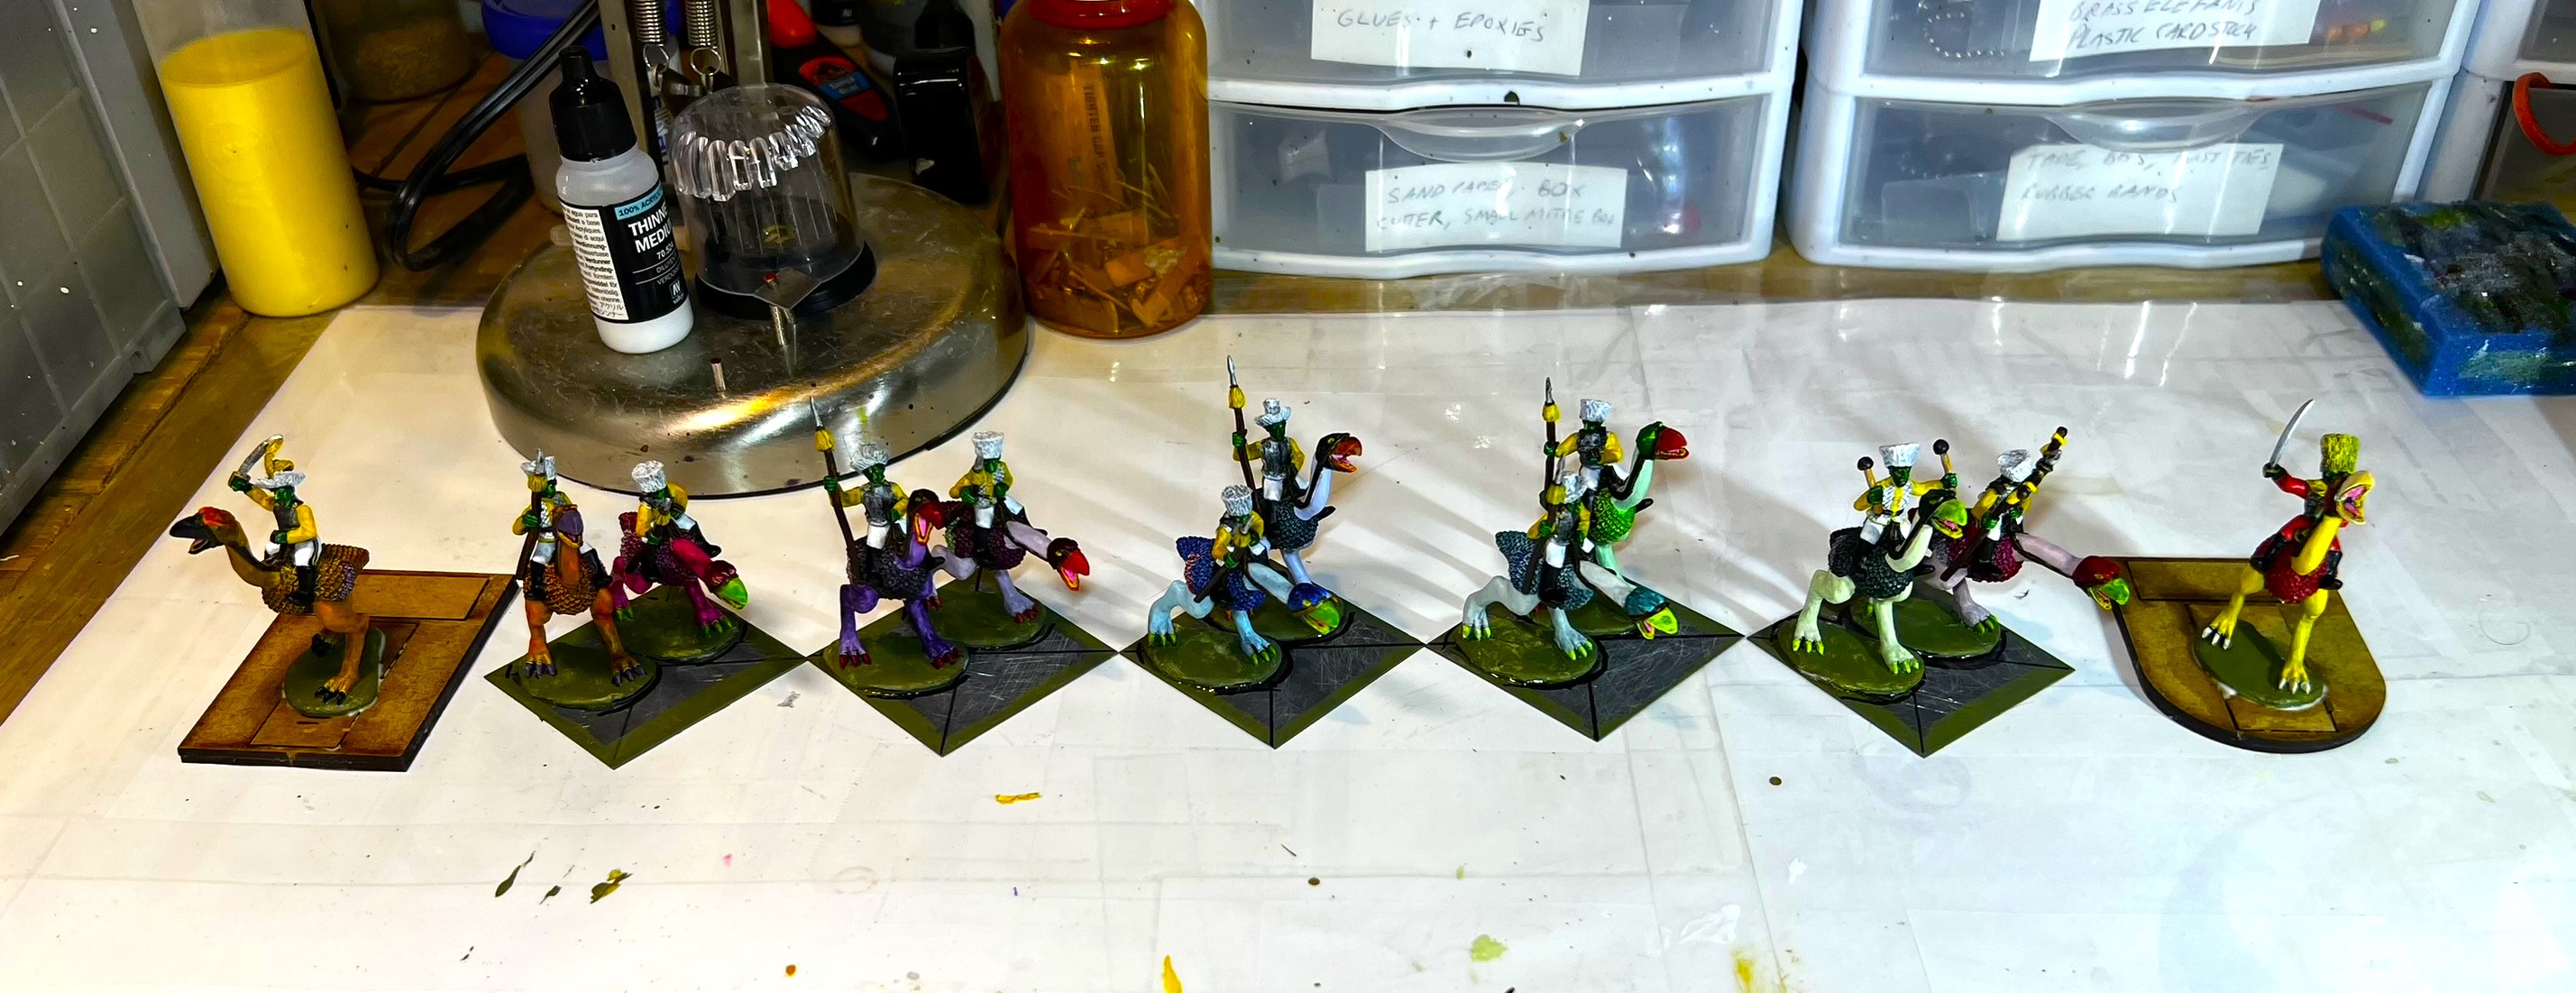
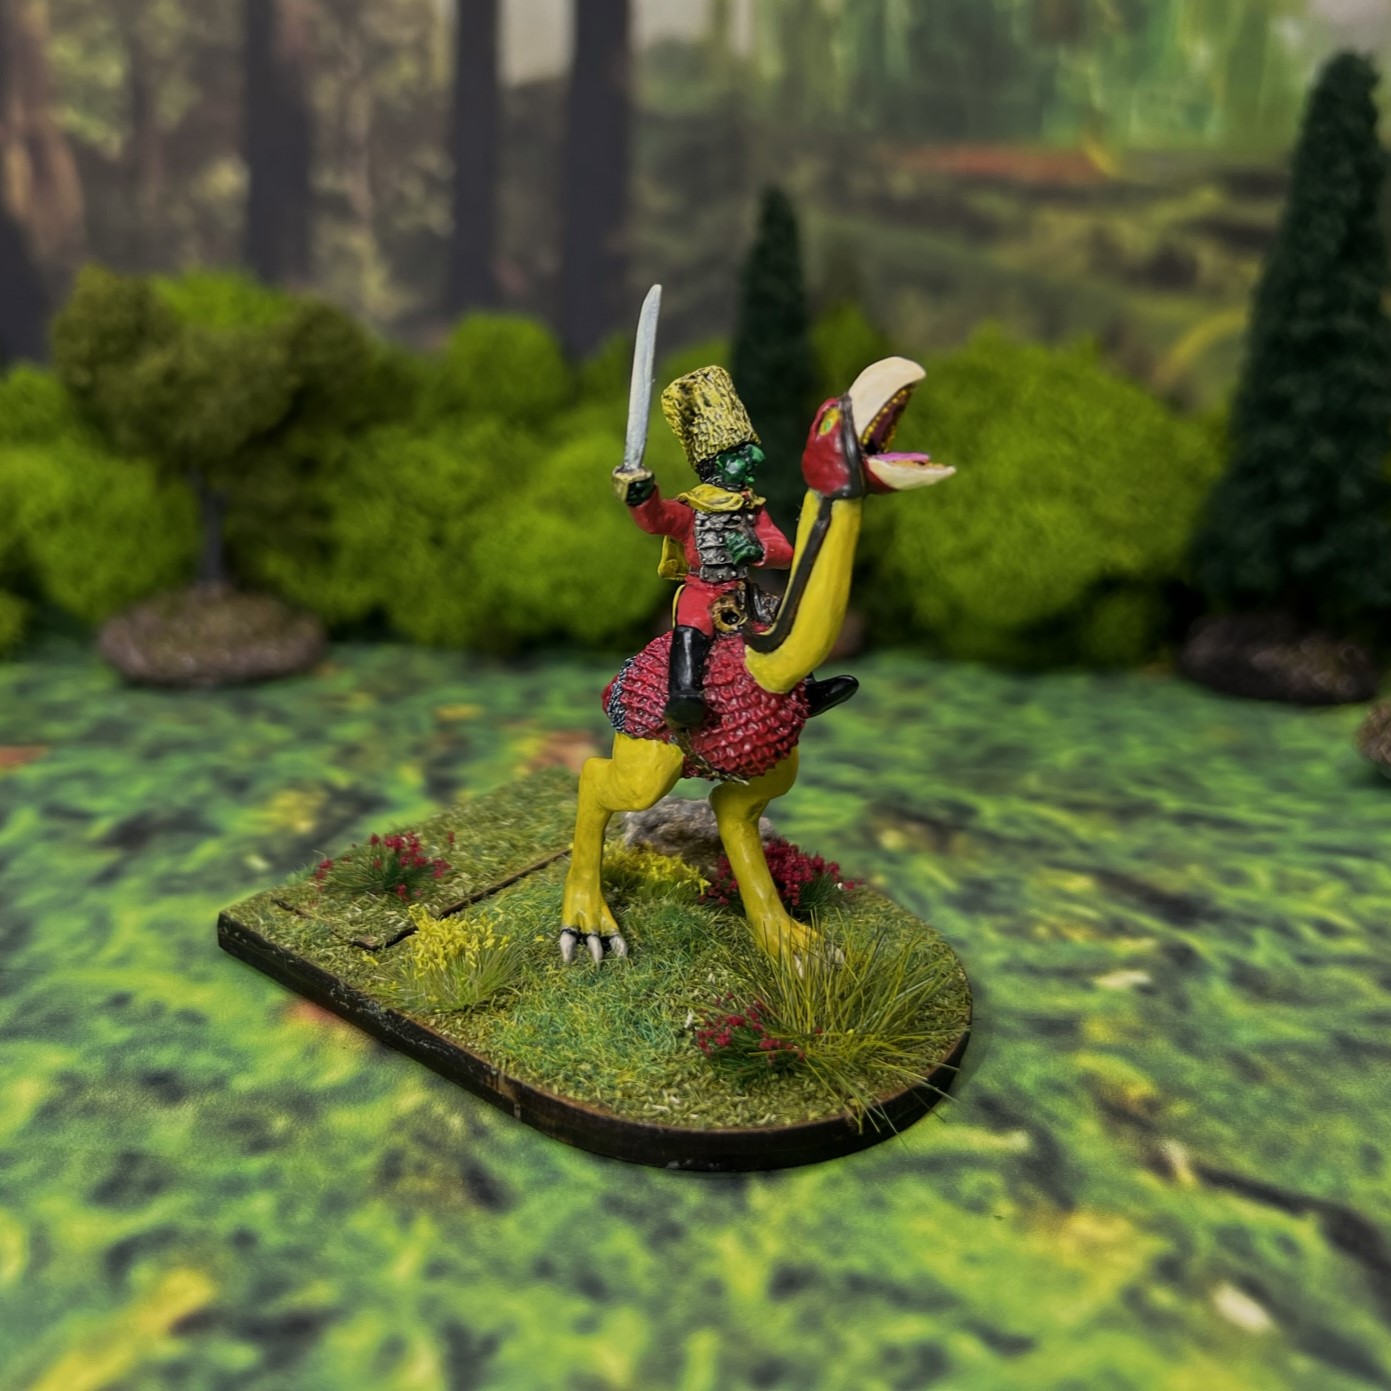
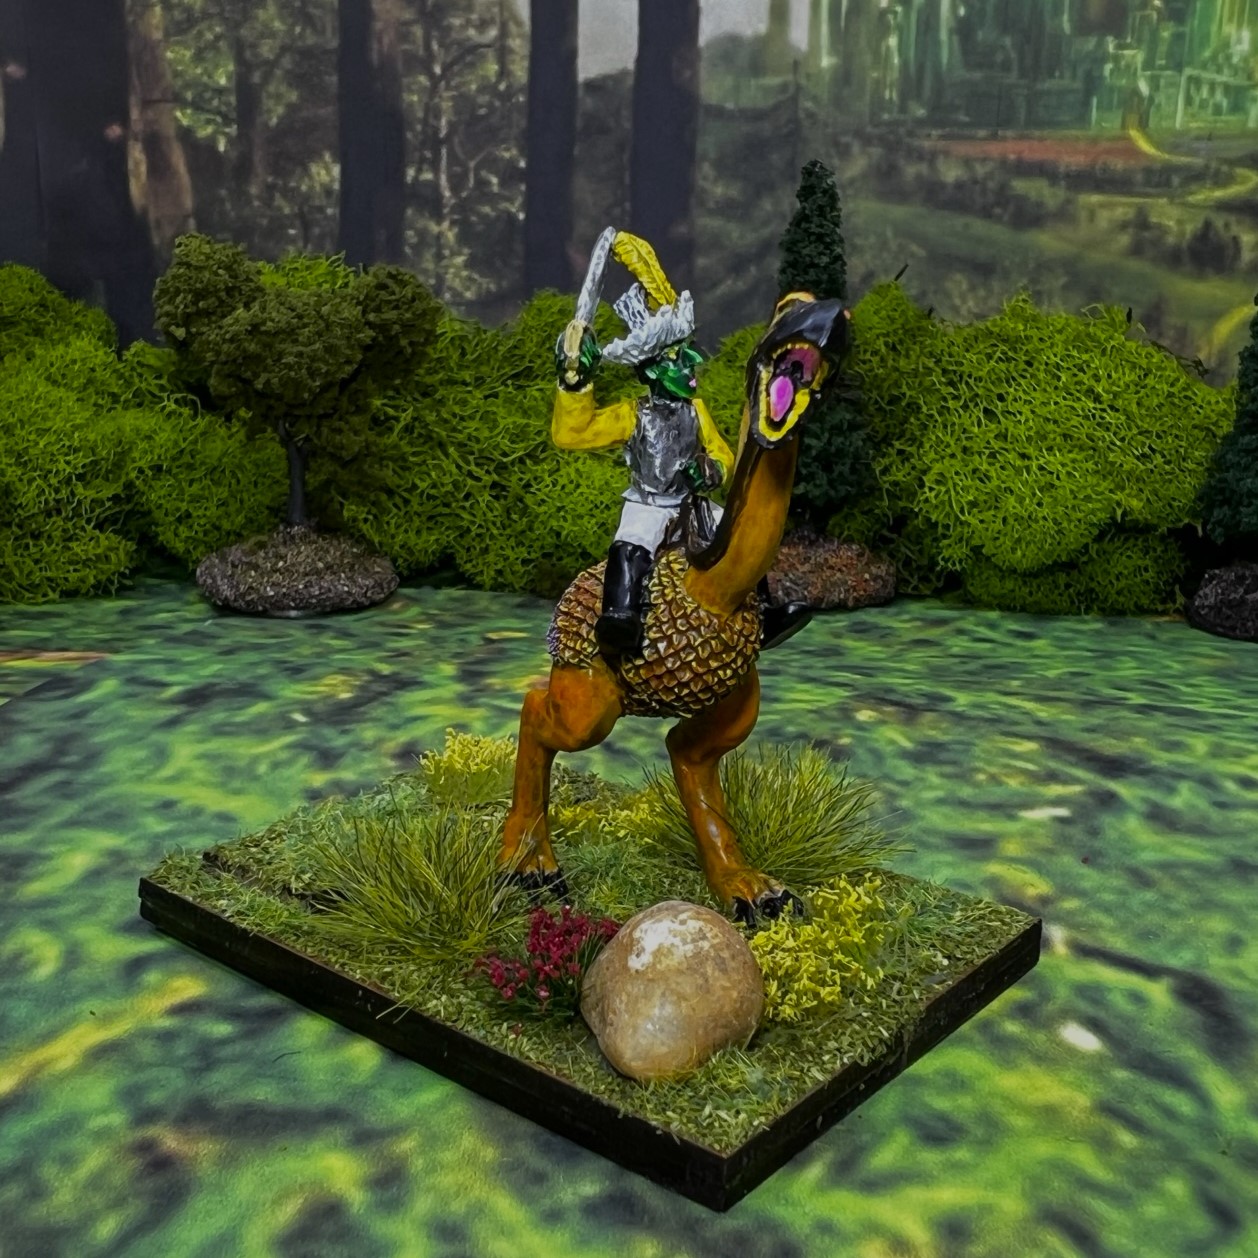
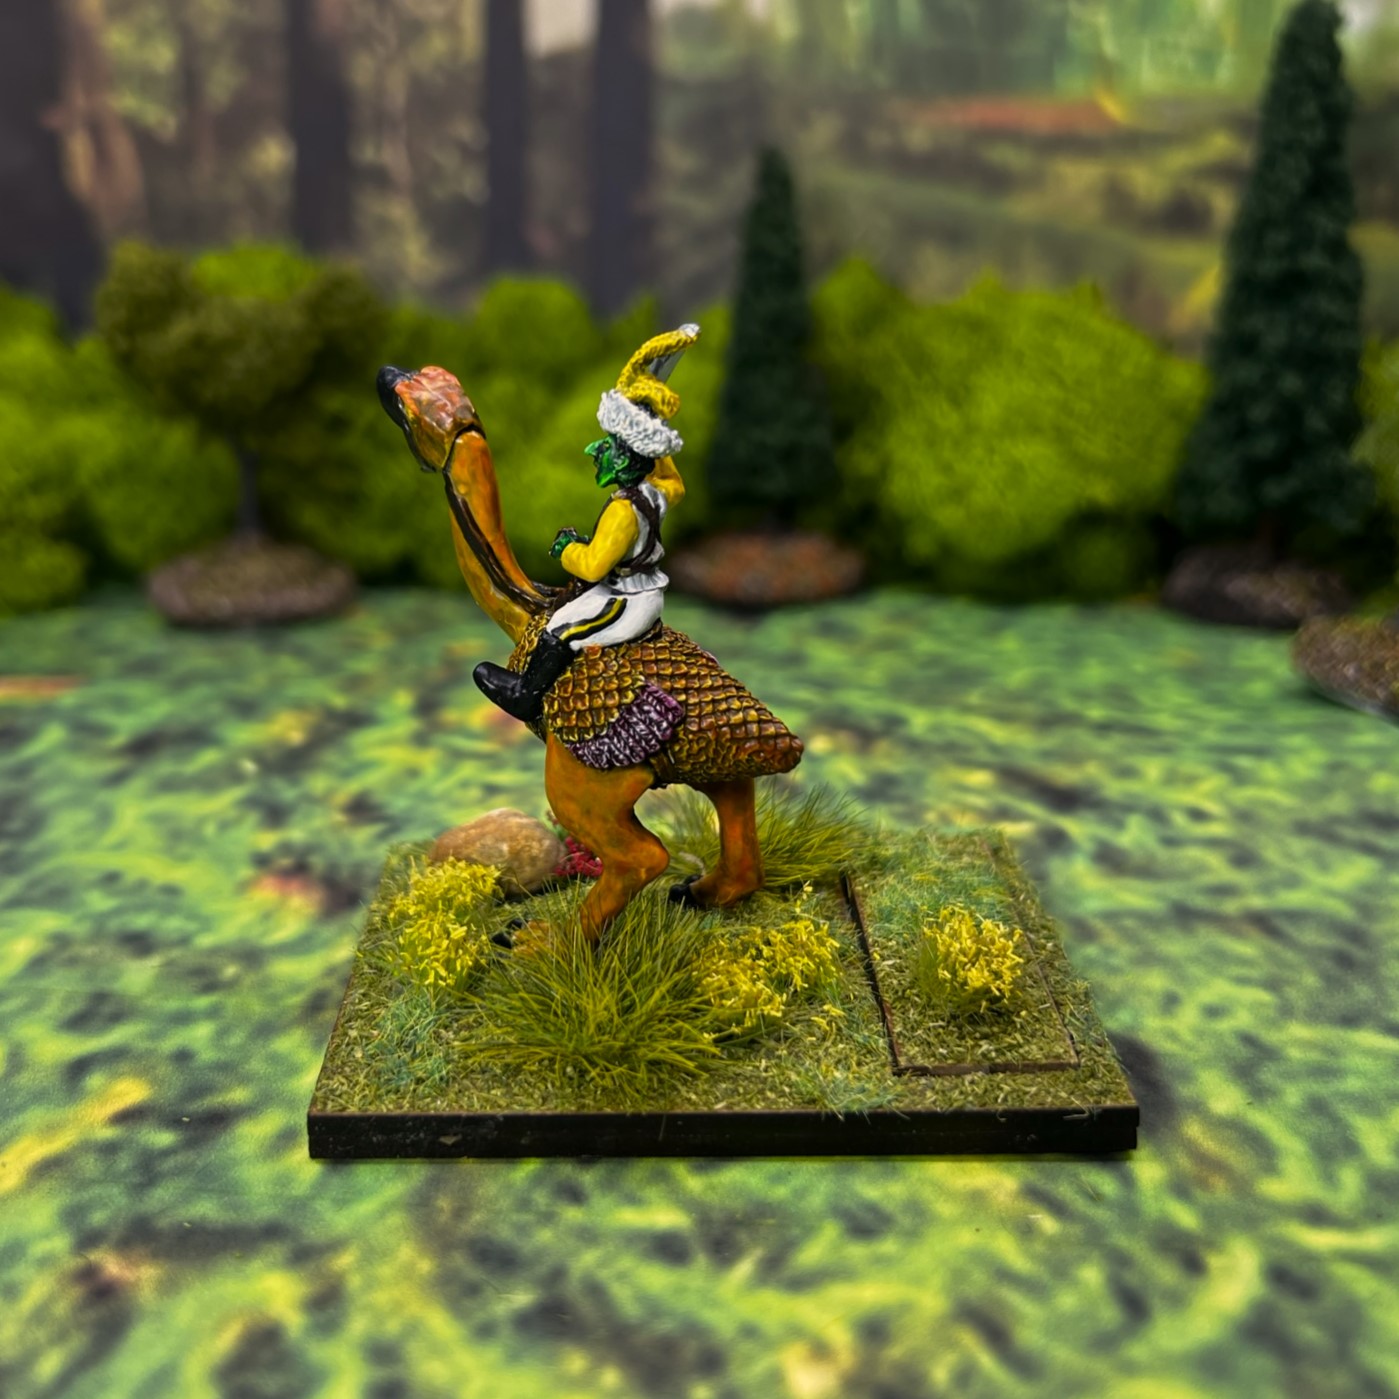
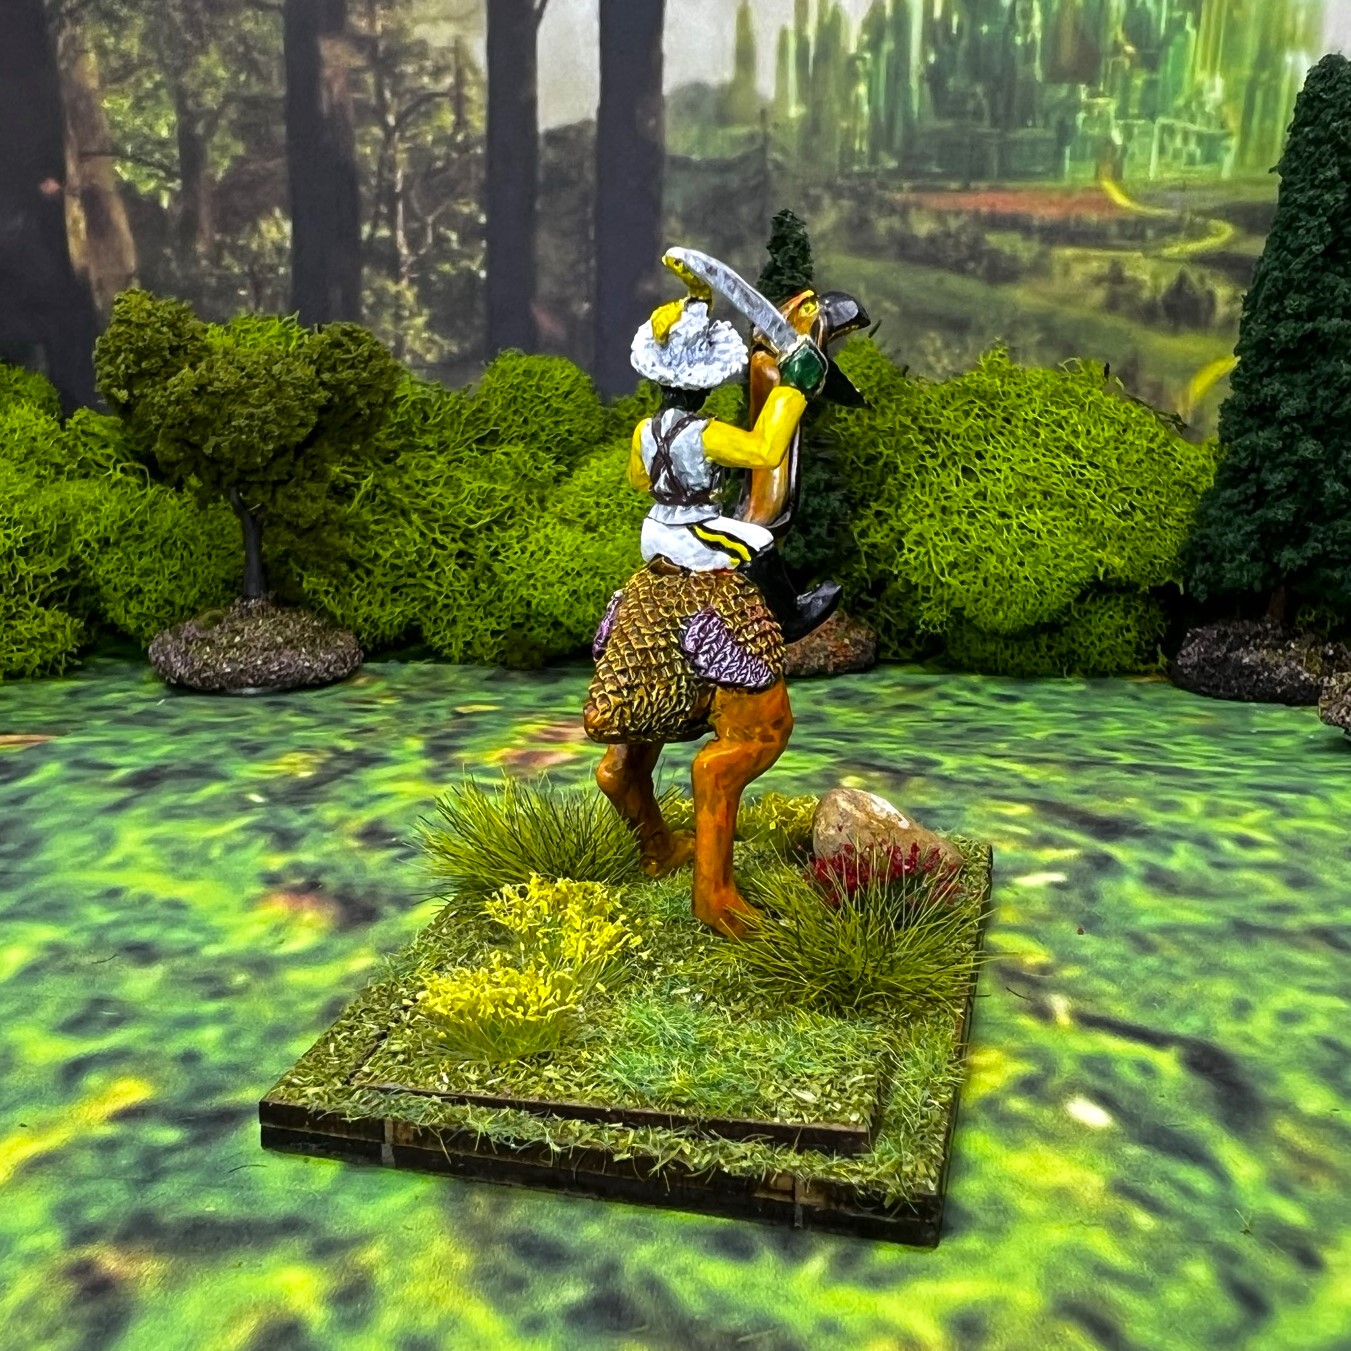
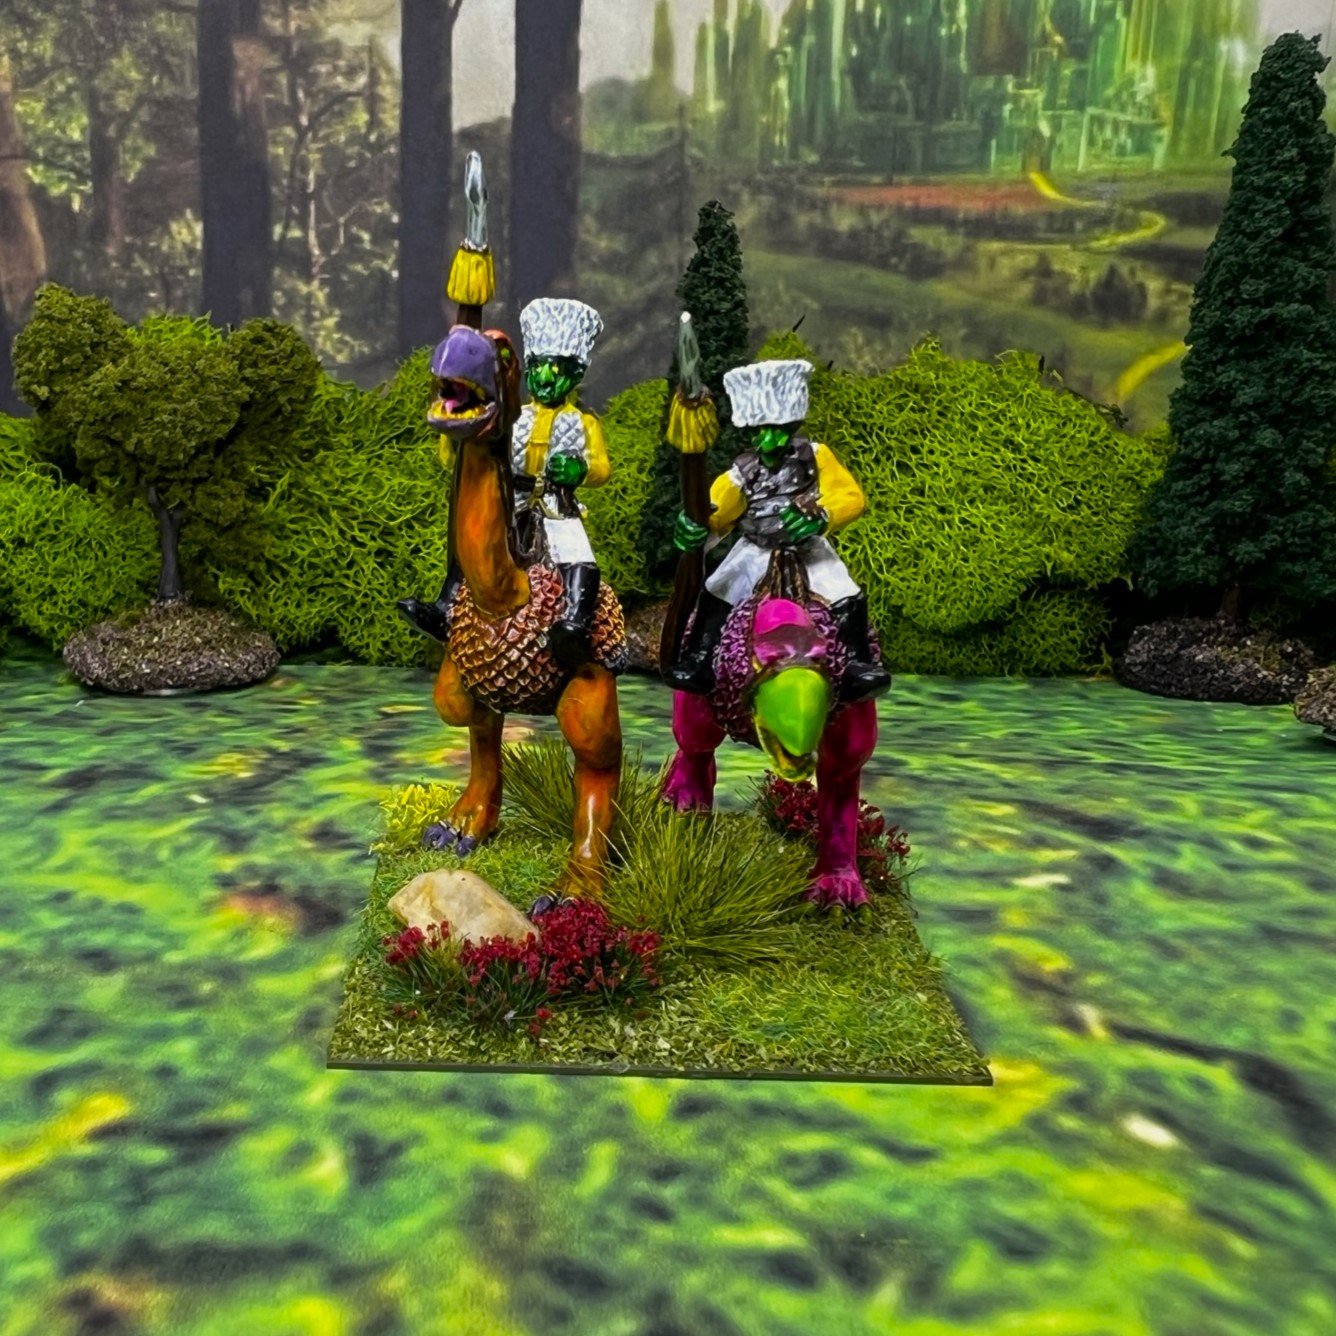
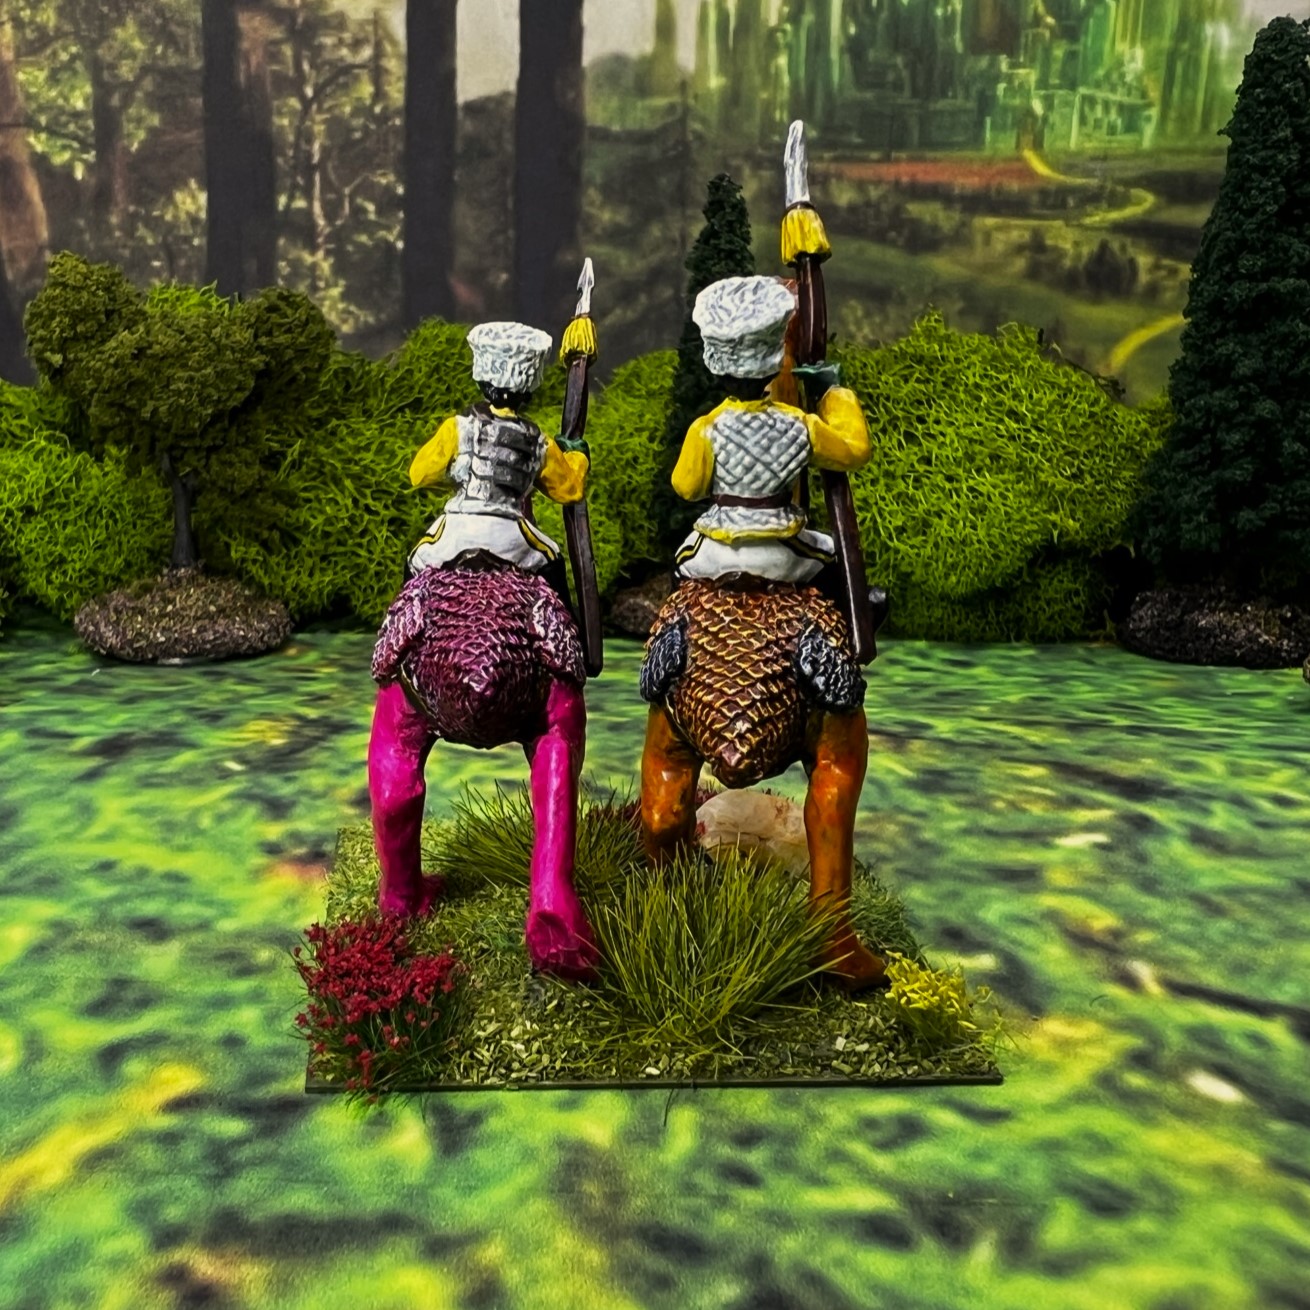
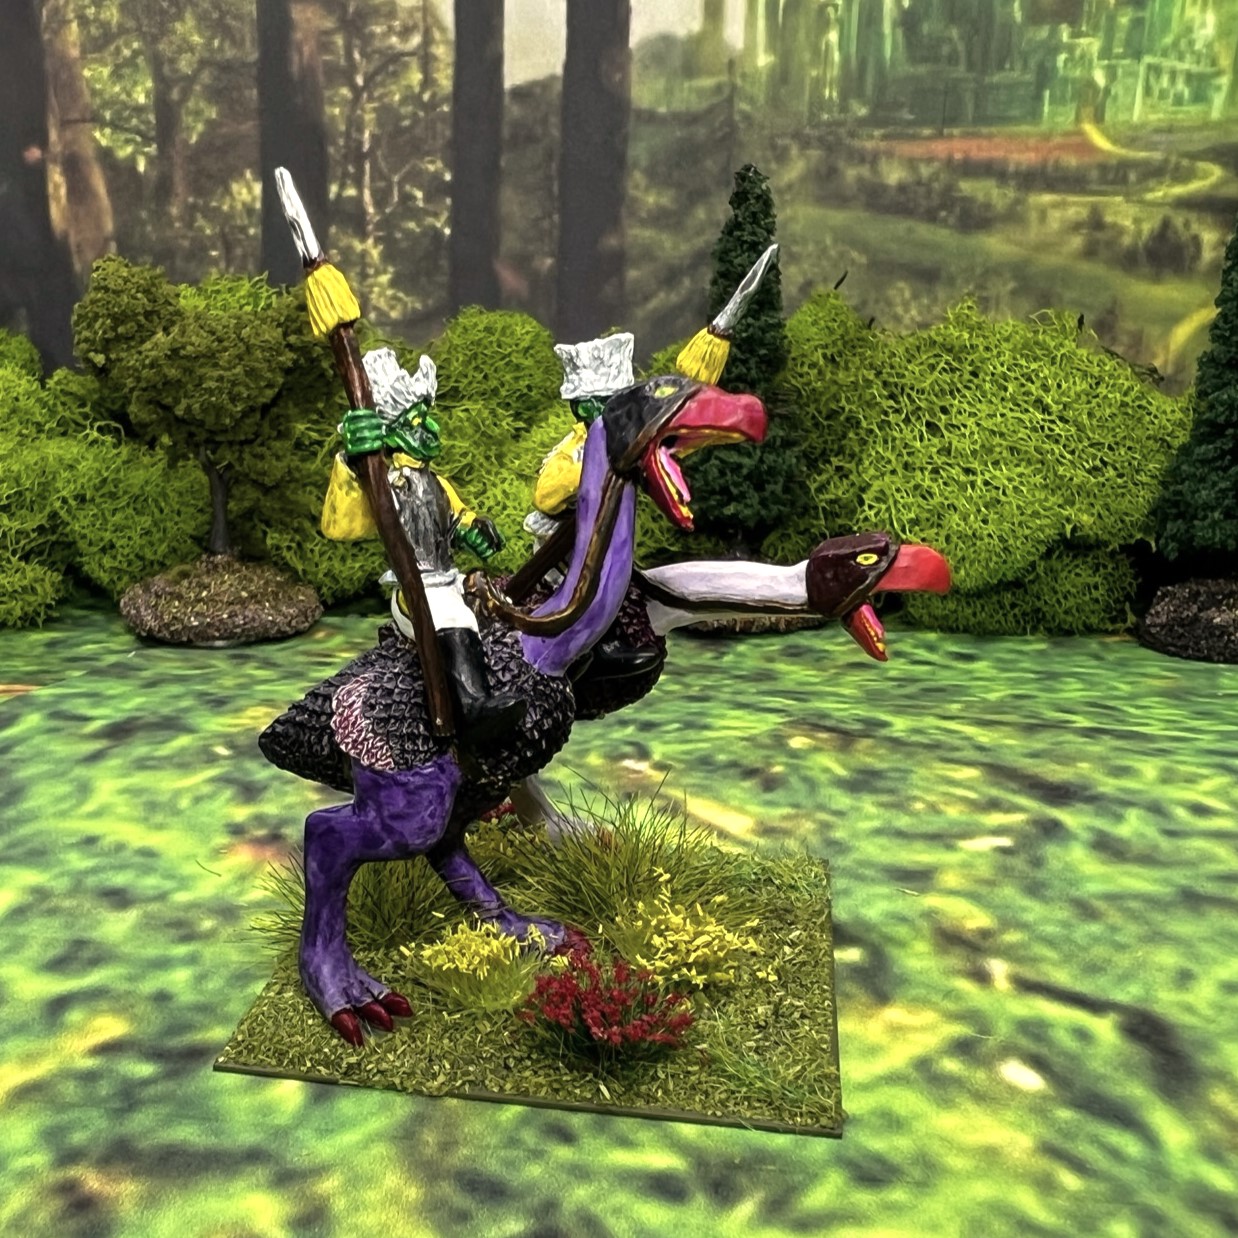
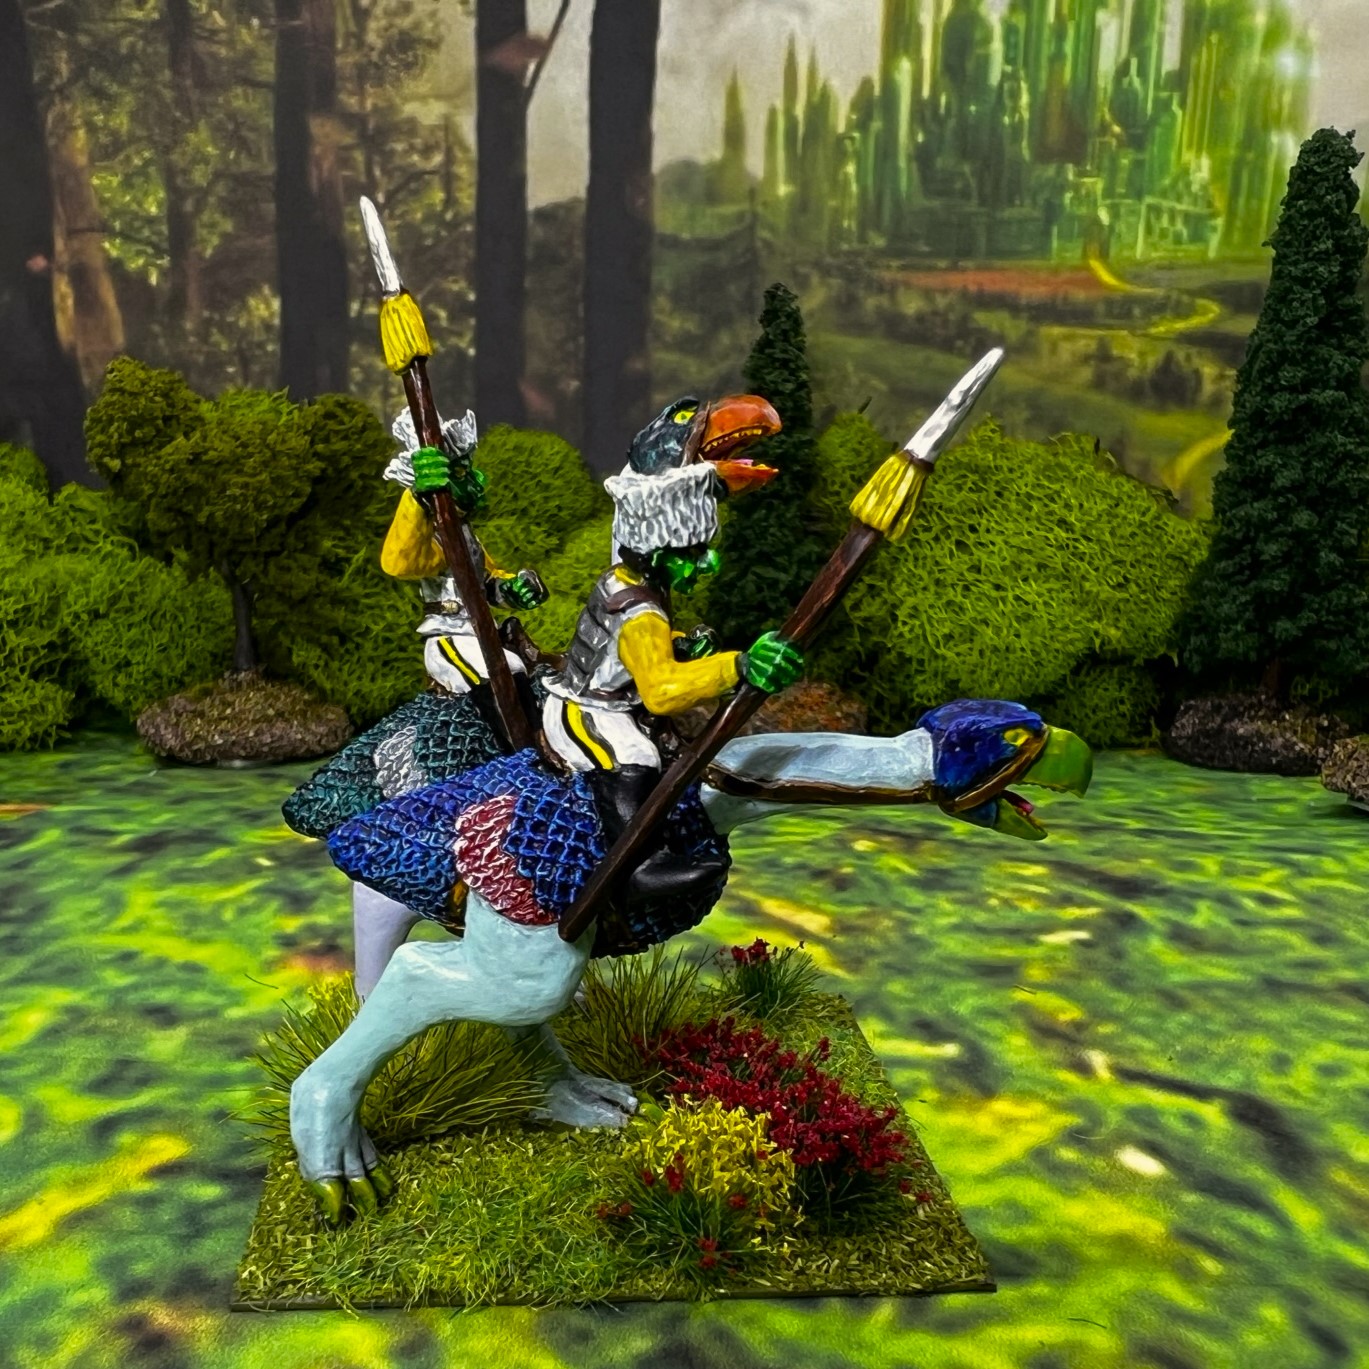
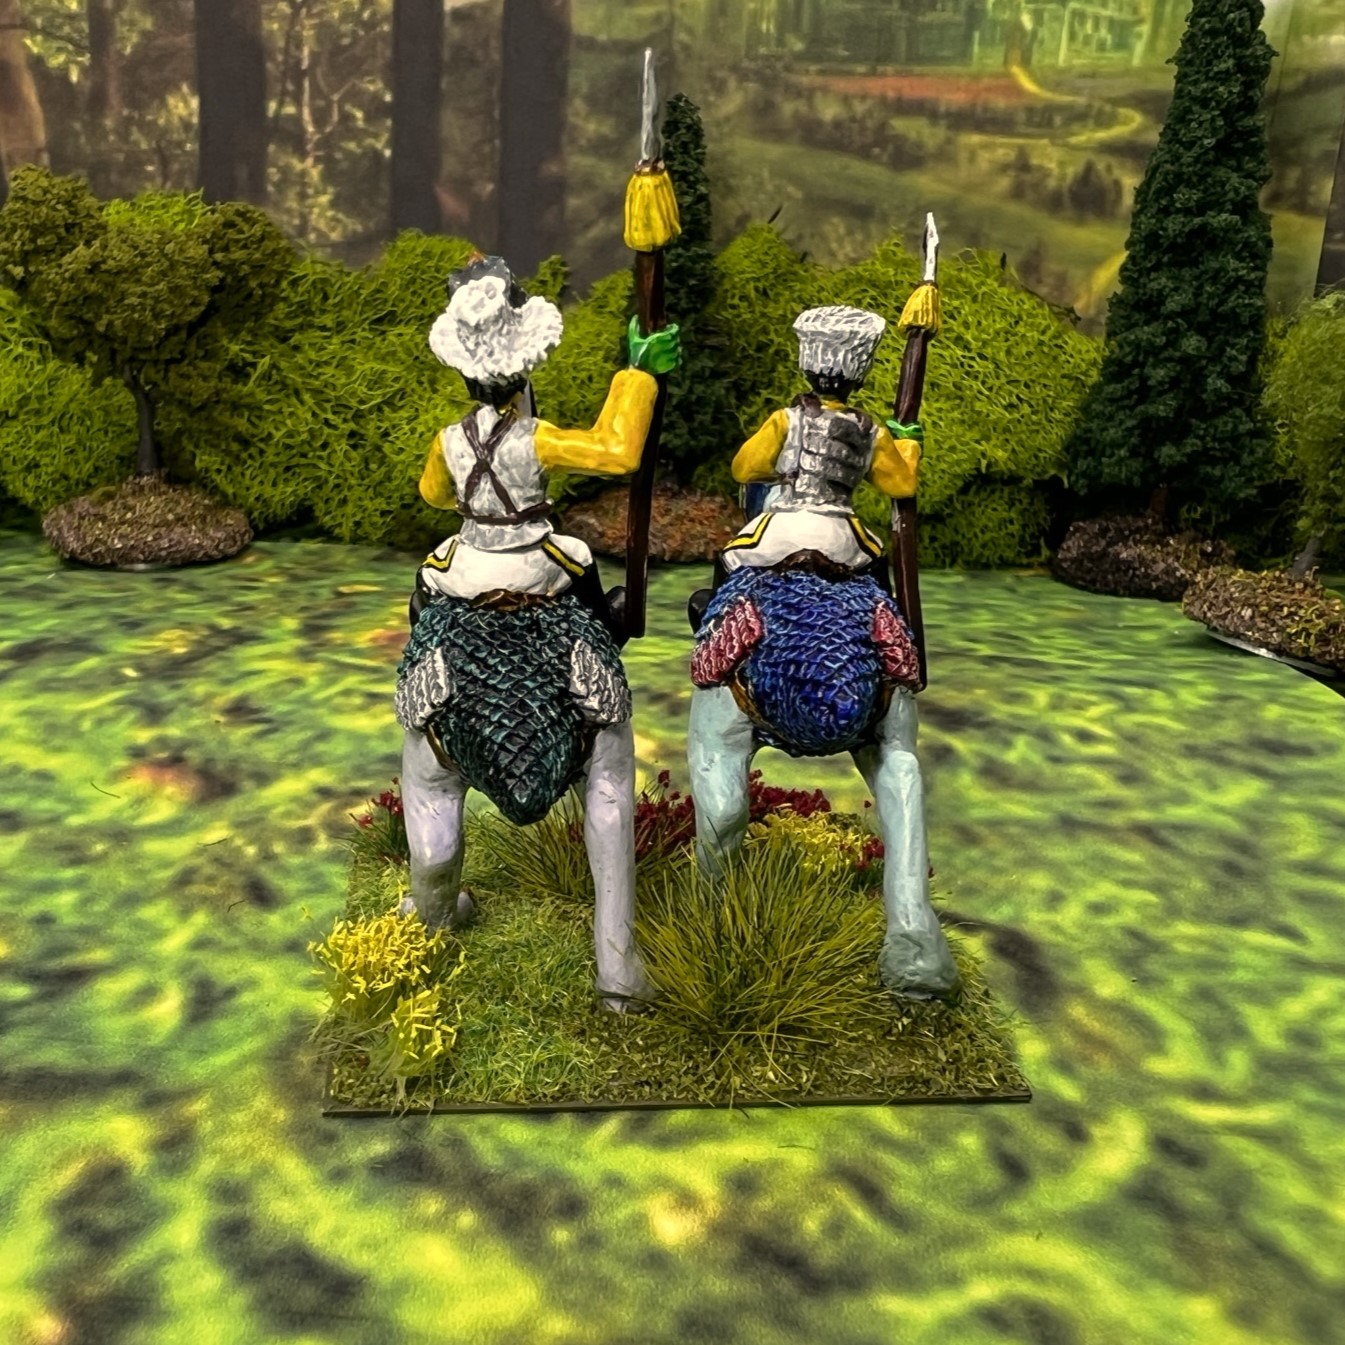
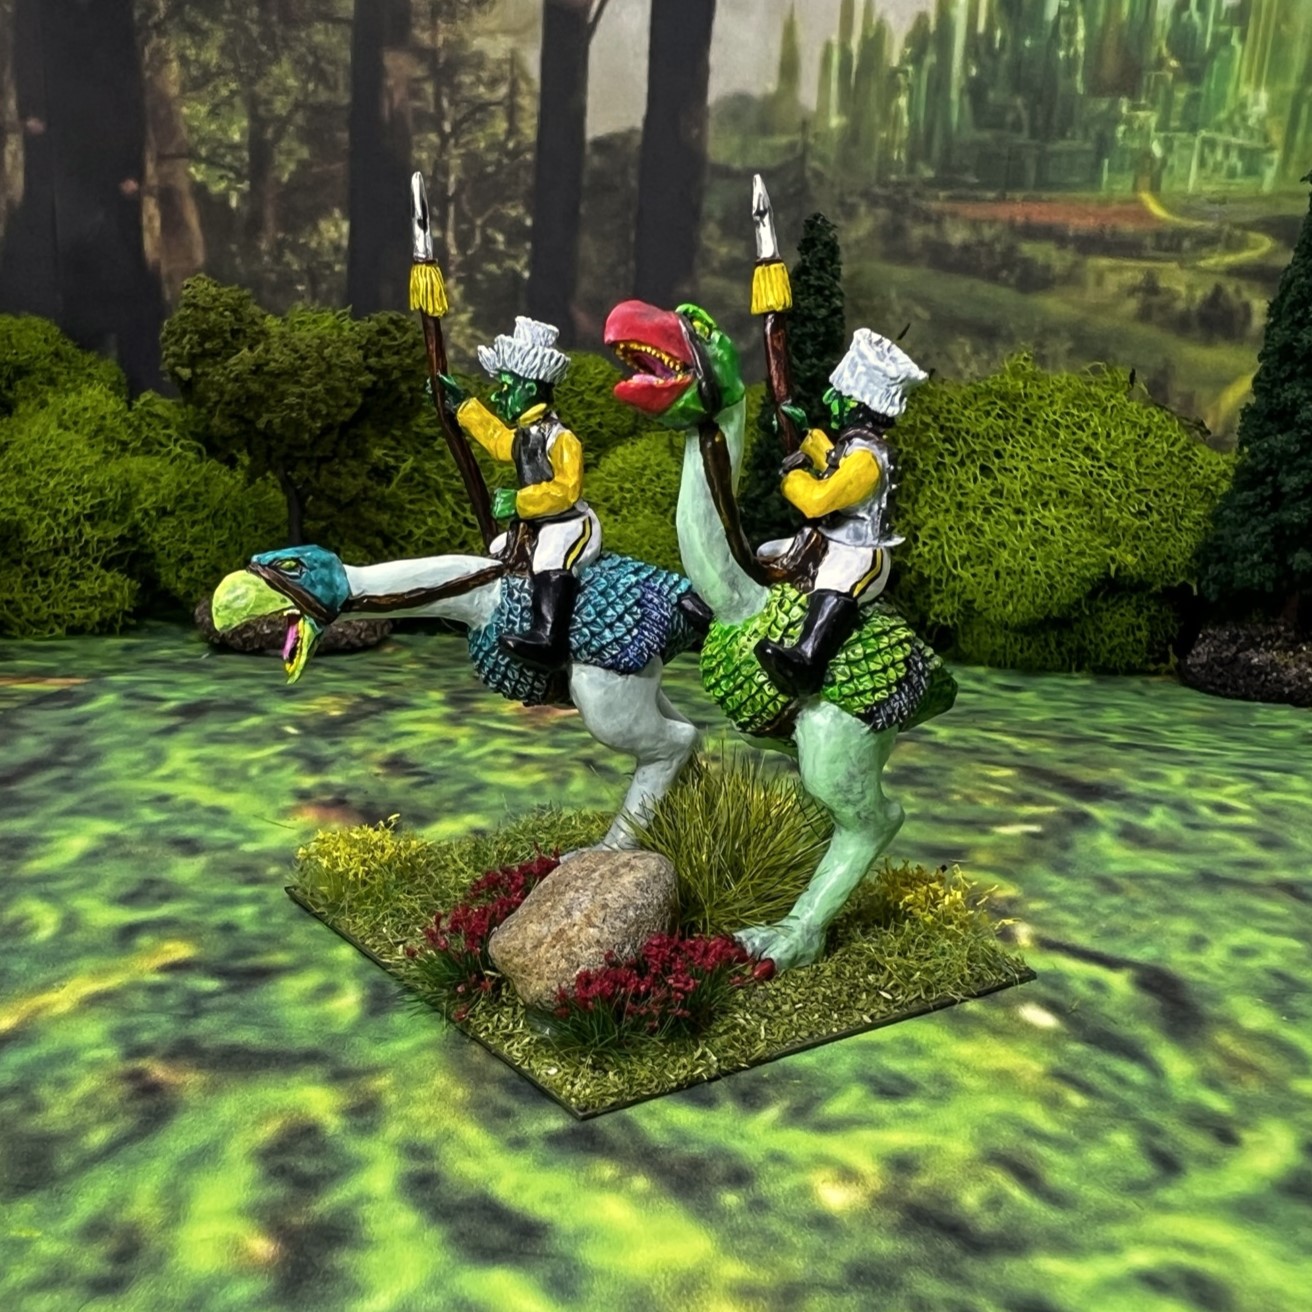
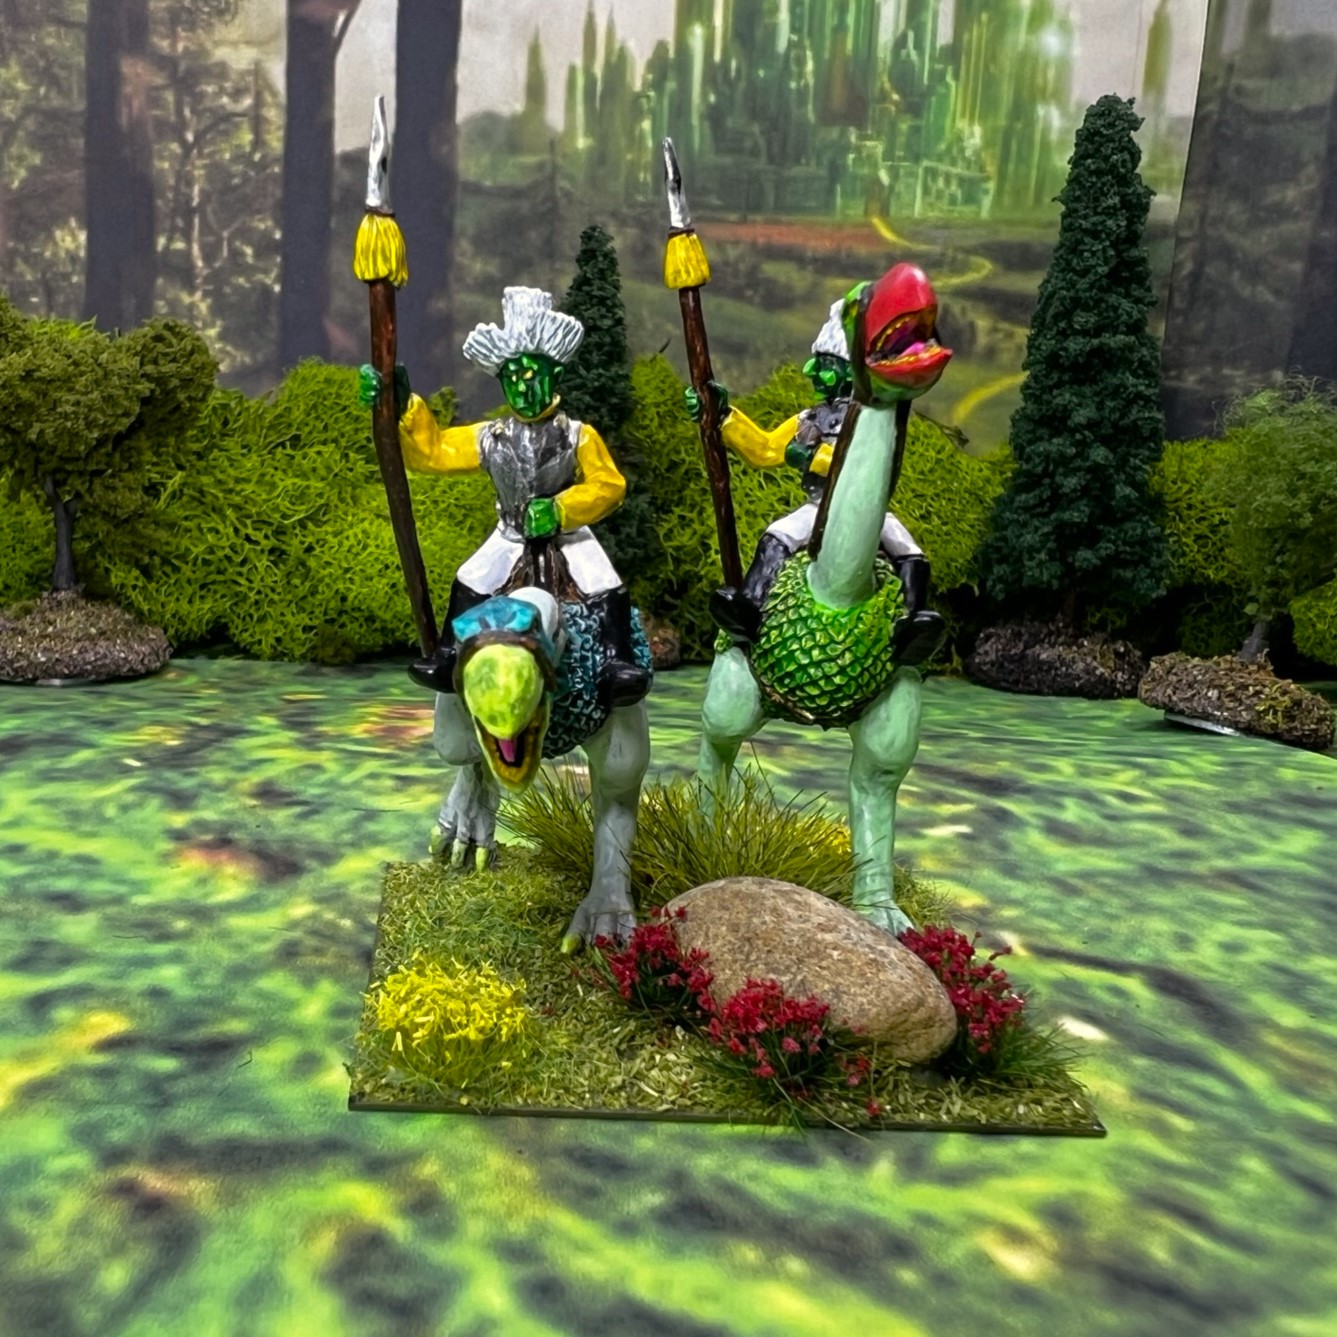
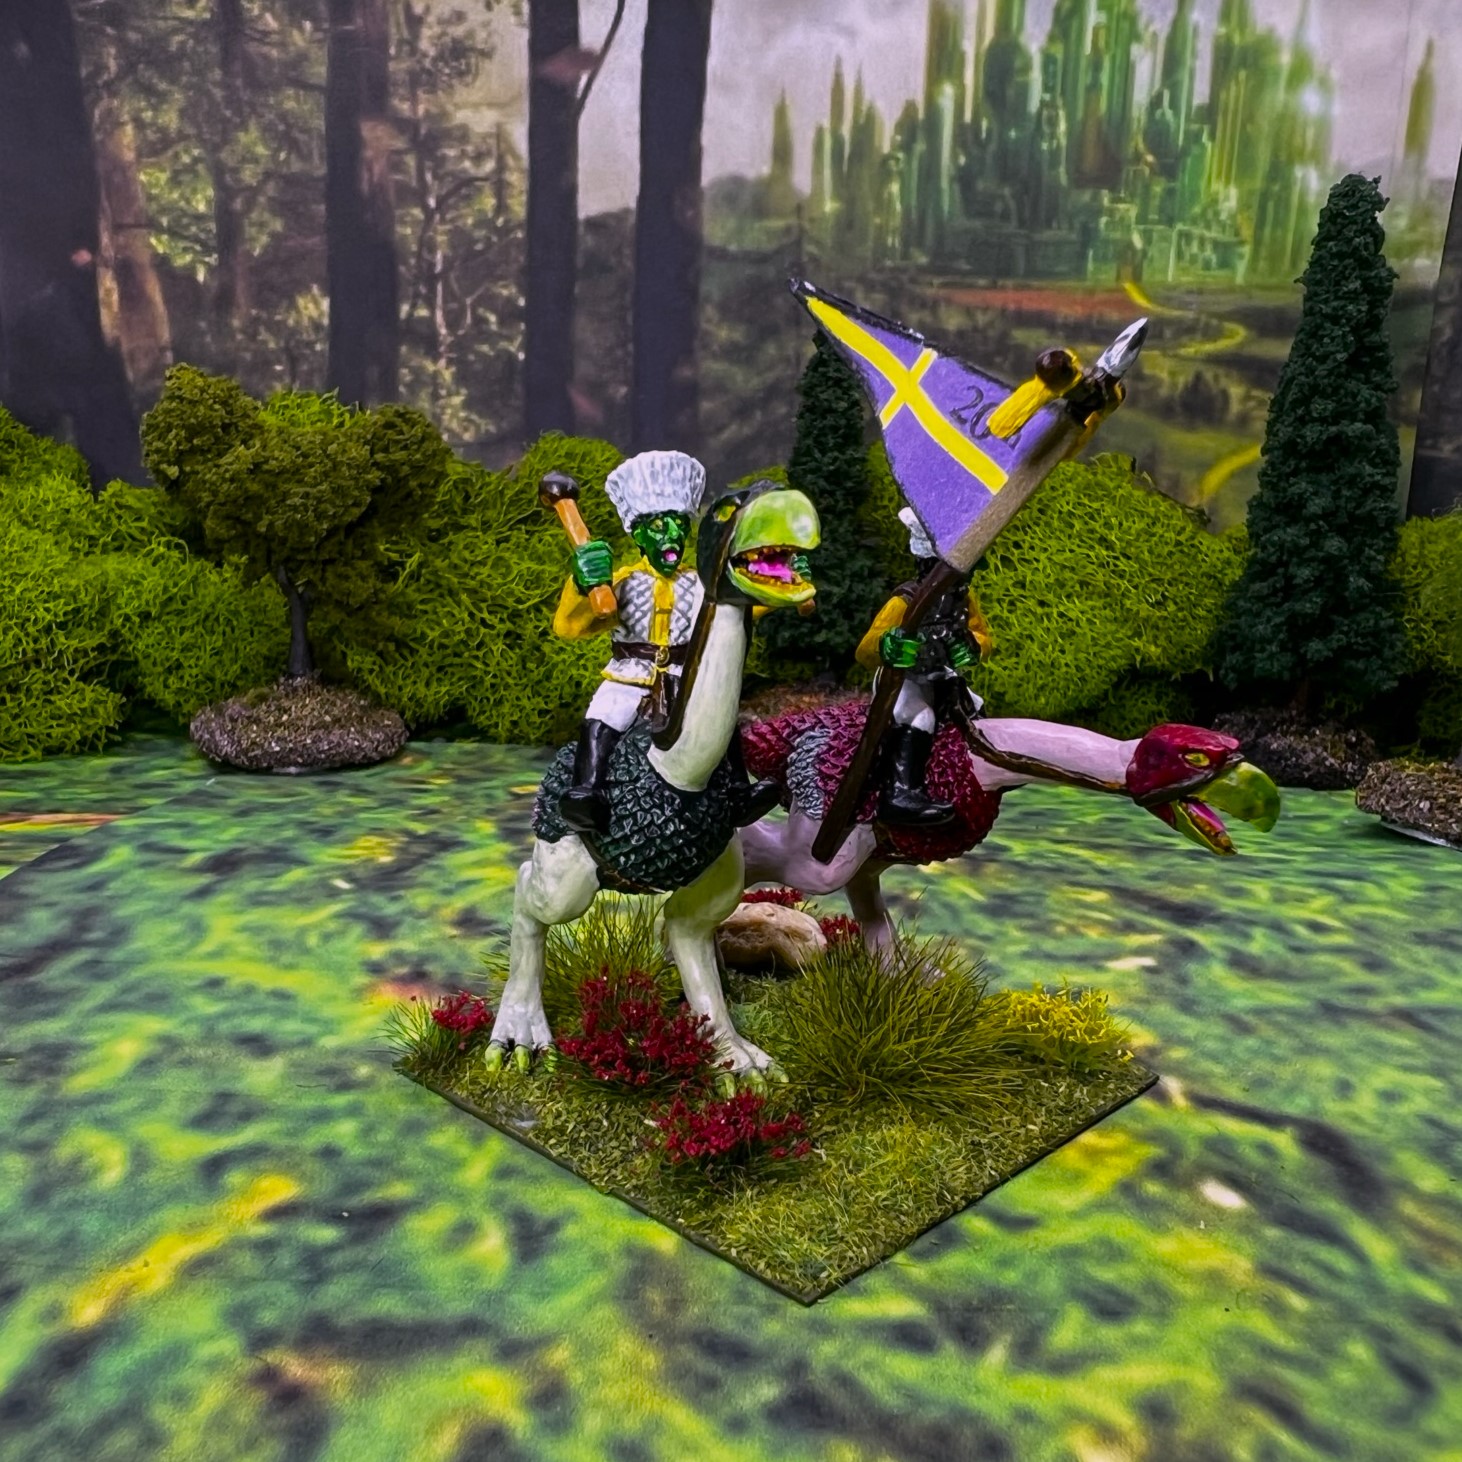
All are riding Zilks, which are carnivorous huge birds. The SKU# is OZZ305 and can be seen here. The figures come in two pieces (rider torso and a zilk combo rider’s legs combo). I had ordered/selected OZZ304 during the Kickstarter a while back, but got shipped OZZ305. The OZZ304 SKU is for the Winkie Heavy Cavalry – but they are the same price and I had no problem with having them in my brigade. There are 10 figures based on five 2″ square bases, plus the Regimental Commander on his own MDF base.
The Winkie Light Cavalry costs one point less than the Winkie Heavy Cavalry (6 vs 5) – and only loses one point of Melee (8 versus 9) and Elan (8 versus 9), so it’s still a pretty potent unit to have. Plus, I needed a Brigade Commander which came in the Kickstarter, so all is good by me.
According to “The History of Ozz”, after the Madness Bombs fell at the end of the Last Great War, Ozz was founded. East of the Emerald City, Evora the Wicked Witch of the East, conquered and molded the Winkies into her own fighting force. Winkies are believed to be mutated humans, perhaps even descended from genetically-created super soldiers at the end of the Last Great War.
As for the Winkie Cavalry, according to The Wars of Ozz:
After Evora lost her first battle to goat-riding raiders from the Great Endless Desert, she suddenly wanted cavalry. Perhaps inspired by the Madness, she had a vision of zilk-riding lancers sweeping down on her enemies. There were only two problems with this. First, the Winkies were not a mounted people. Second, nobody had ever thought of riding a zilk – – and with good reason. Zilks or “terror birds”, weren’t ridable – they were giant, carnivorous, two-legged birds of the high mountain valleys. Simply getting close to one was risking death.
Of course, after a few executions, nobody wanted to tell Evora it couldn’t be done. An expedition was mounted and a herd of zilks was corralled and broken to saddle. The Winkie survivors had the honour of being the first commanders of the Zilk Squadrons. For the rank and file soldiers being promoted to Zilk trooper is seen as a punishment rather than an honour. Everyone knew a terror bird would find a way to kill its rider sooner or later. Since drilling was almost impossible and the riders could barely get their mounts to cooperate on the field, Zilk regiments were and are poorly trained. Still, if the riders can get them to go in a straight line, the Zilks can land a charge with a powerful impact.
As discussed on previous posts, the Winkies (the orcs of the Ozz world) consider melee as their preferred means of combat. No missile weapons here!
I began prepping the unit back on Monday, February 13th by cleaning up and filing off as many mold lines as I could without taking off any details. I then washed the figures with soap and water to remove any oils left over from the casting process. I decided to paint the riders and the mounts separately as I thought that might be easier given the proximity that the Winkie lances would be to the Zilk mounts. After drilling with a pin vise, I carefully put small balls of poster tack into the wells where the riders would be affixed – so as to prevent any primer from compromising future glue adhesion when I was assembling them. I then applied primer with an airbrush, followed by a wash of Citadel “Nuln Oil”. As usual, I will list all the paints I used on this project at the end of this post for those interested in that sort of thing. There were 82 this time!
One different approach that I took on for this project was to have every zilk be painted totally differently from every other zilk in terms of a painting scheme. To accomplish this, I chose a range of pastel craft paints from Michaels and mixed them with Vallejo Thinning Medium. These are shades that I would not normally use – and I used these pastels for the legs and necks, and married those to other paints (mainly contrast and speed paints) on the beaks, claws and feathers. I used a lot of different paints here! For that reason, I definitely needed another Excel spreadsheet – like this one:
Let’s move on to some WIP. Click any picture to get a better view.
WIP shots…
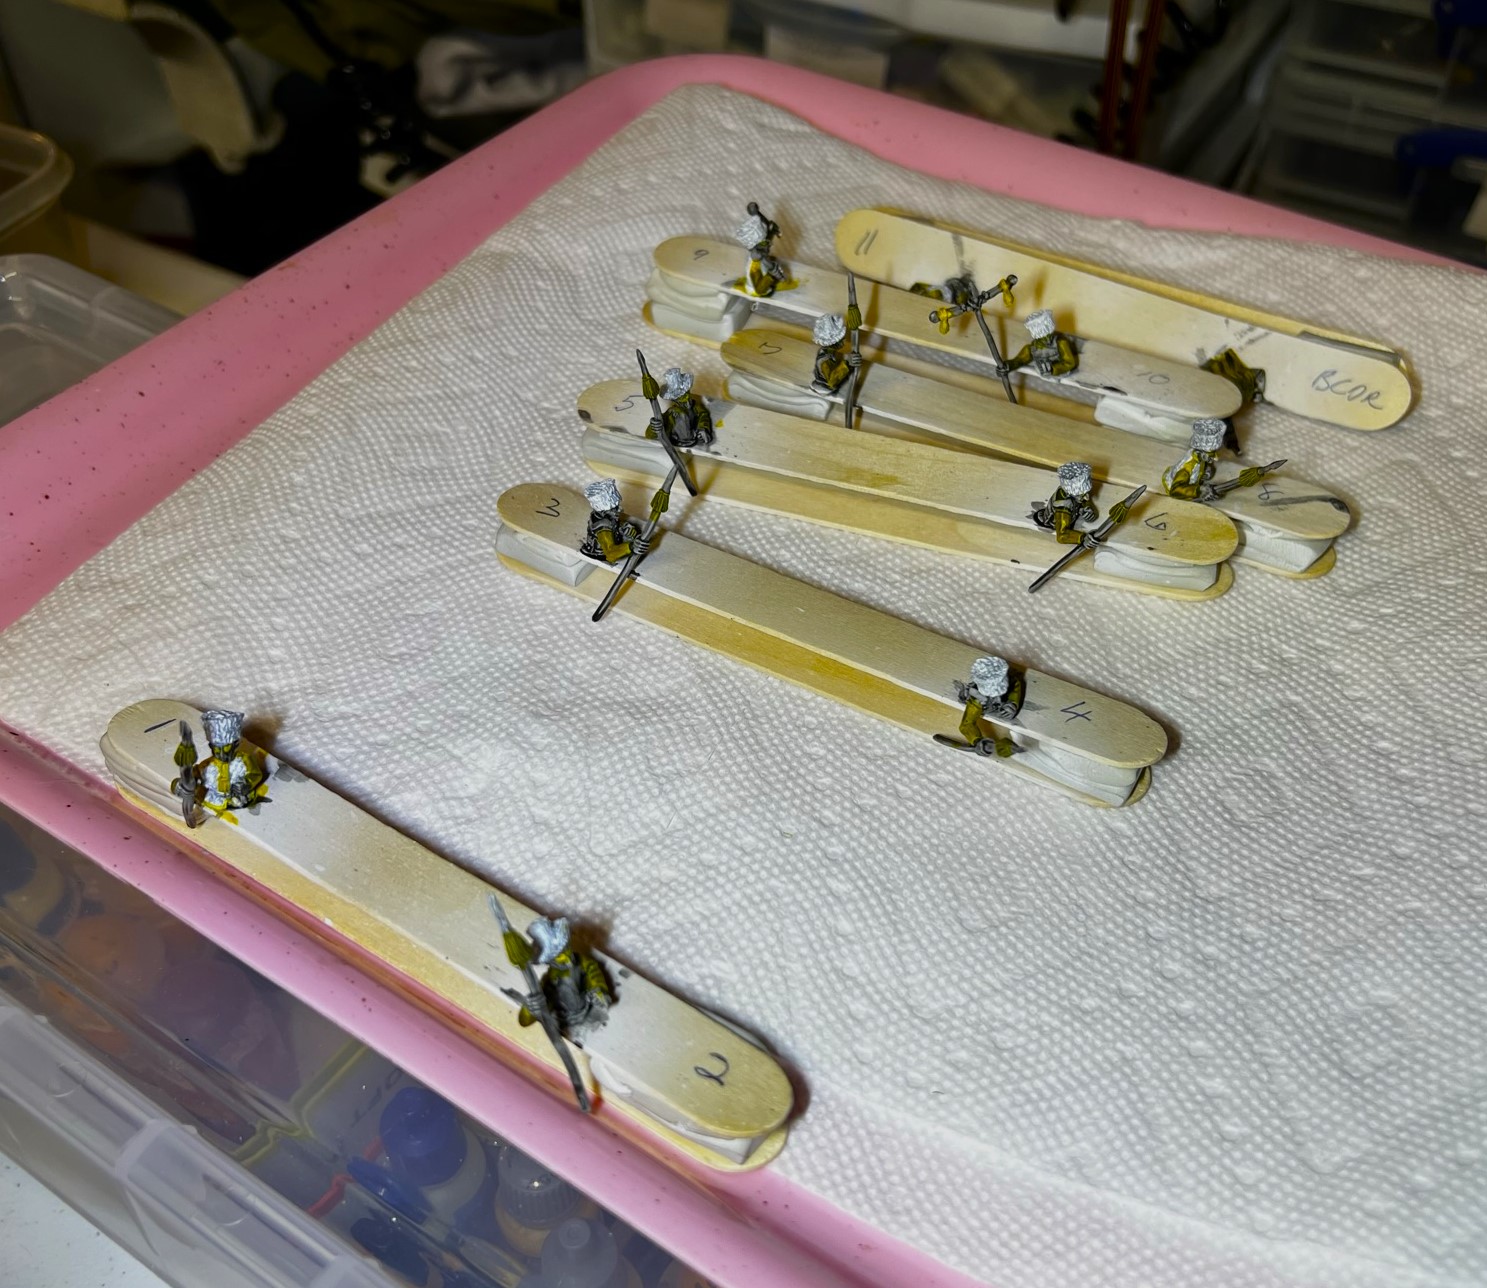
The Winkie Light Cavalry Regiment and the Brigade Commander at the start of the project.Here the figures are prepped for priming – note I used some ad hoc drilled out popsicle stick jigs (with poster tack in the holes) to hold and work on the riders until their mounts were done and I had painted the lances.Zilk progress on 2/19Winkie progress on 2/19
Below is my progress through 2/20:
With TotalCon37 looming, I pushed as far as I could before I needed to pack the car with all my Aztec, Maya, and Conquistador stuff. When I returned, I jumped back into working simultaneously on them and the Jungle Bases.
By 3/1 I had the riders mounted and had readied the figures for varnishing.The varnished (and dried) figures are glued to their bases and ready for flocking.
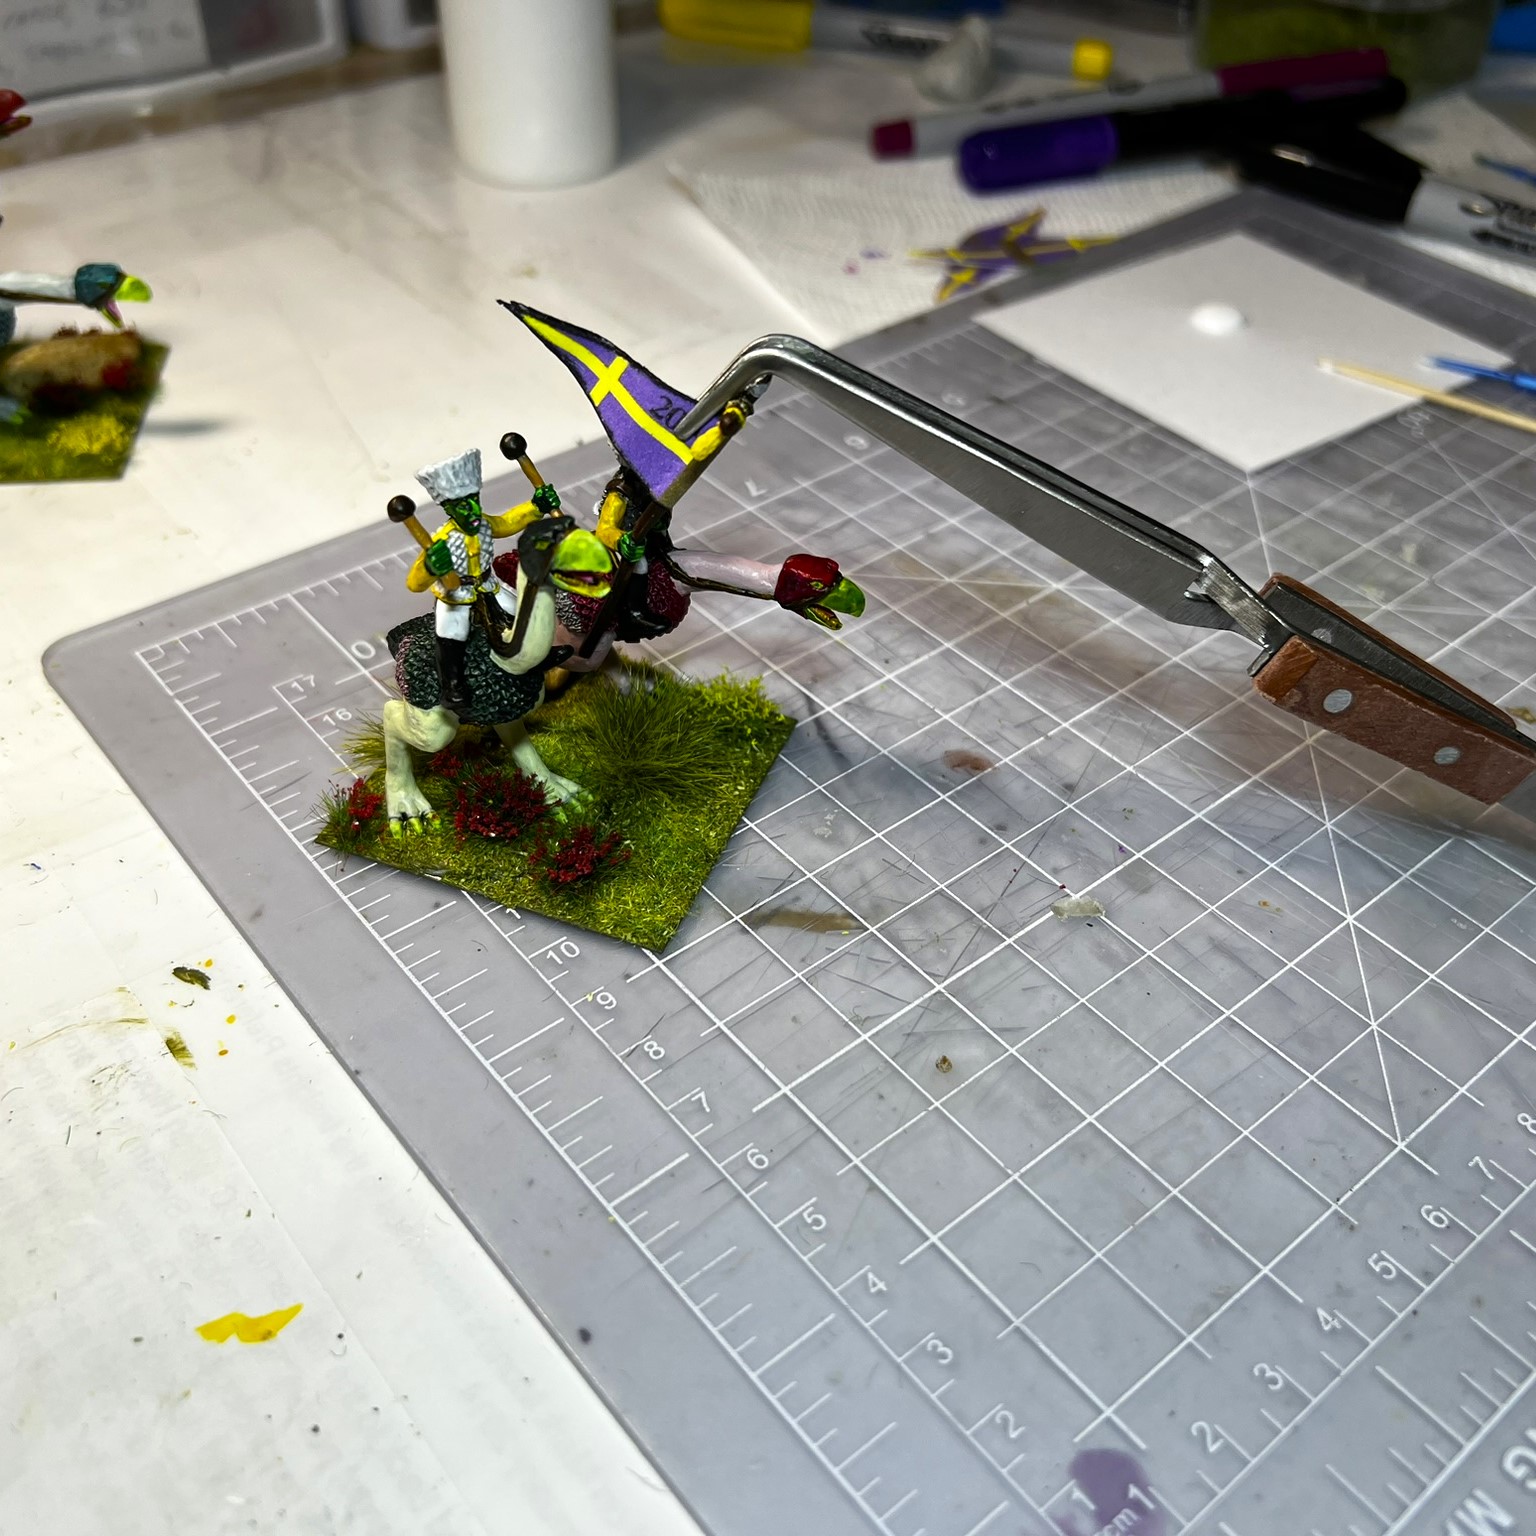
I chose a variety of tufts and grasses for flocking – plus some small rocks from near my driveway that I washed. After that, all I needed to add was the 20th colors – purple just for Roger!
I finally found a way to glue the guidon close to the pole – with these tweezers as clamps.
Now that you have seen the WIP, how about some…
Eye Candy
Winkie Brigade Commander
This figure had its own mount – and is free to have in your force in the game. The Brigade commander will have attribute tabs (which is why there is a tab well at the back of the figure). Early on I decided to freehand the stripes on all of these zilk-mounted warriors. His colors are unique in the brigade – I went with a red and yellow theme here.
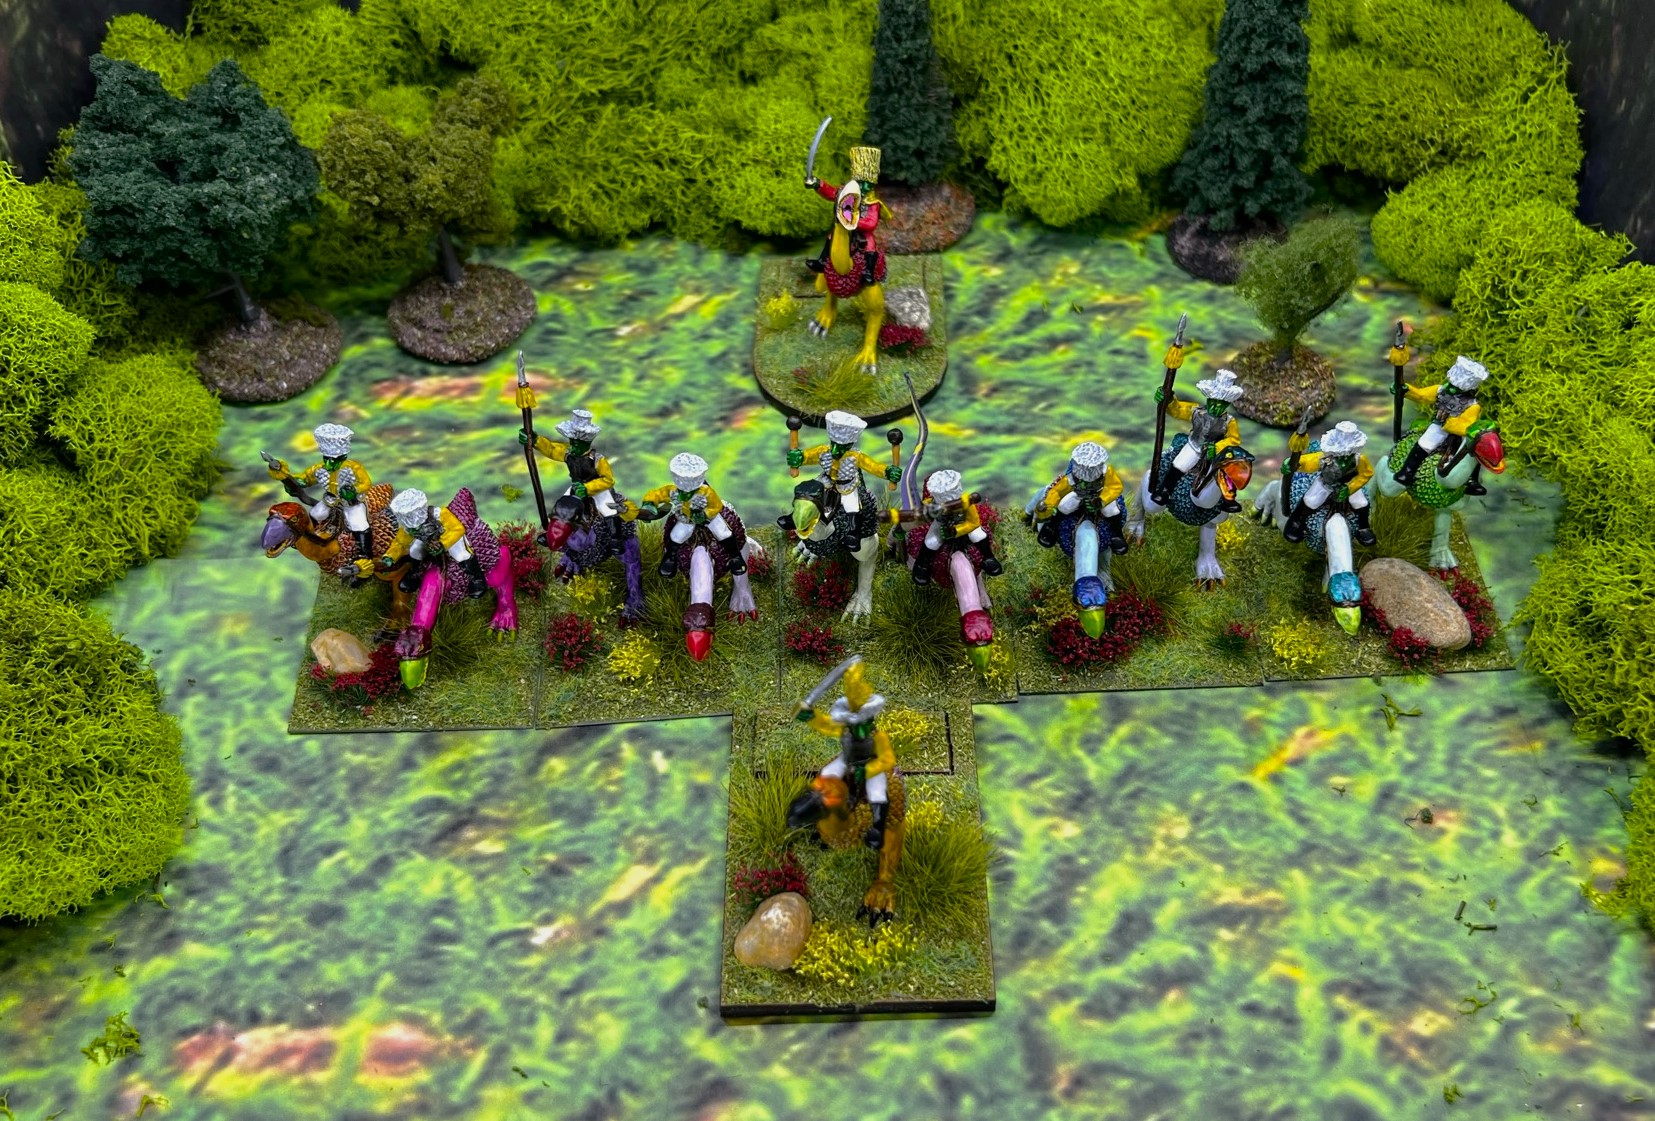
2oth Winkie Light Cavalry Regiment
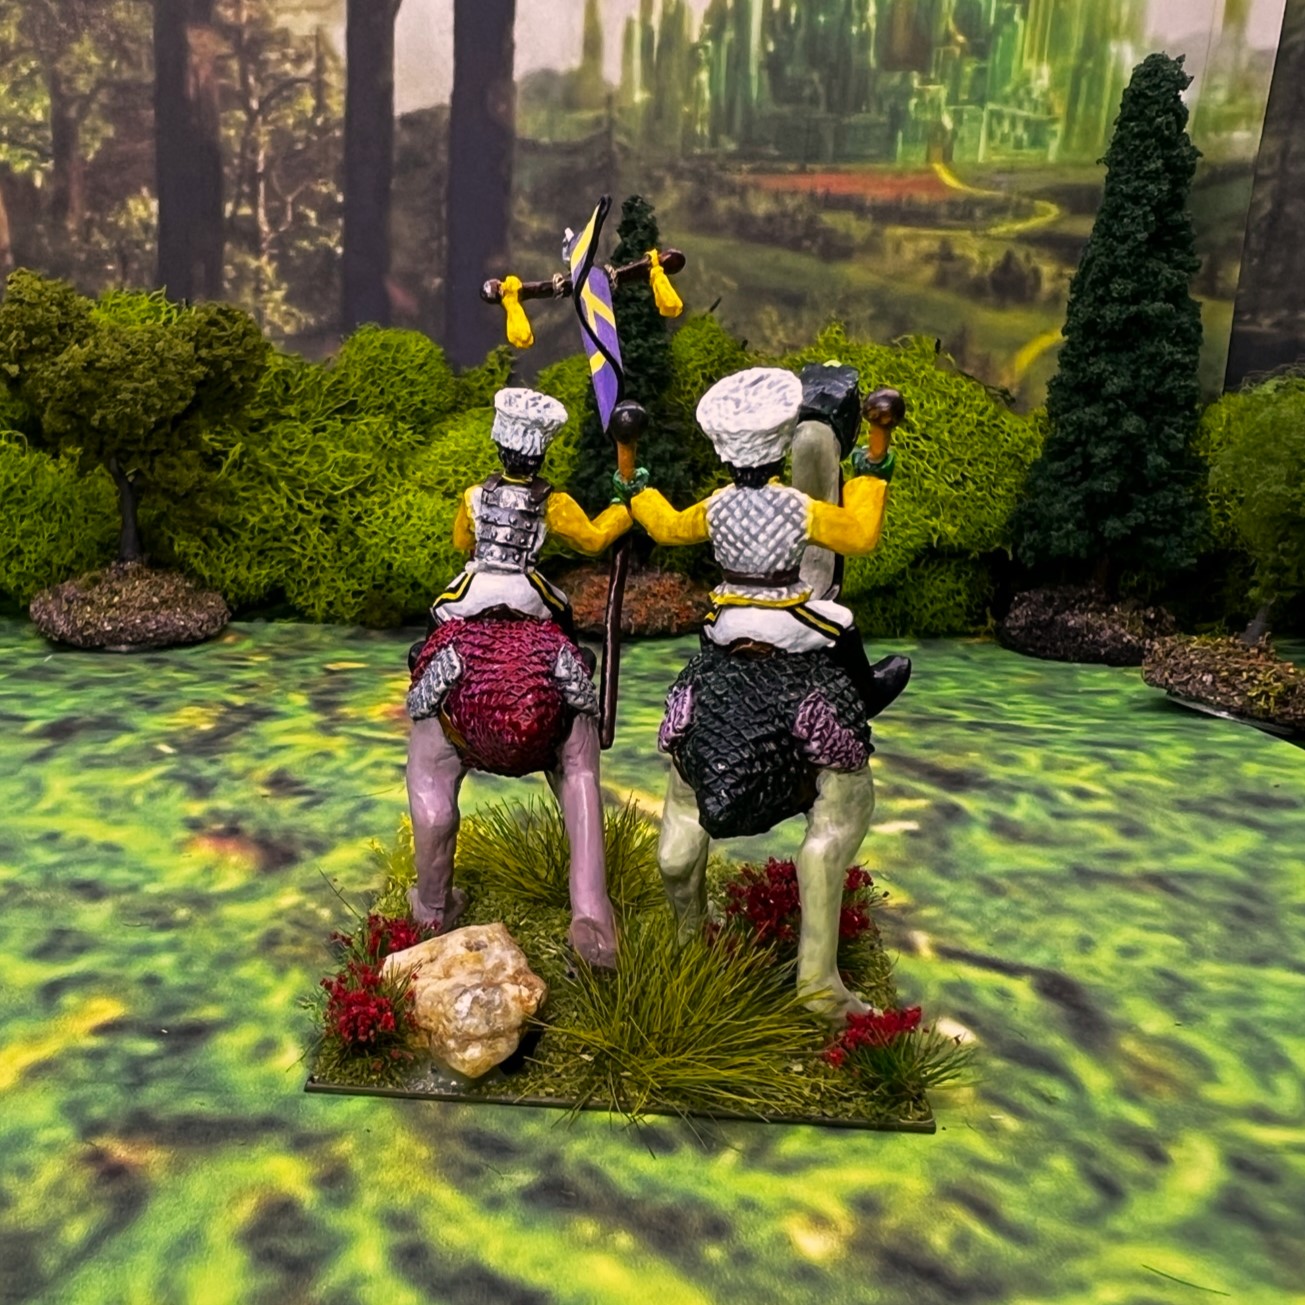
There are 5 stands of 2 figures each plus a regimental commander – and I tried to pose, paint, and arrange them as differently as possible. As with all zilk-mounted regimental commanders the one here goes on an MDF stand with a removable tab for an attribute tab in the game if needed. All have white hats per The Wars of Ozz.
Regimental Commander Stand
Stand 1
Stand 2
Stand 3
Stand 4
Command Stand
Group Shots
The WLCR in line with the Regimental Commander in front and the Brigade Commander in the rear.Side view or the WLCR in column with the regimental commander up front.Angled shot of the group giving an idea as to the color variations when grouped together.
I thought by having these with a lot of color that they would be wonderful attacking the Munchkin Light Cavalry!
This completes (for now) my Winkie Brigade. Next, I will be moving on to the Land of Harvest faction as well as some terrain for Ozz. But first, I am going to Cold Wars – where these Winkies will see battle!
Winkie Brigade (less apes) in a boxYes, another spreadsheet showing what I have for Winkies.
And yes, I still have more to come…
Miscellaneous details and references for those interested in that sort of thing:
For all of my previous posts on Wars of Ozz games, figures, units, and other related projects – please see this page.
PAINTS, INKS, GLAZES, SHADES, WASHES, PIGMENTS, FLOCKING, GLUES AND MORE THAT I USED ON THIS WINKIE LIGHT CAVALRY REGIMENT & THE WINKIE BRIGADE COMMANDER:
Regimental MDF base from Old Glory/Wars of Ozz Miniatures
Mounted Brigade Commander MDF base from Old Glory/Wars of Ozz Miniatures
Elmer’s PVA Glue
Paper clip wire pieces
Gorilla Glue
1 1/4″ x 1″ steel base from Wargames Accessories (#FOW1)
2″ square steel base from Wargames Accessories (#21)
Vallejo Mecha Varnish “Gloss Varnish”
Vallejo Mecha Varnish “Matte Varnish”
Black Sharpie pen
Army Painter “Battlefields Grass Green” (flocking)
Army Painter “Battlefield Field Grass” (flocking)
Army Painter “Battlefields Field Grass” (flocking)
Shadow’s Edge Miniatures “6mm Dark Forest Red Tufts” (flocking)
Small stones
Army Painter “Battlefields Meadow Flowers” (flocking)
Winkie Flags from Buck Surdu printed on card stock
Again, as you may want to check out the Wars of Ozz figures’ range – there are two places to get them (and I make no money from this btw). The game rules and the figures are available from the following two places:
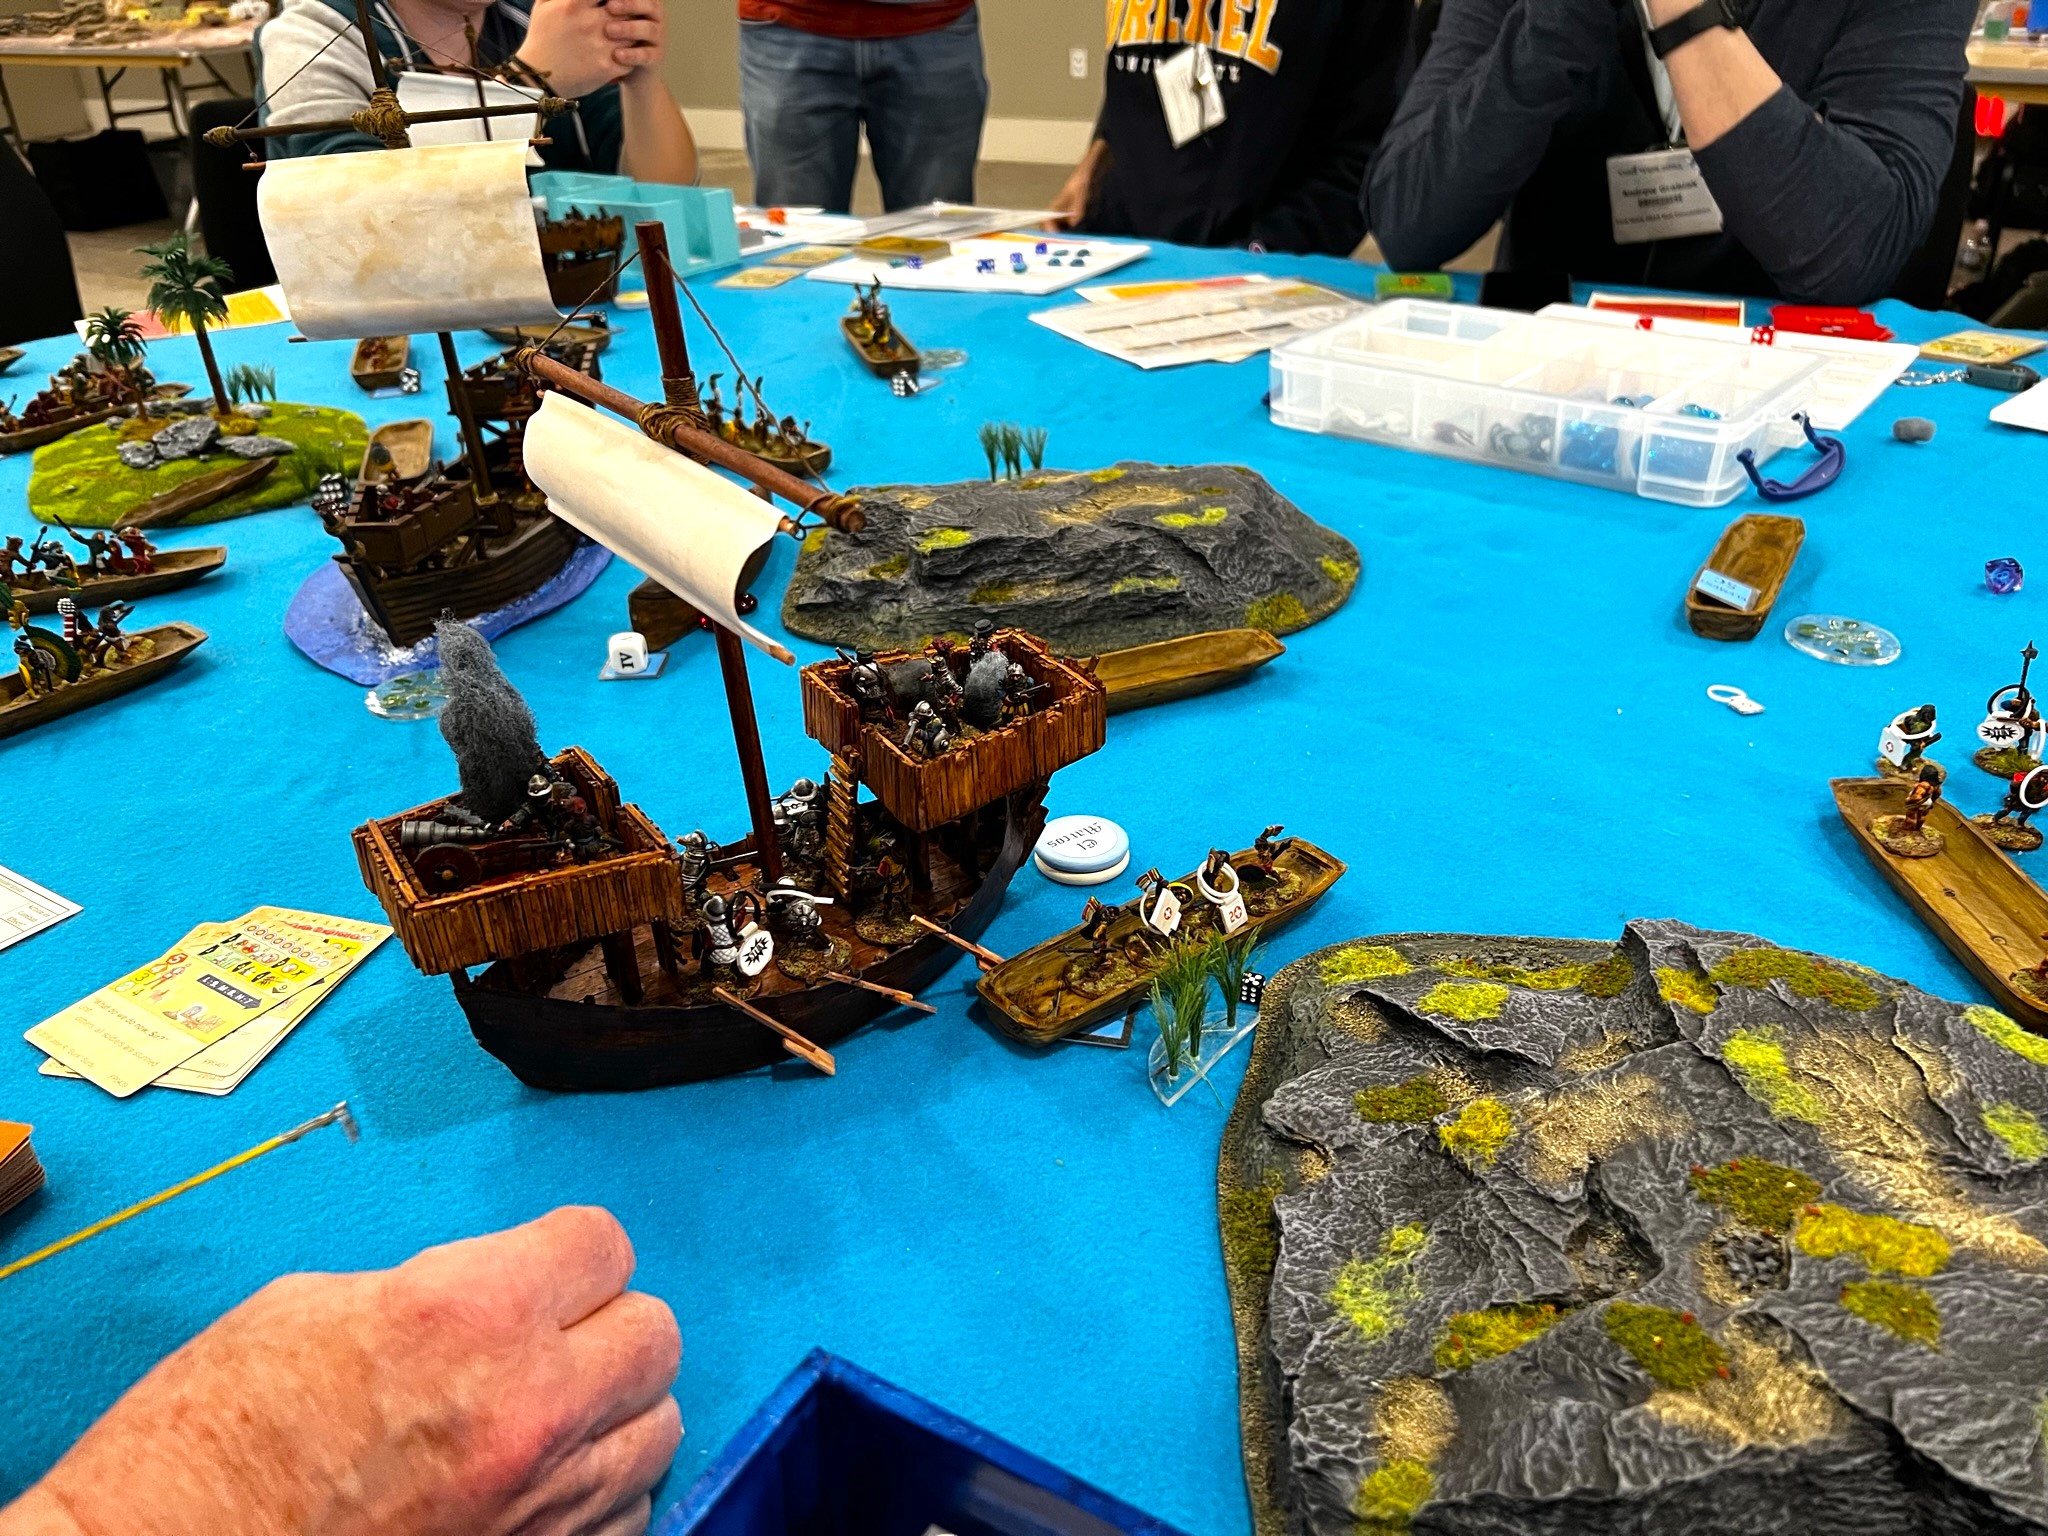
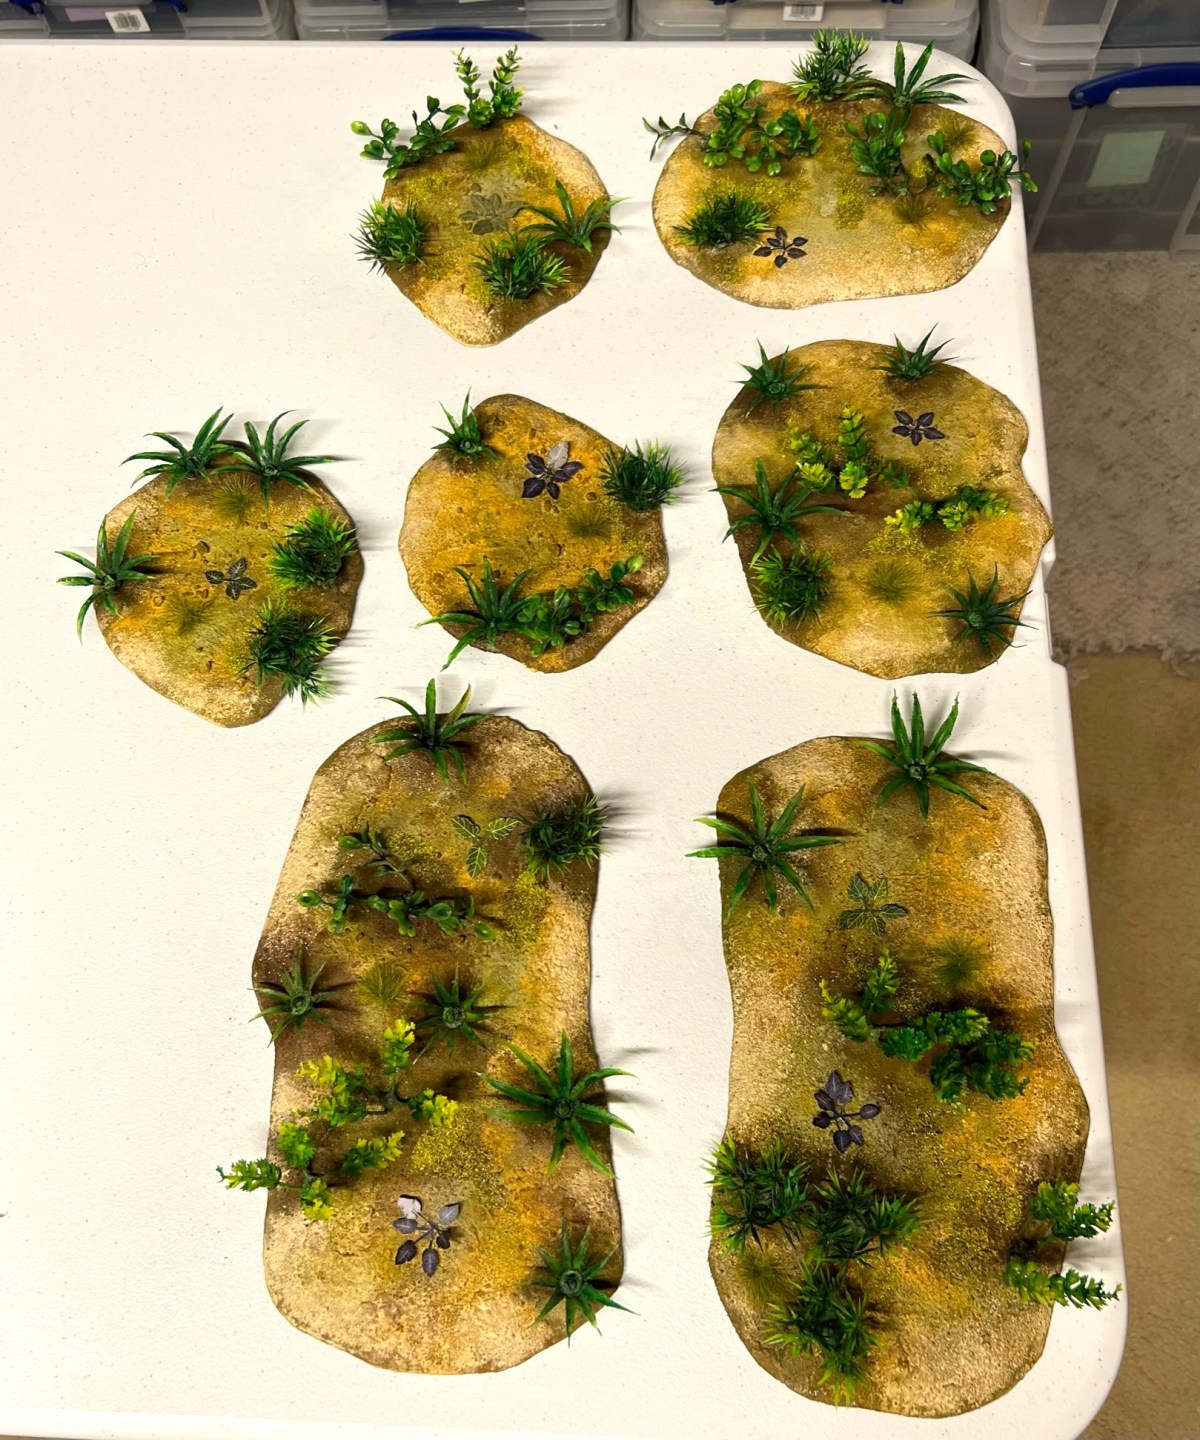
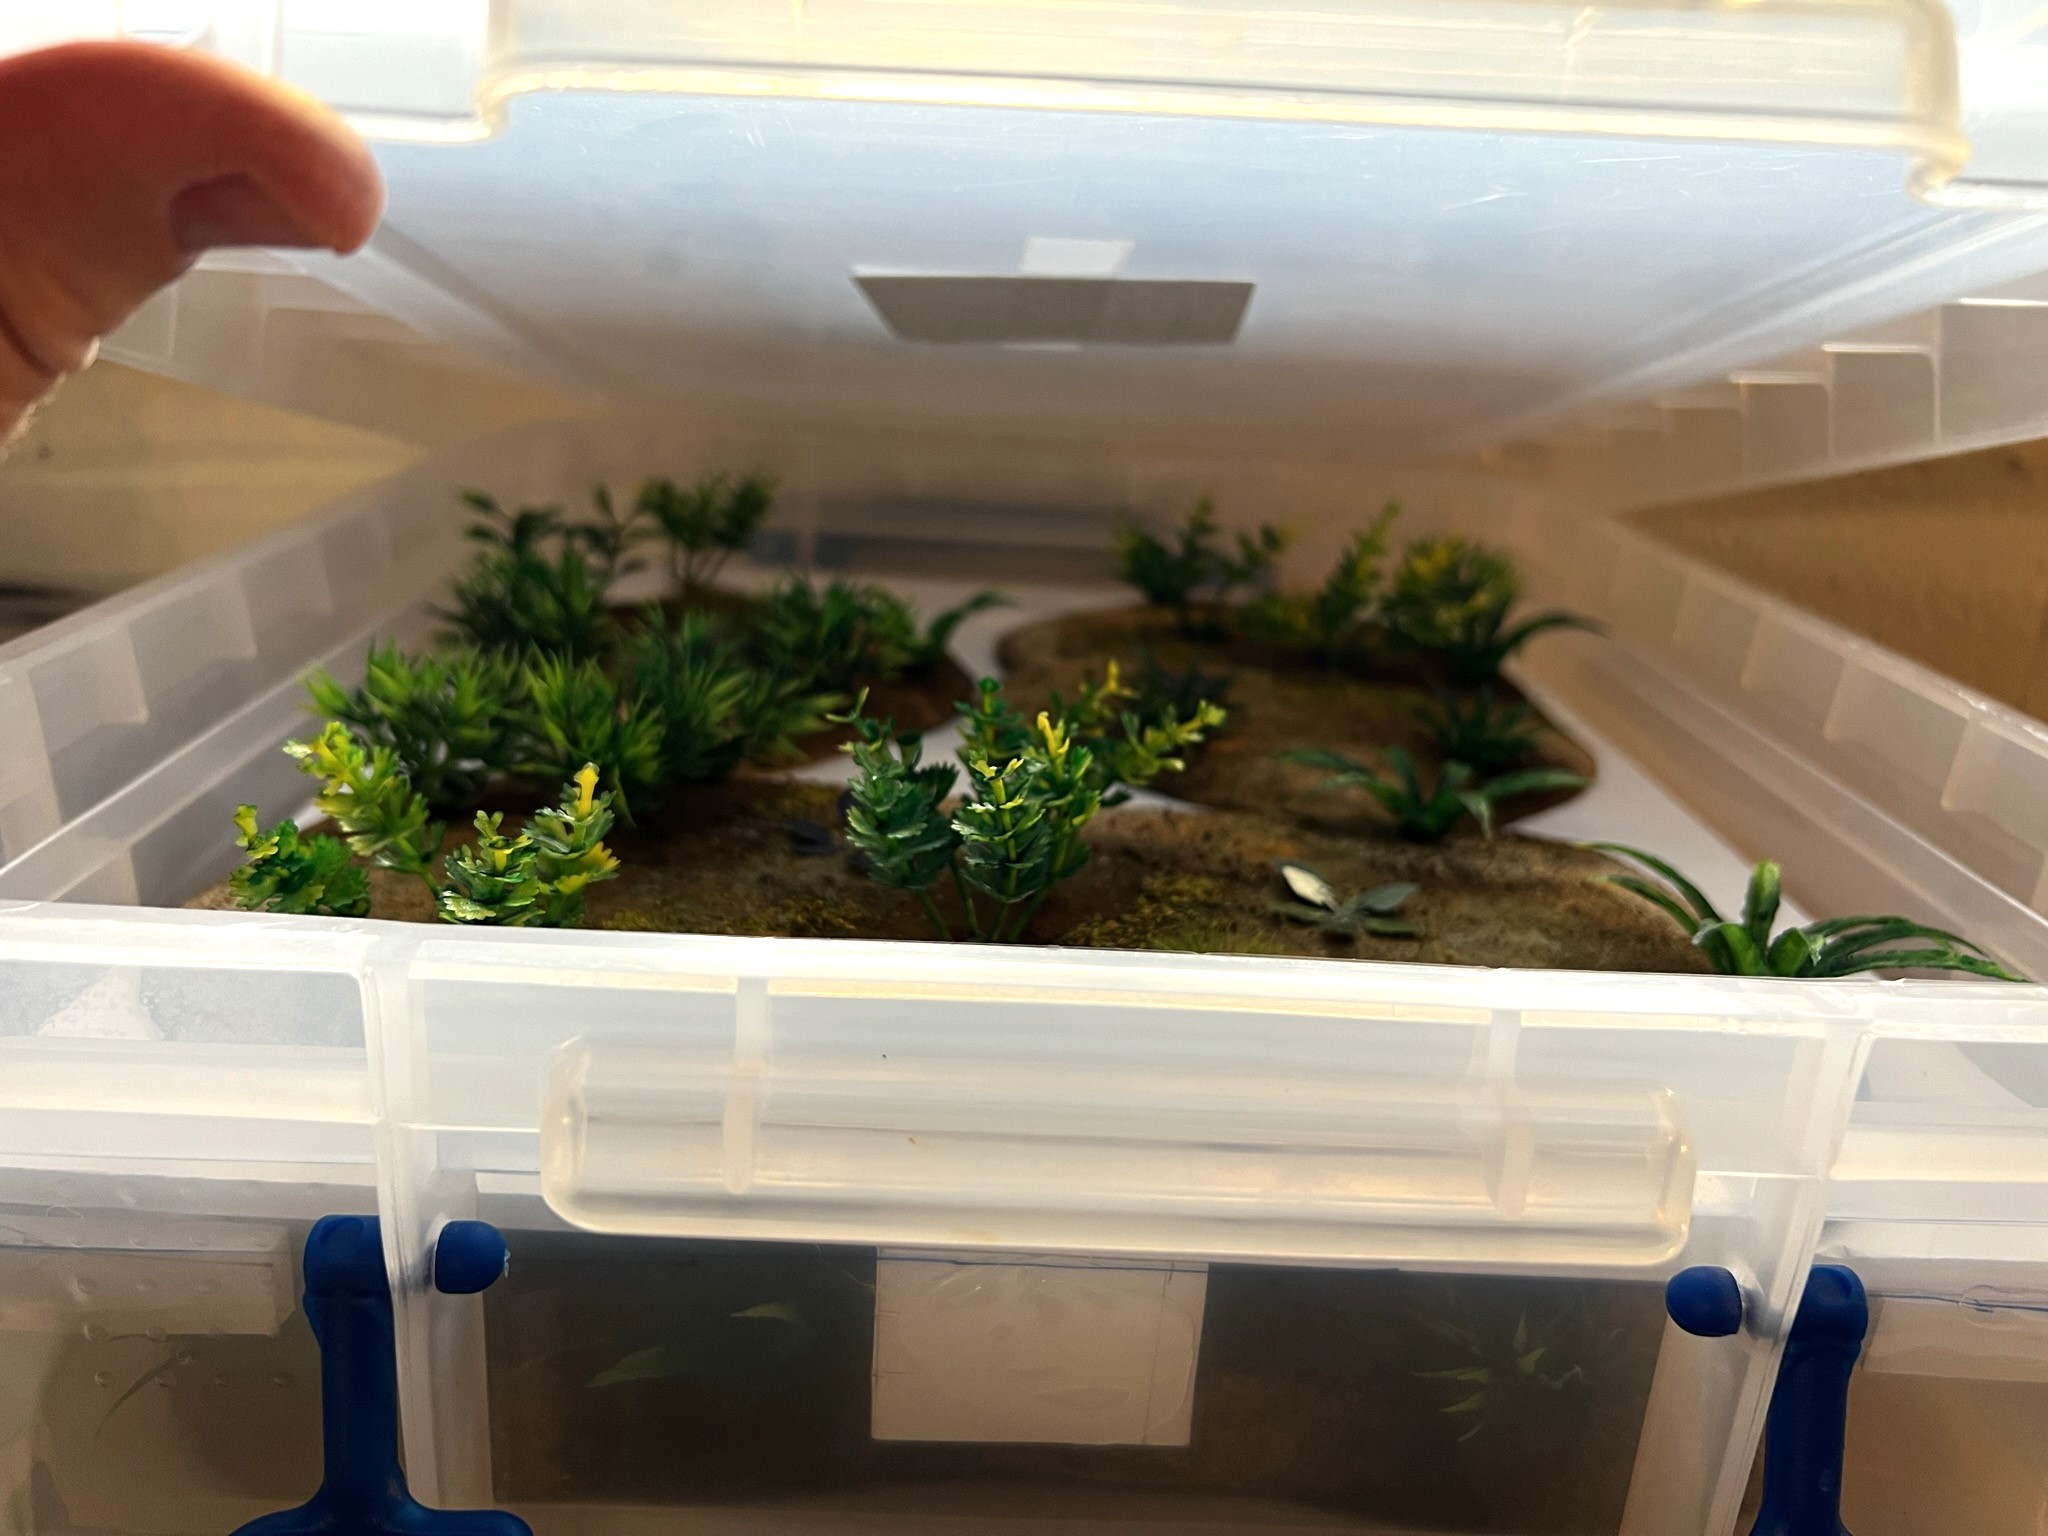
The scenario involves a beach area with a jungle nearby and a Maya city. The Conquistadors start on the beach and try to move inland. You can see a description of the game in my recent TotalCon 37 recap post. Below is a set up of the battle – note the seven printed green card stock areas at the juncture between the jungle and the beach near the ends of the jungle paths. These areas I described as being easy to cross (no movement penalty) but providing a degree of concealment and cover – basically a scrub-type area.
I used these card stock pieces in lieu of the 7 scatter terrain jungle bases that I ordered from our blogger friend Dave Stone of Wargames Terrain Workshop in the UK back at the turn of the year. I even sized my card stock pieces to match the ones that I ordered from Dave.
Dave built them post-haste – and sent them to me via the Royal Mail on January 11th – so we both thought I’d get them in time to prepare for the February 23rd TotalCon37 convention. Unfortunately, a combination of a cyber attack on the Royal Mail and labor strikes in the UK combined and conspired to keep them from arriving at my home until Wednesday February 22nd – one day before the convention. As I wanted to detail them for the game, and I did not have enough time to give them the justice I wanted with less than a day’s preparation, I decided to work on them after TotalCon 37 so that they’d be ready for Cold Wars. I want to say that Dave was great in following up with me and this situation was definitely not his fault. The seven bases that I bought were as follows:
I started them on February 27th and worked on them alongside some Winkie cavalry (that I will post about next). All of the 7 bases came unpainted with a very generous supply of different plastic foliage on sprues – which allowed me to customize them. The bases themselves were resin with multiple small conical prongs with which to attach the plants. Dave recommended attaching them with green stuff – but I went with Apoxie Sculpt as I had some mixed already for a box handle I needed to repair.
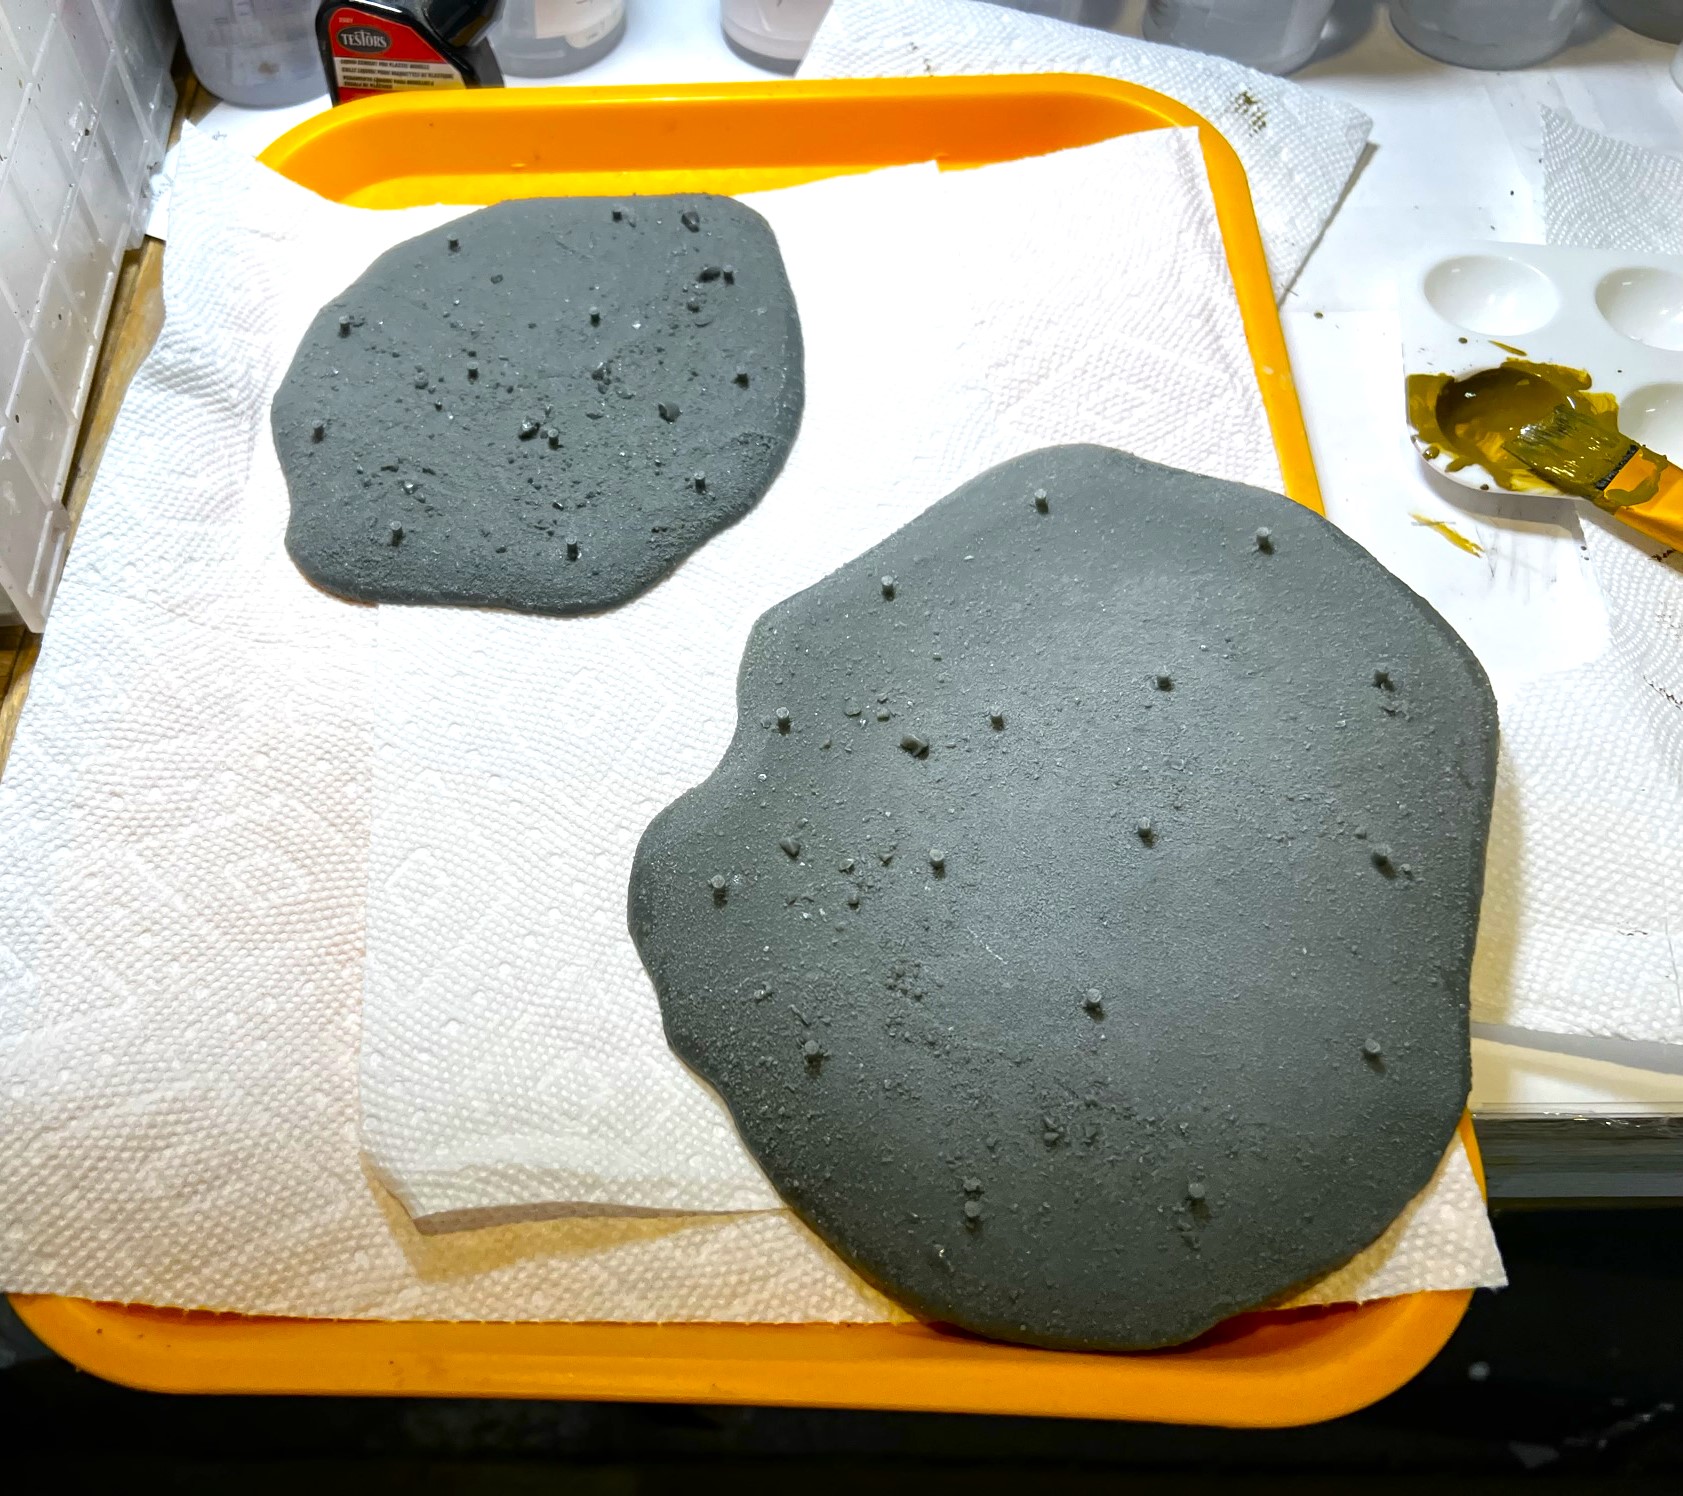
The first steps were to wash the resin and the foliage so that paints and washes would adhere properly.
Washing the plastic foliage and the bases.Two of the washed resin bases showing the prongs, right before priming – on the right!
I primed the bases green-brown and let them dry overnight. I list all the paints and other materials at the end of the blog for those interested in that type of information.
Five of the seven bases primed and drying.Lots of available foliage!
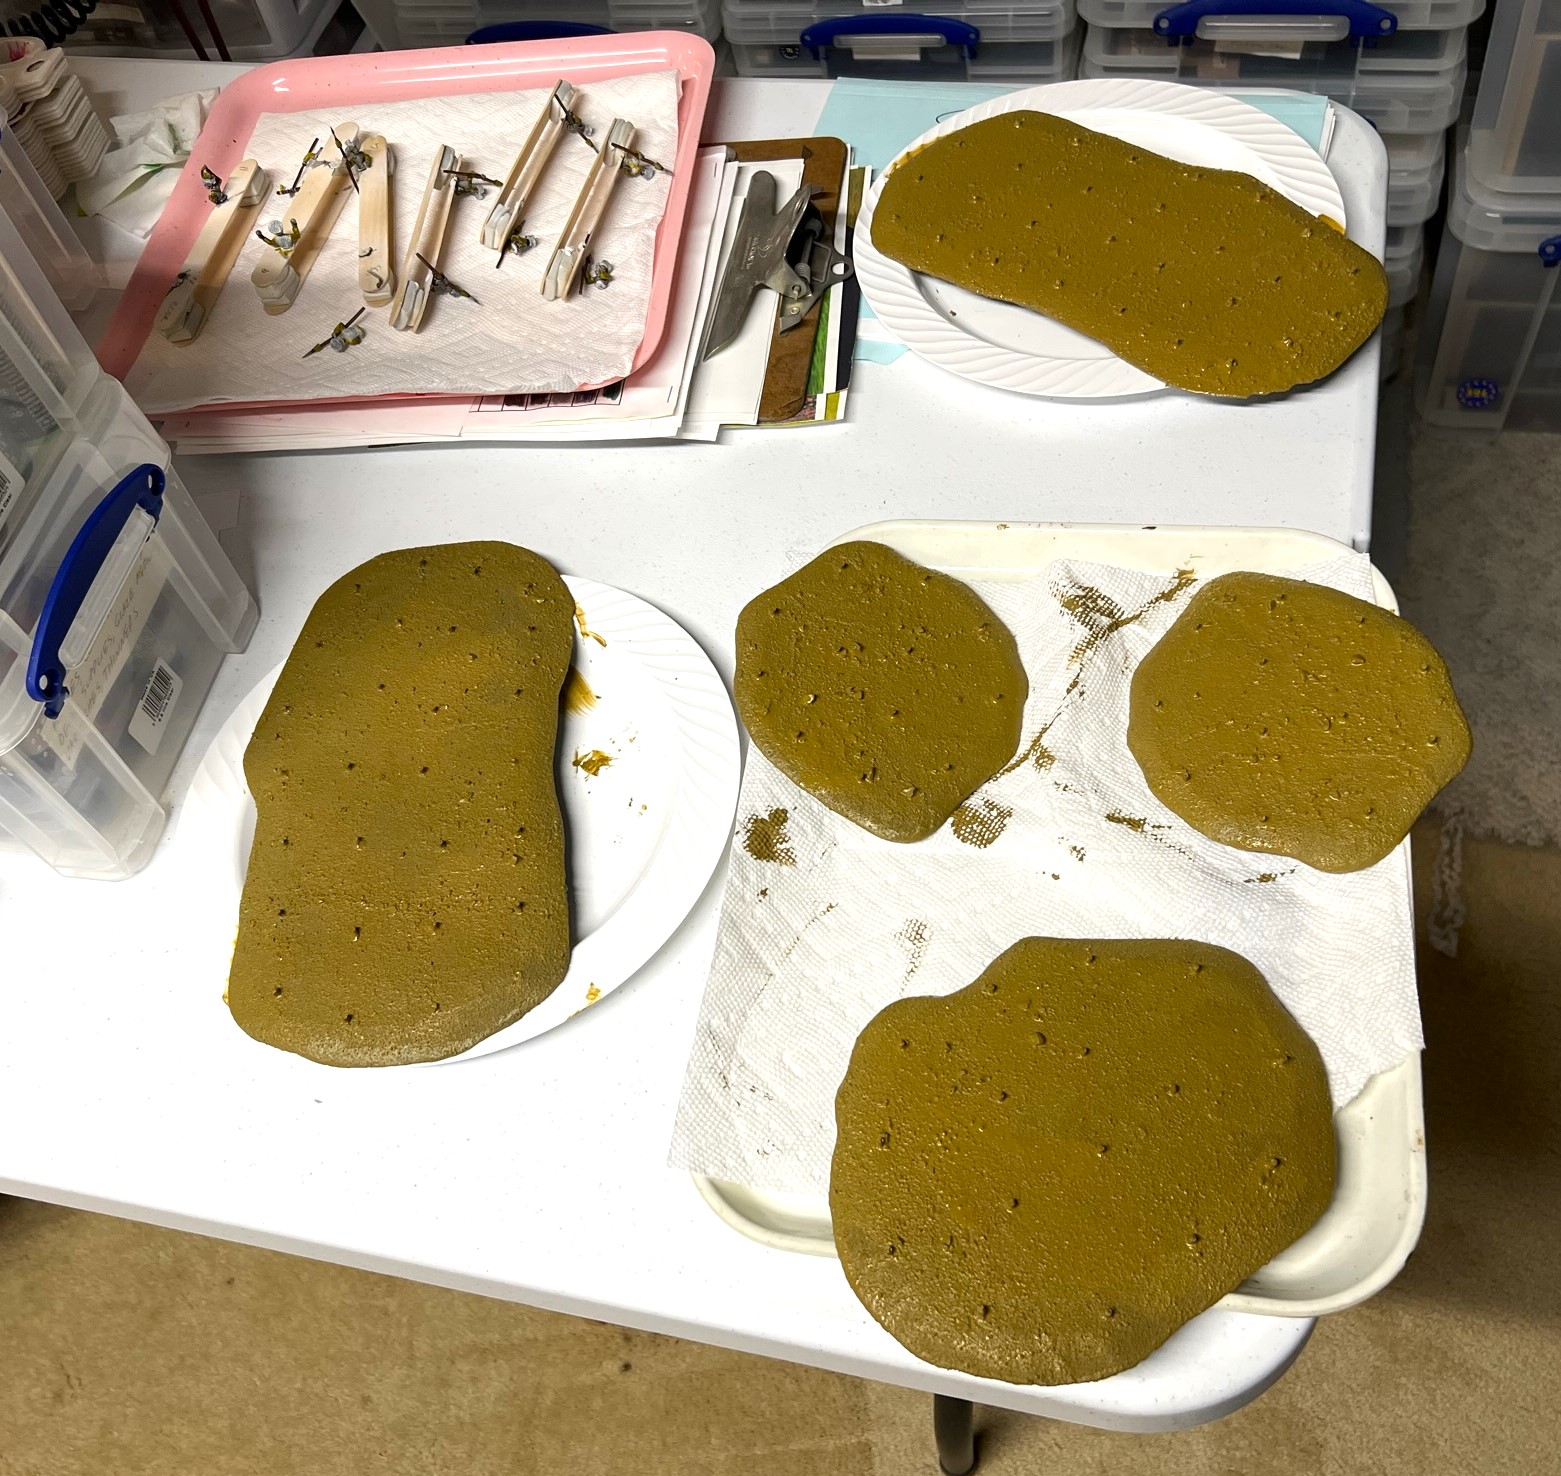
Then, I then mocked out where I would apply the foliage with 1.25″ washers. When I was happy, I applied the foliage with Apoxie Sculpt to 5 of the bases and let that cure overnight. Why five and not seven? Well, as I said, I was also working on Winkie cavalry, and two of the primed bases were hiding under a paper towel and I missed them.
Small base with foliage affixed with Apoxie Sculpt.The 5 non-missing bases with the foliage attached as above – plus the extra prongs have been removed down to the base level.
The next day, the Apoxie Sculpt had cured, I did a quick inventory and I was concerned that I did not buy enough bases! After finding the hidden two, I decided that I did not have the luxury of time to wait another day to wait for Apoxie Sculpt to cure on these last two – so I went with hot glue – which worked great and instantly. I then painted over the Apoxie Sculpt and glue with a couple of green craft paints. Next, I applied three successive green hobby washes to the foliage, and let that dry. Then I cut off the remaining prongs, and applied brown texture paint over the places where the prongs had been removed.
Glue gun to the rescue.The 7 bases are shown here after I added the brown texture paint over the removed prong locations. These are shown over the card stock stand-ins I used at TotalCon 37 – so size-wise I was pretty close. Note that the washes on the foliage have lessened the plastic look significantly.
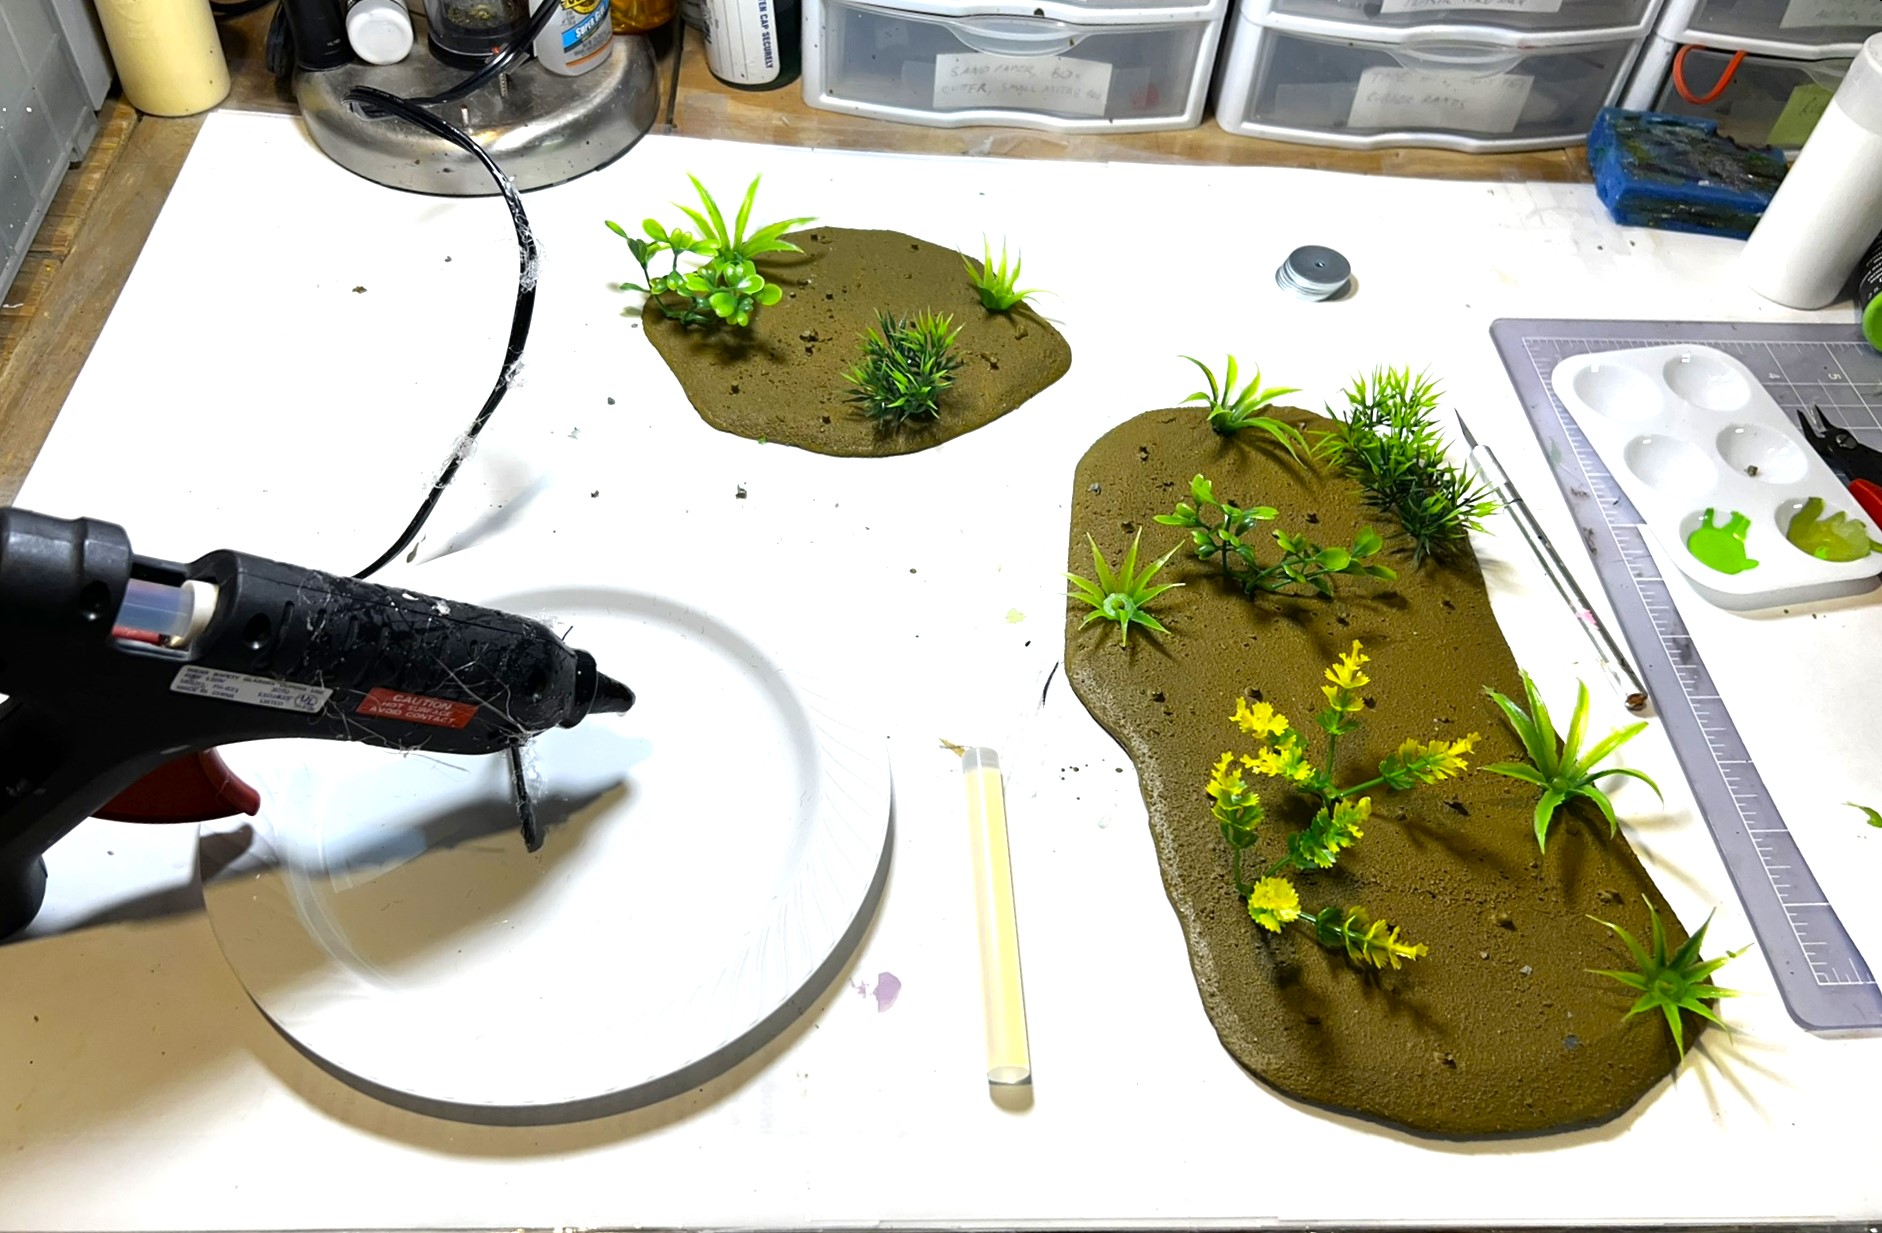
At this point I moved on to adding multiple pigments (like 7!). My goal was to blend the edges to look as if they bordered a beach, with a more jungle-like ground surface towards the centers of the bases. I added the 7 pigments, and fixed them with Vallejo thinner and let them dry.
First pigments session.
I was not satisfied with the first go with the pigments. I felt that the blends could be better – especially the transition from the beach areas inward. I also was not happy with the beach-bordering areas themselves. With that, I gave it a second attempt to address the shortcomings. That did address the issues – and then I added some scatter leaves and some laser cut low lying Gamers Grass plants that I bought from Things from the Basement at TotalCon – plus some Shadow’s Edge Miniatures jungle tufts.
I was pretty happy with the final products seen below.
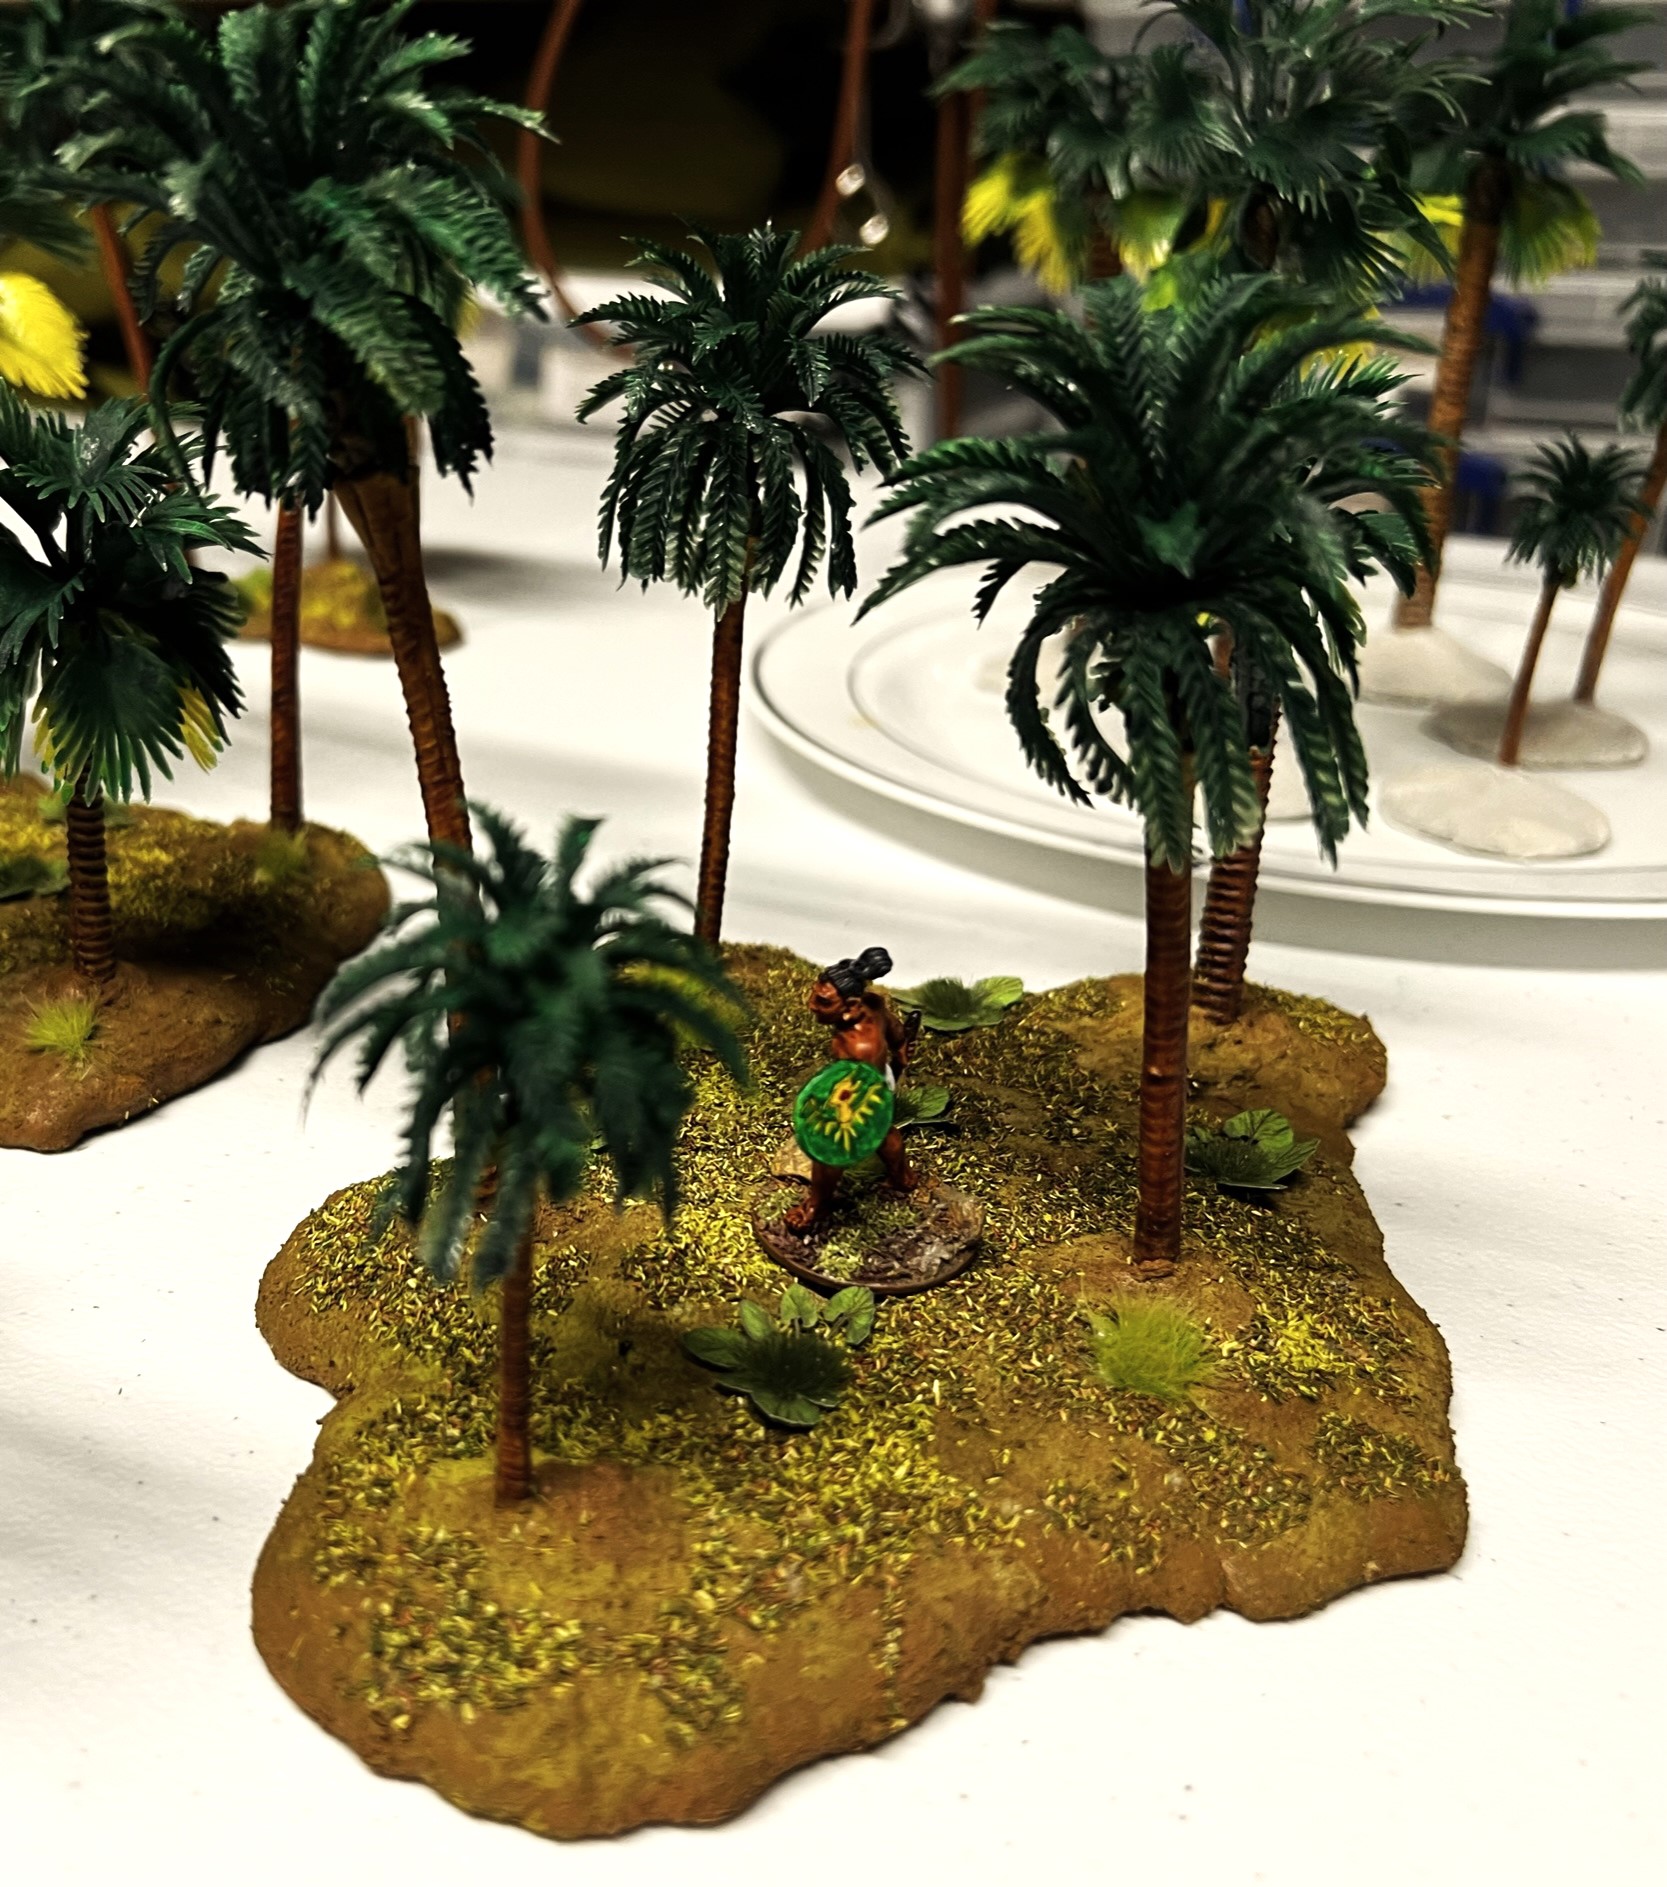
The seven bases completed. Note the added low-lying plants and tufts.Close up of a medium base with a conquistador halberdier and an “underdressed” Maya novice for scale. For the Maya’s sake, let’s hope there are very few thorns.
I can see using these bases for many other games – and I believe that they work well with my jungle bases with the palm trees. As to now storing and transporting them – I modified a 32-liter Really Useful Box with hot glue and posterboard/foam board into a three-level “apartment” Jungle Box. The bottom level is lined with adhesive magnetic sheets (my jungle bases with the palm trees have steel washers embedded underneath). The jungle paths also fit in here rolled up with the trees being upright. The next two levels fit the seven bases described here – four on one, and three on another. Both levels are made of posterboard and are resting on posterboard pieces that I hot-glued to the walls of the box. I did need to make the level that is immediately above the trees into three pieces so that I could get it by the supports of the top level (which is in one piece). No levels will crush any foliage (thankfully). Voila – a Jungle Box ready for Cold Wars transport!
The top level – rests on one solid piece of foam board.Side view of the Jungle Box showing the three levels.
I hope this was useful to those of you considering similar projects. I do highly recommend Dave Stone’s stuff – I also previously shared his Aztec Style Serpent Statues that have been very popular at my games. Check him out!
My next post will be coming (hopefully) somewhat quickly as I need to finish preparations and packing up for Cold Wars. It will show my Winkie Zilk-riding cavalry – stay tuned! For my fellow bloggers, I’m trying to keep up with you, and know that I always read your posts and try to give you feedback. This month is, however, nuts, so I might be a bit tardy, mea culpa. As always, much thanks for taking a look – and let me know what you think!
Miscellaneous details and references for those interested in that sort of thing:
For all of my previous posts on games, units, and other projects for my 16th Century Spanish Conquest supplement for Feudal Patrol™ – “Civilizations Collide” – please see this page.
PAINTS, INKS, GLAZES, SHADES, WASHES, PIGMENTS, FLOCKING, GLUES AND MORE THAT I USED ON THESE JUNGLE BASES:
This was a fun convention. I promised that I’d share some photos and some descriptions of the 5 games that I ran here at TotalCon 37. The five games were all Feudal PatrolTM games using my Civilizations Collide supplement. Check out the photos to see what it was all about – and if you played you might just recognize yourself! There are a LOT of photos – hell I ran 5 games!
It’s not easy to both run a game and take pictures. Let me add a caveat – it’s not easy to do both and do justice to the game and to the players’ needs. I was fortunate this time that a lot of the players had experience with Feudal PatrolTM and were very helpful to the new players. It’s been a week since the end of TotalCon 37 – so without further ado, let me get into the games that I ran.
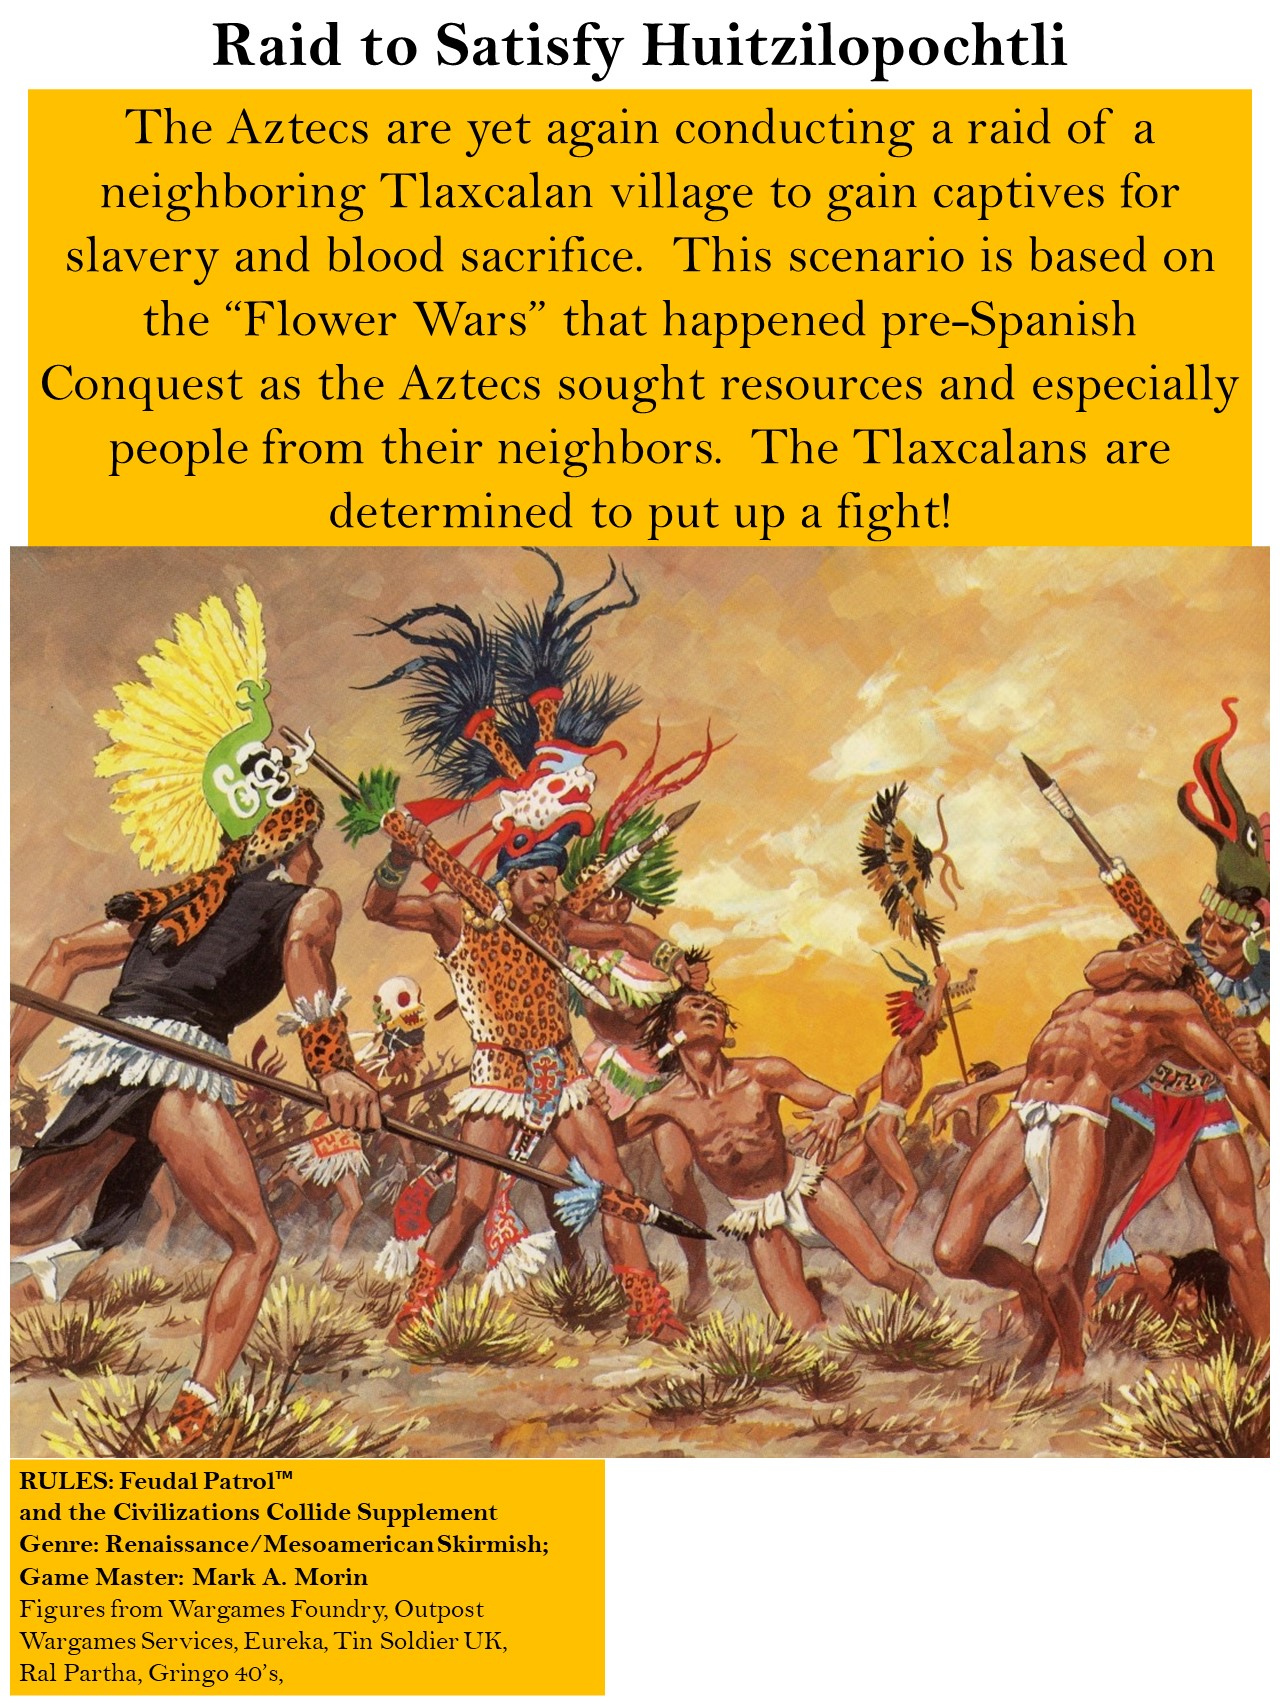
Raid to Satisfy Huitzilopochtli
This game took place on Thursday the 24th at 1 PM. It pits the Aztecs against the Tlaxcalans before the Spanish Conquest. I have run this game many times – and it has won awards at both HUZZAH! and Fall In in 2022. I had not run it at TotalCon, so I thought it appropriate to do so.
I had 8 players for the game.
Happy gamers ready for battle. The Aztec players are on the right, the Tlaxcalan players are on the left.The Tlaxcalan defense prepares.The Aztecs mounted a strong attack right down the middle with Jaguar and Eagle Warriors.Tlaxcalan bows took a heavy toll on these attackers.
The Aztecs assault in the middle faltered due to accurate bow shots of the Tlaxcalans. On the Aztec left, a force of Arrow Knights and Jaguar Warriors took the long way around hoping to flank the defenders. On the Aztec right, a veteran/novice force moved up – reinforces by the elite Shorn Ones – and also took some casualties before making it to the very gates of the Temple and the Tlaxcalan leader Xayacamach.
Despite the Tlaxcalan bows, melee finally happens.The Aztec right closes on the Temple.Things are looking desperate for the Tlaxcalans. That Temple is worth a LOT of VP.Tlaxcalans begin to drag away Aztecs as prisoners for sacrifice.
At this point, the Tlaxcalan leader Xayacamach sortied with his signaler, put himself at personal risk, and engaged the Aztecs. His actions reversed the Aztec elites’ attack. The Tlaxcalans also held off the Aztec veterans who were on their left flank and threatening a food resource. back on the Aztec left, the long march of the Arrow Knights and the Jaguar Warriors reached a critical juncture with a threat to the Tlaxcalan corn supply and the rear of their bowmen. With the middle assault no longer a threat, the Tlaxcalan bows redeployed to face the new threat. Loosing a deadly barrage, they killed the Aztec Warband Leader and scattered the remaining attackers.
The Tlaxcalans defend their food.The figure with the “W” is the soon to be mourned Aztec Warband Leader. The Tlaxcalans defend the Temple.The Tlaxcalan defense is successful!
The final score was 95-41 in favor of the defending Tlaxcalans.
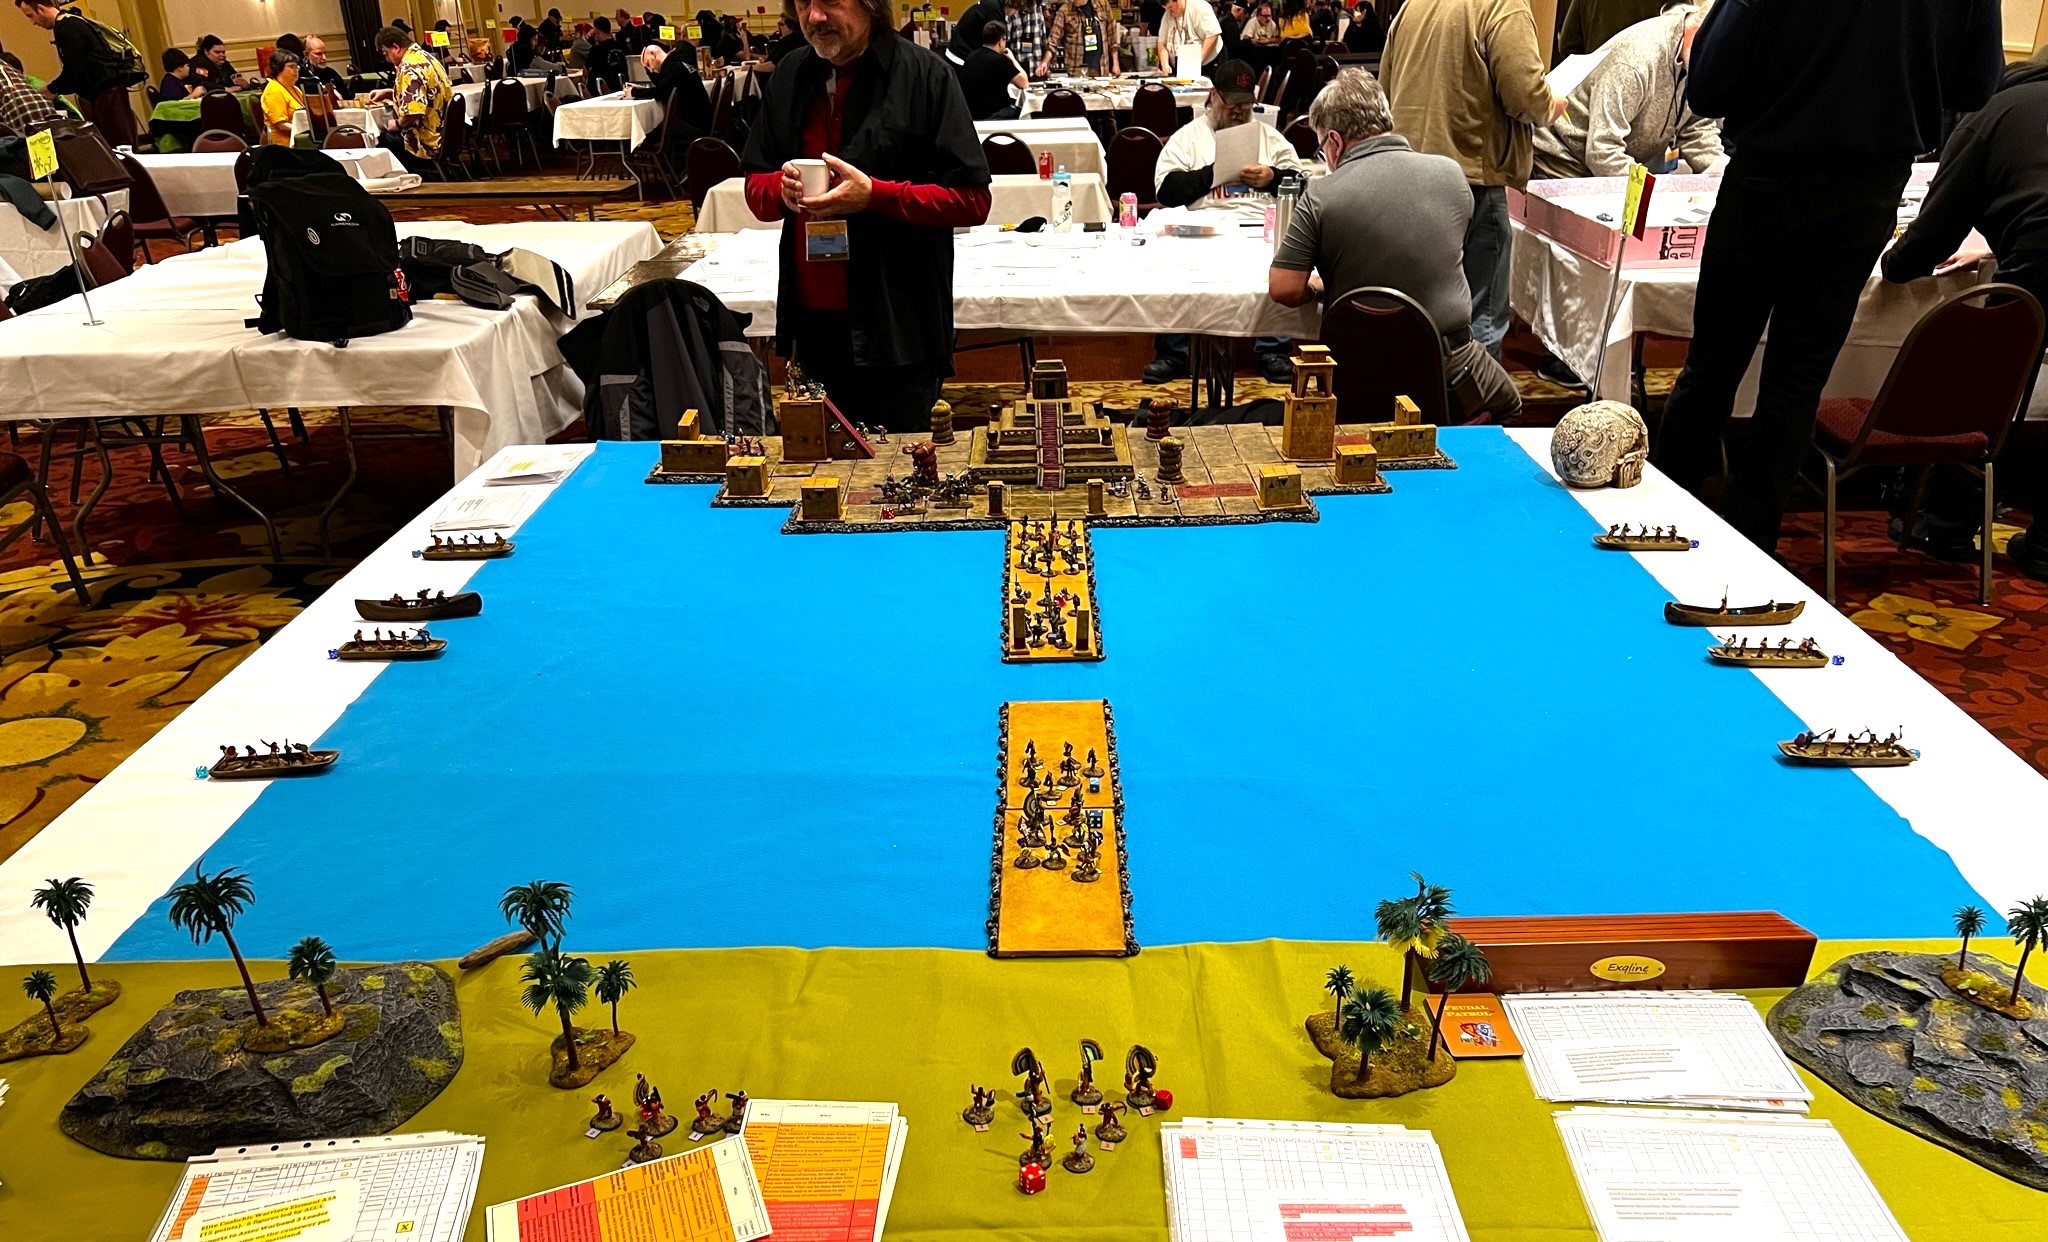
La Noche Triste – Bloodbath on the Tacuba Causeway
I had 7 players for this game which took place on Friday the 24th in the morning.
The game set up.
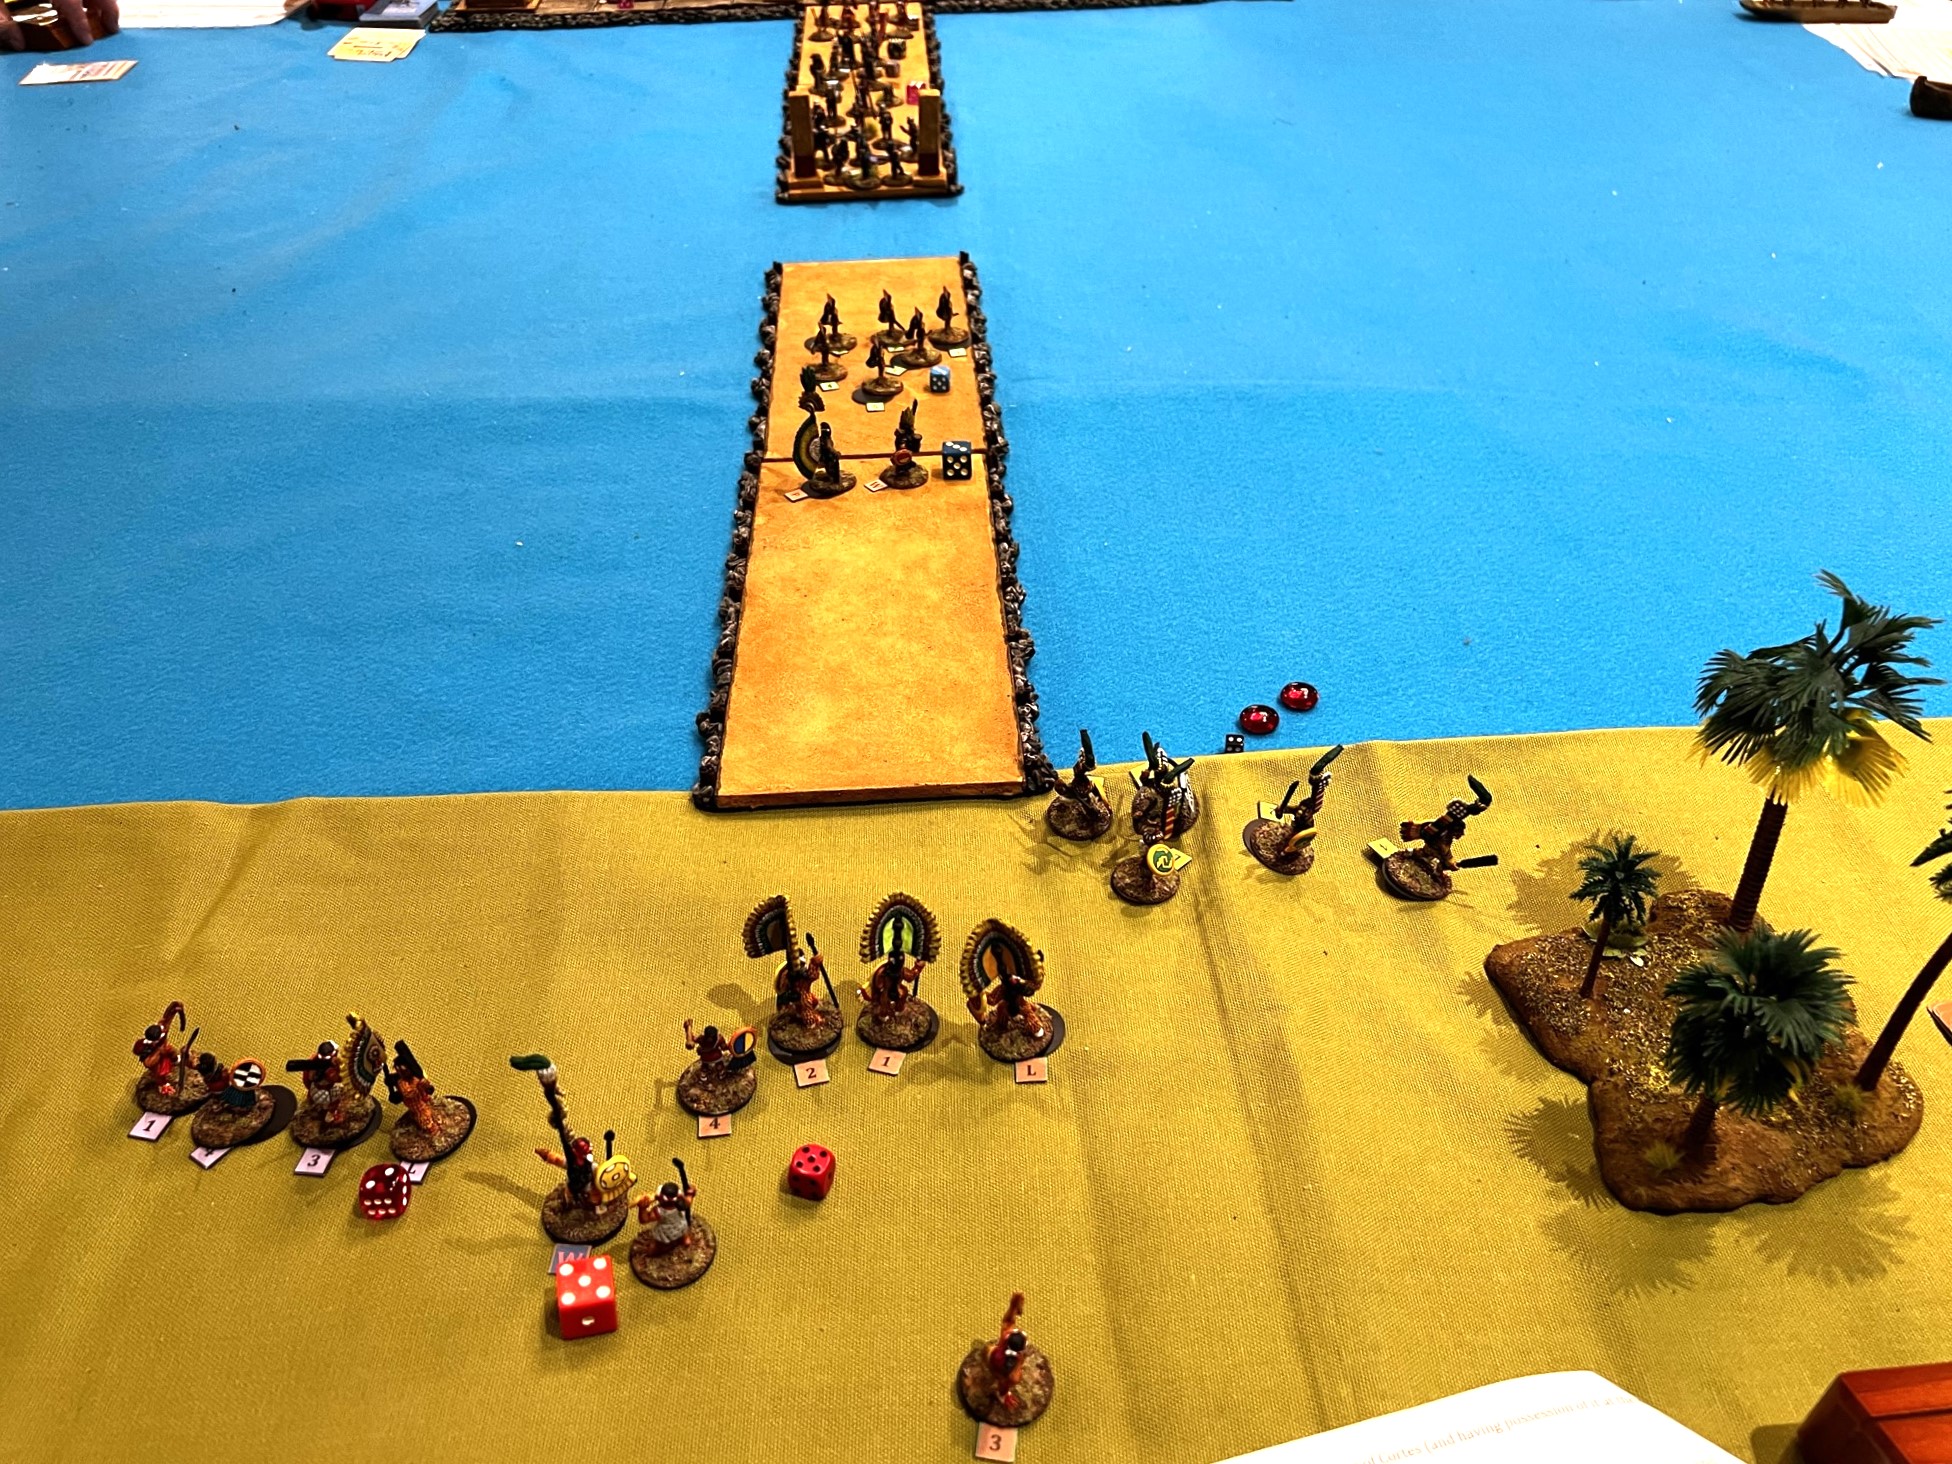
The Tlaxcalans on the mainland managed to drive the Shorn Ones away from the causeway entrance. Meanwhile, the Spanish took a long time to get the bridge installed – and by that time the war canoes were hitting them with missile fire from two sides. The rear guard lost a couple of cavalrymen, but managed to perform their role well against a surge of Jaguar Warriors.
The Tlaxcalans engage the Shorn Ones with missile fire – and eventually drive them away.The Spanish took a long time to bridge the causeway gap.The Shorn Ones flee.Still no bridge…
The war canoes made an effort to harry the Conquistadores.
War canoes approach.Still no bridge…I survey the scene – (pic from Facebook)Still no bridge…
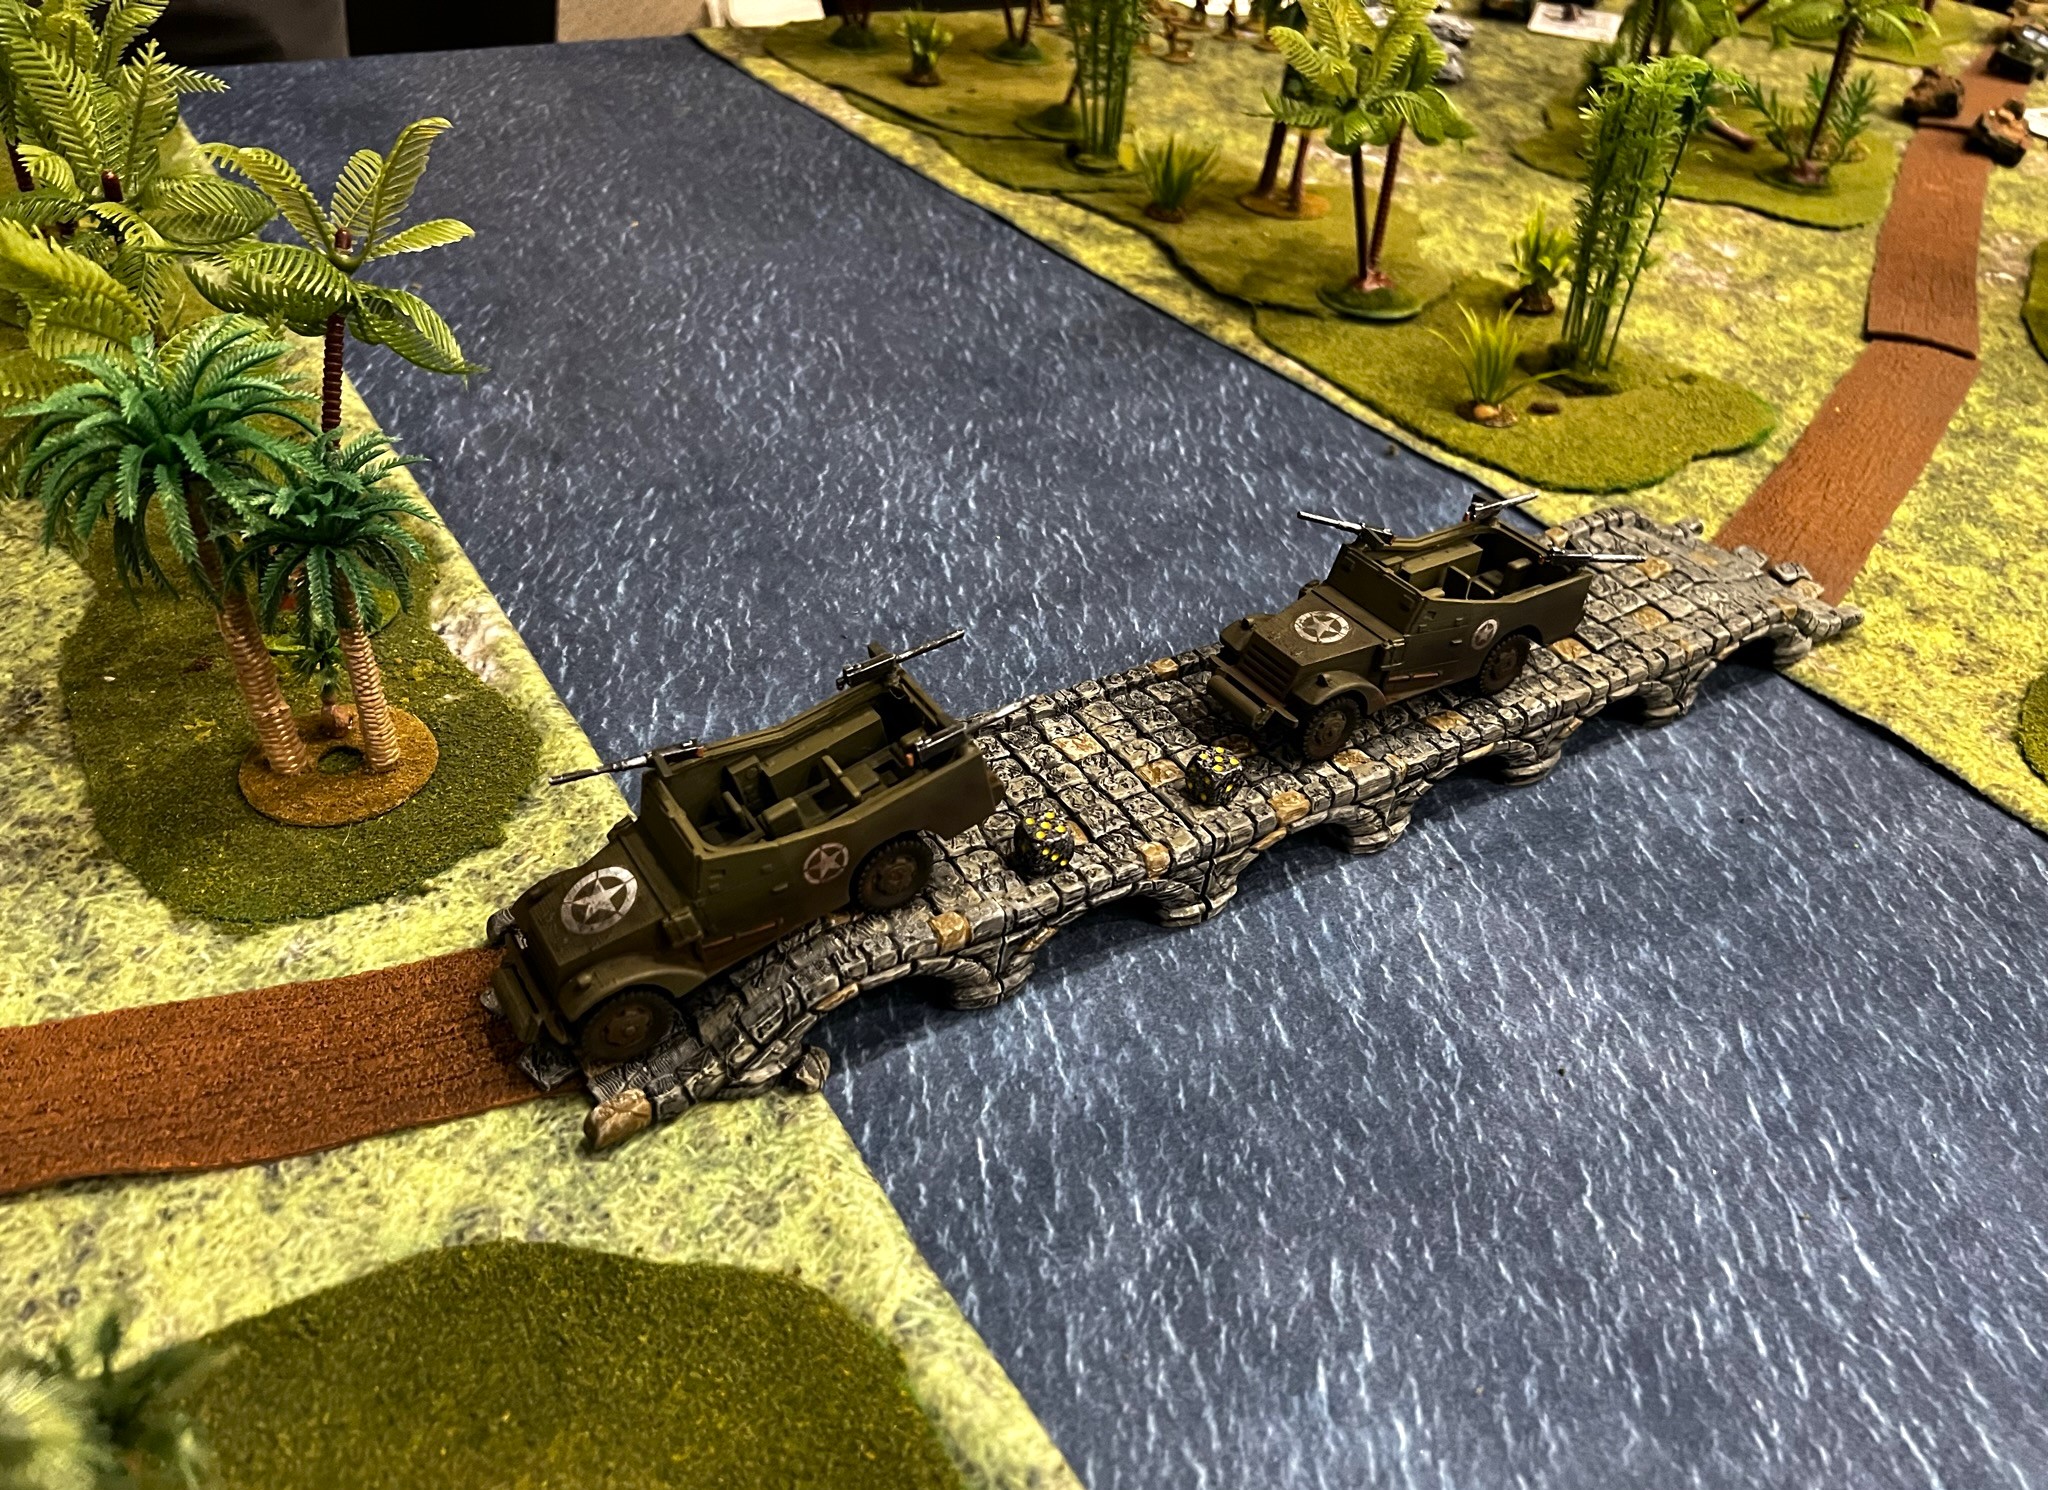
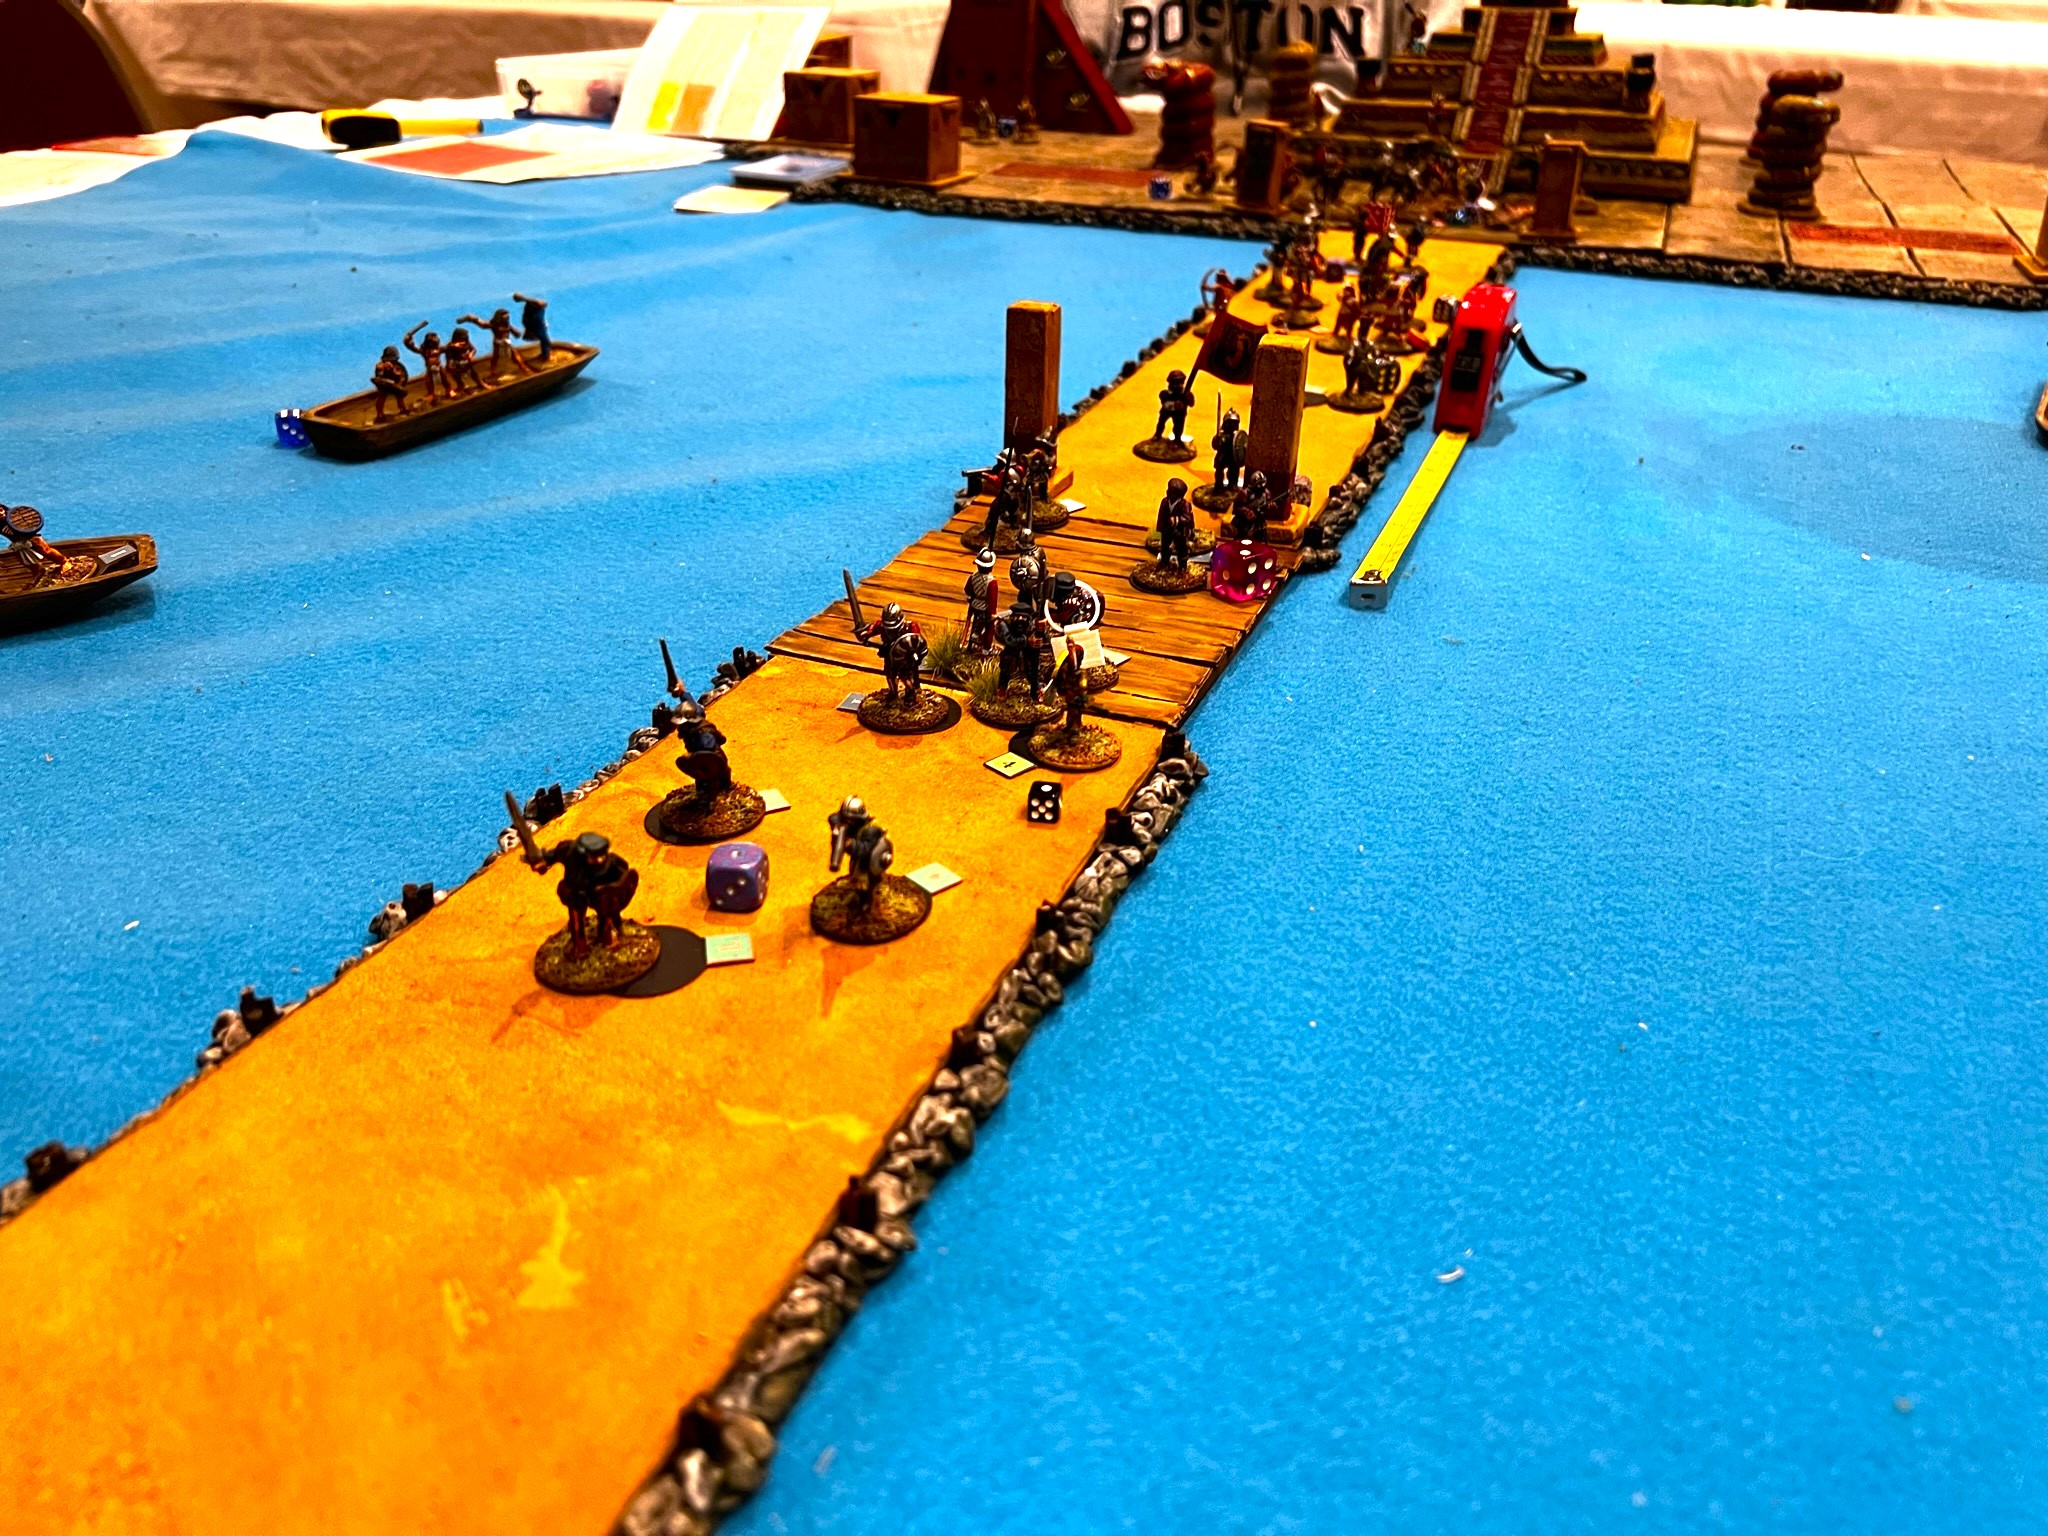
After Turn 4 the bridge is automatically installed and the Spanish get a “Burst of Exuberance” move as they try to make it to the mainland! This was an important objective as getting as few as 1 figure to the mainland would negate a 100 VP for the Aztecs.
The bridge is in! Vamanos!Rear guard battle.The Spanish race to escape……but the few remaining Aztecs and the war canoes threaten their success.
On the last card of the last turn, the Spanish had one chance to get at least one figure to the mainland – Cortes’ Catholic priest. The priest had 11″ to sprint – and made 14″! (Good thing he had no armor to weigh him down!).
That effectively took away 100 free points for the Aztecs and won the game for the Conquistadores at the last possible moment. The final score was 71-22. Had the Spanish failed, the score would have been 122-71.
The Battle of Lake Texcoco
On Saturday the 25th, I ran two massive games of the Battle of Lake Texcoco, one in the morning, and one in the afternoon.
Morning Game
The morning game was all mayhem – lots of boarding, canoe ramming, and cannon fire. I had seven players.
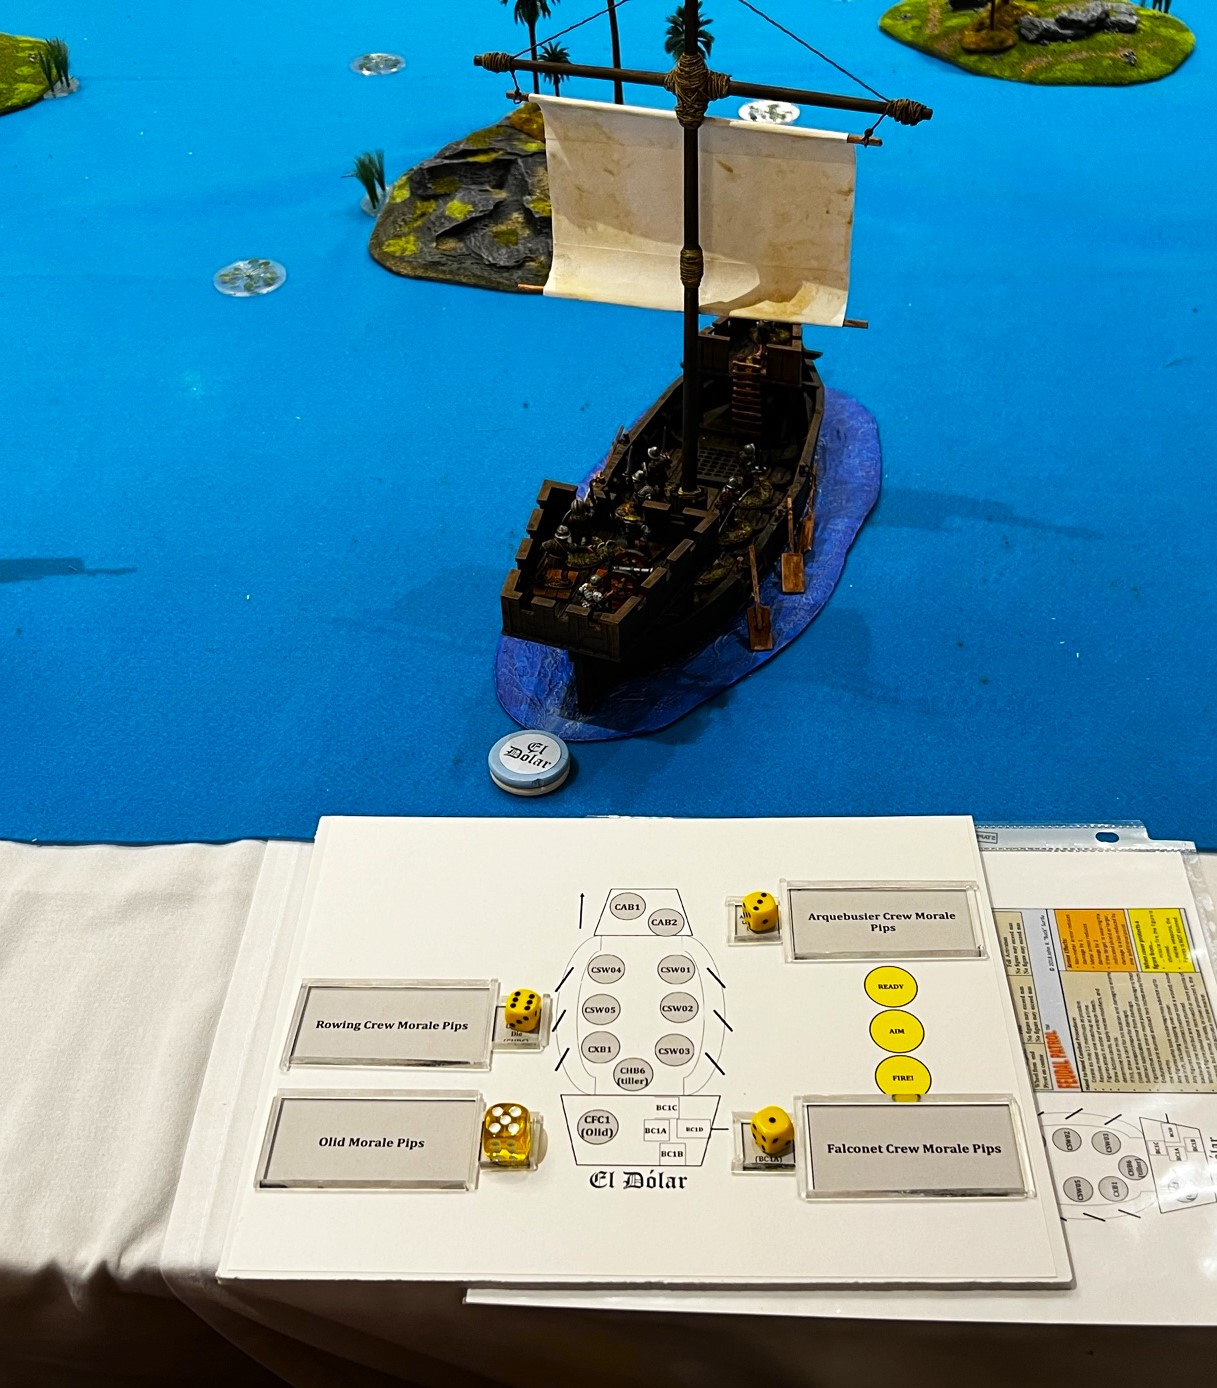
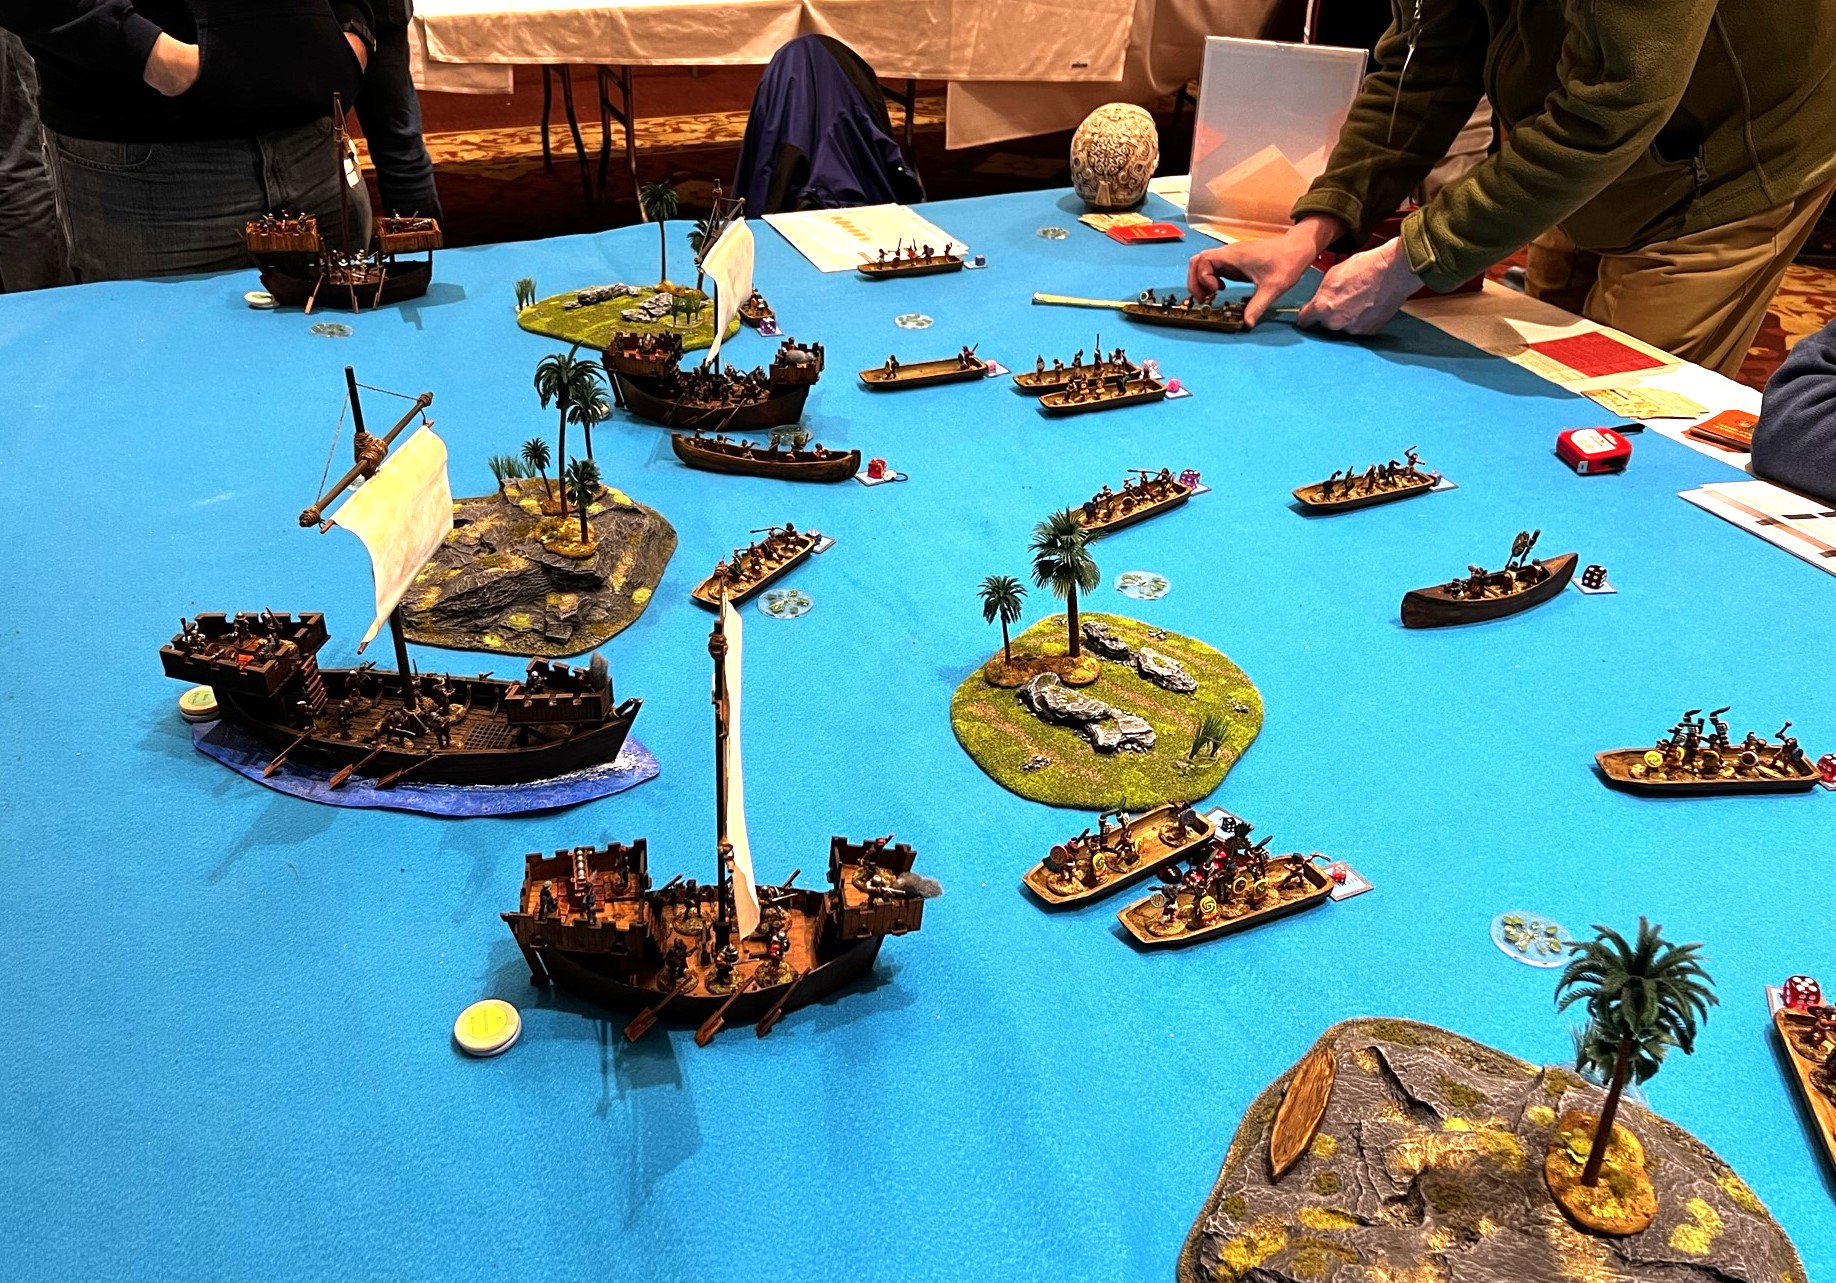
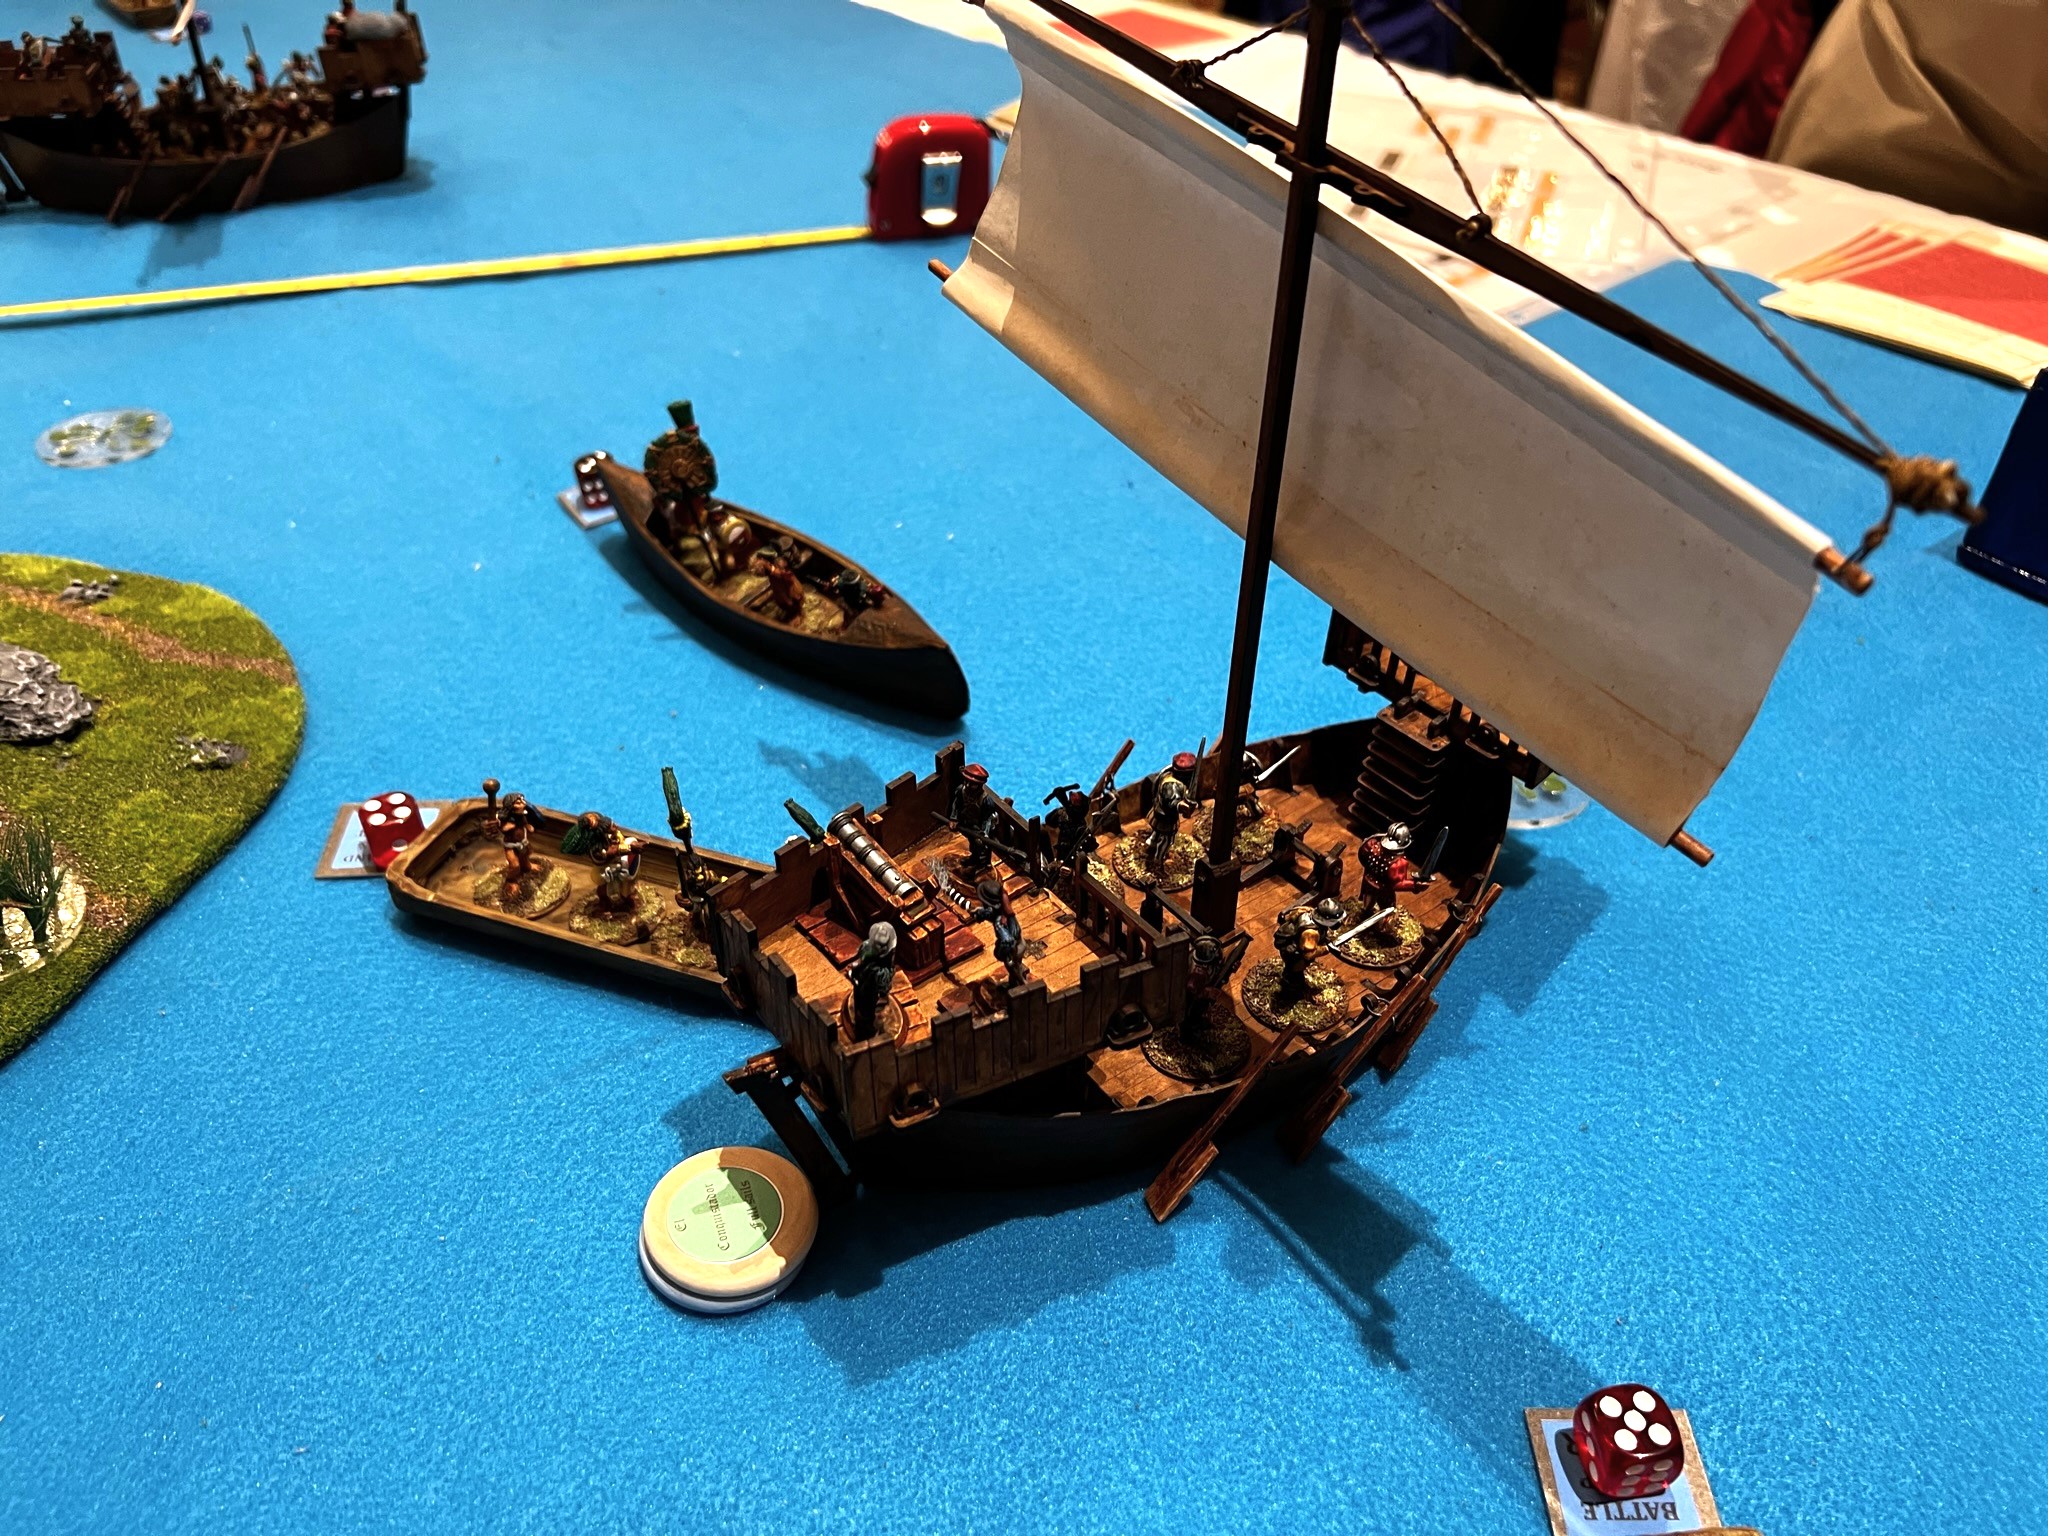
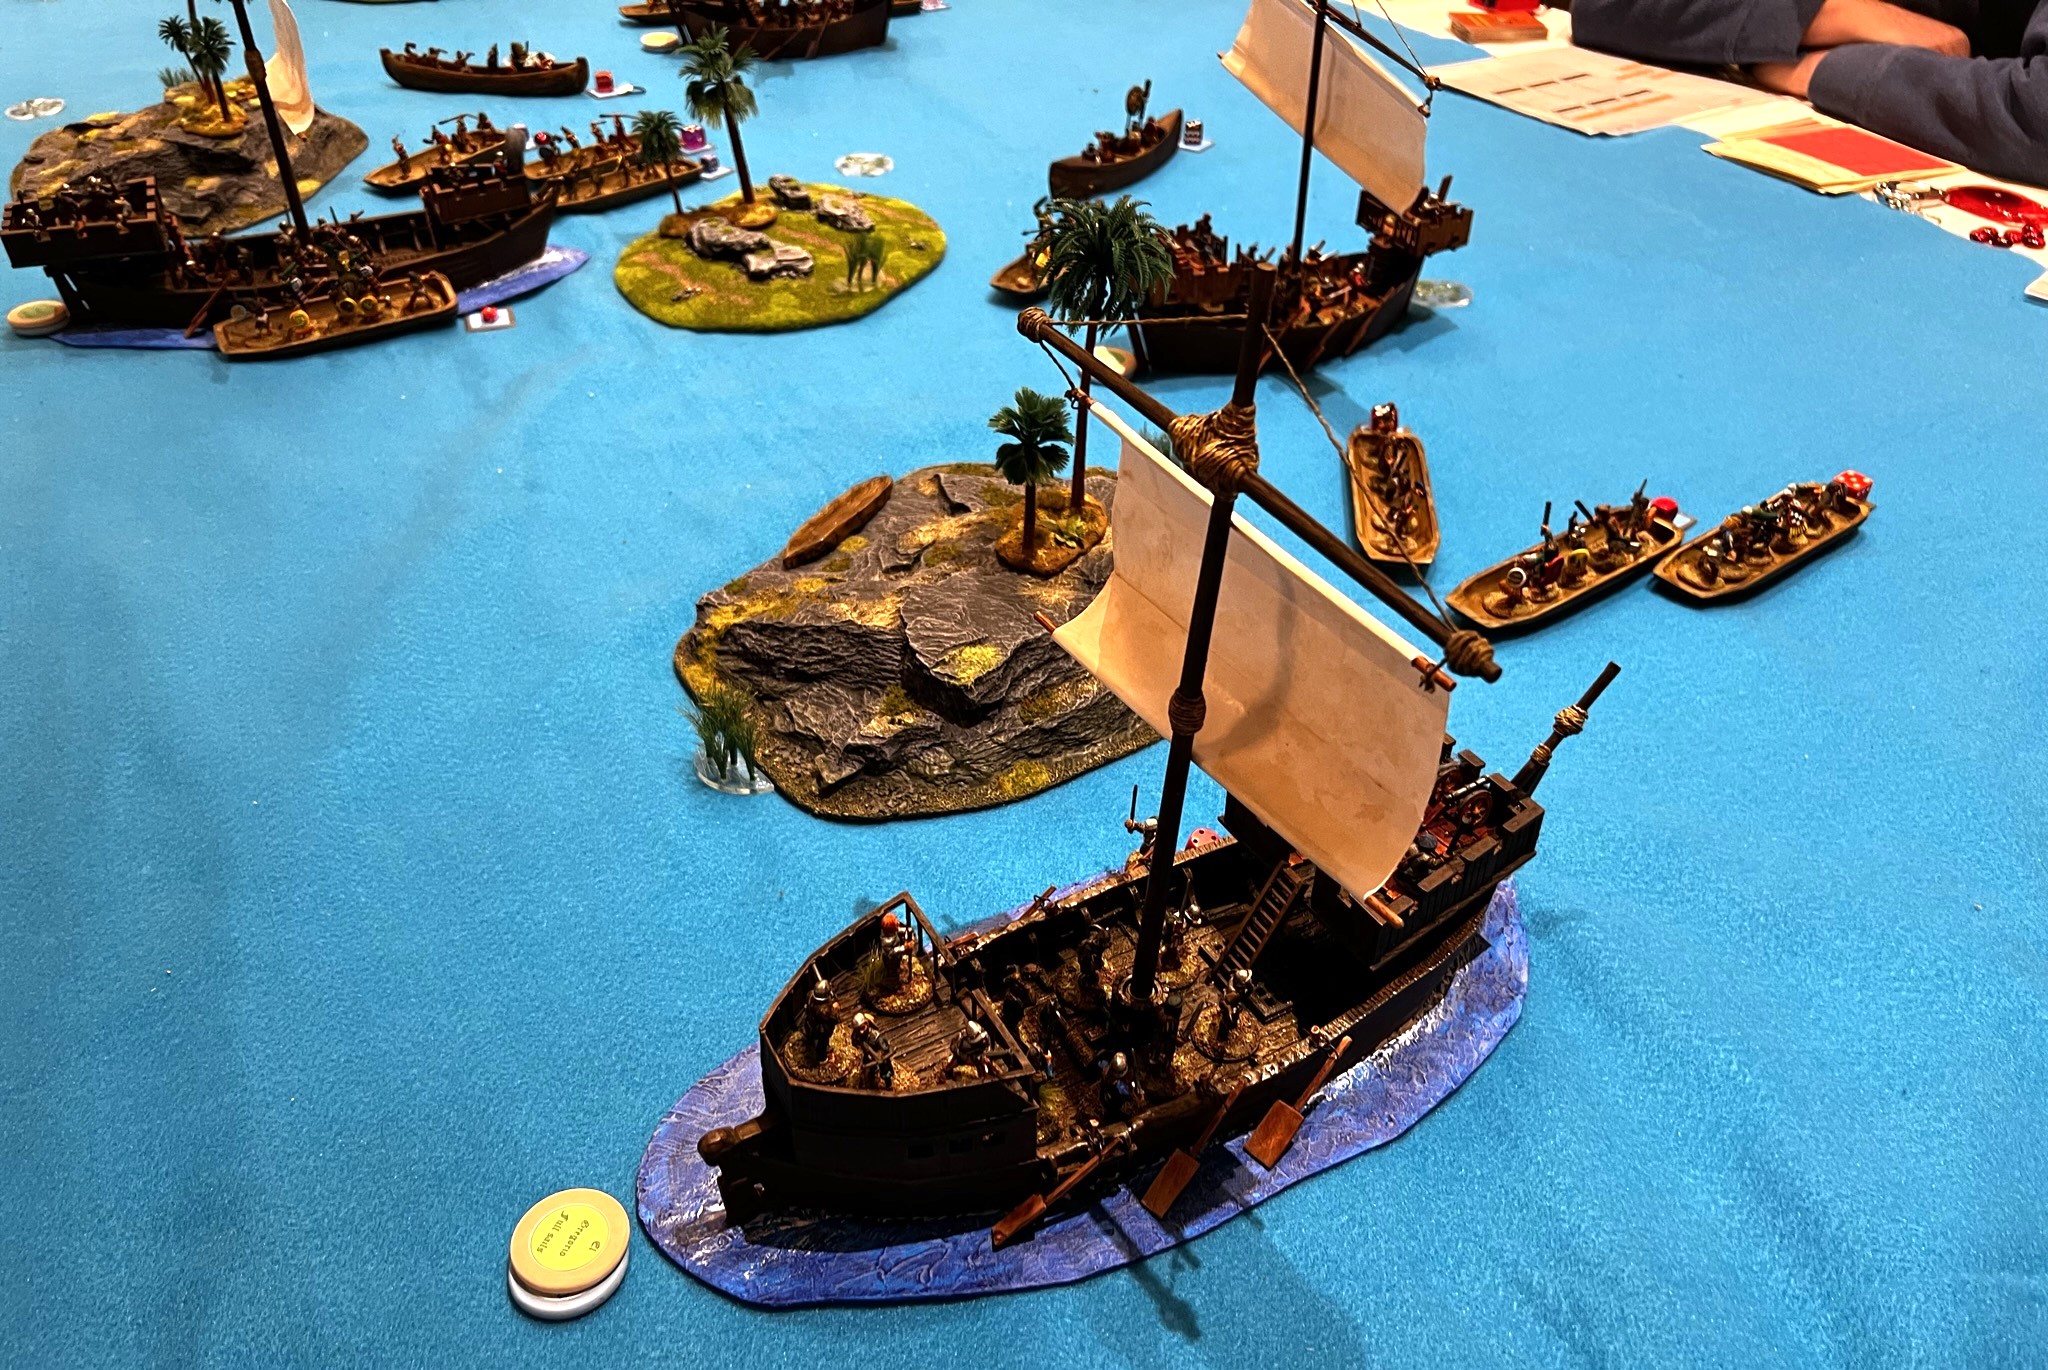
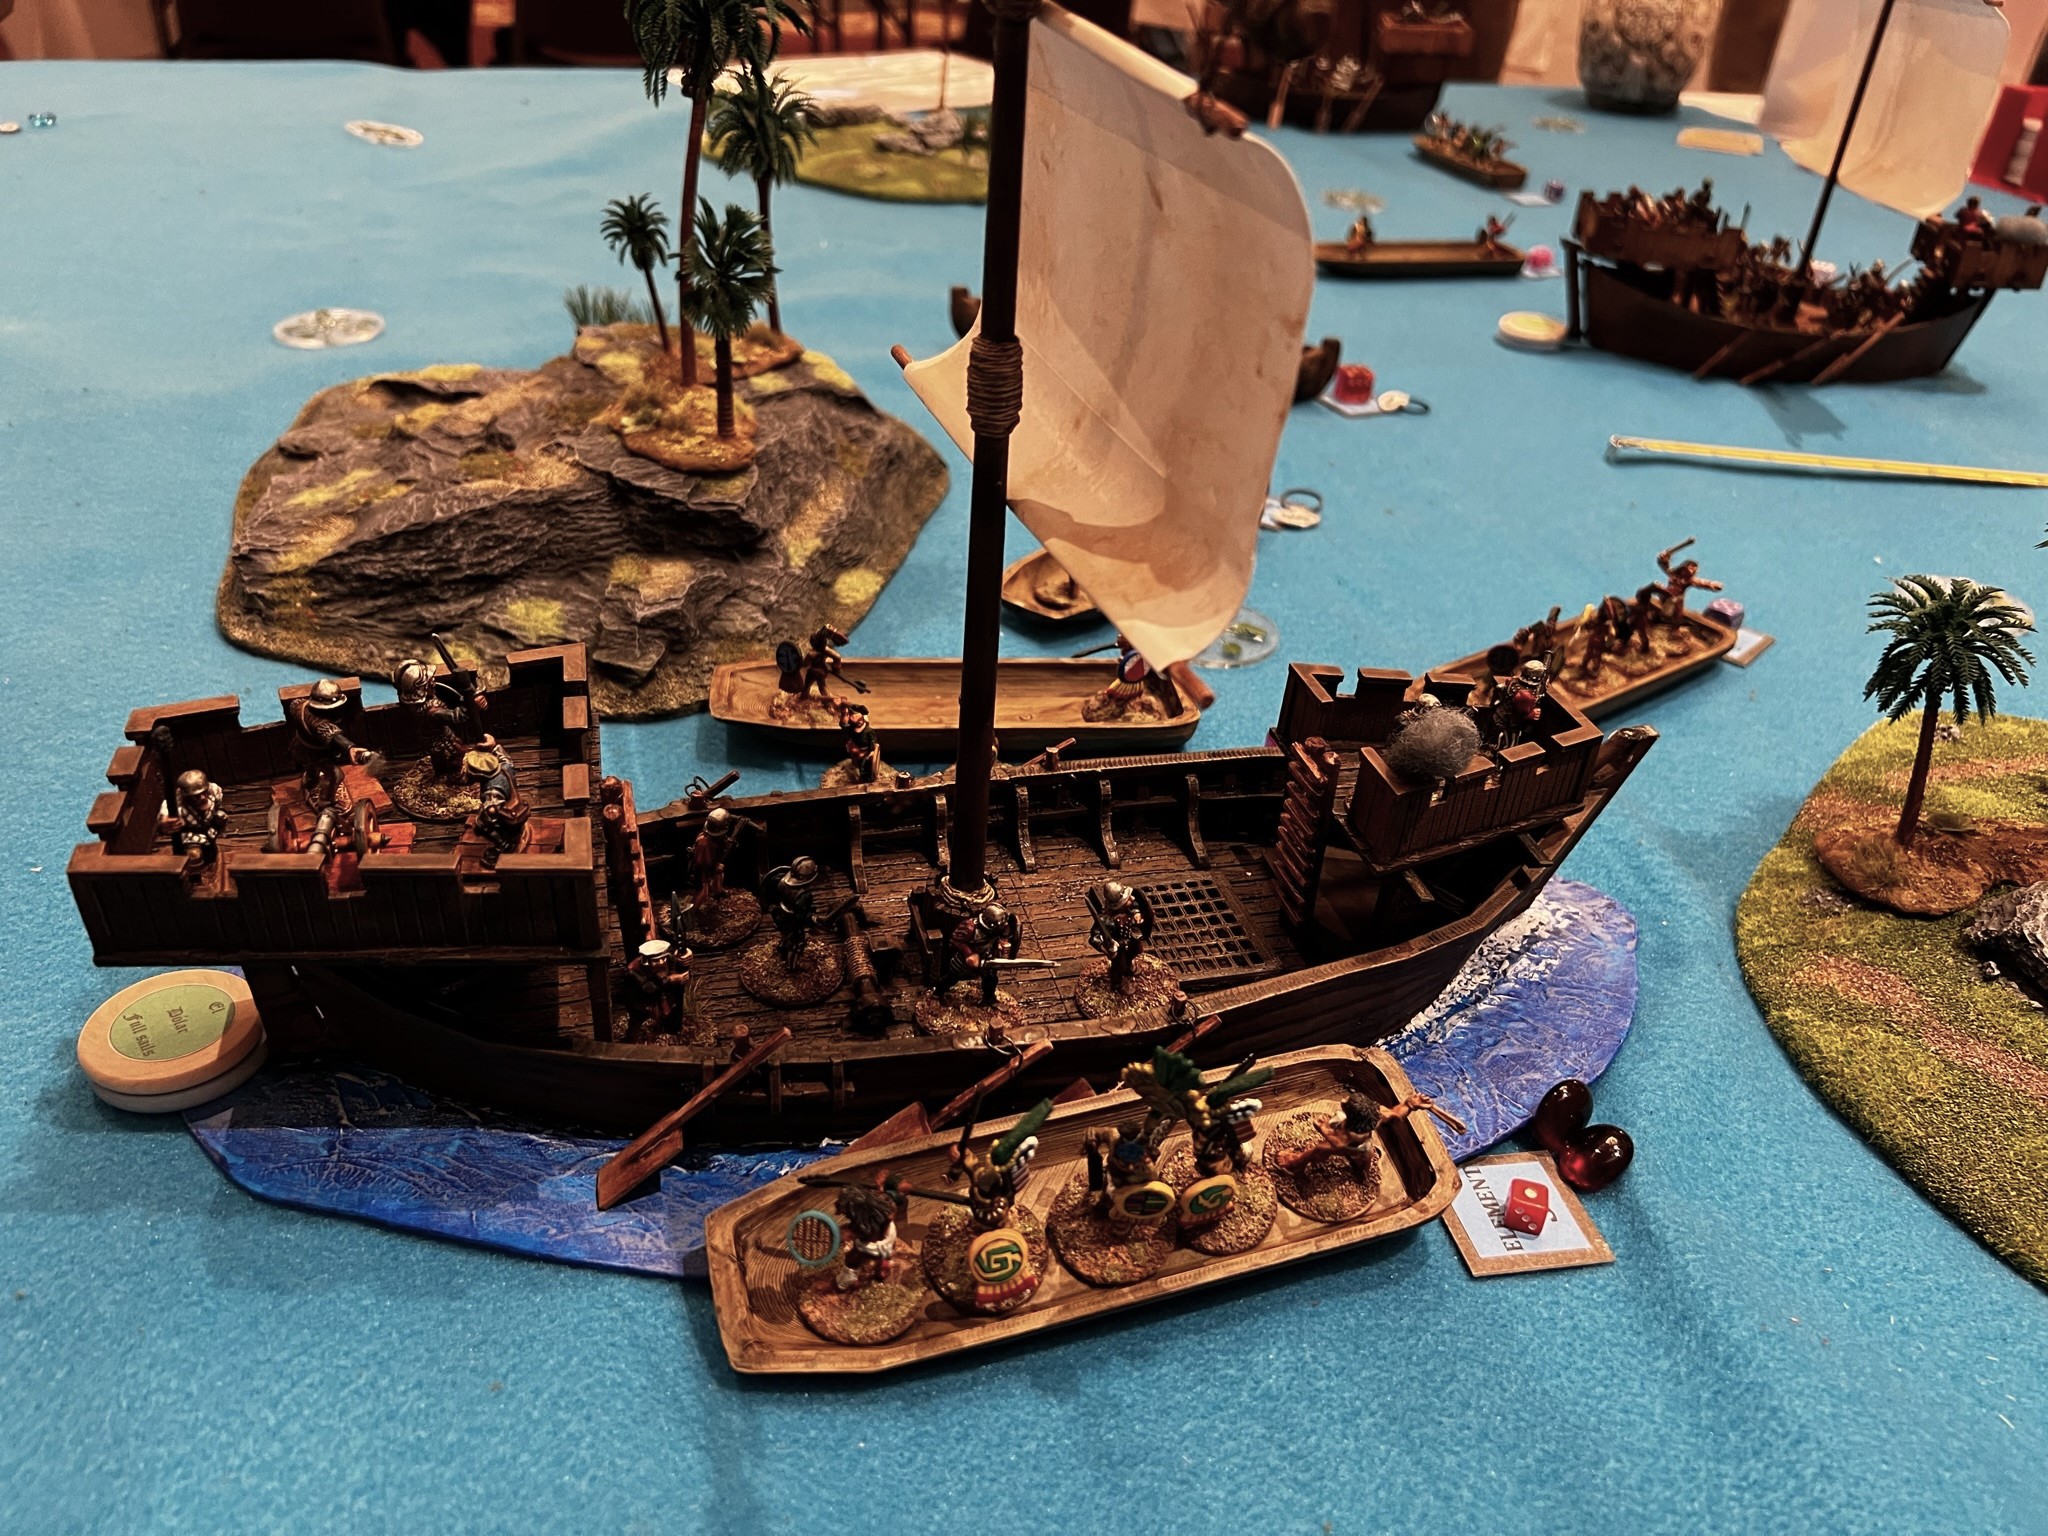
Game set up from the Aztec side.Game set up from the Spanish side.Close up of El Dolar and the dashboard for this brigantine.Happy gamers!Forces close…El Gregorio fires her cannon and sinks a war canoe.Boarding about to happen!
El Dolar ran aground and was swarmed by Aztec boarders. The other vessels continued towards their goal of shelling the Aztec capital (at the end of the mat where the Aztec players were).
Boarding!More boarding!El Gregorio goes full sails towards the city walls.El Dolar is boarded on two sides!
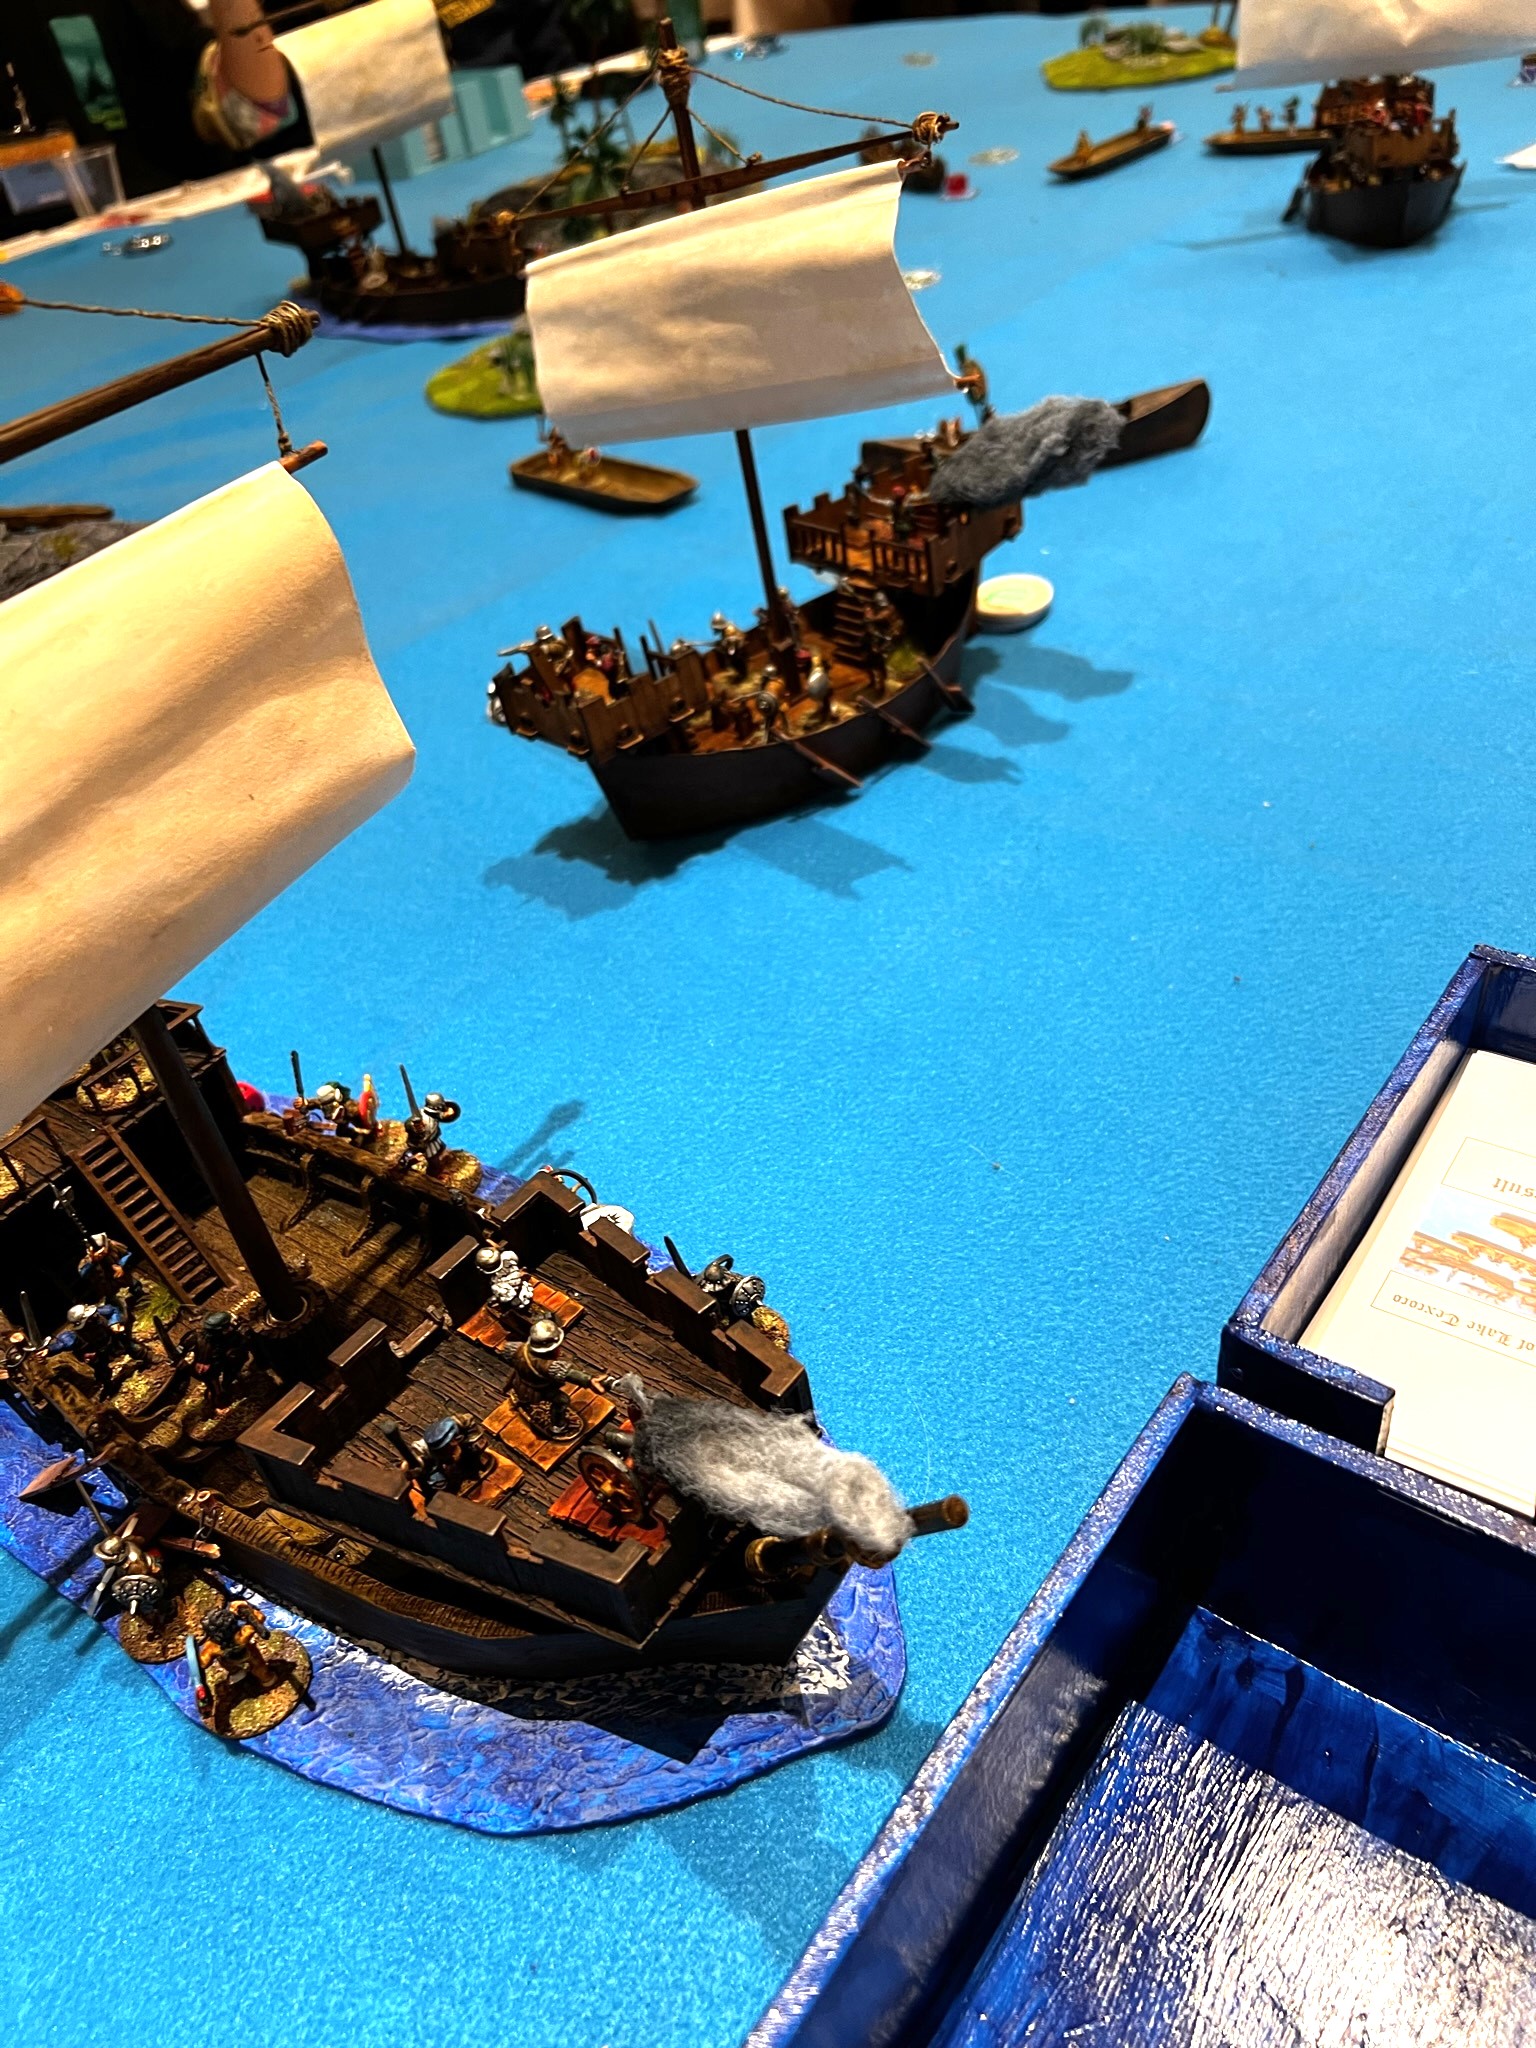
El Gregorio, El Marcos, and El Perro de Guerra moved up to the city (well El Gregorio slammed into it at full speed but got lucky on damage). Cannon fire from El Marcos and El Gregorio rocked Tenochtitlan for 50 points apiece.
Fire at the city from El Gregorio!At the end of the game.
The battle was cinematic to be sure. In the end, the Spanish won 383-269 – with their successful artillery fire gaining the win.
Afternoon Game
I then reset and ran this game again with 8 players – unfortunately with fewer photos.
I brief the gamers for game two (photo by Peter Bostwick).At the start of the second game.
In this game, there was a lot less boarding by the Aztecs and a lot more ramming of war canoes – sinking a lot of them. As a result, it was a bigger Spanish victory – 391-145. The brigantines El Conquistador, El Perro de Guerra, and El Marcos all hit Tenochtitlan with solid shot for 150 VP.
At the game’s end.
Arofan Gregory took a very nice photograph of El Marcos (thank you sir) and put it on Facebook – and I’ll share it below:
Arofan Gregory’s photo of El Marcos.
The Battle of Centla
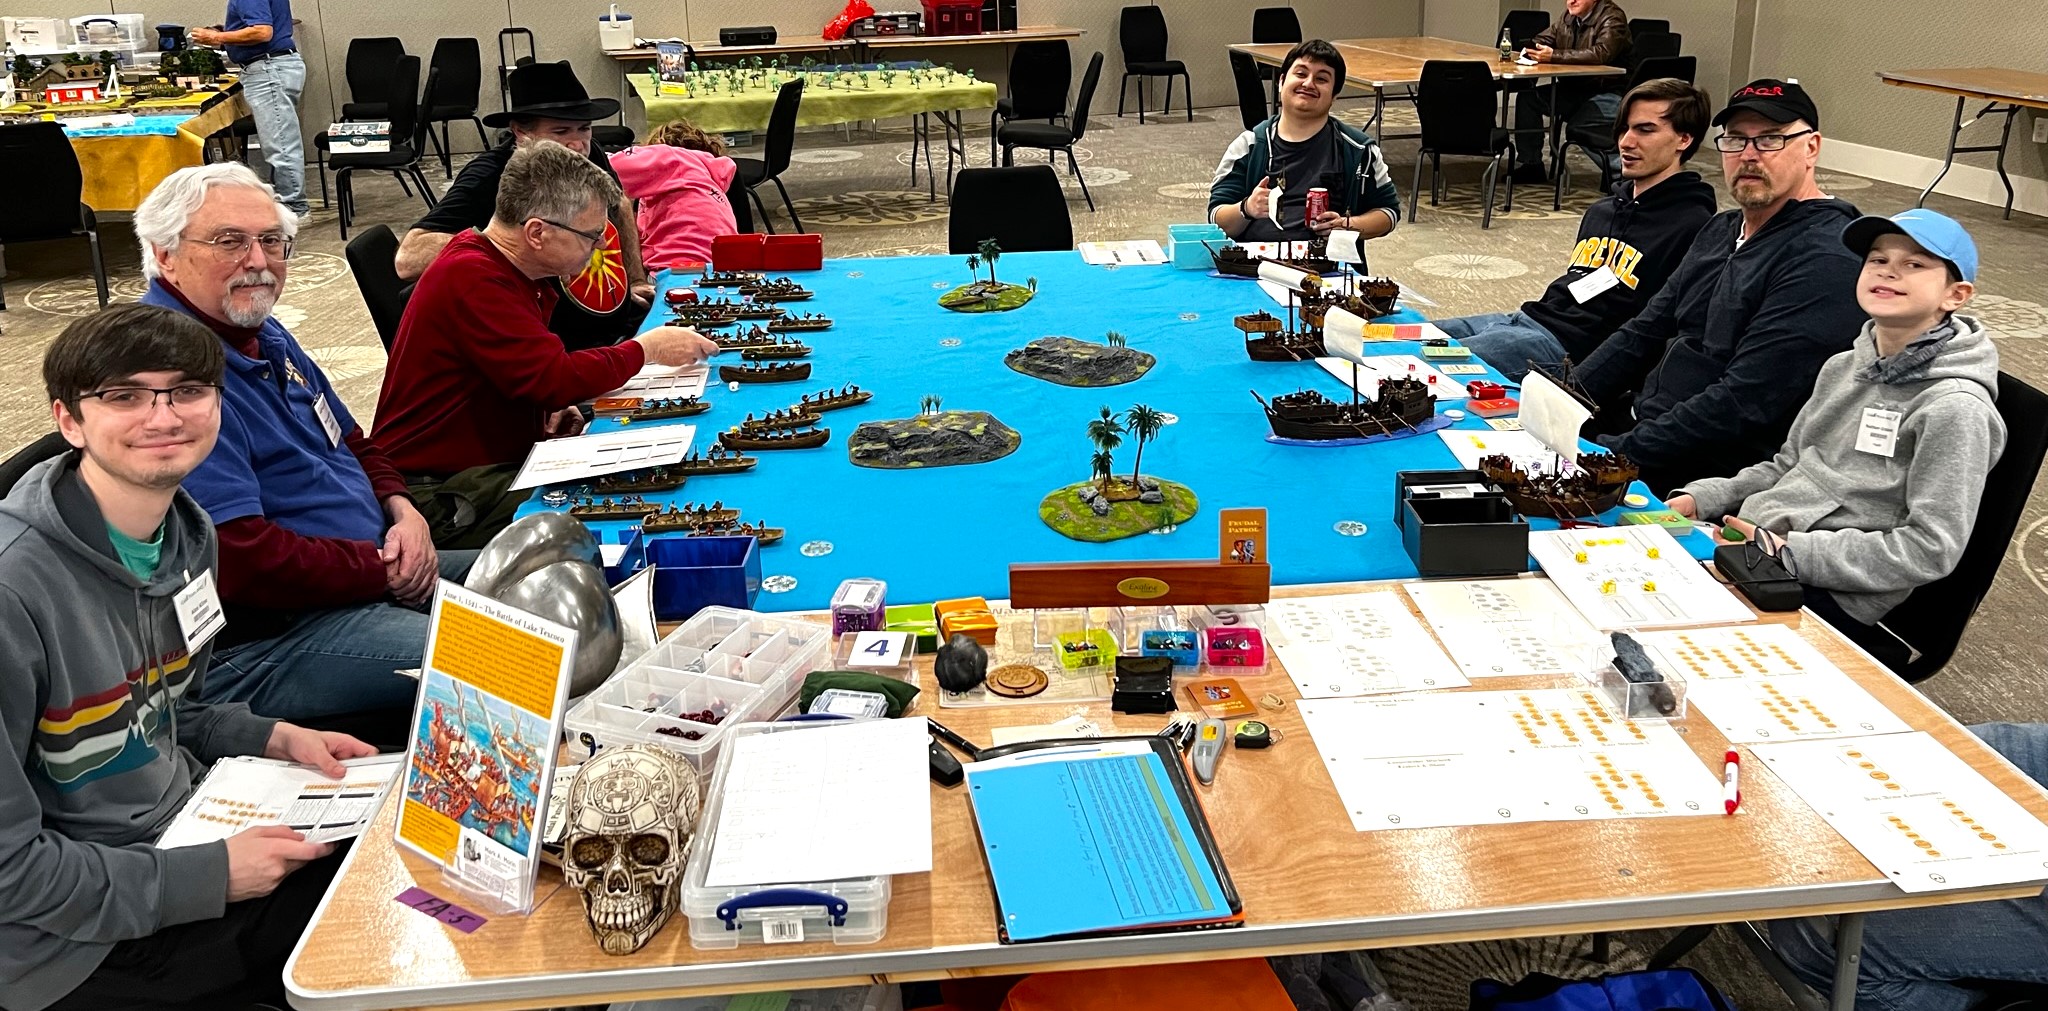
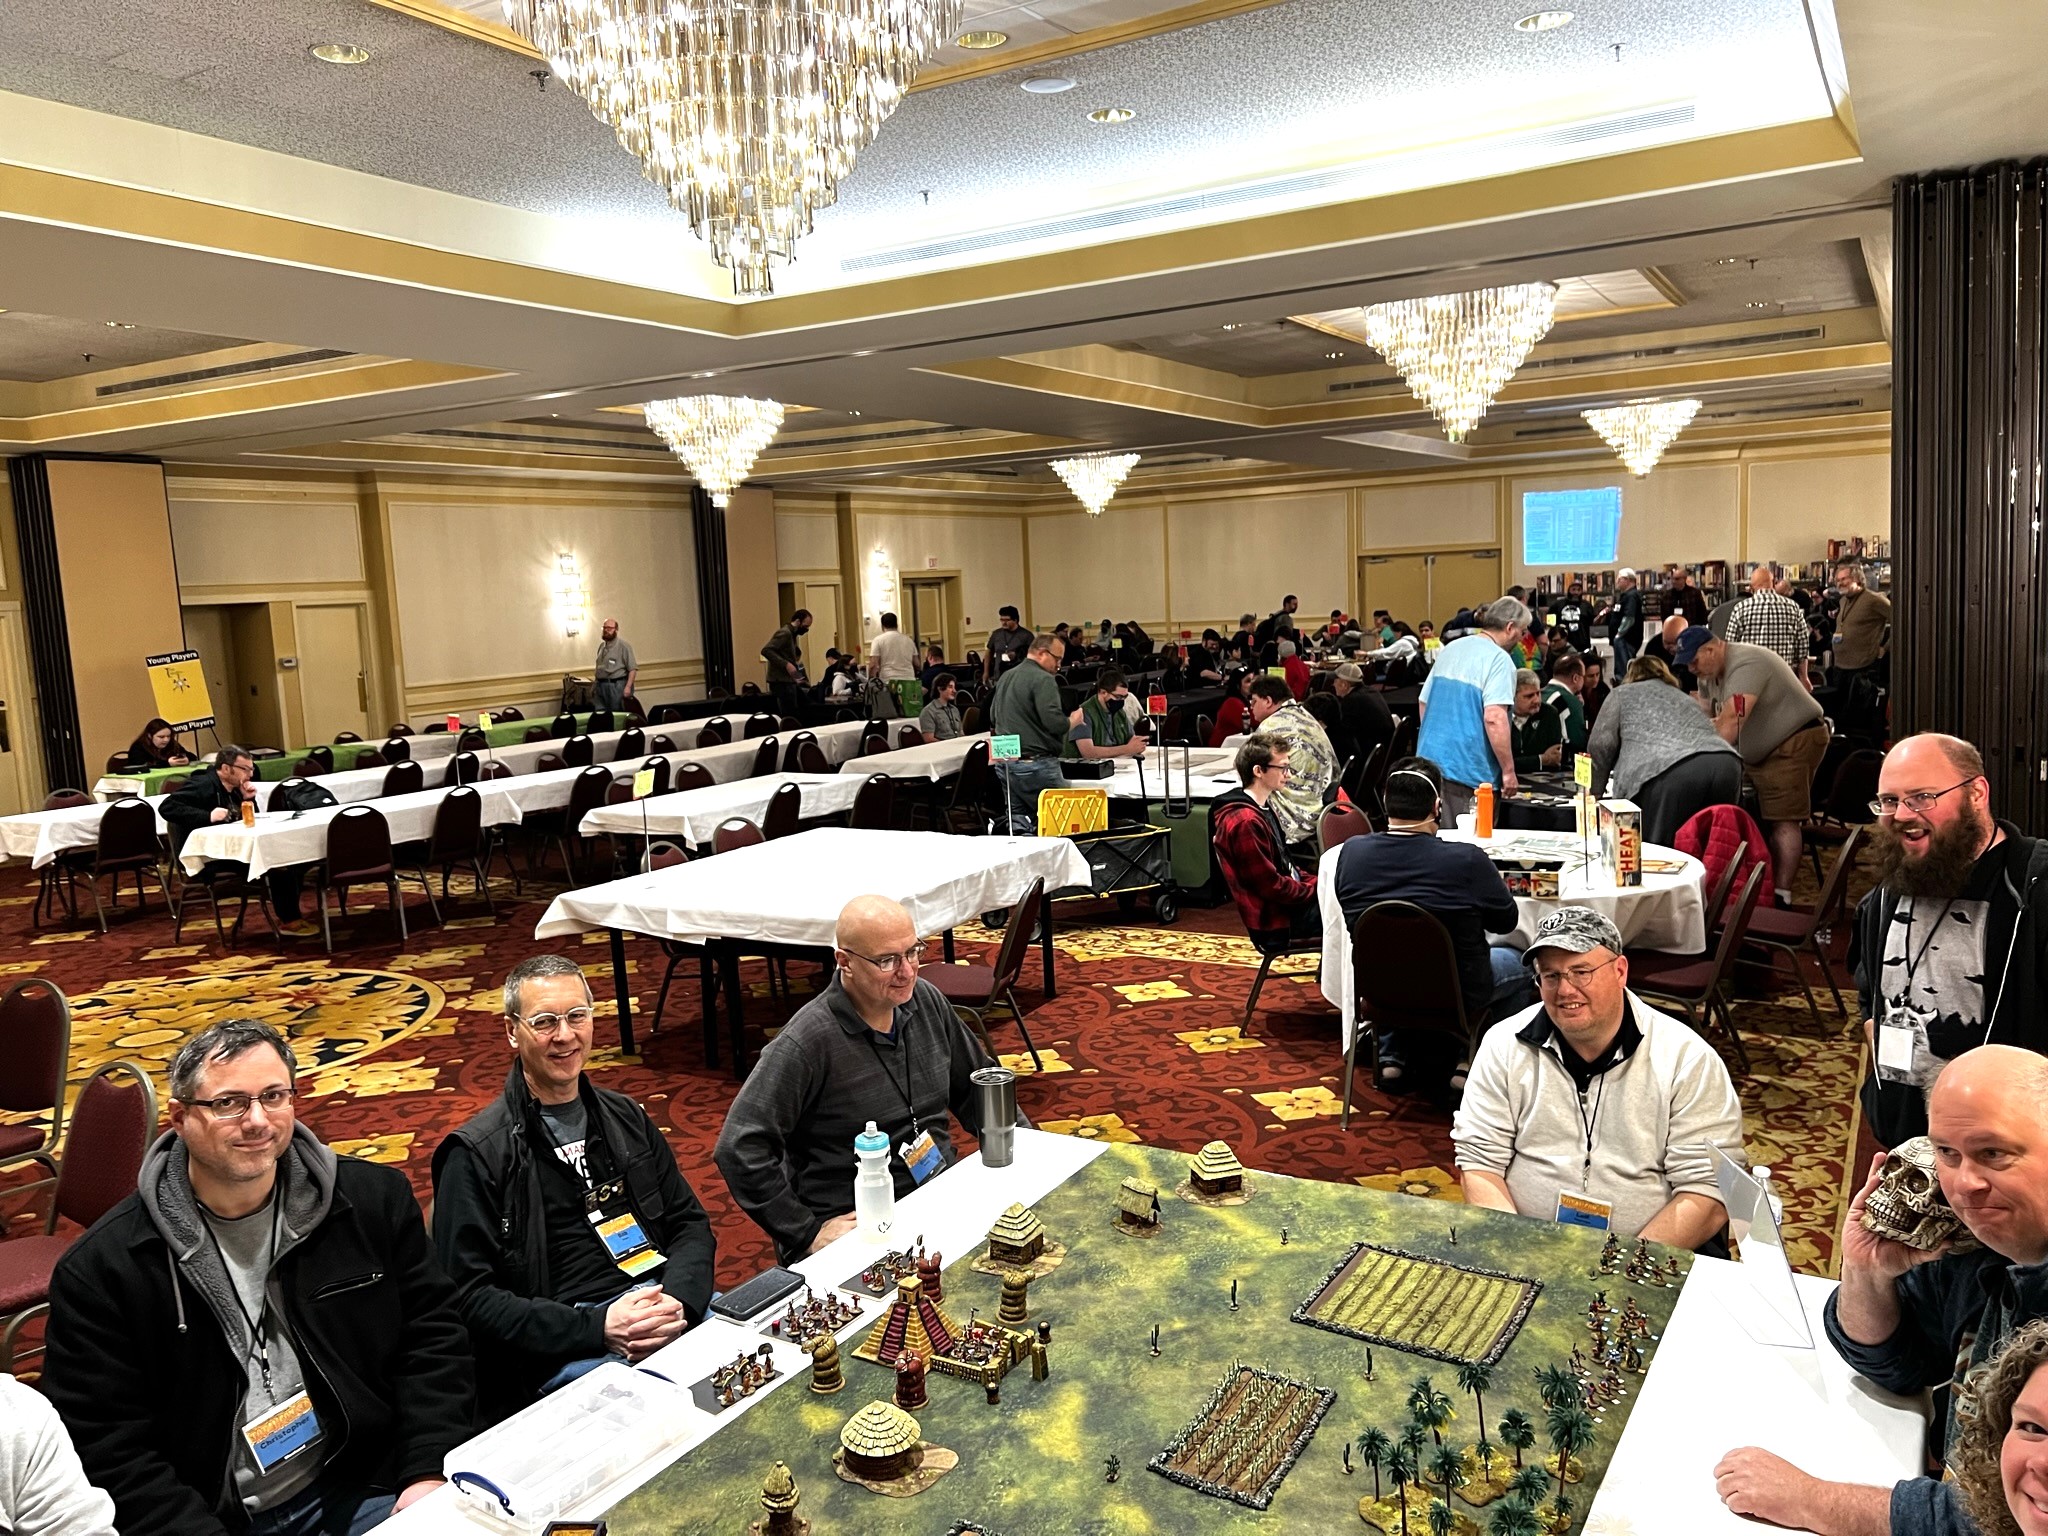
This was a very full game – 12 players on Sunday!
The battlefield set up.A happy full table!
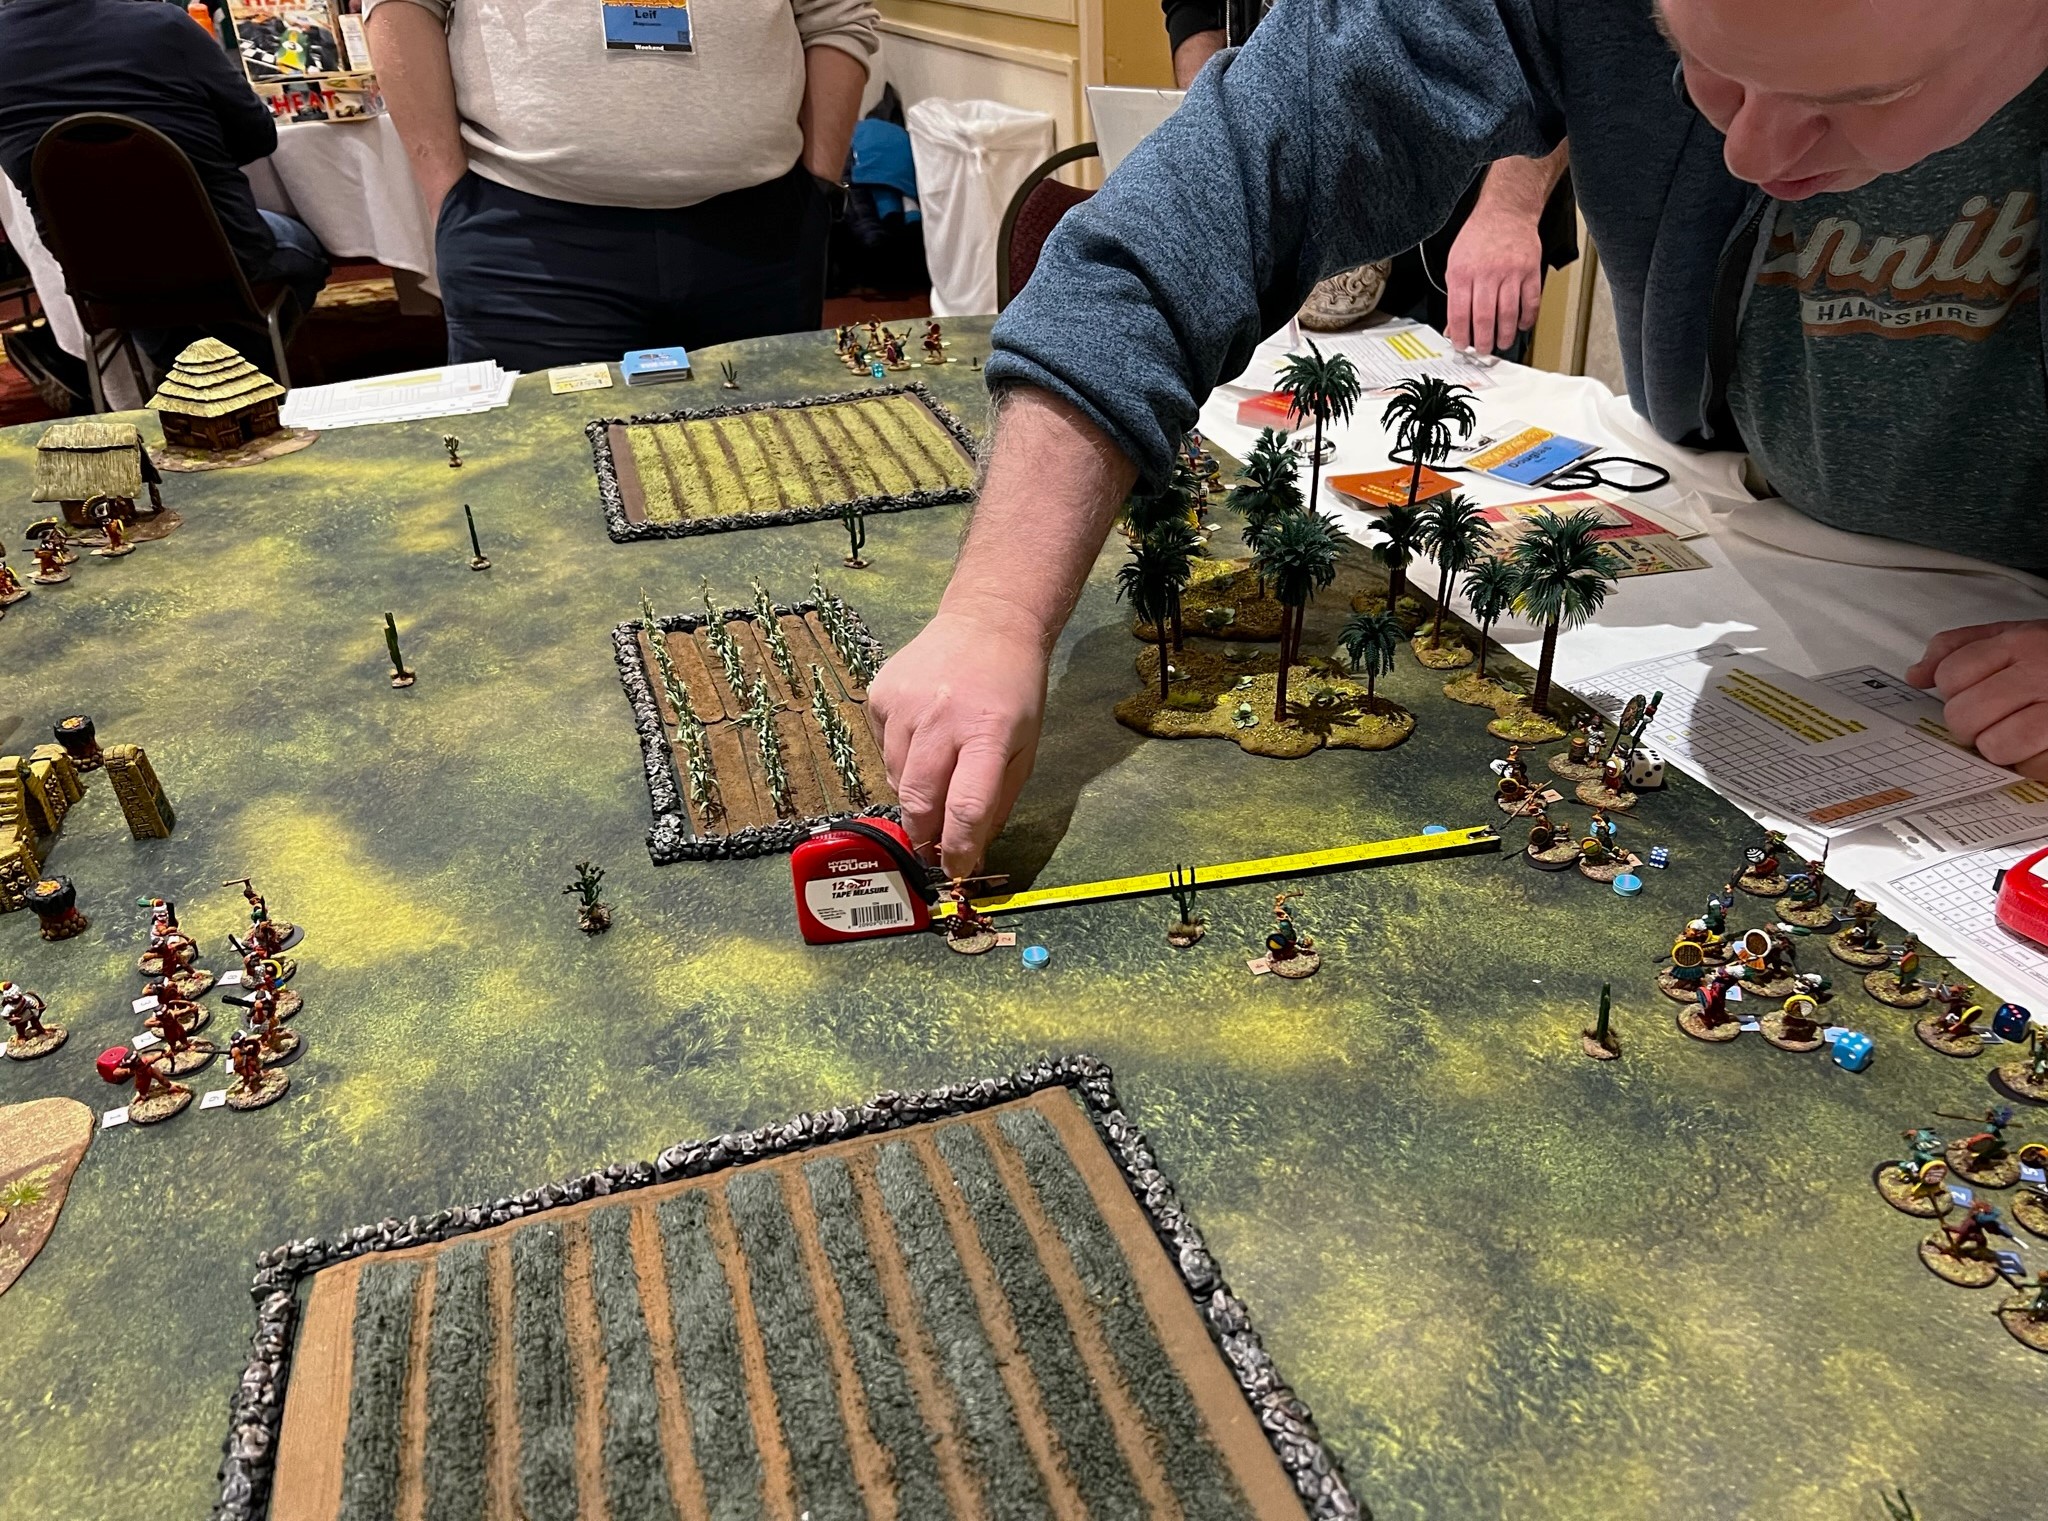
The Maya were fighting a delaying action – they needed to keep the Spanish from reaching the city or incapacitate half of them. The Spanish needed to incapacitate half of the Maya or reach the city. The Maya can randomly get reinforcements from the dead pile – making it harder for the Spanish to reach that 50% Maya killed level. The Spanish get no reinforcements.
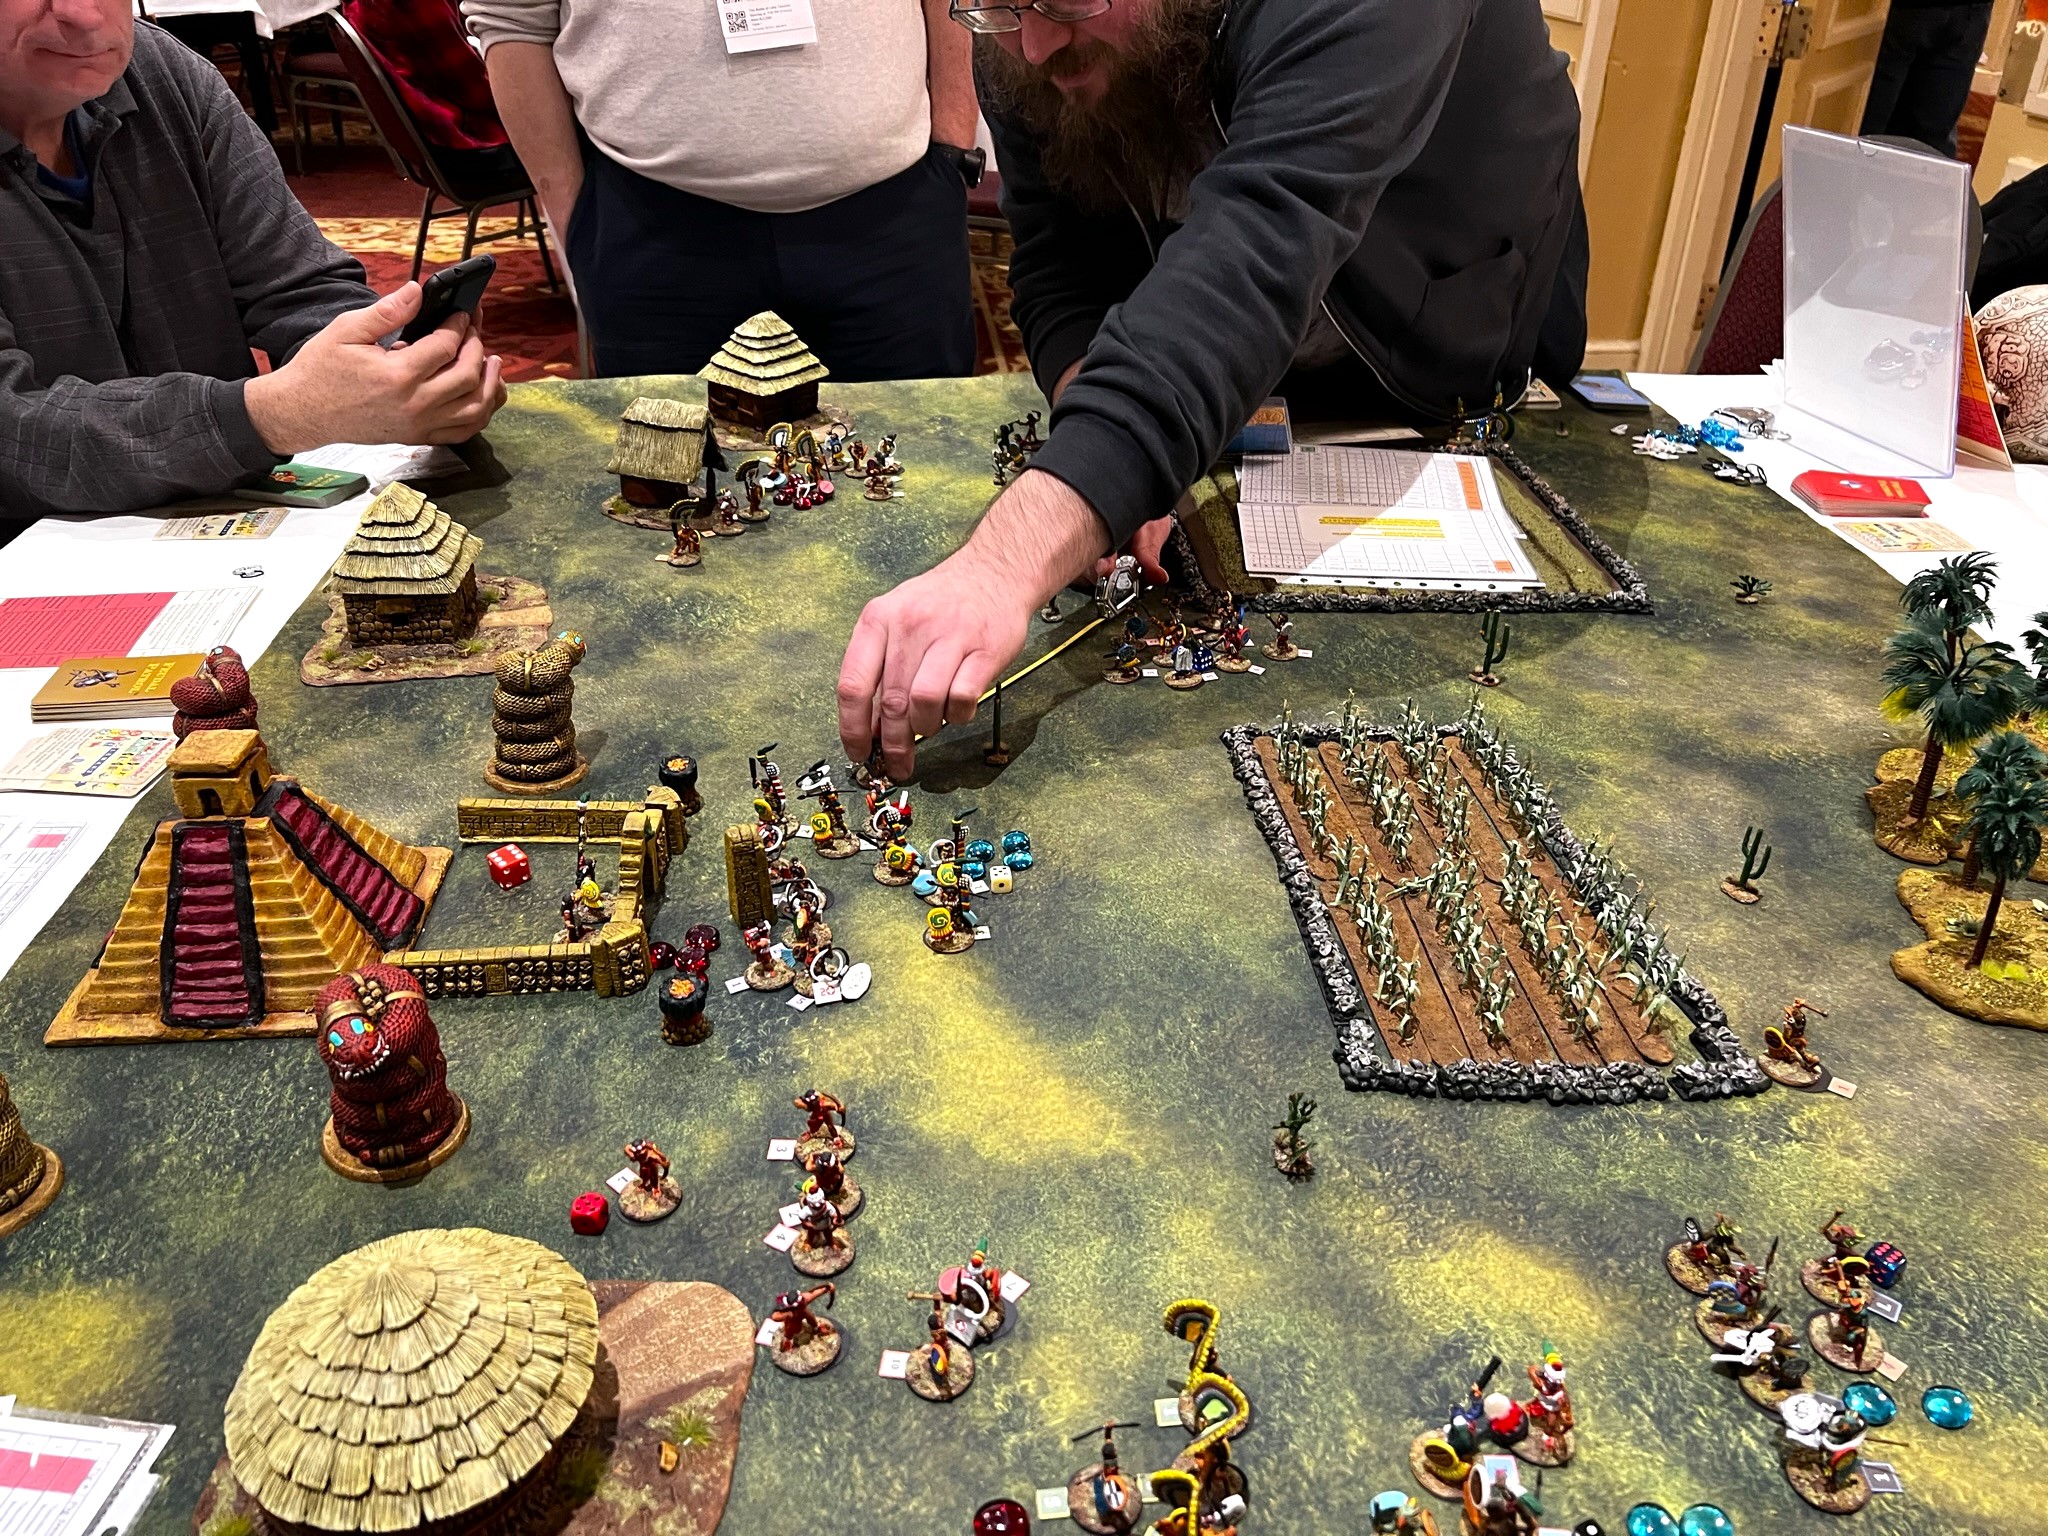
Spanish move up.View from the city.Maya fight stubbornly.The Spanish assault well – and use arquebusiers to good effect.
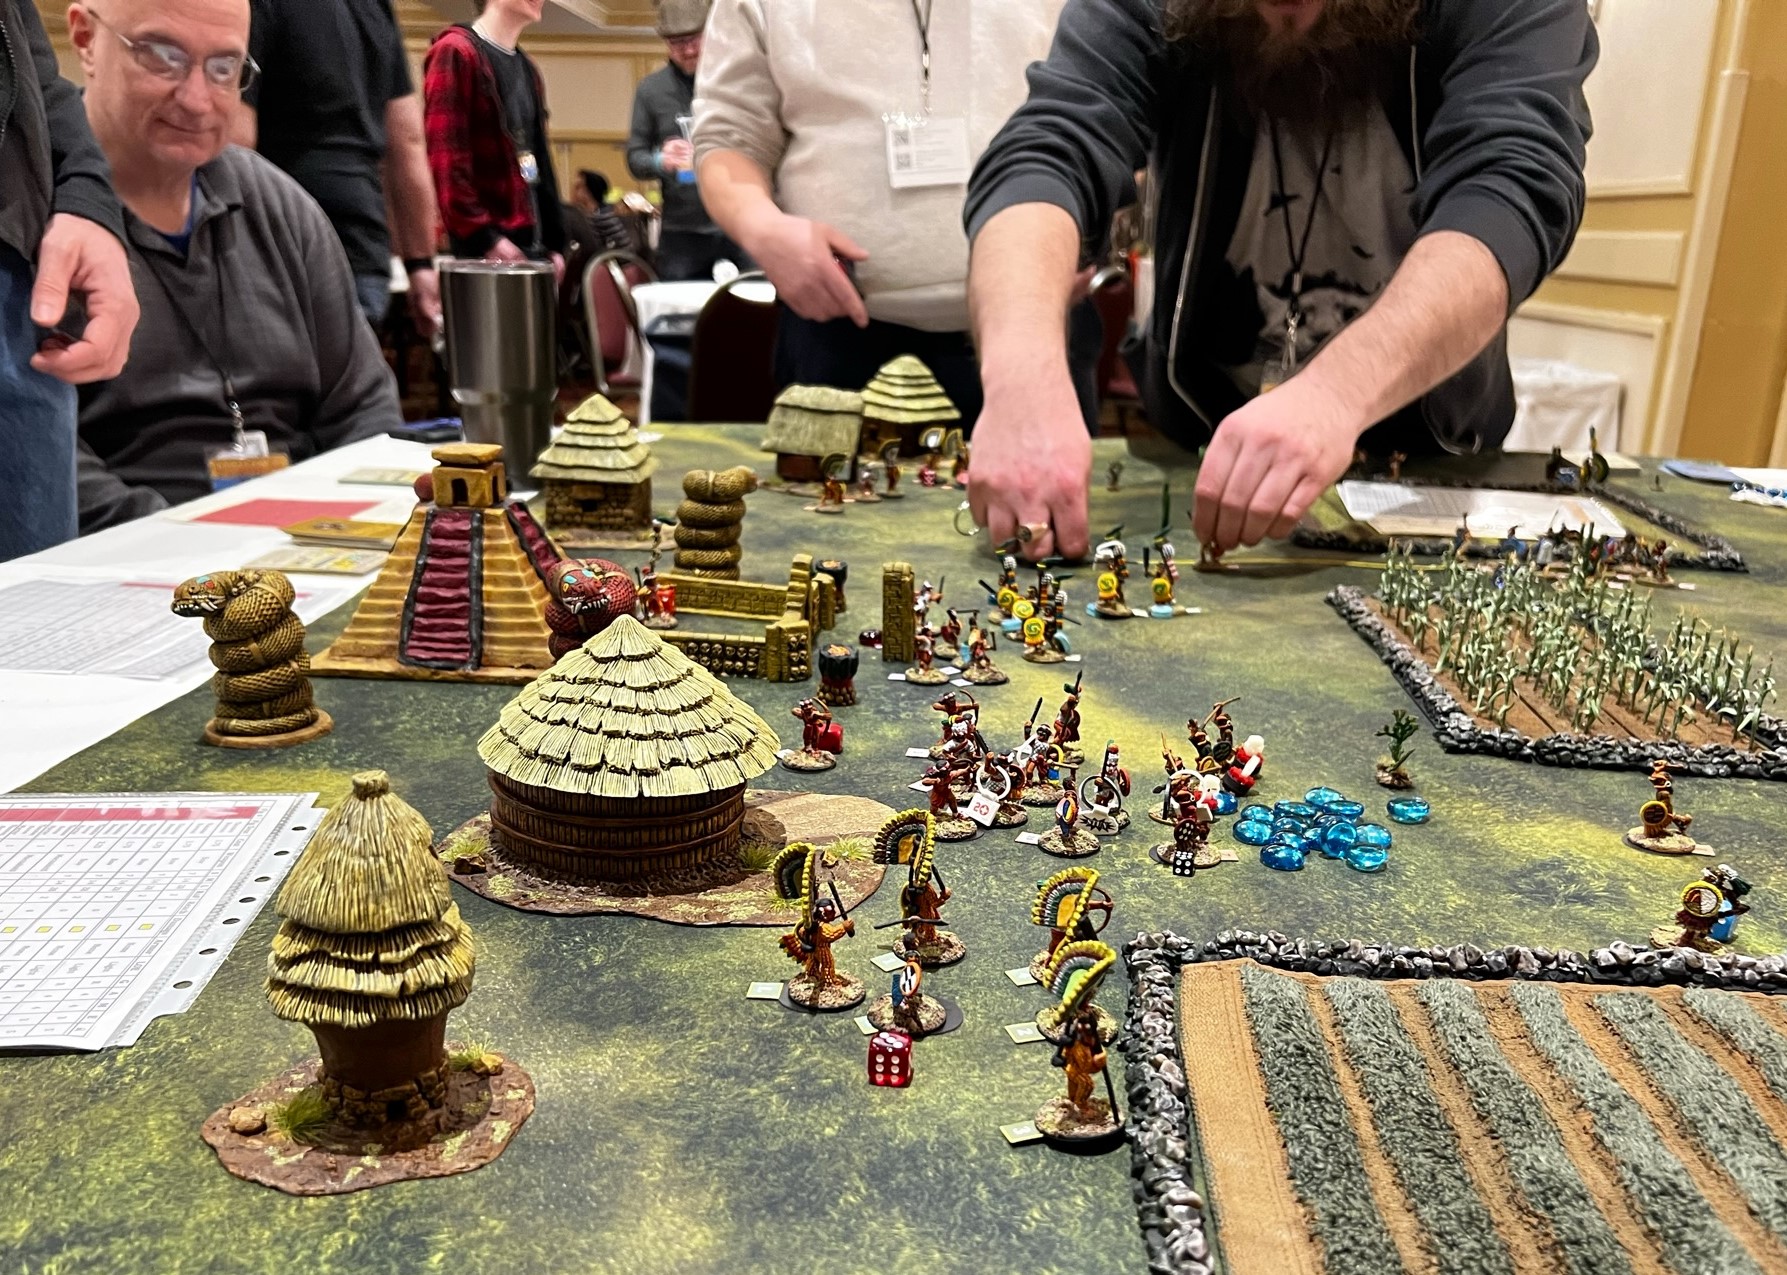
Meanwhile, Tabscoob’s (the Maya chieftain) leadership held his forces together – but taking on the Spanish directly in melee did not go their way.
In the end the Maya were unlucky with reinforcements and the Spanish were effective in their onslaught – resulting in a historical repeat – a Conquistador win.
I really want to thank all the players and especially Leif Magnuson, Brad Gosselin, and Chris Comeau who went above and beyond. I also want thank the whole staff – its a big convention and takes a lot of work. I want to highlight the work of Steven Parenteau and all his staff. Lastly, a big thanks to the incredibly helpful Bryan Clauss who headed up the miniatures section and who assisted in getting me the right table sizes.
Leif, myself, and Brad
Painting Contest
Finally, like last year, there was a painting contest. This year, I entered my Conquistador cavalry in the unit category – and won! Yay!
That’s it for TotalCon 37!
Going forward, I’ll be bringing “The Battle of Lake Texcoco” and “The Battle of Centla” to HMGS Cold Wars next week, plus “The Surprise Raid on the Spanish Outpost”. At the end of March, at HAVOC, I’ll be bringing “The Battle of Lake Texcoco” and “The Battle of Centla” as well as two “Wars of Ozz” games. I need to submit my games for HUZZAH! in May – and I’ll be doing that shortly.
I hope that you enjoyed this post – it’s been hectic with preparing for these conventions all so closely spaced together – but in the end I was very happy with how TotalCon 37 went – and I hope to repeat this at the other two planned gaming conventions.
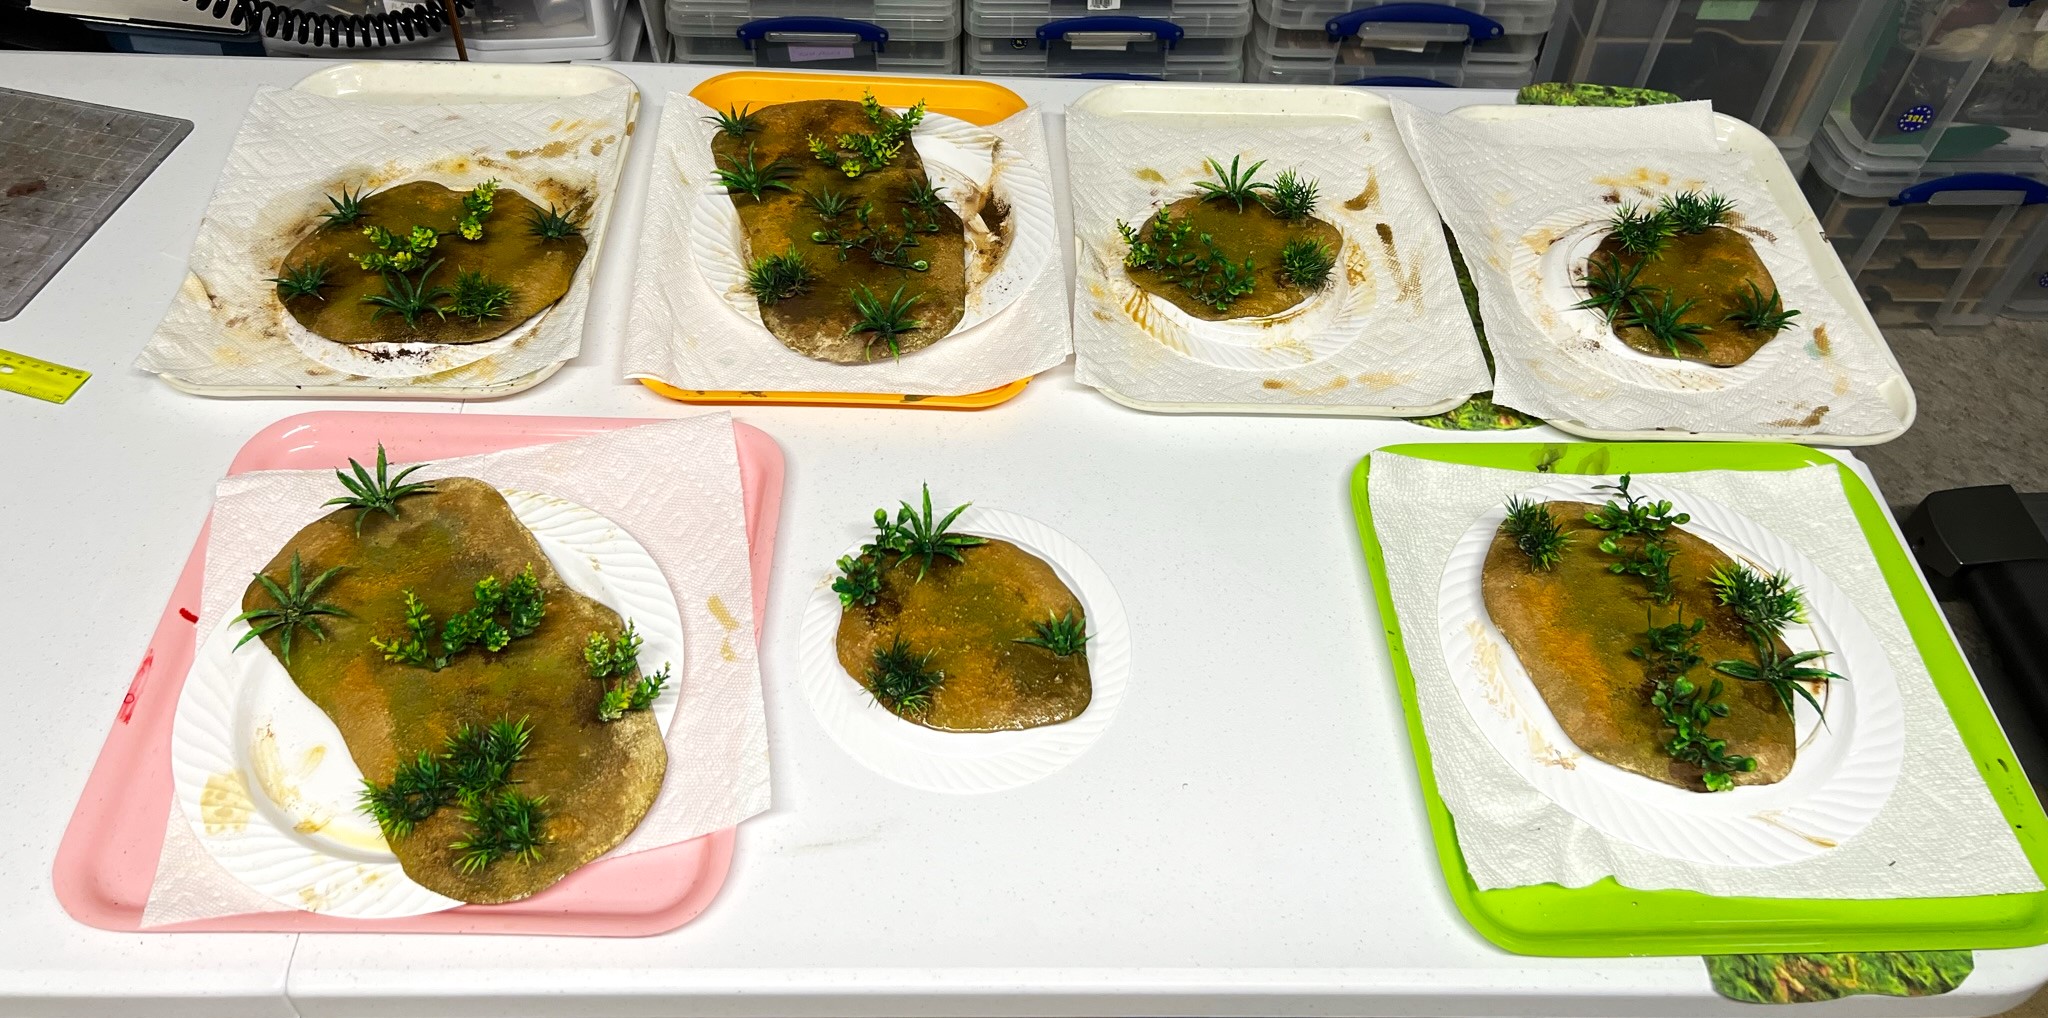
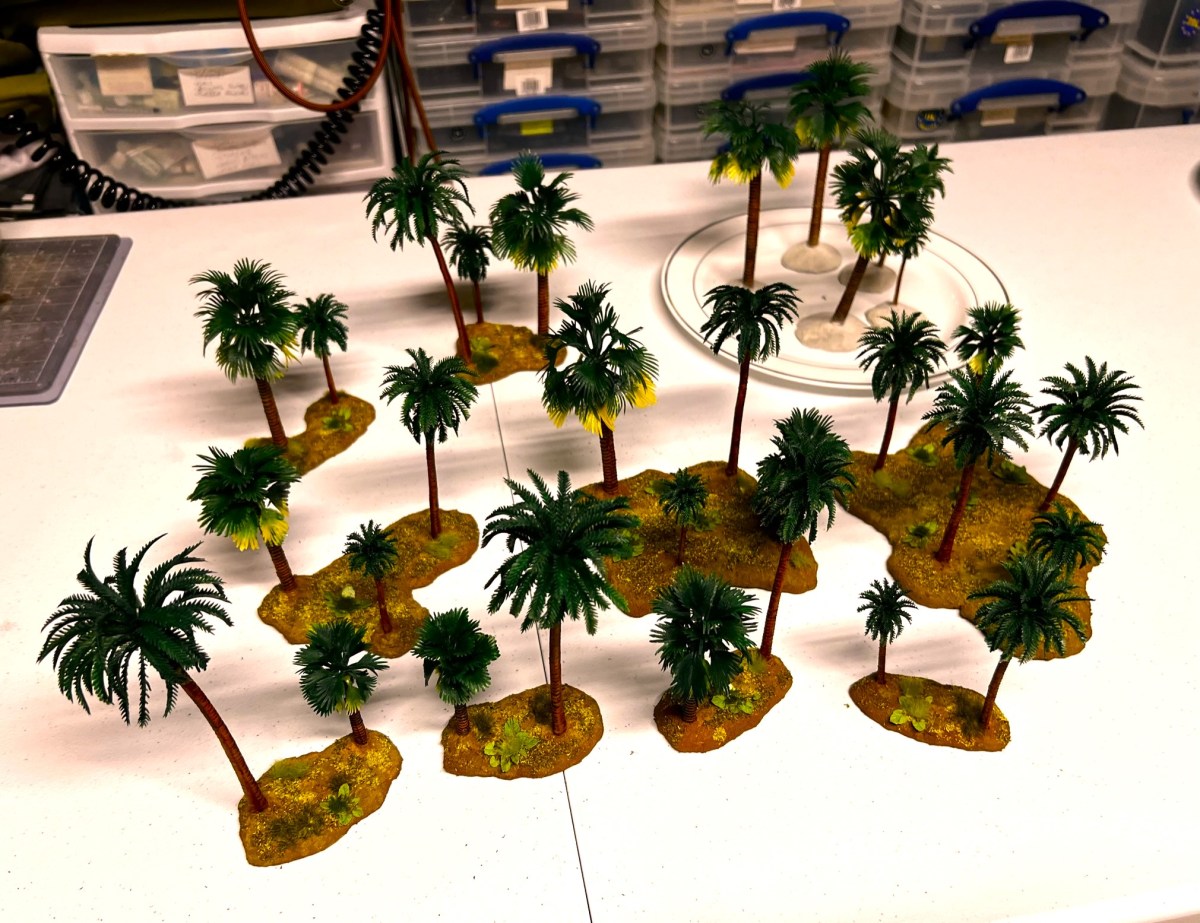
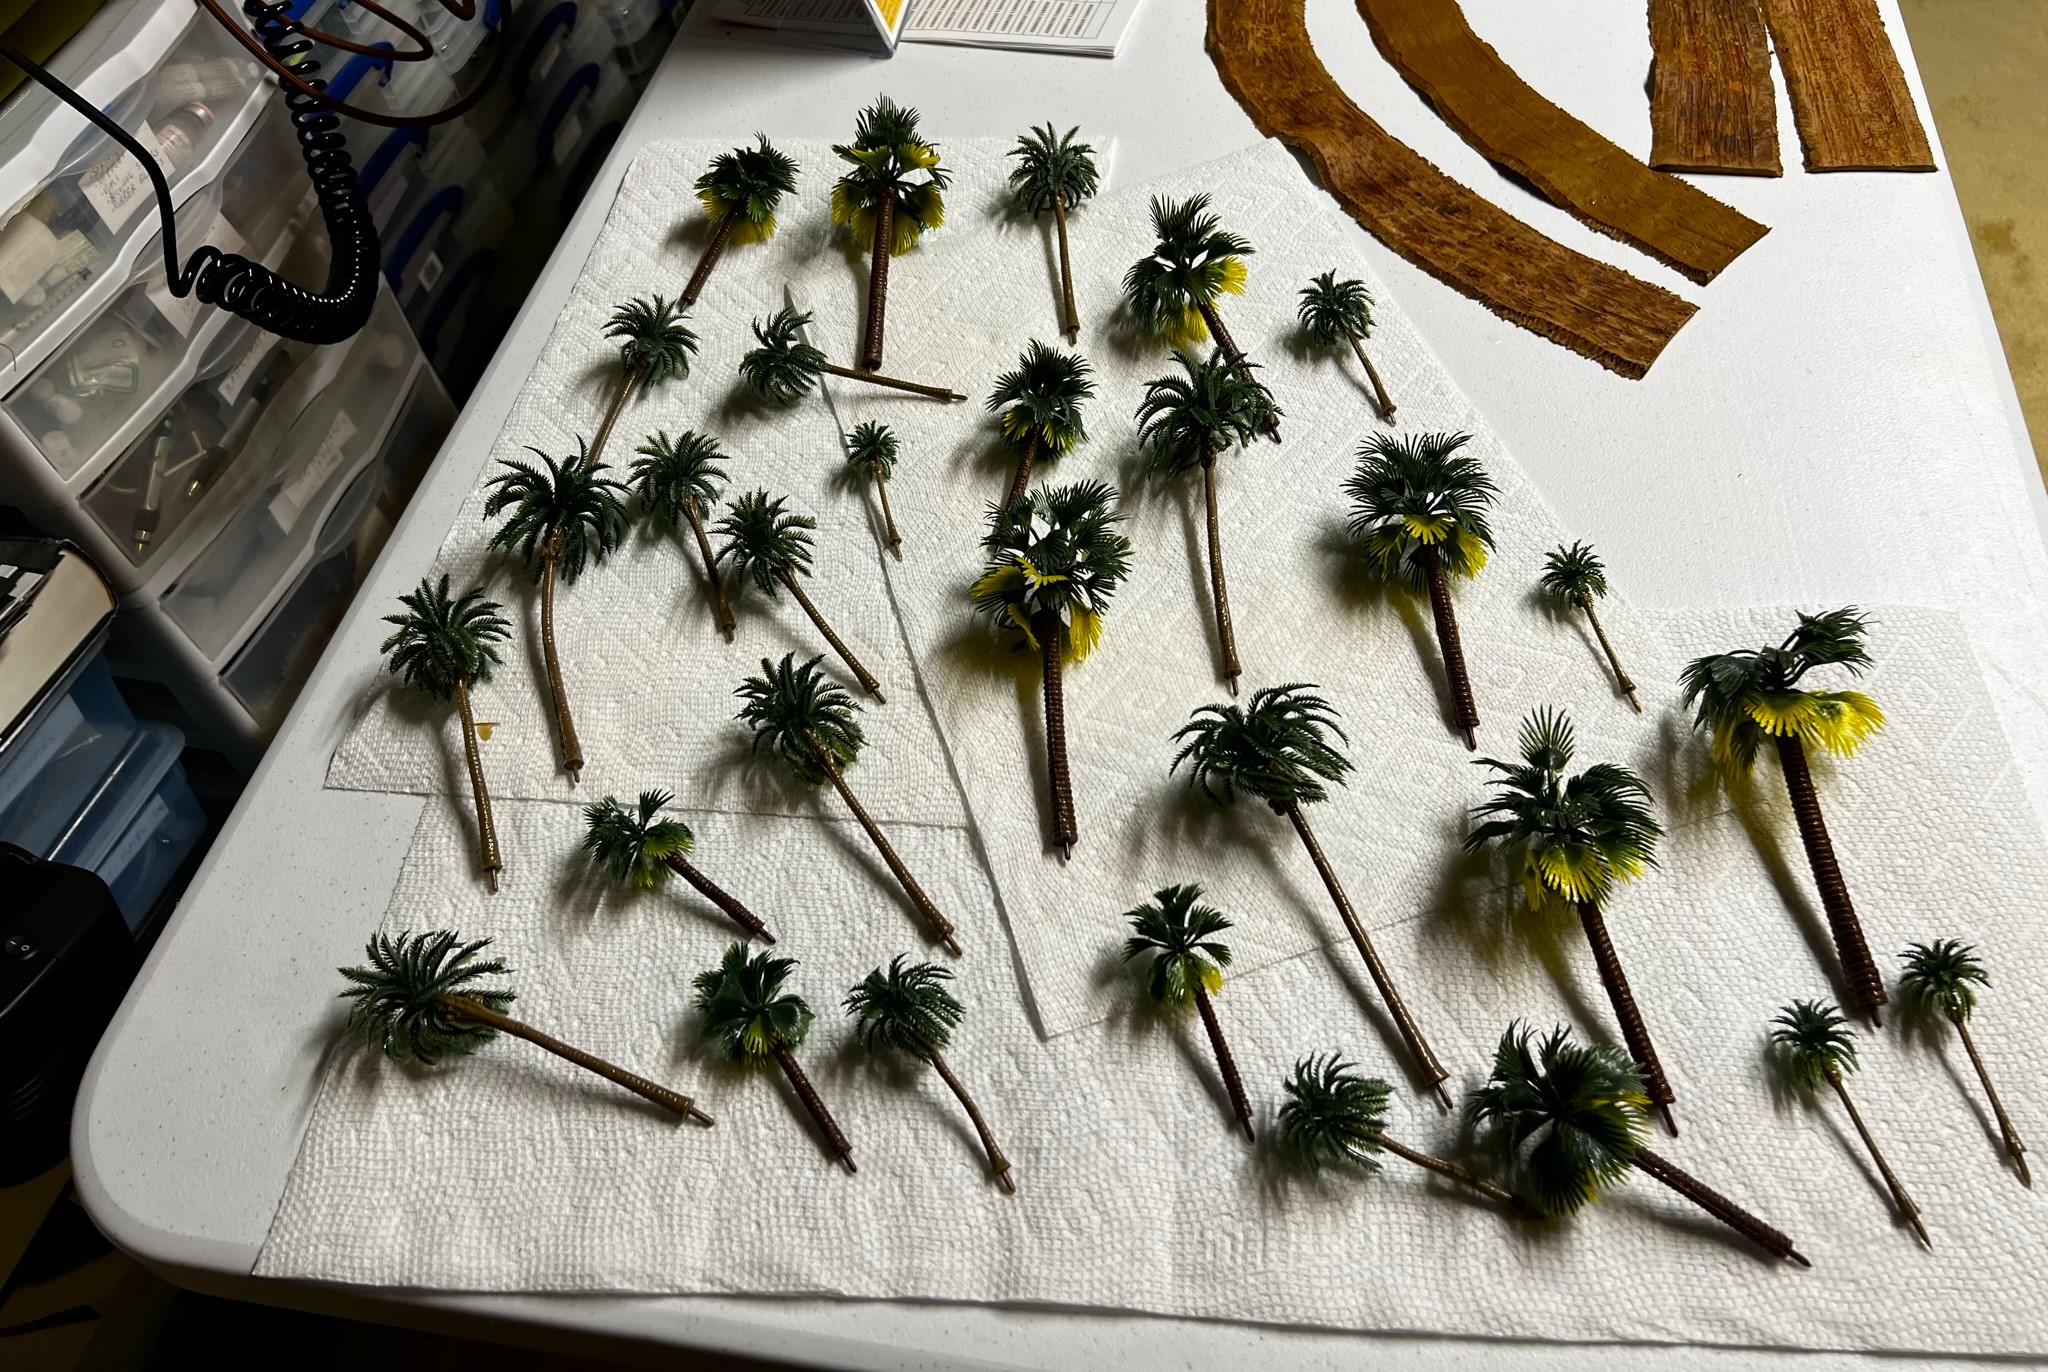
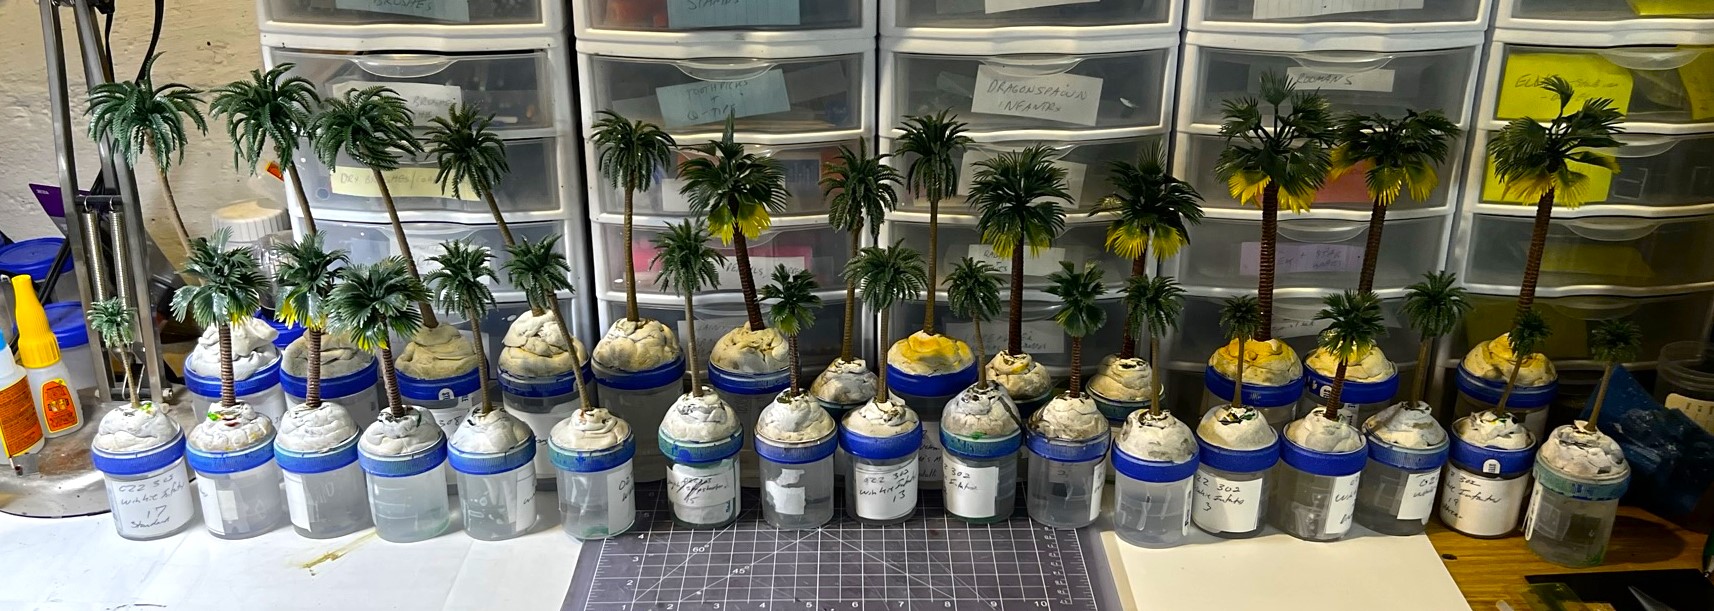
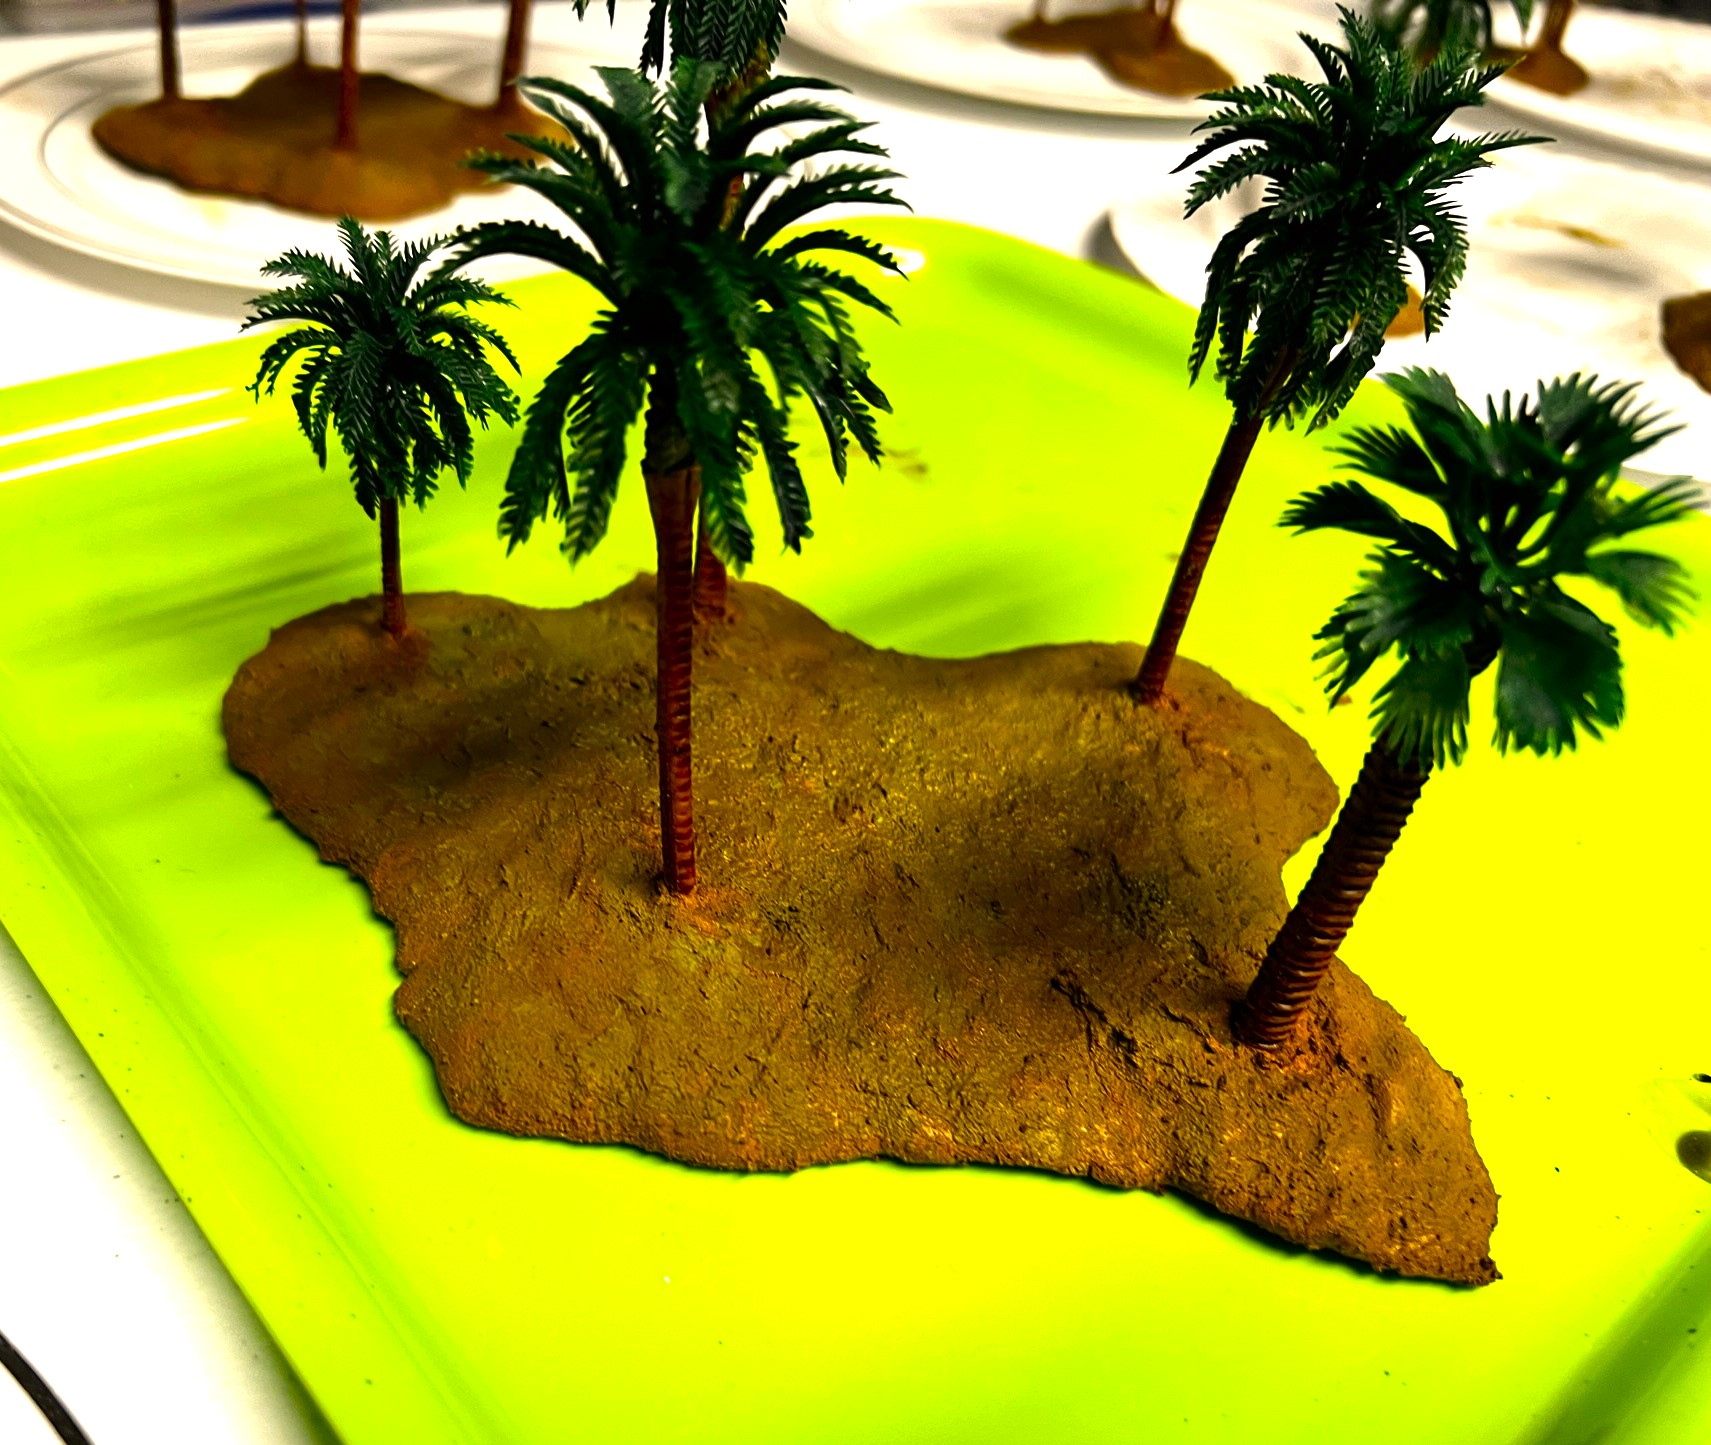
As convention season is upon me – starting with TotalCon 37 this weekend – I wanted to make a quick post on some jungle bases I have sculpted for my new Maya scenario. I bought some inexpensive palm trees on Amazon – the one on the left was for cake decorating and the other on the right marketed for use on railroad dioramas. I had 30 trees in total – and they looked pretty shiny as one would expect of plastic. And shiny is not what I wanted.
The basic preparation of the trees involved removing mold lines (lots), washing them, and making a plan for their use. I needed some single trees for use on a beach (sandy bases) and some larger more muddy looking bases for the jungle around a Maya village. These are for the Battle of CentlaFeudal PatrolTM games I’ll be running in upcoming conventions. In addition to removing the mold lines, I lightly sanded and filed the plastic which gave the bark a more friable look.
After cleaning up bad mold lines – wash time……and drying time
I then mounted the trees into poster tack on specimen jars and used three different washes on the foliage (all the paints and materials that I used are listed at the end of this post for those interested).
Mounted for applying washes to the plastic foliage to make them look more realistic.
Next, I needed a more detailed plan – I wanted to make the bases such that the 30 trees were varied across all of the bases and spaced far enough apart for good gaming with miniatures. I decided to make one 5-tree base, one 4-tree base, two 3-tree bases, three 2-tree bases, and 5 single bases. The single ones would be beach bases and the others jungle bases.
The plan – with a shot of my game map as a planning guide.
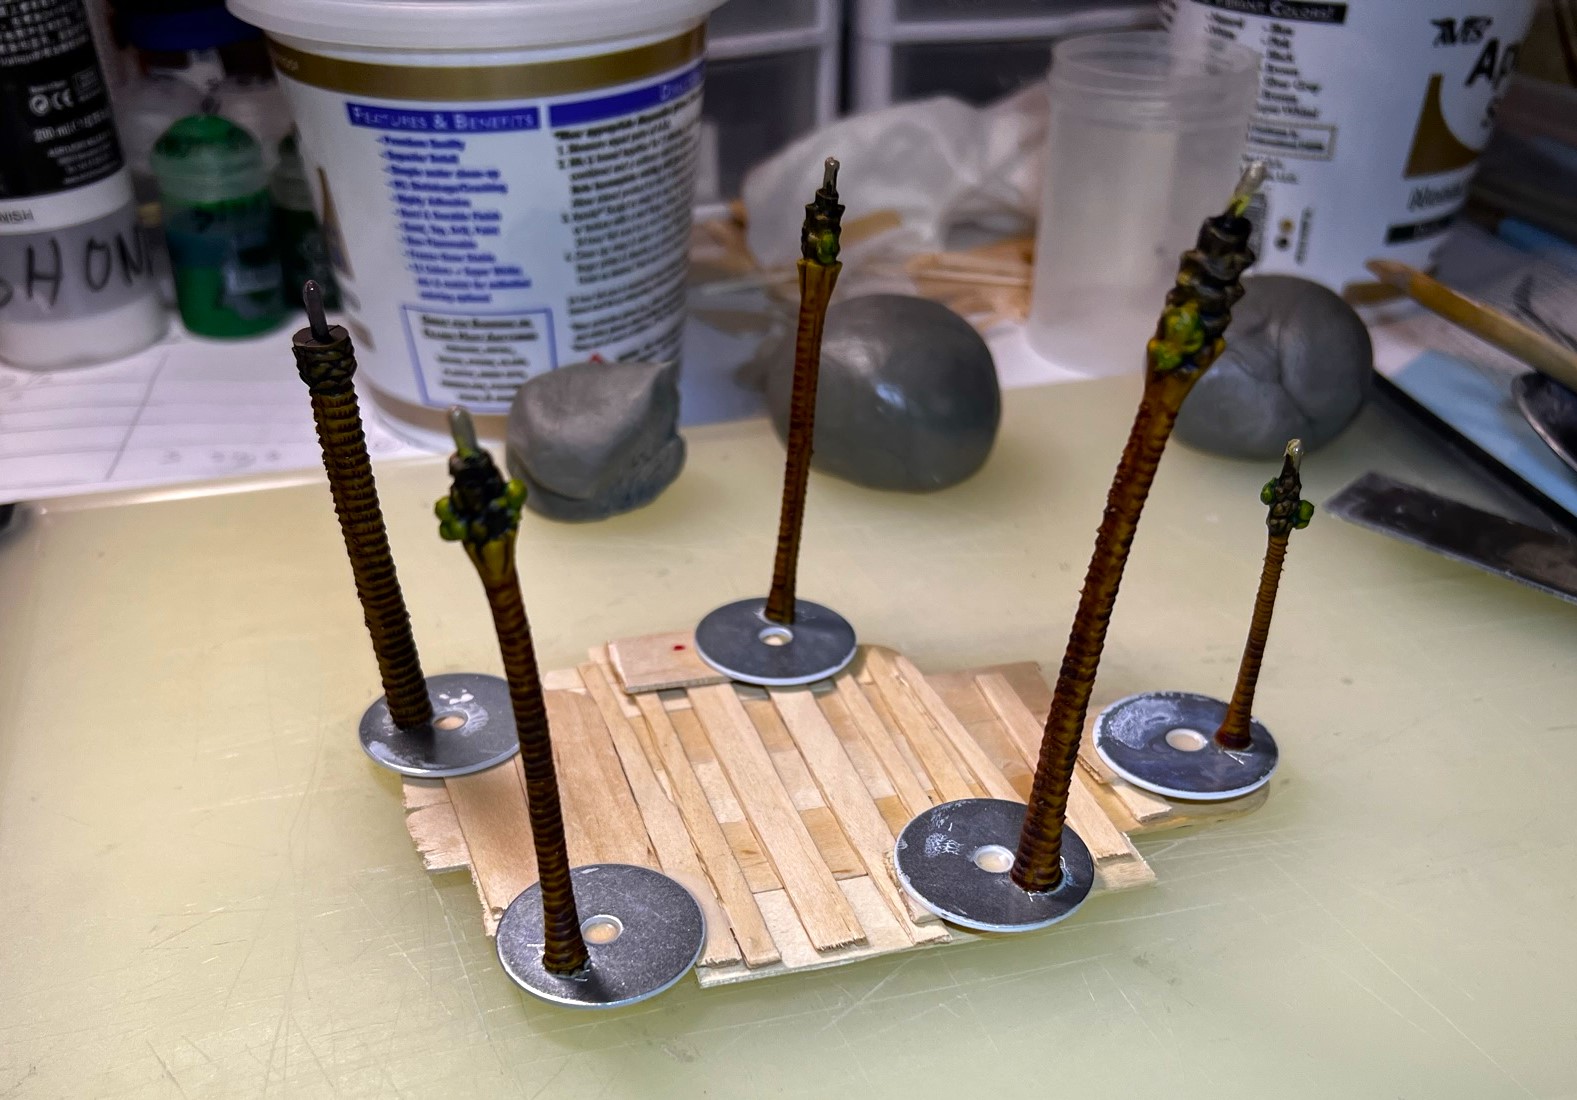
For sculpting, I went with Apoxie Sculpt, a 2-piece resin that is very workable but hardens like a rock. I needed to have some support for the trees – otherwise they would have just drooped excessively while the Apoxie Sculpt cured and hardened overnight. To solve this, I removed the little tabs on the tree bottoms, and glued the trees to steel washers. I gave a few a little bend as well.
For the 2-tree and 3-tree bases, the washers were easy to sculpt around and provided support – and I added some popsicle stick supports connecting the washers that I encased with Apoxie Sculpt and sculpted over. For the two bigger bases, I made supporting bases out of several popsicle sticks, then glued the washers with the affixed trees to them. I sculpted over the bases. More or less, these actions provided structural support and allowed me to make the bases strong. I needed to make sure that I used a putty knife to lift them from time to time off of plastic plates and cutting mats else they would cure permanently to them.
Apoxie SculptThe larger bases gleed and setting up.Washer-mounted treesTrees on washers now glues to a 5-tree base.
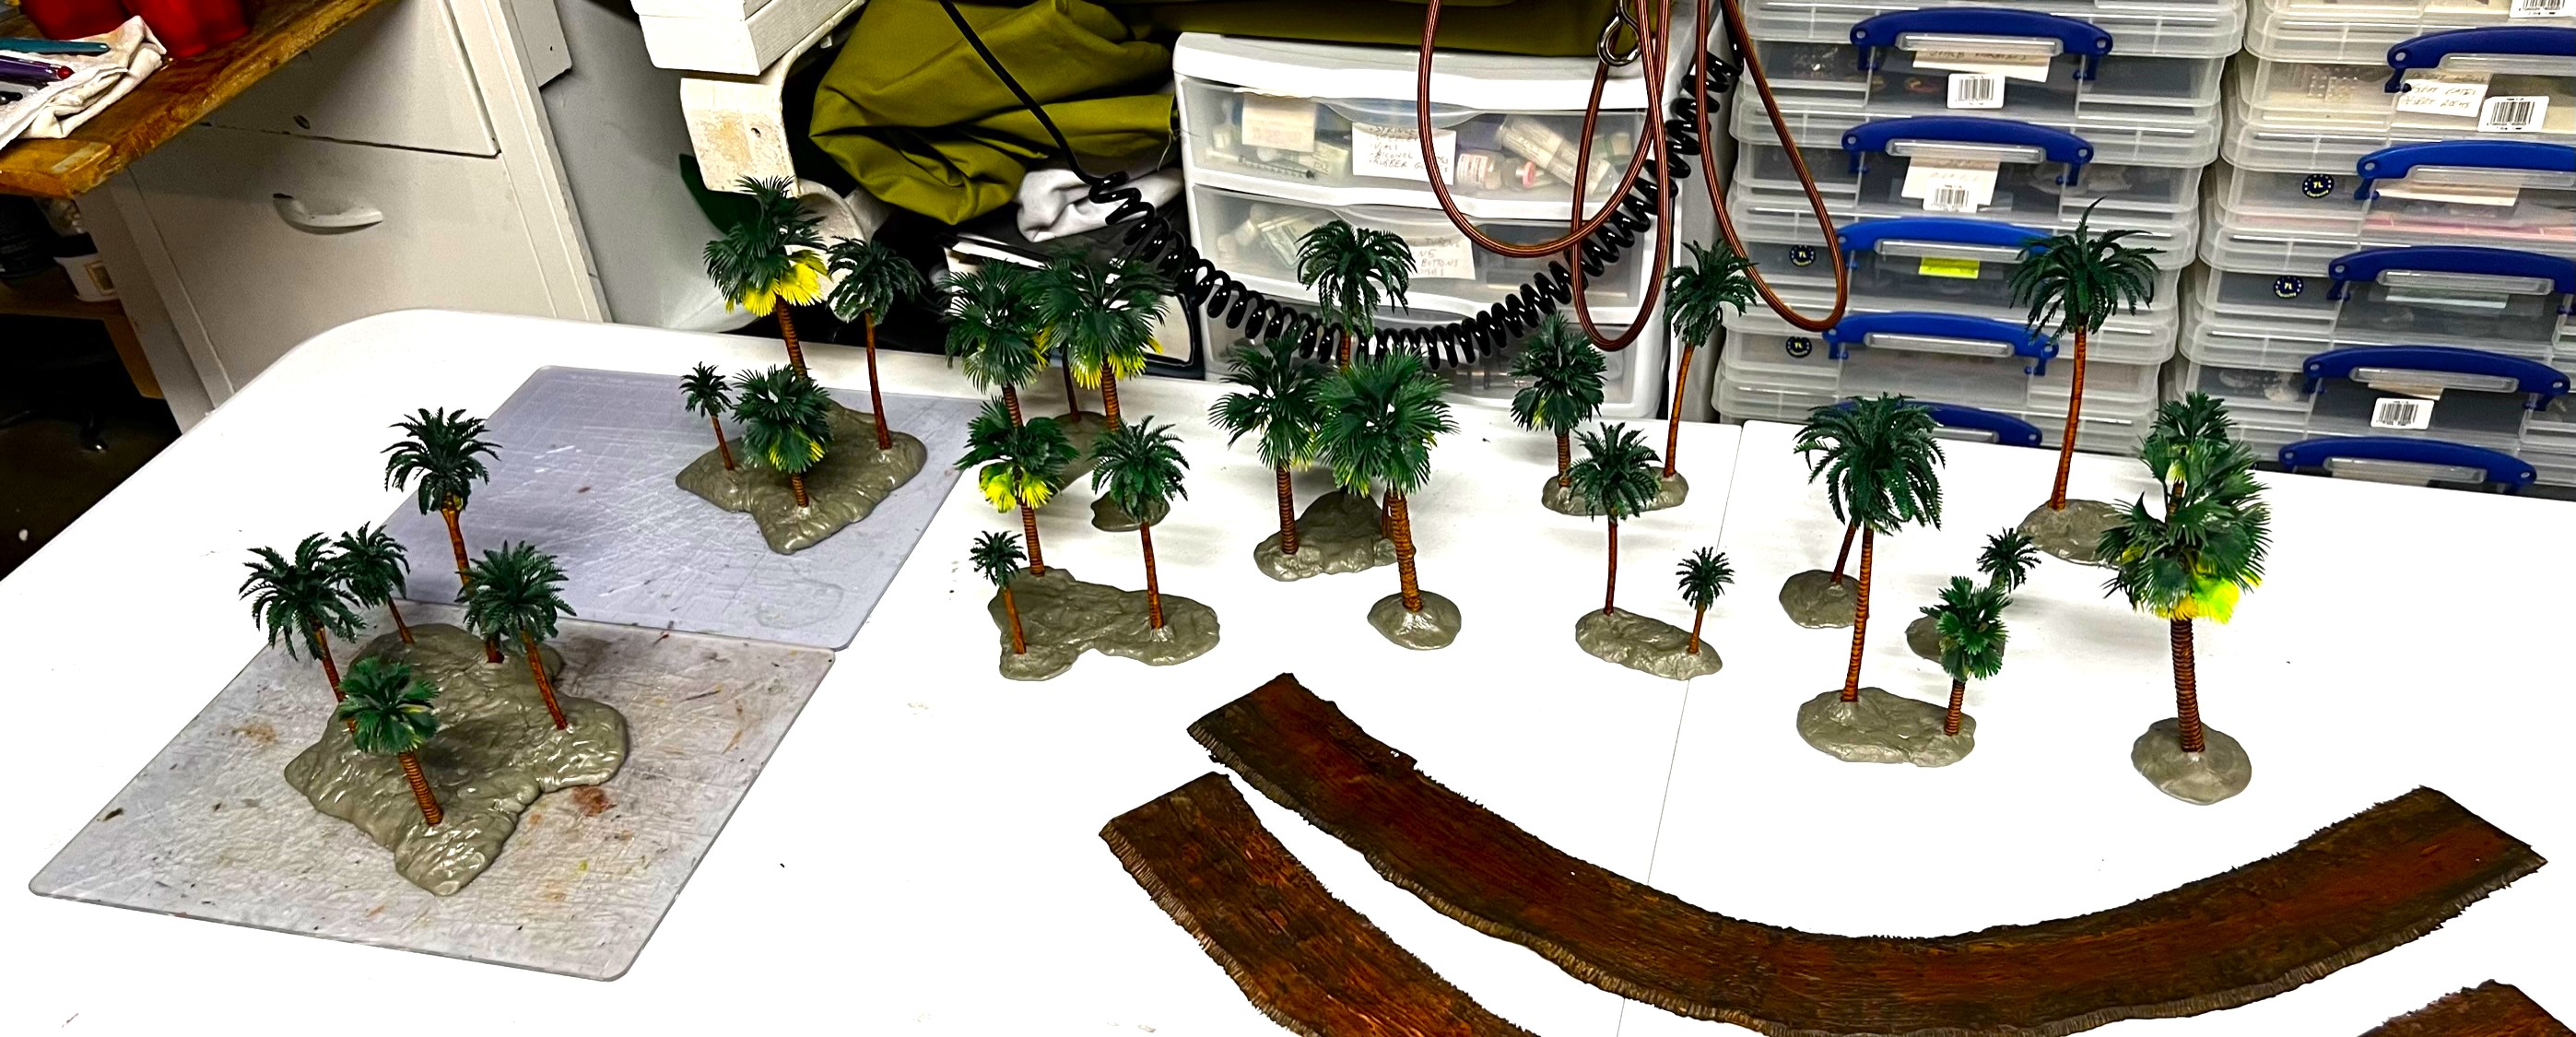
After curing to tremendous rock-hardness, the next steps for them were to get painted and flocked. For the single-tree beach bases, I used chinchilla dust over PVA (thanks again TIM!) that I have used in the past. For the jungle bases, I used a texture paint, pigments, and different flocking materials.
Bases curing – a couple of jungle paths are in front. These I got from Buck Surdu and I muddied them up with a couple of inks.Early flocking drying – pigments still wet.Close up of beach bases with chinchilla dust and glue drying.
After the texture paint dried, I played around and added multiple (3) pigments, and let them dry.
5-tree base with pigments drying.Pigments after drying.
At this point, I wanted to add some tufts, debris, and low-lying foliage. I had some old 4-Ground leaves, and a Ziterdes “butterbur” laser-cut foliage that had been hanging around for years with no home. I mixed those with some tufts to create a hybrid jungle-looking plant. I learned butterbur is not native to the Americas, but with the tufts it looked fine.
The completed bases – showing the debris and low-lying plants.A close up shot of the base with a Maya warrior for scale comparison.
I have also acquired some more bases from Dave Stone’s workshop that I will eventually work into the game. These are very nice and I will also flock them similarly to match mine. Unfortunately, the UK cyber attack delayed them getting here in Massachusetts until today so they won’t get done until later – not Dave’s fault!
I hope that this was interesting – certainly it was a diversion from my recent Ozz stuff. I’m still going to run Mesoamerican games – and will be adding Ozz games too. I certainly have room for both!
Thanks for taking a look – let me know what you think!
Miscellaneous details and references for those interested in that sort of thing:
For all of my previous posts on games, units, and other projects for my 16th Century Spanish Conquest supplement for Feudal Patrol™ – “Civilizations Collide” – please see this page.
PAINTS, INKS, GLAZES, SHADES, WASHES, PIGMENTS, FLOCKING, GLUES AND MORE THAT I USED ON THESE PALM TREES AND BASES:
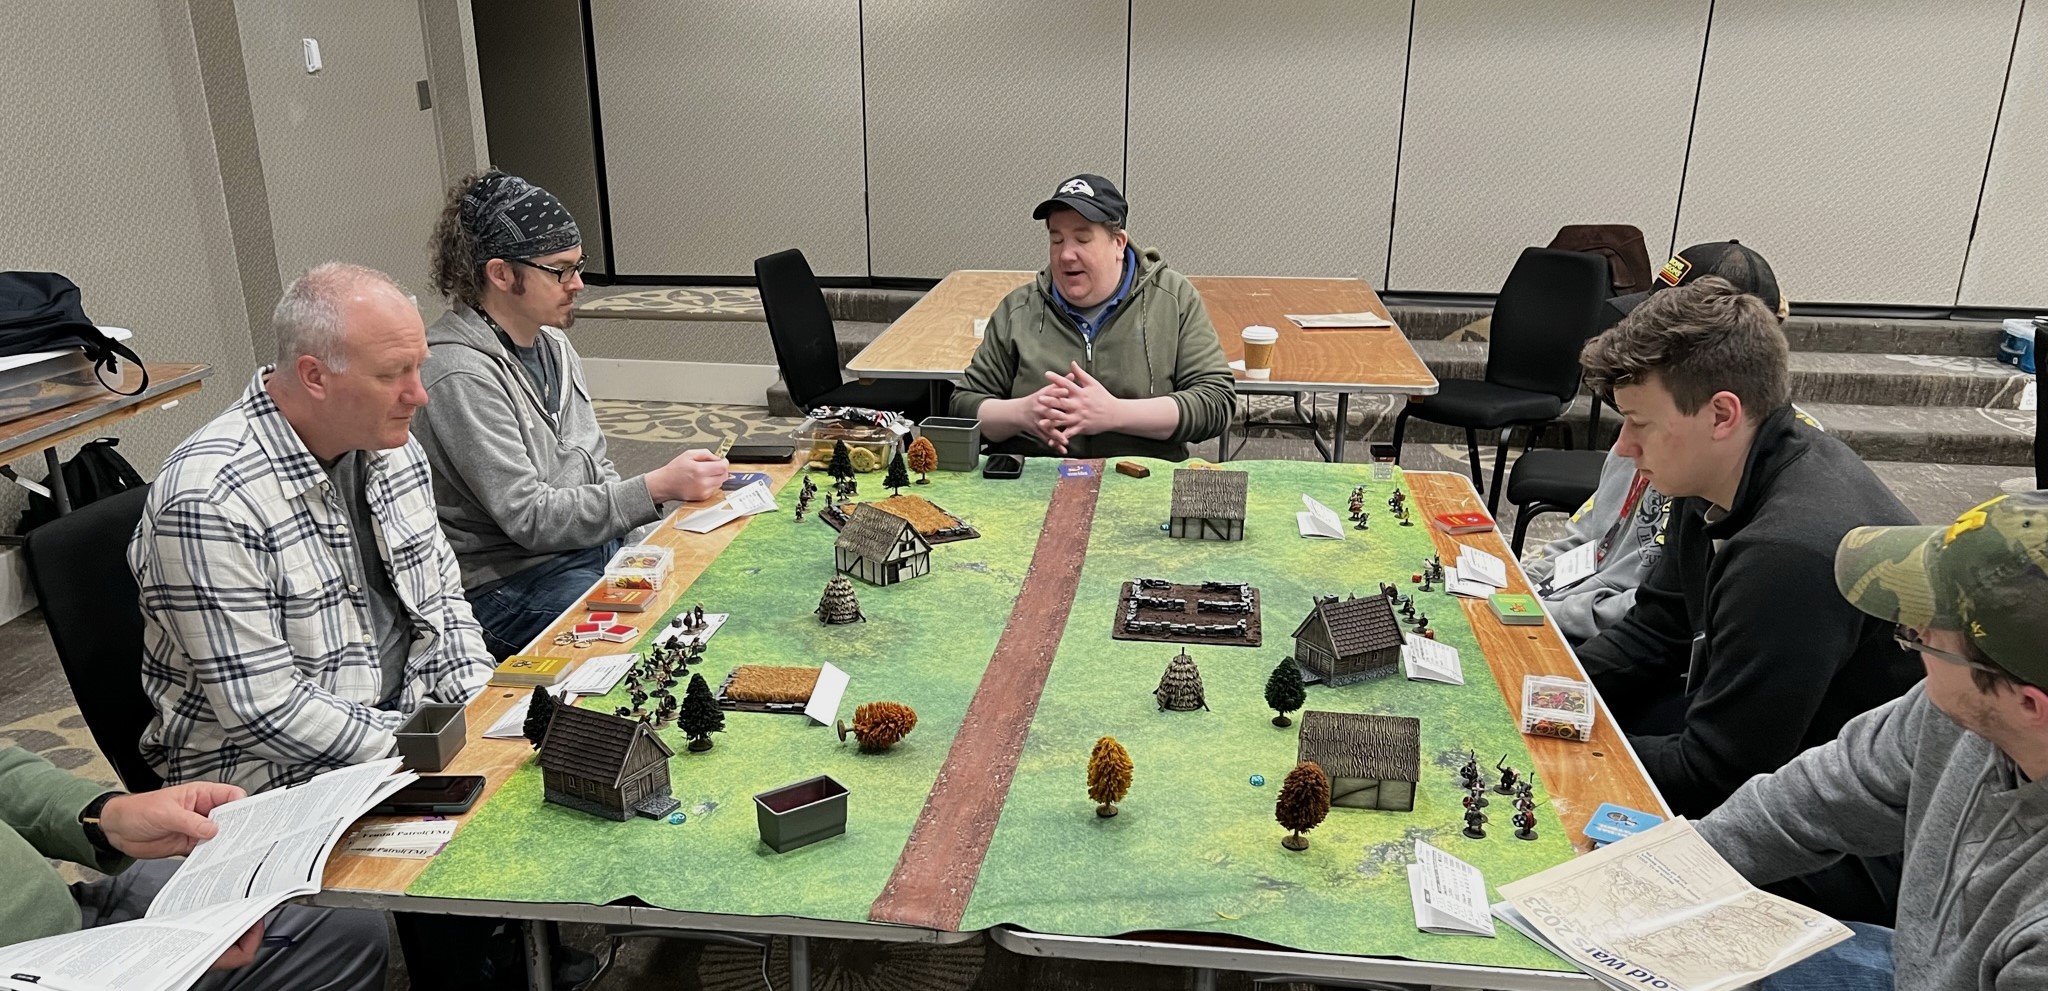
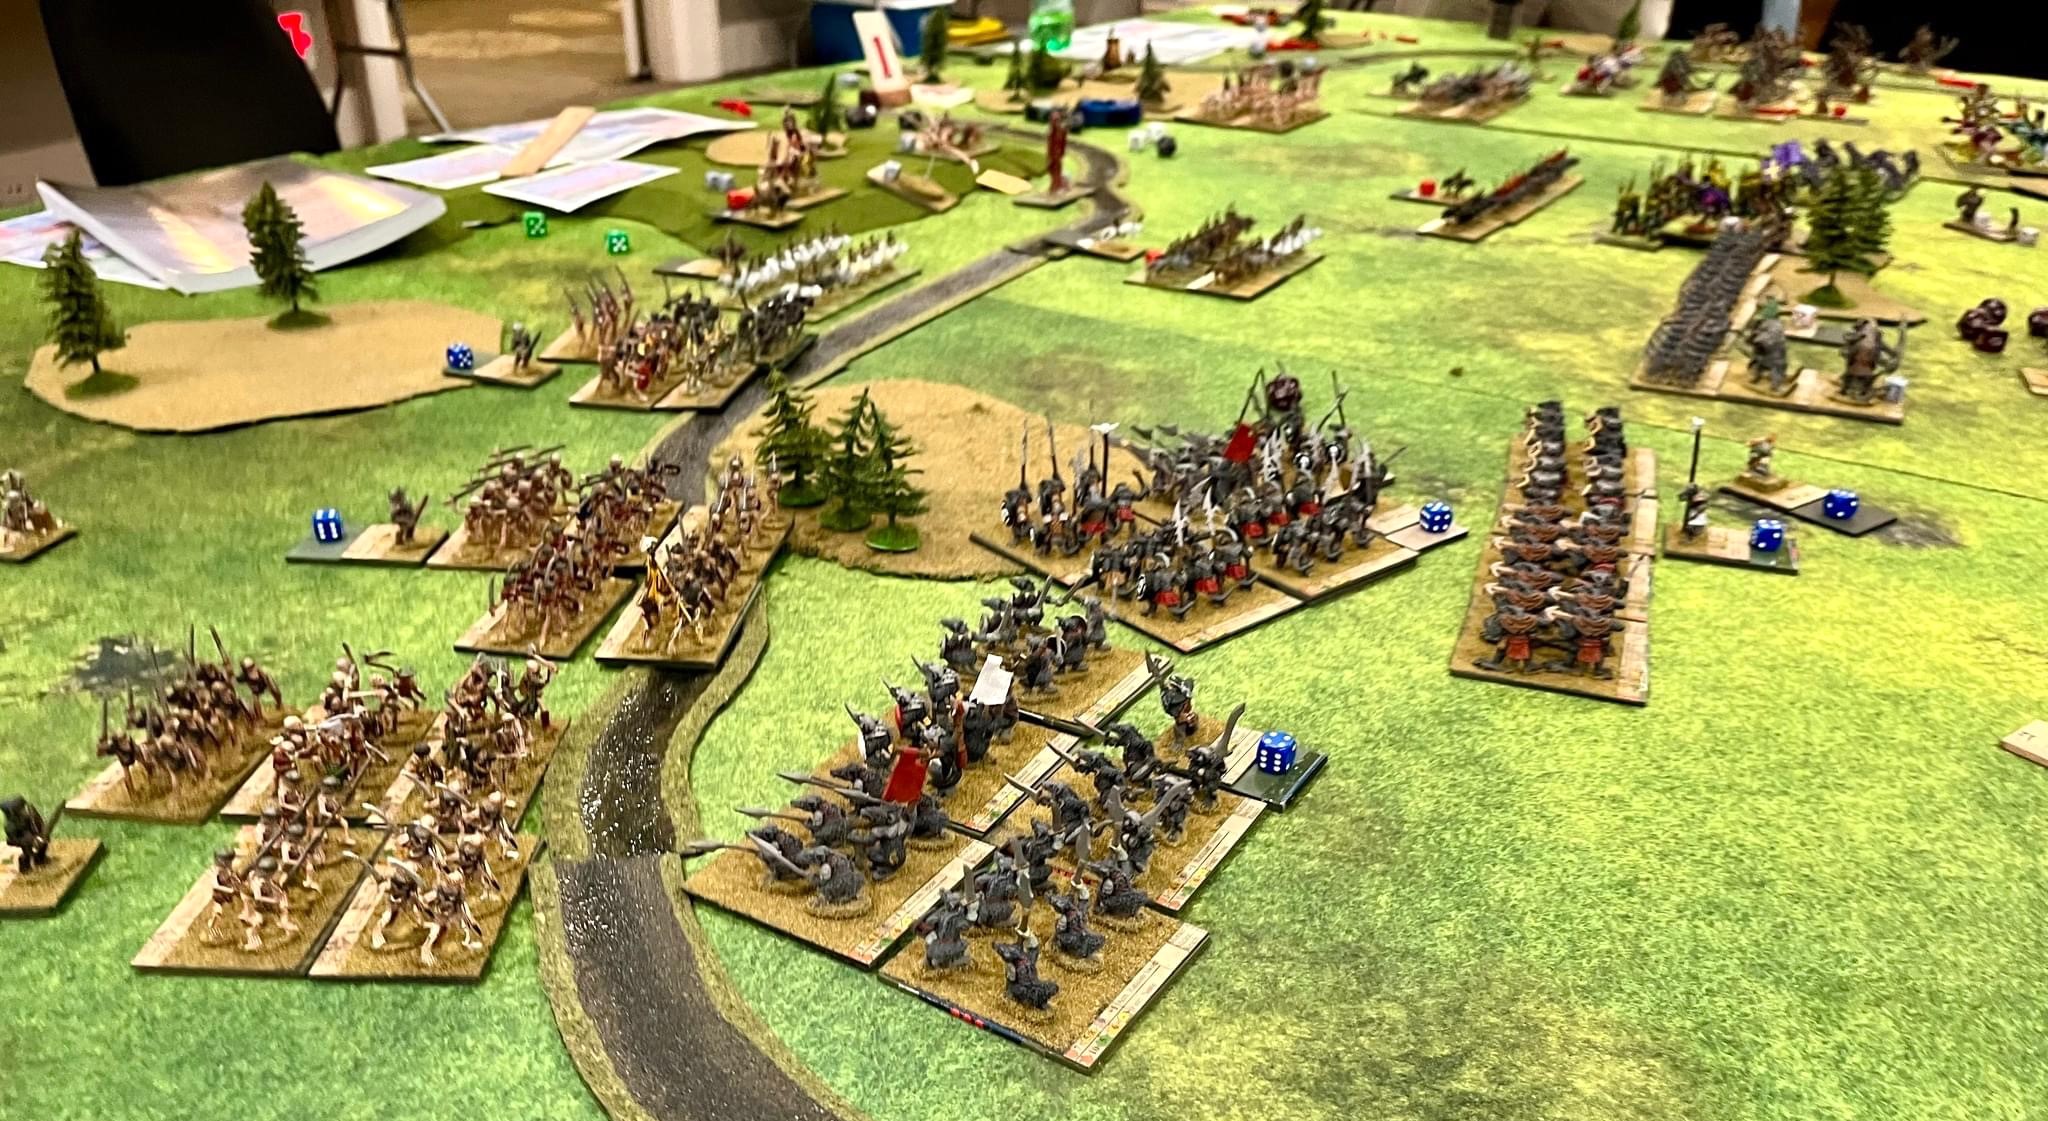
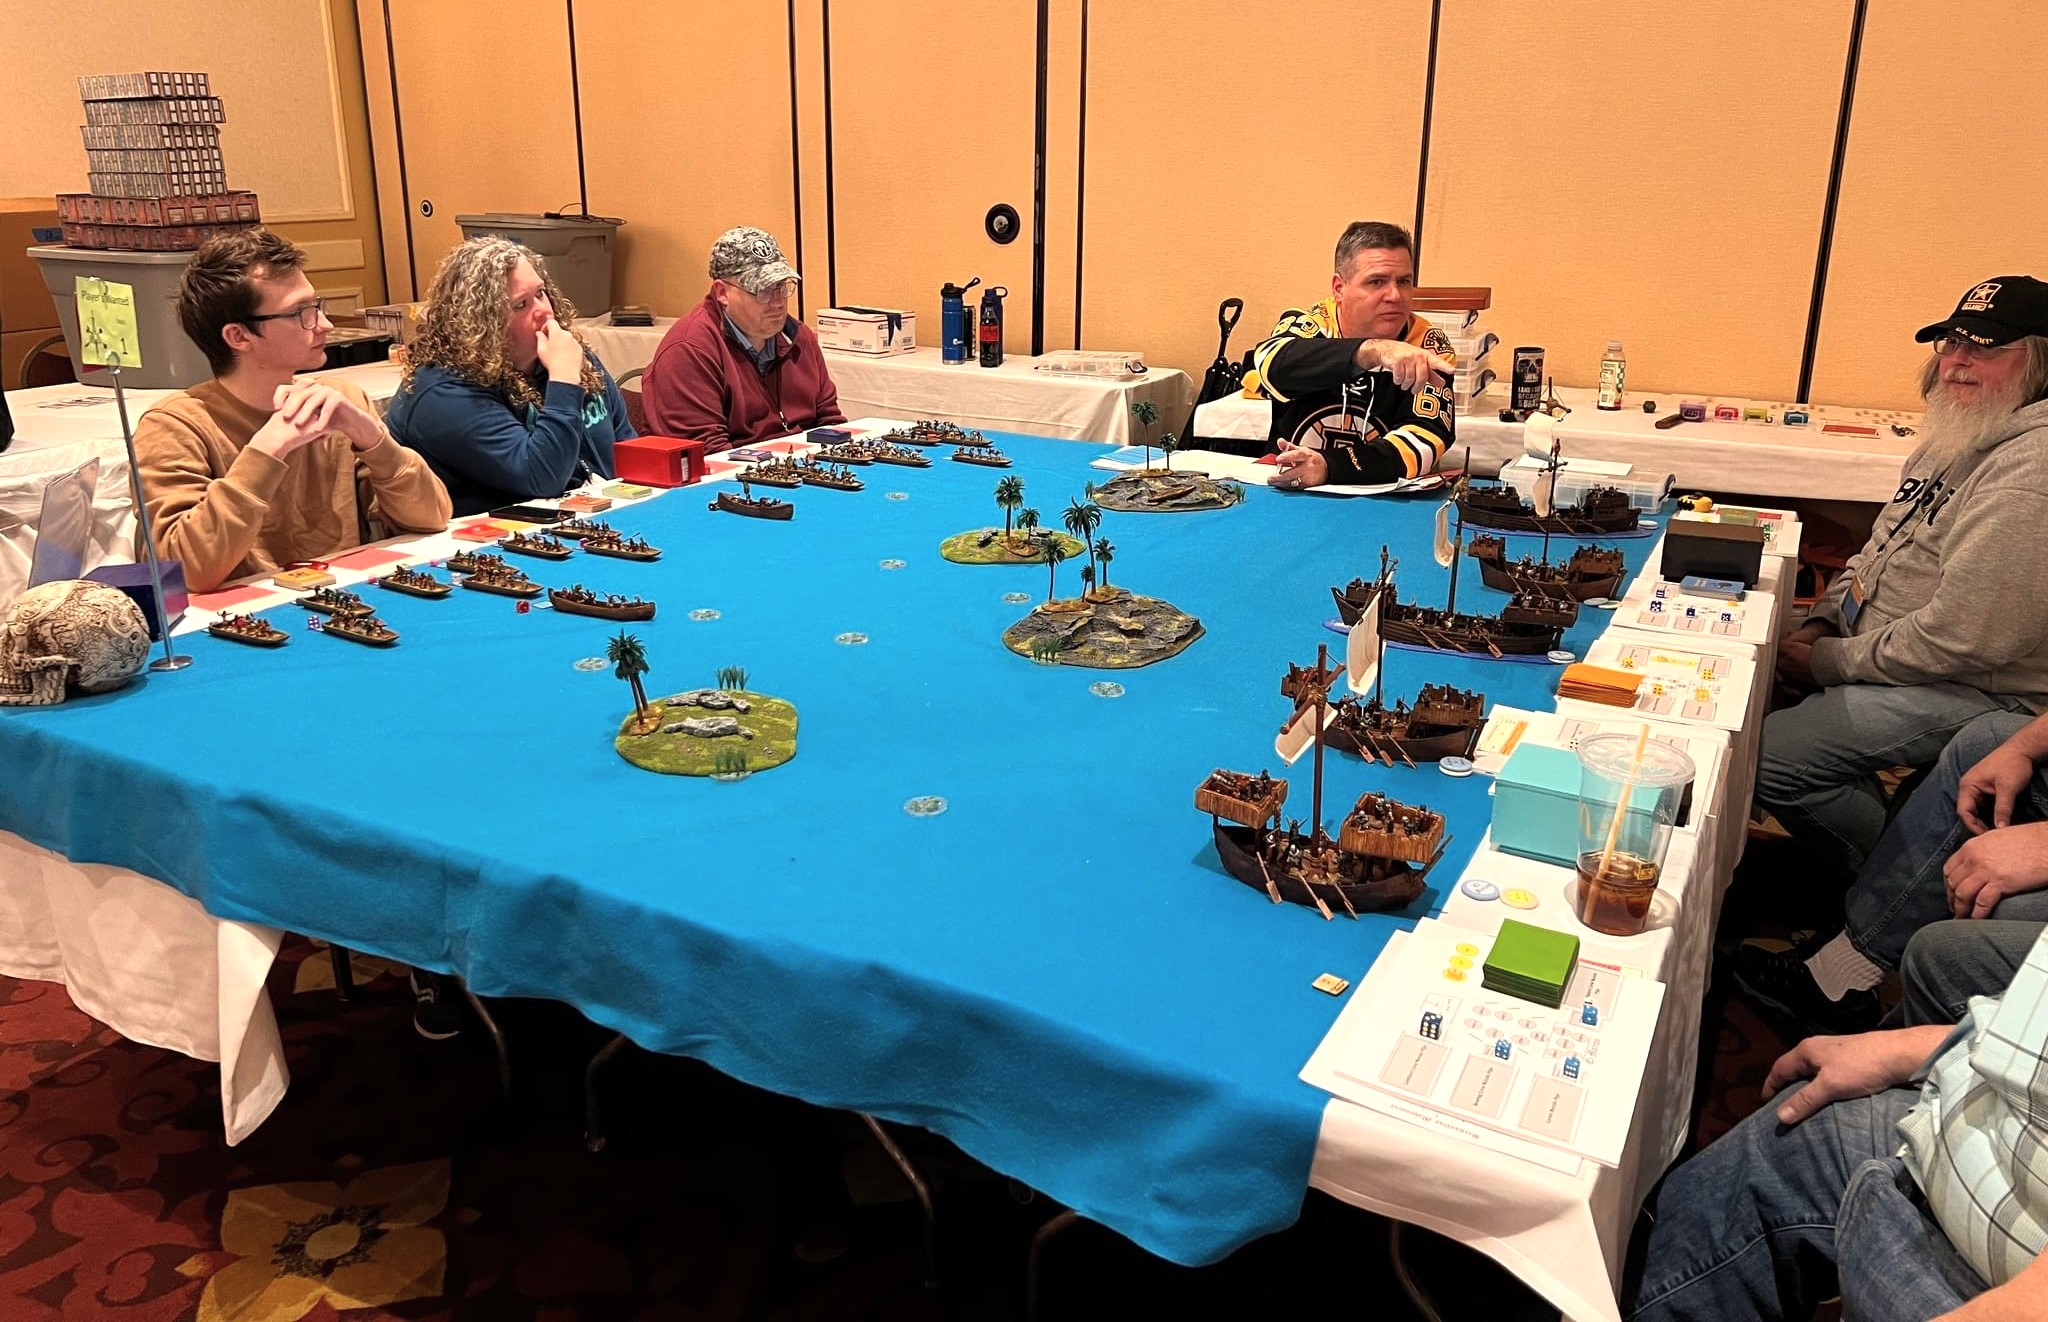
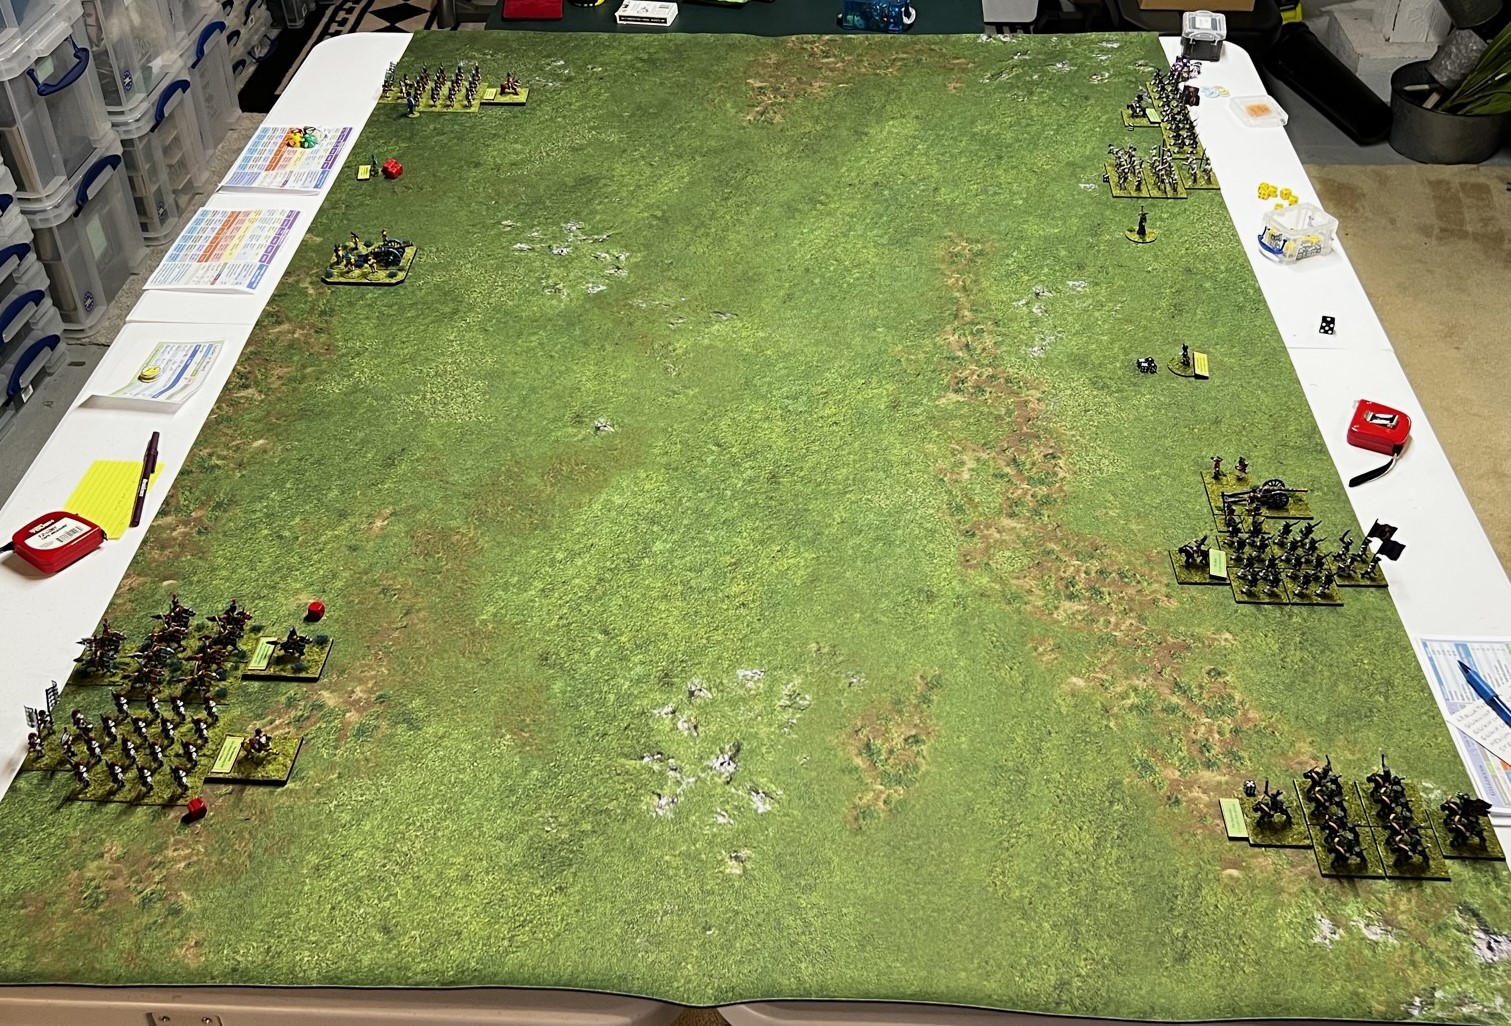
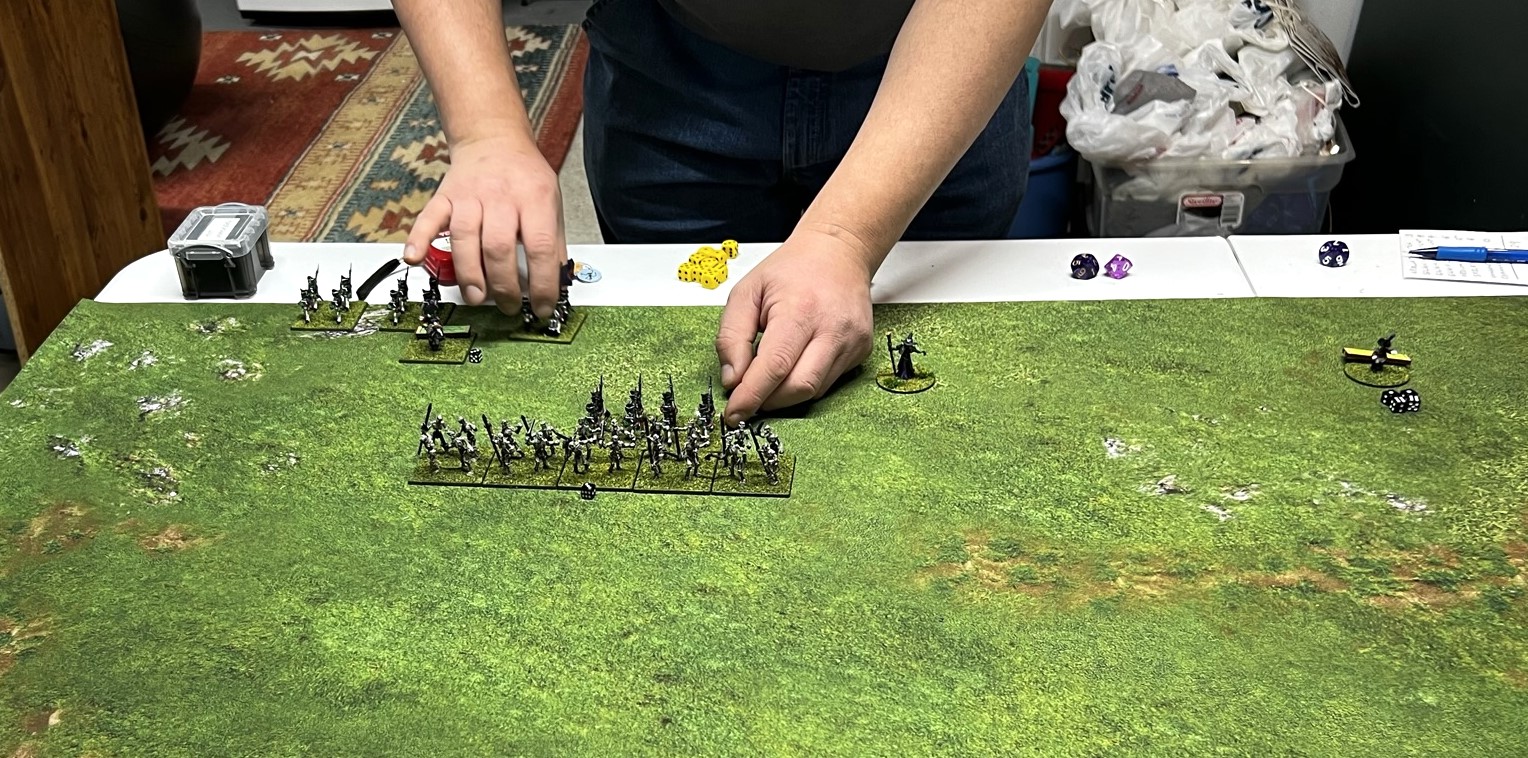
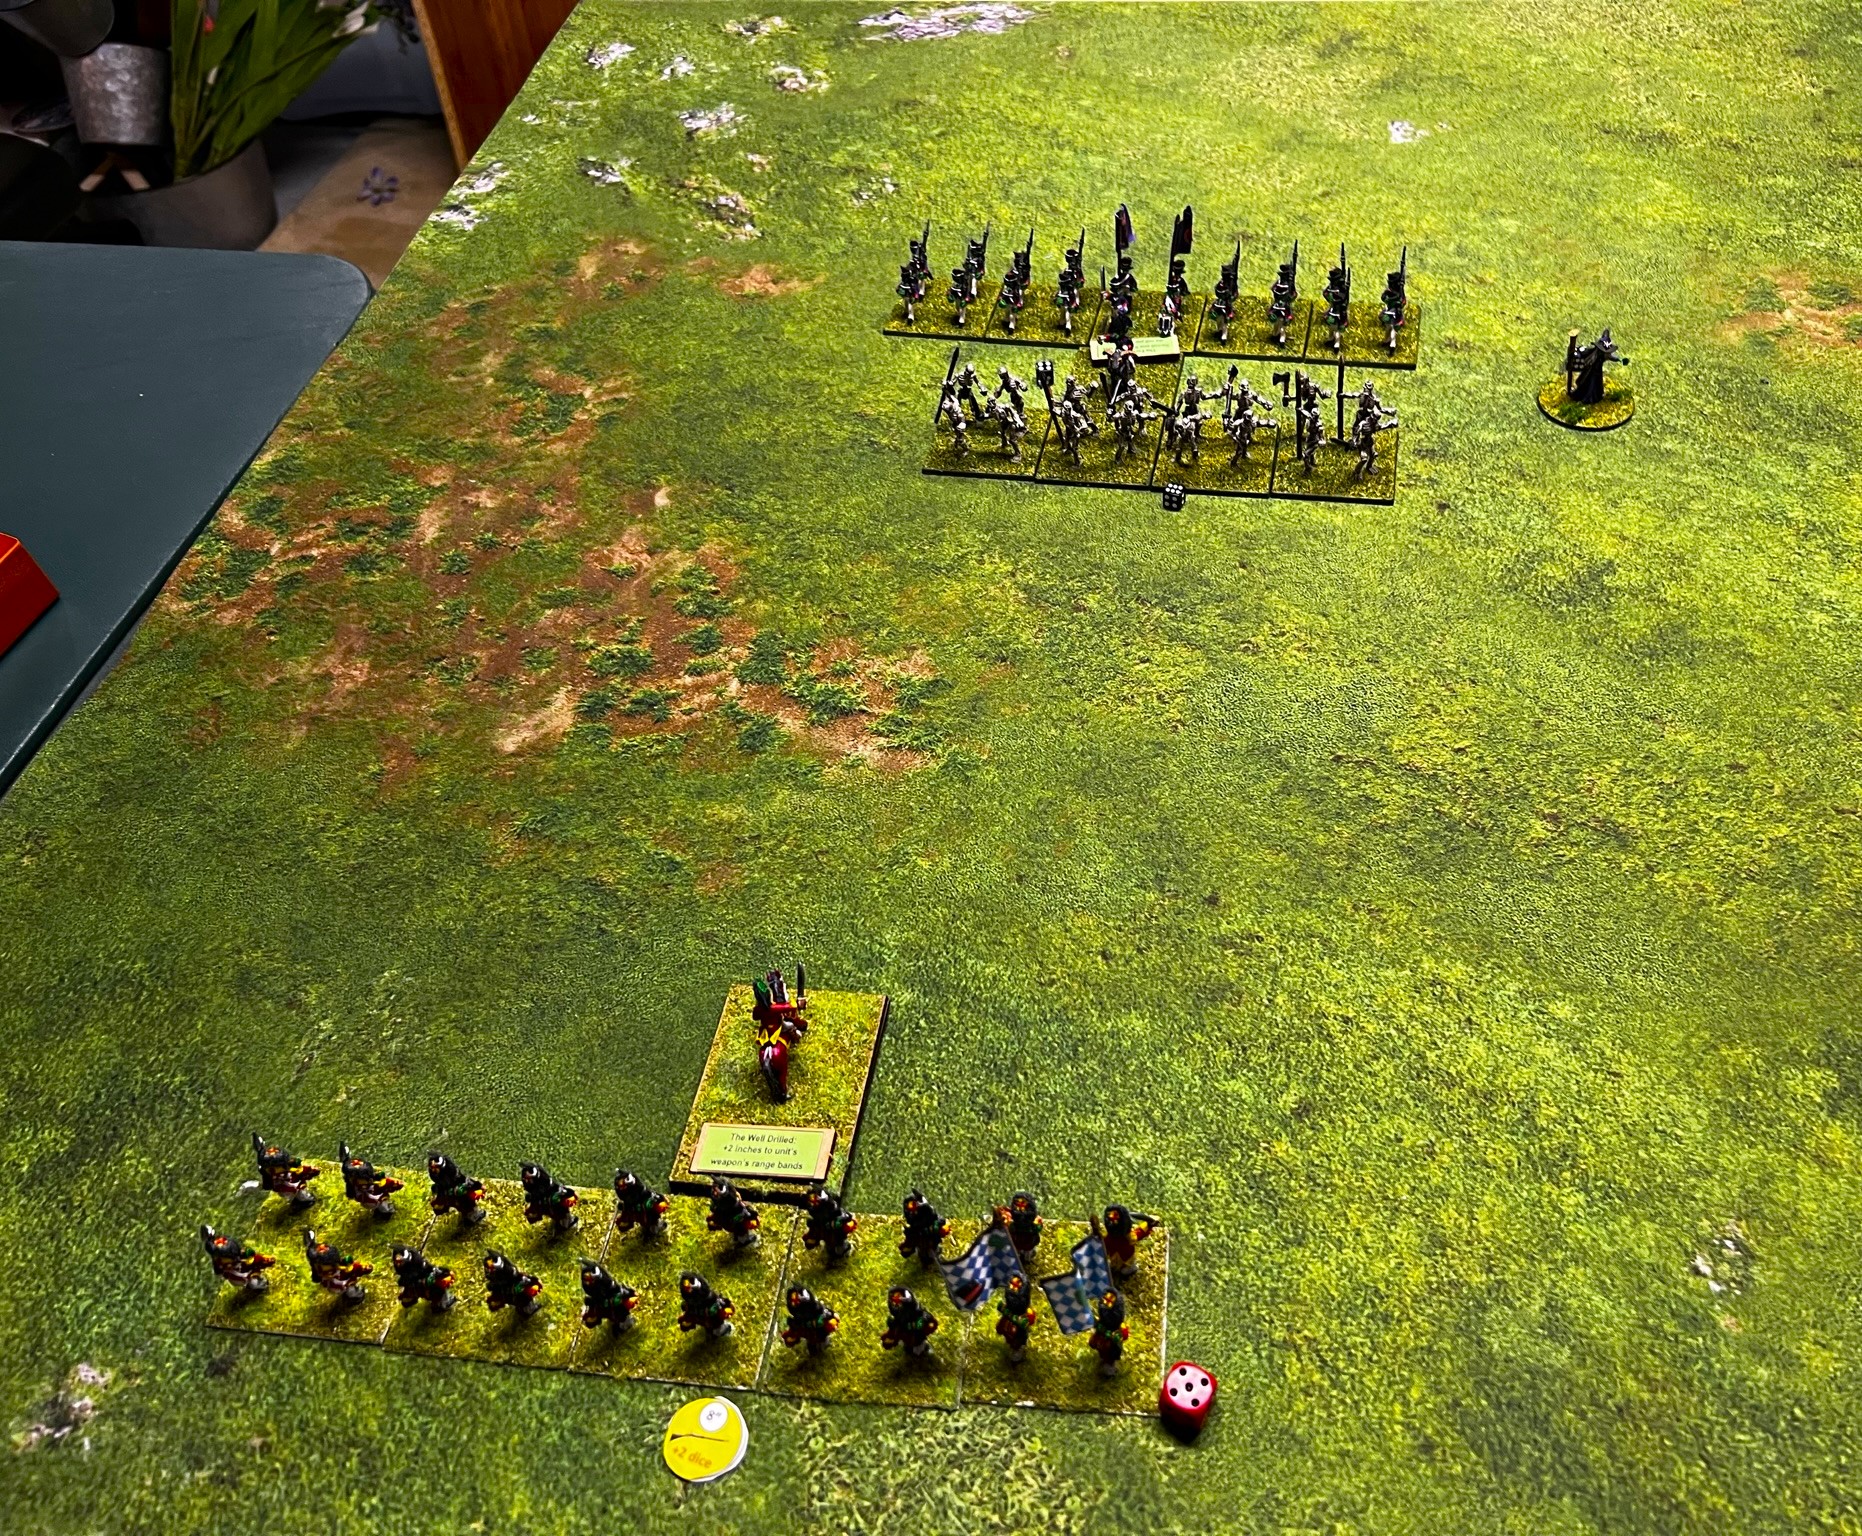
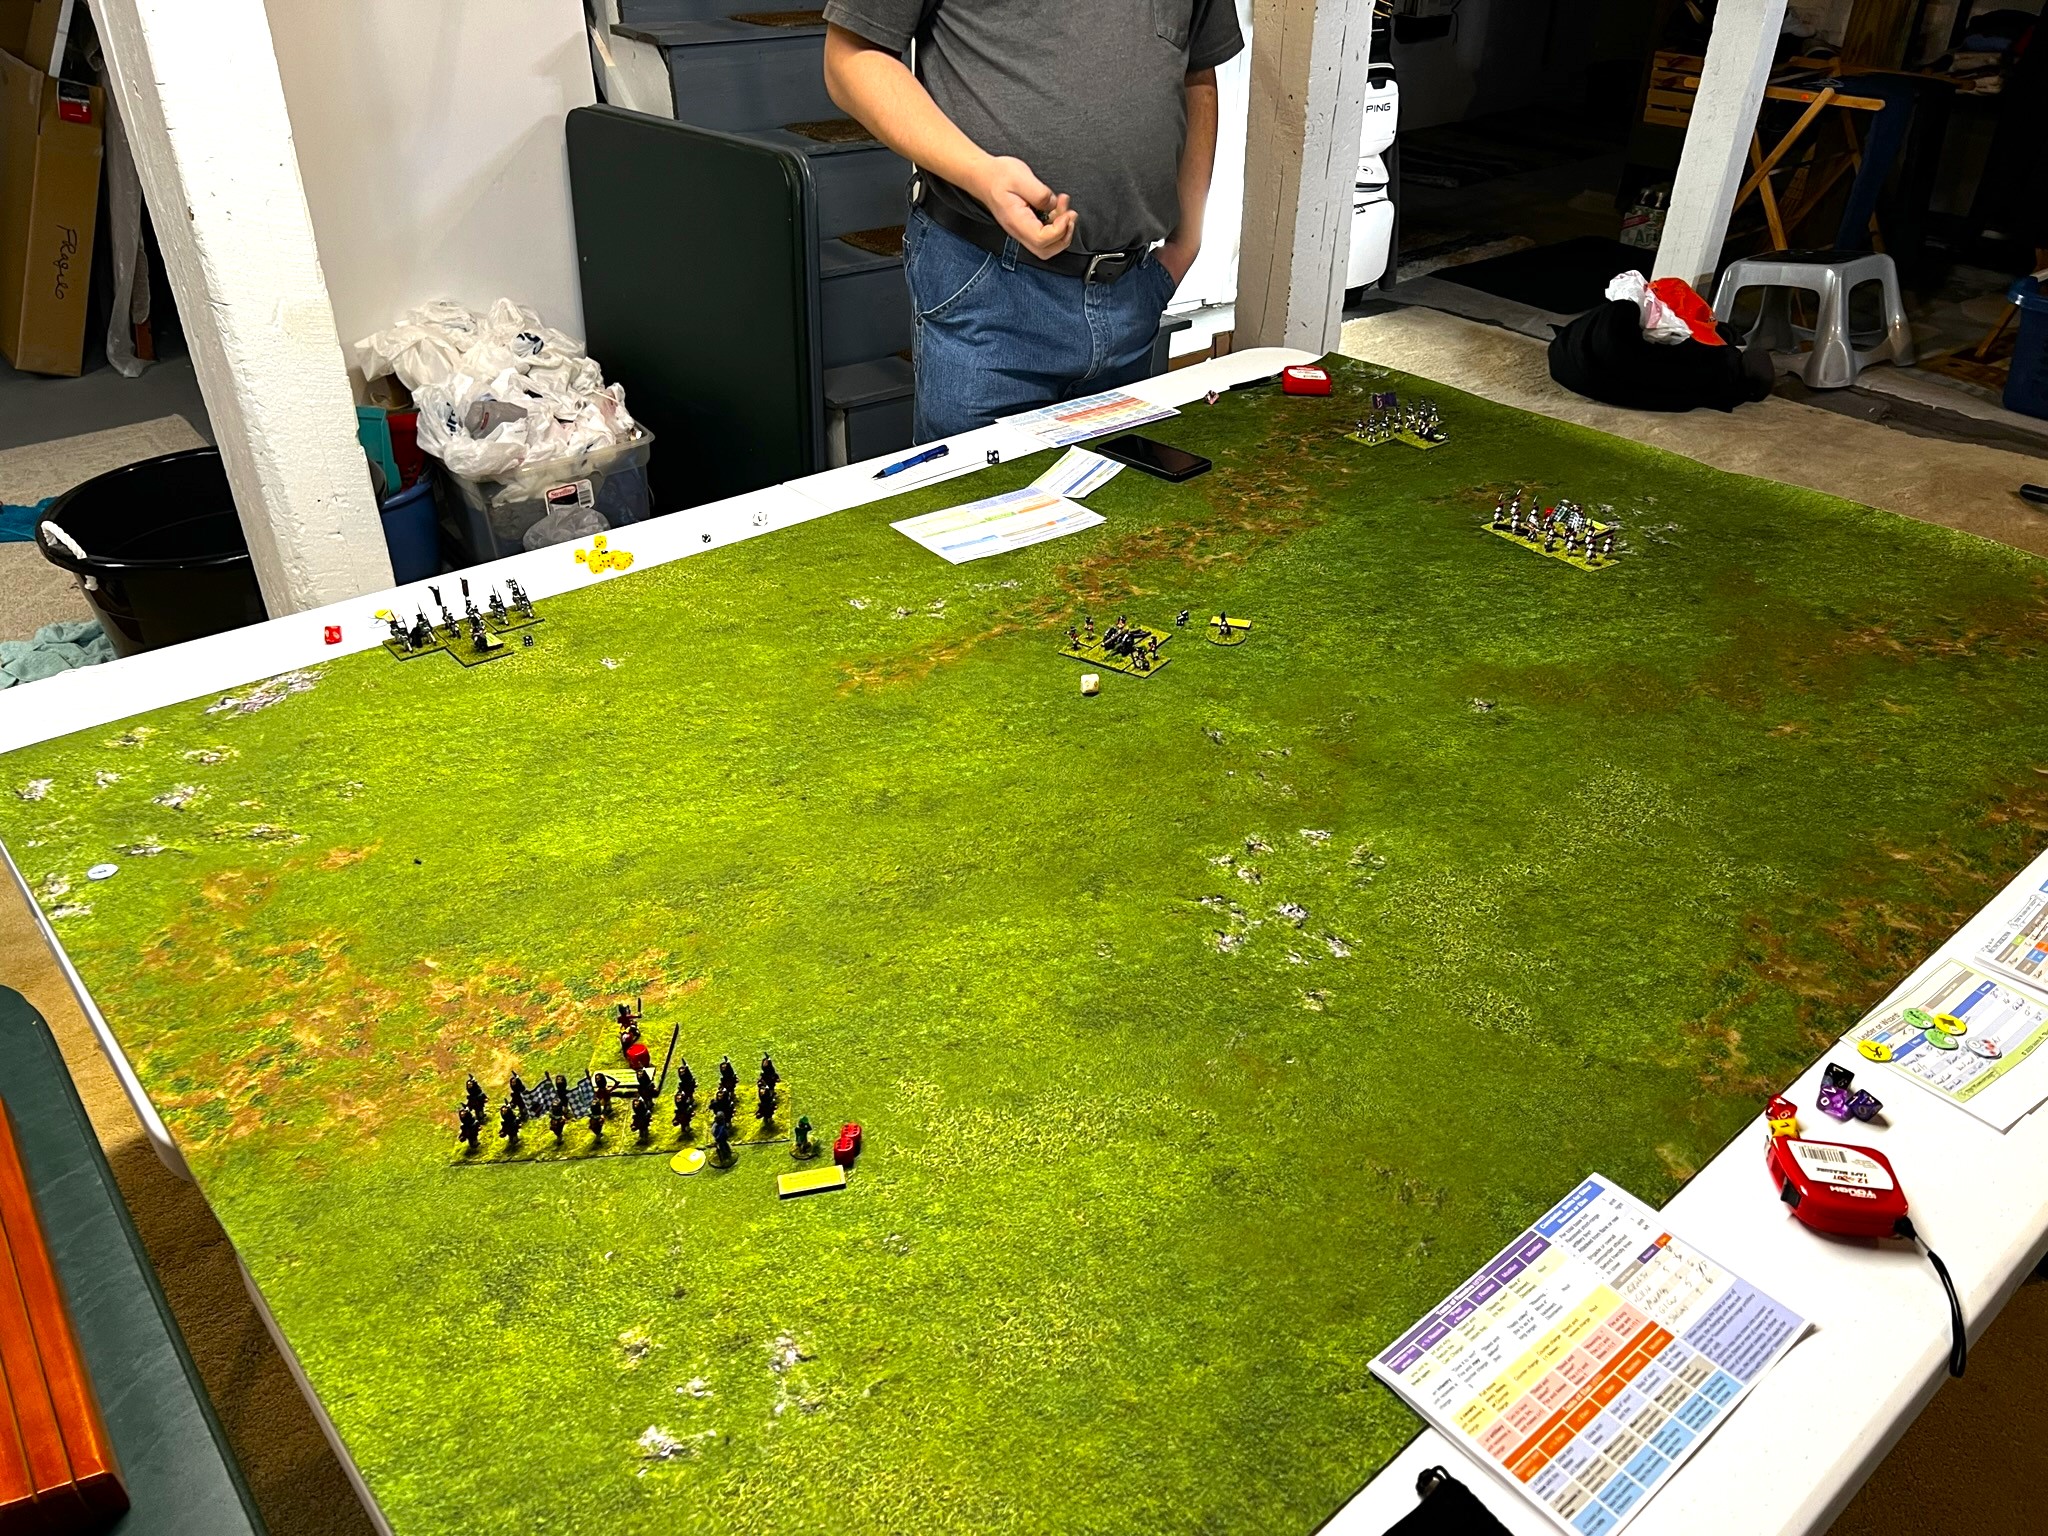
As you saw in my last battle report, there was a game of Wars of Ozz between the Munchkins and the Gillikins. Chris’ Gillikins won 21-15. I wanted a rematch, and Chris Comeau agreed to one. We agreed to again use the meeting engagement scenario with random deployment zones as before. This post will show how this game went this time, mostly with pictures and a bit of narrative. It had a lot of excitement to be sure! We ended up playing in my cellar as opposed to the nice garage – as my wife was not feeling well and I wanted to be nearby in case she needed me.
As a side note, yes, this is a late post, but my wife Lynn and I had a subsequent unwanted medical “adventure” the day after this game – which I will describe at the end.
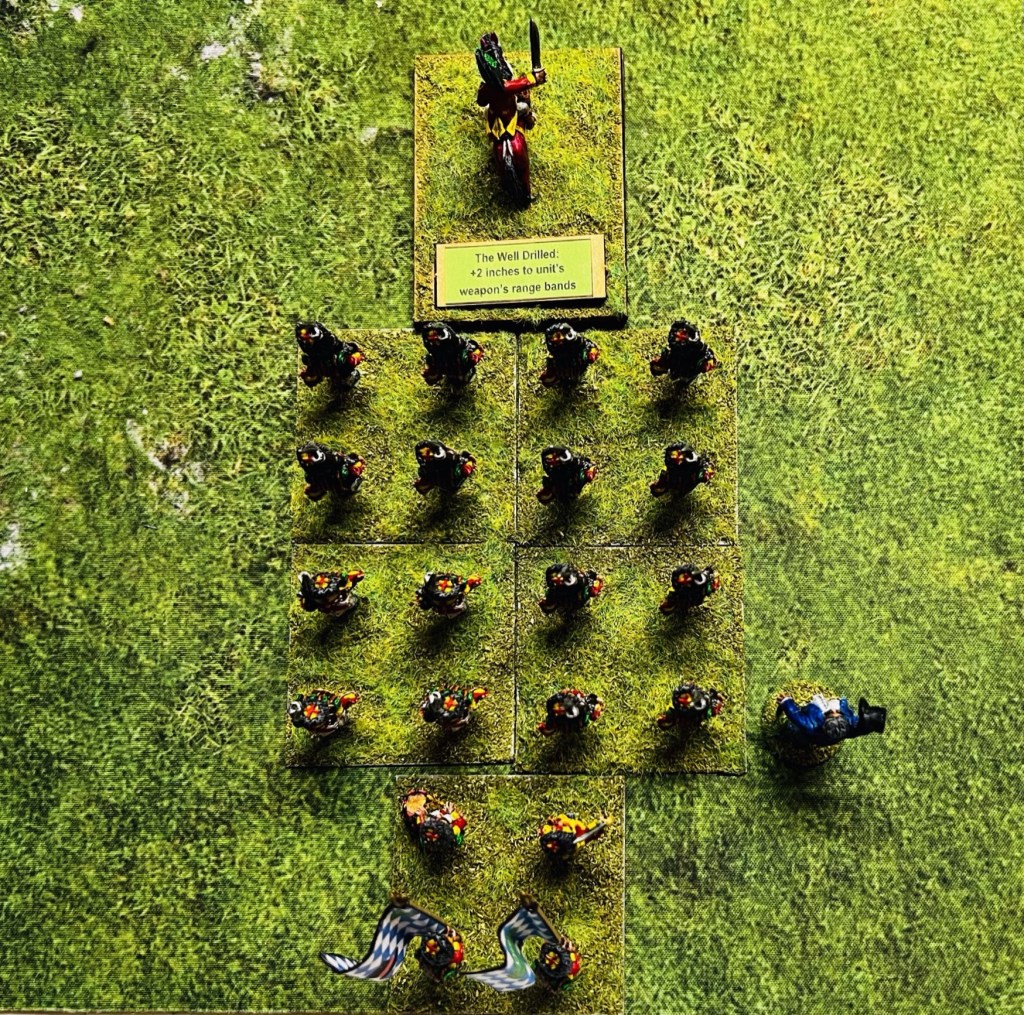
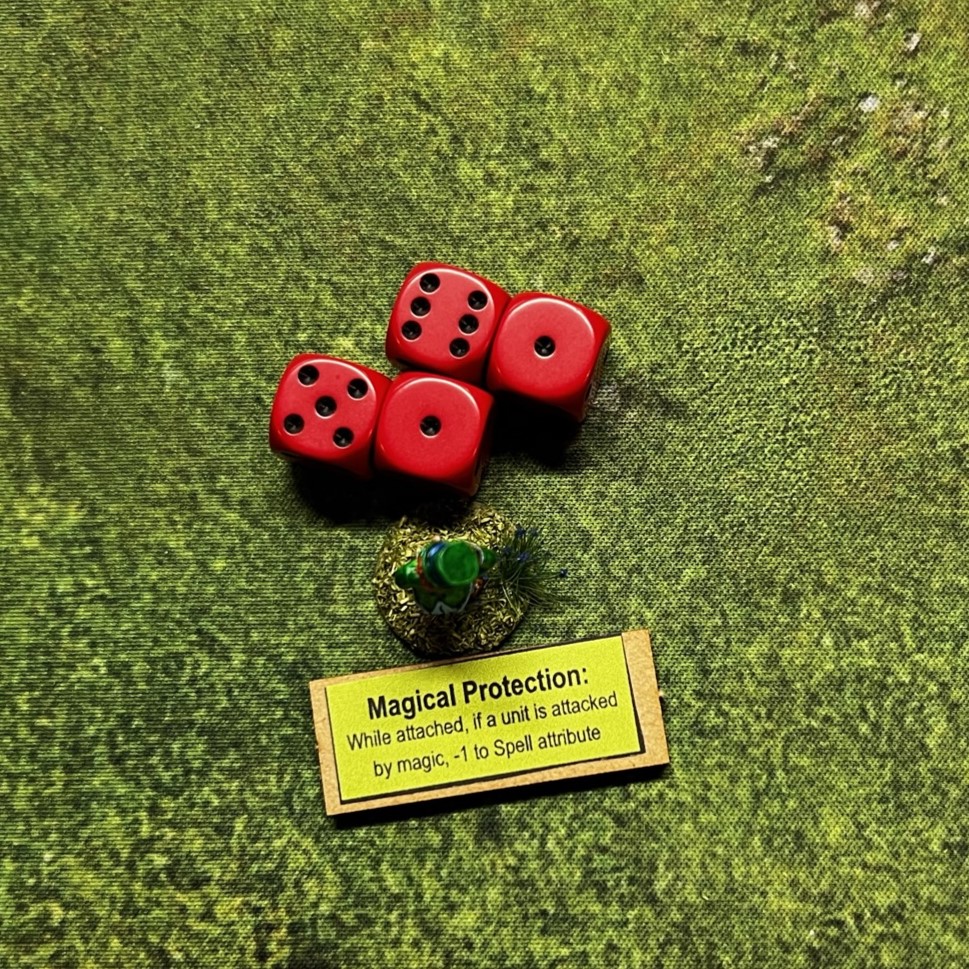
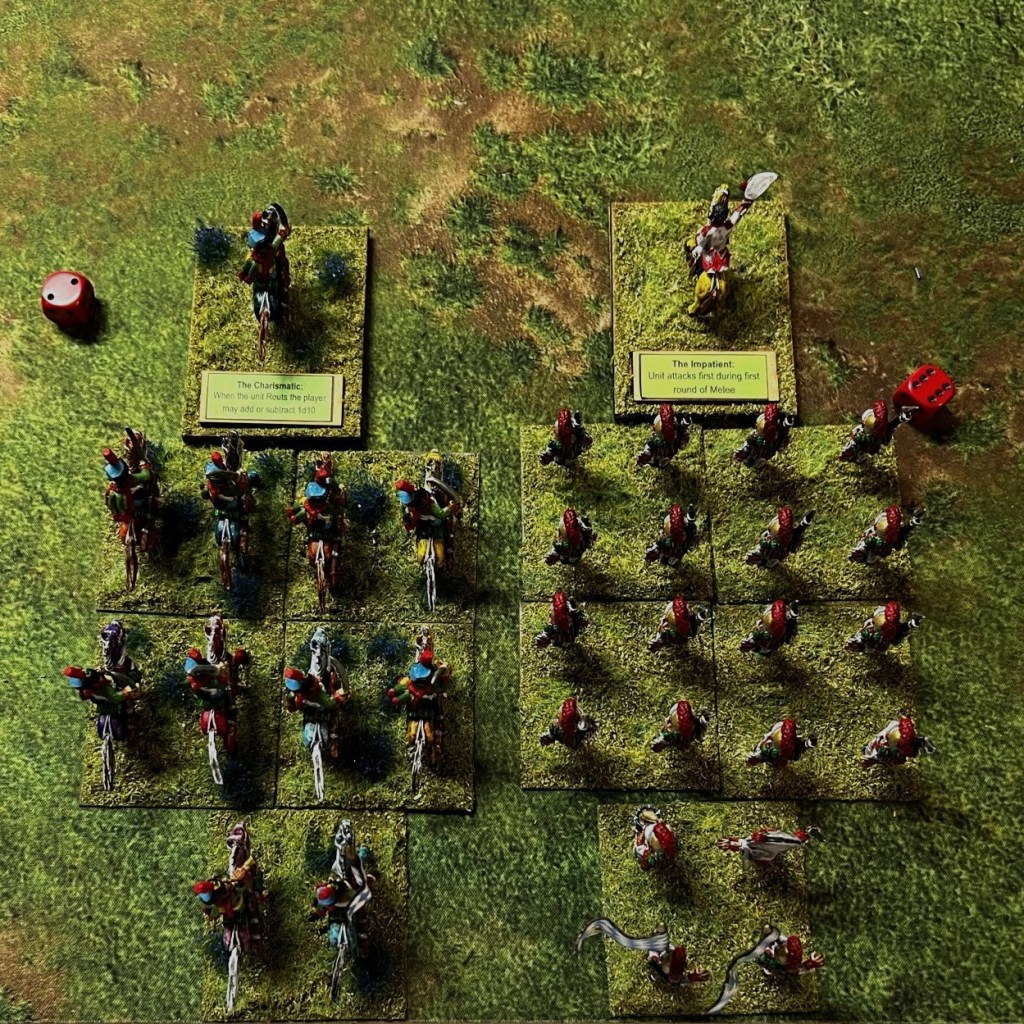
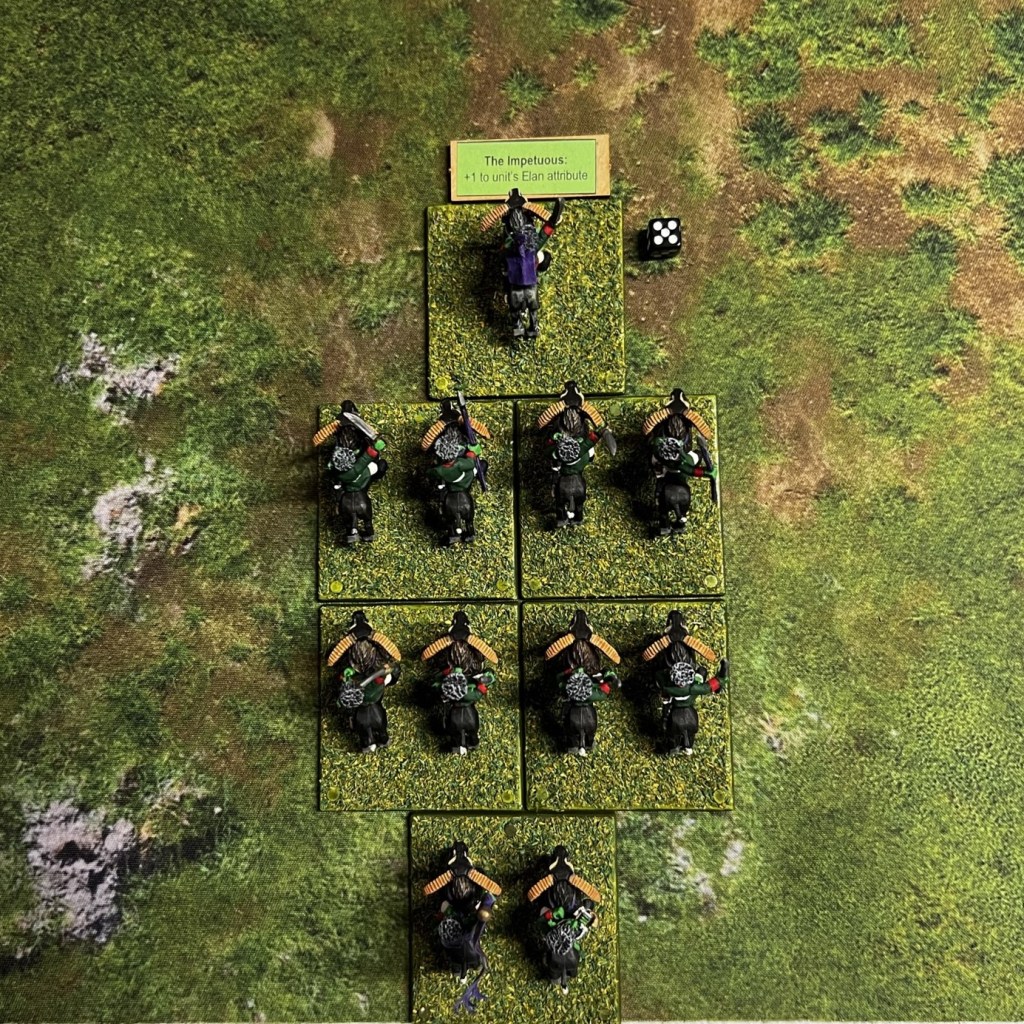
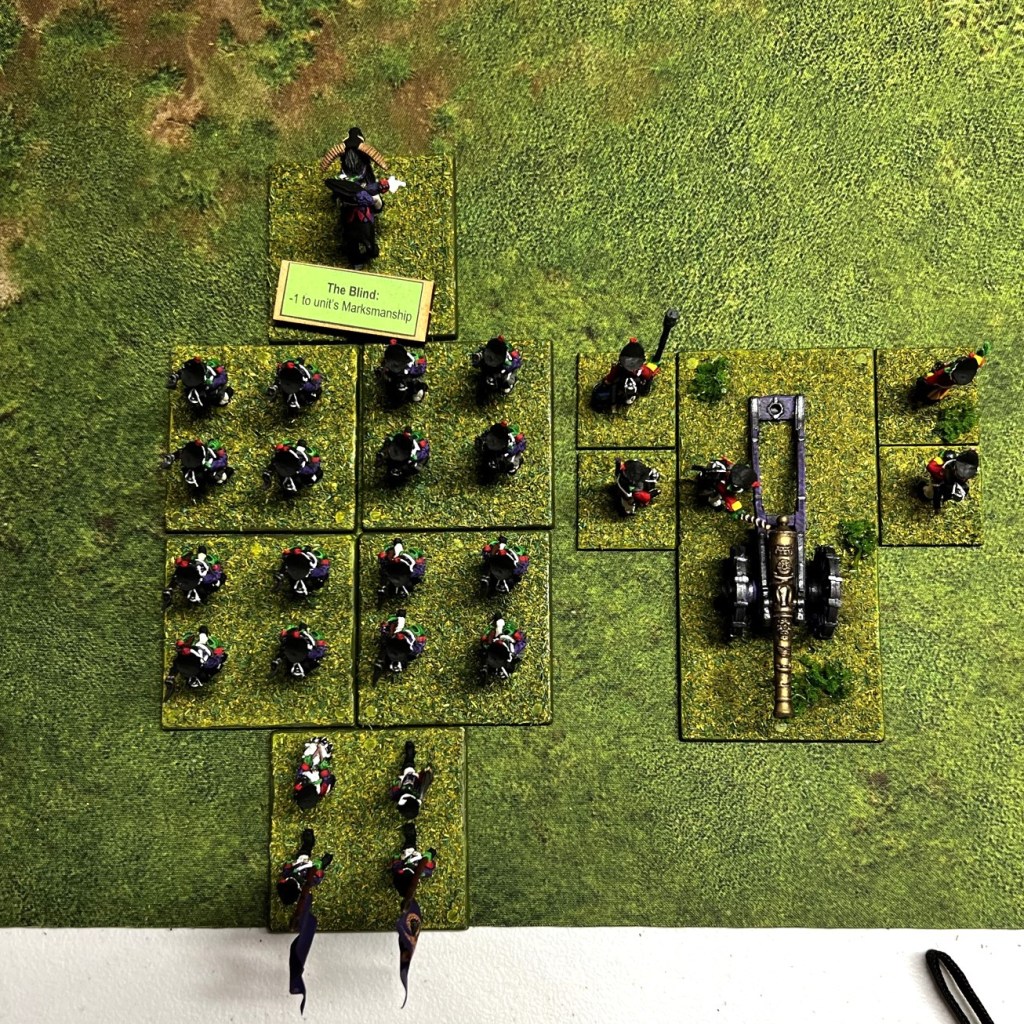
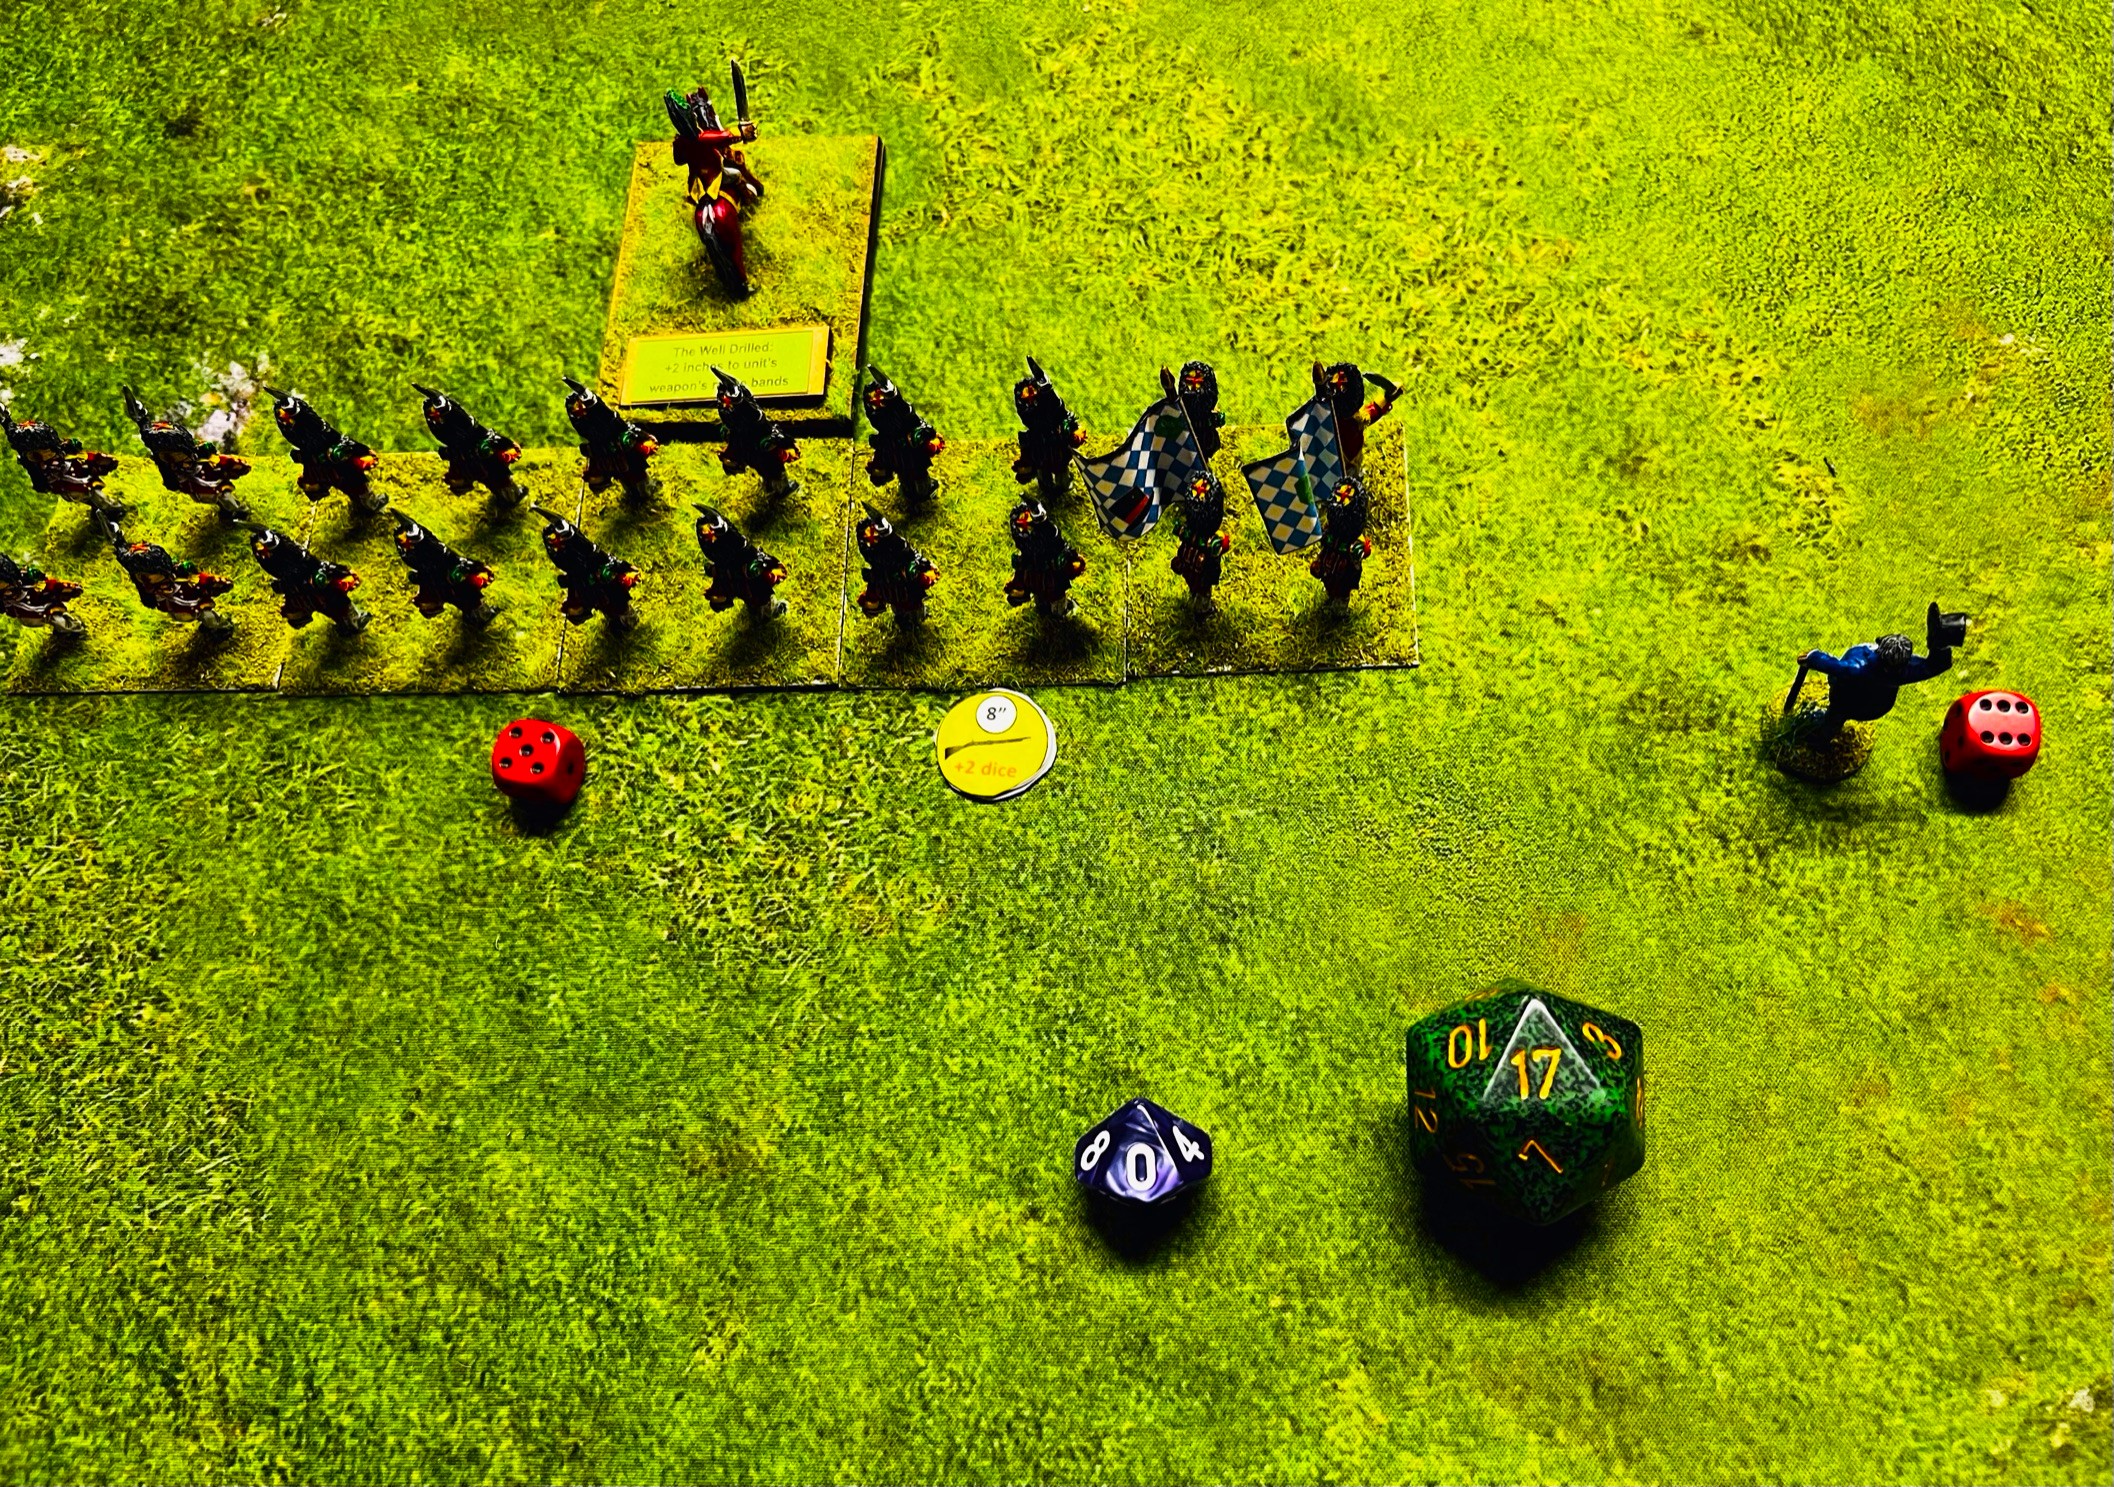
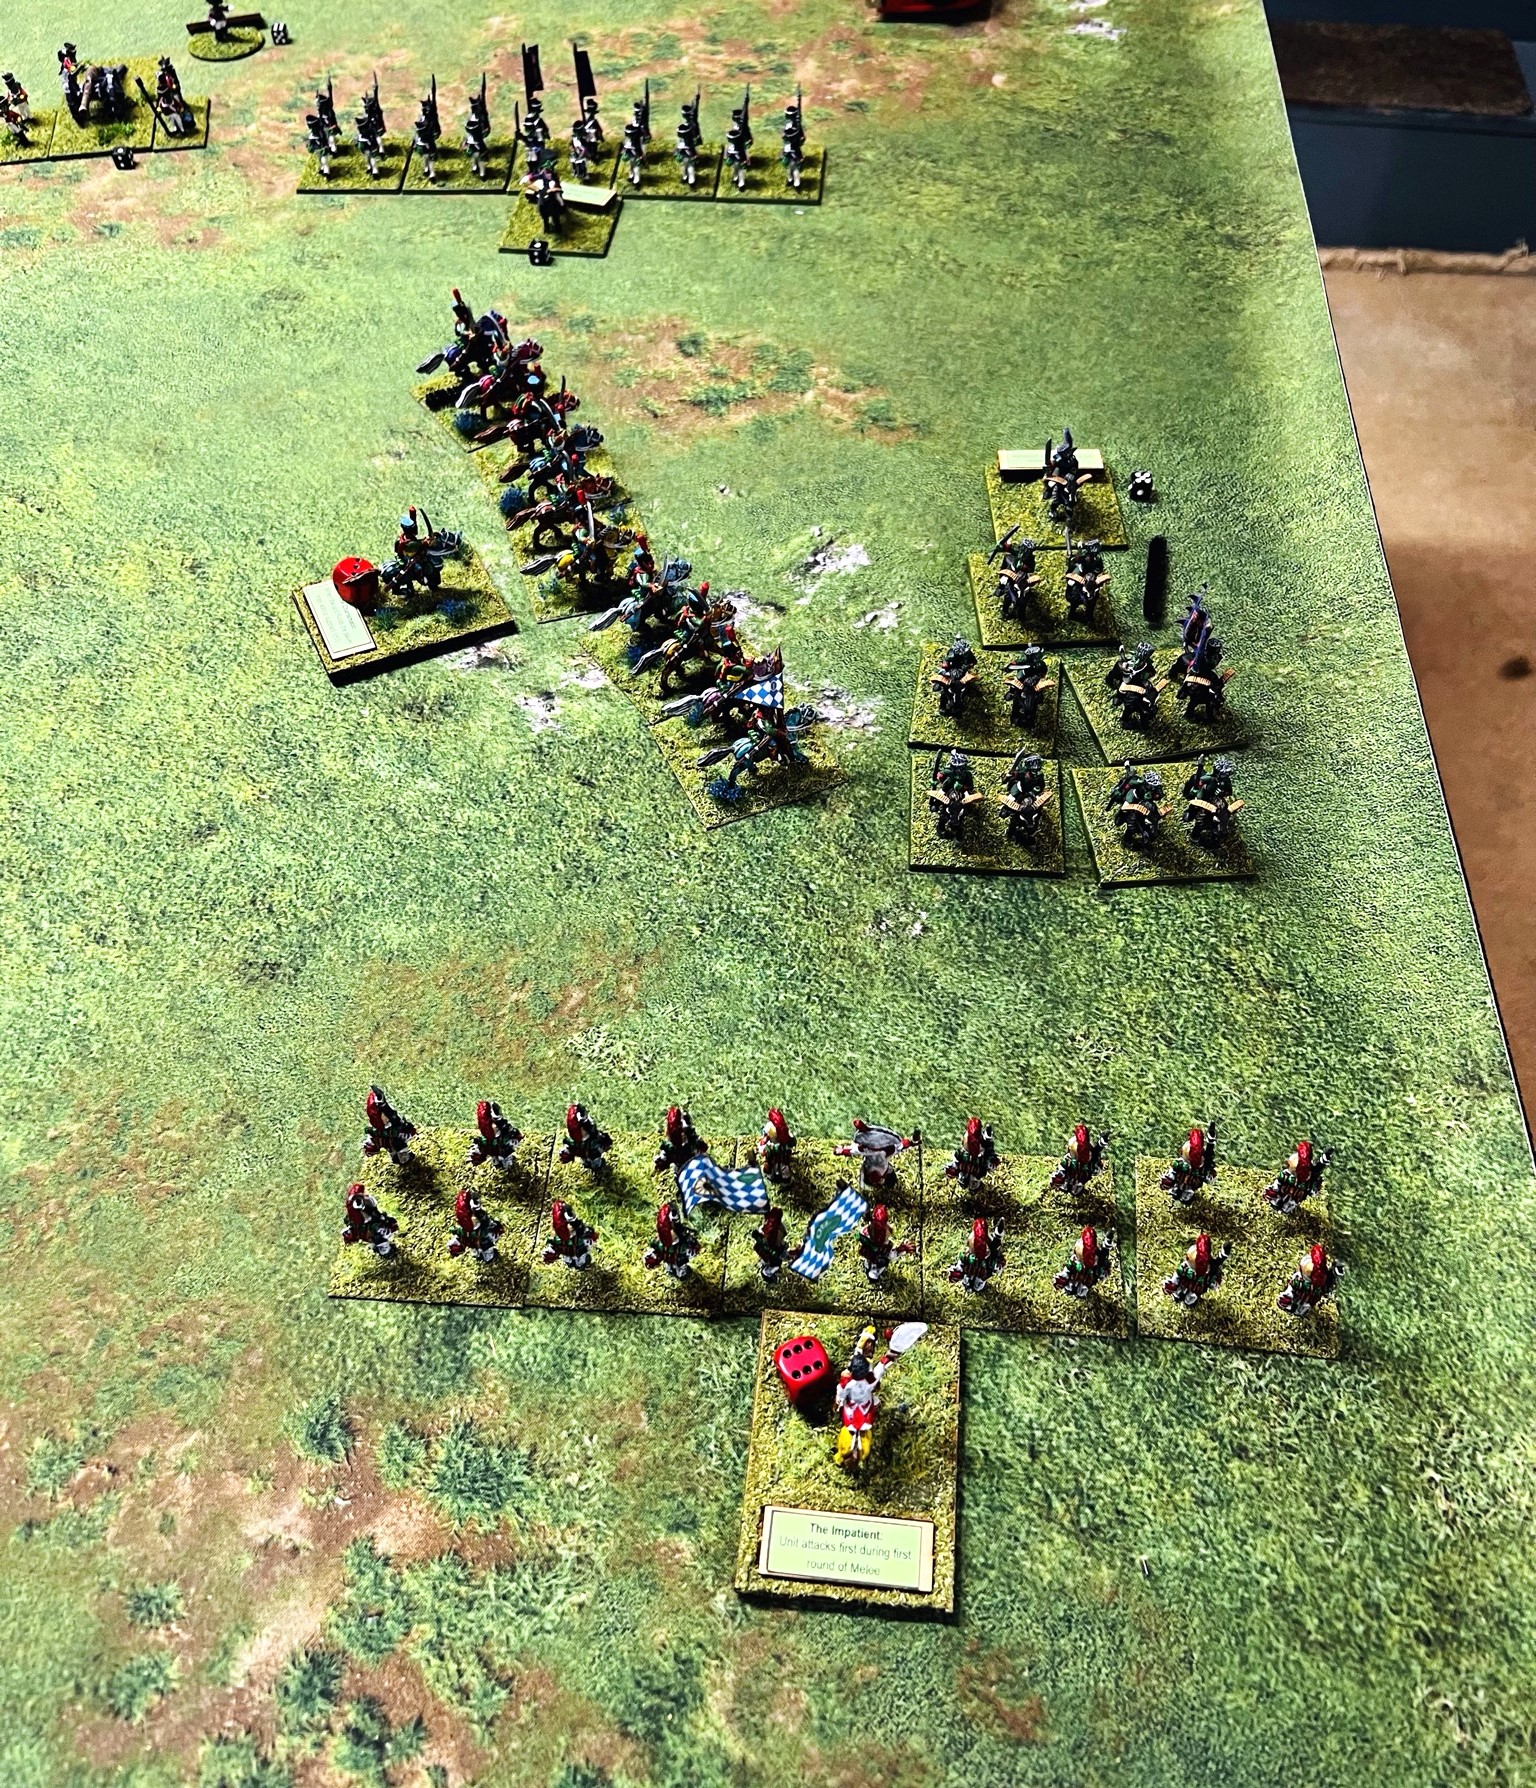
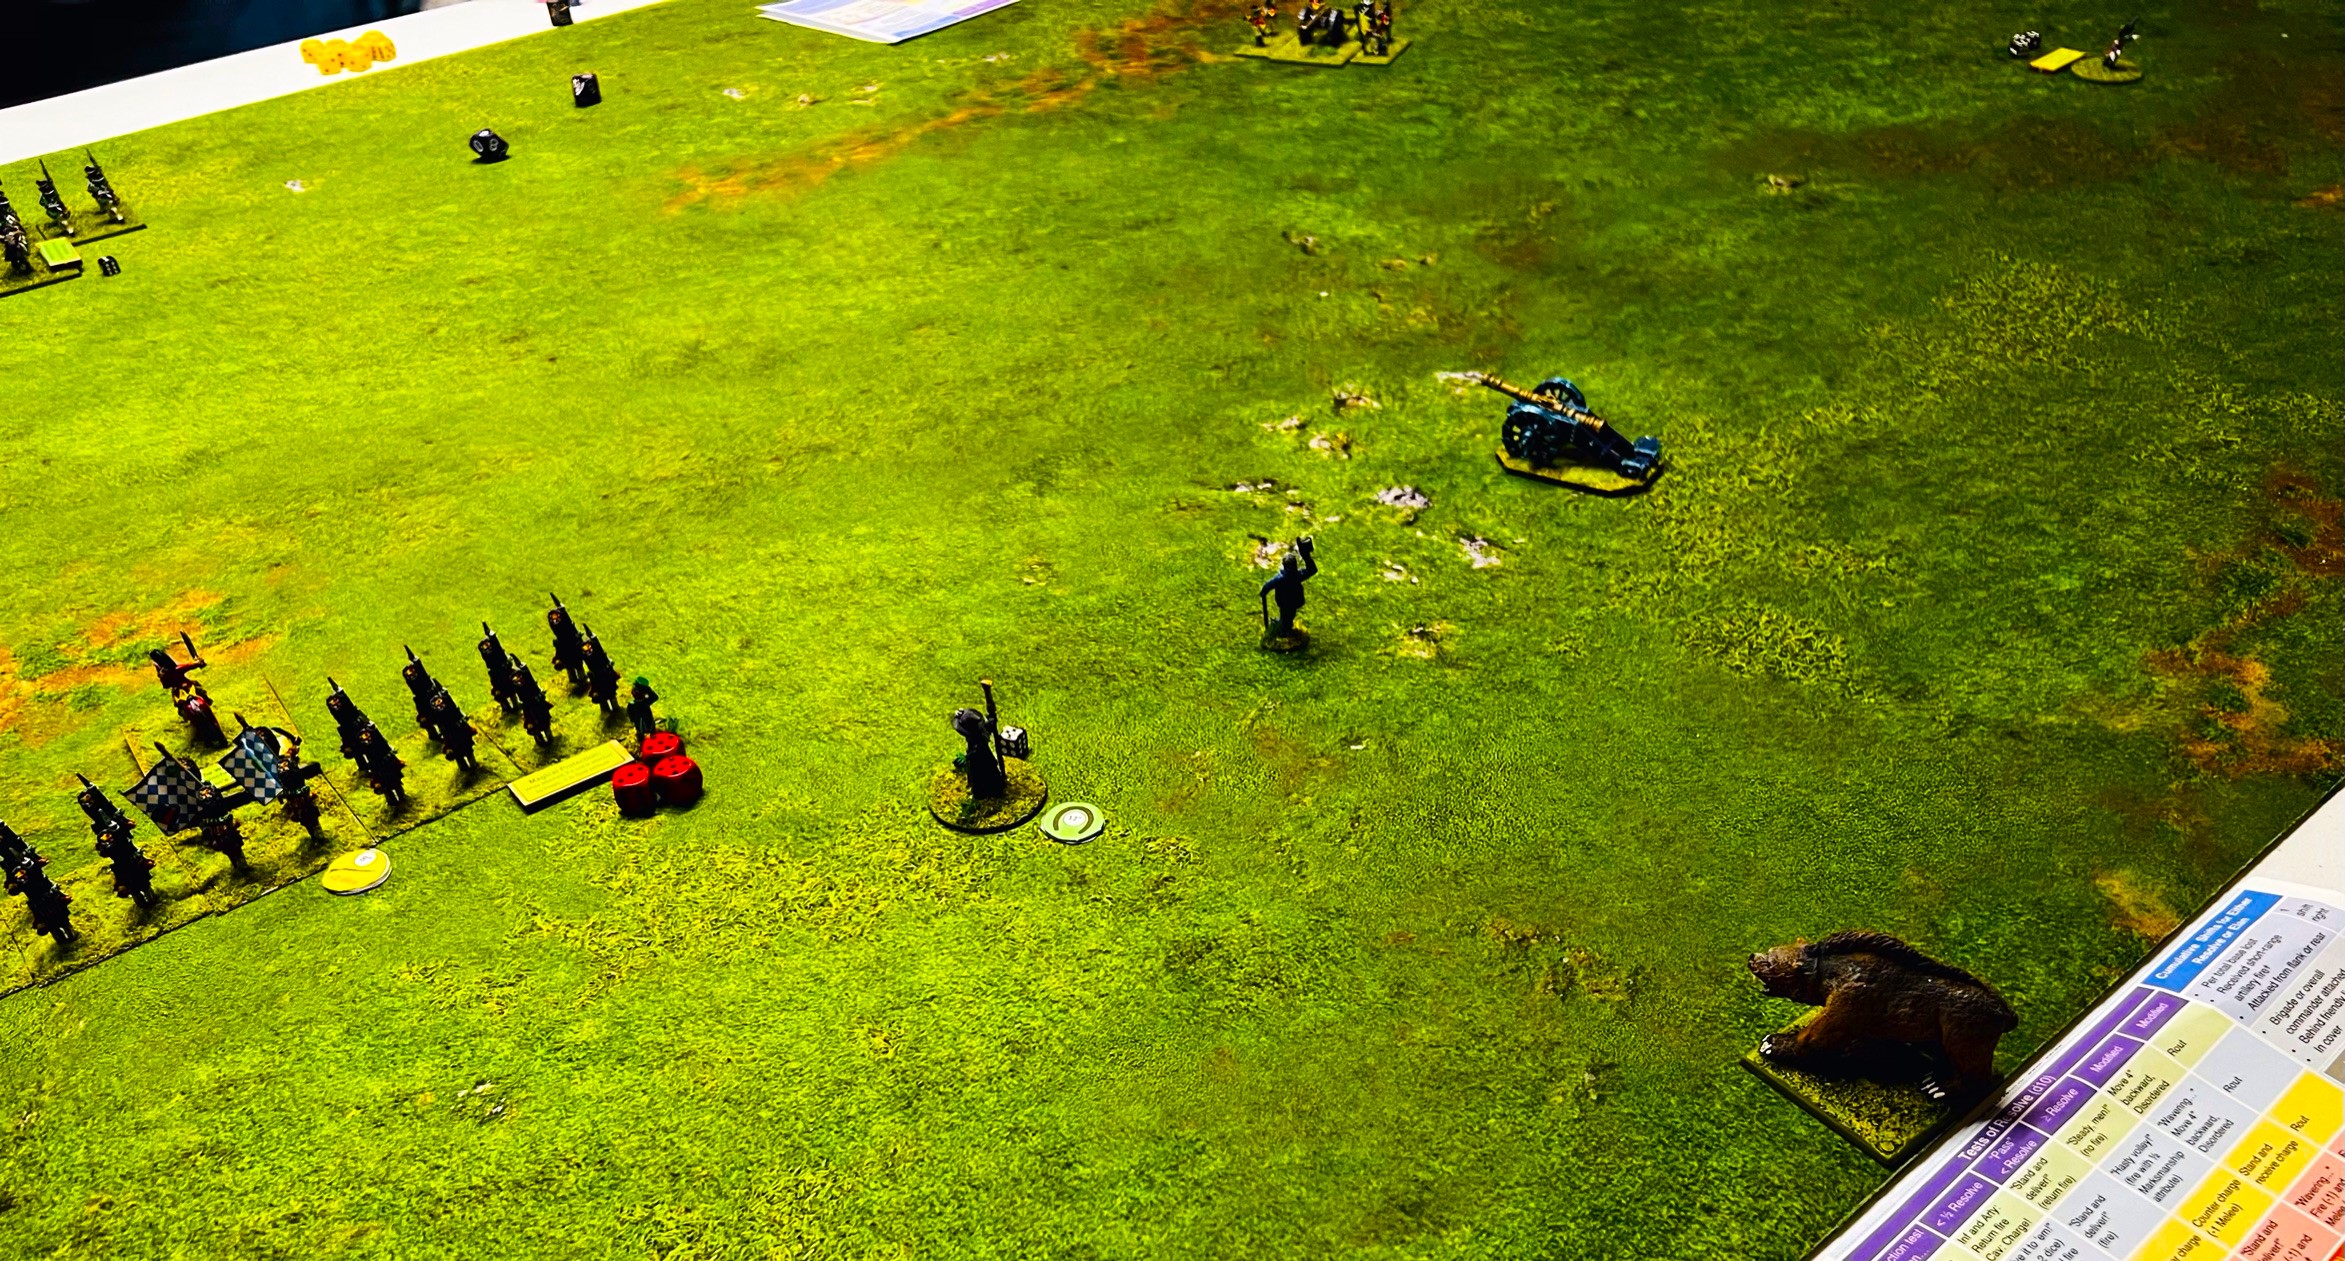
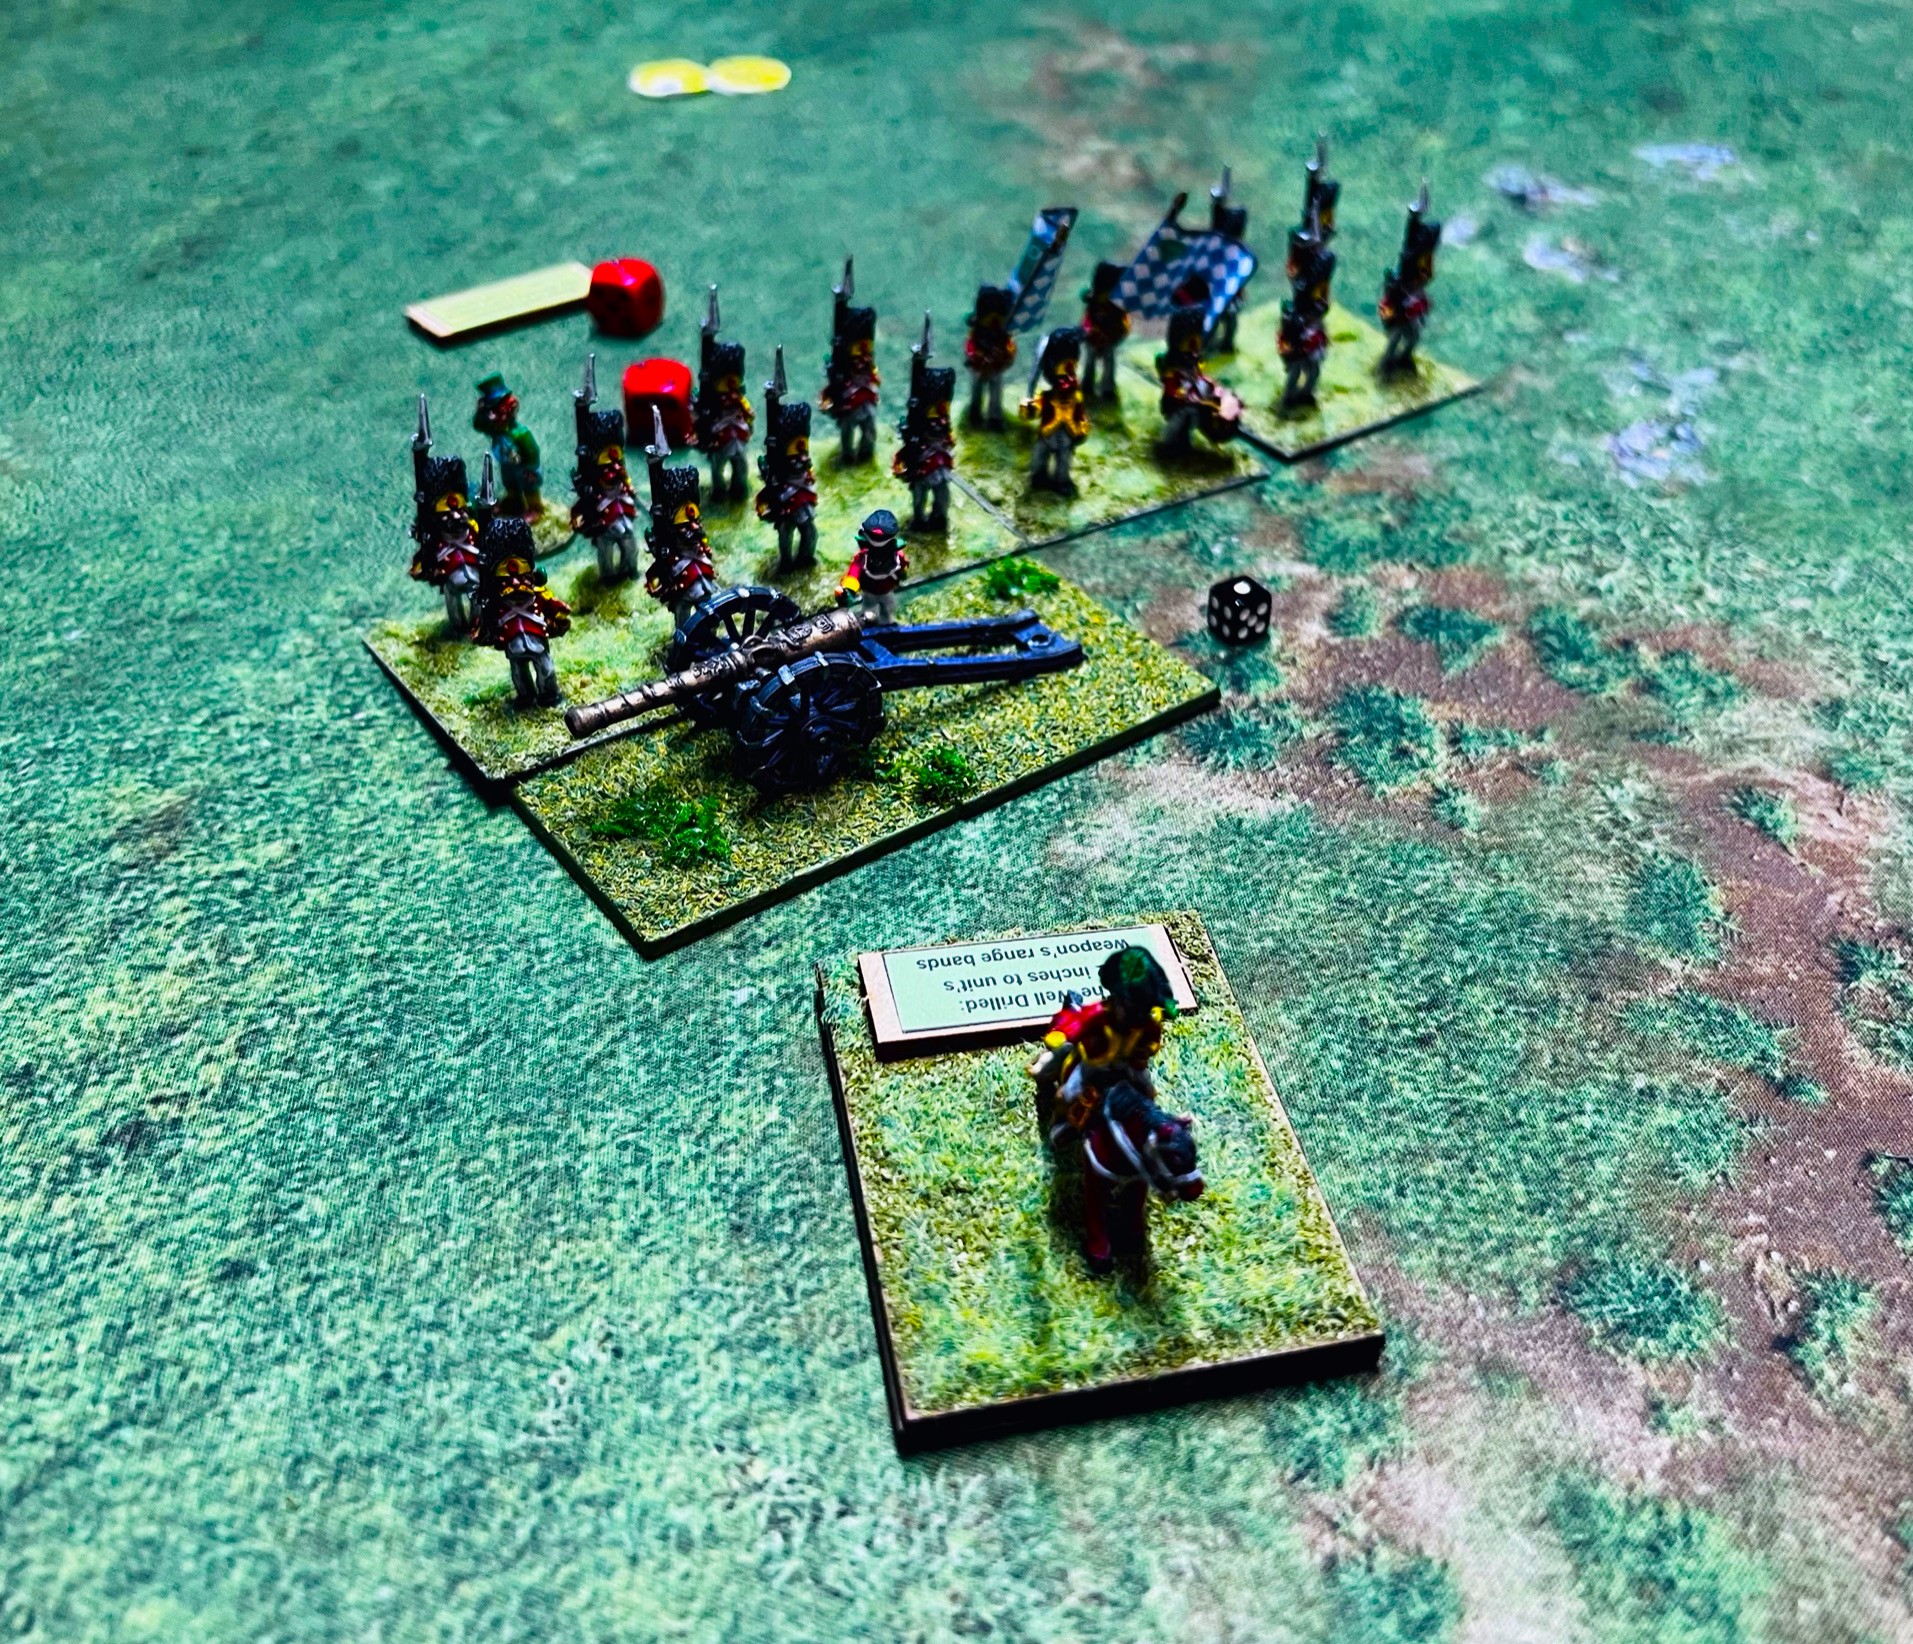
Back to the game – the forces were the same as last game. I did, however, end up drawing excellent characteristics for my two infantry regiments. The Zoraster’s Guard Infantry Regiment (ZGIR) was already the best musketry unit on the table – and I the “Well-Drilled” attribute which gained me an additional 2″ of range to both my long and short firing ranges. For Colonel Tik-Tok’s regiment – I got the “Impatient” characteristic which gave me first hit capability in melee. My Munchkin cavalry got the “Charismatic” attribute which only affects routing distance. My brigade commander drew the “Magical Protection” attribute which helps when your enemy has a witch nearby. My opponent was slightly less fortunate – as one of his two regiments drew the “Blind” attribute which hurt his marksmanship. His other infantry regiment drew a good attribute, “The Fortunate”, which allowed a reroll of a bad result during the game. His goat riders got “The Impetuous” attribute which improved their elan. I don’t remember his brigade commander’s attribute, but it was moderately positive. By the way, artillery batteries, allied units (like skeletons), and witches and wizards don’t get these bonuses.
Zoraster’s Guard Infantry and Zoraster the WizardMunchkin Brigade CommanderMunchkin Medium BatteryMunchkin Light Cavalry and Colonel Tik-Tok’s Infantry RegimentGillikin Goat rider cavalryGillikin Infantry and Medium BatterySkeleton Regiment and Gillikin Infantry Regiment. Arella the Witch is close by.
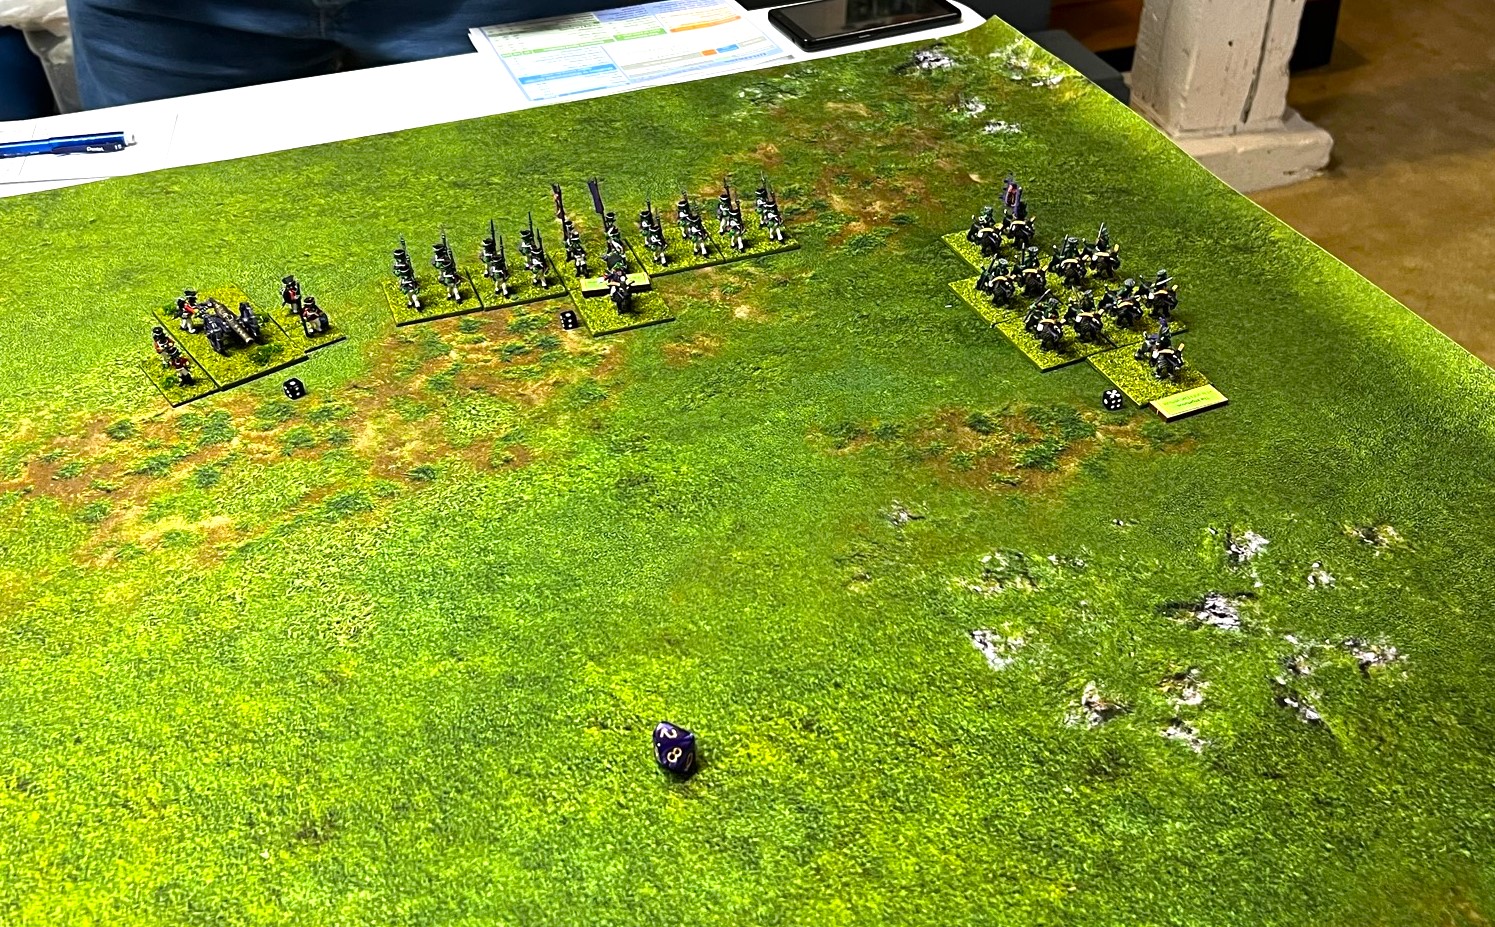
The deployments were as shown below. The Munchkins are on the left and the Gillikins are on the right. I had my two Munchkin infantry regiments at opposite ends of the tabletop – one near my wizard and my medium battery – and one next to my cavalry. My opponent had a skeleton regiment screening one of his Gillikin infantry regiments on one end and his goat riders, medium battery, and the other infantry regiment on the other end.
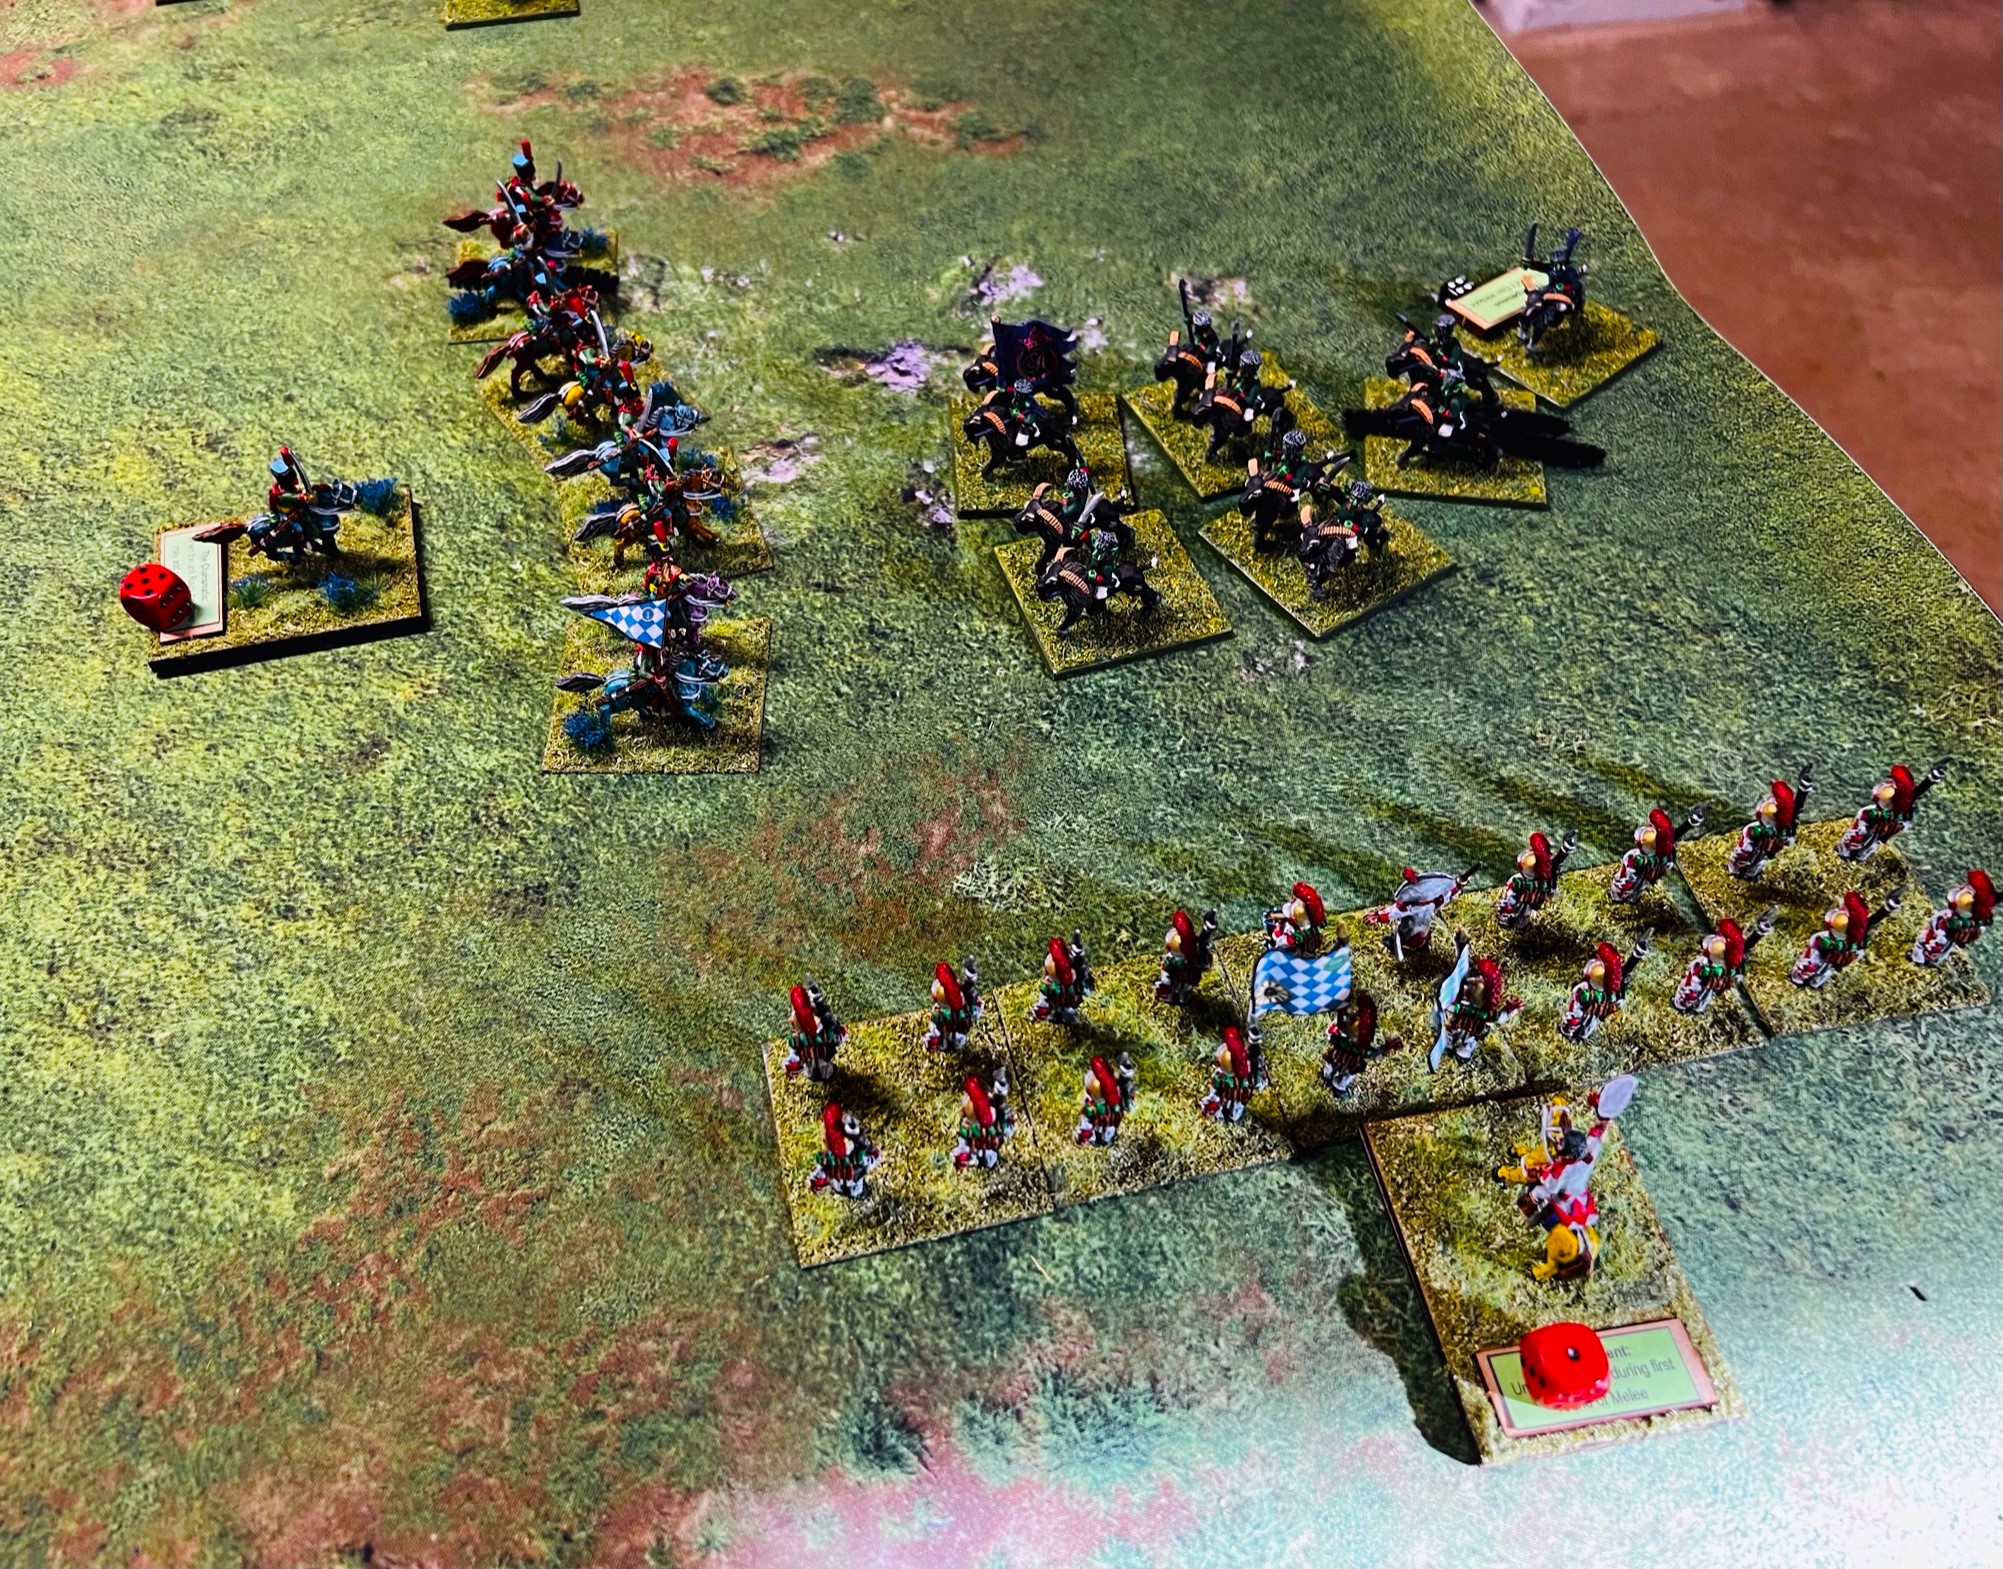
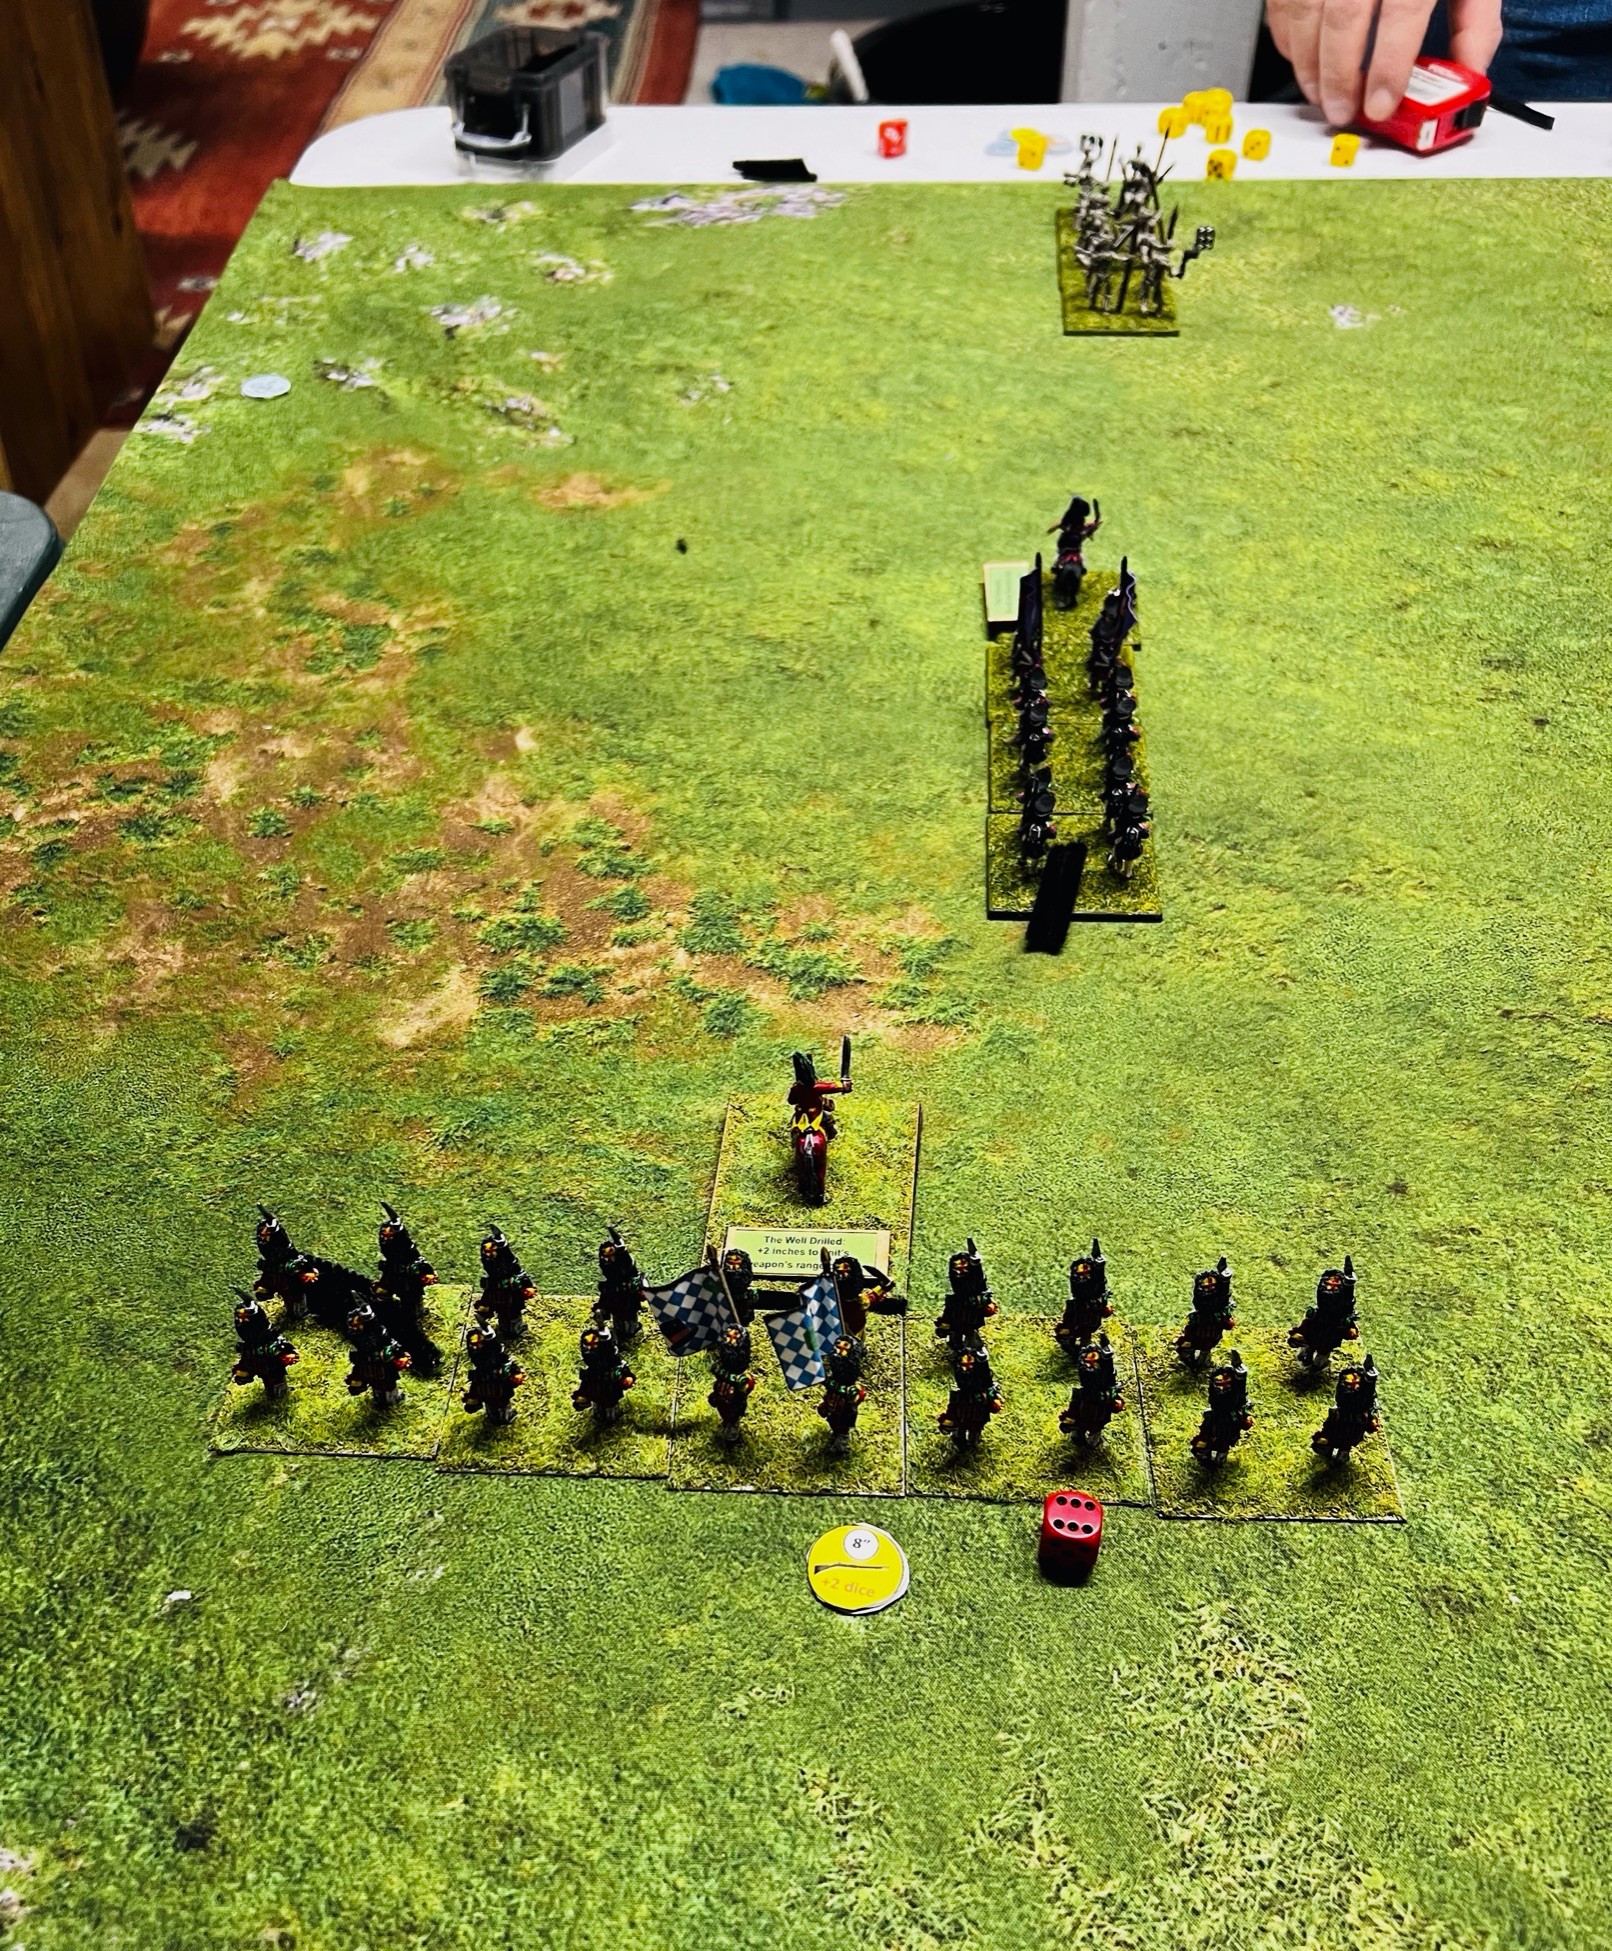
The start – Munchkins to the left and Gillikins to the right.Chris again used his skeletons to screen his Gillikin infantry. Here they advance with Arella the witch close by.This time, I moved closer to the enemy. Here the ZGIR advances to engage the skeletons with musketry. Normally, skeletons are less vulnerable to musketry – lacking, well, organs.The Gillikin Medium battery unlimbered and faced both the Munchkin cavalry and Colonel Tik-Tok. The “blind” Gillikin infantry shouldered their muskets in column and moved up quickly, with the goat riders to their left flank.The Gillikin infantry moved up and into line formation, while the goat-riders went into column trying to close with the Munchkins quickly.Meanwhile, I moved both the Munchkin Light Cavalry and Tik-Tok into line.
Then I decided to try to improve the ZGIR’s marksmanship with an “Uncanny Marksmanship” spell from Zoraster. This would raise my already strong marksmanship from a 7 to a 9 out of 10 hit probability at short range (on top of the increased range bonus)! As you may remember, a spell needs to roll under a spell level on a D10. Zoraster, with a level of 8, needed only to roll anything but an 8, 9, or 10. A 10 is a critical failure (which last game caused his head to explode). Sometimes a critical failure has a bizarre result that can be positive. In this game, I rolled a 10 no less than 7 times out of 12. With different dice!!!!
Luckily, this time the critical failure did not cause a head explosion, and I even got some good results. Below, I rolled my first of 7 critical failures (the zero) and got a 17 for the following result roll. This let the spell work, but lowered my spell rating to 7 for the remainder of the game. Which, when you roll 10, is largely irrelevant! In any case, my ZGIR was even more deadly – even to the point of negating the skeletons’ advantage versus my musketry.
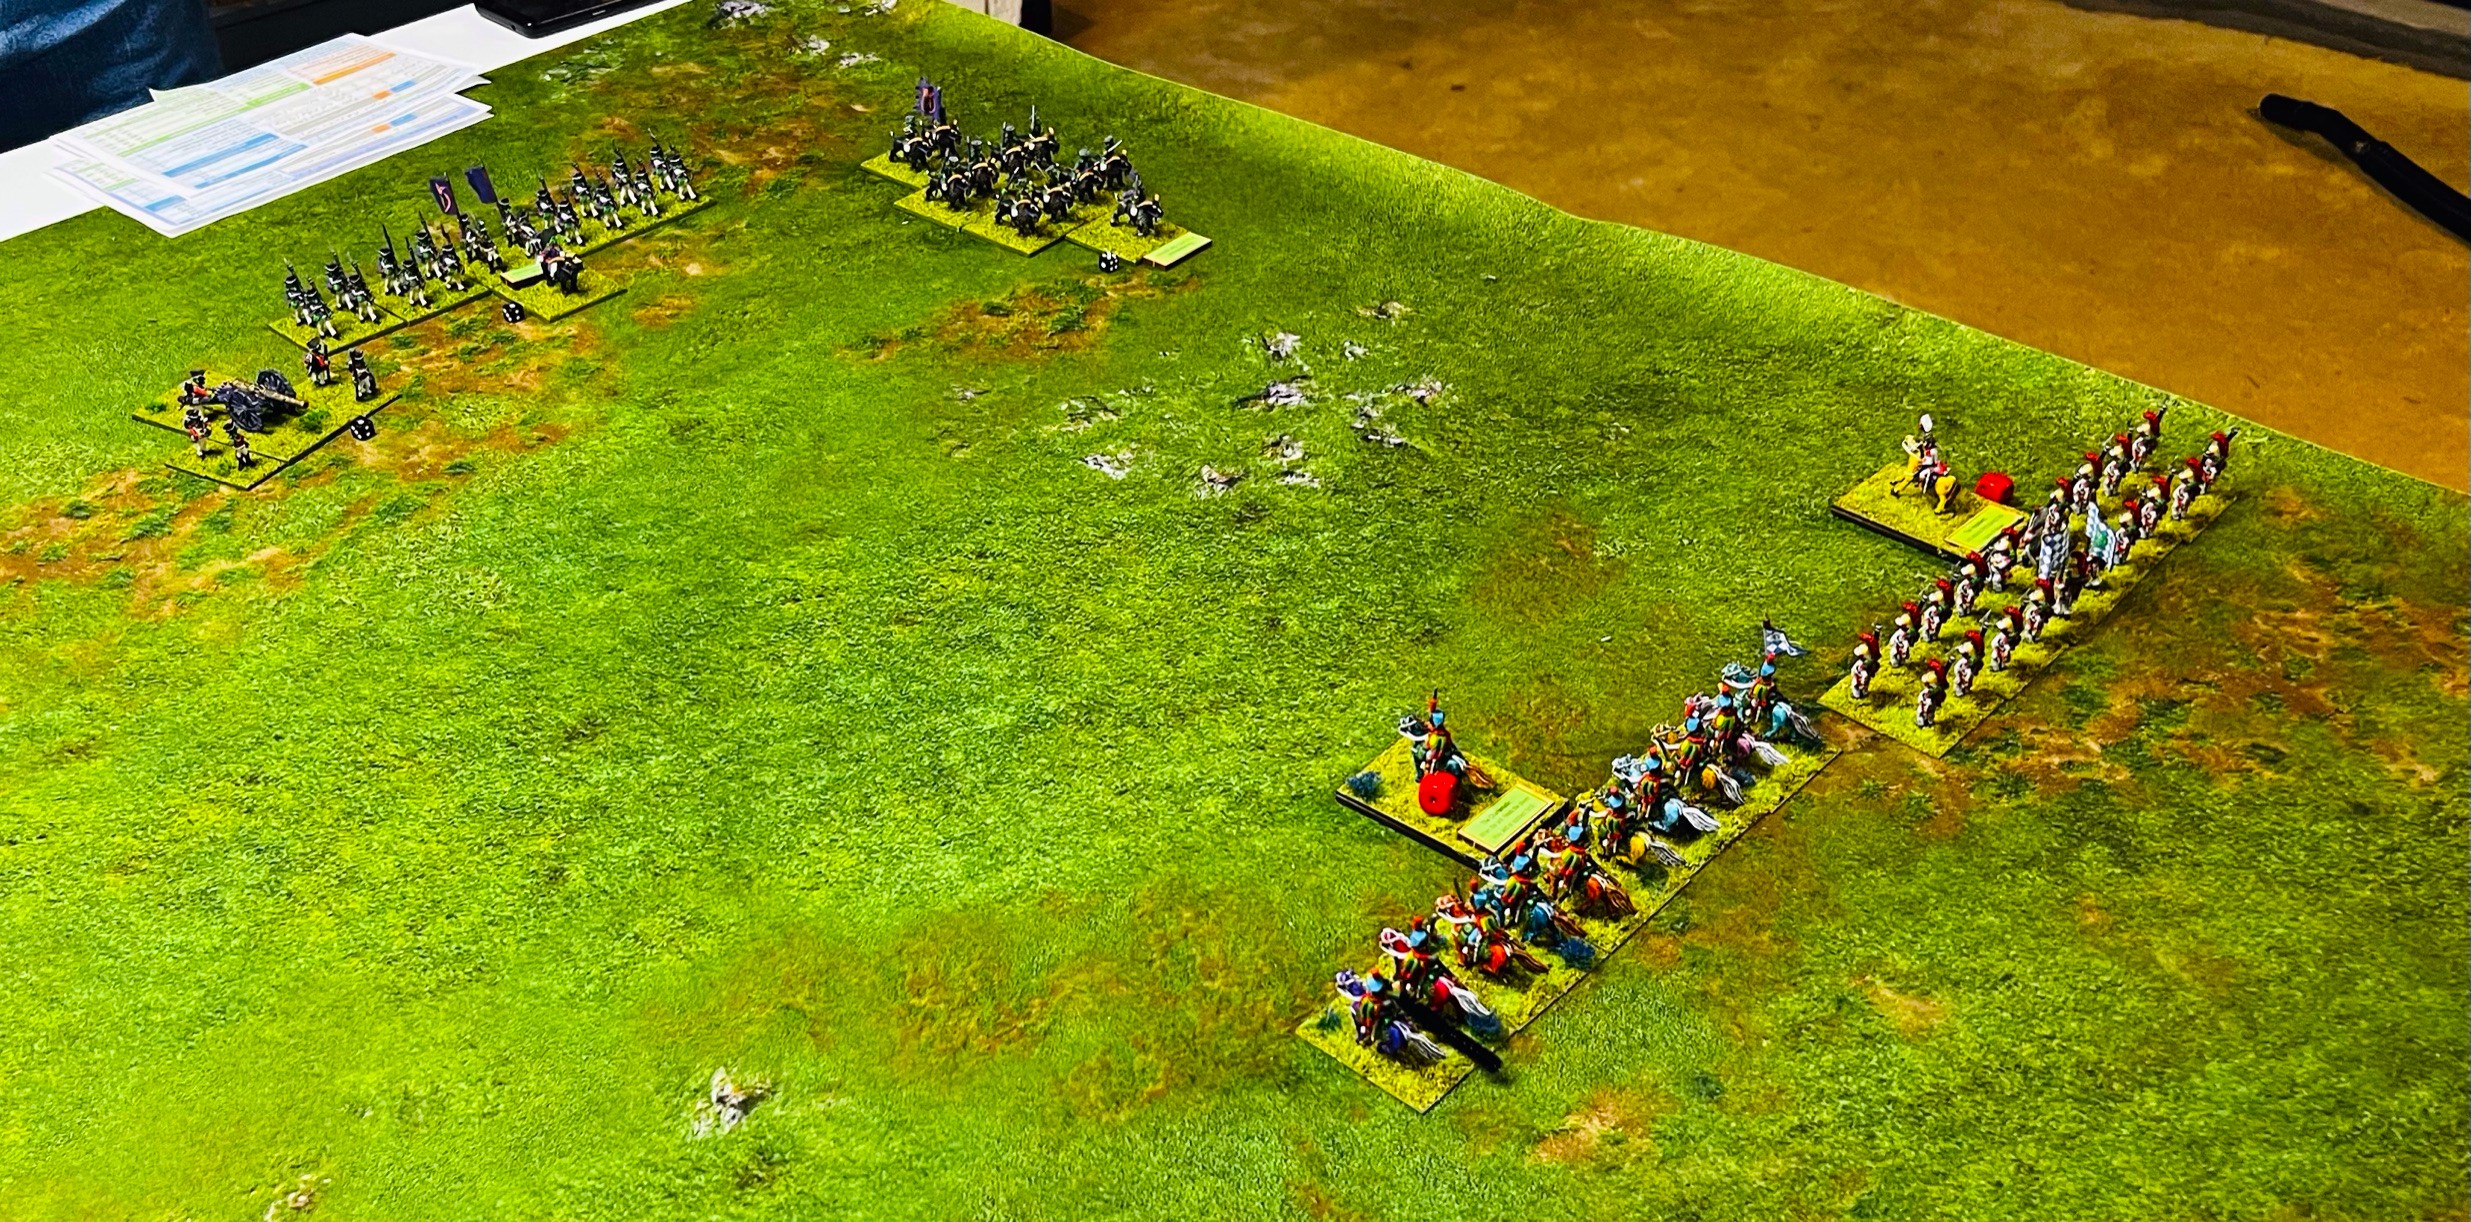
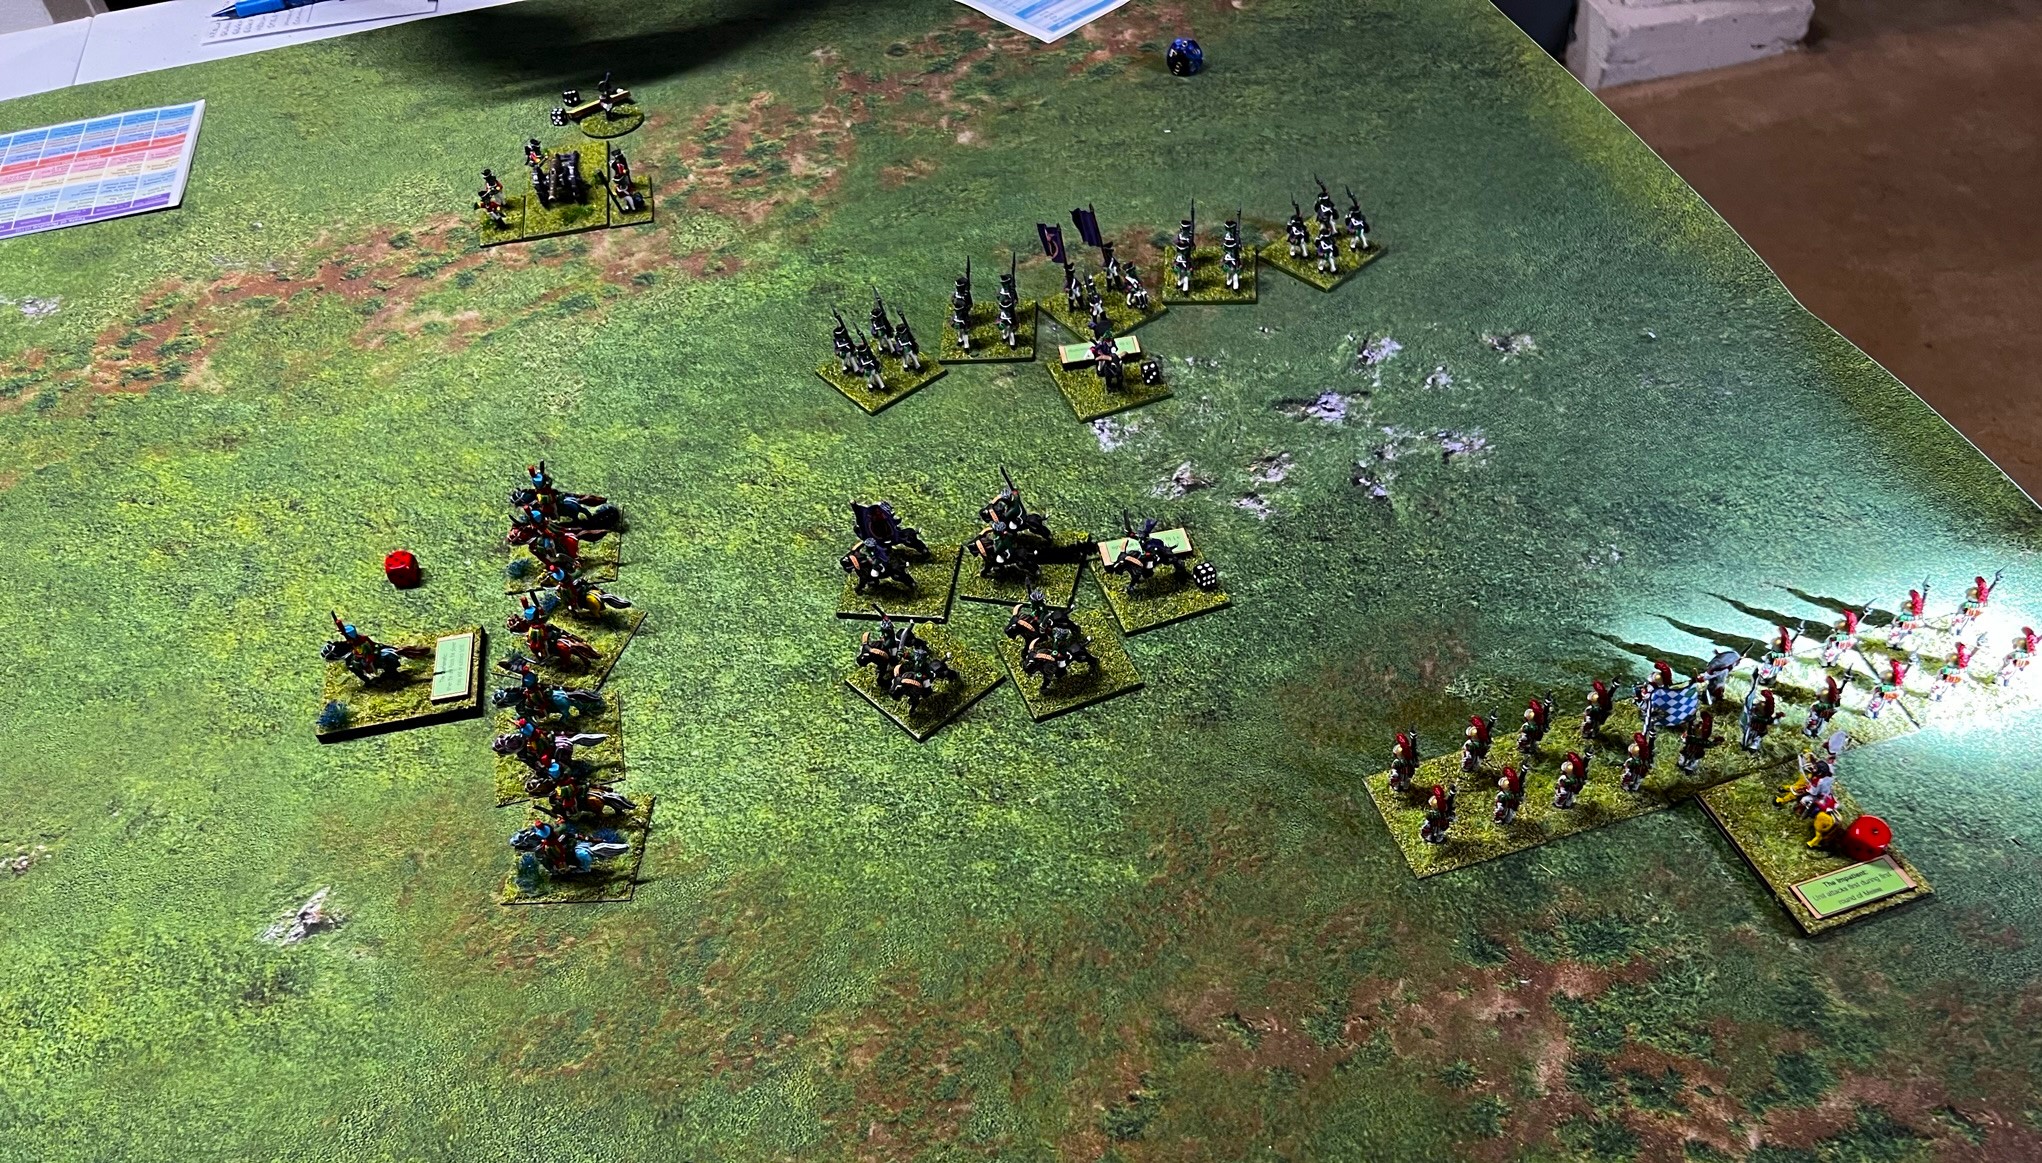
A critical spell failure with a positive result – my best unit now hit 80% of the time (70% versus skeletons).My Munchkin cavalry attempts to hit the Gillikin cavalry on the flank – exposing their flank to the Gillikin “blind” infantry and the Gillikin battery. They get only one hit and disorganize the goat riders. Overview of battle at this point. The Munchkin Medium Battery aims to take out the Gillikin battery. You can see the other two fights here as well.The Gillikin cavalry reacts and turns to face the Munchkin cavalry, which shortly after this got hit by both flanking infantry “blind” fire and in the rear from the Gillikin artillery. Not good for me.After firing, the Gillikin infantry then tried to hit the Munchkin cavalry in the flank – and they moved away to the left to escape the trap before it could close – however now the enemy medium battery had another flank shot – which succeeded in routing the Munchkin pony riders for the second game in a row. This left Tik-Tok alone on this end of the tabletop facing three enemy units (but in a ray of sunshine as an omen perhaps?).Flanking fire hitting the cav……and Munchkin cavalry routs yet again…Meanwhile, the ZGIR was doing massive damage to the skeletons with musket fire.In response, Arella the Witch successfully cast a “Raise the Dead” spell and raised a new and separate base of skeletons (from the casualty pile) to engage the Munchkin Medium Battery before it could hurt their own battery.Undeterred, the ZGIR continued to pour lead down range and routed the skeletons through the close-following Gillikins, disorganizing them.An overview of the battle at this point. The new skeleton base damaged the Munchkin battery, but it was also wiped out in the melee attempt. Arella then hit the battery with successive fireballs, and the Gillikin battery also pivoted and hit the enemy battery. Shortly thereafter, the Munchkin Battery would be wiped out. Shown here routing away are the both the Munchkin cavalry and the skeletons on opposite ends of the tabletop.
At this point in the game, I was down to my two infantry regiments, plus my wizard. The Gillikins had two infantry regiments, plus a medium battery, a damaged goat-rider regiment, and a witch.
Then, the Gillikin infantry tried to engage the ZGIR in a firefight. The ZGIR sent the Gillikins high-tailing after the already routed skeletons. Both Gillikin units would then would leave the game for safer places. Then Arella moved in to throw a fireball at the ZGIR from the rear. The Munchkins activated and performed an about face. Arella then activated and threw her fireball and missed. The ZGIR returned fire and took her out with one volley.Arella right before her demise. Zoraster tried to throw a “Poor Luck” spell on her and – yes – rolled a 10. However, this critical failure resulted in a the gaining of a new one-base unit for the Munchkins – a giant bear! The bear immediately turned towards the beleaguered Tik-Tok regiment which was holding but getting surrounded.Colonel Tik-Tok’s regiment with Gillikin Infantry to the front and badly damaged goat riders to the rear. The bear would aim to engage the goat riders.The bear is coming to the rescue, oh my!
This move took the pressure off of Tik-Tok. The Gillikin cavalry was in no shape to close with the bear, but decided that that was better than being hit in the rear and routed. In the end, the bear base did its job before being eliminated, but the Gillikin Goat Riders routed nonetheless – having had enough for the day. The two infantry regiments got into melee with Tik-Tik getting the better of the exchange (being “Impatient” and getting the first hits in help a lot too). The Gillikin infantry now routed as well. This left only the Gillikin Medium Battery on the battlefield facing the two Munchkin infantry regiments – which closed in on it.
Rout the “‘blind” Gillikins! Tik-Tok holds!An overview of the battle at this point – all Gillikins are routing away except the battery – which has two Munchkin Infantry regiments on each side of it – and bent on revenge.
In the end, it was the ZGIR which wiped out and overran the Gillikin battery, and won the game 21-18.
The Gillikin battery is wiped out and overran.
It was a good game – and I feel I was lucky to pull out the victory. Certainly the magic critical failures had us both laughing. I will be running two games similar to this at HAVOC in late March/early April.
As for our adventure, I had travelled to Shrewsbury (45 minutes away) for a 7 AM car service – while Lynn got a 10 AM doctor’s appointment at UMASS (40 minutes away) to see why she was having shooting pains in her back. My car took a while. Around 11 AM she texted me that the doctor ordered a “blood clot test” for her as that was a worry for her lungs. By the way, I hate texting but the lab was too crowded for her to speak clearly with me at that point. With my knowledge and background, I texted to ask what the name of the test was (she was unsure) and to ask/tell her not to leave the hospital until she got her results. Unfortunately, when Lynn asked the phlebotomist how long the results would take, and was told maybe an hour, maybe a day. I knew that a potential blood clot in the lung was a STAT situation, and that likely the test was a d-dimer (which I have had myself). In any case, she left and drove home – as I did and we arrived at home about 5 minutes apart around 1 PM.
Within 5 more minutes, she got both an email and a call to go to the ER as the d-dimer test was elevated. So we drove together to UMASS Memorial in Worcester, arriving at 1:51 PM in the waiting room or the ER. It was SWAMPED. We did not get into the medical area of the ER and a bed for her until after 6 PM. We waited for a CAT scan until 11:30 PM, and then a read. It was not sure if she was going to be admitted or not but the diagnosis was pneumonia. At this time they started IV antibiotics – BUT as I recently had had a bad sinus infection I was on and needed to take my own antibiotic dose (which was of course at home). So I left her, drove home, got my own pills, then got a call from Lynn that she was being discharged. I then drove back to Worcester, got her, got her late night McDonald’s (she had not eaten since the morning). We got home about 3:30 AM, at which point I’d been up for nearly 24 hours.
So, good news, she’s already better! Not a fun story, but one I’m glad worked out.
Anyways, I hope you liked the battle report – I should have a couple more posts for you this week on a couple other playtests and some jungle terrain that I built for a Maya convention game.
Whenever I think of seeing the classic 1939 movie The Wizard of Oz, on TV in the ’60’s as a kid, I think the most striking aspect for me was appearance of the Flying Monkeys. Of course back then, our TV’s were not always in color, so I did not even know that most of the film was even in color for a few years! Still, those aviator primates were impressively done for 1939 movie and scary enough for me at 4 or 5 years old.
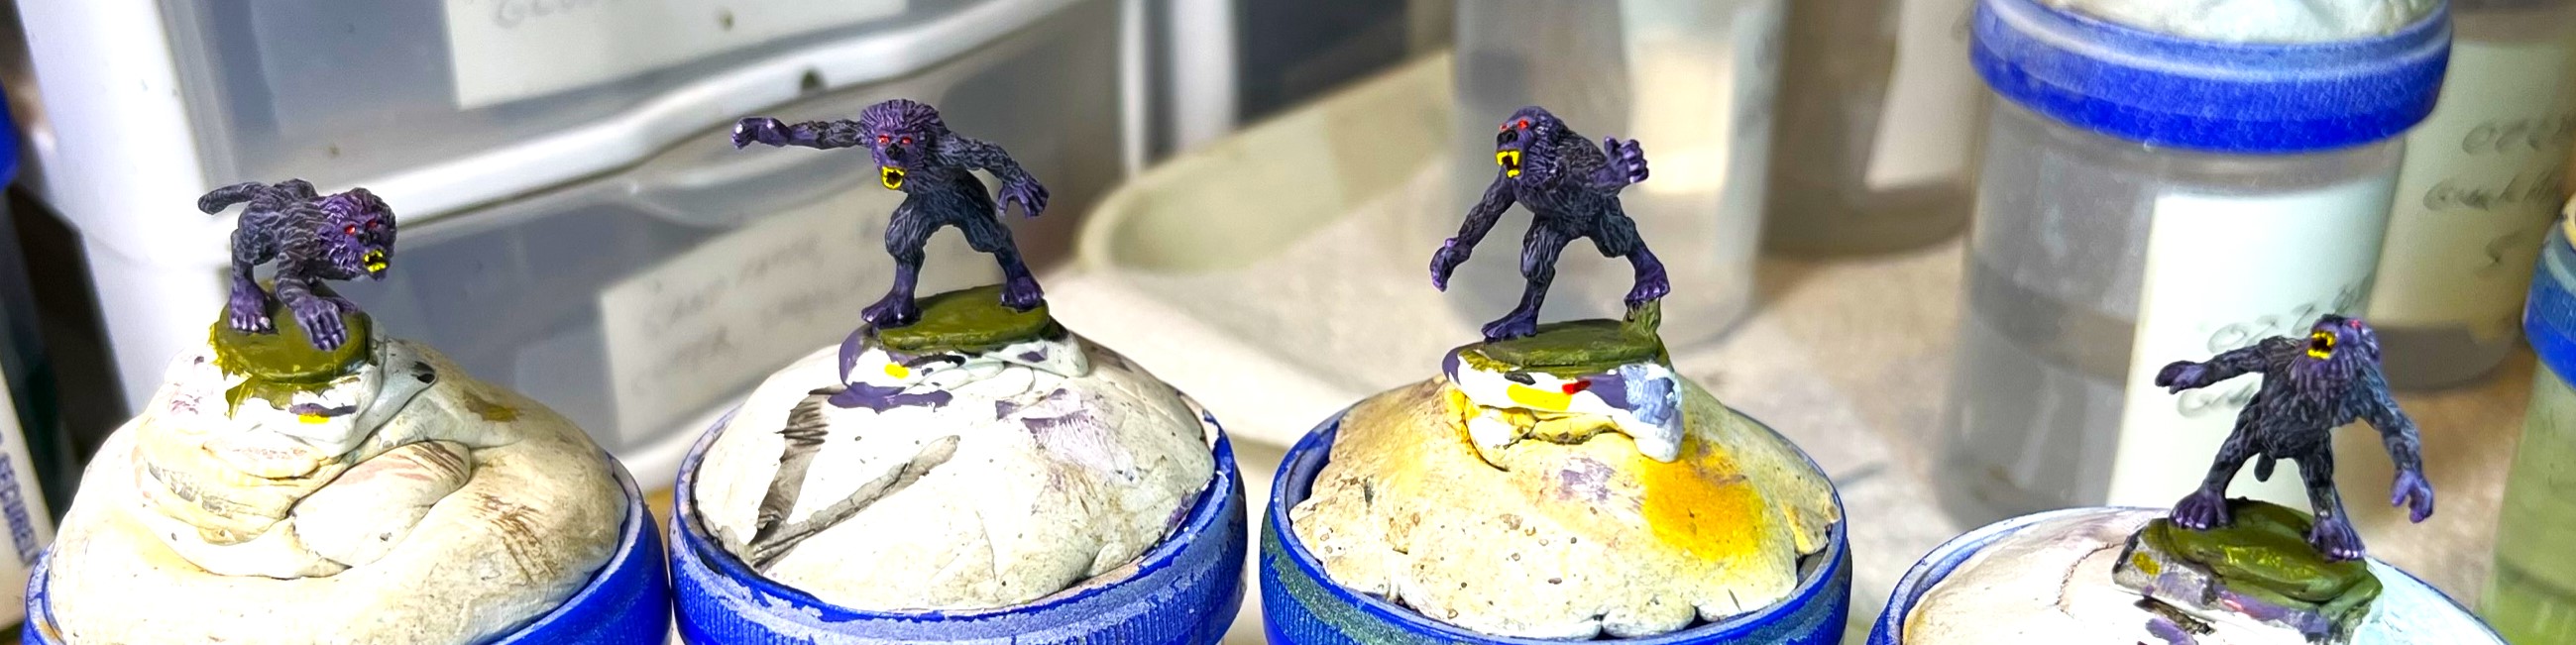
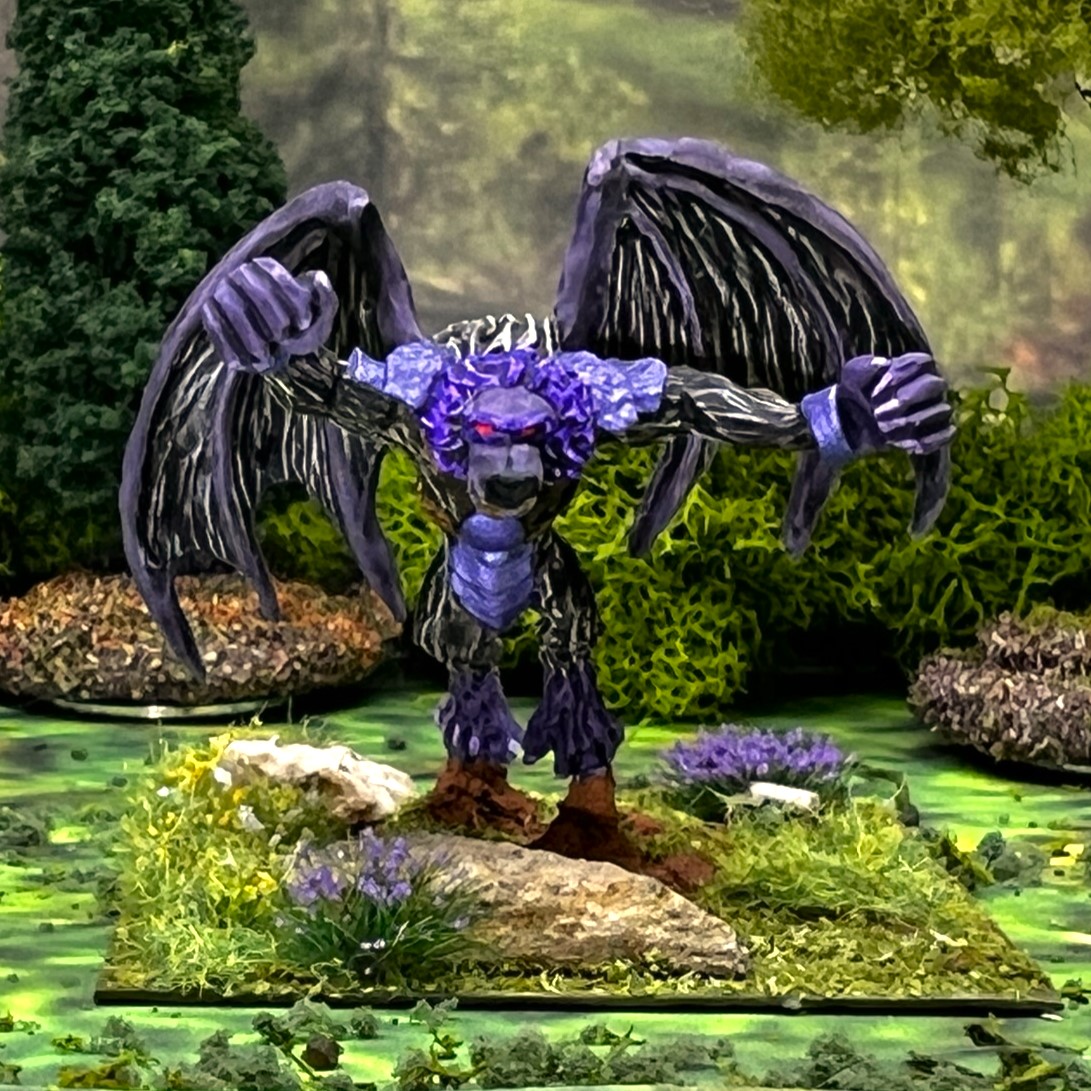
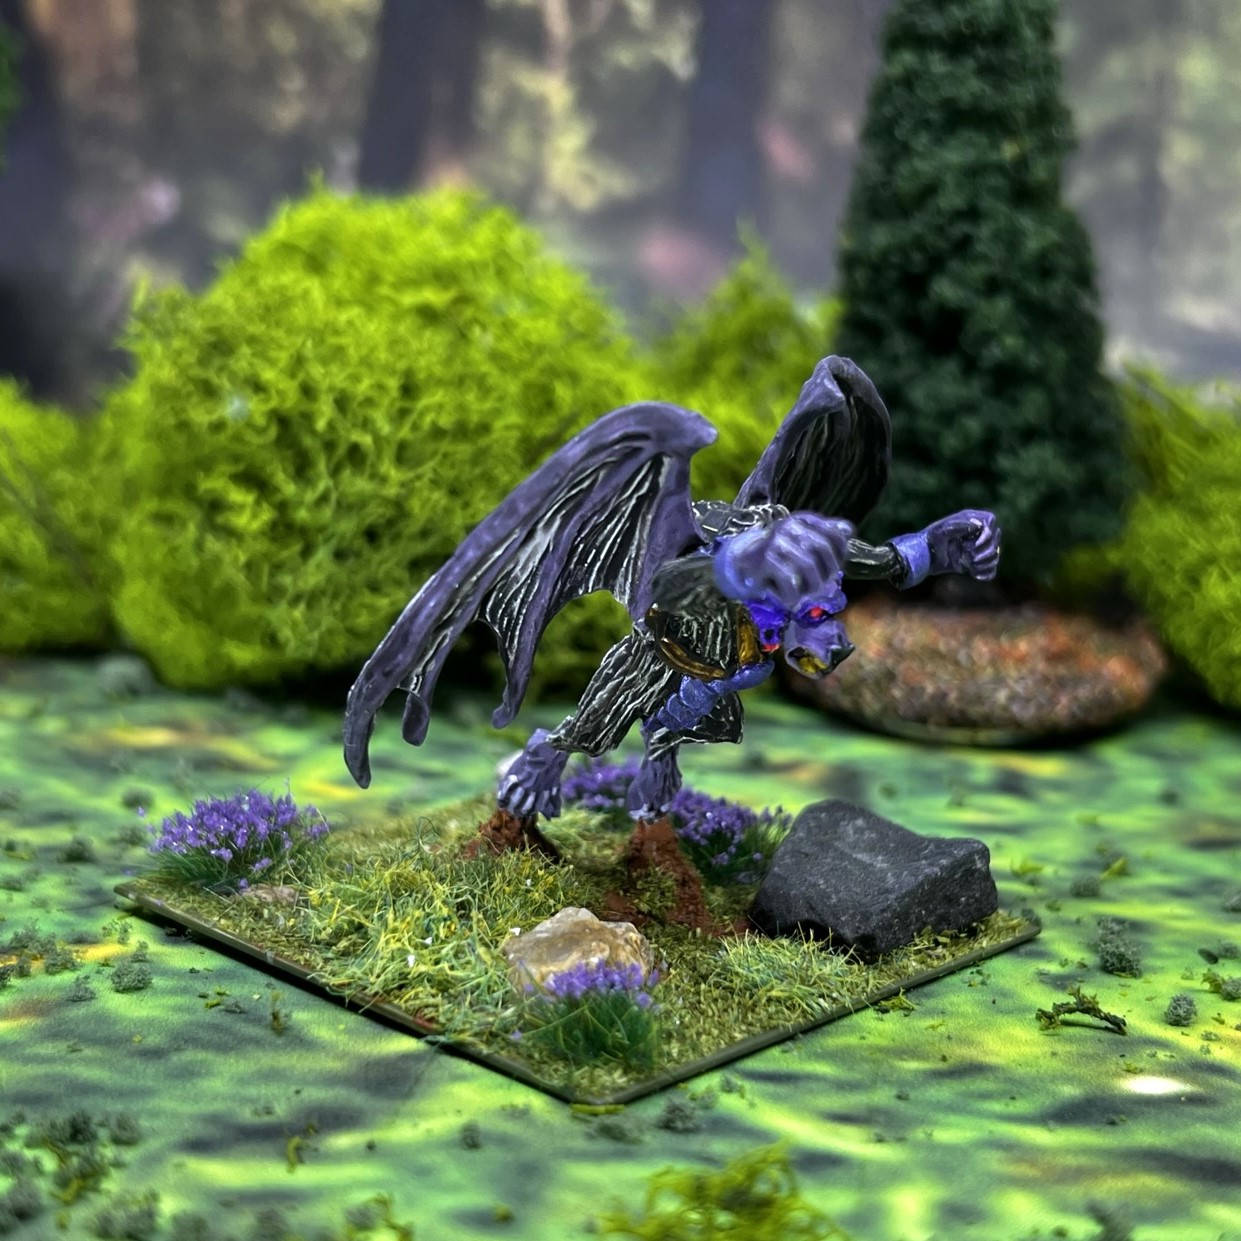
Now, the world of the Wars of Ozz is not the same as that tread by Dorothy. In this world, the Winkies have allies in the form of Lesser Apes and Great Flying Apes due to the efforts of Evora:
One of Evora’s diplomatic coups was convincing the King of the Flying Apes to send her tribute in exchange for leaving his land in the Cold Barren Mountains unmolested. By their agreement each year he sends a number of Great Flying Apes and their cousins, the Lesser Apes, to serve in her armies and follow her commands for the course of the year. While it might seen like a very unfair arrangement, it has kept the rest of the apes safe from her armies, provided an easy way to train his soldiers, and given the old ape king a convenient way to manoeuvre his rivals out of his lands.
Wars of Ozz, section 2.2.2.4, page 25
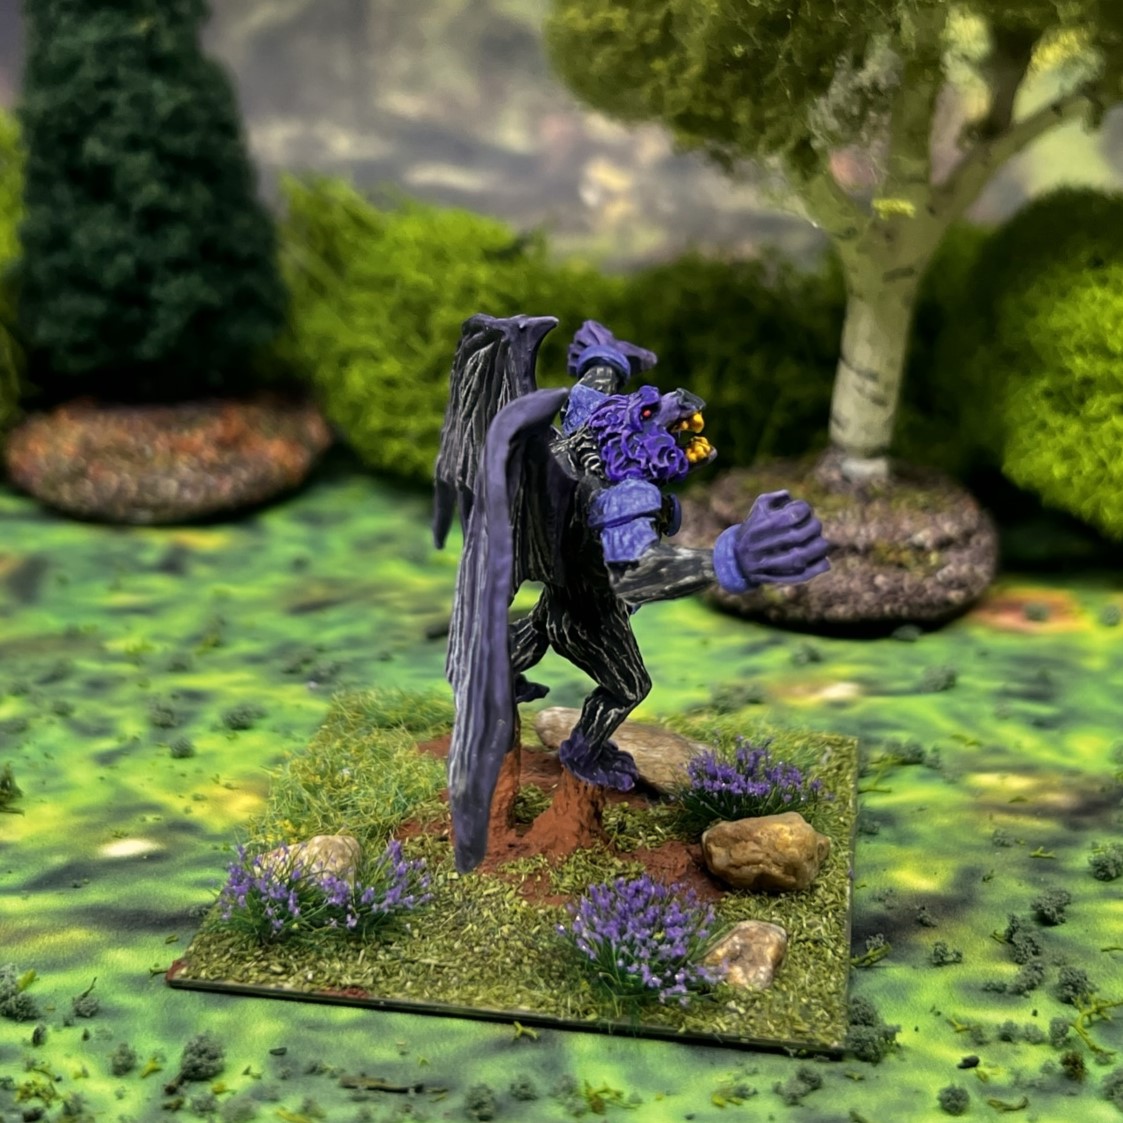
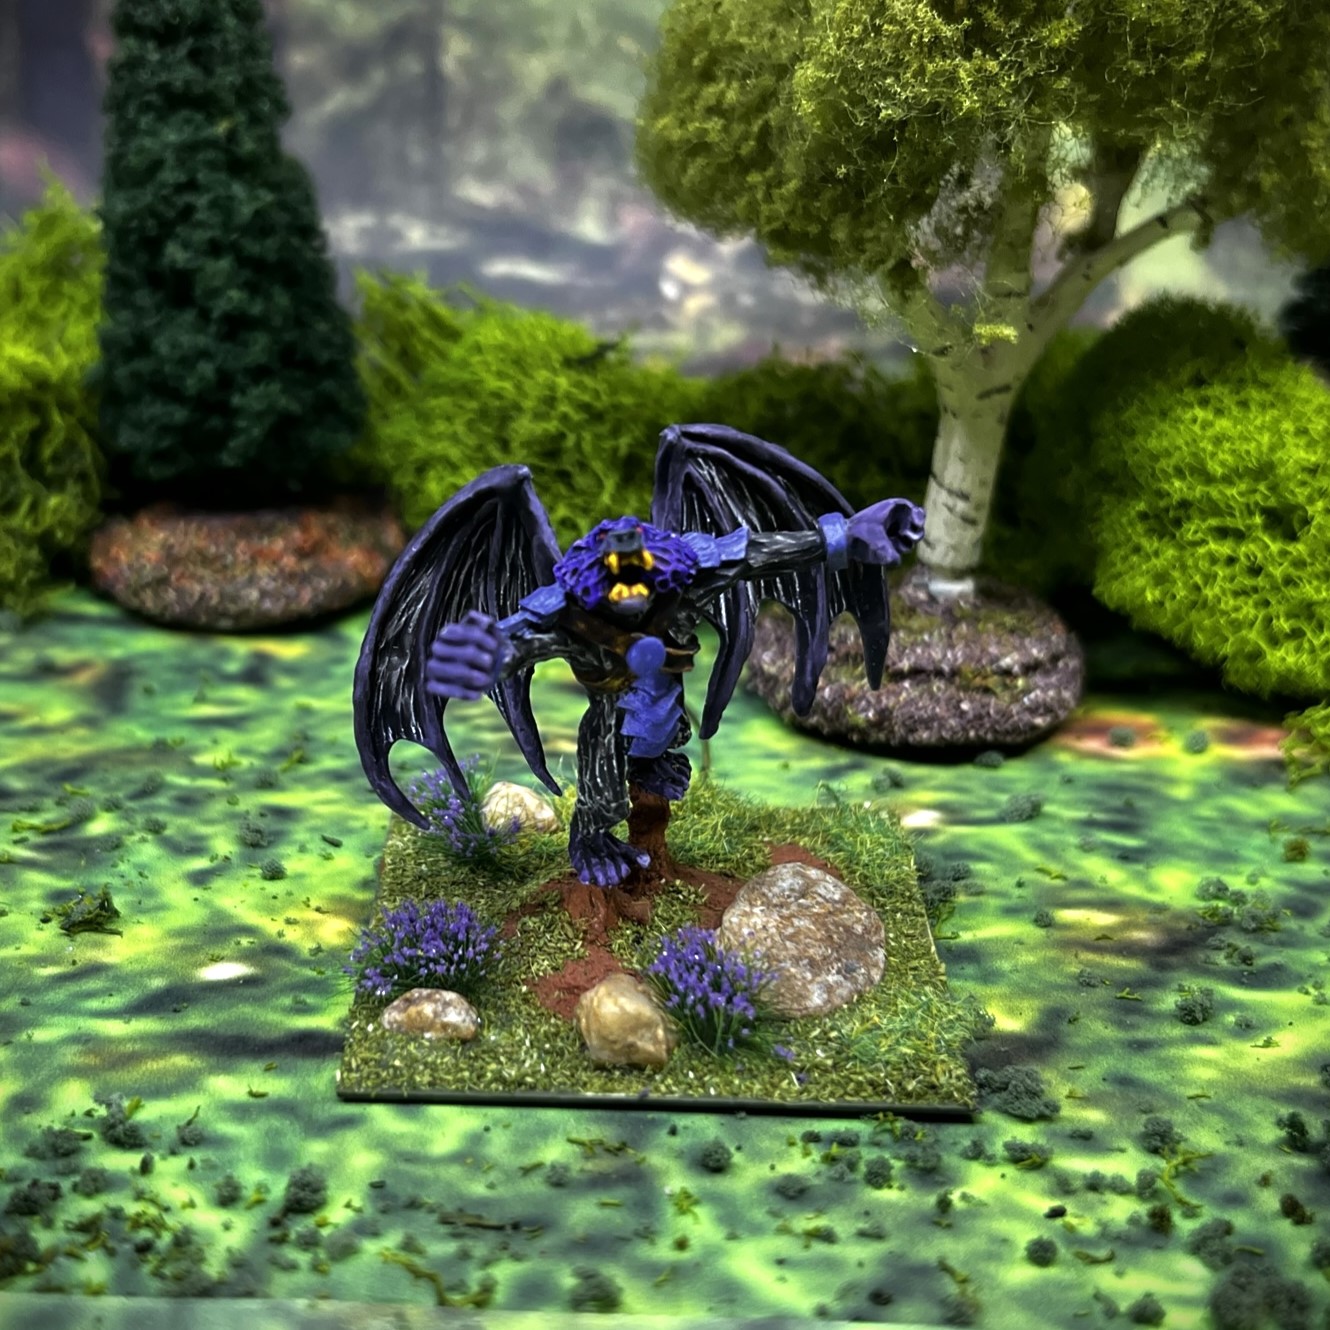
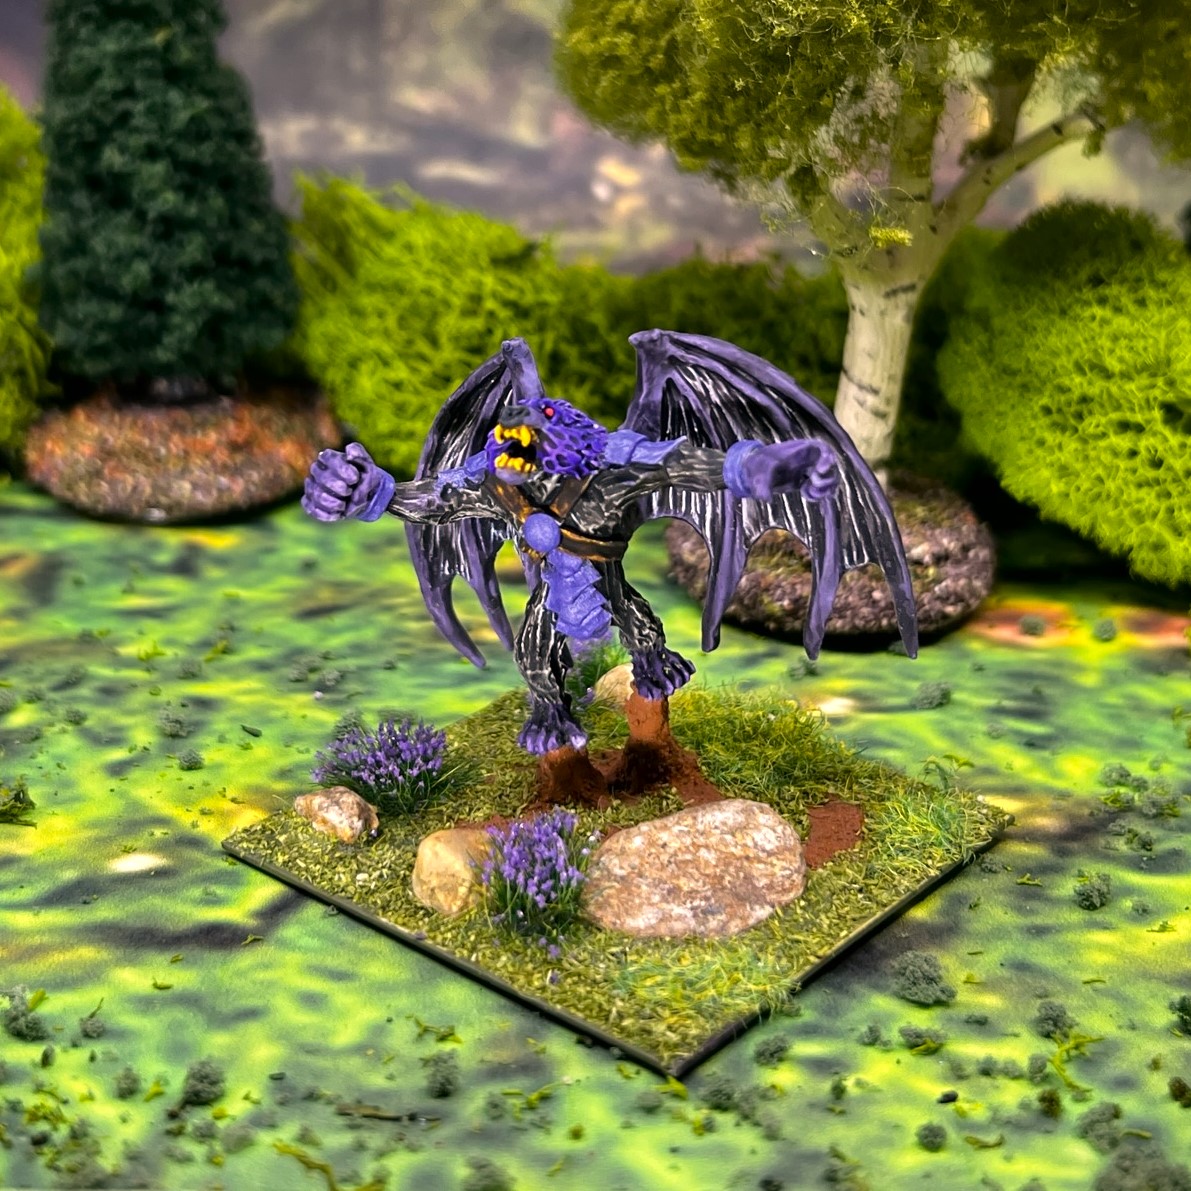
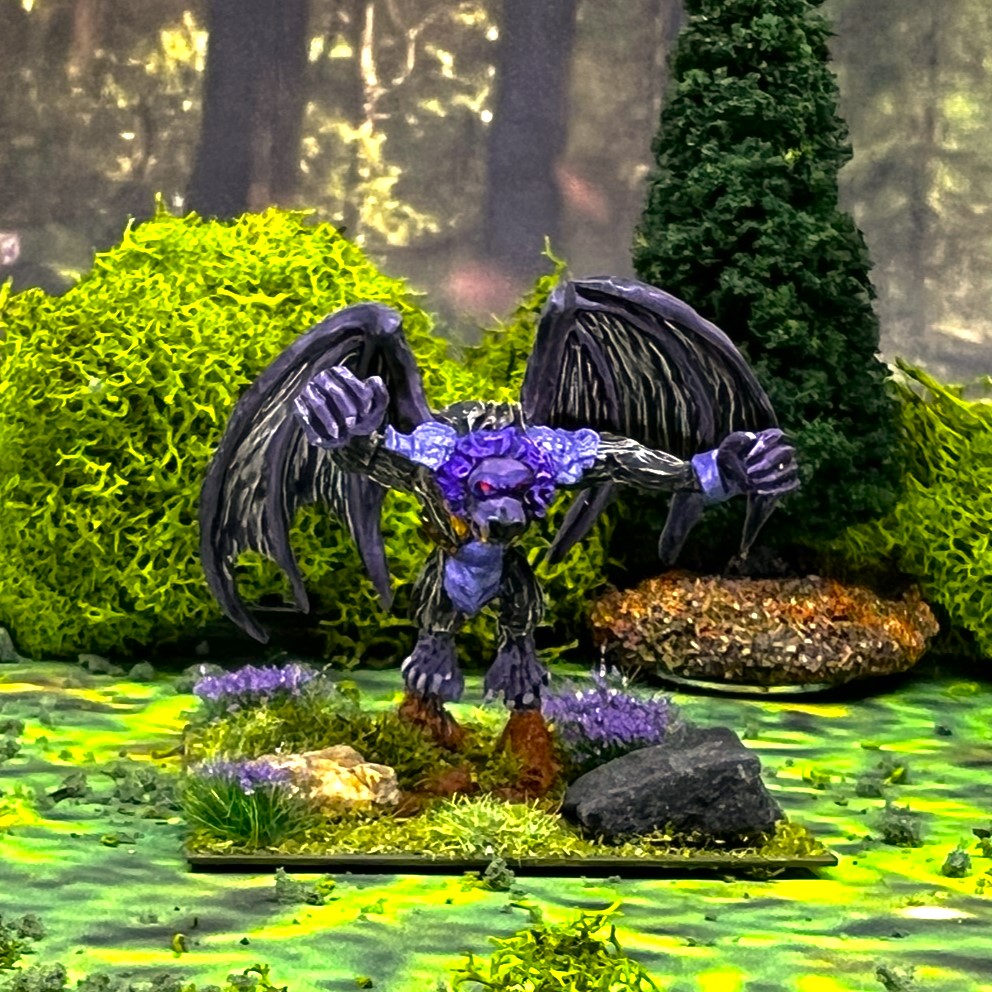
Both of these ape regiments are available to any force in Ozz, BUT they are cheaper to incorporate into Winkie Brigades. Therefore, I just had to add both to my current Winkie forces – and potentially others in the future if they can pay. The Lesser Apes and Great Flying Apes cost the Winkies 4 and 6 points respectively, while costing other factions an additional 2 points each for each. The Great Flying Apes ignore any terrain effects, and can of course fly over an enemy, land, and try to hit the enemy’s rear. They also will be useful in attacking the Munchkin’s Aerostat Corps Balloon (mine is in the painting queue as well). The Lesser Apes move through woods with no penalty.
As they are kin, I thought it made sense to share both of these together in one blog post.
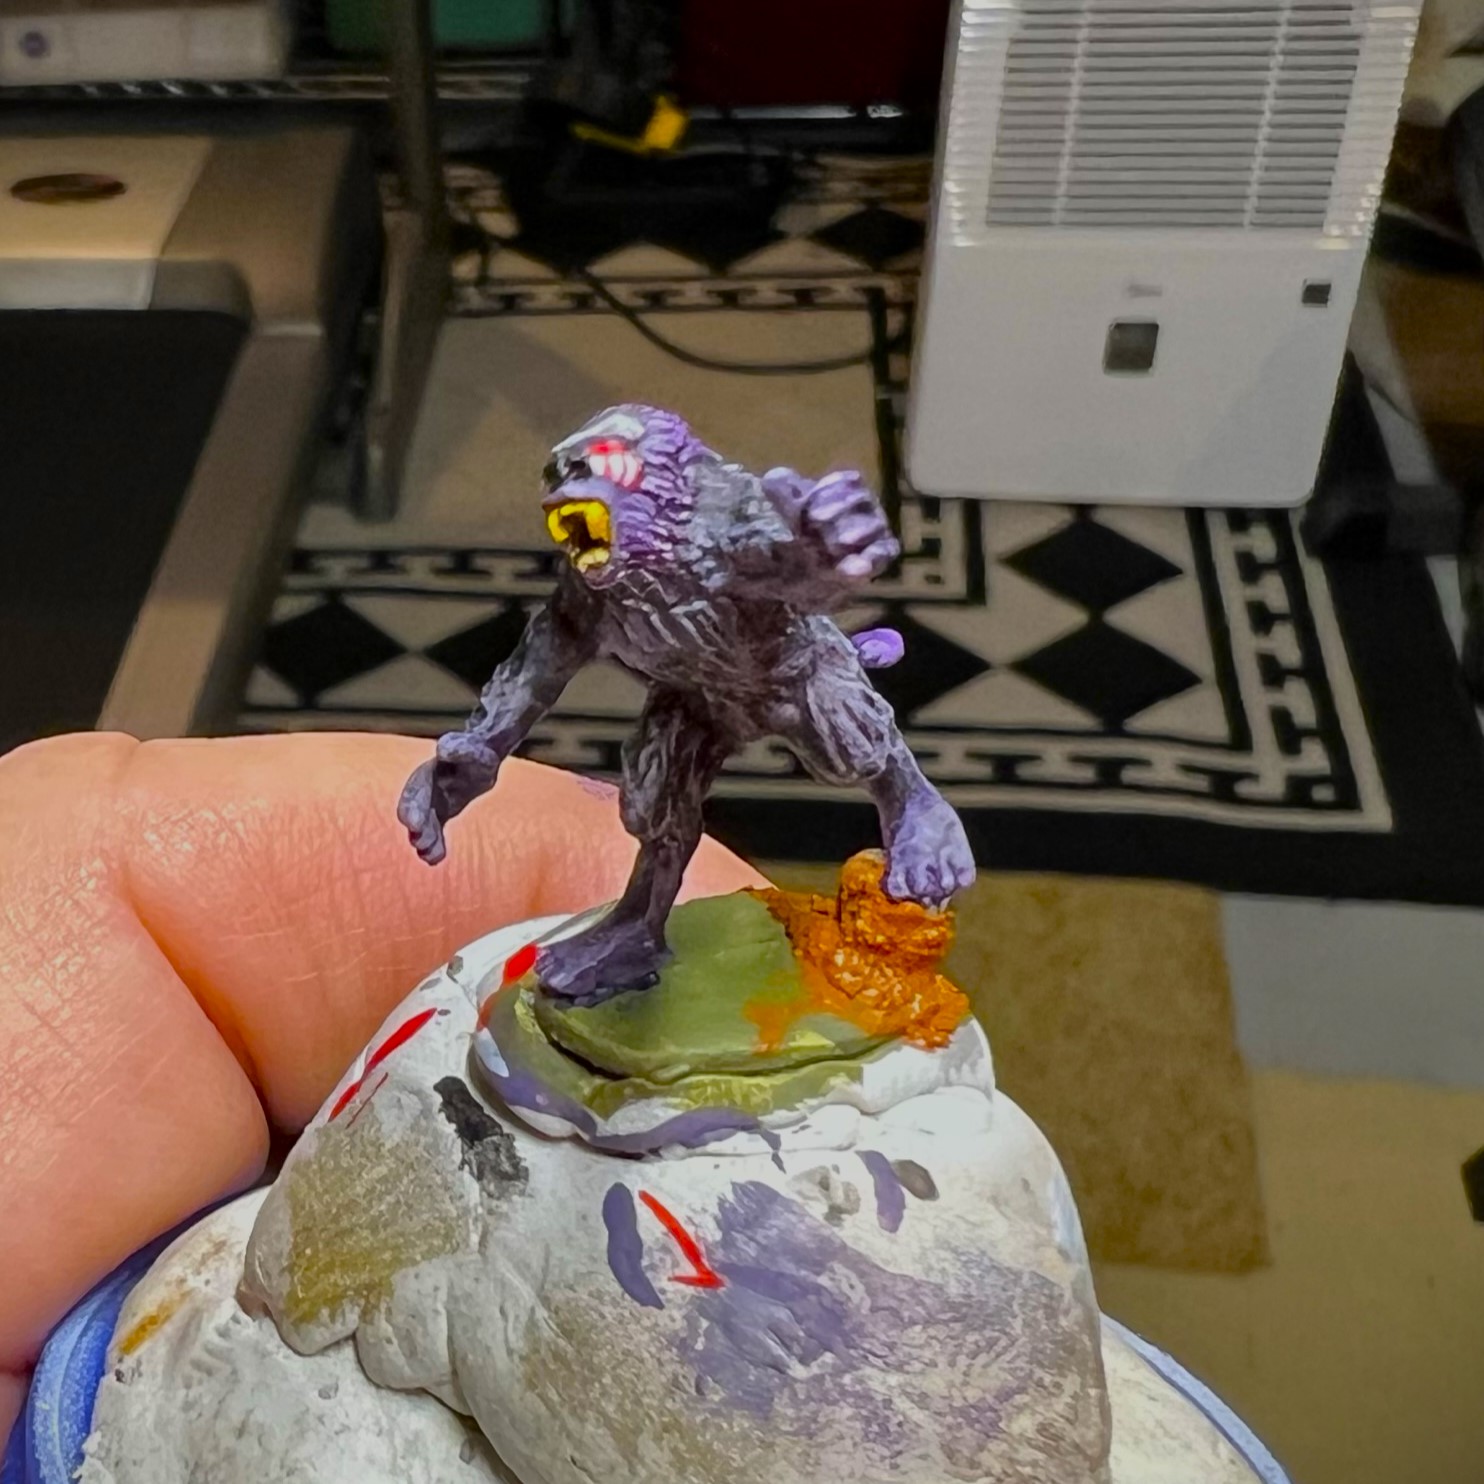
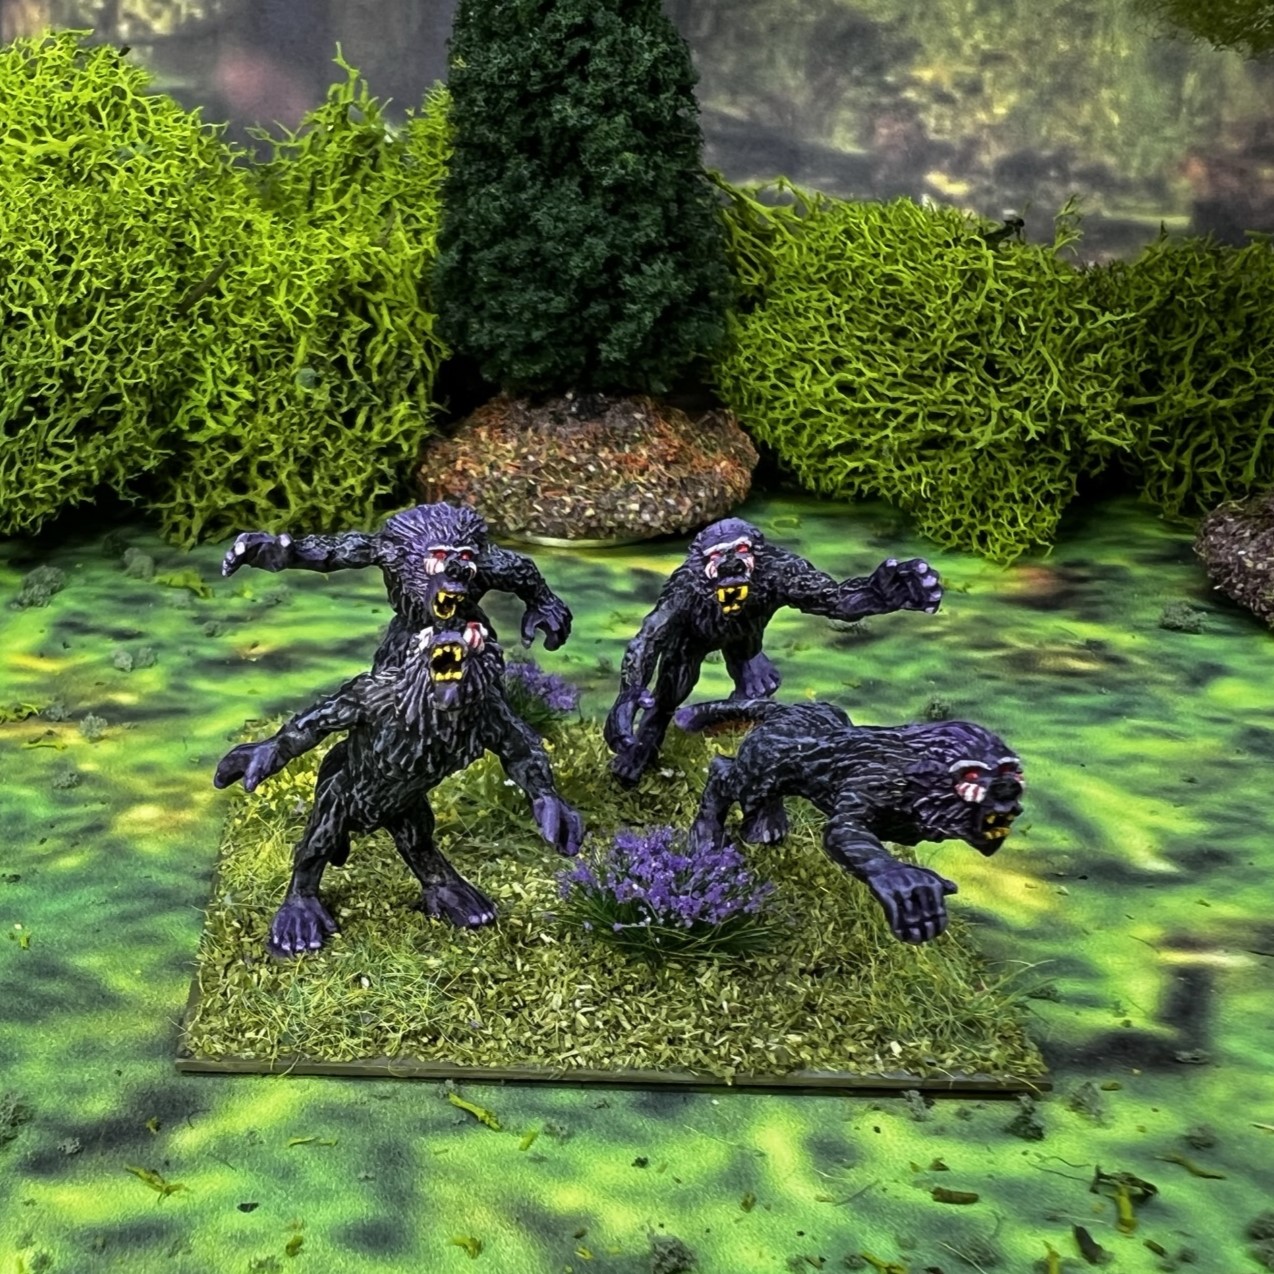
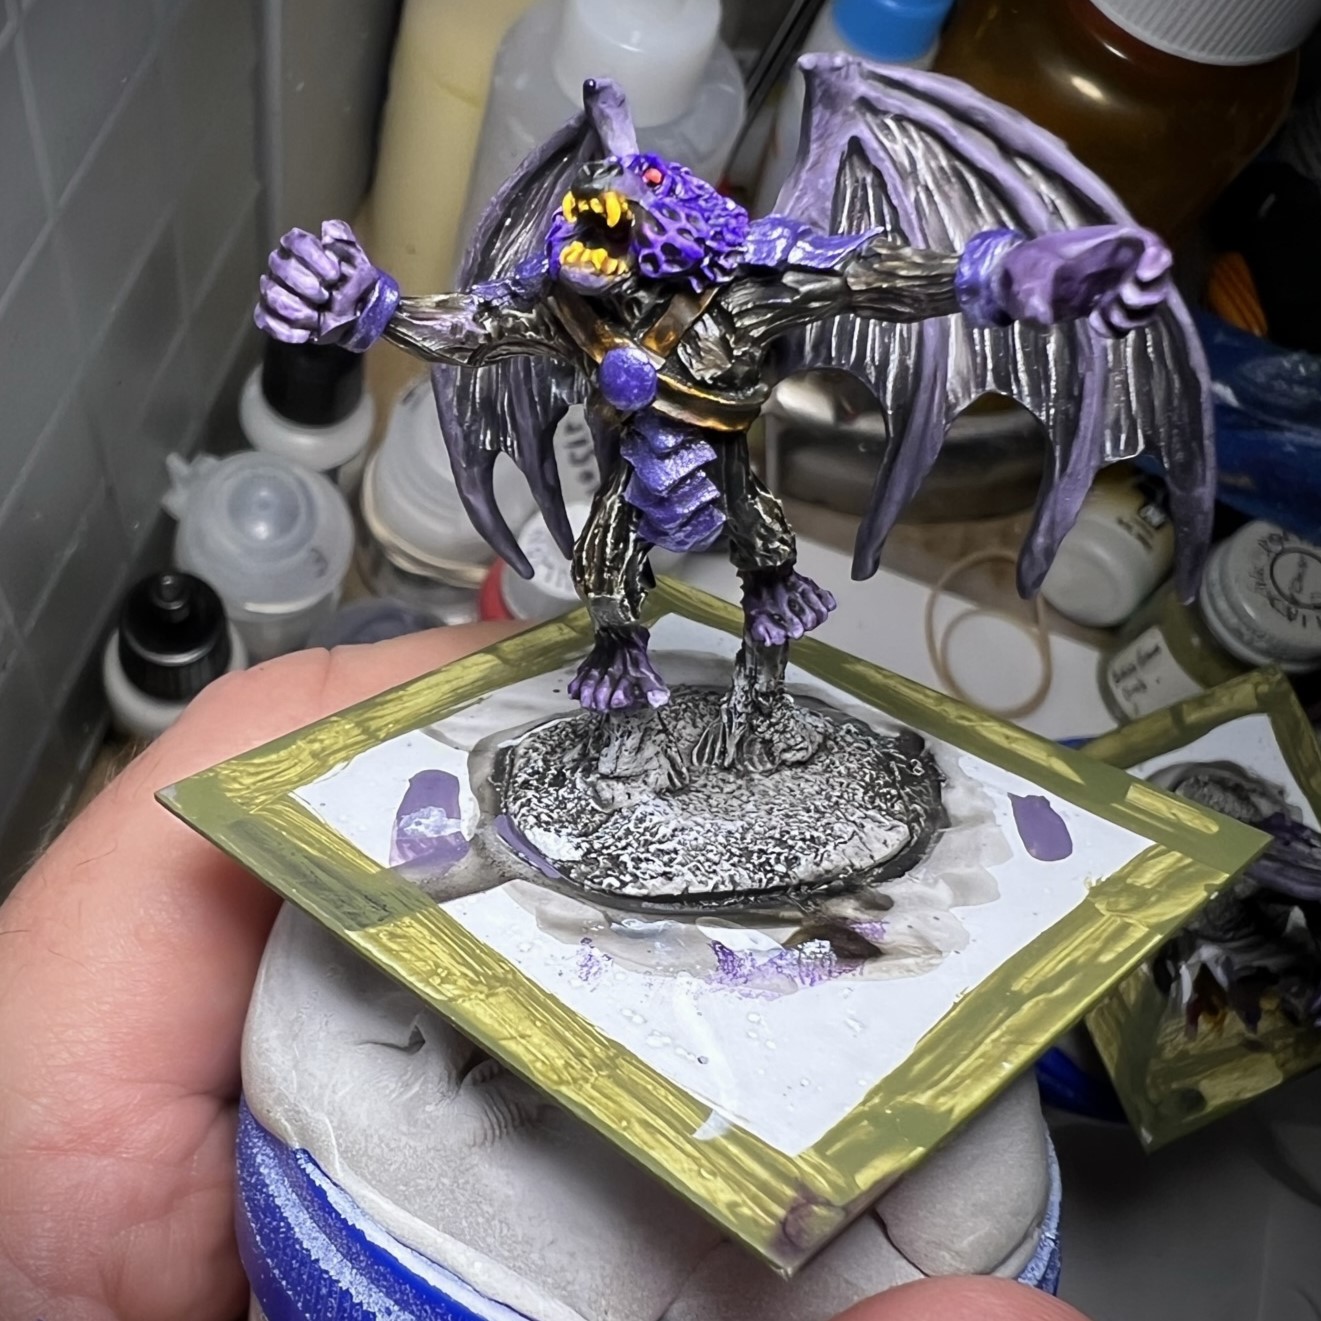
I decided to paint both regiments at the same time so that their colors could be somewhat aligned. The color theme that I chose for both was purple. While Gillikins are very purple, I thought that a bunch of “grape apes” would look decidedly different on the tabletop versus plain old brown or grey. I ended up experimenting with two paints a lot here – Citadel “Dreadful Visage” and “Ratling Grime” contrast paints. I found that “Dreadful Visage” used over white left a nice shade of purple – more like a light glaze. I also used it over other shades of purples and the “Ratling Grime”. The “Ratling Grime” is more of a cross between dirty black and brown – and I liked it as a base to dry brush over with “Warpfiend Grey”. I also used purple contrast paints and inks. Overall, this gave me the purplish look I wanted.
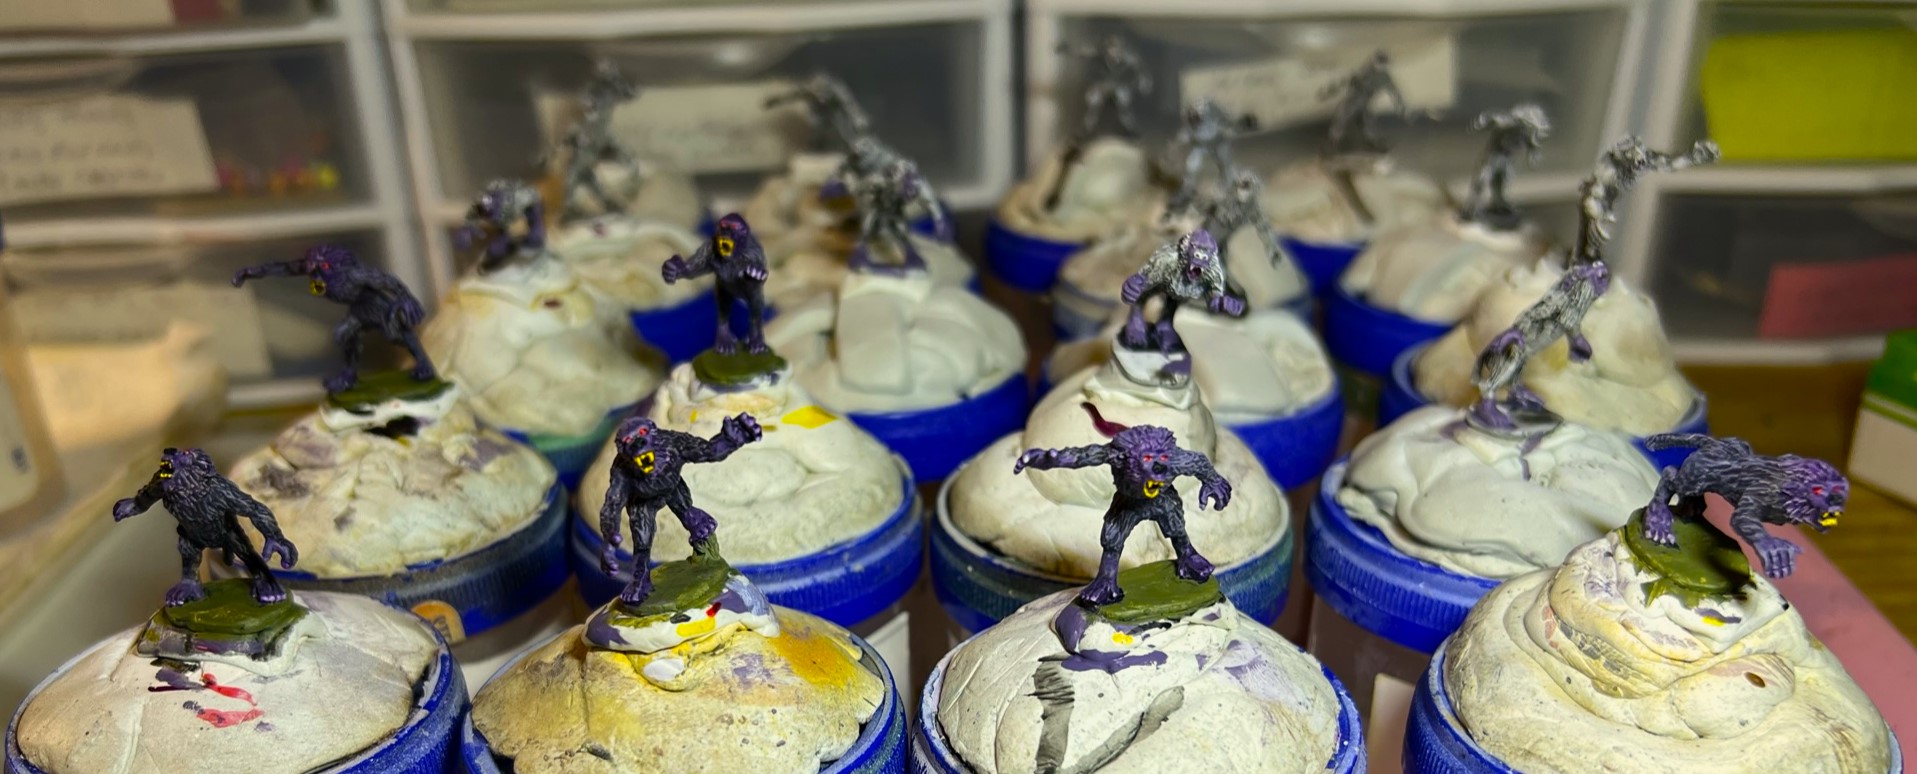
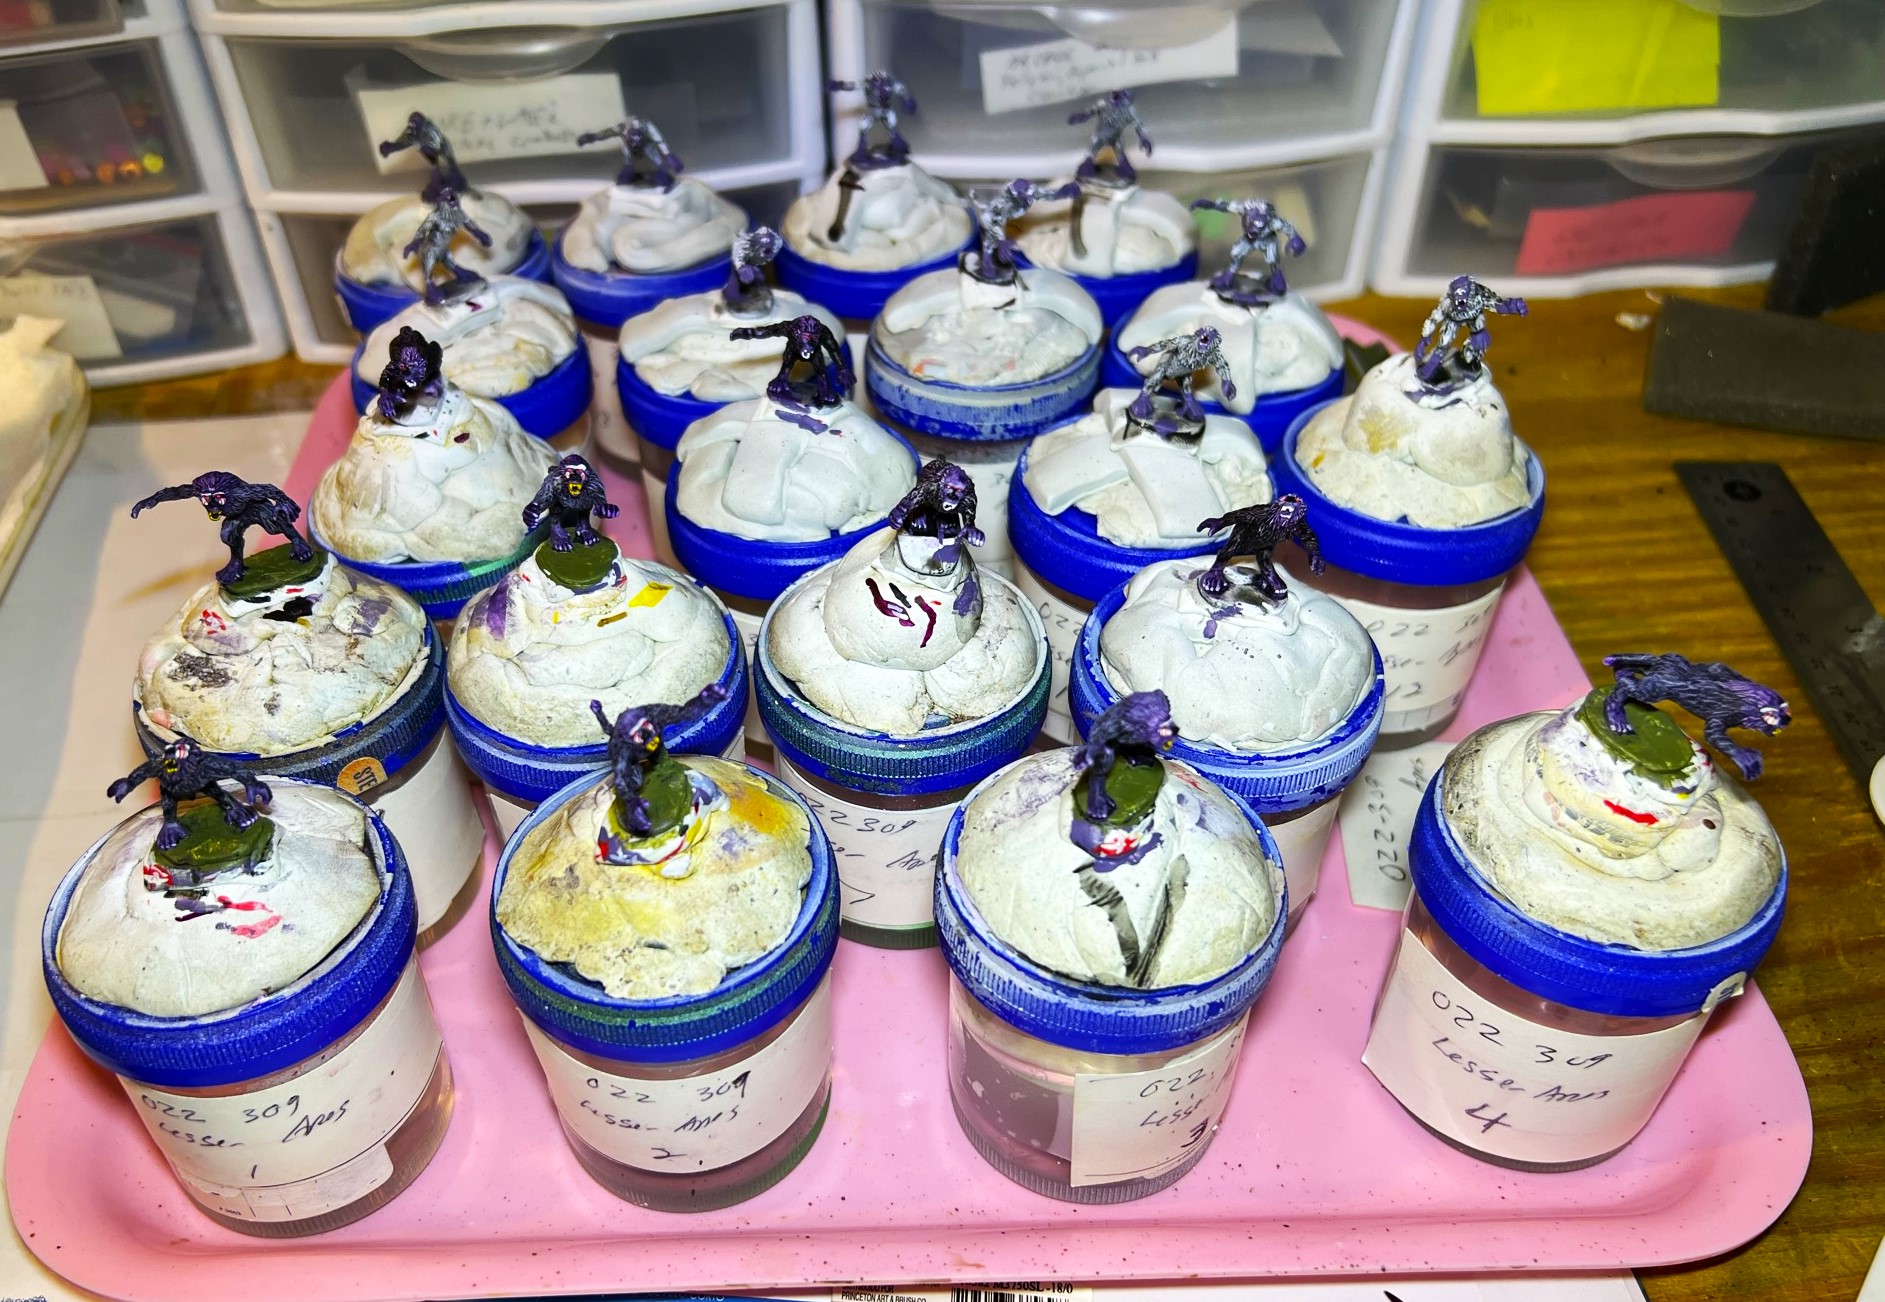
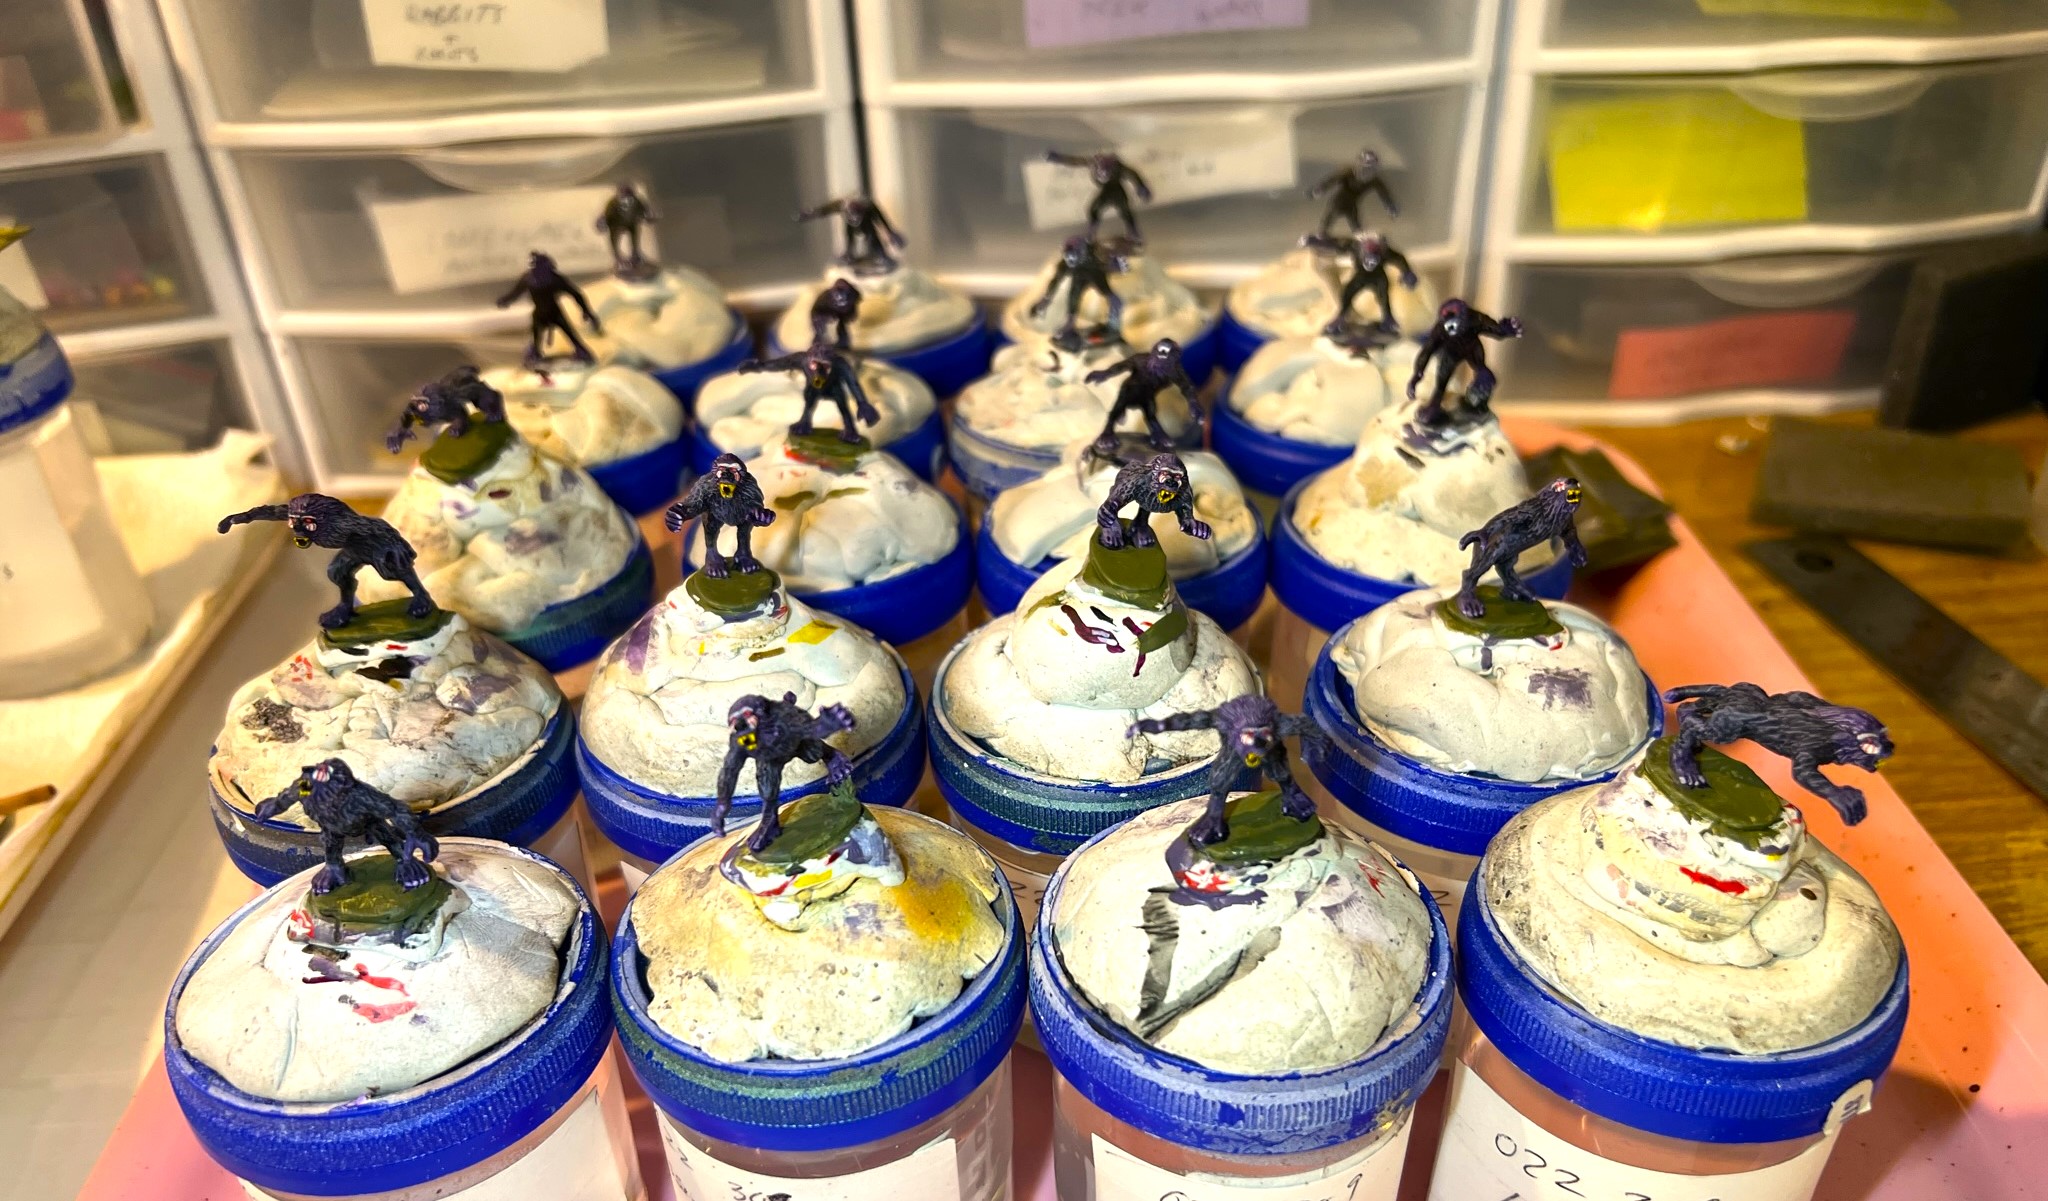
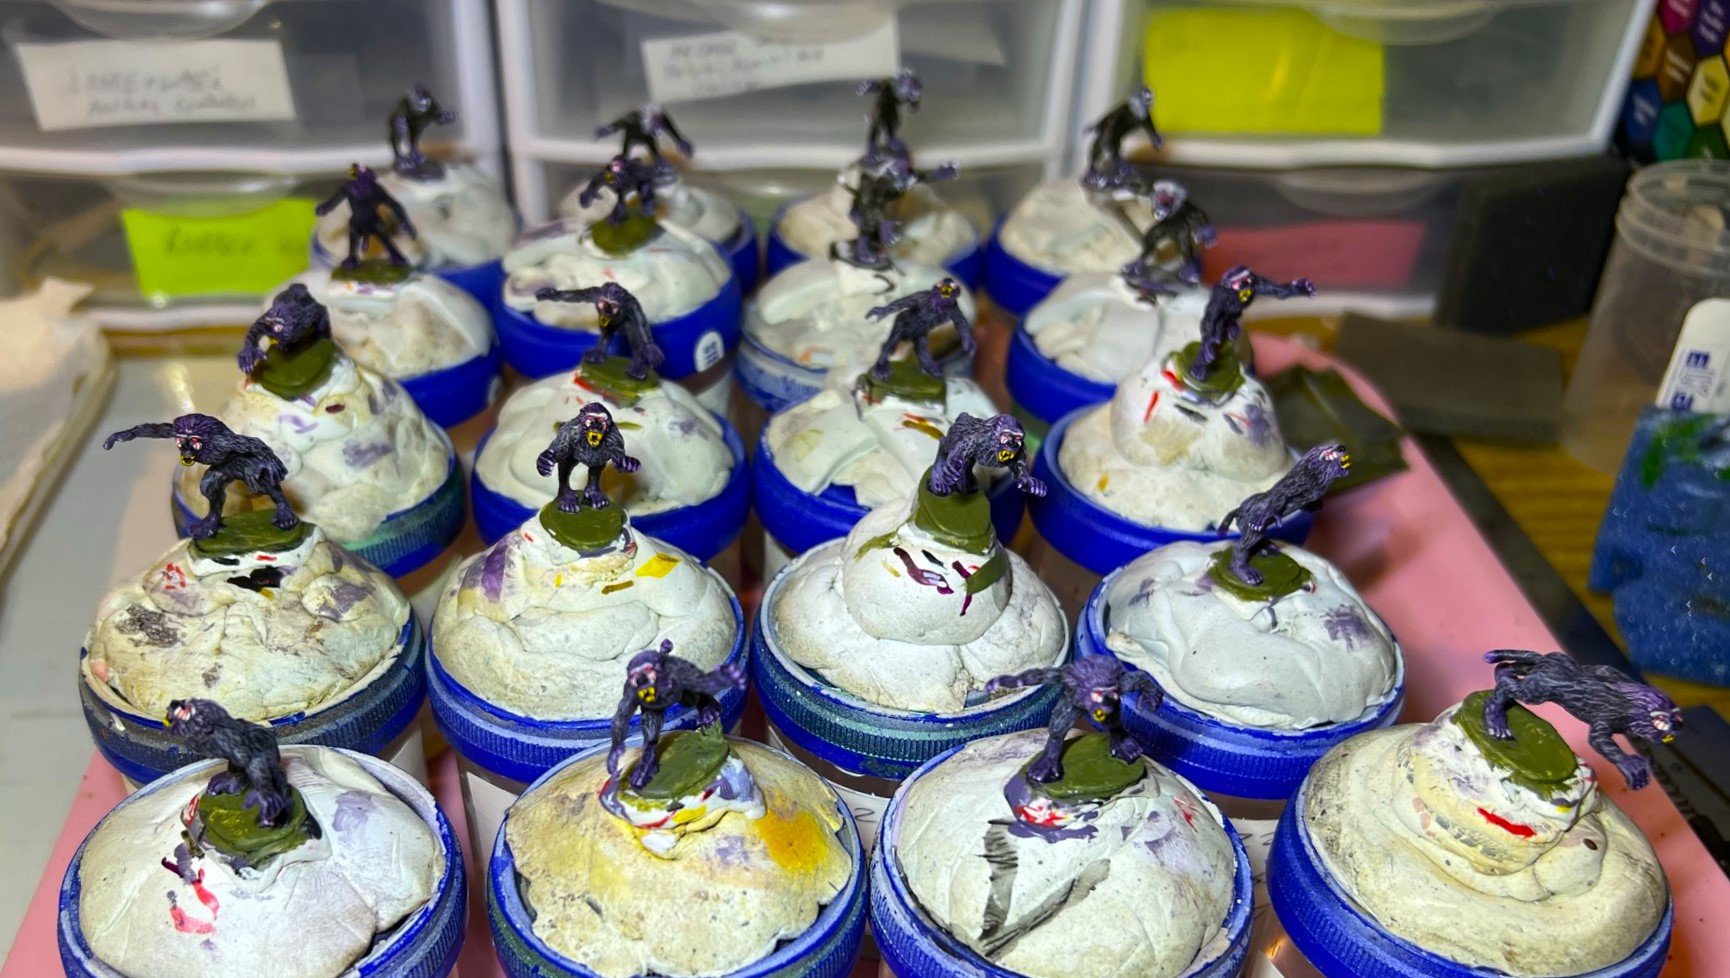
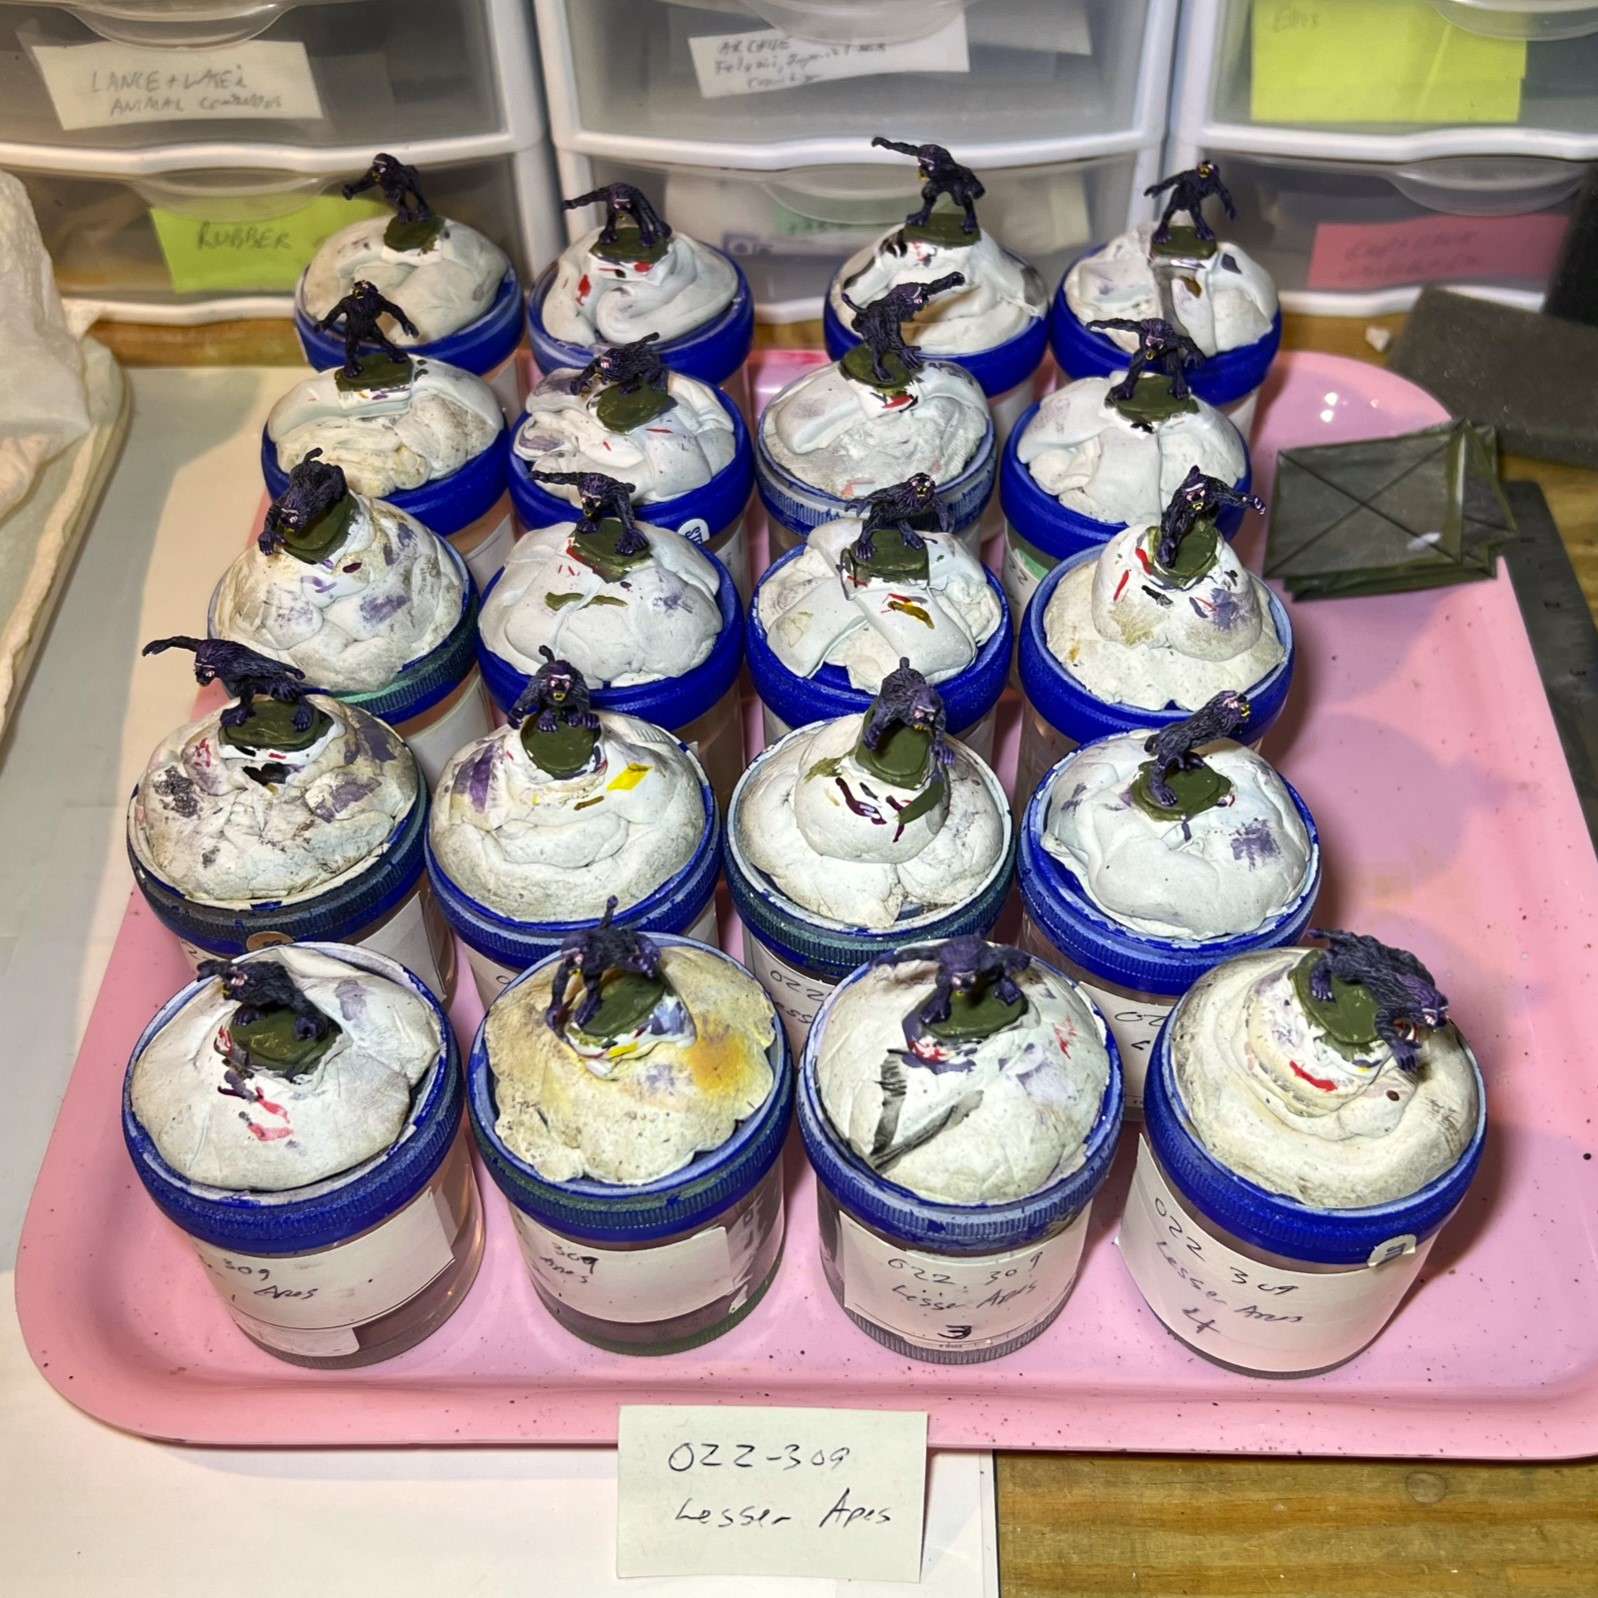
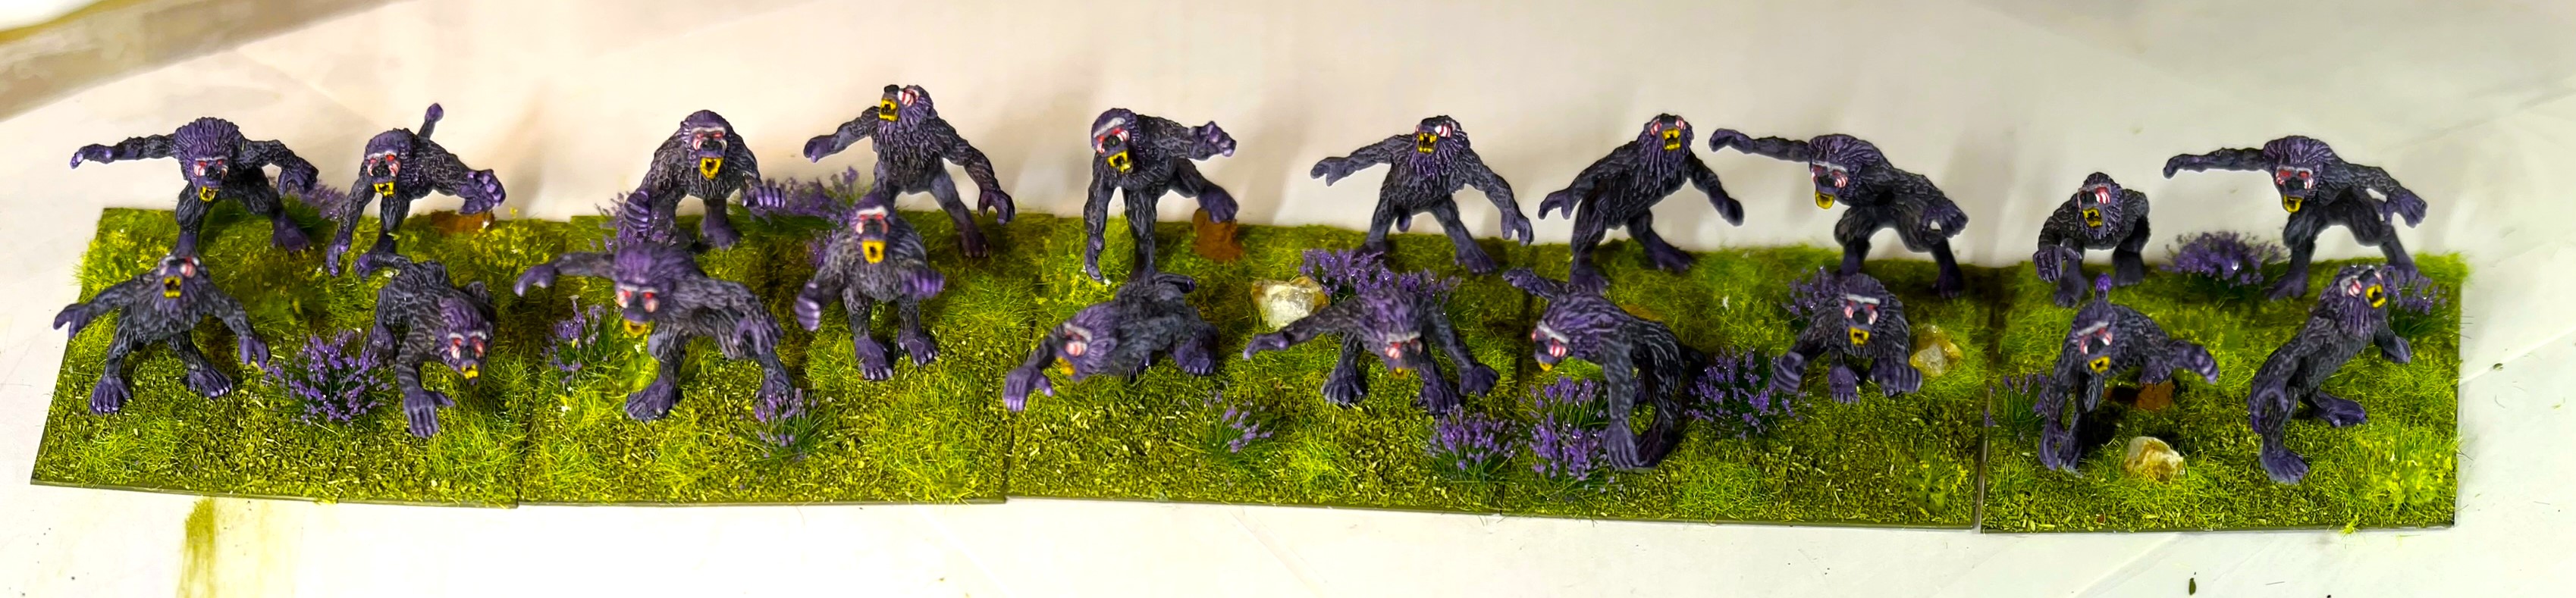
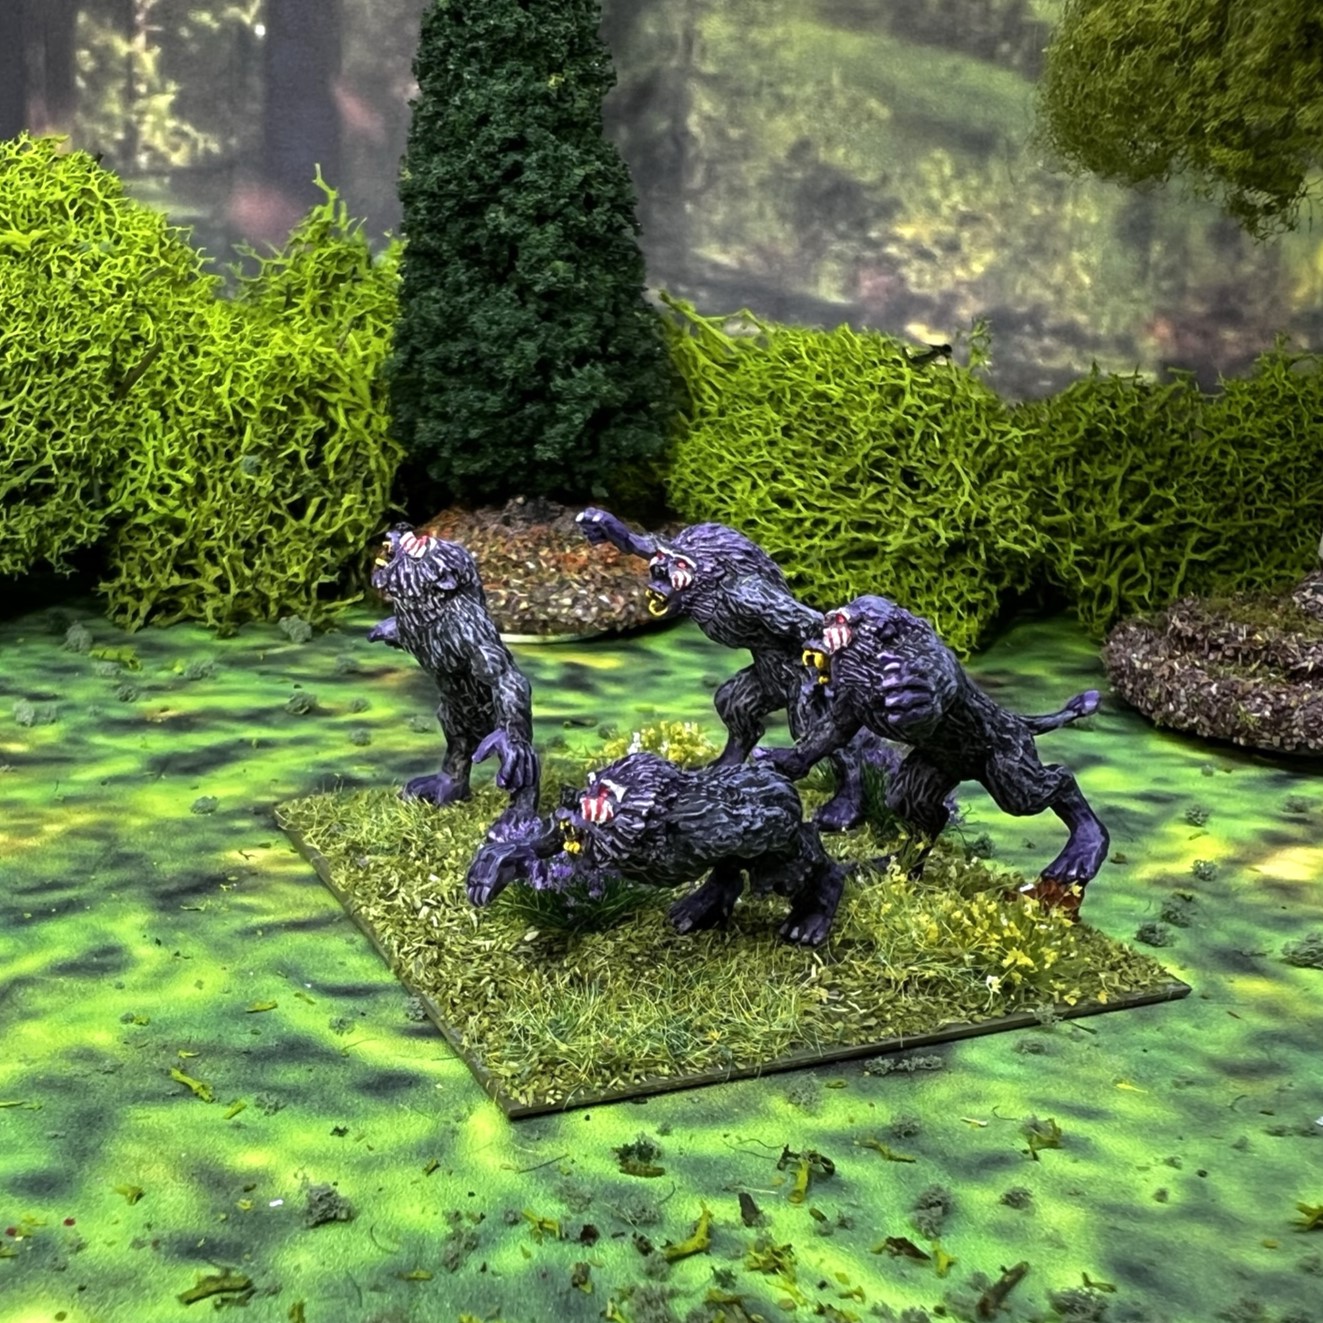
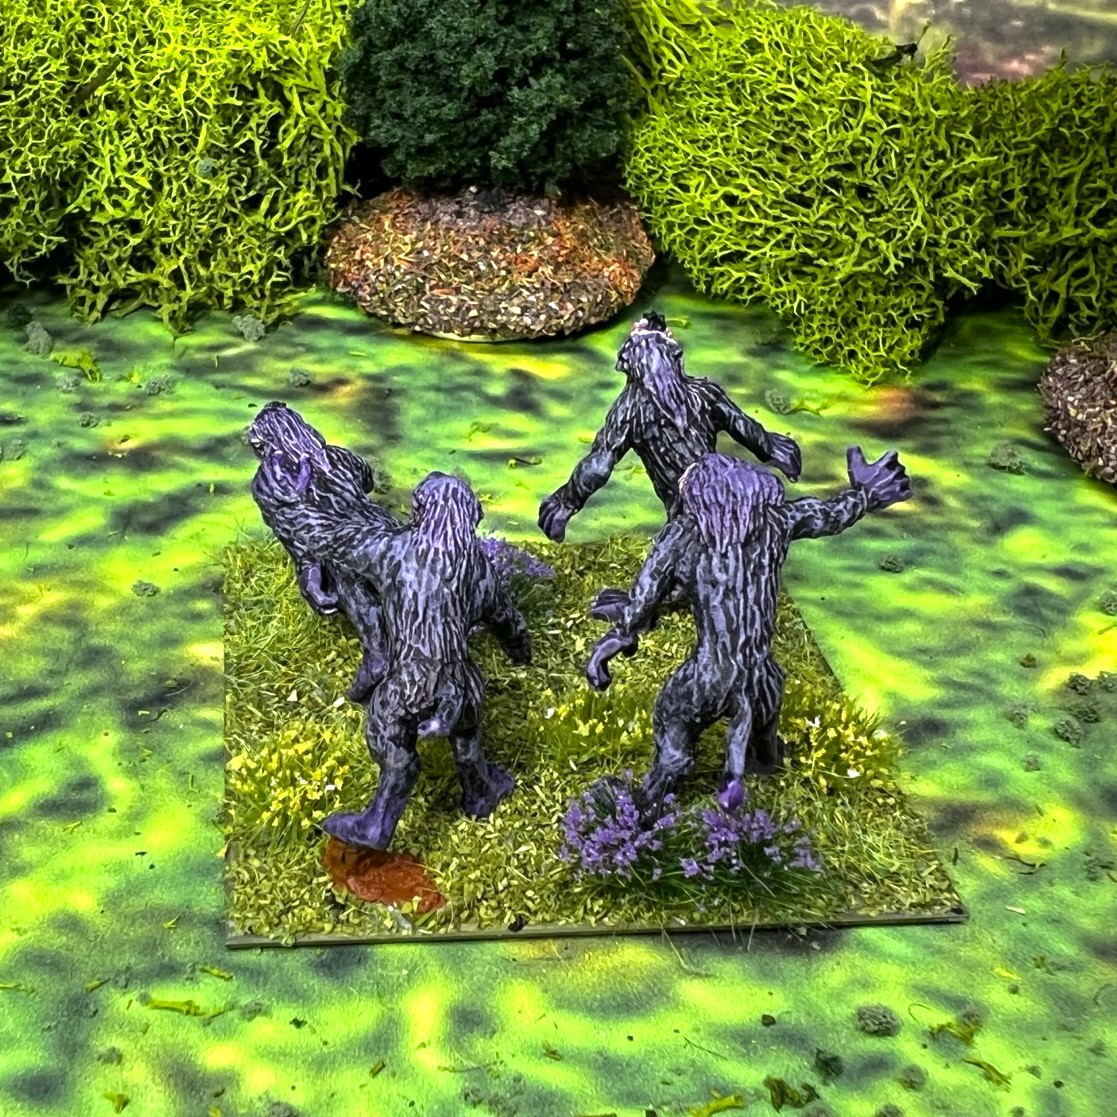
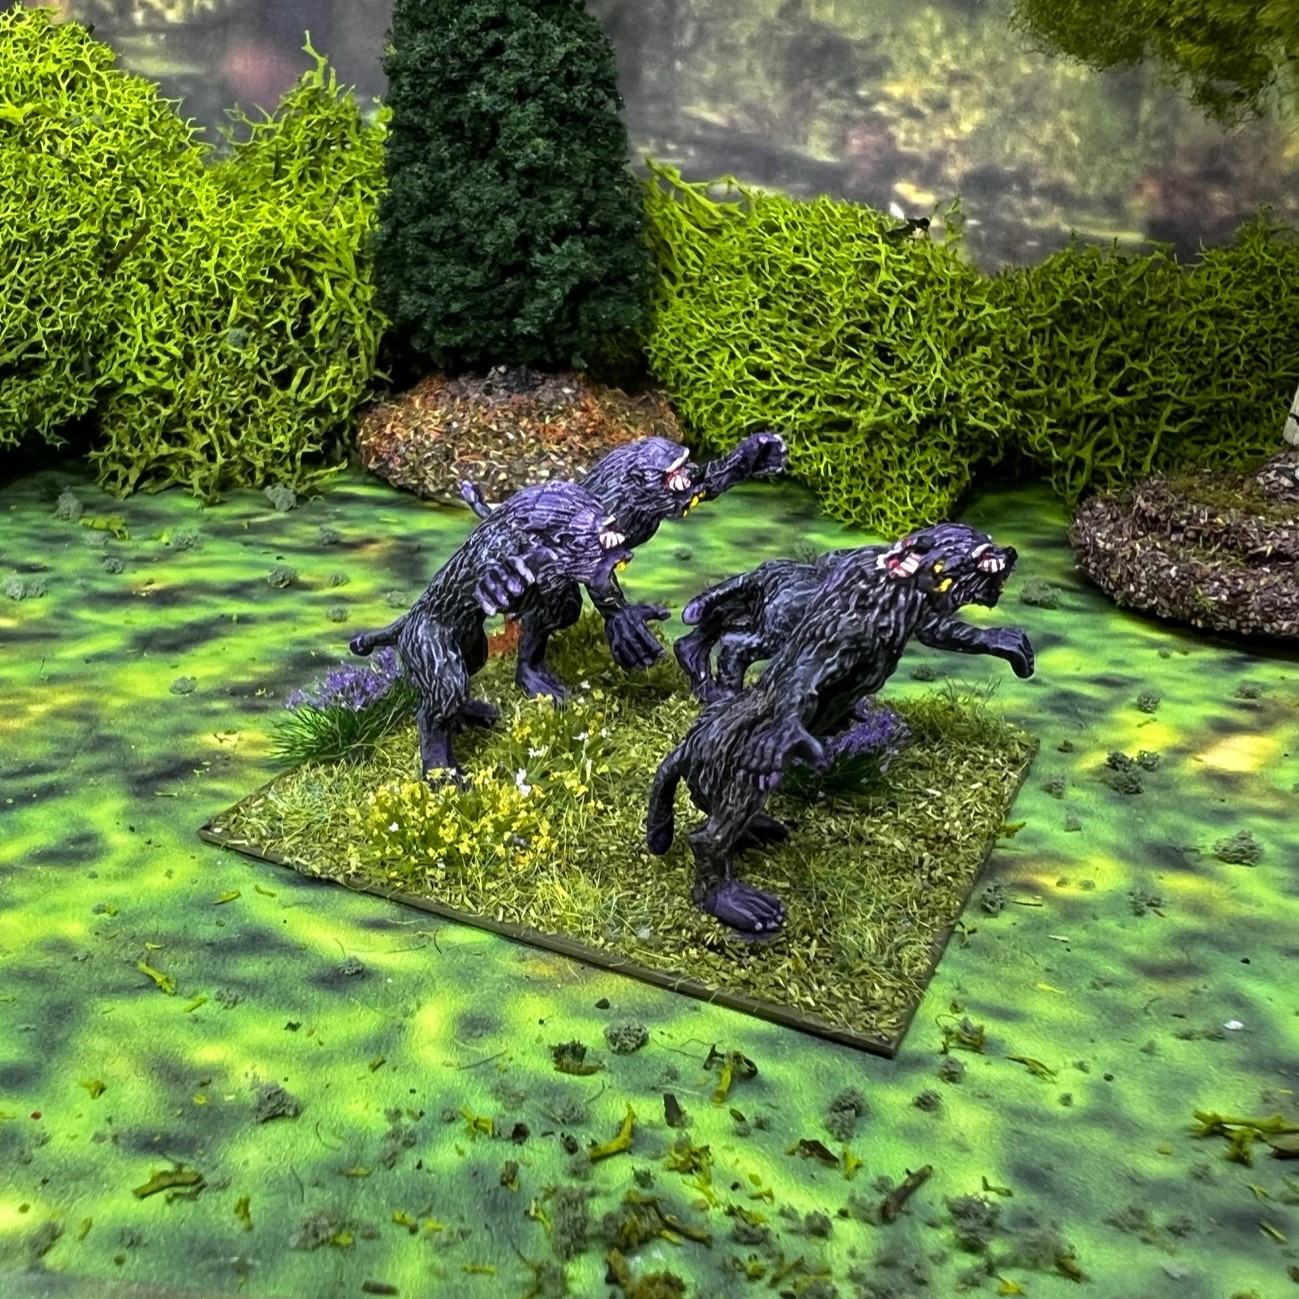
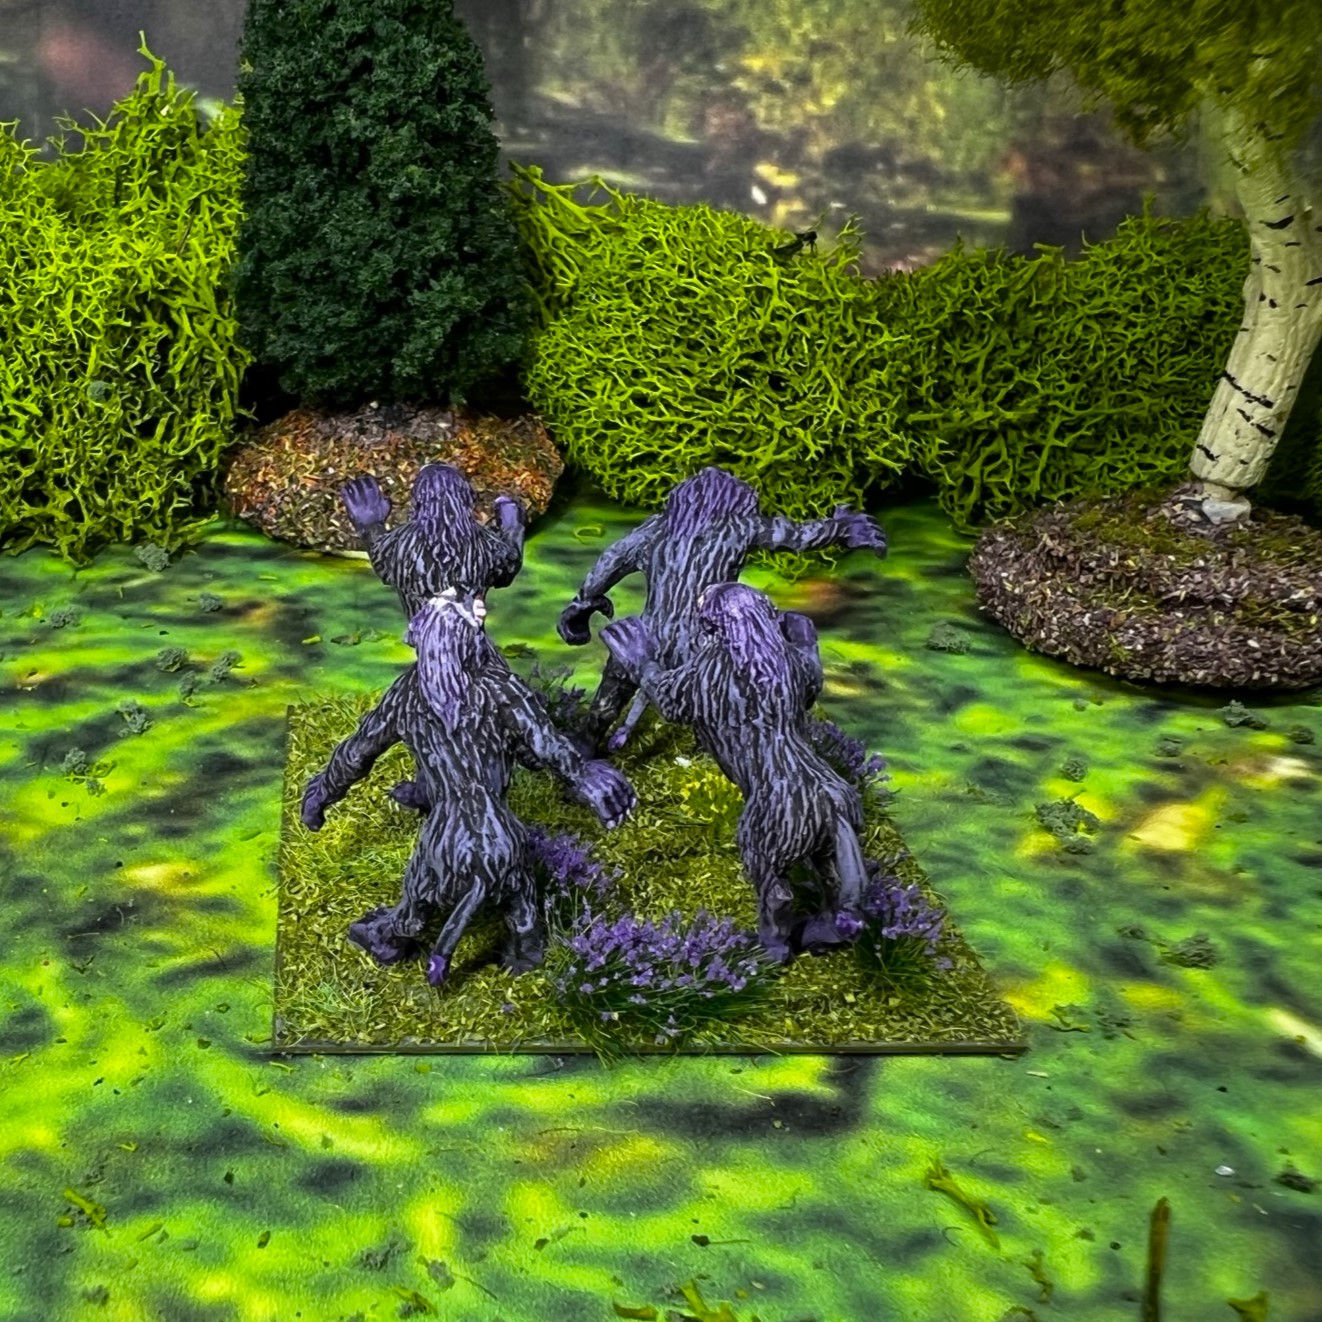
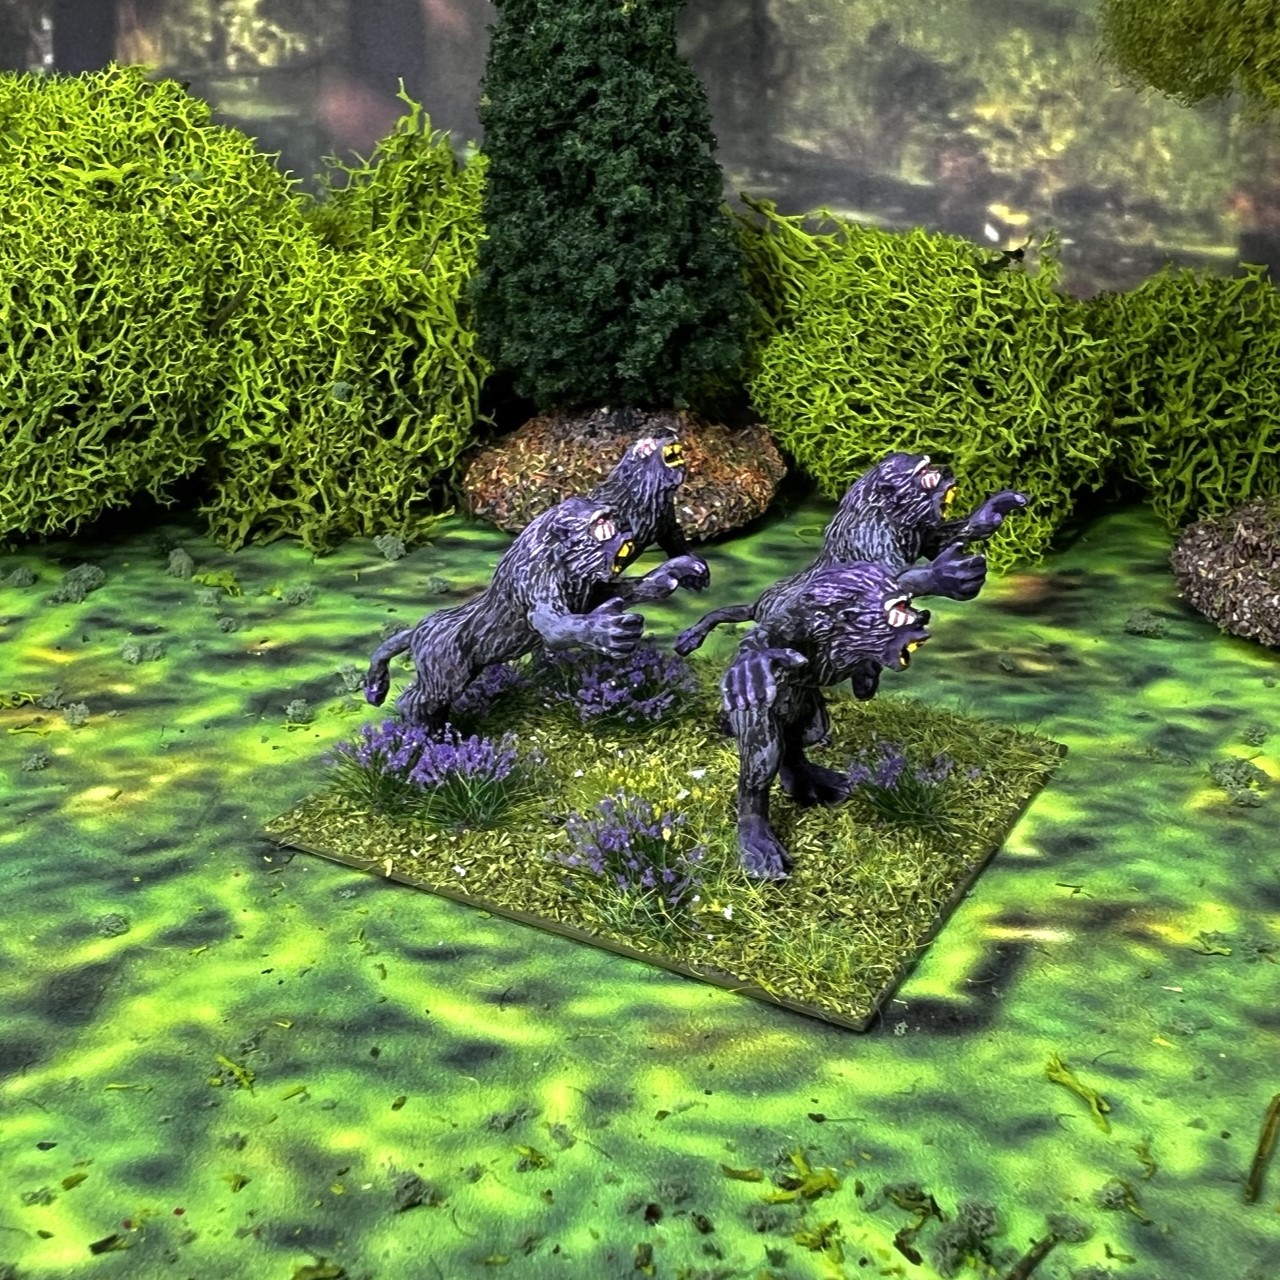
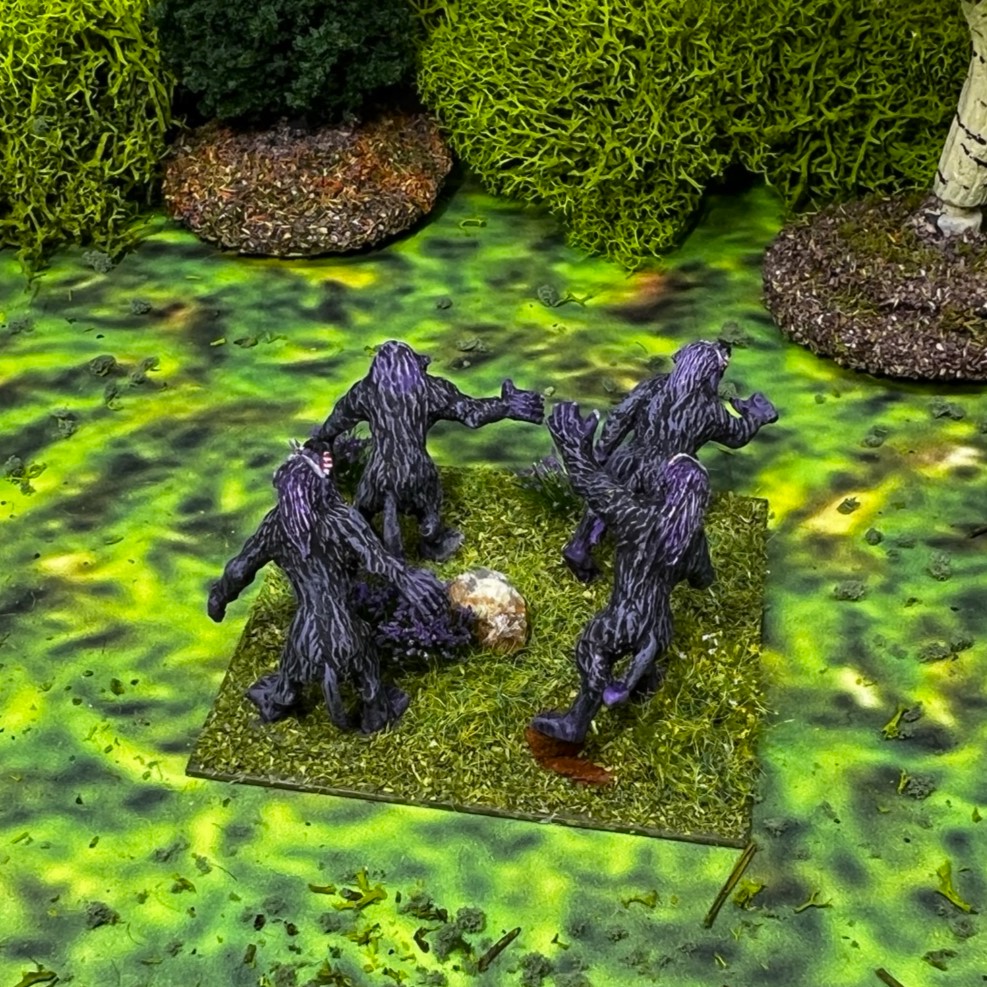
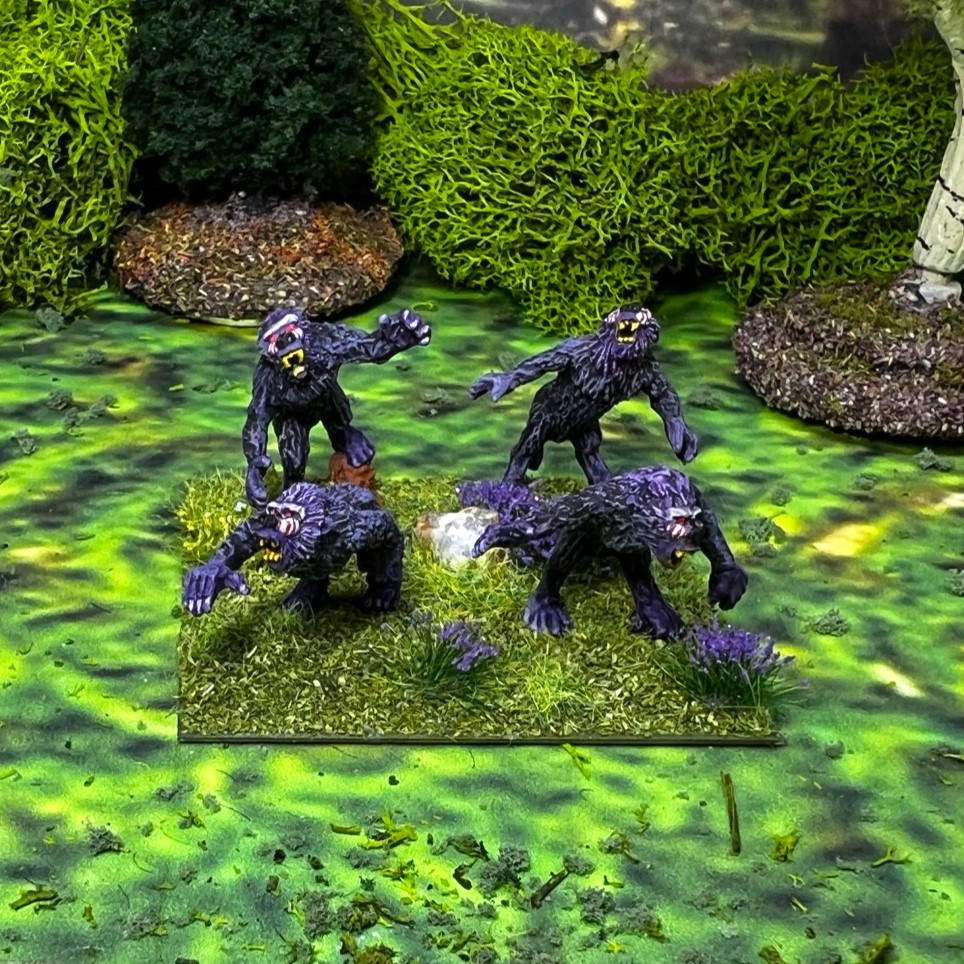
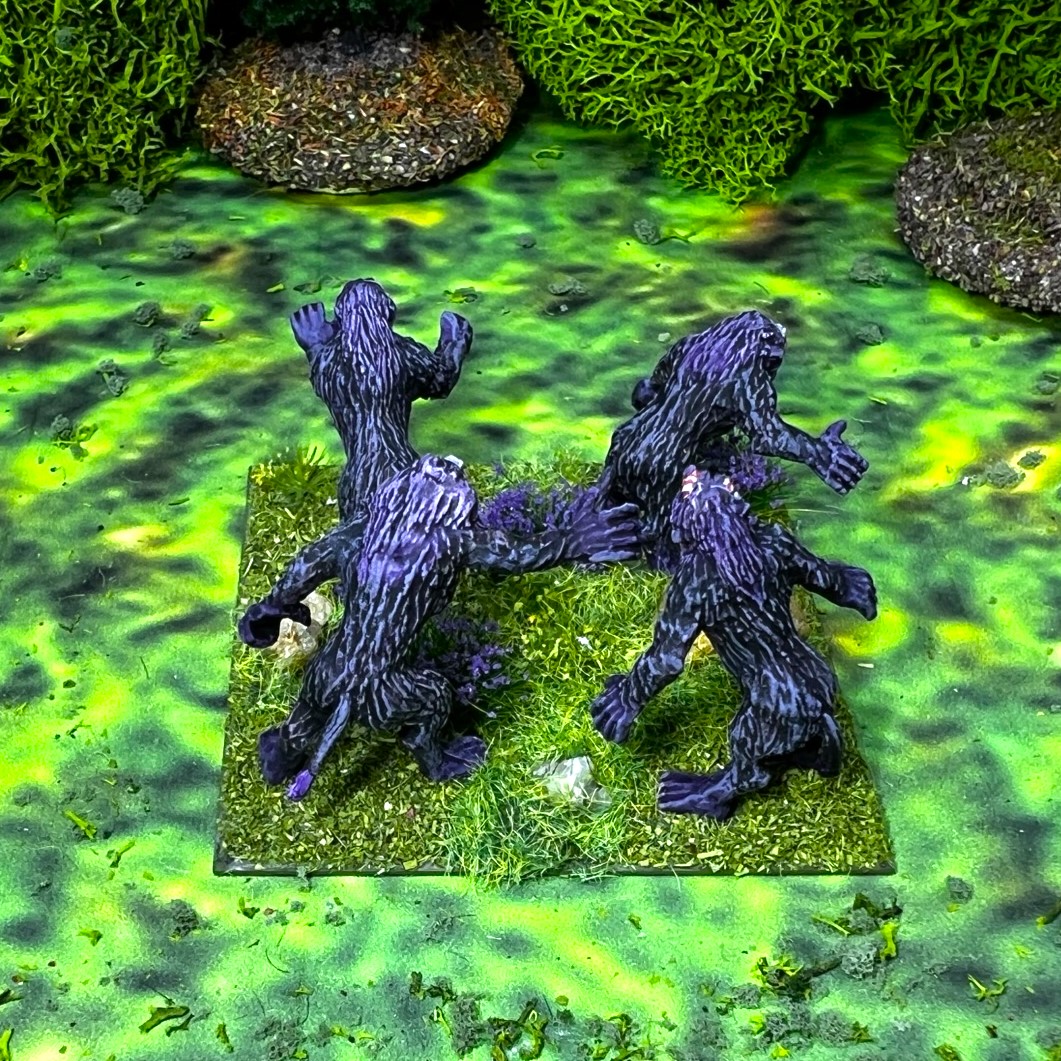
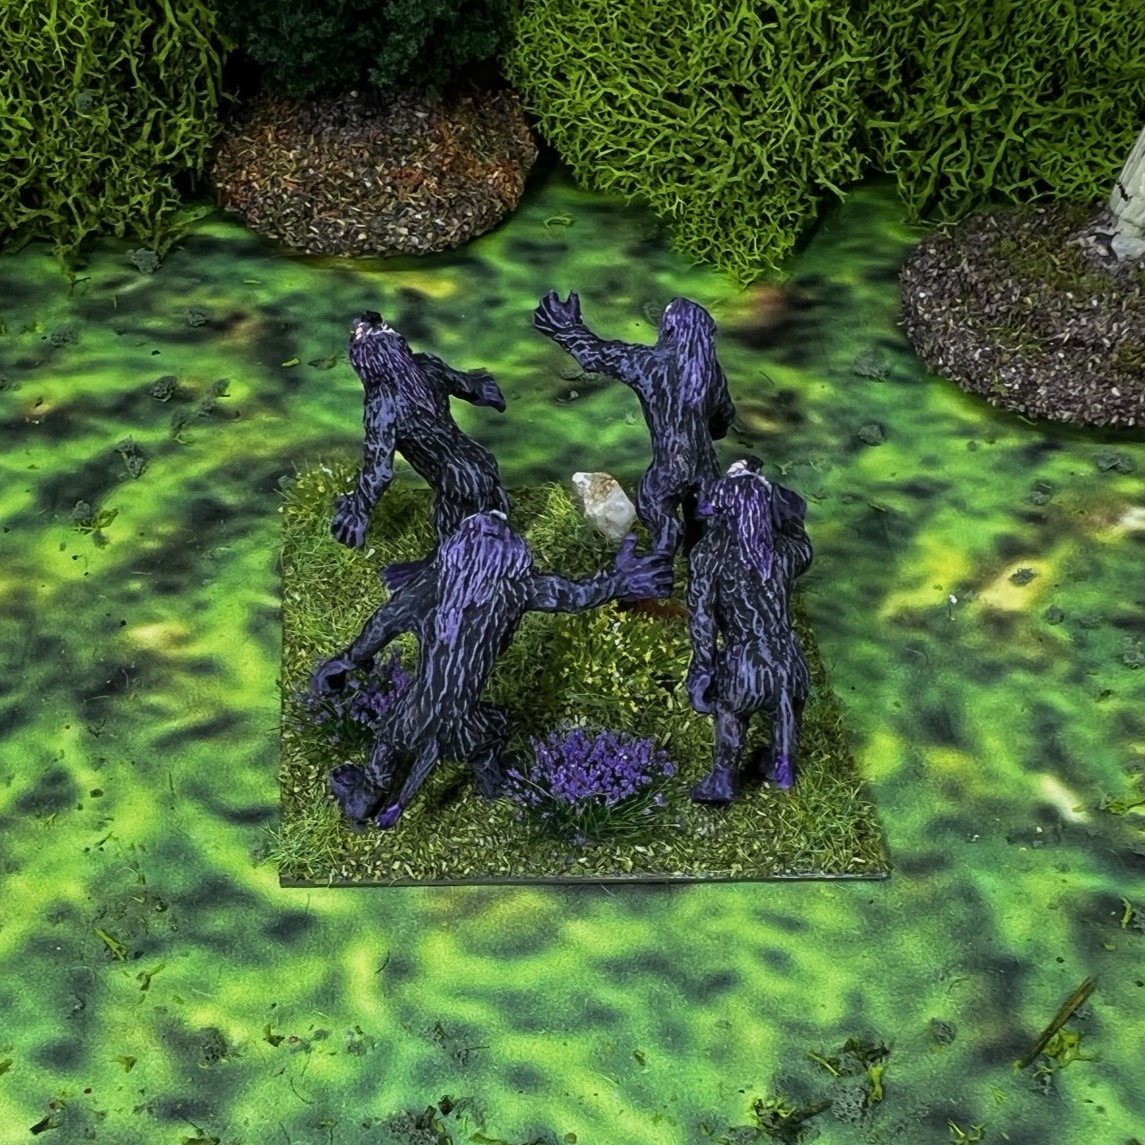
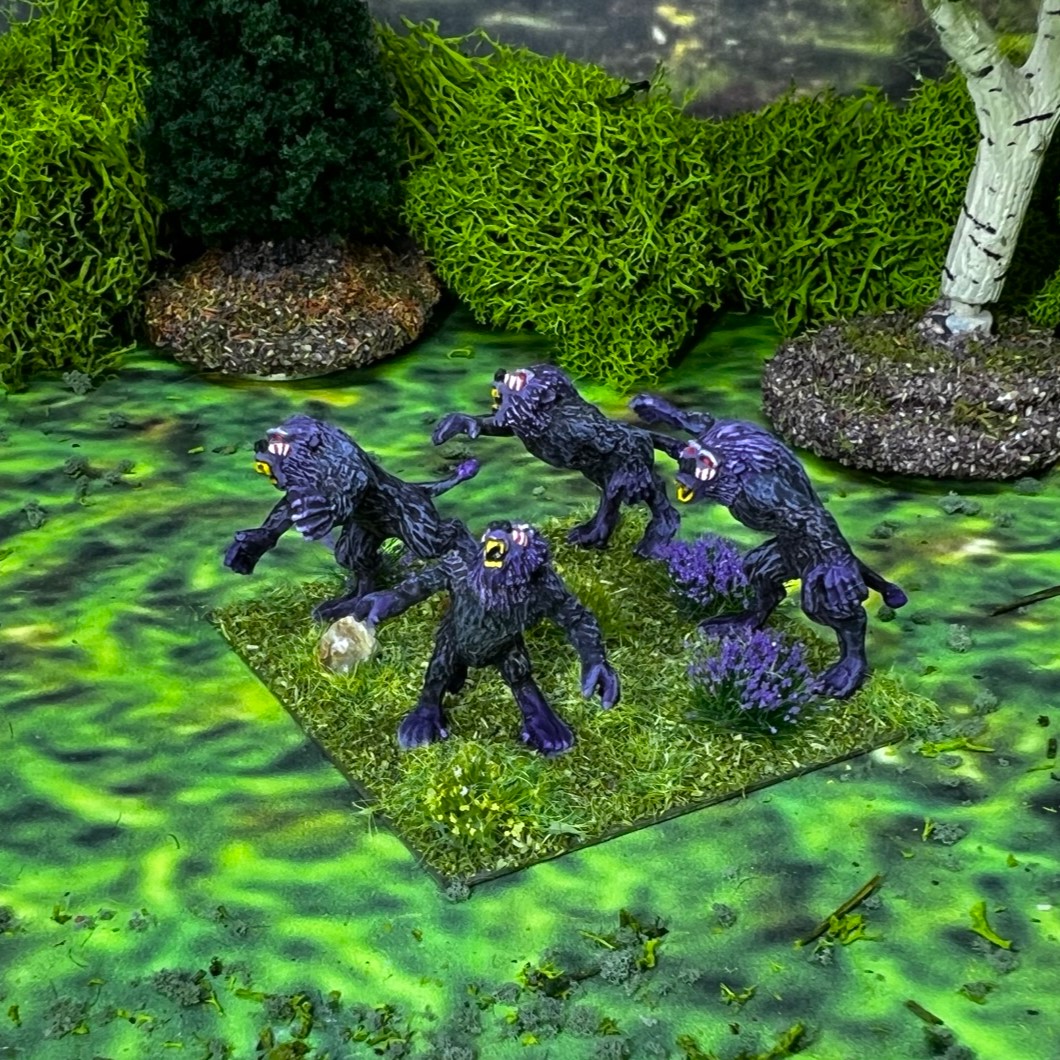
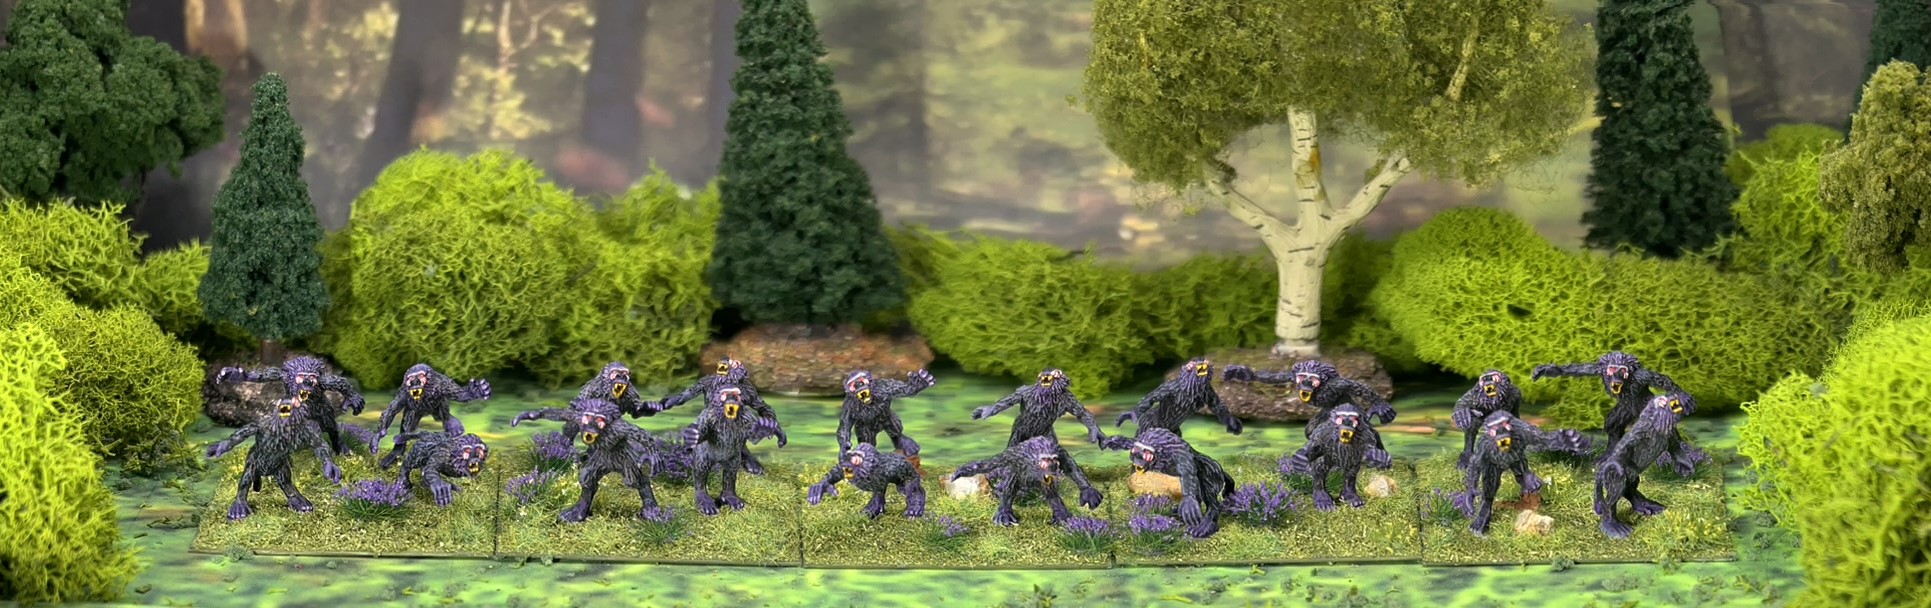
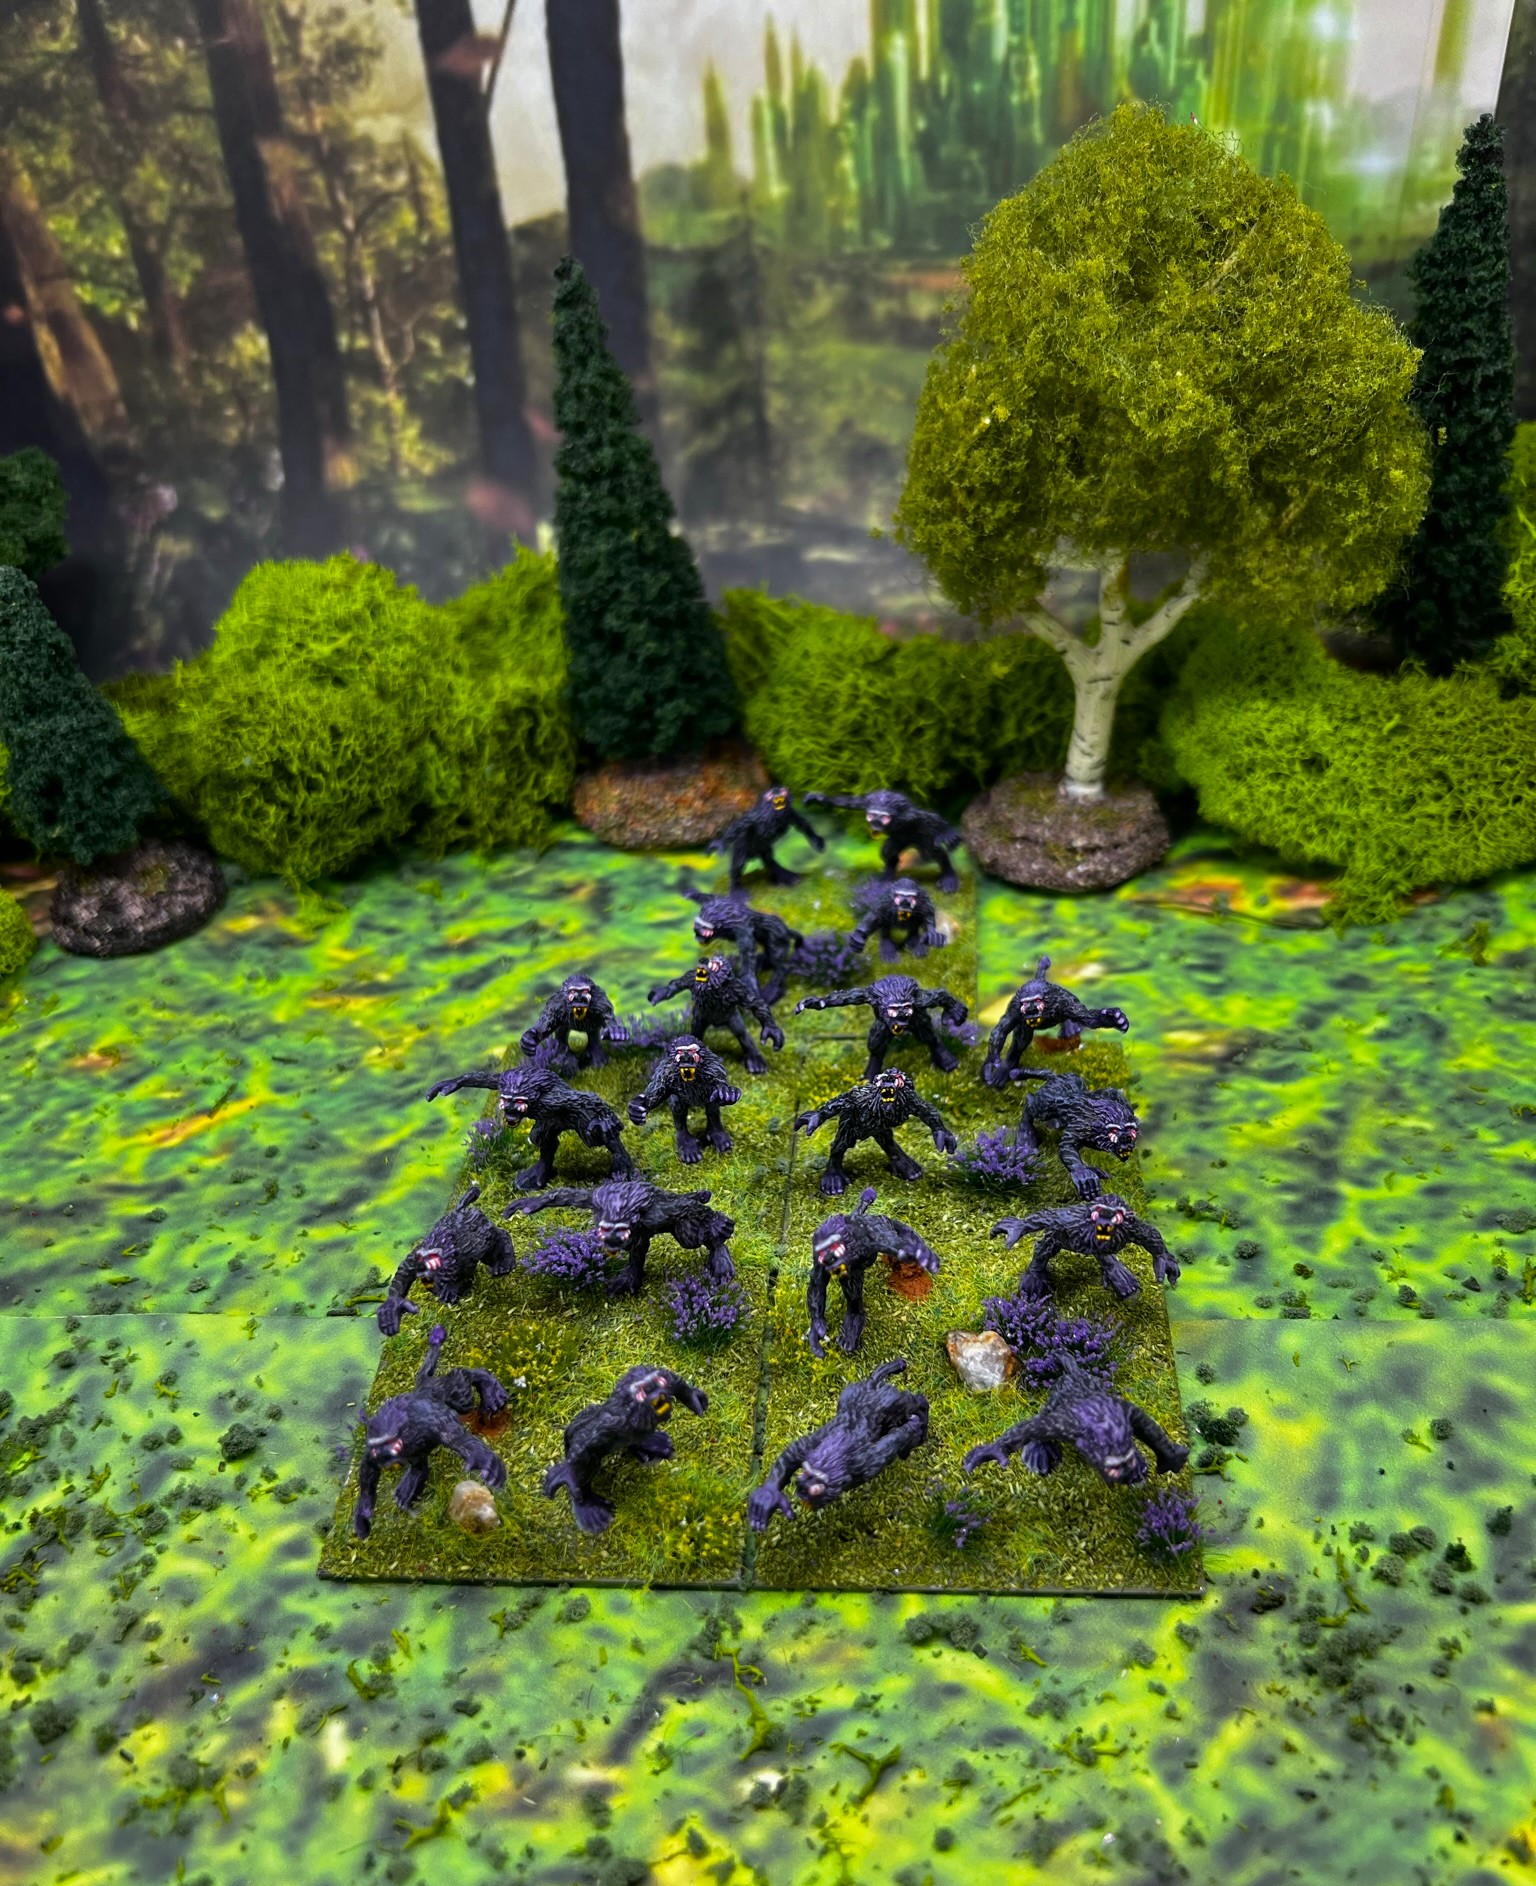
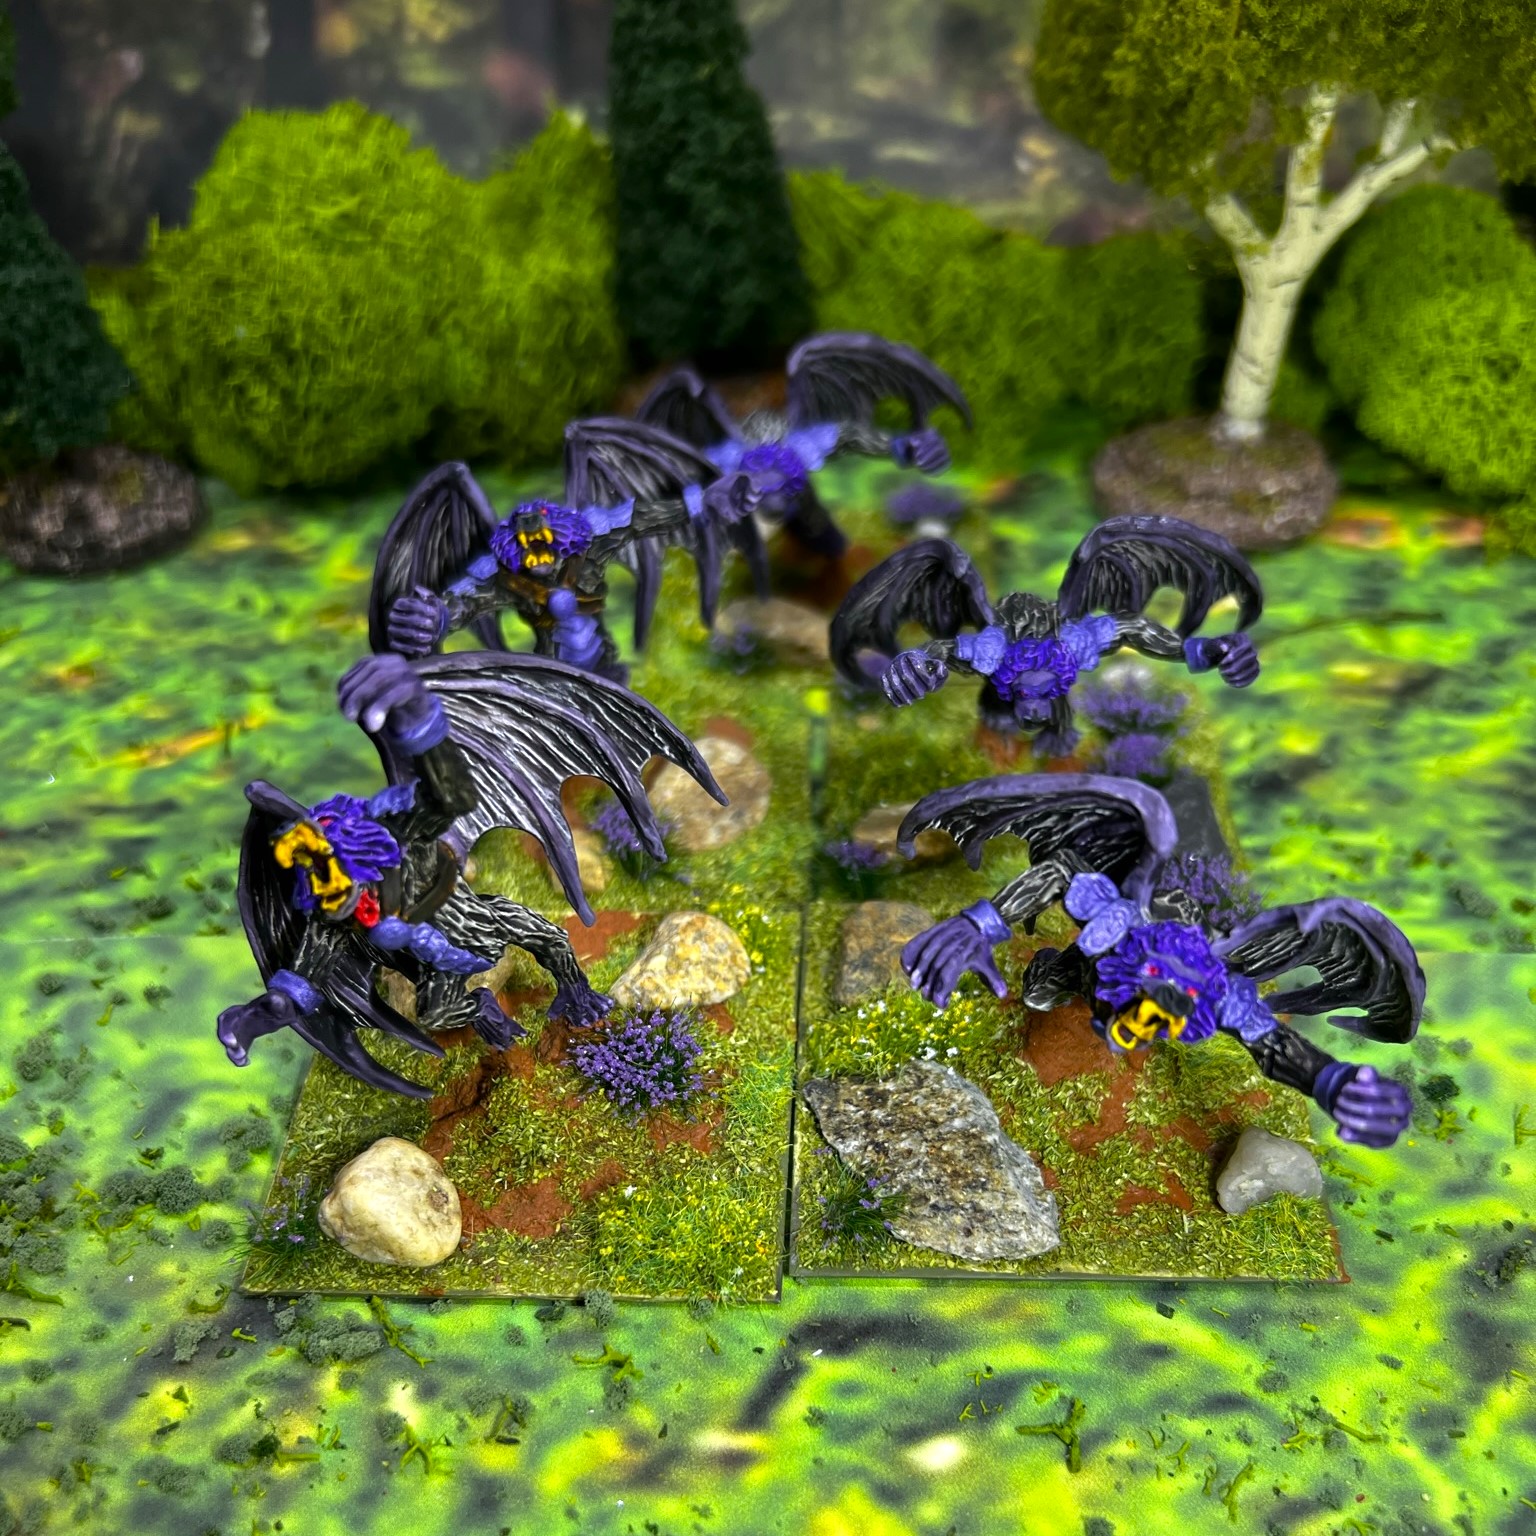
Besides, the Lesser Ape figures have tails – yet look otherwise like gorillas. They are deployed on 5 two-inch square bases in groups of four figures. The Lesser Apes are SKU #OZZ309, and are made up of twenty 28mm ape figures in several different poses.
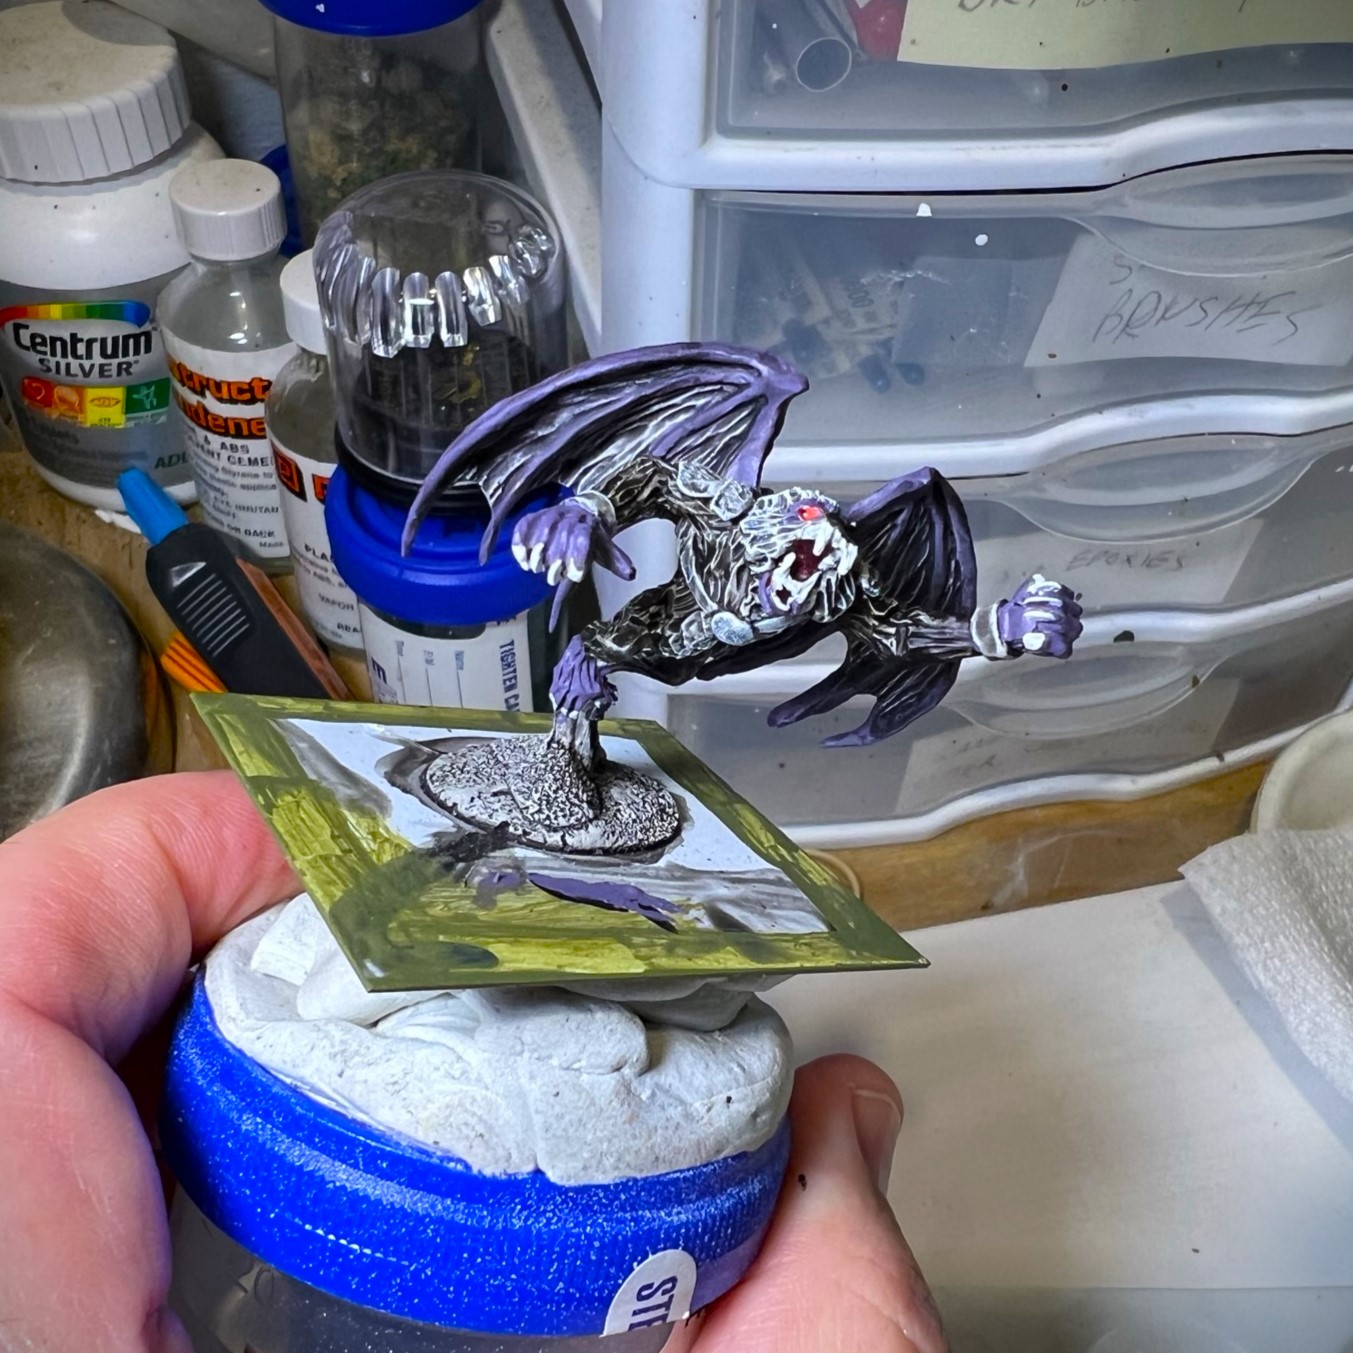
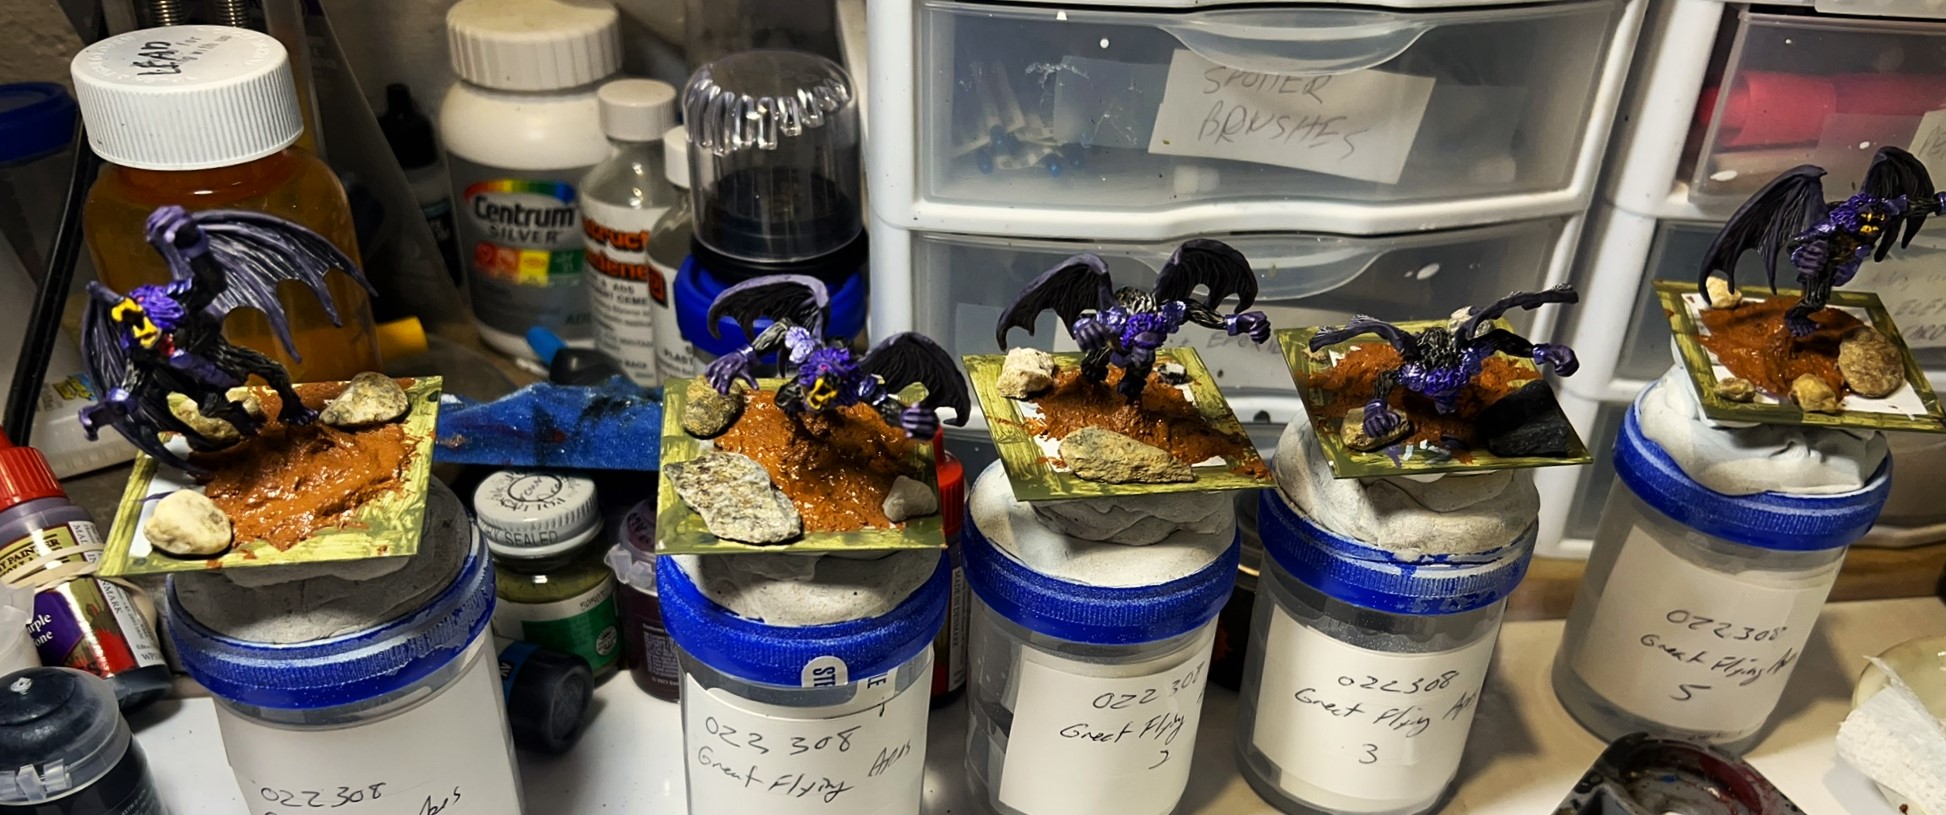
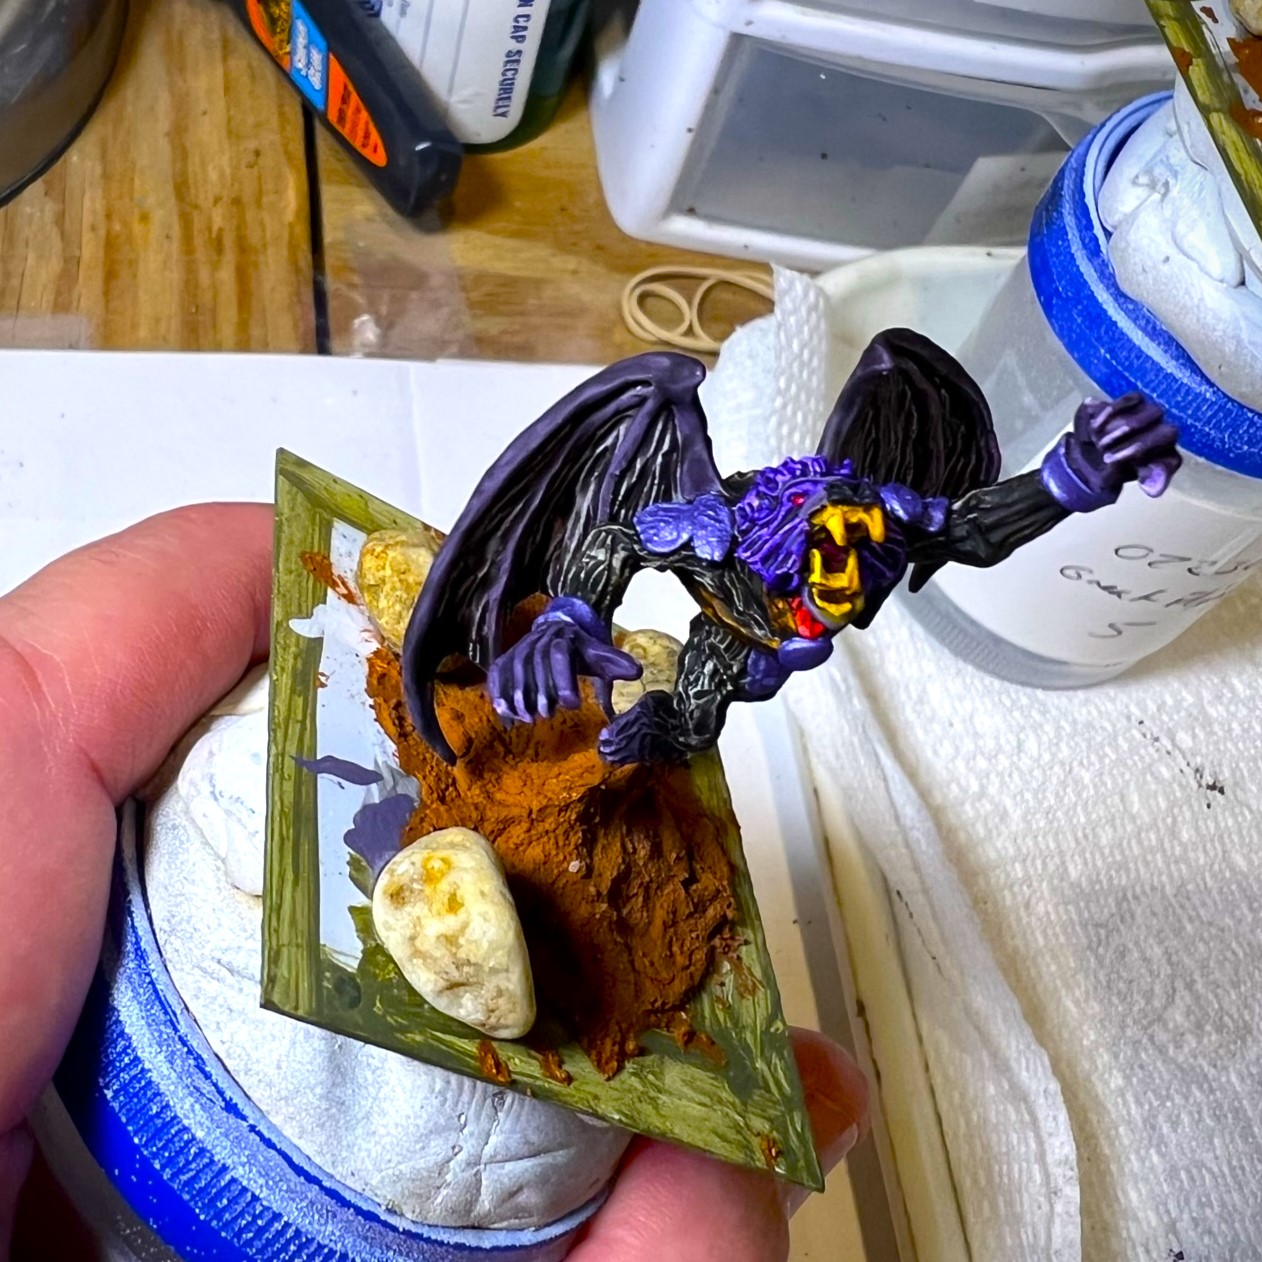
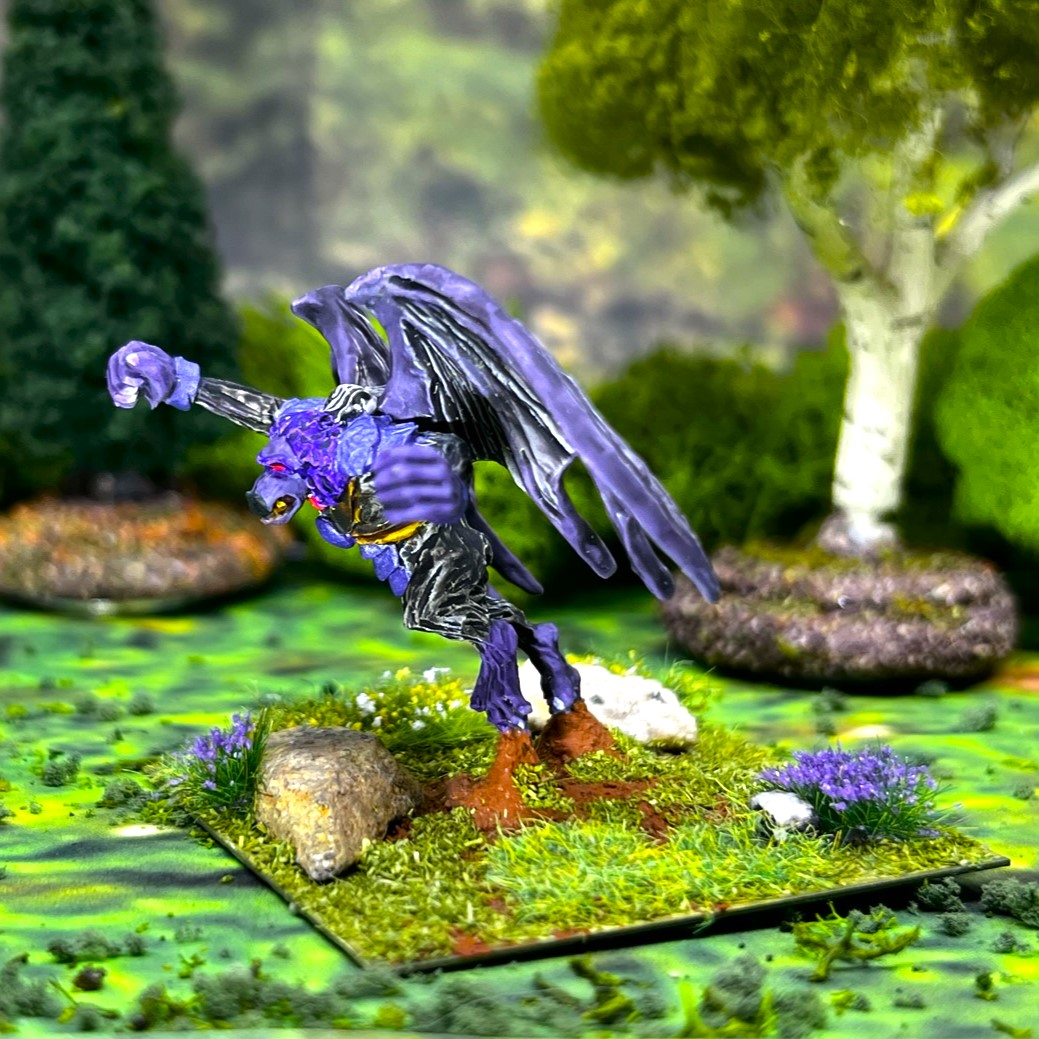
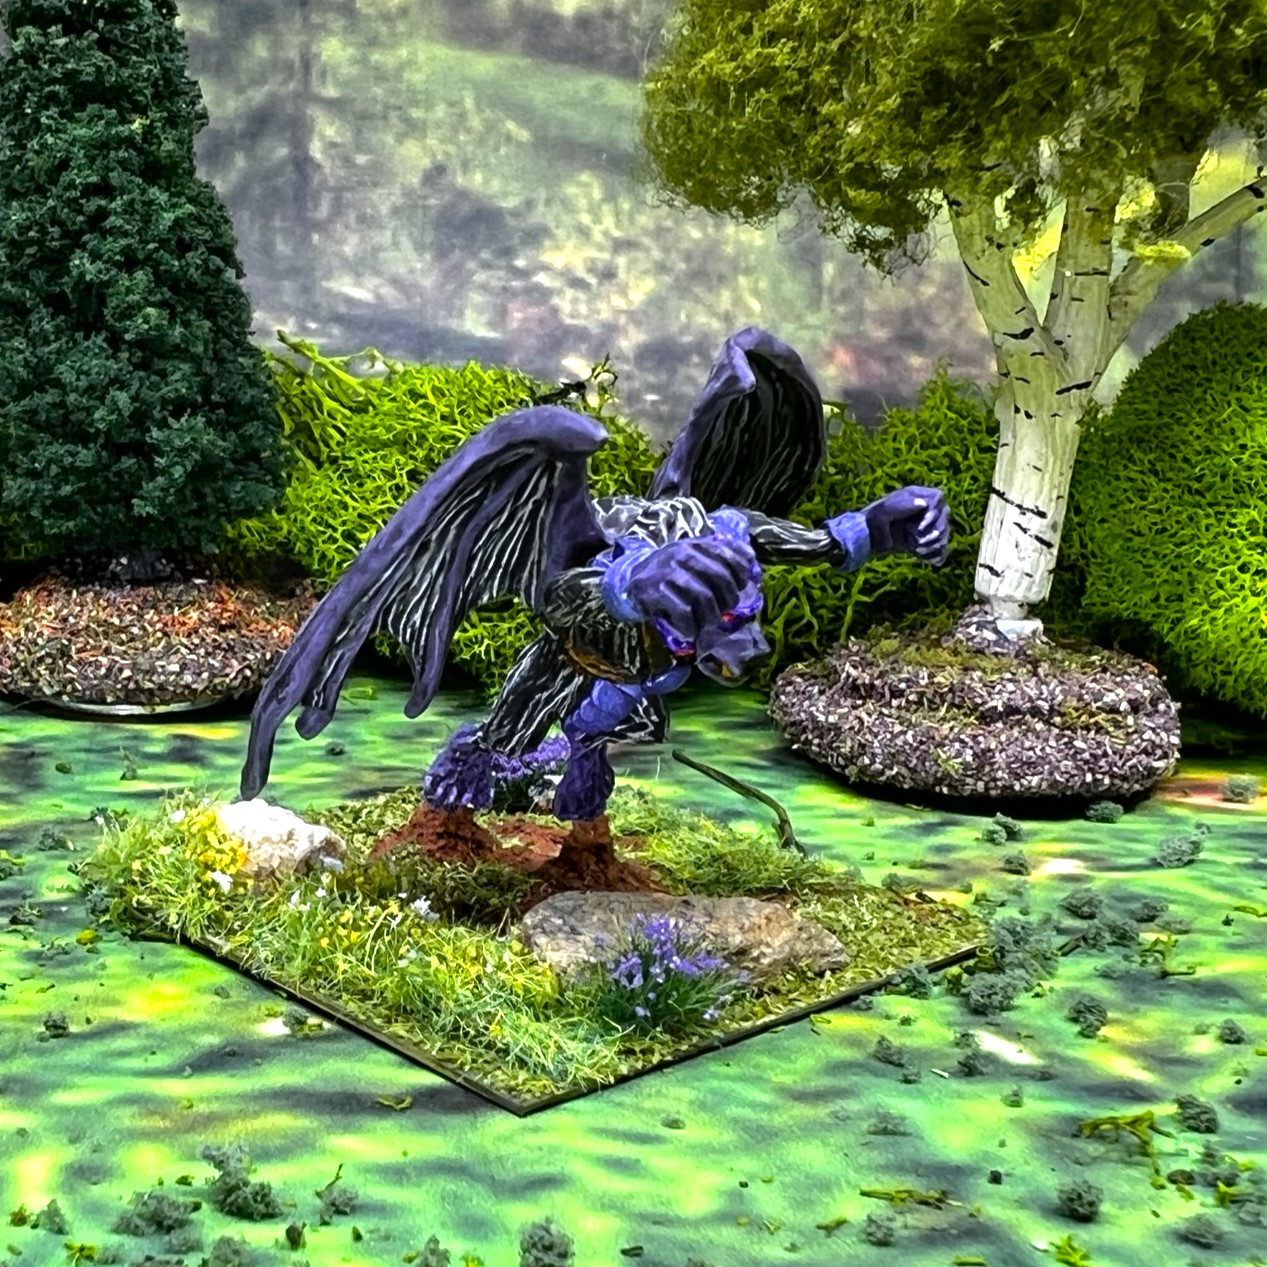
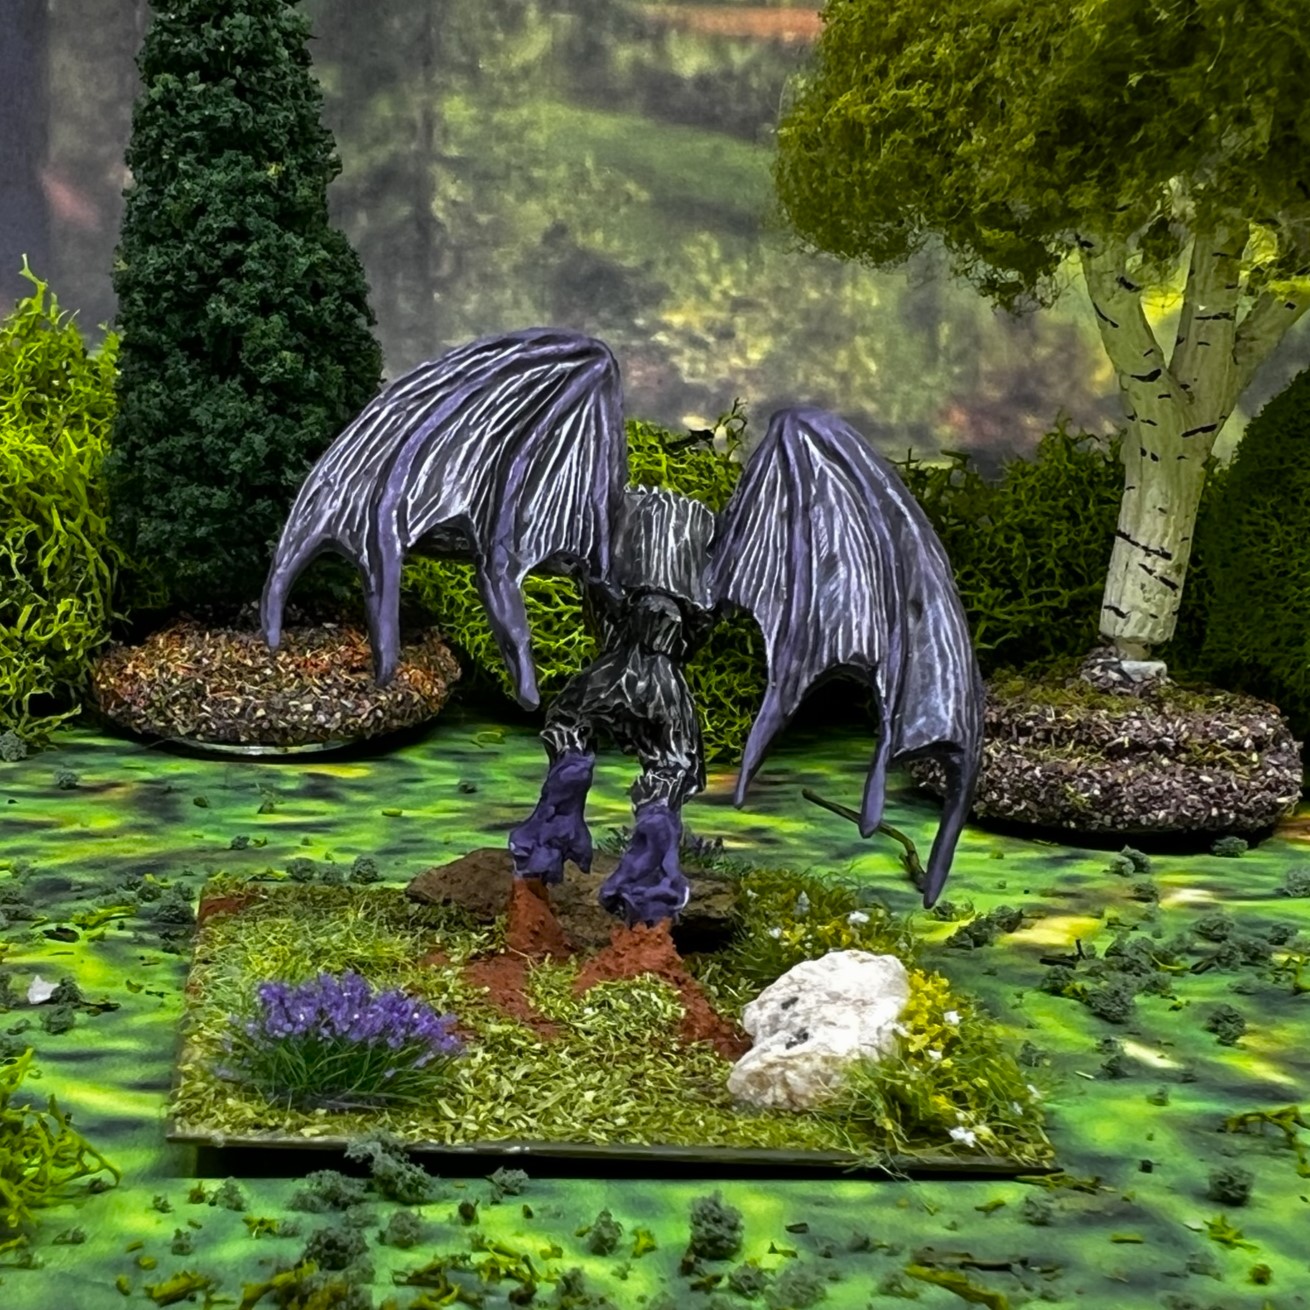
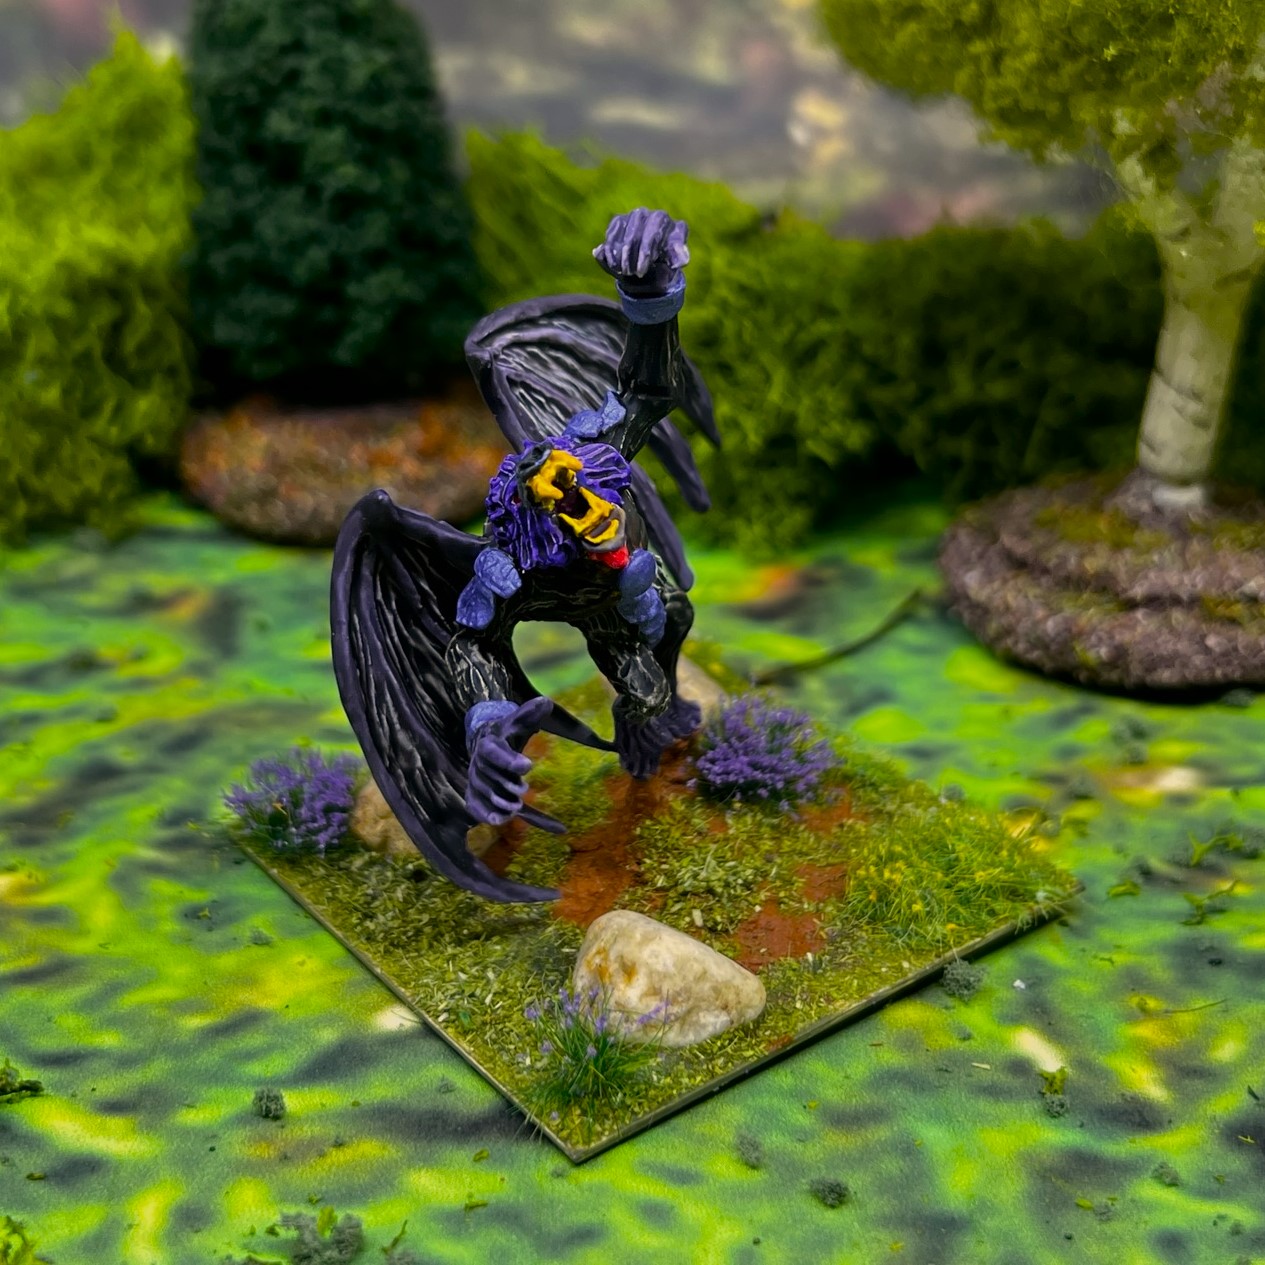
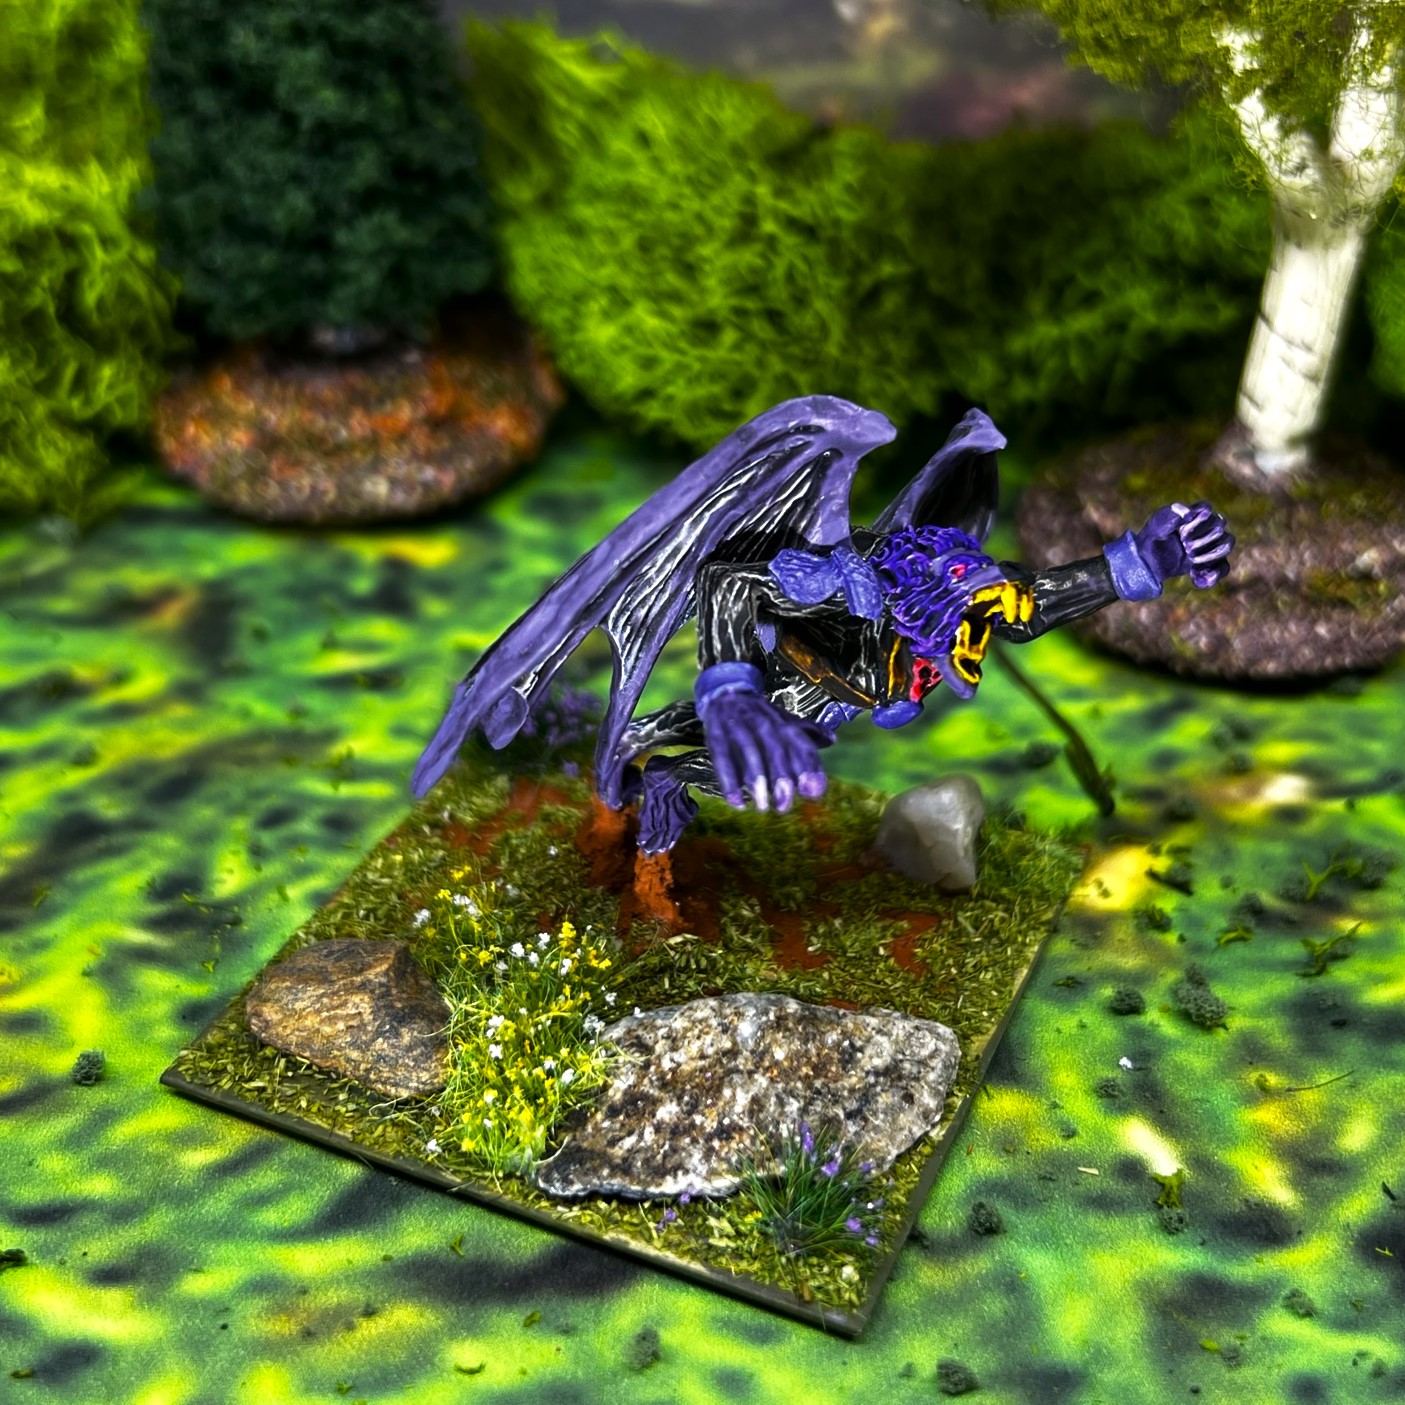
The Great Flying Apes are SKU #OZZ308. The figures are large 28mm scale figures deployed one per each two-inch square base. Their faces and poses are varied – but are more dog-like or baboon-like. They needed assembly (two pieces). As you’ll see, I took the approach of painting prototypes for each type of ape and adjusting their looks to suit me.
Below you will see some WIP shots, and then some eye candy diorama-type shots. The units were both primed earlier on January 7th, but the painting and flocking mainly went from January 20th to January 27th. This was again was a good pace for me (25 figures in 7 days). Below you’ll see the WIP shots – click on any to get a better view.
WIP shots…Lesser Apes
My process for the Lesser Apes was to try to paint up a few and see what I liked and what I did not with end results. I ended up going with a mandrill look on their cheeks – which I liked a lot better than my initial more monocolor try – though painting vermilion and white lines on little ape cheeks is a bit tedious (but rewarding too). As I painted these, I also started one of the Great Flying Apes so as to align their color schemes. I used a various assortment of purples and purplish grays – all are listed at this post’s end if you’re interested in that.
January 20th progress on prototype stand – no cheeks yet.By Jan 21st, I had 6/20 painted – but I thought they needed more than the yellow fangs…White and red mandrill cheeks and brows were added on Jan 21st and I went back and corrected the previously painted figures to this scheme.January 22nd progress – 6 fully done and 4 more partially.Jan 23rd close upJanuary 23rd progressJanuary 24th progress – 14/20.Jan 25th – all are painted minus varnishingAfter varnishing a few figures in this pose I added some “earth” texture paint under their left legs.January 27th – done and ready for eye candy shots!
Lesser Apes Eye Candy
I arranged these such that each stand had different poses in different positions. There are 5 stands of 4 figures each.
Stand 1
Stand 2
Stand 3
Stand 4
Stand 5
Lesser Apes Group Shot
The Lesser Apes in line formation.The Lesser Ape Regiment in column formation.
On to the WIP shots for the Great Flying Apes – click on any to get a better view.
WIP shots…Great Flying Apes
These are very large figures!
January 23rd work.January 25th progress – note the different poses.Close up of January 25th progress on one figure.Later on January 25th, I collected rocks from near my driveway (the non-frozen ones), and began to add them and some texture paint to the bases.Then on Jan 26th I applied the varnish to the model. I used a craft metallic purple paint for the armor – and I like how it came out.A panoramic shot of the finished figures before I removed them from the poster tack/specimen jar combos.
Now for more eye candy – this time for the Great Flying Apes!
Eye Candy Great Flying Apes
Stand 1
Stand 2
Stand 3
Stand 4
Stand 5
Great Flying Apes Group shots
Panoramic shot of the Great Flying Apes in line formation.The Great Flying Apes in column formation.
Family Photo!
A gathering of Apes!
I appreciate your taking a look at this post – as always I appreciate your interest and readership – and hope that this kept you entertained. This makes 52 Wars of Ozz figures that I have painted for January, and 146 since November.
And yes, again, I still have more to come…
Miscellaneous details and references for those interested in that sort of thing:
For all of my previous posts on Wars of Ozz games, figures, units, and other related projects – please see this page.
PAINTS, INKS, GLAZES, SHADES, WASHES, PIGMENTS, FLOCKING, GLUES AND MORE THAT I USED ON THE LESSER APES AND THE GREAT FLYING APES:
Please note that any paints used on both Ape units in bold, otherwise they were just used on the Great Flying Apes except as annotated.
Gorilla Glue
2″ square steel base from Wargames Accessories (#21)
Poster tack
Vallejo Premium Primer “White”
Vallejo “Flow Improver”
Vallejo “Airbrush Thinner”
Citadel “Nuln Oil” (wash)
Vallejo Model Color “White”
Citadel “Contrast Paint – Sigvald Burgundy”
Citadel “Contrast Paint – Contrast Medium”
PS Model Color “British Brown Drab”
Citadel “Daemonette Hide”
Citadel “Contrast Paint – Dreadful Visage”
Citadel “Contrast Paint – Ratling Grime”
Citadel “Warpfiend Grey”
Vallejo Game Ink “Red”
Army Painter “Purple Tone” (wash/shade)
Vallejo Game Ink “Violet” (on Great Flying Apes only)
Citadel “Contrast Paint – Black Legion”
Vallejo Game Ink “Yellow”
Citadel “Seraphim Sepia” (wash/shade)
Vallejo Model Air “White Grey”
Citadel “Contrast Paint – Luxion Purple”(on Great Flying Apes only)
Craftsmart “Amethyst” (on Great Flying Apes only)
Vallejo Model Color “Vermilion” (on Lesser Apes only)
Citadel “Contrast Paint – Snakebite Leather” (on Great Flying Apes only)
Citadel “Blackfire Earth” (texture)
Elmer’s PVA Glue
Assorted small rocks and stones
Vallejo Mecha Varnish “Gloss Varnish”
Vallejo Mecha Varnish “Matte Varnish”
Army Painter “Battlefields Grass Green” (flocking)
Army Painter “Battlefield Field Grass” (flocking)
Army Painter “Battlefields Field Grass” (flocking)
Shadow’s Edge Miniatures “6mm Dark Forest Purple Tufts” (flocking)
Army Painter “Battlefields Meadow Flowers” (flocking)
Again, as you may want to check out the Wars of Ozz figures’ range – there are two places to get them (and I make no money from this btw). The game rules and the figures are available from the following two places: