Battle Group Boston’s HAVOC 2019 (or HAVOC XXXV) is in the books. This previous weekend in Shrewsbury, MA was a Friday-Sunday gaming marathon that saw me run two games (“What a Tanker”in North Africa and “Attack of the Warbots” using Combat Patrol™). I also played in three other games: a First Boer War scenario using Combat Patrol™; “Look Sarge we are Invading Russia” using Look Sarge, No Charts™; and another “What a Tanker” game on Sunday. I have not been blogging much recently as my prep for the event took a lot of time. So, this post will share some shots of the events, with more focus on the games that either I ran as a GM or participated in as a player.
Of note, it was very nice to have my West Point classmate and good friend Dave Wood from the Maryland HAWKS make it up to play in my games and run two of his own. It was also great to see attendance and gaming from the Mass Pikemen, especially Mike Morgan, Leif Magnuson, Chris Comeau, and others.
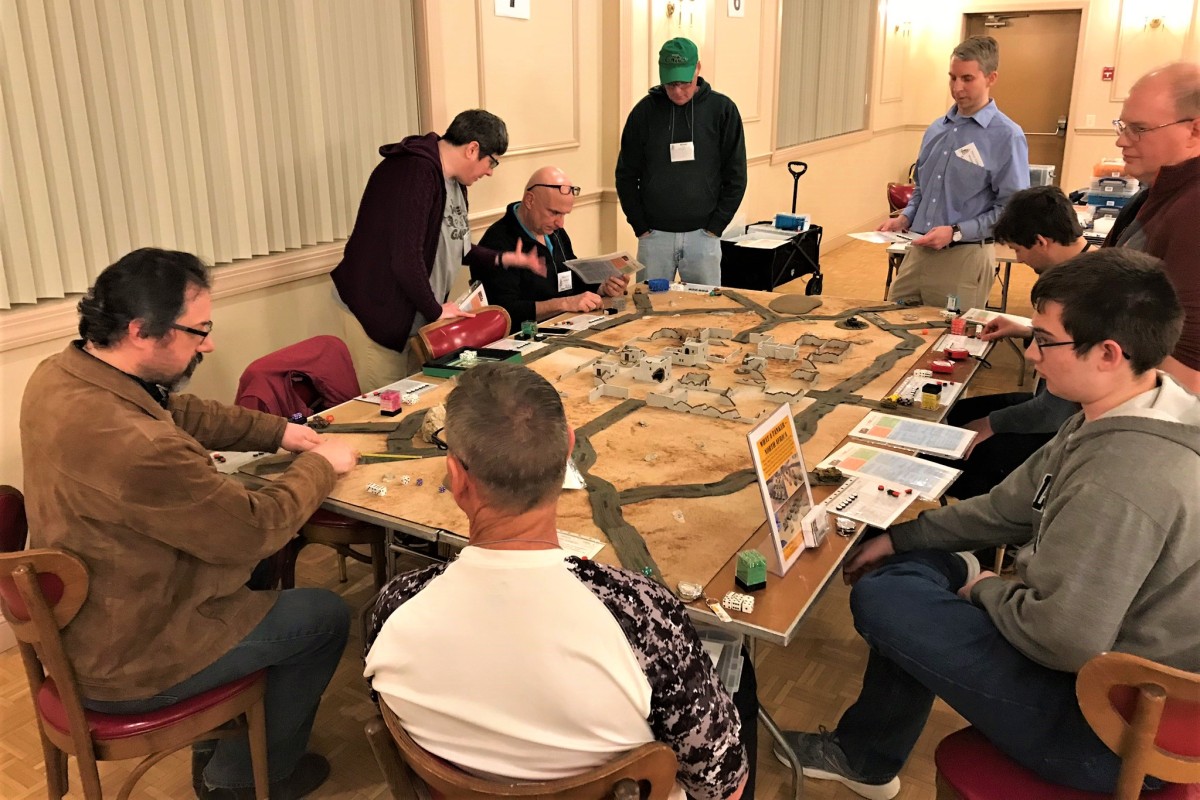
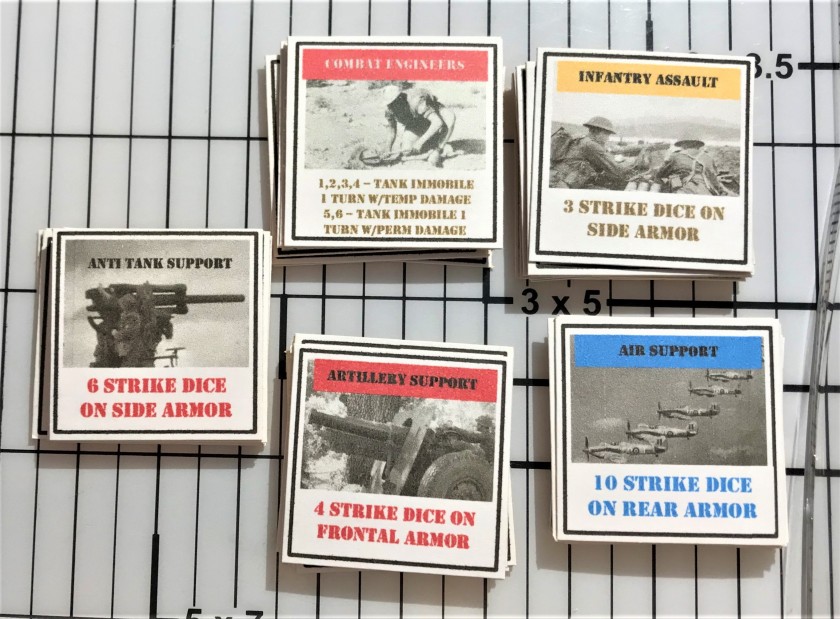
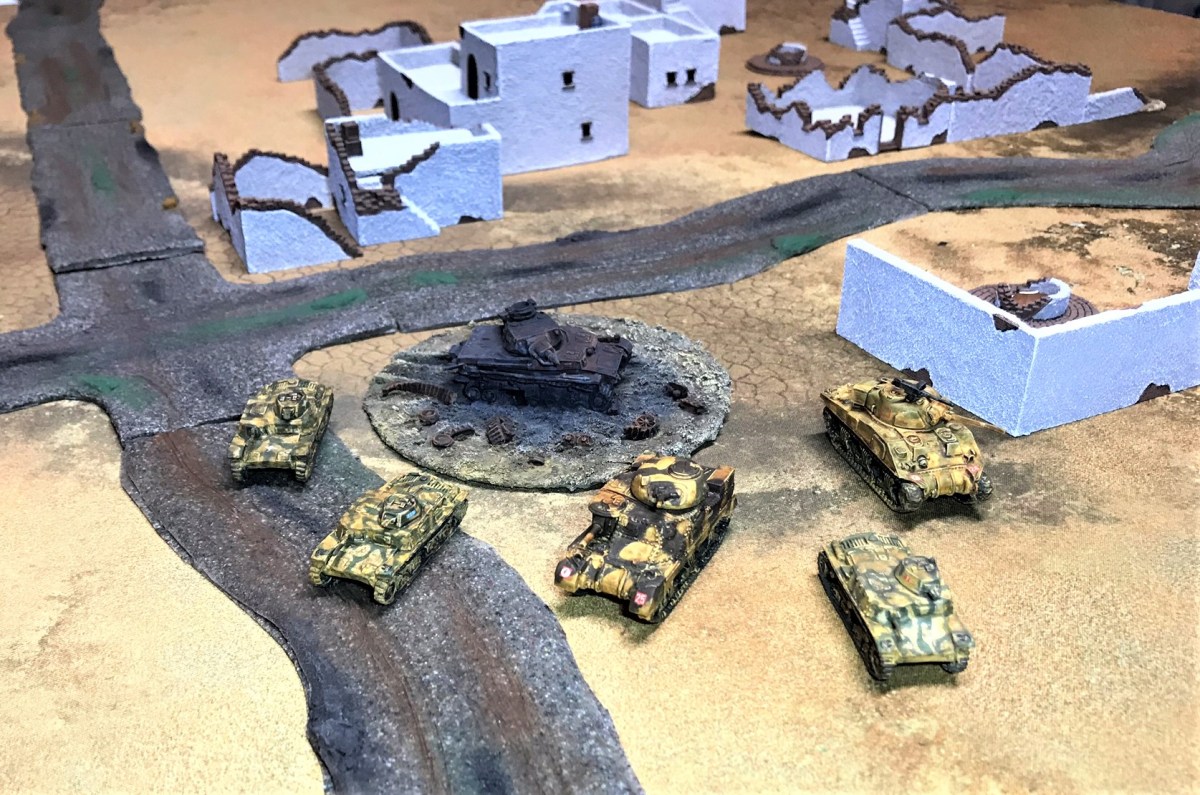
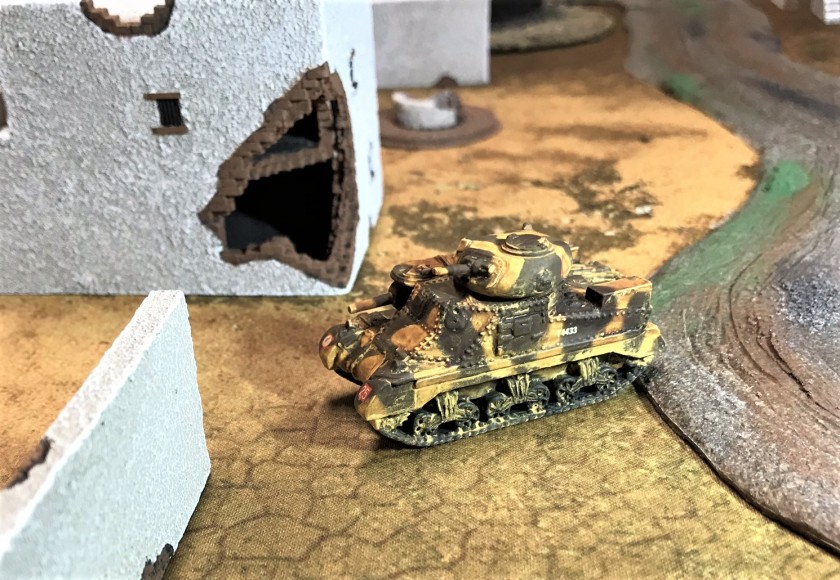
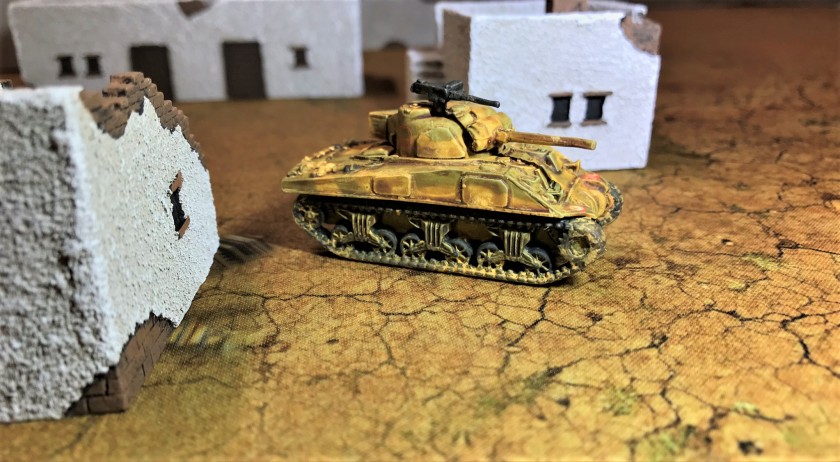
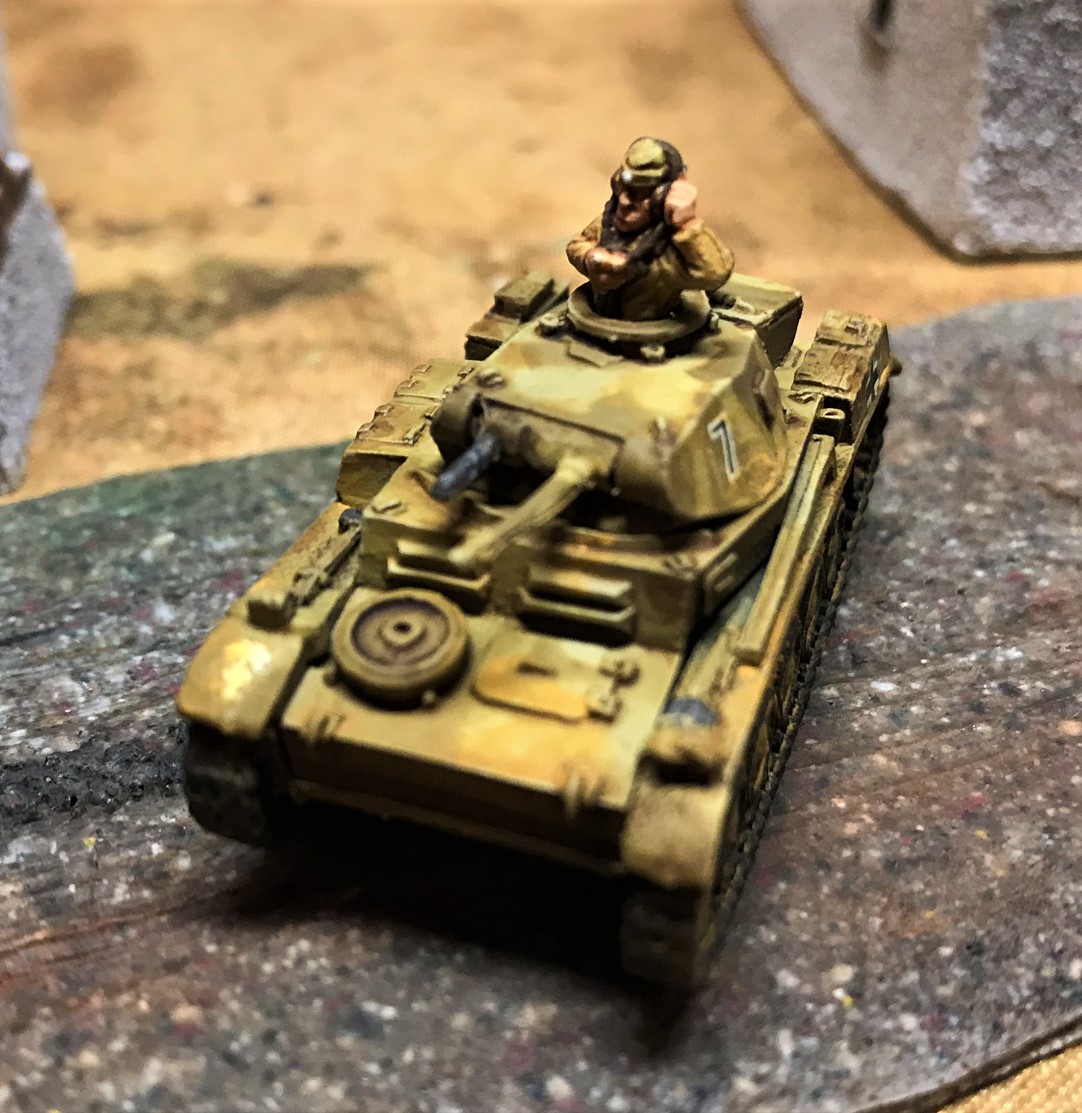
On Friday, I ran “What a Tanker – North Africa” and had a full table. I was able to roll out my new Bonus Attack cards that I created for the convention. They were very popular in the game and I will be expanding my use of them in the future based on the scenarios I run and the historical aspects of the specific theaters and scenarios/battles. I will adjust their use, and how I allow tank replacements going forward. Still, the game went very well, and I earned an award for the “Best in Time Slot”! The Axis battled back from early losses and defeated the British 104-58.
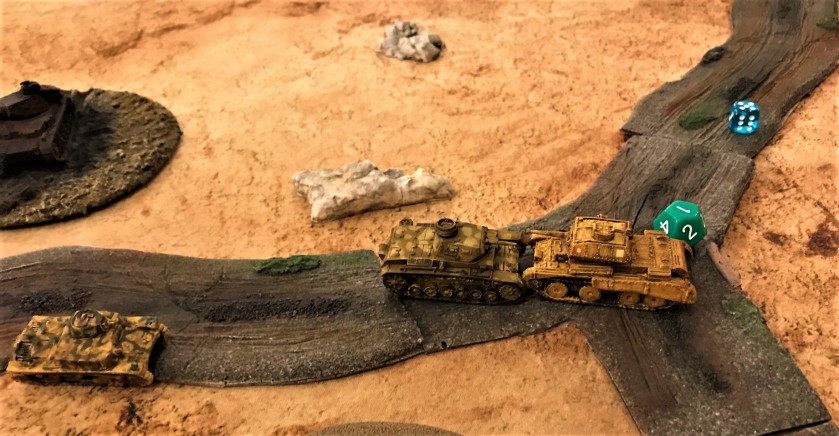
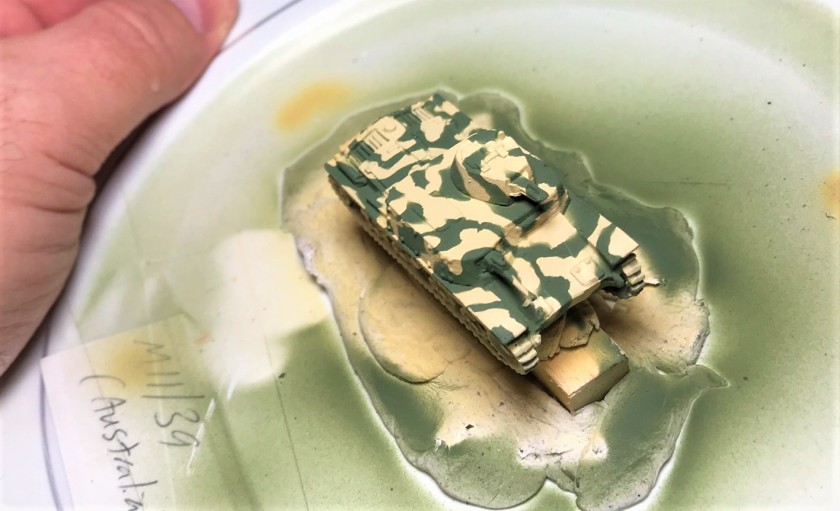
My game announcement posterMy “Bonus Attack” cards for the game. They worked well, especially the Combat Engineers.I mapped out the game board in my cellar beforehand. I got a new 8′ x 4′ badlands/desert mat that worked very well for the scenario from Frontline Gaming.Detail of the town I put in the middle of the battlefieldFriday night’s full crowd at What a Tanker – North Africa using 15mm tanks.The first use of one of my Bonus Attack cards – in this case an airstrike card on a hapless M11/39.What a Tanker – or in this case “What a Rammer” as a Panzer IIIE runs into an A13. The Panzer IIIE got the worst of it from the Brit, but the A13 was subsequently knocked out by an Italian M13/40.The game had a lot of action, but in the end the Axis prevailed.I was happy to earn this award, but the players’ enthusiasm carried the day.
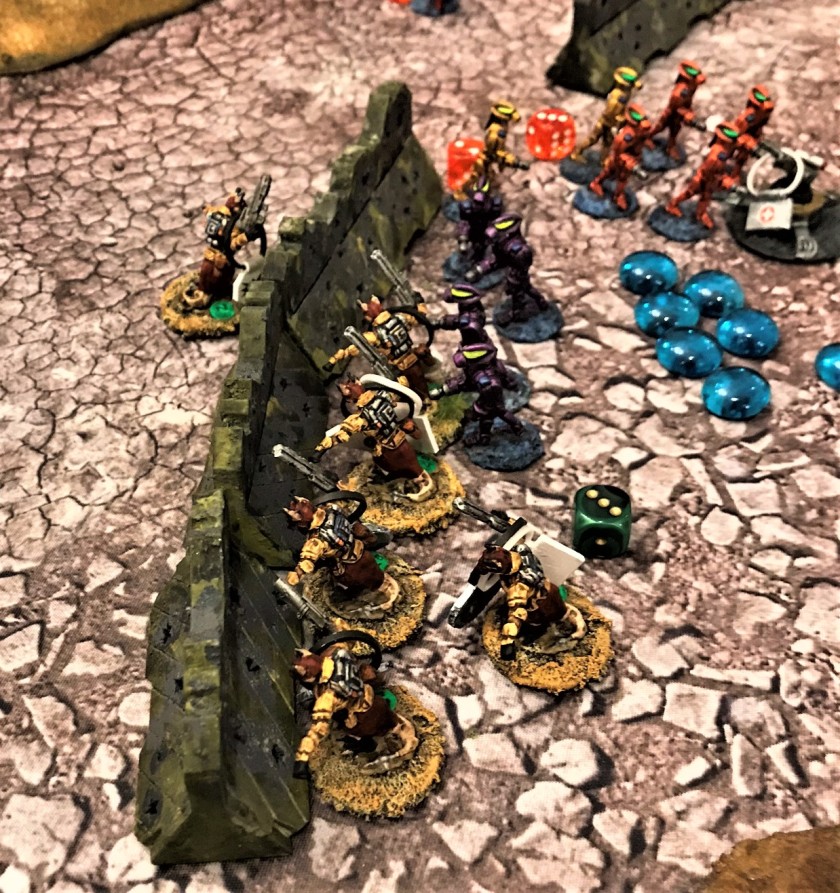
Saturday, I played in two games, and ran a third. The first one Saturday morning was “First Battle of the First Boer War” using the Combat Patrol™ rules system as modified for this era. It was a fun game, with the Boers holding off the British as they attempted to seize a wagon. In the end, the Boers prevailed.
Dave Wood briefs the players on the Boer War scenario.Boers are outnumbered, but hold the wall – each glass bead represents a morale check. They held for a long time.
There were many other games – over 56 I believe, and I did not get a chance to take a picture of all of them, but here are some shots below.
A beautiful American Civil War board.Palestine in WWI. Definitely a game I would have loved to try.Wings of Glory.Bolt Action.A new sci-fi game, Trilaterum, had some beautiful scenery.Test of Honor – and note a 1970’s classic return in the back – OGRE – a near future tank game. I played that game with cardboard chits in the early 1980’s.
The next game went up in operational level and down in miniature scale. Dave Wood ran “Look Sarge, We are invading Russia”, using the Look Sarge No Charts set of rules and 6 mm microarmor. The Germans held off the Russian counterattack, and won the game. Both of Dave’s games were very well-received.
The Germans move down the road.
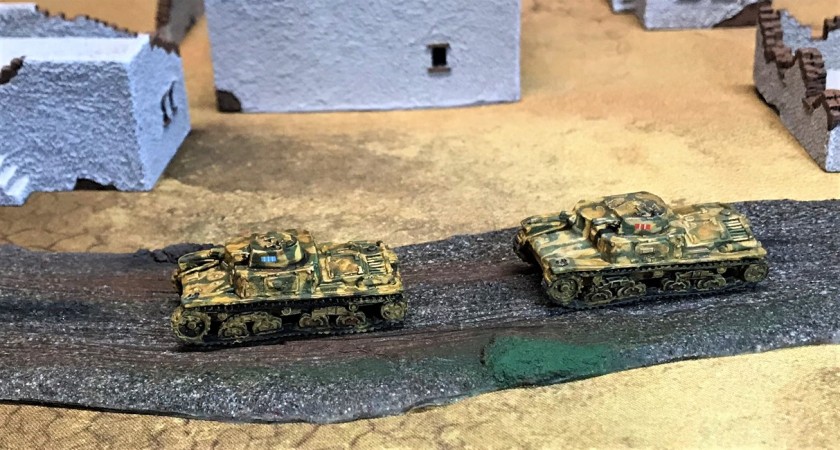
Skipping to Sunday, Leif Magnuson ran a nice What a Tanker game using 28mm tanks in an Eastern Front battle. It was a lot of fun, and the Soviets eked out a win. Leif also won an award for “Best in Time Slot” – well-deserved. This meant that our club (The Mass Pikemen) won two awards – and both were “What a Tanker” games!
“Ivan is a Tanker” run by Leif Magnuson.
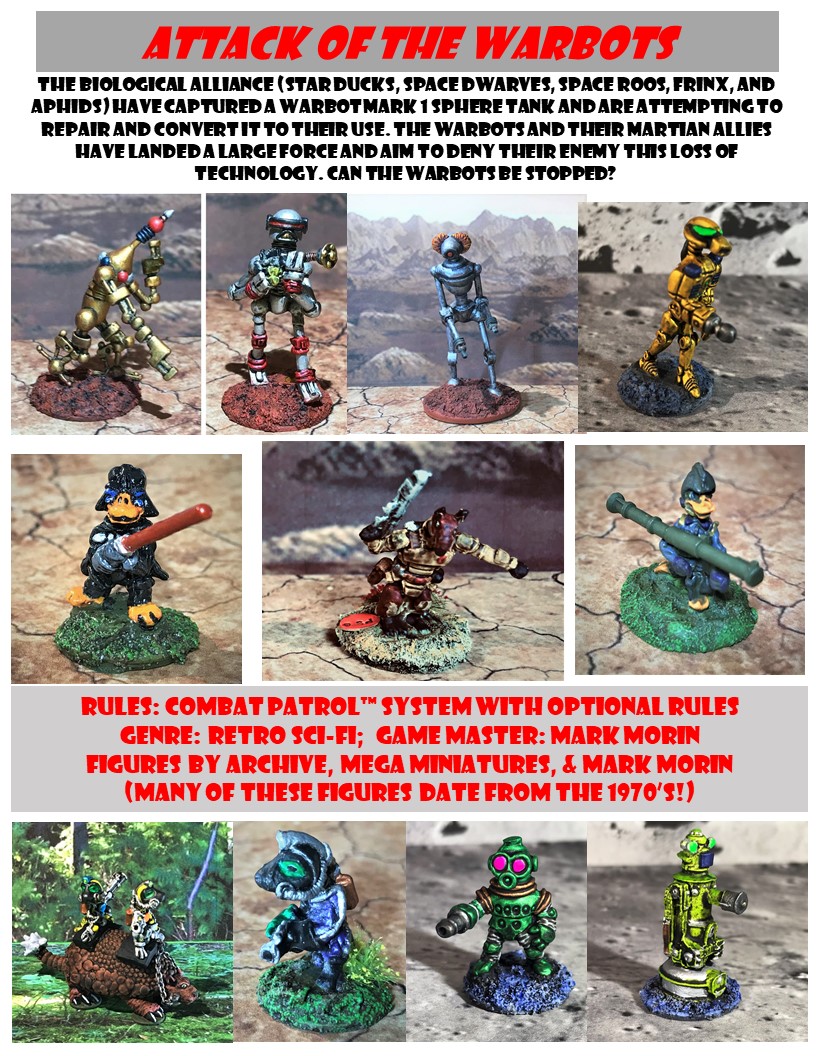
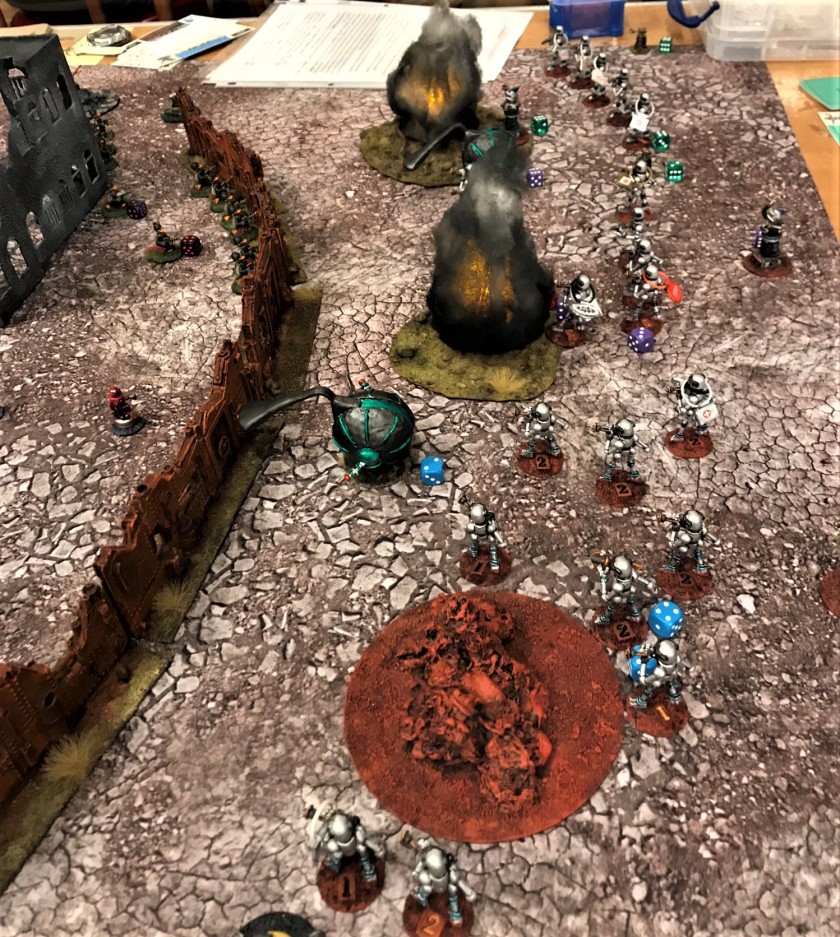
Flashing back to Saturday night – I ran an updated “Attack of the Warbots” game. The game was a success, as the players had a great time.
My game posterThe game set up plan.The tabletop is set – and the attack begins.The Warbots got slowed by the Aphids defense, but managed to advance a Mark 1 Sphere tank to the wall.On the other side of the board, Leif Magnuson’s Martians and Robot Peacekeepers press their attack against Chris Comeau’s Space Roos.Chris jet-packed his Space Roos into the heart of the Martian attack. The Star Ducks disabled a second Mark 1 Sphere tank with a satchel charge, immobilizing it and taking it out of the fight – a critical loss.Biological forces desperately converge on the Mark 1 Sphere tank as it breaks through and approaches the captured tank and its Space Dwarf repair crew.Meanwhile, the Robot Peacekeepers pulled a “Banzai” charge morale check and swarm the defending Space Roos on the other side of the table.
At this point in the battle, Duck Wader made a power leap with his Sith powers, and drove his light saber into the Warbot tank, resulting in its disabling just two inches from victory.
Nearby, Roberker, a giant robot (with flame-throwing arms) was the Warbots’ last chance. The Frinx shot Roberker a bit, and its resulting morale check caused a miracle result – apparently the robot lost face, ran away in shame, and blew himself up!
The suicide of Roberker. I replace these “ancient” miniatures on the battlefield when they become casualties with homemade cards.The card that did in Roberker. Note the morale result at the bottom – I have the Warbots use the South Pacific deck from Combat Patrol deck which have different (WWII Japanese) morale results.
The death of Roberker was followed by raucous laughter from the table – even from the player who had it happen to his Roberker.
I was tired after the weekend, but it was a great time. I want to thank all the players, as well as the GM’s, and especially Battle Group Boston for another fun convention!
I have been very busy – too busy to effectively write blog entries lately. I have been working on terrain and game support for the two games I will be running at HAVOC on April 5th and 6th. Each will support 10 players – and its my goal that all have a blast! So, in the interim, please enjoy these two announcements – hopefully I get some other stuff painted and blog-worthy for you dear readers! The link for the convention is here.
I am looking forward to seeing a number of friends – including my old USMA classmate (and HAWKS member) Dave Wood who is also running a couple of games – so that’s exciting too.
I’ll be running these two games!
I updated this game with my Space Roos and have new terrain!
This overall North Africa project has been documented in this blog in five previous posts, (which you can read about here, here, here, here, and here) and I plan on a summary post as well in the near future. There I will detail more about the game scenario and how I run it. These 5 tanks brings me to a total of 46 tanks since December for this scenario.
I decided to try a different source for the tank models, and found that I could get three from Old Glory for $25, which seemed reasonable. I also bought a few other vehicles for other scenarios. I was surprised to see that they were completely made of metal – even with a lead warning on the package! As a metal aficionado, I was pleased.
A bag of early war Italian tanks
Wow – still making with lead!
I did have however a concern with the quality of the castings. They all had significantly problematic mold lines on the machine gun turret, and the details on the hull were much less clear than Battlefront models. Still, the price reflected that, so it was up to me to make it work. Which I did.
Two of these would be for the Italians, and one would be an Australian-captured M11/39 tank. While technically not a squad, they certainly could have started out that way in the Italian Army! For that reason – and because my good friend Azazel runs a fun painting challenge each month (and is an Aussie) – these three will constitute a submission from me for March’s“Squad March” painting challenge.
The turrets needed a good amount of surgery and filing.After assembly and a lot of filing. I glued the machine gun turrets as it made no sense to have them be movable for What a Tanker games..The three M11/39’s assembled.
For priming, I went with a brush, as these seemed to be very smooth castings. I worried that it would be difficult to get the paint to “bite”. They also were hollow at the bottom, so I needed to devise a way to mount them for painting. I ended up using a small square dowel and poster tack on small plates.
I brush primed these
The hollow bottom of the model
I did not take as many pictures during the process as I wanted to get these done for a game this weekend, but unfortunately some snow took care of that, and they will get a chance next weekend. I list all the paints I used at the end of the blog for those interested.
Poster tack on the M11/39’s as they are prepped for camouflage paint. I use gauze on the spray booth filter to extend the life of my spray booth filters.Close up of the poster tack before painting.This is not a fine Italian meal by any stretch!After the poster tack was gently removed, I got this result.
Then I used washes, pigments, decals, and other paints to finish them all up. There will be an eye-candy section following the sections on the tanks.
My Italian M11/39’s with the model I used. I ended up with more green, but I still liked the results. In any case, I always want my tanks dusty and dirty.And here is the M11/39 the Aussie’s captured that will join the 8th Army forces.A nice comparison with a photo of the actual Aussie M11/39’s used. I love the ‘roos.
I read that the Aussies used these until they ran out of diesel (their tanks had gasoline engines so diesel was rare). Then they blew them up. I believe that there are no surviving examples of the M11/39 in the world.
M3 Grant
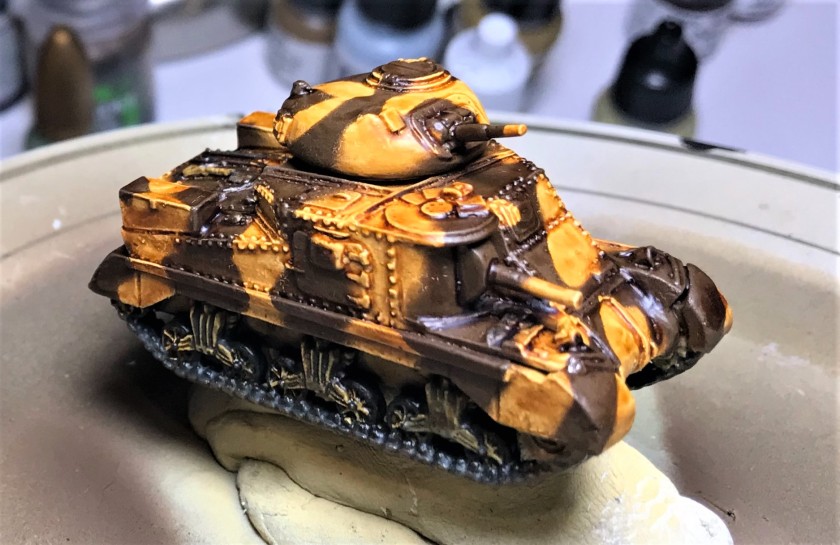
I already had one M3 Grant painted, but with the Germans having a Panzer IVF2 and a Tiger I in the DAK inventory, I wanted to augment the 8th Army’s later war desert forces with another Grant and a Sherman.
My Grant in the blister
Assembled Grant
Awaiting decals, pigments, and varnish.The completed model with the one I used as a guide. There was no way I was going to be able to pull off the white and black outlines here on such a small model. I do like how it came out – again dirty and dusty.
M4 Sherman
My Sherman in the blister
Assembled Sherman
The major difference in painting here from the M3 Grant was the camouflage pattern I used.
M4 Sherman awaiting decals, pigments, and varnish.The completed model with the guide in my research material.Here are the two with images I printed out from Battlefront’s web page.
Please let me know any feedback in the comments section, I do appreciate your thoughts. Now it’s time for…
Eye Candy
Here are the three M11/39’s, with the Aussie on the far right.Right front view of one of the Italian M11/39’s. The main gun is the antitank weapon, and can only be moved with the tank itself as the turret had only machine-guns.Left side view of the M11/39.The two Italian M11/39’s hit the road.Rear view of the two Italian M11/39’s.The Australian M11/39 with ‘Roo markings so as not to attract friendly fire.Gotta say I love the ‘Roo.Other side.Aussie M11/39 driving by a wrecked Panzer IVD.M3 Grant with Desert Rat markings.Nice left side view of the M3 Grant.Coming at ya!Rear view.The M4 all dusted up. I also gave the M4 Desert Rat markings.M4 Sherman moving out.I don’t want to end up like Heinz!Rear view of the M4 Sherman. I had to pin the bustle rack, and at certain angles it looks off, but at a distance its unnoticeable.The 8th Army additions all assembled.All the tanks that were completed for this post.
PAINTS, INKS, GLAZES, SHADES, WASHES, PIGMENTS AND FLOCKING USED ON THE M11/39’s:
Vallejo “Flow Improver”
Vallejo “Airbrush Thinner”
Vallejo “Surface Primer – Black”
Vallejo “Dark Sand”
Battlefront “Dry Dust”
Battlefront “Army Green”
Vallejo Game Air “Black”
Battlefront “Monty Shade” (shade)
Army Painter Quickshade “Soft Tone” (wash)
Army Painter Quickshade “Strong Tone” (wash) – on Australian version only
Battlefront “Dark Gunmetal”
Vallejo Mecha Color “Light Rust Wash” (wash)
Testors “Universal Acrylic Thinner”
Vallejo “Dark Yellow Ochre” (pigment)
Vallejo “Light Slate Grey” (pigment)
Vallejo “Light Yellow Ochre” (pigment)
Vallejo “Desert Dust” (pigment)
Vallejo “Natural Umber” (pigment)
Gorilla Glue
Vallejo Mecha Varnish “Gloss Varnish”
Microscale Micro-Set
Microscale Micro-Sol
Microscale Satin
Microscale Liquid Decal Film
Appropriate decals from Battlefront
Vallejo Mecha Varnish “Matt Varnish”
Aleene’s poster tack
Sponges
PAINTS, INKS, GLAZES, SHADES, WASHES, PIGMENTS AND FLOCKING USED ON THE M3 GRANT AND M4 SHERMAN:
As for research materials, I used the same ones as I cited in previous posts plus Google searches and Battlefront’s website. Here the books are in case you are interested – you can find them on Amazon and I highly recommend them all:
Jean Restayn:WWII Tank Encyclopaedia, 1939-45
Smithsonian/DK: Tank: The Definitive Visual History of Armored Vehicles
Michael Green:Axis Armoured Fighting Vehicles of the Second World War (Images of War)
Robert Jackson:Tanks and Armored Fighting Vehicles Visual Encyclopedia
I would again easily recommend all of these books as really good resources for gamers and modelers. Thanks for looking and for sharing your feedback in the comments section.
Now I might go back to retro sci-fi for a bit! Still have many more tanks to do, but those will be for other scenarios.
Do you have a favorite tank of the ones here? Why? Let me know!
These projects are my February submissions for Azazel’s February Community Painting Challenge, which he supplemented to include terrain. This week I also started a new job! So, I wanted to wrap up these projects this weekend.
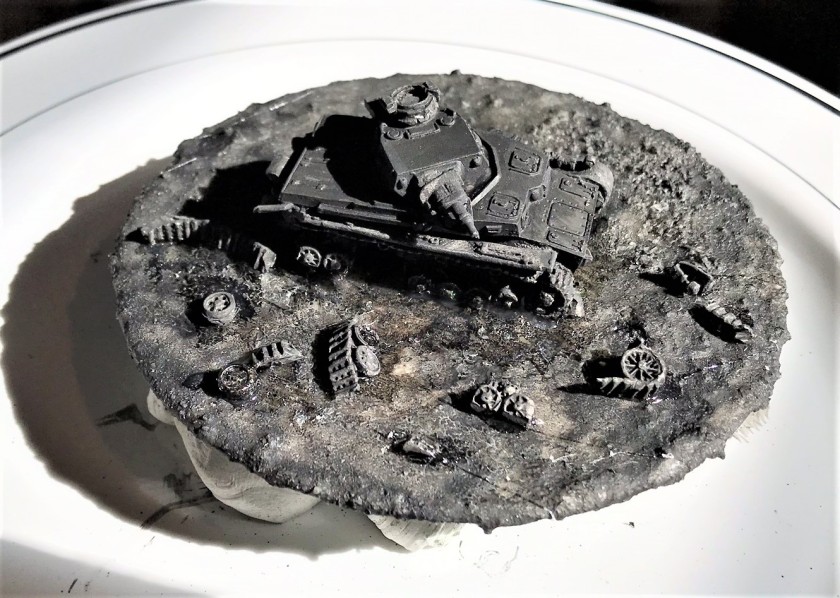
Panzer IVD Wreck
I decided to base the wreck on an old CD that was surfaced with play sand and Elmer’s (PVA) glue. To cover the hole, I affixed some leftover polystyrene bits. Then, I used sandpaper to lightly scratch the CD, then applied the glue, then the sand, and let it harden overnight. I removed the front and rear sprockets from one of the tracks and cut away some road wheels, so as to be able to flip them on the CD and make them available for the right side of the wreck in the correct locations as debris. I carefully cut away the road wheels and part of the track and some fender, and washed everything to prep for painting.
All the pieces I would use
Sand and PVA glue on the CD hardening
Ready to assemble
After all the pieces had dried, I then I assembled the model to look “messed up”. I put the gun and mantlet on slightly crooked. The turret and bustle rack were put on a bit akimbo as well.
I took a 1/8″ drill bit and drilled a hole into the hull between the missing road wheels to simulate the impact of a hard shot into the weaker flank of the tank. In my portrayal, that shot hit ammunition, causing an explosion. I scattered the resultant debris on one side of the tank to simulate that, affixing everything with E6000 epoxy. I then mounted the CD onto a disposable plastic plate using poster tack for ease of painting. I applied a coat of Citadel “Imperium Primer” as the E6000 was a bit rubbery and smooth – and I was worried that it would not hold paint well. To double up on priming, I then airbrushed on another primer coat – Vallejo “Surface Primer – Black”.
My initial basing and priming
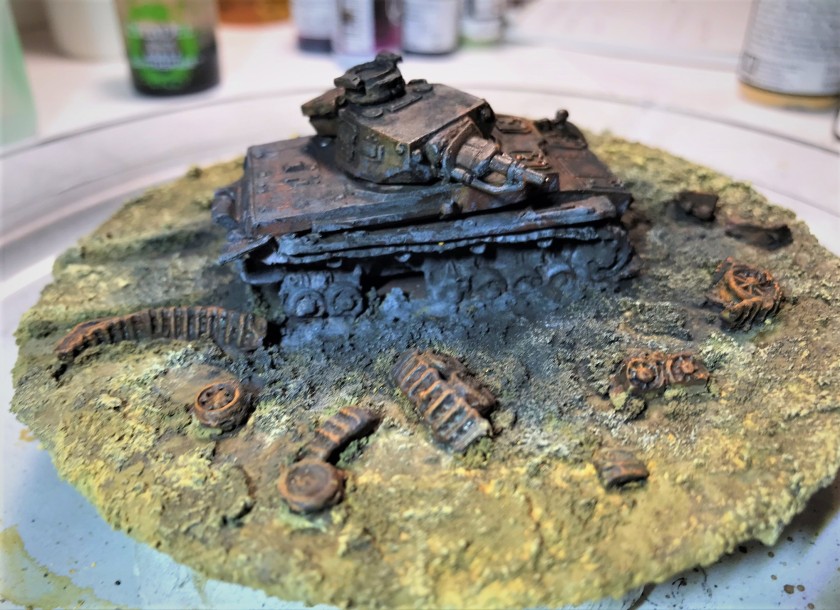
My next thought was to do a bit of the original Panzer IVD paint on the wreck before I changed it into a wreck, as perhaps some of it would survive (I don’t think much eventually did, but I thought, better safe than sorry). This consisted of the same basic pattern I followed on my previous German tanks.
First some grey……and then some more DAK colors.
My concept at this point was to portray the Panzer IVD as having been hit, having caught fire, then after being abandoned, rusting away. The fire would have destroyed all or most of the original paint on the hull. Any metal debris would have rusted afterwards in my opinion, so I decided that decals would be a waste here.
Here, I worked on rusting things up with several different rusting products (all listed at the end of the post).
The sand and PVA glue texture was insufficiently granular for the base, so I used Citadel “Armageddon Dunes” to roughen up the landscape. It also allowed me to make the doomed German tank’s last tracks in the desert at the rear of the vehicle. I darkened them up with Citadel “Agrax Earthshade”.
After using the Armageddon Dunes texture paint to gain a better surface on the base.
Then I went into using various Vallejo weathering pigments to create soot, smoke, and dust on and around the model. I especially like the soot!
Impact side, after weathering but before varnishing.Opposite side of the tank before varnishing.Top of the tank before varnishing.
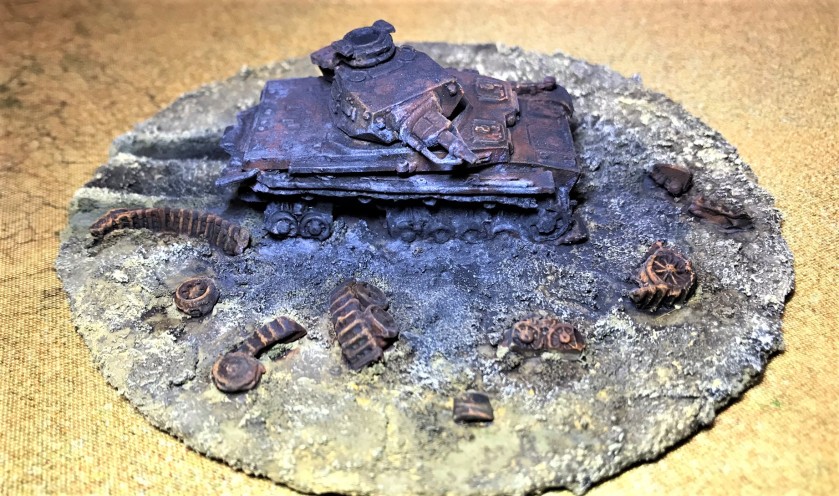
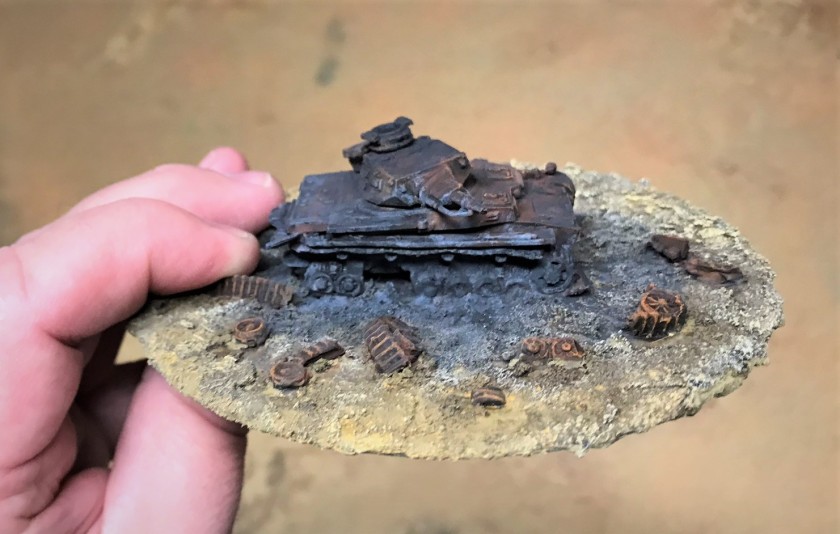
For varnishing, I used two coats. First, I applied a Vallejo “Satin” varnish with my airbrush. After that had dried, I applied a light coat of Vallejo Mecha Color “Matt Varnish”. I did not want to overly dull the tank, but I definitely did not want it too glossy.
After first coat of varnish.
I am reasonably happy with the final results. Here are some eye-candy shots on my desert game mat – you be the judge!
Completed Panzer IVD wreck model, impact side.Completed Panzer IVD wreck model, rear side, showing the track marks in the sand before its final moments.Completed Panzer IVD wreck model, left side.One of my favorite views.An intact Panzer IVD crew drives by the wreck, thinking it could have been them!Let’s be careful Heinz! We don’t want to end up crispy like that one!A little different angle – plus my hands for scale.Nice view of the top – some of the original paint can be seen here I think.
Smoke/Blast Markers
The next project was making some more (and better) to put on the tabletop when tanks meet their demise – or for any explosions in general. I took tea lights, and hot glued thin strips of pillow batting to them in a “closed lily” type of shape.
After building the markers, but before painting them.Lit up with the lights down.
I then painted them black and grey, trying to make them less dark thank my previous attempts.
Completed and lit in the light.Look much better in less light!
Thanks for looking at these – and I hope that perhaps these give you some ideas. In any case, I hope you enjoyed seeing them and my processes. Please share any feedback you have in the comments section!
PAINTS, INKS, GLAZES, SHADES, WASHES, PIGMENTS AND FLOCKING USED ON THE PANZER IVD WRECK:
Play sand
Used CD
Elmer’s Glue
Battlefront model #GE040
E6000 epoxy
Gorilla Glue
Testors “Universal Acrylic Thinner”
Citadel “Imperium Primer”
Polystyrene bits
Vallejo “Flow Improver”
Vallejo “Airbrush Thinner”
Vallejo “Surface Primer – Black”
Vallejo Model Air “Base Grey”
Vallejo Model Air “German Green Brown”
Vallejo Model Air “Light”
Vallejo Model Air “German Green Brown”
Vallejo Model Air “Hull Red”
Vallejo Model Air “First Light”
Vallejo Model Air “Brown”
Citadel “Armageddon Dunes” (Texture)
Battlefront “Monty Shade” (shade)
Vallejo Mecha Color “Light Rust Wash” (wash)
Vallejo Mecha Color “Dark Rust Wash” (wash)
Citadel “Agrax Earthshade” (wash)
Vallejo “Dark Sand”
Battlefront “Dry Dust”
Vallejo “Titanium White” (pigment)
Vallejo “Carbon Black” (pigment)
Vallejo “Pigment Binder”
Citadel “Typhus Corrosion”
Citadel “Ryza Rust”
Vallejo “Desert Dust” (pigment)
Vallejo “Dark Yellow Ochre” (pigment)
Vallejo “Light Yellow Ochre” (pigment)
Vallejo Model Air “Satin Varnish”
Vallejo Mecha Varnish “Matt Varnish”
Citadel “Nuln Oil” (wash)
PAINTS, INKS, GLAZES, SHADES, WASHES, PIGMENTS AND FLOCKING USED ON THE SMOKE/BLAST MARKERS:
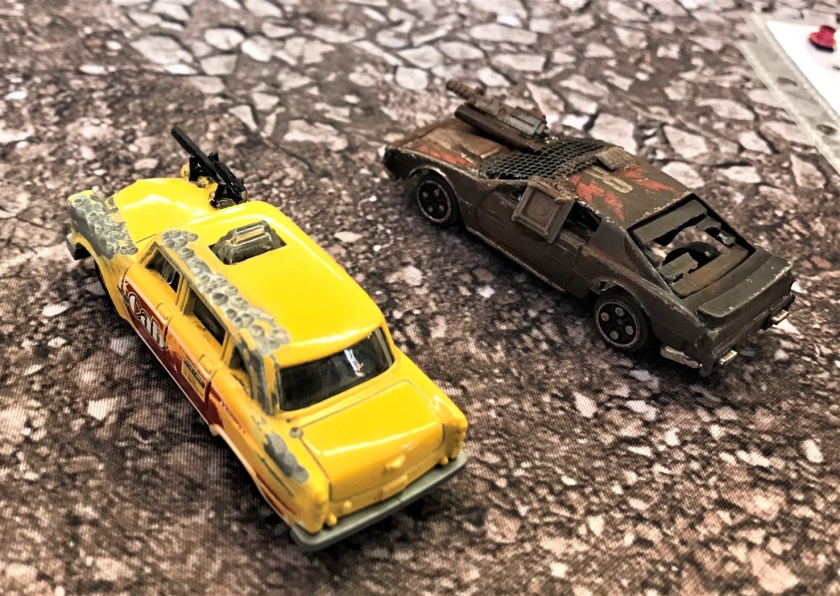
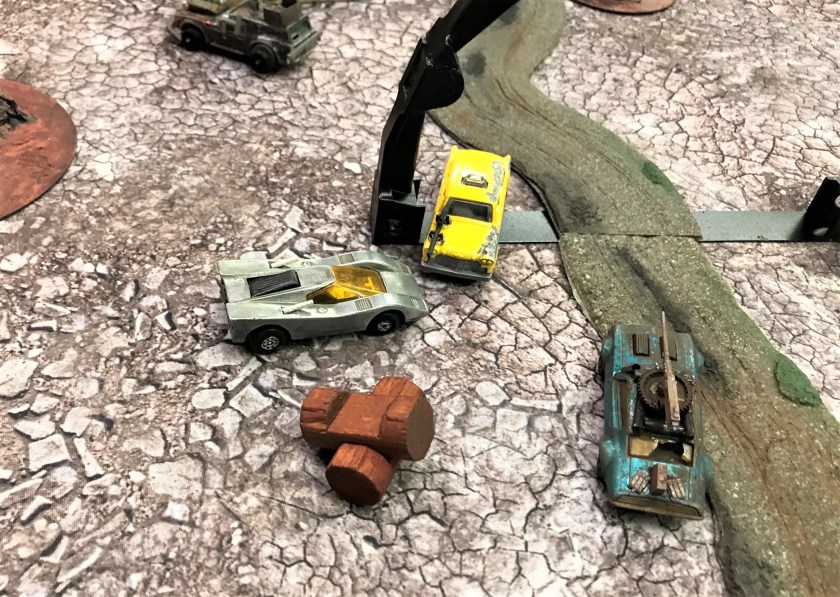
Last Saturday Jared Burns ran a very fun game of GASLANDS at the February meeting of the Mass Pikemen gaming club. For those of you not familiar with the game, it involves an apocalyptic race/gladiatorial battle using Matchbox cars. The cars are armed with different weapons such as rams, machine guns, and armor, and in the scenario they were racing through three gates with the first car to finish all three as the winning car.
Each of us had two cars. Jared brought his car collection which he had very effectively weathered. Also, Scott Howland brought his cool GASLANDS cars, so we had a nice selection. Jared had also made some very nice dashboards which made play much easier.
The game set up – it was nice as several of us were able to contribute terrain to make a fun tabletop.Scott Howland made a couple of very cool billboards that were very fun – including this Johnny Cab one from “Total Recall” and……this one showing spaceship service to Mars.These are the two cars that I had in the game. The cab (from Scott) had a ram and a machine gun. The rusty car (from Jared) had a machine gun and a limited ammo mortar.
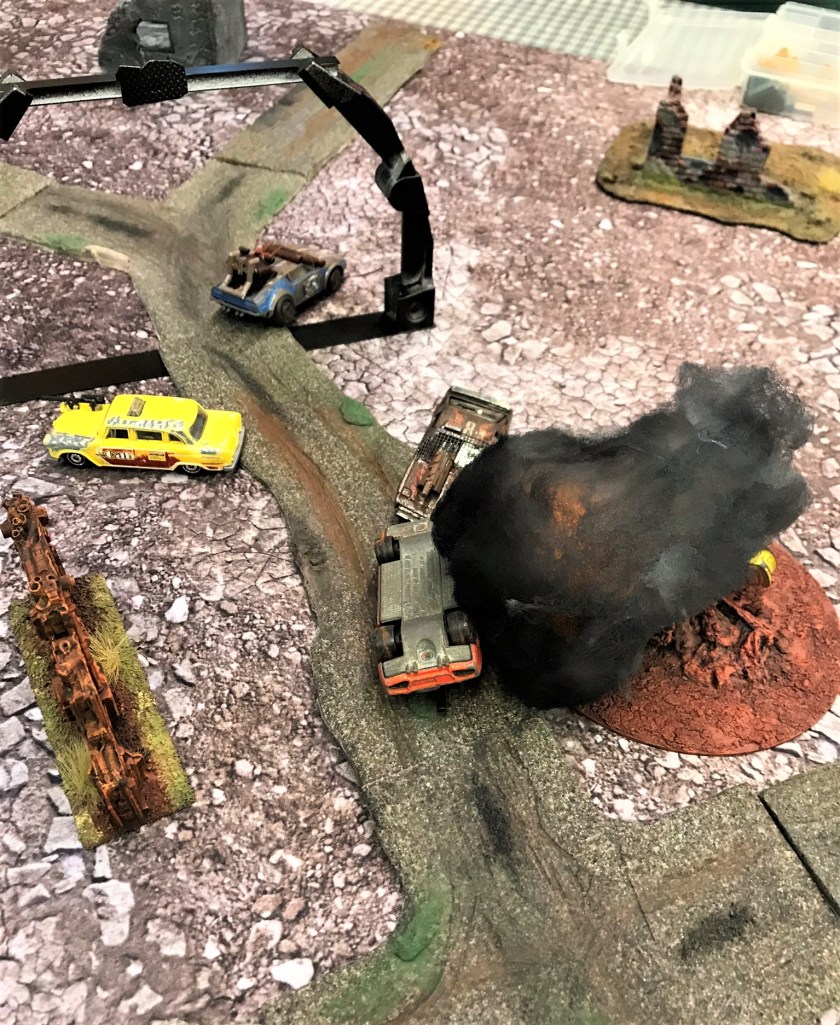
We all started at gate one, with no firing weapons to be active until we crossed the first gate. Several cars, including my cab, never made it through that first gate. My rusty car did, and turned back to attack Jared’s similarly-armed orange car. I rolled well, and Jared did not, with the result being I destroyed his car. Unfortunately, his ammo sympathetically detonated and both of my cars took damage from that blast.
The first kill – but the ensuing explosion damaged both of my cars.
At the same time, Mike Morgan had been sidelined due to a starting box collision that left one of his cars just getting going. His other car was speeding dangerously towards the stadium wall (the edge of the tabletop), so he was not being engaged. Scott and Jared were both heading to the second gate and taking shots at each other along the way. Scott’s other car was in front of my rusty one, so I shot at it, and the dice were with me again. Boom.
At the top of this shot you see Scott’s (silver car) and Jared’s (blue car) doing a NASCAR run while heading towards the second gate. Mike’s cars are on the far right and far left trying to get back into the fight.Jared, Mike and Scott ponder their next moves.
Unfortunately, the act of shooting Scott’s car also caused an explosion that wrecked my rusty car, leaving me with only the cab.
My rusty car, a victim of its own murderous aggressiveness!
This left Mike with two cars, and Jared, Scott and I with one, and mine could only ram. I saw them headed for gate two, so I headed there.
My cab goes at the two survivors.
I did damage to Scott’s silver car, causing it to flip and hit the post, and explode. Both my cab and Jared’s blue car were caught in the explosion. This action took all three out of the game, leaving Mike with the only remaining cars and victory!
The mashup that took out three cars.
The game ended and I think we all had a blast (pun unintentional) even though I inadvertently succeeded in destroying my own cars. Thanks to Jared for running a great game.
Our next session is on March 2nd at 2 PM during which we will be playing What a Tanker in North Africa!
My ultimate goal is to have an excellent game that I can run at conventions or club meetings. I now have that, but will probably add some Marder III’s, M3 Grants/Lees, and M4 Shermans to be complete.
I will share here both the Italian vehicles and the Panzer IVD – and some of their in progress photos. Then, you will get a chance to view some eye candy shots! Because I have been very busy seeking new employment (and it looks good on that front!), I was able to finish the tanks and run a couple of play tests before I could finish this post. So there will be a few shots of the play tests I have been running with these tanks. I also share the materials and research used at the end for those interested.
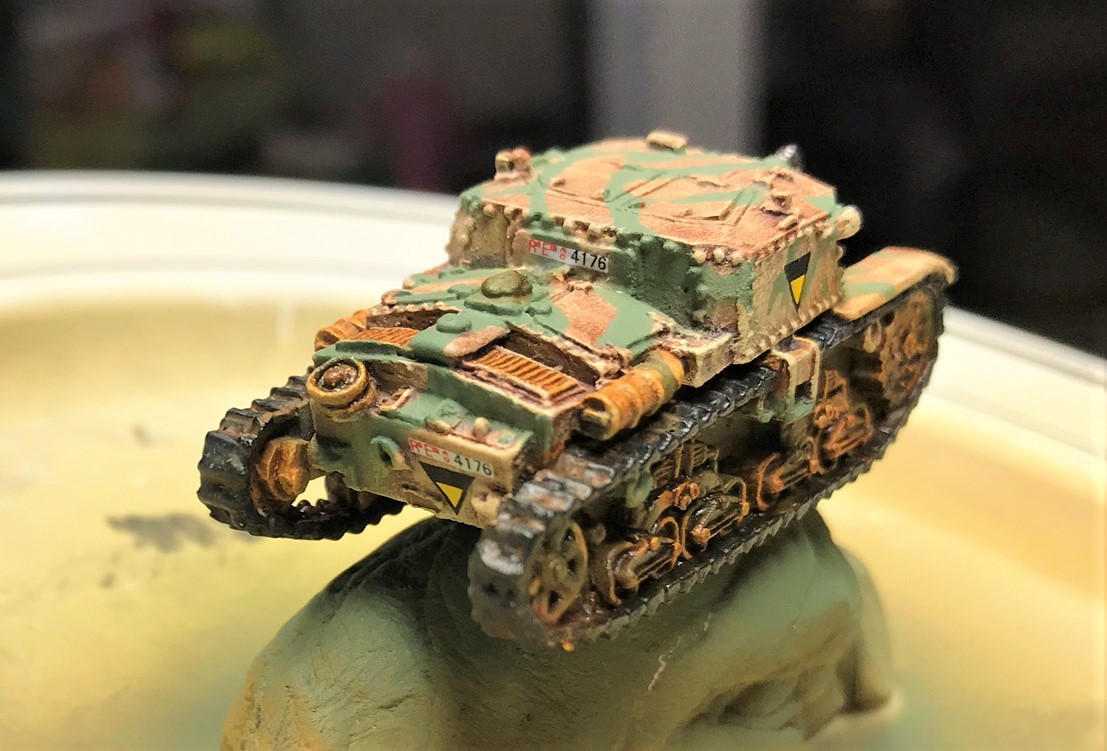
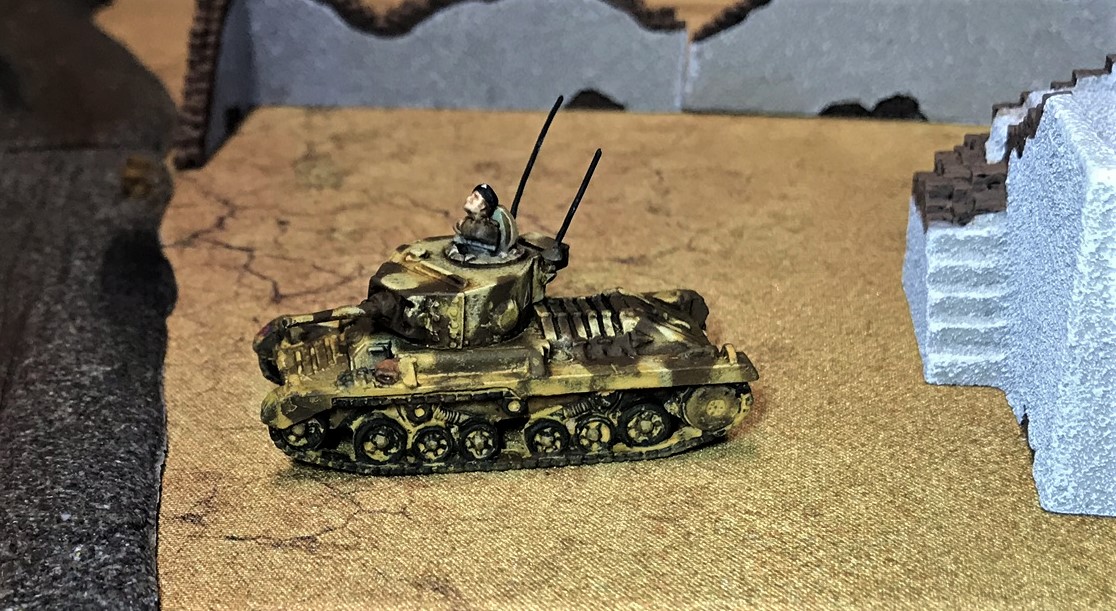
This tank is basically the M13/40 with a better engine and slightly better armor.
M14/41 in blister
Cleaned up and ready for assembly
Assembled tank
I used a painting scheme that attempted to match the one example in the Bovington museum.
M14/41 primed and base coated
Prepped for camouflage
After camouflage paint – a little lighter than I wanted
After applying decal and varnish, but before adding weathering powders.The completed M14/41 tank model next to one in the book.
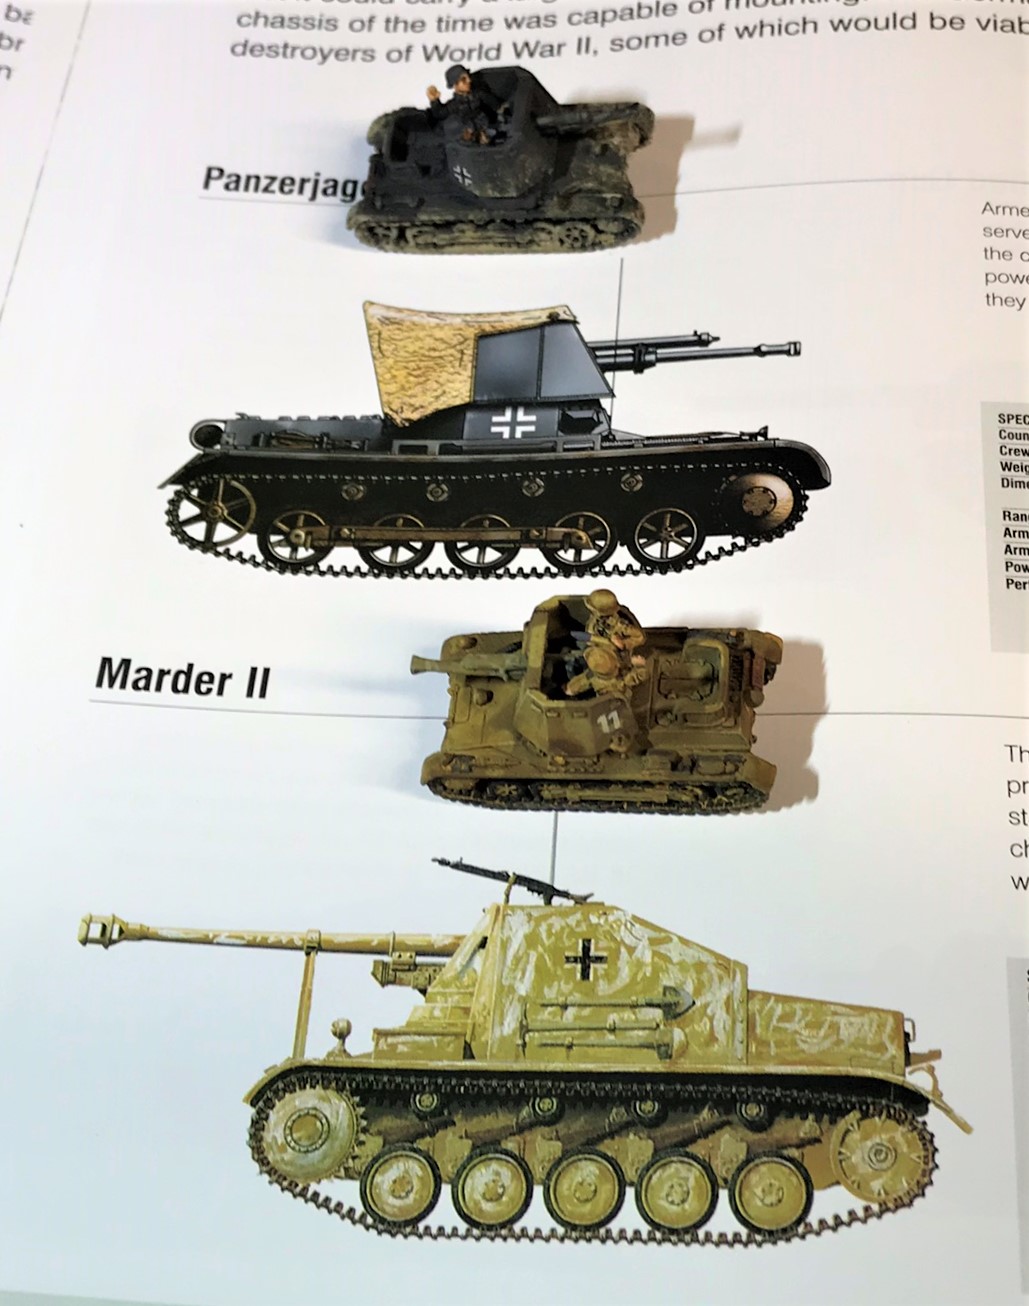
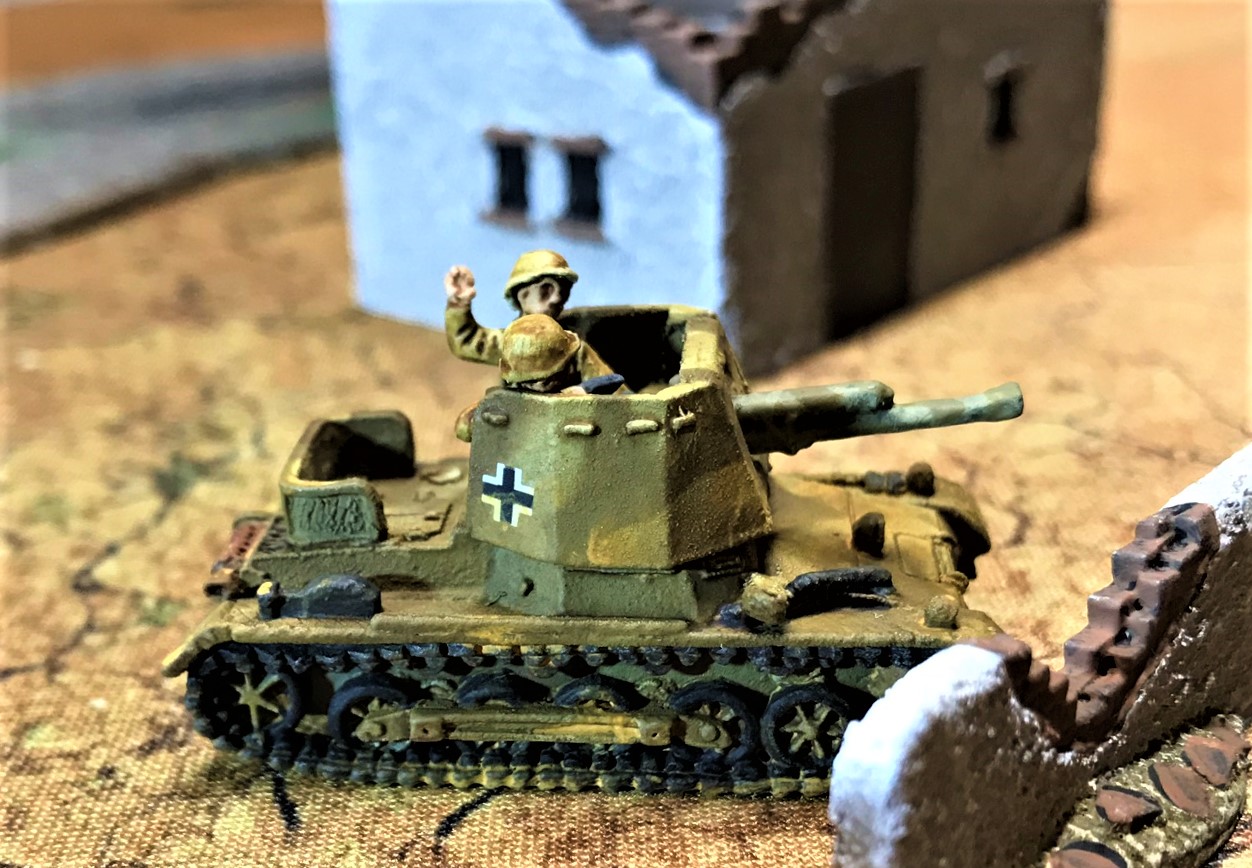
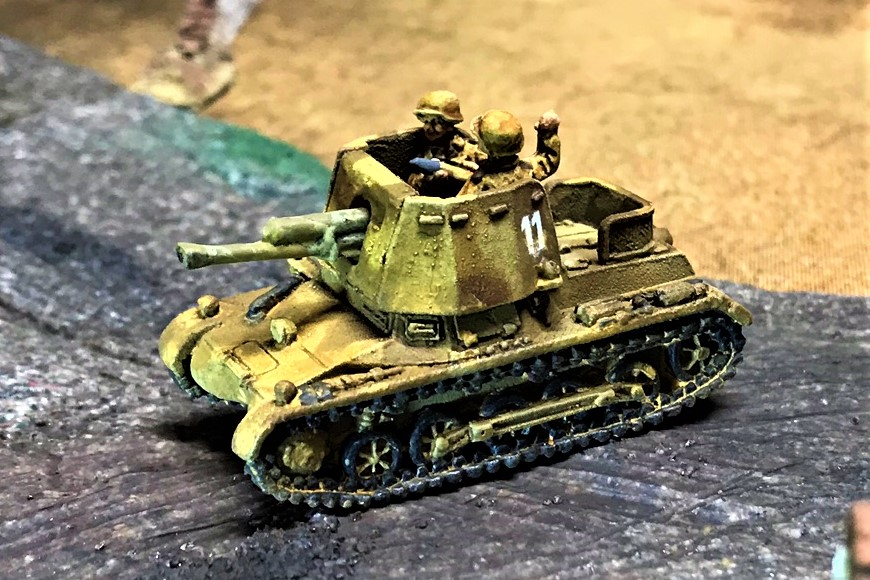
Semovente 47/32
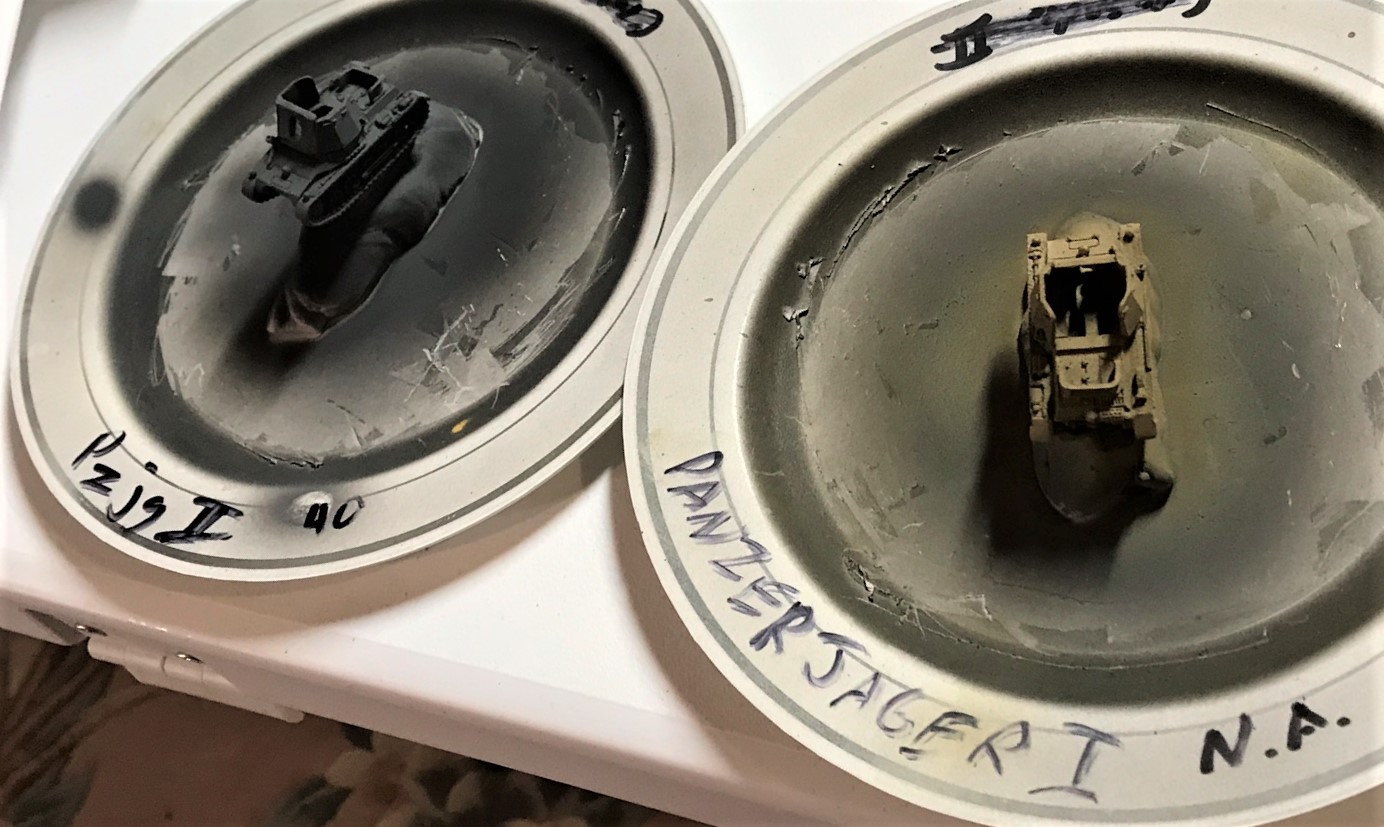
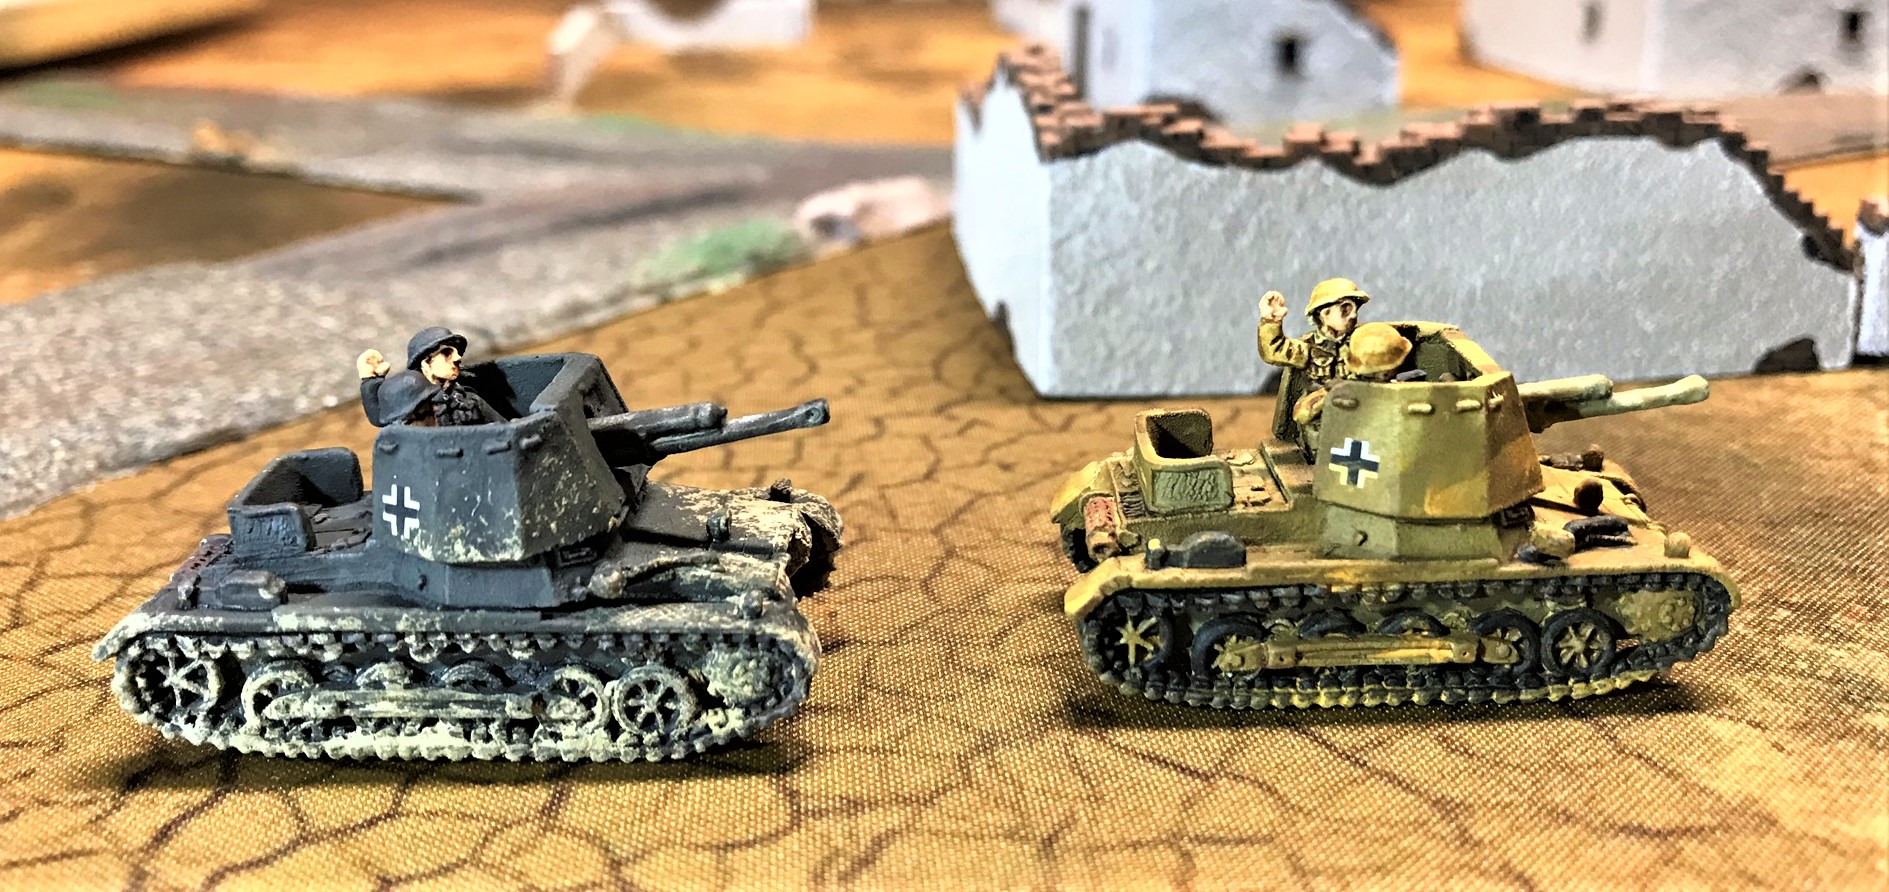
In the WaT rules, this vehicle is interesting. It is small (tougher to hit), low profile (tougher to acquire), fast (can move every turn), and a tank destroyer (can aim easier). It also is, like the Panzerjager I, open-topped, so never buttoned (and more vulnerable). Each blister had two vehicles, and I bought two at the 50% off sale!
Semovente 47/32’s in blisters.
Ready for assembly.
The tiny tank destroyers primed and base coated.
Close up after decals
With the book example
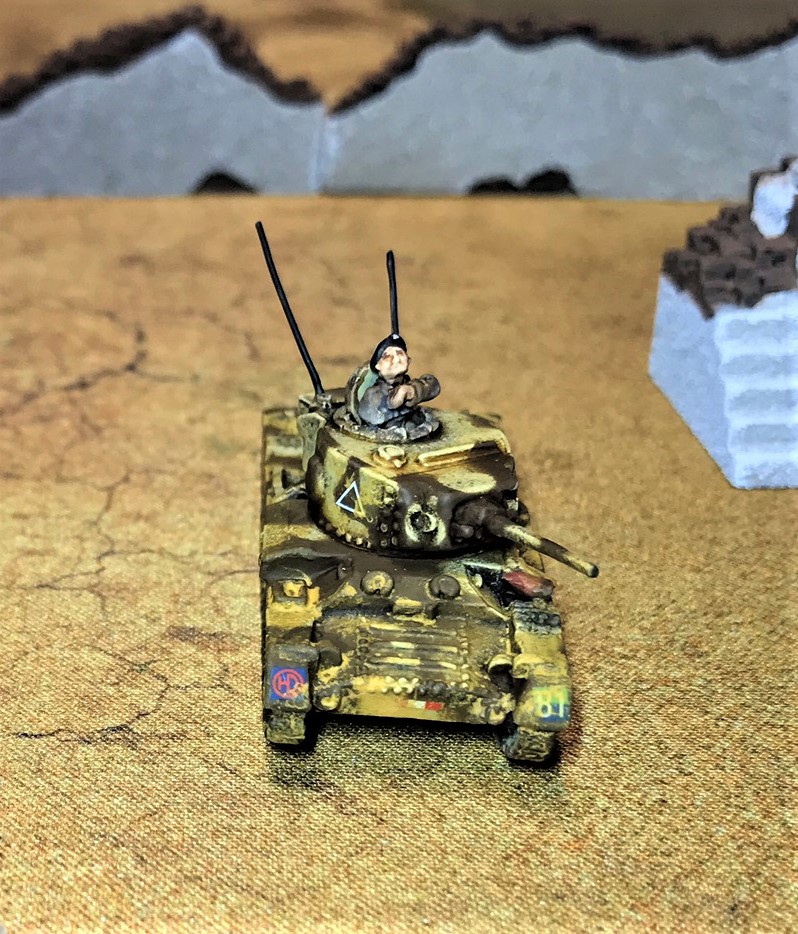
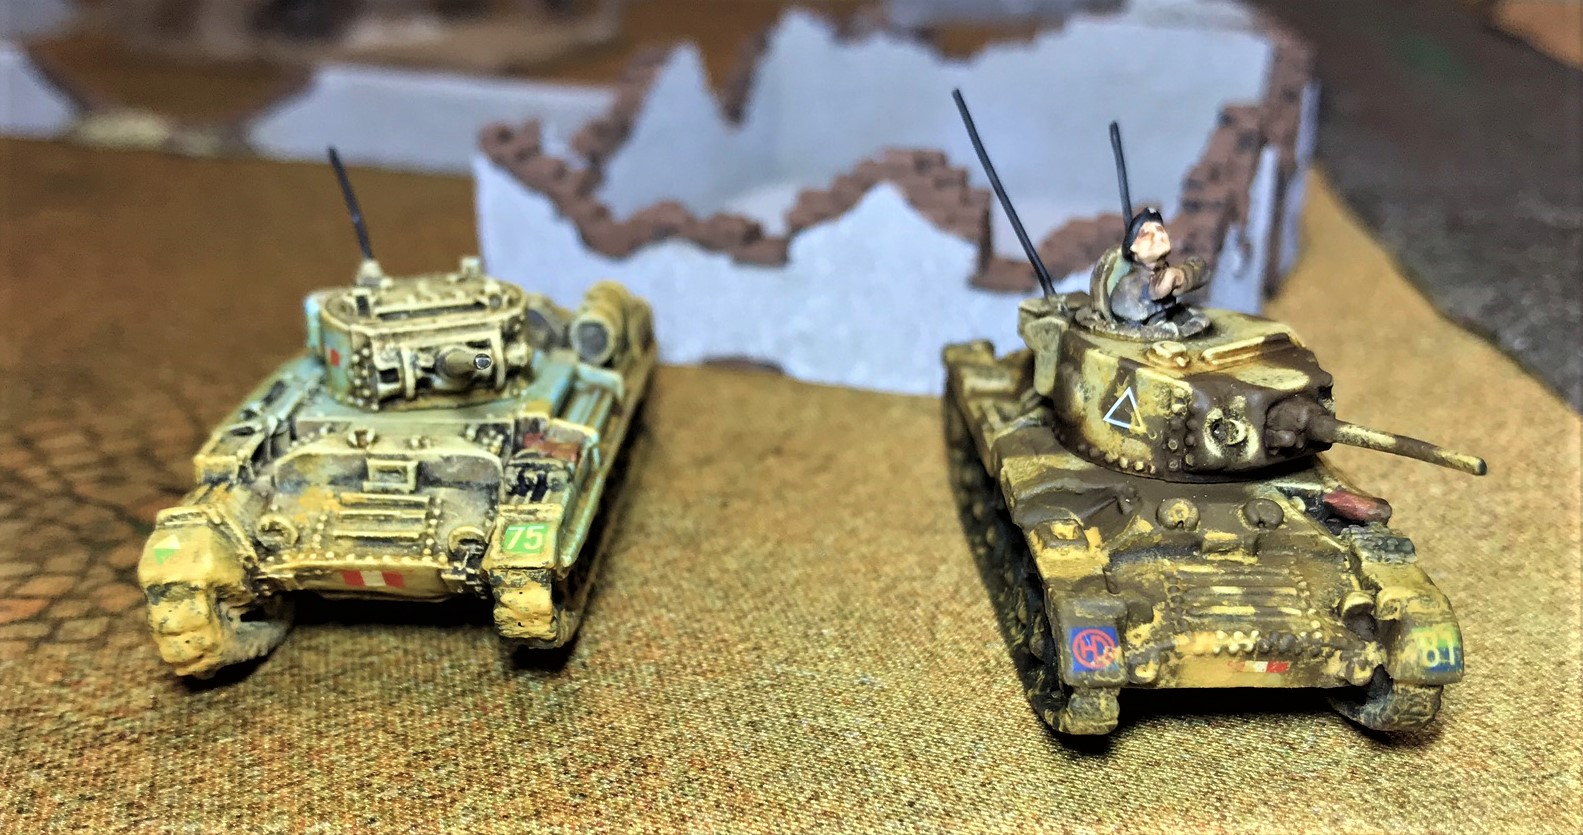
Semovente 75-18
I had two of these, with one being a command model (carro comando), that had a range finder (called a goniometer). I used a slightly different camouflage scheme with these and love the triangle vehicle marking decals that these got.
The two 75/18 types in their blisters
Components – with useless instructions (wrong model).
Primed and base coated
Prepped for camouflage
After adding crew and decals
Hey, matching licence plates!I used this color scheme, and went with the decals anyways.
Panzer IVD
My previous Panzer IVD did not make the last project group as it came with two left tracks. Battlefront sent me a replacement, and I plan to use the defective one soon as a wreck project.
In the blister
Ready fir assembly
Had to pin the main gun.
Assembled Panzer IVD
Italian Repainting
For my Wargame Model in Ohio tanks, I decided to give them a makeover with paint and decals so that they were less different than the newer Italian vehicles. They are still not perfect, but I decided to stick with what I have done with them now.
My repaint of the other Italians
I hope you liked the in progress stuff above – and now…it’s Eye Candy time!
Eye Candy
Front view of M14/41.Left rear view of M14/41Right side view of M14/41 on the roadLittle Semovente 47/32’s in a convoyFront left view of Semovente 47/32Rear right view of Semovente 47/32Semovente 75/18 right side view.Left front view of Semovente 75/85Rear view of the Semovente 75/18 tank destroyerIn comparison, here is the Semovente 75/18 Carro Comando version from the backSemovente 75/18 right sideSemovente Carro Comando 75/18 right side. Note the goniometer on the top in front of the crewman.The two versions of the Semovente 75/18’s togetherPanzer IVD left sidePanzer IVD left sideRear view of the Panzer IVDItalian Group shot!
Lastly, I am thankful to Chris Rett, Ryan MacRae, Frank Ramsay, and Mike Morgan for helping me to start to play test the scenario and rules tweaks that I will use to make this work at HAVOC in April for up to 10-12 players. Here’s a few shots!
At Great Stories in Uxbridge, MA – Chris, Ryan, and Frank have fun. The Brits made a comeback and won here under Chris’ command.Mike Morgan maneuvers his Brits to a narrow victory at my house.One of my innovations – Kill Ring Cards!
Thanks for looking – and I hope that you found this post interesting and fun. As I add more tanks/tank destroyers, I will share them. I also hope to add better pics from future games.
Please let me know your thoughts and feedback – as always – in the comments section!
PAINTS, INKS, GLAZES, SHADES, WASHES, PIGMENTS AND FLOCKING USED ON THIS TANK GROUP:
Vallejo “Flow Improver”
Vallejo “Airbrush Thinner”
Vallejo “Surface Primer – Black”
Citadel “Imperium Primer”
Battlefront “German Camo Orange Ochre”
Testors “Universal Acrylic Thinner”
Vallejo Model Air “Base Grey”
Army Painter Quickshade “Mid Brown” (wash)
Battlefront “Dry Dust”
Vallejo Model Air “German Green Brown”
Battlefront “Monty Shade” (shade)
Army Painter Quickshade “Strong Tone” (wash)
Battlefront “Army Green”
Battlefront “Dark Gunmetal”
Battlefront “Panzer Gray”
Vallejo “Neutral Grey”
Vallejo Model Air “Green Brown”
Vallejo Model Air “Light”
Vallejo Model Air “Cam. Grey Green”
Battlefront “Black”
Battlefront “Battledress Brown”
Vallejo Mecha Color “Light Rust Wash” (wash)
DecoArt “White Pearl”
Army Painter Quickshade “Light Tone” (wash)
Battlefront “European Skin”
Battlefront “Skin Shade” (shade)
Vallejo “Dark Flesh”
Vallejo “Dark Prussian Blue”
Vallejo “Dark Yellow Ochre” (pigment)
Vallejo “Light Slate Grey” (pigment)
Vallejo “Light Sienna” (pigment)
Vallejo “Desert Dust” (pigment)
Citadel “Nuln Oil” (wash)
Gorilla Glue
Vallejo Mecha Varnish “Gloss Varnish”
Microscale Micro-Set
Microscale Micro-Sol
Microscale Liquid Decal Film
1/8″ rare earth neodymium magnets
Appropriate decals from Battlefront
Vallejo Mecha Varnish “Matt Varnish”
Aleene’s poster tack
Sponges
Thanks for looking and for sharing your feedback!
ONCE MORE – ON MY RESEARCH MATERIALS
As for research materials, I used the same ones as I cited before – but for completeness here they are in case you are interested (you can find them on Amazon):
One by Jean Restayn:WWII Tank Encyclopaedia, 1939-45
One by the Smithsonian/DK: Tank: The Definitive Visual History of Armored Vehicles
One by Michael Green:Axis Armoured Fighting Vehicles of the Second World War (Images of War)
One by Robert Jackson:Tanks and Armored Fighting Vehicles Visual Encyclopedia
I would again easily recommend all of these books as really good resources for gamers and modelers.
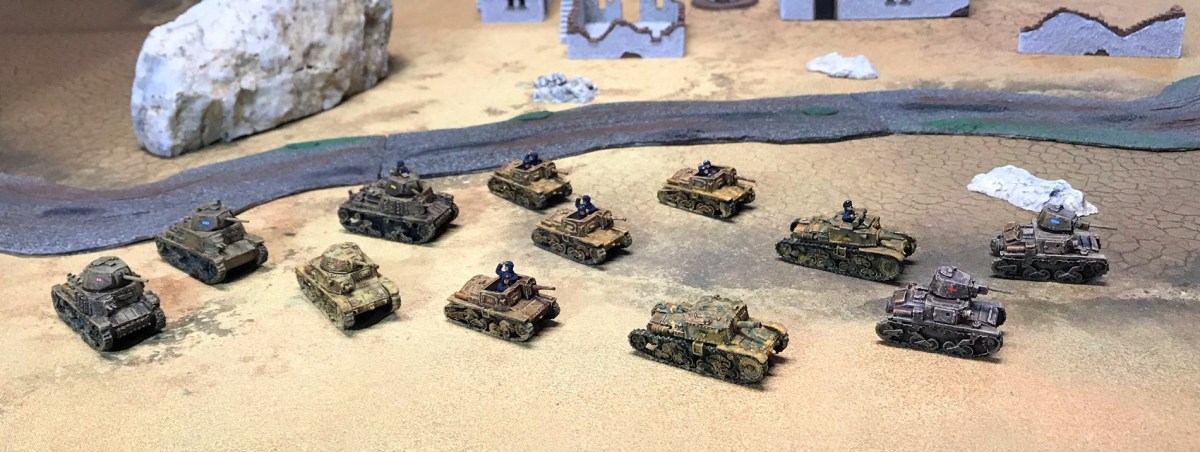
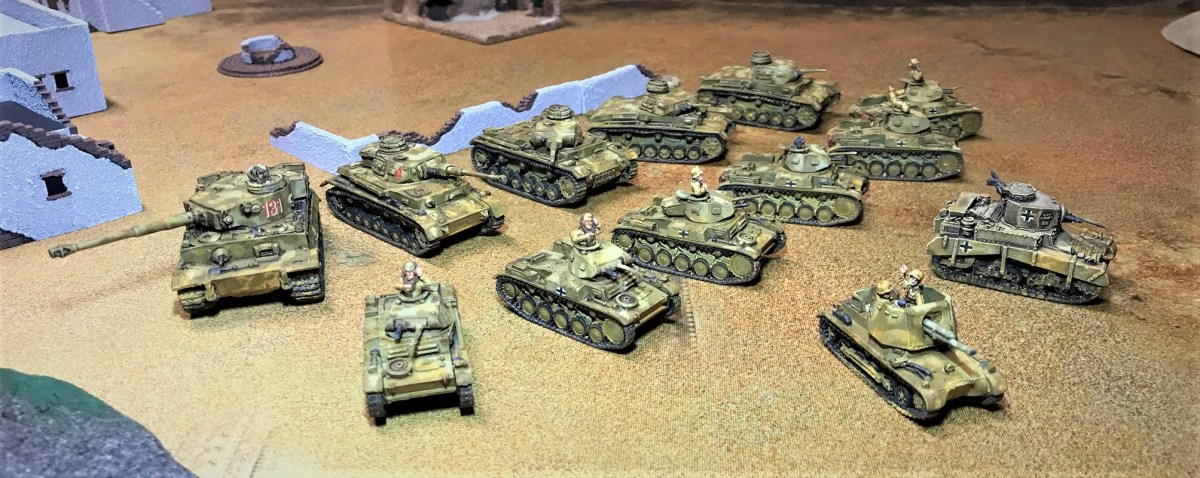
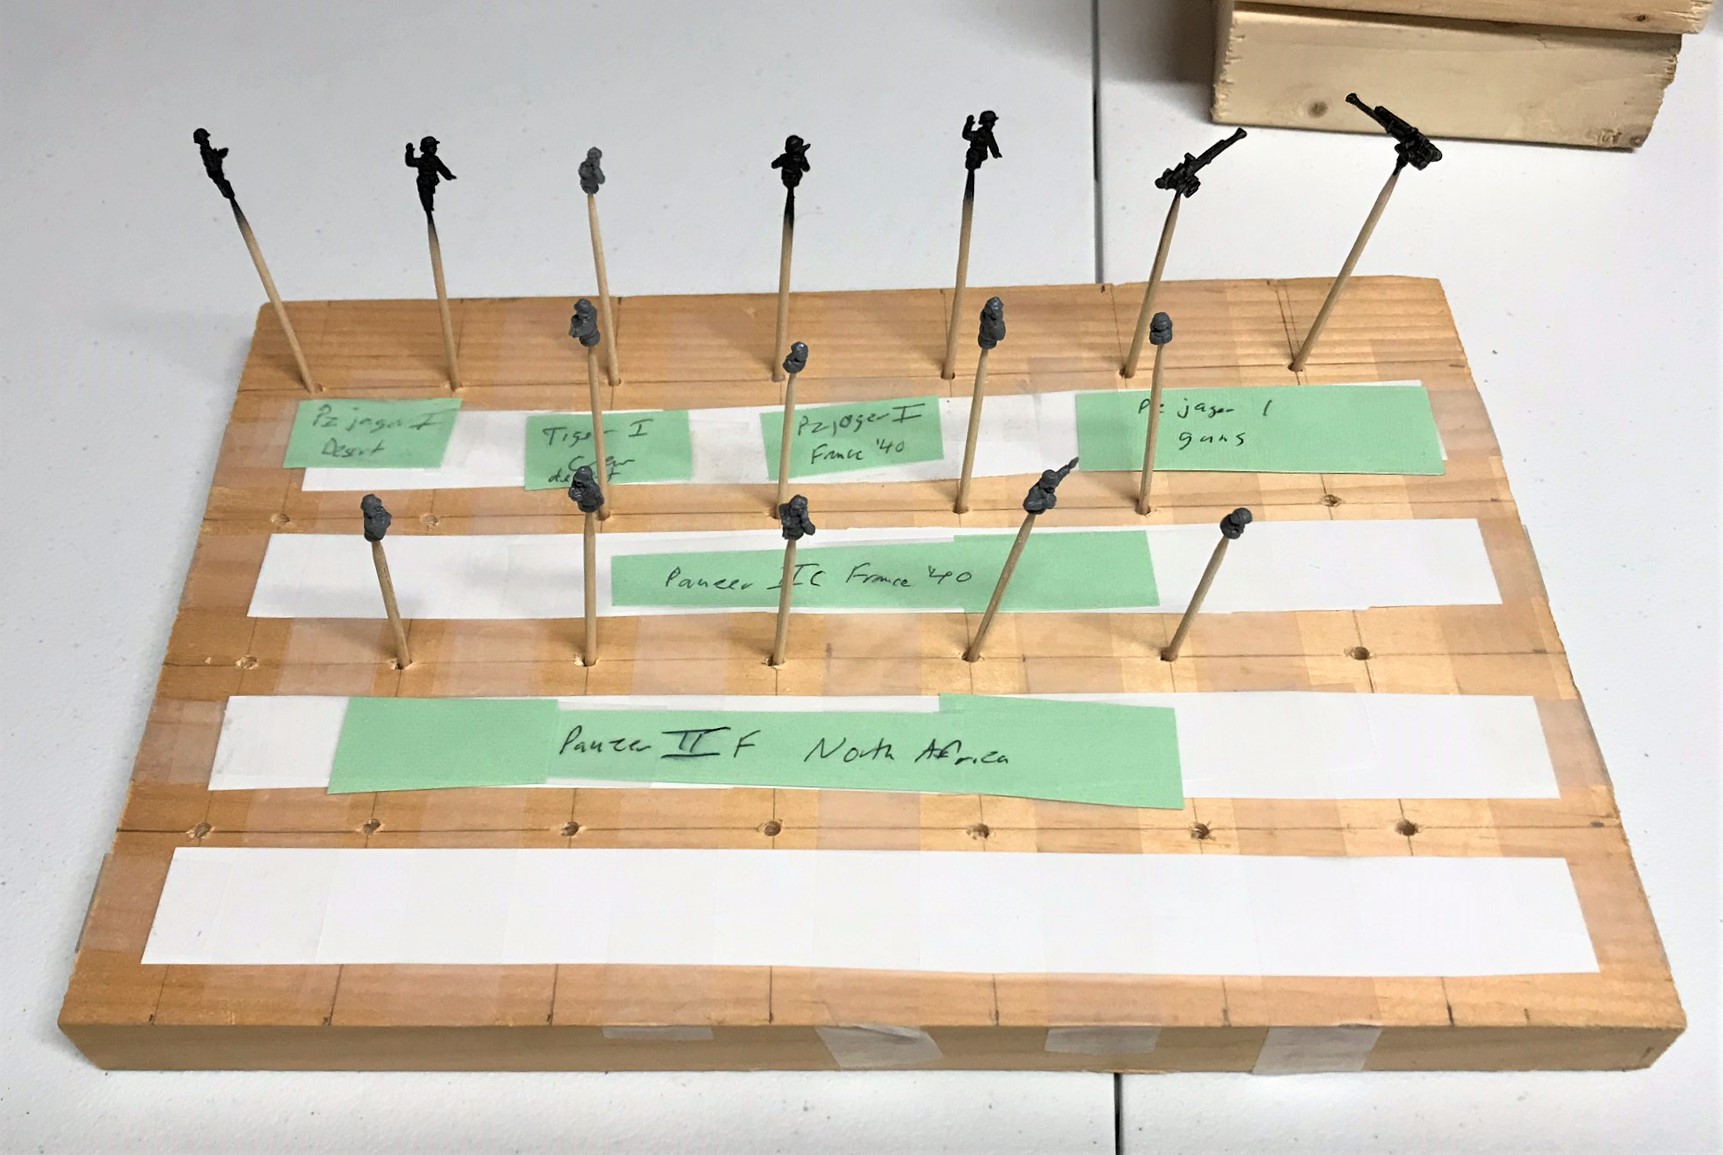
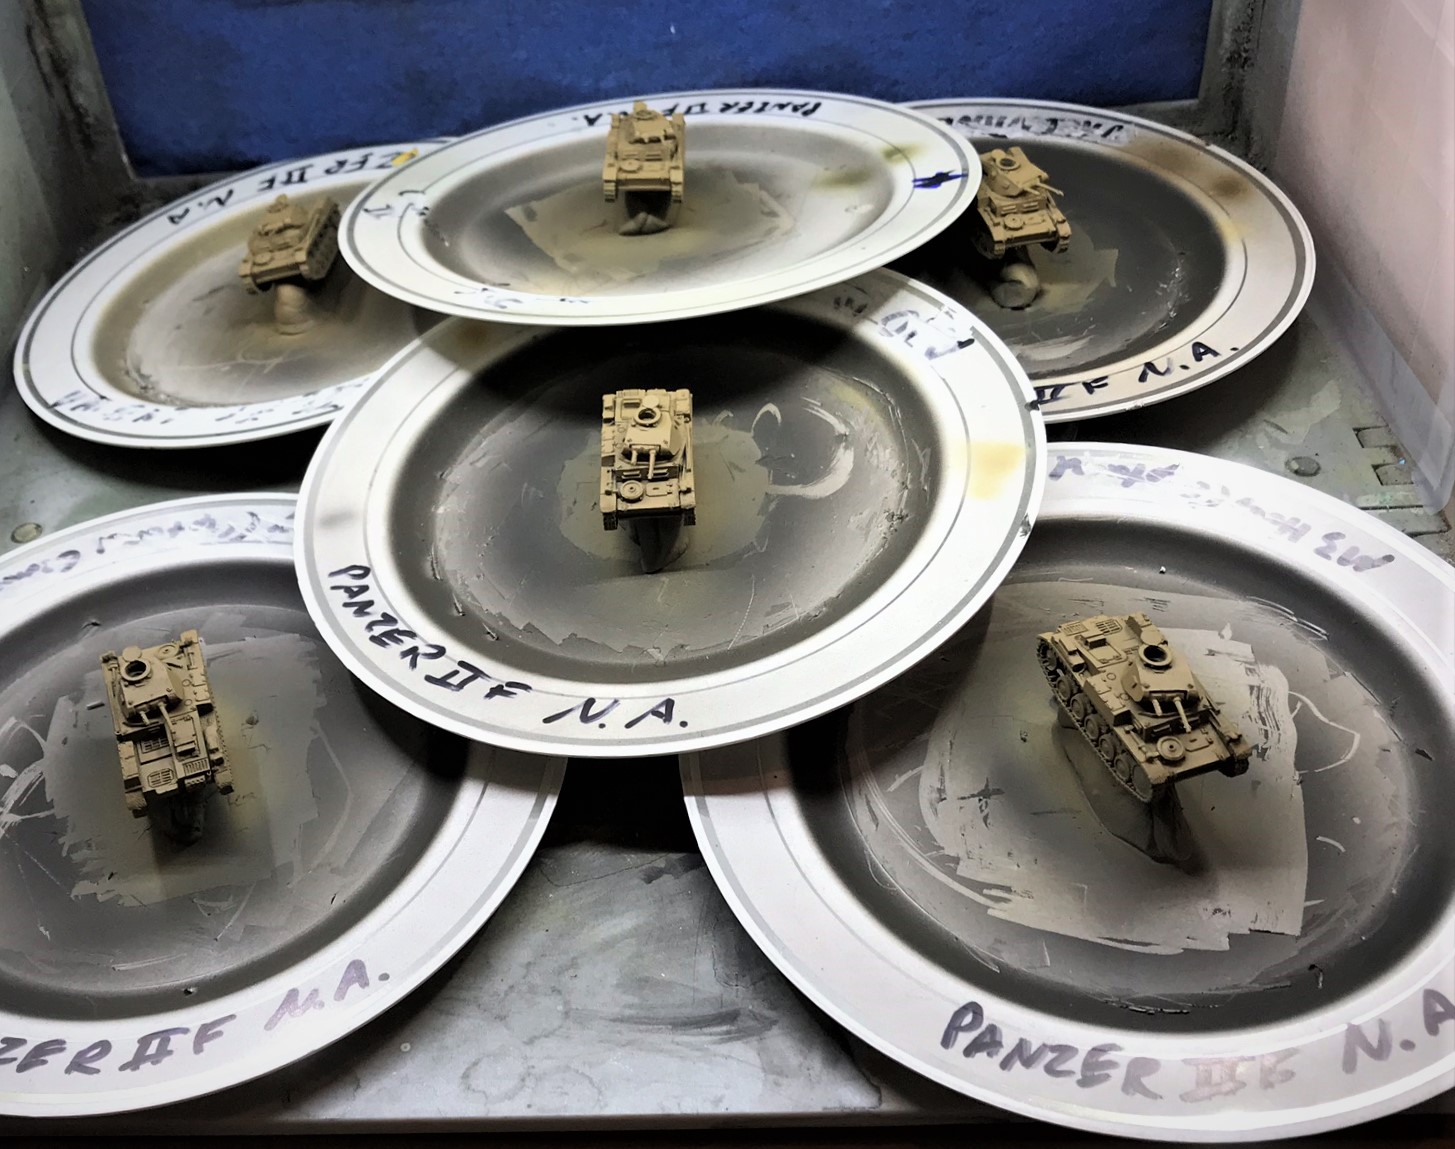
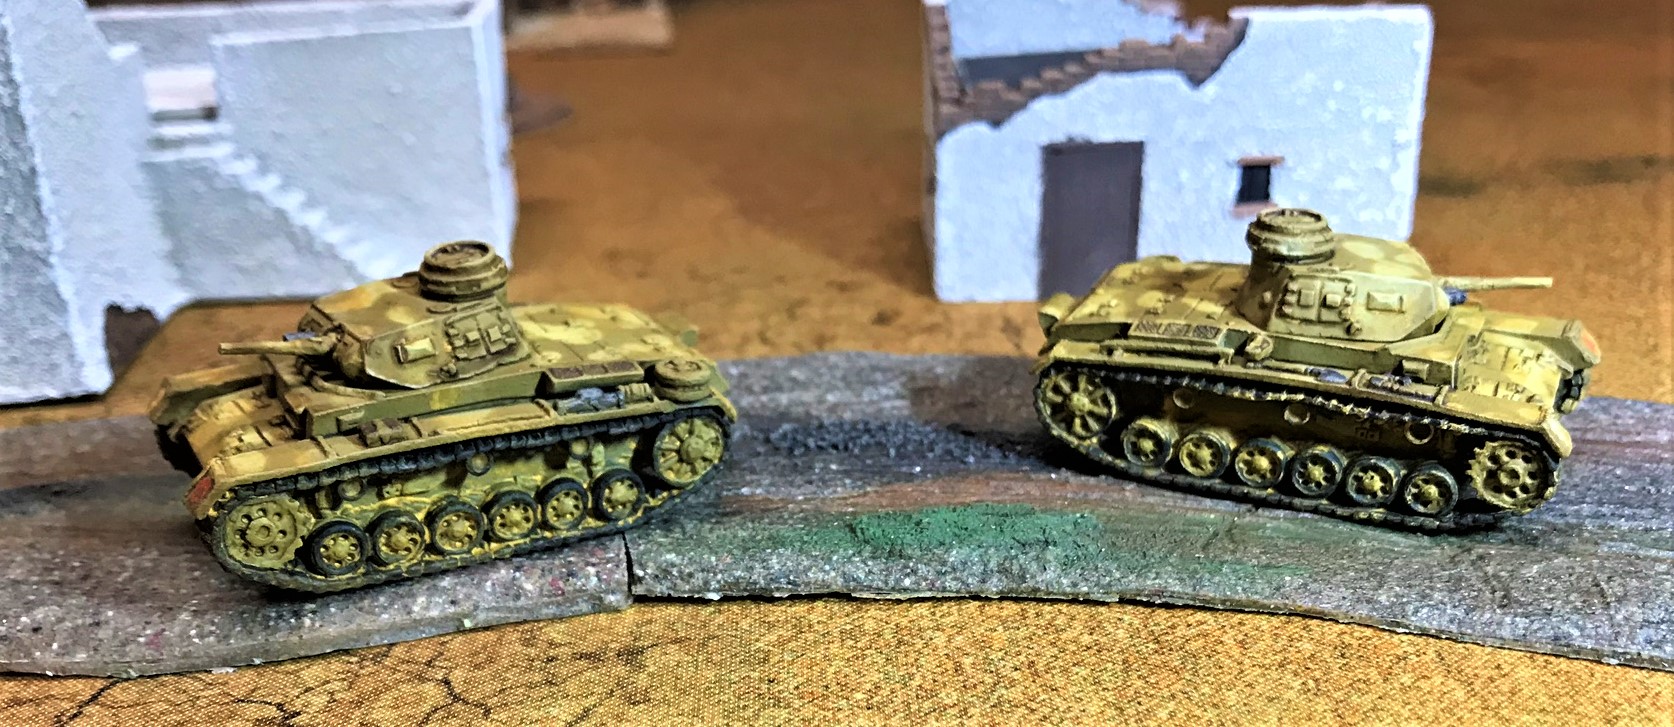
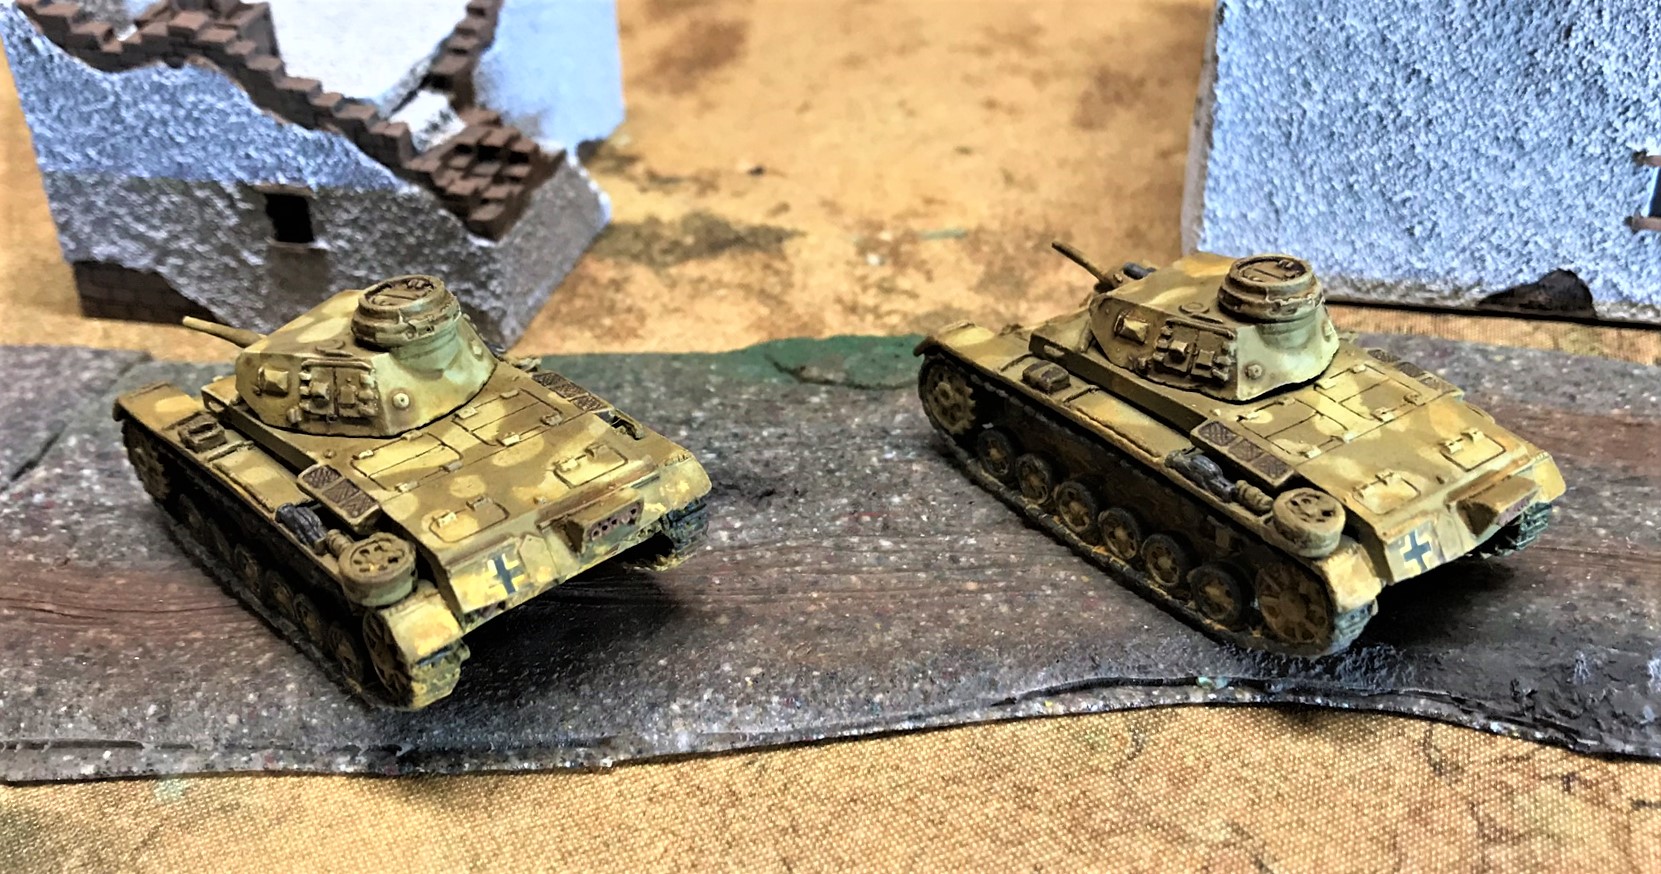
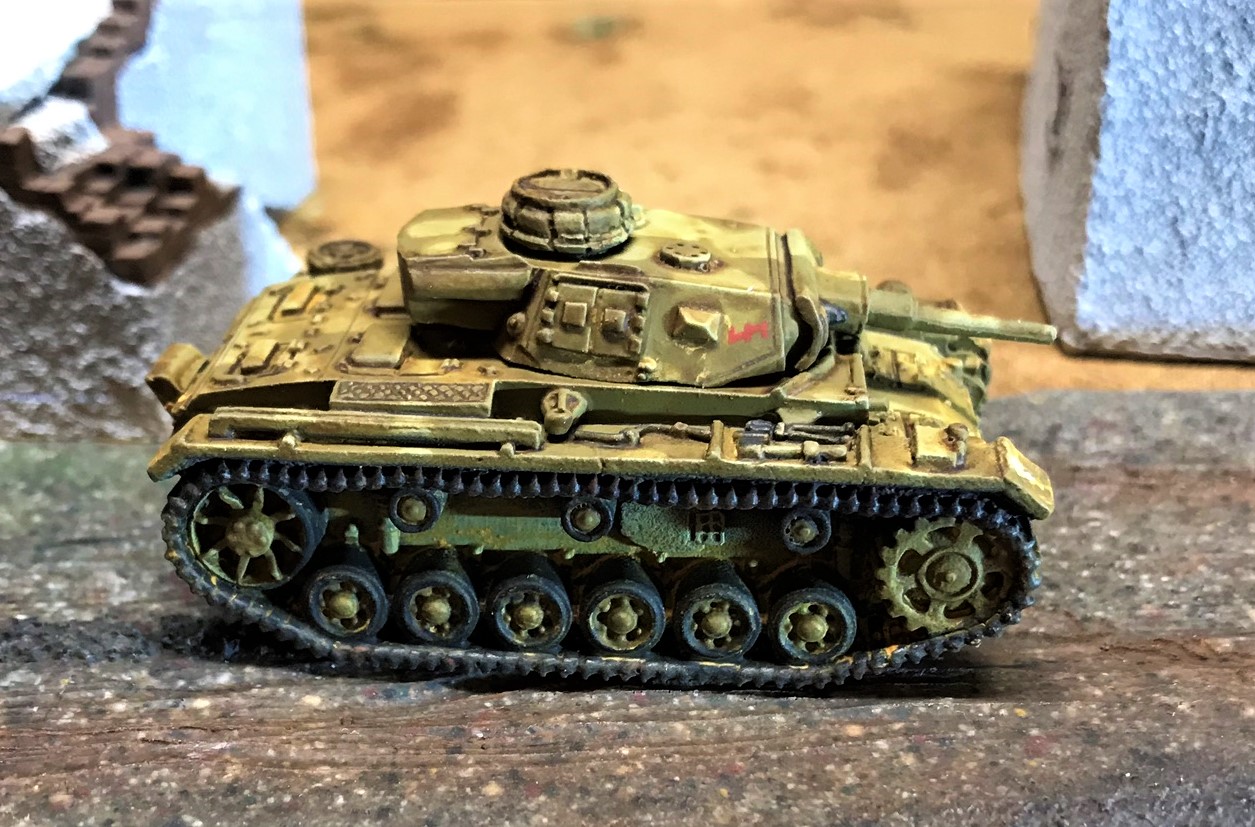
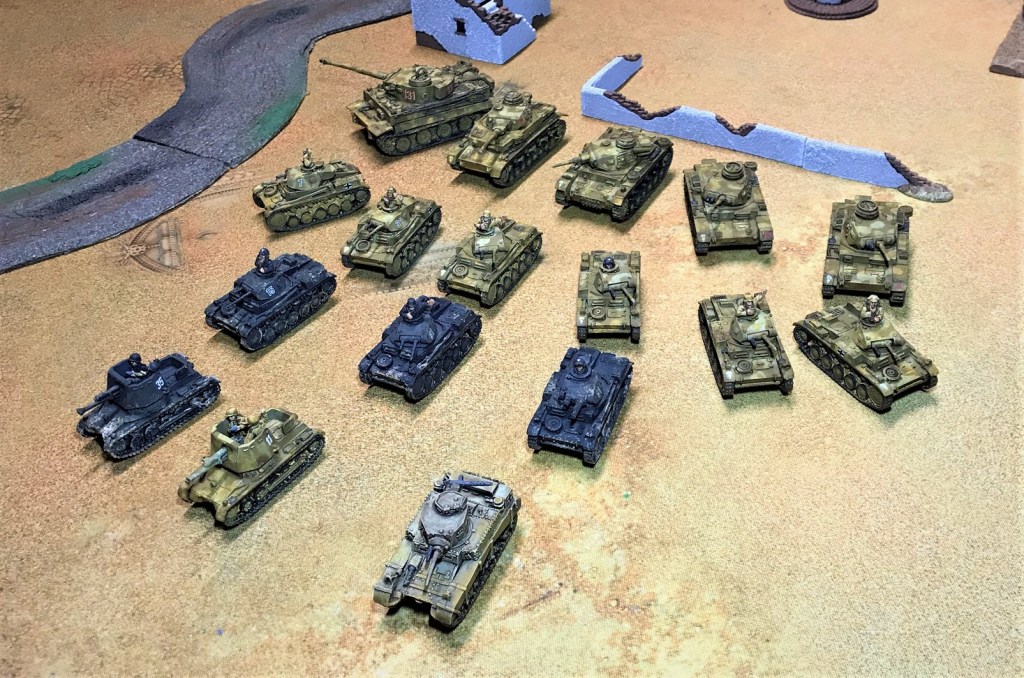
I finished a total of 17 tanks/tank destroyers this month. These were all 15mm scale and from Battlefront Miniatures. Thirteen of these were for North Africa, while four would augment my forces for my France 1940 scenario. The largest single number were nine Panzer II variants. I had purchased a box of five Panzer II’s previously, and built one for France 1940, but the box was short one tank guns. Battlefront made good on this, and sent me another entire box of five tanks! This allowed me to convert an extra British A10 gun I had lying around into one for a Panzer IIC. It’s not perfect, but should work on the tabletop. I also had a Panzer IVD from Battlefront, and discovered that it had two left tracks. Battlefront has done right by me on that too, and replaced that entire tank as well. I will probably take the extra Panzer IVD and make it into a wreck later on. So this post will review these 17 tanks I built and painted:
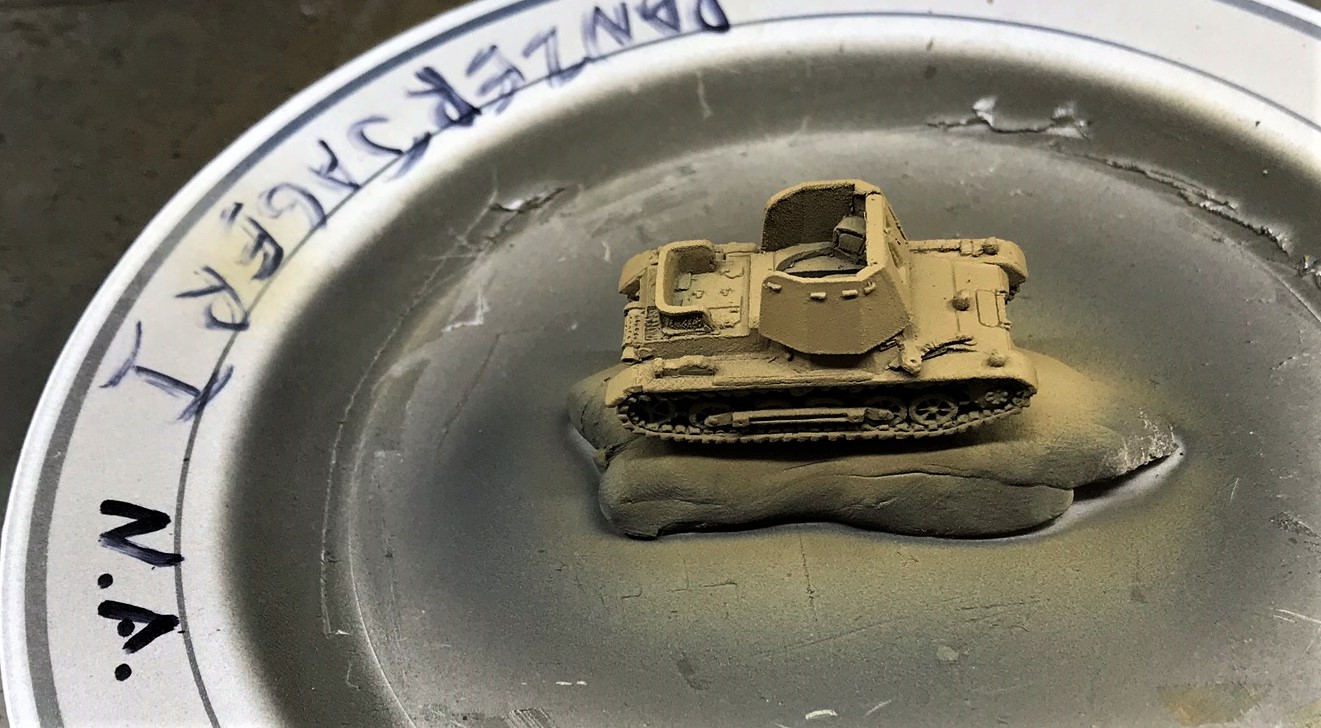
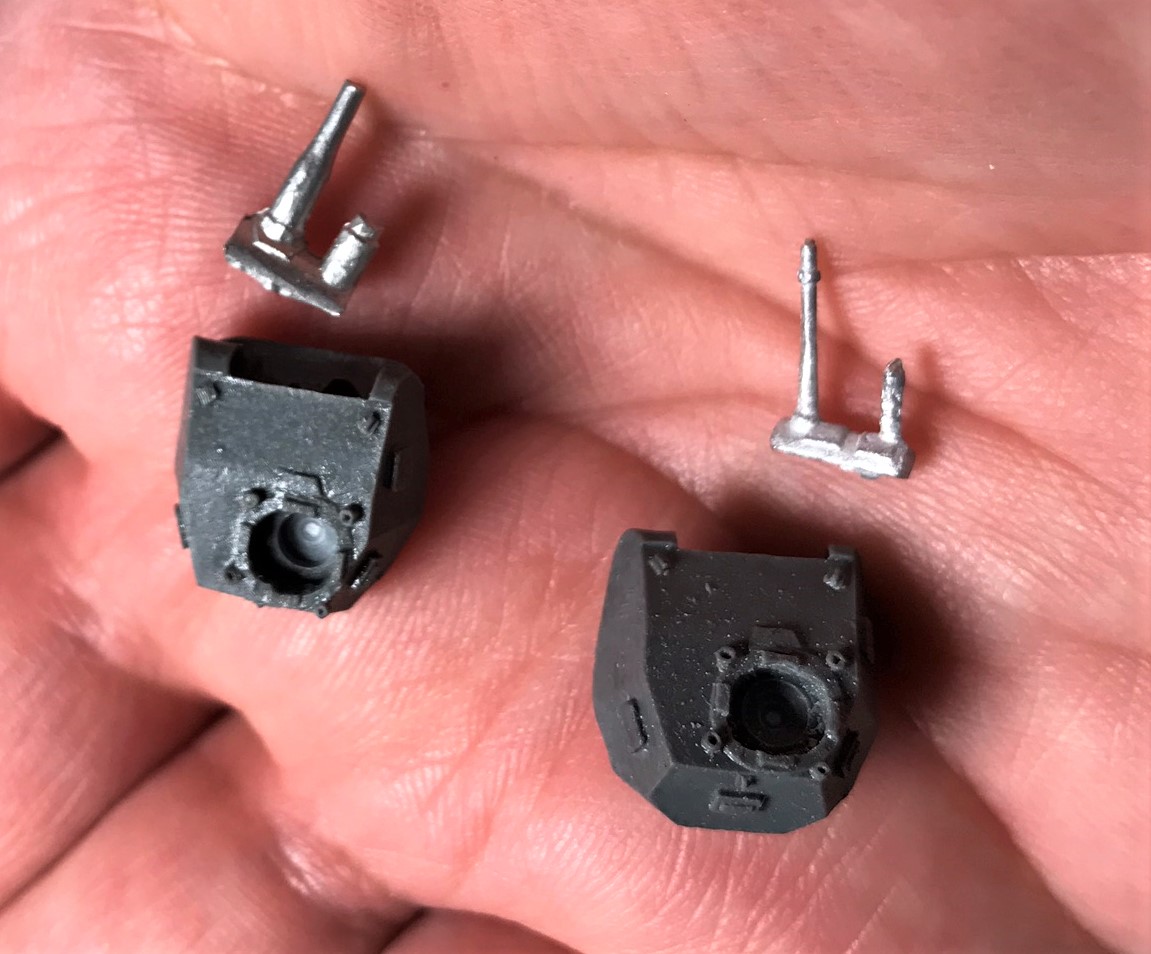
2 Panzerjager I’s (one for France 1940 and one for North Africa)(15mm/1:100 scale), from Battlefront Miniatures (#GE100)
3 Panzer IIC’s (15mm/1:100 scale), from Battlefront Miniatures (#GBX108) for France 1940
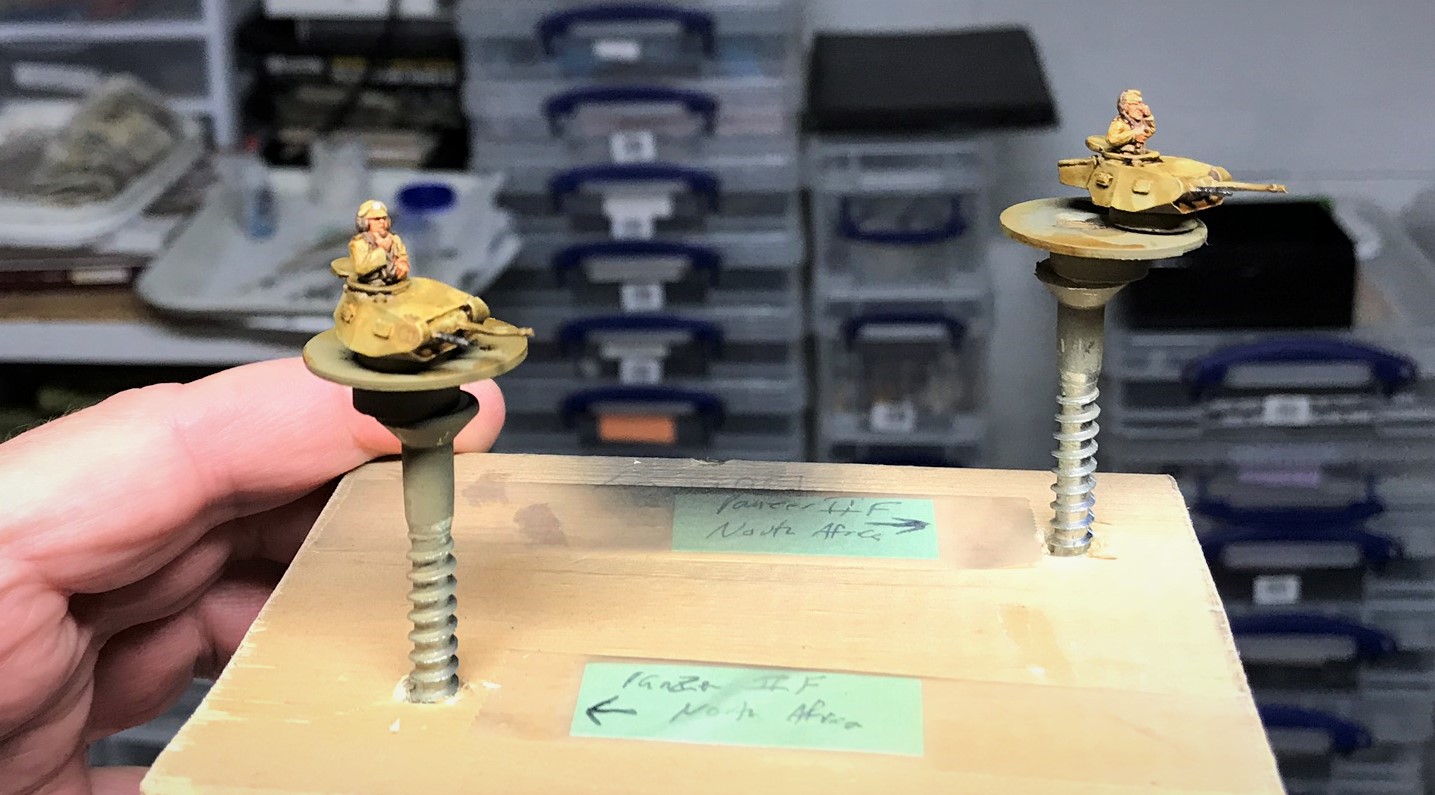
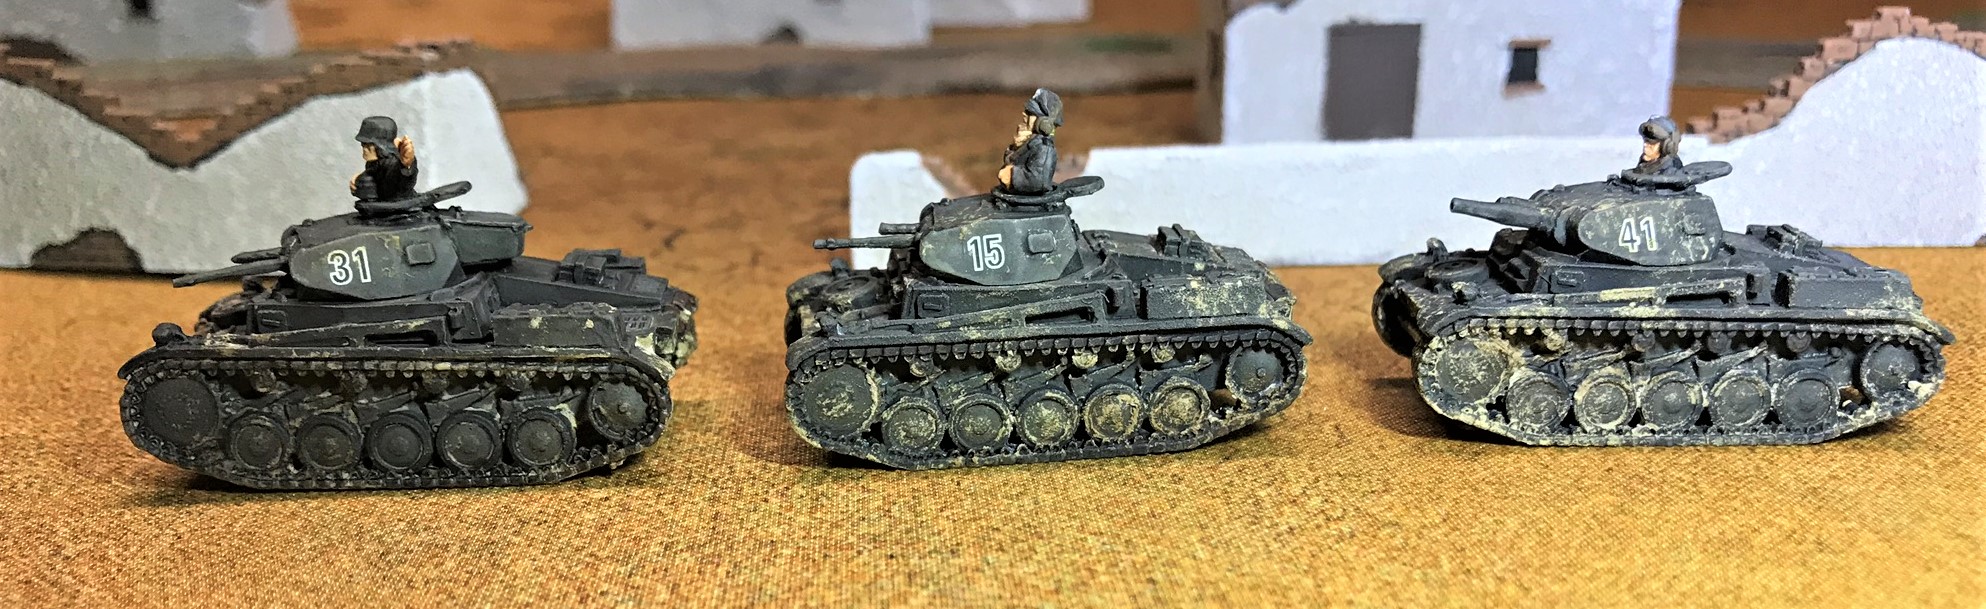
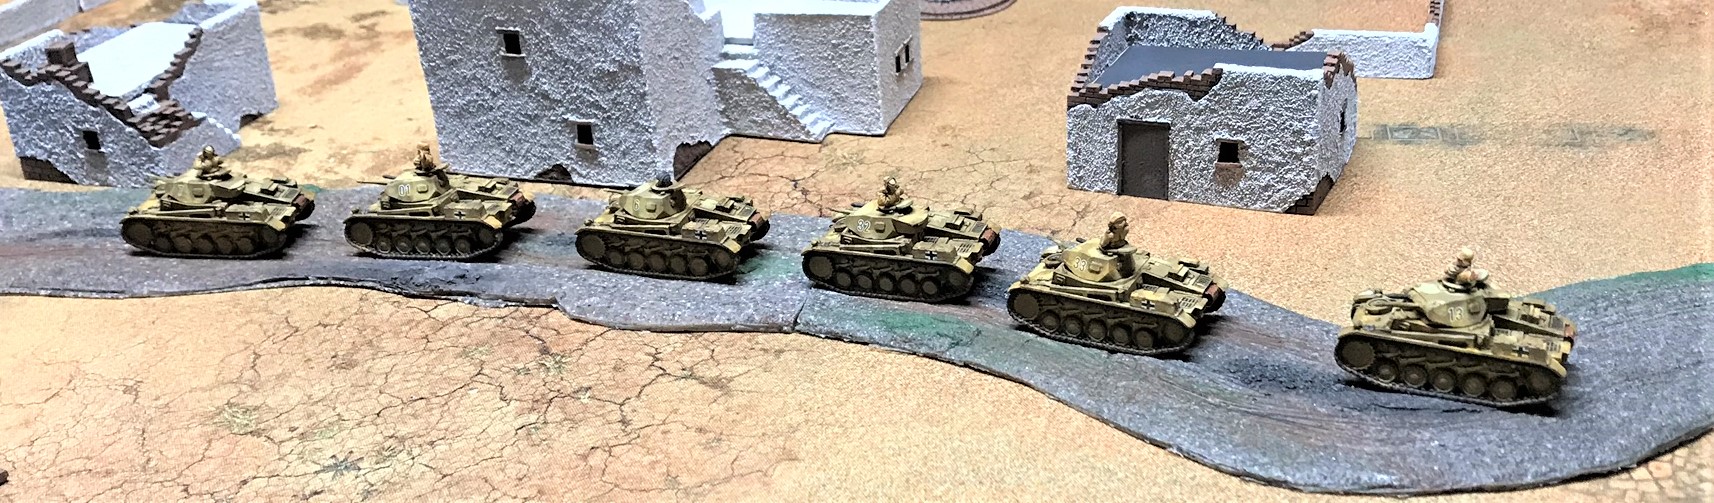
6 Panzer IIF’s (15mm/1:100 scale), from Battlefront Miniatures (#GBX108) for North Africa
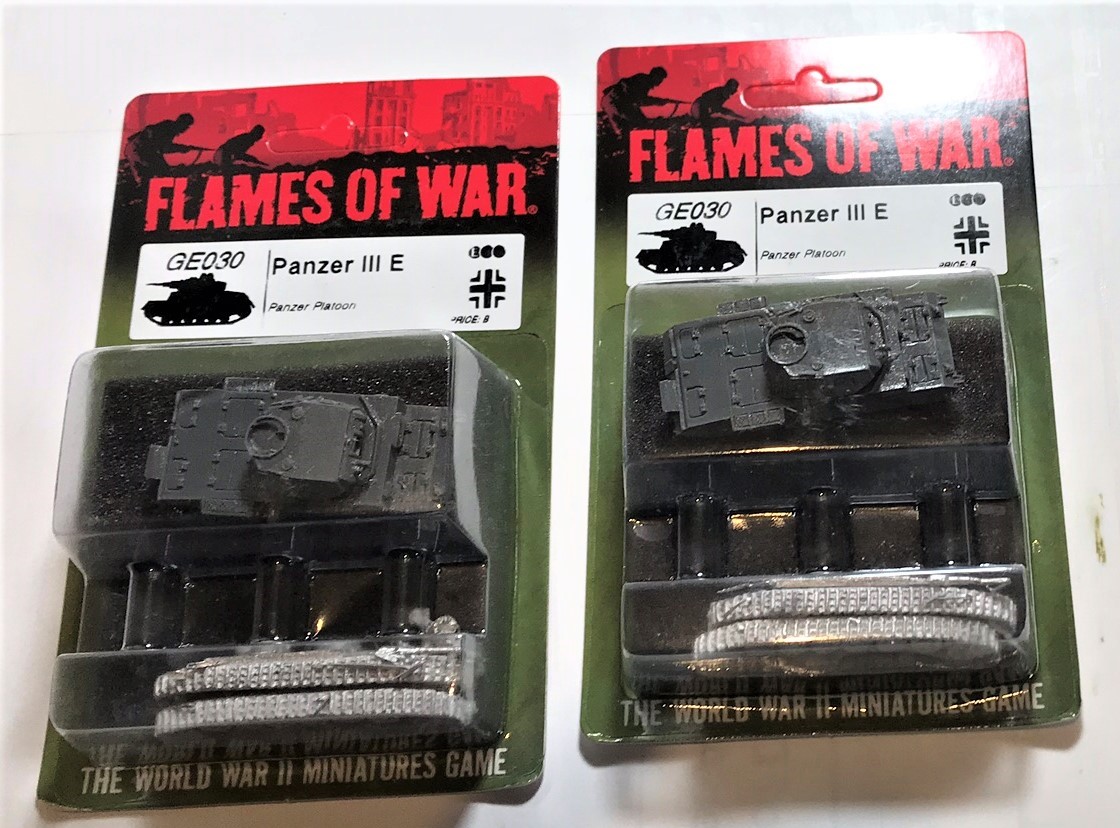
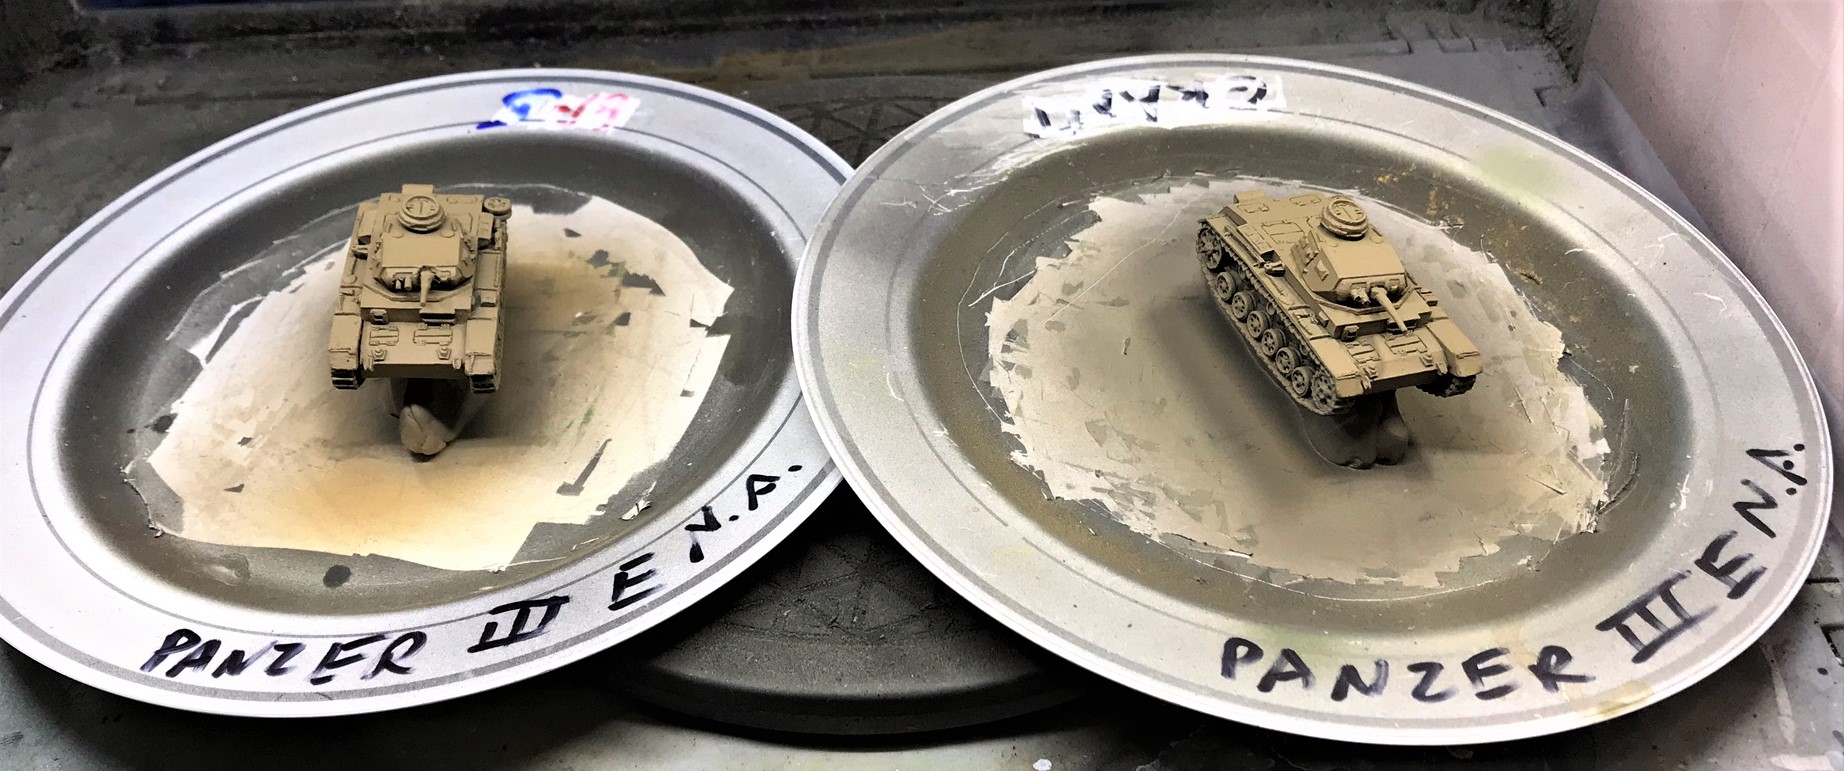
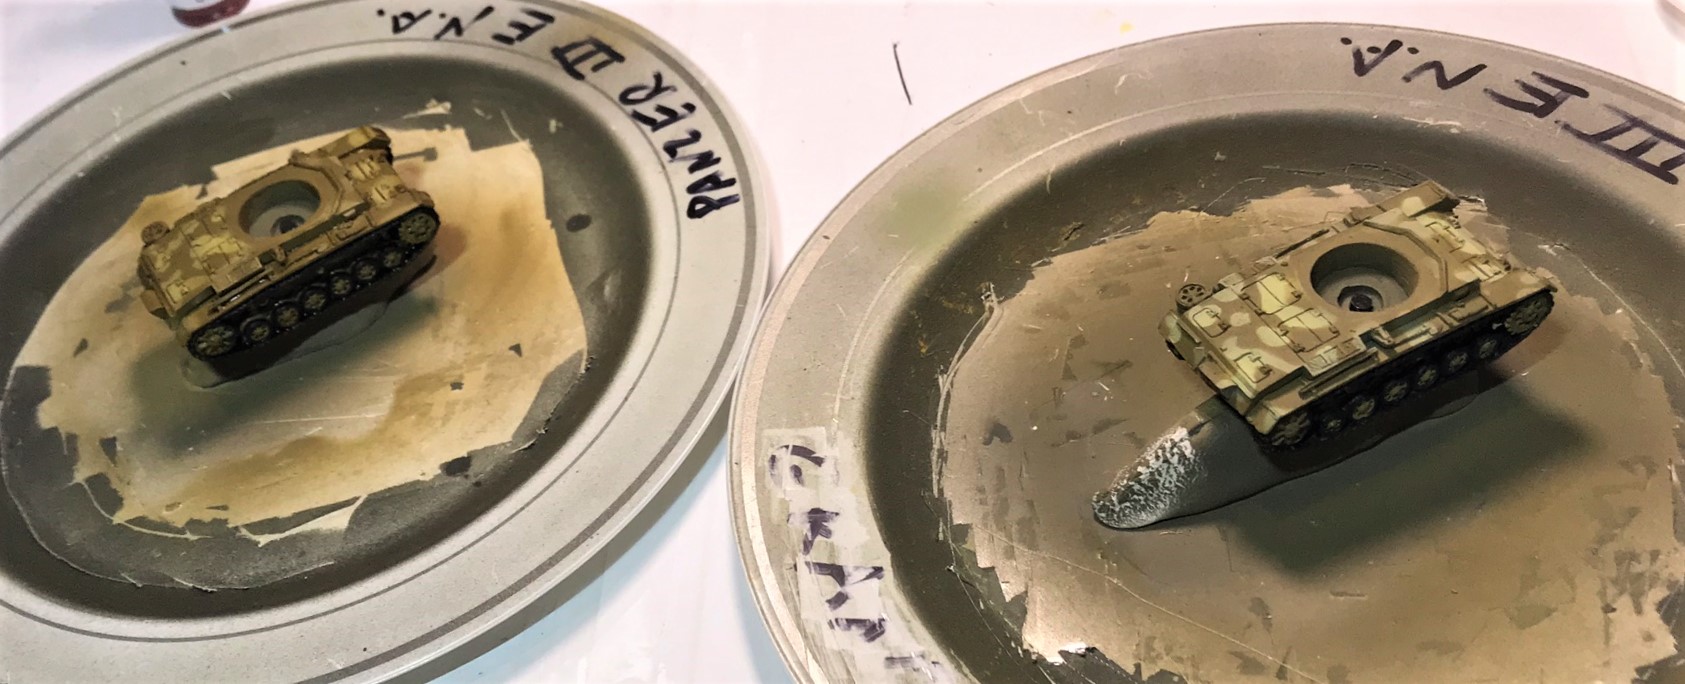
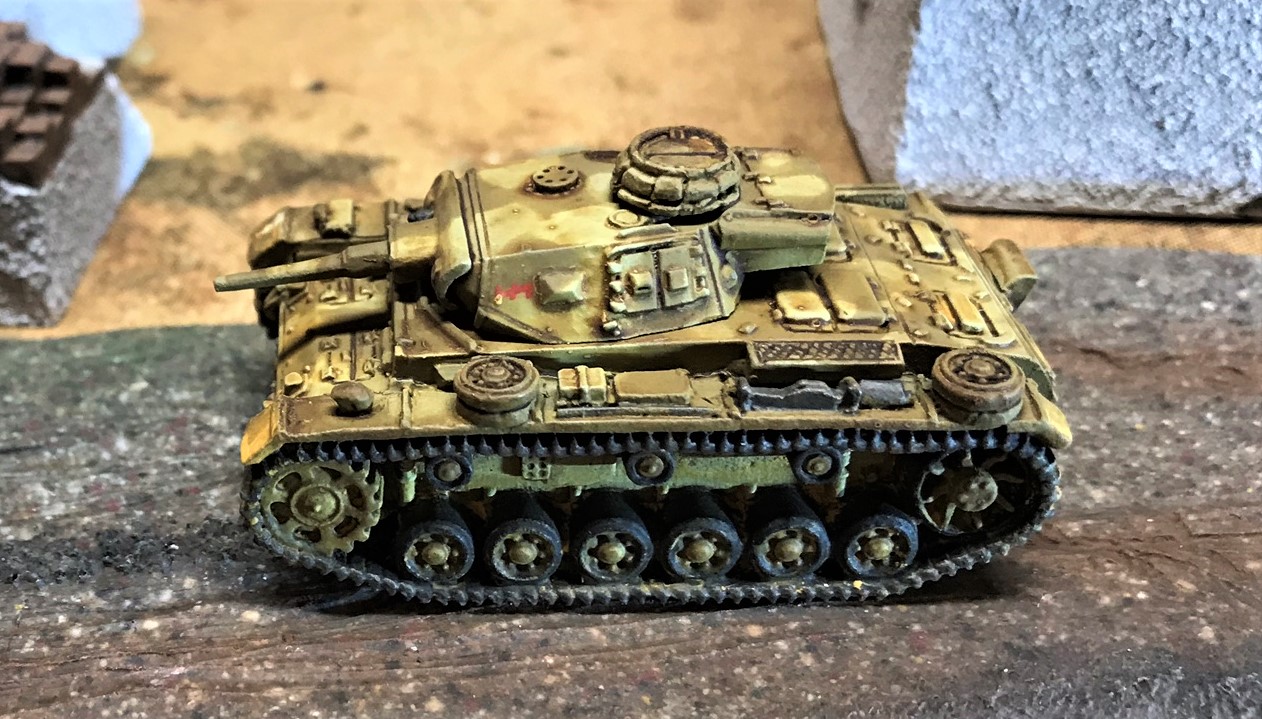
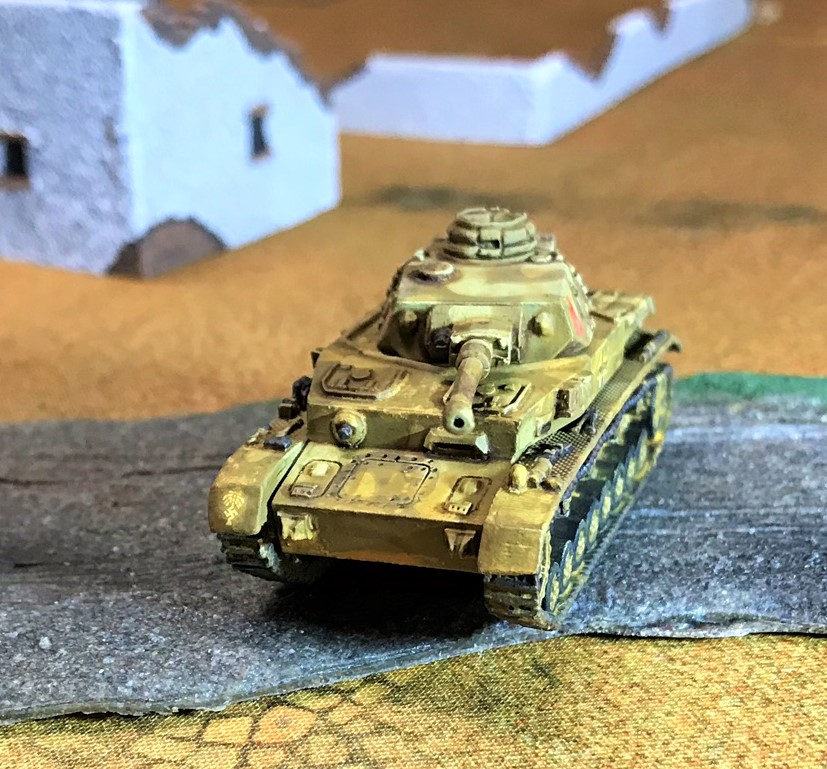
2 Panzer IIIE’s (15mm/1:100 scale), from Battlefront Miniatures (#GE030) for North Africa
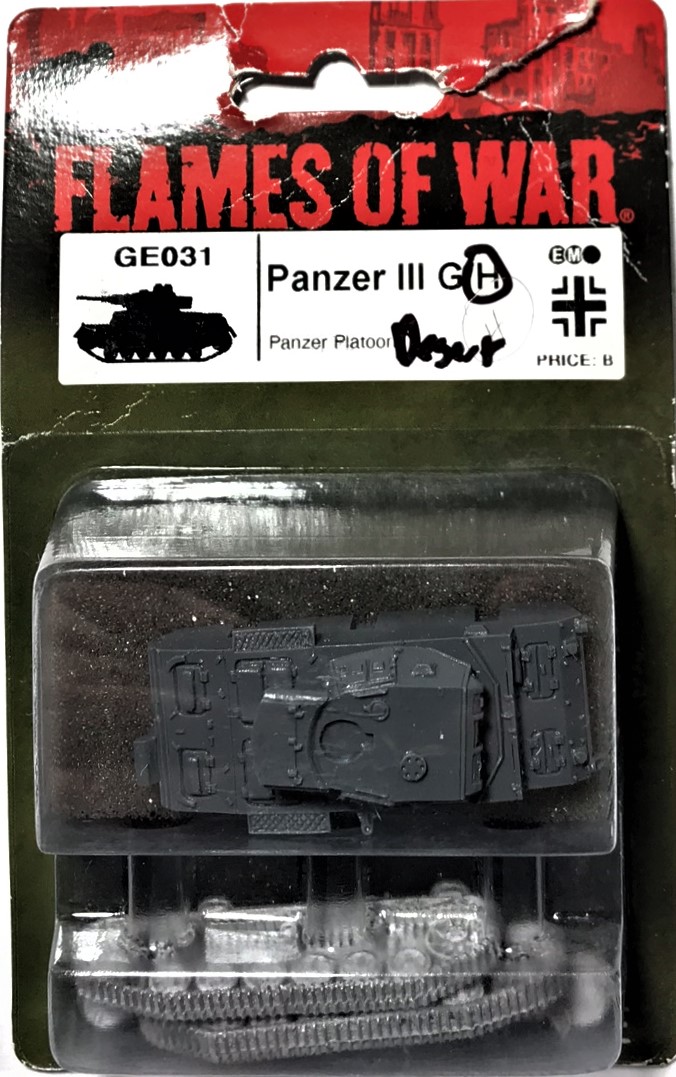
1 Panzer IIIH (15mm/1:100 scale), from Battlefront Miniatures (#GE031) for North Africa
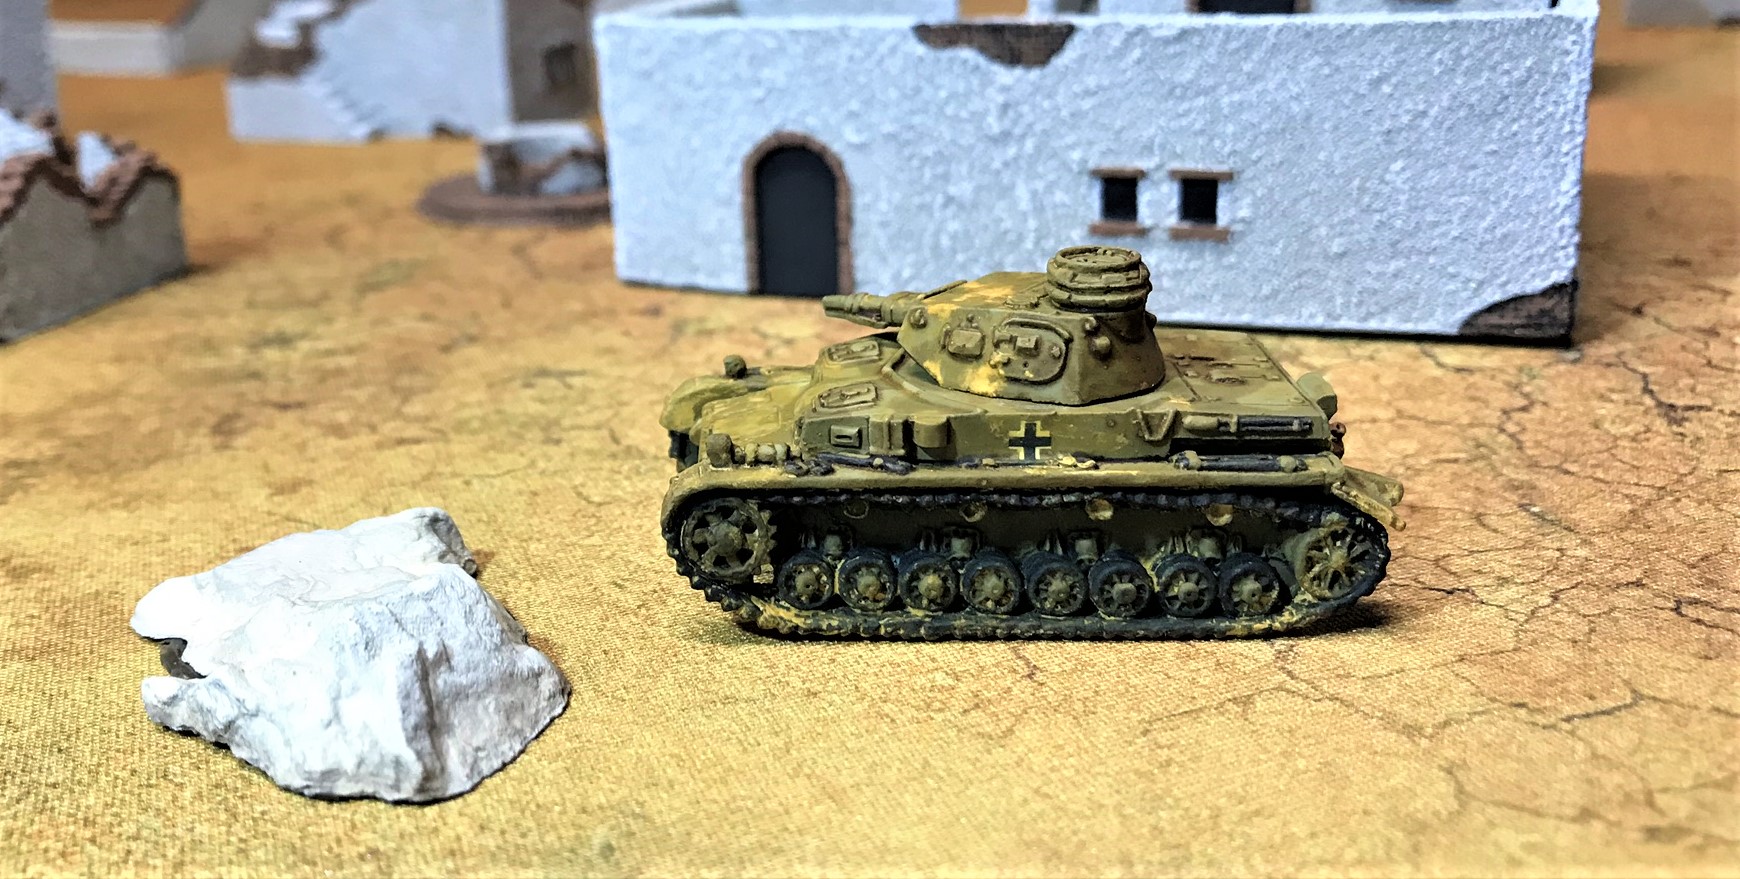
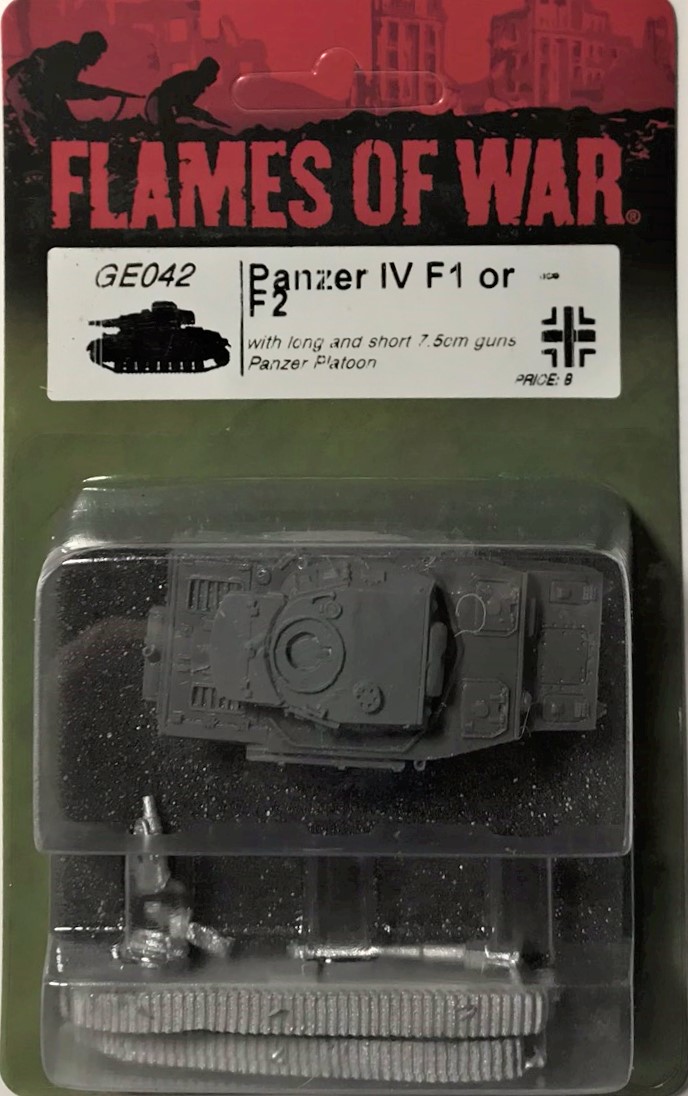
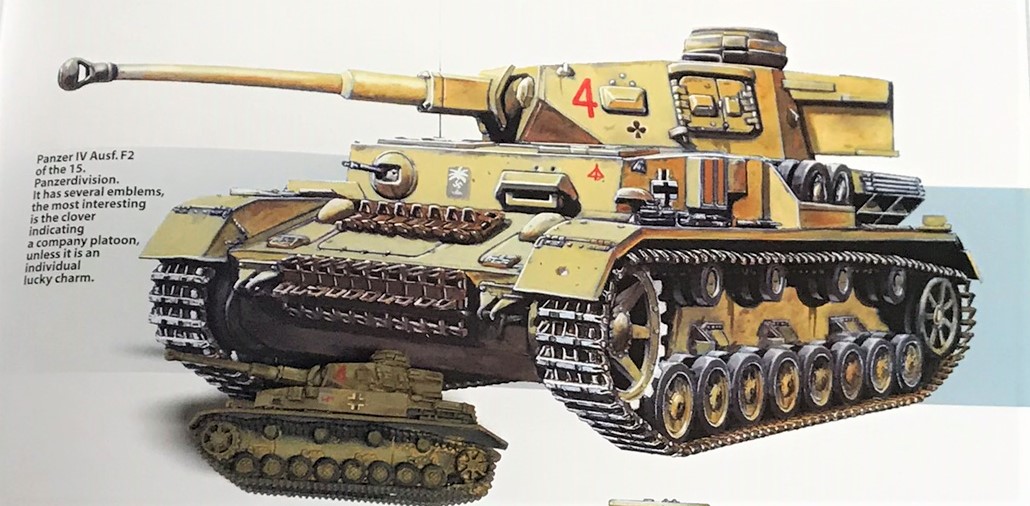
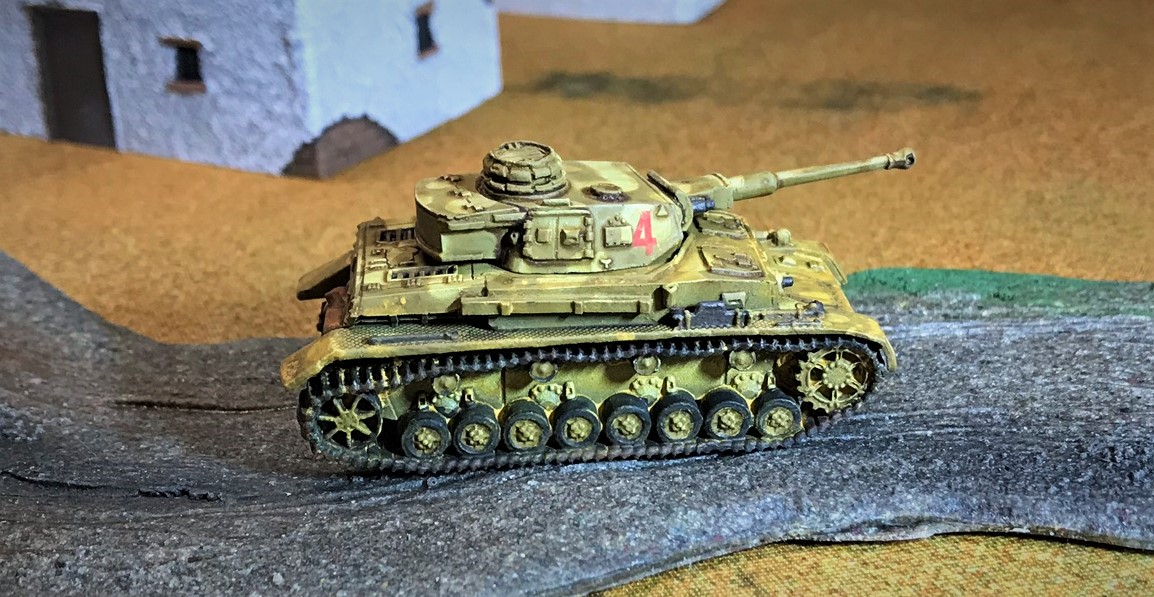
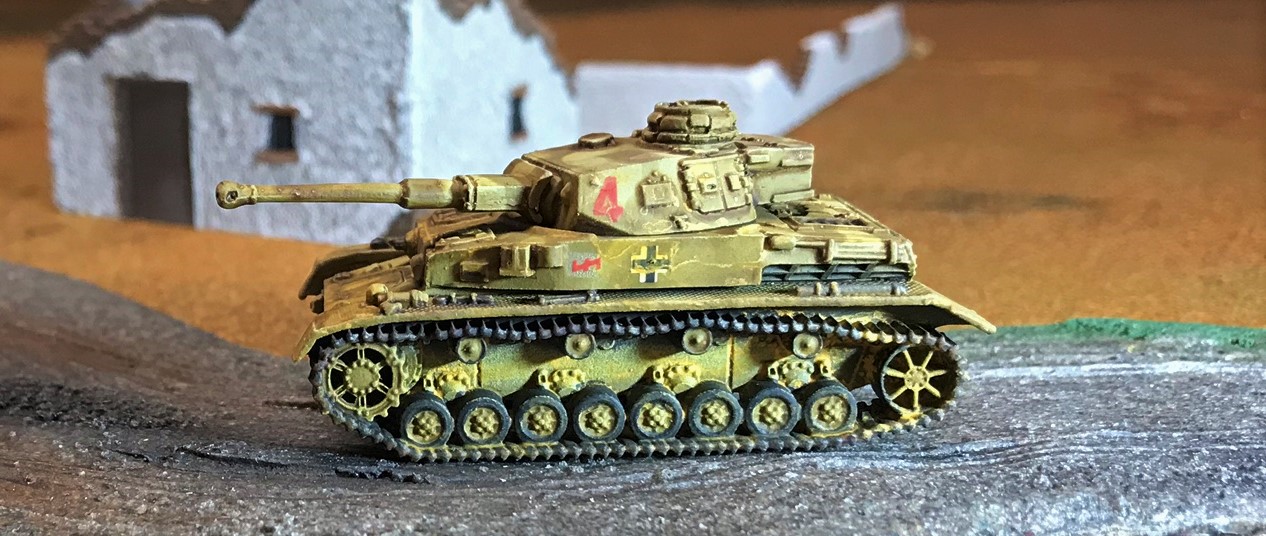
1 Panzer IVF2 (15mm/1:100 scale), from Battlefront Miniatures (#GE042) for North Africa
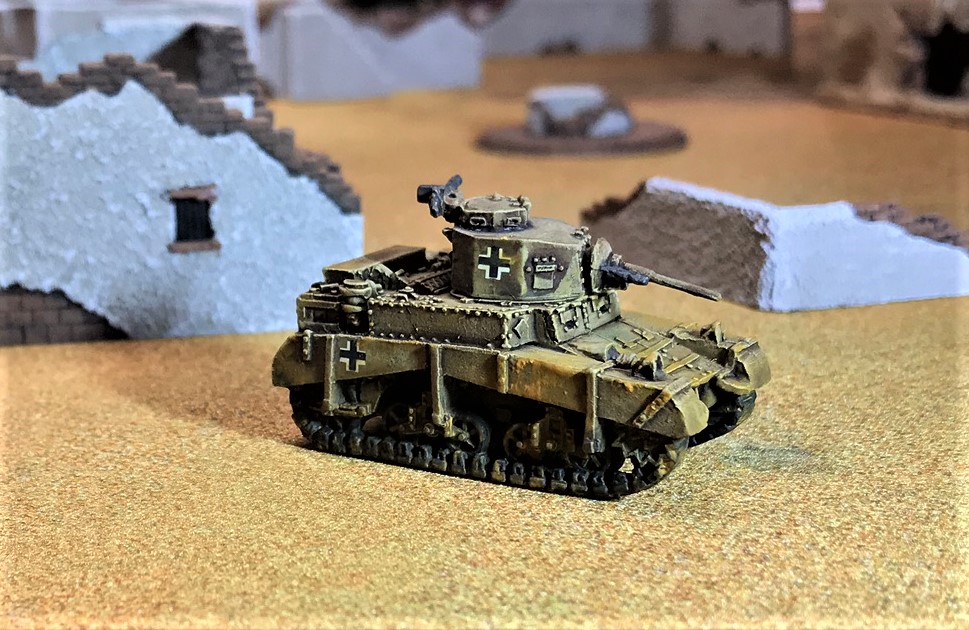
1 M3 Stuart “Honey” tank (15mm/1:100 scale), from Battlefront Miniatures (#BR006) – one captured by the Germans for use in North Africa
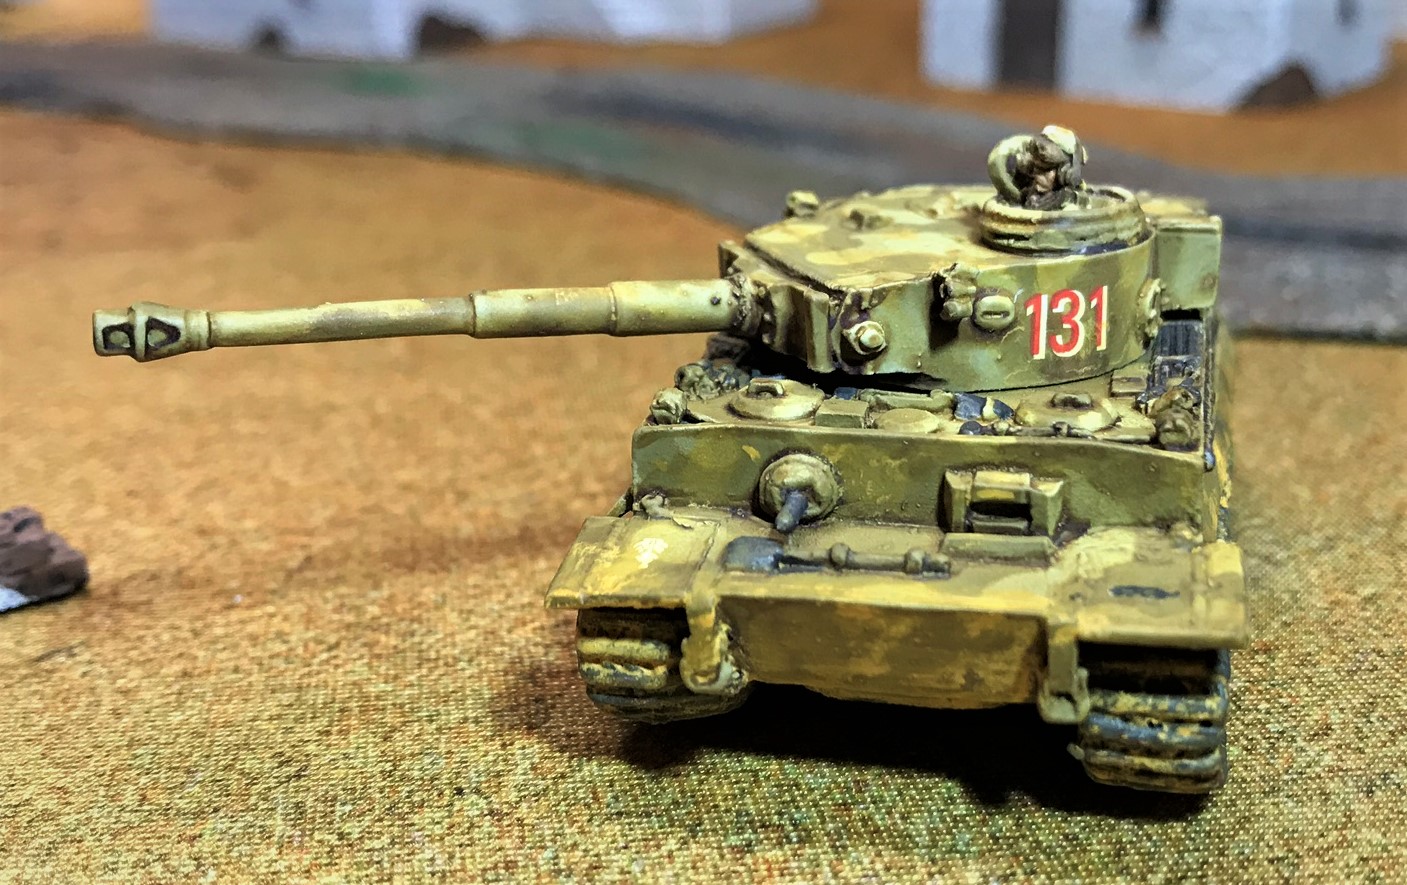
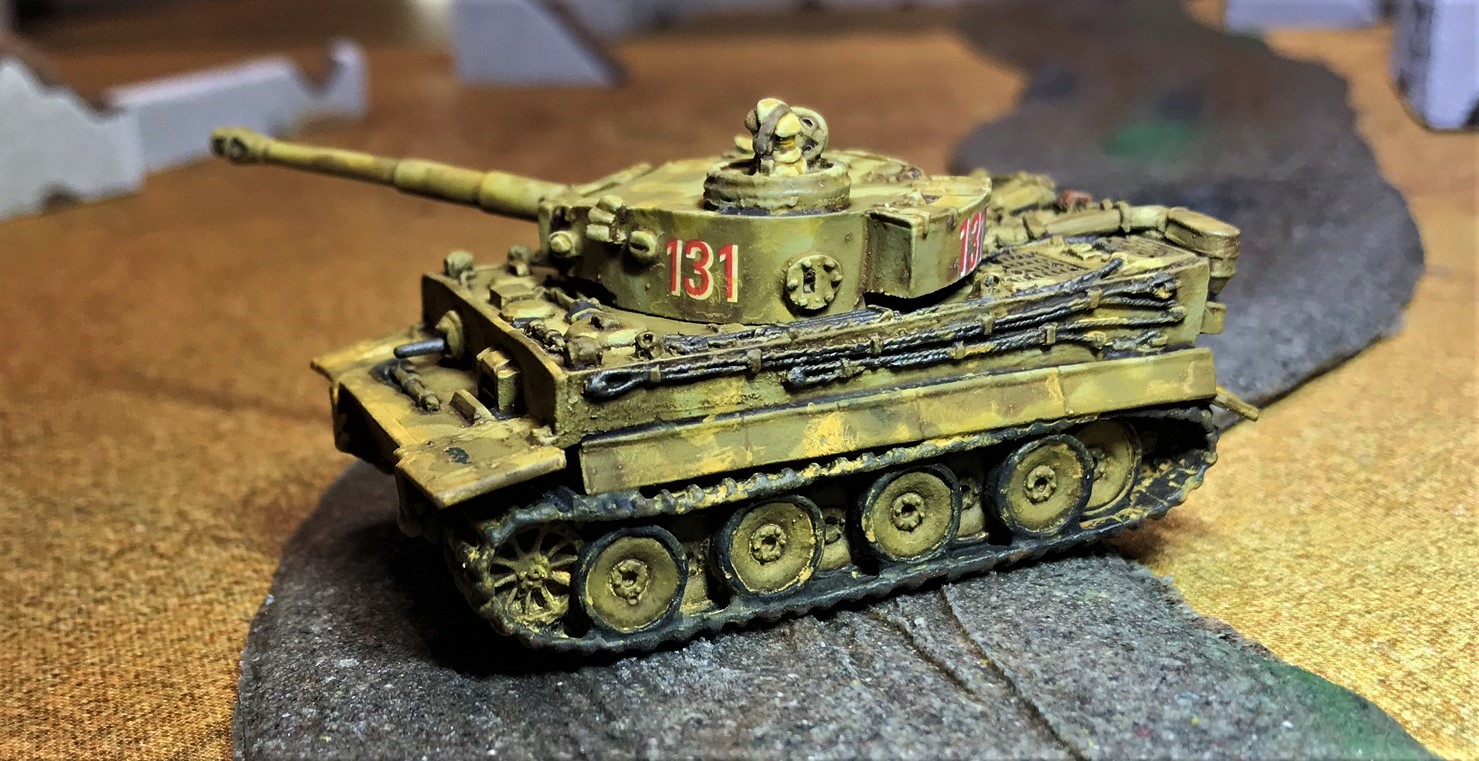
1 Tiger I(15mm/1:100 scale), from Battlefront Miniatures (#GE070) for North Africa
I will review each briefly, and give bigger shots in the eye candy section. Of course, I list the paints and other materials I used at the end for those interested. And there were 61 decals!
PANZERJAGER I’S
The two Panzerjager I’s base coated
Close up of North Africa Panzer IIF
Images that I used for modeling.
In the end, I chose a camouflage pattern for my Panzer Army Africa version similar to what you see on the Marder II image.
PANZER II’S
There were nine Panzer II’s!
A10 gun conversion
How to paint a bunch of crews!
In the spray booth – 6 Panzer IIF’s.
Close up of crews in turrets.
I modeled my Panzer IIF on this image.
PANZER IIIE’S
I had two unpainted Panzer IIIE’s left over from France 1940. They were not easy to put decals on – so that was minimal.
Panzer IIIE in blister
Base coat applied
After camouflage applied.
Close up of camouflage.
PANZER IIIH
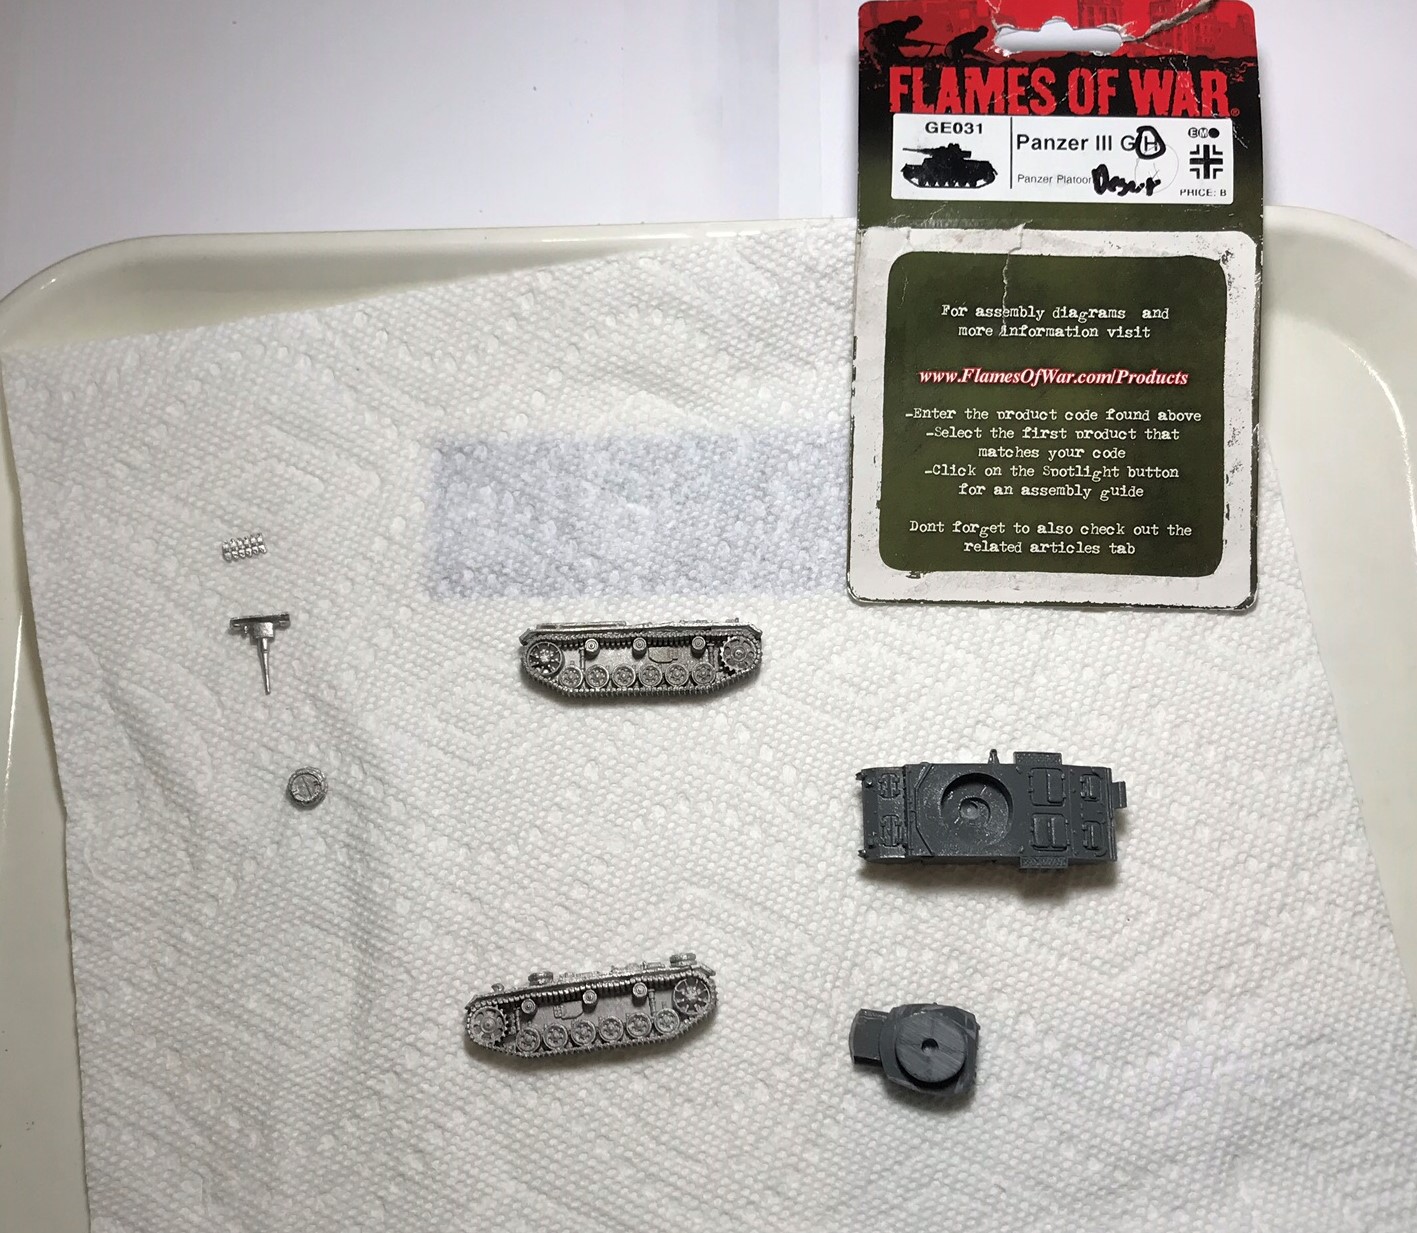
Panzer IIIH in blister.
All cleaned up for assembly.
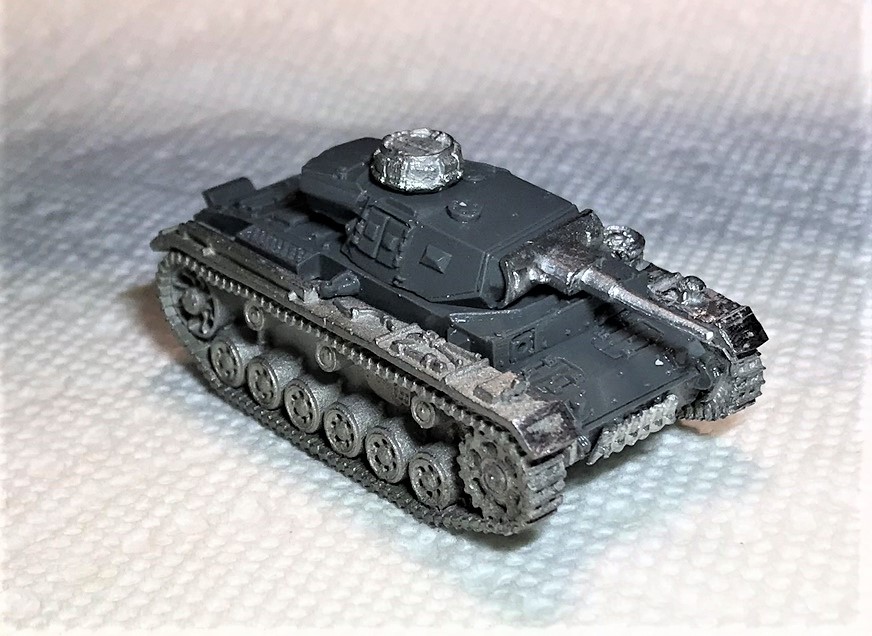
Panzer IIIH assembled
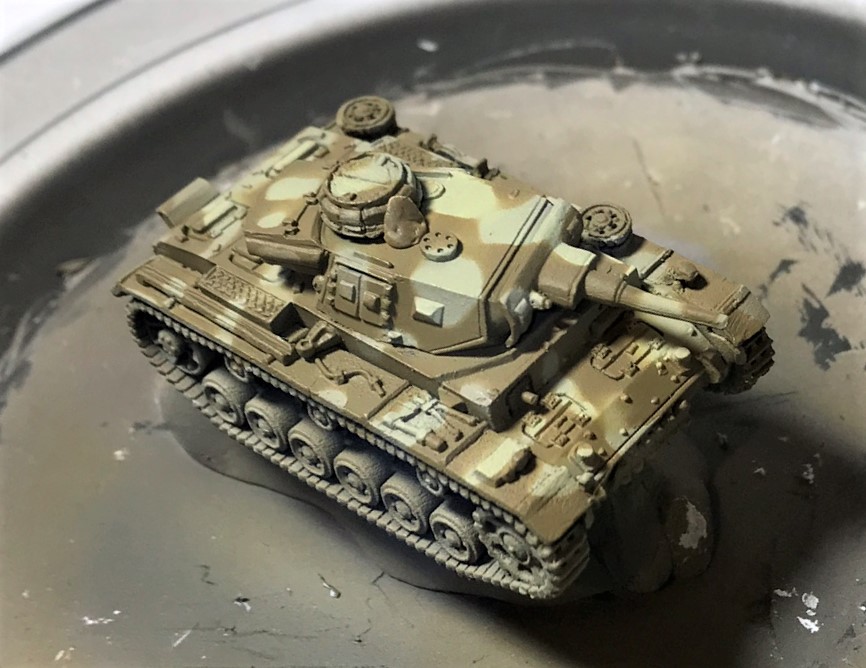
After camouflage applied.
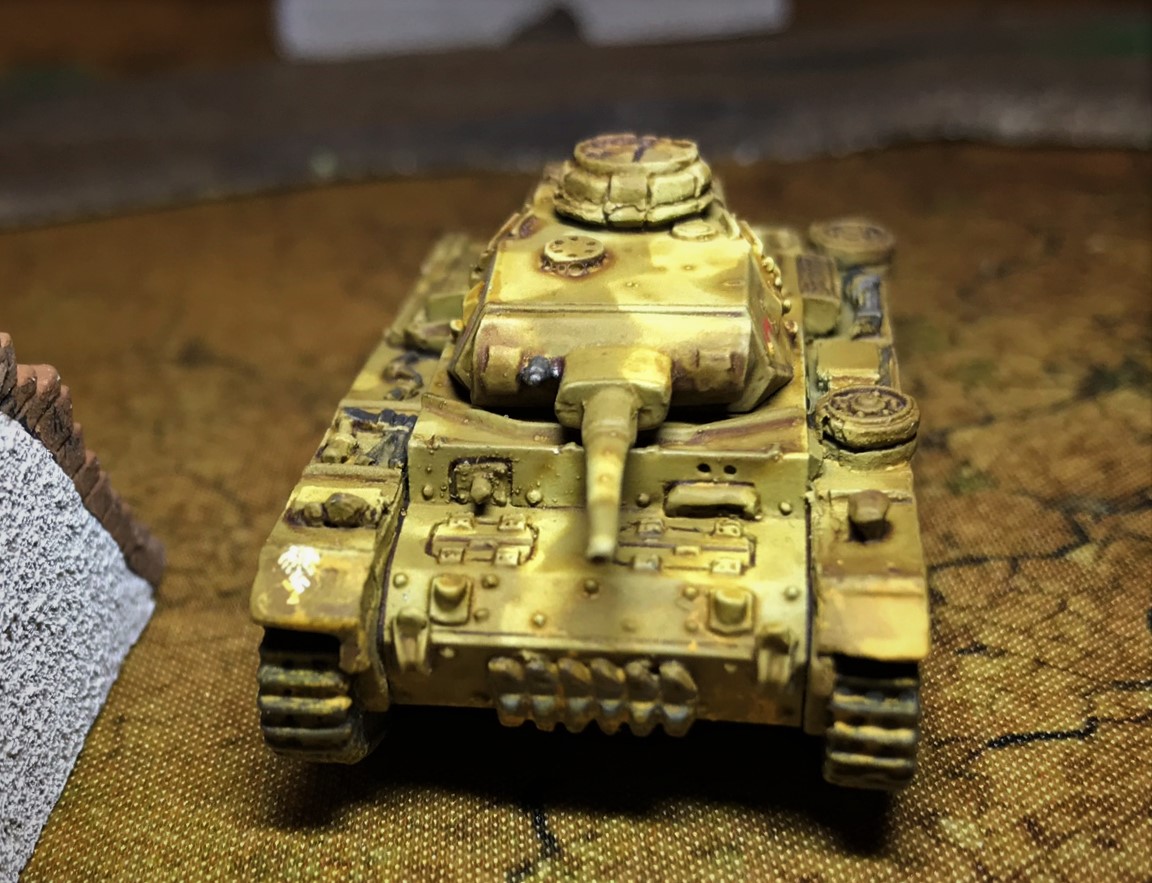
PANZER IVF2
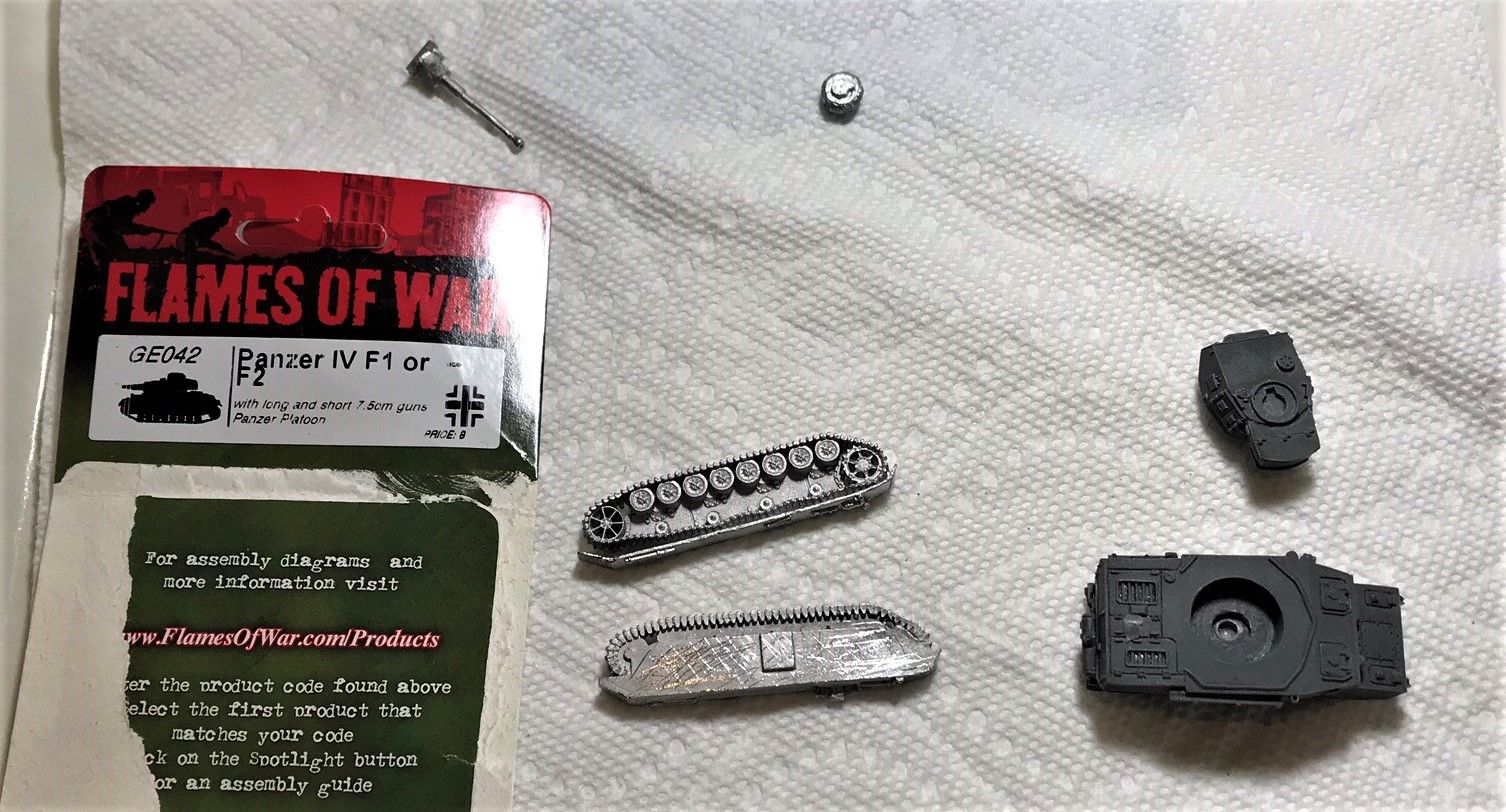
Panzer IVF2 in blister
All cleaned up, ready for assembly
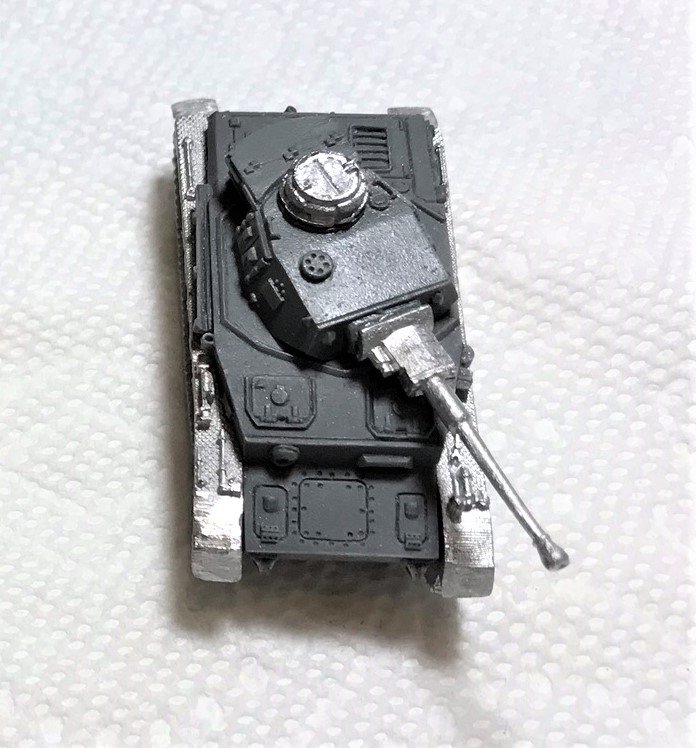
Assembled!
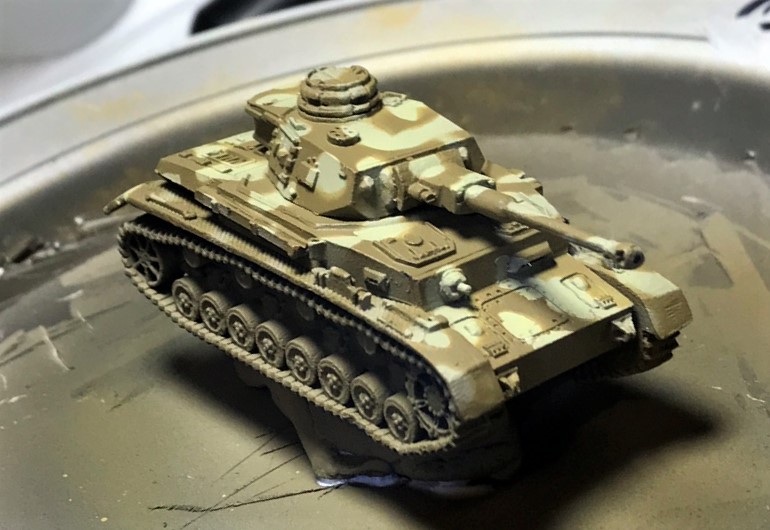
After camouflage – Panzer IVF2.
I modeled this tank on this image.
CAPTURED GERMAN M3 STUART “HONEY”
The Germans did a good job of recovering all kinds of AFV’s in North Africa. This included enemy vehicles – so I decided that an M3 Stuart would be a good addition.
I saw this and had to give the Germans a little American-made steel.
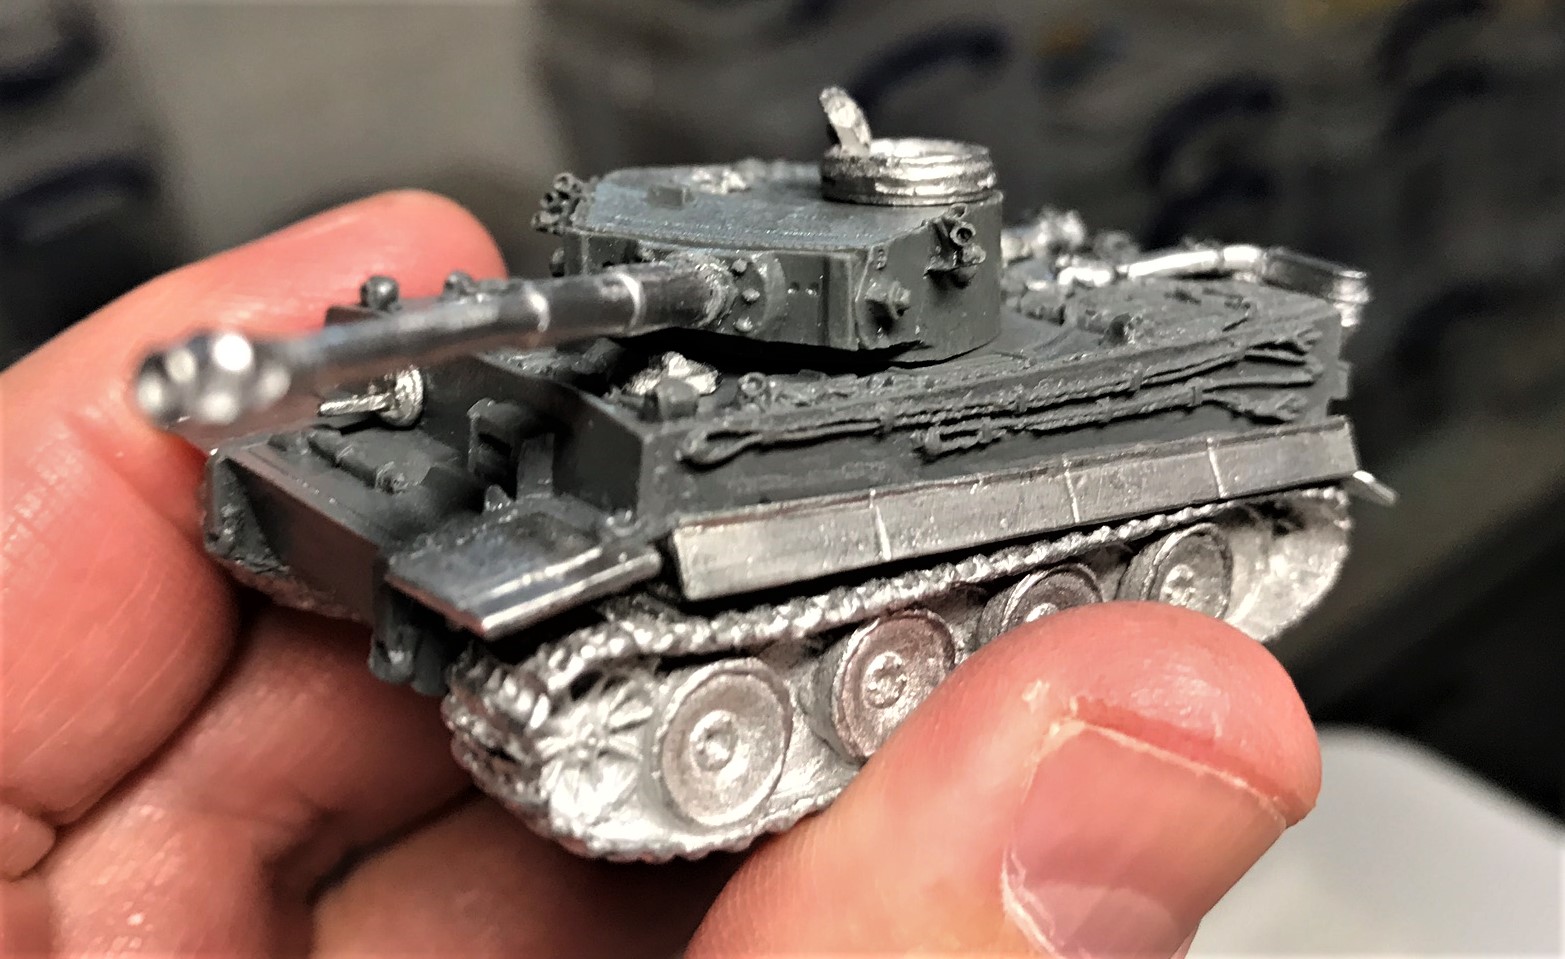
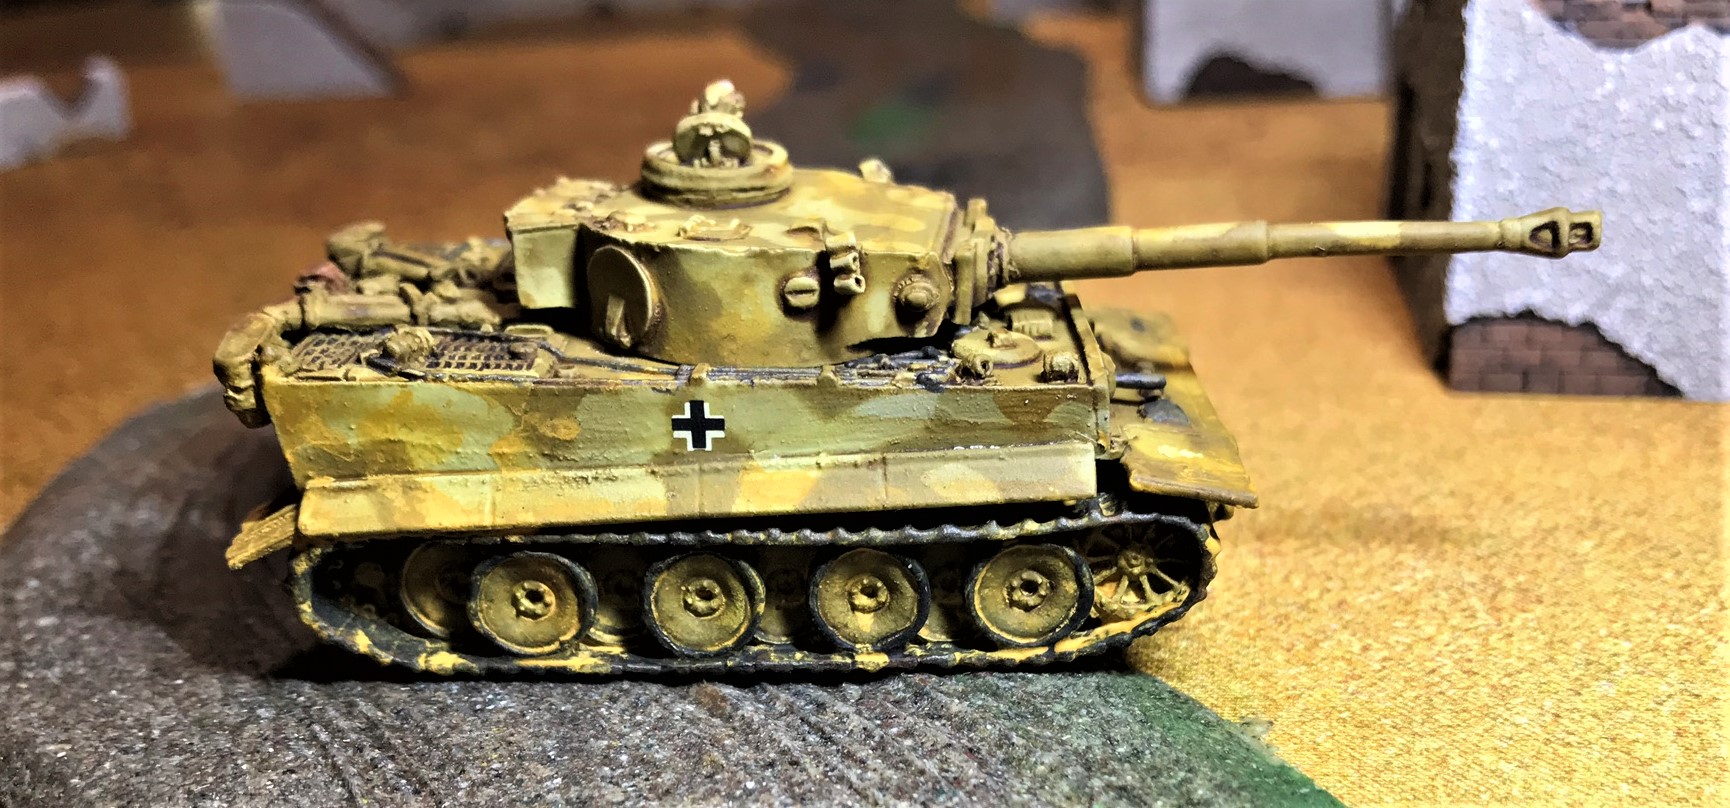
TIGER I
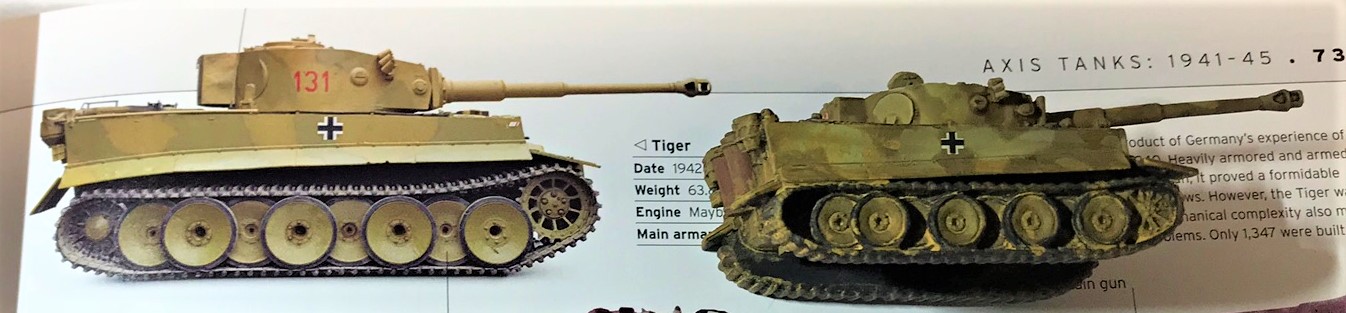
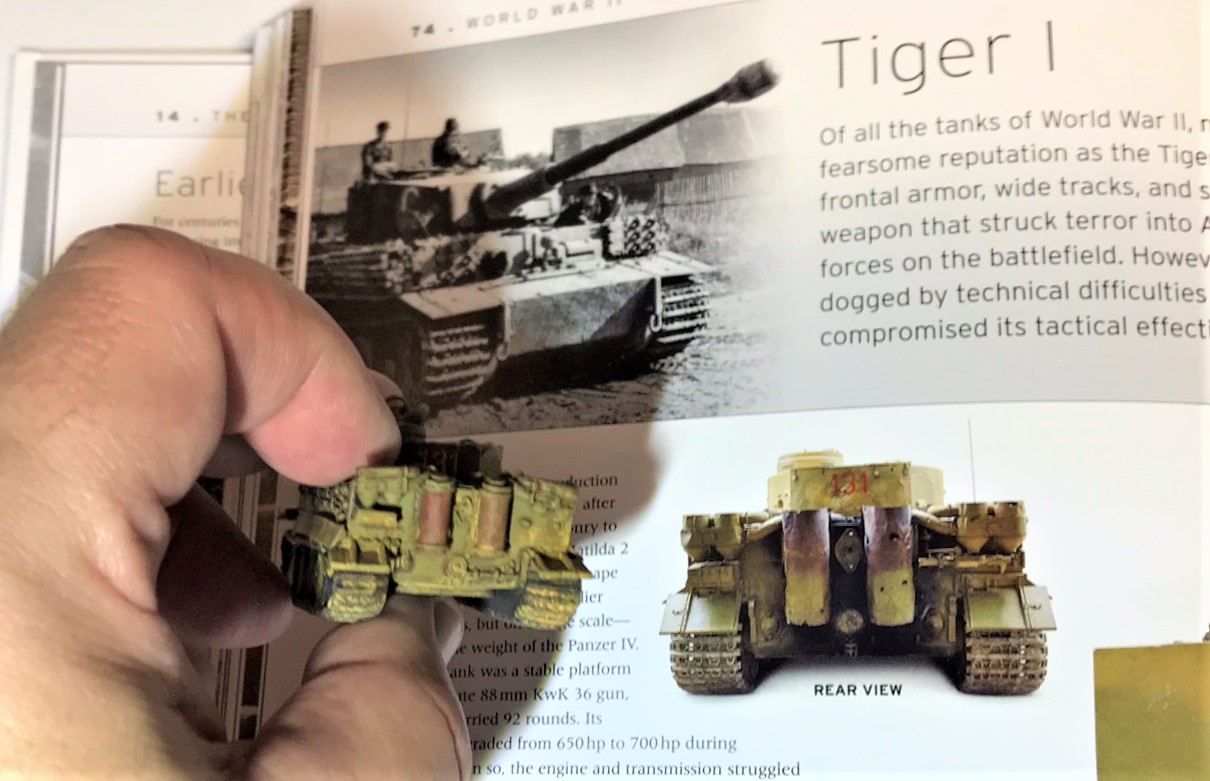
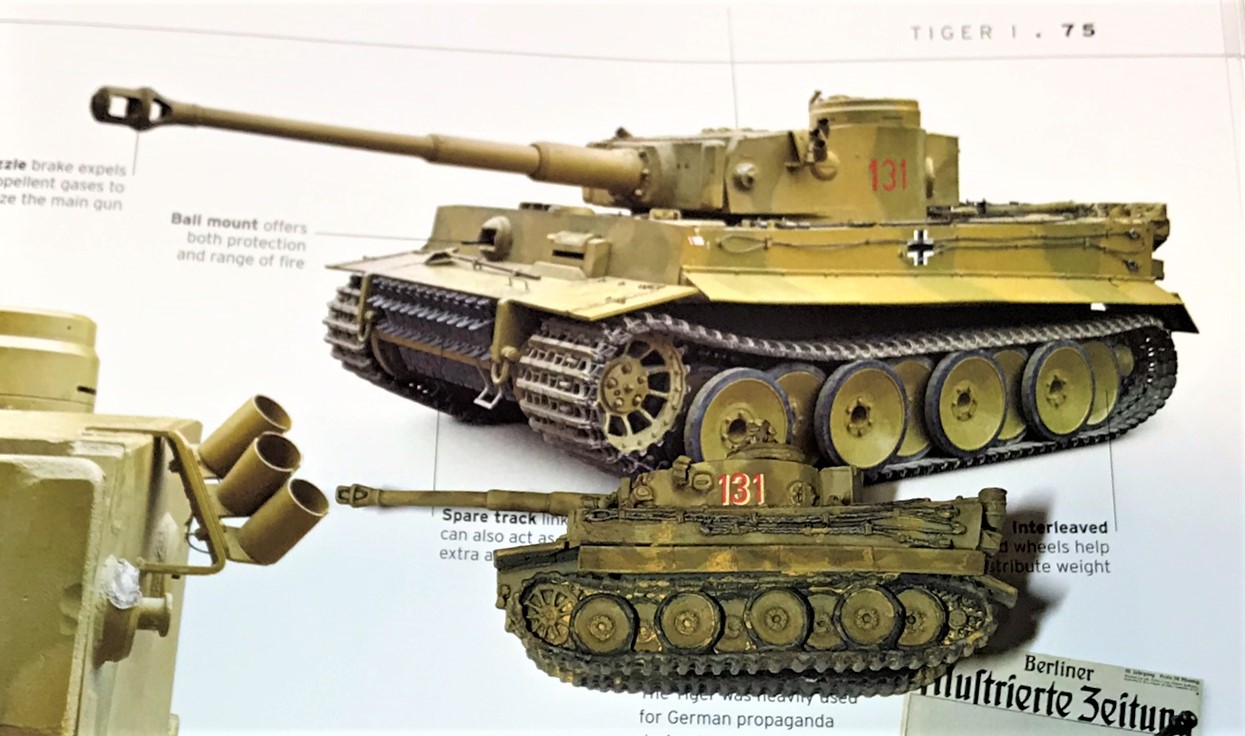
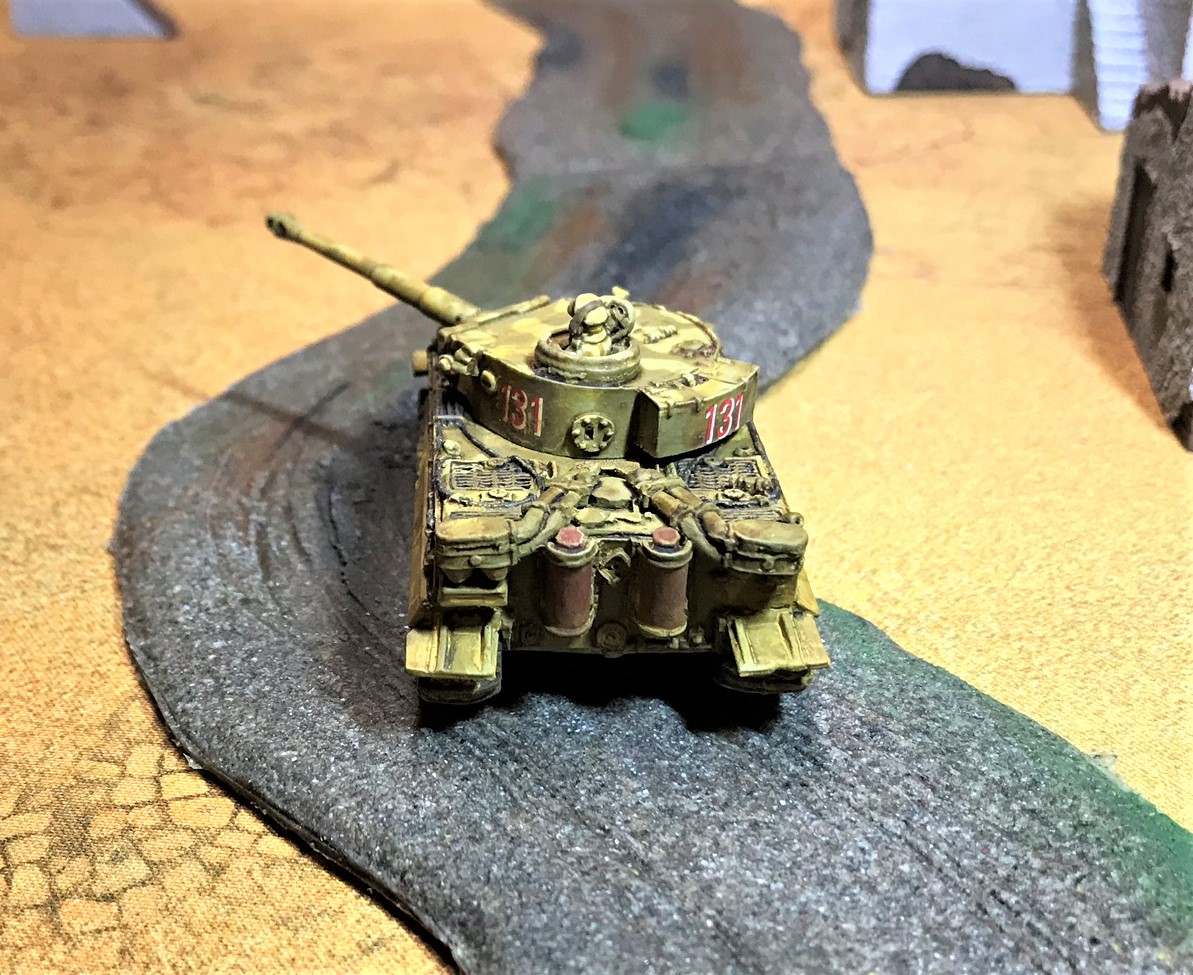
The last tank that I will share here is the centerpiece of the collection – a true behemoth – the early Tiger I. I modeled this one on the famous #131, which was captured virtually intact by the British in 1943 in Tunisia. A lucky British AP round lodged in the Tiger’s turret ring, and its crew abandoned it. Today, it is the only functional Tiger I on the planet and is at the Bovington tank museum.
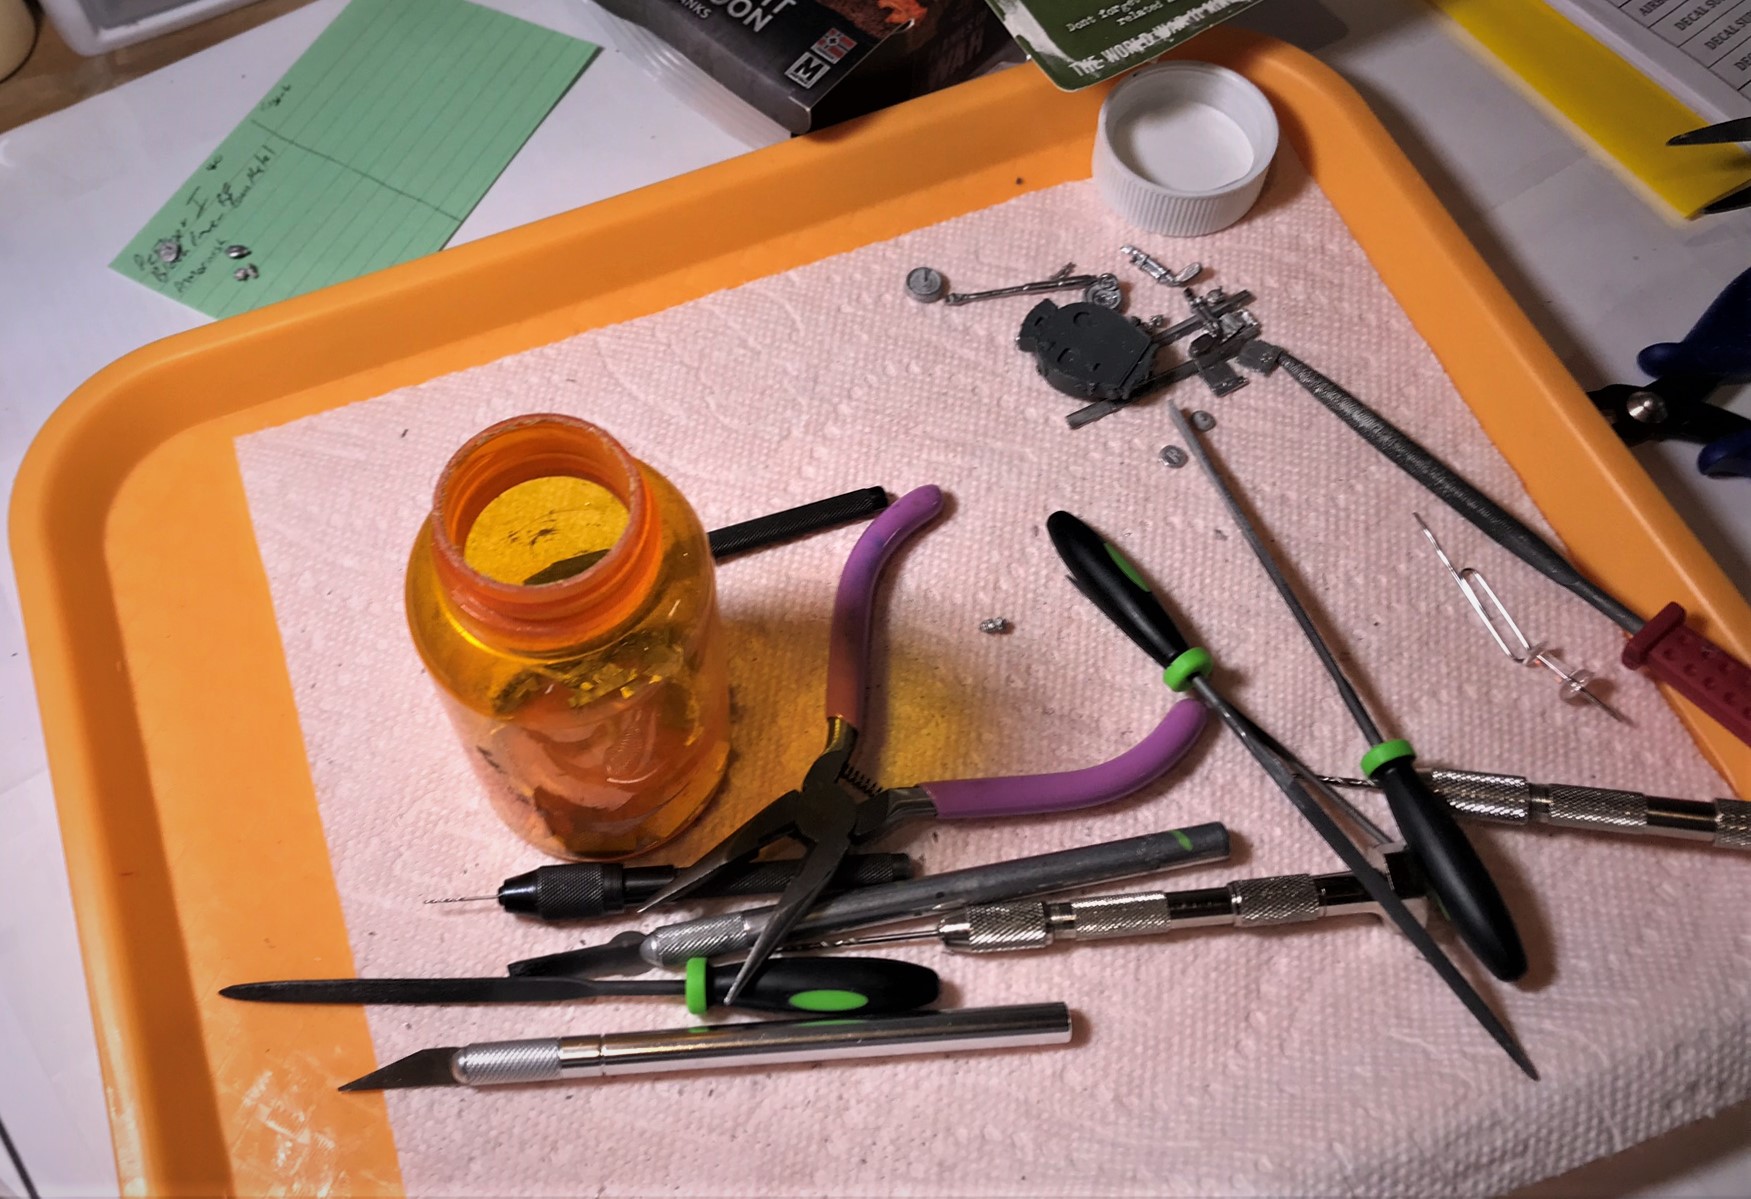
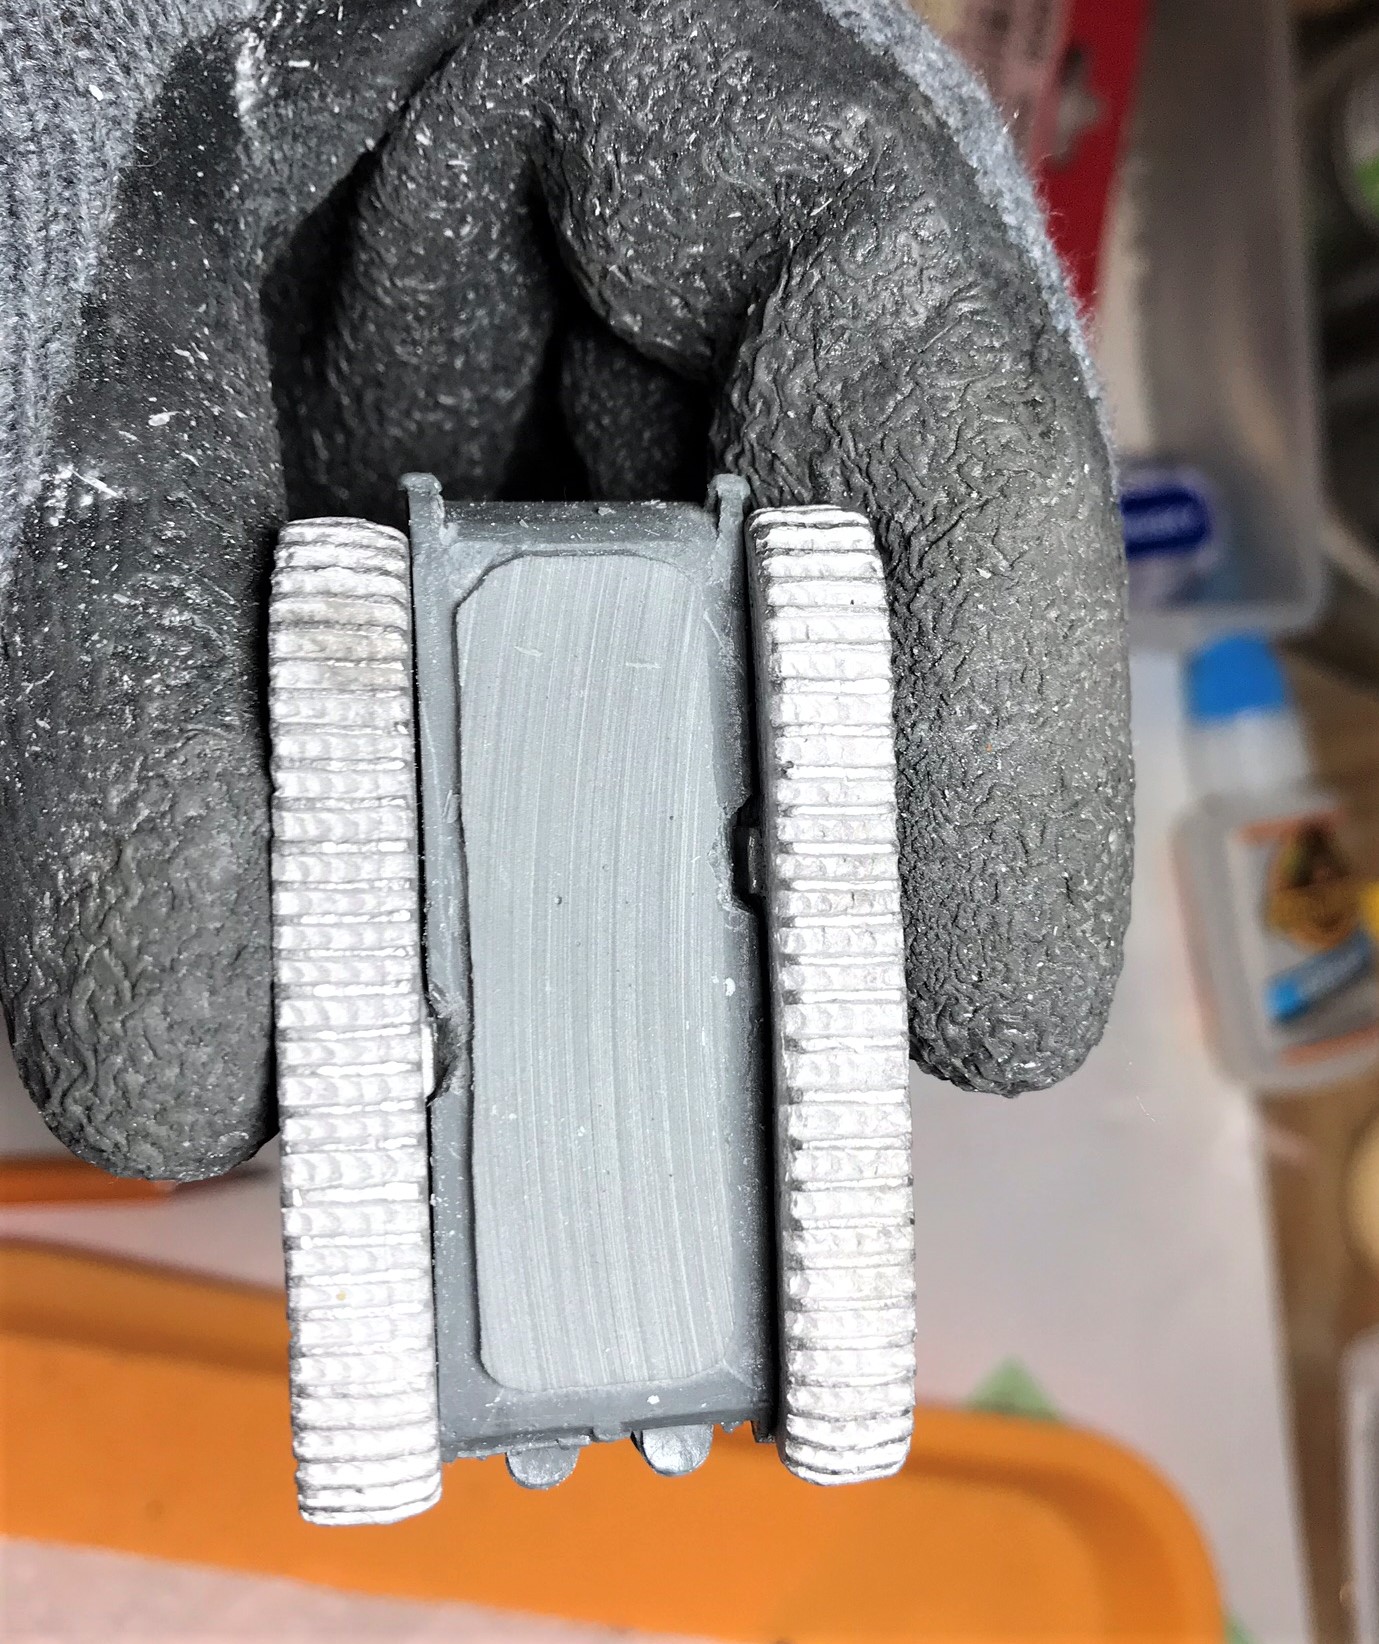
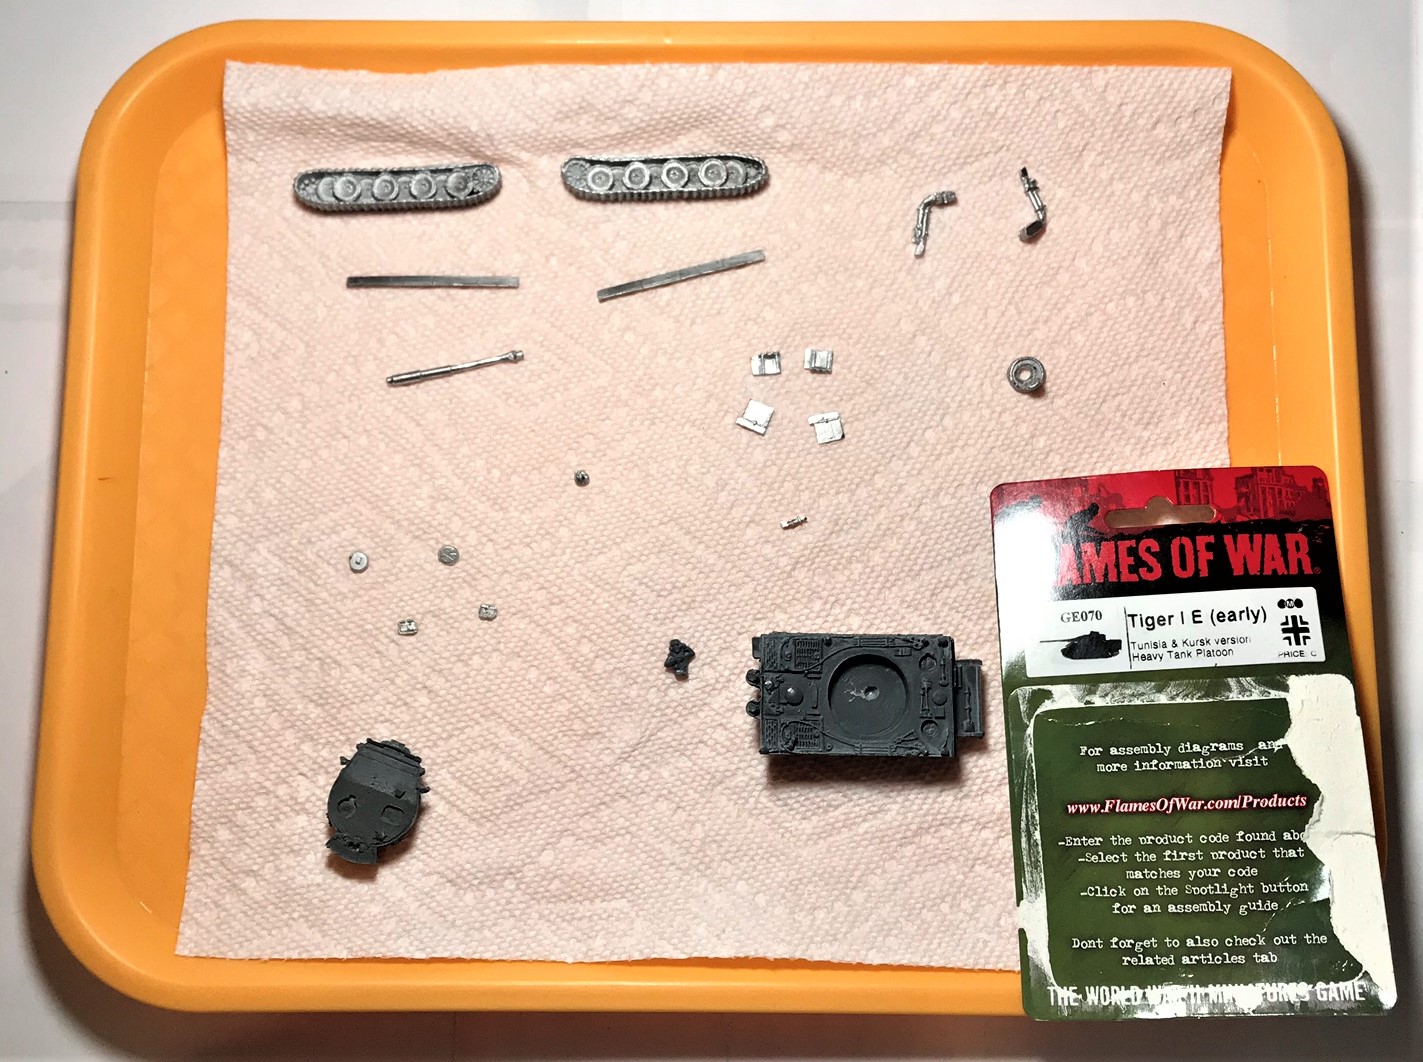
Assembly of this model was NOT easy. There were 21 pieces and no assembly instructions, which is amazing given that Battlefront has assembly instructions for much simpler models. I also had issues with getting the tracks to fit the hull as there were no slots for the detents on the metal tracks.
My Tiger I in its blister
No track slots? Grrrr…
Lots of surgery and filing…
I got the tracks to fit – note the protective “cut gloves”
Lots of little bits for a big tank.
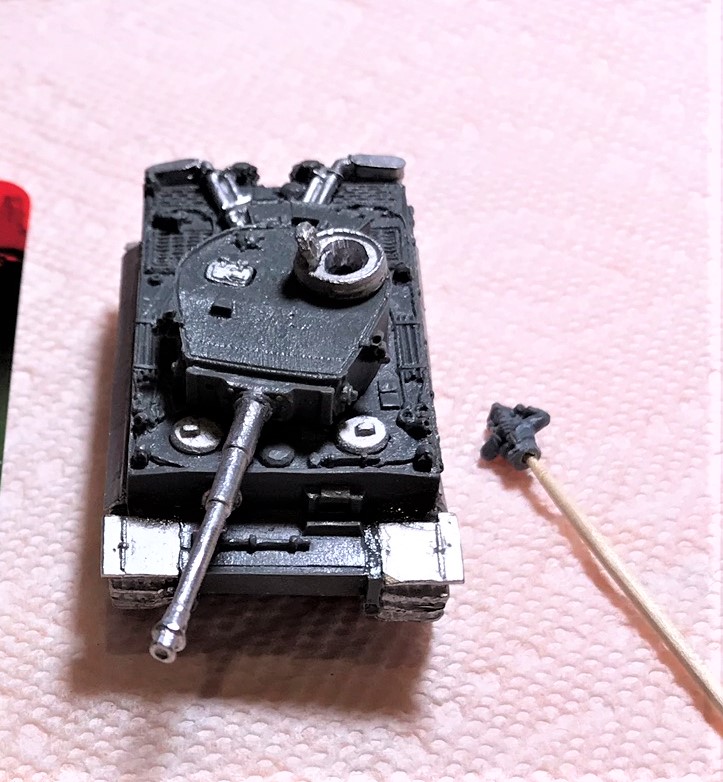
Assembled.
This was a tough build.
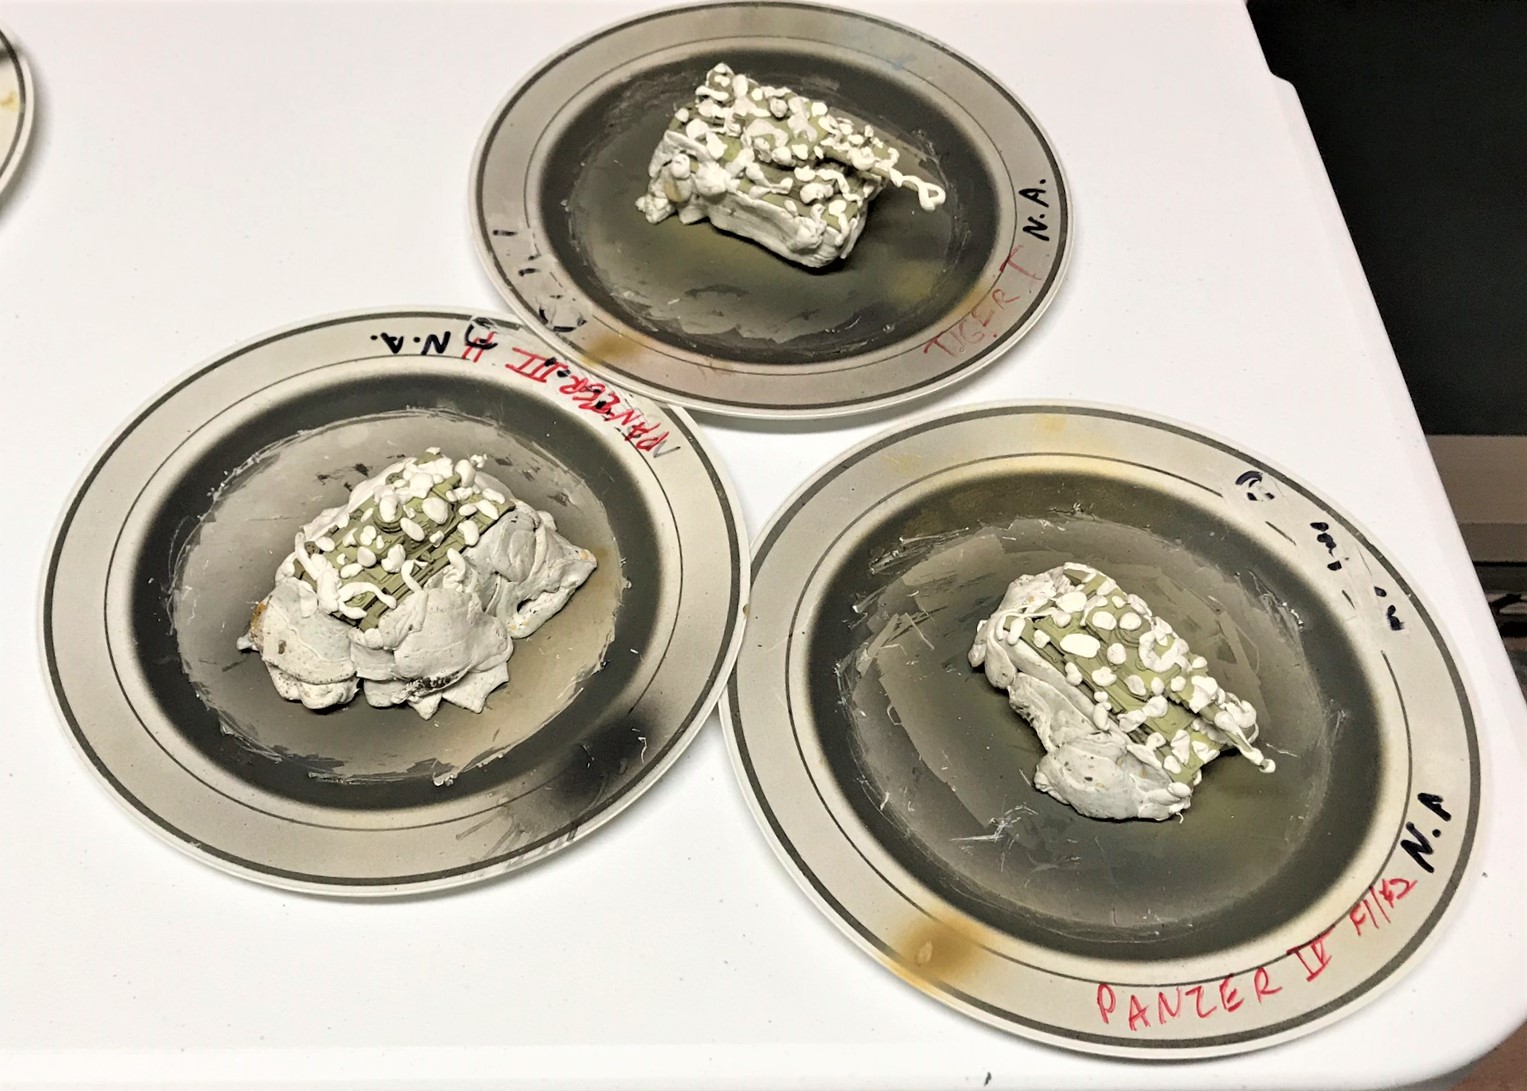
How I camouflaged tanks by using poster tack.
Tiger after the poster tack removed.
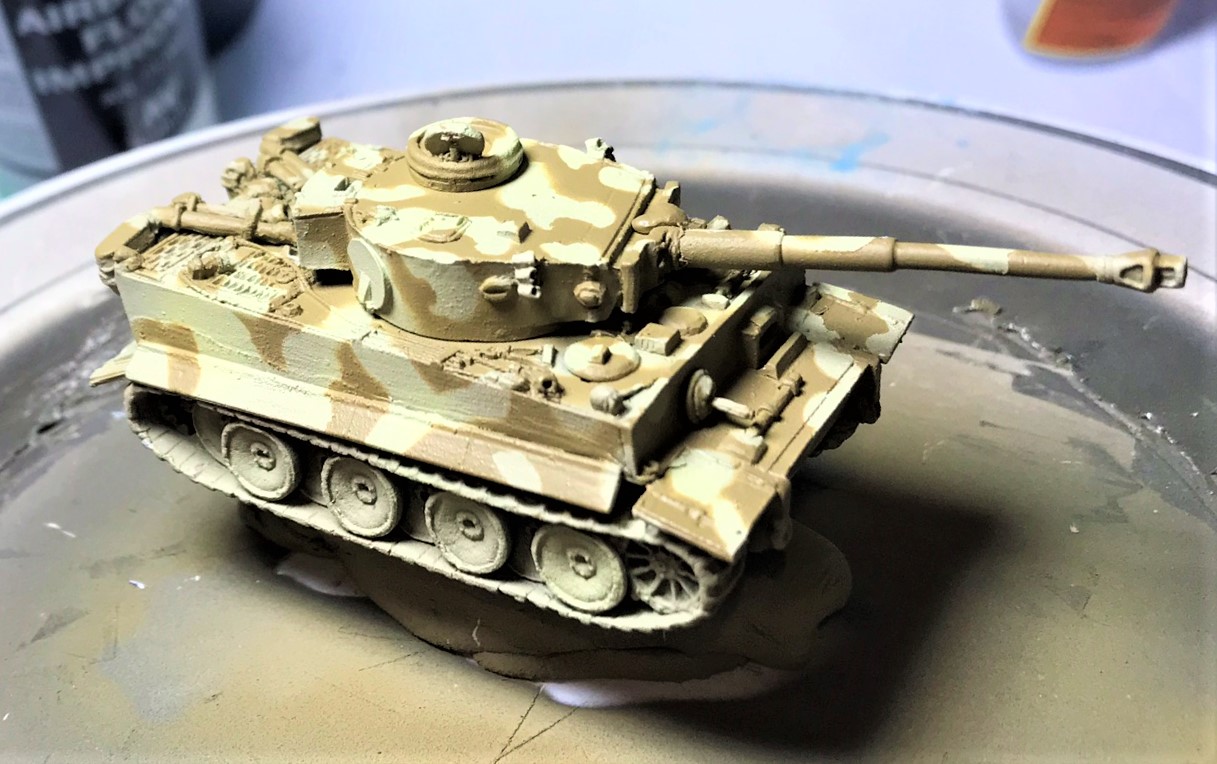
Turret close up after decals and crew added.
One of the three images I used to finish the model.
The second image showing the rear of the actual Tiger 1 #131.
The third image.
I wanted to install a radio aerial, but in the end I decided that it was impractical due to the size of the model and the likelihood of future damage. I also wanted to include this Tiger as my “centerpiece model” in the January monthly painting challenge that I participate in – run by Azazel (whose blog is well-worth following).
So now, its time for…
EYE CANDY!
Panzerjager I, right side
Panzerjager I, left side.
I completed two Panzerjager I’s – one obviously needs to get a paint job for North Africa!
Rear view showing the crews of this early tank destroyer.
The three Panzer IIC’s that will be for France 1940. The one on the far right has the converted gun.
The six Panzer IIF’s for North Africa.
Panzer IIF convoy.
Front close up of Panzer IIF.
The two Panzer IIIE’s.
Rear view of the Panzer IIIE’s.
Panzer IIIH, right side.
Panzer IIIH, left side.
Front view of Panzer IIIH, with nice view of DAK decal.
Panzer IVF2, right side.
And the Panzer IVF2, left side.
Front view of the Panzer IVF2.
Captured German Stuart “Honey”.
Other side of the German Stuart.
AND THE TIGER I!
Tiger I, left side.
Tiger I, right side.
Tiger I, rear view.
German motor pool! The 13 German tanks for Panzer Army Africa.
All 17 German tanks for January! Bigger motor pool!
This was a big project – and now on to the Italians (and my replacement Panzer IVD).
I thank you for looking and hope this was enjoyable for you. What tanks are your two favorites (I know the Tiger I will be a big favorite!). Please share your thoughts and any feedback in the comments section!
PAINTS, INKS, GLAZES, SHADES, WASHES, PIGMENTS AND FLOCKING USED ON THIS TANK GROUP:
Vallejo “Flow Improver”
Vallejo “Airbrush Thinner”
Vallejo “Surface Primer – Black”
Testors “Universal Acrylic Thinner”
Battlefront “Dark Gunmetal”
Secret Weapons Washes “Armor Wash” (wash)
Battlefront “Panzer Gray”
Vallejo Model Air “Base Grey”
Vallejo “Neutral Grey”
Vallejo Model Air “Green Brown”
Vallejo Model Air “Green Brown”
Vallejo Model Air “German Green Brown”
Vallejo Model Air “Light”
Vallejo Model Air “Cam. Grey Green”
Vallejo Model Air “Bright Brass”
Battlefront “Boot Brown”
Battlefront “Dry Dust”
Battlefront “Black”
Battlefront “Oxide Red”
Army Painter Quickshade “Light Tone” (wash)
Battlefront “European Skin”
Battlefront “Skin Shade” (shade)
Vallejo Game Air “Moon Yellow”
DecoArt “White Pearl”
Army Painter Quickshade “Mid Brown” (wash)
Army Painter Quickshade “Strong Tone” (wash)
Vallejo “Dark Yellow Ochre” (pigment)
Vallejo “Light Slate Grey” (pigment)
Vallejo “Light Sienna” (pigment)
Battlefront “Rommel Shade” (shade)
Battlefront “Bradley Shade” (shade)
Citadel “Agrax Earthshade” (wash)
Citadel “Nuln Oil” (wash)
Gorilla Glue
Vallejo Mecha Varnish “Gloss Varnish”
Microscale Micro-Set
Microscale Micro-Sol
Microscale Liquid Decal Film
1/8″ rare earth neodymium magnets
Appropriate decals from Battlefront
Vallejo Mecha Varnish “Matt Varnish
Aleene’s poster tack
Sponges
Thanks for looking and for sharing your feedback!
ON MY RESEARCH MATERIALS
As for research materials, I used the same ones as I cited before – but for completeness here they are in case you are interested (you can find them on Amazon):
One by Jean Restayn:WWII Tank Encyclopaedia, 1939-45
One by the Smithsonian/DK:Tank: The Definitive Visual History of Armored Vehicles
One by Michael Green:Axis Armoured Fighting Vehicles of the Second World War (Images of War)
One by Robert Jackson:Tanks and Armored Fighting Vehicles Visual Encyclopedia
I would easily recommend all of these books as good resources for gamers and modelers.
I’ll cover each of the types individually, then some eye-candy shots at the end for your (I am hopeful) enjoyment. Of course, I will list my paints and materials at the end for those interested. I used my airbrush and standard brushes on all of these.
A10’s and A13
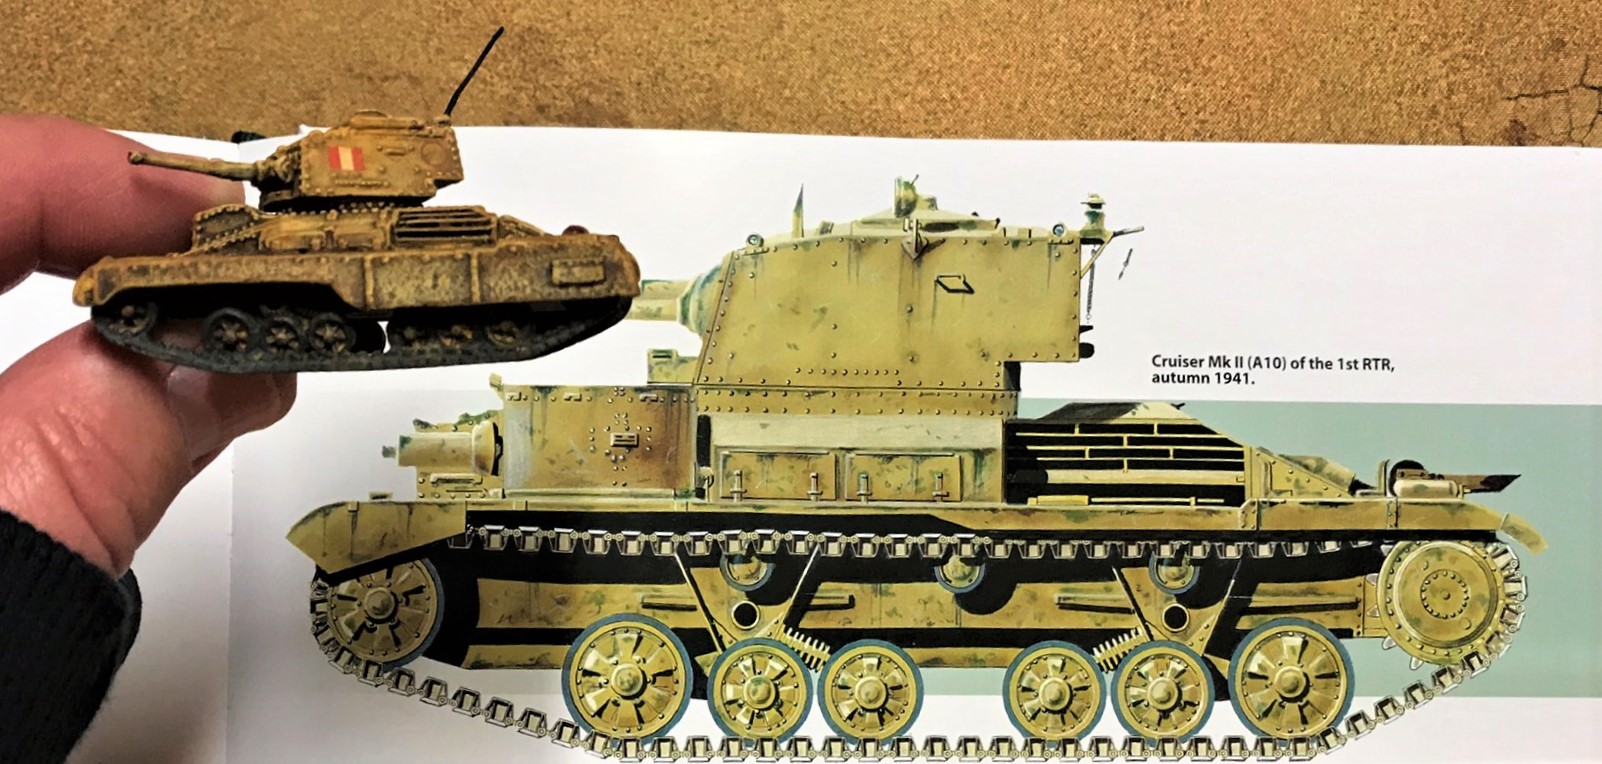
I finished three more cruiser tanks – two A10 Mark IIA’s and one A13.
A10 in the blister, as we say, a BAHGIN
A10 Assembled
A10 prepped for assembly
I find that cleaning, filing, and general preparation of these models does take a bit of time. I know that washing the resin parts is very important. My last step in cleaning the resin involves a gentle brush wash/application of isopropyl alcohol (rubbing alcohol to some of you) to it. This has been helpful I think – you just need to let that dry before handling or you may leave fingerprints on the resin. I also added radio antenna aerials with 24 gauge wire if the model would withstand the drilling and mounting process structurally. Sometimes, I just could not add one without damaging the model.
One of the two A10’s as completed. I went with a sandy look compared to the Caunter scheme I used on the A9’s, mainly for tabletop identification. This is what I was aiming for, but of course I add pigments and dirty up my tanks! Note that either the book or my model has a different skirt, possibly because mine were A10 Mark IIA’s.
During the war, compared to the A10’s, the A13’s were much faster due to the Christie suspension and a better engine. Combat wise, they were not much better, and are not better in the game rules either. They are adequate foes for Panzer II’s and some Italian light AFV’s.
On all of my tanks I tried to use different FoW decals that seemed to make sense – they are so small! Of course, getting the decals to look sand-worn was important, and the pigment helped. Getting the decals to conform to the curved surfaces took many slow applications of Micro-Set, Micro-Sol, and Liquid decal film. Our hobby blog-guru Azazel mentioned using barely-moist sponges to lightly apply pigments, so I gave that a shot, especially on the decals. While I think I got a darker look, it did made the decals look less out of place, and I liked the effect.
My A13 and the painting scheme that I went with, minus the remnants of the blue Caunter camouflage pattern – as I thought that bluish tinge would be nearly impossible to see at 15mm scale.
Valentines
I picked up the two Valentine infantry tanks on sale at two different hobby shops. The track treads were a bit different. Of note, the Valentine II needed significant reinforcing with green stuff to come together as it was either poorly designed or not well made.
Valentine II in blister another Massachusetts “BAHGIN”
Valentine III in blister
Valentine II assembled
Repair work on Valentine II
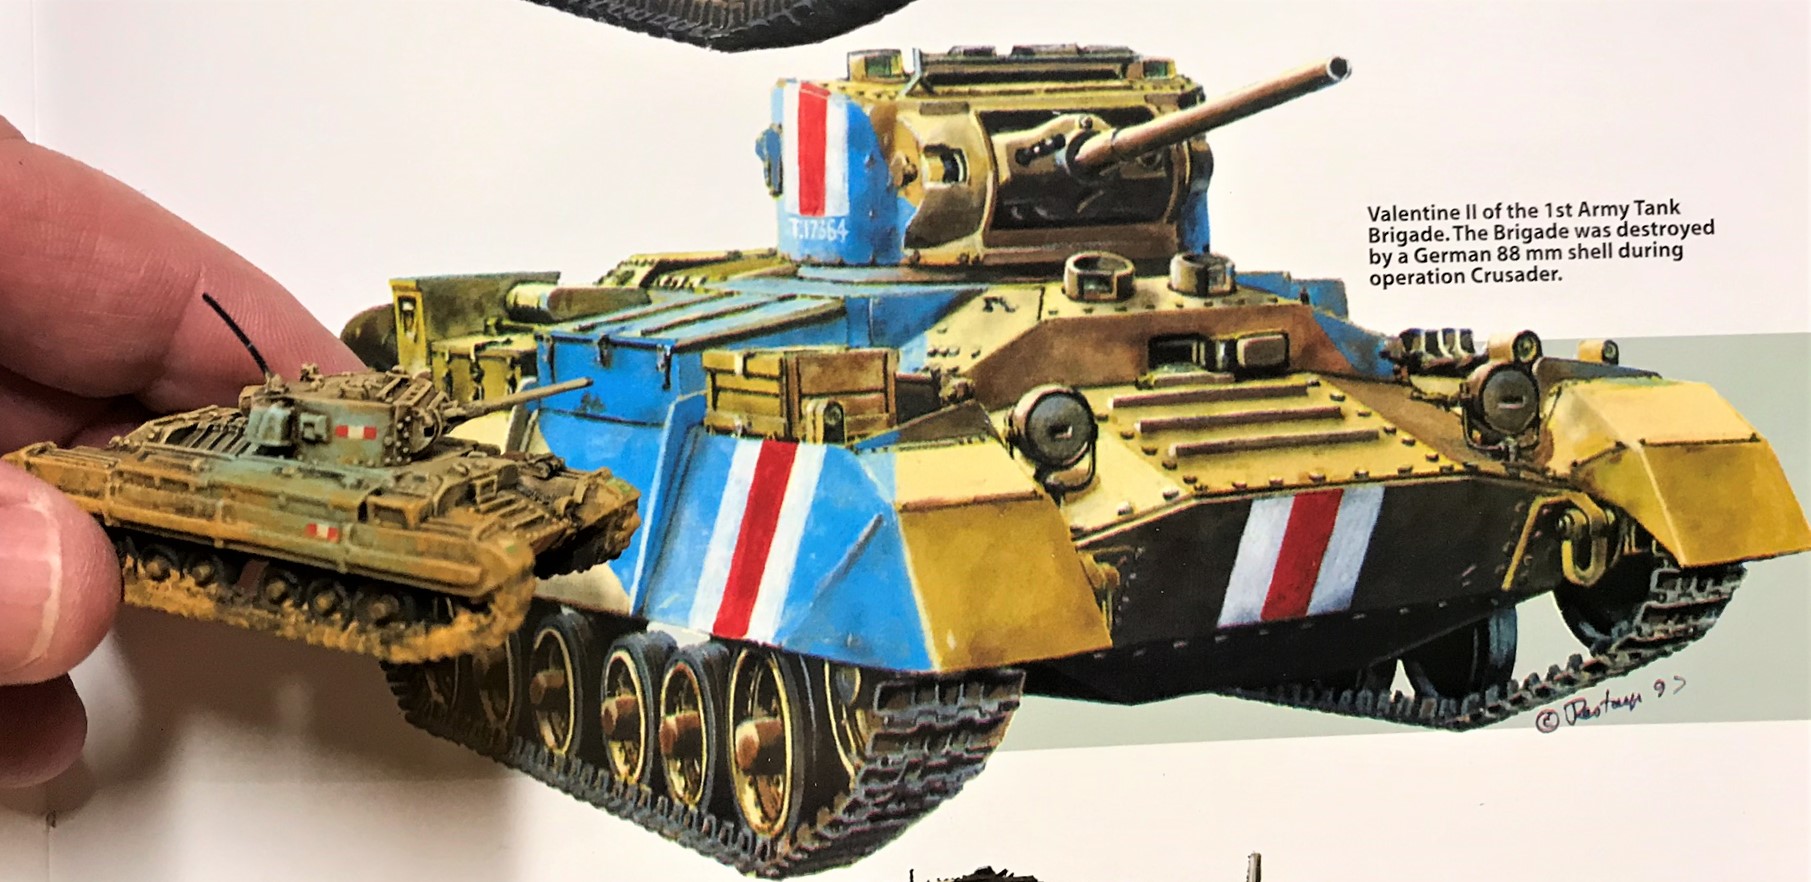
For the Valentine II, I chose a Caunter camouflage scheme that was more bluish than what I had done previously with the A9’s or the Honeys. That would help on the tabletop as well – and the biggest difficulty was masking the appropriate parts of the tank for airbrushing the blue.
Valentine II masked for airbrushing the blue Caunter camouflage scheme.
I am not sure how effective the blue scheme was in WWII combat, but as the British abandoned it my guess is not very. Still, it does look striking and different.
My Valentine II versus its model in the book. The red and white markers were too small for me to mask and paint, so I went with decals. Also, the sides of my model differed a bit as well. I chose to have a lighter blue – it was tough to bring myself to paint that bright of a blue on a tank!
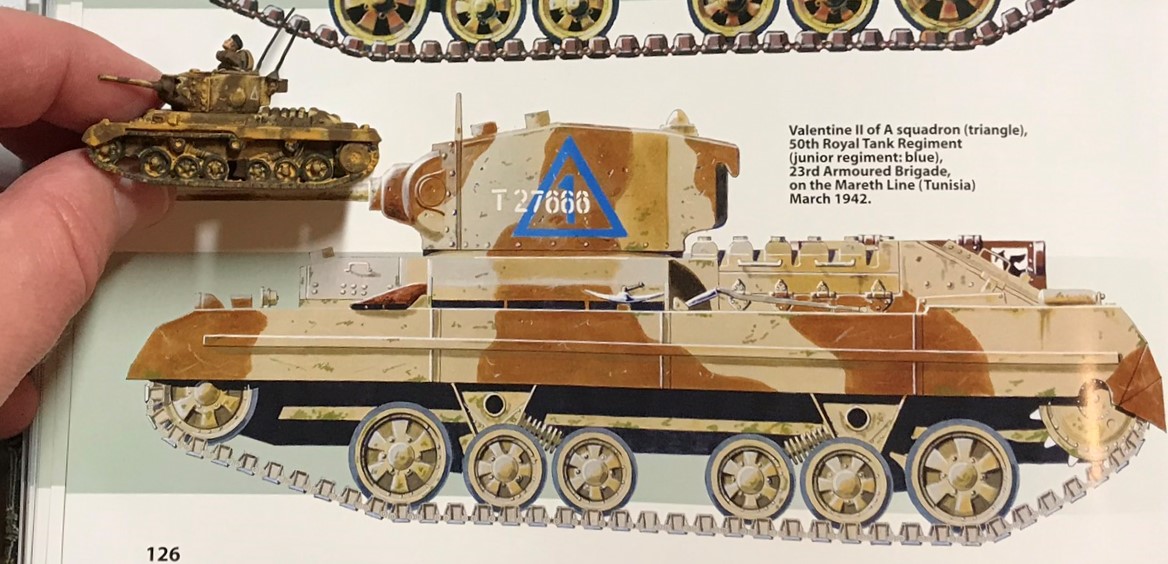
For the Valentine III, I went with a camouflage scheme that was more brown and sand. I also added two aerials to this one.
The Valentine III and the paint scheme I emulated. Once again, my pigment use darkened it, but in the eye-candy section below, you can see it better.
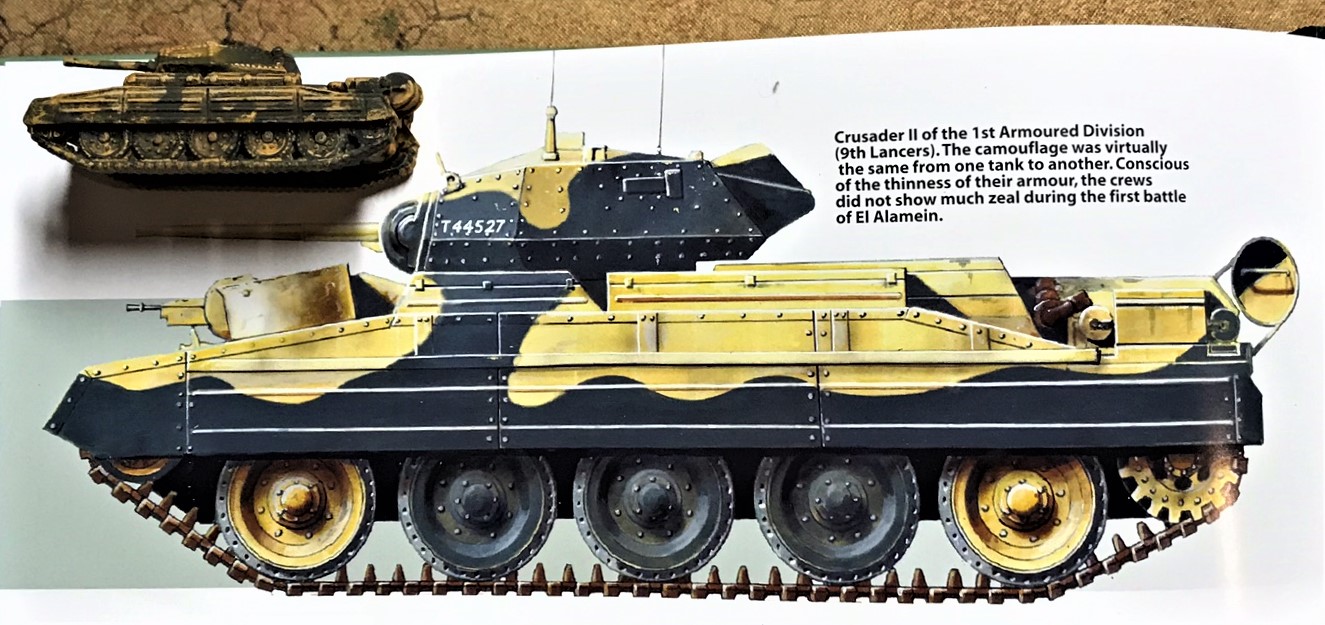
Crusaders
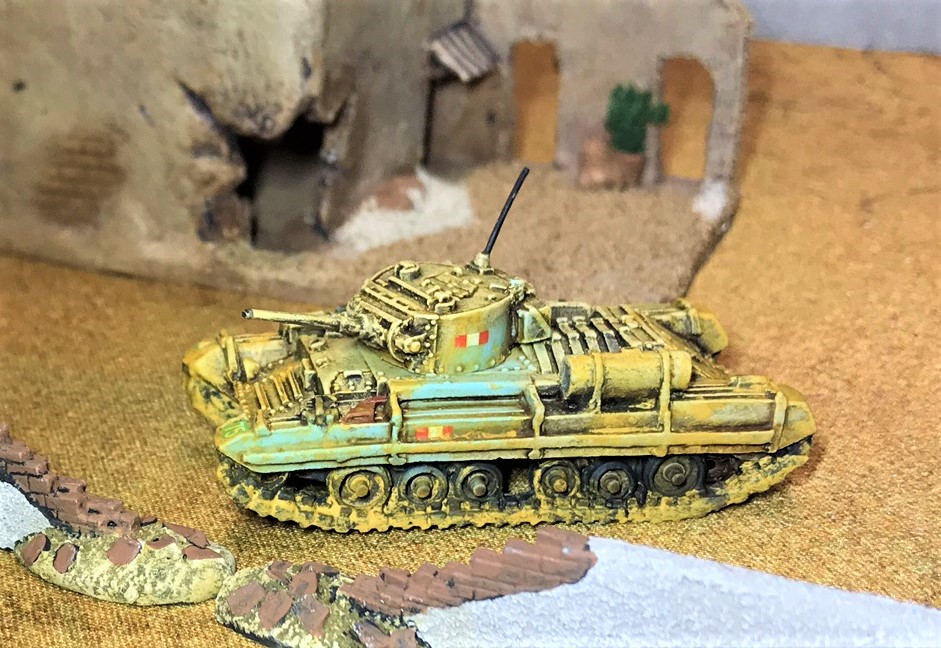
I definitely wanted to have a couple of Crusader cruiser tanks in my force. They do look good, though in combat their armor was not effective enough against their Axis counterparts.
My two Crusaders in blister
Crusaders assembled
Base-coated and ready for final work
I decided to use two different painting schemes here as well. The earlier Crusader II would get a sandy look, while the Crusader III would get a brown camouflage pattern.
My Crusader III awaits the airbrushing of the brown camouflage. Poster tack works great for this kind of masking.
The finished Crusader II and the book version.
The Crusader III was for me a mix of two images – first this one…
and secondly this one. Again, I want dirty tanks that look like they have been driving in the desert and not off the show room/museum floor.
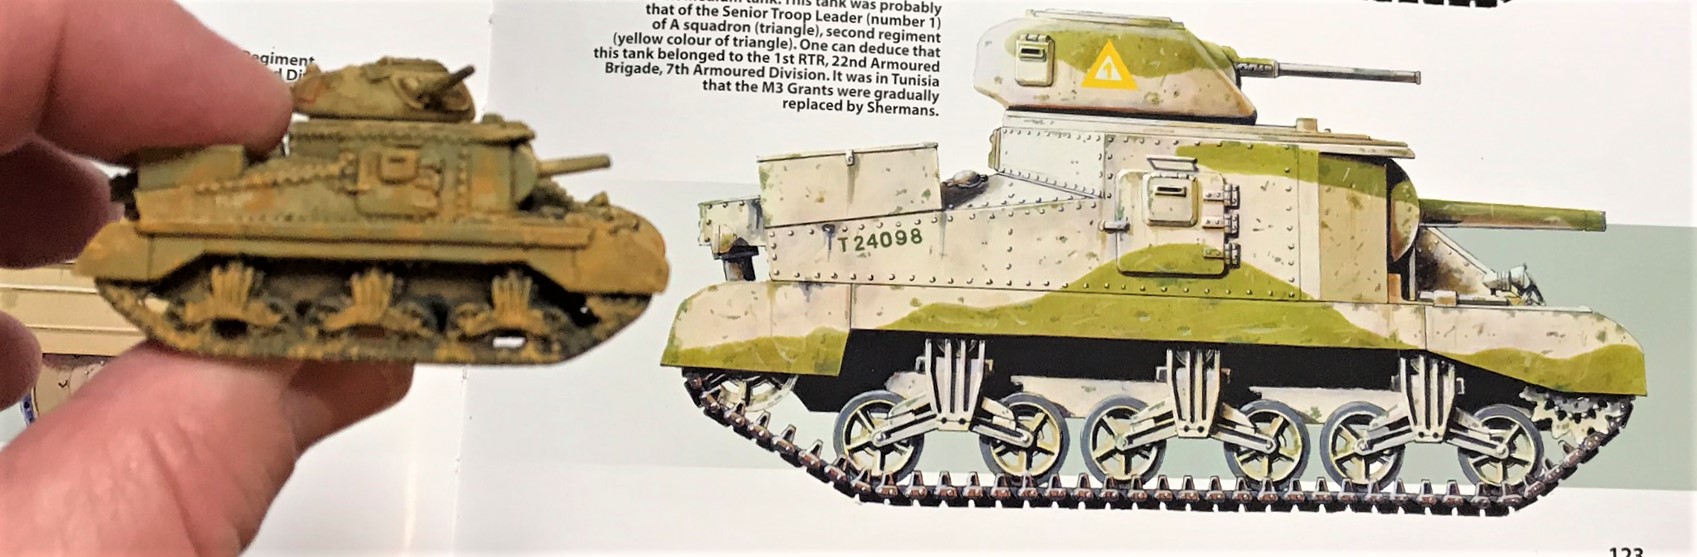
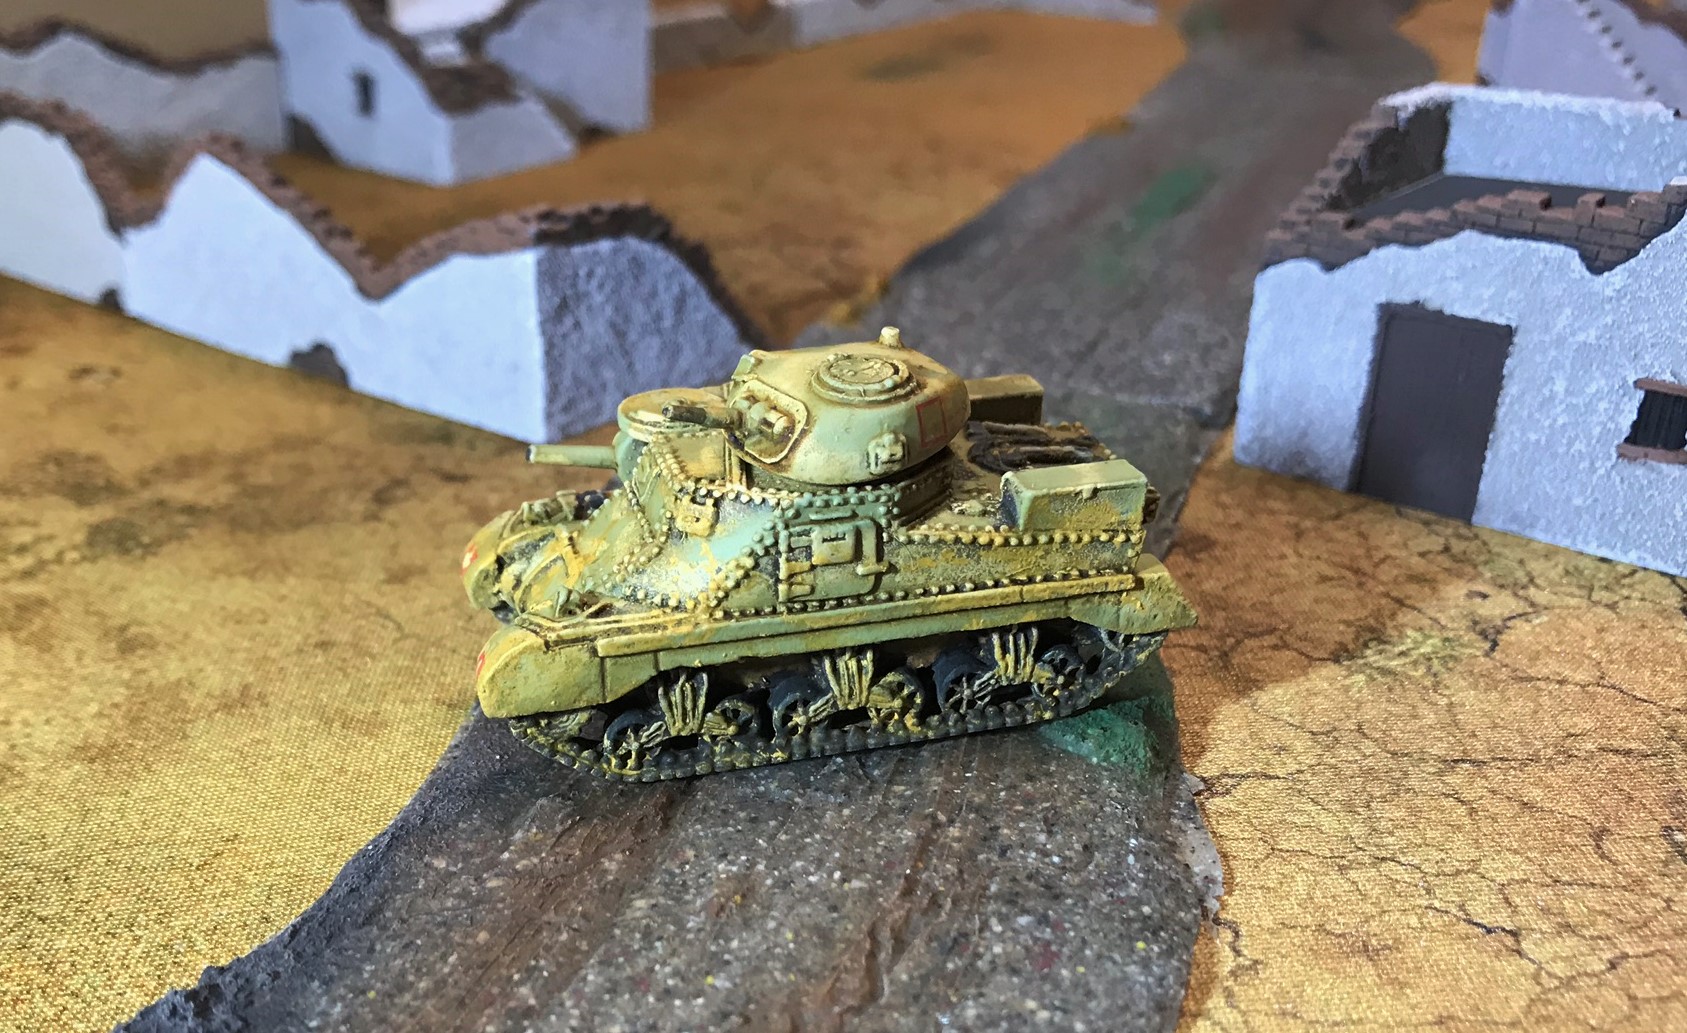
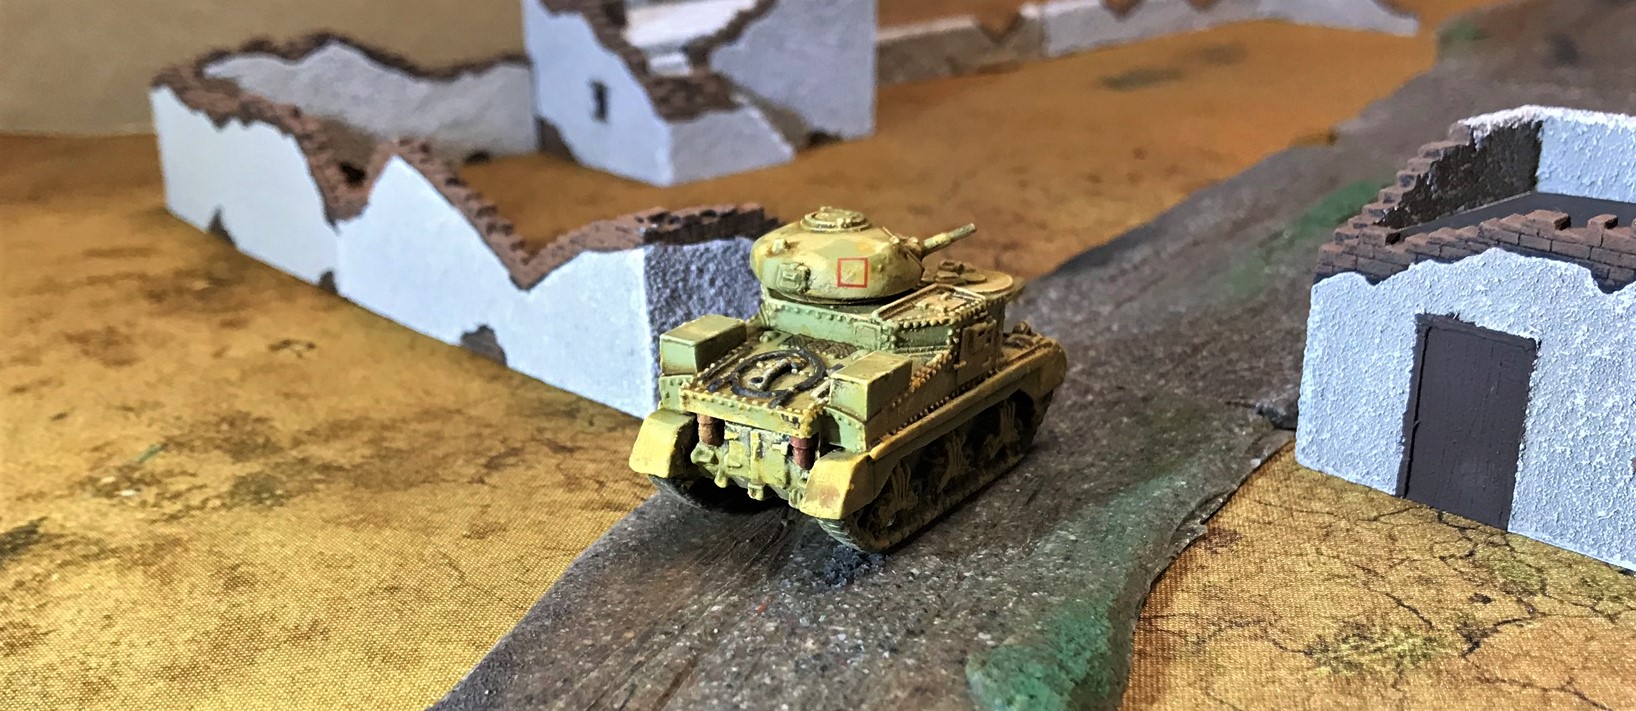
M3 Grant
The British were not happy to get American tanks at first. They did invent the tank after all in WWI, and they were proud of them. They wanted the US to build British designs, but with the risk of the UK losing the war early on, we Americans balked and said we would only build US designs. That way, if the British lost, we would not have our factories tooled for non-American designs. One of these was the light tank M3 Stuart, another was the medium tank M3 Lee. To placate the Brits, a different and more rounded turret was made than that of the American M3 Lee, and that is the major difference between a Grant and a Lee. So, my tank is a Grant. In doing my research, it was interesting to learn that the sponson-mounted 75mm gun was more prized (eventually) because it had an HE round. That meant that the Grant 75 was far better able to deal with anti-tank gun crews, like the dreaded 88mm, than a solid shot AP round would have been. In the turret, a 37mm gun was the main anti-tank weapon (though certainly the sponson gun was used in that role as well).
The M3 Grant in blister
Assembled, base-coated, and dry brushed – needs camo and washes
If the chassis looks familiar, yes, it was used as the basis for the M4 Sherman as well.
My Grant with its model – the light green was interesting to apply – better pictures in the eye-candy section below.
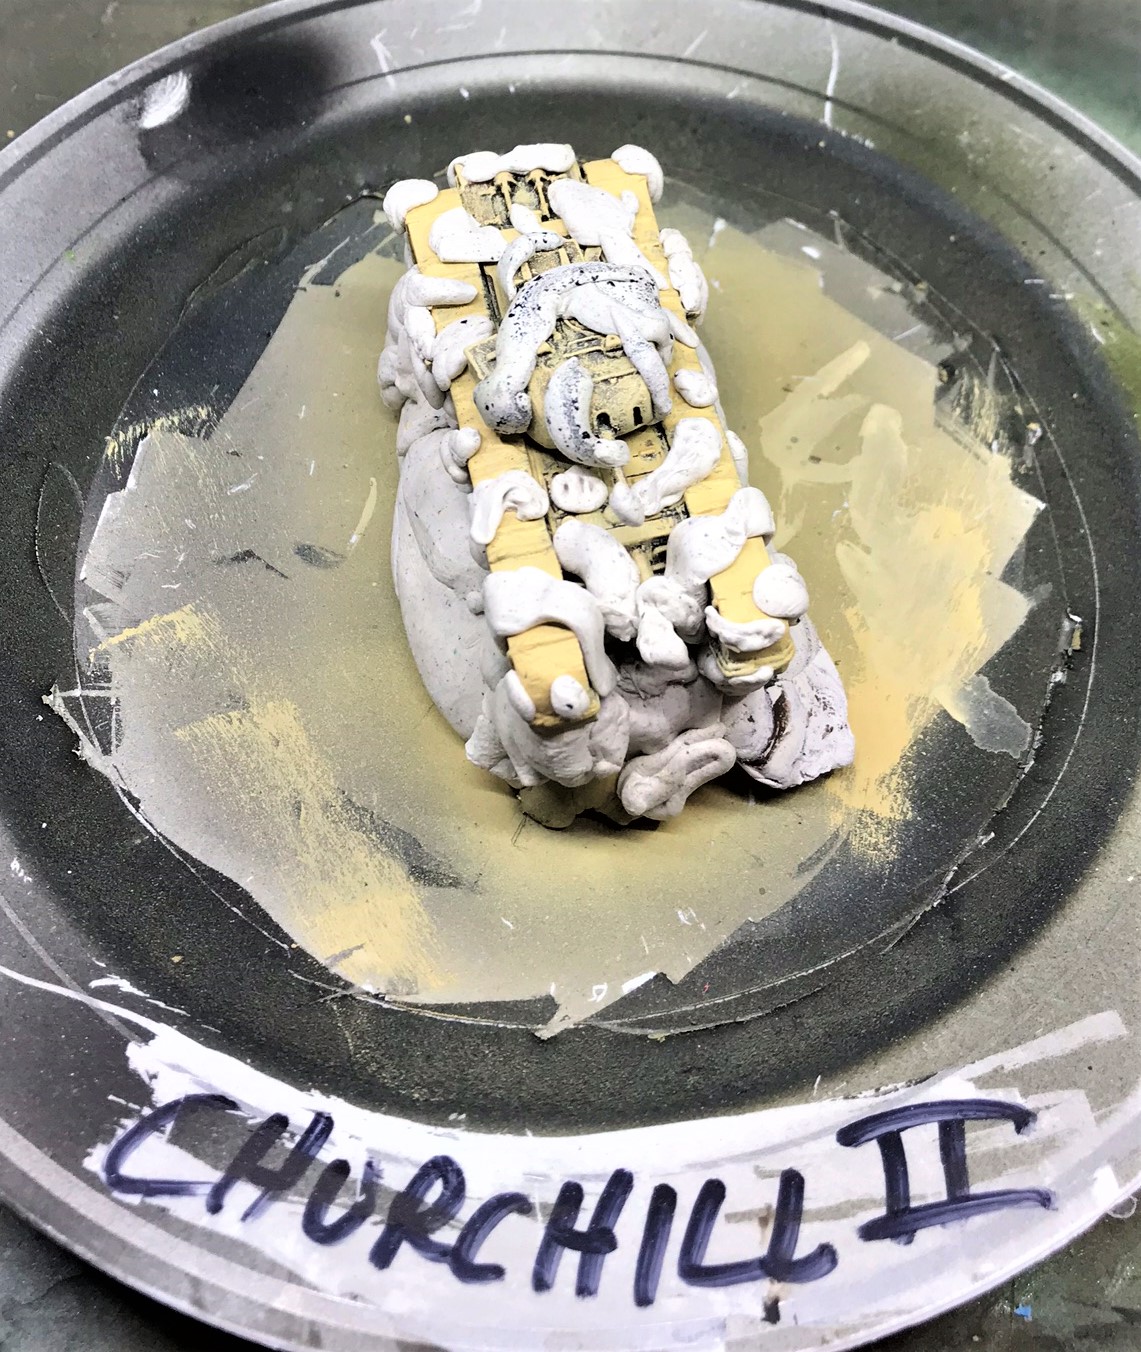
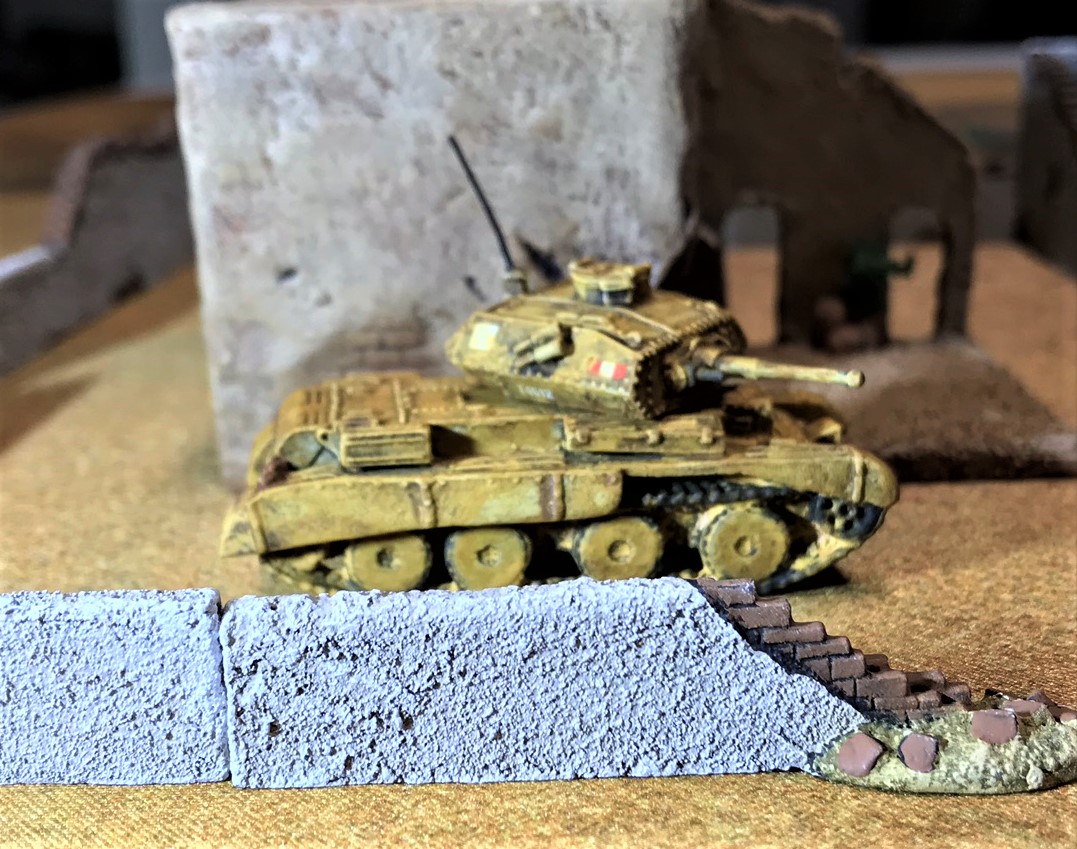
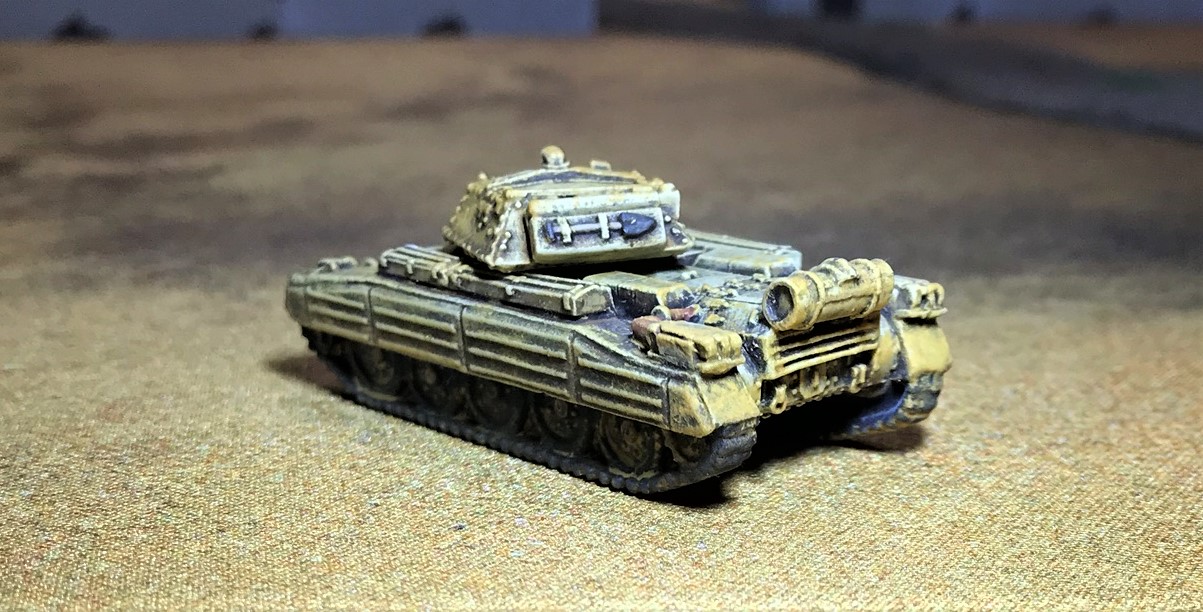
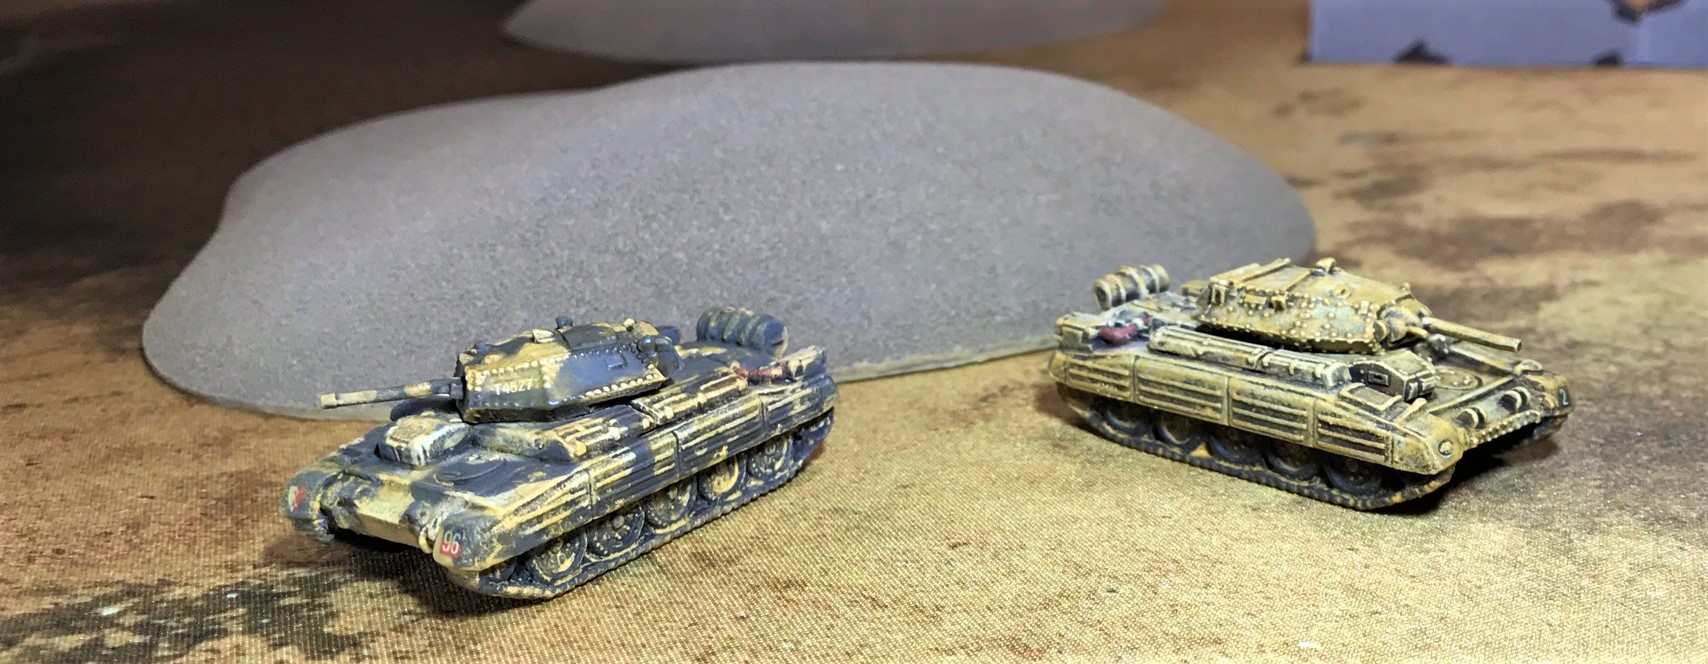
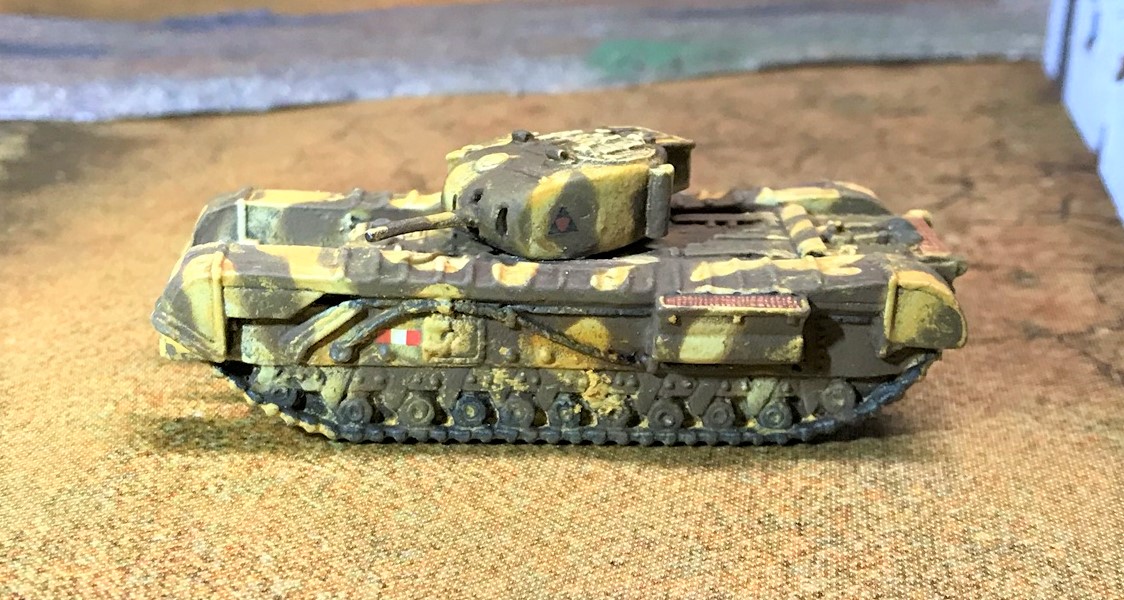
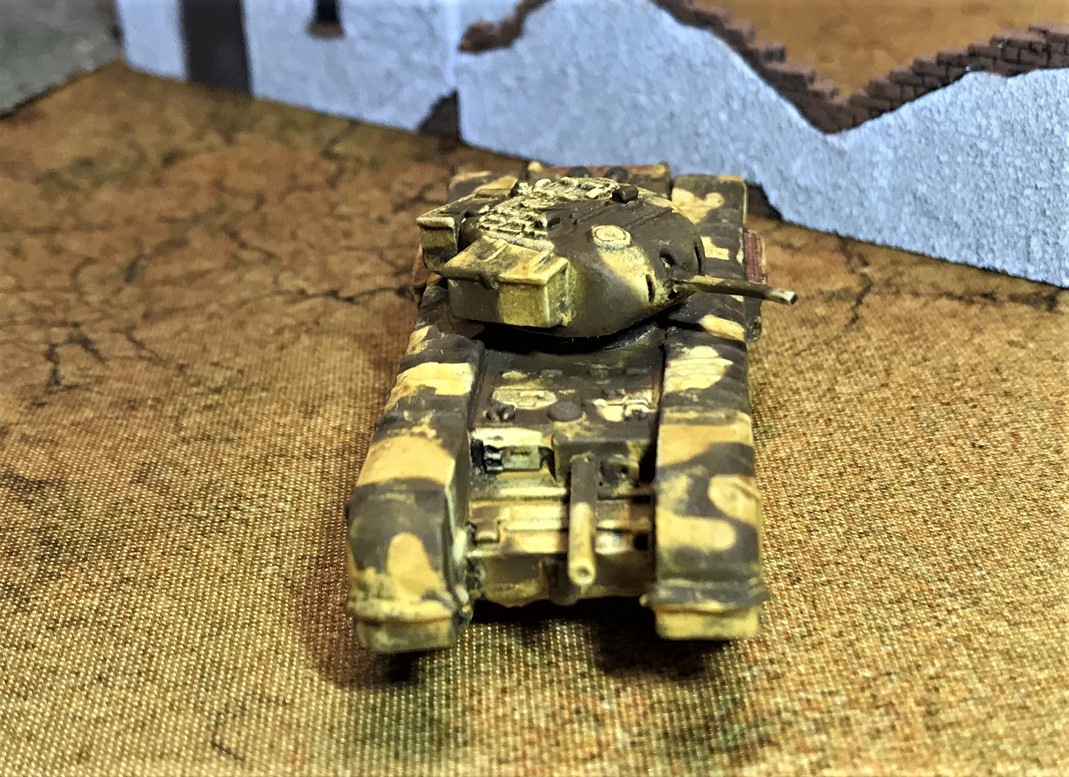
Churchill Mark II
The Churchill infantry tank made its unhappy debut in the costly Canadian forces raid at Dieppe (these were Churchill Mark I’s). The Churchill Mark II was first used by the “Kingforce” detachment (6 Churchill II tanks) in North Africa in October 1942, and Churchills were used in that theater and in Western Europe throughout the rest of the war.
The Churchill in the blister – I chose to make it a Churchill II as the Mark I was only at Dieppe.
How I started painting the turrets – I later transitioned my approach to using drill holes in wooden blocks instead of styrofoam. That approach worked much better. The #14 2″ screw held a magnet and a steel washer, and the magnetized turret stayed on top for painting.
I then masked this big behemoth (for 15mm). The effort on this tank took some doing – I needed a lot of poster tack.
Churchill tank awaits its desert camouflage paint job.
What I was going for – and again more dirty on mine.
Now my force was – as you Brits out there might say – “proper” in terms of game-worthiness.
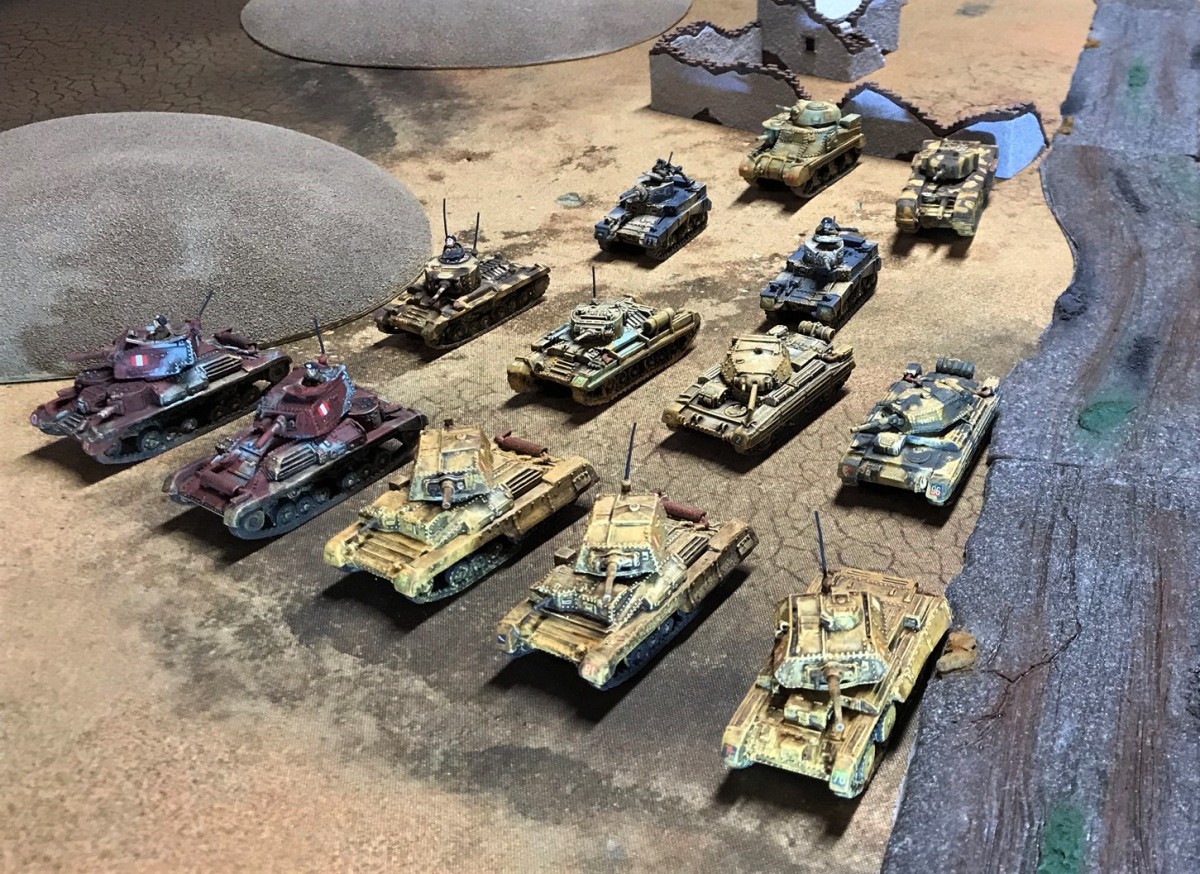
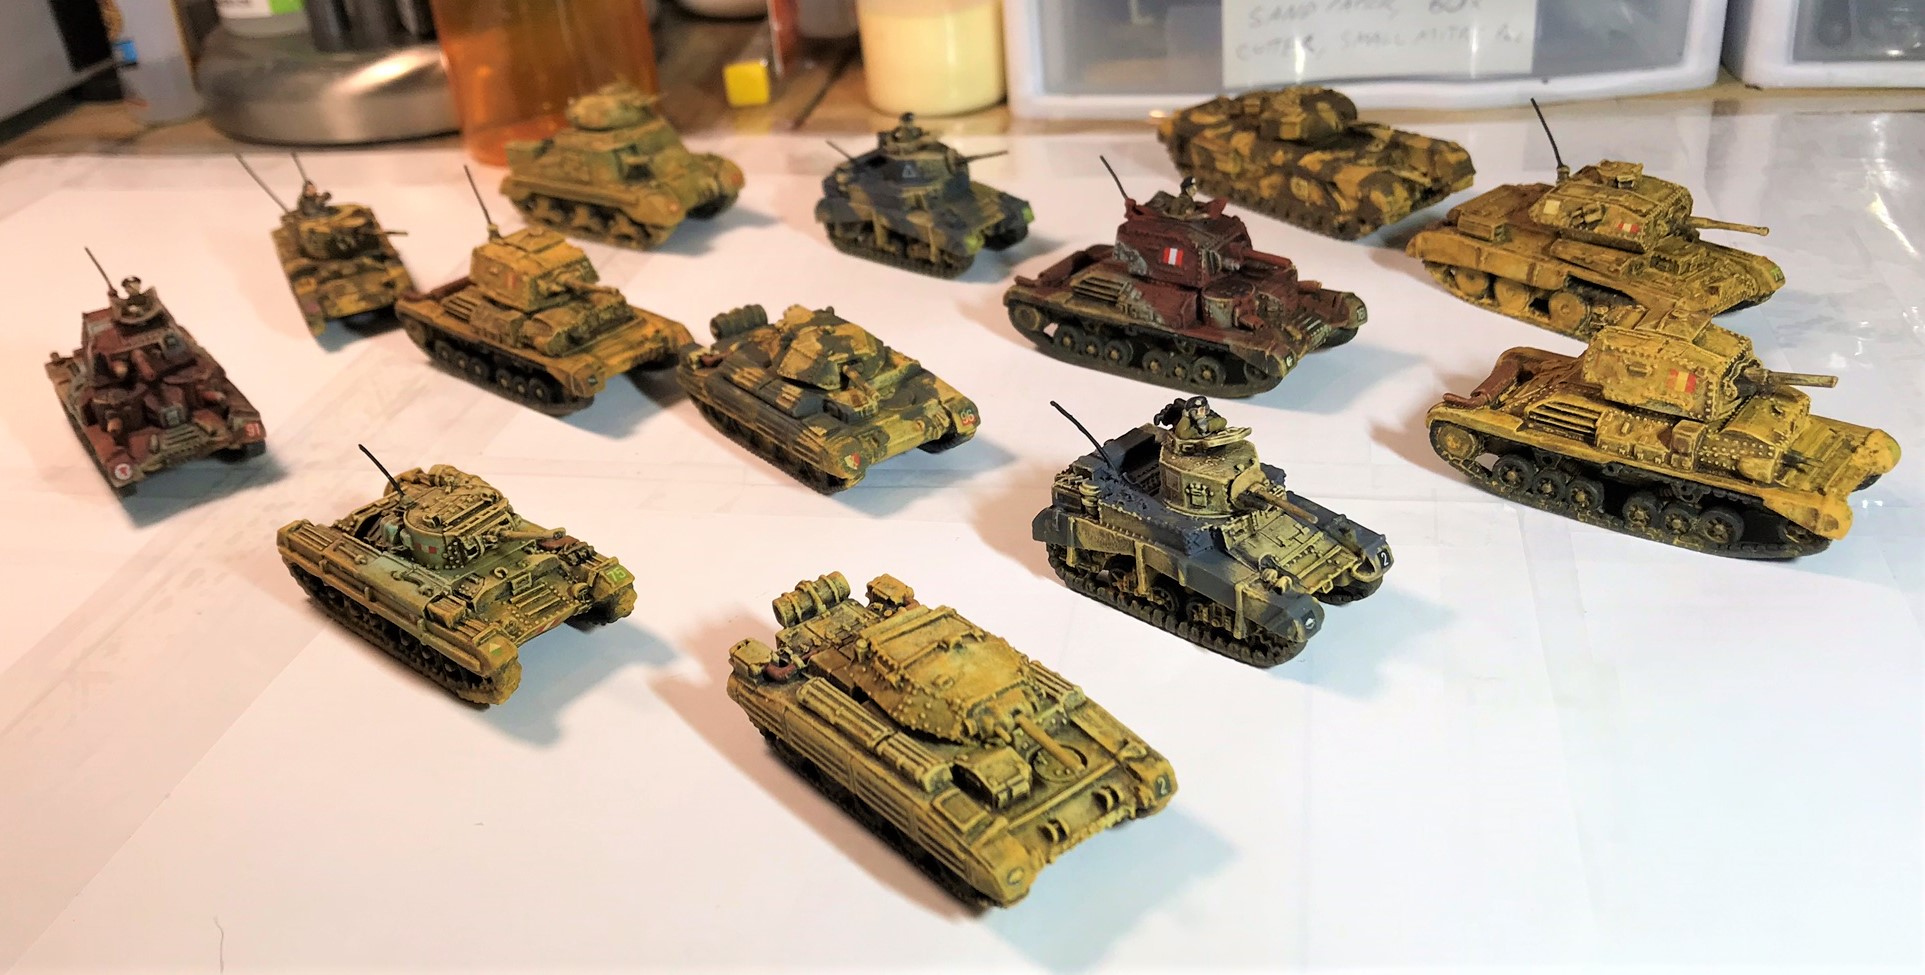
All of the 8th Army tanks I painted since November.
That concludes the history/what-I-did section – now for the…
Eye Candy
Right side view of the two A10’s.
Left rear view of the same A10’s approaching the village.
The A13 patrols a village.
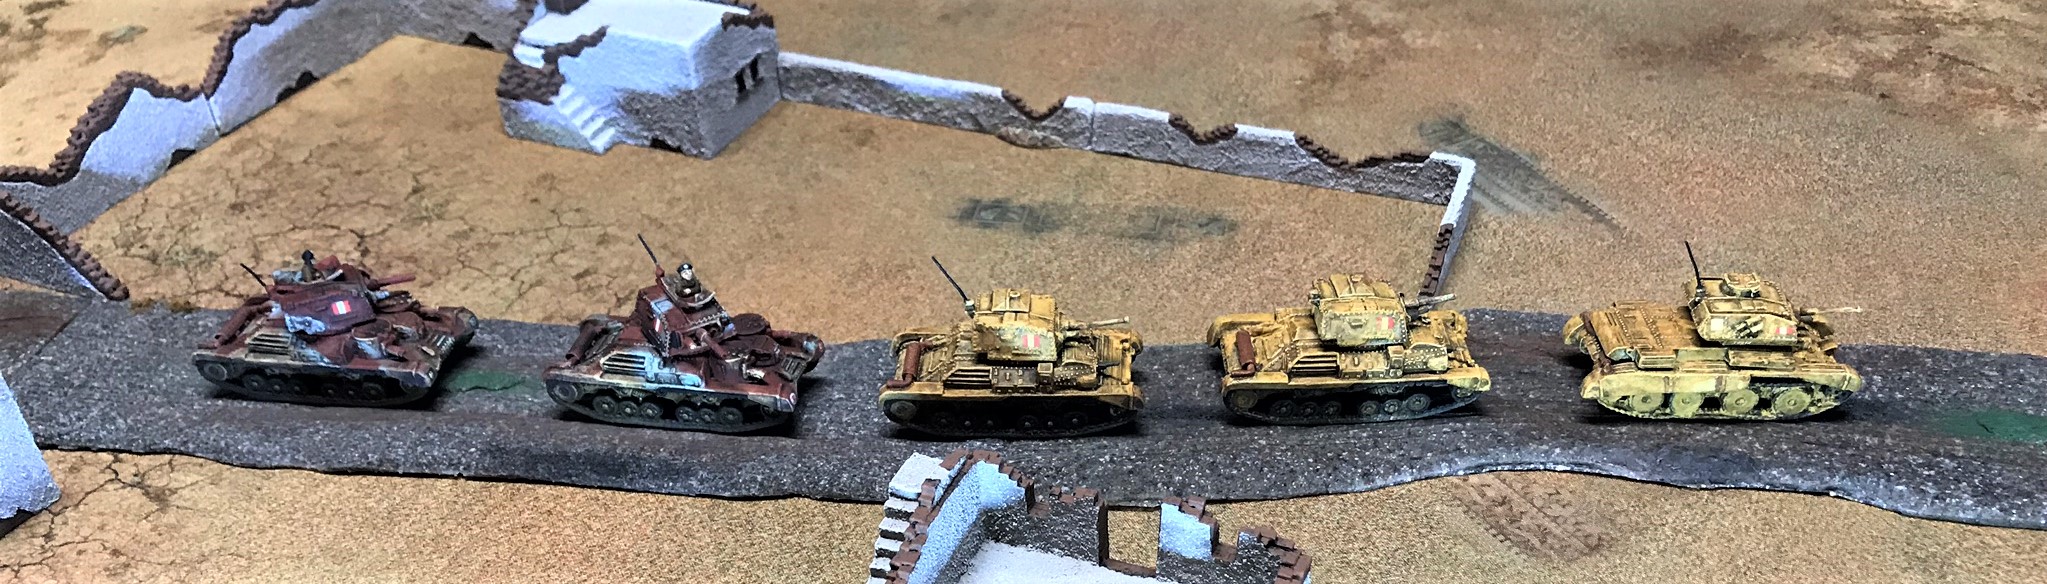
Just for fun, I lined up all of my early Cruiser tanks in a convoy.
The Valentine II, with its blue Caunter camouflage scheme, guards a well.
Opposite side view of the Valentine II. I do like the muted appearance of the blue. The decals were practically microscopic to work with!
The Valentine III with its brown camouflage pattern approaches a road.
Head on view of the Valentine III. For perspective, the front of this tank is little more than an inch wide, so this image is 3-4 times the size of the model.
My two Valentines (soon to be a romantic comedy perhaps on the BBC?).
Nice view of the fronts of the Valentines. I had a bit of a concern with the tracks of the Valentine II on the left . As you can see they are a slight bit off – and this was the one Valentine that I needed to reinforce during assembly. Again, these are the things you notice when your picture is 3-4 times the size of the model!
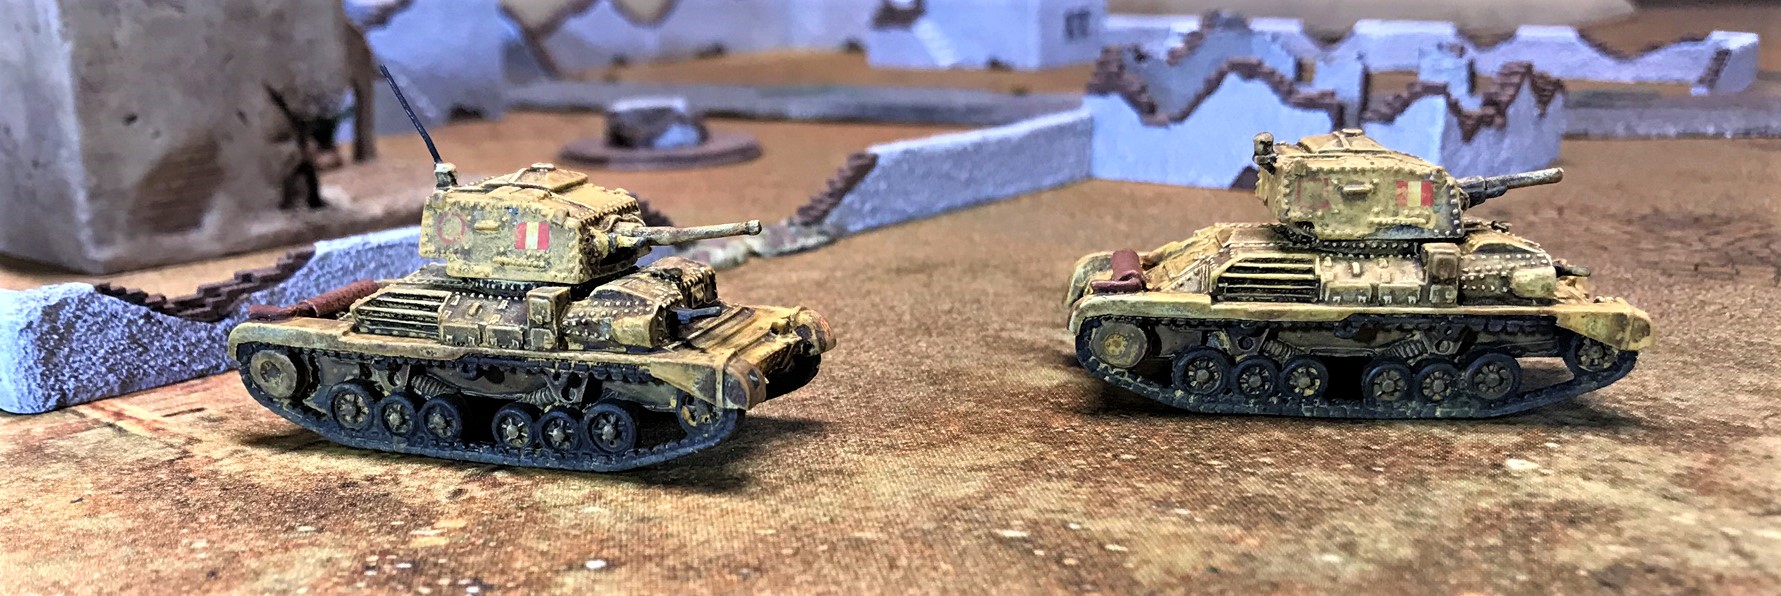
Crusader II right side view.
Crusader II left rear view.
Left side view of my Crusader III with its camouflage scheme.
Right rear view of the Crusader III.
The two Crusaders, not caped like Batman and Robin though…and this is not Gotham City…
Frontal view of the M3 Grant. As a nod to its possible Canadian forces use and/or manufacture, I gave it a Canadian unit marking. Many of the Grants were made in Montreal, at a locomotive plant. AND I did this as a Bruins fan (its a hockey thing)!
The light green camouflage is a little more visible here. I did not want it to be overwhelming, but it is tough to photograph.
Entering the village.
My Churchill II, left side.
Right side of the Churchill II. The camouflage painting on this and the others was fun.
Front view of the Churchill II.
For even MORE fun, I convoyed all of my painted 8th Army tanks.
Is this a motor pool or what? Nice group shot – my Matilda II’s did not make the shot, but I only touched them up so they hardly deserve to be in this shot. Still like them though, but they are kind of adopted…
Now it’s onto the Germans and Italians – which I hope to finish soon. But never soon enough…
Thanks for looking, and I very much hope that you enjoyed seeing these. Any favorites? Feedback? Winning lottery numbers? Please leave me your thoughts in the comments section!
PAINTS, INKS, GLAZES, SHADES, WASHES, AND FLOCKING USED ON THIS TANK GROUP:
Vallejo “Flow Improver”
Vallejo “Airbrush Thinner”
Vallejo “Surface Primer – Black”
Testors “Universal Acrylic Thinner”
Citadel “Imperium Primer”
Battlefront “European Skin”
Battlefront “Skin Shade” (shade)
Vallejo “English Uniform”
Battlefront “Crusader Sand”
Vallejo “Desert Sand”
Battlefront “Worn Canvas”
FolkArt “Champagne”
Battlefront “Black”
Citadel “Agrax Earthshade” (wash)
Citadel “Nuln Oil” (wash)
Vallejo “Dark Sand”
Battlefront “Dry Dust”
Battlefront “Wool Brown”
Battlefront “Boot Brown”
Battlefront “Rommel Shade” (shade)
Battlefront “Bradley Shade” (shade)
Battlefront “Dark Gunmetal”
Battlefront “Dark Leather”
Battlefront “Oxide Red”
Battlefront “Tommy Green”
Gorilla Glue
Green stuff (kneadatite)
Tamiya masking tape
Vallejo Mecha Varnish “Gloss Varnish”
Microscale Micro-Set
Microscale Micro-Sol
Microscale Liquid Decal Film
1/8″ rare earth neodymium magnets
Appropriate decals from Battlefront
Vallejo Mecha Varnish “Matt Varnish”
Vallejo Mecha Color “Sky Blue”
Aleene’s poster tack
Vallejo Model Air “Blue Grey”
Secret Weapons Washes “Armor Wash” (wash)
Vallejo “Dark Yellow Ochre” (pigment)
Sponges
Army Painter Quickshade “Light Tone” (wash)
Thanks again for looking and for sharing your feedback!
RESEARCH MATERIALS
As for research materials, I used the same ones as I cited before – but for completeness here they are in case you are interested (you can find them on Amazon):
Two by David Fletcher:
British Battle Tanks: British-made tanks of World War II
British Battle Tanks: American-made World War II Tanks
One by Jean Restayn:
WWII Tank Encyclopaedia, 1939-45
One by the Smithsonian/DK:
Tank: The Definitive Visual History of Armored Vehicles
One by Michael Green:
Axis Armoured Fighting Vehicles of the Second World War (Images of War)
One by Robert Jackson:
Tanks and Armored Fighting Vehicles Visual Encyclopedia
I would easily recommend all of these books as good resources for gamers and modelers.