

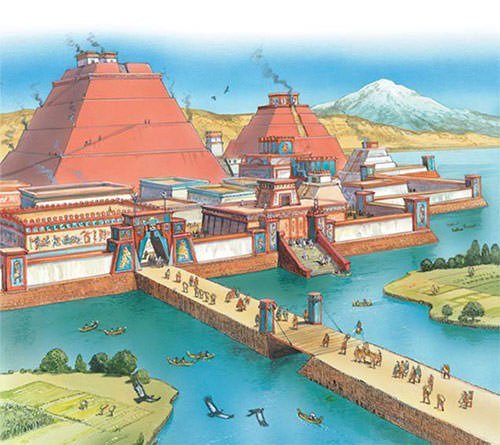
I have been working through July to build a representative 6′ x 4′ cityscape gaming table that would evoke the flavor of the city of Tenochtitlan, which was the capital of the Aztec Empire. On the arrival of Hernan Cortes in 1519, Tenochtitlan was populated by an estimated 200,000 to 400,000 people – making it even larger than contemporary London. It was built on an island in Lake Texcoco, and was linked to the mainland by multiple causeways. These causeways also had removable or liftable bridge sections. In effect, Lake Texcoco formed a “moat” around the city, making it impregnable to enemies for hundreds of years (until the Spanish Conquest occurred anyways). The causeways would be of major importance during all phases of the Spanish Conquest. Cortes met Montezuma II on a causeway for the first time. The Spanish and their Tlaxcalan allies would fight desperately at different times to both escape Tenochtitlan (La Noche Triste) and to return to conquer it afterwards. The nature and importance of the causeways were major aspects of these battles, so any representation of the city of Tenochtitlan needed to have causeways.


To build a city of such size would be massive – and certainly beyond the scope of a reasonably-sized gaming table. My goals were to make something special – while ensuring that it was something that could be used in games of Buck Surdu’s Feudal Patrol™ in Mesoamerica (using my Civilizations Collide supplement). I wanted a diorama that could be played on. To that end, I have built many buildings and figures that have been previously shared in this blog. What I needed to add was the underlying structure of the city – “the cityscape”.
The work that I did to build and paint this cityscape was extensive and would overwhelm a single blog post. Hell, it almost overwhelmed me just building it! Therefore, I have decided to break my work on it into 5 posts that I will share over the next few days. There will be a lot of WIP shots on each category, leading up to a final reveal. I am also continuing with my weekly garage+ build posts (like here and here), and I have some golf stuff to add as well. This is “Life, Golf, Miniatures, & Other Distractions” after all! My blogging drought is coming to an end! As for the cityscape posts, here is the listing of what is on deck:
- Building an Aztec Cityscape – Part 1: Causeways, Lifting Piers, and Removable Bridge Sections (this post)
- Building an Aztec Cityscape – Part 2: Pavements
- Building an Aztec Cityscape – Part 3: Revetments, Lily Pads, and Cattails
- Building an Aztec Cityscape – Part 4: Cortes’ War Wagons
- Building an Aztec Cityscape – Part 5: Tenochtitlan – THE FINAL REVEAL
To build the cityscape, I started off with building the causeways, but work on all of these components overlapped. Please enjoy them and hopefully this is useful for my fellow gamers, modelers, and hobbyists. Luckily, these all can be part of Dave’s Season of Scenery Challenge – which is fun as well.
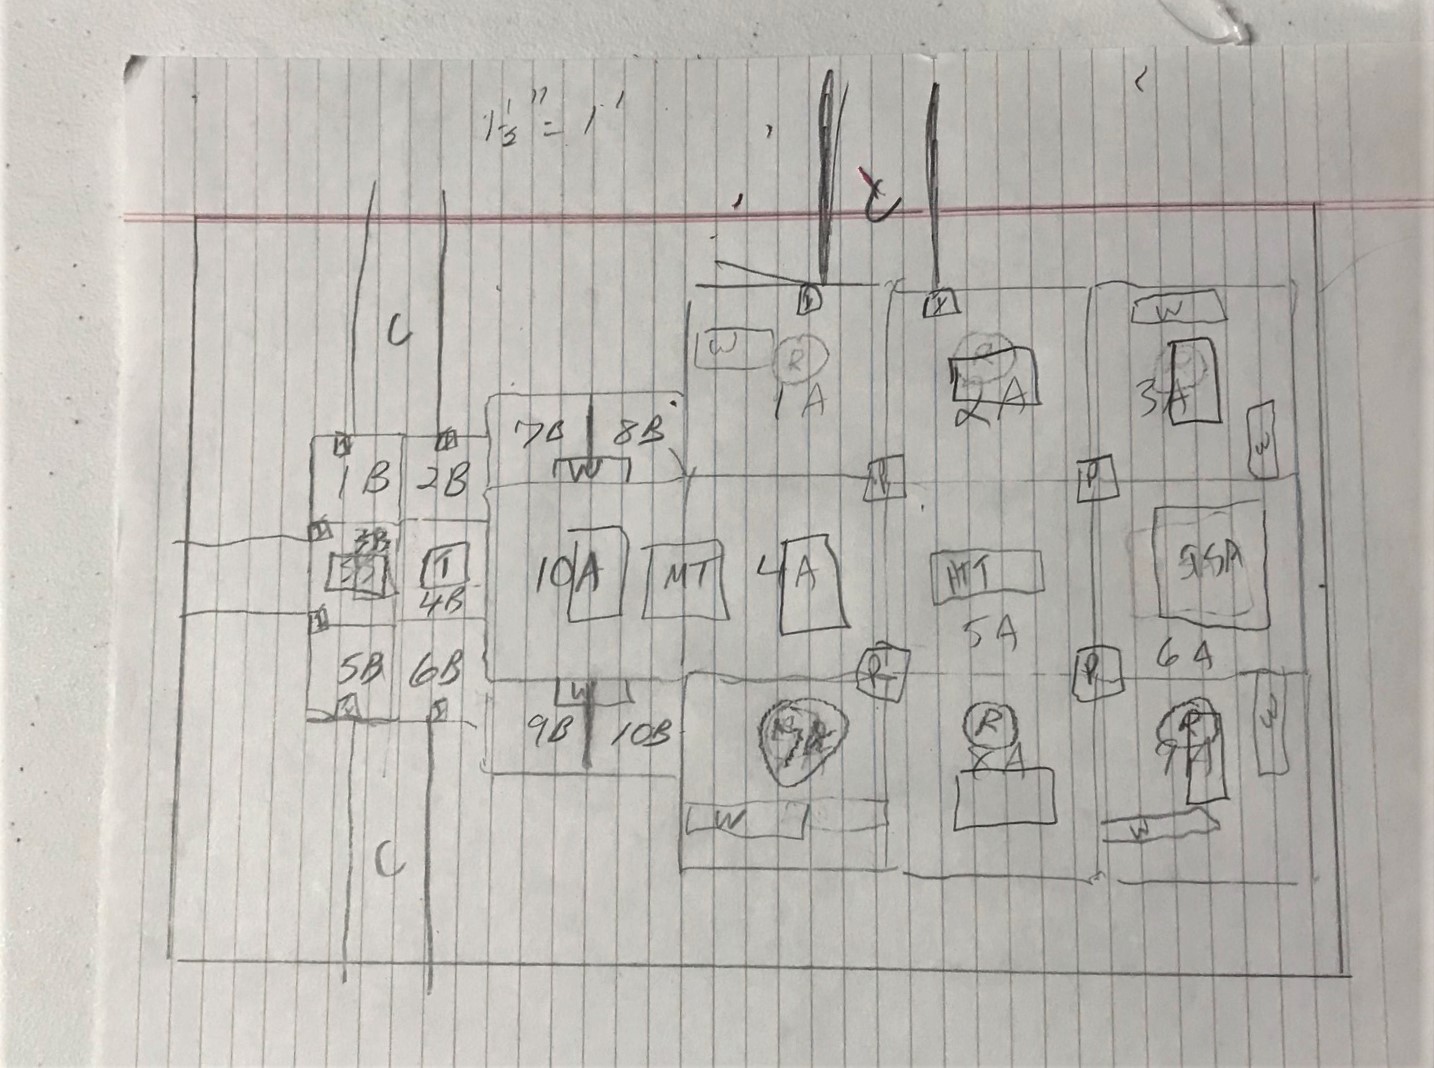
Initially, I wanted to plan the cityscape layout for a 6′ x4′ mat. I drew a rough sketch, and decided that I would get two 2′ x 4′ sheets of 1/4″ MDF from Home Depot. My friend Jeff Smith (a fantastic woodworker) has a lot of tools – to include a nice table saw, which I do not have. As I needed more precise cuts than I could achieve with my Black and Decker skilsaw, I enlisted his help. He was able to cut all the pieces in no time at all (and again, thanks Jeff!!!).

After the MDF was all cut, I laid out the pieces that I had on my FLG swamp mat, and arranged my buildings. Later, I would get a water mat from them, as I thought the swamp would not work as well. After the MDF concept layout, I was on to the building of the six causeways. I usually went through the process of doing one phase of work on one piece (like a prototype), and if that worked, moving on to the rest in similar phases.

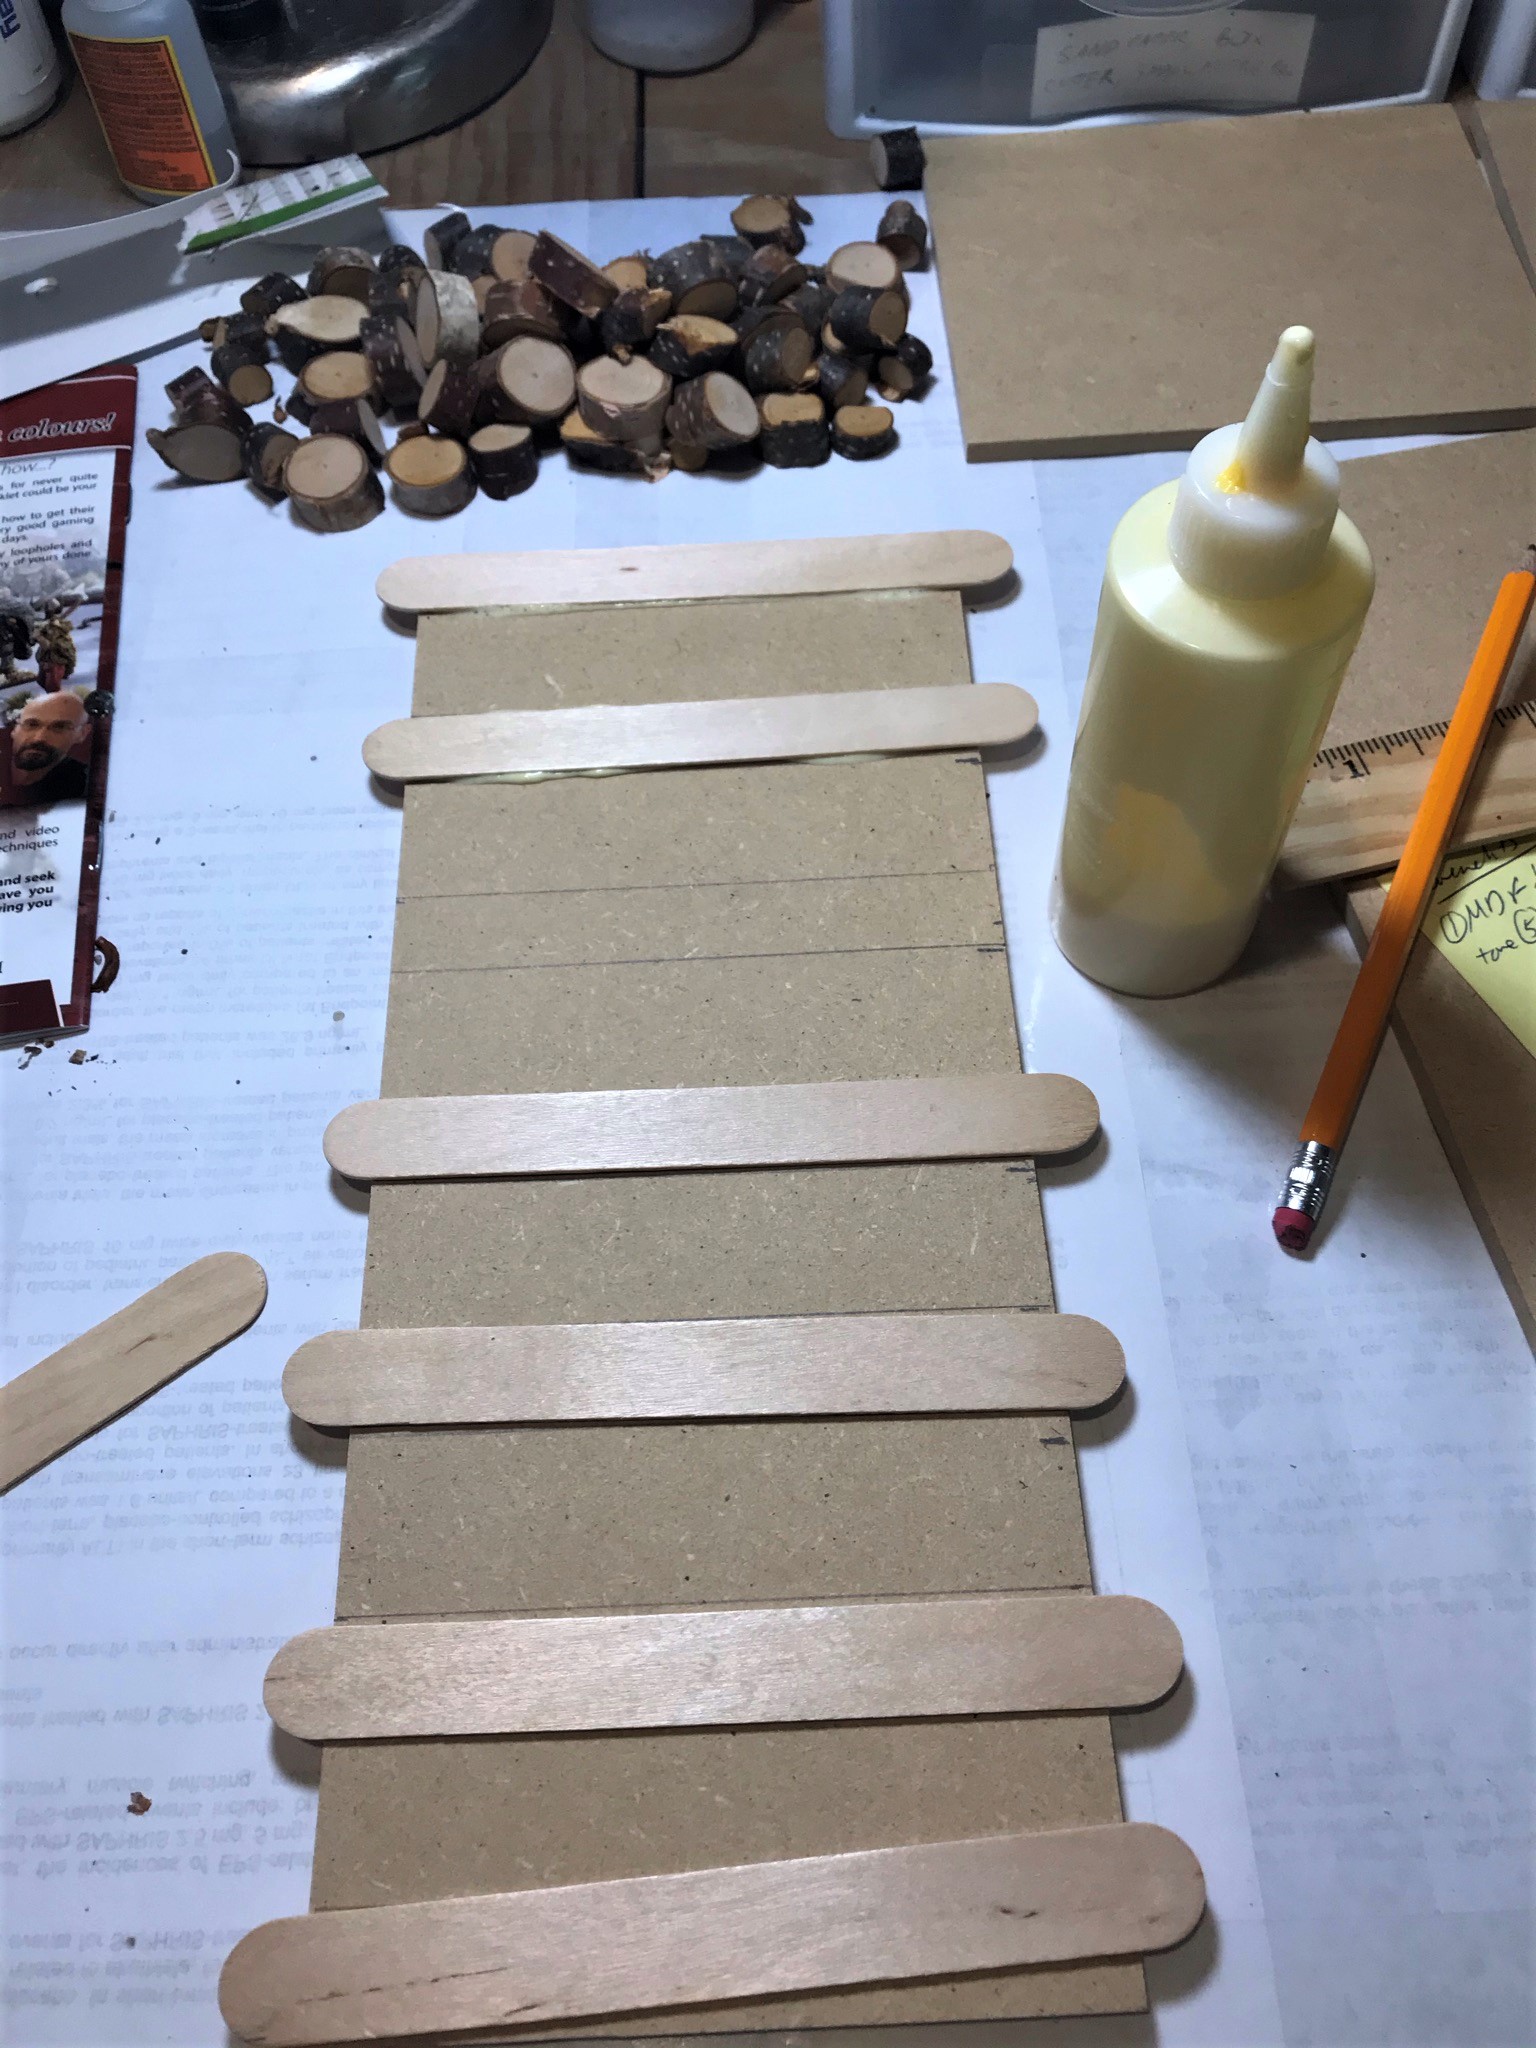
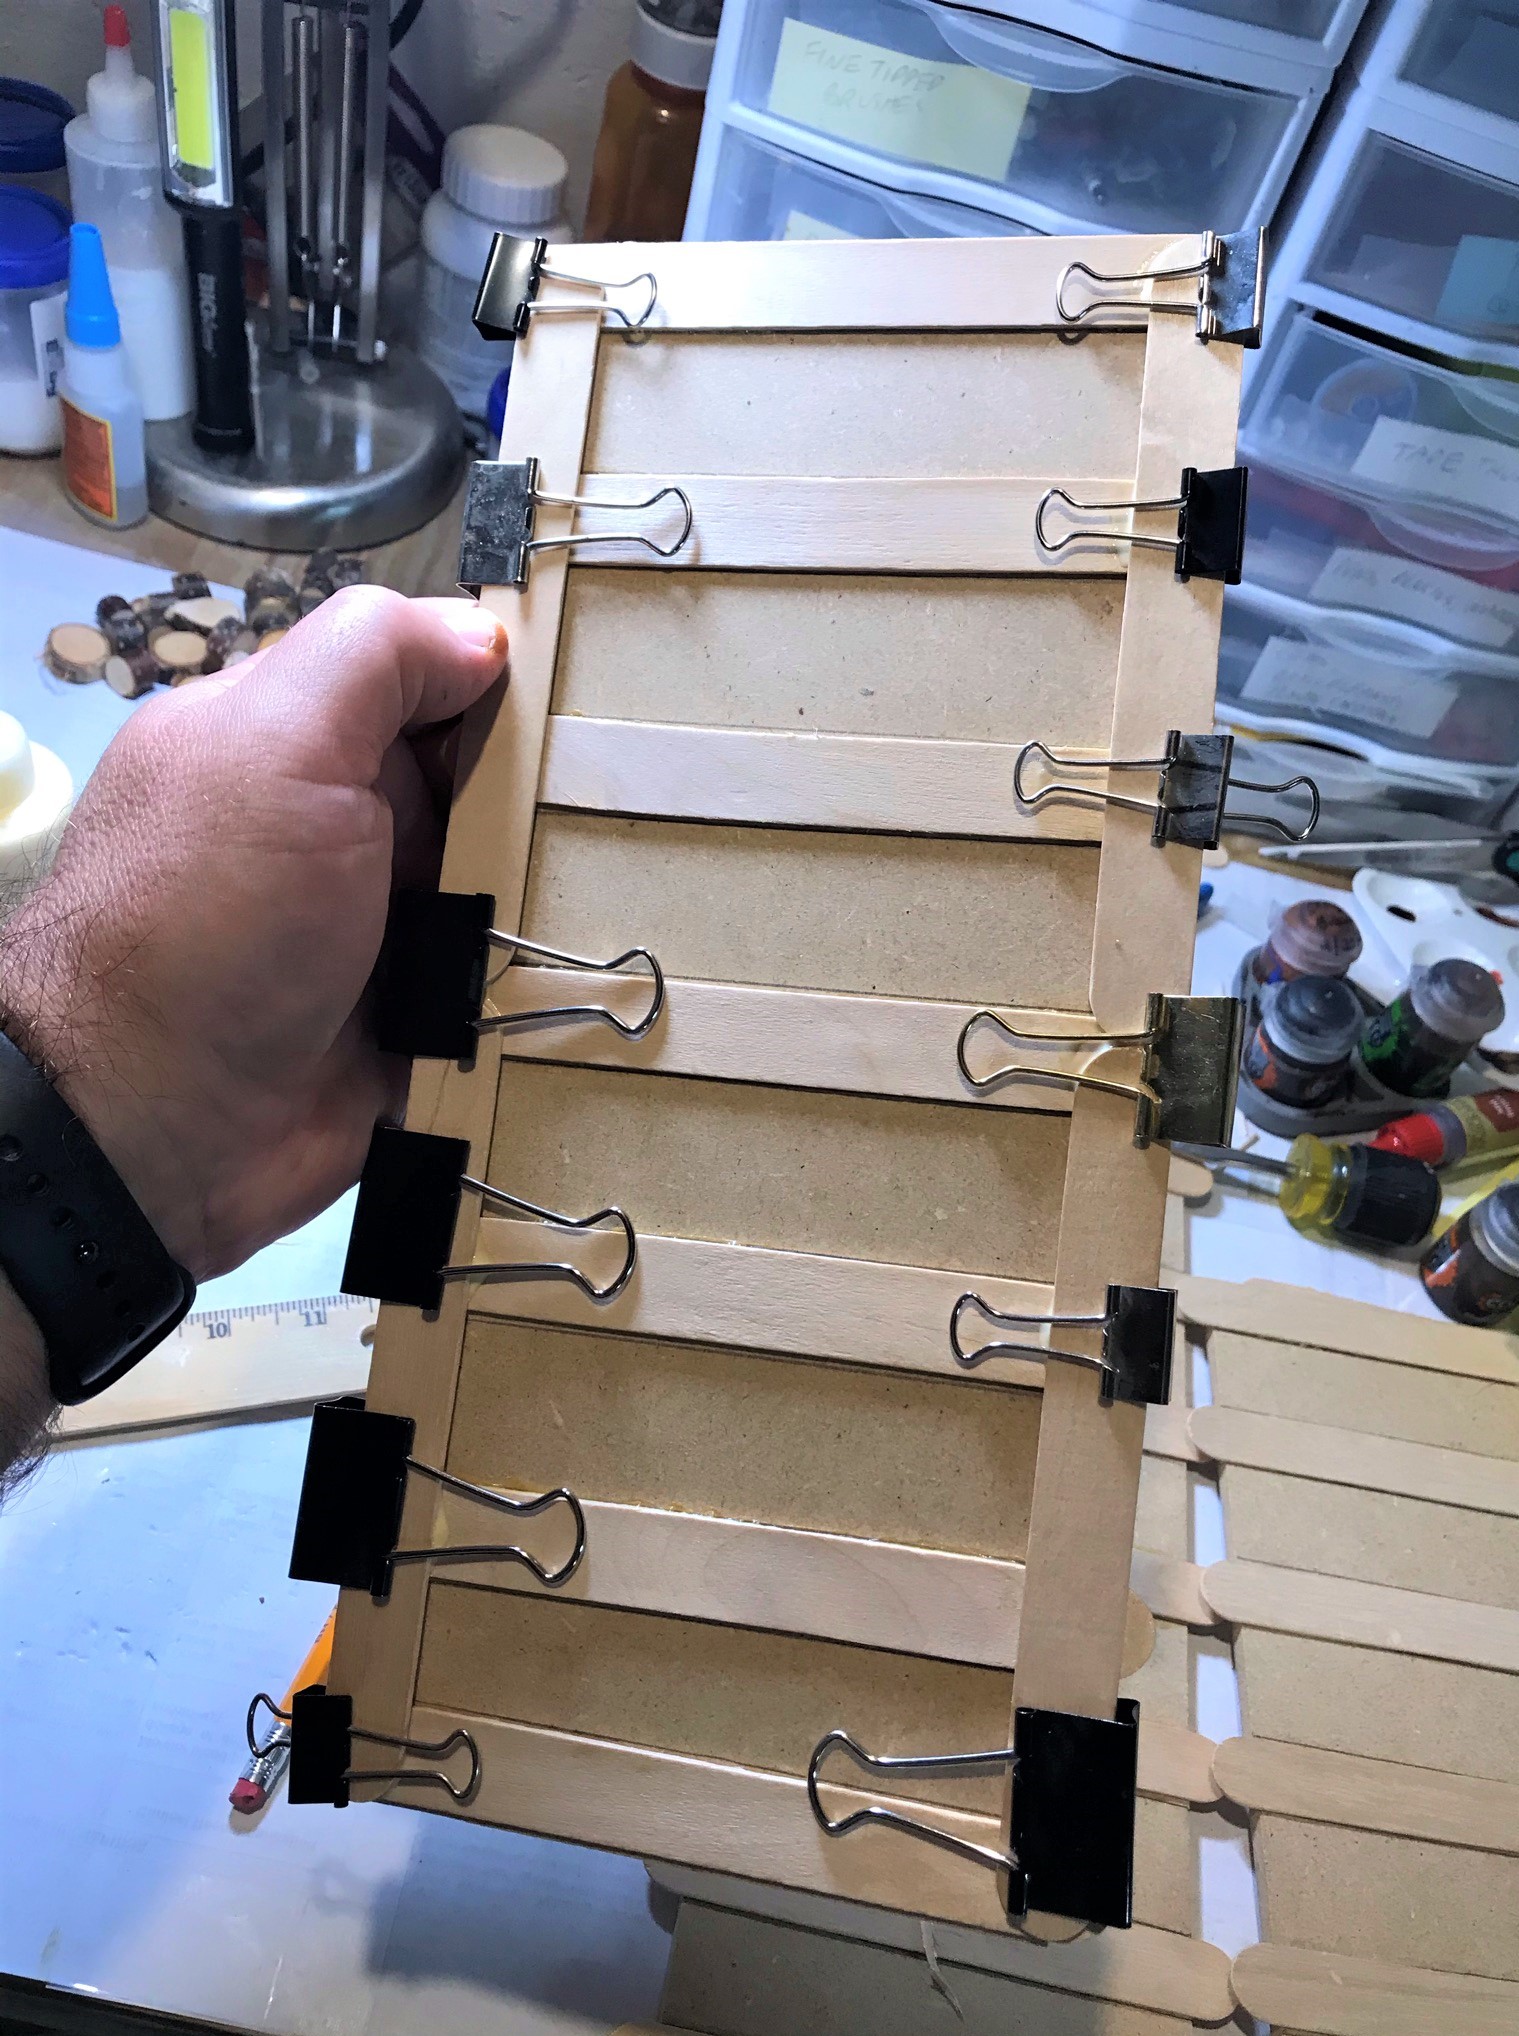
My causeway section prototype would be 5″ wide and a foot long. I spaced out some 6″ craft sticks evenly across the bottom and used wood glue to affix them. These would be to support the wooden piers and stones around them on the sides of the top surface. This worked ok, so I did all six with the cross-glued craft sticks.

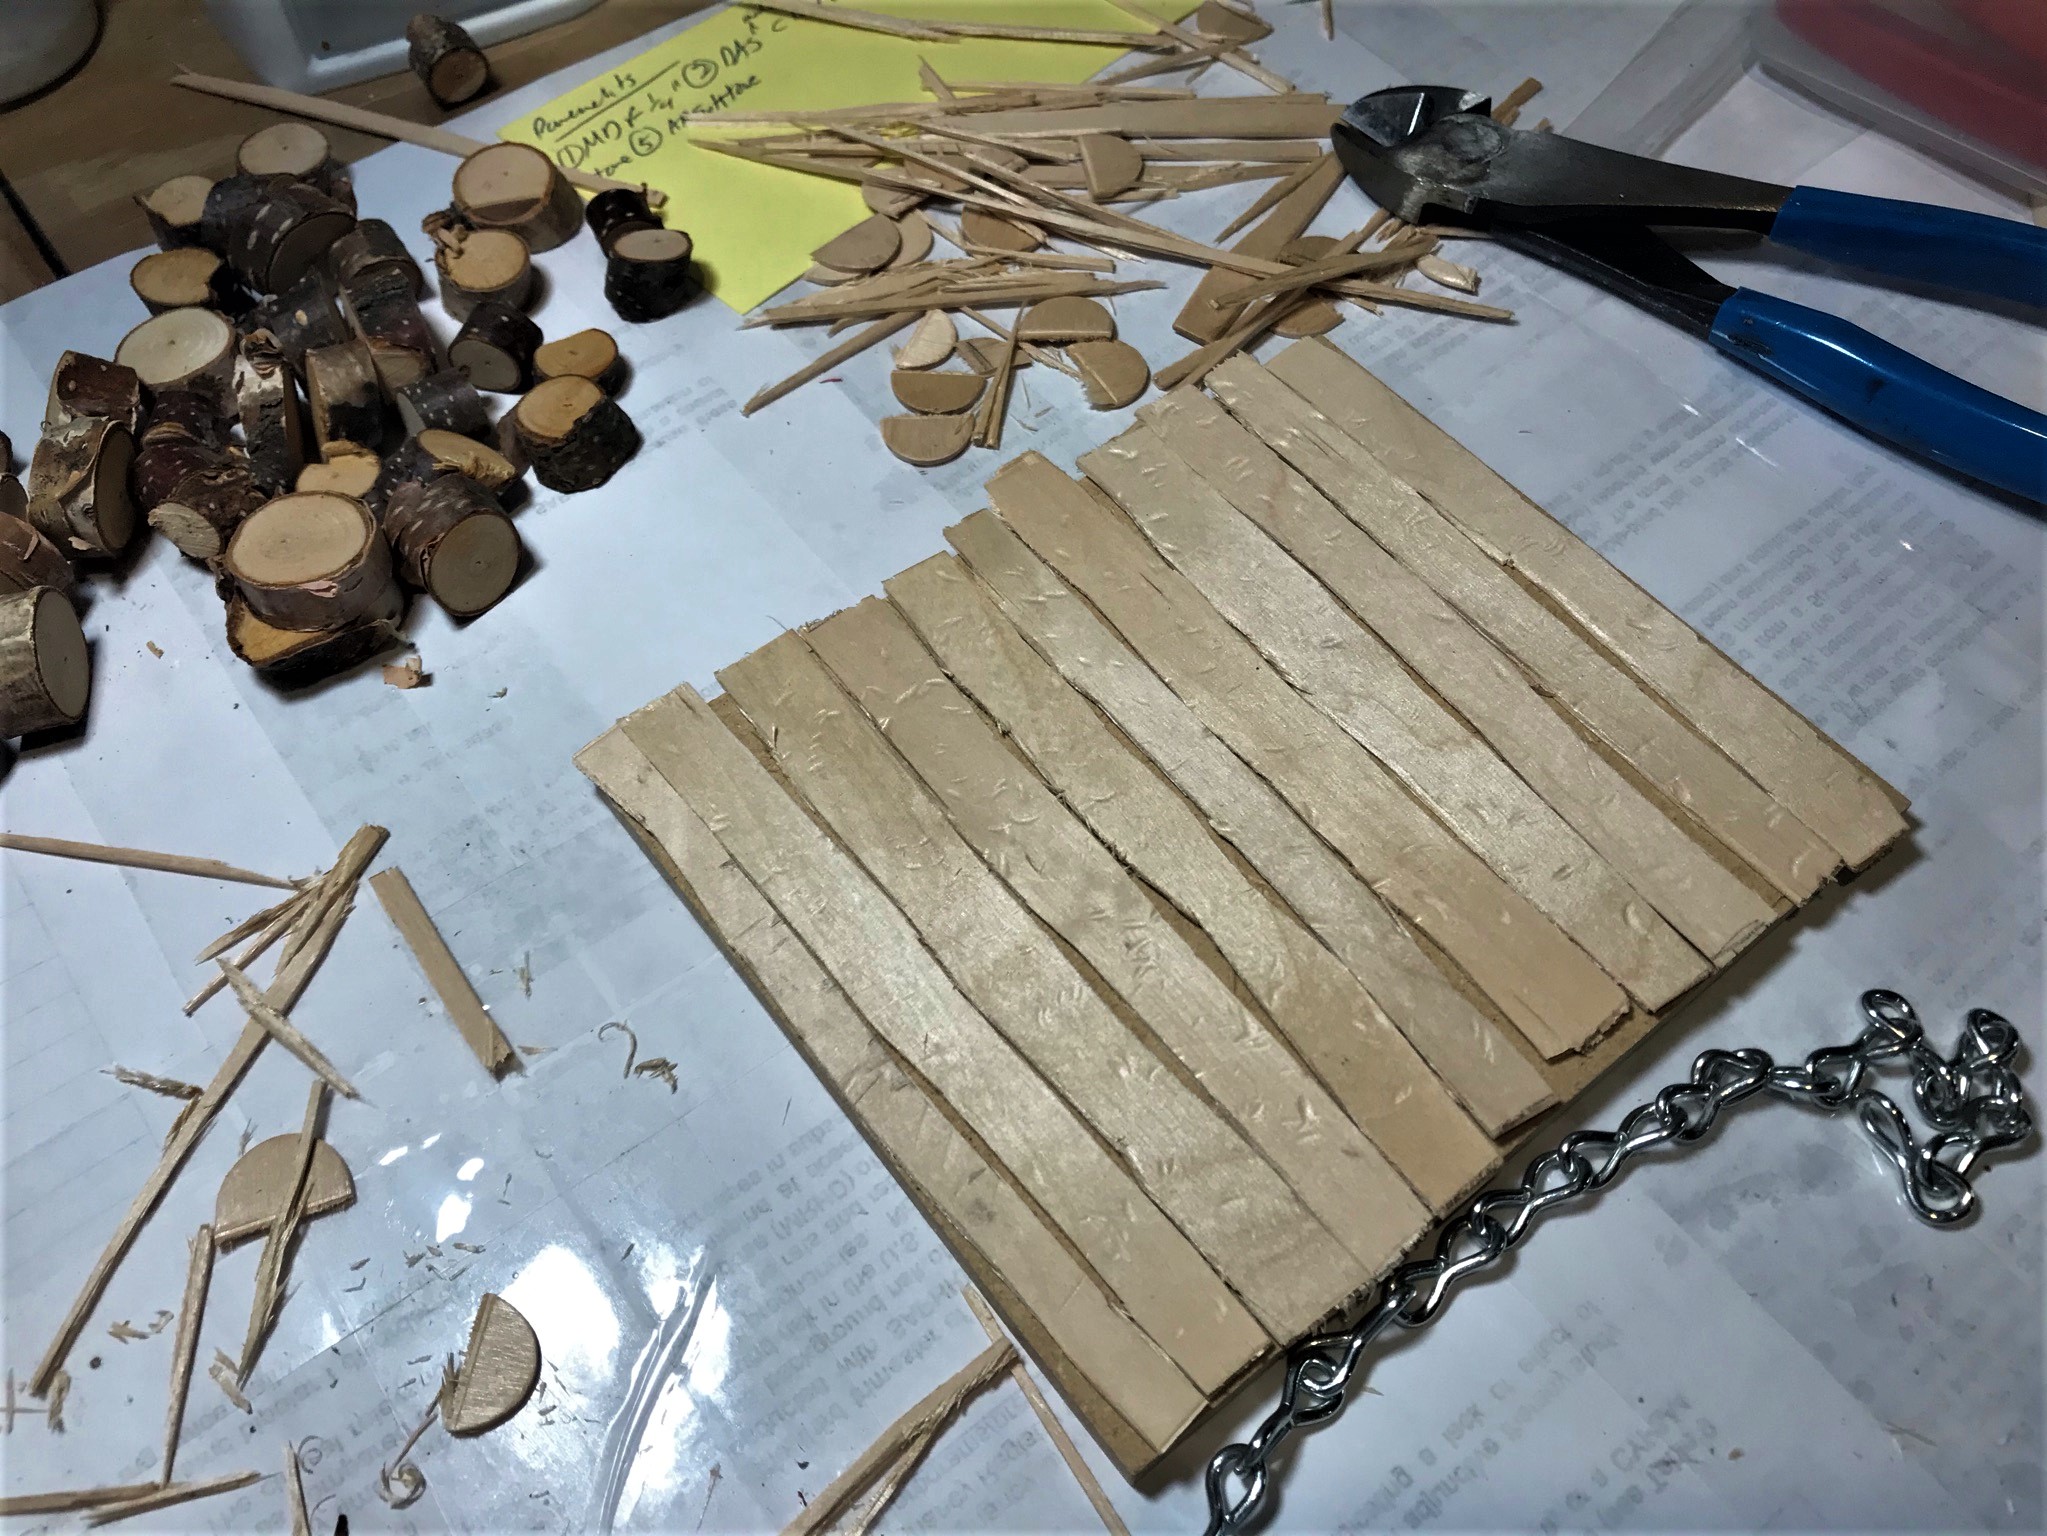
While the glue was setting on phase I of the causeway undersides, I built the two removable bridge sections. These are 6″ long and the same width as the causeways. These would be analogous to a medieval drawbridge. I broke up craft sticks irregularly and dry-fitted them to the top of the bridge sections. Then, I weathered the wood by beating a small chain on and into them with a ball peen hammer. After this, I glued them on with wood glue and let dry overnight. I did not press these with weight as I wanted a less uniform surface of the bridge to represent wear and aging.

Then, I went back to the causeways. The cross-sections were ok, but I needed to have a way to add the revetments along the sides – so I added more craft sticks longitudinally on each side. They would jut out about 1/2″ on the side of the causeways.

Once dry, I covered the surfaces with glue and then chinchilla dust.

I finished painting the removable bridge sections and build and painted 4 lifting piers out of square dowels and 1/8″ plywood.


Next, I moved on to the side piers and causeway revetments. The following day I grabbed a dry oak branch from the woods behind the house and cut it up. As each causeway section would need 14 wooden piers (seven per side), I figured I’d need 84 piers. So, I initially planned on using some birch wood discs I had plus the oak sections. I cut up the wood in sizes I thought would work well. However, as I laid it out (dry fit), I was not happy with the appearance. At all. Clearly, compared to a 28mm figure, the wood size was far in excess of what would have been used as piers along the causeways.

The oak and birch wood pier candidates 
Laid out, I saw that these were not the right size or appearance. The finished surfaces of the causeways that you see here were ok though.
It was time to regroup. For piers, I then decided to use 1/8″ wooden dowels instead. I cut them up roughly to represent timber and glued them together in threes – and if you are doing the math, yes, that is cutting up and gluing together 252 pieces for the 84 piers. This project had a LOT of gluing and drying stages! I also found a nice source of rocks at Michaels – those little filler stones that some people use in glass vases. These were much cheaper than any hobby talus would have been. The time downside was that for effective placement I needed to glue one course of rocks at at a time – one rock at a time – with PVA – more gluing and waiting for drying…


I then painted the piers and added some shade to them.

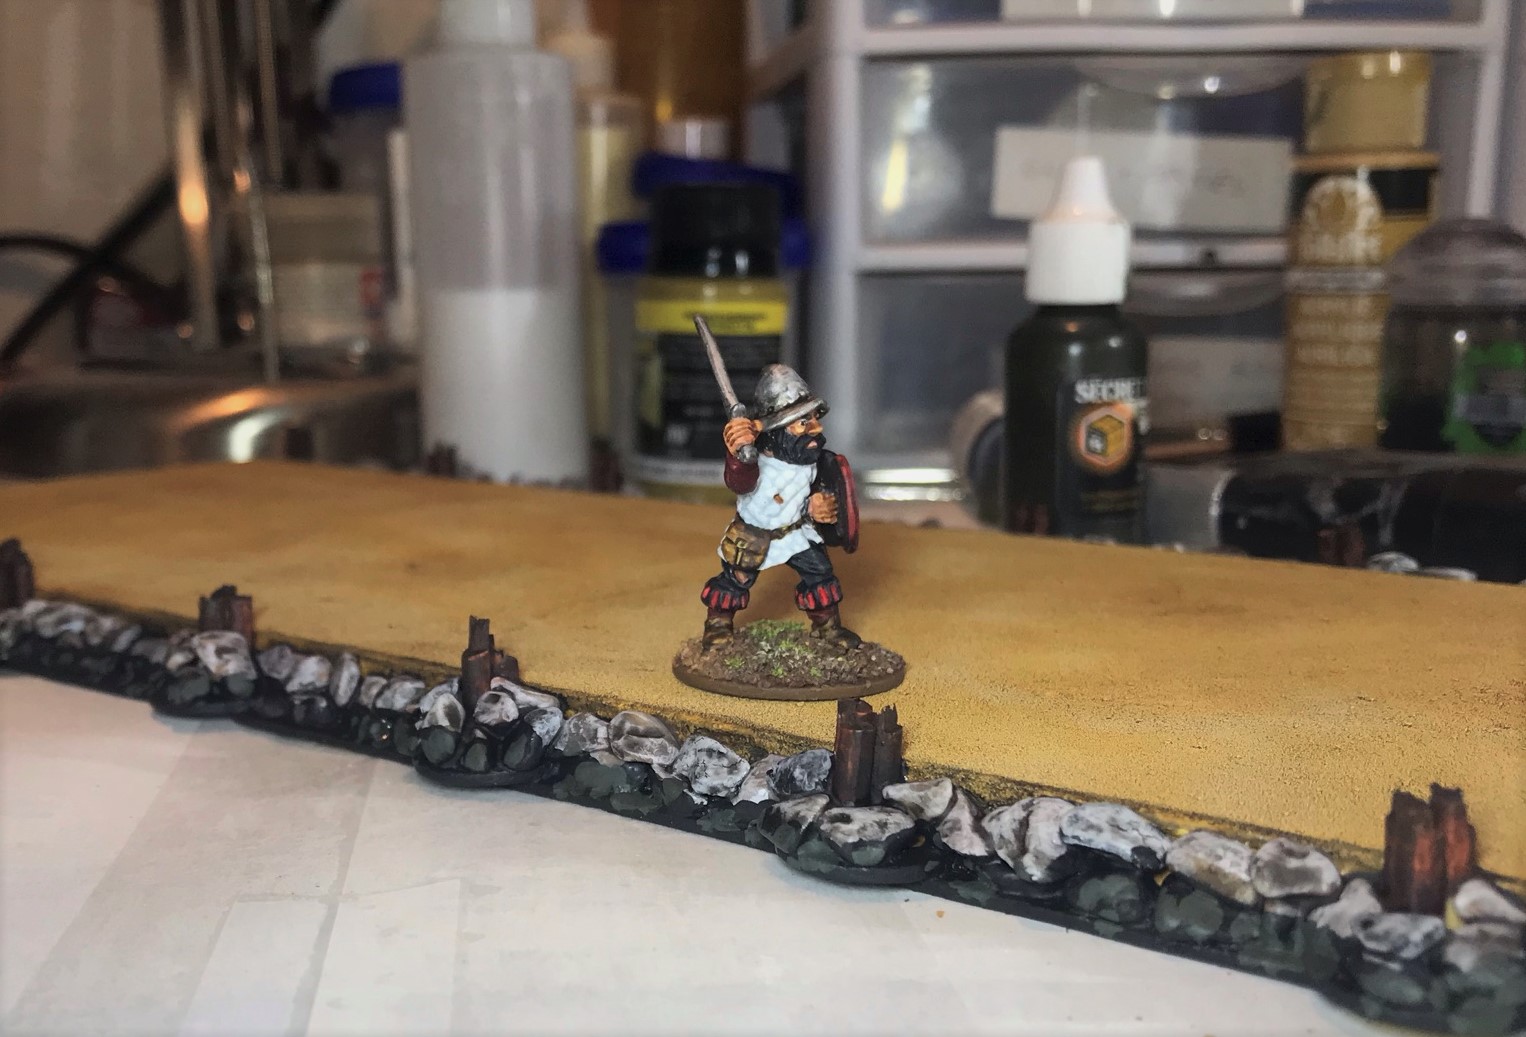
For the rocks, I painted them with Vallejo “Grey Surface Primer, followed by a layer of Reaper “MSP Black Primer” on the bottom (where the rocks would have been by the lake), and added some slime to them there as well. After that, I added an aggressive layer of shading with Citadel “Nuln Oil”. The effect on the rocks was excellent. You can see a list of all the paints and other materials that I used at the end of this post.


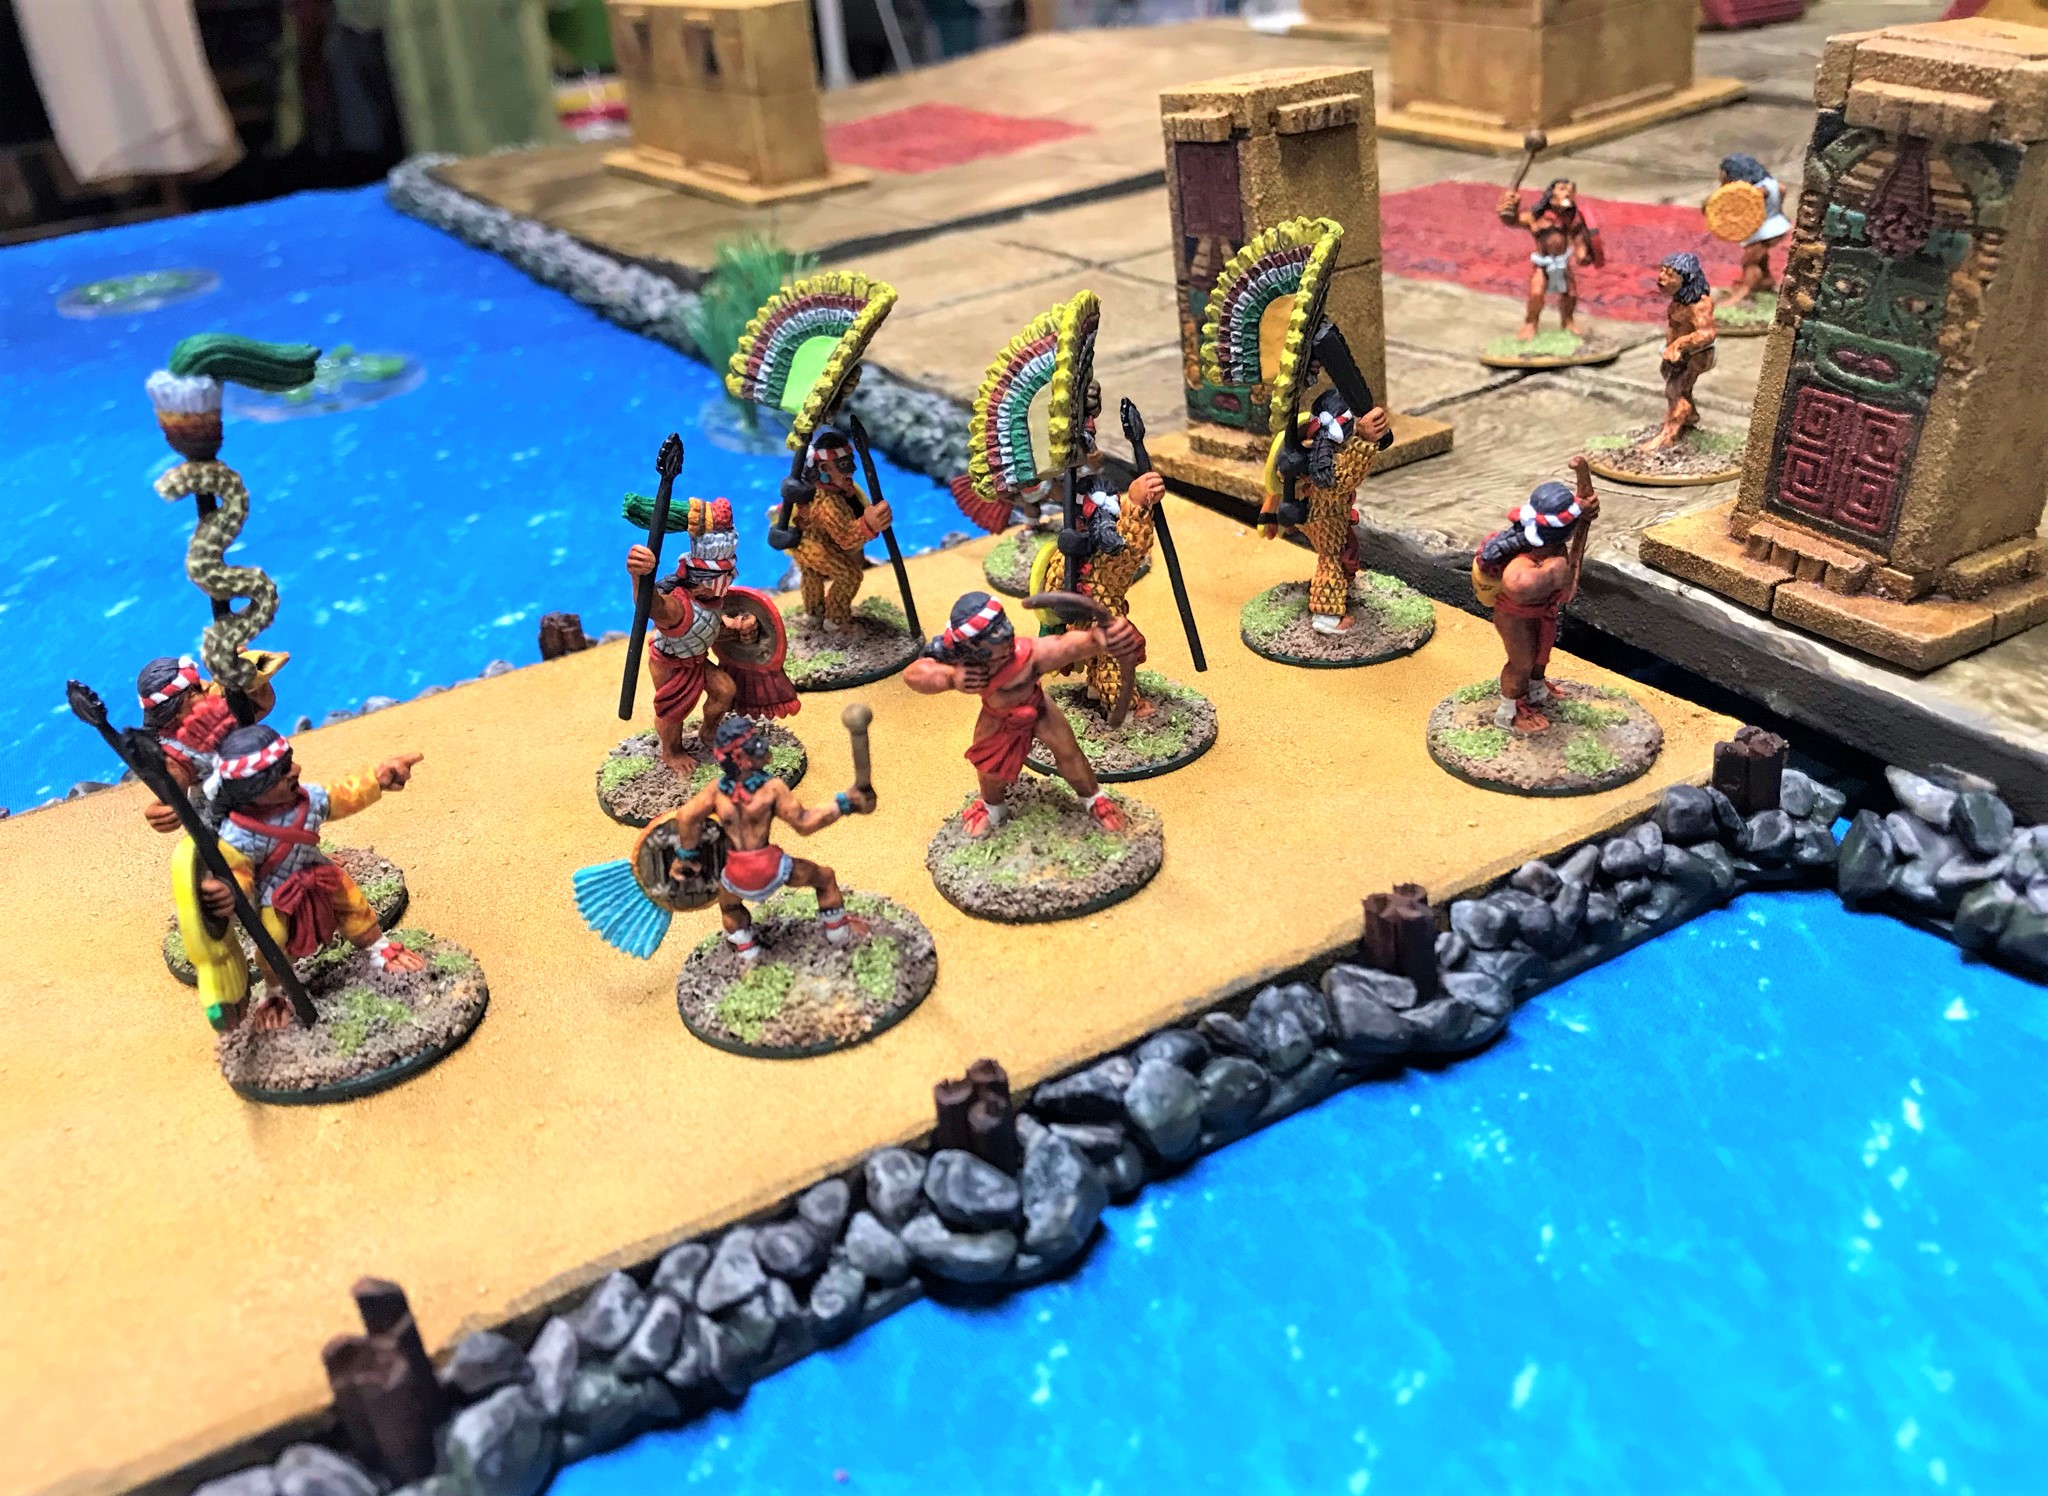
With the causeways, removable bridge sections, and lifting piers, I now have terrain components that I can use for the cityscape. I also could use them for a causeway battle, and add war canoes in the lake with Aztecs shooting bows, slings, and atlatl at the Conquistadors and Tlaxcalans from the water.
I think you can see why I am breaking up this into multiple posts! This started in June and ended in July. My next post will focus on the design and building of the cityscape pavements. I hope you found this useful and will keep following this series – and please let me know your thoughts in the comments section.
Thanks so much for looking!
For all of my previous posts on games, units, and other projects for my 16th Century Spanish Conquest supplement for Feudal Patrol™ – “Civilizations Collide” – please see this page.
PAINTS, INKS, GLAZES, SHADES, WASHES, PIGMENTS, FLOCKING, GLUES AND MORE THAT I USED ON THESE TERRAIN PIECES/MODELS:
- 2′ x 4′ MDF sheets – 1/4″ thick
- Wood Glue
- Binder clips
- GOCREATE Jumbo Craft Sticks
- All Living Things Dry Dust Bath (chinchilla dust)
- Painters Masking Tape
- Vallejo “Flow Improver”
- Vallejo “Airbrush Thinner”
- Vallejo Mecha Color “Sand Yellow”
- Vallejo Game Air “Desert Yellow”
- Vallejo Model Air “Sand (Ivory)”
- Citadel “Seraphim Sepia” (shade)
- Vallejo Model Color “Dark Sand”
- Citadel “Ushabti Bone”
- FolkArt “Yellow Ochre”
- Vallejo Game Color “Red”
- Army Painter “Light Tone” (wash)
- Citadel “Agrax Earthshade” (shade)
- Elmer’s PVA Glue
- Gorilla Glue
- Ashland “Decorative Filler” (rocks)
- 1/8″ wooden dowels
- Vallejo Model Color “Wood Grain”
- Vallejo “Surface Primer Grey”
- Reaper MSP “Black Primer”
- Citadel “Nuln Oil” (shade)
- Vallejo Environment “Slime Green Dark”

That is very impressive!
LikeLiked by 3 people
Thanks – hope you will like the rest too!
LikeLike
Seriously cool project. Nice idea with the chain to weather the wood.
LikeLiked by 3 people
Thanks much!
LikeLike
Great work Mark.
I always like your methodical approach to these things. The technique you used to rouch up the wooden planks looks very effective.
Cheers,
Pete.
LikeLiked by 3 people
I guess methodical is my way Pete – thanks so much. I saw that technique at some point on TV as using a chain is a common method used to make furniture look antique. Here I needed to add the ball peen hammer!
LikeLiked by 1 person
Wow, that’s incredibly impressive, not just the actual quality of the work you’ve done but in terms of its size and scope. Really looking forward to seeing more of this project.
Also, I have to thank you for the chinchilla dust technique you used a few months back, it made all the difference to an MDF building I did last month 🙂
LikeLiked by 4 people
Very nice to hear that Matt! Did you post it – not sure that I caught it but would love to see your building. I give all chinchilla dust credit to The Imperfect Modeler!!!
LikeLiked by 1 person
Here’s the link to Part 1 (of three): https://pmpainting.blogspot.com/2021/07/season-of-scenery-convenience-store.html
LikeLiked by 1 person
Cool – I am appreciative of your sharing that – and hey, you’re in neighboring VT! I was going to go to CARNAGE but it looks like I’ll just be doing HISTORICON (for the first time). Anyways, I do like your convenience store a lot!
LikeLiked by 1 person
The causeways and removable sections all turned out great Mark, and interesting to see your process on each component.
LikeLiked by 3 people
Glad you like them too Dave – more good stuff for your challenge is on the way shortly.
LikeLiked by 1 person
Awesomeness, that is looking great, I cannot wait to see more of it.
LikeLiked by 3 people
Cool! and your Shetland wish is my command 😊
LikeLiked by 1 person
Those really do look very good indeed! 🙂 I can appreciate how much has gone into sticking down everything, particularly the stones. I think both the swamp and sea mats work well!
LikeLiked by 3 people
Thanks John. If PVA was toxic I’d be dead by now from massive exposure. I did like both mats, but saw for future expansions (like the naval battle on Lake Texcoco), I knew I’d need a blue-water mat. The swamp mat is versatile, and anyways, who can have too many mats?
LikeLiked by 1 person
Great work Mark. Keep it up as it is always great to see how others approach terrain projects. I probably spend more time on the terrain than I do on painting the figures that will fight over it. I cannot see the point in spending hours painting figures and then playing on pieces of foam, felt and cardboard.
LikeLiked by 3 people
Amen to that. As I once commented to your fellow Aussie IRO, I want to create an broad and encompassing panorama. I figure I owe that to myself and my gamers. Although it’s still all set up in my basement and the wife is lobbying for me to put it away!
LikeLiked by 1 person
Mark these look great, and once again I had never thought of using Nuln Oil to give shading to the rocks, rather I would just dry brush them, so I’m adding this to the Chinchilla Dust hint for my future terrain efforts. So thank you for the tips.
LikeLiked by 2 people
Anthony, I appreciate your saying that A LOT that as one of the main goals I had starting this blog 6 years ago was to provide lessons learned from my experiences to others, so that for me checks a big box! The rocks had a lot of natural nooks and crannies that the Nuln Oil really helped accent. I think if I had dry brushed them (which I considered but rejected after my prototype was done) that I would have had some undesirable paint removal on the rocks. The grey primer kind of “pre-highlighted” the rocks for the Nuln Oil.
LikeLiked by 2 people
I’m tempted to wait a few posts and jump straight to the big reveal! What an ace project, looking forward to this tour of Tenochitlin
LikeLiked by 3 people
Oh Dave, don’t jump to the end yet!! Glad to have you along for the ride man!
LikeLiked by 2 people
Brilliant work! Epic really, in scope and scale.
LikeLiked by 2 people
Thank you!
LikeLike
At first it wasn’t looking so good, but as you kept adding to it… incredible. The final product looks really effective, particularly the bridge sections, piers and stones. Well done!
LikeLiked by 3 people
Ah Tarmor, your first sentence describes so much of my life, let alone this project! Well, maybe not the incredible part, but hey, I’ll gladly take the nice compliment. As the Conquistadores would say, Gracias!
LikeLiked by 1 person
Bienvenido! (I had to look that up… personally, my most used phrase in Mexico was ‘no comprendo espanol’.) Thankfully, the Conquistadores are long gone or we probably wouldn’t have the history and culture to model and discuss.
LikeLiked by 1 person
Well the Aztecs were in to human sacrifice and cannibalism, so no angels here on either side. Thanks again for checking it all out Tarmor!
LikeLike
Very nicely done Mark. That’s a lot of work going on there I must say and with so much more to be done this is quite a project. Looking forward to seeing the next installments unfold. 🙂
LikeLiked by 2 people
Thanks again Dave, as you inspired a lot of this and your advice was so helpful. So, there’s a wee bit of TIM in all of this let me tell you. More to come shortly!
LikeLiked by 2 people
Great work once again Mark and interesting to see how you went about making the causeway and city for this project.
LikeLiked by 1 person
Thanks Steve and I hope you’ll keep watching and that I keep your interest!
LikeLiked by 1 person
This is so impressive Mark! I can’t wait to see it all finished! Fantastic work!
Ps new Osprey book out in December; Cuzco!
LikeLiked by 2 people
Nice to hear that Mike – is that last December or next? My rules cover the Inca and I do want to build an army there too. Appreciate the kind words and keep watching – and share with the Dice Studz! (and you need to try Feudal Patrol!)
LikeLiked by 2 people
Wouldn’t miss your blog! You should ask for your garage to be finished in a South American style!
LikeLiked by 2 people
Aw shucks! As for the style, if I could have South American weather maybe. Gotta consider snow load my friend 😊 We got 110″ of snow one winter. In three weeks, while the temperature never broke the freezing point (0 for you, 32 for me!)
LikeLiked by 3 people
Snow load! Snow is a treat for us! Centigrade is banned in our house!
LikeLiked by 2 people
Mike you can have all of my snow any day
LikeLiked by 1 person
I had a sneaky peek at these a while back as you know, but it hasn’t distracted from the impact of the finished causeways they are probably about average for your standard of work, which is to say they are bloody fantastic mate!
Cheers Roger.
LikeLiked by 3 people
Aww, ya got me there Roger! Thanks man.
LikeLiked by 2 people
As always, I really enjoy the step-by-step process you share with us, Mark! It is amazing how versatile popsicle sticks can be for terrain too. I’ve used them a little bit and I feel like they will be something I go for a lot more in the future, especially after seeing what you accomplished with them. I really like the idea behind this project and the final results speak for themselves. I can’t wait to see more about how this turned out!
LikeLiked by 1 person
Your wish is my command! Just please don’t check it out on your honeymoon!
LikeLiked by 1 person
Haha, as tempting as it might be, I’ll try not to! 🙂
LikeLiked by 1 person
Love it, this is turning out so nice!
LikeLiked by 1 person
Thanks Mikko!
LikeLike
Brilliant work Mark!!a lot of work went into this one and it was well worth it as its so effective., great idea using those pebbles they turned out a treat in the end . Oh and the weathering of the wood with the chain ! Ace!
LikeLiked by 1 person
Thanks Pat – I hope you’ll like the remaining 4 parts too.
LikeLiked by 1 person
Wow – this is one epic project with some fascinating history behind it – I had no idea about the layout of Tenochtitlan or any of those details. Also, can I borrow Jeff? I need a bunch of MDF cut and it looks like he’d be super helpful – and cheerful! 😀
LikeLiked by 1 person
Borrowing Jeff requires his wife’s approval, not mine! 😀 Glad you like the layout, though it is designed to give more of a flavor at 28mm. I did learn a lot doing this technically as well – and in the end the folks at Historicon were quite pleased. I am looking forward to running more games on it this year for sure (and probably beyond). Thanks Az!
LikeLike