

Back when I was acquiring the Texican Space Rangers from Michael Thomas’ site, classicminiatures.net, Michael let me know that he had some other cool figures that were not listed on his miniatures list. One of these was a cool robot that he called “Advancing Robot”. Supposedly, it was from the now-shuttered Mega Miniatures company as part of its Salvage Crew Robots & Vehicles line, with a product number of DEAL-0372. Michael sent me a picture, and I bought 11 for a squad for Combat Patrol™ games, along with some others that I will hopefully be able to share with you all when they are painted. The figures are 28mm in size. Certainly, Michael is great to work with if you have any interest in buying from him
This unit is also one I can use for the June Community Painting Challenge from Azazel as my second unit for the month.

However, when I looked at the Lost Minis Wiki, I was perplexed – it was not there! I reached out to the Old School Miniatures group on FaceBook as I thought these might be old, but no luck was to be found there. Then I tried The Miniatures Page (TMP), and got a bit luckier with this information. So, my newly acquired robots were indeed from Mega Miniatures but circa 2008, which ironically makes them relatively young in my collection. Still, I had no luck with any catalog or descriptor info, until Neil at Lost Minis Wiki helped me out with a 2012 Mega Miniatures catalog and there on page 60 was my robot.

I now knew the figure was DEAL-0372, Robot Peacekeeper from Mega Miniatures! It was armed with an automatic weapon left hand and a claw on its right hand. As I had 11 of these, I decided that it would be a squad of two teams of five robots (four each plus its own team leader) and led by a squad leader.
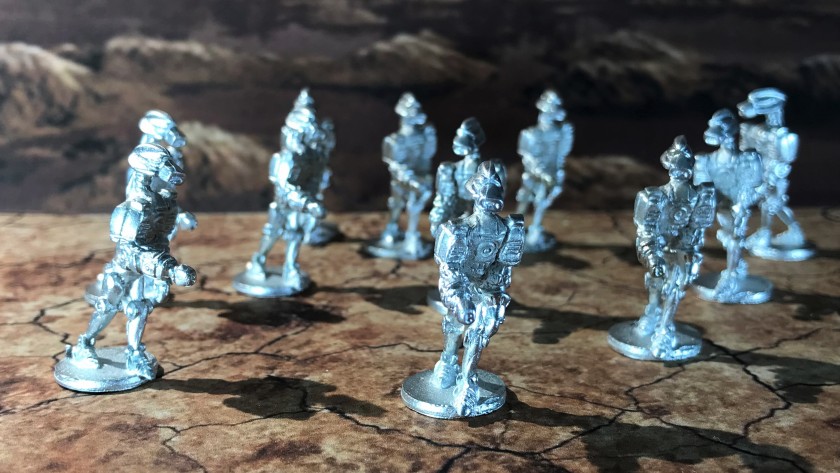
I cleaned the figures, and filed and cut away any flash (of which there was very little). I mounted them on ¾” steel washers with Gorilla Glue. Then I affixed them to poster tack on top of specimen jars for painting. I used my airbrush to prime them white with Vallejo “Surface Primer-White”.

As for a painting scheme, I decided that I wanted them to pop color-wise, so I again used paints that are more likely to be used models of muscle cars. Createx makes some really cool pearlized colors that I like for metallics – they really work well as long as you use the proper pressure in your airbrush and you thin them appropriately. What I really like is that they put the appropriate pressure setting on the bottle.
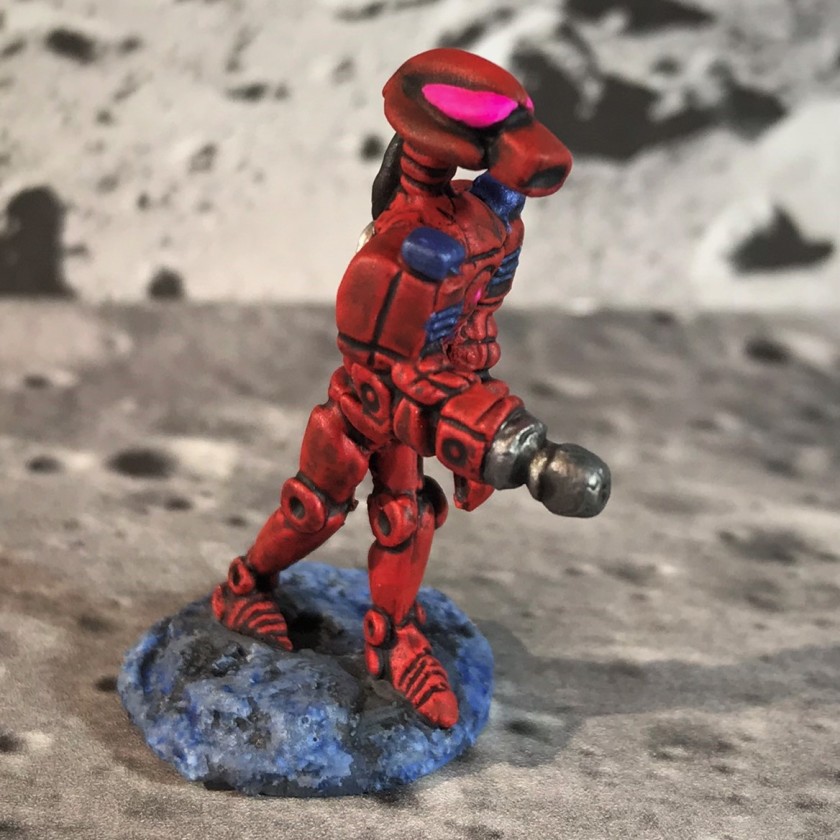
For the squad leader, I used “Pearlized Red”. Each of the two team leaders got “Pearl Copper”. Team A got “Pearl Tangerine”, and Team B got “Pearl Plum”. Each of these had different pressure requirements, but switching between paints was extremely easy and cleanup afterwards was a breeze.


At this point, my daughter Ellen, who was visiting with her daughter (our granddaughter) Tabitha, saw them and said, “cool, they look like Skittles”. As a result, I kept thinking about candy as I worked on them! Of course, a song crept into my mind, and so from 1982, here’s the theme for this blog post, from Bow Wow Wow for no other reason that it stuck in my head.
Try getting that out of your head now!
Back to the project! I then used a series of washes and paints on them to bring out details better and to make them easier to use on the tabletop. I decided that the optics (can’t really say that the robots have eyes) would be the key differentiating feature between Team A and Team B. I painted the optics white, then lined them with “Nuln Oil Gloss” (the gloss version works much better on metallics). Then, using fluorescent colors (yellow, magenta, and green) from Vallejo Mecha Colors, I painted each robots peepers (I needed another word for optics) multiple times until I got a nice radiant glow from them. I highlighted the group with brushing on more of the aforementioned pearlized paints. All the paints that I used are listed at the end of this post for those interested.


I then used an airbrushed gloss varnish to protect the paint jobs. But wait you say, gloss? On already shiny minis? Yes – and after that dried it allowed me then to work on my bases.
For this group, I wanted to use a less Martian-like red on the bases – and go with a more lunar look. For this, I used Citadel’s “Astrogranite”, a texture paint on the bases. With all of Citadel’s texture paints, I find it useful to use a hand-held hair dryer to get better effects from them in terms of cracking or making crevices. I did not see that effect with the “Astrogranite”, but it did dry enough for easy dry brushing later. After it dried I was able to effectively apply a wash of Citadel “Nuln Oil Gloss” to darken the low spots. For dry brushing, I applied Vallejo “Wolf Grey” to the bases. That turned out to be a bit too plain for my tastes, so I added a glaze of Citadel “Gulliman Blue” which made a nice tint on the bases. Now I had a good lunar look.

Lastly, I finished the models with a second coat of varnish, this time Vallejo “Mecha Varnish Matt Varnish” with my airbrush. This did a nice job on the models and the bases.


I am pretty satisfied with how the unit came out. The sculpts are retro-looking enough to work with my other Archive stuff – I think they look “Robocop-ish”, and I’m sure I can use them to augment any force, maybe even the Texican Space Rangers. The Lost Minis Wiki is now updated with the Salvage Crew Robots & Vehicles range.


I hope you enjoyed these Robot Peacekeepers! Please leave your feedback in the comments section – I enjoy your thoughts and suggestions. Thanks and hopefully I get another group done soon.
PAINTS, INKS, GLAZES, WASHES, AND FLOCKING USED:
- Vallejo “Surface Primer – White”
- Createx “Pearl Red”
- Createx “Pearl Copper”
- Createx “Pearl Tangerine”
- Createx “Pearl Plum”
- Vallejo “Flow Improver”
- Vallejo “”Airbrush Thinner”
- Createx “4012 High Performance Reducer”
- Citadel “Nuln Oil Gloss” (wash)
- Citadel “Ceramite White”
- Vallejo Mecha Color “Metallic Blue”
- Vallejo Mecha Color “Green Fluorescent”
- Vallejo Mecha Color “Magenta Fluorescent”
- Vallejo Mecha Color “Yellow Fluorescent”
- Vallejo Model Air “Gun Metal”
- Vallejo Model Air “Black (metallic)”
- Vallejo Model Air “Chrome”
- Vallejo “Black Grey”
- Vallejo “Gloss Varnish”
- Citadel “Astrogranite” (texture)
- Vallejo Game Air “Wolf Grey”
- Citadel “Gulliman Blue” (glaze)
- Vallejo Mecha Varnish “Matt Varnish”
Thanks again for looking!

I love your photo backdrop. I like setting stuff like that up too, it really enhances the presentation of one’s painting and just looks cool. This one was well chosen, because it’s spacey, but it also makes the colours stand out…
LikeLiked by 1 person
Thanks Allison. I agree, and you very much saw what I was going for – glad you liked it!
LikeLike
I like what you did with these. Ive never known there was so much lost/forgotton minnies out there. Thank you for educating me
LikeLiked by 2 people
I’m glad! I hopefully will be able to add to my troop list with more obscure stuff. I think it (bringing back cool stuff from the commercial grave) became my niche. Almost all of my stuff includes things that I need to research, which is part of the journey. Again, thanks for looking and the feedback savageddt!
LikeLiked by 1 person
Pleasure man keep it up. I might not always be commenting but i admire the effort you put in
LikeLiked by 1 person
Very nice paint job – you’ve made it sound easy! I find them quite sinister figures! Like ’em!
LikeLiked by 1 person
It was fun to experiment with the pearlized paints. Will be doing more like this! Yeah, Peacekeeper sounds ominously anti-liberty, huh? Glad you enjoyed them JNV!
LikeLiked by 1 person
Glad you managed to find these in the end, great painting too, really suits them.
I love the way you keep turning up these wonderful figures I never knew existed.
Cheers Roger.
LikeLiked by 1 person
Thanks Roger. It’s become my mission I think. Hopefully many more to come (and soon, Junit ends this week!).
LikeLike
Lovely figures Mark and I like the colours you’ve chosen to use, very nice.
LikeLiked by 1 person
Thanks TIM!
LikeLiked by 1 person
Great work here, Mark. The only downside really is that I know we’re not seeing the full effect of those pearlised paints and the final finish on those models. You might need to start up a YouTube channel as a supplement to the Blog! The flouro optics work really well, especially on the close-up photos.
Now, will the Rangers and the Peacekeepers be on the same side in future battles? Or both trying to “keep the peace” by eliminating one another?
Have you seen these:
http://www.greenstuffworld.com/en/chameleon-acrylic-paints/667-colorshift-chameleon-acrylic-paint-set-1.html
http://www.greenstuffworld.com/en/chameleon-acrylic-paints/668-colorshift-chameleon-acrylic-paint-set-2.html
They seem like they’d be right up your alley for a related project to these robots.
Ah yes – only four of the Citadel texture paints crack – Agrellan Earth and Martian Ironearth give the fine, flat “dry lake bed” cracked texture while Agrellan Badland and Martian Ironcrust do the larger, more textured cracks. The rest are pretty much just texture paint in various colours and a couple of “thicknesses”.
I’ve used the Agrellan stuff on my bases and drybrushed over it to get the light desert texture that I use on my Orks. There’s also these – I’ve picked both up but not yet used them.
http://www.greenstuffworld.com/en/inicio/377-crystal-clear-crackle-paint-20ml.html
http://josonja.com/index.php?page=shop.product_details&category_id=35&product_id=285&option=com_virtuemart&Itemid=38
I see Amazon has some from Folk Art and Vallejo as well. Probably all the exact same stuff.
https://www.amazon.com/FolkArt-Medium-Ounce-696-Crackle/dp/B000YQKLCM/ref=sr_1_1?ie=UTF8&qid=1530225241&sr=8-1&keywords=crackle+medium
https://www.amazon.com/Vallejo-Acrylic-Crackle-Medium-200ml/dp/B005SBKQAK/ref=sr_1_23?ie=UTF8&qid=1530225241&sr=8-23&keywords=crackle+medium
LikeLiked by 1 person
Thanks AZ, those paints look awesome, will look to get. Appreciate the update on the Citadel stuff, I guess I’ve been lucky that I’ve been working with the stuff that cracks up to now. I do have the Vallejo medium though, but as I basically use the texture stuff as “clay” not sure how that could work. Hmm…anyways the links are most appreciated.
Not sure how the fight would go btw, friends today, foes tomorrow!
LikeLiked by 1 person
Work together to crush the frogs, then turn on one another!
LikeLiked by 1 person
That’s the nice thing about Combat Patrol, no messy Codex!
LikeLike
Great mate. I love that you dig deep to find out who where what when on your minis. It makes for interesting reading and then seeing what you do with the minis is even cooler. I love the background for the photos too.
LikeLiked by 1 person
Oh, you get me IRO! I made a new background (lunar) for background, glad you like it. Had to do it twice, oh the printer ink 😩! Gotta say your photography on your stuff has inspired me to up my game in that department as it were! Thanks again!
LikeLiked by 1 person
That’s nice to hear man. I’m not a big fan of a nice painted mini in just a light box. I like to get lost in the whole mini scenario
LikeLiked by 1 person
Lovely stuff Mark – I love the shiny paint & glowing optics, and the look is perfectly retro. I didn’t realise at first, but seeing that catalogue page reminded me that I’ve actually painted most of that range!
You can see my efforts here: https://leadballoony.com/2016/08/22/two-portions-of-fish-and-a-huge-bag-of-chips-please/
LikeLiked by 1 person
Cool! Thanks for sharing that – they are fun bots and I like what you did with them. Glad you enjoyed my Robot Peacekeeper squad.
LikeLiked by 1 person
Damn Alex, was not yet done. Wanted to ask if you’d had a chance to get your bots in a game? I just learned that Jason Miller sculpted the range – he saw this blog post on Facebook and commented, so that was cool.
LikeLike
Haha, “I want candy!”. I remember hearing that on the radio quite a bit. I don’t remember seeing the video, but I’ll have a hard time getting the lead singer out of my head now. 😉
Which reminds me, I was thinking about doing a song dedication for the Necromunda gang, but alas forgot in the rush of posting. Next time, next time.
Really nice work on these! All the research behind finding them and choosing paints. Woo! Did the Vallejo “Mecha Varnish Matt Varnish” really dull down the gloss that much? That’s pretty incredible. Congrats on getting an awesome set of Robo-units done!
LikeLiked by 1 person
Hey Faust much appreciated. Yes, the Vallejo Mecha Varnish Matt Varnish really did a nice job, one reason I was pretty certain that I could use the gloss first. I used to use Testors Dullcote after varnishing (and still could), but I’m finding that step unnecessary at this point. I’m glad, as rattlecans are too high maintenance for New England weather. Pleased that you enjoyed these bots!
As for Bow Wow Wow’s song, I hear it all the time on SiriusXM First Wave. I do remember the video distinctly from 1982, and at the time (I was 19 going on 20) I thought the lead singer was pretty cute,especially with that new wave haircut. I had no idea of the controversy around her as she was only 16 in this video and she had some racy band promo photos two years before. I did not know also that her band mates were ripped from Adam Ant by Malcolm McLaren. Still, now she’s 51 I think!
LikeLike
Wow, only 16?! Yea, I dig the haircut, I just about had the same thing in the 90s. She was ahead of her time. 😉
Oh, so I must have missed something….do you apply the Vallejo Mecha Varnish Matt Varnish with an airbrush? If so, how do you make sure you get the airbrush totally clean afterwards?
LikeLiked by 1 person
The Mecha stuff from Vallejo is all designed for airbrush use. I use an Iwata Eclipse or an Iwata Neo (have both). I just follow good cleaning practices after I use my airbrush.. .there are dozens of good videos like this one https://youtu.be/Ga2ZFdWGzao
LikeLiked by 1 person
Aha, so that’s what the “mecha”’part must be about
LikeLiked by 1 person
And my phone post mid-thought *sigh*. I have an Iwata Eclipse CS. I’ll definitely look at the video. I mainly take everything apart (though there are some people who argue against), rinse with bottled water, rinse with some airbrush cleaner.
Put parts, water, small amount of airbrush cleaner into an ultrasonic bath. Run three cycles. Let air dry. Apply a small amount of lube to needle, if it’s going to be put away for a bit.
LikeLiked by 1 person
I mainly use mine for priming and base coating. No ultrasonic cleaner. Did get the Iwata cleaning set that has a superb magnifying glass set. Can see if your needle tip is straight, let alone paint residue! I tend to use Vallejo airbrush cleaner and water.
LikeLiked by 1 person
The lube really helps keep paint residue off. I should look over the needle with a magnifier sometime. I was having pressure issues for awhile…turned out the Quick Disconnect had come loose. Felt pretty dumb that I had overlooked that. Checking the tube and connections is as basic in my line of work, as checking computer cable connections and power.
LikeLiked by 1 person
Oh definitely on the lube!
LikeLiked by 1 person
Love the vibrancy and brightness of the colours. Ace man. Great work! Kudos!
LikeLiked by 1 person
Thanks Luke!
LikeLike
Cool work on these guys – they look a bit like more menacing Trade Federation droids from Star Wars to me, if they had been designed by the costumes department of the original Star Trek series.
LikeLiked by 1 person
I agree with that assessment Subedai. And I guess that’s what’s nice about working on stuff you want to be retro, you get to give the feel you aptly describe. Appreciate the kind feedback!
LikeLiked by 1 person