My recent efforts on the hobby front have been focused on multiple projects. Some of these are figures and vehicles, others are terrain-oriented. These are all in support of the games I will run at multiple 2026 gaming conventions.
This year, I will be running Wars of Ozz and What a Tanker games. I am also getting back into retro sci-fi skirmish games with Combat Patrol:WWII. I have not run these games in a while and they were always a lot of fun. To that end, I decided to add more terrain to the mix.
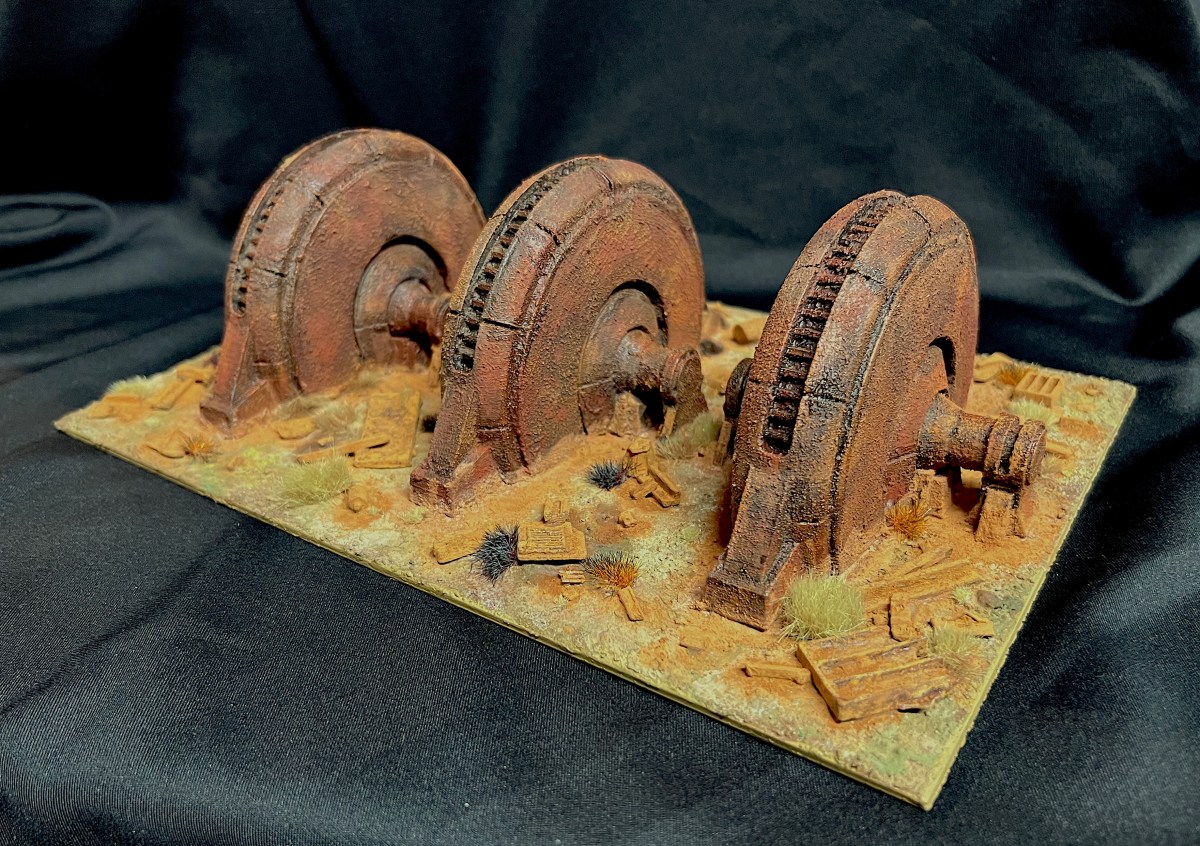
As background, a friend, Chris Rett, 3D-printed three excellent generators for me way back in 2018 (I think). These were great terrain pieces. At that point I was still immersed in retro sci-fi skirmish gaming with Combat Patrol:WWII as my preferred system. However, I was on the cusp of jumping my focus to WWII What a Tanker games. Thus, the generators took a back seat. My gaming then went in sequence to What a Tanker, then Feudal Patrol for the Spanish Conquest in Mesoamerica. Finally, I moved on to Wars of Ozz. Recently, I felt a need for a bit more variety as I mentioned – so terrain is what I hit first.
The three generators would be useful for retro sci-fi apocalyptic planet scenarios. They would also be useful for some Wars of Ozz scenarios. This includes any involving Professor Nitpik and the Industrial City. That city was wrecked over 300 years ago in the “Last Great War”. Plus I could use it as part of a “Space Cowboys” apocalyptic scenario.
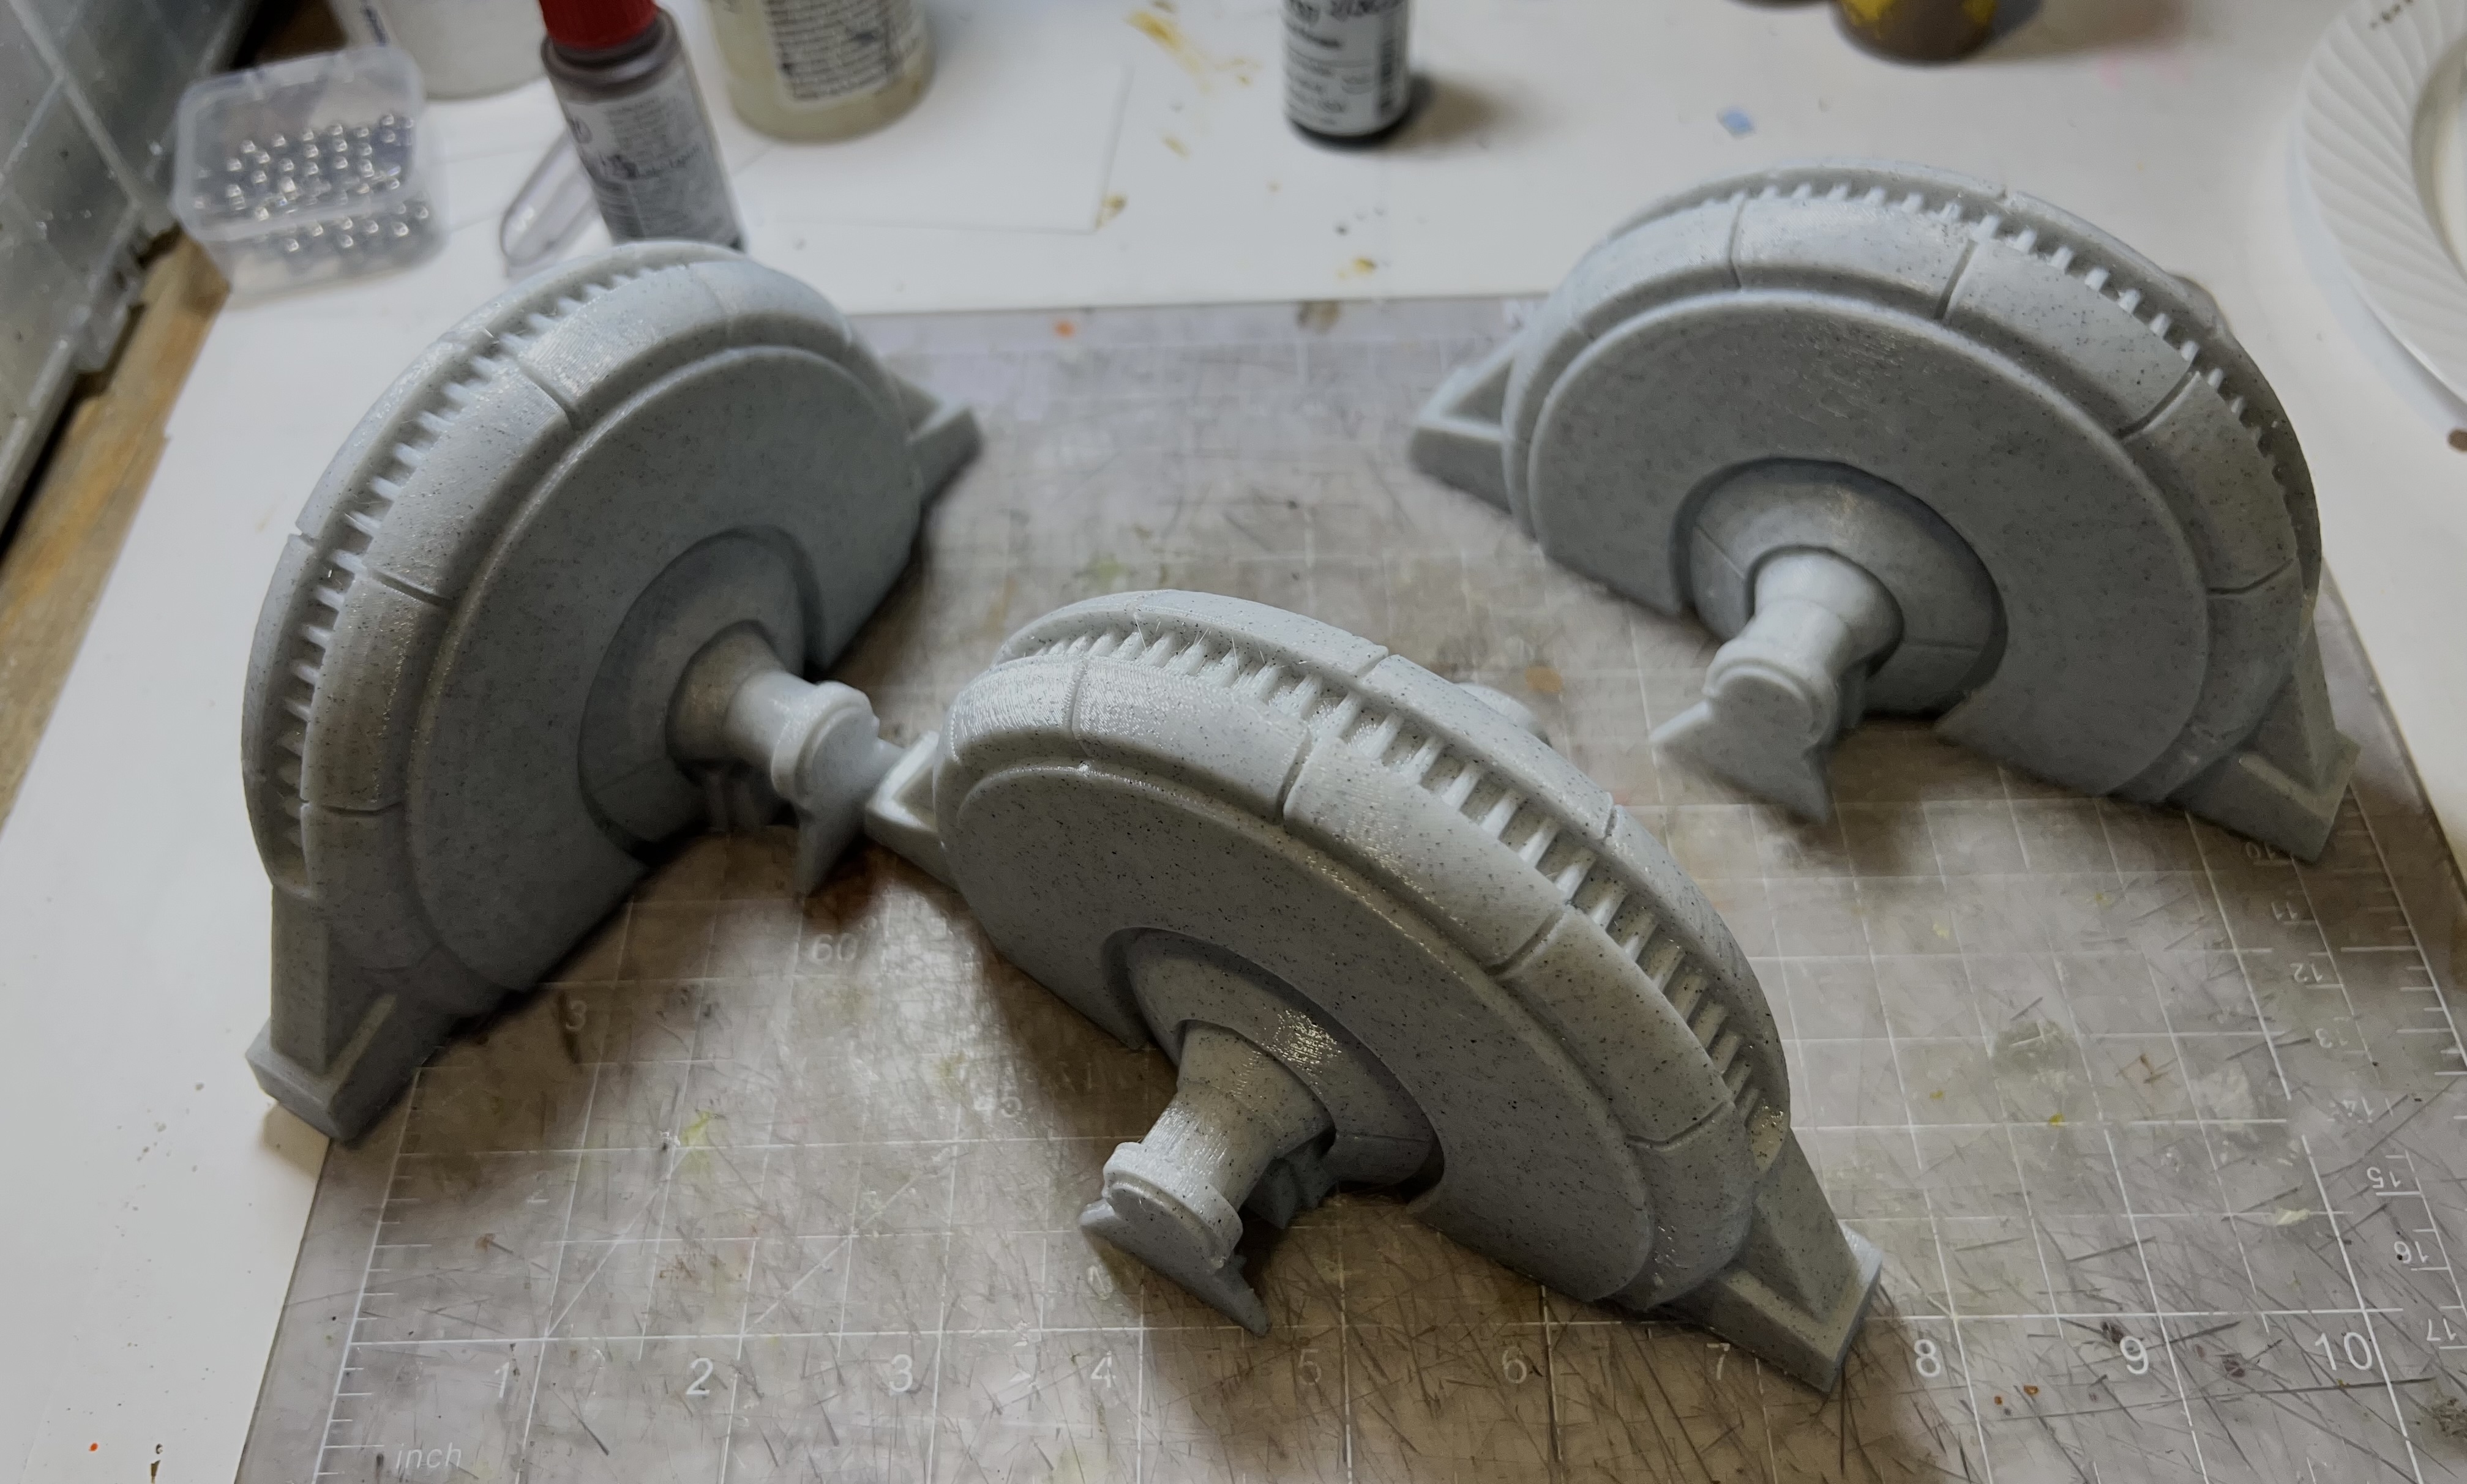
The generators at the start of the project.
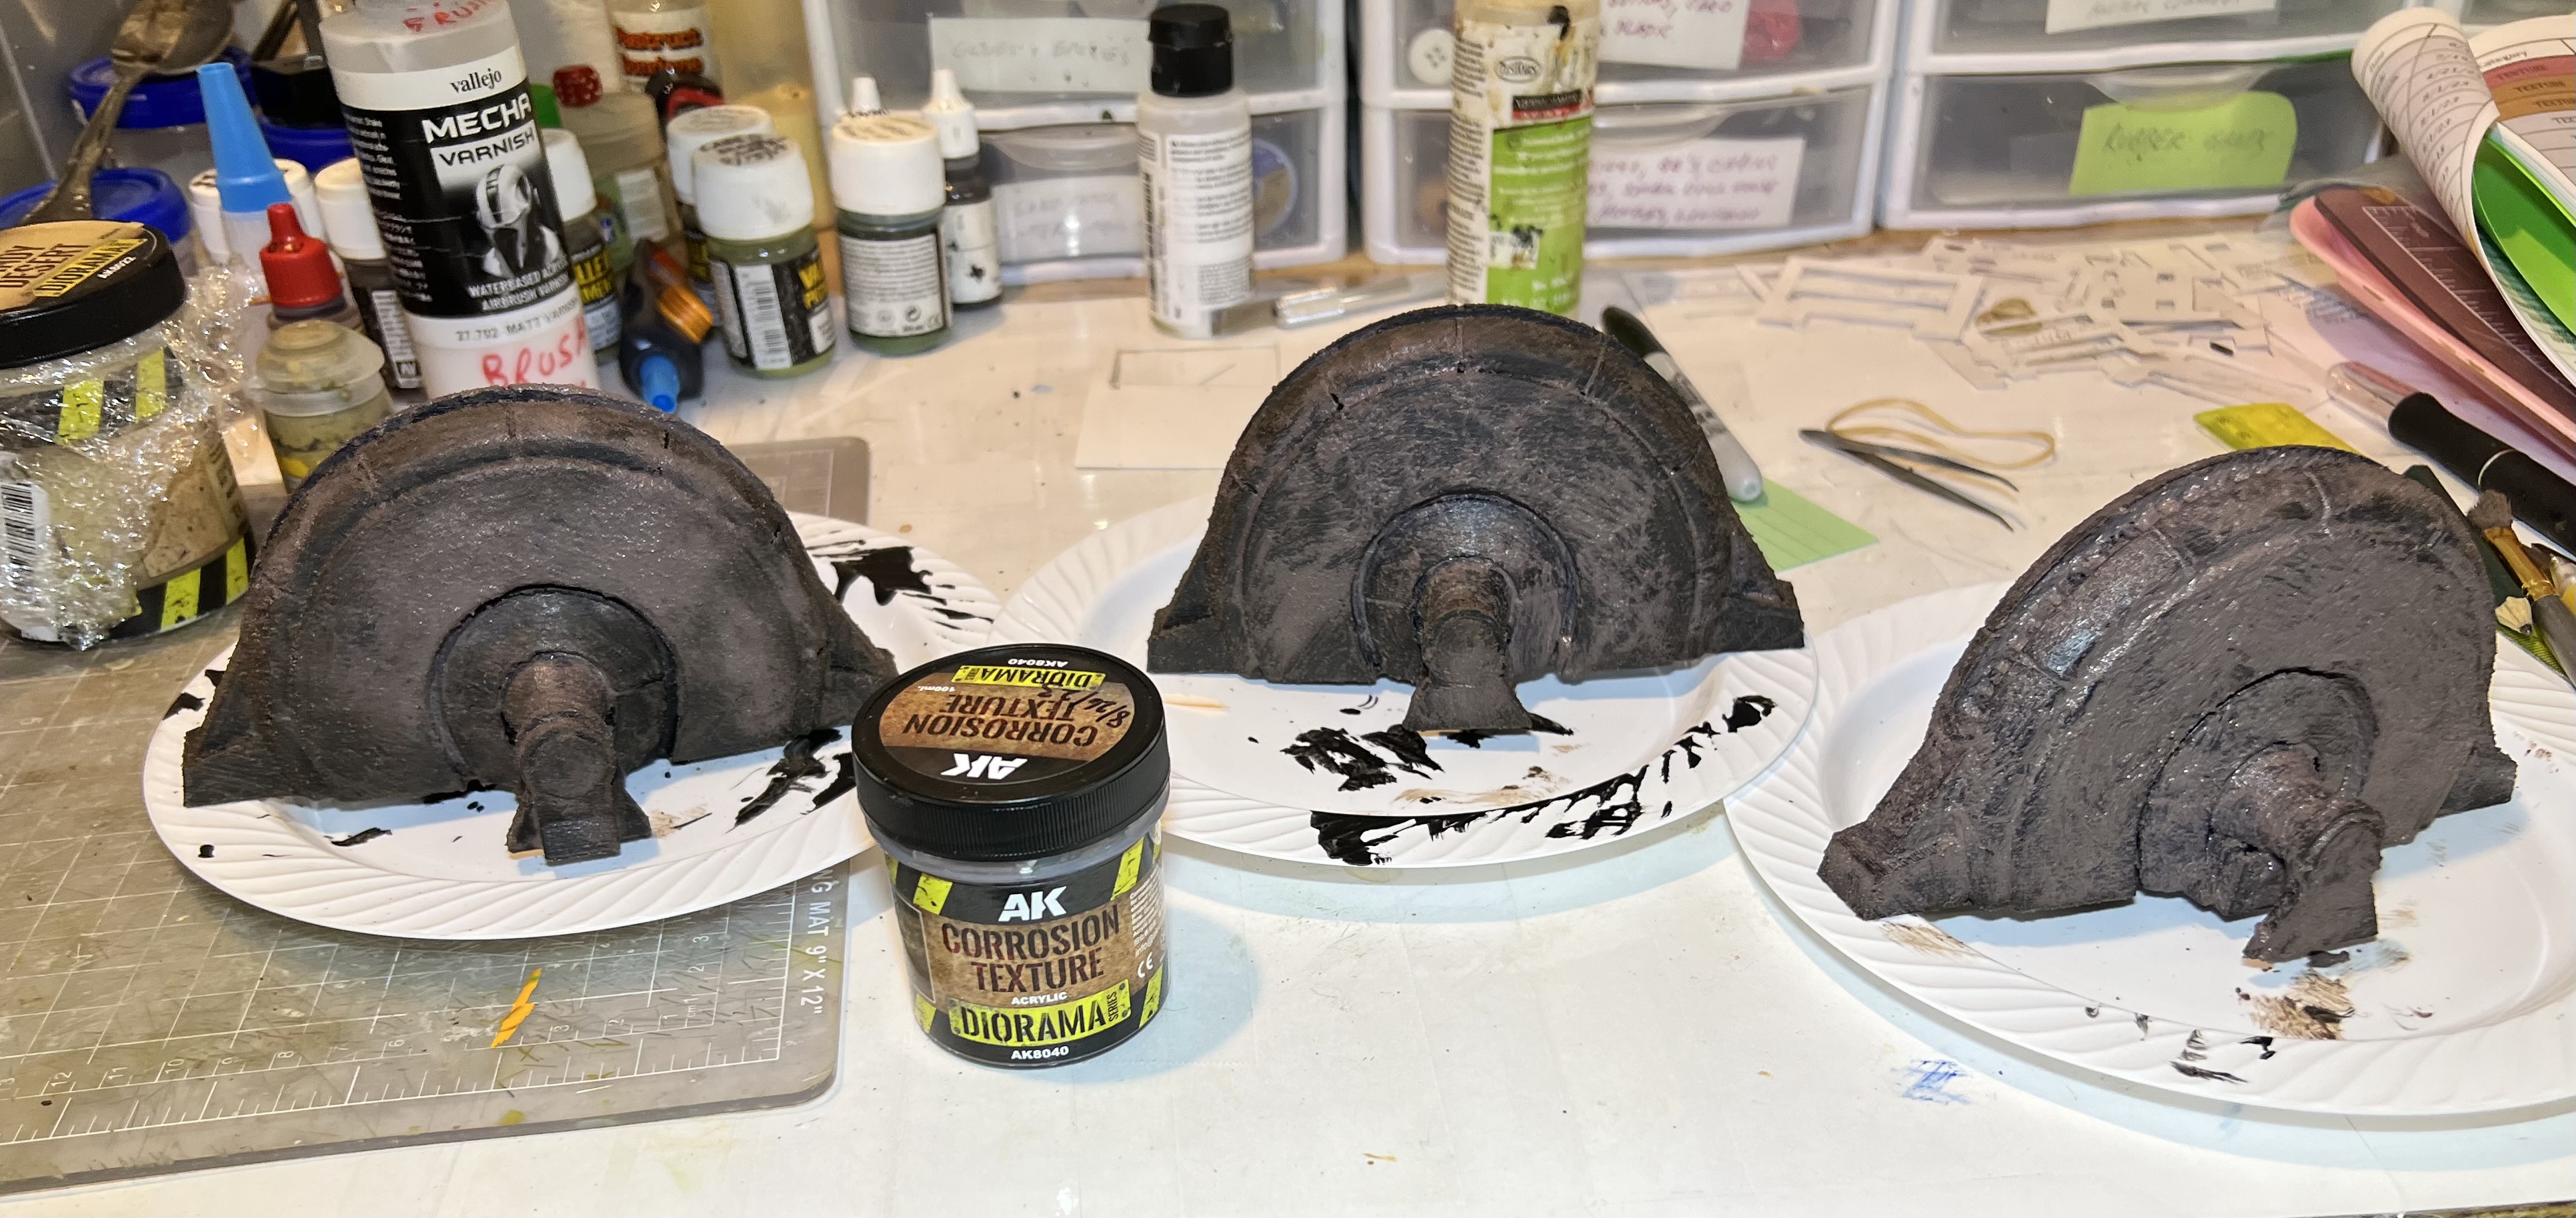
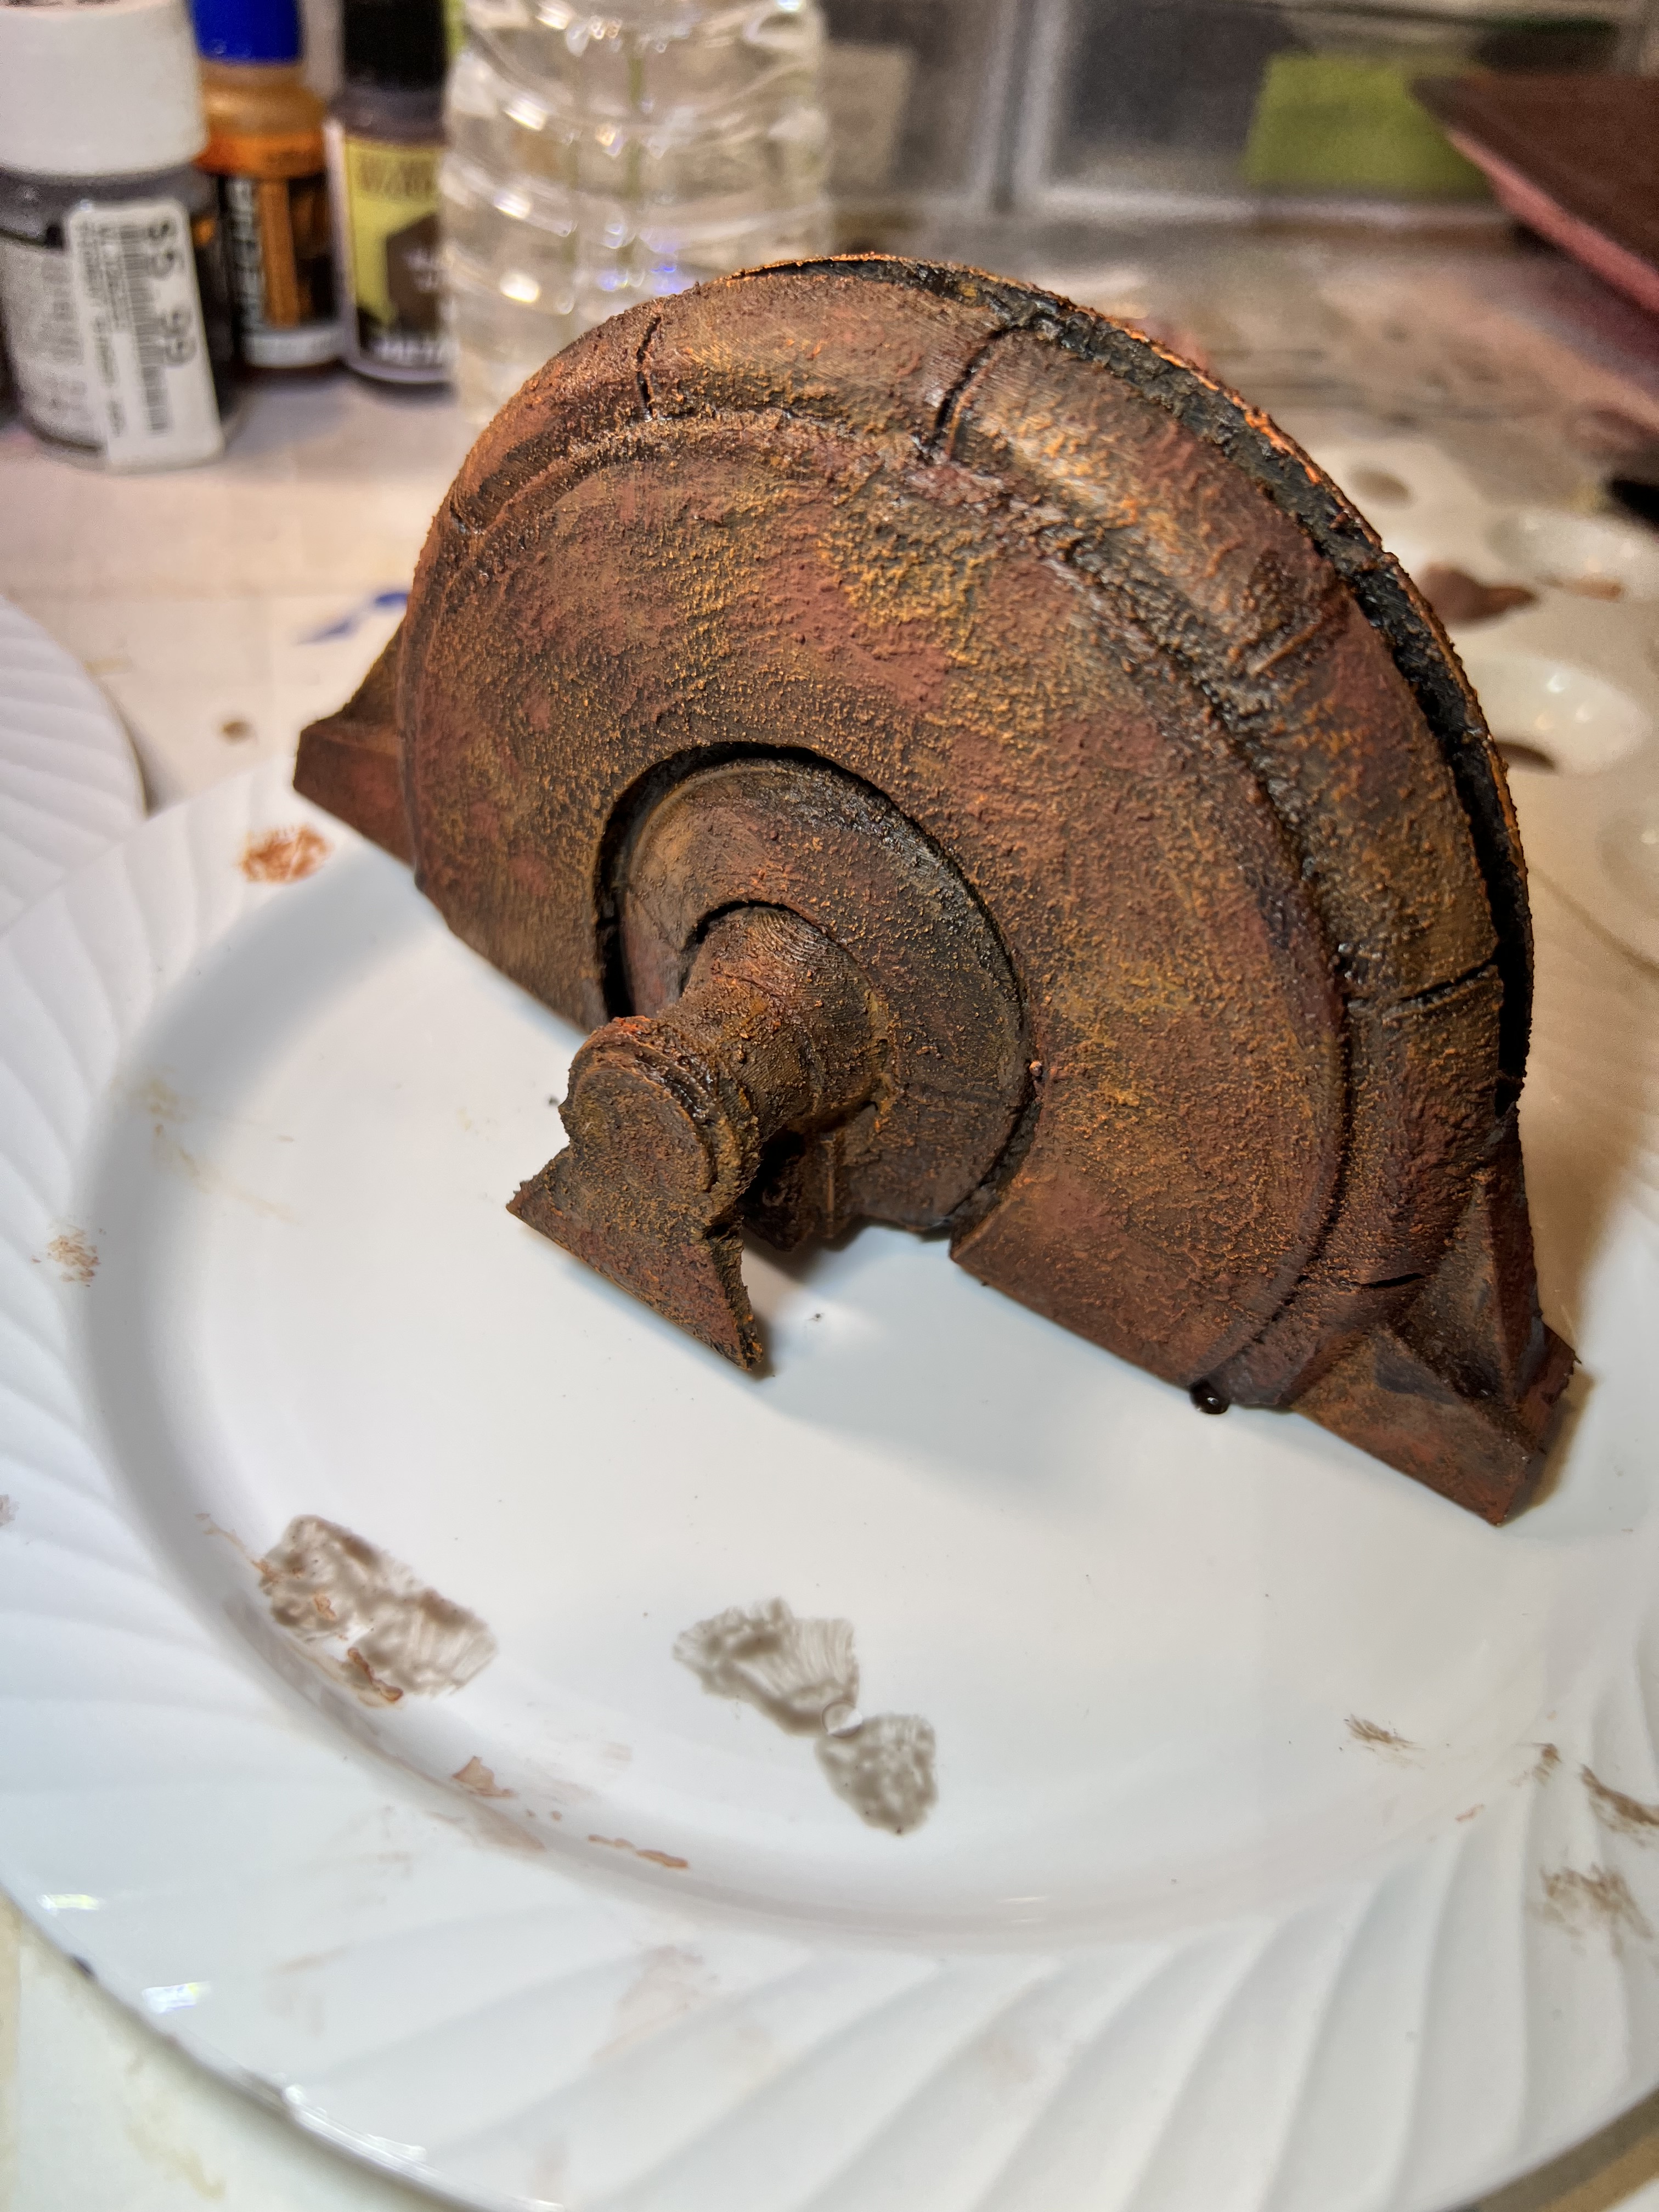
I primed the pieces. Then I used AK “Corrosion Texture” on it. This allowed me to use different rust pigments and paints on it.
Primed with corrosion texture added and drying here.
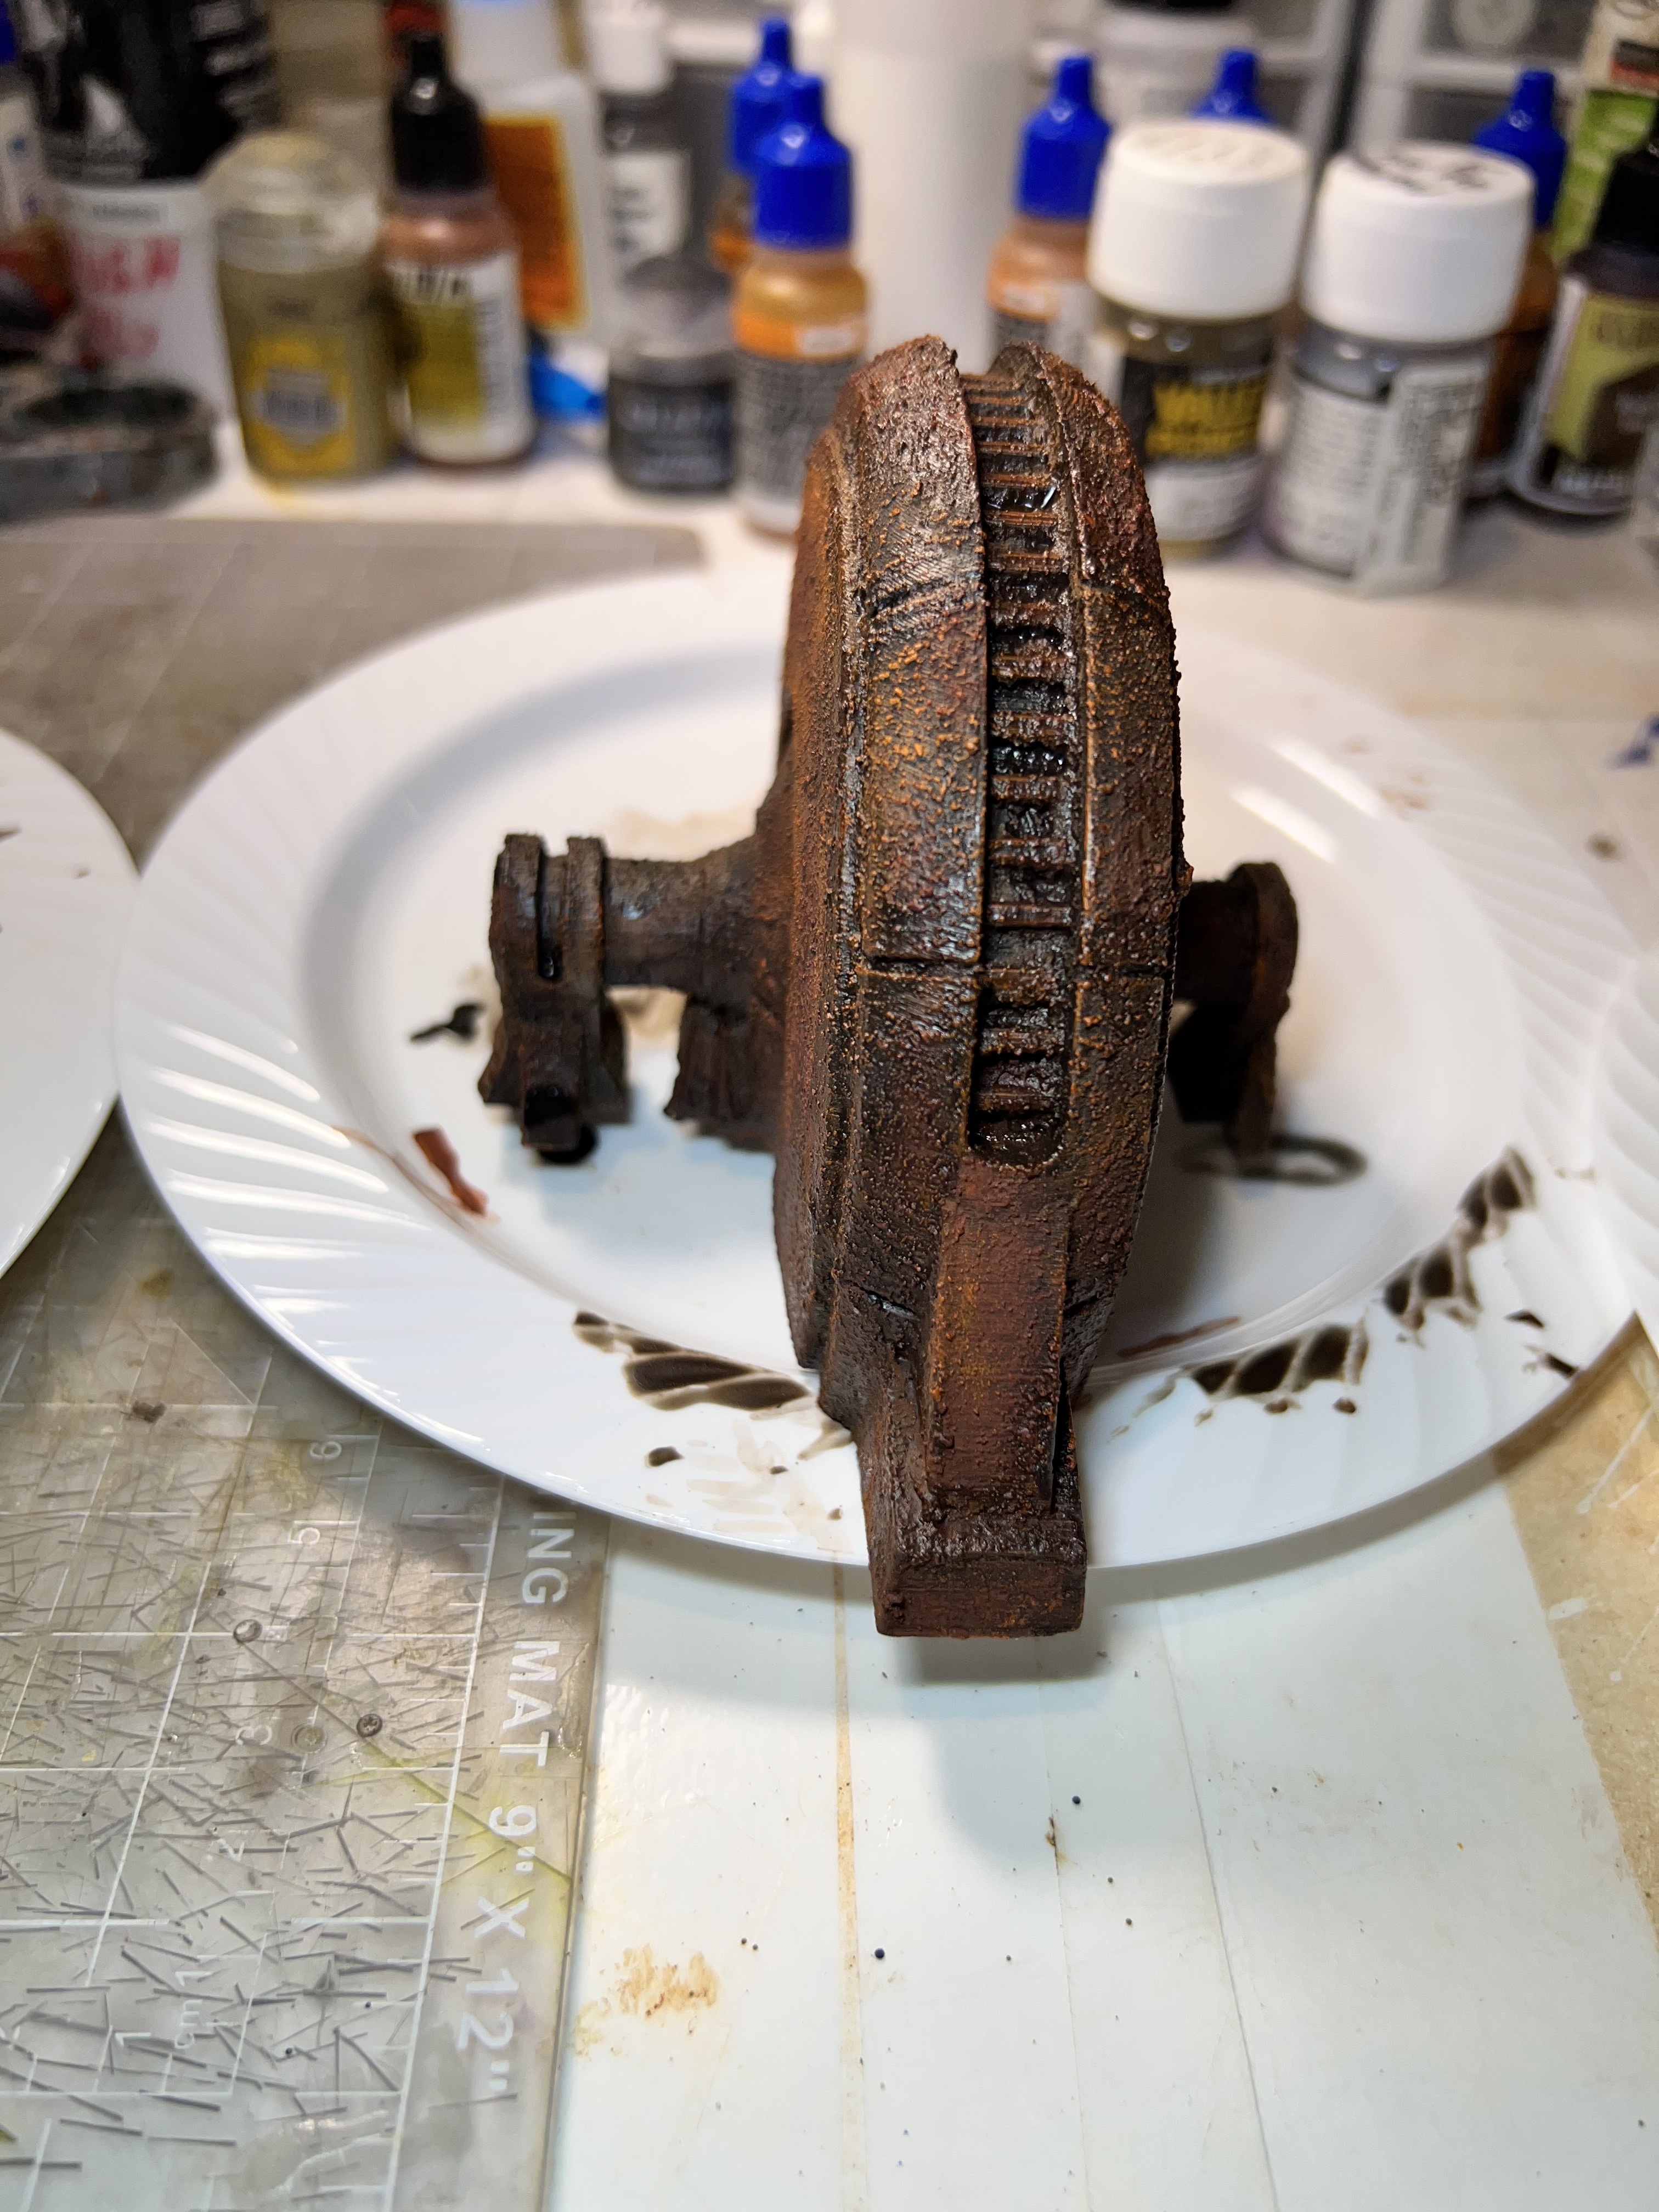
After the corrosion texture dried, I used the paints and pigments to “rust them up”.
All rusted up!
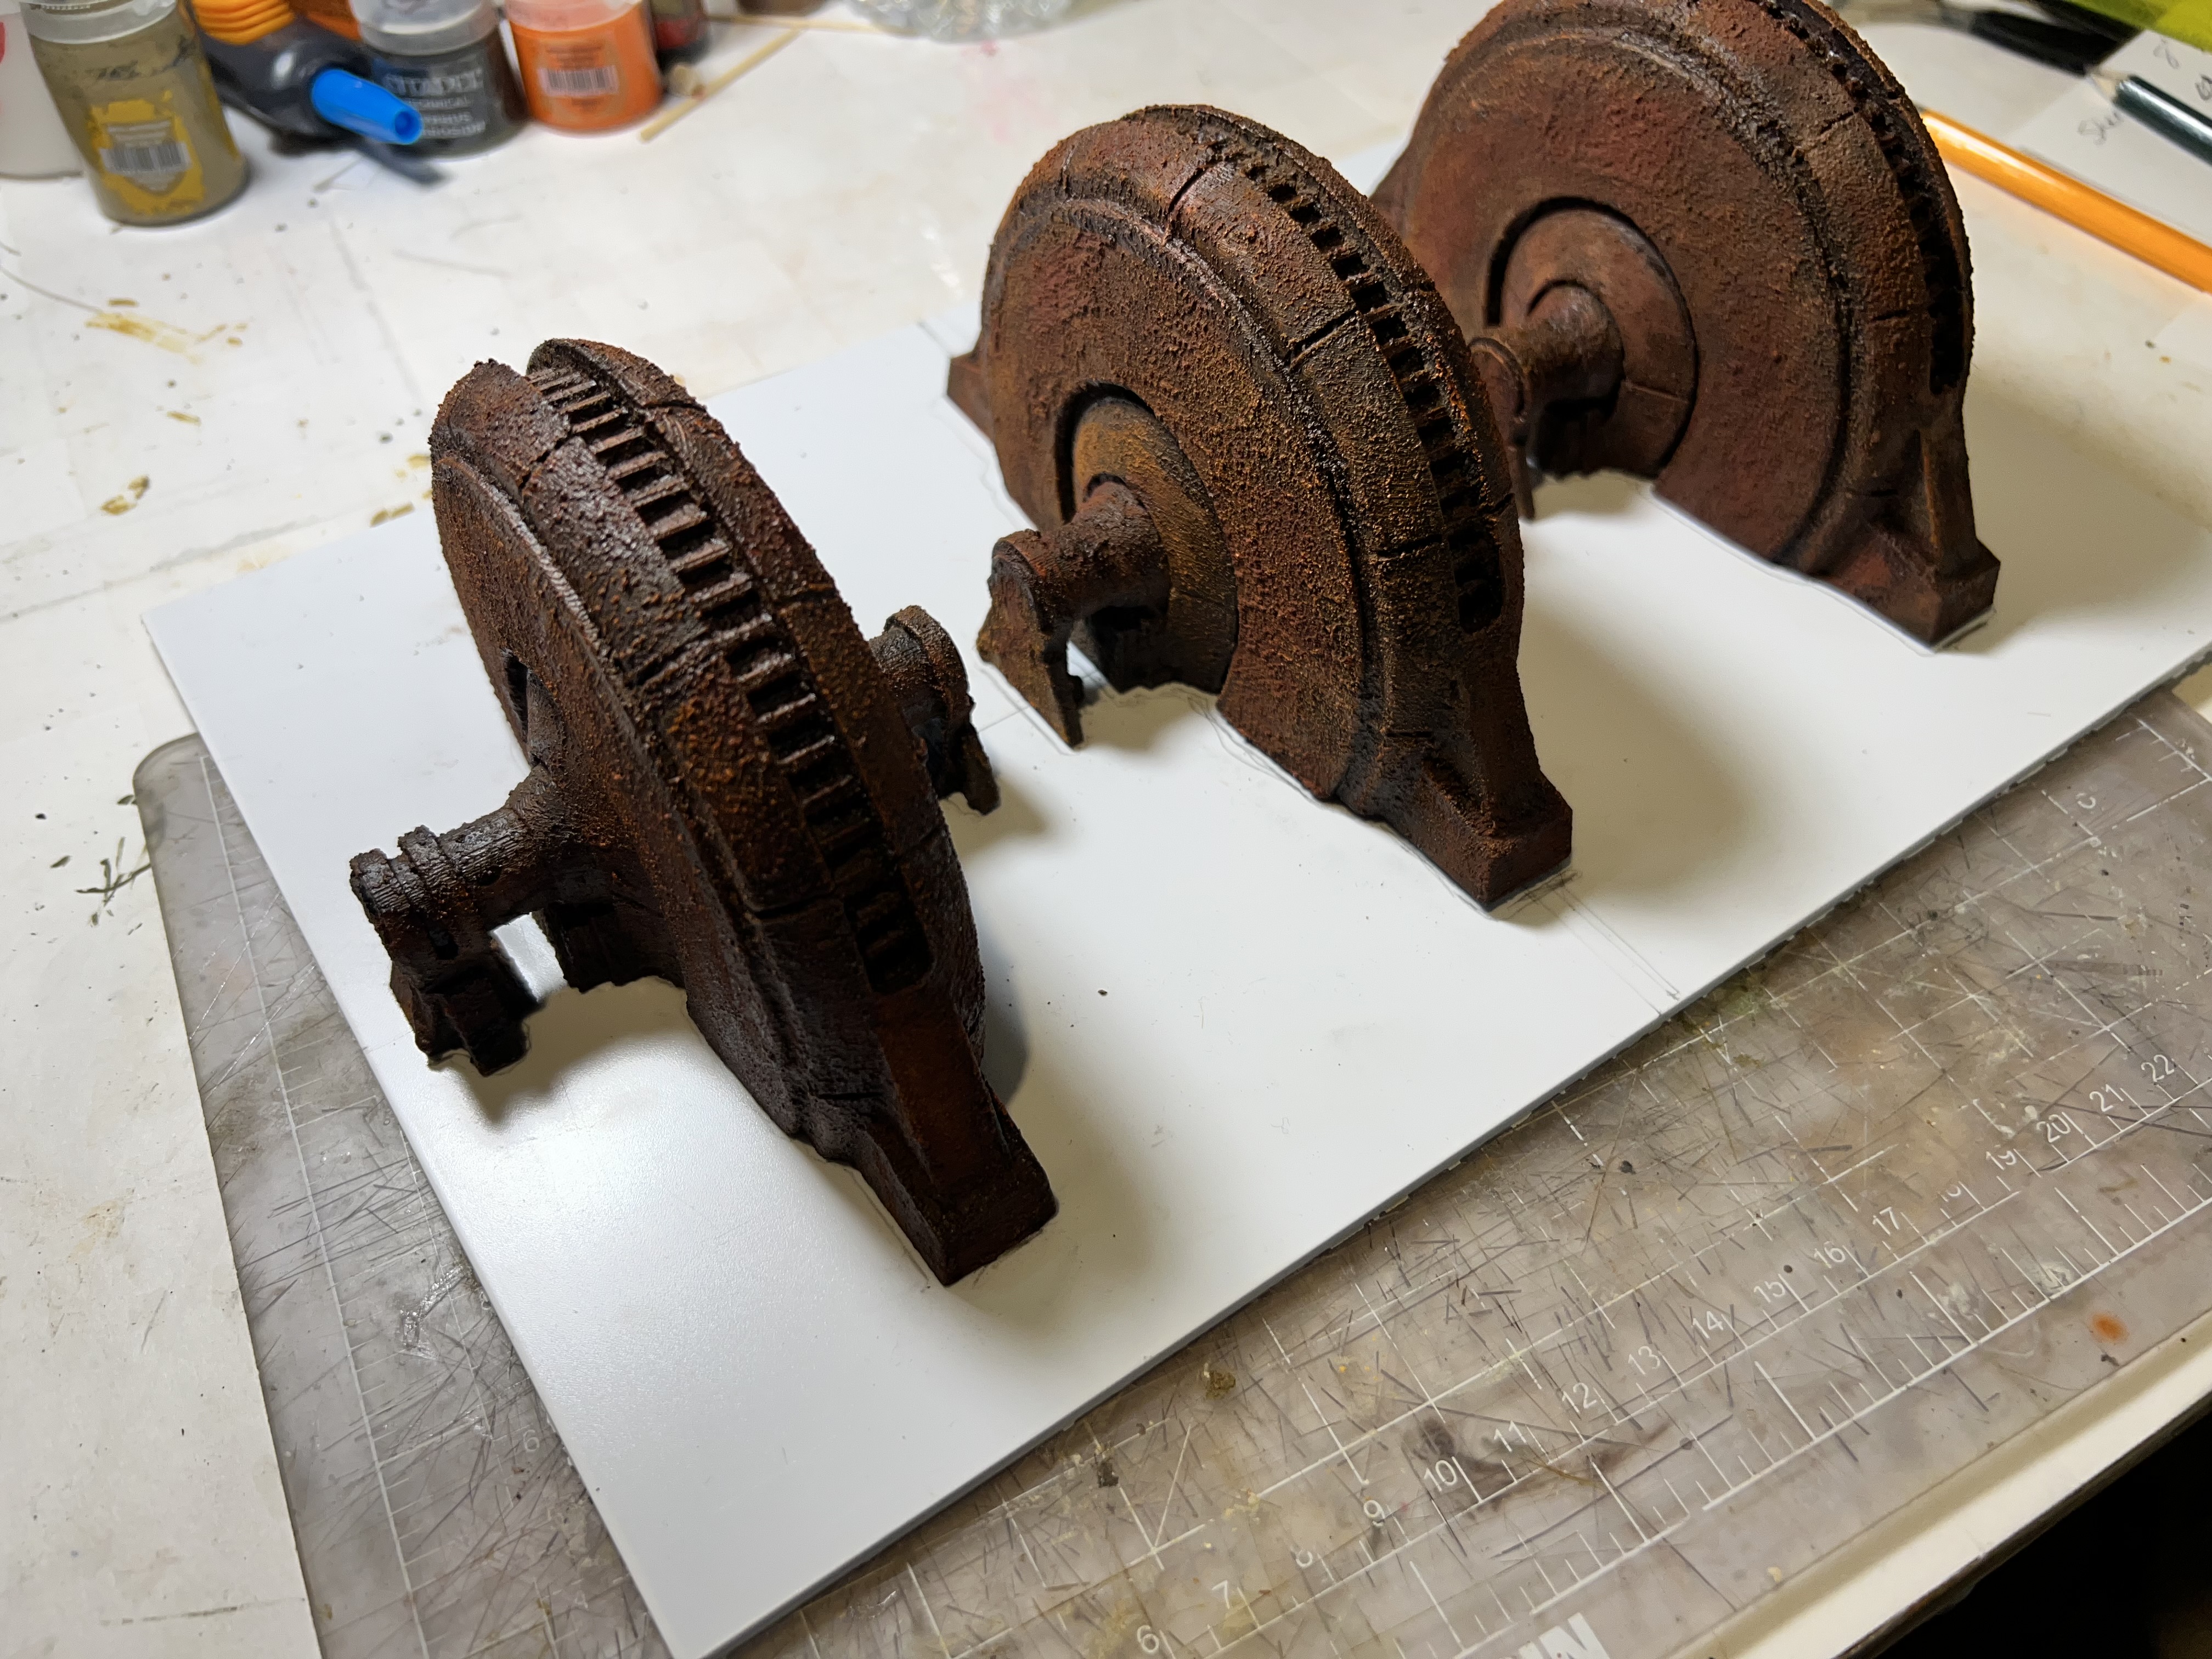
Two of the models were identical – so I planned on using them symmetrically on a polystyrene base. Using sand and PVA, I had a substrate for the rust pigments.
Here I measured carefully to align the three equidistantly on the base. Then, I traced out on the base where they would be glued. The one odd generator is in the center.Here you see the sand applied over the PVA. Note that where the generators would go is not covered with any glue/sand mixture.
Once the sand mix had hardened, I assembled the pigments as you see below. I fixed all the pigments with pigment binder, as I have found that other liquids can dissolve the PVA/sand bonds.
Ready for gluing down the generators. Then, adding pigments to the base. As is my habit, I list all the materials that I used at the end of this post. This practice served me well here as older posts I did on rusty walls had some pearls that I forgot.
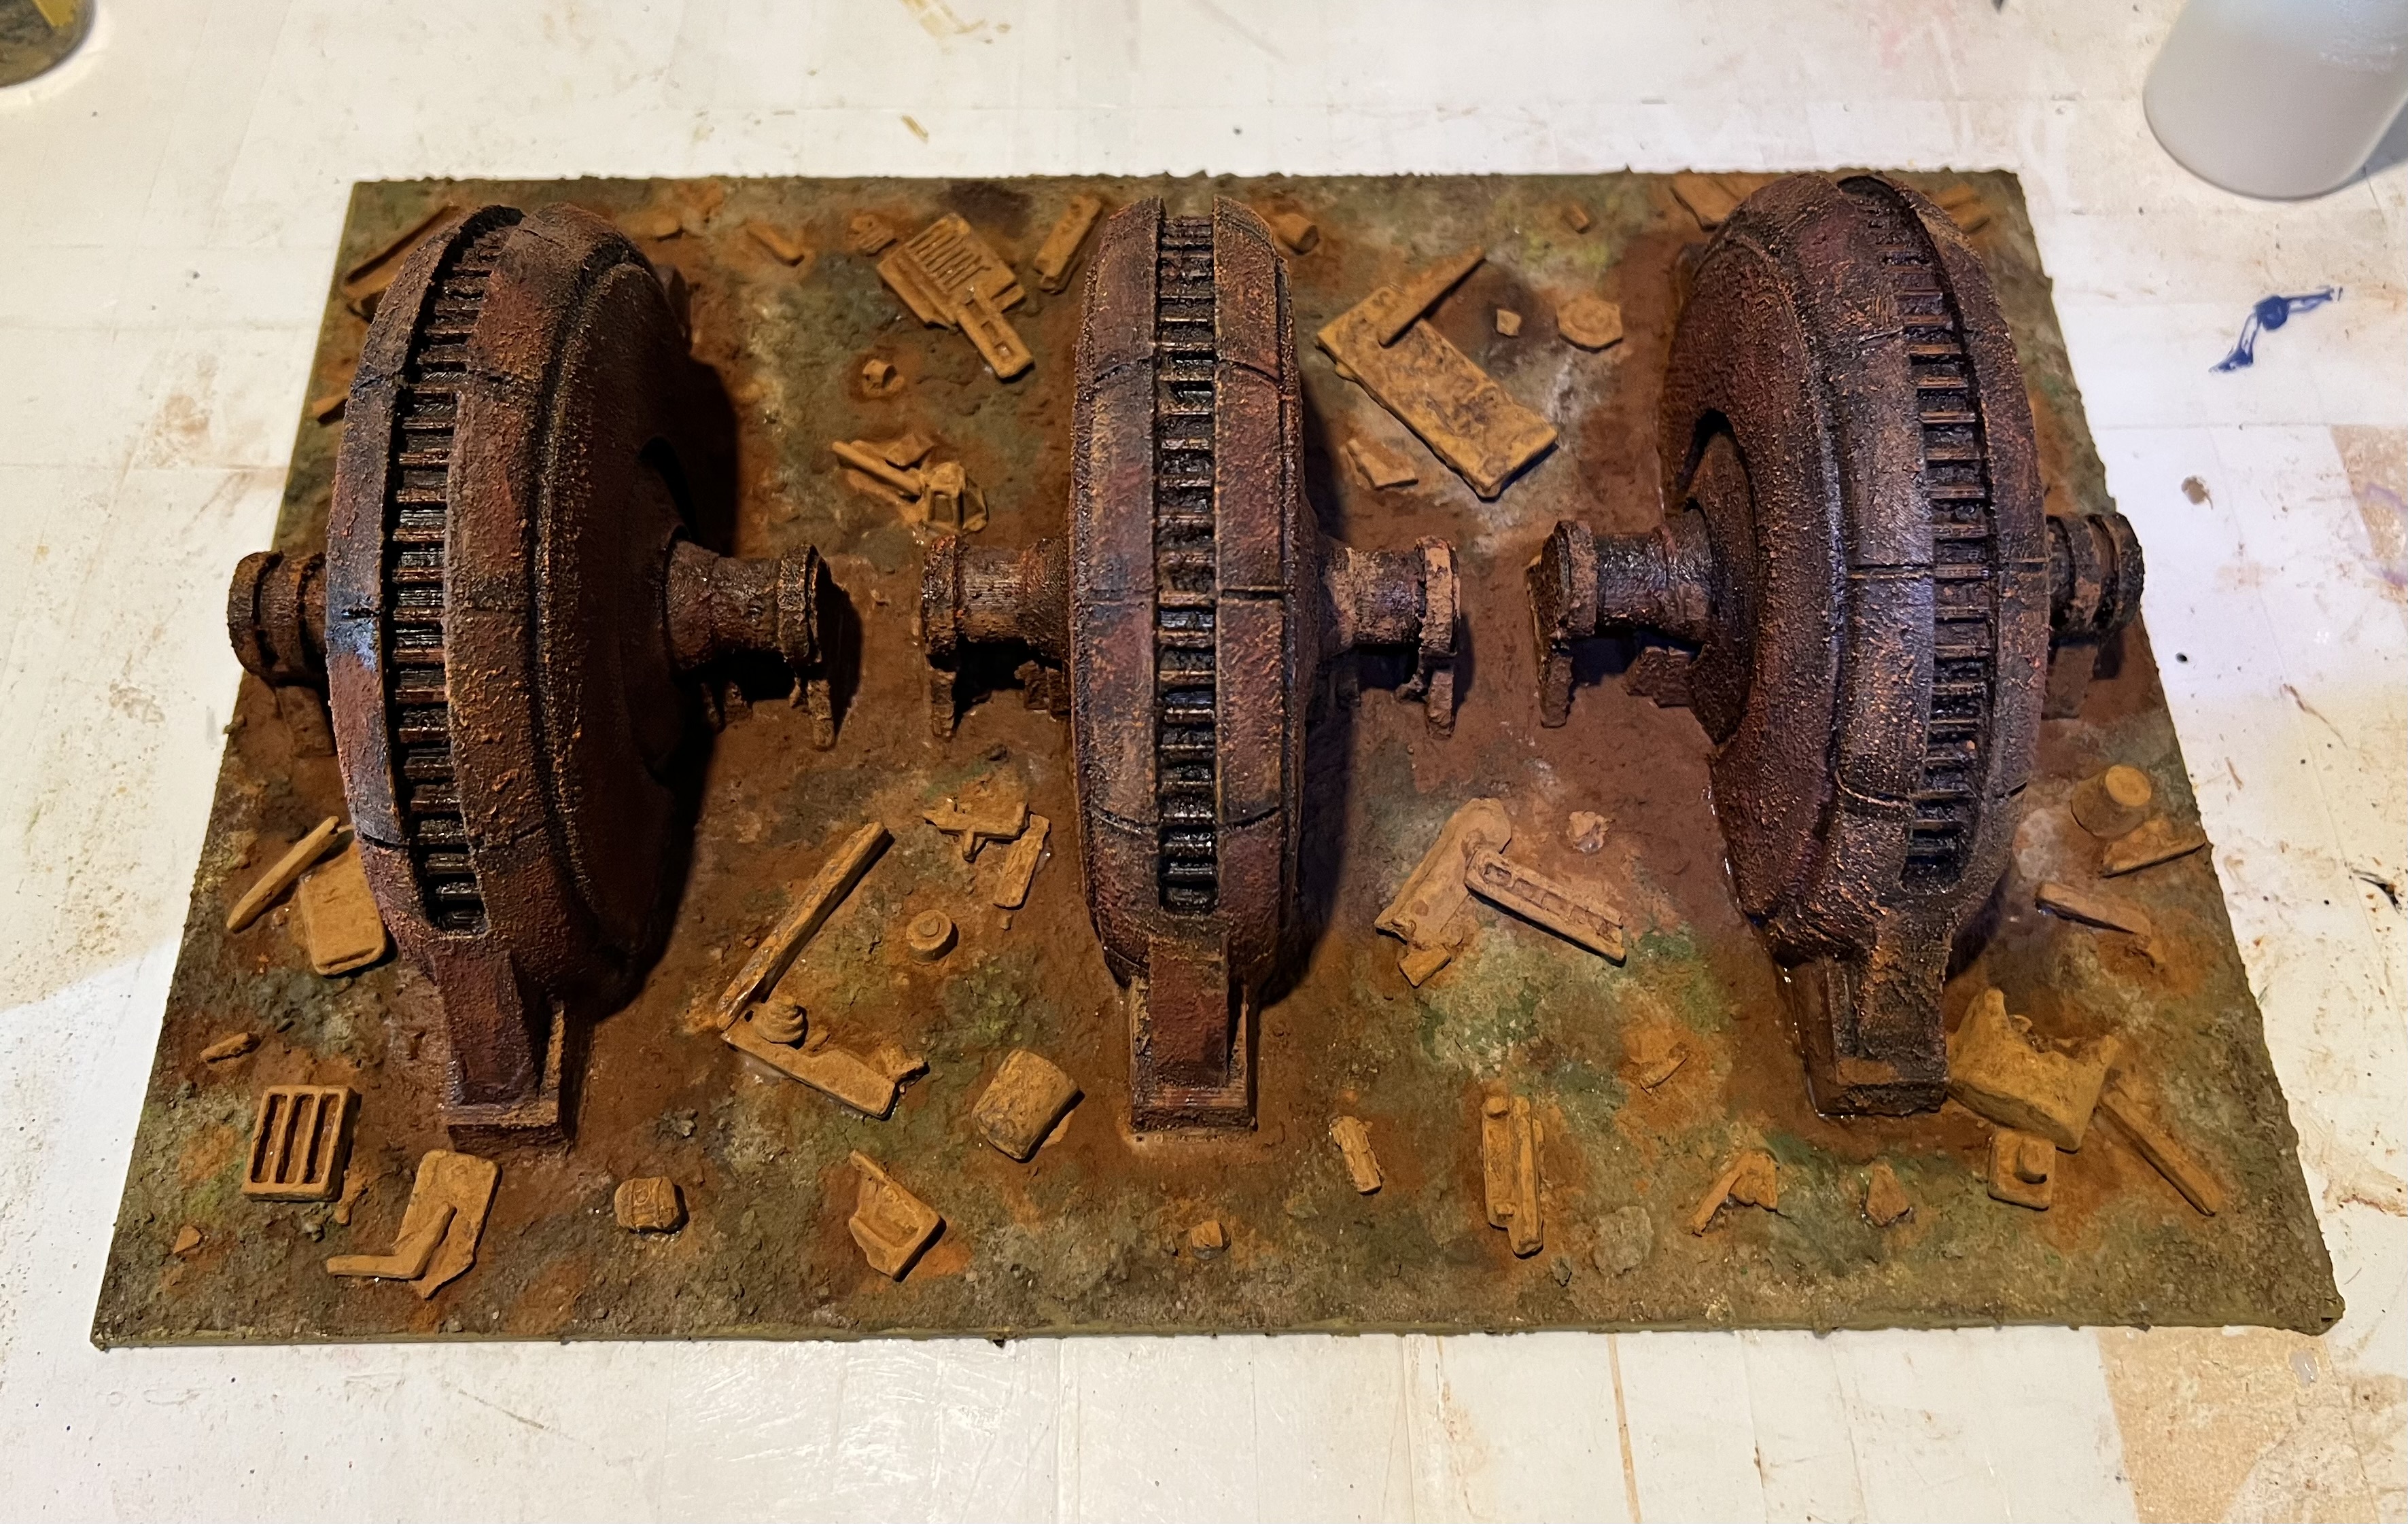
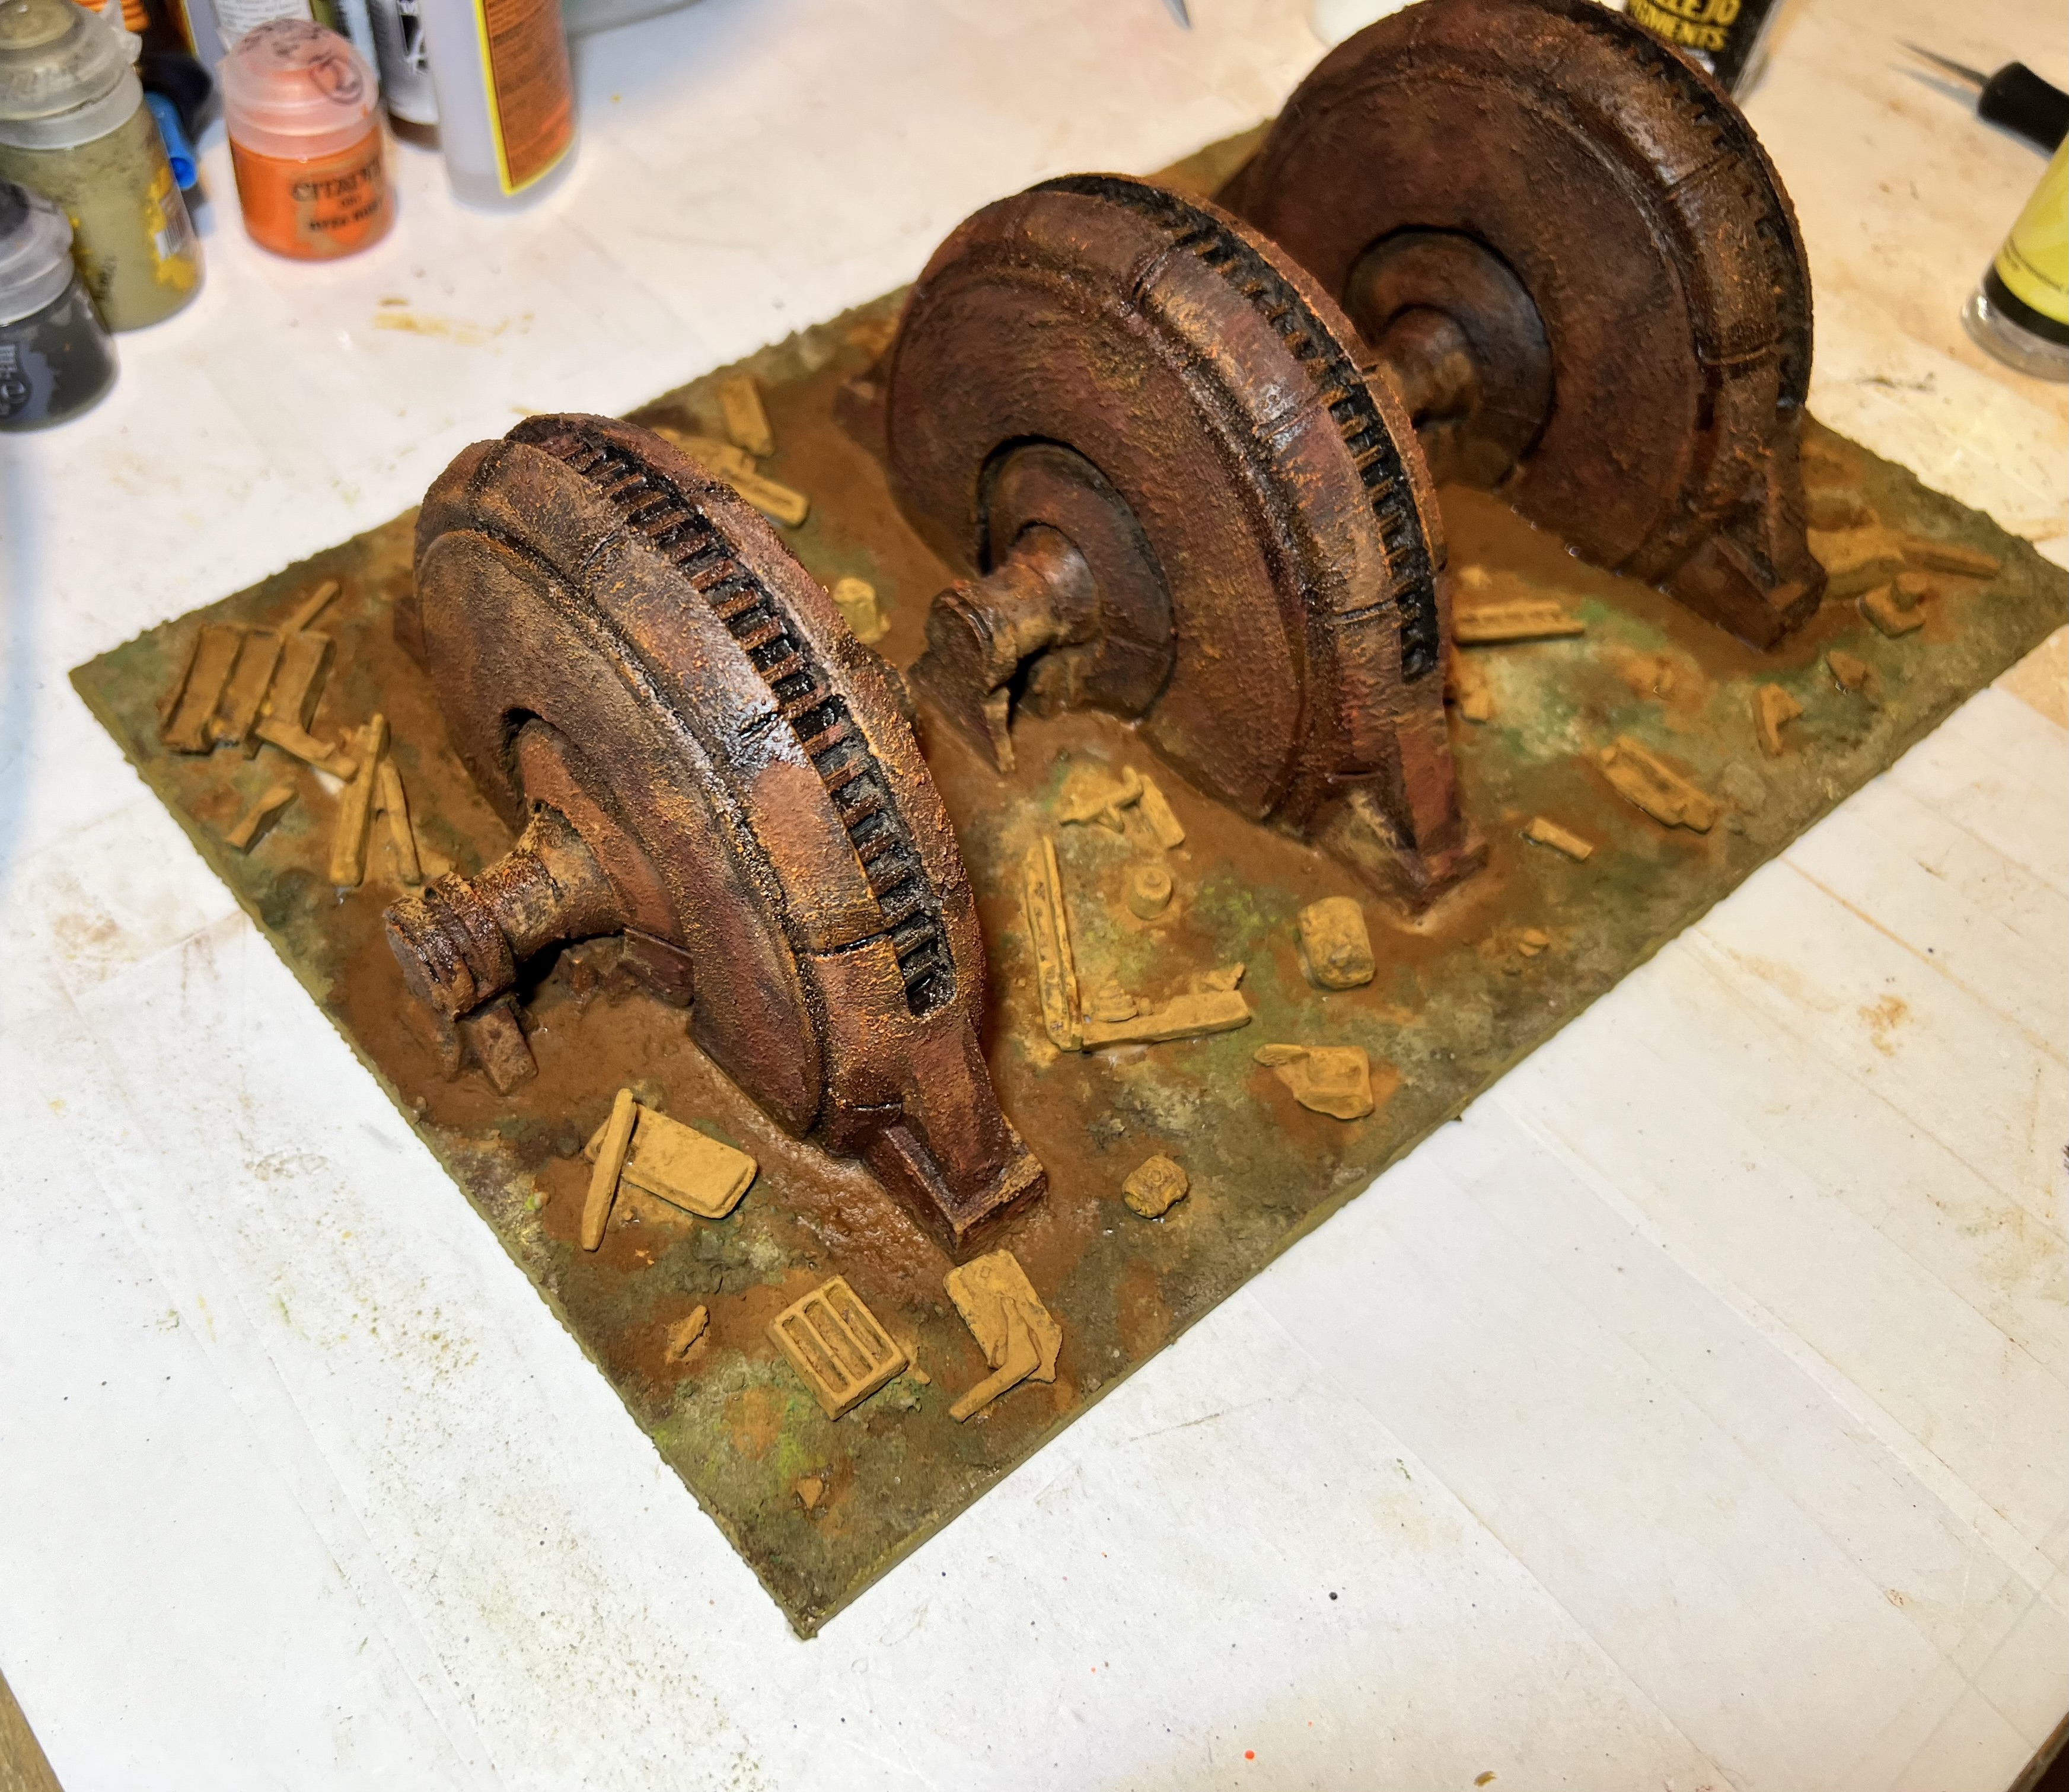
The generators were secured to the base by Gorilla Glue. Once that dried, I added the pigments to the base and fixed them with the binder. I then decided that there should be more detritus and wreckage here. I added some of my rusty Juweela scrap pieces. Then, I applied more rust pigments to them. These actions are shown in the gallery below.
Finally, in an effort to add some wasteland life to the piece, I added multiple different flocking tufts. Here are some finished shots.
Thanks again to Chris Rett for this gift, and sorry it took me so long to finally complete it!
I’m looking forward to having this on the tabletop. It will be a companion piece to my rusty walls and ruined buildings. It will also complement my ruined chemical plant. I will be making other pieces soon. Stay tuned! I hope that you found this interesting or useful. Let me know in the comments section.
Until next time.
For all of my previous posts on terrain projects, please see this page.For all of my previous posts on sci-fi projects, please see this page..
PAINTS, INKS, GLAZES, SHADES, WASHES, PIGMENTS, FLOCKING, GLUES AND MORE THAT I USED ON THIS MODEL
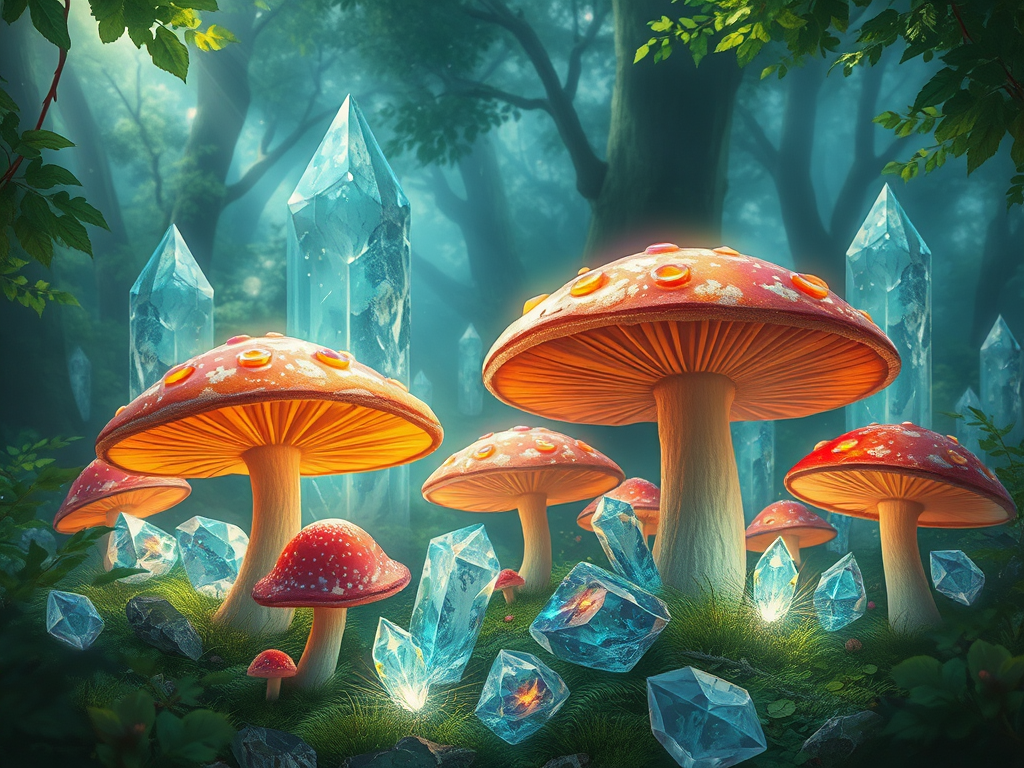
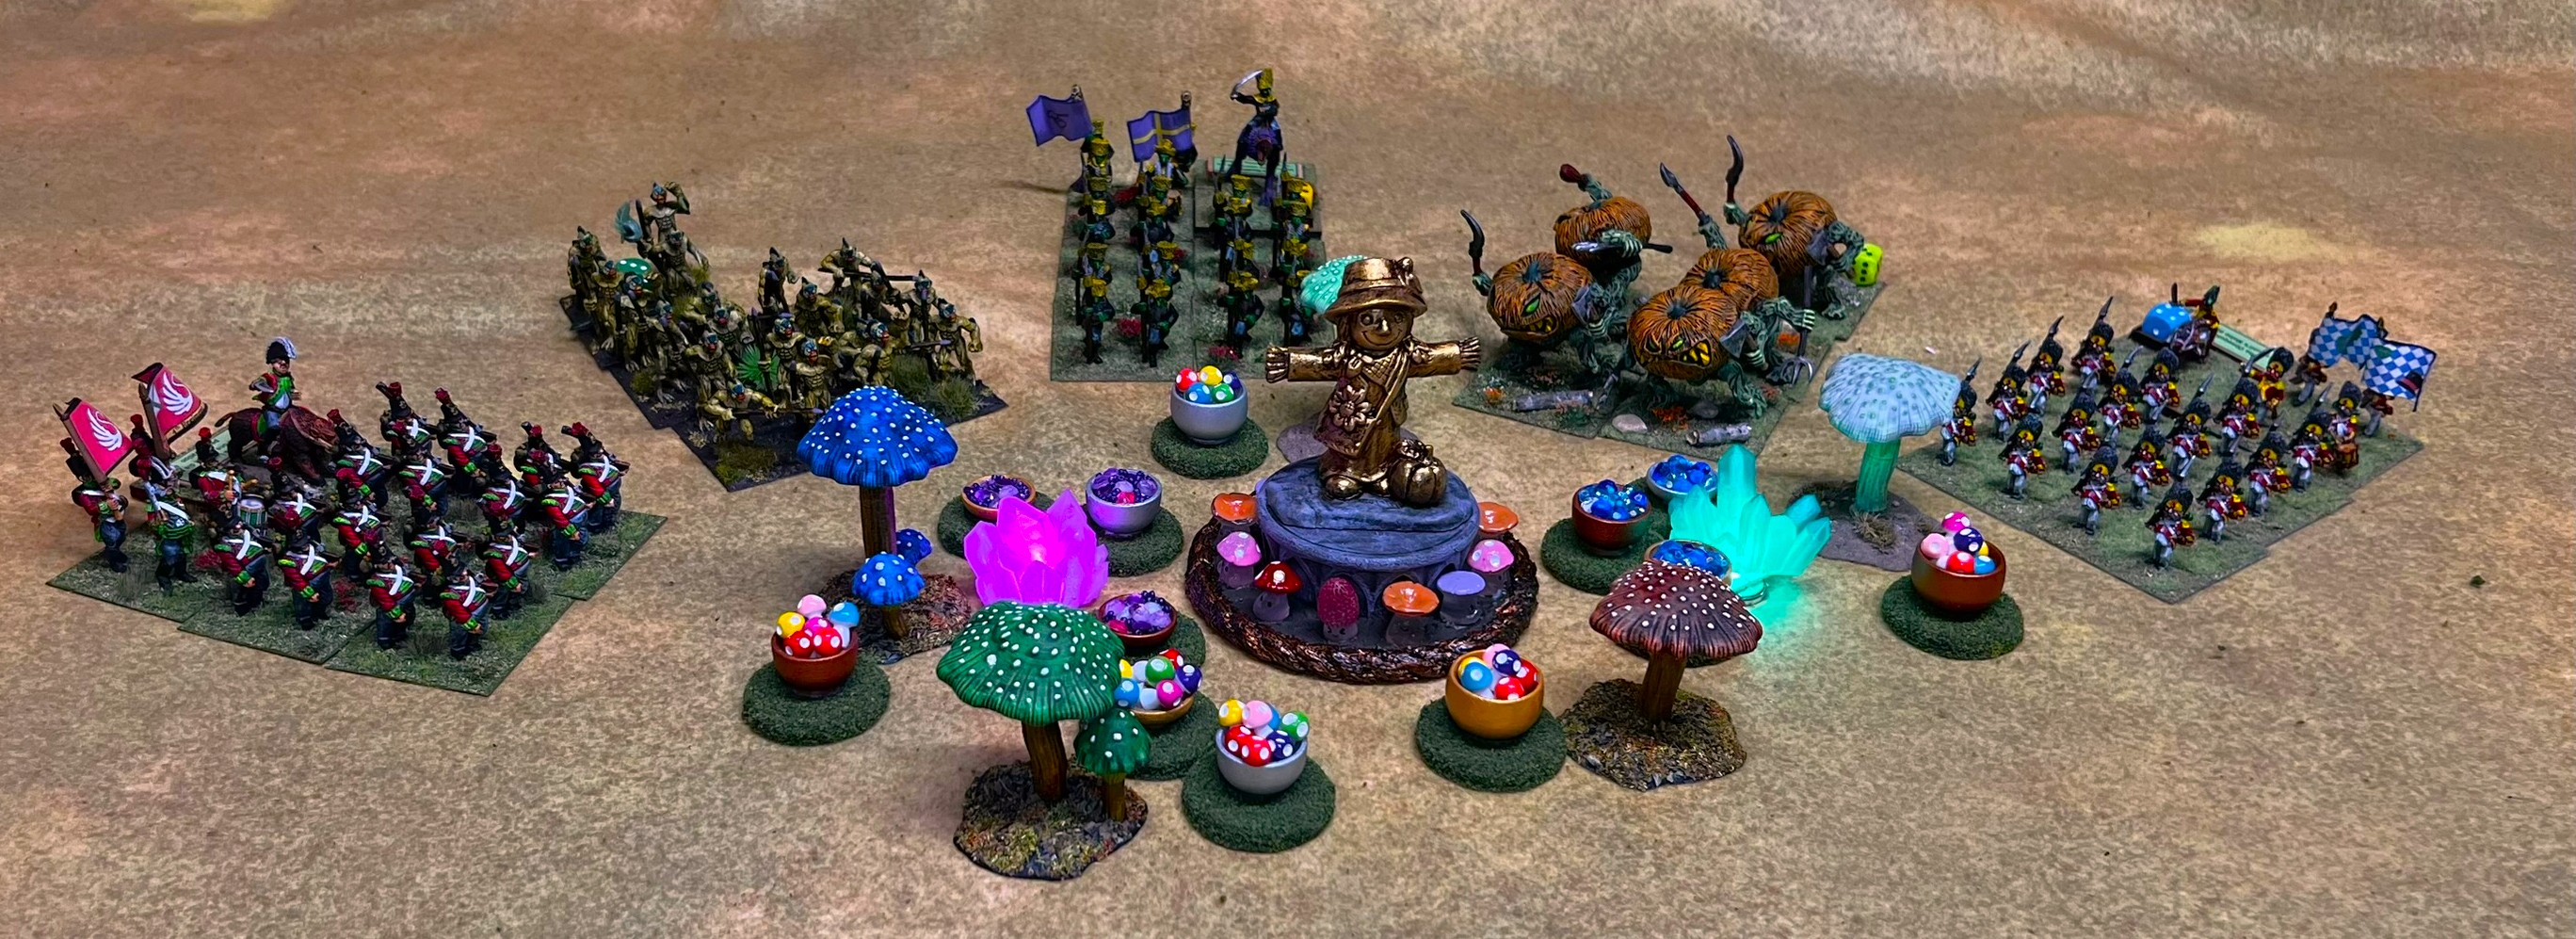
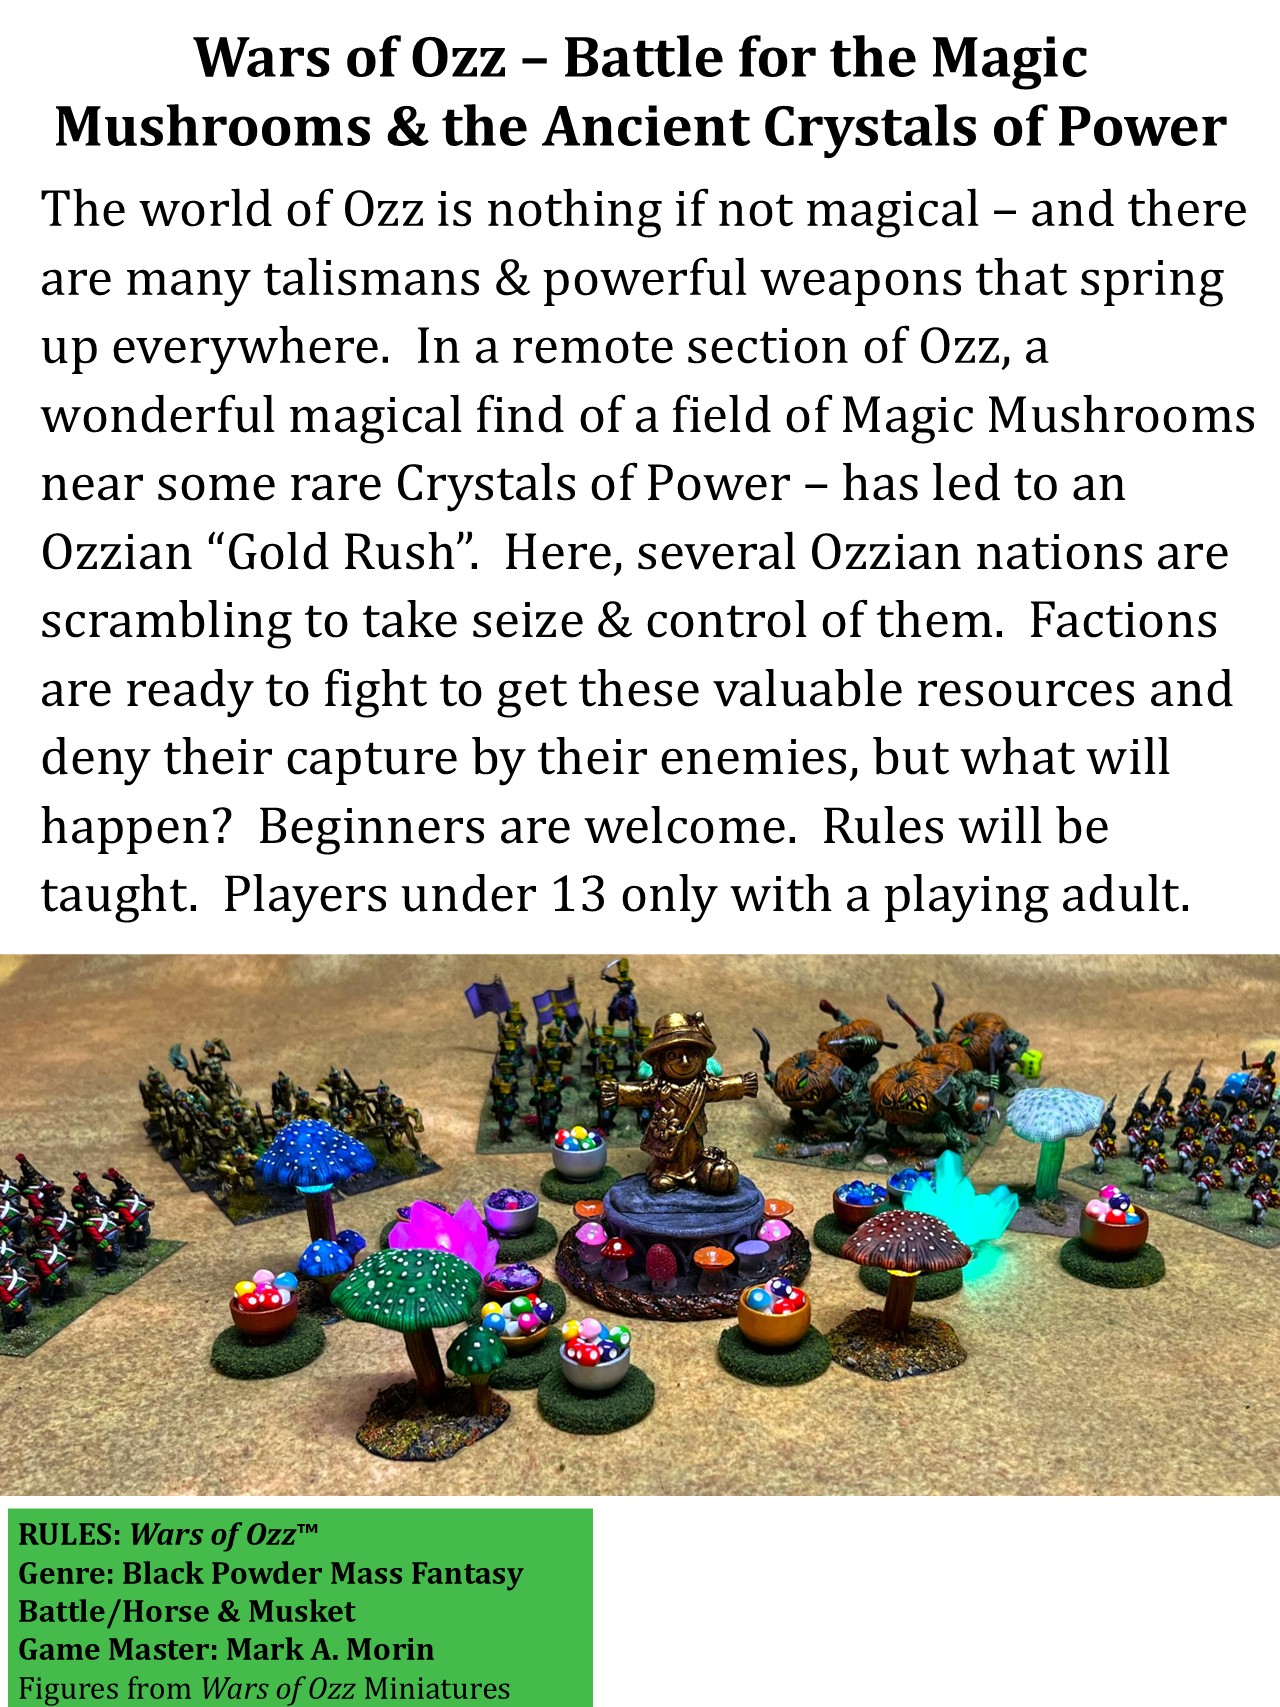
For part three of this series, I wanted to share some smaller Wars of Ozz games projects. These projects included making some game markers. These are for a convention scenario I will be running. The scenario is called “Wars of Ozz – Battle for the Magic Mushrooms & the Ancient Crystals of Power“. There will be 6-8 players, each controlling one brigade, all converging on the center of the tabletop. At that center will be the Scarecrow Girl that I spotlighted in part 1. She will be surrounded by the Magic Mushrooms and the Ancient Crystals of Power. The players’ goal is to secure supplies of these and get them off the table to their homelands. Naturally, all the other players will compete for the same objective. Alternatively, they might try to deny possession to their competitors. Here is the game flyer:
Game flyer
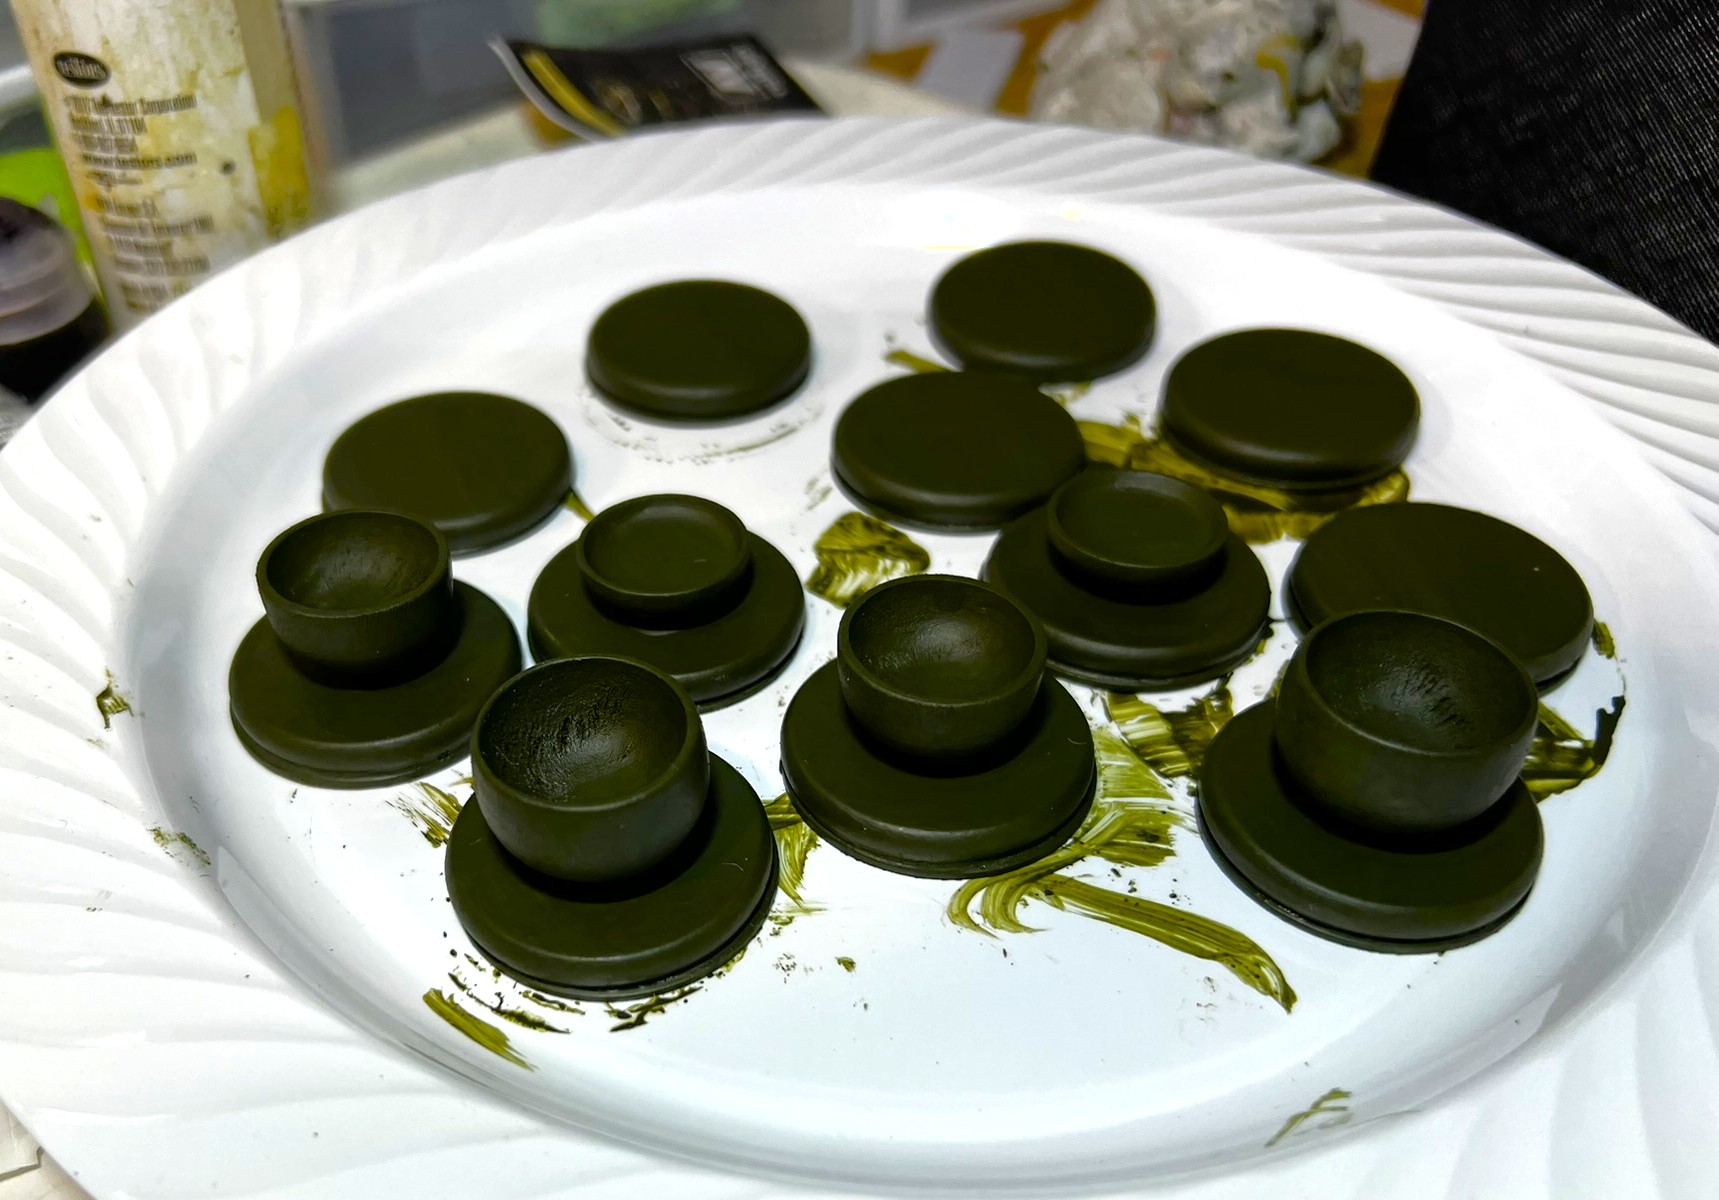
Naturally, I would need to have some markers or tokens to denote actual possession of either mushrooms and crystals. Therefore, I put some together – that would at least look like terrain. These were not difficult to make, cobbling together some bits from here and there. First, I saw some wooden miniature bowls at Michael’s that I thought would fit the bill. I got 12 in 2 packages, and based them on wooded disks atop steel washers. I primed them green.
Primed bowls.
I decided to paint one third of these copper, one third gold, and one third silver. Then I flocked them as I was also working on the trees you saw in my last post.
The bowls shown here flocked.
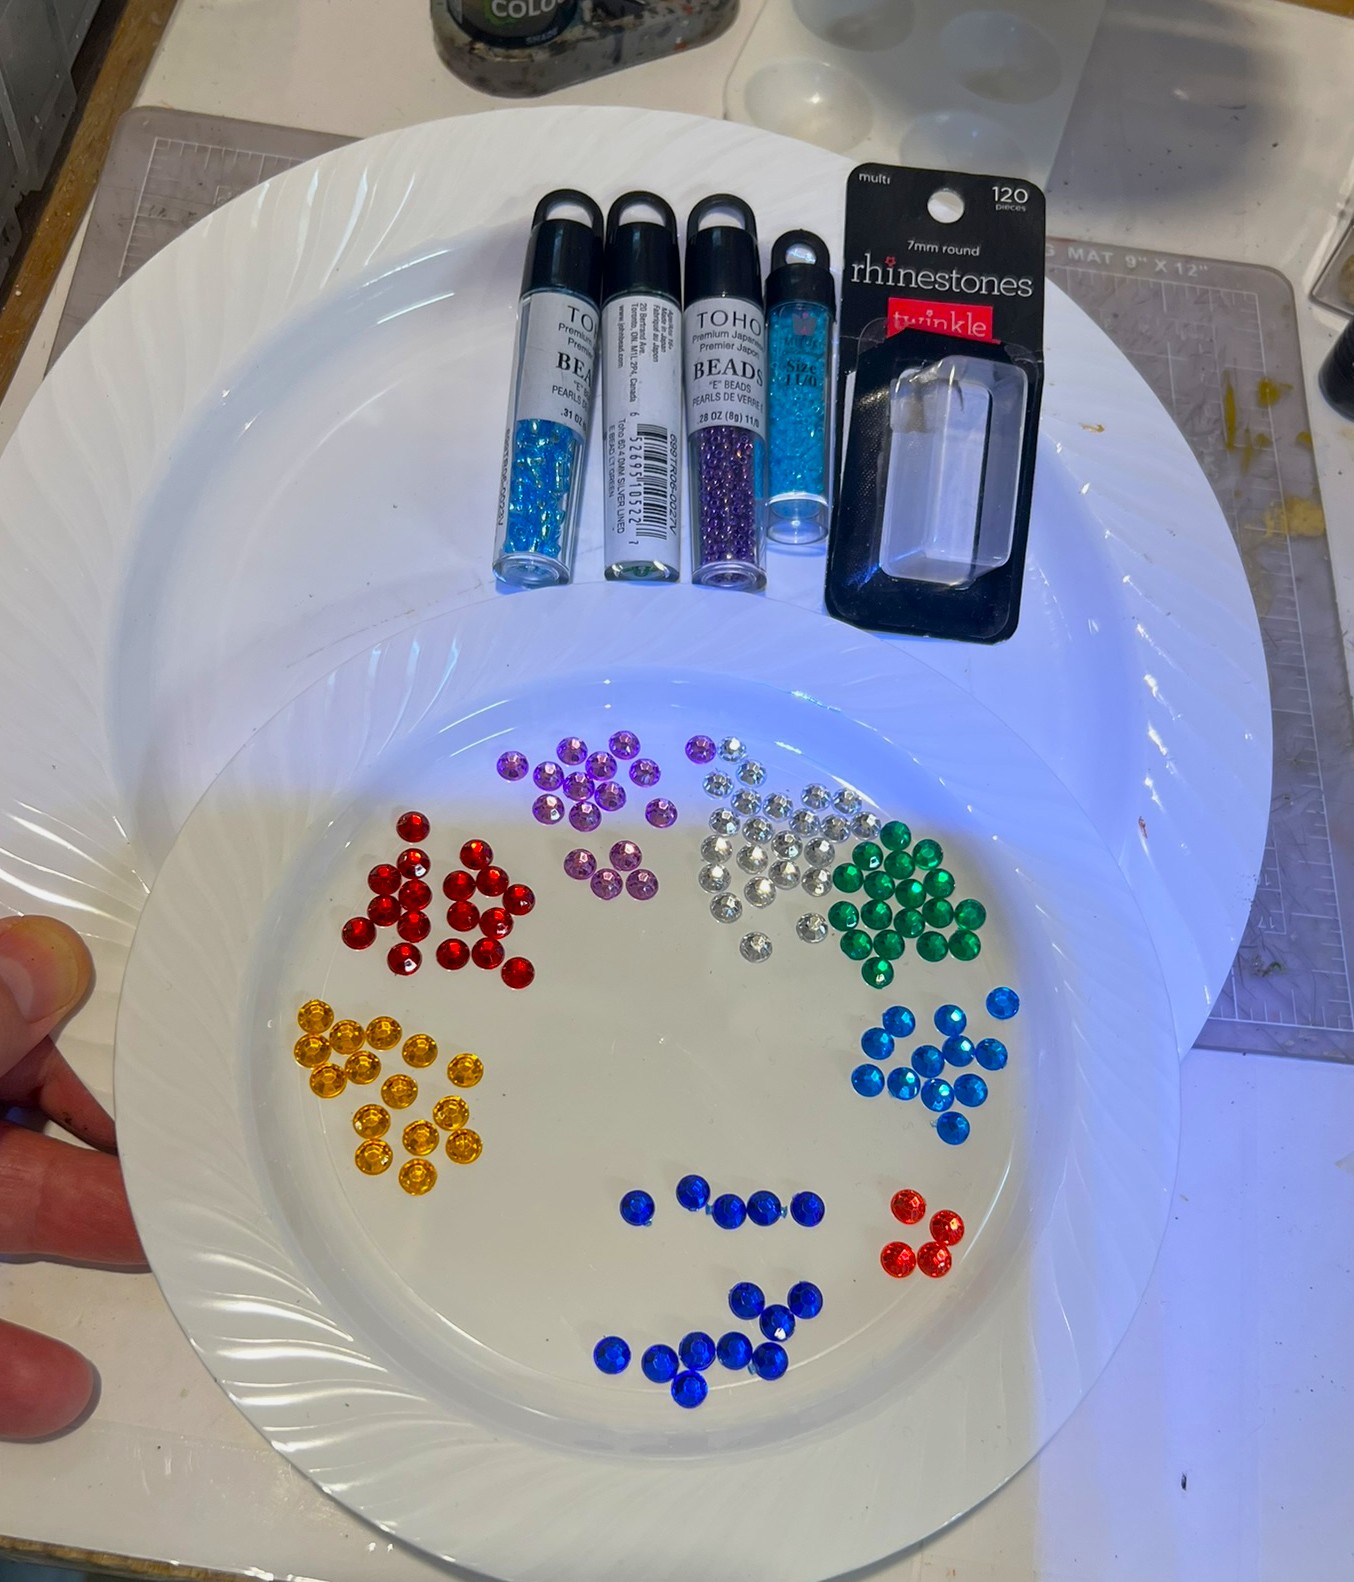
The next challenge would be to get small mushrooms and crystals to fill the bowls. To that end, I used multiple products to bling out the bowls as full of ancient magic crystals.
Rhinestones, glass beads…and more rhinestones!
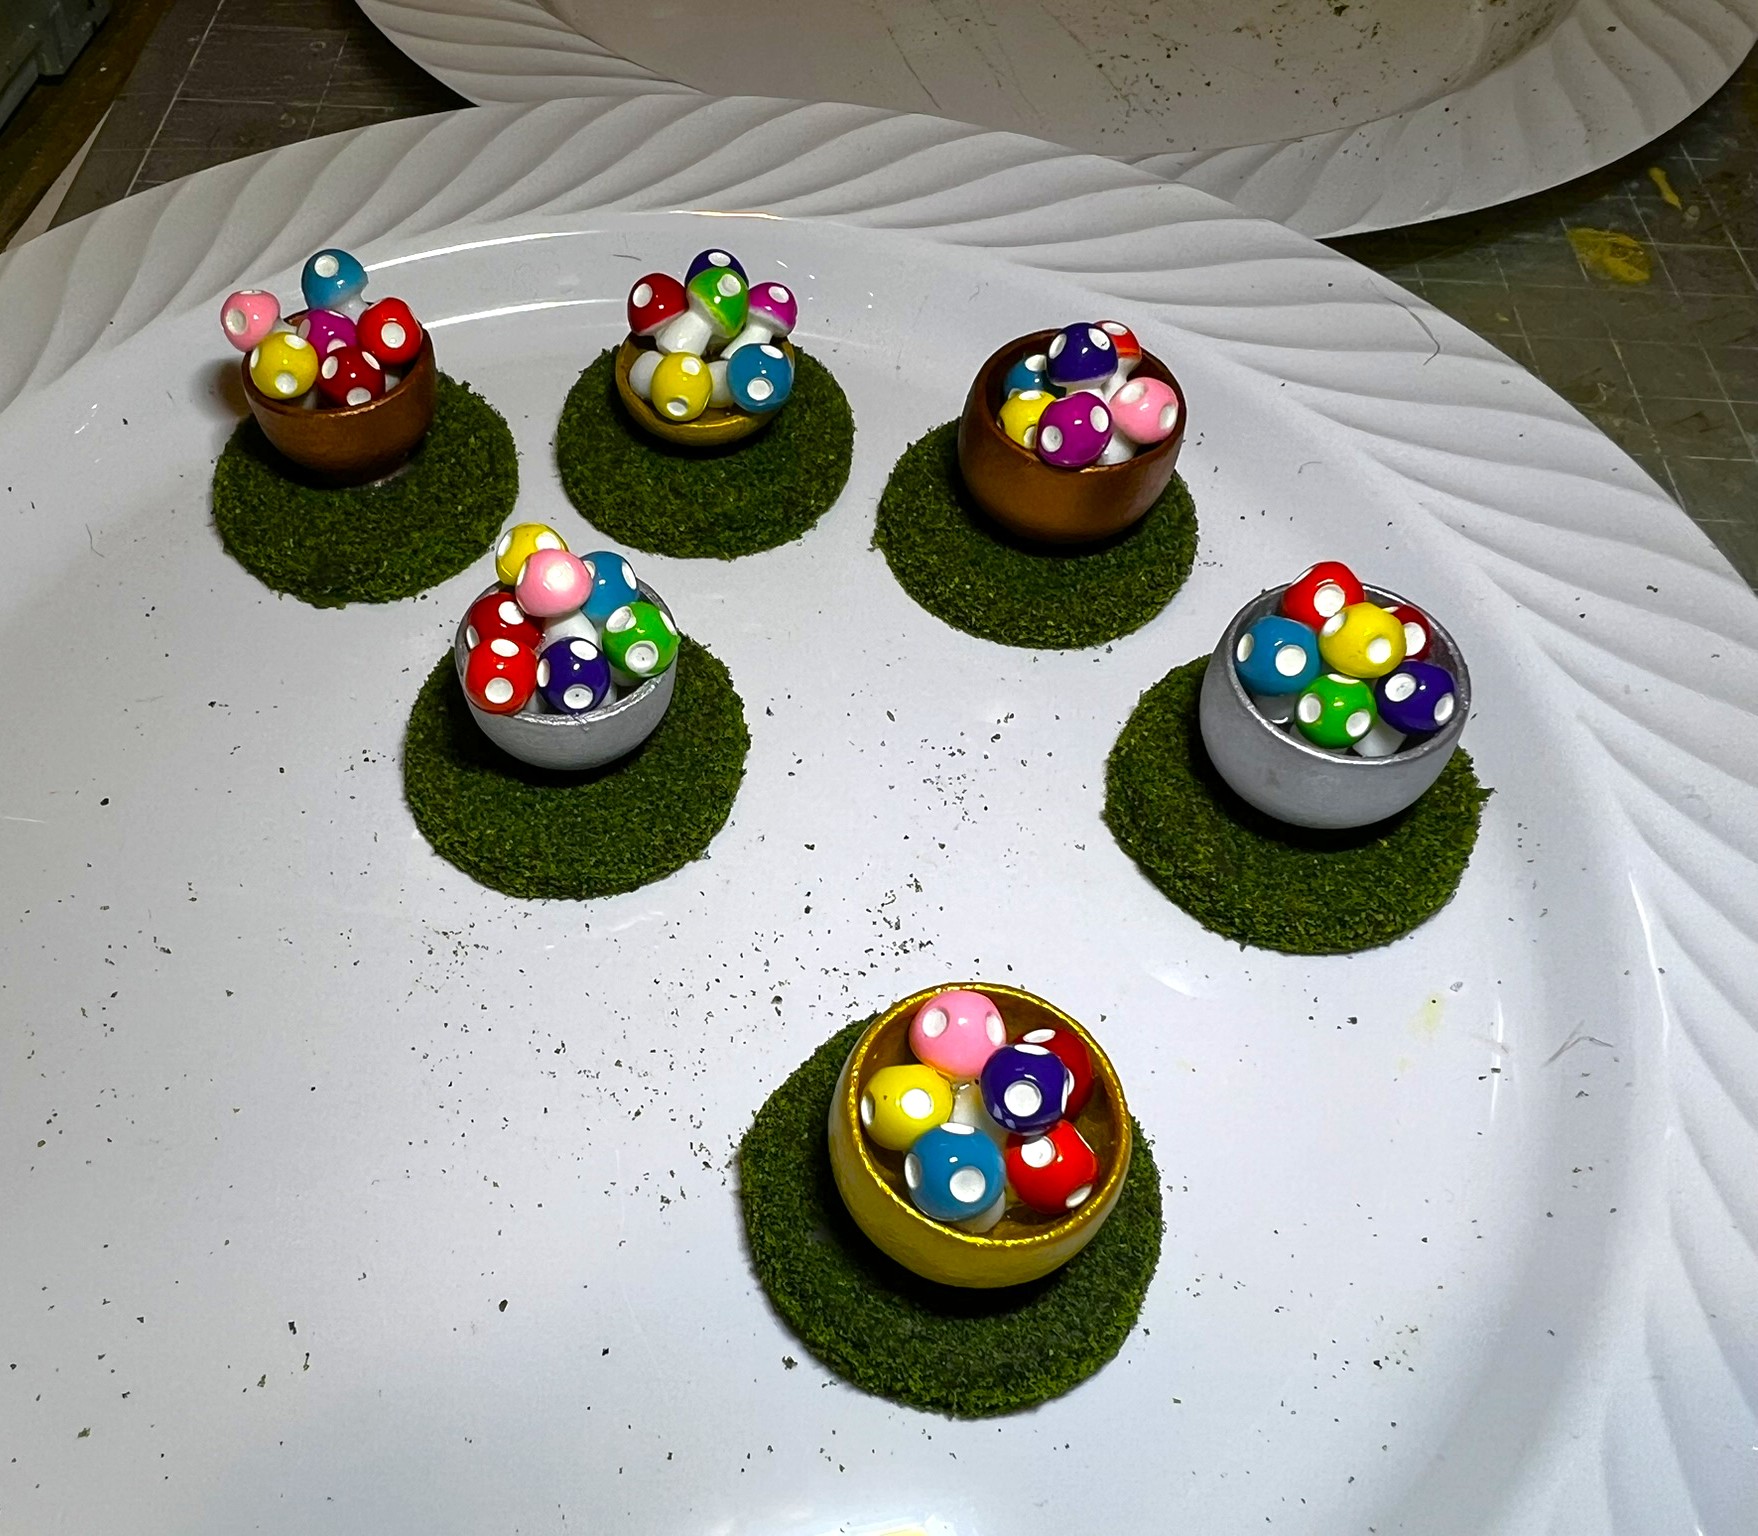
I used Gorilla Glue to mount them in various combinations for the crystal markers.
6 crystal markers.
As for the mushrooms, I found some colorful little ones on Amazon. They serve the purpose. I can use them on unit bases too.
Mushroom markers.
And these were done!
I hope that these were fun to look at. In the game, possession of these will cause detrimental effects to the holders! So I expect a free-for-all in the game!
Additionally, I did adjust two units’ bases. The Great Flying Apes had one base that still needed adjustment to stay upright. I added a support wire and camouflaged it with some tall jungle turf.
Great Flying Ape base front……and back – repaired.
The other basing challenge I needed to rectify involved my regiment of Mushroom Creatures. I really like the regiment, but their big caps obscure their eyes from above. The issue is that players struggle to identify the actual facing direction of the Mushroom Creatures’ bases. The same little mushrooms that I used for the markers shown here were the solution. I added them to the front of each base – problem solved!
Mushroom Creatures with small mushrooms
I initially thought that this series would be one with just 3 parts. Now it will be 4 as I have finished off a very cool set of terrain pieces. I made these as gifts that simply MUST be shared. Stay tuned for a bonus part 4 and see if you agree!
Final Note
Want to learn more about Ozz? If you want to check out the excellent Wars of Ozz figures’ range, there are two places to get them. You can also get the rules there. (I make no money from this.) The game rules and the figures are available from the next two places:
Below you’ll see the list of paints and the like that I used on the markers. They are more useful for me when I need to recreate a color scheme in the future. They might not be as useful for you. In any case, that’s why I post them.
Miscellaneous details and references for those interested in that sort of thing:
For my earlier posts on Wars of Ozz games, view this page. It includes figures, units, and other related projects.
PAINTS, INKS, GLAZES, SHADES, WASHES, PIGMENTS, FLOCKING, GLUES AND MORE THAT I USED ON THE MAGIC MUSHROOM AND ANCIENT CRYSTALS OF POWER MARKERS:
1½” wooden disks from Michael’s
Everbilt ASD 1½” steel washers
Gorilla Glue
Twinkle 7mm plastic rhinestones
TOHO glass beads from Michael’s
Recollections purple bling stickers
Make Market Miniature Bowls & Plates (2 sets) from Michael’s
Everbilt ASP washers
PVA Glue
Binder clips
Vallejo Surface Primer “Russian Green”
Citadel “Auric Armour Gold”
Tamiya “XF-6 Copper”
Tamiya “XF-11 Chrome Silver”
Woodland Scenics “Blended Turf” (flocking)
Exasinine Mini Mushroom Resin Figurines for Home DéCor (Style 1, Small)
On the last time that I posted, I shared my Scarecrow Girl statue that I cobbled together. After Christmas, I was able to add even more to my scatter terrain with a myriad of pieces. In the case of this post, I’ll share how I built out and painted up desert/cactus pieces and some oases. I also did a bit of tree build and rehab work that I will share here.
It’s all for my Wars of Ozz games. I needed some more desert pieces – especially now as I have significant numbers of desert units from both the Whim Whim and Temujican factions. I did previously use some cacti from Hobby Lobby in my Mesoamerican games.
Two Christmas gifts from my Mom – cacti and trees (both kinds the types for model railroads or dioramas) – brought me an opportunity to go further. On a side note, she says I’m tough to get a gift for – to which I say I really don’t need any at my age – but I do appreciate her a lot and it was very thoughtful (she’s probably reading this too!). In any case they will outlast golf balls for sure…
The cacti were great for building some scatter terrain. Additionally, I needed to make objective markers for one of my desert games – and oases seemed appropriate for that purpose. Lastly, my deciduous and evergreen tree collection (which is mostly second-hand from a flea market) needed an upgrade badly as they were looking like victims of Agent Orange defoliant. So, Mom’s tree gift of three Hobby Lobby trees was another scatter terrain opportunity. I’ll discuss the cacti scatter bases first, then the oases build, and lastly the trees.
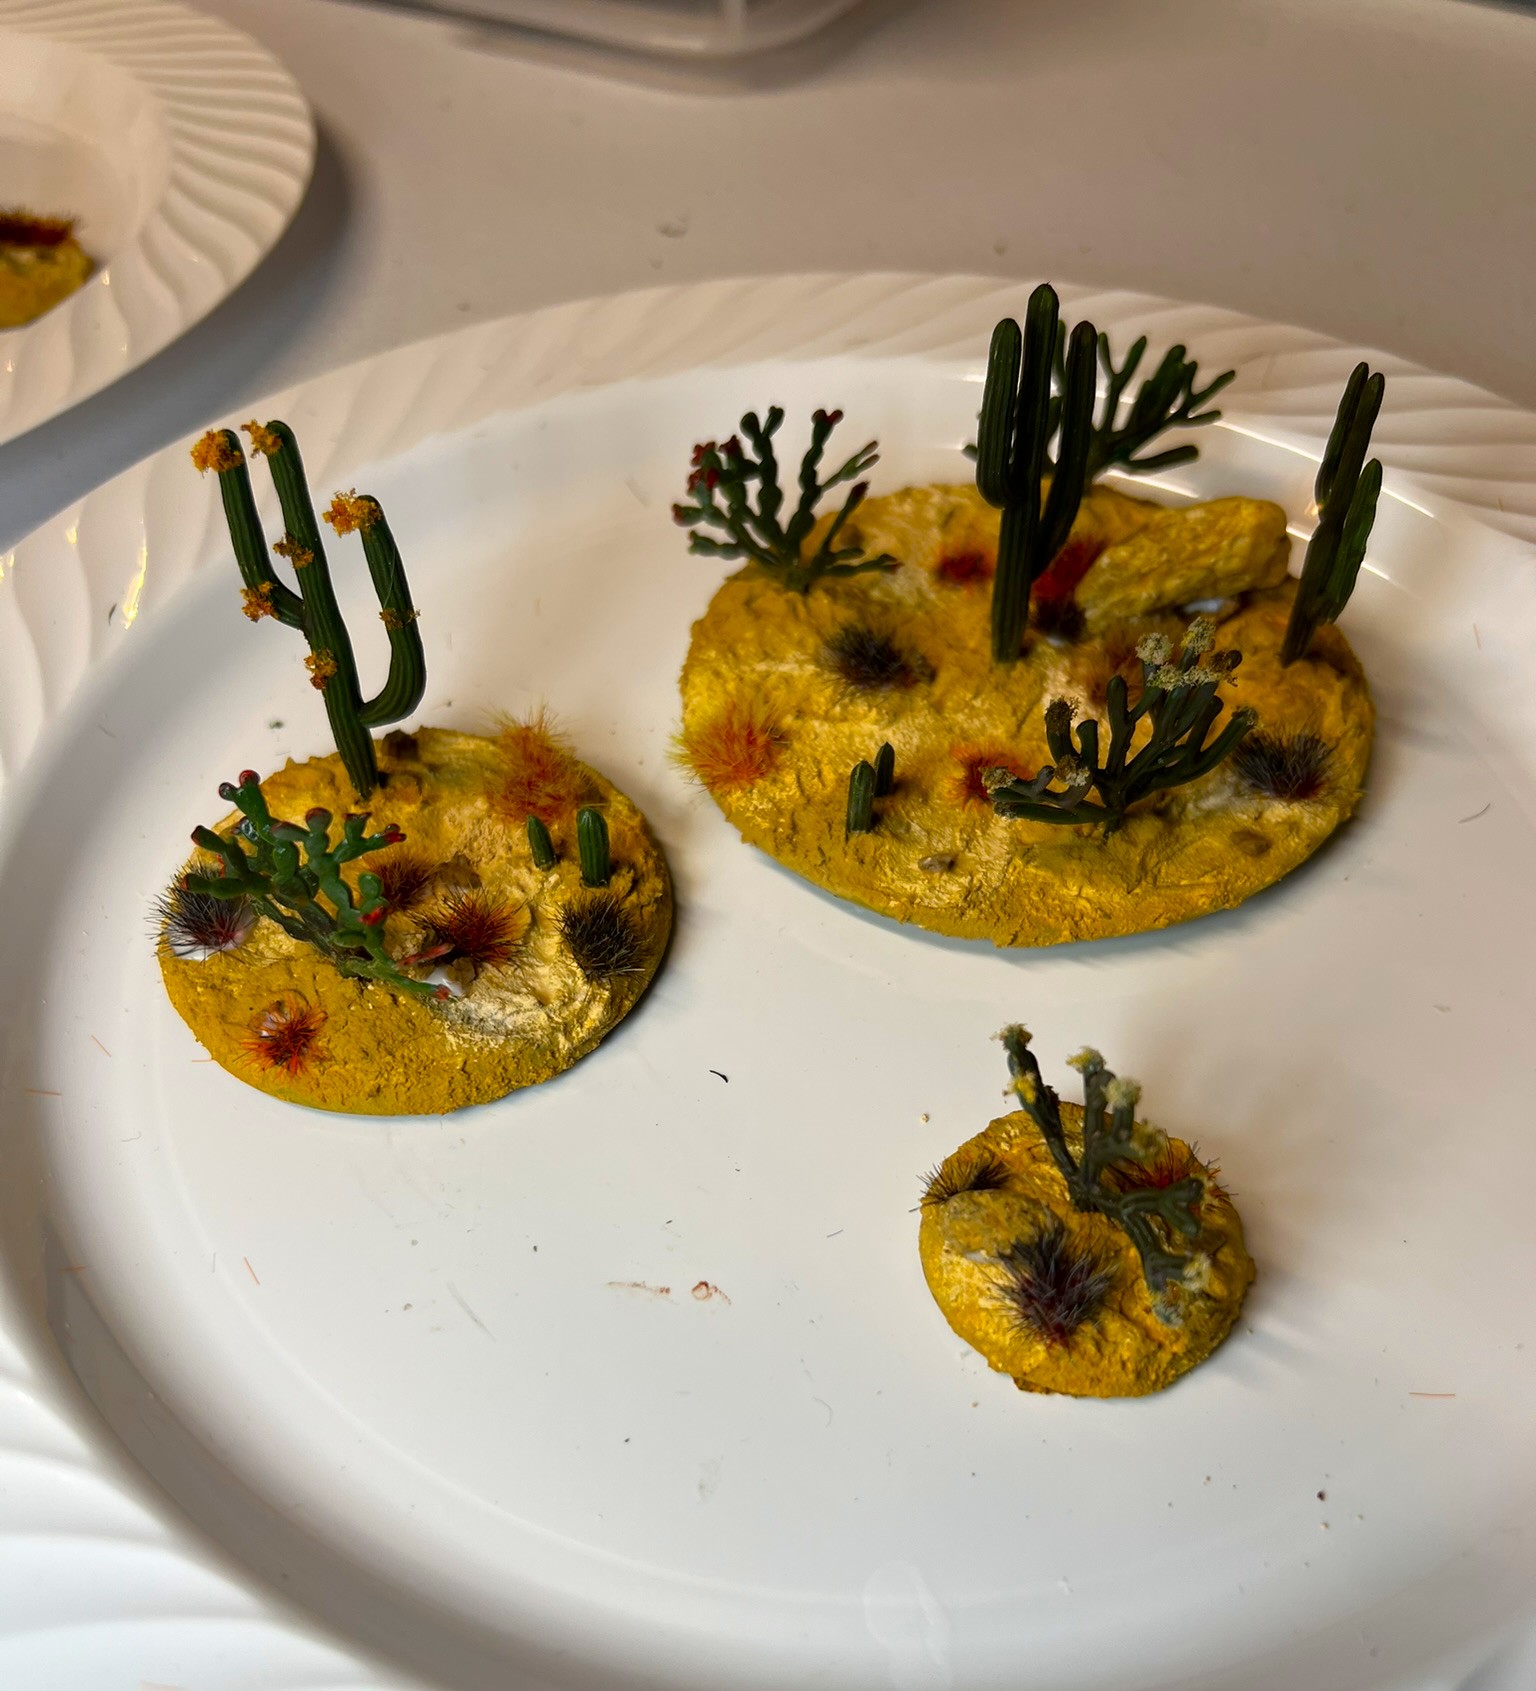
Cacti Bases
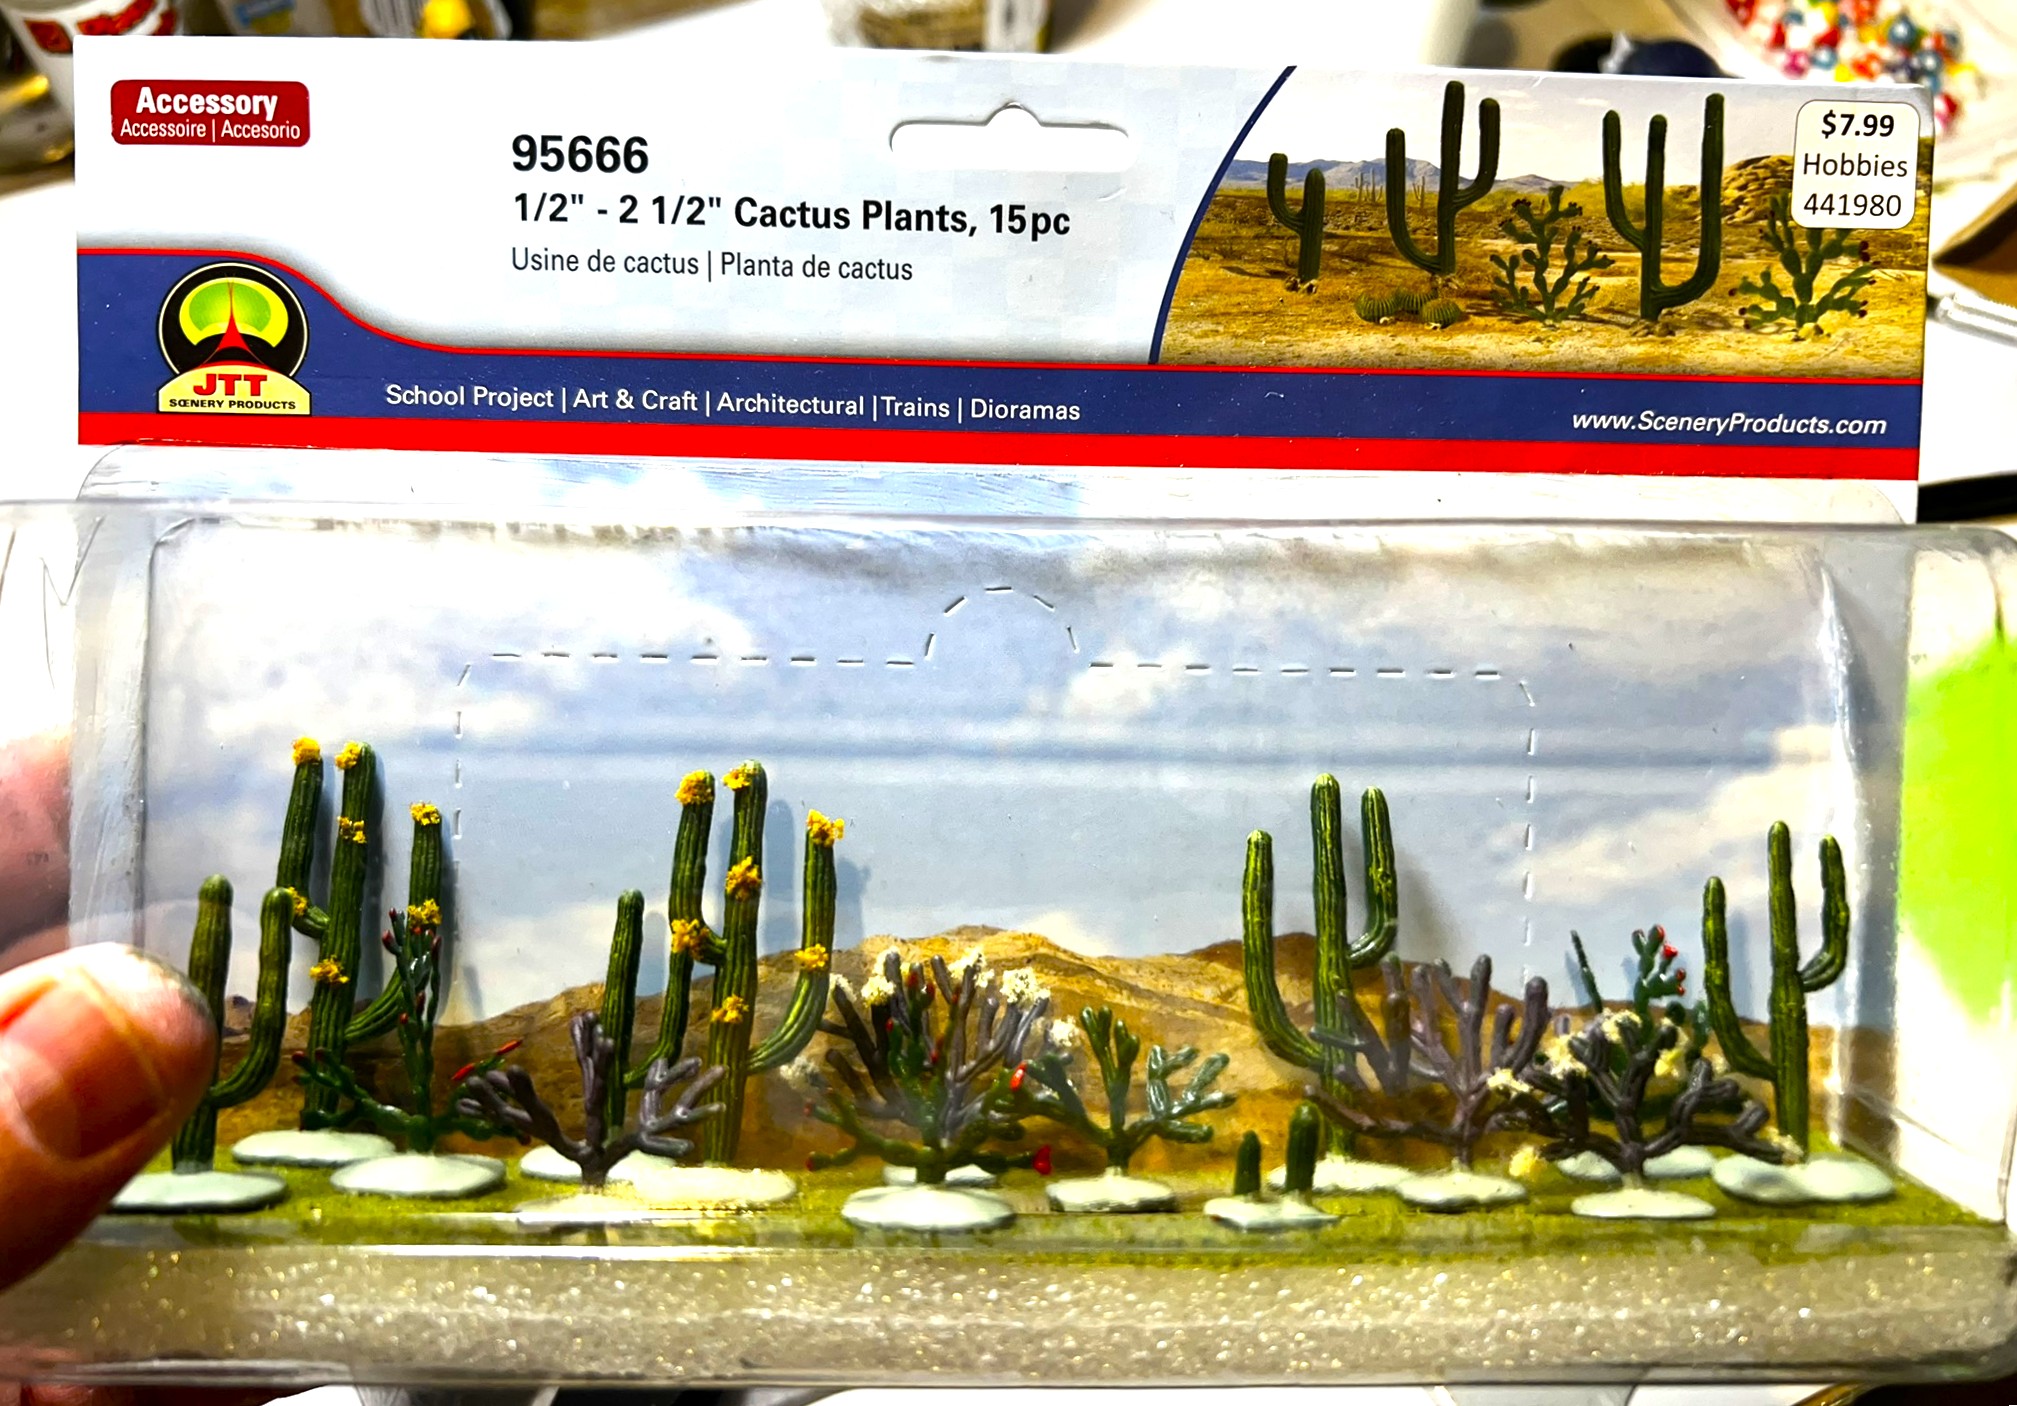
Cactus plants from JTT Scenery – I had two packages of 15 cacti.
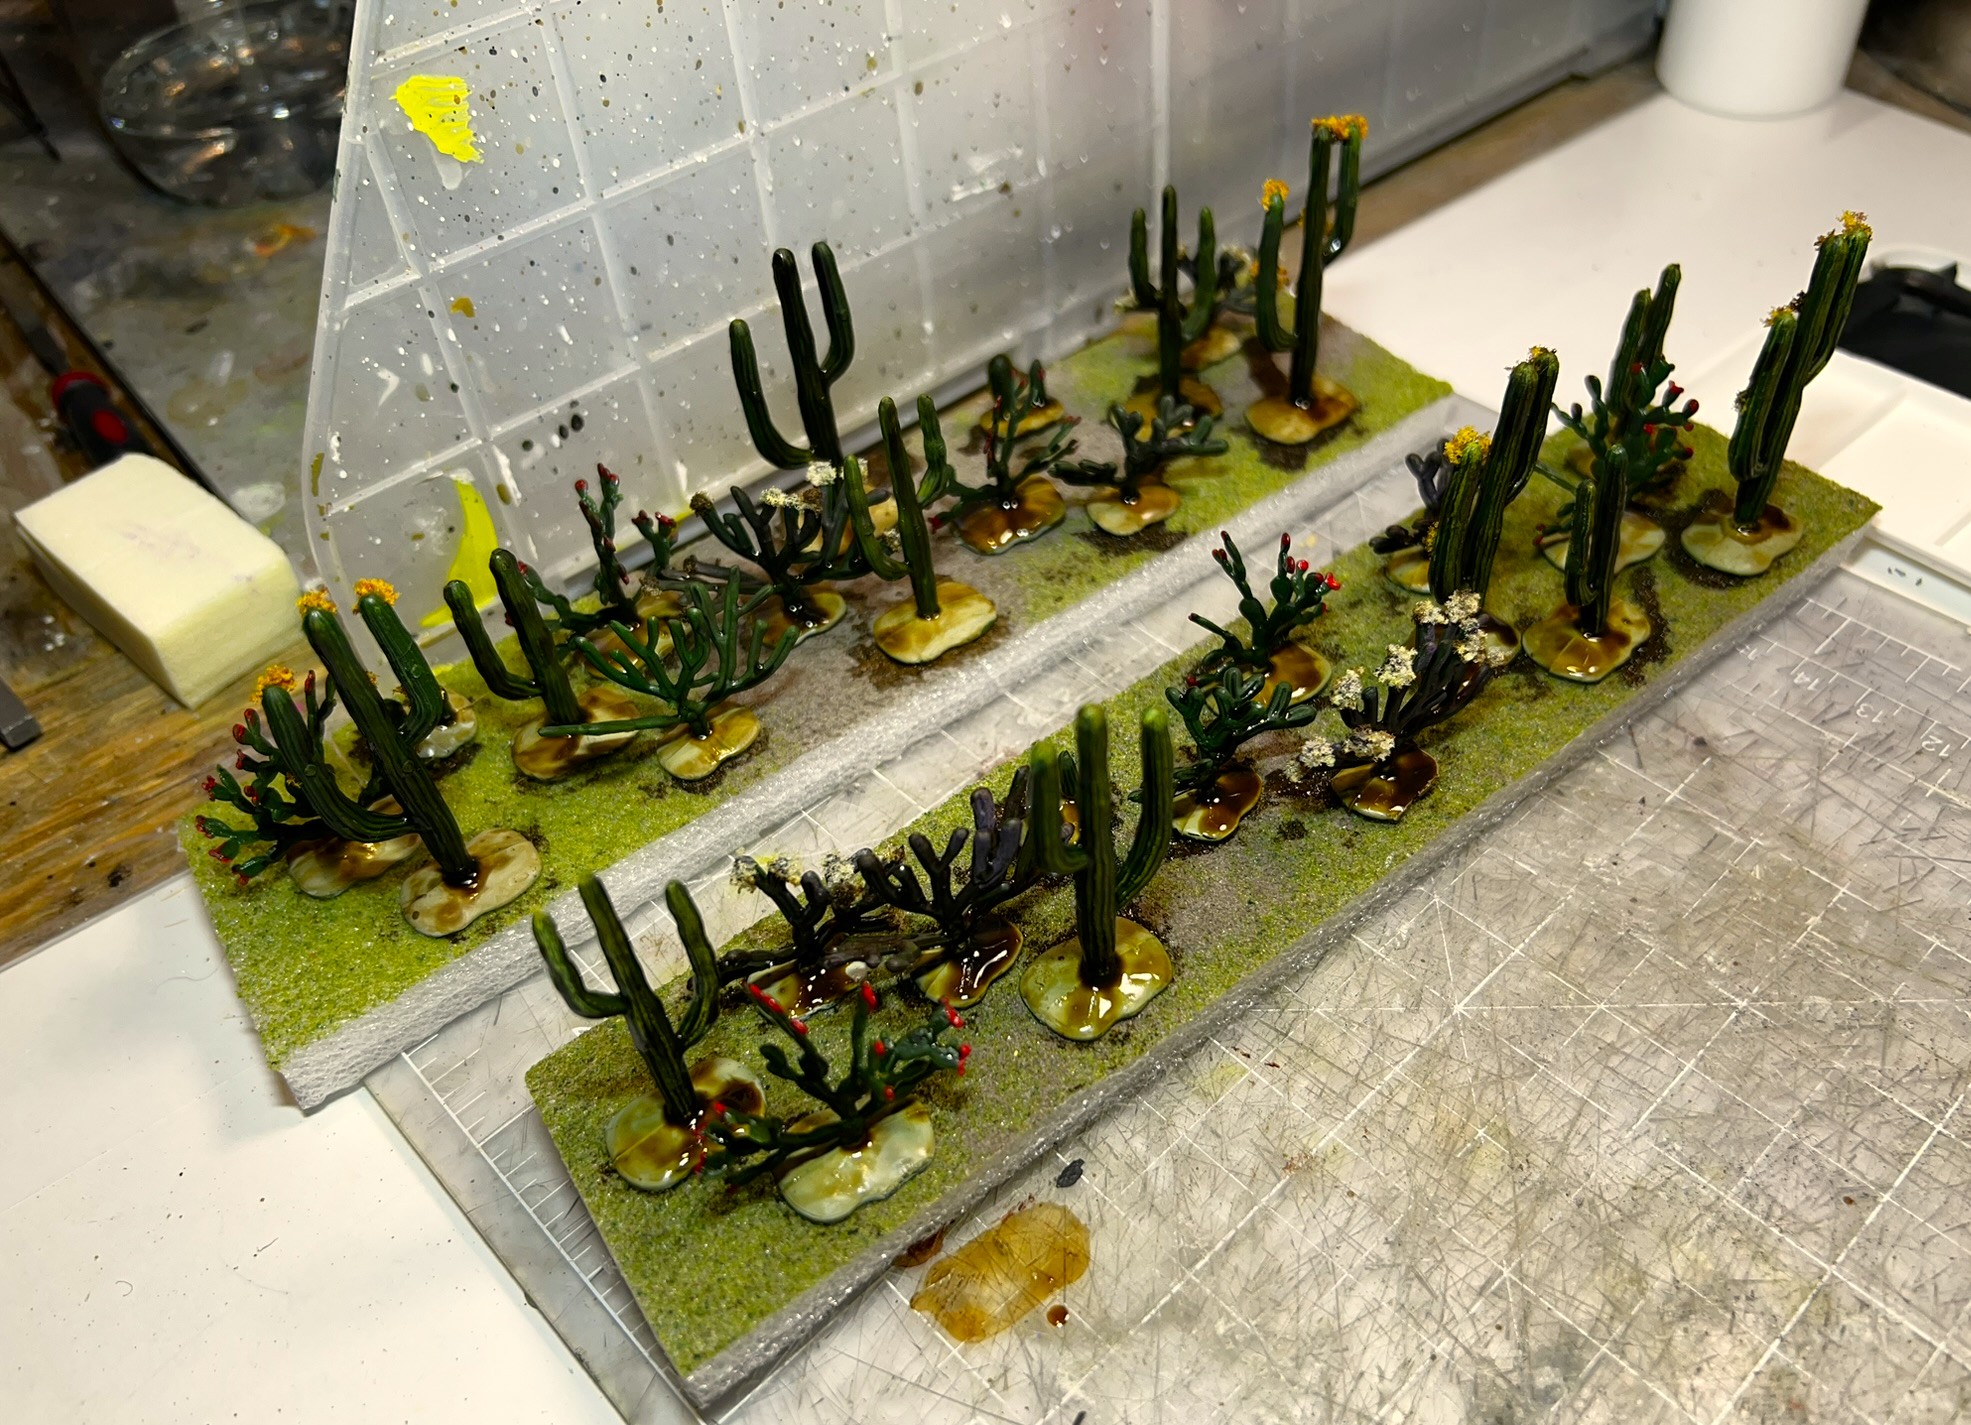
The cacti are from JTT, and are plastic, and hence, they have that glossy look. I used a wash to knock off the glossy appearance and to give some depth to the plants’ striations. This was easy to do as the plants are set in the package into a styrofoam base. That base holds them loosely enough for applying a sepia wash and removing the cacti and bushes afterwards was simple.
After applying a sepia wash. The mounting styrofoam made this easy.
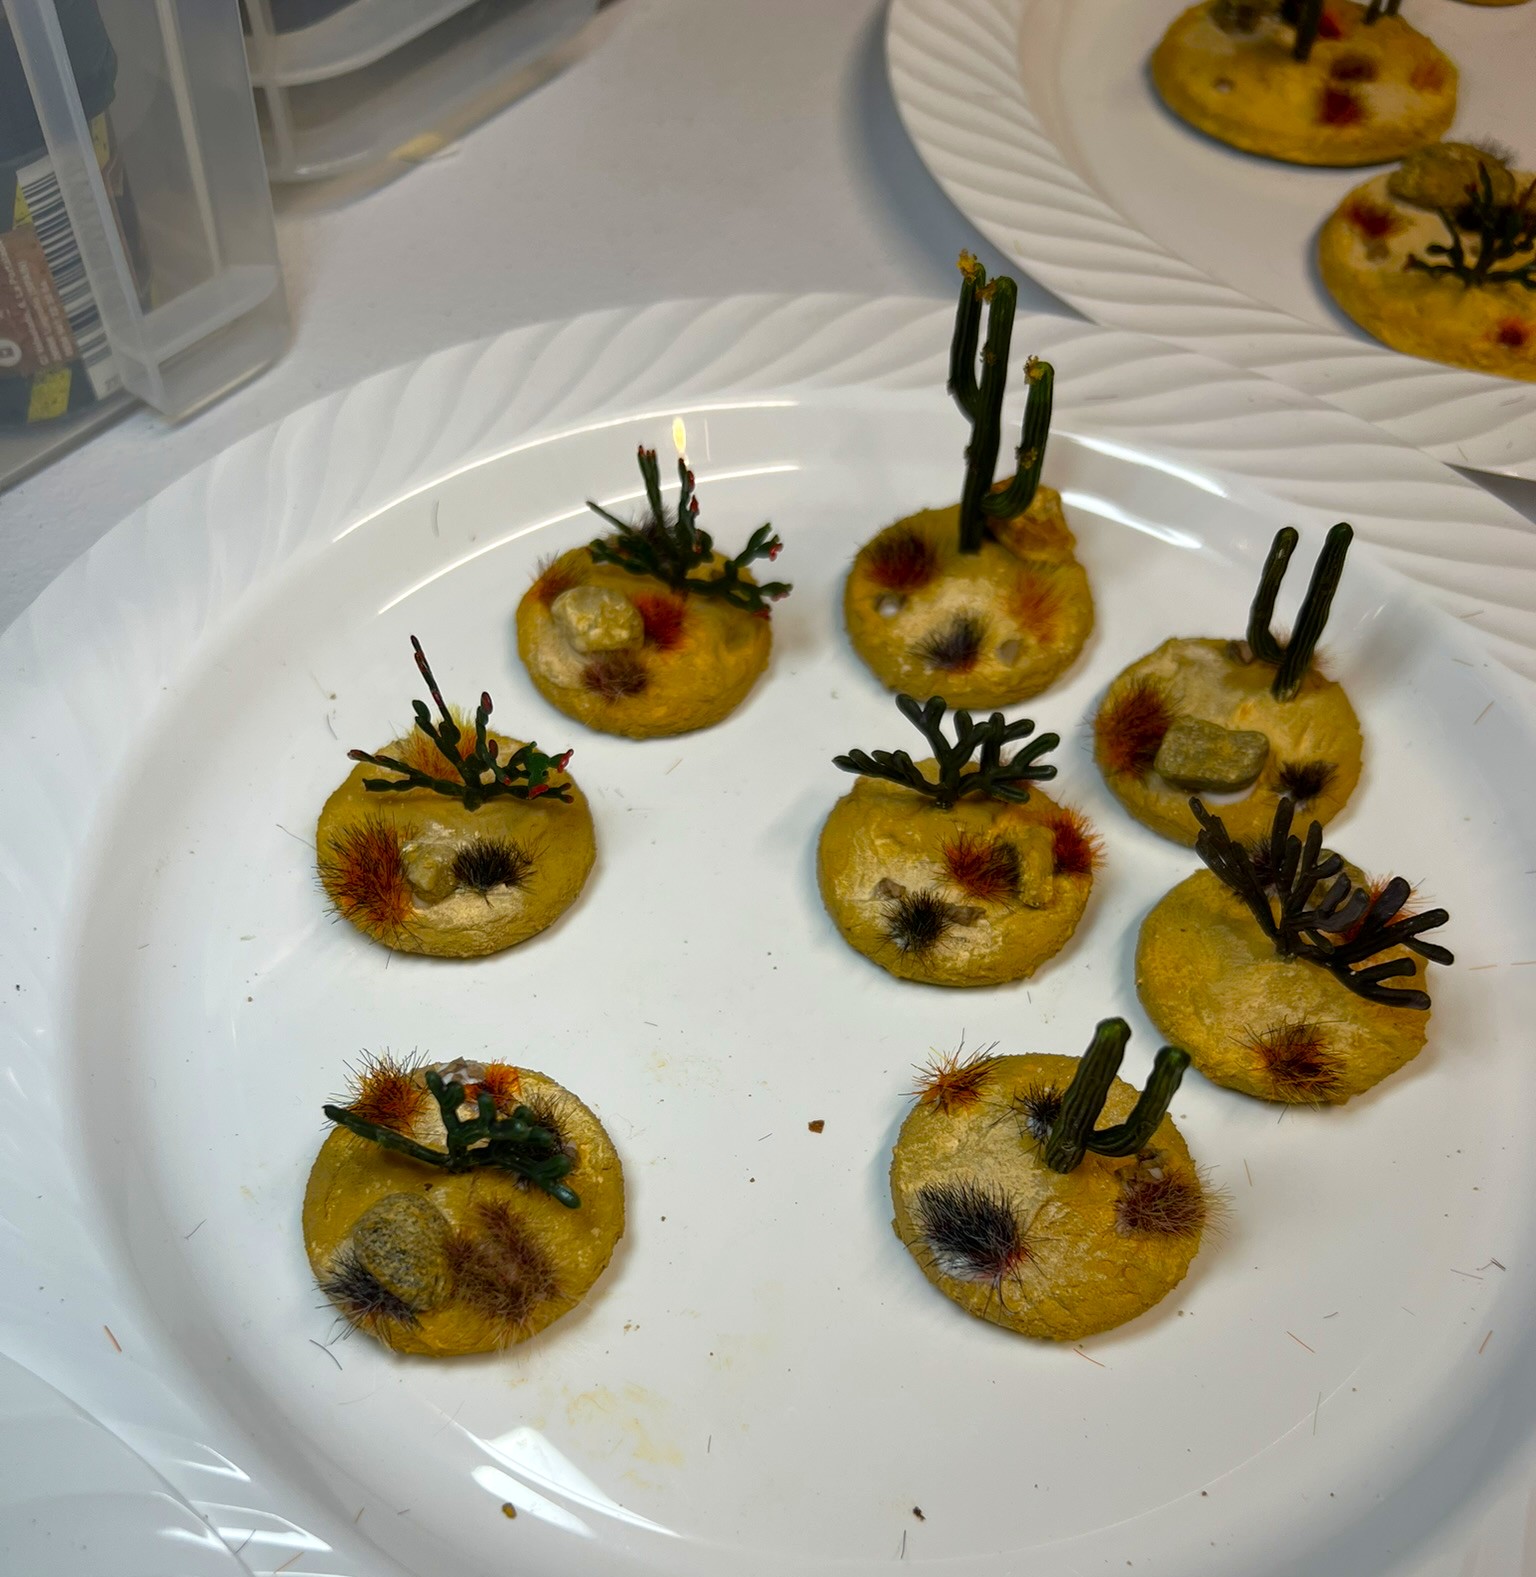
As for bases for the plants, I decided it was a good opportunity to clear out a bunch of different plastic and wooden bases from my collection. One was even the same as I used on the Scarecrow Girl statue. You can see them below – I ended up with 20 bases. All of them got appropriately-sized steel washers underneath.
Some of the bases I used – well 19/20 anyways! The other one was a wooden scratch-built base that needed a purpose.
I glued the plants to the base, then added the AK basing paste, let that dry, then added pigments. When that was set, I added flocking to match my Whim Whim and Temujican unit basing schemes.
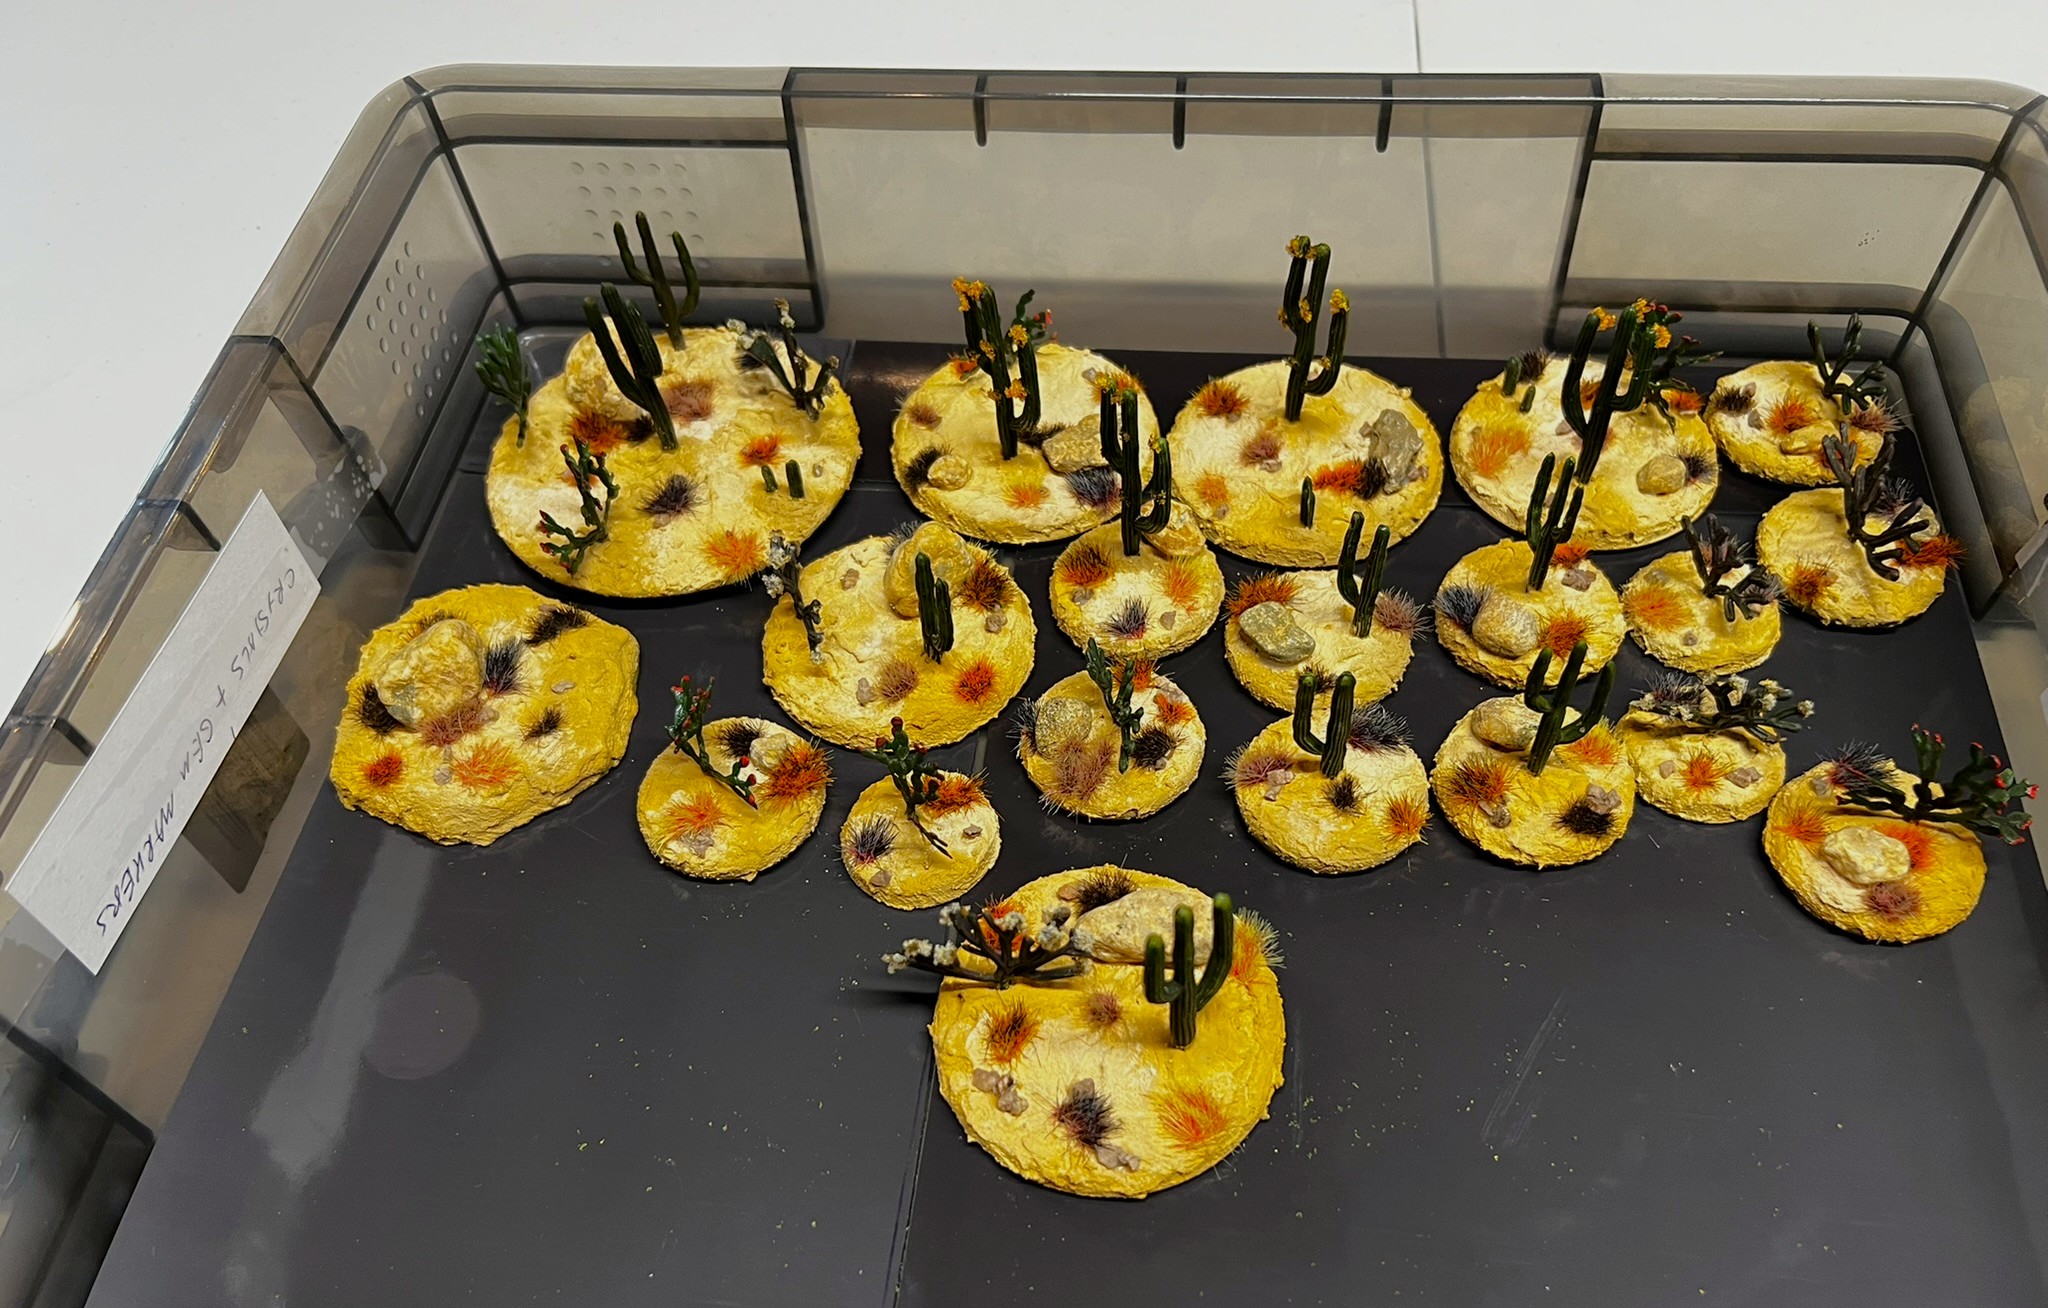
When I sent my mother these pictures on my phone, she thought they were cookies! Below you can see all 20 of them in a Really Useful Box.
Oases
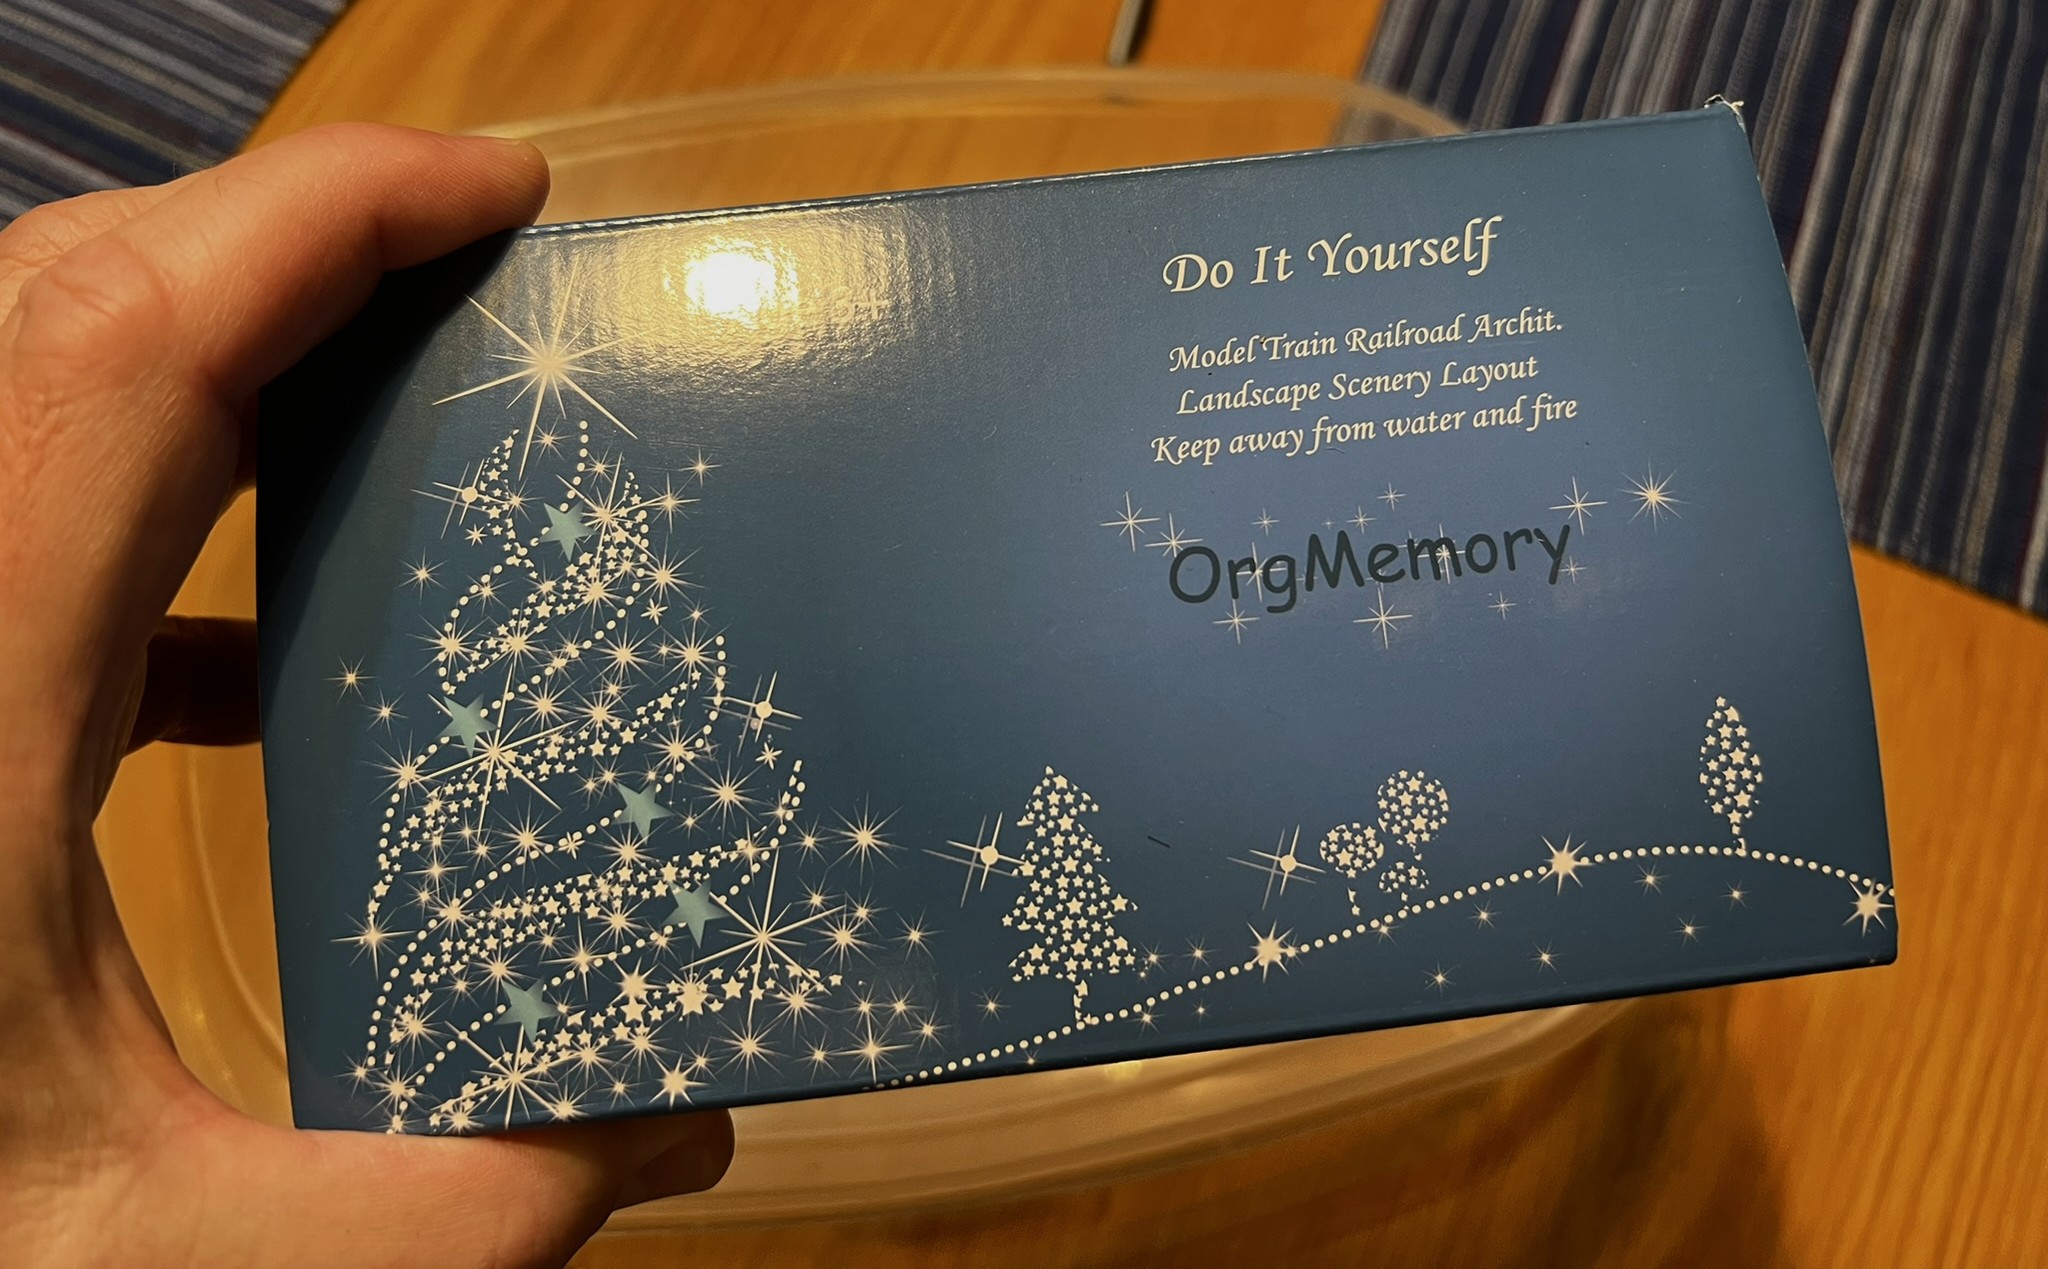
Some of you may remember that for my Conquistador/Maya game, I built some sandy scrub-like terrain pieces, that had a few palm trees. These did not look like an oasis to me – so I decided to make some that did. I found some model landscape palm trees on Amazon from OrgMemory.
The OrgMemory palm tree box.
The plastic palm trees would need (similar to the previous situation with the cacti), a sepia wash. To ensure that a sepia wash would adhere properly, I washed all of the palms in soap and water and let them dry. This would also let me figure out what sizes would be best to use on this scratch-build.
A mass of trees ready to wash……and drying. Now I needed somewhere to put them and to determine the appropriate mix of types and sizes. The little prongs on the bottoms of the trees would help later with mounting on the oases.
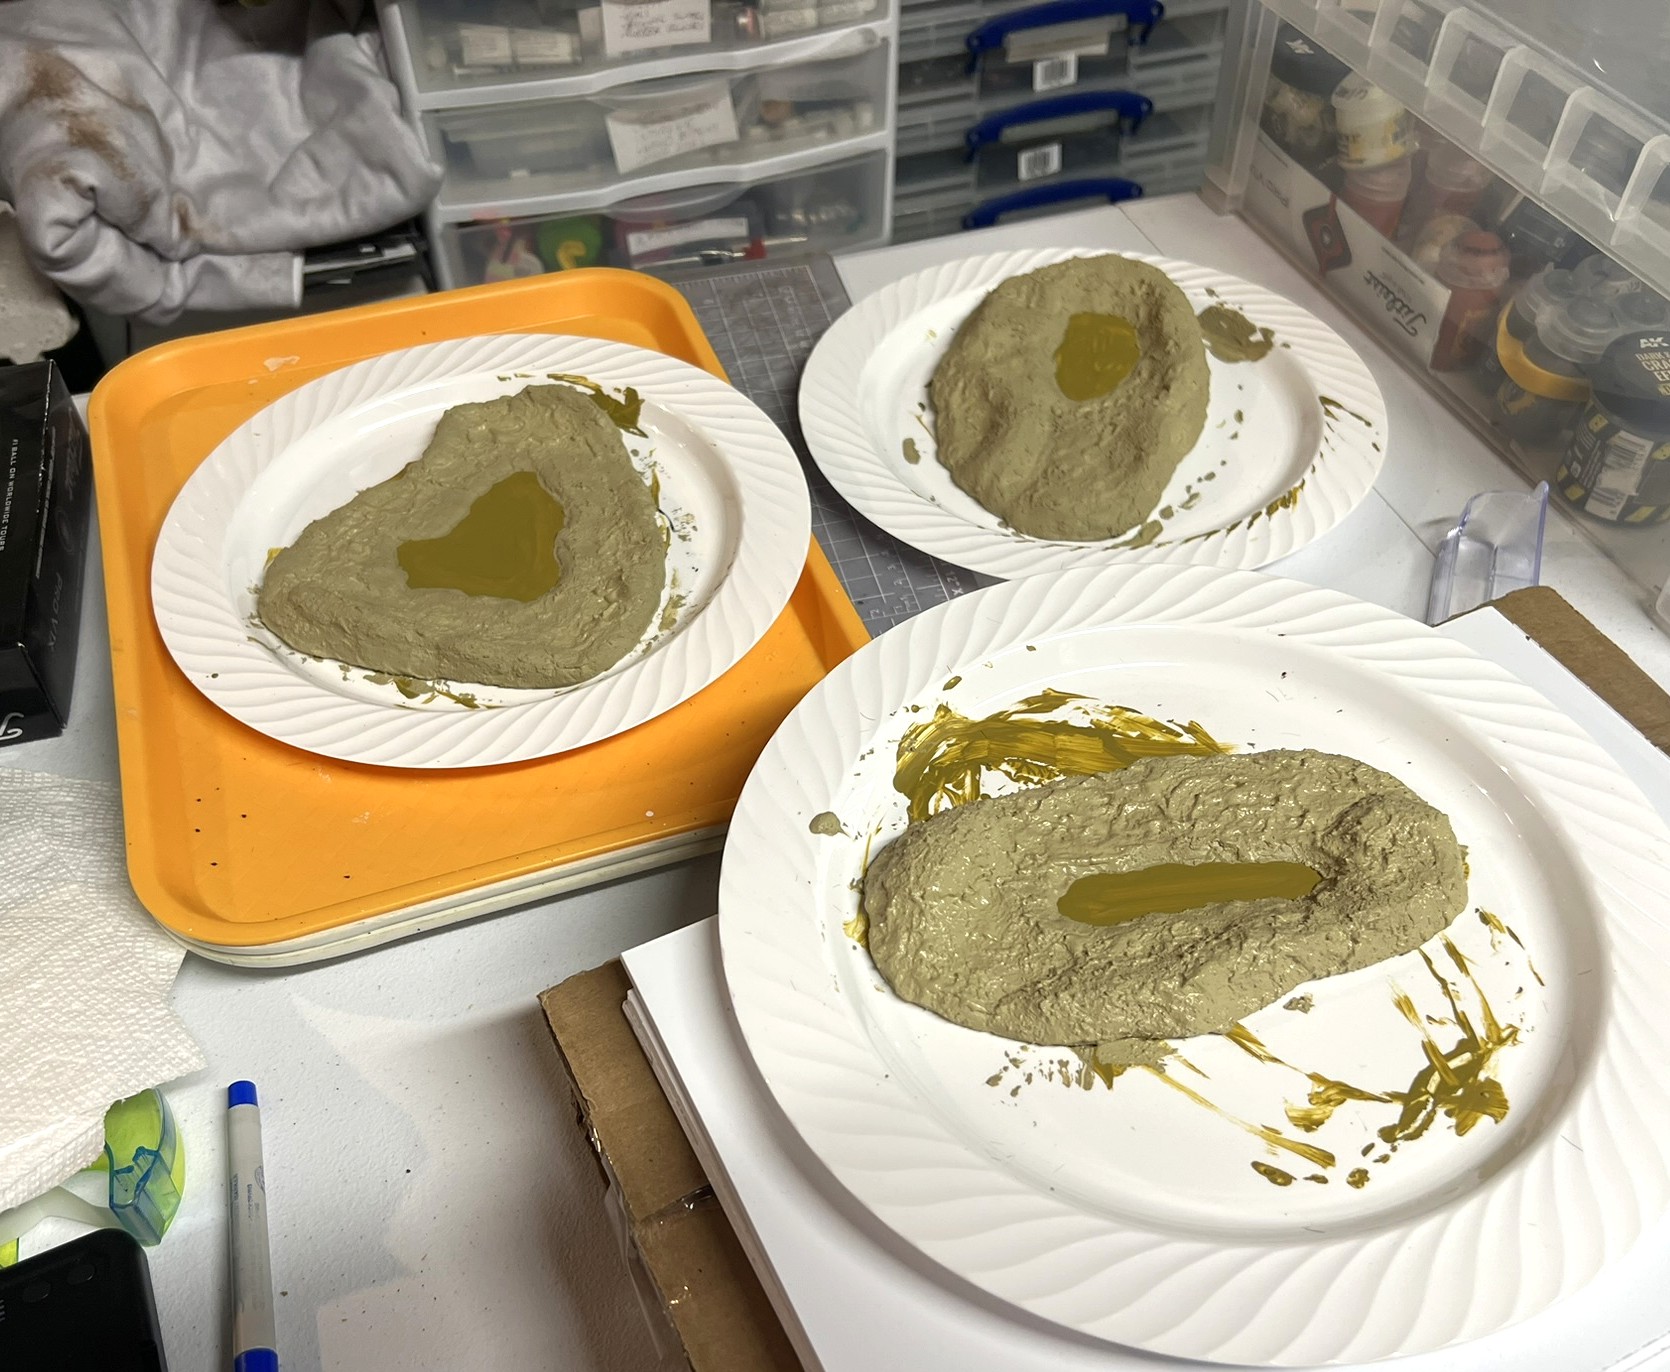
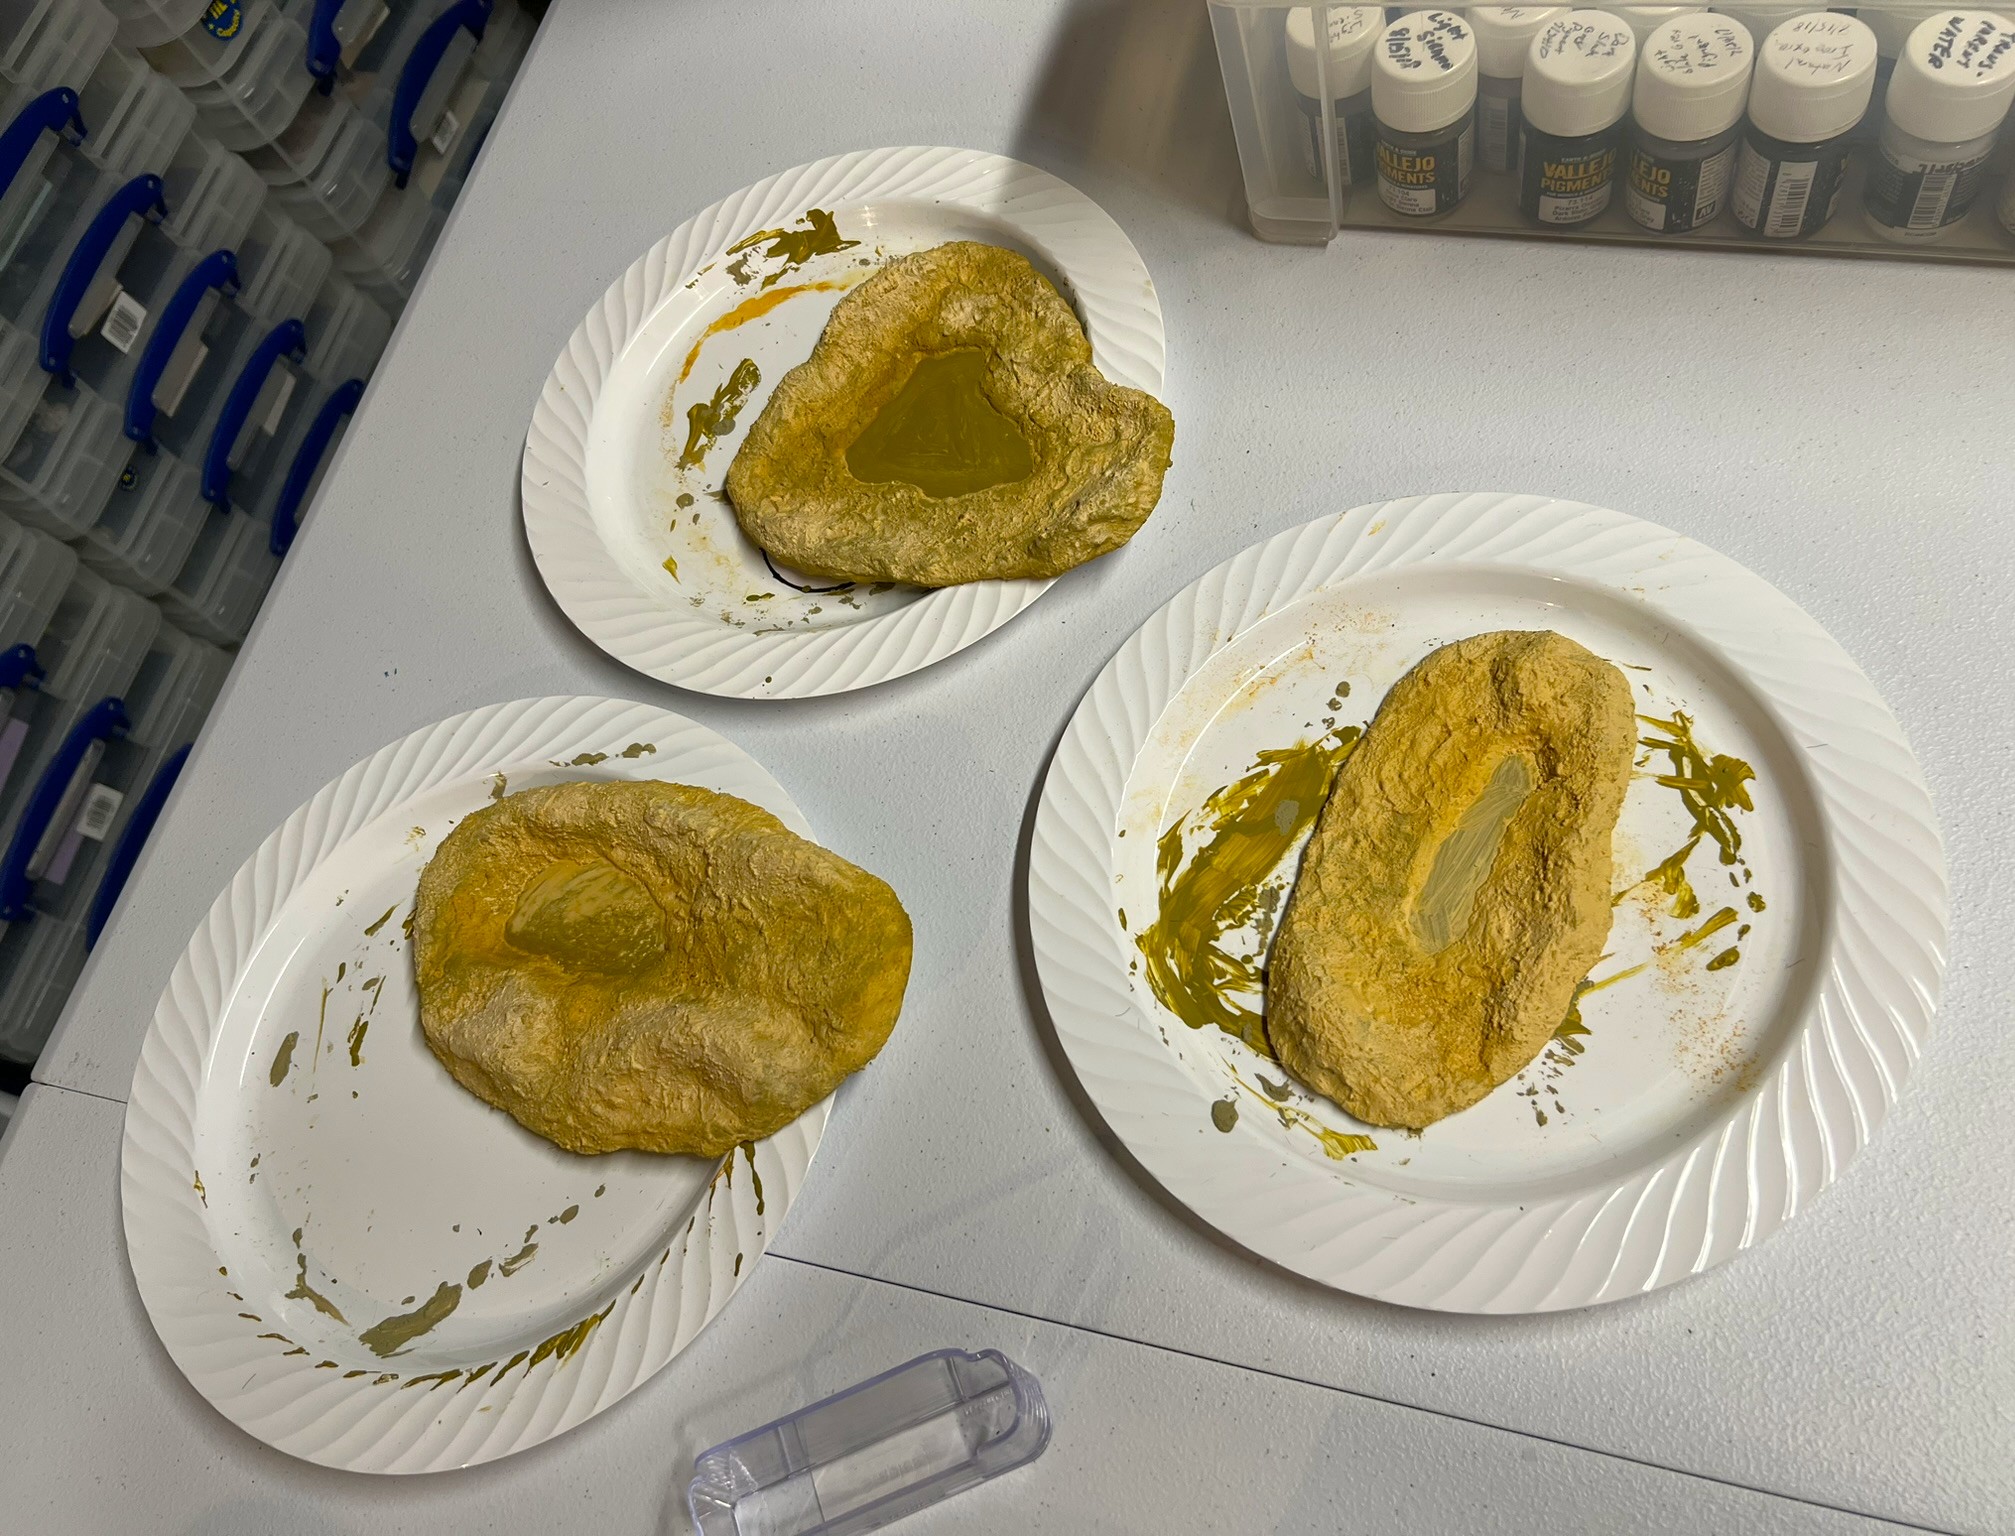
While the palm trees dried, I used my scroll saw cut up four polystyrene sheets into random shapes for the oases’ bases (that rhymes?). Apoxie Sculpt was applied on the sheets to create the shapes of the terrain. In the end, I only used three of the four sheets. I’ll save the other for later use.
The polystyrene sheets cut into shapes for the oases.The Apoxie Sculpt setting up and hardening as shaped on the three oases. It cures in 24 hours.Once the Apoxie Sculpt had cured, I primed all three with a light yellow primer – and let that cure before adding the desert paste.Here you see the AK dry desert paste applied and starting to dry.Once dry, I added three different pigments (similar to my desert bases and scatter terrain), and let the pigments set.The next step was to paint the bottom of the water holes a distinct turquoise in anticipation of adding the Vallejo Still Water product later. I wanted the water to really stand out color-wise.
Once all the flocking was in I added the Vallejo Still Water in – mixed with some Secret Weapon Washes blue ink.
I then mixed and matched the palm trees to see what worked. The cured Apoxie Sculpt was pliable enough – yet strong enough – such that I was able to use an awl to make the holes for the trees’ prongs you saw above to set in the oases. This allows them to be removable, which is a plus, while the holes stay strong for reinsertion of the trees.
Completed!
Lastly, here is a video of them and a brief description by yours truly:
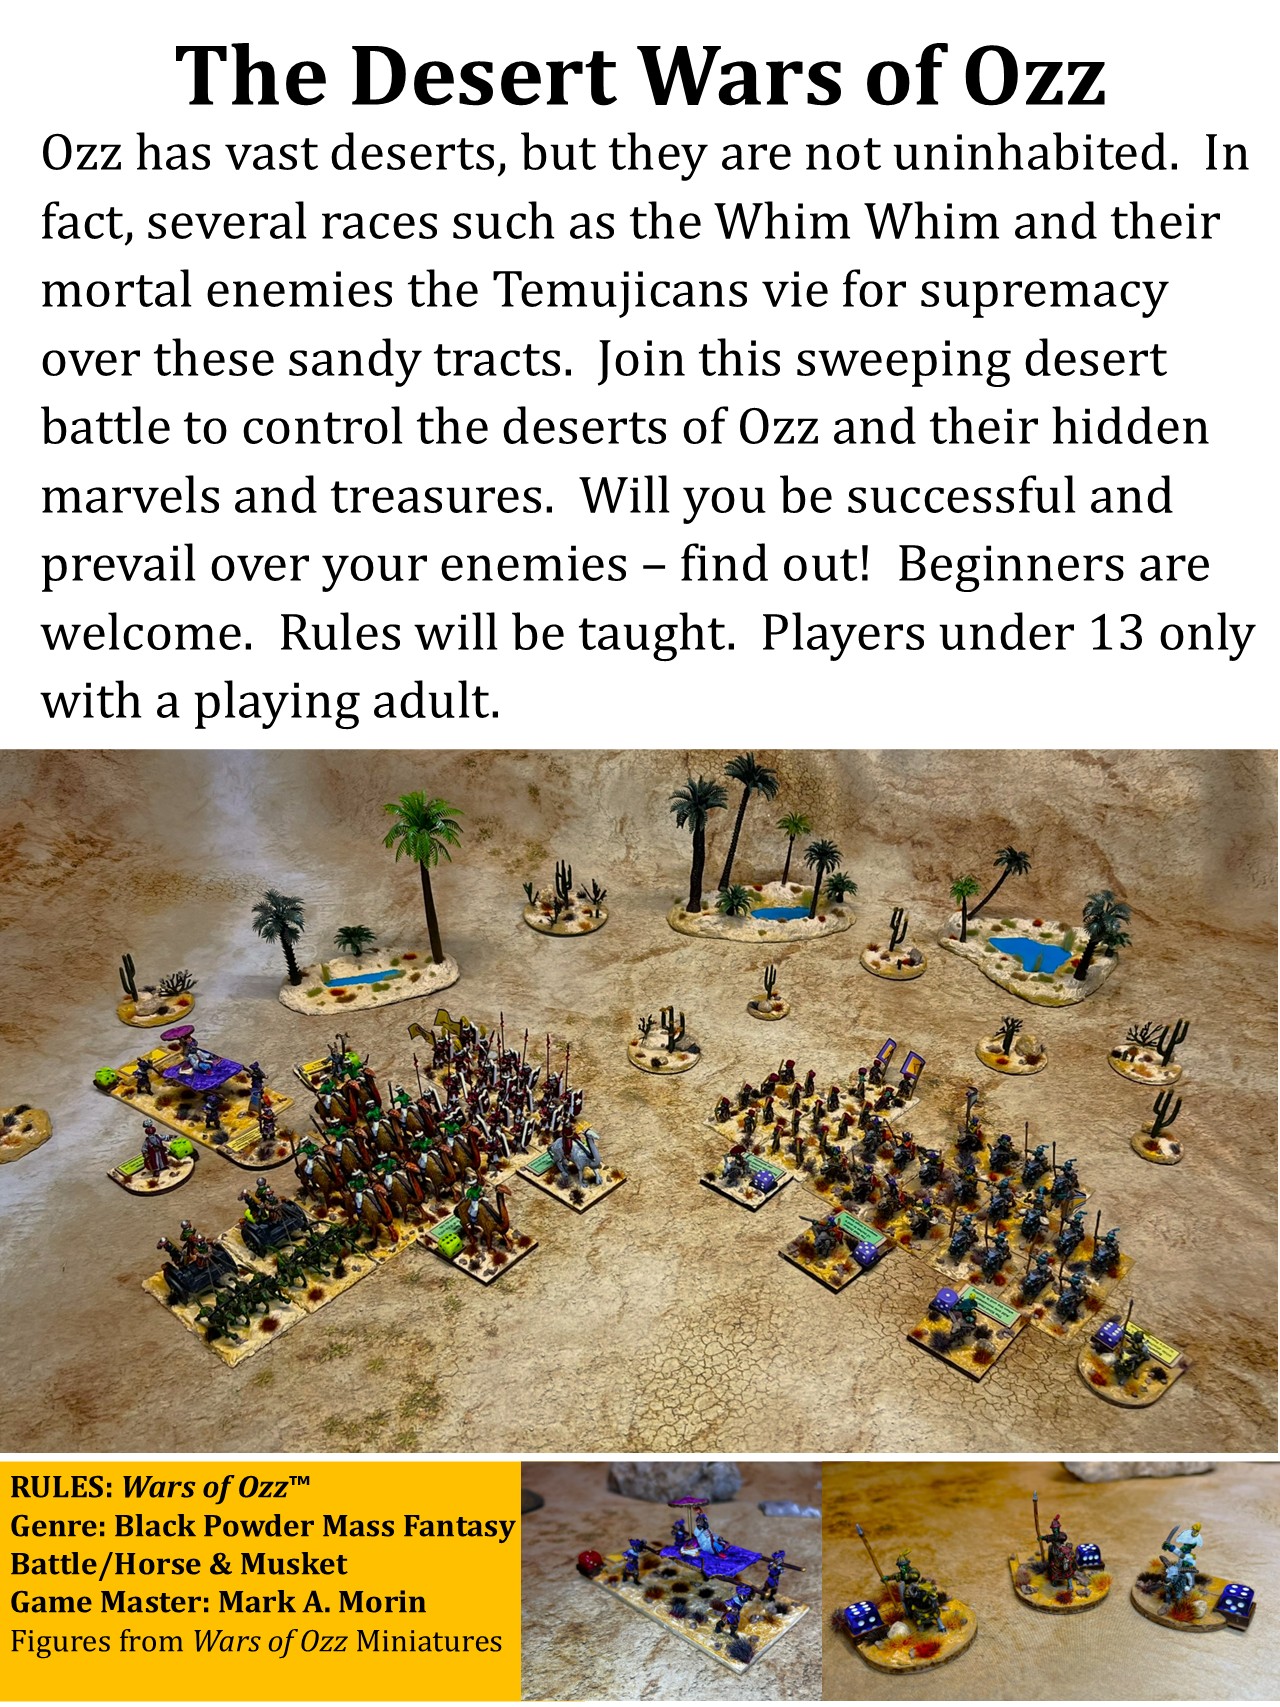
These three oases are the objective markers for my game, “The Desert Wars of Ozz“. The flyer for that game is below. You can see the some of the cactus bases and the oases – though they lost some color on the flyer being in the back.
“The Desert Wars of Ozz” game flyer.
I will be running this game (or a similar one) at multiple gaming conventions this year.
Tree Builds and Rehabilitation
My tree collection that I have used for years was in need of rehabilitation. The other gift from Mom was a JTT product that you see below:
The tree package.
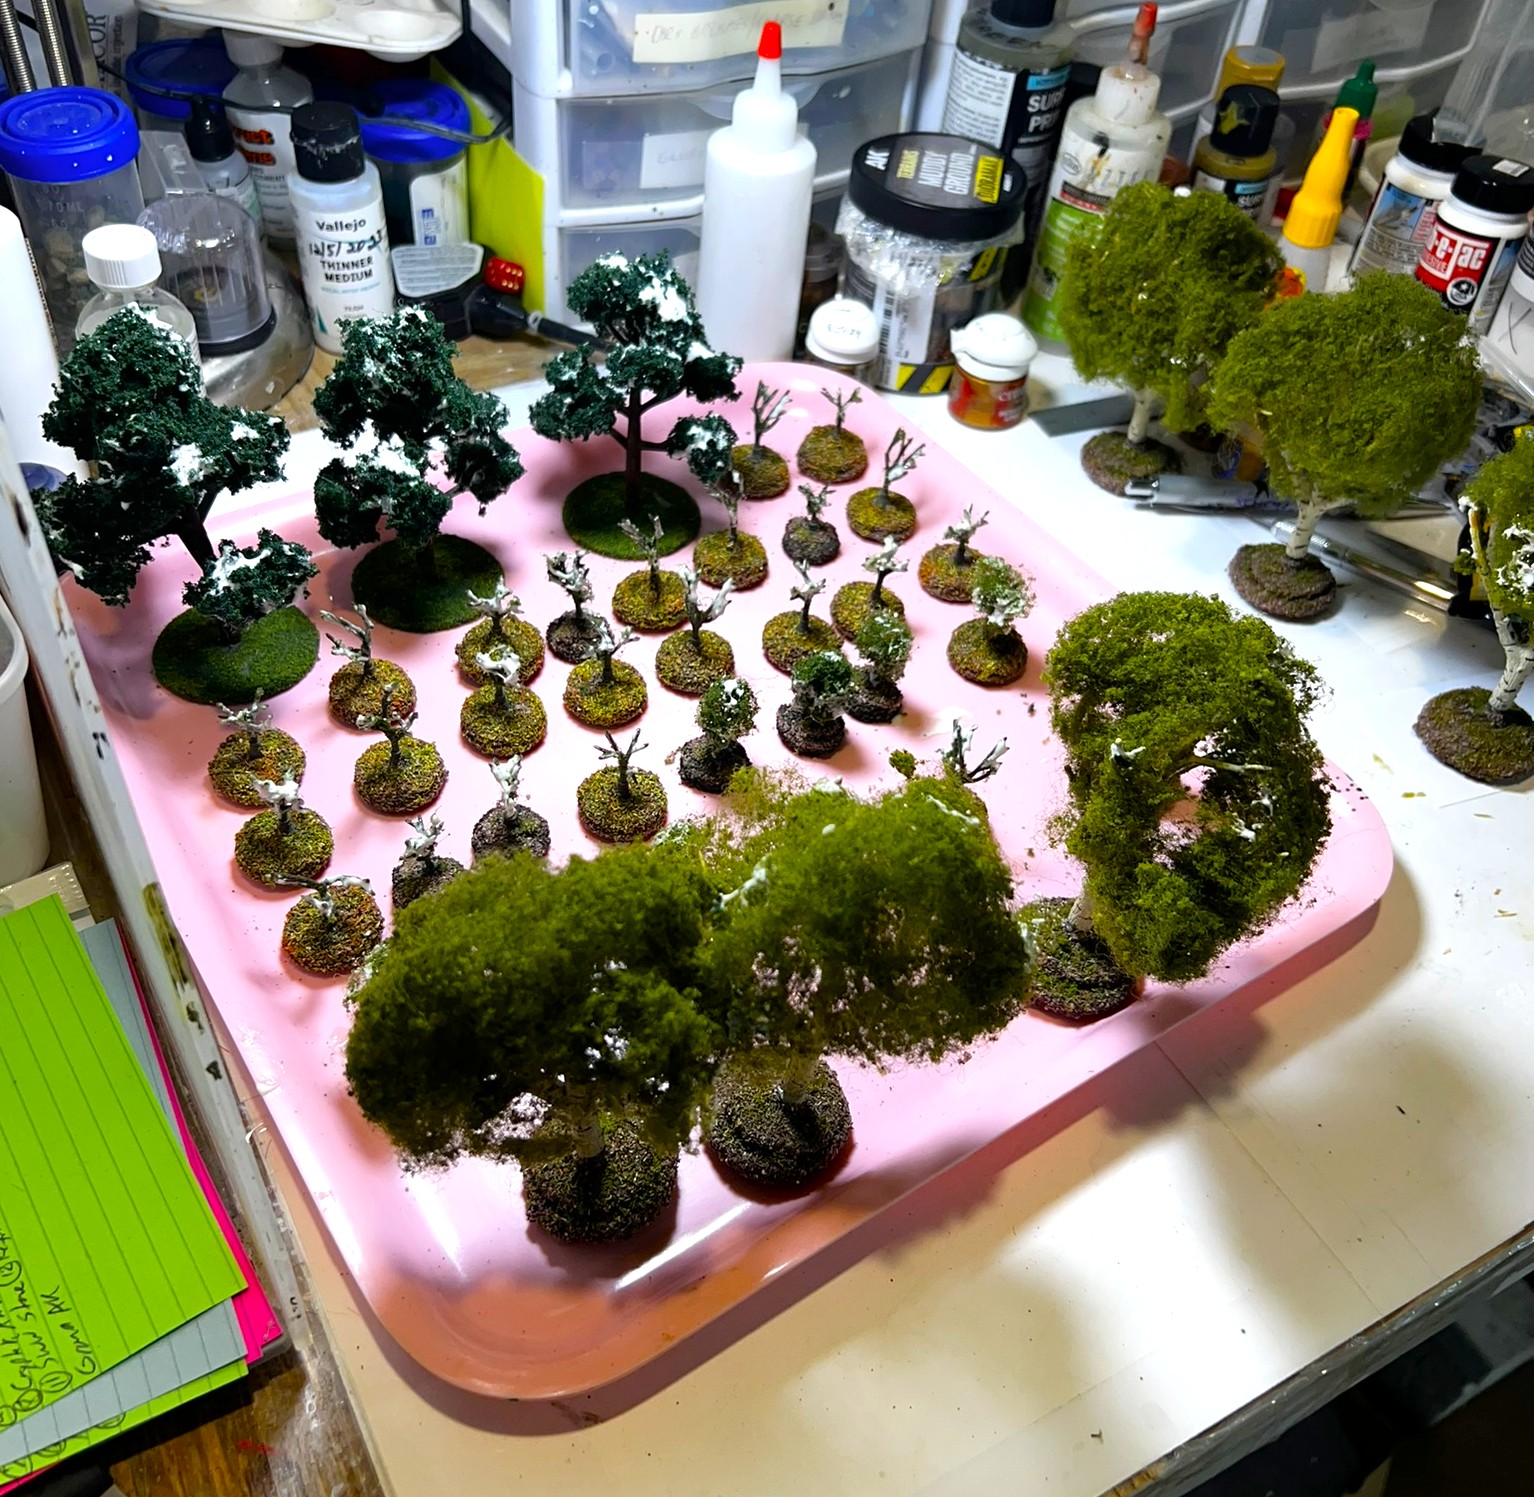
These were nice trees, but the foliage was a bit stringy in places. Plus I needed to wash the plastic limbs and trunks down with sepia and a darker wash. I assembled and mounted these three on large 2″ steel washers. Then I went to my tree collection and stripped off the stringier foliage on the older trees I already had. I applied Woodland Scenics Hob-E-Tac to the older trees and the newer ones. After the glue had turned clear, I used Woodland Scenics Light and Medium Green clump foliage to finish them off. There were 32 trees in all.
The stripped trees with the three new ones in the back – all with Hob-E-Tac drying.The post-makeover trees.
As trees are just so essential to a tabletop, I was happy to have these in better shape for my games going forward.
That wraps up part 2 of this mini-series on terrain. I think I got a lot done here and it was fun. The cactus bases and the oases also qualify for Dave Stone’s annual “Paint What You Got Challenge”. Please, check it out – Dave is a great guy and runs this every year between Christmas and the end of February.
If you have any suggestions or feedback, as always, let me know in the comment section.
And part 3 (the last one) in this series will be coming soon…
Final Note
Want to learn more about Ozz? Well, if you do want to check out the excellent Wars of Ozz figures’ range – there are two places to get them and to get the rules (and I make no money from this). The game rules and the figures are available from the next two places:
Below you’ll see the list of paints and the like that I used on these – and they are more useful for me when I need to recreate a color scheme in the future than maybe you – but in any case that’s why I post them.
Miscellaneous details and references for those interested in that sort of thing:
For all of my earlier posts on Wars of Ozz games, figures, units, and other related projects – please see this page.
PAINTS, INKS, GLAZES, SHADES, WASHES, PIGMENTS, FLOCKING, GLUES AND MORE THAT I USED ON THE CACTUS SCATTER TERRAIN BASES:
2 packages of Cacti/desert bushes from JTT Scenery (SKU 95666)
Homemade wooden hex base
1½” wooden disks from Michael’s
Games Workshops 3½” Plastic bases
Games Workshops 2½” Plastic bases
Unknown 1¼” Plastic bases
Unknown 1½” Plastic bases
Unknown 2¼” Plastic bases
War Games Accessories Steel Bases (FOW1)
Citadel “Seraphim Sepia” (shade/wash)
Vallejo Surface Primer “German Dark Yellow”
PVA Glue
AK Terrains Diorama Series “Sandy Desert” (texture/basing paste)
Several upcoming wargame conventions are looming on my horizon, so I needed to get going on adding some new terrain and game markers for my Wars of Ozz games. I will be posting about these three parts for ease of reading. I have been (as you will see) very engaged with multiple terrain projects. Luckily, I was able to get all of them completed in early January after finishing my brigade of Pollywomps. At Christmas, I received several cool gifts that would be useful to convert or build as terrain pieces. This post will cover the first one I finished, a Scarecrow Girl statue.
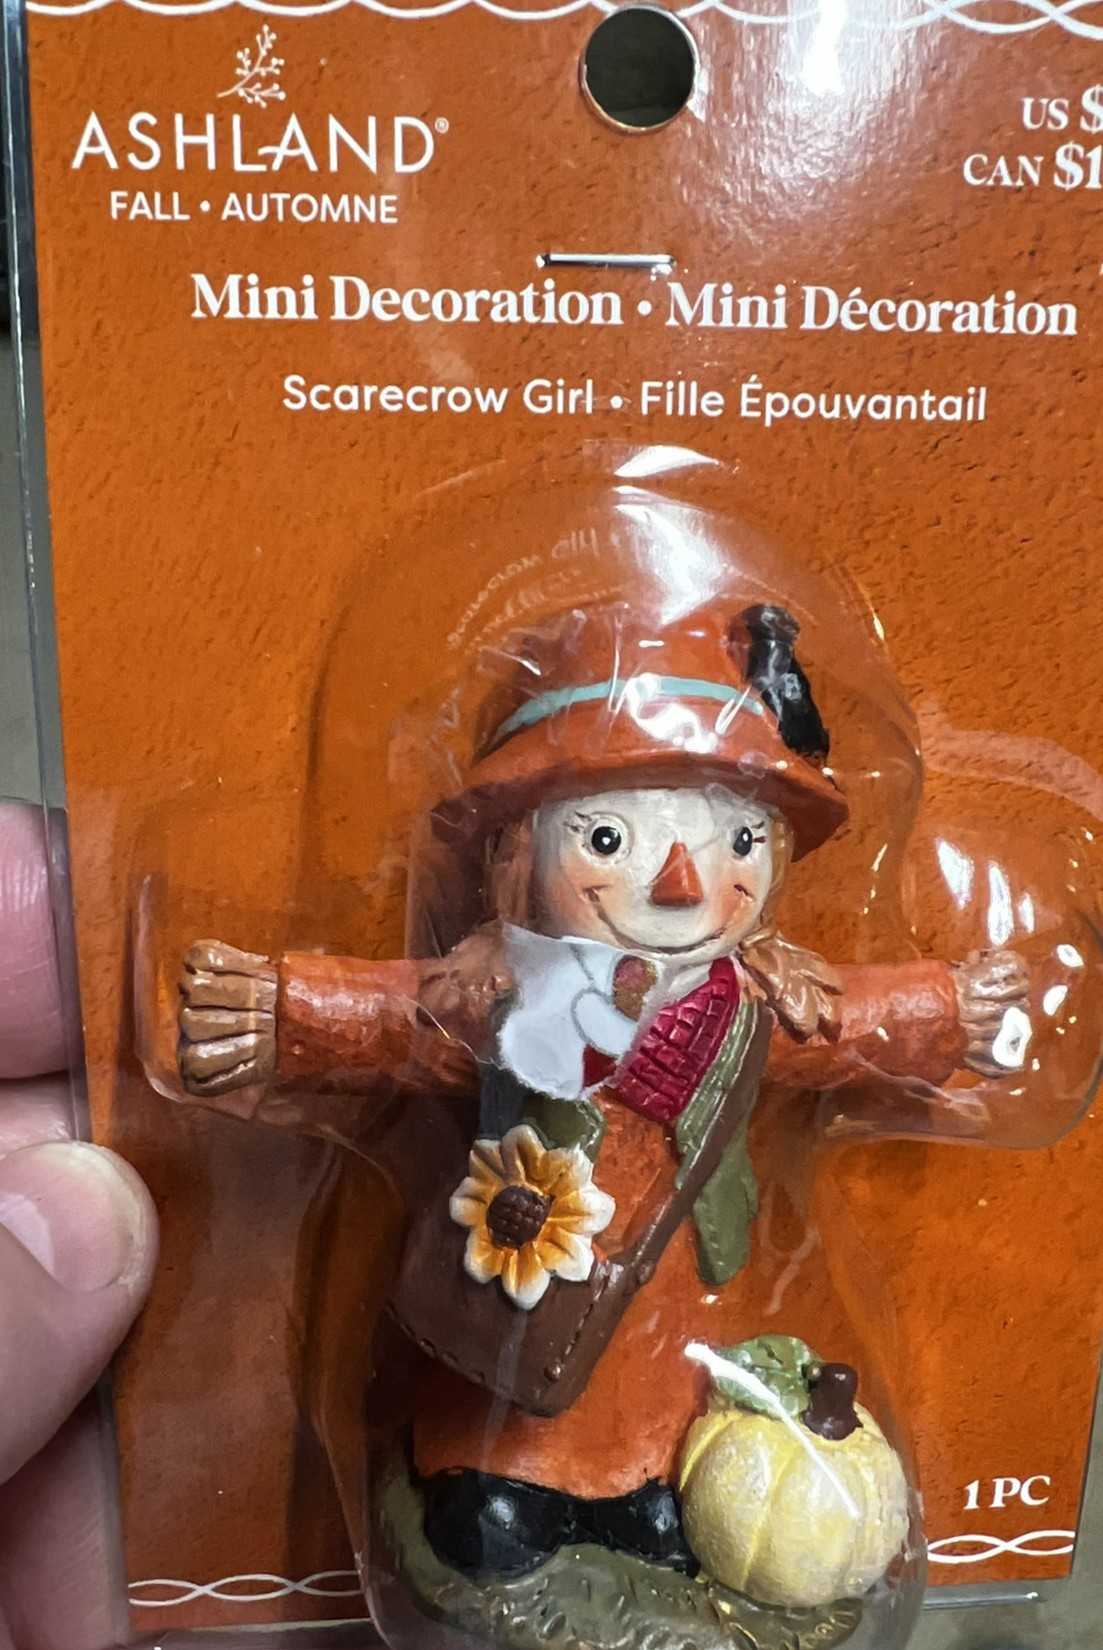
My wife Lynn saw a 3″ tall resin figurine of a scarecrow girl at the Dollar Store – and got it for me. It was factory-painted. When I saw it, ideas in my brain began to churn. I thought with the statue’s size she would make a nice centerpiece as a statue. I’ll share how I worked on it and then some shots of the finished product.
WIP Shots of the Project
The figurine in its package with wrapping paper shard still attached!
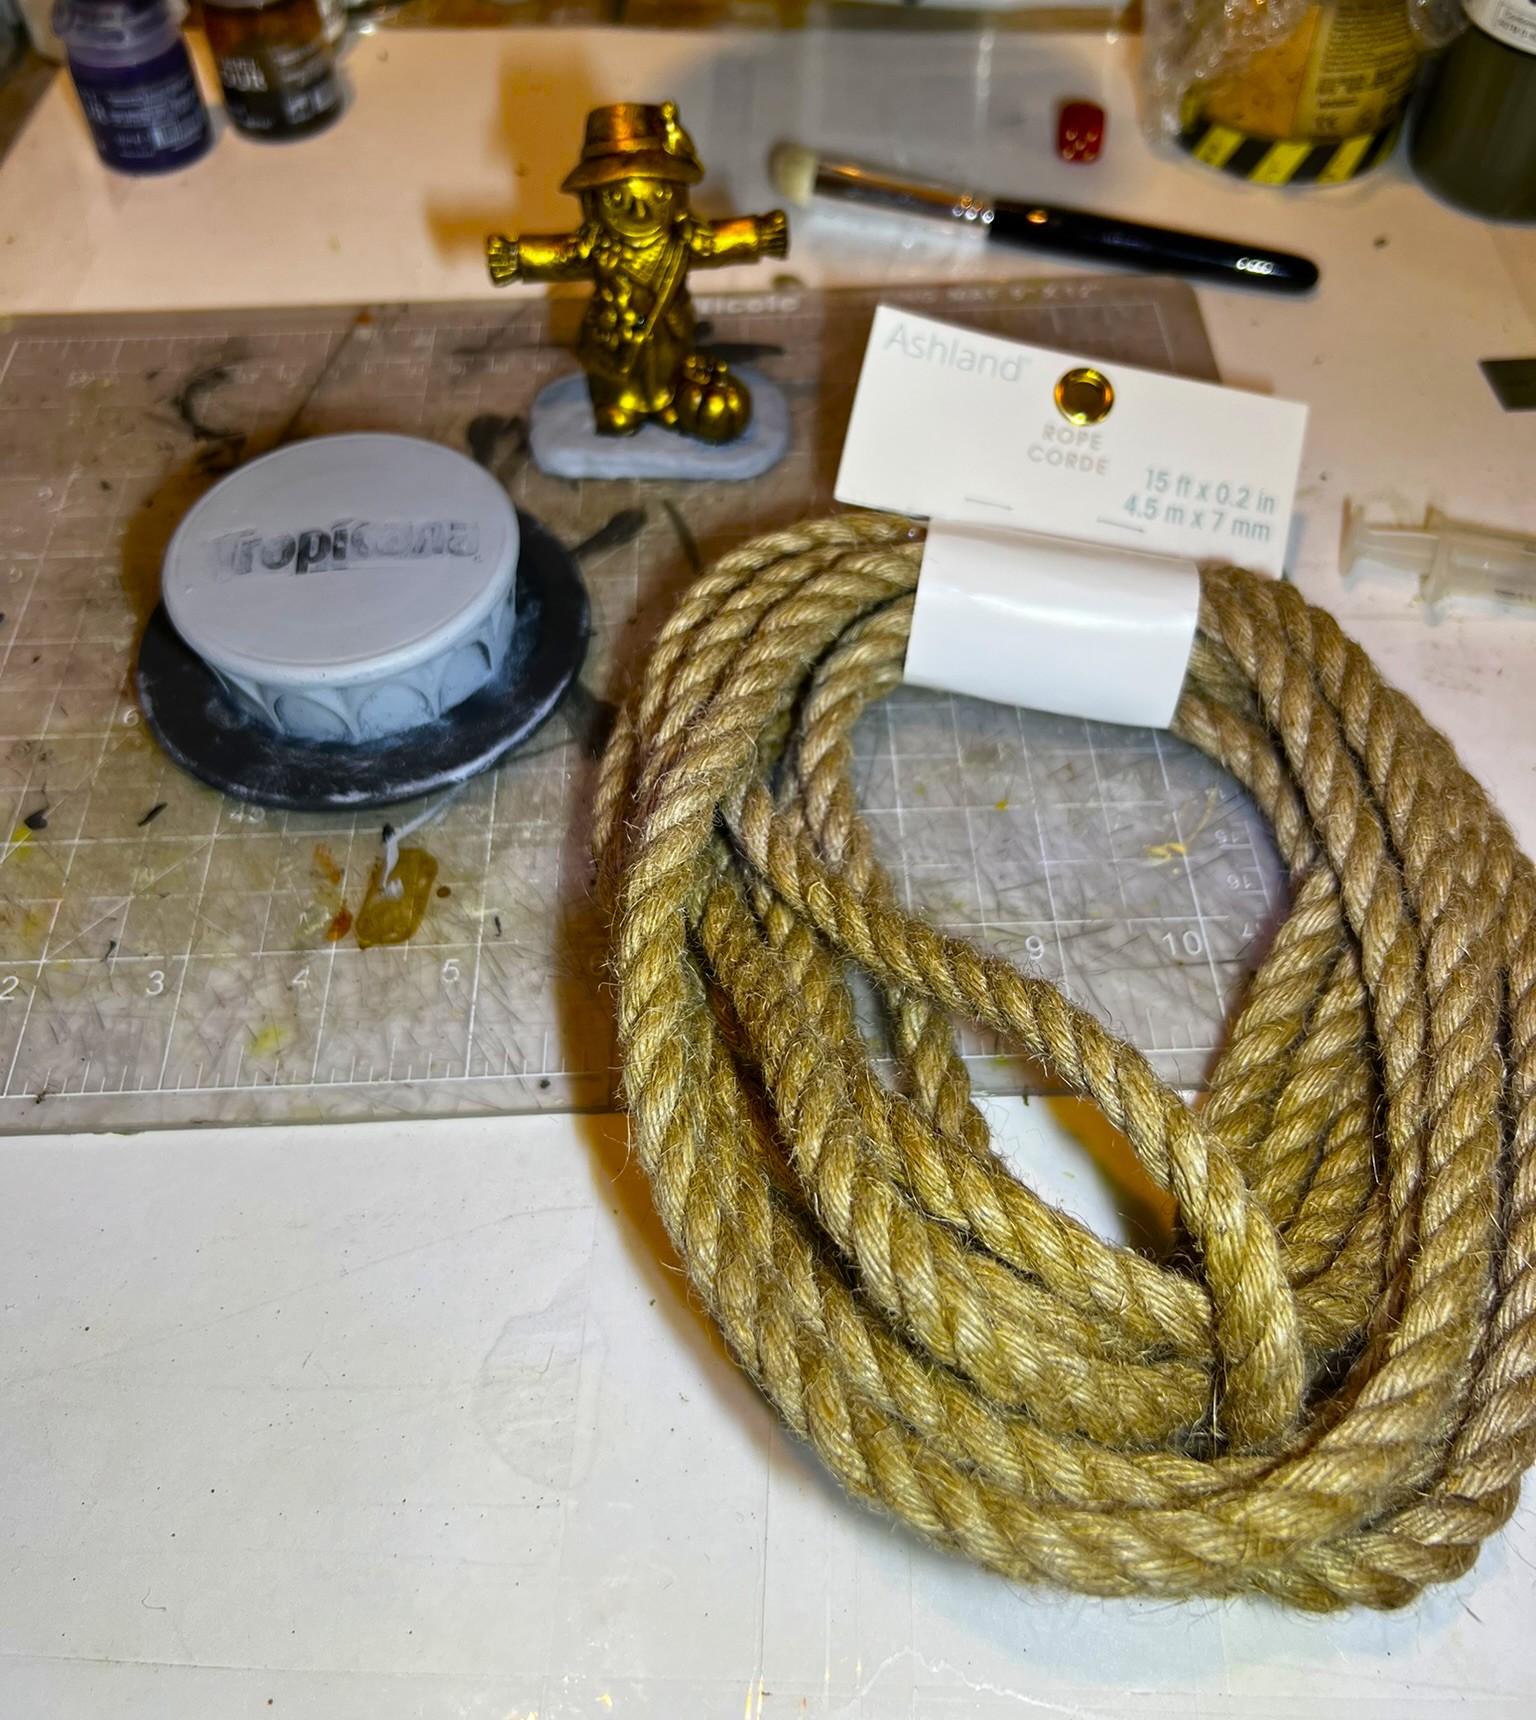
My plan was to build the terrain piece as a metal statue on a granite plinth. I had various plastic bases that I had not been using – and I selected one that was not originally even designed as a base for figures. It was probably came from something household-like that I assembled years ago and came as an extra piece. I saved it as I thought someday I could use it. I sanded off its shiny surface for better primer adhesion. Also, I had saved a plastic lid from a Tropicana orange juice bottle that had a nice shapes on its outside surface. Lastly, I added a heavy large steel fender washer underneath the plastic base for stability and adhesion to a magnetic sheet in a storage box.
The Tropicana lid, steel fender washer, sanded and repurposed base, and the Scarecrow Girl shown here at the start.
The steel washer was glued to the underside of the plastic base. I primed the lid and base all black, except where I was to glue the lid to the base, and let that cure. Then I affixed the lid to the base with PVA and let that set up.
Primed lid and base that would serve as the plinth
For the figure, I just overlaid the factory paint with gold paint in a dry-brushing fashion. Then I built out the Scarecrow Girl’s base with enough green stuff that it would cover the “Tropicana” logo. to do that, I had cut a piece of card stock to determine the size and shape that I would need to obscure the logo. After gluing that card stock to the statue, it was a lot easier to shape the green stuff perfectly.
Primed plinth and statue with enlarged base
I washed the statue down with a metal wash to give better definition. and added another dry-brush application of gold.
Statue after adding the dark wash and more gold. I also painted the green stuff as granite to match what I wanted for the plinth.
Then, I started to dry-bush the plinth to look like stone, but I saw that it had a small gap underneath. The steel washer was just thick enough to make the plinth seem to hover over the ground. I visited Michael’s store for inspiration, and saw a rope for decorative hobby projects – and voila – solution!
The plinth , statue, and rope
I cut the rope such that it would be the same circumference as the plinth. I then massively saturated the rope and where it touched the plinth with PVA glue. I drove the ends of the rope together where they met with a combination of toothpicks and small-gauge steel needles, and let it dry – hoping that approach would work.
The plinth and rope with the PVA drying
It worked well as you can see below. All I needed to do was remove the needles and clip off the toothpicks flush with the rope.
Fry and before removing toothpicks
I had also tried to use toothpicks underneath as “bridges” to hold the rope ends together. PVA is great here as the rope and toothpicks are porous enough to make great bonds.
Underneath view of the plinth showing the steel washer thickness that caused the gap. You can also see the toothpicks used both in the rope and as bridges.
Then I glued the statue to the plinth. Having previously applied the card stock that the green stuff rested on to the underside of the statue – I got a great bond to the plinth with PVA.
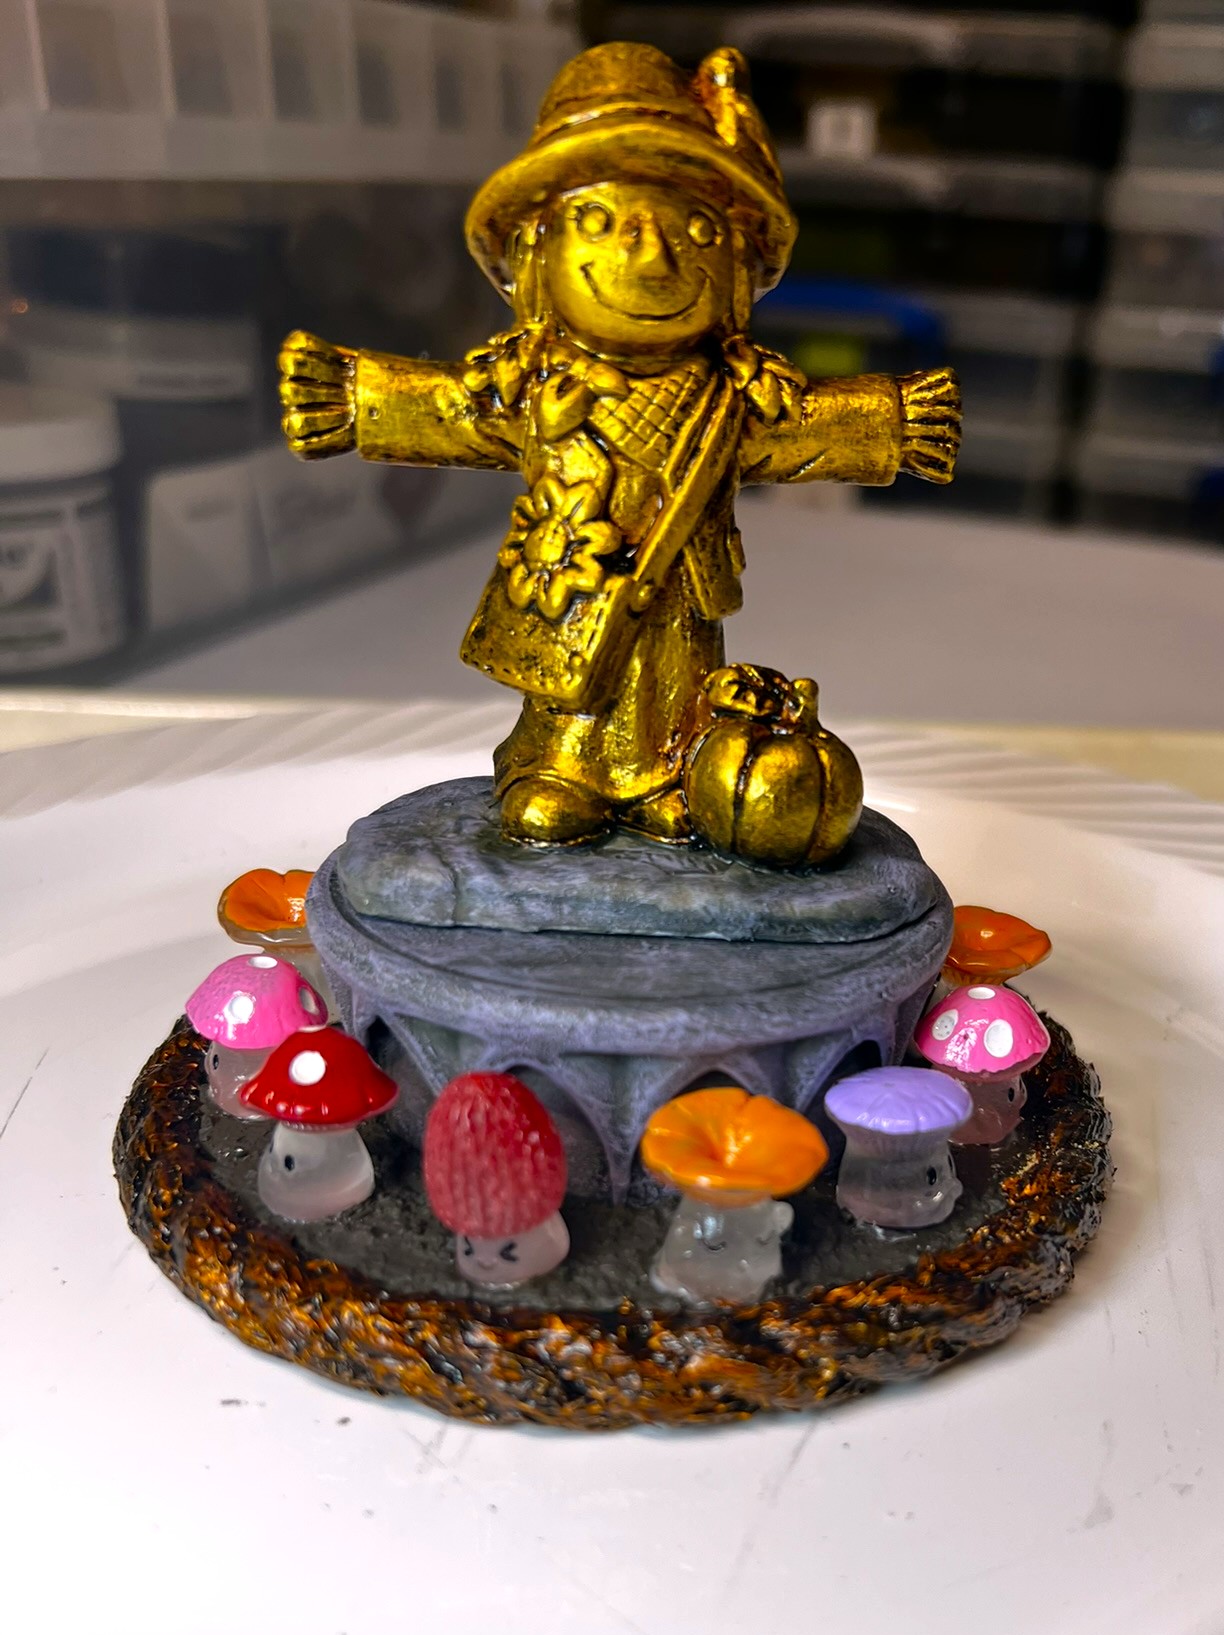
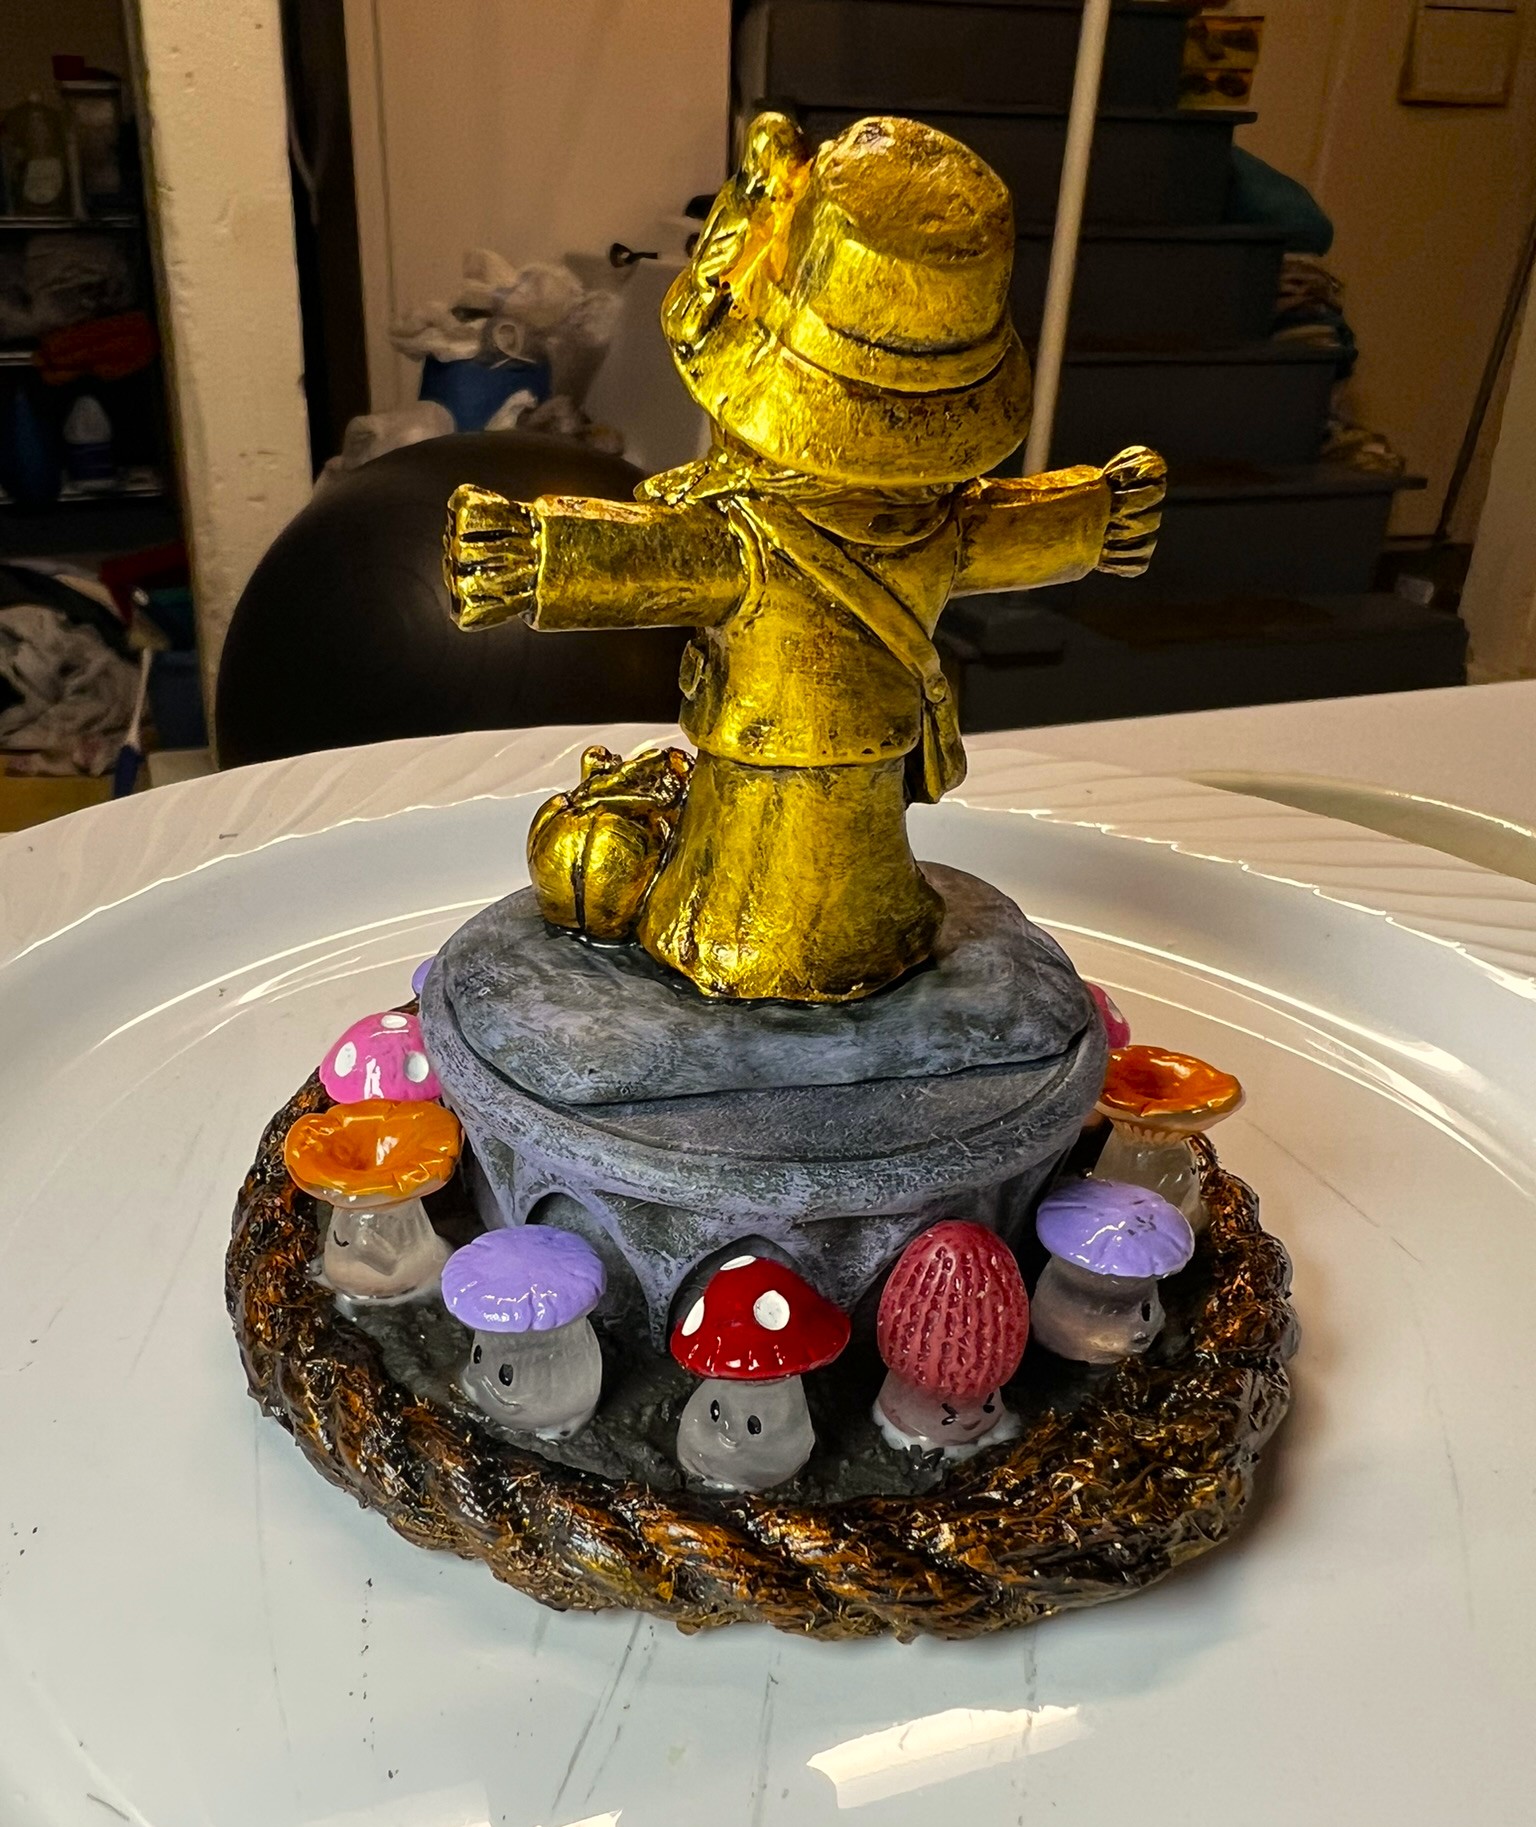
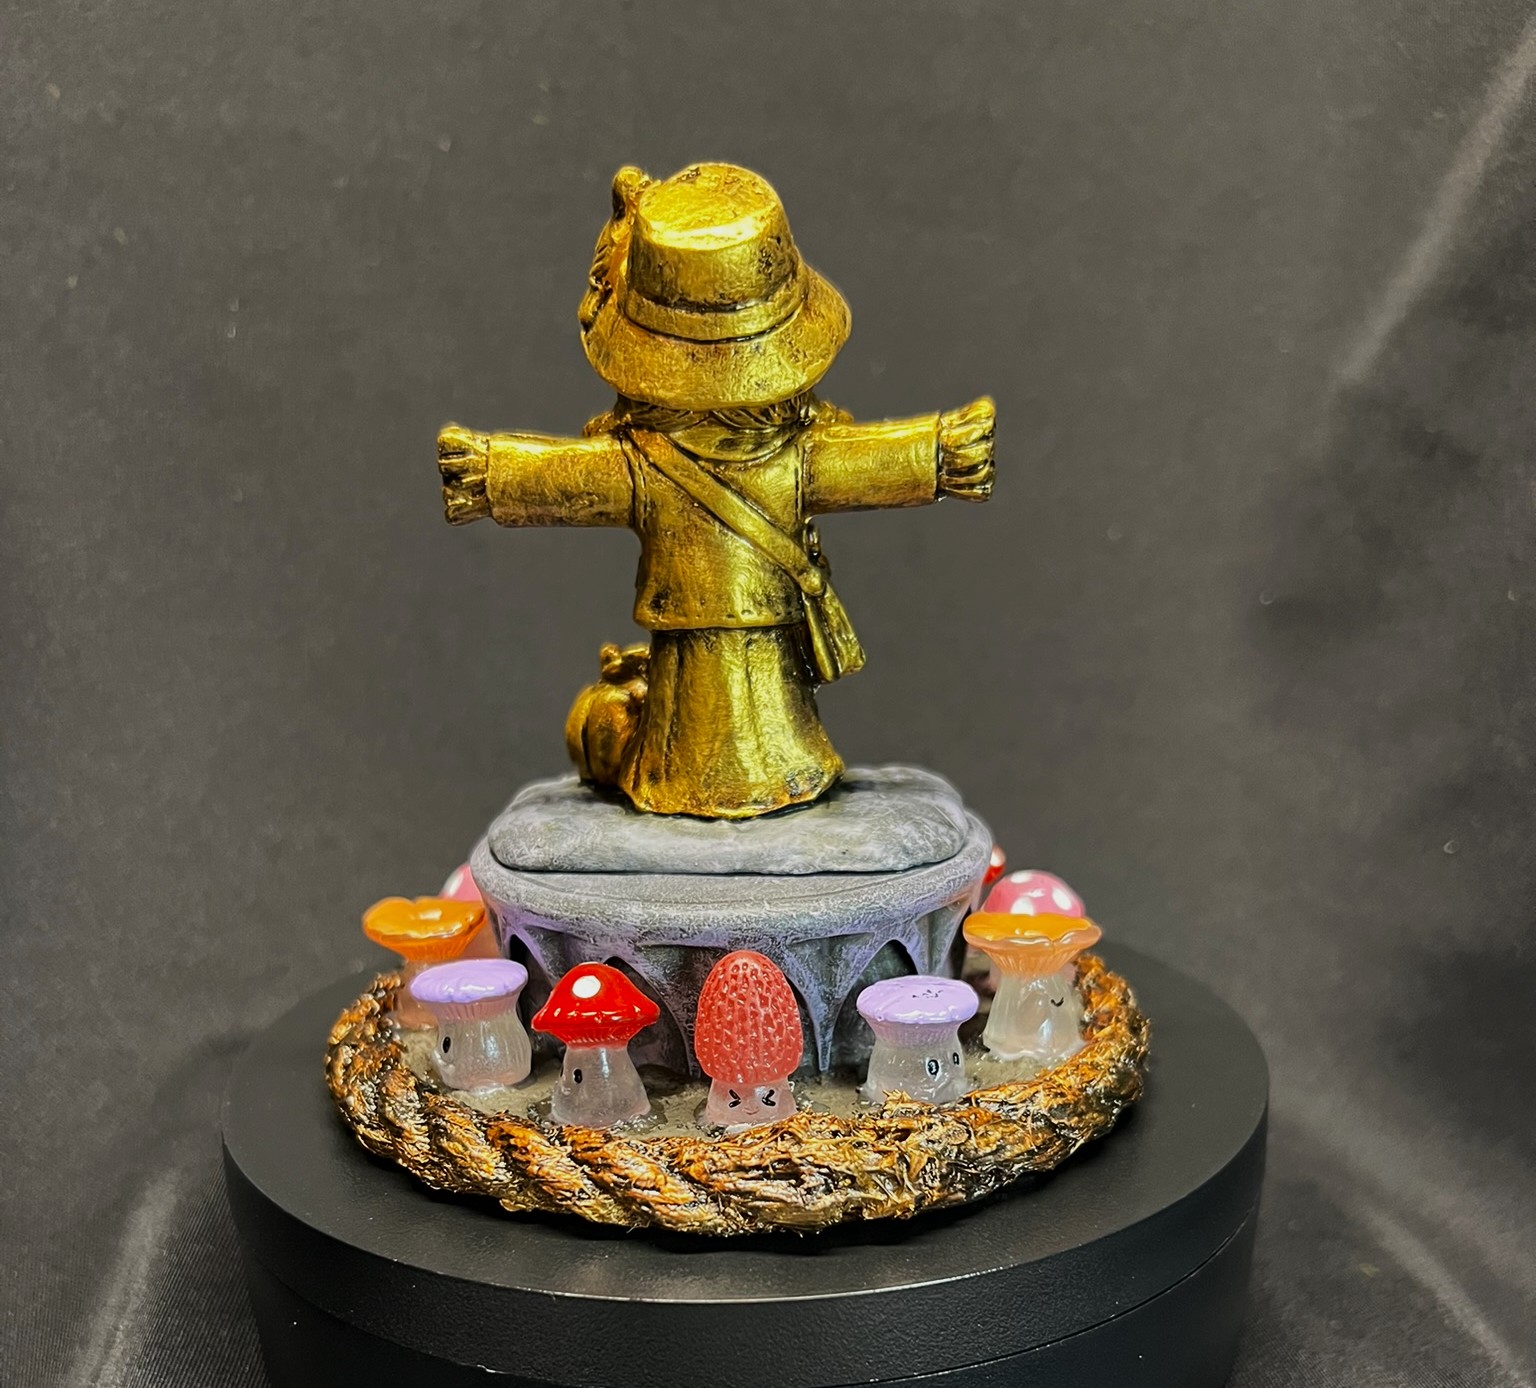
I used a different (darker) metallic gold color on the rope to simulate it as part of the entire work, then applied a dark wash. Lastly, I decided that there would be a “garden of guardian mushrooms” protecting here around the plinth. I did not paint them as this would allow me to treat the little guys as either carved or anthropomorphic!
Finished Scarecrow girl with little miushrooms’s glue drying (front)……and back
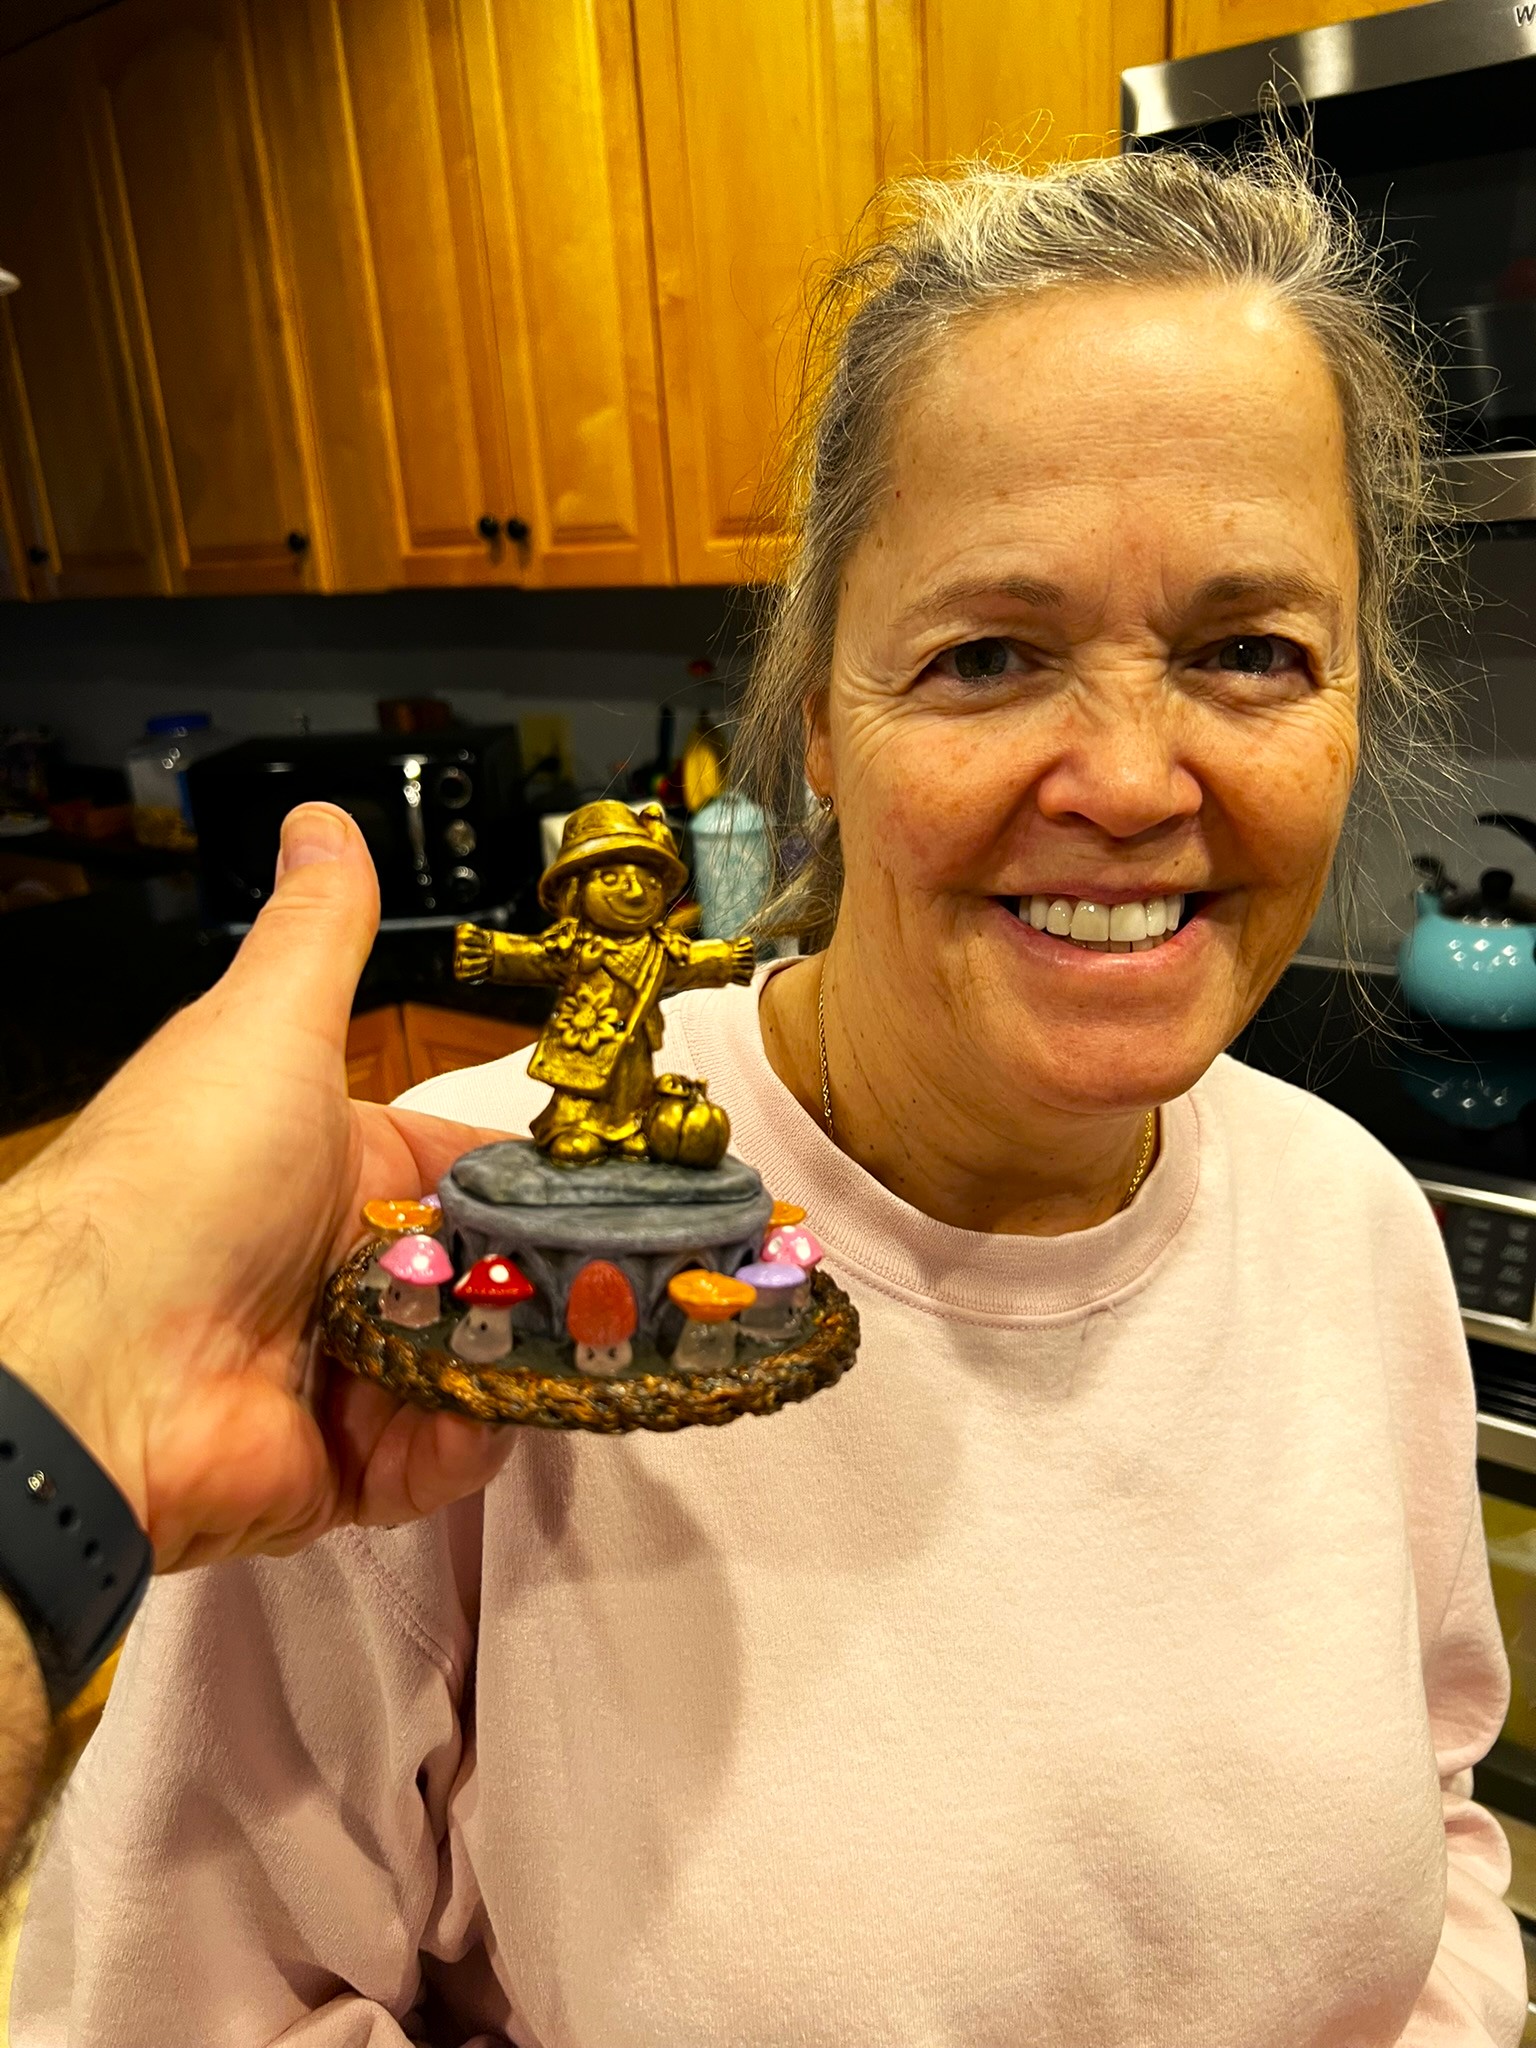
I of course had to show my lovely bride how much I appreciated her gift and what I had done with it! I think she liked it.
In the video I mention that I did not have a game for it – well, I decided that she will be the centerpiece on the tabletop for my “Wars of Ozz – Battle for the Magic Mushrooms & the Ancient Crystals of Power” game, described as follows:
The world of Ozz is nothing if not magical – and there are many talismans & powerful weapons that spring up everywhere. In a remote section of Ozz, a wonderful magical find of a field of Magic Mushrooms near some rare Crystals of Power – has led to an Ozzian “Gold Rush”. Here, several Ozzian nations are scrambling to take seize & control of them. Factions have teamed up & are ready to fight to get these valuable resources and deny their capture by their enemies, but what will happen?
Here is the flyer for that game – and you can see some game markers that will be fully shared in part 3 of this series.
Game Flyer
Thanks for looking – this was a fun change of pace. It also qualifies for Dave Stone’s annual “Paint What You Got Challenge”. It’s a fun and global challenge to paint up figures between Christmas and the end of February, check it out!
I’d be interested in hearing your feedback on this – thanks in advance for any sharing!
And part 2 in this series will be coming soon…
Final Note
While this figure is NOT official, if you do want to check out the excellent Wars of Ozz figures’ range – there are two places to get them and to get the rules (and I make no money from this). The game rules and the figures are available from the next two places:
Below you’ll see the list of paints and the like that I used on these – and they are more useful for me when I need to recreate a color scheme in the future than maybe you – but in any case that’s why I post them.
Miscellaneous details and references for those interested in that sort of thing:
For all of my earlier posts on Wars of Ozz games, figures, units, and other related projects – please see this page.
PAINTS, INKS, GLAZES, SHADES, WASHES, PIGMENTS, FLOCKING, GLUES AND MORE THAT I USED ON THIS SCARECROW GIRL STATUE:
Ashland “Scarecrow Girl Mini Decoration” statue
Black plastic disk
Plastic Tropicana Orange Juice lid
2″ Square War Games Accessories Steel Bases (21)
PVA Glue
Card stock
Green stuff
Ashland 7mm Rope Cord
Vallejo Surface Primer “German Panzer Grey”
Citadel “Liberator Gold”
Citadel “Retributor Armour”
Citadel “Cryptek Armourshade” (wash)
Americana “Slate Gray”
Toothpicks
Secret Weapon Washes “Stone”
Citadel “Slaneesh Grey”
AK Terrains Diorama Series “Muddy Ground” (texture/basing paste)