Happy New Year to all! I am deep into getting ready for a number of wargaming conventions this winter, BUT, like many of you, golf remains on my mind…
As does warmer weather…
While we are still in balmy January in Massachusetts, it’s not too early to mark those calendars for this year’s Tour of the Brookfields!
The schedule is below:
At this point I expect to put up sign up sheets in early April, both on Facebook, Quail Hollow, and at Harts. We do not expect any changes in format or cost, but that is always changeable if needed. At this time, there will still be a minimum number of events to play in to qualify for the FINALS. I expect three, but the committee will determine that in April.
If you know of a new player that wants to join – they do need to be vetted by the committee as to age, handicap, etc. The TOB has grown significantly in the last three-four years, so we need to make sure of avoiding any no-shows.
The Temujicans are a fierce faction of green-skinned Gillikin-cousins that roam the deserts of the world of Ozz in search of plunder, enemies, and glory. Like their Whim Whim rivals, they have no artillery, and similarly rely heavily on cavalry more than infantry to win their battles. By “cavalry”, please know that these dudes ride rams and goats!
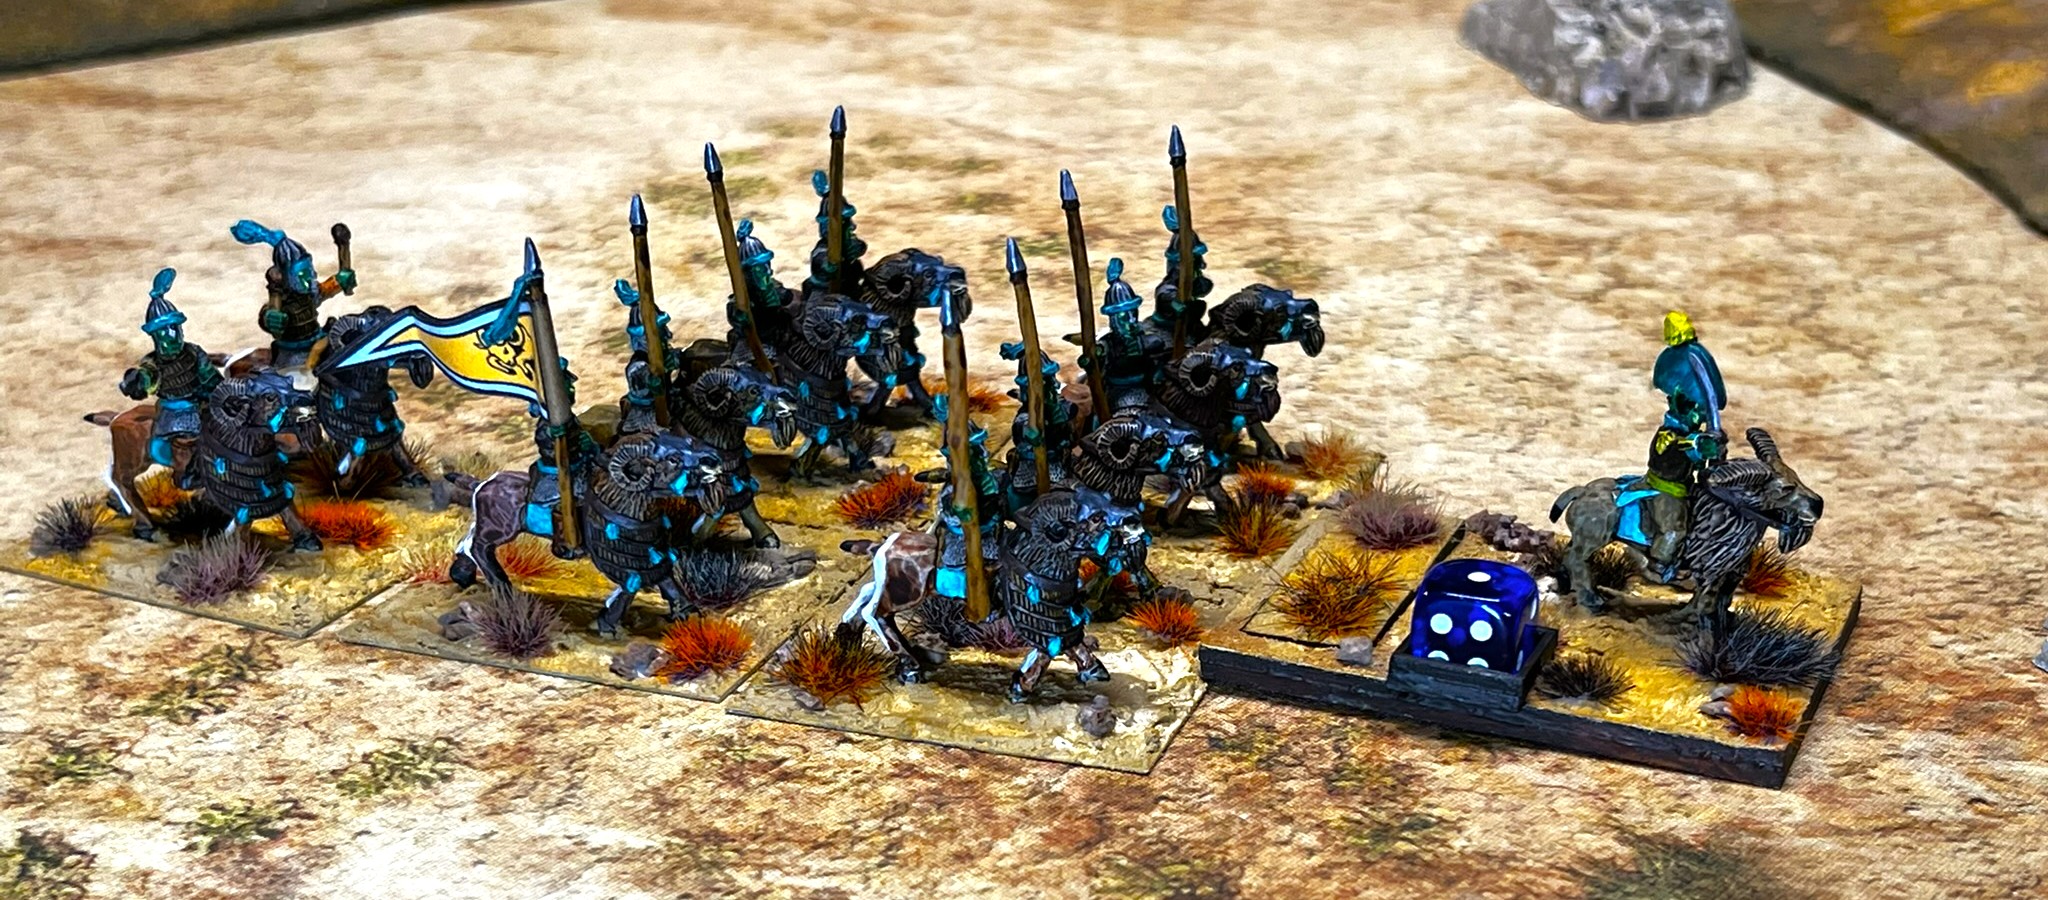
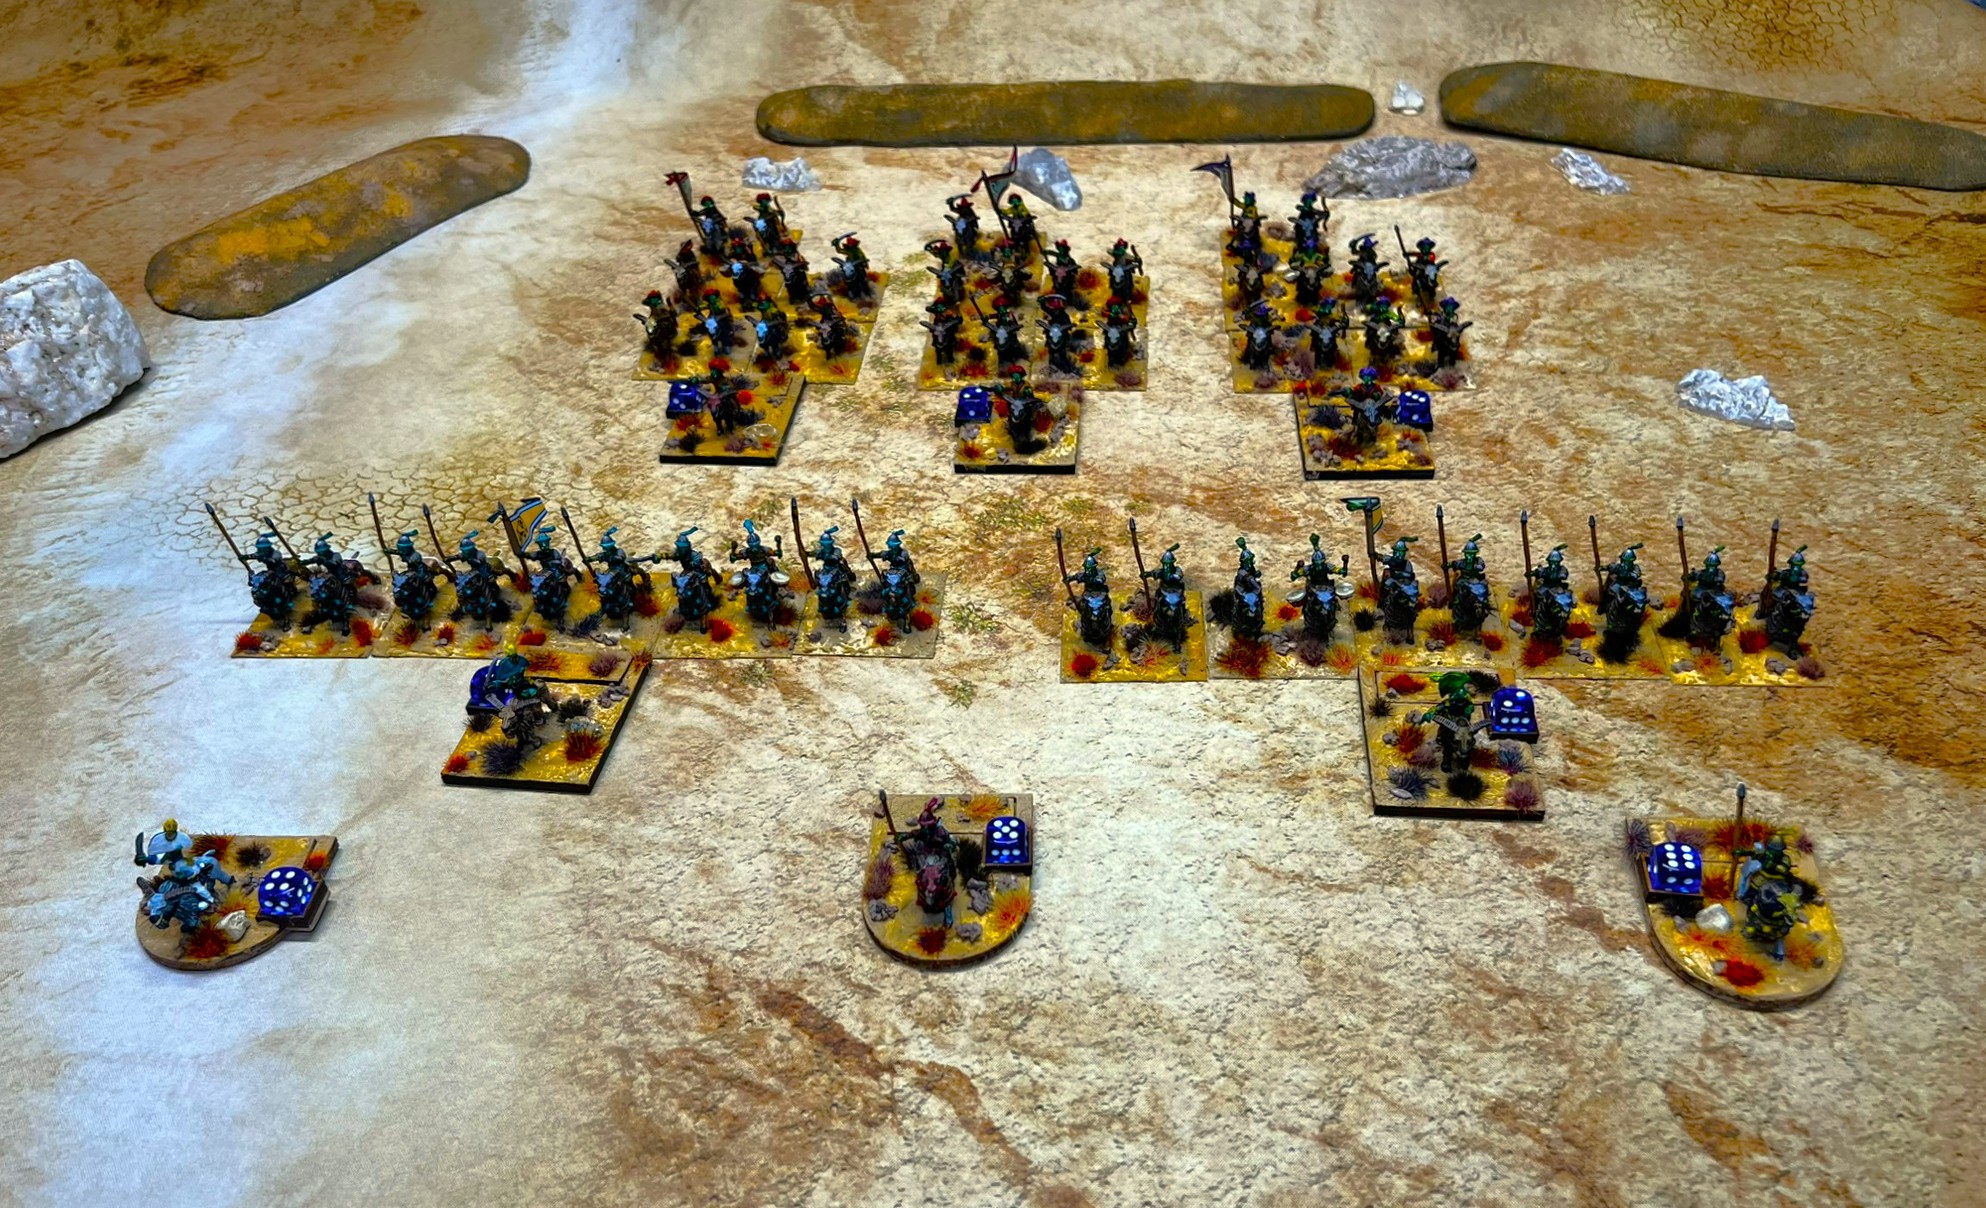
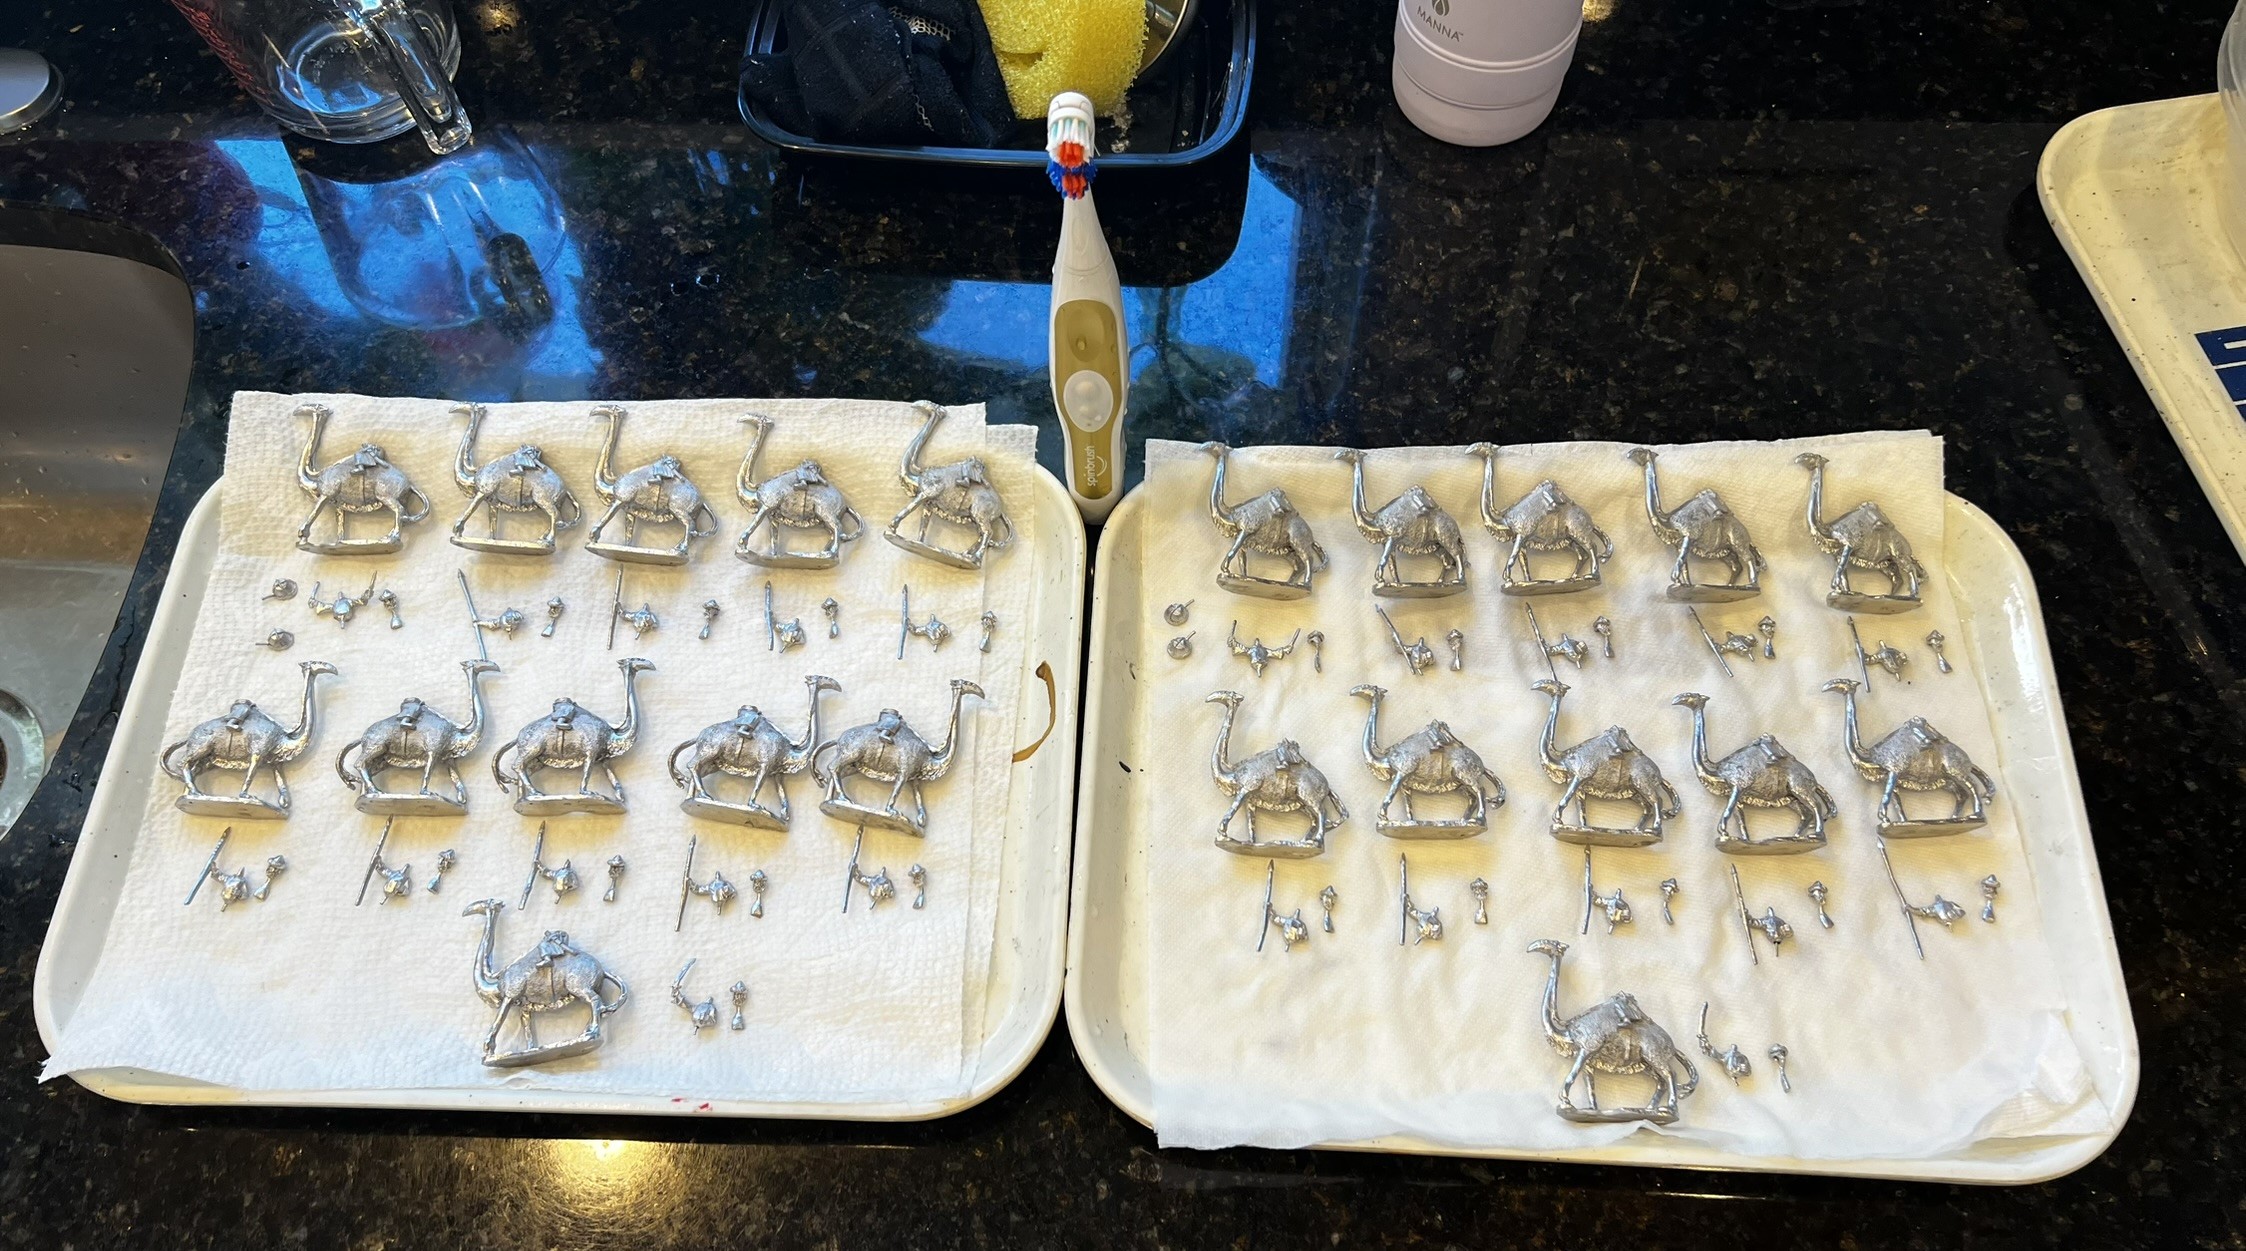
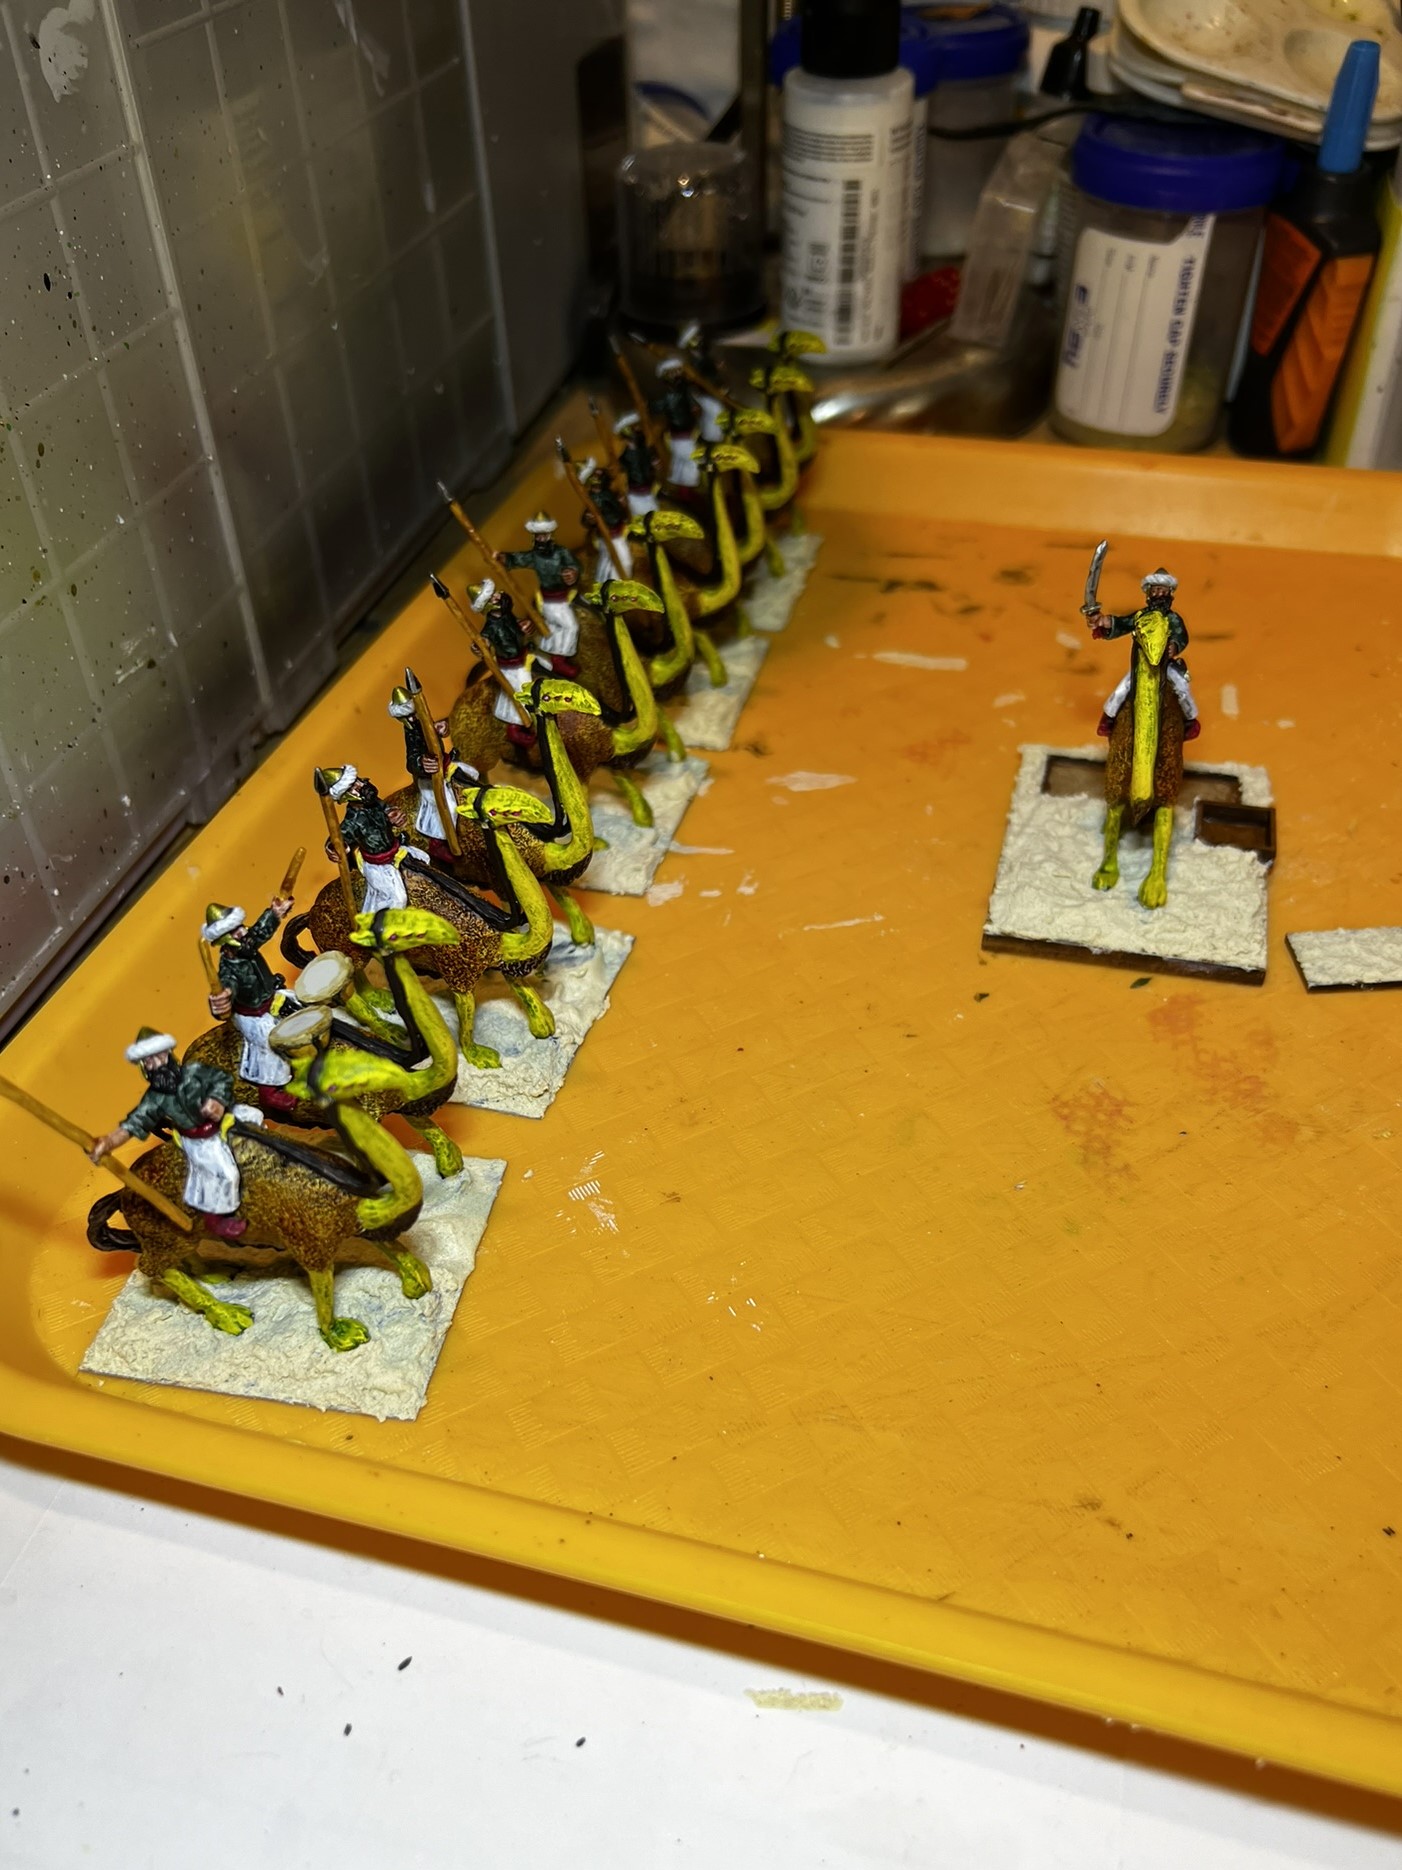
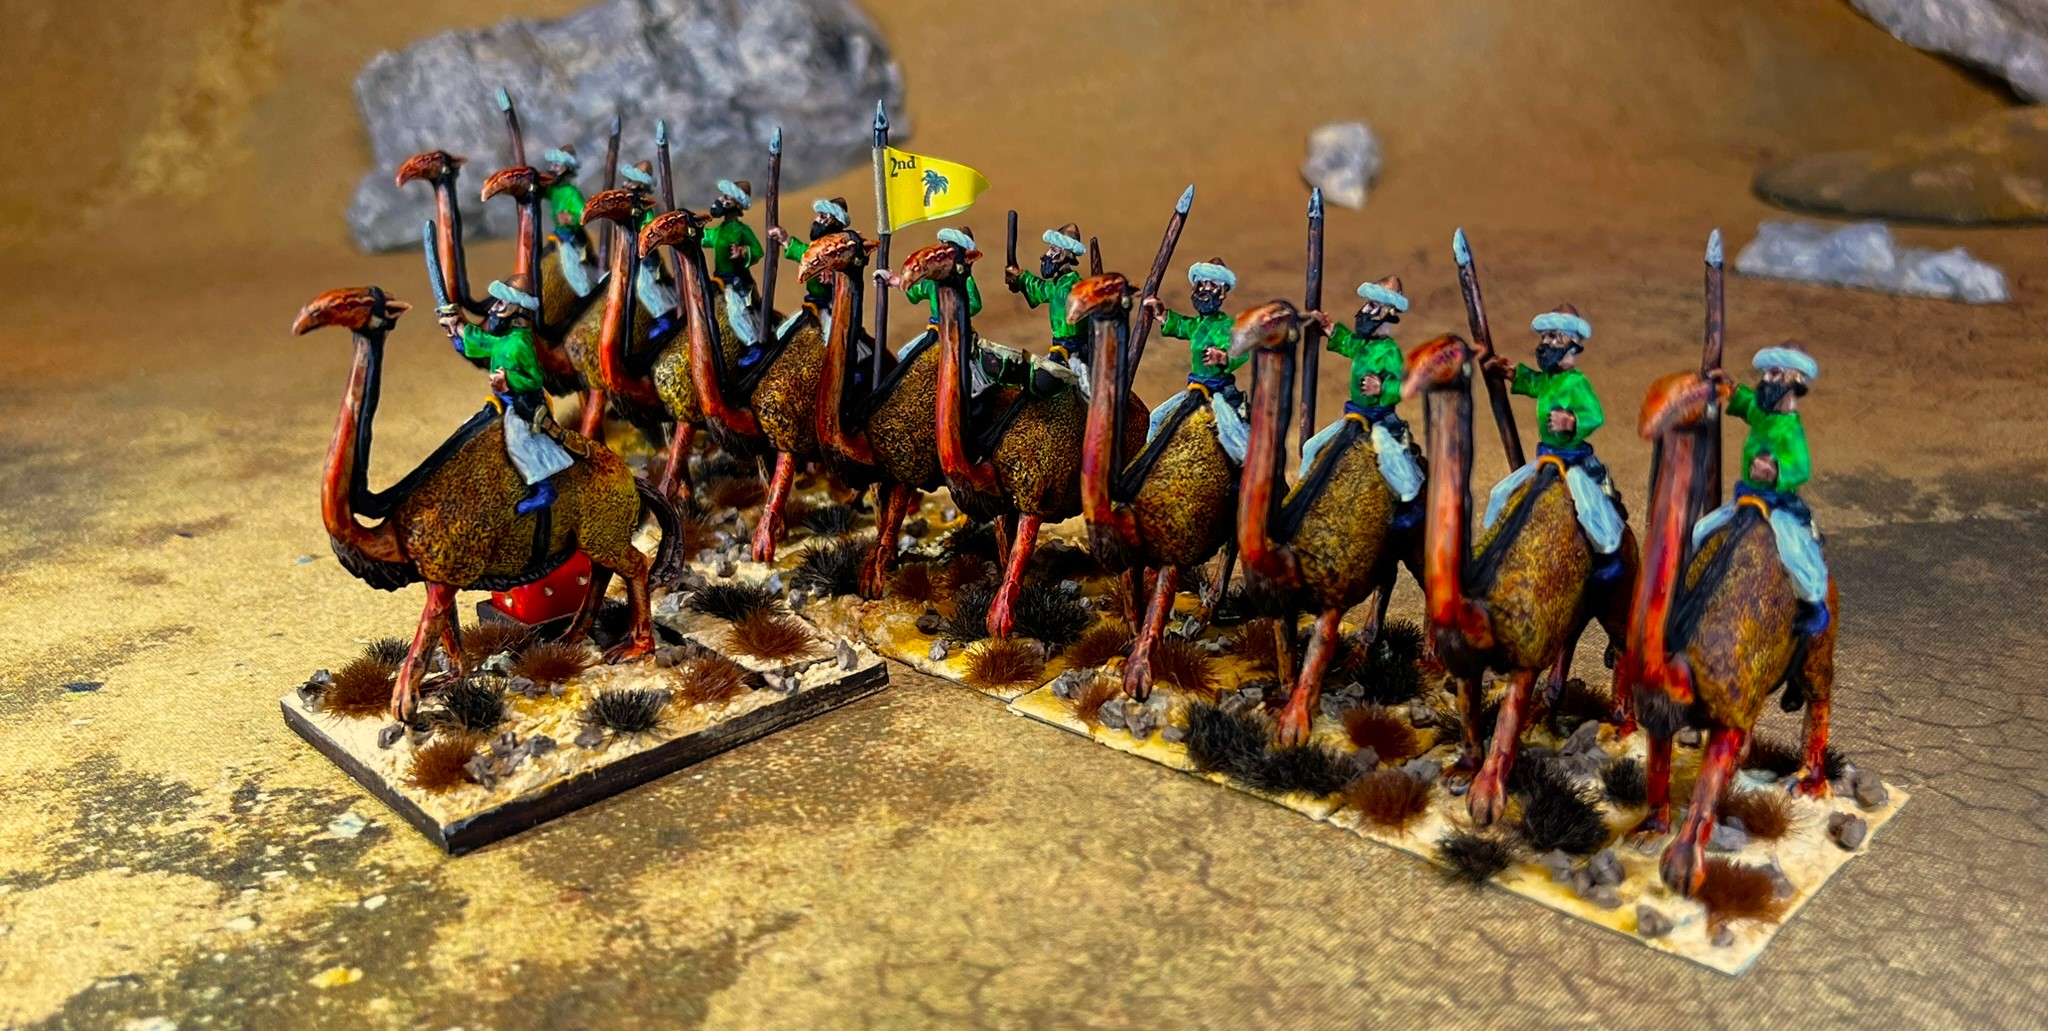
Over a month ago, I posted about my four Temujican infantry regiments (84 figures) that I built and painted. Since then I have been deep into completing the Temujican faction. By that I mean that I have been working on not one but FIVE regiments of Temujican cavalry (55 mounted figures) and three brigade commanders – 58 figures in total.
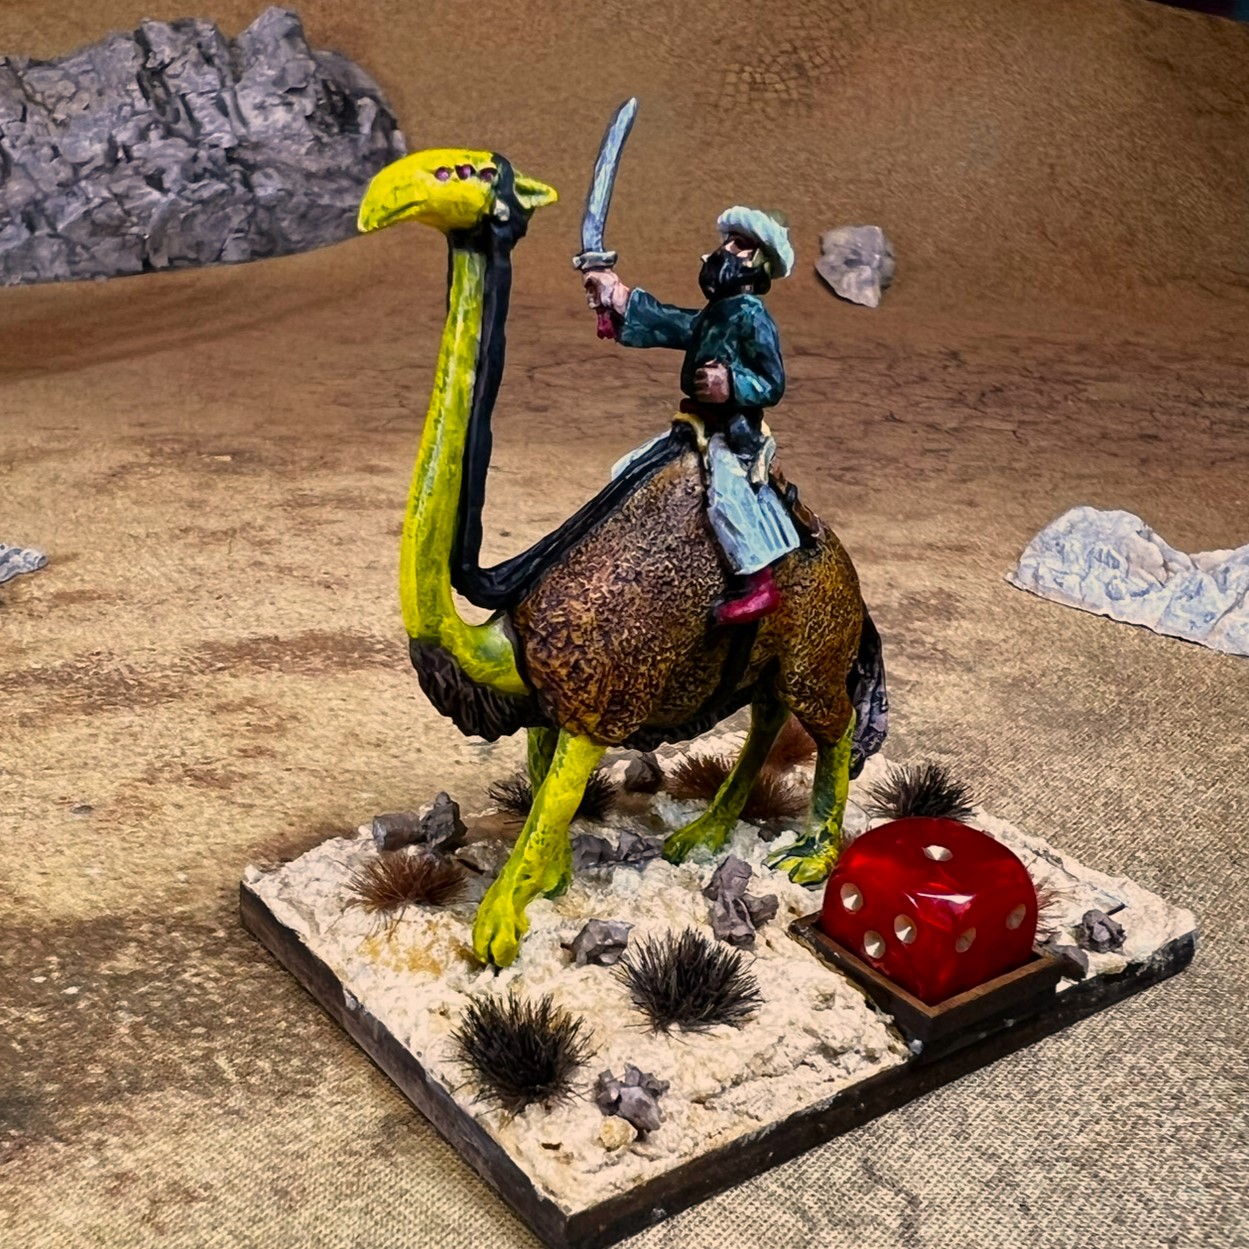
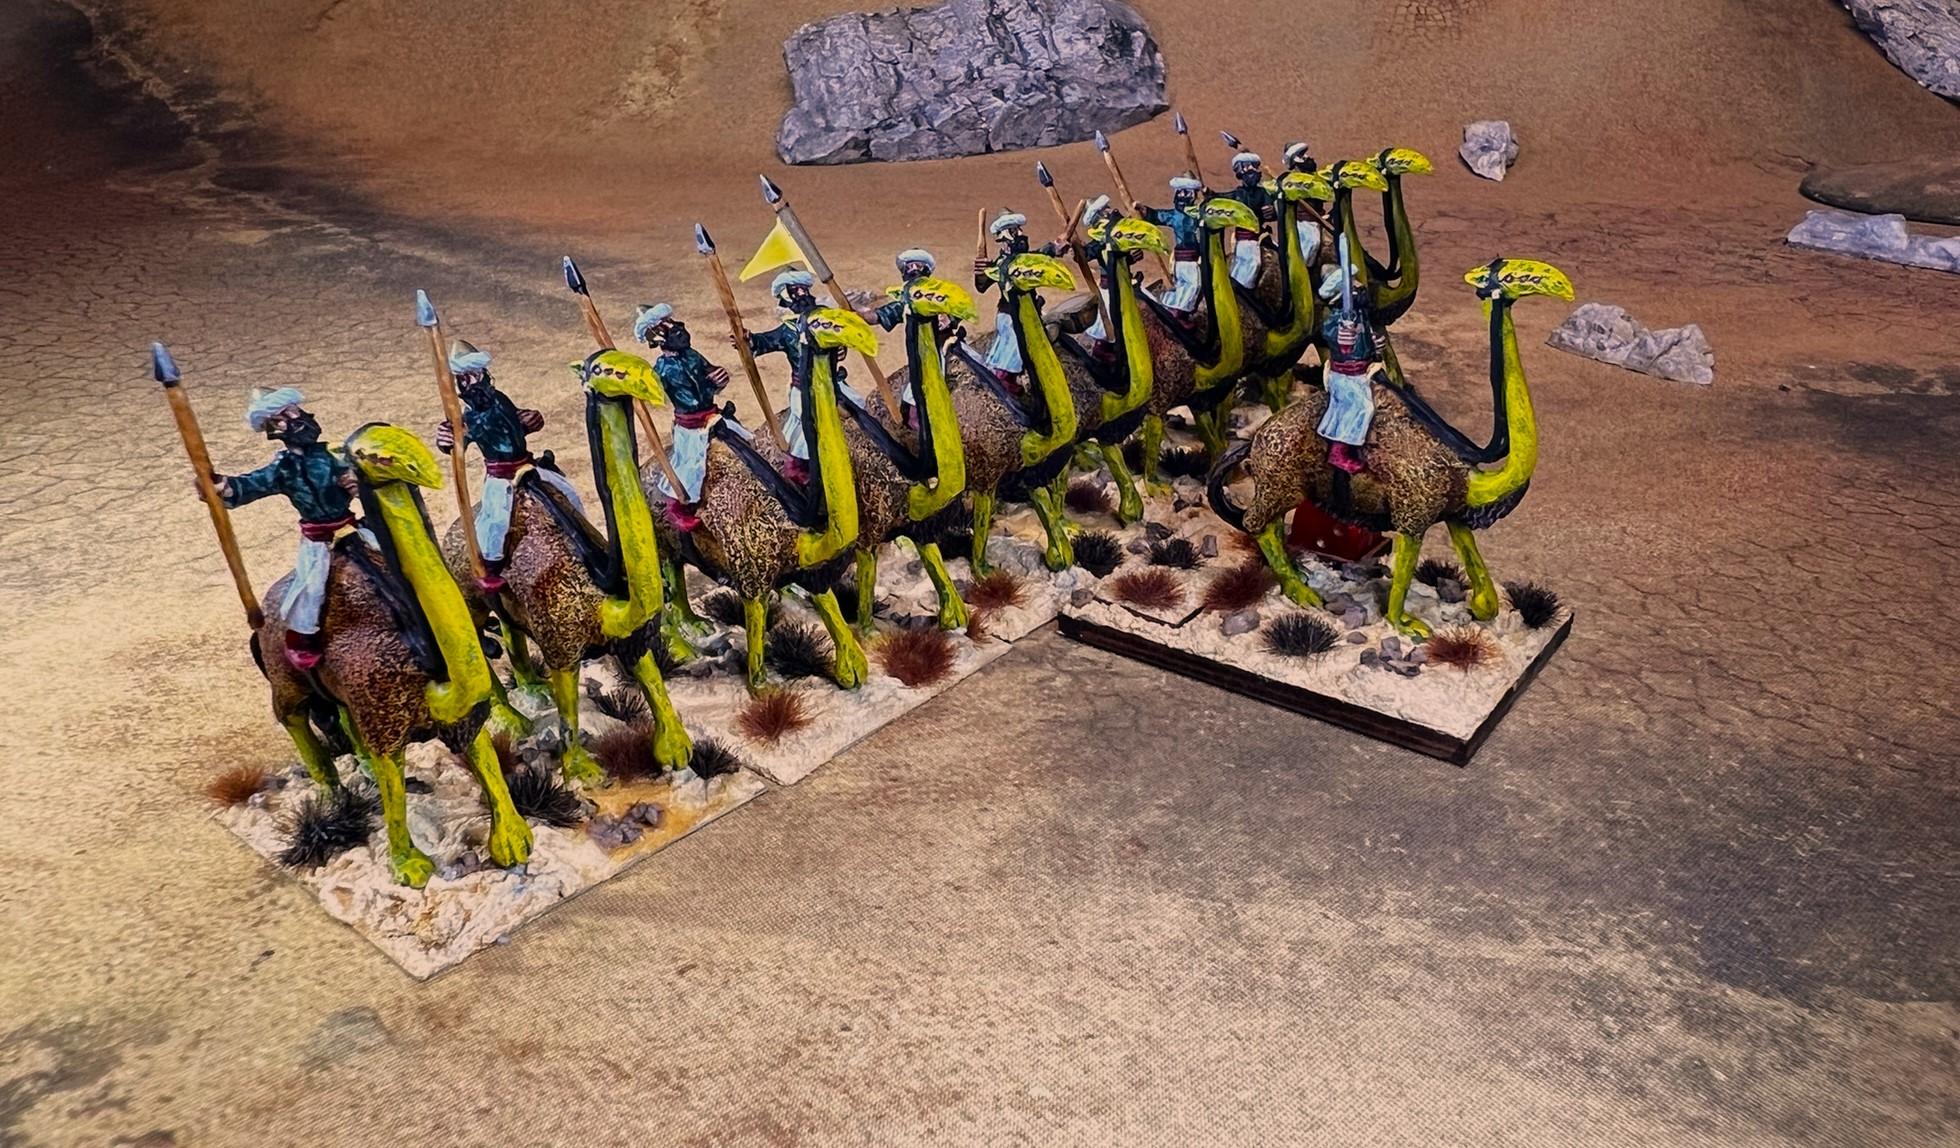
The regiments in question consist of two heavy cavalry and three light cavalry. The heavy cavalry can only move at the speed of infantry, and has inherent missile capabilities as well. The light cavalry moves at regular cavalry speed, and also has bows. They are very versatile compared with other cavalry units in Ozz. All figures are metal and 28mm. The stats and official colors of the Temujicans units and individuals can be downloaded here – and can be seen below:
Official Wars of Ozz stats for the Temujicans
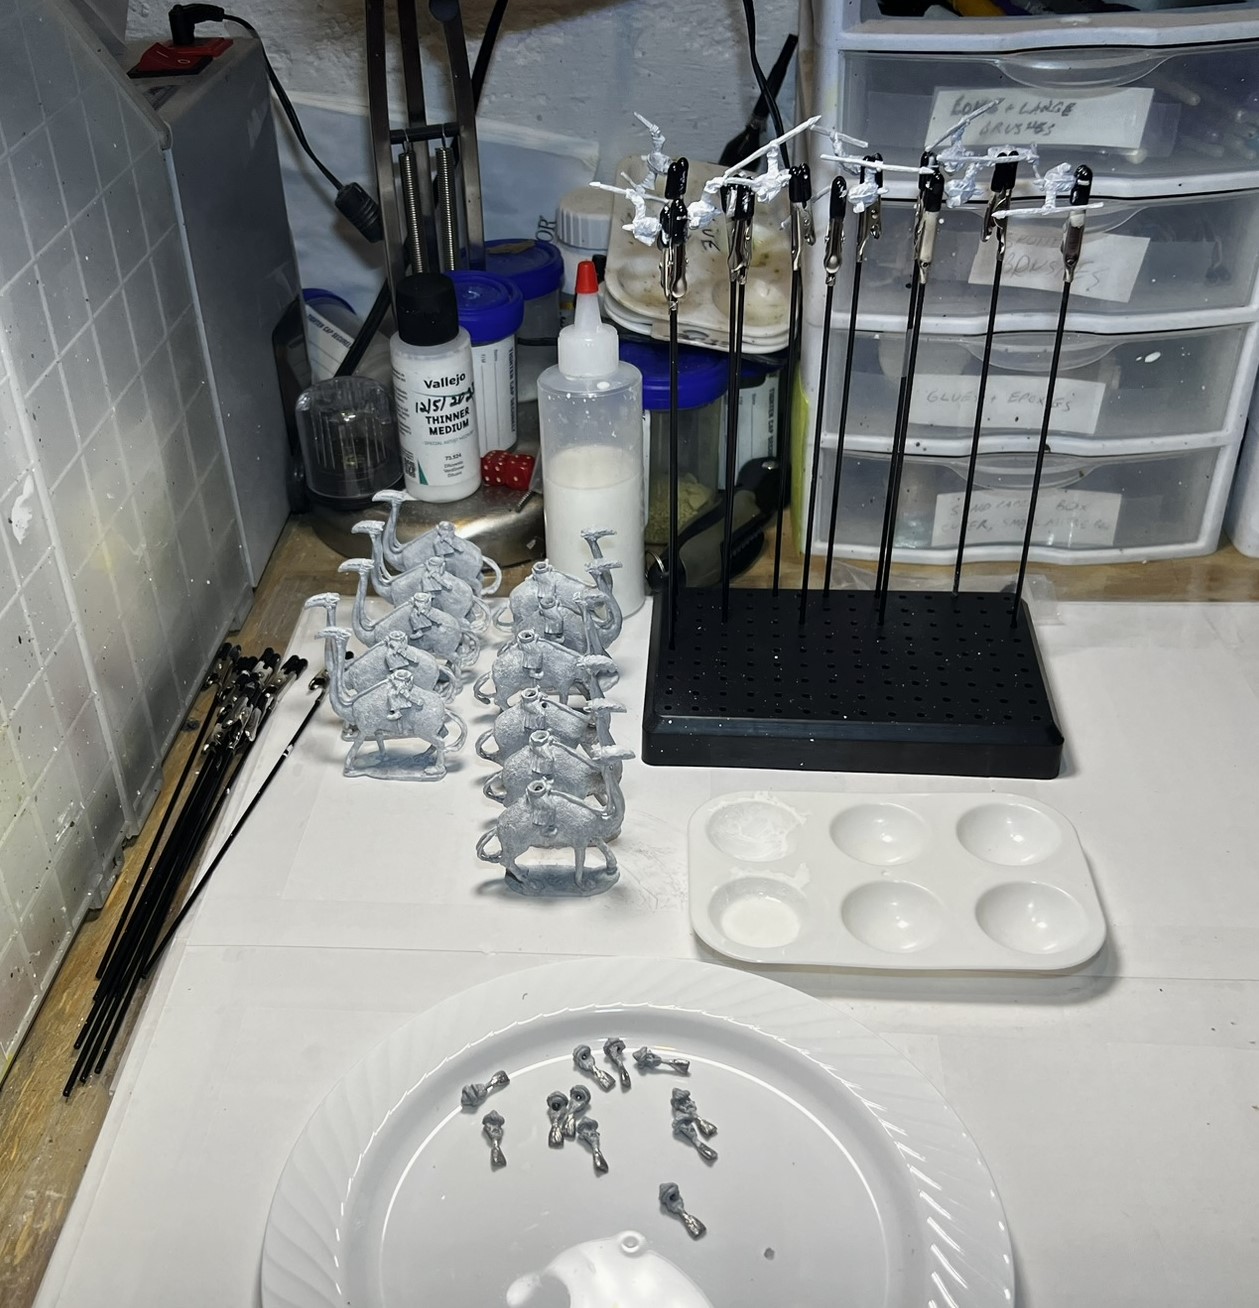
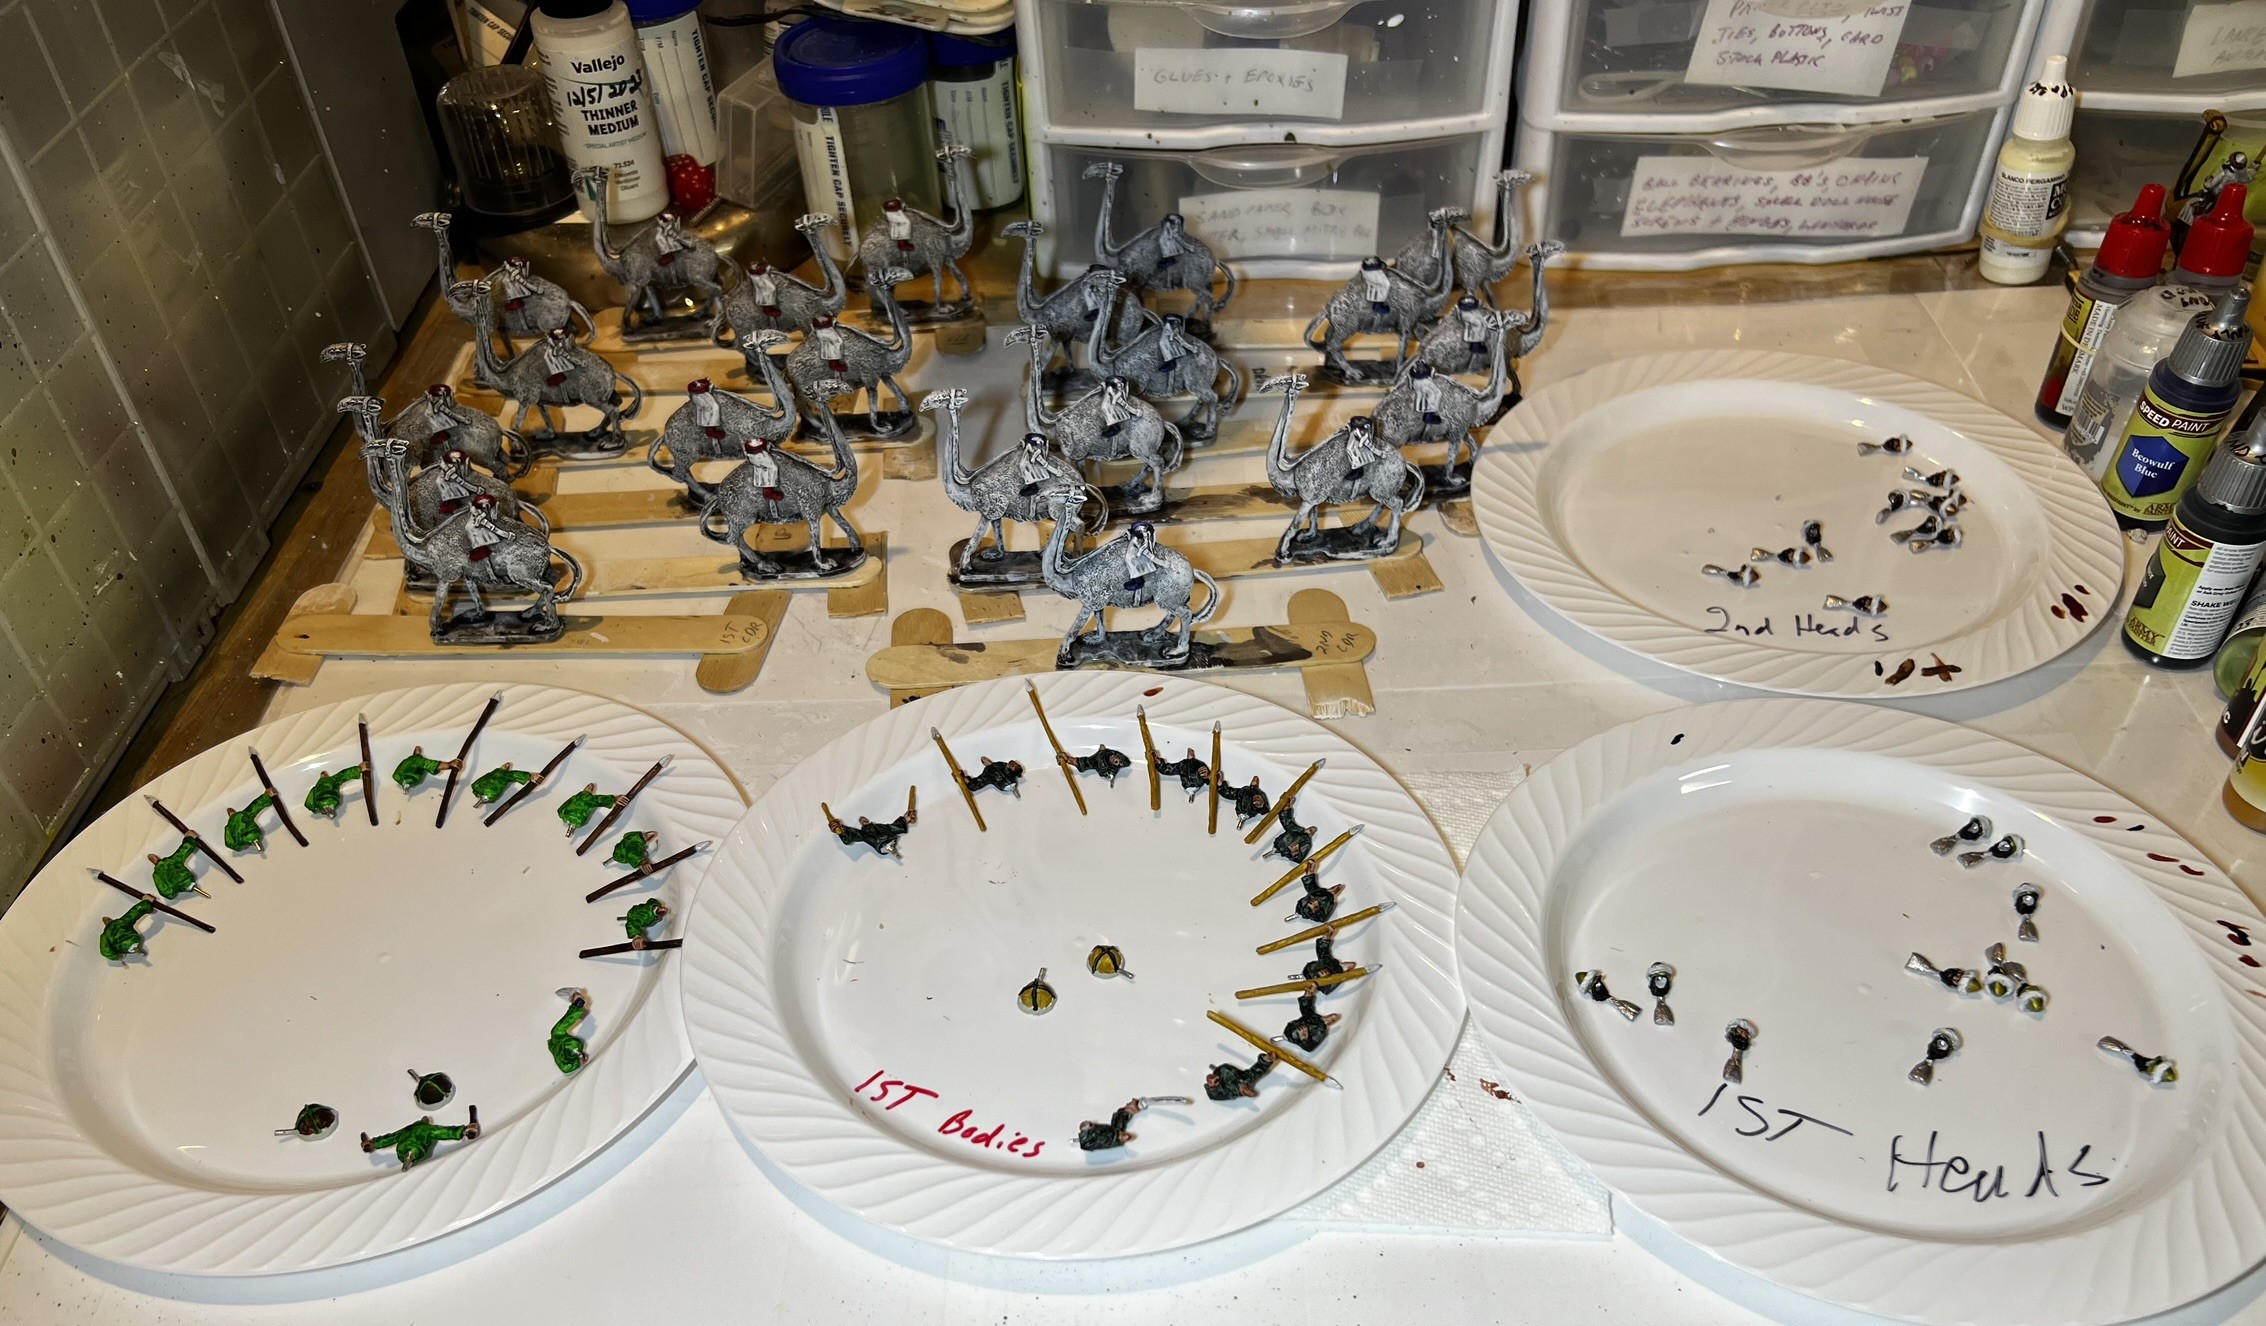
A nice aspect of all Ozz cavalry figures is that the mounts come separate from the riders. This makes the painting somewhat easier. Still, these did take a long time for me to finish, primarily as the light cavalry had extra stuff (bow holders and quivers) to paint and assemble. And – unsurprisingly to regular readers of this blog – did go overboard on ensuring that EACH of the 33 light cavalry had differently-colored goats and dissimilar riders’ coats. Why?
Well, the answer is twofold. First, I wanted both of the regiments to have a look of relative nonuniformity as to their mounts and similarly I wanted that same effect on the light regimental coats. Secondly, in my paint inventory I now have over 78 different types of brown, 49 tans, and 41 grays. If you include some of the flesh tones and washes those numbers get even bigger. I wanted to use some of the ones I don’t usually use – or have never used – before they turn to hardened latex rubber. And I used several different flocking materials for the bases to give an Ozz-desert look. More on that to come.
For this post, with so many paints used, any semblance of WIP discussion is out the window. I simply think that sharing the photos of the completed figures will be enough. Let me know! At the end of the post you will see the list of paints and materials that I used by type of unit and/or individuals. Know that this is more paints that I have ever used on a single project – period. The lists themselves are a good record for me to use on future projects. With that said, feel free to scroll past the painting list when you get there and wonder if I am nuts after all.
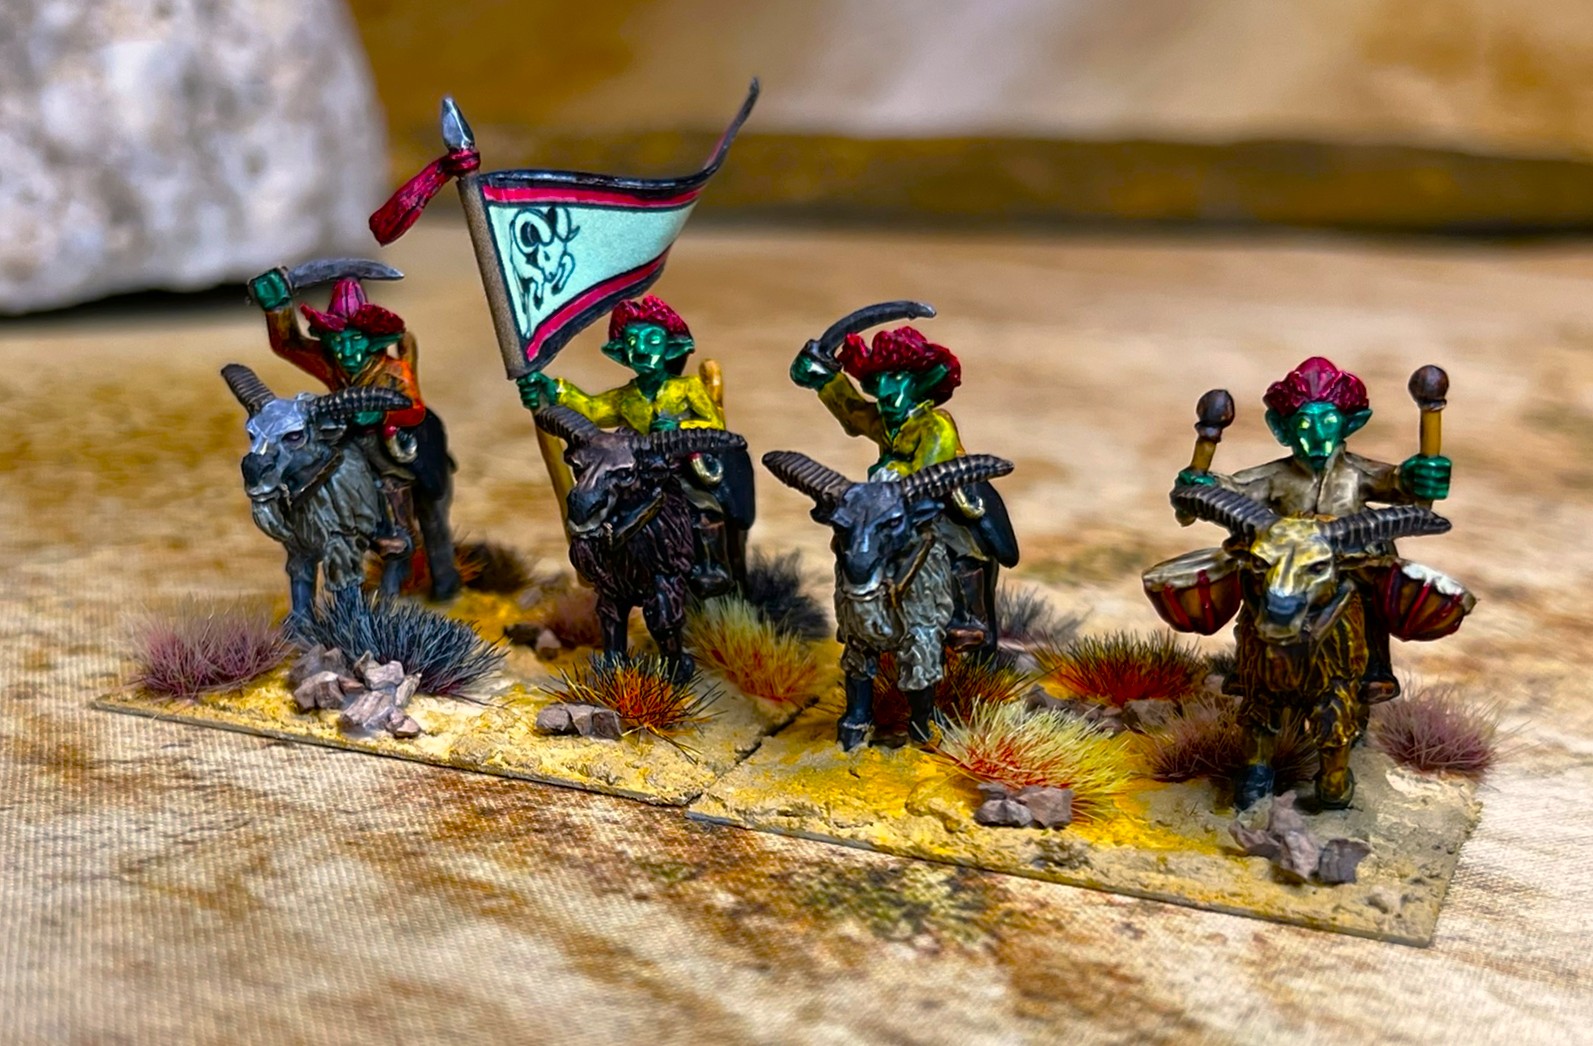
I painted the rams like the Bighorns and added white patches on their rumps, faces, and leg backs. The two heavy regiments have differently-edged flag colors – light blue and light green. That difference became the centerpiece of my color differentiation that you will see below in their photos.
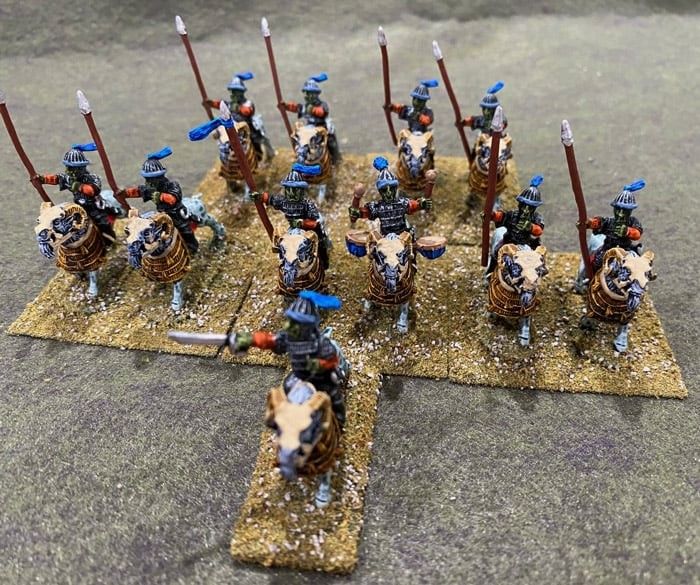
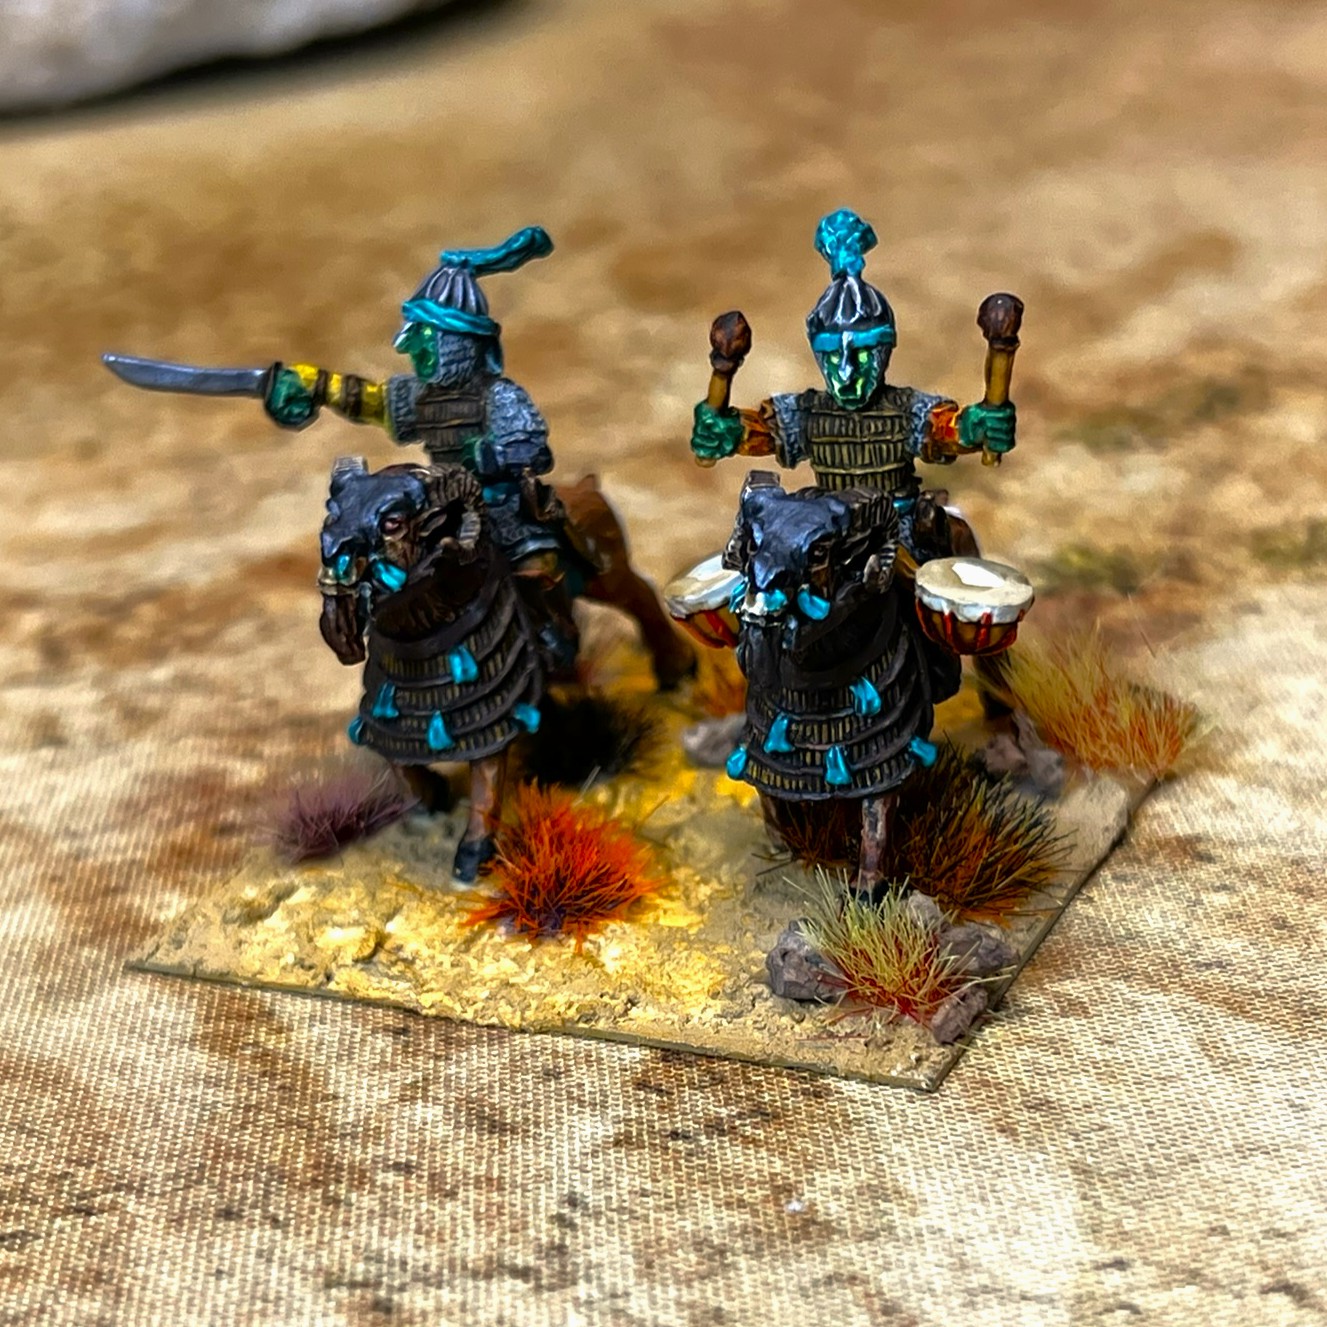
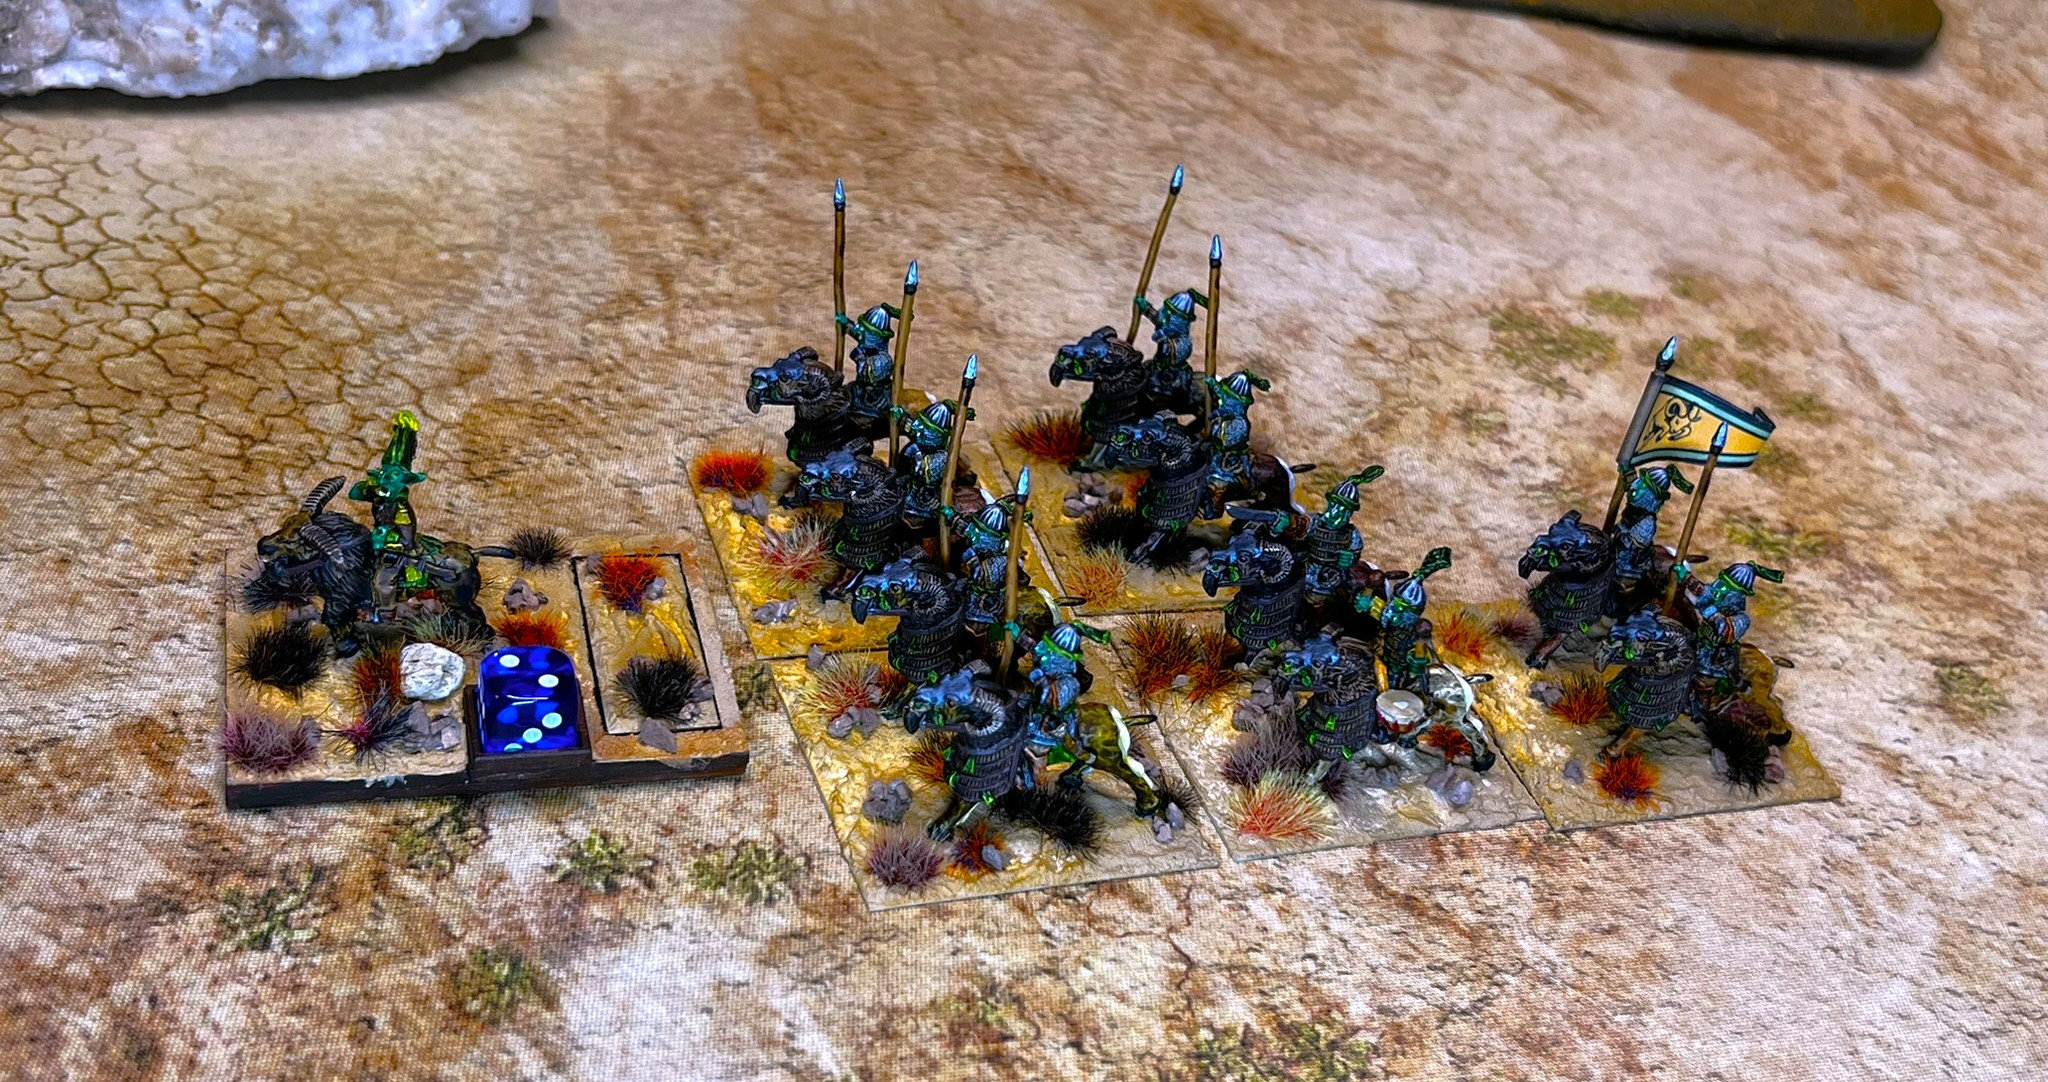
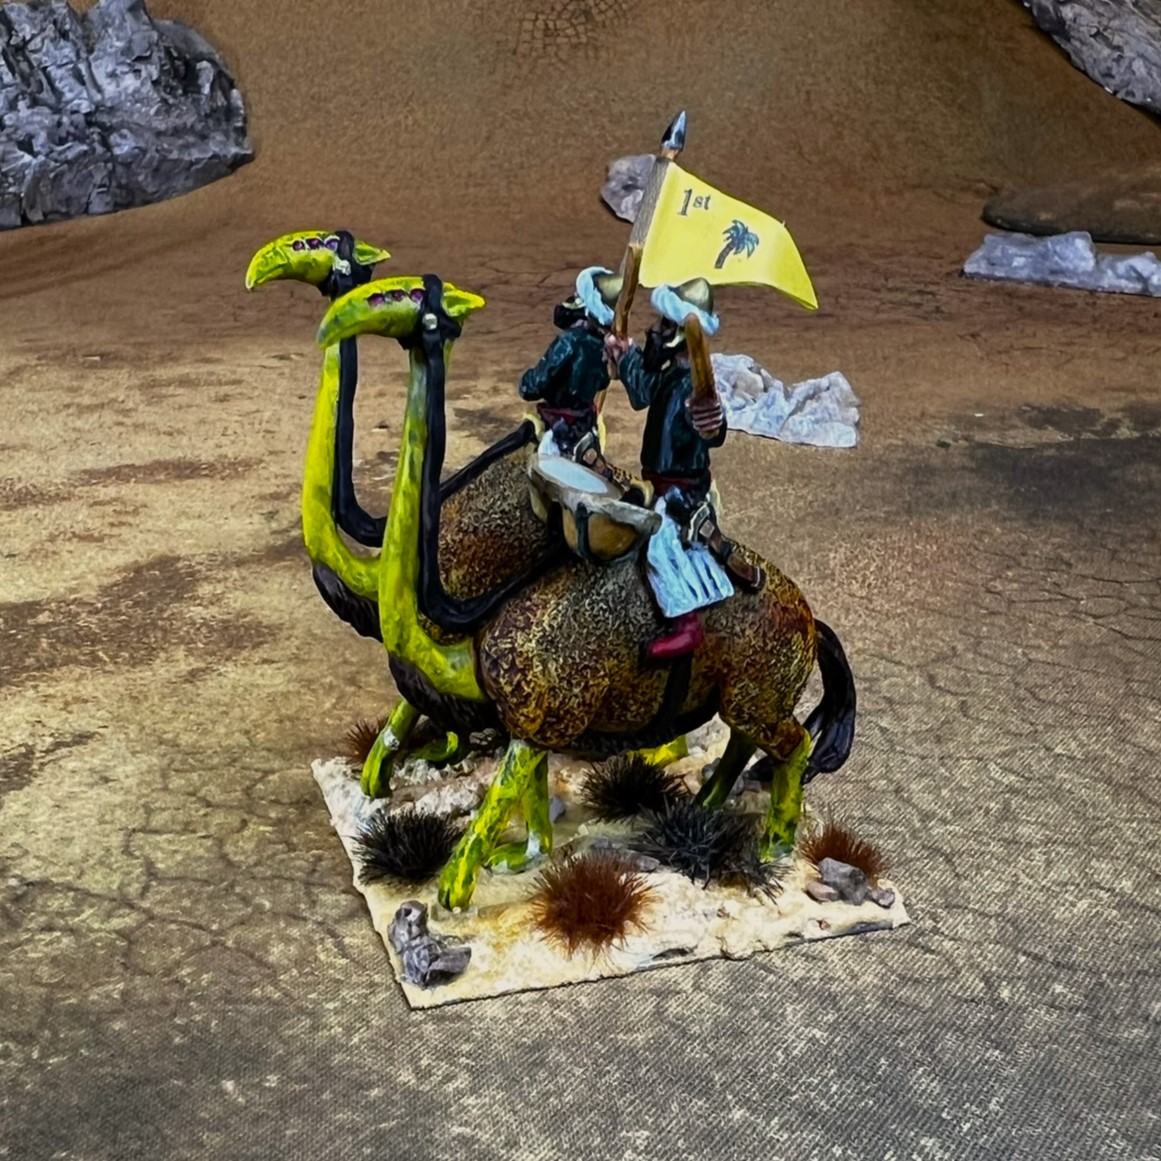
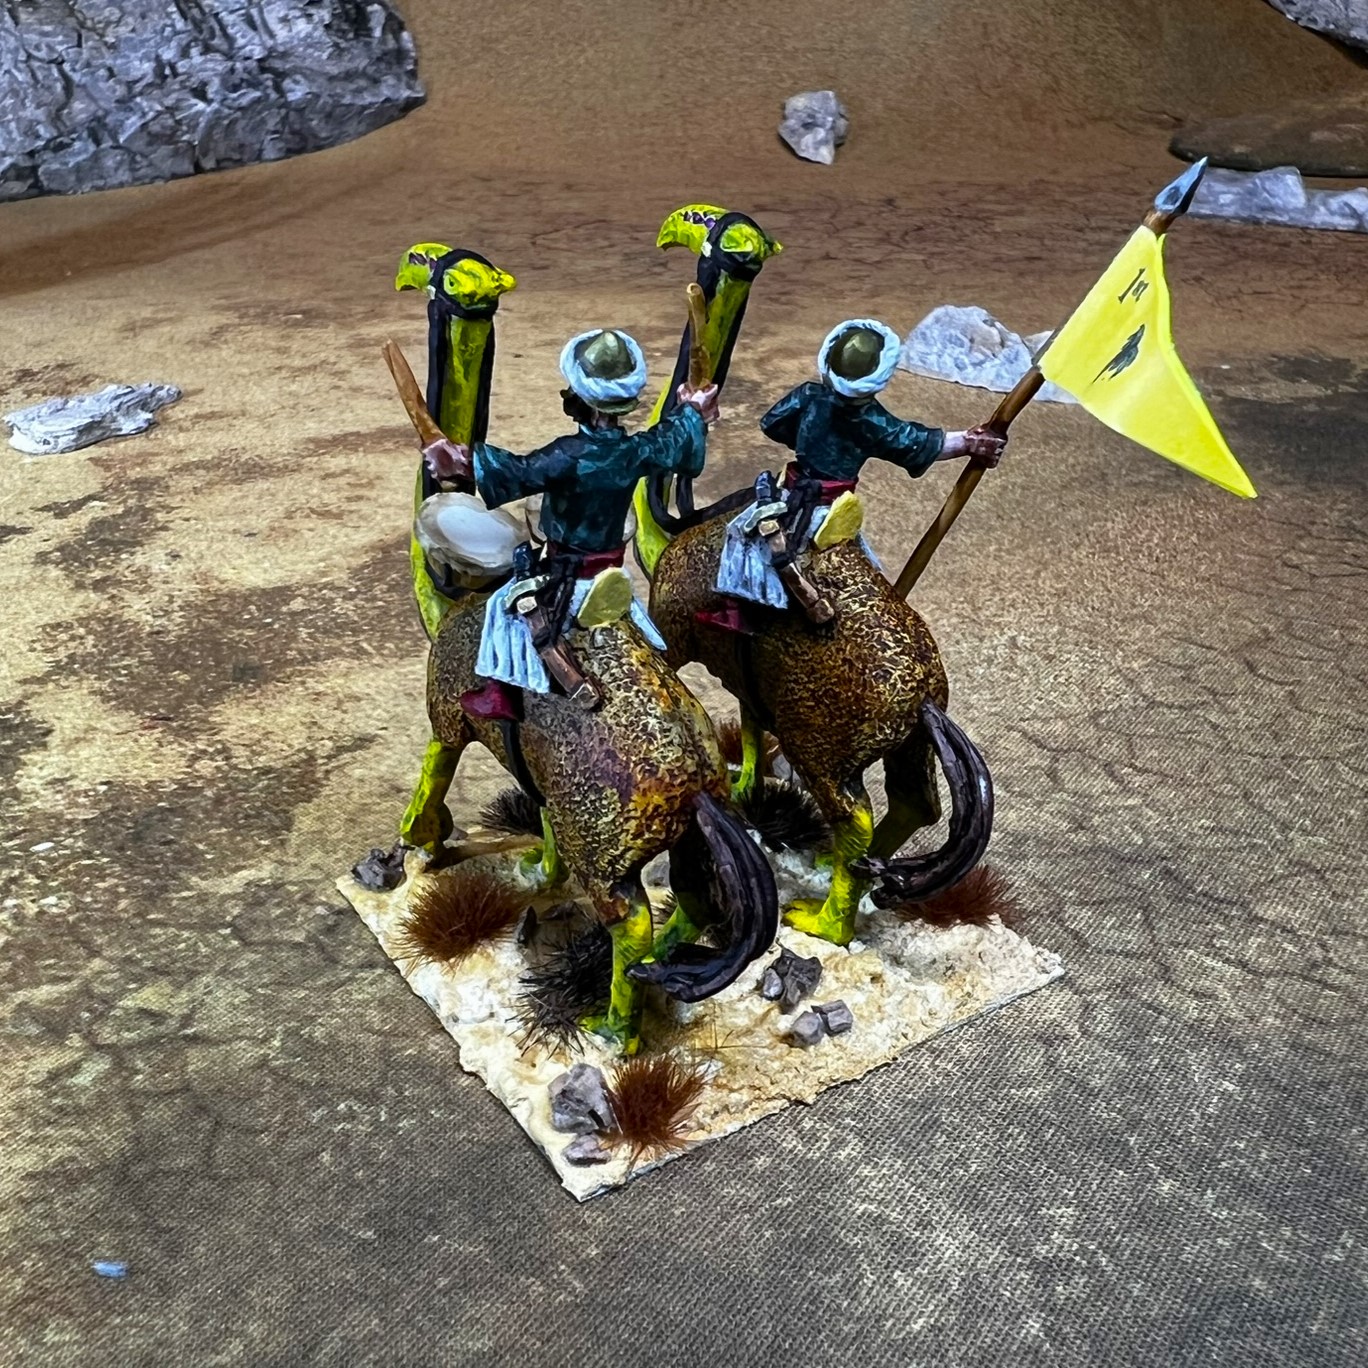
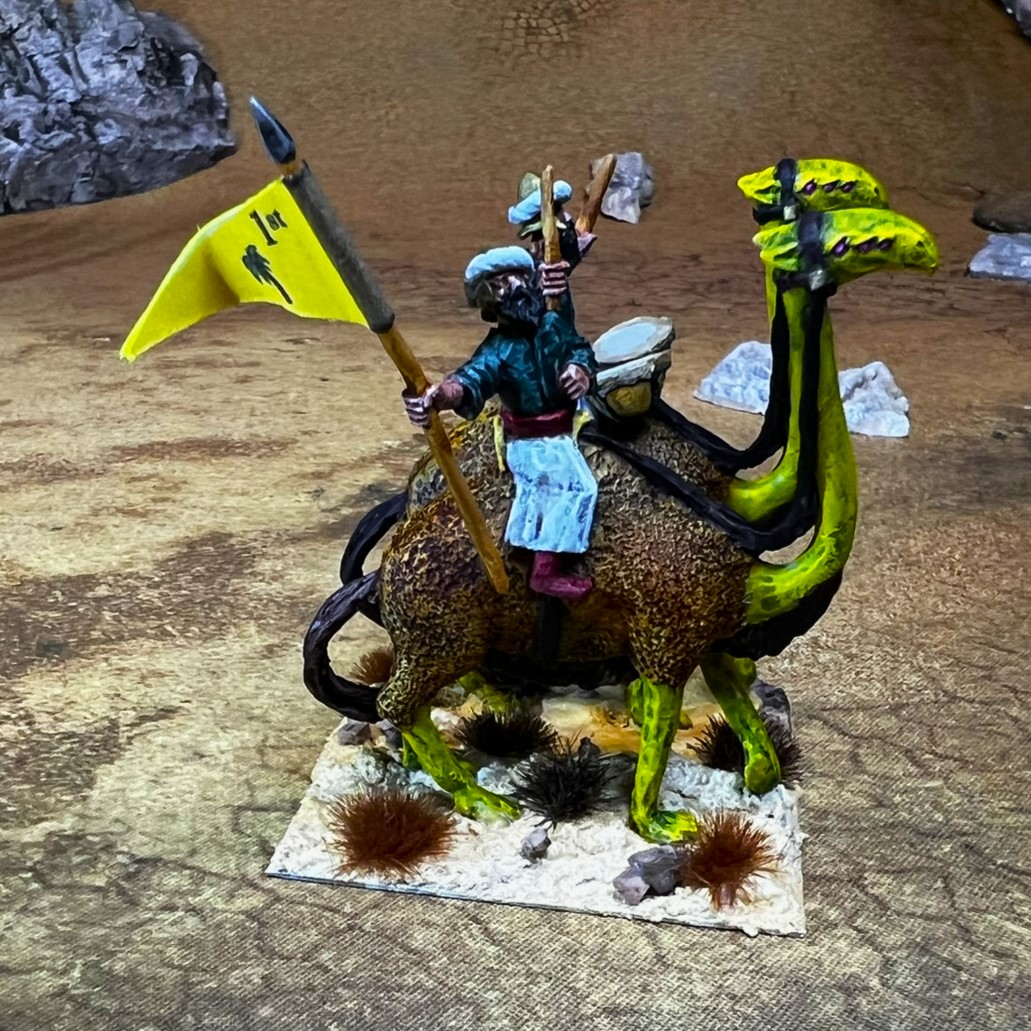
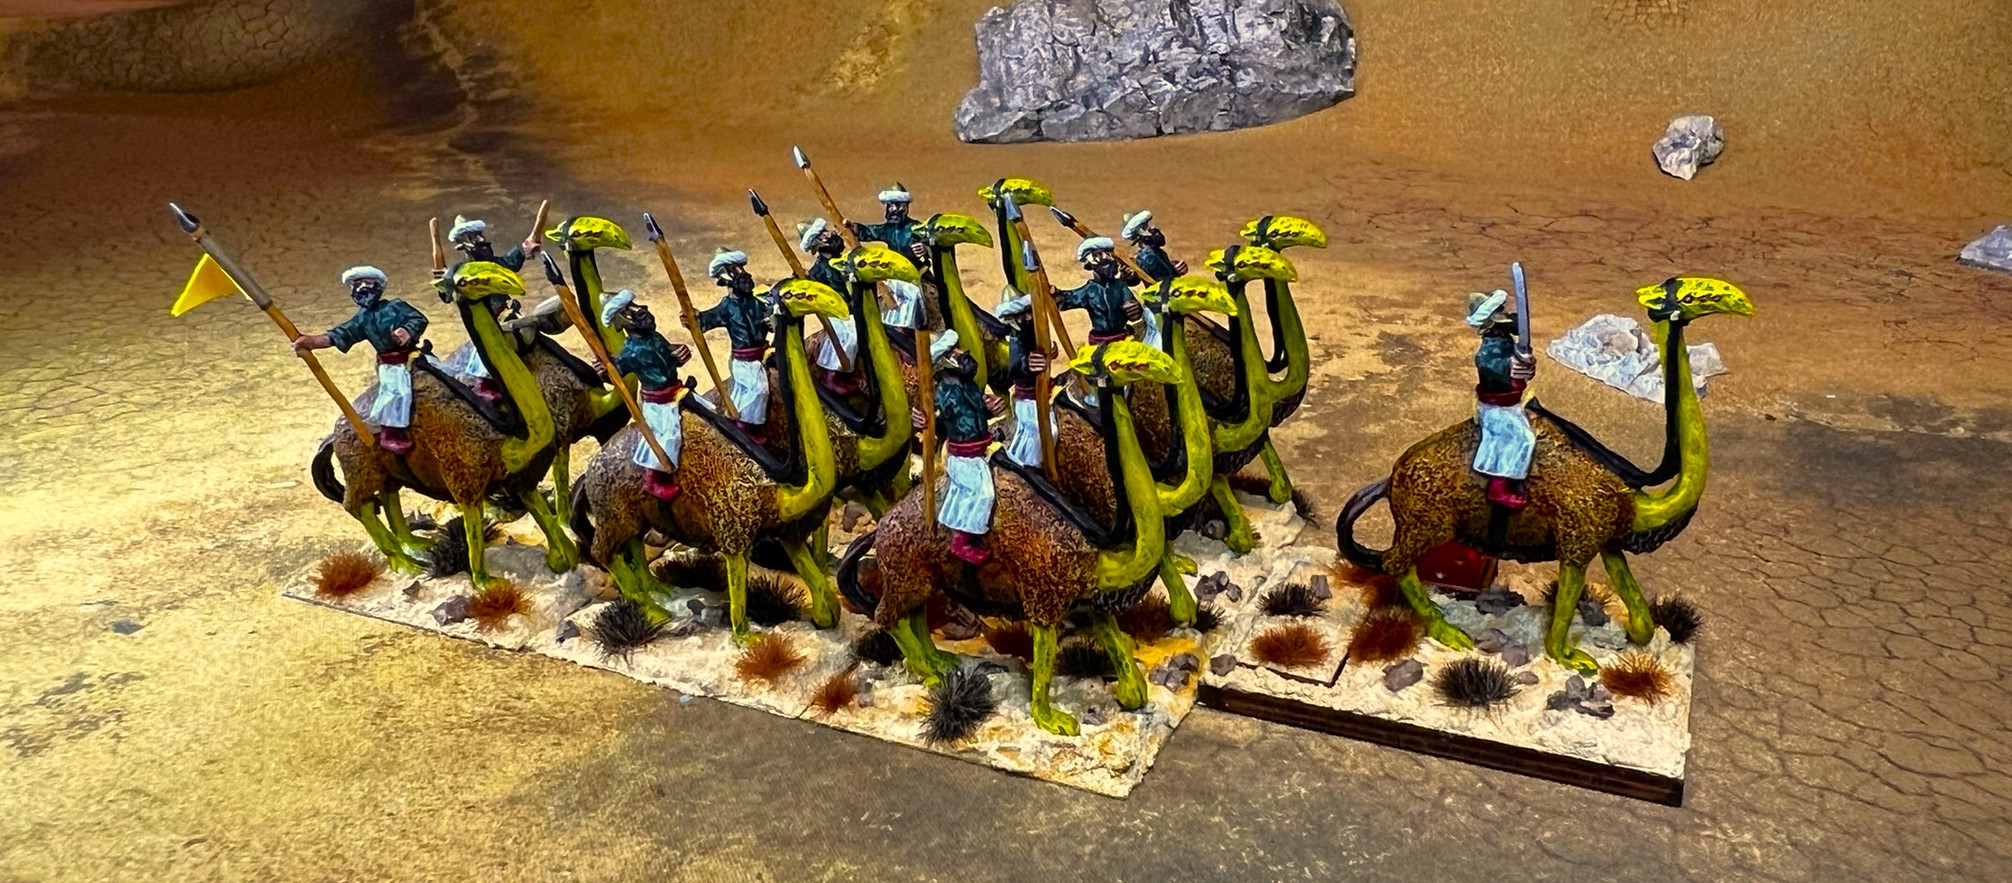
1st Temujican Heavy Cavalry Regiment
The 1st Heavy Cavalry Regiment in line formationRegimental commander standRegular baseFlag baseClose up of the stand with the officer and drummer.
Lastly, another regimental shot:
The 1st Temujican Heavy Cavalry Regiment in column formation
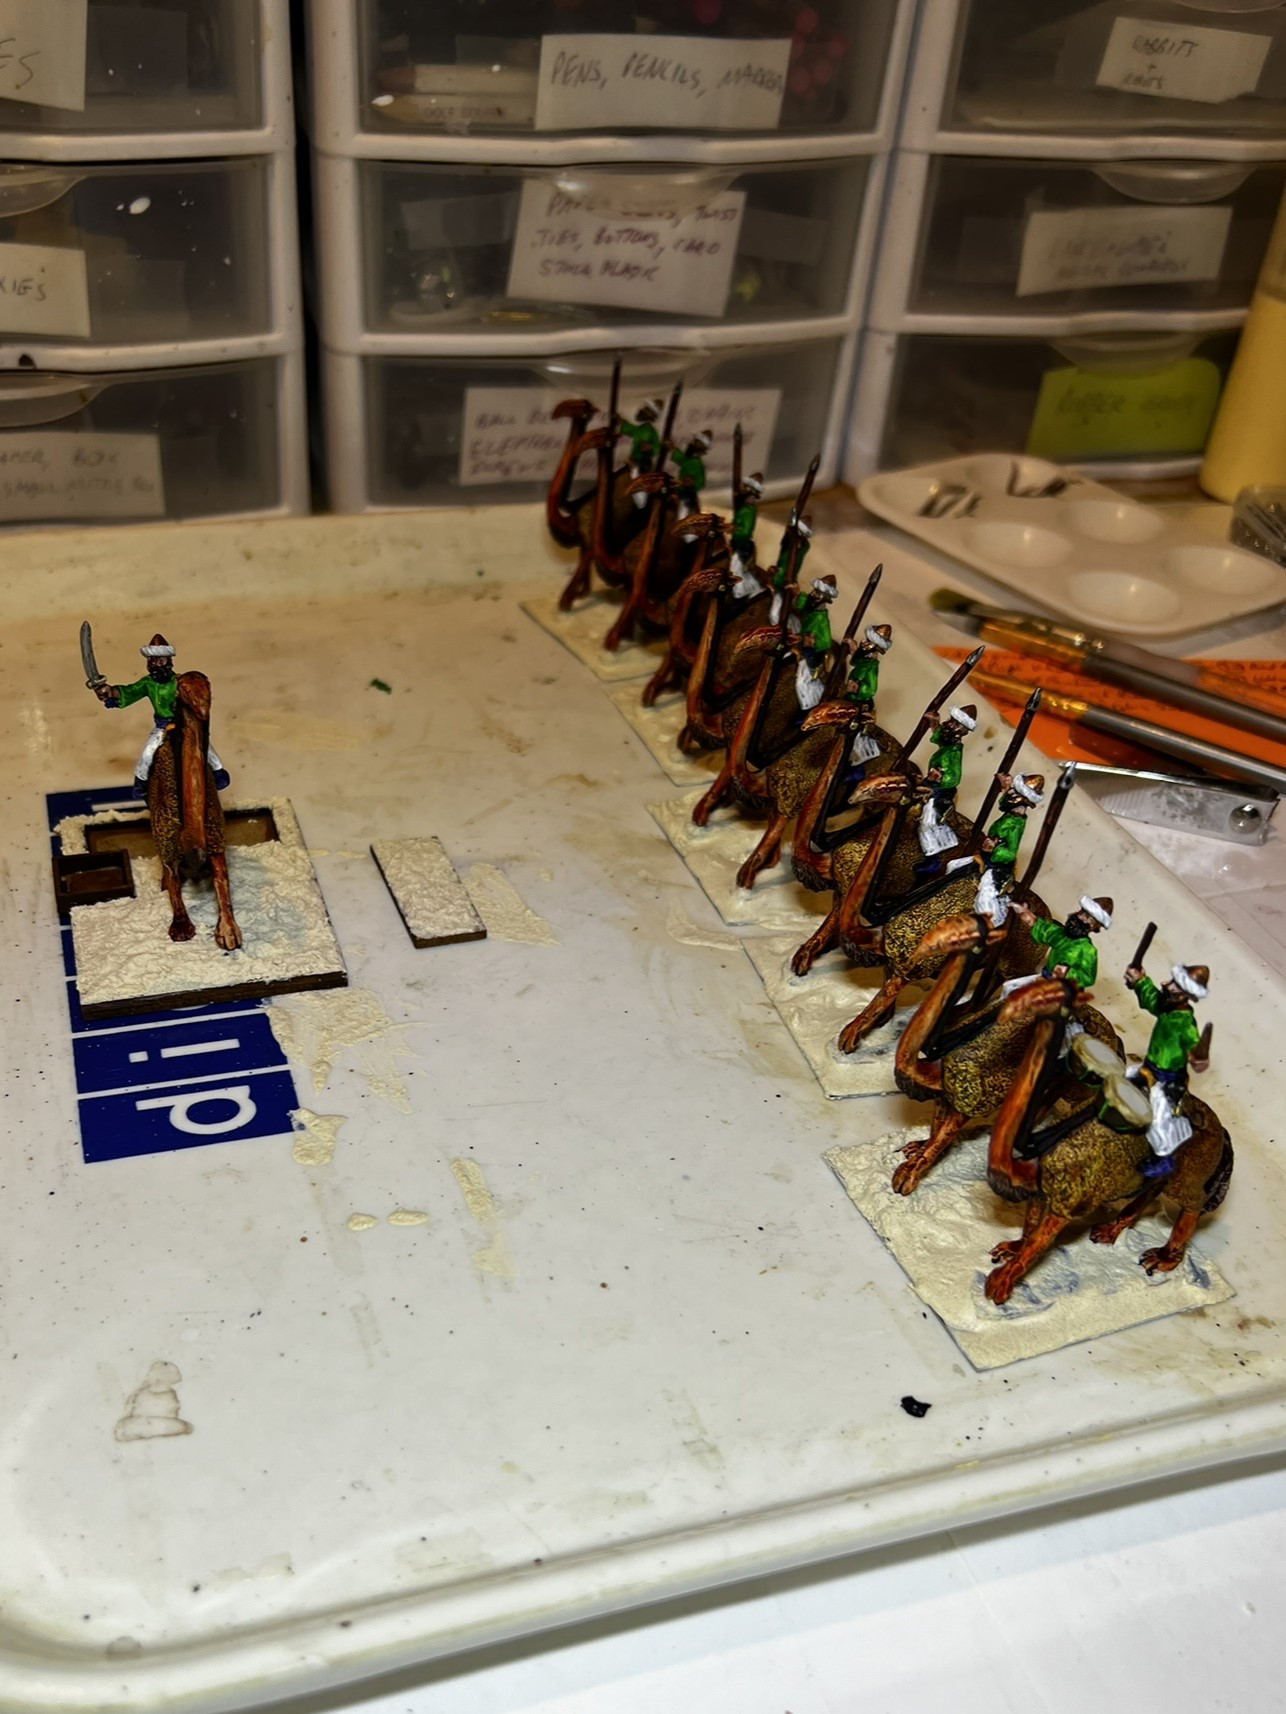
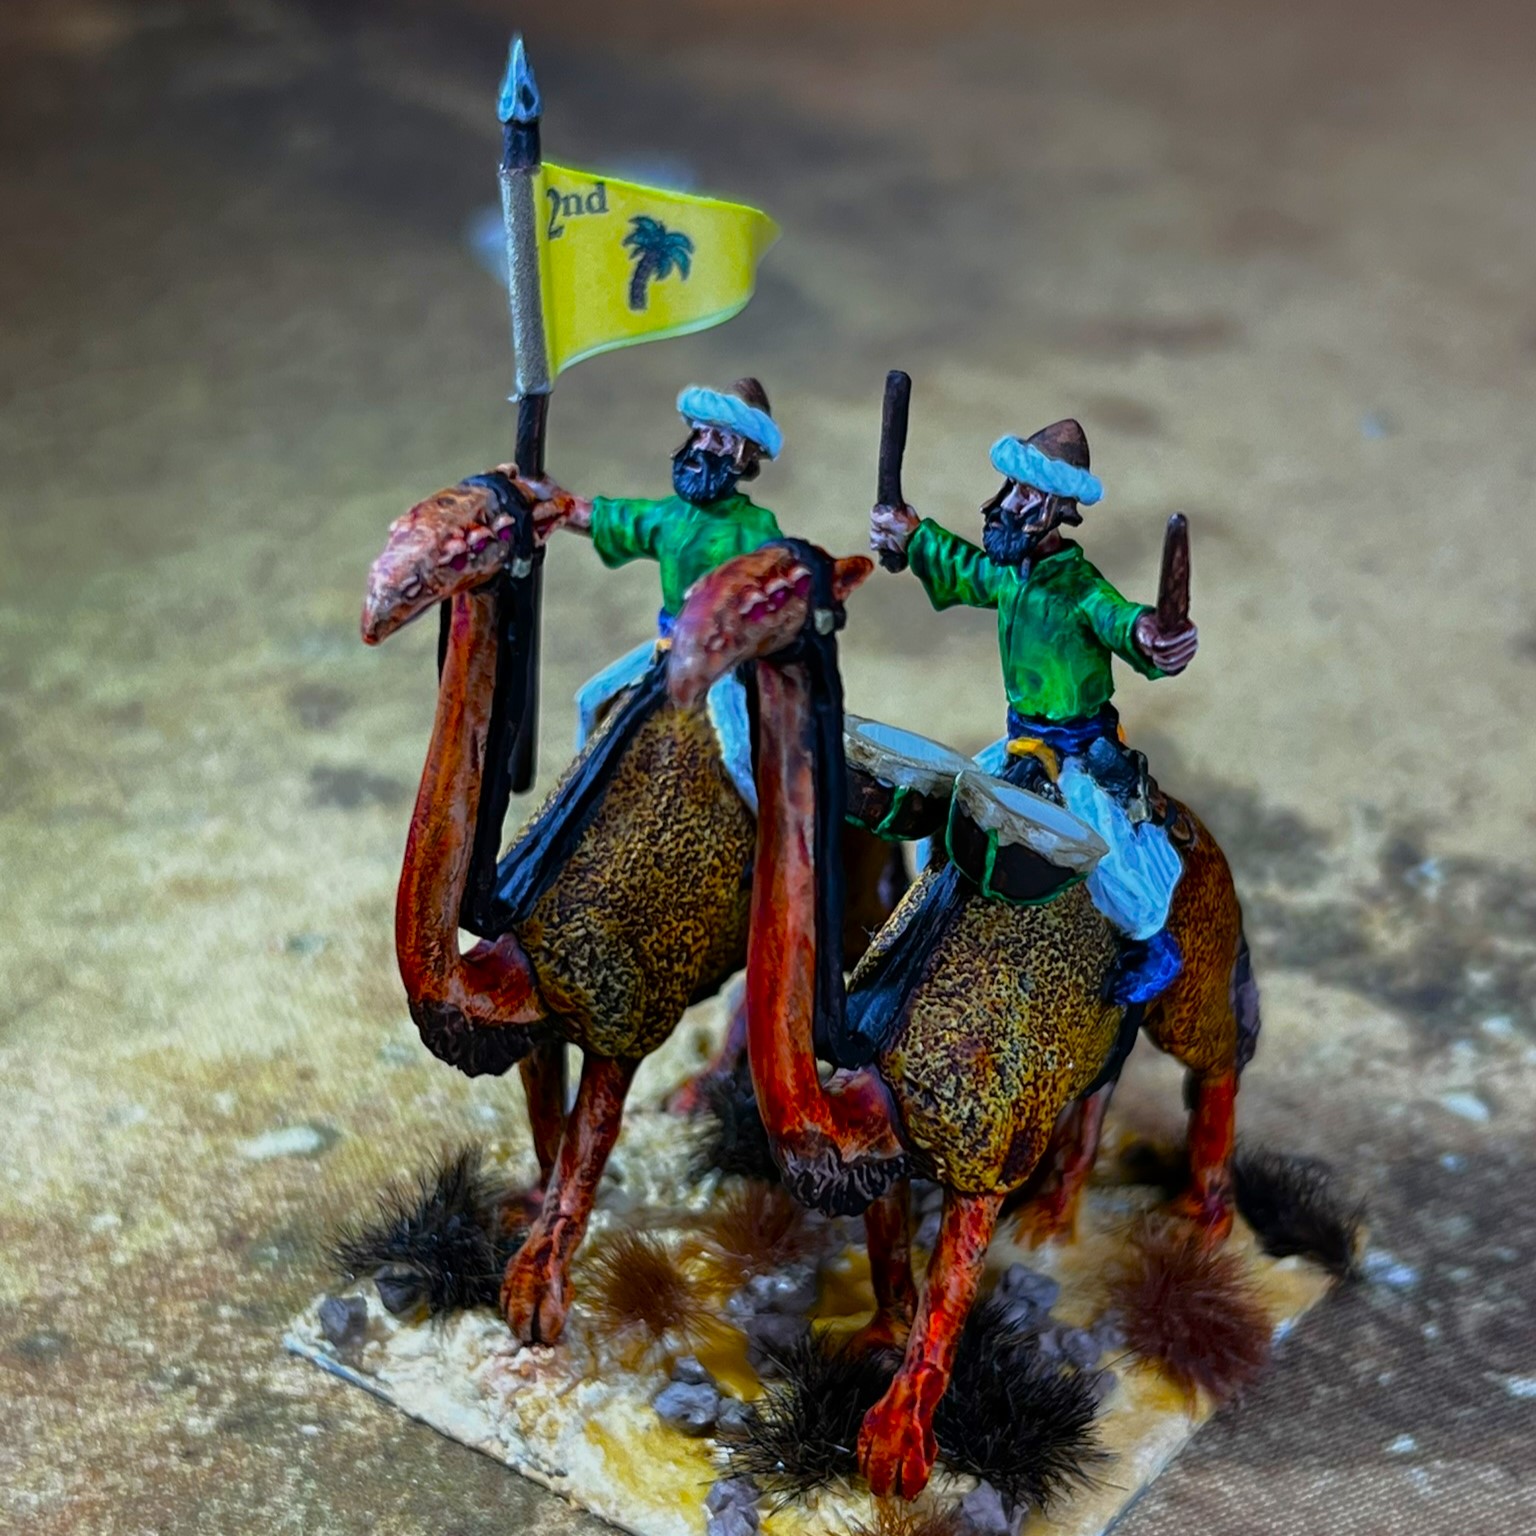
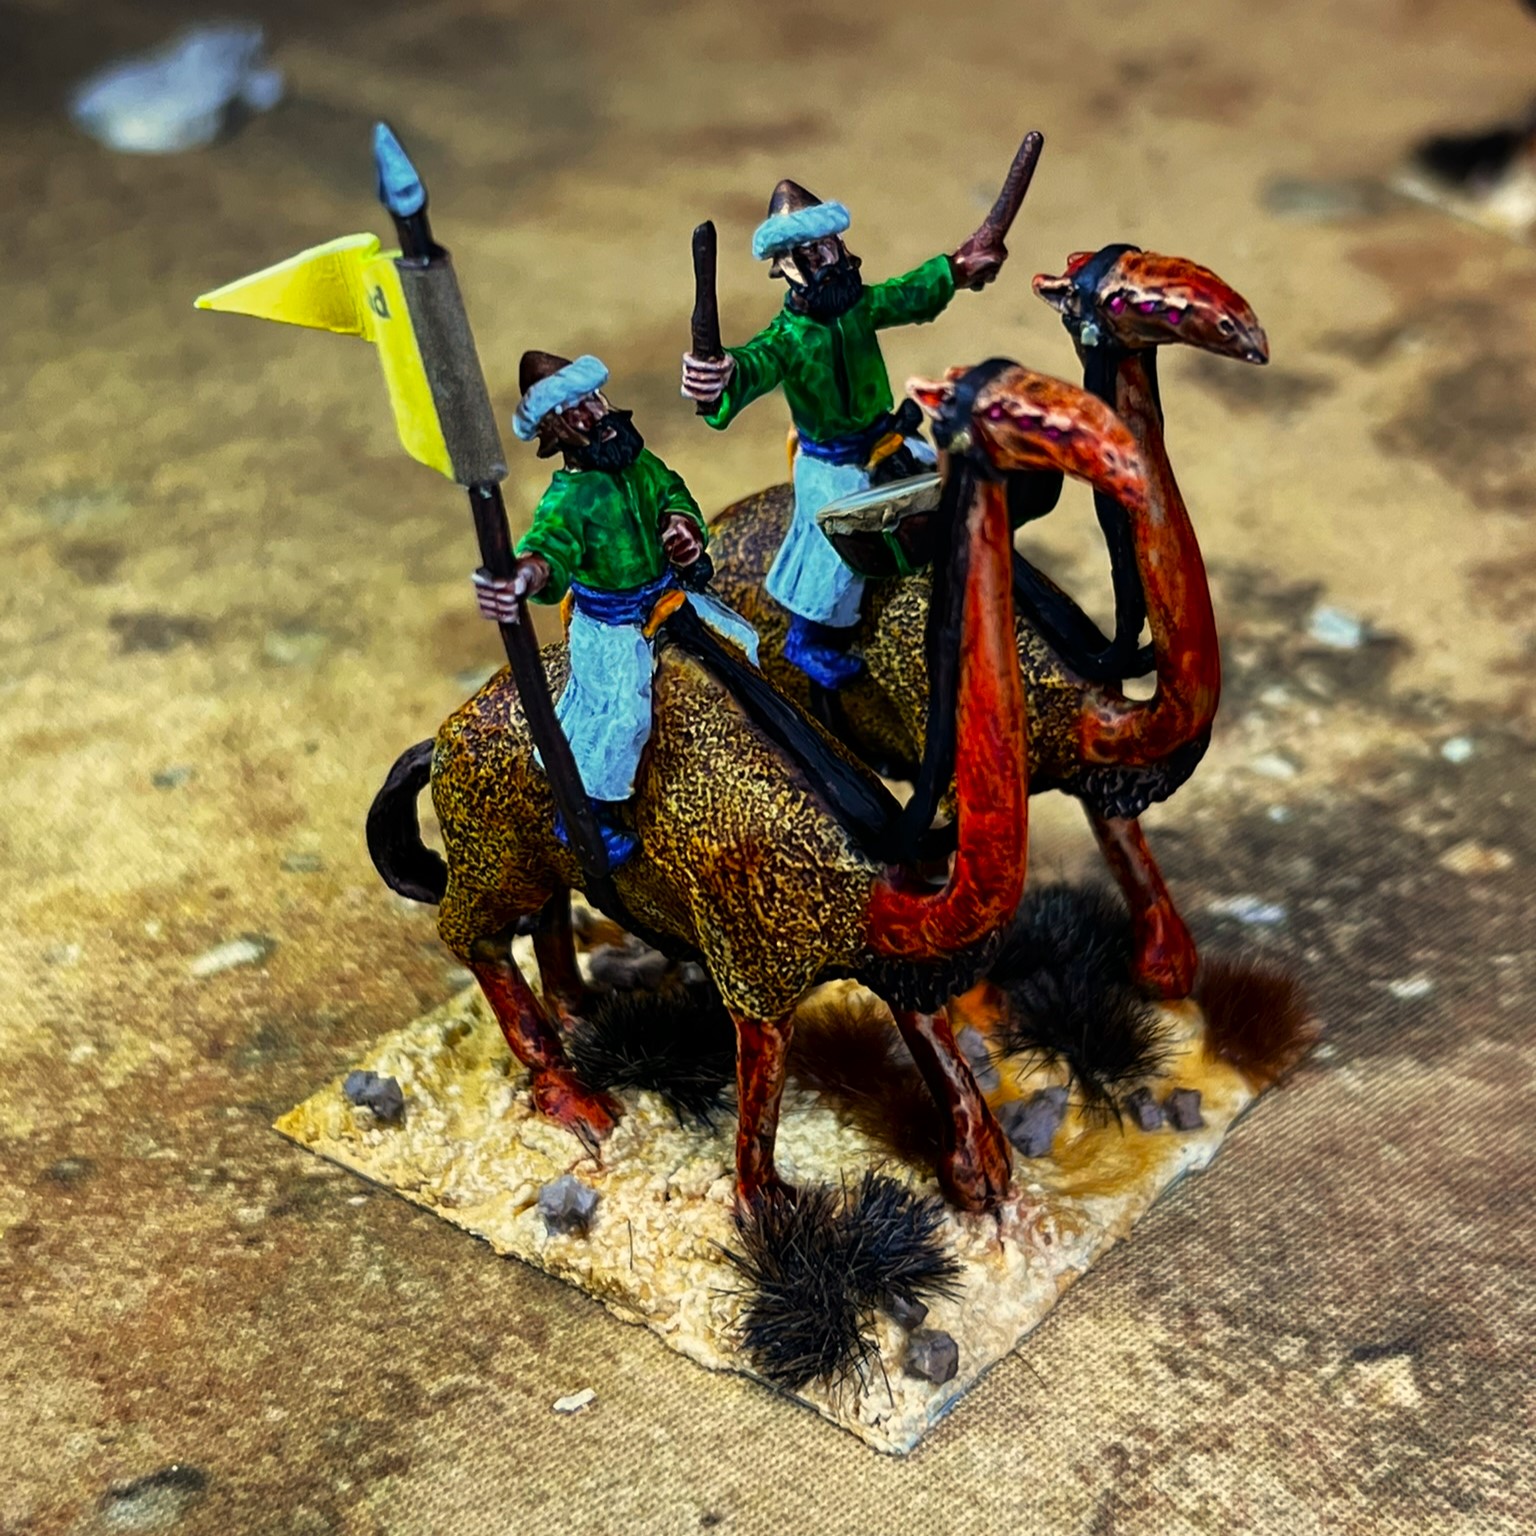
2nd Temujican Heavy Cavalry Regiment
The 2nd Temujican Heavy Cavalry Regiment in line formation.Regimental commanderRegular stand of two troopersThe stand with the officer and drummerFlag stand
And here is the 2nd Temujican Heavy Cavalry Regiment in column formation:
The 2nd Temujican Heavy Cavalry Regiment in column
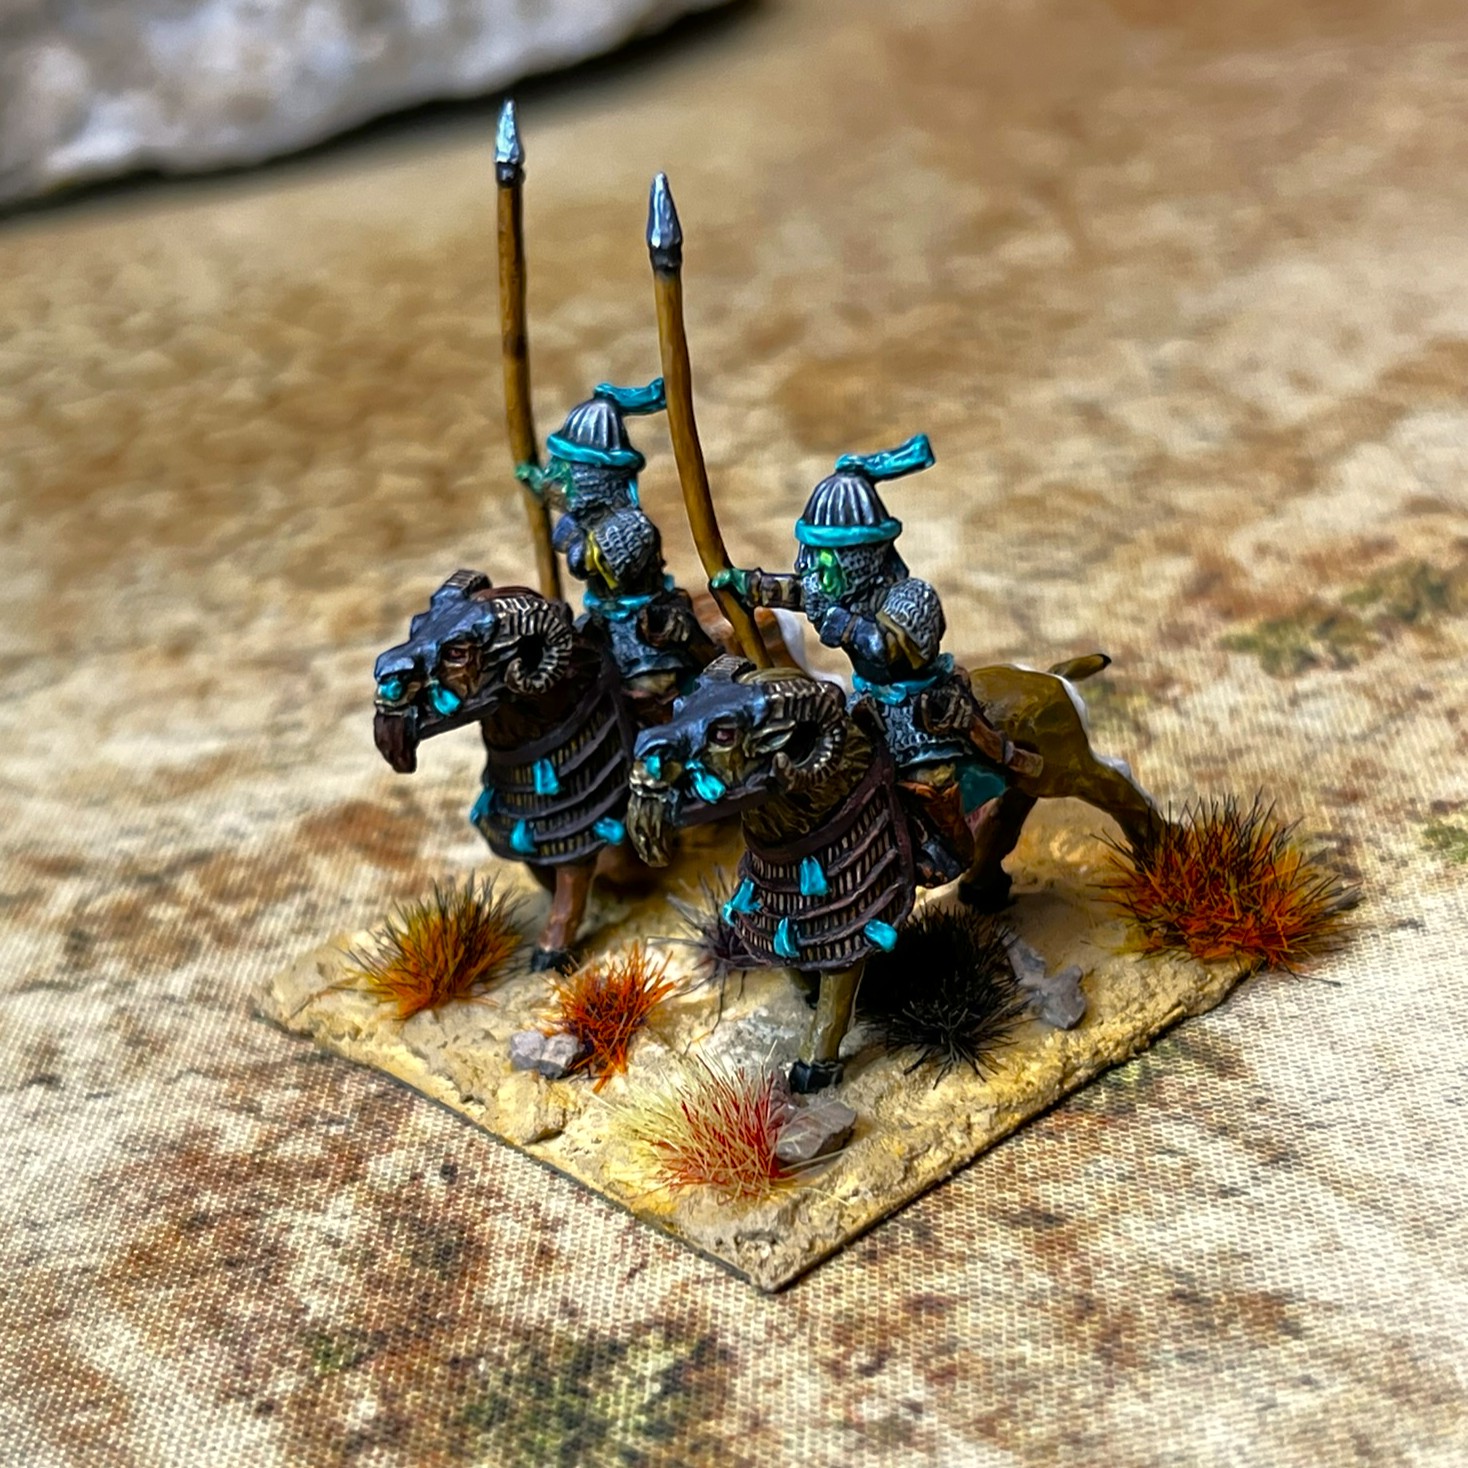
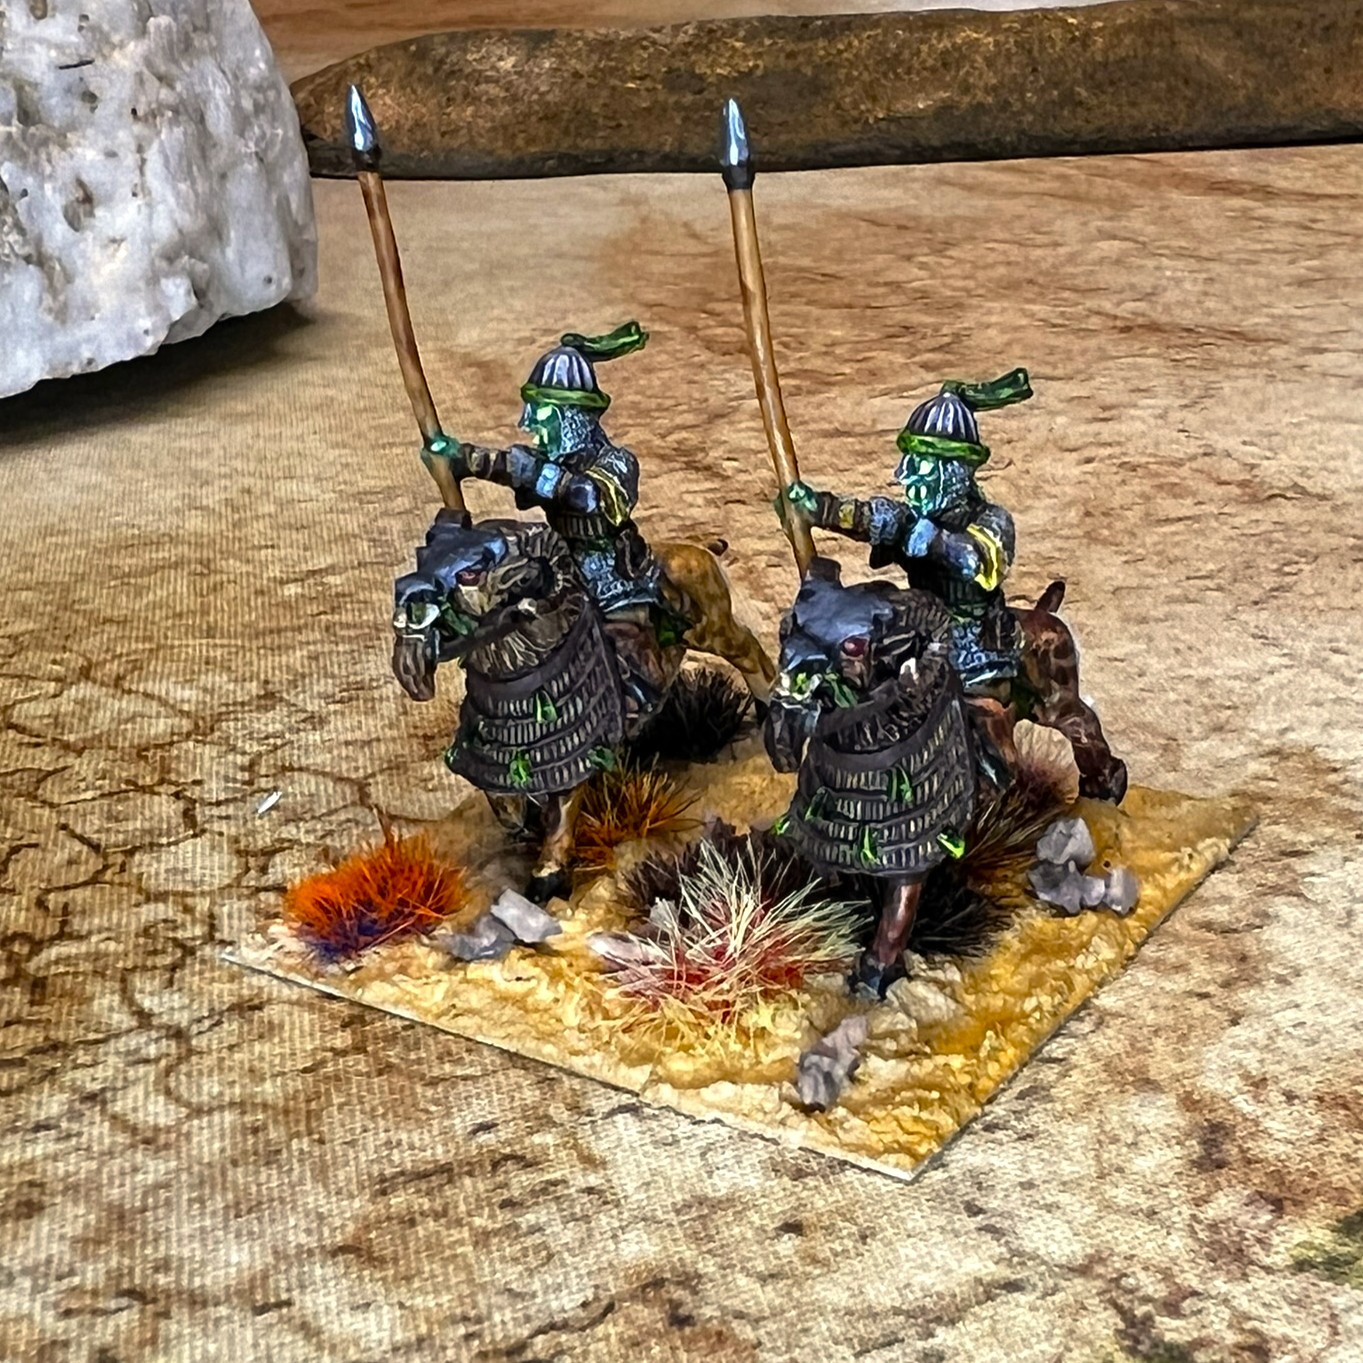
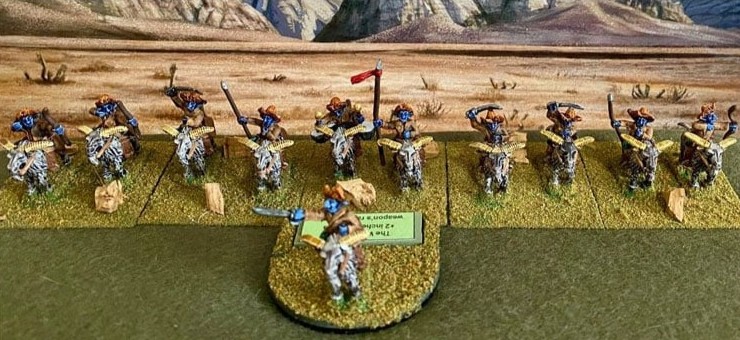
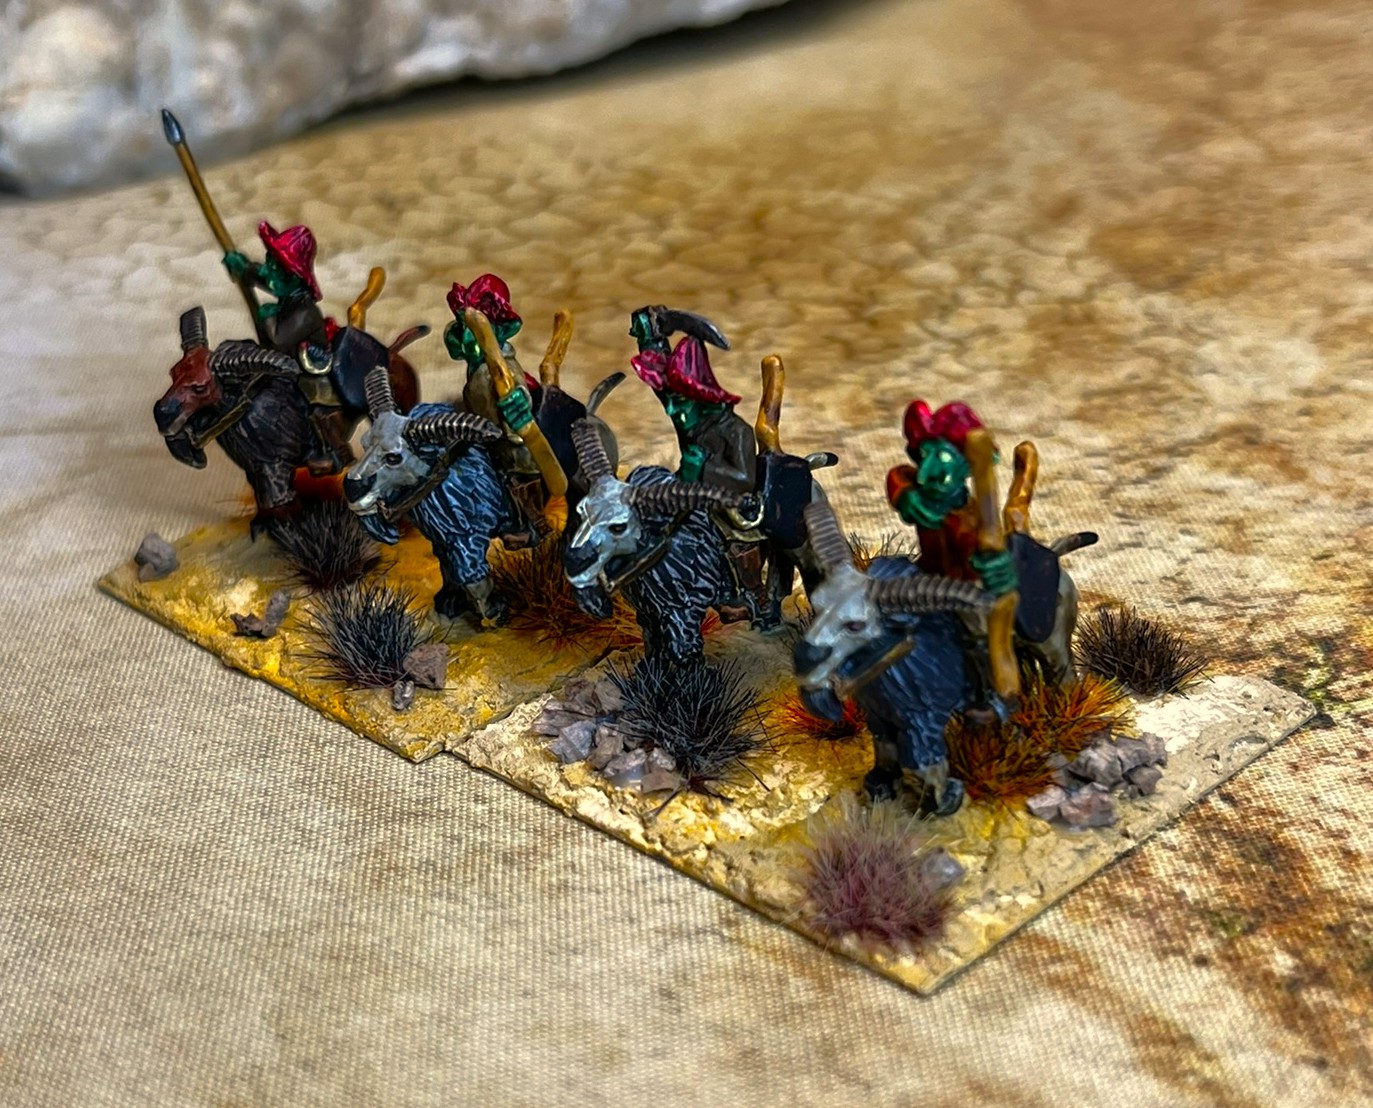
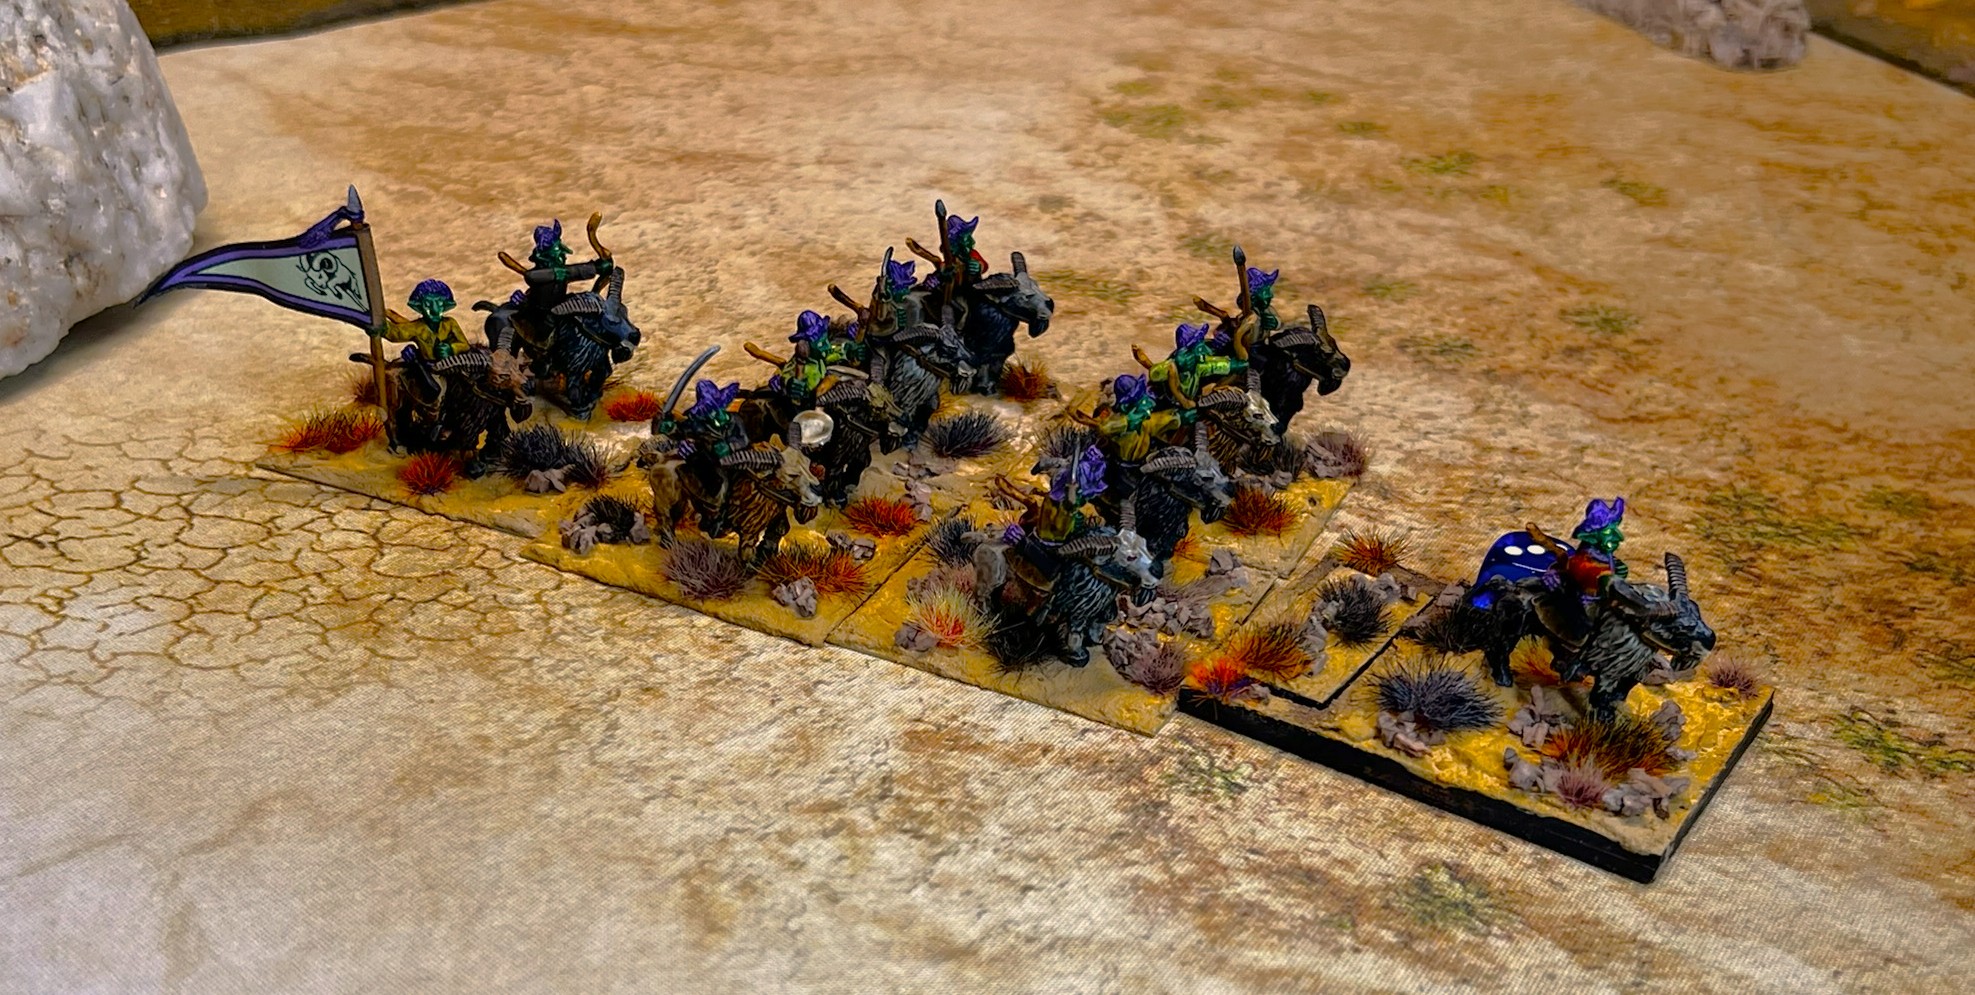
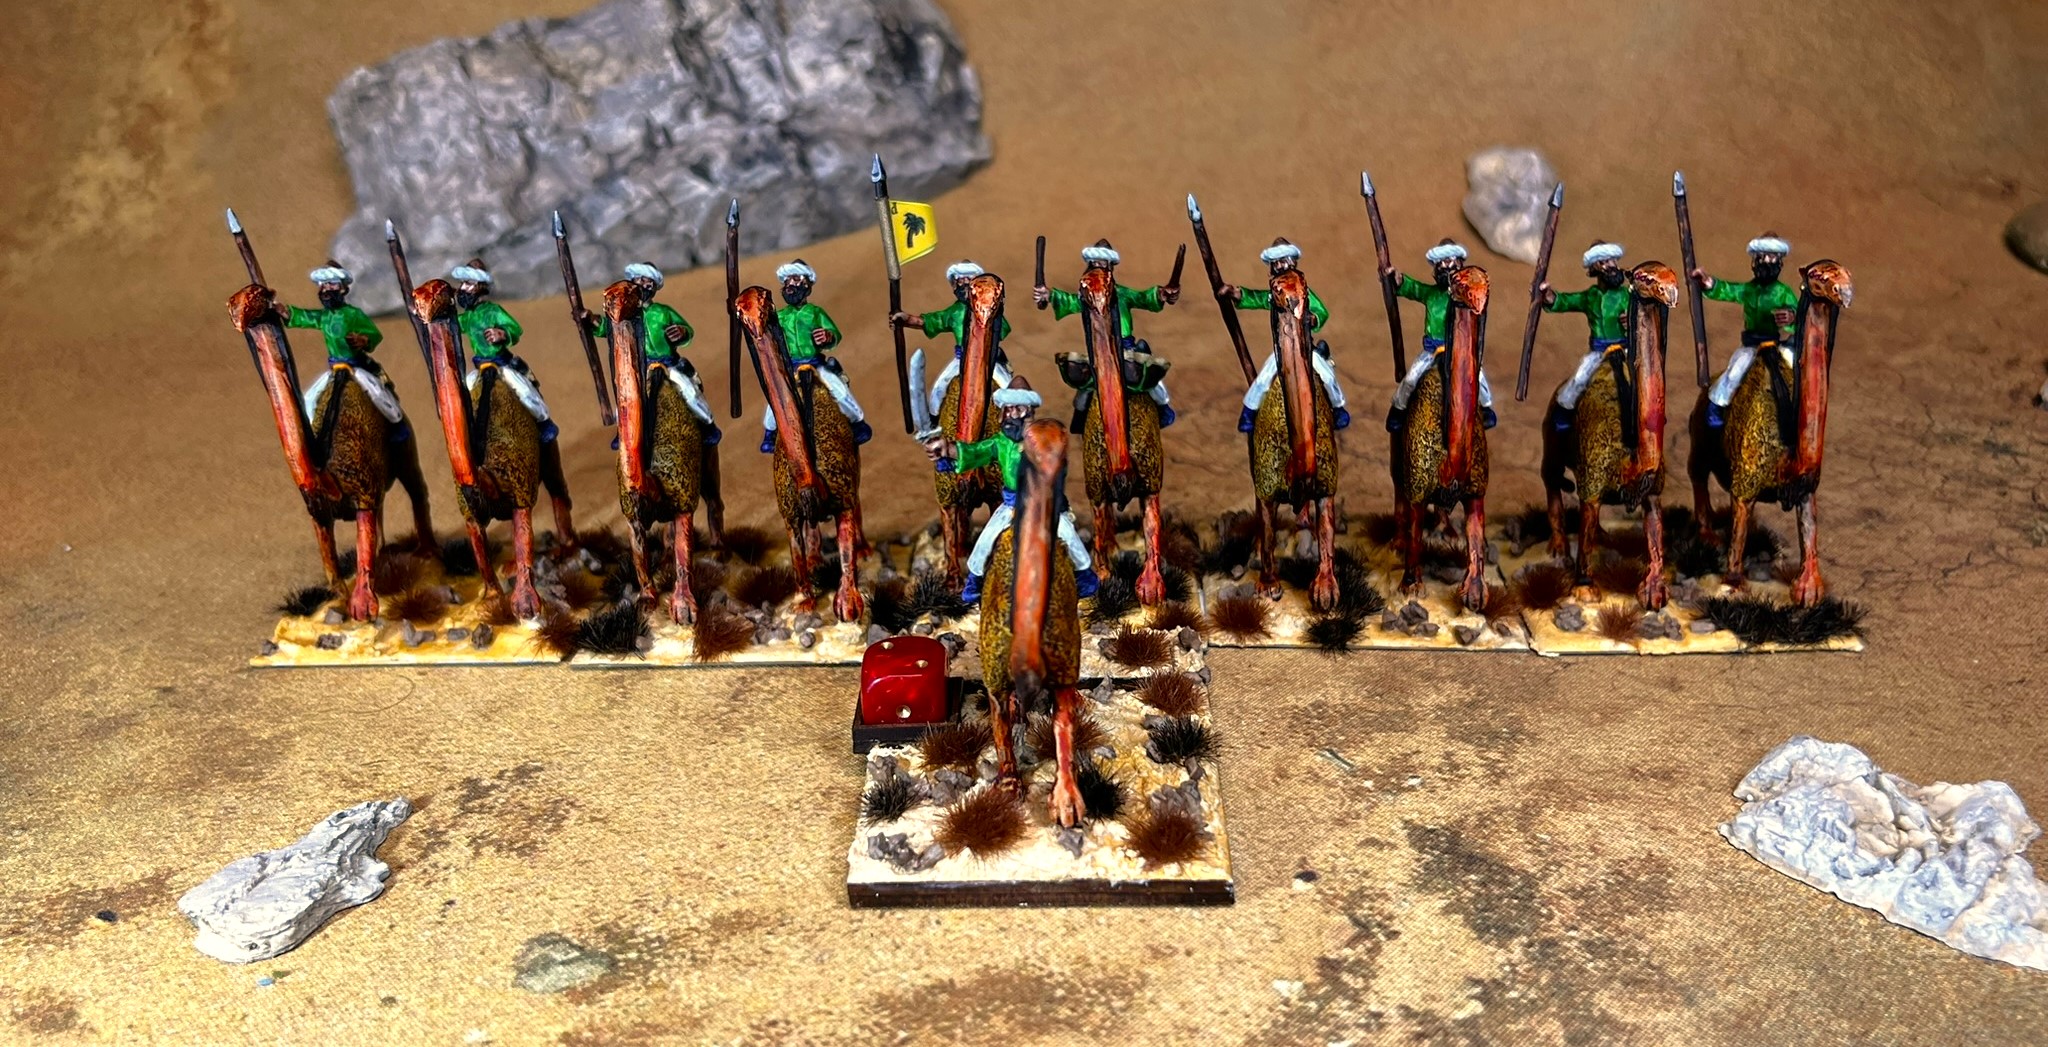
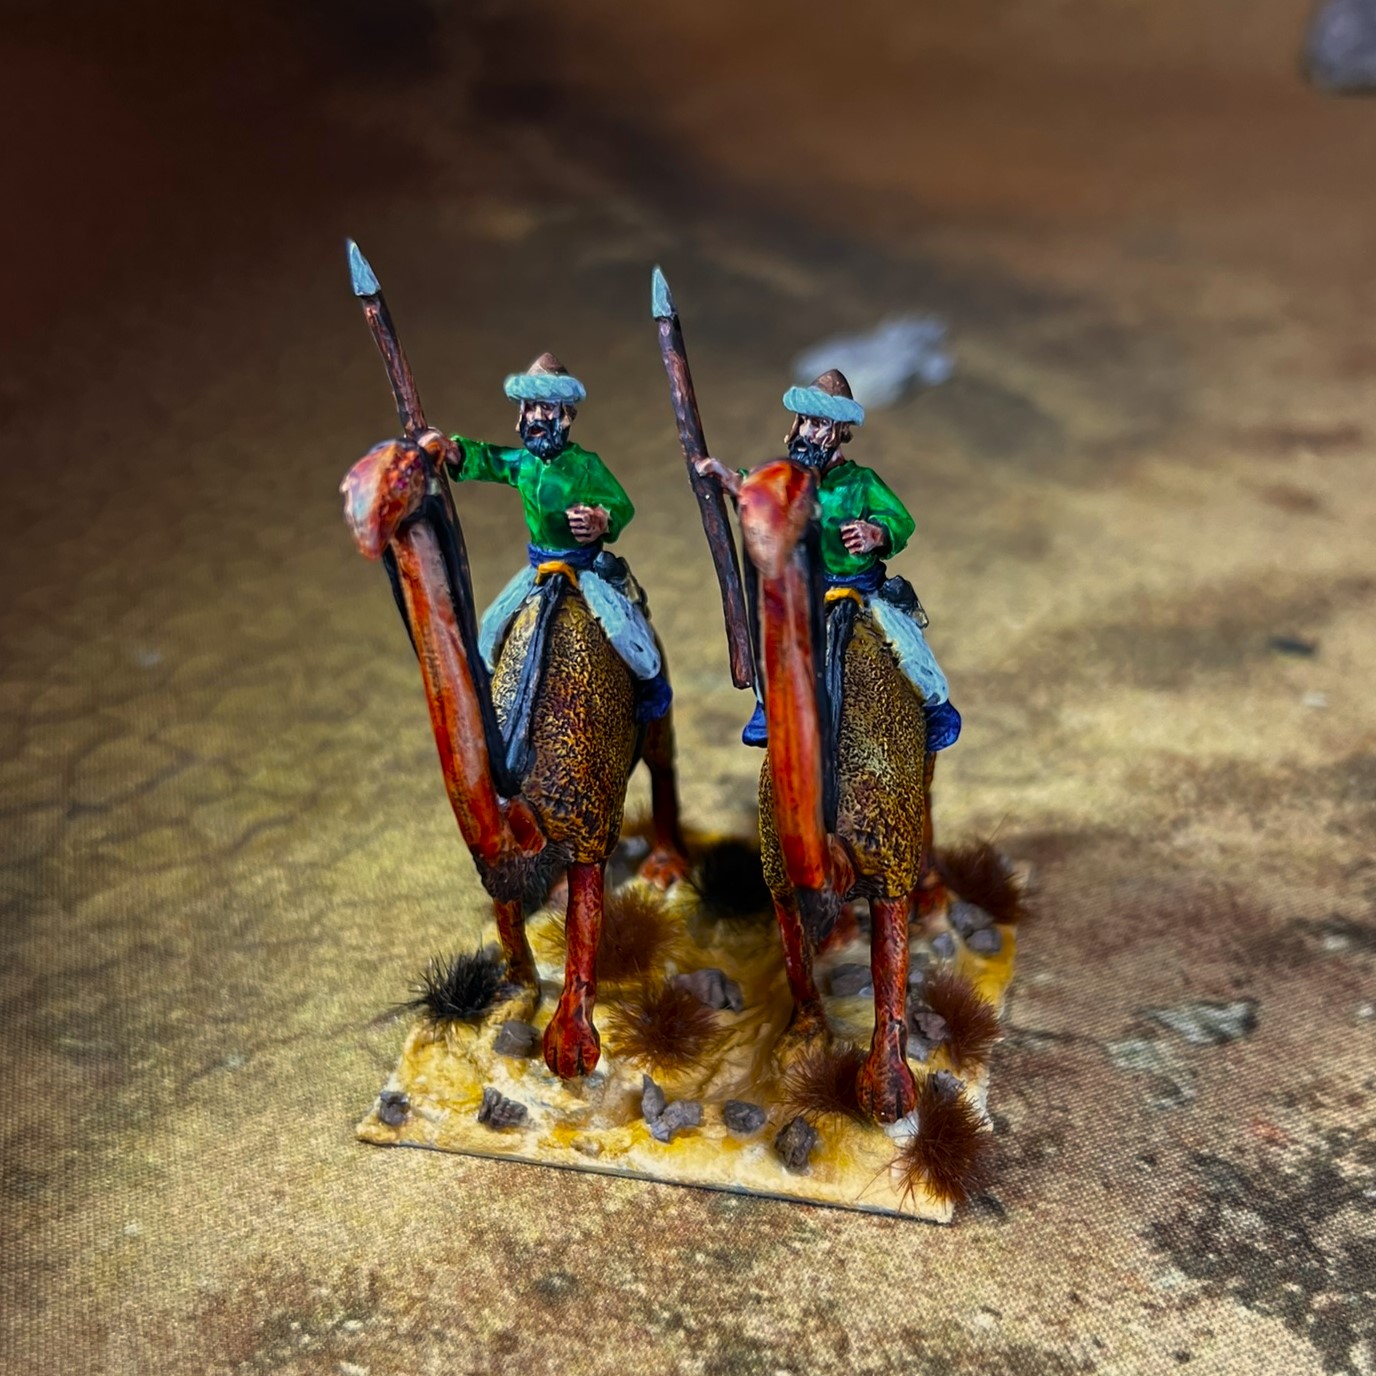
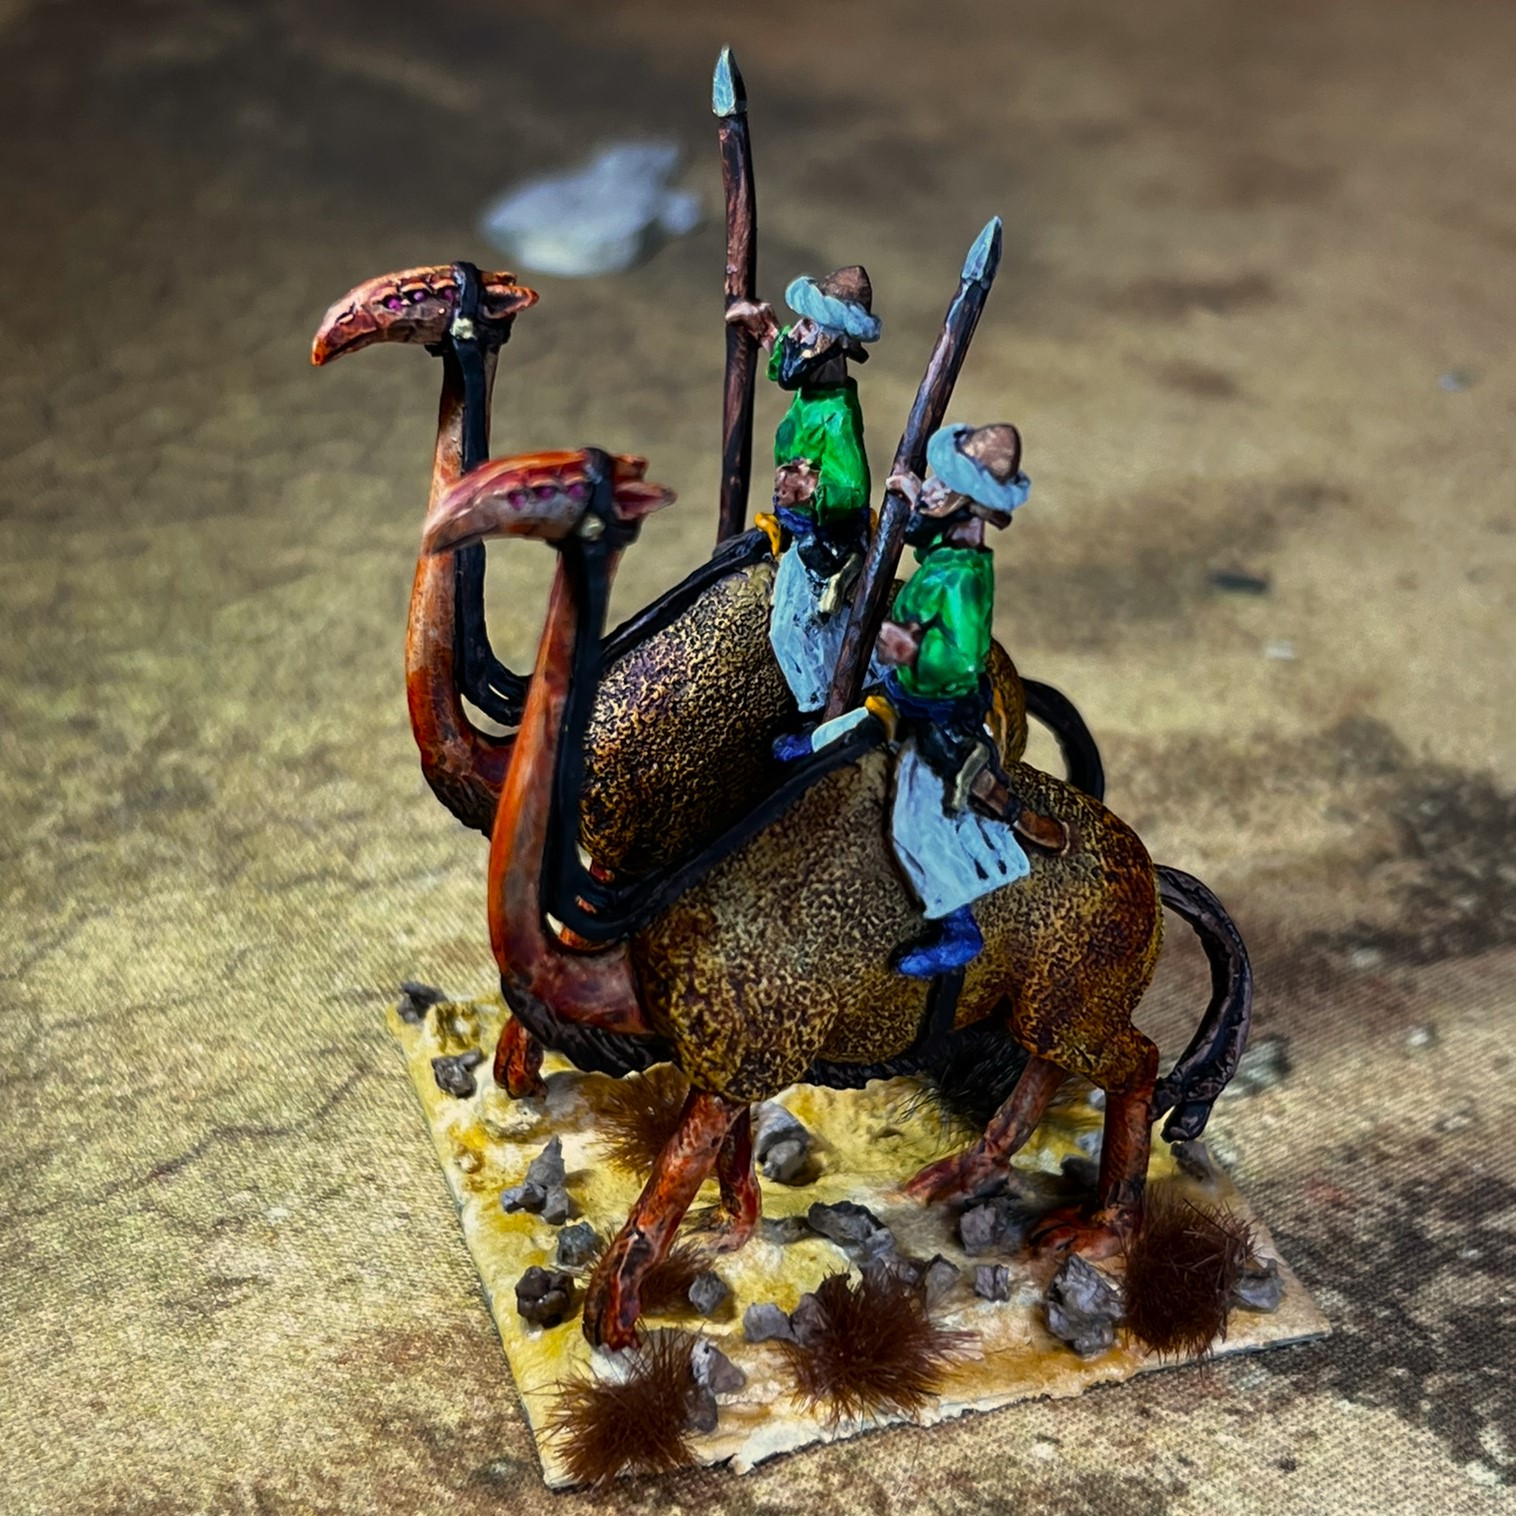
There were three light regiments of cavalry as well. These are OZZ-510, “Light Cavalry on Great Rams” on the website, but these all to me really ride goats. Their flags have orange, red, and purple borders – so those became the hat colors for their respective regiments. Otherwise, I followed the canon on coat colors and went crazy on mixing up goat colors with more grays than browns and tans.
Here is the light cavalry photo from the Wars of Ozz website:
And here below are my three regiments of Temujican Light Cavalry…
1st Temujican Light Cavalry Regiment
The 1st Temujican Light Cavalry Regiment – note the orange hatsRegimental CommanderRegular standFlag and leader/drummer standsThe 1st Temujican Light Cavalry Regiment in column formation
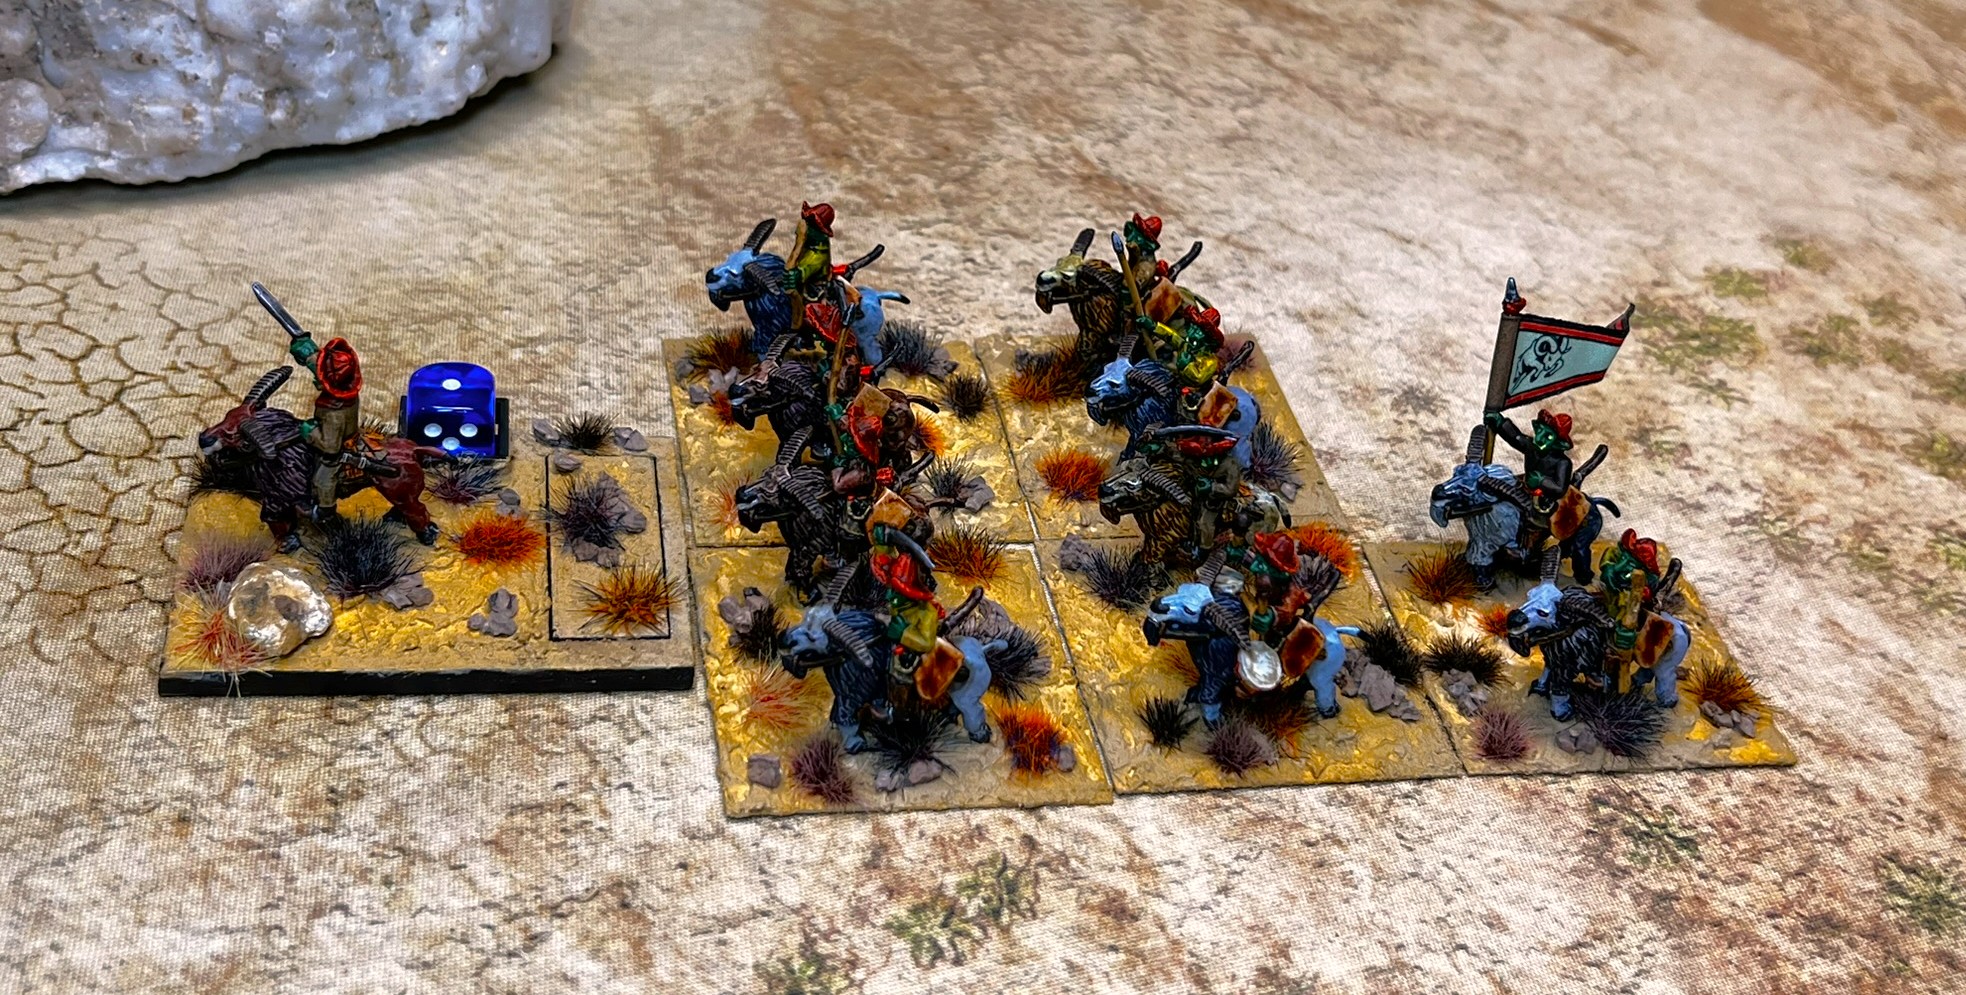
2nd Temujican Light Cavalry Regiment
The 2nd Temujican Light Cavalry Regiment – note the red hatsRegimental CommanderRegular standCommand stands for the 2ndThe 2nd Temujican Light Cavalry Regiment in column formation
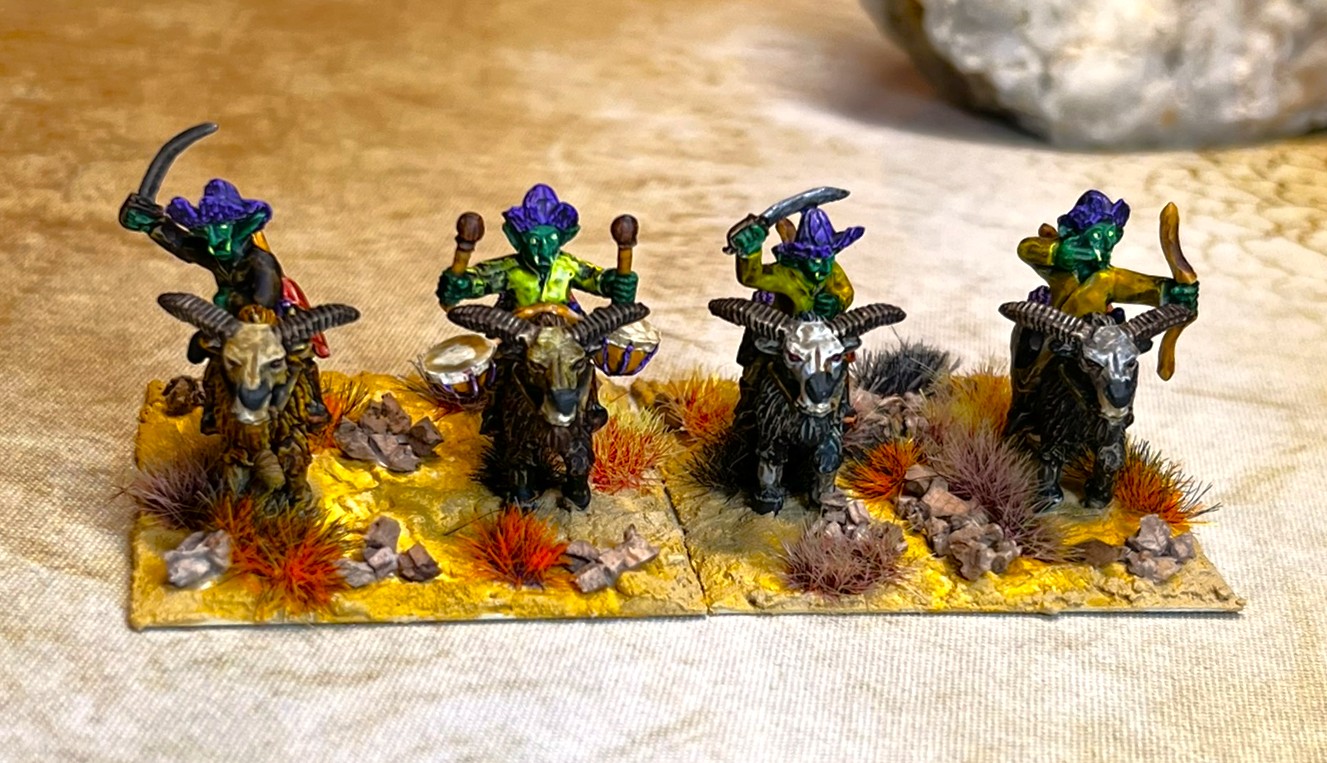
3rd Temujican Light Cavalry Regiment
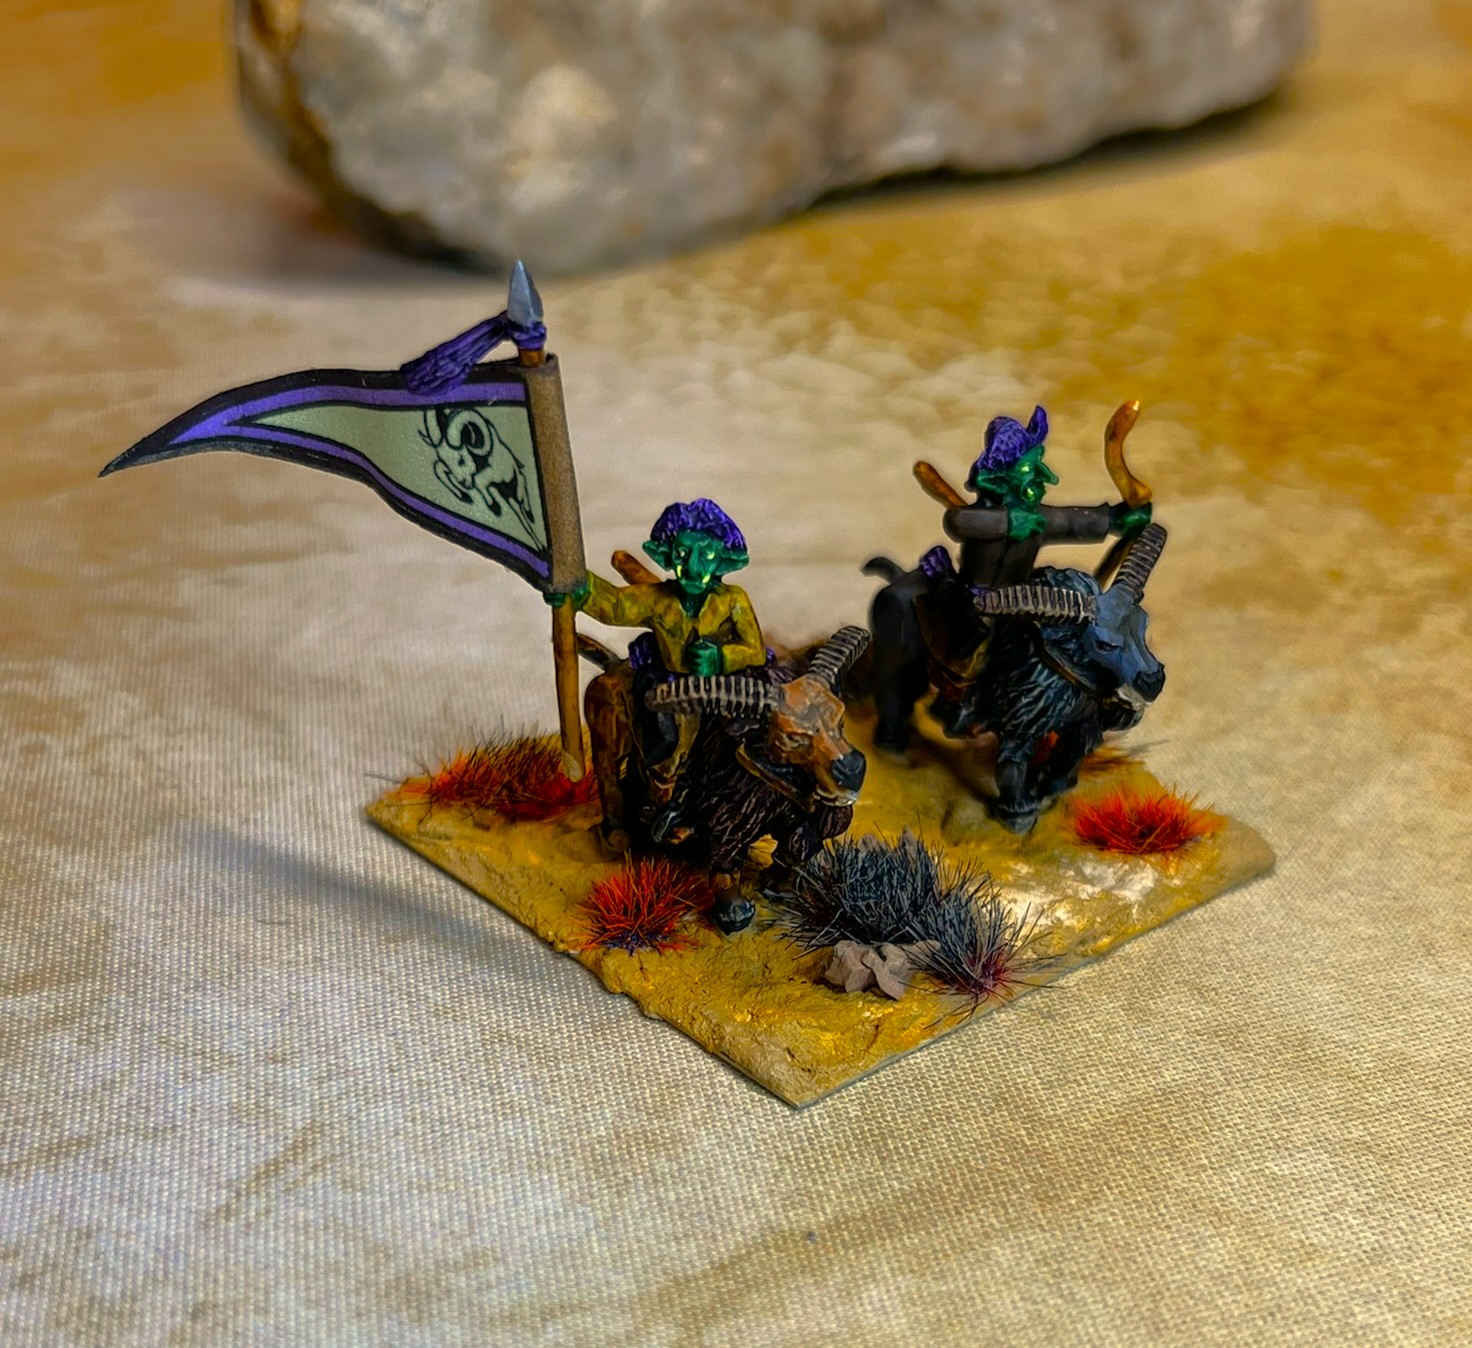
The 3rd Temujican Light Cavalry Regiment – note the purple hatsRegimental CommanderOfficer/drummer stand and a regular oneFlag standThe 3rd Temujican Light Cavalry Regiment in column formation
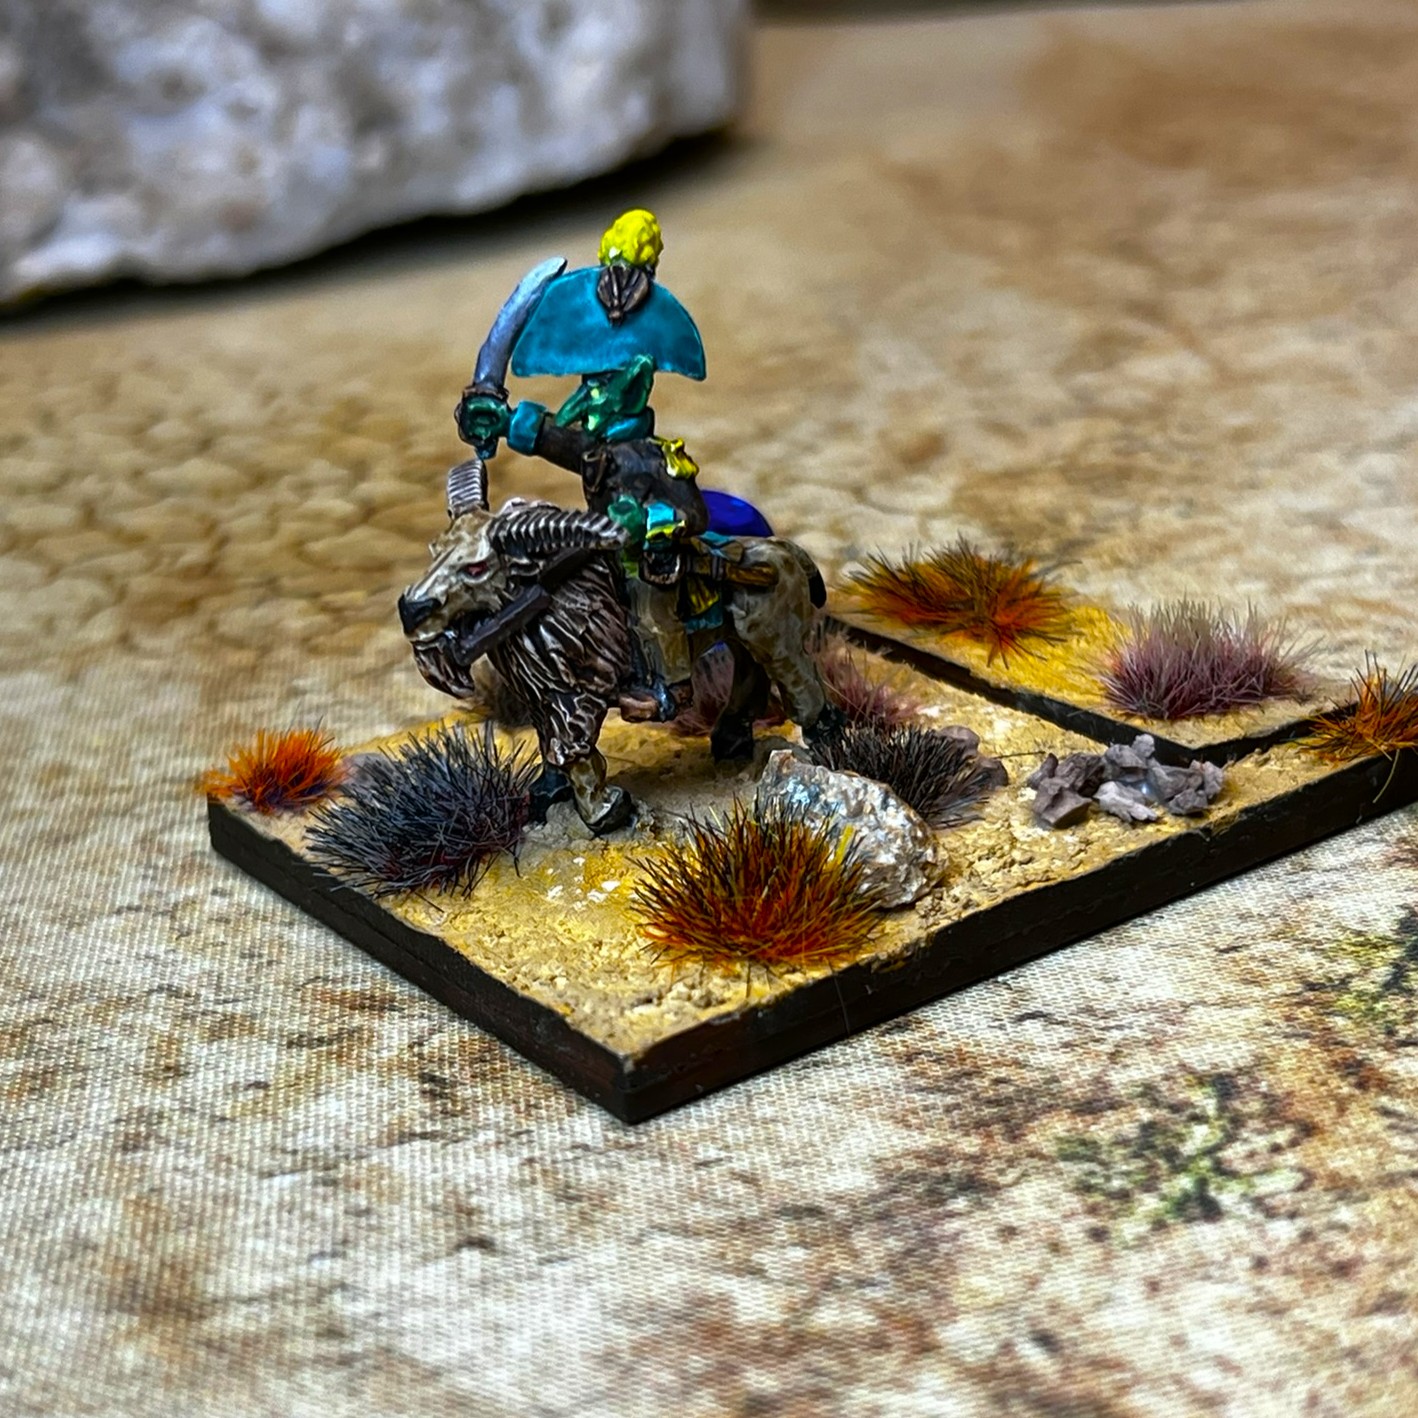
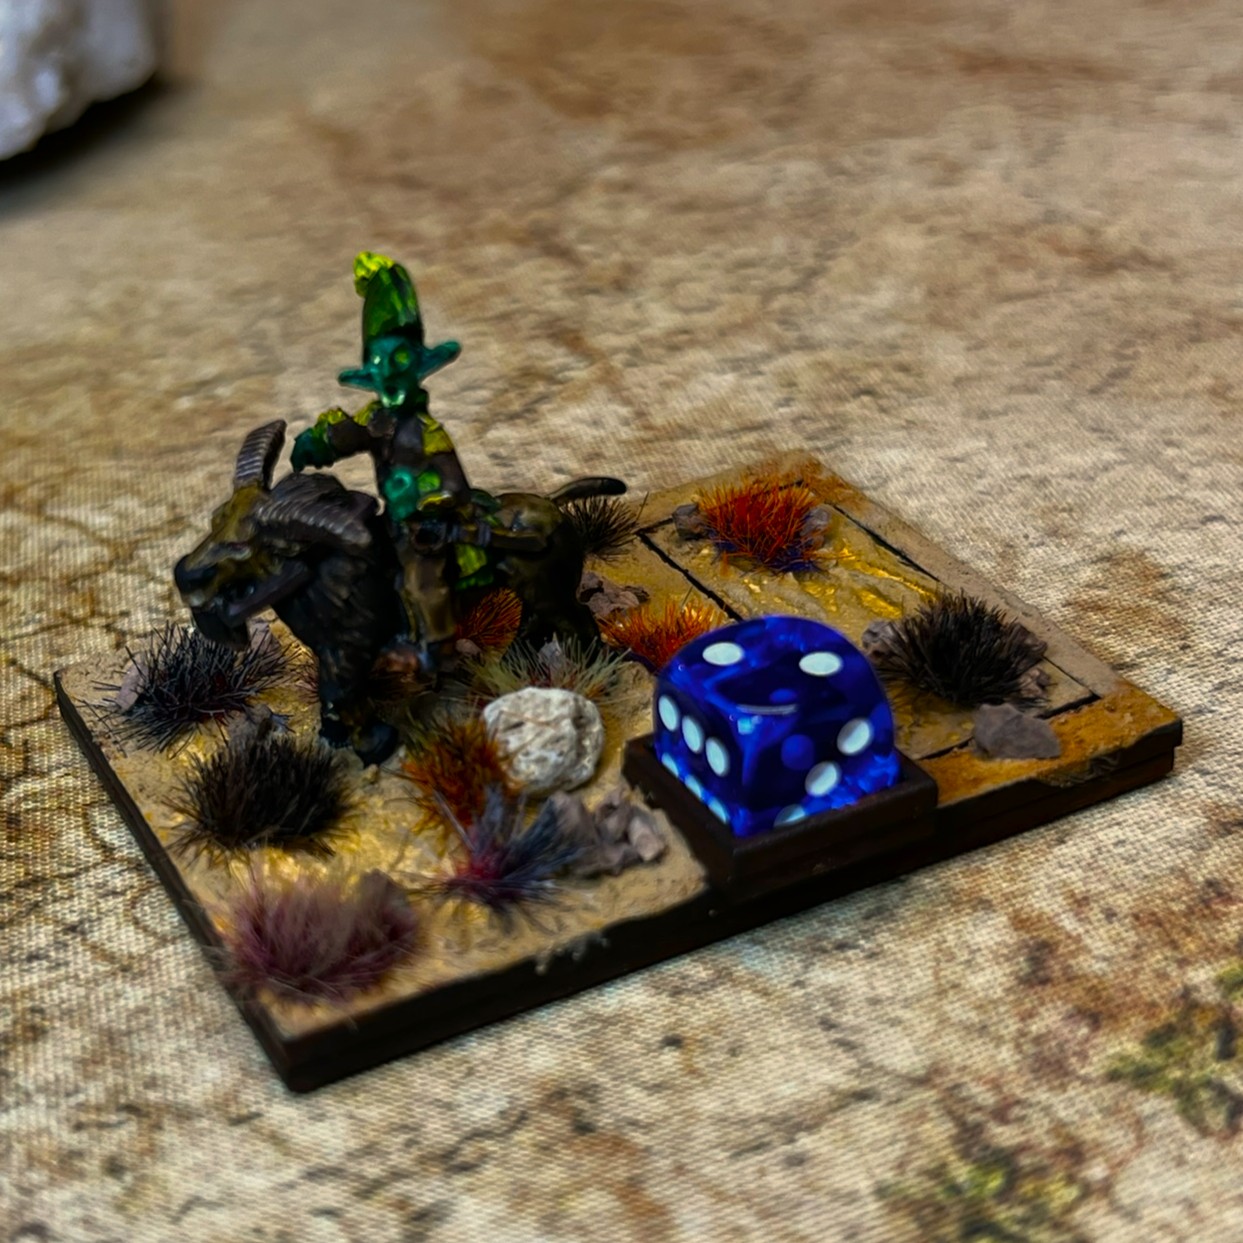
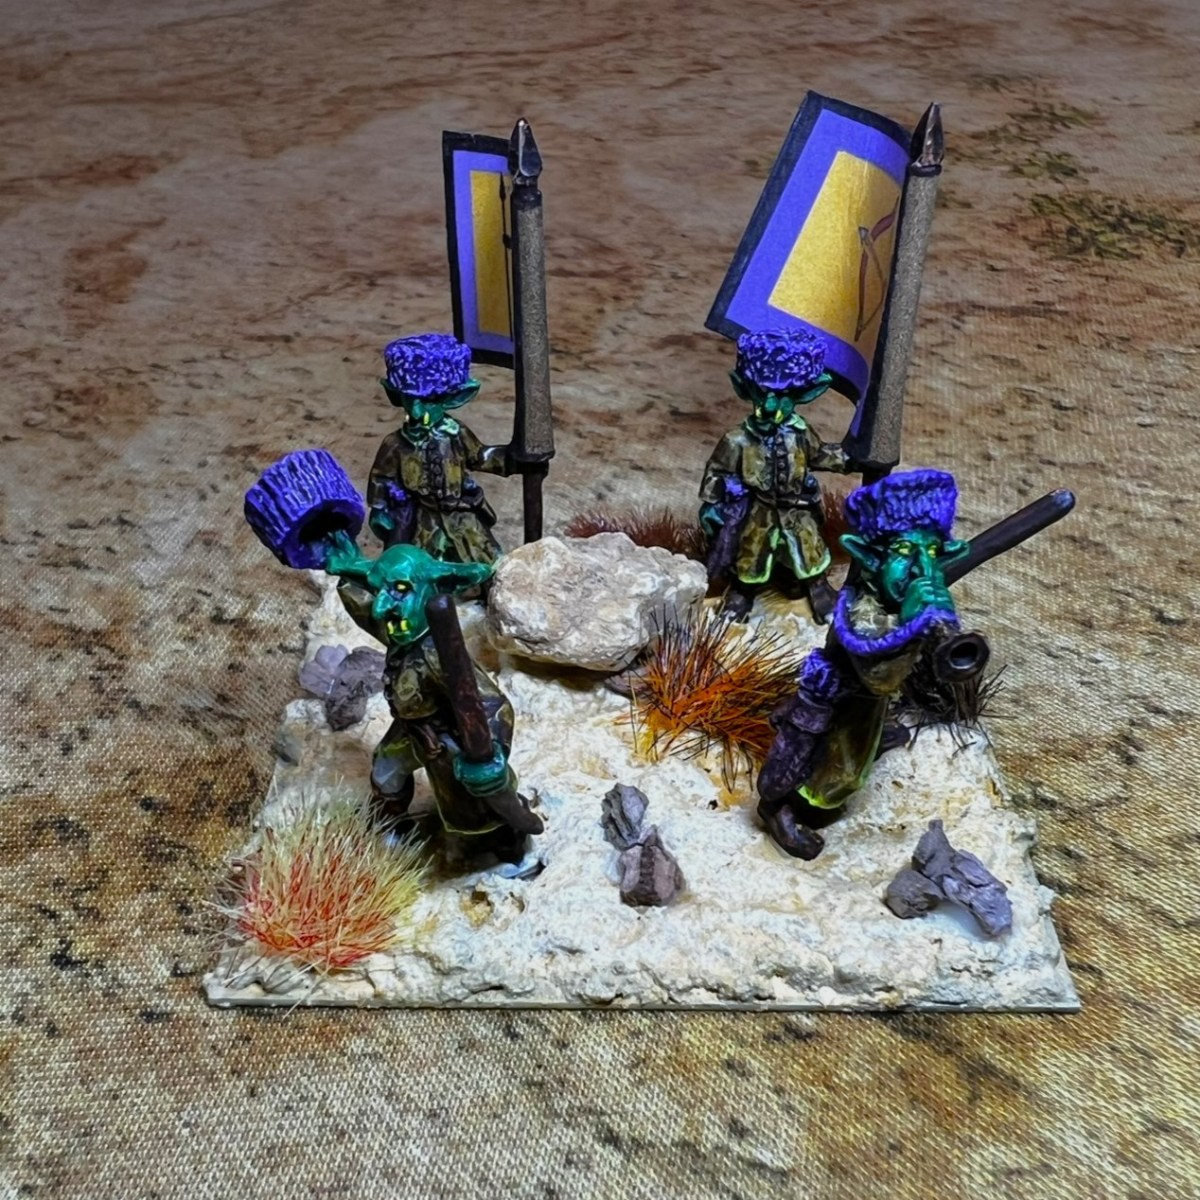
I also mixed and matched figures to make three brigade commander stands for the Temujicans. These will command combined infantry and cavalry forces.
Temujican Brigade Commanders
The three brigade commanders for the Temujicans
Group shots and a video!
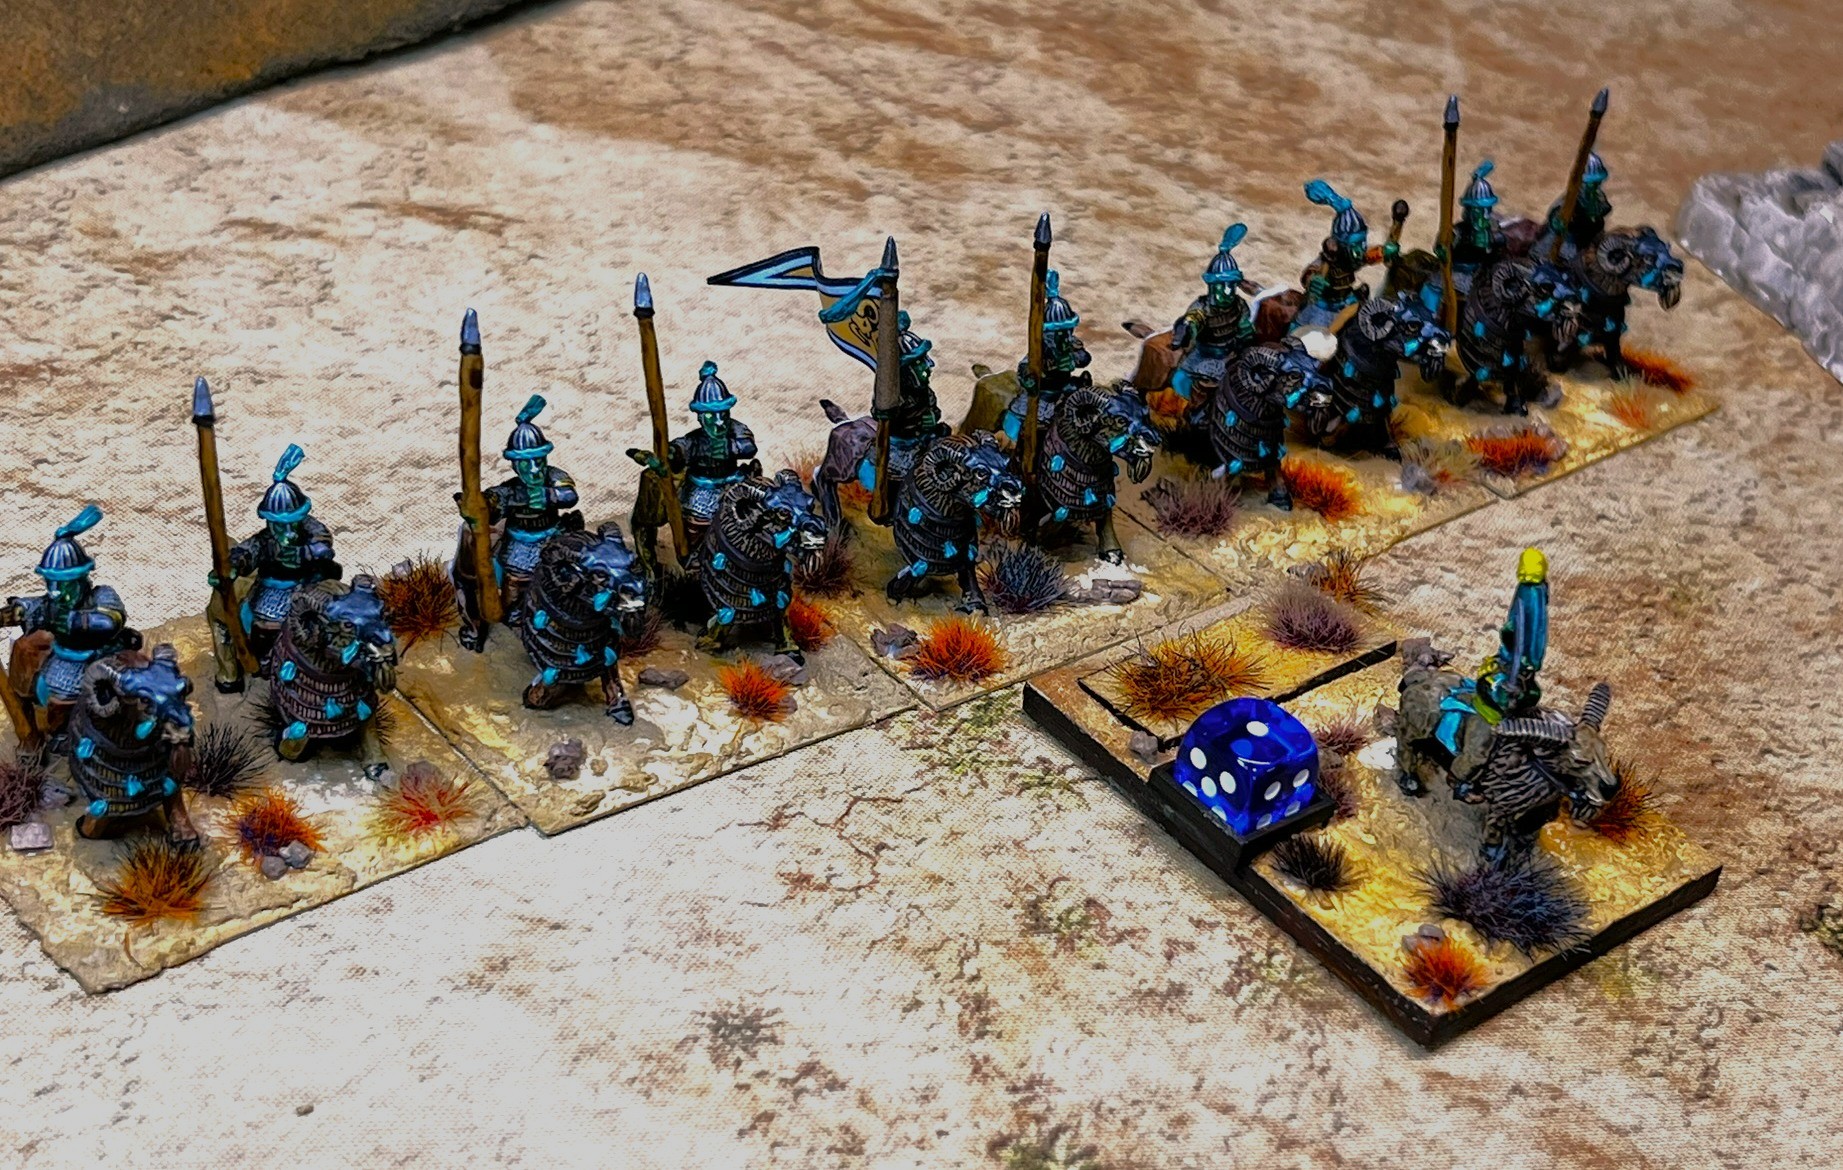
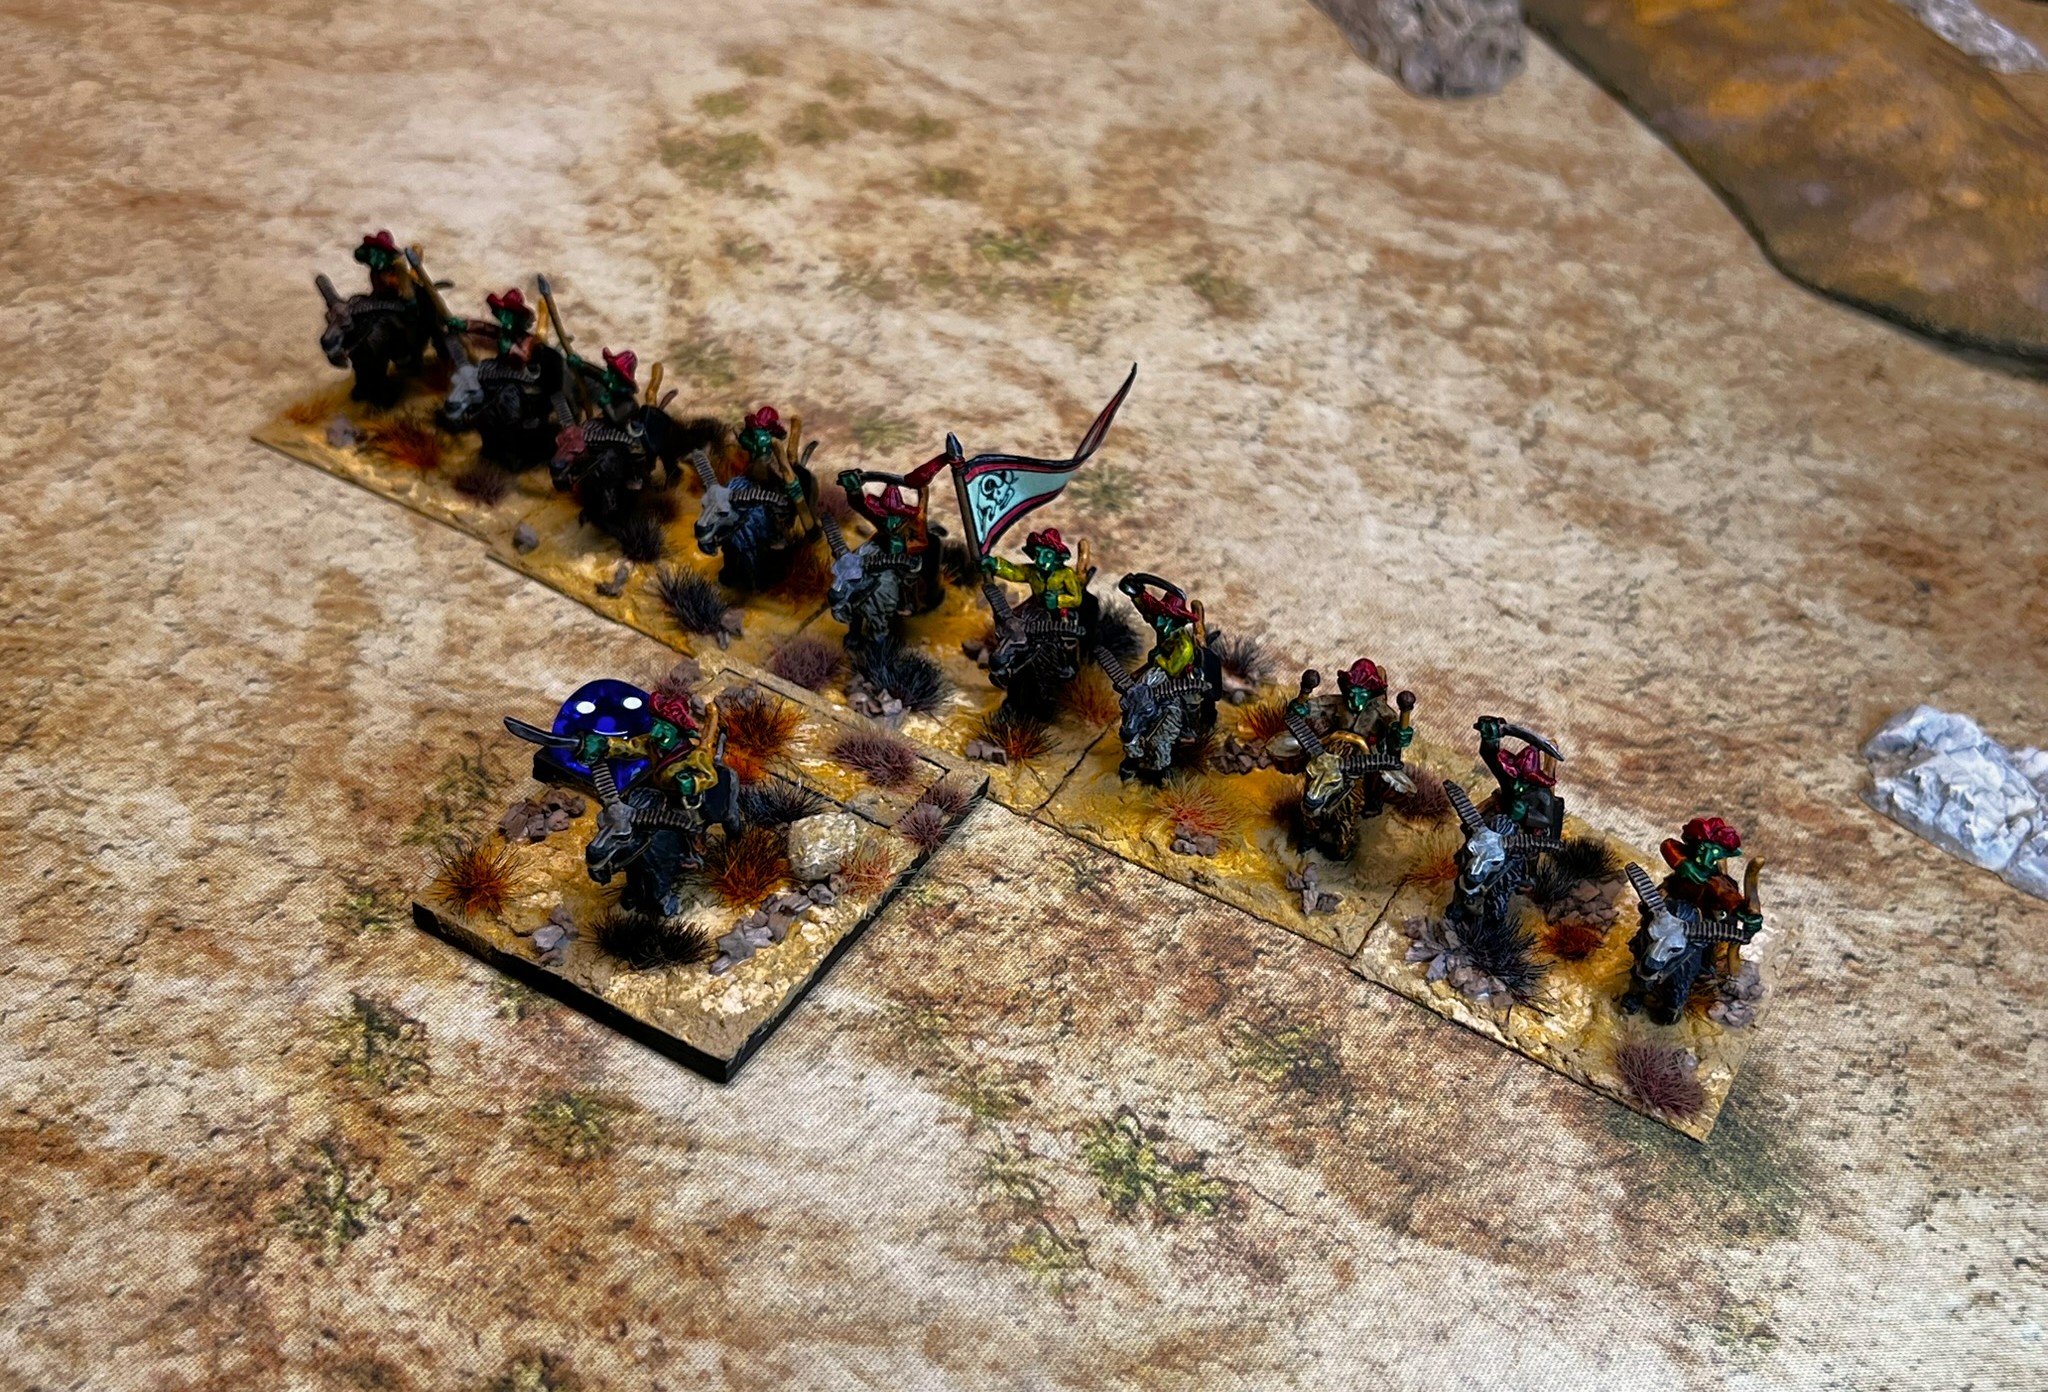
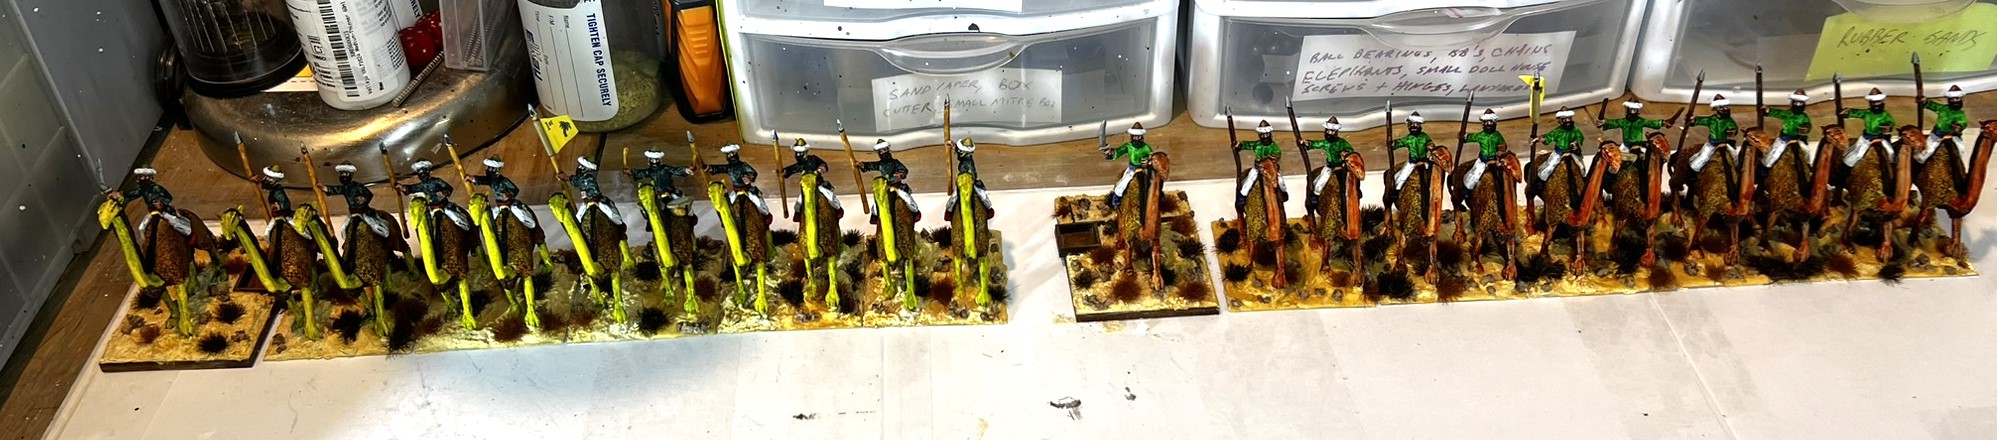
Lastly, I thought I’d share a photo of all the cavalry and a video. First, a couple of group shots – there wasn’t room enough to add the infantry and still show details!
All five Temujican cavalry regiments from the frontAll five cavalry regiments at an angle
Lastly a couple of video links. I don’t do a lot on Instagram – but here is the video below and that link as well.
If you want to check out the excellent Wars of Ozz figures’ range – there are two places to get them and to get the rules (and I make no money from this btw). The game rules and the figures are available from the next two places:
The first question that I am sure that you have is – “what the hell is a Temujican?“!
To answer that, let’s ponder the wild and wonderful world of the Wars of Ozz for a minute. Recently, my posts have shown the mighty Whim Whim and their leader, Sultan Whim. While the Whim Whim are indeed a force to be reckoned with in the Great Impassable Desert of the South- they do face a rival force in the Temujicans. These green-skinned desert nomads are cousins of the Gillikins (and are somewhat goblin-like).
Map of Ozz
As for the name “Temujicans”, it has an origin, and I had a hand in it. When the force was launched they were called “Eastern Desert” nomads. Rather mundane to be sure. The great Buck Surdu challenged several of us to come up with a better name that would evoke a historical reference for a cavalry-based force that could sweep across plains and deserts. My first thoughts went to considerations of the history of Genghis Khan:
Now you see. As he was born “Temujin”, and the Gillikins were their cousins, I came up with the name “Temujicans”. Thus this was adopted as the official name of the faction! I contributed!
In any case, I decided to start building my Temujican army with the four infantry regiments I had. While in the game they are more cavalry-oriented – I decided that starting with infantry was a reasonable way to get going on the faction. Like the Whim Whim, the Temujicans do not have artillery or musketry.
As cousins of the Gillikins, they do have access to units of “Mercenary Gillikin Longbows”, which are SKU OZZ-409. I had two of these regiments to paint. I also had two other infantry regiments of “Infantry with Command – Unknown Immortals”, which are SKU OZZ-533. All four regiments have 21 figures each for a total of 84 figures for this post. All are metal and 28mm – though both Gillikins and Temujicans are somewhat diminutive in stature. They are bigger than Munchkins though. The Unknown Immortals, have their faces hidden, and all have the same pose except for the leader, drummer and regimental commander. The MGL’s have multiple poses.
Mercenary Gillikin Longbowmen from the Wars of Ozz websiteUnknown Immortals from the Wars of Ozzwebsite
Both types are armed with bows, but the Mercenary Gillikins have longbows (regiments hereafter referred to as MGL). An advantage for the MGL’s is that longbows can fire over intervening troops. The Unknown Immortals have bows and spears.
The MGL’s cost 5 points apiece – and have values for Marksmanship, Melee, Resolve, and Elan of 6/10, 5/10, 6/10, and 5/10. Each brigade can have up to two of them. The Unknown Immortals cost 6 points and have similar values for Marksmanship, Melee, Resolve, and Elan of 6/10, 5/10, 5/10, and 6/10. There can be up to two regiments of Unknown Immortals in a Temujican brigade.
So why are Temujicans green skinned? In Wars of Ozz, all races, to include Gillikins and Temujicans, were affected by the viruses and mutagenics released in the Last Great War. One of those effects was mutation of humans (and others) into different races. Another was the effect of “color mania” – with different factions being affected differently. While the Army lists (found here) describe the Temujicans as being outfitted in different sandy and brown shades, I thought they must have some residual affinity for purples as the Gillikins do. Hence, I decided to use some magenta and purple colors on them. I also used some darker bronze for some of the metallics like buttons and badges. You will also notice some neon colors like yellow and yellow/orange as liners and shield colors. Additionally, like I did with the Whim Whim, I tried to have common colors among the units designated as 1st or 2nd. I did this so as to manage to make sense on the tabletop as I deploy brigades. This will be more clear after you see some photos, so let’s start with WIP shots and discussions
WIP Discussion and how the Project Progressed
I started back on October 14th, and finished all on November 2nd. In between all this I had several golf events plus a costume party! More on those in a bit. While there were 84 figures in total – the Immortals had each a shield, a bow holder, and a quiver.
First, I needed to do lots of filing!
The Unknown Immortals regiments in prep.Close up of the sprue that held the Immortal’s bow holder/sword handle combination, and a quiver with arrows.
Then it was on to washing and organizing it all:
All pieces for this Temujican infantry project filed, washed, and ready for assembly/painting on October 15th.
By October 24th I had made some progress on the accouterments and the figures.
As I mentioned, there was golf and Halloween too. I did end up shooting an 84 on my home course – which was a personal best – plus coming in tied for first in the year-long contest at my club – but I digress…
Plus for Halloween we had a nice visit from Elsa (aka Tabitha my granddaughter):
My daughter Ellen, Tabitha (as Elsa), and my wife Lynn
Then our Halloween party saw this couple (us) as Gru and a Minion:
Gru and his minion
Back to the Temujicans!
By October 29th, I was nearly finished with initial painting and assemblies:
Basing work on the figures followed:
Gluing the figures down AND SURGICALLY covering the bases with the sand paste and rocks took some time. I did not want a mess on the paint jobs, so typically I glued down 3 out of 4 of the figures first, then applied the paste, then added the final figure. Below you’ll see that after the paste dried, I added pigments to the bases. One regiment has no pigments as a comparator. I really like the effect of the three pigments I use on the sand paste – and recommend their use if you want a desert look.
Bases showing 3/4 with pigments.
Then I varnished the lot with an airbrush, and once that dried I added flocking tufts and rocks.
All the paints that I used are listed at the end of this post – but let’s share some…
Eye Candy
1st Mercenary Gillikin Regiment
1st Gillikin Mercenary Longbow Regiment in line formation. Their coats are reddish brown with a sallow yellow/orange liner.1st Gillikin Mercenary Longbow Regimental Commander. Note the magenta bicorne hat.Typical stand of the 1st Gillikin Mercenary Longbow Regiment.Command stand of the 1st Gillikin Mercenary Longbow Regiment.1st Gillikin Mercenary Longbow Regiment in column formation.
2nd Mercenary Gillikin Regiment
2nd Gillikin Mercenary Longbow Regiment in line formation. The coats are a sandy brown with neon yellow/greenish lining.1st Gillikin Mercenary Longbow Regimental Commander. Note the purple bicorne hat.Typical stand of the 2nd Gillikin Mercenary Longbow Regiment.Command stand of the 2nd Gillikin Mercenary Longbow Regiment.2nd Gillikin Mercenary Longbow Regiment in column formation.
1st Temujican Unknown Immortals Regiment
1st Temujican Unknown Immortals Regiment in line formation. Their coats are greenish brown. Their shields have alternating chevron colors of green (for Temujicans flesh color) and sallow yellow/orange.1st Temujican Unknown Immortals Regimental Commander. Note the magenta bicorne hat.Typical stand of the 1st Temujican Unknown Immortals Regiment.Command stand of the 1st Temujican Unknown Immortals Regiment.1st Temujican Unknown Immortals Regiment in column formation.
2nd Temujican Unknown Immortals Regiment
2nd Temujican Unknown Immortals Regiment in line formation.2nd Temujican Unknown Immortals Regimental Commander. Note the purple bicorne hat.Typical stand of the 2nd Temujican Unknown Immortals Regiment.2nd Temujican Unknown Immortals Regiment in column formation. I thought this showed the command stand pretty well.
Group Shots
Here are some group shots of all of the 4 regiments:
Video
Lastly, here is a very short video I took of all 4 regiments that is nice:
Alternatively, I did post the same video on Instagram with some music from Thin Lizzy:
I did think about how many “points” IRO or Wudugast would have given me for these 84 goblinoids for their “Orktober” painting extravaganza (if I was in it), but that’s more curiosity than anything else. Plus I really took until November 2nd to finish. Given that my 1984 West Point class was having our 40th reunion during that (last) weekend (which I did not attend) AND that Army beat Air Force in football too (which I did watch) – I did get to remember my 84 class with finishing these 84 figures.
So next I am on to the Temujican cavalry. I have two regiments of heavy and three of light, plus three brigade commanders to do. Onwards!
PAINTS, INKS, GLAZES, SHADES, WASHES, PIGMENTS, FLOCKING, GLUES AND MORE THAT I USED ON THE TWO REGIMENTS OF MERCENARY GILLIKIN LONGBOWMEN:
Square MDF Brigade Leader bases from Wars of Ozz Miniatures (used as regimental commander bases)
Wargames Accessories number 21 bases (2″ square steel bases)
Wargames Accessories number 17 (1.5″ X 1″ steel bases)
Temujican flag designs from Wars of Ozz Facebook page (printed on card stock)
Card stock
If you want to check out the excellent Wars of Ozz figures’ range – there are two places to get them and to get the rules (and I make no money from this btw). The game rules and the figures are available from the next two places:
Hmm…that title sounded very ominous…are the Whim Whim, wiped out, a dead faction, lost forever in the sands of time, or at least the sands of the deserts of Ozz?
Well, the Whim Whim are still around! After 215 figures, I have just finished painting up this faction of nomadic desert-dwelling tribesmen! And before I moved on, I wanted to document the last few pieces of the Whim Whim faction that I have completed.
In a bit, you’ll get to see a video of the entire faction on the tabletop. But for now, what this post will cover are the last three SKU’s that I finished up. One SKU is the elite regiment of Whim Whim Janissaries (OZZ-1400), another is Sultan Whim himself (OZZ-1406), and the last one is the faction’s wizard, The Ancient Mystical One (OZZ-1405). The Janissaries are the same figures as the Whim Whim Spearmen I painted before, just with different colors. I will include some select WIP photos, as well as eye candy.
One reason for my relative photographic laxness is that I finished these off while fighting off COVID in early October! That was a bit of a struggle, but nothing I couldn’t overcome…eventually. Thus, my photography took a back seat to getting these figures done.
All of the figures are metal and 28mm in size. Let’s look at each in turn.
The Whim Whim Janissaries Regiment
The Whim Whim Janissaries Regiment (WWJR) is similarly-armed like the other spearmen. The difference is that their attributes are better. Neither type have missile weapons, and both have Melee values of 7/10 with a first-strike bonus. The WWJR has a Resolve value of 9/10 (50% higher than a regular spearmen regiment’s 6/10), and an Elan value of 10/10 (versus 8/10 for the regular spearmen). The WWJR costs 1 point more at 6 points. However, a Whim Whim brigade can only have one of them.
I decided that, like my previous spearmen, the WWJR needed a similar addition to the front of the shields to cover the little holes – but a different style.
I found some terracotta stars that fit perfectly on the head of a number 18 flat nail. With some really careful drilling, I managed to add the stars/nail combos to the shields and use them to support their mounting. I also used the DH-507 spear tip pennons again from Iron Winds Metals to jazz up the spears.
Additionally, as the elite infantry unit of the Whim Whim, I armed them with golden weapons. Yes, gold’s impractical in such a use, but it looks good! I also gave the regimental commander a rare albino siliyiplix as a mount. The Army List canon for them says:
Red armor and uniforms, brown boots. Turbans are white. Shields red with white trim. Spears have red pennons.
I used a metallic craft paint on the armor to decent effect. To offset so much red, I gave them white kilts. In the end, they do look a bit Santa-like with all the red. All the paints I used are listed at the end of this post for each project. Mainly for me as I often need to recreate a look!
Whim Whim Janissaries Regiment WIP Shots
I started these on September 22nd and finished them on October 7th. The key WIP I want to share is the star additions. I’ll share some shots below.
All filed, washed, and ready to get started.I drilled out the shields twice. First, I did so with a pin vise that would give just enough space for the shaft of an 18-gauge flat head nail to pass through. Then I went on to VERY gently drilling out the shield with a 1/8″ drill bit on my power drill – such that the depth of the holes would allow the heads of the nails to nest flatly on the shields.Here you see the 18-gauge nail head flush with the hole in the shield.The cheap stars.Stars on nail heads.…and mocked up on the shields (not yet glued).
I used the alligator clip base for painting the shields. Once it was time to mount them into the holes that I had drilled into the wrists and hands of the Janissaries, I individually sized the cut needed on each nail.
Here you see how I individually sized up each nail – I needed enough length but not too much. Cutting the nails involved SLOWLY cutting around the nails at the right length with wire cutters in a circular fashion. Then I bent the excess steel off – without having nail shards ricochet into my eyes.
Now for the finished regiment!
Whim Whim Janissaries Eye Candy
The Whim Whim Janissaries in line viewed from their left front.The Whim Whim Janissaries in line viewed from their right front.The Whim Whim Janissaries in column formation viewed from their left.
Sultan Whim
The Sultan Whim figure comes listed as OZZ-1406 “Sulton Whim Carried on a Palanguin”. I will refer to him as “Sultan”. Also, technically a “palanquin” has a covered box – and he is on a litter with blankets and an umbrella. No worries, I just had to look up a few words to be sure myself. Litter, palanquin, call it what you want.
Early concept/sculpt of the Sultan Whim model from Russ Dunaway.
Sultan Whim WIP Shots
This project went pretty fast as far as assembly and painting goes. I made a small 3″ by 5.75″ styrene base for him, with steel bases underneath for magnetic storage and travel. I also built a placard holder on the back end. I mounted the bearers on it first and made sure that the litter would fit by manipulating and bending the arms, then lining them up with a steel ruler. The bearers were easy to paint this way – and I ended up using my alligator clip modeling base to hold the litter for painting. I drilled out Sultan’s – um posterior – and put a screw in there to allow painting him to be easy as well. The umbrella was treated similarly.
Laying out the pieces and figuring out the right design. (The Ancient Mystical One is not part of this model and is on the right).Side view of earlier image.I used graph paper and a steel ruler to figure out both the appropriate base size and figure locations. You can see the placard holder and 12mm dice frames in the back.Somehow I needed to figure a way to paint the Sultan – the image above is enough of a clue I think!
For painting, I tried to incorporate purples, oranges, and golds, as those were dominant colors I used in the different regiments of the same type. My concept was to give Sultan Whim a luxurious bed on his litter/palanquin to travel the desert while consuming a large turkey leg! In the game, the Sultan can give an attached unit Superior Fighting skills, and as an overall commander has the “Legendary” ability.
I started the model on October 8th, finishing it on October 10th.
Sultan Whim Eye Candy
Sultan Whim on his litter from his front left.Sultan Whim on his litter from his front right.Sultan Whim on his litter from his front.A view of the back. He has a nice pink parasol to give him shade as he devours his turkey leg.
The Ancient Mystical One
This painted up very easily in one day as you can see. Skulls make painting so much easier!
The Ancient Mystical One has Spell and luck values of both 6/10. He does get three spells, at a cost of 2 points.
The Ancient Mystical One WIP Shots
The Ancient Mystical One seen here before varnishing and final base work.
The Ancient Mystical One Eye Candy
The Ancient Mystical One from the front.Rear view.Side view.
Lastly, I promised a video of all of the Whim Whim faction on the table. It consists of 11 regiments plus individuals:
I hope that you have enjoyed this Whim Whim journey with me. As the Wars of Ozz is a post-apocalyptic world, the Whim Whim Janissaries, Sultan Whim, and The Ancient Mystical One you have seen here are eligible for Dave Stone’s recent painting challenge, “APOCALYPSE ME 2024”. It might not be the apocalypse many of you envisioned, but it is in Ozz!
Thanks for looking – and now on to the Temujicans – sworn enemies of the Whim Whim!
Miscellaneous details and references for those interested in that sort of thing:
For all of my earlier posts on Wars of Ozz games, figures, units, and other related projects – please see this page.
PAINTS, INKS, GLAZES, SHADES, WASHES, PIGMENTS, FLOCKING, GLUES AND MORE THAT I USED ON THE REGIMENT OF WHIM WHIM JANISSARIES:
Iron Wind Metals Banner Spear Head Sprues SKU #DH507
MDF Brigade Leader bases from Wars of Ozz Miniatures (used as regimental commander bases)
As you may want to check out the excellent Wars of Ozz figures’ range – there are two places to get them and to get the rules (and I make no money from this btw). The game rules and the figures are available from the next two places:
We had our FINALS for the 2024 Tour of the Brookfields season on Saturday, September 28th. It is also called “The Grand Tour“. Each division/flight had 6 teams placing in the prize circle. There were also skins awarded (3) as well as 4 closest to the pins.
We had an amazing field of 128 players – broken out into 32 teams. We had not had so many in a long time. We had 10 teams in the Nicklaus Flight, and 11 teams each in the Palmer and Player Flights.
There was incredibly competitive golf in each flight as you will see below. In the Nicklaus Flight, 6/10 teams were within just three strokes. In each of the Player Divisions, 7/11 teams were within three strokes! You can’t get much more close and competitive than that.
There were two playoffs as well for the top honors – one lasting 3 extra holes in the Palmer and one in the Player Flight – that one lasting four extra holes! The gallery got to cheer on both as they played it out on the 18th hole.
OVERALL RESULTS FROM THE 2024 TOUR OF THE BROOKFIELDS GRAND TOUR
Nicklaus Division/Flight
In the top division (the Nicklaus Division), the team of Tom Staiti, Brad Earle, Ken Burnham, and Patty Kularski had the BEST score of any team in the tournament. They shot a STELLAR 12-under par to finish on top over 4 teams that came in at -10 (not shabby either). Those four teams, who shared in the 2nd to 5th awards, were:
Ryan Auger, Dan Foley, Ray Rawlston, Bob Weighill
Cory Heyes, William Foley, Peter Davis, Paul Wyman
Chris Depasse, Mike Kularski, Kristen Depasse, Dick LaPierre
Josh Russell, Dave Russell, Darryl Furtado, Greg Wypych
Rounding out in sixth place at -9:
Rick Lindsten, Kathleen Soltys, Dave Ashworth, Keith Tytula
Player Division/Flight
In the Player Division, there was a marathon playoff of 4 holes between two teams that finished at 11 under par. To decide the top team, these teams slugged it out 3 times on the 10th hole before moving on to the 18th for the 4th and decisive playoff hole. In the end, the team of Jack Dorman, Dave Fiske, Gary Donlin, and Jim McKeon outlasted their rivals to come in first with a birdie putt by Jim McKeon on the 18th.
Coming in second in the playoff, at -11, was:
Mike Ellis, Jim Gregoire, Bill Gaudette, Ed Kosla
Tied for third at -10, and sharing in the 3rd and 4th team awards, was:
Fran Lamothe ,Bob Demaio, Tom McCarthy, George Jette
Tanner Frankian, Paul Davis, John Desimone, John Wheeler
Coming in 5th, and sharing in the 5th and 6th awards at -9 were the teams of:
Tom Orszulak, Mark A. Morin (me), Norm Laliberte, Jeff McLeod
Todd Allen, Paul Sanborn, John McQuaid, Jamie McShera
Palmer Division/Flight
In the Palmer Division there was yet another playoff as two teams finished at impressive -10’s each. This time, the playoff was three iterations of the 18th hole. Coming out on top was the team of Jim Wilson, Ron Jette, Clayton Rice, and Alex Morales.
Coming in second in the playoff, at -10, was:
Joe Desimone, Shane Higgins, Jim Lovett, Lynn Morin
Alone in 3rd place at -9 was:
Gary Ward, Stan Nolin, Leo Forget, Hoss Ford
In 4th place at -8 was:
Ron Allen, Lex Varney, George Fiske, Tim Nason Sr.
Lastly, coming in 5th, and sharing in the 5th and 6th awards at -7 were the teams of:
Ken Dorman, Dylan Allen, Wyatt Alm, Rick Gendreau
Ron McCann, Lisa Kularski, Tony Woodman, Rob Peterson
Skins
There were three skins – all eagles!
Eagle on number 2: Fran Lamothe, Bob Demaio, Tom McCarthy, George Jette
Eagle on number 8: Mike Ellis, Jim Gregoire, Bill Gaudette, Ed Kosla
Eagle on number 13: Chris Depasse, Mike Kularski, Kristen Depasse, Dick LaPierre
We also had all four par-three holes eligible for closest to the pin prizes. Any teams that did not finish in the top 6 in any division could compete for these prizes. Winning those were:
Closest to the Pin on number 4:
Tom Foley, 10′ 3″
Closest to the Pin on number 6:
Kevin Paradis, 9′ 0″
Closest to the Pin on number 11:
Steve Whitman, 8″ !!!!!
Closest to the Pin on number 17:
Jim Kularski, 3′ 10″
That rounds out the awards – congrats to all the winners and the players. Special thanks to Quail Hollow, especially Debbie Donlin, Gary Donlin, Jim LeBlanc, and the rest of the staff for making this season and this event so special.
Below are some photos I shot during the event.
A Few Event Photos
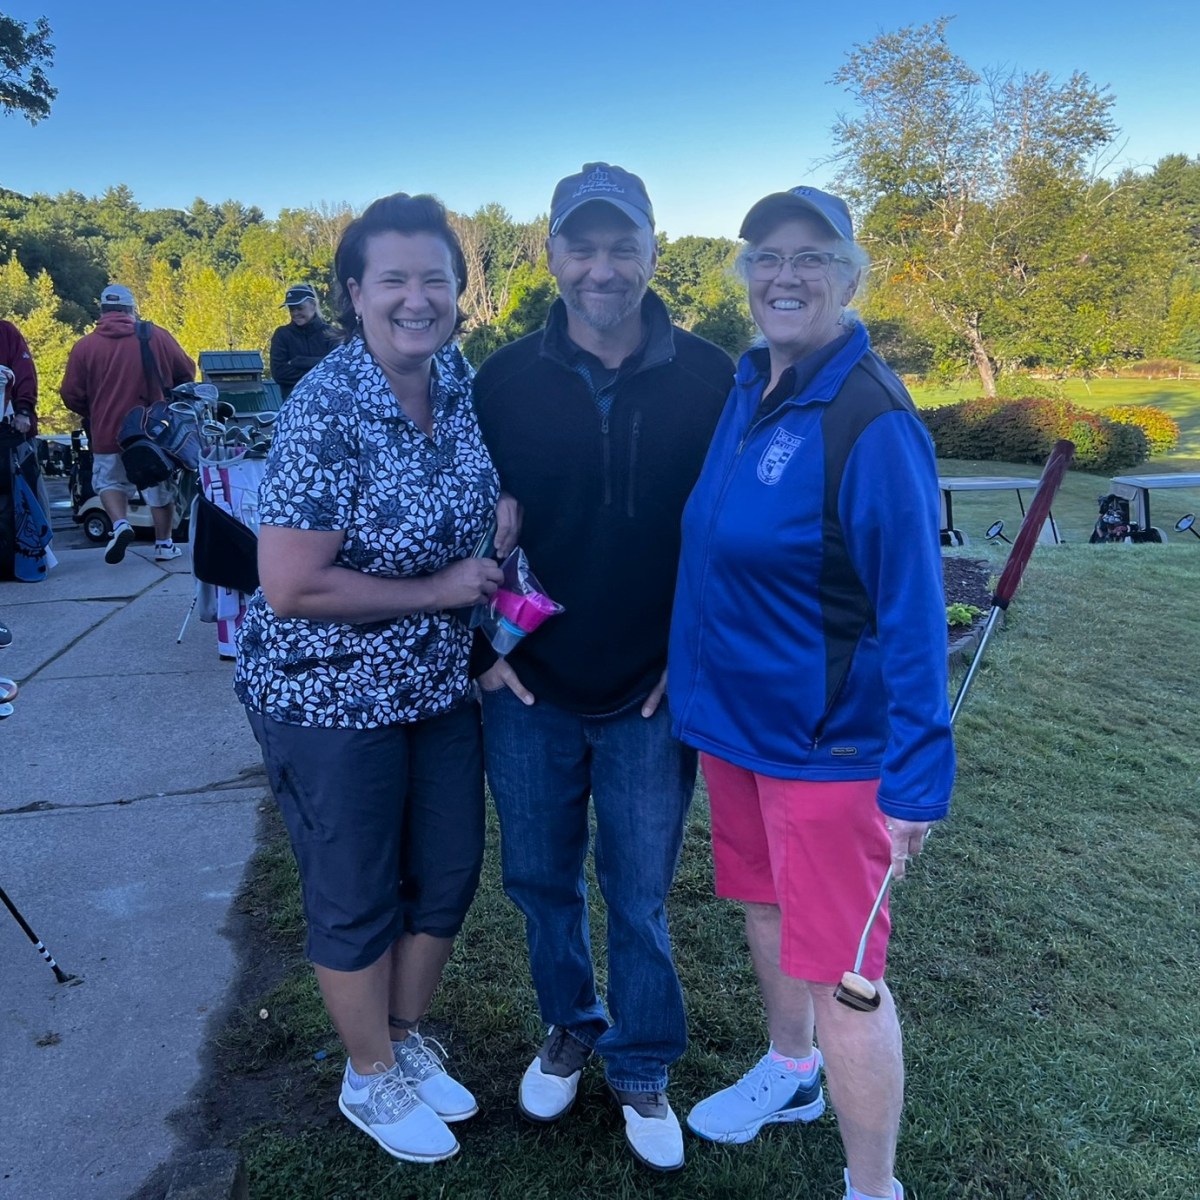
Busy putting green and range before tee-off time!John Desimone, Stan Nolin, and Jim McKeonTara readies the beverage cartPatty Kularski, Mike McCarthy, and Jeff McLeod chat it up at the bar.George Fiske, Brad Earle, and Mike Kularski diligently doing the committee thing at the sign in desk.Matt Brown, Pete Peloquin, Sr., and Jim McKeon consider their picks to win.Teammates Lynn Morin and Jim Lovett ready to play.Brothers Reece and Matt McLeod.Todd Allen, Dylan Allen, and Ryan Toomey.We had to get extra carts there were so many teams!Ryan Auger surrounded by the Foley brothers Dan and William.Lynn Morin heads out to her golf cart.Rich Casault gives a casual thumbs up, while Matt Desimone rocks it out.Spencer Rice, Norm Laliberte, and Tom OrszulakMy team poses! Tom Orszulak, Mark A. Morin, Jeff McLeod, and Norm Laliberte.Palmer playoff action.
What Next?
Well, the TOB will return in 2025 in April. Stay tuned to this blog for information (you can be an email subscriber for free just select follow and subscribe at the bottom of this article).
The Draft night starts at 7 PM SHARP on Thursday, September 26th! If an A player is late, we will still proceed at 7 PM – so please plan accordingly and arrive early. All are welcome to attend the draft as it is a fun and exciting night!
As the FINALS for the 2024 Tour of the Brookfields season is nearly here, I need to share information!! This blog post will have all of the pertinent data for all players – especially the A players – for the Draft Night at Quail Hollow Golf Course and Country Club. I will share the files (which are downloadable) and screenshots of the files, with some explanations.
The “A” Players Ranking and Pick Sheet
The screenshot below shows the pick/fill in sheet for the Draft Night, to include the 3 divisions/flights.
In Round 1, the “A” players will pick in order from the player field starting with number 32 (Rich Johnson) and finishing with number 1 (Chris Depasse) across the three flights. Players can choose any remaining player from the player pool when their turn comes (the player pool will be seen later in this blog post).
In Round 2, the “A” players will pick in order from the player field starting with number 1 (Chris Depasse) and finishing with number 32 (Rich Johnson) across the three flights. Again, players can choose any remaining player from the player pool when their turn comes.
Round 3 is the “WILDCARD” Round. Each flight will be randomly selected to go first, then second and then third. When a flight is chosen, all of the “A” players in that flight will be chosen in a random order to pick their final player from any of the remaining players from the player pool. At this point, they will also choose their starting holes at random as well.
The Excel file that you can download and print for the pick is called “2024 TOB Finals Fill In Pick Sheet” and is below:
The next question of course is, who is in the player pool as B, C, and D players? There are screenshots below – click on any for a bigger image – or download the file:
Remember, “A” players can choose any available player from any group they want when it’s their turn to pick. Here is the downloadable Excel file for the entire field of 128 players – it is called “09262024 FINALS Field by ABCD”:
In my last post I wrote about the two regiments of Whim Whim cavalry that I painted up in August 2024. There, I mentioned that while each brigade of these desert nomads can have up to six regiments of spearmen, they are limited to just one unit of cavalry, chariots, bowmen, or Janissaries, and just two units of Noobi. With the figures that I have, I believe that I will be fielding two distinct brigades of Whim Whim, with common color features that do not distract from the canon colors.
Regarding bowmen, I had two Whim Whim Bowmen regiments (WWBR) to paint. Each has 20 bowmen and a mounted leader on the common 6-eyed multiple-tailed beasts called siliyiplix. The SKU number is OZZ-1401. The figures are metal, and 28mm in size. The bowmen came in five different poses. My goal was to get these done between golf rounds in September!
On the Wars of Ozz website the photo of the regiment is as shown below:
“Sand-colored tunics, white turbans, brown boots.”
So, not much in terms of restrictions there – and that left me with a lot of room to both follow the canon and add my own colors to make some differentiation between the two regiments. I decided to make these color choices:
Greenish-yellow (1st Regiment) and orange (2nd Regiment) mounts as I did for the cavalry, as well as yellow (1st Regiment) and orange (2nd Regiment) saddles.
Aztec yellow (1st Regiment) and copper helmets (2nd Regiment).
Dark green kilts and leader sashes (1st Regiment) and light green kilts and leader sashes (2nd Regiment).
Yellowish-sand tunics (1st Regiment) and tan-sand tunics (2nd Regiment).
Light (1st Regiment) and dark-colored (2nd Regiment) bows and spears.
Three different beard colors (grey, dark grey, and black) were also used to vary the figures. I figured that these WWBR’s would be a more logical place for older warriors.
For the white turbans, I used Army Painter “Speed Paint – Blinding Light 2.0” for the first time. In color, it is very similar to Citadel “Apothecary White”. Also similar to the Citadel product, it is not quite white enough – but a little dry brush action with some off-white paint on the turbans remedied that. I will say that the AP product flowed better – and was less difficult to mix and distribute the pigment after shaking. Both are good, I just think I’ll prefer the “Speed Paint – Blinding Light 2.0” version going forward.
I do list all of the exact paints and more that I used at the end of the post for those interested in such information.
WWBR are excellent missile units that cost 6 points. In the game, their bows are equivalent to muskets in terms of combat power and range. The WWBR have a Marksmanship value of 8/10. In Melee, they are still relatively stalwart at 6/10. The WWBR have similar a Resolve value (ability to stand against an attack) and Elan value (desire to get into and stay in a fight)of 6/10.
I started work on my WWBR’s on August 30th and finished them on September 20th. I’ll share some WIP work below, and then some eye candy of the completed regiments.
Whim Whim Bowmen WIP Shots and Discussion
Unlike the cavalry, there was minimal assembly here (just for the leaders and the drummers).
The two regiments as received. Note that there were 5 different poses of the bowmen.
Mold-line and flash removal preceded washing of the figures on September 1st.
All cleaned up!
Once again I brush-primed both units to use up my 200ml primer bottle of Vallejo Mecha White Primer that was clogging my airbrush. I have about 20% left and don’t want to waste it. After the primer had had a day to cure, I added a wash with Army Painter Dark Tone – by September 2nd. Next, I dry-brushed both regiments with an off-white paint.
The two regiments are here primed and mounted for painting. I used popsicle sticks with similar poses put together, as well as the stand with alligator clips for the components that needed assembly.
I worked on and off on the WWBR’s through September 15th – usually anywhere from a half hour to more at a time. By then, the figures were done.
Main painting completed.
As I had only lightly glued the figures to the popsicle sticks (with PVA glue), they were easy to detach on September 16th.
The WWBR’s ready for basing.
I have found that sequential basing works best for these desert dudes and the sand basing paste. Normally, infantry are mounted four figures to a base. By sequential, I mean that I use Gorilla Glue to affix two of the four figures to the 2″ square steel bases. Then I apply the sand basing paste/texture paint to the sides of the bases with the two figures – and let that dry. I then glue on the remaining two figures to each base. Next, I apply the remaining unpainted parts of the bases with the sand paste, and let that dry.
This photo shows the dried sand paste covering half of the steel bases and a recent add of the remaining figures on September 16th.The remaining parts of the bases here are recently covered with the sand paste on September 16th. Application of three pigments and two types of varnish came next.
I then mounted the figures on poster tack-covered specimen jars (as seen in the gallery below). This I did in order to add three types of sandy pigments before using my air brush to varnish everything.
2nd Regiment stand after varnishing but before final flocking and flags are added.1st Regiment command stand at the same point.
Once the two coats of varnish dried, I flocked everything with rocks and tufts, then added the flags. On September 20th – these were 100% done.
So how did they come out…let’s see! Click on any image to see them better.
Eye Candy
1st Whim Whim Bowmen Regiment
1st WWBR Stands
1st WWBR COMMAND Stand
1st WWBR Regimental Commander
1st WWBR Group Shots
2nd Whim Whim Bowmen Regiment
2nd WWBR Stands
2nd WWBR COMMAND Stand
2nd WWBR Regimental Commander
2nd WWBR Group Shots
Group shots of both
The completion of these two WWBR’s brings me up to 187 painted figures for the Whim Whim faction. Right now, for Whim Whim units, I have just one regiment left to paint – the elite Janissaries.
I hope that you enjoyed these two and that it was of interest. I’d be interested in any feedback on my color choices – as it is Ozz!
And yes, I still have much more Ozz to come…
Miscellaneous details and references for those interested in that sort of thing:
For all of my earlier posts on Wars of Ozz games, figures, units, and other related projects – please see this page.
PAINTS, INKS, GLAZES, SHADES, WASHES, PIGMENTS, FLOCKING, GLUES AND MORE THAT I USED ON THESE TWO REGIMENTS OF WHIM WHIM BOWMEN:
MDF Brigade Leader bases from Wars of Ozz Miniatures (used as regimental commander bases)
Pendraken 12mm dice frames
Wargames Accessories FOW #1 (1.25″ X 1″ steel bases)
Whim Whim flag design from Wars of Ozz Facebook page (printed on card stock)
Blue Sharpie pen
Brown Sharpie pen
As you may want to check out the excellent Wars of Ozz figures’ range – there are two places to get them and to get the rules (and I make no money from this btw). The game rules and the figures are available from the next two places:
Our sixth and LAST regular season TOB event – the September 2024 Tour of the Brookfields Tournament was held on Sunday, September 8th at Quail Hollow Golf and Country Club in Oakham, MA. It was sponsored by Lamoureux Ford in East Brookfield.
We sincerely thank Lamoureux Ford for their longtime sponsorship of this event and the Tour of the Brookfields!
There was a nip in the air and it seemed as if Fall was knocking on summer’s door. I arrived with Lynn before 7 AM and discovered a baby snapping turtle on the cart path by the cart shed below the clubhouse. I saw Debbie Donlin and let her know of my discovery as I thought it was cool. The little cold-blooded guy or gal (I did not investigate) was struggling with the cold (around 52 degrees Fahrenheit) to cross and make his way to safety.
Debbie exclaimed, “Oh my God, they hatched!”, and sure enough there was a small conga line of little snappers trying to make their way to the distant (for them) pond by the 18th hole green. Their eggs were laid on a hill earlier this year by a bog momma snapper.
I spotted the little reptiles for her and she scooped them up with an old golf ball box and got them to the pond/grass edge safely. I think she got between 12-15 of them to cover. If they had come out the day before or even an hour later I think the golf carts would have done them in – so it was an auspicious start to a golf day!
The first baby snapper I spotted – the shell was about 2″ long.A mini-shot of the conga line – you can see there are two exiting the buried nest here and one in the lower right on its way down the hill towards water.
I thought I’d share as not many of you got to catch this little miracle of nature!
Back to the golf! Despite the initial cold, it did warm up and we had great golf weather. There were 96 golfers on 24 teams divided into three divisions/flights. The three were competitive as you will see, and we did have one very exciting playoff. There were just two skins won as well.
In the Nicklaus Flight, the team of Chris Depasse, Clayton Rice, Tim Nason, Sr., and Alex Morales came in first place with a great score of -11. This was the lowest score by any team in the tournament. Congratulations to all for a fine round of golf! Coming in second place only one stroke back at -10 was the team of Cory Heyes, Tom McCarthy, Rick Gendreau, and Jamie McShera. Very well done!
In the Player Flight, the winning team won by the largest stroke difference between first and second place that we had all year – 3 strokes! Coming out on top was the team of Tom Orszulak, Brad Earle, Brian Chaffee, and Spencer Rice. Amazing! Coming in second and taking that honor due to better match on the 15th hole was the team of Ryan Auger, Tom Foley, Dan Foley, and Brandy Peterson. Congrats to all!
Lastly, in the Palmer Flight, we had a very tight group of teams. Two of them ended up playing off in sudden death over three holes as both top flight teams came in at 8 under par. Outlasting the competition in the playoff was the team of Beth McCann, Dave Woodward, Nelson Malin, and Jason Malin.Dave Woodward, in very dramatic fashion – and with the gallery watching – made the winning putt as the last player on the last playoff hole. Wow!! with Woody’s great putt, Beth’s team narrowly outlasted the team of John Snelling, Adam Stati, Kathy Keough, and Nick Snelling. John’s team are to be congratulated as well on a tough performance – to include precariously standing on the wall over the pond on one shot (giving the baby snappers a nice view perhaps?). Amazing golf was played by these two teams!
Two skins were won – an Eagle on the par-4 second hole by the winners of the Player Flight, Beth McCann, Dave Woodward, Nelson Malin, and Jason Malin! A birdie on the par-4 fifteenth hole netted the other skin for the team of Jack Dorman, Ken Burnham, Kristen Depasse, and Greg Wypych. Congrats!
For the closest to the pin prize on 17, that went to Rich Casault for his team with a fine shot – a 2′ 1″ laser.
The results table is below, as are some notes for the upcoming and highly-anticipated FINALS! I’ll also share a few photos
2024 Lamoureux Ford Open Results
The Next Tournament IS THE FINALS!!
Thanks again to all the players, to Lamoureux Ford for sponsoring this event, and to Gary and Debbie Donlin, Jim LeBlanc, and all the staff at Quail Hollow who work so hard to make the Tour of the Brookfields possible.
The next tournament is the FINALS and it will be HUGE!.
Key information for the FINALS – Mark your calendars!
The FINALS will be on Saturday September 28th with registration starting at 8:30 AM as daylight and cold will be approaching.
This blog will have KEY INFORMATION about the FINALS. I will publish all of the results for this year’s events in a consolidated and downloadable list in this blog (“Life, Golf, Miniatures, & Other Distractions”) similar to what I did last year.
As soon as the committee decides the ranking of the A-players for the draft and the field choices, I will also include that information in the same post. I expect to put that out by the evening of September 22nd or early on the 23rd. The committee’s decision on A-men rankings and the publication of the players in the field will occur by September 23rd – also here in this blog.
Due diligence on the A-players’ parts will be an important aspect in preparing for the draft night. All will have access to the same information published here.
The FINALS sign up will close no later than September 15th – and possibly even closed up earlier. We will be looking for subs volunteers through the Facebook group Facebook page for the TOB here.
The DRAFT NIGHT for the FINALS will be held at Quail Hollow on September 26th (Thursday) evening at 7 PM. ALL are invited and encouraged to attend.
If you have any feedback or comments on this blog post – there is a comment section that you can use below. I will continue to put up these events on Facebook – with results posted here on this blog.
Once again, this blog is titled, “Life, Golf, Miniatures, and Other Distractions”. I do post other stuff here – mainly around miniature toy soldiers and tabletop wargaming (my other passions). Feel free to subscribe as an email follower! (and it is free and you’ll get instant updates).
Your committee at work! The line at 7:36 – great as everyone came on time!Jim Wilson is ready!Cheryl Woodman, Spencer Rice, and Beth McCannPaul Boulette, Ken Begin, Tim Nason, Jr, and Lynn Morin try to stay warm with the sun finally coming up.Bill Gaudette and Doug Brown chat it upKathleen Soltys, Greg Wypych, Lisa Persson and Jamie McSheraEddie Kosla, Dave and Josh RussellTony Woodman exudes confidence, while Rich Casault and Spencer look on…
Each Whim Whim brigade can have up to six regiments of spearmen. However, each brigade is limited to a single regiment each of chariots, a single regiment of cavalry, and one of janissaries. They for example cannot have two regiments of cavalry, but could have a chariot and a cavalry and a janissary. When I have completed the Whim Whim, I will have enough to field two to three separate brigades. Each of these two cavalry (WWCAV) regiments will be assigned to different brigades.
And a word about “cavalry”. When I first saw these, I immediately thought “camelry”. On further learning that the mounts were not camels, but called siliyiplix. Yes, try pronouncing that… Further, are these “siliyiplixery” units, what is the plural? Never mind, it’s Ozz! Oh, and they have 6 eyes and double or triple tails too!
On the Wars of Ozz website the photo of the regiment is as shown below:
Photo from the Wars of Ozz website
The Army list file from the Wars of Ozz Facebook group (it’s a private group but when/if you ask to join reference me) shows the following regarding colors:
“Green tunics, white turbans. Mounts are yellow or orange. Spears do not have pennons.”
As I had the two WWCAV’s, and as I always try to have some differentiation between similar regiments, I decided to make these color choices:
Greenish-yellow (1st Regiment) and orange (2nd Regiment) mounts
Dark green (1st Regiment) and light green (2nd Regiment) tunics
Yellow (1st Regiment) and orange (2nd Regiment) saddles
Aztec yellow (1st Regiment) and (2nd Regiment) copper helmets
Red (1st Regiment) blue (2nd Regiment) sashes and boots
Light (1st Regiment) and dark-colored (2nd Regiment) spears
Each WWCAV regiment consists of 10 mounted troopers and a mounted regimental commander. The unit is found on the website as SKU OZZ-1402. Therefore I had a total of 22 figures for both. The figures are metal, and are 28mm scale.
Similar to other cavalry units in Ozz, the WWCAV are quite powerful and can have a great shock effect when used properly. The most combat power is due to a Melee value of 8/10. They are armed with spears but have no missile capabilities. The WWCAV regiments are above-average with a Resolve (ability to stand against an attack) value of 7/10, 2 better than the chariots. Their desire to get into and stay in a fight (Elan) is also 7/10. Point-wise, they cost 6 points per WWCAV. The sculpts of both the siliyiplix and the riders have a few differentions, but they are massive together and look impressive.
I started work on my WWCAV’s on August 10th and finished them on August 28th. I’ll share some WIP work below – these did involve a good bit of hobby work.
Whim Whim Cavalry WIP Shots and Discussion
I worked on the different components separately. These were:
The siliyiplix mounts and rider legs
The riders’ torsi
The riders’ heads
I decided to work on each component separately. First, I performed the obligatory filing off of mold lines and removal of flash. I also drilled out for mounting of the drummers’ drums and each of the heads. Then it was on to washing the metal before priming it.
All cleaned and drying – I use an old electric toothbrush with dishwashing soap.
As my 200 ml primer bottle of Vallejo Mecha White Primer was clogging my airbrush, I went with a brush application. I won’t be buying any more 200ml primers or varnishes any more btw, they are not reliable long-term for airbrush use. I’ll buy 60 ml from now on.
I brush-primed the lot – and used my alligator-clip stand and popsicle stick jigs to mount for painting for the torsi.
Priming done.
Then I added a wash with Army Painter Dark Tone by August 15th.
Washing done.
Then it was dry-brushing time with off-white. By August 18th I had made some progress.
August 18th progress.
By the 24th, I was on my way to getting ready for assembly – though it felt like these were taking forever!
I finished assembly and on the 26th started to apply the sand paste for the bases, adding and gluing on one figure at a time.
Once that paste had dried, I added pigments before using my air brush to varnish everything. The last step was to flock everything with rocks and tufts.
Done by August 28th – FINALLY!
And yes, my siliyiplix have pink eyes (well, magenta really)! So do the Noobi.
Enough WIP, time now for…
Eye Candy
1st Whim Whim Cavalry Regiment
Frontal view of the 1st WWCAV.
1st WWCAV Regimental Commander
Example of a regular 1st WWCAV stand
1st WWCAV Command Stand
1st WWCAV in formation
The 1st Whim Whim Cavalry Regiment in column formation.The 1st Whim Whim Cavalry Regiment in line formation.
2nd Whim Whim Cavalry Regiment
Frontal view of the 2nd WWCAV.
2nd WWCAV Regimental Commander
Example of a regular 2nd WWCAV stand
2nd WWCAV Command Stand
2nd WWCAV in formation
The 2nd Whim Whim Cavalry Regiment in line formation.The 2nd Whim Whim Cavalry Regiment in column formation.
Whim Whim Cavalry Group Shot
All together now!
Perhaps this project also may qualify for Dave Stone’s “Season of Scenery 2024” community painting challenge as he includes vehicles – that is, if siliyiplix count as vehicle? Either way, Dave, much thanks for running that!
As for my remaining Whim Whim units, I have two regiments of bowmen and one janissary left to paint. I appreciate that you took a look and I hope that it was of interest.
And yes, I still have much more Ozz to come…
Miscellaneous details and references for those interested in that sort of thing:
For all of my earlier posts on Wars of Ozz games, figures, units, and other related projects – please see this page.
PAINTS, INKS, GLAZES, SHADES, WASHES, PIGMENTS, FLOCKING, GLUES AND MORE THAT I USED ON THESE TWO WHIM WHIM CAVALRY REGIMENTS:
Whim Whim flag design from Wars of Ozz Facebook page (printed on card stock)
Yellow Sharpie highlighter
Brown Sharpie pen
As you may want to check out the excellent Wars of Ozz figures’ range – there are two places to get them and to get the rules (and I make no money from this btw). The game rules and the figures are available from the next two places:
Our fifth regular season TOB event – the August 2024 Tour of the Brookfields Tournament was held on Saturday, August 17th at Quail Hollow Golf and Country Club in Oakham, MA. It was sponsored by Hardwick Crossing Golf Course.
We had great golf weather – and for the second time in a row had 104 golfers on 26 teams in three divisions/flights.
We sincerely thank Hardwick Crossing for their sponsorship of the event!
I may sound like a broken record, but once again, each of the three flights were very competitive. One were decided by two strokes, one by one, and one by a playoff to break the tie.
There were just two skins won as well.
In the Nicklaus Flight, the team of Reece McLeod, Tom McCarthy, Paul Boulette, and Lynn Morin won with agreat score of -11. Congratulations to all for a fine round of golf! Coming in second place two strokes back at -9 was the team of Jim Kularski, Rick Gemme, George Fiske, and Greg Wypych. Well done!
In the Player Flight, there was once again a two-team playoff as both top teams ended their rounds at 9 under par. That playoff took place on hole number 18, and was decided there. The team of Jim Wilson, Amanda Pierce, Jarrod Dandurant, and Joe Nichols won the playoff. The team that fought it out for first place and came in second was the team of Chip Wetherell, Pete Peloquin, Sr., Jake Malin, and Bernie Lapierre, Sr.. Of course, Chip’s team did get an amazing Eagle on the par-5 hole number 16 which was worth a good number of bucks – so kudos there!
Finally, in the Palmer Flight, the team of Dave Daoust, Tom Foley, Nelson Malin, and Mike McCarthy took top honors with the best score of the entire tournament at -12!! Wow!! In second place at only one stroke back was the team of Tanner Frankian, Dave Russell, Dylan Allen, and Jamie McShera. That team also were happy winners of the other tournament skin with an Eagle on the par-4 8th hole! So good news for them too! GREAT golf was played by these two teams!
On hole number 17, Matt Desimone got the closest to the pin prize for his team with a fine shot – a 3′ 5″ pin-seeker (that edged out his brother Joe Desimone!).
The results table is below as are some notes for the upcoming September event and the highly-anticipated FINALS! As I was busy at the event, I did not get any photos or videos this time – my apologies.
2024 Hardwick Crossing Express Results
The Next Tournament and some notes
Thanks again to all the players, to Hardwick Crossing for sponsoring this event, and to Gary and Debbie Donlin, Jim LeBlanc, and all the staff at Quail Hollow who work so hard to make the Tour of the Brookfields possible.
The next tournament is the last regular season event.
It is a SUNDAY – NOT A SATURDAY – event!
It is coming up on Sunday the 8th of September, and will be the great Lamoureux Ford Open. Sign ups for this event will come down on the afternoon of Wednesday, August 28th.
The event is coming up very quickly – and this event will also likely be VERY well-attended, so sign up early at Still Harts, at Quail Hollow, or on the Tour of the Brookfields Facebook page!
Registration starts on the day of the event (September 8th) at 7:00 AM.
Some of you need to play in this event to qualify for the FINALS, so sign up!
As before, many players are trying to get qualified for the FINALS (you need to have played in 3 to be qualified for the FINALS).
Going forward only players who have a chance at playing in 3 will be allowed to sign up. The exceptions will be sponsor’s teams and individual medical issues as reviewed by the Committee.
Key information for the FINALS – Mark your calendars!
After the Lamoureux Ford Open, all of the results for this year’s events will be consolidated and published in a blog post here in this blog (“Life, Golf, Miniatures, & Other Distractions”) similar to what I did last year. Due diligence on the A-players’ parts will be an important aspect in preparing for the draft night. All will have access to the same information published here.
The FINALS sign up will close no later than September 15th – and possibly even closed up earlier. Sign up at the September 8th event or afterwards at Still Harts, at Quail Hollow, or on the Tour of the Brookfields Facebook page!
The committee’s decision on A-men rankings and the publication of the players in the field will occur by September 23rd – also here in this blog.
The DRAFT NIGHT for the FINALS will be held at Quail Hollow on September 26th (Thursday) evening at 7 PM. ALL are invited and encouraged to attend.
The FINALS will be on Saturday September 28th with registration starting at 7:30 AM.
REQUESTS AND FYI
Thanks for arriving on time on Saturday! Thanks for getting the scorecards in quickly – these two items made things run a LOT more smoothly. Please keep that going by continuing to come early for registration. 7:30 should find everyone at Quail on September 8th.
As we hope to continue a full player showing, please sign up early – by August 28th – that’s a Wednesday! When it’s full, it’s full. If we still have openings after Aug 28th, that will be shared on the Facebook page.
If you have any feedback or comments on this blog post – there is a comment section that you can use below. I will continue to put up these events on Facebook – with results posted here on this blog.
Once again, this blog is titled, “Life, Golf, Miniatures, and Other Distractions”. I do post other stuff here – mainly around miniature toy soldiers and tabletop wargaming (my other passions). Feel free to subscribe as an email follower! (and it is free and you’ll get instant updates).