Several upcoming wargame conventions are looming on my horizon, so I needed to get going on adding some new terrain and game markers for my Wars of Ozz games. I will be posting about these three parts for ease of reading. I have been (as you will see) very engaged with multiple terrain projects. Luckily, I was able to get all of them completed in early January after finishing my brigade of Pollywomps. At Christmas, I received several cool gifts that would be useful to convert or build as terrain pieces. This post will cover the first one I finished, a Scarecrow Girl statue.
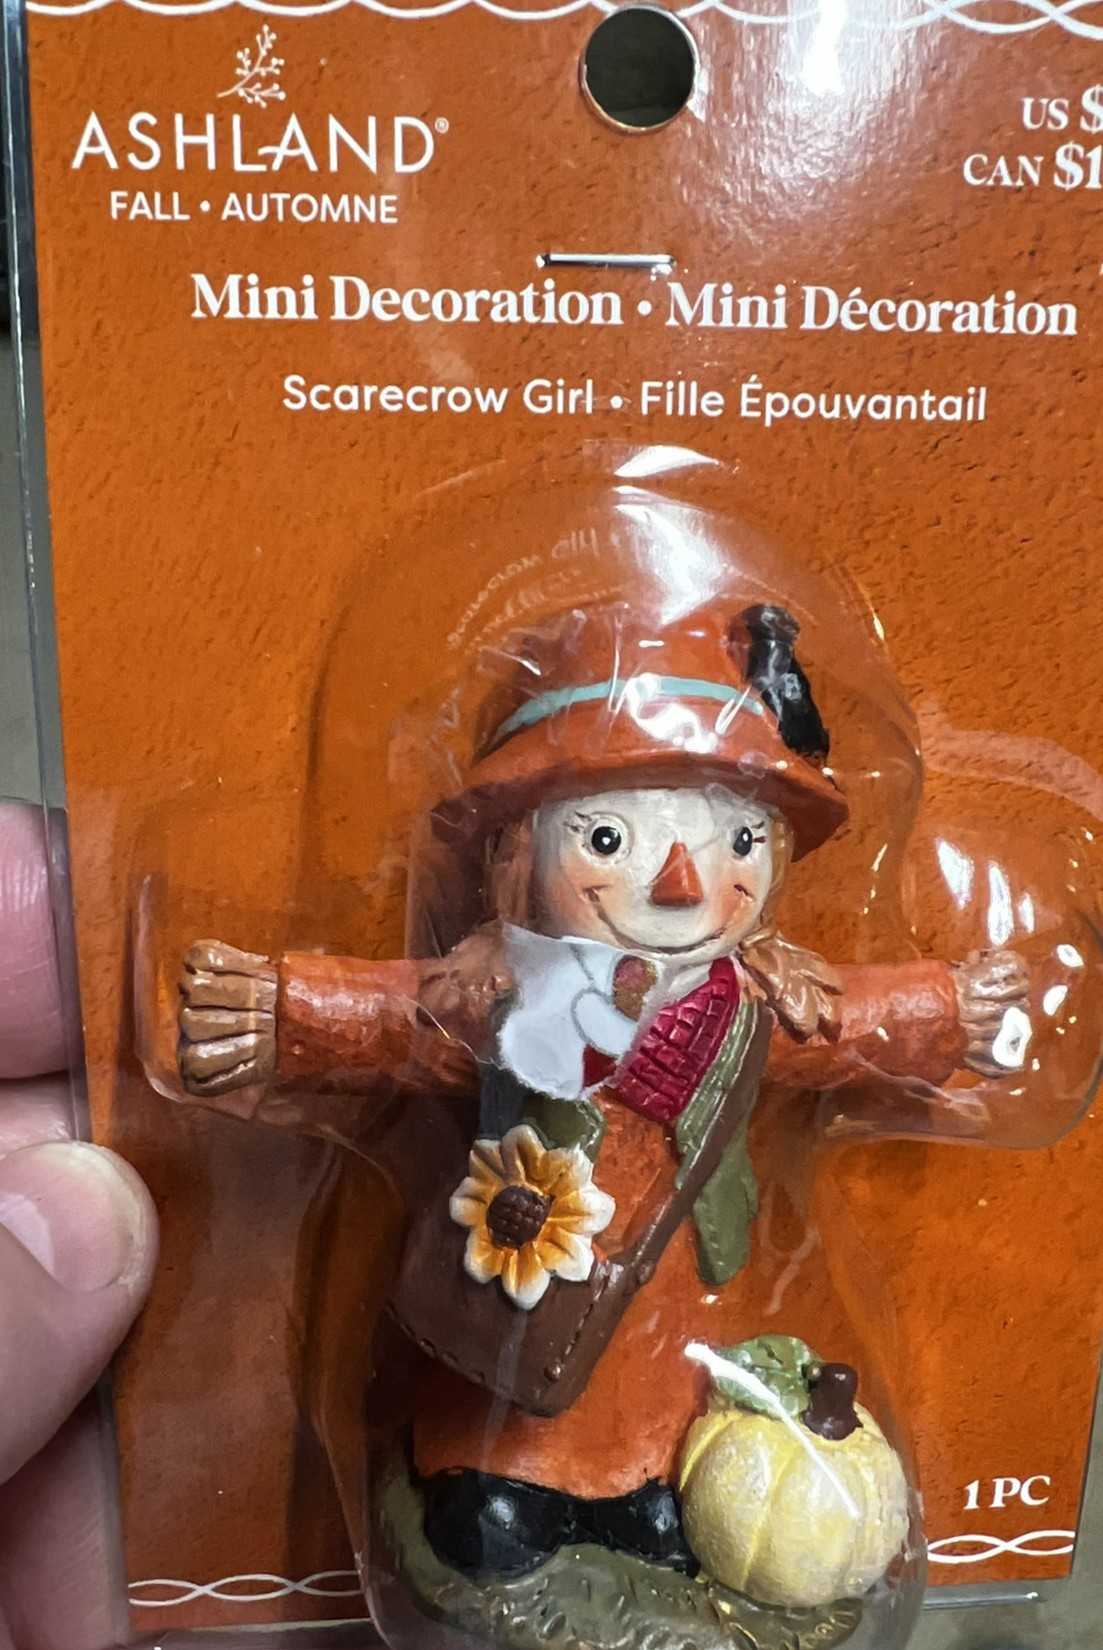
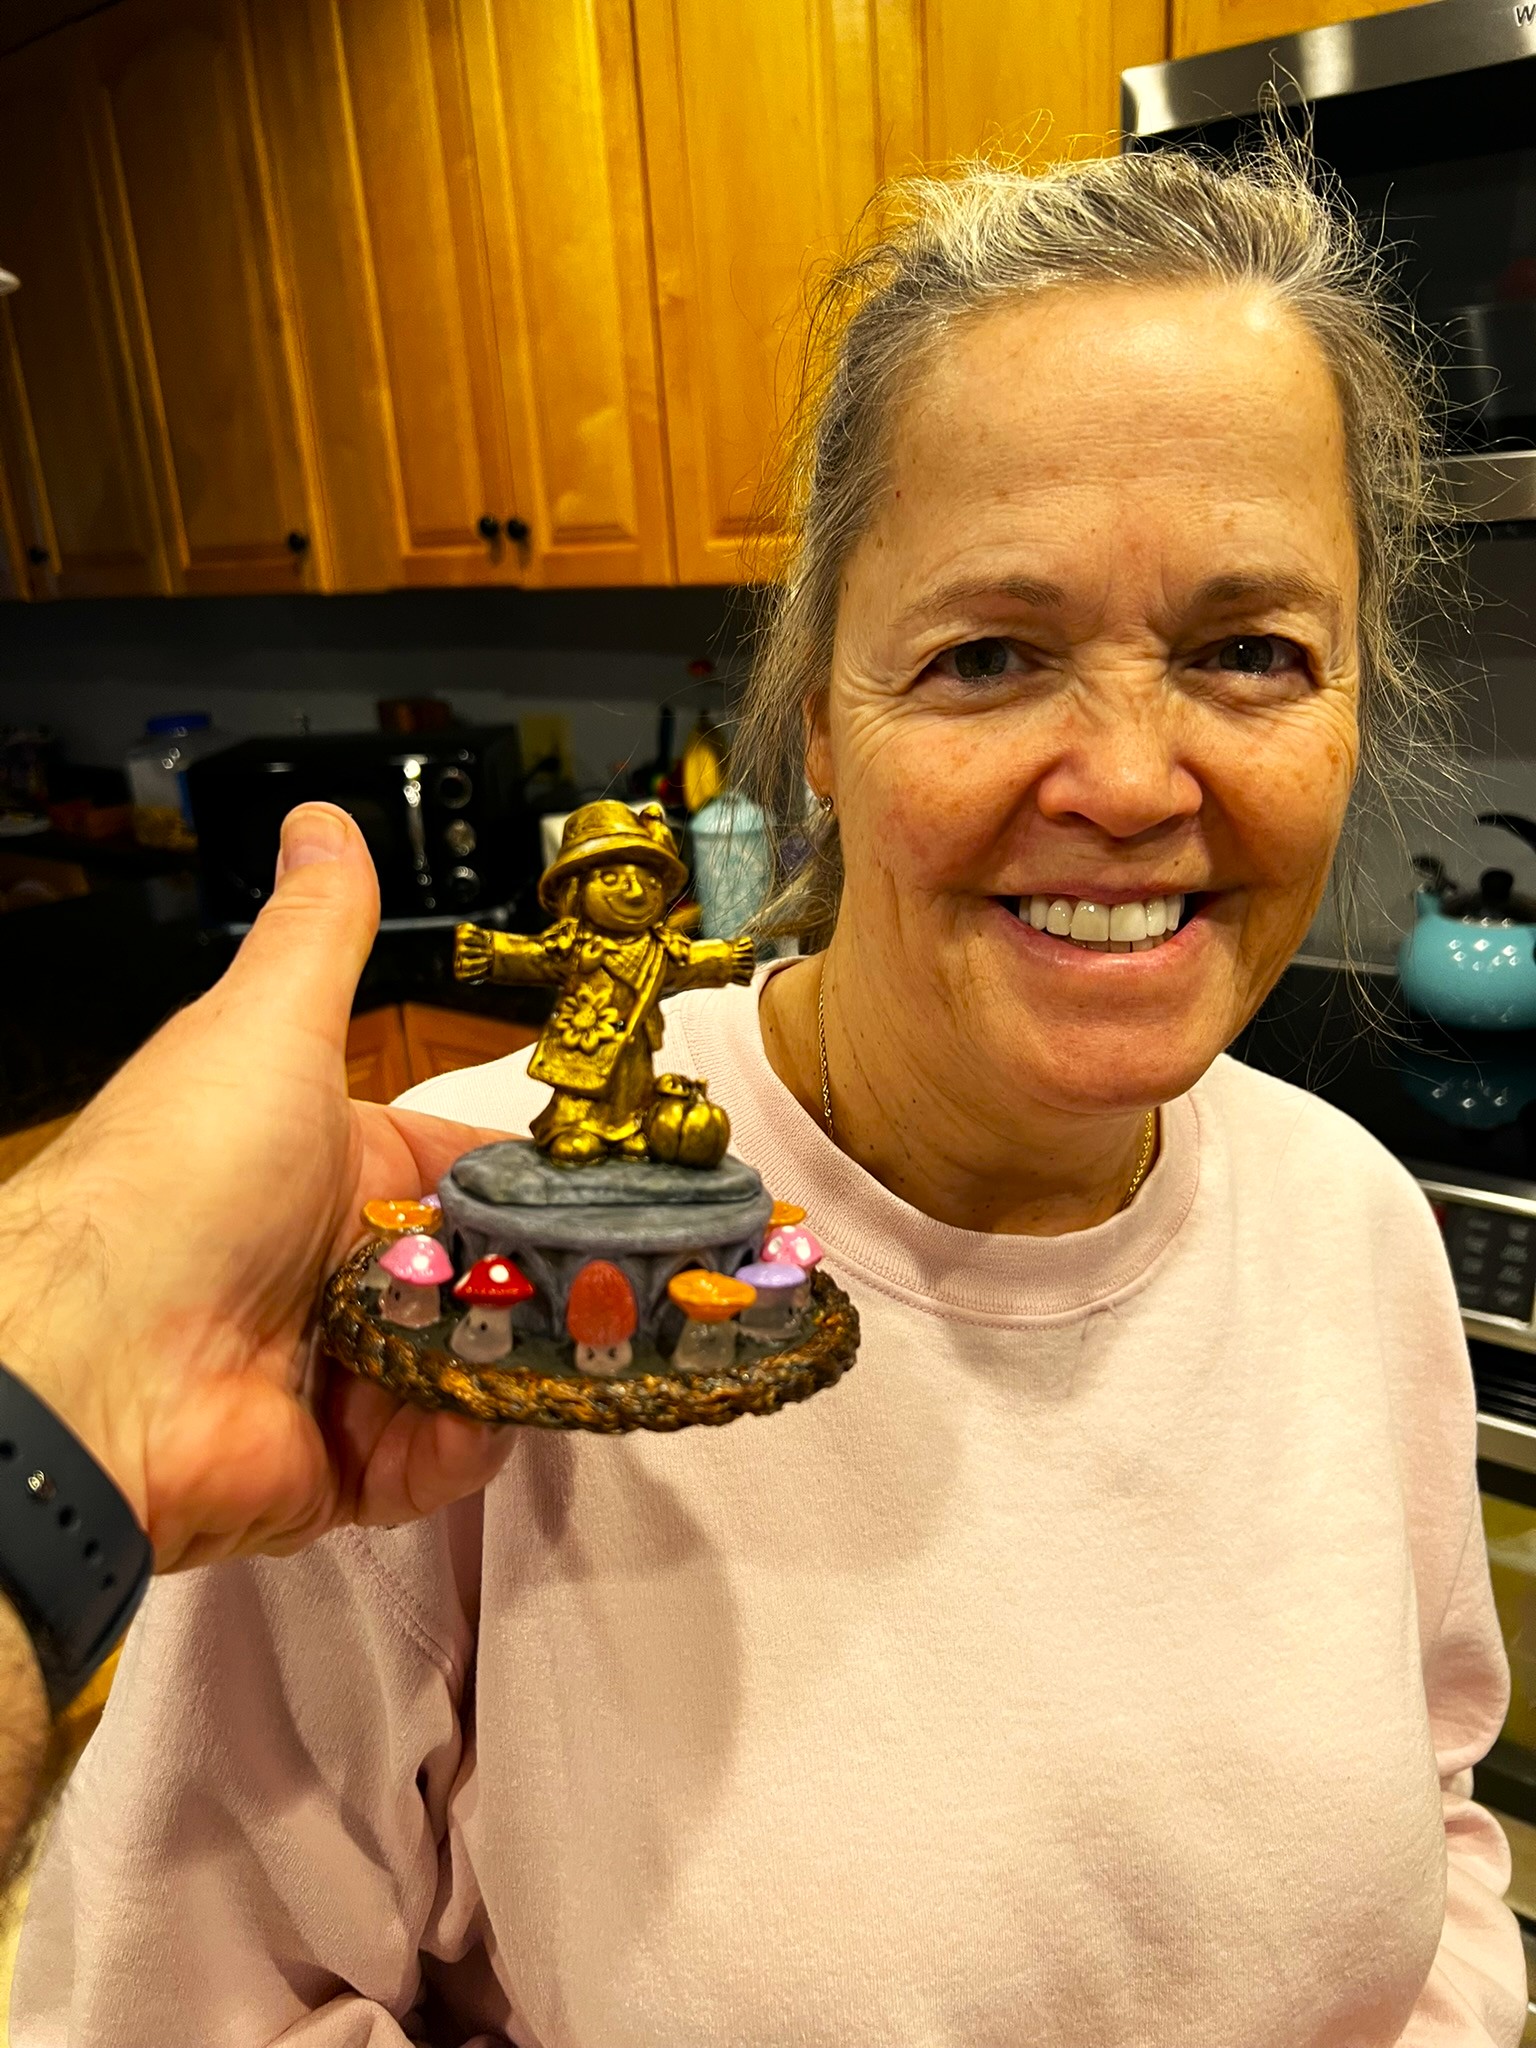
My wife Lynn saw a 3″ tall resin figurine of a scarecrow girl at the Dollar Store – and got it for me. It was factory-painted. When I saw it, ideas in my brain began to churn. I thought with the statue’s size she would make a nice centerpiece as a statue. I’ll share how I worked on it and then some shots of the finished product.
WIP Shots of the Project
The figurine in its package with wrapping paper shard still attached!
My plan was to build the terrain piece as a metal statue on a granite plinth. I had various plastic bases that I had not been using – and I selected one that was not originally even designed as a base for figures. It was probably came from something household-like that I assembled years ago and came as an extra piece. I saved it as I thought someday I could use it. I sanded off its shiny surface for better primer adhesion. Also, I had saved a plastic lid from a Tropicana orange juice bottle that had a nice shapes on its outside surface. Lastly, I added a heavy large steel fender washer underneath the plastic base for stability and adhesion to a magnetic sheet in a storage box.
The Tropicana lid, steel fender washer, sanded and repurposed base, and the Scarecrow Girl shown here at the start.
The steel washer was glued to the underside of the plastic base. I primed the lid and base all black, except where I was to glue the lid to the base, and let that cure. Then I affixed the lid to the base with PVA and let that set up.
Primed lid and base that would serve as the plinth
For the figure, I just overlaid the factory paint with gold paint in a dry-brushing fashion. Then I built out the Scarecrow Girl’s base with enough green stuff that it would cover the “Tropicana” logo. to do that, I had cut a piece of card stock to determine the size and shape that I would need to obscure the logo. After gluing that card stock to the statue, it was a lot easier to shape the green stuff perfectly.
Primed plinth and statue with enlarged base
I washed the statue down with a metal wash to give better definition. and added another dry-brush application of gold.
Statue after adding the dark wash and more gold. I also painted the green stuff as granite to match what I wanted for the plinth.
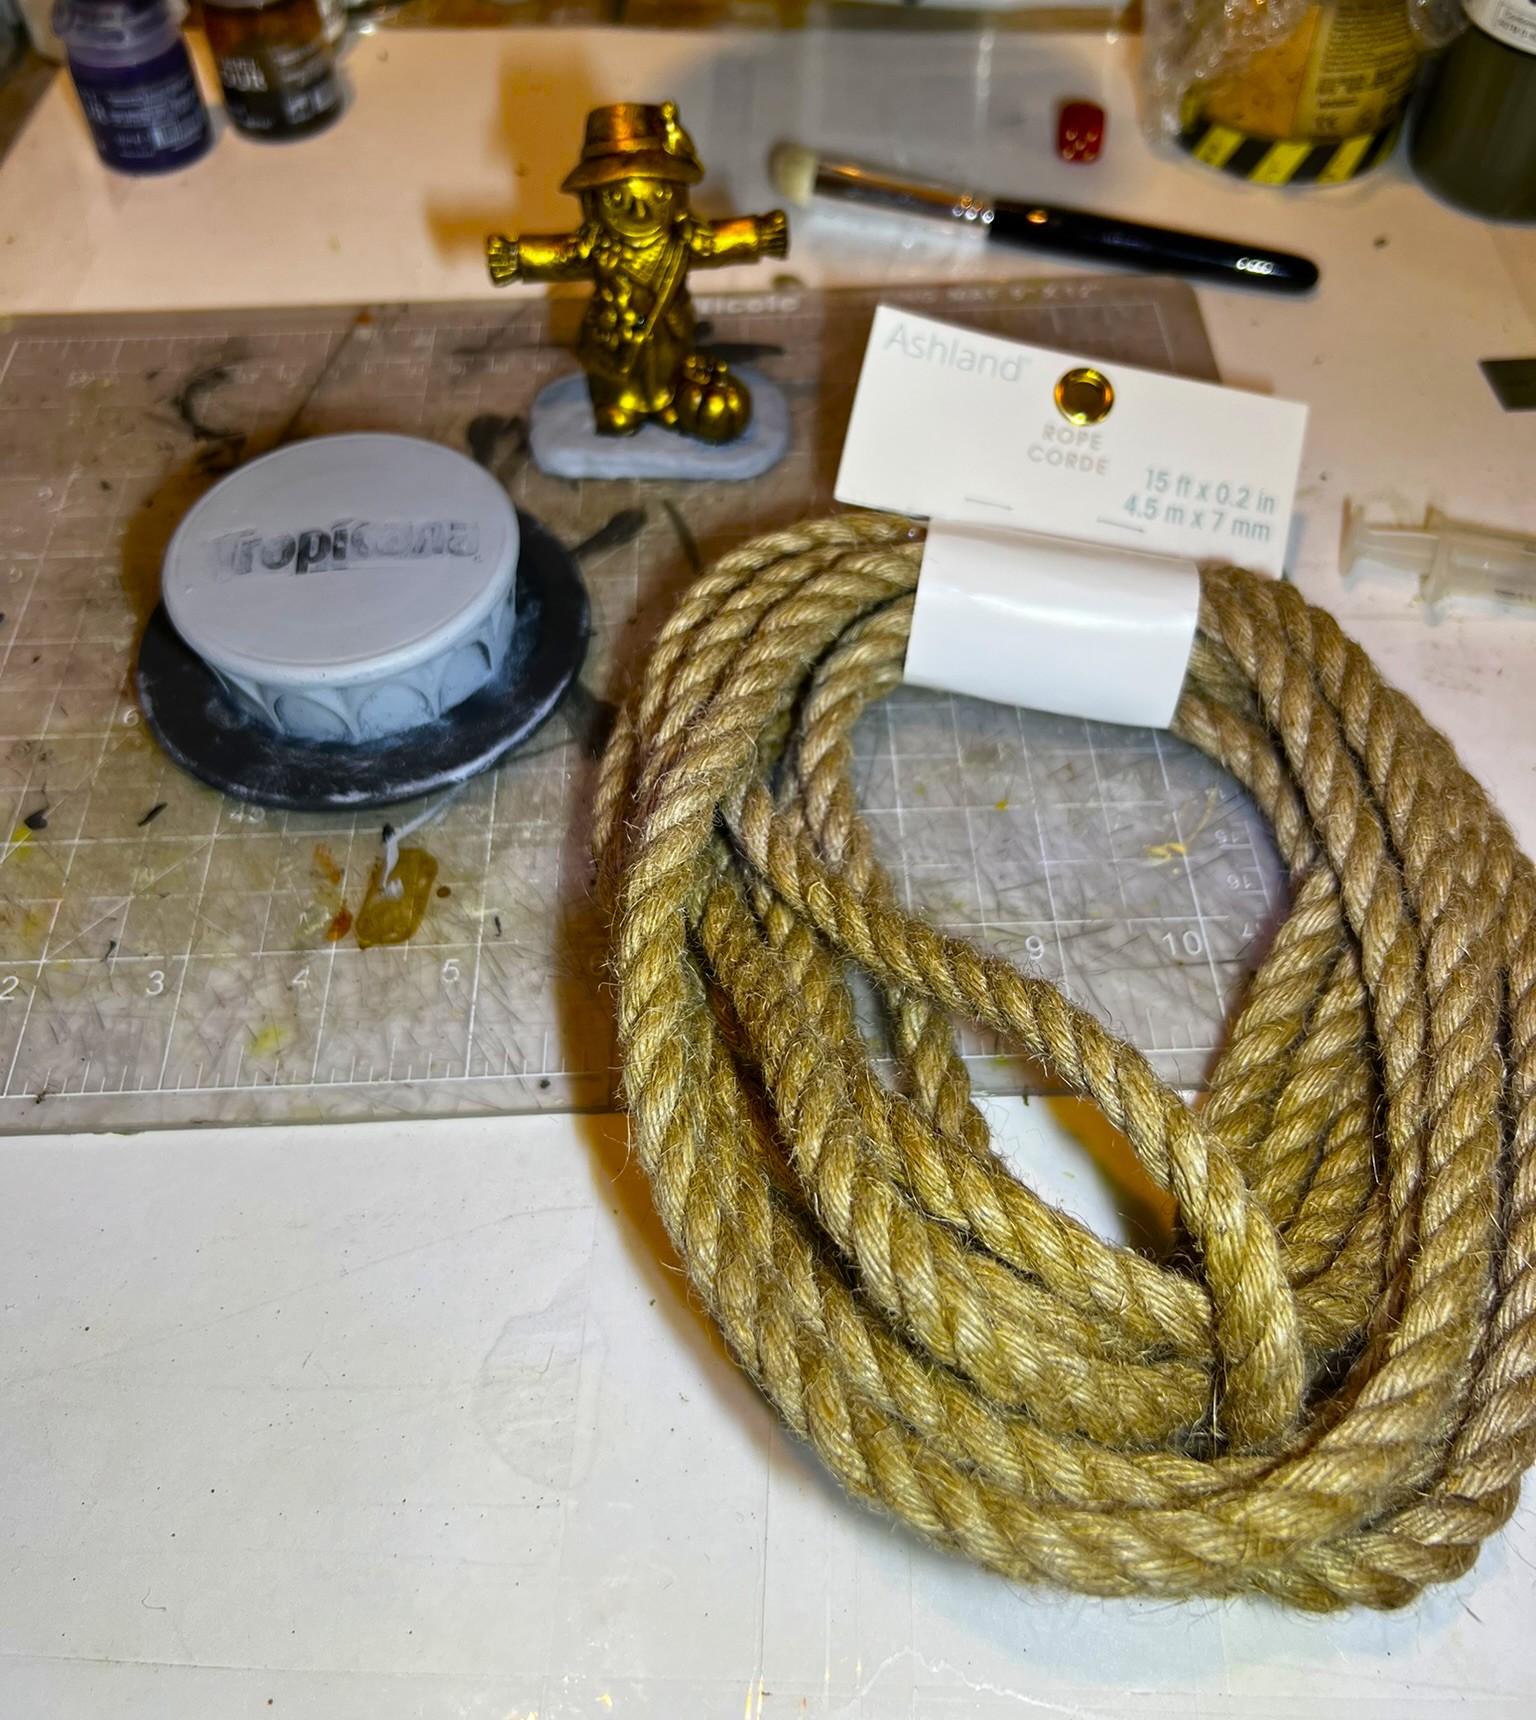
Then, I started to dry-bush the plinth to look like stone, but I saw that it had a small gap underneath. The steel washer was just thick enough to make the plinth seem to hover over the ground. I visited Michael’s store for inspiration, and saw a rope for decorative hobby projects – and voila – solution!
The plinth , statue, and rope
I cut the rope such that it would be the same circumference as the plinth. I then massively saturated the rope and where it touched the plinth with PVA glue. I drove the ends of the rope together where they met with a combination of toothpicks and small-gauge steel needles, and let it dry – hoping that approach would work.
The plinth and rope with the PVA drying
It worked well as you can see below. All I needed to do was remove the needles and clip off the toothpicks flush with the rope.
Fry and before removing toothpicks
I had also tried to use toothpicks underneath as “bridges” to hold the rope ends together. PVA is great here as the rope and toothpicks are porous enough to make great bonds.
Underneath view of the plinth showing the steel washer thickness that caused the gap. You can also see the toothpicks used both in the rope and as bridges.
Then I glued the statue to the plinth. Having previously applied the card stock that the green stuff rested on to the underside of the statue – I got a great bond to the plinth with PVA.
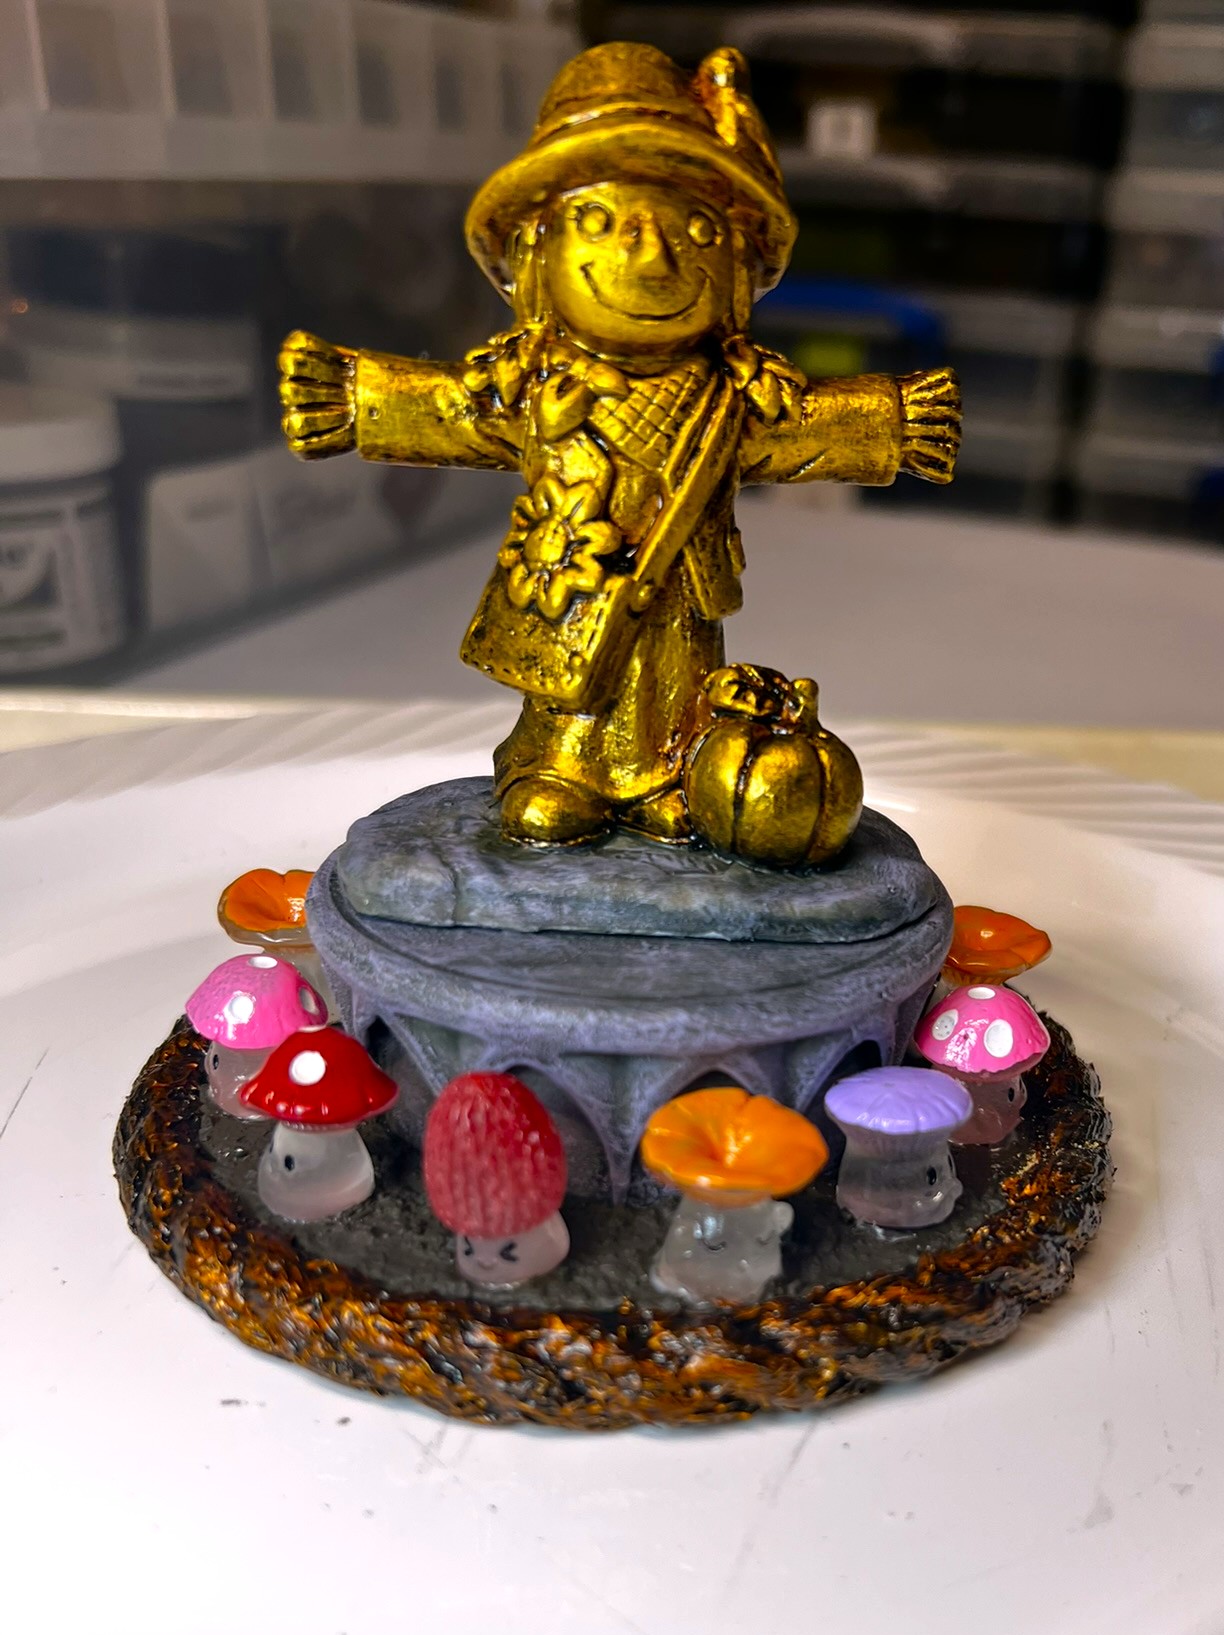
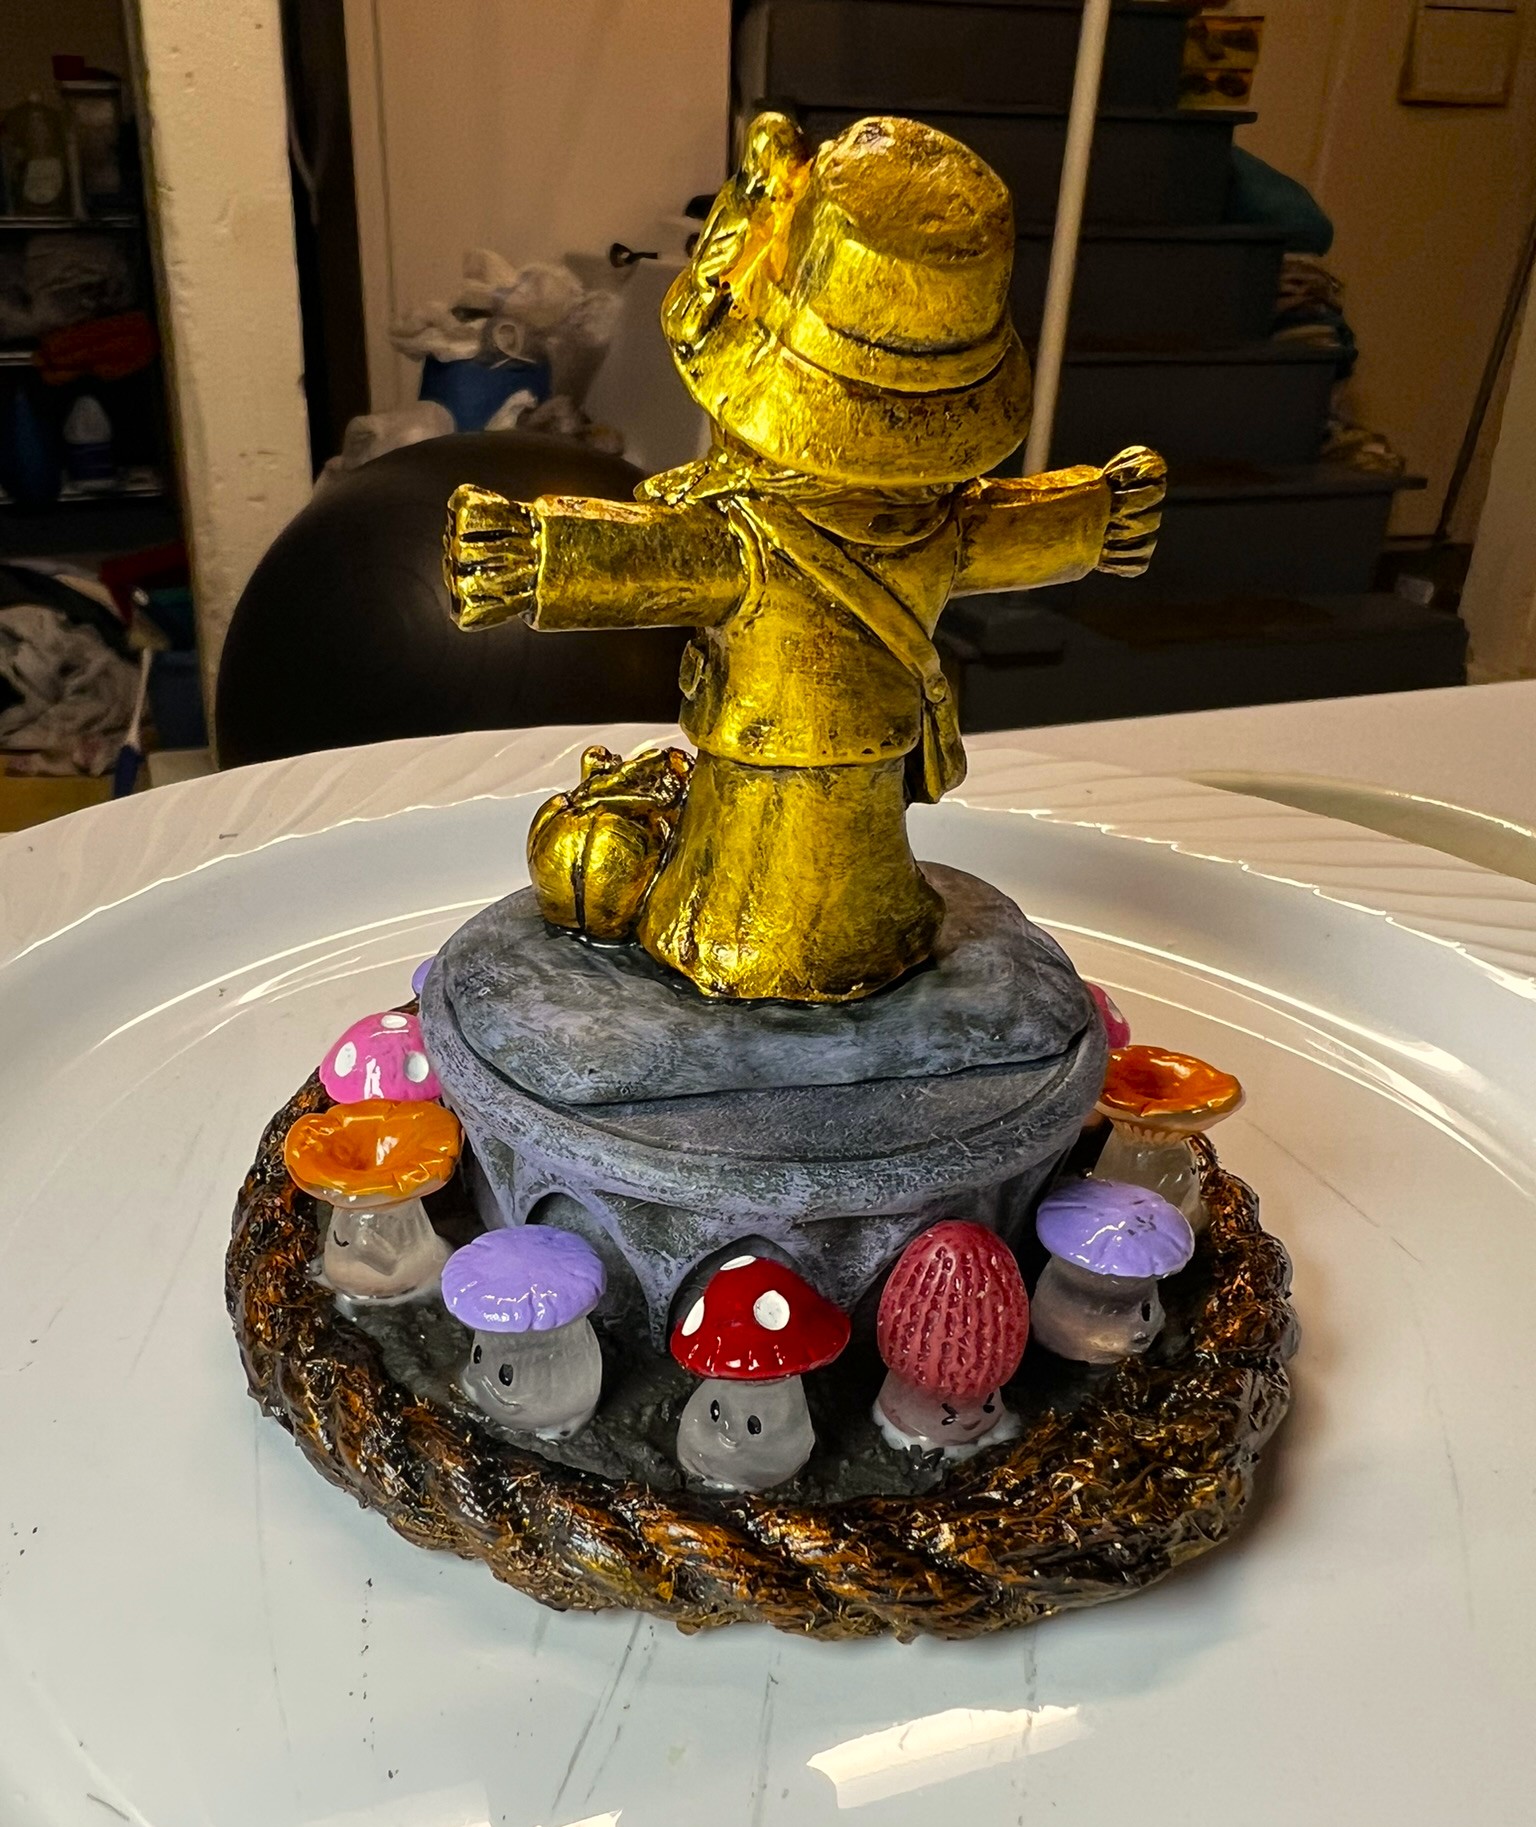
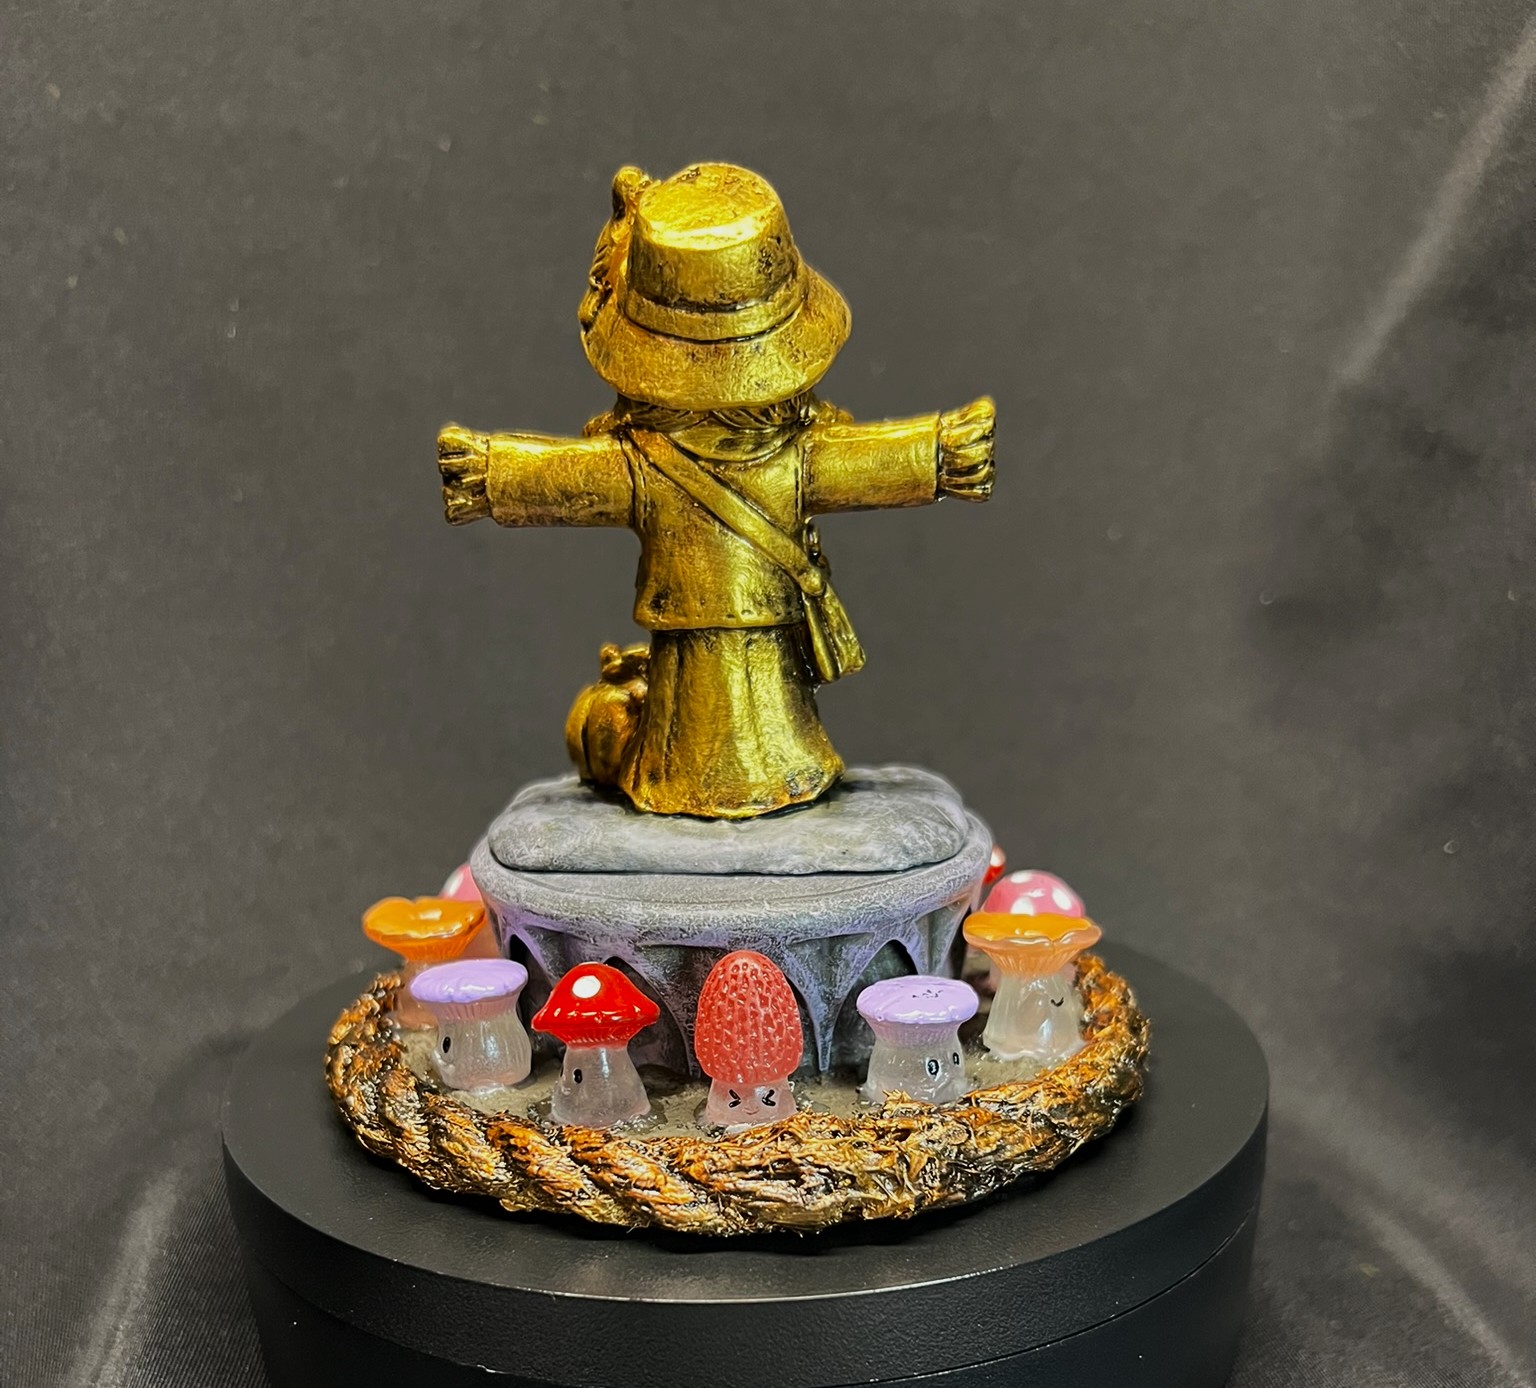
I used a different (darker) metallic gold color on the rope to simulate it as part of the entire work, then applied a dark wash. Lastly, I decided that there would be a “garden of guardian mushrooms” protecting here around the plinth. I did not paint them as this would allow me to treat the little guys as either carved or anthropomorphic!
Finished Scarecrow girl with little miushrooms’s glue drying (front)……and back
I of course had to show my lovely bride how much I appreciated her gift and what I had done with it! I think she liked it.
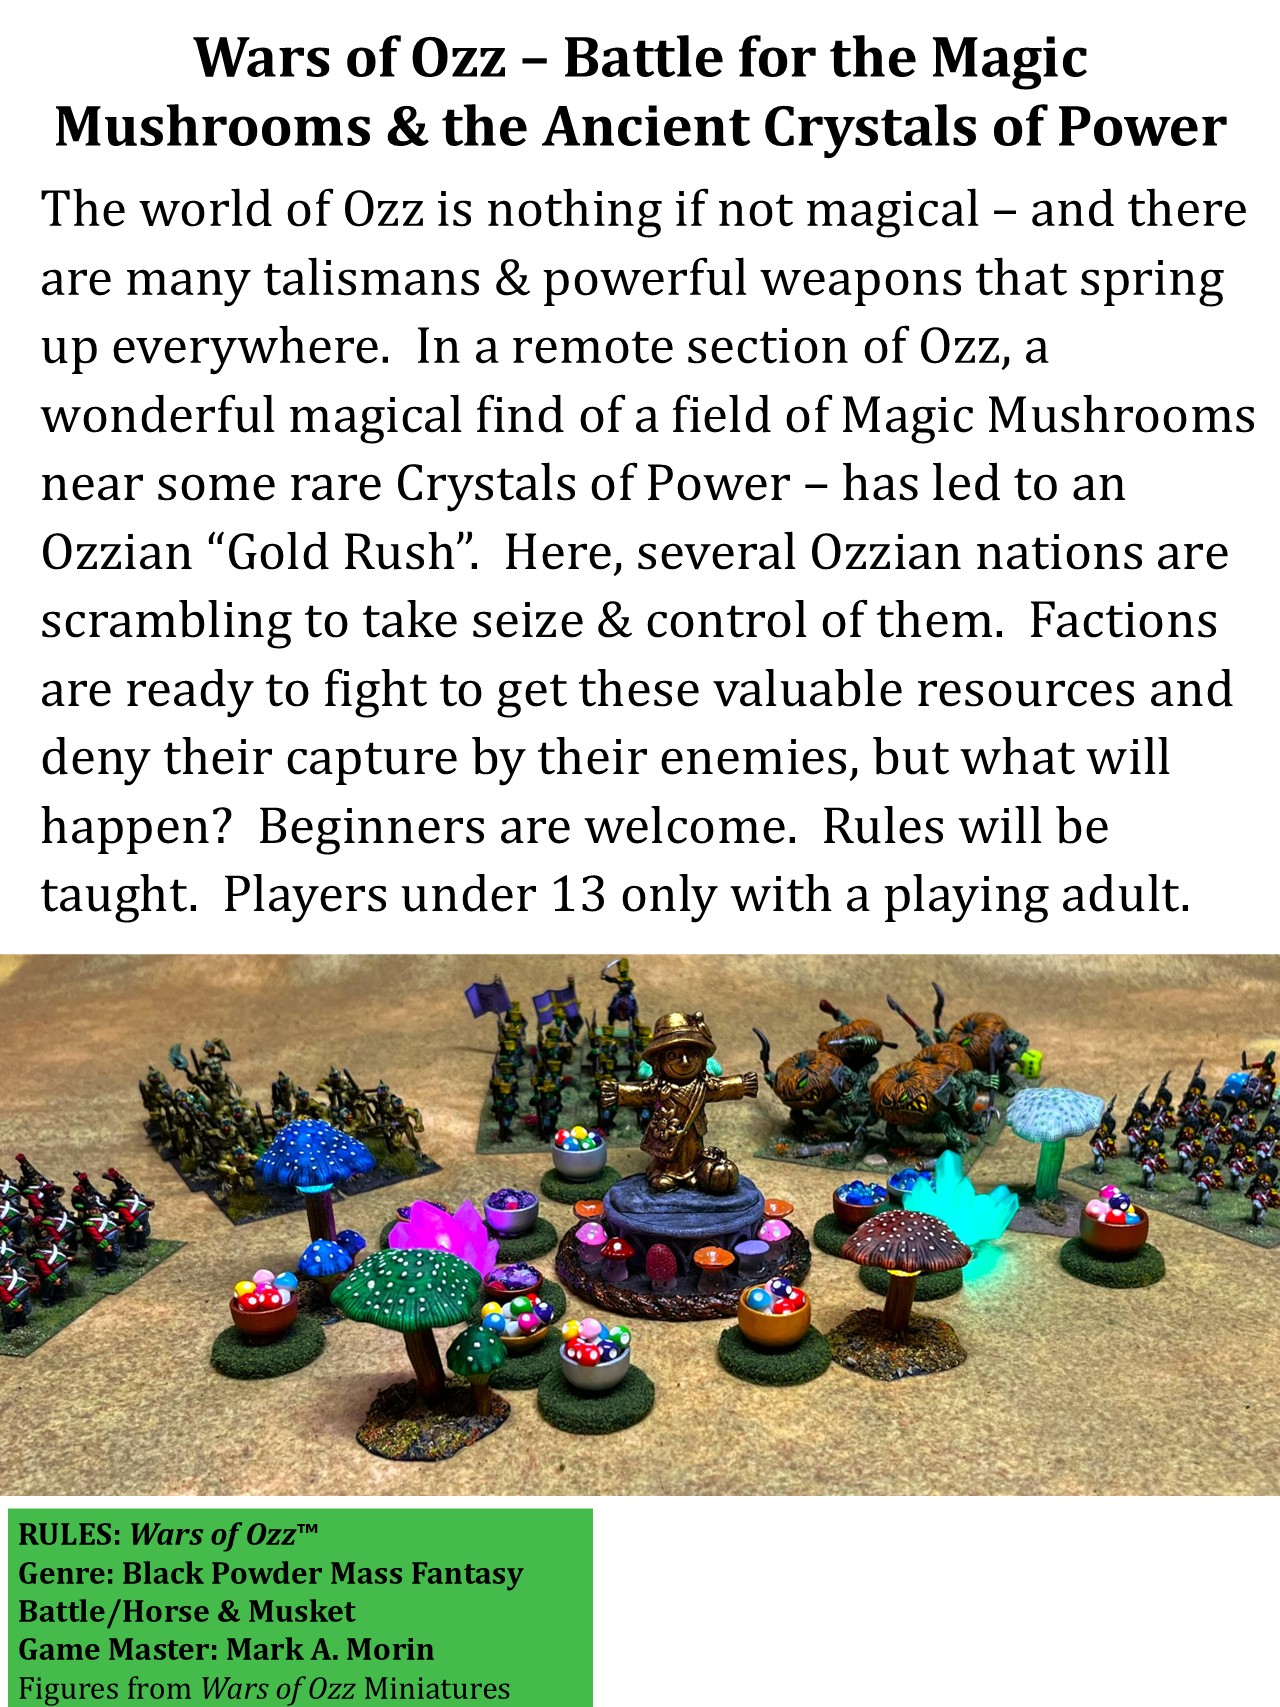
In the video I mention that I did not have a game for it – well, I decided that she will be the centerpiece on the tabletop for my “Wars of Ozz – Battle for the Magic Mushrooms & the Ancient Crystals of Power” game, described as follows:
The world of Ozz is nothing if not magical – and there are many talismans & powerful weapons that spring up everywhere. In a remote section of Ozz, a wonderful magical find of a field of Magic Mushrooms near some rare Crystals of Power – has led to an Ozzian “Gold Rush”. Here, several Ozzian nations are scrambling to take seize & control of them. Factions have teamed up & are ready to fight to get these valuable resources and deny their capture by their enemies, but what will happen?
Here is the flyer for that game – and you can see some game markers that will be fully shared in part 3 of this series.
Game Flyer
Thanks for looking – this was a fun change of pace. It also qualifies for Dave Stone’s annual “Paint What You Got Challenge”. It’s a fun and global challenge to paint up figures between Christmas and the end of February, check it out!
I’d be interested in hearing your feedback on this – thanks in advance for any sharing!
And part 2 in this series will be coming soon…
Final Note
While this figure is NOT official, if you do want to check out the excellent Wars of Ozz figures’ range – there are two places to get them and to get the rules (and I make no money from this). The game rules and the figures are available from the next two places:
Below you’ll see the list of paints and the like that I used on these – and they are more useful for me when I need to recreate a color scheme in the future than maybe you – but in any case that’s why I post them.
Miscellaneous details and references for those interested in that sort of thing:
For all of my earlier posts on Wars of Ozz games, figures, units, and other related projects – please see this page.
PAINTS, INKS, GLAZES, SHADES, WASHES, PIGMENTS, FLOCKING, GLUES AND MORE THAT I USED ON THIS SCARECROW GIRL STATUE:
Ashland “Scarecrow Girl Mini Decoration” statue
Black plastic disk
Plastic Tropicana Orange Juice lid
2″ Square War Games Accessories Steel Bases (21)
PVA Glue
Card stock
Green stuff
Ashland 7mm Rope Cord
Vallejo Surface Primer “German Panzer Grey”
Citadel “Liberator Gold”
Citadel “Retributor Armour”
Citadel “Cryptek Armourshade” (wash)
Americana “Slate Gray”
Toothpicks
Secret Weapon Washes “Stone”
Citadel “Slaneesh Grey”
AK Terrains Diorama Series “Muddy Ground” (texture/basing paste)
Back in the mid-1970’s, there was the live-action show “Land of the Lost“. It was a Sid and Marty Krofft production that aired on Saturday mornings alongside all our other cartoon options. It was easily my favorite back then – and I eagerly watched every episode that I could. My daughter informed me that it was also rebroadcast in the 1980’s and 1990’s so her generation saw that too. It was also made into a Will Ferrell film in 2009 (that was apparently a box office flop that I never saw).
Short version: The premise of the original TV show concerned a family of three – Dad Rick Marshall, his son (Will), and his daughter (Holly). While rafting on a camping trip, the family is transported to another world through a portal. In this world, they hole up in a cave and try to find a way back home. Their new world has dinosaurs (stop-action and puppet-animated), friendly and diminutive hominid Pakuni (notably their friend Cha-Ka), and Sleestak.
The Sleestak are slow but aggressive bipedal reptilian creatures. Some carry crossbows and in the show have all the accuracy of an Imperial Storm Trooper. The Sleestak inhabit the ruins of an ancient city and temple complex, and are occasional nemeses of the Marshalls. Among the Sleestak is a differently-colored Altrusian named Enik. The Altrusian civilization fell 1,000 years prior to the Marshalls’ arrival – and the Sleestak are their corrupted barbaric descendants. Enik had similarly been transported through a portal from his time to the ruined Altrusian city of the show. He sometimes helps the Marshalls – and the Sleestak generally yield to him because of his powers.
So, what the hell has that got to do with my Wars of Ozz projects ???
Well, I was getting ready to paint up my Pollywomps and make a brigade of them. Pollywomps are swamp-dwelling reptilian humanoid that are ruled by Prince Dismal, ruler of their swamp. They have a passing resemblance to both 1954’s “Creature from the Black Lagoon” AND the Sleestak. For my Pollywomp Brigade, I have an infantry regiment, a cavalry regiment, and an artillery battery. All are VERY cool and I will share in due course in future posts. But unfortunately I needed a brigade commander – and Prince Dismal is not yet sculpted and available for purchase.
However, in surfing the internet I found Forge of Ice Miniatures up in Alaska that has a few extremely cool “Saleesa” figures that are pretty much Sleestak. As they brought back nostalgic feelings, I ordered some, and I was very pleased with them and especially the customer service from Alex Bates. The figures that I got were:
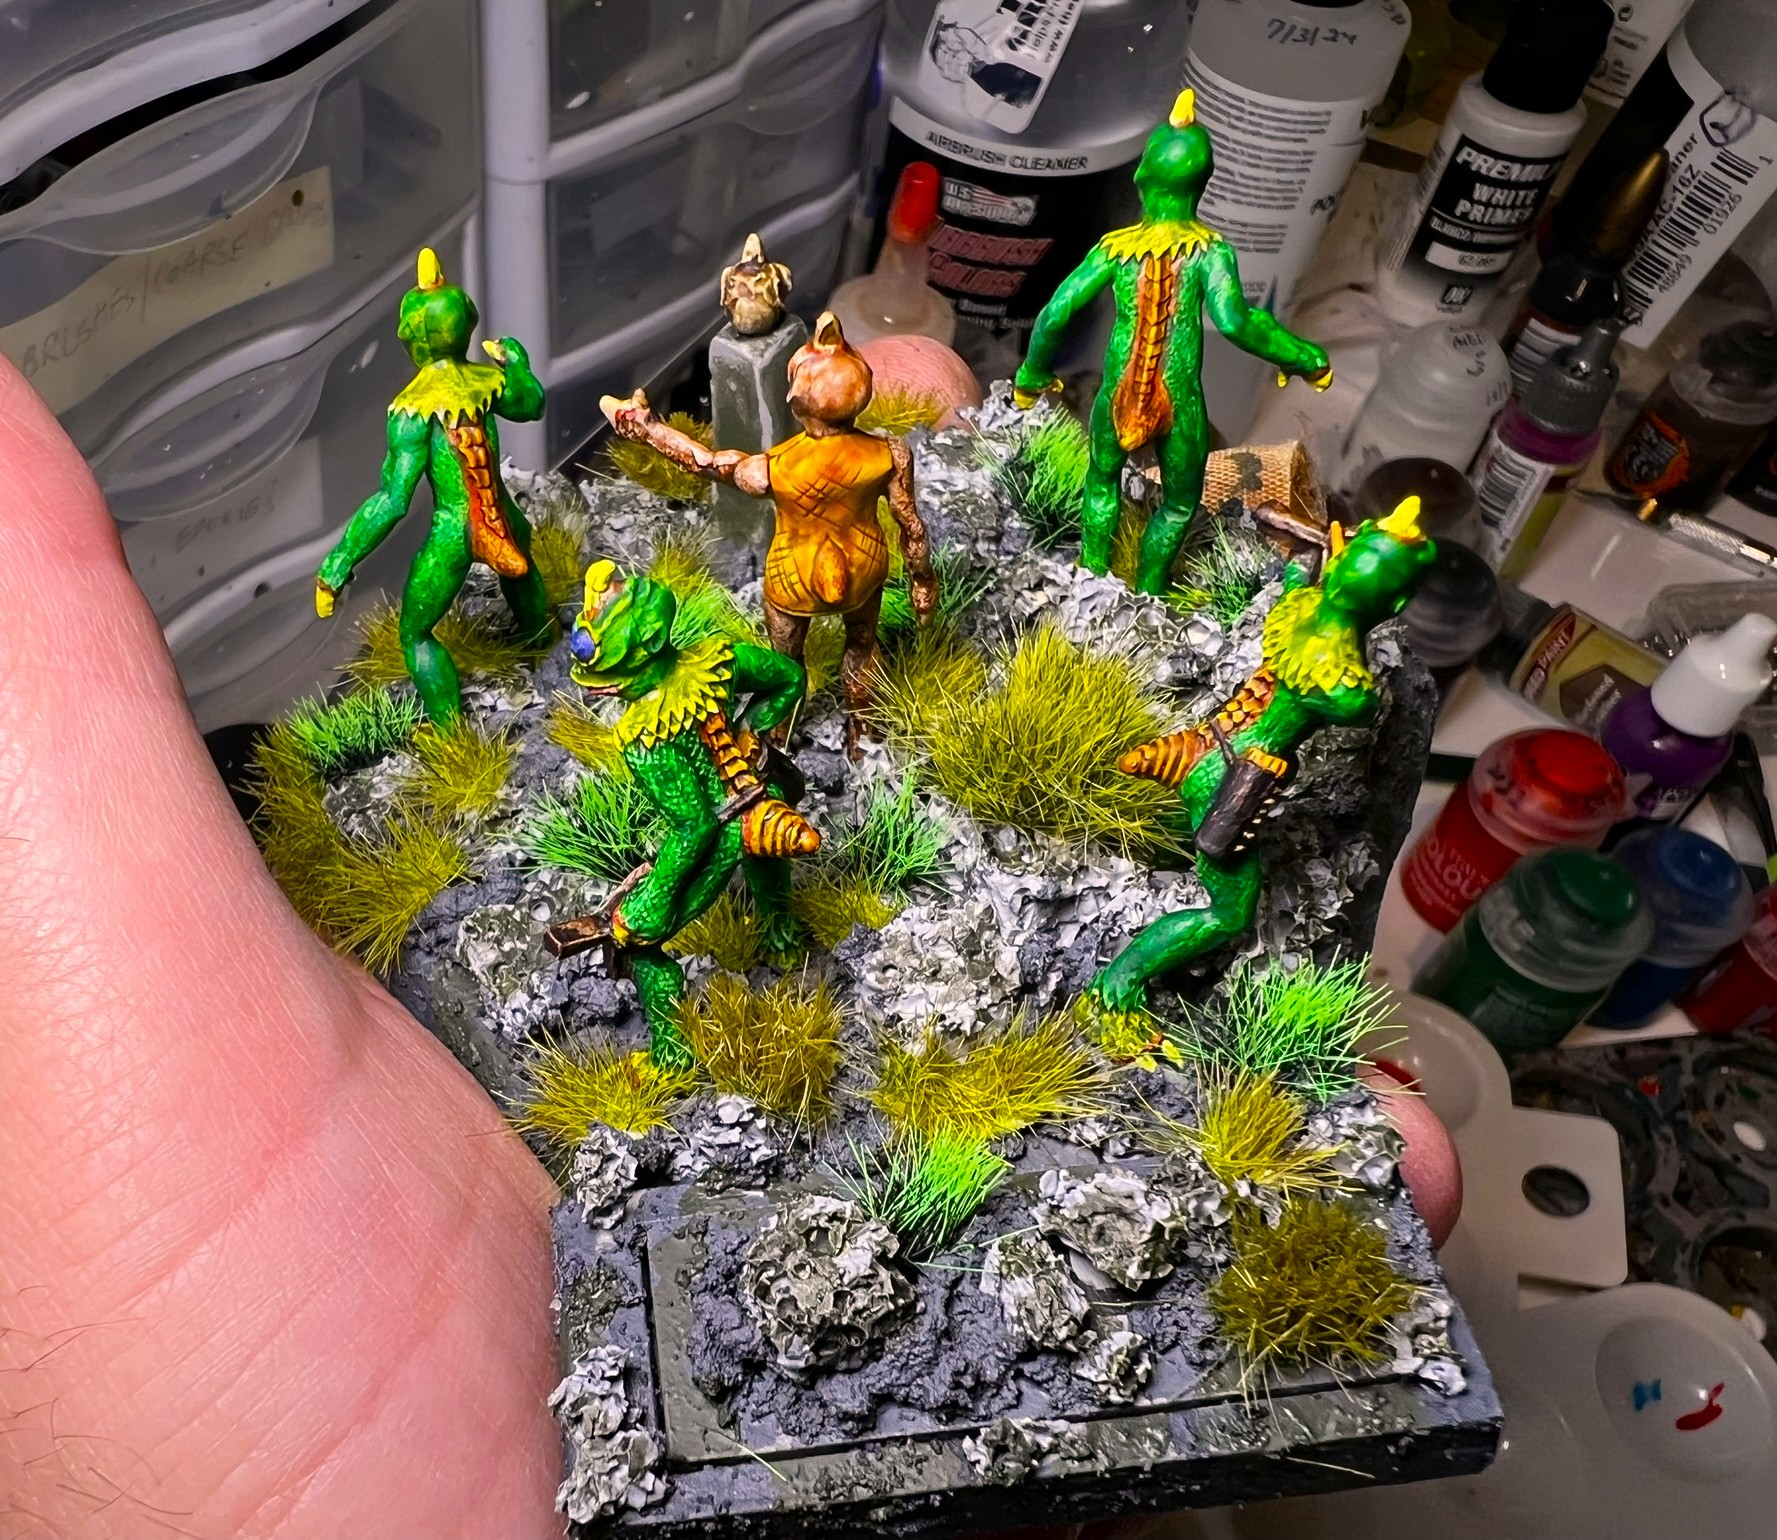
I’ll share below how I made these into a brigade command base for Wars of Ozz. My plan was to have the Sleestak surround Enik and his “Index Skull” on a base that would look like a ruined city overgrown by jungle.
WIP Shots
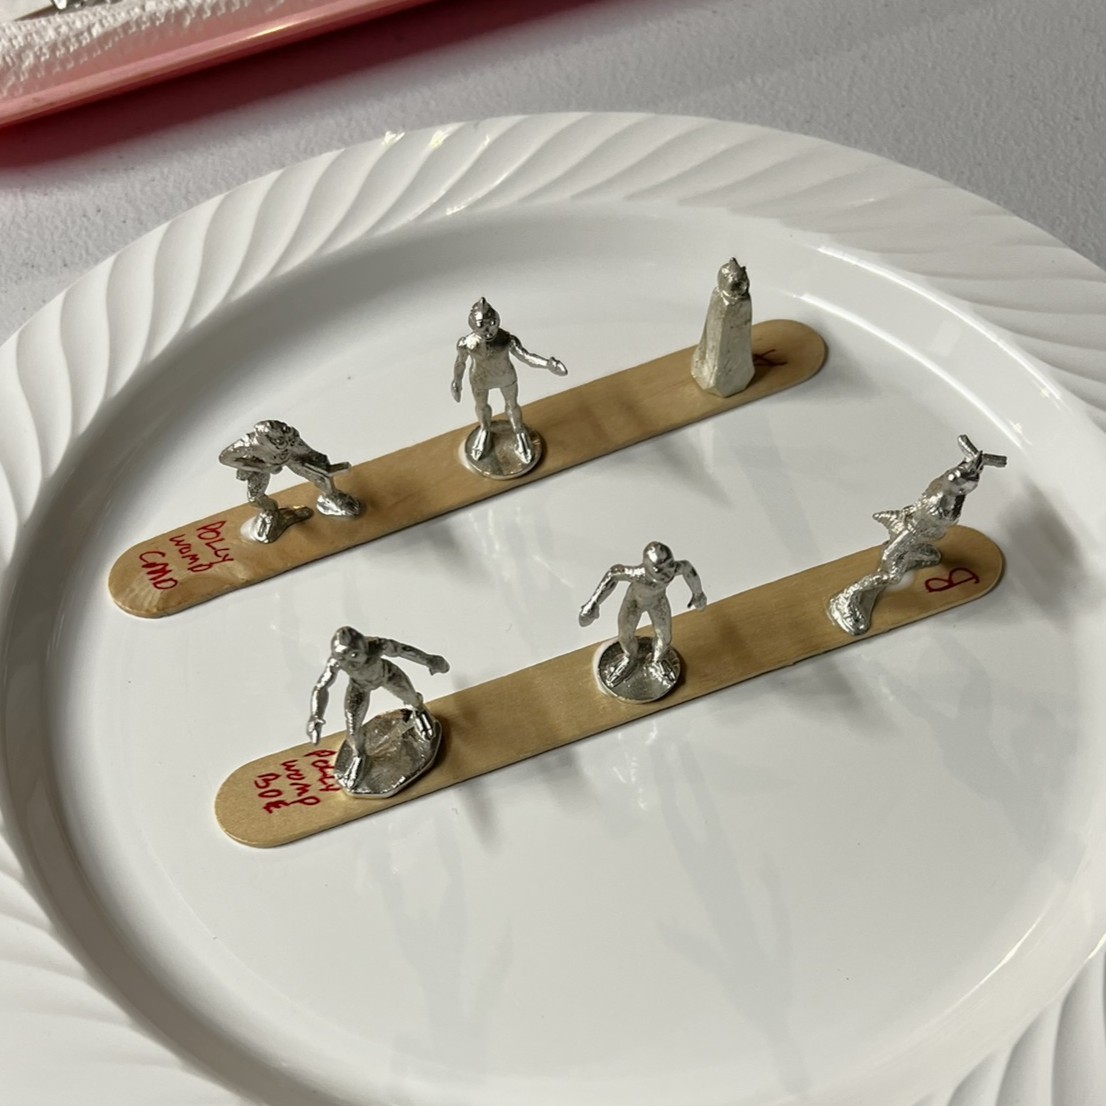
I used popsicle sticks and PVA to set the figures up for painting. These are metal and 28mm in size.
Ready for painting……and primed!
As for the base, I decided to use a balsa wood base left over from my Minifigs World of Greyhawk Cairn Cavemen project from 9 years ago. I would need to add a space on the base for the both the leader ability placard and the 12mm dice frame. To those ends, I additionally repurposed part of a placard frame from Wars of Ozz miniatures OZZ-BA5 and a square of basswood I had lying around.
The base materials.
Using PVA, I glued metal supports under the base and set with binder clips. I even reused a metal garage door sample that would adhere to my magnetic sheet-covered Really Useful Boxes that I use for storage and transport.
The base – underneath.
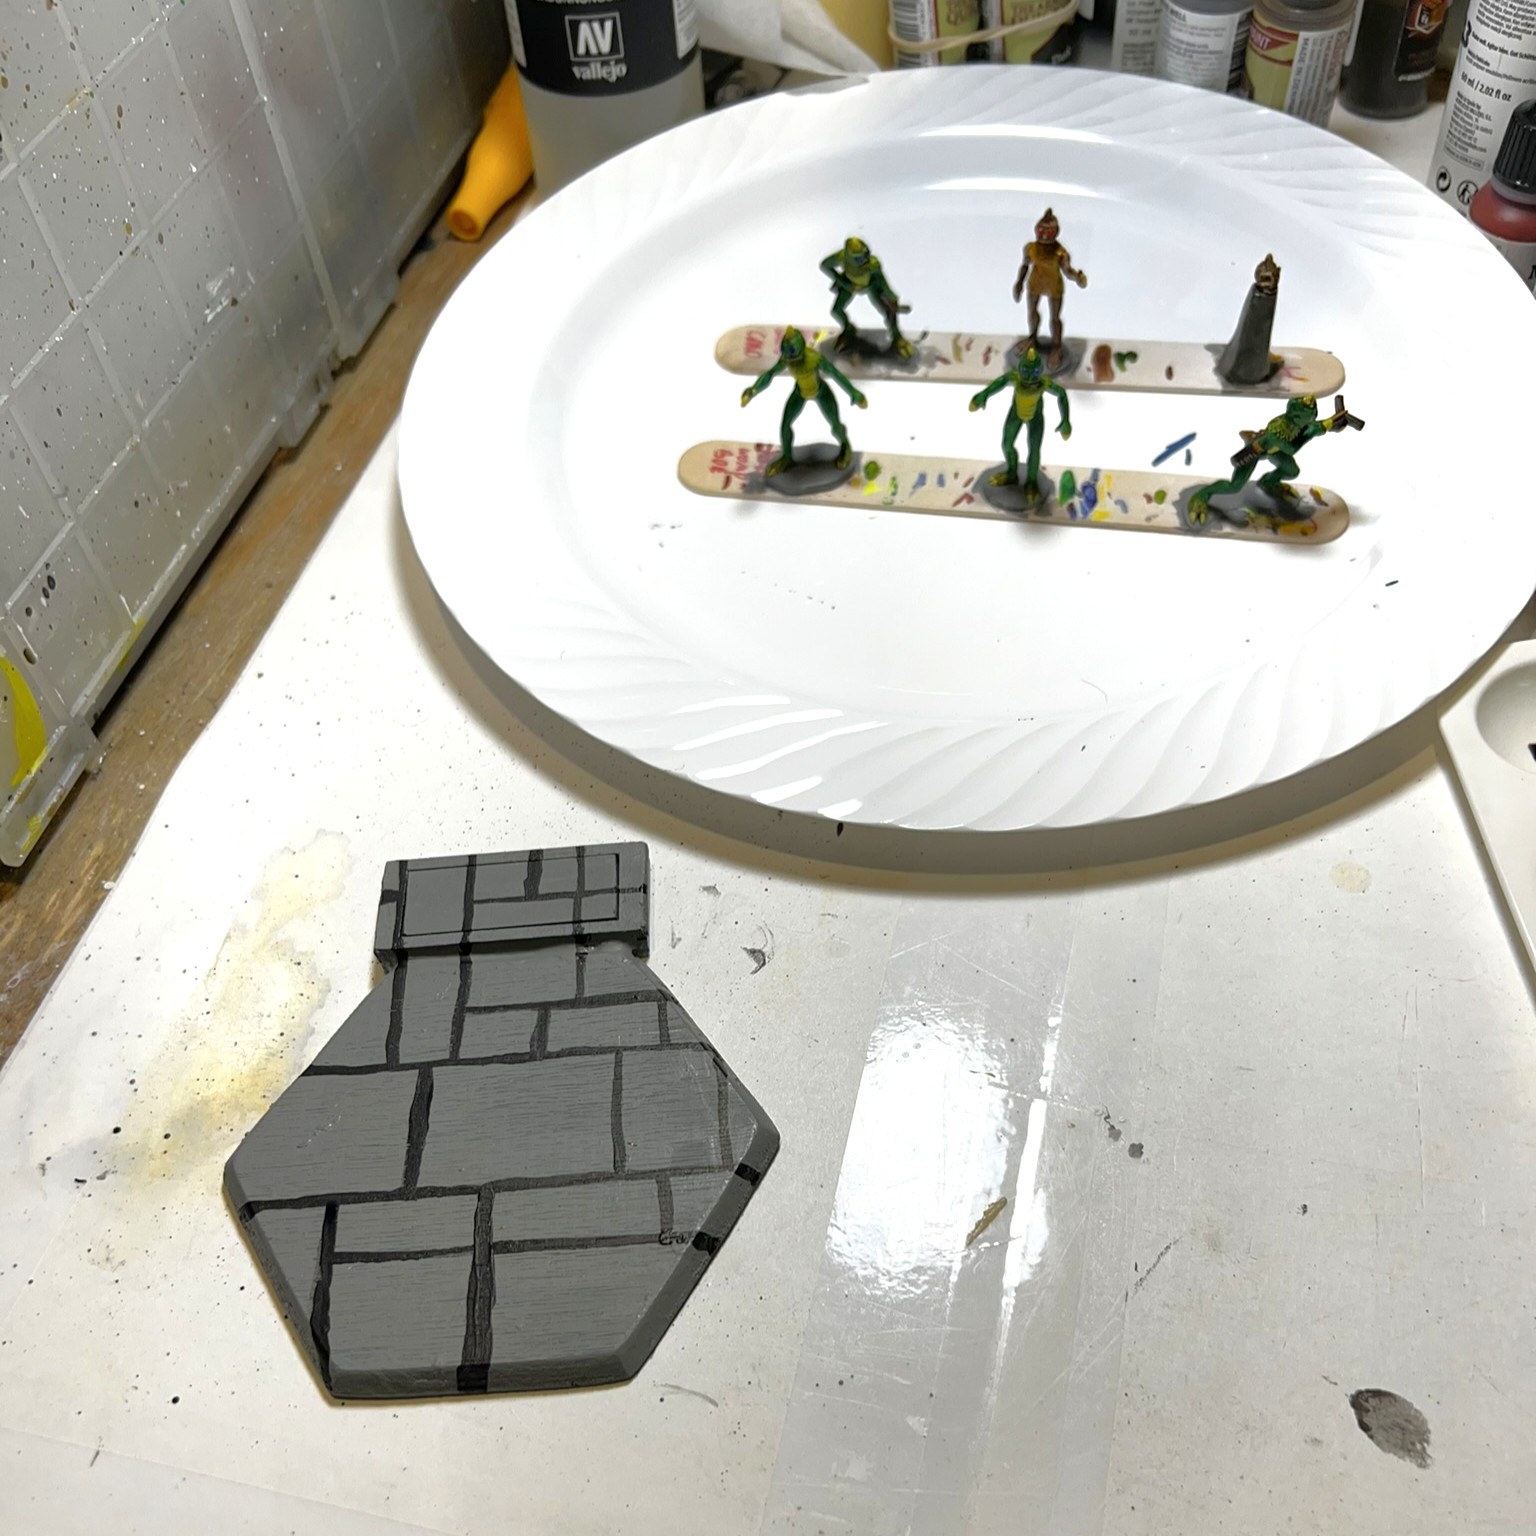
I painted up the miniatures in the theme of the TV show – and did not take any WIP of them except as you see immediately below. Here, you see the wooden base – and I used a black Sharpie to try to create tiles. While I was not happy with it – it was a start.
Base completed (less dice frame) with painted figures. It needed more…
I had some “Make It Fun Project Bricks” made of hard foam. I crushed several of them, put them in a Solo cup, added craft Americana gray paint, and mixed them until the paint covered it all. They were then useful as texture flocking together with Citadel “Astrogranite Debris”.
The crushed “bricks” painted and drying.
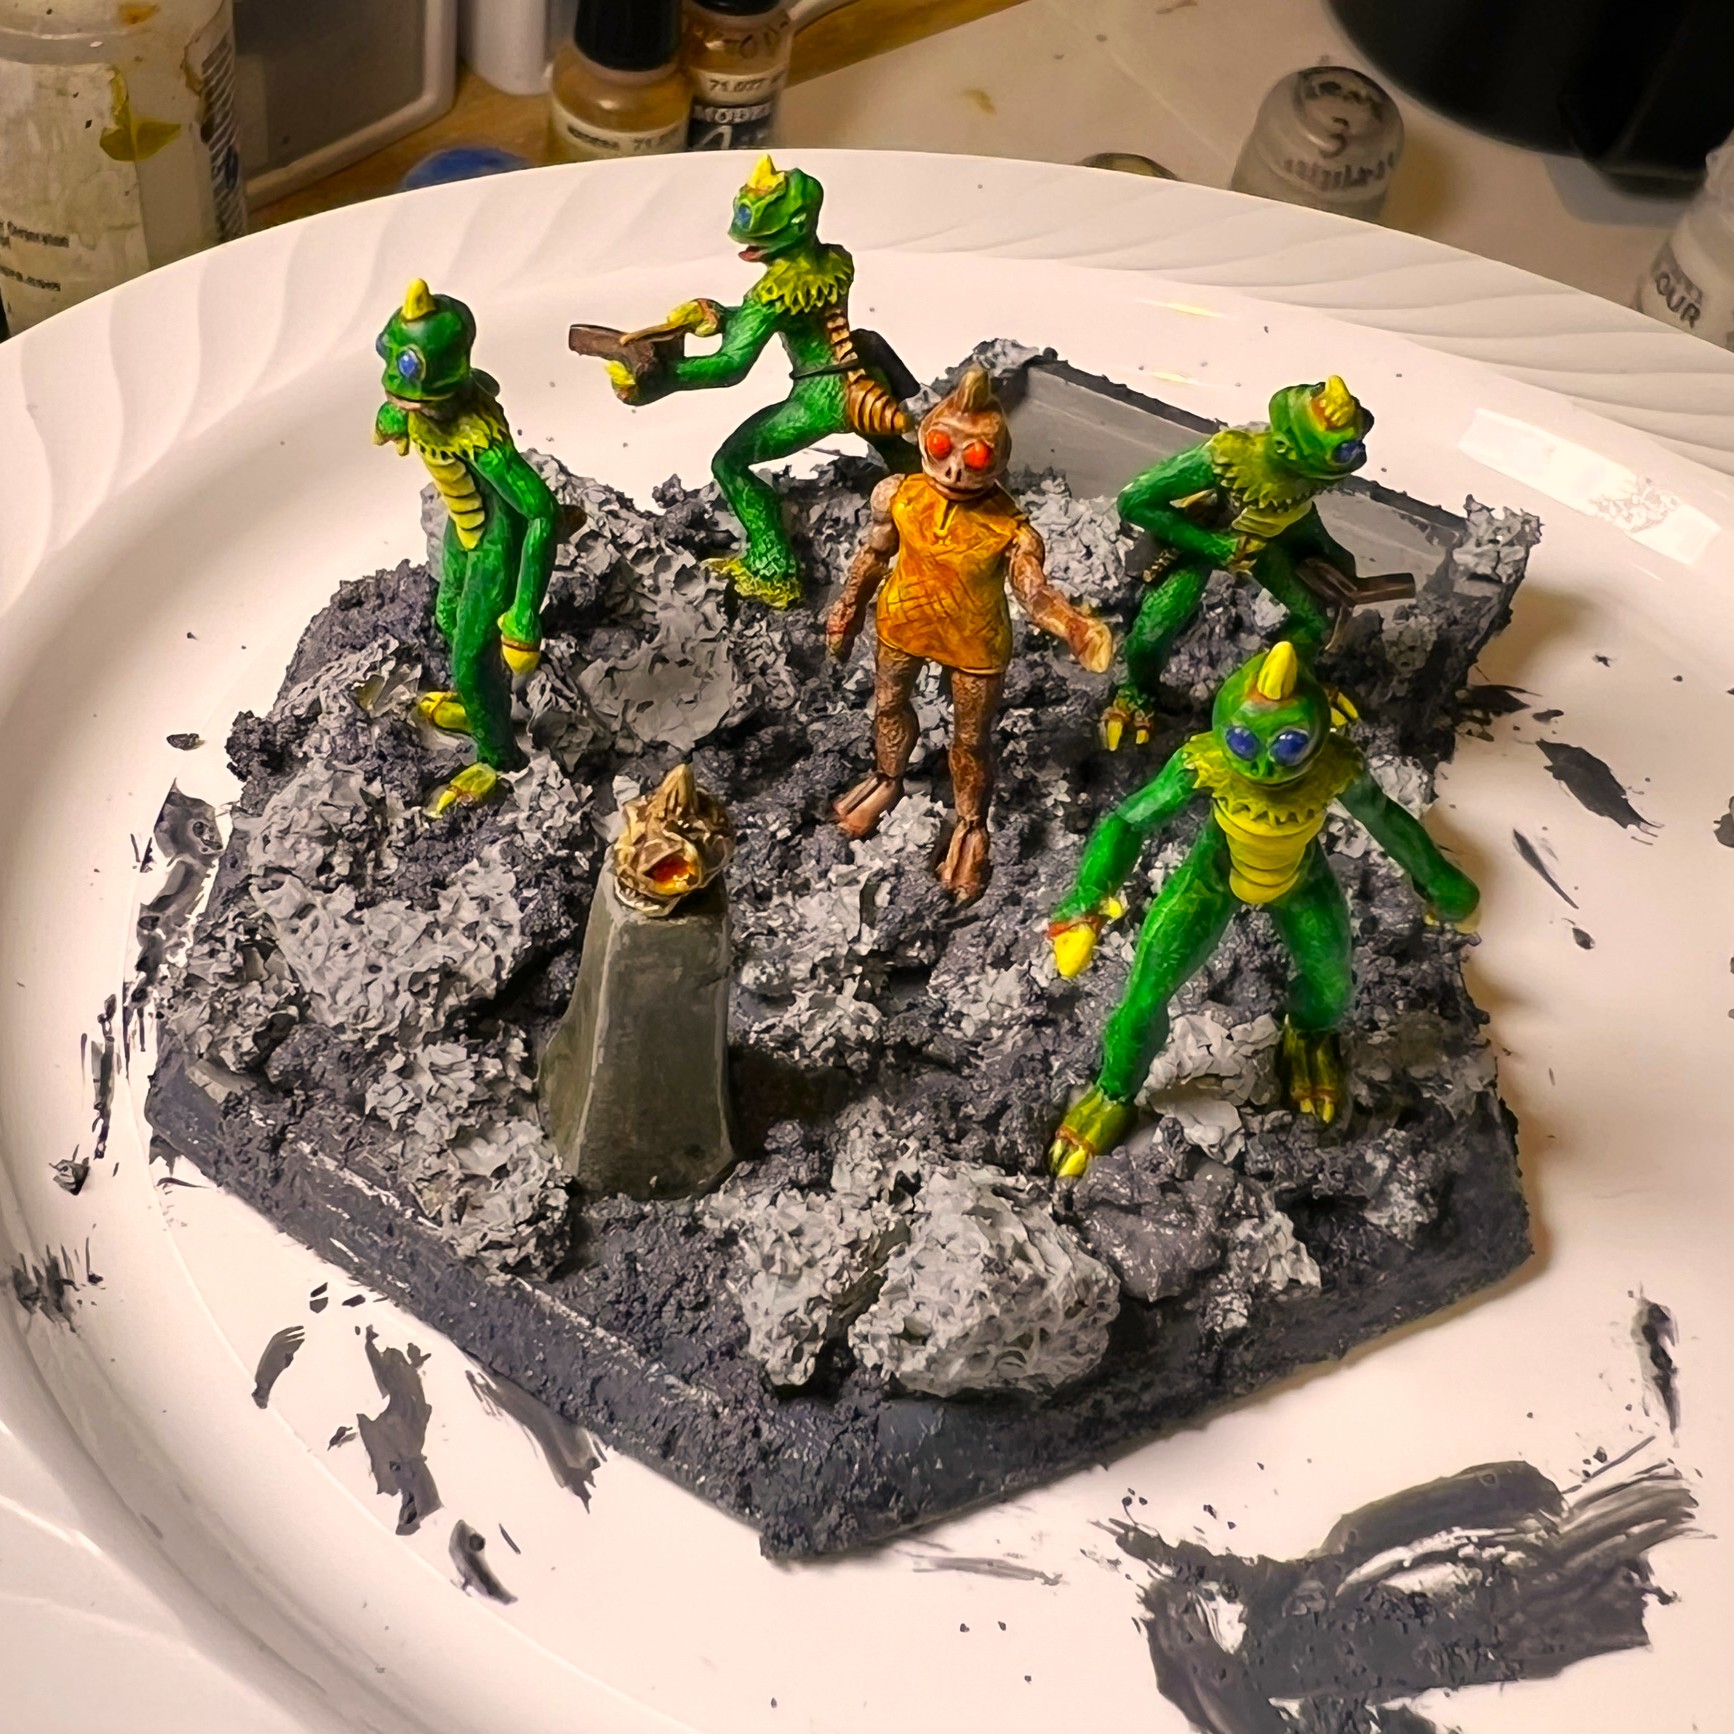
The next step was to mount the figures, let that dry, and then add the debris flocking. Then, I added undergrowth once the debris was dry, as well as the dice frame and support.
Adding the debris.
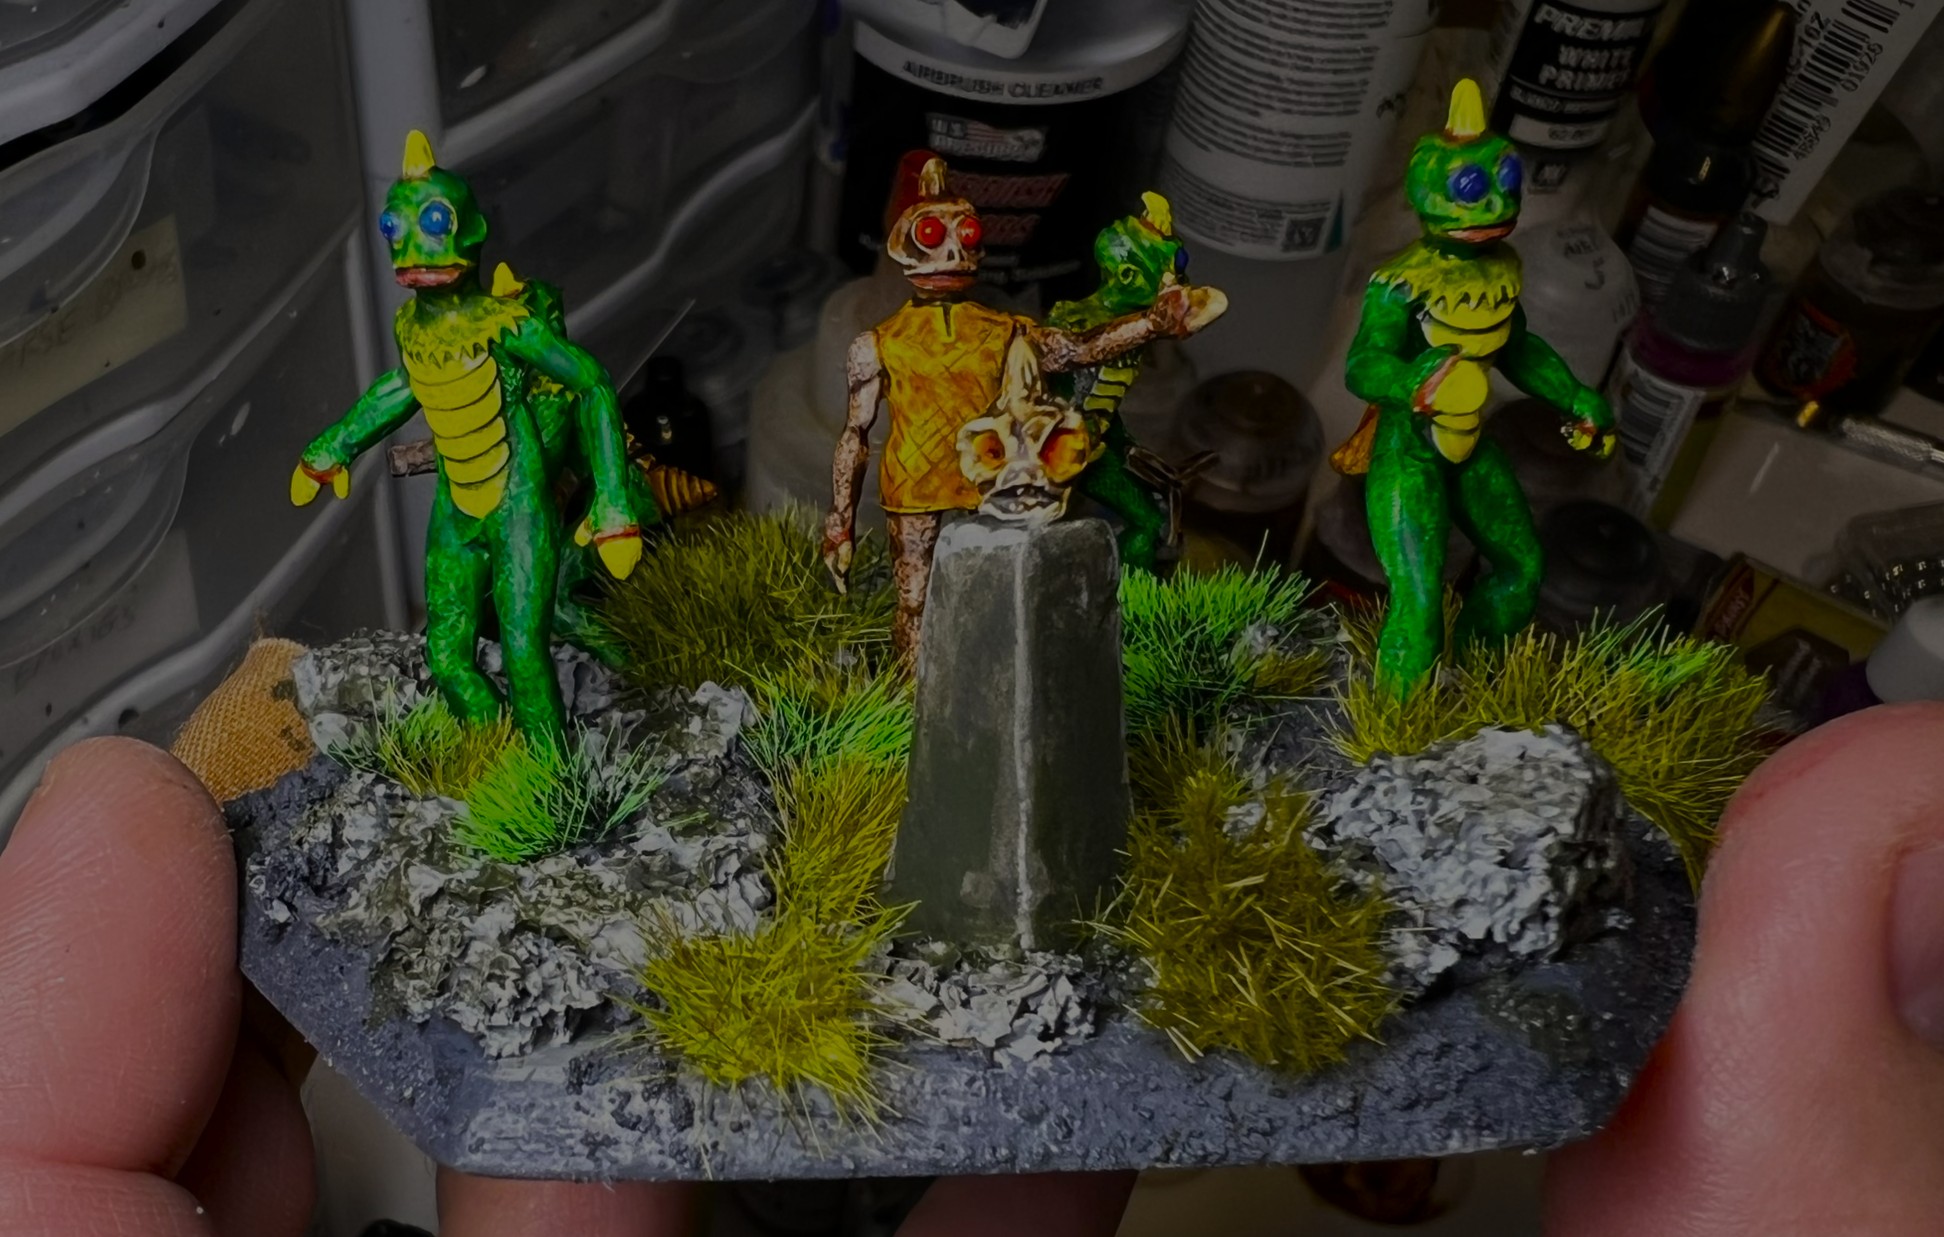
And then I added the undergrowth/foliage:
I tried to give the eyes a reflective look. Enough WIP, let me share the finished work with you!
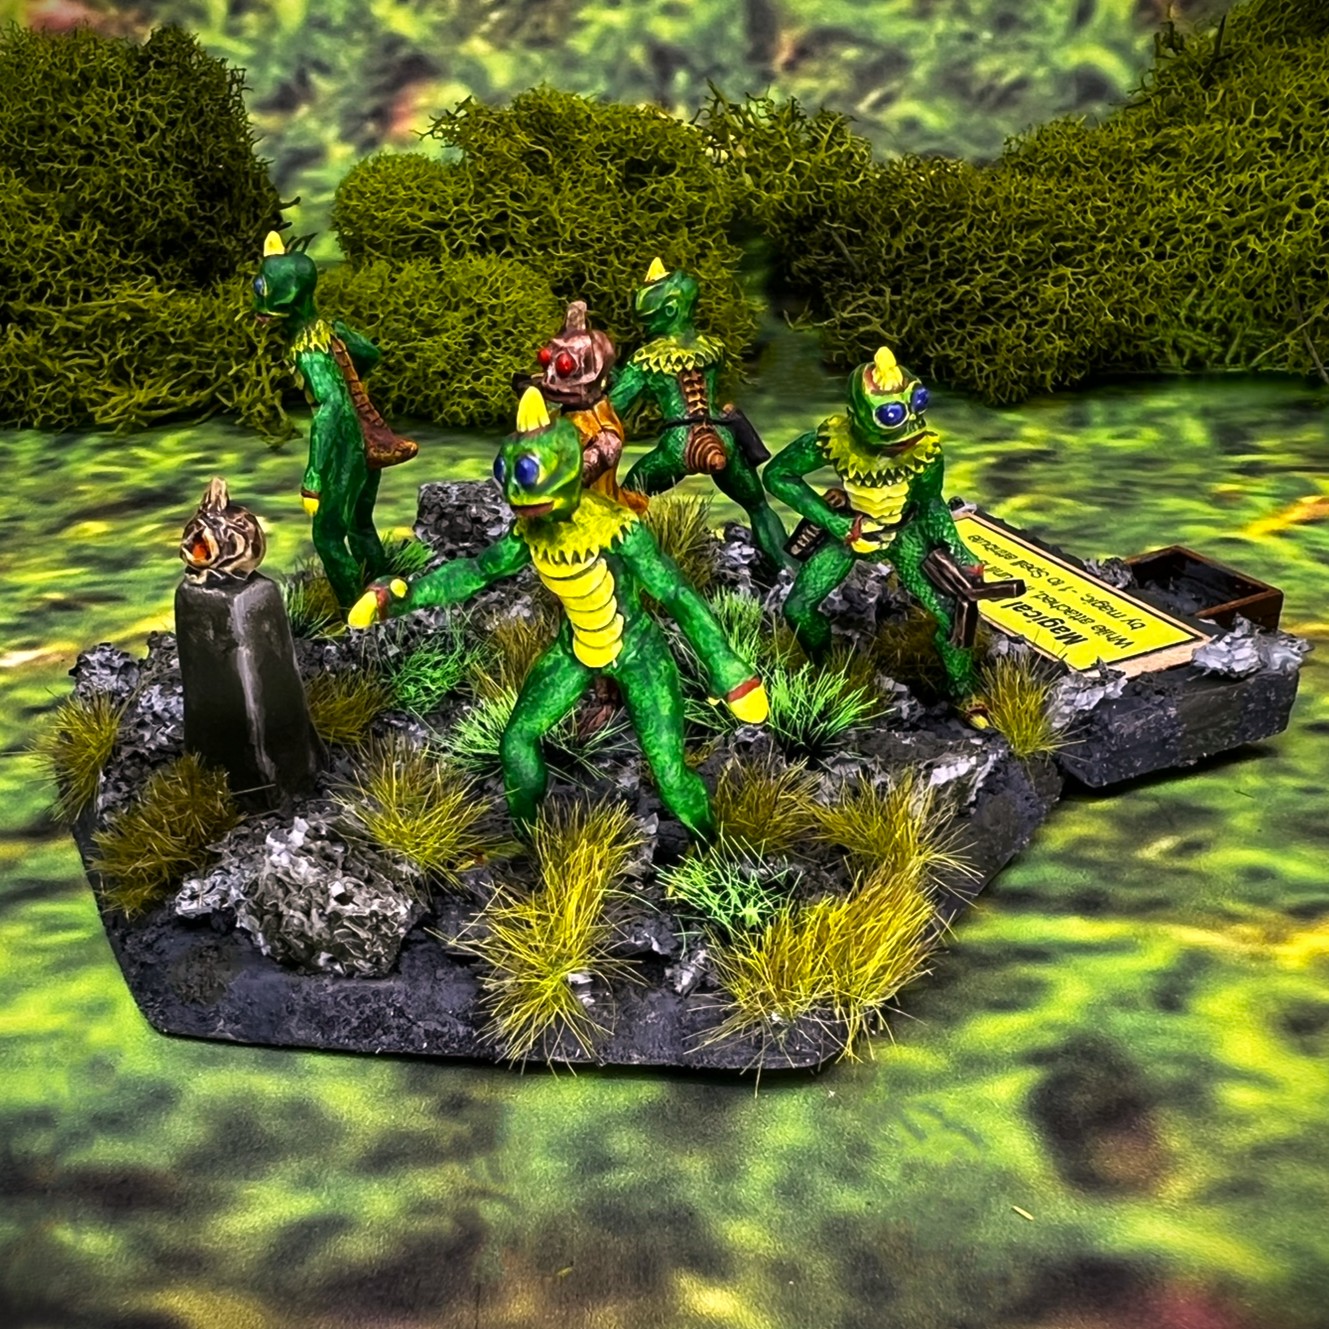
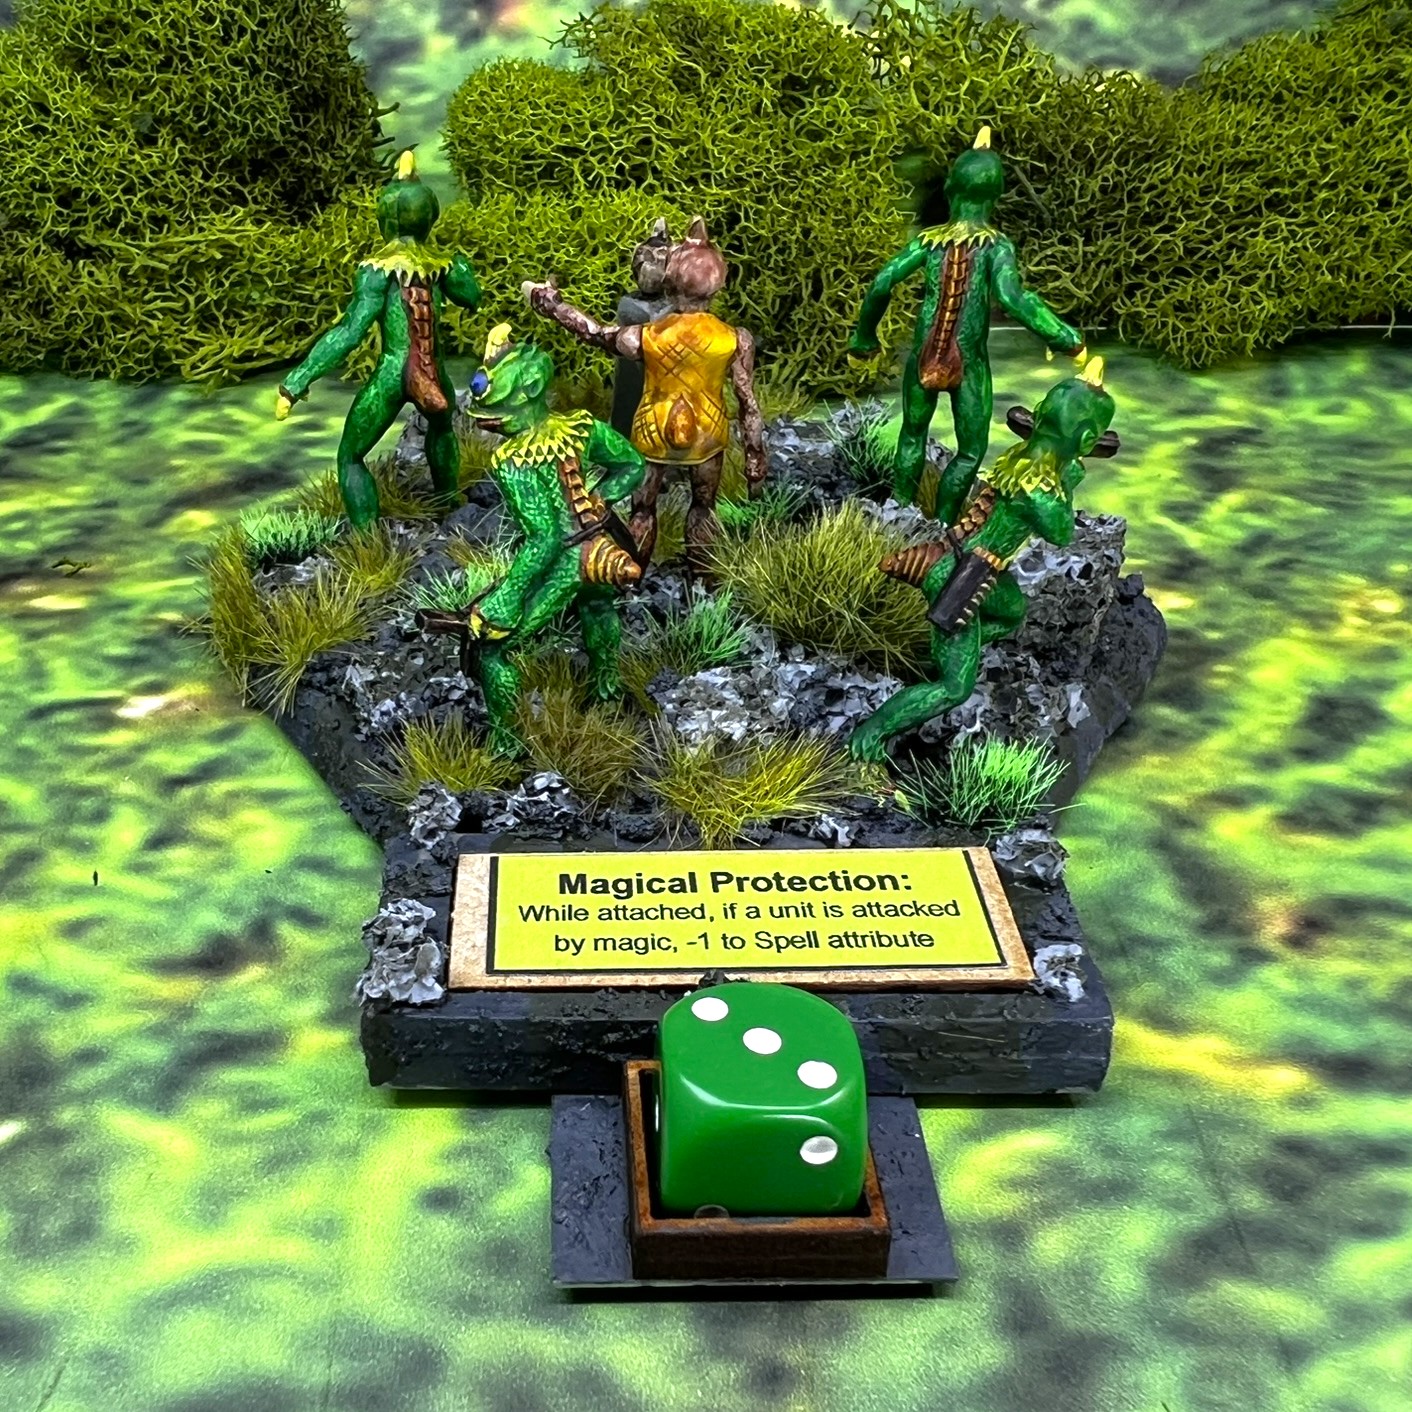
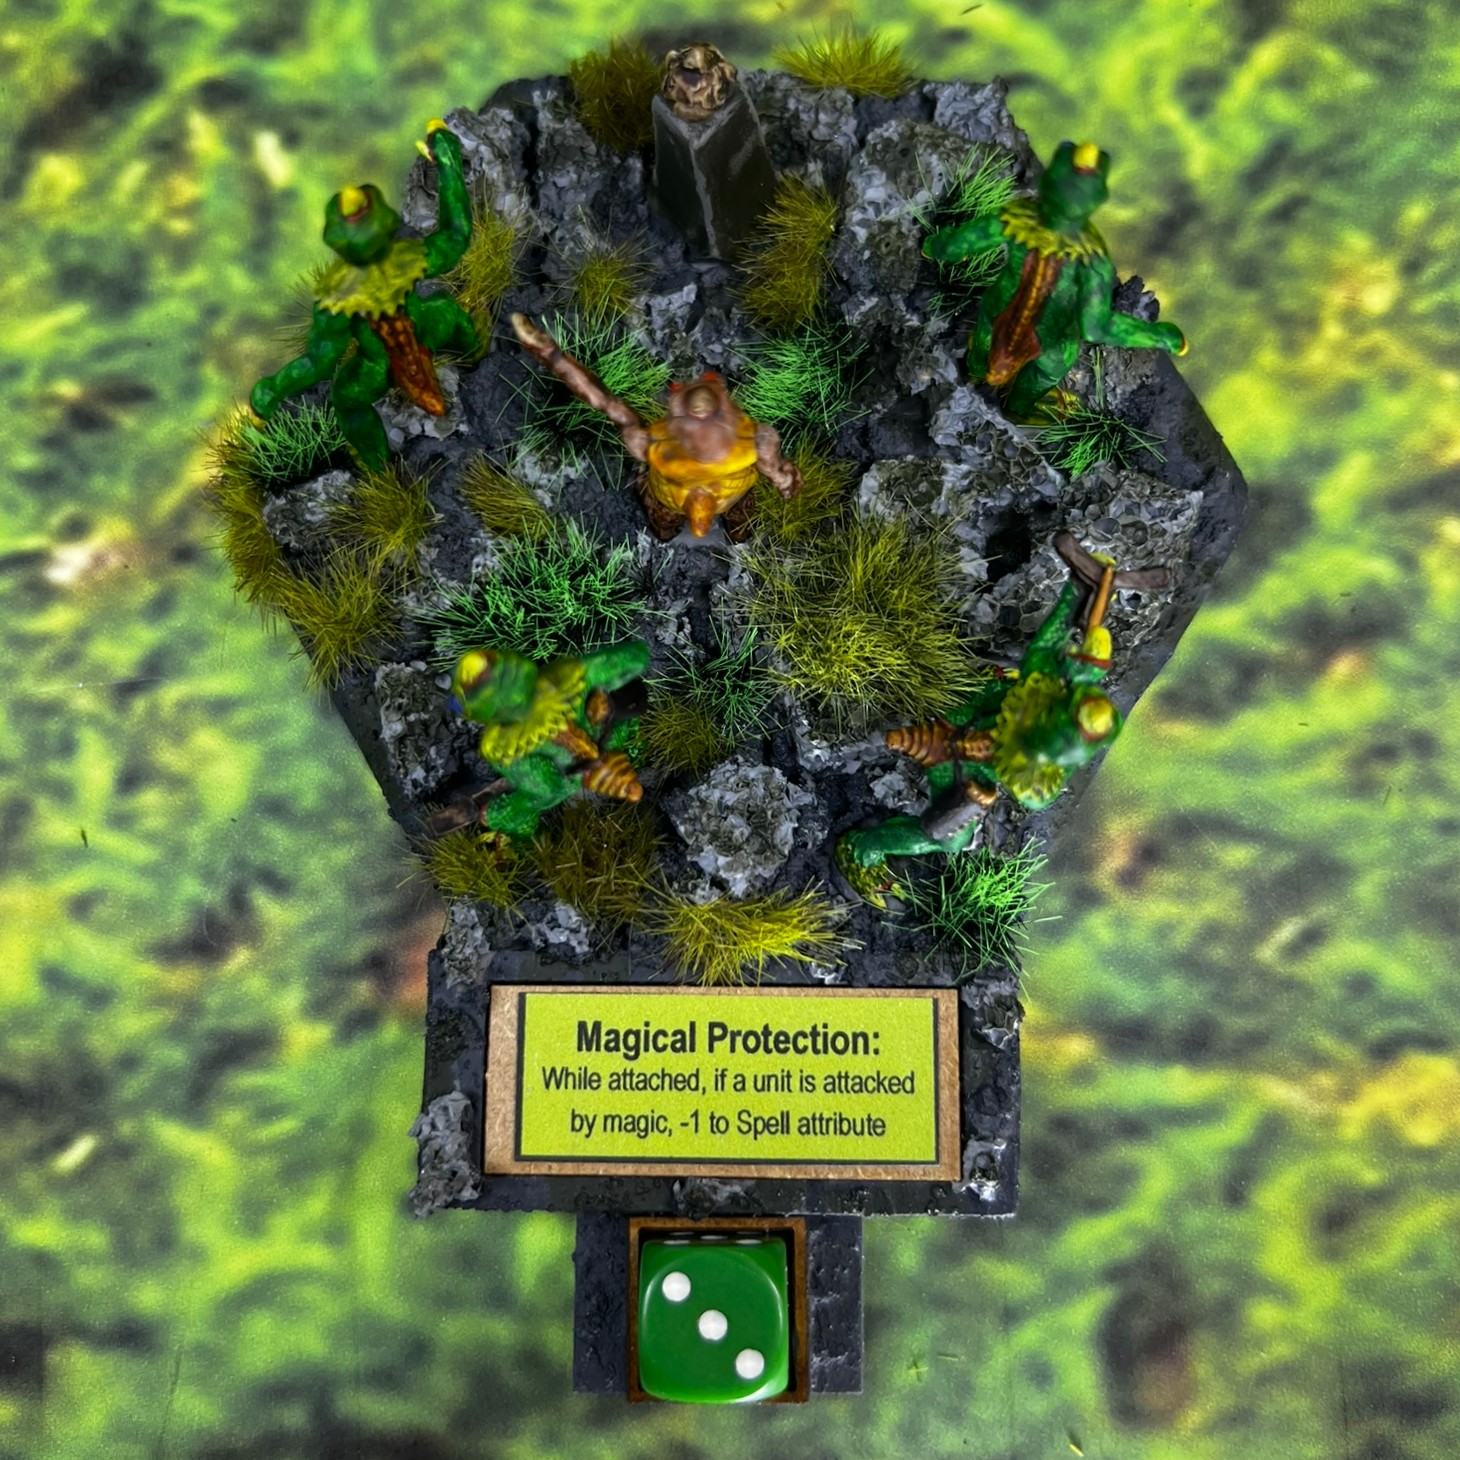
Sleestak Eye Candy…errr…I mean Pollywomp Brigade Commander Base
As you can see, I rolled for the brigade commander’s ability – and it came up with “Magical Protection”. I am now making my unit abilities permanent once they are completed instead of changing them later on.
Gifts from Buck!
As a side note, before I get into the list of paints that I used on the Sleestak, I’d like to share a couple photos of the cool Christmas gifts that I got from Buck Surdu. One is “Nit-Tickers” – which is a single base of walking time bombs for Wars of Ozz. Buck scratch-built these and they will be fun in a game – they are more or less sentient IED’s/walking time bombs that will be part of Professor NitPik’s forces. I do believe that Wars of Ozz miniatures has actual sculpts in the works for these. Still, I love Buck’s creations!
Nit-Tickers
I also got a second awesome gift! Buck took a Whim Whim figure to create a “bannerman”. In the rules he can be added to the Sultan Whim figure at an extra cost to increase subordinate brigade commanders’ command radii to 18″ (normally they are 12″). I rebased the figure on an MDF base and added the requisite flocking and placard as you’ll see below.
As for the Pollywomps, I’ll be sharing those units shortly as they qualified for Dave Stone’s annual “Paint What You Got Challenge”. The Sleestak base does not qualify (as I finished it right before Christmas), but my other Pollywomps will, so stay tuned. At least now they have a leader base!
Miscellaneous details and references for those interested in that sort of thing:
For all of my earlier posts on Wars of Ozz games, figures, units, and other related projects – please see this page.
PAINTS, INKS, GLAZES, SHADES, WASHES, PIGMENTS, FLOCKING, GLUES AND MORE THAT I USED ON THIS ERSATZ POLLYWOMPS/SLEESTAK COMMAND BASE:
Balsa wood hex base
Repurposed Frame from Ozz Placards MDF sheet
Bass wood square
War Games Accessories Steel Bases (FOW1)
Garaga garage color sample piece
Popsicle sticks
War Games Accessories 1″x 1.5″ Steel Bases (18)
PVA Glue
Vallejo Premium White Primer
Vallejo Flow Improver
Vallejo Thinner
Army Painter “Dark Tone” (wash)
Vallejo Mecha Color “Off White”
Vallejo Model Color “Off White”Army Painter Warpaints Air “Neon Yellow”
Vallejo Model Air “Brown”
Army Painter Speed Paint 2.0 “Satchel Brown”
Army Painter Speed Paint 1.0 “Dark Wood”
Citadel “Contrast Medium”
Citadel “Morghast Bone”
Vallejo Thinner Medium
Citadel Contrast Paint “Nazdreg Yellow”
Vallejo Model Air “Wood”
Vallejo Game Air “Red Terracotta”
Citadel “Spritstone Red” (technical)
Citadel “Soulstone Blue” (technical)
Secret Weapon Washes “Purple”
Army Painter Speed Paint 2.0 “Familiar Pink”
Citadel “Tallarn Sand”
P3 “Blazing Ink” (ink)
Citadel Contrast Paint “Mantis Warriors Green”
MSP “Sun Yellow”
Citadel Contrast Paint “Karandras Green”
Army Painter Speed Paint 2.0 “Bony Matter”
Citadel Contrast Paint “Gulliman Flesh”
Citadel Contrast Paint “Darkoath Flesh”
Citadel “Seraphim Sepia” (shade/wash)
Vallejo Model Color “Dark Sea Grey”
Secret Weapon Washes “Stone”
Pendraken 12mm dice frames
Pencil
Black Sharpie pen
Make It Fun Project Bricks (crushed, painted, and used as flocking)
Shadow’s Edge Miniatures “4mm Flaming Light Green Tufts” (flocking)
Pendraken 12mm dice frames
Of course, the list above is of FAR more use to me for future projects – like I would remember otherwise!!
Final Note
If you want to check out the excellent Wars of Ozz figures’ range – there are two places to get them and to get the rules (and I make no money from this btw). The game rules and the figures are available from the next two places:
Hmm…that title sounded very ominous…are the Whim Whim, wiped out, a dead faction, lost forever in the sands of time, or at least the sands of the deserts of Ozz?
Well, the Whim Whim are still around! After 215 figures, I have just finished painting up this faction of nomadic desert-dwelling tribesmen! And before I moved on, I wanted to document the last few pieces of the Whim Whim faction that I have completed.
In a bit, you’ll get to see a video of the entire faction on the tabletop. But for now, what this post will cover are the last three SKU’s that I finished up. One SKU is the elite regiment of Whim Whim Janissaries (OZZ-1400), another is Sultan Whim himself (OZZ-1406), and the last one is the faction’s wizard, The Ancient Mystical One (OZZ-1405). The Janissaries are the same figures as the Whim Whim Spearmen I painted before, just with different colors. I will include some select WIP photos, as well as eye candy.
One reason for my relative photographic laxness is that I finished these off while fighting off COVID in early October! That was a bit of a struggle, but nothing I couldn’t overcome…eventually. Thus, my photography took a back seat to getting these figures done.
All of the figures are metal and 28mm in size. Let’s look at each in turn.
The Whim Whim Janissaries Regiment
The Whim Whim Janissaries Regiment (WWJR) is similarly-armed like the other spearmen. The difference is that their attributes are better. Neither type have missile weapons, and both have Melee values of 7/10 with a first-strike bonus. The WWJR has a Resolve value of 9/10 (50% higher than a regular spearmen regiment’s 6/10), and an Elan value of 10/10 (versus 8/10 for the regular spearmen). The WWJR costs 1 point more at 6 points. However, a Whim Whim brigade can only have one of them.
I decided that, like my previous spearmen, the WWJR needed a similar addition to the front of the shields to cover the little holes – but a different style.
I found some terracotta stars that fit perfectly on the head of a number 18 flat nail. With some really careful drilling, I managed to add the stars/nail combos to the shields and use them to support their mounting. I also used the DH-507 spear tip pennons again from Iron Winds Metals to jazz up the spears.
Additionally, as the elite infantry unit of the Whim Whim, I armed them with golden weapons. Yes, gold’s impractical in such a use, but it looks good! I also gave the regimental commander a rare albino siliyiplix as a mount. The Army List canon for them says:
Red armor and uniforms, brown boots. Turbans are white. Shields red with white trim. Spears have red pennons.
I used a metallic craft paint on the armor to decent effect. To offset so much red, I gave them white kilts. In the end, they do look a bit Santa-like with all the red. All the paints I used are listed at the end of this post for each project. Mainly for me as I often need to recreate a look!
Whim Whim Janissaries Regiment WIP Shots
I started these on September 22nd and finished them on October 7th. The key WIP I want to share is the star additions. I’ll share some shots below.
All filed, washed, and ready to get started.I drilled out the shields twice. First, I did so with a pin vise that would give just enough space for the shaft of an 18-gauge flat head nail to pass through. Then I went on to VERY gently drilling out the shield with a 1/8″ drill bit on my power drill – such that the depth of the holes would allow the heads of the nails to nest flatly on the shields.Here you see the 18-gauge nail head flush with the hole in the shield.The cheap stars.Stars on nail heads.…and mocked up on the shields (not yet glued).
I used the alligator clip base for painting the shields. Once it was time to mount them into the holes that I had drilled into the wrists and hands of the Janissaries, I individually sized the cut needed on each nail.
Here you see how I individually sized up each nail – I needed enough length but not too much. Cutting the nails involved SLOWLY cutting around the nails at the right length with wire cutters in a circular fashion. Then I bent the excess steel off – without having nail shards ricochet into my eyes.
Now for the finished regiment!
Whim Whim Janissaries Eye Candy
The Whim Whim Janissaries in line viewed from their left front.The Whim Whim Janissaries in line viewed from their right front.The Whim Whim Janissaries in column formation viewed from their left.
Sultan Whim
The Sultan Whim figure comes listed as OZZ-1406 “Sulton Whim Carried on a Palanguin”. I will refer to him as “Sultan”. Also, technically a “palanquin” has a covered box – and he is on a litter with blankets and an umbrella. No worries, I just had to look up a few words to be sure myself. Litter, palanquin, call it what you want.
Early concept/sculpt of the Sultan Whim model from Russ Dunaway.
Sultan Whim WIP Shots
This project went pretty fast as far as assembly and painting goes. I made a small 3″ by 5.75″ styrene base for him, with steel bases underneath for magnetic storage and travel. I also built a placard holder on the back end. I mounted the bearers on it first and made sure that the litter would fit by manipulating and bending the arms, then lining them up with a steel ruler. The bearers were easy to paint this way – and I ended up using my alligator clip modeling base to hold the litter for painting. I drilled out Sultan’s – um posterior – and put a screw in there to allow painting him to be easy as well. The umbrella was treated similarly.
Laying out the pieces and figuring out the right design. (The Ancient Mystical One is not part of this model and is on the right).Side view of earlier image.I used graph paper and a steel ruler to figure out both the appropriate base size and figure locations. You can see the placard holder and 12mm dice frames in the back.Somehow I needed to figure a way to paint the Sultan – the image above is enough of a clue I think!
For painting, I tried to incorporate purples, oranges, and golds, as those were dominant colors I used in the different regiments of the same type. My concept was to give Sultan Whim a luxurious bed on his litter/palanquin to travel the desert while consuming a large turkey leg! In the game, the Sultan can give an attached unit Superior Fighting skills, and as an overall commander has the “Legendary” ability.
I started the model on October 8th, finishing it on October 10th.
Sultan Whim Eye Candy
Sultan Whim on his litter from his front left.Sultan Whim on his litter from his front right.Sultan Whim on his litter from his front.A view of the back. He has a nice pink parasol to give him shade as he devours his turkey leg.
The Ancient Mystical One
This painted up very easily in one day as you can see. Skulls make painting so much easier!
The Ancient Mystical One has Spell and luck values of both 6/10. He does get three spells, at a cost of 2 points.
The Ancient Mystical One WIP Shots
The Ancient Mystical One seen here before varnishing and final base work.
The Ancient Mystical One Eye Candy
The Ancient Mystical One from the front.Rear view.Side view.
Lastly, I promised a video of all of the Whim Whim faction on the table. It consists of 11 regiments plus individuals:
I hope that you have enjoyed this Whim Whim journey with me. As the Wars of Ozz is a post-apocalyptic world, the Whim Whim Janissaries, Sultan Whim, and The Ancient Mystical One you have seen here are eligible for Dave Stone’s recent painting challenge, “APOCALYPSE ME 2024”. It might not be the apocalypse many of you envisioned, but it is in Ozz!
Thanks for looking – and now on to the Temujicans – sworn enemies of the Whim Whim!
Miscellaneous details and references for those interested in that sort of thing:
For all of my earlier posts on Wars of Ozz games, figures, units, and other related projects – please see this page.
PAINTS, INKS, GLAZES, SHADES, WASHES, PIGMENTS, FLOCKING, GLUES AND MORE THAT I USED ON THE REGIMENT OF WHIM WHIM JANISSARIES:
Iron Wind Metals Banner Spear Head Sprues SKU #DH507
MDF Brigade Leader bases from Wars of Ozz Miniatures (used as regimental commander bases)
As you may want to check out the excellent Wars of Ozz figures’ range – there are two places to get them and to get the rules (and I make no money from this btw). The game rules and the figures are available from the next two places: