The Munchkins Have an Air Force!

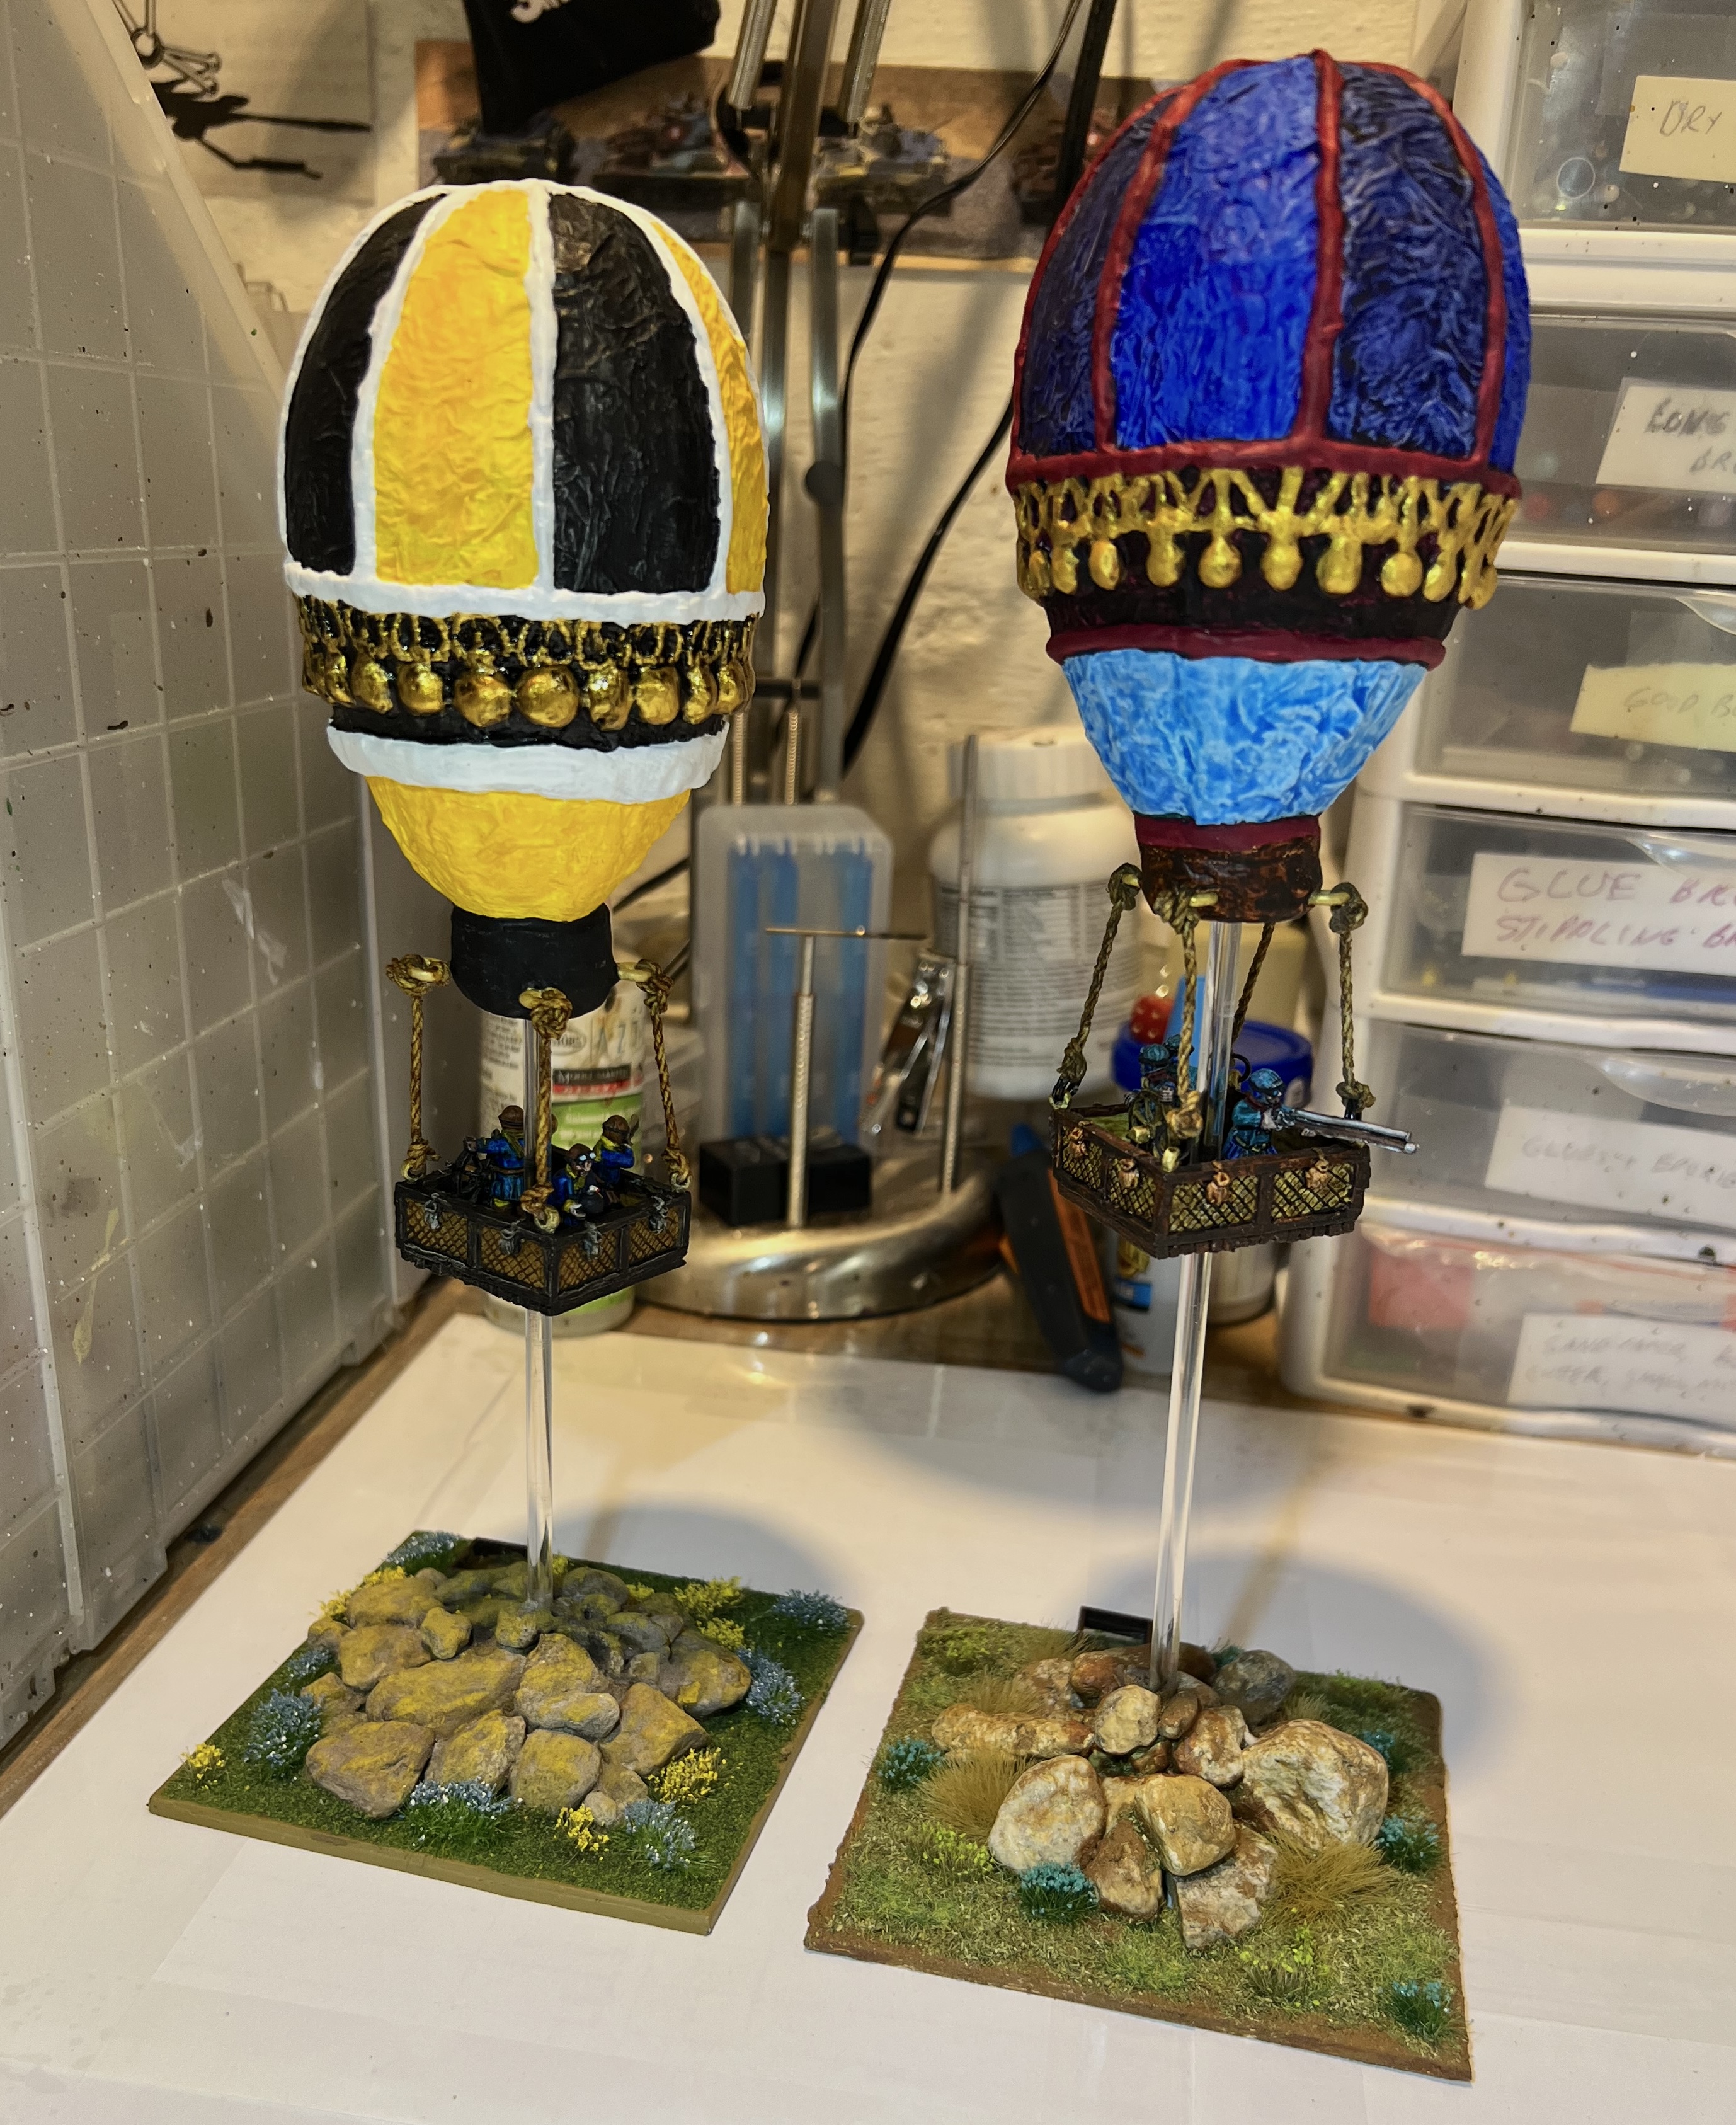
Way back in July of 2023, I built and painted a “Munchkin Aerostat” for my Wars of Ozz games. It is a special unit that only the Munchkins have. I know that when I have had it on my tabletop it has always grabbed the attention of any passerby. You can see my post on that blue beauty here.

Since golf season ended, I have been preparing for many convention wargames. I will be running WWII (modified What a Tanker games), retro sci-fi skirmish games (using modified Combat Patrol TM WWII rules), and of course games of Wars of Ozz.

For Ozz, this year, I am focusing on the ruined “Robotic Sanctum – a.k.a. The Industrial City” of Professor Nitpik for my scenarios. There Nitpik toils away making armed automatons of tin – (Tin Men) to defend his city from outside raiders. Supposedly he is over 300 years old and the last survivor of “The Last Great War” that brought the post-apocalyptic world of Ozz to be. He guards his secrets jealously from all those who would raid his technological secrets.

With this in mind, my two scenarios involve the Munchkins and some allied troops perpetrating such a raid. One game will have the Munchkins attacking the city. The other will have the Munchkins trying to escape the wrath of Nitpik and escape to home. Oh yeah, the robots are in hot pursuit in game number 2.

These two games will necessitate my building and painting more units and more terrain. I will be sharing those efforts here in the next weeks.

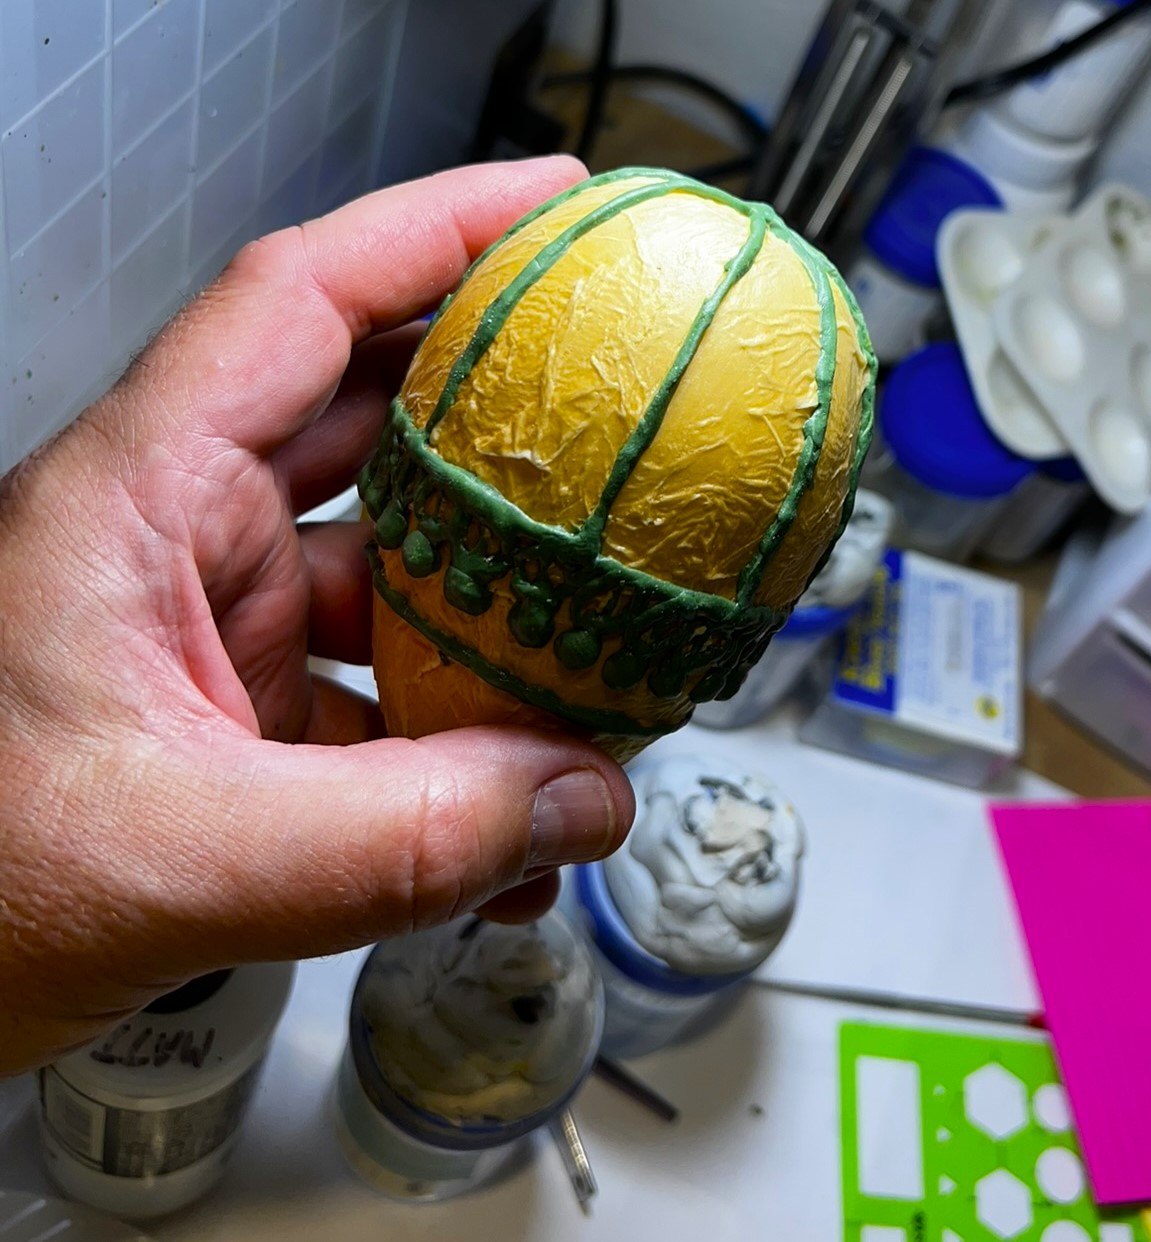
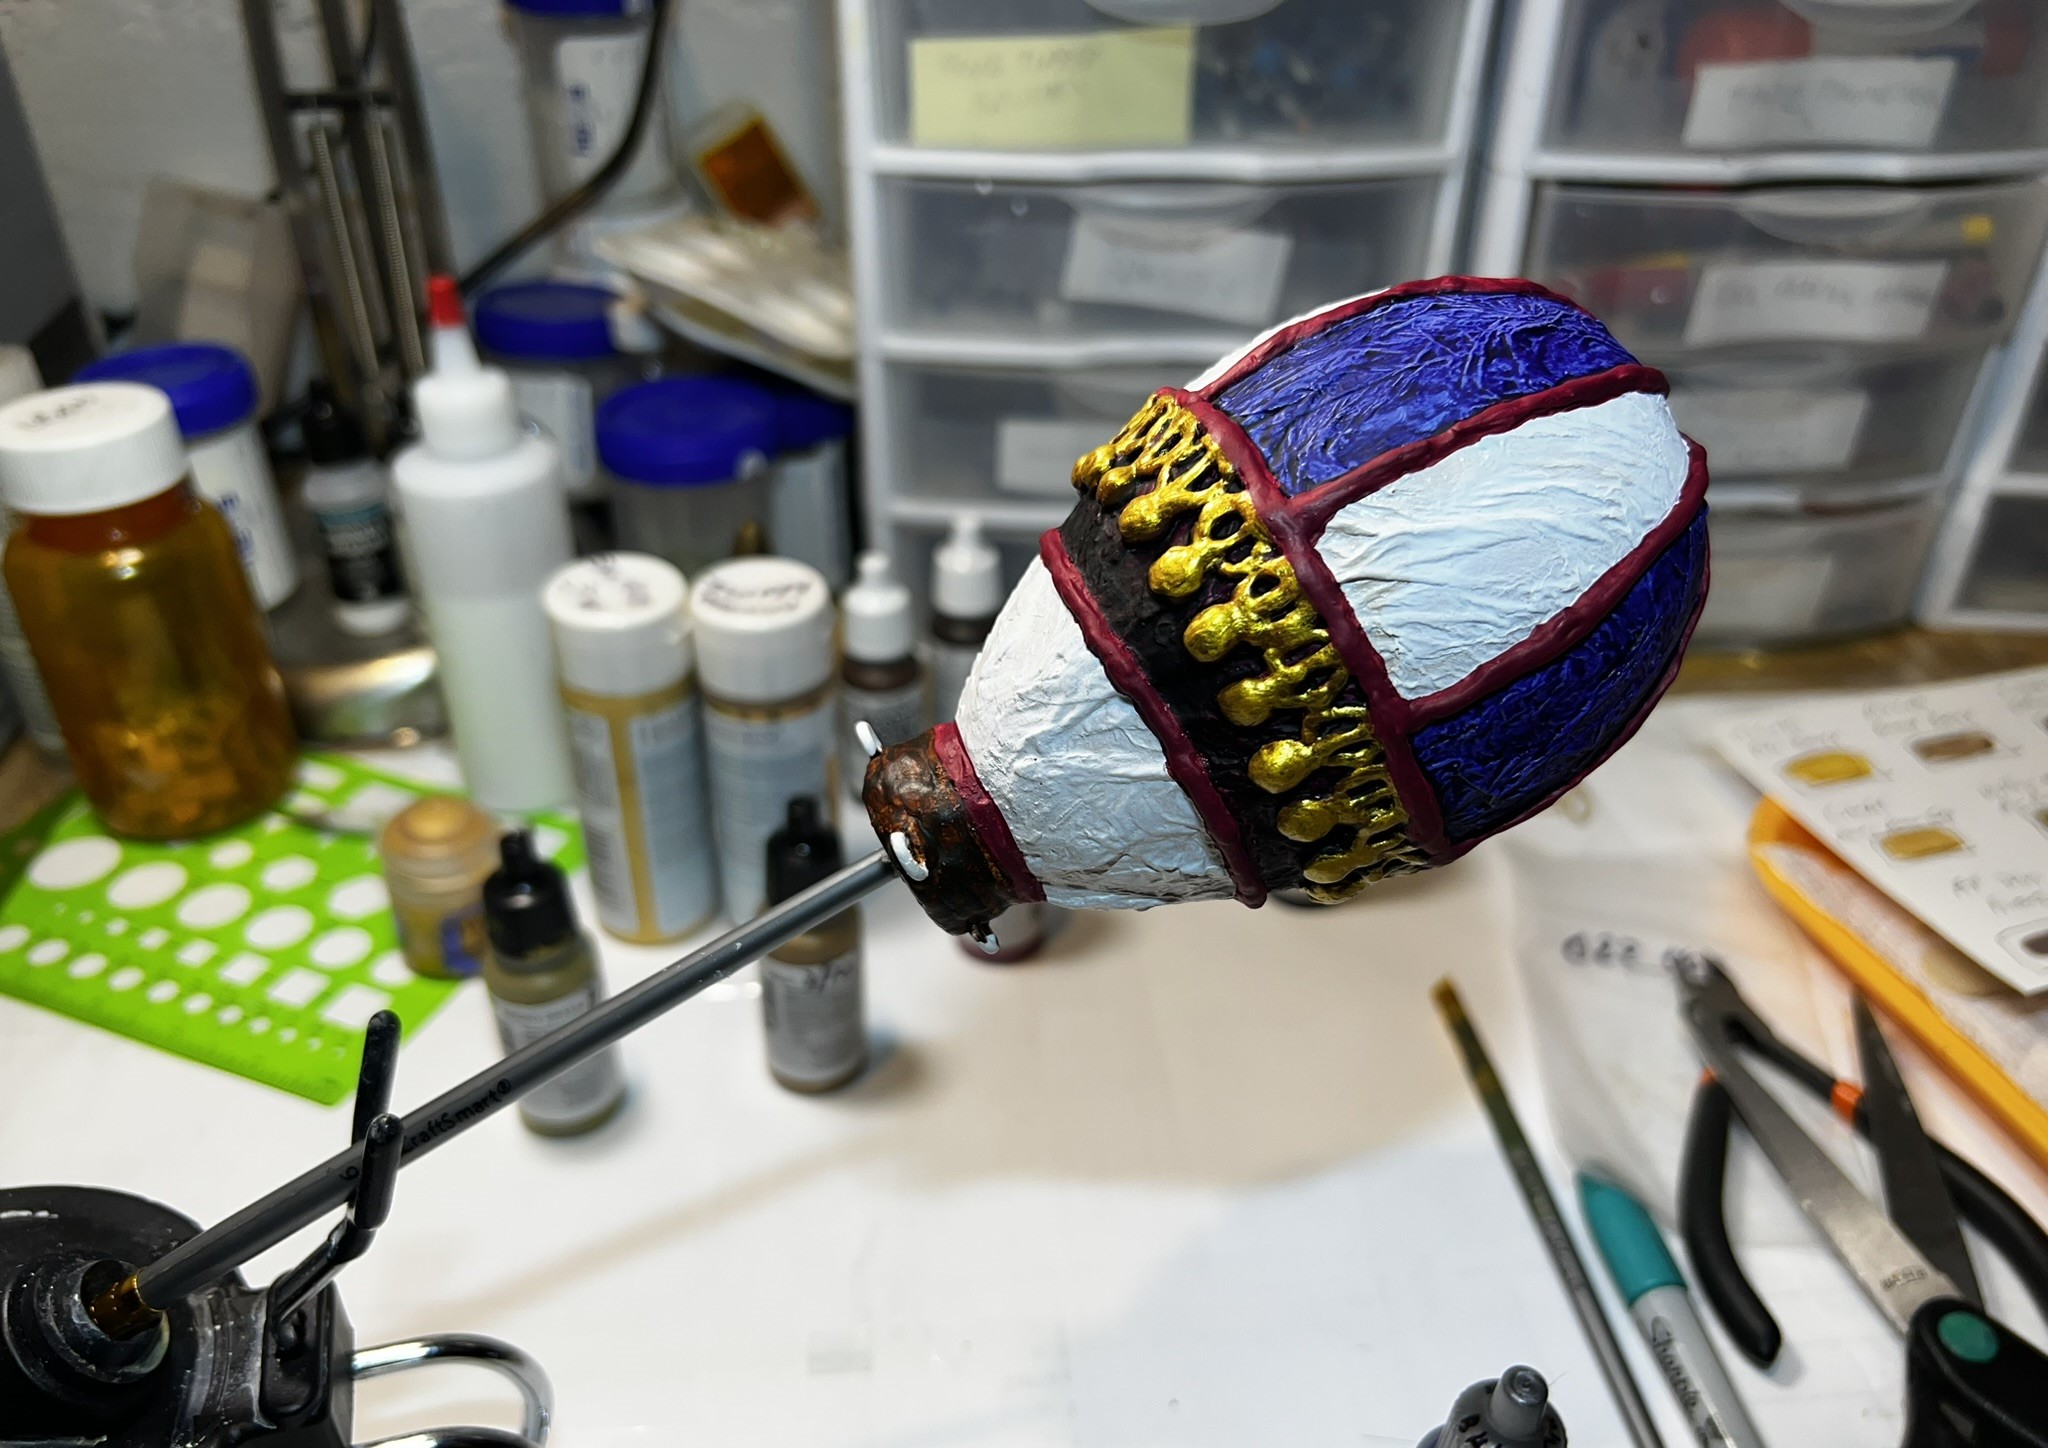
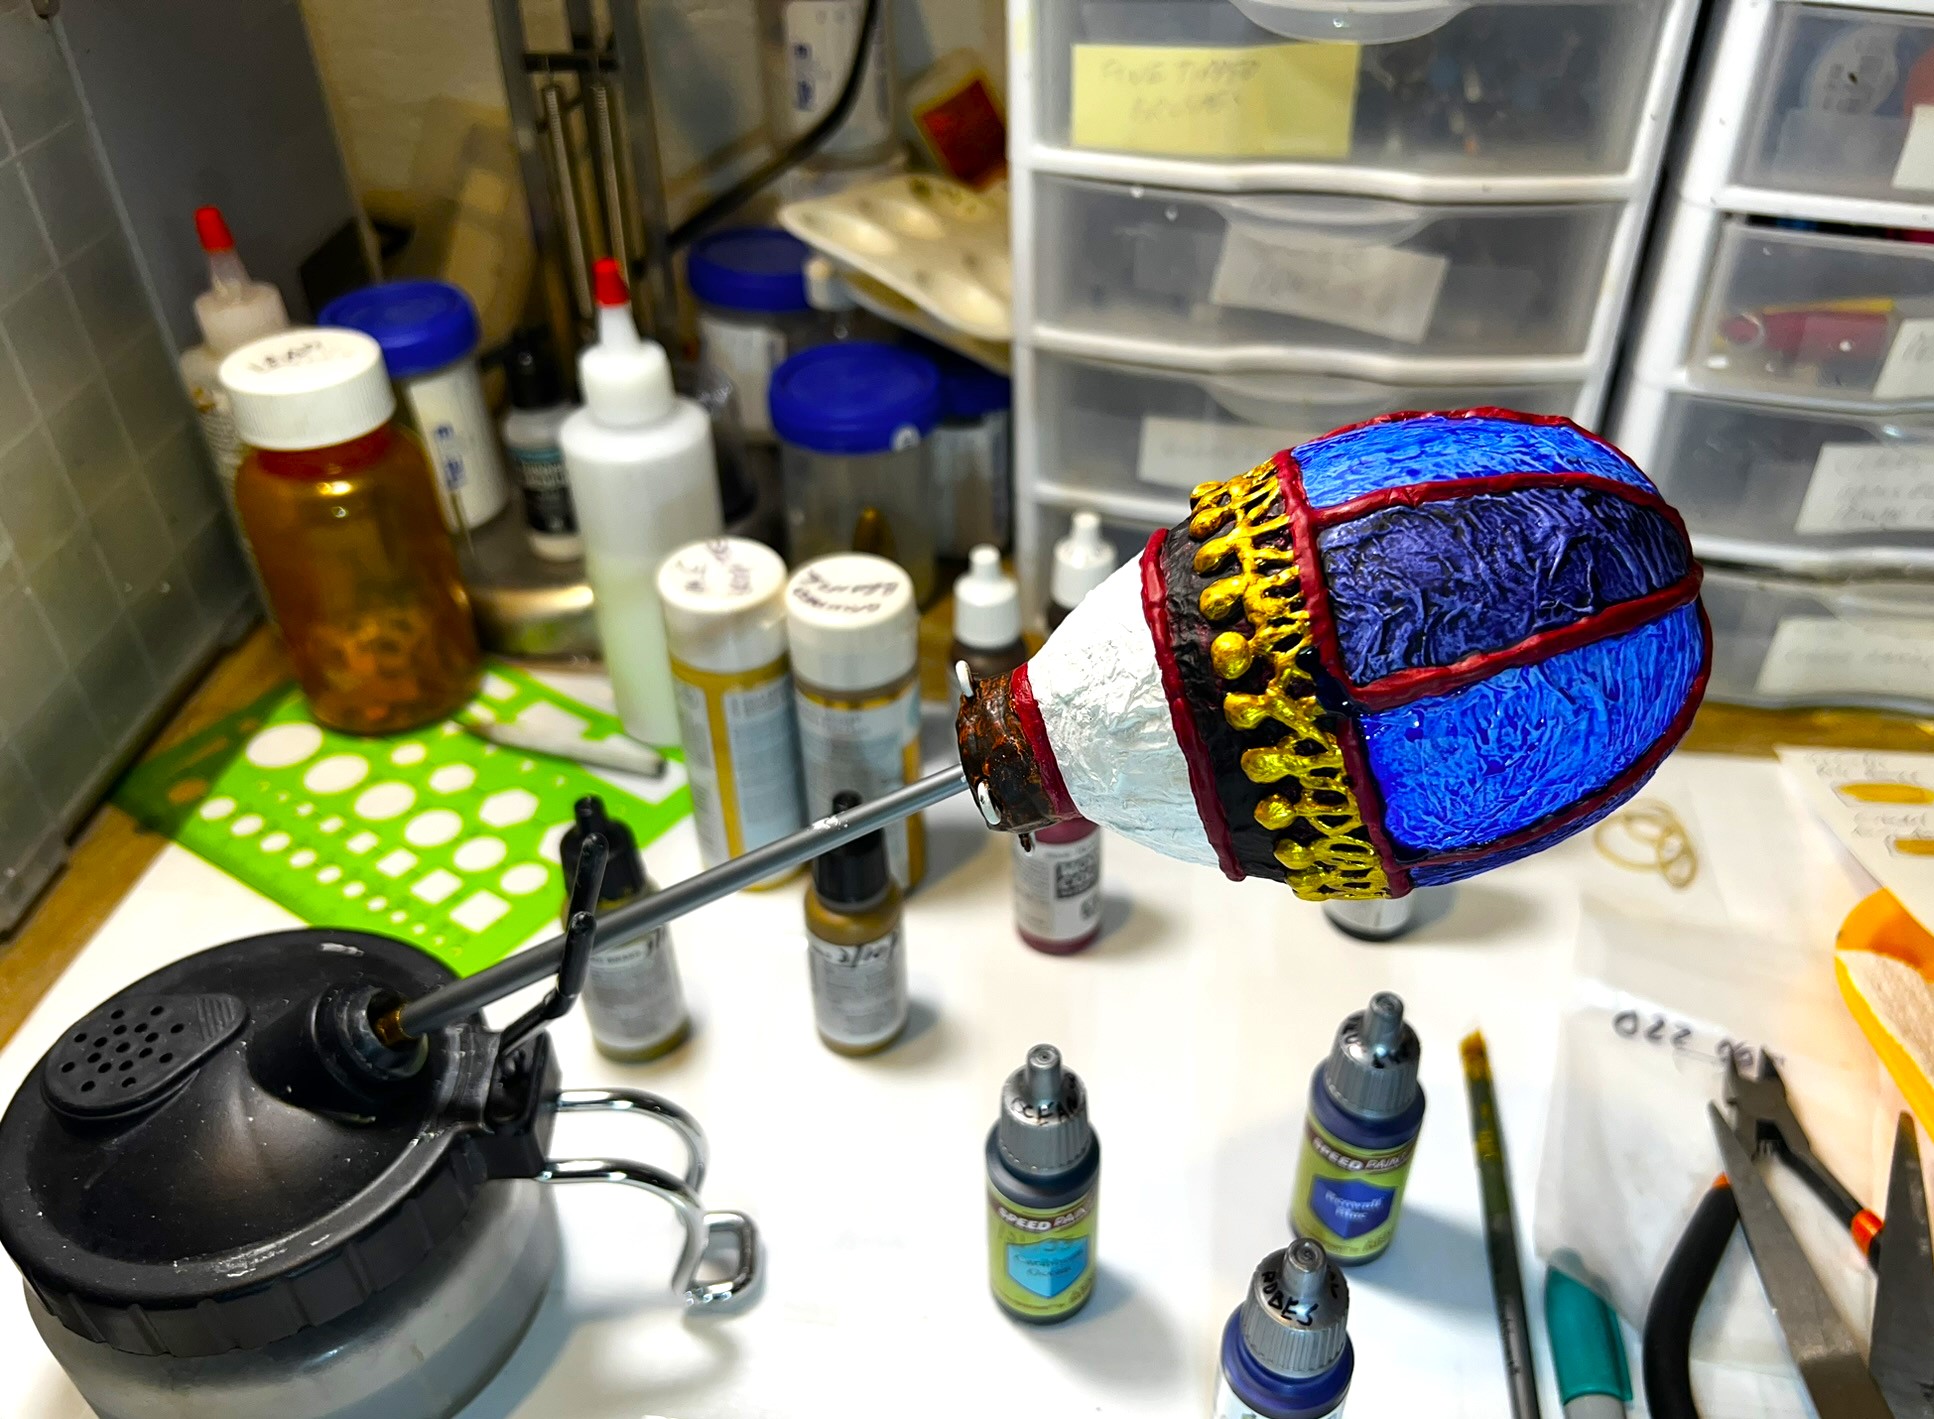
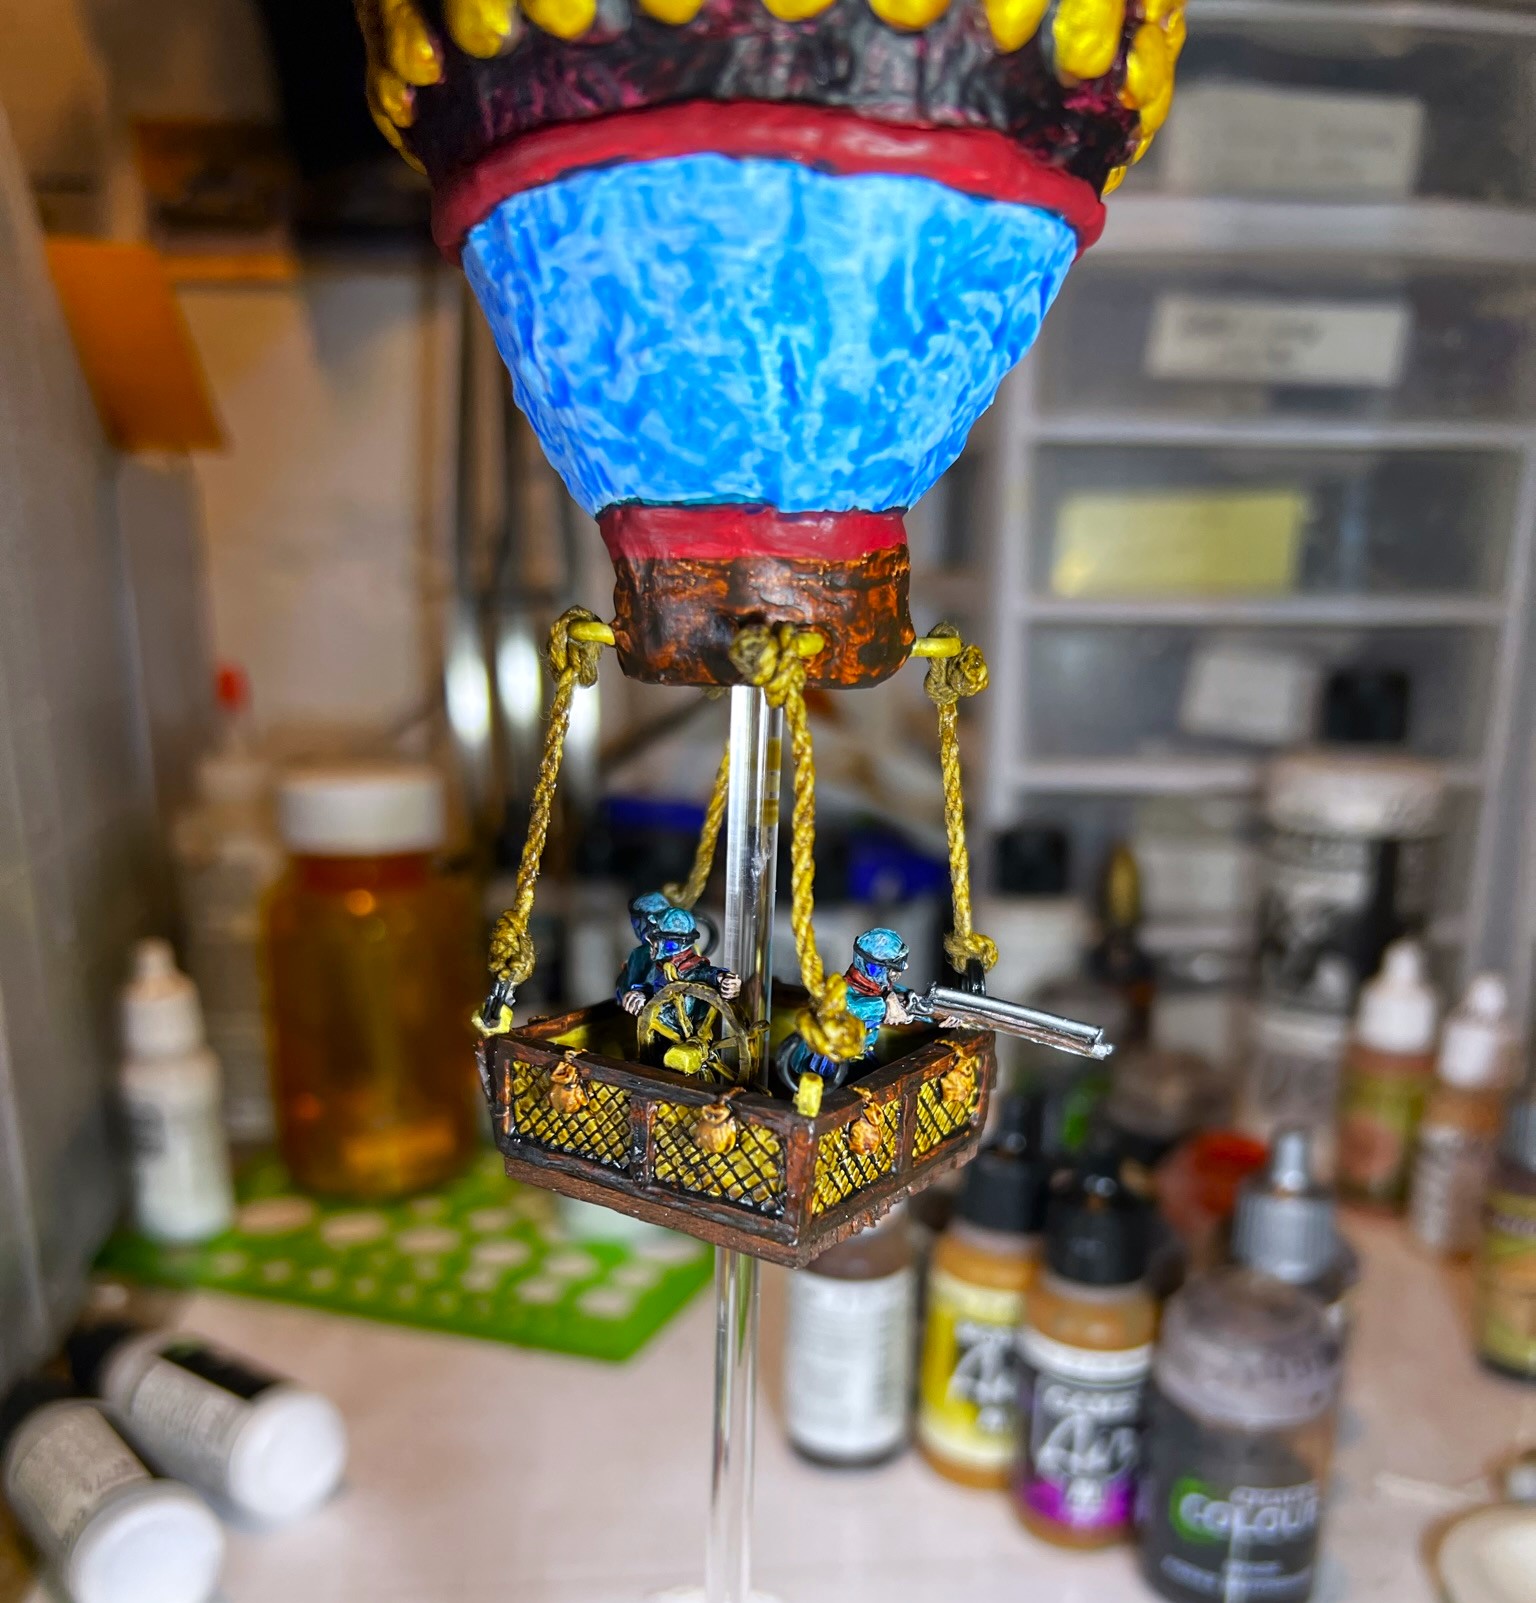
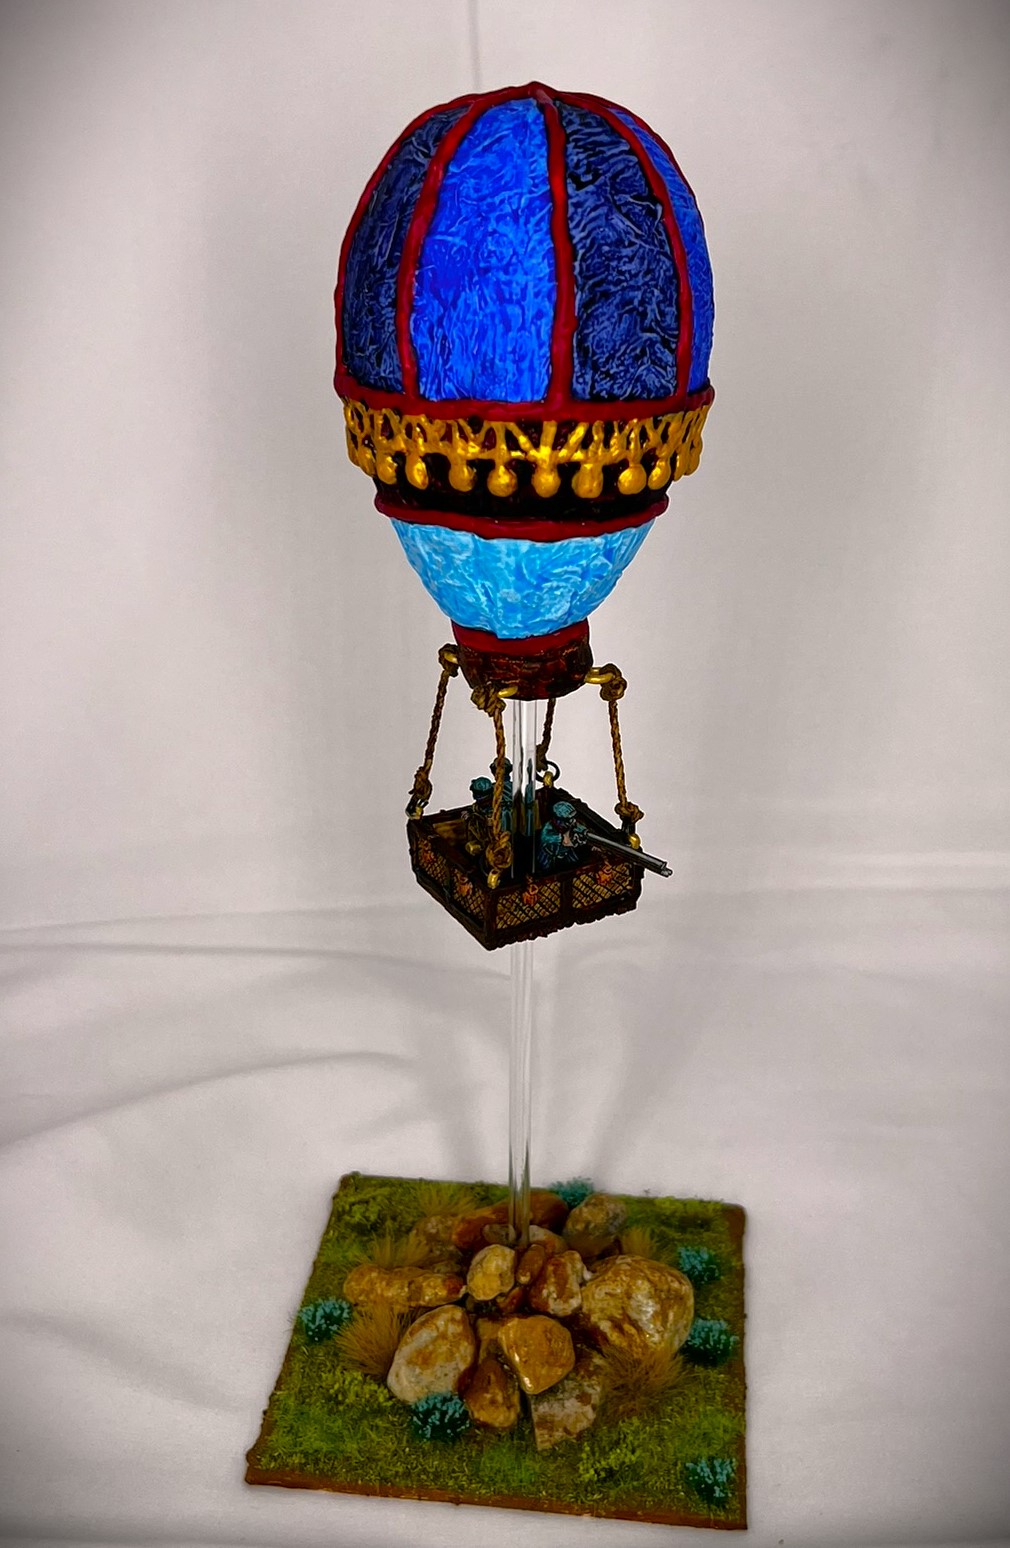
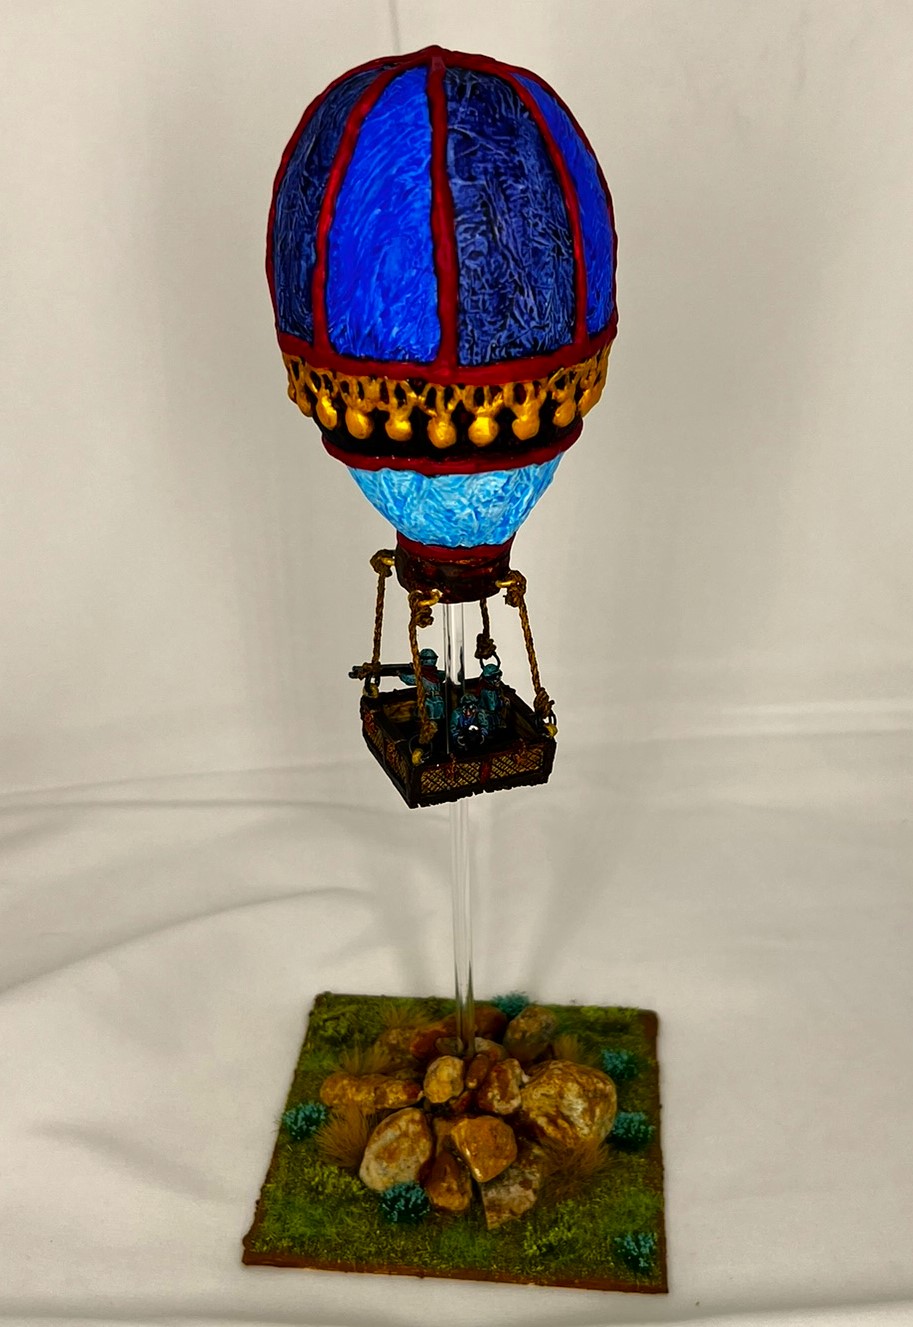
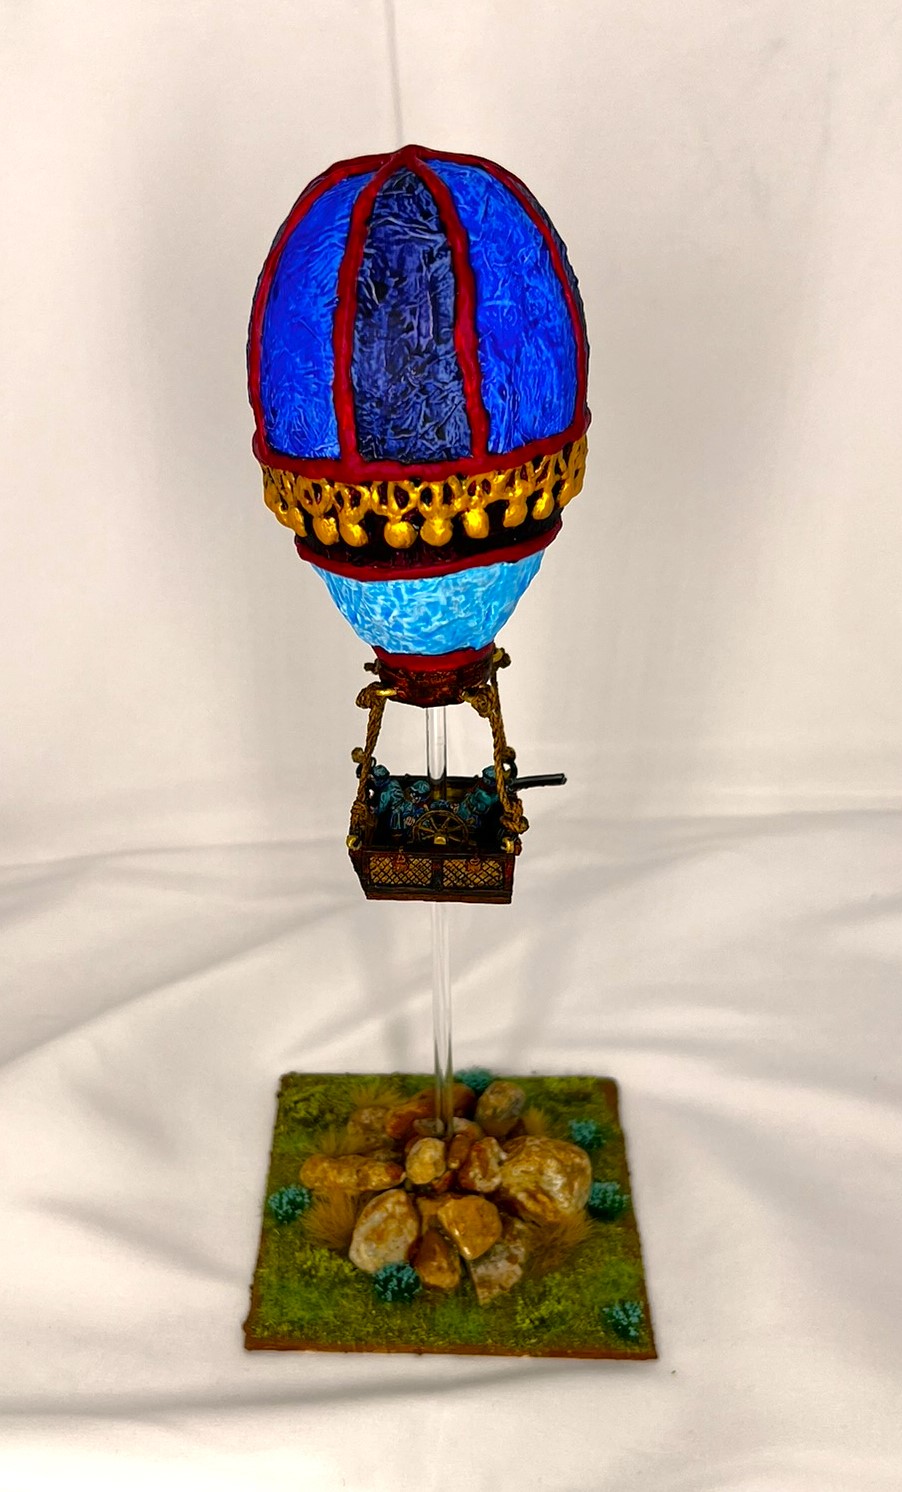
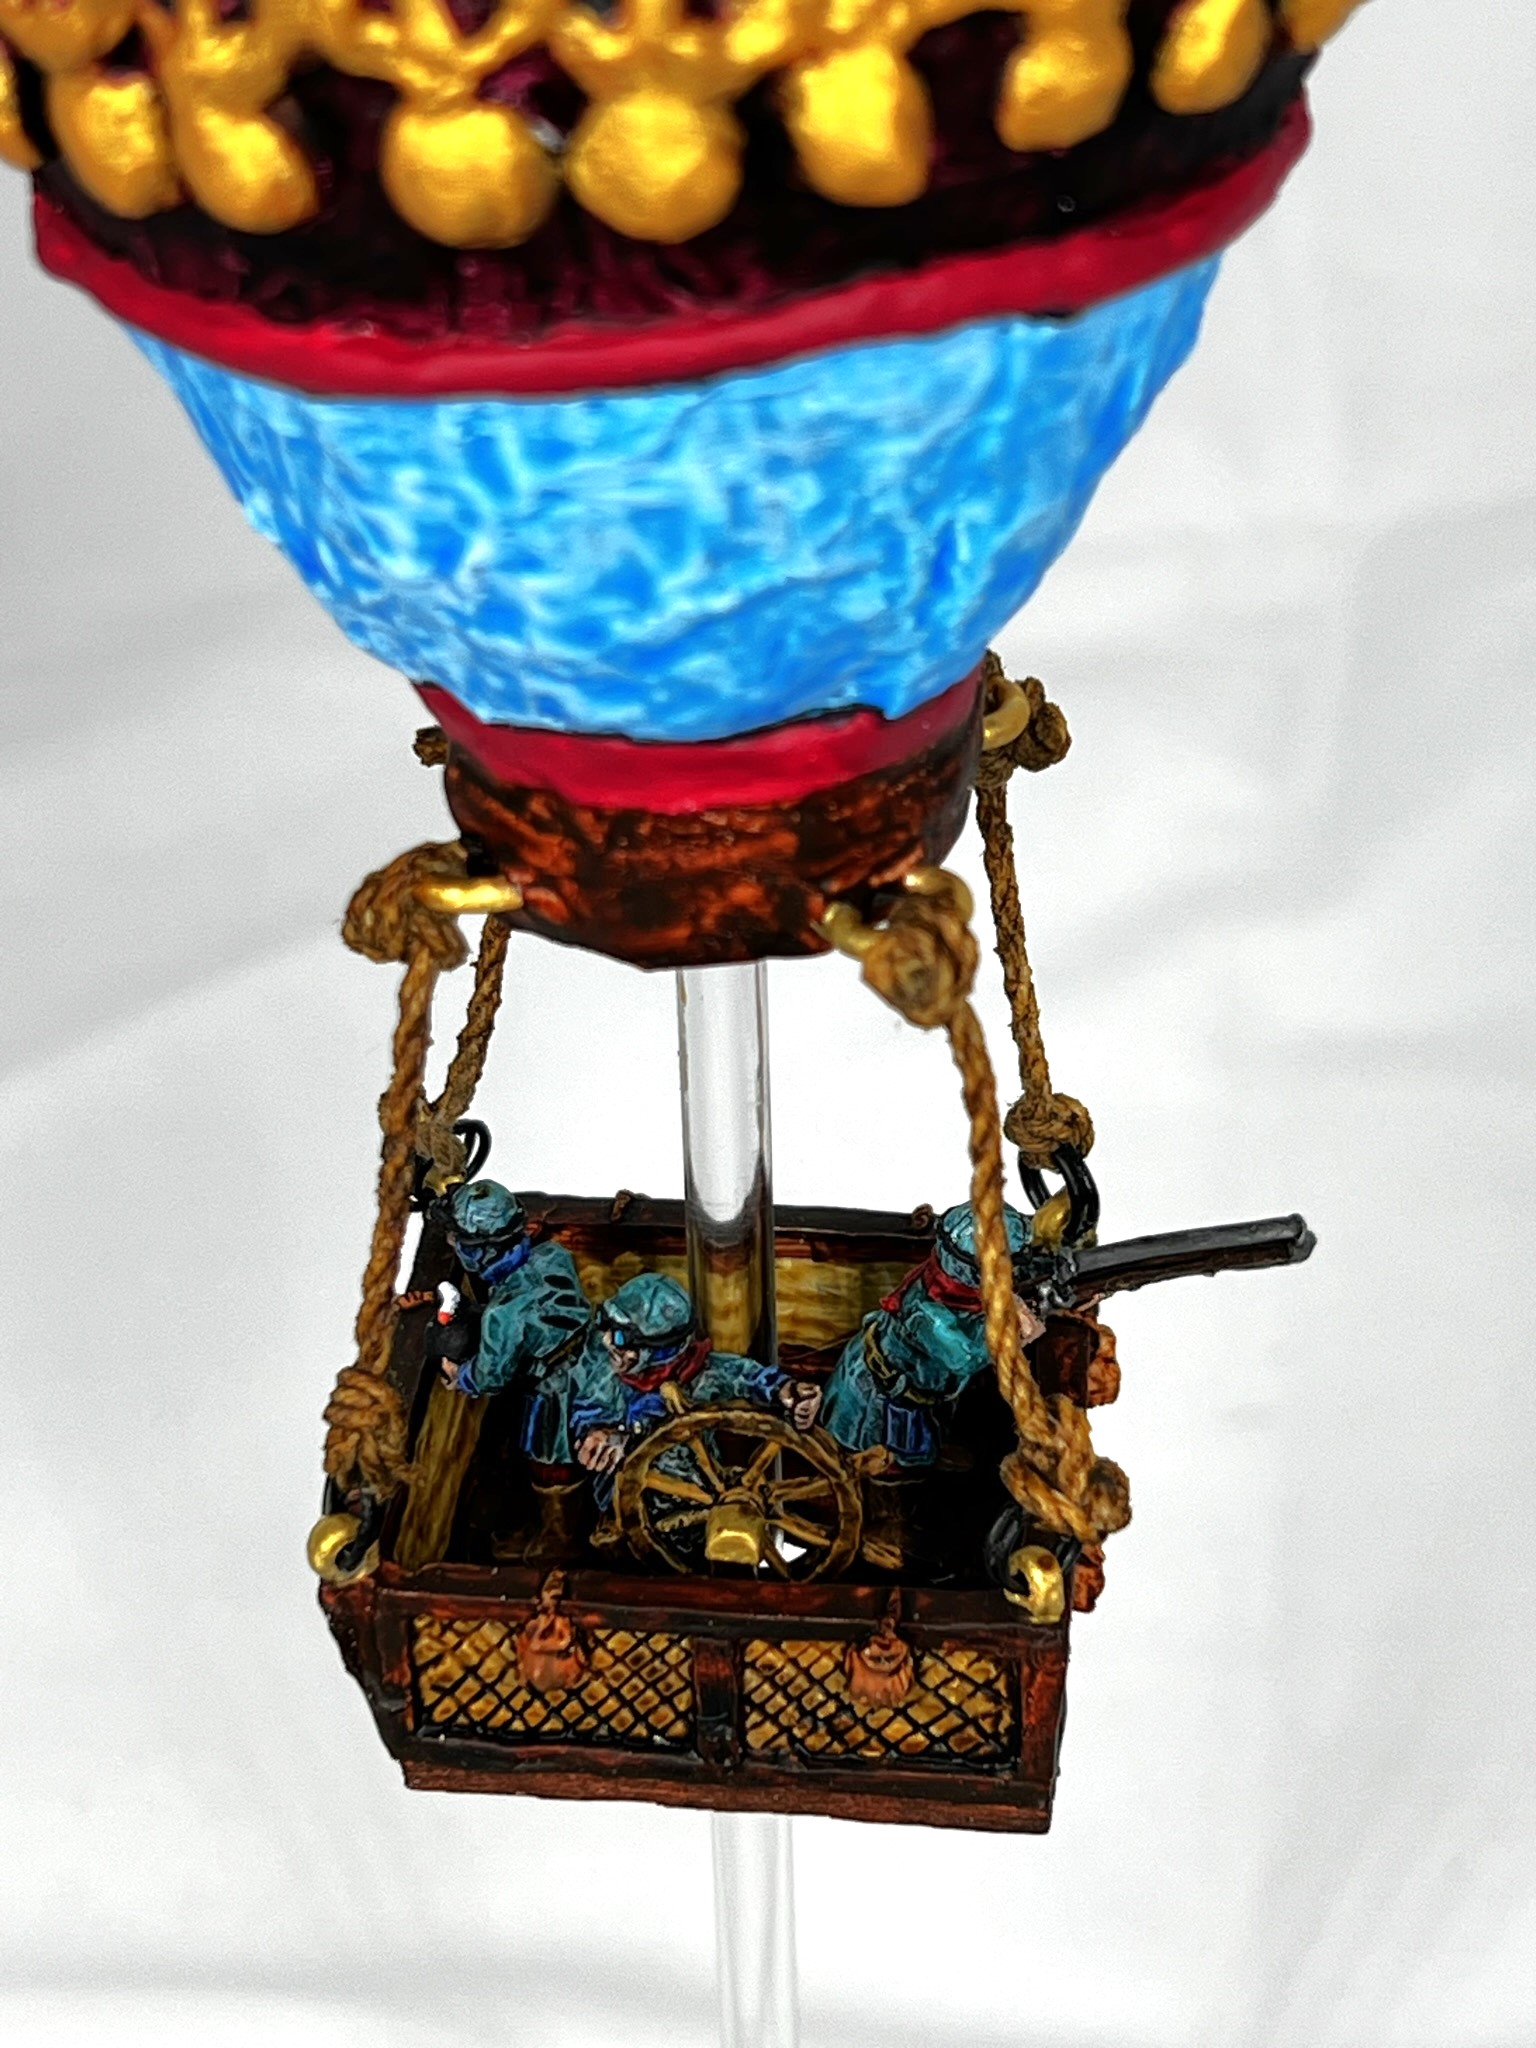
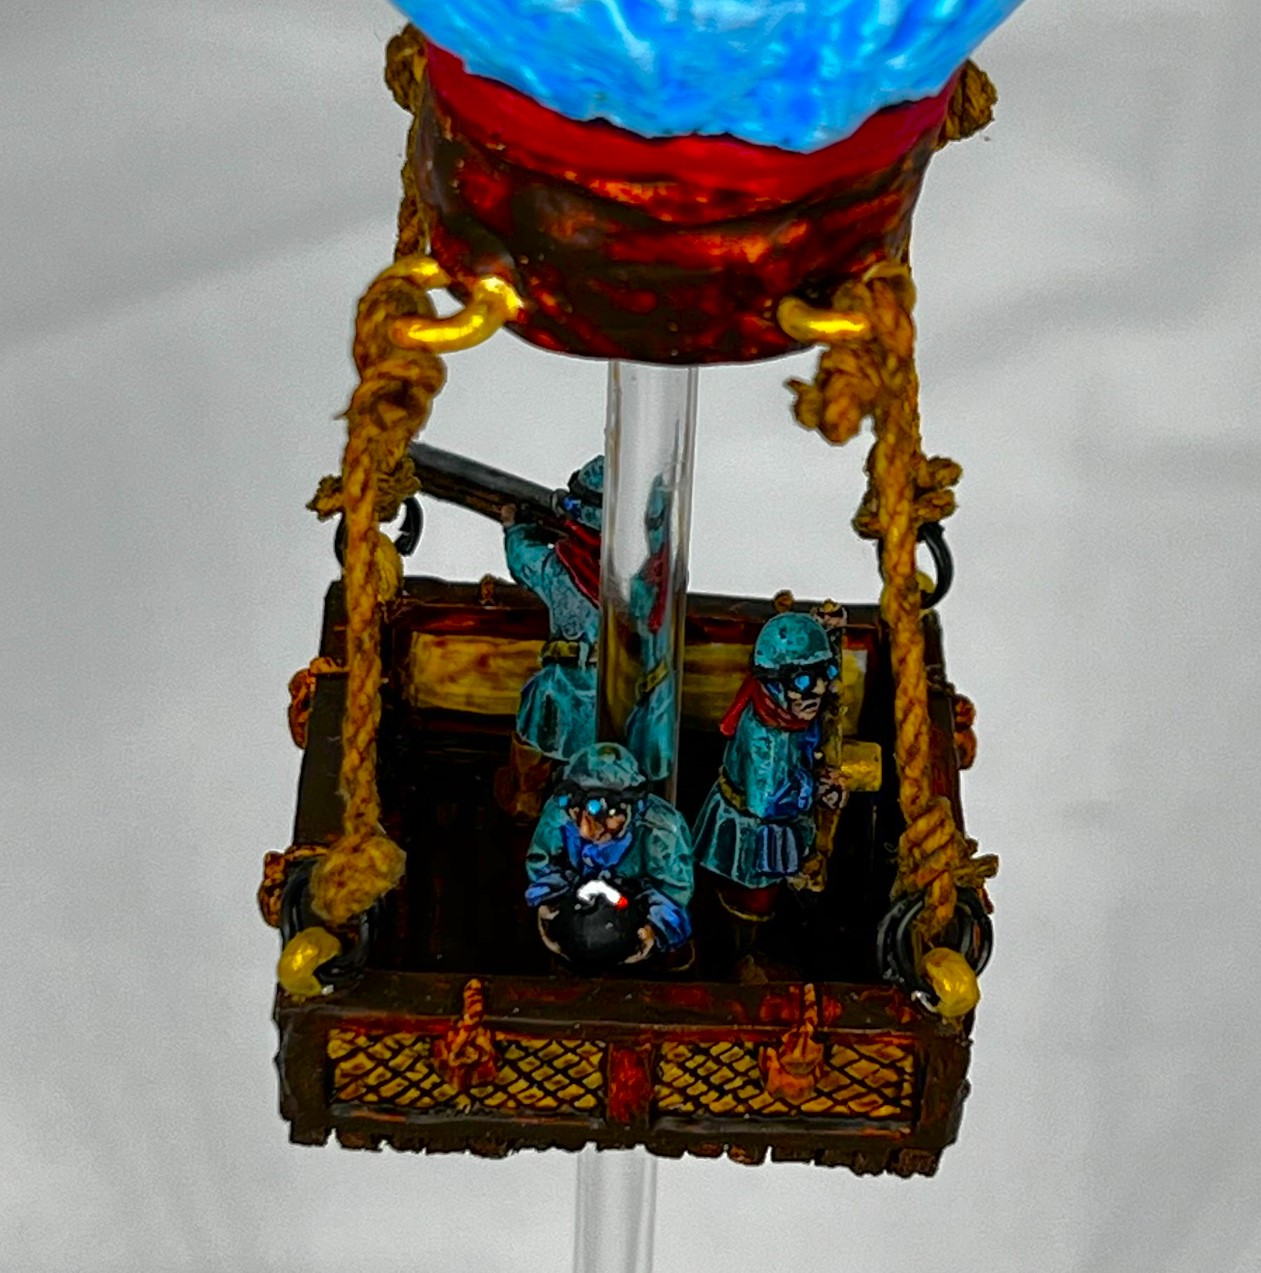
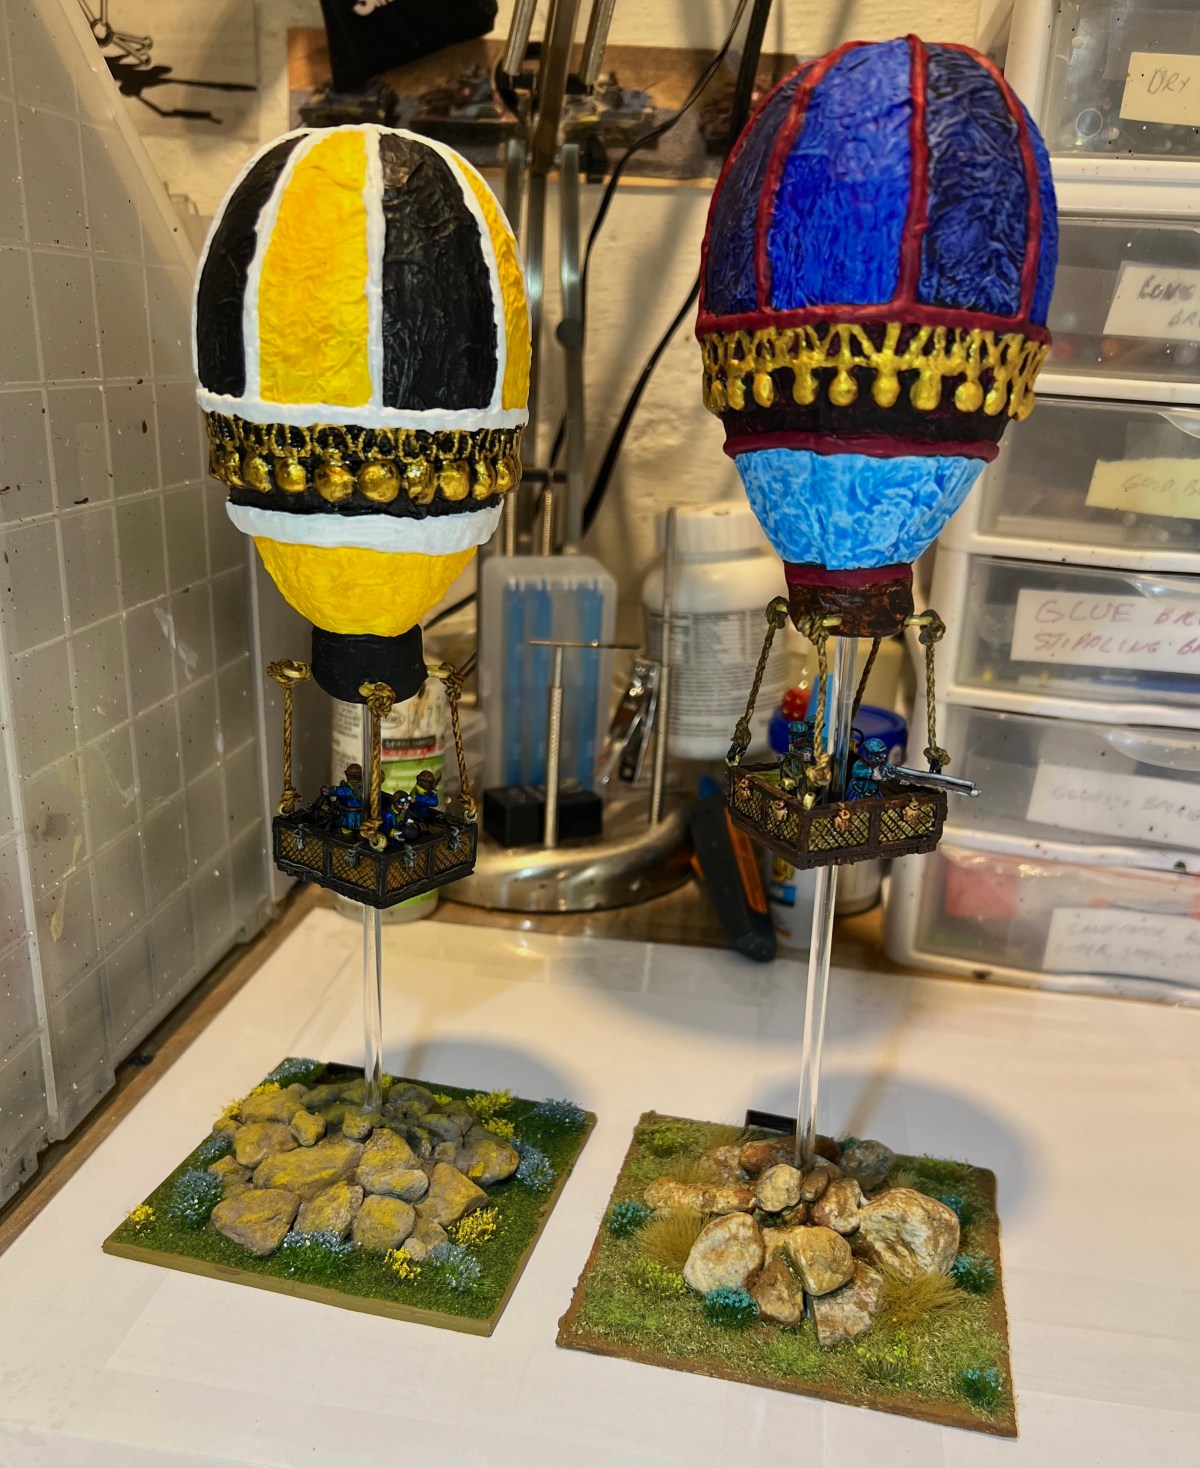
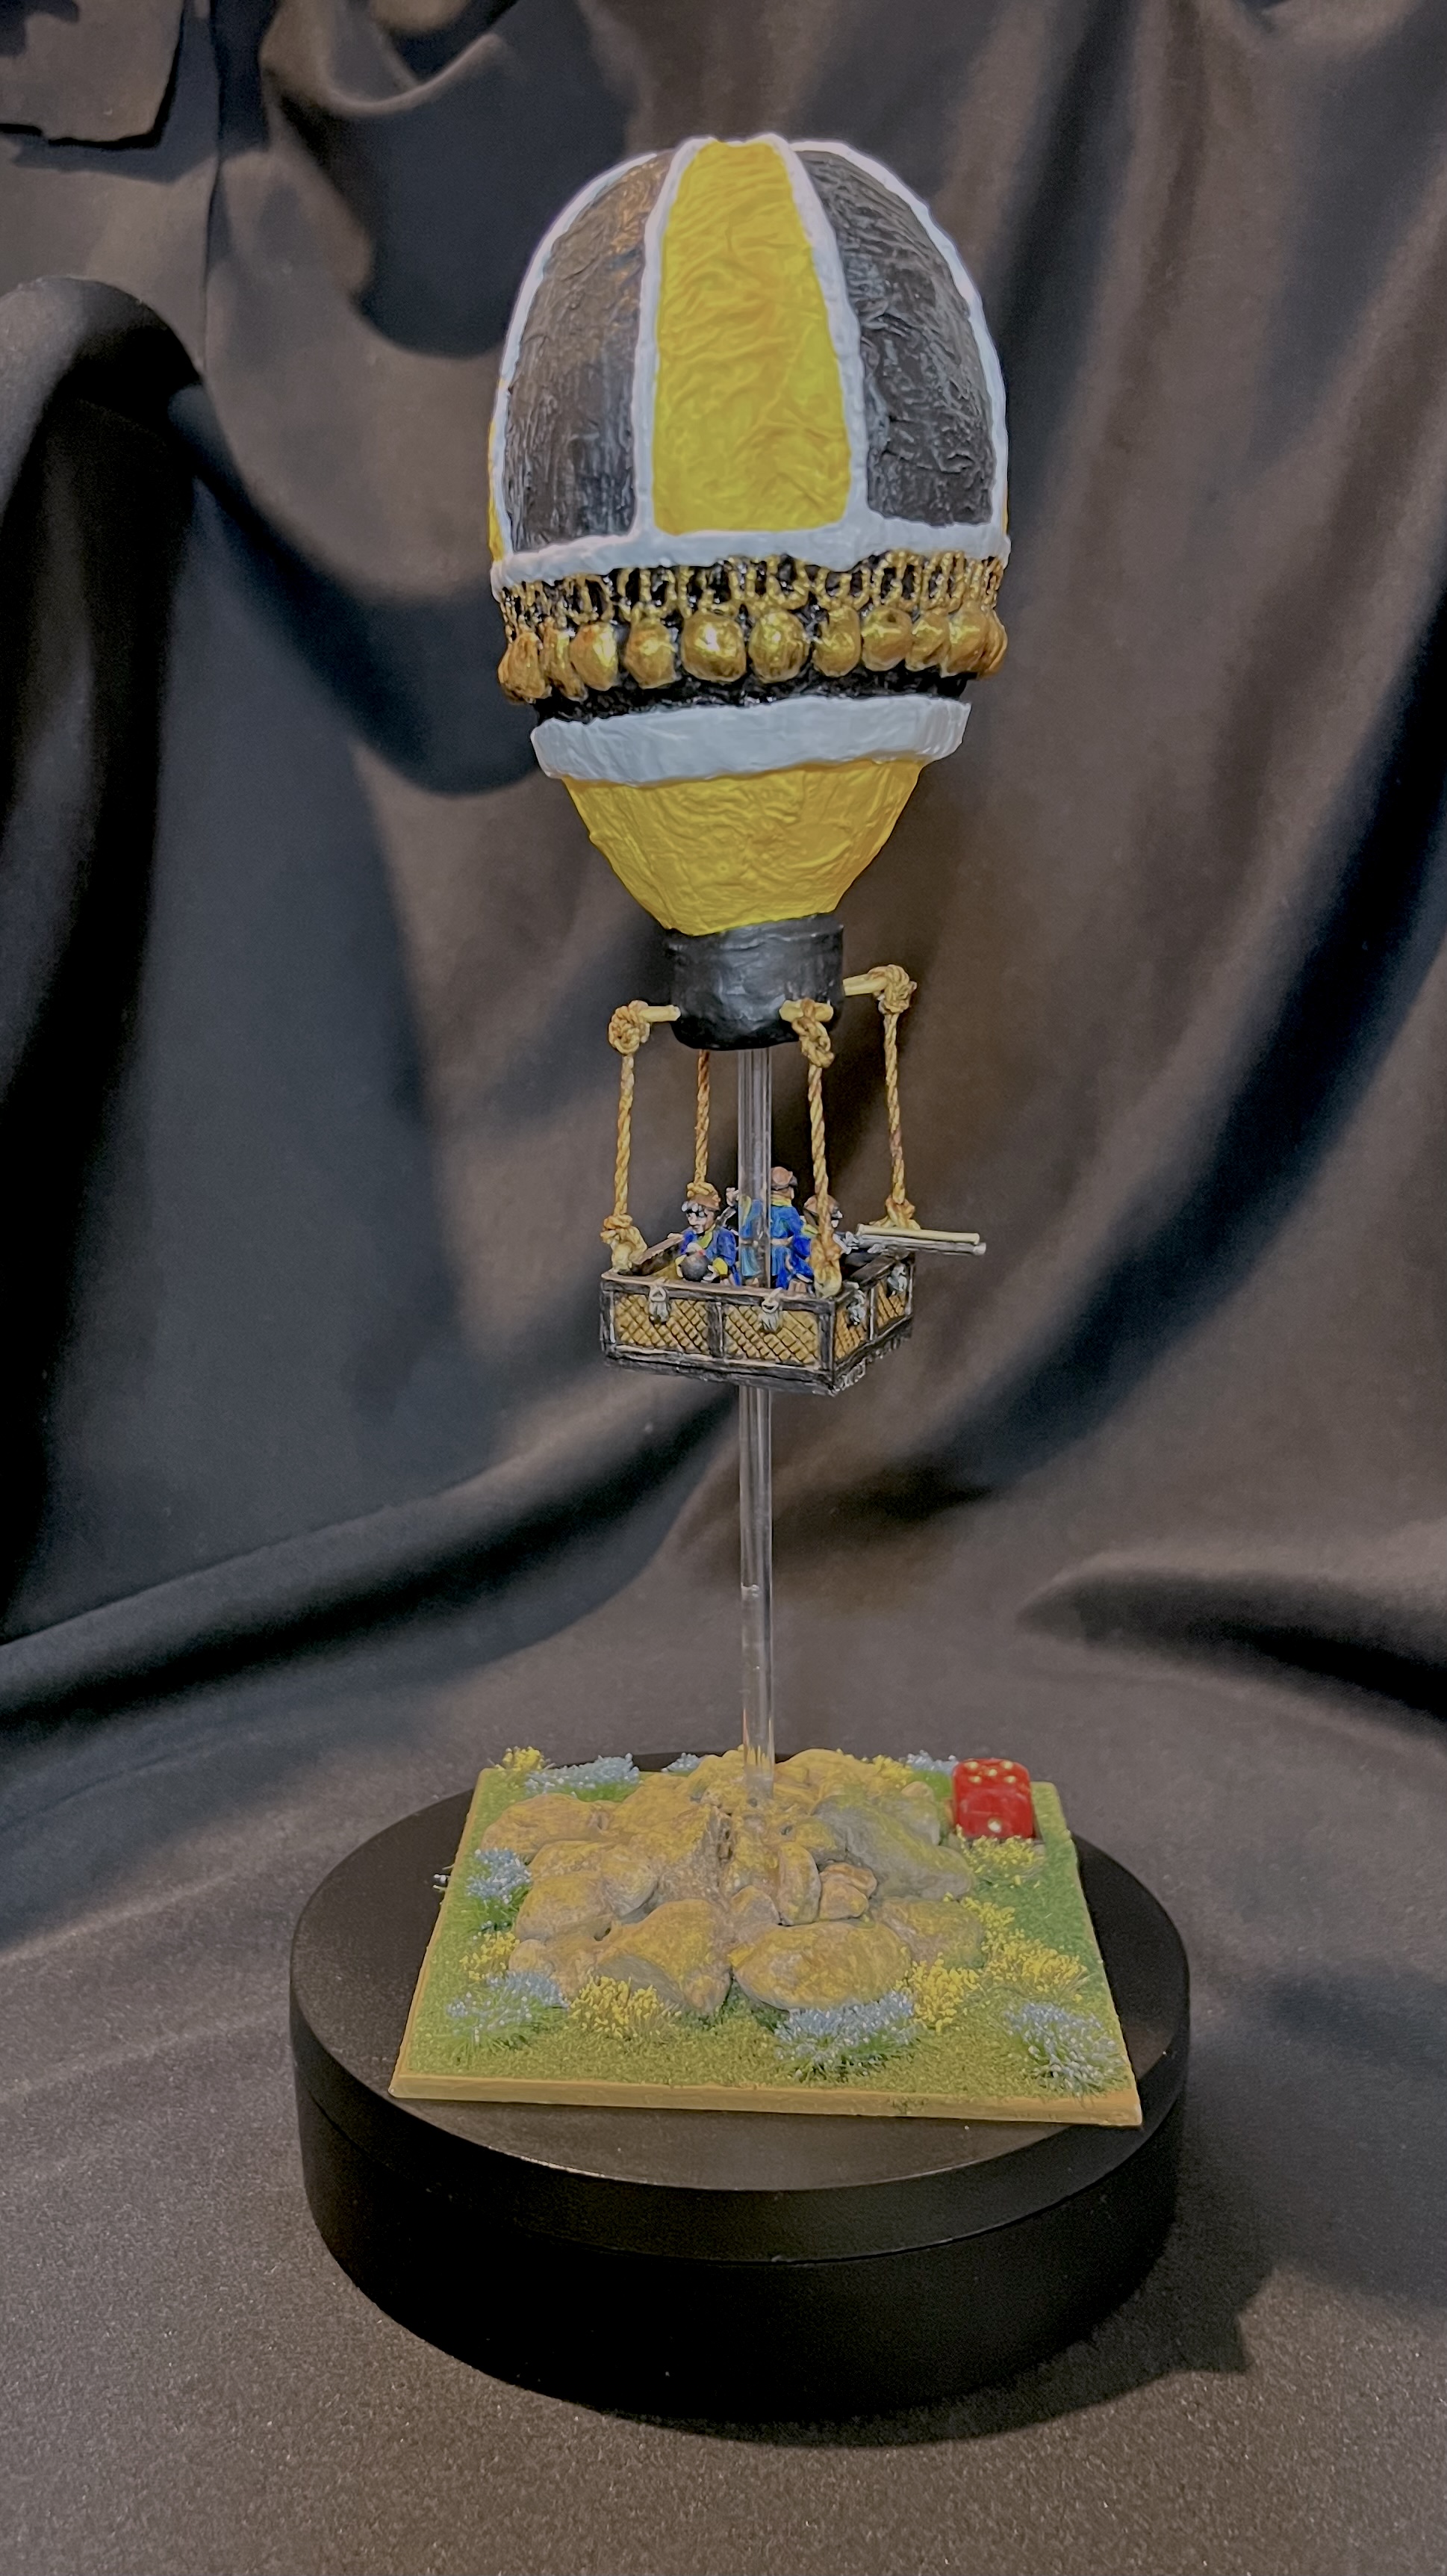
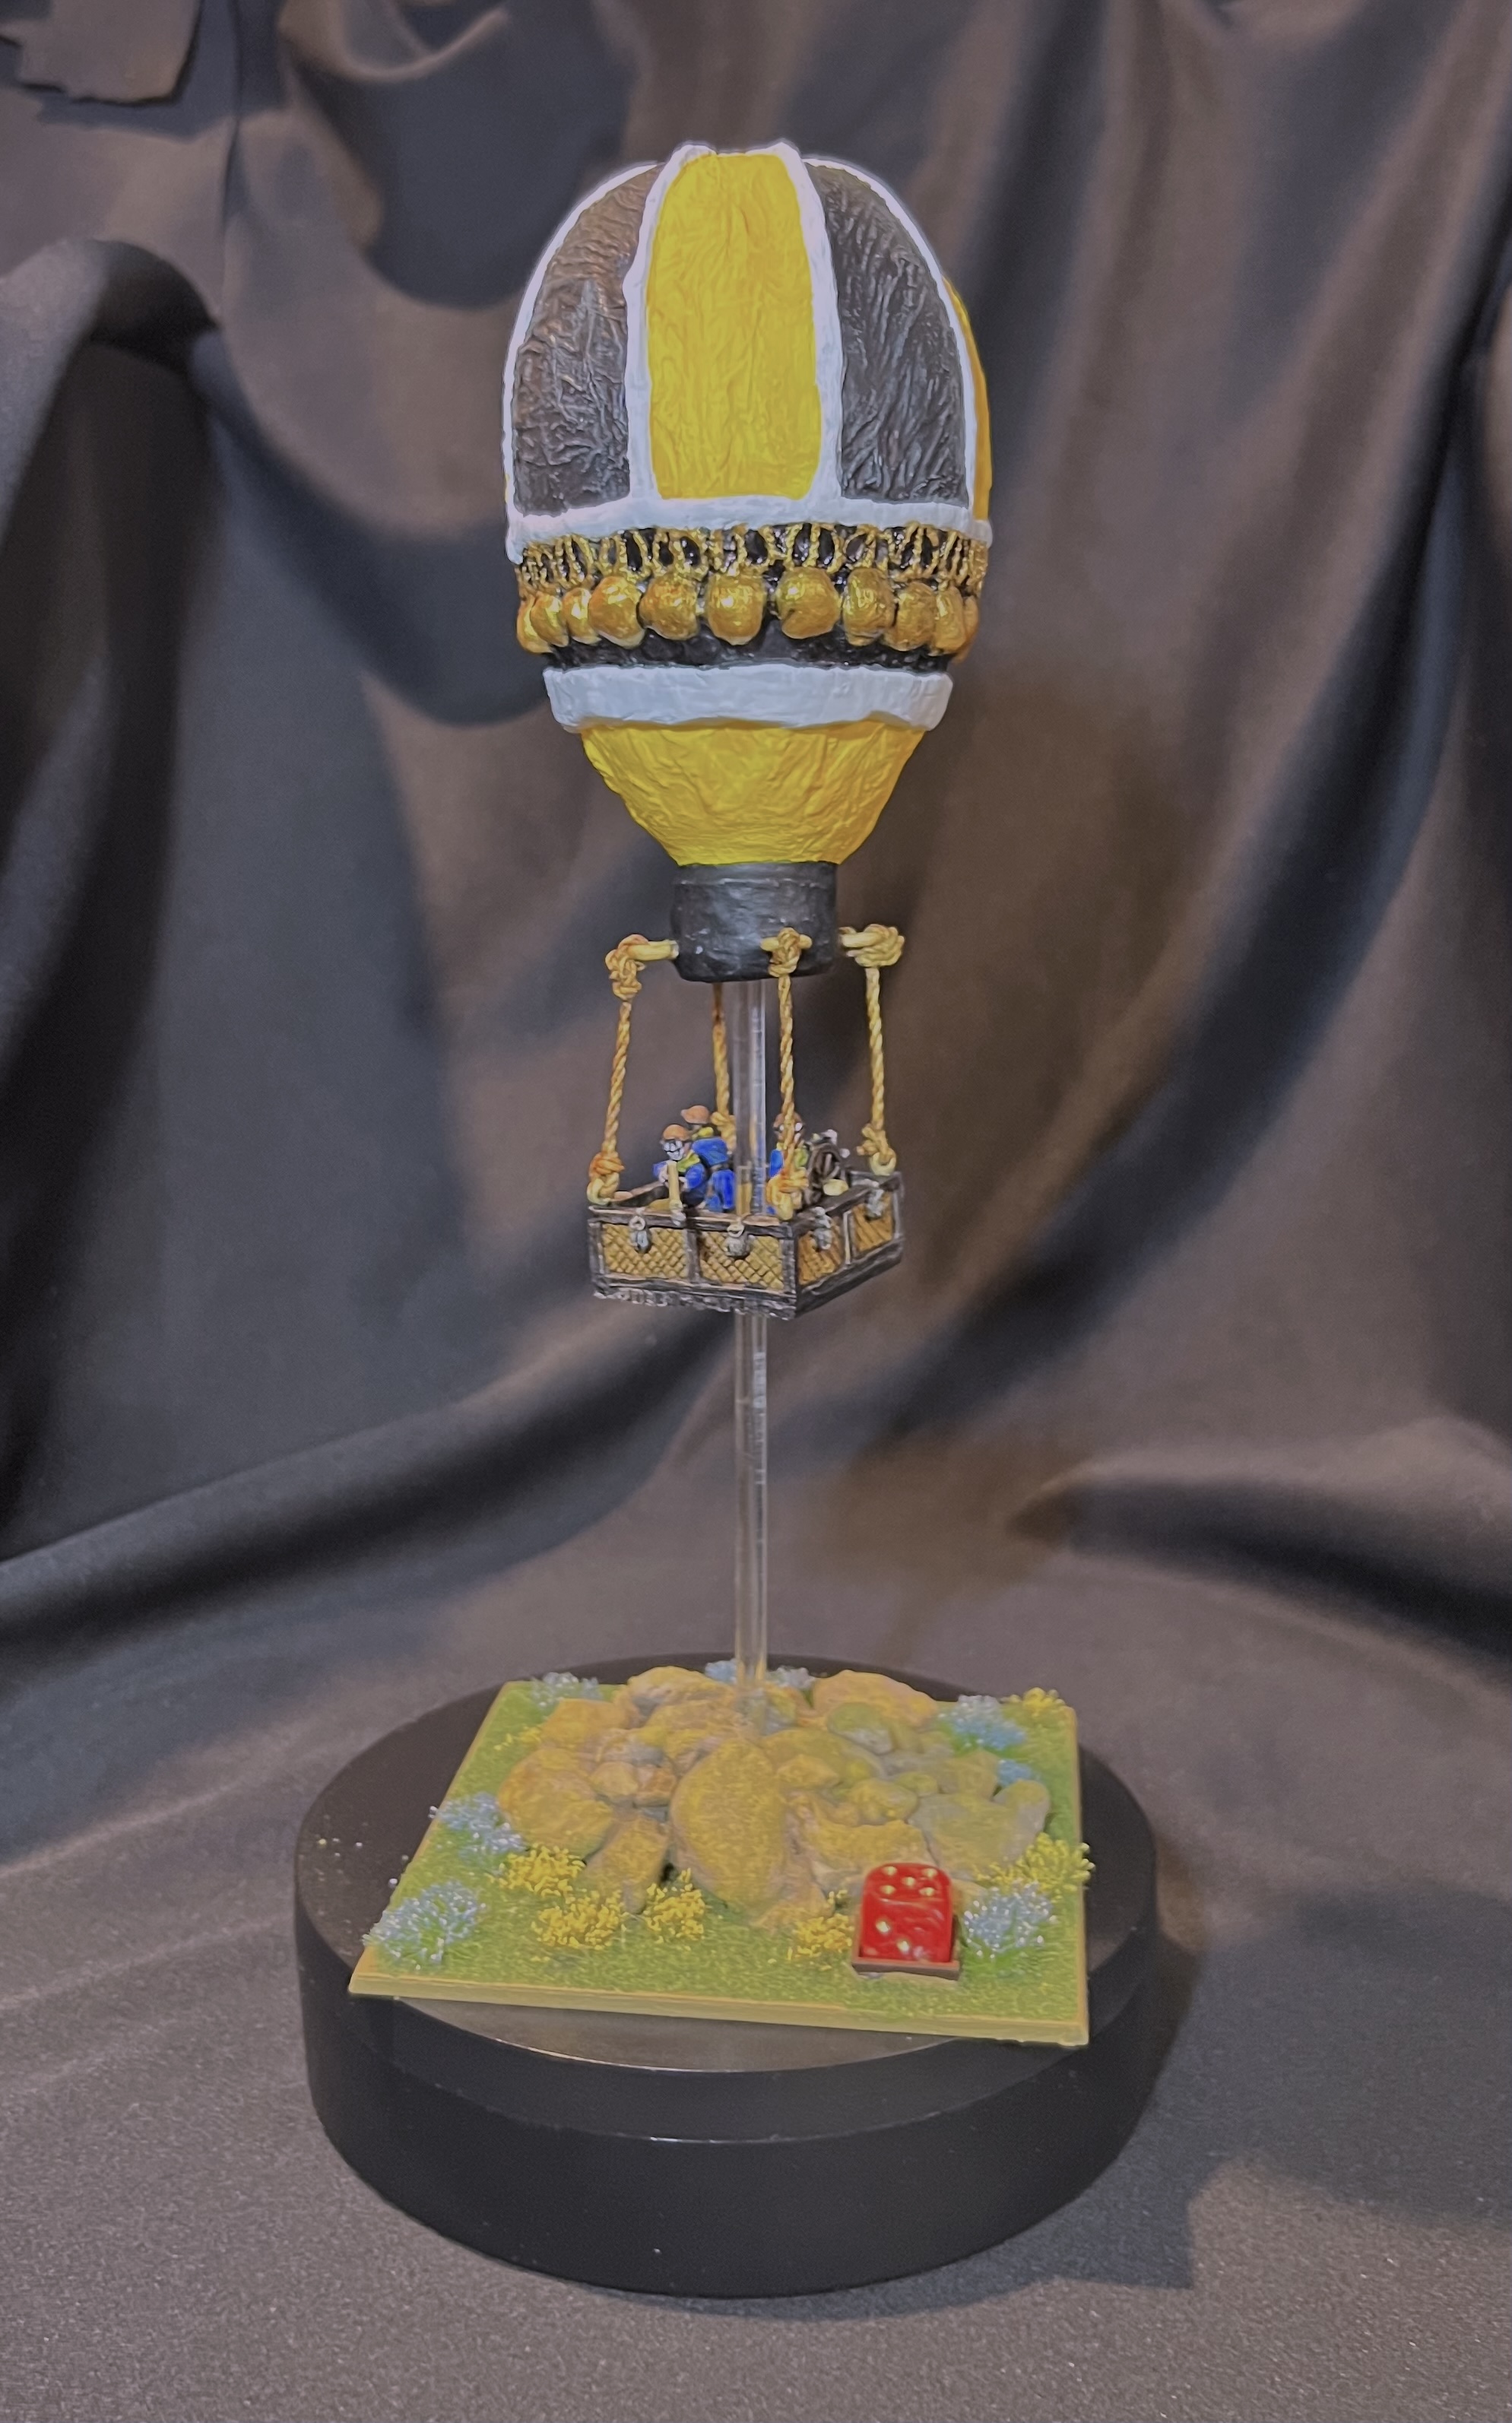
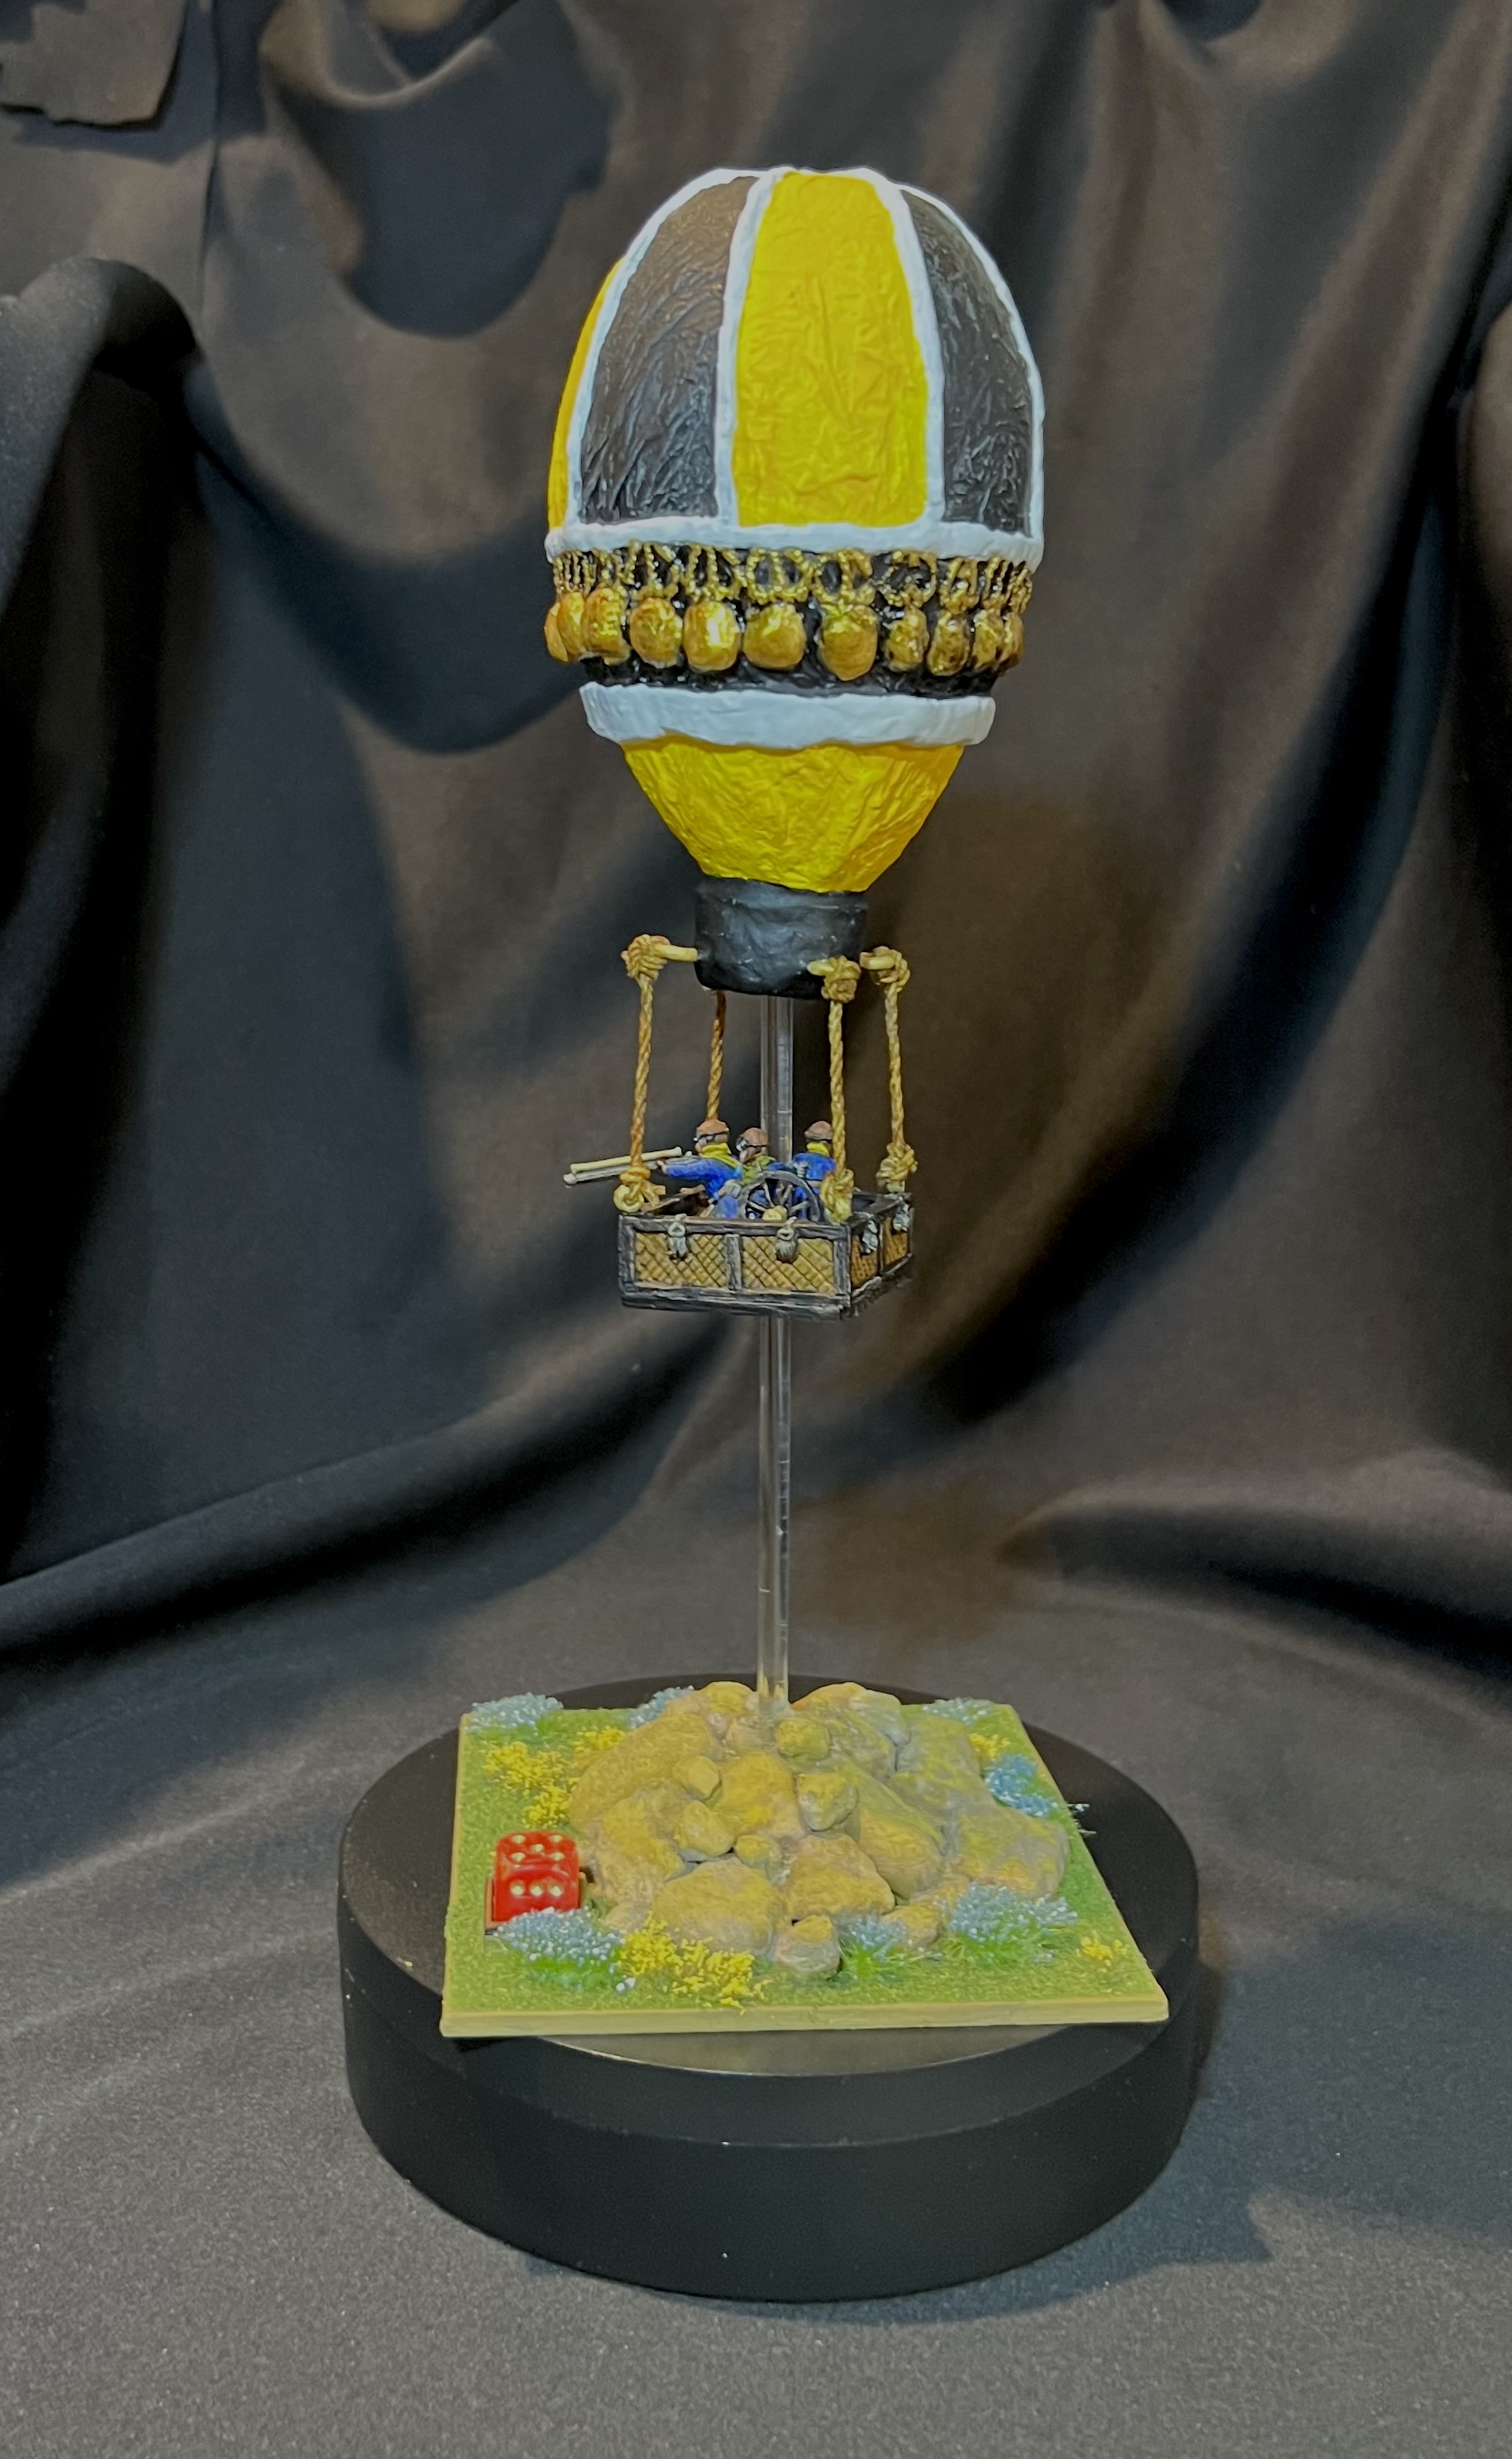
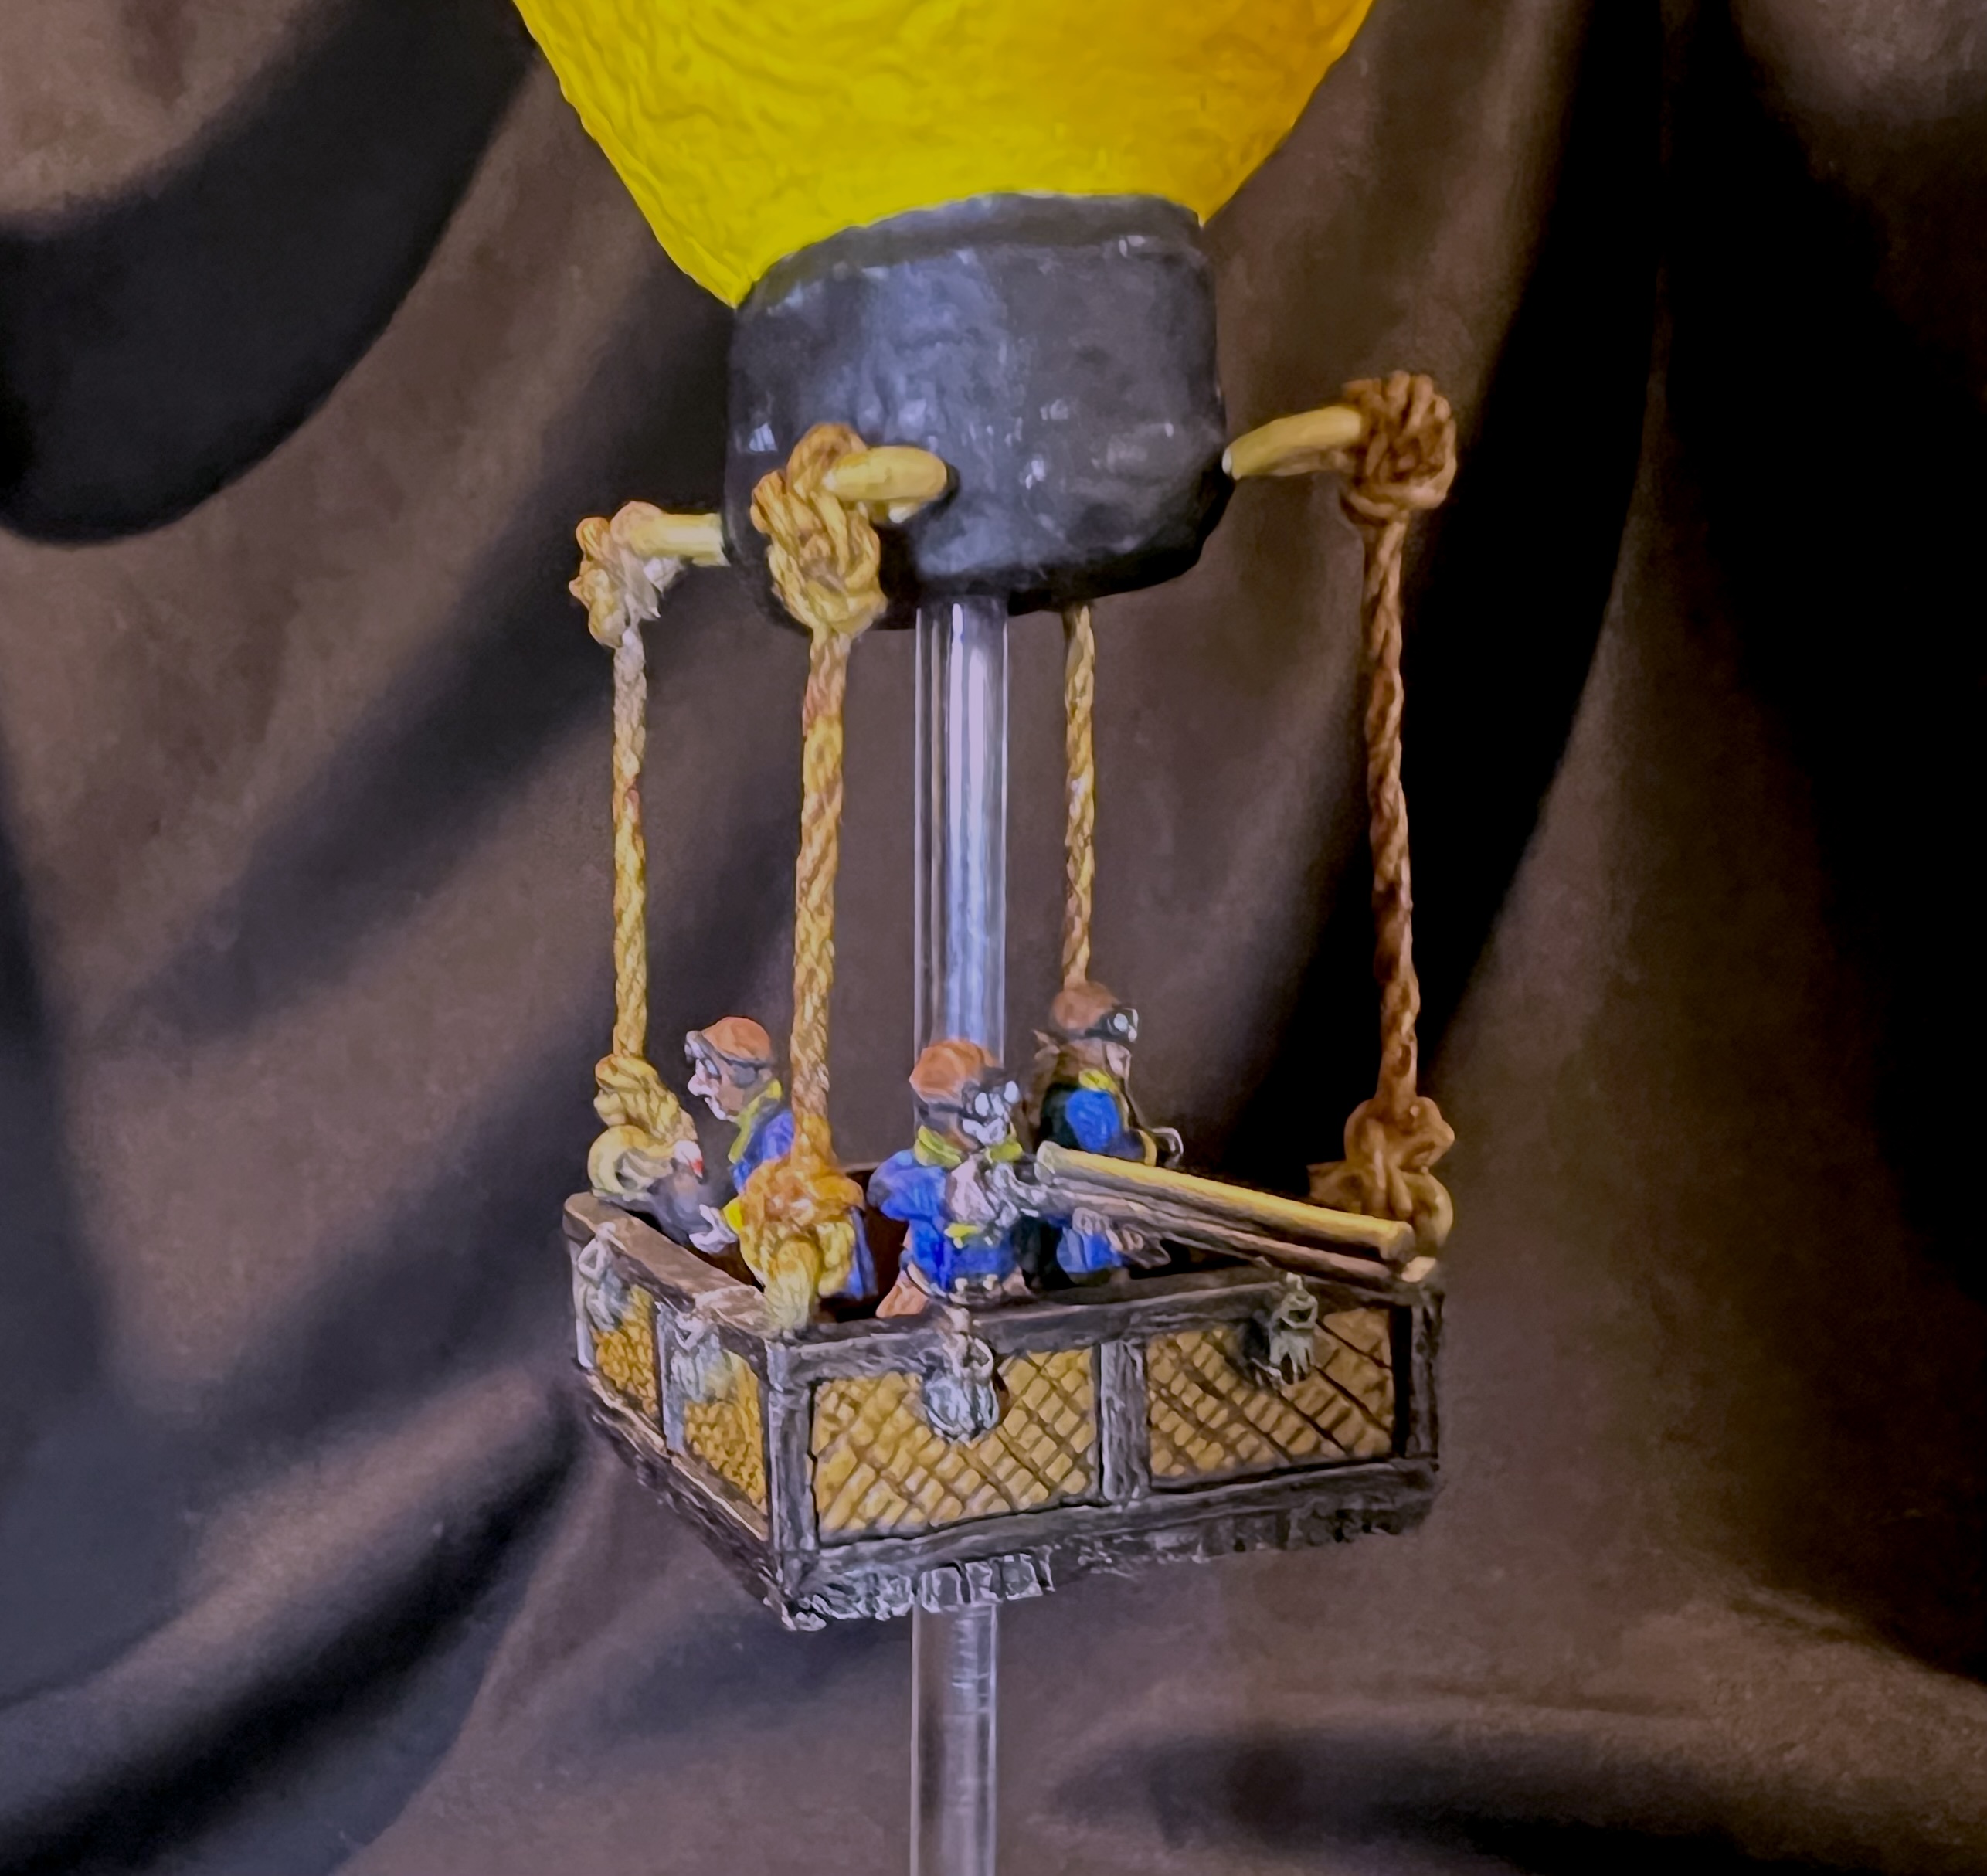
To augment the Munchkins’ forces, I decided to add a second Aerostat – and form a true Munchkin Air Force. As I wanted some color differentiation from my previous model – I went with Boston Bruins colors of Black, Gold, and White for the balloon, whole keeping the Munchkin crew in traditional blues. The model is 28mm in scale.

Go Bruins!

Assembly and Painting the Aerostat

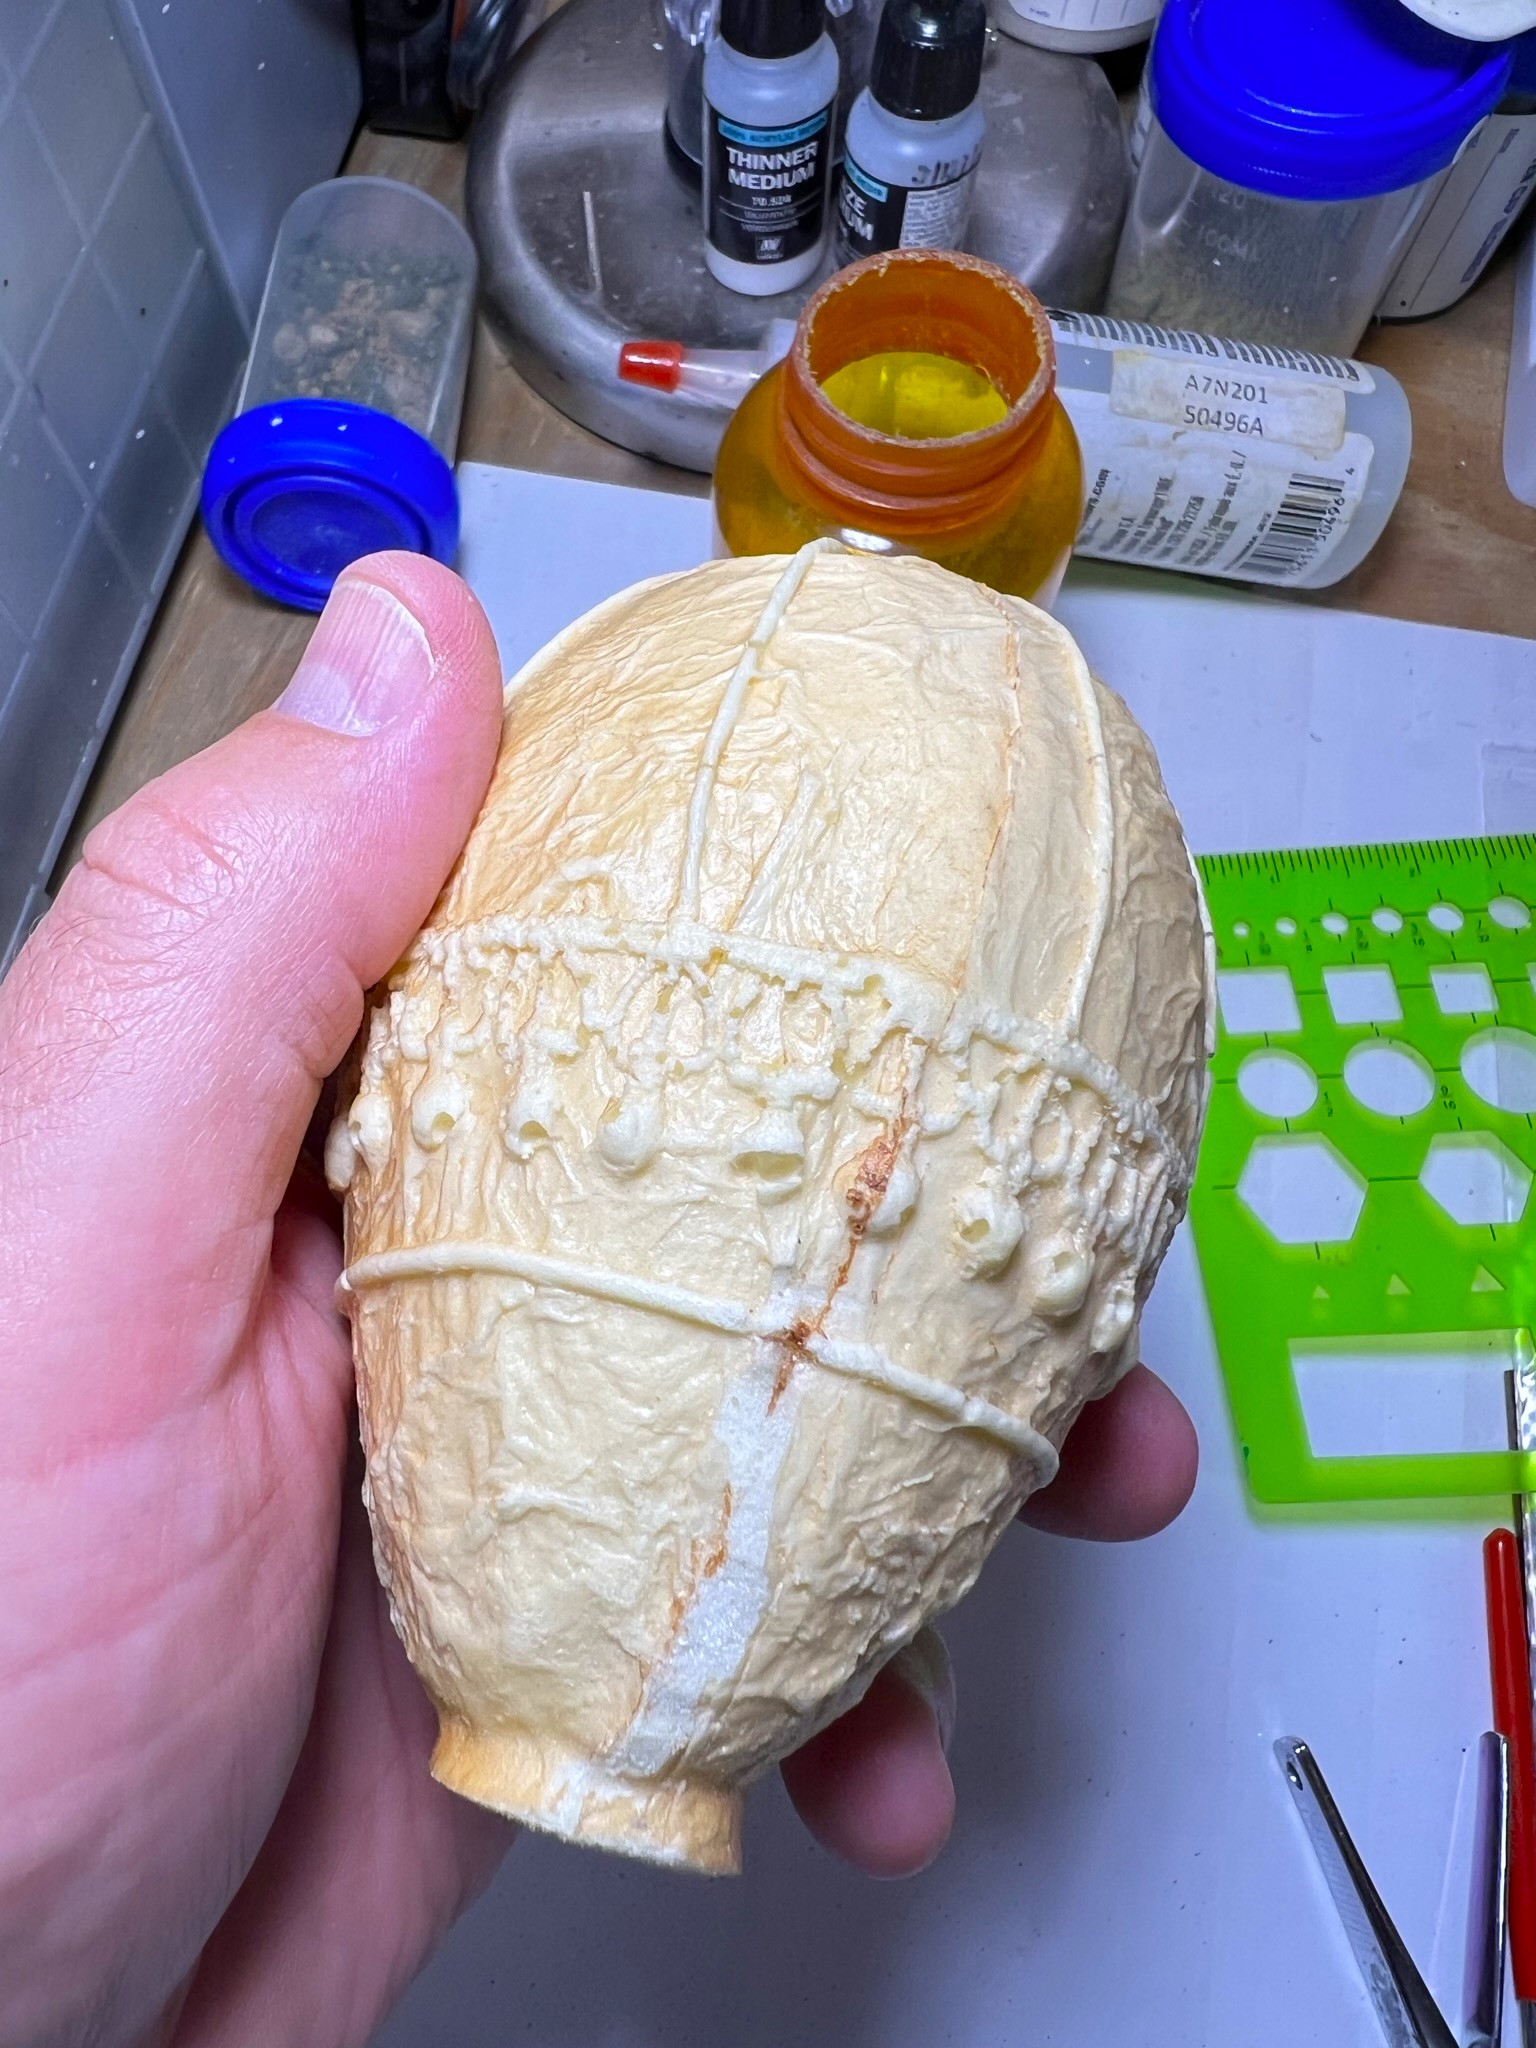
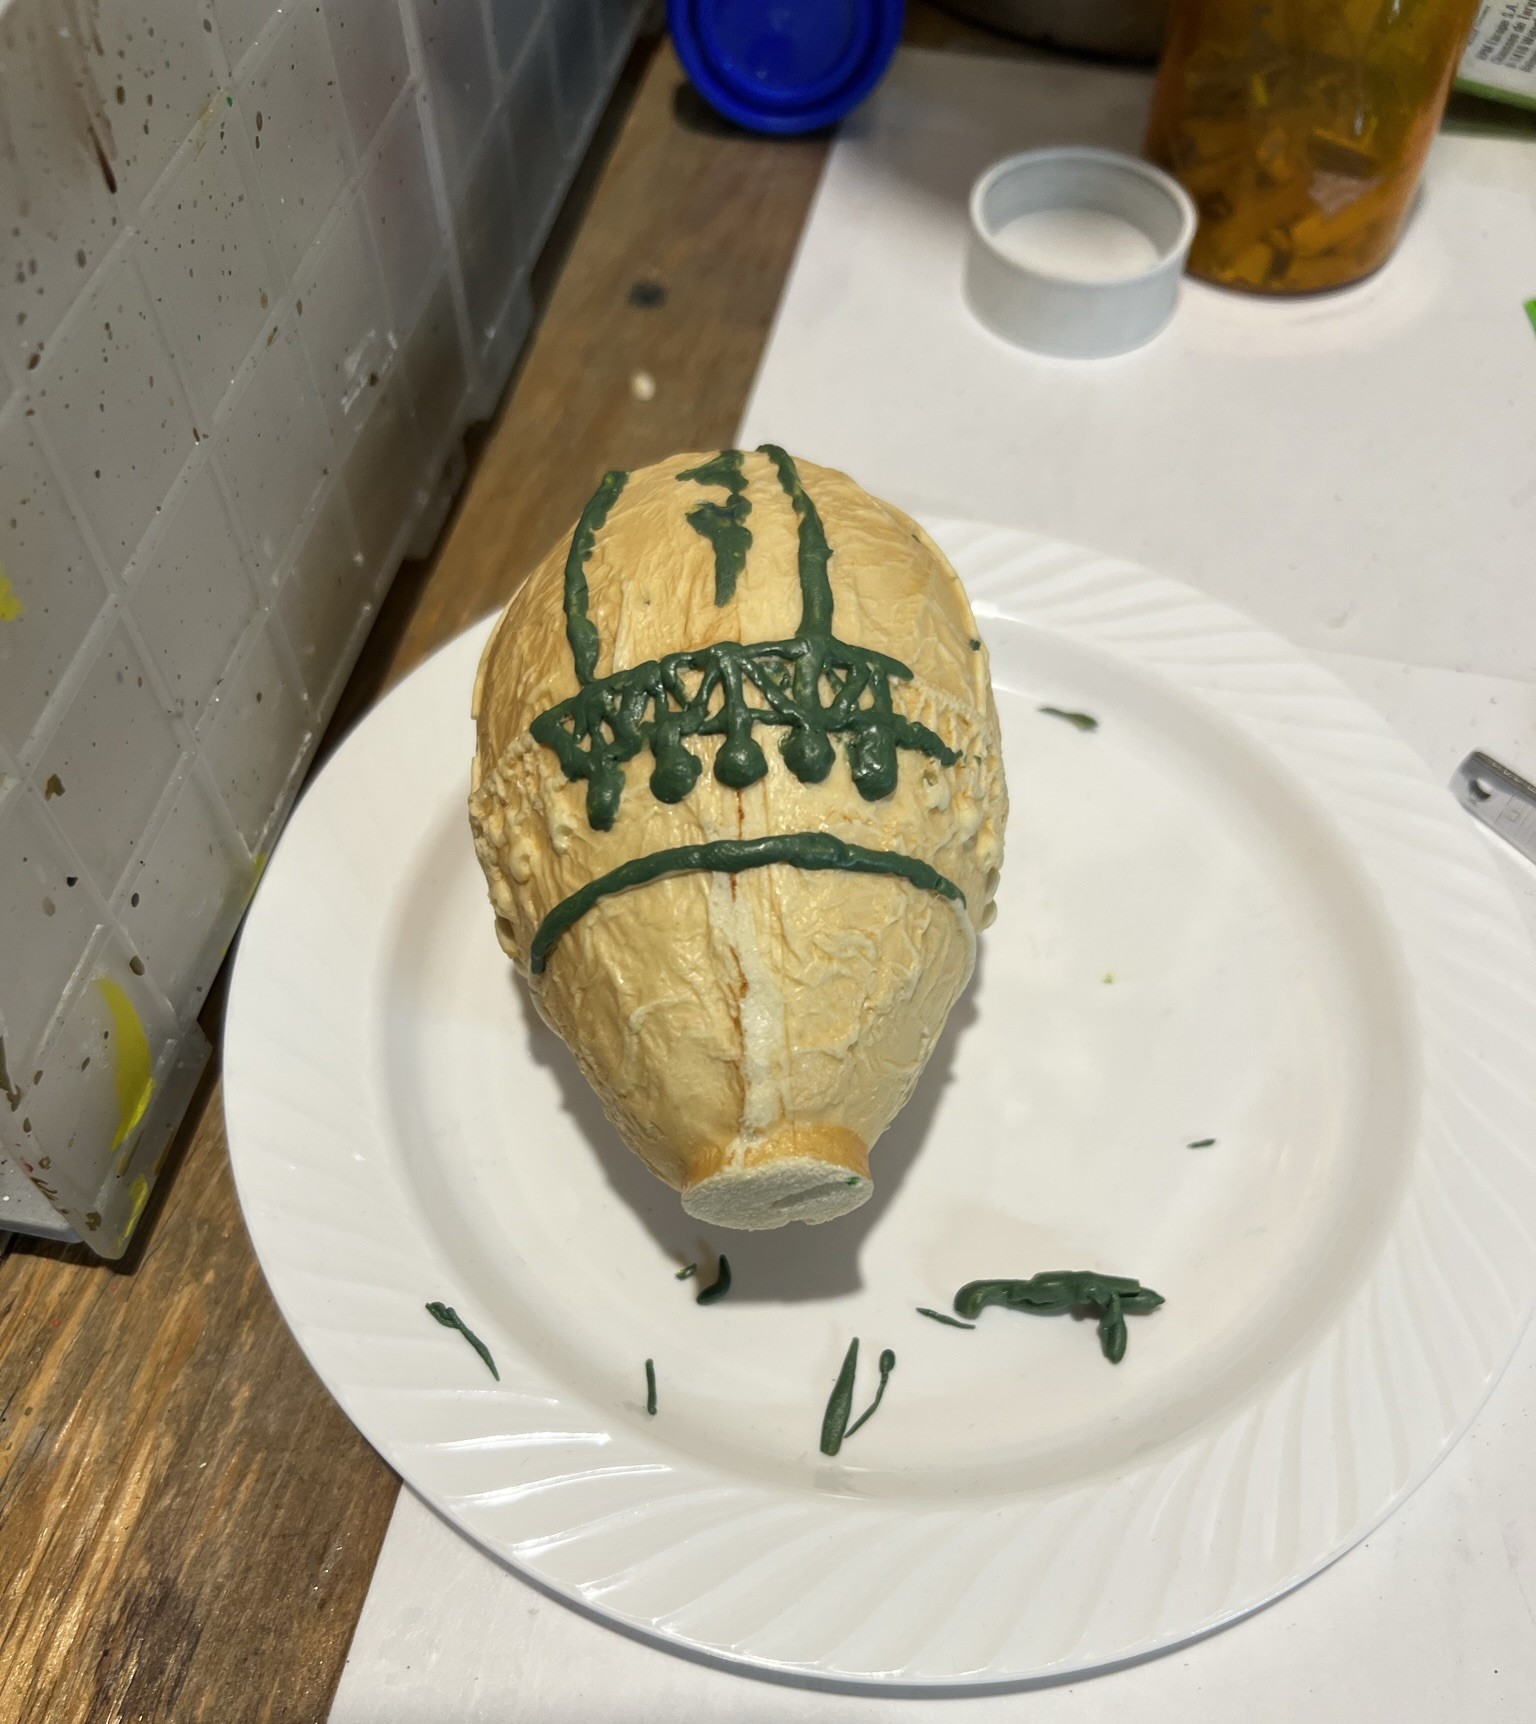
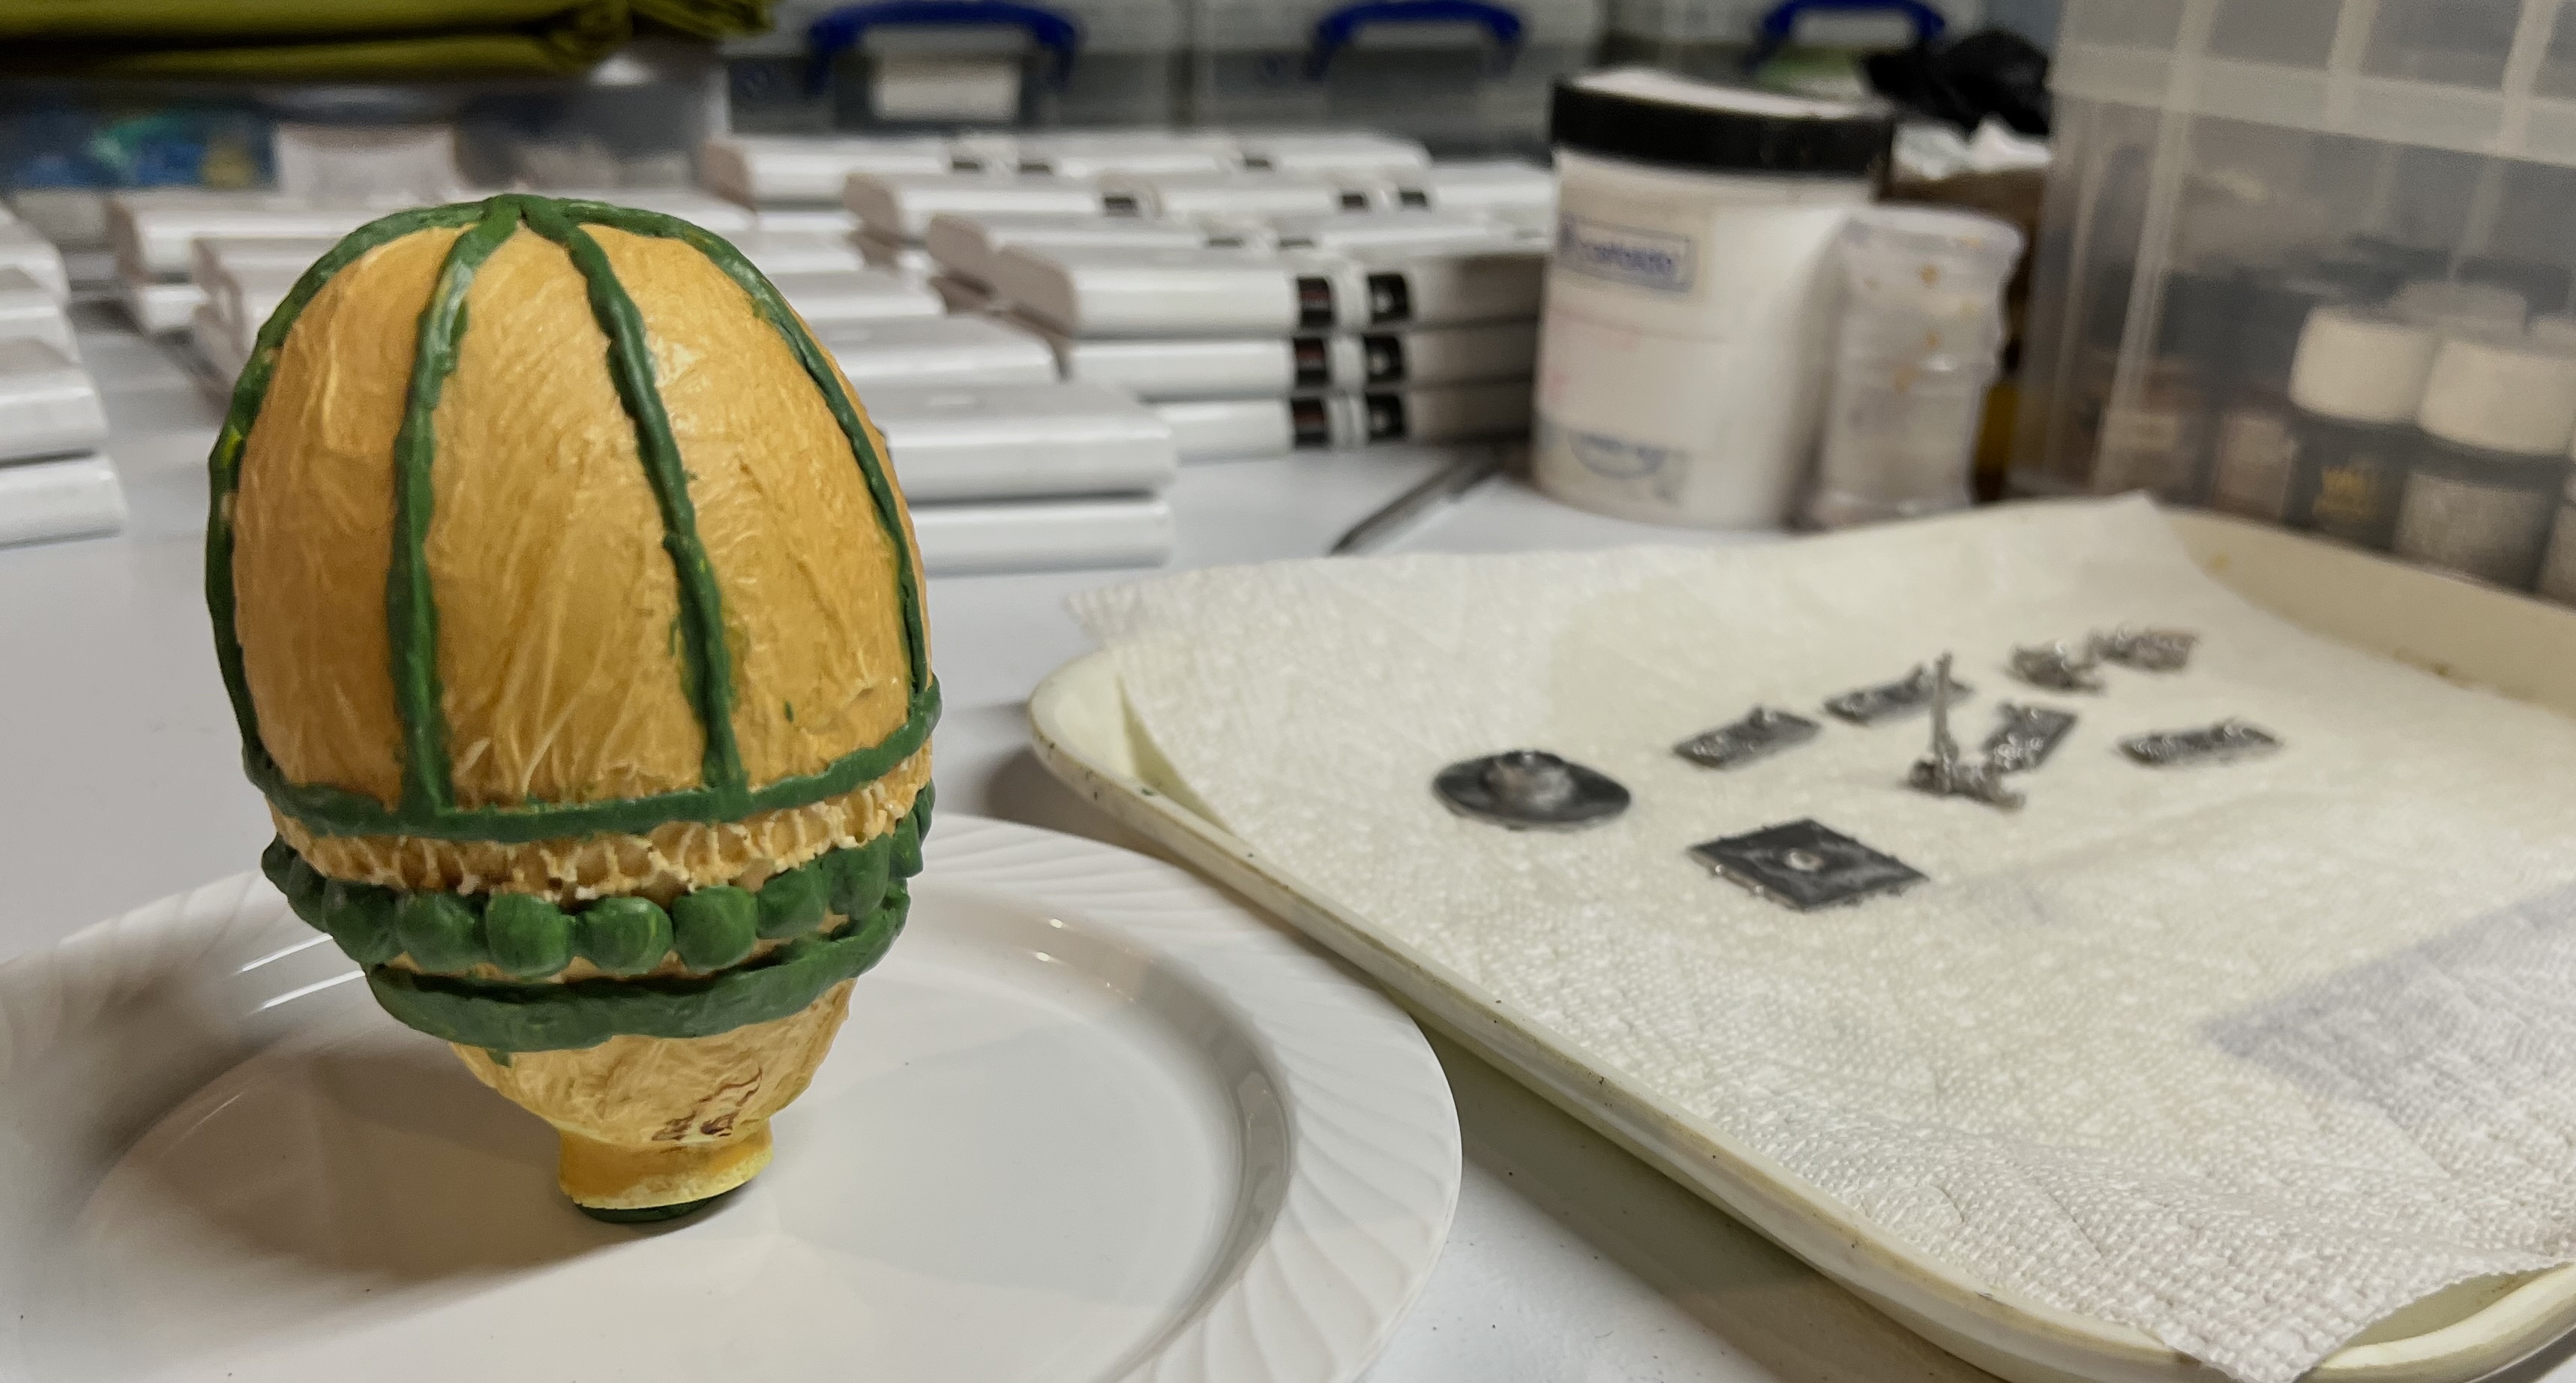
I basically followed the same process as I used on the last model. Having a blog post to review certainly proved useful in that endeavor! First step was not short as the balloon is made of foam. There were some (more than I’d like but fixable) cavitations similar to what you see in resin. I covered all the balloon lines and cavitations with green stuff – and reinforced the structure as you see below.

Lots of sculpting with green stuff. The metal parts of the model are in the background.

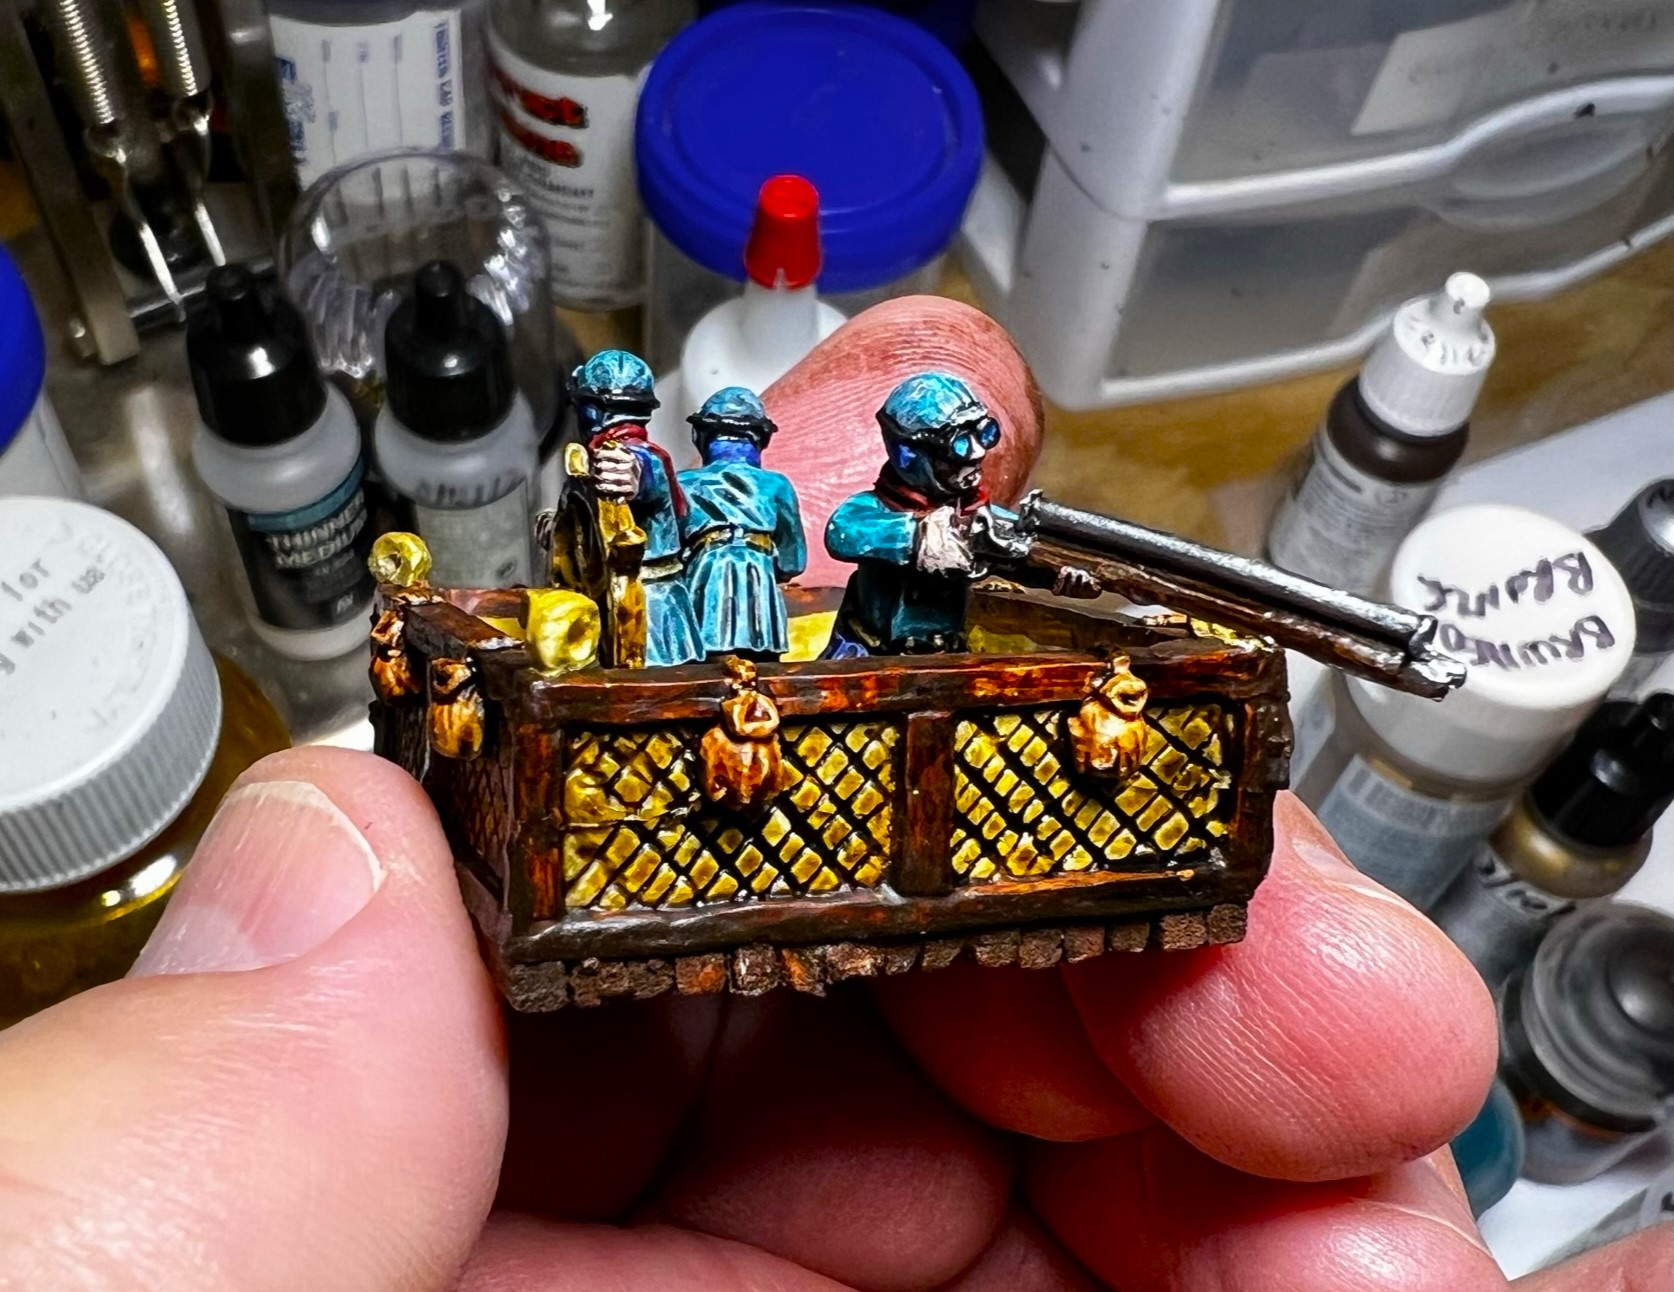
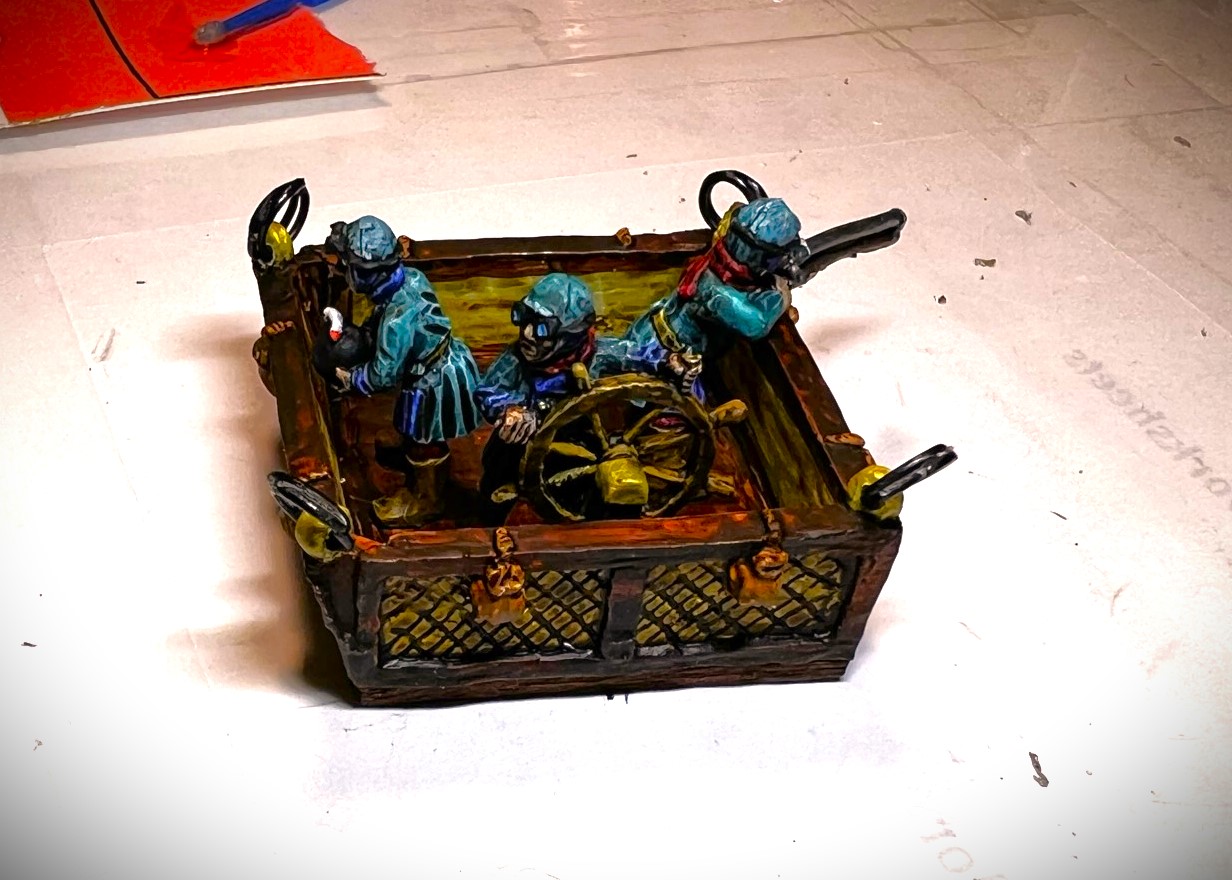
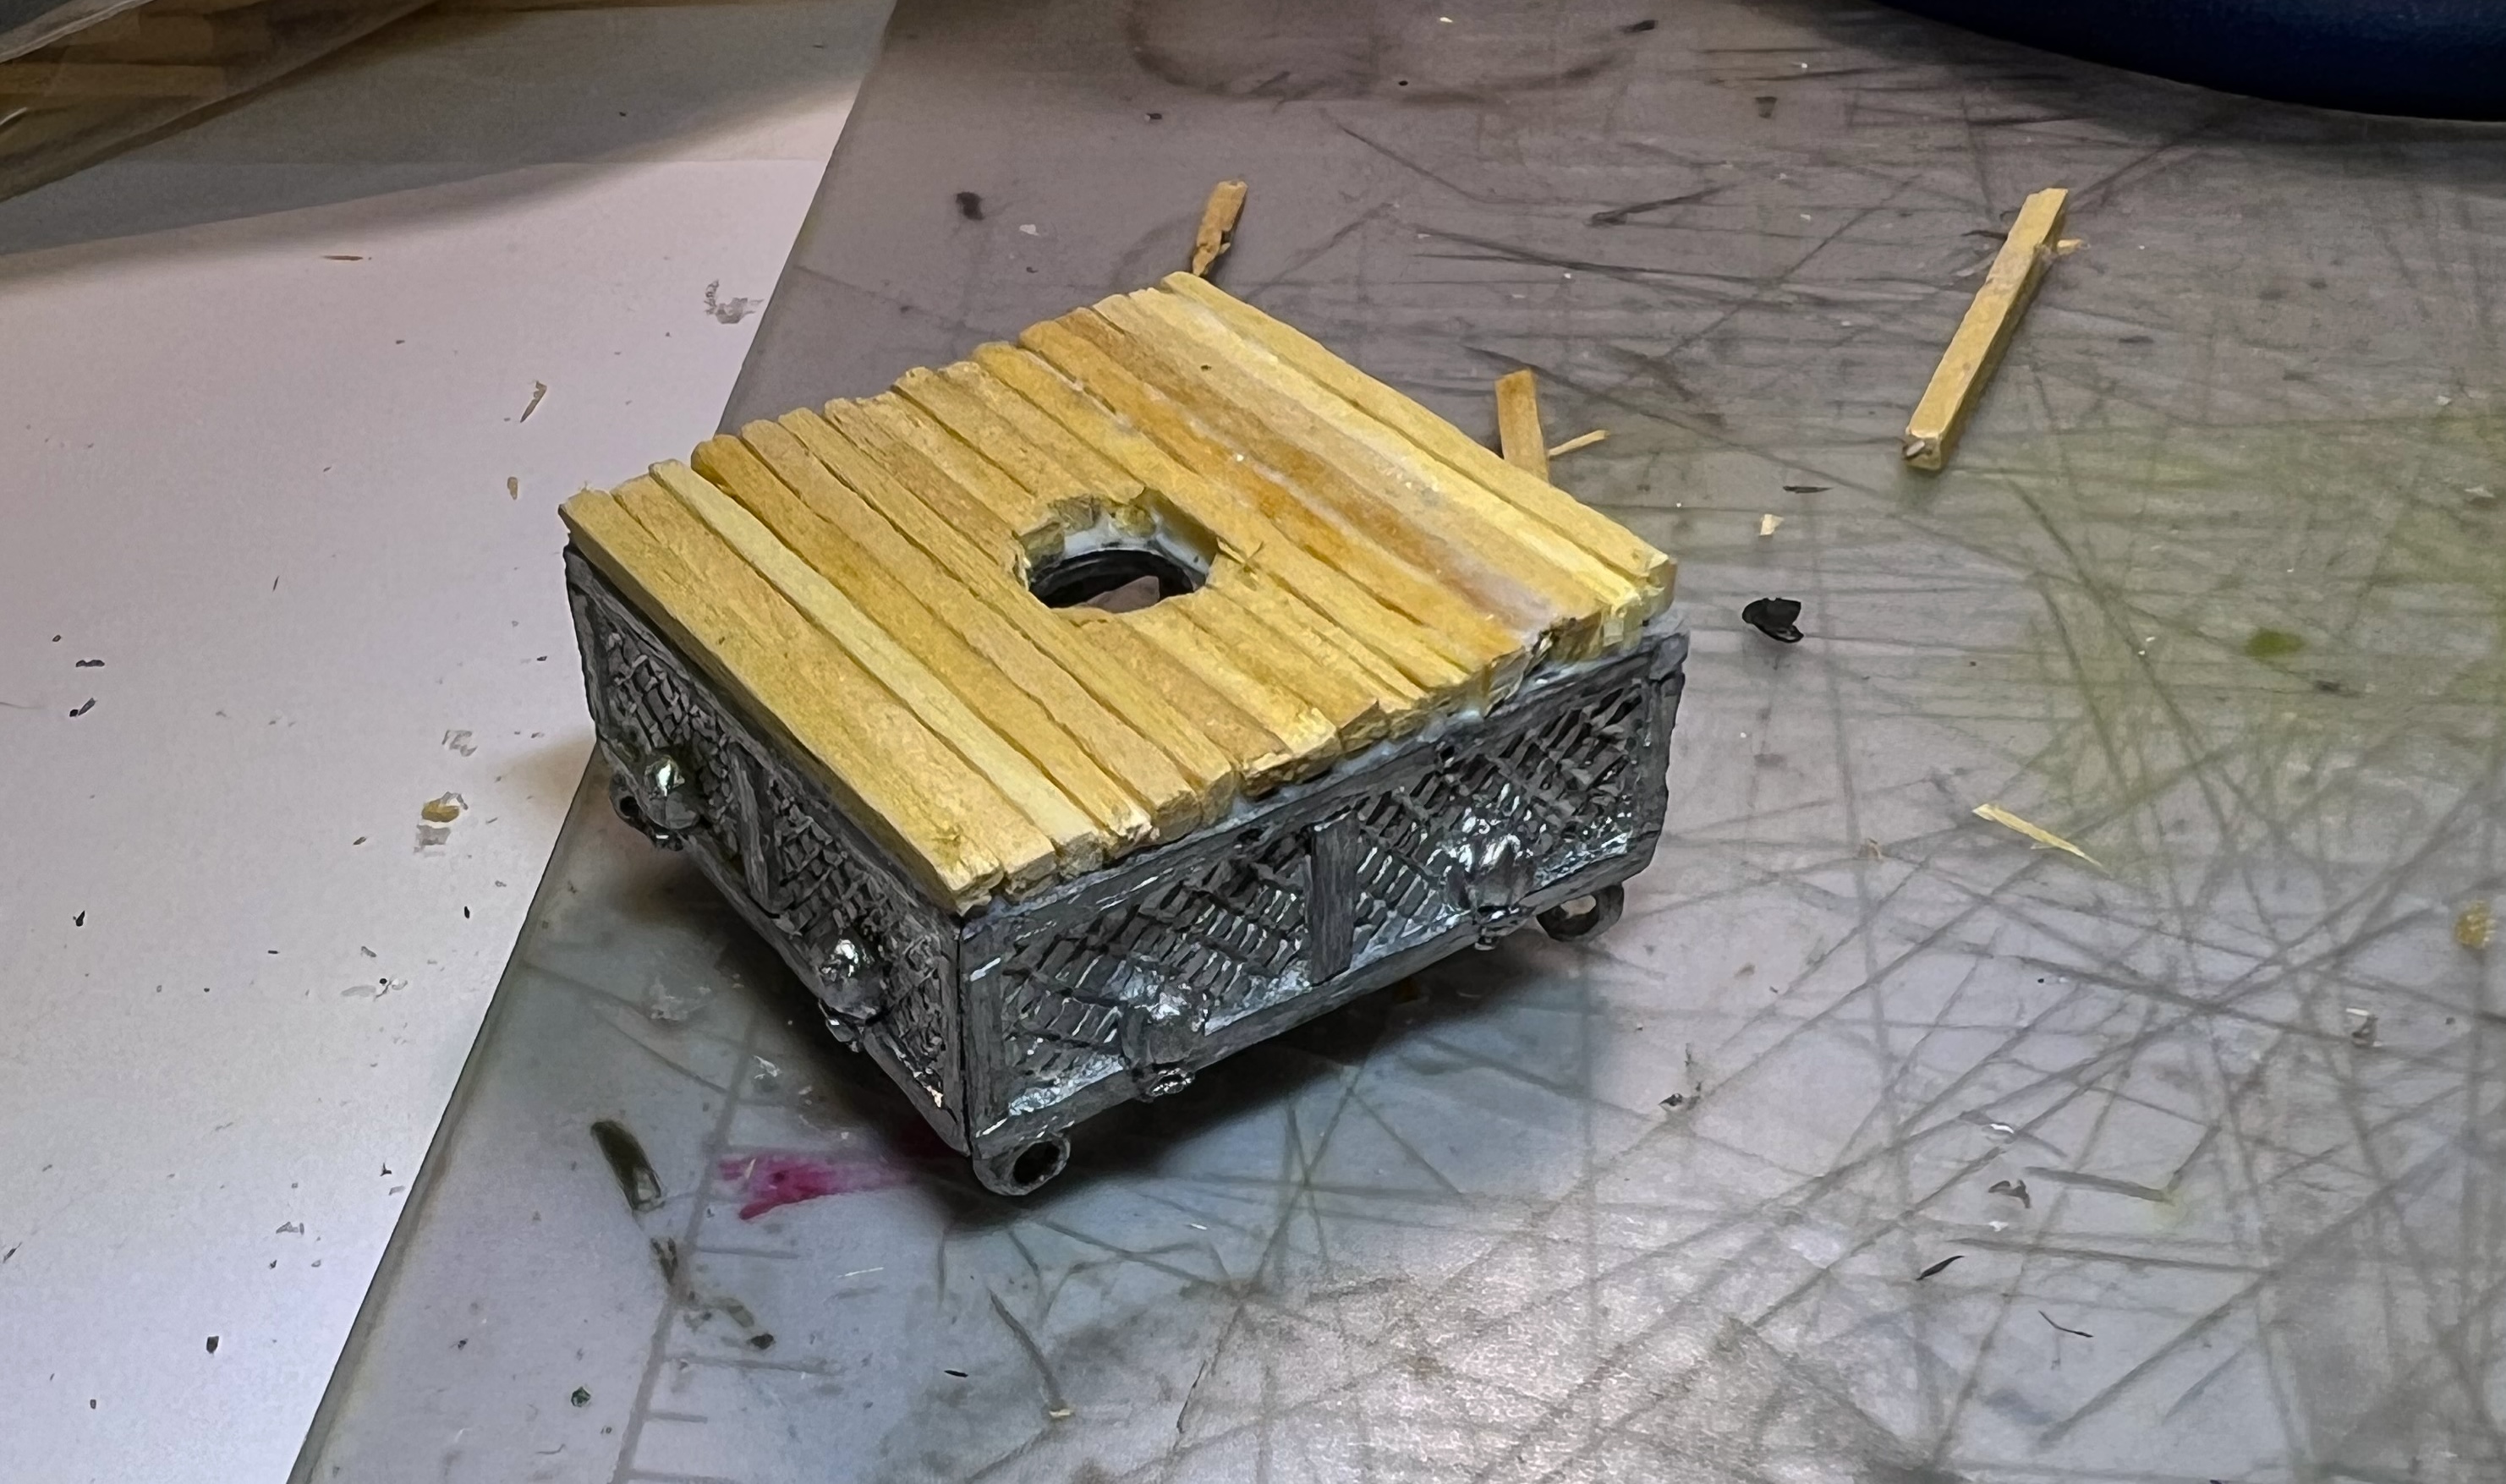
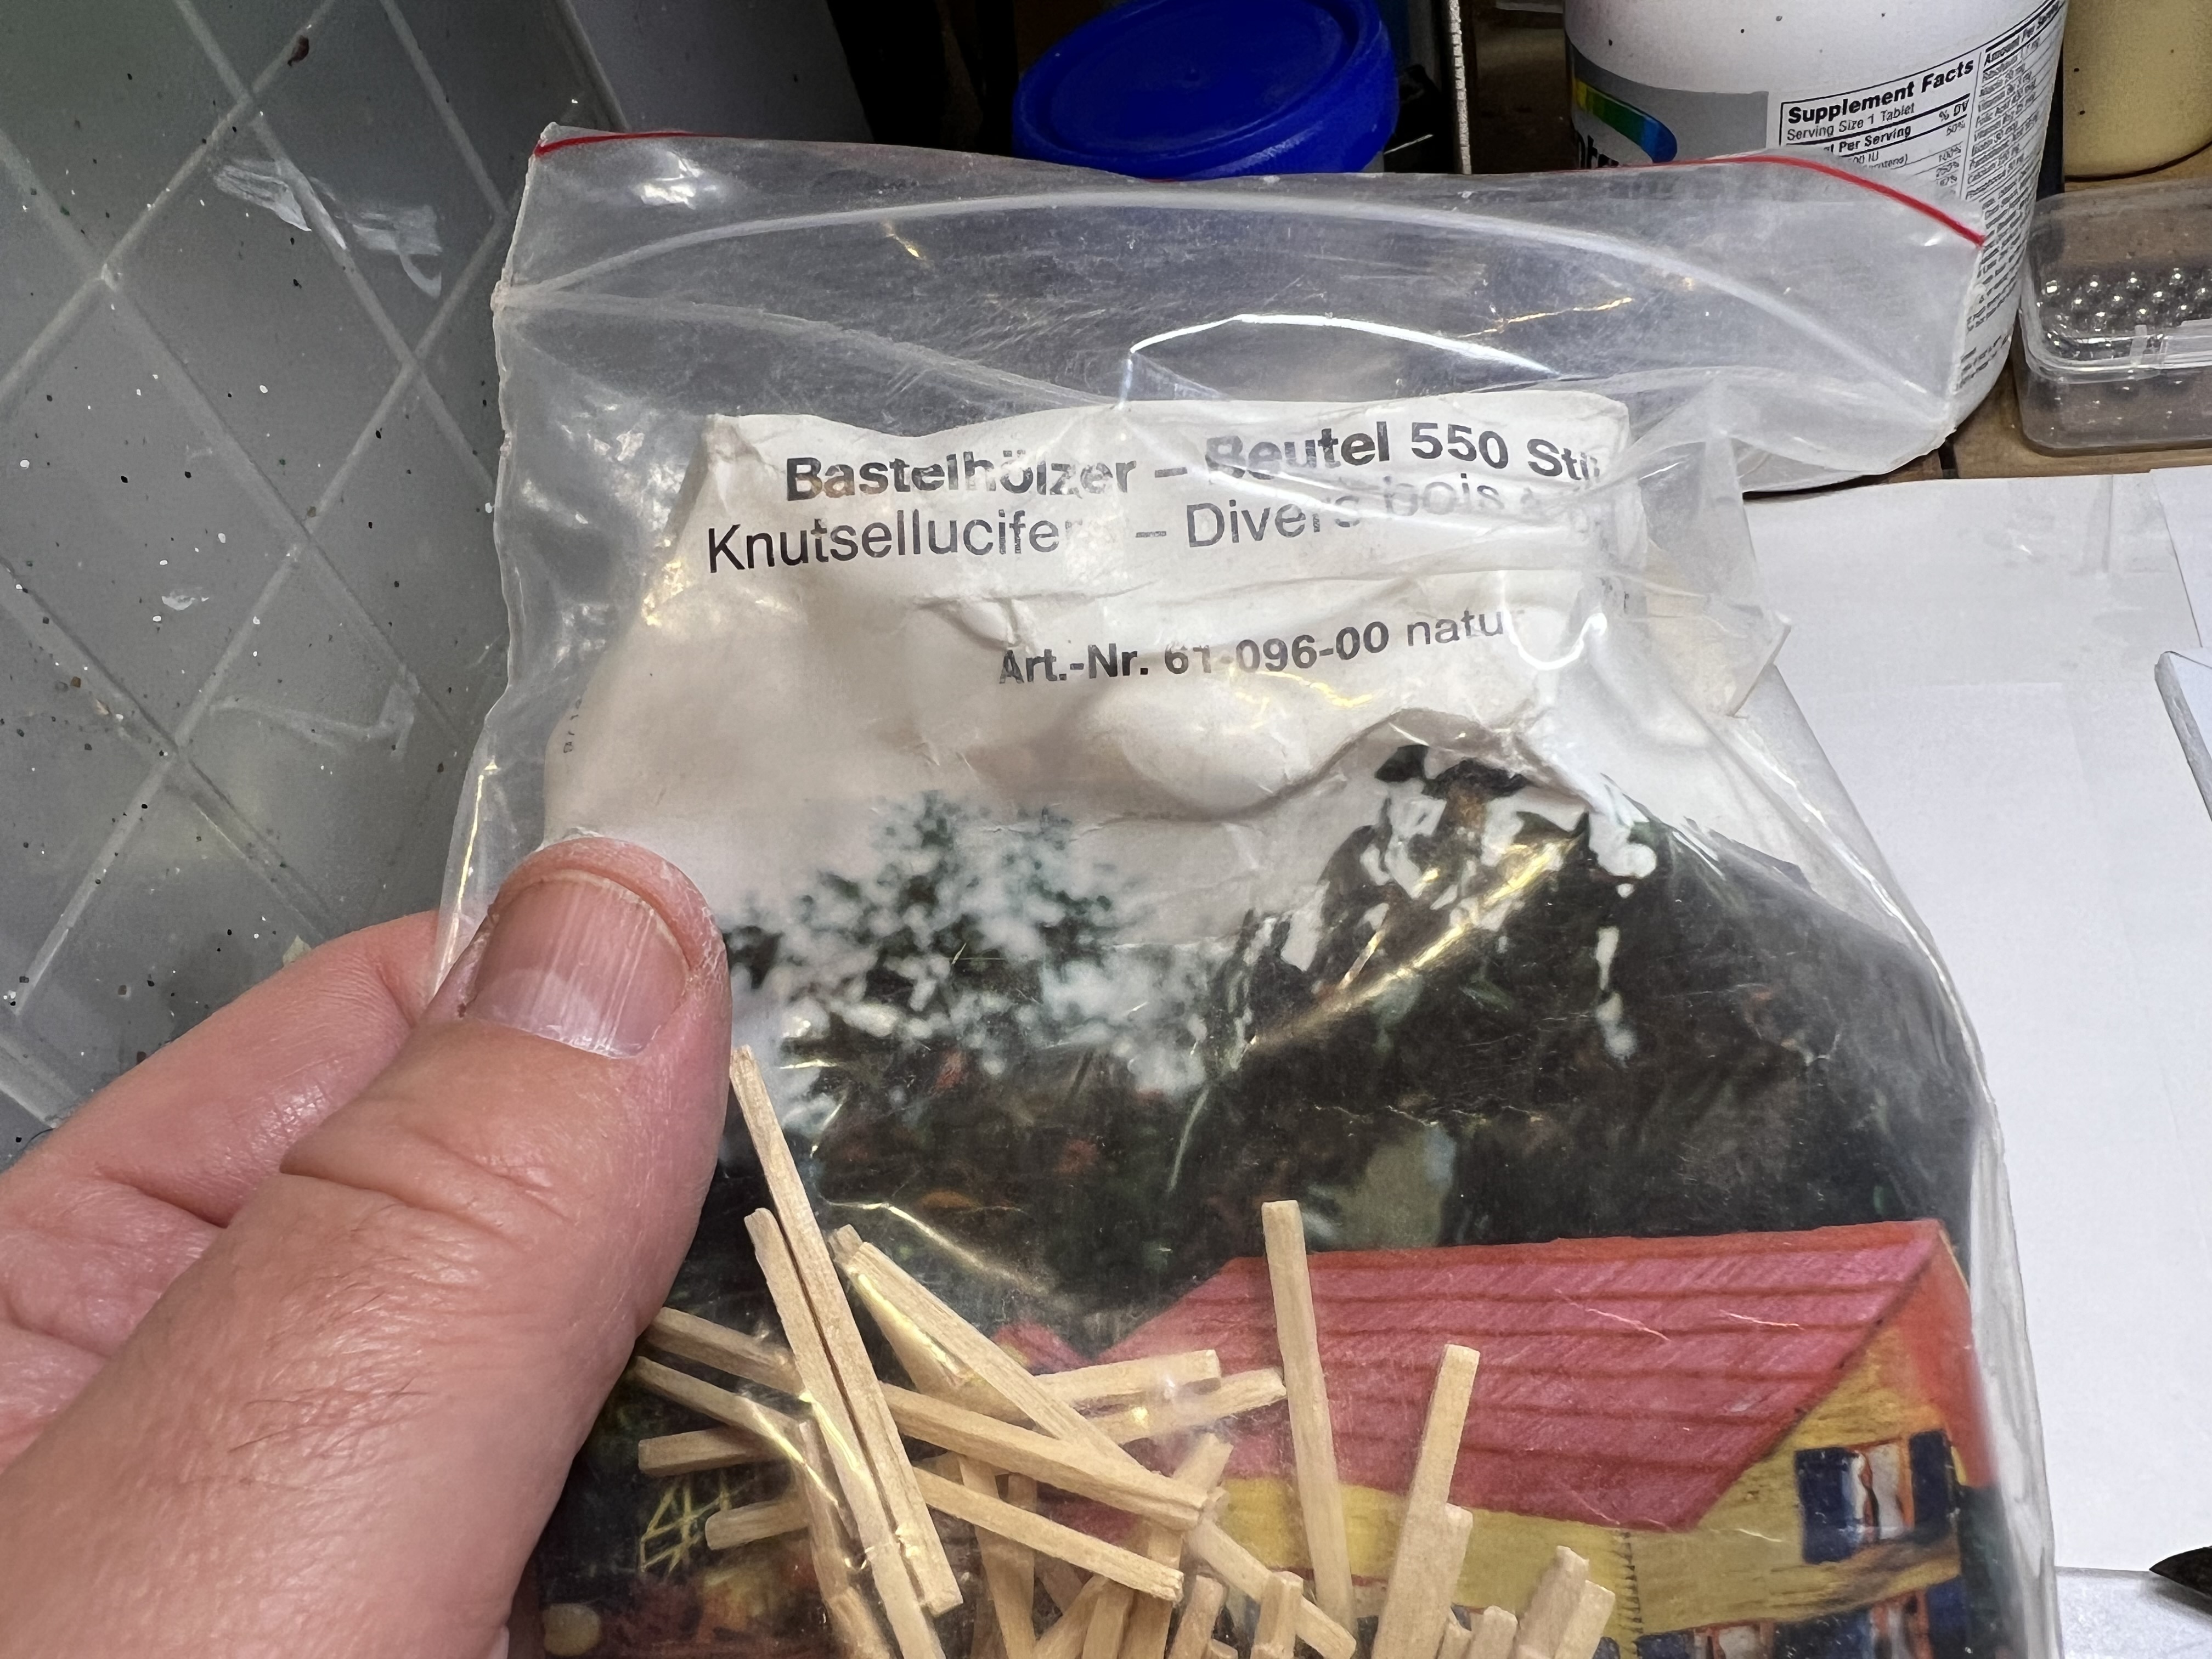
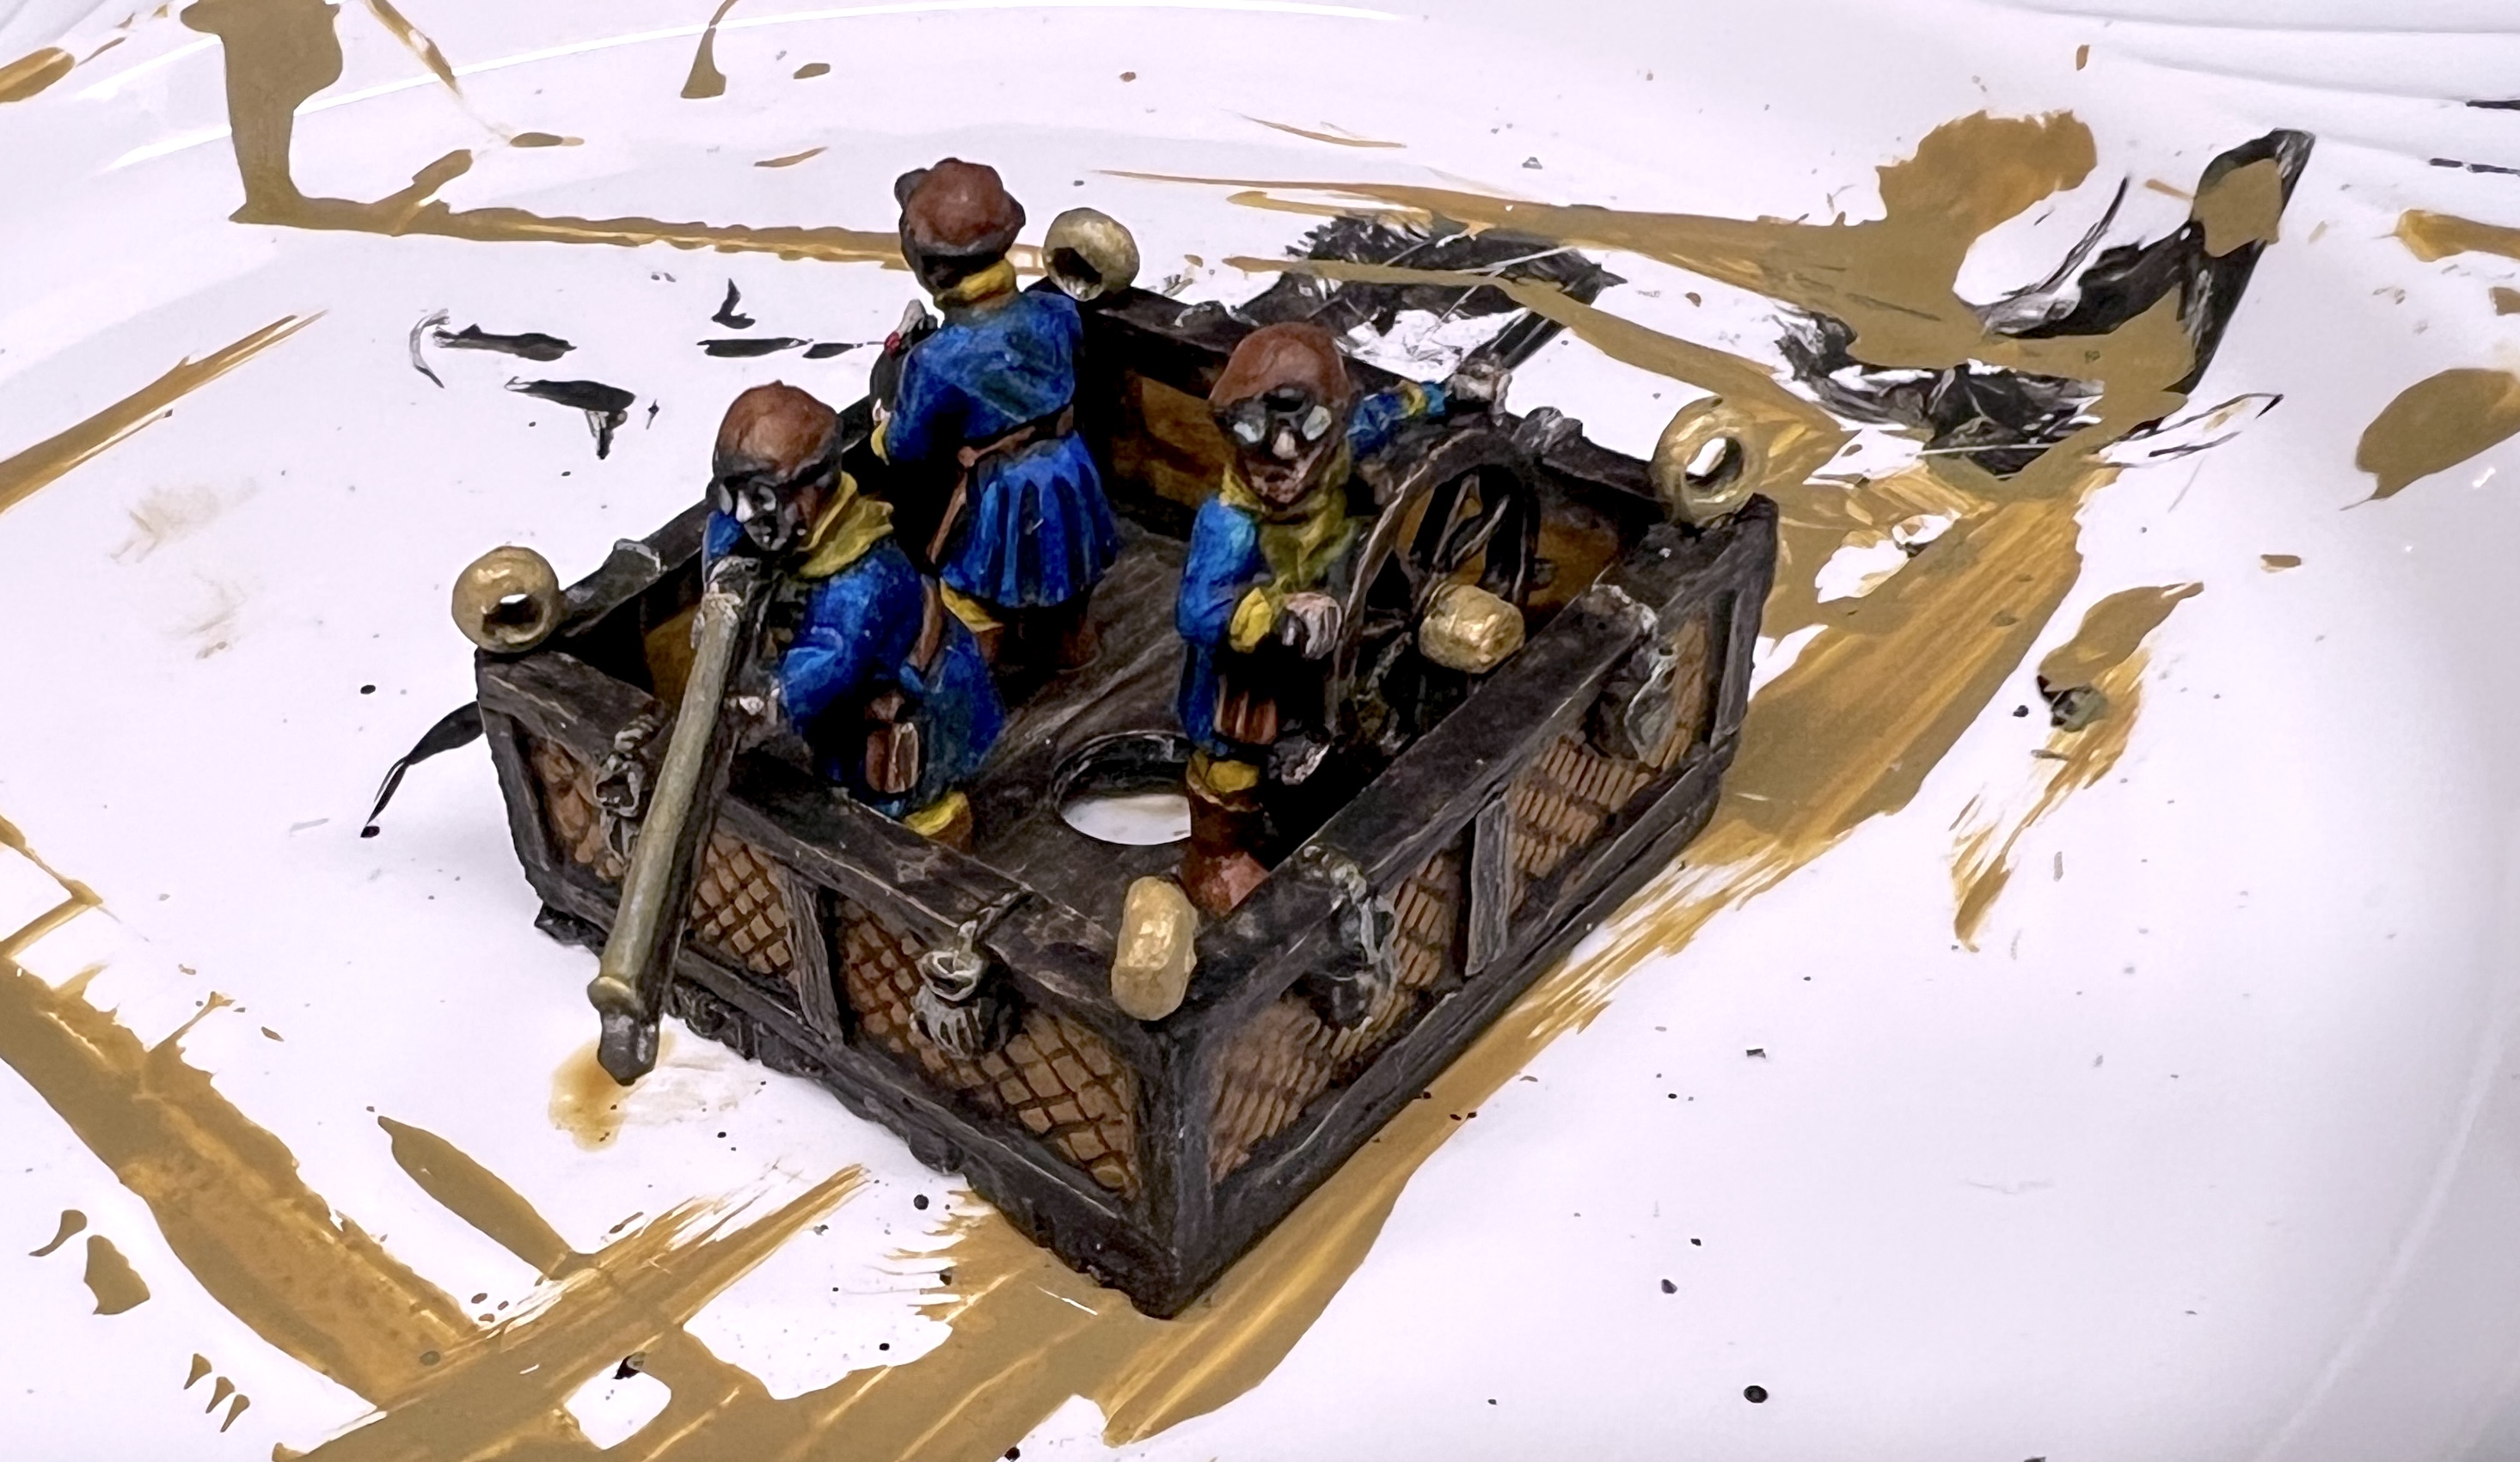
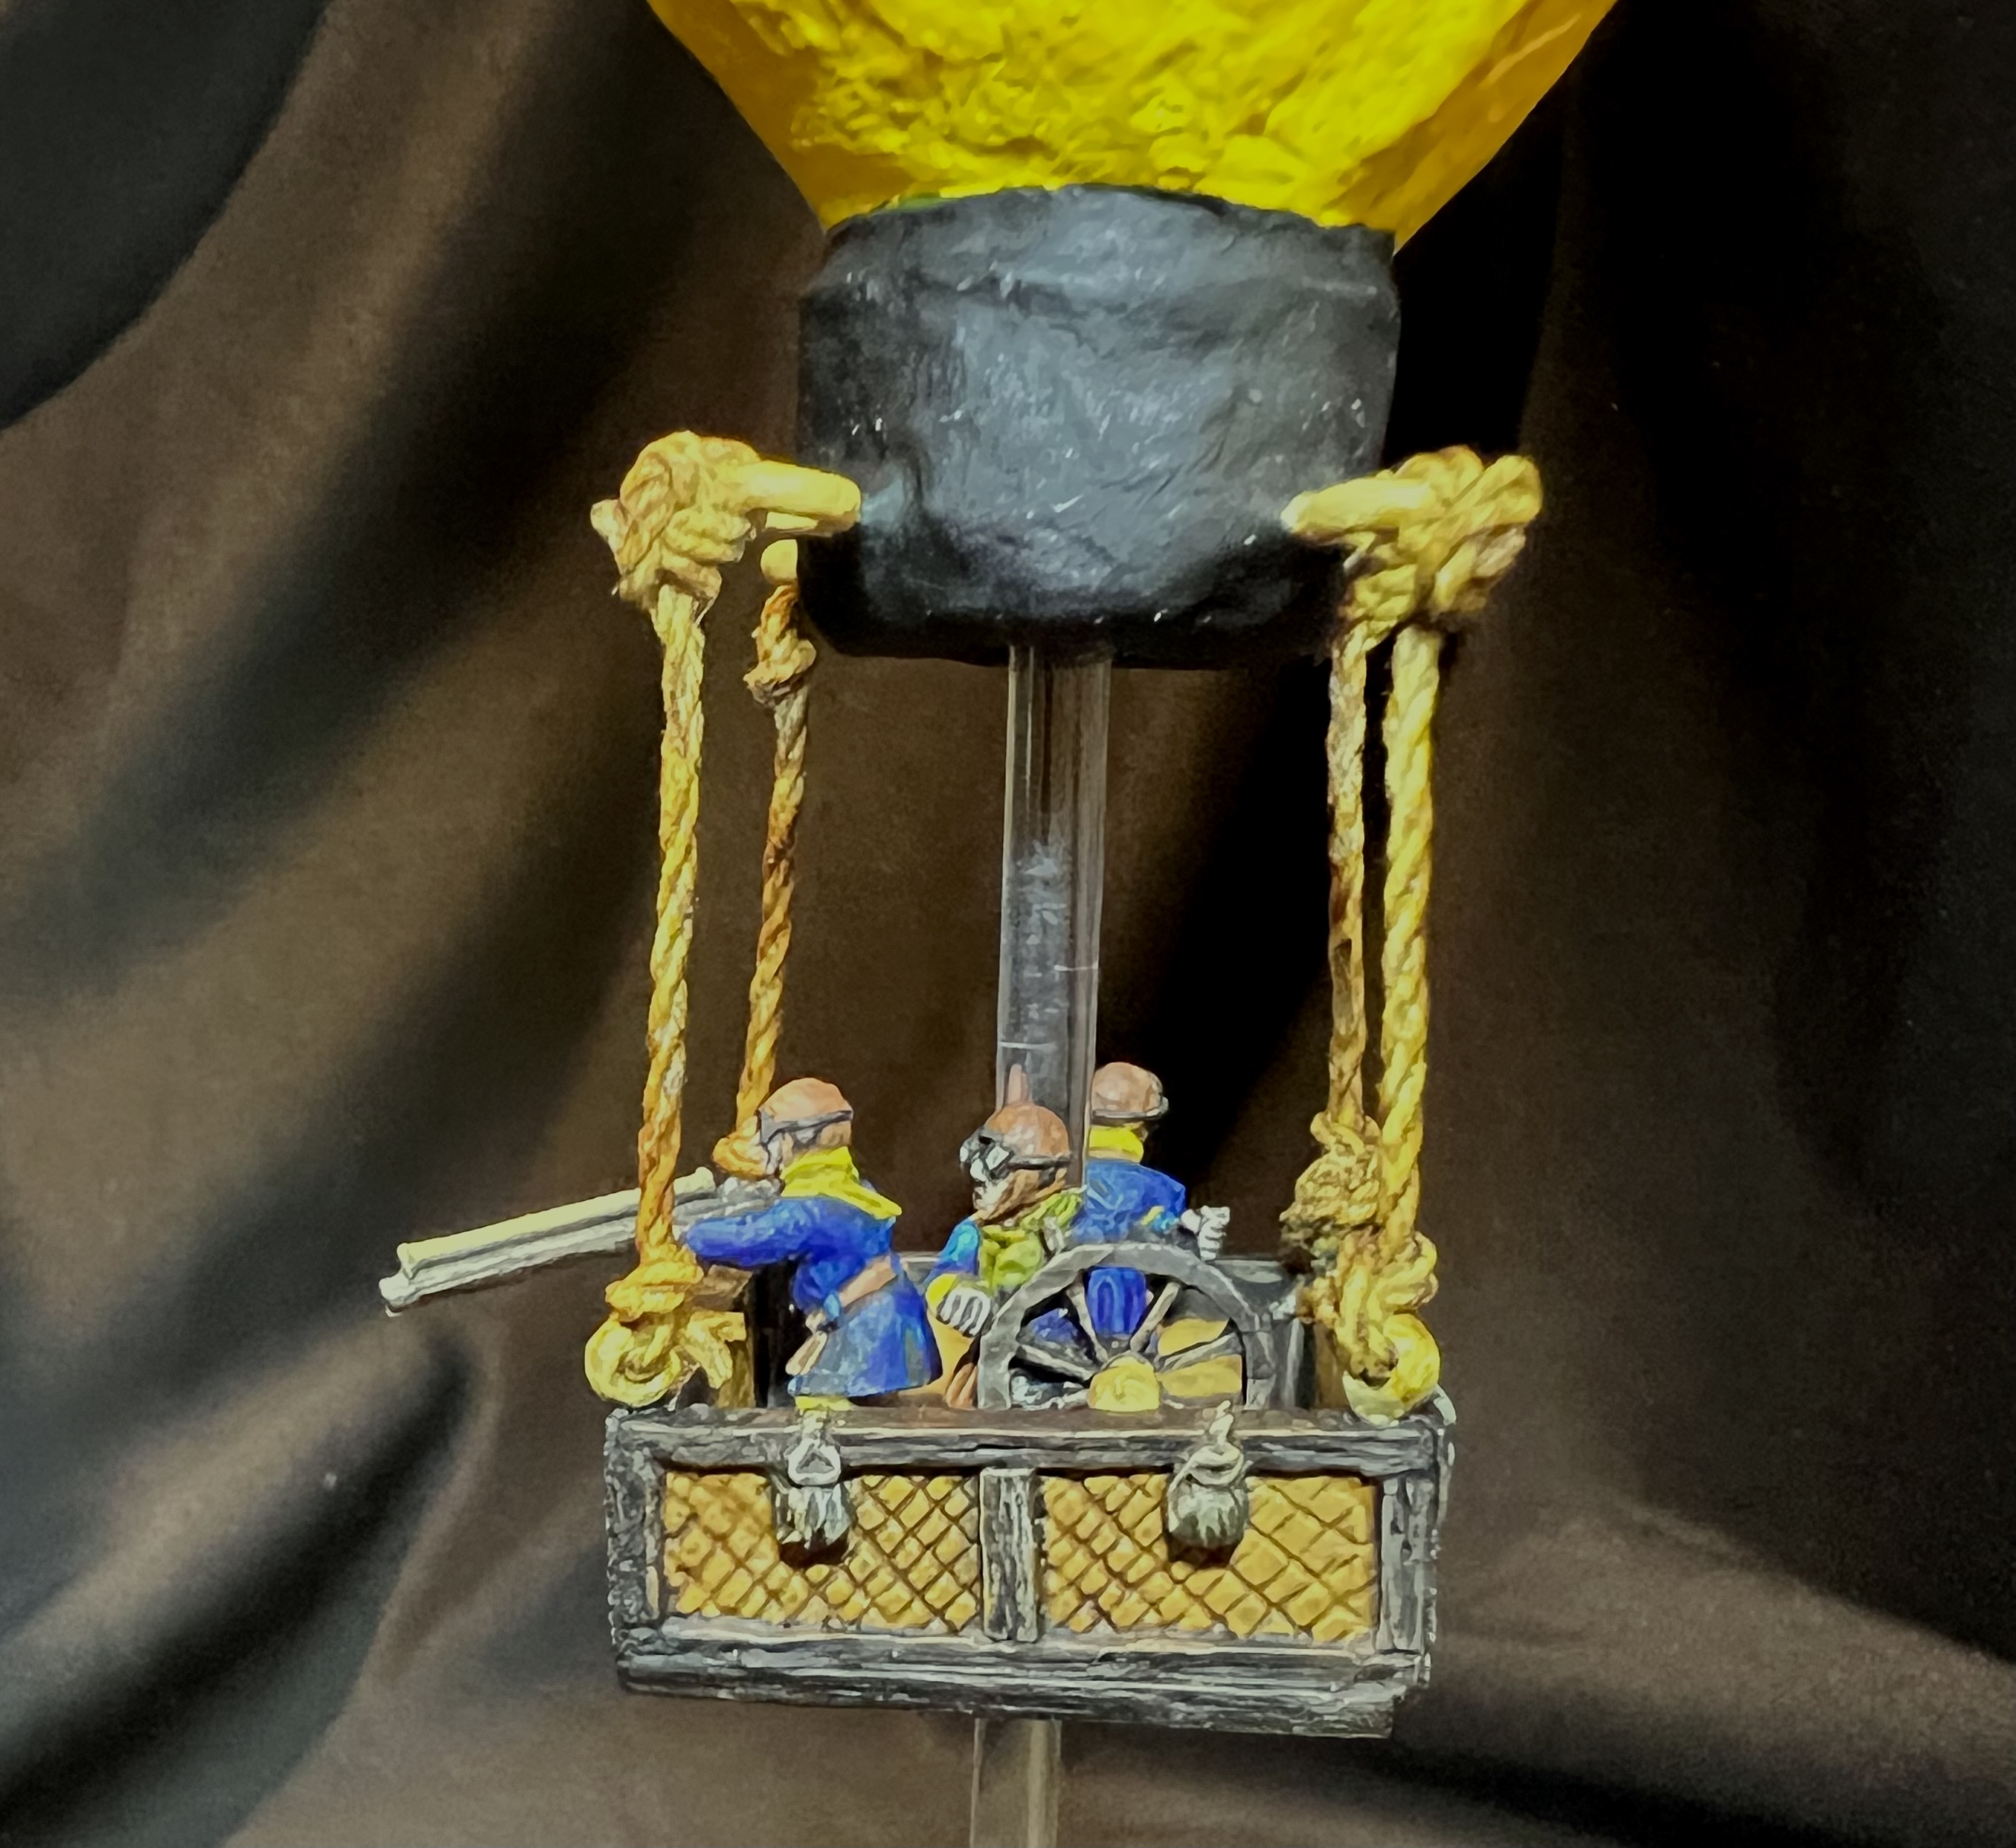
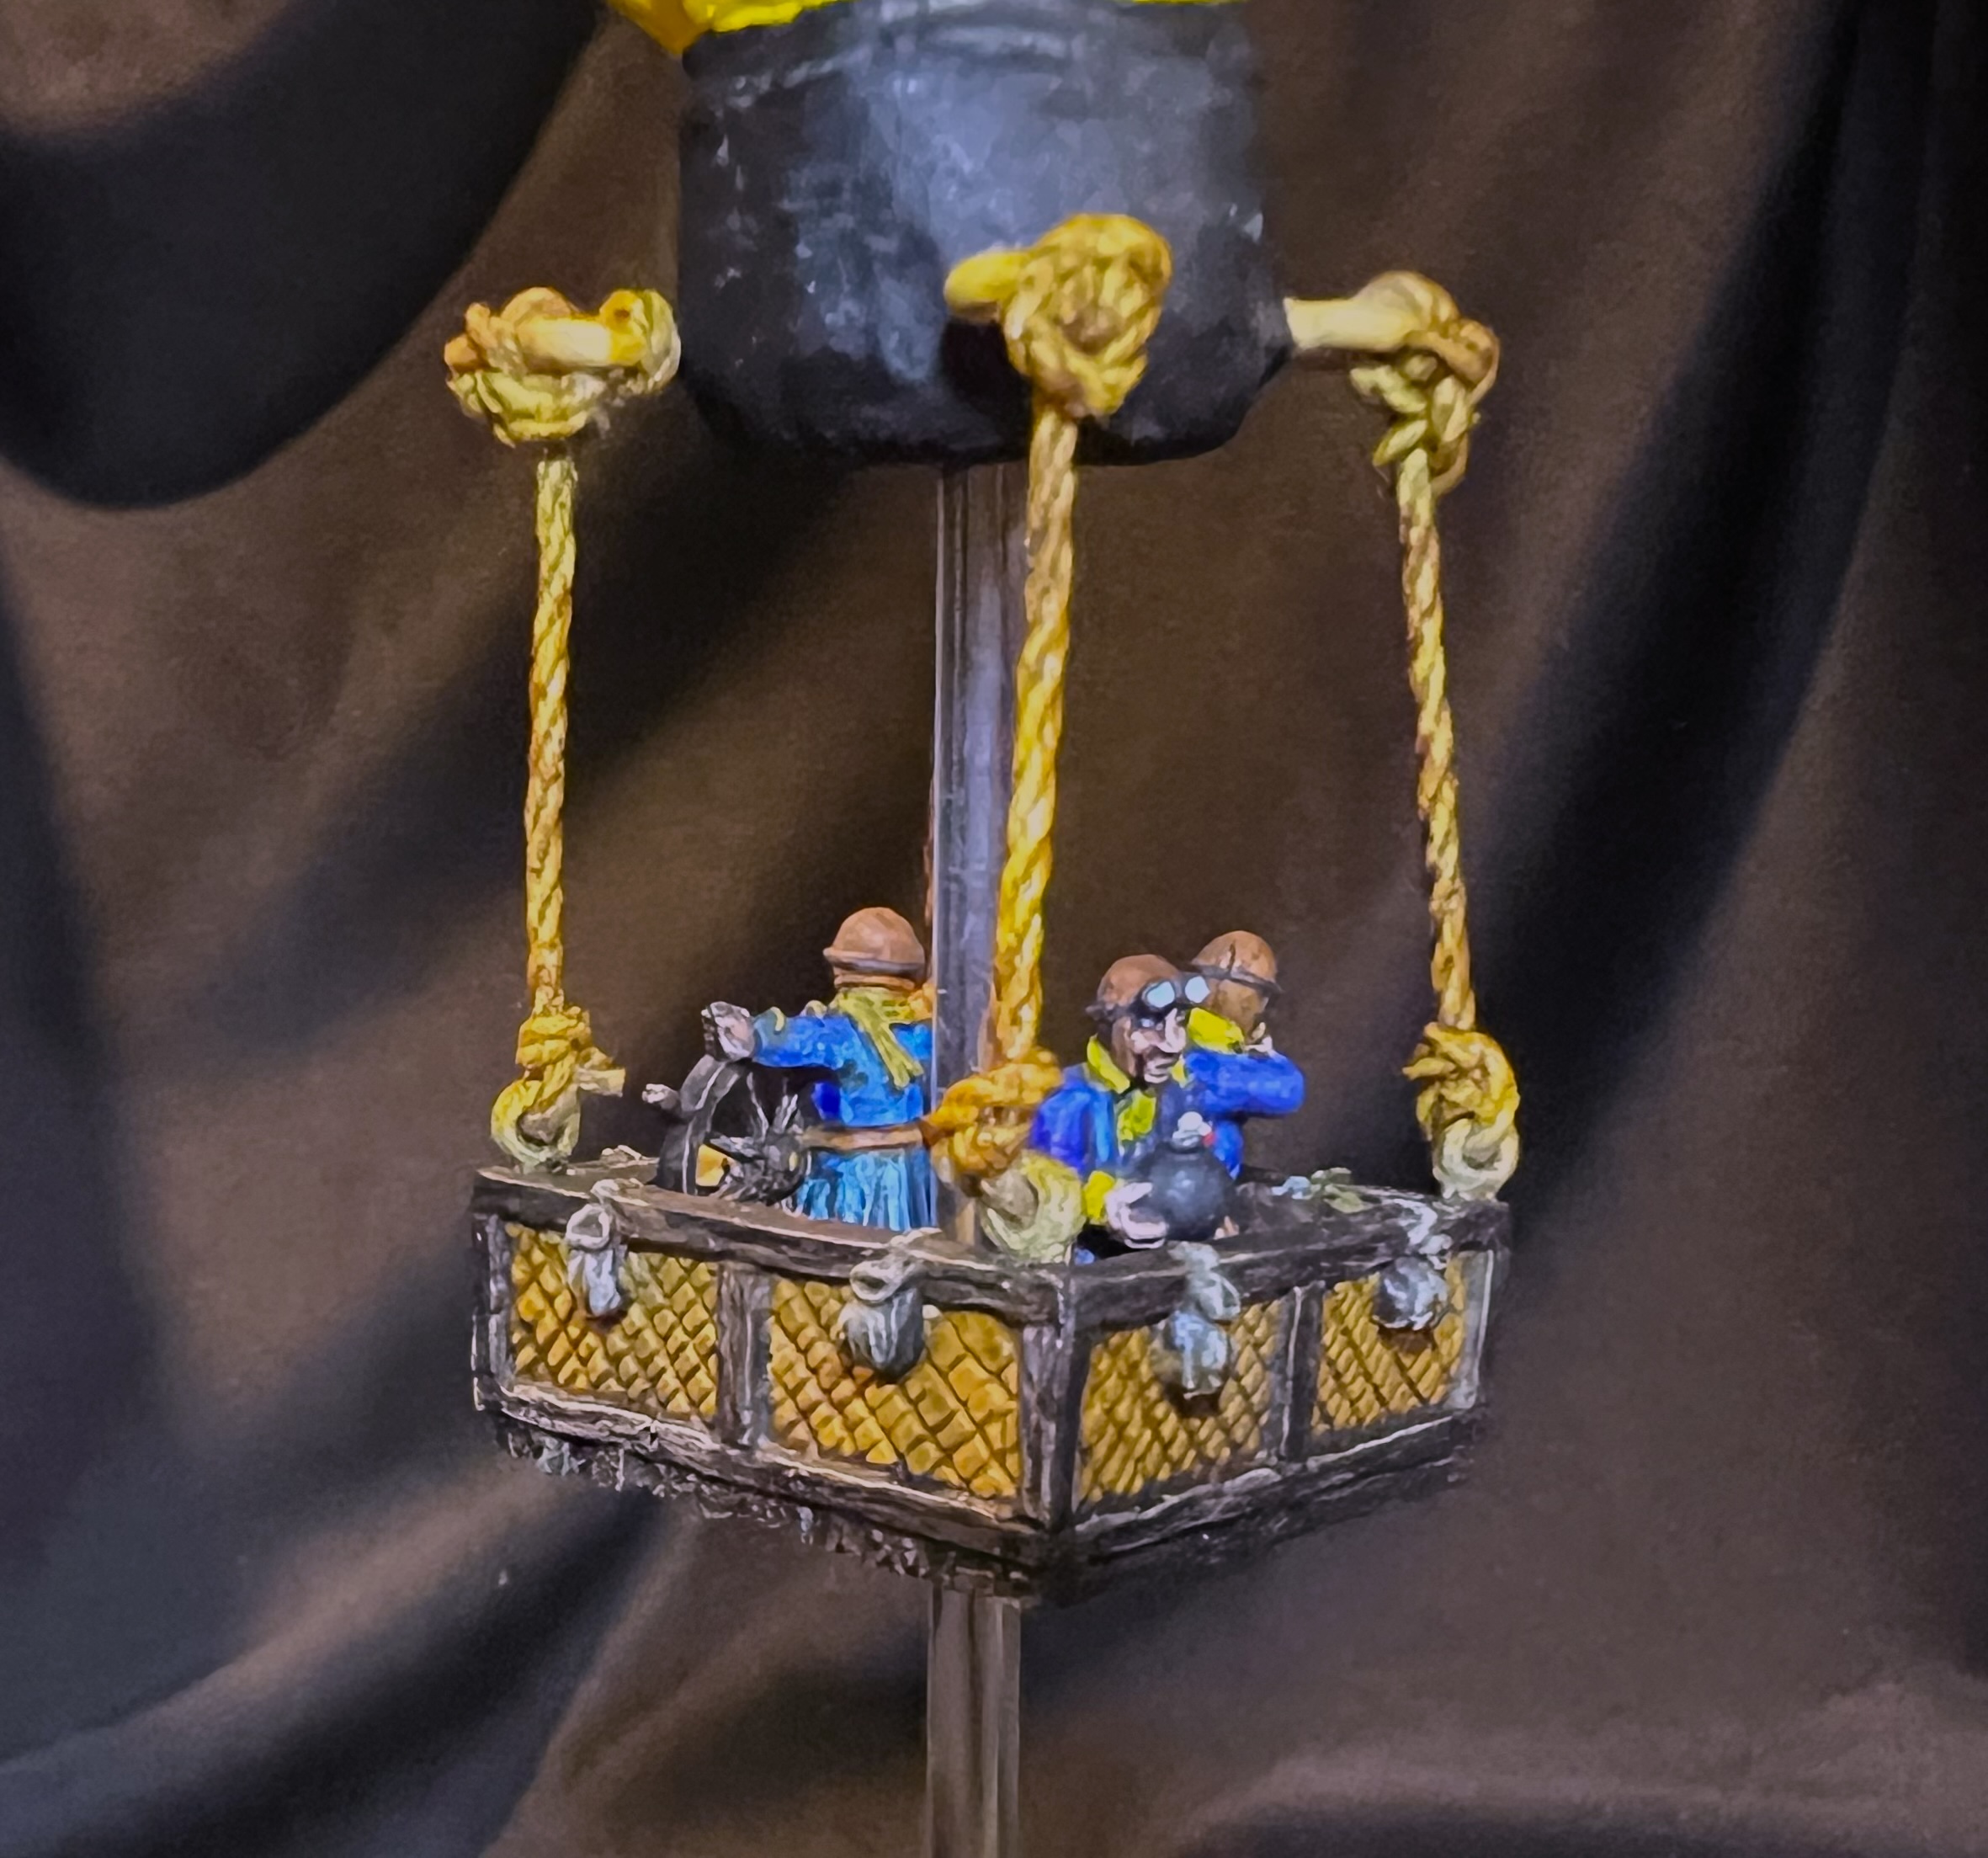
The basket is metal, and easily glued together. Once again, I used my 1987 matchsticks (that I purchased while stationed in West Germany) to give a more realistic look to the bare metal basket’s underside.

The basket’s underside with added matchsticks.
Still in my hobby supplies – now for nearly 40 years!

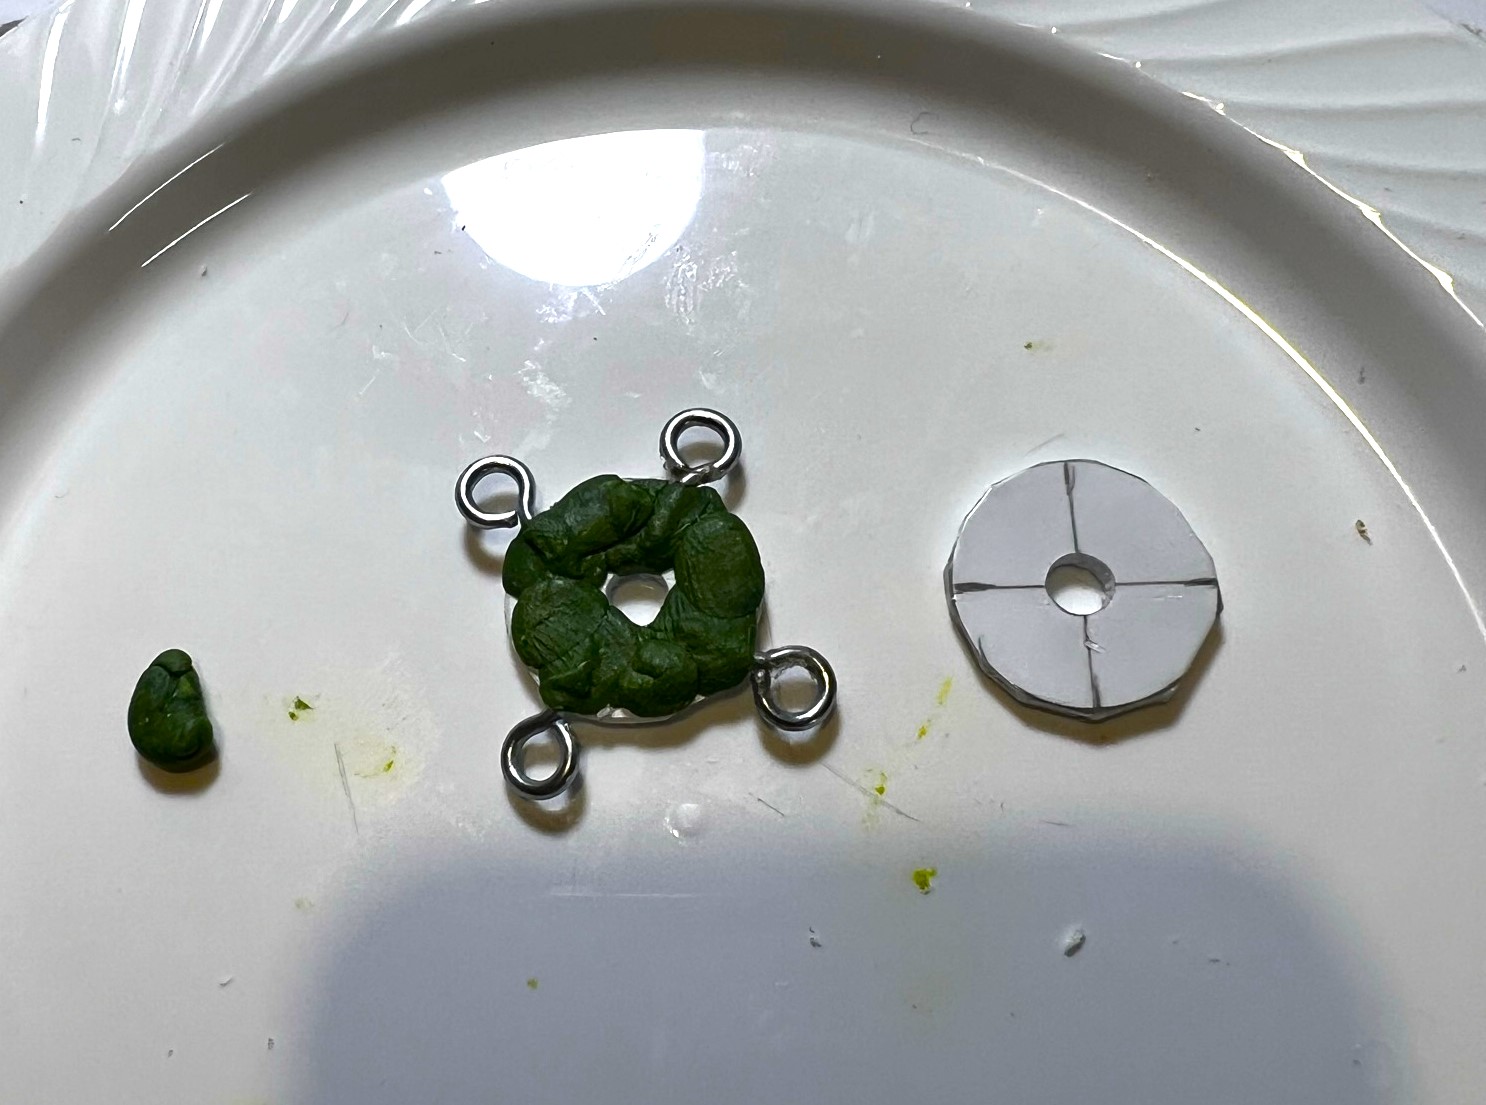
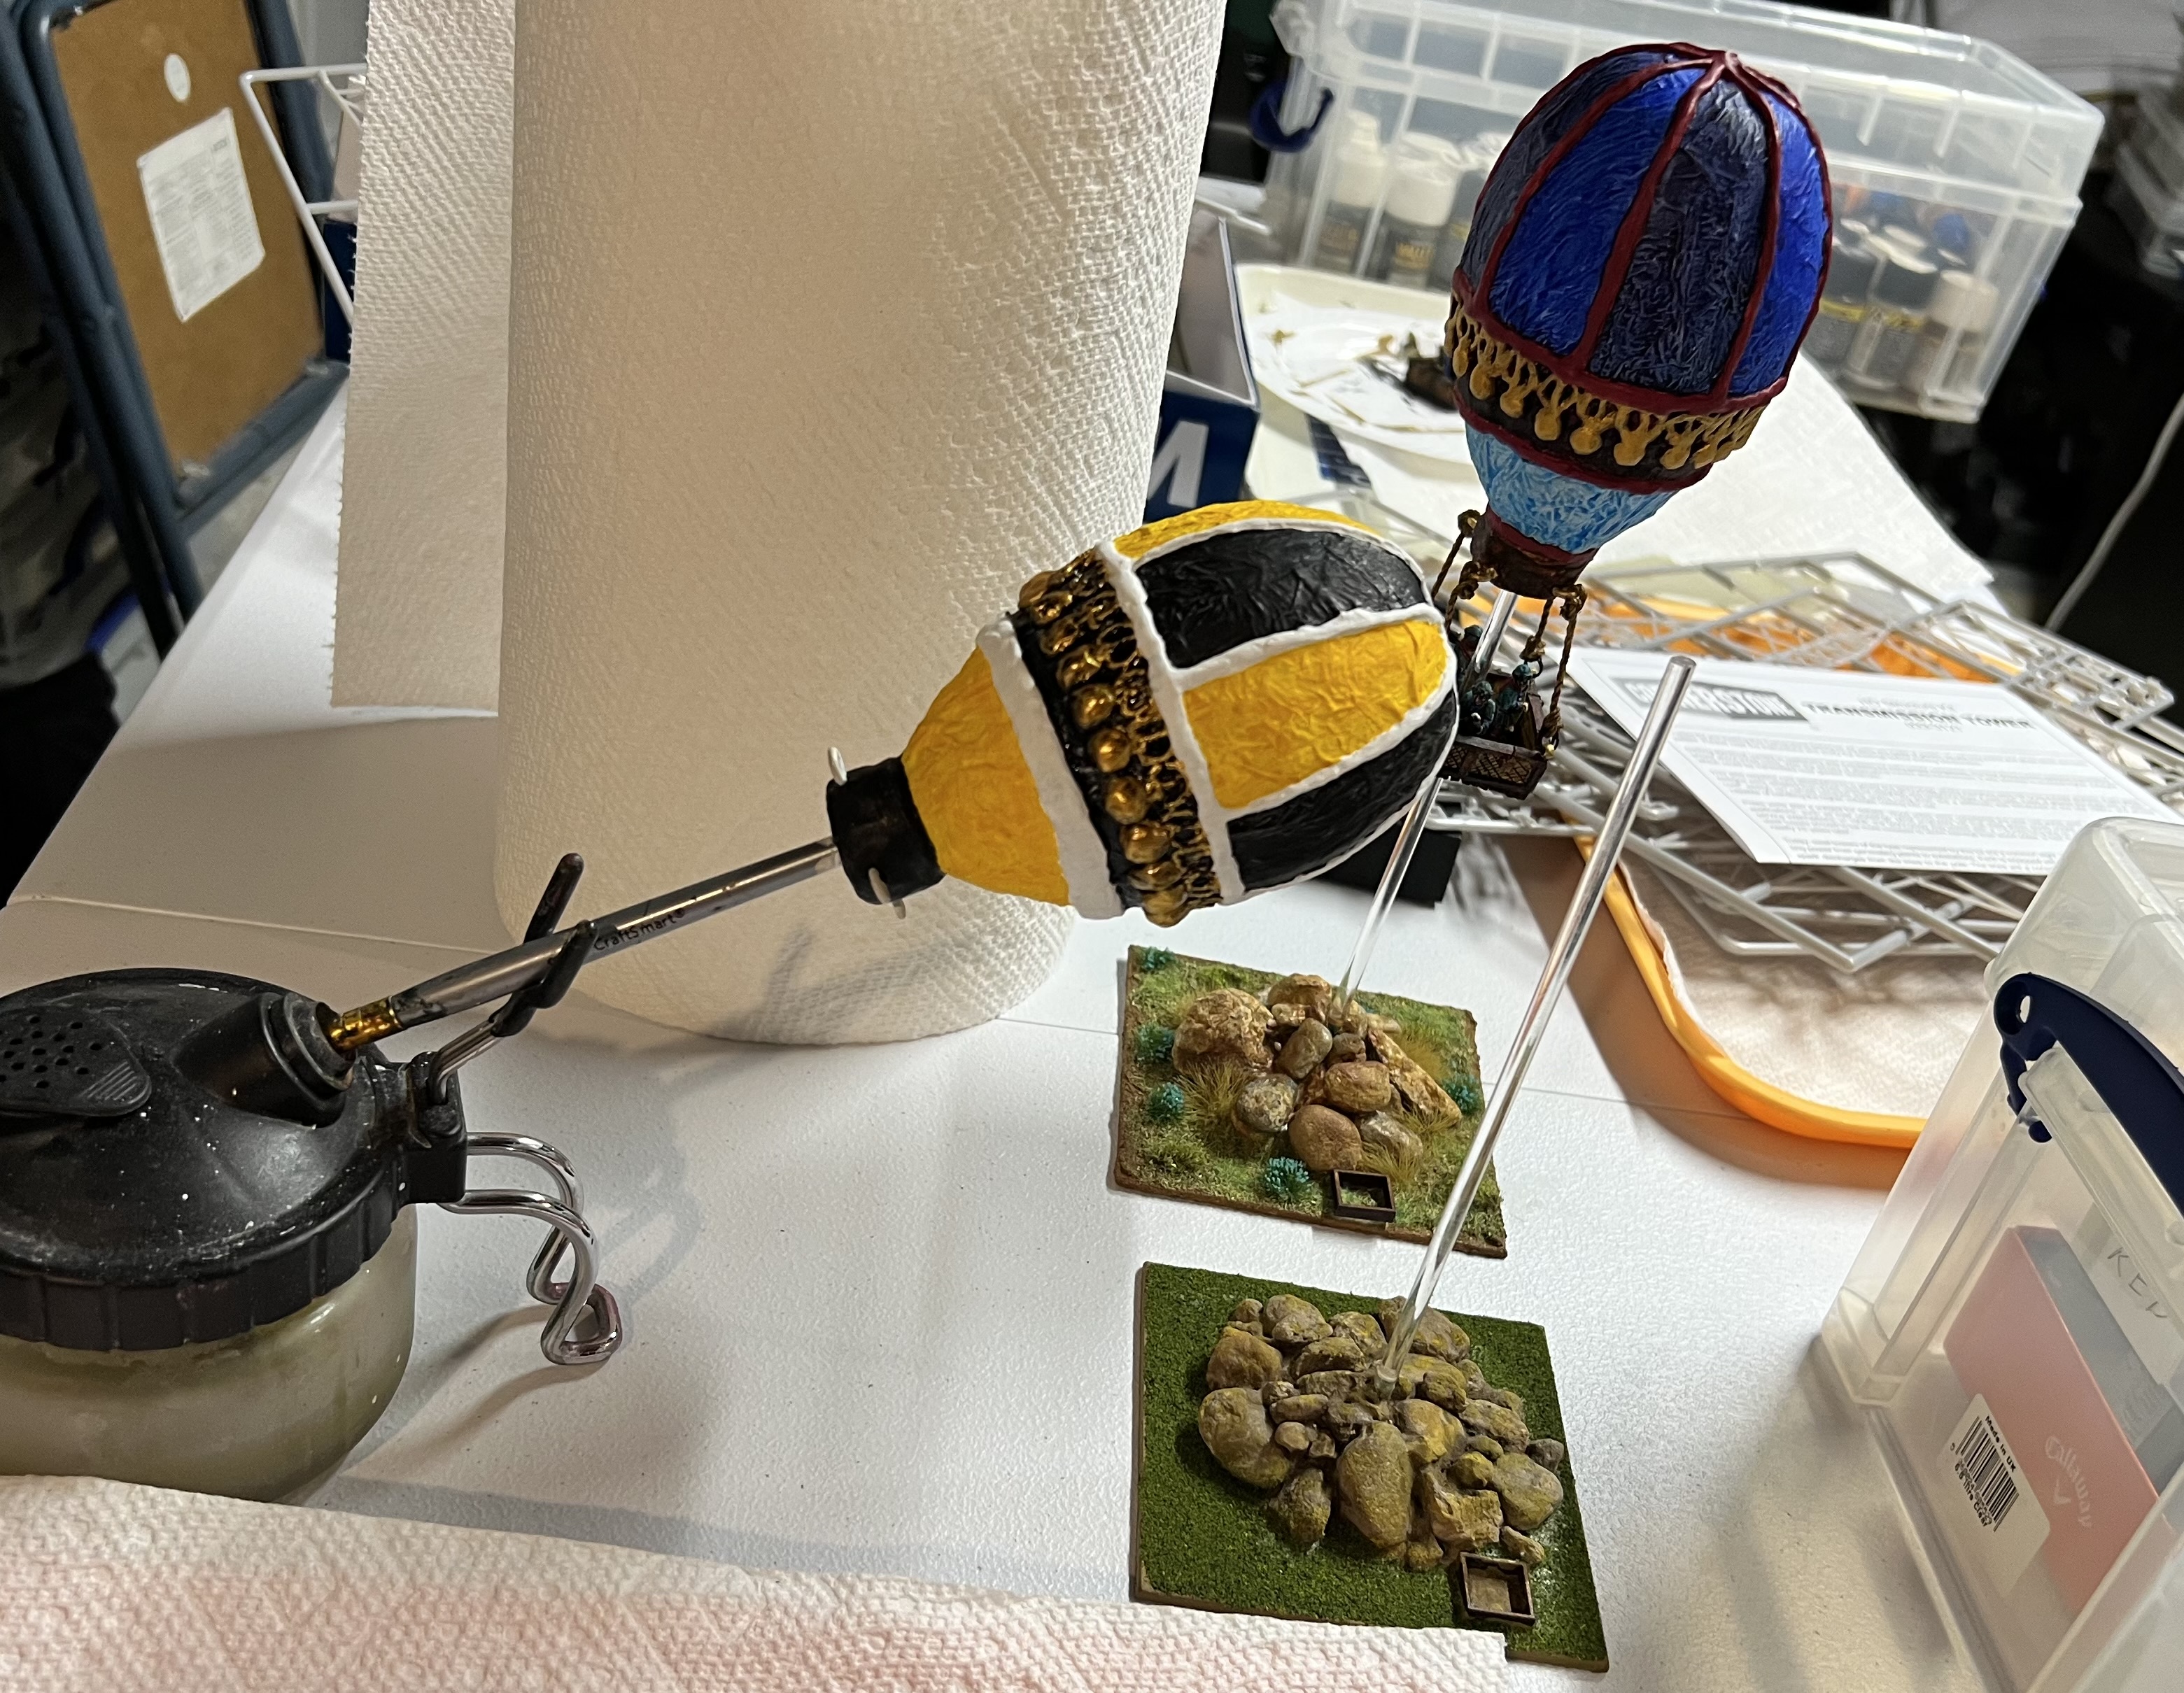
The model comes with wire to attach the basket to the balloon. Once again, I decided to employ a better mounting. A polystyrene and green stuff sandwich with inserted screw eyes worked well before – so I used that again.

Cutting out the disks from the drilled-out polystyrene. I sanded off any rough edges, then added the green stuff and the screw eyes to make the “sandwich”.

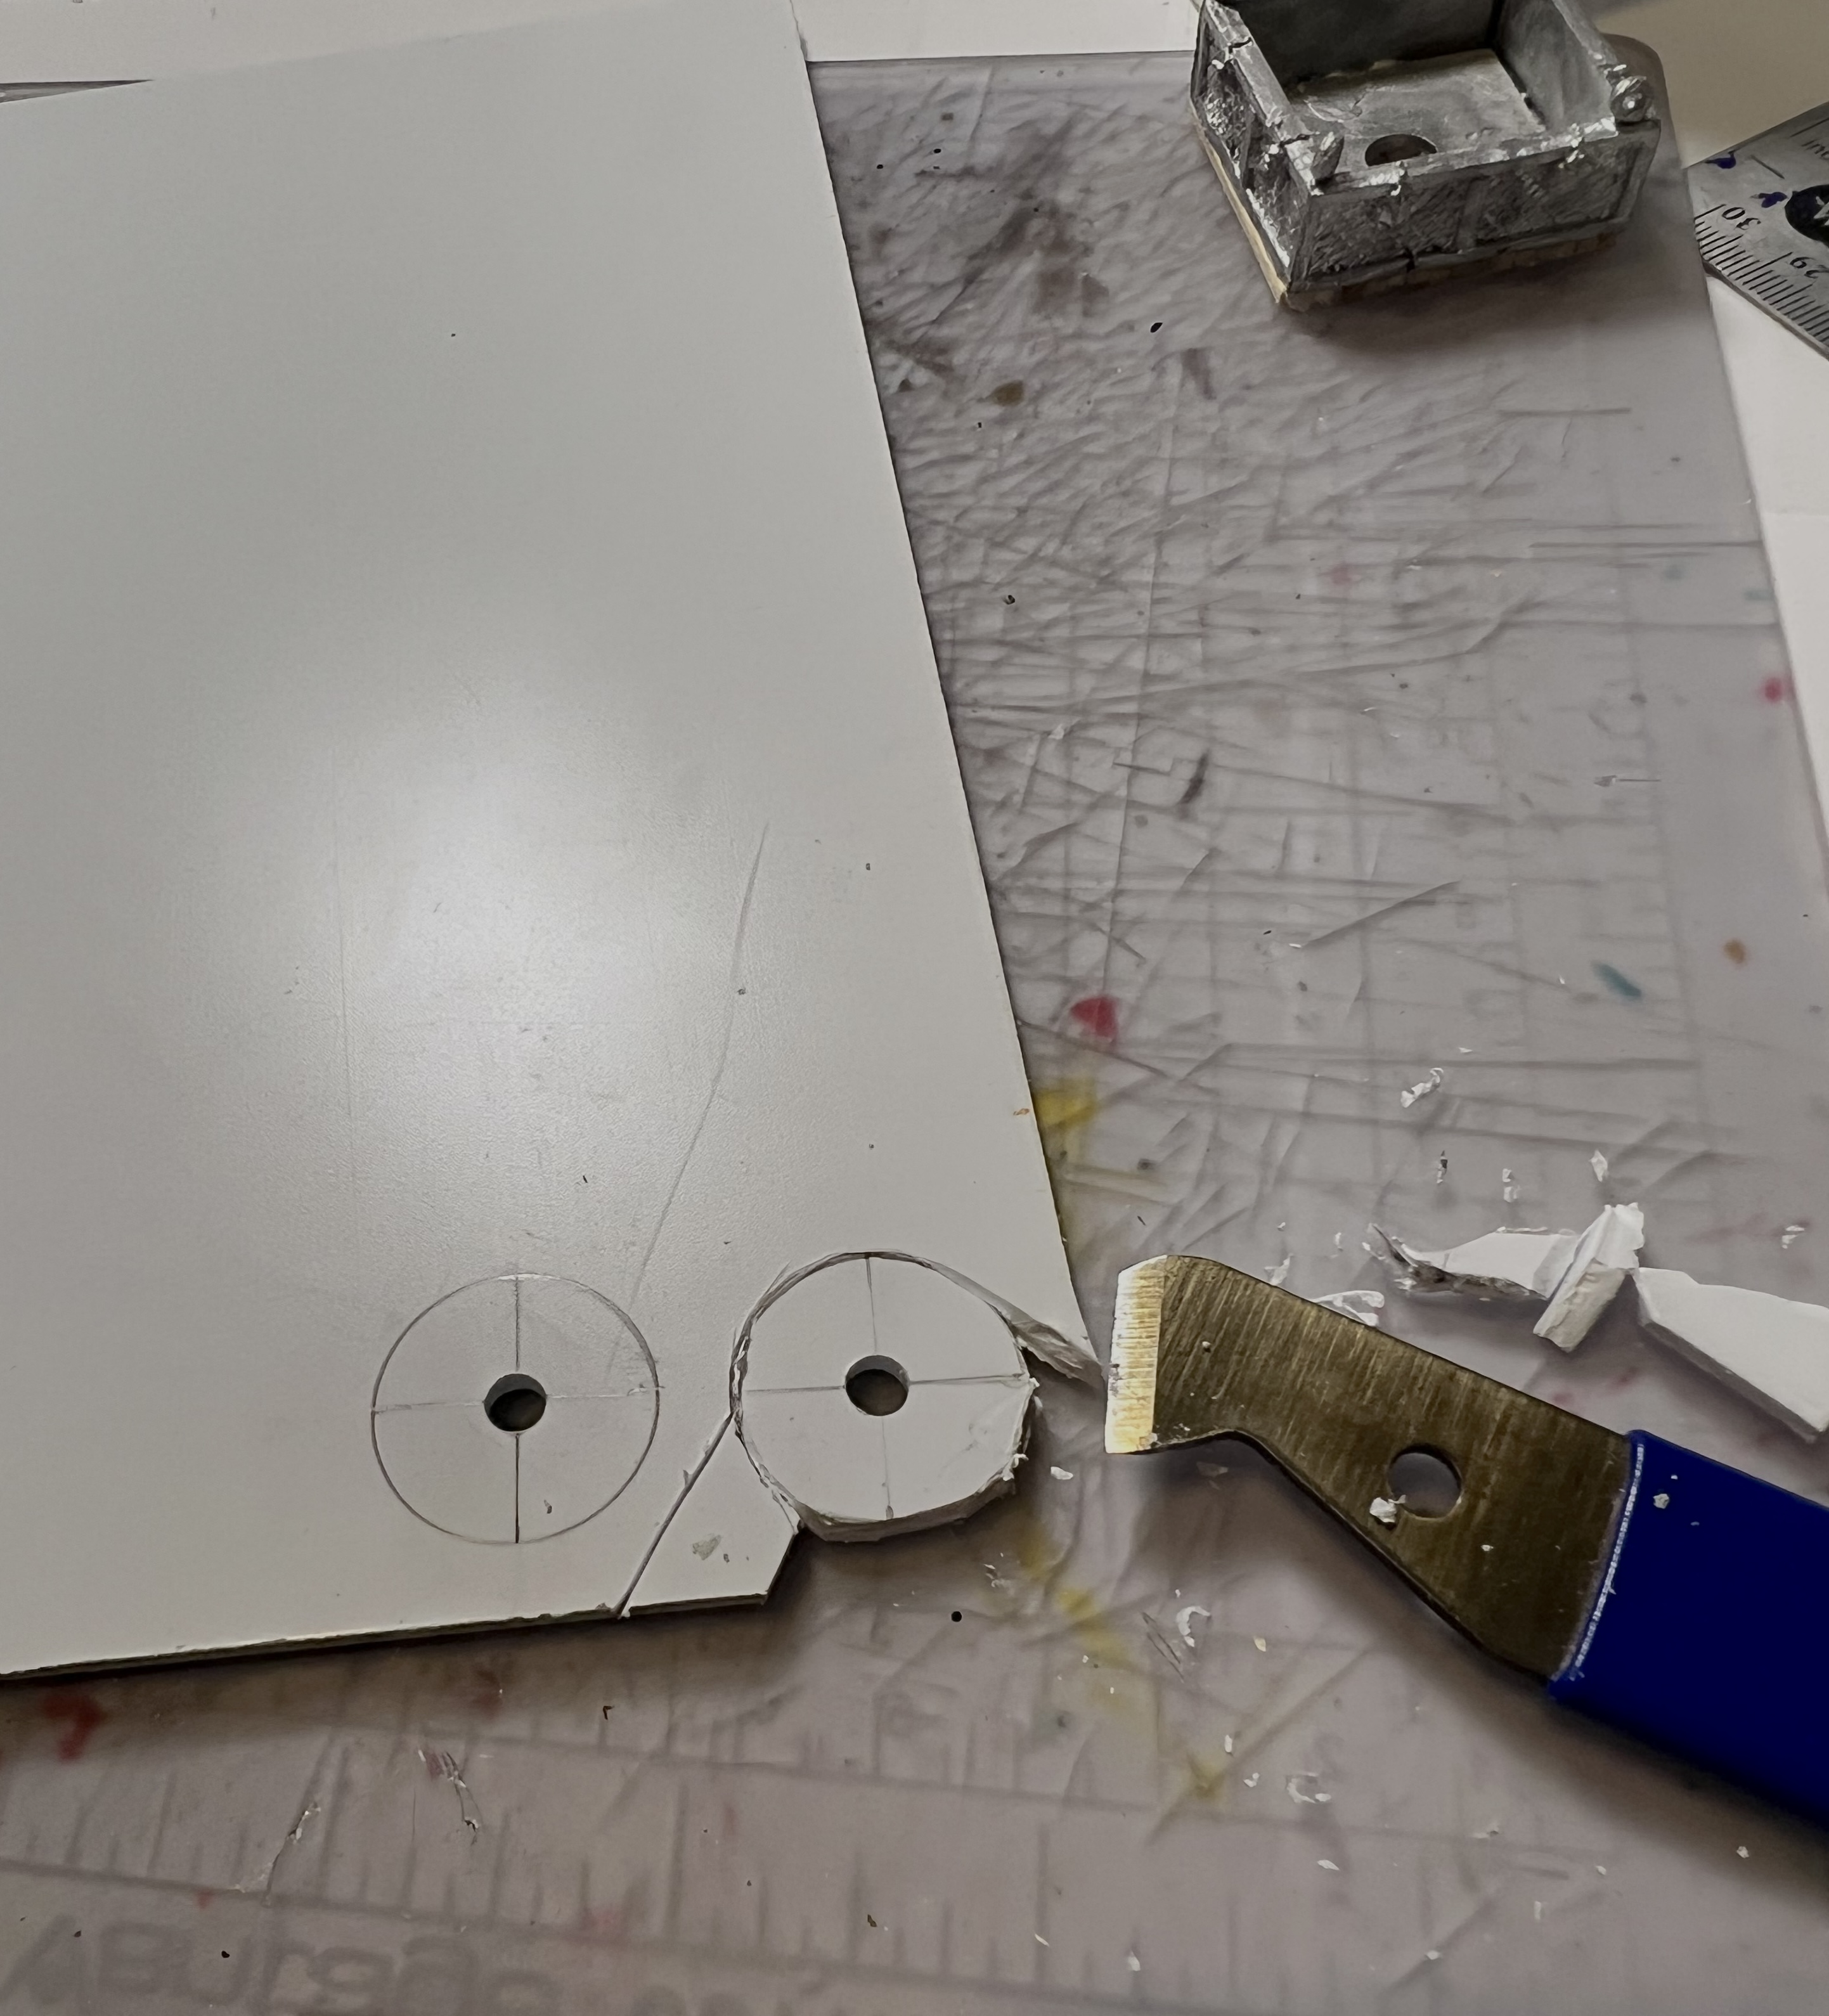
I affixed the sandwich to the balloon’s bottom with PVA – letting that dry overnight. I then drilled out though the sandwich (as perpendicularly as possible!) to make a path for the acrylic rod base support. This allowed me to prime and paint easily by using an old paint brush inserted into the balloon on one end and my airbrush cleaning bottle on the other.

Set up for painting – here primed.

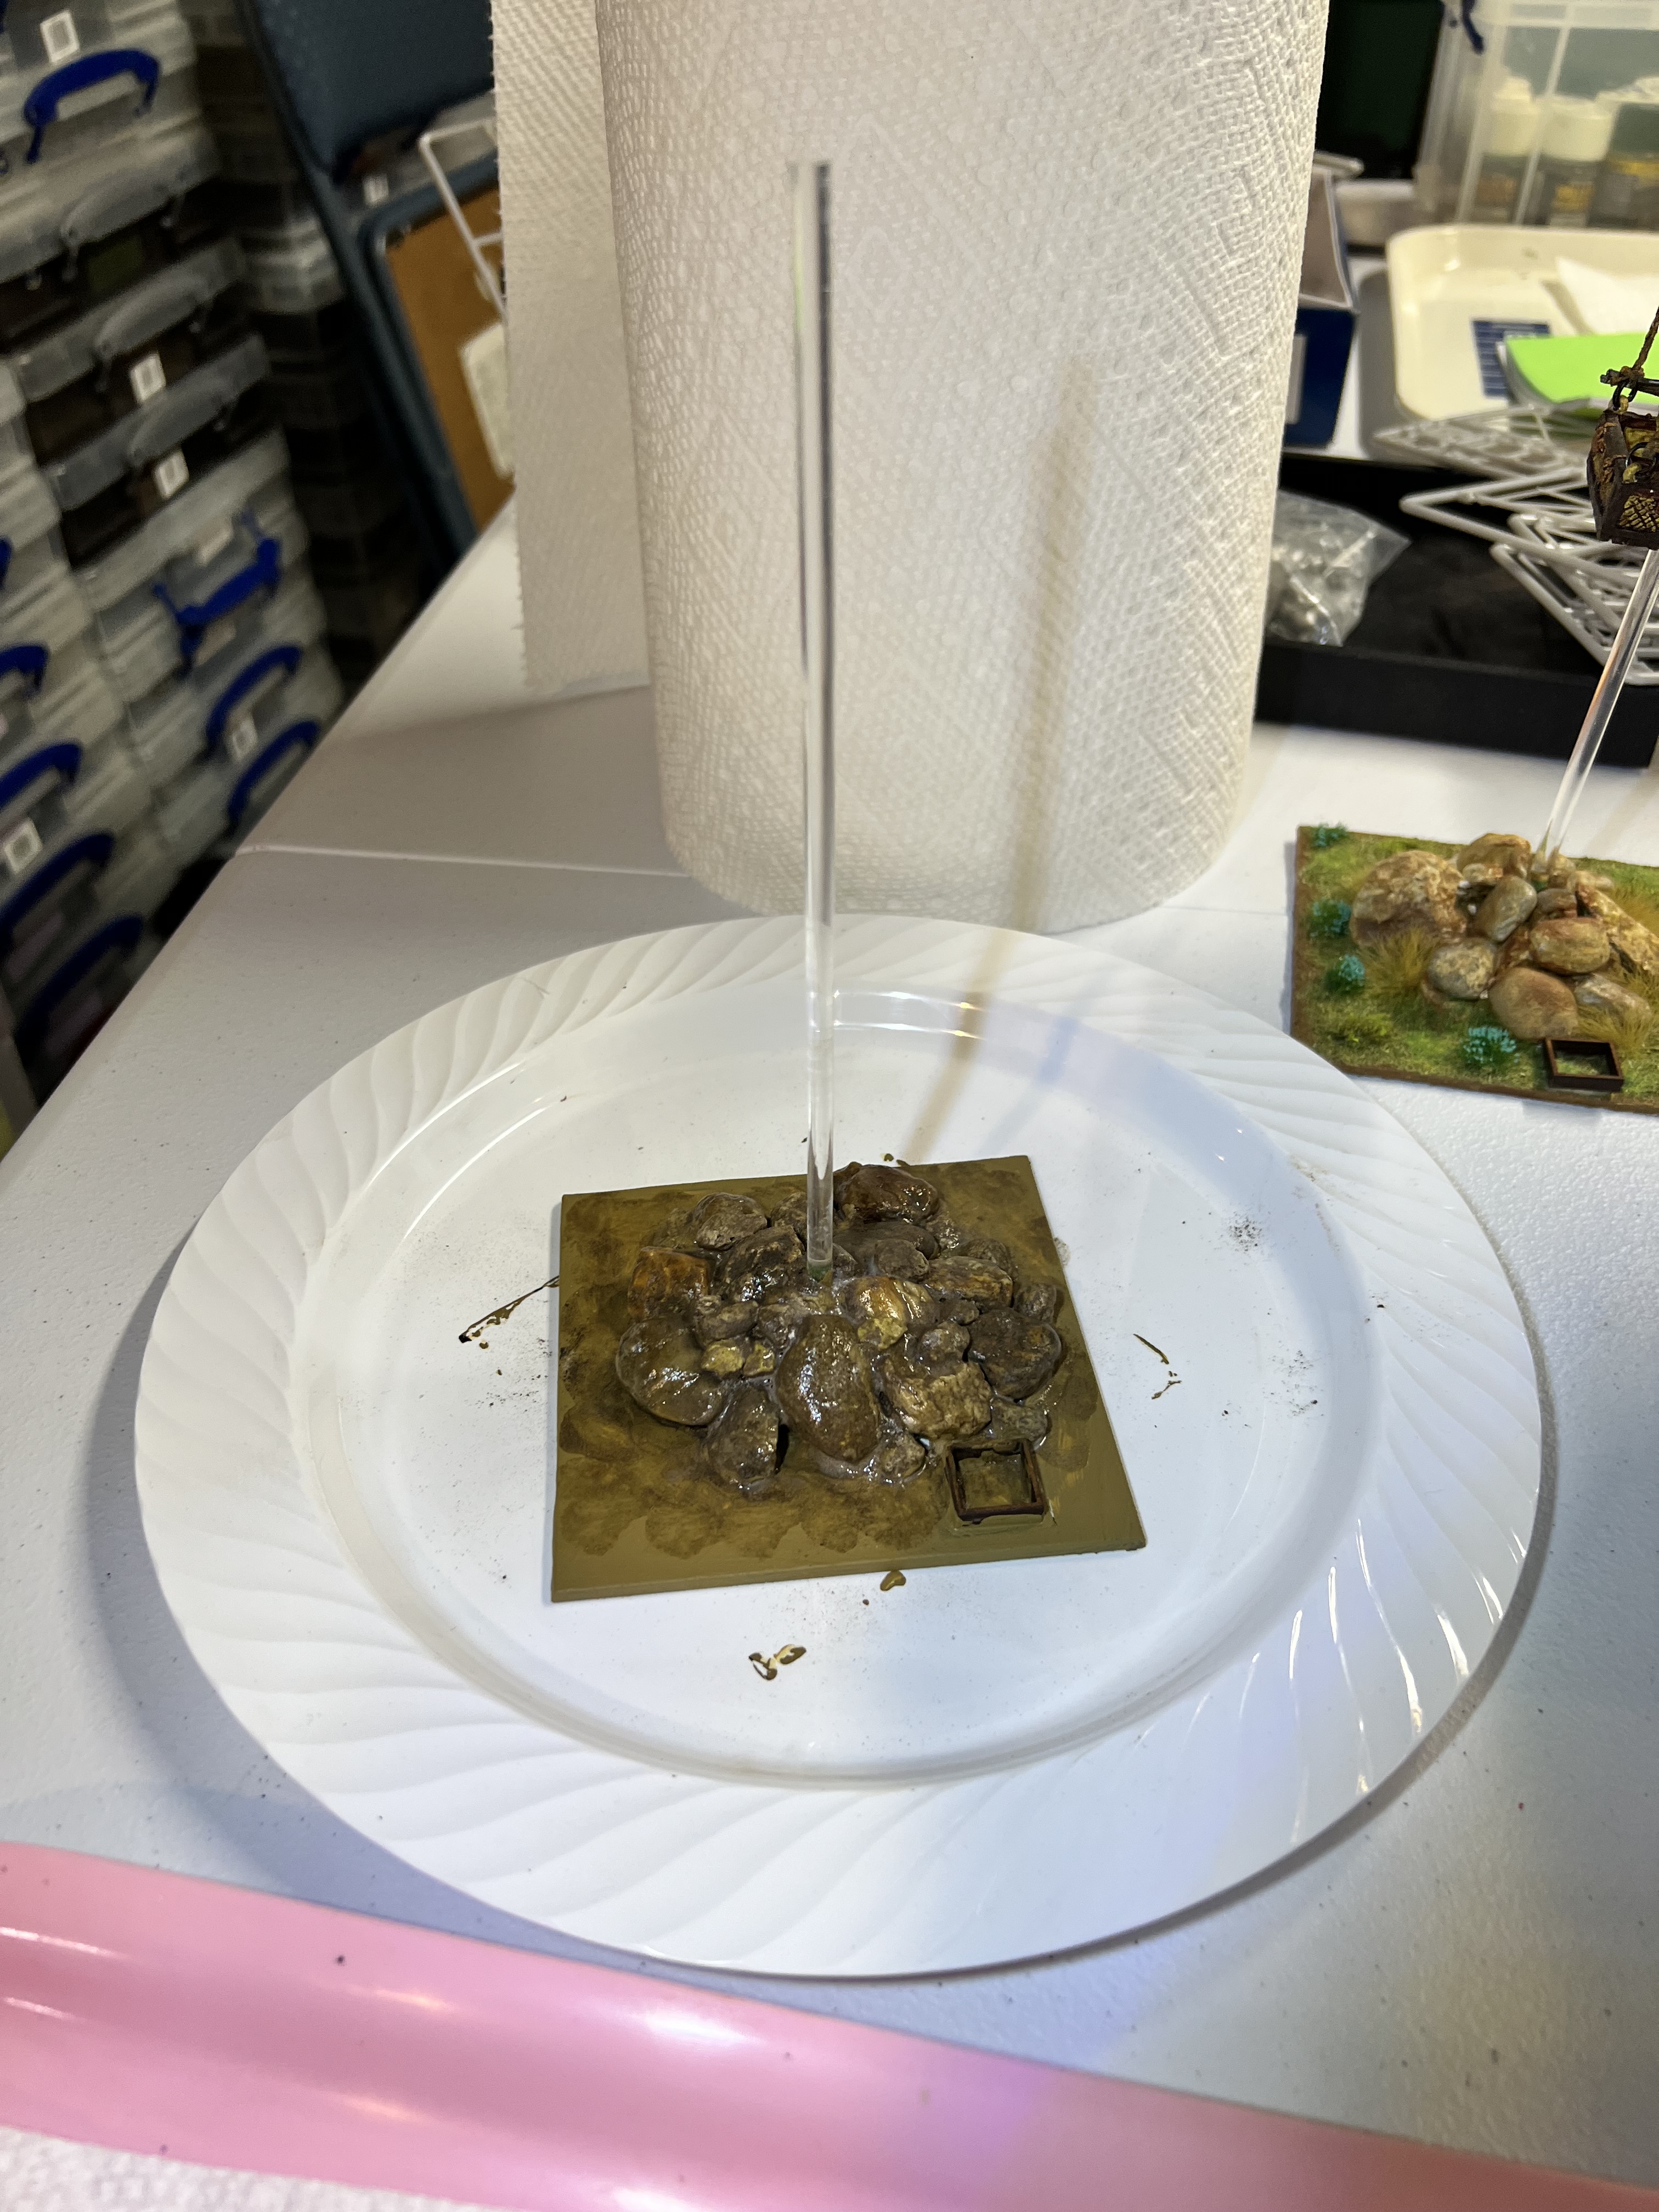
As for the base, I used metal support braces, small rocks, and green stuff to secure the acrylic support rod as vertically as possible to a piece of 4″ square polystyrene. Once the green stuff cured, I added pigments and pigment binder to the base.

Early base work

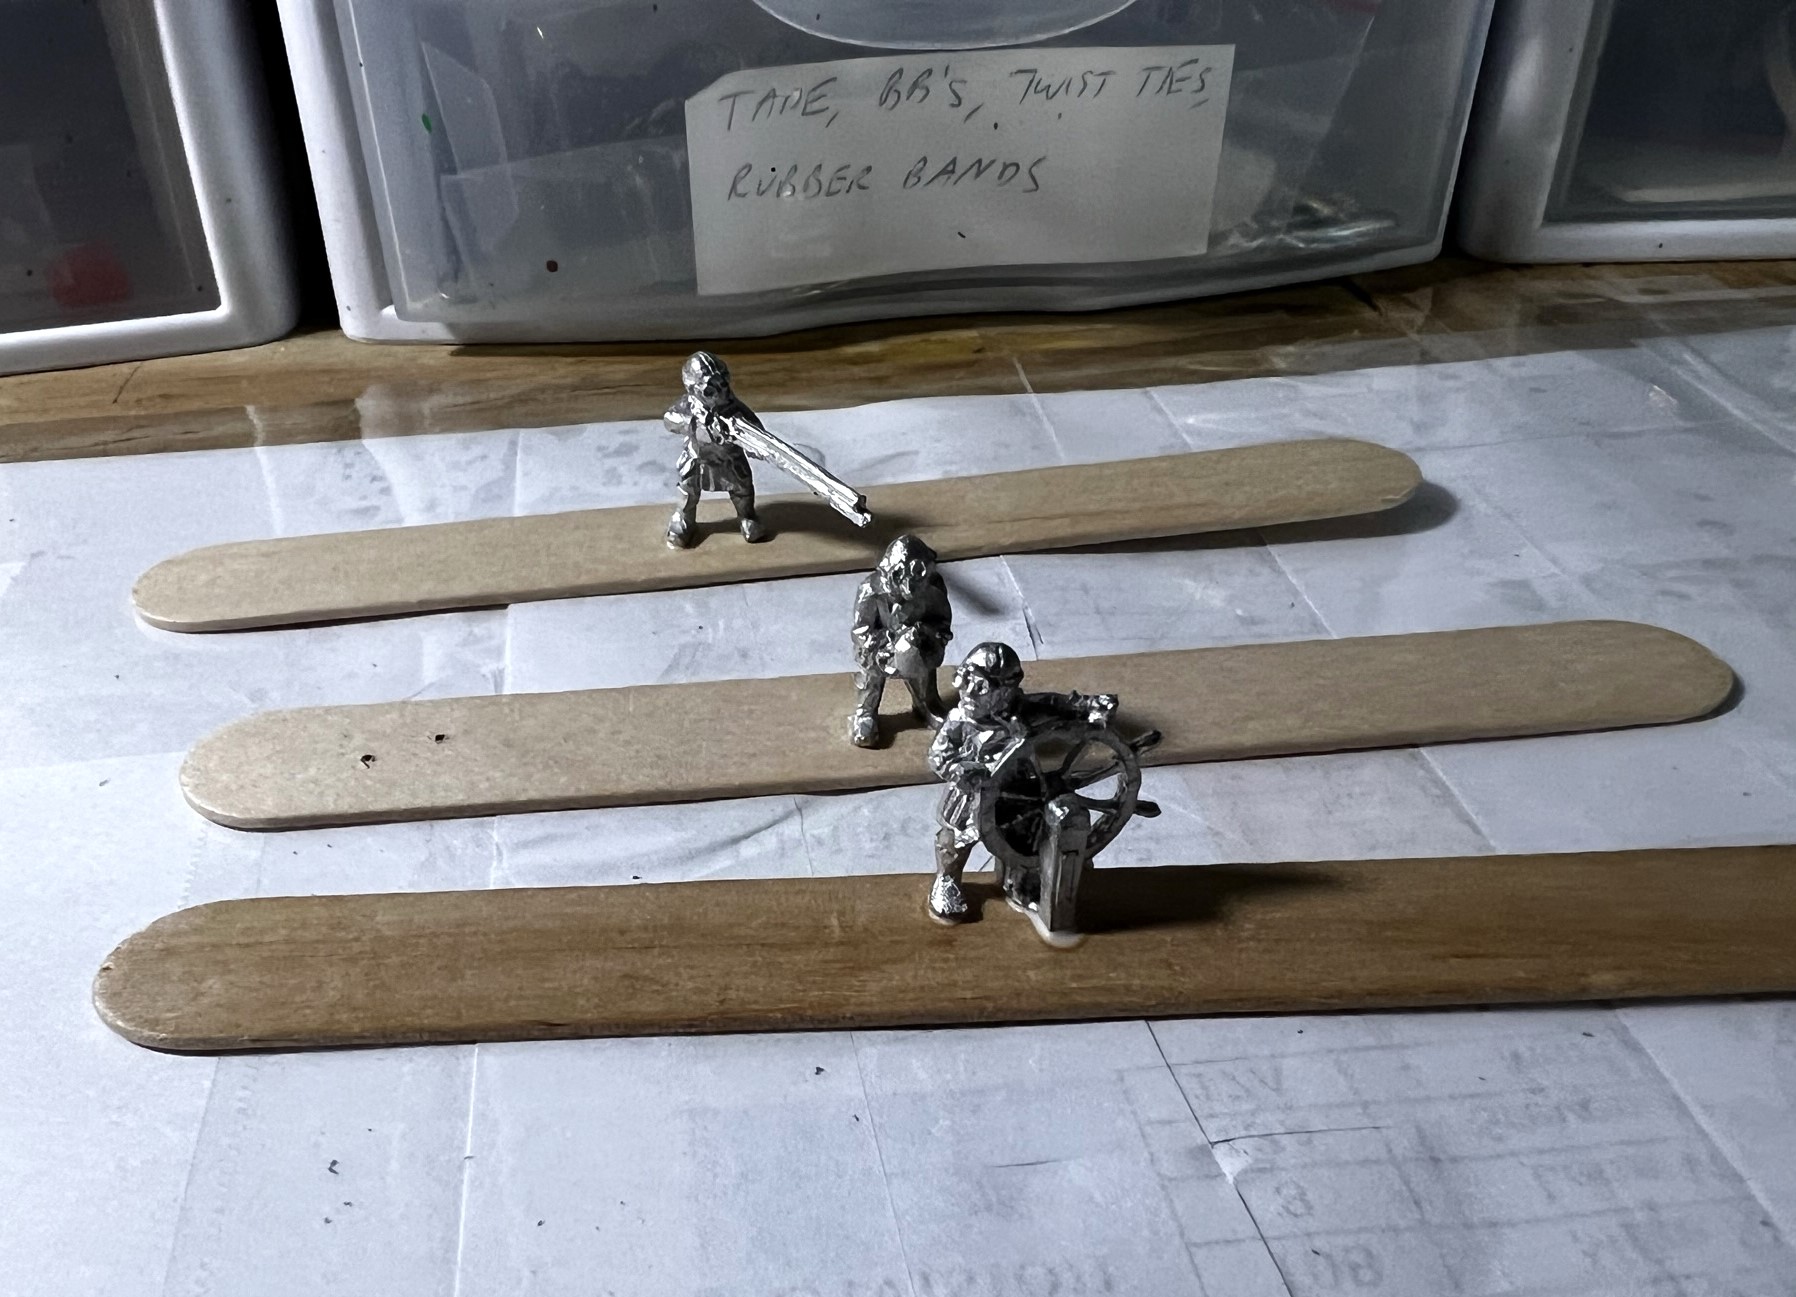
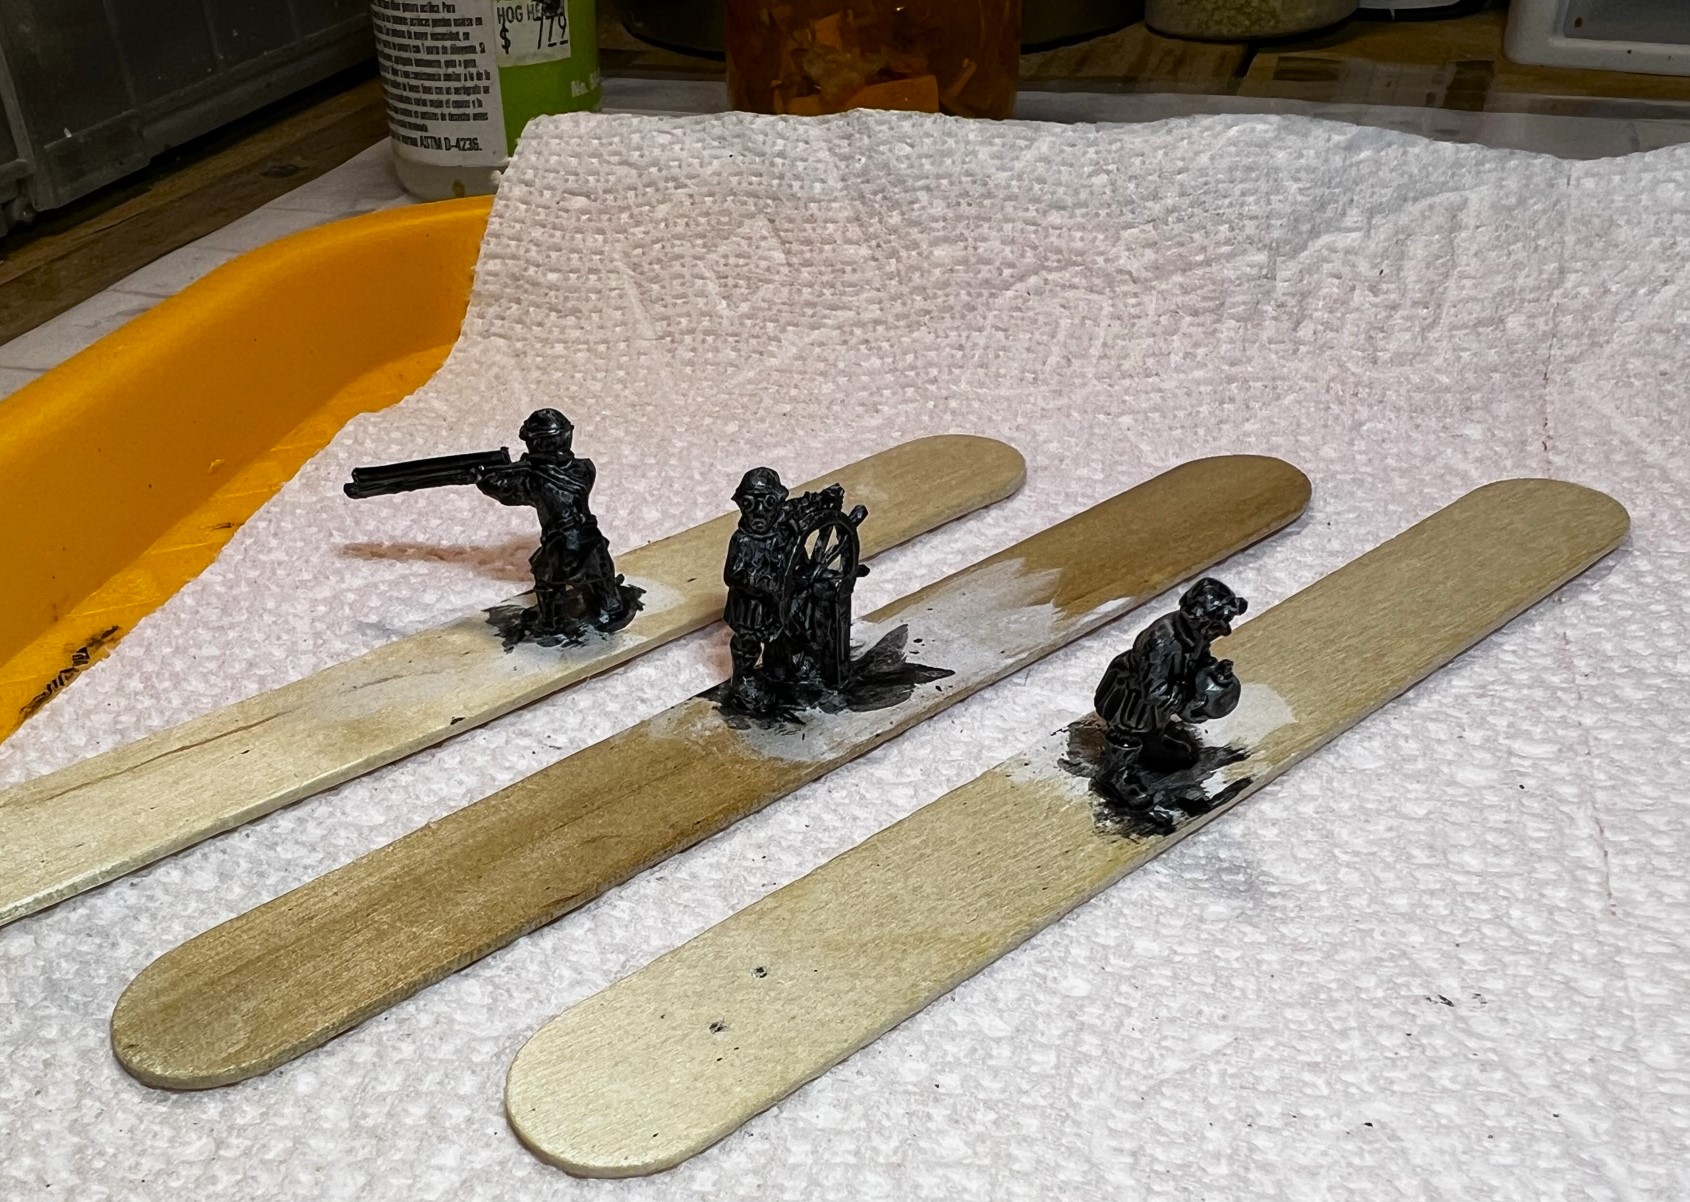
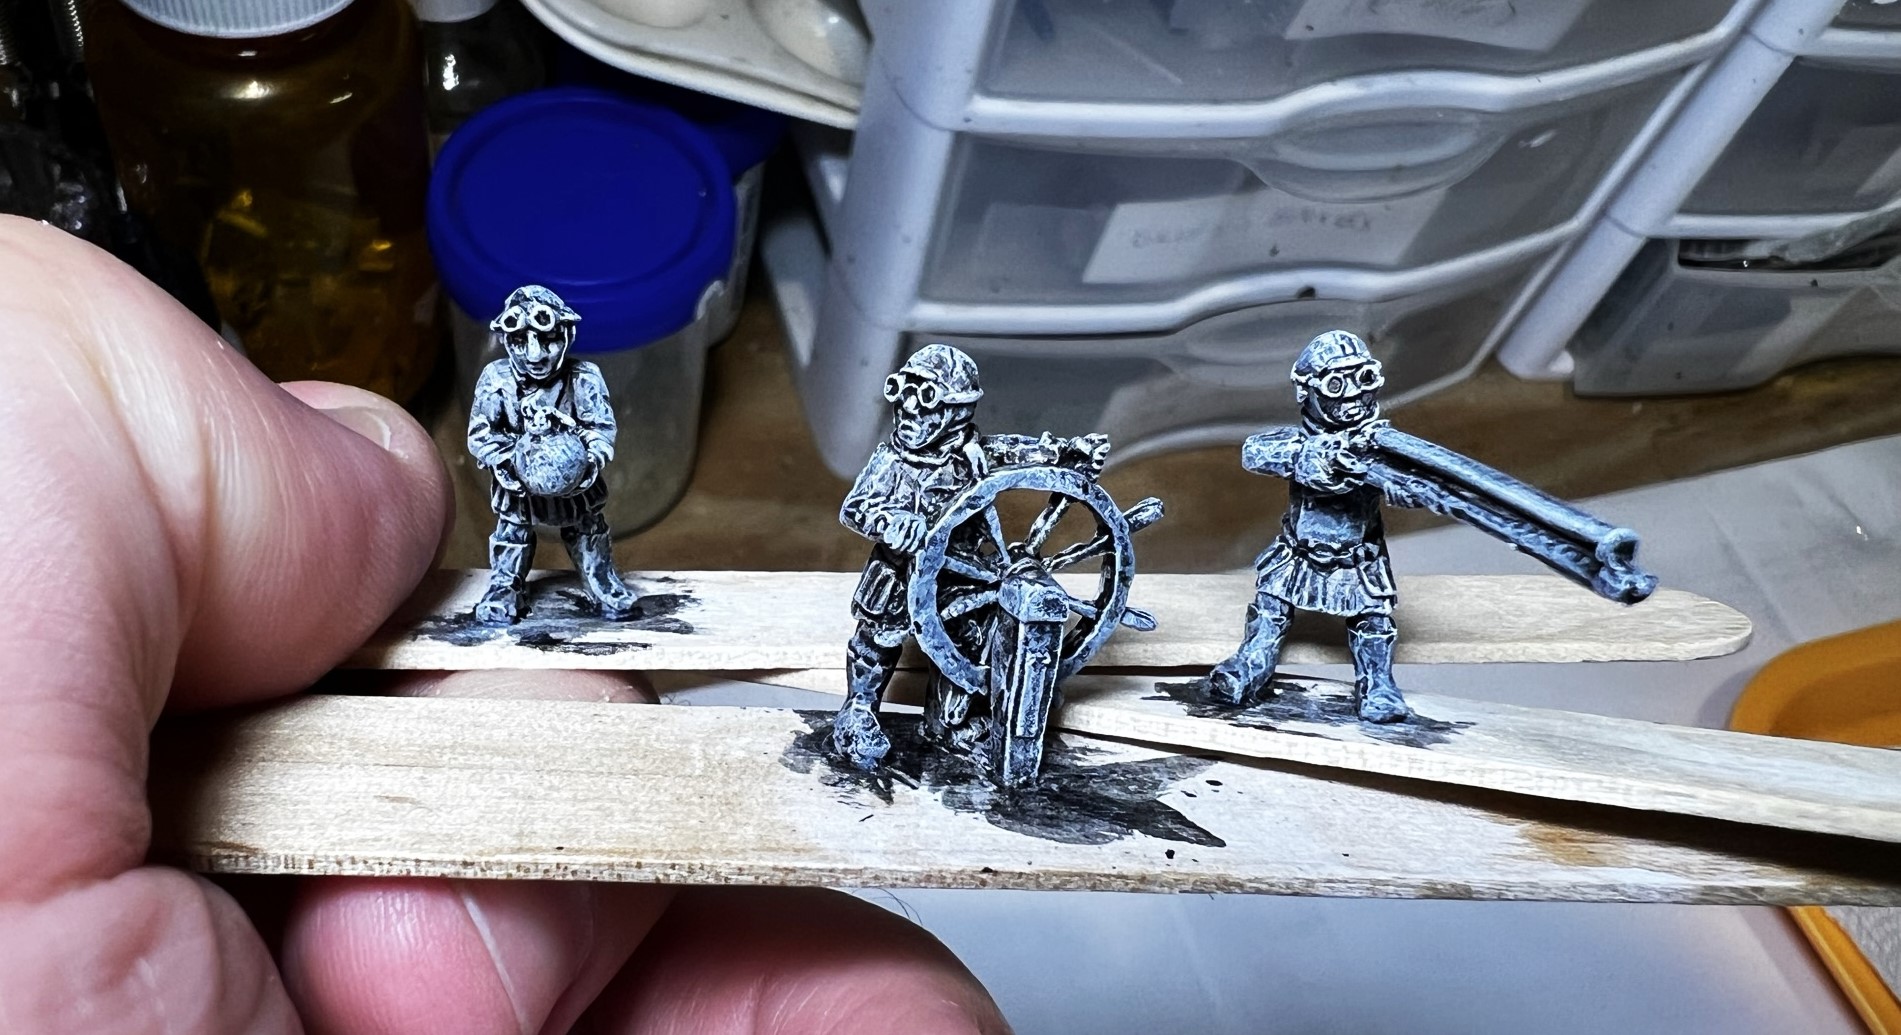
Then I painted the crew and the basket.

Painted crew and basket

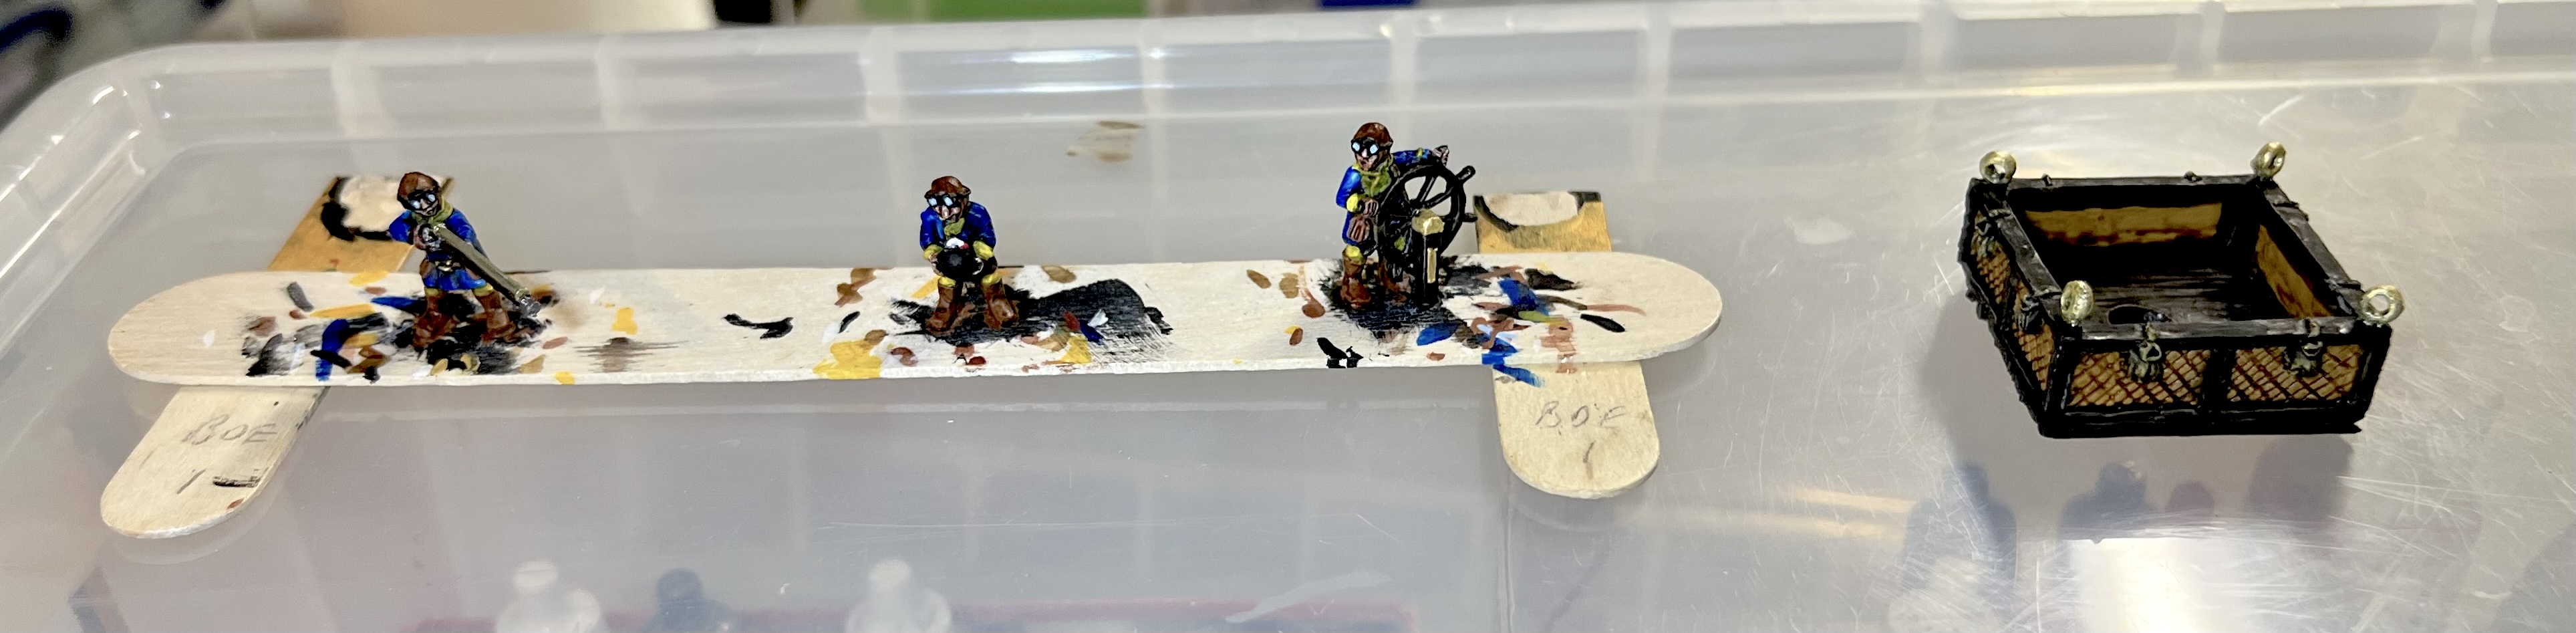
The crew have small tabs under their feet that correspond to little pre-drilled holes in the basket floor. Unfortunately, some of those did not make it off the popsicle sticks – but I was still able to use Gorilla Glue to securely mount them in the basket.

Crew in the balloon basket. Note the hole in the center for the support rod.

Painting of the balloon itself went fairly easily. I also flocked the base as you see below so that it would be completed before my rigging.

New balloon and base next to previous model for comparison.

It was then on to rigging with twine – which is my least favorite thing to do with models. I made it work such that the basket was more or less level. Then I coated the twine with PVA, let that dry, then painted over that to make the twine look like rope.

I was done!

Here are some eye candy shots – as it is a model with no front or back – you’ll see a few shots of the total model as well as some crew shots. I did post a video on Instagram as well (a bit bright on the lighting):

Eye Candy

And now some closeups of the crew:

Here now – the Munchkin Air Force assembled and ready to go after Professor Nitpik’s secrets!

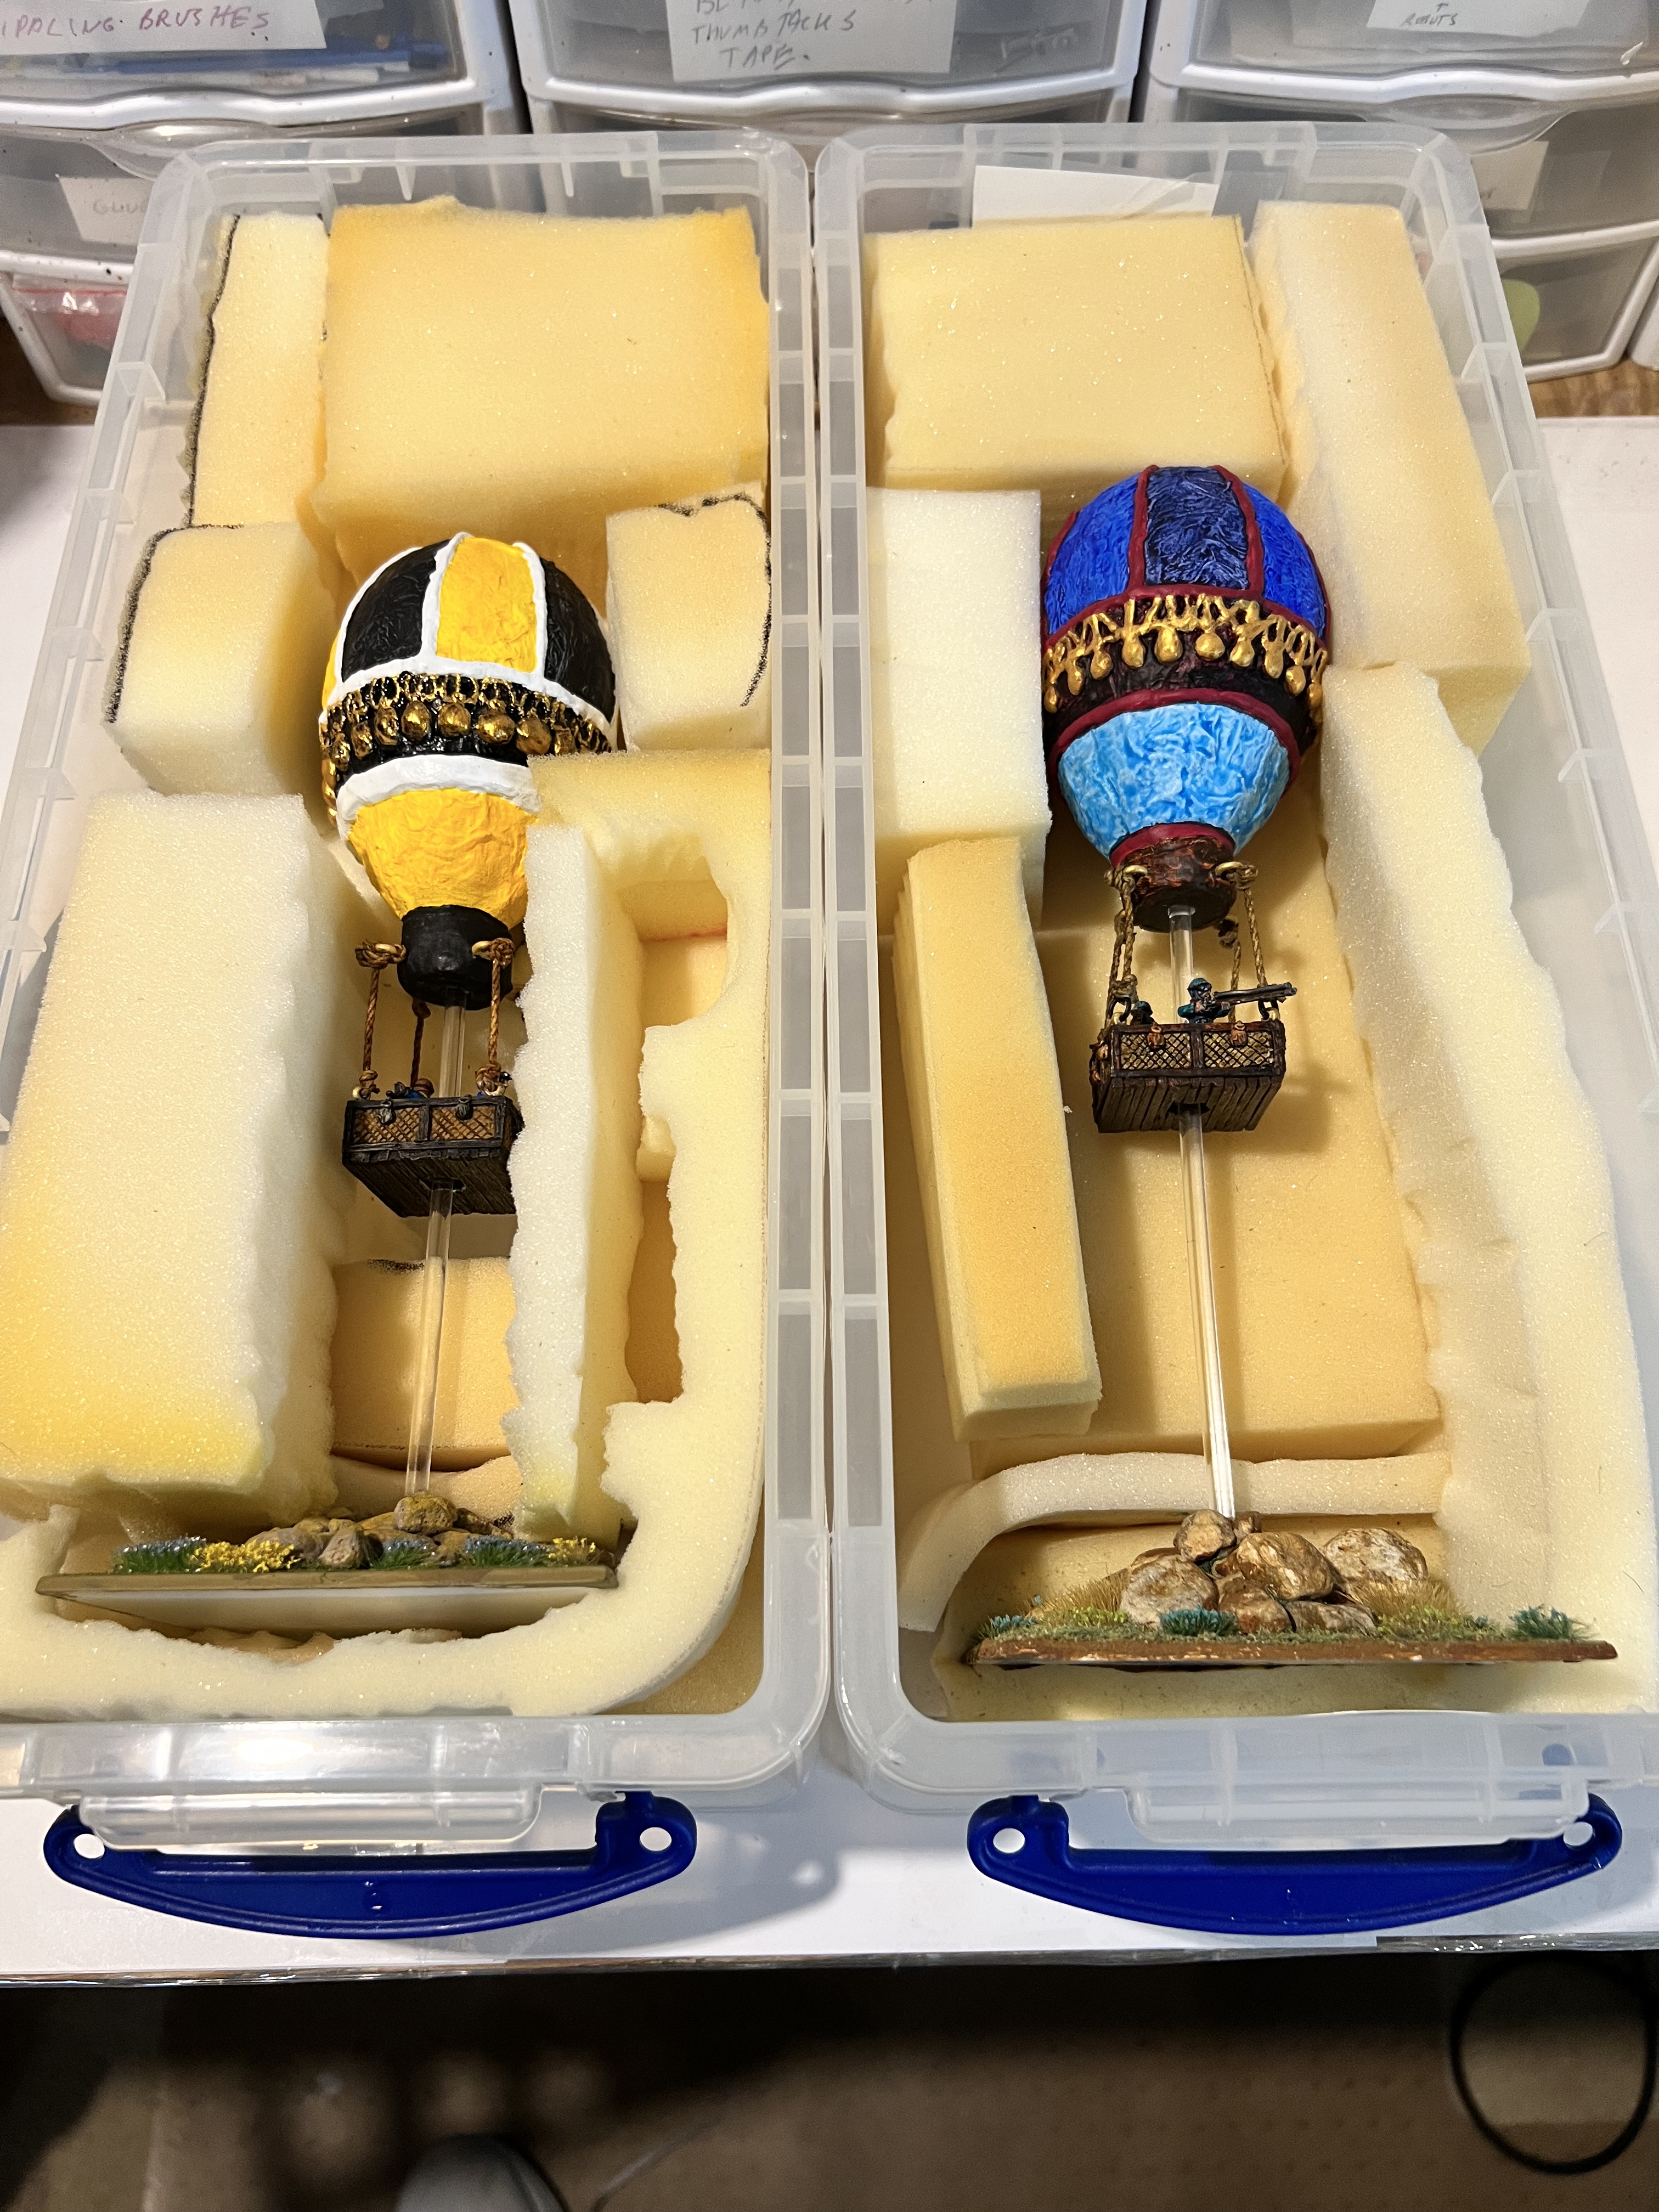
And as they will need to travel -to these conventions- matching Really Useful Boxes…

I finished this model right before Christmas. This is my first Wars of Ozz modeling post since April! Wow! More will be coming. I also will have Nitpik forces AND terrain for his apocalyptic world. Come see this and join the fun at COLD WARS, TotalCon 2026, Cold Barrage 2026, HAVOC XL 2026, and Huzzah 2026 “The Revolution”.

I hope you found this interesting – if so (or if not), let me know in the comments section! And join me at a convention or two!

Final Notes and Links

Want to learn more about Ozz and its world? If you want to check out the excellent Wars of Ozz figures’ range, there are two places to get them. You can also get the rules there. (I make no money from this.) The game rules and the figures are available from the next two places:

In the US Old Glory has a site – Wars of Ozz Miniatures.

In the UK go to Sally 4th.

And the new Wars of Ozz Supplement is available as a PDF download from the next two websites:

Below you’ll see the list of paints and the like that I used on this Aerostat project. As I mentioned, I often use my old blog posts to help me remember what I did – and sometimes even what I should NOT do. Anyways, they are not likely as useful for you as they are for me, but that’s why I post the lists.

Miscellaneous details and references for those interested in that sort of thing:

For my earlier posts on Wars of Ozz games, view this page. It includes figures, units, and other related projects.

PAINTS, INKS, GLAZES, SHADES, WASHES, PIGMENTS, FLOCKING, GLUES AND MORE THAT I USED ON THE BOSTON BRUINS-COLOR THEMED MUNCHKIN AEROSTAT:

  1. Polystyrene sheet
  2. Gorilla Glue
  3. PVA Glue
  4. Popsicle sticks
  5. Matchsticks
  6. Green stuff
  7. Small screw eyes
  8. Twine
  9. Small stones and talus
  10. Chinchilla dust
  11. Vallejo Mecha Primer “White”
  12. Vallejo Mecha Color “Off White”
  13. Vallejo Surface Primer “German Green Brown”
  14. Vallejo Premium White Primer
  15. Vallejo Model Air “Wood”
  16. Army Painter Speed Paint 1.0 “Dark Wood”
  17. Vallejo Model Color “Black”
  18. Army Painter Warpaints Metallic “Gun Metal”
  19. Vallejo Model Color “Red Leather”
  20. Army Painter Speed Paint 1.0 “Crusader Skin”
  21. Citadel “Contrast Medium”
  22. Army Painter Speed Paint 1.0 “Pallid Bone”
  23. Martha Stewart Crafts “Pale Bronze”
  24. Vallejo Model Air “Bright Brass”
  25. Citadel Contrast Paint “Imperial Fist”
  26. Vallejo Model Color “Light Flesh”
  27. Vallejo Game Air “Somber Grey”
  28. Vallejo Model Color “Sepia” (wash)
  29. Vallejo Mecha Color “Sky Blue”
  30. Vallejo Mecha Color “Turquoise”
  31. Citadel Contrast Paint “Talassar Blue”
  32. Citadel Contrast Paint “Baal Red”
  33. Vallejo “Natural Umber” (pigment)
  34. Vallejo Pigment Binder
  35. Vallejo Mecha Varnish “Matte”
  36. Vallejo Thinner
  37. Vallejo “Gloss Acrylic Varnish”
  38. Gamers Grass “Yellow Flowers” (flocking)
  39. Shadow’s Edge Miniatures “6mm Pink Sunset” (flocking)

Munchkin Aerostat Corps – Hot Air Balloon with Crew (Wars of Ozz)

In building out my available troops for my Wars of Ozz games, I have focused on infantry, cavalry, and artillery units for the most part. I started with the Munchkins in this vein, then moved onto other factions as I have shared in previous posts in this blog. My Munchkin forces are excellent with musketry, but as far as mobility on the battlefield goes, well, they do have very small feet and do not move quickly…

Meanwhile, as you may remember, the Winkies (the oh-we-oh dudes) in  Wars of Ozz have very mobile units, especially in terms of cavalry and the Great Flying Apes.

I decided that it was high time that I got the Munchkins some air power of their own. While I have in some games given them allies (like the Great Owls), there is one organic flying unit available to the Munchkins. It is OZZ-110 “Hot Air Balloon & Crew. The model consists of a foam balloon, three crewmen, a basket, and some wires. In the game, it is called a part of the Munchkin Aerostat Corps” located at the Emerald City. The Aerostat Corps is commanded by Professor Wogglebug. Balloons in the game are 360-degree aerial sharpshooter firing platforms for the Munchkins. They are faster than the Munchkin infantry and their movement is described as semi-magical (not just by the wind). While they cannot under normal circumstances engage in melee, other flying units may engage them in melee. As befits a sniping unit, they just engage the enemy with harassing attacks of sharpshooters and bombs – from above. While there are only three figures in the basket, it takes 5 hits on the balloonists to eliminate the unit – the balloon itself cannot be shot down.

This post will be quite WIP photo heavy as this was a stiff modeling challenge for me to be sure. I started on June 20th and finished on July 3rd.

I bought the model a while back and decided after looking at it to delay working on it until I had a few more other Ozz units done. I really wanted to make it cool (in my own way) – and I could see this would take some effort – so it languished in my collection of unpainted Ozz stuff – daring me to take it on. It is 28mm in scale. The figures and the basket are metal, while the balloon is a foam casting. There is an acrylic dowel as a stand that goes into a metal flight stand base, plus some wires for attaching the basket to the balloon. The rules stipulate that the base should be 4″ x 4″, so I used styrene for that..

The kit as received with the styrene sheets. I did not end up using the metal bases seen here under the styrene.

WIP Shots…

I had visions of trying to recreate the font on the balloon to match that of the movie, but I decided otherwise as this is Ozz not Oz, and the foam cast needed some TLC.

The balloon close up before starting.

Now, I take on modeling challenges not expecting that everything would be perfect – and here is a good example. You have to be reasonable as what you buy is a starting point, not a finish line. Let me be clear:

I LOVE THIS MODEL!!!! I highly recommend it!

However, there were a number of voids that needed to be fixed, and I just channeled my innovative juices. I needed to address that – as well as how exactly would I mount the basket and more that you’ll see shortly. The figures themselves are really nice. So what to do?

Sculpt with green stuff! That would allow me to bulk out the sculptor’s intended design as well as make the balloon “pop”…ok sorry about that…

Initial green stuff work.
Completed green stuff modifications.

This took more time than I wanted but I did need to let one part cure before moving on and this was a 360-degree operation. Once this was done, the mounting options swirled around in my head. I did not like the idea of using the wires – plus I was hesitant to run the wires through the foam balloon itself. I wanted the look of ropes – and that meant something to tie the ropes onto – so I made an “oreo cookie” of sorts with styrene, green stuff, and screw eyes to fit the bottom of the balloon, and let that cure. Then I drilled lined-up holes in the middle of the cookie and the balloon for the insertion of the acrylic flight pole. Once these lined up, I affixed the cookie with more green stuff and made it part of the balloon itself.

After this had cured, I covered the outside with more green stuff to make it match the balloon body.

Sculpting done on balloon.

At this point I moved on to the crew and the basket. Because there were tiny prongs on the boots of the crew and corresponding tiny holes on the basket floor for their mounting, I took two approaches. One was to use a pin vise to drill tiny holes on three popsicle sticks to accommodate the boot prongs and secured the crew with a drop of PVA glue. The second was to modify the basket bottom with matchsticks so as to hide the holes in the basket bottom.

The basket bottom after some initial painting with the matchsticks glued to the bottom.

Back to the crew, I primed them then covered them with a dark wash (Secret Weapon Washes “Heavy Body Black”. Once this had dried, a strong white dry brush application was made.

Returning to the balloon, I used my airbrush cleaning pot and an old brush handle to mount for priming and painting. As Munchkins love blue, I decided to follow the pattern of colors shown on the OZZ-110 “Hot Air Balloon & Crew picture on the website. I did have some trouble with one panel section that necessitated a repriming and repaint as the light blue contrast paint did not fully adhere – but that worked out fine (after a bit of repainting frustration of course). The basic sequence is shown in the gallery below.

Moving back to the crew and the basket – I painted each separately then assembled them. As I mentioned before, I wanted to use ropes (using twine) instead of the wires to connect the balloon to the basket. That required drilling out the four mounting holes on the basket and inserting two jewelry rings into each hole. The rings in each hole were then glued to each other with Gorilla Glue as shown in the sequence below.

As for the acrylic flight stand pole and the metal base, they were affixed to the styrene 4″ x 4″ base. I then added small stones and green stuff to support the pole as it was not overly supported by just the metal stand. I tried to level it out as best as I could.

The next section I dreaded doing, because rigging a balloon like this could easily come out horribly if not relatively level. I went slowly with the twine and measures out lengths carefully and tried to use appropriate knots.

Initial rigging – relatively level.

I gave the twine a coat of PVA for stiffening, then gave them a speed paint hue to represent rope.

Then it was time to flock the base.

Base flocked.

Eye Candy

First, the balloon in it’s entirety from three angles.

And three close-ups of the crew in the basket:

The Coxswain
The Sharpshooter
The Bombardier

I really was happy to finally get this done – but wait – I need to transport this contraption! So, I took a 6.5 liter Really Useful Box, customized some foam padding, and voila!

This was a project that I am certain will be a lot of fun on the tabletop – until Great Flying Apes or similar attack – or the balloonists get shot up!

Next up – Gillikin stuff!

And yes, I still have more to come…

Miscellaneous details and references for those interested in that sort of thing:

For all of my previous posts on Wars of Ozz games, figures, units, and other related projects – please see this page.

PAINTS, INKS, GLAZES, SHADES, WASHES, PIGMENTS, FLOCKING, GLUES AND MORE THAT I USED ON THIS MUNCHKIN AEROSTAT & CREW:

  1. Green stuff (kneadatite)
  2. Plastruct styrene sheet
  3. Vallejo Mecha Surface Primer “White”
  4. Vallejo “Airbrush Thinner”
  5. Gorilla Glue
  6. Elmer’s PVA Glue
  7. 4 small screw eyes
  8. Secret Weapon Washes “Heavy Body Black”
  9. Vallejo Model Color “White”
  10. Vallejo Model Color “Red”
  11. Army Painter “Speed Paint – Murder Scene”
  12. Vallejo Model Color “Wood Grain”
  13. Battlefront “Black”
  14. Vallejo Game Air “Beastly Brown”
  15. Citadel “Auric Armour Gold”
  16. Army Painter “Speed Paint – Beowulf Blue”
  17. Army Painter “Speed Paint – Royal Robes”
  18. Army Painter “Speed Paint – Caribbean Ocean”
  19. Citadel “Contrast Paint – Aggaros Dunes”
  20. Army Painter “Speed Paint – Crusader Flesh”
  21. Citadel “Contrast Paint – Aethermatic Blue”
  22. Citadel “Contrast Paint – Pylar Glacier”
  23. Army Painter “Tanned Flesh”
  24. MSP Core Colors “Fair Shadow”
  25. Citadel “Contrast Paint – Baal Red”
  26. Citadel “Contrast Paint – Snakebite Leather”
  27. Citadel “Contrast Paint – Contrast Medium”
  28. Citadel “Contrast Paint – Magmadroth Flame”
  29. Vallejo Model Air “Gun Metal”
  30. Martha Stewart Crafts “Pale Bronze”
  31. Vallejo Model Air “Wood”
  32. Army Painter “Speed Paint – Hardened Leather”
  33. Vallejo Model Air “Bright Brass”
  34. Citadel “Agrax Earthshade” (wash)
  35. Citadel “Nuln Oil GLOSS” (wash/shade)
  36. Vallejo “Flow Improver”
  37. Vallejo Varnish “Satin Varnish”
  38. Vallejo Mecha Varnish “Matte Varnish”
  39. Small jewelry rings
  40. Wooden matchsticks
  41. Cotton twine
  42. Citadel “Contrast Paint – Skeleton Horde”
  43. Small rocks
  44. Vallejo Earth Texture “Brown Earth Gel”
  45. Army Painter “Battlefields Grass Green” (flocking)
  46. Army Painter “Battlefield Field Grass” (flocking)
  47. Shadow’s Edge Miniatures “Tan Tufts” (flocking)
  48. Shadow’s Edge Miniatures “6mm Light Blue Tufts” (flocking)
  49. Gamers Grass “Wild”

Again, as you may want to check out the Wars of Ozz figures’ range – there are two places to get them (and I make no money from this btw). The game rules and the figures are available from the following two places:

In the US Old Glory has a site – Wars of Ozz Miniatures.

In the UK go to Sally 4th.

Man of TIN blog two

Toy Soldiers, Gaming, ImagiNations

Gisby's Gaming Blog

Miniatures gaming projects, products, and reviews

Carrion Crow's Buffet

Narrative Wargaming, Fiction and General Musings on the Universe

Despatches from Fort Syllabub

An account of fictional adventures on the North West Frontier - and other times and places, real or imagined

Man of Tin blog

Toy soldiers, gaming, Imagi-Nations

Zauberwurfs Blog

Ein Blog über Tabletop und Miniature Wargames.

Frank Tank Rants

musings of a fat old bloke on tanks and wargames

Dragons of Lancasm

Games, miniatures, painting, books and more games

Tiny Painted Heroes

The Adventures of a lifelong Tabletop Gamer, Game Design hobbyist, and full-time Software Engineer

Steve's Paint Brush

Grimdark model making and mini painting

Wargamesculptors Blog

Life, Golf, Miniatures, & Other Distractions

Dead Dick's Tavern and Temporary Lodging

Life, Golf, Miniatures, & Other Distractions

Guru Pig - the gaming Guru

Guru's thoughts on wargaming, life, and the universe!

Wisely lead... without a head!

History, Miniatures and Wargaming

Kuribo's Painting

Fallout Wasteland Warfare, Warhammer, and Hellboy Painting, Terrain, Dioramas, and Battle Reports

Don't Give Greg Ideas

Seriously, just don't

War Across the Ages, and other dark horrors

A discussion of miniatures collecting, painting and gaming.

Classic Warhammer 40K

Painting diary focused on Warhammer 40K 2nd ed., 5th ed. WHFB, related GW games, and miscellaneous whimsy

Colonel Mustard

WW2 Modelling in 1/72 Scale

Bogenwald

Random painting and terrain making.

Pat's 1:72 Military Diorama's

Scale diorama tips and ideas

Arcade Dreams

Building the Arcade Dream

P.B.Eye-Candy

Phil's 20th century wargame pages

SP's Projects Blog

A futile fight against entropy or 'Every man should have a hobby'? Either way it is a blog on tabletop wargames, board games and megagames

30mmdave

Wargaming Plausible reality?

The Imperfect Modeller

Miniature Figure Painting and Diorama Modelling

Double Down Dice

Painting miniatures and rolling dice!

Just Needs Varnish!

My ongoing wargames projects!

miniaturepopcorns

Sculpting some worlds

Despertaferres

Wargaming with the ability of a dull nine year old

Dawn of the Lead

Miniature wargaming and the occasional zombie

Rantings from under the Wargames table

Wargames, Figures, Sculpting and Converting Miniatures

Simple as War

Miniatures & Terrains

Buck's Blog

Life, Golf, Miniatures, & Other Distractions

IRO aka Imperial Rebel Ork

- I model - therefore I am -