Congrats to Ellen and to Chris on their romantic engagement on Sunday – see the blog post by Ellen below to hear how Chris did an outstanding job!!
Chris called me Saturday to ask for my blessing the beforehand and I was so happy to give it! I was on the 4th hole at Bay Path when the call came in. At first, I was worried that there had been an emergency, but soon I could tell it was an important call. Chris was trying to keep his voice down and Ellen from hearing – but I got to hear all the important parts. WOW!
I was so happy to hear and Lynn and I are so happy for both of them. They are both so special to us and loved by us!
They came over Sunday on their return to show off the ring and we celebrated – including Caesar!
All of us celebrate!
Posing for the celebration photo (thank you Apple Watch)!
This weekend, Chris and I went out to Provincetown for a convention called Nauticon. It’s a 21+ convention full of all things nerd and geek and awesome (and alcoholic). We went to the first one back in 2012 and were excited to have the chance to go again. It’s held at the historic Provincetown Inn, […]
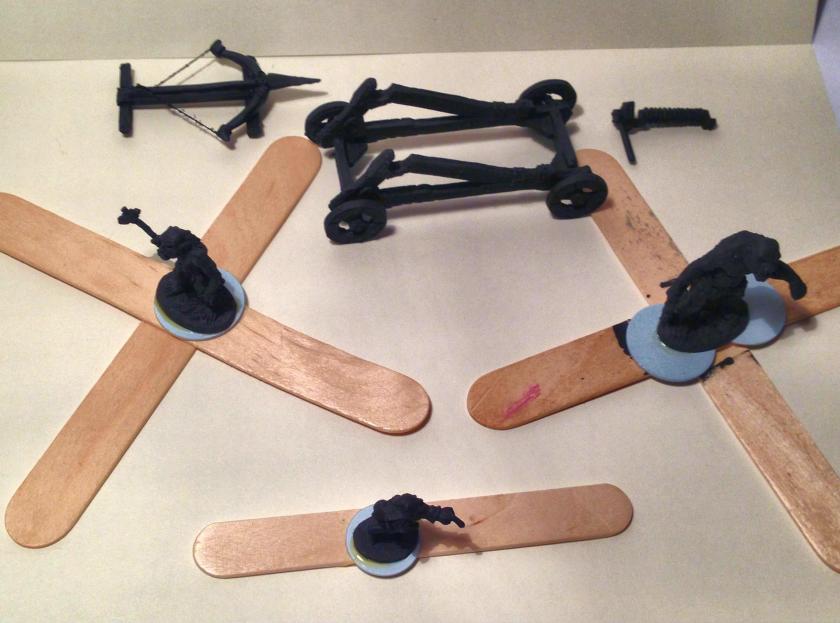
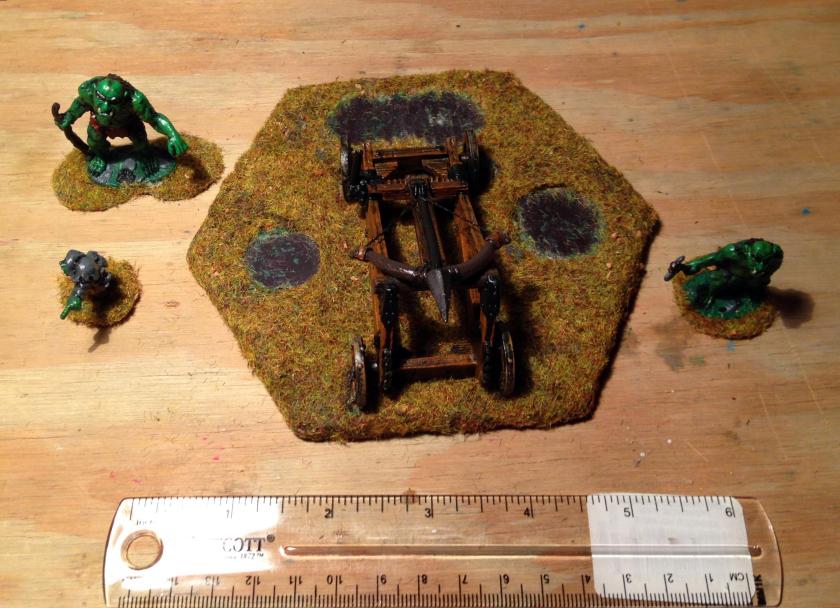
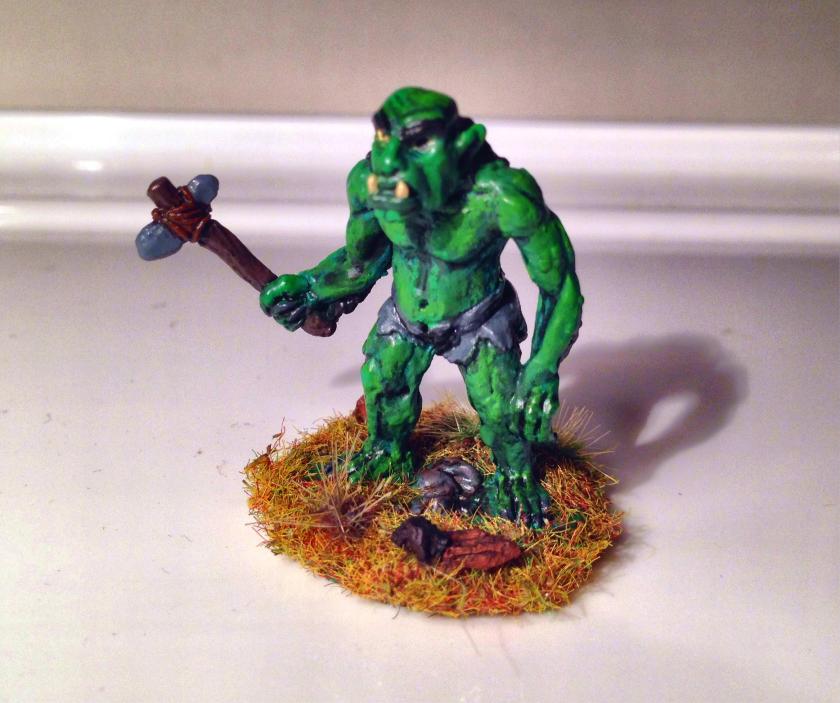
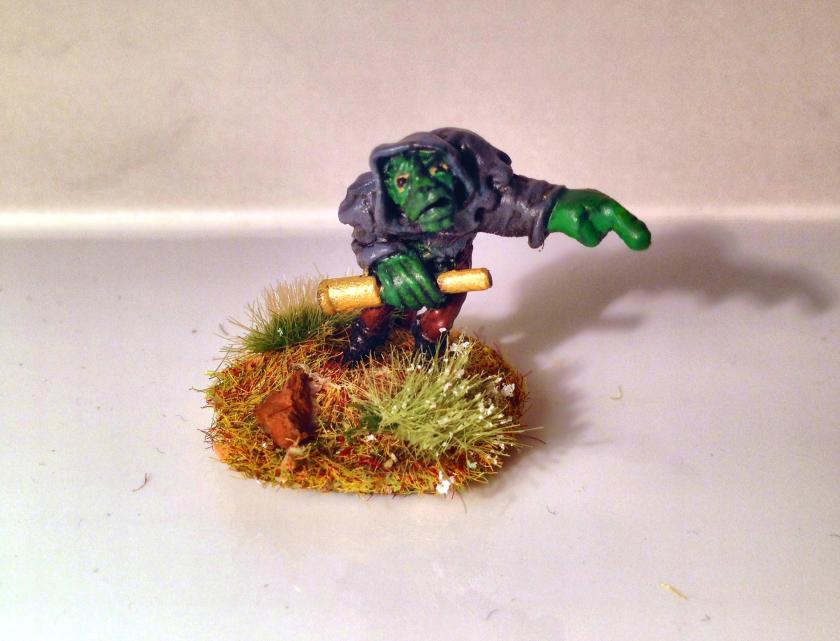
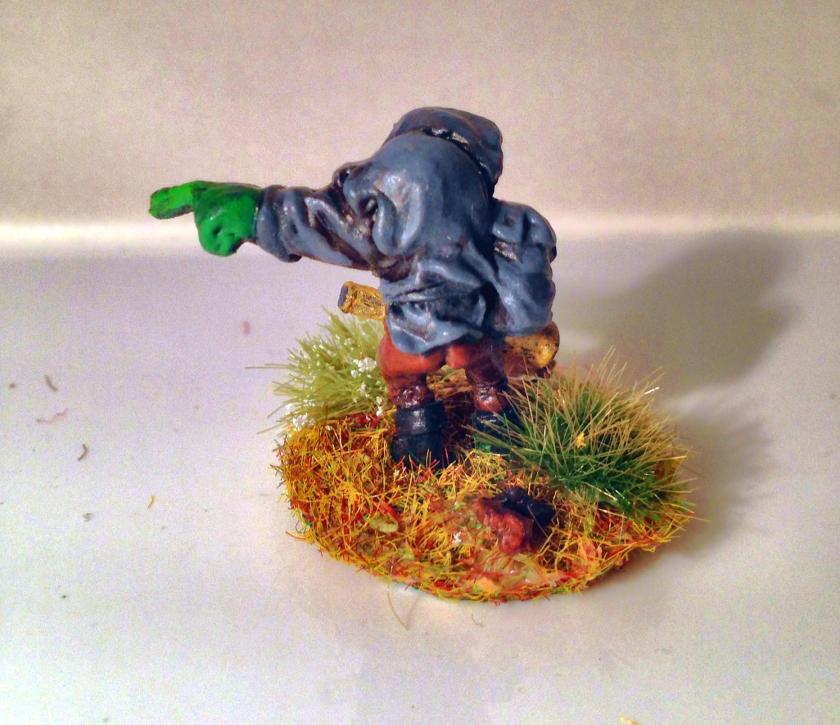
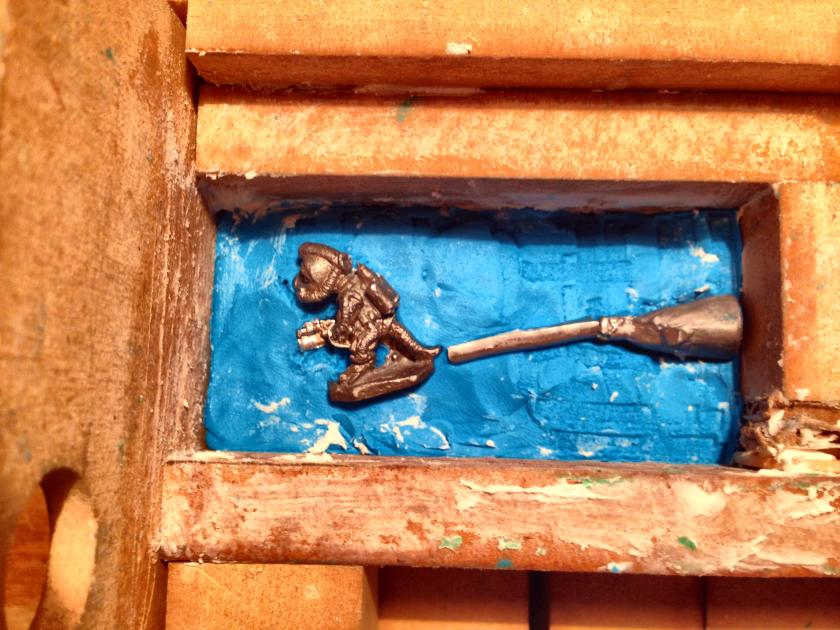
I saw an item on eBay that was listed as “Ogre Baleesta”. As I already had an Elven Ballista, I thought it a good idea to have a crew-served weapon for the bad guys. Little did I know that this would turn out to be a pretty involved project! I paid a little more than $30 for the three figures and the ballista.
The figures as shippedI love doing a little research on Lost Mini’s Wiki site: http://www.miniatures-workshop.com/lostminiswiki/index.php?title=Main_Page. I want to document my figures as best as possible, and I have gotten a bit more familiar with digging into the catalogs there. I found these all in the 1994 Grenadier catalog. However, they were not Ogres, but “Trolls” and a separately listed “Heavy Bolt Thrower with Hunchback Gunner”.
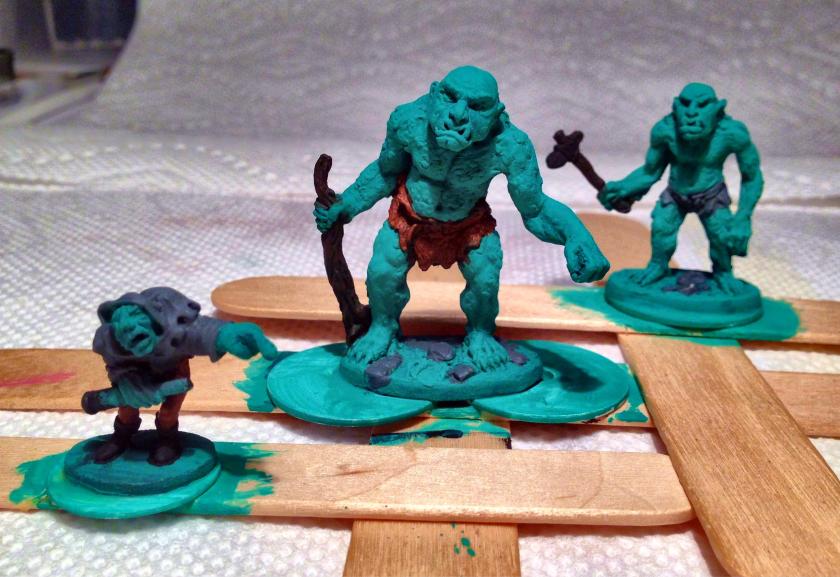
The set of Trolls is #3107, sculpted by Sandra Garrity, and included both Trolls in a blister pack. It was part of the “Fantasy Legends Blisters” line. The figures themselves had “1992” and SM-33 and SM-34 and “Garrity” on the bases.
The ballista and gunner was #9204, and was in the “Fantasy Warriors Grand Pack Line”. I then proceeded to treat them all as a Troll crew and a ballista. To call them Ogres when they were Trolls seemed so inappropriate!
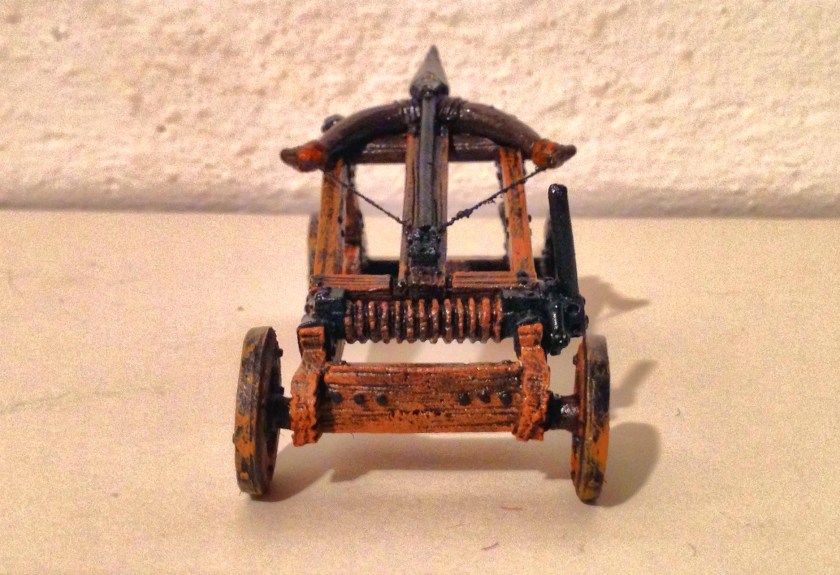
The ballista had been crudely cemented, and that took some work to correct. I was happy that a string had been attached to the ballista as that saved me some work.
Ballista rear view as shippedDetail of the bottom of #3107 Trolls by Sandra Garrity
I removed the old cement and disassembled the ballista. I then primed the set in Jeff Smith’s workshop on a cold February day with Krylon “Ultra Flat Black” and mounted as below for painting.
On washers on popsicle sticks and ready for painting!
I used Citadel’s “Dryad Bark ” as a base coat for the ballista wooden elements. I subsequently employed two inks in succession as washes – Secret Weapon’s Washes “Heavy Body Black” and P3’s “Brown Ink”. On this I applied a dry brush application of Citadel’s “Scrag Brown”, followed by a wash with Citadel’s “Agrax Earthshade”. For the bolt and other iron parts, I used Tamiya’s “Gun Metal” and Polly-S “Rust”. Finally, I used Citadel’s “Nuln Oil” as a light wash to darken the iron components even more. Eventually I was able to apply a couple of coats of varnish to the ballista. As I needed to apply coats of varnish to the undercarriage and the top of the ballista, and as New England would not warm up, this took longer than I wanted! I was able to apply Krylon “Clear Glossy” followed by Krylon “Clear Matte” varnish and moved on to the crew.
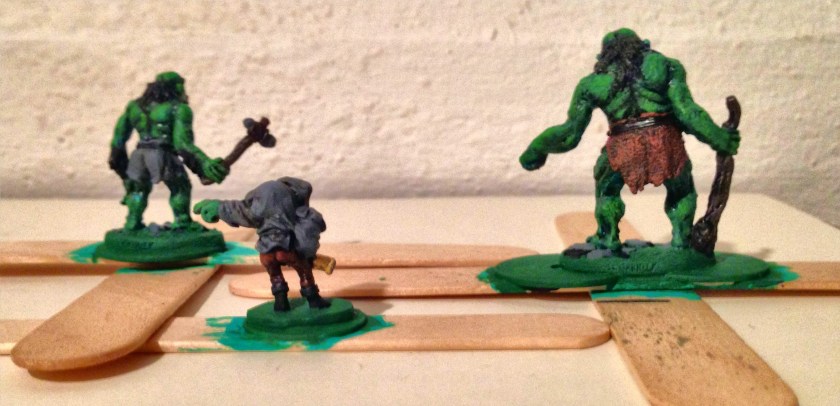
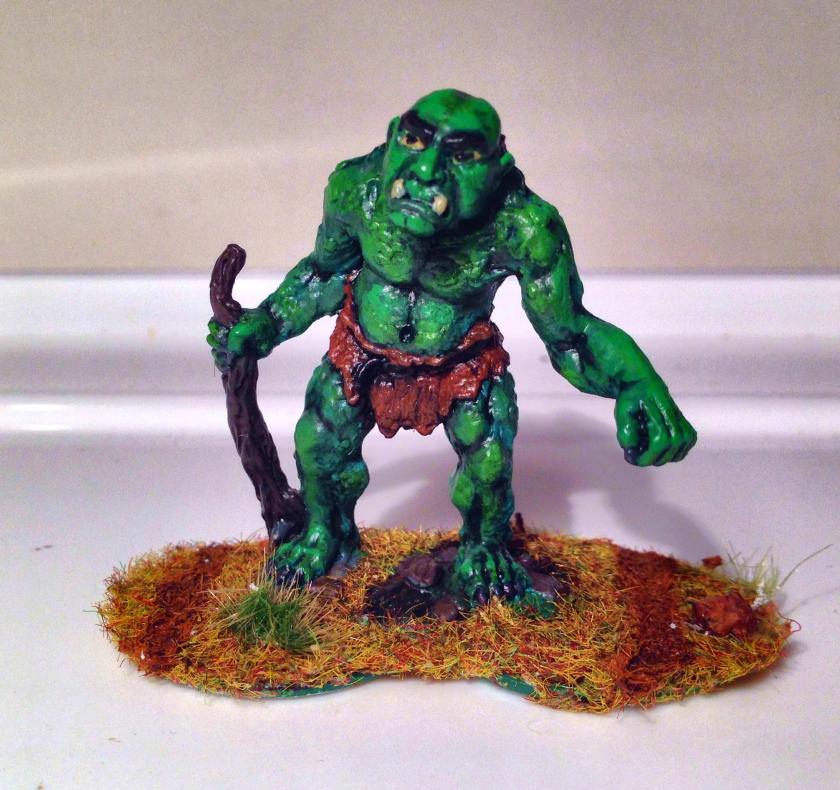
The ballista completedI base coated the crew with Armory “Dark Green” on the skin, with Armory “Chestnut” and Americana “Zinc” on pants and cloaks and stones at the figures’ bases. For the clubs and handles I used Citadel’s “Dryad Bark”. The gunner’s boots got Americana “Black”. Then I applied a wash with two inks – Secret Weapon Washes “Storm Cloud” and Citadel’s Agrax Earthshade on the skin. For the eyes, I used Citadel’s “Ushabti Bone” and Americana “Lamp Black”. I further wanted to get the right tone for the skin – I wanted greasy, sweaty Trolls! To accomplish this, Citadel’s “Waaagh! Flesh” and Polly-S “Slime Green” worked well when highlighted with Citadel’s “Niblet Green”. Then I used Americana “Lamp Black” on all the Trolls’ hairy parts. For the gunner’s telescope, I used Martha Stewart Craft’s “Pale Bronze”. I proceeded to add highlights (with Americana “Black Tie” on the hair and lightened “Zinc” on the cloak) and depth to the skin with the use of washes (more “Nuln Oil”, “Agrax Earthshade”, and Secret Weapons Washes “Stone”. Then I varnished them the same way as the ballista.
The first base coat on the TrollsAfter painting and varnishingRear view after painting and varnishing.
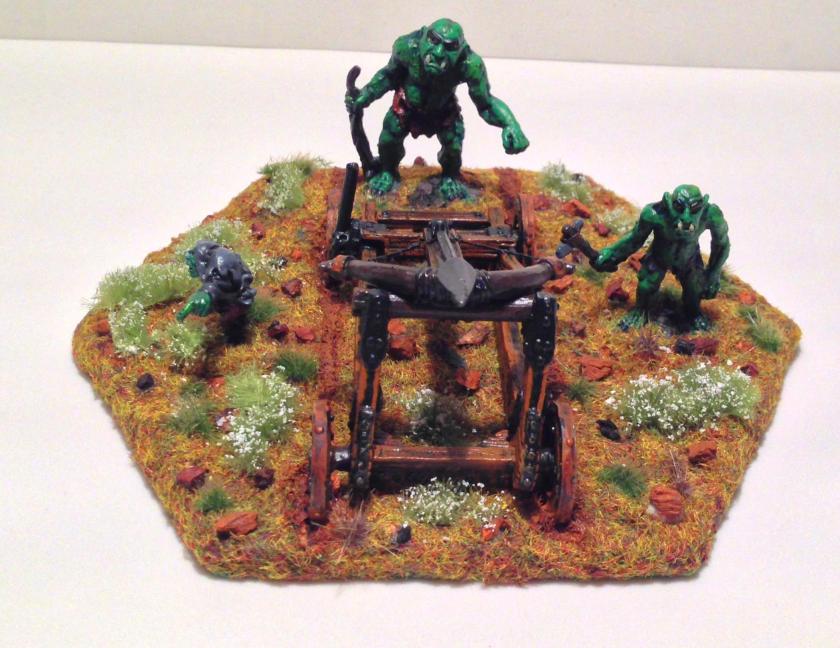
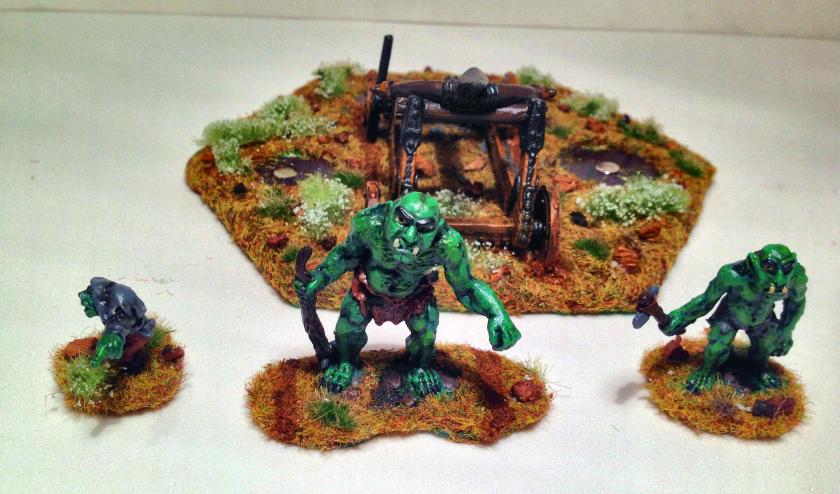
My concept was to craft a hex base large enough to deploy the set. I cut out a hex base from 1/8″ plywood (luan), and primed it with Deka-Lack “Grun”. On the bottom of the base I glued several washers for the model to be stored on magnetic sheets. I flocked the base with Ziterdes “Alpine Meadows” and painted any rocks “Skrag Brown”. Using my Dremel, I carefully removed enough wood to install magnetic sheets in the base so that I could have the crew leave the ballista. These sheets proved insufficient to the task in terms of being able to hold the figures to the base. I fixed this by drilling 1/4″ holes with a spade bit and adding neodymium magnets (1/4″) in the middle of each base. These are powerful magnets. The figures can hang upside down from the base without falling now!
I wanted the idea of the model to be that the large Troll was the locomotive force for the large ballista, with the other Troll being the loader and the small Troll the gunner. The large Troll would push the ballista through the turf leaving wheel ruts. Therefore, I used more “Skrag Brown” to create the image of the wheel ruts. I then reflocked the bases of the figures and the main base and added more rocks, grass, and meadow flowers from Army Painter. After a couple of iterations, I was able to disguise the fact that the crew could be removed.
The initial routing for magnets and slots for ballistaFirst shot at magnets and flockingBefore addition of 1/4″ neodymium magnetsFinal frontal view of the modelGunner side viewLoader side view
Rear view angle Crew detached – note neodymium magnets in the center of where figures are mounted Large Troll, Frontal view
Large Troll, reverse sideMedium TrollMedium Troll reverse sideThe Hunchback GunnerThe Hunchback Gunner, reverse side
All in all, I am happy with the way that it all came out. I like the deployability of the crew, and will use this technique in other models. I hope that they are fun to control in my next game!
Certainly Iron Winds Metals is attempting to outdo its Kickstarter project from last year!
There are a LOT of options here and anyone who wanted to get in would certainly find much here to be desired. Unlike last year, the miniatures will be shipped as orders are filled. It ends soon – and these are great Ral Partha figures!
Kudos to IWM – this is pretty impressive. I am still working through my projects (like last year’s Kickstarter!), which is the only thing holding me back!
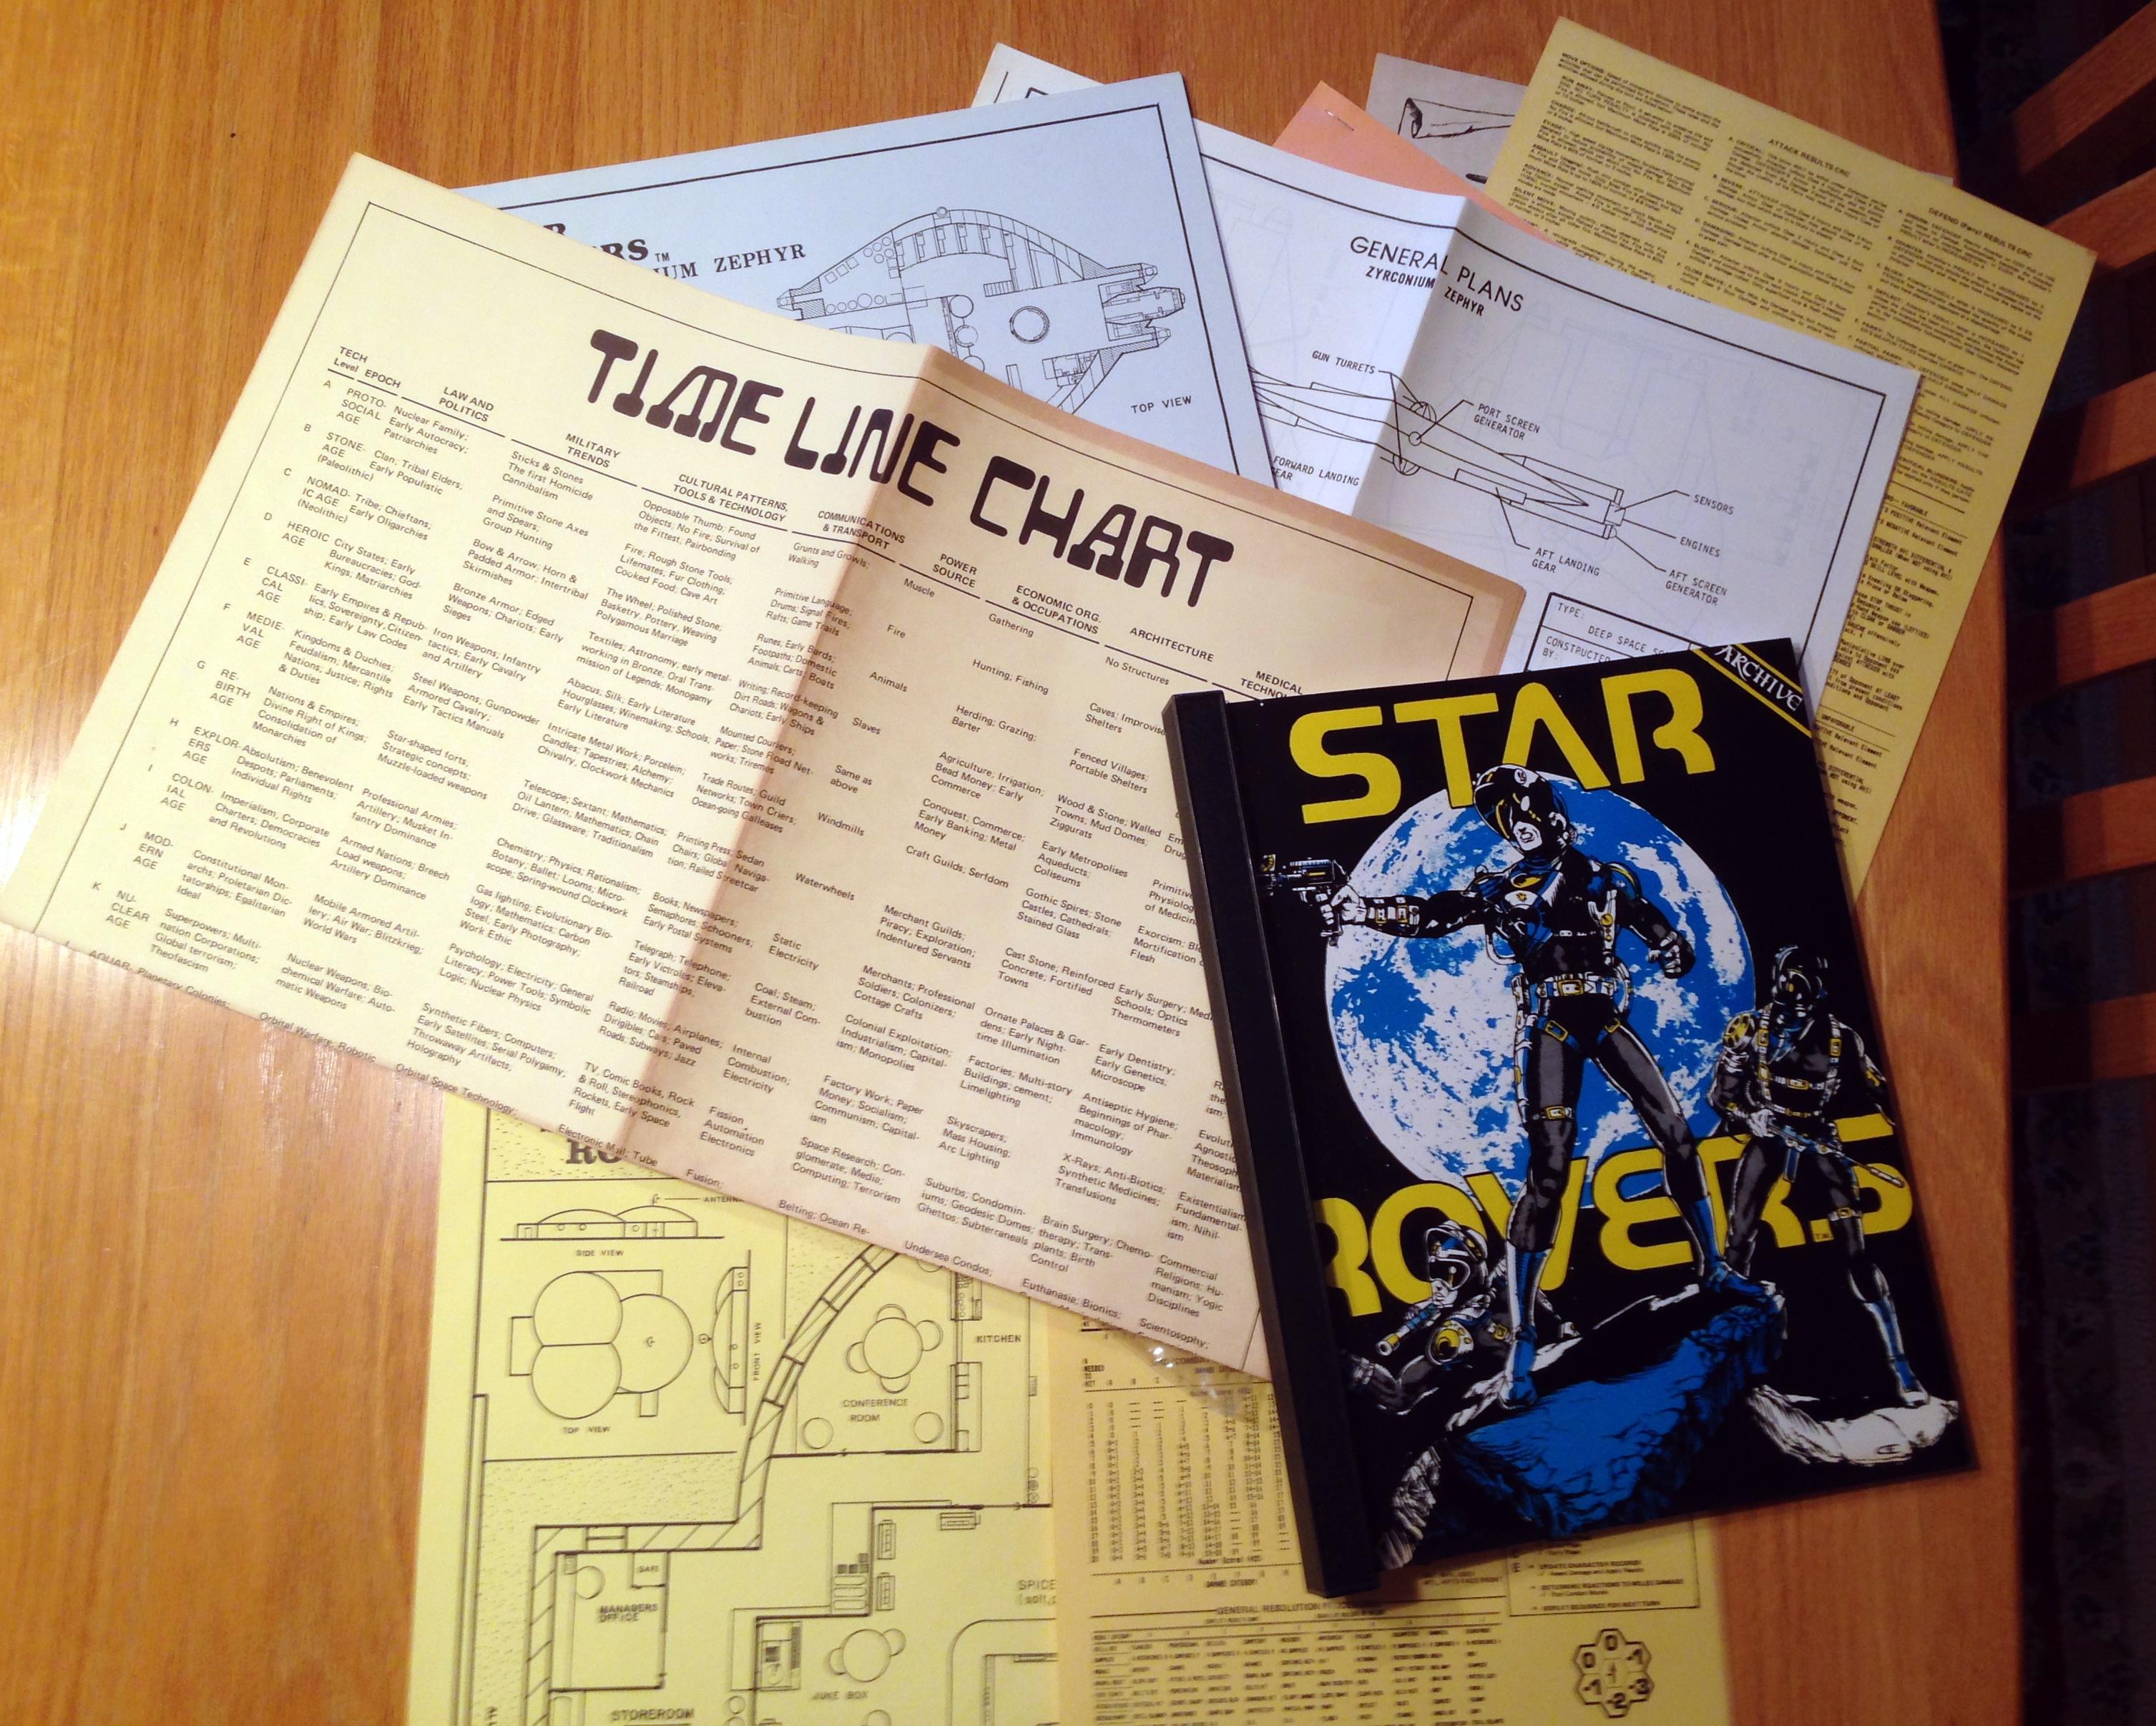
Buck My friend Ma’k Morin recently discovered the Star Rovers line of figures from Archive. See his article here. Ma’k molded some of them for me, since they are no longer in production. The guy who has all the Archive molds, doesn’t have these, so they may be lost. Last weekend, Ma’k gave me two […]
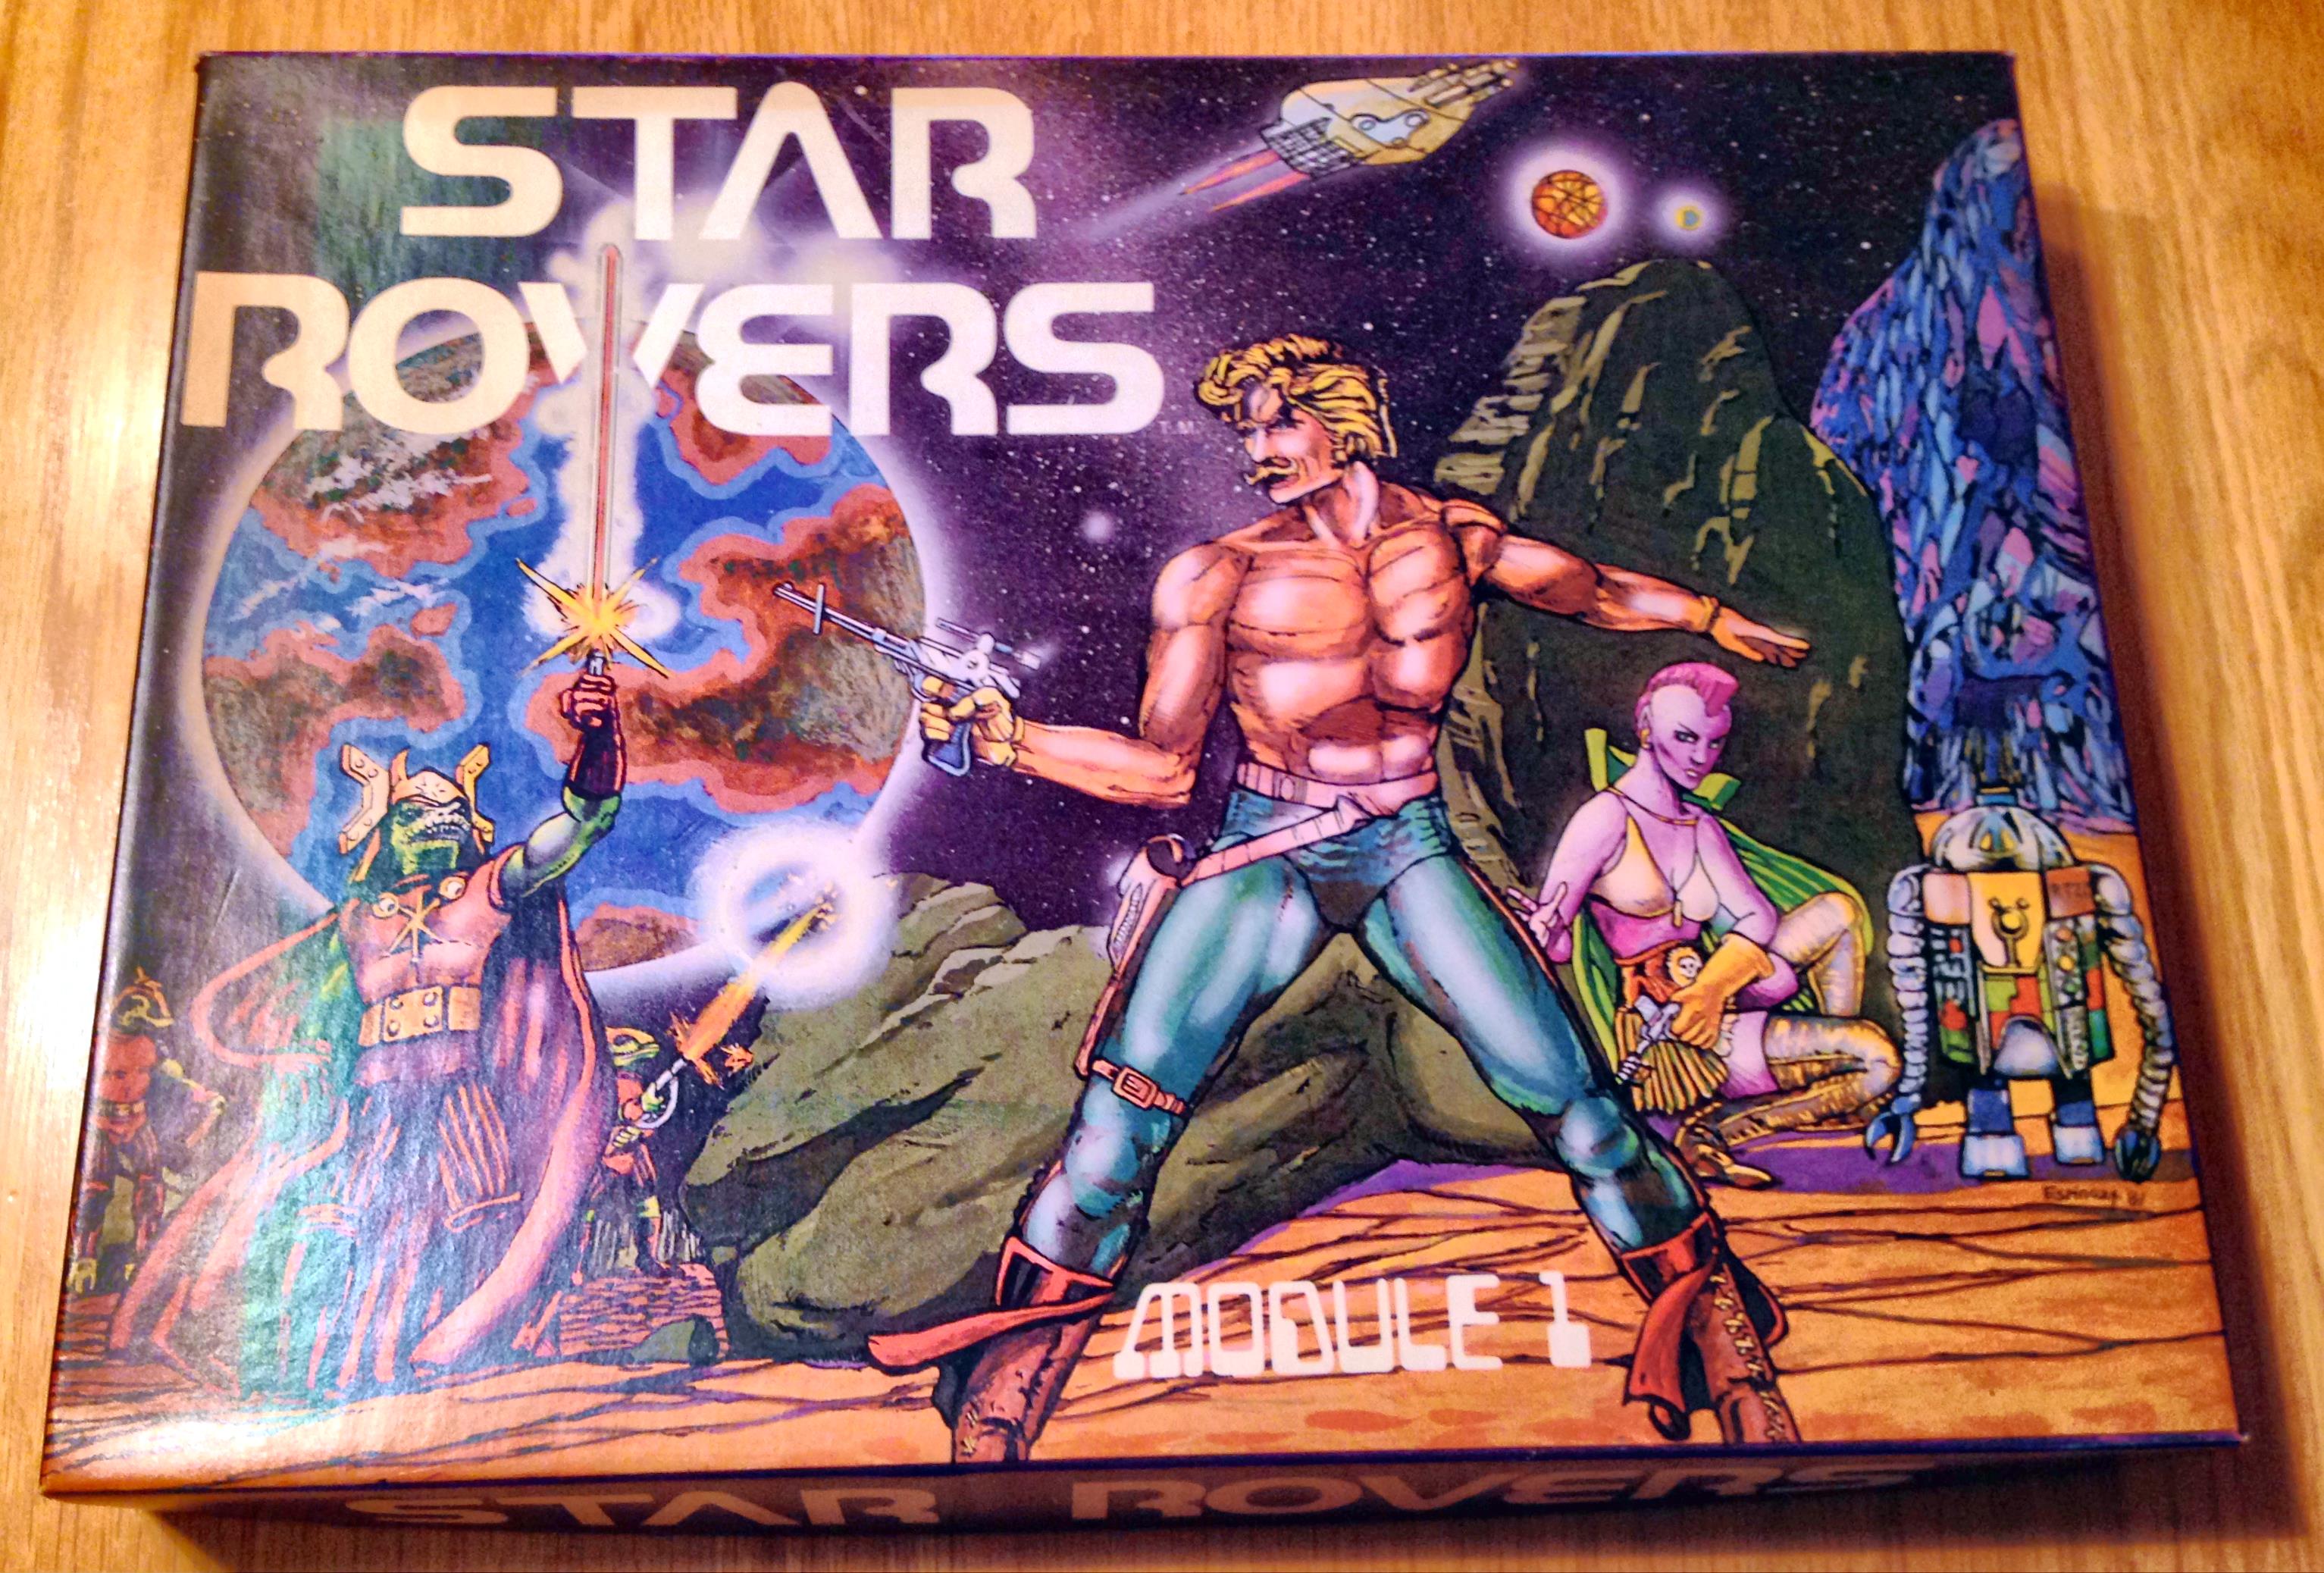
Having recently discovered how cool the miniatures from Archive Miniatures “Star Rovers” line was – I was interested in getting a copy of the game. Thanks to eBay, I got a brand new one at a reasonable price.
It was an sci-fi RPG from 1981. While it was “Module 1”, I do not believe that any other modules were printed.
The game looks pretty cool – and there was a lot of cool artwork. As I have been amassing Archive Miniature Star Rovers figures like Star Ducks and Power-Armored Frinx, I am hoping that reading the game will help me. Also, there was an original Archive catalog in mint condition in the box as well.
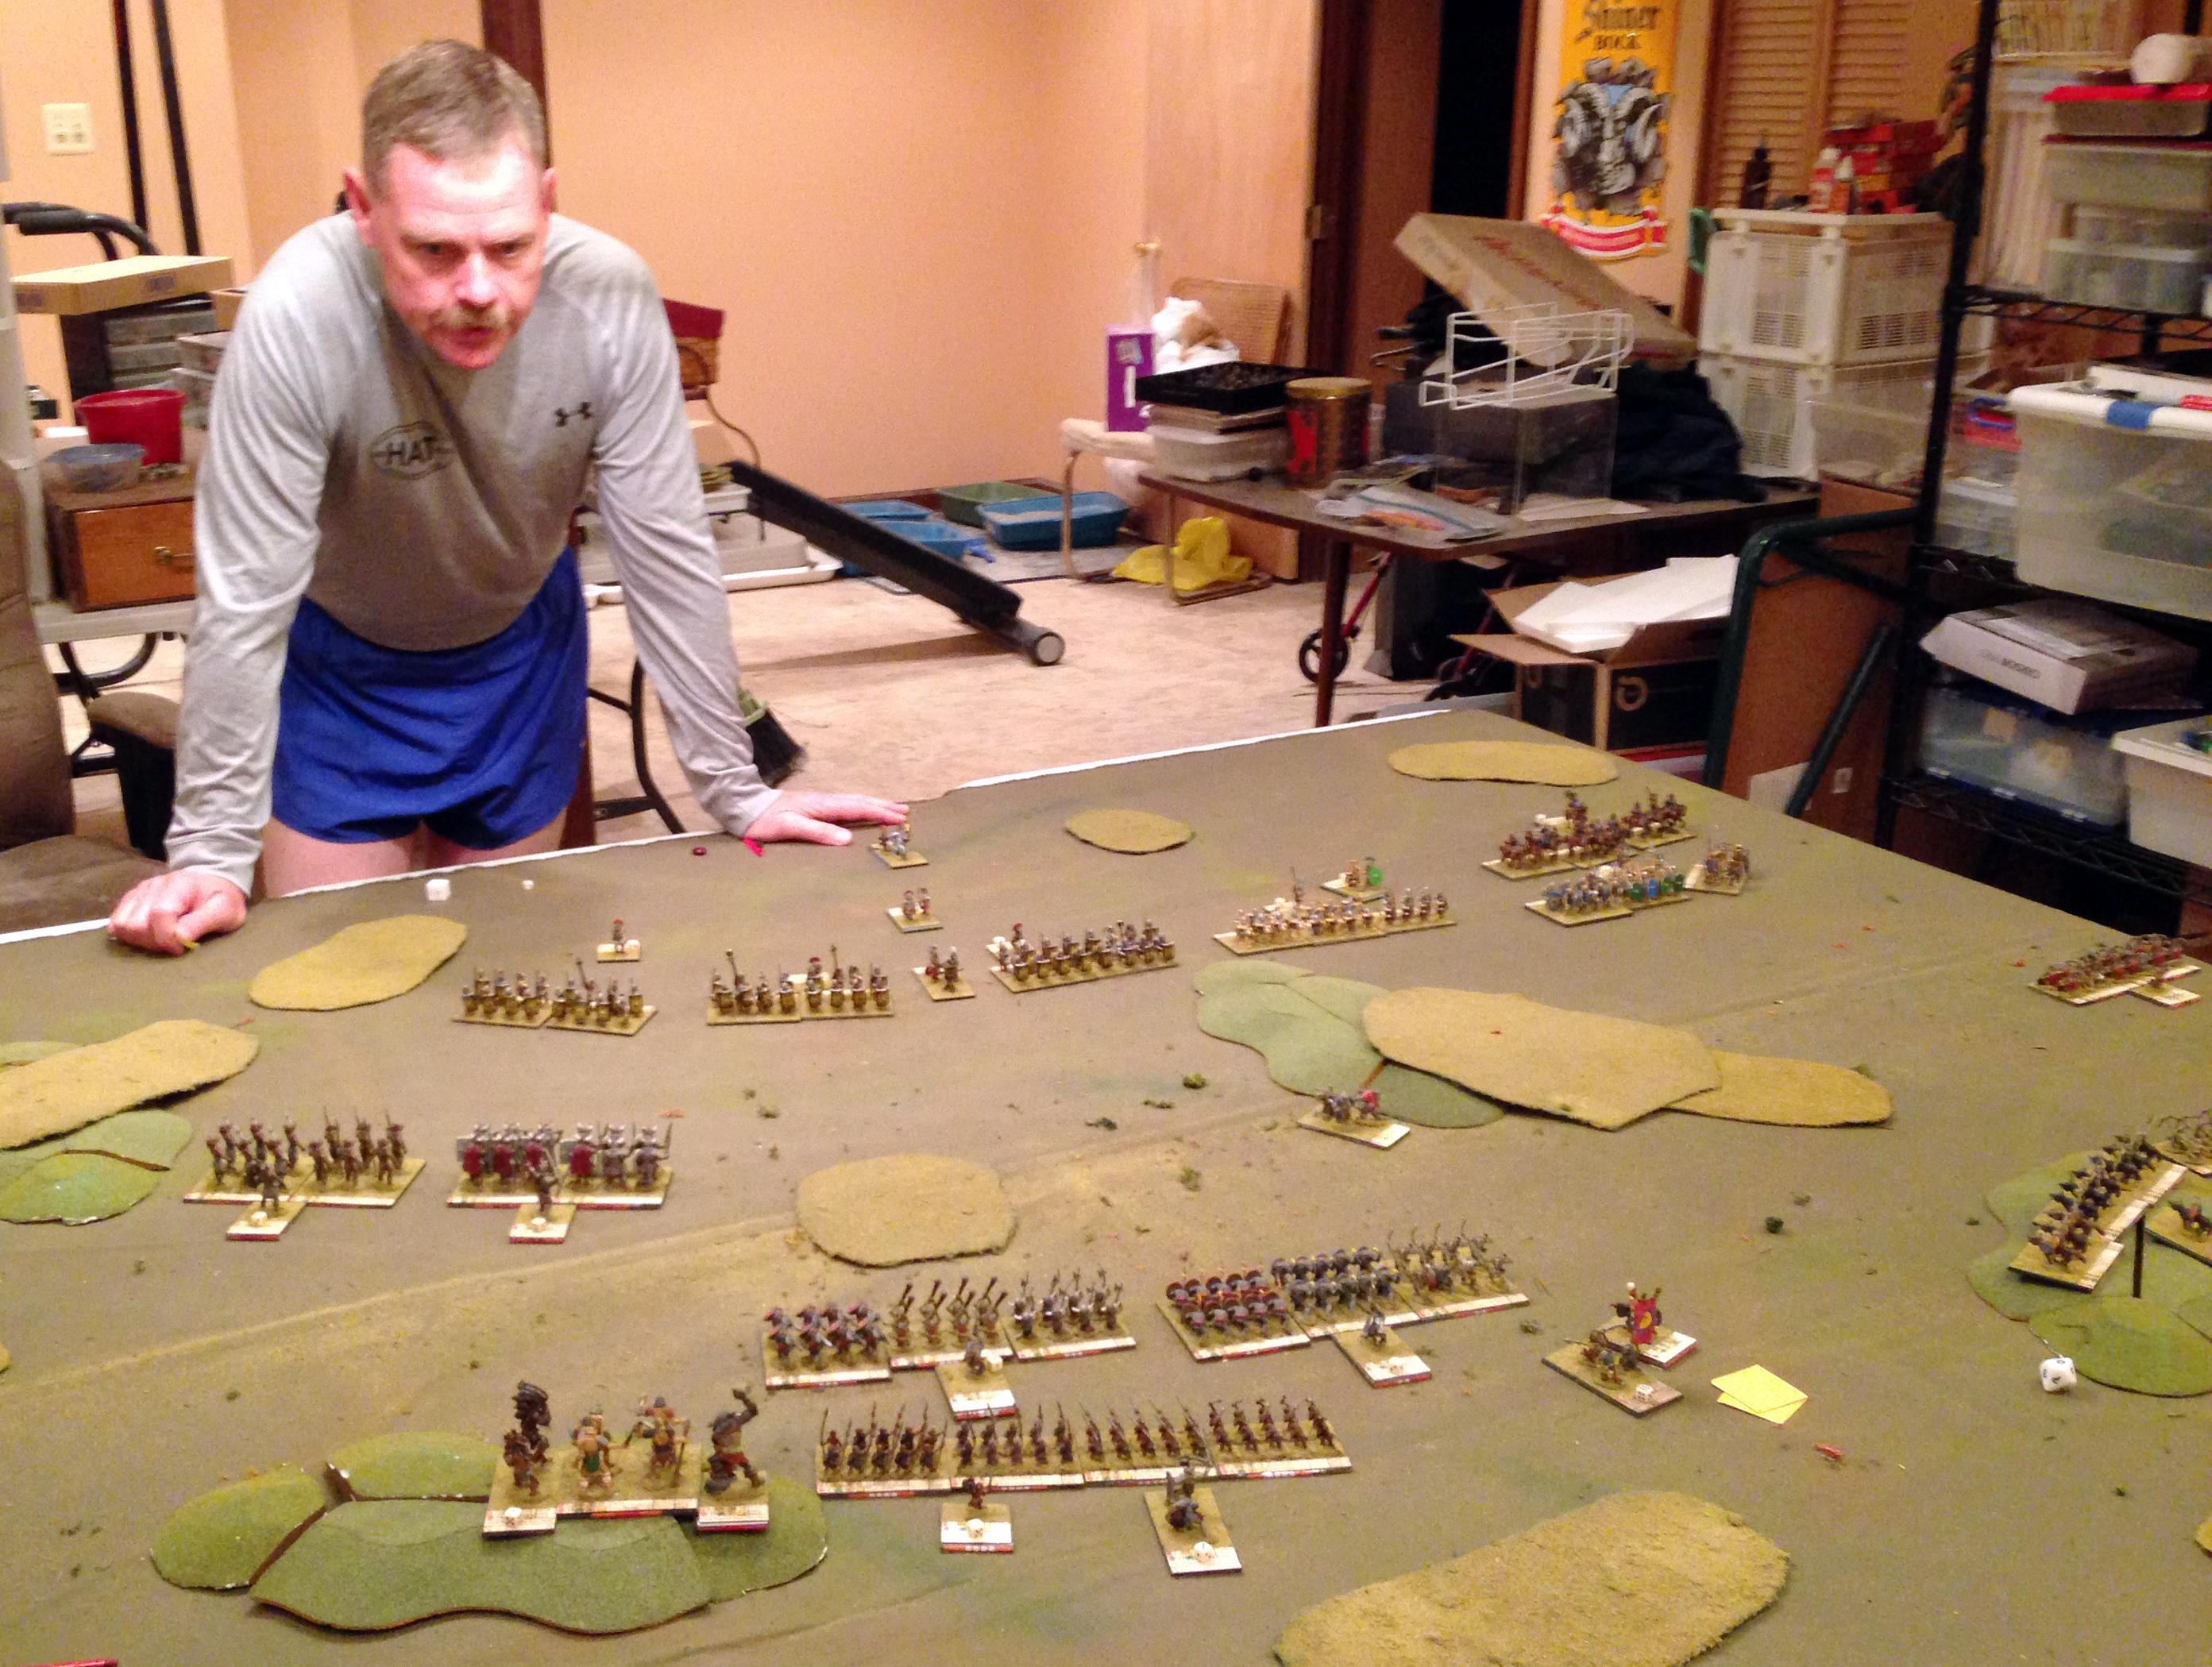
I was fortunate to be able to meet with Dave Wood for a couple days in Abingdon, MD (let’s call it WOODCON) and with Buck Surdu at the Harford, MD HARCON in the last week of April. To round out the month of April, what could be better than getting together with friends and getting some gaming in? Plus, I got to deliver to both the miniatures that I had been casting for them that have been discussed extensively in this blog. Dave got Roomans and crossbows, while Buck got Star Ducks, Power-Armored Frinx, Roomans, and crossbows. I also supplied him with an Apple watch box and an iPhone box for his sci-fi Combat Patrol project.
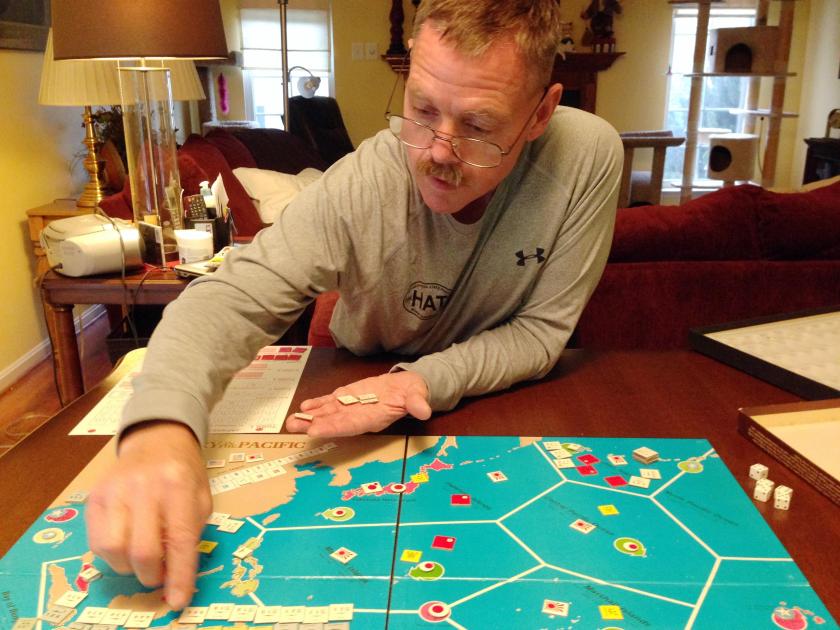
Dave and I started out with a game that we had played probably dozens of times back when we were roommates at West Point. It was the old Avalon Hill game Victory in the Pacific. Its a board game simulating the naval conflicts in World War II. I played the Japanese, and lost to Dave in the last turn, but it was a nice time.
The next day, we started by getting in a fantasy game with Romans defending against a horde of Orcs, Goblins, Minotaurs, and some other bad guys. I wanted some more experience with the Bear Yourselves Valiantly rules, and Dave was happy to help. I took the bad guys side. The highlight of the game was being able to use a spell on an Orc ballista which was then able to hit his overall Roman Army Commander. Luckily, Dave was able to get that commander safely out of the way of the ballista, so he lived. Dave’s Roman Legions did a number on my Minotaurs, while my Goblins and wargs had better luck with his Roman Auxiliaries. We called it early (I think Dave would have prevailed easily) so we could get in some game play with Buck’s Combat Patrol rules.
Starting positions – Romans on leftDave’s Roman Legion dispatches the MinotaursThe Orc Ballista hits the Roman Army Commander (with the help of a spell)Melee in the MiddleThe Roman Auxiliary Commander faces an Onslaught of Goblins on Wargs
The scenario we used for the Combat Patrol game was Boers versus Zulus. I took the Boers, and it was a great skirmish game. While I own these rules and the card decks, I had not yet played with the. My hats off to Buck and Chris Palmer on putting together a really nice system.
Here, I was able to hold off the Zulus, although not without casualties. In fairness, Dave did give me a substantial advantage in forces.
Boers hold the line against ZulusThe Boers Survey the Carnage
The last thing that Dave and I got to play was another Victory in the Pacific game, with us swapping sides from the previous game. As the Americans, I was able to win. We both feel that the Americans have an advantage in the game, which is counter to what you might see in the Wikipedia entry! Anyways, thanks Dave for a great time, and thanks Brenda for letting me borrow Dave!
Of course, I also have to thank Dave as he loaded me up with some great Thunderbolt Mountain miniatures (that eventually I will paint!), and a few others.
Dave plays the Japanese Empire in Game 2
On Saturday I attended the HARCON with the HAWKS. It was great to hang out with Buck again, and the Muskets and Tomahawks game (French and Indian War skirmish) was a blast. I got to play twice. As you can see, the tabletop was phenomenal!
The first game I had three groups of Iroquois (British allies) who had to raid a trading post and burn down half of the buildings (there were three so hmmm). I went up against Kurt, who luckily for me did not get his Huron allies until later in the game. Still, he conducted a great defense and I only burned down one building. Great GM’ing by Don!
Between games, there was a nice seminar about game design with Buck, Chris, and Zeb. That was very interesting!
The second game was against Eric, and I took the French side. That game come down to a final roll, where Eric charged my French officer with the Iroquois sachem and another Iroquois warrior. I had one other French figure left, and my office pulled a rabbit out of his hat and died dispatching the attackers. Here, Kurt was a great GM!
It was a great day and thanks again to the HAWKS who made me feel welcome yet again!
Buck gets his Star Ducks, Power-Armored Frinx, and RoomansMuskets and Tomahawks TabletopGreat Looking Waterfall!My Iroquois attempt to flank the French in the first gameAfter a close assault, my Iroquois take some leadMy Iroquois got around the building and ignited it, but the French fought backThe building is burned!In game 2 against Eric, the French save the trading post!
Chris Palmer This past Saturday, the HAWKs attended the HAR-CON gaming convention put on by the game club at the local Harford Community College. This con is a mixed gaming con, with video games, role-playing games, card games, board games, and miniatures games. A group of us posing with the French & Indian […]
This weekend was cold and blustery. Definitely no golf! Saturday was cold and rainy, and we got 5″ of snow on Saturday night, and 5″ more all Monday – kept me looking for Spring!
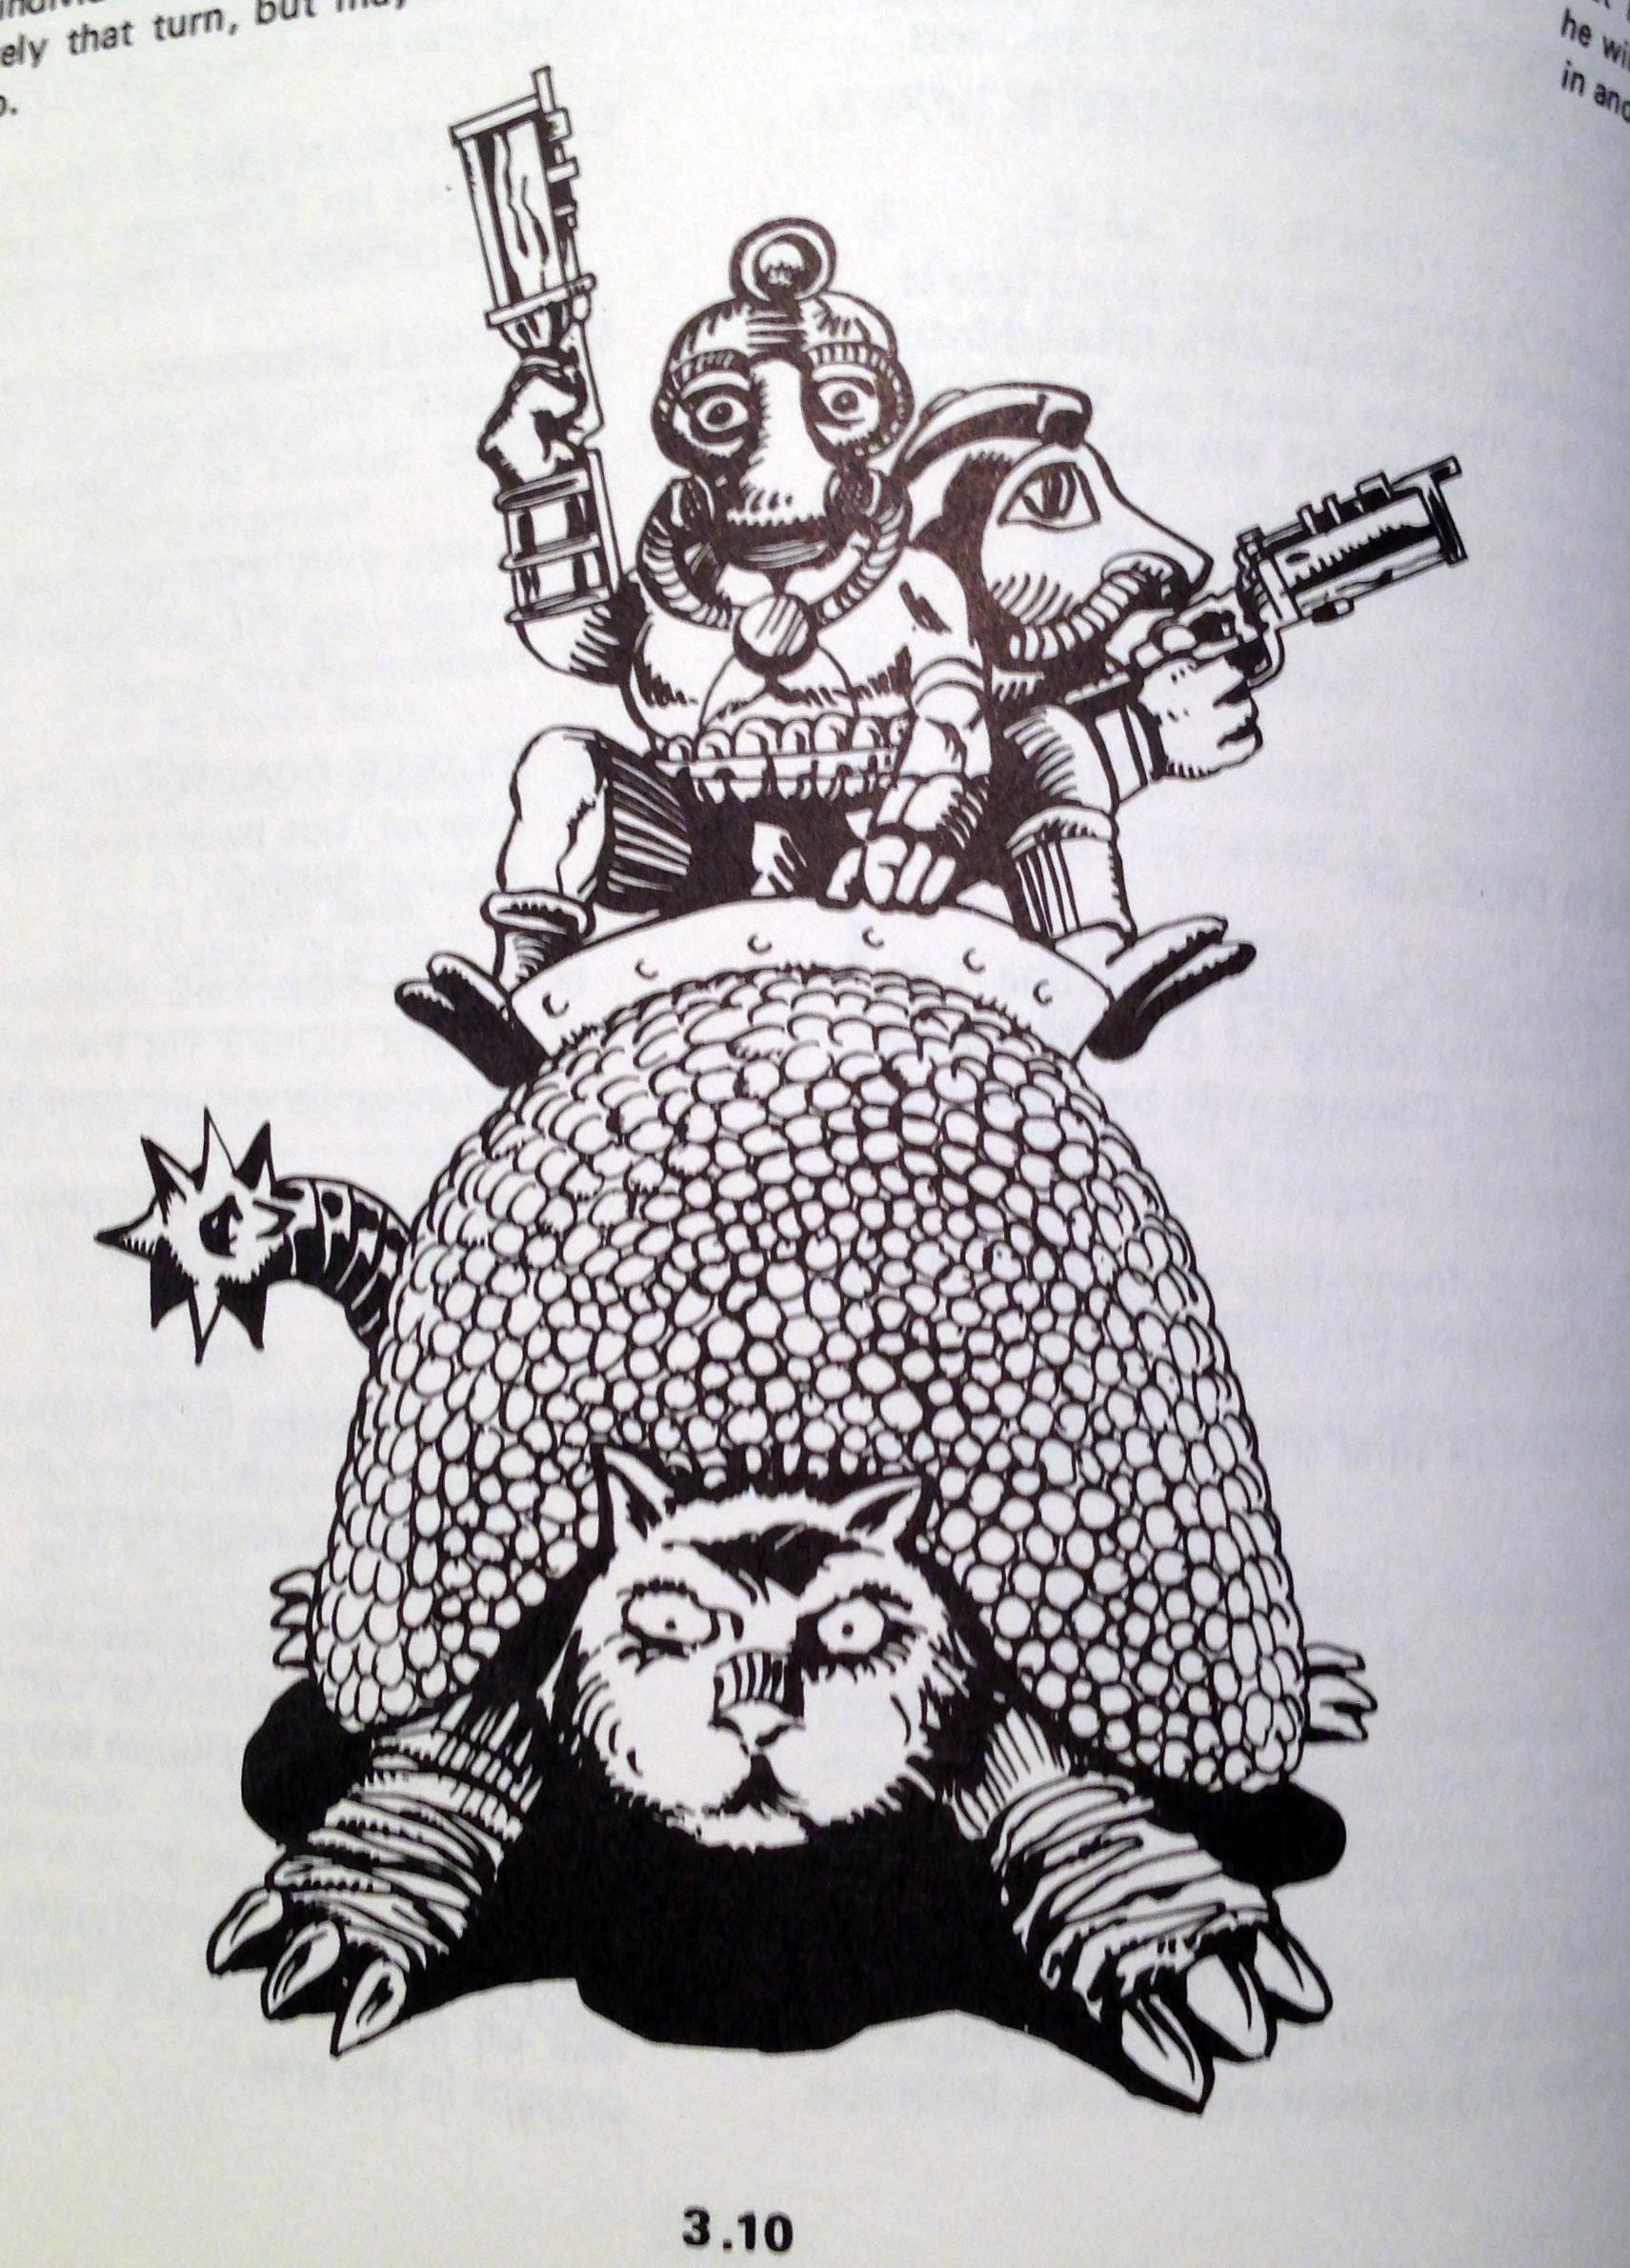
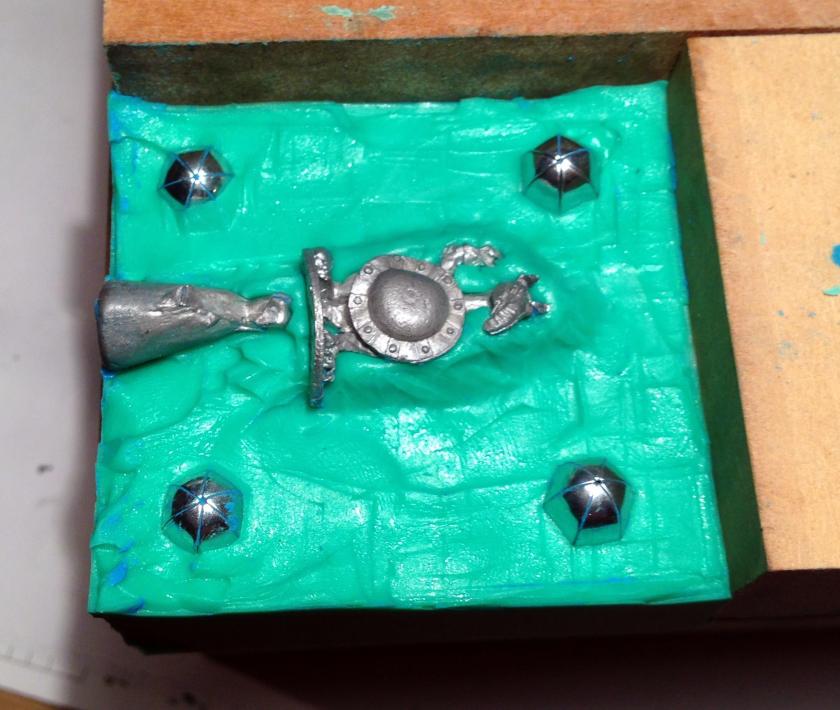
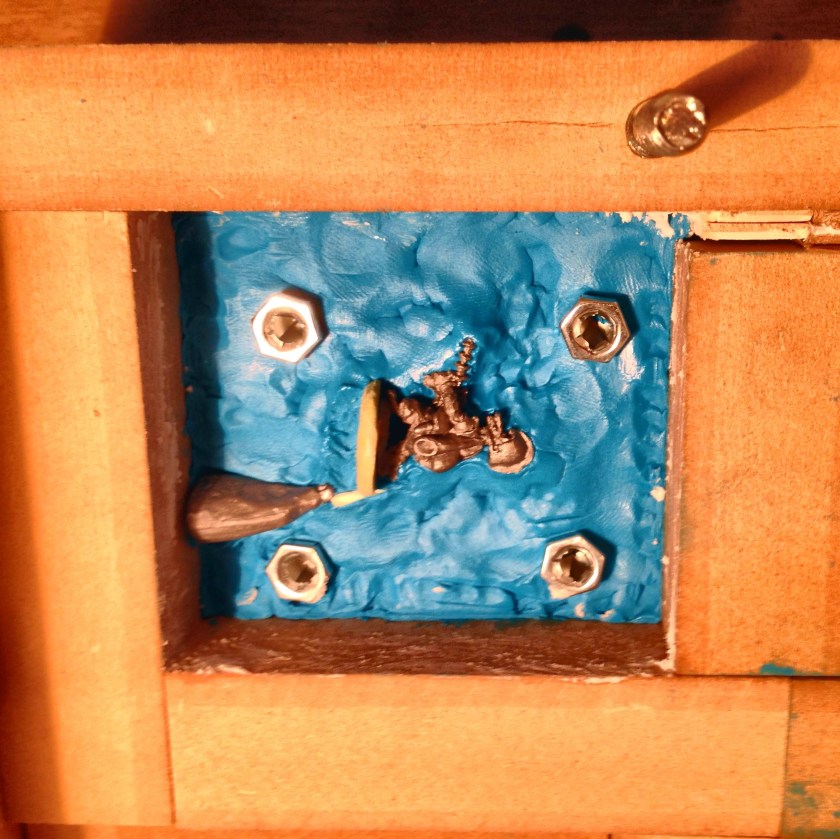
I took the opportunity to make a couple of more molds on Saturday. I made another Rooman War Party mold of the smooth shield Rooman from Ral Partha 01-044 or ES-44 (1977 miniature). I also made a new mold for eventual sci-fi play with Buck Surdu’s “Combat Patrol” rules. This was a 1981 “Power-Armored Frinx” (2040) from now-defunct Archive Miniatures “Star Rovers” line. From what I can see, a Frinx is a goofy reptilian biped. He could be armed with a large gun or a flamethrower, or perhaps a blaster? The figures looked cool and worthy of casting. I made both of these two molds a little longer and less wide.
Power-Armored Frinx Mold Half
Sunday came, and with it the miserable cold, wind, and snow. Undaunted, I set up my operation in my unheated garage. When the wind got too strong, I just shut the door- which was most of the day.
Ahh, April in Massachusetts! My casting operation is set up in the garage.
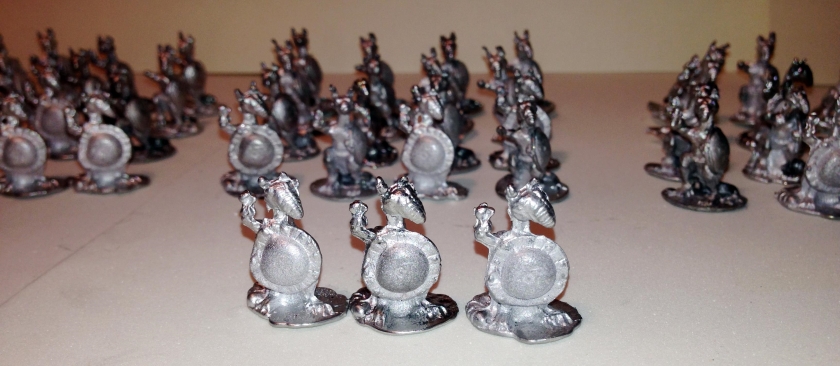
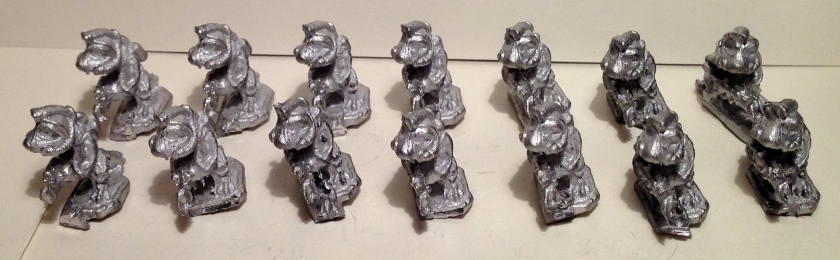
I was able to have a much lower melting temperature than my last efforts ( a range of 360-400 °F versus 600-650 F°). The flow was better and more manageable. As I got the hang of it, my castings got better, even with molds that I thought I might have damaged with the higher temperatures on my last casting. With six molds, I was able to crank out 82 miniatures, which really was satisfying.
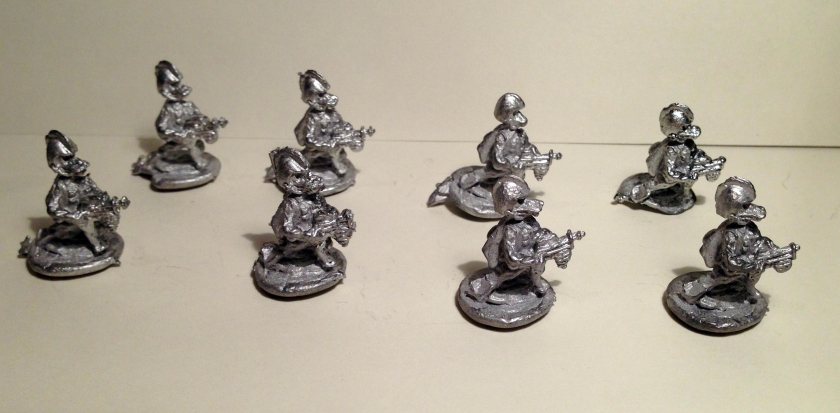
A Regiment of Roomans
I had a total of 83 Roomans now, enough to complete my units, with a battalion for friends Dave Wood, Buck, and my daughter Ellen. In the process of cleaning up flash and doing Quality Control, I ended up putting 8 into the recasting collection – but that just left me with the best of the Roomans left for myself, Ellen, Buck, and Dave. Some were better than others – but all in all they should paint up nicely and could have a variety of weapons and not just their original pikes.
Rooman Regiment Close Up on Command Group
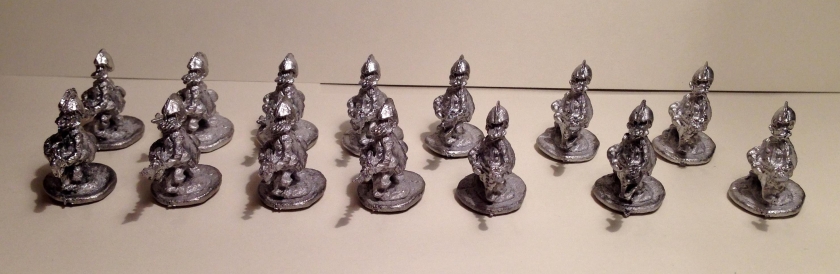
The Archive Star Ducks (2200) came from the “Star Rovers” line. These were a challenge as their ray guns did not always come out. I decided that the Star Ducks with truncated Ray Guns looked like and would be armed with submachine guns – and be just fine. With some practice and the new alloy, I had greater success as the afternoon went on, and ended up with a total of 14 armed with ray guns with 8 with submachine guns.
Star Ducks with Ray GunsStar Ducks with Submachine Guns
I was very pleased with the Power-Armored Frinx figures. The longer molds allowed me to get more details into the molds by tamping and rotating them after filling them with the molten metal. I ended up with 14 of these Frinx, and I can’t wait to see them get the Surdu touch!
Power-Armored Frinx
I had several key learnings from my efforts.
I found that longer molds are easier than wider ones for casting.
Using an alloy with 50% tin as described above was a lot easier than using plain lead, in terms of being able to use lower temperatures as well as better flow.
Each figure averaged 0.39 ounces of the alloy after recycling plugs and flash. With that ratio, I could cast 25 figures from 10 ounces.
I think six molds is the perfect number for quality production and safety.
The Quick-Sil is a great material to make molds with, but you need to be prepared to have an Exacto knife to add venting gates and open channels. Luckily, Quick-Sil is easily cut. If the mold needs adjusting, do it with the Exacto knife.
After pouring, tap/tamp/bang gently and rotate the mold to get the metal into the details.
Safety is paramount. The molten metal can indeed fly around, and it is HOT. I would not even think to try this without heat-resistant gloves, eye protection, and a respirator (breathing lead fumes is not a good choice). Having all of my skin protected is important, as well as anything that could get hot metal on it, like shoes, pants, long-sleeve shirts, etc. Protect your workspace too. I use steel sheets to insulate my work bench, which also has the advantage of making splattered metal easy to clean up and recast.
This was a fun project – and I am so happy that now I can round out any unit of out-of-print miniatures as long as I have one to mold and cast.
On Easter Sunday after dinner, Chris Smedile and I were able to crank out 6 Archive (1981) Star Ducks (#2200 from the “Star Rovers” line) and 22 Roomans (both types from Ral Partha “Rooman War Party”). I made two molds earlier in the day and we had fun trying to get the casting process correct.
First mold half for the Second Rooman ModelStar Duck Ready for MoldingMaster Star Duck for Casting
Thanks to Chris there was a good number produced. Two of the Star Ducks did not have their ray guns fully formed, but ended up looking like they had submachine guns, so I kept them. The other four were good, and had flash that looked like the guns were firing – an unexpected bonus.
The Roomans mostly came out, but some were remelted for recasts. Some were missing an ear, which my daughter Ellen Morin described as “battle damage”!
Still have more to do but having fun making them – and even more fun doing them with Chris!