

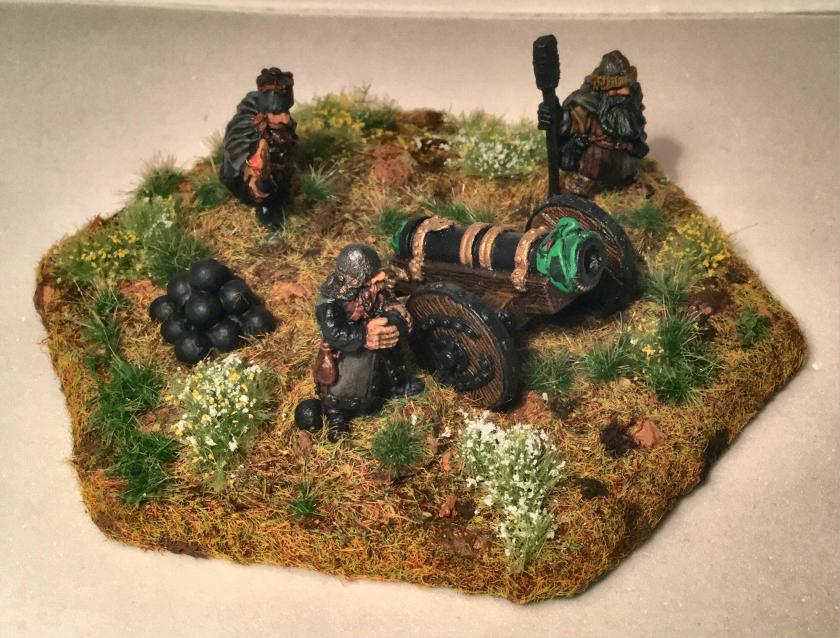
The other Dwarven crew-served weapon that I have been working on is a complete Ral Partha “Dwarf-Bombard” (02-161) that I got on eBay. The sculptor was B. Ollie, and the model is 25mm scale (I believe). It is a smaller bombard than the large RAFM one for certain, but two of the crew are identical figures – so I painted them differently.


This would be a more mobile weapon for my Dwarven forces. It was part of the “All Things Dark and Dangerous” line. There are three crew figures and the bombard. One was a had a ram for the bombard, one held a torch for igniting the weapon’s fuse, and the other was a loader holding a cannonball.


After a quick scrub with a toothbrush and some dishwashing soap, I let the set dry. I then primed the crew and the bombard (also in the winter depths in February at Jeff Smith’s workshop) with Krylon Ultra-flat Black spray paint. Then I mounted them on ¾” washers with wood glue, which was subsequently glued to popsicle sticks.
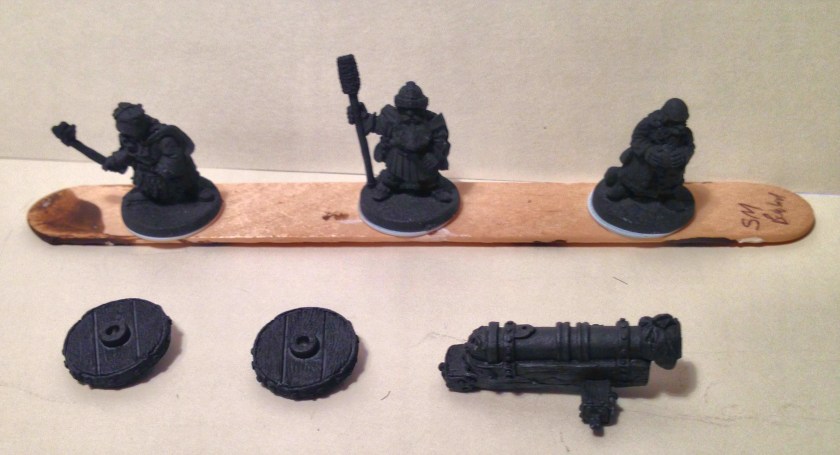
I started by working on the bombard and some cannonballs. The blister did not come with any cannonballs, so I used some Daisy BB’s I got at Wal-Mart to make a stack of them with the help of wood glue and some toothpicks for a frame. Once done, I also primed these with Krylon Ultra-flat Black spray paint. I then painted them with Secret Weapons Washes “Heavy Body Black” ink.
Here again, I wanted a wooden hex base with magnetic attachments for the set. I cut a smaller base for the kit with my scroll saw – a 3″ hex base with 30° beveled sides from 1/8″ luan plywood. I glued ¾” steel washers to the base for easier storage on Aleene’s tacky magnetic sheets that I have affixed to my “Really Useful” plastic boxes.
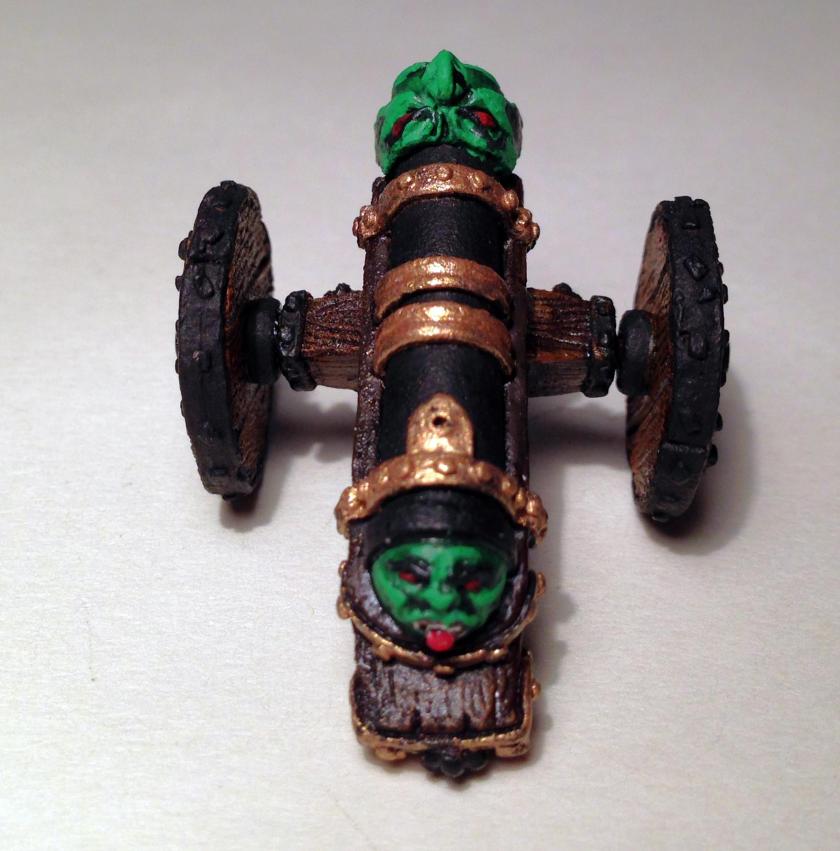
Next, I proceeded to paint the bombard. I base-coated the weapon carriage and its component wheels with Citadel “Dryad Bark”. This I followed with an application of P3 “Brown Ink”. Then I dry-brushed the carriage and the wheels with Citadel “Skrag Brown” and then washed it with Citadel “Nuln Oil”. I then added another wash, this time with Citadel “Agrax Earthshade”. I painted the metal sections of the gun and the cannonballs with Americana “Ebony”. There was a Goblin head on the bombard’s business end and back end – and those I painted with an old Polly-S “Slime Green”. I chose to paint the metal bands holding the bombard to its carriage with Martha Stewart Crafts “Brushed Bronze”. I added some Americana “Primary Red” to the goblin heads’ eyes and tongue on the bombard, as well as some Americana “Snow” to the sculpted fangs on the goblin. To finish the weapon with varnish, three coats were applied successively – Krylon “Clear Glossy”, Krylon “Clear Matte”, and Testors “Dull Coat”.

I now had another crew now needed to complete – and I had three different ones to paint. I will cover each in turn. These were the torch bearing Dwarf (“A”), the Dwarf with the Ram (“B”), and the Dwarf loader (“C”). All three got their visible skin painted with P3 “Midland Flesh”. Any visible eyes were painted with Americana’s “Snow” and “Ebony”.
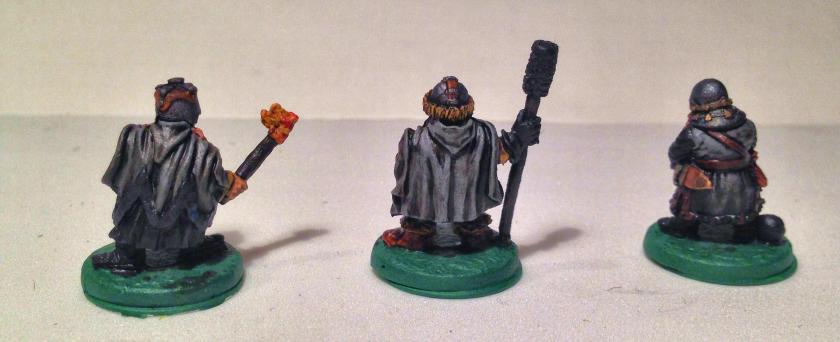
For torch bearing “A”, I used Citadel “Balor Brown” on his tunic and Americans “Zinc” on his cape. I painted his leather armor with Armory “Chestnut”. His beard was painted with Polly-S “Venetian Dull Red”. I wanted the boots to be black, so I used Americana “Ebony” to good effect here as well as on the bolts in the leather armor. I chose Citadel “Dryad Bark” for the shaft of the torch. For the flame, I painted it with a successive mix of Armory “Red”, Tamiya “Orange”, and Craftsmart “Yellow”. Highlighting followed as before, and a wash of Citadel “Agrax Earthshade”. I painted “A”‘s cape frill with Armory “Prussian Blue”, and his leggings with a mix of Craftsmart “Khaki” and Citadel “Balor Brown”. Armory “Red” was my choice for the trim on the cape. I chose Citadel “Dryad Bark” for the shaft of the torch. For the flame, I painted it with a successive mix of Armory “Red”, Tamiya “Orange”, and Craftsmart “Yellow”. I used Folk Art “Gunmetal Gray” on the helmet and belt buckle. I highlighted the cape frill with a mix of Armory “Prussian Blue” and Americana “Sky Blue”, and the cape itself with a mix of Americana :Zinc” and Craftsmart “Grey”. I touched up the leather and the skin tones, then applied a wash of Citadel “Agrax Earthshade”.
The ram bearer “B” was started with Citadel “Balor Brown” on his tunic and Americana “Zinc” on his cape. Here again, I employed Armory “Chestnut” on his leather. I chose for this rammer to have a black beard – so I used Americana “Ebony” for that, as well as for his gloves, and his ram. His helmet straps got Armory “Leather Brown”. I then mixed Citadel’s Balor Brown” and Craftsmart “Khaki” for his helmet ruff and his boot spats. I chose Citadel “Dryad Bark” for the ram shaft. The cape I highlighted with a mix of Americana “Zinc” and Craftsmart “Grey”. The metals (helmet, belt buckle) were done with Folk Art “Gunmetal Gray”, while the leatherwork was highlighted with Citadel “Balor Brown”. A wash of Citadel “Agrax Earthshade” was applied, followed by more highlighting, and another repetitive wash.
The loader “C” was next. Similar to “A”, I painted his beard with Polly-S “Venetian Dull Red”. “C” followed a similar pattern as “A” and “B”. His overcoat was painted with Americana “Zinc” and his leatherwork on it and his pouches were completed similar to “A”‘s leatherwork. I used Americana “Ebony” for his sleeves and the cannonball in his hands. For the sword, I used Folk Art “Gunmetal Gray”, chestnut, and Martha Stewart Crafts “Brushed Bronze”. Highlighting followed as before, and a wash of Citadel “Agrax Earthshade”, and a touch up of skin tones with P3 “Midland Flesh”.
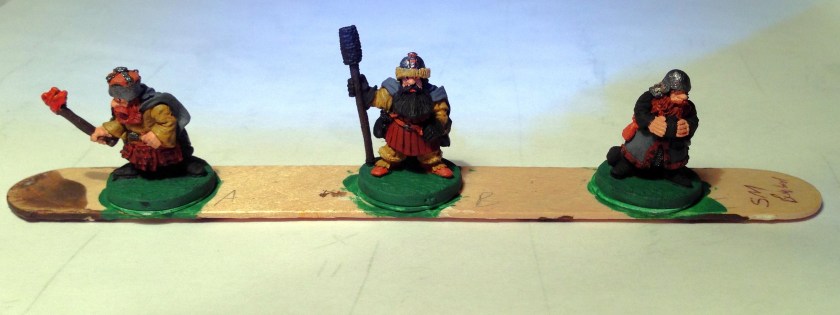


I then painted all three crew bases and the hex base with Americana “Forest Green”. I took the hex base, and applied an initial flocking with Ziterdes “Alpine Meadows” and removing half of the cork “boulders”. After a day, I then used my Dremel to score places for the wheels and back of the bombard as well and the crew wells. I put in Aleene’s magnetic sheets in the 3 wells for the crew, as well as subsequently drilling ¼” holes for neodymium magnets. I used wood glue to secure the bombard and the cannonballs to their respective scored areas. Lastly I put in the neodymium magnets – securing them with wood glue and steel washes on the bottom of the base.
I next reflocked again the bases (crew and bombard) so as to try to hide the wells with the Ziterdes “Alpine Meadows”. I also used Army Painter “Meadow Flowers”, and “Wilderness Tuft” with wood glue. I also added more cork rocks (the Ziterdes product is loaded with way too many so I had a lot left over again) , and alternated painting them with Americana “Ebony”, Armory “Chestnut” and Citadel “Balor Brown”. I gave the bases a light coat of a white glue and water slurry so as to secure all the flocking. I think that I achieved a nice effect on the base in terms of a natural look.
Once everything had dried, I gave the three coat varnish to the crew as I had to the bombard as before. Each coat was allowed to fully dry. The whole kit then got a light coat of Testors Dull coat. The series of photos below show the final product.
.


I am very happy with this kit as well! It will be a great addition to Dwarven Army with the larger bombard kit.
