

An Aztec cityscape gaming table would be incomplete without the use of proper pavements. Tenochtitlan was not built to look hardscrabble. These pavements would need to go under the massive buildings I had to represent the city of Tenochtitlan, the capital of the Aztec Empire. This post will cover the pavements I made for the cityscape. As I shared in my previous post, Building an Aztec Cityscape – Part 1: Causeways, Lifting Piers, and Removable Bridge Sections, I will similarly share my WIP photos as well as my lessons learned.
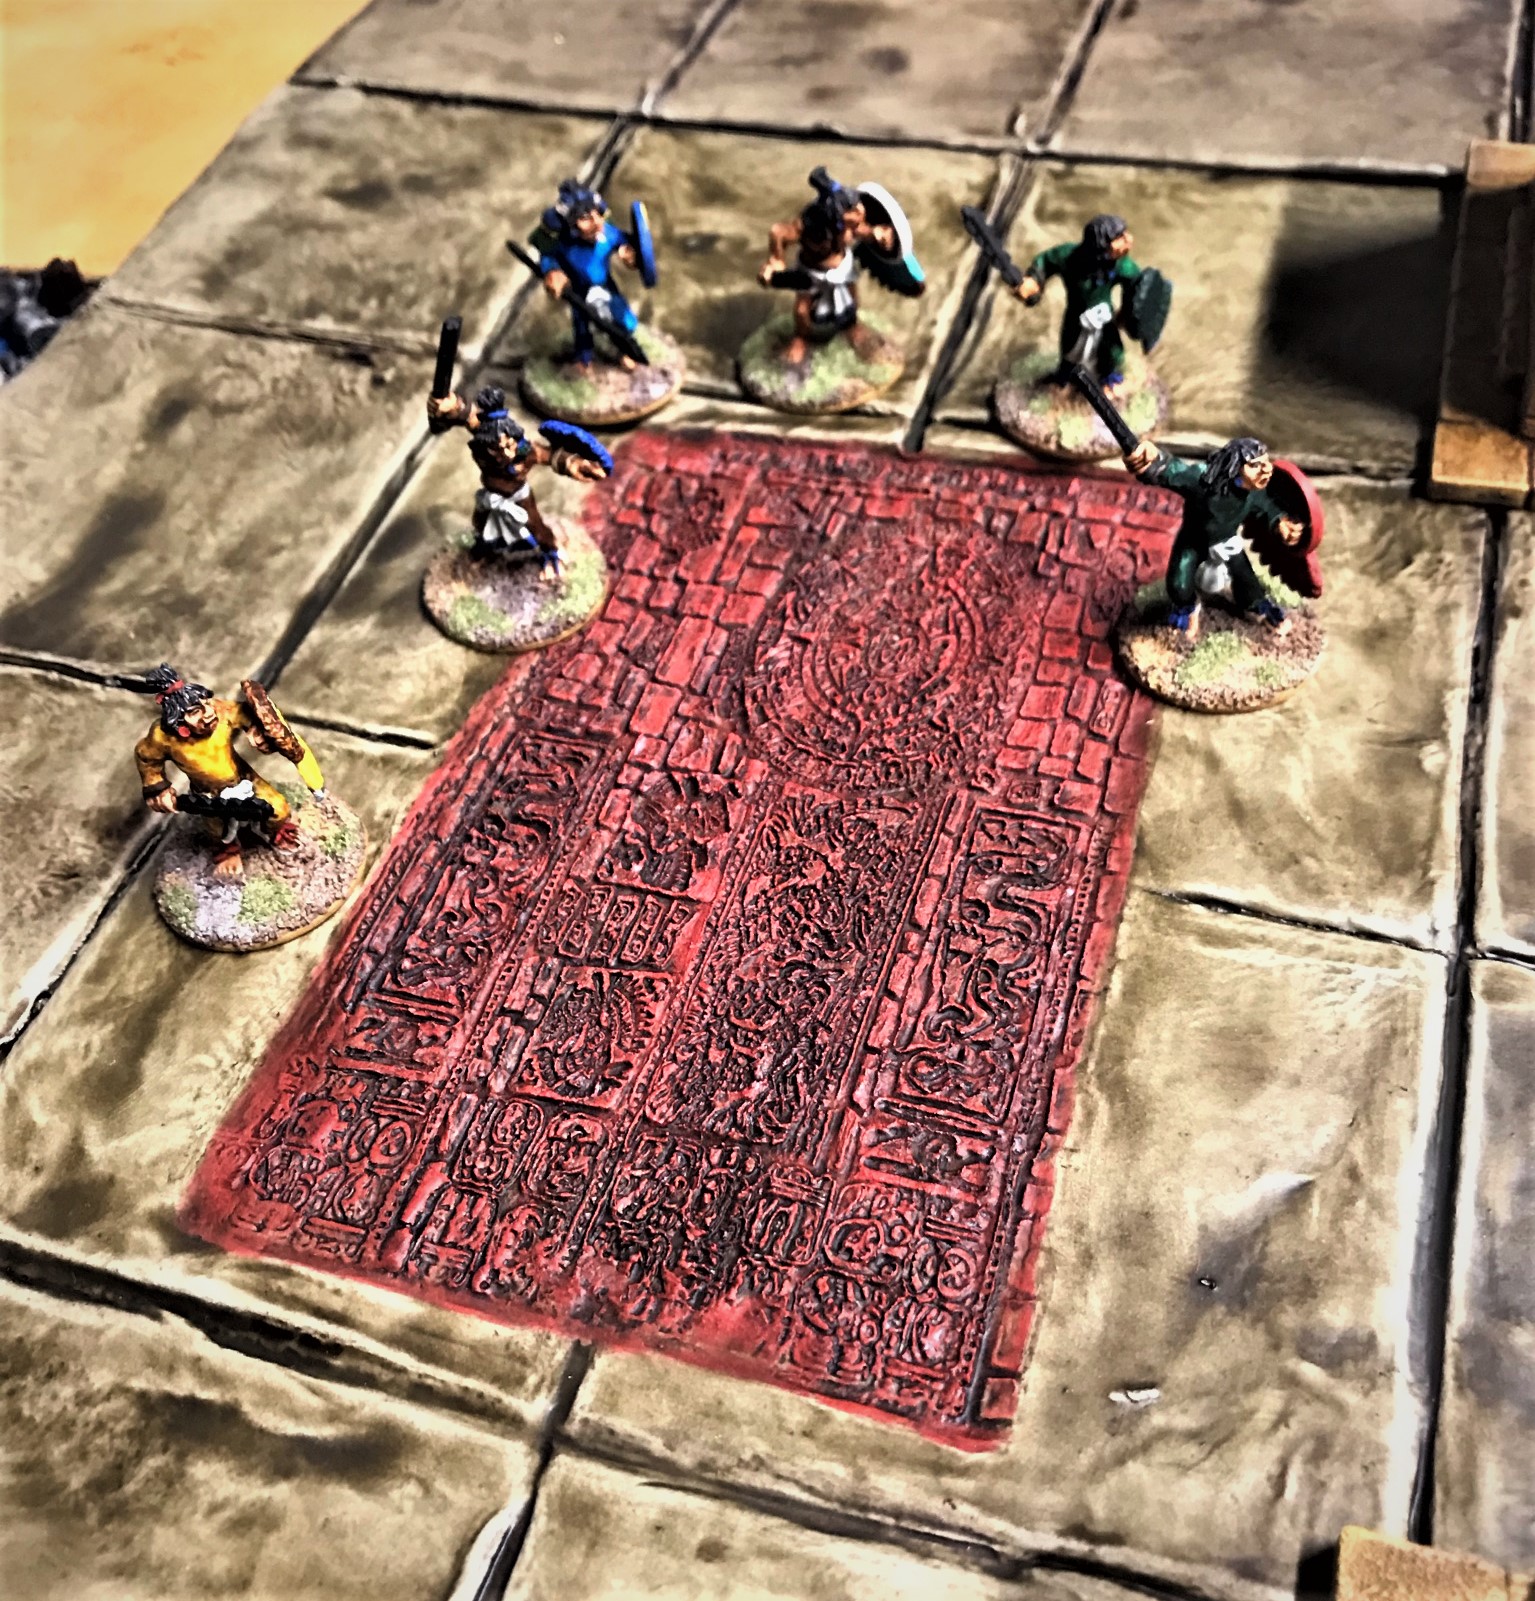
Many contemporary images of Tenochtitlan show a brilliantly white city. I am not convinced that this was its actual appearance. Much of the rock used would have been basaltic or limestone-like in quality. Both are subject to oxidation, and turn brownish-grey over time. That would be particularly true for pavements that were exposed daily to the intense rays of the sun. The painting below reinforced my decision not to go with a white/bleached appearance of stone structures for this project. I went more brownish/grayish.

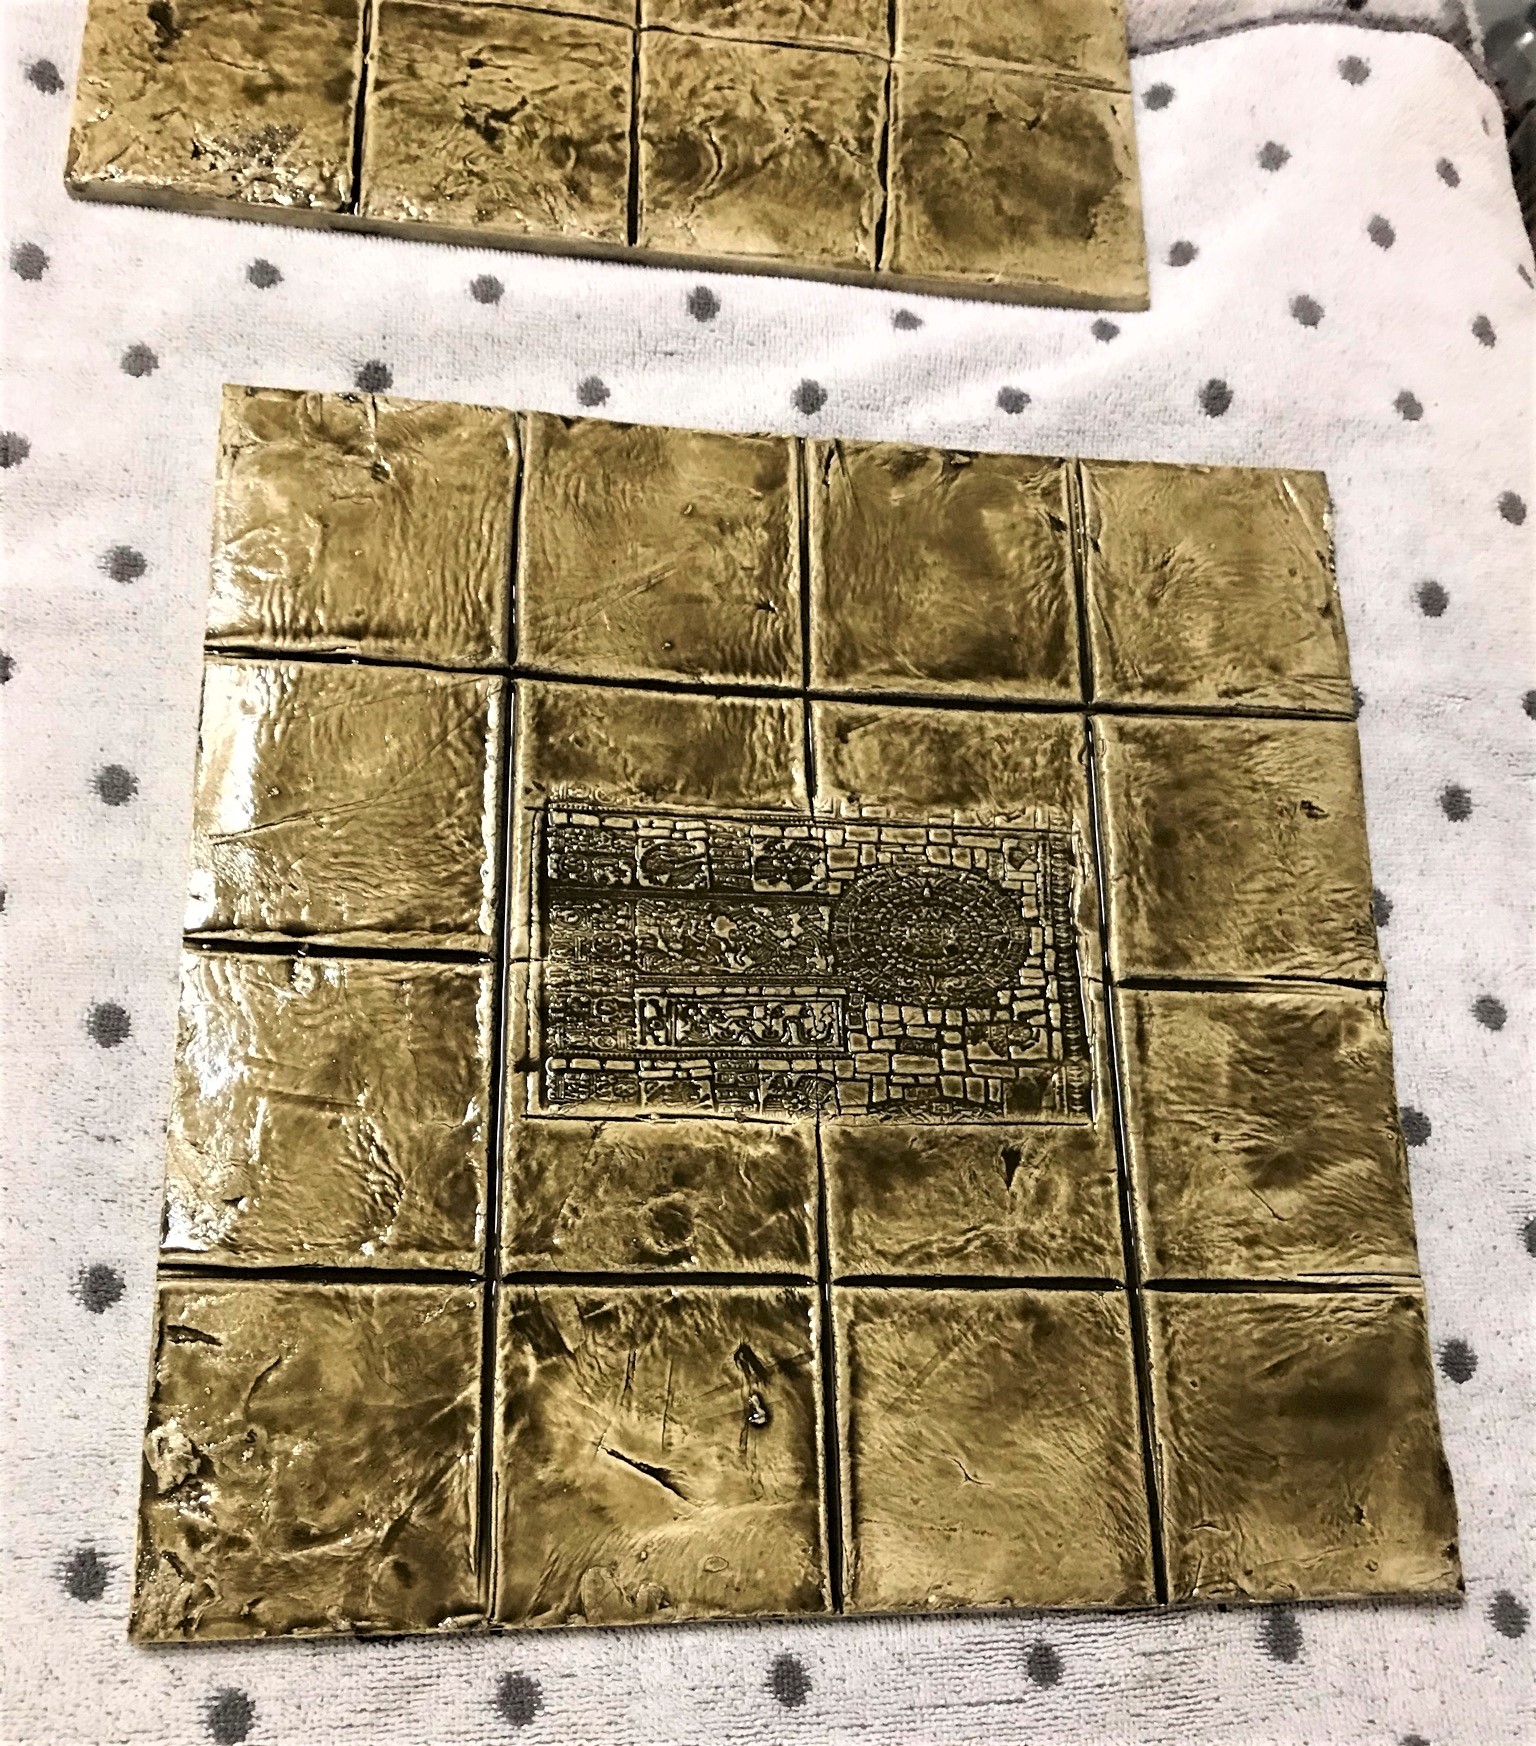
As with the causeways that I built, I used the MDF sheets I bought from Home Depot. They were 1/4″ thick sheets of 2′ by 4′ that Jeff Smith helped me to cut into ten 1’x 1′ and ten 6″ x 6″ sections. Then I laid them out to see if my initial layout concept would work. It did. But, unlike the causeways, I had an idea that the pavements should look weathered, and have some patterns sculpted onto them – Aztec patterns.

The initial plan 
Jeff cutting the MDF 
Dry-fitting the MDF on a swamp mat
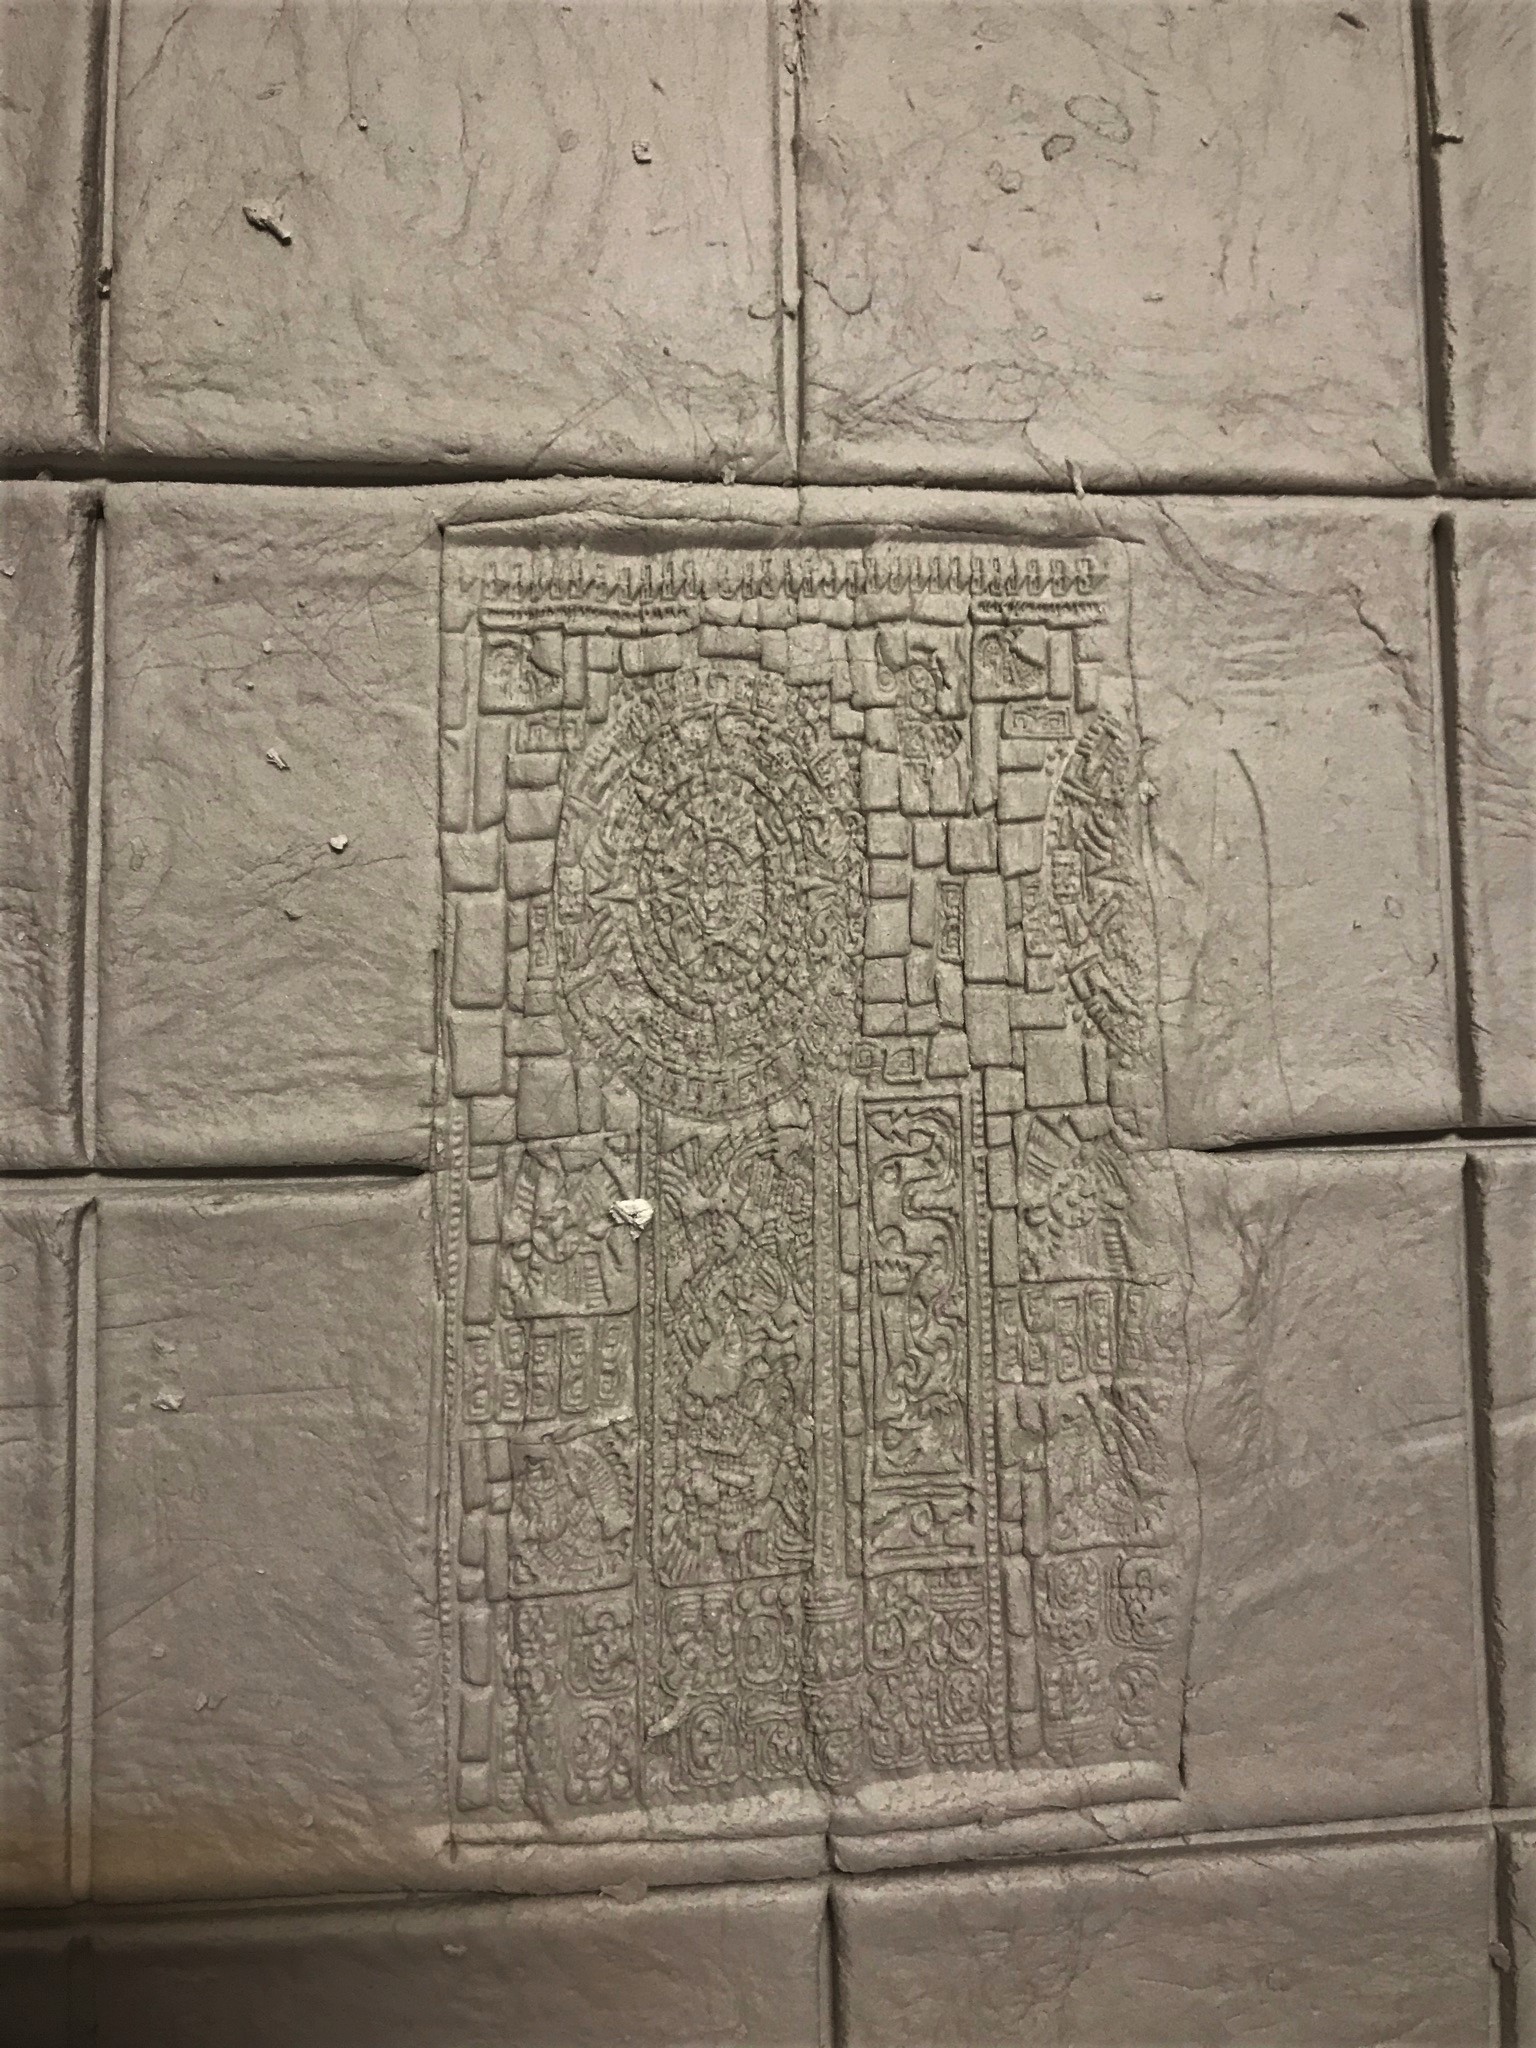
A few months prior I had learned from a friend in Maryland (Greg Priebe) that he had a surplus Aztec Roller from Green Stuff World (see it here). I was deep into painting the figures that I had at that point – but I traded some Ral Partha Vikings to him for it – with some idea that I would use it when I got to the point of building a cityscape – somehow. (THANKS GREG!!)
I was not going to like just having the MDF just be painted, I wanted a more tactile, almost 3D effect on them.
However, we are talking about 15 square feet of surface! I considered using green stuff and Apoxie Sculpt (both too expensive and potentially difficult for a huge build like this). I considered using modeling clay and then baking it and passed as that would end up potentially with either MDF on fire or a cause for my wife to terminate my existence for using her stove or both. After perusing YouTube for some ideas on sculpting on the MDF, I found this video from a guy named Luke in the UK where he used DAS clay mixed with PVA glue to use with Green Stuff Rollers. I decided that I would give that approach a go. I bought this DAS in white at Michaels.
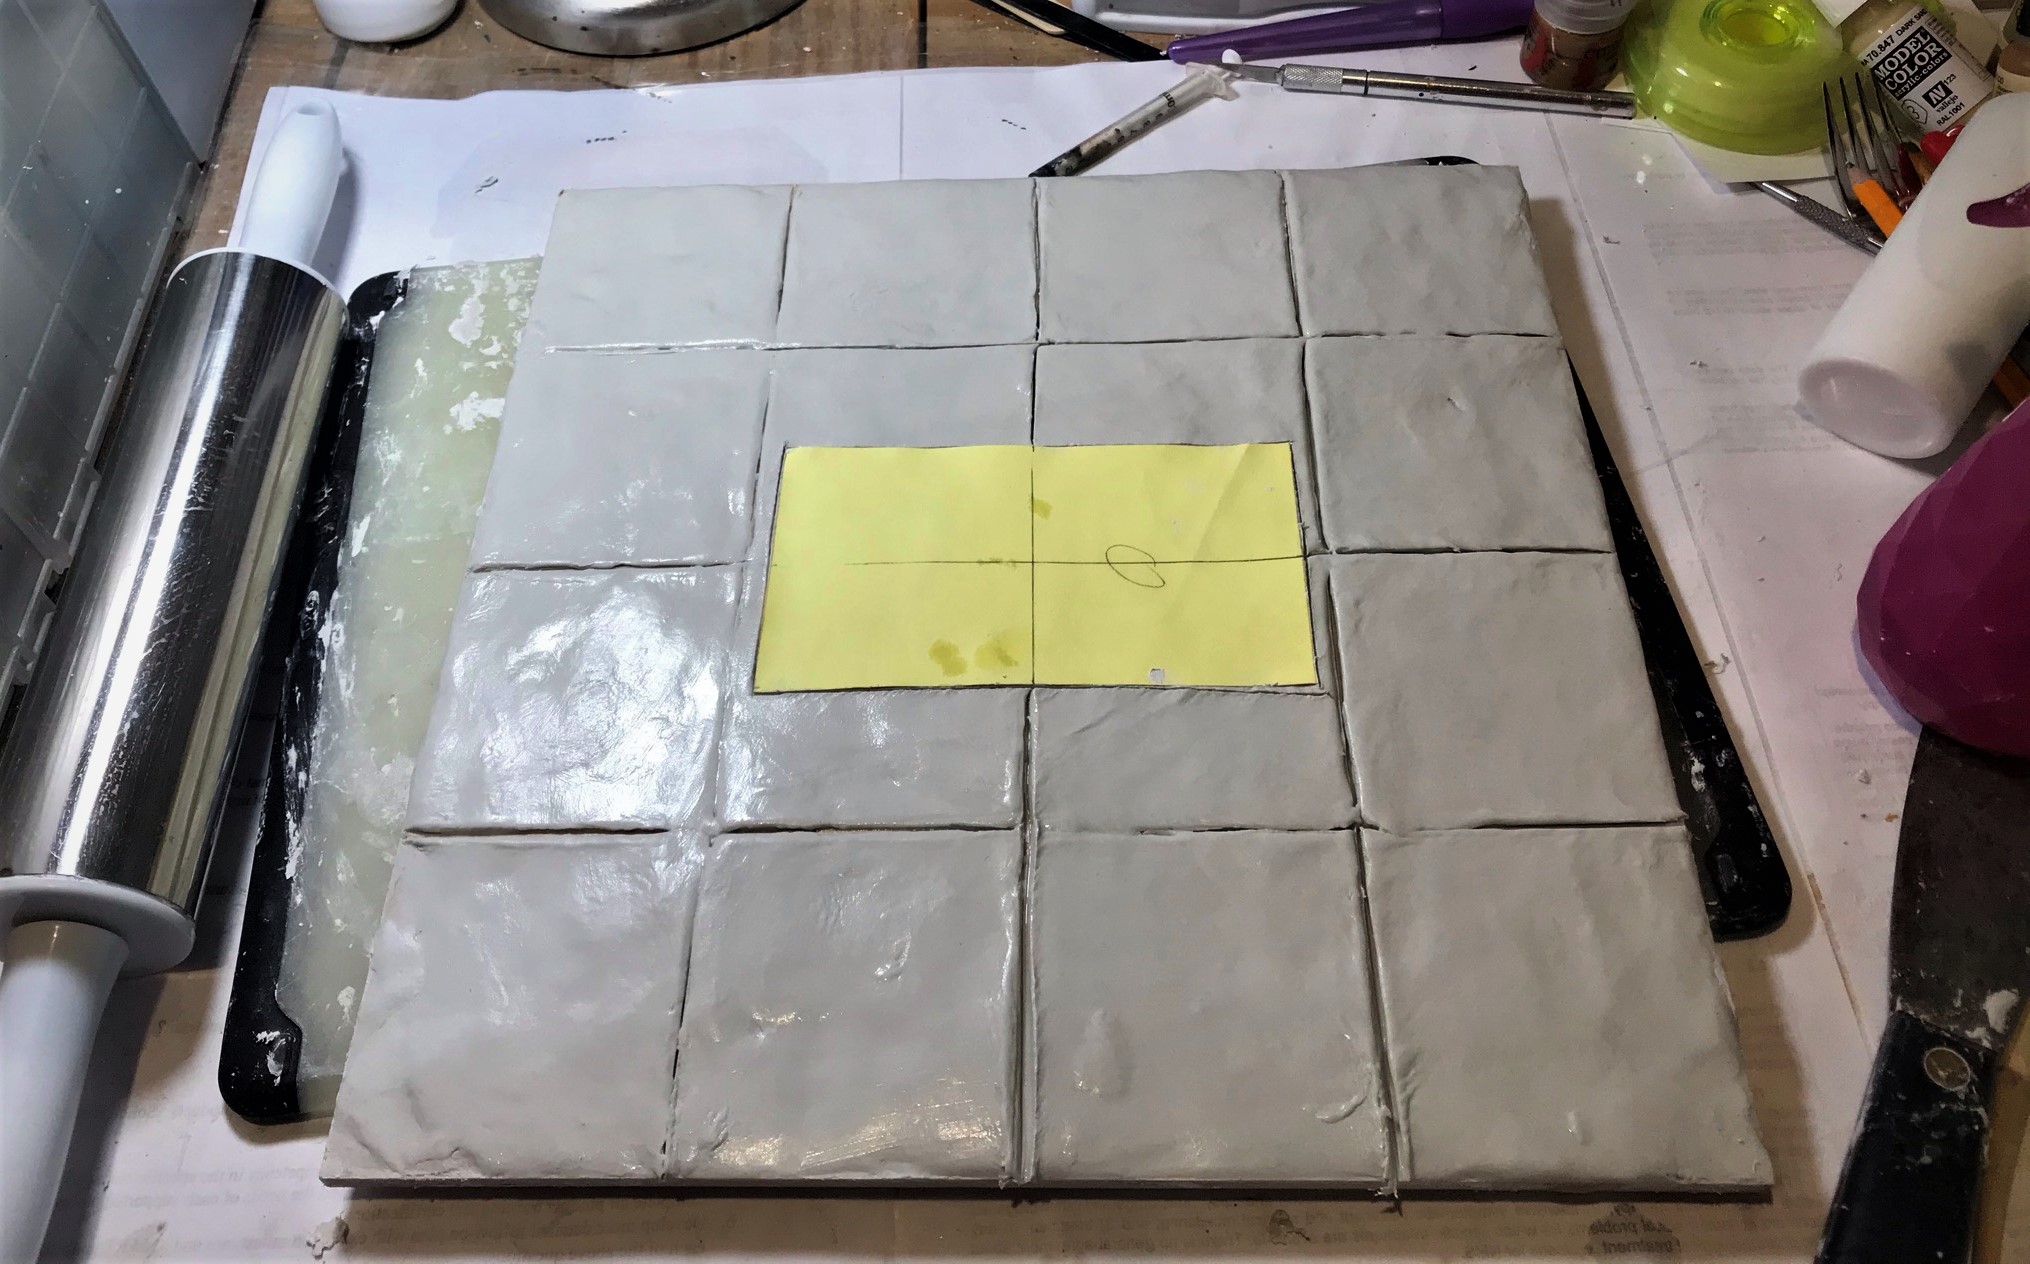
Before I started, I needed to test and practice with the roller itself. It has a rectangular pattern, but it is a roller. Therefore, I would need to know where to start and where to stop. The solution came in borrowing some of my granddaughter Tabitha’s Play-Doh and marking a start and stop point on the roller with a Sharpie (and then returning the Play-Doh of course). This also let me figure out how large the imprint would be.

The next step was to figure out the marking/sculpting plan for each pavement. I decided that having 3″ x 3″ squares would work well with both the larger and smaller MDF tiles. I needed to have a properly-sized template for the Aztec roller such that I could center it on the sculpted tiles. I planned to do 6 large tiles with the roller imprint, 4 without, and 9 small tiles without the roller imprint, and one with it. The roller imprint would be approximately 3″ x 5.5″.

It was now time to, well, get all messy and sticky with DAS and PVA. I used a smooth pastry roller (my own thank you not my wife’s), and a carpenter’s square (also mine!) to smooth out the DAS/PVA as well as to score lines in the mix at 3″ intervals. I used separate plastic tubs to mix the DAS/PVA and to clean my tools.
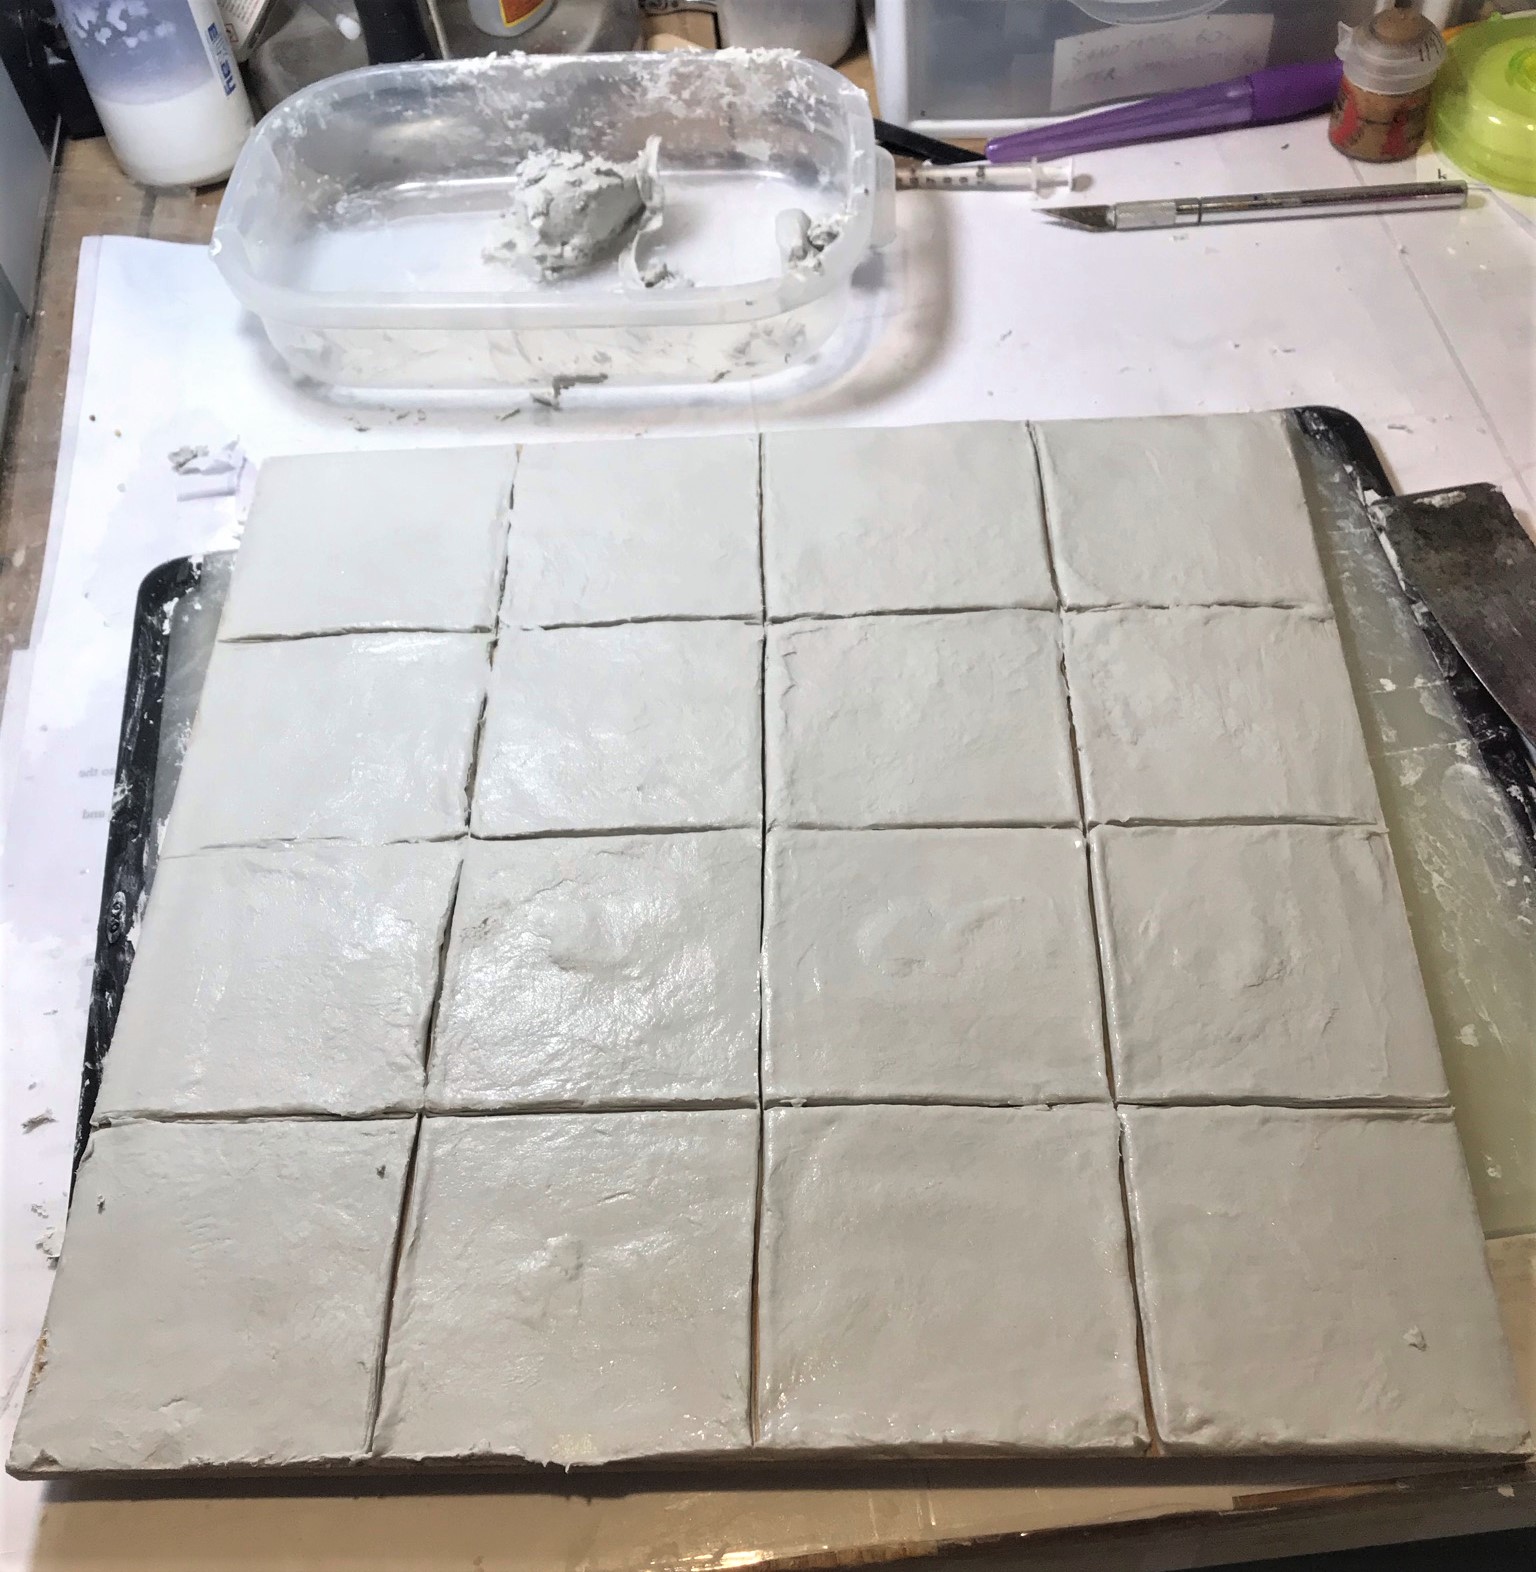
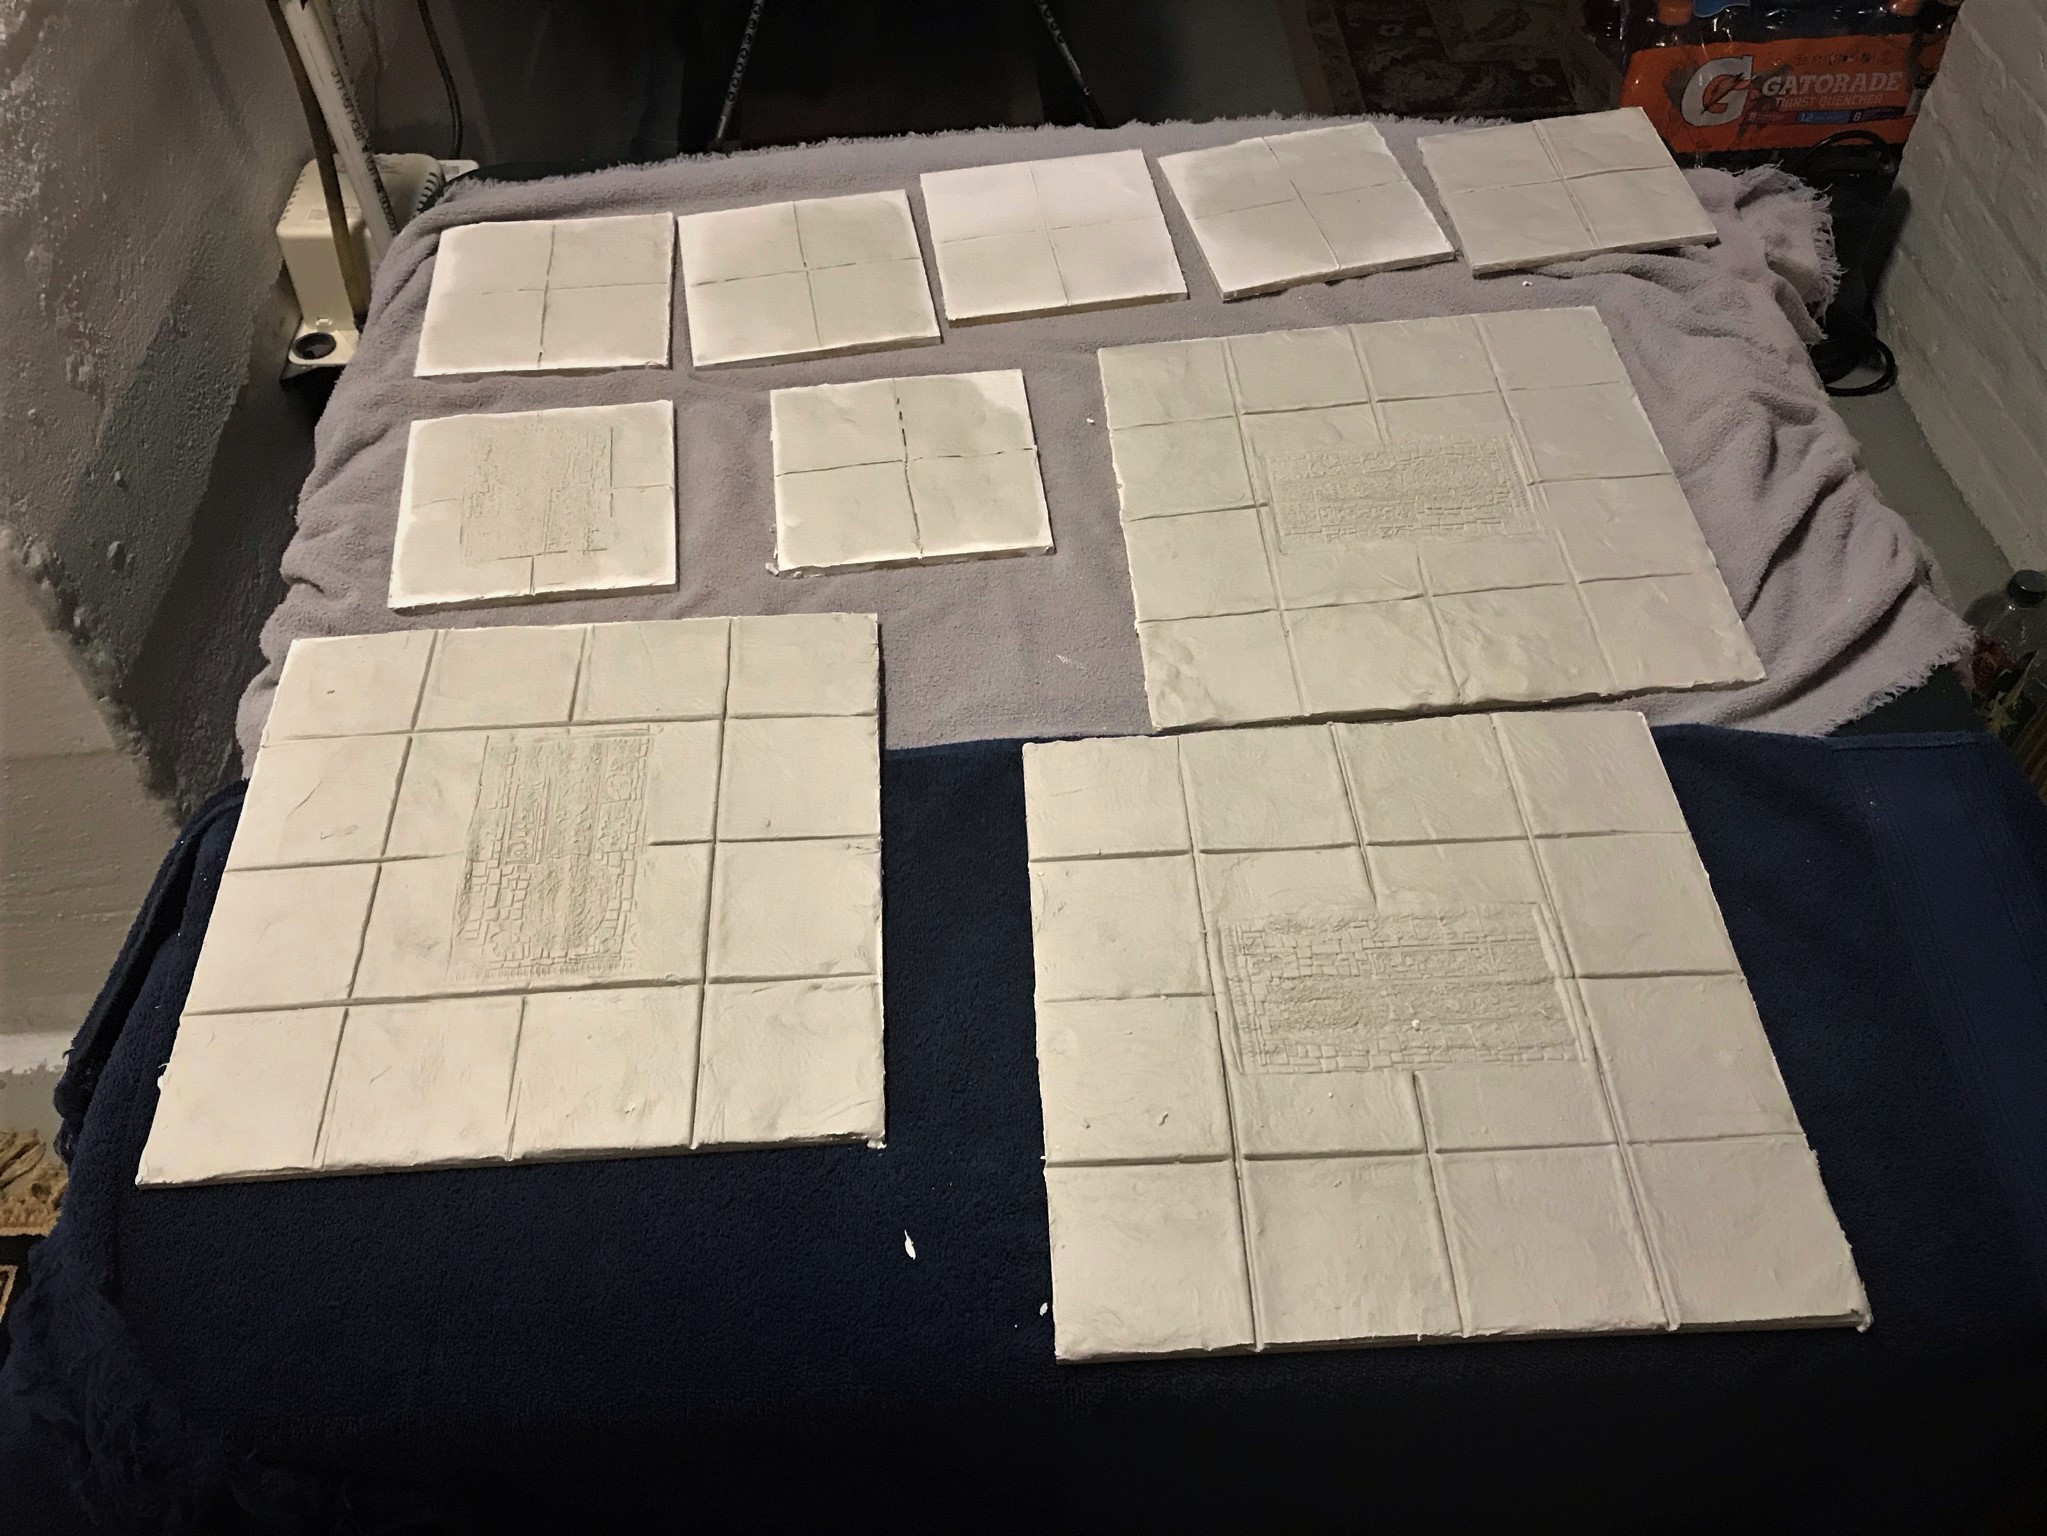
The roller worked fairly well, though there was a learning curve to be sure. I definitely needed to have a tub of water, a brush, and microfiber towels to clean it (and my tools) constantly. The DAS/PVA on the MDF was left to dry over 24 hours. On a few of the larger tiles, I was surprised to see some of the MDF had a bit of warp from the drying clay/glue combo. The smaller pieces had none. Lesson learned. Certainly, finding enough flat surface for all 15 square feet to dry was not easy. I ended up using multiple card tables in the cellar. Yes, the wife was annoyed again. This whole process used up three packs of DAS – that’s 3 kilograms/6.6 pounds – of the stuff.
Once they had dried, the next question was how to paint them? I decided to use up my cans of Army Painter Strong Tone and Soft Tone (the dip), as they would be otherwise gathering dust in my paint shed. They theoretically would provide a bit of protection as well. Again, I also needed 24 hours of drying after application – yet again.

Normally, I do not use spray varnishes, but these large pieces were good candidates for a spray of Krylon matte varnish. It was warm outside, so I gave them a coat. All went well – until some of the pieces – mainly one – started bubbling up like a cheese pizza. AHHHHH!
From what I could figure out, that was caused by the aerosolized solvent in the can vaporizing in the DAS and trying to release through the varnish and the dip surface. Luckily it was only on one large tile, but that tile took a rework and made this last at least a week or two longer as I tried to find the right combination to recreate a similar color. This took me into mid-July.

I then brush varnished and shaded all of the tiles. At this time I moved on to dry brushing the imprints with Citadel “Astorath Red”. I also darkened the edges with DecoArt “Raw Umber”. The tiles line up together on the lines nicely. Though some warp is visible, it is not horrible. I also went over all of the tiles and shaded them as needed so that the colors were similar and no untouched DAS/PVA was visible.

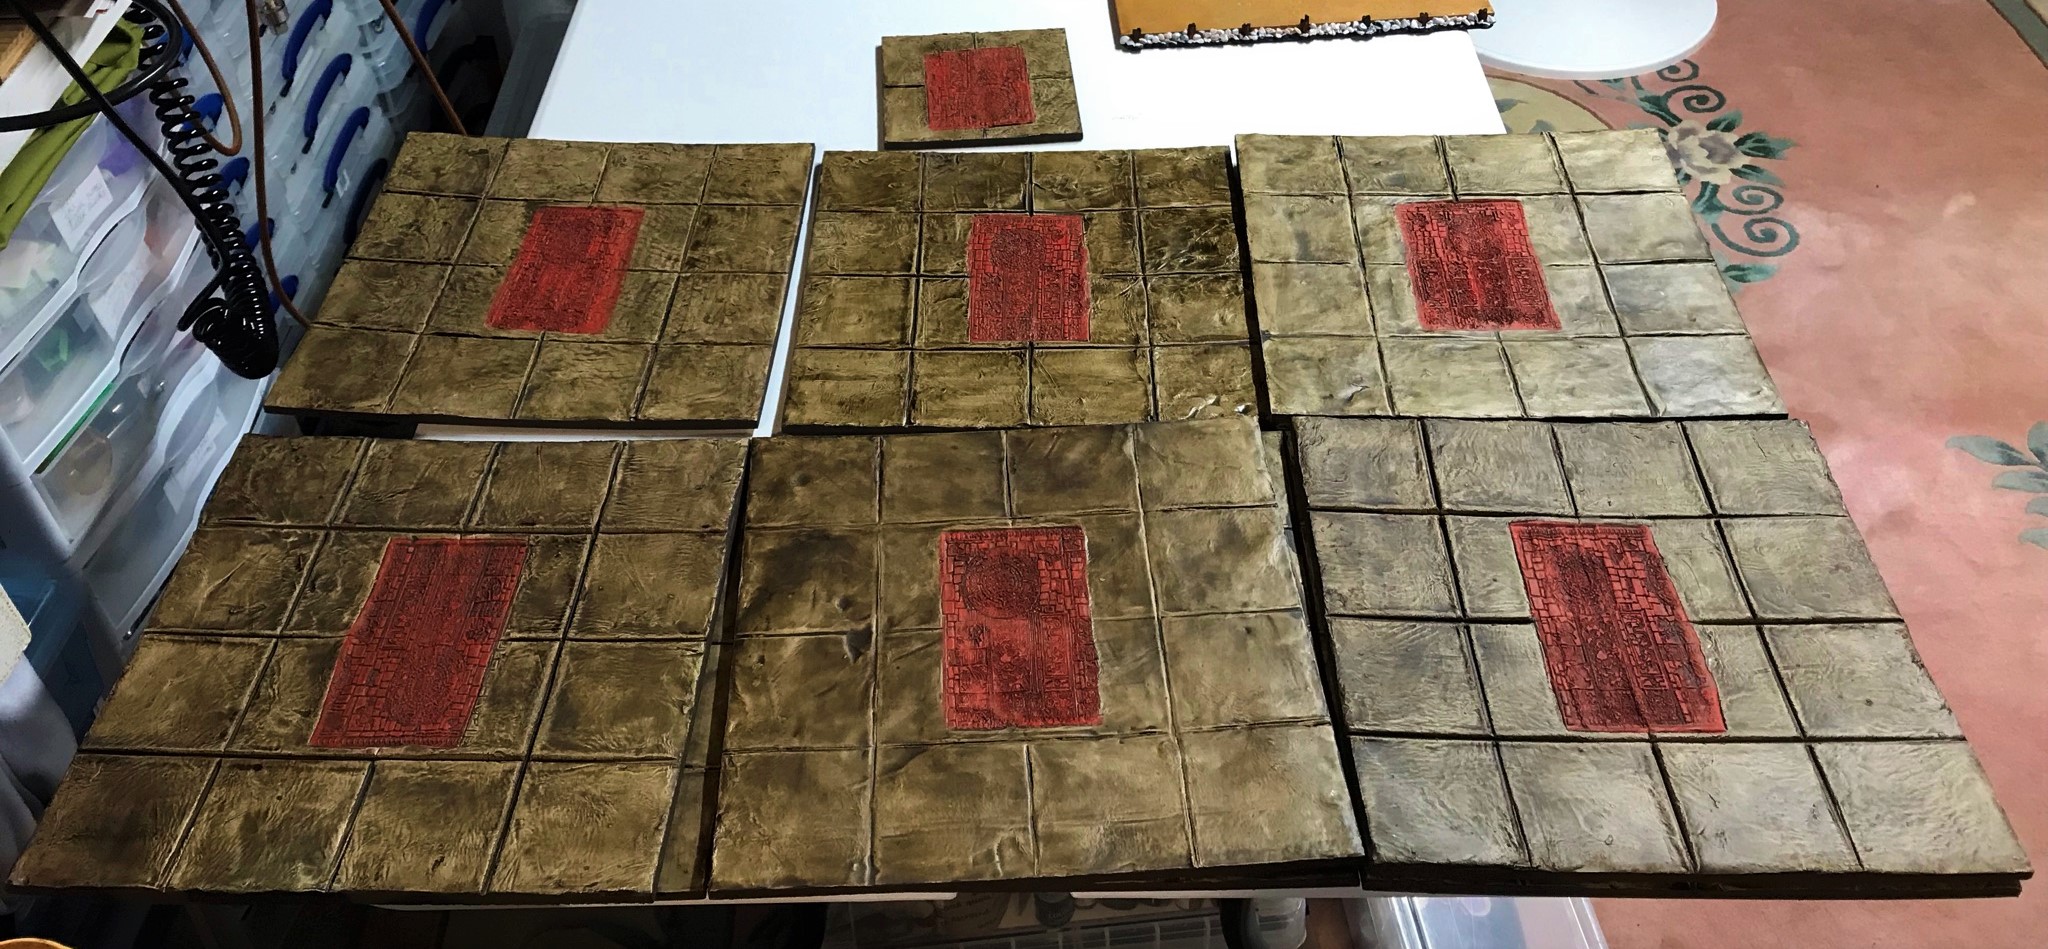

Of course, when you see the completed cityscape, you will be able to better judge how all of these came out. As they are modular, I should be able to use them in many ways. They certainly meet the Aztec criteria of symmetry. Also, these all can be part of Dave’s Season of Scenery Challenge!
At this point in the project, I noticed how the edges of the tiles were a distraction and needed some attention. I thought that seeing bare 90 degree edges and MDF sides coming out of a lake (or swamp) was a less than aesthetically correct situation for my cityscape. People would have built the city up from the lake – and that would have involved reclaiming the lake as dry ground. How? Well, I am sure that the Aztecs would have used slave labor to haul and deposit tons upon tons of rocks on the water’s edge.
My fix was to build some revetments around the cityscape’s edge plus some lily pads, and cattails – which will be the next installment in this series!
I hope that you enjoyed this part 2 and that you stay tuned for the rest – let me know your thoughts in the comments section and I appreciate your giving this a read!
For all of my previous posts on games, units, and other projects for my 16th Century Spanish Conquest supplement for Feudal Patrol™ – “Civilizations Collide” – please see this page.
PAINTS, INKS, GLAZES, SHADES, WASHES, PIGMENTS, FLOCKING, GLUES AND MORE THAT I USED ON THESE TERRAIN PIECES/MODELS:
- 2′ x 4′ MDF sheets – 1/4″ thick
- White DAS Air Dry Modeling Clay
- Elmer’s PVA Glue
- Army Painter “Strong Tone” (the “dip”)
- Army Painter “Soft Tone” (the “dip”)
- Krylon “Clear Matte” (spray varnish)
- Army Painter “Mid Brown” (wash)
- Citadel “Agrax Earthshade” (shade)
- Americana “Bleached Sand”
- Army Painter “Strong Tone” (wash)
- DecoArt “Raw Umber”
- Citadel “Astorath Red”
- Vallejo “Airbrush Thinner”
- Vallejo Mecha Varnish “Matt Varnish”
- Citadel “Nuln Oil” (shade)

Great work, they certainly look the part.
LikeLiked by 3 people
Impressive, Mark! 🙂 That is a lot of paving! I think you’ve done well getting it all done!
LikeLiked by 3 people
Thanks John, it was a lot indeed
LikeLiked by 1 person
Well done on getting all that paving and roller imprints done Mark, before you put the clay PVA mix on the MDF did you give it a coat of PVA with water to seal the MDF first ? I find this minimises warping of the MDF.
Like the colour choices gives it a used look to the paving
LikeLiked by 3 people
Glad you like the colors. As a matter of fact, I did use a watery/PVA slurry to seal, but I did not let it dry before going forward. And the warping was evident on a couple of tiles more than others. It’s manageable though and not horrible. My belief is that when the clay dried it contracted to a degree (more on the bigger pieces), and that was part of the warping. When you see the final reveal, you’ll see it’s ok.
LikeLiked by 2 people
Again, Mark, this is excellent work. I’m in awe at your planning and dedication. The DAS/PVA mix is genius and looks to have worked well; it’s a shame about warping but I’m getting the feeling that unless you’re using glass or metal warping is inevitable with porous surfaces and wet media! The painting and shading is top notch and the roller has done a great job. Really looking forward to seeing more of this.
LikeLiked by 5 people
Thanks Matt and yup, warping is a bit inevitable. Luckily I think the final reveal will show it’s ok.
LikeLiked by 1 person
Wow! What and excellent job. The roller was a great idea. Bring on the rest Mark.
LikeLiked by 3 people
Cheers dude!
LikeLike
The roller leaves an wonderful imprint. Nice work finding a solution to getting the tiles done. I agree with your stone colours too… (I dug out photos to check) whites are only common if there is plaster, the stone itself tends to range from pale grey &creams to darker grays &browns. This is a BIG project and its looking great. Can’t wait to see more!
LikeLiked by 4 people
Cheers dude. More to come indeed!
LikeLike
Another excellent post Mark and very much looking forward to seeing how this all comes together in due course. Warping is a pain when it comes to using MDF. The only way around it I have found is by having having more rigid structure. That works well on buildings when you have four sides pulling together but not easy on something like a tile unless you can put a frame work underneath which isn’t always possible. The paint finish has come out very well too. 🙂
LikeLiked by 3 people
I appreciate that Dave. I think you are right on the warping, and a structure for a tile might have helped, but they are already pretty heavy, so that would have been a trade off. Glad you like the painting, that took a bit too. I think the final reveal will be ok.
LikeLiked by 2 people
top notch; so many techniques you are demonstrating over this project. Thanks for the effort in documenting and sharing it.
LikeLiked by 3 people
Thanks Dave, I’ve got some more yet to share!
LikeLiked by 1 person
The tiles have come out excellent Mark, as everyone else has said it’s a real shame about the warping, I think this is a cross we have all borne at some point, I think Dave has the best solution I’ve seen in the PVA brush-over, but too minimise the “rocking” of the tiles you could add small blocks to the corners to raise the middles clear of the table, and as the city is higher than the water level you should be able to get away with this, just an idea.
Cheers Roger.
LikeLiked by 2 people
Thanks Roger, I’ve also considered sanding down the middle of the more affected tiles (bottom side) to lower them. As I think it works and the revetments (next installment) help, it might not be necessary. Dish towels underneath neighboring tile edges also seem to help! Take care!
LikeLiked by 1 person
Great work Mark- glad you got there in the end with the varnish (it can be tricky stuff at times) as the effect with the roller is great.
Cheers,
Pete.
LikeLiked by 2 people
Thanks Pete.
LikeLiked by 1 person
The roller imprints are so cool man. So detailed. I love the lengths you’ve gone to create the overall aesthetic. I’m glad you added that you returned your granddaughters play doh though because otherwise I would have stopped following your progress haha. Great work Mark. I’ll be checking out part 1 as soon as I can.
LikeLiked by 2 people
Aw buddy nice to hear. In any case I just seem to buy more Play Doh for her a lot.
LikeLiked by 2 people
Incredible amount of work, Mark. Bravo!
LikeLiked by 2 people
😀 Luke!
LikeLiked by 1 person
Again…this is looking amazing, and a great use of rollers…can’t wait to see the whole city laid out.
LikeLiked by 2 people
Glad you are along for the journey Anthony, three more to go!
LikeLike
Great work all around on the latest addition to your terrain collection. Those rollers do look handy and you’re making me want to give them a shot! You got excellent results from them and I think the roads look much more thematic than if you had only gone with tiles for example to save time. I’m excited to see more progress as you continue to bring the city to life.
LikeLiked by 1 person
Appreciate that Kuribo! The causeways are so important to gaming this historical period. The roller was a nice add, I do wish it was available in different sizes. I guess most folks would just use it to add to their bases.
LikeLiked by 1 person
A great post mate, don’t you just love Luke! I have used a few of his ideas after being put onto him by one of our group, looks like you are going into a full scale production line!!! After seeing that roller and the one Luke used I have to have one for the next show! so thanks Mark brilliant as always!
LikeLiked by 1 person
Oh yeah Pat. Luke is the best. Thanks and I’m glad you learned about the roller for future use
LikeLiked by 1 person
Very bloody impressive once again, Mark! Great use of the GSW roller as well and some great looking tiles as a result!
LikeLiked by 1 person
That was a learning curve too – especially on the DAS-PVA combo, but it did work in the end – thanks again!
LikeLike