
When one considers the Aztecs and their empire, what does the historical record say about which visual images struck the Conquistadores in 1519 with awe? Colorfully costumed and tremendously fierce warriors? Eagle Warriors? Jaguar Warriors? Montezuma II and his palace? Untold amounts of gold and silver? Perhaps their quite bloody reputation for human sacrifice, slavery, and occasional cannibalism? The magnificence of the city of Tenochtitlan and its amazing architecture? Probably all that and more, at least in what I have read.
As I shared in my last post – I am working on terrain/buildings for the period as part of “Mark’s Aztec Building Challenge Contest”. These buildings are either resin or MDF. I originally thought that I would start with the resin buildings and then move onto the MDF ones. To do that, I wanted a good primer on the resin – and the manufacturer (Acheson Creations) recommended a Rustoleum primer. This meant spray painting with the rattlecan outside safely – or doing it unsafely inside the house and provoking my lovely bride to commit several felonies upon my person due to the fumes. Well, I can’t visit her in jail during a pandemic – or from the grave – so I decided on the outside option.
However, despite one beautiful Massachusetts day in March where we saw the 70’s (that’s the low 20’s for you metric folks), it has been in the 40’s (4-9 for you metric folks) and rainy. Neither are good for outside. So, flip the order, and onto the MDF.
My experience with MDF is very limited – all I have done before is some MDF barriers that I did back in 2017. And they were not my best work IMO. All of my MDF in the challenge is supposed to be made of stone. MDF does not look like stone of course. It’s manufactured from wood dust and glue. So, what to do? First, I watched a smattering of YouTube videos on MDF kits. The best one said to wipe down MDF with a damp microfiber to clean prior to painting which was very important for paint to adhere!
I also reached out to a couple of friends – Buck Surdu (of Buck’s Blog) and The Imperfect Modeler (TIM) to seek their unbridled wisdom. Both were great – and TIM opened my eyes to a new (to me) and amazing hobby tool that I wanted to share with you all as I am in love with it.
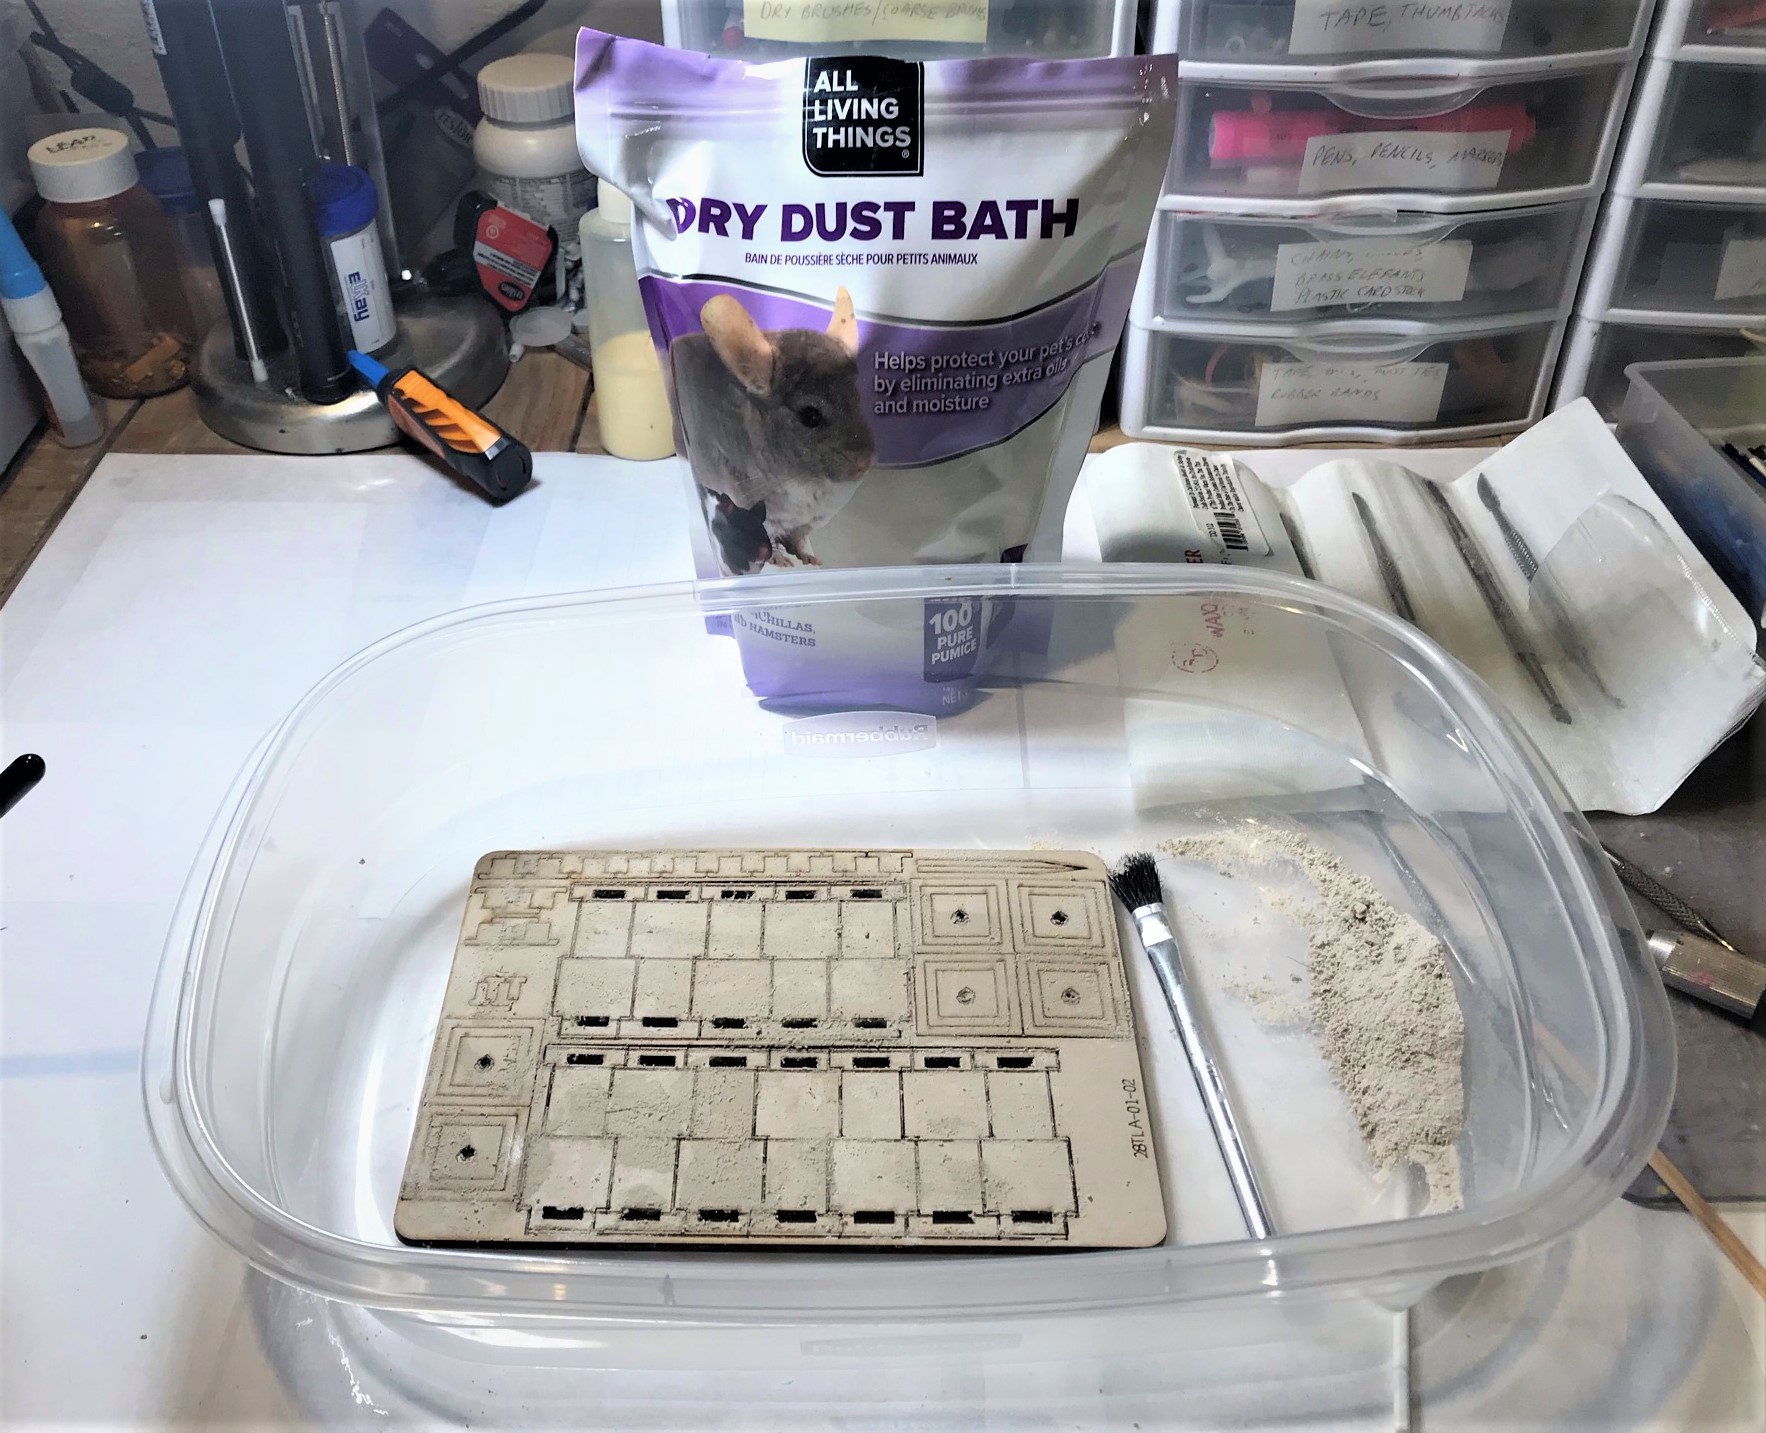
Chinchilla dust.
Yes, I had never heard of it before either. I have a 26 year old cockatiel, no gerbils or similar. You find it in the pet store – apparently gerbils and chinchillas and similar beasties bathe in dust, not water. This stuff is very, very finely ground pumice. A bag cost me $22 , and I think its a lifetime supply! Based on TIM’s recommendations and advice, I planned to try to use it to create a stone-like look. I hoped to accomplish this by using it over a watery PVA application.
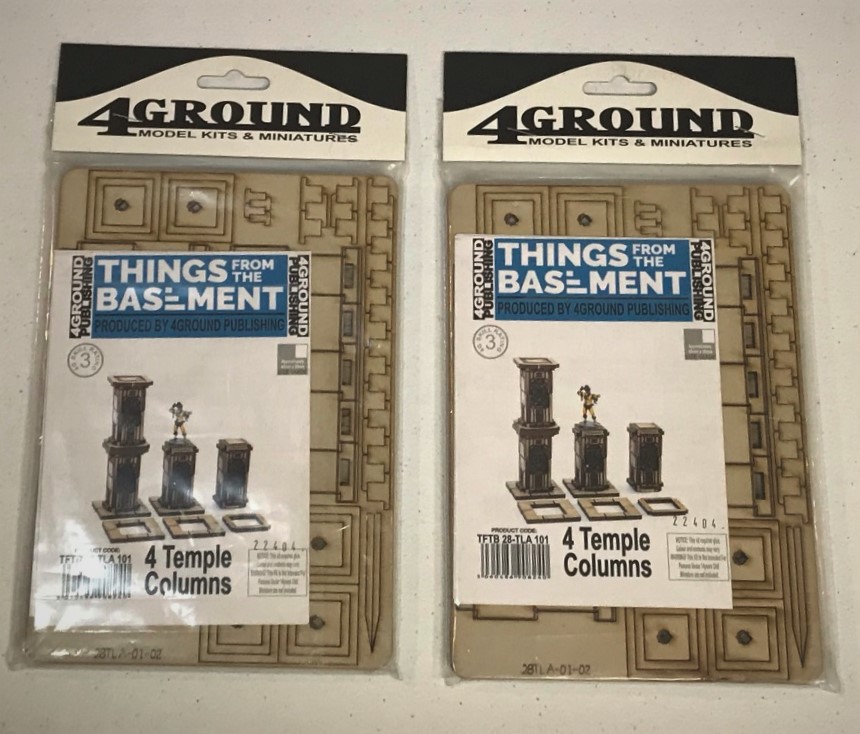
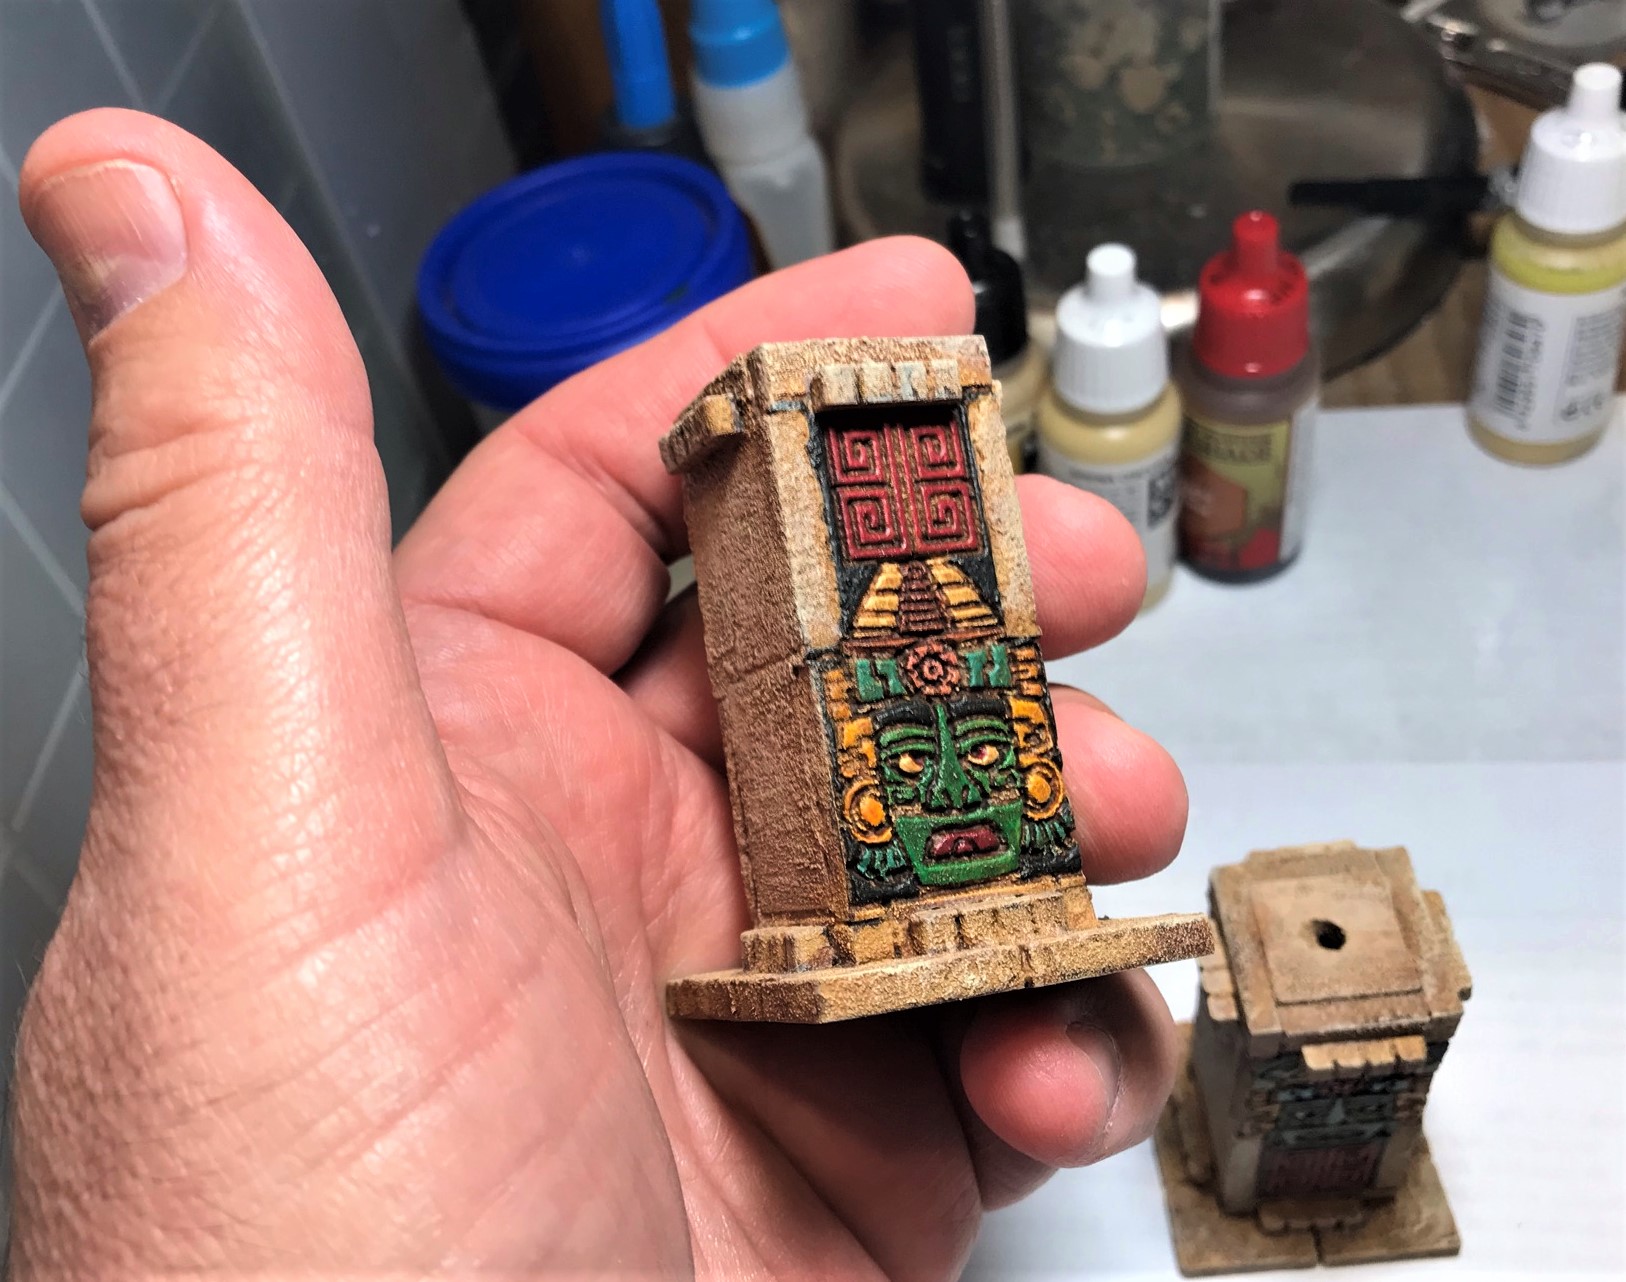
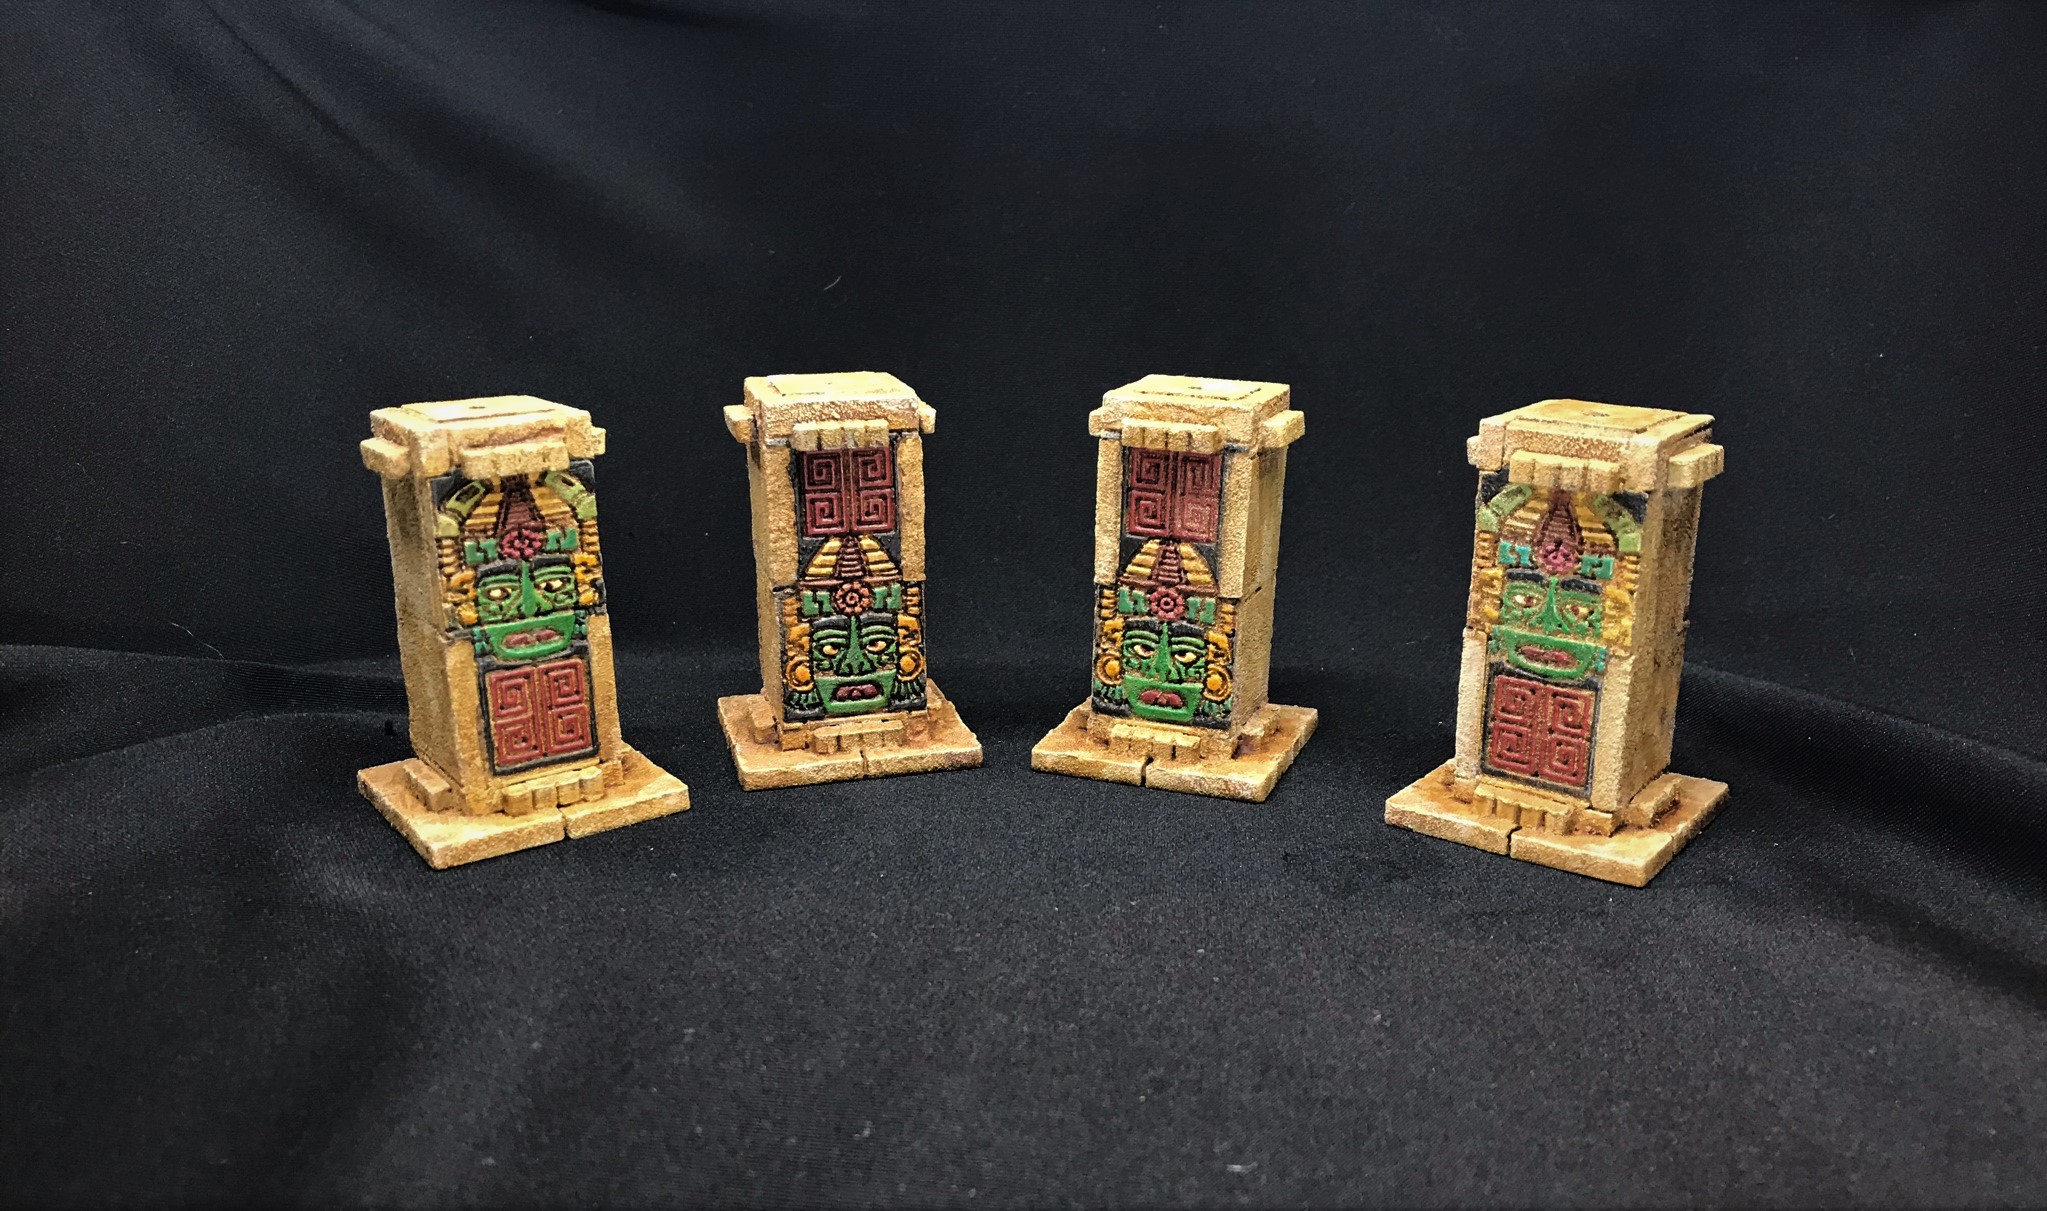
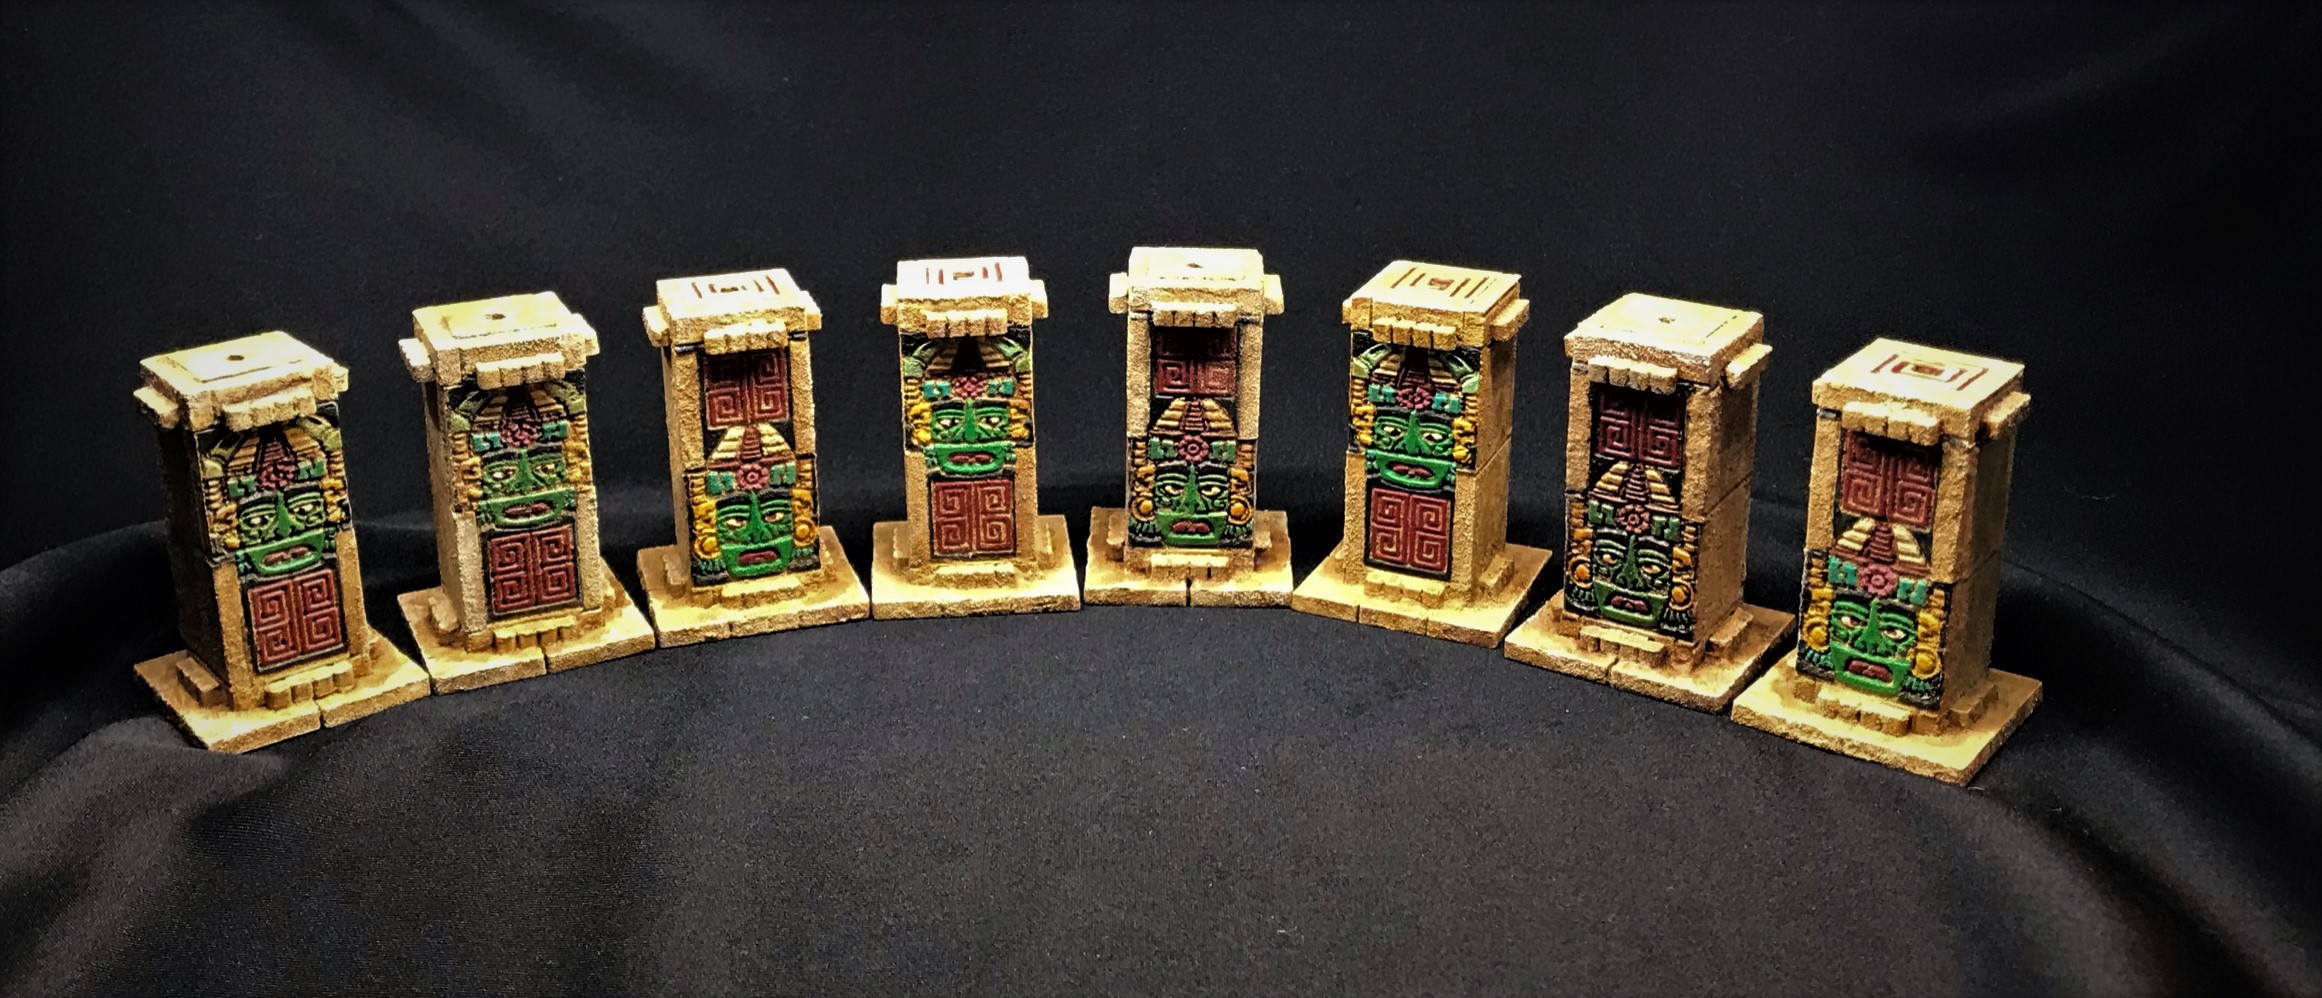
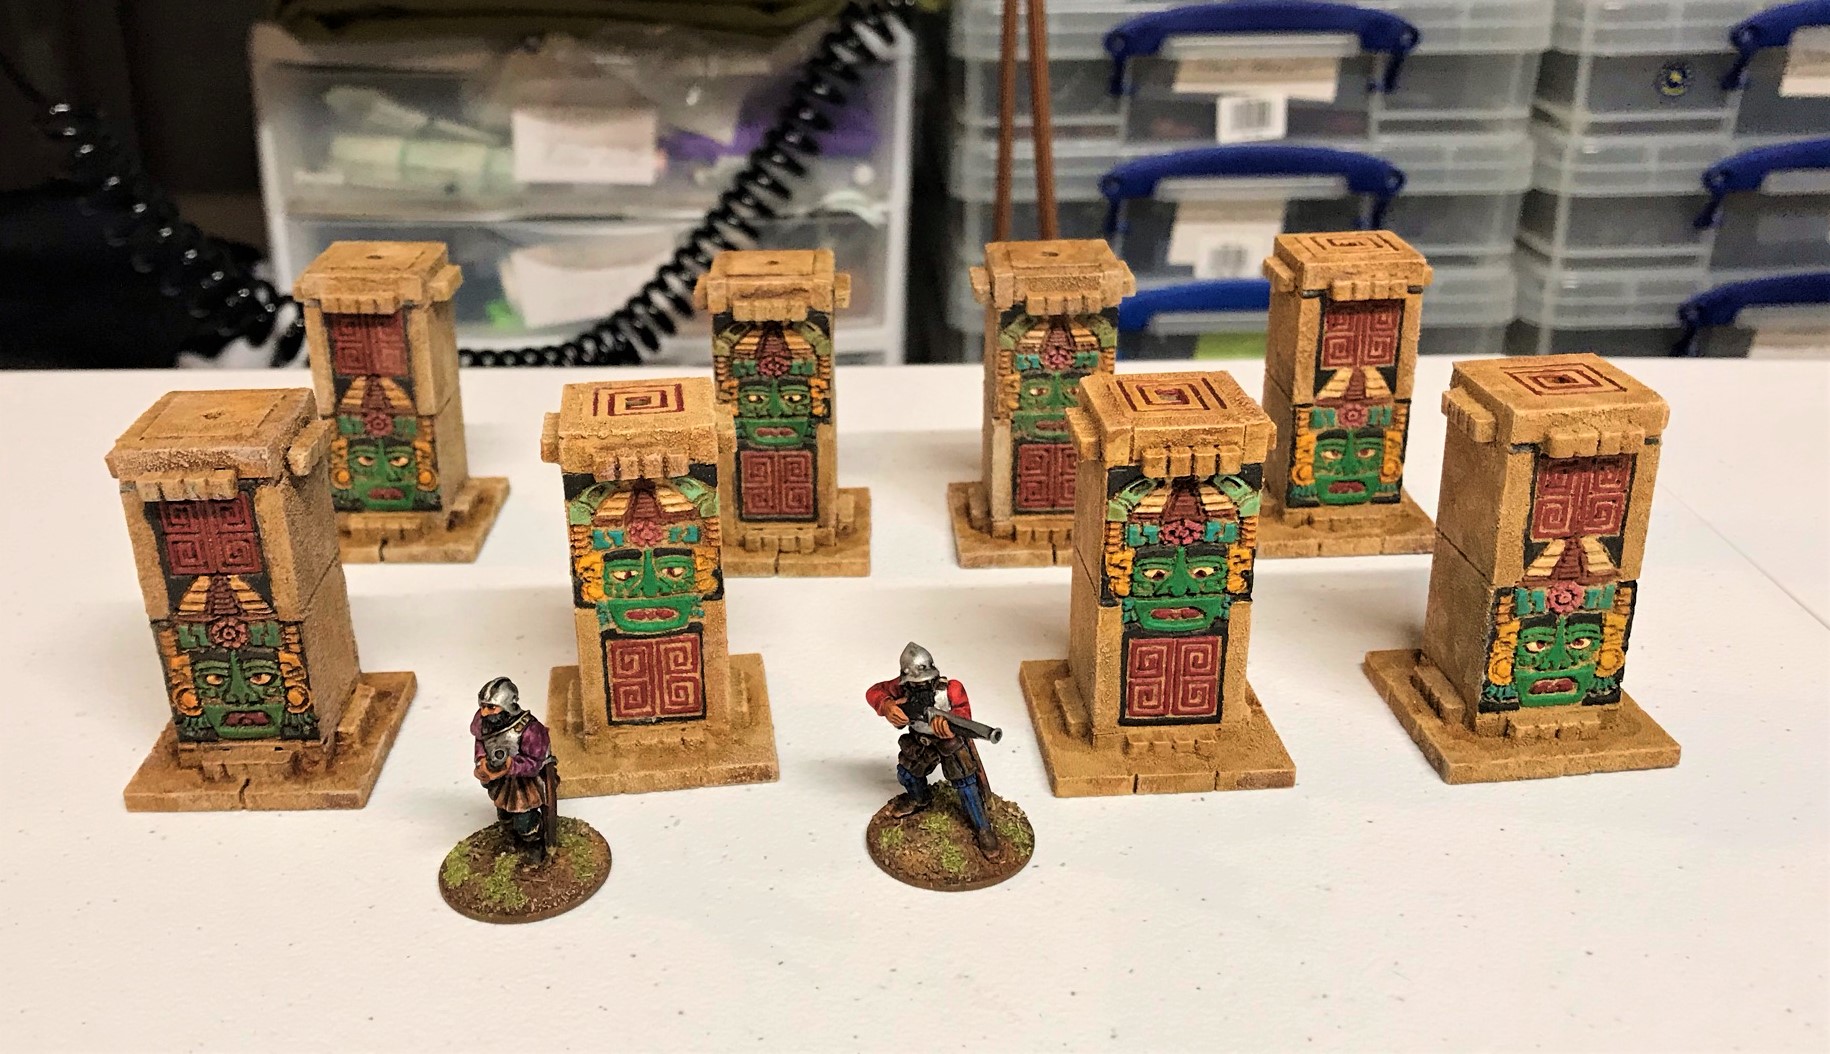
As I had two kits of the ones called “4 Temple Columns“, I thought I’d start there as it would enable me to experiment and learn for the rest of the MDF. I broke the kits into two attempts – with the first being painting and dusting the MDF on its sheet and then assembling the kit. The second attempt would be to assemble the kit first, and then dust up and paint.

As stated, my first kit attempt was to paint and flock in situ as it were. I applied a watery PVA coat to the MDF, and then lightly spooned on or pinch-applied the chinchilla dust. I tried removing excess with a reusable Testors plastic cheap brush. I did this in a plastic tub so as to minimize the mess (and avoid unnecessarily ticking off the wife with the unannounced arrival of a new beach in the cellar). This was a bit time-consuming and not very efficient I found.
After the glue had dried, I used my cheapest airbrush (my Iwata Neo) to paint the sheet with Vallejo Model Air “Sand (Ivory)”. When that was dry and basically cured, I dry brushed the sheet serially with three colors: Vallejo Model Color “Dark Sand’, then Citadel “Ushabti Bone”, then DecoArt “Buttermilk”. I wanted to get some depth of color this way. Then I painted the idols’ faces (all paints are listed at the end of this post as references too). The main challenge I had was not to let my paints be too thin, as they could easily run via capillary action to unwanted parts of the models. Happily, the chinchilla dust is so porous that it grabs paint easily.
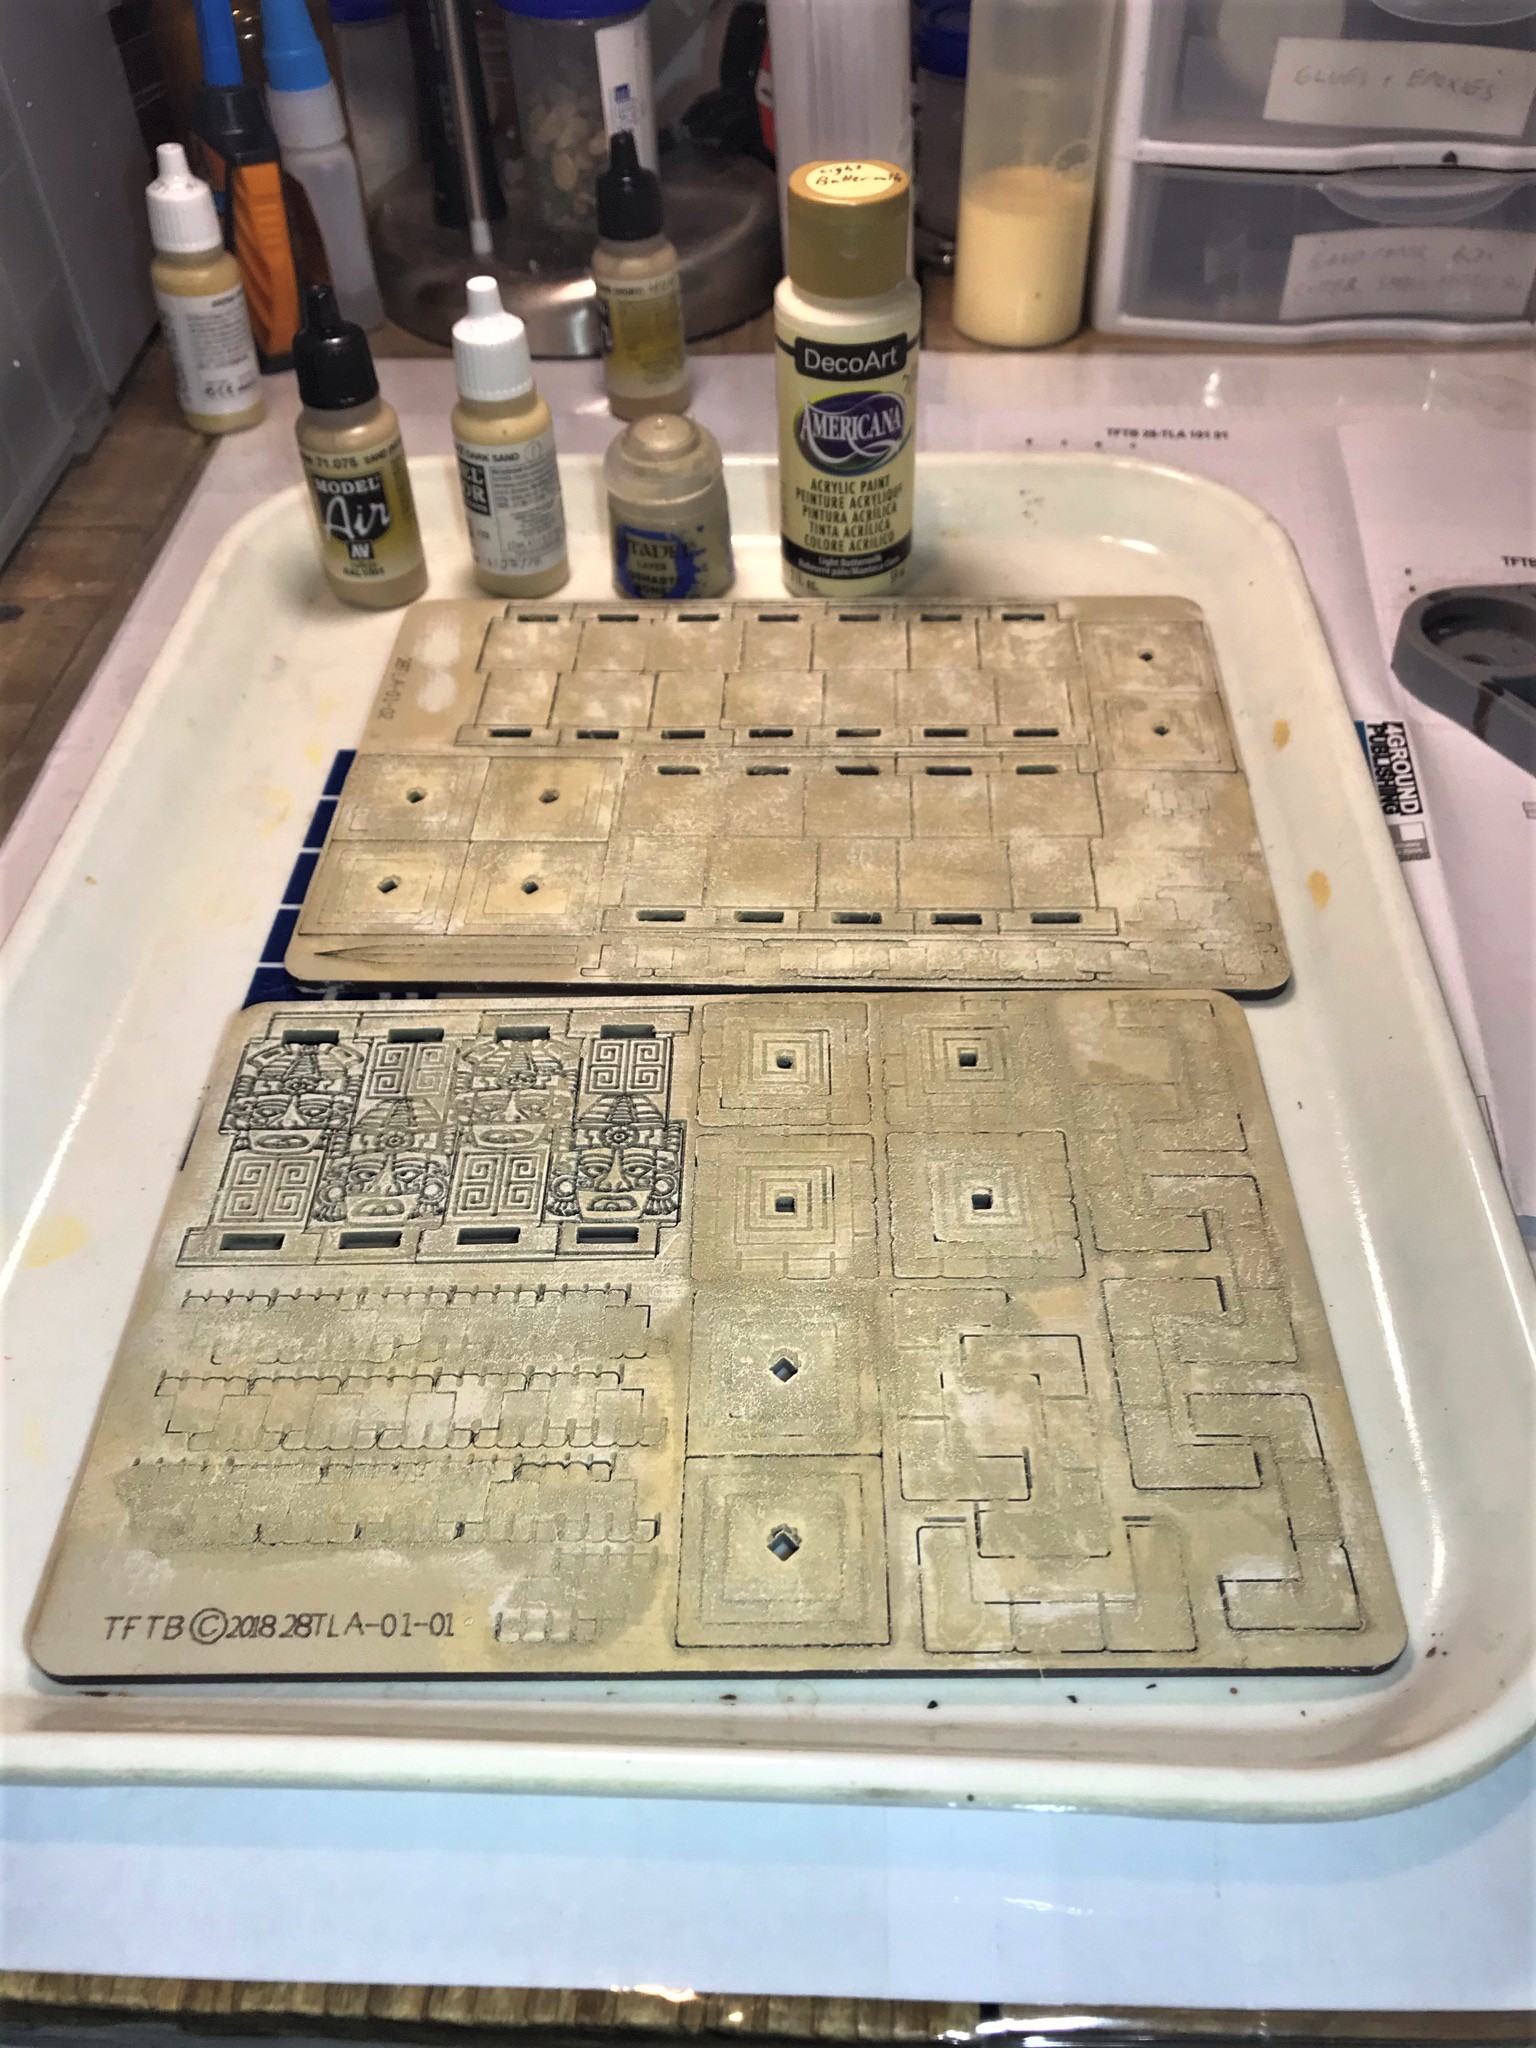
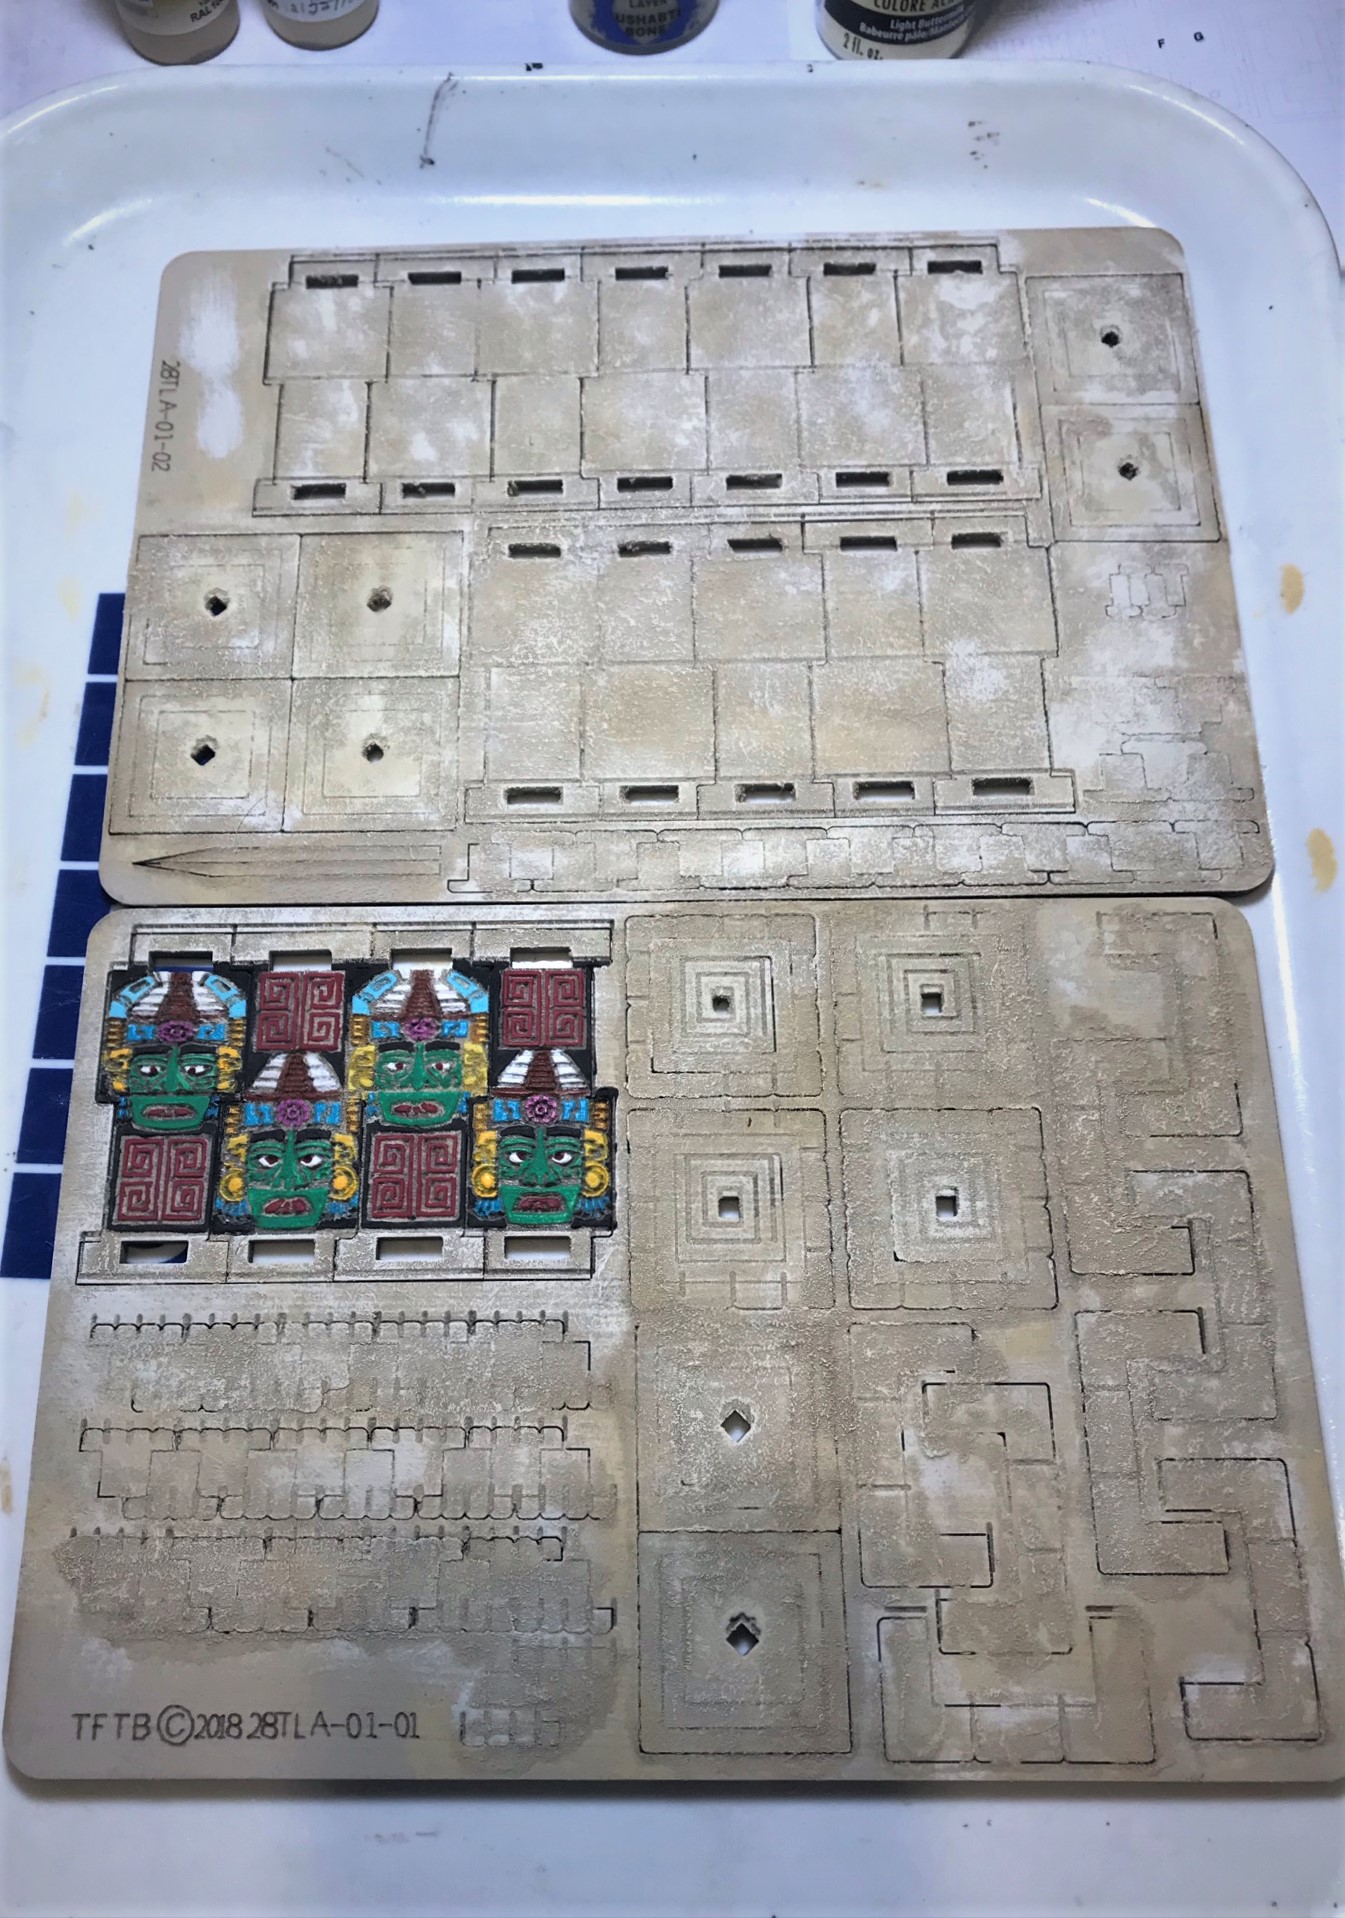
After painting all of it, I used Army Painter “Light Tone” over the whole of both sheets.
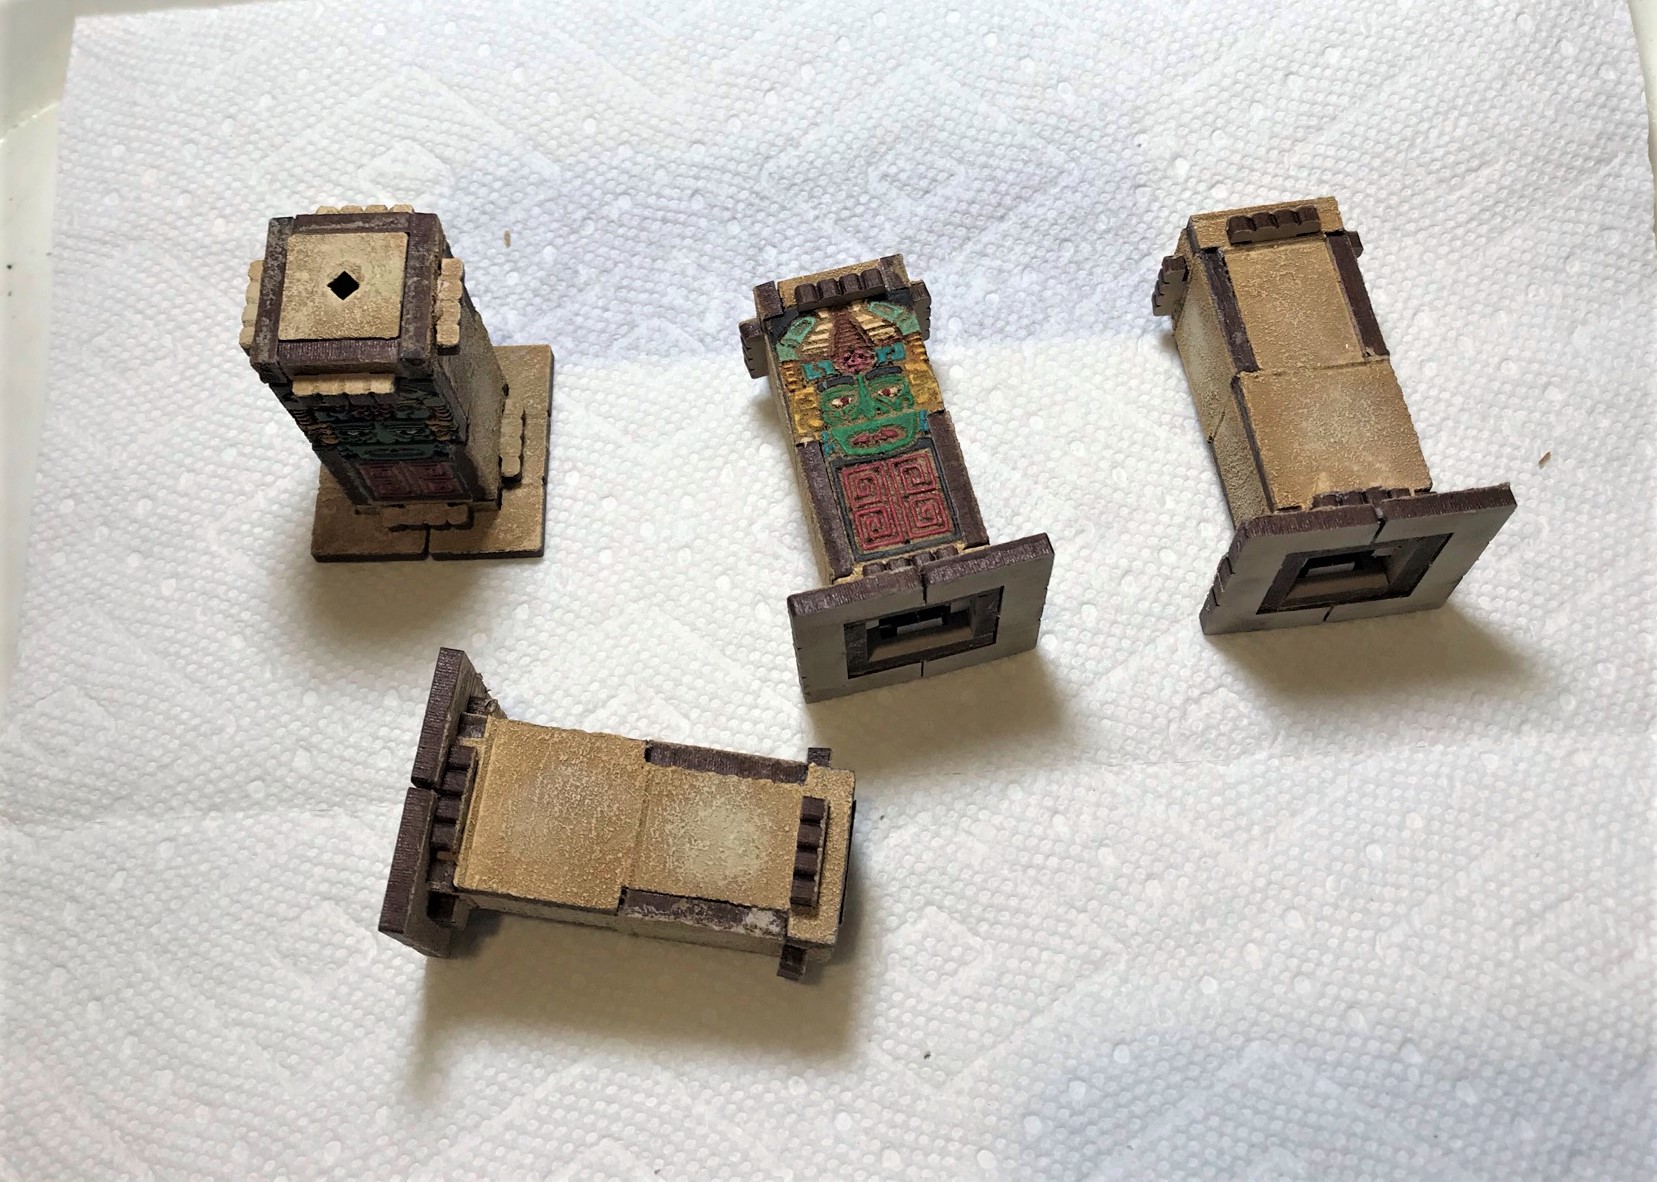
Now, it was time to assemble. the directions were easy enough – but I discovered three issues. One was that I wasted a lot of paint and effort on parts I would not need. Second, that assembly would be complicated (just slightly) by the added thickness of the painted/dusted MDF. That was easily dealt with by an Exacto blade. Thirdly, the brown (laser-burned) surfaces of the MDF would not be the same texture and color of the rest – hardly a way to look like stone. These were the surfaces I did not get to paint by leaving the pieces of MDF on the sheets. I needed to touch all of those areas up after assembly and leaving to let the glue to dry overnight.


Going forward, I saw opportunities to address the shortcomings from the first go -around.
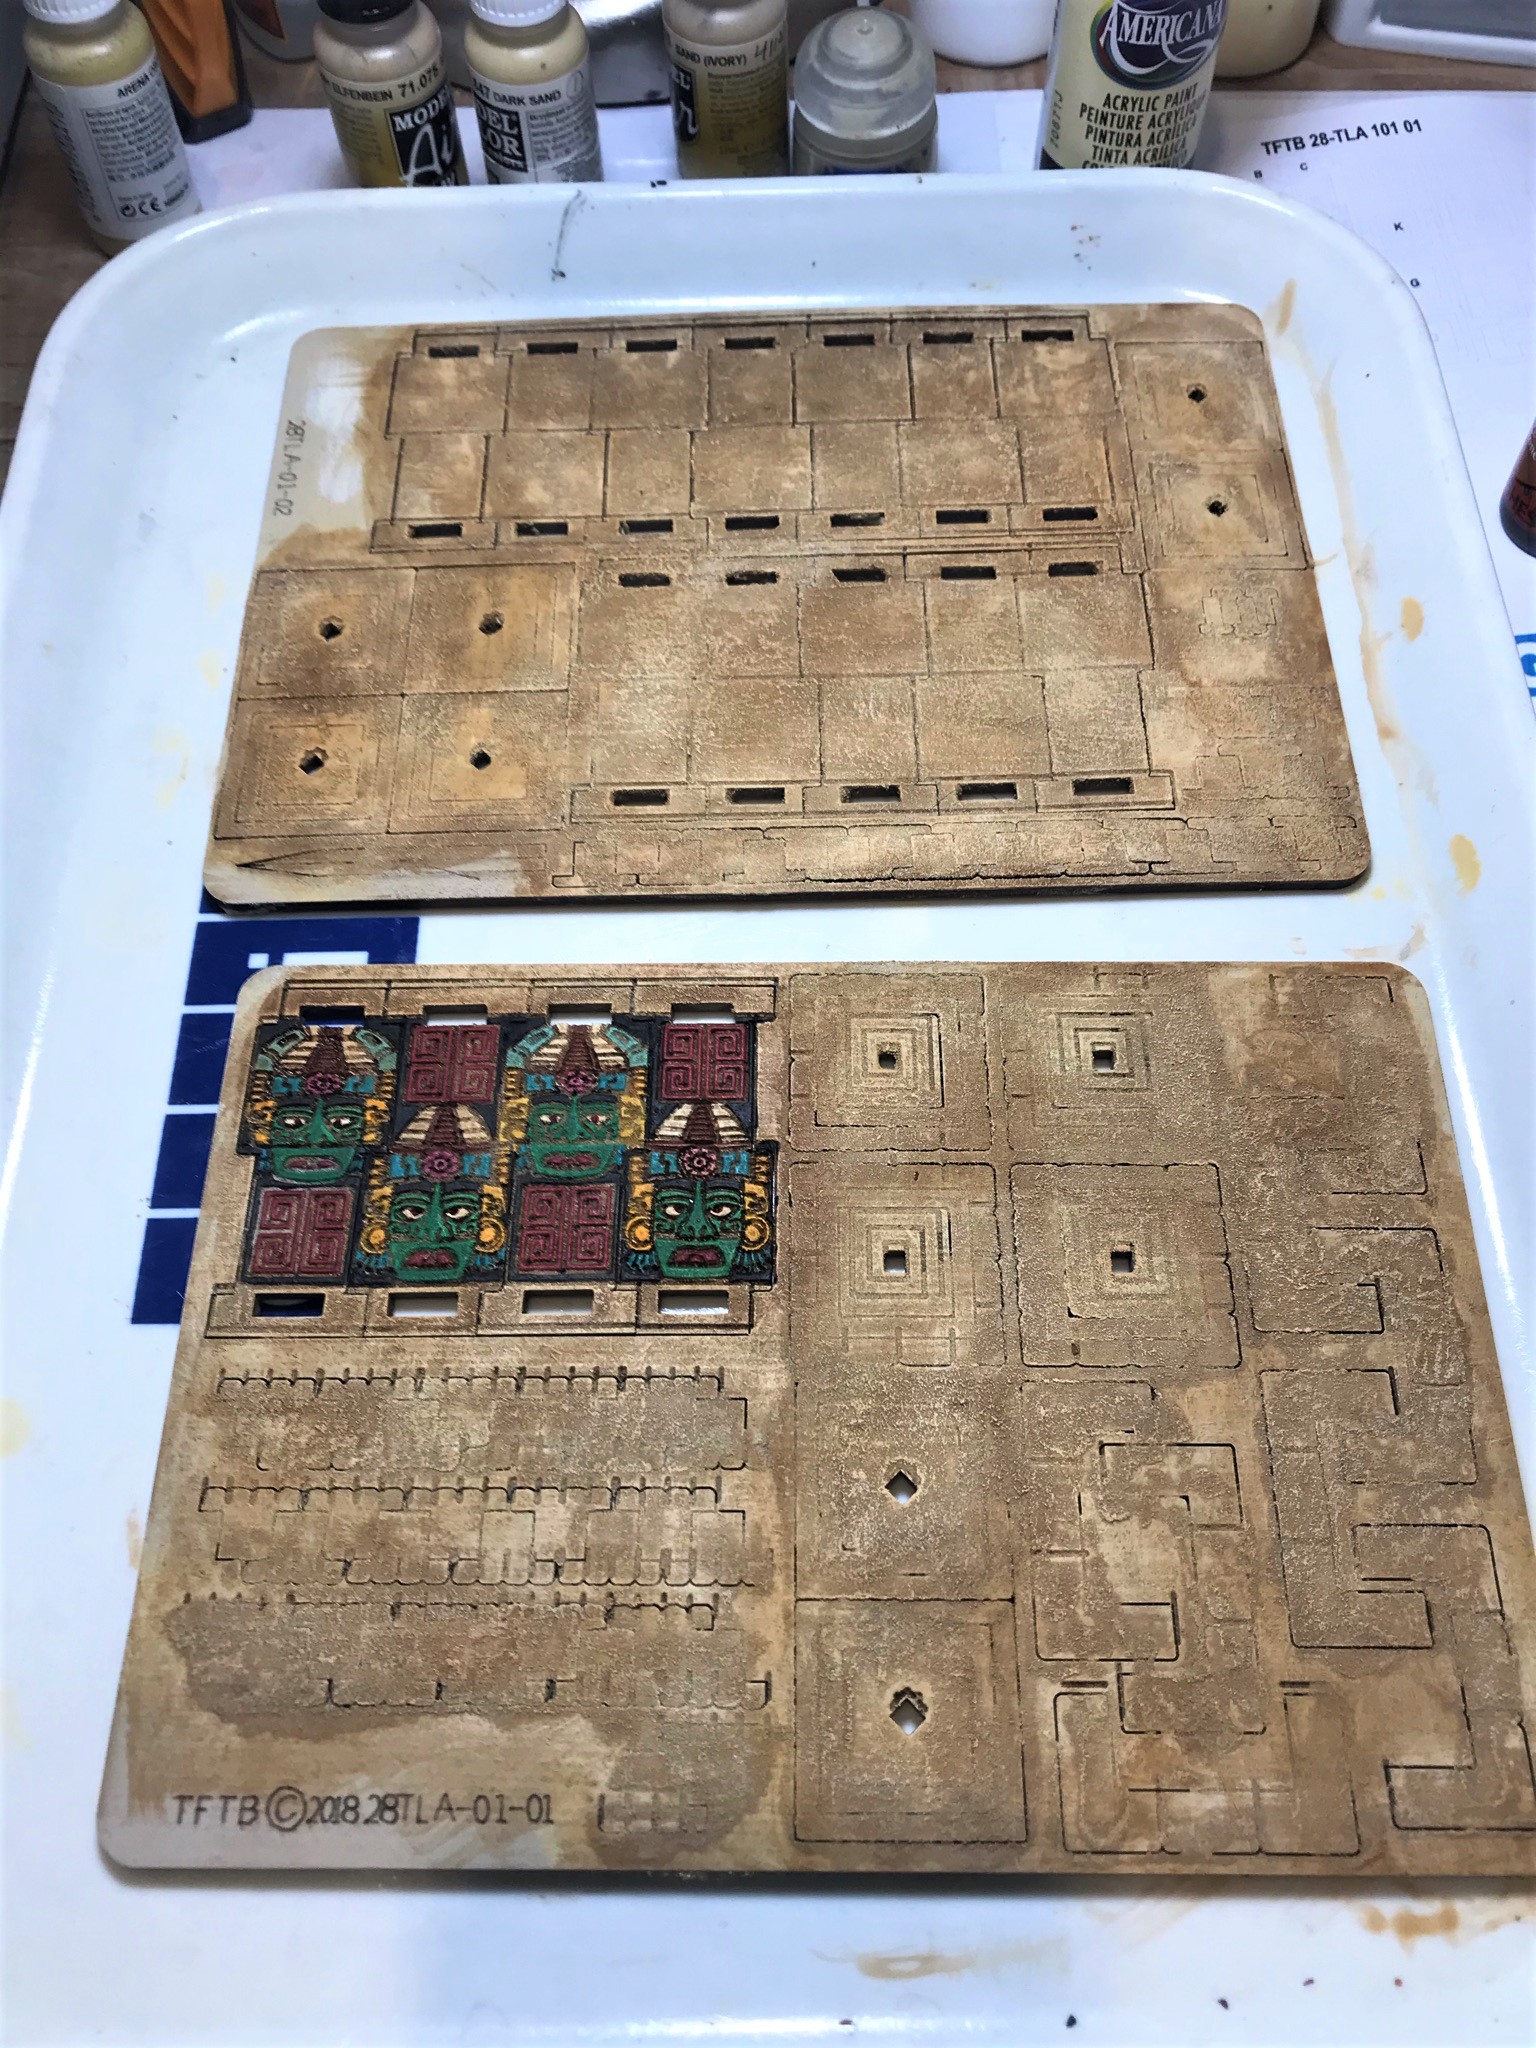
First, I would assemble first, and then apply the chinchilla dust, paint and wash. This would limit the need for so much touch up. Second, I got a small spray bottle and a cheap salt shaker from Wal-Mart to respectively apply the watery PVA glue and the chinchilla dust more easily. Both were huge improvements for round two.

I used the exact same order of paints and washes as before – and then went back afterwards with “Light Tone” to get better blending on all of them. A few bonuses here around chinchilla dust – it is so porous that it traps a lot of the paint and the wash – and it dry brushes great. You will use more paint too. Varnishing was unnecessary – a big plus!
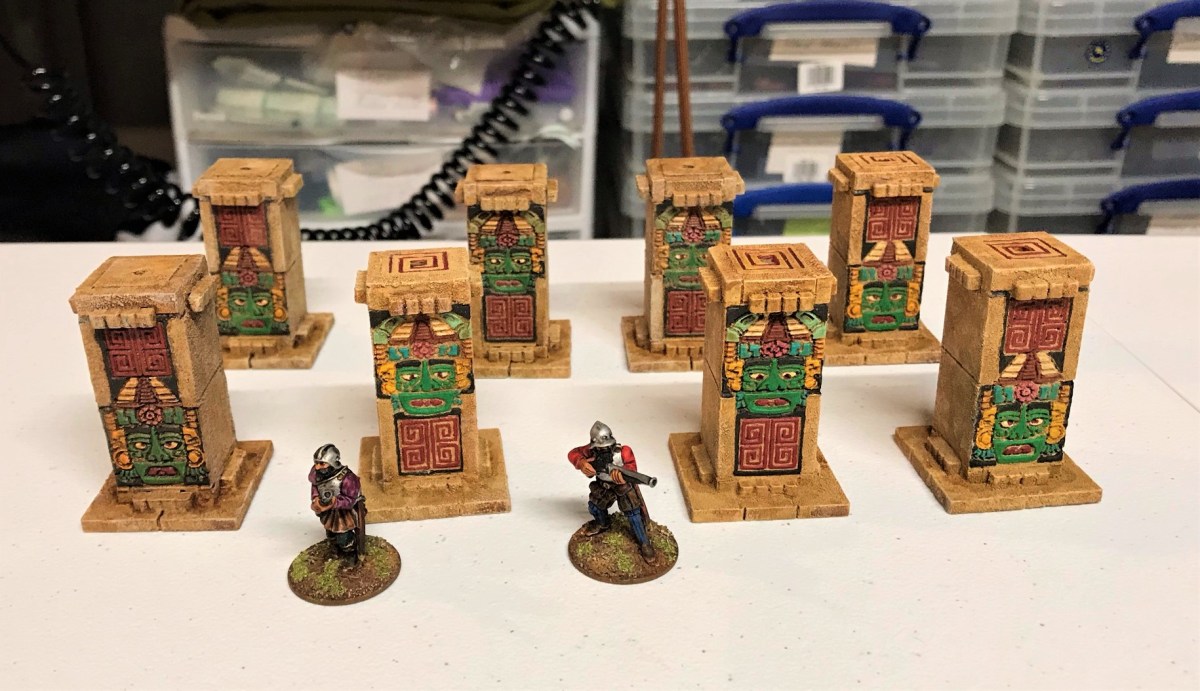
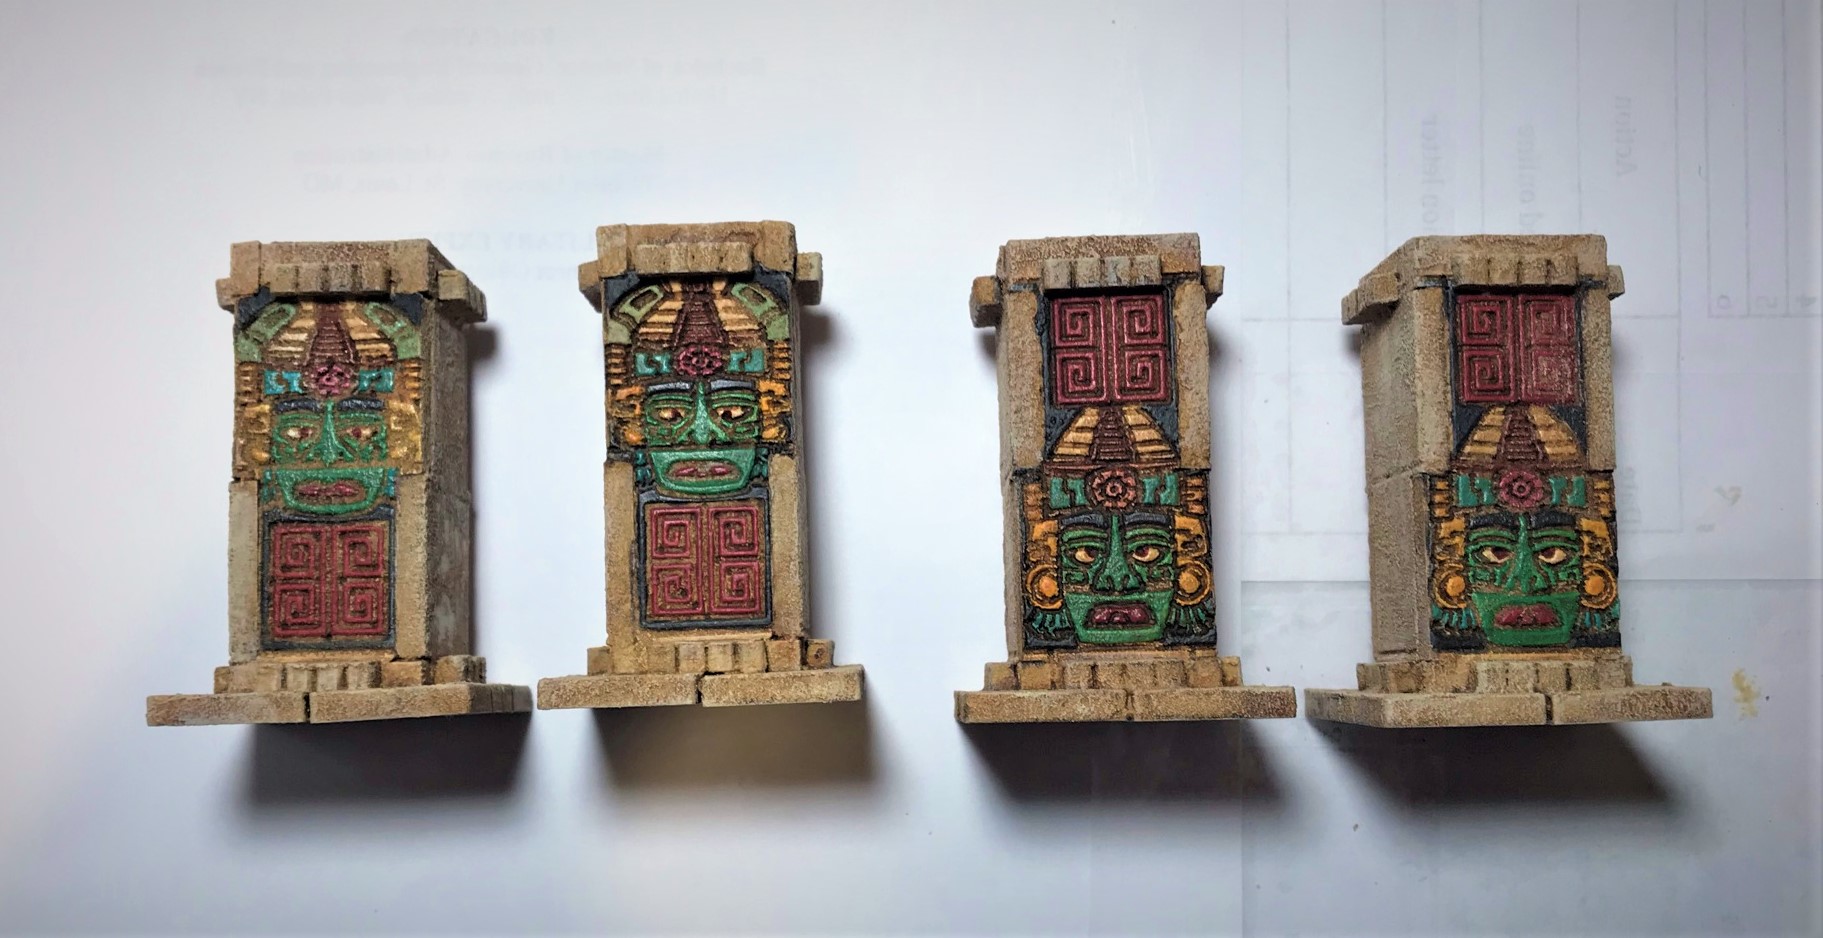
So here are the final results:

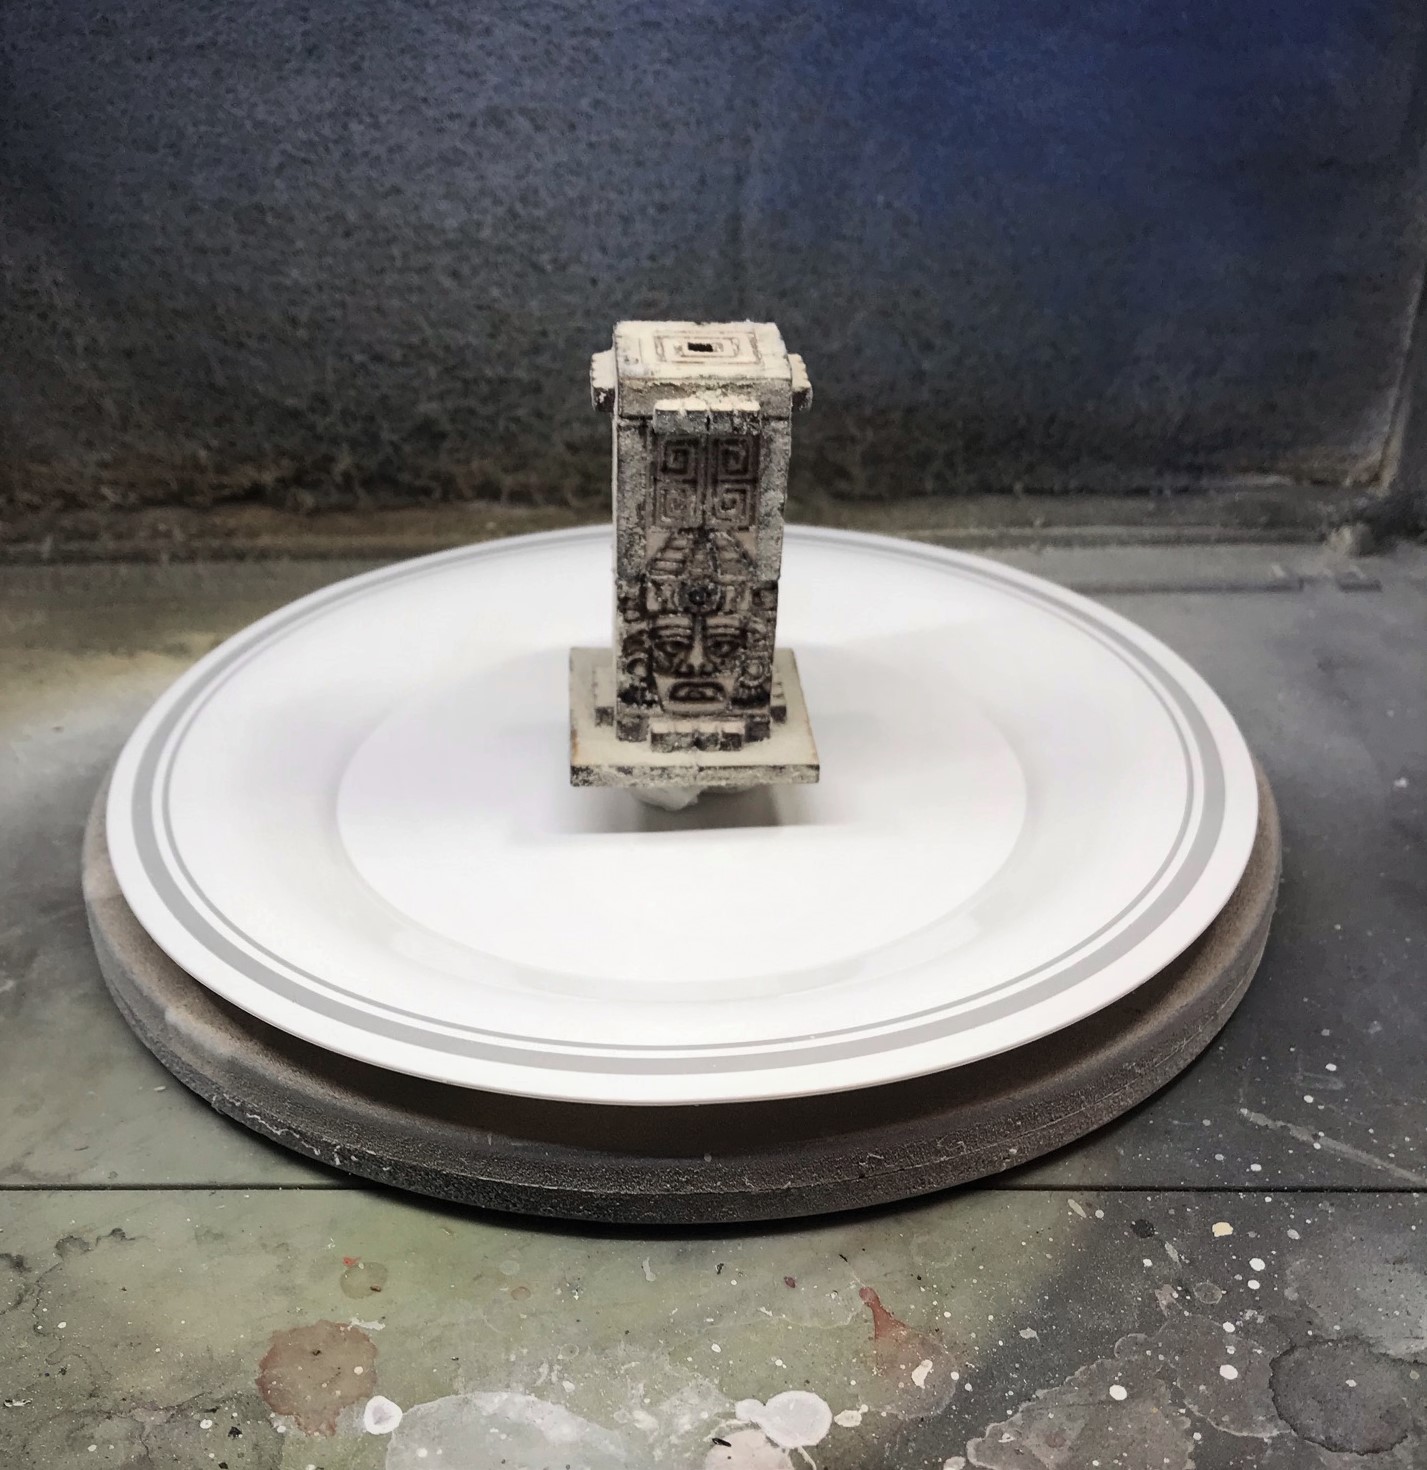
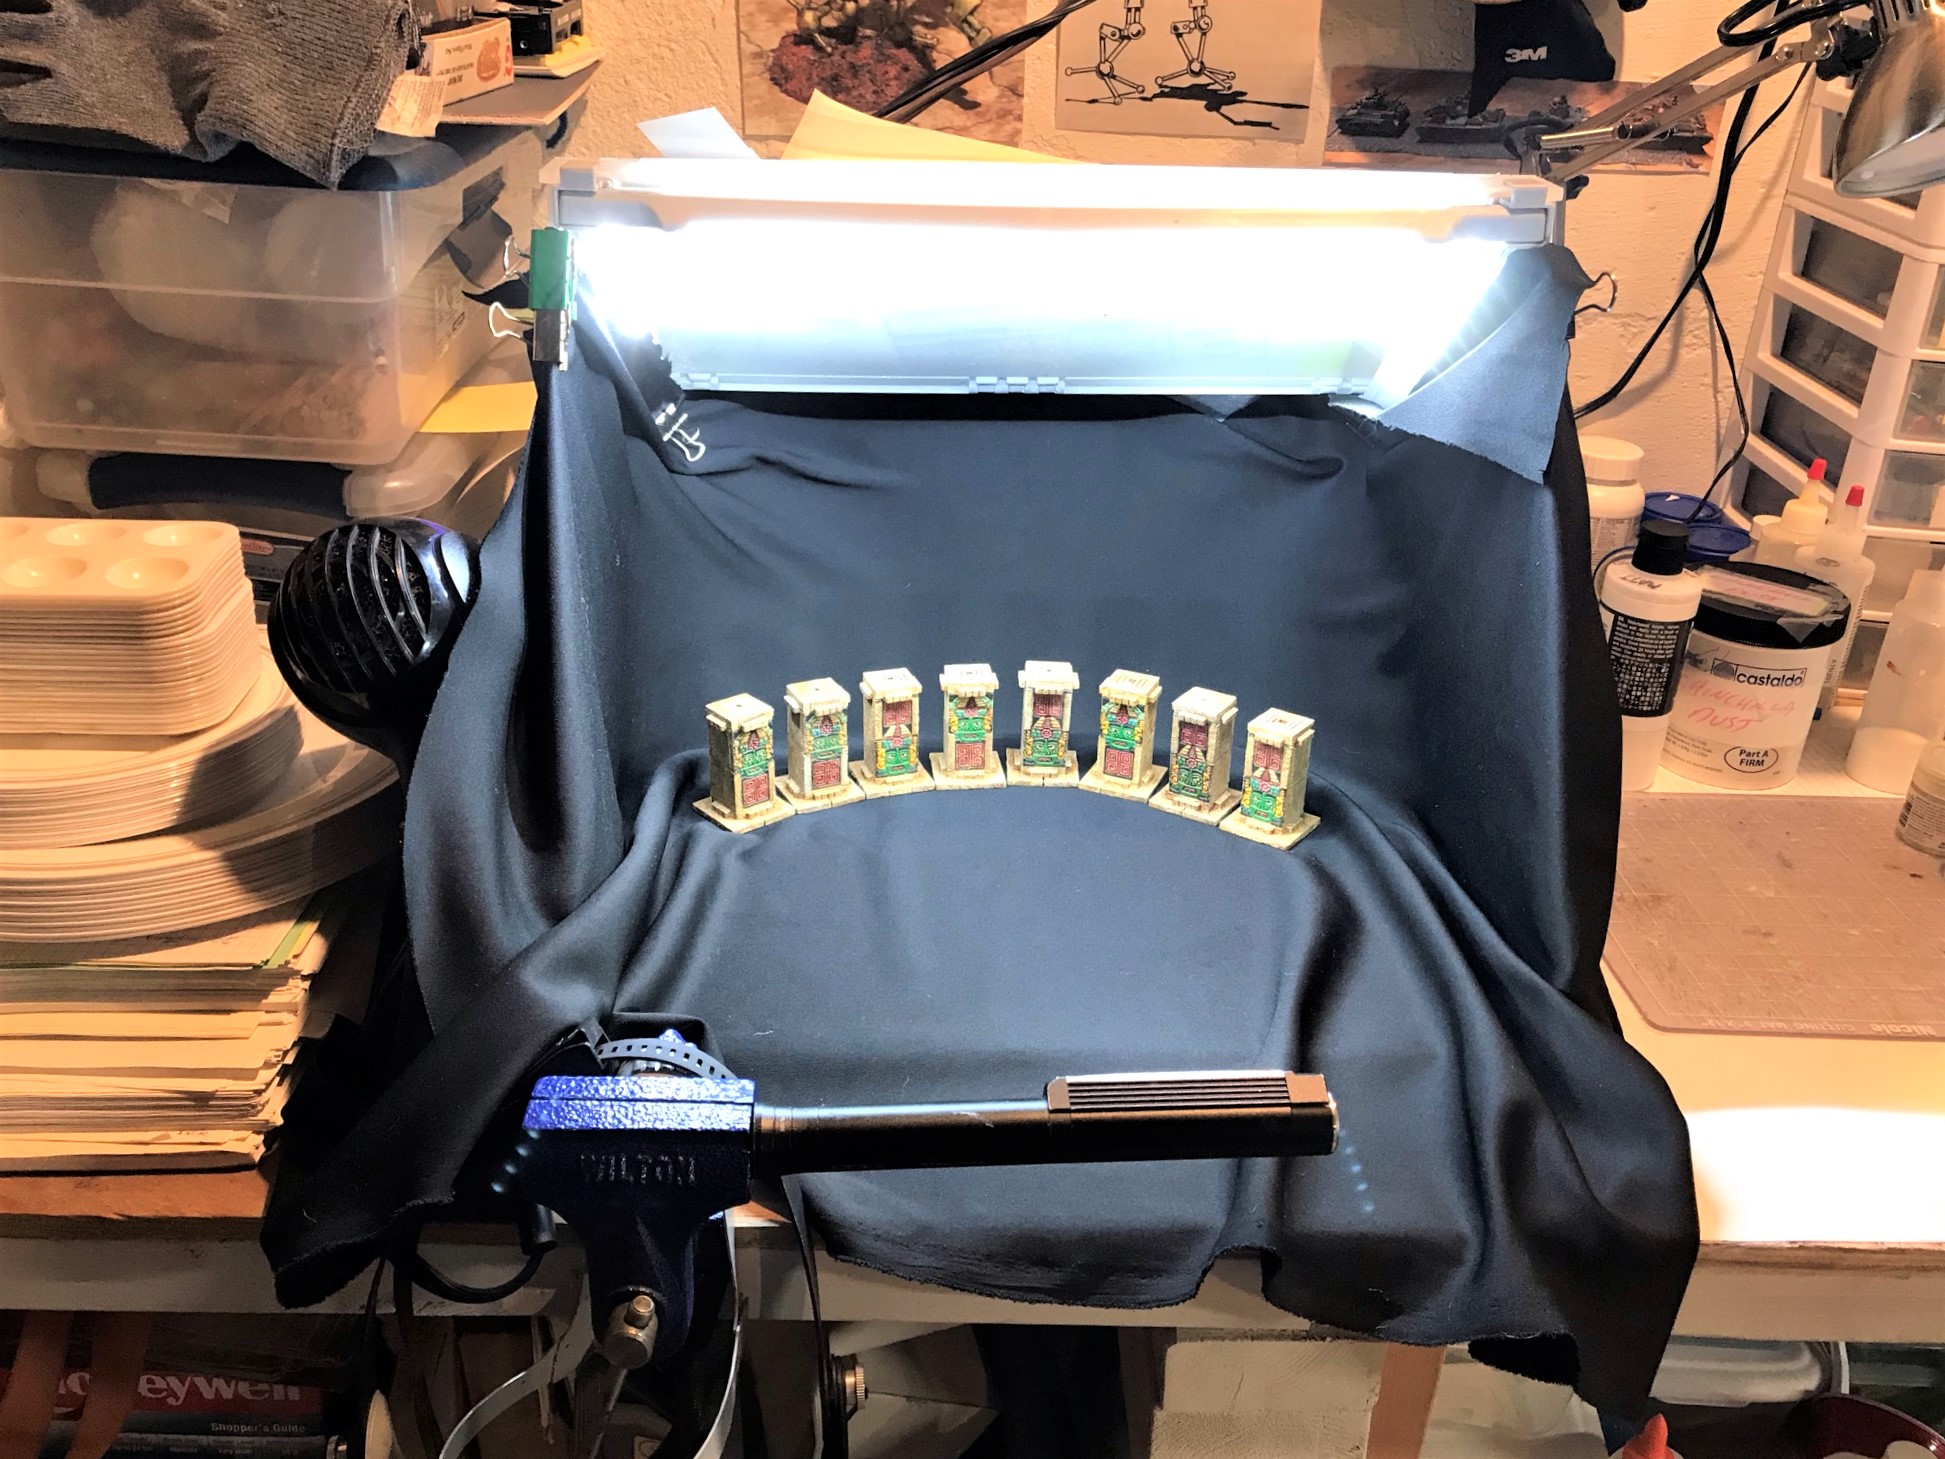
I did use a new setup for photos here – got some black fabric to put in my spray booth, binder-clipped it, and add a flashlight – et viola. My previous Sonoran Desert background would not have worked well. I probably need to put a filter over the spray booth light next time as the light was too bright – even with editing.
So that’s my March 31st completion. I am hoping to add any next April-completed pieces to Ann’s “Paint the Crap You Already Own” challenge.
BIG THANKS TO BUCK AND TO TIM!
Remember to follow my blog and enter my contest! The entry window closes on midnight EDT (US East Coast time) on April 10th, 2021.
And always, I invite your feedback on this post! Thanks for taking a look!
Miscellaneous details and references for those interested in that sort of thing:
Previous posts on games, units, and other projects for my 16th Century Spanish Conquest supplement for Feudal Patrol™ – “Civilizations Collide”
- Aztec Temple Columns and My New Love for Chinchilla Dust (this post)
- Mark’s Aztec Building Challenge Contest
- Game Aids and Tools for Feudal Patrol games using the Civilizations Collide Supplement
- And the Winners of “Mark’s Conquistador Contest” are…
- Conquistador Cavalry. 24 figures total: Outpost Wargame Services #CON5 “Conquistador Cavalry in light armour 1” (4 horses & 4 riders); Outpost Wargame Services #CON6 “Conquistador Cavalry in full armour” (4 horses & 4 riders); Eureka Miniatures “Moving Horses” #100ANM05 (8 horses used as casualty markers).
- Conquistador Falconet and Crew (Artillery). 3 figures total: Outpost Wargame Services #CONA1 “Falconet and Crew”.
- More Conquistador Sword and Buckler Men. 8 figures total Outpost Wargame Services #CON001 “Sword and Buckler Men”.
- Conquistador Sword and Buckler Men (Wargames Foundry). 18 figures total in three blister packs: Wargames Foundry #SB015 “Swaggering Swordsmen”, #SB016 “Brutal Sword and Buckler Men”, and #SB017 “Bold Bladesmen”.
- Perro de Guerra (Conquistador War Dogs). 13 figures total: Outpost Wargames Services #CONS6 “War Dogs” (8 war dogs); Eureka #100CON13 “Dog Handler and Dogs” (1 dog handler/pikeman and 4 war dogs)
- Conquistador Foot Command, Crossbowmen, and a Couple of Officers. 11 figures total: Outpost Wargames Services #CONC1 “Conquistador Foot Command” (a leader, a banner bearer, a drummer, and a bugler); Eureka #100CON04 “Crossbowmen” (5 crossbowmen); and Eureka CONC1 “Conquistador Officer” and an unknown SKU officer (2 officers)
- Merciless Adventurers (this post) – Wargames Foundry #SB014 (6 Conquistadores with arquebuses)
- Audacious Arquebusiers! – Wargames Foundry #SB012 (6 Conquistadores with arquebuses)
- Mark’s Conquistador Contest – for my loyal blog followers!
- Montezuma and Chieftains – Wargames Foundry #AZ011 for Feudal Patrol – 6 Aztec figures (Montezuma, 4 Chieftains, 1 Warrior Priest)
- Aztec Shock Troops – Cuachic Warriors aka The Shorn Ones – 8 Aztec cuachicqueh warriors
- Tloxtoxl and the Priests of the Great Temple, Wargames Foundry AZ021 – 2 warrior priests, 1 priestess, 1 priest, 1 leader, and 1 signaler
- Civilizations Collide – The Wars of the Aztecs, the Inca, the Maya, and the Conquistadores is now available as a FREE Download for Feudal Patrol™ – plus a Feudal Patrol™ review!
- 18 Aztec Novice Warriors for Feudal Patrol Walk into a Bar – 18 Novice Warriors
- Aztec Warrior Priests (painted as Tlaxcalans), Ral Partha 42-302, circa 1988 (this post) – 6 figures – 6 Tlaxcalan Warrior Priests
- Tlaxcalan Novices, Elite Warriors, and Command Group – 18 figures – 8 Novice Tlaxcalan Warriors, 8 Elite Tlaxcalan Warriors, 1 Tlaxcalan Captain, 1 Tlaxcalan Conch Blower
- Tlaxcalan Archers – 8 Veteran Tlaxcalan Archers
- Aztec Game for Feudal Patrol across thousands of miles – via Zoom!
- Aztec Snake Woman and Drummer – 1 Aztec General, 1 Aztec Drummer
- A June and July Jaguar Warrior Frenzy (plus some Aztec Veterans and a Warrior Priest to Boot) – 3 Aztec Veteran Warriors, 17 Jaguar Warriors, 1 Aztec Warrior Priest
- Doubling Down – Aztec Veteran Warriors – 24 Aztec Veteran Warriors
- Aztec Arrow Knights, Ral Partha circa 1988 – 6 Aztec Arrow Knights
- Aztec Eagle Warriors from Tin Soldier UK – 6 Aztec Eagle Knights
- Aztec Novice Warriors and a few Frinx – 12 Novice Warriors
PAINTS, INKS, GLAZES, SHADES, WASHES, PIGMENTS, FLOCKING, GLUES AND MORE THAT I USED ON THESE PIECES:
- Elmer’s PVA Glue
- Poster tack
- Plastic Plates
- All Living Things Dry Dust Bath (chinchilla dust)
- Vallejo “Flow Improver”
- Vallejo “Airbrush Thinner”
- Vallejo Model Air “Sand (Ivory)”
- Vallejo Model Color “Dark Sand”
- Citadel “Ushabti Bone”
- DecoArt “Buttermilk”
- Army Painter “Light Tone” (wash)
- Vallejo Mecha Color “Off-white”
- Vallejo Model Color “Red”
- Americana “Kelley Green”
- Craftsmart “Black”
- Citadel “Yriel Yellow”
- Americana “Vivid Violet”
- Vallejo Mecha Color “Turquoise”
- Vallejo Game Air “Red Terracotta”
- Citadel “Contrast Paint – Iyanden Yellow”
- Craftsmart “Bahama Blue”

Those look fantastic! Ive been using lizard sand (also from the pet store) for a variety of terrain uses. While I’ve heard if chinchilla sand, I had never though to use it. After seeing your results I’m going to pick up a bag.
Great post!
LikeLiked by 3 people
Thanks borderguy – this stuff is ultra finely ground pumice – it almost flows like liquid. I found it at Petco but had to ask the help as its not so easy to find. I’m really happy with it as I have a lot more to do for my contest (hint hint!)
LikeLiked by 2 people
The lizard sand is very fine. But having something even more finely ground would sure be useful.
LikeLiked by 2 people
I can’t help but think the dust technique would be a great way to improve the quality of stonework on 3D printed models as well, sand of course being too course, but a fine dust might just be perfect. Ok…off to the pet store.
LikeLiked by 3 people
For sure!!
LikeLiked by 2 people
Hope it works for you!
LikeLiked by 1 person
They have come up great Mark.
LikeLiked by 2 people
Thank you!
LikeLiked by 1 person
They look awesome Mark. Very nice models, paint, and technique! The only suggestion I might make is to use some filler to cover the hole in the top, to give them a more solid feel.
LikeLiked by 3 people
Thanks Faust! I considered that. It was supposed to be part of the design I think and diamond-shaped. If I were to do again I’d use the piece with the design.
LikeLiked by 2 people
Oh mate ! very nice.
LikeLiked by 3 people
Thanks Pat!
LikeLiked by 2 people
They really have turned out well Mark and glad I could be of help. I’ll be very interested to see how the rest turn out in due course. 🙂
LikeLiked by 3 people
Glad you approve! Thanks again for all the advice!
LikeLiked by 2 people
They look really great, Mark. Very solid looking and they’ll add a lot to a fully set up tabletop – and thanks for the tip on Chinchilla Dust. I’m going to pick some up for some MDF buildings that I need to get around to painting one day. The only thing I knew to use for MDF was shellac spray to stop them drinking all of the paint, but this looks like it’ll add a nice second option.
LikeLiked by 3 people
Thanks Az. It still will be thirsty for paint, but the PVA and dust give a great cover. I think the porosity of the dust is why it’s still thirsty. But I did not need varnish so that’s a big plus.
LikeLiked by 2 people
I might try going shellac then dust and see ow it works out. It’ll be a little while before I get to the MDF, though. I’ve got a few sets of tiles I’ve stalled out on doing and would like to get back to over the next couple of weeks…
LikeLiked by 1 person
I’d be interested in hearing how that works out
LikeLiked by 1 person
Slow down for the love of God! Play golf for a break; this has to last until May!!!!!!
LikeLiked by 3 people
God has been keeping it rather chilly!
LikeLiked by 2 people
Bright sunshine here- unfortunately I have to work on my mums car🥵😳
LikeLiked by 1 person
I’m sure she appreciates it!
LikeLiked by 1 person
Mark, I really like the way the dust hides the telltale MDF edges. Nice work.
LikeLiked by 3 people
Thanks Buck and thanks again for being a helpful sounding board. More stuff to come!
LikeLiked by 1 person
Great work on all Mark, the extra texture certainly makes it less like a MDF kit
LikeLiked by 2 people
And less was the goal Dave, thanks much!
LikeLiked by 2 people
They look really good, Mark! 🙂 I can see pet stores selling out of chinchilla dust! I really like the painted images on the columns!
LikeLiked by 2 people
Thanks John, the response has been quite positive on the chinchilla dust. Maybe only TIM was aware of its potential?
LikeLiked by 1 person
Awesome work mate. I have Lizard sand, but never had a go at the chinchilla stuff. I might have to order a bag online.
LikeLiked by 2 people
Thanks much, it’s pretty amazing stuff with a little watery PVA
LikeLiked by 1 person
Excellent work on these columns. Really like the slightly faded paints on the carvings. The texturing worked well, too.
As you have an airbrush, you could also shot some lacquer primer through it for the resin. Less over spray, and maybe you can do it on a window sill.
LikeLiked by 1 person
Thanks D&B, nice to hear that from you. As for the resin, I think by next Tuesday I can go outside as it will be warming up. I only use water-based stuff in my airbrush- to simplify cleaning let alone the vapor issues.
LikeLike
Very nice Mark- the Chinchilla dust seems ideal for the job- I’ll have to pick some up for myself.
Cheers,
Pete.
LikeLiked by 1 person
Thanks Pete, I’m really thrilled with it.
LikeLike
They look superb! I have an MDF building that I’m saving for a certain someone’s annual challenge, so I’ll be on the lookout for chinchilla dust for when I come to build it.
LikeLiked by 1 person
Thanks Matt, appreciate that! Great to know it will help you! Stay tuned too, as I have a few more to do.
LikeLike
TIM gave you an excellent suggestion there, I must say and I enjoyed reading the process you followed. The results speak for themselves! Those will look great with all of the other minis you’ve painted up recently. Excited to see more terrain, though as others have said, take your time with them to help my odds in the competition 😉
LikeLiked by 1 person
I agree Kuribo, TIM is awesome. Glad that you enjoyed the post and my process. Got a lot more to do as you saw, so we’ll see how it goes!
LikeLiked by 1 person
They’re beautiful, really great work Mark! The chinchilla dust tip is very helpful too – there’s also chinchilla bath sand available, which is very fine grain (think tropical beach) sand. That might also be useful for textures!
LikeLiked by 1 person
Hey Mikko nice to hear from you and thanks for the kind words. It is actually that stuff you get a chinchilla for that bathing. It’s a finely (unbelievably finely) ground pumice.
LikeLiked by 1 person
Really nice work, I hope to have a go at some MDF kits in the not to distant future so might have to give that a try.
Cheers Roger.
LikeLiked by 1 person
Cheers back at ya Roger!
LikeLike
Ah yes the old chinchilla trick. I think I remember reading about it on TIMs blog at some point in time. They’ve turned out really well mate.
LikeLiked by 1 person
Thanks buddy
LikeLiked by 1 person
Very good looking, Mark, and it seems like chinchilla dust is a very useful find for MDF sotn/plaster work in general.
I do have to admit, however, was my first reaction to seeing your pillars was Aztec vending machines with the precise squarenss and colorful displays. Which one dispenses the diet coke?
LikeLiked by 1 person
Thanks! Given that they are Aztecs, maybe (probably) diet blood 😜
LikeLike
Those are excellent – think I need to pick up some of that chinchilla dust myself. I’m yet to try my hand at mdf terrain although seeing results like this I’m increasingly tempted. 🙂
LikeLiked by 1 person
Thanks Wudugast! When I decided to buy these I was hoping to come up with a solution to make them less like MDF. I did not dream that something like chinchilla dust would be the solution. If not for TIM I never would have. Given the strong positive response on this here (and other fora such as Lead Adventure Forum, The Miniatures Page, and The Wargames Website, and even my Facebook and Instagram) I think pet stores around the world will be selling out on chinchilla dust!
LikeLiked by 1 person