
The Power-Armored Frinx are back, and this time as cavalry riding glyptodons into battle! The Frinx were a creation of Archive Miniatures back around 1977 or 1978. They are a smallish lizard-like race, often wearing power armor.
Glyptodons on the other hand were very real and existed from the Ice Age until about 11,650 years ago (give or take). They were prehistoric cousins of the modern armadillo, only they were mega fauna – and were as big as a Volkswagen bug. Plus, there is that massive spiked tail to consider. Why Archive put these two together is anyone’s guess, but the combination is indeed quirky and fun.


As a Frinx backgrounder for those interested, I have previously written several posts on the venerable Frinx, going back to my casting of their infantry in February 2016 (here), my painting and figure conversions of my Power-Armored Frinx infantry platoon in February 2017 (here), my May 2017 discovery and acquisition of an original Star Rovers RPG (here), and my casting of the Power-Armored Frinx on Glyptodon (Archive #2042) in July of 2017 (here). So this journey has already been 2½ years in the making. Phew!
Interestingly, the 1981 Archive catalog that came with my Star Rovers game does not have the #2042 listed, despite the drawing shown above being in the rule book. My guess would be that the kit was uneconomical to produce and/or difficult to produce well. I document several these issues in my casting post – but originally the kit contained no less than 11 pieces as shown below. As reference, the scale of the set is 25mm to 28mm.

I made my own modifications to this particular set and made molds to recreate the kit. It is indeed rare and given that it was already OOP by 1981, there cannot be many of these around. I thought they would serve well in a traditional cavalry role for my Frinx platoon. I cast several and shared with Buck Surdu (who graciously provided me the original you see above so that we both could have some). Buck did a great job painting seven of my recasts of these back in 2017 which you can see here.
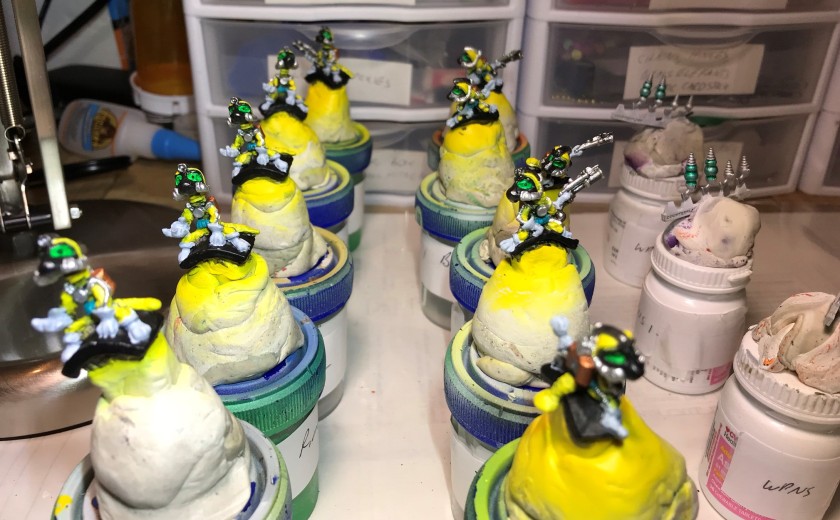
This month to add to my Frinx forces I managed to finish 5 Power-Armored Frinx on Glyptodons (let’s call them PAFOG for short!) models. As shown above, each set has two Frinx riders on a glyptodon. I chose 5 because I felt that 10 Frinx riders would be a good number for a cavalry squad in either the recon or screening role in my Combat Patrol™ games. It also would give the unit enough punch if deployed as a mobile counterattack force. I sorted out what figures that I had, and chose the ones I would use for the cavalry squad. Some of the riders’ weapons were not very well cast, so I converted these weapons. I used Bombshell Miniatures sprues of Arc Weapons (#36013) to replace six of the blasters. My initial plan is currently to give these weapons better capabilities versus robot foes, which should prove interesting given that I have a lot of robots now.


In order to make these Frinx “pop”, I needed a plan. Clearly, my painting was going to do a lot to overcome the plainness of the riders. I also needed to figure out how I was going to base them for painting and handling – unlike other Archive Miniatures these had no bases. These are also very heavy (solid lead/tin). The feet of the glyptodons were not level, so choosing the right basing was a big quandary for me for several reasons. I tried several approaches in my mind, but eventually chose to emulate Buck’s choice and use washers. I did choose smaller ones than Buck did – using #8 steel washers and E6000 epoxy under each foot, allowing for hardening overnight.

Once they had set, I began by priming the bottoms, letting that cure, and then doing the tops. My goal was to make the bottoms reddish brown, leading to a more brownish top as the drawing of the glyptodon above shows. It was not easy! I had to do a lot of handling of the paint jobs and eventually I moved them to popsicle stick frames with poster tack, which was good for a temporary, if imperfect, solution.


After carving away 6 defective metal weapons, I mounted the riders on poster tack mounds on specimen jars. The saddles really did not present me with many other options for mounting them for painting.
As for a color scheme, I decided to go with the branch color of the US Army Cavalry (now Armor), that being yellow. Besides, yellow is a difficult color to pull off, so I thought it would pose a nice additional challenge. I primed them, and subsequently airbrushed the riders with Vallejo Game Air “Moon Yellow” as a base coat. I then used Reaper MSP “Grey Liner” over the riders to help show me what parts I could paint to bring out the best details. This step really was useful.


It was time now to return to the sturdy mounts – and I had gotten to the point that I was happy with my painting on them. However, what was missing was a set of reins for each glyptodon. When I cast them, I did use the original bits in their mouths, but the original reins were totally inadequate in my view.
I decided to make reins from the smallest jewelry chain I could find. Figuring out how to affix the chains was a lot of trial and error on one of the extra unpainted glyptodons that I had. I tried using wire, thread, as well as just hooking the chain to the mounts – all for naught. Then, a light bulb went off – toothpicks!
I determined that I needed 27 links for the main chain loop for the reins. I threaded the last chain link through a wooden toothpick. I then inserted the toothpick into the bits by the mouths. I used a push pin to slide the link into position on the toothpick, and applied a very small amount of Gorilla Glue on the wood/chain/bit connection. After the glue dried (often with the assistance of a hand held hair dryer), I snipped the toothpick with a sprue cutter as close as I could to the bit. The net effect was like a tent peg and a rope, securing the chain to the glyptodons’ bridle bits. I repeated the process on both sides, then tack glued the chain at the top and above the ears to make a loop. Then I dry brushed the chain with Tamiya “Gun Metal X-10” and let it dry. Lastly, I applied Citadel “Nuln Oil” to the chain.


After this, I removed the glyptodons from the frames in order to give the mounts a matte varnish airbrush treatment. Then I mounted the riders to the mounts with E6000 epoxy, and let it harden. I wanted to connect the chains to the front riders hands. For this I needed a massive 4 links of jewelry chain per model, push pins, and patience. I used Gorilla Glue, push pins, and the blow dryer to get the additional chain segments in place. I then applied the same painting and wash techniques to the 4 links.


The PAFOG squad project was now complete – except that I needed to make corrals for them as they are so heavy as to slide in my other Frinx box. No worries, as I want them to survive for many future games, and I’ve done that for other outsized figures
This project also counts for me in a community painting challenge that my Australian friend Azazel has sent out for July 2018. It is for a “Jewel” project – and given all the work that went into these from acquisition to casting to conversion to final painting – I’m confident that these will meet the requirement!
The eye candy follows, and hopefully you will find these as cool as I did. I always appreciate your feedback dear readers – let me know your thoughts and suggestions. Thanks for looking!


For those interested, here is the list of the paints, etc. that I used in this project.
PAINTS, INKS, GLAZES, WASHES, AND FLOCKING USED:
- Citadel “Imperium Primer”
- Vallejo “Surface Primer – White”
- Vallejo “Flow Improver”
- Vallejo “”Airbrush Thinner”
- Testors “Universal Acrylic Thinner”
- Vallejo Game Air “Beastly Brown”
- Vallejo Game Air “Dead White”
- Vallejo “Red”
- Vallejo Game Air “Moon Yellow”
- Vallejo “Black Grey”
- Citadel “Agrax Earthshade” (wash)
- Reaper MSP “Grey Liner” (wash)
- Vallejo Game Air “Black”
- Vallejo Model Air “Black (metallic)”
- Vallejo Mecha Color “Yellow Ochre”
- Vallejo Mecha Color “Brown”
- Vallejo Model Air “Rust 080”
- Citadel “Ceramite White”
- Tamiya “Chrome Silver X-11”
- Tamiya “X-20A Thinner”
- Vallejo Mecha Color “Turquoise”
- Vallejo Model Air “Medium Gunship Gray”
- Tamiya “Copper XF-6”
- Tamiya “Gun Metal X-10”
- Vallejo Game Air “Wolf Grey”
- Citadel “Hexwraith Flame”
- P3 “Green” (ink)
- Citadel “‘Ardcoat”
- Secret Weapons Washes “Just Red” (ink)
- Citadel “Soulstone Blue”
- Vallejo Game Air “Fluorescent Red”
- Citadel “Nuln Oil Gloss” (wash)
- Secret Weapons Washes “Purple” (ink)
- Vallejo Mecha Color “Yellow Fluorescent”
- Vallejo Mecha Color “Sand Yellow”
- Citadel “Seraphim Sepia” (wash)
- Polly Scale “WWII British Aircraft Gull Gray Light”
- Citadel “Agrax Earthshade Gloss” (wash)
- Citadel “Carroburg Crimson” (wash)
- Citadel “Castellan Green”
- Citadel “Nuln Oil” (wash)
- Vallejo “Thinner Medium”
- Vallejo “Gloss Varnish”
- Vallejo Mecha Varnish “Matt Varnish”
Thanks again!

Great work, Ma’k. You painted yours in a completely different scheme than I did.
LikeLiked by 1 person
Thanks Buck, glad you like them and I hope to get them into battle soon. Remember, without your collaboration, these would not exist!
LikeLike
Brilliant Mark, like these little guys a lot and all the work that you put in has really paid off. I smiled at how you used the chain and fixed it in place. Quite a while ago I did something similar for harnessing horses to a stage coach diorama I did and then a little later for a ACW limber one too. The creative side is a big part of the hobby and a part I like very much. I’m always intreagued by what people come up with. Great work once again!
LikeLiked by 1 person
Thanks TIM, the chain use was a challenge to be sure and I’m hoping that sometime down the line my approach helps. Certainly the approaches you’ve taken on your creative dioramas that you’ve shared, especially your recent fantasy one, have more than intrigued me too. All a labor of love right?
LikeLiked by 1 person
Definately a labour of love but it passes the time and keeps the grey matter ticking over which is no bad thing that’s for sure!
LikeLiked by 1 person
A lot of work went into these, and they came out great. Thank you for the history lesson as to where the models come from. I never knew models were so intricate. Have you ever done a post on how you do an actual recasting? As in the process you follow, or is that like a state secret?
LikeLiked by 2 people
Thanks savageddt, and my security clearance is long expired so no state secret. I’ve done several posts which chronicle my recasting experiences and how I have learned to improve my process. Just type in “casting” in the search window on my blog and they will come up. I have not done any casting this year as I made so much that I have still much to paint. Let me know if you like the casting stuff and if I can answer any questions.
LikeLiked by 1 person
Wow Mark, talk about effort man – all that work recasting, all that problem solving, all that attention to detail… what you do is more like archaeology mate, and it is just so cool to see these little pieces of hobby history getting a new lease of life! Utterly brilliant 🙂
LikeLiked by 1 person
You get me Alex, and the idea that I’m able to bring back these gems is a big part of my hobby motivation. When I run games with stuff like these at a convention it’s always fun. Plus, who doesn’t love problem solving! Really glad you like them!
LikeLiked by 2 people
Amazing work mate ,just love the casting bit ,well done, I did silver smithing in my youth and dabbled in the lost wax method so as savageddt says it would be very interesting to see your process .
I just love your little beasties !. I must say Armadillos are strange little creatures .
LikeLiked by 1 person
That’s cool, I would love to do smithing! Especially with silver, that’s cool. My casting efforts were borne of realizing that if I wanted units of these figures I could either go broke on eBay or learn to cast. Just type in “casting “ in my blog search window and all my stuff is there in detail. Thanks for asking and glad you like them!
LikeLiked by 1 person
Whaaaaaaat? You never cease to amaze me with your gear man. That moon yellow is great. Love the effort you went to and it all certainly paid off. Very cool man 🤘🏼
LikeLiked by 1 person
They could use your Sky Raiders as air support! If only we weren’t on opposite sides of the globe…😁. Thanks IRO, I live to amaze!
LikeLiked by 1 person
Impressive effort! It’s like hobby preservation and restoration. Very cool.
And the weight. The full set is like a kg. An complete army would need a forklift to get on the table. 😉
LikeLiked by 1 person
And a strong table to be sure! I sometimes wonder if my work will be around in a century?
LikeLiked by 1 person
A shelled rodent the size of a VW bug. I should tell my Wife about that…then again, maybe not.
Glorious project you accomplished there Mark! I don’t know how you do it. Especially with the casting stuff. I really liked how your paints turned out on the Glyptodons and they are such interesting creatures to boot. Never heard of Star Rovers, but the art does intrigue me. Always a sucker for some 80s line art. I can’t believe how heavy those are. In comparison, they are around 8x the weight, of one of my Goliath minis with a custom weighted base!
LikeLiked by 1 person
Thanks Faust, too bad they weren’t in your brothers set for Old Mini Mondays! The Star Rovers game comes up on eBay from time to time. Best source for Star Rovers artwork for sure (and there’s a lot there too).
Yeah, they’ve got mass!
LikeLiked by 1 person
I can’t even imagine trying to track down those minis if he had them. That’s a job only Mazing Mark could pull off!
LikeLiked by 1 person
Aww, dude you’re too kind!
LikeLiked by 1 person
Like these guys, especially the colour contrast between the riders and their mounts. Individual washers on each foot is great idea! Definitely looking forward to seeing this lot in a game!
LikeLiked by 1 person
JNV that was one of my goals so I’m glad you noticed that. Once I get their data cards done, it’s “put me in coach/GM”…😁
LikeLiked by 1 person
I remember you casting up those beasties, and the extra work you had to put in on the sculpting front around the back of the shells (nice to see your “master” getting some love with the paintbrush!).
Once again a truly inspiring post, a history lesson and a wonderful paintjob all rolled into one! I love what you do and more power to you for bringing back these wonderful historic mini’s
Cheers Roger.
LikeLiked by 1 person
Thanks Roger, very kind. Wish it hadn’t taken so long, but as you know, my painting queue is long (and eventually I’ll get to Retovians and Khangs and Amazon Space Pirates!
LikeLike
I mean Retrovians 😝
LikeLike
That’s fine Mark, like me they answer to anything! 😉
LikeLiked by 1 person
Being reasonably new to your blog I’m hugely impressed by the amount of work put into these. It’s got me back reading to see if this is an ‘everyday’ occurrence on your blog! It reminds me of the restoration work done to preserve the tapestries and fabrics at the local national trust stately homes but with the minis of yesteryear. It’s some truly impressive dedication to the hobby.
LikeLiked by 2 people
Very kind of you and glad to have you aboard with me on this journey! I generally have done quite a few of these types of “resurrections from the commercial grave” as I call them, but as you’ve seen there’s a good amount of work to make this happen. If I can find a legitimate source for the figures, I will purchase them, but often their molds have long been destroyed or in other cases no one is making them anymore. In an era of new releases and Kickstarters, the hobby market gets a lot of new stuff all the time, and of course that’s great, we all love cool new stuff. What I often try to do is to bring back stuff that I find cool and give it new life and share it with a new audience on my blog and the tabletop. That you like these tells me you’re in the right place and hope you get a chance to see the other stuff here BTTH!
LikeLiked by 2 people
That’s some awesome work there, Mark – and great to see the long tail of the project in it’s tabletop form. I almost said final form, but then again – who knows where you might throw some more of these up one day?
LikeLiked by 1 person
Thanks – I do have the extras left plus I can always cast more! However on to the next project!
LikeLiked by 1 person