
As described earlier in this blog (here), I had acquired and cast some Archive Star Rovers figures – “Power-Armored Frinx” (#2040 or #2305) last year. As these were made between 1977 and 1981, it became difficult to acquire enough of them for a unit, and Archive no longer exists to purchase them. I cast several of them for myself and friends.
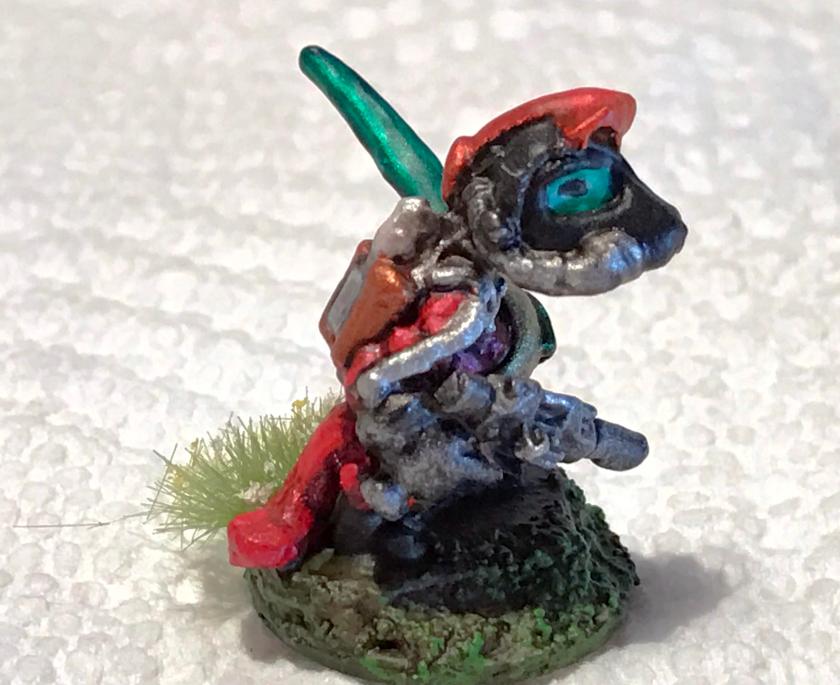
My goal was to create a platoon-sized unit of these Frinx for a retro-sci-fi battle using Combat Patrol™. My concept of these figures is that they are reptilian, and that they wear suits of “power-armor” that protect them, while negatively affecting their movement. They are armed with a blaster-type weapon. My castings did not pick up the details of the helmets which had a light-like feature similar to that of a miners helmet. What they did pick up yielded a look similar to a beret (if a helmet could become a beret), and I incorporated that feature into my painting scheme.
For fun, below is a catalog shot that came with my Star Rovers game. Note that it lists “Frinx” and “Nude Frinx”. I do have one of the latter, and its a Frinx out of armor!


After I had 32 figures, I organized them for the platoon. I needed to convert several troopers to make a platoon leader, a platoon sergeant, and an anti-tank section. I also plan on attaching the Mark 1 Sphere tanks I previously created into the platoon. The organization of the platoon is below.
Power-Armored Frinx platoon structure (32 fighting figures plus 3 vehicles):
- Frinx Platoon Leader (1 Frinx with blaster pistol and light cutlass)
- Frinx Platoon Sergeant (1 Frinx with automatic grenade launcher)
- AT section (3 Frinx with bazookas)
- Jade Squad (9 Frinx)
- Squad Leader (1 Frinx with blaster rifle, also leads Jade A team)
- A Team – 4 Frinx Infantry with blaster rifles
- B Team Leader (1 Frinx with blaster rifle, also leads Jade B team)
- 3 Frinx Infantry with blaster rifles in Jade B team
- Pearl Squad (9 Frinx)
- Squad Leader (1 Frinx with blaster rifle, also leads Pearl A team)
- A Team – 4 Frinx Infantry with blaster rifles
- B Team Leader (1 Frinx with blaster rifle, also leads Pearl B team)
- 3 Frinx Infantry with blaster rifles in Pearl B team
- Amethyst Squad (9 Frinx)
- Squad Leader (1 Frinx with blaster rifle, also leads Amethyst A team)
- A Team – 4 Frinx Infantry with blaster rifles
- B Team Leader (1 Frinx with blaster rifle, also leads Amethyst B team)
- 3 Frinx Infantry with blaster rifles in Amethyst B team
- Sphere Tank Section (3 Mark 1 Sphere Tanks with heat rays and ray guns)
- Frinx Platoon Sergeant (1 Frinx with automatic grenade launcher)
I used a jewelry saw and some blades to remove the blaster on two figures, as well as the left arm on the platoon leader. I had some sci-fi weapons that I had gotten on eBay and from Buck Surdu (perhaps from War Games Supply Dump). I gave the platoon leader a light cutlass (instead of a light saber) and a blaster pistol.

I then moved on to the AT section, which reports to the platoon sergeant. After removing the blaster and shaving some space, I used a pin vise drill to make space for the bazookas on 3 Frinx. I used 3 bazookas from 3 Reaper Chronoscope Weapons Pack III’s (#5o234). I split the bazookas in half and sized them to the figures. For the platoon sergeant, I removed the blaster, and gave him a cool automatic grenade launcher.


I mounted all the figures on ¾” steel washers with wood glue, and let them dry. Subsequently, I used white glue to lightly mount the figures to numbered popsicle sticks. I covered the numbers with scotch tape, and primed the lot with Krylon “Ultra Flat Gray”. I then removed the tape so as to know what stick I was working on and have a reference point for the beginning and the end as painting units can cause one to forget. Using Citadel “Nuln Oil”, I gave the unit a wash to better identify their features. This gave me a surprise for the platoon sergeant!

The automatic grenade launcher already had a couple of hands on it! The Frinx hands are gloved – similar to say 1920’s Mickey Mouse for lack of a better comparison. I had to create a left arm with Milliput for the figure that would cover up the left glove and extend to the left hand under his weapon. For the right extra hand, I filled in the fingers with Milliput and made it look like part of the grenade launcher.


As far as my painting scheme, I wanted to try something new – and use a lot of metallic paint for a few purposes. First, to create the image of the “power armor” I used a series of DecoArt metallic paints. These had a side benefit of also allowing me to easier differentiate my squads into three (Jade, Pearl, and Amethyst). I used other Citadel Technical Paints to denote leaders, and parts of weapons. Additionally, I used a few Tamiya metallic paints as I will describe. The net effect of the metallic was to make this a difficult project due to the thicknesses of the metallic paints – but I think the results worked (but the reader can be the judge). These photos are ok, but I found it difficult to get the lighting right for them.
Basically, I had to abandon the typical assembly line approach I normally take to when painting units due to the properties of the metallic paints (especially the viscosity and the clotting). Thinning helped, but to get the desired effects I went slow and methodically. Each figure was base coated with a DecoArt Dazzling Metallic or Craftsmart metallic main color (DecoArt “Festive Red” for the platoon leader, Craftsmart “Sapphire” for the platoon sergeant, DecoArt “Festive Green” for the AT section, DecoArt “Crystal Green” for the Jade squad, DecoArt “Peacock Pearl” for the Pearl squad, and Craftsmart “Amethyst” for the Amethyst squad. Tamiya “Chrome Silver” was my choice for the breathing regulators, straps, part of the blaster sights, and the center of the helmets. Tamiya “Gun Metal” was what I used for the blasters and the remainder of the helmets. For the Frinx faceplates, gloves, and boots, I used another metallic, Craftsmart “Onyx”. The main part of the breathing tanks was coated with another metallic, DecoArt “White Pearl”, while the tanks themselves got Tamiya “Copper”. Inside the faceplates, I painted the eye wells with Citadel “Ceramite White”, then dotted the eyes with “Onyx”. Using Citadel Technical “Waystone Green”, I filled in the rest of the eye well, creating an eye. I ten used Citadel “‘Ardcoat” to create a lens-like effect on the faceplate – this took a while as I had to do one side at a time, and let each dry. I also used the “Chrome Silver” as a base for “Waystone Green” on parts of the blasters, the platoon leader’s light cutlass, and on the team leaders’ helmets. For the squad leader’s and platoon sergeant’s helmets, I used the same approach but with another Citadel Technical paint, “Soulstone Blue”. The platoon leader’s helmet got Citadel “Spiritstone Red” (yet another “Technical” paint).
I then used “Nuln Oil” for shade, and highlighted all the areas overly darkened by it with the original colors to add depth. For the black gloves, I used highlights of “Chrome Silver” intermixed and slightly covered by “Onyx”. For the bazookas, I used my first Vallejo paint, “US Dark Green” – and I loved the paint. It was so easy to use after all the metallics! I shaded the bazookas with Citadel “Athonian Camoshade”.
For the bases, I tried a new approach to hide the raised bases. Using Citadel “Lustrian Undergrowth” (a thick “Texture” product), I carefully filled in around each base. This was better than I thought as far as effects. After the bases were dry, I washed them with Citadel “Seraphim Sepia” and let them dry. I was able to dry brush the bases successively with Armory “Musket Brown” and Citadel “Niblet Green”. Due to the cold weather, I was not able to varnish at home. Luckily, my friend Jeff Smith has a nice heated workshop that he was kind enough to let me use. There I gave the platoon a couple of coats of Testors “Dullcoat”.
Lastly, I used tufts to better differentiate for play between A and B teams on the squads. Jade team A got one Army Painter “Swamp Tuft”. Pearl Team A got Army Painter “Wilderness Tuft”. Amethyst Team A got Army Painter yellow “Meadow Flowers”. The platoon leader and platoon sergeant got white “Meadow Flowers”.


I tried a number of new things for this project and learned some things:
- Multiple metallic paints
- Tamiya – use their thinner, it works better than water and can rejuvenate old Tamiya paints
- Craftsmart and DecoArt – thick stuff, but will work
- Citadel products
- “‘Ardcoat” – great for lenses over Citadel Technicals
- “Lustrian Undergrowth” (Texture) – works well on bases and drybrushes well
- Technicals (“Soulstone Blue”, “Spiritstone Red”, “Waystone Green” – all good, but need to consider what you use as base and drying time
- “Seraphim Sepia” and “Athonian Camoshade” are nice washes
- Conversions – sometimes the details are not immediately visible on additions! Use a wash on gray or white primer to see details
- Vallejo paint – gotta get more of these!

Well done! I really like the bazooka men. The platoon turned out excellently!
LikeLiked by 1 person
Thanks Buck – your metallics inspired my painting scheme
LikeLiked by 1 person
Love them together with the Mark 1’s!
LikeLiked by 1 person
Thanks! I think they complement each other too!
LikeLiked by 1 person
That’s a striking looking force! Great work on the conversions, at that scale it can’t have been easy.
LikeLiked by 1 person
Thanks, you’re right, a lot of surgery- definitely needed my Carson glasses at 2.5 power
LikeLike
Mark, they are impressive. Now we just need to work out a chance to game together.
LikeLike
Thanks Dave! Definitely need to do that soon!
LikeLike
Great work on these guys – from their literal creation to the finished product. The metallics work well I think – giving them a very different, and appropriately sci-fi/unearthly look. Especially on the MK1s.
Definately look into more Vallejo paints, particularly their Model Air Metallics which I consider the best range of acrylic metallics (there’s a great set of all of them). I’ve supplemented mine in the last year with the Warcolous Metallic set and also a bunch of Vallejo Premium Airbrush Color paints in much larger 60ml/2fl oz bottles.
You can also use coloured washes with good success over shades of silver/iron (I recommend both the Army Painter Warpaints Washes set), especially if you’re after less “rich” shades. My Minotaurs Space Marines’ gold/brass https://azazelx.wordpress.com/2016/10/09/minotaurs-space-marines-vi-squad/
were done with washes over silver, as well as my Chaos Ogre’s armour.
https://azazelx.wordpress.com/2015/03/02/classic-c23-citadel-ogres-for-kings-of-war-unit-2-ogre-berserkers/
I’ve gotten inspired to play with metallic paint a bit in the last year. I’ll be doing some more experiments with more Space Marines in the next months, hope to see what else you come up with as well to keep my motivation up!
LikeLiked by 1 person
Thanks so much – really appreciate the feedback. I am pretty proud as they are all either my castings or my originals. I really appreciate the heads up on the paint lines you mentioned. Are they for brush and airbrush? I have not got an airbrush, but would guess these work well on both delivery methods. Glad they are motivating for you, as yours are for me. Wish there was a hobby store that was near me that had Vallejo or even Army Painter, closest is in Boston which is a 2 hour trip each way with traffic (55 miles only too). I could always order on line though of course, I just have found that often the paint I buy on line is the oldest in the inventory! Back to the Frinx and Mark 1’s, I actually showed these at my local hobby store and it’s like I came out of a time machine. Astonishment at the age of the range of the Frinx (way older than anyone in the store), and kids who have never seen lead/tin alloy minis. Pretty amazing. Have a good one!
LikeLike
I have an Airbrush, but I’m worse than rubbish with it (and broke it), so literally 99% of what I do is with a regular brush. I only sometimes do scenery stuff with the bottom-feed single action brush that I have left, so all of what I wrote goes for using a normal brush – including the huge recommendation for the Model Air paints. Vallejo Game Air metallics are also excellent, and I’d also recommend those actually. A much nicer copper than the Model Air.
I get most of my paints from http://www.firestormgames.co.uk – free shipping for orders over 30 quid and I just pay via PayPal. They have the Model Air, Game Air and the Army Painter. I’ve been buying from them for about 5 years now. They’re good blokes, ship fast and they haven’t ever shafted me on product. I found a place on the other side of Melbourne that had the Premium Airbrush Colours and just got those through the post as well since it would be well over an hours’ drive each way. I’ve seen them on eBay and US websites with reasonable/free postage though.
Funny to hear of kids that have never seen metal models. I see people raging against metals on Dakka every so often and I can’t do anything but scratch my heads at them. Something I really enjoy about your blogging is the age and resurrection of old and OOP models and ranges, brought up to date for modern gaming.
LikeLike
Very impressive mate. It’s all come together really well. You should be proud
LikeLike
Much appreciated- and I am deep into my next project which is a 45 figure Archive Star Duck Platoon. Been using Vallejo metallics as suggested above in previous comments, and coming along better. Hope to share soon, but glad you like them!
LikeLiked by 1 person
Wow man. I just love how obscure your projects are. Or maybe I just didn’t know star ducks existed hehe
LikeLiked by 1 person
Yup – the Star Rovers stuff was from 1980-1 or earlier

LikeLiked by 1 person
That’s cool.
LikeLiked by 1 person
Thanks! Glad you liked it – it was a huge project!
LikeLiked by 1 person